W↓
All docs
🔑
Sign Up/Sign In
bun.sh/docs/cli/
Public Link
Apr 8, 2025, 12:50:54 PM - complete - 76.4 kB
Apr 8, 2025, 12:50:54 PM - complete - 76.4 kB
Apr 8, 2025, 12:50:21 PM - complete -
Created by:
****ad@vlad.studio
Starting URLs:
https://bun.sh/docs
Crawl Prefixes:
https://bun.sh/docs/cli/
## Page: https://bun.sh/docs Bun is an all-in-one toolkit for JavaScript and TypeScript apps. It ships as a single executable called `bun`. At its core is the _Bun runtime_, a fast JavaScript runtime designed as **a drop-in replacement for Node.js**. It's written in Zig and powered by JavaScriptCore under the hood, dramatically reducing startup times and memory usage. bun run index.tsx # TS and JSX supported out of the box The `bun` command-line tool also implements a test runner, script runner, and Node.js-compatible package manager, all significantly faster than existing tools and usable in existing Node.js projects with little to no changes necessary. bun run start # run the `start` script bun install <pkg> # install a package bun build ./index.tsx # bundle a project for browsers bun test # run tests bunx cowsay 'Hello, world!' # execute a package Get started with one of the quick links below, or read on to learn more about Bun. ## What is a runtime? JavaScript (or, more formally, ECMAScript) is just a _specification_ for a programming language. Anyone can write a JavaScript _engine_ that ingests a valid JavaScript program and executes it. The two most popular engines in use today are V8 (developed by Google) and JavaScriptCore (developed by Apple). Both are open source. But most JavaScript programs don't run in a vacuum. They need a way to access the outside world to perform useful tasks. This is where _runtimes_ come in. They implement additional APIs that are then made available to the JavaScript programs they execute. ### Browsers Notably, browsers ship with JavaScript runtimes that implement a set of Web-specific APIs that are exposed via the global `window` object. Any JavaScript code executed by the browser can use these APIs to implement interactive or dynamic behavior in the context of the current webpage. ### Node.js Similarly, Node.js is a JavaScript runtime that can be used in non-browser environments, like servers. JavaScript programs executed by Node.js have access to a set of Node.js-specific globals like `Buffer`, `process`, and `__dirname` in addition to built-in modules for performing OS-level tasks like reading/writing files (`node:fs`) and networking (`node:net`, `node:http`). Node.js also implements a CommonJS-based module system and resolution algorithm that pre-dates JavaScript's native module system. Bun is designed as a faster, leaner, more modern replacement for Node.js. ## Design goals Bun is designed from the ground-up with today's JavaScript ecosystem in mind. * **Speed**. Bun processes start 4x faster than Node.js currently (try it yourself!) * **TypeScript & JSX support**. You can directly execute `.jsx`, `.ts`, and `.tsx` files; Bun's transpiler converts these to vanilla JavaScript before execution. * **ESM & CommonJS compatibility**. The world is moving towards ES modules (ESM), but millions of packages on npm still require CommonJS. Bun recommends ES modules, but supports CommonJS. * **Web-standard APIs**. Bun implements standard Web APIs like `fetch`, `WebSocket`, and `ReadableStream`. Bun is powered by the JavaScriptCore engine, which is developed by Apple for Safari, so some APIs like `Headers` and `URL` directly use Safari's implementation. * **Node.js compatibility**. In addition to supporting Node-style module resolution, Bun aims for full compatibility with built-in Node.js globals (`process`, `Buffer`) and modules (`path`, `fs`, `http`, etc.) _This is an ongoing effort that is not complete._ Refer to the compatibility page for the current status. Bun is more than a runtime. The long-term goal is to be a cohesive, infrastructural toolkit for building apps with JavaScript/TypeScript, including a package manager, transpiler, bundler, script runner, test runner, and more. --- ## Page: https://bun.sh/docs/cli/init Scaffold an empty Bun project with the interactive `bun init` command. bun init bun init helps you get started with a minimal project and tries to guess sensible defaults. Press ^C anytime to quit. package name (quickstart): entry point (index.ts): Done! A package.json file was saved in the current directory. + index.ts + .gitignore + tsconfig.json (for editor auto-complete) + README.md To get started, run: bun run index.ts Press `enter` to accept the default answer for each prompt, or pass the `-y` flag to auto-accept the defaults. How `bun init` works ## CLI Usage $bun init <entrypoints> ### Flags #### Help \--help Print this menu #### Defaults \-y,\--yes Accept all default options --- ## Page: https://bun.sh/docs/cli/bun-create **Note** — You don’t need `bun create` to use Bun. You don’t need any configuration at all. This command exists to make getting started a bit quicker and easier. Template a new Bun project with `bun create`. This is a flexible command that can be used to create a new project from a React component, a `create-<template>` npm package, a GitHub repo, or a local template. If you're looking to create a brand new empty project, use `bun init`. ## From a React component `bun create ./MyComponent.tsx` turns an existing React component into a complete dev environment with hot reload and production builds in one command. bun create ./MyComponent.jsx # .tsx also supported 🚀 **Create React App Successor** — `bun create <component>` provides everything developers loved about Create React App, but with modern tooling, faster builds, and backend support. #### How this works When you run `bun create <component>`, Bun: 1. Uses Bun's JavaScript bundler to analyze your module graph. 2. Collects all the dependencies needed to run the component. 3. Scans the exports of the entry point for a React component. 4. Generates a `package.json` file with the dependencies and scripts needed to run the component. 5. Installs any missing dependencies using `bun install --only-missing`. 6. Generates the following files: * `${component}.html` * `${component}.client.tsx` (entry point for the frontend) * `${component}.css` (css file) 7. Starts a frontend dev server automatically. ### Using TailwindCSS with Bun TailwindCSS is an extremely popular utility-first CSS framework used to style web applications. When you run `bun create <component>`, Bun scans your JSX/TSX file for TailwindCSS class names (and any files it imports). If it detects TailwindCSS class names, it will add the following dependencies to your `package.json`: package.json { "dependencies": { "tailwindcss": "^4", "bun-plugin-tailwind": "latest" } } We also configure `bunfig.toml` to use Bun's TailwindCSS plugin with `Bun.serve()` bunfig.toml [serve.static] plugins = ["bun-plugin-tailwind"] And a `${component}.css` file with `@import "tailwindcss";` at the top: MyComponent.css @import "tailwindcss"; ### Using `shadcn/ui` with Bun `shadcn/ui` is an extremely popular component library tool for building web applications. `bun create <component>` scans for any shadcn/ui components imported from `@/components/ui`. If it finds any, it runs: # Assuming bun detected imports to @/components/ui/accordion and @/components/ui/button bunx shadcn@canary add accordion button # and any other components Since `shadcn/ui` itself uses TailwindCSS, `bun create` also adds the necessary TailwindCSS dependencies to your `package.json` and configures `bunfig.toml` to use Bun's TailwindCSS plugin with `Bun.serve()` as described above. Additionally, we setup the following: * `tsconfig.json` to alias `"@/*"` to `"src/*"` or `.` (depending on if there is a `src/` directory) * `components.json` so that shadcn/ui knows its a shadcn/ui project * `styles/globals.css` file that configures Tailwind v4 in the way that shadcn/ui expects * `${component}.build.ts` file that builds the component for production with `bun-plugin-tailwind` configured `bun create ./MyComponent.jsx` is one of the easiest ways to run code generated from LLMs like Claude or ChatGPT locally. ## From `npm` bun create <template> [<destination>] Assuming you don't have a local template with the same name, this command will download and execute the `create-<template>` package from npm. The following two commands will behave identically: bun create remix bunx create-remix Refer to the documentation of the associated `create-<template>` package for complete documentation and usage instructions. ## From GitHub This will download the contents of the GitHub repo to disk. bun create <user>/<repo> bun create github.com/<user>/<repo> Optionally specify a name for the destination folder. If no destination is specified, the repo name will be used. bun create <user>/<repo> mydir bun create github.com/<user>/<repo> mydir Bun will perform the following steps: * Download the template * Copy all template files into the destination folder * Install dependencies with `bun install`. * Initialize a fresh Git repo. Opt out with the `--no-git` flag. * Run the template's configured `start` script, if defined. By default Bun will _not overwrite_ any existing files. Use the `--force` flag to overwrite existing files. ## From a local template **⚠️ Warning** — Unlike remote templates, running `bun create` with a local template will delete the entire destination folder if it already exists! Be careful. Bun's templater can be extended to support custom templates defined on your local file system. These templates should live in one of the following directories: * `$HOME/.bun-create/<name>`: global templates * `<project root>/.bun-create/<name>`: project-specific templates **Note** — You can customize the global template path by setting the `BUN_CREATE_DIR` environment variable. To create a local template, navigate to `$HOME/.bun-create` and create a new directory with the desired name of your template. cd $HOME/.bun-create mkdir foo cd foo Then, create a `package.json` file in that directory with the following contents: { "name": "foo" } You can run `bun create foo` elsewhere on your file system to verify that Bun is correctly finding your local template. #### Setup logic You can specify pre- and post-install setup scripts in the `"bun-create"` section of your local template's `package.json`. { "name": "@bun-examples/simplereact", "version": "0.0.1", "main": "index.js", "dependencies": { "react": "^17.0.2", "react-dom": "^17.0.2" }, "bun-create": { "preinstall": "echo 'Installing...'", // a single command "postinstall": ["echo 'Done!'"], // an array of commands "start": "bun run echo 'Hello world!'" } } The following fields are supported. Each of these can correspond to a string or array of strings. An array of commands will be executed in order. <table><thead></thead><tbody><tr><td><code>postinstall</code></td><td>runs after installing dependencies</td></tr><tr><td><code>preinstall</code></td><td>runs before installing dependencies</td></tr></tbody></table> After cloning a template, `bun create` will automatically remove the `"bun-create"` section from `package.json` before writing it to the destination folder. ## Reference ### CLI flags | Flag | Description | | --- | --- | | `--force` | Overwrite existing files | | `--no-install` | Skip installing `node_modules` & tasks | | `--no-git` | Don’t initialize a git repository | | `--open` | Start & open in-browser after finish | ### Environment variables | Name | Description | | --- | --- | | `GITHUB_API_DOMAIN` | If you’re using a GitHub enterprise or a proxy, you can customize the GitHub domain Bun pings for downloads | | `GITHUB_TOKEN` (or `GITHUB_ACCESS_TOKEN`) | This lets `bun create` work with private repositories or if you get rate-limited. `GITHUB_TOKEN` is chosen over `GITHUB_ACCESS_TOKEN` if both exist. | How `bun create` works --- ## Page: https://bun.sh/docs/cli/run The `bun` CLI can be used to execute JavaScript/TypeScript files, `package.json` scripts, and executable packages. ## Performance Bun is designed to start fast and run fast. Under the hood Bun uses the JavaScriptCore engine, which is developed by Apple for Safari. In most cases, the startup and running performance is faster than V8, the engine used by Node.js and Chromium-based browsers. Its transpiler and runtime are written in Zig, a modern, high-performance language. On Linux, this translates into startup times 4x faster than Node.js. <table><thead></thead><tbody><tr><td><code>bun hello.js</code></td><td><code>5.2ms</code></td></tr><tr><td><code>node hello.js</code></td><td><code>25.1ms</code></td></tr></tbody></table> Running a simple Hello World script on Linux ## Run a file Compare to `node <file>` Use `bun run` to execute a source file. bun run index.js Bun supports TypeScript and JSX out of the box. Every file is transpiled on the fly by Bun's fast native transpiler before being executed. bun run index.js bun run index.jsx bun run index.ts bun run index.tsx Alternatively, you can omit the `run` keyword and use the "naked" command; it behaves identically. bun index.tsx bun index.js ### `--watch` To run a file in watch mode, use the `--watch` flag. bun --watch run index.tsx **Note** — When using `bun run`, put Bun flags like `--watch` immediately after `bun`. bun --watch run dev # ✔️ do this bun run dev --watch # ❌ don't do this Flags that occur at the end of the command will be ignored and passed through to the `"dev"` script itself. ## Run a `package.json` script Compare to `npm run <script>` or `yarn <script>` bun [bun flags] run <script> [script flags] Your `package.json` can define a number of named `"scripts"` that correspond to shell commands. { // ... other fields "scripts": { "clean": "rm -rf dist && echo 'Done.'", "dev": "bun server.ts" } } Use `bun run <script>` to execute these scripts. bun run clean $ rm -rf dist && echo 'Done.' Cleaning... Done. Bun executes the script command in a subshell. On Linux & macOS, it checks for the following shells in order, using the first one it finds: `bash`, `sh`, `zsh`. On windows, it uses bun shell to support bash-like syntax and many common commands. ⚡️ The startup time for `npm run` on Linux is roughly 170ms; with Bun it is `6ms`. Scripts can also be run with the shorter command `bun <script>`, however if there is a built-in bun command with the same name, the built-in command takes precedence. In this case, use the more explicit `bun run <script>` command to execute your package script. bun run dev To see a list of available scripts, run `bun run` without any arguments. bun run quickstart scripts: bun run clean rm -rf dist && echo 'Done.' bun run dev bun server.ts 2 scripts Bun respects lifecycle hooks. For instance, `bun run clean` will execute `preclean` and `postclean`, if defined. If the `pre<script>` fails, Bun will not execute the script itself. ### `--bun` It's common for `package.json` scripts to reference locally-installed CLIs like `vite` or `next`. These CLIs are often JavaScript files marked with a shebang to indicate that they should be executed with `node`. #!/usr/bin/env node // do stuff By default, Bun respects this shebang and executes the script with `node`. However, you can override this behavior with the `--bun` flag. For Node.js-based CLIs, this will run the CLI with Bun instead of Node.js. bun run --bun vite ### Filtering In monorepos containing multiple packages, you can use the `--filter` argument to execute scripts in many packages at once. Use `bun run --filter <name_pattern> <script>` to execute `<script>` in all packages whose name matches `<name_pattern>`. For example, if you have subdirectories containing packages named `foo`, `bar` and `baz`, running bun run --filter 'ba*' <script> will execute `<script>` in both `bar` and `baz`, but not in `foo`. Find more details in the docs page for filter. ## `bun run -` to pipe code from stdin `bun run -` lets you read JavaScript, TypeScript, TSX, or JSX from stdin and execute it without writing to a temporary file first. echo "console.log('Hello')" | bun run - Hello You can also use `bun run -` to redirect files into Bun. For example, to run a `.js` file as if it were a `.ts` file: echo "console.log!('This is TypeScript!' as any)" > secretly-typescript.js bun run - < secretly-typescript.js This is TypeScript! For convenience, all code is treated as TypeScript with JSX support when using `bun run -`. ## `bun run --smol` In memory-constrained environments, use the `--smol` flag to reduce memory usage at a cost to performance. bun --smol run index.tsx This causes the garbage collector to run more frequently, which can slow down execution. However, it can be useful in environments with limited memory. Bun automatically adjusts the garbage collector's heap size based on the available memory (accounting for cgroups and other memory limits) with and without the `--smol` flag, so this is mostly useful for cases where you want to make the heap size grow more slowly. ## Resolution order Absolute paths and paths starting with `./` or `.\\` are always executed as source files. Unless using `bun run`, running a file with an allowed extension will prefer the file over a package.json script. When there is a package.json script and a file with the same name, `bun run` prioritizes the package.json script. The full resolution order is: 1. package.json scripts, eg `bun run build` 2. Source files, eg `bun run src/main.js` 3. Binaries from project packages, eg `bun add eslint && bun run eslint` 4. (`bun run` only) System commands, eg `bun run ls` ## CLI Usage $bun run <file or script> ### Flags #### Execution \--silent Don't print the script command \-b,\--bun Force a script or package to use Bun's runtime instead of Node.js (via symlinking node) \--watch Automatically restart the process on file change \--hot Enable auto reload in the Bun runtime, test runner, or bundler \--no-clear-screen Disable clearing the terminal screen on reload when --hot or --watch is enabled \-e,\--eval\=<val> Evaluate argument as a script \-p,\--print\=<val> Evaluate argument as a script and print the result #### Package Management \--no-install Disable auto install in the Bun runtime \--install\=<val> Configure auto-install behavior. One of "auto" (default, auto-installs when no node\_modules), "fallback" (missing packages only), "force" (always). \-i Auto-install dependencies during execution. Equivalent to --install=fallback. \--prefer-offline Skip staleness checks for packages in the Bun runtime and resolve from disk \--prefer-latest Use the latest matching versions of packages in the Bun runtime, always checking npm #### Debugging \--inspect\=<val> Activate Bun's debugger \--inspect-wait\=<val> Activate Bun's debugger, wait for a connection before executing \--inspect-brk\=<val> Activate Bun's debugger, set breakpoint on first line of code and wait #### Environment \--shell\=<val> Control the shell used for package.json scripts. Supports either 'bun' or 'system' \--smol Use less memory, but run garbage collection more often \--expose-gc Expose gc() on the global object. Has no effect on Bun.gc(). \--no-deprecation Suppress all reporting of the custom deprecation. \--throw-deprecation Determine whether or not deprecation warnings result in errors. \--title\=<val> Set the process title \--zero-fill-buffers Boolean to force Buffer.allocUnsafe(size) to be zero-filled. \--main-fields\=<val> Main fields to lookup in package.json. Defaults to --target dependent \--extension-order\=<val> Defaults to: .tsx,.ts,.jsx,.js,.json #### Configuration \--if-present Exit without an error if the entrypoint does not exist \--port\=<val> Set the default port for Bun.serve \--conditions\=<val> Pass custom conditions to resolve \--fetch-preconnect\=<val> Preconnect to a URL while code is loading \--max-http-header-size\=<val> Set the maximum size of HTTP headers in bytes. Default is 16KiB \--dns-result-order\=<val> Set the default order of DNS lookup results. Valid orders: verbatim (default), ipv4first, ipv6first \--tsconfig-override\=<val> Specify custom tsconfig.json. Default <d>$cwd<r>/tsconfig.json \-c,\--config\=<val> Specify path to Bun config file. Default <d>$cwd<r>/bunfig.toml #### Filters and Execution Scope \--elide-lines\=<val> Number of lines of script output shown when using --filter (default: 10). Set to 0 to show all lines. \-F,\--filter\=<val> Run a script in all workspace packages matching the pattern \-r,\--preload\=<val> Import a module before other modules are loaded #### Transpilation and Bundling \-d,\--define\=<val> Substitute K:V while parsing, e.g. --define process.env.NODE\_ENV:"development". Values are parsed as JSON. \--drop\=<val> Remove function calls, e.g. --drop=console removes all console.\* calls. \-l,\--loader\=<val> Parse files with .ext:loader, e.g. --loader .js:jsx. Valid loaders: js, jsx, ts, tsx, json, toml, text, file, wasm, napi \--no-macros Disable macros from being executed in the bundler, transpiler and runtime \--jsx-factory\=<val> Changes the function called when compiling JSX elements using the classic JSX runtime \--jsx-fragment\=<val> Changes the function called when compiling JSX fragments \--jsx-import-source\=<val> Declares the module specifier to be used for importing the jsx and jsxs factory functions. Default: "react" \--jsx-runtime\=<val> "automatic" (default) or "classic" \--ignore-dce-annotations Ignore tree-shaking annotations such as @\_\_PURE\_\_ #### Environment Variables \--env-file\=<val> Load environment variables from the specified file(s) \--cwd\=<val> Absolute path to resolve files & entry points from. This just changes the process' cwd. #### Help and Errors \-h,\--help Display this menu and exit \--verbose-error-trace Dump error return traces #### Other Options \--breakpoint-print\=<val> DEBUG MODE: breakpoint when printing something that includes this string ### Examples Run a JavaScript or TypeScript file bun run ./index.js bun run ./index.tsx Run a package.json script bun run dev bun run lint Full documentation is available at https://bun.sh/docs/cli/run --- ## Page: https://bun.sh/docs/cli/install The `bun` CLI contains a Node.js-compatible package manager designed to be a dramatically faster replacement for `npm`, `yarn`, and `pnpm`. It's a standalone tool that will work in pre-existing Node.js projects; if your project has a `package.json`, `bun install` can help you speed up your workflow. **⚡️ 25x faster** — Switch from `npm install` to `bun install` in any Node.js project to make your installations up to 25x faster. 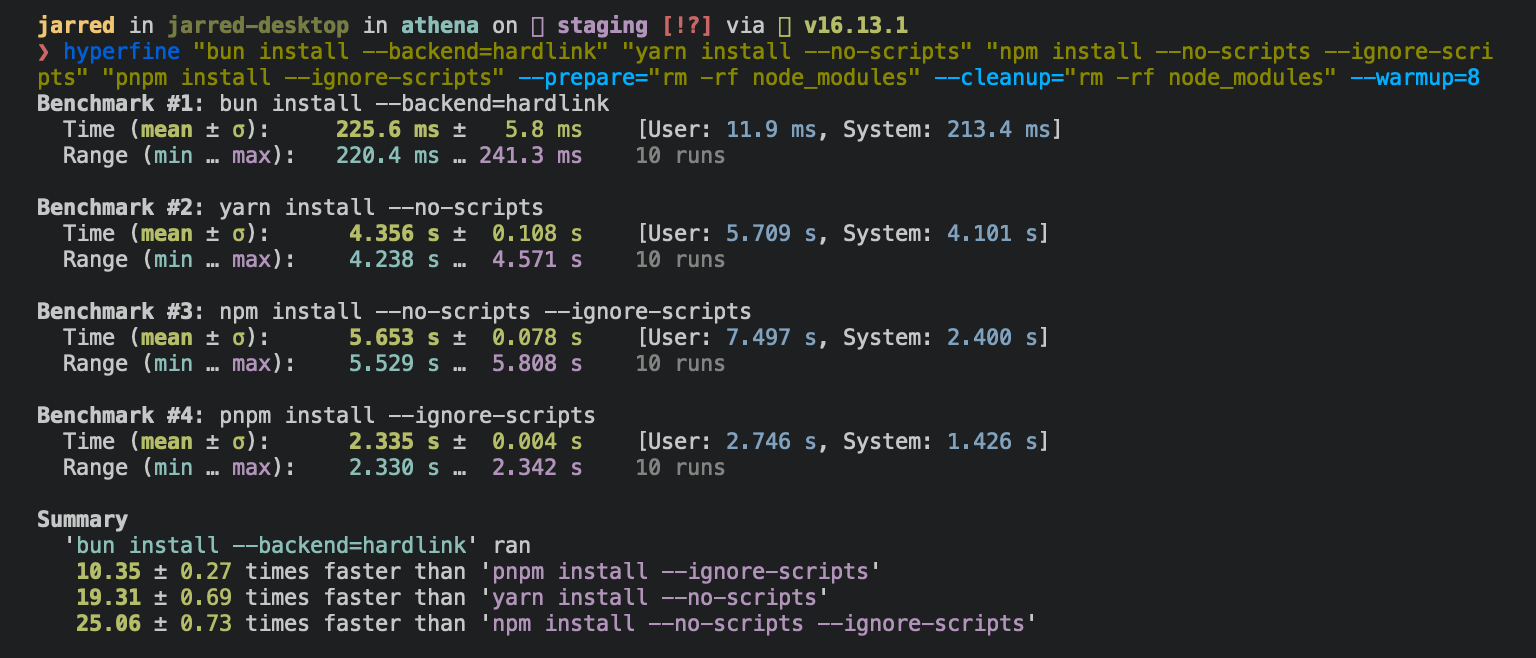 For Linux users To install all dependencies of a project: bun install Running `bun install` will: * **Install** all `dependencies`, `devDependencies`, and `optionalDependencies`. Bun will install `peerDependencies` by default. * **Run** your project's `{pre|post}install` and `{pre|post}prepare` scripts at the appropriate time. For security reasons Bun _does not execute_ lifecycle scripts of installed dependencies. * **Write** a `bun.lock` lockfile to the project root. ## Logging To modify logging verbosity: bun install --verbose # debug logging bun install --silent # no logging ## Lifecycle scripts Unlike other npm clients, Bun does not execute arbitrary lifecycle scripts like `postinstall` for installed dependencies. Executing arbitrary scripts represents a potential security risk. To tell Bun to allow lifecycle scripts for a particular package, add the package to `trustedDependencies` in your package.json. { "name": "my-app", "version": "1.0.0", "trustedDependencies": ["my-trusted-package"] } Then re-install the package. Bun will read this field and run lifecycle scripts for `my-trusted-package`. Lifecycle scripts will run in parallel during installation. To adjust the maximum number of concurrent scripts, use the `--concurrent-scripts` flag. The default is two times the reported cpu count or GOMAXPROCS. bun install --concurrent-scripts 5 ## Workspaces Bun supports `"workspaces"` in package.json. For complete documentation refer to Package manager > Workspaces. package.json { "name": "my-app", "version": "1.0.0", "workspaces": ["packages/*"], "dependencies": { "preact": "^10.5.13" } } ## Installing dependencies for specific packages In a monorepo, you can install the dependencies for a subset of packages using the `--filter` flag. # Install dependencies for all workspaces except `pkg-c` bun install --filter '!pkg-c' # Install dependencies for only `pkg-a` in `./packages/pkg-a` bun install --filter './packages/pkg-a' For more information on filtering with `bun install`, refer to Package Manager > Filtering ## Overrides and resolutions Bun supports npm's `"overrides"` and Yarn's `"resolutions"` in `package.json`. These are mechanisms for specifying a version range for _metadependencies_—the dependencies of your dependencies. Refer to Package manager > Overrides and resolutions for complete documentation. package.json { "name": "my-app", "dependencies": { "foo": "^2.0.0" }, "overrides": { "bar": "~4.4.0" } } ## Global packages To install a package globally, use the `-g`/`--global` flag. Typically this is used for installing command-line tools. bun install --global cowsay # or `bun install -g cowsay` cowsay "Bun!" ______ < Bun! > ------ \ ^__^ \ (oo)\_______ (__)\ )\/\ ||----w | || || ## Production mode To install in production mode (i.e. without `devDependencies` or `optionalDependencies`): bun install --production For reproducible installs, use `--frozen-lockfile`. This will install the exact versions of each package specified in the lockfile. If your `package.json` disagrees with `bun.lock`, Bun will exit with an error. The lockfile will not be updated. bun install --frozen-lockfile For more information on Bun's lockfile `bun.lock`, refer to Package manager > Lockfile. ## Omitting dependencies To omit dev, peer, or optional dependencies use the `--omit` flag. # Exclude "devDependencies" from the installation. This will apply to the # root package and workspaces if they exist. Transitive dependencies will # not have "devDependencies". bun install --omit dev # Install only dependencies from "dependencies" bun install --omit=dev --omit=peer --omit=optional ## Dry run To perform a dry run (i.e. don't actually install anything): bun install --dry-run ## Non-npm dependencies Bun supports installing dependencies from Git, GitHub, and local or remotely-hosted tarballs. For complete documentation refer to Package manager > Git, GitHub, and tarball dependencies. package.json { "dependencies": { "dayjs": "git+https://github.com/iamkun/dayjs.git", "lodash": "git+ssh://github.com/lodash/lodash.git#4.17.21", "moment": "git@github.com:moment/moment.git", "zod": "github:colinhacks/zod", "react": "https://registry.npmjs.org/react/-/react-18.2.0.tgz", "bun-types": "npm:@types/bun" } } ## Configuration The default behavior of `bun install` can be configured in `bunfig.toml`. The default values are shown below. [install] # whether to install optionalDependencies optional = true # whether to install devDependencies dev = true # whether to install peerDependencies peer = true # equivalent to `--production` flag production = false # equivalent to `--save-text-lockfile` flag saveTextLockfile = false # equivalent to `--frozen-lockfile` flag frozenLockfile = false # equivalent to `--dry-run` flag dryRun = false # equivalent to `--concurrent-scripts` flag concurrentScripts = 16 # (cpu count or GOMAXPROCS) x2 ## CI/CD Looking to speed up your CI? Use the official `oven-sh/setup-bun` action to install `bun` in a GitHub Actions pipeline. .github/workflows/release.yml name: bun-types jobs: build: name: build-app runs-on: ubuntu-latest steps: - name: Checkout repo uses: actions/checkout@v4 - name: Install bun uses: oven-sh/setup-bun@v2 - name: Install dependencies run: bun install - name: Build app run: bun run build ## CLI Usage $bun install <name>@<version> ### Flags #### Lockfile Management \-y,\--yarn Write a yarn.lock file (yarn v1) \--no-save Don't update package.json or save a lockfile \--save Save to package.json (true by default) \--frozen-lockfile Disallow changes to lockfile \--save-text-lockfile Save a text-based lockfile \--lockfile-only Generate a lockfile without installing dependencies #### Dependency Management \-p,\--production Don't install devDependencies \-f,\--force Always request the latest versions from the registry & reinstall all dependencies \--ignore-scripts Skip lifecycle scripts in the project's package.json (dependency scripts are never run) \--trust Add to trustedDependencies in the project's package.json and install the package(s) \--omit\=<val> Exclude 'dev', 'optional', or 'peer' dependencies from install \-d,\--dev Add dependency to "devDependencies" \--optional Add dependency to "optionalDependencies" \--peer Add dependency to "peerDependencies" \-E,\--exact Add the exact version instead of the ^range \--only-missing Only add dependencies to package.json if they are not already present #### Installation Behavior \--dry-run Don't install anything \--cache-dir\=<val> Store & load cached data from a specific directory path \--no-cache Ignore manifest cache entirely \--no-verify Skip verifying integrity of newly downloaded packages \-g,\--global Install globally \--backend\=<val> Platform-specific optimizations for installing dependencies. Possible values: "clonefile" (default), "hardlink", "symlink", "copyfile" \--concurrent-scripts\=<val> Maximum number of concurrent jobs for lifecycle scripts (default 5) \--network-concurrency\=<val> Maximum number of concurrent network requests (default 48) \-a,\--analyze Analyze & install all dependencies of files passed as arguments recursively (using Bun's bundler) #### Output and Logging \--silent Don't log anything \--verbose Excessively verbose logging \--no-progress Disable the progress bar \--no-summary Don't print a summary #### Configuration \-c,\--config\=<val> Specify path to config file (bunfig.toml) \--ca\=<val> Provide a Certificate Authority signing certificate \--cafile\=<val> The same as \`--ca\`, but is a file path to the certificate \--cwd\=<val> Set a specific cwd \--registry\=<val> Use a specific registry by default, overriding .npmrc, bunfig.toml and environment variables \--filter\=<val> Install packages for the matching workspaces #### Help \-h,\--help Print this help menu ### Examples Install the dependencies for the current project bun install Skip devDependencies bun install --production Full documentation is available at https://bun.sh/docs/cli/install --- ## Page: https://bun.sh/docs/cli/add To add a particular package: bun add preact To specify a version, version range, or tag: bun add zod@3.20.0 bun add zod@^3.0.0 bun add zod@latest ## `--dev` **Alias** — `--development`, `-d`, `-D` To add a package as a dev dependency (`"devDependencies"`): bun add --dev @types/react bun add -d @types/react ## `--optional` To add a package as an optional dependency (`"optionalDependencies"`): bun add --optional lodash ## `--peer` To add a package as a peer dependency (`"peerDependencies"`): bun add --peer @types/bun ## `--exact` **Alias** — `-E` To add a package and pin to the resolved version, use `--exact`. This will resolve the version of the package and add it to your `package.json` with an exact version number instead of a version range. bun add react --exact bun add react -E This will add the following to your `package.json`: { "dependencies": { // without --exact "react": "^18.2.0", // this matches >= 18.2.0 < 19.0.0 // with --exact "react": "18.2.0" // this matches only 18.2.0 exactly } } To view a complete list of options for this command: bun add --help ## `--global` **Note** — This would not modify package.json of your current project folder. **Alias** - `bun add --global`, `bun add -g`, `bun install --global` and `bun install -g` To install a package globally, use the `-g`/`--global` flag. This will not modify the `package.json` of your current project. Typically this is used for installing command-line tools. bun add --global cowsay # or `bun add -g cowsay` cowsay "Bun!" ______ < Bun! > ------ \ ^__^ \ (oo)\_______ (__)\ )\/\ ||----w | || || Configuring global installation behavior ## Trusted dependencies Unlike other npm clients, Bun does not execute arbitrary lifecycle scripts for installed dependencies, such as `postinstall`. These scripts represent a potential security risk, as they can execute arbitrary code on your machine. To tell Bun to allow lifecycle scripts for a particular package, add the package to `trustedDependencies` in your package.json. { "name": "my-app", "version": "1.0.0", "trustedDependencies": ["my-trusted-package"] } Bun reads this field and will run lifecycle scripts for `my-trusted-package`. ## Git dependencies To add a dependency from a public or private git repository: bun add git@github.com:moment/moment.git **Note** — To install private repositories, your system needs the appropriate SSH credentials to access the repository. Bun supports a variety of protocols, including `github`, `git`, `git+ssh`, `git+https`, and many more. { "dependencies": { "dayjs": "git+https://github.com/iamkun/dayjs.git", "lodash": "git+ssh://github.com/lodash/lodash.git#4.17.21", "moment": "git@github.com:moment/moment.git", "zod": "github:colinhacks/zod" } } ## Tarball dependencies A package name can correspond to a publicly hosted `.tgz` file. During installation, Bun will download and install the package from the specified tarball URL, rather than from the package registry. bun add zod@https://registry.npmjs.org/zod/-/zod-3.21.4.tgz This will add the following line to your `package.json`: package.json { "dependencies": { "zod": "https://registry.npmjs.org/zod/-/zod-3.21.4.tgz" } } ## CLI Usage $bun add <package> <@version> ### Flags #### Lockfile Options \-y,\--yarn Write a yarn.lock file (yarn v1) \--no-save Don't update package.json or save a lockfile \--save Save to package.json (true by default) \--frozen-lockfile Disallow changes to lockfile \--save-text-lockfile Save a text-based lockfile \--lockfile-only Generate a lockfile without installing dependencies #### Dependency Types \-p,\--production Don't install devDependencies \-d,\--dev Add dependency to "devDependencies" \--optional Add dependency to "optionalDependencies" \--peer Add dependency to "peerDependencies" #### Security and Trust \--ca\=<val> Provide a Certificate Authority signing certificate \--cafile\=<val> The same as \`--ca\`, but is a file path to the certificate \--no-verify Skip verifying integrity of newly downloaded packages \--trust Add to trustedDependencies in the project's package.json and install the package(s) #### Installation Behavior \--dry-run Don't install anything \-f,\--force Always request the latest versions from the registry & reinstall all dependencies \--ignore-scripts Skip lifecycle scripts in the project's package.json (dependency scripts are never run) \--only-missing Only add dependencies to package.json if they are not already present #### Caching and Performance \--cache-dir\=<val> Store & load cached data from a specific directory path \--no-cache Ignore manifest cache entirely \--backend\=<val> Platform-specific optimizations for installing dependencies. Possible values: "clonefile" (default), "hardlink", "symlink", "copyfile" \--concurrent-scripts\=<val> Maximum number of concurrent jobs for lifecycle scripts (default 5) \--network-concurrency\=<val> Maximum number of concurrent network requests (default 48) #### Logging and Output \--silent Don't log anything \--verbose Excessively verbose logging \--no-progress Disable the progress bar \--no-summary Don't print a summary #### Configuration \-c,\--config\=<val> Specify path to config file (bunfig.toml) \--registry\=<val> Use a specific registry by default, overriding .npmrc, bunfig.toml and environment variables \--omit\=<val> Exclude 'dev', 'optional', or 'peer' dependencies from install #### Workspace \-g,\--global Install globally \--cwd\=<val> Set a specific cwd #### Misc \-E,\--exact Add the exact version instead of the ^range \-a,\--analyze Recursively analyze & install dependencies of files passed as arguments (using Bun's bundler) \-h,\--help Print this help menu ### Examples Add a dependency from the npm registry bun add zod bun add zod@next Add a dev, optional, or peer dependency bun add -d typescript bun add --optional lodash Full documentation is available at https://bun.sh/docs/cli/add --- ## Page: https://bun.sh/docs/cli/remove ### Flags #### Config File \-c,\--config\=<val> Specify path to config file (bunfig.toml) #### Lockfile Management \-y,\--yarn Write a yarn.lock file (yarn v1) \--no-save Don't update package.json or save a lockfile \--save Save to package.json (true by default) \--frozen-lockfile Disallow changes to lockfile \--save-text-lockfile Save a text-based lockfile \--lockfile-only Generate a lockfile without installing dependencies #### Dependency Management \-p,\--production Don't install devDependencies \--trust Add to trustedDependencies in the project's package.json and install the package(s) \--omit\=<val> Exclude 'dev', 'optional', or 'peer' dependencies from install #### Certificate Management \--ca\=<val> Provide a Certificate Authority signing certificate \--cafile\=<val> The same as \`--ca\`, but is a file path to the certificate #### Dry Run \--dry-run Don't install anything #### Force Update \-f,\--force Always request the latest versions from the registry & reinstall all dependencies #### Caching \--cache-dir\=<val> Store & load cached data from a specific directory path \--no-cache Ignore manifest cache entirely #### Logging and Output \--silent Don't log anything \--verbose Excessively verbose logging \--no-progress Disable the progress bar \--no-summary Don't print a summary #### Integrity and Scripts \--no-verify Skip verifying integrity of newly downloaded packages \--ignore-scripts Skip lifecycle scripts in the project's package.json (dependency scripts are never run) #### Global Installation \-g,\--global Install globally #### Working Directory \--cwd\=<val> Set a specific cwd #### Installation Backend \--backend\=<val> Platform-specific optimizations for installing dependencies. Possible values: "clonefile" (default), "hardlink", "symlink", "copyfile" #### Registry \--registry\=<val> Use a specific registry by default, overriding .npmrc, bunfig.toml and environment variables #### Concurrency \--concurrent-scripts\=<val> Maximum number of concurrent jobs for lifecycle scripts (default 5) \--network-concurrency\=<val> Maximum number of concurrent network requests (default 48) #### Help \-h,\--help Print this help menu --- ## Page: https://bun.sh/docs/cli/update To update all dependencies to the latest version: bun update To update a specific dependency to the latest version: bun update [package] ## `--latest` By default, `bun update` will update to the latest version of a dependency that satisfies the version range specified in your `package.json`. To update to the latest version, regardless of if it's compatible with the current version range, use the `--latest` flag: bun update --latest For example, with the following `package.json`: { "dependencies": { "react": "^17.0.2" } } * `bun update` would update to a version that matches `17.x`. * `bun update --latest` would update to a version that matches `18.x` or later. ## CLI Usage $bun update <name>@<version> ### Flags #### General Configuration \-c,\--config\=<val> Specify path to config file (bunfig.toml) \-g,\--global Install globally \--cwd\=<val> Set a specific cwd #### Lockfile Management \-y,\--yarn Write a yarn.lock file (yarn v1) \--no-save Don't update package.json or save a lockfile \--save Save to package.json (true by default) \--frozen-lockfile Disallow changes to lockfile \--save-text-lockfile Save a text-based lockfile \--lockfile-only Generate a lockfile without installing dependencies #### Dependency Management \-p,\--production Don't install devDependencies \-f,\--force Always request the latest versions from the registry & reinstall all dependencies \--ignore-scripts Skip lifecycle scripts in the project's package.json (dependency scripts are never run) \--trust Add to trustedDependencies in the project's package.json and install the package(s) \--omit\=<val> Exclude 'dev', 'optional', or 'peer' dependencies from install \--latest Update packages to their latest versions #### Caching and Performance \--cache-dir\=<val> Store & load cached data from a specific directory path \--no-cache Ignore manifest cache entirely \--concurrent-scripts\=<val> Maximum number of concurrent jobs for lifecycle scripts (default 5) \--network-concurrency\=<val> Maximum number of concurrent network requests (default 48) #### Registry and Authentication \--ca\=<val> Provide a Certificate Authority signing certificate \--cafile\=<val> The same as \`--ca\`, but is a file path to the certificate \--registry\=<val> Use a specific registry by default, overriding .npmrc, bunfig.toml and environment variables #### Output and Logging \--silent Don't log anything \--verbose Excessively verbose logging \--no-progress Disable the progress bar \--no-summary Don't print a summary #### Verification and Integrity \--no-verify Skip verifying integrity of newly downloaded packages #### Miscellaneous \--dry-run Don't install anything \--backend\=<val> Platform-specific optimizations for installing dependencies. Possible values: "clonefile" (default), "hardlink", "symlink", "copyfile" \-h,\--help Print this help menu ### Examples Update all dependencies: bun update Update all dependencies to latest: bun update --latest Update specific packages: bun update zod jquery@3 Full documentation is available at https://bun.sh/docs/cli/update --- ## Page: https://bun.sh/docs/cli/publish Use `bun publish` to publish a package to the npm registry. `bun publish` will automatically pack your package into a tarball, strip workspace protocols from the `package.json` (resolving versions if necessary), and publish to the registry specified in your configuration files. Both `bunfig.toml` and `.npmrc` files are supported. ## Publishing the package from the current working directory bun publish ## Output bun publish v1.2.8 (ca7428e9) packed 203B package.json packed 224B README.md packed 30B index.ts packed 0.64KB tsconfig.json Total files: 4 Shasum: 79e2b4377b63f4de38dc7ea6e5e9dbee08311a69 Integrity: sha512-6QSNlDdSwyG/+[...]X6wXHriDWr6fA== Unpacked size: 1.1KB Packed size: 0.76KB Tag: latest Access: default Registry: http://localhost:4873/ + publish-1@1.0.0 Alternatively, you can pack and publish your package separately by using `bun pm pack` followed by `bun publish` with the path to the output tarball. bun pm pack ... bun publish ./package.tgz **Note** - `bun publish` will not run lifecycle scripts (`prepublishOnly/prepack/prepare/postpack/publish/postpublish`) if a tarball path is provided. Scripts will only be run if the package is packed by `bun publish`. ### `--access` The `--access` flag can be used to set the access level of the package being published. The access level can be one of `public` or `restricted`. Unscoped packages are always public, and attempting to publish an unscoped package with `--access restricted` will result in an error. bun publish --access public `--access` can also be set in the `publishConfig` field of your `package.json`. { "publishConfig": { "access": "restricted" } } ### `--tag` Set the tag of the package version being published. By default, the tag is `latest`. The initial version of a package is always given the `latest` tag in addition to the specified tag. bun publish --tag alpha `--tag` can also be set in the `publishConfig` field of your `package.json`. { "publishConfig": { "tag": "next" } } ### `--dry-run` The `--dry-run` flag can be used to simulate the publish process without actually publishing the package. This is useful for verifying the contents of the published package without actually publishing the package. bun publish --dry-run ### `--gzip-level` Specify the level of gzip compression to use when packing the package. Only applies to `bun publish` without a tarball path argument. Values range from `0` to `9` (default is `9`). ## CLI Usage $bun publish dist ### Flags #### Configuration \-c,\--config\=<val> Specify path to config file (bunfig.toml) #### Dependency Management \-y,\--yarn Write a yarn.lock file (yarn v1) \-p,\--production Don't install devDependencies \--omit\=<val> Exclude 'dev', 'optional', or 'peer' dependencies from install #### Lockfile Management \--no-save Don't update package.json or save a lockfile \--save Save to package.json (true by default) \--frozen-lockfile Disallow changes to lockfile \--save-text-lockfile Save a text-based lockfile \--lockfile-only Generate a lockfile without installing dependencies #### Security \--ca\=<val> Provide a Certificate Authority signing certificate \--cafile\=<val> The same as \`--ca\`, but is a file path to the certificate #### Installation Behavior \--dry-run Don't install anything \-f,\--force Always request the latest versions from the registry & reinstall all dependencies \--ignore-scripts Skip lifecycle scripts in the project's package.json (dependency scripts are never run) \--trust Add to trustedDependencies in the project's package.json and install the package(s) \-g,\--global Install globally \--cwd\=<val> Set a specific cwd \--backend\=<val> Platform-specific optimizations for installing dependencies. Possible values: "clonefile" (default), "hardlink", "symlink", "copyfile" #### Caching \--cache-dir\=<val> Store & load cached data from a specific directory path \--no-cache Ignore manifest cache entirely #### Logging and Output \--silent Don't log anything \--verbose Excessively verbose logging \--no-progress Disable the progress bar \--no-summary Don't print a summary \--no-verify Skip verifying integrity of newly downloaded packages #### Registry \--registry\=<val> Use a specific registry by default, overriding .npmrc, bunfig.toml and environment variables #### Performance \--concurrent-scripts\=<val> Maximum number of concurrent jobs for lifecycle scripts (default 5) \--network-concurrency\=<val> Maximum number of concurrent network requests (default 48) #### Help and Usage \-h,\--help Print this help menu #### Publishing \--access\=<val> Set access level for scoped packages \--tag\=<val> Tag the release. Default is "latest" \--otp\=<val> Provide a one-time password for authentication \--auth-type\=<val> Specify the type of one-time password authentication (default is 'web') \--gzip-level\=<val> Specify a custom compression level for gzip. Default is 9. ### Examples Display files that would be published, without publishing to the registry. bun publish --dry-run Publish the current package with public access. bun publish --access public Publish a pre-existing package tarball with tag 'next'. bun publish --tag next ./path/to/tarball.tgz ### `--auth-type` If you have 2FA enabled for your npm account, `bun publish` will prompt you for a one-time password. This can be done through a browser or the CLI. The `--auth-type` flag can be used to tell the npm registry which method you prefer. The possible values are `web` and `legacy`, with `web` being the default. bun publish --auth-type legacy ... This operation requires a one-time password. Enter OTP: 123456 ... ### `--otp` Provide a one-time password directly to the CLI. If the password is valid, this will skip the extra prompt for a one-time password before publishing. Example usage: bun publish --otp 123456 **Note** - `bun publish` respects the `NPM_CONFIG_TOKEN` environment variable which can be used when publishing in github actions or automated workflows. --- ## Page: https://bun.sh/docs/cli/outdated Use `bun outdated` to check for outdated dependencies in your project. This command displays a table of dependencies that have newer versions available. $bun outdated bun outdated v1.2.8 Package Current Update Latest @sinclair/typebox 0.34.15 0.34.16 0.34.16 @types/bun (dev) 1.2.0 1.2.8 1.2.8 eslint (dev) 8.57.1 8.57.1 9.20.0 eslint-plugin-security (dev) 2.1.1 2.1.1 3.0.1 eslint-plugin-sonarjs (dev) 0.23.0 0.23.0 3.0.1 expect-type (dev) 0.16.0 0.16.0 1.1.0 prettier (dev) 3.4.2 3.5.0 3.5.0 tsup (dev) 8.3.5 8.3.6 8.3.6 typescript (dev) 5.7.2 5.7.3 5.7.3 ## Version Information The output table shows three version columns: * **Current**: The version currently installed * **Update**: The latest version that satisfies your package.json version range * **Latest**: The latest version published to the registry ### Dependency Filters `bun outdated` supports searching for outdated dependencies by package names and glob patterns. To check if specific dependencies are outdated, pass the package names as positional arguments: $bun outdated eslint-plugin-security eslint-plugin-sonarjs bun outdated v1.2.8 Package Current Update Latest eslint-plugin-security (dev) 2.1.1 2.1.1 3.0.1 eslint-plugin-sonarjs (dev) 0.23.0 0.23.0 3.0.1 You can also pass glob patterns to check for outdated packages: $bun outdated 'eslint\*' bun outdated v1.2.8 Package Current Update Latest eslint (dev) 8.57.1 8.57.1 9.20.0 eslint-plugin-security (dev) 2.1.1 2.1.1 3.0.1 eslint-plugin-sonarjs (dev) 0.23.0 0.23.0 3.0.1 For example, to check for outdated `@types/*` packages: $bun outdated '@types/\*' bun outdated v1.2.8 Package Current Update Latest @types/bun (dev) 1.2.0 1.2.8 1.2.8 Or to exclude all `@types/*` packages: $bun outdated '!@types/\*' bun outdated v1.2.8 Package Current Update Latest @sinclair/typebox 0.34.15 0.34.16 0.34.16 eslint (dev) 8.57.1 8.57.1 9.20.0 eslint-plugin-security (dev) 2.1.1 2.1.1 3.0.1 eslint-plugin-sonarjs (dev) 0.23.0 0.23.0 3.0.1 expect-type (dev) 0.16.0 0.16.0 1.1.0 prettier (dev) 3.4.2 3.5.0 3.5.0 tsup (dev) 8.3.5 8.3.6 8.3.6 typescript (dev) 5.7.2 5.7.3 5.7.3 ### Workspace Filters Use the `--filter` flag to check for outdated dependencies in a different workspace package: $bun outdated --filter='@monorepo/types' bun outdated v1.2.8 Package Current Update Latest tsup (dev) 8.3.5 8.3.6 8.3.6 typescript (dev) 5.7.2 5.7.3 5.7.3 You can pass multiple `--filter` flags to check multiple workspaces: $bun outdated --filter @monorepo/types --filter @monorepo/cli bun outdated v1.2.8 Package Current Update Latest eslint (dev) 8.57.1 8.57.1 9.20.0 eslint-plugin-security (dev) 2.1.1 2.1.1 3.0.1 eslint-plugin-sonarjs (dev) 0.23.0 0.23.0 3.0.1 expect-type (dev) 0.16.0 0.16.0 1.1.0 tsup (dev) 8.3.5 8.3.6 8.3.6 typescript (dev) 5.7.2 5.7.3 5.7.3 You can also pass glob patterns to filter by workspace names: $bun outdated --filter='@monorepo/{types,cli}' bun outdated v1.2.8 Package Current Update Latest eslint (dev) 8.57.1 8.57.1 9.20.0 eslint-plugin-security (dev) 2.1.1 2.1.1 3.0.1 eslint-plugin-sonarjs (dev) 0.23.0 0.23.0 3.0.1 expect-type (dev) 0.16.0 0.16.0 1.1.0 tsup (dev) 8.3.5 8.3.6 8.3.6 typescript (dev) 5.7.2 5.7.3 5.7.3 ## CLI Usage $bun outdated filter ### Flags #### Configuration \-c,\--config\=<val> Specify path to config file (bunfig.toml) \--registry\=<val> Use a specific registry by default, overriding .npmrc, bunfig.toml and environment variables #### Lockfile Management \-y,\--yarn Write a yarn.lock file (yarn v1) \--no-save Don't update package.json or save a lockfile \--save Save to package.json (true by default) \--frozen-lockfile Disallow changes to lockfile \--save-text-lockfile Save a text-based lockfile \--lockfile-only Generate a lockfile without installing dependencies #### Dependency Management \-p,\--production Don't install devDependencies \-f,\--force Always request the latest versions from the registry & reinstall all dependencies \--ignore-scripts Skip lifecycle scripts in the project's package.json (dependency scripts are never run) \--trust Add to trustedDependencies in the project's package.json and install the package(s) \--omit\=<val> Exclude 'dev', 'optional', or 'peer' dependencies from install #### Caching and Verification \--cache-dir\=<val> Store & load cached data from a specific directory path \--no-cache Ignore manifest cache entirely \--no-verify Skip verifying integrity of newly downloaded packages #### Logging and Output \--silent Don't log anything \--verbose Excessively verbose logging \--no-progress Disable the progress bar \--no-summary Don't print a summary #### Installation Behavior \--dry-run Don't install anything \--concurrent-scripts\=<val> Maximum number of concurrent jobs for lifecycle scripts (default 5) \--network-concurrency\=<val> Maximum number of concurrent network requests (default 48) \--backend\=<val> Platform-specific optimizations for installing dependencies. Possible values: "clonefile" (default), "hardlink", "symlink", "copyfile" #### Security and Certificates \--ca\=<val> Provide a Certificate Authority signing certificate \--cafile\=<val> The same as \`--ca\`, but is a file path to the certificate #### Installation Scope \-g,\--global Install globally \--cwd\=<val> Set a specific cwd #### Help \-h,\--help Print this help menu #### Filtering \-F,\--filter\=<val> Display outdated dependencies for each matching workspace ### Examples Display outdated dependencies in the current workspace. bun outdated Use --filter to include more than one workspace. bun outdated --filter="\*" bun outdated --filter="./app/\*" Filter dependencies with name patterns. bun outdated jquery bun outdated "is-\*" --- ## Page: https://bun.sh/docs/cli/link Use `bun link` in a local directory to register the current package as a "linkable" package. cd /path/to/cool-pkg cat package.json { "name": "cool-pkg", "version": "1.0.0" } bun link bun link v1.x (7416672e) Success! Registered "cool-pkg" To use cool-pkg in a project, run: bun link cool-pkg Or add it in dependencies in your package.json file: "cool-pkg": "link:cool-pkg" This package can now be "linked" into other projects using `bun link cool-pkg`. This will create a symlink in the `node_modules` directory of the target project, pointing to the local directory. cd /path/to/my-app bun link cool-pkg In addition, the `--save` flag can be used to add `cool-pkg` to the `dependencies` field of your app's package.json with a special version specifier that tells Bun to load from the registered local directory instead of installing from `npm`: { "name": "my-app", "version": "1.0.0", "dependencies": { "cool-pkg": "link:cool-pkg" } } ## CLI Usage $bun link <packages> ### Flags #### Configuration \-c,\--config\=<val> Specify path to config file (bunfig.toml) \--registry\=<val> Use a specific registry by default, overriding .npmrc, bunfig.toml and environment variables #### Lockfile Management \-y,\--yarn Write a yarn.lock file (yarn v1) \--no-save Don't update package.json or save a lockfile \--save Save to package.json (true by default) \--frozen-lockfile Disallow changes to lockfile \-f,\--force Always request the latest versions from the registry & reinstall all dependencies \--save-text-lockfile Save a text-based lockfile \--lockfile-only Generate a lockfile without installing dependencies #### Dependency Management \-p,\--production Don't install devDependencies \--omit\=<val> Exclude 'dev', 'optional', or 'peer' dependencies from install \--trust Add to trustedDependencies in the project's package.json and install the package(s) #### Caching and Performance \--cache-dir\=<val> Store & load cached data from a specific directory path \--no-cache Ignore manifest cache entirely \--concurrent-scripts\=<val> Maximum number of concurrent jobs for lifecycle scripts (default 5) \--network-concurrency\=<val> Maximum number of concurrent network requests (default 48) \--backend\=<val> Platform-specific optimizations for installing dependencies. Possible values: "clonefile" (default), "hardlink", "symlink", "copyfile" #### Verification and Security \--ca\=<val> Provide a Certificate Authority signing certificate \--cafile\=<val> The same as \`--ca\`, but is a file path to the certificate \--no-verify Skip verifying integrity of newly downloaded packages #### Logging and Output \--silent Don't log anything \--verbose Excessively verbose logging \--no-progress Disable the progress bar \--no-summary Don't print a summary #### Installation Behavior \--dry-run Don't install anything \--ignore-scripts Skip lifecycle scripts in the project's package.json (dependency scripts are never run) #### Global Installation \-g,\--global Install globally #### Working Directory \--cwd\=<val> Set a specific cwd #### Help \-h,\--help Print this help menu ### Examples Directory should contain a package.json. bun link Add a previously-registered linkable package as a dependency of the current project. bun link <package> Full documentation is available at https://bun.sh/docs/cli/link --- ## Page: https://bun.sh/docs/cli/pm The `bun pm` command group provides a set of utilities for working with Bun's package manager. ## pack To create a tarball of the current workspace: bun pm pack Options for the `pack` command: * `--dry-run`: Perform all tasks except writing the tarball to disk. * `--destination`: Specify the directory where the tarball will be saved. * `--filename`: Specify an exact file name for the tarball to be saved at. * `--ignore-scripts`: Skip running pre/postpack and prepare scripts. * `--gzip-level`: Set a custom compression level for gzip, ranging from 0 to 9 (default is 9). Note `--filename` and `--destination` cannot be used at the same time ## bin To print the path to the `bin` directory for the local project: bun pm bin /path/to/current/project/node_modules/.bin To print the path to the global `bin` directory: bun pm bin -g <$HOME>/.bun/bin ## ls To print a list of installed dependencies in the current project and their resolved versions, excluding their dependencies. bun pm ls /path/to/project node_modules (135) ├── eslint@8.38.0 ├── react@18.2.0 ├── react-dom@18.2.0 ├── typescript@5.0.4 └── zod@3.21.4 To print all installed dependencies, including nth-order dependencies. bun pm ls --all /path/to/project node_modules (135) ├── @eslint-community/eslint-utils@4.4.0 ├── @eslint-community/regexpp@4.5.0 ├── @eslint/eslintrc@2.0.2 ├── @eslint/js@8.38.0 ├── @nodelib/fs.scandir@2.1.5 ├── @nodelib/fs.stat@2.0.5 ├── @nodelib/fs.walk@1.2.8 ├── acorn@8.8.2 ├── acorn-jsx@5.3.2 ├── ajv@6.12.6 ├── ansi-regex@5.0.1 ├── ... ## whoami Print your npm username. Requires you to be logged in (`bunx npm login`) with credentials in either `bunfig.toml` or `.npmrc`: bun pm whoami ## hash To generate and print the hash of the current lockfile: bun pm hash To print the string used to hash the lockfile: bun pm hash-string To print the hash stored in the current lockfile: bun pm hash-print ## cache To print the path to Bun's global module cache: bun pm cache To clear Bun's global module cache: bun pm cache rm ## migrate To migrate another package manager's lockfile without installing anything: bun pm migrate ## untrusted To print current untrusted dependencies with scripts: bun pm untrusted ./node_modules/@biomejs/biome @1.8.3 » [postinstall]: node scripts/postinstall.js These dependencies had their lifecycle scripts blocked during install. ## trust To run scripts for untrusted dependencies and add to `trustedDependencies`: bun pm trust <names> Options for the `trust` command: * `--all`: Trust all untrusted dependencies. ## default-trusted To print the default trusted dependencies list: bun pm default-trusted see the current list on GitHub here --- ## Page: https://bun.sh/docs/cli/filter The `--filter` (or `-F`) flag is used for selecting packages by pattern in a monorepo. Patterns can be used to match package names or package paths, with full glob syntax support. Currently `--filter` is supported by `bun install` and `bun outdated`, and can also be used to run scripts for multiple packages at once. ## Matching ### Package Name `--filter <pattern>` Name patterns select packages based on the package name, as specified in `package.json`. For example, if you have packages `pkg-a`, `pkg-b` and `other`, you can match all packages with `*`, only `pkg-a` and `pkg-b` with `pkg*`, and a specific package by providing the full name of the package. ### Package Path `--filter ./<glob>` Path patterns are specified by starting the pattern with `./`, and will select all packages in directories that match the pattern. For example, to match all packages in subdirectories of `packages`, you can use `--filter './packages/**'`. To match a package located in `packages/foo`, use `--filter ./packages/foo`. ## `bun install` and `bun outdated` Both `bun install` and `bun outdated` support the `--filter` flag. `bun install` by default will install dependencies for all packages in the monorepo. To install dependencies for specific packages, use `--filter`. Given a monorepo with workspaces `pkg-a`, `pkg-b`, and `pkg-c` under `./packages`: # Install dependencies for all workspaces except `pkg-c` bun install --filter '!pkg-c' # Install dependencies for packages in `./packages` (`pkg-a`, `pkg-b`, `pkg-c`) bun install --filter './packages/*' # Save as above, but exclude the root package.json bun install --filter --filter '!./' --filter './packages/*' Similarly, `bun outdated` will display outdated dependencies for all packages in the monorepo, and `--filter` can be used to restrict the command to a subset of the packages: # Display outdated dependencies for workspaces starting with `pkg-` bun outdated --filter 'pkg-*' # Display outdated dependencies for only the root package.json bun outdated --filter './' For more information on both these commands, see `bun install` and `bun outdated`. ## Running scripts with `--filter` Use the `--filter` flag to execute scripts in multiple packages at once: bun --filter <pattern> <script> Say you have a monorepo with two packages: `packages/api` and `packages/frontend`, both with a `dev` script that will start a local development server. Normally, you would have to open two separate terminal tabs, cd into each package directory, and run `bun dev`: cd packages/api bun dev # in another terminal cd packages/frontend bun dev Using `--filter`, you can run the `dev` script in both packages at once: bun --filter '*' dev Both commands will be run in parallel, and you will see a nice terminal UI showing their respective outputs:  ### Running scripts in workspaces Filters respect your workspace configuration: If you have a `package.json` file that specifies which packages are part of the workspace, `--filter` will be restricted to only these packages. Also, in a workspace you can use `--filter` to run scripts in packages that are located anywhere in the workspace: # Packages # src/foo # src/bar # in src/bar: runs myscript in src/foo, no need to cd! bun run --filter foo myscript ### Dependency Order Bun will respect package dependency order when running scripts. Say you have a package `foo` that depends on another package `bar` in your workspace, and both packages have a `build` script. When you run `bun --filter '*' build`, you will notice that `foo` will only start running once `bar` is done. --- ## Page: https://bun.sh/docs/cli/test Bun ships with a fast, built-in, Jest-compatible test runner. Tests are executed with the Bun runtime, and support the following features. * TypeScript and JSX * Lifecycle hooks * Snapshot testing * UI & DOM testing * Watch mode with `--watch` * Script pre-loading with `--preload` Bun aims for compatibility with Jest, but not everything is implemented. To track compatibility, see this tracking issue. ## Run tests bun test Tests are written in JavaScript or TypeScript with a Jest-like API. Refer to Writing tests for full documentation. math.test.ts import { expect, test } from "bun:test"; test("2 + 2", () => { expect(2 + 2).toBe(4); }); The runner recursively searches the working directory for files that match the following patterns: * `*.test.{js|jsx|ts|tsx}` * `*_test.{js|jsx|ts|tsx}` * `*.spec.{js|jsx|ts|tsx}` * `*_spec.{js|jsx|ts|tsx}` You can filter the set of _test files_ to run by passing additional positional arguments to `bun test`. Any test file with a path that matches one of the filters will run. Commonly, these filters will be file or directory names; glob patterns are not yet supported. bun test <filter> <filter> ... To filter by _test name_, use the `-t`/`--test-name-pattern` flag. # run all tests or test suites with "addition" in the name bun test --test-name-pattern addition To run a specific file in the test runner, make sure the path starts with `./` or `/` to distinguish it from a filter name. bun test ./test/specific-file.test.ts The test runner runs all tests in a single process. It loads all `--preload` scripts (see Lifecycle for details), then runs all tests. If a test fails, the test runner will exit with a non-zero exit code. ## CI/CD integration `bun test` supports a variety of CI/CD integrations. ### GitHub Actions `bun test` automatically detects if it's running inside GitHub Actions and will emit GitHub Actions annotations to the console directly. No configuration is needed, other than installing `bun` in the workflow and running `bun test`. #### How to install `bun` in a GitHub Actions workflow To use `bun test` in a GitHub Actions workflow, add the following step: jobs: build: name: build-app runs-on: ubuntu-latest steps: - name: Checkout uses: actions/checkout@v4 - name: Install bun uses: oven-sh/setup-bun@v2 - name: Install dependencies # (assuming your project has dependencies) run: bun install # You can use npm/yarn/pnpm instead if you prefer - name: Run tests run: bun test From there, you'll get GitHub Actions annotations. ### JUnit XML reports (GitLab, etc.) To use `bun test` with a JUnit XML reporter, you can use the `--reporter=junit` in combination with `--reporter-outfile`. bun test --reporter=junit --reporter-outfile=./bun.xml This will continue to output to stdout/stderr as usual, and also write a JUnit XML report to the given path at the very end of the test run. JUnit XML is a popular format for reporting test results in CI/CD pipelines. ## Timeouts Use the `--timeout` flag to specify a _per-test_ timeout in milliseconds. If a test times out, it will be marked as failed. The default value is `5000`. # default value is 5000 bun test --timeout 20 ## Rerun tests Use the `--rerun-each` flag to run each test multiple times. This is useful for detecting flaky or non-deterministic test failures. bun test --rerun-each 100 ## Bail out with `--bail` Use the `--bail` flag to abort the test run early after a pre-determined number of test failures. By default Bun will run all tests and report all failures, but sometimes in CI environments it's preferable to terminate earlier to reduce CPU usage. # bail after 1 failure bun test --bail # bail after 10 failure bun test --bail=10 ## Watch mode Similar to `bun run`, you can pass the `--watch` flag to `bun test` to watch for changes and re-run tests. bun test --watch ## Lifecycle hooks Bun supports the following lifecycle hooks: | Hook | Description | | --- | --- | | `beforeAll` | Runs once before all tests. | | `beforeEach` | Runs before each test. | | `afterEach` | Runs after each test. | | `afterAll` | Runs once after all tests. | These hooks can be defined inside test files, or in a separate file that is preloaded with the `--preload` flag. $ bun test --preload ./setup.ts See Test > Lifecycle for complete documentation. ## Mocks Create mock functions with the `mock` function. Mocks are automatically reset between tests. import { test, expect, mock } from "bun:test"; const random = mock(() => Math.random()); test("random", () => { const val = random(); expect(val).toBeGreaterThan(0); expect(random).toHaveBeenCalled(); expect(random).toHaveBeenCalledTimes(1); }); Alternatively, you can use `jest.fn()`, it behaves identically. import { test, expect, mock } from "bun:test"; import { test, expect, jest } from "bun:test"; const random = mock(() => Math.random()); const random = jest.fn(() => Math.random()); See Test > Mocks for complete documentation. ## Snapshot testing Snapshots are supported by `bun test`. // example usage of toMatchSnapshot import { test, expect } from "bun:test"; test("snapshot", () => { expect({ a: 1 }).toMatchSnapshot(); }); To update snapshots, use the `--update-snapshots` flag. bun test --update-snapshots See Test > Snapshots for complete documentation. ## UI & DOM testing Bun is compatible with popular UI testing libraries: * HappyDOM * DOM Testing Library * React Testing Library See Test > DOM Testing for complete documentation. ## Performance Bun's test runner is fast. 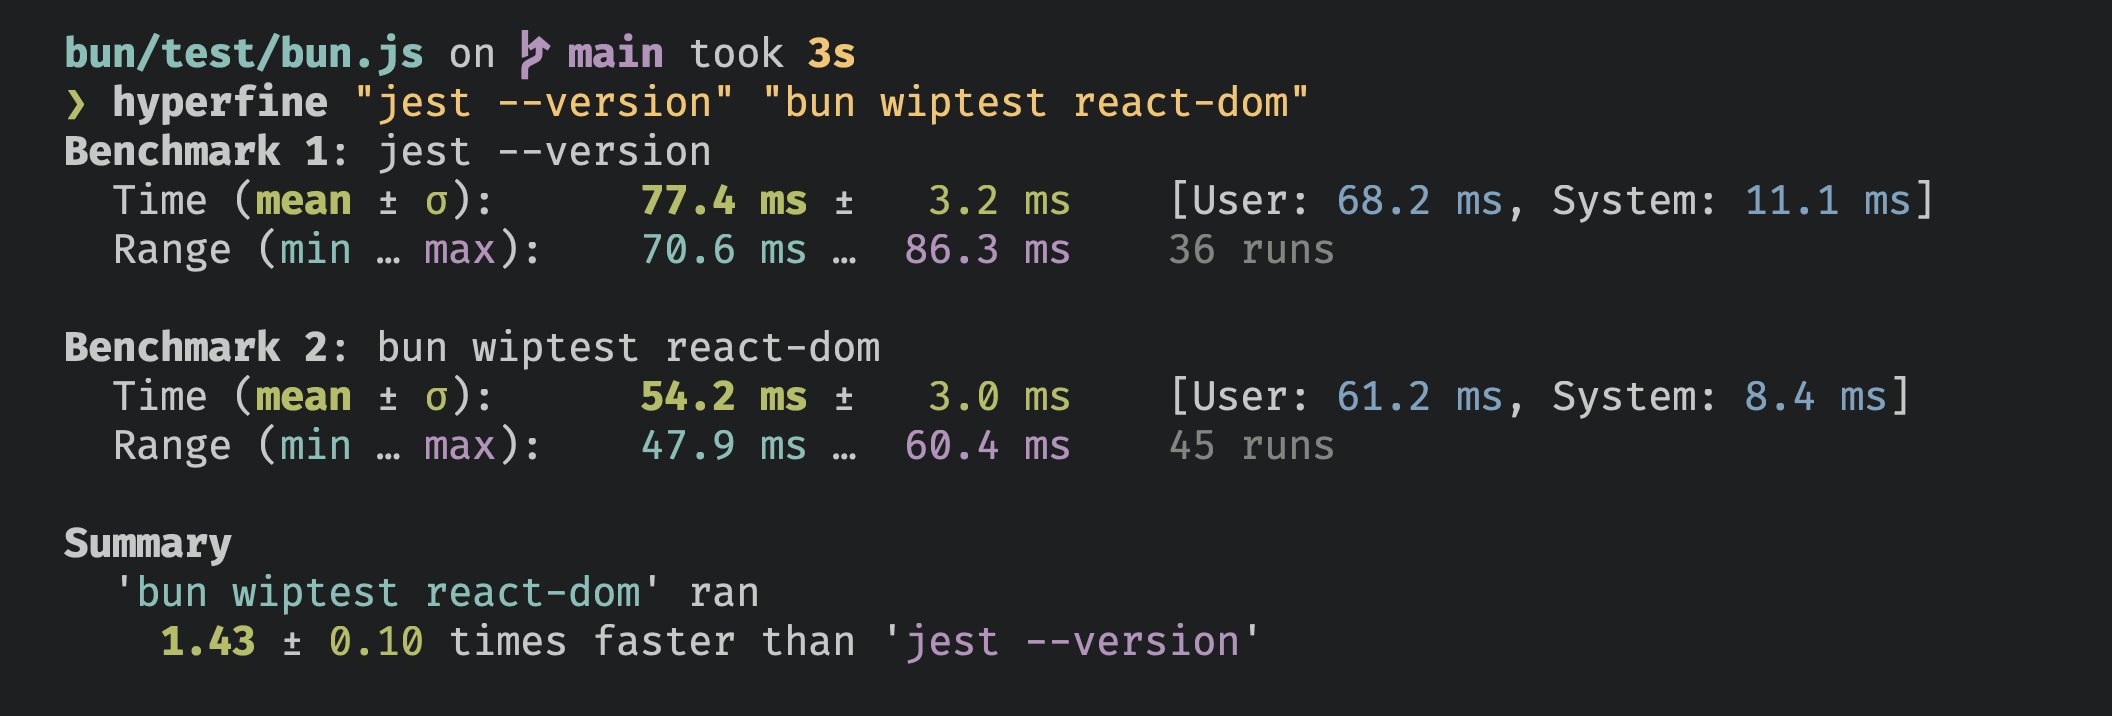 Running 266 React SSR tests faster than Jest can print its version number. ## CLI Usage $bun test <patterns> ### Flags #### Test Execution Control \--only Only run tests that are marked with "test.only()" \--todo Include tests that are marked with "test.todo()" \-t,\--test-name-pattern\=<val> Run only tests with a name that matches the given regex. \--rerun-each\=<val> Re-run each test file <NUMBER> times, helps catch certain bugs \--timeout\=<val> Set the per-test timeout in milliseconds, default is 5000. \--bail\=<val> Exit the test suite after <NUMBER> failures. If you do not specify a number, it defaults to 1. #### Snapshots \-u,\--update-snapshots Update snapshot files #### Coverage \--coverage Generate a coverage profile \--coverage-reporter\=<val> Report coverage in 'text' and/or 'lcov'. Defaults to 'text'. \--coverage-dir\=<val> Directory for coverage files. Defaults to 'coverage'. #### Reporting \--reporter\=<val> Specify the test reporter. Currently --reporter=junit is the only supported format. \--reporter-outfile\=<val> The output file used for the format from --reporter. ### Examples Run all test files bun test Run all test files with "foo" or "bar" in the file name bun test foo bar Run all test files, only including tests whose names includes "baz" bun test --test-name-pattern baz Full documentation is available at https://bun.sh/docs/cli/test --- ## Page: https://bun.sh/docs/cli/bunx **Note** — `bunx` is an alias for `bun x`. The `bunx` CLI will be auto-installed when you install `bun`. Use `bunx` to auto-install and run packages from `npm`. It's Bun's equivalent of `npx` or `yarn dlx`. bunx cowsay "Hello world!" ⚡️ **Speed** — With Bun's fast startup times, `bunx` is roughly 100x faster than `npx` for locally installed packages. Packages can declare executables in the `"bin"` field of their `package.json`. These are known as _package executables_ or _package binaries_. package.json { // ... other fields "name": "my-cli", "bin": { "my-cli": "dist/index.js" } } These executables are commonly plain JavaScript files marked with a shebang line to indicate which program should be used to execute them. The following file indicates that it should be executed with `node`. dist/index.js #!/usr/bin/env node console.log("Hello world!"); These executables can be run with `bunx`, bunx my-cli As with `npx`, `bunx` will check for a locally installed package first, then fall back to auto-installing the package from `npm`. Installed packages will be stored in Bun's global cache for future use. ## Arguments and flags To pass additional command-line flags and arguments through to the executable, place them after the executable name. bunx my-cli --foo bar ## Shebangs By default, Bun respects shebangs. If an executable is marked with `#!/usr/bin/env node`, Bun will spin up a `node` process to execute the file. However, in some cases it may be desirable to run executables using Bun's runtime, even if the executable indicates otherwise. To do so, include the `--bun` flag. bunx --bun my-cli The `--bun` flag must occur _before_ the executable name. Flags that appear _after_ the name are passed through to the executable. bunx --bun my-cli # good bunx my-cli --bun # bad To force bun to always be used with a script, use a shebang. #!/usr/bin/env bun