W↓
All docs
🔑
Sign Up/Sign In
www.instantdb.com/docs
Public Link
Apr 8, 2025, 12:39:01 PM - complete - 163.7 kB
Created by:
****ad@vlad.studio
Starting URLs:
https://www.instantdb.com/docs
## Page: https://www.instantdb.com/docs Instant is the Modern Firebase. With Instant you can easily build realtime and collaborative apps like Notion or Figma. And if you're ready, follow the quick start below to **build a live app in less than 5 minutes!** To use Instant in a brand new project, fire up your terminal and run the following: npx create-next-app instant-demo --tailwind --yes cd instant-demo npm i @instantdb/react npm run dev Now open up `app/page.tsx` in your favorite editor and replace the entirety of the file with the following code. "use client"; import { id, i, init, InstaQLEntity } from "@instantdb/react"; const APP\_ID \= "\_\_APP\_ID\_\_"; const schema \= i.schema({ entities: { todos: i.entity({ text: i.string(), done: i.boolean(), createdAt: i.number(), }), }, }); type Todo \= InstaQLEntity<typeof schema, "todos"\>; const db \= init({ appId: APP\_ID, schema }); function App() { const { isLoading, error, data } \= db.useQuery({ todos: {} }); if (isLoading) { return; } if (error) { return <div className\="text-red-500 p-4"\>Error: {error.message}</div\>; } const { todos } \= data; return ( <div className\="font-mono min-h-screen flex justify-center items-center flex-col space-y-4"\> <h2 className\="tracking-wide text-5xl text-gray-300"\>todos</h2\> <div className\="border border-gray-300 max-w-xs w-full"\> <TodoForm todos\={todos} /\> <TodoList todos\={todos} /\> <ActionBar todos\={todos} /\> </div\> <div className\="text-xs text-center"\> Open another tab to see todos update in realtime! </div\> </div\> ); } function addTodo(text: string) { db.transact( db.tx.todos\[id()\].update({ text, done: false, createdAt: Date.now(), }) ); } function deleteTodo(todo: Todo) { db.transact(db.tx.todos\[todo.id\].delete()); } function toggleDone(todo: Todo) { db.transact(db.tx.todos\[todo.id\].update({ done: !todo.done })); } function deleteCompleted(todos: Todo\[\]) { const completed \= todos.filter((todo) \=> todo.done); const txs \= completed.map((todo) \=> db.tx.todos\[todo.id\].delete()); db.transact(txs); } function toggleAll(todos: Todo\[\]) { const newVal \= !todos.every((todo) \=> todo.done); db.transact( todos.map((todo) \=> db.tx.todos\[todo.id\].update({ done: newVal })) ); } function ChevronDownIcon() { return ( <svg viewBox\="0 0 20 20"\> <path d\="M5 8 L10 13 L15 8" stroke\="currentColor" fill\="none" strokeWidth\="2" /\> </svg\> ); } function TodoForm({ todos }: { todos: Todo\[\] }) { return ( <div className\="flex items-center h-10 border-b border-gray-300"\> <button className\="h-full px-2 border-r border-gray-300 flex items-center justify-center" onClick\={() \=> toggleAll(todos)} \> <div className\="w-5 h-5"\> <ChevronDownIcon /\> </div\> </button\> <form className\="flex-1 h-full" onSubmit\={(e) \=> { e.preventDefault(); const input \= e.currentTarget.input as HTMLInputElement; addTodo(input.value); input.value \= ""; }} \> <input className\="w-full h-full px-2 outline-none bg-transparent" autoFocus placeholder\="What needs to be done?" type\="text" name\="input" /\> </form\> </div\> ); } function TodoList({ todos }: { todos: Todo\[\] }) { return ( <div className\="divide-y divide-gray-300"\> {todos.map((todo) \=> ( <div key\={todo.id} className\="flex items-center h-10"\> <div className\="h-full px-2 flex items-center justify-center"\> <div className\="w-5 h-5 flex items-center justify-center"\> <input type\="checkbox" className\="cursor-pointer" checked\={todo.done} onChange\={() \=> toggleDone(todo)} /\> </div\> </div\> <div className\="flex-1 px-2 overflow-hidden flex items-center"\> {todo.done ? ( <span className\="line-through"\>{todo.text}</span\> ) : ( <span\>{todo.text}</span\> )} </div\> <button className\="h-full px-2 flex items-center justify-center text-gray-300 hover:text-gray-500" onClick\={() \=> deleteTodo(todo)} \> X </button\> </div\> ))} </div\> ); } function ActionBar({ todos }: { todos: Todo\[\] }) { return ( <div className\="flex justify-between items-center h-10 px-2 text-xs border-t border-gray-300"\> <div\>Remaining todos: {todos.filter((todo) \=> !todo.done).length}</div\> <button className\=" text-gray-300 hover:text-gray-500" onClick\={() \=> deleteCompleted(todos)} \> Delete Completed </button\> </div\> ); } export default App; Go to `localhost:3000`, aand huzzah 🎉 You've got your first Instant web app running! Check out the Working with data section to learn more about how to use Instant :) --- ## Page: https://www.instantdb.com/docs/start-rn You can use Instant in React Native projects too! Below is an example using Expo. Open up your terminal and do the following: npx create-expo-app instant-rn-demo cd instant-rn-demo npm i @instantdb/react-native npm i @react-native-async-storage/async-storage @react-native-community/netinfo react-native-get-random-values Now open up `app/(tabs)/index.tsx` in your favorite editor and replace the entirety of the file with the following code. import { init, i, InstaQLEntity } from "@instantdb/react-native"; import { View, Text, Button, StyleSheet } from "react-native"; const APP\_ID \= "\_\_APP\_ID\_\_"; const schema \= i.schema({ entities: { colors: i.entity({ value: i.string(), }), }, }); type Color \= InstaQLEntity<typeof schema, "colors"\>; const db \= init({ appId: APP\_ID, schema }); const selectId \= "4d39508b-9ee2-48a3-b70d-8192d9c5a059"; function App() { const { isLoading, error, data } \= db.useQuery({ colors: { $: { where: { id: selectId } }, }, }); if (isLoading) { return ( <View\> <Text\>Loading...</Text\> </View\> ); } if (error) { return ( <View\> <Text\>Error: {error.message}</Text\> </View\> ); } return <Main color\={data.colors\[0\]} /\>; } function Main(props: { color?: Color }) { const { value } \= props.color || { value: "lightgray" }; return ( <View style\={\[styles.container, { backgroundColor: value }\]}\> <View style\={\[styles.contentSection\]}\> <Text style\={styles.header}\>Hi! pick your favorite color</Text\> <View style\={styles.spaceX4}\> {\["green", "blue", "purple"\].map((c) \=> { return ( <Button title\={c} onPress\={() \=> { db.transact(db.tx.colors\[selectId\].update({ value: c })); }} key\={c} /\> ); })} </View\> </View\> </View\> ); } const styles \= StyleSheet.create({ container: { flex: 1, justifyContent: "center", alignItems: "center", }, spaceY4: { marginVertical: 16, }, spaceX4: { flexDirection: "row", justifyContent: "space-between", marginHorizontal: 16, }, contentSection: { backgroundColor: "white", opacity: 0.8, padding: 12, borderRadius: 8, }, header: { fontSize: 24, fontWeight: "bold", marginBottom: 16, }, }); export default App; If you haven't already, install the Expo Go app on iOS or Android. Once you have that installed you can run the app from your terminal. Huzzah 🎉 You've got your first React Native Instant app running! Check out the Working with data section to learn more about how to use Instant! --- ## Page: https://www.instantdb.com/docs/start-vanilla You can use Instant with plain ol' Javascript/Typescript too. You may find this helpful to integrate Instant with a framework that doesn't have an official SDK yet. To use Instant in a brand new project fire up your terminal set up a new project with Vite. npx create-vite@latest -t vanilla-ts instant-vanilla cd instant-vanilla npm i @instantdb/core npm run dev Now open up `src/main.ts` in your favorite editor and replace the entirety of the file with the following code. import { init, i, id, InstaQLEntity } from "@instantdb/core"; const APP\_ID \= "\_\_APP\_ID\_\_"; const schema \= i.schema({ entities: { todos: i.entity({ text: i.string(), done: i.boolean(), createdAt: i.date(), }), }, }); type Todo \= InstaQLEntity<typeof schema, "todos"\>; const db \= init({ appId: APP\_ID, schema }); db.subscribeQuery({ todos: {} }, (resp) \=> { if (resp.error) { renderError(resp.error.message); return; } if (resp.data) { render(resp.data); } }); function addTodo(text: string) { db.transact( db.tx.todos\[id()\].update({ text, done: false, createdAt: Date.now(), }) ); focusInput(); } function deleteTodoItem(todo: Todo) { db.transact(db.tx.todos\[todo.id\].delete()); } function toggleDone(todo: Todo) { db.transact(db.tx.todos\[todo.id\].update({ done: !todo.done })); } function deleteCompleted(todos: Todo\[\]) { const completed \= todos.filter((todo) \=> todo.done); const txs \= completed.map((todo) \=> db.tx.todos\[todo.id\].delete()); db.transact(txs); } function toggleAllTodos(todos: Todo\[\]) { const newVal \= !todos.every((todo) \=> todo.done); db.transact( todos.map((todo) \=> db.tx.todos\[todo.id\].update({ done: newVal })) ); } const styles: Record<string, string\> \= { container: \` box-sizing: border-box; background-color: #fafafa; font-family: code, monospace; height: 100vh; display: flex; justify-content: center; align-items: center; flex-direction: column; \`, header: \` letter-spacing: 2px; font-size: 50px; color: lightgray; margin-bottom: 10px; \`, form: \` box-sizing: inherit; display: flex; border: 1px solid lightgray; border-bottom-width: 0px; width: 350px; \`, toggleAll: \` font-size: 30px; cursor: pointer; margin-left: 11px; margin-top: -6px; width: 15px; margin-right: 12px; \`, input: \` background-color: transparent; font-family: code, monospace; width: 287px; padding: 10px; font-style: italic; \`, todoList: \` box-sizing: inherit; width: 350px; \`, checkbox: \` font-size: 30px; margin-left: 5px; margin-right: 20px; cursor: pointer; \`, todo: \` display: flex; align-items: center; padding: 10px; border: 1px solid lightgray; border-bottom-width: 0px; \`, todoText: \` flex-grow: 1; overflow: hidden; \`, delete: \` width: 25px; cursor: pointer; color: lightgray; \`, actionBar: \` display: flex; justify-content: space-between; width: 328px; padding: 10px; border: 1px solid lightgray; font-size: 10px; \`, footer: \` margin-top: 20px; font-size: 10px; \`, }; const app \= document.getElementById("app")!; app.style.cssText \= styles.container; function render(data: { todos: Todo\[\] }) { app.innerHTML \= ""; const { todos } \= data; const containerHTML \= \` <div style="${styles.container}"> <div style="${styles.header}">todos</div> ${TodoForm()} ${TodoList(todos)} ${ActionBar(todos)} <div style="${ styles.footer }">Open another tab to see todos update in realtime!</div> </div> \`; app.innerHTML \= containerHTML; document .querySelector(".toggle-all") ?.addEventListener("click", () \=> toggleAllTodos(todos)); document.querySelector("form")?.addEventListener("submit", submitForm); todos.forEach((todo) \=> { document .getElementById(\`toggle-${todo.id}\`) ?.addEventListener("change", () \=> toggleDone(todo)); document .getElementById(\`delete-${todo.id}\`) ?.addEventListener("click", () \=> deleteTodoItem(todo)); }); document .querySelector(".delete-completed") ?.addEventListener("click", () \=> deleteCompleted(todos)); } function renderError(errorMessage: string) { app.innerHTML \= \` <div\>${errorMessage}</div\> \`; } function TodoForm() { return \` <div style="${styles.form}"> <div class="toggle-all" style="${styles.toggleAll}">⌄</div> <form> <input style="${styles.input}" placeholder="What needs to be done?" type="text" autofocus> </form> </div> \`; } function TodoList(todos: Todo\[\]) { return \` <div style="${styles.todoList}"> ${todos .map( (todo) \=> \` <div style="${styles.todo}"> <input id="toggle-${todo.id}" type="checkbox" style="${ styles.checkbox }" ${todo.done ? "checked" : ""}\> <div style="${styles.todoText}"> ${ todo.done ? \`<span style="text-decoration: line-through;">${todo.text}</span>\` : \`<span>${todo.text}</span>\` } </div> <span id="delete-${todo.id}" style="${styles.delete}">𝘟</span> </div> \` ) .join("")} </div> \`; } function ActionBar(todos: Todo\[\]) { return \` <div style="${styles.actionBar}"> <div>Remaining todos: ${todos.filter((todo) \=> !todo.done).length}</div> <div class="delete-completed" style="cursor: pointer;">Delete Completed</div> </div> \`; } function focusInput() { const input \= document.querySelector<HTMLInputElement\>('input\[type="text"\]'); if (input) { input.focus(); } } function submitForm(event: Event) { event.preventDefault(); const input \= (event.target as HTMLFormElement).querySelector("input"); if (input && input.value.trim()) { addTodo(input.value); input.value \= ""; } } Huzzah 🎉 You've got your first Instant web app running! Check out the Working with data section to learn more about how to use Instant :) --- ## Page: https://www.instantdb.com/docs/init #### Pick your app The examples below will be updated with your app ID. Working with data ## Initializing Instant ## Basic Initialization The first step to using Instant in your app is to call `init`. Here is a simple example at the root of your app. import { init } from '@instantdb/react'; const APP\_ID \= '\_\_APP\_ID\_\_'; const db \= init({ appId: APP\_ID }); function App() { return <Main /\>; } With that, you can use `db` to write data, make queries, handle auth, and more! ## Flexible Initialization Instant maintains a single connection regardless of where or how many times you call `init` with the same app ID. This means you can safely call `init` multiple times without worrying about creating multiple connections or performance overhead. However we do recommend the pattern of exporting a reference from a utility file like so: import { init } from '@instantdb/react'; const APP\_ID \= '\_\_APP\_ID\_\_'; export const db \= init({ appId: APP\_ID }); import { db } from './util/instant'; function MyComponent() { db.useQuery({ ... }); } ## Typesafety If you're using typescript, `init` accepts a `schema` argument. Adding a schema provides auto-completion and typesafety for your queries and transactions. import { init, i } from '@instantdb/react'; const APP\_ID \= '\_\_APP\_ID\_\_'; const schema \= i.schema({ entities: { todos: i.entity({ text: i.string(), done: i.boolean(), createdAt: i.number(), }), }, }); const db \= init({ appId: APP\_ID, schema }); To learn more about writing schemas, head on over to the Modeling your data section. Previous Getting started w/ React Next Modeling data --- ## Page: https://www.instantdb.com/docs/modeling-data In this section we’ll learn how to model data using Instant's schema. By the end of this document you’ll know how to: * Create namespaces and attributes * Add indexes and unique constraints * Model relationships * Lock down your schema for production We’ll build a micro-blog to illustrate; we'll have authors, posts, comments, and tags. ## Schema as Code With Instant you can define your schema and your permissions in code. If you haven't already, use the CLI to generate an `instant.schema.ts`, and a `instant.perms.ts` file: npx instant-cli@latest init The CLI will guide you through picking an Instant app and generate these files for you. ## instant.schema.ts Now we can define the data model for our blog! Open `instant.schema.ts`, and paste the following: import { i } from '@instantdb/react'; const \_schema \= i.schema({ entities: { $users: i.entity({ email: i.string().unique().indexed(), }), profiles: i.entity({ nickname: i.string(), createdAt: i.date(), }), posts: i.entity({ title: i.string(), body: i.string(), createdAt: i.date(), }), comments: i.entity({ body: i.string(), createdAt: i.date(), }), tags: i.entity({ title: i.string(), }), }, links: { postAuthor: { forward: { on: 'posts', has: 'one', label: 'author' }, reverse: { on: 'profiles', has: 'many', label: 'authoredPosts' }, }, commentPost: { forward: { on: 'comments', has: 'one', label: 'post' }, reverse: { on: 'posts', has: 'many', label: 'comments' }, }, commentAuthor: { forward: { on: 'comments', has: 'one', label: 'author' }, reverse: { on: 'profiles', has: 'many', label: 'authoredComments' }, }, postsTags: { forward: { on: 'posts', has: 'many', label: 'tags' }, reverse: { on: 'tags', has: 'many', label: 'posts' }, }, profileUser: { forward: { on: 'profiles', has: 'one', label: '$user' }, reverse: { on: '$users', has: 'one', label: 'profile' }, }, }, }); type \_AppSchema \= typeof \_schema; interface AppSchema extends \_AppSchema {} const schema: AppSchema \= \_schema; export type { AppSchema }; export default schema; Let's unpack what we just wrote. There are three core building blocks to model data with Instant: **Namespaces**, **Attributes**, and **Links**. ## 1) Namespaces Namespaces are equivelant to "tables" in relational databases or "collections" in NoSQL. In our case, these are: `$users`, `profiles`, `posts`, `comments`, and `tags`. They're all defined in the `entities` section: const \_schema \= i.schema({ entities: { posts: i.entity({ }), }, }); ## 2) Attributes Attributes are properties associated with namespaces. These are equivelant to a "column" in relational databases or a "field" in NoSQL. For the `posts` entity, we have the `title`, `body`, and `createdAt` attributes: const \_schema \= i.schema({ entities: { posts: i.entity({ title: i.string(), body: i.string(), createdAt: i.date(), }), }, }); ### Typing attributes Attributes can be typed as `i.string()`, `i.number()`, `i.boolean()`, `i.date()`, `i.json()`, or `i.any()`. `i.date()` accepts dates as either a numeric timestamp (in milliseconds) or an ISO 8601 string. `JSON.stringify(new Date())` will return an ISO 8601 string. When you type `posts.title` as a `string`: const \_schema \= i.schema({ entities: { posts: i.entity({ title: i.string(), }), }, }); Instant will _make sure_ that all `title` attributes are strings, and you'll get the proper typescript hints to boot! ### Unique constraints Sometimes you'll want to introduce a unique constraint. For example, say we wanted to add friendly URL's to posts. We could introduce a `slug` attribute: const \_schema \= i.schema({ entities: { posts: i.entity({ slug: i.string().unique(), }), }, }); Since we're going to use post slugs in URLs, we'll want to make sure that no two posts can have the same slug. If we mark `slug` as `unique`, _Instant will guarantee this constraint for us_. Plus unique attributes come with their own special index. This means that if you use a unique attribute inside a query, we can fetch the object quickly: const query \= { posts: { $: { where: { slug: 'completing\_sicp', }, }, }, }; ### Indexing attributes Speaking of fast queries, let's take a look at one: What if we wanted to query for a post that was published at a particular date? Here's a query to get posts that were published during SpaceX's chopstick launch: const rocketChopsticks \= '2024-10-13T00:00:00Z'; const query \= { posts: { $: { where: { createdAt: rocketChopsticks } } } }; This would work, but the more posts we create, the slower the query would get. We'd have to scan every post and compare the `createdAt` date. To make this query faster, we can index `createdAt`: const \_schema \= i.schema({ entities: { posts: i.entity({ createdAt: i.date().indexed(), }), }, }); As it says on the tin, this command tells Instant to index the `createdAt` field, which lets us quickly look up entities by this attribute. ## 3) Links Links connect two namespaces together. When you define a link, you define it both in the 'forward', and the 'reverse' direction. For example: postAuthor: { forward: { on: "posts", has: "one", label: "author" }, reverse: { on: "profiles", has: "many", label: "authoredPosts" }, } This links `posts` and `profiles` together: * `posts.author` links to _one_ `profiles` entity * `profiles.authoredPosts` links back to _many_ `posts` entities. Since links are defined in both directions, you can query in both directions too: const query1 \= { posts: { author: {}, }, }; const query2 \= { profiles: { authoredPosts: {}, }, }; Links can have one of four relationship types: `many-to-many`, `many-to-one`, `one-to-many`, and `one-to-one` Our micro-blog example has the following relationship types: * **One-to-one** between `profiles` and `$users` * **One-to-many** between `posts` and `profiles` * **One-to-many** between `comments` and `posts` * **One-to-many** between `comments` and `profiles` * **Many-to-many** between `posts` and `tags` ### Cascade Delete Links defined with `has: "one"` can set `onDelete: "cascade"`. In this case, when the profile entity is deleted, all post entities will be deleted too: postAuthor: { forward: { on: "posts", has: "one", label: "author", onDelete: "cascade" }, reverse: { on: "profiles", has: "many", label: "authoredPosts" }, } db.tx.profiles\[user\_id\].delete(); Without `onDelete: "cascade"`, deleting a profile would simply delete the links but not delete the underlying posts. If you prefer to model links in other direction, you can do it, too: postAuthor: { forward: { on: "profiles", has: "many", label: "authoredPosts" }, reverse: { on: "posts", has: "one", label: "author", onDelete: "cascade" }, } ## Publishing your schema Now that you have your schema, you can use the CLI to `push` it to your app: npx instant-cli@latest push schema The CLI will look at your app in production, show you the new columns you'd create, and run the changes for you! Checking for an Instant SDK... Found @instantdb/react in your package.json. Found NEXT\_PUBLIC\_INSTANT\_APP\_ID: \*\*\*\*\* Planning schema... The following changes will be applied to your production schema: ADD ENTITY profiles.id ADD ENTITY posts.id ADD ENTITY comments.id ADD ENTITY tags.id ADD ATTR profiles.nickname :: unique=false, indexed=false ADD ATTR profiles.createdAt :: unique=false, indexed=false ADD ATTR posts.title :: unique=false, indexed=false ADD ATTR posts.slug :: unique=true, indexed=false ADD ATTR posts.body :: unique=false, indexed=false ADD ATTR posts.createdAt :: unique=false, indexed=true ADD ATTR comments.body :: unique=false, indexed=false ADD ATTR comments.createdAt :: unique=false, indexed=false ADD ATTR tags.title :: unique=false, indexed=false ADD LINK posts.author <=> profiles.authoredPosts ADD LINK comments.post <=> posts.comments ADD LINK comments.author <=> profiles.authoredComments ADD LINK posts.tags <=> tags.posts ADD LINK profiles.$user <=> $users.profile ? **OK to proceed? yes Schema updated!** ## Use schema for typesafety You can also use your schema inside `init`: import { init } from '@instantdb/react'; import schema from '../instant.schema.ts'; const db \= init({ appId: process.env.NEXT\_PUBLIC\_INSTANT\_APP\_ID!, schema, }); When you do this, all queries and transactions will come with typesafety out of the box. If you haven't used the CLI to push your schema yet, no problem. Any time you write `transact`, we'll automatically create missing entities for you. ## Update or Delete attributes You can always modify or delete attributes after creating them. **You can't use the CLI to do this yet, but you can use the dashboard.** Say we wanted to rename `posts.createdAt` to `posts.publishedAt`: 1. Go to your Dashboard 2. Click "Explorer" 3. Click "posts" 4. Click "Edit Schema" 5. Click `createdAt` You'll see a modal that you can use to rename the attribute, index it, or delete it: 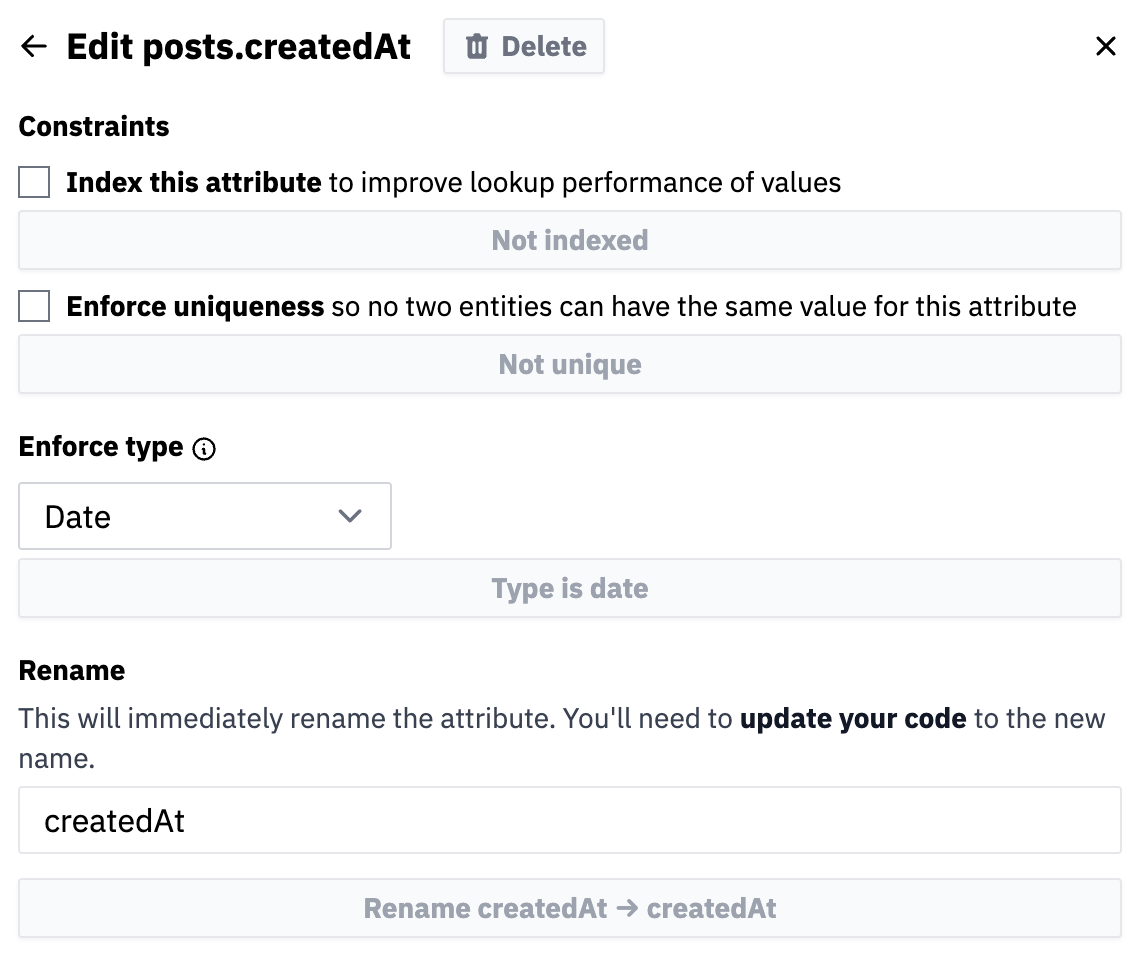 ## Secure your schema with permissions In the earlier sections we mentioned that new `entities` and `attributes` can be created on the fly when you call `transact`. This can be useful for development, but you may not want this in production. To prevent changes to your schema on the fly, simply add these permissions to your app. import type { InstantRules } from '@instantdb/react'; const rules \= { attrs: { allow: { $default: 'false', }, }, } satisfies InstantRules; export default rules; Once you push these permissions to production: npx instant-cli@latest push perms Checking for an Instant SDK... Found @instantdb/react in your package.json. Found NEXT\_PUBLIC\_INSTANT\_APP\_ID: \*\*\*\*\* Planning perms... The following changes will be applied to your perms: \-null +{ \+ attrs: { \+ allow: { \+ $default: "false" \+ } \+ } +} **OK to proceed? yes Permissions updated!** You'll still be able to make changes in the explorer or with the CLI, but client-side transactions that try to modify your schema will fail. This means your schema is safe from unwanted changes! * * * **If you've made it this far, congratulations! You should now be able to fully customize and lock down your data model. Huzzah!** --- ## Page: https://www.instantdb.com/docs/instaml Instant uses a **Firebase-inspired** interface for mutations. We call our mutation language **InstaML** ## Update data We use the `update` action to create entities. import { init, id } from '@instantdb/react'; const db \= init({ appId: process.env.NEXT\_PUBLIC\_INSTANT\_APP\_ID!, }); db.transact(db.tx.goals\[id()\].update({ title: 'eat' })); This creates a new `goal` with the following properties: * It's identified by a randomly generated id via the `id()` function. * It has an attribute `title` with value `eat`. Similar to NoSQL, you don't need to use the same schema for each entity in a namespace. After creating the previous goal you can run the following: db.transact( db.tx.goals\[id()\].update({ priority: 'none', isSecret: true, value: 10, aList: \[1, 2, 3\], anObject: { foo: 'bar' }, }), ); You can store `strings`, `numbers`, `booleans`, `arrays`, and `objects` as values. You can also generate values via functions. Below is an example for picking a random goal title. db.transact( db.tx.goals\[id()\].update({ title: \['eat', 'sleep', 'hack', 'repeat'\]\[Math.floor(Math.random() \* 4)\], }), ); * * * The `update` action is also used for updating entities. Suppose we had created the following goal const eatId \= id(); db.transact( db.tx.goals\[eatId\].update({ priority: 'top', lastTimeEaten: 'Yesterday' }), ); We eat some food and decide to update the goal. We can do that like so: db.transact(db.tx.goals\[eatId\].update({ lastTimeEaten: 'Today' })); This will only update the value of the `lastTimeEaten` attribute for entity `eat`. ## Merge data When you `update` an attribute, you overwrite it. This is fine for updating values of strings, numbers, and booleans. But if you use `update` to overwrite json objects you may encounter two problems: 1. You lose any data you didn't specify. 2. You risk clobbering over changes made by other clients. For example, imagine we had a `game` entity, that stored a `state` of favorite colors: db.transact(db.tx.games\[gameId\].update({ state: { '0-0': 'red' } })); db.transact(db.tx.games\[gameId\].update({ state: { '0-1': 'blue' } })); To make working with deeply-nested, document-style JSON values a breeze, we created `merge`. Similar to lodash's `merge` function, `merge` allows you to specify the slice of data you want to update: db.transact(db.tx.games\[gameId\].merge({ state: { '0-0': 'red' } })); db.transact(db.tx.games\[gameId\].merge({ state: { '0-1': 'blue' } })); `merge` only merges objects. Calling `merge` on **arrays, numbers, or booleans** will overwrite the values. Sometimes you may want to remove keys from a nested object. You can do so by calling `merge` with a key set to `null` or `undefined`. This will remove the corresponding property from the object. db.transact(db.tx.games\[gameId\].merge({ state: { '0-1': null } })); ## Delete data The `delete` action is used for deleting entities. db.transact(db.tx.goals\[eatId\].delete()); You can generate an array of `delete` txs to delete all entities in a namespace const { isLoading, error, data } \= db.useQuery({ goals: {} }); const { goals } \= data; db.transact(goals.map((g) \=> db.tx.goals\[g.id\].delete())); Calling `delete` on an entity also deletes its associations. So no need to worry about cleaning up previously created links. ## Link data `link` is used to create associations. Suppose we create a `goal` and a `todo`. db.transact(\[ db.tx.todos\[workoutId\].update({ title: 'Go on a run' }), db.tx.goals\[healthId\].update({ title: 'Get fit!' }), \]); We can associate `healthId` with `workoutId` like so: db.transact(db.tx.goals\[healthId\].link({ todos: workoutId })); We could have done all this in one `transact` too via chaining transaction chunks. db.transact(\[ db.tx.todos\[workoutId\].update({ title: 'Go on a run' }), db.tx.goals\[healthId\] .update({ title: 'Get fit!' }) .link({ todos: workoutId }), \]); You can specify multiple ids in one `link` as well: db.transact(\[ db.tx.todos\[workoutId\].update({ title: 'Go on a run' }), db.tx.todos\[proteinId\].update({ title: 'Drink protein' }), db.tx.todos\[sleepId\].update({ title: 'Go to bed early' }), db.tx.goals\[healthId\] .update({ title: 'Get fit!' }) .link({ todos: \[workoutId, proteinId, sleepId\] }), \]); Links are bi-directional. Say we link `healthId` to `workoutId` db.transact(db.tx.goals\[healthId\].link({ todos: workoutId })); We can query associations in both directions const { isLoading, error, data } \= db.useQuery({ goals: { todos: {} }, todos: { goals: {} }, }); const { goals, todos } \= data; console.log('goals with nested todos', goals); console.log('todos with nested goals', todos); ## Unlink data Links can be removed via `unlink.` db.transact(db.tx.goals\[healthId\].unlink({ todos: workoutId })); This removes links in both directions. Unlinking can be done in either direction so unlinking `workoutId` from `healthId` would have the same effect. db.transact(\[db.tx.todos\[workoutId\].unlink({ goals: healthId })\]); We can `unlink` multiple ids too: db.transact(\[ db.tx.goals\[healthId\].unlink({ todos: \[workoutId, proteinId, sleepId\] }), db.tx.goals\[workId\].unlink({ todos: \[standupId, reviewPRsId, focusId\] }), \]); ## Lookup by unique attribute If your entity has a unique attribute, you can use `lookup` in place of the id to perform updates. import { lookup } from '@instantdb/react'; db.transact( db.tx.profiles\[lookup('email', 'eva\_lu\_ator@instantdb.com')\].update({ name: 'Eva Lu Ator', }), ); The `lookup` function takes the attribute as its first argument and the unique attribute value as its second argument. When it is used in a transaction, the updates will be applied to the entity that has the unique value. If no entity has the value, then a new entity with a random id will be created with the value. It can be used with `update`, `delete`, `merge`, `link`, and `unlink`. ## Lookups in links When used with links, it can also be used in place of the linked entity's id. db.transact( db.tx.users\[lookup('email', 'eva\_lu\_ator@instantdb.com')\].link({ posts: lookup('number', 15), }), ); ## Transacts are atomic When you call `db.transact`, all the transactions are committed atomically. If any of the transactions fail, none of them will be committed. ## Typesafety By default, `db.transact` is permissive. When you save data, we'll create missing attributes for you: db.tx.todos\[workoutId\].update({ dueDate: Date.now() + 60 \* 1000, }); As your app grows, you may want to start enforcing types. When you're ready, you can start using a schema: import { init } from '@instantdb/react'; import schema from '../instant.schema.ts'; const db \= init({ appId: process.env.NEXT\_PUBLIC\_INSTANT\_APP\_ID!, schema, }); If your schema includes a `todos.dueDate` for example: const \_schema \= i.schema({ entities: { todos: i.entity({ dueDate: i.date(), }), }, }); Instant will enforce that `todos.dueDate` are actually dates, and you'll get some nice intellisense to boot:  Instant also comes with a few utility types, which can help you write abstractions over `transact`. For example, say you wanted to write a custom `update` function: myCustomUpdate('todos', { dueDate: Date.now() }); You can use the `UpdateParams` utility to make sure arguments follow the schema: import { UpdateParams } from '@instantdb/react'; import { AppSchema } from '../instant.schema.ts'; type EntityTypes \= keyof AppSchema\['entities'\]; function myCustomUpdate<EType extends EntityTypes\>( etype: EType, args: UpdateParams<AppSchema, EType\>, ) { } And the `LinkParams` utility do the same for links: import { LinkParams } from '@instantdb/react'; import { AppSchema } from '../instant.schema.ts'; type EntityTypes \= keyof AppSchema\['entities'\]; function myCustomLink<EType extends EntityTypes\>( etype: EType, args: LinkParams<AppSchema, EType\>, ) { } To learn more about writing schemas, check out the Modeling Data section. ## Batching transactions If you have a large number of transactions to commit, you'll want to batch them to avoid hitting transaction limits and time outs. Suppose we want to create 3000 goals. Here's how we can batch them into 30 transactions of 100 goals each. const batchSize \= 100; const createGoals \= async (total) \=> { let goals \= \[\]; const batches \= \[\]; for (let i \= 0; i < total; i++) { const goalNumber \= i + 1; goals.push( db.tx.goals\[id()\].update({ goalNumber, title: \`Goal ${goalNumber}\` }), ); if (goals.length \>= batchSize) { batches.push(goals); goals \= \[\]; } } if (goals.length) { batches.push(goals); } for (const batch of batches) { await db.transact(batch); } }; ## Using the tx proxy object `db.tx` is a proxy object which creates transaction chunks to be committed via `db.transact`. It follows the format db.tx.NAMESPACE\_LABEL\[ENTITY\_IDENTIFIER\].ACTION(ACTION\_SPECIFIC\_DATA) * `NAMESPACE_LABEL` refers to the namespace to commit (e.g. `goals`, `todos`) * `ENTITY_IDENTIFIER` is the id to look up in the namespace. This id must be a uuid and unique to the namespace. You can use the `id()` function to generate a uuid for convenience. * `ACTION` is one of `update`, `merge`, `delete`, `link`, `unlink` * `ACTION_SPECIFIC_DATA` depends on the action * `update` takes in an object of information to commit * `merge` takes in an object to deep merge with the existing data * `delete` is the only action that doesn't take in any data, * `link` and `unlink` takes an object of label-entity pairs to create/delete associations --- ## Page: https://www.instantdb.com/docs/instaql Instant uses a declarative syntax for querying. It's like GraphQL without the configuration. Here's how you can query data with **InstaQL.** ## Fetch namespace One of the simplest queries you can write is to simply get all entities of a namespace. import { init } from '@instantdb/react'; const db \= init({ appId: process.env.NEXT\_PUBLIC\_INSTANT\_APP\_ID!, }); function App() { const query \= { goals: {} }; const { isLoading, error, data } \= db.useQuery(query); } Inspecting `data`, we'll see: console.log(data) { "goals": \[ { "id": healthId, "title": "Get fit!" }, { "id": workId, "title": "Get promoted!" } \] } For comparison, the SQL equivalent of this would be something like: const data \= { goals: doSQL('SELECT \* FROM goals') }; ## Fetch multiple namespaces You can fetch multiple namespaces at once: const query \= { goals: {}, todos: {} }; const { isLoading, error, data } \= db.useQuery(query); We will now see data for both namespaces. console.log(data) { "goals": \[...\], "todos": \[ { "id": focusId, "title": "Code a bunch" }, { "id": proteinId, "title": "Drink protein" }, ... \] } The equivalent of this in SQL would be to write two separate queries. const data \= { goals: doSQL('SELECT \* from goals'), todos: doSQL('SELECT \* from todos'), }; ## Fetch a specific entity If you want to filter entities, you can use the `where` keyword. Here we fetch a specific goal const query \= { goals: { $: { where: { id: healthId, }, }, }, }; const { isLoading, error, data } \= db.useQuery(query); console.log(data) { "goals": \[ { "id": healthId, "title": "Get fit!" } \] } The SQL equivalent would be: const data \= { goals: doSQL("SELECT \* FROM goals WHERE id = 'healthId'") }; ## Fetch associations We can fetch goals and their related todos. const query \= { goals: { todos: {}, }, }; const { isLoading, error, data } \= db.useQuery(query); `goals` would now include nested `todos` console.log(data) { "goals": \[ { "id": healthId, "title": "Get fit!", "todos": \[...\], }, { "id": workId, "title": "Get promoted!", "todos": \[...\], } \] } ### Comparing with SQL The SQL equivalent for this would be something along the lines of: const query \= \` SELECT g.\*, gt.todos FROM goals g JOIN ( SELECT g.id, json\_agg(t.\*) as todos FROM goals g LEFT JOIN todos t on g.id = t.goal\_id GROUP BY 1 ) gt on g.id = gt.id \`; const data \= { goals: doSQL(query) }; Notice the complexity of this SQL query. Although fetching associations in SQL is straightforward via `JOIN`, marshalling the results in a nested structure via SQL is tricky. An alternative approach would be to write two straight-forward queries and then marshall the data on the client. const \_goals \= doSQL("SELECT \* from goals") const \_todos \= doSQL("SELECT \* from todos") const data \= {goals: \_goals.map(g \=> ( return {...g, todos: \_todos.filter(t \=> t.goal\_id \=== g.id)} )) Now compare these two approaches with `InstaQL` const query \= { goals: { todos: {}, }, }; const { isLoading, error, data } \= db.useQuery(query); Modern applications often need to render nested relations, `InstaQL` really starts to shine for these use cases. ## Fetch specific associations ### A) Fetch associations for filtered namespace We can fetch a specific entity in a namespace as well as it's related associations. const query \= { goals: { $: { where: { id: healthId, }, }, todos: {}, }, }; const { isLoading, error, data } \= db.useQuery(query); Which returns console.log(data) { "goals": \[ { "id": healthId, "title": "Get fit!", "todos": \[ { "id": proteinId, "title": "Drink protein" }, { "id": sleepId, "title": "Go to bed early" }, { "id": workoutId, "title": "Go on a run" } \] } \] } ### B) Filter namespace by associated values We can filter namespaces **by their associations** const query \= { goals: { $: { where: { 'todos.title': 'Code a bunch', }, }, todos: {}, }, }; const { isLoading, error, data } \= db.useQuery(query); Returns console.log(data) { "goals": \[ { "id": workId, "title": "Get promoted!", "todos": \[ { "id": focusId, "title": "Code a bunch" }, { "id": reviewPRsId, "title": "Review PRs" }, { "id": standupId, "title": "Do standup" } \] } \] } ### C) Filter associations We can also filter associated data. const query \= { goals: { todos: { $: { where: { 'todos.title': 'Go on a run', }, }, }, }, }; const { isLoading, error, data } \= db.useQuery(query); This will return goals and filtered todos console.log(data) { "goals": \[ { "id": healthId, "title": "Get fit!", "todos": \[ { "id": workoutId, "title": "Go on a run" } \] }, { "id": workId, "title": "Get promoted!", "todos": \[\] } \] } * * * Notice the difference between these three cases. * A) Fetched all todos for goal with id `health` * B) Filtered goals with a least one todo titled `Code a bunch` * C) Fetched all goals and filtered associated todos by title `Go on a run` * * * ## Inverse Associations Associations are also available in the reverse order. const query \= { todos: { goals: {}, }, }; const { isLoading, error, data } \= db.useQuery(query); console.log(data) { "todos": \[ { "id": focusId, "title": "Code a bunch", "goals": \[ { "id": workId, "title": "Get promoted!" } \] }, ..., \] } ## Defer queries You can also defer queries until a condition is met. This is useful when you need to wait for some data to be available before you can run your query. Here's an example of deferring a fetch for todos until a user is logged in. const { isLoading, user, error } \= db.useAuth(); const { isLoading: isLoadingTodos, error, data, } \= db.useQuery( user ? { todos: { $: { where: { userId: user.id, }, }, }, } : null, ); **NOTE:** Passing `null` to `db.useQuery` will result in `isLoading` being true. In the example above, this means that `isLoadingTodos` will _always be true_ if the user is not logged in. You can limit the number of items from a top level namespace by adding a `limit` to the option map: const query \= { todos: { $: { limit: 10 }, }, }; const { isLoading, error, data, pageInfo } \= db.useQuery(query); Instant supports both offset-based and cursor-based pagination for top-level namespaces. ### Offset To get the next page, you can use an offset: const query \= { todos: { $: { limit: 10, offset: 10, }, }, }; const { isLoading, error, data, pageInfo } \= db.useQuery(query); In a React application, your offset-based pagination code might look something like this: const \[pageNumber, setPageNumber\] \= React.useState(1); const pageSize \= 10; const query \= { todos: { $: { limit: pageSize, offset: pageSize \* (pageNumber \- 1), }, }, }; const { isLoading, error, data } \= db.useQuery(query); const loadNextPage \= () \=> { setPageNumber(pageNumber + 1); }; const loadPreviousPage \= () \=> { setPageNumber(pageNumber \- 1); }; ### Cursors You can also get the next page with the `endCursor` returned in the `pageInfo` map from the previous result: const query \= { todos: { $: { first: 10, after: pageInfo?.todos?.endCursor, }, }, }; To get the previous page, use the `startCursor` in the `before` field of the option map and ask for the `last` items: const query \= { todos: { $: { last: 10, before: pageInfo?.todos?.startCursor, }, }, }; In a React application, your cursor-based pagination code might look something like this: const pageSize \= 10; const \[cursors, setCursors\] \= React.useState({ first: pageSize }); const query \= { todos: { $: { ...cursors, }, }, }; const { isLoading, error, data, pageInfo } \= db.useQuery(query); const loadNextPage \= () \=> { const endCursor \= pageInfo?.todos?.endCursor; if (endCursor) { setCursors({ after: endCursor, first: pageSize }); } }; const loadPreviousPage \= () \=> { const startCursor \= pageInfo?.todos?.startCursor; if (startCursor) { setCursors({ before: startCursor, last: pageSize, }); } }; ### Ordering The default ordering is by the time the objects were created, in ascending order. You can change the order with the `order` key in the option map for top-level namespaces: const query \= { todos: { $: { limit: 10, order: { serverCreatedAt: 'desc', }, }, }, }; The `serverCreatedAt` field is a reserved key that orders by the time that the object was first persisted on the Instant backend. It can take the value 'asc' (the default) or 'desc'. You can also order by any attribute that is indexed and has a checked type. const query \= { todos: { $: { limit: 10, where: { dueDate: { $gt: Date.now() }, }, order: { dueDate: 'asc', }, }, }, }; ## Advanced filtering ### Multiple `where` conditions The `where` clause supports multiple keys which will filter entities that match all of the conditions. const query \= { todos: { $: { where: { completed: true, 'goals.title': 'Get promoted!', }, }, }, }; const { isLoading, error, data } \= db.useQuery(query); console.log(data) { "todos": \[ { "id": focusId, "title": "Code a bunch", "completed": true } \] } ### And The `where` clause supports `and` queries which are useful when you want to filter entities that match multiple associated values. In this example we want to find goals that have todos with the titles `Drink protein` and `Go on a run` const query \= { goals: { $: { where: { and: \[ { 'todos.title': 'Drink protein' }, { 'todos.title': 'Go on a run' }, \], }, }, }, }; const { isLoading, error, data } \= db.useQuery(query); console.log(data) { "goals": \[ { "id": healthId, "title": "Get fit!" } \] } ### OR The `where` clause supports `or` queries that will filter entities that match any of the clauses in the provided list: const query \= { todos: { $: { where: { or: \[{ title: 'Code a bunch' }, { title: 'Review PRs' }\], }, }, }, }; const { isLoading, error, data } \= db.useQuery(query); console.log(data); { "todos": \[ { "id": focusId, "title": "Code a bunch" }, { "id": reviewPRsId, "title": "Review PRs" }, \] } ### $in The `where` clause supports `$in` queries that will filter entities that match any of the items in the provided list. You can think of this as a shorthand for `or` on a single key. const query \= { todos: { $: { where: { title: { $in: \['Code a bunch', 'Review PRs'\] }, }, }, }, }; const { isLoading, error, data } \= db.useQuery(query); console.log(data) { "todos": \[ { "id": focusId, "title": "Code a bunch" }, { "id": reviewPRsId, "title": "Review PRs" } \] } ### Comparison operators The `where` clause supports comparison operators on fields that are indexed and have checked types. | Operator | Description | JS equivalent | | --- | --- | --- | | `$gt` | greater than | `>` | | `$lt` | less than | `<` | | `$gte` | greater than or equal to | `>=` | | `$lte` | less than or equal to | `<=` | const query \= { todos: { $: { where: { timeEstimateHours: { $gt: 24 }, }, }, }, }; const { isLoading, error, data } \= db.useQuery(query); console.log(data); { "todos": \[ { "id": buildShipId, "title": "Build a starship prototype", "timeEstimateHours": 5000 } \] } Dates can be stored as timestamps (milliseconds since the epoch, e.g. `Date.now()`) or as ISO 8601 strings (e.g. `JSON.stringify(new Date())`) and can be queried in the same formats: const now \= '2024-11-26T15:25:00.054Z'; const query \= { todos: { $: { where: { dueDate: { $lte: now } } }, }, }; const { isLoading, error, data } \= db.useQuery(query); console.log(data); { "todos": \[ { "id": slsFlightId, "title": "Space Launch System maiden flight", "dueDate": "2017-01-01T00:00:00Z" } \] } If you try to use comparison operators on data that isn't indexed and type-checked, you'll get an error: const query \= { todos: { $: { where: { priority: { $gt: 2 } } }, }, }; const { isLoading, error, data } \= db.useQuery(query); console.log(error); { "message": "Validation failed for query", "hint": { "data-type": "query", "errors": \[ { "expected?": "indexed?", "in": \["priority", "$", "where", "priority"\], "message": "The \`todos.priority\` attribute must be indexed to use comparison operators." } \], "input": { "todos": { "$": { "where": { "priority": { "$gt": 2 } } } } } } } ### $not The `where` clause supports `$not` queries that will return entities that don't match the provided value for the field, including entities where the field is null or undefined. const query \= { todos: { $: { where: { location: { $not: 'work' }, }, }, }, }; const { isLoading, error, data } \= db.useQuery(query); console.log(data) { "todos": \[ { "id": cookId, "title": "Cook dinner", "location": "home" }, { "id": readId, "title": "Read", "location": null }, { "id": napId, "title": "Take a nap" } \] } ### $isNull The `where` clause supports `$isNull` queries that will filters entities by whether the field value is either null or undefined. Set `$isNull` to `true` to return entities where where the field is null or undefined. Set `$isNull` to `false` to return entities where the field is not null and not undefined. const query \= { todos: { $: { where: { location: { $isNull: false }, }, }, }, }; const { isLoading, error, data } \= db.useQuery(query); console.log(data) { "todos": \[ { "id": cookId, "title": "Cook dinner", "location": "home" } \] } const query \= { todos: { $: { where: { location: { $isNull: true }, }, }, }, }; const { isLoading, error, data } \= db.useQuery(query); console.log(data) { "todos": \[ { "id": readId, "title": "Read", "location": null }, { "id": napId, "title": "Take a nap" } \] } ### $like The `where` clause supports `$like` on fields that are indexed with a checked `string` type. `$like` queries will return entities that match a **case sensitive** substring of the provided value for the field. For **case insensitive** matching use `$ilike` in place of `$like`. Here's how you can do queries like `startsWith`, `endsWith` and `includes`. | Example | Description | JS equivalent | | --- | --- | --- | | `{ $like: "Get%" }` | Starts with 'Get' | `startsWith` | | `{ $like: "%promoted!" }` | Ends with 'promoted!' | `endsWith` | | `{ $like: "%fit%" }` | Contains 'fit' | `includes` | Here's how you can use `$like` to find all goals that end with the word "promoted!" const query \= { goals: { $: { where: { title: { $like: '%promoted!' }, }, }, }, }; const { isLoading, error, data } \= db.useQuery(query); console.log(data) { "goals": \[ { "id": workId, "title": "Get promoted!", } \] } You can use `$like` in nested queries as well const query \= { goals: { $: { where: { 'todos.title': { $like: '%standup%' }, }, }, }, }; const { isLoading, error, data } \= db.useQuery(query); Returns console.log(data) { "goals": \[ { "id": standupId, "title": "Perform standup!", } \] } Case-insensitive matching with `$ilike`: const query \= { goals: { $: { where: { 'todos.title': { $ilike: '%stand%' }, }, }, }, }; const { isLoading, error, data } \= db.useQuery(query); console.log(data) { "goals": \[ { "id": standupId, "title": "Perform standup!", }, { "id": standId, "title": "Stand up a food truck.", } \] } ## Select fields An InstaQL query will fetch all fields for each object. If you prefer to select the specific fields that you want your query to return, use the `fields` param: const query \= { goals: { $: { fields: \['status'\], }, }, }; const { isLoading, error, data } \= db.useQuery(query); console.log(data) { "goals": \[ { "id": standupId, "status": "in-progress" }, { "id": standId, "status": "completed" } \] } `fields` also works with nested relations: const query \= { goals: { $: { fields: \['title'\], }, todos: { $: { fields: \['id'\], }, }, }, }; const { isLoading, error, data } \= db.useQuery(query); console.log(data) { "goals": \[ { "id": standupId, "title": "Perform standup!", "todos": \[{"id": writeJokesId}, {"id": goToOpenMicId}\] }, { "id": standId, "title": "Stand up a food truck.", "todos": \[{"id": learnToCookId}, {"id": buyATruckId}\] } \] } Using `fields` can be useful for performance optimization. It reduces the amount of data that needs to be transferred from the server and minimizes the number of re-renders in your React application if there are no changes to your selected fields. Using `fields` doesn't restrict a client from doing a full query. If you have sensitive data on your entities that you don't want to expose you'll want to use permissions and potentially split your namespace to restrict access. ## Typesafety By default, `db.useQuery` is permissive. You don't have to tell us your schema upfront, and you can write any kind of query: const query \= { goals: { todos: {}, }, }; const { isLoading, error, data } \= db.useQuery(query); As your app grows, you may want to start enforcing types. When you're ready you can write a schema: import { init } from '@instantdb/react'; import schema from '../instant.schema.ts'; const db \= init({ appId: process.env.NEXT\_PUBLIC\_INSTANT\_APP\_ID!, schema, }); If your schema includes `goals` and `todos` for example: import { i } from '@instantdb/react'; const \_schema \= i.schema({ entities: { goals: i.entity({ title: i.string(), }), todos: i.entity({ title: i.string(), text: i.string(), done: i.boolean(), createdAt: i.date(), dueDate: i.date(), }), }, links: { goalsTodos: { forward: { on: 'goals', has: 'many', label: 'todos' }, reverse: { on: 'todos', has: 'many', label: 'goals' }, }, }, }); type \_AppSchema \= typeof \_schema; interface AppSchema extends \_AppSchema {} const schema: AppSchema \= \_schema; export type { AppSchema }; export default schema; ### Intellisense Instant will start giving you intellisense for your queries. For example, if you're querying for goals, you'll see that only `todos` can be associated: 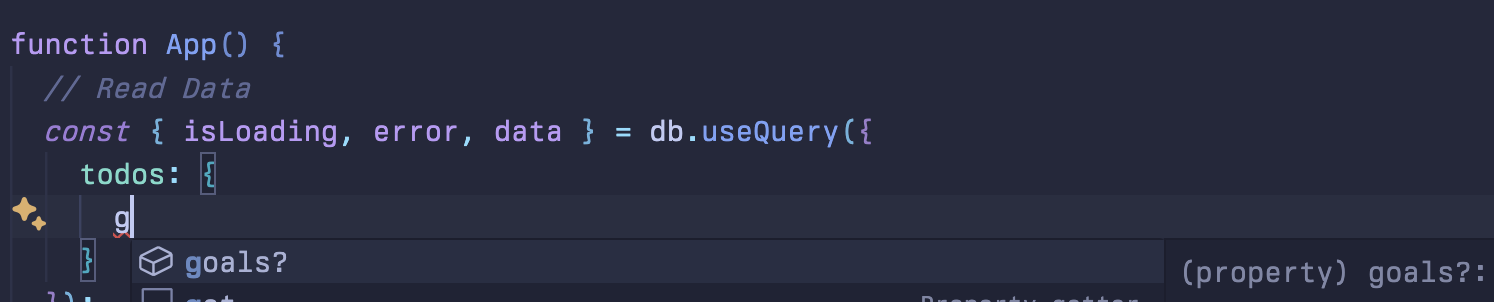 And if you hover over `data`, you'll see the actual typed output of your query: 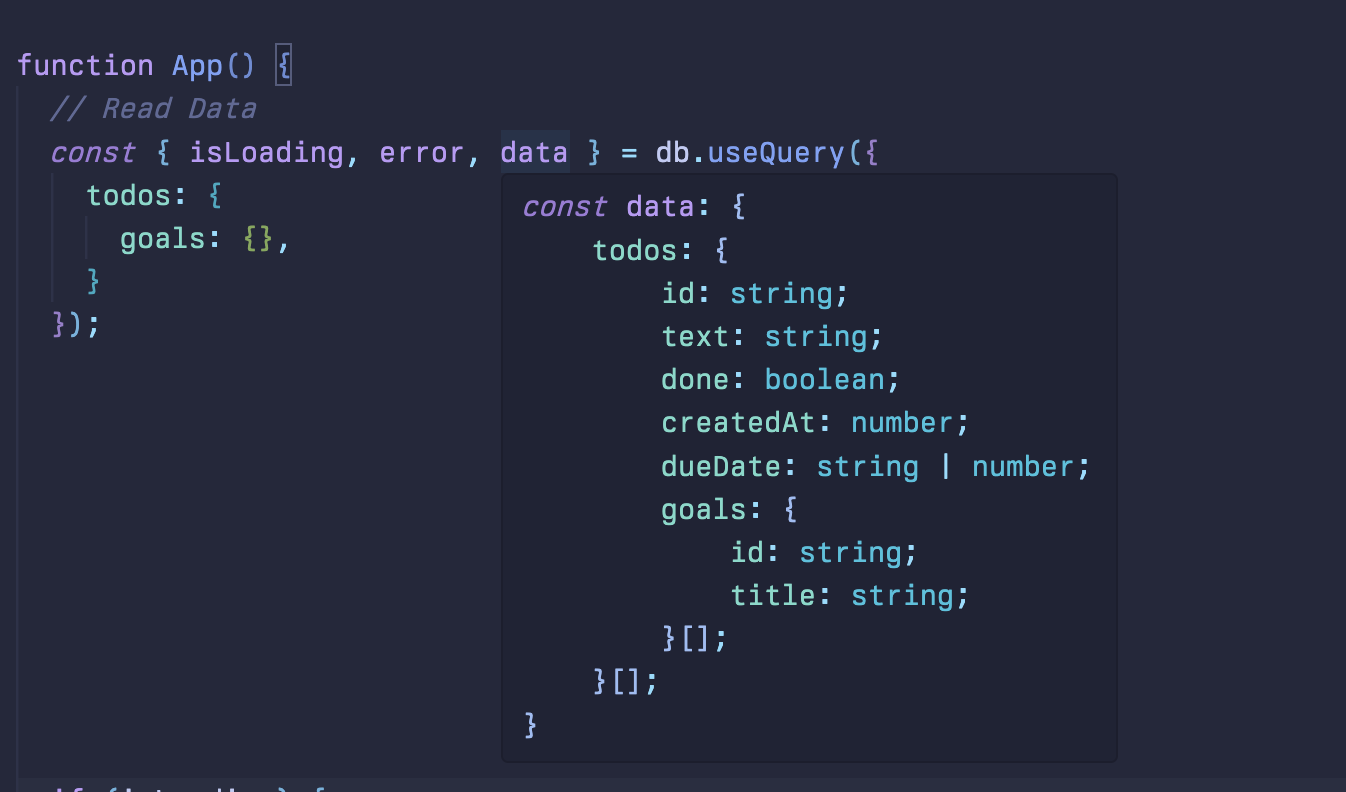 ### Utility Types Instant also comes with some utility types to help you use your schema in TypeScript. For example, you could define your `query` upfront: import { InstaQLParams } from '@instantdb/react'; import { AppSchema } from '../instant.schema.ts'; const query \= { goals: { todos: {} }, } satisfies InstaQLParams<AppSchema\>; Or you can define your result type: import { InstaQLResult } from '@instantdb/react'; import { AppSchema } from '../instant.schema.ts'; type GoalsTodosResult \= InstaQLResult<AppSchema, { goals: { todos: {} } }\>; Or you can extract a particular entity: import { InstaQLEntity } from '@instantdb/react'; import { AppSchema } from '../instant.schema.ts'; type Todo \= InstaQLEntity<AppSchema, 'todos'\>; You can specify links relative to your entity: type TodoWithGoals \= InstaQLEntity<AppSchema, 'todos', { goals: {} }\>; To learn more about writing schemas, check out the Modeling Data section. ## Query once Sometimes, you don't want a subscription, and just want to fetch data once. For example, you might want to fetch data before rendering a page or check whether a user name is available. In these cases, you can use `queryOnce` instead of `useQuery`. `queryOnce` returns a promise that resolves with the data once the query is complete. Unlike `useQuery`, `queryOnce` will throw an error if the user is offline. This is because `queryOnce` is intended for use cases where you need the most up-to-date data. const query \= { todos: {} }; const { data } \= await db.queryOnce(query); You can also do pagination with `queryOnce`: const query \= { todos: { $: { limit: 10, offset: 10, }, }, }; const { data, pageInfo } \= await db.queryOnce(query); --- ## Page: https://www.instantdb.com/docs/backend You can use Instant on the server as well! This can be especially useful for running scripts, custom auth flows, or sensitive application logic. ## Admin SDK We currently offer a javascript library `@instantdb/admin` for using Instant in a non-browser context. This library is similar to our client SDK with a few tweaks. ### init import { init, id } from '@instantdb/admin'; const db \= init({ appId: INSTANT\_APP\_ID, adminToken: process.env.INSTANT\_APP\_ADMIN\_TOKEN, }); Similar to `@instantdb/react`, you must `init` before doing any queries or writes. Running `init` authenticates you against our admin API. In addition to providing your `appId`, you must also provide your `adminToken`. Whereas exposing your `appId` in source control is fine, it's not safe to expose your admin token. Permission checks will not run for queries and writes from our admin API. Be sure to regenerate your token from your dashboard if it accidentally leaks. ## Reading and Writing Data `query` and `transact` let you read and write data as an admin. ### query const data \= await db.query({ goals: {}, todos: {} }); const { goals, todos } \= data; In react we use `db.useQuery` to enable "live queries", queries that will automatically update when data changes. In the admin SDK we instead use an async `db.query` function that simply fires a query once and returns a result. ### transact const res \= await db.transact(\[db.tx.todos\[id()\].update({ title: 'Get fit' })\]); console.log('New todo entry made for with tx-id', res\['tx-id'\]); `db.transact` is an async function that behaves nearly identical to `db.transact` from `@instantdb/react`. It returns a `tx-id` on success. ## Schema `init` also accepts a schema argument: import { init, id } from '@instantdb/admin'; import schema from '../instant.schema.ts'; const db \= init({ appId: process.env.INSTANT\_APP\_ID, adminToken: process.env.INSTANT\_APP\_ADMIN\_TOKEN, schema, }); If you add a schema, `db.query` and `db.transact` will come with autocompletion and typesafety out of the box. The backend will also use your schema to generate missing attributes. To learn more about writing schemas, head on over to the Modeling your data section. ## Impersonating users When you use the admin SDK, you can make _any_ query or transaction. As an admin, you bypass permissions. But, sometimes you want to make queries on behalf of your users, and would like to respect permissions. You can do this with the `db.asUser` function. const scopedDb \= db.asUser({ email: 'alyssa\_p\_hacker@instantdb.com' }); const token \= db.auth.createToken('alyssa\_p\_hacker@instantdb.com'); const scopedDb \= db.asUser({ token }); const scopedDb \= db.asUser({ guest: true }); await scopedDb.query({ logs: {} }); ## Retrieve a user As an admin, you can retrieve an app user record by `email`, `id`, or `refresh_token`. You can do this with the `db.auth.getUser` function. const user \= await db.auth.getUser({ email: 'alyssa\_p\_hacker@instantdb.com' }); const user \= await db.auth.getUser({ id: userId, }); const user \= await db.auth.getUser({ refresh\_token: userRefreshToken, }); ## Delete a user You can also delete an app user record by `email`, `id`, or `refresh_token`. You can do this with the `db.auth.deleteUser` function. const deletedUser \= await db.auth.deleteUser({ email: 'alyssa\_p\_hacker@instantdb.com', }); const deletedUser \= await db.auth.deleteUser({ id: userId, }); const deletedUser \= await db.auth.deleteUser({ refresh\_token: userRefreshToken, }); Note, this _only_ deletes the user record and any associated data with cascade on delete. If there's additional data you need to clean up you'll need to do it manually: const { goals, todos } \= await db.query({ goals: { $: { where: { creator: userId } } }, todos: { $: { where: { creator: userId } } }, }); await db.transact(\[ ...goals.map((item) \=> db.tx.goals\[item.id\].delete()), ...todos.map((item) \=> tx.todos\[item.id\].delete()), \]); await db.auth.deleteUser({ id: userId }); ## Presence in the Backend If you use rooms & presence, you may want to query for the data currently in a room with the admin API. This can be especially useful if you are sending a notification for example, and want to skip it if the user is already online. To do get room data from the admin API, use `db.rooms.getPresence`: const data \= await db.rooms.getPresence('chat', 'room-123'); console.log(Object.values(data)); ## Sign Out The `db.auth.signOut` method allows you to log out a users. You can log a user out from every session by passing in their `email`, or `id`. Or you can log a user out from a particular session by passing in a `refresh_token`: await db.auth.signOut({ email: 'alyssa\_p\_hacker@instantdb.com' }); const user \= await db.auth.signOut({ id: userId, }); await db.auth.signOut({ refresh\_token: userRefreshToken, }); ## Custom Auth You can use the Admin SDK to create your own authentication flows. To implement custom auth flows, you would make one change in your backend, and one change in your frontend. Here's how it would look: ### 1\. Backend: db.auth.createToken Create a new `sign-in` endpoint in your backend. This endpoint will use `db.auth.createToken` to generate an authentication token for the user: app.post('/sign-in', async (req, res) \=> { const token \= await db.auth.createToken(email); return res.status(200).send({ token }); }); If a user with this email does not exist, `auth.createToken` will create a user for you. Right now we require that every user _must_ have an email. If you need to relax this constraint let us know. ### 2\. Frontend: db.auth.signInWithToken Once your frontend calls your `sign-in` endpoint, it can then use the generated token and sign a user in with `db.auth.signInWithToken`. Here's a full example: import React, { useState } from 'react'; import { init } from '@instantdb/react'; const APP\_ID \= "\_\_APP\_ID\_\_"; const db \= init({ appId: APP\_ID }); async function customSignIn( email: string, password: string ): Promise<{ token: string }\> { const response \= await fetch('your-website.com/api/sign-in', { method: 'POST', headers: { 'Content-Type': 'application/json', }, body: JSON.stringify({ email, password }), }); const data \= await response.json(); return data; } function App() { const { isLoading, user, error } \= db.useAuth(); if (isLoading) { return <div\>Loading...</div\>; } if (error) { return <div\>Uh oh! {error.message}</div\>; } if (user) { return <div\>Hello {user.email}!</div\>; } return <Login /\>; } function Login() { const \[email, setEmail\] \= useState(''); const \[password, setPassword\] \= useState(''); const handleEmailChange \= (event: React.ChangeEvent<HTMLInputElement\>) \=> { setEmail(event.target.value); }; const handlePasswordChange \= (event: React.ChangeEvent<HTMLInputElement\>) \=> { setPassword(event.target.value); }; const handleSignIn \= async () \=> { const data \= await customSignIn(email, password); db.auth.signInWithToken(data.token); }; return ( <div\> <input type\="email" placeholder\="Enter your email" value\={email} onChange\={handleEmailChange} /\> <input type\="password" placeholder\="Enter your password" value\={password} onChange\={handlePasswordChange} /\> <button onClick\={handleSignIn}\>Sign In</button\> </div\> ); } ## Generating magic codes We support a magic code flow out of the box. However, if you'd like to use your own email provider to send the code, you can do this with `db.auth.generateMagicCode` function: app.post('/custom-send-magic-code', async (req, res) \=> { const { code } \= await db.auth.generateMagicCode(req.body.email); await sendMyCustomMagicCodeEmail(req.body.email, code); return res.status(200).send({ token }); }); ## Authenticated Endpoints You can also use the admin SDK to authenticate users in your custom endpoints. This would have two steps: ### 1\. Frontend: user.refresh\_token In your frontend, the `user` object has a `refresh_token` property. You can pass this token to your endpoint: import { init } from '@instantdb/react'; const db \= init() function App() { const { user } \= db.useAuth(); function onClick() { myAPI.customEndpoint(user.refresh\_token, ...); } } ### 2\. Backend: auth.verifyToken You can then use `auth.verifyToken` to verify the `refresh_token` that was passed in. app.post('/custom\_endpoint', async (req, res) \=> { const user \= await db.auth.verifyToken(req.headers\['token'\]); if (!user) { return res.status(400).send('Uh oh, you are not authenticated'); } }); --- ## Page: https://www.instantdb.com/docs/patterns Below are some common patterns for working with InstantDB. We'll add more patterns over time and if you have a pattern you'd like to share, please feel free to submit a PR for this page. ## You can expose your app id to the client. Similar to Firebase, the app id is a unique identifier for your application. If you want to secure your data, you'll want to add permissions for the app. ## Restrict creating new attributes. When your ready to lock down your schema, you can restrict creating a new attribute by adding this to your app's permissions { "attrs": { "allow": { "$default": "false" } } } This will prevent any new attributes from being created. ## Attribute level permissions When you query a namespace, it will return all the attributes for an entity. You can use the `fields` clause to restrict which attributes are returned from the server but this will not prevent a client from doing another query to get the full entity. At the moment InstantDB does not support attribute level permissions. This is something we are actively thinking about though! In the meantime you can work around this by splitting your entities into multiple namespaces. This way you can set separate permissions for private data. Here's an example ## Find entities with no links. If you want to find entities that have no links, you can use the `$isNull` query filter. For example, if you want to find all posts that are not linked to an author you can do db.useQuery({ posts: { $: { where: { 'author.id': { $isNull: true, }, }, }, }, }); ## Setting limits via permissions. If you want to limit the number of entities a user can create, you can do so via permissions. Here's an example of limiting a user to creating at most 2 todos. First the schema: import { i } from '@instantdb/core'; const \_schema \= i.schema({ entities: { $users: i.entity({ email: i.string().unique().indexed(), }), todos: i.entity({ label: i.string(), }), }, links: { userTodos: { forward: { on: 'todos', has: 'one', label: 'owner', }, reverse: { on: '$users', has: 'many', label: 'ownedTodos', }, }, }, }); type \_AppSchema \= typeof \_schema; interface AppSchema extends \_AppSchema {} const schema: AppSchema \= \_schema; export type { AppSchema }; export default schema; Then the permissions: import type { InstantRules } from '@instantdb/react'; const rules \= { todos: { allow: { create: "size(data.ref('owner.todos.id')) <= 2", }, }, } satisfies InstantRules; export default rules; ## Listen to InstantDB connection status. Sometimes you want to let clients know when they are connected or disconnected to the DB. You can use `db.subscribeConnectionStatus` in vanilla JS or `db.useConnectionStatus` in React to listen to connection changes const unsub \= db.subscribeConnectionStatus((status) \=> { const statusMap \= { connecting: 'authenticating', opened: 'authenticating', authenticated: 'connected', closed: 'closed', errored: 'errored', }; const connectionState \= statusMap\[status\] || 'unexpected state'; console.log('Connection status:', connectionState); }); function App() { const statusMap \= { connecting: 'authenticating', opened: 'authenticating', authenticated: 'connected', closed: 'closed', errored: 'errored', }; const status \= db.useConnectionStatus(); const connectionState \= statusMap\[status\] || 'unexpected state'; return <div\>Connection state: {connectionState}</div\>; } ## Using Instant via CDN If you have a plain html page or avoid using a build step, you can use InstantDB via a CDN through unpkg. <!\-- Load Instant via unpkg. Consider replacing \`@latest\` with current version \--\> <script src\="https://www.unpkg.com/@instantdb/core@latest/dist/standalone/index.umd.js"\></script\> <!\-- Use Instant like normal \--\> <script\> const { init, id } = instant; const db = init({ appId: 'your-app-id' }); async function createMessage() { await db.transact( db.tx.messages\[id()\].update({ text: 'Hello world!' }) ); } </script\> ## Making Local ids Sometimes you need an identifier that stays the same between refreshes. A "local id" of sorts. Local ids are especially useful for features like "guest" mode. You need an identifier for the user who is accessing the service, but they haven't signed up yet. Well, you can use a `localId` for that. To generate one, use `db.getLocalId`: import { init } from '@instantdb/react'; const db \= init({ appId: 'your-app-id' }); const id \= await db.getLocalId('guest'); console.log(id, 'stays the same even if you refresh'); Or a handy hook if you're inside React: import { init } from '@instantdb/react'; const db \= init({ appId: 'your-app-id' }); function App() { const id \= db.useLocalId('guest'); if (!id) return; console.log(id, 'stays the same even if you refresh'); } Note: passing in different arguments will produce different ids: const id1 \= db.useLocalId('device'); const id2 \= db.useLocalId('session'); console.log( id1, id2, 'are different. But each will stay the same even if you refresh', ); Once you have an ID, you can pass it around in your transactions and queries, and use them in ruleParams. ## Making admin queries work with NextJS Caching NextJS caches fetch requests and lets you revalidate them. `adminDB.query` uses fetch under the hood, so NextJS caching will work by default. If you want to finely control how the query caches, you can pass in the same kind of fetch options for NextJS. For example, to revalidate a query every hour: await adminDB.query( { goals: {} }, { fetchOpts: { next: { revalidate: 3600 }, }, }, ); Or to set a specific tag: await adminDB.query( { goals: {} }, { fetchOpts: { next: { tags: \['goals:all'\] }, }, }, ); ## Composite keys Sometimes you an item is unique by two or more attributes. For example, consider a `location`: it's unique by `latitude` _and_ `longitude`. How can you enforce this uniqueness in Instant? We don't have composite keys built-in, but you can manage them by creating a composite column. For example, you can make sure `locations` are unique by adding a `latLong` column: import { i } from '@instantdb/core'; const \_schema \= i.schema({ entities: { locations: i.entity({ latitude: i.number().indexed(), longitude: i.number().indexed(), latLong: i.string().unique() }), }, We can then set `latLong` in our updates: function createLocation({ latitude, longitude }) { db.transact( db.tx.locations\[id()\].update({ latitude, longitude, latLong: \`${latitude}\_${longitude}\`, }), ); } Now, any locations with the same latitude and longitude will throw a uniqueness error. To make sure that `latLong` _always_ matches `latitude` and `longitude`, you can add a rule in your permissions: const rules \= { locations: { allow: { create: "(data.latitude + '\_' + data.longitude) == data.latLong", update: "(newData.latitude + '\_' + newData.longitude) == newData.latLong", }, }, }; --- ## Page: https://www.instantdb.com/docs/showcase ## Sample Apps Here are some sample apps showing how to use Instant to build a real app. * Instldraw - collaborative drawing app built with Instant. * Instant Awedience - simple chat app with presence, typing indicators, and reactions!. * Glazepal - React Native app for managing ceramic glazes * Stroopwafel - casual multiplayer game built with React Native. ## Real World Apps Here are some apps in production that are powered by Instant. * Palette.tools - Palette is a modern, all-in-one project management app for studios & digital artists 🎨 * Mentor - Simplify your goals and get things done with mentor, your personal assistant * Subset - A high-quality, no-frills, modern spreadsheet ## More examples Are you looking for more examples? Do you want to contribute your app to this list? Let us know on discord or twitter --- ## Page: https://www.instantdb.com/docs/auth #### Pick your app The examples below will be updated with your app ID. Authentication and Permissions ## Auth Instant comes with support for auth. We currently offer magic codes, Google OAuth, Sign In with Apple, and Clerk. If you want to build your own flow, you can use the Admin SDK. ## Magic Codes Send login codes to your users via email. Removes the need for passwords! ## Google OAuth We provide flows for Web and React Native to enable Google OAuth for your app. ## Sign In with Apple Sign In to native apps with Apple ID. ## Clerk Integrate Clerk's auth flow with Instant. ## Custom Auth Integrate your own auth flow with the Admin SDK. Previous Showcase Next Magic codes --- ## Page: https://www.instantdb.com/docs/auth/magic-codes Instant supports a "magic-code" flow for auth. Users provide their email, we send them a login code on your behalf, and they authenticate with your app. Here's how you can do it with react. ## Full Magic Code Example The example below shows how to use magic codes in a React app. If you're looking for an example with vanilla JS, check out this sandbox. Open up your `app/page.tsx` file, and replace the entirety of it with the following code: "use client"; import React, { useState } from "react"; import { init, User } from "@instantdb/react"; const APP\_ID \= "\_\_APP\_ID\_\_"; const db \= init({ appId: APP\_ID }); function App() { const { isLoading, user, error } \= db.useAuth(); if (isLoading) { return; } if (error) { return <div className\="p-4 text-red-500"\>Uh oh! {error.message}</div\>; } if (user) { return <Main user\={user} /\>; } return <Login /\>; } function Main({ user }: { user: User }) { return ( <div className\="p-4 space-y-4"\> <h1 className\="text-2xl font-bold"\>Hello {user.email}!</h1\> <button onClick\={() \=> db.auth.signOut()} className\="px-3 py-1 bg-blue-600 text-white font-bold hover:bg-blue-700" \> Sign out </button\> </div\> ); } function Login() { const \[sentEmail, setSentEmail\] \= useState(""); return ( <div className\="flex justify-center items-center min-h-screen"\> <div className\="max-w-sm"\> {!sentEmail ? ( <EmailStep onSendEmail\={setSentEmail} /\> ) : ( <CodeStep sentEmail\={sentEmail} /\> )} </div\> </div\> ); } function EmailStep({ onSendEmail }: { onSendEmail: (email: string) \=> void }) { const inputRef \= React.useRef<HTMLInputElement\>(null); const handleSubmit \= (e: React.FormEvent<HTMLFormElement\>) \=> { e.preventDefault(); const inputEl \= inputRef.current!; const email \= inputEl.value; onSendEmail(email); db.auth.sendMagicCode({ email }).catch((err) \=> { alert("Uh oh :" + err.body?.message); onSendEmail(""); }); }; return ( <form key\="email" onSubmit\={handleSubmit} className\="flex flex-col space-y-4" \> <h2 className\="text-xl font-bold"\>Let's log you in</h2\> <p className\="text-gray-700"\> Enter your email, and we'll send you a verification code. We'll create an account for you too if you don't already have one. </p\> <input ref\={inputRef} type\="email" className\="border border-gray-300 px-3 py-1 w-full" placeholder\="Enter your email" required autoFocus /\> <button type\="submit" className\="px-3 py-1 bg-blue-600 text-white font-bold hover:bg-blue-700 w-full" \> Send Code </button\> </form\> ); } function CodeStep({ sentEmail }: { sentEmail: string }) { const inputRef \= React.useRef<HTMLInputElement\>(null); const handleSubmit \= (e: React.FormEvent<HTMLFormElement\>) \=> { e.preventDefault(); const inputEl \= inputRef.current!; const code \= inputEl.value; db.auth.signInWithMagicCode({ email: sentEmail, code }).catch((err) \=> { inputEl.value \= ""; alert("Uh oh :" + err.body?.message); }); }; return ( <form key\="code" onSubmit\={handleSubmit} className\="flex flex-col space-y-4" \> <h2 className\="text-xl font-bold"\>Enter your code</h2\> <p className\="text-gray-700"\> We sent an email to <strong\>{sentEmail}</strong\>. Check your email, and paste the code you see. </p\> <input ref\={inputRef} type\="text" className\="border border-gray-300 px-3 py-1 w-full" placeholder\="123456..." required autoFocus /\> <button type\="submit" className\="px-3 py-1 bg-blue-600 text-white font-bold hover:bg-blue-700 w-full" \> Verify Code </button\> </form\> ); } export default App; Go to `localhost:3000`, aand huzzah 🎉 You've got auth. * * * **Let's dig deeper.** We created a `Login` component to handle our auth flow. Of note is `auth.sendMagicCode` and `auth.signInWithMagicCode`. On successful validation, Instant's backend will return a user object with a refresh token. The client SDK will then restart the websocket connection with Instant's sync layer and provide the refresh token. When doing `useQuery` or `transact`, the refresh token will be used to hydrate `auth` on the backend during permission checks. On the client, `useAuth` will set `isLoading` to `false` and populate `user` -- huzzah! ## useAuth function App() { const { isLoading, user, error } \= db.useAuth(); if (isLoading) { return; } if (error) { return <div className\="p-4 text-red-500"\>Uh oh! {error.message}</div\>; } if (user) { return <Main /\>; } return <Login /\>; } Use `useAuth` to fetch the current user. Here we guard against loading our `Main` component until a user is logged in ## Send a Magic Code db.auth.sendMagicCode({ email }).catch((err) \=> { alert('Uh oh :' + err.body?.message); onSendEmail(''); }); Use `auth.sendMagicCode` to generate a magic code on instant's backend and email it to the user. ## Sign in with Magic Code db.auth.signInWithMagicCode({ email: sentEmail, code }).catch((err) \=> { inputEl.value \= ''; alert('Uh oh :' + err.body?.message); }); You can then use `auth.signInWithMagicCode` to authenticate the user with the magic code they provided. ## Sign out db.auth.signOut(); Use `auth.signOut` from the client to invalidate the user's refresh token and sign them out.You can also use the admin SDK to sign out the user from the server. ## Get auth const user \= await db.getAuth(); console.log('logged in as', user.email); For scenarios where you want to know the current auth state without subscribing to changes, you can use `getAuth`. --- ## Page: https://www.instantdb.com/docs/auth/google-oauth Instant supports logging in your users with their Google account. We support flows for Web and React Native. Follow the steps below to get started. **Step 1: Configure OAuth consent screen** Go to the Google Console. Click "CONFIGURE CONSENT SCREEN." If you already have a consent screen, you can skip to the next step. Select "External" and click "CREATE". Add your app's name, a support email, and developer contact information. Click "Save and continue". No need to add scopes or test users. Click "Save and continue" for the next screens. Until you reach the "Summary" screen, click "Back to dashboard". **Step 2: Create an OAuth client for Google** From Google Console, click "+ CREATE CREDENTIALS" Select "OAuth client ID" Select "Web application" as the application type. Add `https://api.instantdb.com/runtime/oauth/callback` as an Authorized redirect URI. If you're testing from localhost, **add both `http://localhost`** and `http://localhost:3000` to "Authorized JavaScript origins", replacing `3000` with the port you use. For production, add your website's domain. **Step 3: Register your OAuth client with Instant** Go to the Instant dashboard and select the `Auth` tab for your app. Register a Google client and enter the client id and client secret from the OAuth client that you created. **Step 4: Register your website with Instant** In the `Auth` tab, add the url of the websites where you are using Instant to the Redirect Origins. If you're testing from localhost, add `http://localhost:3000`, replacing `3000` with the port you use. For production, add your website's domain. **Step 5: Add login to your app** The next sections will show you how to use your configured OAuth client with Instant. ## Native button for Web You can use Google's Sign in Button with Instant. You'll use `db.auth.SignInWithIdToken` to authenticate your user. The benefit of using Google's button is that you can display your app's name in the consent screen. First, make sure that your website is in the list of "Authorized JavaScript origins" for your Google client on the Google console. If you're using React, the easiest way to include the signin button is through the `@react-oauth/google` package. npm install @react-oauth/google Include the button and use `db.auth.signInWithIdToken` to complete sign in. Here's a full example 'use client'; import React, { useState } from 'react'; import { init } from '@instantdb/react'; import { GoogleOAuthProvider, GoogleLogin } from '@react-oauth/google'; const APP\_ID \= '\_\_APP\_ID\_\_'; const db \= init({ appId: APP\_ID }); const GOOGLE\_CLIENT\_ID \= 'REPLACE\_ME'; const GOOGLE\_CLIENT\_NAME \= 'REPLACE\_ME'; function App() { const { isLoading, user, error } \= db.useAuth(); if (isLoading) { return <div\>Loading...</div\>; } if (error) { return <div\>Uh oh! {error.message}</div\>; } if (user) { return <h1\>Hello {user.email}!</h1\>; } return <Login /\>; } function Login() { const \[nonce\] \= useState(crypto.randomUUID()); return ( <GoogleOAuthProvider clientId\={GOOGLE\_CLIENT\_ID}\> <GoogleLogin nonce\={nonce} onError\={() \=> alert('Login failed')} onSuccess\={({ credential }) \=> { db.auth .signInWithIdToken({ clientName: GOOGLE\_CLIENT\_NAME, idToken: credential, nonce, }) .catch((err) \=> { alert('Uh oh: ' + err.body?.message); }); }} /\> </GoogleOAuthProvider\> ); } If you're not using React or prefer to embed the button yourself, refer to Google's docs on how to create the button and load their client library. When creating your button, make sure to set the `data-ux_mode="popup"`. Your `data-callback` function should look like: async function handleSignInWithGoogle(response) { await db.auth.signInWithIdToken({ clientName: 'REPLACE\_ME', idToken: response.credential, nonce: 'REPLACE\_ME', }); } --- ## Page: https://www.instantdb.com/docs/auth/apple Instant supports Sign In with Apple on the Web and in native applications. ## Step 1: Create App ID * Navigate to Certificates, Identifiers & Profiles * Select _Identifiers_ * Click _+_ * _Register a new identifier_ → Select _App IDs_ * _Select a type_ → Select _App_ * _Capabilities_ → _Sign In with Apple_ → Check * Fill in _Bundle ID_ and _Description_ * Click _Register_ ## Step 2: Create Services ID * Navigate to Services IDs * Click _+_ * _Register a new identifier_ → Select _Services IDs_ * Fill in _Description_ and _Identifier_. You’ll need this _Identifier_ later * Click _Register_ ## Step 3: Configure Services ID (Web Popup flow) * Select newly created Services ID * Enable _Sign In with Apple_ * Click _Configure_ * Select _Primary App ID_ from Step 1 * To _Domains_, add your app domain (e.g. `myapp.com`) * To _Return URLs_, add URL of your app where authentication happens (e.g. `https://myapp.com/signin`) * Click _Continue_ → _Save_ ## Step 4: Register your OAuth client with Instant * Go to the Instant dashboard and select _Auth_ tab. * Select _Add Apple Client_ * Select unique _clientName_ (`apple` by default, will be used in `db.auth` calls) * Fill in _Services ID_ from Step 2 * Fill in _Team ID_ from Membership details * Fill in _Key ID_ from Step 3.5 * Fill in _Private Key_ by copying file content from Step 3.5 * Click `Add Apple Client` ## Step 5: Add Sign In code to your app (Web Popup flow) Add Apple Sign In library to your app: https://appleid.cdn-apple.com/appleauth/static/jsapi/appleid/1/en\_US/appleid.auth.js Initialize with `Services ID` from Step 2: AppleID.auth.init({ clientId: '<Services ID>', scope: 'name email', redirectURI: window.location.href, }); Implement `signInPopup` using `clientName` from Step 4: async function signInPopup() { let nonce \= crypto.randomUUID(); let resp \= await AppleID.auth.signIn({ nonce: nonce, usePopup: true, }); await db.auth.signInWithIdToken({ clientName: '<clientName>', idToken: resp.authorization.id\_token, nonce: nonce, }); } Add Sign In button: <button onClick\={signInPopup}\>Sign In with Apple</button\> --- ## Page: https://www.instantdb.com/docs/auth/clerk Instant supports auth with Clerk. ## Setup **Step 1: Configure Clerk** Go to your Clerk dashboard, navigate to `Sessions`, then click the `Edit` button in the `Customize session token` section. Add the email claim to your session token: { "email": "{{user.primary\_email\_address}}" } You can have additional claims as long as the `email` claim is set to `{{user.primary_email_address}}`. 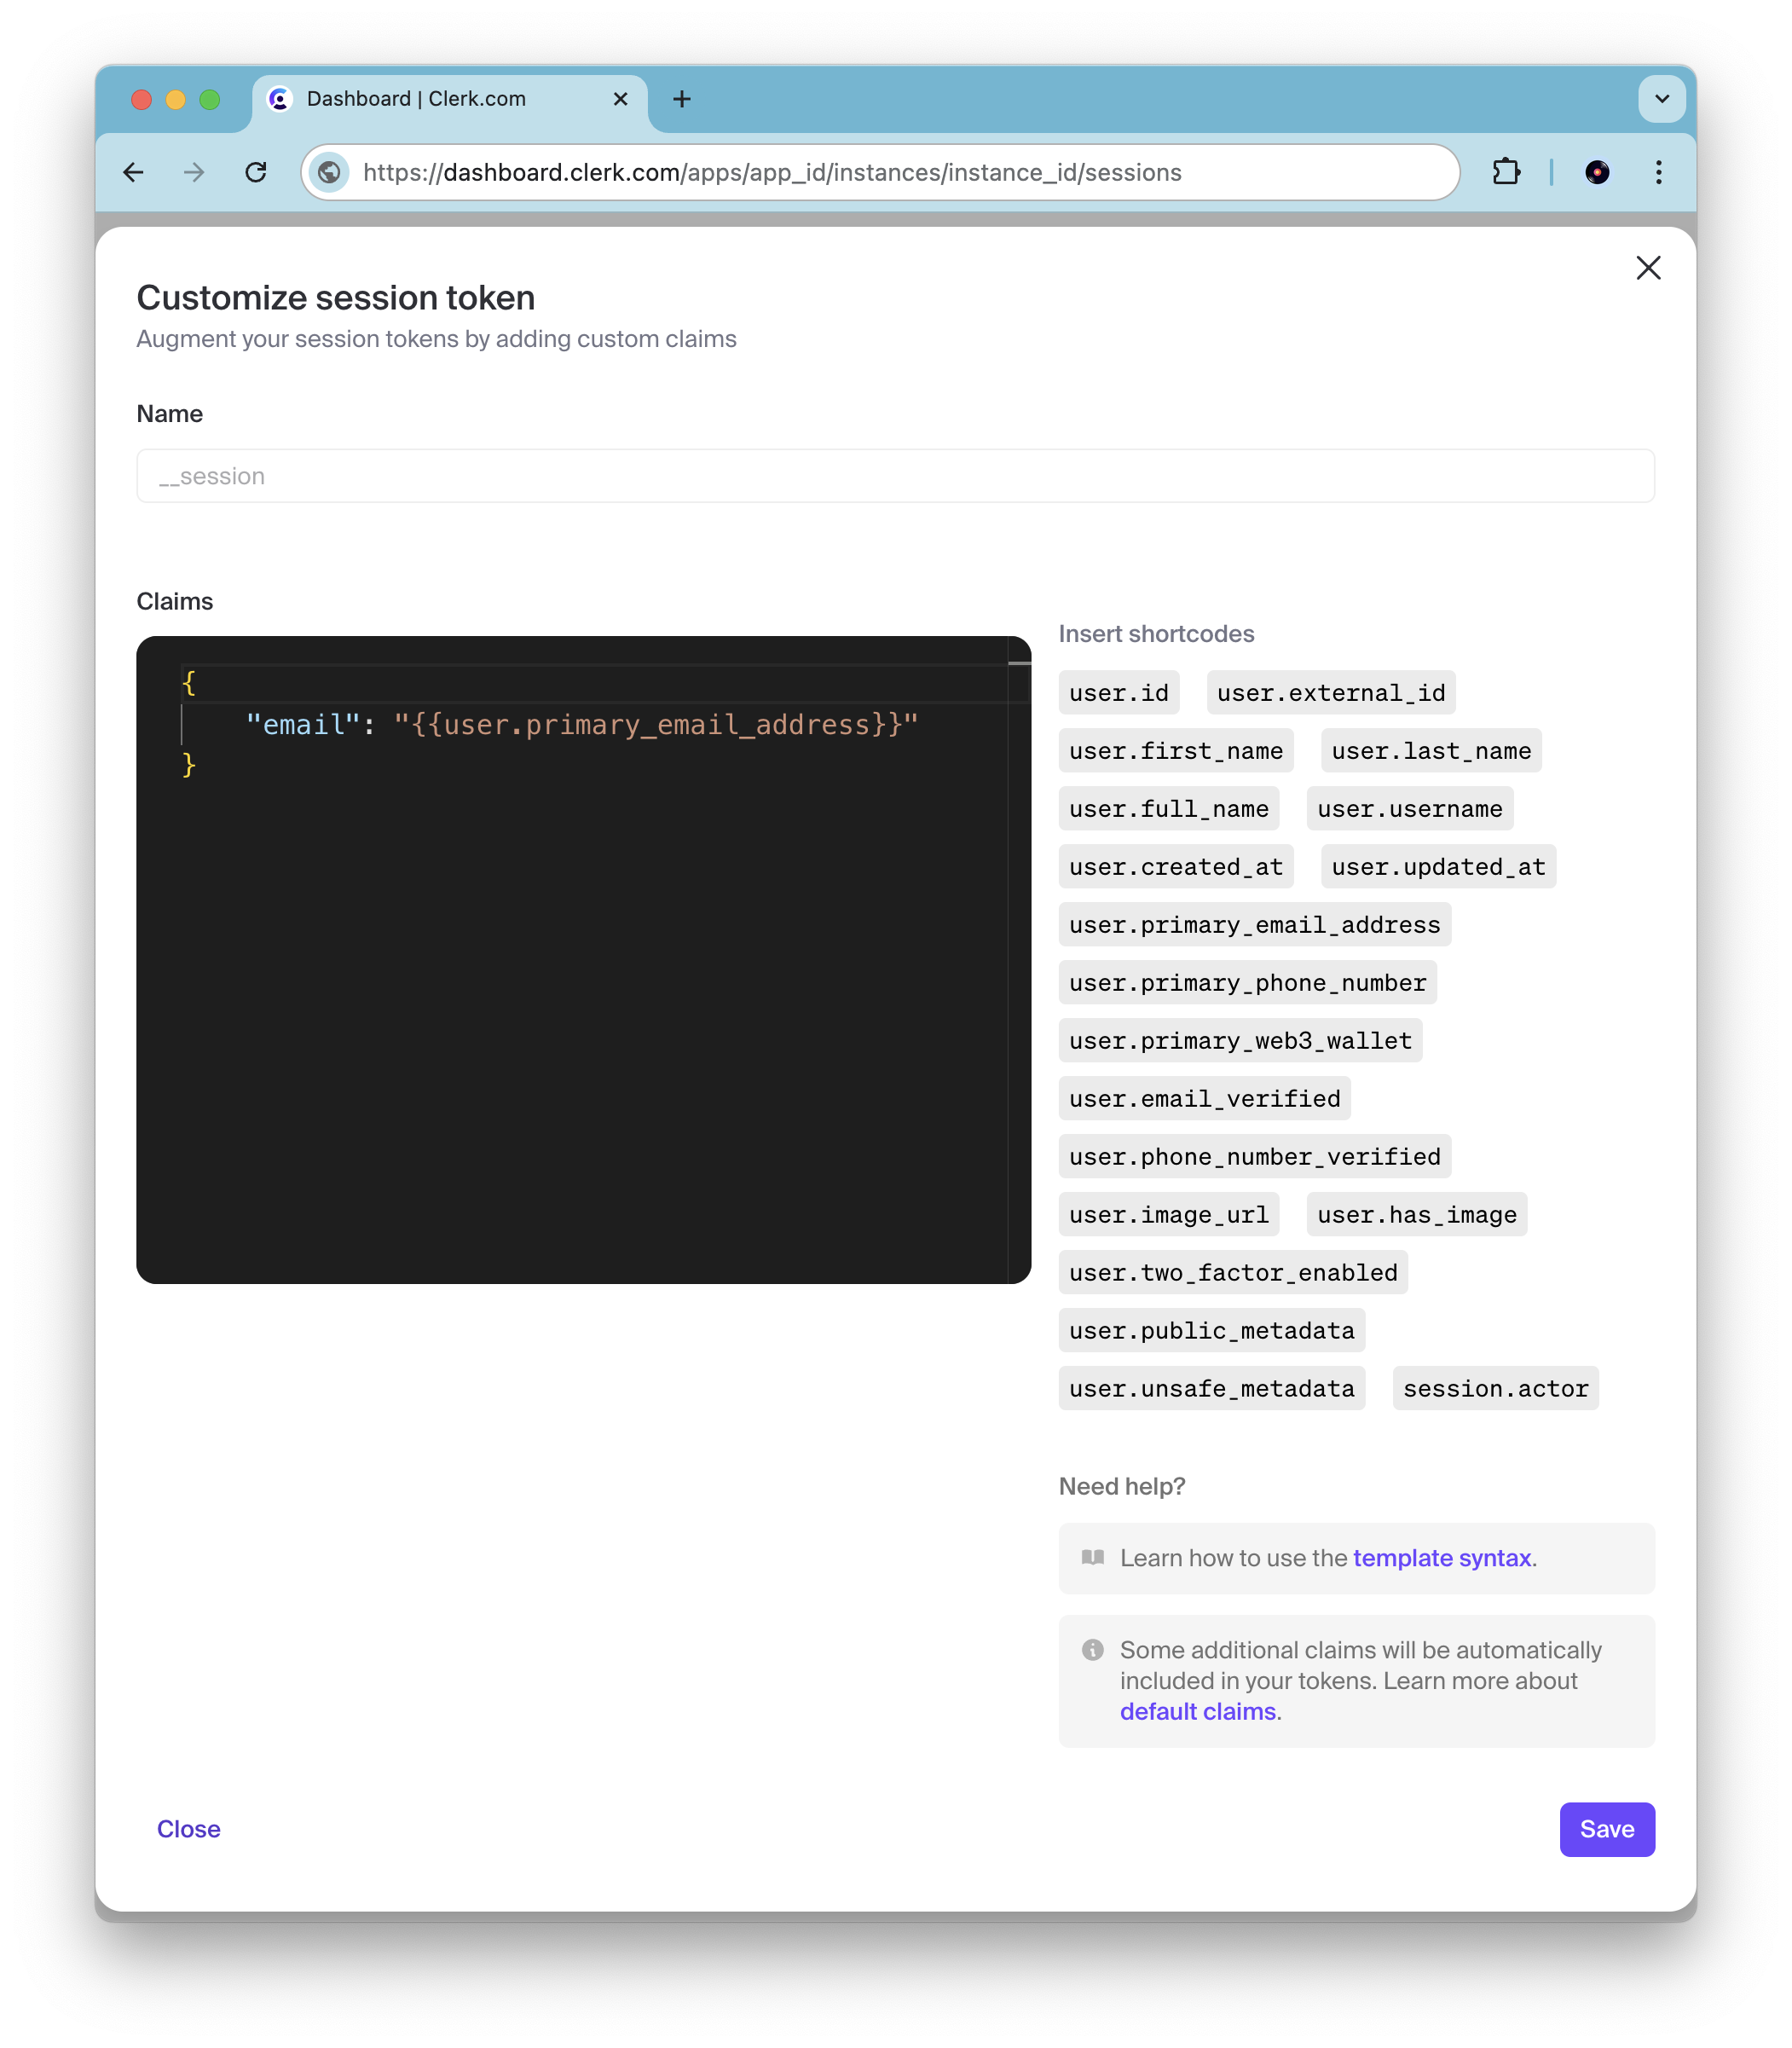 **Step 2: Get your Clerk Publishable key** On the Clerk dashboard, navigate to `API keys`, then copy the `Publishable key`. It should start with `pk_`. **Step 3: Register your Clerk Publishable key with your instant app** Go to the Instant dashboard, navigate to the `Auth` tab and add a new clerk app with the publishable key you copied. ## Usage Use Clerk's `getToken` helper to get a session JWT for your signed-in user. Then call Instant's `db.auth.signInWithIdToken` with the JWT and the client name you set on the Instant dashboard. When you call `db.auth.signInWithIdToken`, Instant will verify that the JWT was signed by your Clerk app. If verified, Instant use the email in the JWT's claims to lookup your user or create a new one and create a long-lived session. Be sure to call Instant's `db.auth.signOut` when you want to sign the user out. Here is a full example using clerk's next.js library: 'use client'; import { useAuth, ClerkProvider, SignInButton, SignedIn, SignedOut, } from '@clerk/nextjs'; import { init } from '@instantdb/react'; import { useEffect } from 'react'; const APP\_ID \= '\_\_APP\_ID\_\_'; const db \= init({ appId: APP\_ID }); const CLERK\_CLIENT\_NAME \= 'REPLACE\_ME'; function ClerkSignedInComponent() { const { getToken, signOut } \= useAuth(); const signInToInstantWithClerkToken \= async () \=> { const idToken \= await getToken(); if (!idToken) { return; } db.auth.signInWithIdToken({ clientName: CLERK\_CLIENT\_NAME, idToken: idToken, }); }; useEffect(() \=> { signInToInstantWithClerkToken(); }, \[\]); const { isLoading, user, error } \= db.useAuth(); if (isLoading) { return <div\>Loading...</div\>; } if (error) { return <div\>Error signing in to Instant! {error.message}</div\>; } if (user) { return ( <div\> <p\>Signed in with Instant through Clerk!</p\>{' '} <button onClick\={() \=> { db.auth.signOut().then(() \=> { signOut(); }); }} \> Sign out </button\> </div\> ); } return ( <div\> <button onClick\={signInToInstantWithClerkToken}\> Sign in to Instant </button\> </div\> ); } function App() { return ( <ClerkProvider\> <SignedOut\> <SignInButton /\> </SignedOut\> <SignedIn\> <ClerkSignedInComponent /\> </SignedIn\> </ClerkProvider\> ); } export default App; --- ## Page: https://www.instantdb.com/docs/permissions To secure user data, you can use Instant’s Rule Language. Our rule language takes inspiration from Rails’ ActiveRecord, Google’s CEL, and JSON. Here’s an example ruleset below import type { InstantRules } from '@instantdb/react'; const rules \= { todos: { allow: { view: 'auth.id != null', create: 'isOwner', update: 'isOwner', delete: 'isOwner', }, bind: \['isOwner', 'auth.id != null && auth.id == data.creatorId'\], }, } satisfies InstantRules; export default rules; You can manage permissions via configuration files or through the Instant dashboard. ## Permissions as code With Instant you can define your permissions in code. If you haven't already, use the CLI to generate an `instant.perms.ts` file: npx instant-cli@latest init The CLI will guide you through picking an Instant app and generate these files for you. Once you've made changes to `instant.perms.ts`, you can use the CLI to push those changes to production: npx instant-cli@latest push perms ## Permissions in the dashboard For each app in your dashboard, you’ll see a permissions editor. Permissions are expressed as JSON. Each top level key represents one of your namespaces — for example `goals`, `todos`, and the like. There is also a special top-level key `attrs` for defining permissions on creating new types of namespaces and attributes. ## Namespaces For each namespace you can define `allow` rules for `view`, `create`, `update`, `delete`. Rules must be boolean expressions. If a rule is not set then by default it evaluates to true. The following three rulesets are all equivalent In this example we explicitly set each action for `todos` to true { "todos": { "allow": { "view": "true", "create": "true", "update": "true", "delete": "true" } } } In this example we explicitly set `view` to be true. However, all the remaining actions for `todo` also default to true. { "todos": { "allow": { "view": "true" } } } In this example we set no rules, and thus all permission checks pass. {} When you start developing you probably won't worry about permissions. However, once you start shipping your app to users you will want to secure their data! ### View `view` rules are evaluated when doing `db.useQuery`. On the backend every object that satisfies a query will run through the `view` rule before being passed back to the client. This means as a developer you can ensure that no matter what query a user executes, they’ll _only_ see data that they are allowed to see. ### Create, Update, Delete Similarly, for each object in a transaction, we make sure to evaluate the respective `create`, `update`, and `delete` rule. Transactions will fail if a user does not have adequate permission. ### Default permissions By default, all permissions are considered to be `"true"`. To change that, use `"$default"` key. This: { "todos": { "allow": { "$default": "false" } } } is equivalent to this: { "todos": { "allow": { "view": "false", "create": "false", "update": "false", "delete": "false" } } } Specific keys can override defaults: { "todos": { "allow": { "$default": "false", "view": "true" } } } You can use `$default` as the namespace: { "$default": { "allow": { "view": "false" } }, "todos": { "allow": { "view": "true" } } } Finally, the ultimate default: { "$default": { "allow": { "$default": "false" } } } ## Attrs Attrs are a special kind of namespace for creating new types of data on the fly. Currently we only support creating attrs. During development you likely don't need to lock this rule down, but once you ship you will likely want to set this permission to `false` Suppose our data model looks like this { "goals": { "id": UUID, "title": string } } And we have a rules defined as { "attrs": { "allow": { "create": "false" } } } Then we could create goals with existing attr types: db.transact(db.tx.goals\[id()\].update({title: "Hello World"}) But we would not be able to create goals with new attr types: db.transact(db.tx.goals\[id()\].update({title: "Hello World", priority: "high"}) ## CEL expressions Inside each rule, you can write CEL code that evaluates to either `true` or `false`. { "todos": { "allow": { "view": "auth.id != null", "create": "auth.id in data.ref('creator.id')", "update": "!(newData.title == data.title)", "delete": "'joe@instantdb.com' in data.ref('users.email')" } } } The above example shows a taste of the kind of rules you can write :) ### data `data` refers to the object you have saved. This will be populated when used for `view`, `create`, `update`, and `delete` rules ### newData In `update`, you'll also have access to `newData`. This refers to the changes that are being made to the object. ### bind `bind` allows you to alias logic. The following are equivalent { "todos": { "allow": { "create": "isOwner" }, "bind": \["isOwner", "auth.id != null && auth.id == data.creatorId"\] } } { "todos": { "allow": { "create": "auth.id != null && auth.id == data.creatorId" } } } `bind` is useful for not repeating yourself and tidying up rules { "todos": { "allow": { "create": "isOwner || isAdmin" }, "bind": \[ "isOwner", "auth.id != null && auth.id == data.creatorId", "isAdmin", "auth.email in \['joe@instantdb.com', 'stopa@instantdb.com'\]" \] } } ### ref You can also refer to relations in your permission checks. This rule restricts delete to only succeed on todos associated with a specific user email. { "todos": { "allow": { "delete": "'joe@instantdb.com' in data.ref('users.email')" } } } `ref` works on the `auth` object too. Here's how you could restrict `deletes` to users with the 'admin' role: { "todos": { "allow": { "delete": "'admin' in auth.ref('$user.role.type')" }, }, }; See managing users to learn more about that. ### ruleParams Imagine you have a `documents` namespace, and want to implement a rule like _"Only people who know my document's id can access it."_ You can use `ruleParams` to write that rule. `ruleParams` let you pass extra options to your queries and transactions. For example, pass a `knownDocId` param to our query: const myDocId \= getId(window.location); const query \= { docs: {}, }; const { data } \= db.useQuery(query, { ruleParams: { knownDocId: myDocId }, }); Or to your transactions: db.transact( db.tx.docs\[id\].ruleParams({ knownDocId: id }).update({ title: 'eat' }), ); And then use it in your permission rules: { "documents": { "allow": { "view": "data.id == ruleParams.knownDocId", "update": "data.id == ruleParams.knownDocId", "delete": "data.id == ruleParams.knownDocId" } } } With that, you've implemented the rule _"Only people who know my document's id can access it."_! **Here are some more patterns** If you want to: access a document and _all related comments_ by one `knownDocId`: { "docs": { "view": "data.id == ruleParams.knownDocId" }, "comment": { "view": "ruleParams.knownDocId in data.ref('parent.id')" } } Or, if you want to allow multiple documents: db.useQuery(..., { knownDocIds: \[id1, id2, ...\] }) { "docs": { "view": "data.id in ruleParams.knownDocIds" } } To create a “share links” feature, where you have multiple links to the same doc, you can create a separate namespace: { "docs": { "view": "ruleParams.secret in data.ref('docLinks.secret')" } } Or if you want to separate “view links” from “edit links”, you can use two namespaces like this: { "docs": { "view": "hasViewerSecret || hasEditorSecret", "update": "hasEditorSecret", "delete": "hasEditorSecret", "bind": \[ "hasViewerSecret", "ruleParams.secret in data.ref('docViewLinks.secret')", "hasEditorSecret", "ruleParams.secret in data.ref('docEditLinks.secret')" \] } } --- ## Page: https://www.instantdb.com/docs/auth/platform-oauth Instant supports the standard OAuth 2.0 Authorization Code grant flow, enabling users to authorize your application to access their Instant data and perform actions on their behalf, like reading app details or managing apps. This guide walks you through the steps required to integrate your application with Instant using OAuth. You can also walk-through a demo to see it in action. ## OAuth flow ### 1\. Create an OAuth App and Client The first step is to register your OAuth application with Instant. This is done through the Instant Dashboard: 1. Navigate to the **OAuth Apps section of the Instant Dashboard** 2. Create a new "OAuth App" associated with your Instant App. Give it a descriptive name. 3. Within that OAuth App, create a new "OAuth Client". * Provide a name for the client (e.g., "My Web App Integration"). * Specify one or more **Authorized Redirect URIs**. These are the exact URLs that Instant is allowed to redirect the user back to after they authorize (or deny) your application. 4. Upon creating the client, you will be provided with: * **Client ID:** A public identifier for your application. * **Client Secret:** A confidential secret known only to your application and Instant. **Treat this like a password and keep it secure.** You will need the Client ID and Client Secret for subsequent steps. Your OAuth app will start in test mode. Only members of your Instant app will be able to authorize with the app. Once you have your OAuth flow working, ping us in Discord to go live. To start the flow, redirect the user from your application to the Instant authorization endpoint. Construct the URL as follows: **Base URL:** https://api.instantdb.com/platform/oauth/start **Query Parameters:** * `client_id` (Required): Your OAuth Client ID obtained in Step 1. * `response_type` (Required): Must be set to `code`. * `redirect_uri` (Required): One of the exact Authorized Redirect URIs you registered for your client in Step 1. * `scope` (Required): A space-separated list of permissions your application is requesting. Available scopes are: * `apps-read`: Allows listing user's apps and viewing their schema/permissions. * `apps-write`: Allows creating/deleting apps and updating schema/permissions. * `state` (Required): A random, opaque string generated by your application. This value is used to prevent Cross-Site Request Forgery (CSRF) attacks. You should generate a unique value for each authorization request and store it (e.g., in the user's session) to verify later. **Example Authorization URL:** https://api.instantdb.com/platform/oauth/start?client\_id=YOUR\_CLIENT\_ID&response\_type=code&redirect\_uri=YOUR\_REDIRECT\_URI&scope=apps-read%20apps-write&state=RANDOM\_STATE\_STRING When the user visits this URL, they will be prompted by Instant to log in (if they aren't already) and asked to grant your application the requested permissions (scopes). ### 3\. Handle the Redirect from Instant After the user grants or denies authorization, Instant redirects them back to the `redirect_uri` you specified. **If Successful:** The redirect URL will include `code` and `state` query parameters: YOUR\_REDIRECT\_URI?code=AUTHORIZATION\_CODE&state=RANDOM\_STATE\_STRING * **Verify the `state` parameter:** Check that the received `state` value matches the one you generated in Step 2 for this user. If they don't match, reject the request to prevent CSRF attacks. * **Extract the `code`:** This is a short-lived, single-use authorization code. **If Unsuccessful:** The redirect URL will include `error` and potentially `error_description` parameters: YOUR\_REDIRECT\_URI?error=access\_denied&state=RANDOM\_STATE\_STRING Handle these errors appropriately (e.g., display a message to the user). ### 4\. Exchange Authorization Code for Tokens Once you have verified the `state` and obtained the `code`, exchange the code for an access token and a refresh token by making a `POST` request from your backend server to the Instant token endpoint. **Endpoint:** https://api.instantdb.com/platform/oauth/token **Method:** `POST` **Headers:** * `Content-Type: application/json` **Request Body (JSON):** { "grant\_type": "authorization\_code", "code": "YOUR\_AUTHORIZATION\_CODE", "redirect\_uri": "YOUR\_REDIRECT\_URI", "client\_id": "YOUR\_CLIENT\_ID", "client\_secret": "YOUR\_CLIENT\_SECRET" } **Example `curl`:** export CLIENT\_ID\="YOUR\_CLIENT\_ID" export CLIENT\_SECRET\="YOUR\_CLIENT\_SECRET" export REDIRECT\_URI\="YOUR\_REDIRECT\_URI" export CODE\="YOUR\_AUTHORIZATION\_CODE" curl -v -X POST "https://api.instantdb.com/platform/oauth/token" \\ -H "Content-Type: application/json" \\ -d "{ \\"client\_id\\": \\"$CLIENT\_ID\\", \\"client\_secret\\": \\"$CLIENT\_SECRET\\", \\"redirect\_uri\\": \\"$REDIRECT\_URI\\", \\"grant\_type\\": \\"authorization\_code\\", \\"code\\": \\"$CODE\\" }" **Successful Response (JSON):** { "access\_token": "ACCESS\_TOKEN\_VALUE", "refresh\_token": "REFRESH\_TOKEN\_VALUE", "expires\_in": 1209600, "scope": "apps-read apps-write", "token\_type": "Bearer" } * **`access_token`**: The token used to authenticate API requests on behalf of the user. It has a limited lifetime (`expires_in`). * **`refresh_token`**: A long-lived token used to obtain new access tokens when the current one expires. Store this securely, associated with the user. * **`expires_in`**: The number of seconds until the `access_token` expires. * **`scope`**: The actual scopes granted by the user (may be different from requested). Store the `access_token`, `refresh_token`, and expiration time securely on your backend, associated with the user who authorized your application. ### 5\. Use the Access Token To make authenticated API calls to Instant on behalf of the user, include the `access_token` in the `Authorization` header of your requests: Authorization: Bearer ACCESS\_TOKEN\_VALUE **Example `curl` (Fetching User's Apps):** export ACCESS\_TOKEN\="ACCESS\_TOKEN\_VALUE" curl -v "https://api.instantdb.com/superadmin/apps" \\ -H "Authorization: Bearer $ACCESS\_TOKEN" This allows you to perform actions permitted by the granted scopes. ### 6\. Refresh the Access Token Access tokens expire. When an access token expires, or shortly before it does, use the `refresh_token` obtained in Step 4 to get a new `access_token` without requiring the user to go through the authorization flow again. Make a `POST` request from your **backend server** to the token endpoint: **Endpoint:** https://api.instantdb.com/platform/oauth/token **Method:** `POST` **Headers:** * `Content-Type: application/json` **Request Body (JSON):** { "grant\_type": "refresh\_token", "refresh\_token": "REFRESH\_TOKEN\_VALUE", "client\_id": "YOUR\_CLIENT\_ID", "client\_secret": "YOUR\_CLIENT\_SECRET" } **Example `curl`:** export CLIENT\_ID\="YOUR\_CLIENT\_ID" export CLIENT\_SECRET\="YOUR\_CLIENT\_SECRET" export REFRESH\_TOKEN\="REFRESH\_TOKEN\_VALUE" curl -v -X POST "\[https://api.instantdb.com/platform/oauth/token\](https://api.instantdb.com/platform/oauth/token)" \\ -H "Content-Type: application/json" \\ -d "{ \\"client\_id\\": \\"$CLIENT\_ID\\", \\"client\_secret\\": \\"$CLIENT\_SECRET\\", \\"grant\_type\\": \\"refresh\_token\\", \\"refresh\_token\\": \\"$REFRESH\_TOKEN\\" }" **Successful Response (JSON):** The response format is similar to the code exchange, providing a _new_ access token and potentially a _new_ refresh token: { "access\_token": "NEW\_ACCESS\_TOKEN\_VALUE", "refresh\_token": "NEW\_REFRESH\_TOKEN\_VALUE", "expires\_in": 1209600, "scope": "apps-read apps-write", "token\_type": "Bearer" } * Update the stored access token and expiration time for the user. * If the refresh token request fails (e.g., the refresh token was revoked), you will need to direct the user through the authorization flow (Step 2) again. ### 7\. Invalidate a token You can invalidate an access token or a refresh token through the `revoke` endpoint. **Endpoint:** https://api.instantdb.com/platform/oauth/revoke **Method:** `POST` **Query Parameters:** * `token` (Required): The token you want to invalidate **Example URL:** https://api.instantdb.com/platform/oauth/revoke?token=YOUR\_TOKEN ## Endpoints ### List Apps * **Description:** Retrieves a list of all applications created by the authenticated user. * **Method:** `GET` * **Path:** `/superadmin/apps` * **Authentication:** Required (Bearer Token) * **Required OAuth Scope:** `apps-read` * **Success Response:** * Code: `200 OK` * Body: { "apps": \[ { "id": "uuid", "title": "string", "creator\_id": "uuid", "created\_at": "timestamp" } \] } ### Get App Details * **Description:** Retrieves details for a specific application. * **Method:** `GET` * **Path:** `/superadmin/apps/:app_id` * **Authentication:** Required (Bearer Token) * **Required OAuth Scope:** `apps-read` * **Path Parameters:** * `app_id` (UUID, required): The ID of the application to retrieve. The authenticated user must be the creator. * **Success Response:** * Code: `200 OK` * Body: { "app": { "id": "uuid", "title": "string", "creator\_id": "uuid", "created\_at": "timestamp" } } * **Error Responses:** * `404 Not Found`: If the app doesn't exist or doesn't belong to the user. ### Create App * **Description:** Creates a new application. * **Method:** `POST` * **Path:** `/superadmin/apps` * **Authentication:** Required (Bearer Token) * **Required OAuth Scope:** `apps-write` * **Request Body:** { "title": "New App Name" } * `title` (string, required): The desired name for the new application. Must not be blank. * **Success Response:** * Code: `200 OK` * Body: { "app": { "id": "uuid", "title": "string", "creator\_id": "uuid", "created\_at": "timestamp" } } ### Update App (Rename) * **Description:** Updates the details of a specific application (currently only supports renaming). * **Method:** `POST` * **Path:** `/superadmin/apps/:app_id` * **Authentication:** Required (Bearer Token) * **Required OAuth Scope:** `apps-write` * **Path Parameters:** * `app_id` (UUID, required): The ID of the application to update. The authenticated user must be the creator. * **Request Body:** { "title": "New App Name" } * `title` (string, required): The new desired name for the application. Must not be blank. * **Success Response:** * Code: `200 OK` * Body: { "app": { "id": "uuid", "title": "string", "creator\_id": "uuid", "created\_at": "timestamp" } } * **Error Responses:** * `404 Not Found`: If the app doesn't exist or doesn't belong to the user. * `400 Bad Request`: If the title is blank or invalid. ### Delete App * **Description:** Marks an application for deletion. The app data may be retained for a period before permanent removal. * **Method:** `DELETE` * **Path:** `/superadmin/apps/:app_id` * **Authentication:** Required (Bearer Token) * **Required OAuth Scope:** `apps-write` * **Path Parameters:** * `app_id` (UUID, required): The ID of the application to delete. The authenticated user must be the creator. * **Success Response:** * Code: `200 OK` * Body: { "app": { "id": "uuid", "title": "string", "creator\_id": "uuid", "created\_at": "timestamp" } } * **Error Responses:** * `404 Not Found`: If the app doesn't exist or doesn't belong to the user. ### Get Permissions (Rules) * **Description:** Retrieves the current permission rules for the application. * **Method:** `GET` * **Path:** `/superadmin/apps/:app_id/perms` * **Authentication:** Required (Bearer Token) * **Required OAuth Scope:** `apps-read` * **Path Parameters:** * `app_id` (UUID, required): The ID of the application. * **Success Response:** * Code: `200 OK` * Body: { "perms": { } } ### Set Permissions (Rules) * **Description:** Overwrites the existing permission rules for the application with the provided definition. * **Method:** `POST` * **Path:** `/superadmin/apps/:app_id/perms` * **Authentication:** Required (Bearer Token) * **Required OAuth Scope:** `apps-write` * **Path Parameters:** * `app_id` (UUID, required): The ID of the application. * **Request Body:** { "code": { } } * `code` (object, required): The complete permission rules definition. * **Success Response:** * Code: `200 OK` * Body: { "rules": { } } * **Error Responses:** * `400 Bad Request`: If the provided `code` object fails validation. ### Get schema * **Description:** Views the schema for the app. * **Method:** `POST` * **Path:** `/superadmin/apps/:app_id/schema` * **Authentication:** Required (Bearer Token) * **Required OAuth Scope:** `apps-read` * **Path Parameters:** * `app_id` (UUID, required): The ID of the application. * **Success Response:** * Code: `200 OK` * Body: An object detailing the planned schema changes. { "schema": { "blobs": { "namespace-name": { "attribute-name": { "id": "uuid", "cardinality": "one | many", "forward-identity": \["uuid", "namespace-name", "attribute-name"\], "index?": "boolean", "unique?": "boolean", "checked-data-type": "'string' | 'number' | 'boolean' | 'date' | null" } } }, "refs": { "ref-string": { "id": "uuid", "cardinality": "one | many", "forward-identity": \["uuid", "namespace-name", "attribute-name"\], "reverse-identity": \[ "uuid", "linked-namespace-name", "linked-attribute-name" \], "index?": "boolean", "unique?": "boolean" } } } } ### Plan Schema Push * **Description:** Calculates the changes required to apply a new schema definition without actually applying them. Useful for previewing migrations. * **Method:** `POST` * **Path:** `/superadmin/apps/:app_id/schema/push/plan` * **Authentication:** Required (Bearer Token) * **Required OAuth Scope:** `apps-read` * **Path Parameters:** * `app_id` (UUID, required): The ID of the application. * **Request Body:** { "schema": { "entities": { "namespace-name": { "attrs": { "attribute-name": { "valueType": "'string' | 'number' | 'boolean' | 'date' | 'json'", "config": { "indexed": "boolean", "unique": "boolean" } } } } }, "links": { "unique-string": { "forward": { "on": "forward-namespace-name", "label": "forward-attr-label", "has": "many | one", "onDelete": "cascade | null" }, "reverse": { "on": "reverse-namespace-name", "label": "reverse-attr-label", "has": "many | one" "onDelete": "cascade | null" } } } } } * `schema` (object, required): An object with `entities` and `links` that matches the structure of instant.schema.ts * **Success Response:** * Code: `200 OK` * Body: { "current-schema": "schema object (same structure as GET schema)", "new-schema": "schema object (same structure as GET schema)", "steps": \[ \[ "add-attr", { "id": "uuid", "cardinality": "one | many", "forward-identity": \["uuid", "namespace-name", "attribute-name"\], "index?": "boolean", "unique?": "boolean", "checked-data-type": "'string' | 'number' | 'boolean' | 'date' | null" } \], \[ "add-attr", { "id": "uuid", "cardinality": "one | many", "forward-identity": \["uuid", "namespace-name", "attribute-name"\], "index?": "boolean", "unique?": "boolean", "checked-data-type": "'string' | 'number' | 'boolean' | 'date' | null" } \], \[ "index", { "attr-id": "uuid", "forward-identity": \["uuid", "namespace-name", "attribute-name"\] } \], \[ "remove-index", { "attr-id": "uuid", "forward-identity": \["uuid", "namespace-name", "attribute-name"\] } \], \[ "unique", { "attr-id": "uuid", "forward-identity": \["uuid", "namespace-name", "attribute-name"\] } \], \[ "remove-unique", { "attr-id": "uuid", "forward-identity": \["uuid", "namespace-name", "attribute-name"\] } \], \[ "check-data-type", { "attr-id": "uuid",, "checked-data-type": "'string' | 'boolean' | 'number' | 'date'", "forward-identity": \["uuid", "namespace-name", "attribute-name"\] } \], \[ "remove-data-type", { "attr-id": "uuid", "forward-identity": \["uuid", "namespace-name", "attribute-name"\] } \] \] } ### Apply Schema Push * **Description:** Calculates and applies the schema changes based on the provided definition. * **Method:** `POST` * **Path:** `/superadmin/apps/:app_id/schema/push/apply` * **Authentication:** Required (Bearer Token) * **Required OAuth Scope:** `apps-write` * **Path Parameters:** * `app_id` (UUID, required): The ID of the application. * **Request Body:** Same as "Plan Schema Push". { "schema": { "entities": { "namespace-name": { "attrs": { "attribute-name": { "valueType": "'string' | 'number' | 'boolean' | 'date' | 'json'", "config": { "indexed": "boolean", "unique": "boolean" } } } } }, "links": { "unique-string": { "forward": { "on": "forward-namespace-name", "label": "forward-attr-label", "has": "many | one", "onDelete": "cascade | null" }, "reverse": { "on": "reverse-namespace-name", "label": "reverse-attr-label", "has": "many | one" "onDelete": "cascade | null" } } } } } * `schema` (object, required): An object with `entities` and `links` that matches the structure of instant.schema.ts * **Success Response:** * Code: `200 OK` * Body: { "current-schema": "schema object (same structure as GET schema)", "new-schema": "schema object (same structure as GET schema)", "steps": \[ \[ "add-attr", { "id": "uuid", "cardinality": "one | many", "forward-identity": \["uuid", "namespace-name", "attribute-name"\], "index?": "boolean", "unique?": "boolean", "checked-data-type": "'string' | 'number' | 'boolean' | 'date' | null" } \], \[ "add-attr", { "id": "uuid", "cardinality": "one | many", "forward-identity": \["uuid", "namespace-name", "attribute-name"\], "index?": "boolean", "unique?": "boolean", "checked-data-type": "'string' | 'number' | 'boolean' | 'date' | null" } \], \[ "index", { "attr-id": "uuid", "forward-identity": \["uuid", "namespace-name", "attribute-name"\] } \], \[ "remove-index", { "attr-id": "uuid", "forward-identity": \["uuid", "namespace-name", "attribute-name"\] } \], \[ "unique", { "attr-id": "uuid", "forward-identity": \["uuid", "namespace-name", "attribute-name"\] } \], \[ "remove-unique", { "attr-id": "uuid", "forward-identity": \["uuid", "namespace-name", "attribute-name"\] } \], \[ "check-data-type", { "attr-id": "uuid",, "checked-data-type": "'string' | 'boolean' | 'number' | 'date'", "forward-identity": \["uuid", "namespace-name", "attribute-name"\] } \], \[ "remove-data-type", { "attr-id": "uuid", "forward-identity": \["uuid", "namespace-name", "attribute-name"\] } \] \] } --- ## Page: https://www.instantdb.com/docs/users ## See users in your app You can manage users in your app using the `$users` namespace. This namespace is automatically created when you create an app. You'll see the `$users` namespace in the `Explorer` tab with all the users in your app! ## Querying users The `$users` namespace can be queried like any normal namespace. However, we've set some default permissions so that only a logged-in user can view their own data. import type { InstantRules } from "@instantdb/react"; const rules \= { $users: { allow: { view: 'auth.id == data.id', create: 'false', delete: 'false', update: 'false', }, }, } satisfies InstantRules; export default rules; Right now `$users` is a read-only namespace. You can override the `view` permission to whatever you like, but `create`, `delete`, and `update` are restricted. ## Adding properties Although you cannot directly add properties to the `$users` namespace, you can create links to other namespaces. Here is an example of a schema for a todo app that has users, roles, profiles, and todos: import { i } from '@instantdb/react'; const \_schema \= i.schema({ entities: { $users: i.entity({ email: i.any().unique().indexed(), }), profiles: i.entity({ nickname: i.string(), userId: i.string().unique(), }), roles: i.entity({ type: i.string().unique(), }), todos: i.entity({ text: i.string(), userId: i.string(), completed: i.boolean(), }), }, links: { todoOwner: { forward: { on: 'todos', has: 'one', label: 'owner' }, reverse: { on: '$users', has: 'many', label: 'todos'}, }, userRoles: { forward: { on: 'roles', has: 'many', label: 'users' }, reverse: { on: '$users', has: 'one', label: 'role' }, }, userProfiles: { forward: { on: 'profiles', has: 'one', label: 'user' }, reverse: { on: '$users', has: 'one', label: 'profile' }, }, }, }); type \_AppSchema \= typeof \_schema; interface AppSchema extends \_AppSchema {} const schema: AppSchema \= \_schema; export type { AppSchema }; export default schema; ### Links We created three links `todoOwner`, `userRoles`, and `userProfiles` to link the `$users` namespace to the `todos`, `roles`, and `profiles` namespaces respectively: import { i } from '@instantdb/react'; const \_schema \= i.schema({ links: { todoOwner: { forward: { on: 'todos', has: 'one', label: 'owner' }, reverse: { on: '$users', has: 'many', label: 'todos' }, }, userRoles: { forward: { on: 'roles', has: 'many', label: 'users' }, reverse: { on: '$users', has: 'one', label: 'role' }, }, userProfiles: { forward: { on: 'profiles', has: 'one', label: 'user' }, reverse: { on: '$users', has: 'one', label: 'profile' }, }, }, }); Notice that the `$users` namespace is in the reverse direction for all links. If you try to create a link with `$users` in the forward direction, you'll get an error. ### Attributes Now take a look at the `profiles` namespace: import { i } from '@instantdb/react'; const \_schema \= i.schema({ entities: { profiles: i.entity({ nickname: i.string(), }), }, }); You may be wondering why we didn't add `nickname` directly to the `$users` namespace. This is because the `$users` namespace is read-only and we cannot add properties to it. If you want to add additional properties to a user, you'll need to create a new namespace and link it to `$users`. * * * Once done, you can include user information in the client like so: const addTodo \= (newTodo, currentUser) \=> { const newId \= id(); db.transact( tx.todos\[newId\] .update({ text: newTodo, userId: currentUser.id, completed: false }) .link({ owner: currentUser.id }), ); }; const updateNick \= (newNick, currentUser) \=> { const profileId \= lookup('email', currentUser.email); db.transact(\[ tx.profiles\[profileId\] .update({ userId: currentUser.id, nickname: newNick }) .link({ user: currentUser.id }), \]); }; If attr creation on the client is enabled, you can also create new links without having to define them in the schema. In this case you can only link to `$users` and not from `$users`. const commentId \= id() db.transact( tx.comments\[commentId\].update({ text: 'Hello world', userId: currentUser.id }) .link({ $user: currentUser.id })); const commentId \= id() db.transact(\[ tx.comments\[id()\].update({ text: 'Hello world', userId: currentUser.id }), tx.$users\[currentUser.id\].link({ comment: commentId }))\]); db.transact(tx.$users\[currentUser.id\].update({ nickname: "Alyssa" })) ## User permissions You can reference the `$users` namespace in your permission rules just like a normal namespace. For example, you can restrict a user to only update their own todos like so: export default { todos: { allow: { update: "auth.id in data.ref('owner.id')", }, }, }; You can also traverse the `$users` namespace directly from the `auth` object via `auth.ref`. When using `auth.ref` the arg must start with `$user`. Here's the equivalent rule to the one above using `auth.ref`: export default { todos: { allow: { update: "data.id in auth.ref('$user.todos.id')", }, }, }; By creating links to `$users` and leveraging `auth.ref`, you can expressively build more complex permission rules. export default { todos: { bind: \[ 'isAdmin', "'admin' in auth.ref('$user.role.type')", 'isOwner', "data.id in auth.ref('$user.todos.id')", \], allow: { update: 'isAdmin || isOwner', }, }, }; --- ## Page: https://www.instantdb.com/docs/presence-and-topics Sometimes you want to show real-time updates to users without persisting the data to your database. Common scenarios include: * Shared cursors in a collaborative whiteboard like Figma * Who's online in a document editor like Google Docs * Typing indicators in chat apps like Discord * Live reactions in a video streaming app like Twitch Instant provides three primitives for quickly building these ephemeral experiences: rooms, presence, and topics. **Rooms** A room represents a temporary context for realtime events. Users in the same room will receive updates from every other user in that room. **Presence** Presence is an object that each peer shares with every other peer. When a user updates their presence, it's instantly replicated to all users in that room. Presence persists throughout the remainder of a user's connection, and is automatically cleaned up when a user leaves the room You can use presence to build features like "who's online." Instant's cursor and typing indicator are both built on top of the presence API. **Topics** Topics have "fire and forget" semantics, and are better suited for data that don't need any sort of persistence. When a user publishes a topic, a callback is fired for every other user in the room listening for that topic. You can use topics to build features like "live reactions." The real-time emoji button panel on Instant's homepage is built using the topics API. **Transact vs. Ephemeral** You may be thinking when would I use `transact` vs `presence` vs `topics`? Here's a simple breakdown: * Use `transact` when you need to persist data to the db. For example, when a user sends a message in a chat app. * Use `presence` when you need to persist data in a room but not to the db. For example, showing who's currently viewing a document. * Use `topics` when you need to broadcast data to a room, but don't need to persist it. For example, sending a live reaction to a video stream. ## Setup To obtain a room reference, call `db.room(roomType, roomId)` import { init } from '@instantdb/react'; const APP\_ID \= '\_\_APP\_ID\_\_'; const db \= init({ appId: APP\_ID }); const roomId \= 'hacker-chat-room-id'; const room \= db.room('chat', roomId); ## Typesafety By default rooms accept any kind of data. However, you can enforce typesafety with a schema: import { init } from '@instantdb/react'; import schema from '../instant.schema.ts'; const APP\_ID \= '\_\_APP\_ID\_\_'; const db \= init({ appId: APP\_ID, schema }); const roomId \= 'hacker-chat-room-id'; const room \= db.room('chat', roomId); Here's how we could add typesafety to our `chat` rooms: import { i } from '@instantdb/core'; const \_schema \= i.schema({ rooms: { chat: { presence: i.entity({ name: i.string(), status: i.string(), }), topics: { sendEmoji: i.entity({ emoji: i.string(), }), }, }, }, }); type \_AppSchema \= typeof \_schema; interface AppSchema extends \_AppSchema {} const schema: AppSchema \= \_schema; export type { AppSchema }; export default schema; Once you've updated your schema, you'll start seeing types in your intellisense: 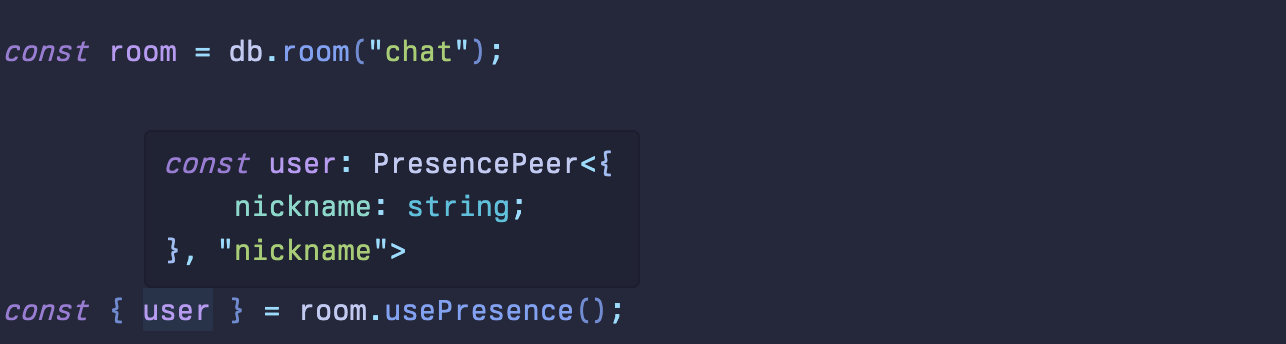 ## Presence One common use case for presence is to show who's online. Instant's `usePresence` is similar in feel to `useState`. It returns an object containing the current user's presence state, the presence state of every other user in the room, and a function (`publishPresence`) to update the current user's presence. `publishPresence` is similar to React's `setState`, and will merge the current and new presence objects. import { init } from '@instantdb/react'; const APP\_ID \= "\_\_APP\_ID\_\_"; const db \= init({ appId: APP\_ID }); const room \= db.room('chat', 'hacker-chat-room-id'); const randomId \= Math.random().toString(36).slice(2, 6); const user \= { name: \`User#${randomId}\`, }; function App() { const { user: myPresence, peers, publishPresence } \= db.rooms.usePresence(room); useEffect(() \=> { publishPresence({ name: user.name }); }, \[\]); if (!myPresence) { return <p\>App loading...</p\>; } return ( <div\> <h1\>Who's online?</h1\> <p\>You are: {myPresence.name}</p\> <h2\>Others:</h2\> <ul\> { } {Object.entries(peers).map((\[peerId, peer\]) \=> ( <li key\={peerId}\>{peer.name}</li\> ))} </ul\> </div\> ); } `usePresence` accepts a second parameter to select specific slices of user's presence object. const room \= db.room('chat', 'hacker-chat-room-id'); const { user, peers, publishPresence } \= db.rooms.usePresence(room, { keys: \['status'\], }); You may also specify an array of `peers` and a `user` flag to further constrain the output. If you wanted a "write-only" hook, it would look like this: const room \= db.room('chat', 'hacker-chat-room-id'); const { publishPresence } \= db.rooms.usePresence(room, { peers: \[\], user: false, }); ## Topics Instant provides 2 hooks for sending and handling events for a given topic. `usePublishTopic` returns a function you can call to publish an event, and `useTopicEffect` will be called each time a peer in the same room publishes a topic event. Here's a live reaction feature using topics. You can also play with it live on our examples page 'use client'; import { init } from '@instantdb/react'; import { RefObject, createRef, useRef } from 'react'; const APP\_ID \= "\_\_APP\_ID\_\_"; const emoji \= { fire: '🔥', wave: '👋', confetti: '🎉', heart: '❤️', } as const; type EmojiName \= keyof typeof emoji; const db \= init({ appId: APP\_ID, }); const room \= db.room('main'); export default function InstantTopics() { const publishEmoji \= db.rooms.usePublishTopic(room, 'emoji'); db.rooms.useTopicEffect(room, 'emoji', ({ name, directionAngle, rotationAngle }) \=> { if (!emoji\[name\]) return; animateEmoji( { emoji: emoji\[name\], directionAngle, rotationAngle }, elRefsRef.current\[name\].current ); }); const elRefsRef \= useRef<{ \[k: string\]: RefObject<HTMLDivElement\>; }\>(refsInit); return ( <div className\={containerClassNames}\> <div className\="flex gap-4"\> {emojiNames.map((name) \=> ( <div className\="relative" key\={name} ref\={elRefsRef.current\[name\]}\> <button className\={emojiButtonClassNames} onClick\={() \=> { const params \= { name, rotationAngle: Math.random() \* 360, directionAngle: Math.random() \* 360, }; animateEmoji( { emoji: emoji\[name\], rotationAngle: params.rotationAngle, directionAngle: params.directionAngle, }, elRefsRef.current\[name\].current ); publishEmoji(params); }} \> {emoji\[name\]} </button\> </div\> ))} </div\> </div\> ); } const emojiNames \= Object.keys(emoji) as EmojiName\[\]; const refsInit \= Object.fromEntries( emojiNames.map((name) \=> \[name, createRef<HTMLDivElement\>()\]) ); const containerClassNames \= 'flex h-screen w-screen items-center justify-center overflow-hidden bg-gray-200 select-none'; const emojiButtonClassNames \= 'rounded-lg bg-white p-3 text-3xl shadow-lg transition duration-200 ease-in-out hover:-translate-y-1 hover:shadow-xl'; function animateEmoji( config: { emoji: string; directionAngle: number; rotationAngle: number }, target: HTMLDivElement | null ) { if (!target) return; const rootEl \= document.createElement('div'); const directionEl \= document.createElement('div'); const spinEl \= document.createElement('div'); spinEl.innerText \= config.emoji; directionEl.appendChild(spinEl); rootEl.appendChild(directionEl); target.appendChild(rootEl); style(rootEl, { transform: \`rotate(${config.directionAngle \* 360}deg)\`, position: 'absolute', top: '0', left: '0', right: '0', bottom: '0', margin: 'auto', zIndex: '9999', pointerEvents: 'none', }); style(spinEl, { transform: \`rotateZ(${config.rotationAngle \* 400}deg)\`, fontSize: \`40px\`, }); setTimeout(() \=> { style(directionEl, { transform: \`translateY(40vh) scale(2)\`, transition: 'all 400ms', opacity: '0', }); }, 20); setTimeout(() \=> rootEl.remove(), 800); } function style(el: HTMLElement, styles: Partial<CSSStyleDeclaration\>) { Object.assign(el.style, styles); } ## Cursors and Typing Indicators (React only) We wanted to make adding real-time features to your apps as simple as possible, so we shipped our React library with 2 drop-in utilities: `Cursors` and `useTypingIndicator`. ### Cursors Adding multiplayer cursors to your app is as simple as importing our `<Cursors>` component! 'use client'; import { init, Cursors } from '@instantdb/react'; const APP\_ID \= "\_\_APP\_ID\_\_"; const db \= init({ appId: APP\_ID }); const room \= db.room("chat", "main"); export default function App() { return ( <Cursors room\={room} className\="h-full w-full" userCursorColor\="tomato"\> <div style\={{ width: "100vw", height: "100vh" }}\> Open two tabs, and move your cursor around! </div\> </Cursors\> ); } You can provide a `renderCursor` function to return your own custom cursor component. <Cursors room\={room} className\="cursors" userCursorColor\="papayawhip" renderCursor\={renderCoolCustomCursor} /\> You can render multiple cursor spaces. For instance, imagine you're building a screen with multiple tabs. You want to only show cursors on the same tab as the current user. You can provide each `<Cursors />` element with their own `spaceId`. <Tabs\> {tabs.map((tab) \=> ( <Tab\> <Cursors room\={room} spaceId\={\`tab-${tab.id}\`} className\="tab-cursor"\> {} </Cursors\> </Tab\> ))} </Tabs\> ### Typing indicators `useTypingIndicator` is a small utility useful for building inputs for chat-style apps. You can use this hook to show things like "<user> is typing..." in your chat app. 'use client'; import { init } from '@instantdb/react'; const APP\_ID \= '\_\_APP\_ID\_\_'; const db \= init({ appId: APP\_ID }); const randomId \= Math.random().toString(36).slice(2, 6); const user \= { name: \`User#${randomId}\`, }; const room \= db.room('chat', 'hacker-chat-room-id'); export default function InstantTypingIndicator() { db.rooms.useSyncPresence(room, user); const typing \= db.rooms.useTypingIndicator(room, 'chat'); const onKeyDown \= (e) \=> { typing.inputProps.onKeyDown(e); if (e.key \=== 'Enter' && !e.shiftKey) { e.preventDefault(); console.log('Message sent:', e.target.value); } }; return ( <div className\="flex h-screen gap-3 p-2"\> <div key\="main" className\="flex flex-1 flex-col justify-end"\> <textarea onBlur\={typing.inputProps.onBlur} onKeyDown\={onKeyDown} placeholder\="Open two tabs and start typing..." className\="w-full rounded-md border-gray-300 p-2 text-sm" /\> <div className\="truncate text-xs text-gray-500"\> {typing.active.length ? typingInfo(typing.active) : <\> </\>} </div\> </div\> </div\> ); } function typingInfo(users) { if (users.length \=== 0) return null; if (users.length \=== 1) return \`${users\[0\].name} is typing...\`; if (users.length \=== 2) return \`${users\[0\].name} and ${users\[1\].name} are typing...\`; return \`${users\[0\].name} and ${users.length \- 1} others are typing...\`; } --- ## Page: https://www.instantdb.com/docs/cli The Instant CLI was designed to drive your Instant application entirely from a project's codebase. You can create apps, define your data model, and update your permissions, **all through your terminal**. ## Init To get started, head on over to your project's root repository, and write: npx instant-cli@latest init This will guide you through picking an Instant app and generate two files for you: * `instant.schema.ts` defines your application's data model. * `instant.perms.ts` defines your permission rules. To learn how to change `instant.schema.ts`, check our Modeling Data. For `instant.perms.ts`, check out the permissions page. ## Push When you're ready to publish your changes to `instant.schema.ts`, run: npx instant-cli@latest push schema This will evaluate your schema, compare it with production, and migrate your data model. `push schema` doesn't support _renaming_ or _deleting_ attributes yet. To do this, use the Explorer Similarly, when you change `instant.perms.ts`, you can run: npx instant-cli@latest push perms ## Pull Sometimes, you change your schema or rules from your Explorer. If you want to `pull` the latest version of schema and perms for production, write: npx instant-cli@latest pull This will generate new `instant.schema.ts` and `instant.perms.ts` files, based on your production state. ## App ID Whenever you run a CLI command, we look up your app id. You can either provide an app id as an option: npx instant-cli@latest init --app $MY\_APP\_ID Or store it in your `.env` file: INSTANT\_APP\_ID=\*\*\*\*\* As a convenience, apart from `INSTANT_APP_ID`, we also check for: * `NEXT_PUBLIC_INSTANT_APP_ID` for next apps, * `PUBLIC_INSTANT_APP_ID` for svelte apps, * `VITE_INSTANT_APP_ID` for vite apps * `NUXT_PUBLIC_INSTANT_APP_ID` for nuxt apps * `EXPO_PUBLIC_INSTANT_APP_ID` for expo apps ## Where to save files By default, Instant will search for your `instant.schema.ts` and `instant.perms.ts` file in: 1. The `root` directory: `./` 2. The `src` directory: `./src` 3. The `app` directory: `./app` If you'd like to save them in a custom location, you can set the following environment variables: * `INSTANT_SCHEMA_FILE_PATH` sets the location for your `instant.schema.ts` file. * `INSTANT_PERMS_FILE_PATH` sets the location for your `instant.perms.ts` file. INSTANT\_SCHEMA\_FILE\_PATH=./src/db/instant.schema.ts INSTANT\_PERMS\_FILE\_PATH=./src/db/instant.perms.ts ## Authenticating in CI In CI or similar environments, you may want to handle authentication without having to go through a web-based validation step each time. In these cases, you can provide a `INSTANT_CLI_AUTH_TOKEN` environment variable. To obtain a token for later use, run: npx instant-cli@latest login -p Instead of saving the token to your local device, the CLI will print it to your console. You can copy this token and provide it as `INSTANT_CLI_AUTH_TOKEN` later in your CI tool. --- ## Page: https://www.instantdb.com/docs/devtool #### Pick your app The examples below will be updated with your app ID. Platform features ## Devtool When you load your app in development, you'll notice a little "Instant" Icon show up: 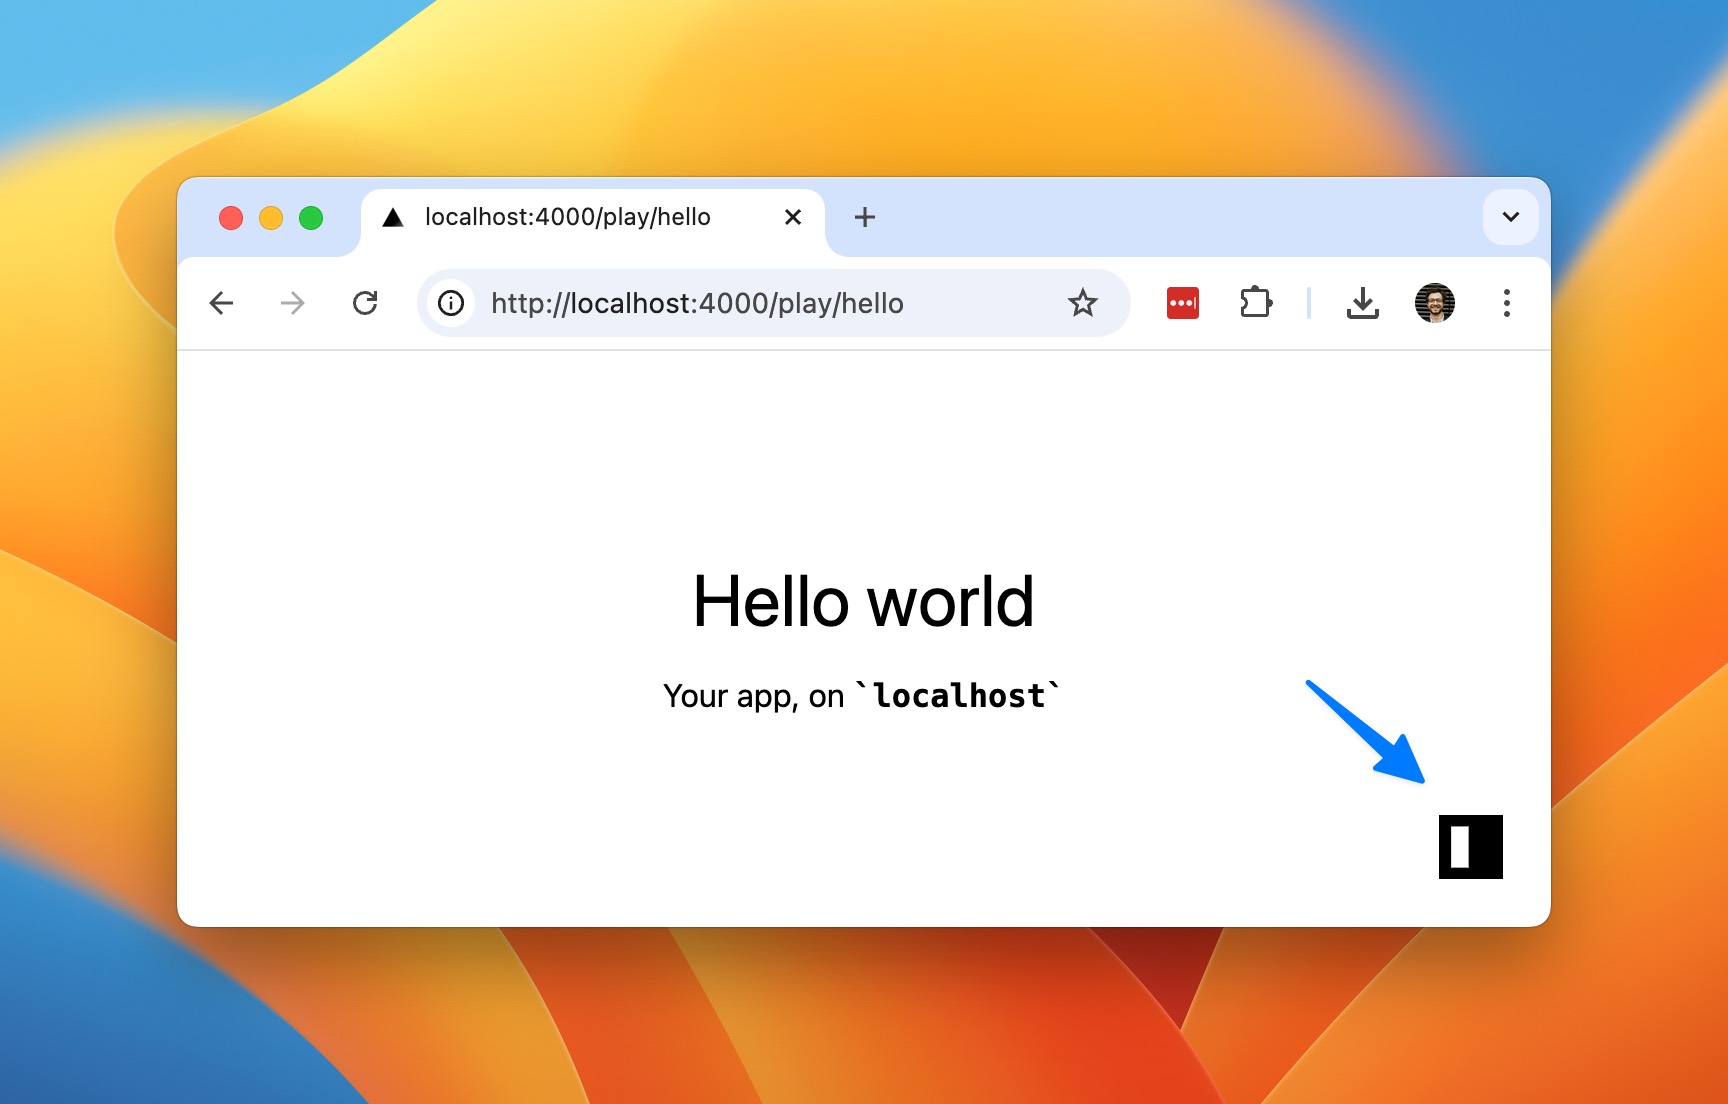 This is your handy `devtool` shortcut. Once you click it, you'll see a widget that lets you make changes to your app. Use the `Explorer` to change up your data and schema: 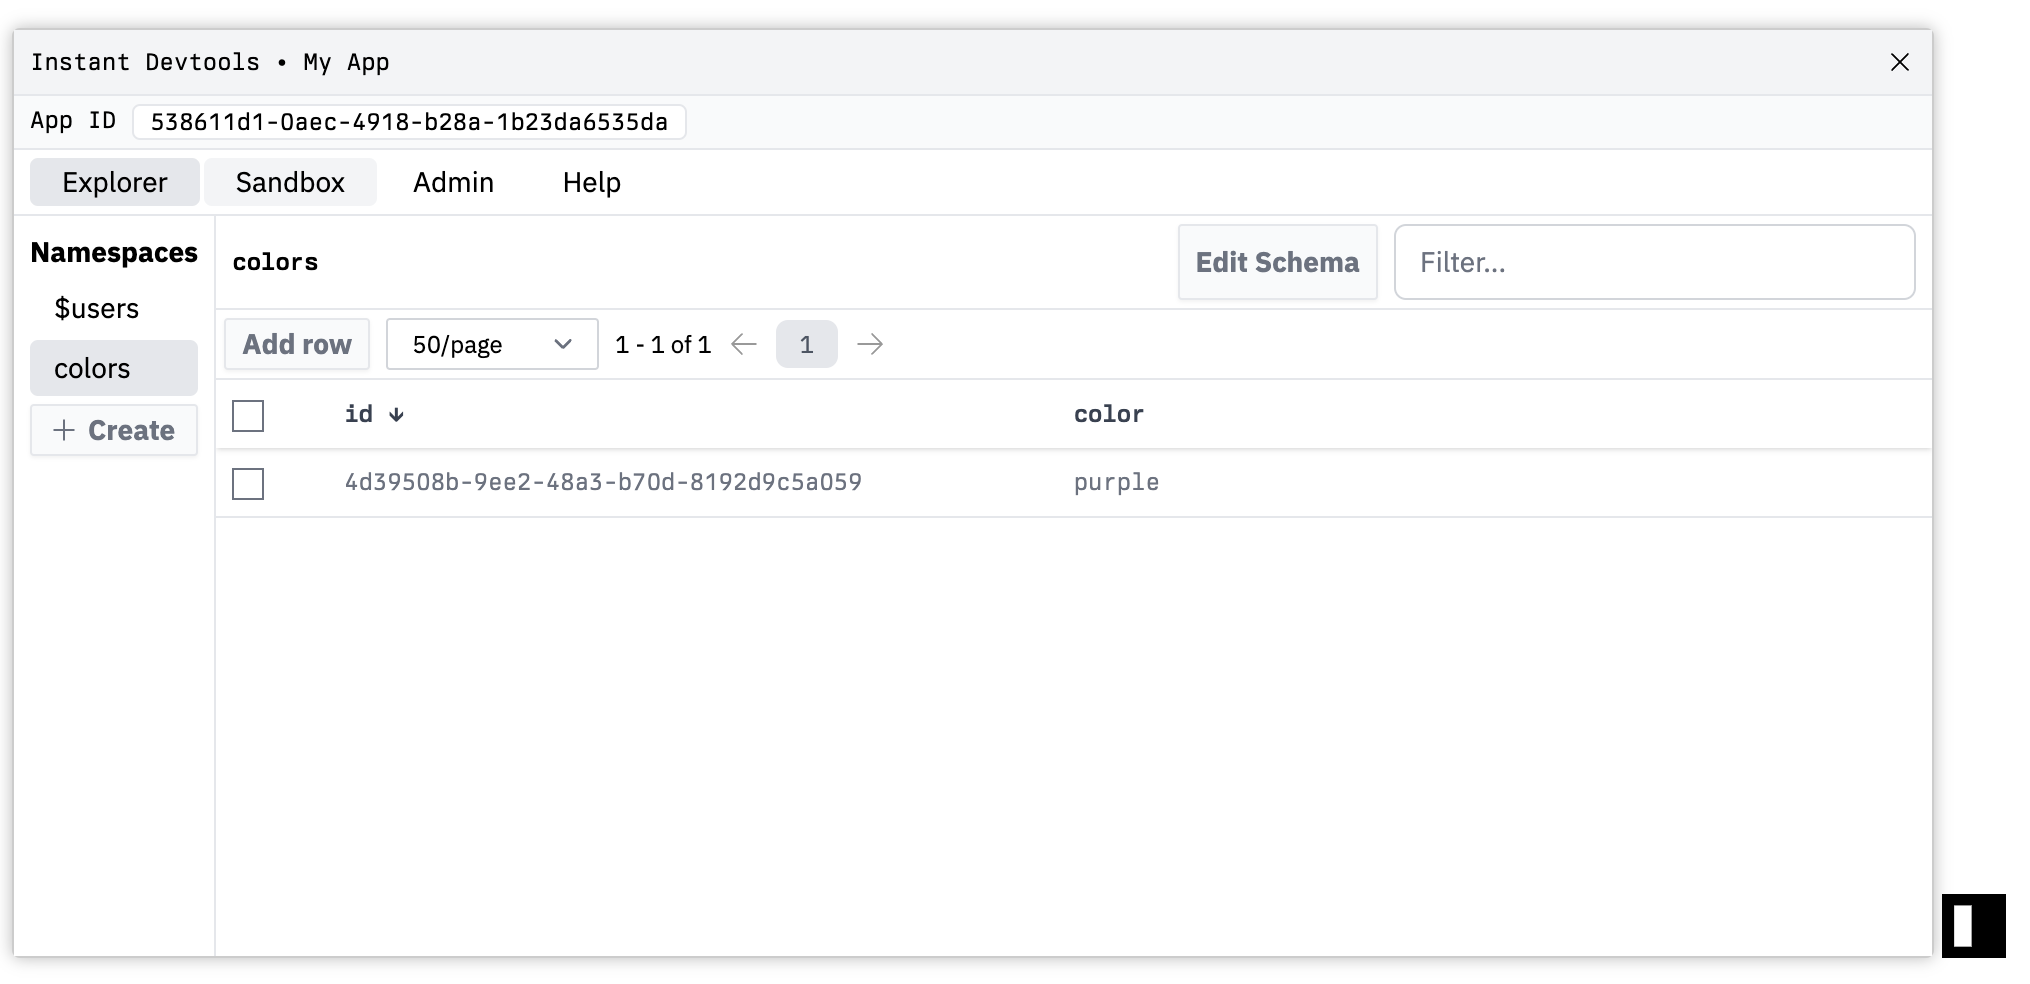 Or the `Sandbox` to try out different queries and transactions: 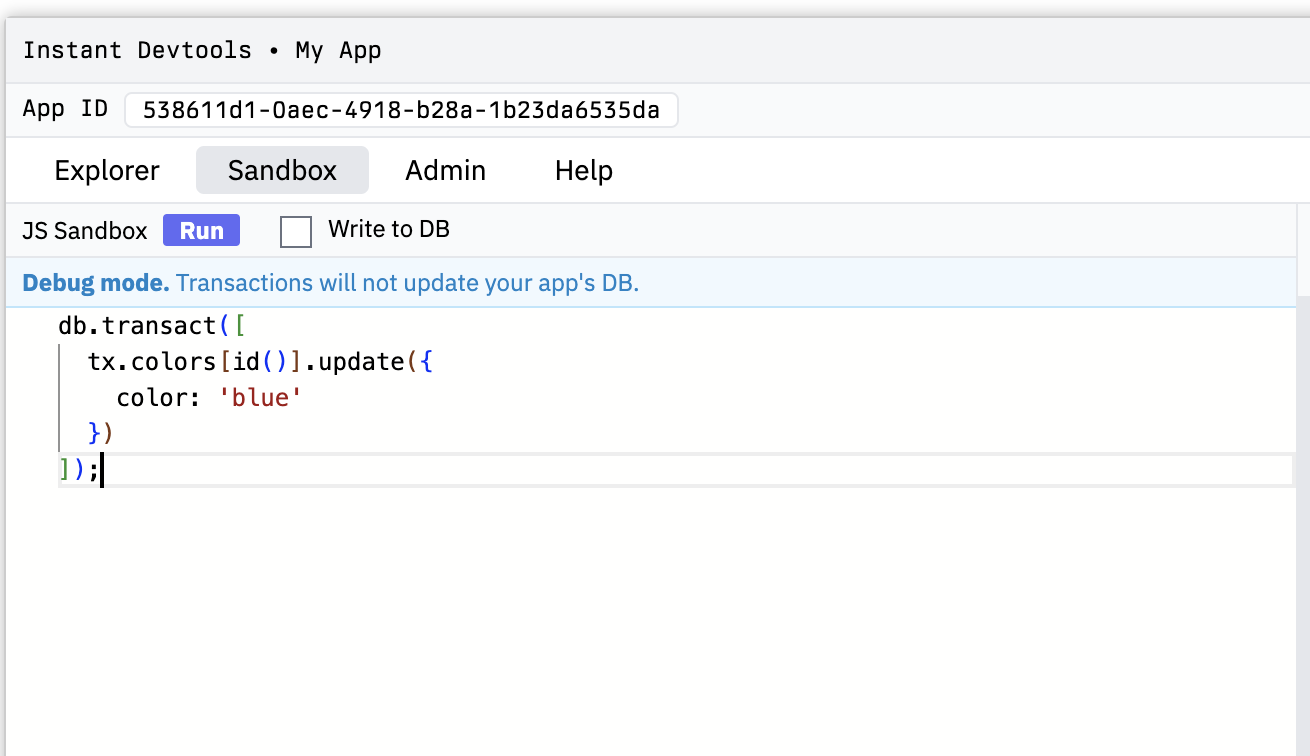 ## Changing Positions You can choose where to position your devtool as well. Pass in the `devtool` configuration in `init`: import { init } from '@instantdb/react'; import schema from '../instant.schema.ts'; const db \= init({ appId: process.env.NEXT\_PUBLIC\_INSTANT\_APP\_ID!, schema, devtool: { position: 'bottom-right', }, }); You can set `bottom-left`, `top-left`, `top-right`, `bottom-right`. ## Custom Hosts By default, the devtool only shows up on `localhost`. But you can decide which hosts to show it on too. Pass in the `allowedHosts` option: import { init } from '@instantdb/react'; import schema from '../instant.schema.ts'; const db \= init({ appId: process.env.NEXT\_PUBLIC\_INSTANT\_APP\_ID!, schema, devtool: { allowedHosts: \['localhost', 'site.local'\], }, }); ## Disabling the devtool If you would like to hide the devtool completely, you can add `devtool: false` in `init`: import { init } from '@instantdb/react'; import schema from '../instant.schema.ts'; const db \= init({ appId: process.env.NEXT\_PUBLIC\_INSTANT\_APP\_ID!, schema, devtool: false, }); ## Shortcuts To quickly toggle the window, you can use the shortcut `ctrl` + `shit` + `0` (zero) ## Feedback? If you have any feedback, let us know on Discord Previous Instant CLI Next Custom emails --- ## Page: https://www.instantdb.com/docs/emails You can customize all aspects of your Instant app's "magic code" email: the body (plain text or HTML), subject, sender name, and even the `from` address. ## Dashboard To start, go to your Dashboard's auth tab. Click "Custom Magic Code Email", and you're ready to go. ### Variables We provide a handful of variables you can use in both your subject line and body template: * `{code}`, the magic code, e.g. _123456_. Note, this variable is required in both the subject and body. * `{user_email}`, the recipient user's email address, e.g. _happyuser@gmail.com_ * `{app_title}`, your app's name Using a variable is as easy as adding the variable's name in curly brackets, e.g. `{variable_name}`. <p\>Hi {user\_email}, here's your code for {app\_title}:</p\> <strong\>{code}</strong\> ## Custom sender addresses You can also set Instant's email's `from` and `reply-to` fields to an address on your own domain. If you provide a custom sender address, you'll need to confirm it before we can start delivering from it. Our email partner, Postmark, will send a confirmation to the provided address with a link to verify. Until the address is verified, emails will continue to be sent from Instant's default auth sender (`auth@pm.instantdb.com`). --- ## Page: https://www.instantdb.com/docs/teams Apps with a Pro subscription can be managed by multiple users. To add team members to your app, head on over to the Dashboard Admin tab. ## Roles App team members can have one of three roles: collaborator, admin or owner. #### Collaborators * Can view the Explorer, update Permissions, and configure Auth. #### Admins * Can invite other team members. #### Owners (i.e., an app's creator) * Can access the Billing tab. * Can regenerate the app's admin tokens. * Can delete their app. ## Invites #### Inviting a team member A pro app's admin or owner simply needs to navigate to the Dashboard Admin tab and click "Invite a team member". This will open a dialog that accepts an email and role. This will send an email with instructions to the specified address. #### Accepting an invite Once an invited user signs up for Instant, they can access the Dashboard Invites section where they can accept or decline the invite. --- ## Page: https://www.instantdb.com/docs/storage Instant Storage makes it simple to upload and serve files for your app. You can store images, videos, documents, and any other file type. ## Storage quick start Let's build a full example of how to upload and display a grid of images npx create-next-app instant-storage --tailwind --yes cd instant-storage npm i @instantdb/react Initialize your schema and permissions via the cli tool npx instant-cli@latest init Now open `instant.schema.ts` and replace the contents with the following code. import { i } from "@instantdb/react"; const \_schema \= i.schema({ entities: { $files: i.entity({ path: i.string().unique().indexed(), url: i.string(), }), $users: i.entity({ email: i.string().unique().indexed(), }), }, links: {}, rooms: {}, }); type \_AppSchema \= typeof \_schema; interface AppSchema extends \_AppSchema {} const schema: AppSchema \= \_schema; export type { AppSchema }; export default schema; Similarly open `instant.perms.ts` and replace the contents with the following import type { InstantRules } from "@instantdb/react"; const rules \= { "$files": { "allow": { "view": "true", "create": "true", "delete": "true" } } } satisfies InstantRules; export default rules; Push up both the schema and permissions to your Instant app with the following command npx instant-cli@latest push And then replace the contents of `app/page.tsx` with the following code. 'use client'; import { init, InstaQLEntity } from '@instantdb/react'; import schema, { AppSchema } from '../instant.schema'; import React from 'react'; type InstantFile \= InstaQLEntity<AppSchema, '$files'\> const APP\_ID \= process.env.NEXT\_PUBLIC\_INSTANT\_APP\_ID; const db \= init({ appId: APP\_ID, schema }); async function uploadImage(file: File) { try { const opts \= { contentType: file.type, contentDisposition: 'attachment', }; await db.storage.uploadFile(file.name, file, opts); } catch (error) { console.error('Error uploading image:', error); } } async function deleteImage(image: InstantFile) { await db.storage.delete(image.path); } function App() { const { isLoading, error, data } \= db.useQuery({ $files: { $: { order: { serverCreatedAt: 'asc' }, }, }, }); if (isLoading) { return null; } if (error) { return <div\>Error fetching data: {error.message}</div\>; } const { $files: images } \= data return ( <div className\="box-border bg-gray-50 font-mono min-h-screen p-5 flex items-center flex-col"\> <div className\="tracking-wider text-5xl text-gray-300 mb-8"\> Image Feed </div\> <ImageUpload /\> <div className\="text-xs text-center py-4"\> Upload some images and they will appear below! Open another tab and see the changes in real\-time! </div\> <ImageGrid images\={images} /\> </div\> ); } interface SelectedFile { file: File; previewURL: string; } function ImageUpload() { const \[selectedFile, setSelectedFile\] \= React.useState<SelectedFile | null\>(null); const \[isUploading, setIsUploading\] \= React.useState(false); const fileInputRef \= React.useRef<HTMLInputElement\>(null); const { previewURL } \= selectedFile || {}; const handleFileSelect \= (e: React.ChangeEvent<HTMLInputElement\>) \=> { const file \= e.target.files?.\[0\]; if (file) { const previewURL \= URL.createObjectURL(file); setSelectedFile({ file, previewURL }); } }; const handleUpload \= async () \=> { if (selectedFile) { setIsUploading(true); await uploadImage(selectedFile.file); URL.revokeObjectURL(selectedFile.previewURL); setSelectedFile(null); fileInputRef.current?.value && (fileInputRef.current.value \= ''); setIsUploading(false); } }; return ( <div className\="mb-8 p-5 border-2 border-dashed border-gray-300 rounded-lg"\> <input ref\={fileInputRef} type\="file" accept\="image/\*" onChange\={handleFileSelect} className\="font-mono" /\> {isUploading ? ( <div className\="mt-5 flex flex-col items-center"\> <div className\="w-8 h-8 border-2 border-t-2 border-gray-200 border-t-green-500 rounded-full animate-spin"\></div\> <p className\="mt-2 text-sm text-gray-600"\>Uploading...</p\> </div\> ) : previewURL && ( <div className\="mt-5 flex flex-col items-center gap-3"\> <img src\={previewURL} alt\="Preview" className\="max-w-xs max-h-xs object-contain" /\> <button onClick\={handleUpload} className\="py-2 px-4 bg-green-500 text-white border-none rounded cursor-pointer font-mono"\> Upload Image </button\> </div\> )} </div\> ); } function ImageGrid({ images }: { images: InstantFile\[\] }) { const \[deletingIds, setDeletingIds\] \= React.useState<Set<string\>>(new Set()); const handleDelete \= async (image: InstantFile) \=> { setDeletingIds((prev) \=> new Set(\[...prev, image.id\])); await deleteImage(image); setDeletingIds((prev) \=> { prev.delete(image.id); return prev; }); } return ( <div className\="grid grid-cols-1 sm:grid-cols-2 md:grid-cols-3 lg:grid-cols-4 gap-5 w-full max-w-6xl"\> {images.map((image) \=> { const isDeleting \= deletingIds.has(image.id); return ( <div key\={image.id} className\="border border-gray-300 rounded-lg overflow-hidden"\> <div className\="relative"\> {} <img src\={image.url} alt\={image.path} className\="w-full h-64 object-cover" /\> {isDeleting && ( <div className\="absolute inset-0 bg-black bg-opacity-50 flex items-center justify-center"\> <div className\="w-8 h-8 border-2 border-t-2 border-gray-200 border-t-white rounded-full animate-spin"\></div\> </div\> )} </div\> <div className\="p-3 flex justify-between items-center bg-white"\> <span\>{image.path}</span\> <span onClick\={() \=> handleDelete(image)} className\="cursor-pointer text-gray-300 px-1"\> 𝘟 </span\> </div\> </div\> ) })} </div\> ); } export default App; With your schema, permissions, and application code set, you can now run your app! npm run dev Go to `localhost:3000`, and you should see a simple image feed where you can upload and delete images! ## Storage client SDK Below you'll find a more detailed guide on how to use the Storage API from react. ### Upload files Use `db.storage.uploadFile(path, file, opts?)` to upload a file. * `path` determines where the file will be stored, and can be used with permissions to restrict access to certain files. * `file` should be a `File` type, which will likely come from a file-type input. * `opts` is optional and can be used to set the `contentType` and `contentDisposition` headers for the file. await db.storage.uploadFile(file.name, file); const path \= \`${user.id}/avatar.png\`; await db.storage.uploadFile(path, file); const path \= \`${user.id}/orders/${orderId}.pdf\`; await db.storage.uploadFile(path, file, { contentType: 'application/pdf', contentDisporition: \`attachment; filename="${orderId}\-confirmation.pdf"\`, }); ### Overwrite files If the `path` already exists in your storage directory, it will be overwritten! await db.storage.uploadFile('demo.png', file); await db.storage.uploadFile('demo.png', file); If you don't want to overwrite files, you'll need to ensure that each file has a unique path. ### View files You can retrieve files by querying the `$files` namespace. const query \= { $files: { $: { order: { serverCreatedAt: 'asc' }, }, }, }); const { isLoading, error, data } \= db.useQuery(query); console.log(data) { "$files": \[ { "id": fileId, "path": "demo.png" "url": "https://instant-storage.s3.amazonaws.com/...", "content-type": "image/png", "content-disposition": "attachment; filename=\\"demo.png\\"", }, \] } You can use query filters and associations as you would with any other namespace to filter and sort your files. import { i } from '@instantdb/core'; const \_schema \= i.schema({ entities: { $files: i.entity({ path: i.string().unique().indexed(), url: i.string(), }), $users: i.entity({ email: i.string().unique().indexed(), }), profiles: i.entity({ nickname: i.string(), createdAt: i.date(), }), }, links: { profileUser: { forward: { on: 'profiles', has: 'one', label: '$user' }, reverse: { on: '$users', has: 'one', label: 'profile' }, }, profileUploads: { forward: { on: 'profiles', has: 'many', label: '$files' }, reverse: { on: '$files', has: 'one', label: 'profile' }, }, }, }); const { user } \= db.useAuth(); const query \= { profiles: { $: { where: {"$user.id": user.id} }, $files: {}, }, }); const { isLoading, error, data } \= db.useQuery(user ? query : null); ### Delete files Use `db.storage.delete(path)` to delete a file. await db.storage.delete('demo.png'); ### Link files Use links to associate files with other entities in your schema. async function uploadImage(file: File) { try { const path \= \`${user.id}/avatar\`; const { data } \= await db.storage.uploadFile(path, file); await db.transact(db.tx.profiles\[profileId\].link({ avatar: data.id })); } catch (error) { console.error('Error uploading image:', error); } } Similar to `$users`, links on `$files` can only be created in the **reverse direction.** const \_schema \= i.schema({ entities: { $files: i.entity({ path: i.string().unique().indexed(), url: i.string(), }), $users: i.entity({ email: i.string().unique().indexed(), }), profiles: i.entity({ createdAt: i.date().indexed(), nickname: i.string().unique().indexed(), }), }, links: { profiles$user: { forward: { on: 'profiles', has: 'one', label: '$user', }, reverse: { on: '$users', has: 'one', label: 'profile', }, }, profilesAvatar: { forward: { on: 'profiles', has: 'one', label: 'avatar', }, reverse: { on: '$files', has: 'one', label: 'profile', }, }, }, rooms: {}, }); Check out this repo for a more detailed example showing how you may leverage links to implement an avatar upload feature ## Using Storage with React Native The SDK expects a `File` object. In React Native the built-in `fetch` function can be used to construct a `File`, then you can pass that to the `uploadFile` metod. Example: import { init, InstaQLEntity } from '@instantdb/react-native'; import schema, { AppSchema } from '../instant.schema'; import \* as FileSystem from 'expo-file-system'; const APP\_ID \= process.env.EXPO\_PUBLIC\_INSTANT\_APP\_ID; const db \= init({ appId: APP\_ID, schema }); const localFilePath \= 'file:///var/mobile/Containers/Data/my\_file.m4a'; const fileInfo \= await FileSystem.getInfoAsync(localFilePath); if (!fileInfo.exists) { throw new Error(\`File does not exist at path: ${localFilePath}\`); } const res \= await fetch(fileInfo.uri); const blob \= await res.blob(); const file \= new File(\[blob\], payload.recordingId, { type: 'audio/x-m4a' }); await db.storage.uploadFile('my\_file.m4a', file); ## Storage admin SDK The Admin SDK offers a similar API for managing storage on the server. Permission checks are not enforced when using the Admin SDK, so you can use it to manage files without worrying about authentication. ### Uploading files Once again, we use the `db.storage.uploadFile(path, file, opts?)` function to upload a file on the backend. Note that unlike our browser SDK, the `file` argument must be a `Buffer`. In this case you'll likely want to at least specify the `contentType` in the options otherwise the default content-type will be `application/octet-stream`. import fs from 'fs'; async function upload(filepath: string) { const buffer \= fs.readFileSync(filepath); await db.storage.upload('images/demo.png', buffer, { contentType: 'image/png', } } ### View Files Retrieving files is similar to the client SDK, but we use `db.query()` instead of `db.useQuery()`. const query \= { $files: { $: { order: { serverCreatedAt: 'asc' }, }, }, }); const data \= db.query(query); ### Delete files There are two ways to delete files with the admin SDK: * `db.storage.delete(pathname: string)` * `db.storage.deleteMany(pathnames: string[])` These allow you to either delete a single file, or bulk delete multiple files at a time. const filename \= 'demo.txt'; await db.storage.delete(filename); const images \= \['images/1.png', 'images/2.png', 'images/3.png'\]; await db.storage.deleteMany(images); ## Permissions By default, Storage permissions are disabled. This means that until you explicitly set permissions, no uploads or downloads will be possible. * _create_ permissions enable uploading `$files` * _view_ permissions enable viewing `$files` * _delete_ permissions enable deleting `$files` * _view_ permissions on `$files` and _update_ permisssions on the forward entity enabling linking and unlinking `$files` In your permissions rules, you can use `auth` to access the currently authenticated user, and `data` to access the file metadata. At the moment, the only available file metadata is `data.path`, which represents the file's path in Storage. Here are some example permissions Allow anyone to upload and retrieve files (easy to play with but not recommended for production): { "$files": { "allow": { "view": "true", "create": "true" } } } Allow all authenticated users to view and upload files: { "$files": { "allow": { "view": "isLoggedIn", "create": "isLoggedIn" }, "bind": \["isLoggedIn", "auth.id != null"\] } } Authenticated users may only upload and view files from their own subdirectory: { "$files": { "allow": { "view": "isOwner", "create": "isOwner" }, "bind": \["isOwner", "data.path.startsWith(auth.id + '/')"\] } } --- ## Page: https://www.instantdb.com/docs/using-llms To make it easier to use Instant we've put together an llms.txt and llms-full.txt that you can paste or download to use as context for your LLM of choice. Here's an example prompt you can use with Claude on the web. You are an expert Next.js, React, and InstantDB developer. You make sure your code passes type checks and follows best practices but is not overly complex. You can find a list of guides on how to use instantdb in the provided llms.txt and you can find the full documentation on how to use instantdb in llms-full.txt You ALWAYS output full files. I NEED full files so I can easily copy and paste them into my project. You NEVER give me partial diffs or redacted code. If you are ever interrupted while outputting a file and need to continue start the file from the beginning so I can get a FULL file // \[Prompt for what you want to build\] // \[llms.txt and llms-full.txt pasted below\] If you have any feedback on your experience using LLMs w/ Instant we would love to hear it! Feel free to use the feedback buttons below or reach out to us on Discord.