W↓
All docs
🔑
Sign Up/Sign In
zero.rocicorp.dev/docs
Public Link
Apr 6, 2025, 10:02:37 AM - complete - 122.8 kB
Starting URLs:
https://zero.rocicorp.dev/docs/introduction
Crawl Prefixes:
https://zero.rocicorp.dev/docs
Max Pages:
2000
Exclude Patterns:
https://zero.rocicorp.dev/docs/roadmap
https://zero.rocicorp.dev/docs/reporting-bugs
https://zero.rocicorp.dev/docs/release-notes
https://zero.rocicorp.dev/docs/open-source
## Page: https://zero.rocicorp.dev/docs/introduction Zero is a new kind of sync engine powered by queries. Rather than syncing entire tables to the client, or using static rules to carefully specify what to sync, you just write queries directly in your client code. Queries can access the entire backend database. Zero caches the data for queries locally on the device, and reuses that data automatically to answer future queries whenever possible. For typical applications, the result is that almost all queries are answered locally, instantly. It feels like you have access to the entire backend database directly from the client in memory. Occasionally, when you do a more specific query, Zero falls back to the server. But this happens automatically without any extra work required. Zero is made possible by a custom streaming query engine we built called ZQL, which uses Incremental View Maintenance on both client and server to efficiently keep large, complex queries up to date. ## Status Zero is in alpha. There are still some rough edges, and to run it, you need to deploy it yourself to AWS or similar. Even so, Zero is already quite fun to work with. We are using it ourselves to build our very own Linear-style bug tracker. We find that Zero is already much more productive than alternatives, even having to occasionally work around a missing feature. If you are building a new web app that needs to be fast and reactive, and can do the deployment yourself, it's a great time to get started with Zero. We're working toward a beta release and full production readiness this year. --- ## Page: https://zero.rocicorp.dev/docs/quickstart ## Prerequisites * Docker * Node 20+ 🤔Note ## Run In one terminal, install and start the database: git clone https://github.com/rocicorp/hello-zero.git cd hello-zero npm install npm run dev:db-up Not using npm? Zero's server component depends on `@rocicorp/zero-sqlite3`, which contains a binary that requires running a postinstall script. Most alternative package managers (non-npm) disable these scripts by default for security reasons. Here's how to enable installation for common alternatives: ### pnpm For pnpm, either: * Run `pnpm approve-builds` to approve all build scripts, or * Add the specific dependency to your `package.json`: "pnpm": { "onlyBuiltDependencies": [ "@rocicorp/zero-sqlite3" ] } ### Bun For Bun, add the dependency to your trusted dependencies list: "trustedDependencies": [ "@rocicorp/zero-sqlite3" ], In a second terminal, start `zero-cache`: cd hello-zero npm run dev:zero-cache In a final terminal, start the UI: cd hello-zero npm run dev:ui ## Quick Overview `hello-zero` is a demo app that allows querying over a small dataset of fake messages between early Zero users. Here are some things to try: * Press the **Add Messages** button to add messages to the UI. Any logged-in or anonymous users are allowed to add messages. * Press the **Remove Messages** button to remove messages. Only logged-in users are allowed to remove messages. You can **hold shift** to bypass the UI warning and see that write access control is being enforced server-side – the UI flickers as the optimistic write happens instantly and is then reverted by the server. Press **login** to login as a random user, then the remove button will work. * Open two different browsers and see how fast sync propagates changes. * Add a filter using the **From** and **Contains** controls. Notice that filters are fully dynamic and synced. * Edit a message by pressing the **pencil icon**. You can only edit messages from the user you’re logged in as. As before you can attempt to bypass by holding shift. * Check out the SQL schema for this database in `seed.sql`. * Login to the database with `psql postgresql://user:password@127.0.0.1:5430/postgres` (or any other pg viewer) and delete or alter a row. Observe that it deletes from UI automatically. ## Detailed Walkthrough Your browser does not support the video tag. ## Deployment You can deploy Zero apps to most cloud providers that support Docker and Postgres. See Deployment for more information. --- ## Page: https://zero.rocicorp.dev/docs/samples ## zbugs zbugs is a complete issue tracker in the style of Linear built with Zero. Not just a demo app, this is the Rocicorp’s actual issue tracker. We use it everyday and depend on it. When Zero launches publicly this will be our public issue tracker, not GitHub. 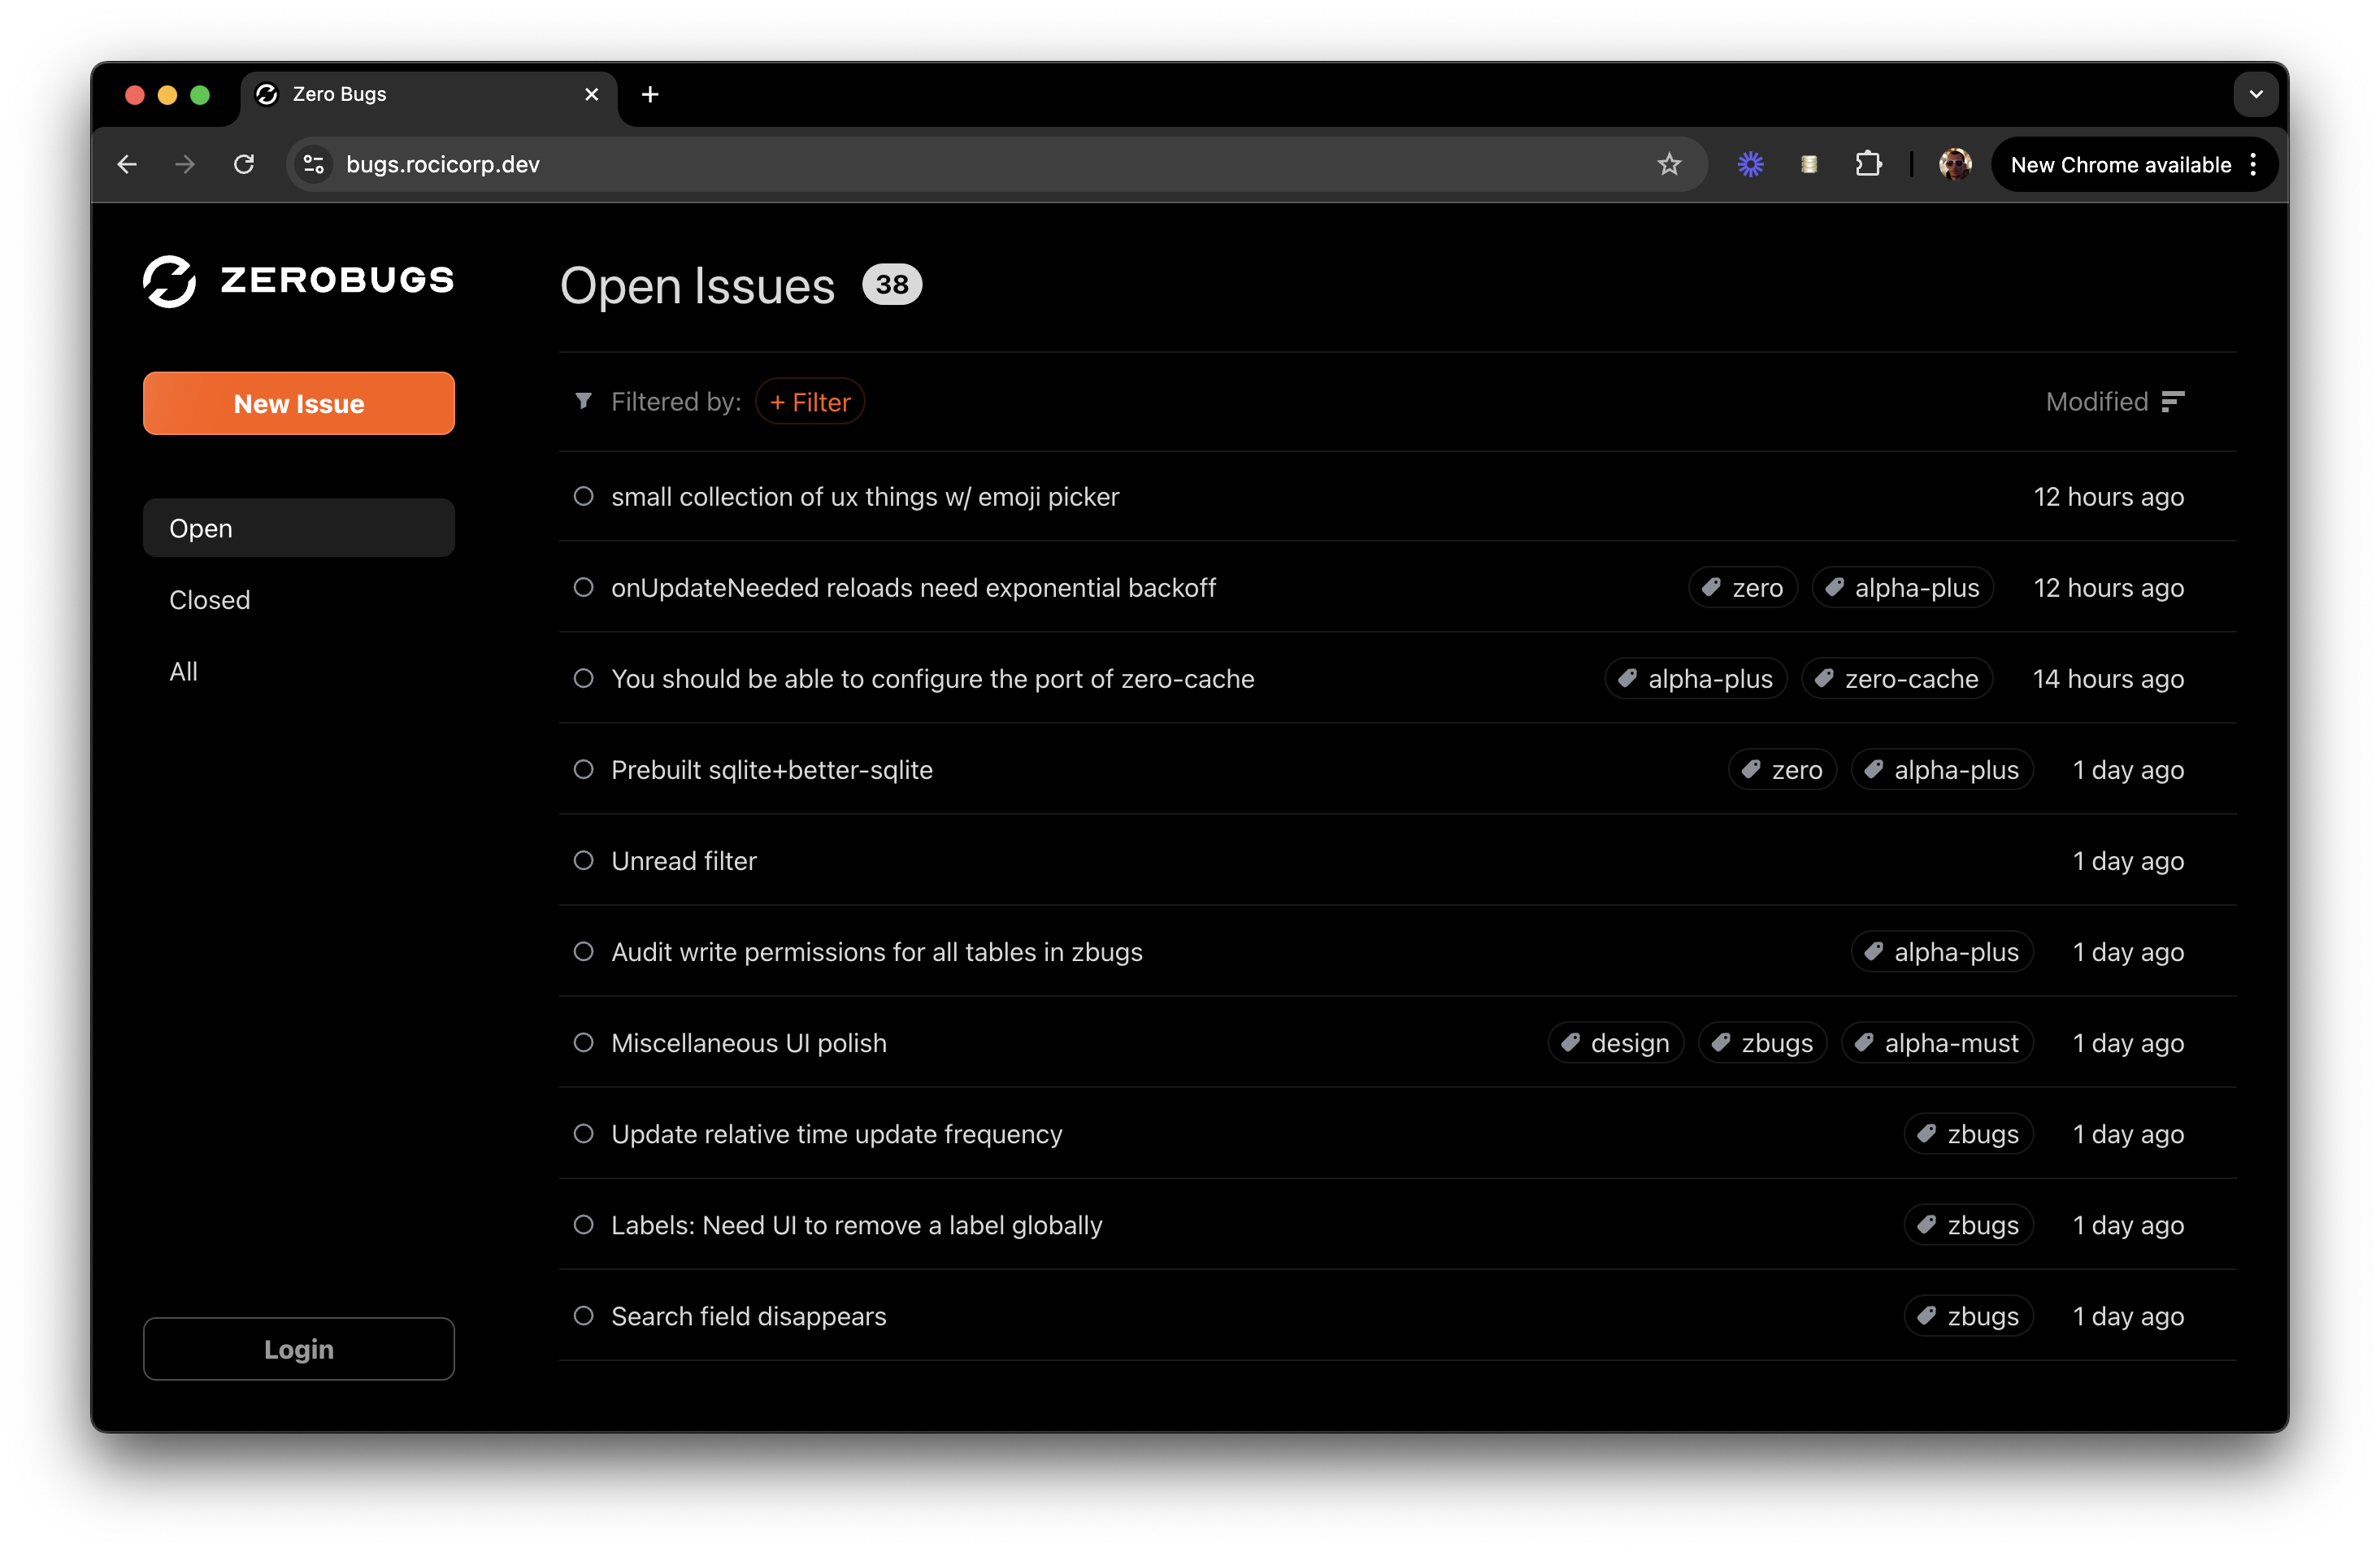 **Stack:** Vite/Fastify/React **Live demo:** https://bugs.rocicorp.dev/ (password: `zql`) **Source:** https://github.com/rocicorp/mono/tree/main/apps/zbugs ### Features * Instant reads and writes with realtime updates throughout * Github auth * Write permissions (anyone can create a bug, but only creator can edit their own bug, etc) * Read permissions (only admins can see internal issues and comments on those issues) * Complex filters * Unread indicators * Basic text search * Emojis * Short numeric bug IDs rather than cryptic hashes ## hello-zero A quickstart showing off the key features of Zero. 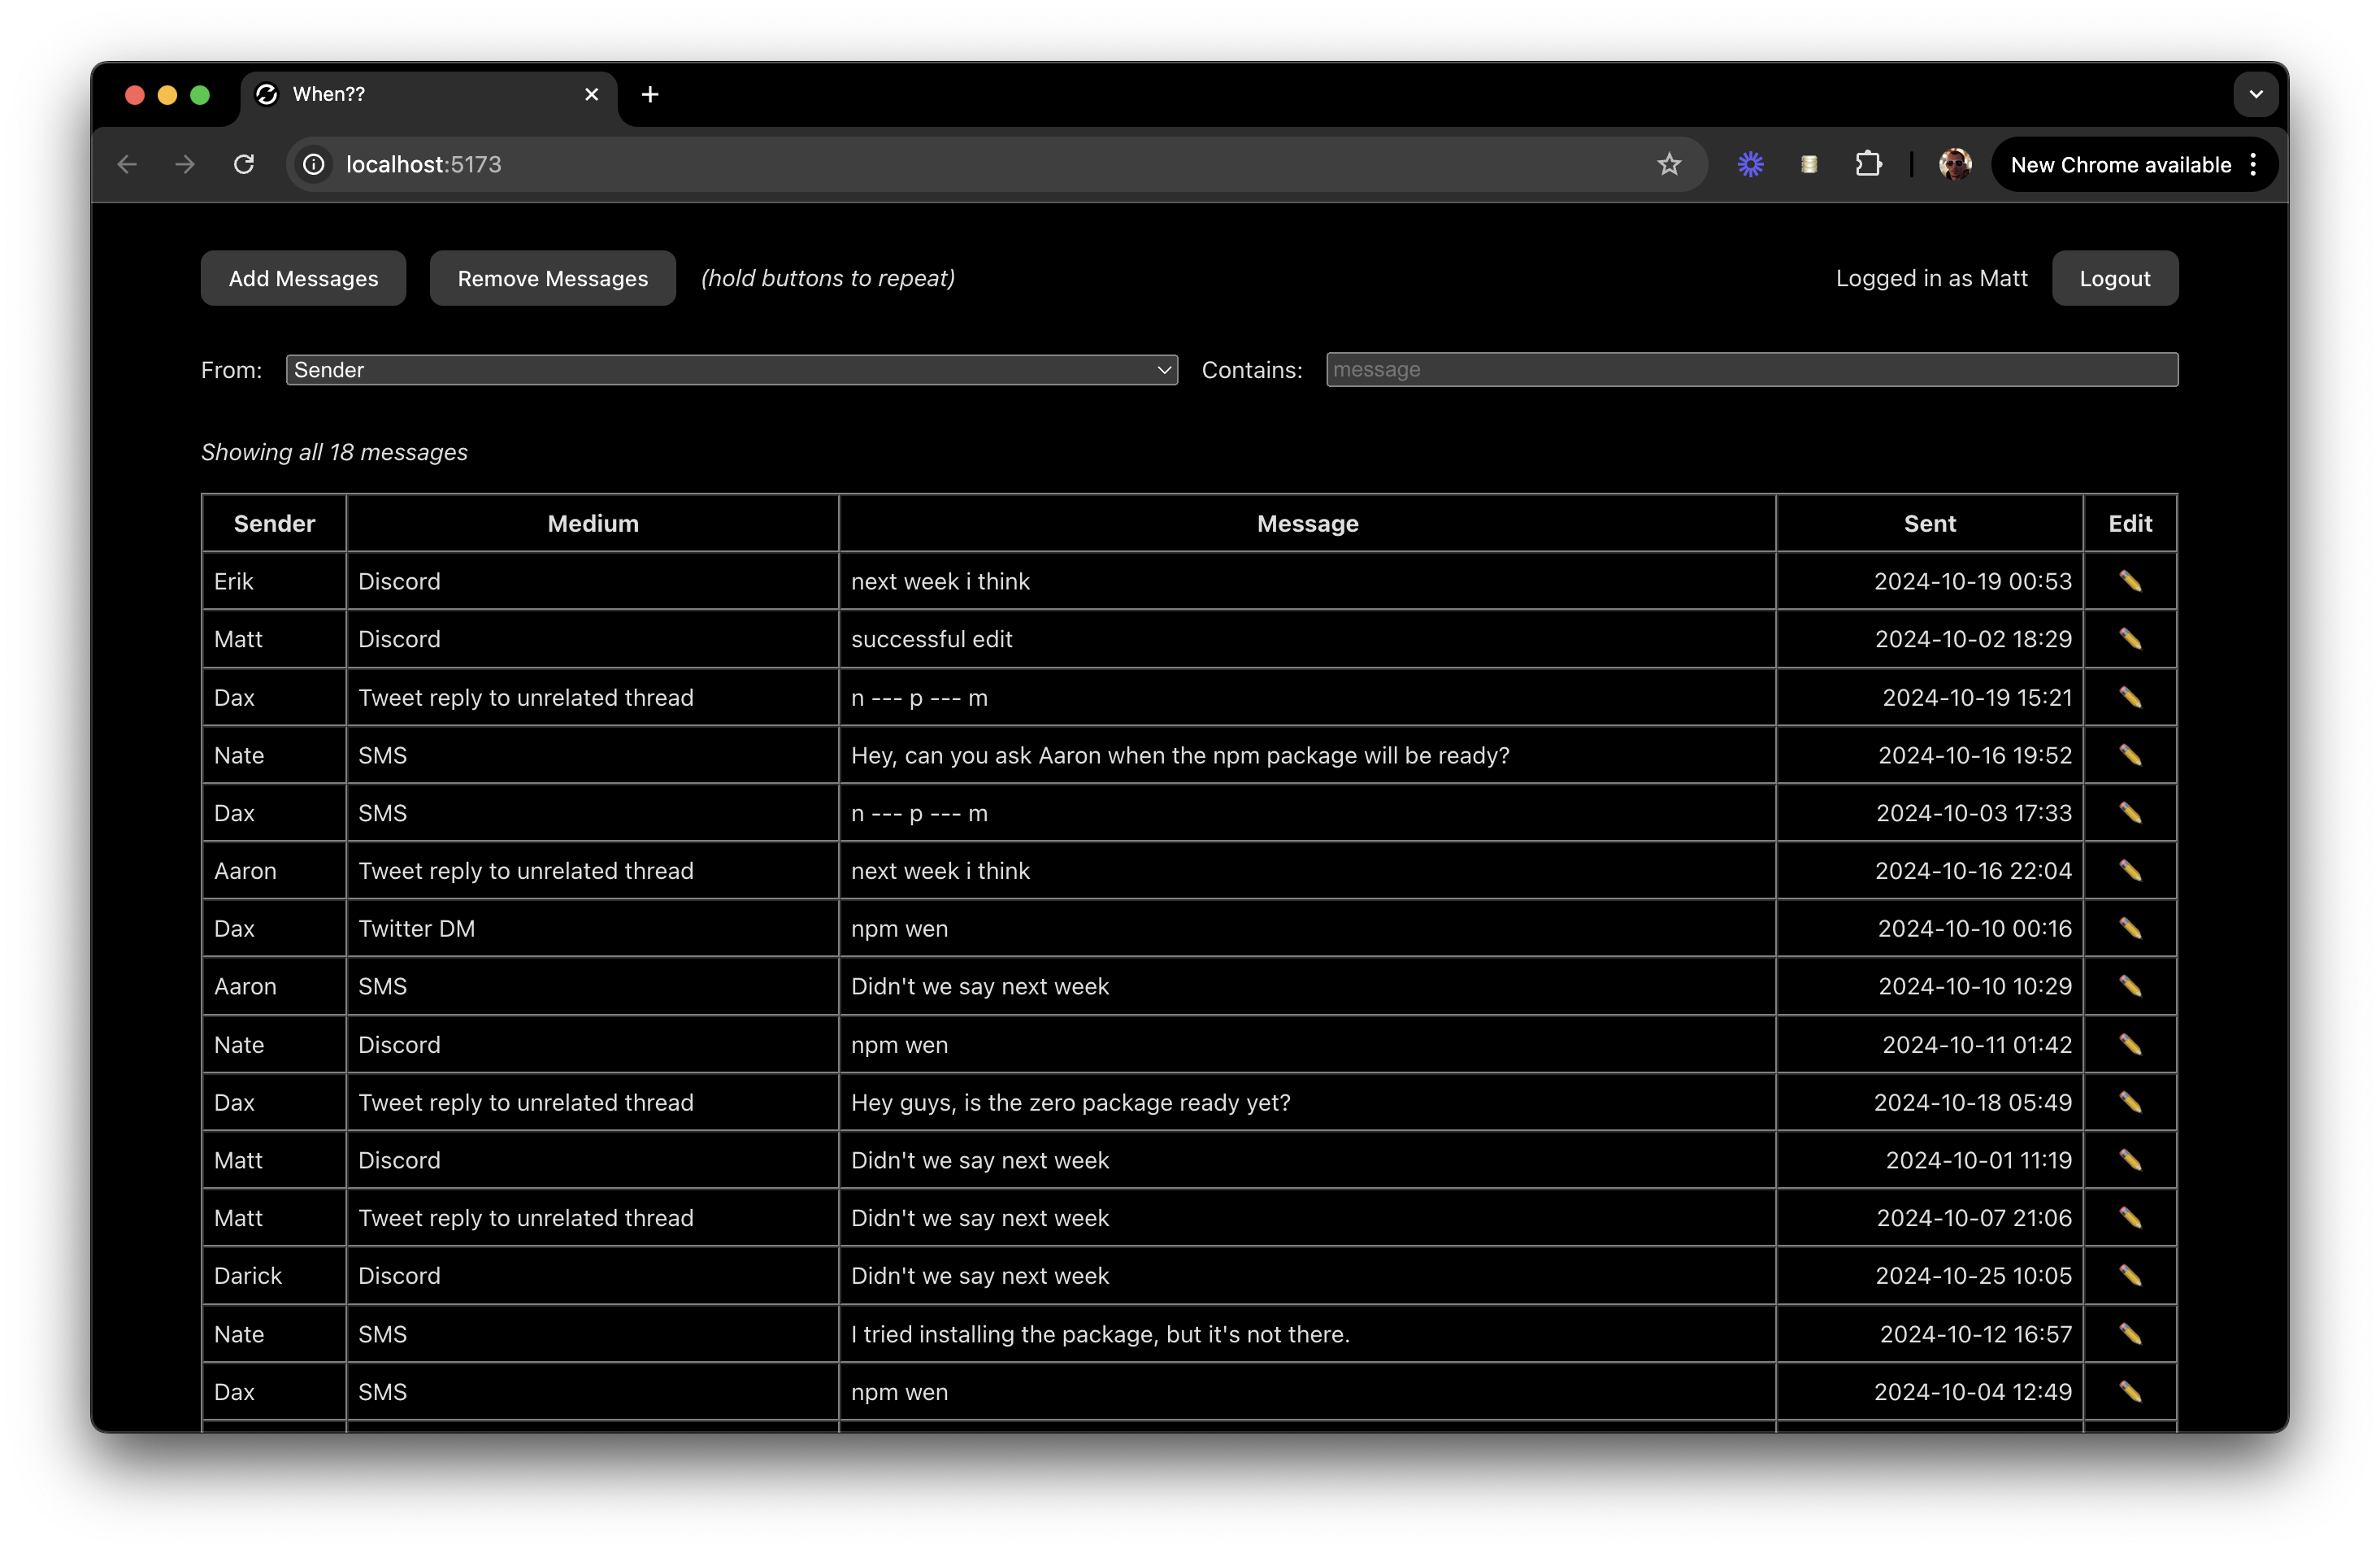 **Stack:** Vite/Hono/React **Source:** https://github.com/rocicorp/hello-zero **Docs:** Quickstart ### Features * Instant reads and writes with realtime updates throughout * 60fps (ish) mutations and sync * Hard-coded auth + write permissions * Write permissions (only logged in users can remove messages, only creating user can edit a message) * Complex filters * Basic text search ## hello-zero-solid Same as `hello-zero`, but in Solid. See @SolidJS. ## hello-zero-do Your browser does not support the video tag. Same as `zero-hello` and `zero-hello-solid` above, but demonstrates Cloudflare Durable Objects integration. This sample runs `zero-client` within a Durable Object and monitors changes to a Zero query. This can be used to do things like send notifications, update external services, etc. **Stack:** Vite/Hono/React/Cloudflare Workers **Source:** https://github.com/rocicorp/hello-zero-do --- ## Page: https://zero.rocicorp.dev/docs/connecting-to-postgres In the future, Zero will work with many different backend databases. Today only Postgres is supported. Specifically, Zero requires Postgres v15.0 or higher, and support for logical replication. Here are some common Postgres options and what we know about their support level: | Postgres | Support Status | | --- | --- | | Postgres.app | ✅ | | postgres:16.2-alpine docker image | ✅ | | AWS RDS | ✅ | | AWS Aurora | ✅ v15.6+ | | Google Cloud SQL | ✅ See notes below | | Fly.io Postgres | ✅ | | Supabase, Neon, Render, Heroku | 🤷♂️ Partial support with autoreset. See Schema Changes and provider-specific notes below. | ## Schema Changes Zero uses Postgres “Event Triggers” when possible to implement high-quality, efficient schema migration. Some hosted Postgres providers don’t provide access to Event Triggers. Zero still works out of the box with these providers, but for correctness, any schema change triggers a full reset of all server-side and client-side state. For small databases (< 1GB) this can be OK, but for bigger databases we recommend choosing a provider that grants access to Event Triggers. ## Configuration The Postgres `wal_level` config parameter has to be set to `logical`. You can check what level your pg has with this command: psql -c 'SHOW wal_level' If it doesn’t output `logical` then you need to change the wal level. To do this, run: psql -c "ALTER SYSTEM SET wal_level = 'logical';" Then restart Postgres. On most pg systems you can do this like so: data_dir=$(psql -t -A -c 'SHOW data_directory') pg_ctl -D "$data_dir" restart After your server restarts, show the `wal_level` again to ensure it has changed: psql -c 'SHOW wal_level' ## SSL Mode Some Postgres providers (notably Fly.io, so far) do not support TLS on their internal networks. You can disable attempting to use it by adding the `sslmode=disable` query parameter to your connection strings from `zero-cache`. ## Provider-Specific Notes ### Google Cloud SQL To use Google Cloud SQL you must manually create a `PUBLICATION` and specify that publication name in the App Publications option when running `zero-cache`. (Google Cloud SQL does not provide sufficient permissions for `zero-cache` to create its default publication.) ### Supabase In order to connect to Supabase you must use the "Direct Connection" style connection string, not the pooler: 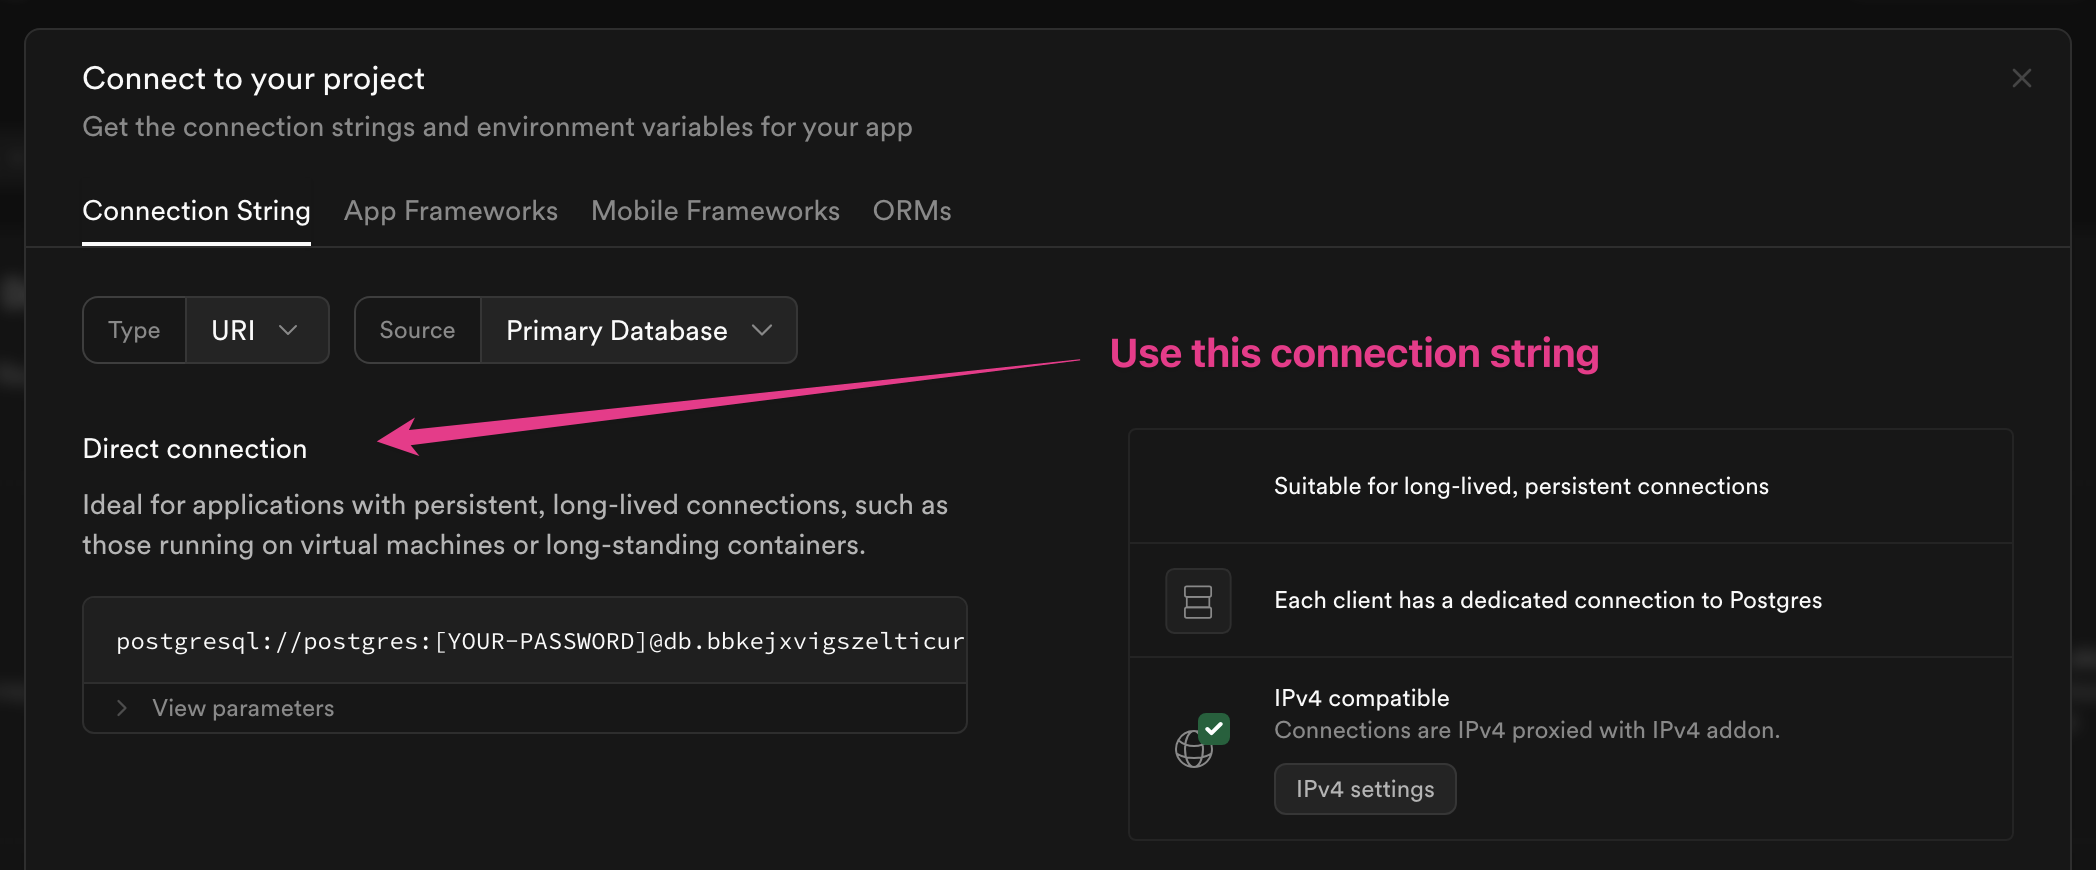 This is because Zero sets up a logical replication slot, which is only supported with a direct connection. Additionally, you'll likely need to assign a IPv4 address to your Supabase instance. This is not supported on the free Supabase tier, and is an extra $4/mo fee. 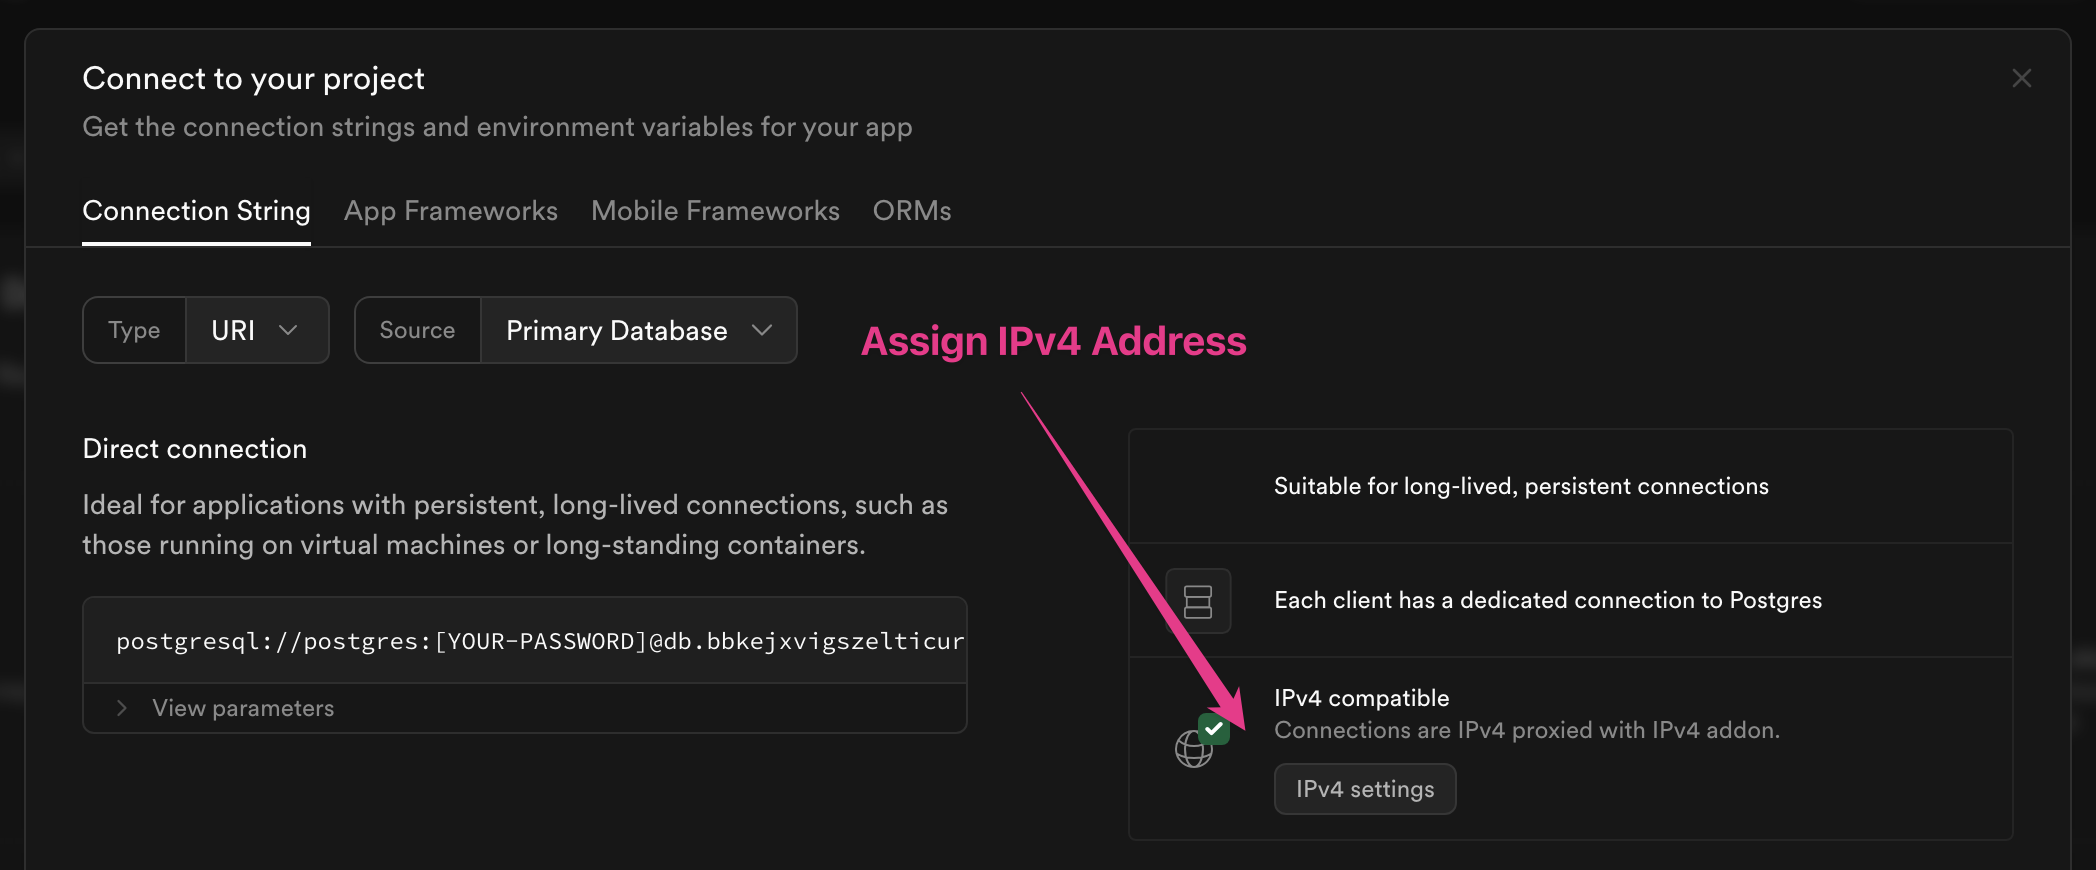 --- ## Page: https://zero.rocicorp.dev/docs/postgres-support Postgres has a massive feature set, of which Zero supports a growings subset. ## Object Names * Table and column names must begin with a letter or underscore * This can be followed letters, numbers, underscores, and hyphens * Regex: `/^[A-Za-z_]+[A-Za-z0-9_-]*$/` * The column name `_0_version` is reserved for internal use ## Object Types * Tables are synced * Views are not synced * `identity` generated columns are synced * All other generated columns are not synced * Indexes aren’t _synced_ per-se but we do implicitly add indexes to the replica that match the upstream indexes. In the future this will be customizable. ## Column Types | Postgres Type | Type to put in `schema.ts` | Resulting JS/TS Type | | --- | --- | --- | | All numeric types | `number` | `number` | | `char`, `varchar`, `text`, `uuid` | `string` | `string` | | `bool` | `boolean` | `boolean` | | `date`, `timestamp`, `timestampz` | `number` | `number` | | `json`, `jsonb` | `json` | `JSONValue` | | `enum` | `enumeration` | `string` | Other Postgres column types aren’t supported. They will be ignored when replicating (the synced data will be missing that column) and you will get a warning when `zero-cache` starts up. If your schema has a pg type not listed here, you can support it in Zero by using a trigger to map it to some type that Zero can support. For example if you have an enum type `Mood` used by column `user_mood mood`, you can use a trigger to map it to a `user_mood_text text` column. You would then use another trigger to map changes to `user_mood_text` back to `user_mood` so that the data can be updated by Zero. Let us know if the lack of a particular column type is hindering your use of Zero. It can likely be added. ## Column Defaults Default values are allowed in the Postgres schema but there currently is no way to use them from a Zero app. The create mutation requires all columns to be specified, except when columns are nullable (in which case,they default to null). Since there is no way to leave non-nullable columns off the insert, there is no way for PG to apply the default. This is a known issue and will be fixed in the future. ## IDs It is strongly recommended that primary keys be client-generated random strings like uuid, ulid, nanoid, etc. This makes optimistic creation and updates much easier. 🤔Why are client-generated IDs better? If you want to have a short auto-incrementing numeric ID for ux reasons (ie, a bug number), that is possible – See Demo Video! ## Primary Keys Each table synced with Zero must have either a primary key or at least one unique index. This is needed so that Zero can identify rows during sync, to distinguish between an edit and a remove/add. Multi-column primary and foreign keys are supported. ## Limiting Replication You can use Permissions to limit tables and rows from replicating to Zero. In the near future you’ll also be able to use Permissions to limit individual columns. Until then, a workaround is to use the Postgres _publication_ feature to control the tables and columns that are replicated into `zero-cache`. In your pg schema setup, create a Postgres `publication` with the tables and columns you want: CREATE PUBLICATION zero_data FOR TABLE users (col1, col2, col3, ...), issues, comments; Then, specify this publication in the App Publications `zero-cache` option. (By default, Zero creates a publication that publishes the entire public schema.) To limit what is synced from the `zero-cache` replica to actual clients (e.g., web browsers) you can use read permissions. ## Schema changes Most Postgres schema changes are supported as is. Two cases require special handling: ### Adding columns Adding a column with a non-constant `DEFAULT` value is not supported. This includes any expression with parentheses, as well as the special functions `CURRENT_TIME`, `CURRENT_DATE`, and `CURRENT_TIMESTAMP` (due to a constraint of SQLite). However, the `DEFAULT` value of an _existing_ column can be changed to any value, including non-constant expressions. To achieve the desired column default: * Add the column with no `DEFAULT` value * Backfill the column with desired values * Set the column's `DEFAULT` value BEGIN; ALTER TABLE foo ADD bar ...; -- without a DEFAULT value UPDATE foo SET bar = ...; ALTER TABLE foo ALTER bar SET DEFAULT ...; COMMIT; ### Changing publications Postgres allows you to change published tables/columns with an `ALTER PUBLICATION` statement. Zero automatically adjusts the table schemas on the replica, but it does not receive the pre-existing data. To stream the pre-existing data to Zero, make an innocuous `UPDATE` after adding the tables/columns to the publication: BEGIN; ALTER PUBLICATION zero_data ADD TABLE foo; ALTER TABLE foo REPLICA IDENTITY FULL; UPDATE foo SET id = id; -- For some column "id" in "foo" ALTER TABLE foo REPLICA IDENTITY DEFAULT; COMMIT; ## Self-Referential Relationships See zero-schema --- ## Page: https://zero.rocicorp.dev/docs/zero-schema Zero applications have both a _database schema_ (the normal backend database schema that all web apps have) and a _Zero schema_. The purpose of the Zero schema is to: 1. Provide typesafety for ZQL queries 2. Define first-class relationships between tables 3. Define permissions for access control 🤔You do not need to define the Zero schema by hand This page describes using the schema to define your tables, columns, and relationships. ## Defining the Zero Schema The Zero schema is encoded in a TypeScript file that is conventionally called `schema.ts` file. For example, see the schema file for`hello-zero`. ## Table Schemas Use the `table` function to define each table in your Zero schema: import {table, string, boolean} from '@rocicorp/zero'; const user = table('user') .columns({ id: string(), name: string(), partner: boolean(), }) .primaryKey('id'); Column types are defined with the `boolean()`, `number()`, `string()`, `json()`, and `enumeration()` helpers. See Column Types for how database types are mapped to these types. 😬Warning ### Name Mapping Use `from()` to map a TypeScript table or column name to a different database name: const userPref = table('userPref') // Map TS "userPref" to DB name "user_pref" .from('user_pref') .columns({ id: string(), // Map TS "orgID" to DB name "org_id" orgID: string().from('org_id'), }); ### Multiple Schemas You can also use `from()` to access other Postgres schemas: // Sync the "event" table from the "analytics" schema. const event = table('event').from('analytics.event'); ### Optional Columns Columns can be marked _optional_. This corresponds to the SQL concept `nullable`. const user = table('user') .columns({ id: string(), name: string(), nickName: string().optional(), }) .primaryKey('id'); An optional column can store a value of the specified type or `null` to mean _no value_. 🤔Note ### Enumerations Use the `enumeration` helper to define a column that can only take on a specific set of values. This is most often used alongside an `enum` Postgres column type. import {table, string, enumeration} from '@rocicorp/zero'; const user = table('user') .columns({ id: string(), name: string(), mood: enumeration<'happy' | 'sad' | 'taco'>(), }) .primaryKey('id'); ### Custom JSON Types Use the `json` helper to define a column that stores a JSON-compatible value: import {table, string, json} from '@rocicorp/zero'; const user = table('user') .columns({ id: string(), name: string(), settings: json<{theme: 'light' | 'dark'}>(), }) .primaryKey('id'); ### Compound Primary Keys Pass multiple columns to `primaryKey` to define a compound primary key: const user = table('user') .columns({ orgID: string(), userID: string(), name: string(), }) .primaryKey('orgID', 'userID'); ## Relationships Use the `relationships` function to define relationships between tables. Use the `one` and `many` helpers to define singular and plural relationships, respectively: const messageRelationships = relationships(message, ({one, many}) => ({ sender: one({ sourceField: ['senderID'], destField: ['id'], destSchema: user, }), replies: many({ sourceField: ['id'], destSchema: message, destField: ['parentMessageID'], }), })); This creates "sender" and "replies" relationships that can later be queried with the `related` ZQL clause: const messagesWithSenderAndReplies = z.query.messages .related('sender') .related('replies'); This will return an object for each message row. Each message will have a `sender` field that is a single `User` object or `null`, and a `replies` field that is an array of `Message` objects. ### Many-to-Many Relationships You can create many-to-many relationships by chaining the relationship definitions. Assuming `issue` and `label` tables, along with an `issueLabel` junction table, you can define a `labels` relationship like this: const issueRelationships = relationships(issue, ({many}) => ({ labels: many( { sourceField: ['id'], destSchema: issueLabel, destField: ['issueID'], }, { sourceField: ['labelID'], destSchema: label, destField: ['id'], }, ), })); 🤔Note ### Compound Keys Relationships Relationships can traverse compound keys. Imagine a `user` table with a compound primary key of `orgID` and `userID`, and a `message` table with a related `senderOrgID` and `senderUserID`. This can be represented in your schema with: const messageRelationships = relationships(message, ({one}) => ({ sender: one({ sourceField: ['senderOrgID', 'senderUserID'], destSchema: user, destField: ['orgID', 'userID'], }), })); ### Circular Relationships Circular relationships are fully supported: const commentRelationships = relationships(comment, ({one}) => ({ parent: one({ sourceField: ['parentID'], destSchema: comment, destField: ['id'], }), })); ## Database Schemas Use `createSchema` to define the entire Zero schema: import {createSchema} from '@rocicorp/zero'; export const schema = createSchema( 1, // Schema version. See [Schema Migrations](/docs/migrations) for more info. { tables: [user, medium, message], relationships: [ userRelationships, mediumRelationships, messageRelationships, ], }, ); ## Migrations Zero uses TypeScript-style structural typing to detect schema changes and implement smooth migrations. ### How it Works When the Zero client connects to `zero-cache` it sends a copy of the schema it was constructed with. `zero-cache` compares this schema to the one it has, and rejects the connection with a special error code if the schema is incompatible. By default, The Zero client handles this error code by calling `location.reload()`. The intent is to to get a newer version of the app that has been updated to handle the new server schema. 🤔Note If you want to delay this reload, you can do so by providing the `onUpdateNeeded` constructor parameter: const z = new Zero({ onUpdateNeeded: updateReason => { if (reason.type === 'SchemaVersionNotSupported') { // Do something custom here, like show a banner. // When you're ready, call `location.reload()`. } }, }); If the schema changes while a client is running in a compatible way, `zero-cache` syncs the schema change to the client so that it's ready when the app reloads and gets new code that needs it. If the schema changes while a client is running in an incompatible way, `zero-cache` will close the client connection with the same error code as above. ### Schema Change Process Like other database-backed applications, Zero schema migration generally follow an “expand/migrate/contract” pattern: 1. Implement and run an “expand” migration on the backend that is backwards compatible with existing schemas. Add new rows, tables, as well as any defaults and triggers needed for backwards compatibility. 2. Add any new permissions required for the new tables/columns by running `zero-deploy-permissions`. 3. Update and deploy the client app to use the new schema. 4. Optionally, after some grace period, implement and run a “contract” migration on the backend, deleting any obsolete rows/tables. Steps 1-3 can generally be done as part of one deploy by your CI pipeline, but step 4 would be weeks later when most open clients have refreshed and gotten new code. 😬Warning --- ## Page: https://zero.rocicorp.dev/docs/reading-data ZQL is Zero’s query language. Inspired by SQL, ZQL is expressed in TypeScript with heavy use of the builder pattern. If you have used Drizzle or Kysley, ZQL will feel familiar. ZQL queries are composed of one or more _clauses_ that are chained together into a _query_. Unlike queries in classic databases, the result of a ZQL query is a _view_ that updates automatically and efficiently as the underlying data changes. You can call a query’s `materialize()` method to get a view, but more typically you run queries via some framework-specific bindings. For example see `useQuery` for React or SolidJS. 🧑🏫Data returned from ZQL should be considered immutable ## Select ZQL queries start by selecting a table. There is no way to select a subset of columns; ZQL queries always return the entire row (modulo column permissions). const z = new Zero(...); // Returns a query that selects all rows and columns from the issue table. z.query.issue; This is a design tradeoff that allows Zero to better reuse the row locally for future queries. This also makes it easier to share types between different parts of the code. ## Ordering You can sort query results by adding an `orderBy` clause: z.query.issue.orderBy('created', 'desc'); Multiple `orderBy` clauses can be present, in which case the data is sorted by those clauses in order: // Order by priority descending. For any rows with same priority, // then order by created desc. z.query.issue.orderBy('priority', 'desc').orderBy('created', 'desc'); All queries in ZQL have a default final order of their primary key. Assuming the `issue` table has a primary key on the `id` column, then: // Actually means: z.query.issue.orderBy('id', 'asc'); z.query.issue; // Actually means: z.query.issue.orderBy('priority', 'desc').orderBy('id', 'asc'); z.query.issue.orderBy('priority', 'desc'); ## Limit You can limit the number of rows to return with `limit()`: z.query.issue.orderBy('created', 'desc').limit(100); ## Paging You can start the results at or after a particular row with `start()`: let start: IssueRow | undefined; while (true) { let q = z.query.issue.orderBy('created', 'desc').limit(100); if (start) { q = q.start(start); } const batch = q.run(); console.log('got batch', batch); if (batch.length < 100) { break; } start = batch[batch.length - 1]; } By default `start()` is _exclusive_ - it returns rows starting **after** the supplied reference row. This is what you usually want for paging. If you want _inclusive_ results, you can do: z.query.issue.start(row, {inclusive: true}); ## Uniqueness If you want exactly zero or one results, use the `one()` clause. This causes ZQL to return `Row|undefined` rather than `Row[]`. const result = z.query.issue.where('id', 42).one(); if (!result) { console.error('not found'); } `one()` overrides any `limit()` clause that is also present. ## Relationships You can query related rows using _relationships_ that are defined in your Zero schema. // Get all issues and their related comments z.query.issue.related('comments'); Relationships are returned as hierarchical data. In the above example, each row will have a `comments` field which is itself an array of the corresponding comments row. You can fetch multiple relationships in a single query: z.query.issue.related('comments').related('reactions').related('assignees'); ### Refining Relationships By default all matching relationship rows are returned, but this can be refined. The `related` method accepts an optional second function which is itself a query. z.query.issue.related( 'comments', // It is common to use the 'q' shorthand variable for this parameter, // but it is a _comment_ query in particular here, exactly as if you // had done z.query.comment. q => q.orderBy('modified', 'desc').limit(100).start(lastSeenComment), ); This _relationship query_ can have all the same clauses that top-level queries can have. ### Nested Relationships You can nest relationships arbitrarily: // Get all issues, first 100 comments for each (ordered by modified,desc), // and for each comment all of its reactions. z.query.issue.related( 'comments', q => q.orderBy('modified', 'desc').limit(100).related( 'reactions') ) ); ## Where You can filter a query with `where()`: z.query.issue.where('priority', '=', 'high'); The first parameter is always a column name from the table being queried. Intellisense will offer available options (sourced from your Zero Schema). ### Comparison Operators Where supports the following comparison operators: | Operator | Allowed Operand Types | Description | | --- | --- | --- | | `=` , `!=` | boolean, number, string | JS strict equal (===) semantics | | `<` , `<=`, `>`, `>=` | number | JS number compare semantics | | `LIKE`, `NOT LIKE`, `ILIKE`, `NOT ILIKE` | string | SQL-compatible `LIKE` / `ILIKE` | | `IN` , `NOT IN` | boolean, number, string | RHS must be array. Returns true if rhs contains lhs by JS strict equals. | | `IS` , `IS NOT` | boolean, number, string, null | Same as `=` but also works for `null` | TypeScript will restrict you from using operators with types that don’t make sense – you can’t use `>` with `boolean` for example. 🤔Note ### Equals is the Default Comparison Operator Because comparing by `=` is so common, you can leave it out and `where` defaults to `=`. z.query.issue.where('priority', 'high'); ### Comparing to `null` As in SQL, ZQL’s `null` is not equal to itself (`null ≠ null`). This is required to make join semantics work: if you’re joining `employee.orgID` on `org.id` you do **not** want an employee in no organization to match an org that hasn’t yet been assigned an ID. When you purposely want to compare to `null` ZQL supports `IS` and `IS NOT` operators that work just like in SQL: // Find employees not in any org. z.query.employee.where('orgID', 'IS', null); TypeScript will prevent you from comparing to `null` with other operators. ### Compound Filters The argument to `where` can also be a callback that returns a complex expression: // Get all issues that have priority 'critical' or else have both // priority 'medium' and not more than 100 votes. z.query.issue.where(({cmp, and, or, not}) => or( cmp('priority', 'critical'), and(cmp('priority', 'medium'), not(cmp('numVotes', '>', 100))), ), ); `cmp` is short for _compare_ and works the same as `where` at the top-level except that it can’t be chained and it only accepts comparison operators (no relationship filters – see below). Note that chaining `where()` is also a one-level `and`: // Find issues with priority 3 or higher, owned by aa z.query.issue.where('priority', '>=', 3).where('owner', 'aa'); ### Relationship Filters Your filter can also test properties of relationships. Currently the only supported test is existence: // Find all orgs that have at least one employee z.query.organization.whereExists('employees'); The argument to `whereExists` is a relationship, so just like other relationships it can be refined with a query: // Find all orgs that have at least one cool employee z.query.organization.whereExists('employees', q => q.where('location', 'Hawaii'), ); As with querying relationships, relationship filters can be arbitrarily nested: // Get all issues that have comments that have reactions z.query.issue.whereExists('comments', q => q.whereExists('reactions')); ); The `exists` helper is also provided which can be used with `and`, `or`, `cmp`, and `not` to build compound filters that check relationship existence: // Find issues that have at least one comment or are high priority z.query.issue.where({cmp, or, exists} => or( cmp('priority', 'high'), exists('comments'), ), ); ## Data Lifetime and Reuse Zero reuses data synced from prior queries to answer new queries when possible. This is what enables instant UI transitions. But what controls the lifetime of this client-side data? How can you know whether any partiular query will return instant results? How can you know whether those results will be up to date or stale? The answer is that the data on the client is simply the union of rows returned from queries which are currently syncing. Once a row is no longer returned by any syncing query, it is removed from the client. Thus, there is never any stale data in Zero. So when you are thinking about whether a query is going to return results instantly, you should think about _what other queries are syncing_, not about what data is local. Data exists locally if and only if there is a query syncing that returns that data. 🤔Caches vs Replicas ## Query Lifecycle 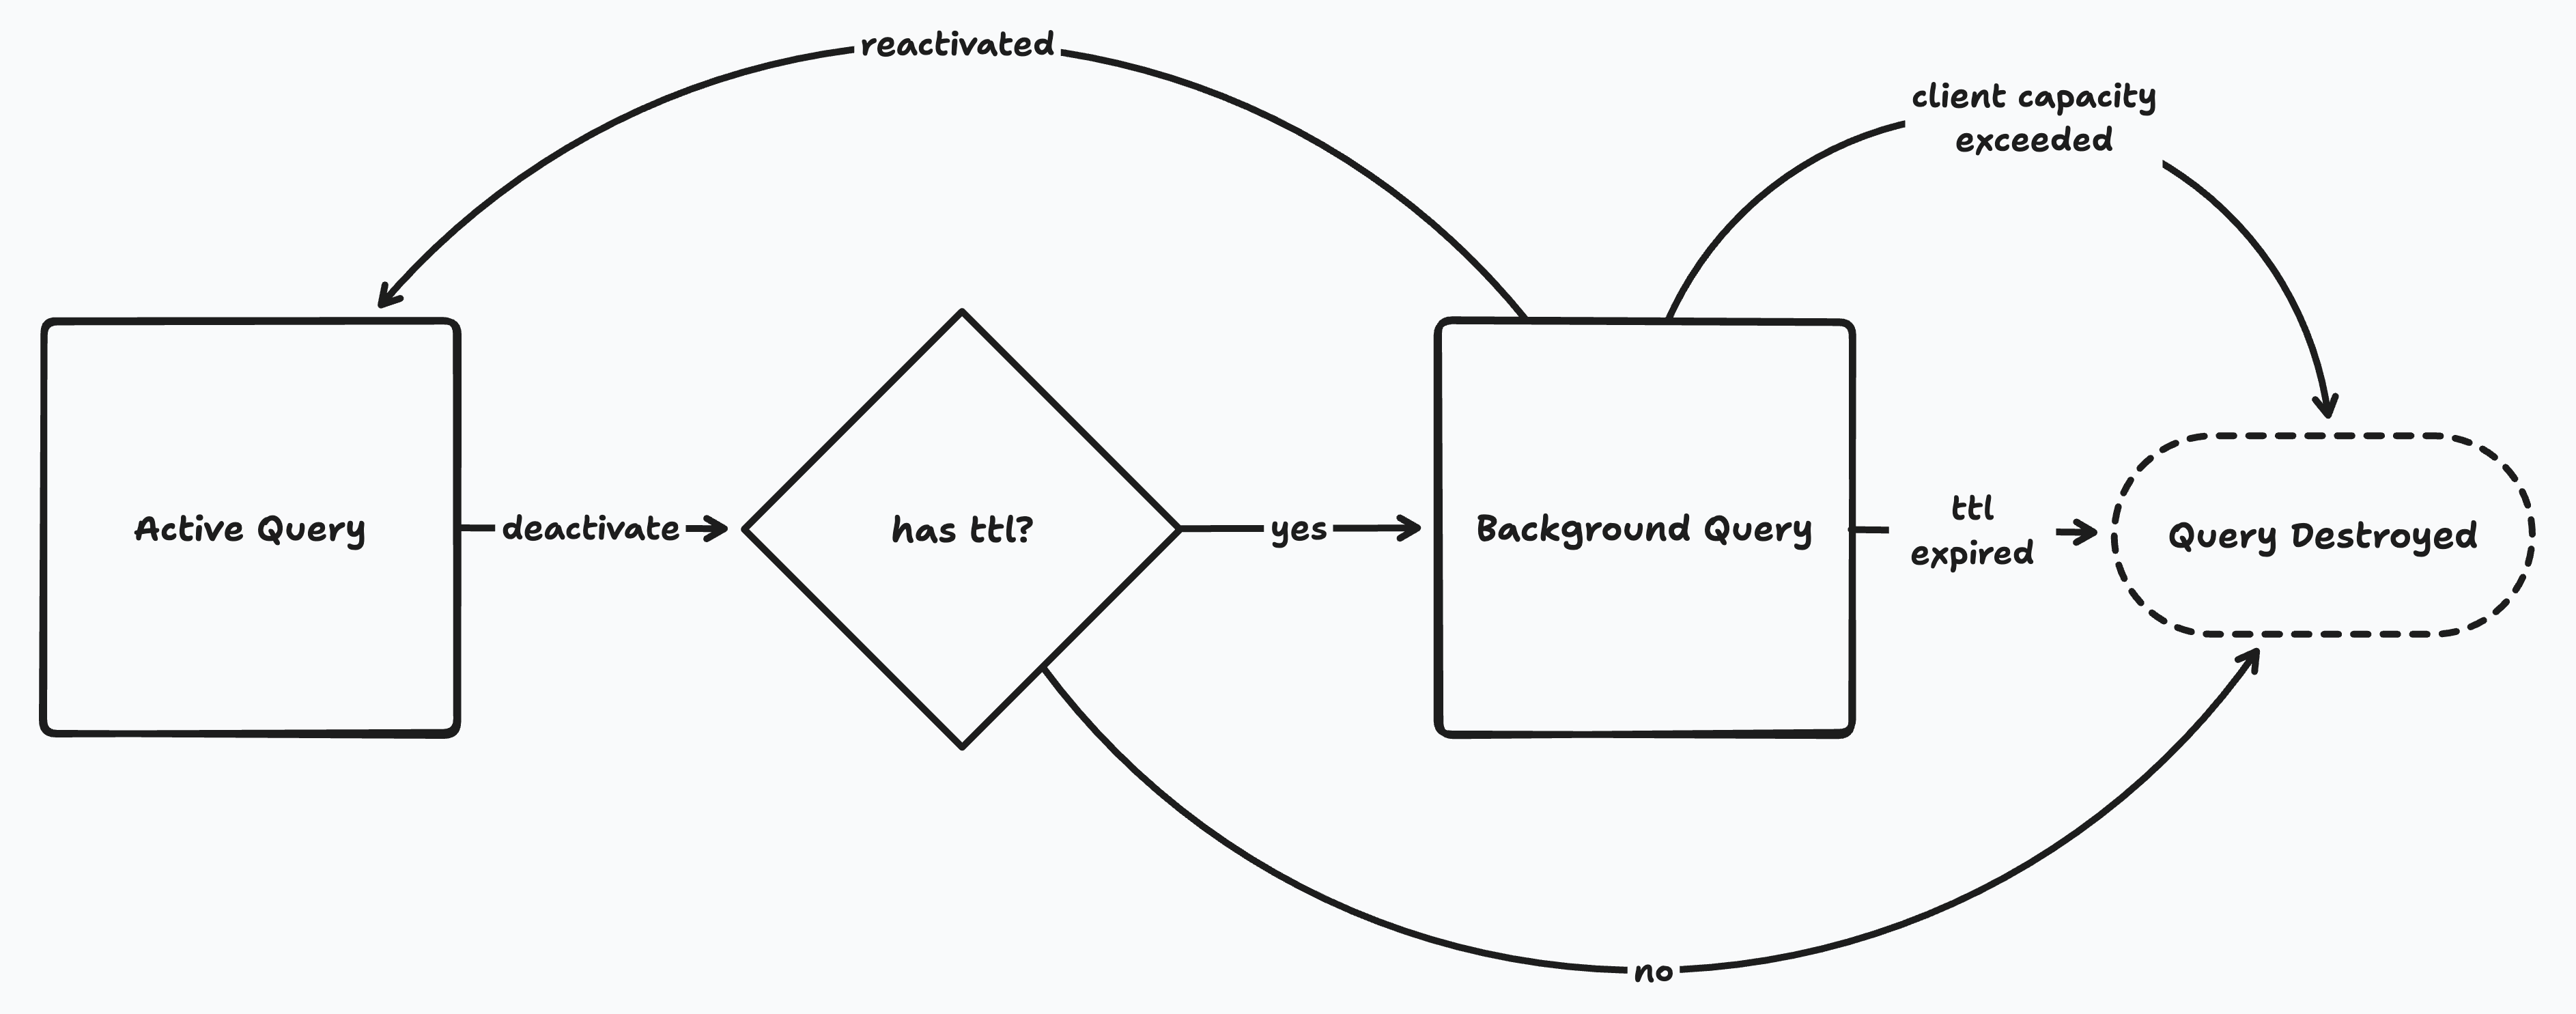 Queries can be either _active_ or _backgrounded_. An active query is one that is currently being used by the application. Backgrounded queries are not currently in use, but continue syncing in case they are needed again soon. Active queries are created one of three ways: 1. The app calls `q.materialize()` to get a `View`. 2. The app uses a platform binding like React's `useQuery(q)`. 3. The app calls `preload()` to sync larger queries without a view. Active queries sync until they are _deactivated_. The way this happens depends on how the query was created: 1. For `materialize()` queries, the UI calls `destroy()` on the view. 2. For `useQuery()`, the UI unmounts the component (which calls `destroy()` under the covers). 3. For `preload()`, the UI calls `cleanup()` on the return value of `preload()`. ### Background Queries By default a deactivated query stops syncing immediately. But it's often useful to keep queries syncing beyond deactivation in case the UI needs the same or a similar query in the near future. This is accomplished with the `ttl` parameter: const [user] = useQuery(z.query.user.where('id', userId), {ttl: '1d'}); The `ttl` paramater specifies how long the app developer wishes the query to run inthe background. The following formats are allowed (where `%d` is a positive integer): | Format | Meaning | | --- | --- | | `none` | No backgrounding. Query will immediately stop when deactivated. This is the default. | | `%ds` | Number of seconds. | | `%dm` | Number of minutes. | | `%dh` | Number of hours. | | `%dd` | Number of days. | | `%dy` | Number of years. | | `forever` | Query will never be stopped. | If the UI re-requests a background query, it becomes an active query again. Since the query was syncing in the background, the very first synchronous result that the UI receives after reactivation will be up-to-date with the server (i.e., it will have `resultType` of `complete`). Just like other types of queries, the data from background queries is available for use by new queries. A common pattern in to preload a subset of most commonly needed data with `{ttl: 'forever'}` and then do more specific queries from the UI with, e.g., `{ttl: '1d'}`. Most often the preloaded data will be able to answer user queries, but if not, the new query will be answered by the server and backgrounded for a day in case the user revisits it. ### Client Capacity Management Zero has a default soft limit of 20,000 rows on the client-side, or about 20MB of data assuming 1KB rows. This limit can be increased with the `--target-client-row-count` flag, but we do not recommend setting it higher than 100,000. 🤔Why does Zero store so little data client-side? Here is how this limit is managed: 1. Active queries are never destroyed, even if the limit is exceeded. Developers are expected to keep active queries well under the limit. 2. The `ttl` value counts from the moment a query deactivates. Backgrounded queries are destroyed immediately when the `ttl` is reached, even if the limit hasn't been reached. 3. If the client exceeds its limit, Zero will destroy backgrounded queries, least-recently-used first, until the store is under the limit again. ### Thinking in Queries Although IVM is a very efficient way to keep queries up to date relative to re-running them, it isn't free. You still need to think about how many queries you are creating, how long they are kept alive, and how expensive they are. This is why Zero defaults to _not_ backgrounding queries and doesn't try to aggressively fill its client datastore to capacity. You should put some thought into what queries you want to run in the background, and for how long. Zero currently provides a few basic tools to understand the cost of your queries: * The client logs a warning for slow query materializations. Look for `Slow query materialization` in your logs. The default threshold is `5s` (including network) but this is configurable with the `slowMaterializeThreshold` parameter. * The client logs the materialization time of all queries at the `debug` level. Look for `Materialized query` in your logs. * The server logs a warning for slow query materializations. Look for `Slow query materialization` in your logs. The default threshold is `5s` but this is configurable with the `log-slow-materialize-threshold` configuration parameter. We will be adding more tools over time. ## Completeness Zero returns whatever data it has on the client immediately for a query, then falls back to the server for any missing data. Sometimes it's useful to know the difference between these two types of results. To do so, use the `result` from `useQuery`: const [issues, issuesResult] = useQuery(z.query.issue); if (issueResult.type === 'complete') { console.log('All data is present'); } else { console.log('Some data is missing'); } The possible values of `result.type` are currently `complete` and `unknown`. The `complete` value is currently only returned when Zero has received the server result. But in the future, Zero will be able to return this result type when it _knows_ that all possible data for this query is already available locally. Additionally, we plan to add a `prefix` result for when the data is known to be a prefix of the complete result. See Consistency for more information. ## Preloading Almost all Zero apps will want to preload some data in order to maximize the “local-first” feel of instantaneous UI transitions. In Zero, preloading is done via queries – the same queries you use in the UI and for auth. However, because preload queries are usually much larger than a screenful of UI, Zero provides a special `preload()` helper to avoid the overhead of materializing the result into JS objects: // Preload the first 1k issues + their creator, assignee, labels, and // the view state for the active user. // // There's no need to render this data, so we don't use `useQuery()`: // this avoids the overhead of pulling all this data into JS objects. z.query.issue .related('creator') .related('assignee') .related('labels') .related('viewState', q => q.where('userID', z.userID).one()) .orderBy('created', 'desc') .limit(1000) .preload(); ## Running Queries Once Usually subscribing to a query is what you want in a reactive UI but every so often running a query once is all that’s needed. const results = z.query.issue.where('foo', 'bar').run(); 🤔Note ## Consistency Zero always syncs a consistent partial replica of the backend database to the client. This avoids many common consistency issues that come up in classic web applications. But there are still some consistency issues to be aware of when using Zero. For example, imagine that you have a bug database w/ 10k issues. You preload the first 1k issues sorted by created. The user then does a query of issues assigned to themselves, sorted by created. Among the 1k issues that were preloaded imagine 100 are found that match the query. Since the data we preloaded is in the same order as this query, we are guaranteed that any local results found will be a _prefix_ of the server results. The UX that result is nice: the user will see initial results to the query instantly. If more results are found server-side, those results are guaranteed to sort below the local results. There's no shuffling of results when the server response comes in. Now imagine that the user switches the sort to ‘sort by modified’. This new query will run locally, and will again find some local matches. But it is now unlikely that the local results found are a prefix of the server results. When the server result comes in, the user will probably see the results shuffle around. To avoid this annoying effect, what you should do in this example is also preload the first 1k issues sorted by modified desc. In general for any query shape you intend to do, you should preload the first `n` results for that query shape with no filters, in each sort you intend to use. 🤔Note In the future, we will be implementing a consistency model that fixes these issues automatically. We will prevent Zero from returning local data when that data is not known to be a prefix of the server result. Once the consistency model is implemented, preloading can be thought of as purely a performance thing, and not required to avoid unsightly flickering. --- ## Page: https://zero.rocicorp.dev/docs/writing-data Zero generates basic CRUD mutators for every table you sync. Mutators are available at `zero.mutate.<tablename>`: const z = new Zero(...); z.mutate.user.insert({ id: nanoid(), username: 'abby', language: 'en-us', }); 🤔Need more power? ## Insert Create new records with `insert`: z.mutate.user.insert({ id: nanoid(), username: 'sam', language: 'js', }); Optional fields can be set to `null` to explicitly set the new field to `null`. They can also be set to `undefined` to take the default value (which is often `null` but can also be some generated value server-side). // schema.ts import {createTableSchema} from '@rocicorp/zero'; const userSchema = createTableSchema({ tableName: 'user', columns: { id: {type: 'string'}, name: {type: 'string'}, language: {type: 'string', optional: true}, }, primaryKey: ['id'], relationships: {}, }); // app.tsx // Sets language to `null` specifically z.mutate.user.insert({ id: nanoid(), username: 'sam', language: null, }); // Sets language to the default server-side value. Could be null, or some // generated or constant default value too. z.mutate.user.insert({ id: nanoid(), username: 'sam', }); // Same as above z.mutate.user.insert({ id: nanoid(), username: 'sam', language: undefined, }); ## Upsert Create new records or update existing ones with `upsert`: z.mutate.user.upsert({ id: samID, username: 'sam', language: 'ts', }); `upsert` supports the same `null` / `undefined` semantics for optional fields that `insert` does (see above). ## Update Update an existing record. Does nothing if the specified record (by PK) does not exist. You can pass a partial, leaving fields out that you don’t want to change. For example here we leave the username the same: // Leaves username field to previous value. z.mutate.user.update({ id: samID, language: 'golang', }); // Same as above z.mutate.user.update({ id: samID, username: undefined, language: 'haskell', }); // Reset language field to `null` z.mutate.user.update({ id: samID, language: null, }); ## Delete Delete an existing record. Does nothing if specified record does not exist. z.mutate.user.delete({ id: samID, }); ## Batch Mutate You can do multiple CRUD mutates in a single _batch_. If any of the mutations fails, all will. They also all appear together atomically in a single transaction to other clients. z.mutateBatch(async tx => { const samID = nanoid(); tx.user.create({ id: samID, username: 'sam', }); const langID = nanoid(); tx.language.insert({ id: langID, userID: samID, name: 'js', }); }); --- ## Page: https://zero.rocicorp.dev/docs/custom-mutators _Custom Mutators_ are a new way to write data in Zero that is much more powerful than the original "CRUD" mutator API. Instead of having only the few built-in `insert`/`update`/`delete` write operations for each table, custom mutators _allow you to create your own write operations_ using arbitrary code. This makes it possible to do things that are impossible or awkward with other sync engines. For example, you can create custom mutators that: * Perform arbitrary server-side validation * Enforce fine-grained permissions * Send email notifications * Query LLMs * Use Yjs for collaborative editing * … and much, _much_ more – custom mutators are just code, and they can do anything code can do! Despite their increased power, custom mutators still participate fully in sync. They execute instantly on the local device, immediately updating all active queries. They are then synced in the background to the server and to other clients. 🤔Custom mutators will eventually become Zero's only write API ## Understanding Custom Mutators ### Architecture Custom mutators introduce a new _server_ component to the Zero architecture. 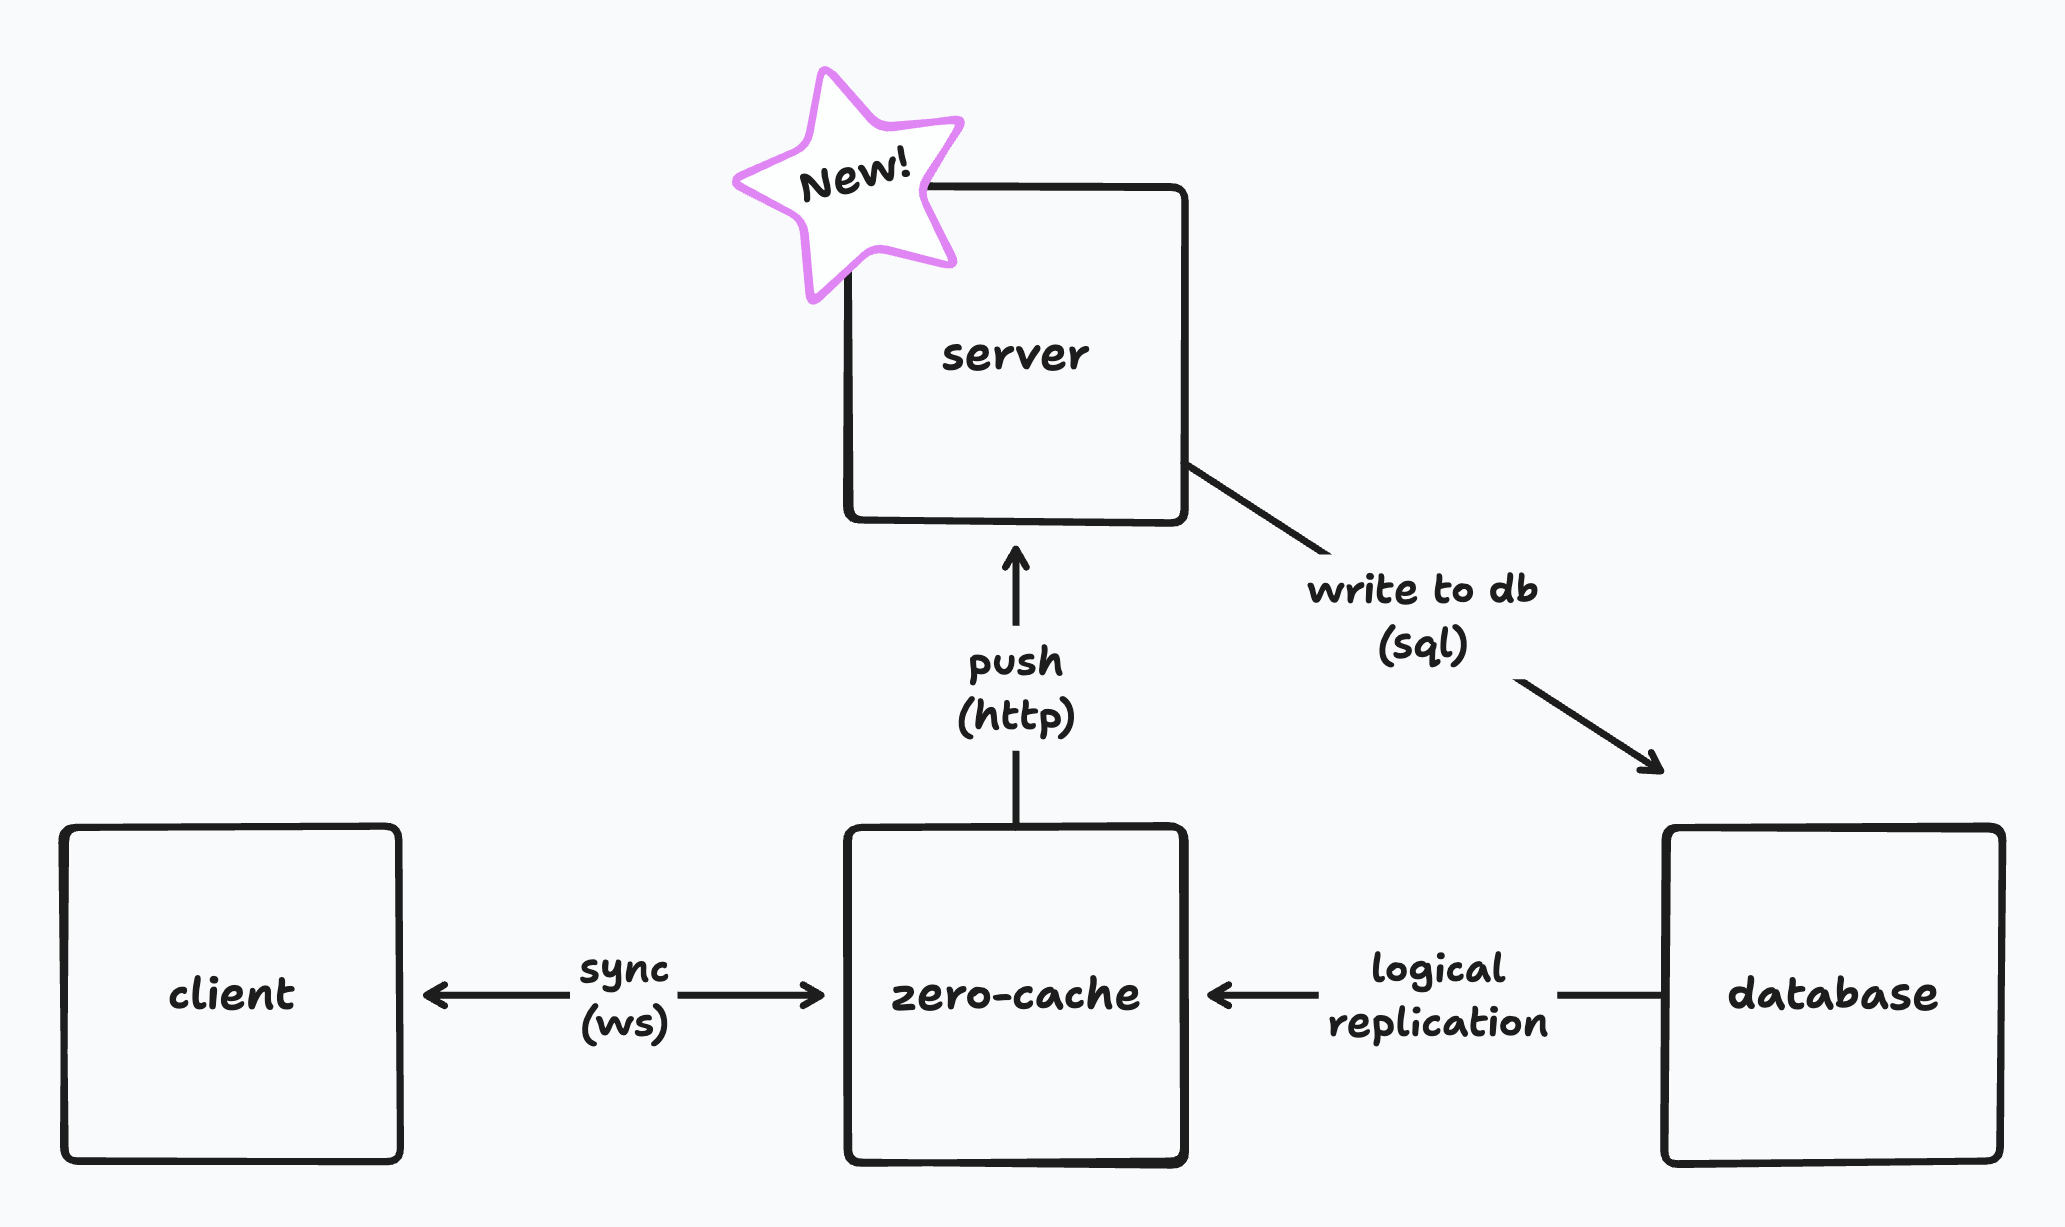 This server is implemented by you, the developer. It's typically just your existing backend, where you already put auth or other server-side functionality. The server can be a serverless function, a microservice, or a full stateful server. The only real requirment is that it expose a special _push endpoint_ that `zero-cache` can call to process mutations. This endpoint implements the push protocol and contains your custom logic for each mutation. Zero provides utilities in `@rocicorp/zero` that make it really easy implement this endpoint in TypeScript. But you can also implement it yourself if you want. As long as your endpoint fulfills the push protocol, `zero-cache` doesn't care. You can even write it in a different programming language. ### What Even is a Mutator? Zero's custom mutators are based on _server reconciliation_ – a technique for robust sync that has been used by the video game industry for decades. 🌈The more you know A custom mutator is just a function that runs within a database transaction, and which can read and write to the database. Here's an example of a very simple custom mutator written in TypeScript: async function updateIssue( tx: Transaction, {id, title}: {id: string; title: string}, ) { // Validate title length. if (title.length > 100) { throw new Error(`Title is too long`); } await tx.mutate.issue.update({id, title}); } Each custom mutator gets **two implementations**: one on the client and one on the server. The client implementation must be written in TypeScript against the Zero `Transaction` interface, using ZQL for reads and a CRUD-style API for writes. The server implementation runs on your server, in your push endpoint, against your database. In principle, it can be written in any language and use any data access library. For example you could have the following Go-based server implementation of the same mutator: func updateIssueOnServer(tx *sql.Tx, id string, title string) error { // Validate title length. if len(title) > 100 { return errors.New("Title is too long") } _, err := tx.Exec("UPDATE issue SET title = $1 WHERE id = $2", title, id) return err } In practice however, most Zero apps use TypeScript on the server. For these users we provide a handy `ServerTransaction` that implements ZQL against Postgres, so that you can share code between client and server mutators naturally. So on a TypeScript server, that server mutator can just be: async function updateIssueOnServer( tx: ServerTransaction, {id, title}, {id: string, title: string}, ) { // Delegate to client mutator. // The `ServerTransaction` here has a different implementation // that runs the same ZQL queries against Postgres! await updateIssue(tx, {id, title}); } 🤔Code sharing in mutators is optional You may be wondering what happens if the client and server mutators implementations don't match. Zero is an example of a _server-authoritative_ sync engine. This means that the server mutator always takes precedence over the client mutator. The result from the client mutator is considered _speculative_ and is discarded as soon as the result from the server mutator is known. This is a very useful feature: it enables server-side validation, permissions, and other server-specific logic. Imagine that you wanted to use an LLM to detect whether an issue update is spammy, rather than a simple length check. We can just add that to our server mutator: async function updateIssueOnServer( tx: ServerTransaction, {id, title}: {id: string; title: string}, ) { const response = await llamaSession.prompt( `Is this title update likely spam?\n\n${title}\n\nResponse "yes" or "no"`, ); if (/yes/i.test(response)) { throw new Error(`Title is likely spam`); } // delegate rest of implementation to client mutator await updateIssue(tx, {id, title}); } If the server detects that the mutation is spammy, the client will see the error message and the mutation will be rolled back. If the server mutator succeeds, the client mutator will be rolled back and the server result will be applied. ### Life of a Mutation Now that we understand what client and server mutations are, let's walk through they work together with Zero to sync changes from a source client to the server and then other clients: 1. When you call a custom mutator on the client, Zero runs your client-side mutator immediately on the local device, updating all active queries instantly. 2. In the background, Zero then sends a _mutation_ (a record of the mutator having run with certain arguments) to your server's push endpoint. 3. Your push endpoint runs the push protocol, executing the server-side mutator in a transaction against your database and recording the fact that the mutation ran. 4. The changes to the database are replicated to `zero-cache` as normal. 5. `zero-cache` calculates the updates to active queries and sends rows that have changed to each client. It also sends information about the mutations that have been applied to the database. 6. Clients receive row updates and apply them to their local cache. Any pending mutations which have been applied to the server have their local effects rolled back. 7. Client-side queries are updated and the user sees the changes. ## Using Custom Mutators ### Registering Client Mutators By convention, the client mutators are defined with a function called `createMutators` in a file called `mutators.ts`: // mutators.ts import {CustomMutatorDefs} from '@rocicorp/zero'; import {schema} from './schema'; export function createMutators() { return { issue: { update: async (tx, {id, title}: {id: string; title: string}) => { // Validate title length. Legacy issues are exempt. if (e.length > 100) { throw new Error(`Title is too long`); } await tx.mutate.issue.update({id, title}); }, }, } as const satisfies CustomMutatorDefs<typeof schema>; } The `mutators.ts` convention allows mutator implementations to be easily reused server-side. The `createMutators` function convention is used so that we can pass authentication information in to implement permissions. You are free to make different code layout choices – the only real requirement is that you register your map of mutators in the `Zero` constructor: // main.tsx import {Zero} from '@rocicorp/zero'; import {schema} from './schema'; import {createMutators} from './mutators'; const zero = new Zero({ schema, mutators: createMutators(), }); ### Write Data on the Client The `Transaction` interface passed to client mutators exposes the same `mutate` API as the existing CRUD-style mutators: async function myMutator(tx: Transaction) { // Insert a new issue await tx.mutate.issue.insert({ id: 'issue-123', title: 'New title', description: 'New description', }); // Upsert a new issue await tx.mutate.issue.upsert({ id: 'issue-123', title: 'New title', description: 'New description', }); // Update an issue await tx.mutate.issue.update({ id: 'issue-123', title: 'New title', }); // Delete an issue await tx.mutate.issue.delete({ id: 'issue-123', }); } See the CRUD docs for detailed semantics on these methods. ### Read Data on the Client You can read data within a client mutator using ZQL: export function createMutators() { return { issue: { update: async (tx, {id, title}: {id: string; title: string}) => { // Read existing issue const prev = await tx.query.issue.where('id', id).one().run(); // Validate title length. Legacy issues are exempt. if (!prev.isLegacy && title.length > 100) { throw new Error(`Title is too long`); } await tx.mutate.issue.update({id, title}); }, }, } as const satisfies CustomMutatorDefs<typeof schema>; } You have the full power of ZQL at your disposal, including relationships, filters, ordering, and limits. Reads and writes within a mutator are transactional, meaning that the datastore is guaranteed to not change while your mutator is running. And if the mutator throws, the entire mutation is rolled back. ### Invoking Client Mutators Once you have registered your client mutators, you can call them from your client-side application: zero.mutate.issue.update({ id: 'issue-123', title: 'New title', }); Mutations execute instantly on the client, but it is sometimes useful to know when the server has applied the mutation (or experienced an error doing so). You can get the server result of a mutation with the `server` property of a mutator's return value: const serverResult = await zero.mutate.issue.update({ id: 'issue-123', title: 'New title', }).server; if (server.error) { console.error('Server mutation went boom', server.error); } else { console.log('Server mutation complete'); } 🤔Returning data from mutators ### Setting Up the Server You will need a server somewhere you can run an endpoint on. This is typically a serverless function on a platform like Vercel or AWS but can really be anything. The URL of the endpoint can be anything. You control it with the push-url option to `zero-cache`. The push endpoint receives a `PushRequest` as input describing one or more mutations to apply to the backend, and must return a `PushResponse` describing the results of those mutations. If you are implementing your server in TypeScript, you can use the `PushProcessor` class to trivially implement this endpoint. Here’s an example in a Hono app: import {Hono} from 'hono'; import {handle} from 'hono/vercel'; import {connectionProvider, PushProcessor} from '@rocicorp/zero/pg'; import postgres from 'postgres'; import {schema} from '../shared/schema'; import {createMutators} from '../shared/mutators'; // PushProcessor is provided by Zero to encapsulate a standard // implementation of the push protocol. const processor = new PushProcessor( schema, connectionProvider(postgres(process.env.ZERO_UPSTREAM_DB as string)), ); export const app = new Hono().basePath('/api'); app.post('/push', async c => { const result = await processor.process( createMutators(), c.req.query(), await c.req.json(), ); return await c.json(result); }); export default handle(app); The `connectionProvider` argument allows `PushProcessor` to create a connection and run transactions against your database. We provide an implementation for the excellent `postgres.js` library, but you can implement an adapter for a different Postgres library if you prefer. To reuse the client mutators exactly as-is on the server just pass the result of the same `createMutators` function to `PushProcessor`. ### Server-Specific Code To implement server-specific code, just run different mutators in your push endpoint! An approach we like is to create a separate `server-mutators.ts` file that wraps the client mutators: // server-mutators.ts import { CustomMutatorDefs } from "@rocicorp/zero"; import { schema } from "./schema"; export function createMutators(clientMutators: CustomMutatorDefs<typeof schema>) { return { // Reuse all client mutators except the ones in `issue` ...clientMutators issue: { // Reuse all issue mutators except `update` ...clientMutators.issue, update: async (tx, {id, title}: { id: string; title: string }) => { // Call the shared mutator first await clientMutators.issue.update(tx, args); // Record a history of this operation happening in an audit // log table. await tx.mutate.auditLog.insert({ // Assuming you have an audit log table with fields for // `issueId`, `action`, and `timestamp`. issueId: args.id, action: 'update-title', timestamp: new Date().toISOString(), }); }, } } as const satisfies CustomMutatorDefs<typeof schema>; } For simple things, we also expose a `location` field on the transaction object that you can use to branch your code: myMutator: (tx) => { if (tx.location === 'client') { // Client-side code } else { // Server-side code } }, ### Permissions Because custom mutators are just arbitrary TypeScript functions, there is no need for a special permissions system. Therefore, you won't use Zero's write permissions when you use custom mutators. 💡You do still need \*read\* permissions In order to do permission checks, you'll need to know what user is making the request. You can pass this information to your mutators by adding a `AuthData` parameter to the `createMutators` function: type AuthData = { sub: string; }; export function createMutators(authData: AuthData | undefined) { return { issue: { launchMissiles: async (tx, args: {target: string}) => { if (!authData) { throw new Error('Users must be logged in to launch missiles'); } const hasPermission = await tx.query.user .where('id', authData.sub) .whereExists('permissions', q => q.where('name', 'launch-missiles')) .one() .run(); if (!hasPermission) { throw new Error('User does not have permission to launch missiles'); } }, }, } as const satisfies CustomMutatorDefs<typeof schema>; } The `AuthData` parameter can be any data required for authorization, but is typically just the decoded JWT: // app.tsx const zero = new Zero({ schema, auth: encodedJWT, mutators: createMutators(decodedJWT), }); // hono-server.ts const processor = new PushProcessor( schema, connectionProvider(postgres(process.env.ZERO_UPSTREAM_DB as string)), ); processor.process( createMutators(decodedJWT), c.req.query(), await c.req.json(), ); ### Dropping Down to Raw SQL On the server, you can use raw SQL in addition or instead of ZQL. This is useful for complex queries, or for using Postgres features that Zero doesn't support yet: async function markAllAsRead(tx: Transaction, {userId: string}) { await tx.dbTransaction.query( ` UPDATE notification SET read = true WHERE user_id = $1 `, [userId], ); } ### Notifications and Async Work It is bad practice to hold open database transactions while talking over the network, for example to send notifications. Instead, you should let the db transaction commit and do the work asynchronously. There is no specific support for this in custom mutators, but since mutators are just code, it’s easy to do: // server-mutators.ts export function createMutators( authData: AuthData, asyncTasks: Array<() => Promise<void>>, ) { return { issue: { update: async (tx, {id, title}: {id: string; title: string}) => { await tx.mutate.issue.update({id, title}); asyncTasks.push(async () => { await sendEmailToSubscribers(args.id); }); }, }, } as const satisfies CustomMutatorDefs<typeof schema>; } Then in your push handler: app.post('/push', async c => { const asyncTasks: Array<() => Promise<void>> = []; const result = await processor.process( createMutators(authData, asyncTasks), c.req.query(), await c.req.json(), ); await Promise.all(asyncTasks.map(task => task())); return await c.json(result); }); ### Custom Database Connections You can implement an adapter to a different Postgres library, or even a different database entirely. To do so, provide a `connectionProvider` to `PushProcessor` that returns a different `DBConnection` implementation. For an example implementation, see the `postgres` implementation. ### Custom Push Implementation You can manually implement the push protocol in any programming language. This will be documented in the future, but you can refer to the PushProcessor source code for an example for now. ## Examples * Zbugs uses custom mutators for all mutations, write permissions, and notifications. * `hello-zero-solid` uses custom mutators for all mutations, and for permissions. --- ## Page: https://zero.rocicorp.dev/docs/auth Zero uses a JWT\-based flow to authenticate connections to zero-cache. ## Frontend During login: 1. Your API server creates a `JWT` and sends it to your client. 2. Your client constructs a `Zero` instance with this token by passing it to the `auth` option. 🤔Note const zero = new Zero({ ..., auth: token, // your JWT userID, // this must match the `sub` field from `token` }); ## Server For `zero-cache` to be able to verify the JWT, one of the following environment variables needs to be set: 1. `ZERO_AUTH_SECRET` - If your API server uses a symmetric key (secret) to create JWTs then this is that same key. 2. `ZERO_AUTH_JWK` - If your API server uses a private key to create JWTs then this is the corresponding public key, in JWK format. 3. `ZERO_AUTH_JWKS_URL` - Many auth providers host the public keys used to verify the JWTs they create at a public URL. If you use a provider that does this, or you publish your own keys publicly, set this to that URL. ## Refresh The `auth` parameter to Zero can also be a function: const zero = new Zero({ ..., auth: async () => { const token = await fetchNewToken(); return token; }, userID, }); In this case, Zero will call this function to get a new JWT if verification fails. ## Permissions Any data placed into your JWT (claims) can be used by permission rules on the backend. const isAdminRule = (decodedJWT, {cmp}) => cmp(decodedJWT.role, '=', 'admin'); See the permissions section for more details. ## Examples See zbugs or hello-zero. --- ## Page: https://zero.rocicorp.dev/docs/permissions Permissions are expressed using ZQL and run automatically with every read and write. ## Define Permissions Permissions are defined in `schema.ts` using the `definePermissions` function. Here's an example of limiting deletes to only the creator of an issue: // The decoded value of your JWT. type AuthData = { // The logged-in user. sub: string; }; export const permissions = definePermissions<AuthData, Schema>(schema, () => { const allowIfIssueCreator = ( authData: AuthData, {cmp}: ExpressionBuilder<Schema, 'issue'>, ) => cmp('creatorID', authData.sub); return { issue: { row: { delete: [allowIfIssueCreator], }, }, } satisfies PermissionsConfig<AuthData, Schema>; }); `definePermission` returns a _policy_ object for each table in the schema. Each policy defines a _ruleset_ for the _operations_ that are possible on a table: `select`, `insert`, `update`, and `delete`. ## Access is Denied by Default If you don't specify any rules for an operation, it is denied by default. This is an important safety feature that helps ensure data isn't accidentally exposed. To enable full access to an action (i.e., during development) use the `ANYONE_CAN` helper: import {ANYONE_CAN} from '@rocicorp/zero'; const permissions = definePermissions<AuthData, Schema>(schema, () => { return { issue: { row: { select: ANYONE_CAN, // Other operations are denied by default. }, }, // Other tables are denied by default. } satisfies PermissionsConfig<AuthData, Schema>; }); To do this for all actions, use `ANYONE_CAN_DO_ANYTHING`: import {ANYONE_CAN_DO_ANYTHING} from '@rocicorp/zero'; const permissions = definePermissions<AuthData, Schema>(schema, () => { return { // All operations on issue are allowed to all users. issue: ANYONE_CAN_DO_ANYTHING, // Other tables are denied by default. } satisfies PermissionsConfig<AuthData, Schema>; }); ## Permission Evaluation Zero permissions are "compiled" into a JSON-based format at build-time. This file is stored in the `{ZERO_APP_ID}.permissions` table of your upstream database. Like other tables, it replicates live down to `zero-cache`. `zero-cache` then parses this file, and applies the encoded rules to every read and write operation. 😬Warning ## Permission Deployment During development, permissions are compiled and uploaded to your database completely automatically as part of the `zero-cache-dev` script. For production, you need to call `npx zero-deploy-permissions` within your app to update the permissions in the production database whenever they change. You would typically do this as part of your normal schema migration or CI process. For example, the SST deployment script for zbugs looks like this: new command.local.Command( 'zero-deploy-permissions', { create: `npx zero-deploy-permissions -p ../../src/schema.ts`, // Run the Command on every deploy ... triggers: [Date.now()], environment: { ZERO_UPSTREAM_DB: commonEnv.ZERO_UPSTREAM_DB, // If the application has a non-default App ID ... ZERO_APP_ID: commonEnv.ZERO_APP_ID, }, }, // after the view-syncer is deployed. {dependsOn: viewSyncer}, ); See the SST Deployment Guide for more details. ## Rules Each operation on a policy has a _ruleset_ containing zero or more _rules_. A rule is just a TypeScript function that receives the logged in user's `AuthData` and generates a ZQL where expression. At least one rule in a ruleset must return a row for the operation to be allowed. ## Select Permissions You can limit the data a user can read by specifying a `select` ruleset. Select permissions act like filters. If a user does not have permission to read a row, it will be filtered out of the result set. It will not generate an error. For example, imagine a select permission that restricts reads to only issues created by the user: definePermissions<AuthData, Schema>(schema, () => { const allowIfIssueCreator = ( authData: AuthData, {cmp}: ExpressionBuilder<Schema, 'issue'>, ) => cmp('creatorID', authData.sub); return { issue: { row: { select: [allowIfIssueCreator], }, }, } satisfies PermissionsConfig<AuthData, Schema>; }); If the issue table has two rows, one created by the user and one by someone else, the user will only see the row they created in any queries. ## Insert Permissions You can limit what rows can be inserted and by whom by specifying an `insert` ruleset. Insert rules are evaluated after the entity is inserted. So if they query the database, they will see the inserted row present. If any rule in the insert ruleset returns a row, the insert is allowed. Here's an example of an insert rule that disallows inserting users that have the role 'admin'. definePermissions<AuthData, Schema>(schema, () => { const allowIfNonAdmin = ( authData: AuthData, {cmp}: ExpressionBuilder<Schema, 'user'>, ) => cmp('role', '!=', 'admin'); return { user: { row: { insert: [allowIfNonAdmin], }, }, } satisfies PermissionsConfig<AuthData, Schema>; }); ## Update Permissions There are two types of update rulesets: `preMutation` and `postMutation`. Both rulesets must pass for an update to be allowed. `preMutation` rules see the version of a row _before_ the mutation is applied. This is useful for things like checking whether a user owns an entity before editing it. `postMutation` rules see the version of a row _after_ the mutation is applied. This is useful for things like ensuring a user can only mark themselves as the creator of an entity and not other users. Like other rulesets, `preMutation` and `postMutation` default to `NOBODY_CAN`. This means that every table must define both these rulesets in order for any updates to be allowed. For example, the following ruleset allows an issue's owner to edit, but **not** re-assign the issue. The `postMutation` rule enforces that the current user still own the issue after edit. definePermissions<AuthData, Schema>(schema, () => { const allowIfIssueOwner = ( authData: AuthData, {cmp}: ExpressionBuilder<Schema, 'issue'>, ) => cmp('ownerID', authData.sub); return { issue: { row: { update: { preMutation: [allowIfIssueOwner], postMutation: [allowIfIssueOwner], }, }, }, } satisfies PermissionsConfig<AuthData, Schema>; }); This ruleset allows an issue's owner to edit and re-assign the issue: definePermissions<AuthData, Schema>(schema, () => { const allowIfIssueOwner = ( authData: AuthData, {cmp}: ExpressionBuilder<Schema, 'issue'>, ) => cmp('ownerID', authData.sub); return { issue: { row: { update: { preMutation: [allowIfIssueOwner], postMutation: ANYONE_CAN, }, }, }, } satisfies PermissionsConfig<AuthData, Schema>; }); And this allows anyone to edit an issue, but only if they also assign it to themselves. Useful for enforcing _"patches welcome"_? 🙃 definePermissions<AuthData, Schema>(schema, () => { const allowIfIssueOwner = ( authData: AuthData, {cmp}: ExpressionBuilder<Schema, 'issue'>, ) => cmp('ownerID', authData.sub); return { issue: { row: { update: { preMutation: ANYONE_CAN, postMutation: [allowIfIssueOwner], }, }, }, } satisfies PermissionsConfig<AuthData, Schema>; }); ## Delete Permissions Delete permissions work in the same way as `insert` positions except they run _before_ the delete is applied. So if a delete rule queries the database, it will see that the deleted row is present. If any rule in the ruleset returns a row, the delete is allowed. ## Debugging See Debugging Permissions. ## Examples See hello-zero for a simple example of write auth and zbugs for a much more involved one. --- ## Page: https://zero.rocicorp.dev/docs/deployment To deploy a Zero app, you need to: 1. Deploy your backend database. Most standard Postgres hosts work with Zero. 2. Deploy `zero-cache`. We provide a Docker image that can work with most Docker hosts. 3. Deploy your frontend. You can use any hosting service like Vercel or Netlify. This page described how to deploy `zero-cache`. ## Architecture `zero-cache` is a horizontally scalable, stateful web service that maintains a SQLite replica of your Postgres database. It uses this replica to sync ZQL queries to clients over WebSockets. You don't have to know the details of how `zero-cache` works to run it, but it helps to know the basic structure. 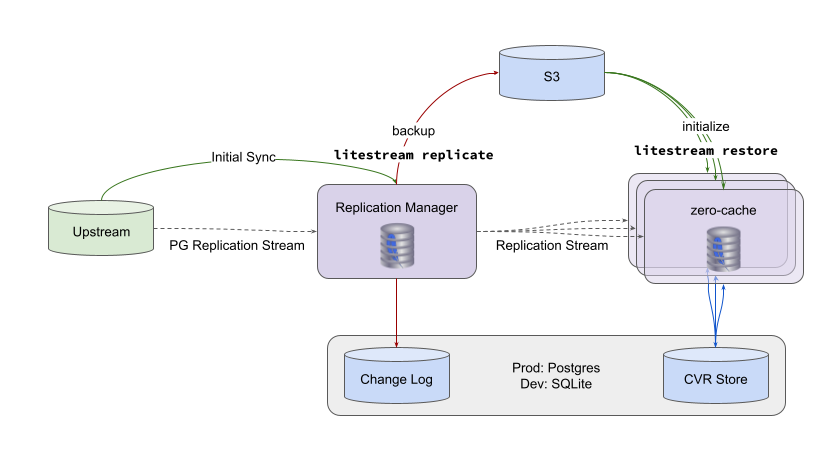 A running `zero-cache` is composed of a single `replication-manager` node and multiple `view-syncer` nodes. It also depends on Postgres, S3, and attached SSD storage. **Upstream:** Your application's Postgres database. **Change DB:** A Postgres DB used by Zero to store a recent subset of the Postgres replication log. **CVR DB:** A Postgres DB used by Zero to store Client View Records (CVRs). CVRs track the state of each synced client. 🤔Note **S3:** Stores a canonical copy of the SQLite replica. **File System:** Used by both node types to store local copies of the SQLite replica. Can be ephemeral – Zero will re-initialize from S3 on startup. Recommended to use attached SSD storage for best performance. **Replication Manager:** Serves as the single consumer of the Postgres replication log. Stores a recent subset of the Postgres changelog in the _Change DB_ for catching up ViewSyncers when they initialize. Also maintains the canonical replica, which ViewSyncers initialize from. **View Syncers:** Handle WebSocket connections from clients and run ZQL queries. Updates CVR DB with the latest state of each client as queries run. Uses CVR DB on client connection to compute the initial diff to catch clients up. ## Topology You should deploy `zero-cache` close to your database because the mutation implementation is chatty. In the future, mutations will move out of `zero-cache`. When that happens you can deploy `zero-cache` geographically distributed and it will double as a read-replica. ## Updating When run with multiple View Syncer nodes, `zero-cache` supports rolling, downtime-free updates. A new Replication Manager takes over the replication stream from the old Replication Manager, and connections from the old View Syncers are gradually drained and absorbed by active View Syncers. ## Configuration The `zero-cache` image is configured via environment variables. See zero-cache Config for available options. ## Guide: Multi-Node on SST+AWS SST is our recommended way to deploy Zero. The setup below costs about $35/month. You can scale it up or down as needed by adjusting the amount of vCPUs and memory in each task. ### Setup Upstream Create an upstream Postgres database server somewhere. See Connecting to Postgres for details. Populate the schema and any initial data for your application. ### Setup AWS See AWS setup guide. The end result should be that you have a dev profile and SSO session defined in your `~/.aws/config` file. ### Initialize SST npx sst init --yes Choose "aws" for where to deploy. Then overwite `/sst.config.ts` with the following code: /* eslint-disable */ /// <reference path="./.sst/platform/config.d.ts" /> import {execSync} from 'child_process'; export default $config({ app(input) { return { name: 'hello-zero', removal: input?.stage === 'production' ? 'retain' : 'remove', home: 'aws', region: process.env.AWS_REGION || 'us-east-1', providers: { command: true, }, }; }, async run() { const zeroVersion = execSync( 'npm list @rocicorp/zero | grep @rocicorp/zero | cut -f 3 -d @', ) .toString() .trim(); // S3 Bucket const replicationBucket = new sst.aws.Bucket(`replication-bucket`); // VPC Configuration const vpc = new sst.aws.Vpc(`vpc`, { az: 2, }); // ECS Cluster const cluster = new sst.aws.Cluster(`cluster`, { vpc, }); const conn = new sst.Secret('PostgresConnectionString'); const zeroAuthSecret = new sst.Secret('ZeroAuthSecret'); // Common environment variables const commonEnv = { ZERO_UPSTREAM_DB: conn.value, ZERO_CVR_DB: conn.value, ZERO_CHANGE_DB: conn.value, ZERO_AUTH_SECRET: zeroAuthSecret.value, ZERO_REPLICA_FILE: 'sync-replica.db', ZERO_LITESTREAM_BACKUP_URL: $interpolate`s3://${replicationBucket.name}/backup`, ZERO_IMAGE_URL: `rocicorp/zero:${zeroVersion}`, ZERO_CVR_MAX_CONNS: '10', ZERO_UPSTREAM_MAX_CONNS: '10', }; // Replication Manager Service const replicationManager = cluster.addService(`replication-manager`, { cpu: '0.5 vCPU', memory: '1 GB', architecture: 'arm64', image: commonEnv.ZERO_IMAGE_URL, link: [replicationBucket], health: { command: ['CMD-SHELL', 'curl -f http://localhost:4849/ || exit 1'], interval: '5 seconds', retries: 3, startPeriod: '300 seconds', }, environment: { ...commonEnv, ZERO_CHANGE_MAX_CONNS: '3', ZERO_NUM_SYNC_WORKERS: '0', }, loadBalancer: { public: false, ports: [ { listen: '80/http', forward: '4849/http', }, ], }, transform: { loadBalancer: { idleTimeout: 3600, }, target: { healthCheck: { enabled: true, path: '/keepalive', protocol: 'HTTP', interval: 5, healthyThreshold: 2, timeout: 3, }, }, }, }); // View Syncer Service const viewSyncer = cluster.addService(`view-syncer`, { cpu: '1 vCPU', memory: '2 GB', architecture: 'arm64', image: commonEnv.ZERO_IMAGE_URL, link: [replicationBucket], health: { command: ['CMD-SHELL', 'curl -f http://localhost:4848/ || exit 1'], interval: '5 seconds', retries: 3, startPeriod: '300 seconds', }, environment: { ...commonEnv, ZERO_CHANGE_STREAMER_URI: replicationManager.url, }, logging: { retention: '1 month', }, loadBalancer: { public: true, rules: [{listen: '80/http', forward: '4848/http'}], }, transform: { target: { healthCheck: { enabled: true, path: '/keepalive', protocol: 'HTTP', interval: 5, healthyThreshold: 2, timeout: 3, }, stickiness: { enabled: true, type: 'lb_cookie', cookieDuration: 120, }, loadBalancingAlgorithmType: 'least_outstanding_requests', }, }, }); // Permissions deployment // Note: this setup requires your CI/CD pipeline to have access to your // Postgres database. If you do not want to do this, you can also use // `npx zero-deploy-permissions --output-format=sql` during build to // generate a permissions.sql file, then run that file as part of your // deployment within your VPC. See hello-zero-solid for an example: // https://github.com/rocicorp/hello-zero-solid/blob/main/sst.config.ts#L141 new command.local.Command( 'zero-deploy-permissions', { create: `npx zero-deploy-permissions -p ../../src/schema.ts`, // Run the Command on every deploy ... triggers: [Date.now()], environment: { ZERO_UPSTREAM_DB: commonEnv.ZERO_UPSTREAM_DB, }, }, // after the view-syncer is deployed. {dependsOn: viewSyncer}, ); }, }); ### Set SST Secrets Configure SST with your Postgres connection string and Zero Auth Secret. Note that if you use JWT-based auth, you'll need to change the environment variables in the `sst.config.ts` file above, then set a different secret here. npx sst secret set PostgresConnectionString "YOUR-PG-CONN-STRING" npx sst secret set ZeroAuthSecret "YOUR-ZERO-AUTH-SECRET" ### Deploy npx sst deploy This takes about 5-10 minutes. If successful, you should see a URL for the `view-syncer` service. This is the URL to pass to the `server` parameter of the `Zero` constructor on the client. If unsuccessful, you can get detailed logs with `npx sst deploy --verbose`. Come find us on Discord and we'll help get you sorted out. ## Guide: Single-Node on Fly.io Let's deploy the Quickstart app to Fly.io. We'll use Fly.io for both the database and `zero-cache`. ### Setup Quickstart Go through the Quickstart guide to get the app running locally. ### Setup Fly.io Create an account on Fly.io and install the Fly CLI. ### Create Postgres app 😬Warning INITIALS=aa PG_APP_NAME=$INITIALS-zstart-pg PG_PASSWORD="$(head -c 256 /dev/urandom | od -An -t x1 | tr -d ' \n' | tr -dc 'a-zA-Z' | head -c 16)" fly postgres create \ --name $PG_APP_NAME \ --region lax \ --initial-cluster-size 1 \ --vm-size shared-cpu-2x \ --volume-size 40 \ --password=$PG_PASSWORD ### Seed Upstream database Populate the database with initial data and set its `wal_level` to `logical` to support replication to `zero-cache`. Then restart the database to apply the changes. (cat ./docker/seed.sql; echo "\q") | fly pg connect -a $PG_APP_NAME echo "ALTER SYSTEM SET wal_level = logical; \q" | fly pg connect -a $PG_APP_NAME fly postgres restart --app $PG_APP_NAME ### Create `zero-cache` Fly.io app CACHE_APP_NAME=$INITIALS-zstart-cache fly app create $CACHE_APP_NAME ### Publish `zero-cache` Create a `fly.toml` file. CONNECTION_STRING="postgres://postgres:$PG_PASSWORD@$PG_APP_NAME.flycast:5432" ZERO_VERSION=$(npm list @rocicorp/zero | grep @rocicorp/zero | cut -f 3 -d @) cat <<EOF > fly.toml app = "$CACHE_APP_NAME" primary_region = 'lax' [build] image = "registry.hub.docker.com/rocicorp/zero:${ZERO_VERSION}" [http_service] internal_port = 4848 force_https = true auto_stop_machines = 'off' min_machines_running = 1 [[http_service.checks]] grace_period = "10s" interval = "30s" method = "GET" timeout = "5s" path = "/" [[vm]] memory = '2gb' cpu_kind = 'shared' cpus = 2 [mounts] source = "sqlite_db" destination = "/data" [env] ZERO_REPLICA_FILE = "/data/sync-replica.db" ZERO_UPSTREAM_DB="${CONNECTION_STRING}/zstart?sslmode=disable" ZERO_CVR_DB="${CONNECTION_STRING}/zstart_cvr?sslmode=disable" ZERO_CHANGE_DB="${CONNECTION_STRING}/zstart_cdb?sslmode=disable" ZERO_AUTH_SECRET="secretkey" LOG_LEVEL = "debug" EOF Then publish `zero-cache`: fly deploy ### Deploy Permissions Now `zero-cache` is running on Fly.io, but there are no permissions. If you run the app against this `zero-cache`, you'll see that no data is returned from any query. To fix this, deploy your permissions: npx zero-deploy-permissions --schema-path='./src/schema.ts' --output-file='/tmp/permissions.sql' (cat /tmp/permissions.sql; echo "\q") | fly pg connect -a $PG_APP_NAME -d zstart You will need to redo this step every time you change your app's permissions, likely as part of your CI/CD pipeline. ### Use Remote `zero-cache` VITE_PUBLIC_SERVER="https://${CACHE_APP_NAME}.fly.dev/" npm run dev:ui Now restart the frontend to pick up the env change, and refresh the app. You can stop your local database and `zero-cache` as we're not using them anymore. Open the web inspector to verify the app is talking to the remote `zero-cache`! You can deploy the frontend to any standard hosting service like Vercel or Netlify, or even to Fly.io! ### Deploy Frontend to Vercel If you've followed the above guide and deployed `zero-cache` to fly, you can simply run: vercel deploy --prod \ -e ZERO_AUTH_SECRET="secretkey" \ -e VITE_PUBLIC_SERVER='https://${CACHE_APP_NAME}.fly.dev/' to deploy your frontend to Vercel. Explaining the arguments above -- * `ZERO_AUTH_SECRET` - The secret to create and verify JWTs. This is the same secret that was used when deploying zero-cache to fly. * `VITE_PUBLIC_SERVER` - The URL the frontend will call to talk to the zero-cache server. This is the URL of the fly app. ## Guide: Multi-Node on Raw AWS ### S3 Bucket Create an S3 bucket. `zero-cache` uses S3 to backup its SQLite replica so that it survives task restarts. ### Fargate Services Run `zero-cache` as two Fargate services (using the same rocicorp/zero docker image): #### replication-manager * `zero-cache` config: * `ZERO_LITESTREAM_BACKUP_URL=s3://{bucketName}/{generation}` * `ZERO_NUM_SYNC_WORKERS=0` * Task count: **1** #### view-syncer * `zero-cache` config: * `ZERO_LITESTREAM_BACKUP_URL=s3://{bucketName}/{generation}` * `ZERO_CHANGE_STREAMER_URI=http://{replication-manager}` * Task count: **N** * Loadbalancing to port **4848** with * algorithm: `least_outstanding_requests` * health check path: `/keepalive` * health check interval: 5 seconds * stickiness: `lb_cookie` * stickiness duration: 3 minutes ### Notes * Standard rolling restarts are fine for both services * The `view-syncer` task count is static; update the service to change the count. * Support for dynamic resizing (i.e. Auto Scaling) is planned * Set `ZERO_CVR_MAX_CONNS` and `ZERO_UPSTREAM_MAX_CONNS` appropriately so that the total connections from both running and updating `view-syncers` (e.g. DesiredCount \* MaximumPercent) do not exceed your database’s `max_connections`. * The `{generation}` component of the `s3://{bucketName}/{generation}` URL is an arbitrary path component that can be modified to reset the replica (e.g. a date, a number, etc.). Setting this to a new path is the multi-node equivalent of deleting the replica file to resync. * Note: `zero-cache` does not manage cleanup of old generations. * The `replication-manager` serves requests on port **4849**. Routing from the `view-syncer` to the `http://{replication-manager}` can be achieved using the following mechanisms (in order of preference): * An internal load balancer * Service Connect * Service Discovery * Fargate ephemeral storage is used for the replica. * The default size is 20GB. This can be increased up to 200GB * Allocate at least twice the size of the database to support the internal VACUUM operation. ## Guide: $PLATFORM Where should we deploy Zero next?? Let us know on Discord! --- ## Page: https://zero.rocicorp.dev/docs/zero-cache-config `zero-cache` is configured either via CLI flag or environment variable. There is no separate `zero.config` file. You can also see all available flags by running `zero-cache --help`. ## Required Flags ### Upstream DB The "upstream" authoritative postgres database. In the future we will support other types of upstream besides PG. flag: `--upstream-db` env: `ZERO_UPSTREAM_DB` required: `true` ### Replica File File path to the SQLite replica that zero-cache maintains. This can be lost, but if it is, zero-cache will have to re-replicate next time it starts up. flag: `--replica-file` env: `ZERO_REPLICA_FILE` required: `true` ### Auth One of Auth JWK, Auth JWK URL, or Auth Secret must be specified. See Authentication for more details. ## Optional Flags ### Push URL The URL of the API server to which zero-cache will push mutations. Required if you use custom mutators. flag: `--push-url` env: `ZERO_PUSH_URL` required: `false` ### Upstream Max Connections The maximum number of connections to open to the upstream database for committing mutations. This is divided evenly amongst sync workers. In addition to this number, zero-cache uses one connection for the replication stream. Note that this number must allow for at least one connection per sync worker, or zero-cache will fail to start. See num-sync-workers. flag: `--upstream-max-conns` env: `ZERO_UPSTREAM_MAX_CONNS` default: `20` ### CVR DB The Postgres database used to store CVRs. CVRs (client view records) keep track of the data synced to clients in order to determine the diff to send on reconnect. If unspecified, the upstream-db will be used. flag: `--cvr-db` env: `ZERO_CVR_DB` required: `false` ### CVR Max Connections The maximum number of connections to open to the CVR database. This is divided evenly amongst sync workers. Note that this number must allow for at least one connection per sync worker, or zero-cache will fail to start. See num-sync-workers. flag: `--cvr-max-conns` env: `ZERO_CVR_MAX_CONNS` default: `30` ### Change DB The Postgres database used to store recent replication log entries, in order to sync multiple view-syncers without requiring multiple replication slots on the upstream database. If unspecified, the upstream-db will be used. flag: `--change-db` env: `ZERO_CHANGE_DB` required: `false` ### Change Max Connections The maximum number of connections to open to the change database. This is used by the change-streamer for catching up zero-cache replication subscriptions. flag: `--change-max-conns` env: `ZERO_CHANGE_MAX_CONNS` default: `5` ### Replica Vacuum Interval Hours Performs a VACUUM at server startup if the specified number of hours has elapsed since the last VACUUM (or initial-sync). The VACUUM operation is heavyweight and requires double the size of the db in disk space. If unspecified, VACUUM operations are not performed. flag: `--replica-vacuum-interval-hours` env: `ZERO_REPLICA_VACUUM_INTERVAL_HOURS` required: `false` ### Log Level Sets the logging level for the application. flag: `--log-level` env: `ZERO_LOG_LEVEL` default: `"info"` values: `debug`, `info`, `warn`, `error` ### Log Format Use text for developer-friendly console logging and json for consumption by structured-logging services. flag: `--log-format` env: `ZERO_LOG_FORMAT` default: `"text"` values: `text`, `json` ### Log Trace Collector The URL of the trace collector to which to send trace data. Traces are sent over http. Port defaults to 4318 for most collectors. flag: `--log-trace-collector` env: `ZERO_LOG_TRACE_COLLECTOR` required: `false` ### Log Slow Row Threshold The number of ms a row must take to fetch from table-source before it is considered slow. flag: `--log-slow-row-threshold` env: `ZERO_LOG_SLOW_ROW_THRESHOLD` default: `2` ### Log Slow Hydrate Threshold The number of milliseconds a query hydration must take to print a slow warning. flag: `--log-slow-hydrate-threshold` env: `ZERO_LOG_SLOW_HYDRATE_THRESHOLD` default: `100` ### Log IVM Sampling How often to collect IVM metrics. 1 out of N requests will be sampled where N is this value. flag: `--log-ivm-sampling` env: `ZERO_LOG_IVM_SAMPLING` default: `5000` ### Target Client Row Count A soft limit on the number of rows Zero will keep on the client. 20k is a good default value for most applications, and we do not recommend exceeding 100k. See Client Capacity Management for more details. flag: `--target-client-row-count` env: `ZERO_TARGET_CLIENT_ROW_COUNT` default: `20000` ### App ID Unique identifier for the app. Multiple zero-cache apps can run on a single upstream database, each of which is isolated from the others, with its own permissions, sharding (future feature), and change/cvr databases. The metadata of an app is stored in an upstream schema with the same name, e.g. `zero`, and the metadata for each app shard, e.g. client and mutation ids, is stored in the `{app-id}_{#}` schema. (Currently there is only a single "0" shard, but this will change with sharding). The CVR and Change data are managed in schemas named `{app-id}_{shard-num}/cvr` and `{app-id}_{shard-num}/cdc`, respectively, allowing multiple apps and shards to share the same database instance (e.g. a Postgres "cluster") for CVR and Change management. Due to constraints on replication slot names, an App ID may only consist of lower-case letters, numbers, and the underscore character. Note that this option is used by both `zero-cache` and `zero-deploy-permissions`. flag: `--app-id` env: `ZERO_APP_ID` default: `zero` ### App Publications Postgres PUBLICATIONs that define the tables and columns to replicate. Publication names may not begin with an underscore, as zero reserves that prefix for internal use. If unspecified, zero-cache will create and use an internal publication that publishes all tables in the public schema, i.e.: CREATE PUBLICATION _{app-id}_public_0 FOR TABLES IN SCHEMA public; Note that once an app has begun syncing data, this list of publications cannot be changed, and zero-cache will refuse to start if a specified value differs from what was originally synced. To use a different set of publications, a new app should be created. flag: `--app-publications` env: `ZERO_APP_PUBLICATIONS` default: `[]` ### Auth JWK A public key in JWK format used to verify JWTs. Only one of jwk, jwksUrl and secret may be set. flag: `--auth-jwk` env: `ZERO_AUTH_JWK` required: `false` ### Auth JWK URL A URL that returns a JWK set used to verify JWTs. Only one of jwk, jwksUrl and secret may be set. flag: `--auth-jwks-url` env: `ZERO_AUTH_JWKS_URL` required: `false` ### Auth Secret A symmetric key used to verify JWTs. Only one of jwk, jwksUrl and secret may be set. flag: `--auth-secret` env: `ZERO_AUTH_SECRET` required: `false` ### Port The port for sync connections. flag: `--port` env: `ZERO_PORT` default: `4848` ### Change Streamer Port The port on which the change-streamer runs. This is an internal protocol between the replication-manager and zero-cache, which runs in the same process in local development. If unspecified, defaults to --port + 1. flag: `--change-streamer-port` env: `ZERO_CHANGE_STREAMER_PORT` required: `false` ### Task ID Globally unique identifier for the zero-cache instance. Setting this to a platform specific task identifier can be useful for debugging. If unspecified, zero-cache will attempt to extract the TaskARN if run from within an AWS ECS container, and otherwise use a random string. flag: `--task-id` env: `ZERO_TASK_ID` required: `false` ### Per User Mutation Limit Max The maximum mutations per user within the specified windowMs. flag: `--per-user-mutation-limit-max` env: `ZERO_PER_USER_MUTATION_LIMIT_MAX` required: `false` ### Per User Mutation Limit Window (ms) The sliding window over which the perUserMutationLimitMax is enforced. flag: `--per-user-mutation-limit-window-ms` env: `ZERO_PER_USER_MUTATION_LIMIT_WINDOW_MS` default: `60000` ### Number of Sync Workers The number of processes to use for view syncing. Leave this unset to use the maximum available parallelism. If set to 0, the server runs without sync workers, which is the configuration for running the replication-manager. flag: `--num-sync-workers` env: `ZERO_NUM_SYNC_WORKERS` required: `false` ### Change Streamer URI When unset, the zero-cache runs its own replication-manager (i.e. change-streamer). In production, this should be set to the replication-manager URI, which runs a change-streamer on port 4849. flag: `--change-streamer-uri` env: `ZERO_CHANGE_STREAMER_URI` required: `false` ### Auto Reset Automatically wipe and resync the replica when replication is halted. This situation can occur for configurations in which the upstream database provider prohibits event trigger creation, preventing the zero-cache from being able to correctly replicate schema changes. For such configurations, an upstream schema change will instead result in halting replication with an error indicating that the replica needs to be reset. When auto-reset is enabled, zero-cache will respond to such situations by shutting down, and when restarted, resetting the replica and all synced clients. This is a heavy-weight operation and can result in user-visible slowness or downtime if compute resources are scarce. flag: `--auto-reset` env: `ZERO_AUTO_RESET` default: `true` ### Query Hydration Stats Track and log the number of rows considered by each query in the system. This is useful for debugging and performance tuning. flag: `--query-hydration-stats` env: `ZERO_QUERY_HYDRATION_STATS` required: `false` ### Litestream Executable Path to the litestream executable. This option has no effect if litestream-backup-url is unspecified. flag: `--litestream-executable` env: `ZERO_LITESTREAM_EXECUTABLE` required: `false` ### Litestream Config Path Path to the litestream yaml config file. zero-cache will run this with its environment variables, which can be referenced in the file via `${ENV}` substitution, for example: * ZERO\_REPLICA\_FILE for the db Path * ZERO\_LITESTREAM\_BACKUP\_LOCATION for the db replica url * ZERO\_LITESTREAM\_LOG\_LEVEL for the log Level * ZERO\_LOG\_FORMAT for the log type flag: `--litestream-config-path` env: `ZERO_LITESTREAM_CONFIG_PATH` default: `./src/services/litestream/config.yml` ### Litestream Log Level flag: `--litestream-log-level` env: `ZERO_LITESTREAM_LOG_LEVEL` default: `warn` values: `debug`, `info`, `warn`, `error` ### Litestream Backup URL The location of the litestream backup, usually an s3:// URL. If set, the litestream-executable must also be specified. flag: `--litestream-backup-url` env: `ZERO_LITESTREAM_BACKUP_URL` required: `false` ### Litestream Checkpoint Threshold MB The size of the WAL file at which to perform an SQlite checkpoint to apply the writes in the WAL to the main database file. Each checkpoint creates a new WAL segment file that will be backed up by litestream. Smaller thresholds may improve read performance, at the expense of creating more files to download when restoring the replica from the backup. flag: `--litestream-checkpoint-threshold-mb` env: `ZERO_LITESTREAM_CHECKPOINT_THRESHOLD_MB` default: `40` ### Litestream Incremental Backup Interval Minutes The interval between incremental backups of the replica. Shorter intervals reduce the amount of change history that needs to be replayed when catching up a new view-syncer, at the expense of increasing the number of files needed to download for the initial litestream restore. flag: `--litestream-incremental-backup-interval-minutes` env: `ZERO_LITESTREAM_INCREMENTAL_BACKUP_INTERVAL_MINUTES` default: `15` ### Litestream Snapshot Backup Interval Hours The interval between snapshot backups of the replica. Snapshot backups make a full copy of the database to a new litestream generation. This improves restore time at the expense of bandwidth. Applications with a large database and low write rate can increase this interval to reduce network usage for backups (litestream defaults to 24 hours). flag: `--litestream-snapshot-backup-interval-hours` env: `ZERO_LITESTREAM_SNAPSHOT_BACKUP_INTERVAL_HOURS` default: `12` ### Litestream Restore Parallelism The number of WAL files to download in parallel when performing the initial restore of the replica from the backup. flag: `--litestream-restore-parallelism` env: `ZERO_LITESTREAM_RESTORE_PARALLELISM` default: `48` ### Storage DB Temp Dir Temporary directory for IVM operator storage. Leave unset to use `os.tmpdir()`. flag: `--storage-db-tmp-dir` env: `ZERO_STORAGE_DB_TMP_DIR` required: `false` ### Initial Sync Table Copy Workers The number of parallel workers used to copy tables during initial sync. Each worker copies a single table at a time, fetching rows in batches of `initial-sync-row-batch-size`. flag: `--initial-sync-table-copy-workers` env: `ZERO_INITIAL_SYNC_TABLE_COPY_WORKERS` default: `5` ### Initial Sync Row Batch Size The number of rows each table copy worker fetches at a time during initial sync. This can be increased to speed up initial sync, or decreased to reduce the amount of heap memory used during initial sync (e.g. for tables with large rows). flag: `--initial-sync-row-batch-size` env: `ZERO_INITIAL_SYNC_ROW_BATCH_SIZE` default: `10000` ### Server Version The version string outputted to logs when the server starts up. flag: `--server-version` env: `ZERO_SERVER_VERSION` required: `false` ### Tenants JSON JSON encoding of per-tenant configs for running the server in multi-tenant mode: { /** * Requests to the main application port are dispatched to the first tenant * with a matching host and path. If both host and path are specified, * both must match for the request to be dispatched to that tenant. * * Requests can also be sent directly to the ZERO_PORT specified * in a tenant's env overrides. In this case, no host or path * matching is necessary. */ tenants: { id: string; // value of the "tid" context key in debug logs host?: string; // case-insensitive full Host: header match path?: string; // first path component, with or without leading slash /** * Options are inherited from the main application (e.g. args and ENV) by default, * and are overridden by values in the tenant's env object. */ env: { ZERO_REPLICA_DB_FILE: string ZERO_UPSTREAM_DB: string ZERO_CVR_DB: string ZERO_CHANGE_DB: string ... }; }[]; } flag: `--tenants-json` env: `ZERO_TENANTS_JSON` required: `false` --- ## Page: https://zero.rocicorp.dev/docs/react Zero has built-in support for React. Here’s what basic usage looks like: import {useQuery, useZero} from "@rocicorp/zero/react"; function IssueList() { const z = useZero(); let issueQuery = z.query.issue .related('creator') .related('labels') .limit(100); const userID = selectedUserID(); if (userID) { issueQuery = issueQuery.where('creatorID', '=', userID); } const [issues, issuesDetail] = useQuery(issueQuery); return <div>{issuesDetail.type === 'complete' ? 'Complete results' : 'Partial results'}</div> <div>{issues.map(issue => <IssueRow issue={issue} />)}</div> } Complete quickstart here: https://github.com/rocicorp/hello-zero --- ## Page: https://zero.rocicorp.dev/docs/solidjs Zero has built-in support for Solid. Here’s what basic usage looks like: import {useQuery} from '@rocicorp/zero/solid'; const issues = useQuery(() => { let issueQuery = z.query.issue .related('creator') .related('labels') .limit(100); const userID = selectedUserID(); if (userID) { issueQuery = issueQuery.where('creatorID', '=', userID); } return issueQuery; }); Complete quickstart here: https://github.com/rocicorp/hello-zero-solid --- ## Page: https://zero.rocicorp.dev/docs/community Integrations with various tools, built by the Zero dev community. If you have made something that should be here, send us a pull request. ## UI Frameworks * One is a full-stack React (and React Native!) framework with built-in Zero support. * zero-svelte and zero-svelte-query are two different approaches to Zero bindings for Svelte. * zero-vue adds Zero bindings to Vue. * zero-astro adds Zero bindings to Astro. ## Database Tools * drizzle-zero generates Zero schemas from Drizzle. * prisma-generator-zero generates Zero schemas from Prisma. --- ## Page: https://zero.rocicorp.dev/docs/debug/inspector The Zero instance provides an API to gather information about the client's current state, such as: * All active queries * Query TTL * Active clients * Client database contents This can help figuring out why you hit loading states, how many queries are active at a time, if you have any resource leaks due to failing to clean up queries or if expected data is missing on the client. ## Creating an Inspector Each `Zero` instance has an `inspect` method that will return the inspector. const z = new Zero({ /*your zero options*/ }); const inspector = await z.inspect(); Once you have an inspector you can inspect the current client and client group. 🤔Clients and Client Groups For example to see active queries for the current client: console.table(await inspector.client.queries()); To inspect other clients within the group: const allClients = await inspector.clients(); ## Dumping Data In addition to information about queries, you can see the contents of the client side database. const inspector = await zero.inspect(); const client = inspector.client; // All raw k/v data currently synced to client console.log('client map:'); console.log(await client.map()); // kv table extracted into tables // This is same info that is in z.query[tableName].run() for (const tableName of Object.keys(schema.tables)) { console.log(`table ${tableName}:`); console.table(await client.rows(tableName)); } --- ## Page: https://zero.rocicorp.dev/docs/debug/slow-queries In the `zero-cache` logs, you may see statements indicating a query is slow: { "level": "DEBUG", "worker": "syncer", "component": "view-syncer", "hydrationTimeMs": 1339, "message": "Total rows considered: 146" }, or: hash=3rhuw19xt9vry transformationHash=1nv7ot74gxfl7 Slow query materialization 325.46865100000286 Here are some tips to help debug such slow queries. ## Check Storage `zero-cache` is effectively a database. It requires fast (low latency and high bandwidth) disk access to perform well. If you're running on network attached storage with high latency, or on AWS with low IOPS, then this is the most likely culprit. The default deployment of Zero currently uses Fargate which scales IOPS with vCPU. Increasing the vCPU will increase storage throughput and likely resolve the issue. Fly.io provides physically attached SSDs, even for their smallest VMs. Deploying zero-cache there (or any other provider that offers physically attached SSDs) is another option. ## Locality If you see log lines like: flushed cvr ... (124ms) this indicates that `zero-cache` is likely deployed too far away from your CVR database. If you did not configure a CVR database URL then this will be your product's Postgres DB. A slow CVR flush can slow down Zero, since it must complete the flush before sending query result(s) to clients. Try moving `zero-cache` to be deployed as close as possible to the CVR database. ## Query Plan If neither (1) nor (2) is a problem, then the query itself is the most likely culprit. The `@rocicorp/zero` package ships with a query analyzer to help debug this. The analyzer should be run in the directory that contains the `.env` file for `zero-cache` as it will use the `.env` file to find your replica. Example: npx analyze-query \ --schema=./shared/schema.ts \ --query='issue.related("comments")' This will output the query plan and time to execute each phase of that plan. If you're unsure which query is slow, or you do not know what it looks like after permissions have been applied, you can obtain the query from the hash that is output in the server logs (e.g., `hash=3rhuw19xt9vry`): npx transform-query --hash=2i81bazy03a00 --schema=./shared/schema.ts This will find the query with that hash in the CVR DB and output the ZQL for that query, with all read permissions applied. You can then feed this output into `analyze-query`. --- ## Page: https://zero.rocicorp.dev/docs/debug/permissions Given that permissions are defined in their own file and internally applied to queries, it might be hard to figure out if or why a permission check is failing. ## Read Permissions The `transform-query` utility is provided to transform a query by applying permissions to it. As of today you'll need to provide the hash of the query you want to transform. You can find this in server logs, websocket network inspector, or in the CVR database. In a future release, you'll be able to write ZQL directly. npx transform-query --hash=2i81bazy03a00 --schema=./shared/schema.ts The output will be the ZQL query with permissions applied as well as the AST of that query. 🤔Note ## Write Permissions Look for a `WARN` level log in the output from `zero-cache` like this: Permission check failed for {"op":"update","tableName":"message",...}, action update, phase preMutation, authData: {...}, rowPolicies: [...], cellPolicies: [] Zero prints the row, auth data, and permission policies that was applied to any failed writes. 🤔Note --- ## Page: https://zero.rocicorp.dev/docs/debug/replication ## Resetting During development we all do strange things (unsafely changing schemas, removing files, etc.). If the replica ever gets wedged (stops replicating, acts strange) you can wipe it and start over. * If you copied your setup from `hello-zero` or `hello-zero-solid`, you can also run `npm run dev:clean` * Otherwise you can run `rm /tmp/my-zero-replica.db*` (see your `.env` file for the replica file location) to clear the contents of the replica. It is always safe to wipe the replica. Wiping will have no impact on your upstream database. Downstream zero-clients will get re-synced when they connect. ## Inspecting For data to be synced to the client it must first be replicated to `zero-cache`. You can check the contents of `zero-cache` via: $ npx zero-sqlite3 /tmp/my-zero-replica.db This will drop you into a `sqlite3` shell with which you can use to explore the contents of the replica. sqlite> .tables _zero.changeLog emoji viewState _zero.replicationConfig issue zero.permissions _zero.replicationState issueLabel zero.schemaVersions _zero.runtimeEvents label zero_0.clients _zero.versionHistory user comment userPref sqlite> .mode qbox sqlite> SELECT * FROM label; ┌─────────────────────────┬──────────────────────────┬────────────┐ │ id │ name │ _0_version │ ├─────────────────────────┼──────────────────────────┼────────────┤ │ 'ic_g-DZTYDApZR_v7Cdcy' │ 'bug' │ '4ehreg' │ ... ## Miscellaneous If you see `FATAL: sorry, too many clients already` in logs, it’s because you have two zero-cache instances running against dev. One is probably in a background tab somewhere. In production, `zero-cache` can run horizontally scaled but on dev it doesn’t run in the config that allows that. --- ## Page: https://zero.rocicorp.dev/docs/debug/query-asts An AST (Abstract Syntax Tree) is a representation of a query that is used internally by Zero. It is not meant to be human readable, but it sometimes shows up in logs and other places. If you need to read one of these, save the AST to a json file. Then run the following command: The returned ZQL query will be using server names, rather than client names, to identify columns and tables. If you provide the schema file as an option you will get mapped back to client names: This comes into play if, in your schema.ts, you use the `from` feature to have different names on the client than your backend DB. 🤔Note --- ## Page: https://zero.rocicorp.dev/docs/zero-schema/#migrations Zero applications have both a _database schema_ (the normal backend database schema that all web apps have) and a _Zero schema_. The purpose of the Zero schema is to: 1. Provide typesafety for ZQL queries 2. Define first-class relationships between tables 3. Define permissions for access control 🤔You do not need to define the Zero schema by hand This page describes using the schema to define your tables, columns, and relationships. ## Defining the Zero Schema The Zero schema is encoded in a TypeScript file that is conventionally called `schema.ts` file. For example, see the schema file for`hello-zero`. ## Table Schemas Use the `table` function to define each table in your Zero schema: import {table, string, boolean} from '@rocicorp/zero'; const user = table('user') .columns({ id: string(), name: string(), partner: boolean(), }) .primaryKey('id'); Column types are defined with the `boolean()`, `number()`, `string()`, `json()`, and `enumeration()` helpers. See Column Types for how database types are mapped to these types. 😬Warning ### Name Mapping Use `from()` to map a TypeScript table or column name to a different database name: const userPref = table('userPref') // Map TS "userPref" to DB name "user_pref" .from('user_pref') .columns({ id: string(), // Map TS "orgID" to DB name "org_id" orgID: string().from('org_id'), }); ### Multiple Schemas You can also use `from()` to access other Postgres schemas: // Sync the "event" table from the "analytics" schema. const event = table('event').from('analytics.event'); ### Optional Columns Columns can be marked _optional_. This corresponds to the SQL concept `nullable`. const user = table('user') .columns({ id: string(), name: string(), nickName: string().optional(), }) .primaryKey('id'); An optional column can store a value of the specified type or `null` to mean _no value_. 🤔Note ### Enumerations Use the `enumeration` helper to define a column that can only take on a specific set of values. This is most often used alongside an `enum` Postgres column type. import {table, string, enumeration} from '@rocicorp/zero'; const user = table('user') .columns({ id: string(), name: string(), mood: enumeration<'happy' | 'sad' | 'taco'>(), }) .primaryKey('id'); ### Custom JSON Types Use the `json` helper to define a column that stores a JSON-compatible value: import {table, string, json} from '@rocicorp/zero'; const user = table('user') .columns({ id: string(), name: string(), settings: json<{theme: 'light' | 'dark'}>(), }) .primaryKey('id'); ### Compound Primary Keys Pass multiple columns to `primaryKey` to define a compound primary key: const user = table('user') .columns({ orgID: string(), userID: string(), name: string(), }) .primaryKey('orgID', 'userID'); ## Relationships Use the `relationships` function to define relationships between tables. Use the `one` and `many` helpers to define singular and plural relationships, respectively: const messageRelationships = relationships(message, ({one, many}) => ({ sender: one({ sourceField: ['senderID'], destField: ['id'], destSchema: user, }), replies: many({ sourceField: ['id'], destSchema: message, destField: ['parentMessageID'], }), })); This creates "sender" and "replies" relationships that can later be queried with the `related` ZQL clause: const messagesWithSenderAndReplies = z.query.messages .related('sender') .related('replies'); This will return an object for each message row. Each message will have a `sender` field that is a single `User` object or `null`, and a `replies` field that is an array of `Message` objects. ### Many-to-Many Relationships You can create many-to-many relationships by chaining the relationship definitions. Assuming `issue` and `label` tables, along with an `issueLabel` junction table, you can define a `labels` relationship like this: const issueRelationships = relationships(issue, ({many}) => ({ labels: many( { sourceField: ['id'], destSchema: issueLabel, destField: ['issueID'], }, { sourceField: ['labelID'], destSchema: label, destField: ['id'], }, ), })); 🤔Note ### Compound Keys Relationships Relationships can traverse compound keys. Imagine a `user` table with a compound primary key of `orgID` and `userID`, and a `message` table with a related `senderOrgID` and `senderUserID`. This can be represented in your schema with: const messageRelationships = relationships(message, ({one}) => ({ sender: one({ sourceField: ['senderOrgID', 'senderUserID'], destSchema: user, destField: ['orgID', 'userID'], }), })); ### Circular Relationships Circular relationships are fully supported: const commentRelationships = relationships(comment, ({one}) => ({ parent: one({ sourceField: ['parentID'], destSchema: comment, destField: ['id'], }), })); ## Database Schemas Use `createSchema` to define the entire Zero schema: import {createSchema} from '@rocicorp/zero'; export const schema = createSchema( 1, // Schema version. See [Schema Migrations](/docs/migrations) for more info. { tables: [user, medium, message], relationships: [ userRelationships, mediumRelationships, messageRelationships, ], }, ); ## Migrations Zero uses TypeScript-style structural typing to detect schema changes and implement smooth migrations. ### How it Works When the Zero client connects to `zero-cache` it sends a copy of the schema it was constructed with. `zero-cache` compares this schema to the one it has, and rejects the connection with a special error code if the schema is incompatible. By default, The Zero client handles this error code by calling `location.reload()`. The intent is to to get a newer version of the app that has been updated to handle the new server schema. 🤔Note If you want to delay this reload, you can do so by providing the `onUpdateNeeded` constructor parameter: const z = new Zero({ onUpdateNeeded: updateReason => { if (reason.type === 'SchemaVersionNotSupported') { // Do something custom here, like show a banner. // When you're ready, call `location.reload()`. } }, }); If the schema changes while a client is running in a compatible way, `zero-cache` syncs the schema change to the client so that it's ready when the app reloads and gets new code that needs it. If the schema changes while a client is running in an incompatible way, `zero-cache` will close the client connection with the same error code as above. ### Schema Change Process Like other database-backed applications, Zero schema migration generally follow an “expand/migrate/contract” pattern: 1. Implement and run an “expand” migration on the backend that is backwards compatible with existing schemas. Add new rows, tables, as well as any defaults and triggers needed for backwards compatibility. 2. Add any new permissions required for the new tables/columns by running `zero-deploy-permissions`. 3. Update and deploy the client app to use the new schema. 4. Optionally, after some grace period, implement and run a “contract” migration on the backend, deleting any obsolete rows/tables. Steps 1-3 can generally be done as part of one deploy by your CI pipeline, but step 4 would be weeks later when most open clients have refreshed and gotten new code. 😬Warning --- ## Page: https://zero.rocicorp.dev/docs/auth/ Zero uses a JWT\-based flow to authenticate connections to zero-cache. ## Frontend During login: 1. Your API server creates a `JWT` and sends it to your client. 2. Your client constructs a `Zero` instance with this token by passing it to the `auth` option. 🤔Note const zero = new Zero({ ..., auth: token, // your JWT userID, // this must match the `sub` field from `token` }); ## Server For `zero-cache` to be able to verify the JWT, one of the following environment variables needs to be set: 1. `ZERO_AUTH_SECRET` - If your API server uses a symmetric key (secret) to create JWTs then this is that same key. 2. `ZERO_AUTH_JWK` - If your API server uses a private key to create JWTs then this is the corresponding public key, in JWK format. 3. `ZERO_AUTH_JWKS_URL` - Many auth providers host the public keys used to verify the JWTs they create at a public URL. If you use a provider that does this, or you publish your own keys publicly, set this to that URL. ## Refresh The `auth` parameter to Zero can also be a function: const zero = new Zero({ ..., auth: async () => { const token = await fetchNewToken(); return token; }, userID, }); In this case, Zero will call this function to get a new JWT if verification fails. ## Permissions Any data placed into your JWT (claims) can be used by permission rules on the backend. const isAdminRule = (decodedJWT, {cmp}) => cmp(decodedJWT.role, '=', 'admin'); See the permissions section for more details. ## Examples See zbugs or hello-zero.