W↓
All docs
🔑
Sign Up/Sign In
electric-sql.com/docs/integrations
Public Link
Apr 8, 2025, 9:38:55 AM - complete - 61.4 kB
Created by:
****ad@vlad.studio
Starting URLs:
https://electric-sql.com/docs/integrations/livestore
Crawl Prefixes:
https://electric-sql.com/docs/integrations
## Page: https://electric-sql.com/docs/integrations/livestore  ## LiveStore LiveStore is a reactive SQLite-based state management library focused on high-performance client-side reactivity, originally based on Riffle. ## Electric and LiveStore LiveStore is under active development by Johannes Schickling. ElectricSQL are sponsoring LiveStore development and building a sync integration. Some early docs are published at livestore.dev. You can also see the Expo launch day blog post and video: ## Early access LiveStore is now open access for GitHub Sponsors. You can get access by sponsoring Johannes here for $20 per month. --- ## Page: https://electric-sql.com/docs/integrations/mobx  ## MobX MobX is a framework for simple, scalable, client-side state management. ## Electric and MobX Electric can be integrated with MobX by syncing data into a Shape and then making the shape observable. ## Help wanted Good first issue We have an open GitHub issue tracking this if you'd like to contribute an example or library integrating Electric and MobX. Please leave a comment or ask on Discord if you'd like any pointers or to discuss how best to approach this. --- ## Page: https://electric-sql.com/docs/integrations/next  ## Next.js Next.js is a full-stack React framework. ## Electric and Next.js Next.js is based on React. Electric works with React. You can integrate Electric into your Next.js application like any other npm / React library. ### Examples #### Next.js example See the Nextjs example on GitHub. This demonstrates using Electric for read-path sync and a Next.js API for handling writes: tsx "use client" import { v4 as uuidv4 } from "uuid" import { useOptimistic } from "react" import { useShape, getShapeStream } from "@electric-sql/react" import "./Example.css" import { matchStream } from "./match-stream" import { ShapeStreamOptions } from "@electric-sql/client/*" const itemShape = (): ShapeStreamOptions => { if (typeof window !== `undefined`) { return { url: new URL(`/shape-proxy`, window?.location.origin).href, params: { table: `items`, }, } } else { return { url: new URL(`https://not-sure-how-this-works.com/shape-proxy`).href, params: { table: `items`, }, } } } type Item = { id: string } async function createItem(newId: string) { const itemsStream = getShapeStream<Item>(itemShape()) // Match the insert const findUpdatePromise = matchStream({ stream: itemsStream, operations: [`insert`], matchFn: ({ message }) => message.value.id === newId, }) // Generate new UUID and post to backend const fetchPromise = fetch(`/api/items`, { method: `POST`, body: JSON.stringify({ uuid: newId }), }) return await Promise.all([findUpdatePromise, fetchPromise]) } async function clearItems() { const itemsStream = getShapeStream<Item>(itemShape()) // Match the delete const findUpdatePromise = matchStream({ stream: itemsStream, operations: [`delete`], // First delete will match matchFn: () => true, }) // Post to backend to delete everything const fetchPromise = fetch(`/api/items`, { method: `DELETE`, }) return await Promise.all([findUpdatePromise, fetchPromise]) } export default function Home() { const { data: items } = useShape<Item>(itemShape()) const [optimisticItems, updateOptimisticItems] = useOptimistic< Item[], { newId?: string; isClear?: boolean } >(items, (state, { newId, isClear }) => { if (isClear) { return [] } if (newId) { // Merge data from shape & optimistic data from fetchers. This removes // possible duplicates as there's a potential race condition where // useShape updates from the stream slightly before the action has finished. const itemsMap = new Map() state.concat([{ id: newId }]).forEach((item) => { itemsMap.set(item.id, { ...itemsMap.get(item.id), ...item }) }) return Array.from(itemsMap.values()) } return [] }) return ( <div> <form action={async (formData: FormData) => { const intent = formData.get(`intent`) const newId = formData.get(`new-id`) as string if (intent === `add`) { updateOptimisticItems({ newId }) await createItem(newId) } else if (intent === `clear`) { updateOptimisticItems({ isClear: true }) await clearItems() } }} > <input type="hidden" name="new-id" value={uuidv4()} /> <button type="submit" className="button" name="intent" value="add"> Add </button> <button type="submit" className="button" name="intent" value="clear"> Clear </button> </form> {optimisticItems.map((item: Item, index: number) => ( <p key={index} className="item"> <code>{item.id}</code> </p> ))} </div> ) } It also demonstrates using a shape-proxy endpoint for proxying access to the Electric sync service. This allows you to implement auth and routing in-front-of Electric (and other concerns like transforming or decrypting the stream) using your Next.js backend: ts export async function GET(request: Request) { const url = new URL(request.url) const originUrl = new URL( process.env.ELECTRIC_URL ? `${process.env.ELECTRIC_URL}/v1/shape` : `http://localhost:3000/v1/shape` ) url.searchParams.forEach((value, key) => { originUrl.searchParams.set(key, value) }) if (process.env.ELECTRIC_SOURCE_ID) { originUrl.searchParams.set(`source_id`, process.env.ELECTRIC_SOURCE_ID) } const headers = new Headers() if (process.env.ELECTRIC_SOURCE_SECRET) { originUrl.searchParams.set( `source_secret`, process.env.ELECTRIC_SOURCE_SECRET ) } const newRequest = new Request(originUrl.toString(), { method: `GET`, headers, }) // When proxying long-polling requests, content-encoding & content-length are added // erroneously (saying the body is gzipped when it's not) so we'll just remove // them to avoid content decoding errors in the browser. // // Similar-ish problem to https://github.com/wintercg/fetch/issues/23 let resp = await fetch(newRequest) if (resp.headers.get(`content-encoding`)) { const headers = new Headers(resp.headers) headers.delete(`content-encoding`) headers.delete(`content-length`) resp = new Response(resp.body, { status: resp.status, statusText: resp.statusText, headers, }) } return resp } #### ElectroDrizzle ElectroDrizzle is an example application by Leon Alvarez using Next.js, Drizzle, PGLite and Electric together. See the Getting Started guide here. #### SSR Next.js supports SSR. We are currently experimenting with patterns to use Electric with SSR in a way that supports server rendering _and_ client-side components seamlessly moving into realtime sync. ## Help wanted Good first issue We have a pull request open if you'd like to contribute to improving our Next.js documentation, patterns and framework integrations. Please leave a comment or ask on Discord if you'd like any pointers or to discuss how best to approach this. --- ## Page: https://electric-sql.com/docs/integrations/phoenix  ## Phoenix Phoenix is a full-stack web development framework for Elixir. ## Electric and Phoenix Electric is developed in Elixir and provides an Elixir client and deep Phoenix-framework integration in the form of the official Phoenix.Sync libarary. ### Phoenix.Sync Phoenix.Sync enables real-time sync for Postgres-backed Phoenix applications. You can use it to sync data into Elixir, `LiveView` and frontend web and mobile applications. The library integrates with `Plug` and `Phoenix.{Controller, LiveView, Router, Stream}`. It uses ElectricSQL as the core sync engine, either as an embedded application dependency, or running as an external HTTP service. The APIs map Ecto queries to Shapes. Documentation is available at hexdocs.pm/phoenix\_sync. ## Usage There are four key APIs: * `Phoenix.Sync.Client.stream/2` for low level usage in Elixir * `Phoenix.Sync.LiveView.sync_stream/4` to sync into a LiveView stream * `Phoenix.Sync.Router.sync/2` macro to expose a statically defined shape in your Router * `Phoenix.Sync.Controller.sync_render/3` to expose dynamically constructed shapes from a Controller ### Low level usage in Elixir Use `Phoenix.Sync.Client.stream/2` to convert an `Ecto.Query` into an Elixir `Stream`: elixir stream = Phoenix.Sync.Client.stream(Todos.Todo) stream = Ecto.Query.from(t in Todos.Todo, where: t.completed == false) |> Phoenix.Sync.Client.stream() ### Sync into a LiveView stream Swap out `Phoenix.LiveView.stream/3` for `Phoenix.Sync.LiveView.sync_stream/4` to automatically keep a LiveView up-to-date with the state of your Postgres database: elixir defmodule MyWeb.MyLive do use Phoenix.LiveView import Phoenix.Sync.LiveView def mount(_params, _session, socket) do {:ok, sync_stream(socket, :todos, Todos.Todo)} end def handle_info({:sync, event}, socket) do {:noreply, sync_stream_update(socket, event)} end end LiveView takes care of automatically keeping the front-end up-to-date with the assigned stream. What Phoenix.Sync does is automatically keep the _stream_ up-to-date with the state of the database. This means you can build fully end-to-end real-time multi-user applications without writing Javascript _and_ without worrying about message delivery, reconnections, cache invalidation or polling the database for changes. ### Sync shapes through your Router Use the `Phoenix.Sync.Router.sync/2` macro to expose statically (compile-time) defined shapes in your Router: elixir defmodule MyWeb.Router do use Phoenix.Router import Phoenix.Sync.Router pipeline :sync do plug :my_auth end scope "/shapes" do pipe_through :sync sync "/todos", Todos.Todo end end Because the shapes are exposed through your Router, the client connects through your existing Plug middleware. This allows you to do real-time sync straight out of Postgres _without_ having to translate your auth logic into complex/fragile database rules. ### Sync dynamic shapes from a Controller Sync shapes from any standard Controller using the `Phoenix.Sync.Controller.sync_render/3` view function: elixir defmodule Phoenix.Sync.LiveViewTest.TodoController do use Phoenix.Controller import Phoenix.Sync.Controller import Ecto.Query, only: [from: 2] def show(conn, %{"done" => done} = params) do sync_render(conn, params, from(t in Todos.Todo, where: t.done == ^done)) end def show_mine(%{assigns: %{current_user: user_id}} = conn, params) do sync_render(conn, params, from(t in Todos.Todo, where: t.owner_id == ^user_id)) end end This allows you to define and personalise the shape definition at runtime using the session and request. ### Consume shapes in the frontend You can sync _into_ any client in any language that speaks HTTP and JSON. For example, using the Electric Typescript client: typescript import { Shape, ShapeStream } from "@electric-sql/client"; const stream = new ShapeStream({ url: `/shapes/todos`, }); const shape = new Shape(stream); // The callback runs every time the data changes. shape.subscribe((data) => console.log(data)); Or binding a shape to a component using the React bindings: tsx import { useShape } from "@electric-sql/react"; const MyComponent = () => { const { data } = useShape({ url: `shapes/todos`, }); return <List todos={data} />; }; See the Electric demos and documentation for more client-side usage examples. ## Installation and configuration `Phoenix.Sync` can be used in two modes: 1. `:embedded` where Electric is included as an application dependency and Phoenix.Sync consumes data internally using Elixir APIs 2. `:http` where Electric does _not_ need to be included as an application dependency and Phoenix.Sync consumes data from an external Electric service using it's HTTP API ### Embedded mode In `:embedded` mode, Electric must be included an application dependency but does not expose an HTTP API (internally or externally). Messages are streamed internally between Electric and Phoenix.Sync using Elixir function APIs. The only HTTP API for sync is that exposed via your Phoenix Router using the `sync/2` macro and `sync_render/3` function. Example config: elixir # mix.exs defp deps do [ {:electric, ">= 1.0.0-beta.20"}, {:phoenix_sync, "~> 0.3"} ] end # config/config.exs config :phoenix_sync, env: config_env(), mode: :embedded, repo: MyApp.Repo # application.ex children = [ MyApp.Repo, # ... {MyApp.Endpoint, phoenix_sync: Phoenix.Sync.plug_opts()} ] ### HTTP In `:http` mode, Electric does not need to be included as an application dependency. Instead, Phoenix.Sync consumes data from an external Electric service over HTTP. elixir # mix.exs defp deps do [ {:phoenix_sync, "~> 0.3"} ] end # config/config.exs config :phoenix_sync, env: config_env(), mode: :http, url: "https://api.electric-sql.cloud", credentials: [ secret: "...", # required source_id: "..." # optional, required for Electric Cloud ] # application.ex children = [ MyApp.Repo, # ... {MyApp.Endpoint, phoenix_sync: Phoenix.Sync.plug_opts()} ] ### Local HTTP services It is also possible to include Electric as an application dependency and configure it to expose a local HTTP API that's consumed by Phoenix.Sync running in `:http` mode: elixir # mix.exs defp deps do [ {:electric, ">= 1.0.0-beta.20"}, {:phoenix_sync, "~> 0.3"} ] end # config/config.exs config :phoenix_sync, env: config_env(), mode: :http, http: [ port: 3000, ], repo: MyApp.Repo, url: "http://localhost:3000" # application.ex children = [ MyApp.Repo, # ... {MyApp.Endpoint, phoenix_sync: Phoenix.Sync.plug_opts()} ] This is less efficient than running in `:embedded` mode but may be useful for testing or when needing to run an HTTP proxy in front of Electric as part of your development stack. ### Different modes for different envs Apps using `:http` mode in certain environments can exclude `:electric` as a dependency for that environment. The following example shows how to configure: * `:embedded` mode in `:dev` * `:http` mode with a local Electric service in `:test` * `:http` mode with an external Electric service in `:prod` With Electric only included and compiled as a dependency in `:dev` and `:test`. elixir # mix.exs defp deps do [ {:electric, "~> 1.0.0-beta.20", only: [:dev, :test]}, {:phoenix_sync, "~> 0.3"} ] end # config/dev.exs config :phoenix_sync, env: config_env(), mode: :embedded, repo: MyApp.Repo # config/test.esx config :phoenix_sync, env: config_env(), mode: :http, http: [ port: 3000, ], repo: MyApp.Repo, url: "http://localhost:3000" # config/prod.exs config :phoenix_sync, mode: :http, url: "https://api.electric-sql.cloud", credentials: [ secret: "...", # required source_id: "..." # optional, required for Electric Cloud ] # application.ex children = [ MyApp.Repo, # ... {MyApp.Endpoint, phoenix_sync: Phoenix.Sync.plug_opts()} ] ## Examples The source code for Phoenix.Sync is maintained at electric-sql/phoenix\_sync. You can see various usage examples in the test/support folder. ### Phoenix LiveView The main Electric monorepo has a Phoenix LiveView example. This is an example Phoenix LiveView application that uses `Electric.Phoenix.LiveView.sync_stream/4` to sync data from Postgres into a LiveView using Phoenix Streams. ### Gatekeeper Auth The Gatekeeper auth example also contains a Phoenix application that uses Plug to authorize shape access and issue shape-scoped access tokens. ### Conductor There's also a conference demo app using Phoenix.Sync on GitHub at thruflo/conductor. This demonstrates using the LiveView, Router and Controller integrations. ## Support There's an `#elixir` channel in the Electric Discord that's a good place to ask questions. ## Help wanted Good first issue We have an open GitHub issue tracking this if you'd like to contribute an equivalent integration for other server-side frameworks, such as Rails, Laravel, Django, etc. Please leave a comment or ask on Discord if you'd like any pointers or to discuss how best to approach this. --- ## Page: https://electric-sql.com/docs/integrations/react  ## React React is a popular library for building declarative, component-based UI. ## Electric and React Electric has first-class support for React. We maintain a react-hooks package that provides a number of React Hooks to bind Shape data to your components. ## How to use ### Install The package is published on NPM as `@electric-sql/react`. Install using e.g.: shell npm i @electric-sql/react ### `useShape` `useShape` binds a materialised Shape to a state variable. For example: tsx import { useShape } from '@electric-sql/react' const MyComponent = () => { const { isLoading, data } = useShape<{title: string}>({ url: `http://localhost:3000/v1/shape`, params: { table: 'items' } }) if (isLoading) { return <div>Loading ...</div> } return ( <div> {data.map(item => <div>{item.title}</div>)} </div> ) } You can also include additional PostgreSQL-specific parameters: tsx const MyFilteredComponent = () => { const { isLoading, data } = useShape<{id: number, title: string}>({ url: `http://localhost:3000/v1/shape`, params: { table: 'items', where: 'status = \'active\'', columns: ['id', 'title'] } }) // ... } `useShape` takes the same options as ShapeStream. The return value is a `UseShapeResult`: tsx export interface UseShapeResult<T extends Row<unknown> = Row> { /** * The array of rows that make up the materialised Shape. * @type {T[]} */ data: T[] /** * The Shape instance used by this useShape * @type {Shape<T>} */ shape: Shape<T> /** True during initial fetch. False afterwise. */ isLoading: boolean /** Unix time at which we last synced. Undefined when `isLoading` is true. */ lastSyncedAt?: number /** Unix time at which we last synced. Undefined when `isLoading` is true. */ isError: boolean error: Shape<T>[`error`] } ### `preloadShape` `preloadShape` is useful to call in route loading functions or elsewhere when you want to ensure Shape data is loaded before rendering a route or component. tsx export const clientLoader = async () => { return await preloadShape({ url: `http://localhost:3000/v1/shape`, params: { table: 'items' } }) } You can also preload filtered data: tsx export const filteredLoader = async () => { return await preloadShape({ url: `http://localhost:3000/v1/shape`, params: { table: 'items', where: 'category = \'electronics\'', columns: ['id', 'name', 'price'] } }) } It takes the same options as ShapeStream. ### `getShapeStream` `getShapeStream<T>` get-or-creates a `ShapeStream` off the global cache. tsx const itemsStream = getShapeStream<Item>({ url: `http://localhost:3000/v1/shape`, params: { table: 'items' } }) This allows you to avoid consuming multiple streams for the same shape log. ### `getShape` `getShape<T>` get-or-creates a `Shape` off the global cache. tsx const itemsShape = getShape<Item>({ url: `http://localhost:3000/v1/shape`, params: { table: 'items' } }) This allows you to avoid materialising multiple shapes for the same stream. ### How to abort a shape subscription — `AbortController` If you'd like to abort the shape's subscription to live updates e.g. after unmounting a component or navigating away from a route, you can use the `AbortController`. The following is a simple example which aborts the subscription when the component is unmounted. tsx function MyComponent() { const [controller, _] = useState(new AbortController()) const { data } = useShape({ ... signal: controller.signal }) useEffect(() => { return () { // Live updates are now disabled. controller.abort() } }, []) ... } Note that if you have multiple components using the same component, this will stop updates for all subscribers. Which is probably not what you want. We plan to add a better API for unsubscribing from updates & cleaning up shapes that are no longer needed. If interested, please file an issue to start a discussion. --- ## Page: https://electric-sql.com/docs/integrations/redis  ## Redis Redis is an in-memory "data structure server", often used as a cache. ## Electric and Redis Many applications use Redis as a local cache. With Electric, you can define a Shape and sync it into a Redis data structure. ### Example The shape stream comes through as a log of insert, update and delete messages. Apply these to the Redis hash and the cache automatically stays up-to-date: ts import { createClient } from 'redis' import { ShapeStream, Message, isChangeMessage } from '@electric-sql/client' // Create a Redis client const REDIS_HOST = `localhost` const REDIS_PORT = 6379 const client = createClient({ url: `redis://${REDIS_HOST}:${REDIS_PORT}`, }) client.connect().then(async () => { console.log(`Connected to Redis server`) // Clear out old data on the hash. client.del(`items`) // Lua script for updating hash field. We need to merge in partial updates // from the shape log. const script = ` local current = redis.call('HGET', KEYS[1], KEYS[2]) local parsed = {} if current then parsed = cjson.decode(current) end for k, v in pairs(cjson.decode(ARGV[1])) do parsed[k] = v end local updated = cjson.encode(parsed) return redis.call('HSET', KEYS[1], KEYS[2], updated) ` // Load the script into Redis and get its SHA1 digest const updateKeyScriptSha1 = await client.SCRIPT_LOAD(script) const itemsStream = new ShapeStream({ url: `http://localhost:3000/v1/shape`, params: { table: `items`, }, }) itemsStream.subscribe(async (messages: Message[]) => { // Begin a Redis transaction // // FIXME The Redis docs suggest only sending 10k commands at a time // to avoid excess memory usage buffering commands. const pipeline = client.multi() // Loop through each message and make writes to the Redis hash for action messages messages.forEach((message) => { if (!isChangeMessage(message)) return console.log(`message`, message) // Upsert/delete switch (message.headers.operation) { case `delete`: pipeline.hDel(`items`, message.key) break case `insert`: pipeline.hSet( `items`, String(message.key), JSON.stringify(message.value) ) break case `update`: { pipeline.evalSha(updateKeyScriptSha1, { keys: [`items`, String(message.key)], arguments: [JSON.stringify(message.value)], }) break } } }) // Execute all commands as a single transaction try { await pipeline.exec() console.log(`Redis hash updated successfully with latest shape updates`) } catch (error) { console.error(`Error while updating hash:`, error) } }) }) See the Redis example for more details. ## Help wanted Good first issue We have an open GitHub issue tracking this if you'd like to contribute a library that wraps up the `redis-sync` example into an `@electric-sql/redis` integration library. Please leave a comment or ask on Discord if you'd like any pointers or to discuss how best to approach this. --- ## Page: https://electric-sql.com/docs/integrations/tanstack  ## TanStack TanStack is a set of utilities for building web applications. TanStack Query is a data-fetching and state management library. ## Electric and TanStack Electric works very well together with TanStack Query, where Electric provides the read-path sync and TanStack provides a local write-path with optimistic state. 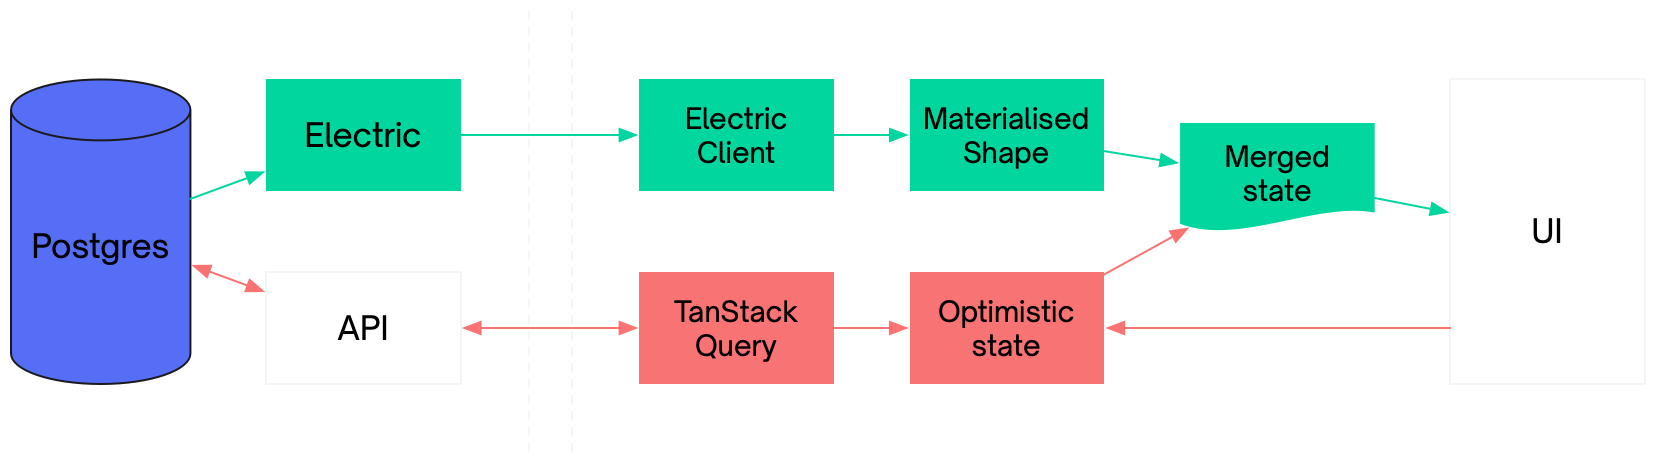 _Green shows read-path sync via Electric. Red shows write-path via TanStack._ In this configuration, Electric and TanStack can provide a fully offline-capable system with active-active replication of both reads and writes. ### Example The example below shows a simple todo application that uses Electric for read-path sync and TanStack for local optimistic writes. Electric is used to sync a shape. TanStack is used to apply mutations and maintain optimistic state. When a mutation is confirmed, it cleares the optimistic state. When the component renders, it merges the optimistic state into the shape data. tsx import { getShapeStream, useShape } from "@electric-sql/react" import { useMutation, useMutationState, useQueryClient, } from "@tanstack/react-query" import { matchStream } from "./match-stream" import { v4 as uuidv4 } from "uuid" import "./Example.css" type Item = { id: string } const baseUrl = import.meta.env.ELECTRIC_URL ?? `http://localhost:3000` const baseApiUrl = `http://localhost:3001` const itemsUrl = new URL(`/items`, baseApiUrl) const itemShape = () => ({ url: new URL(`/v1/shape`, baseUrl).href, params: { table: `items`, }, }) async function createItem(newId: string) { const itemsStream = getShapeStream<Item>(itemShape()) // Match the insert const findUpdatePromise = matchStream({ stream: itemsStream, operations: [`insert`], matchFn: ({ message }) => message.value.id === newId, }) // Insert item const fetchPromise = fetch(itemsUrl, { method: `POST`, body: JSON.stringify({ id: newId }), }) return await Promise.all([findUpdatePromise, fetchPromise]) } async function clearItems(numItems: number) { const itemsStream = getShapeStream(itemShape()) // Match the delete const findUpdatePromise = numItems > 0 ? matchStream({ stream: itemsStream, operations: [`delete`], // First delete will match matchFn: () => true, }) : Promise.resolve() // Delete all items const fetchPromise = fetch(itemsUrl, { method: `DELETE` }) return await Promise.all([findUpdatePromise, fetchPromise]) } export const Example = () => { const queryClient = useQueryClient() const { data: items } = useShape<Item>(itemShape()) const submissions: Item[] = useMutationState({ filters: { status: `pending` }, select: (mutation) => mutation.state.context as Item, }).filter((item) => item !== undefined) const { mutateAsync: addItemMut } = useMutation({ scope: { id: `items` }, mutationKey: [`add-item`], mutationFn: (newId: string) => createItem(newId), onMutate: (id) => { const optimisticItem: Item = { id } return optimisticItem }, }) const { mutateAsync: clearItemsMut, isPending: isClearing } = useMutation({ scope: { id: `items` }, mutationKey: [`clear-items`], mutationFn: (numItems: number) => clearItems(numItems), onMutate: () => { const addMutations = queryClient .getMutationCache() .findAll({ mutationKey: [`add-item`] })! addMutations?.forEach((mut) => queryClient.getMutationCache().remove(mut)) }, }) // Merge data from shape & optimistic data from fetchers. This removes // possible duplicates as there's a potential race condition where // useShape updates from the stream slightly before the action has finished. const itemsMap = new Map<string, Item>() if (!isClearing) { items.concat(submissions).forEach((item) => { itemsMap.set(item.id, { ...itemsMap.get(item.id), ...item }) }) } else { submissions.forEach((item) => itemsMap.set(item.id, item)) } return ( <div> <div> <button type="submit" className="button" onClick={() => addItemMut(uuidv4())} > Add </button> <button type="submit" className="button" onClick={() => clearItemsMut(items.length)} > Clear </button> </div> {[...itemsMap.values()].map((item: Item, index: number) => ( <p key={index} className="item"> <code>{item.id}</code> </p> ))} </div> ) } See the Tanstack example for the full source code. ## Help wanted Good first issue We have an open GitHub issue tracking this if you'd like to contribute a library based on the `tanstack` example that integrates Electric and TanStack into a higher level interface. Please leave a comment or ask on Discord if you'd like any pointers or to discuss how best to approach this. --- ## Page: https://electric-sql.com/docs/integrations/yjs  ## Yjs Yjs is a CRDT library for building collaborative applications. ## Electric and Yjs Electric can be used with Yjs to create collaborative applications on top of Postgres. See the Notes and Yjs provider examples for two different example apps showing how to integrate Electric with Yjs. ## Help wanted Good first issue We have an open GitHub issue tracking this if you'd like to contribute a Yjs integration library based on the `notes` and `yjs-provider` examples. Please leave a comment or ask on Discord if you'd like any pointers or to discuss how best to approach this. --- ## Page: https://electric-sql.com/docs/integrations/aws  ## Amazon Web Services (AWS) AWS is a cloud infrastructure platform. ## Electric and AWS You can use AWS to deploy any or all components of the Electric stack: * deploy a Postgres database * an Electric sync service * your client application If you already run Postgres in AWS, potentially using RDS or Aurora, then it's a great idea to also deploy Electric within the same network. ### Deploy Postgres AWS provides Postgres hosting via RDS and Aurora. Electric works with either. You need to configure them to enable logical replication and connect with the right user. The default `wal_level` is `minimal` for RDS and `replica` for Aurora. It can be changed to `logical` by creating a custom parameter group for the RDS instance (or the Aurora DB cluster) and setting the value of the `rds.logical_replication` parameter to `1` and rebooting the instance. The default `postgres` user has the `REPLICATION` role. If you need to add it to another user you can do so by granting the `rds_replication` role, e.g.: sql GRANT rds_replication TO someuser; ### Deploy Electric AWS provides a wide range of container hosting. For example, you can deploy Electric to AWS Elastic Container Service using AWS Fargate. You should store Shape logs to a persistent disk (not an ephemoral filesystem). For example using Amazon Elastic File System. ### Deploy your app AWS provides a range of website hosting options. For example you can deploy a static app to AWS Amplify. ## Examples ### AWS Terraform We have an example Terraform repo at electric-sql/terraform-aws. --- ## Page: https://electric-sql.com/docs/integrations/cloudflare  ## Cloudflare Cloudflare is a global network and edge-cloud platform. ## Electric and Cloudflare You can use Cloudflare as a CDN in front of Electric and as a sync target to sync data into Cloudflare primitives including Workers and Durable Objects. ### CDN Cloudflare provides a global content delivery network. This guide walks through the process of using it. Basically you need to create a DNS rule resolving to the Electric service and enable Cloudflare as a proxy for it. Electric's HTTP API caching will work out of the box. ### Workers You can also use Cloudflare Workers in front of the CDN to handle concerns like authorization and routing. #### Auth example For example, you could validate an auth token to protect access to a shape and then proxy the request through to Electric: ts export default { async fetch(request): Promise<Response> { const ELECTRIC_URL = 'https://my-electric.example.com' const headers = request.headers const authHeader = request.headers.get('Authorization') const isValid = (header) => { /* ... e.g.: verify JWT ... */ } if (!isValid(authHeader)) { return new Response('Forbidden', {status: 403}) } if (request.method != `GET`) { return new Response('Method Not Allowed', {status: 405}) } const url = new URL(request.url) const shapeUrl = `${ELECTRIC_URL}${url.pathname}${url.search}` const clonedHeaders = new Headers(new Request(request).headers) return await fetch( shapeUrl, { headers: clonedHeaders, cf: { cacheEverything: true } } ) }, } satisfies ExportedHandler; #### Syncing data into the worker Or you can use Electric to hydrate data quickly into an edge worker. For example, you could sync data into an edge worker to dynamically redirect the request: ts import { ShapeStream, Shape } from '@electric-sql/client' export default { async fetch(request): Promise<Response> { const ELECTRIC_URL = 'https://my-electric.example.com' const stream = new ShapeStream({ url: `${ELECTRIC_URL}/v1/shape`, params: { table: 'routes' } }) const shape = new Shape(stream) const routes = await shape.value const url = new URL(request.url) const match = routes.find(x => x.path == url.pathname) if (!match) { return new Response('Not Found', {status: 404}) } return Response.redirect(match.redirect, 301) }, } satisfies ExportedHandler; ### Durable Objects You can implement a similar pattern to the sync example above to sync data into a Durable Object. The key difference is that with a Durable Object, the data can be persisted across requests. This allows you to sync a shape log into the Durable Object, materialise the shape into persistent storage and then re-sync the latest changes whenever the Durable Object is accessed. You can see a demo of this pattern, using SQLite to persist the Shape data, at KyleAMathews/electric-demo-cloudflare-sqlite: Combining CDN and Durable Objects Note that if you sync data into a Durable Object (or a Worker) from Cloudflare's CDN it can be _extremely fast_ — with high bandwidth and low network latency. ## Help wanted Good first issue We have an open GitHub issue tracking this if you'd like to contribute example apps using Cloudflare and/or wrap up the code samples above into a library. Please leave a comment or ask on Discord if you'd like any pointers or to discuss how best to approach this. --- ## Page: https://electric-sql.com/docs/integrations/crunchy  ## Crunchy Data Crunchy is a Postgres hosting provider. ## Electric and Crunchy You can use Electric with Crunchy Bridge, their managed cloud Postgres product. ### Deploy Postgres Sign up to Crunchy Bridge and go through the steps to create a cluster. Go to the "Connection" tab, select "URL", set the role to "postgres (superuser)" and copy the connection string. You can then run Electric with this connection string as the `DATABASE_URL`, e.g.: shell docker run -it \ -e "DATABASE_URL=postgres://postgres:****@p.YOUR_CLUSTER_ID.db.postgresbridge.com:5432/postgres" \ electricsql/electric:latest You can also use the `postgres` superuser to create other users with the `REPLICATION` role, e.g.: sql CREATE ROLE electric WITH REPLICATION LOGIN PASSWORD '...'; GRANT ALL PRIVILEGES ON DATABASE "postgres" to electric; You can then connect as the new `electric` user. --- ## Page: https://electric-sql.com/docs/integrations/digital-ocean  ## Digital Ocean Digital Ocean is a cloud hosting platform. ## Electric and Digital Ocean You can use Digital Ocean to deploy any or all components of the Electric stack: * deploy a Postgres database * an Electric sync service * your client application If you already run a Managed Postgres in Digital Ocean, then it's a great idea to also deploy Electric within the same network. ### Deploy Postgres Digital Ocean provides Managed Postgres. This has logical replication enabled and works with Electric out of the box. Use `doadmin` for older Postgres versions If you're using Postgres version 15 or lower, you will need to connect to your Managed Postgres as the `doadmin` user. This is the default user and the only user with the `REPLICATION` role. (With later Postgres versions its fine to create other users and use the `doadmin` user to grant them the `REPLICATION` role). ### Deploy Electric Digital Ocean has a number of different ways to deploy web services. We recommend using a Docker Droplet. Below we walk through the steps to deploy Electric using a Docker Droplet. First you create the Droplet. Then setup some Docker / SSH networking so your local Docker can talk to it. Then use Docker Compose to run Electric inside the Droplet. Don't use App Platform We **don't recommend** that you use App Platform to deploy the Electric sync service because App Platform does not provide persistent file storage for Shape logs. #### Create Droplet Go to the Docker marketplace page and click on the "Create Docker Droplet" button. Follow the prompts. You **must** use key-based SSH authentication (so that you can set up your local Docker to talk to the remote daemon). It's a good idea to change the hostname to something like `electric-sync` as well. Create the Droplet and wait until its ready with an IPv4 address. Copy the address and use it in place of `YOUR_IP_ADDRESS` in the instructions that follow. #### Connect Docker Connect to your new Droplet using `ssh` in order to verify the authenticity of the host and add its public key to your local `known_hosts` file. console $ ssh root@YOUR_IP_ADDRESS ... Are you sure you want to continue connecting (yes/no/[fingerprint])? yes Warning: Permanently added 'YOUR_IP_ADDRESS' (ED25519) to the list of known hosts. Permission denied? If the output from the command above ends with: ... Permission denied (publickey). Then you need to add a section to your `~/.ssg/config` to tell it to use your SSH key when connecting to `YOUR_IP_ADDRESS`. Something like this will do: Host YOUR_IP_ADDRESS Port 22 Hostname YOUR_IP_ADDRESS AddKeysToAgent yes IdentitiesOnly yes IdentityFile ~/.ssh/path_to_your_private_ssh_key TCPKeepAlive yes UseKeychain yes Now set the `DOCKER_HOST` environment variable to point to your Droplet's IP address: shell export DOCKER_HOST=ssh://root@YOUR_IP_ADDRESS #### Deploy Save the following contents into a file called `compose.yaml`, changing the `DATABASE_URL` and setting any other environment variables to match your setup. yaml services: electric: image: electricsql/electric:latest environment: DATABASE_URL: "postgresql://..." ports: - 80:3000 restart: always Now launch on the remote server, with output that should look something like this: console $ docker compose up [+] Running 8/8 ✔ electric 7 layers [⣿⣿⣿⣿⣿⣿⣿] 0B/0B Pulled 8.2s ✔ efc2b5ad9eec Pull complete 3.4s ✔ 2cb0d575dcef Pull complete 4.5s ✔ c1b251d76665 Pull complete 4.6s ✔ c82981779fd9 Pull complete 4.7s ✔ 65b429e477c5 Pull complete 4.8s ✔ 1fd7ee9efb04 Pull complete 6.0s ✔ 87053f06541e Pull complete 6.1s [+] Running 2/2 ✔ Network electric-sync-droplet_default Created 0.2s ✔ Container electric-sync-droplet-electric-1 Created 0.2s Attaching to electric-sync-droplet-electric-1 electric-sync-droplet-electric-1 | =INFO REPORT==== 23-Oct-2024::13:16:01.777082 === electric-sync-droplet-electric-1 | Loading 140 CA(s) from otp store electric-sync-droplet-electric-1 | 13:16:01.832 [info] Running Electric.Plug.Router with Bandit 1.5.5 at 0.0.0.0:3000 (http) electric-sync-droplet-electric-1 | 13:16:01.935 [info] Acquiring lock from postgres with name electric_slot_default electric-sync-droplet-electric-1 | 13:16:01.937 [info] Lock acquired from postgres with name electric_slot_default electric-sync-droplet-electric-1 | 13:16:02.006 [info] Postgres server version = 160004, system identifier = 7428958789530034185, timeline_id = 1 electric-sync-droplet-electric-1 | 13:16:02.145 [info] No previous timeline detected. electric-sync-droplet-electric-1 | 13:16:02.146 [info] Connected to Postgres and timeline electric-sync-droplet-electric-1 | 13:16:02.147 [info] Starting shape replication pipeline electric-sync-droplet-electric-1 | 13:16:02.150 [info] Starting replication from postgres You can hit the health check endpoint to verify that everything is running OK: console $ curl http://YOUR_IP_ADDRESS/v1/health {"status":"active"} ### Deploy your app You can deploy your client app to Digital Ocean using App Platform. --- ## Page: https://electric-sql.com/docs/integrations/expo  ## Expo Expo is a platform that helps you deploy React Native applications. ## Electric and Expo Expo applications are developed in Javacript (or Typescript) using React Native. You can use the Electric Typescript client in your Expo applications. This allows you to sync data from Electric into mobile apps. ## Example Follow the Expo Quickstart to create an Expo app. Replace the generated `./app/(tabs)/index.tsx` with the following: tsx import { Text } from 'react-native' import { useShape } from '@electric-sql/react' // Edit to match your setup. const ELECTRIC_URL = 'https://my-electric-sync-service.example.com' export default function HomeScreen() { const { isLoading, data } = useShape({ url: `${ELECTRIC_URL}/v1/shape`, params: { table: 'items' } }) if (isLoading) { return null } return ( <Text>{ JSON.stringify(data, null, 4) }</Text> ) } Install `@electric-sql/react` (if necessary using `--force` to work around a React dependency version mismatch): shell npm install '@electric-sql/react' --force Run, e.g. in the browser: shell npm run web If there's data in the `items` table of your Postgres, you should see it syncing into your app. ## PGlite PGlite doesn't _yet_ work in React Native. We have an open issue tracking support for it. When it does, we hope to work with the Expo team to get an official `expo-pglite` package published. --- ## Page: https://electric-sql.com/docs/integrations/fly  ## Fly.io Fly.io is a public cloud built for developers who ship. ## Electric and Fly You can use Fly to deploy any or all components of the Electric stack: * deploy a Postgres database * an Electric sync service * your client application One of Fly's specialities is deploying Elixir applications. So Fly is especially good for deploying the Electric sync service and/or Phoenix applications using Electric. ### Deploy Postgres Fly Postgres is not a managed Postgres service. See the general advice on Running Postgres in the deployment guide for information on how to configure Postgres to work with Electric. Fly's Supabase Postgres is a managed Postgres service, powered by Supabase. If you use it, make sure to connect on the IPv6 `DATABASE_URL` rather than the `DATABASE_POOLER_URL`. See the Supabase deployment docs and the IPv6 section of the troubleshooting guide for more information about IPv6 support. ### Deploy Electric Copy the following config into a file called `fly.toml`, replacing the app name and `DATABASE_URL`: toml app = "YOUR_UNIQUE_APP_NAME" [build] image = "electricsql/electric:latest" [env] DATABASE_URL = "postgresql://..." ELECTRIC_DATABASE_USE_IPV6 = true [http_service] internal_port = 3000 force_https = true [[http_service.checks]] interval = "10s" timeout = "2s" grace_period = "20s" method = "GET" path = "/v1/health" Using the `flyctl` client, in the same directory as `fly.toml`, run: shell flyctl launch --copy-config --ha=false Hit the health check endpoint to verify that everything is running OK: console $ curl https://YOUR_UNIQUE_APP_NAME.fly.dev/v1/health {"status":"active"} ### Deploy your app You can run most kinds of apps on Fly, including static sites. --- ## Page: https://electric-sql.com/docs/integrations/gcp  ## Google Cloud Platform (GCP) GCP is a cloud infrastructure platform. ## Electric and GCP You can use GCP to deploy any or all components of the Electric stack: * deploy a Postgres database * an Electric sync service * your client application If you already run Postgres in GCP, then it's a great idea to also deploy Electric within the same network. ### Deploy Postgres GCP provides Postgres hosting via Cloud SQL or AlloyDB. Electric works with either. You need to configure them to enable logical replication and connect with the right user. #### Cloud SQL The default `wal_level` is `replica`. Change it to `logical` by setting the `cloudsql.logical_decoding` flag to `on`. Customise your instance on setup You can set flags in the "Flags" panel of the "Customise your instance" section of the create database page in the console, when setting up your database. Be careful to connect using the "Outgoing IP address", not the "Public IP address". You will also need to create a new database user with `REPLICATION`. Log in using the default `postgres` user and then run something like this, changing the username and database name as necessary: sql CREATE ROLE electric WITH REPLICATION LOGIN PASSWORD '...'; GRANT ALL PRIVILEGES ON DATABASE "postgres" to electric; You can then connect to Postgres from Electric as that user, which you can verify using e.g.: shell docker run -it -e DATABASE_URL=postgresql://electric:YOUR_PASSWORD@YOUR_OUTGOING_IP/postgres electricsql/electric:latest #### AlloyDB For AlloyDB, the flag to enable logical replication is called `alloydb.logical_decoding`. ### Deploy Electric GCP provides a wide range of container hosting. We recommend using Containers on Compute Engine or Google Kubernetes Engine (GKE). For example, you can deploy Electric on a Container-Optimized OS with a Persistent Disk for storing Shape logs. Don't use Cloud Run We **don't recommend** that you use Cloud Run to deploy the Electric sync service because Cloud Run uses an in-memory filesystem and does not provide persistent file storage for Shape logs. ### Deploy your app GCP provides a range of website hosting options. For example you can deploy a static app to Google Storage with Cloud Build. --- ## Page: https://electric-sql.com/docs/integrations/neon  ## Neon Neon is a serverless Postgres hosting platform. ## Electric and Neon You can use Electric with Neon's serverless Postgres hosting. ### Deploy Postgres Sign up to Neon and go through the steps to create a database. On the project page, go to `Settings -> Logical Replication` and click "Enable". ### Connect Electric Go to the Dashboard page and copy the database connection string. Make sure you **don't** check "Pooled connection". You want the direct connection string in order to use logical replication. You can then run Electric with this connection string as the `DATABASE_URL`, e.g.: shell docker run -it \ -e "DATABASE_URL=YOUR_NEON_CONNECTION_STRING" \ electricsql/electric:latest Need somewhere to host Electric? If you need somewhere to deploy Electric then Neon works well with Render. ## PGlite Electric and Neon have also collaborated to develop PGlite, which was started as a project by Neon's CTO, Stas Kelvich. --- ## Page: https://electric-sql.com/docs/integrations/netlify  ## Netlify Netlify is an application deployment platform. ## Electric and Netlify Netlify is a great choice for deploying client-side web apps that use Electric. Need context? See the Deployment guide for more details. ### Deploy your app Create your app, connect it to Netlify and deploy via `git push`. ### Connect to Electric You need Electric (and Postgres) running somewhere else The easiest way is to use the Electric Cloud. Or see the Deployment guide. Copy the URL to your Electric instance and use it when syncing data into your app. E.g.: by setting an environment variable and using it in your code: tsx const ELECTRIC_URL = process.env.ELECTRIC_URL const stream = new ShapeStream({ url: `${ELECTRIC_URL}/v1/shape`, params: { table: 'items' } }) See the Client docs for more information. ## Example ### Deploy example app Deploy our standalone-basic-example app using the form below: `ELECTRIC_URL`: required, must start with `https://`.  --- ## Page: https://electric-sql.com/docs/integrations/render  ## Render Render is a cloud infrastructure and web hosting platform. ## Electric and Render You can use Render to deploy an Electric sync service and your client application. Postgres on Render and logical replication Render does provide managed Postgres hosting. However, this doesn't yet support logical replication, so you can't currently use Electric with it. If you need Postgres hosting to use with Render, Neon and Supabase both work great. ### Deploy Electric Deploy Electric as a Web Service using their deploy from a container registry option. In the Render dashboard, create a new Web Service, select Existing Image and paste `electricsql/electric` as the image URL. Then on the next screen set a `DATABASE_URL` and any other config as environment variables. You can also optionally enter `/v1/health` as the path for a health check. Under "Advanced" make sure you add a Persistent Disk and set the Mount path to e.g.: `/var/electric`. Then also set the `ELECTRIC_STORAGE_DIR` environment variable to the same mount path, e.g.: `ELECTRIC_STORAGE_DIR=/var/electric`. ### Deploy your app You can deploy your app on Render as a Static Site. For example, you can deploy our standalone-basic-example by: * selecting "Public GitHub Repository" and pasting `https://github.com/electric-sql/standalone-basic-example` as the value * setting the publish directory to `dist` * setting a `VITE_ELECTRIC_URL` environment variable to the URL of your Electric web service, such as `https://YOUR_WEB_SERVICE_NAME.onrender.com` Then make sure that your Postgres database has an `items` table with an `id` column and insert some data into it. ## Example Render supports Blueprints to deploy infrastructure as code. The following example shows how to deploy Electric and an example web app that connects to it. Requires an existing Postgres running somewhere else The Blueprint above requires a `DATABASE_URL` to an existing Postgres database hosted somewhere else. Also, as per the example above, the example app it deploys assumes you have an `items` table in your database. ### `render.yaml` Blueprint Clone github.com/electric-sql/render-blueprint or copy the following config into a `render.yaml` file: yaml services: - type: web runtime: image name: electric image: url: electricsql/electric:latest disk: name: storage mountPath: /var/electric sizeGB: 20 envVars: - key: DATABASE_URL sync: false - key: ELECTRIC_STORAGE_DIR value: "/var/electric" - type: web runtime: static name: app buildCommand: VITE_ELECTRIC_URL="https://${ELECTRIC_HOST}.onrender.com" npm run build staticPublishPath: ./dist envVars: - key: ELECTRIC_HOST fromService: name: electric type: web property: host You can then follow the instructions here to deploy the Blueprint on Render. In short, you push the `render.yaml` to a repo, open the Render Dashboard, click "New > Blueprint", connect the repo and enter your `DATABASE_URL` when prompted. --- ## Page: https://electric-sql.com/docs/integrations/supabase  ## Supabase Supabase is a Postgres hosting and backend-as-a-service platform for building web, mobile and AI applications. ## Electric and Supabase You can use Electric on Supabase's hosted Postgres. You can also use Electric to sync data into Supabase Edge Functions. ### Deploy Postgres Supabase Postgres databases come with logical replication enabled and the necessary permissions for Electric to work. Create a database on Supabase.com. Click the "Connect" button in the top right to get the connection string. Make sure you untick the "Display connection pooler" option to get the direct access URL, because the pooled URL does not support logical replication. Note that this direct access URL only works with IPv6, which means you will need to configure Electric to connect over IPv6. ### Connect Electric Configure Electric to connect to the direct access `DATABASE_URL` you copied above. Set `ELECTRIC_DATABASE_USE_IPV6` to `true`, e.g.: shell docker run -it \ -e "DATABASE_URL=postgresql://postgres:[YOUR_PASSWORD]@db.[YOUR_PROJECT_ID].supabase.co:5432/postgres" \ -e "ELECTRIC_DATABASE_USE_IPV6=true" \ -p 3000:3000 \ electricsql/electric:latest #### Troubleshooting IPv6 When connecting to a Supabase Postgres, you either need to make sure Electric and its network supports IPv6, or you need to be on a Pro or Team plan with Supabase Platform to enable their IPv4 add-on. See the troubleshooting guide on IPv6 for tips on enabling IPv6 support for Electric. Or see this Supabase guide for information about enabling their IPv4 add-on. ### Sync into Edge Function You can also use Electric to sync data into a Supabase Edge Function. Install the Supabase CLI and follow the steps in this Quickstart to initialise a new project and create an edge function, e.g.: shell supabase init supabase functions new hello-electric Start Supabase and serve the functions locally: shell supabase start supabase functions serve Run `tail` to see the `curl` command at the bottom of the generated `supabase/functions/hello-electric/index.ts` file: shell tail supabase/functions/hello-electric/index.ts Copy the `curl` command (with the real value for `[YOUR_ANON_KEY]`) and run it once against the default function implementation: console $ curl -i --location --request POST 'http://127.0.0.1:54321/functions/v1/hello-electric' \ --header 'Authorization: Bearer [YOUR_ANON_KEY]' \ --header 'Content-Type: application/json' \ --data '{"name":"Functions"}' ... {"message":"Hello Functions!"} Now, replace the contents of `supabase/functions/hello-electric/index.ts` with the following, replacing `[YOUR_ELECTRIC_URL]` with the URL of an Electric service, running against a Postgres database with an `items` table. (This can be `http://localhost:3000` if you're running the local docker command we used above when connecting Electric to Supabase Postgres). ts import { Shape, ShapeStream } from 'npm:@electric-sql/client' Deno.serve(async (req) => { const stream = new ShapeStream({ url: '[YOUR_ELECTRIC_URL]/v1/shape', params: { table: 'items' } }) const shape = new Shape(stream) const items = [...await shape.value] return new Response( JSON.stringify(items), { headers: { "Content-Type": "application/json" } }, ) }) Save it, wait a second and then run the same `curl` command you just ran before to make a request to the edge function. You should see the data from your `items` table in the HTTP response, e.g.: console $ curl -i --location --request POST 'http://127.0.0.1:54321/functions/v1/hello-electric' \ --header 'Authorization: Bearer [YOUR_ANON_KEY]' \ --header 'Content-Type: application/json' \ --data '{"name":"Functions"}' ... [["\"public\".\"items\"/\"69ad0c7c-7a84-48e8-84fc-d92e5bd5e2f4\"", ...] ## PGlite Electric and Supabase are also collaborating to develop PGlite, which Supabase sponsor, contribute to and have developed database.build on.