W↓
All docs
🔑
Sign Up/Sign In
nextjs.org/docs
Public Link
Apr 23, 2025, 11:49:26 AM - complete - 5.2 MB
Created by:
****st@ptct.net
Starting URLs:
https://nextjs.org/docs
## Page: https://nextjs.org/docs Welcome to the Next.js documentation! ## What is Next.js? Next.js is a React framework for building full-stack web applications. You use React Components to build user interfaces, and Next.js for additional features and optimizations. Under the hood, Next.js also abstracts and automatically configures tooling needed for React, like bundling, compiling, and more. This allows you to focus on building your application instead of spending time with configuration. Whether you're an individual developer or part of a larger team, Next.js can help you build interactive, dynamic, and fast React applications. ## Main Features Some of the main Next.js features include: | Feature | Description | | --- | --- | | Routing | A file-system based router built on top of Server Components that supports layouts, nested routing, loading states, error handling, and more. | | Rendering | Client-side and Server-side Rendering with Client and Server Components. Further optimized with Static and Dynamic Rendering on the server with Next.js. Streaming on Edge and Node.js runtimes. | | Data Fetching | Simplified data fetching with async/await in Server Components, and an extended `fetch` API for request memoization, data caching and revalidation. | | Styling | Support for your preferred styling methods, including CSS Modules, Tailwind CSS, and CSS-in-JS | | Optimizations | Image, Fonts, and Script Optimizations to improve your application's Core Web Vitals and User Experience. | | TypeScript | Improved support for TypeScript, with better type checking and more efficient compilation, as well as custom TypeScript Plugin and type checker. | ## How to Use These Docs On the left side of the screen, you'll find the docs navbar. The pages of the docs are organized sequentially, from basic to advanced, so you can follow them step-by-step when building your application. However, you can read them in any order or skip to the pages that apply to your use case. On the right side of the screen, you'll see a table of contents that makes it easier to navigate between sections of a page. If you need to quickly find a page, you can use the search bar at the top, or the search shortcut (`Ctrl+K` or `Cmd+K`). To get started, check out the Installation guide. ## App Router vs Pages Router Next.js has two different routers: the App Router and the Pages Router. The App Router is a newer router that allows you to use React's latest features, such as Server Components and Streaming. The Pages Router is the original Next.js router, which allowed you to build server-rendered React applications and continues to be supported for older Next.js applications. At the top of the sidebar, you'll notice a dropdown menu that allows you to switch between the **App Router** and the **Pages Router** features. Since there are features that are unique to each directory, it's important to keep track of which tab is selected. The breadcrumbs at the top of the page will also indicate whether you're viewing App Router docs or Pages Router docs. ## Pre-Requisite Knowledge Although our docs are designed to be beginner-friendly, we need to establish a baseline so that the docs can stay focused on Next.js functionality. We'll make sure to provide links to relevant documentation whenever we introduce a new concept. To get the most out of our docs, it's recommended that you have a basic understanding of HTML, CSS, and React. If you need to brush up on your React skills, check out our React Foundations Course, which will introduce you to the fundamentals. Then, learn more about Next.js by building a dashboard application. ## Accessibility For optimal accessibility when using a screen reader while reading the docs, we recommend using Firefox and NVDA, or Safari and VoiceOver. If you have questions about anything related to Next.js, you're always welcome to ask our community on GitHub Discussions, Discord, X (Twitter), and Reddit. --- ## Page: https://nextjs.org/docs/app/getting-started #### Subscribe to our newsletter Stay updated on new releases and features, guides, and case studies. --- ## Page: https://nextjs.org/docs/app/getting-started/installation ## How to set up a new Next.js project ## System requirements Before you begin, make sure your system meets the following requirements: * Node.js 18.18 or later. * macOS, Windows (including WSL), or Linux. ## Automatic installation The quickest way to create a new Next.js app is using `create-next-app`, which sets up everything automatically for you. To create a project, run: npx create-next-app@latest On installation, you'll see the following prompts: What is your project named? my-app Would you like to use TypeScript? No / Yes Would you like to use ESLint? No / Yes Would you like to use Tailwind CSS? No / Yes Would you like your code inside a `src/` directory? No / Yes Would you like to use App Router? (recommended) No / Yes Would you like to use Turbopack for `next dev`? No / Yes Would you like to customize the import alias (`@/*` by default)? No / Yes What import alias would you like configured? @/* After the prompts, `create-next-app` will create a folder with your project name and install the required dependencies. ## Manual installation To manually create a new Next.js app, install the required packages: npm install next@latest react@latest react-dom@latest Then, add the following scripts to your `package.json` file: { "scripts": { "dev": "next dev", "build": "next build", "start": "next start", "lint": "next lint" } } These scripts refer to the different stages of developing an application: * `next dev`: Starts the development server. * `next build`: Builds the application for production. * `next start`: Starts the production server. * `next lint`: Runs ESLint. ### Create the `app` directory Next.js uses file-system routing, which means the routes in your application are determined by how you structure your files. Create an `app` folder. Then, inside `app`, create a `layout.tsx` file. This file is the root layout. It's required and must contain the `<html>` and `<body>` tags. export default function RootLayout({ children, }: { children: React.ReactNode }) { return ( <html lang="en"> <body>{children}</body> </html> ) } Create a home page `app/page.tsx` with some initial content: export default function Page() { return <h1>Hello, Next.js!</h1> } Both `layout.tsx` and `page.tsx` will be rendered when the user visits the root of your application (`/`).  > **Good to know**: > > * If you forget to create the root layout, Next.js will automatically create this file when running the development server with `next dev`. > * You can optionally use a `src` directory in the root of your project to separate your application's code from configuration files. ### Create the `public` folder (optional) Create a `public` folder at the root of your project to store static assets such as images, fonts, etc. Files inside `public` can then be referenced by your code starting from the base URL (`/`). You can then reference these assets using the root path (`/`). For example, `public/profile.png` can be referenced as `/profile.png`: import Image from 'next/image' export default function Page() { return <Image src="/profile.png" alt="Profile" width={100} height={100} /> } ## Run the development server 1. Run `npm run dev` to start the development server. 2. Visit `http://localhost:3000` to view your application. 3. Edit the`app/page.tsx` file and save it to see the updated result in your browser. ## Set up TypeScript > Minimum TypeScript version: `v4.5.2` Next.js comes with built-in TypeScript support. To add TypeScript to your project, rename a file to `.ts` / `.tsx` and run `next dev`. Next.js will automatically install the necessary dependencies and add a `tsconfig.json` file with the recommended config options. ### IDE Plugin Next.js includes a custom TypeScript plugin and type checker, which VSCode and other code editors can use for advanced type-checking and auto-completion. You can enable the plugin in VS Code by: 1. Opening the command palette (`Ctrl/⌘` + `Shift` + `P`) 2. Searching for "TypeScript: Select TypeScript Version" 3. Selecting "Use Workspace Version" 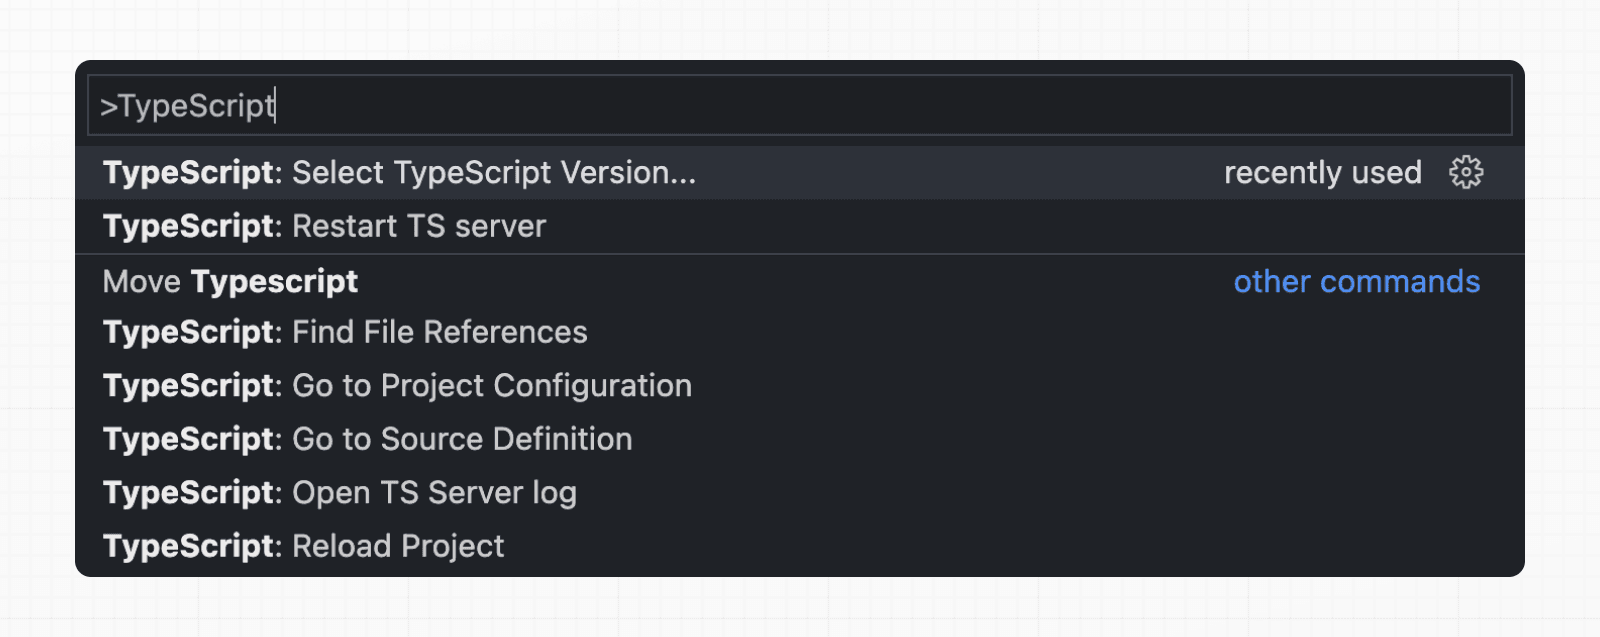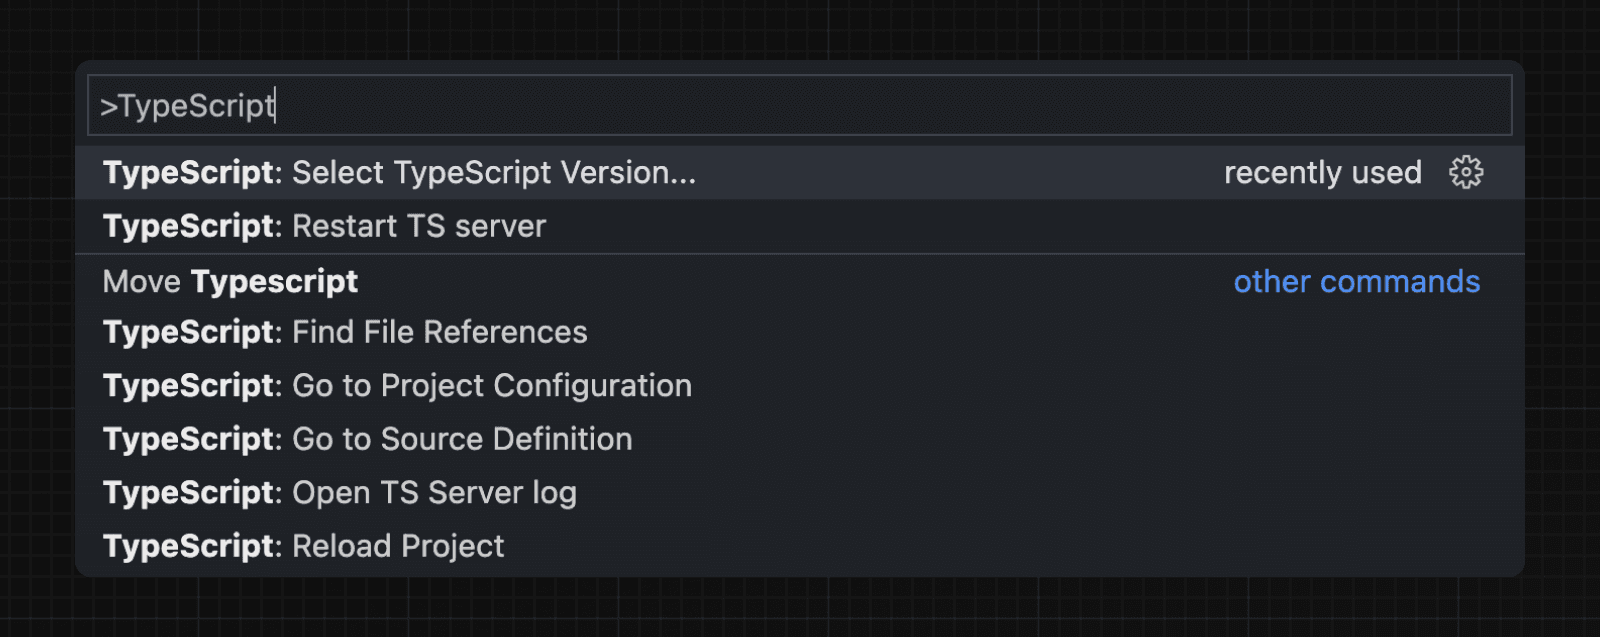 See the TypeScript reference page for more information. ## Set up ESLint Next.js comes with built-in ESLint. It automatically installs the necessary packages and configures the proper settings when you create a new project with `create-next-app`. To manually add ESLint to an existing project, add `next lint` as a script to `package.json`: { "scripts": { "lint": "next lint" } } Then, run `npm run lint` and you will be guided through the installation and configuration process. npm run lint You'll see a prompt like this: > ? How would you like to configure ESLint? > > ❯ Strict (recommended) > Base > Cancel * **Strict**: Includes Next.js' base ESLint configuration along with a stricter Core Web Vitals rule-set. This is the recommended configuration for developers setting up ESLint for the first time. * **Base**: Includes Next.js' base ESLint configuration. * **Cancel**: Skip configuration. Select this option if you plan on setting up your own custom ESLint configuration. If `Strict` or `Base` are selected, Next.js will automatically install `eslint` and `eslint-config-next` as dependencies in your application and create an `.eslintrc.json` file in the root of your project that includes your selected configuration. You can now run `next lint` every time you want to run ESLint to catch errors. Once ESLint has been set up, it will also automatically run during every build (`next build`). Errors will fail the build, while warnings will not. See the ESLint Plugin page for more information. ## Set up Absolute Imports and Module Path Aliases Next.js has in-built support for the `"paths"` and `"baseUrl"` options of `tsconfig.json` and `jsconfig.json` files. These options allow you to alias project directories to absolute paths, making it easier and cleaner to import modules. For example: // Before import { Button } from '../../../components/button' // After import { Button } from '@/components/button' To configure absolute imports, add the `baseUrl` configuration option to your `tsconfig.json` or `jsconfig.json` file. For example: { "compilerOptions": { "baseUrl": "src/" } } In addition to configuring the `baseUrl` path, you can use the `"paths"` option to `"alias"` module paths. For example, the following configuration maps `@/components/*` to `components/*`: { "compilerOptions": { "baseUrl": "src/", "paths": { "@/styles/*": ["styles/*"], "@/components/*": ["components/*"] } } } Each of the `"paths"` are relative to the `baseUrl` location. --- ## Page: https://nextjs.org/docs/app/getting-started/project-structure ## Project structure and organization This page provides an overview of **all** the folder and file conventions in Next.js, and recommendations for organizing your project. ## Folder and file conventions ### Top-level folders Top-level folders are used to organize your application's code and static assets. 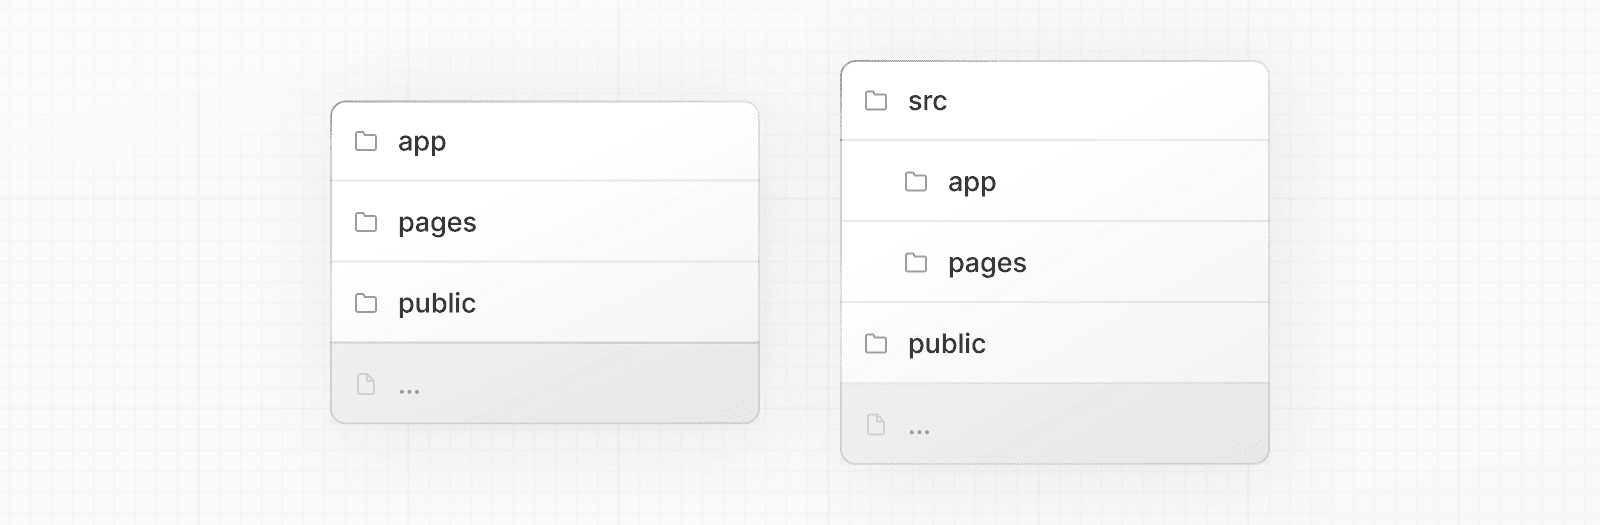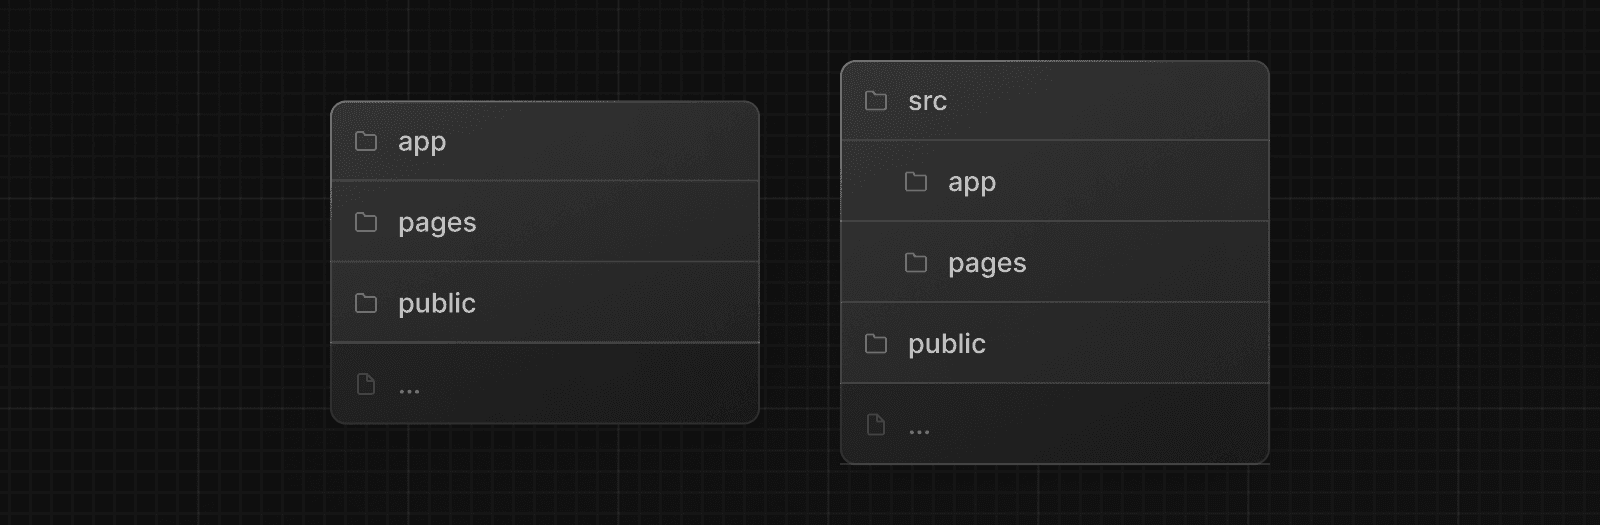 | | | | --- | --- | | `app` | App Router | | `pages` | Pages Router | | `public` | Static assets to be served | | `src` | Optional application source folder | ### Top-level files Top-level files are used to configure your application, manage dependencies, run middleware, integrate monitoring tools, and define environment variables. | | | | --- | --- | | **Next.js** | | | `next.config.js` | Configuration file for Next.js | | `package.json` | Project dependencies and scripts | | `instrumentation.ts` | OpenTelemetry and Instrumentation file | | `middleware.ts` | Next.js request middleware | | `.env` | Environment variables | | `.env.local` | Local environment variables | | `.env.production` | Production environment variables | | `.env.development` | Development environment variables | | `.eslintrc.json` | Configuration file for ESLint | | `.gitignore` | Git files and folders to ignore | | `next-env.d.ts` | TypeScript declaration file for Next.js | | `tsconfig.json` | Configuration file for TypeScript | | `jsconfig.json` | Configuration file for JavaScript | ### Routing Files | | | | | --- | --- | --- | | `layout` | `.js` `.jsx` `.tsx` | Layout | | `page` | `.js` `.jsx` `.tsx` | Page | | `loading` | `.js` `.jsx` `.tsx` | Loading UI | | `not-found` | `.js` `.jsx` `.tsx` | Not found UI | | `error` | `.js` `.jsx` `.tsx` | Error UI | | `global-error` | `.js` `.jsx` `.tsx` | Global error UI | | `route` | `.js` `.ts` | API endpoint | | `template` | `.js` `.jsx` `.tsx` | Re-rendered layout | | `default` | `.js` `.jsx` `.tsx` | Parallel route fallback page | ### Nested routes | | | | --- | --- | | `folder` | Route segment | | `folder/folder` | Nested route segment | ### Dynamic routes | | | | --- | --- | | `[folder]` | Dynamic route segment | | `[...folder]` | Catch-all route segment | | `[[...folder]]` | Optional catch-all route segment | ### Route Groups and private folders | | | | --- | --- | | `(folder)` | Group routes without affecting routing | | `_folder` | Opt folder and all child segments out of routing | ### Parallel and Intercepted Routes | | | | --- | --- | | `@folder` | Named slot | | `(.)folder` | Intercept same level | | `(..)folder` | Intercept one level above | | `(..)(..)folder` | Intercept two levels above | | `(...)folder` | Intercept from root | ### Metadata file conventions #### App icons | | | | | --- | --- | --- | | `favicon` | `.ico` | Favicon file | | `icon` | `.ico` `.jpg` `.jpeg` `.png` `.svg` | App Icon file | | `icon` | `.js` `.ts` `.tsx` | Generated App Icon | | `apple-icon` | `.jpg` `.jpeg`, `.png` | Apple App Icon file | | `apple-icon` | `.js` `.ts` `.tsx` | Generated Apple App Icon | #### Open Graph and Twitter images | | | | | --- | --- | --- | | `opengraph-image` | `.jpg` `.jpeg` `.png` `.gif` | Open Graph image file | | `opengraph-image` | `.js` `.ts` `.tsx` | Generated Open Graph image | | `twitter-image` | `.jpg` `.jpeg` `.png` `.gif` | Twitter image file | | `twitter-image` | `.js` `.ts` `.tsx` | Generated Twitter image | #### SEO | | | | | --- | --- | --- | | `sitemap` | `.xml` | Sitemap file | | `sitemap` | `.js` `.ts` | Generated Sitemap | | `robots` | `.txt` | Robots file | | `robots` | `.js` `.ts` | Generated Robots file | ## Organizing your project Next.js is **unopinionated** about how you organize and colocate your project files. But it does provide several features to help you organize your project. ### Component hierarchy The components defined in special files are rendered in a specific hierarchy: * `layout.js` * `template.js` * `error.js` (React error boundary) * `loading.js` (React suspense boundary) * `not-found.js` (React error boundary) * `page.js` or nested `layout.js` 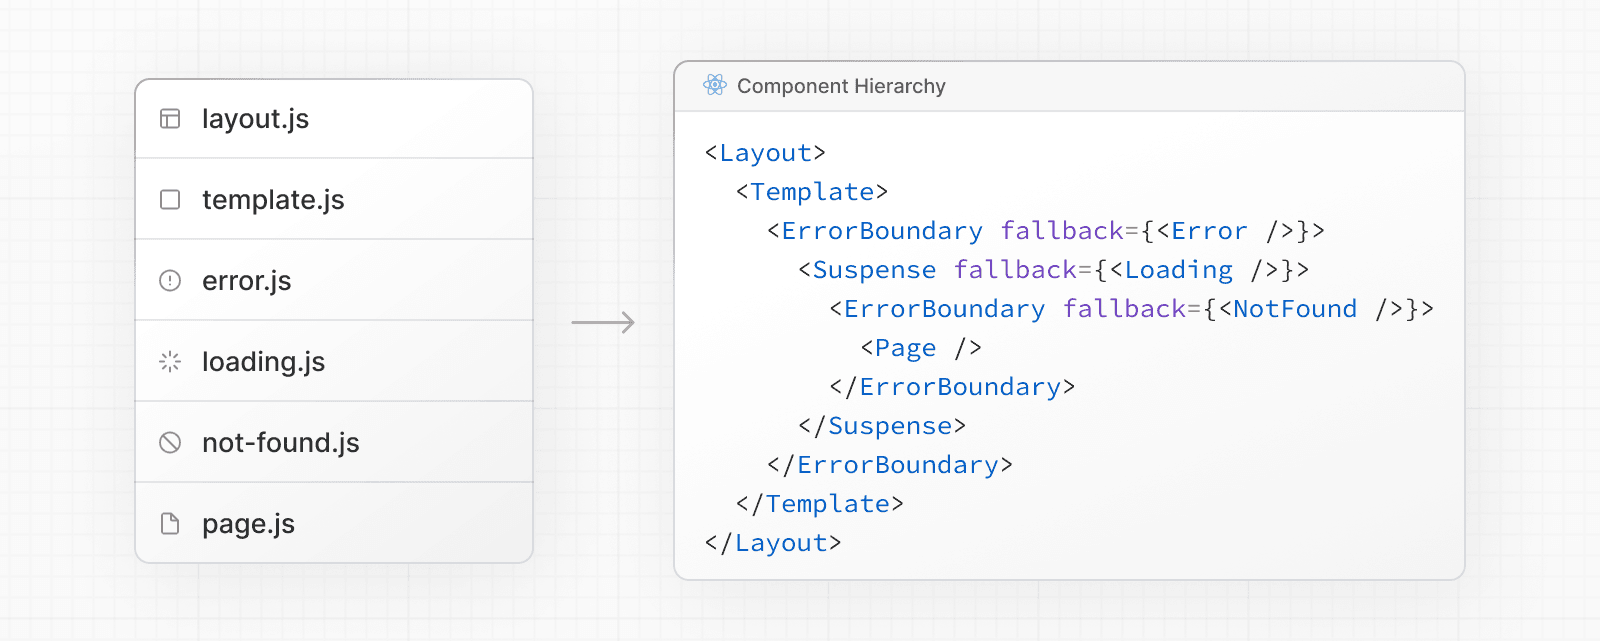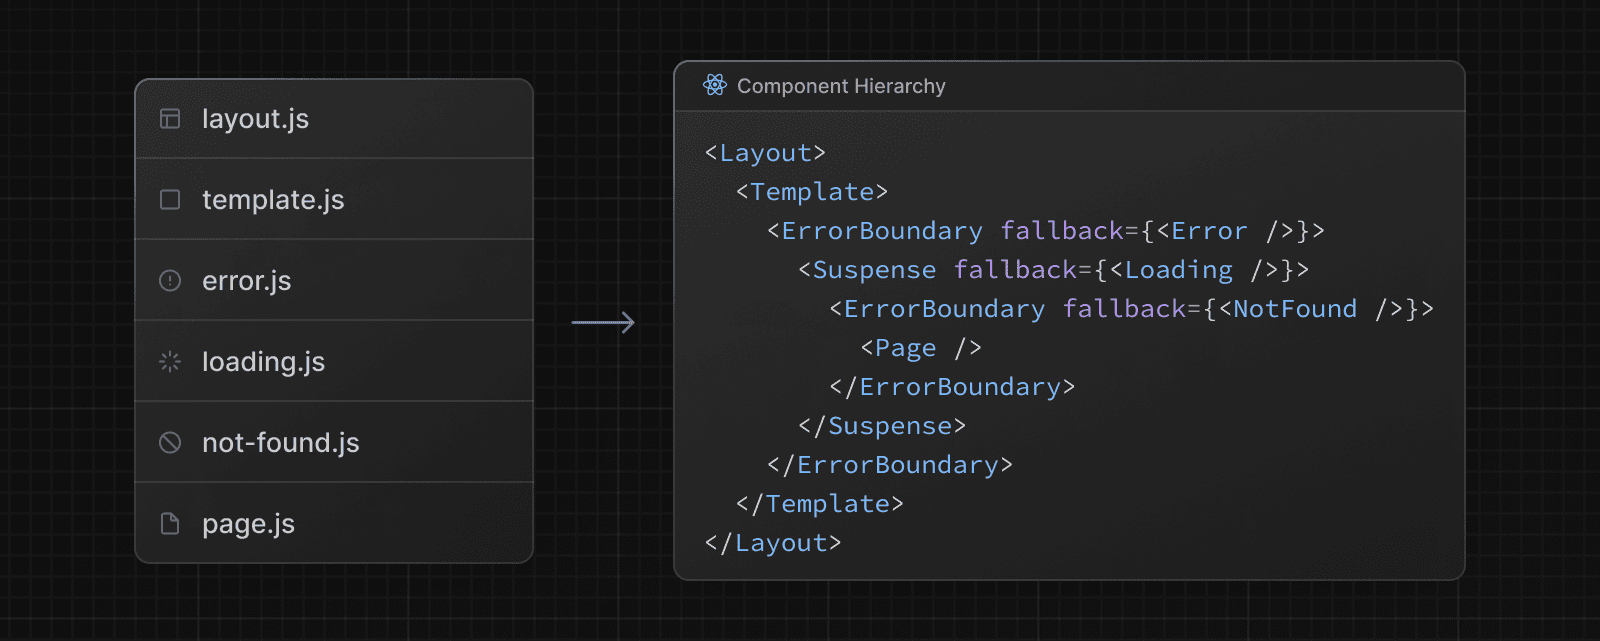 The components are rendered recursively in nested routes, meaning the components of a route segment will be nested **inside** the components of its parent segment. 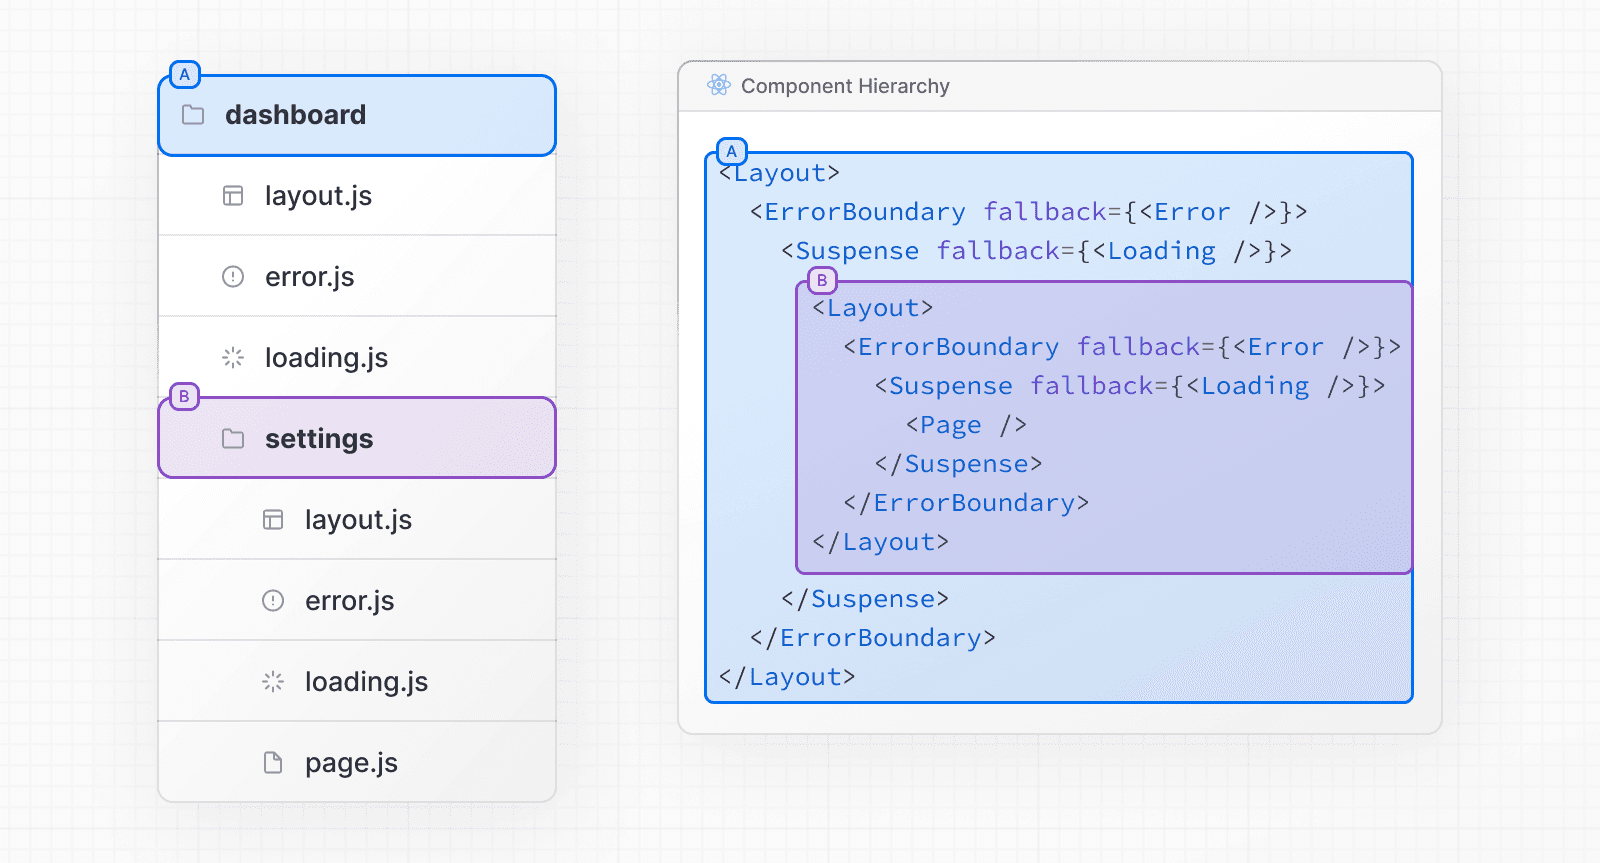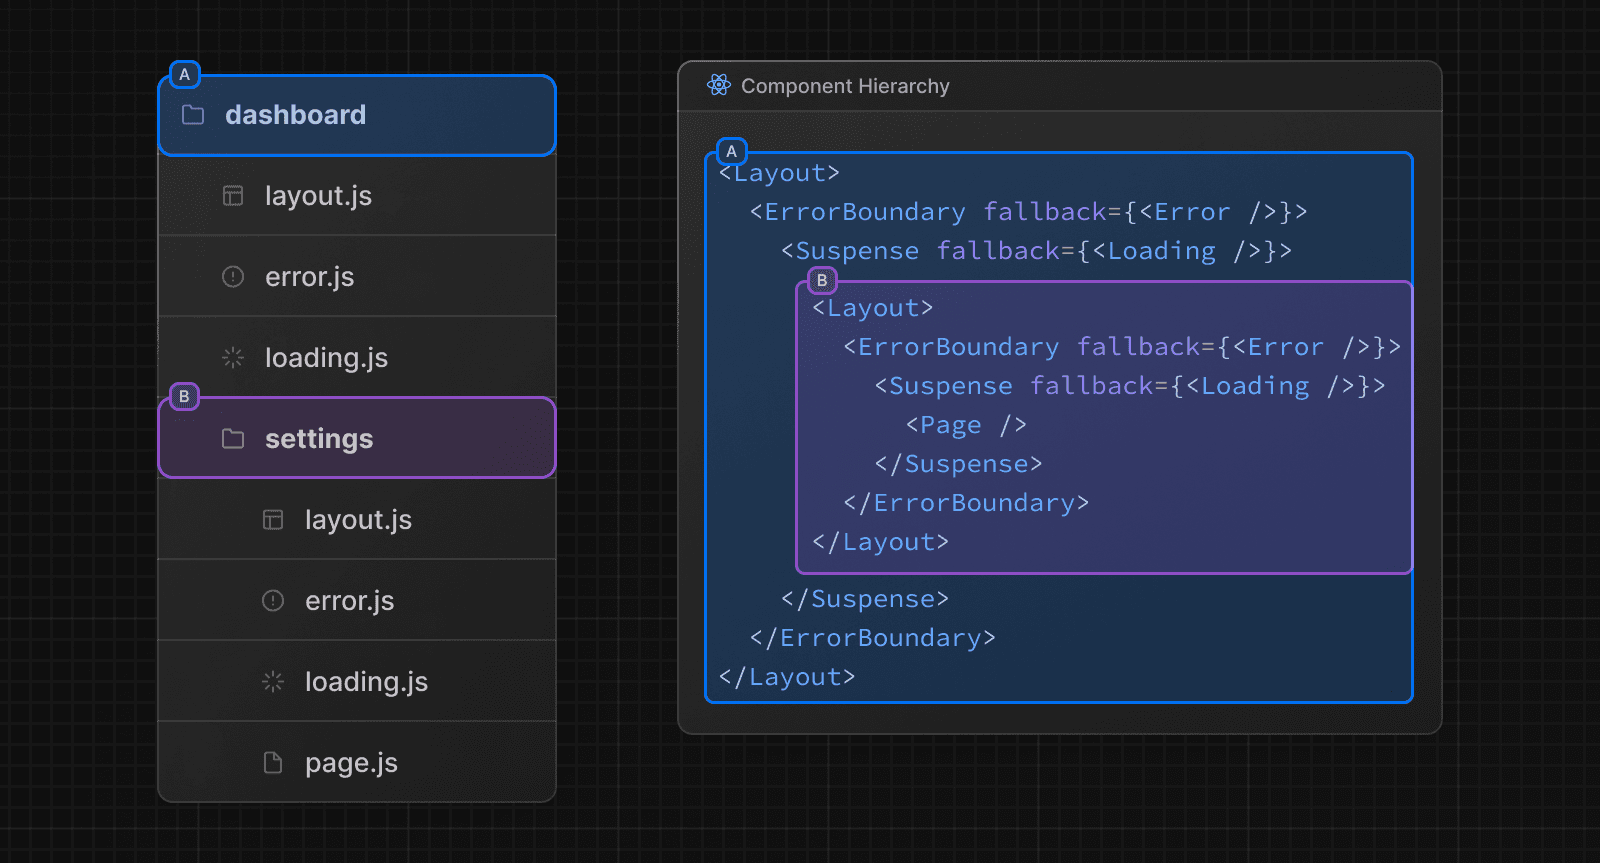 ### Colocation In the `app` directory, nested folders define route structure. Each folder represents a route segment that is mapped to a corresponding segment in a URL path. However, even though route structure is defined through folders, a route is **not publicly accessible** until a `page.js` or `route.js` file is added to a route segment. 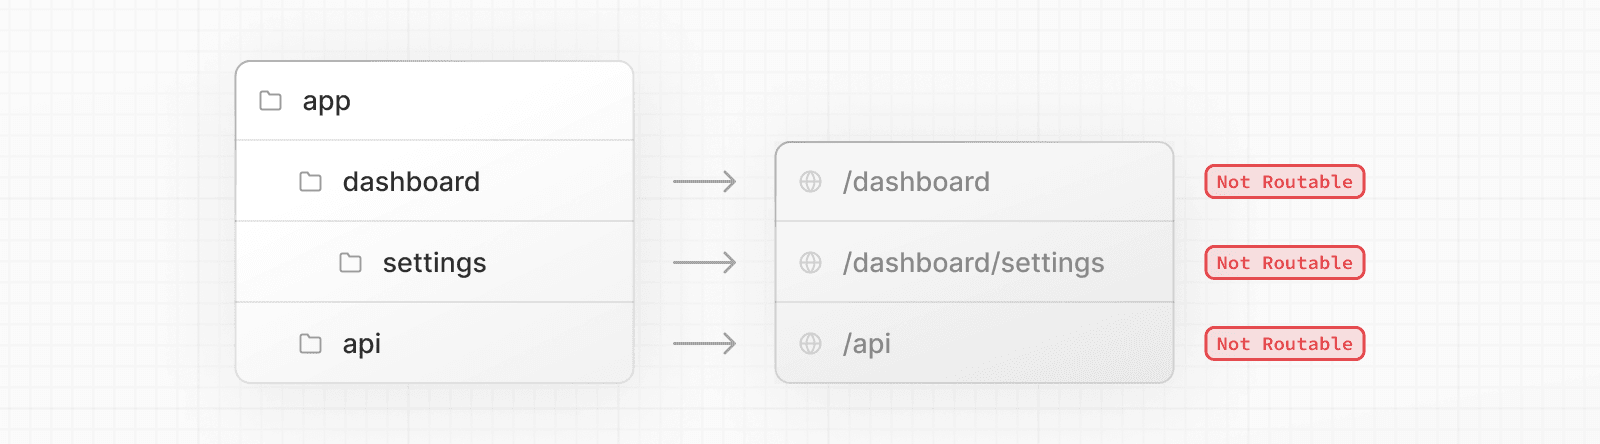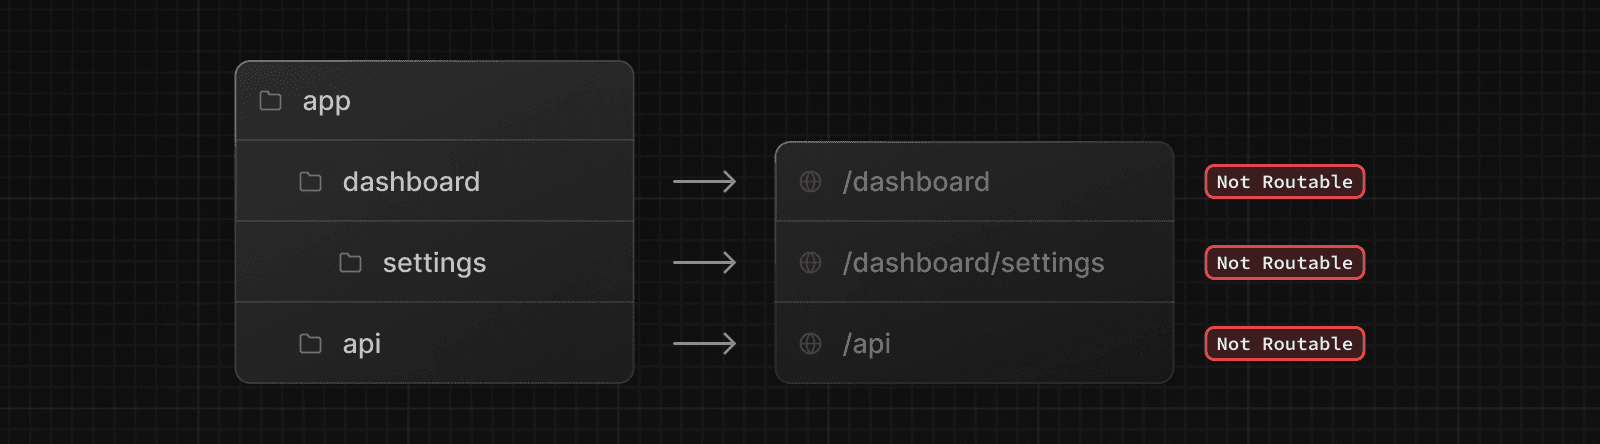 And, even when a route is made publicly accessible, only the **content returned** by `page.js` or `route.js` is sent to the client. 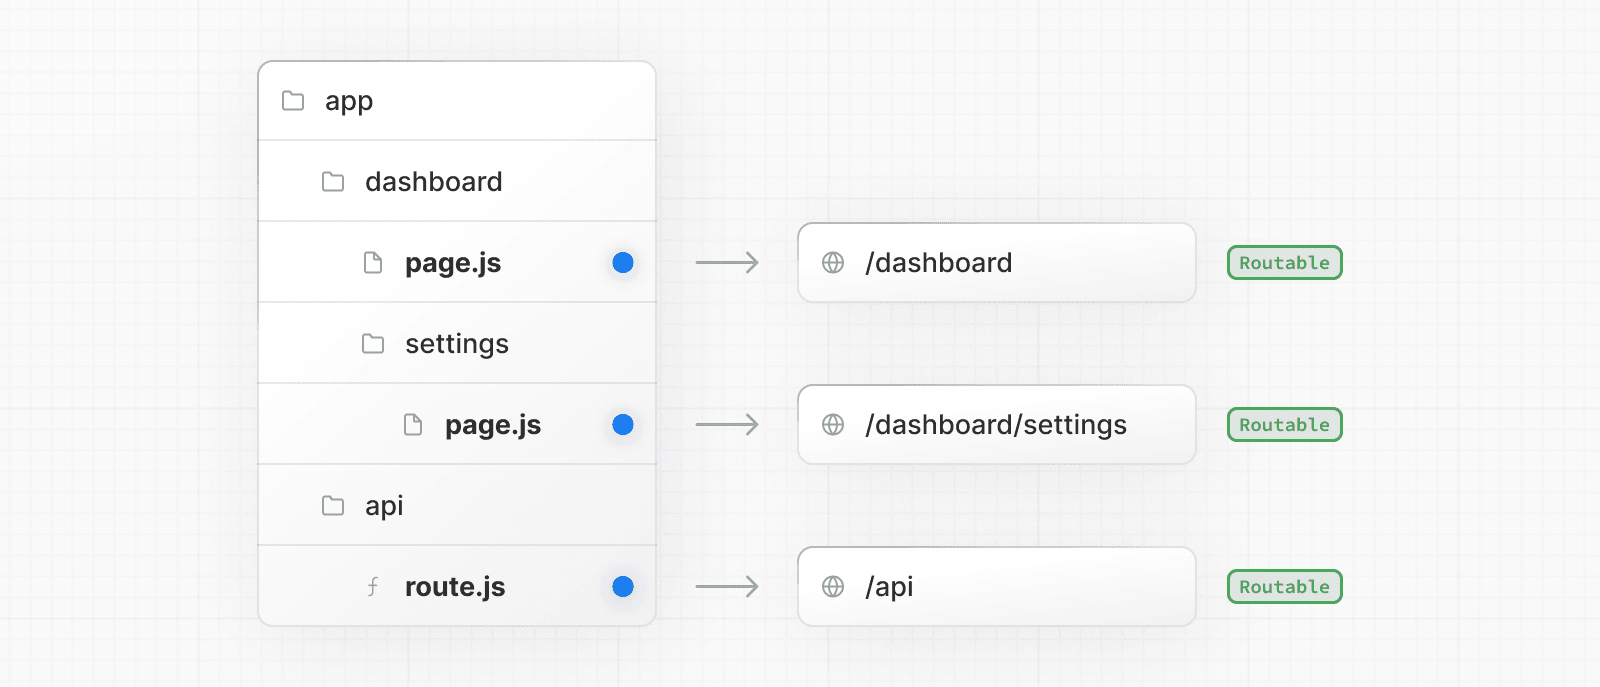 This means that **project files** can be **safely colocated** inside route segments in the `app` directory without accidentally being routable. 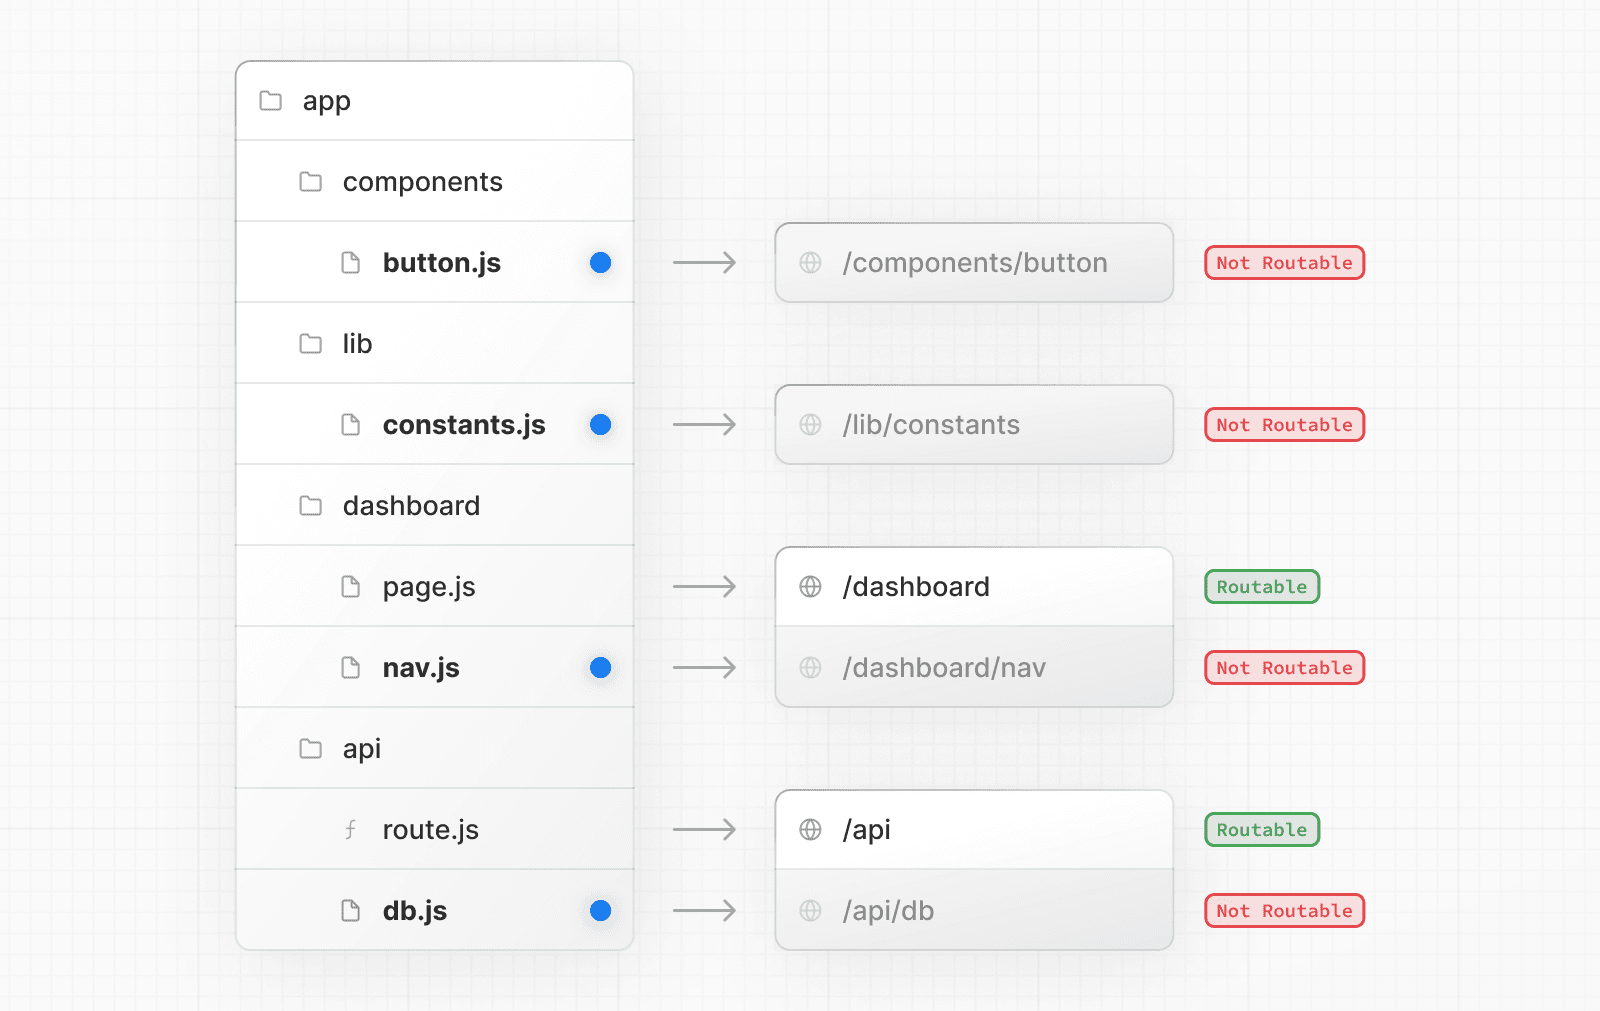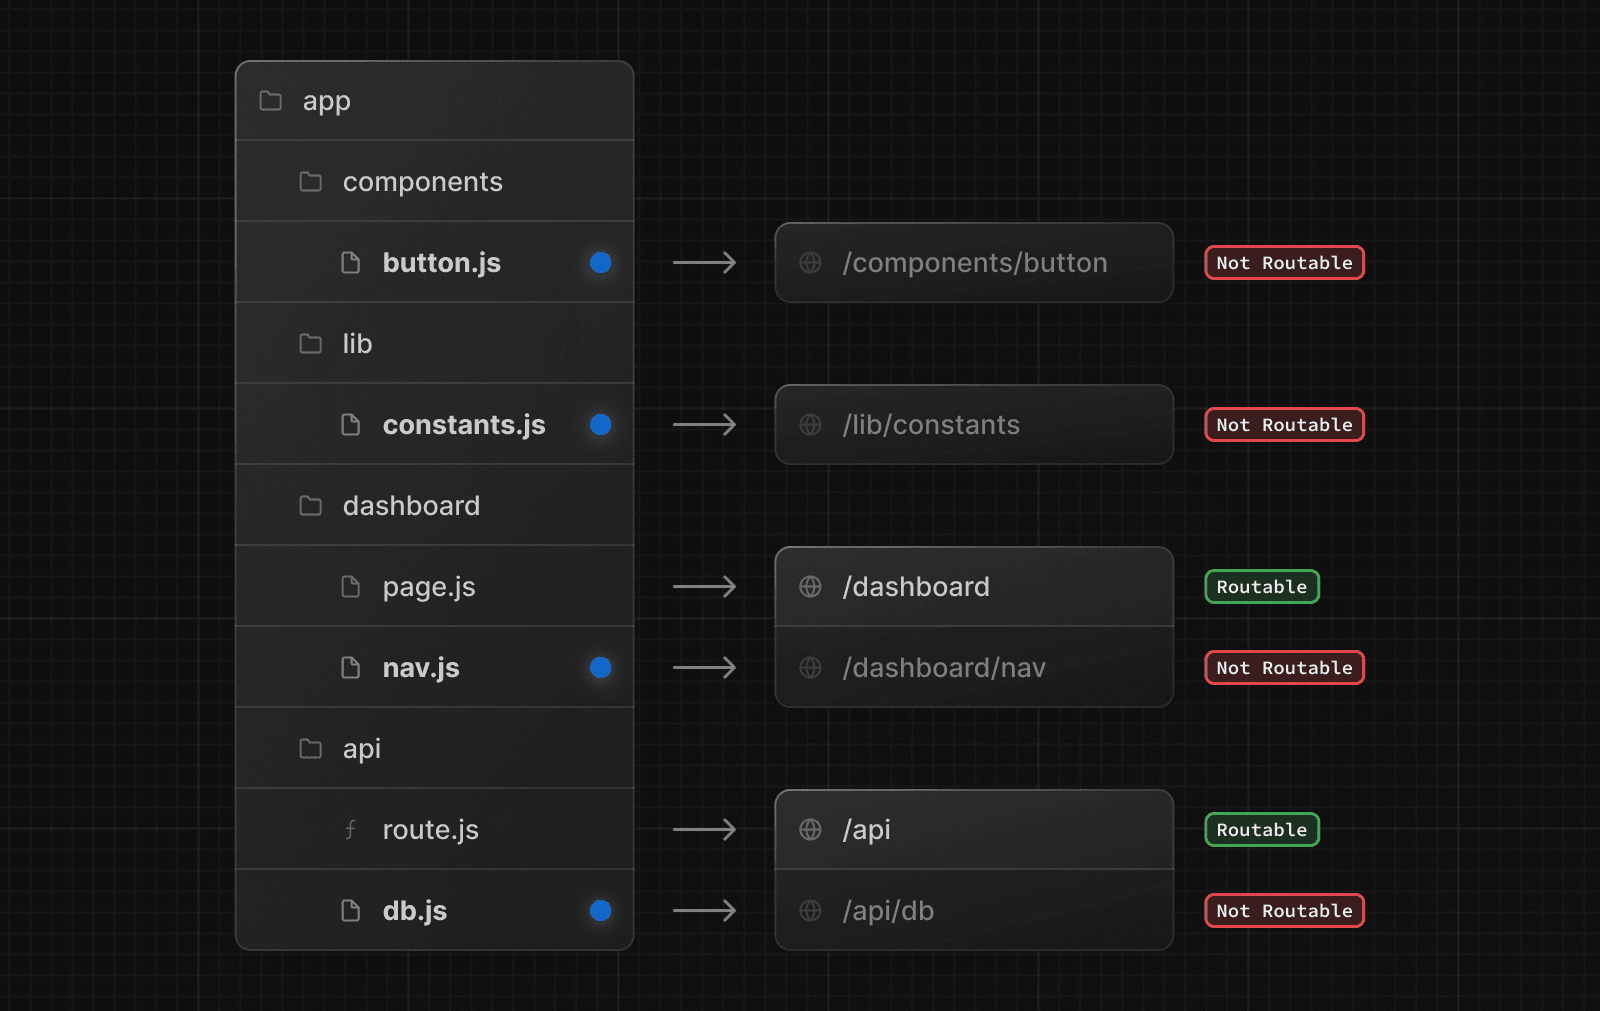 > **Good to know**: While you **can** colocate your project files in `app` you don't **have** to. If you prefer, you can keep them outside the `app` directory. ### Private folders Private folders can be created by prefixing a folder with an underscore: `_folderName` This indicates the folder is a private implementation detail and should not be considered by the routing system, thereby **opting the folder and all its subfolders** out of routing. 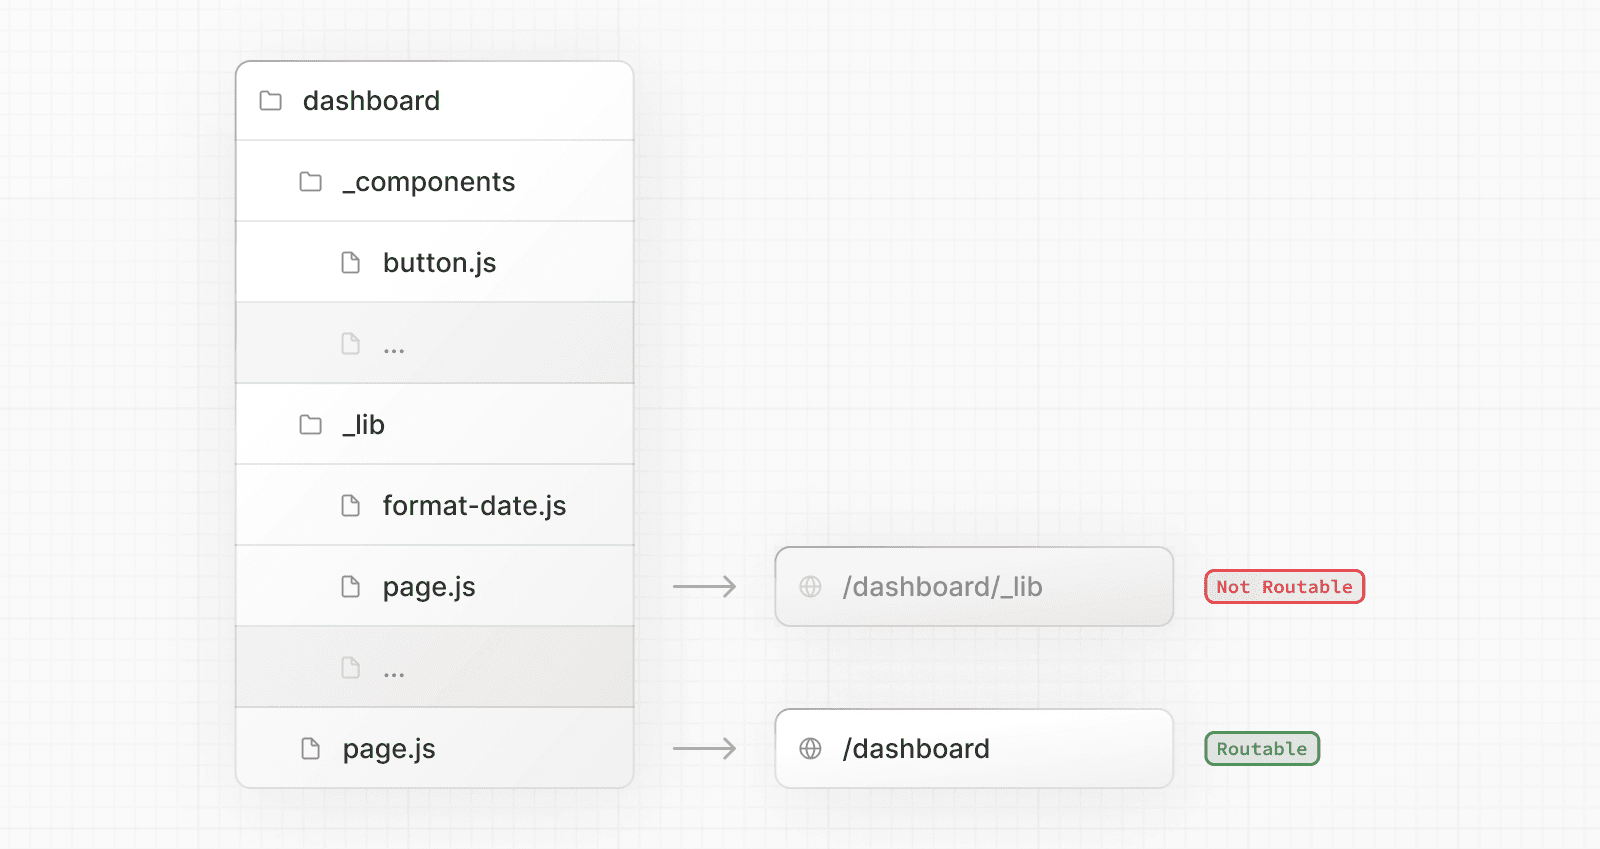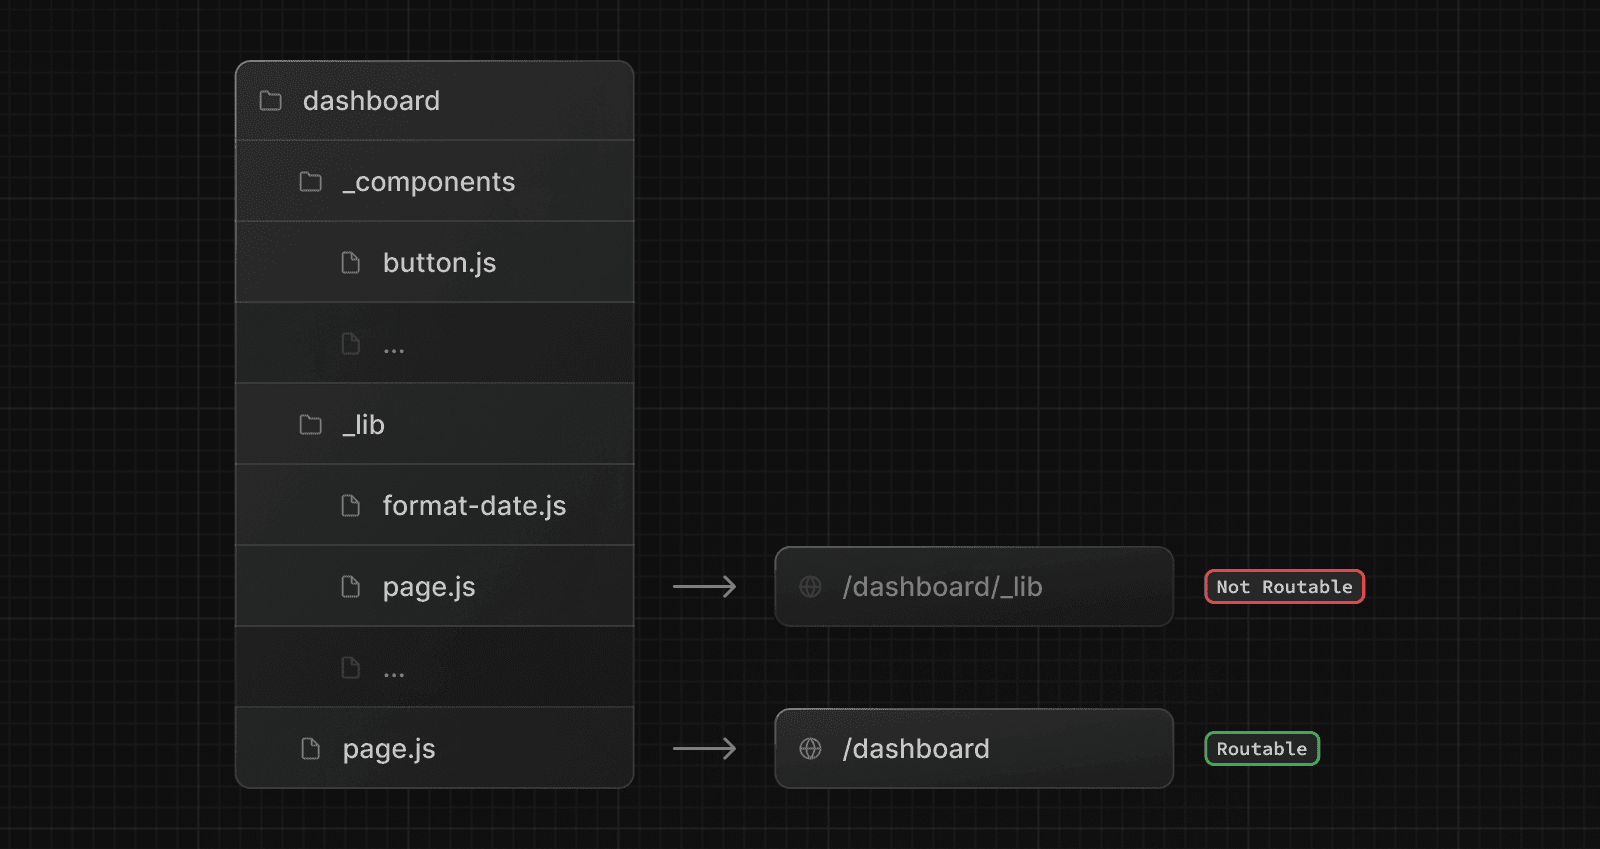 Since files in the `app` directory can be safely colocated by default, private folders are not required for colocation. However, they can be useful for: * Separating UI logic from routing logic. * Consistently organizing internal files across a project and the Next.js ecosystem. * Sorting and grouping files in code editors. * Avoiding potential naming conflicts with future Next.js file conventions. > **Good to know**: > > * While not a framework convention, you might also consider marking files outside private folders as "private" using the same underscore pattern. > * You can create URL segments that start with an underscore by prefixing the folder name with `%5F` (the URL-encoded form of an underscore): `%5FfolderName`. > * If you don't use private folders, it would be helpful to know Next.js special file conventions to prevent unexpected naming conflicts. ### Route groups Route groups can be created by wrapping a folder in parenthesis: `(folderName)` This indicates the folder is for organizational purposes and should **not be included** in the route's URL path. 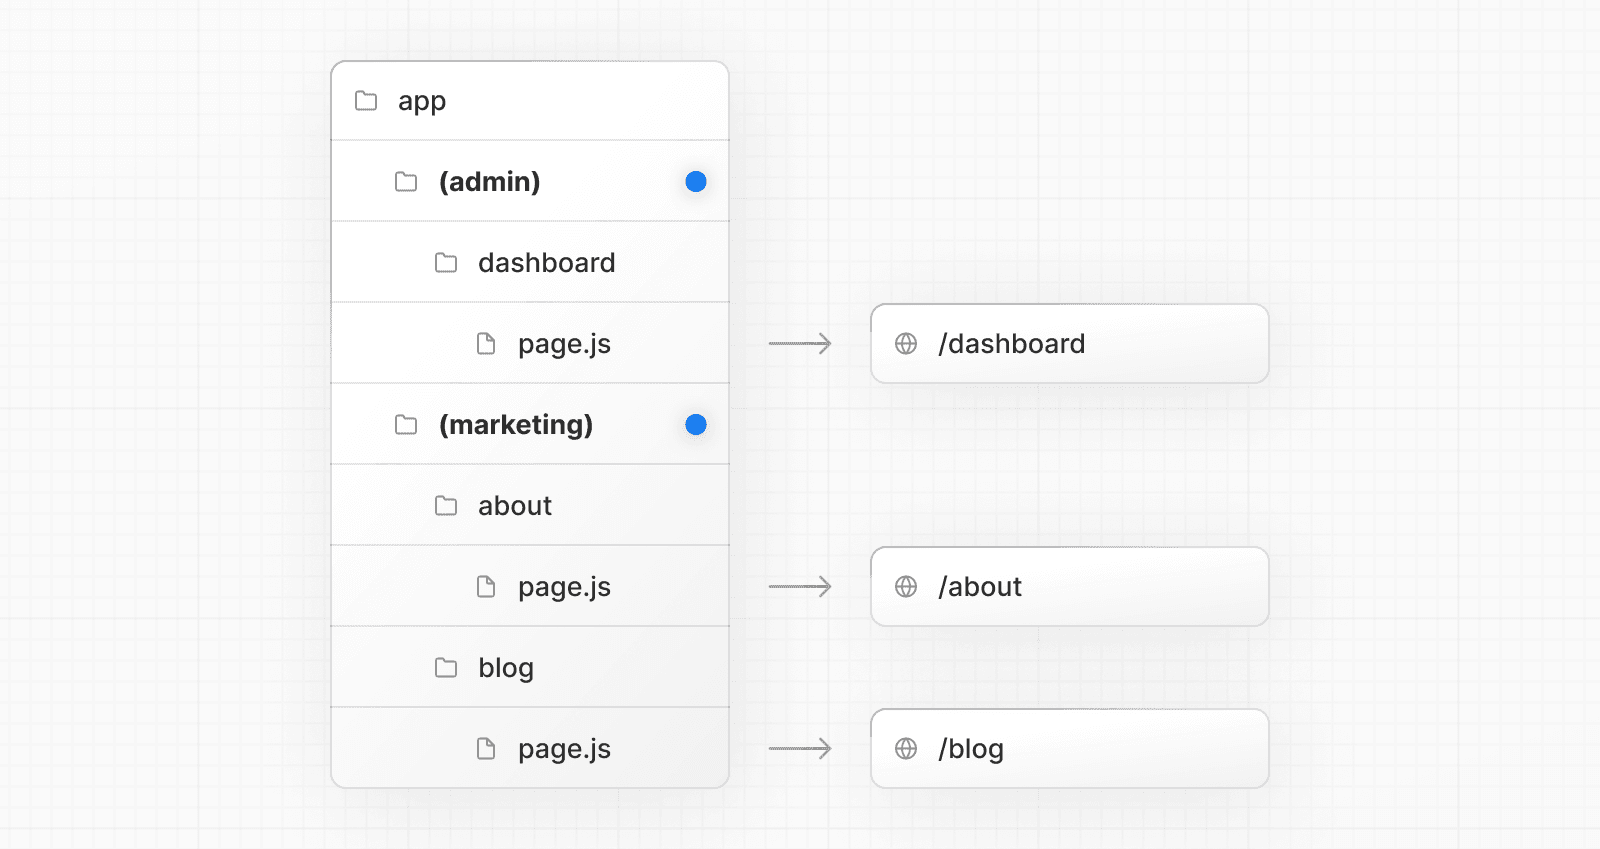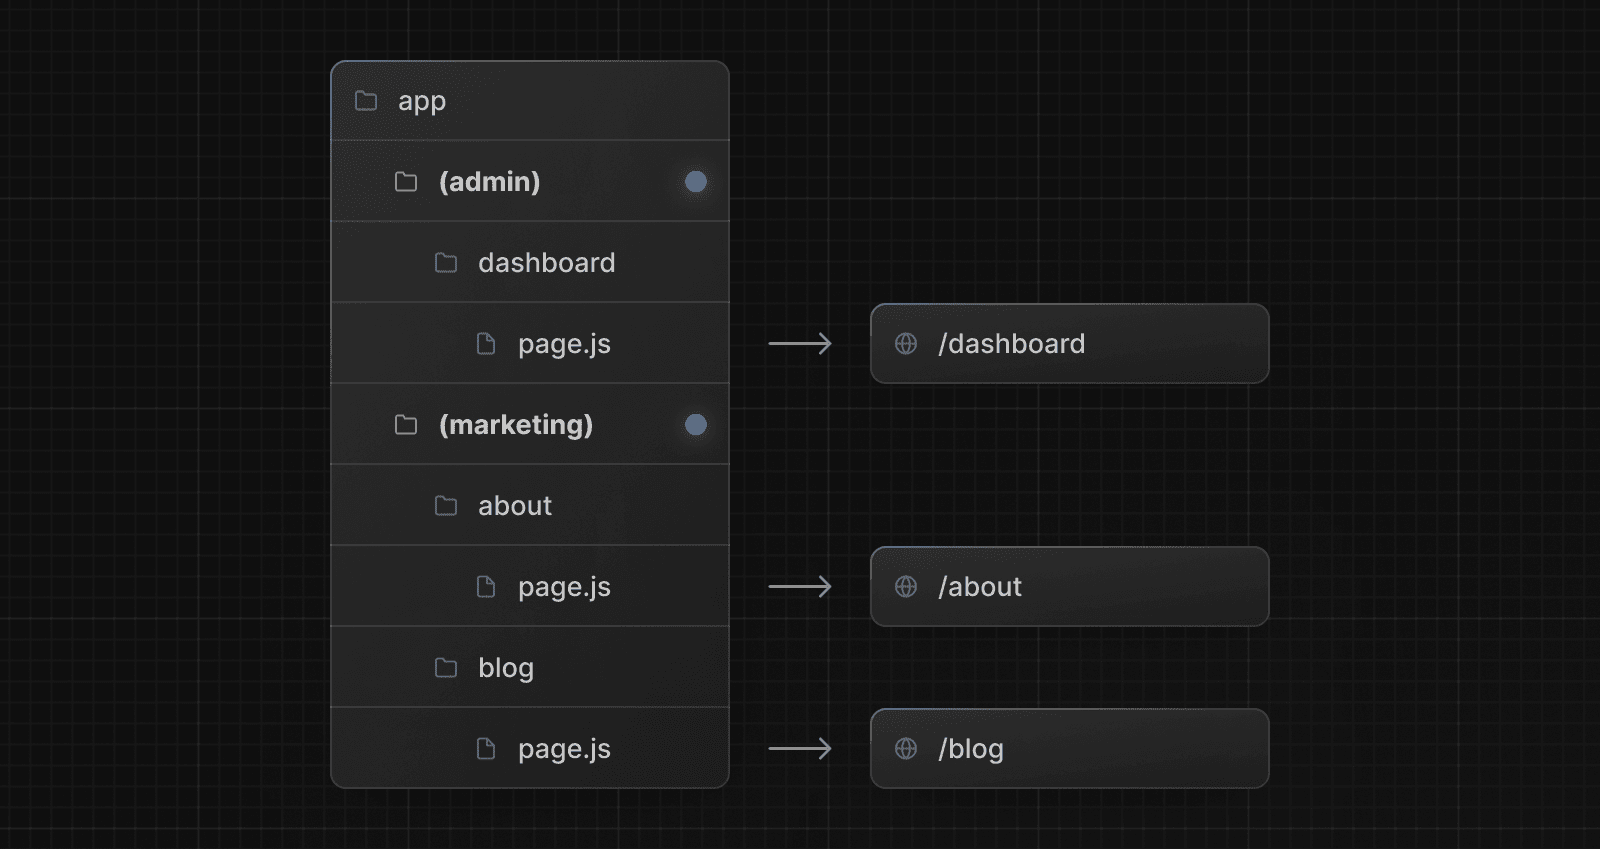 Route groups are useful for: * Organizing routes by site section, intent, or team. e.g. marketing pages, admin pages, etc. * Enabling nested layouts in the same route segment level: * Creating multiple nested layouts in the same segment, including multiple root layouts * Adding a layout to a subset of routes in a common segment ### `src` directory Next.js supports storing application code (including `app`) inside an optional `src` directory. This separates application code from project configuration files which mostly live in the root of a project. 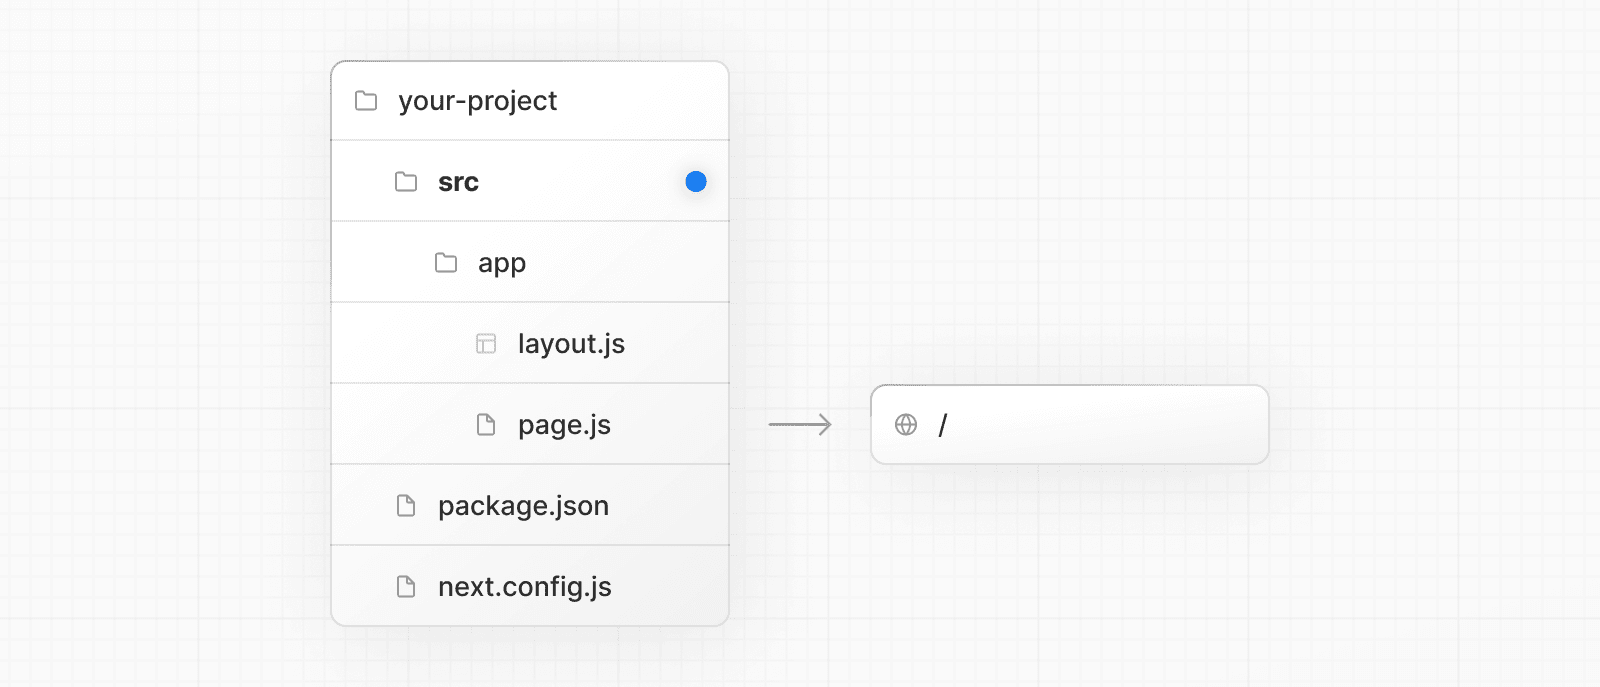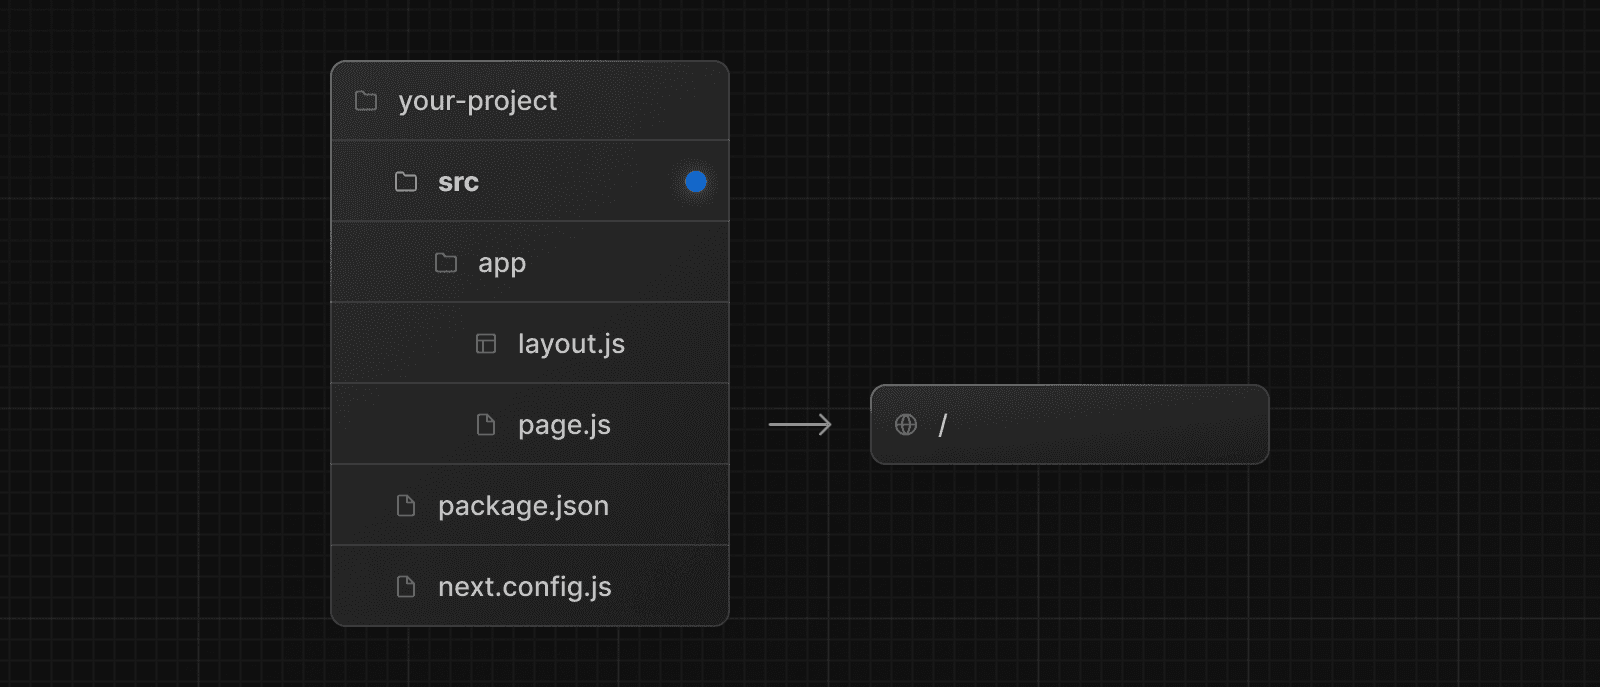 ### Examples The following section lists a very high-level overview of common strategies. The simplest takeaway is to choose a strategy that works for you and your team and be consistent across the project. > **Good to know**: In our examples below, we're using `components` and `lib` folders as generalized placeholders, their naming has no special framework significance and your projects might use other folders like `ui`, `utils`, `hooks`, `styles`, etc. #### Store project files outside of `app` This strategy stores all application code in shared folders in the **root of your project** and keeps the `app` directory purely for routing purposes. 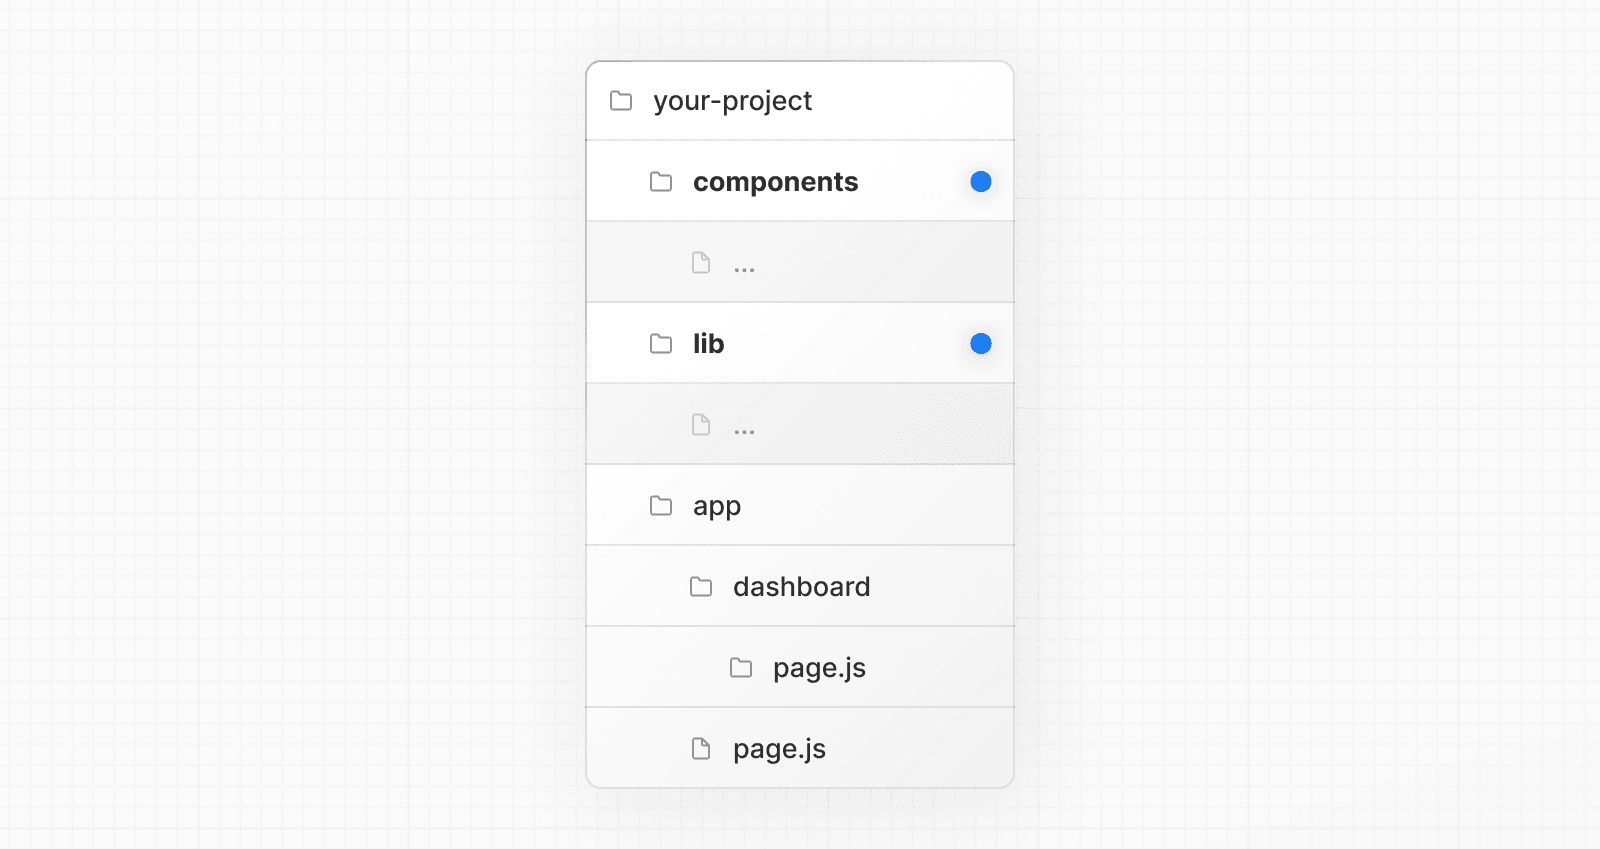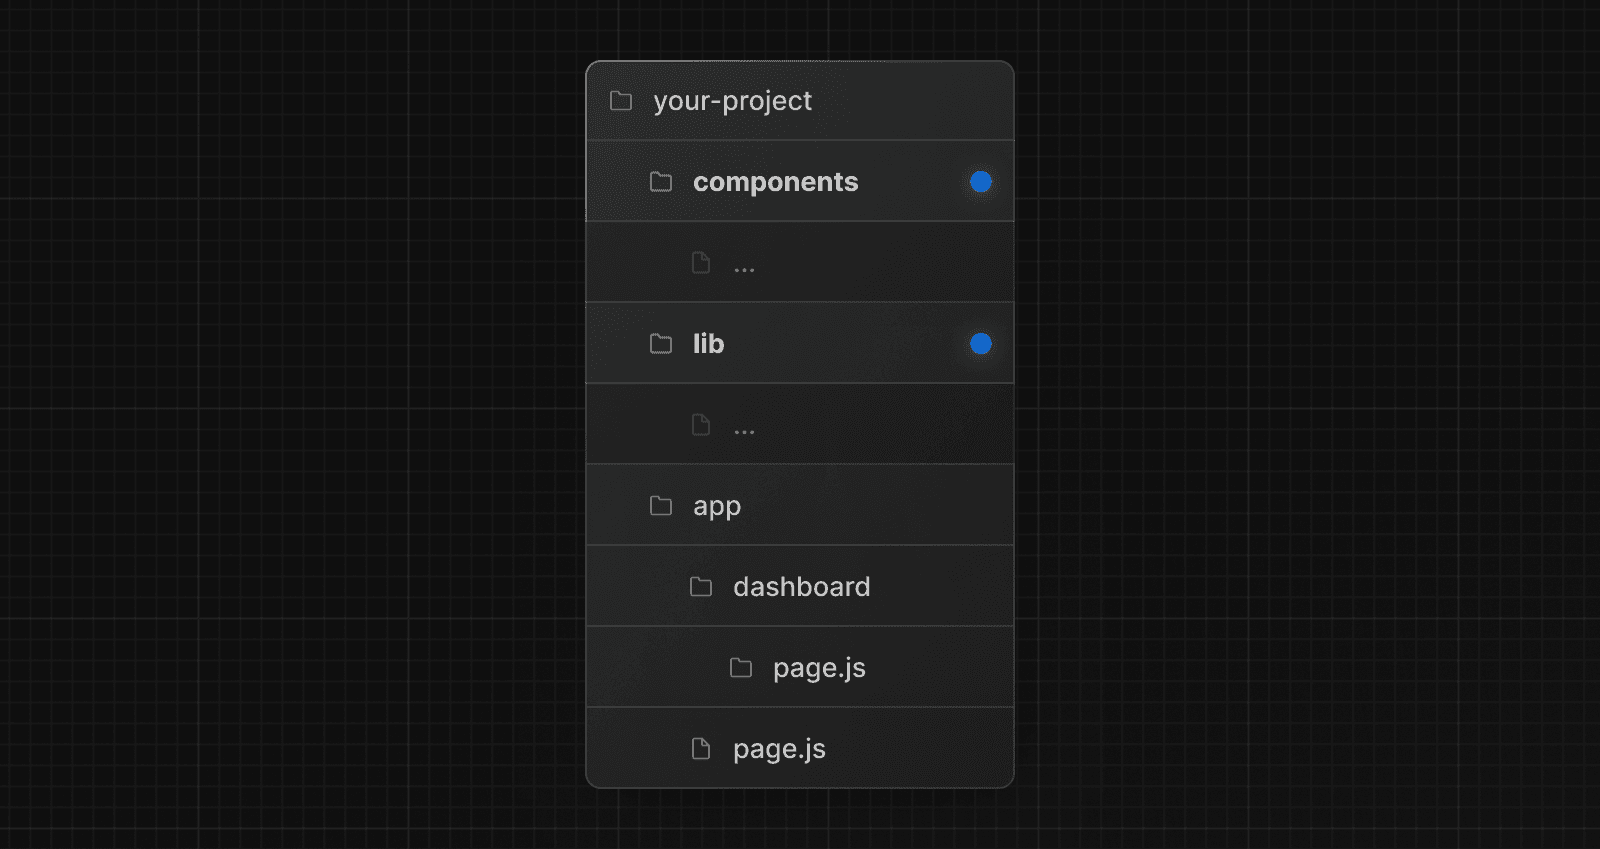 #### Store project files in top-level folders inside of `app` This strategy stores all application code in shared folders in the **root of the `app` directory**. 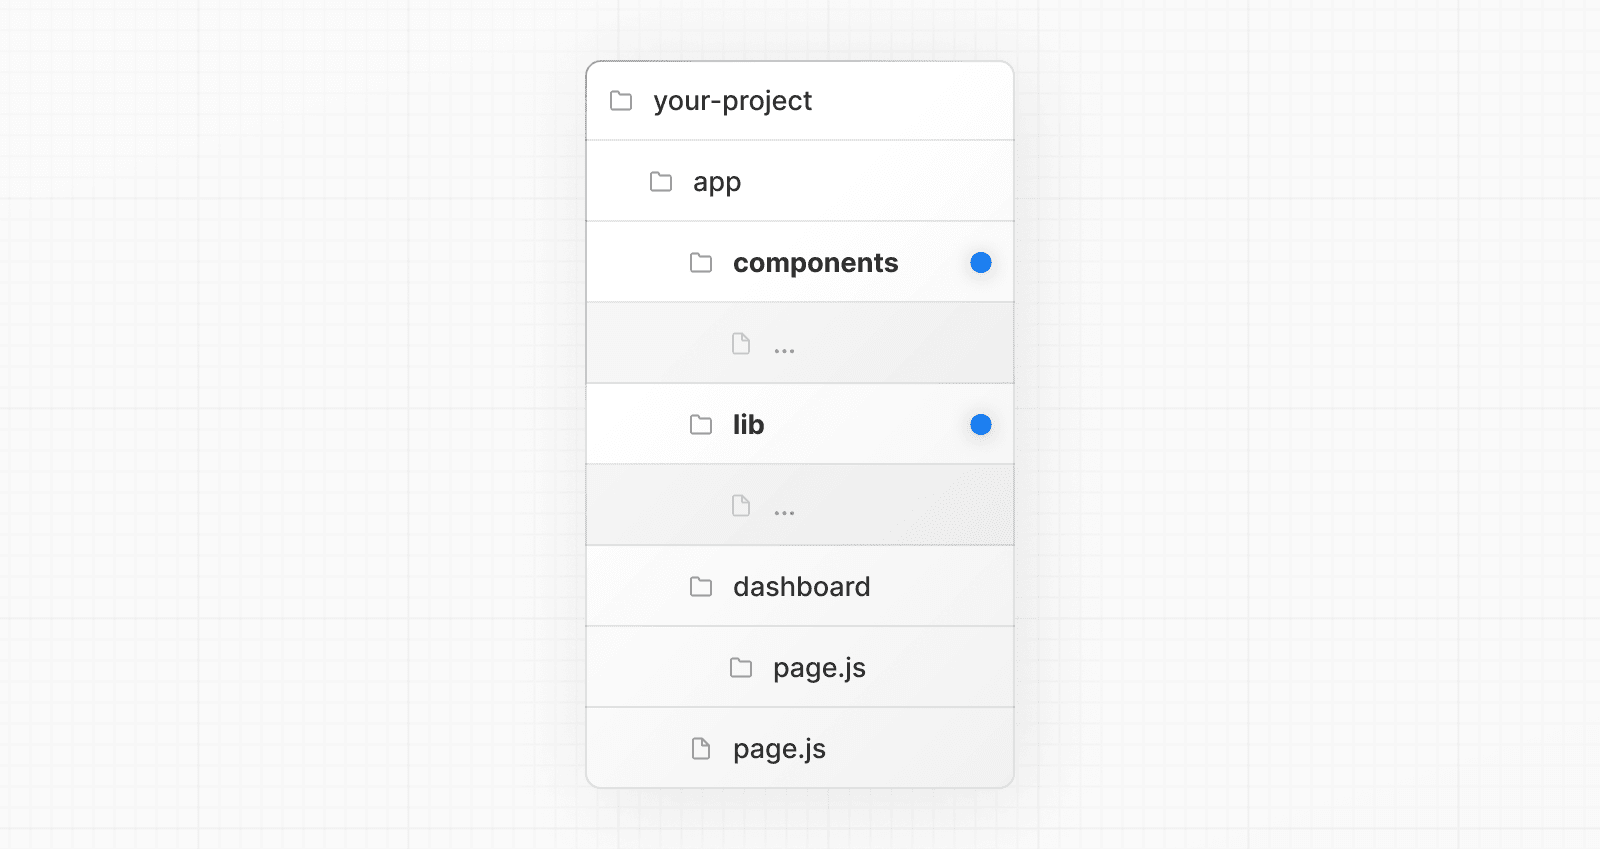 #### Split project files by feature or route This strategy stores globally shared application code in the root `app` directory and **splits** more specific application code into the route segments that use them. 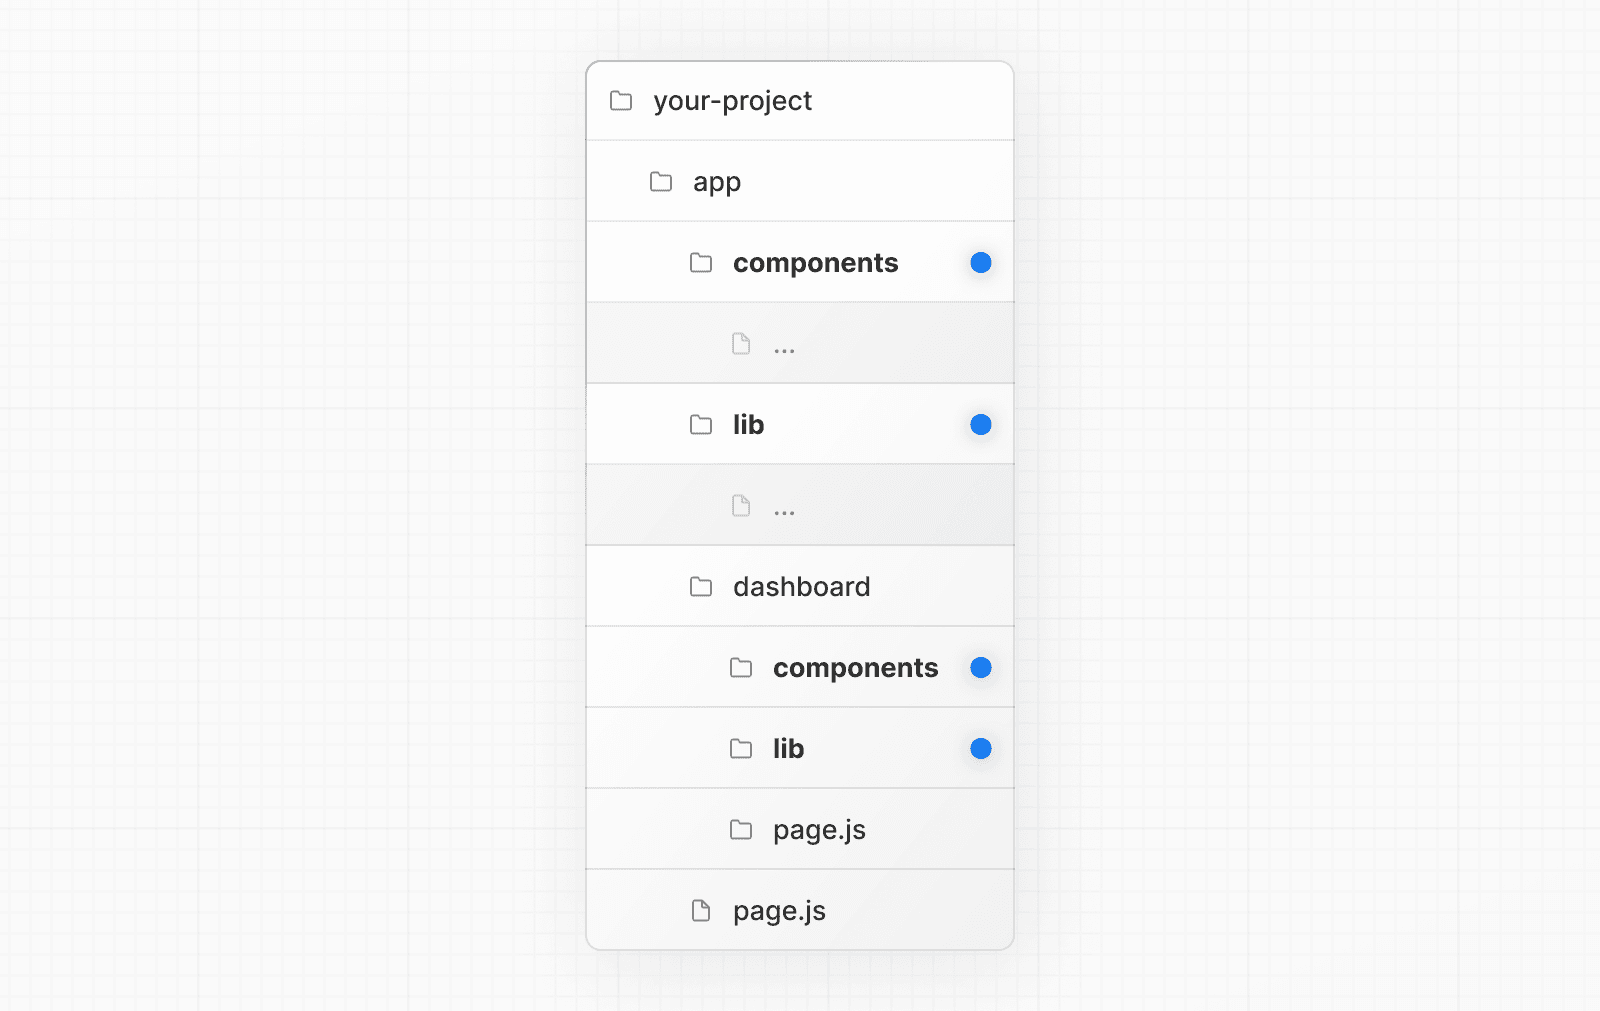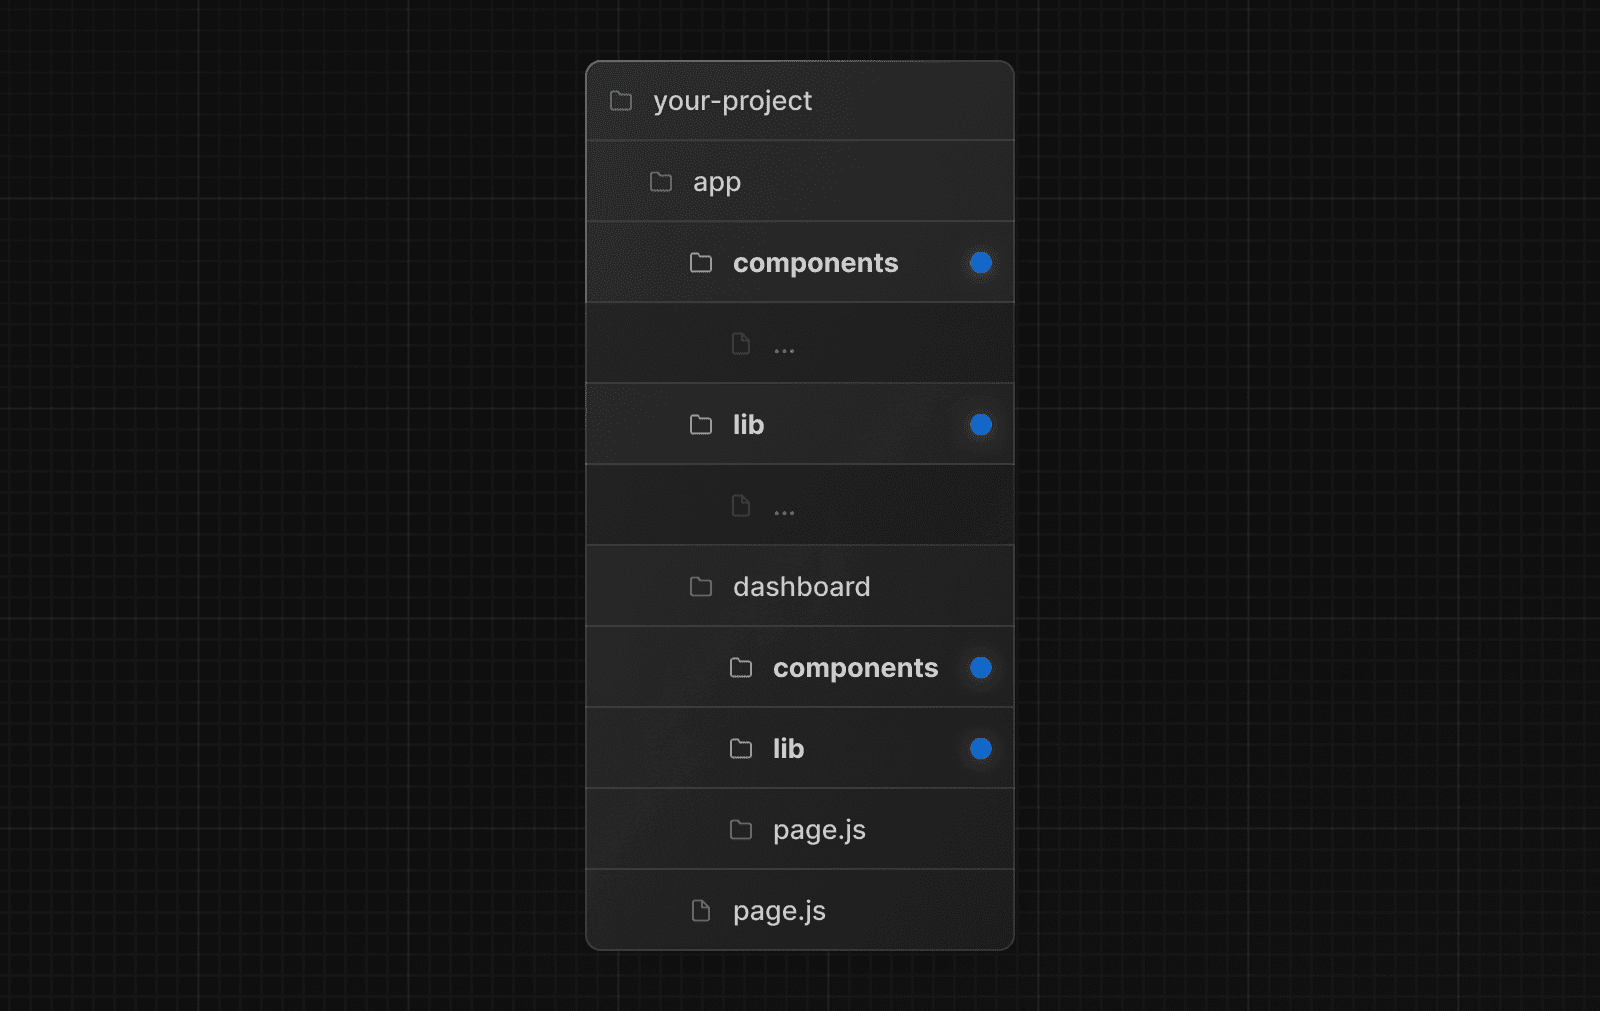 ### Organize routes without affecting the URL path To organize routes without affecting the URL, create a group to keep related routes together. The folders in parenthesis will be omitted from the URL (e.g. `(marketing)` or `(shop)`). 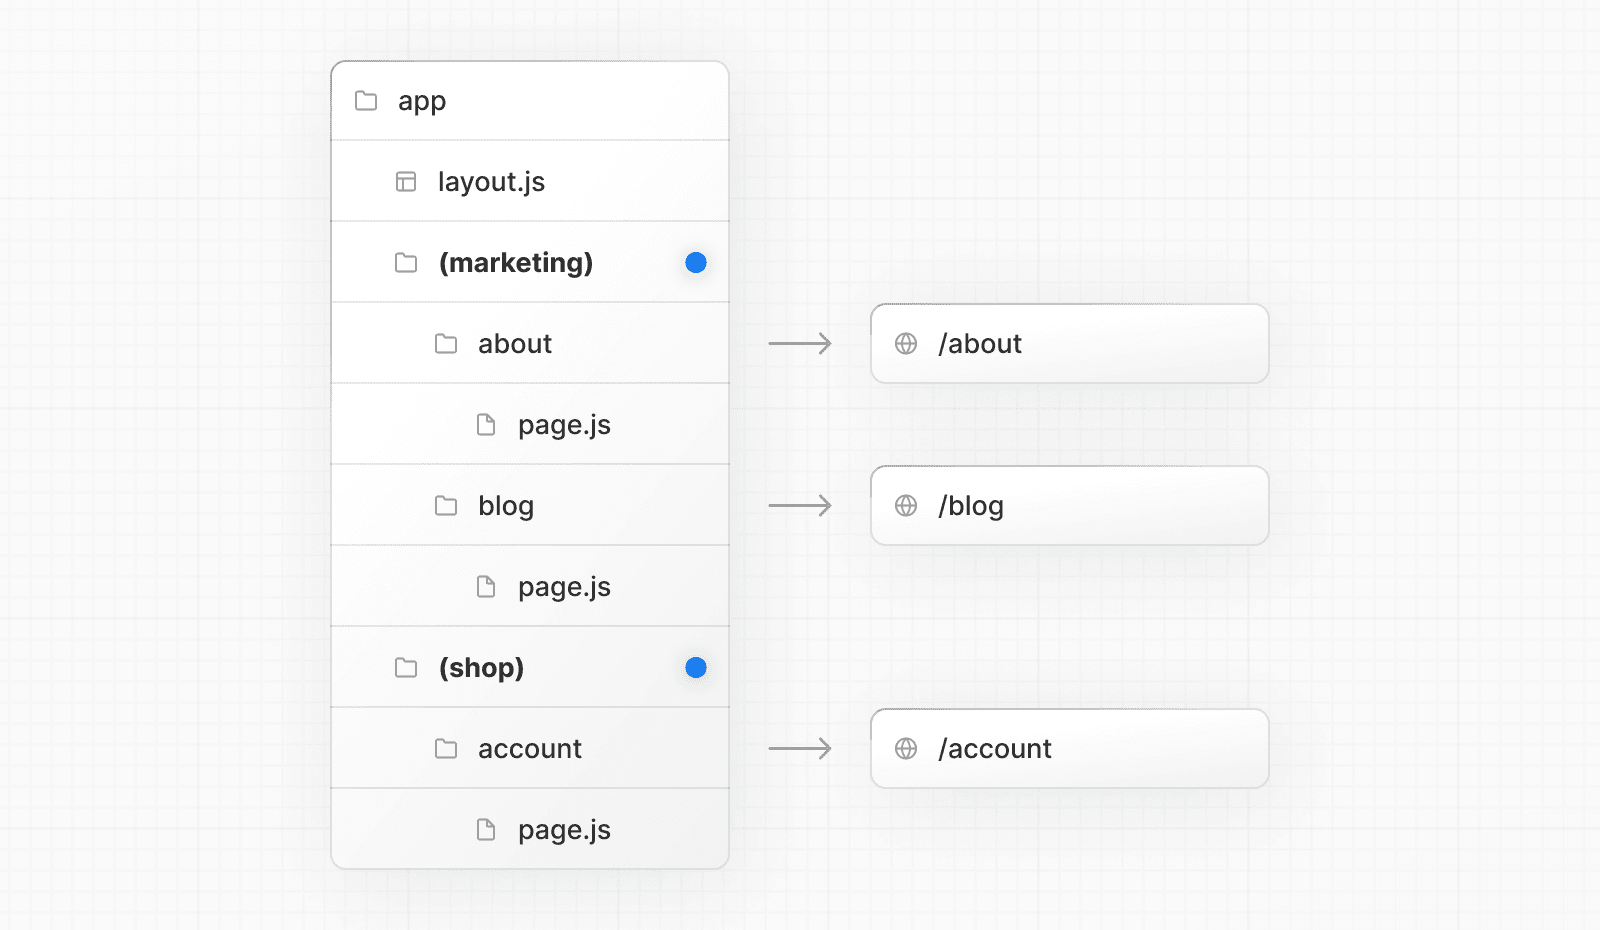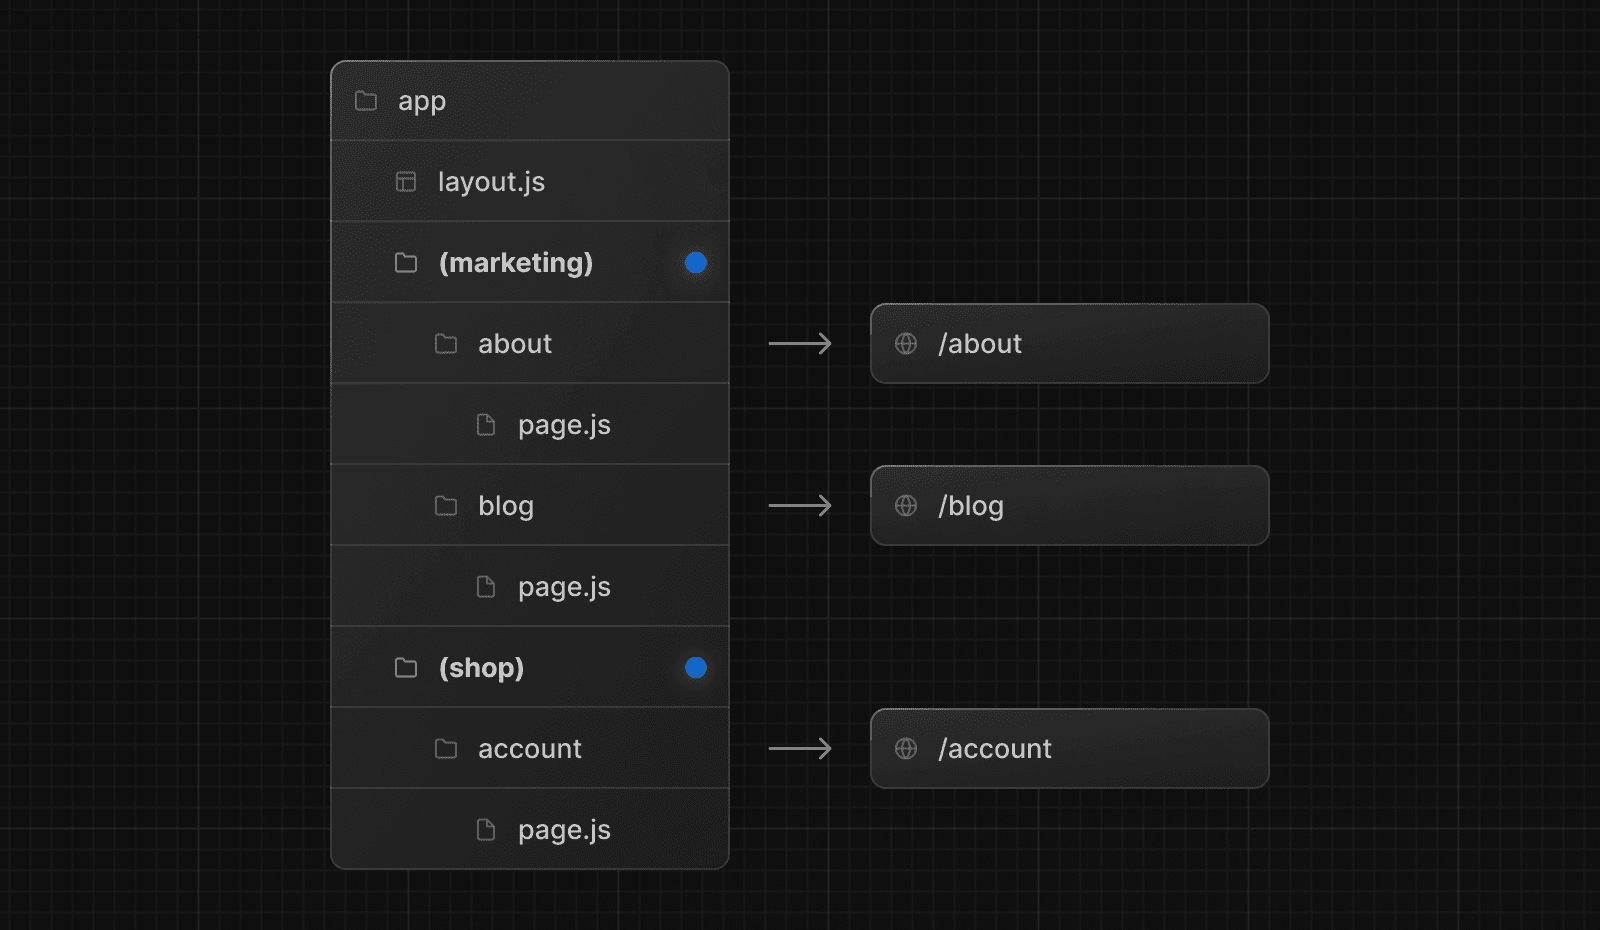 Even though routes inside `(marketing)` and `(shop)` share the same URL hierarchy, you can create a different layout for each group by adding a `layout.js` file inside their folders. 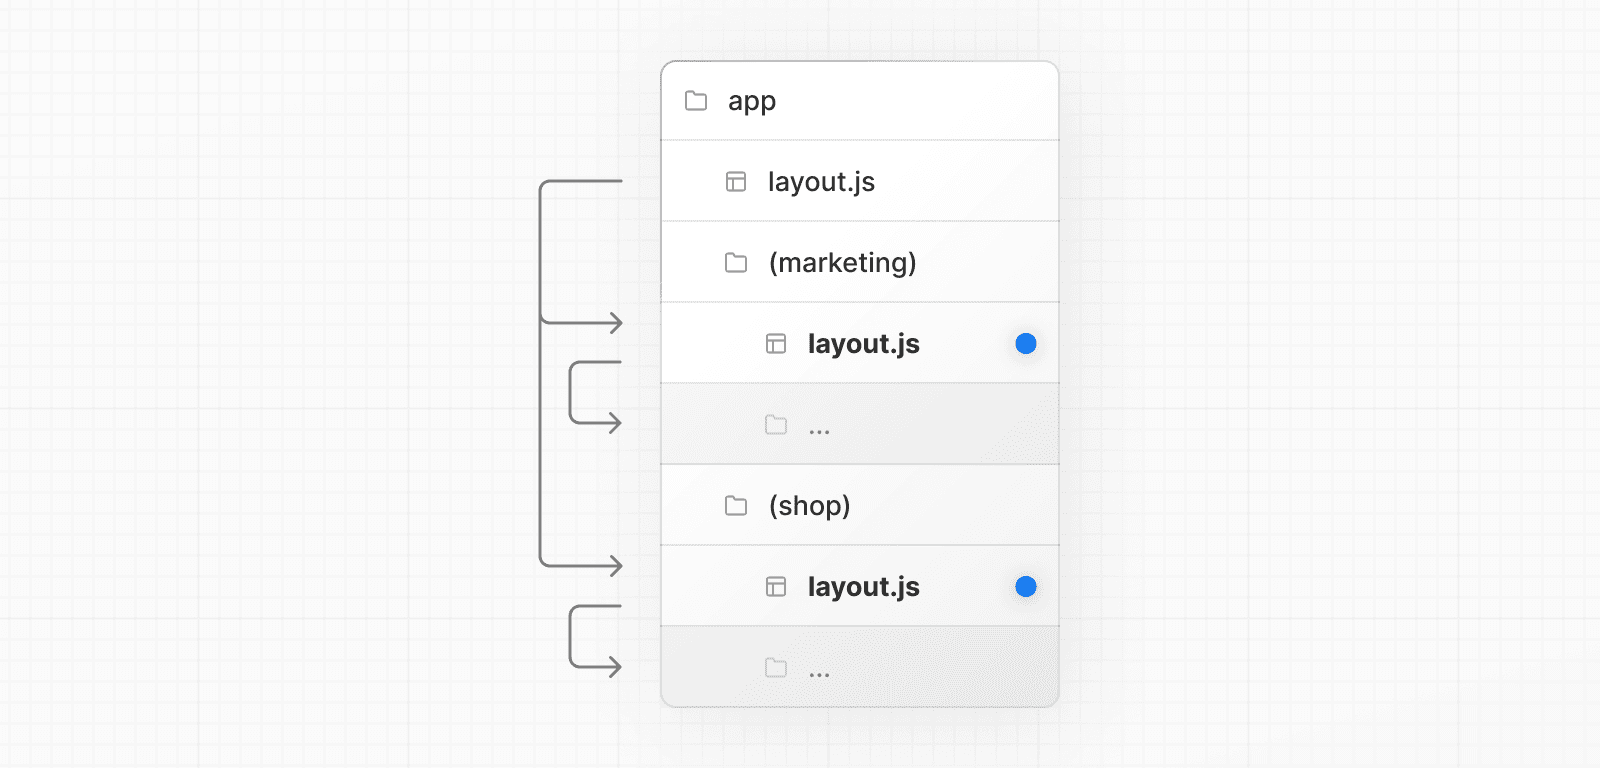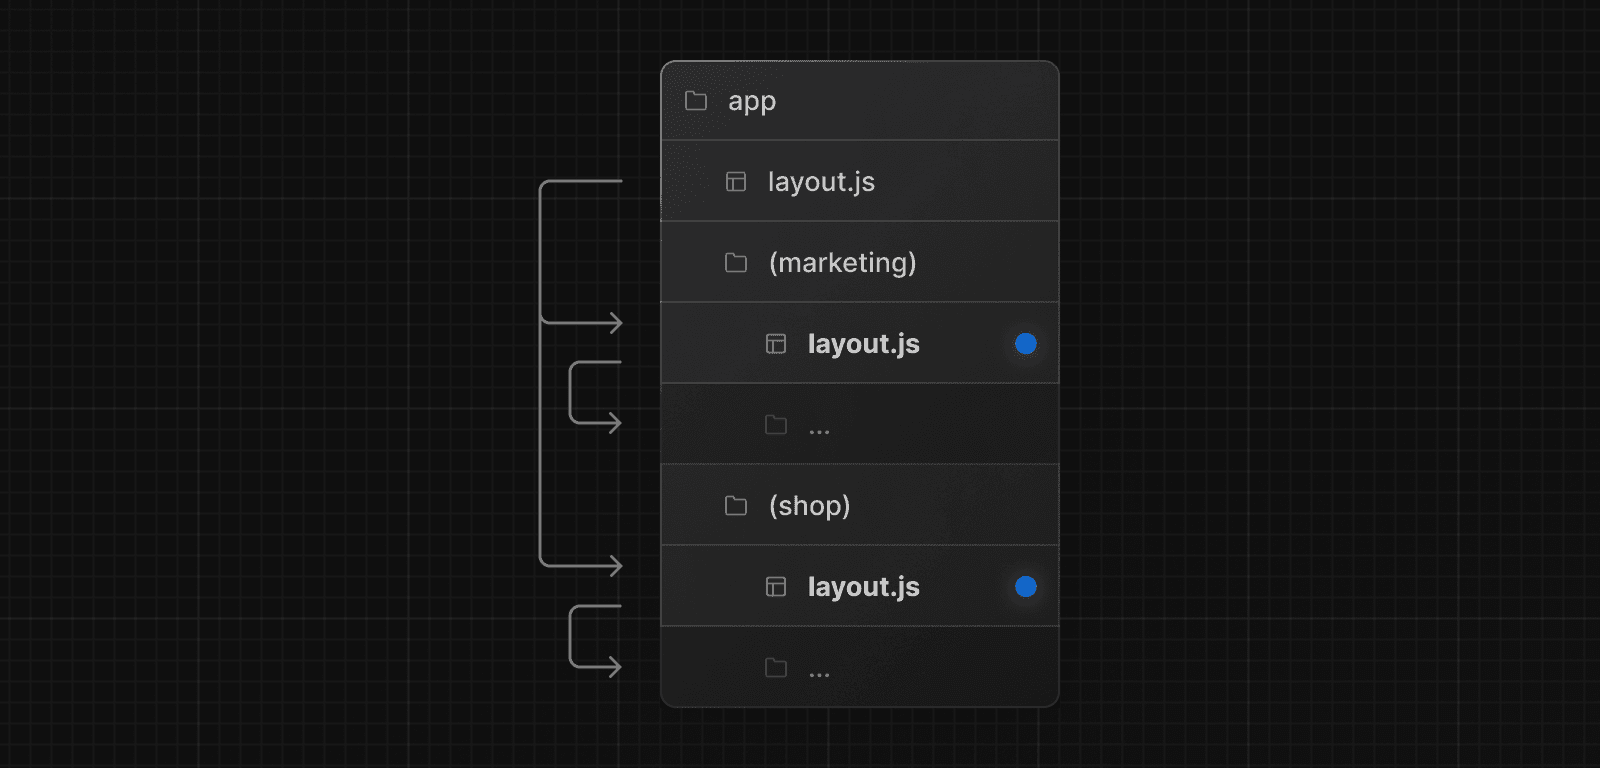 ### Opting specific segments into a layout To opt specific routes into a layout, create a new route group (e.g. `(shop)`) and move the routes that share the same layout into the group (e.g. `account` and `cart`). The routes outside of the group will not share the layout (e.g. `checkout`). 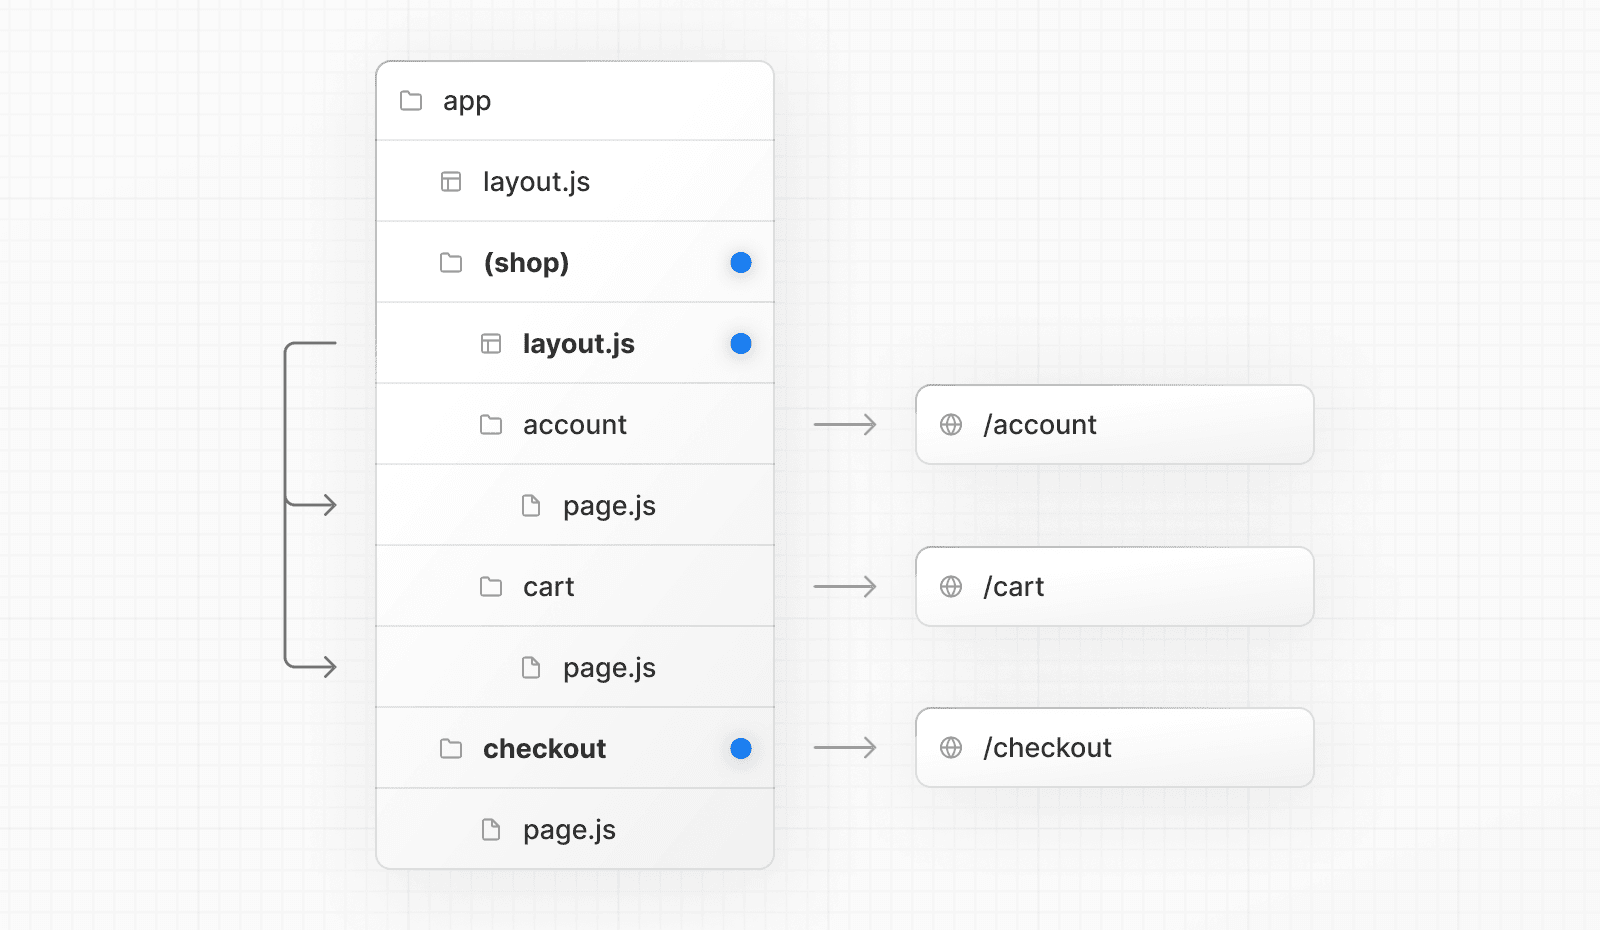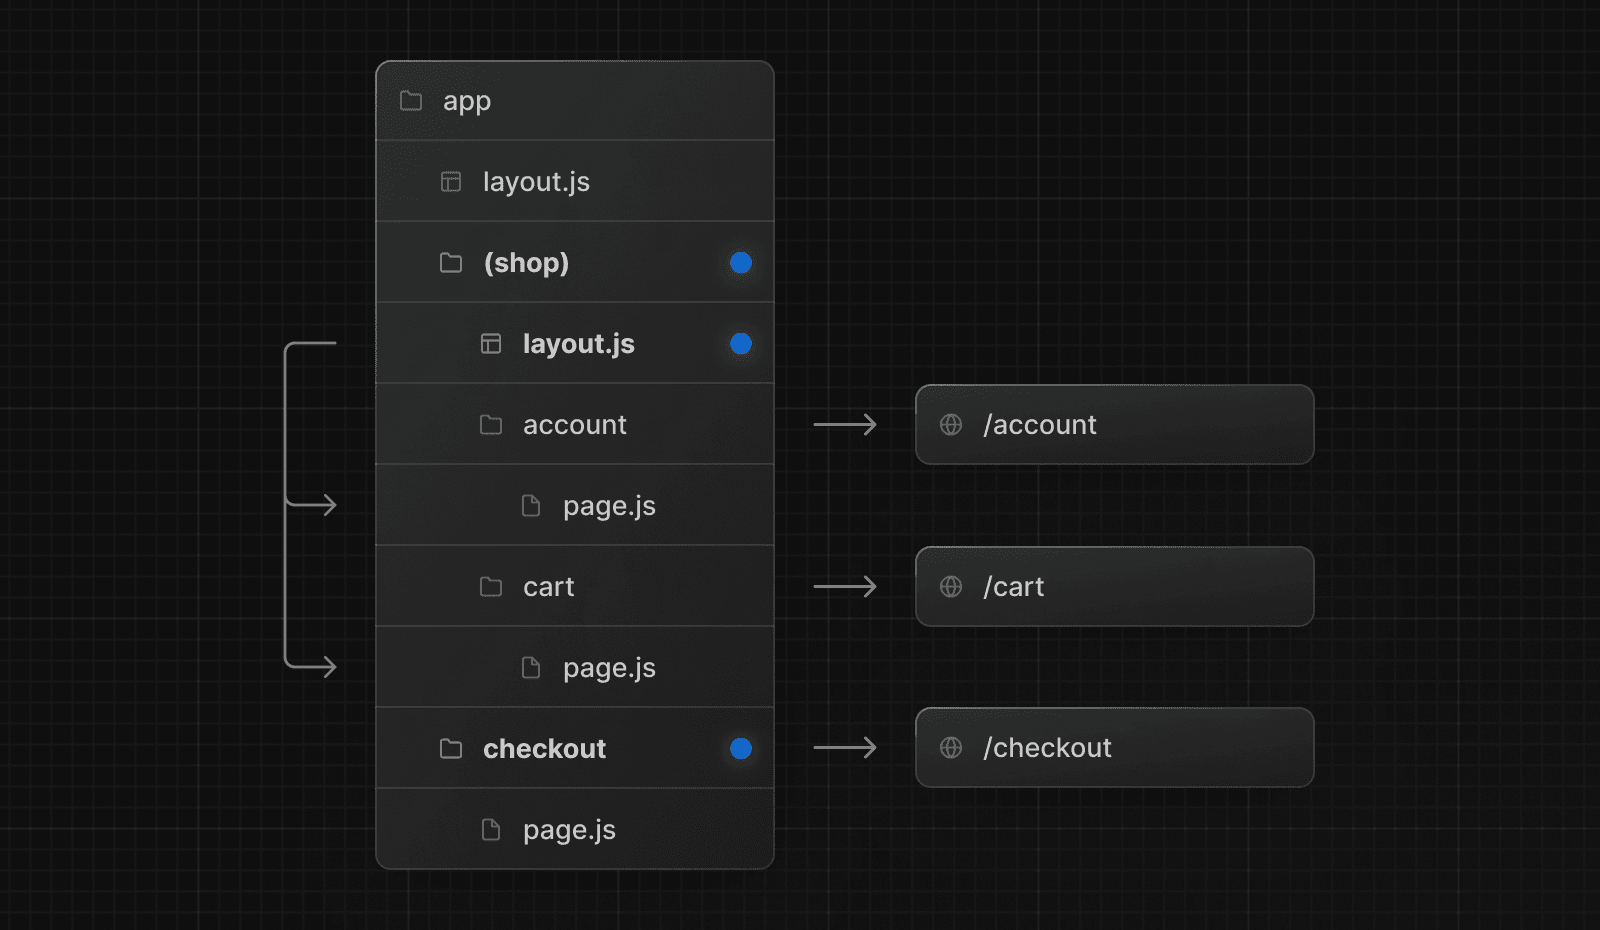 ### Opting for loading skeletons on a specific route To apply a loading skeleton via a `loading.js` file to a specific route, create a new route group (e.g., `/(overview)`) and then move your `loading.tsx` inside that route group.  Now, the `loading.tsx` file will only apply to your dashboard → overview page instead of all your dashboard pages without affecting the URL path structure. ### Creating multiple root layouts To create multiple root layouts, remove the top-level `layout.js` file, and add a `layout.js` file inside each route group. This is useful for partitioning an application into sections that have a completely different UI or experience. The `<html>` and `<body>` tags need to be added to each root layout. 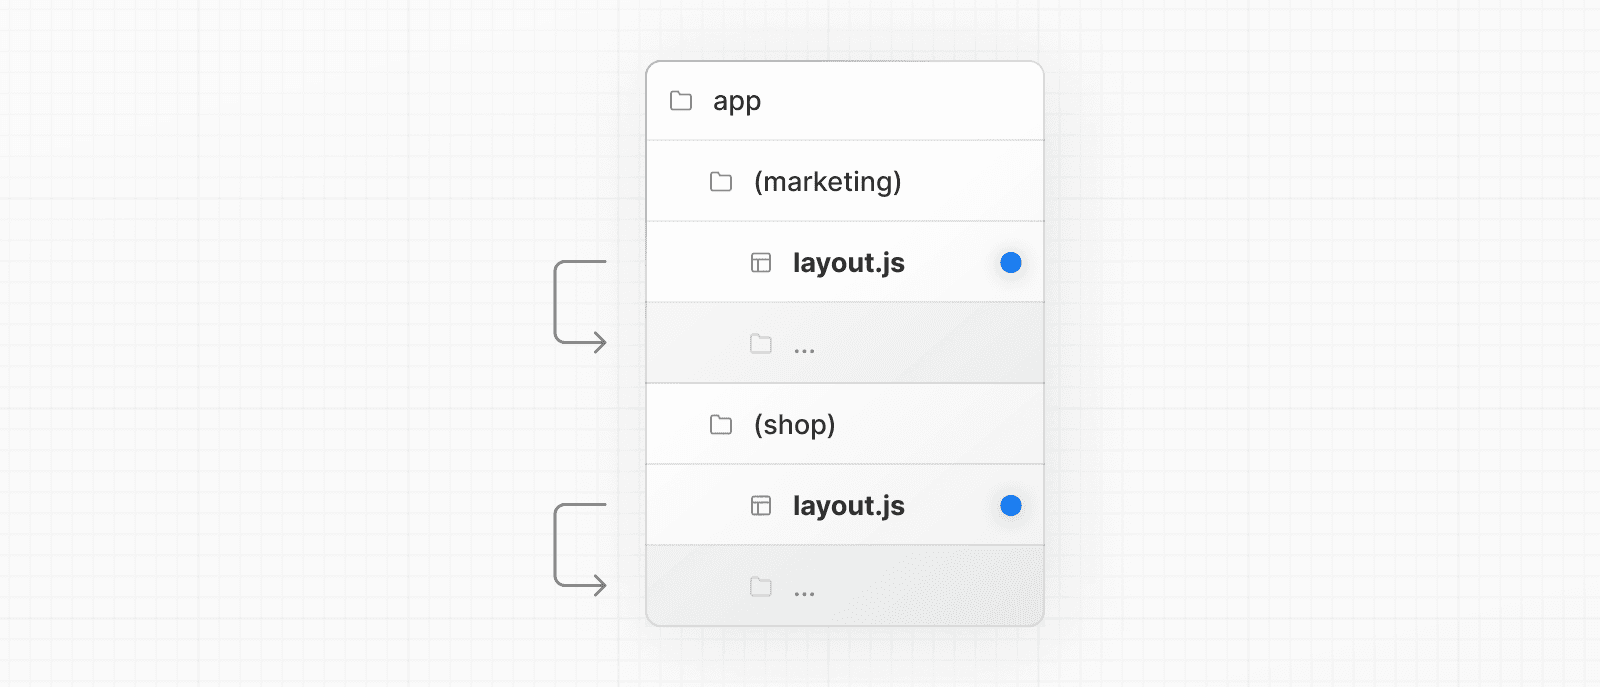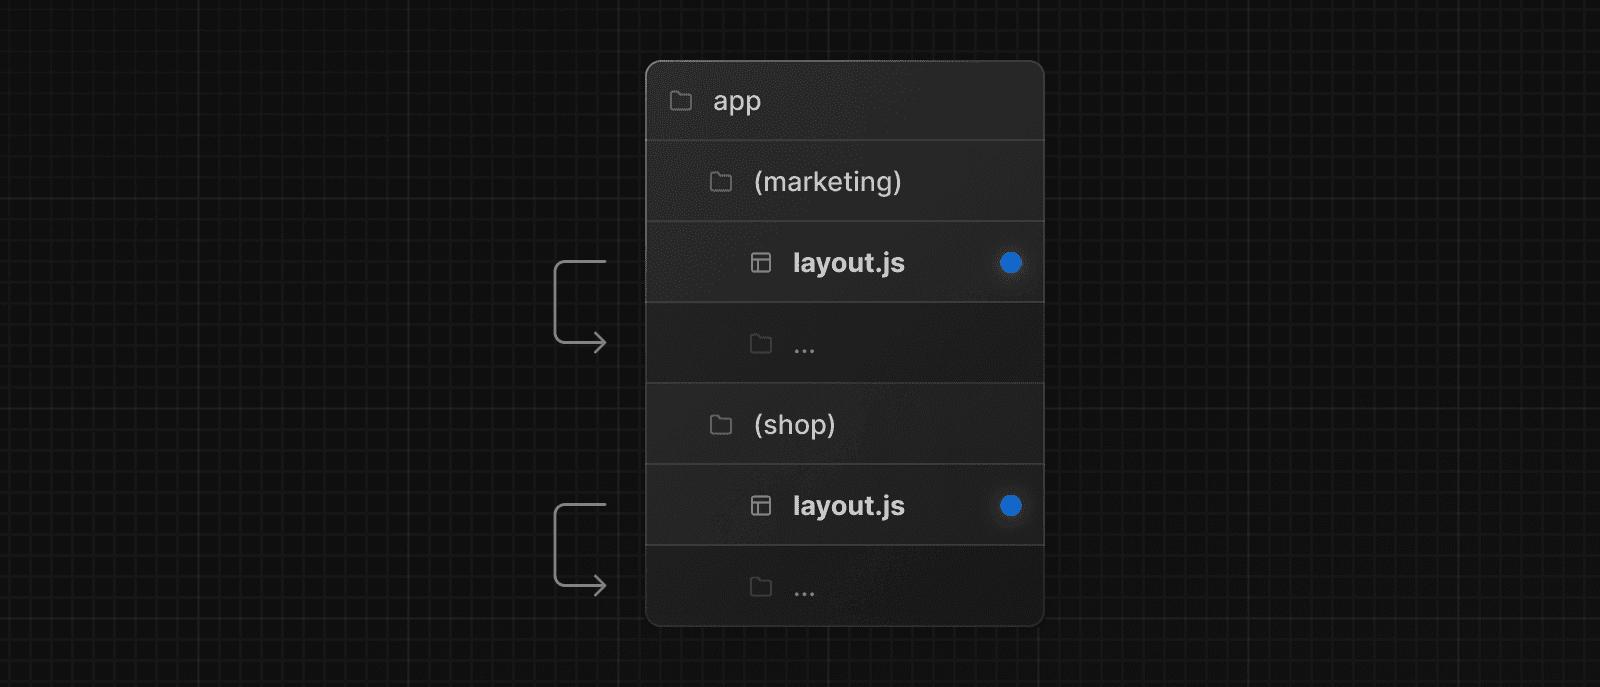 In the example above, both `(marketing)` and `(shop)` have their own root layout. --- ## Page: https://nextjs.org/docs/app/getting-started/layouts-and-pages ## How to create layouts and pages Next.js uses **file-system based routing**, meaning you can use folders and files to define routes. This page will guide you through how to create layouts and pages, and link between them. ## Creating a page A **page** is UI that is rendered on a specific route. To create a page, add a `page` file inside the `app` directory and default export a React component. For example, to create an index page (`/`):  export default function Page() { return <h1>Hello Next.js!</h1> } ## Creating a layout A layout is UI that is **shared** between multiple pages. On navigation, layouts preserve state, remain interactive, and do not rerender. You can define a layout by default exporting a React component from a `layout` file. The component should accept a `children` prop which can be a page or another layout. For example, to create a layout that accepts your index page as child, add a `layout` file inside the `app` directory:  export default function DashboardLayout({ children, }: { children: React.ReactNode }) { return ( <html lang="en"> <body> {/* Layout UI */} {/* Place children where you want to render a page or nested layout */} <main>{children}</main> </body> </html> ) } The layout above is called a root layout because it's defined at the root of the `app` directory. The root layout is **required** and must contain `html` and `body` tags. ## Creating a nested route A nested route is a route composed of multiple URL segments. For example, the `/blog/[slug]` route is composed of three segments: * `/` (Root Segment) * `blog` (Segment) * `[slug]` (Leaf Segment) In Next.js: * **Folders** are used to define the route segments that map to URL segments. * **Files** (like `page` and `layout`) are used to create UI that is shown for a segment. To create nested routes, you can nest folders inside each other. For example, to add a route for `/blog`, create a folder called `blog` in the `app` directory. Then, to make `/blog` publicly accessible, add a `page.tsx` file: 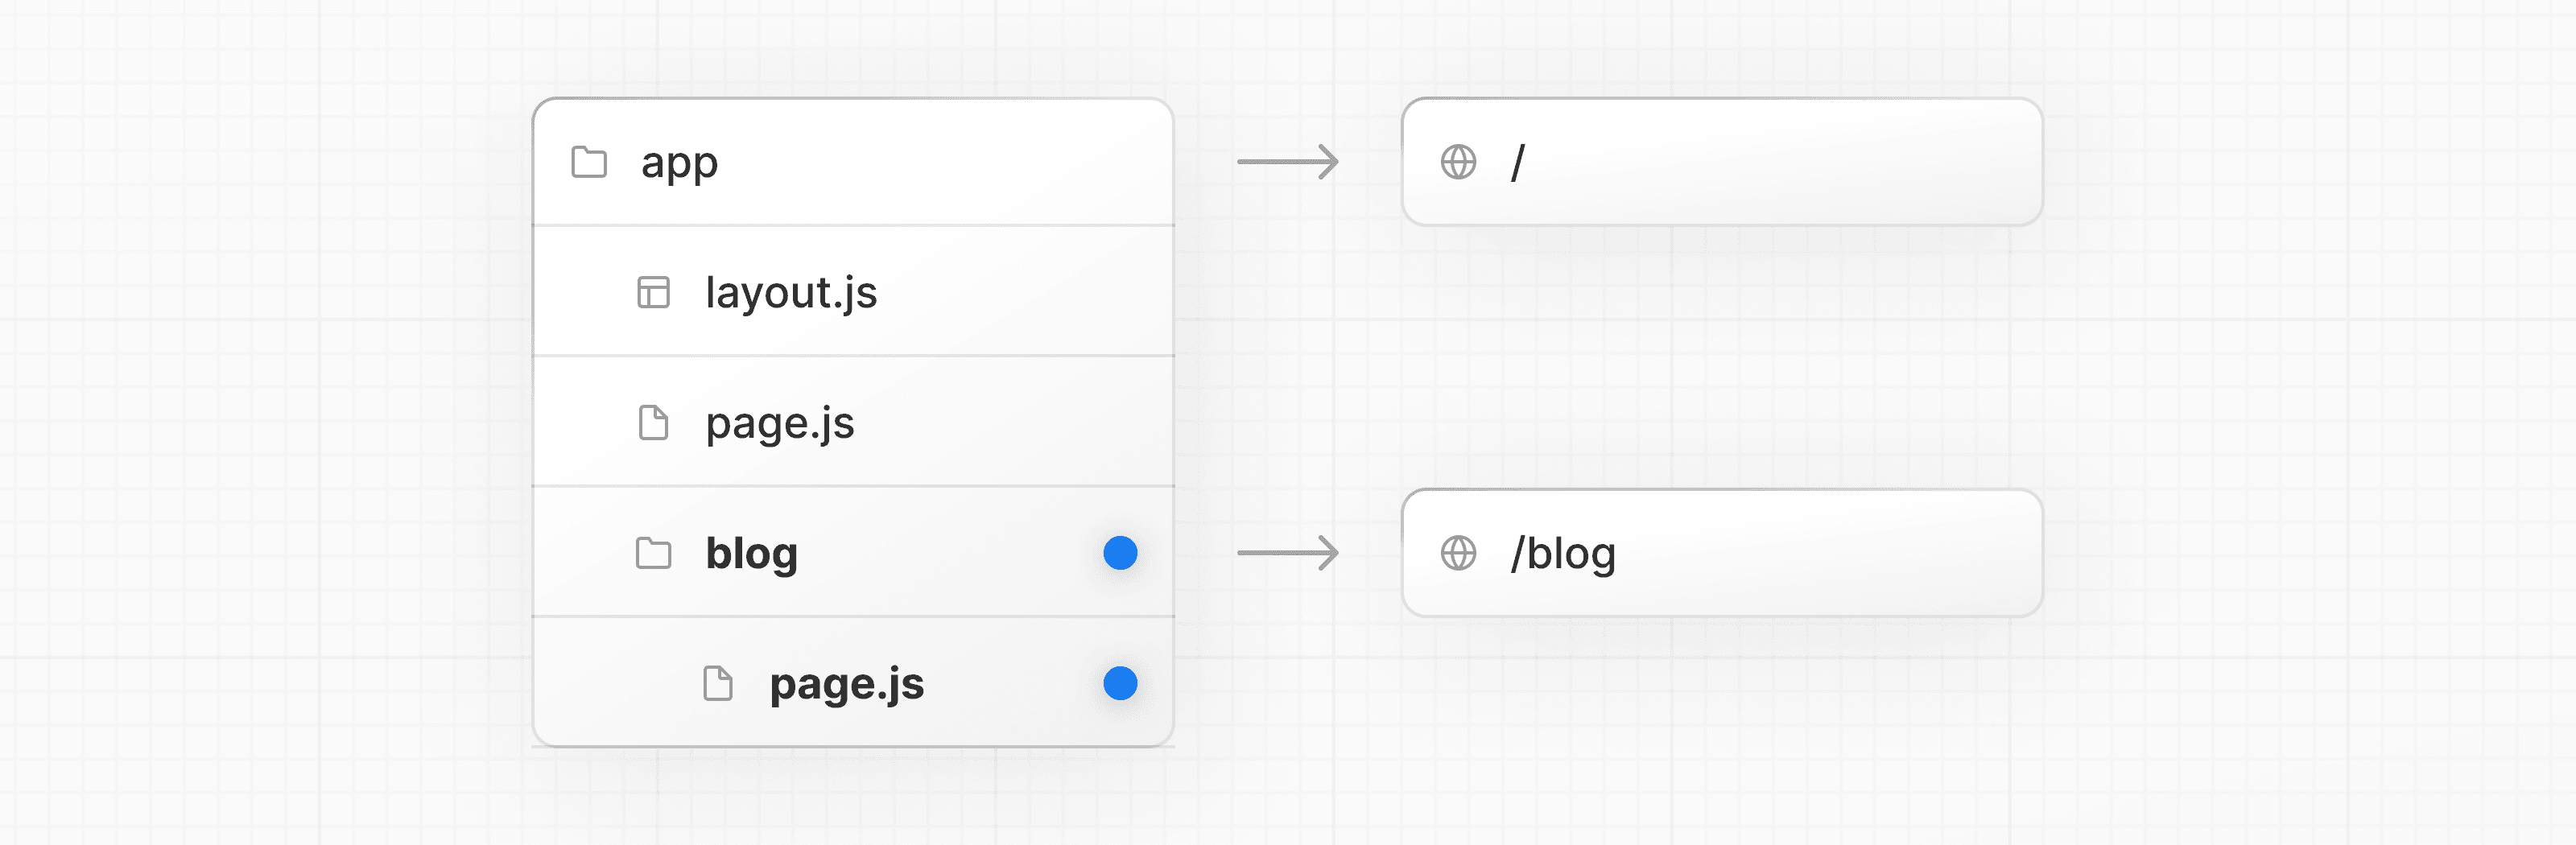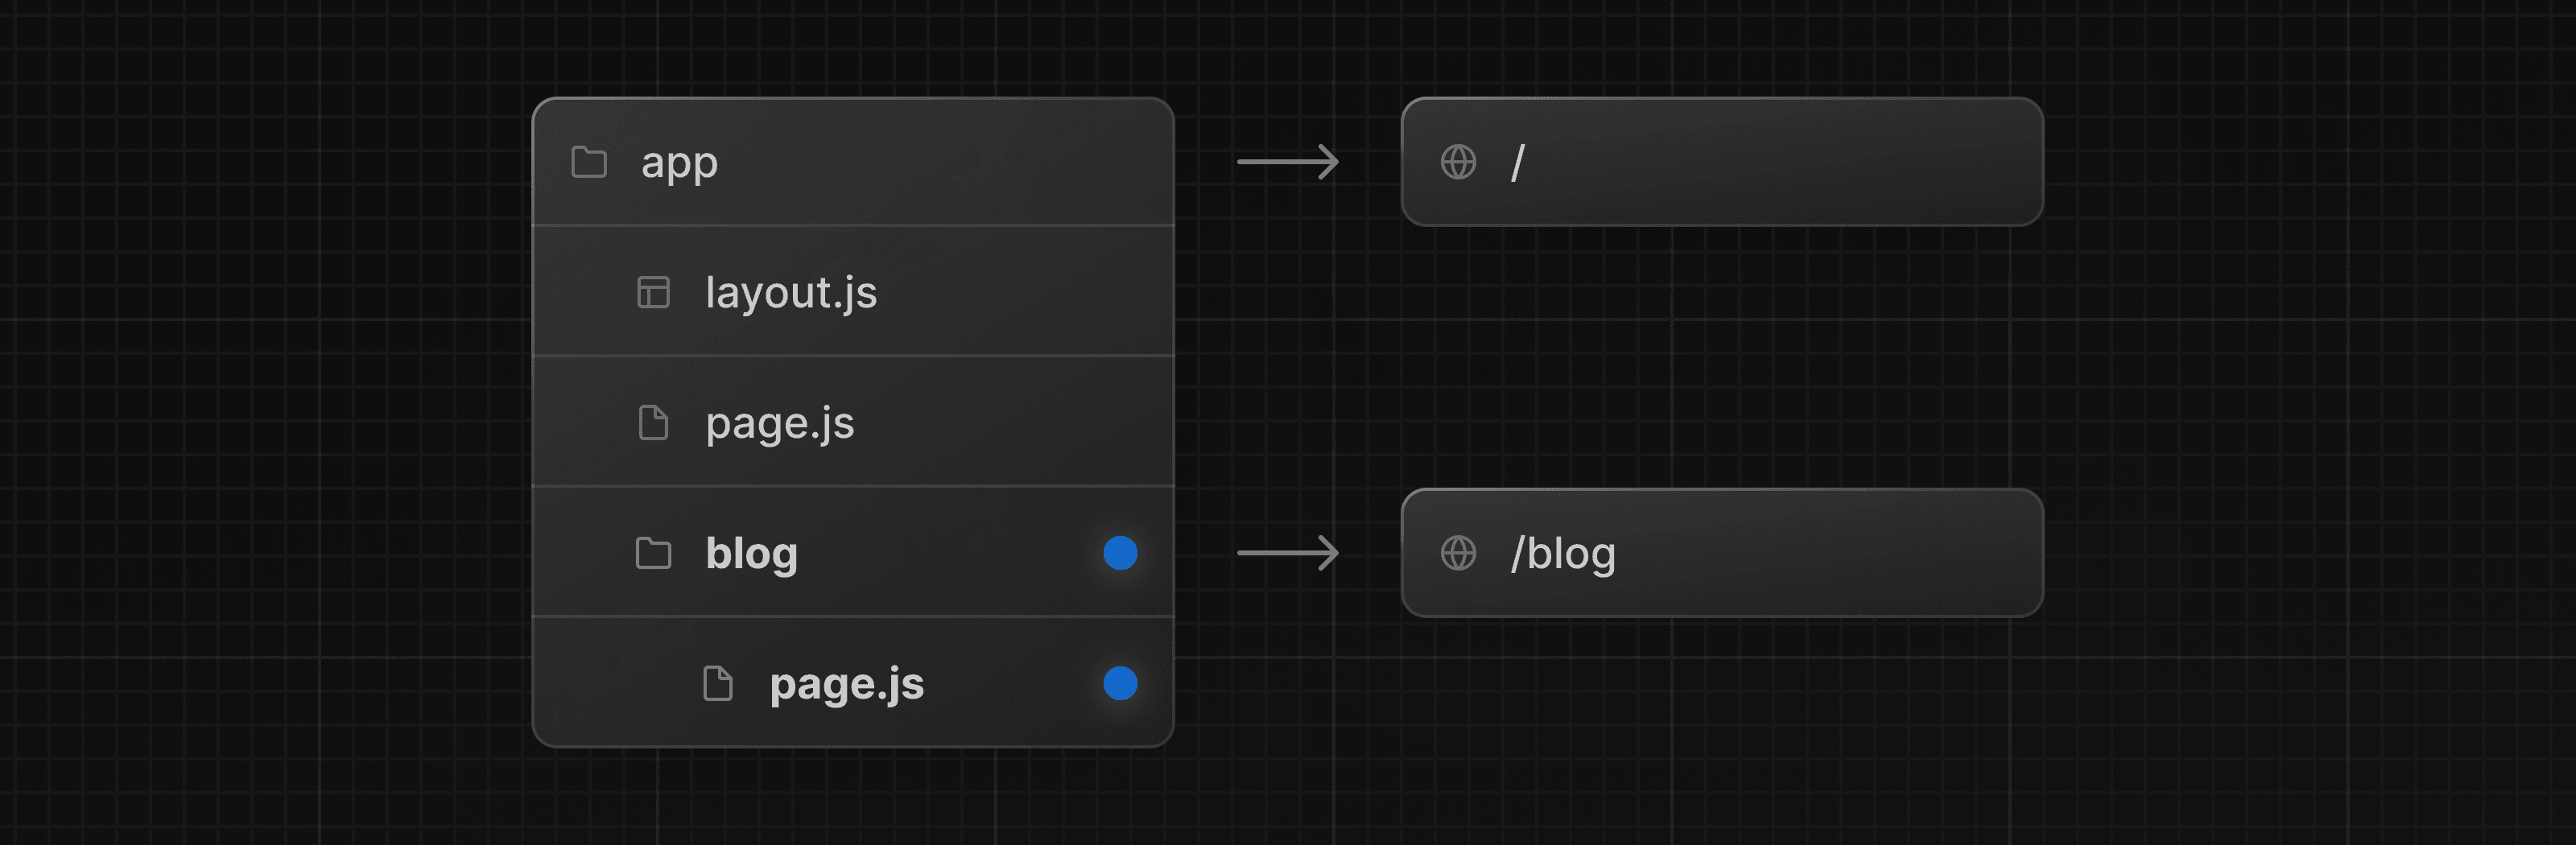 // Dummy imports import { getPosts } from '@/lib/posts' import { Post } from '@/ui/post' export default async function Page() { const posts = await getPosts() return ( <ul> {posts.map((post) => ( <Post key={post.id} post={post} /> ))} </ul> ) } You can continue nesting folders to create nested routes. For example, to create a route for a specific blog post, create a new `[slug]` folder inside `blog` and add a `page` file: 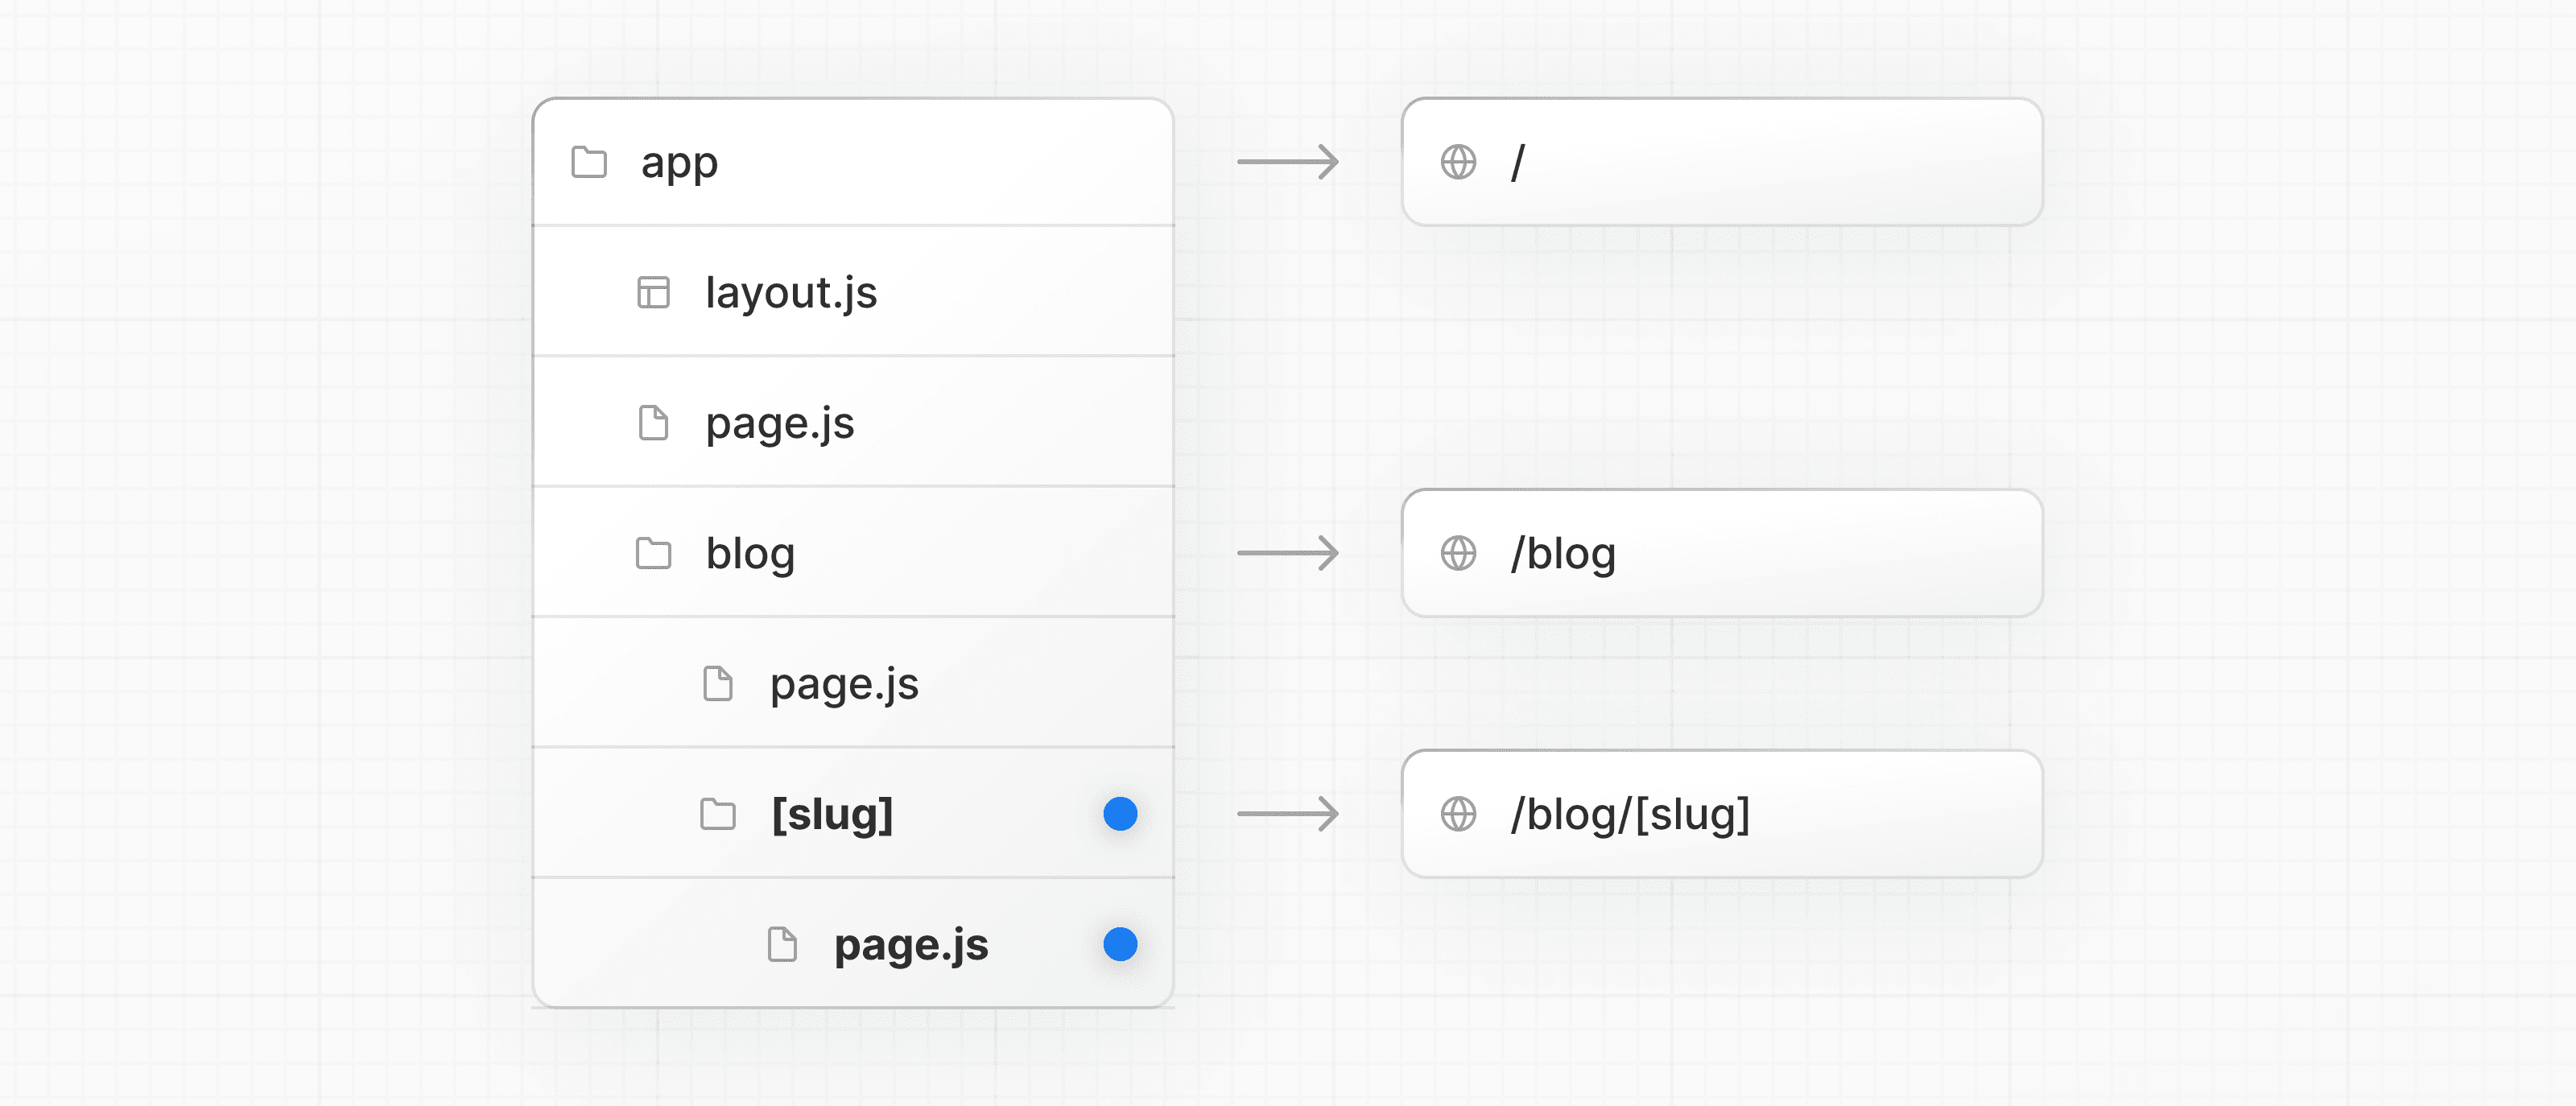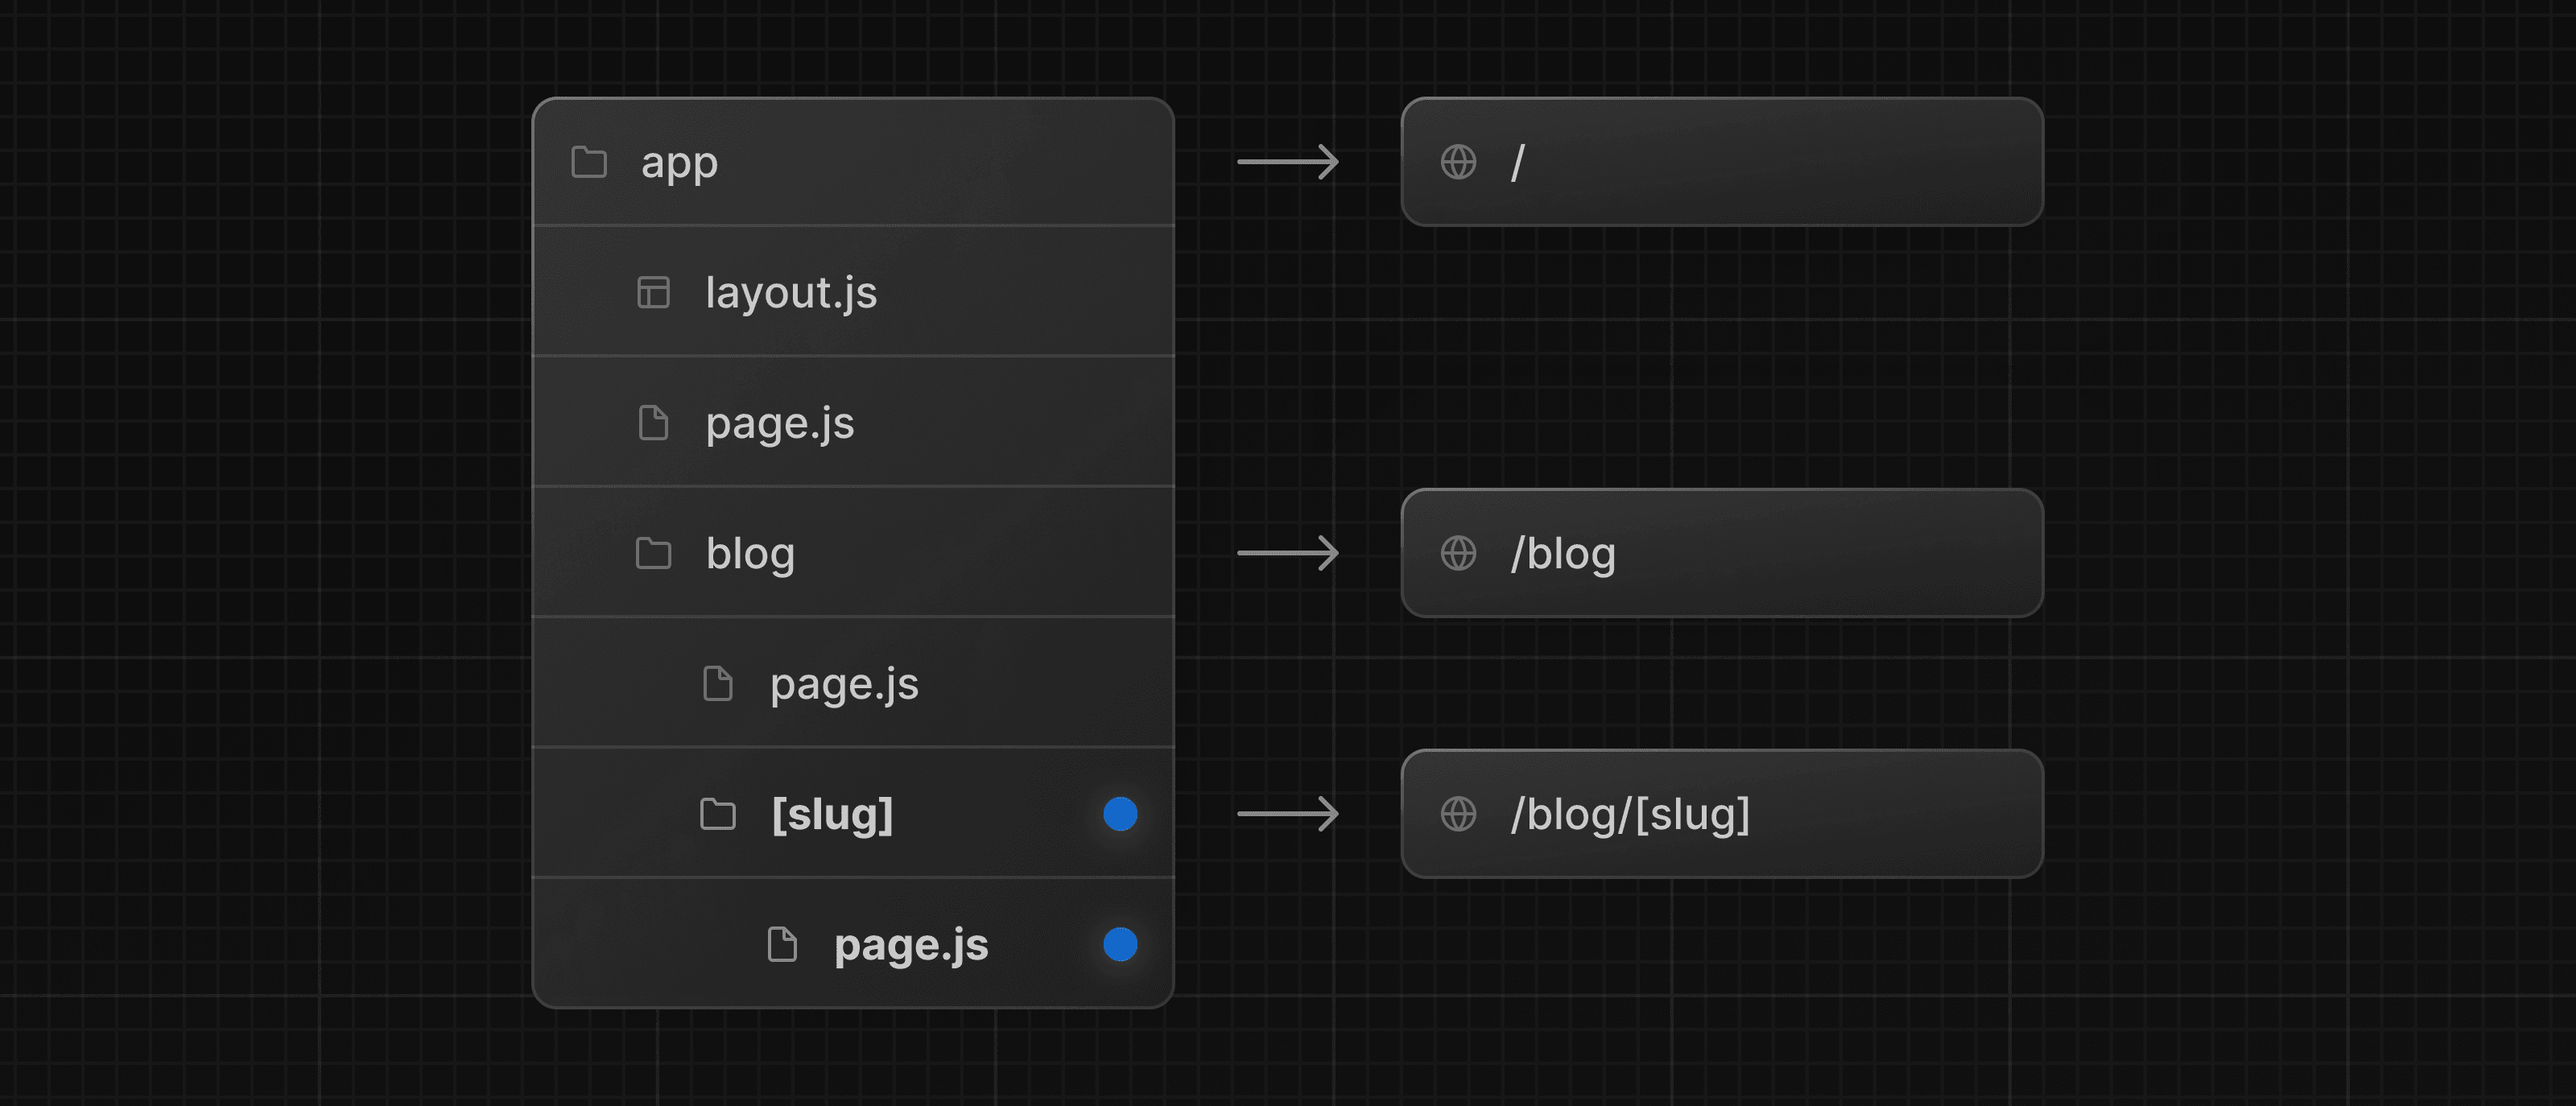 function generateStaticParams() {} export default function Page() { return <h1>Hello, Blog Post Page!</h1> } Wrapping a folder name in square brackets (e.g. `[slug]`) creates a dynamic route segment which is used to generate multiple pages from data. e.g. blog posts, product pages, etc. ## Nesting layouts By default, layouts in the folder hierarchy are also nested, which means they wrap child layouts via their `children` prop. You can nest layouts by adding `layout` inside specific route segments (folders). For example, to create a layout for the `/blog` route, add a new `layout` file inside the `blog` folder. 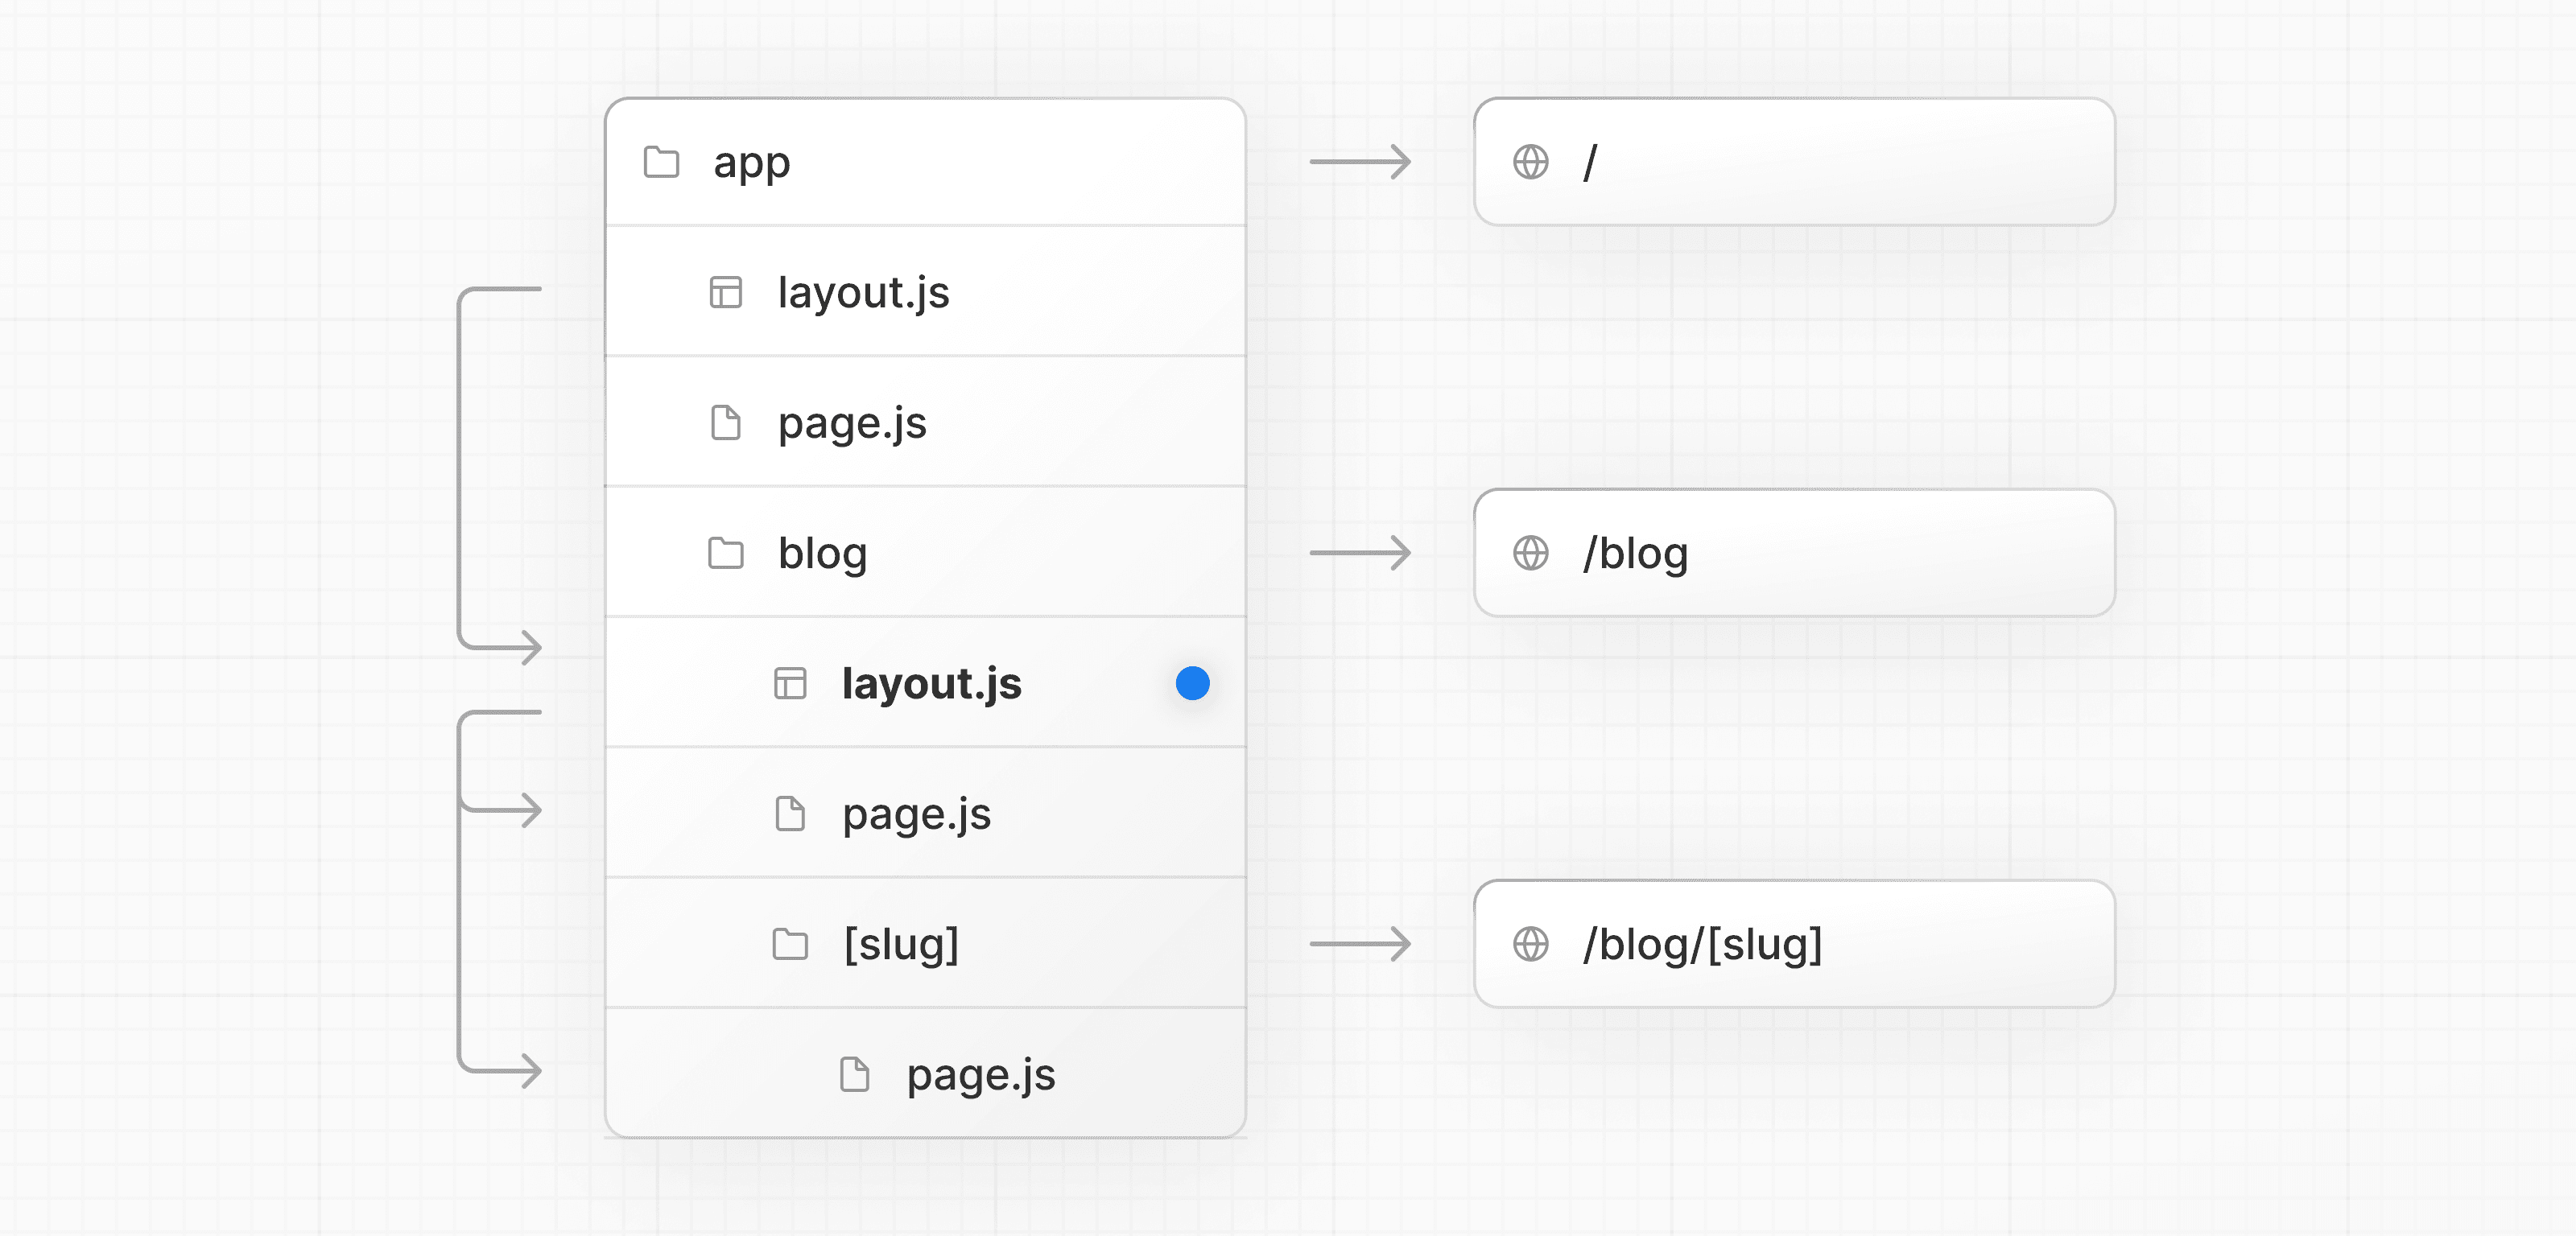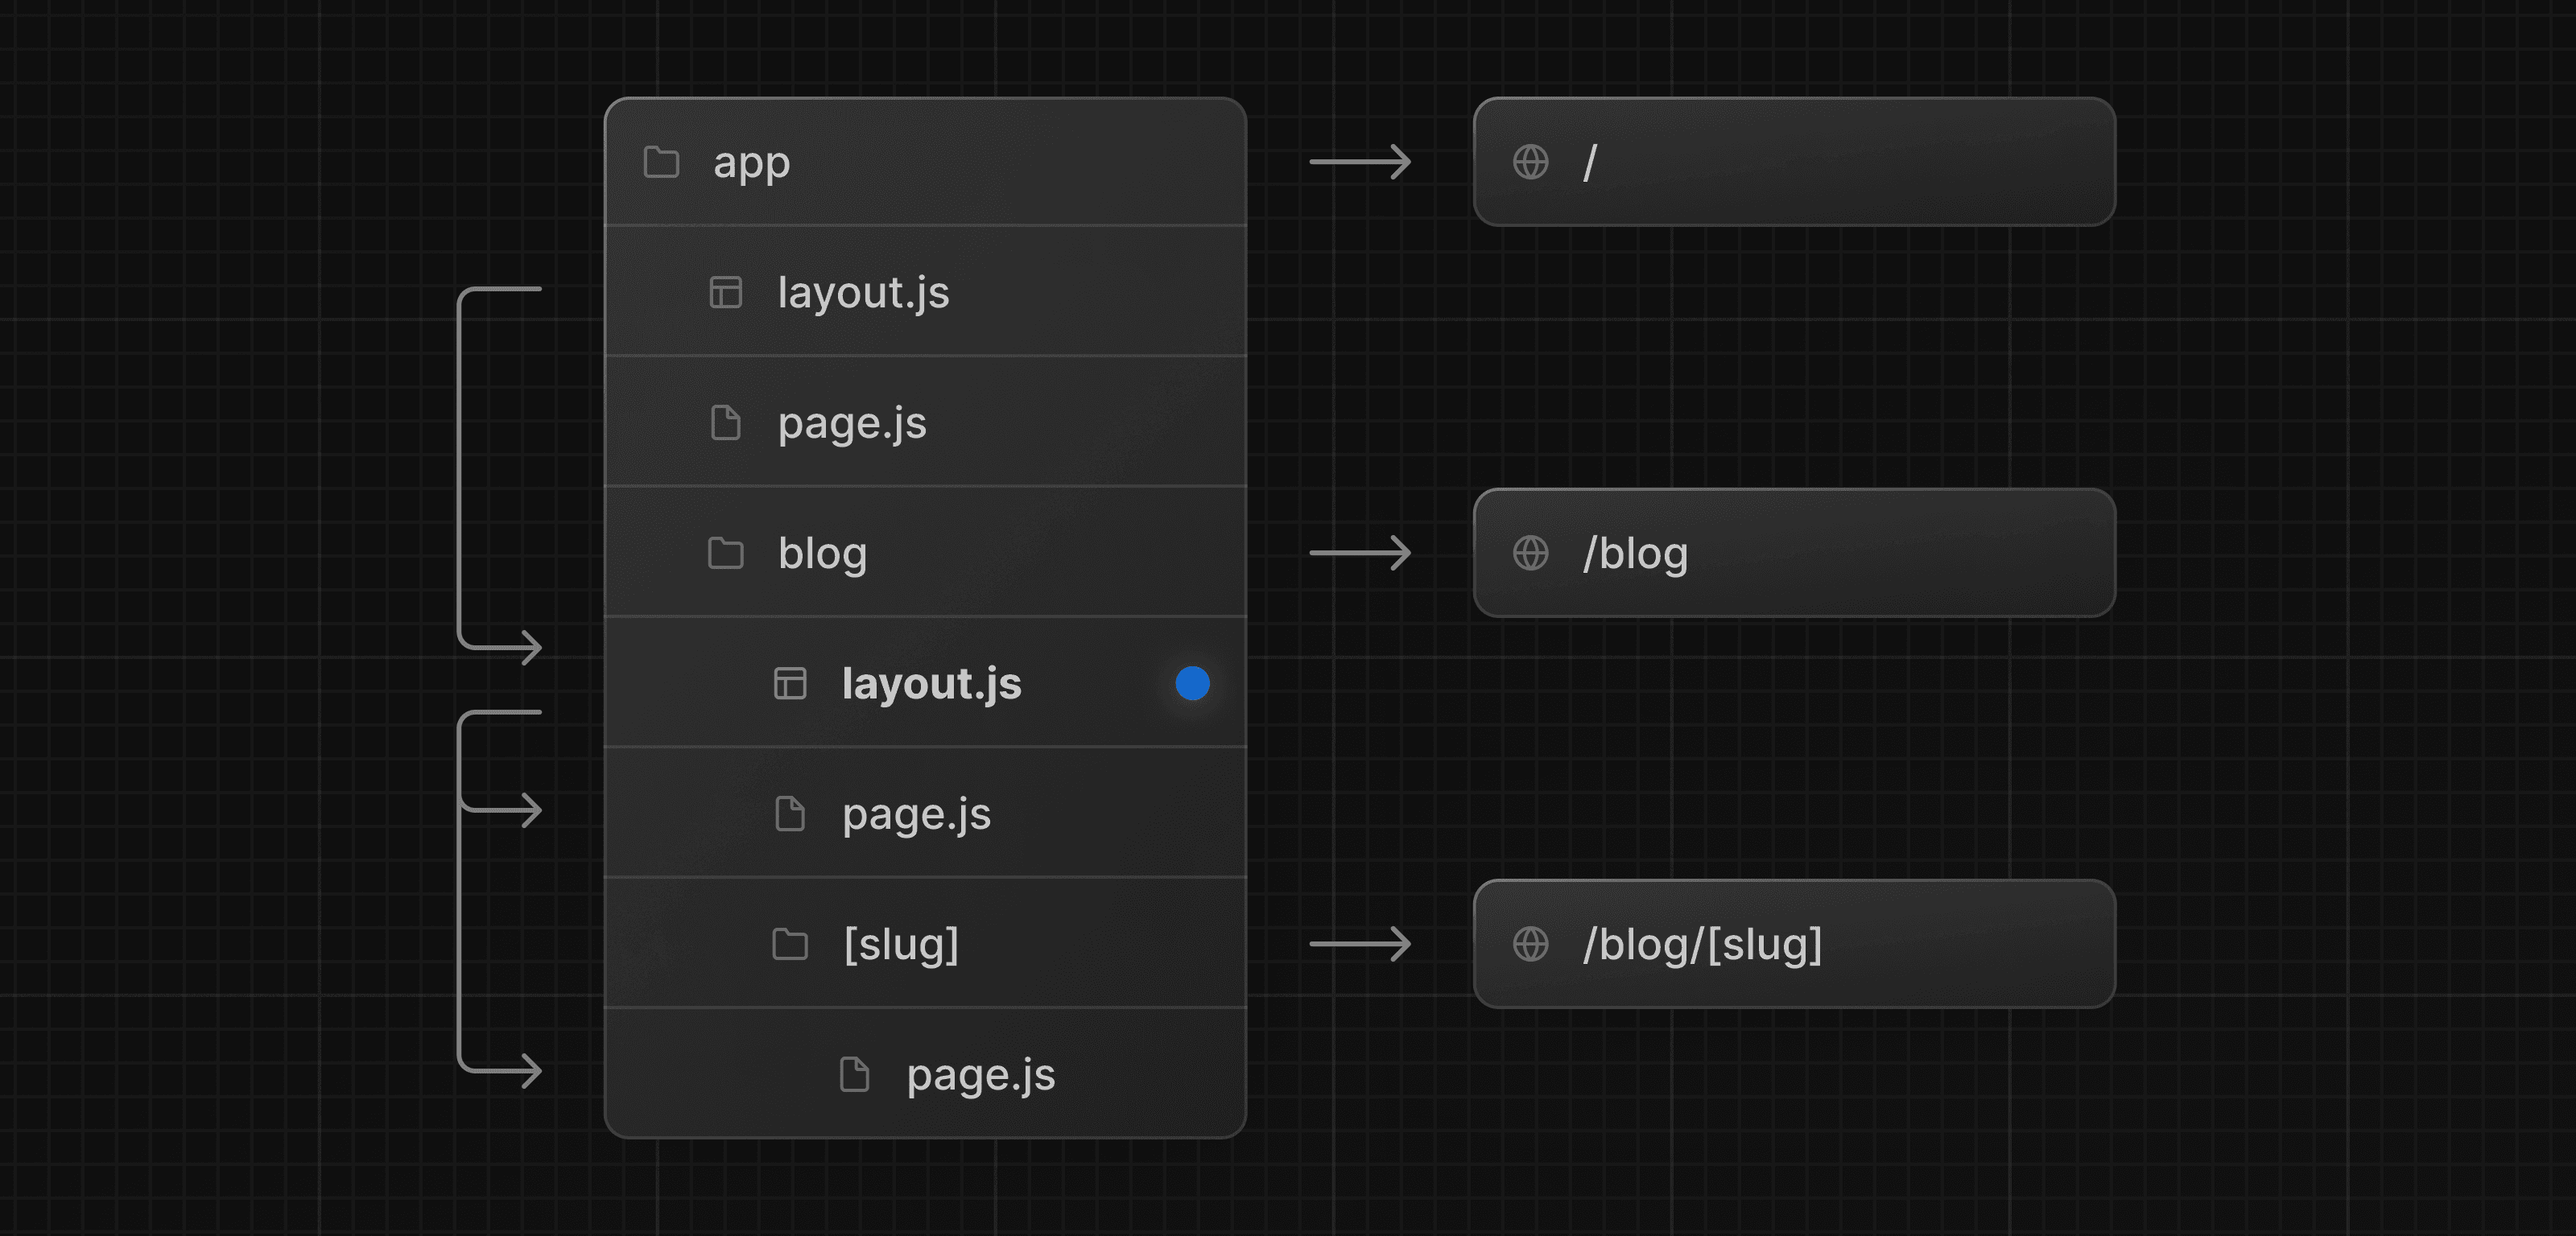 export default function BlogLayout({ children, }: { children: React.ReactNode }) { return <section>{children}</section> } If you were to combine the two layouts above, the root layout (`app/layout.js`) would wrap the blog layout (`app/blog/layout.js`), which would wrap the blog (`app/blog/page.js`) and blog post page (`app/blog/[slug]/page.js`). ## Linking between pages You can use the `<Link>` component to navigate between routes. `<Link>` is a built-in Next.js component that extends the HTML `<a>` tag to provide prefetching and client-side navigation. For example, to generate a list of blog posts, import `<Link>` from `next/link` and pass a `href` prop to the component: import Link from 'next/link' export default async function Post({ post }) { const posts = await getPosts() return ( <ul> {posts.map((post) => ( <li key={post.slug}> <Link href={`/blog/${post.slug}`}>{post.title}</Link> </li> ))} </ul> ) } `<Link>` is the primary and recommended way to navigate between routes in your Next.js application. However, you can also use the `useRouter` hook for more advanced navigation. --- ## Page: https://nextjs.org/docs/app/getting-started/images-and-fonts ## How to optimize images and fonts Next.js comes with automatic image and font optimization. This page will guide you through how to start using them. ## Optimizing images The Next.js `<Image>` component extends the HTML `<img>` element to provide: * **Size optimization:** Automatically serving correctly sized images for each device, using modern image formats like WebP. * **Visual stability:** Preventing layout shift automatically when images are loading. * **Faster page loads:** Only loading images when they enter the viewport using native browser lazy loading, with optional blur-up placeholders. * **Asset flexibility:** Resizing images on-demand, even images stored on remote servers. To start using `<Image>`, import it from `next/image` and render it within your component. import Image from 'next/image' export default function Page() { return <Image src="" alt="" /> } The `src` property can be a local or remote image. ### Local images You can store static files, like images and fonts, under a folder called `public` in the root directory. Files inside `public` can then be referenced by your code starting from the base URL (`/`).  import Image from 'next/image' import profilePic from './me.png' export default function Page() { return ( <Image src={profilePic} alt="Picture of the author" // width={500} automatically provided // height={500} automatically provided // blurDataURL="data:..." automatically provided // placeholder="blur" // Optional blur-up while loading /> ) } Next.js will automatically determine the intrinsic `width` and `height` of your image based on the imported file. These values are used to determine the image ratio and prevent Cumulative Layout Shift while your image is loading. ### Remote images To use a remote image, you can provide a URL string for the `src` property. import Image from 'next/image' export default function Page() { return ( <Image src="https://s3.amazonaws.com/my-bucket/profile.png" alt="Picture of the author" width={500} height={500} /> ) } Since Next.js does not have access to remote files during the build process, you'll need to provide the `width`, `height` and optional `blurDataURL` props manually. The `width` and `height` are used to infer the correct aspect ratio of image and avoid layout shift from the image loading in. To safely allow images from remote servers, you need to define a list of supported URL patterns in `next.config.js`. Be as specific as possible to prevent malicious usage. For example, the following configuration will only allow images from a specific AWS S3 bucket: import { NextConfig } from 'next' const config: NextConfig = { images: { remotePatterns: [ { protocol: 'https', hostname: 's3.amazonaws.com', port: '', pathname: '/my-bucket/**', search: '', }, ], }, } export default config ## Optimizing fonts The `next/font` module automatically optimizes your fonts and removes external network requests for improved privacy and performance. It includes **built-in self-hosting** for any font file. This means you can optimally load web fonts with no layout shift. To start using `next/font`, import it from `next/font/local` or `next/font/google`, call it as a function with the appropriate options, and set the `className` of the element you want to apply the font to. For example: import { Geist } from 'next/font/google' const geist = Geist({ subsets: ['latin'], }) export default function Layout({ children }: { children: React.ReactNode }) { return ( <html lang="en" className={geist.className}> <body>{children}</body> </html> ) } ### Google fonts You can automatically self-host any Google Font. Fonts are included in the deployment and served from the same domain as your deployment, meaning no requests are sent to Google by the browser when the user visits your site. To start using a Google Font, import your chosen font from `next/font/google`: import { Geist } from 'next/font/google' const geist = Geist({ subsets: ['latin'], }) export default function RootLayout({ children, }: { children: React.ReactNode }) { return ( <html lang="en" className={geist.className}> <body>{children}</body> </html> ) } We recommend using variable fonts for the best performance and flexibility. But if you can't use a variable font, you will need to specify a weight: import { Roboto } from 'next/font/google' const roboto = Roboto({ weight: '400', subsets: ['latin'], }) export default function RootLayout({ children, }: { children: React.ReactNode }) { return ( <html lang="en" className={roboto.className}> <body>{children}</body> </html> ) } ### Local fonts To use a local font, import your font from `next/font/local` and specify the `src` of your local font file. import localFont from 'next/font/local' const myFont = localFont({ src: './my-font.woff2', }) export default function RootLayout({ children, }: { children: React.ReactNode }) { return ( <html lang="en" className={myFont.className}> <body>{children}</body> </html> ) } If you want to use multiple files for a single font family, `src` can be an array: const roboto = localFont({ src: [ { path: './Roboto-Regular.woff2', weight: '400', style: 'normal', }, { path: './Roboto-Italic.woff2', weight: '400', style: 'italic', }, { path: './Roboto-Bold.woff2', weight: '700', style: 'normal', }, { path: './Roboto-BoldItalic.woff2', weight: '700', style: 'italic', }, ], }) --- ## Page: https://nextjs.org/docs/app/getting-started/css ## How to use CSS in your application Next.js provides several ways to use CSS in your application, including: * CSS Modules * Global CSS * Tailwind CSS * Sass * CSS-in-JS * External Stylesheets This page will guide you through how to use each of these approaches. ## CSS Modules CSS Modules locally scope CSS by generating unique class names. This allows you to use the same class in different files without worrying about naming collisions. To start using CSS Modules, create a new file with the extension `.module.css` and import it into any component inside the `app` directory: .blog { padding: 24px; } import styles from './styles.module.css' export default function Page({ children }: { children: React.ReactNode }) { return <main className={styles.blog}>{children}</main> } ## Global CSS You can use global CSS to apply styles across your application. To use global styles, create a `app/global.css` file and import it in the root layout to apply the styles to **every route** in your application: body { padding: 20px 20px 60px; max-width: 680px; margin: 0 auto; } // These styles apply to every route in the application import './global.css' export default function RootLayout({ children, }: { children: React.ReactNode }) { return ( <html lang="en"> <body>{children}</body> </html> ) } > **Good to know:** Global styles can be imported into any layout, page, or component inside the `app` directory. However, since Next.js uses React's built-in support for stylesheets to integrate with Suspense, this currently does not remove stylesheets as you navigate between routes which can lead to conflicts. We recommend using global styles for _truly_ global CSS, and CSS Modules for scoped CSS. ## Tailwind CSS Tailwind CSS is a utility-first CSS framework that integrates seamlessly with Next.js. ### Installing Tailwind To start using Tailwind, install the necessary Tailwind CSS packages: npm install tailwindcss @tailwindcss/postcss postcss ### Configuring Tailwind Create a `postcss.config.mjs` file in the root of your project and add the `@tailwindcss/postcss` plugin to your PostCSS configuration: /** @type {import('tailwindcss').Config} */ export default { plugins: { '@tailwindcss/postcss': {}, }, } ### Using Tailwind Add the Tailwind directives to your Global Stylesheet: @import 'tailwindcss'; Then, import the styles in the root layout: import type { Metadata } from 'next' // These styles apply to every route in the application import './globals.css' export const metadata: Metadata = { title: 'Create Next App', description: 'Generated by create next app', } export default function RootLayout({ children, }: { children: React.ReactNode }) { return ( <html lang="en"> <body>{children}</body> </html> ) } You can then start writing Tailwind's utility classes in your application. export default function Page() { return <h1 className="text-3xl font-bold underline">Hello, Next.js!</h1> } ## Sass Next.js integrates with Sass using both the `.scss` and `.sass` extensions and syntax. You can also use component-level Sass via CSS Modules and the `.module.scss`or `.module.sass` extension. ### Installing Sass To start using Sass, install the `sass` package: npm install --save-dev sass ### Customizing Sass options If you want to configure your Sass options, use the `sassOptions` option in `next.config.js`. import type { NextConfig } from 'next' const nextConfig: NextConfig = { sassOptions: { additionalData: `$var: red;`, }, } export default nextConfig > **Warning:** CSS-in-JS libraries which require runtime JavaScript are not currently supported in React Server Components. Using CSS-in-JS with newer React features like Server Components and Streaming requires library authors to support the latest version of React. The following libraries are supported in **Client Components** in the `app` directory (alphabetical): * `ant-design` * `chakra-ui` * `@fluentui/react-components` * `kuma-ui` * `@mui/material` * `@mui/joy` * `pandacss` * `styled-jsx` * `styled-components` * `stylex` * `tamagui` * `tss-react` * `vanilla-extract` The following are currently working on support: * `emotion` If you want to style Server Components, we recommend using CSS Modules or other solutions that output CSS files, like Tailwind CSS. ### Configuring CSS-in-JS To configure CSS-in-JS, you need to: 1. Create a **style registry** to collect all CSS rules in a render. 2. Use the `useServerInsertedHTML` hook to inject rules before any content that might use them. 3. Create a Client Component that wraps your app with the style registry during initial server-side rendering. #### `styled-jsx` To configure `styled-jsx` for your application, create a new registry: 'use client' import React, { useState } from 'react' import { useServerInsertedHTML } from 'next/navigation' import { StyleRegistry, createStyleRegistry } from 'styled-jsx' export default function StyledJsxRegistry({ children, }: { children: React.ReactNode }) { // Only create stylesheet once with lazy initial state // x-ref: https://reactjs.org/docs/hooks-reference.html#lazy-initial-state const [jsxStyleRegistry] = useState(() => createStyleRegistry()) useServerInsertedHTML(() => { const styles = jsxStyleRegistry.styles() jsxStyleRegistry.flush() return <>{styles}</> }) return <StyleRegistry registry={jsxStyleRegistry}>{children}</StyleRegistry> } Then, wrap your root layout with the registry: import StyledJsxRegistry from './registry' export default function RootLayout({ children, }: { children: React.ReactNode }) { return ( <html> <body> <StyledJsxRegistry>{children}</StyledJsxRegistry> </body> </html> ) } #### `styled-components` To use `styled-components`, enable it in `next.config.js`: import type { NextConfig } from 'next' const nextConfig: NextConfig = { compiler: { styledComponents: true, }, } export default nextConfig Then, use the `styled-components` API to create a global registry component to collect all CSS style rules generated during a render, and a function to return those rules. Then use the `useServerInsertedHTML` hook to inject the styles collected in the registry into the `<head>` HTML tag in the root layout. 'use client' import React, { useState } from 'react' import { useServerInsertedHTML } from 'next/navigation' import { ServerStyleSheet, StyleSheetManager } from 'styled-components' export default function StyledComponentsRegistry({ children, }: { children: React.ReactNode }) { // Only create stylesheet once with lazy initial state // x-ref: https://reactjs.org/docs/hooks-reference.html#lazy-initial-state const [styledComponentsStyleSheet] = useState(() => new ServerStyleSheet()) useServerInsertedHTML(() => { const styles = styledComponentsStyleSheet.getStyleElement() styledComponentsStyleSheet.instance.clearTag() return <>{styles}</> }) if (typeof window !== 'undefined') return <>{children}</> return ( <StyleSheetManager sheet={styledComponentsStyleSheet.instance}> {children} </StyleSheetManager> ) } Wrap the `children` of the root layout with the style registry component: import StyledComponentsRegistry from './lib/registry' export default function RootLayout({ children, }: { children: React.ReactNode }) { return ( <html> <body> <StyledComponentsRegistry>{children}</StyledComponentsRegistry> </body> </html> ) } ## External stylesheets Stylesheets published by external packages can be imported anywhere in the `app` directory, including colocated components: import 'bootstrap/dist/css/bootstrap.css' export default function RootLayout({ children, }: { children: React.ReactNode }) { return ( <html lang="en"> <body className="container">{children}</body> </html> ) } External stylesheets must be directly imported from an npm package or downloaded and colocated with your codebase. You cannot use `<link rel="stylesheet" />`. --- ## Page: https://nextjs.org/docs/app/getting-started/fetching-data ## How to fetch data and stream This page will walk you through how you can fetch data in Server Components and Client Components. As well as how to stream content that depends on data. ### Server Components You can fetch data in Server Components using: 1. The `fetch` API 2. An ORM or database #### With the `fetch` API To fetch data with the `fetch` API, turn your component into an asynchronous function, and await the `fetch` call. For example: export default async function Page() { const data = await fetch('https://api.vercel.app/blog') const posts = await data.json() return ( <ul> {posts.map((post) => ( <li key={post.id}>{post.title}</li> ))} </ul> ) } #### With an ORM or database Since Server Components are rendered on the server, you can safely make database queries using an ORM or database client. Turn your component into an asynchronous function, and await the call: import { db, posts } from '@/lib/db' export default async function Page() { const allPosts = await db.select().from(posts) return ( <ul> {allPosts.map((post) => ( <li key={post.id}>{post.title}</li> ))} </ul> ) } ### Client Components There are two ways to fetch data in Client Components, using: 1. React's `use` hook 2. A community library like SWR or React Query #### With the `use` hook You can use React's `use` hook to stream data from the server to client. Start by fetching data in your Server component, and pass the promise to your Client Component as prop: import Posts from '@/app/ui/posts import { Suspense } from 'react' export default function Page() { // Don't await the data fetching function const posts = getPosts() return ( <Suspense fallback={<div>Loading...</div>}> <Posts posts={posts} /> </Suspense> ) } Then, in your Client Component, use the `use` hook to read the promise: 'use client' import { use } from 'react' export default function Posts({ posts, }: { posts: Promise<{ id: string; title: string }[]> }) { const allPosts = use(posts) return ( <ul> {allPosts.map((post) => ( <li key={post.id}>{post.title}</li> ))} </ul> ) } In the example above, you need to wrap the `<Posts />` component in a `<Suspense>` boundary. This means the fallback will be shown while the promise is being resolved. Learn more about streaming. You can use a community library like SWR or React Query to fetch data in Client Components. These libraries have their own semantics for caching, streaming, and other features. For example, with SWR: 'use client' import useSWR from 'swr' const fetcher = (url) => fetch(url).then((r) => r.json()) export default function BlogPage() { const { data, error, isLoading } = useSWR( 'https://api.vercel.app/blog', fetcher ) if (isLoading) return <div>Loading...</div> if (error) return <div>Error: {error.message}</div> return ( <ul> {data.map((post: { id: string; title: string }) => ( <li key={post.id}>{post.title}</li> ))} </ul> ) } ## Streaming > **Warning:** The content below assumes the `dynamicIO` config option is enabled in your application. The flag was introduced in Next.js 15 canary. When using `async/await` in Server Components, Next.js will opt into **dynamic rendering**. This means the data will be fetched and rendered on the server for every user request. If there are any slow data requests, the whole route will be blocked from rendering. To improve the initial load time and user experience, you can use streaming to break up the page's HTML into smaller chunks and progressively send those chunks from the server to the client. 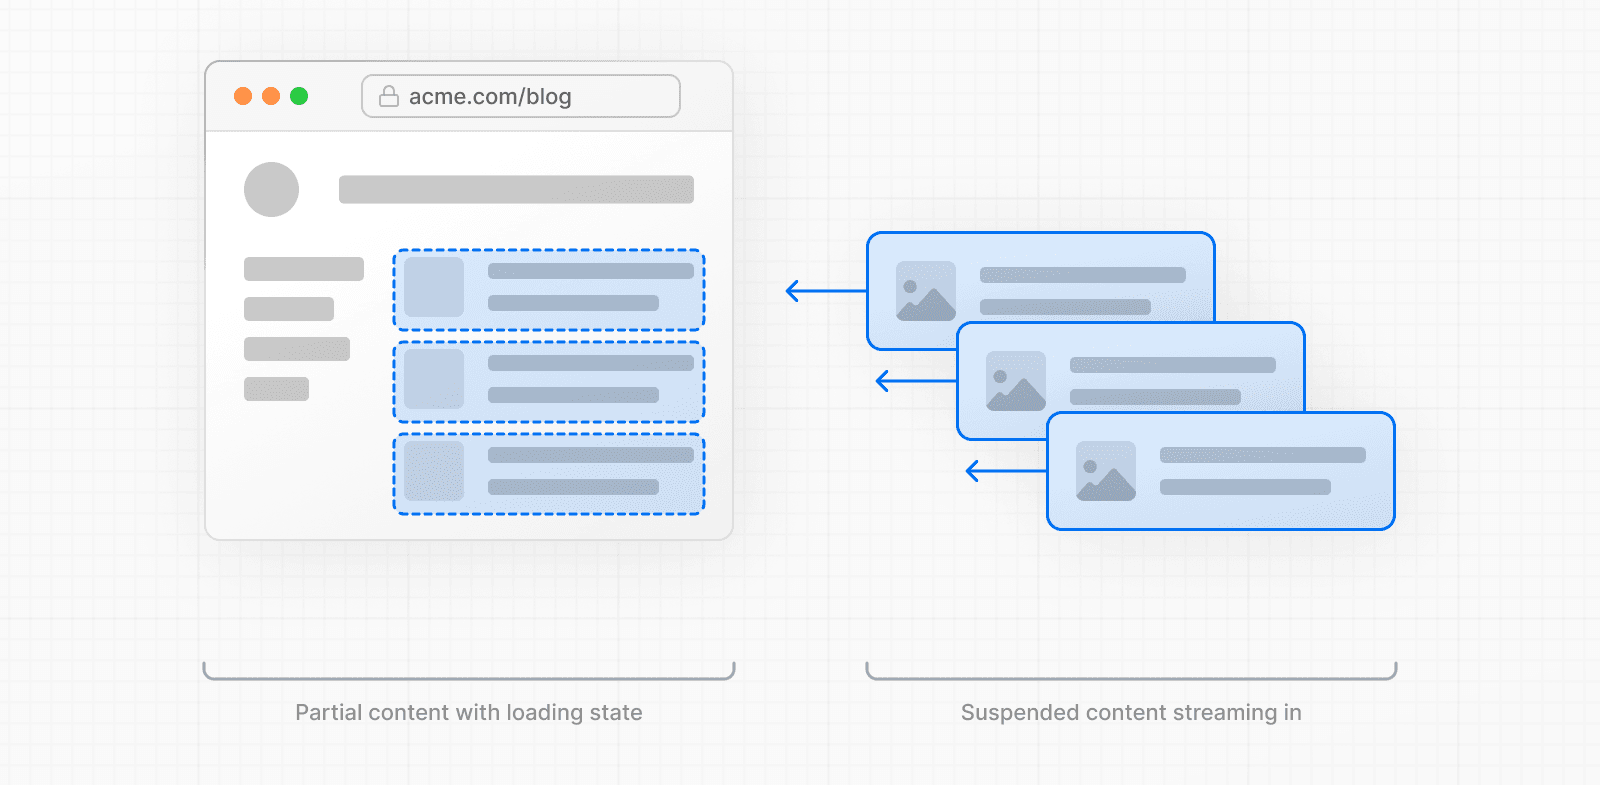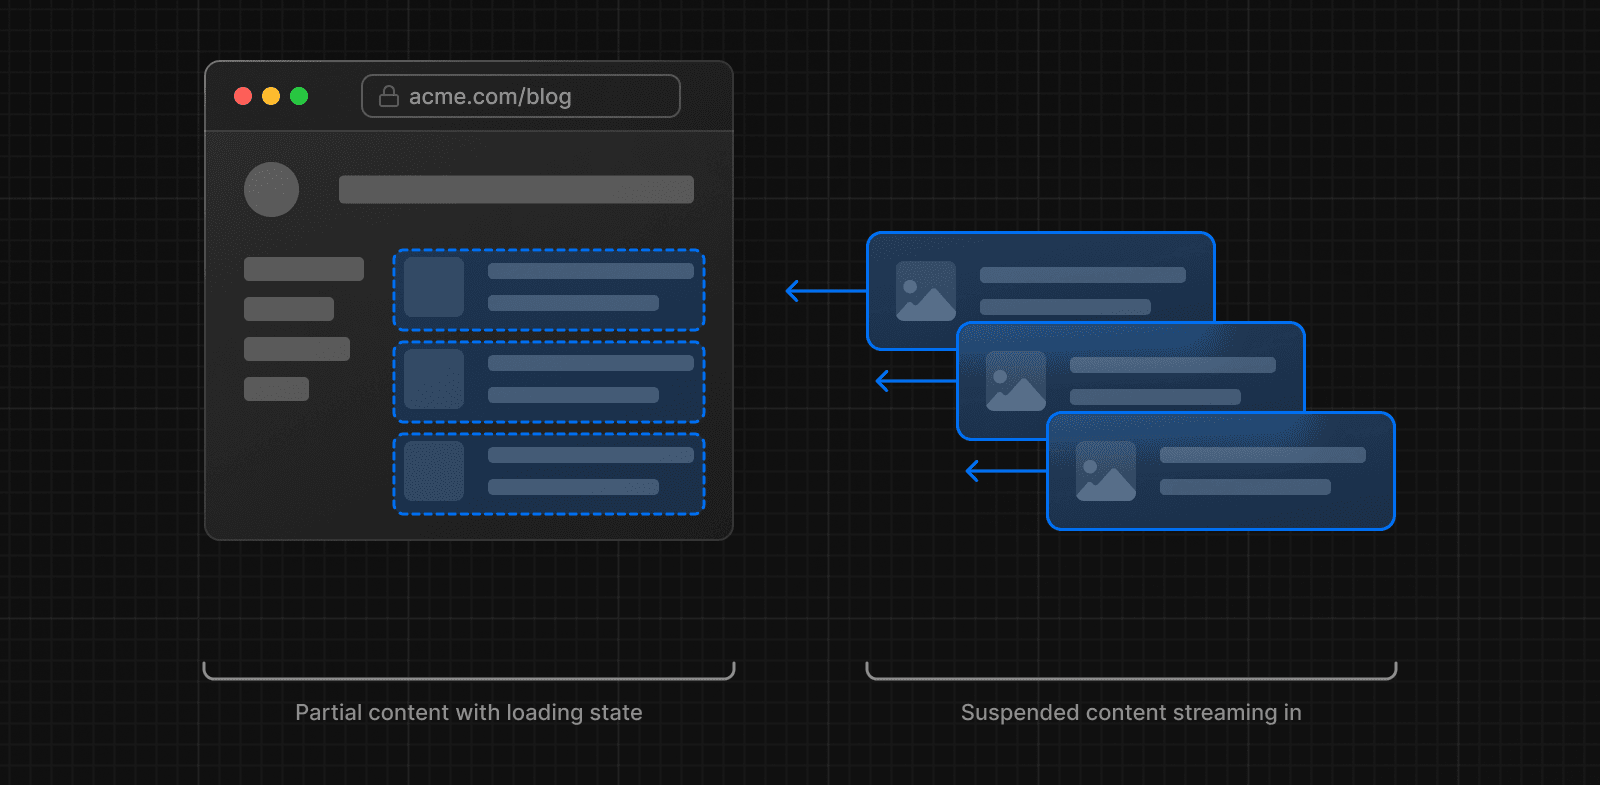 There are two ways you can implement streaming in your application: 1. With the `loading.js` file 2. With React's `<Suspense>` component ### With `loading.js` You can create a `loading.js` file in the same folder as your page to stream the **entire page** while the data is being fetched. For example, to stream `app/blog/page.js`, add the file inside the `app/blog` folder.  export default function Loading() { // Define the Loading UI here return <div>Loading...</div> } On navigation, the user will immediately see the layout and a loading state while the page is being rendered. The new content will then be automatically swapped in once rendering is complete. 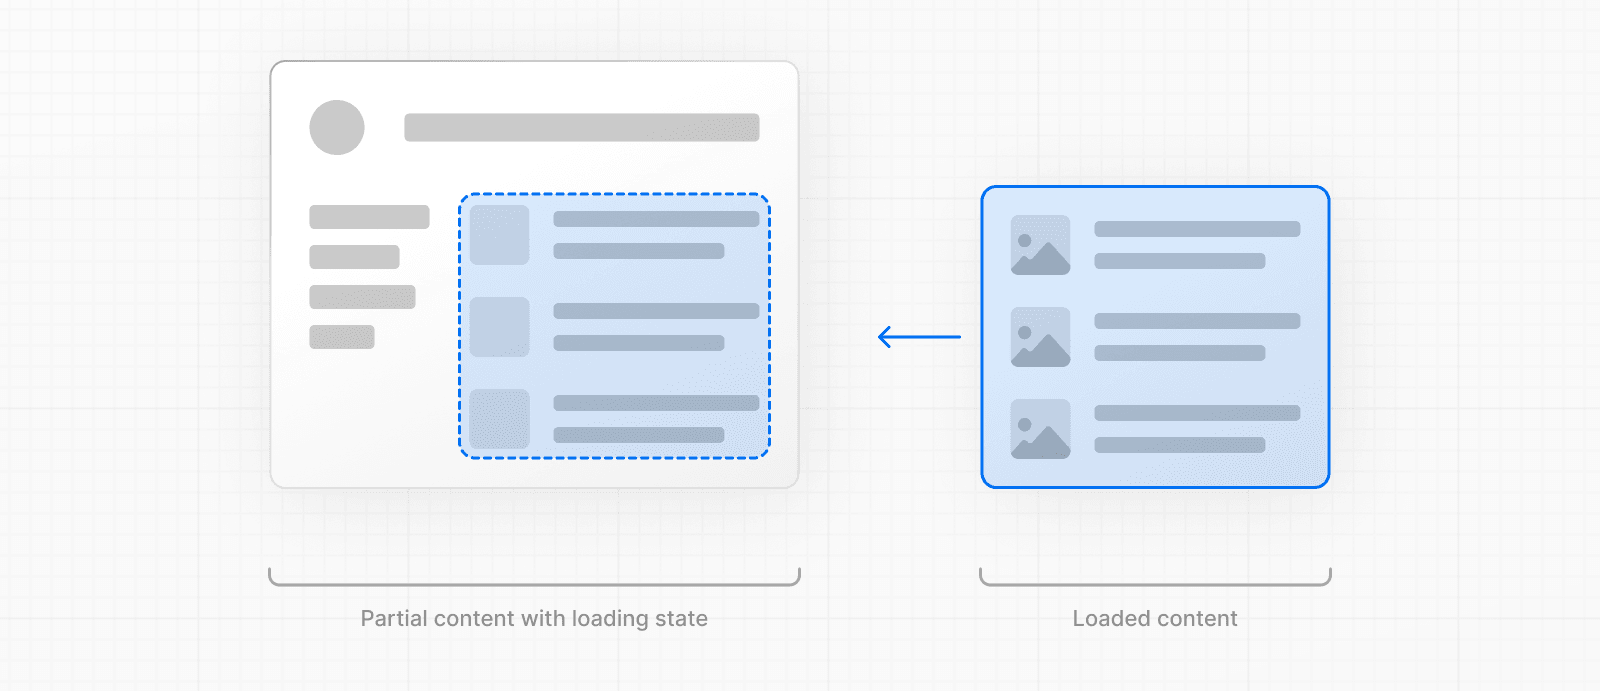 Behind-the-scenes, `loading.js` will be nested inside `layout.js`, and will automatically wrap the `page.js` file and any children below in a `<Suspense>` boundary. 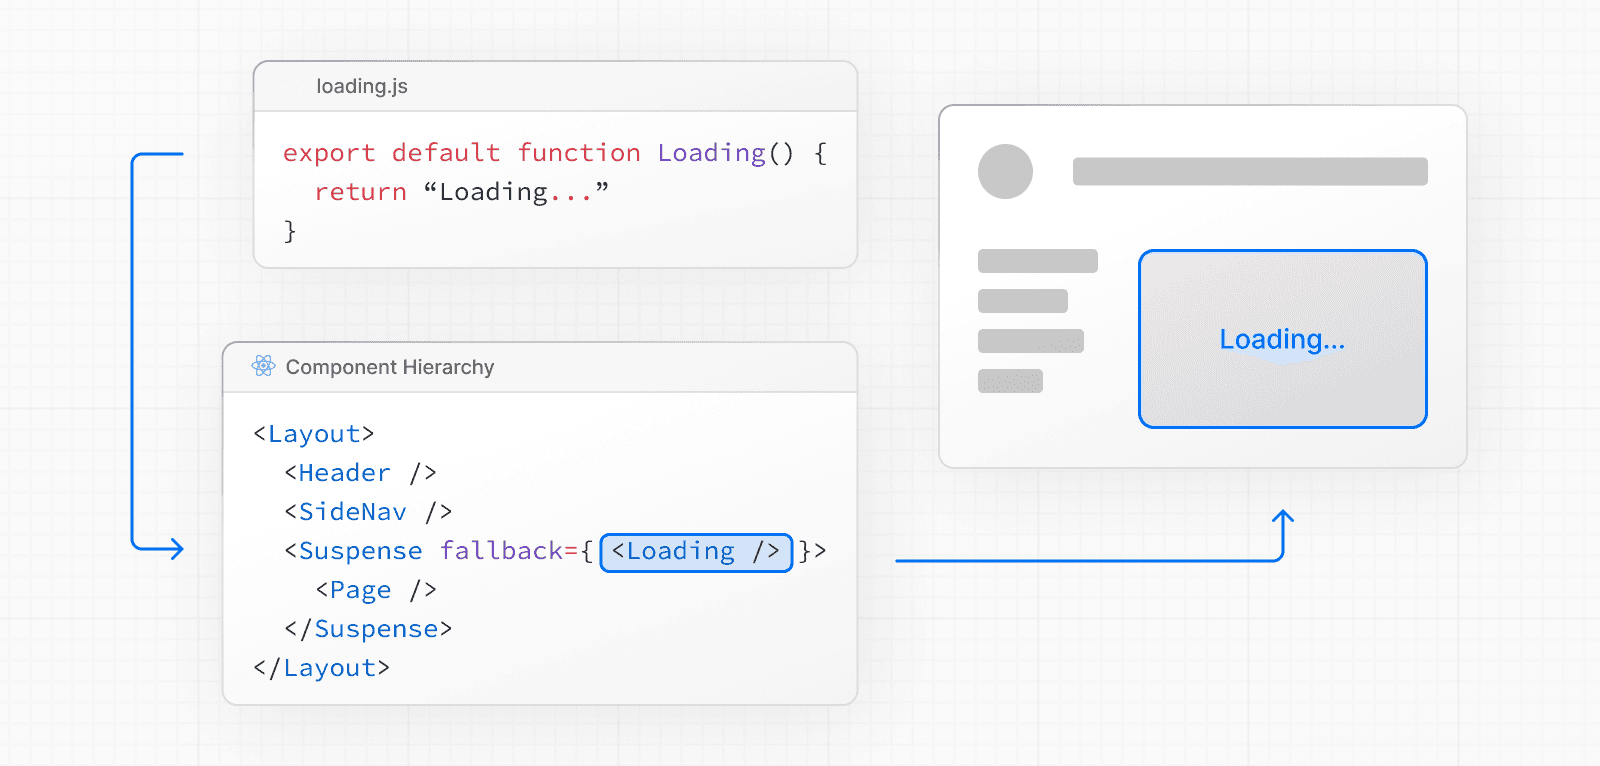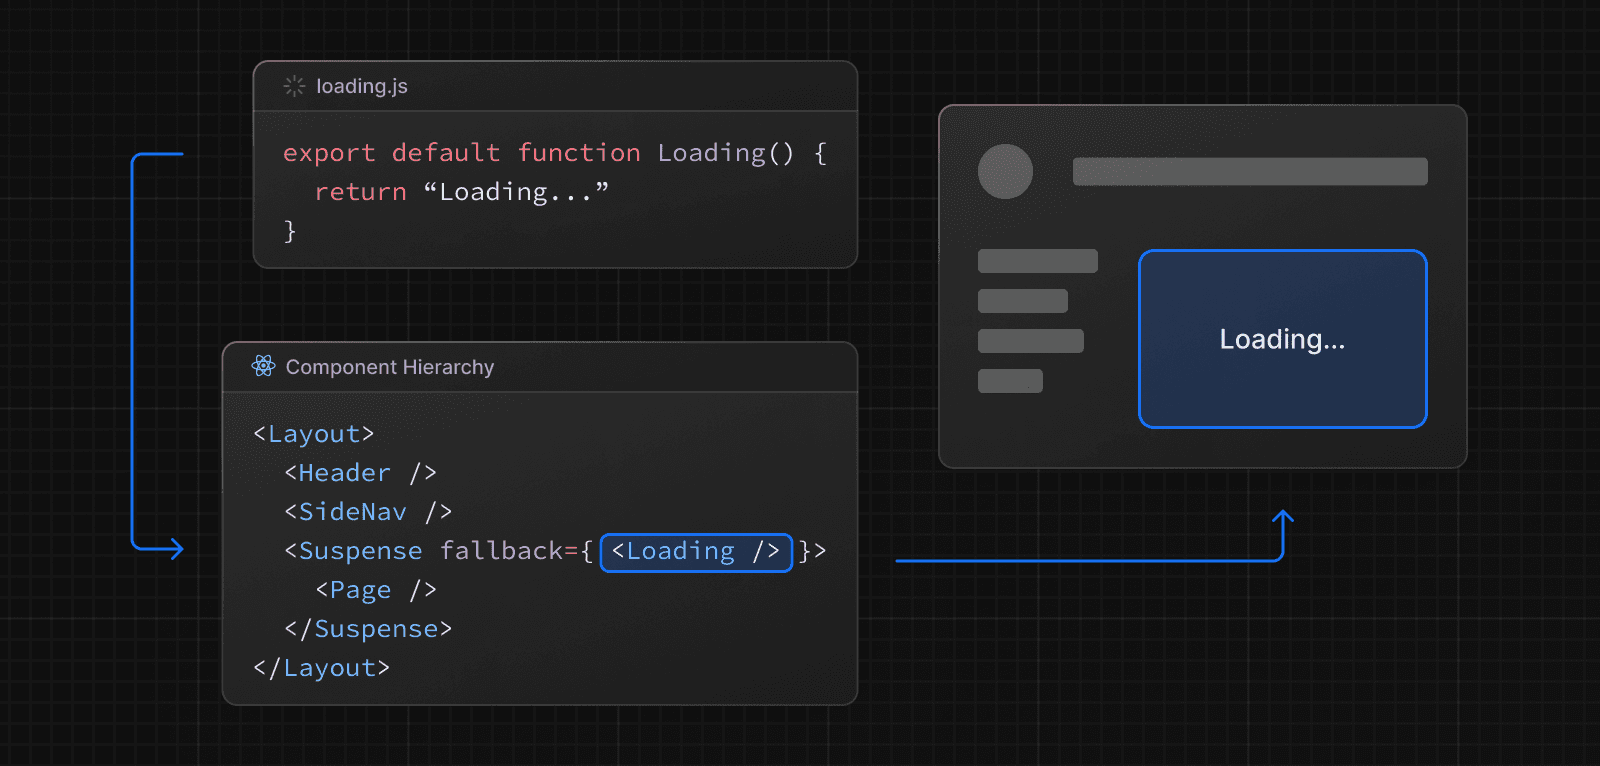 This approach works well for route segments (layouts and pages), but for more granular streaming, you can use `<Suspense>`. ### With `<Suspense>` `<Suspense>` allows you to be more granular about what parts of the page to stream. For example, you can immediately show any page content that falls outside of the `<Suspense>` boundary, and stream in the list of blog posts inside the boundary. import { Suspense } from 'react' import BlogList from '@/components/BlogList' import BlogListSkeleton from '@/components/BlogListSkeleton' export default function BlogPage() { return ( <div> {/* This content will be sent to the client immediately */} <header> <h1>Welcome to the Blog</h1> <p>Read the latest posts below.</p> </header> <main> {/* Any content wrapped in a <Suspense> boundary will be streamed */} <Suspense fallback={<BlogListSkeleton />}> <BlogList /> </Suspense> </main> </div> ) } ### Creating meaningful loading states An instant loading state is fallback UI that is shown immediately to the user after navigation. For the best user experience, we recommend designing loading states that are meaningful and help users understand the app is responding. For example, you can use skeletons and spinners, or a small but meaningful part of future screens such as a cover photo, title, etc. In development, you can preview and inspect the loading state of your components using the React Devtools. --- ## Page: https://nextjs.org/docs/app/getting-started/updating-data ## How to update data You can update data in Next.js using React's Server Functions. This page will go through how you can create and invoke Server Functions. ## Creating Server Functions A Server Function can be defined by using the `use server` directive. You can place the directive at the top of an **asynchronous** function to mark the function as a Server Function, or at the top of a separate file to mark all exports of that file. export async function createPost(formData: FormData) { 'use server' const title = formData.get('title') const content = formData.get('content') // Update data // Revalidate cache } export async function deletePost(formData: FormData) { 'use server' const id = formData.get('id') // Update data // Revalidate cache } ### Server Components Server Functions can be inlined in Server Components by adding the `"use server"` directive to the top of the function body: export default function Page() { // Server Action async function createPost(formData: FormData) { 'use server' // ... } return <></> } ### Client Components It's not possible to define Server Functions in Client Components. However, you can invoke them in Client Components by importing them from a file that has the `"use server"` directive at the top of it: 'use server' export async function createPost() {} 'use client' import { createPost } from '@/app/actions' export function Button() { return <button formAction={createPost}>Create</button> } ## Invoking Server Functions There are two main ways you can invoke a Server Function: 1. Forms in Server and Client Components 2. Event Handlers in Client Components ### Forms React extends the HTML `<form>` element to allow Server Function to be invoked with the HTML `action` prop. When invoked in a form, the function automatically receives the `FormData` object. You can extract the data using the native `FormData` methods: import { createPost } from '@/app/actions' export function Form() { return ( <form action={createPost}> <input type="text" name="title" /> <input type="text" name="content" /> <button type="submit">Create</button> </form> ) } 'use server' export async function createPost(formData: FormData) { const title = formData.get('title') const content = formData.get('content') // Update data // Revalidate cache } > **Good to know:** When passed to the `action` prop, Server Functions are also known as _Server Actions_. ### Event Handlers You can invoke a Server Function in a Client Component by using event handlers such as `onClick`. 'use client' import { incrementLike } from './actions' import { useState } from 'react' export default function LikeButton({ initialLikes }: { initialLikes: number }) { const [likes, setLikes] = useState(initialLikes) return ( <> <p>Total Likes: {likes}</p> <button onClick={async () => { const updatedLikes = await incrementLike() setLikes(updatedLikes) }} > Like </button> </> ) } ## Examples ### Showing a pending state While executing a Server Function, you can show a loading indicator with React's `useActionState` hook. This hook returns a `pending` boolean: 'use client' import { useActionState } from 'react' import { createPost } from '@/app/actions' import { LoadingSpinner } from '@/app/ui/loading-spinner' export function Button() { const [state, action, pending] = useActionState(createPost, false) return ( <button onClick={async () => action()}> {pending ? <LoadingSpinner /> : 'Create Post'} </button> ) } ### Revalidating the cache After performing an update, you can revalidate the Next.js cache and show the updated data by calling `revalidatePath` or `revalidateTag` within the Server Function: import { revalidatePath } from 'next/cache' export async function createPost(formData: FormData) { 'use server' // Update data // ... revalidatePath('/posts') } ### Redirecting You may want to redirect the user to a different page after performing an update. You can do this by calling `redirect` within the Server Function: 'use server' import { redirect } from 'next/navigation' export async function createPost(formData: FormData) { // Update data // ... redirect('/posts') } --- ## Page: https://nextjs.org/docs/app/getting-started/error-handling ## How to handle errors Errors can be divided into two categories: expected errors and uncaught exceptions. This page will walk you through how you can handle these errors in your Next.js application. ## Handling expected errors Expected errors are those that can occur during the normal operation of the application, such as those from server-side form validation or failed requests. These errors should be handled explicitly and returned to the client. ### Server Functions You can use the `useActionState` hook to handle expected errors in Server Functions. For these errors, avoid using `try`/`catch` blocks and throw errors. Instead, model expected errors as return values. 'use server' export async function createPost(prevState: any, formData: FormData) { const title = formData.get('title') const content = formData.get('content') const res = await fetch('https://api.vercel.app/posts', { method: 'POST', body: { title, content }, }) const json = await res.json() if (!res.ok) { return { message: 'Failed to create post' } } } You can pass your action to the `useActionState` hook and use the returned `state` to display an error message. 'use client' import { useActionState } from 'react' import { createPost } from '@/app/actions' const initialState = { message: '', } export function Form() { const [state, formAction, pending] = useActionState(createPost, initialState) return ( <form action={formAction}> <label htmlFor="title">Title</label> <input type="text" id="title" name="title" required /> <label htmlFor="content">Content</label> <textarea id="content" name="content" required /> {state?.message && <p aria-live="polite">{state.message}</p>} <button disabled={pending}>Create Post</button> </form> ) } ### Server Components When fetching data inside of a Server Component, you can use the response to conditionally render an error message or `redirect`. export default async function Page() { const res = await fetch(`https://...`) const data = await res.json() if (!res.ok) { return 'There was an error.' } return '...' } ### Not found You can call the `notFound` function within a route segment and use the `not-found.js` file to show a 404 UI. import { getPostBySlug } from '@/lib/posts' export default async function Page({ params }: { params: { slug: string } }) { const { slug } = await params const post = getPostBySlug(slug) if (!post) { notFound() } return <div>{post.title}</div> } export default function NotFound() { return <div>404 - Page Not Found</div> } ## Handling uncaught exceptions Uncaught exceptions are unexpected errors that indicate bugs or issues that should not occur during the normal flow of your application. These should be handled by throwing errors, which will then be caught by error boundaries. ### Nested error boundaries Next.js uses error boundaries to handle uncaught exceptions. Error boundaries catch errors in their child components and display a fallback UI instead of the component tree that crashed. Create an error boundary by adding an `error.js` file inside a route segment and exporting a React component: 'use client' // Error boundaries must be Client Components import { useEffect } from 'react' export default function Error({ error, reset, }: { error: Error & { digest?: string } reset: () => void }) { useEffect(() => { // Log the error to an error reporting service console.error(error) }, [error]) return ( <div> <h2>Something went wrong!</h2> <button onClick={ // Attempt to recover by trying to re-render the segment () => reset() } > Try again </button> </div> ) } Errors will bubble up to the nearest parent error boundary. This allows for granular error handling by placing `error.tsx` files at different levels in the route hierarchy. 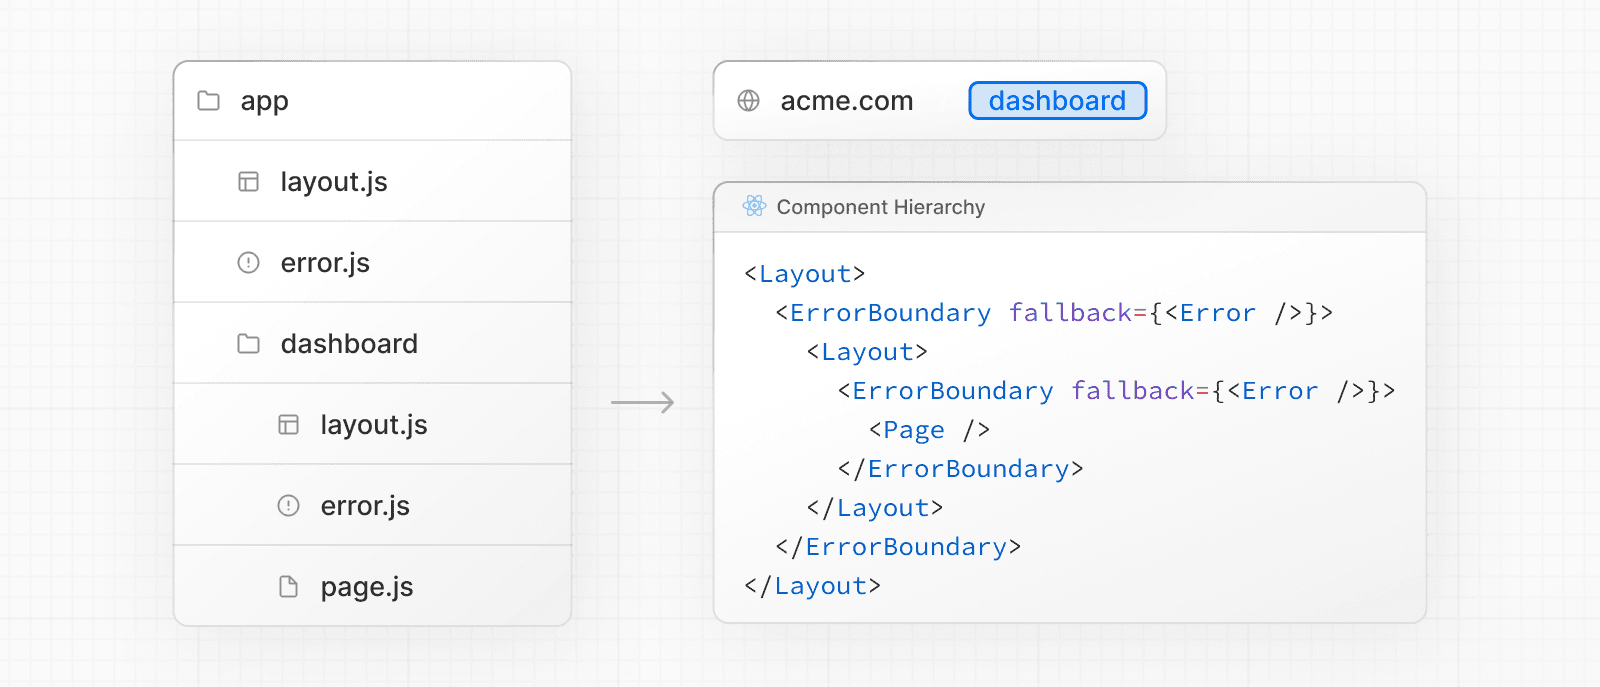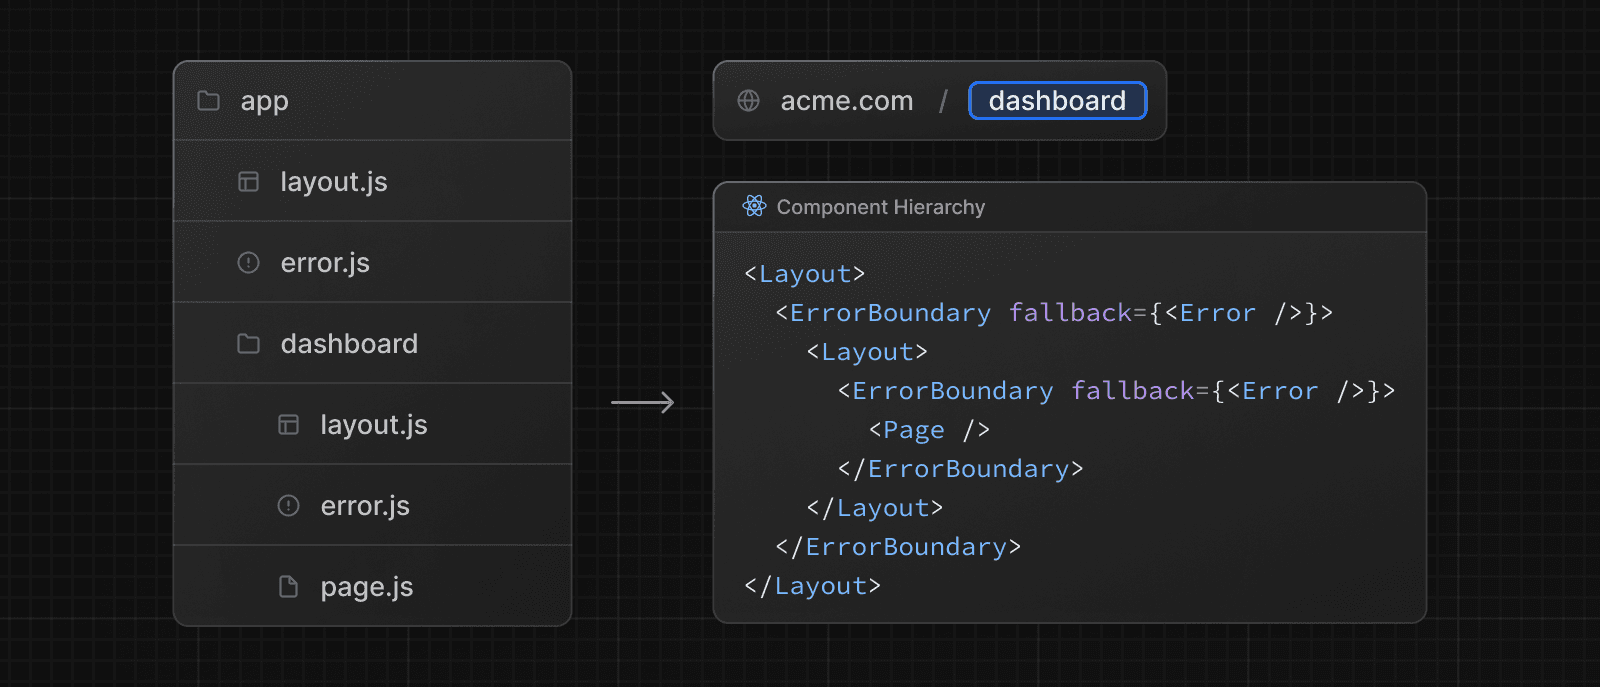 ### Global errors While less common, you can handle errors in the root layout using the `global-error.js` file, located in the root app directory, even when leveraging internationalization. Global error UI must define its own `<html>` and `<body>` tags, since it is replacing the root layout or template when active. 'use client' // Error boundaries must be Client Components export default function GlobalError({ error, reset, }: { error: Error & { digest?: string } reset: () => void }) { return ( // global-error must include html and body tags <html> <body> <h2>Something went wrong!</h2> <button onClick={() => reset()}>Try again</button> </body> </html> ) } --- ## Page: https://nextjs.org/docs/app/getting-started/metadata-and-og-images ## How to add metadata and create OG images The Metadata APIs can be used to define your application metadata for improved SEO and web shareability and include: 1. The static `metadata` object 2. The dynamic `generateMetadata` function 3. Special file conventions that can be used to add static or dynamically generated favicons and OG images. With all the options above, Next.js will automatically generate the relevant `<head>` tags for your page, which can be inspected in the browser's developer tools. ## Default fields There are two default `meta` tags that are always added even if a route doesn't define metadata: * The meta charset tag sets the character encoding for the website. * The meta viewport tag sets the viewport width and scale for the website to adjust for different devices. <meta charset="utf-8" /> <meta name="viewport" content="width=device-width, initial-scale=1" /> The other metadata fields can be defined with the `Metadata` object (for static metadata) or the `generateMetadata` function (for generated metadata). To define static metadata, export a `Metadata` object from a static `layout.js` or `page.js` file. For example, to add a title and description to the blog route: import type { Metadata } from 'next' export const metadata: Metadata = { title: 'My Blog', description: '...', } export default function Page() {} You can view a full list of available options, in the generate metadata documentation. You can use `generateMetadata` function to `fetch` metadata that depends on data. For example, to fetch the title and description for a specific blog post: import type { Metadata, ResolvingMetadata } from 'next' type Props = { params: Promise<{ id: string }> searchParams: Promise<{ [key: string]: string | string[] | undefined }> } export async function generateMetadata( { params, searchParams }: Props, parent: ResolvingMetadata ): Promise<Metadata> { const slug = (await params).slug // fetch post information const post = await fetch(`https://api.vercel.app/blog/${slug}`).then((res) => res.json() ) return { title: post.title, description: post.description, } } export default function Page({ params, searchParams }: Props) {} Behind-the-scenes, Next.js will stream metadata separately from the UI and inject the metadata into the HTML as soon as it's resolved. ### Memoizing data requests There may be cases where you need to fetch the **same** data for metadata and the page itself. To avoid duplicate requests, you can use React's `cache` function to memoize the return value and only fetch the data once. For example, to fetch the blog post information for both the metadata and the page: import { cache } from 'react' import { db } from '@/app/lib/db' // getPost will be used twice, but execute only once export const getPost = cache(async (slug: string) => { const res = await db.query.posts.findFirst({ where: eq(posts.slug, slug) }) return res }) import { getPost } from '@/app/lib/data' export async function generateMetadata({ params, }: { params: { slug: string } }) { const post = await getPost(params.slug) return { title: post.title, description: post.description, } } export default async function Page({ params }: { params: { slug: string } }) { const post = await getPost(params.slug) return <div>{post.title}</div> } ## Favicons Favicons are small icons that represent your site in bookmarks and search results. To add a favicon to your application, create a `favicon.ico` and add to the root of the app folder.  > You can also programmatically generate favicons using code. See the favicon docs for more information. ## Static Open Graph images Open Graph (OG) images are images that represent your site in social media. To add a static OG image to your application, create a `opengraph-image.png` file in the root of the app folder.  You can also add OG images for specific routes by creating a `opengraph-image.png` deeper down the folder structure. For example, to create an OG image specific to the `/blog` route, add a `opengraph-image.jpg` file inside the `blog` folder.  The more specific image will take precedence over any OG images above it in the folder structure. > Other image formats such as `jpeg`, `png`, and `webp` are also supported. See the Open Graph Image docs for more information. ## Generated Open Graph images The `ImageResponse` constructor allows you to generate dynamic images using JSX and CSS. This is useful for OG images that depend on data. For example, to generate a unique OG image for each blog post, add a `opengraph-image.ts` file inside the `blog` folder, and import the `ImageResponse` constructor from `next/og`: import { ImageResponse } from 'next/og' import { getPost } from '@/app/lib/data' // Image metadata export const size = { width: 1200, height: 630, } export const contentType = 'image/png' // Image generation export default async function Image({ params }: { params: { slug: string } }) { const post = await getPost(params.slug) return new ImageResponse( ( // ImageResponse JSX element <div style={{ fontSize: 128, background: 'white', width: '100%', height: '100%', display: 'flex', alignItems: 'center', justifyContent: 'center', }} > {post.title} </div> ) ) } `ImageResponse` supports common CSS properties including flexbox and absolute positioning, custom fonts, text wrapping, centering, and nested images. See the full list of supported CSS properties. > **Good to know**: > > * Examples are available in the Vercel OG Playground. > * `ImageResponse` uses @vercel/og, Satori, and Resvg to convert HTML and CSS into PNG. > * Only flexbox and a subset of CSS properties are supported. Advanced layouts (e.g. `display: grid`) will not work. --- ## Page: https://nextjs.org/docs/app/getting-started/deploying ## How to deploy your Next.js application Once you're ready to deploy your Next.js app, you can choose a managed infrastructure provider or self-host your application. ## Managed infrastructure providers A managed platform is a practical option for deploying your Next.js app, as these providers take care of hosting, scaling, and server configuration for you. Vercel, the creators and maintainers of Next.js, allows you to deploy your application with **full-feature support** and **zero-configuration**. * Learn more about Next.js on Vercel. * Try Next.js on Vercel by deploying a template. We also have community maintained deployment templates for: * Deno * Flightcontrol * Railway * Render * SST Please refer to each provider's documentation for information on supported Next.js features. ## Self-Hosting Self-hosting may mean you're responsible for provisioning your own servers, managing containers, and scaling. You can self-host Next.js in three different ways: * A Node.js server * A Docker container * A static export We have community maintained deployment examples with the following self-hosting providers: * DigitalOcean * Fly.io * GitHub Pages * Google Cloud Run > **🎥 Watch:** Learn more about self-hosting Next.js → YouTube (45 minutes). --- ## Page: https://nextjs.org/docs/app/getting-started/upgrading ## How to upgrade your Next.js app ## Latest version To update to the latest version of Next.js, you can use the `upgrade` codemod: Terminal npx @next/codemod@canary upgrade latest If you prefer to upgrade manually, install the latest Next.js and React versions: Terminal npm i next@latest react@latest react-dom@latest eslint-config-next@latest ## Canary version To update to the latest canary, make sure you're on the latest version of Next.js and everything is working as expected. Then, run the following command: Terminal npm i next@canary ### Features available in canary The following features are currently available in canary: **Caching**: * `"use cache"` * `cacheLife` * `cacheTag` * `dynamicIO` **Authentication**: * `forbidden` * `unauthorized` * `forbidden.js` * `unauthorized.js` * `authInterrupts` --- ## Page: https://nextjs.org/docs/app/guides #### Subscribe to our newsletter Stay updated on new releases and features, guides, and case studies. --- ## Page: https://nextjs.org/docs/app/guides/authentication ## How to implement authentication in Next.js Understanding authentication is crucial for protecting your application's data. This page will guide you through what React and Next.js features to use to implement auth. Before starting, it helps to break down the process into three concepts: 1. **Authentication**: Verifies if the user is who they say they are. It requires the user to prove their identity with something they have, such as a username and password. 2. **Session Management**: Tracks the user's auth state across requests. 3. **Authorization**: Decides what routes and data the user can access. This diagram shows the authentication flow using React and Next.js features: 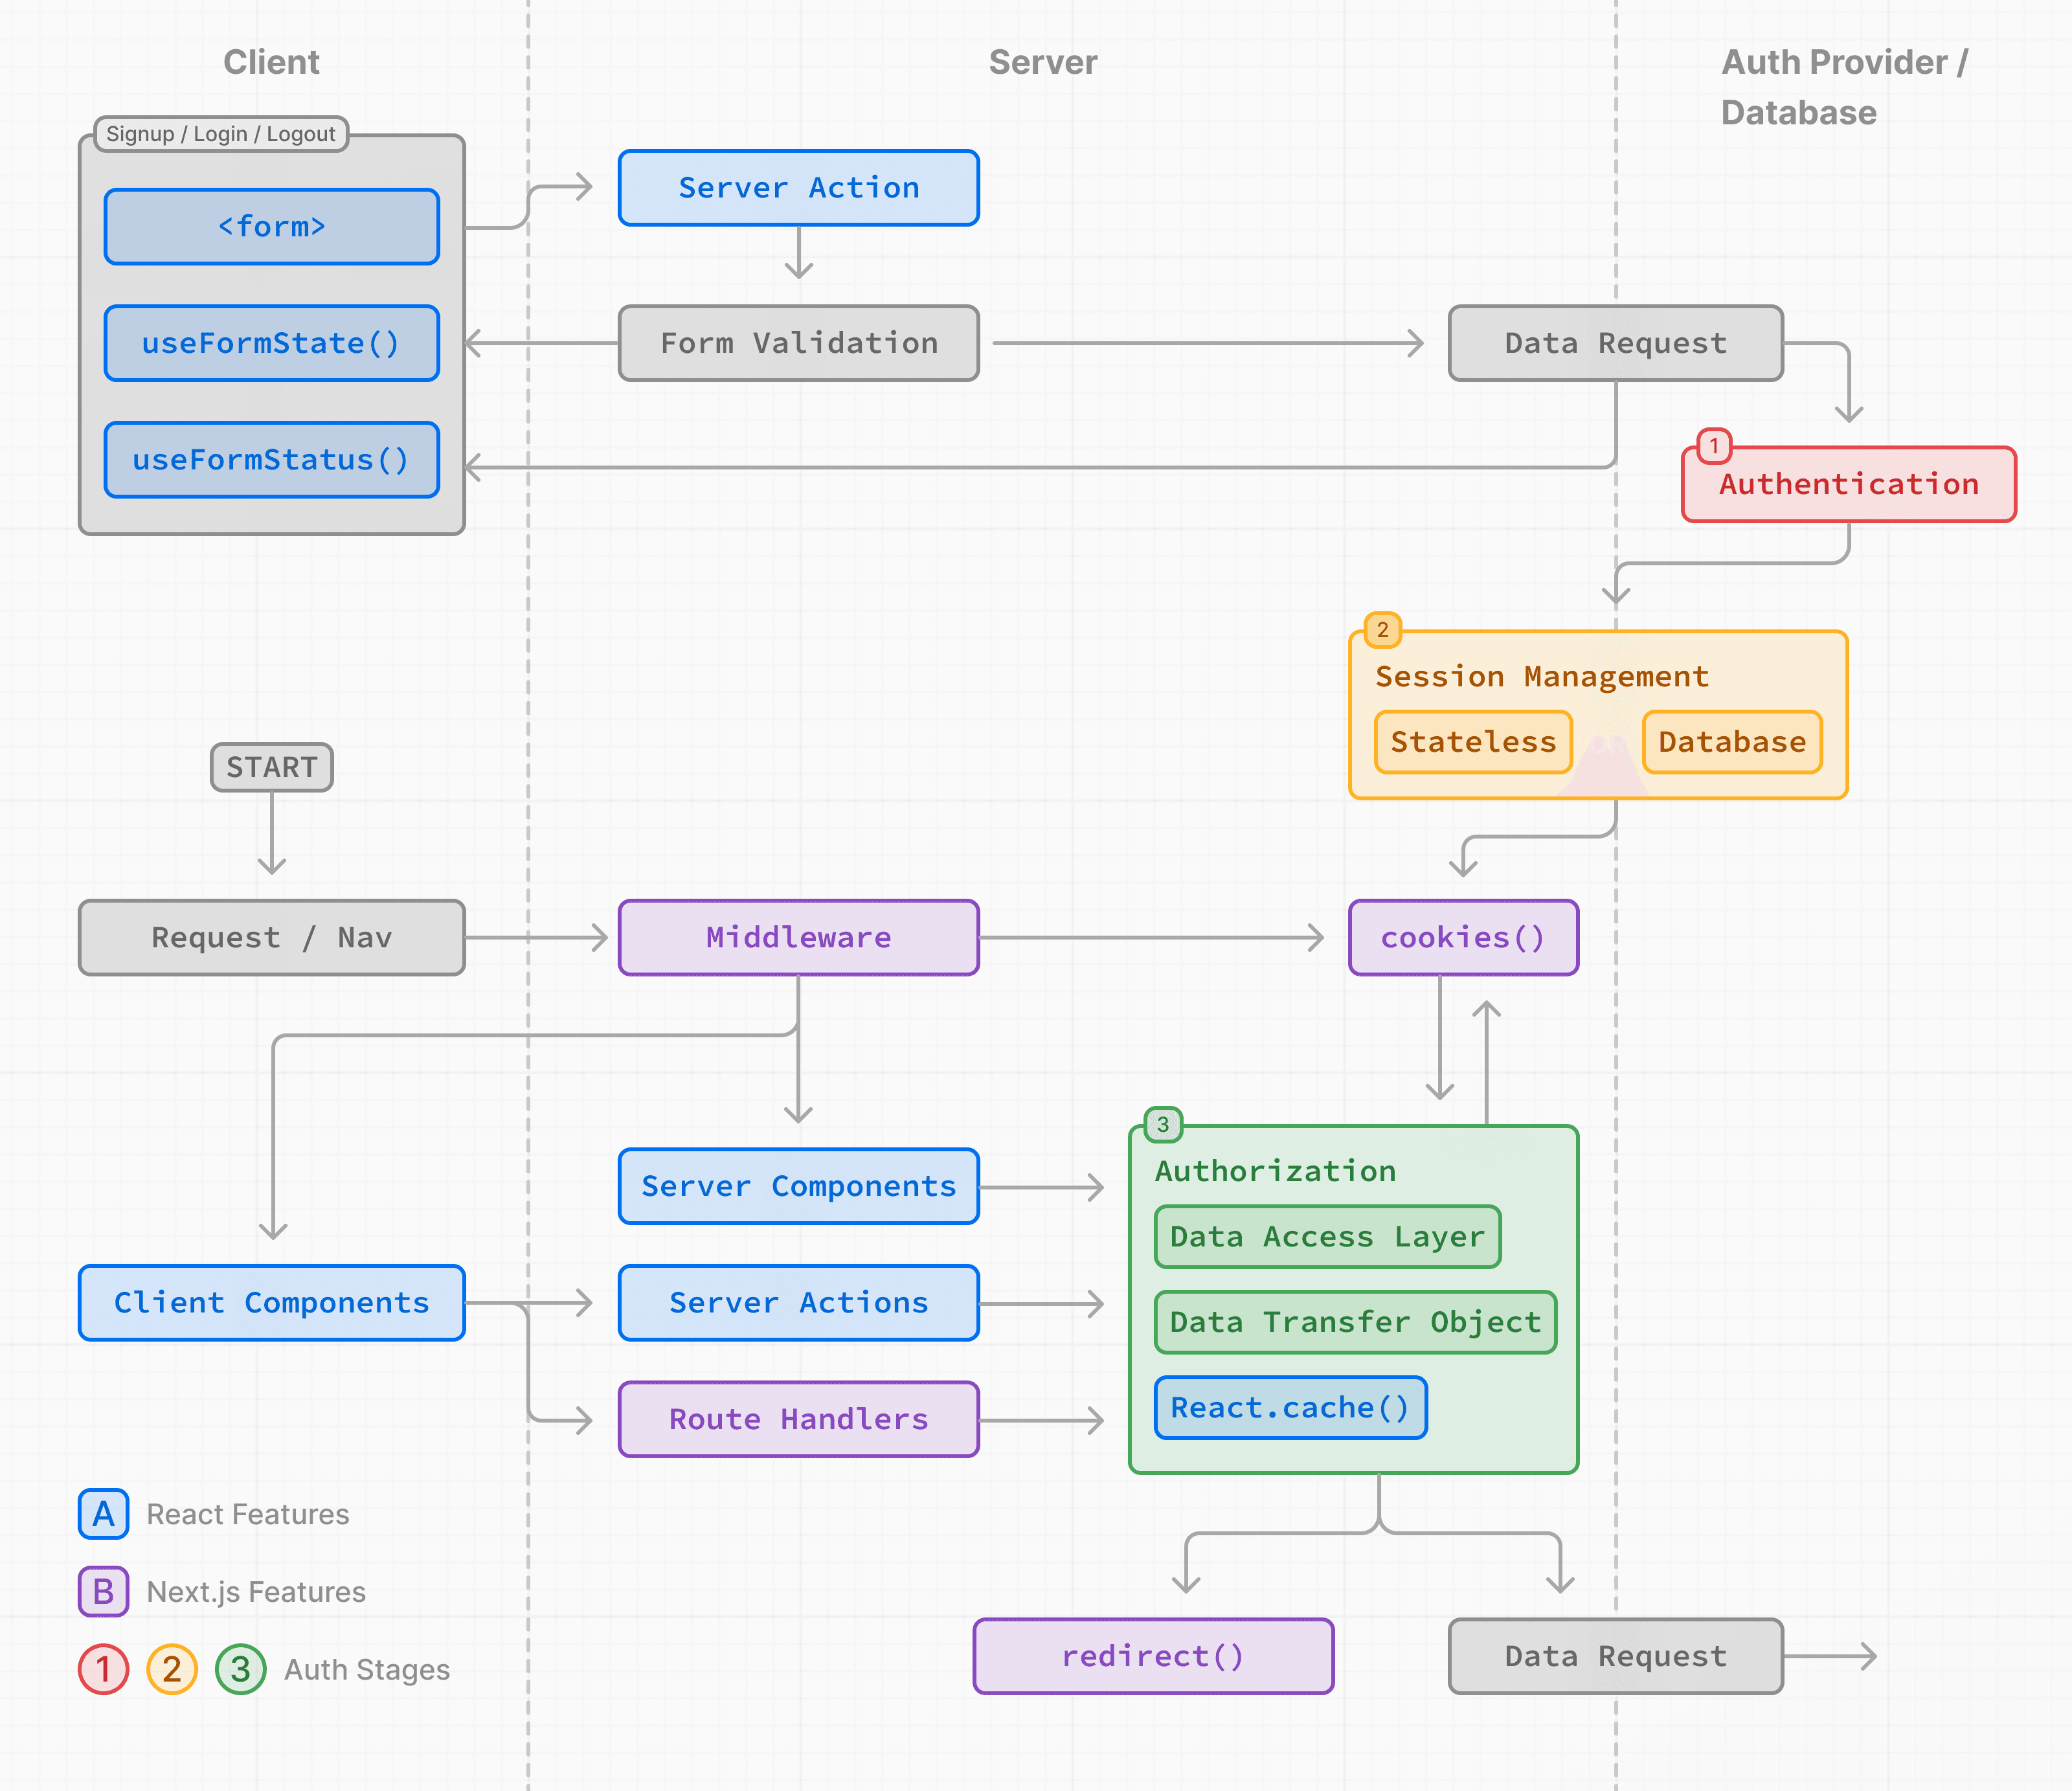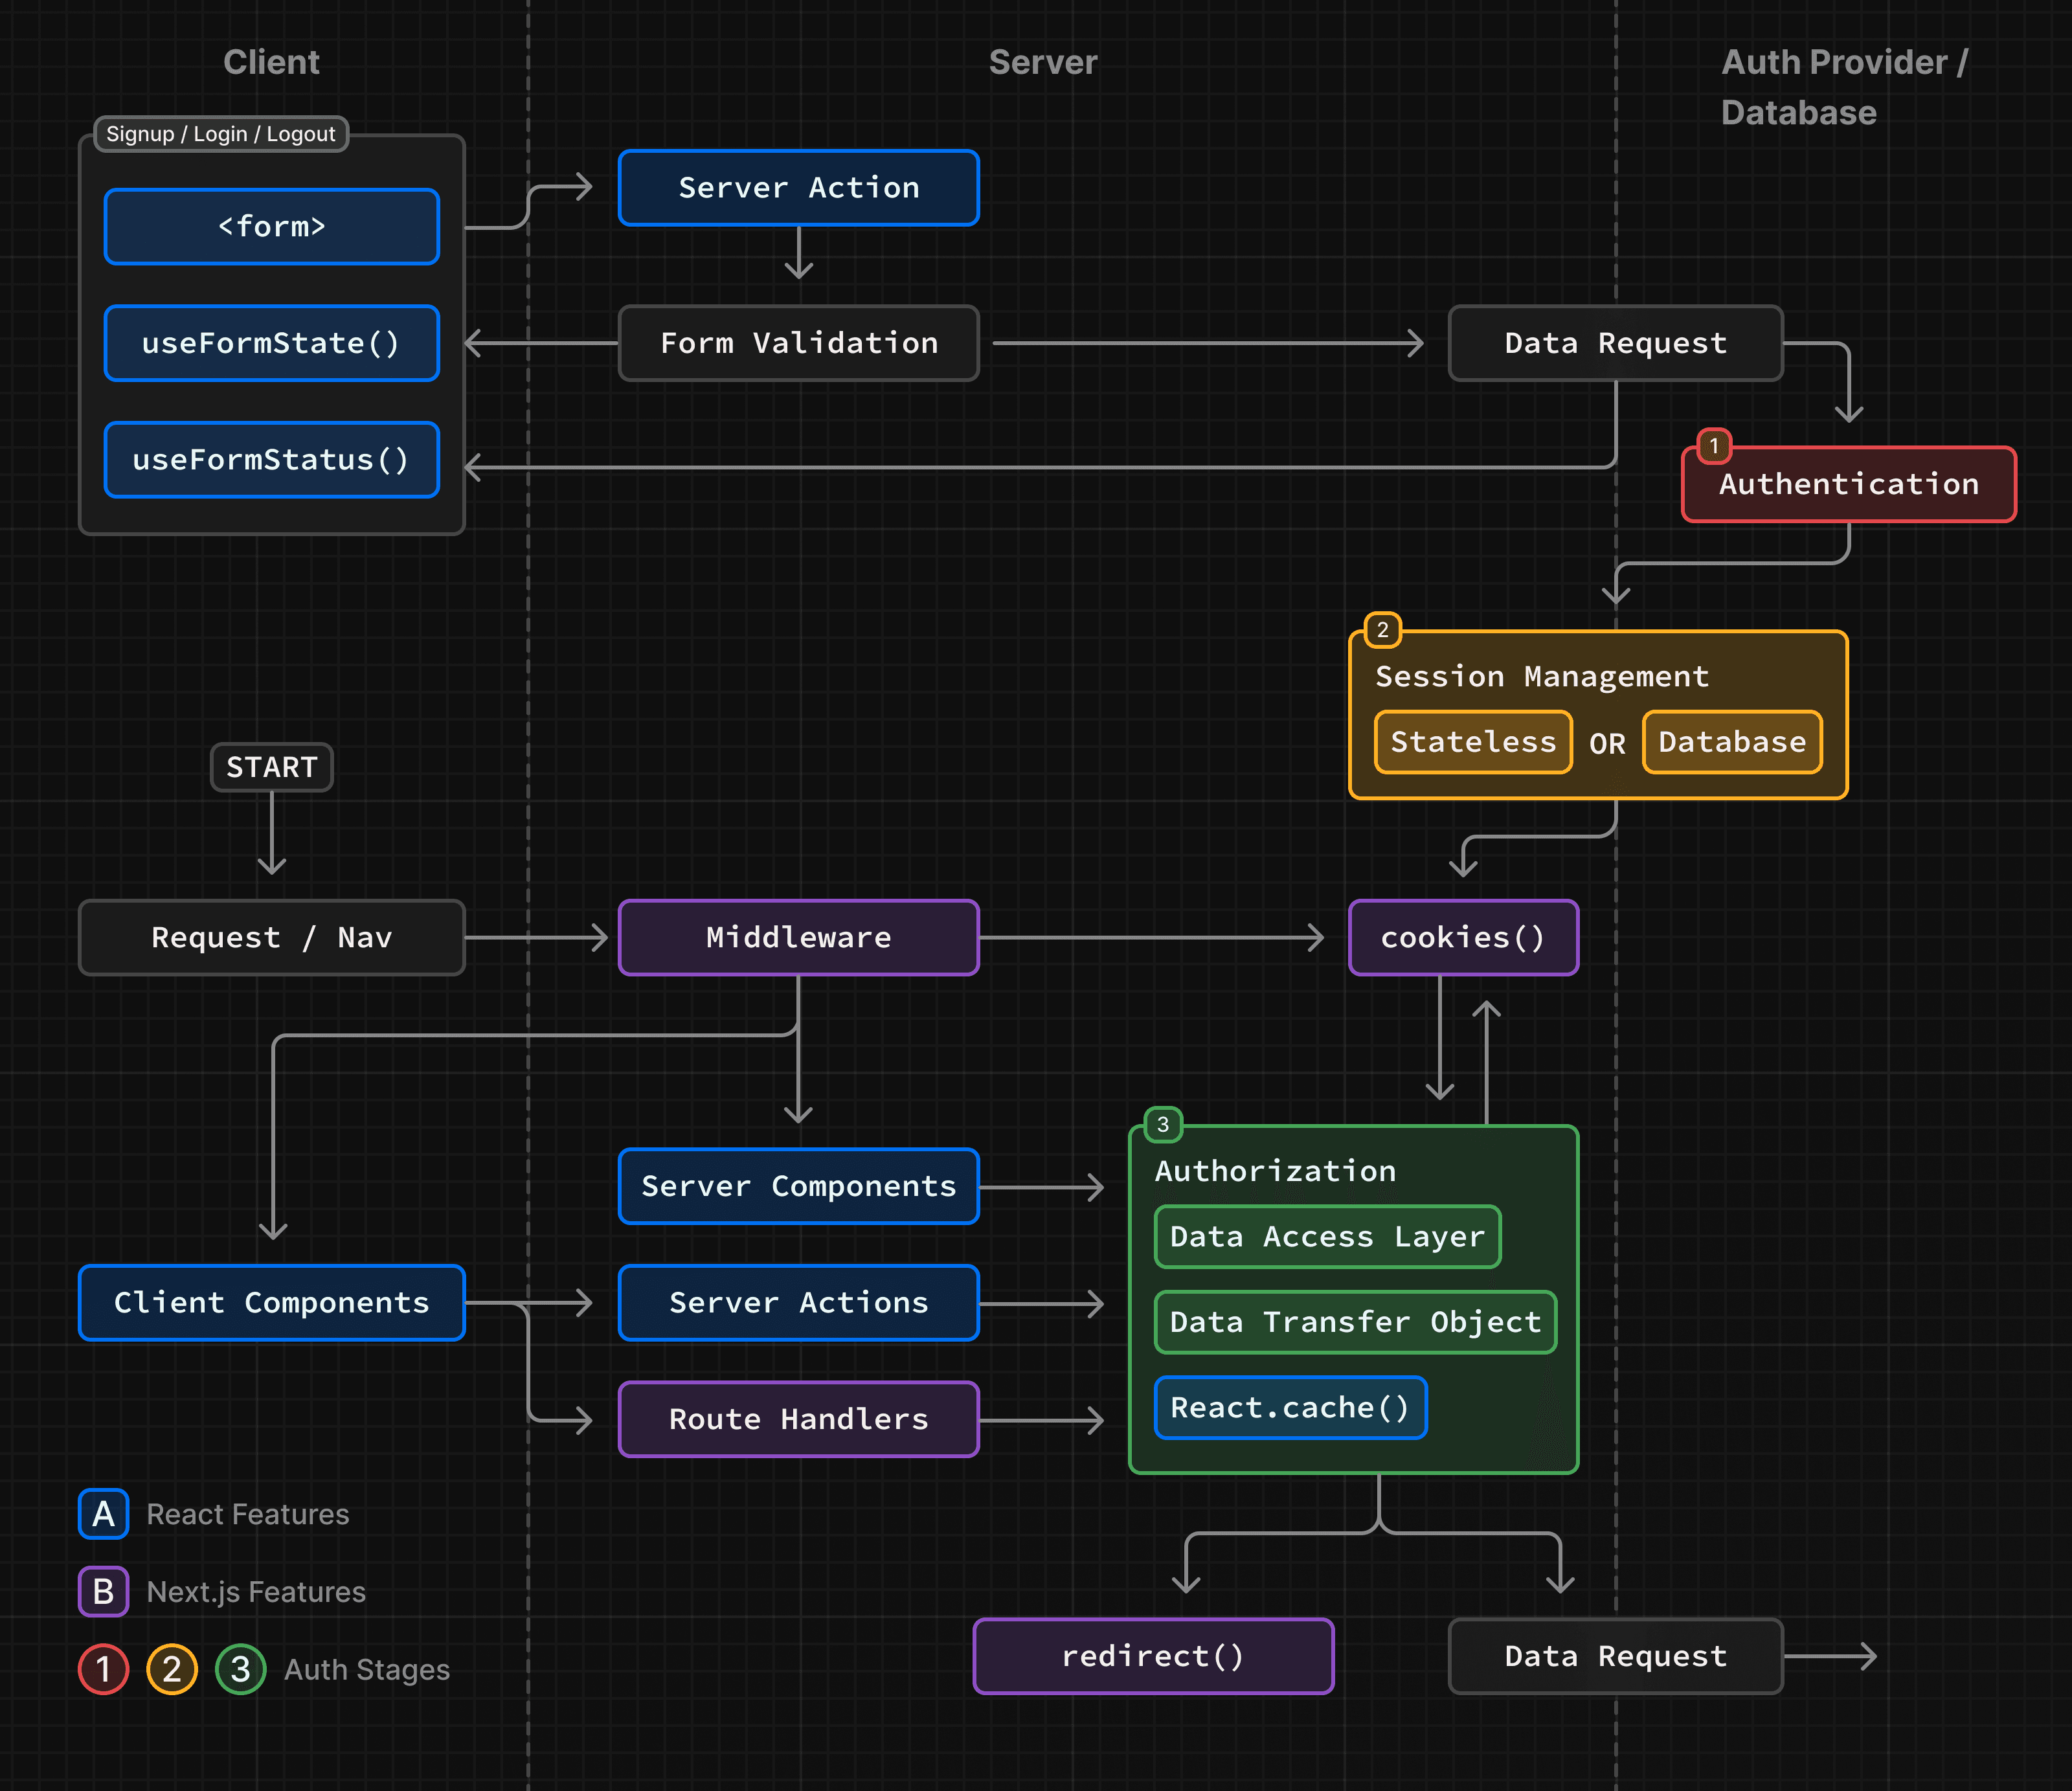 The examples on this page walk through basic username and password auth for educational purposes. While you can implement a custom auth solution, for increased security and simplicity, we recommend using an authentication library. These offer built-in solutions for authentication, session management, and authorization, as well as additional features such as social logins, multi-factor authentication, and role-based access control. You can find a list in the Auth Libraries section. ### Sign-up and login functionality You can use the `<form>` element with React's Server Actions and `useActionState` to capture user credentials, validate form fields, and call your Authentication Provider's API or database. Since Server Actions always execute on the server, they provide a secure environment for handling authentication logic. Here are the steps to implement signup/login functionality: #### 1\. Capture user credentials To capture user credentials, create a form that invokes a Server Action on submission. For example, a signup form that accepts the user's name, email, and password: import { signup } from '@/app/actions/auth' export function SignupForm() { return ( <form action={signup}> <div> <label htmlFor="name">Name</label> <input id="name" name="name" placeholder="Name" /> </div> <div> <label htmlFor="email">Email</label> <input id="email" name="email" type="email" placeholder="Email" /> </div> <div> <label htmlFor="password">Password</label> <input id="password" name="password" type="password" /> </div> <button type="submit">Sign Up</button> </form> ) } export async function signup(formData: FormData) {} #### 2\. Validate form fields on the server Use the Server Action to validate the form fields on the server. If your authentication provider doesn't provide form validation, you can use a schema validation library like Zod or Yup. Using Zod as an example, you can define a form schema with appropriate error messages: import { z } from 'zod' export const SignupFormSchema = z.object({ name: z .string() .min(2, { message: 'Name must be at least 2 characters long.' }) .trim(), email: z.string().email({ message: 'Please enter a valid email.' }).trim(), password: z .string() .min(8, { message: 'Be at least 8 characters long' }) .regex(/[a-zA-Z]/, { message: 'Contain at least one letter.' }) .regex(/[0-9]/, { message: 'Contain at least one number.' }) .regex(/[^a-zA-Z0-9]/, { message: 'Contain at least one special character.', }) .trim(), }) export type FormState = | { errors?: { name?: string[] email?: string[] password?: string[] } message?: string } | undefined To prevent unnecessary calls to your authentication provider's API or database, you can `return` early in the Server Action if any form fields do not match the defined schema. import { SignupFormSchema, FormState } from '@/app/lib/definitions' export async function signup(state: FormState, formData: FormData) { // Validate form fields const validatedFields = SignupFormSchema.safeParse({ name: formData.get('name'), email: formData.get('email'), password: formData.get('password'), }) // If any form fields are invalid, return early if (!validatedFields.success) { return { errors: validatedFields.error.flatten().fieldErrors, } } // Call the provider or db to create a user... } Back in your `<SignupForm />`, you can use React's `useActionState` hook to display validation errors while the form is submitting: 'use client' import { signup } from '@/app/actions/auth' import { useActionState } from 'react' export default function SignupForm() { const [state, action, pending] = useActionState(signup, undefined) return ( <form action={action}> <div> <label htmlFor="name">Name</label> <input id="name" name="name" placeholder="Name" /> </div> {state?.errors?.name && <p>{state.errors.name}</p>} <div> <label htmlFor="email">Email</label> <input id="email" name="email" placeholder="Email" /> </div> {state?.errors?.email && <p>{state.errors.email}</p>} <div> <label htmlFor="password">Password</label> <input id="password" name="password" type="password" /> </div> {state?.errors?.password && ( <div> <p>Password must:</p> <ul> {state.errors.password.map((error) => ( <li key={error}>- {error}</li> ))} </ul> </div> )} <button disabled={pending} type="submit"> Sign Up </button> </form> ) } > **Good to know:** > > * In React 19, `useFormStatus` includes additional keys on the returned object, like data, method, and action. If you are not using React 19, only the `pending` key is available. > * Before mutating data, you should always ensure a user is also authorized to perform the action. See Authentication and Authorization. #### 3\. Create a user or check user credentials After validating form fields, you can create a new user account or check if the user exists by calling your authentication provider's API or database. Continuing from the previous example: export async function signup(state: FormState, formData: FormData) { // 1. Validate form fields // ... // 2. Prepare data for insertion into database const { name, email, password } = validatedFields.data // e.g. Hash the user's password before storing it const hashedPassword = await bcrypt.hash(password, 10) // 3. Insert the user into the database or call an Auth Library's API const data = await db .insert(users) .values({ name, email, password: hashedPassword, }) .returning({ id: users.id }) const user = data[0] if (!user) { return { message: 'An error occurred while creating your account.', } } // TODO: // 4. Create user session // 5. Redirect user } After successfully creating the user account or verifying the user credentials, you can create a session to manage the user's auth state. Depending on your session management strategy, the session can be stored in a cookie or database, or both. Continue to the Session Management section to learn more. > **Tips:** > > * The example above is verbose since it breaks down the authentication steps for the purpose of education. This highlights that implementing your own secure solution can quickly become complex. Consider using an Auth Library to simplify the process. > * To improve the user experience, you may want to check for duplicate emails or usernames earlier in the registration flow. For example, as the user types in a username or the input field loses focus. This can help prevent unnecessary form submissions and provide immediate feedback to the user. You can debounce requests with libraries such as use-debounce to manage the frequency of these checks. ## Session Management Session management ensures that the user's authenticated state is preserved across requests. It involves creating, storing, refreshing, and deleting sessions or tokens. There are two types of sessions: 1. **Stateless**: Session data (or a token) is stored in the browser's cookies. The cookie is sent with each request, allowing the session to be verified on the server. This method is simpler, but can be less secure if not implemented correctly. 2. **Database**: Session data is stored in a database, with the user's browser only receiving the encrypted session ID. This method is more secure, but can be complex and use more server resources. > **Good to know:** While you can use either method, or both, we recommend using a session management library such as iron-session or Jose. ### Stateless Sessions To create and manage stateless sessions, there are a few steps you need to follow: 1. Generate a secret key, which will be used to sign your session, and store it as an environment variable. 2. Write logic to encrypt/decrypt session data using a session management library. 3. Manage cookies using the Next.js `cookies` API. In addition to the above, consider adding functionality to update (or refresh) the session when the user returns to the application, and delete the session when the user logs out. > **Good to know:** Check if your auth library includes session management. #### 1\. Generating a secret key There are a few ways you can generate secret key to sign your session. For example, you may choose to use the `openssl` command in your terminal: openssl rand -base64 32 This command generates a 32-character random string that you can use as your secret key and store in your environment variables file: SESSION_SECRET=your_secret_key You can then reference this key in your session management logic: const secretKey = process.env.SESSION_SECRET #### 2\. Encrypting and decrypting sessions Next, you can use your preferred session management library to encrypt and decrypt sessions. Continuing from the previous example, we'll use Jose (compatible with the Edge Runtime) and React's `server-only` package to ensure that your session management logic is only executed on the server. import 'server-only' import { SignJWT, jwtVerify } from 'jose' import { SessionPayload } from '@/app/lib/definitions' const secretKey = process.env.SESSION_SECRET const encodedKey = new TextEncoder().encode(secretKey) export async function encrypt(payload: SessionPayload) { return new SignJWT(payload) .setProtectedHeader({ alg: 'HS256' }) .setIssuedAt() .setExpirationTime('7d') .sign(encodedKey) } export async function decrypt(session: string | undefined = '') { try { const { payload } = await jwtVerify(session, encodedKey, { algorithms: ['HS256'], }) return payload } catch (error) { console.log('Failed to verify session') } } > **Tips**: > > * The payload should contain the **minimum**, unique user data that'll be used in subsequent requests, such as the user's ID, role, etc. It should not contain personally identifiable information like phone number, email address, credit card information, etc, or sensitive data like passwords. #### 3\. Setting cookies (recommended options) To store the session in a cookie, use the Next.js `cookies` API. The cookie should be set on the server, and include the recommended options: * **HttpOnly**: Prevents client-side JavaScript from accessing the cookie. * **Secure**: Use https to send the cookie. * **SameSite**: Specify whether the cookie can be sent with cross-site requests. * **Max-Age or Expires**: Delete the cookie after a certain period. * **Path**: Define the URL path for the cookie. Please refer to MDN for more information on each of these options. import 'server-only' import { cookies } from 'next/headers' export async function createSession(userId: string) { const expiresAt = new Date(Date.now() + 7 * 24 * 60 * 60 * 1000) const session = await encrypt({ userId, expiresAt }) const cookieStore = await cookies() cookieStore.set('session', session, { httpOnly: true, secure: true, expires: expiresAt, sameSite: 'lax', path: '/', }) } Back in your Server Action, you can invoke the `createSession()` function, and use the `redirect()` API to redirect the user to the appropriate page: import { createSession } from '@/app/lib/session' export async function signup(state: FormState, formData: FormData) { // Previous steps: // 1. Validate form fields // 2. Prepare data for insertion into database // 3. Insert the user into the database or call an Library API // Current steps: // 4. Create user session await createSession(user.id) // 5. Redirect user redirect('/profile') } > **Tips**: > > * **Cookies should be set on the server** to prevent client-side tampering. > * 🎥 Watch: Learn more about stateless sessions and authentication with Next.js → YouTube (11 minutes). #### Updating (or refreshing) sessions You can also extend the session's expiration time. This is useful for keeping the user logged in after they access the application again. For example: import 'server-only' import { cookies } from 'next/headers' import { decrypt } from '@/app/lib/session' export async function updateSession() { const session = (await cookies()).get('session')?.value const payload = await decrypt(session) if (!session || !payload) { return null } const expires = new Date(Date.now() + 7 * 24 * 60 * 60 * 1000) const cookieStore = await cookies() cookieStore.set('session', session, { httpOnly: true, secure: true, expires: expires, sameSite: 'lax', path: '/', }) } > **Tip:** Check if your auth library supports refresh tokens, which can be used to extend the user's session. #### Deleting the session To delete the session, you can delete the cookie: import 'server-only' import { cookies } from 'next/headers' export async function deleteSession() { const cookieStore = await cookies() cookieStore.delete('session') } Then you can reuse the `deleteSession()` function in your application, for example, on logout: import { cookies } from 'next/headers' import { deleteSession } from '@/app/lib/session' export async function logout() { deleteSession() redirect('/login') } ### Database Sessions To create and manage database sessions, you'll need to follow these steps: 1. Create a table in your database to store session and data (or check if your Auth Library handles this). 2. Implement functionality to insert, update, and delete sessions 3. Encrypt the session ID before storing it in the user's browser, and ensure the database and cookie stay in sync (this is optional, but recommended for optimistic auth checks in Middleware). For example: import cookies from 'next/headers' import { db } from '@/app/lib/db' import { encrypt } from '@/app/lib/session' export async function createSession(id: number) { const expiresAt = new Date(Date.now() + 7 * 24 * 60 * 60 * 1000) // 1. Create a session in the database const data = await db .insert(sessions) .values({ userId: id, expiresAt, }) // Return the session ID .returning({ id: sessions.id }) const sessionId = data[0].id // 2. Encrypt the session ID const session = await encrypt({ sessionId, expiresAt }) // 3. Store the session in cookies for optimistic auth checks const cookieStore = await cookies() cookieStore.set('session', session, { httpOnly: true, secure: true, expires: expiresAt, sameSite: 'lax', path: '/', }) } > **Tips**: > > * For faster data retrieval, consider using a database like Vercel Redis. However, you can also keep the session data in your primary database, and combine data requests to reduce the number of queries. > * You may opt to use database sessions for more advanced use cases, such as keeping track of the last time a user logged in, or number of active devices, or give users the ability to log out of all devices. After implementing session management, you'll need to add authorization logic to control what users can access and do within your application. Continue to the Authorization section to learn more. Once a user is authenticated and a session is created, you can implement authorization to control what the user can access and do within your application. There are two main types of authorization checks: 1. **Optimistic**: Checks if the user is authorized to access a route or perform an action using the session data stored in the cookie. These checks are useful for quick operations, such as showing/hiding UI elements or redirecting users based on permissions or roles. 2. **Secure**: Checks if the user is authorized to access a route or perform an action using the session data stored in the database. These checks are more secure and are used for operations that require access to sensitive data or actions. For both cases, we recommend: * Creating a Data Access Layer to centralize your authorization logic * Using Data Transfer Objects (DTO) to only return the necessary data * Optionally use Middleware to perform optimistic checks. ### Optimistic checks with Middleware (Optional) There are some cases where you may want to use Middleware and redirect users based on permissions: * To perform optimistic checks. Since Middleware runs on every route, it's a good way to centralize redirect logic and pre-filter unauthorized users. * To protect static routes that share data between users (e.g. content behind a paywall). However, since Middleware runs on every route, including prefetched routes, it's important to only read the session from the cookie (optimistic checks), and avoid database checks to prevent performance issues. For example: import { NextRequest, NextResponse } from 'next/server' import { decrypt } from '@/app/lib/session' import { cookies } from 'next/headers' // 1. Specify protected and public routes const protectedRoutes = ['/dashboard'] const publicRoutes = ['/login', '/signup', '/'] export default async function middleware(req: NextRequest) { // 2. Check if the current route is protected or public const path = req.nextUrl.pathname const isProtectedRoute = protectedRoutes.includes(path) const isPublicRoute = publicRoutes.includes(path) // 3. Decrypt the session from the cookie const cookie = (await cookies()).get('session')?.value const session = await decrypt(cookie) // 4. Redirect to /login if the user is not authenticated if (isProtectedRoute && !session?.userId) { return NextResponse.redirect(new URL('/login', req.nextUrl)) } // 5. Redirect to /dashboard if the user is authenticated if ( isPublicRoute && session?.userId && !req.nextUrl.pathname.startsWith('/dashboard') ) { return NextResponse.redirect(new URL('/dashboard', req.nextUrl)) } return NextResponse.next() } // Routes Middleware should not run on export const config = { matcher: ['/((?!api|_next/static|_next/image|.*\\.png$).*)'], } While Middleware can be useful for initial checks, it should not be your only line of defense in protecting your data. The majority of security checks should be performed as close as possible to your data source, see Data Access Layer for more information. > **Tips**: > > * In Middleware, you can also read cookies using `req.cookies.get('session').value`. > * Middleware uses the Edge Runtime, check if your Auth library and session management library are compatible. > * You can use the `matcher` property in the Middleware to specify which routes Middleware should run on. Although, for auth, it's recommended Middleware runs on all routes. ### Creating a Data Access Layer (DAL) We recommend creating a DAL to centralize your data requests and authorization logic. The DAL should include a function that verifies the user's session as they interact with your application. At the very least, the function should check if the session is valid, then redirect or return the user information needed to make further requests. For example, create a separate file for your DAL that includes a `verifySession()` function. Then use React's cache API to memoize the return value of the function during a React render pass: import 'server-only' import { cookies } from 'next/headers' import { decrypt } from '@/app/lib/session' export const verifySession = cache(async () => { const cookie = (await cookies()).get('session')?.value const session = await decrypt(cookie) if (!session?.userId) { redirect('/login') } return { isAuth: true, userId: session.userId } }) You can then invoke the `verifySession()` function in your data requests, Server Actions, Route Handlers: export const getUser = cache(async () => { const session = await verifySession() if (!session) return null try { const data = await db.query.users.findMany({ where: eq(users.id, session.userId), // Explicitly return the columns you need rather than the whole user object columns: { id: true, name: true, email: true, }, }) const user = data[0] return user } catch (error) { console.log('Failed to fetch user') return null } }) > **Tip**: > > * A DAL can be used to protect data fetched at request time. However, for static routes that share data between users, data will be fetched at build time and not at request time. Use Middleware to protect static routes. > * For secure checks, you can check if the session is valid by comparing the session ID with your database. Use React's cache function to avoid unnecessary duplicate requests to the database during a render pass. > * You may wish to consolidate related data requests in a JavaScript class that runs `verifySession()` before any methods. ### Using Data Transfer Objects (DTO) When retrieving data, it's recommended you return only the necessary data that will be used in your application, and not entire objects. For example, if you're fetching user data, you might only return the user's ID and name, rather than the entire user object which could contain passwords, phone numbers, etc. However, if you have no control over the returned data structure, or are working in a team where you want to avoid whole objects being passed to the client, you can use strategies such as specifying what fields are safe to be exposed to the client. import 'server-only' import { getUser } from '@/app/lib/dal' function canSeeUsername(viewer: User) { return true } function canSeePhoneNumber(viewer: User, team: string) { return viewer.isAdmin || team === viewer.team } export async function getProfileDTO(slug: string) { const data = await db.query.users.findMany({ where: eq(users.slug, slug), // Return specific columns here }) const user = data[0] const currentUser = await getUser(user.id) // Or return only what's specific to the query here return { username: canSeeUsername(currentUser) ? user.username : null, phonenumber: canSeePhoneNumber(currentUser, user.team) ? user.phonenumber : null, } } By centralizing your data requests and authorization logic in a DAL and using DTOs, you can ensure that all data requests are secure and consistent, making it easier to maintain, audit, and debug as your application scales. > **Good to know**: > > * There are a couple of different ways you can define a DTO, from using `toJSON()`, to individual functions like the example above, or JS classes. Since these are JavaScript patterns and not a React or Next.js feature, we recommend doing some research to find the best pattern for your application. > * Learn more about security best practices in our Security in Next.js article. ### Server Components Auth check in Server Components are useful for role-based access. For example, to conditionally render components based on the user's role: import { verifySession } from '@/app/lib/dal' export default function Dashboard() { const session = await verifySession() const userRole = session?.user?.role // Assuming 'role' is part of the session object if (userRole === 'admin') { return <AdminDashboard /> } else if (userRole === 'user') { return <UserDashboard /> } else { redirect('/login') } } In the example, we use the `verifySession()` function from our DAL to check for 'admin', 'user', and unauthorized roles. This pattern ensures that each user interacts only with components appropriate to their role. ### Layouts and auth checks Due to Partial Rendering, be cautious when doing checks in Layouts as these don't re-render on navigation, meaning the user session won't be checked on every route change. Instead, you should do the checks close to your data source or the component that'll be conditionally rendered. For example, consider a shared layout that fetches the user data and displays the user image in a nav. Instead of doing the auth check in the layout, you should fetch the user data (`getUser()`) in the layout and do the auth check in your DAL. This guarantees that wherever `getUser()` is called within your application, the auth check is performed, and prevents developers forgetting to check the user is authorized to access the data. export default async function Layout({ children, }: { children: React.ReactNode; }) { const user = await getUser(); return ( // ... ) } export const getUser = cache(async () => { const session = await verifySession() if (!session) return null // Get user ID from session and fetch data }) > **Good to know:** > > * A common pattern in SPAs is to `return null` in a layout or a top-level component if a user is not authorized. This pattern is **not recommended** since Next.js applications have multiple entry points, which will not prevent nested route segments and Server Actions from being accessed. ### Server Actions Treat Server Actions with the same security considerations as public-facing API endpoints, and verify if the user is allowed to perform a mutation. In the example below, we check the user's role before allowing the action to proceed: 'use server' import { verifySession } from '@/app/lib/dal' export async function serverAction(formData: FormData) { const session = await verifySession() const userRole = session?.user?.role // Return early if user is not authorized to perform the action if (userRole !== 'admin') { return null } // Proceed with the action for authorized users } ### Route Handlers Treat Route Handlers with the same security considerations as public-facing API endpoints, and verify if the user is allowed to access the Route Handler. For example: import { verifySession } from '@/app/lib/dal' export async function GET() { // User authentication and role verification const session = await verifySession() // Check if the user is authenticated if (!session) { // User is not authenticated return new Response(null, { status: 401 }) } // Check if the user has the 'admin' role if (session.user.role !== 'admin') { // User is authenticated but does not have the right permissions return new Response(null, { status: 403 }) } // Continue for authorized users } The example above demonstrates a Route Handler with a two-tier security check. It first checks for an active session, and then verifies if the logged-in user is an 'admin'. ## Context Providers Using context providers for auth works due to interleaving. However, React `context` is not supported in Server Components, making them only applicable to Client Components. This works, but any child Server Components will be rendered on the server first, and will not have access to the context provider’s session data: import { ContextProvider } from 'auth-lib' export default function RootLayout({ children }) { return ( <html lang="en"> <body> <ContextProvider>{children}</ContextProvider> </body> </html> ) } "use client"; import { useSession } from "auth-lib"; export default function Profile() { const { userId } = useSession(); const { data } = useSWR(`/api/user/${userId}`, fetcher) return ( // ... ); } If session data is needed in Client Components (e.g. for client-side data fetching), use React’s `taintUniqueValue` API to prevent sensitive session data from being exposed to the client. ## Resources Now that you've learned about authentication in Next.js, here are Next.js-compatible libraries and resources to help you implement secure authentication and session management: ### Auth Libraries * Auth0 * Clerk * Kinde * Logto * NextAuth.js * Ory * Stack Auth * Supabase * Stytch * WorkOS ### Session Management Libraries * Iron Session * Jose ## Further Reading To continue learning about authentication and security, check out the following resources: * How to think about security in Next.js * Understanding XSS Attacks * Understanding CSRF Attacks * The Copenhagen Book --- ## Page: https://nextjs.org/docs/app/guides/ci-build-caching ## How to configure Continuous Integration (CI) build caching To improve build performance, Next.js saves a cache to `.next/cache` that is shared between builds. To take advantage of this cache in Continuous Integration (CI) environments, your CI workflow will need to be configured to correctly persist the cache between builds. > If your CI is not configured to persist `.next/cache` between builds, you may see a No Cache Detected error. Here are some example cache configurations for common CI providers: ## Vercel Next.js caching is automatically configured for you. There's no action required on your part. If you are using Turborepo on Vercel, learn more here. ## CircleCI Edit your `save_cache` step in `.circleci/config.yml` to include `.next/cache`: steps: - save_cache: key: dependency-cache-{{ checksum "yarn.lock" }} paths: - ./node_modules - ./.next/cache If you do not have a `save_cache` key, please follow CircleCI's documentation on setting up build caching. ## Travis CI Add or merge the following into your `.travis.yml`: cache: directories: - $HOME/.cache/yarn - node_modules - .next/cache ## GitLab CI Add or merge the following into your `.gitlab-ci.yml`: cache: key: ${CI_COMMIT_REF_SLUG} paths: - node_modules/ - .next/cache/ ## Netlify CI Use Netlify Plugins with `@netlify/plugin-nextjs`. ## AWS CodeBuild Add (or merge in) the following to your `buildspec.yml`: cache: paths: - 'node_modules/**/*' # Cache `node_modules` for faster `yarn` or `npm i` - '.next/cache/**/*' # Cache Next.js for faster application rebuilds ## GitHub Actions Using GitHub's actions/cache, add the following step in your workflow file: uses: actions/cache@v4 with: # See here for caching with `yarn`, `bun` or other package managers https://github.com/actions/cache/blob/main/examples.md or you can leverage caching with actions/setup-node https://github.com/actions/setup-node path: | ~/.npm ${{ github.workspace }}/.next/cache # Generate a new cache whenever packages or source files change. key: ${{ runner.os }}-nextjs-${{ hashFiles('**/package-lock.json') }}-${{ hashFiles('**/*.js', '**/*.jsx', '**/*.ts', '**/*.tsx') }} # If source files changed but packages didn't, rebuild from a prior cache. restore-keys: | ${{ runner.os }}-nextjs-${{ hashFiles('**/package-lock.json') }}- ## Bitbucket Pipelines Add or merge the following into your `bitbucket-pipelines.yml` at the top level (same level as `pipelines`): definitions: caches: nextcache: .next/cache Then reference it in the `caches` section of your pipeline's `step`: - step: name: your_step_name caches: - node - nextcache ## Heroku Using Heroku's custom cache, add a `cacheDirectories` array in your top-level package.json: "cacheDirectories": [".next/cache"] ## Azure Pipelines Using Azure Pipelines' Cache task, add the following task to your pipeline yaml file somewhere prior to the task that executes `next build`: - task: Cache@2 displayName: 'Cache .next/cache' inputs: key: next | $(Agent.OS) | yarn.lock path: '$(System.DefaultWorkingDirectory)/.next/cache' ## Jenkins (Pipeline) Using Jenkins' Job Cacher plugin, add the following build step to your `Jenkinsfile` where you would normally run `next build` or `npm install`: stage("Restore npm packages") { steps { // Writes lock-file to cache based on the GIT_COMMIT hash writeFile file: "next-lock.cache", text: "$GIT_COMMIT" cache(caches: [ arbitraryFileCache( path: "node_modules", includes: "**/*", cacheValidityDecidingFile: "package-lock.json" ) ]) { sh "npm install" } } } stage("Build") { steps { // Writes lock-file to cache based on the GIT_COMMIT hash writeFile file: "next-lock.cache", text: "$GIT_COMMIT" cache(caches: [ arbitraryFileCache( path: ".next/cache", includes: "**/*", cacheValidityDecidingFile: "next-lock.cache" ) ]) { // aka `next build` sh "npm run build" } } } --- ## Page: https://nextjs.org/docs/app/guides/migrating #### Subscribe to our newsletter Stay updated on new releases and features, guides, and case studies. --- ## Page: https://nextjs.org/docs/app/guides/migrating/app-router-migration ## How to migrate from Pages to the App Router This guide will help you: * Update your Next.js application from version 12 to version 13 * Upgrade features that work in both the `pages` and the `app` directories * Incrementally migrate your existing application from `pages` to `app` ## Upgrading ### Node.js Version The minimum Node.js version is now **v18.17**. See the Node.js documentation for more information. ### Next.js Version To update to Next.js version 13, run the following command using your preferred package manager: npm install next@latest react@latest react-dom@latest ### ESLint Version If you're using ESLint, you need to upgrade your ESLint version: npm install -D eslint-config-next@latest > **Good to know**: You may need to restart the ESLint server in VS Code for the ESLint changes to take effect. Open the Command Palette (`cmd+shift+p` on Mac; `ctrl+shift+p` on Windows) and search for `ESLint: Restart ESLint Server`. ## Next Steps After you've updated, see the following sections for next steps: * Upgrade new features: A guide to help you upgrade to new features such as the improved Image and Link Components. * Migrate from the `pages` to `app` directory: A step-by-step guide to help you incrementally migrate from the `pages` to the `app` directory. ## Upgrading New Features Next.js 13 introduced the new App Router with new features and conventions. The new Router is available in the `app` directory and co-exists with the `pages` directory. Upgrading to Next.js 13 does **not** require using the App Router. You can continue using `pages` with new features that work in both directories, such as the updated Image component, Link component, Script component, and Font optimization. ### `<Image/>` Component Next.js 12 introduced new improvements to the Image Component with a temporary import: `next/future/image`. These improvements included less client-side JavaScript, easier ways to extend and style images, better accessibility, and native browser lazy loading. In version 13, this new behavior is now the default for `next/image`. There are two codemods to help you migrate to the new Image Component: * **`next-image-to-legacy-image` codemod**: Safely and automatically renames `next/image` imports to `next/legacy/image`. Existing components will maintain the same behavior. * **`next-image-experimental` codemod**: Dangerously adds inline styles and removes unused props. This will change the behavior of existing components to match the new defaults. To use this codemod, you need to run the `next-image-to-legacy-image` codemod first. ### `<Link>` Component The `<Link>` Component no longer requires manually adding an `<a>` tag as a child. This behavior was added as an experimental option in version 12.2 and is now the default. In Next.js 13, `<Link>` always renders `<a>` and allows you to forward props to the underlying tag. For example: import Link from 'next/link' // Next.js 12: `<a>` has to be nested otherwise it's excluded <Link href="/about"> <a>About</a> </Link> // Next.js 13: `<Link>` always renders `<a>` under the hood <Link href="/about"> About </Link> To upgrade your links to Next.js 13, you can use the `new-link` codemod. ### `<Script>` Component The behavior of `next/script` has been updated to support both `pages` and `app`, but some changes need to be made to ensure a smooth migration: * Move any `beforeInteractive` scripts you previously included in `_document.js` to the root layout file (`app/layout.tsx`). * The experimental `worker` strategy does not yet work in `app` and scripts denoted with this strategy will either have to be removed or modified to use a different strategy (e.g. `lazyOnload`). * `onLoad`, `onReady`, and `onError` handlers will not work in Server Components so make sure to move them to a Client Component or remove them altogether. ### Font Optimization Previously, Next.js helped you optimize fonts by inlining font CSS. Version 13 introduces the new `next/font` module which gives you the ability to customize your font loading experience while still ensuring great performance and privacy. `next/font` is supported in both the `pages` and `app` directories. While inlining CSS still works in `pages`, it does not work in `app`. You should use `next/font` instead. See the Font Optimization page to learn how to use `next/font`. ## Migrating from `pages` to `app` > **🎥 Watch:** Learn how to incrementally adopt the App Router → YouTube (16 minutes). Moving to the App Router may be the first time using React features that Next.js builds on top of such as Server Components, Suspense, and more. When combined with new Next.js features such as special files and layouts, migration means new concepts, mental models, and behavioral changes to learn. We recommend reducing the combined complexity of these updates by breaking down your migration into smaller steps. The `app` directory is intentionally designed to work simultaneously with the `pages` directory to allow for incremental page-by-page migration. * The `app` directory supports nested routes _and_ layouts. Learn more. * Use nested folders to define routes and a special `page.js` file to make a route segment publicly accessible. Learn more. * Special file conventions are used to create UI for each route segment. The most common special files are `page.js` and `layout.js`. * Use `page.js` to define UI unique to a route. * Use `layout.js` to define UI that is shared across multiple routes. * `.js`, `.jsx`, or `.tsx` file extensions can be used for special files. * You can colocate other files inside the `app` directory such as components, styles, tests, and more. Learn more. * Data fetching functions like `getServerSideProps` and `getStaticProps` have been replaced with a new API inside `app`. `getStaticPaths` has been replaced with `generateStaticParams`. * `pages/_app.js` and `pages/_document.js` have been replaced with a single `app/layout.js` root layout. Learn more. * `pages/_error.js` has been replaced with more granular `error.js` special files. Learn more. * `pages/404.js` has been replaced with the `not-found.js` file. * `pages/api/*` API Routes have been replaced with the `route.js` (Route Handler) special file. ### Step 1: Creating the `app` directory Update to the latest Next.js version (requires 13.4 or greater): npm install next@latest Then, create a new `app` directory at the root of your project (or `src/` directory). ### Step 2: Creating a Root Layout Create a new `app/layout.tsx` file inside the `app` directory. This is a root layout that will apply to all routes inside `app`. export default function RootLayout({ // Layouts must accept a children prop. // This will be populated with nested layouts or pages children, }: { children: React.ReactNode }) { return ( <html lang="en"> <body>{children}</body> </html> ) } * The `app` directory **must** include a root layout. * The root layout must define `<html>`, and `<body>` tags since Next.js does not automatically create them * The root layout replaces the `pages/_app.tsx` and `pages/_document.tsx` files. * `.js`, `.jsx`, or `.tsx` extensions can be used for layout files. To manage `<head>` HTML elements, you can use the built-in SEO support: import type { Metadata } from 'next' export const metadata: Metadata = { title: 'Home', description: 'Welcome to Next.js', } #### Migrating `_document.js` and `_app.js` If you have an existing `_app` or `_document` file, you can copy the contents (e.g. global styles) to the root layout (`app/layout.tsx`). Styles in `app/layout.tsx` will _not_ apply to `pages/*`. You should keep `_app`/`_document` while migrating to prevent your `pages/*` routes from breaking. Once fully migrated, you can then safely delete them. If you are using any React Context providers, they will need to be moved to a Client Component. #### Migrating the `getLayout()` pattern to Layouts (Optional) Next.js recommended adding a property to Page components to achieve per-page layouts in the `pages` directory. This pattern can be replaced with native support for nested layouts in the `app` directory. See before and after example **Before** export default function DashboardLayout({ children }) { return ( <div> <h2>My Dashboard</h2> {children} </div> ) } import DashboardLayout from '../components/DashboardLayout' export default function Page() { return <p>My Page</p> } Page.getLayout = function getLayout(page) { return <DashboardLayout>{page}</DashboardLayout> } **After** * Remove the `Page.getLayout` property from `pages/dashboard/index.js` and follow the steps for migrating pages to the `app` directory. export default function Page() { return <p>My Page</p> } * Move the contents of `DashboardLayout` into a new Client Component to retain `pages` directory behavior. 'use client' // this directive should be at top of the file, before any imports. // This is a Client Component export default function DashboardLayout({ children }) { return ( <div> <h2>My Dashboard</h2> {children} </div> ) } * Import the `DashboardLayout` into a new `layout.js` file inside the `app` directory. import DashboardLayout from './DashboardLayout' // This is a Server Component export default function Layout({ children }) { return <DashboardLayout>{children}</DashboardLayout> } * You can incrementally move non-interactive parts of `DashboardLayout.js` (Client Component) into `layout.js` (Server Component) to reduce the amount of component JavaScript you send to the client. ### Step 3: Migrating `next/head` In the `pages` directory, the `next/head` React component is used to manage `<head>` HTML elements such as `title` and `meta` . In the `app` directory, `next/head` is replaced with the new built-in SEO support. **Before:** import Head from 'next/head' export default function Page() { return ( <> <Head> <title>My page title</title> </Head> </> ) } **After:** import type { Metadata } from 'next' export const metadata: Metadata = { title: 'My Page Title', } export default function Page() { return '...' } See all metadata options. ### Step 4: Migrating Pages * Pages in the `app` directory are Server Components by default. This is different from the `pages` directory where pages are Client Components. * Data fetching has changed in `app`. `getServerSideProps`, `getStaticProps` and `getInitialProps` have been replaced with a simpler API. * The `app` directory uses nested folders to define routes and a special `page.js` file to make a route segment publicly accessible. * | `pages` Directory | `app` Directory | Route | | --- | --- | --- | | `index.js` | `page.js` | `/` | | `about.js` | `about/page.js` | `/about` | | `blog/[slug].js` | `blog/[slug]/page.js` | `/blog/post-1` | We recommend breaking down the migration of a page into two main steps: * Step 1: Move the default exported Page Component into a new Client Component. * Step 2: Import the new Client Component into a new `page.js` file inside the `app` directory. > **Good to know**: This is the easiest migration path because it has the most comparable behavior to the `pages` directory. **Step 1: Create a new Client Component** * Create a new separate file inside the `app` directory (i.e. `app/home-page.tsx` or similar) that exports a Client Component. To define Client Components, add the `'use client'` directive to the top of the file (before any imports). * Similar to the Pages Router, there is an optimization step to prerender Client Components to static HTML on the initial page load. * Move the default exported page component from `pages/index.js` to `app/home-page.tsx`. 'use client' // This is a Client Component (same as components in the `pages` directory) // It receives data as props, has access to state and effects, and is // prerendered on the server during the initial page load. export default function HomePage({ recentPosts }) { return ( <div> {recentPosts.map((post) => ( <div key={post.id}>{post.title}</div> ))} </div> ) } **Step 2: Create a new page** * Create a new `app/page.tsx` file inside the `app` directory. This is a Server Component by default. * Import the `home-page.tsx` Client Component into the page. * If you were fetching data in `pages/index.js`, move the data fetching logic directly into the Server Component using the new data fetching APIs. See the data fetching upgrade guide for more details. // Import your Client Component import HomePage from './home-page' async function getPosts() { const res = await fetch('https://...') const posts = await res.json() return posts } export default async function Page() { // Fetch data directly in a Server Component const recentPosts = await getPosts() // Forward fetched data to your Client Component return <HomePage recentPosts={recentPosts} /> } * If your previous page used `useRouter`, you'll need to update to the new routing hooks. Learn more. * Start your development server and visit `http://localhost:3000`. You should see your existing index route, now served through the app directory. ### Step 5: Migrating Routing Hooks A new router has been added to support the new behavior in the `app` directory. In `app`, you should use the three new hooks imported from `next/navigation`: `useRouter()`, `usePathname()`, and `useSearchParams()`. * The new `useRouter` hook is imported from `next/navigation` and has different behavior to the `useRouter` hook in `pages` which is imported from `next/router`. * The `useRouter` hook imported from `next/router` is not supported in the `app` directory but can continue to be used in the `pages` directory. * The new `useRouter` does not return the `pathname` string. Use the separate `usePathname` hook instead. * The new `useRouter` does not return the `query` object. Search parameters and dynamic route parameters are now separate. Use the `useSearchParams` and `useParams` hooks instead. * You can use `useSearchParams` and `usePathname` together to listen to page changes. See the Router Events section for more details. * These new hooks are only supported in Client Components. They cannot be used in Server Components. 'use client' import { useRouter, usePathname, useSearchParams } from 'next/navigation' export default function ExampleClientComponent() { const router = useRouter() const pathname = usePathname() const searchParams = useSearchParams() // ... } In addition, the new `useRouter` hook has the following changes: * `isFallback` has been removed because `fallback` has been replaced. * The `locale`, `locales`, `defaultLocales`, `domainLocales` values have been removed because built-in i18n Next.js features are no longer necessary in the `app` directory. Learn more about i18n. * `basePath` has been removed. The alternative will not be part of `useRouter`. It has not yet been implemented. * `asPath` has been removed because the concept of `as` has been removed from the new router. * `isReady` has been removed because it is no longer necessary. During static rendering, any component that uses the `useSearchParams()` hook will skip the prerendering step and instead be rendered on the client at runtime. * `route` has been removed. `usePathname` or `useSelectedLayoutSegments()` provide an alternative. View the `useRouter()` API reference. #### Sharing components between `pages` and `app` To keep components compatible between the `pages` and `app` routers, refer to the `useRouter` hook from `next/compat/router`. This is the `useRouter` hook from the `pages` directory, but intended to be used while sharing components between routers. Once you are ready to use it only on the `app` router, update to the new `useRouter` from `next/navigation`. ### Step 6: Migrating Data Fetching Methods The `pages` directory uses `getServerSideProps` and `getStaticProps` to fetch data for pages. Inside the `app` directory, these previous data fetching functions are replaced with a simpler API built on top of `fetch()` and `async` React Server Components. export default async function Page() { // This request should be cached until manually invalidated. // Similar to `getStaticProps`. // `force-cache` is the default and can be omitted. const staticData = await fetch(`https://...`, { cache: 'force-cache' }) // This request should be refetched on every request. // Similar to `getServerSideProps`. const dynamicData = await fetch(`https://...`, { cache: 'no-store' }) // This request should be cached with a lifetime of 10 seconds. // Similar to `getStaticProps` with the `revalidate` option. const revalidatedData = await fetch(`https://...`, { next: { revalidate: 10 }, }) return <div>...</div> } #### Server-side Rendering (`getServerSideProps`) In the `pages` directory, `getServerSideProps` is used to fetch data on the server and forward props to the default exported React component in the file. The initial HTML for the page is prerendered from the server, followed by "hydrating" the page in the browser (making it interactive). // `pages` directory export async function getServerSideProps() { const res = await fetch(`https://...`) const projects = await res.json() return { props: { projects } } } export default function Dashboard({ projects }) { return ( <ul> {projects.map((project) => ( <li key={project.id}>{project.name}</li> ))} </ul> ) } In the App Router, we can colocate our data fetching inside our React components using Server Components. This allows us to send less JavaScript to the client, while maintaining the rendered HTML from the server. By setting the `cache` option to `no-store`, we can indicate that the fetched data should never be cached. This is similar to `getServerSideProps` in the `pages` directory. // `app` directory // This function can be named anything async function getProjects() { const res = await fetch(`https://...`, { cache: 'no-store' }) const projects = await res.json() return projects } export default async function Dashboard() { const projects = await getProjects() return ( <ul> {projects.map((project) => ( <li key={project.id}>{project.name}</li> ))} </ul> ) } #### Accessing Request Object In the `pages` directory, you can retrieve request-based data based on the Node.js HTTP API. For example, you can retrieve the `req` object from `getServerSideProps` and use it to retrieve the request's cookies and headers. // `pages` directory export async function getServerSideProps({ req, query }) { const authHeader = req.getHeaders()['authorization']; const theme = req.cookies['theme']; return { props: { ... }} } export default function Page(props) { return ... } The `app` directory exposes new read-only functions to retrieve request data: * `headers`: Based on the Web Headers API, and can be used inside Server Components to retrieve request headers. * `cookies`: Based on the Web Cookies API, and can be used inside Server Components to retrieve cookies. // `app` directory import { cookies, headers } from 'next/headers' async function getData() { const authHeader = (await headers()).get('authorization') return '...' } export default async function Page() { // You can use `cookies` or `headers` inside Server Components // directly or in your data fetching function const theme = (await cookies()).get('theme') const data = await getData() return '...' } #### Static Site Generation (`getStaticProps`) In the `pages` directory, the `getStaticProps` function is used to pre-render a page at build time. This function can be used to fetch data from an external API or directly from a database, and pass this data down to the entire page as it's being generated during the build. // `pages` directory export async function getStaticProps() { const res = await fetch(`https://...`) const projects = await res.json() return { props: { projects } } } export default function Index({ projects }) { return projects.map((project) => <div>{project.name}</div>) } In the `app` directory, data fetching with `fetch()` will default to `cache: 'force-cache'`, which will cache the request data until manually invalidated. This is similar to `getStaticProps` in the `pages` directory. // `app` directory // This function can be named anything async function getProjects() { const res = await fetch(`https://...`) const projects = await res.json() return projects } export default async function Index() { const projects = await getProjects() return projects.map((project) => <div>{project.name}</div>) } #### Dynamic paths (`getStaticPaths`) In the `pages` directory, the `getStaticPaths` function is used to define the dynamic paths that should be pre-rendered at build time. // `pages` directory import PostLayout from '@/components/post-layout' export async function getStaticPaths() { return { paths: [{ params: { id: '1' } }, { params: { id: '2' } }], } } export async function getStaticProps({ params }) { const res = await fetch(`https://.../posts/${params.id}`) const post = await res.json() return { props: { post } } } export default function Post({ post }) { return <PostLayout post={post} /> } In the `app` directory, `getStaticPaths` is replaced with `generateStaticParams`. `generateStaticParams` behaves similarly to `getStaticPaths`, but has a simplified API for returning route parameters and can be used inside layouts. The return shape of `generateStaticParams` is an array of segments instead of an array of nested `param` objects or a string of resolved paths. // `app` directory import PostLayout from '@/components/post-layout' export async function generateStaticParams() { return [{ id: '1' }, { id: '2' }] } async function getPost(params) { const res = await fetch(`https://.../posts/${(await params).id}`) const post = await res.json() return post } export default async function Post({ params }) { const post = await getPost(params) return <PostLayout post={post} /> } Using the name `generateStaticParams` is more appropriate than `getStaticPaths` for the new model in the `app` directory. The `get` prefix is replaced with a more descriptive `generate`, which sits better alone now that `getStaticProps` and `getServerSideProps` are no longer necessary. The `Paths` suffix is replaced by `Params`, which is more appropriate for nested routing with multiple dynamic segments. * * * #### Replacing `fallback` In the `pages` directory, the `fallback` property returned from `getStaticPaths` is used to define the behavior of a page that isn't pre-rendered at build time. This property can be set to `true` to show a fallback page while the page is being generated, `false` to show a 404 page, or `blocking` to generate the page at request time. // `pages` directory export async function getStaticPaths() { return { paths: [], fallback: 'blocking' }; } export async function getStaticProps({ params }) { ... } export default function Post({ post }) { return ... } In the `app` directory the `config.dynamicParams` property controls how params outside of `generateStaticParams` are handled: * **`true`**: (default) Dynamic segments not included in `generateStaticParams` are generated on demand. * **`false`**: Dynamic segments not included in `generateStaticParams` will return a 404. This replaces the `fallback: true | false | 'blocking'` option of `getStaticPaths` in the `pages` directory. The `fallback: 'blocking'` option is not included in `dynamicParams` because the difference between `'blocking'` and `true` is negligible with streaming. // `app` directory export const dynamicParams = true; export async function generateStaticParams() { return [...] } async function getPost(params) { ... } export default async function Post({ params }) { const post = await getPost(params); return ... } With `dynamicParams` set to `true` (the default), when a route segment is requested that hasn't been generated, it will be server-rendered and cached. #### Incremental Static Regeneration (`getStaticProps` with `revalidate`) In the `pages` directory, the `getStaticProps` function allows you to add a `revalidate` field to automatically regenerate a page after a certain amount of time. // `pages` directory export async function getStaticProps() { const res = await fetch(`https://.../posts`) const posts = await res.json() return { props: { posts }, revalidate: 60, } } export default function Index({ posts }) { return ( <Layout> <PostList posts={posts} /> </Layout> ) } In the `app` directory, data fetching with `fetch()` can use `revalidate`, which will cache the request for the specified amount of seconds. // `app` directory async function getPosts() { const res = await fetch(`https://.../posts`, { next: { revalidate: 60 } }) const data = await res.json() return data.posts } export default async function PostList() { const posts = await getPosts() return posts.map((post) => <div>{post.name}</div>) } #### API Routes API Routes continue to work in the `pages/api` directory without any changes. However, they have been replaced by Route Handlers in the `app` directory. Route Handlers allow you to create custom request handlers for a given route using the Web Request and Response APIs. export async function GET(request: Request) {} > **Good to know**: If you previously used API routes to call an external API from the client, you can now use Server Components instead to securely fetch data. Learn more about data fetching. #### Single-Page Applications If you are also migrating to Next.js from a Single-Page Application (SPA) at the same time, see our documentation to learn more. ### Step 7: Styling In the `pages` directory, global stylesheets are restricted to only `pages/_app.js`. With the `app` directory, this restriction has been lifted. Global styles can be added to any layout, page, or component. * CSS Modules * Tailwind CSS * Global Styles * CSS-in-JS * External Stylesheets * Sass #### Tailwind CSS If you're using Tailwind CSS, you'll need to add the `app` directory to your `tailwind.config.js` file: module.exports = { content: [ './app/**/*.{js,ts,jsx,tsx,mdx}', // <-- Add this line './pages/**/*.{js,ts,jsx,tsx,mdx}', './components/**/*.{js,ts,jsx,tsx,mdx}', ], } You'll also need to import your global styles in your `app/layout.js` file: import '../styles/globals.css' export default function RootLayout({ children }) { return ( <html lang="en"> <body>{children}</body> </html> ) } Learn more about styling with Tailwind CSS ## Using App Router together with Pages Router When navigating between routes served by the different Next.js routers, there will be a hard navigation. Automatic link prefetching with `next/link` will not prefetch across routers. Instead, you can optimize navigations between App Router and Pages Router to retain the prefetched and fast page transitions. Learn more. ## Codemods Next.js provides Codemod transformations to help upgrade your codebase when a feature is deprecated. See Codemods for more information. --- ## Page: https://nextjs.org/docs/app/guides/migrating/from-create-react-app ## How to migrate from Create React App to Next.js This guide will help you migrate an existing Create React App (CRA) site to Next.js. ## Why Switch? There are several reasons why you might want to switch from Create React App to Next.js: ### Slow initial page loading time Create React App uses purely client-side React. Client-side only applications, also known as single-page applications (SPAs), often experience slow initial page loading time. This happens due to a couple of reasons: 1. The browser needs to wait for the React code and your entire application bundle to download and run before your code is able to send requests to load data. 2. Your application code grows with every new feature and dependency you add. ### No automatic code splitting The previous issue of slow loading times can be somewhat mitigated with code splitting. However, if you try to do code splitting manually, you can inadvertently introduce network waterfalls. Next.js provides automatic code splitting and tree-shaking built into its router and build pipeline. ### Network waterfalls A common cause of poor performance occurs when applications make sequential client-server requests to fetch data. One pattern for data fetching in a SPA is to render a placeholder, and then fetch data after the component has mounted. Unfortunately, a child component can only begin fetching data after its parent has finished loading its own data, resulting in a “waterfall” of requests. While client-side data fetching is supported in Next.js, Next.js also lets you move data fetching to the server. This often eliminates client-server waterfalls altogether. ### Fast and intentional loading states With built-in support for streaming through React Suspense, you can define which parts of your UI load first and in what order, without creating network waterfalls. This enables you to build pages that are faster to load and eliminate layout shifts. ### Choose the data fetching strategy Depending on your needs, Next.js allows you to choose your data fetching strategy on a page or component-level basis. For example, you could fetch data from your CMS and render blog posts at build time (SSG) for quick load speeds, or fetch data at request time (SSR) when necessary. ### Middleware Next.js Middleware allows you to run code on the server before a request is completed. For instance, you can avoid a flash of unauthenticated content by redirecting a user to a login page in the middleware for authenticated-only pages. You can also use it for features like A/B testing, experimentation, and internationalization. ### Built-in Optimizations Images, fonts, and third-party scripts often have a large impact on an application’s performance. Next.js includes specialized components and APIs that automatically optimize them for you. ## Migration Steps Our goal is to get a working Next.js application as quickly as possible so that you can then adopt Next.js features incrementally. To begin with, we’ll treat your application as a purely client-side application (SPA) without immediately replacing your existing router. This reduces complexity and merge conflicts. > **Note**: If you are using advanced CRA configurations such as a custom `homepage` field in your `package.json`, a custom service worker, or specific Babel/webpack tweaks, please see the **Additional Considerations** section at the end of this guide for tips on replicating or adapting these features in Next.js. ### Step 1: Install the Next.js Dependency Install Next.js in your existing project: npm install next@latest ### Step 2: Create the Next.js Configuration File Create a `next.config.ts` at the root of your project (same level as your `package.json`). This file holds your Next.js configuration options. import type { NextConfig } from 'next' const nextConfig: NextConfig = { output: 'export', // Outputs a Single-Page Application (SPA) distDir: 'build', // Changes the build output directory to `build` } export default nextConfig > **Note**: Using `output: 'export'` means you’re doing a static export. You will **not** have access to server-side features like SSR or APIs. You can remove this line to leverage Next.js server features. ### Step 3: Create the Root Layout A Next.js App Router application must include a root layout file, which is a React Server Component that will wrap all your pages. The closest equivalent of the root layout file in a CRA application is `public/index.html`, which includes your `<html>`, `<head>`, and `<body>` tags. 1. Create a new `app` directory inside your `src` directory (or at your project root if you prefer `app` at the root). 2. Inside the `app` directory, create a `layout.tsx` (or `layout.js`) file: export default function RootLayout({ children, }: { children: React.ReactNode }) { return '...' } Now copy the content of your old `index.html` into this `<RootLayout>` component. Replace `body div#root` (and `body noscript`) with `<div id="root">{children}</div>`. export default function RootLayout({ children, }: { children: React.ReactNode }) { return ( <html lang="en"> <head> <meta charSet="UTF-8" /> <link rel="icon" href="%PUBLIC_URL%/favicon.ico" /> <meta name="viewport" content="width=device-width, initial-scale=1" /> <title>React App</title> <meta name="description" content="Web site created..." /> </head> <body> <div id="root">{children}</div> </body> </html> ) } > **Good to know**: Next.js ignores CRA’s `public/manifest.json`, additional iconography, and testing configuration by default. If you need these, Next.js has support with its Metadata API and Testing setup. ### Step 4: Metadata Next.js automatically includes the `<meta charset="UTF-8" />` and `<meta name="viewport" content="width=device-width, initial-scale=1" />` tags, so you can remove them from `<head>`: export default function RootLayout({ children, }: { children: React.ReactNode }) { return ( <html lang="en"> <head> <link rel="icon" href="%PUBLIC_URL%/favicon.ico" /> <title>React App</title> <meta name="description" content="Web site created..." /> </head> <body> <div id="root">{children}</div> </body> </html> ) } Any metadata files such as `favicon.ico`, `icon.png`, `robots.txt` are automatically added to the application `<head>` tag as long as you have them placed into the top level of the `app` directory. After moving all supported files into the `app` directory you can safely delete their `<link>` tags: export default function RootLayout({ children, }: { children: React.ReactNode }) { return ( <html lang="en"> <head> <title>React App</title> <meta name="description" content="Web site created..." /> </head> <body> <div id="root">{children}</div> </body> </html> ) } Finally, Next.js can manage your last `<head>` tags with the Metadata API. Move your final metadata info into an exported `metadata` object: import type { Metadata } from 'next' export const metadata: Metadata = { title: 'React App', description: 'Web site created with Next.js.', } export default function RootLayout({ children, }: { children: React.ReactNode }) { return ( <html lang="en"> <body> <div id="root">{children}</div> </body> </html> ) } With the above changes, you shifted from declaring everything in your `index.html` to using Next.js' convention-based approach built into the framework (Metadata API). This approach enables you to more easily improve your SEO and web shareability of your pages. ### Step 5: Styles Like CRA, Next.js supports CSS Modules out of the box. It also supports global CSS imports. If you have a global CSS file, import it into your `app/layout.tsx`: import '../index.css' export const metadata = { title: 'React App', description: 'Web site created with Next.js.', } export default function RootLayout({ children, }: { children: React.ReactNode }) { return ( <html lang="en"> <body> <div id="root">{children}</div> </body> </html> ) } If you’re using Tailwind CSS, see our installation docs. ### Step 6: Create the Entrypoint Page Create React App uses `src/index.tsx` (or `index.js`) as the entry point. In Next.js (App Router), each folder inside the `app` directory corresponds to a route, and each folder should have a `page.tsx`. Since we want to keep the app as an SPA for now and intercept **all** routes, we’ll use an optional catch-all route. 1. **Create a `[[...slug]]` directory inside `app`.** app ┣ [[...slug]] ┃ ┗ page.tsx ┣ layout.tsx 2. **Add the following to `page.tsx`**: export function generateStaticParams() { return [{ slug: [''] }] } export default function Page() { return '...' // We'll update this } This tells Next.js to generate a single route for the empty slug (`/`), effectively mapping **all** routes to the same page. This page is a Server Component, prerendered into static HTML. ### Step 7: Add a Client-Only Entrypoint Next, we’ll embed your CRA’s root App component inside a Client Component so that all logic remains client-side. If this is your first time using Next.js, it's worth knowing that clients components (by default) are still prerendered on the server. You can think about them as having the additional capability of running client-side JavaScript. Create a `client.tsx` (or `client.js`) in `app/[[...slug]]/`: 'use client' import dynamic from 'next/dynamic' const App = dynamic(() => import('../../App'), { ssr: false }) export function ClientOnly() { return <App /> } * The `'use client'` directive makes this file a **Client Component**. * The `dynamic` import with `ssr: false` disables server-side rendering for the `<App />` component, making it truly client-only (SPA). Now update your `page.tsx` (or `page.js`) to use your new component: import { ClientOnly } from './client' export function generateStaticParams() { return [{ slug: [''] }] } export default function Page() { return <ClientOnly /> } ### Step 8: Update Static Image Imports In CRA, importing an image file returns its public URL as a string: import image from './img.png' export default function App() { return <img src={image} /> } With Next.js, static image imports return an object. The object can then be used directly with the Next.js `<Image>` component, or you can use the object's `src` property with your existing `<img>` tag. The `<Image>` component has the added benefits of automatic image optimization. The `<Image>` component automatically sets the `width` and `height` attributes of the resulting `<img>` based on the image's dimensions. This prevents layout shifts when the image loads. However, this can cause issues if your app contains images with only one of their dimensions being styled without the other styled to `auto`. When not styled to `auto`, the dimension will default to the `<img>` dimension attribute's value, which can cause the image to appear distorted. Keeping the `<img>` tag will reduce the amount of changes in your application and prevent the above issues. You can then optionally later migrate to the `<Image>` component to take advantage of optimizing images by configuring a loader, or moving to the default Next.js server which has automatic image optimization. **Convert absolute import paths for images imported from `/public` into relative imports:** // Before import logo from '/logo.png' // After import logo from '../public/logo.png' **Pass the image `src` property instead of the whole image object to your `<img>` tag:** // Before <img src={logo} /> // After <img src={logo.src} /> Alternatively, you can reference the public URL for the image asset based on the filename. For example, `public/logo.png` will serve the image at `/logo.png` for your application, which would be the `src` value. > **Warning:** If you're using TypeScript, you might encounter type errors when accessing the `src` property. To fix them, you need to add `next-env.d.ts` to the `include` array of your `tsconfig.json` file. Next.js will automatically generate this file when you run your application on step 9. ### Step 9: Migrate Environment Variables Next.js supports environment variables similarly to CRA but **requires** a `NEXT_PUBLIC_` prefix for any variable you want to expose in the browser. The main difference is the prefix used to expose environment variables on the client-side. Change all environment variables with the `REACT_APP_` prefix to `NEXT_PUBLIC_`. ### Step 10: Update Scripts in `package.json` Update your `package.json` scripts to use Next.js commands. Also, add `.next` and `next-env.d.ts` to your `.gitignore`: { "scripts": { "dev": "next dev --turbopack", "build": "next build", "start": "npx serve@latest ./build" } } # ... .next next-env.d.ts Now you can run: npm run dev Open http://localhost:3000. You should see your application now running on Next.js (in SPA mode). ### Step 11: Clean Up You can now remove artifacts that are specific to Create React App: * `public/index.html` * `src/index.tsx` * `src/react-app-env.d.ts` * The `reportWebVitals` setup * The `react-scripts` dependency (uninstall it from `package.json`) ## Additional Considerations ### Using a Custom `homepage` in CRA If you used the `homepage` field in your CRA `package.json` to serve the app under a specific subpath, you can replicate that in Next.js using the `basePath` configuration in `next.config.ts`: import { NextConfig } from 'next' const nextConfig: NextConfig = { basePath: '/my-subpath', // ... } export default nextConfig ### Handling a Custom `Service Worker` If you used CRA’s service worker (e.g., `serviceWorker.js` from `create-react-app`), you can learn how to create Progressive Web Applications (PWAs) with Next.js. ### Proxying API Requests If your CRA app used the `proxy` field in `package.json` to forward requests to a backend server, you can replicate this with Next.js rewrites in `next.config.ts`: import { NextConfig } from 'next' const nextConfig: NextConfig = { async rewrites() { return [ { source: '/api/:path*', destination: 'https://your-backend.com/:path*', }, ] }, } ### Custom Webpack / Babel Config If you had a custom webpack or Babel configuration in CRA, you can extend Next.js’s config in `next.config.ts`: import { NextConfig } from 'next' const nextConfig: NextConfig = { webpack: (config, { isServer }) => { // Modify the webpack config here return config }, } export default nextConfig > **Note**: This will require disabling Turbopack by removing `--turbopack` from your `dev` script. ### TypeScript Setup Next.js automatically sets up TypeScript if you have a `tsconfig.json`. Make sure `next-env.d.ts` is listed in your `tsconfig.json` `include` array: { "include": ["next-env.d.ts", "app/**/*", "src/**/*"] } ## Bundler Compatibility Both Create React App and Next.js default to webpack for bundling. Next.js also offers Turbopack for faster local development with: next dev --turbopack You can still provide a custom webpack configuration if you need to migrate advanced webpack settings from CRA. ## Next Steps If everything worked, you now have a functioning Next.js application running as a single-page application. You aren’t yet leveraging Next.js features like server-side rendering or file-based routing, but you can now do so incrementally: * **Migrate from React Router** to the Next.js App Router for: * Automatic code splitting * Streaming server rendering * React Server Components * **Optimize images** with the `<Image>` component * **Optimize fonts** with `next/font` * **Optimize third-party scripts** with the `<Script>` component * **Enable ESLint** with Next.js recommended rules by running `npx next lint` and configuring it to match your project’s needs > **Note**: Using a static export (`output: 'export'`) does not currently support the `useParams` hook or other server features. To use all Next.js features, remove `output: 'export'` from your `next.config.ts`. --- ## Page: https://nextjs.org/docs/app/guides/migrating/from-vite ## How to migrate from Vite to Next.js This guide will help you migrate an existing Vite application to Next.js. ## Why Switch? There are several reasons why you might want to switch from Vite to Next.js: ### Slow initial page loading time If you have built your application with the default Vite plugin for React, your application is a purely client-side application. Client-side only applications, also known as single-page applications (SPAs), often experience slow initial page loading time. This happens due to a couple of reasons: 1. The browser needs to wait for the React code and your entire application bundle to download and run before your code is able to send requests to load some data. 2. Your application code grows with every new feature and extra dependency you add. ### No automatic code splitting The previous issue of slow loading times can be somewhat managed with code splitting. However, if you try to do code splitting manually, you'll often make performance worse. It's easy to inadvertently introduce network waterfalls when code-splitting manually. Next.js provides automatic code splitting built into its router. ### Network waterfalls A common cause of poor performance occurs when applications make sequential client-server requests to fetch data. One common pattern for data fetching in an SPA is to initially render a placeholder, and then fetch data after the component has mounted. Unfortunately, this means that a child component that fetches data can't start fetching until the parent component has finished loading its own data. While fetching data on the client is supported with Next.js, it also gives you the option to shift data fetching to the server, which can eliminate client-server waterfalls. ### Fast and intentional loading states With built-in support for streaming through React Suspense, you can be more intentional about which parts of your UI you want to load first and in what order without introducing network waterfalls. This enables you to build pages that are faster to load and eliminate layout shifts. ### Choose the data fetching strategy Depending on your needs, Next.js allows you to choose your data fetching strategy on a page and component basis. You can decide to fetch at build time, at request time on the server, or on the client. For example, you can fetch data from your CMS and render your blog posts at build time, which can then be efficiently cached on a CDN. ### Middleware Next.js Middleware allows you to run code on the server before a request is completed. This is especially useful to avoid having a flash of unauthenticated content when the user visits an authenticated-only page by redirecting the user to a login page. The middleware is also useful for experimentation and internationalization. ### Built-in Optimizations Images, fonts, and third-party scripts often have significant impact on an application's performance. Next.js comes with built-in components that automatically optimize those for you. ## Migration Steps Our goal with this migration is to get a working Next.js application as quickly as possible, so that you can then adopt Next.js features incrementally. To begin with, we'll keep it as a purely client-side application (SPA) without migrating your existing router. This helps minimize the chances of encountering issues during the migration process and reduces merge conflicts. ### Step 1: Install the Next.js Dependency The first thing you need to do is to install `next` as a dependency: npm install next@latest ### Step 2: Create the Next.js Configuration File Create a `next.config.mjs` at the root of your project. This file will hold your Next.js configuration options. /** @type {import('next').NextConfig} */ const nextConfig = { output: 'export', // Outputs a Single-Page Application (SPA). distDir: './dist', // Changes the build output directory to `./dist/`. } export default nextConfig > **Good to know:** You can use either `.js` or `.mjs` for your Next.js configuration file. ### Step 3: Update TypeScript Configuration If you're using TypeScript, you need to update your `tsconfig.json` file with the following changes to make it compatible with Next.js. If you're not using TypeScript, you can skip this step. 1. Remove the project reference to `tsconfig.node.json` 2. Add `./dist/types/**/*.ts` and `./next-env.d.ts` to the `include` array 3. Add `./node_modules` to the `exclude` array 4. Add `{ "name": "next" }` to the `plugins` array in `compilerOptions`: `"plugins": [{ "name": "next" }]` 5. Set `esModuleInterop` to `true`: `"esModuleInterop": true` 6. Set `jsx` to `preserve`: `"jsx": "preserve"` 7. Set `allowJs` to `true`: `"allowJs": true` 8. Set `forceConsistentCasingInFileNames` to `true`: `"forceConsistentCasingInFileNames": true` 9. Set `incremental` to `true`: `"incremental": true` Here's an example of a working `tsconfig.json` with those changes: { "compilerOptions": { "target": "ES2020", "useDefineForClassFields": true, "lib": ["ES2020", "DOM", "DOM.Iterable"], "module": "ESNext", "esModuleInterop": true, "skipLibCheck": true, "moduleResolution": "bundler", "allowImportingTsExtensions": true, "resolveJsonModule": true, "isolatedModules": true, "noEmit": true, "jsx": "preserve", "strict": true, "noUnusedLocals": true, "noUnusedParameters": true, "noFallthroughCasesInSwitch": true, "allowJs": true, "forceConsistentCasingInFileNames": true, "incremental": true, "plugins": [{ "name": "next" }] }, "include": ["./src", "./dist/types/**/*.ts", "./next-env.d.ts"], "exclude": ["./node_modules"] } You can find more information about configuring TypeScript on the Next.js docs. ### Step 4: Create the Root Layout A Next.js App Router application must include a root layout file, which is a React Server Component that will wrap all pages in your application. This file is defined at the top level of the `app` directory. The closest equivalent to the root layout file in a Vite application is the `index.html` file, which contains your `<html>`, `<head>`, and `<body>` tags. In this step, you'll convert your `index.html` file into a root layout file: 1. Create a new `app` directory in your `src` directory. 2. Create a new `layout.tsx` file inside that `app` directory: export default function RootLayout({ children, }: { children: React.ReactNode }) { return '...' } > **Good to know**: `.js`, `.jsx`, or `.tsx` extensions can be used for Layout files. 3. Copy the content of your `index.html` file into the previously created `<RootLayout>` component while replacing the `body.div#root` and `body.script` tags with `<div id="root">{children}</div>`: export default function RootLayout({ children, }: { children: React.ReactNode }) { return ( <html lang="en"> <head> <meta charset="UTF-8" /> <link rel="icon" type="image/svg+xml" href="/icon.svg" /> <meta name="viewport" content="width=device-width, initial-scale=1.0" /> <title>My App</title> <meta name="description" content="My App is a..." /> </head> <body> <div id="root">{children}</div> </body> </html> ) } 4. Next.js already includes by default the meta charset and meta viewport tags, so you can safely remove those from your `<head>`: export default function RootLayout({ children, }: { children: React.ReactNode }) { return ( <html lang="en"> <head> <link rel="icon" type="image/svg+xml" href="/icon.svg" /> <title>My App</title> <meta name="description" content="My App is a..." /> </head> <body> <div id="root">{children}</div> </body> </html> ) } 5. Any metadata files such as `favicon.ico`, `icon.png`, `robots.txt` are automatically added to the application `<head>` tag as long as you have them placed into the top level of the `app` directory. After moving all supported files into the `app` directory you can safely delete their `<link>` tags: export default function RootLayout({ children, }: { children: React.ReactNode }) { return ( <html lang="en"> <head> <title>My App</title> <meta name="description" content="My App is a..." /> </head> <body> <div id="root">{children}</div> </body> </html> ) } 6. Finally, Next.js can manage your last `<head>` tags with the Metadata API. Move your final metadata info into an exported `metadata` object: import type { Metadata } from 'next' export const metadata: Metadata = { title: 'My App', description: 'My App is a...', } export default function RootLayout({ children, }: { children: React.ReactNode }) { return ( <html lang="en"> <body> <div id="root">{children}</div> </body> </html> ) } With the above changes, you shifted from declaring everything in your `index.html` to using Next.js' convention-based approach built into the framework (Metadata API). This approach enables you to more easily improve your SEO and web shareability of your pages. ### Step 5: Create the Entrypoint Page On Next.js you declare an entrypoint for your application by creating a `page.tsx` file. The closest equivalent of this file on Vite is your `main.tsx` file. In this step, you’ll set up the entrypoint of your application. 1. **Create a `[[...slug]]` directory in your `app` directory.** Since in this guide we're aiming first to set up our Next.js as an SPA (Single Page Application), you need your page entrypoint to catch all possible routes of your application. For that, create a new `[[...slug]]` directory in your `app` directory. This directory is what is called an optional catch-all route segment. Next.js uses a file-system based router where folders are used to define routes. This special directory will make sure that all routes of your application will be directed to its containing `page.tsx` file. 2. **Create a new `page.tsx` file inside the `app/[[...slug]]` directory with the following content:** import '../../index.css' export function generateStaticParams() { return [{ slug: [''] }] } export default function Page() { return '...' // We'll update this } > **Good to know**: `.js`, `.jsx`, or `.tsx` extensions can be used for Page files. This file is a Server Component. When you run `next build`, the file is prerendered into a static asset. It does _not_ require any dynamic code. This file imports our global CSS and tells `generateStaticParams` we are only going to generate one route, the index route at `/`. Now, let's move the rest of our Vite application which will run client-only. 'use client' import React from 'react' import dynamic from 'next/dynamic' const App = dynamic(() => import('../../App'), { ssr: false }) export function ClientOnly() { return <App /> } This file is a Client Component, defined by the `'use client'` directive. Client Components are still prerendered to HTML on the server before being sent to the client. Since we want a client-only application to start, we can configure Next.js to disable prerendering from the `App` component down. const App = dynamic(() => import('../../App'), { ssr: false }) Now, update your entrypoint page to use the new component: import '../../index.css' import { ClientOnly } from './client' export function generateStaticParams() { return [{ slug: [''] }] } export default function Page() { return <ClientOnly /> } ### Step 6: Update Static Image Imports Next.js handles static image imports slightly different from Vite. With Vite, importing an image file will return its public URL as a string: import image from './img.png' // `image` will be '/assets/img.2d8efhg.png' in production export default function App() { return <img src={image} /> } With Next.js, static image imports return an object. The object can then be used directly with the Next.js `<Image>` component, or you can use the object's `src` property with your existing `<img>` tag. The `<Image>` component has the added benefits of automatic image optimization. The `<Image>` component automatically sets the `width` and `height` attributes of the resulting `<img>` based on the image's dimensions. This prevents layout shifts when the image loads. However, this can cause issues if your app contains images with only one of their dimensions being styled without the other styled to `auto`. When not styled to `auto`, the dimension will default to the `<img>` dimension attribute's value, which can cause the image to appear distorted. Keeping the `<img>` tag will reduce the amount of changes in your application and prevent the above issues. You can then optionally later migrate to the `<Image>` component to take advantage of optimizing images by configuring a loader, or moving to the default Next.js server which has automatic image optimization. 1. **Convert absolute import paths for images imported from `/public` into relative imports:** // Before import logo from '/logo.png' // After import logo from '../public/logo.png' 2. **Pass the image `src` property instead of the whole image object to your `<img>` tag:** // Before <img src={logo} /> // After <img src={logo.src} /> Alternatively, you can reference the public URL for the image asset based on the filename. For example, `public/logo.png` will serve the image at `/logo.png` for your application, which would be the `src` value. > **Warning:** If you're using TypeScript, you might encounter type errors when accessing the `src` property. You can safely ignore those for now. They will be fixed by the end of this guide. ### Step 7: Migrate the Environment Variables Next.js has support for `.env` environment variables similar to Vite. The main difference is the prefix used to expose environment variables on the client-side. * Change all environment variables with the `VITE_` prefix to `NEXT_PUBLIC_`. Vite exposes a few built-in environment variables on the special `import.meta.env` object which aren’t supported by Next.js. You need to update their usage as follows: * `import.meta.env.MODE` ⇒ `process.env.NODE_ENV` * `import.meta.env.PROD` ⇒ `process.env.NODE_ENV === 'production'` * `import.meta.env.DEV` ⇒ `process.env.NODE_ENV !== 'production'` * `import.meta.env.SSR` ⇒ `typeof window !== 'undefined'` Next.js also doesn't provide a built-in `BASE_URL` environment variable. However, you can still configure one, if you need it: 1. **Add the following to your `.env` file:** # ... NEXT_PUBLIC_BASE_PATH="/some-base-path" 2. **Set `basePath` to `process.env.NEXT_PUBLIC_BASE_PATH` in your `next.config.mjs` file:** /** @type {import('next').NextConfig} */ const nextConfig = { output: 'export', // Outputs a Single-Page Application (SPA). distDir: './dist', // Changes the build output directory to `./dist/`. basePath: process.env.NEXT_PUBLIC_BASE_PATH, // Sets the base path to `/some-base-path`. } export default nextConfig 3. **Update `import.meta.env.BASE_URL` usages to `process.env.NEXT_PUBLIC_BASE_PATH`** ### Step 8: Update Scripts in `package.json` You should now be able to run your application to test if you successfully migrated to Next.js. But before that, you need to update your `scripts` in your `package.json` with Next.js related commands, and add `.next` and `next-env.d.ts` to your `.gitignore`: { "scripts": { "dev": "next dev", "build": "next build", "start": "next start" } } # ... .next next-env.d.ts dist Now run `npm run dev`, and open `http://localhost:3000`. You should see your application now running on Next.js. > **Example:** Check out this pull request for a working example of a Vite application migrated to Next.js. ### Step 9: Clean Up You can now clean up your codebase from Vite related artifacts: * Delete `main.tsx` * Delete `index.html` * Delete `vite-env.d.ts` * Delete `tsconfig.node.json` * Delete `vite.config.ts` * Uninstall Vite dependencies ## Next Steps If everything went according to plan, you now have a functioning Next.js application running as a single-page application. However, you aren't yet taking advantage of most of Next.js' benefits, but you can now start making incremental changes to reap all the benefits. Here's what you might want to do next: * Migrate from React Router to the Next.js App Router to get: * Automatic code splitting * Streaming Server-Rendering * React Server Components * Optimize images with the `<Image>` component * Optimize fonts with `next/font` * Optimize third-party scripts with the `<Script>` component * Update your ESLint configuration to support Next.js rules --- ## Page: https://nextjs.org/docs/app/guides/multi-tenant #### Subscribe to our newsletter Stay updated on new releases and features, guides, and case studies. --- ## Page: https://nextjs.org/docs/app/guides/multi-zones ## How to build micro-frontends using multi-zones and Next.js Examples * With Zones Multi-Zones are an approach to micro-frontends that separate a large application on a domain into smaller Next.js applications that each serve a set of paths. This is useful when there are collections of pages unrelated to the other pages in the application. By moving those pages to a separate zone (i.e., a separate application), you can reduce the size of each application which improves build times and removes code that is only necessary for one of the zones. Since applications are decoupled, Multi-Zones also allows other applications on the domain to use their own choice of framework. For example, let's say you have the following set of pages that you would like to split up: * `/blog/*` for all blog posts * `/dashboard/*` for all pages when the user is logged-in to the dashboard * `/*` for the rest of your website not covered by other zones With Multi-Zones support, you can create three applications that all are served on the same domain and look the same to the user, but you can develop and deploy each of the applications independently. 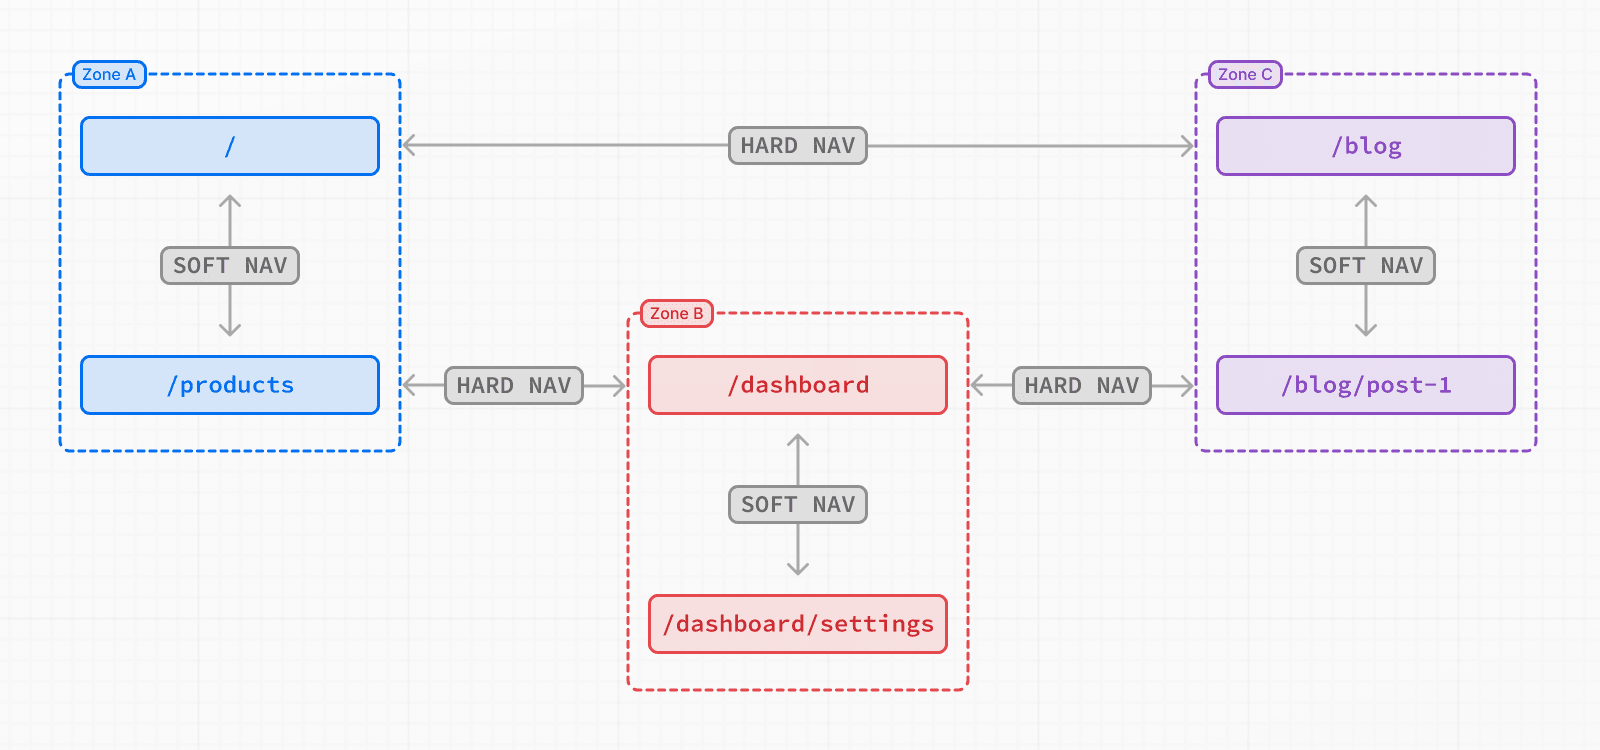 Navigating between pages in the same zone will perform soft navigations, a navigation that does not require reloading the page. For example, in this diagram, navigating from `/` to `/products` will be a soft navigation. Navigating from a page in one zone to a page in another zone, such as from `/` to `/dashboard`, will perform a hard navigation, unloading the resources of the current page and loading the resources of the new page. Pages that are frequently visited together should live in the same zone to avoid hard navigations. ## How to define a zone A zone is a normal Next.js application where you also configure an assetPrefix to avoid conflicts with pages and static files in other zones. /** @type {import('next').NextConfig} */ const nextConfig = { assetPrefix: '/blog-static', } Next.js assets, such as JavaScript and CSS, will be prefixed with `assetPrefix` to make sure that they don't conflict with assets from other zones. These assets will be served under `/assetPrefix/_next/...` for each of the zones. The default application handling all paths not routed to another more specific zone does not need an `assetPrefix`. In versions older than Next.js 15, you may also need an additional rewrite to handle the static assets. This is no longer necessary in Next.js 15. /** @type {import('next').NextConfig} */ const nextConfig = { assetPrefix: '/blog-static', async rewrites() { return { beforeFiles: [ { source: '/blog-static/_next/:path+', destination: '/_next/:path+', }, ], } }, } ## How to route requests to the right zone With the Multi Zones set-up, you need to route the paths to the correct zone since they are served by different applications. You can use any HTTP proxy to do this, but one of the Next.js applications can also be used to route requests for the entire domain. To route to the correct zone using a Next.js application, you can use `rewrites`. For each path served by a different zone, you would add a rewrite rule to send that path to the domain of the other zone. For example: async rewrites() { return [ { source: '/blog', destination: `${process.env.BLOG_DOMAIN}/blog`, }, { source: '/blog/:path+', destination: `${process.env.BLOG_DOMAIN}/blog/:path+`, } ]; } `destination` should be a URL that is served by the zone, including scheme and domain. This should point to the zone's production domain, but it can also be used to route requests to `localhost` in local development. > **Good to know**: URL paths should be unique to a zone. For example, two zones trying to serve `/blog` would create a routing conflict. ### Routing requests using middleware Routing requests through `rewrites` is recommended to minimize latency overhead for the requests, but middleware can also be used when there is a need for a dynamic decision when routing. For example, if you are using a feature flag to decide where a path should be routed such as during a migration, you can use middleware. export async function middleware(request) { const { pathname, search } = req.nextUrl; if (pathname === '/your-path' && myFeatureFlag.isEnabled()) { return NextResponse.rewrite(`${rewriteDomain}${pathname}${search}); } } ## Linking between zones Links to paths in a different zone should use an `a` tag instead of the Next.js `<Link>` component. This is because Next.js will try to prefetch and soft navigate to any relative path in `<Link>` component, which will not work across zones. ## Sharing code The Next.js applications that make up the different zones can live in any repository. However, it is often convenient to put these zones in a monorepo to more easily share code. For zones that live in different repositories, code can also be shared using public or private NPM packages. Since the pages in different zones may be released at different times, feature flags can be useful for enabling or disabling features in unison across the different zones. For Next.js on Vercel applications, you can use a monorepo to deploy all affected zones with a single `git push`. ## Server Actions When using Server Actions with Multi-Zones, you must explicitly allow the user-facing origin since your user facing domain may serve multiple applications. In your `next.config.js` file, add the following lines: const nextConfig = { experimental: { serverActions: { allowedOrigins: ['your-production-domain.com'], }, }, } See `serverActions.allowedOrigins` for more information. --- ## Page: https://nextjs.org/docs/app/guides/production-checklist ## How to optimize your Next.js application for production Before taking your Next.js application to production, there are some optimizations and patterns you should consider implementing for the best user experience, performance, and security. This page provides best practices that you can use as a reference when building your application, before going to production, and after deployment - as well as the automatic Next.js optimizations you should be aware of. ## Automatic optimizations These Next.js optimizations are enabled by default and require no configuration: * **Server Components:** Next.js uses Server Components by default. Server Components run on the server, and don't require JavaScript to render on the client. As such, they have no impact on the size of your client-side JavaScript bundles. You can then use Client Components as needed for interactivity. * **Code-splitting:** Server Components enable automatic code-splitting by route segments. You may also consider lazy loading Client Components and third-party libraries, where appropriate. * **Prefetching:** When a link to a new route enters the user's viewport, Next.js prefetches the route in background. This makes navigation to new routes almost instant. You can opt out of prefetching, where appropriate. * **Static Rendering:** Next.js statically renders Server and Client Components on the server at build time and caches the rendered result to improve your application's performance. You can opt into Dynamic Rendering for specific routes, where appropriate. * **Caching:** Next.js caches data requests, the rendered result of Server and Client Components, static assets, and more, to reduce the number of network requests to your server, database, and backend services. You may opt out of caching, where appropriate. These defaults aim to improve your application's performance, and reduce the cost and amount of data transferred on each network request. ## During development While building your application, we recommend using the following features to ensure the best performance and user experience: ### Routing and rendering * **Layouts:** Use layouts to share UI across pages and enable partial rendering on navigation. * **`<Link>` component:** Use the `<Link>` component for client-side navigation and prefetching. * **Error Handling:** Gracefully handle catch-all errors and 404 errors in production by creating custom error pages. * **Composition Patterns:** Follow the recommended composition patterns for Server and Client Components, and check the placement of your `"use client"` boundaries to avoid unnecessarily increasing your client-side JavaScript bundle. * **Dynamic APIs:** Be aware that Dynamic APIs like `cookies` and the `searchParams` prop will opt the entire route into Dynamic Rendering (or your whole application if used in the Root Layout). Ensure Dynamic API usage is intentional and wrap them in `<Suspense>` boundaries where appropriate. > **Good to know**: Partial Prerendering (experimental) will allow parts of a route to be dynamic without opting the whole route into dynamic rendering. ### Data fetching and caching * **Server Components:** Leverage the benefits of fetching data on the server using Server Components. * **Route Handlers:** Use Route Handlers to access your backend resources from Client Components. But do not call Route Handlers from Server Components to avoid an additional server request. * **Streaming:** Use Loading UI and React Suspense to progressively send UI from the server to the client, and prevent the whole route from blocking while data is being fetched. * **Parallel Data Fetching:** Reduce network waterfalls by fetching data in parallel, where appropriate. Also, consider preloading data where appropriate. * **Data Caching:** Verify whether your data requests are being cached or not, and opt into caching, where appropriate. Ensure requests that don't use `fetch` are cached. * **Static Images:** Use the `public` directory to automatically cache your application's static assets, e.g. images. ### UI and accessibility * **Forms and Validation:** Use Server Actions to handle form submissions, server-side validation, and handle errors. * **Font Module:** Optimize fonts by using the Font Module, which automatically hosts your font files with other static assets, removes external network requests, and reduces layout shift. * **`<Image>` Component:** Optimize images by using the Image Component, which automatically optimizes images, prevents layout shift, and serves them in modern formats like WebP. * **`<Script>` Component:** Optimize third-party scripts by using the Script Component, which automatically defers scripts and prevents them from blocking the main thread. * **ESLint:** Use the built-in `eslint-plugin-jsx-a11y` plugin to catch accessibility issues early. ### Security * **Tainting:** Prevent sensitive data from being exposed to the client by tainting data objects and/or specific values. * **Server Actions:** Ensure users are authorized to call Server Actions. Review the recommended security practices. * **Environment Variables:** Ensure your `.env.*` files are added to `.gitignore` and only public variables are prefixed with `NEXT_PUBLIC_`. * **Content Security Policy:** Consider adding a Content Security Policy to protect your application against various security threats such as cross-site scripting, clickjacking, and other code injection attacks. ### Metadata and SEO * **Metadata API:** Use the Metadata API to improve your application's Search Engine Optimization (SEO) by adding page titles, descriptions, and more. * **Open Graph (OG) images:** Create OG images to prepare your application for social sharing. * **Sitemaps and Robots:** Help Search Engines crawl and index your pages by generating sitemaps and robots files. ### Type safety * **TypeScript and TS Plugin:** Use TypeScript and the TypeScript plugin for better type-safety, and to help you catch errors early. ## Before going to production Before going to production, you can run `next build` to build your application locally and catch any build errors, then run `next start` to measure the performance of your application in a production-like environment. ### Core Web Vitals * **Lighthouse:** Run lighthouse in incognito to gain a better understanding of how your users will experience your site, and to identify areas for improvement. This is a simulated test and should be paired with looking at field data (such as Core Web Vitals). * **`useReportWebVitals` hook:** Use this hook to send Core Web Vitals data to analytics tools. ### Analyzing bundles Use the `@next/bundle-analyzer` plugin to analyze the size of your JavaScript bundles and identify large modules and dependencies that might be impacting your application's performance. Additionally, the following tools can help you understand the impact of adding new dependencies to your application: * Import Cost * Package Phobia * Bundle Phobia * bundlejs ## After deployment Depending on where you deploy your application, you might have access to additional tools and integrations to help you monitor and improve your application's performance. For Vercel deployments, we recommend the following: * **Analytics:** A built-in analytics dashboard to help you understand your application's traffic, including the number of unique visitors, page views, and more. * **Speed Insights:** Real-world performance insights based on visitor data, offering a practical view of how your website is performing in the field. * **Logging:** Runtime and Activity logs to help you debug issues and monitor your application in production. Alternatively, see the integrations page for a list of third-party tools and services. > **Good to know:** > > To get a comprehensive understanding of the best practices for production deployments on Vercel, including detailed strategies for improving website performance, refer to the Vercel Production Checklist. Following these recommendations will help you build a faster, more reliable, and secure application for your users. --- ## Page: https://nextjs.org/docs/app/guides/self-hosting ## How to self-host your Next.js application You can self-host Next.js in three different ways: * A Node.js server * A Docker container * A static export > **🎥 Watch:** Learn more about self-hosting Next.js → YouTube (45 minutes). ## Production Builds Running `next build` generates an optimized version of your application for production. HTML, CSS, and JavaScript files are created based on your pages. JavaScript is **compiled** and browser bundles are **minified** using the Next.js Compiler to help achieve the best performance and support all modern browsers. ### Node.js Server Next.js can be deployed to any hosting provider that supports Node.js. Ensure your `package.json` has the `"build"` and `"start"` scripts: { "scripts": { "dev": "next dev", "build": "next build", "start": "next start" } } Then, run `npm run build` to build your application. Finally, run `npm run start` to start the Node.js server. This server supports all Next.js features. ### Docker Image Next.js can be deployed to any hosting provider that supports Docker containers. You can use this approach when deploying to container orchestrators such as Kubernetes or when running inside a container in any cloud provider. 1. Install Docker on your machine 2. Clone our example (or the multi-environment example) 3. Build your container: `docker build -t nextjs-docker .` 4. Run your container: `docker run -p 3000:3000 nextjs-docker` Next.js through Docker supports all Next.js features. ### Static HTML Export Next.js enables starting as a static site or Single-Page Application (SPA), then later optionally upgrading to use features that require a server. Since Next.js supports this static export, it can be deployed and hosted on any web server that can serve HTML/CSS/JS static assets. This includes tools like AWS S3, Nginx, or Apache. Running as a static export does not support Next.js features that require a server. Learn more. > **Good to know:** > > * Server Components are supported with static exports. ## Features ### Image Optimization Image Optimization through `next/image` works self-hosted with zero configuration when deploying using `next start`. If you would prefer to have a separate service to optimize images, you can configure an image loader. Image Optimization can be used with a static export by defining a custom image loader in `next.config.js`. Note that images are optimized at runtime, not during the build. > **Good to know:** > > * On glibc-based Linux systems, Image Optimization may require additional configuration to prevent excessive memory usage. > * Learn more about the caching behavior of optimized images and how to configure the TTL. > * You can also disable Image Optimization and still retain other benefits of using `next/image` if you prefer. For example, if you are optimizing images yourself separately. ### Middleware Middleware works self-hosted with zero configuration when deploying using `next start`. Since it requires access to the incoming request, it is not supported when using a static export. Middleware uses a runtime that is a subset of all available Node.js APIs to help ensure low latency, since it may run in front of every route or asset in your application. This runtime does not require running “at the edge” and works in a single-region server. Additional configuration and infrastructure are required to run Middleware in multiple regions. If you are looking to add logic (or use an external package) that requires all Node.js APIs, you might be able to move this logic to a layout as a Server Component. For example, checking headers and redirecting. You can also use headers, cookies, or query parameters to redirect or rewrite through `next.config.js`. If that does not work, you can also use a custom server. ### Environment Variables Next.js can support both build time and runtime environment variables. **By default, environment variables are only available on the server**. To expose an environment variable to the browser, it must be prefixed with `NEXT_PUBLIC_`. However, these public environment variables will be inlined into the JavaScript bundle during `next build`. You safely read environment variables on the server during dynamic rendering. import { connection } from 'next/server' export default async function Component() { await connection() // cookies, headers, and other Dynamic APIs // will also opt into dynamic rendering, meaning // this env variable is evaluated at runtime const value = process.env.MY_VALUE // ... } This allows you to use a singular Docker image that can be promoted through multiple environments with different values. > **Good to know:** > > * You can run code on server startup using the `register` function. > * We do not recommend using the runtimeConfig option, as this does not work with the standalone output mode. Instead, we recommend incrementally adopting the App Router. ### Caching and ISR Next.js can cache responses, generated static pages, build outputs, and other static assets like images, fonts, and scripts. Caching and revalidating pages (with Incremental Static Regeneration) use the **same shared cache**. By default, this cache is stored to the filesystem (on disk) on your Next.js server. **This works automatically when self-hosting** using both the Pages and App Router. You can configure the Next.js cache location if you want to persist cached pages and data to durable storage, or share the cache across multiple containers or instances of your Next.js application. #### Automatic Caching * Next.js sets the `Cache-Control` header of `public, max-age=31536000, immutable` to truly immutable assets. It cannot be overridden. These immutable files contain a SHA-hash in the file name, so they can be safely cached indefinitely. For example, Static Image Imports. You can configure the TTL for images. * Incremental Static Regeneration (ISR) sets the `Cache-Control` header of `s-maxage: <revalidate in getStaticProps>, stale-while-revalidate`. This revalidation time is defined in your `getStaticProps` function in seconds. If you set `revalidate: false`, it will default to a one-year cache duration. * Dynamically rendered pages set a `Cache-Control` header of `private, no-cache, no-store, max-age=0, must-revalidate` to prevent user-specific data from being cached. This applies to both the App Router and Pages Router. This also includes Draft Mode. #### Static Assets If you want to host static assets on a different domain or CDN, you can use the `assetPrefix` configuration in `next.config.js`. Next.js will use this asset prefix when retrieving JavaScript or CSS files. Separating your assets to a different domain does come with the downside of extra time spent on DNS and TLS resolution. Learn more about `assetPrefix`. #### Configuring Caching By default, generated cache assets will be stored in memory (defaults to 50mb) and on disk. If you are hosting Next.js using a container orchestration platform like Kubernetes, each pod will have a copy of the cache. To prevent stale data from being shown since the cache is not shared between pods by default, you can configure the Next.js cache to provide a cache handler and disable in-memory caching. To configure the ISR/Data Cache location when self-hosting, you can configure a custom handler in your `next.config.js` file: module.exports = { cacheHandler: require.resolve('./cache-handler.js'), cacheMaxMemorySize: 0, // disable default in-memory caching } Then, create `cache-handler.js` in the root of your project, for example: const cache = new Map() module.exports = class CacheHandler { constructor(options) { this.options = options } async get(key) { // This could be stored anywhere, like durable storage return cache.get(key) } async set(key, data, ctx) { // This could be stored anywhere, like durable storage cache.set(key, { value: data, lastModified: Date.now(), tags: ctx.tags, }) } async revalidateTag(tags) { // tags is either a string or an array of strings tags = [tags].flat() // Iterate over all entries in the cache for (let [key, value] of cache) { // If the value's tags include the specified tag, delete this entry if (value.tags.some((tag) => tags.includes(tag))) { cache.delete(key) } } } // If you want to have temporary in memory cache for a single request that is reset // before the next request you can leverage this method resetRequestCache() {} } Using a custom cache handler will allow you to ensure consistency across all pods hosting your Next.js application. For instance, you can save the cached values anywhere, like Redis or AWS S3. > **Good to know:** > > * `revalidatePath` is a convenience layer on top of cache tags. Calling `revalidatePath` will call the `revalidateTag` function with a special default tag for the provided page. ### Build Cache Next.js generates an ID during `next build` to identify which version of your application is being served. The same build should be used and boot up multiple containers. If you are rebuilding for each stage of your environment, you will need to generate a consistent build ID to use between containers. Use the `generateBuildId` command in `next.config.js`: module.exports = { generateBuildId: async () => { // This could be anything, using the latest git hash return process.env.GIT_HASH }, } ### Version Skew Next.js will automatically mitigate most instances of version skew and automatically reload the application to retrieve new assets when detected. For example, if there is a mismatch in the `deploymentId`, transitions between pages will perform a hard navigation versus using a prefetched value. When the application is reloaded, there may be a loss of application state if it's not designed to persist between page navigations. For example, using URL state or local storage would persist state after a page refresh. However, component state like `useState` would be lost in such navigations. Vercel provides additional skew protection for Next.js applications to ensure assets and functions from the previous version are still available to older clients, even after the new version is deployed. You can manually configure the `deploymentId` property in your `next.config.js` file to ensure each request uses either `?dpl` query string or `x-deployment-id` header. ### Streaming and Suspense The Next.js App Router supports streaming responses when self-hosting. If you are using Nginx or a similar proxy, you will need to configure it to disable buffering to enable streaming. For example, you can disable buffering in Nginx by setting `X-Accel-Buffering` to `no`: module.exports = { async headers() { return [ { source: '/:path*{/}?', headers: [ { key: 'X-Accel-Buffering', value: 'no', }, ], }, ] }, } ### Partial Prerendering Partial Prerendering (experimental) works by default with Next.js and is not a CDN feature. This includes deployment as a Node.js server (through `next start`) and when used with a Docker container. ### Usage with CDNs When using a CDN in front on your Next.js application, the page will include `Cache-Control: private` response header when dynamic APIs are accessed. This ensures that the resulting HTML page is marked as non-cachable. If the page is fully prerendered to static, it will include `Cache-Control: public` to allow the page to be cached on the CDN. If you don't need a mix of both static and dynamic components, you can make your entire route static and cache the output HTML on a CDN. This Automatic Static Optimization is the default behavior when running `next build` if dynamic APIs are not used. ### `after` `after` is fully supported when self-hosting with `next start`. When stopping the server, ensure a graceful shutdown by sending `SIGINT` or `SIGTERM` signals and waiting. This allows the Next.js server to wait until after pending callback functions or promises used inside `after` have finished. If you want to use `after` on custom infrastructure, check your provider documentation to view support for `after`. Reference: supporting `after` for serverless platforms Using `after` in a serverless context requires waiting for asynchronous tasks to finish after the response has been sent. In Next.js and Vercel, this is achieved using a primitive called `waitUntil(promise)`, which extends the lifetime of a serverless invocation until all promises passed to `waitUntil` have settled. If you want your users to be able to run `after`, you will have to provide your implementation of `waitUntil` that behaves in an analogous way. When `after` is called, Next.js will access `waitUntil` like this: const RequestContext = globalThis[Symbol.for('@next/request-context')] const contextValue = RequestContext?.get() const waitUntil = contextValue?.waitUntil Which means that `globalThis[Symbol.for('@next/request-context')]` is expected to contain an object like this: type NextRequestContext = { get(): NextRequestContextValue | undefined } type NextRequestContextValue = { waitUntil?: (promise: Promise<any>) => void } Here is an example of the implementation. import { AsyncLocalStorage } from 'node:async_hooks' const RequestContextStorage = new AsyncLocalStorage<NextRequestContextValue>() // Define and inject the accessor that next.js will use const RequestContext: NextRequestContext = { get() { return RequestContextStorage.getStore() }, } globalThis[Symbol.for('@next/request-context')] = RequestContext const handler = (req, res) => { const contextValue = { waitUntil: YOUR_WAITUNTIL } // Provide the value return RequestContextStorage.run(contextValue, () => nextJsHandler(req, res)) } ## Examples We have community maintained deployment examples with the following providers: * Deno * DigitalOcean * Flightcontrol * Fly.io * GitHub Pages * Google Cloud Run * Railway * Render * SST --- ## Page: https://nextjs.org/docs/app/guides/single-page-applications ## How to build single-page applications with Next.js Next.js fully supports building Single-Page Applications (SPAs). This includes fast route transitions with prefetching, client-side data fetching, using browser APIs, integrating with third-party client libraries, creating static routes, and more. If you have an existing SPA, you can migrate to Next.js without large changes to your code. Next.js then allows you to progressively add server features as needed. ## What is a Single-Page Application? The definition of a SPA varies. We’ll define a “strict SPA” as: * **Client-side rendering (CSR)**: The app is served by one HTML file (e.g. `index.html`). Every route, page transition, and data fetch is handled by JavaScript in the browser. * **No full-page reloads**: Rather than requesting a new document for each route, client-side JavaScript manipulates the current page’s DOM and fetches data as needed. Strict SPAs often require large amounts of JavaScript to load before the page can be interactive. Further, client data waterfalls can be challenging to manage. Building SPAs with Next.js can address these issues. ## Why use Next.js for SPAs? Next.js can automatically code split your JavaScript bundles, and generate multiple HTML entry points into different routes. This avoids loading unnecessary JavaScript code on the client-side, reducing the bundle size and enabling faster page loads. The `next/link` component automatically prefetches routes, giving you the fast page transitions of a strict SPA, but with the advantage of persisting application routing state to the URL for linking and sharing. Next.js can start as a static site or even a strict SPA where everything is rendered client-side. If your project grows, Next.js allows you to progressively add more server features (e.g. React Server Components, Server Actions, and more) as needed. ## Examples Let's explore common patterns used to build SPAs and how Next.js solves them. ### Using React’s `use` within a Context Provider We recommend fetching data in a parent component (or layout), returning the Promise, and then unwrapping the value in a client component with React’s `use` hook. Next.js can start data fetching early on the server. In this example, that’s the root layout — the entry point to your application. The server can immediately begin streaming a response to the client. By “hoisting” your data fetching to the root layout, Next.js starts the specified requests on the server early before any other components in your application. This eliminates client waterfalls and prevents having multiple roundtrips between client and server. It can also significantly improve performance, as your server is closer (and ideally colocated) to where your database is located. For example, update your root layout to call the Promise, but do _not_ await it. import { UserProvider } from './user-provider' import { getUser } from './user' // some server-side function export default function RootLayout({ children, }: { children: React.ReactNode }) { let userPromise = getUser() // do NOT await return ( <html lang="en"> <body> <UserProvider userPromise={userPromise}>{children}</UserProvider> </body> </html> ) } While you can defer and pass a single Promise as a prop to a client component, we generally see this pattern paired with a React context provider. This enables easier access from client components with a custom React hook. You can forward a Promise to the React context provider: 'use client'; import { createContext, useContext, ReactNode } from 'react'; type User = any; type UserContextType = { userPromise: Promise<User | null>; }; const UserContext = createContext<UserContextType | null>(null); export function useUser(): UserContextType { let context = useContext(UserContext); if (context === null) { throw new Error('useUser must be used within a UserProvider'); } return context; } export function UserProvider({ children, userPromise }: { children: ReactNode; userPromise: Promise<User | null>; }) { return ( <UserContext.Provider value={{ userPromise }}> {children} </UserContext.Provider> ); } Finally, you can call the `useUser()` custom hook in any client component and unwrap the Promise: 'use client' import { use } from 'react' import { useUser } from './user-provider' export function Profile() { const { userPromise } = useUser() const user = use(userPromise) return '...' } The component that consumes the Promise (e.g. `Profile` above) will be suspended. This enables partial hydration. You can see the streamed and prerendered HTML before JavaScript has finished loading. ### SPAs with SWR SWR is a popular React library for data fetching. With SWR 2.3.0 (and React 19+), you can gradually adopt server features alongside your existing SWR-based client data fetching code. This is an abstraction of the above `use()` pattern. This means you can move data fetching between the client and server-side, or use both: * **Client-only:** `useSWR(key, fetcher)` * **Server-only:** `useSWR(key)` + RSC-provided data * **Mixed:** `useSWR(key, fetcher)` + RSC-provided data For example, wrap your application with `<SWRConfig>` and a `fallback`: import { SWRConfig } from 'swr' import { getUser } from './user' // some server-side function export default function RootLayout({ children, }: { children: React.ReactNode }) { return ( <SWRConfig value={{ fallback: { // We do NOT await getUser() here // Only components that read this data will suspend '/api/user': getUser(), }, }} > {children} </SWRConfig> ) } Because this is a server component, `getUser()` can securely read cookies, headers, or talk to your database. No separate API route is needed. Client components below the `<SWRConfig>` can call `useSWR()` with the same key to retrieve the user data. The component code with `useSWR` **does not require any changes** from your existing client-fetching solution. 'use client' import useSWR from 'swr' export function Profile() { const fetcher = (url) => fetch(url).then((res) => res.json()) // The same SWR pattern you already know const { data, error } = useSWR('/api/user', fetcher) return '...' } The `fallback` data can be prerendered and included in the initial HTML response, then immediately read in the child components using `useSWR`. SWR’s polling, revalidation, and caching still run **client-side only**, so it preserves all the interactivity you rely on for an SPA. Since the initial `fallback` data is automatically handled by Next.js, you can now delete any conditional logic previously needed to check if `data` was `undefined`. When the data is loading, the closest `<Suspense>` boundary will be suspended. | | SWR | RSC | RSC + SWR | | --- | --- | --- | --- | | SSR data | | | | | Streaming while SSR | | | | | Deduplicate requests | | | | | Client-side features | | | | ### SPAs with React Query You can use React Query with Next.js on both the client and server. This enables you to build both strict SPAs, as well as take advantage of server features in Next.js paired with React Query. Learn more in the React Query documentation. ### Rendering components only in the browser Client components are prerendered during `next build`. If you want to disable prerendering for a client component and only load it in the browser environment, you can use `next/dynamic`: import dynamic from 'next/dynamic' const ClientOnlyComponent = dynamic(() => import('./component'), { ssr: false, }) This can be useful for third-party libraries that rely on browser APIs like `window` or `document`. You can also add a `useEffect` that checks for the existence of these APIs, and if they do not exist, return `null` or a loading state which would be prerendered. ### Shallow routing on the client If you are migrating from a strict SPA like Create React App or Vite, you might have existing code which shallow routes to update the URL state. This can be useful for manual transitions between views in your application _without_ using the default Next.js file-system routing. Next.js allows you to use the native `window.history.pushState` and `window.history.replaceState` methods to update the browser's history stack without reloading the page. `pushState` and `replaceState` calls integrate into the Next.js Router, allowing you to sync with `usePathname` and `useSearchParams`. 'use client' import { useSearchParams } from 'next/navigation' export default function SortProducts() { const searchParams = useSearchParams() function updateSorting(sortOrder: string) { const urlSearchParams = new URLSearchParams(searchParams.toString()) urlSearchParams.set('sort', sortOrder) window.history.pushState(null, '', `?${urlSearchParams.toString()}`) } return ( <> <button onClick={() => updateSorting('asc')}>Sort Ascending</button> <button onClick={() => updateSorting('desc')}>Sort Descending</button> </> ) } Learn more about how routing and navigation work in Next.js. ### Using Server Actions in client components You can progressively adopt Server Actions while still using client components. This allows you to remove boilerplate code to call an API route, and instead use React features like `useActionState` to handle loading and error states. For example, create your first Server Action: 'use server' export async function create() {} You can import and use a Server Action from the client, similar to calling a JavaScript function. You do not need to create an API endpoint manually: 'use client' import { create } from './actions' export function Button() { return <button onClick={() => create()}>Create</button> } Learn more about mutating data with Server Actions. ## Static export (optional) Next.js also supports generating a fully static site. This has some advantages over strict SPAs: * **Automatic code-splitting**: Instead of shipping a single `index.html`, Next.js will generate an HTML file per route, so your visitors get the content faster without waiting for the client JavaScript bundle. * **Improved user experience:** Instead of a minimal skeleton for all routes, you get fully rendered pages for each route. When users navigate client side, transitions remain instant and SPA-like. To enable a static export, update your configuration: import type { NextConfig } from 'next' const nextConfig: NextConfig = { output: 'export', } export default nextConfig After running `next build`, Next.js will create an `out` folder with the HTML/CSS/JS assets for your application. > **Note:** Next.js server features are not supported with static exports. Learn more. ## Migrating existing projects to Next.js You can incrementally migrate to Next.js by following our guides: * Migrating from Create React App * Migrating from Vite If you are already using a SPA with the Pages Router, you can learn how to incrementally adopt the App Router. --- ## Page: https://nextjs.org/docs/app/guides/static-exports ## How to create an static export of your Next.js application Next.js enables starting as a static site or Single-Page Application (SPA), then later optionally upgrading to use features that require a server. When running `next build`, Next.js generates an HTML file per route. By breaking a strict SPA into individual HTML files, Next.js can avoid loading unnecessary JavaScript code on the client-side, reducing the bundle size and enabling faster page loads. Since Next.js supports this static export, it can be deployed and hosted on any web server that can serve HTML/CSS/JS static assets. ## Configuration To enable a static export, change the output mode inside `next.config.js`: /** * @type {import('next').NextConfig} */ const nextConfig = { output: 'export', // Optional: Change links `/me` -> `/me/` and emit `/me.html` -> `/me/index.html` // trailingSlash: true, // Optional: Prevent automatic `/me` -> `/me/`, instead preserve `href` // skipTrailingSlashRedirect: true, // Optional: Change the output directory `out` -> `dist` // distDir: 'dist', } module.exports = nextConfig After running `next build`, Next.js will create an `out` folder with the HTML/CSS/JS assets for your application. ## Supported Features The core of Next.js has been designed to support static exports. ### Server Components When you run `next build` to generate a static export, Server Components consumed inside the `app` directory will run during the build, similar to traditional static-site generation. The resulting component will be rendered into static HTML for the initial page load and a static payload for client navigation between routes. No changes are required for your Server Components when using the static export, unless they consume dynamic server functions. export default async function Page() { // This fetch will run on the server during `next build` const res = await fetch('https://api.example.com/...') const data = await res.json() return <main>...</main> } ### Client Components If you want to perform data fetching on the client, you can use a Client Component with SWR to memoize requests. 'use client' import useSWR from 'swr' const fetcher = (url: string) => fetch(url).then((r) => r.json()) export default function Page() { const { data, error } = useSWR( `https://jsonplaceholder.typicode.com/posts/1`, fetcher ) if (error) return 'Failed to load' if (!data) return 'Loading...' return data.title } Since route transitions happen client-side, this behaves like a traditional SPA. For example, the following index route allows you to navigate to different posts on the client: import Link from 'next/link' export default function Page() { return ( <> <h1>Index Page</h1> <hr /> <ul> <li> <Link href="/post/1">Post 1</Link> </li> <li> <Link href="/post/2">Post 2</Link> </li> </ul> </> ) } ### Image Optimization Image Optimization through `next/image` can be used with a static export by defining a custom image loader in `next.config.js`. For example, you can optimize images with a service like Cloudinary: /** @type {import('next').NextConfig} */ const nextConfig = { output: 'export', images: { loader: 'custom', loaderFile: './my-loader.ts', }, } module.exports = nextConfig This custom loader will define how to fetch images from a remote source. For example, the following loader will construct the URL for Cloudinary: export default function cloudinaryLoader({ src, width, quality, }: { src: string width: number quality?: number }) { const params = ['f_auto', 'c_limit', `w_${width}`, `q_${quality || 'auto'}`] return `https://res.cloudinary.com/demo/image/upload/${params.join( ',' )}${src}` } You can then use `next/image` in your application, defining relative paths to the image in Cloudinary: import Image from 'next/image' export default function Page() { return <Image alt="turtles" src="/turtles.jpg" width={300} height={300} /> } ### Route Handlers Route Handlers will render a static response when running `next build`. Only the `GET` HTTP verb is supported. This can be used to generate static HTML, JSON, TXT, or other files from cached or uncached data. For example: export async function GET() { return Response.json({ name: 'Lee' }) } The above file `app/data.json/route.ts` will render to a static file during `next build`, producing `data.json` containing `{ name: 'Lee' }`. If you need to read dynamic values from the incoming request, you cannot use a static export. ### Browser APIs Client Components are pre-rendered to HTML during `next build`. Because Web APIs like `window`, `localStorage`, and `navigator` are not available on the server, you need to safely access these APIs only when running in the browser. For example: 'use client'; import { useEffect } from 'react'; export default function ClientComponent() { useEffect(() => { // You now have access to `window` console.log(window.innerHeight); }, []) return ...; } ## Unsupported Features Features that require a Node.js server, or dynamic logic that cannot be computed during the build process, are **not** supported: * Dynamic Routes with `dynamicParams: true` * Dynamic Routes without `generateStaticParams()` * Route Handlers that rely on Request * Cookies * Rewrites * Redirects * Headers * Middleware * Incremental Static Regeneration * Image Optimization with the default `loader` * Draft Mode * Server Actions * Intercepting Routes Attempting to use any of these features with `next dev` will result in an error, similar to setting the `dynamic` option to `error` in the root layout. export const dynamic = 'error' ## Deploying With a static export, Next.js can be deployed and hosted on any web server that can serve HTML/CSS/JS static assets. When running `next build`, Next.js generates the static export into the `out` folder. For example, let's say you have the following routes: * `/` * `/blog/[id]` After running `next build`, Next.js will generate the following files: * `/out/index.html` * `/out/404.html` * `/out/blog/post-1.html` * `/out/blog/post-2.html` If you are using a static host like Nginx, you can configure rewrites from incoming requests to the correct files: server { listen 80; server_name acme.com; root /var/www/out; location / { try_files $uri $uri.html $uri/ =404; } # This is necessary when `trailingSlash: false`. # You can omit this when `trailingSlash: true`. location /blog/ { rewrite ^/blog/(.*)$ /blog/$1.html break; } error_page 404 /404.html; location = /404.html { internal; } } ## Version History | Version | Changes | | --- | --- | | `v14.0.0` | `next export` has been removed in favor of `"output": "export"` | | `v13.4.0` | App Router (Stable) adds enhanced static export support, including using React Server Components and Route Handlers. | | `v13.3.0` | `next export` is deprecated and replaced with `"output": "export"` | --- ## Page: https://nextjs.org/docs/app/guides/upgrading #### Subscribe to our newsletter Stay updated on new releases and features, guides, and case studies. --- ## Page: https://nextjs.org/docs/app/guides/upgrading/codemods Codemods are transformations that run on your codebase programmatically. This allows a large number of changes to be programmatically applied without having to manually go through every file. Next.js provides Codemod transformations to help upgrade your Next.js codebase when an API is updated or deprecated. ## Usage In your terminal, navigate (`cd`) into your project's folder, then run: npx @next/codemod <transform> <path> Replacing `<transform>` and `<path>` with appropriate values. * `transform` - name of transform * `path` - files or directory to transform * `--dry` Do a dry-run, no code will be edited * `--print` Prints the changed output for comparison ## Codemods ### 15.0 #### Transform App Router Route Segment Config `runtime` value from `experimental-edge` to `edge` ##### `app-dir-runtime-config-experimental-edge` > **Note**: This codemod is App Router specific. npx @next/codemod@latest app-dir-runtime-config-experimental-edge . This codemod transforms Route Segment Config `runtime` value `experimental-edge` to `edge`. For example: export const runtime = 'experimental-edge' Transforms into: export const runtime = 'edge' #### Migrate to async Dynamic APIs APIs that opted into dynamic rendering that previously supported synchronous access are now asynchronous. You can read more about this breaking change in the upgrade guide. ##### `next-async-request-api` npx @next/codemod@latest next-async-request-api . This codemod will transform dynamic APIs (`cookies()`, `headers()` and `draftMode()` from `next/headers`) that are now asynchronous to be properly awaited or wrapped with `React.use()` if applicable. When an automatic migration isn't possible, the codemod will either add a typecast (if a TypeScript file) or a comment to inform the user that it needs to be manually reviewed & updated. For example: import { cookies, headers } from 'next/headers' const token = cookies().get('token') function useToken() { const token = cookies().get('token') return token } export default function Page() { const name = cookies().get('name') } function getHeader() { return headers().get('x-foo') } Transforms into: import { use } from 'react' import { cookies, headers, type UnsafeUnwrappedCookies, type UnsafeUnwrappedHeaders, } from 'next/headers' const token = (cookies() as unknown as UnsafeUnwrappedCookies).get('token') function useToken() { const token = use(cookies()).get('token') return token } export default async function Page() { const name = (await cookies()).get('name') } function getHeader() { return (headers() as unknown as UnsafeUnwrappedHeaders).get('x-foo') } When we detect property access on the `params` or `searchParams` props in the page / route entries (`page.js`, `layout.js`, `route.js`, or `default.js`) or the `generateMetadata` / `generateViewport` APIs, it will attempt to transform the callsite from a sync to an async function, and await the property access. If it can't be made async (such as with a client component), it will use `React.use` to unwrap the promise . For example: // page.tsx export default function Page({ params, searchParams, }: { params: { slug: string } searchParams: { [key: string]: string | string[] | undefined } }) { const { value } = searchParams if (value === 'foo') { // ... } } export function generateMetadata({ params }: { params: { slug: string } }) { const { slug } = params return { title: `My Page - ${slug}`, } } Transforms into: // page.tsx export default async function Page(props: { params: Promise<{ slug: string }> searchParams: Promise<{ [key: string]: string | string[] | undefined }> }) { const searchParams = await props.searchParams const { value } = searchParams if (value === 'foo') { // ... } } export async function generateMetadata(props: { params: Promise<{ slug: string }> }) { const params = await props.params const { slug } = params return { title: `My Page - ${slug}`, } } > **Good to know:** When this codemod identifies a spot that might require manual intervention, but we aren't able to determine the exact fix, it will add a comment or typecast to the code to inform the user that it needs to be manually updated. These comments are prefixed with **@next/codemod**, and typecasts are prefixed with `UnsafeUnwrapped`. Your build will error until these comments are explicitly removed. Read more. #### Replace `geo` and `ip` properties of `NextRequest` with `@vercel/functions` ##### `next-request-geo-ip` npx @next/codemod@latest next-request-geo-ip . This codemod installs `@vercel/functions` and transforms `geo` and `ip` properties of `NextRequest` with corresponding `@vercel/functions` features. For example: import type { NextRequest } from 'next/server' export function GET(req: NextRequest) { const { geo, ip } = req } Transforms into: import type { NextRequest } from 'next/server' import { geolocation, ipAddress } from '@vercel/functions' export function GET(req: NextRequest) { const geo = geolocation(req) const ip = ipAddress(req) } ### 14.0 #### Migrate `ImageResponse` imports ##### `next-og-import` npx @next/codemod@latest next-og-import . This codemod moves transforms imports from `next/server` to `next/og` for usage of Dynamic OG Image Generation. For example: import { ImageResponse } from 'next/server' Transforms into: import { ImageResponse } from 'next/og' #### Use `viewport` export ##### `metadata-to-viewport-export` npx @next/codemod@latest metadata-to-viewport-export . This codemod migrates certain viewport metadata to `viewport` export. For example: export const metadata = { title: 'My App', themeColor: 'dark', viewport: { width: 1, }, } Transforms into: export const metadata = { title: 'My App', } export const viewport = { width: 1, themeColor: 'dark', } ### 13.2 #### Use Built-in Font ##### `built-in-next-font` npx @next/codemod@latest built-in-next-font . This codemod uninstalls the `@next/font` package and transforms `@next/font` imports into the built-in `next/font`. For example: import { Inter } from '@next/font/google' Transforms into: import { Inter } from 'next/font/google' ### 13.0 #### Rename Next Image Imports ##### `next-image-to-legacy-image` npx @next/codemod@latest next-image-to-legacy-image . Safely renames `next/image` imports in existing Next.js 10, 11, or 12 applications to `next/legacy/image` in Next.js 13. Also renames `next/future/image` to `next/image`. For example: import Image1 from 'next/image' import Image2 from 'next/future/image' export default function Home() { return ( <div> <Image1 src="/test.jpg" width="200" height="300" /> <Image2 src="/test.png" width="500" height="400" /> </div> ) } Transforms into: // 'next/image' becomes 'next/legacy/image' import Image1 from 'next/legacy/image' // 'next/future/image' becomes 'next/image' import Image2 from 'next/image' export default function Home() { return ( <div> <Image1 src="/test.jpg" width="200" height="300" /> <Image2 src="/test.png" width="500" height="400" /> </div> ) } #### Migrate to the New Image Component ##### `next-image-experimental` npx @next/codemod@latest next-image-experimental . Dangerously migrates from `next/legacy/image` to the new `next/image` by adding inline styles and removing unused props. * Removes `layout` prop and adds `style`. * Removes `objectFit` prop and adds `style`. * Removes `objectPosition` prop and adds `style`. * Removes `lazyBoundary` prop. * Removes `lazyRoot` prop. #### Remove `<a>` Tags From Link Components ##### `new-link` npx @next/codemod@latest new-link . Remove `<a>` tags inside Link Components, or add a `legacyBehavior` prop to Links that cannot be auto-fixed. For example: <Link href="/about"> <a>About</a> </Link> // transforms into <Link href="/about"> About </Link> <Link href="/about"> <a onClick={() => console.log('clicked')}>About</a> </Link> // transforms into <Link href="/about" onClick={() => console.log('clicked')}> About </Link> In cases where auto-fixing can't be applied, the `legacyBehavior` prop is added. This allows your app to keep functioning using the old behavior for that particular link. const Component = () => <a>About</a> <Link href="/about"> <Component /> </Link> // becomes <Link href="/about" legacyBehavior> <Component /> </Link> ### 11 #### Migrate from CRA ##### `cra-to-next` npx @next/codemod cra-to-next Migrates a Create React App project to Next.js; creating a Pages Router and necessary config to match behavior. Client-side only rendering is leveraged initially to prevent breaking compatibility due to `window` usage during SSR and can be enabled seamlessly to allow the gradual adoption of Next.js specific features. Please share any feedback related to this transform in this discussion. ### 10 #### Add React imports ##### `add-missing-react-import` npx @next/codemod add-missing-react-import Transforms files that do not import `React` to include the import in order for the new React JSX transform to work. For example: export default class Home extends React.Component { render() { return <div>Hello World</div> } } Transforms into: import React from 'react' export default class Home extends React.Component { render() { return <div>Hello World</div> } } ### 9 #### Transform Anonymous Components into Named Components ##### `name-default-component` npx @next/codemod name-default-component **Versions 9 and above.** Transforms anonymous components into named components to make sure they work with Fast Refresh. For example: export default function () { return <div>Hello World</div> } Transforms into: export default function MyComponent() { return <div>Hello World</div> } The component will have a camel-cased name based on the name of the file, and it also works with arrow functions. ### 8 #### Transform AMP HOC into page config ##### `withamp-to-config` npx @next/codemod withamp-to-config Transforms the `withAmp` HOC into Next.js 9 page configuration. For example: // Before import { withAmp } from 'next/amp' function Home() { return <h1>My AMP Page</h1> } export default withAmp(Home) // After export default function Home() { return <h1>My AMP Page</h1> } export const config = { amp: true, } ### 6 #### Use `withRouter` ##### `url-to-withrouter` npx @next/codemod url-to-withrouter Transforms the deprecated automatically injected `url` property on top level pages to using `withRouter` and the `router` property it injects. Read more here: https://nextjs.org/docs/messages/url-deprecated For example: import React from 'react' export default class extends React.Component { render() { const { pathname } = this.props.url return <div>Current pathname: {pathname}</div> } } import React from 'react' import { withRouter } from 'next/router' export default withRouter( class extends React.Component { render() { const { pathname } = this.props.router return <div>Current pathname: {pathname}</div> } } ) This is one case. All the cases that are transformed (and tested) can be found in the `__testfixtures__` directory. --- ## Page: https://nextjs.org/docs/app/guides/upgrading/version-14 ## How to upgrade to version 14 ## Upgrading from 13 to 14 To update to Next.js version 14, run the following command using your preferred package manager: Terminal npm i next@next-14 react@18 react-dom@18 && npm i eslint-config-next@next-14 -D Terminal yarn add next@next-14 react@18 react-dom@18 && yarn add eslint-config-next@next-14 -D Terminal pnpm i next@next-14 react@18 react-dom@18 && pnpm i eslint-config-next@next-14 -D Terminal bun add next@next-14 react@18 react-dom@18 && bun add eslint-config-next@next-14 -D > **Good to know:** If you are using TypeScript, ensure you also upgrade `@types/react` and `@types/react-dom` to their latest versions. ### v14 Summary * The minimum Node.js version has been bumped from 16.14 to 18.17, since 16.x has reached end-of-life. * The `next export` command has been removed in favor of `output: 'export'` config. Please see the docs for more information. * The `next/server` import for `ImageResponse` was renamed to `next/og`. A codemod is available to safely and automatically rename your imports. * The `@next/font` package has been fully removed in favor of the built-in `next/font`. A codemod is available to safely and automatically rename your imports. * The WASM target for `next-swc` has been removed. --- ## Page: https://nextjs.org/docs/app/guides/upgrading/version-15 ## How to upgrade to version 15 ## Upgrading from 14 to 15 To update to Next.js version 15, you can use the `upgrade` codemod: npx @next/codemod@canary upgrade latest If you prefer to do it manually, ensure that you're installing the latest Next & React versions: npm i next@latest react@latest react-dom@latest eslint-config-next@latest > **Good to know:** > > * If you see a peer dependencies warning, you may need to update `react` and `react-dom` to the suggested versions, or you use the `--force` or `--legacy-peer-deps` flag to ignore the warning. This won't be necessary once both Next.js 15 and React 19 are stable. ## React 19 * The minimum versions of `react` and `react-dom` is now 19. * `useFormState` has been replaced by `useActionState`. The `useFormState` hook is still available in React 19, but it is deprecated and will be removed in a future release. `useActionState` is recommended and includes additional properties like reading the `pending` state directly. Learn more. * `useFormStatus` now includes additional keys like `data`, `method`, and `action`. If you are not using React 19, only the `pending` key is available. Learn more. * Read more in the React 19 upgrade guide. > **Good to know:** If you are using TypeScript, ensure you also upgrade `@types/react` and `@types/react-dom` to their latest versions. ## Async Request APIs (Breaking change) Previously synchronous Dynamic APIs that rely on runtime information are now **asynchronous**: * `cookies` * `headers` * `draftMode` * `params` in `layout.js`, `page.js`, `route.js`, `default.js`, `opengraph-image`, `twitter-image`, `icon`, and `apple-icon`. * `searchParams` in `page.js` To ease the burden of migration, a codemod is available to automate the process and the APIs can temporarily be accessed synchronously. ### `cookies` #### Recommended Async Usage import { cookies } from 'next/headers' // Before const cookieStore = cookies() const token = cookieStore.get('token') // After const cookieStore = await cookies() const token = cookieStore.get('token') #### Temporary Synchronous Usage import { cookies, type UnsafeUnwrappedCookies } from 'next/headers' // Before const cookieStore = cookies() const token = cookieStore.get('token') // After const cookieStore = cookies() as unknown as UnsafeUnwrappedCookies // will log a warning in dev const token = cookieStore.get('token') #### Recommended Async Usage import { headers } from 'next/headers' // Before const headersList = headers() const userAgent = headersList.get('user-agent') // After const headersList = await headers() const userAgent = headersList.get('user-agent') #### Temporary Synchronous Usage import { headers, type UnsafeUnwrappedHeaders } from 'next/headers' // Before const headersList = headers() const userAgent = headersList.get('user-agent') // After const headersList = headers() as unknown as UnsafeUnwrappedHeaders // will log a warning in dev const userAgent = headersList.get('user-agent') ### `draftMode` #### Recommended Async Usage import { draftMode } from 'next/headers' // Before const { isEnabled } = draftMode() // After const { isEnabled } = await draftMode() #### Temporary Synchronous Usage import { draftMode, type UnsafeUnwrappedDraftMode } from 'next/headers' // Before const { isEnabled } = draftMode() // After // will log a warning in dev const { isEnabled } = draftMode() as unknown as UnsafeUnwrappedDraftMode ### `params` & `searchParams` #### Asynchronous Layout // Before type Params = { slug: string } export function generateMetadata({ params }: { params: Params }) { const { slug } = params } export default async function Layout({ children, params, }: { children: React.ReactNode params: Params }) { const { slug } = params } // After type Params = Promise<{ slug: string }> export async function generateMetadata({ params }: { params: Params }) { const { slug } = await params } export default async function Layout({ children, params, }: { children: React.ReactNode params: Params }) { const { slug } = await params } #### Synchronous Layout // Before type Params = { slug: string } export default function Layout({ children, params, }: { children: React.ReactNode params: Params }) { const { slug } = params } // After import { use } from 'react' type Params = Promise<{ slug: string }> export default function Layout(props: { children: React.ReactNode params: Params }) { const params = use(props.params) const slug = params.slug } #### Asynchronous Page // Before type Params = { slug: string } type SearchParams = { [key: string]: string | string[] | undefined } export function generateMetadata({ params, searchParams, }: { params: Params searchParams: SearchParams }) { const { slug } = params const { query } = searchParams } export default async function Page({ params, searchParams, }: { params: Params searchParams: SearchParams }) { const { slug } = params const { query } = searchParams } // After type Params = Promise<{ slug: string }> type SearchParams = Promise<{ [key: string]: string | string[] | undefined }> export async function generateMetadata(props: { params: Params searchParams: SearchParams }) { const params = await props.params const searchParams = await props.searchParams const slug = params.slug const query = searchParams.query } export default async function Page(props: { params: Params searchParams: SearchParams }) { const params = await props.params const searchParams = await props.searchParams const slug = params.slug const query = searchParams.query } #### Synchronous Page 'use client' // Before type Params = { slug: string } type SearchParams = { [key: string]: string | string[] | undefined } export default function Page({ params, searchParams, }: { params: Params searchParams: SearchParams }) { const { slug } = params const { query } = searchParams } // After import { use } from 'react' type Params = Promise<{ slug: string }> type SearchParams = Promise<{ [key: string]: string | string[] | undefined }> export default function Page(props: { params: Params searchParams: SearchParams }) { const params = use(props.params) const searchParams = use(props.searchParams) const slug = params.slug const query = searchParams.query } // Before export default function Page({ params, searchParams }) { const { slug } = params const { query } = searchParams } // After import { use } from "react" export default function Page(props) { const params = use(props.params) const searchParams = use(props.searchParams) const slug = params.slug const query = searchParams.query } #### Route Handlers // Before type Params = { slug: string } export async function GET(request: Request, segmentData: { params: Params }) { const params = segmentData.params const slug = params.slug } // After type Params = Promise<{ slug: string }> export async function GET(request: Request, segmentData: { params: Params }) { const params = await segmentData.params const slug = params.slug } // Before export async function GET(request, segmentData) { const params = segmentData.params const slug = params.slug } // After export async function GET(request, segmentData) { const params = await segmentData.params const slug = params.slug } ## `runtime` configuration (Breaking change) The `runtime` segment configuration previously supported a value of `experimental-edge` in addition to `edge`. Both configurations refer to the same thing, and to simplify the options, we will now error if `experimental-edge` is used. To fix this, update your `runtime` configuration to `edge`. A codemod is available to automatically do this. ## `fetch` requests `fetch` requests are no longer cached by default. To opt specific `fetch` requests into caching, you can pass the `cache: 'force-cache'` option. export default async function RootLayout() { const a = await fetch('https://...') // Not Cached const b = await fetch('https://...', { cache: 'force-cache' }) // Cached // ... } To opt all `fetch` requests in a layout or page into caching, you can use the `export const fetchCache = 'default-cache'` segment config option. If individual `fetch` requests specify a `cache` option, that will be used instead. // Since this is the root layout, all fetch requests in the app // that don't set their own cache option will be cached. export const fetchCache = 'default-cache' export default async function RootLayout() { const a = await fetch('https://...') // Cached const b = await fetch('https://...', { cache: 'no-store' }) // Not cached // ... } ## Route Handlers `GET` functions in Route Handlers are no longer cached by default. To opt `GET` methods into caching, you can use a route config option such as `export const dynamic = 'force-static'` in your Route Handler file. export const dynamic = 'force-static' export async function GET() {} ## Client-side Router Cache When navigating between pages via `<Link>` or `useRouter`, page segments are no longer reused from the client-side router cache. However, they are still reused during browser backward and forward navigation and for shared layouts. To opt page segments into caching, you can use the `staleTimes` config option: /** @type {import('next').NextConfig} */ const nextConfig = { experimental: { staleTimes: { dynamic: 30, static: 180, }, }, } module.exports = nextConfig Layouts and loading states are still cached and reused on navigation. ## `next/font` The `@next/font` package has been removed in favor of the built-in `next/font`. A codemod is available to safely and automatically rename your imports. // Before import { Inter } from '@next/font/google' // After import { Inter } from 'next/font/google' ## bundlePagesRouterDependencies `experimental.bundlePagesExternals` is now stable and renamed to `bundlePagesRouterDependencies`. /** @type {import('next').NextConfig} */ const nextConfig = { // Before experimental: { bundlePagesExternals: true, }, // After bundlePagesRouterDependencies: true, } module.exports = nextConfig ## serverExternalPackages `experimental.serverComponentsExternalPackages` is now stable and renamed to `serverExternalPackages`. /** @type {import('next').NextConfig} */ const nextConfig = { // Before experimental: { serverComponentsExternalPackages: ['package-name'], }, // After serverExternalPackages: ['package-name'], } module.exports = nextConfig ## Speed Insights Auto instrumentation for Speed Insights was removed in Next.js 15. To continue using Speed Insights, follow the Vercel Speed Insights Quickstart guide. ## `NextRequest` Geolocation The `geo` and `ip` properties on `NextRequest` have been removed as these values are provided by your hosting provider. A codemod is available to automate this migration. If you are using Vercel, you can alternatively use the `geolocation` and `ipAddress` functions from `@vercel/functions` instead: import { geolocation } from '@vercel/functions' import type { NextRequest } from 'next/server' export function middleware(request: NextRequest) { const { city } = geolocation(request) // ... } import { ipAddress } from '@vercel/functions' import type { NextRequest } from 'next/server' export function middleware(request: NextRequest) { const ip = ipAddress(request) // ... } --- ## Page: https://nextjs.org/docs/app/building-your-application Next.js provides the building blocks to create flexible, full-stack web applications. The guides in **Building Your Application** explain how to use these features and how to customize your application's behavior. The sections and pages are organized sequentially, from basic to advanced, so you can follow them step-by-step when building your Next.js application. However, you can read them in any order or skip to the pages that apply to your use case. If you're new to Next.js, we recommend starting with the Routing, Rendering, Data Fetching and Styling sections, as they introduce the fundamental Next.js and web concepts to help you get started. Then, you can dive deeper into the other sections such as Optimizing and Configuring. Finally, once you're ready, checkout the Deploying and Upgrading sections. --- ## Page: https://nextjs.org/docs/app/building-your-application/routing #### Subscribe to our newsletter Stay updated on new releases and features, guides, and case studies. --- ## Page: https://nextjs.org/docs/app/building-your-application/routing/layouts-and-templates ## How to create layouts and pages Next.js uses **file-system based routing**, meaning you can use folders and files to define routes. This page will guide you through how to create layouts and pages, and link between them. ## Creating a page A **page** is UI that is rendered on a specific route. To create a page, add a `page` file inside the `app` directory and default export a React component. For example, to create an index page (`/`):  export default function Page() { return <h1>Hello Next.js!</h1> } ## Creating a layout A layout is UI that is **shared** between multiple pages. On navigation, layouts preserve state, remain interactive, and do not rerender. You can define a layout by default exporting a React component from a `layout` file. The component should accept a `children` prop which can be a page or another layout. For example, to create a layout that accepts your index page as child, add a `layout` file inside the `app` directory:  export default function DashboardLayout({ children, }: { children: React.ReactNode }) { return ( <html lang="en"> <body> {/* Layout UI */} {/* Place children where you want to render a page or nested layout */} <main>{children}</main> </body> </html> ) } The layout above is called a root layout because it's defined at the root of the `app` directory. The root layout is **required** and must contain `html` and `body` tags. ## Creating a nested route A nested route is a route composed of multiple URL segments. For example, the `/blog/[slug]` route is composed of three segments: * `/` (Root Segment) * `blog` (Segment) * `[slug]` (Leaf Segment) In Next.js: * **Folders** are used to define the route segments that map to URL segments. * **Files** (like `page` and `layout`) are used to create UI that is shown for a segment. To create nested routes, you can nest folders inside each other. For example, to add a route for `/blog`, create a folder called `blog` in the `app` directory. Then, to make `/blog` publicly accessible, add a `page.tsx` file:  // Dummy imports import { getPosts } from '@/lib/posts' import { Post } from '@/ui/post' export default async function Page() { const posts = await getPosts() return ( <ul> {posts.map((post) => ( <Post key={post.id} post={post} /> ))} </ul> ) } You can continue nesting folders to create nested routes. For example, to create a route for a specific blog post, create a new `[slug]` folder inside `blog` and add a `page` file:  function generateStaticParams() {} export default function Page() { return <h1>Hello, Blog Post Page!</h1> } Wrapping a folder name in square brackets (e.g. `[slug]`) creates a dynamic route segment which is used to generate multiple pages from data. e.g. blog posts, product pages, etc. ## Nesting layouts By default, layouts in the folder hierarchy are also nested, which means they wrap child layouts via their `children` prop. You can nest layouts by adding `layout` inside specific route segments (folders). For example, to create a layout for the `/blog` route, add a new `layout` file inside the `blog` folder.  export default function BlogLayout({ children, }: { children: React.ReactNode }) { return <section>{children}</section> } If you were to combine the two layouts above, the root layout (`app/layout.js`) would wrap the blog layout (`app/blog/layout.js`), which would wrap the blog (`app/blog/page.js`) and blog post page (`app/blog/[slug]/page.js`). ## Linking between pages You can use the `<Link>` component to navigate between routes. `<Link>` is a built-in Next.js component that extends the HTML `<a>` tag to provide prefetching and client-side navigation. For example, to generate a list of blog posts, import `<Link>` from `next/link` and pass a `href` prop to the component: import Link from 'next/link' export default async function Post({ post }) { const posts = await getPosts() return ( <ul> {posts.map((post) => ( <li key={post.slug}> <Link href={`/blog/${post.slug}`}>{post.title}</Link> </li> ))} </ul> ) } `<Link>` is the primary and recommended way to navigate between routes in your Next.js application. However, you can also use the `useRouter` hook for more advanced navigation. --- ## Page: https://nextjs.org/docs/app/building-your-application/routing/linking-and-navigating There are four ways to navigate between routes in Next.js: * Using the `<Link>` Component * Using the `useRouter` hook (Client Components) * Using the `redirect` function (Server Components) * Using the native History API This page will go through how to use each of these options, and dive deeper into how navigation works. ## `<Link>` Component `<Link>` is a built-in component that extends the HTML `<a>` tag to provide prefetching and client-side navigation between routes. It is the primary and recommended way to navigate between routes in Next.js. You can use it by importing it from `next/link`, and passing a `href` prop to the component: import Link from 'next/link' export default function Page() { return <Link href="/dashboard">Dashboard</Link> } There are other optional props you can pass to `<Link>`. See the API reference for more. ## `useRouter()` hook The `useRouter` hook allows you to programmatically change routes from Client Components. 'use client' import { useRouter } from 'next/navigation' export default function Page() { const router = useRouter() return ( <button type="button" onClick={() => router.push('/dashboard')}> Dashboard </button> ) } For a full list of `useRouter` methods, see the API reference. > **Recommendation:** Use the `<Link>` component to navigate between routes unless you have a specific requirement for using `useRouter`. ## `redirect` function For Server Components, use the `redirect` function instead. import { redirect } from 'next/navigation' async function fetchTeam(id: string) { const res = await fetch('https://...') if (!res.ok) return undefined return res.json() } export default async function Profile({ params, }: { params: Promise<{ id: string }> }) { const { id } = await params if (!id) { redirect('/login') } const team = await fetchTeam(id) if (!team) { redirect('/join') } // ... } > **Good to know**: > > * `redirect` returns a 307 (Temporary Redirect) status code by default. When used in a Server Action, it returns a 303 (See Other), which is commonly used for redirecting to a success page as a result of a POST request. > * `redirect` internally throws an error so it should be called outside of `try/catch` blocks. > * `redirect` can be called in Client Components during the rendering process but not in event handlers. You can use the `useRouter` hook instead. > * `redirect` also accepts absolute URLs and can be used to redirect to external links. > * If you'd like to redirect before the render process, use `next.config.js` or Middleware. See the `redirect` API reference for more information. ## Using the native History API Next.js allows you to use the native `window.history.pushState` and `window.history.replaceState` methods to update the browser's history stack without reloading the page. `pushState` and `replaceState` calls integrate into the Next.js Router, allowing you to sync with `usePathname` and `useSearchParams`. ### `window.history.pushState` Use it to add a new entry to the browser's history stack. The user can navigate back to the previous state. For example, to sort a list of products: 'use client' import { useSearchParams } from 'next/navigation' export default function SortProducts() { const searchParams = useSearchParams() function updateSorting(sortOrder: string) { const params = new URLSearchParams(searchParams.toString()) params.set('sort', sortOrder) window.history.pushState(null, '', `?${params.toString()}`) } return ( <> <button onClick={() => updateSorting('asc')}>Sort Ascending</button> <button onClick={() => updateSorting('desc')}>Sort Descending</button> </> ) } ### `window.history.replaceState` Use it to replace the current entry on the browser's history stack. The user is not able to navigate back to the previous state. For example, to switch the application's locale: 'use client' import { usePathname } from 'next/navigation' export function LocaleSwitcher() { const pathname = usePathname() function switchLocale(locale: string) { // e.g. '/en/about' or '/fr/contact' const newPath = `/${locale}${pathname}` window.history.replaceState(null, '', newPath) } return ( <> <button onClick={() => switchLocale('en')}>English</button> <button onClick={() => switchLocale('fr')}>French</button> </> ) } ## How Routing and Navigation Works The App Router uses a hybrid approach for routing and navigation. On the server, your application code is automatically code-split by route segments. And on the client, Next.js prefetches and caches the route segments. This means, when a user navigates to a new route, the browser doesn't reload the page, and only the route segments that change re-render - improving the navigation experience and performance. ### 1\. Code Splitting Code splitting allows you to split your application code into smaller bundles to be downloaded and executed by the browser. This reduces the amount of data transferred and execution time for each request, leading to improved performance. Server Components allow your application code to be automatically code-split by route segments. This means only the code needed for the current route is loaded on navigation. ### 2\. Prefetching Prefetching is a way to preload a route in the background before the user visits it. There are two ways routes are prefetched in Next.js: * **`<Link>` component**: Routes are automatically prefetched as they become visible in the user's viewport. Prefetching happens when the page first loads or when it comes into view through scrolling. * **`router.prefetch()`**: The `useRouter` hook can be used to prefetch routes programmatically. The `<Link>`'s default prefetching behavior (i.e. when the `prefetch` prop is left unspecified or set to `null`) is different depending on your usage of `loading.js`. Only the shared layout, down the rendered "tree" of components until the first `loading.js` file, is prefetched and cached for `30s`. This reduces the cost of fetching an entire dynamic route, and it means you can show an instant loading state for better visual feedback to users. You can disable prefetching by setting the `prefetch` prop to `false`. Alternatively, you can prefetch the full page data beyond the loading boundaries by setting the `prefetch` prop to `true`. See the `<Link>` API reference for more information. > **Good to know**: > > * Prefetching is not enabled in development, only in production. ### 3\. Caching Next.js has an **in-memory client-side cache** called the Router Cache. As users navigate around the app, the React Server Component Payload of prefetched route segments and visited routes are stored in the cache. This means on navigation, the cache is reused as much as possible, instead of making a new request to the server - improving performance by reducing the number of requests and data transferred. Learn more about how the Router Cache works and how to configure it. ### 4\. Partial Rendering Partial rendering means only the route segments that change on navigation re-render on the client, and any shared segments are preserved. For example, when navigating between two sibling routes, `/dashboard/settings` and `/dashboard/analytics`, the `settings` page will be unmounted, the `analytics` page will be mounted with fresh state, and the shared `dashboard` layout will be preserved. This behavior is also present between two routes on the same dynamic segment e.g. with `/blog/[slug]/page` and navigating from `/blog/first` to `/blog/second`. 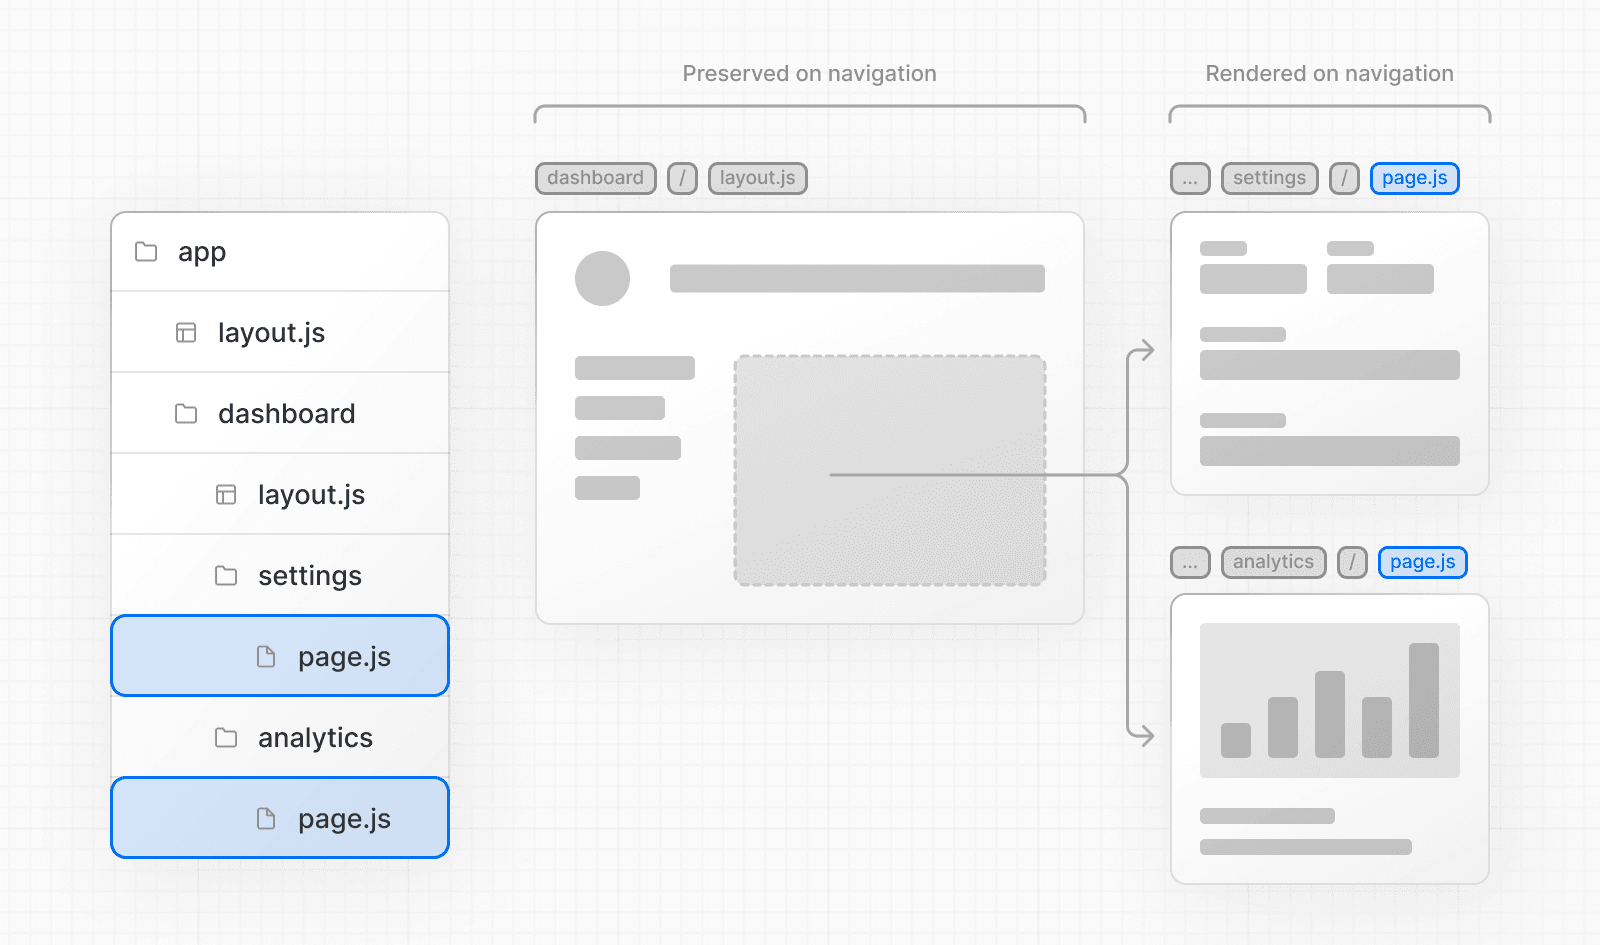 Without partial rendering, each navigation would cause the full page to re-render on the client. Rendering only the segment that changes reduces the amount of data transferred and execution time, leading to improved performance. ### 5\. Soft Navigation Browsers perform a "hard navigation" when navigating between pages. The Next.js App Router enables "soft navigation" between pages, ensuring only the route segments that have changed are re-rendered (partial rendering). This enables client React state to be preserved during navigation. ### 6\. Back and Forward Navigation By default, Next.js will maintain the scroll position for backwards and forwards navigation, and re-use route segments in the Router Cache. ### 7\. Routing between `pages/` and `app/` When incrementally migrating from `pages/` to `app/`, the Next.js router will automatically handle hard navigation between the two. To detect transitions from `pages/` to `app/`, there is a client router filter that leverages probabilistic checking of app routes, which can occasionally result in false positives. By default, such occurrences should be very rare, as we configure the false positive likelihood to be 0.01%. This likelihood can be customized via the `experimental.clientRouterFilterAllowedRate` option in `next.config.js`. It's important to note that lowering the false positive rate will increase the size of the generated filter in the client bundle. Alternatively, if you prefer to disable this handling completely and manage the routing between `pages/` and `app/` manually, you can set `experimental.clientRouterFilter` to false in `next.config.js`. When this feature is disabled, any dynamic routes in pages that overlap with app routes won't be navigated to properly by default. --- ## Page: https://nextjs.org/docs/app/building-your-application/routing/error-handling Errors can be divided into two categories: **expected errors** and **uncaught exceptions**: * **Model expected errors as return values**: Avoid using `try`/`catch` for expected errors in Server Actions. Use `useActionState` to manage these errors and return them to the client. * **Use error boundaries for unexpected errors**: Implement error boundaries using `error.tsx` and `global-error.tsx` files to handle unexpected errors and provide a fallback UI. ## Handling Expected Errors Expected errors are those that can occur during the normal operation of the application, such as those from server-side form validation or failed requests. These errors should be handled explicitly and returned to the client. ### Handling Expected Errors from Server Actions Use the `useActionState` hook to manage the state of Server Actions, including handling errors. This approach avoids `try`/`catch` blocks for expected errors, which should be modeled as return values rather than thrown exceptions. 'use server' import { redirect } from 'next/navigation' export async function createUser(prevState: any, formData: FormData) { const res = await fetch('https://...') const json = await res.json() if (!res.ok) { return { message: 'Please enter a valid email' } } redirect('/dashboard') } Then, you can pass your action to the `useActionState` hook and use the returned `state` to display an error message. 'use client' import { useActionState } from 'react' import { createUser } from '@/app/actions' const initialState = { message: '', } export function Signup() { const [state, formAction, pending] = useActionState(createUser, initialState) return ( <form action={formAction}> <label htmlFor="email">Email</label> <input type="text" id="email" name="email" required /> {/* ... */} <p aria-live="polite">{state?.message}</p> <button disabled={pending}>Sign up</button> </form> ) } You could also use the returned state to display a toast message from the client component. ### Handling Expected Errors from Server Components When fetching data inside of a Server Component, you can use the response to conditionally render an error message or `redirect`. export default async function Page() { const res = await fetch(`https://...`) const data = await res.json() if (!res.ok) { return 'There was an error.' } return '...' } ## Uncaught Exceptions Uncaught exceptions are unexpected errors that indicate bugs or issues that should not occur during the normal flow of your application. These should be handled by throwing errors, which will then be caught by error boundaries. * **Common:** Handle uncaught errors below the root layout with `error.js`. * **Optional:** Handle granular uncaught errors with nested `error.js` files (e.g. `app/dashboard/error.js`) * **Uncommon:** Handle uncaught errors in the root layout with `global-error.js`. ### Using Error Boundaries Next.js uses error boundaries to handle uncaught exceptions. Error boundaries catch errors in their child components and display a fallback UI instead of the component tree that crashed. Create an error boundary by adding an `error.tsx` file inside a route segment and exporting a React component: 'use client' // Error boundaries must be Client Components import { useEffect } from 'react' export default function Error({ error, reset, }: { error: Error & { digest?: string } reset: () => void }) { useEffect(() => { // Log the error to an error reporting service console.error(error) }, [error]) return ( <div> <h2>Something went wrong!</h2> <button onClick={ // Attempt to recover by trying to re-render the segment () => reset() } > Try again </button> </div> ) } If you want errors to bubble up to the parent error boundary, you can `throw` when rendering the `error` component. ### Handling Errors in Nested Routes Errors will bubble up to the nearest parent error boundary. This allows for granular error handling by placing `error.tsx` files at different levels in the route hierarchy.  ### Handling Global Errors While less common, you can handle errors in the root layout using `app/global-error.js`, located in the root app directory, even when leveraging internationalization. Global error UI must define its own `<html>` and `<body>` tags, since it is replacing the root layout or template when active. 'use client' // Error boundaries must be Client Components export default function GlobalError({ error, reset, }: { error: Error & { digest?: string } reset: () => void }) { return ( // global-error must include html and body tags <html> <body> <h2>Something went wrong!</h2> <button onClick={() => reset()}>Try again</button> </body> </html> ) } --- ## Page: https://nextjs.org/docs/app/building-your-application/routing/loading-ui-and-streaming The special file `loading.js` helps you create meaningful Loading UI with React Suspense. With this convention, you can show an instant loading state from the server while the content of a route segment loads. The new content is automatically swapped in once rendering is complete.  ## Instant Loading States An instant loading state is fallback UI that is shown immediately upon navigation. You can pre-render loading indicators such as skeletons and spinners, or a small but meaningful part of future screens such as a cover photo, title, etc. This helps users understand the app is responding and provides a better user experience. Create a loading state by adding a `loading.js` file inside a folder.  export default function Loading() { // You can add any UI inside Loading, including a Skeleton. return <LoadingSkeleton /> } In the same folder, `loading.js` will be nested inside `layout.js`. It will automatically wrap the `page.js` file and any children below in a `<Suspense>` boundary.  > **Good to know**: > > * Navigation is immediate, even with server-centric routing. > * Navigation is interruptible, meaning changing routes does not need to wait for the content of the route to fully load before navigating to another route. > * Shared layouts remain interactive while new route segments load. > **Recommendation:** Use the `loading.js` convention for route segments (layouts and pages) as Next.js optimizes this functionality. ## Streaming with Suspense In addition to `loading.js`, you can also manually create Suspense Boundaries for your own UI components. The App Router supports streaming with Suspense. > **Good to know**: > > * Some browsers buffer a streaming response. You may not see the streamed response until the response exceeds 1024 bytes. This typically only affects “hello world” applications, but not real applications. ### What is Streaming? To learn how Streaming works in React and Next.js, it's helpful to understand **Server-Side Rendering (SSR)** and its limitations. With SSR, there's a series of steps that need to be completed before a user can see and interact with a page: 1. First, all data for a given page is fetched on the server. 2. The server then renders the HTML for the page. 3. The HTML, CSS, and JavaScript for the page are sent to the client. 4. A non-interactive user interface is shown using the generated HTML, and CSS. 5. Finally, React hydrates the user interface to make it interactive. 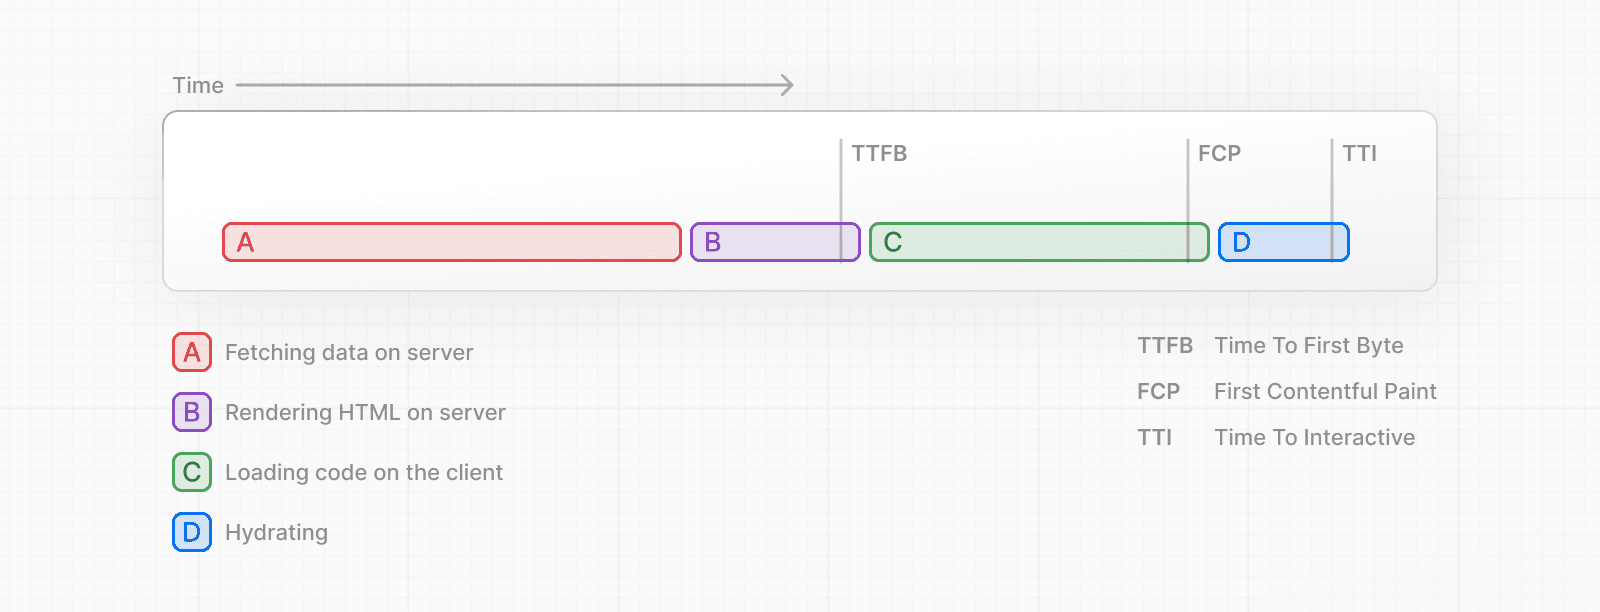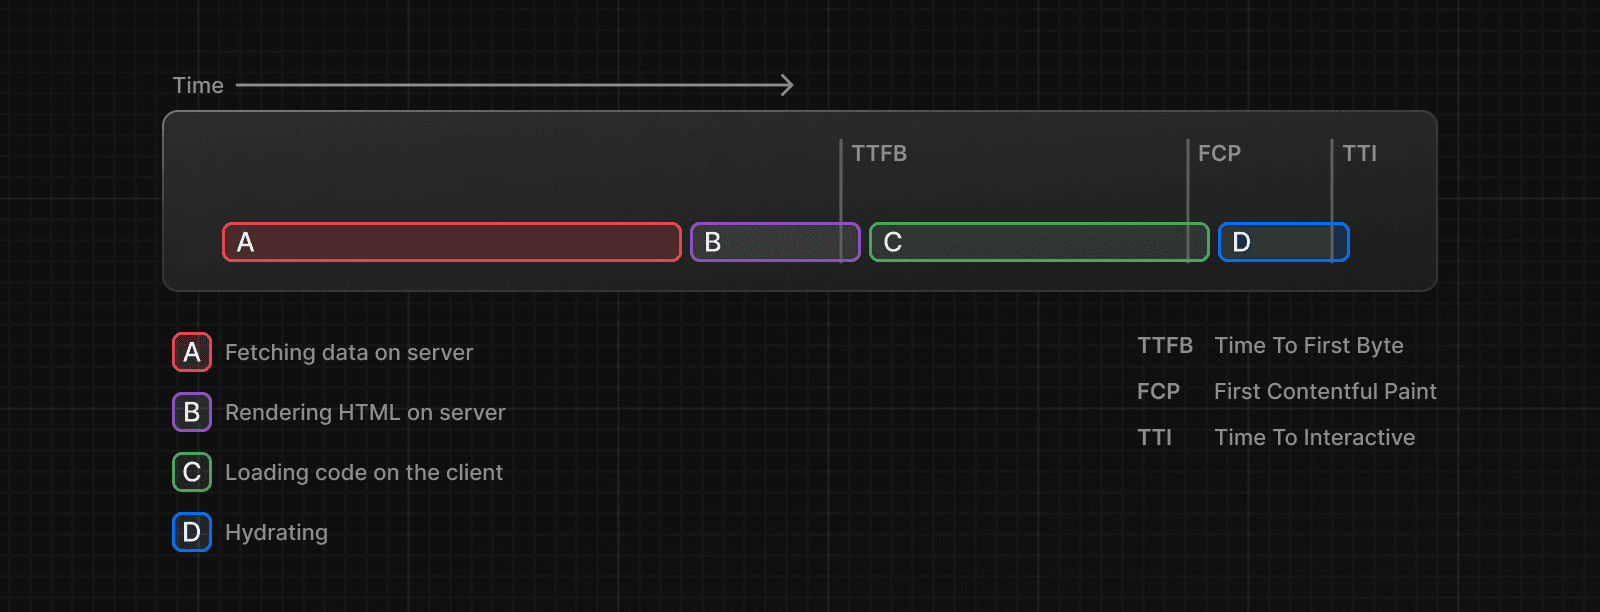 These steps are sequential and blocking, meaning the server can only render the HTML for a page once all the data has been fetched. And, on the client, React can only hydrate the UI once the code for all components in the page has been downloaded. SSR with React and Next.js helps improve the perceived loading performance by showing a non-interactive page to the user as soon as possible. 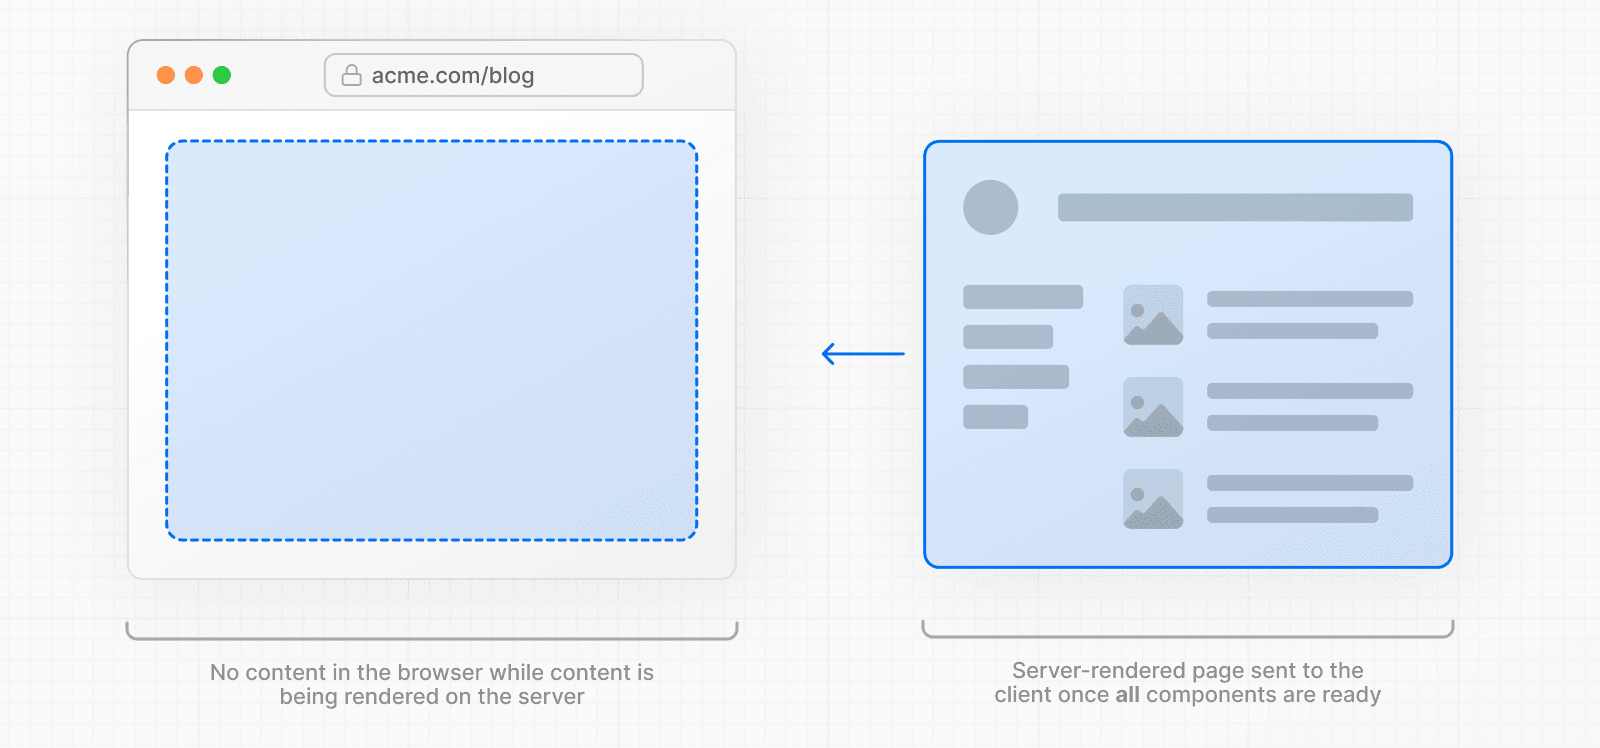 However, it can still be slow as all data fetching on server needs to be completed before the page can be shown to the user. **Streaming** allows you to break down the page's HTML into smaller chunks and progressively send those chunks from the server to the client.  This enables parts of the page to be displayed sooner, without waiting for all the data to load before any UI can be rendered. Streaming works well with React's component model because each component can be considered a chunk. Components that have higher priority (e.g. product information) or that don't rely on data can be sent first (e.g. layout), and React can start hydration earlier. Components that have lower priority (e.g. reviews, related products) can be sent in the same server request after their data has been fetched. 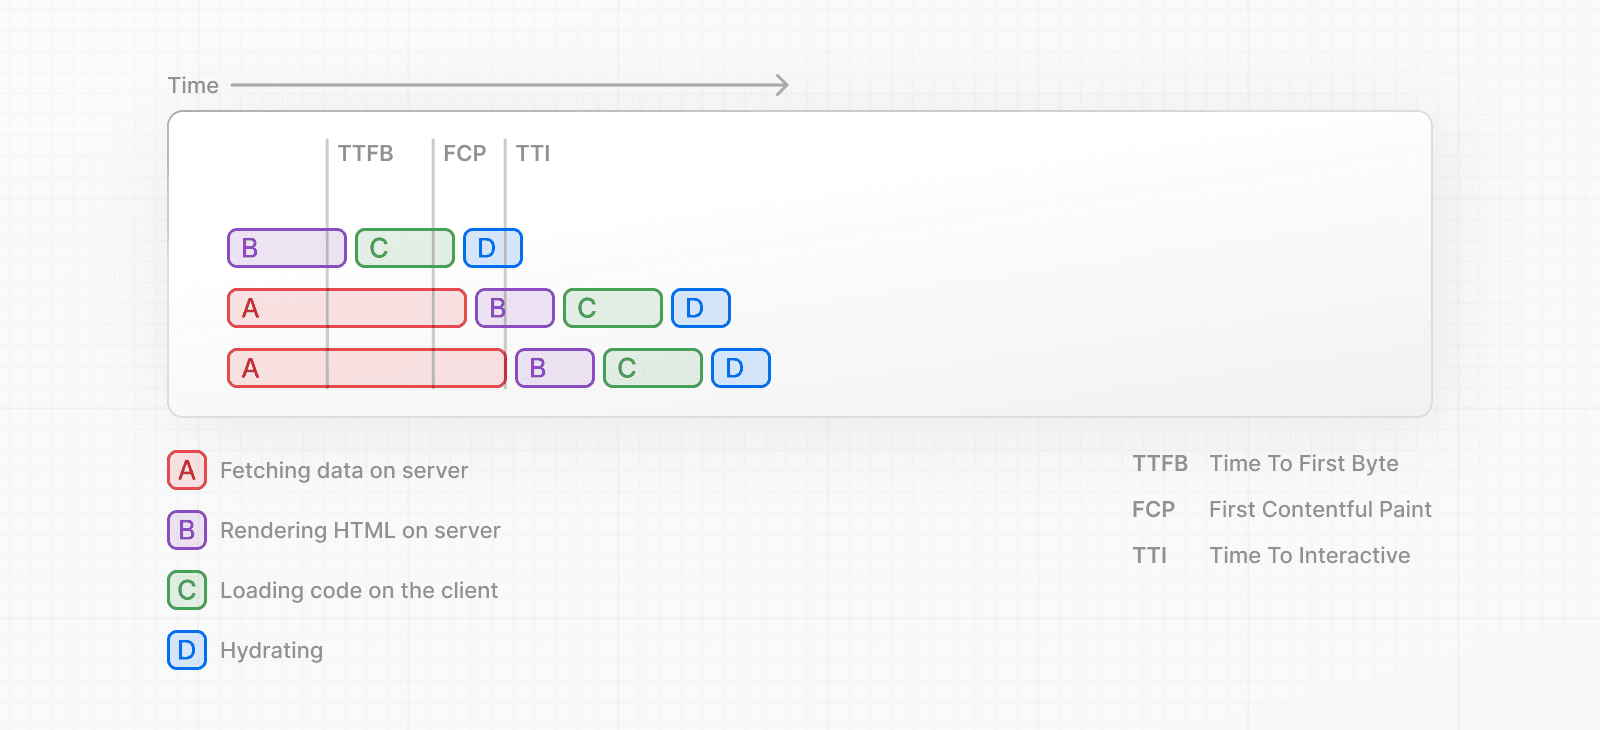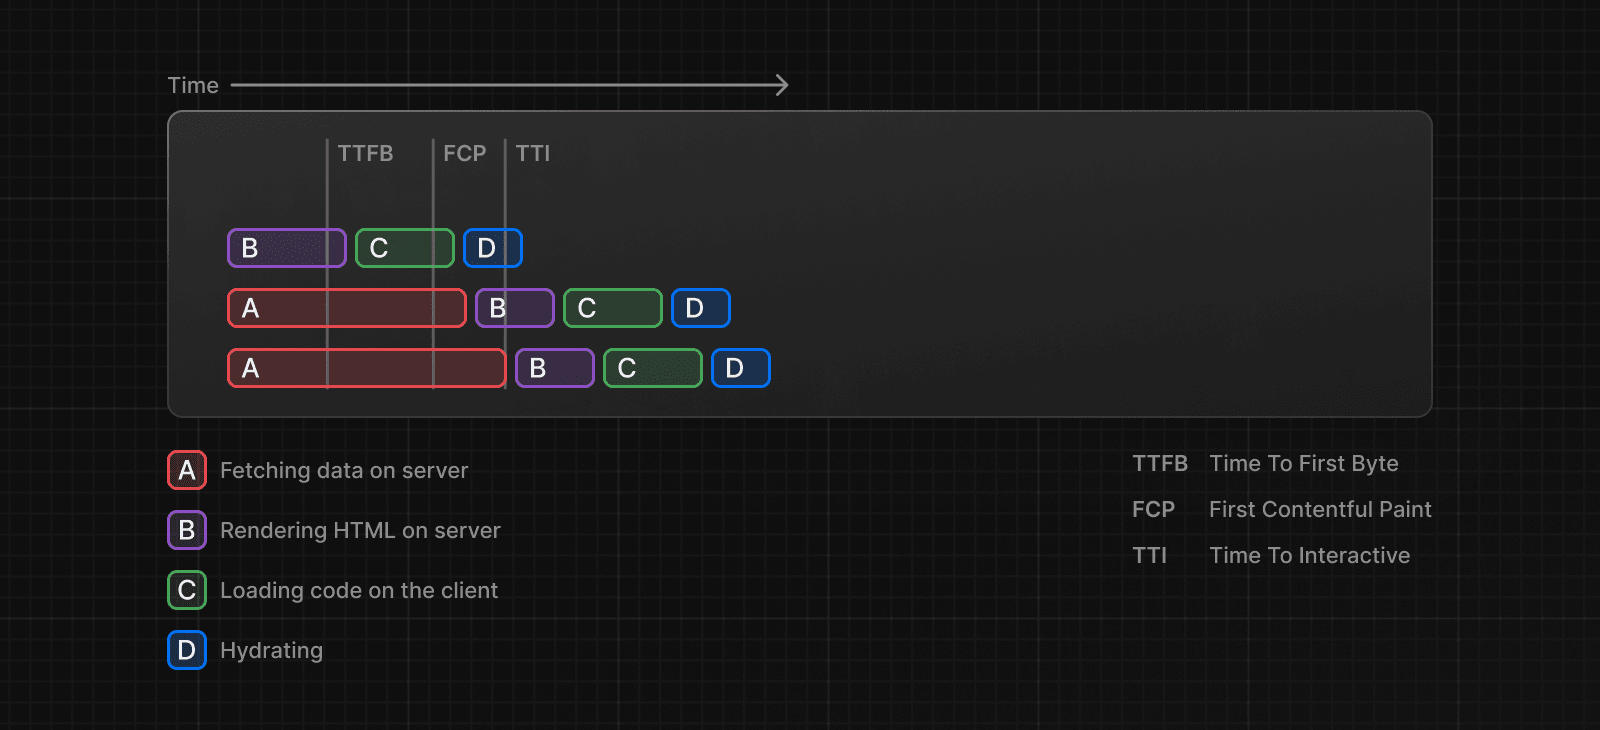 Streaming is particularly beneficial when you want to prevent long data requests from blocking the page from rendering as it can reduce the Time To First Byte (TTFB) and First Contentful Paint (FCP). It also helps improve Time to Interactive (TTI), especially on slower devices. ### Example `<Suspense>` works by wrapping a component that performs an asynchronous action (e.g. fetch data), showing fallback UI (e.g. skeleton, spinner) while it's happening, and then swapping in your component once the action completes. import { Suspense } from 'react' import { PostFeed, Weather } from './Components' export default function Posts() { return ( <section> <Suspense fallback={<p>Loading feed...</p>}> <PostFeed /> </Suspense> <Suspense fallback={<p>Loading weather...</p>}> <Weather /> </Suspense> </section> ) } By using Suspense, you get the benefits of: 1. **Streaming Server Rendering** - Progressively rendering HTML from the server to the client. 2. **Selective Hydration** - React prioritizes what components to make interactive first based on user interaction. For more Suspense examples and use cases, please see the React Documentation. ### SEO * Next.js will wait for data fetching inside `generateMetadata` to complete before streaming UI to the client. This guarantees the first part of a streamed response includes `<head>` tags. * Since streaming is server-rendered, it does not impact SEO. You can use the Rich Results Test tool from Google to see how your page appears to Google's web crawlers and view the serialized HTML (source). ### Status Codes When streaming, a `200` status code will be returned to signal that the request was successful. The server can still communicate errors or issues to the client within the streamed content itself, for example, when using `redirect` or `notFound`. Since the response headers have already been sent to the client, the status code of the response cannot be updated. This does not affect SEO. --- ## Page: https://nextjs.org/docs/app/building-your-application/routing/redirecting There are a few ways you can handle redirects in Next.js. This page will go through each available option, use cases, and how to manage large numbers of redirects. | API | Purpose | Where | Status Code | | --- | --- | --- | --- | | `redirect` | Redirect user after a mutation or event | Server Components, Server Actions, Route Handlers | 307 (Temporary) or 303 (Server Action) | | `permanentRedirect` | Redirect user after a mutation or event | Server Components, Server Actions, Route Handlers | 308 (Permanent) | | `useRouter` | Perform a client-side navigation | Event Handlers in Client Components | N/A | | `redirects` in `next.config.js` | Redirect an incoming request based on a path | `next.config.js` file | 307 (Temporary) or 308 (Permanent) | | `NextResponse.redirect` | Redirect an incoming request based on a condition | Middleware | Any | ## `redirect` function The `redirect` function allows you to redirect the user to another URL. You can call `redirect` in Server Components, Route Handlers, and Server Actions. `redirect` is often used after a mutation or event. For example, creating a post: 'use server' import { redirect } from 'next/navigation' import { revalidatePath } from 'next/cache' export async function createPost(id: string) { try { // Call database } catch (error) { // Handle errors } revalidatePath('/posts') // Update cached posts redirect(`/post/${id}`) // Navigate to the new post page } > **Good to know**: > > * `redirect` returns a 307 (Temporary Redirect) status code by default. When used in a Server Action, it returns a 303 (See Other), which is commonly used for redirecting to a success page as a result of a POST request. > * `redirect` internally throws an error so it should be called outside of `try/catch` blocks. > * `redirect` can be called in Client Components during the rendering process but not in event handlers. You can use the `useRouter` hook instead. > * `redirect` also accepts absolute URLs and can be used to redirect to external links. > * If you'd like to redirect before the render process, use `next.config.js` or Middleware. See the `redirect` API reference for more information. ## `permanentRedirect` function The `permanentRedirect` function allows you to **permanently** redirect the user to another URL. You can call `permanentRedirect` in Server Components, Route Handlers, and Server Actions. `permanentRedirect` is often used after a mutation or event that changes an entity's canonical URL, such as updating a user's profile URL after they change their username: 'use server' import { permanentRedirect } from 'next/navigation' import { revalidateTag } from 'next/cache' export async function updateUsername(username: string, formData: FormData) { try { // Call database } catch (error) { // Handle errors } revalidateTag('username') // Update all references to the username permanentRedirect(`/profile/${username}`) // Navigate to the new user profile } > **Good to know**: > > * `permanentRedirect` returns a 308 (permanent redirect) status code by default. > * `permanentRedirect` also accepts absolute URLs and can be used to redirect to external links. > * If you'd like to redirect before the render process, use `next.config.js` or Middleware. See the `permanentRedirect` API reference for more information. ## `useRouter()` hook If you need to redirect inside an event handler in a Client Component, you can use the `push` method from the `useRouter` hook. For example: 'use client' import { useRouter } from 'next/navigation' export default function Page() { const router = useRouter() return ( <button type="button" onClick={() => router.push('/dashboard')}> Dashboard </button> ) } > **Good to know**: > > * If you don't need to programmatically navigate a user, you should use a `<Link>` component. See the `useRouter` API reference for more information. ## `redirects` in `next.config.js` The `redirects` option in the `next.config.js` file allows you to redirect an incoming request path to a different destination path. This is useful when you change the URL structure of pages or have a list of redirects that are known ahead of time. `redirects` supports path, header, cookie, and query matching, giving you the flexibility to redirect users based on an incoming request. To use `redirects`, add the option to your `next.config.js` file: import type { NextConfig } from 'next' const nextConfig: NextConfig = { async redirects() { return [ // Basic redirect { source: '/about', destination: '/', permanent: true, }, // Wildcard path matching { source: '/blog/:slug', destination: '/news/:slug', permanent: true, }, ] }, } export default nextConfig See the `redirects` API reference for more information. > **Good to know**: > > * `redirects` can return a 307 (Temporary Redirect) or 308 (Permanent Redirect) status code with the `permanent` option. > * `redirects` may have a limit on platforms. For example, on Vercel, there's a limit of 1,024 redirects. To manage a large number of redirects (1000+), consider creating a custom solution using Middleware. See managing redirects at scale for more. > * `redirects` runs **before** Middleware. ## `NextResponse.redirect` in Middleware Middleware allows you to run code before a request is completed. Then, based on the incoming request, redirect to a different URL using `NextResponse.redirect`. This is useful if you want to redirect users based on a condition (e.g. authentication, session management, etc) or have a large number of redirects. For example, to redirect the user to a `/login` page if they are not authenticated: import { NextResponse, NextRequest } from 'next/server' import { authenticate } from 'auth-provider' export function middleware(request: NextRequest) { const isAuthenticated = authenticate(request) // If the user is authenticated, continue as normal if (isAuthenticated) { return NextResponse.next() } // Redirect to login page if not authenticated return NextResponse.redirect(new URL('/login', request.url)) } export const config = { matcher: '/dashboard/:path*', } > **Good to know**: > > * Middleware runs **after** `redirects` in `next.config.js` and **before** rendering. See the Middleware documentation for more information. ## Managing redirects at scale (advanced) To manage a large number of redirects (1000+), you may consider creating a custom solution using Middleware. This allows you to handle redirects programmatically without having to redeploy your application. To do this, you'll need to consider: 1. Creating and storing a redirect map. 2. Optimizing data lookup performance. > **Next.js Example**: See our Middleware with Bloom filter example for an implementation of the recommendations below. ### 1\. Creating and storing a redirect map A redirect map is a list of redirects that you can store in a database (usually a key-value store) or JSON file. Consider the following data structure: { "/old": { "destination": "/new", "permanent": true }, "/blog/post-old": { "destination": "/blog/post-new", "permanent": true } } In Middleware, you can read from a database such as Vercel's Edge Config or Redis, and redirect the user based on the incoming request: import { NextResponse, NextRequest } from 'next/server' import { get } from '@vercel/edge-config' type RedirectEntry = { destination: string permanent: boolean } export async function middleware(request: NextRequest) { const pathname = request.nextUrl.pathname const redirectData = await get(pathname) if (redirectData && typeof redirectData === 'string') { const redirectEntry: RedirectEntry = JSON.parse(redirectData) const statusCode = redirectEntry.permanent ? 308 : 307 return NextResponse.redirect(redirectEntry.destination, statusCode) } // No redirect found, continue without redirecting return NextResponse.next() } ### 2\. Optimizing data lookup performance Reading a large dataset for every incoming request can be slow and expensive. There are two ways you can optimize data lookup performance: * Use a database that is optimized for fast reads, such as Vercel Edge Config or Redis. * Use a data lookup strategy such as a Bloom filter to efficiently check if a redirect exists **before** reading the larger redirects file or database. Considering the previous example, you can import a generated bloom filter file into Middleware, then, check if the incoming request pathname exists in the bloom filter. If it does, forward the request to a Route Handler which will check the actual file and redirect the user to the appropriate URL. This avoids importing a large redirects file into Middleware, which can slow down every incoming request. import { NextResponse, NextRequest } from 'next/server' import { ScalableBloomFilter } from 'bloom-filters' import GeneratedBloomFilter from './redirects/bloom-filter.json' type RedirectEntry = { destination: string permanent: boolean } // Initialize bloom filter from a generated JSON file const bloomFilter = ScalableBloomFilter.fromJSON(GeneratedBloomFilter as any) export async function middleware(request: NextRequest) { // Get the path for the incoming request const pathname = request.nextUrl.pathname // Check if the path is in the bloom filter if (bloomFilter.has(pathname)) { // Forward the pathname to the Route Handler const api = new URL( `/api/redirects?pathname=${encodeURIComponent(request.nextUrl.pathname)}`, request.nextUrl.origin ) try { // Fetch redirect data from the Route Handler const redirectData = await fetch(api) if (redirectData.ok) { const redirectEntry: RedirectEntry | undefined = await redirectData.json() if (redirectEntry) { // Determine the status code const statusCode = redirectEntry.permanent ? 308 : 307 // Redirect to the destination return NextResponse.redirect(redirectEntry.destination, statusCode) } } } catch (error) { console.error(error) } } // No redirect found, continue the request without redirecting return NextResponse.next() } Then, in the Route Handler: import { NextRequest, NextResponse } from 'next/server' import redirects from '@/app/redirects/redirects.json' type RedirectEntry = { destination: string permanent: boolean } export function GET(request: NextRequest) { const pathname = request.nextUrl.searchParams.get('pathname') if (!pathname) { return new Response('Bad Request', { status: 400 }) } // Get the redirect entry from the redirects.json file const redirect = (redirects as Record<string, RedirectEntry>)[pathname] // Account for bloom filter false positives if (!redirect) { return new Response('No redirect', { status: 400 }) } // Return the redirect entry return NextResponse.json(redirect) } > **Good to know:** > > * To generate a bloom filter, you can use a library like `bloom-filters`. > * You should validate requests made to your Route Handler to prevent malicious requests. --- ## Page: https://nextjs.org/docs/app/building-your-application/routing/route-groups In the `app` directory, nested folders are normally mapped to URL paths. However, you can mark a folder as a **Route Group** to prevent the folder from being included in the route's URL path. This allows you to organize your route segments and project files into logical groups without affecting the URL path structure. Route groups are useful for: * Organizing routes into groups e.g. by site section, intent, or team. * Enabling nested layouts in the same route segment level: * Creating multiple nested layouts in the same segment, including multiple root layouts * Opting specific segments into a layout * Opting for loading skeletons on a specific route ## Convention A route group can be created by wrapping a folder's name in parenthesis: `(folderName)` > **Good to know**: > > * The naming of route groups has no special significance other than for organization. They do not affect the URL path. > * Routes that include a route group **should not** resolve to the same URL path as other routes. For example, since route groups don't affect URL structure, `(marketing)/about/page.js` and `(shop)/about/page.js` would both resolve to `/about` and cause an error. > * If you use multiple root layouts without a top-level `layout.js` file, your home `page.js` file should be defined in one of the route groups, For example: `app/(marketing)/page.js`. > * Navigating **across multiple root layouts** will cause a **full page load** (as opposed to a client-side navigation). For example, navigating from `/cart` that uses `app/(shop)/layout.js` to `/blog` that uses `app/(marketing)/layout.js` will cause a full page load. This **only** applies to multiple root layouts. --- ## Page: https://nextjs.org/docs/app/building-your-application/routing/dynamic-routes When you don't know the exact segment names ahead of time and want to create routes from dynamic data, you can use Dynamic Segments that are filled in at request time or prerendered at build time. ## Convention A Dynamic Segment can be created by wrapping a folder's name in square brackets: `[folderName]`. For example, `[id]` or `[slug]`. Dynamic Segments are passed as the `params` prop to `layout`, `page`, `route`, and `generateMetadata` functions. ## Example For example, a blog could include the following route `app/blog/[slug]/page.js` where `[slug]` is the Dynamic Segment for blog posts. export default async function Page({ params, }: { params: Promise<{ slug: string }> }) { const { slug } = await params return <div>My Post: {slug}</div> } | Route | Example URL | `params` | | --- | --- | --- | | `app/blog/[slug]/page.js` | `/blog/a` | `{ slug: 'a' }` | | `app/blog/[slug]/page.js` | `/blog/b` | `{ slug: 'b' }` | | `app/blog/[slug]/page.js` | `/blog/c` | `{ slug: 'c' }` | See the generateStaticParams() page to learn how to generate the params for the segment. ## Good to know * Since the `params` prop is a promise. You must use async/await or React's use function to access the values. * In version 14 and earlier, `params` was a synchronous prop. To help with backwards compatibility, you can still access it synchronously in Next.js 15, but this behavior will be deprecated in the future. * Dynamic Segments are equivalent to Dynamic Routes in the `pages` directory. ## Generating Static Params The `generateStaticParams` function can be used in combination with dynamic route segments to **statically generate** routes at build time instead of on-demand at request time. export async function generateStaticParams() { const posts = await fetch('https://.../posts').then((res) => res.json()) return posts.map((post) => ({ slug: post.slug, })) } The primary benefit of the `generateStaticParams` function is its smart retrieval of data. If content is fetched within the `generateStaticParams` function using a `fetch` request, the requests are automatically memoized. This means a `fetch` request with the same arguments across multiple `generateStaticParams`, Layouts, and Pages will only be made once, which decreases build times. Use the migration guide if you are migrating from the `pages` directory. See `generateStaticParams` server function documentation for more information and advanced use cases. ## Catch-all Segments Dynamic Segments can be extended to **catch-all** subsequent segments by adding an ellipsis inside the brackets `[...folderName]`. For example, `app/shop/[...slug]/page.js` will match `/shop/clothes`, but also `/shop/clothes/tops`, `/shop/clothes/tops/t-shirts`, and so on. | Route | Example URL | `params` | | --- | --- | --- | | `app/shop/[...slug]/page.js` | `/shop/a` | `{ slug: ['a'] }` | | `app/shop/[...slug]/page.js` | `/shop/a/b` | `{ slug: ['a', 'b'] }` | | `app/shop/[...slug]/page.js` | `/shop/a/b/c` | `{ slug: ['a', 'b', 'c'] }` | ## Optional Catch-all Segments Catch-all Segments can be made **optional** by including the parameter in double square brackets: `[[...folderName]]`. For example, `app/shop/[[...slug]]/page.js` will **also** match `/shop`, in addition to `/shop/clothes`, `/shop/clothes/tops`, `/shop/clothes/tops/t-shirts`. The difference between **catch-all** and **optional catch-all** segments is that with optional, the route without the parameter is also matched (`/shop` in the example above). | Route | Example URL | `params` | | --- | --- | --- | | `app/shop/[[...slug]]/page.js` | `/shop` | `{ slug: undefined }` | | `app/shop/[[...slug]]/page.js` | `/shop/a` | `{ slug: ['a'] }` | | `app/shop/[[...slug]]/page.js` | `/shop/a/b` | `{ slug: ['a', 'b'] }` | | `app/shop/[[...slug]]/page.js` | `/shop/a/b/c` | `{ slug: ['a', 'b', 'c'] }` | ## TypeScript When using TypeScript, you can add types for `params` depending on your configured route segment. export default async function Page({ params, }: { params: Promise<{ slug: string }> }) { return <h1>My Page</h1> } | Route | `params` Type Definition | | --- | --- | | `app/blog/[slug]/page.js` | `{ slug: string }` | | `app/shop/[...slug]/page.js` | `{ slug: string[] }` | | `app/shop/[[...slug]]/page.js` | `{ slug?: string[] }` | | `app/[categoryId]/[itemId]/page.js` | `{ categoryId: string, itemId: string }` | > **Good to know**: This may be done automatically by the TypeScript plugin in the future. --- ## Page: https://nextjs.org/docs/app/building-your-application/routing/parallel-routes Parallel Routes allows you to simultaneously or conditionally render one or more pages within the same layout. They are useful for highly dynamic sections of an app, such as dashboards and feeds on social sites. For example, considering a dashboard, you can use parallel routes to simultaneously render the `team` and `analytics` pages: 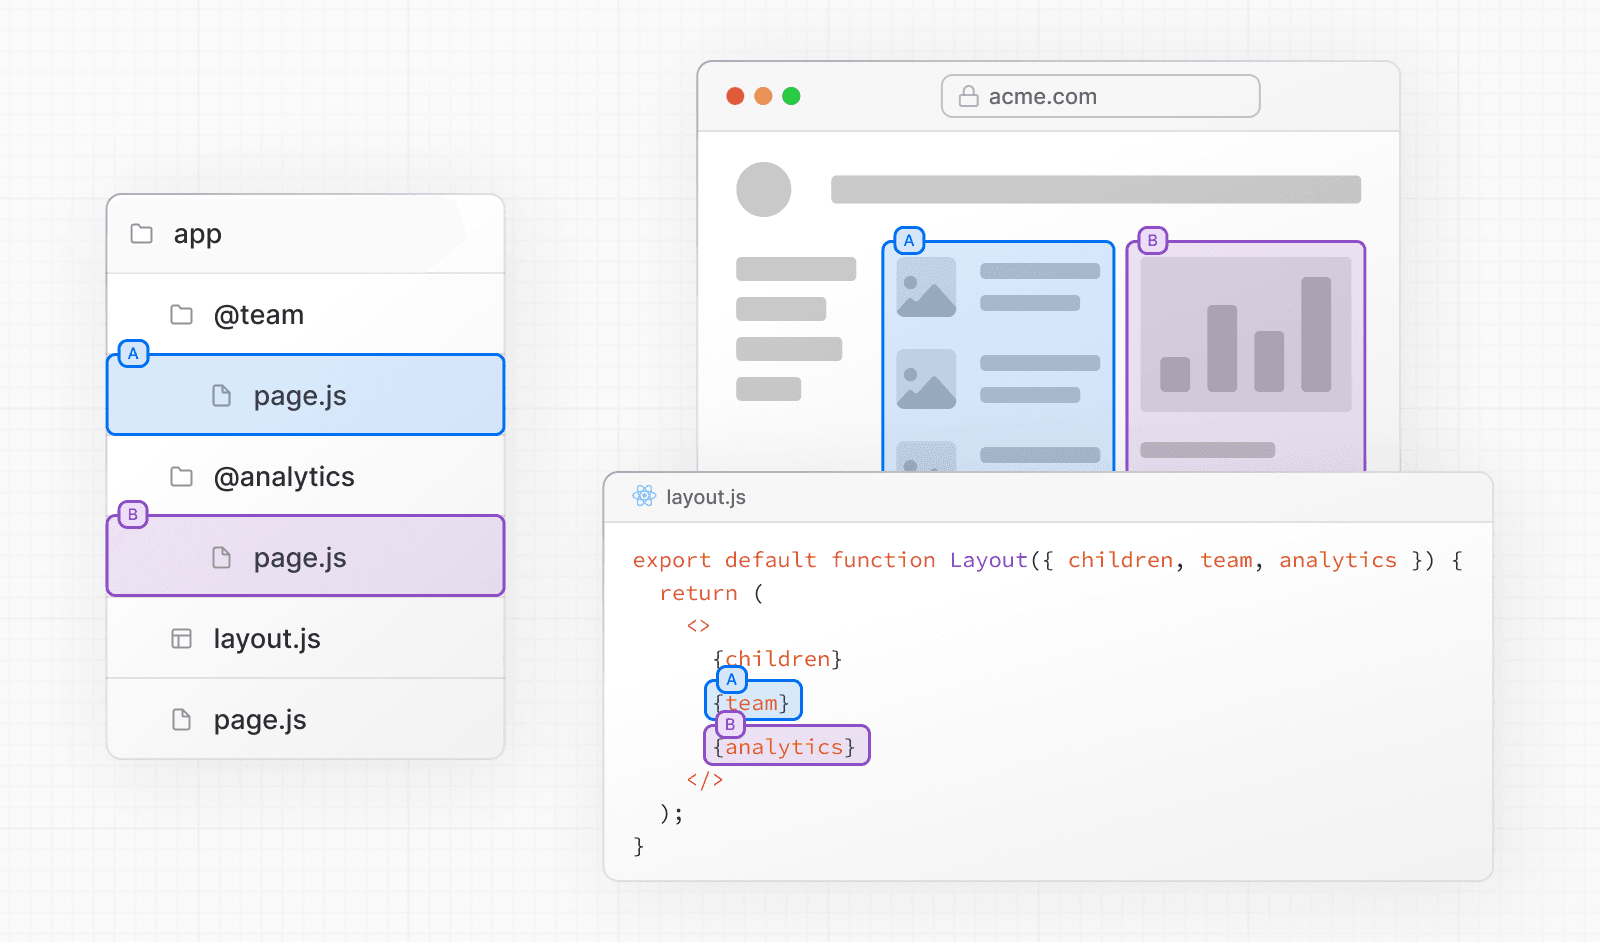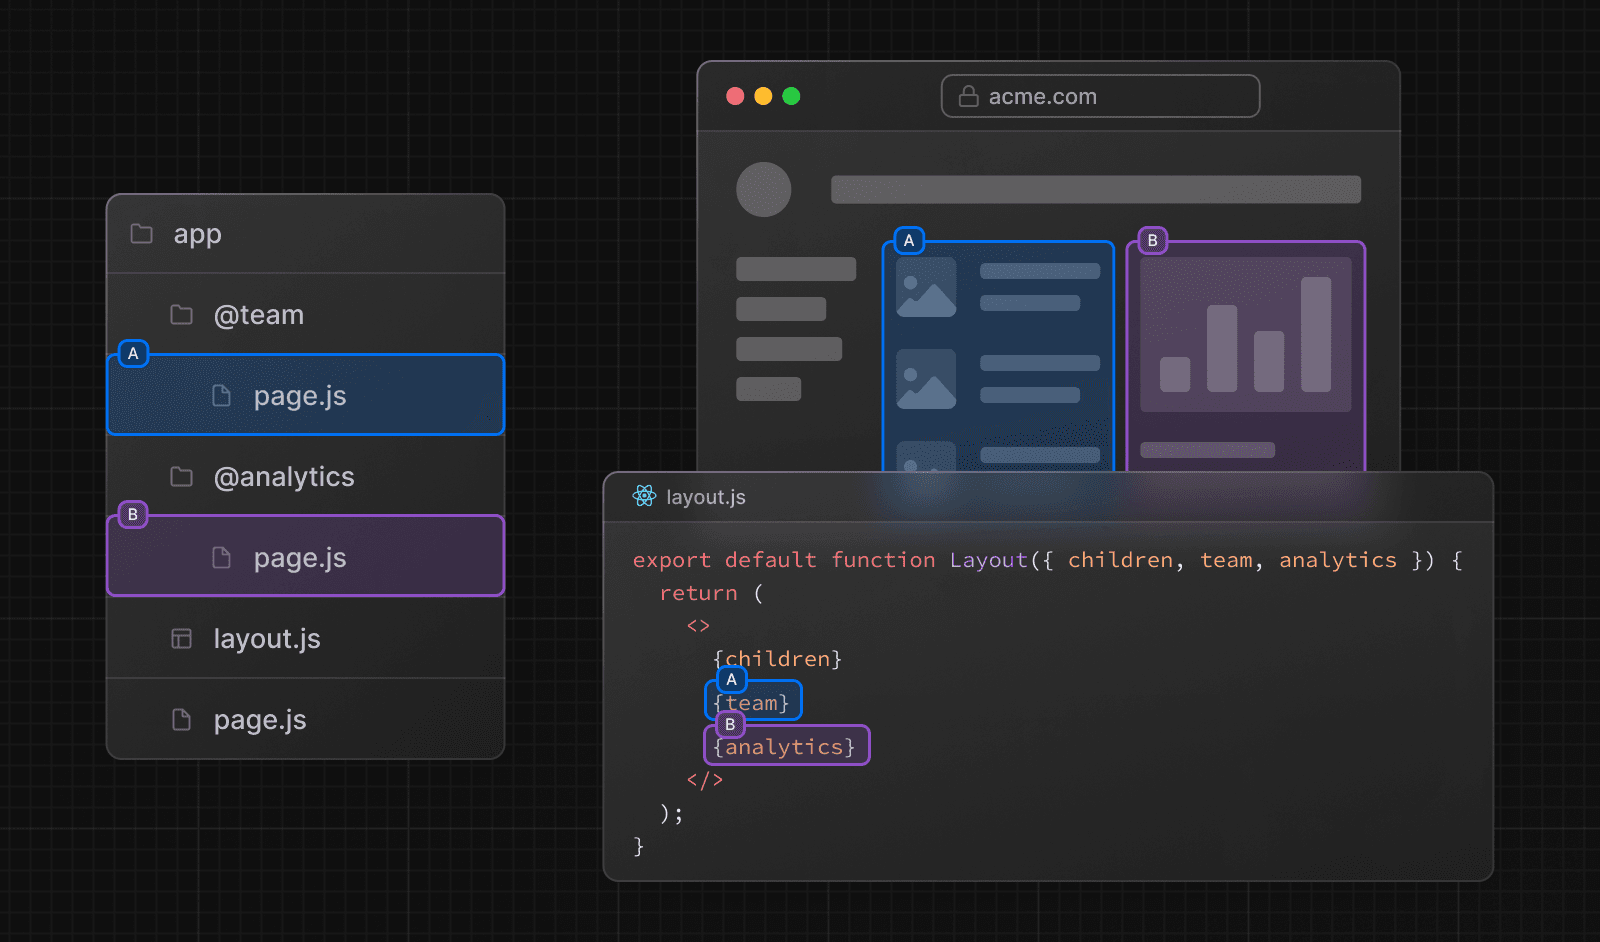 ## Slots Parallel routes are created using named **slots**. Slots are defined with the `@folder` convention. For example, the following file structure defines two slots: `@analytics` and `@team`: 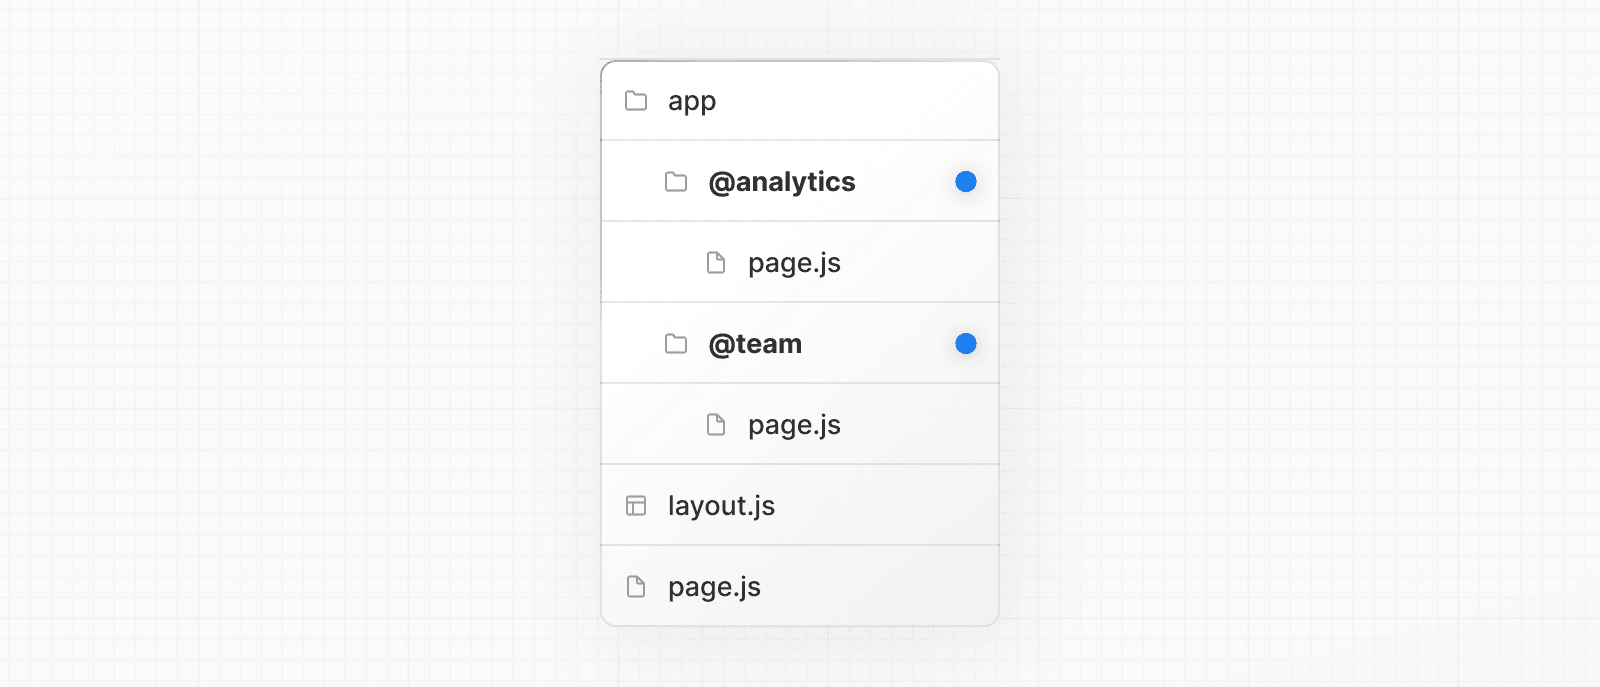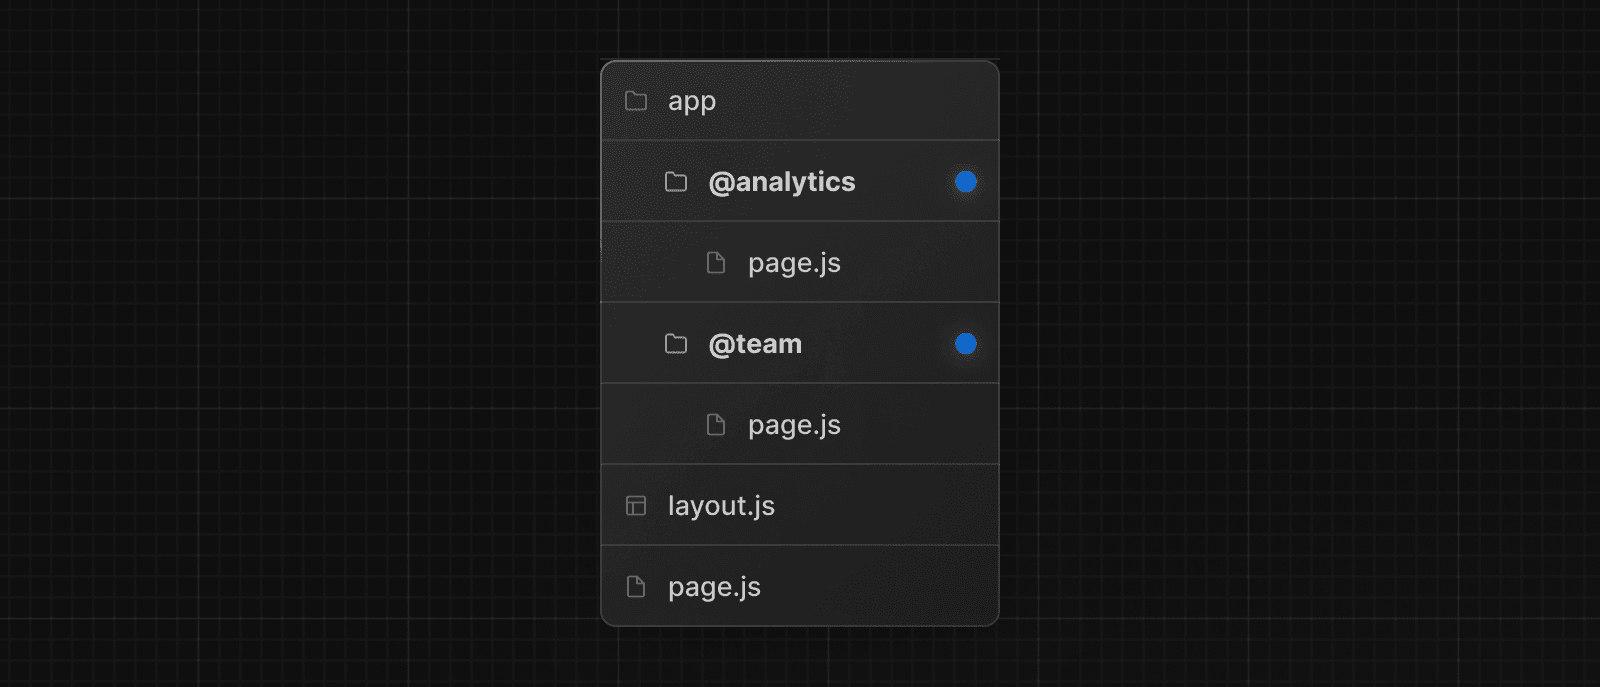 Slots are passed as props to the shared parent layout. For the example above, the component in `app/layout.js` now accepts the `@analytics` and `@team` slots props, and can render them in parallel alongside the `children` prop: export default function Layout({ children, team, analytics, }: { children: React.ReactNode analytics: React.ReactNode team: React.ReactNode }) { return ( <> {children} {team} {analytics} </> ) } However, slots are **not** route segments and do not affect the URL structure. For example, for `/@analytics/views`, the URL will be `/views` since `@analytics` is a slot. Slots are combined with the regular Page component to form the final page associated with the route segment. Because of this, you cannot have separate static and dynamic slots at the same route segment level. If one slot is dynamic, all slots at that level must be dynamic. > **Good to know**: > > * The `children` prop is an implicit slot that does not need to be mapped to a folder. This means `app/page.js` is equivalent to `app/@children/page.js`. ## Active state and navigation By default, Next.js keeps track of the active _state_ (or subpage) for each slot. However, the content rendered within a slot will depend on the type of navigation: * **Soft Navigation**: During client-side navigation, Next.js will perform a partial render, changing the subpage within the slot, while maintaining the other slot's active subpages, even if they don't match the current URL. * **Hard Navigation**: After a full-page load (browser refresh), Next.js cannot determine the active state for the slots that don't match the current URL. Instead, it will render a `default.js` file for the unmatched slots, or `404` if `default.js` doesn't exist. > **Good to know**: > > * The `404` for unmatched routes helps ensure that you don't accidentally render a parallel route on a page that it was not intended for. ### `default.js` You can define a `default.js` file to render as a fallback for unmatched slots during the initial load or full-page reload. Consider the following folder structure. The `@team` slot has a `/settings` page, but `@analytics` does not. 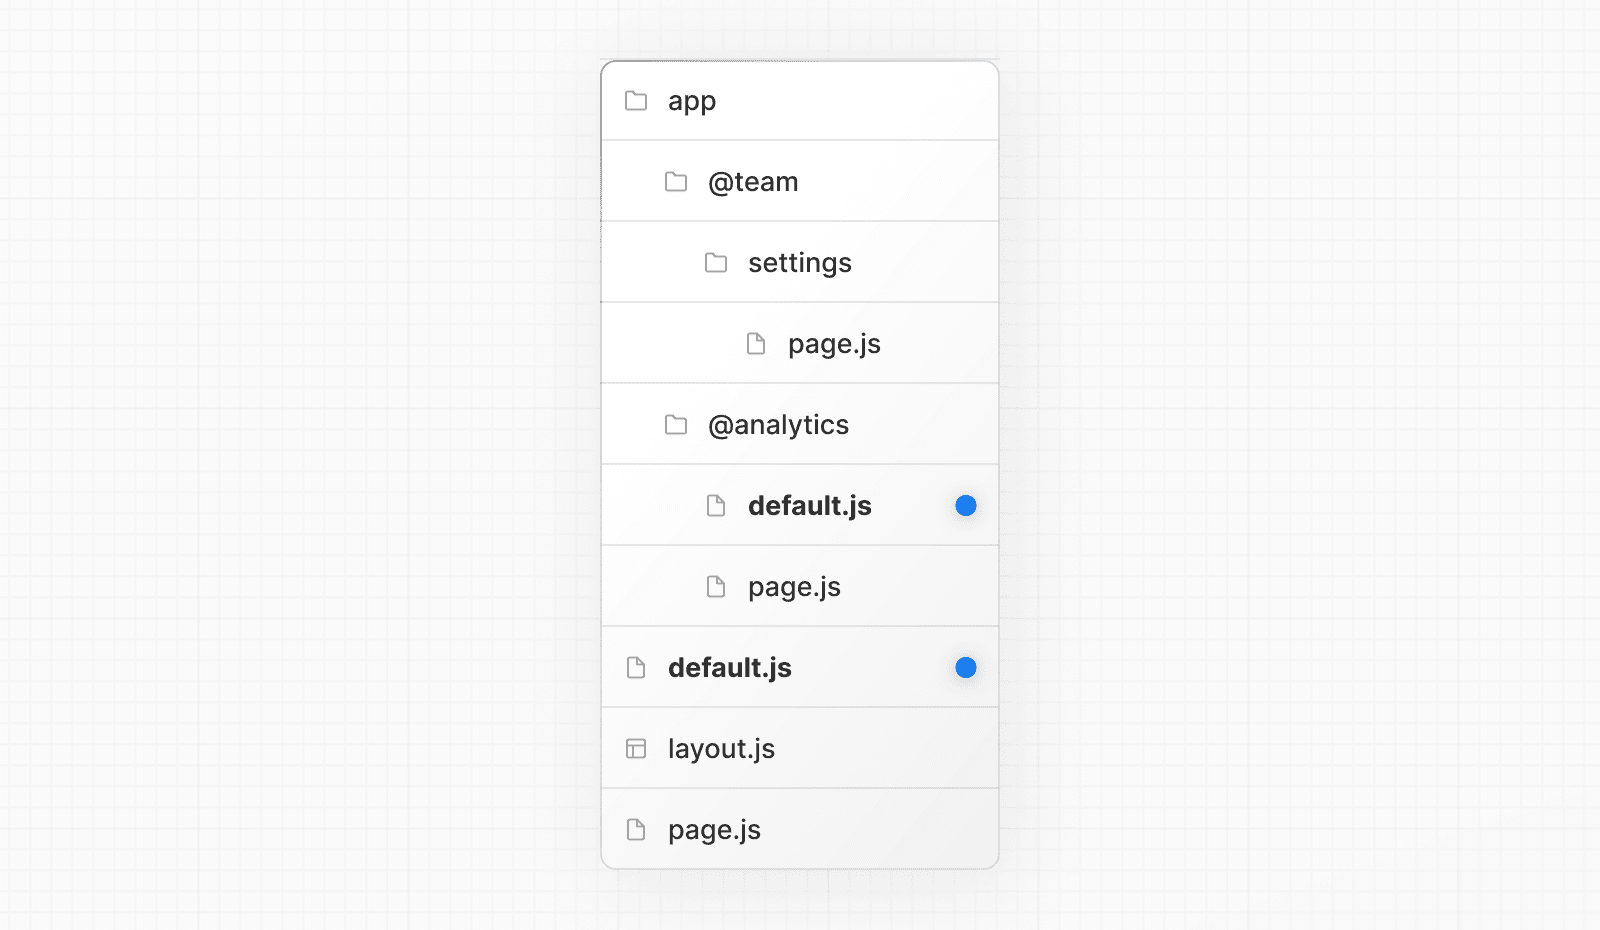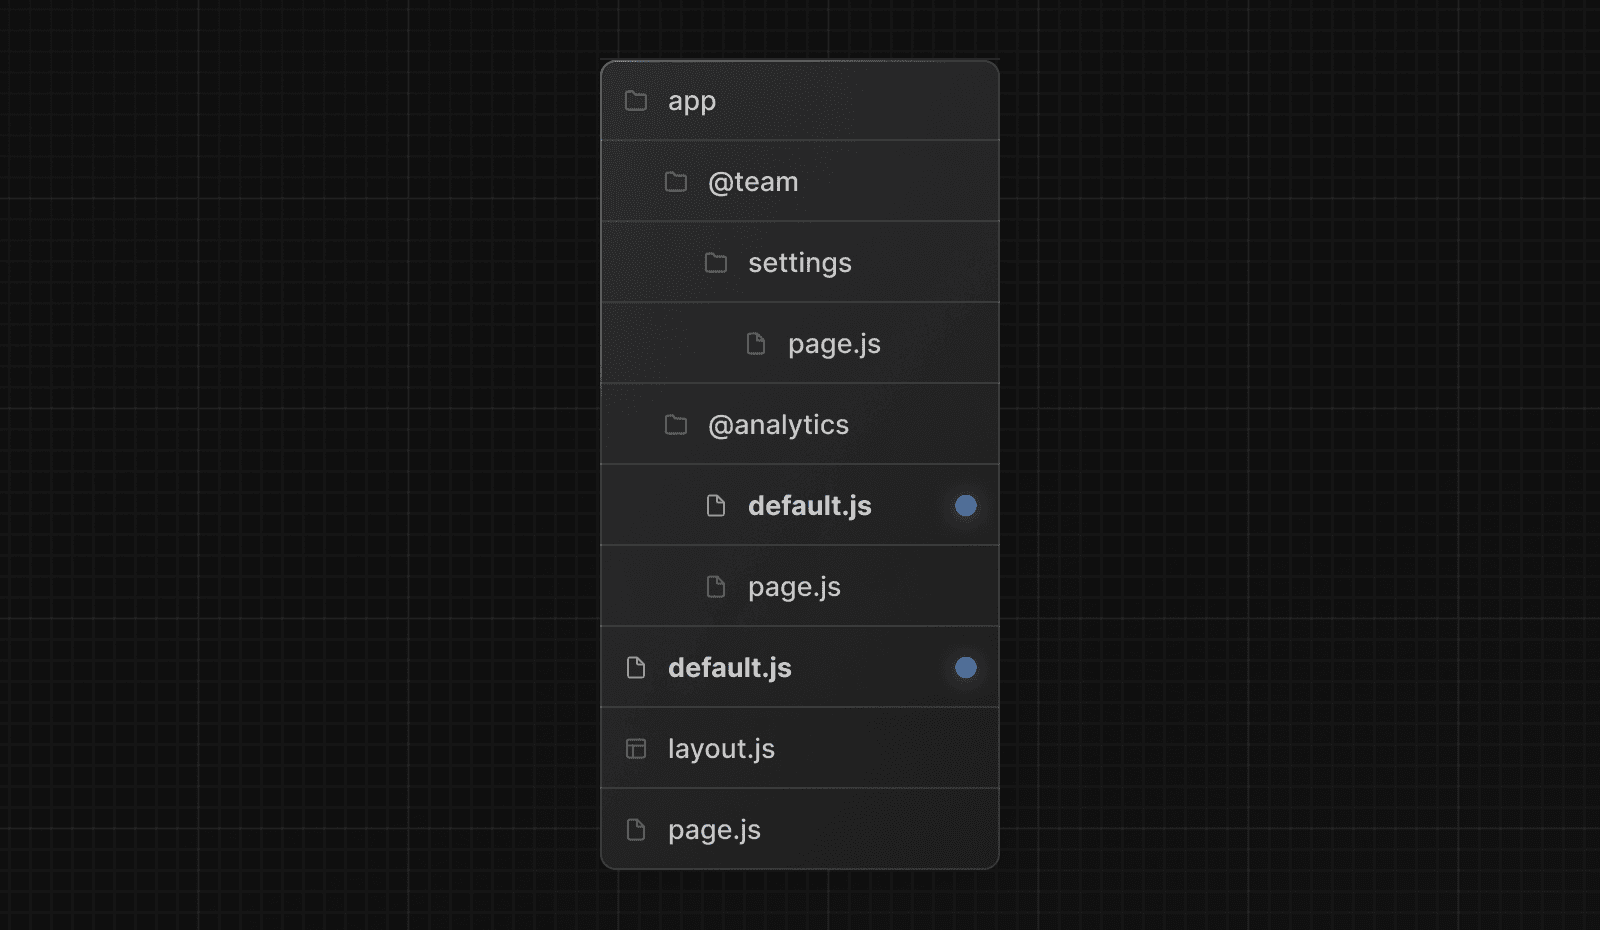 When navigating to `/settings`, the `@team` slot will render the `/settings` page while maintaining the currently active page for the `@analytics` slot. On refresh, Next.js will render a `default.js` for `@analytics`. If `default.js` doesn't exist, a `404` is rendered instead. Additionally, since `children` is an implicit slot, you also need to create a `default.js` file to render a fallback for `children` when Next.js cannot recover the active state of the parent page. ### `useSelectedLayoutSegment(s)` Both `useSelectedLayoutSegment` and `useSelectedLayoutSegments` accept a `parallelRoutesKey` parameter, which allows you to read the active route segment within a slot. 'use client' import { useSelectedLayoutSegment } from 'next/navigation' export default function Layout({ auth }: { auth: React.ReactNode }) { const loginSegment = useSelectedLayoutSegment('auth') // ... } When a user navigates to `app/@auth/login` (or `/login` in the URL bar), `loginSegment` will be equal to the string `"login"`. ## Examples ### Conditional Routes You can use Parallel Routes to conditionally render routes based on certain conditions, such as user role. For example, to render a different dashboard page for the `/admin` or `/user` roles: 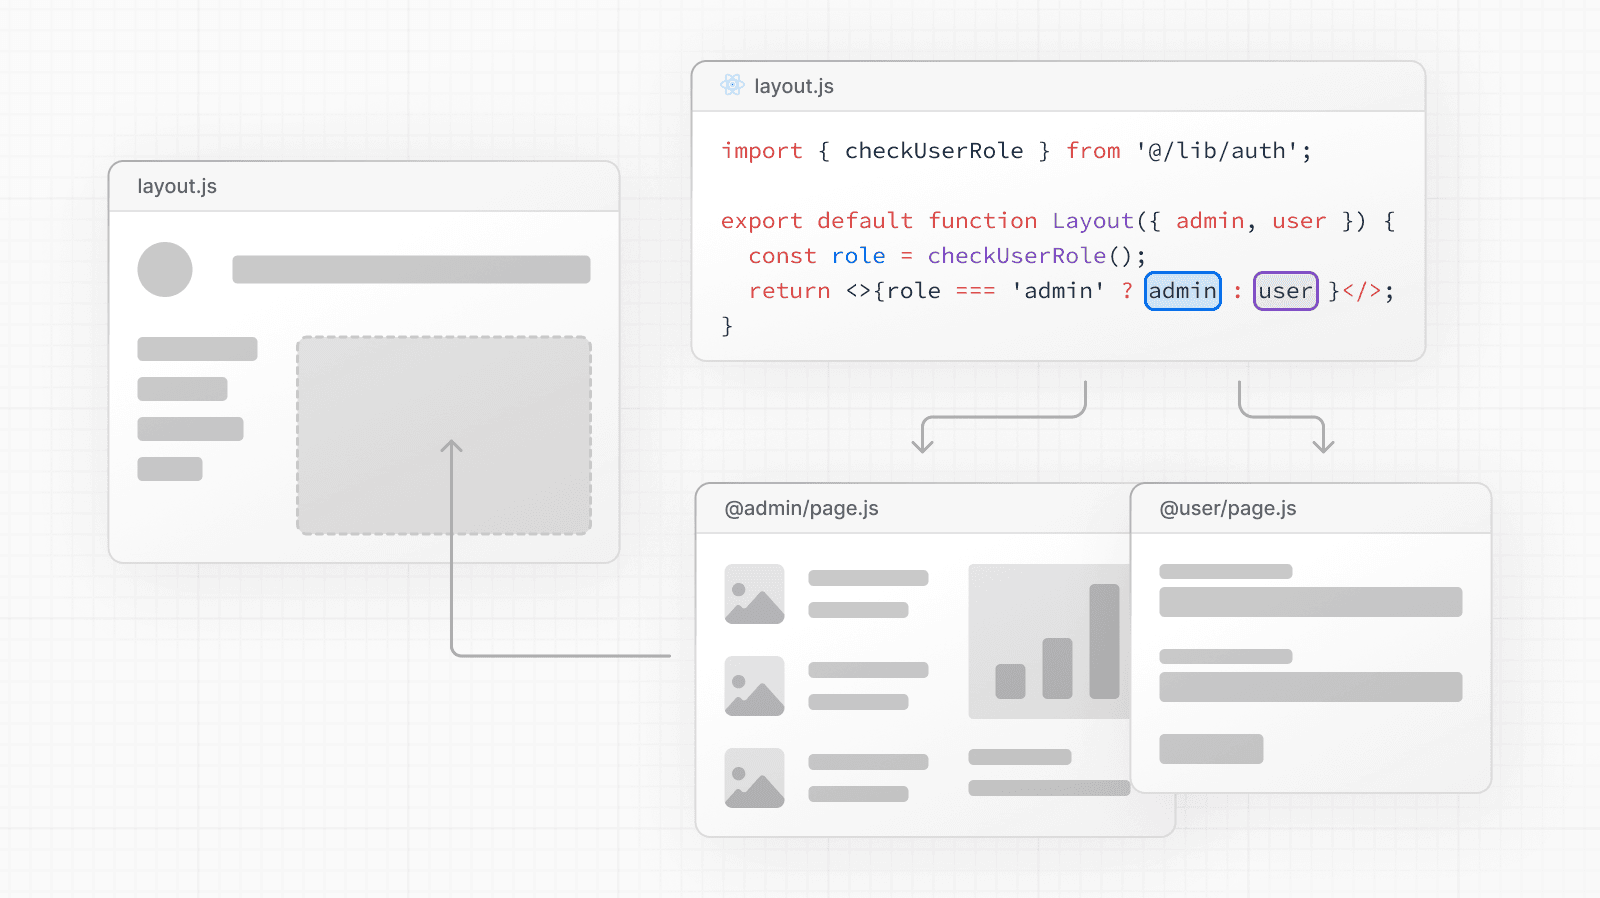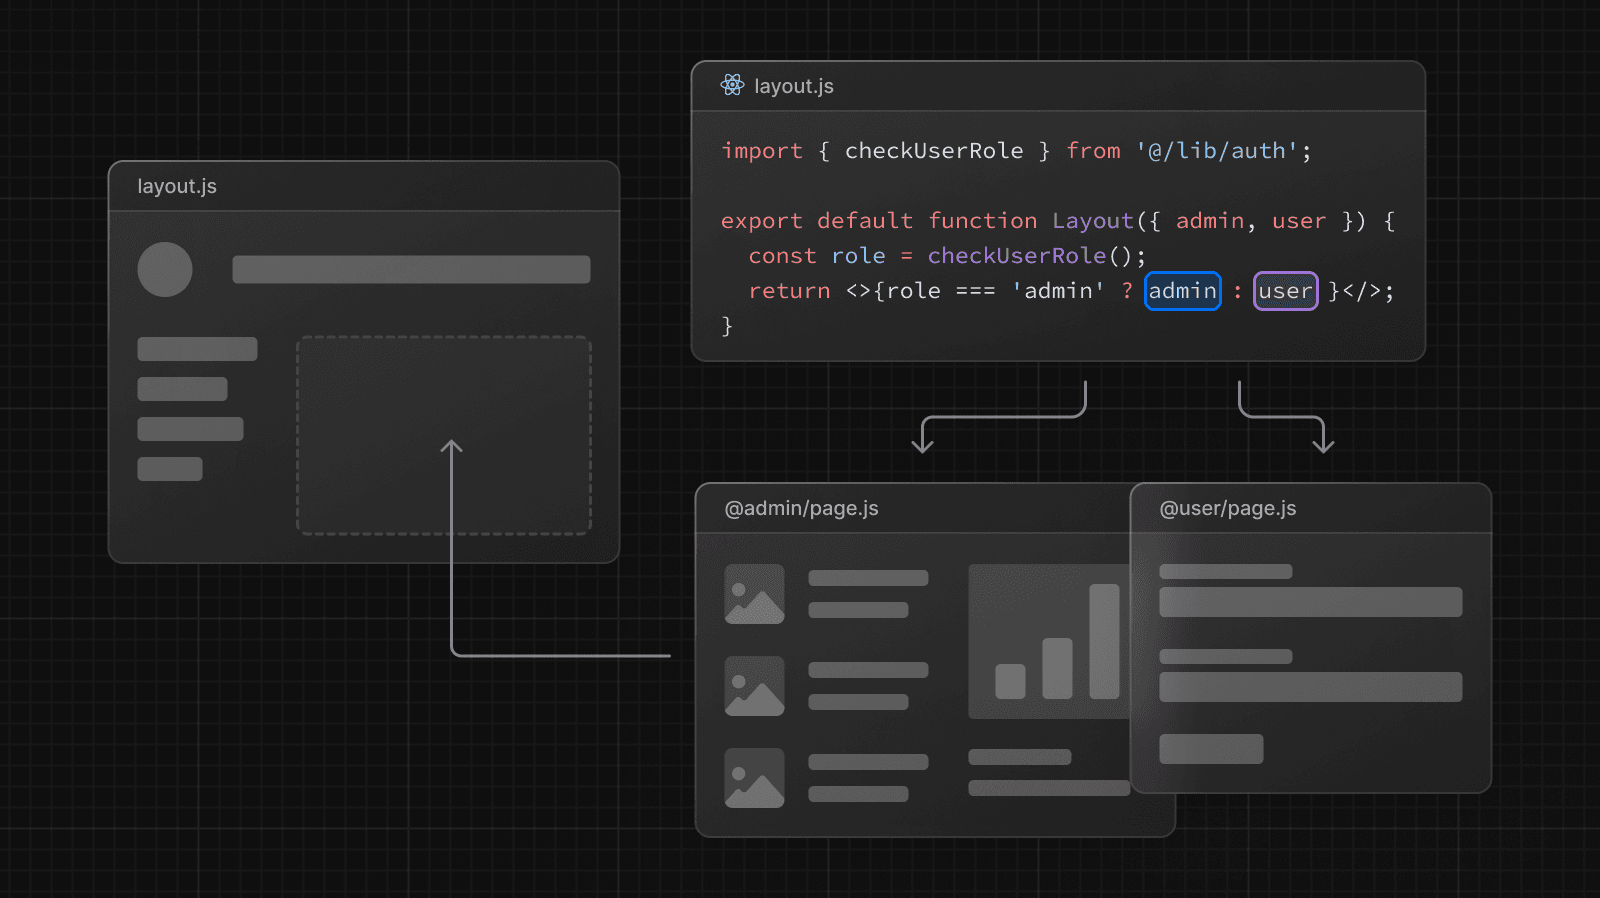 import { checkUserRole } from '@/lib/auth' export default function Layout({ user, admin, }: { user: React.ReactNode admin: React.ReactNode }) { const role = checkUserRole() return role === 'admin' ? admin : user } ### Tab Groups You can add a `layout` inside a slot to allow users to navigate the slot independently. This is useful for creating tabs. For example, the `@analytics` slot has two subpages: `/page-views` and `/visitors`. 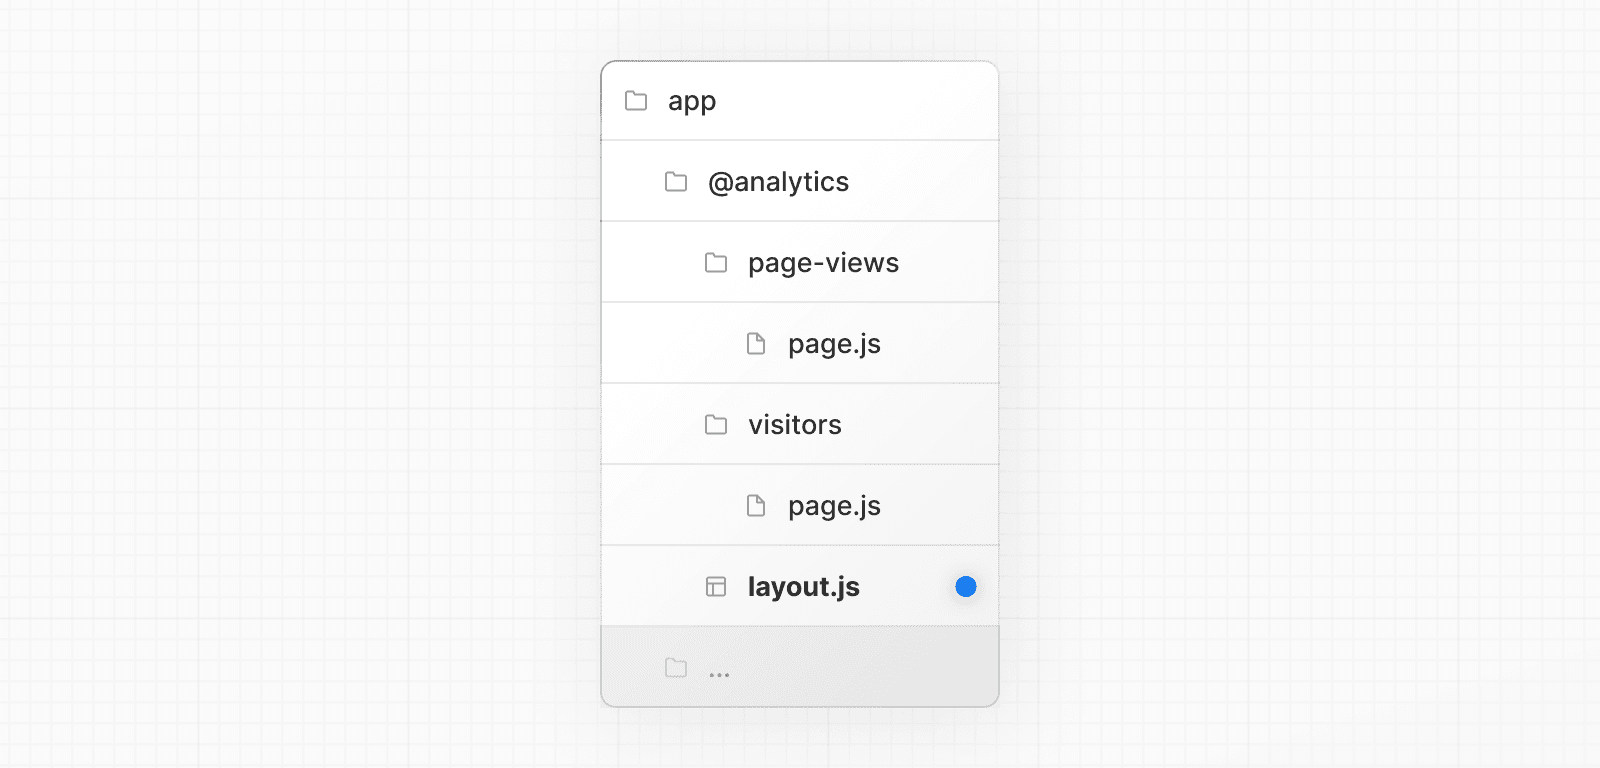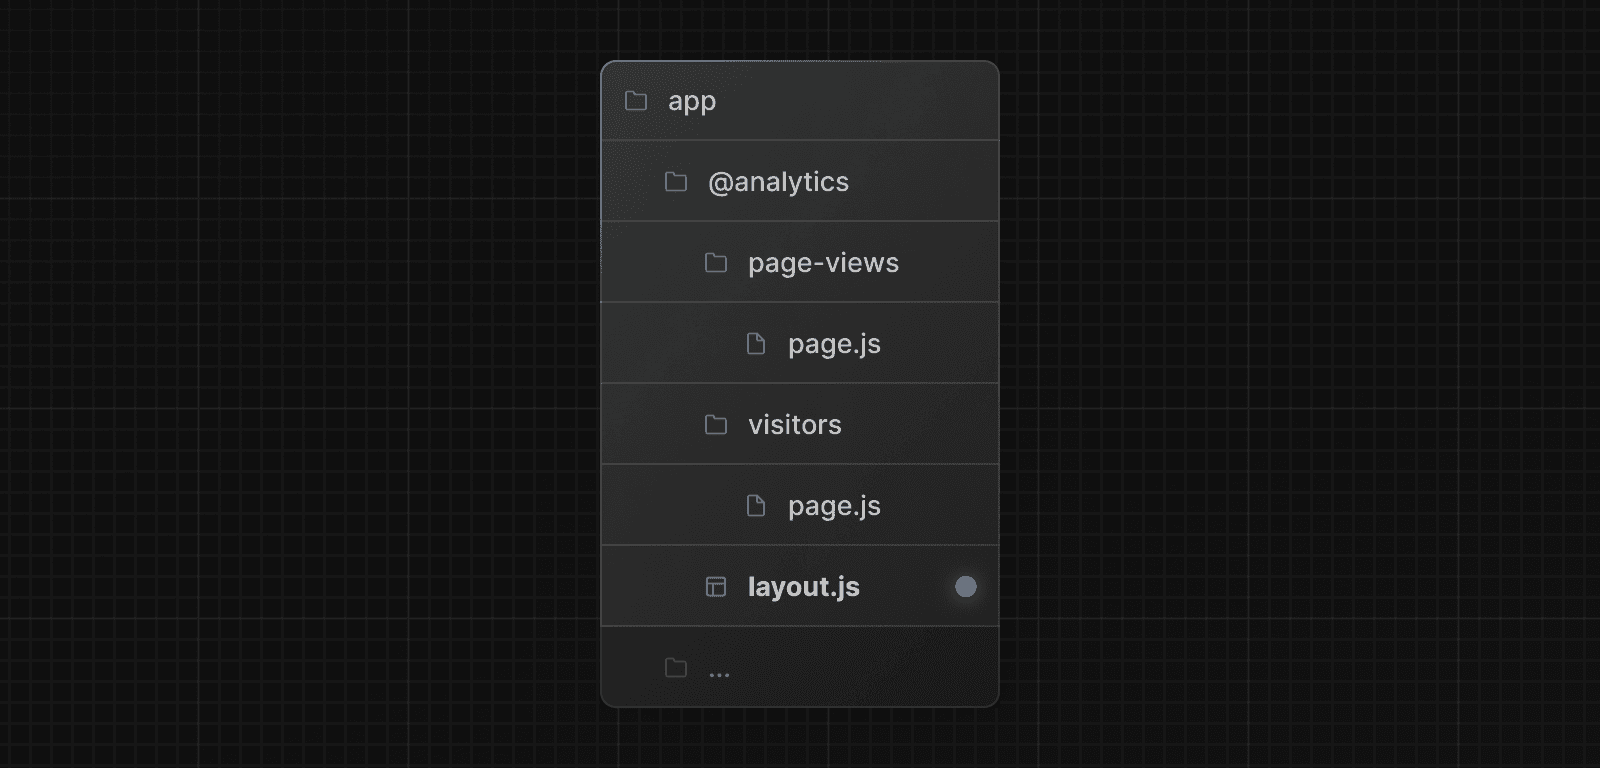 Within `@analytics`, create a `layout` file to share the tabs between the two pages: import Link from 'next/link' export default function Layout({ children }: { children: React.ReactNode }) { return ( <> <nav> <Link href="/page-views">Page Views</Link> <Link href="/visitors">Visitors</Link> </nav> <div>{children}</div> </> ) } ### Modals Parallel Routes can be used together with Intercepting Routes to create modals that support deep linking. This allows you to solve common challenges when building modals, such as: * Making the modal content **shareable through a URL**. * **Preserving context** when the page is refreshed, instead of closing the modal. * **Closing the modal on backwards navigation** rather than going to the previous route. * **Reopening the modal on forwards navigation**. Consider the following UI pattern, where a user can open a login modal from a layout using client-side navigation, or access a separate `/login` page: 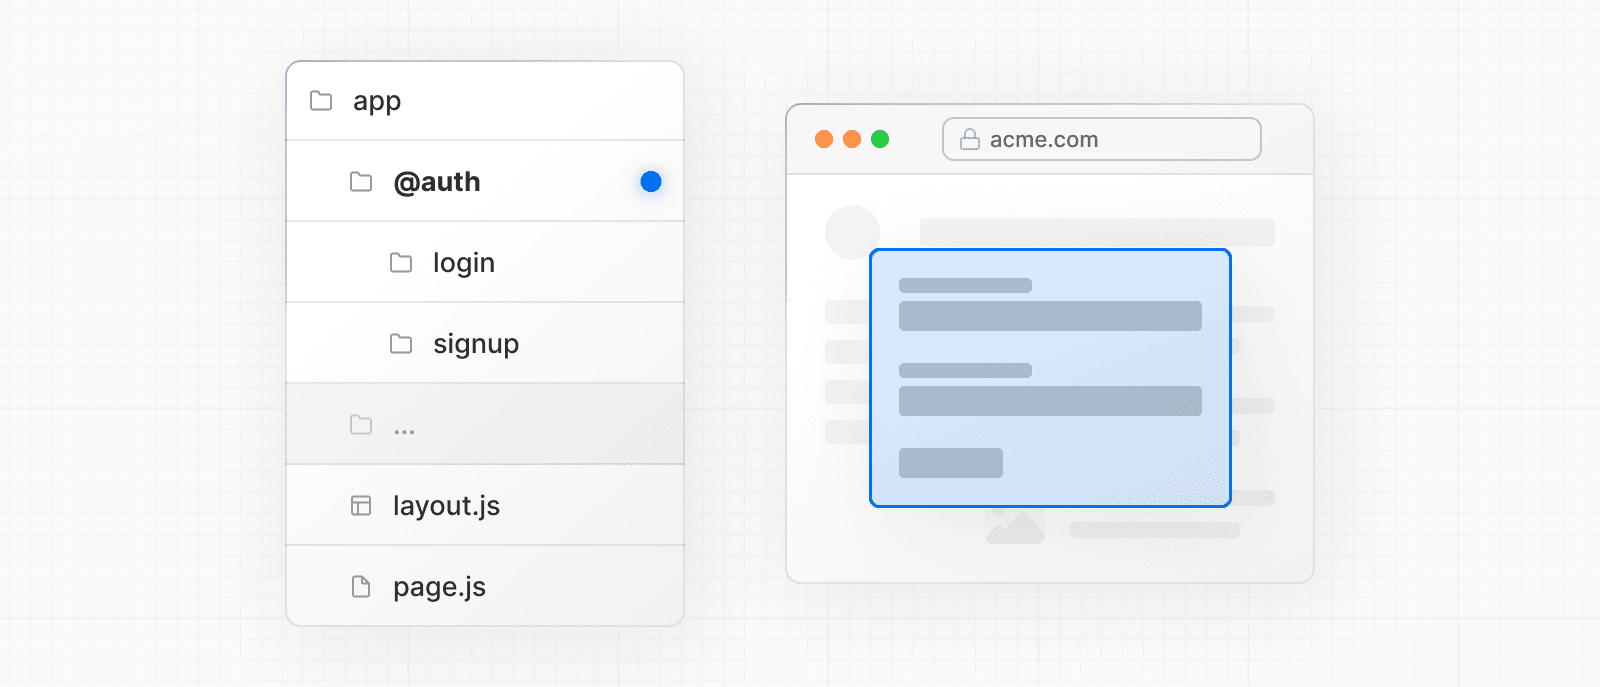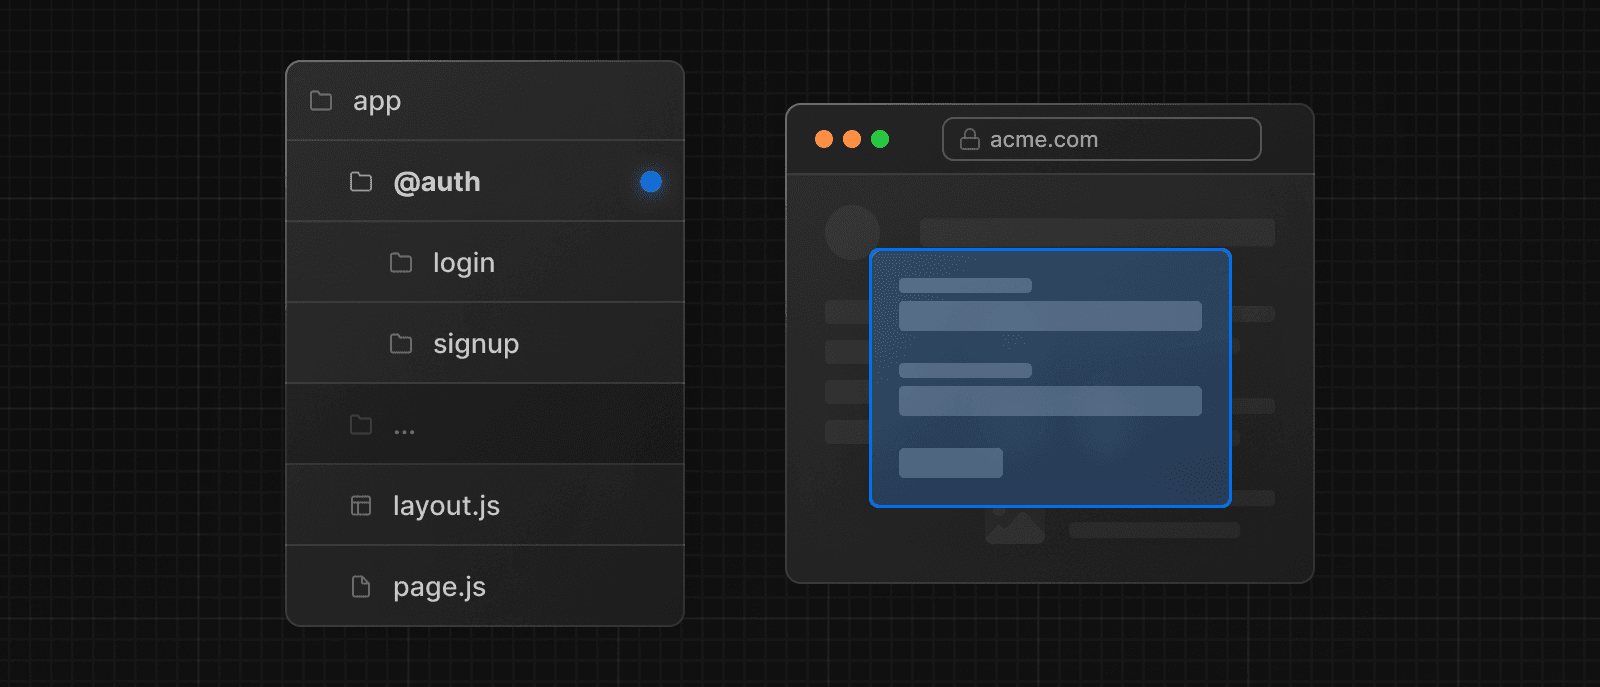 To implement this pattern, start by creating a `/login` route that renders your **main** login page. 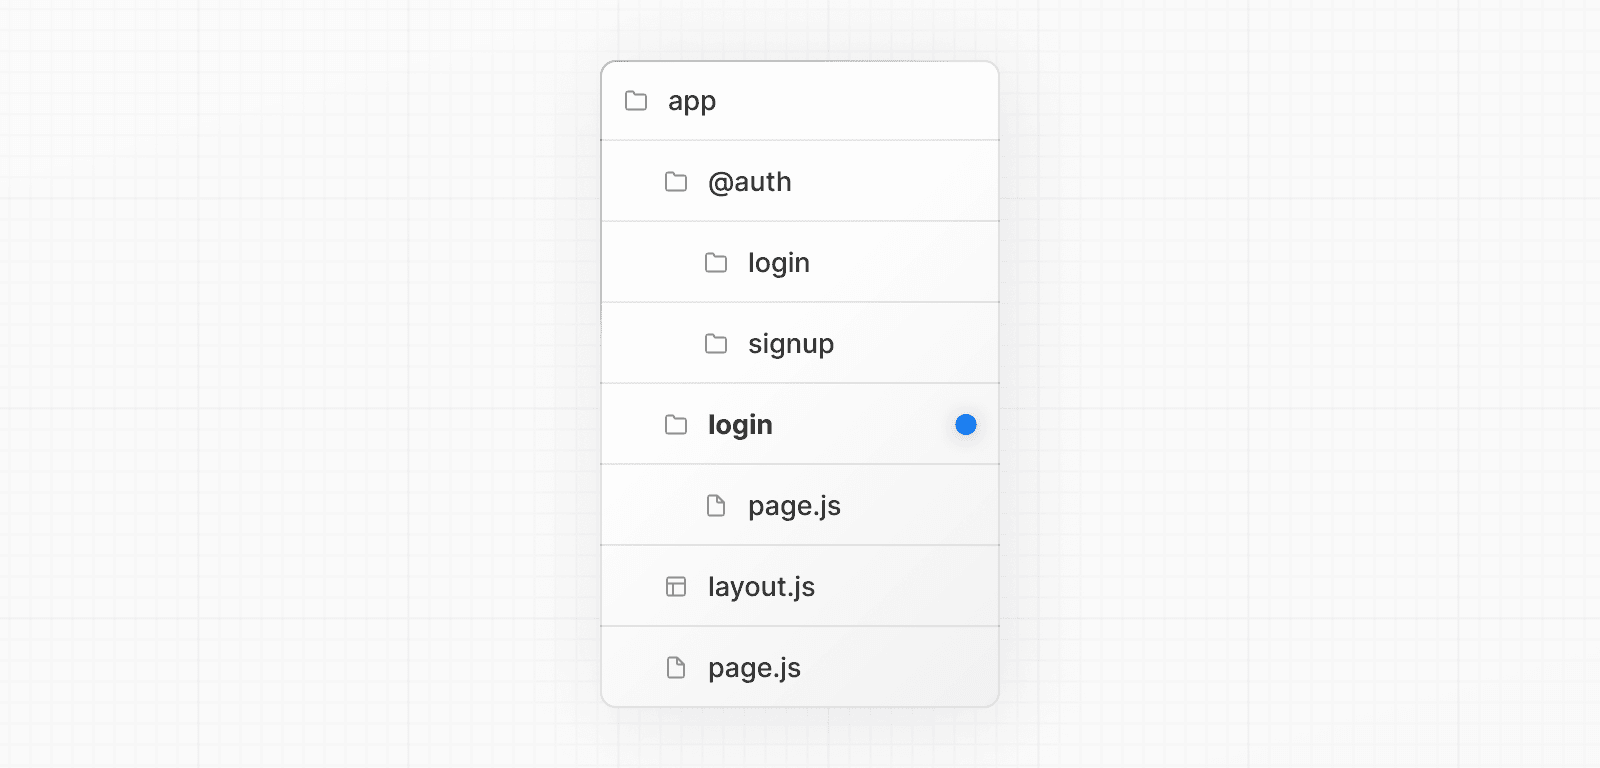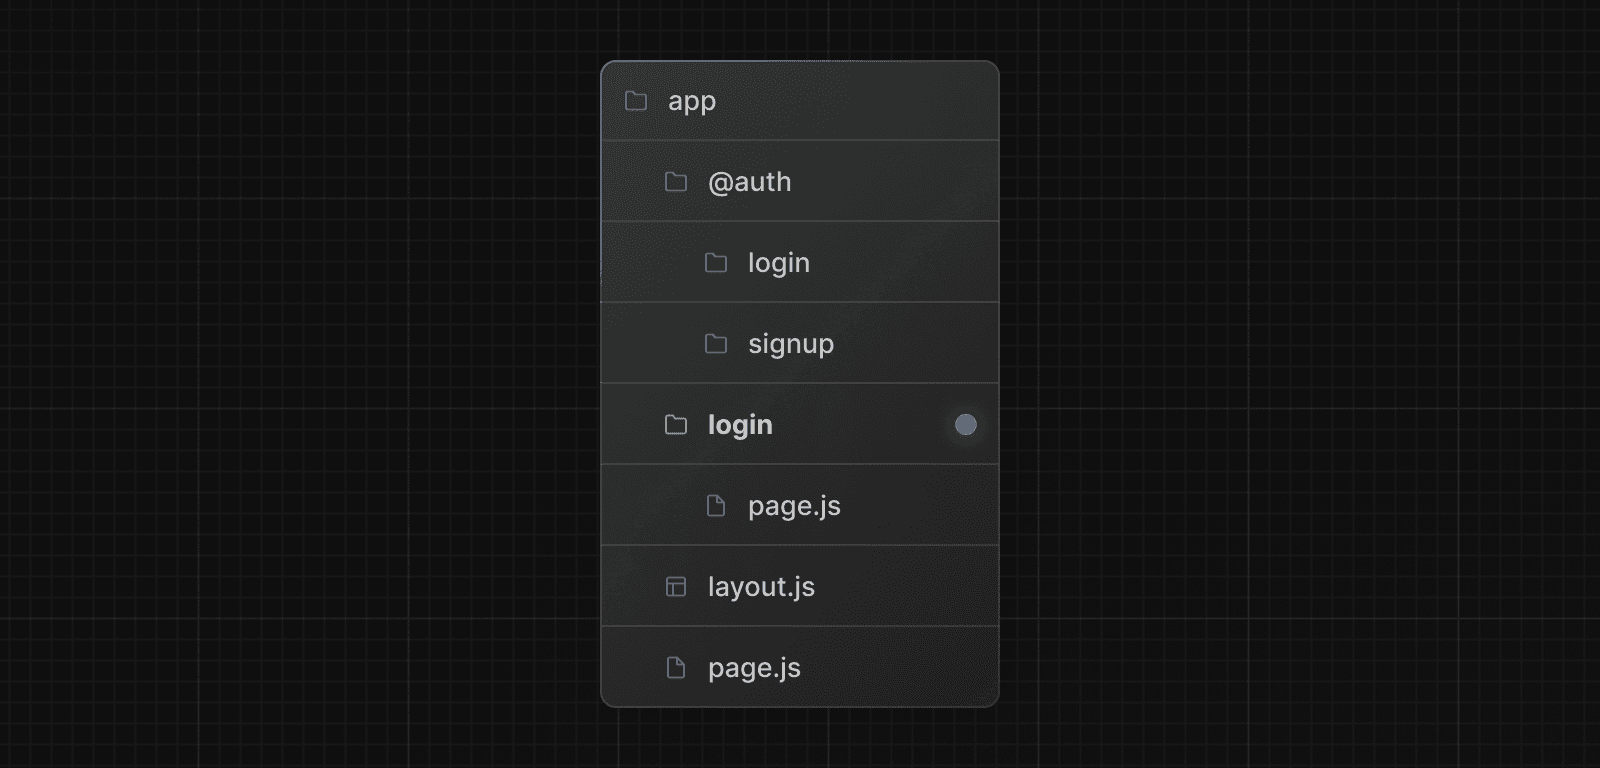 import { Login } from '@/app/ui/login' export default function Page() { return <Login /> } Then, inside the `@auth` slot, add `default.js` file that returns `null`. This ensures that the modal is not rendered when it's not active. export default function Default() { return null } Inside your `@auth` slot, intercept the `/login` route by updating the `/(.)login` folder. Import the `<Modal>` component and its children into the `/(.)login/page.tsx` file: import { Modal } from '@/app/ui/modal' import { Login } from '@/app/ui/login' export default function Page() { return ( <Modal> <Login /> </Modal> ) } > **Good to know:** > > * The convention used to intercept the route, e.g. `(.)`, depends on your file-system structure. See Intercepting Routes convention. > * By separating the `<Modal>` functionality from the modal content (`<Login>`), you can ensure any content inside the modal, e.g. forms, are Server Components. See Interleaving Client and Server Components for more information. #### Opening the modal Now, you can leverage the Next.js router to open and close the modal. This ensures the URL is correctly updated when the modal is open, and when navigating backwards and forwards. To open the modal, pass the `@auth` slot as a prop to the parent layout and render it alongside the `children` prop. import Link from 'next/link' export default function Layout({ auth, children, }: { auth: React.ReactNode children: React.ReactNode }) { return ( <> <nav> <Link href="/login">Open modal</Link> </nav> <div>{auth}</div> <div>{children}</div> </> ) } When the user clicks the `<Link>`, the modal will open instead of navigating to the `/login` page. However, on refresh or initial load, navigating to `/login` will take the user to the main login page. #### Closing the modal You can close the modal by calling `router.back()` or by using the `Link` component. 'use client' import { useRouter } from 'next/navigation' export function Modal({ children }: { children: React.ReactNode }) { const router = useRouter() return ( <> <button onClick={() => { router.back() }} > Close modal </button> <div>{children}</div> </> ) } When using the `Link` component to navigate away from a page that shouldn't render the `@auth` slot anymore, we need to make sure the parallel route matches to a component that returns `null`. For example, when navigating back to the root page, we create a `@auth/page.tsx` component: import Link from 'next/link' export function Modal({ children }: { children: React.ReactNode }) { return ( <> <Link href="/">Close modal</Link> <div>{children}</div> </> ) } export default function Page() { return null } Or if navigating to any other page (such as `/foo`, `/foo/bar`, etc), you can use a catch-all slot: export default function CatchAll() { return null } > **Good to know:** > > * We use a catch-all route in our `@auth` slot to close the modal because of the behavior described in Active state and navigation. Since client-side navigations to a route that no longer match the slot will remain visible, we need to match the slot to a route that returns `null` to close the modal. > * Other examples could include opening a photo modal in a gallery while also having a dedicated `/photo/[id]` page, or opening a shopping cart in a side modal. > * View an example of modals with Intercepted and Parallel Routes. ### Loading and Error UI Parallel Routes can be streamed independently, allowing you to define independent error and loading states for each route: 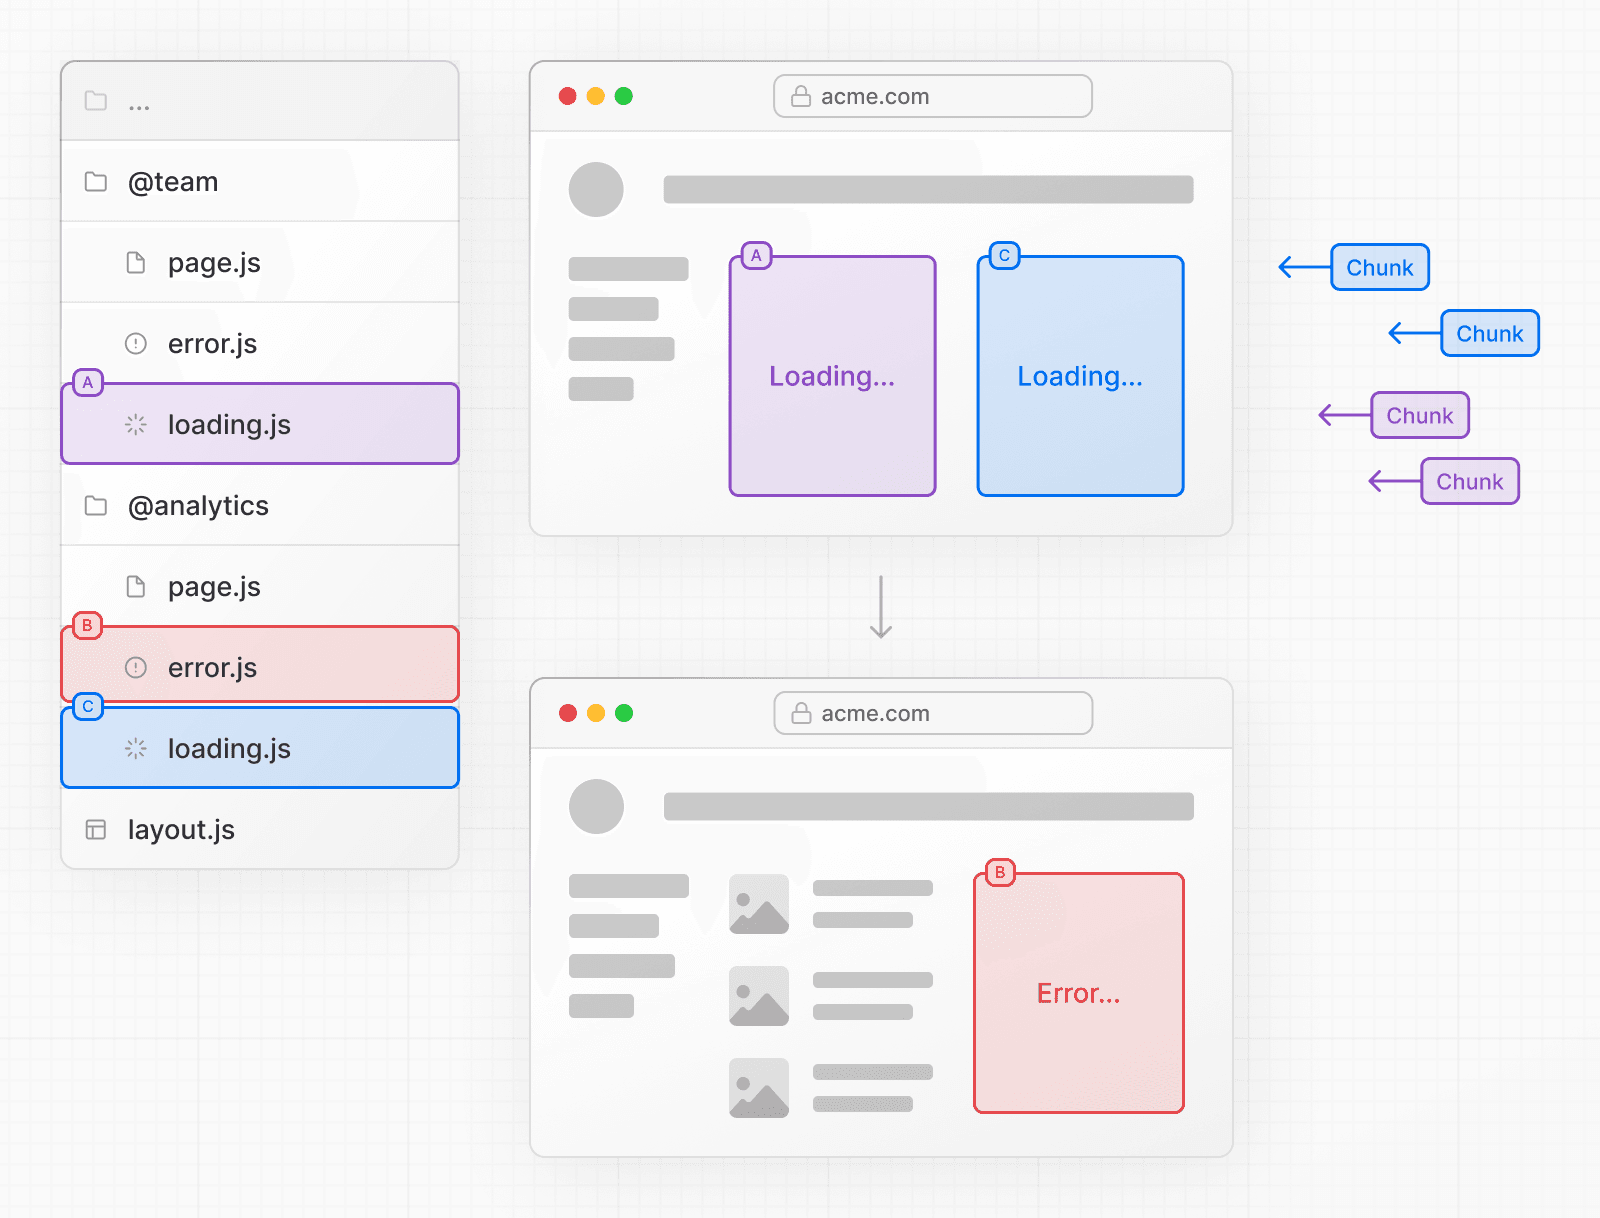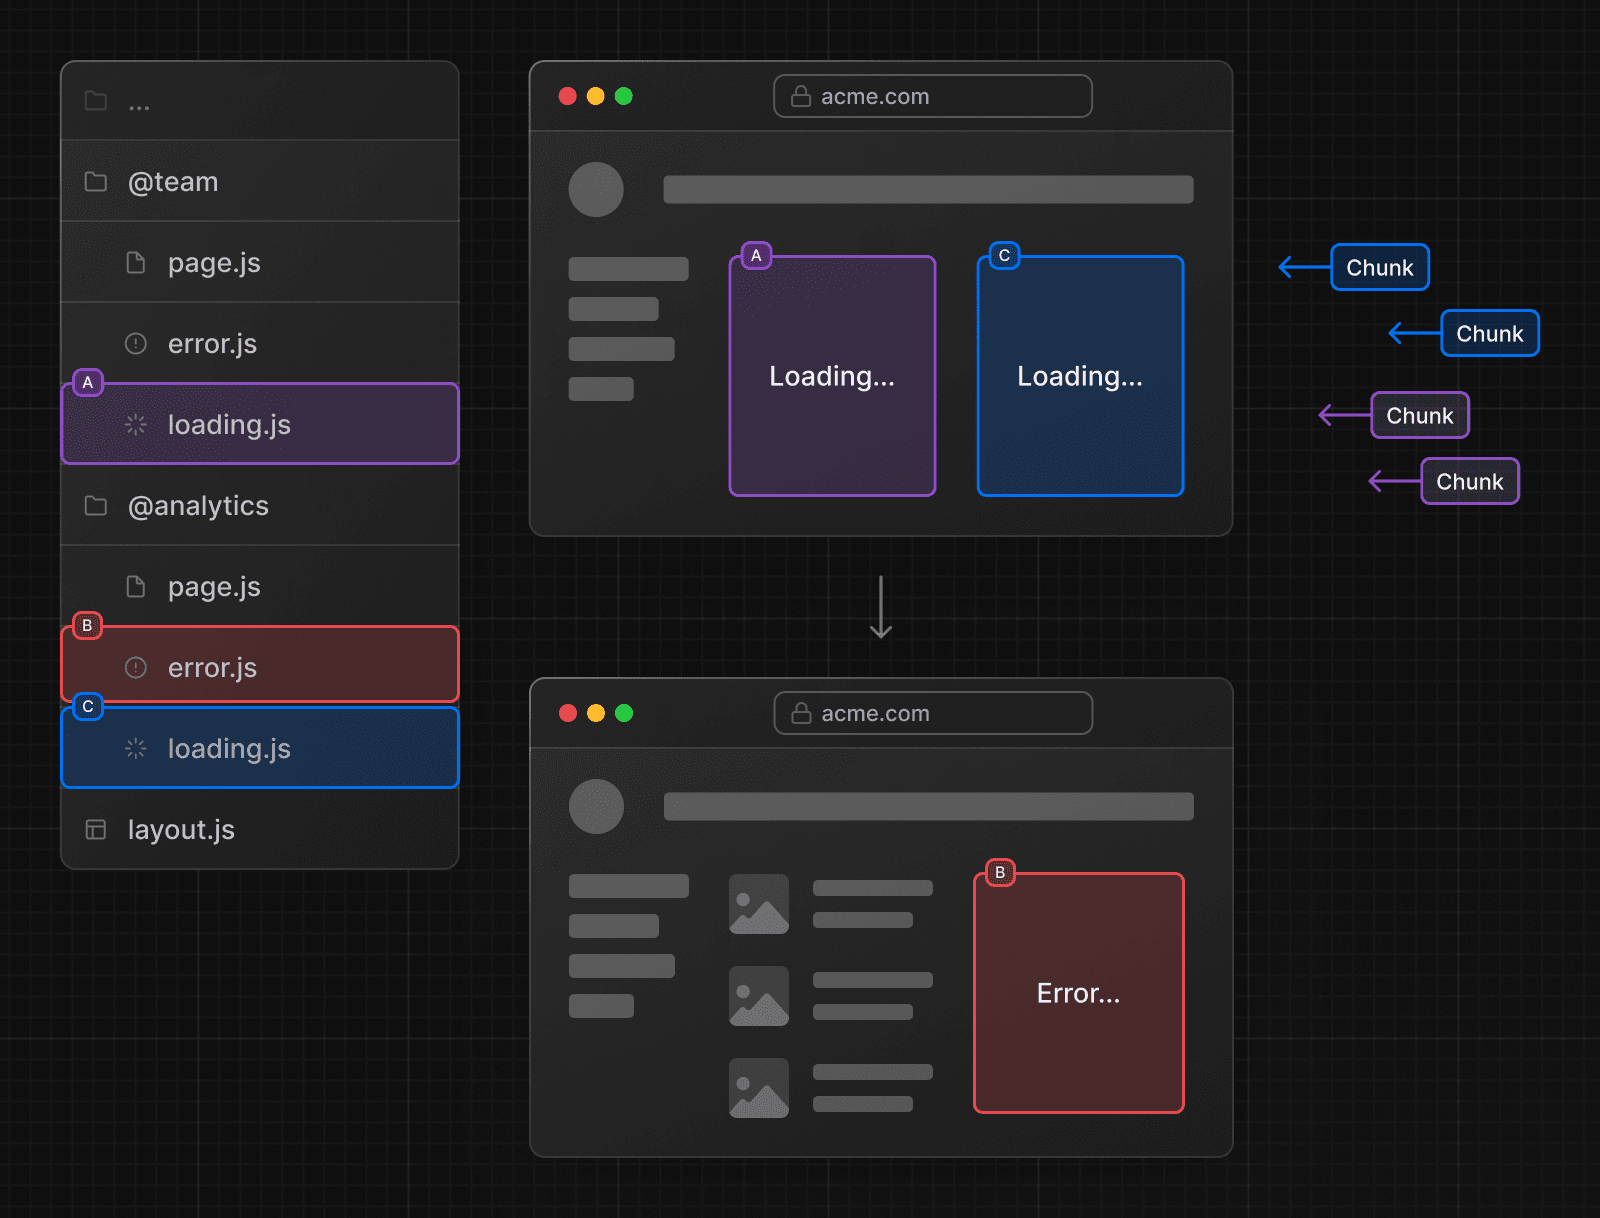 See the Loading UI and Error Handling documentation for more information. --- ## Page: https://nextjs.org/docs/app/building-your-application/routing/intercepting-routes Intercepting routes allows you to load a route from another part of your application within the current layout. This routing paradigm can be useful when you want to display the content of a route without the user switching to a different context. For example, when clicking on a photo in a feed, you can display the photo in a modal, overlaying the feed. In this case, Next.js intercepts the `/photo/123` route, masks the URL, and overlays it over `/feed`. 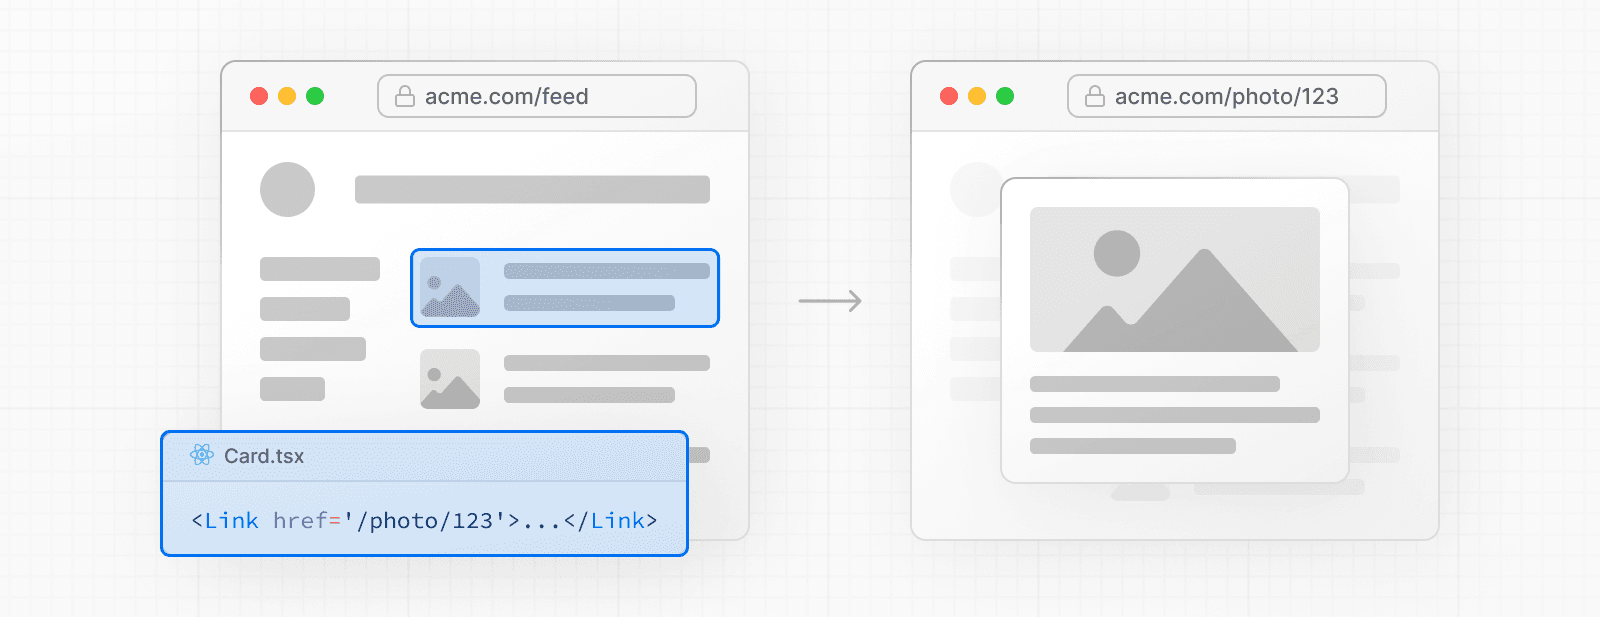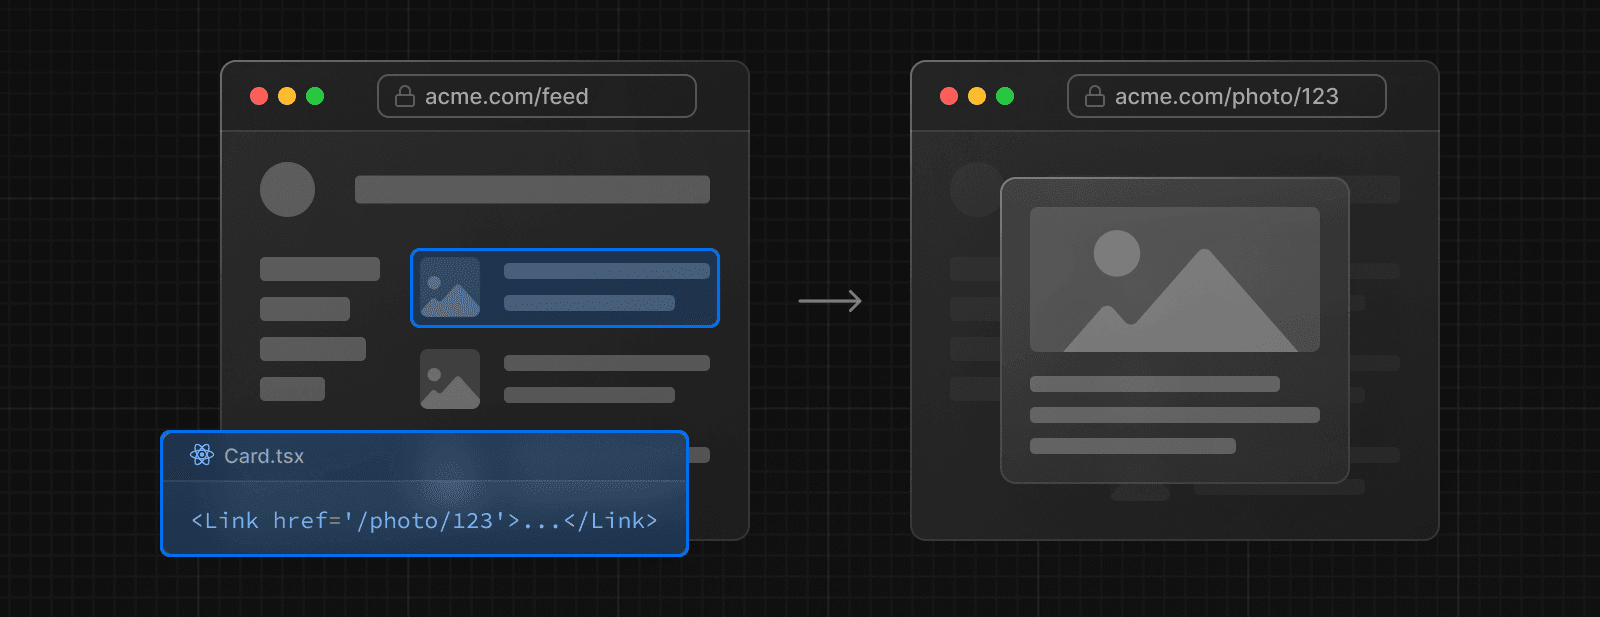 However, when navigating to the photo by clicking a shareable URL or by refreshing the page, the entire photo page should render instead of the modal. No route interception should occur.  ## Convention Intercepting routes can be defined with the `(..)` convention, which is similar to relative path convention `../` but for segments. You can use: * `(.)` to match segments on the **same level** * `(..)` to match segments **one level above** * `(..)(..)` to match segments **two levels above** * `(...)` to match segments from the **root** `app` directory For example, you can intercept the `photo` segment from within the `feed` segment by creating a `(..)photo` directory. 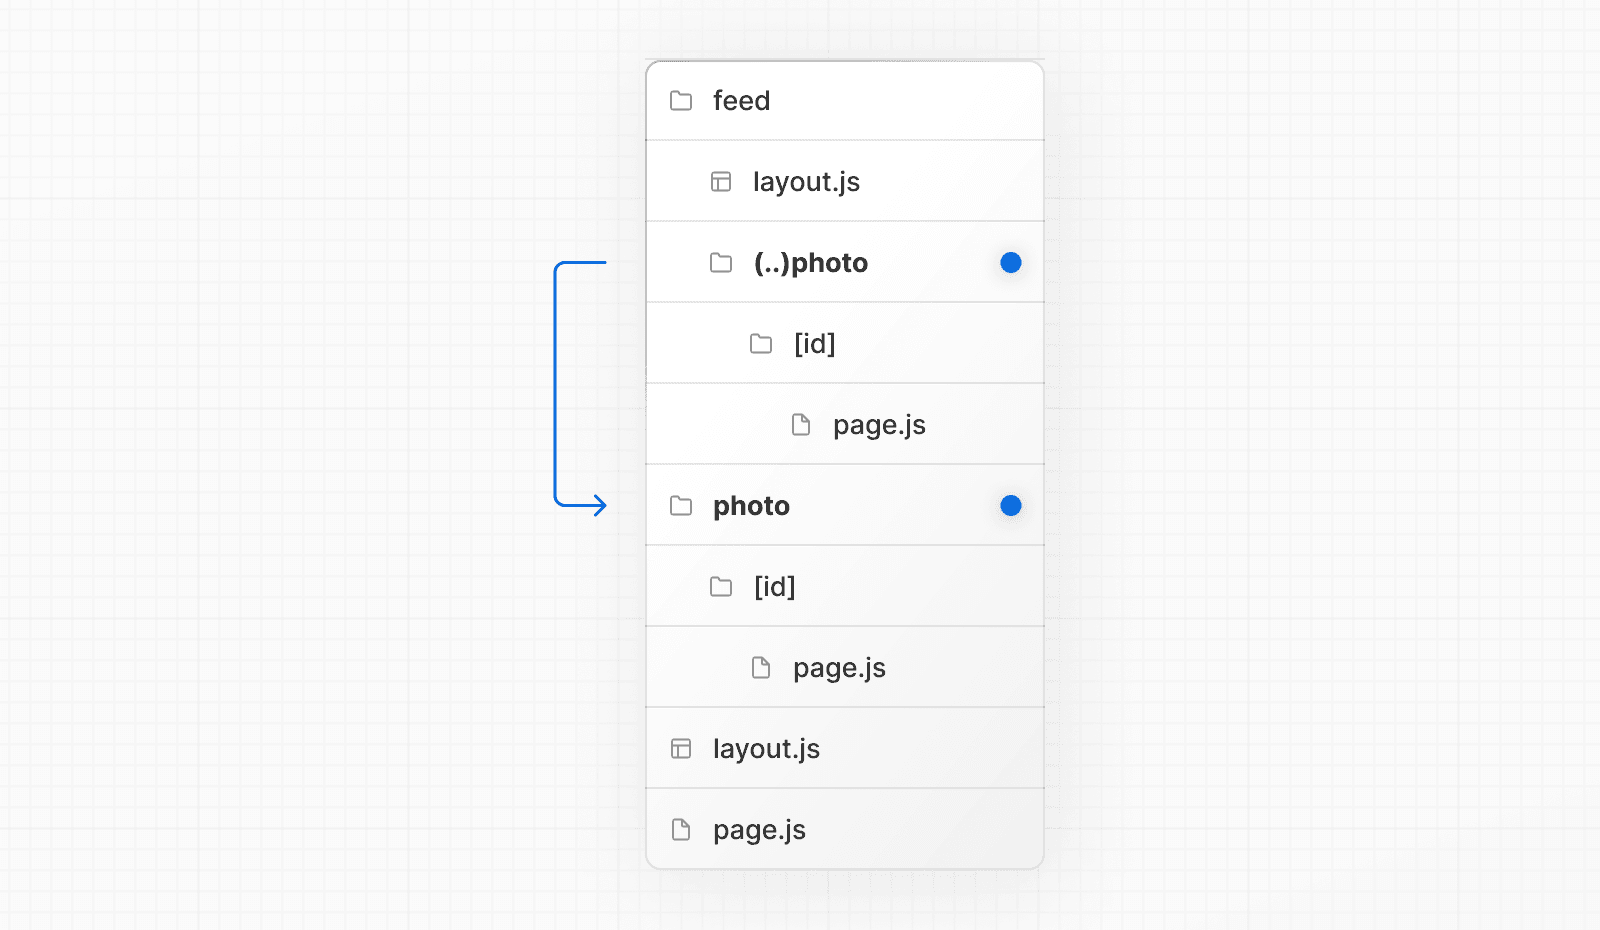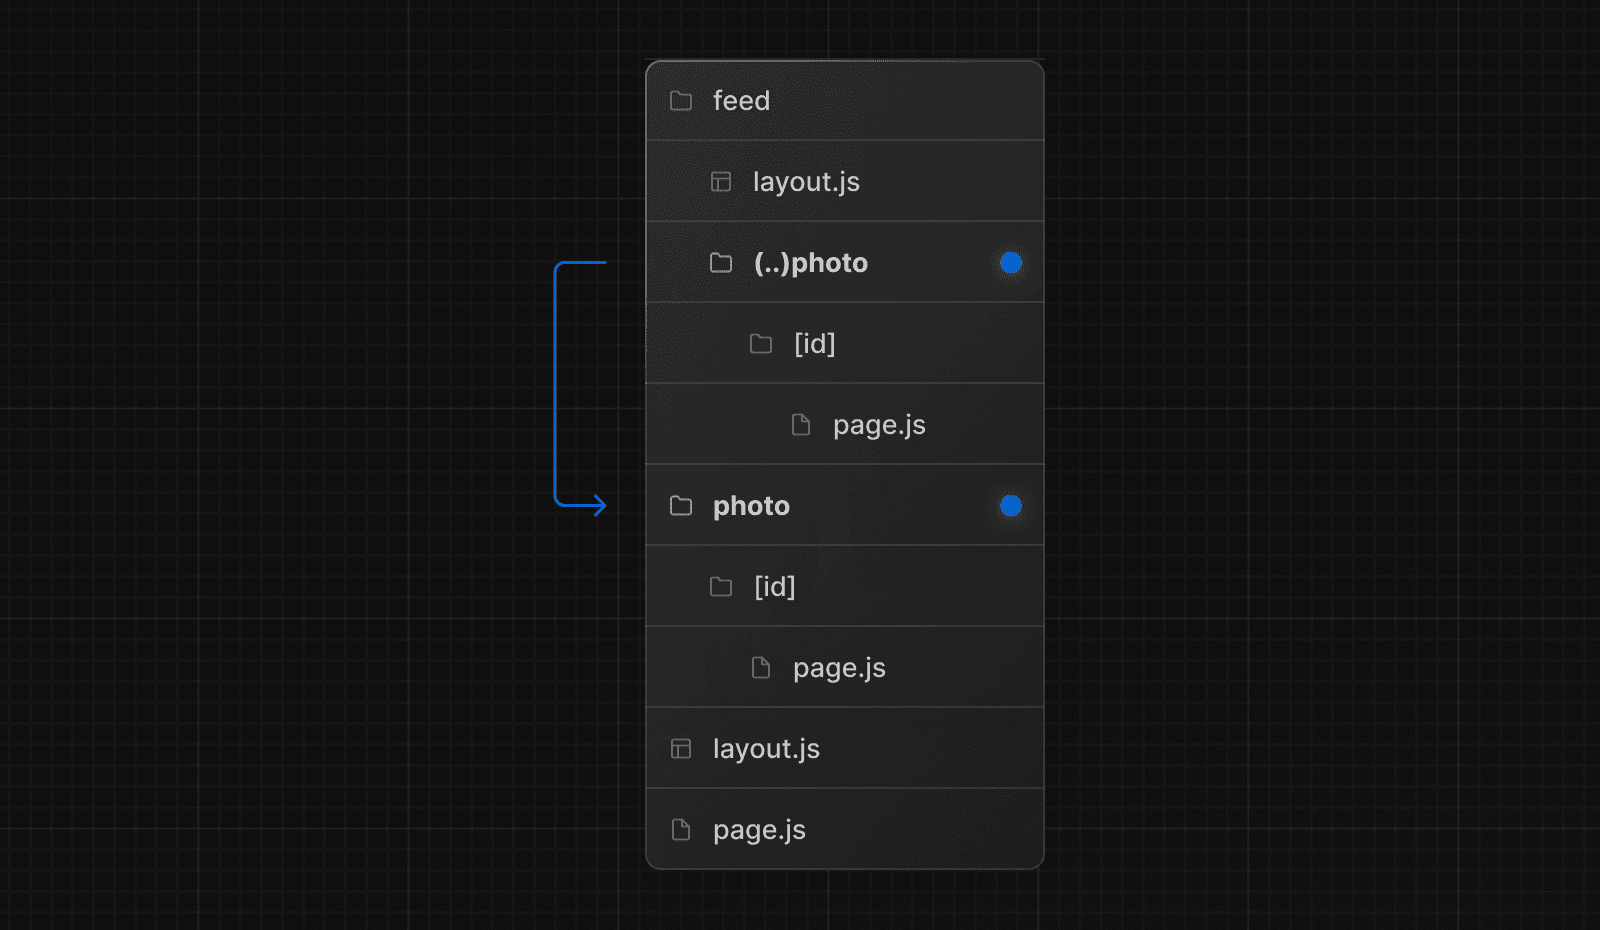 > Note that the `(..)` convention is based on _route segments_, not the file-system. ## Examples ### Modals Intercepting Routes can be used together with Parallel Routes to create modals. This allows you to solve common challenges when building modals, such as: * Making the modal content **shareable through a URL**. * **Preserving context** when the page is refreshed, instead of closing the modal. * **Closing the modal on backwards navigation** rather than going to the previous route. * **Reopening the modal on forwards navigation**. Consider the following UI pattern, where a user can open a photo modal from a gallery using client-side navigation, or navigate to the photo page directly from a shareable URL: 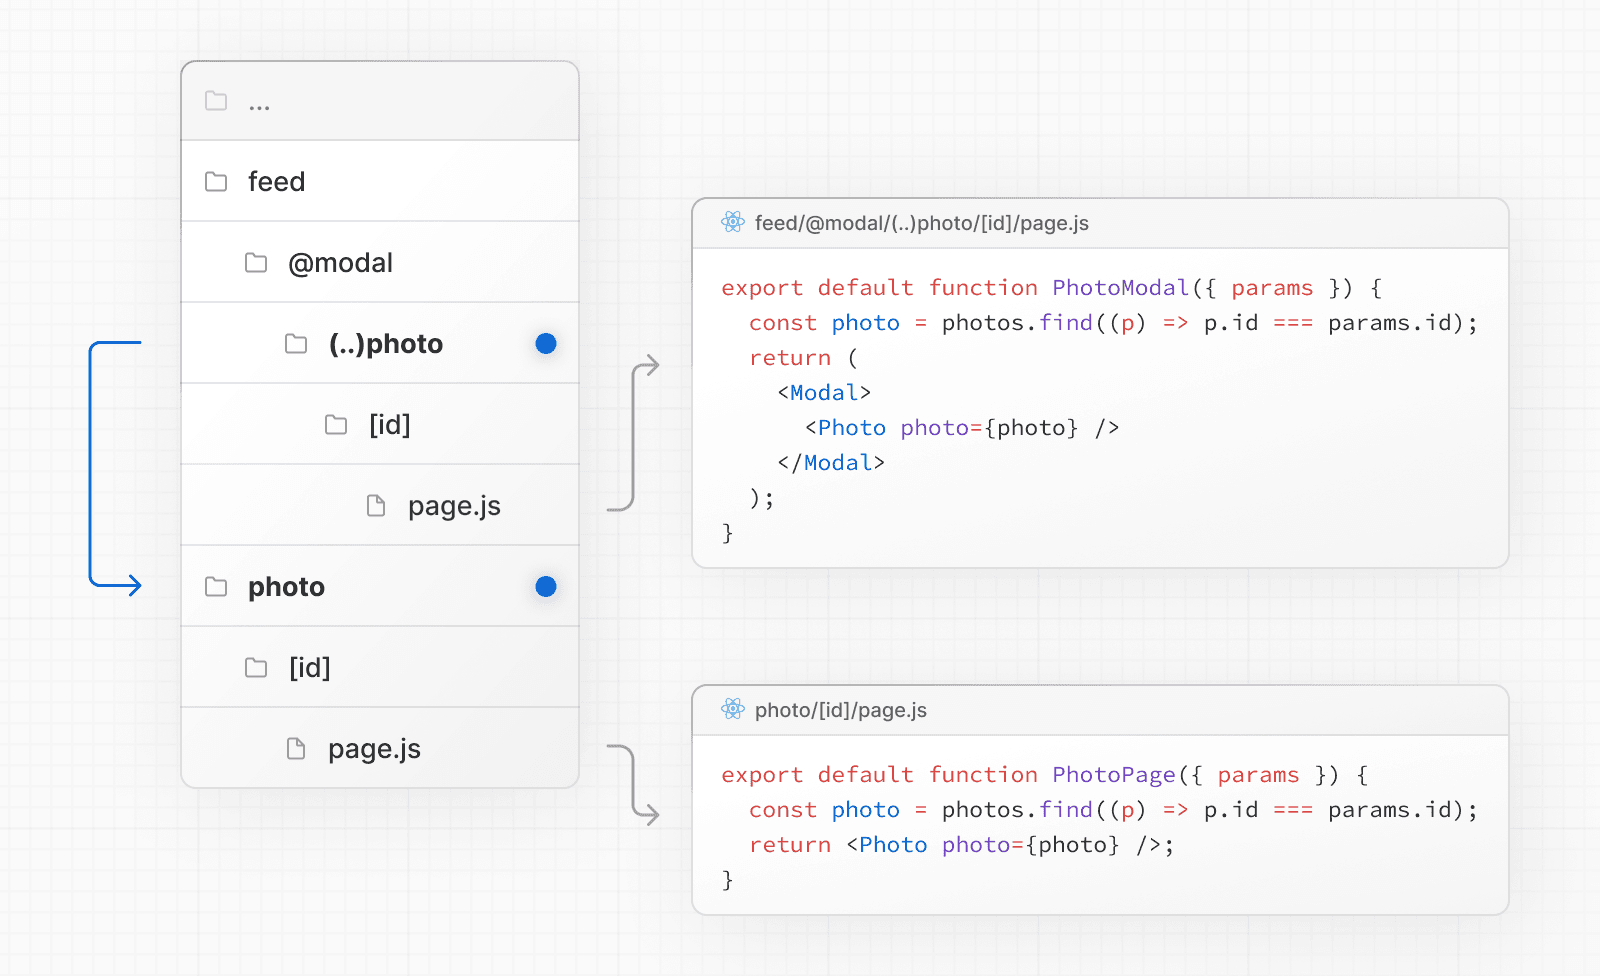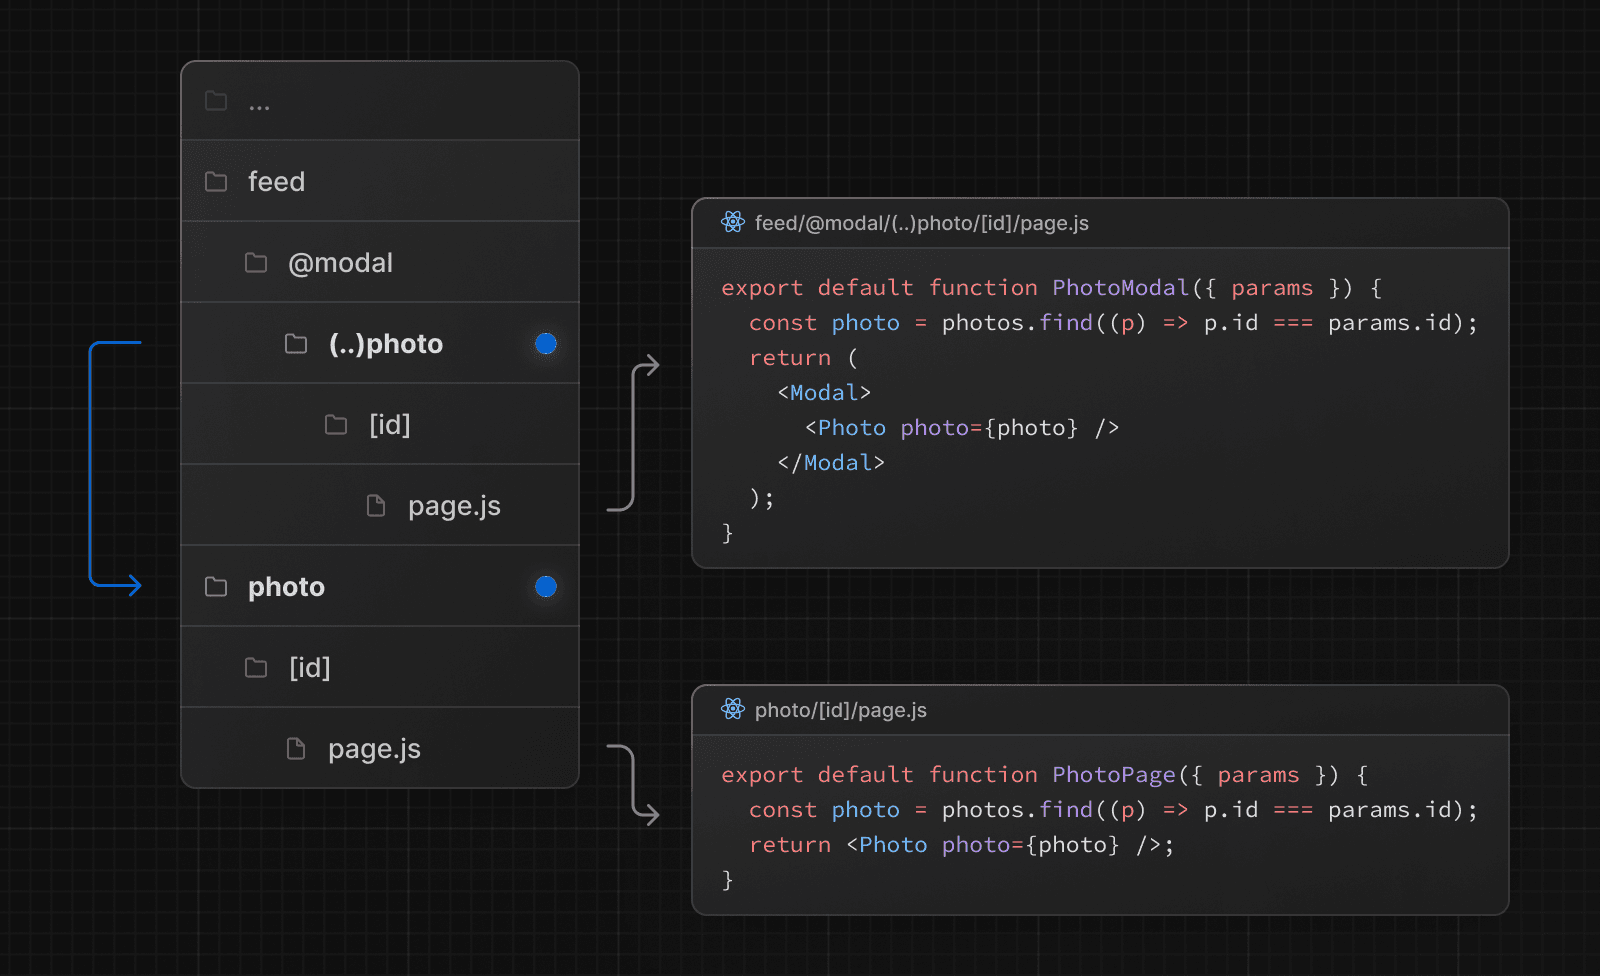 In the above example, the path to the `photo` segment can use the `(..)` matcher since `@modal` is a slot and **not** a segment. This means that the `photo` route is only one segment level higher, despite being two file-system levels higher. See the Parallel Routes documentation for a step-by-step example, or see our image gallery example. > **Good to know:** > > * Other examples could include opening a login modal in a top navbar while also having a dedicated `/login` page, or opening a shopping cart in a side modal. --- ## Page: https://nextjs.org/docs/app/building-your-application/routing/route-handlers Route Handlers allow you to create custom request handlers for a given route using the Web Request and Response APIs. 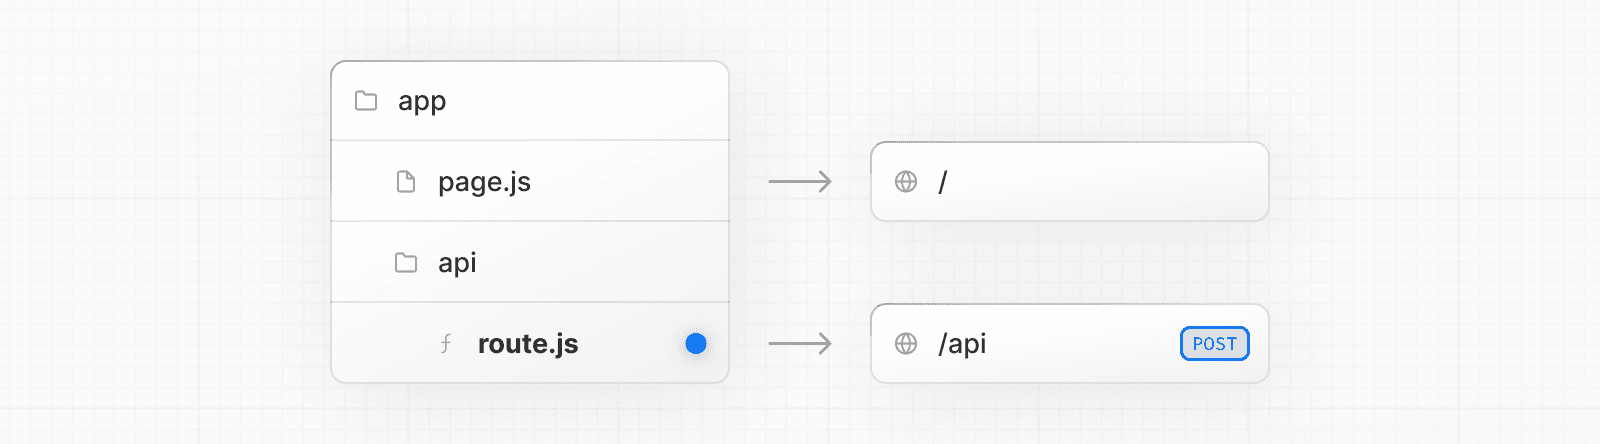 > **Good to know**: Route Handlers are only available inside the `app` directory. They are the equivalent of API Routes inside the `pages` directory meaning you **do not** need to use API Routes and Route Handlers together. ## Convention Route Handlers are defined in a `route.js|ts` file inside the `app` directory: export async function GET(request: Request) {} Route Handlers can be nested anywhere inside the `app` directory, similar to `page.js` and `layout.js`. But there **cannot** be a `route.js` file at the same route segment level as `page.js`. ### Supported HTTP Methods The following HTTP methods are supported: `GET`, `POST`, `PUT`, `PATCH`, `DELETE`, `HEAD`, and `OPTIONS`. If an unsupported method is called, Next.js will return a `405 Method Not Allowed` response. ### Extended `NextRequest` and `NextResponse` APIs In addition to supporting the native Request and Response APIs, Next.js extends them with `NextRequest` and `NextResponse` to provide convenient helpers for advanced use cases. ## Behavior ### Caching Route Handlers are not cached by default. You can, however, opt into caching for `GET` methods. Other supported HTTP methods are **not** cached. To cache a `GET` method, use a route config option such as `export const dynamic = 'force-static'` in your Route Handler file. export const dynamic = 'force-static' export async function GET() { const res = await fetch('https://data.mongodb-api.com/...', { headers: { 'Content-Type': 'application/json', 'API-Key': process.env.DATA_API_KEY, }, }) const data = await res.json() return Response.json({ data }) } > **Good to know**: Other supported HTTP methods are **not** cached, even if they are placed alongside a `GET` method that is cached, in the same file. ### Special Route Handlers Special Route Handlers like `sitemap.ts`, `opengraph-image.tsx`, and `icon.tsx`, and other metadata files remain static by default unless they use Dynamic APIs or dynamic config options. ### Route Resolution You can consider a `route` the lowest level routing primitive. * They **do not** participate in layouts or client-side navigations like `page`. * There **cannot** be a `route.js` file at the same route as `page.js`. | Page | Route | Result | | --- | --- | --- | | `app/page.js` | `app/route.js` | Conflict | | `app/page.js` | `app/api/route.js` | Valid | | `app/[user]/page.js` | `app/api/route.js` | Valid | Each `route.js` or `page.js` file takes over all HTTP verbs for that route. export default function Page() { return <h1>Hello, Next.js!</h1> } // ❌ Conflict // `app/route.ts` export async function POST(request: Request) {} ## Examples The following examples show how to combine Route Handlers with other Next.js APIs and features. ### Revalidating Cached Data You can revalidate cached data using Incremental Static Regeneration (ISR): export const revalidate = 60 export async function GET() { const data = await fetch('https://api.vercel.app/blog') const posts = await data.json() return Response.json(posts) } ### Cookies You can read or set cookies with `cookies` from `next/headers`. This server function can be called directly in a Route Handler, or nested inside of another function. Alternatively, you can return a new `Response` using the `Set-Cookie` header. import { cookies } from 'next/headers' export async function GET(request: Request) { const cookieStore = await cookies() const token = cookieStore.get('token') return new Response('Hello, Next.js!', { status: 200, headers: { 'Set-Cookie': `token=${token.value}` }, }) } You can also use the underlying Web APIs to read cookies from the request (`NextRequest`): import { type NextRequest } from 'next/server' export async function GET(request: NextRequest) { const token = request.cookies.get('token') } You can read headers with `headers` from `next/headers`. This server function can be called directly in a Route Handler, or nested inside of another function. This `headers` instance is read-only. To set headers, you need to return a new `Response` with new `headers`. import { headers } from 'next/headers' export async function GET(request: Request) { const headersList = await headers() const referer = headersList.get('referer') return new Response('Hello, Next.js!', { status: 200, headers: { referer: referer }, }) } You can also use the underlying Web APIs to read headers from the request (`NextRequest`): import { type NextRequest } from 'next/server' export async function GET(request: NextRequest) { const requestHeaders = new Headers(request.headers) } ### Redirects import { redirect } from 'next/navigation' export async function GET(request: Request) { redirect('https://nextjs.org/') } ### Dynamic Route Segments Route Handlers can use Dynamic Segments to create request handlers from dynamic data. export async function GET( request: Request, { params }: { params: Promise<{ slug: string }> } ) { const { slug } = await params // 'a', 'b', or 'c' } | Route | Example URL | `params` | | --- | --- | --- | | `app/items/[slug]/route.js` | `/items/a` | `Promise<{ slug: 'a' }>` | | `app/items/[slug]/route.js` | `/items/b` | `Promise<{ slug: 'b' }>` | | `app/items/[slug]/route.js` | `/items/c` | `Promise<{ slug: 'c' }>` | ### URL Query Parameters The request object passed to the Route Handler is a `NextRequest` instance, which includes some additional convenience methods, such as those for more easily handling query parameters. import { type NextRequest } from 'next/server' export function GET(request: NextRequest) { const searchParams = request.nextUrl.searchParams const query = searchParams.get('query') // query is "hello" for /api/search?query=hello } ### Streaming Streaming is commonly used in combination with Large Language Models (LLMs), such as OpenAI, for AI-generated content. Learn more about the AI SDK. import { openai } from '@ai-sdk/openai' import { StreamingTextResponse, streamText } from 'ai' export async function POST(req: Request) { const { messages } = await req.json() const result = await streamText({ model: openai('gpt-4-turbo'), messages, }) return new StreamingTextResponse(result.toAIStream()) } These abstractions use the Web APIs to create a stream. You can also use the underlying Web APIs directly. // https://developer.mozilla.org/docs/Web/API/ReadableStream#convert_async_iterator_to_stream function iteratorToStream(iterator: any) { return new ReadableStream({ async pull(controller) { const { value, done } = await iterator.next() if (done) { controller.close() } else { controller.enqueue(value) } }, }) } function sleep(time: number) { return new Promise((resolve) => { setTimeout(resolve, time) }) } const encoder = new TextEncoder() async function* makeIterator() { yield encoder.encode('<p>One</p>') await sleep(200) yield encoder.encode('<p>Two</p>') await sleep(200) yield encoder.encode('<p>Three</p>') } export async function GET() { const iterator = makeIterator() const stream = iteratorToStream(iterator) return new Response(stream) } ### Request Body You can read the `Request` body using the standard Web API methods: export async function POST(request: Request) { const res = await request.json() return Response.json({ res }) } ### Request Body FormData You can read the `FormData` using the `request.formData()` function: export async function POST(request: Request) { const formData = await request.formData() const name = formData.get('name') const email = formData.get('email') return Response.json({ name, email }) } Since `formData` data are all strings, you may want to use `zod-form-data` to validate the request and retrieve data in the format you prefer (e.g. `number`). ### CORS You can set CORS headers for a specific Route Handler using the standard Web API methods: export async function GET(request: Request) { return new Response('Hello, Next.js!', { status: 200, headers: { 'Access-Control-Allow-Origin': '*', 'Access-Control-Allow-Methods': 'GET, POST, PUT, DELETE, OPTIONS', 'Access-Control-Allow-Headers': 'Content-Type, Authorization', }, }) } > **Good to know**: > > * To add CORS headers to multiple Route Handlers, you can use Middleware or the `next.config.js` file. > * Alternatively, see our CORS example package. ### Webhooks You can use a Route Handler to receive webhooks from third-party services: export async function POST(request: Request) { try { const text = await request.text() // Process the webhook payload } catch (error) { return new Response(`Webhook error: ${error.message}`, { status: 400, }) } return new Response('Success!', { status: 200, }) } Notably, unlike API Routes with the Pages Router, you do not need to use `bodyParser` to use any additional configuration. ### Non-UI Responses You can use Route Handlers to return non-UI content. Note that `sitemap.xml`, `robots.txt`, `app icons`, and open graph images all have built-in support. export async function GET() { return new Response( `<?xml version="1.0" encoding="UTF-8" ?> <rss version="2.0"> <channel> <title>Next.js Documentation</title> <link>https://nextjs.org/docs</link> <description>The React Framework for the Web</description> </channel> </rss>`, { headers: { 'Content-Type': 'text/xml', }, } ) } ### Segment Config Options Route Handlers use the same route segment configuration as pages and layouts. export const dynamic = 'auto' export const dynamicParams = true export const revalidate = false export const fetchCache = 'auto' export const runtime = 'nodejs' export const preferredRegion = 'auto' See the API reference for more details. --- ## Page: https://nextjs.org/docs/app/building-your-application/routing/middleware Middleware allows you to run code before a request is completed. Then, based on the incoming request, you can modify the response by rewriting, redirecting, modifying the request or response headers, or responding directly. Middleware runs before cached content and routes are matched. See Matching Paths for more details. ## Use Cases Some common scenarios where Middleware is effective include: * Quick redirects after reading parts of the incoming request * Rewriting to different pages based on A/B tests or experiments * Modifying headers for all pages or a subset of pages Middleware is _not_ a good fit for: * Slow data fetching * Session management ## Convention Use the file `middleware.ts` (or `.js`) in the root of your project to define Middleware. For example, at the same level as `pages` or `app`, or inside `src` if applicable. > **Note**: While only one `middleware.ts` file is supported per project, you can still organize your middleware logic modularly. Break out middleware functionalities into separate `.ts` or `.js` files and import them into your main `middleware.ts` file. This allows for cleaner management of route-specific middleware, aggregated in the `middleware.ts` for centralized control. By enforcing a single middleware file, it simplifies configuration, prevents potential conflicts, and optimizes performance by avoiding multiple middleware layers. ## Example import { NextResponse } from 'next/server' import type { NextRequest } from 'next/server' // This function can be marked `async` if using `await` inside export function middleware(request: NextRequest) { return NextResponse.redirect(new URL('/home', request.url)) } // See "Matching Paths" below to learn more export const config = { matcher: '/about/:path*', } ## Matching Paths Middleware will be invoked for **every route in your project**. Given this, it's crucial to use matchers to precisely target or exclude specific routes. The following is the execution order: 1. `headers` from `next.config.js` 2. `redirects` from `next.config.js` 3. Middleware (`rewrites`, `redirects`, etc.) 4. `beforeFiles` (`rewrites`) from `next.config.js` 5. Filesystem routes (`public/`, `_next/static/`, `pages/`, `app/`, etc.) 6. `afterFiles` (`rewrites`) from `next.config.js` 7. Dynamic Routes (`/blog/[slug]`) 8. `fallback` (`rewrites`) from `next.config.js` There are two ways to define which paths Middleware will run on: 1. Custom matcher config 2. Conditional statements ### Matcher `matcher` allows you to filter Middleware to run on specific paths. export const config = { matcher: '/about/:path*', } You can match a single path or multiple paths with an array syntax: export const config = { matcher: ['/about/:path*', '/dashboard/:path*'], } The `matcher` config allows full regex so matching like negative lookaheads or character matching is supported. An example of a negative lookahead to match all except specific paths can be seen here: export const config = { matcher: [ /* * Match all request paths except for the ones starting with: * - api (API routes) * - _next/static (static files) * - _next/image (image optimization files) * - favicon.ico, sitemap.xml, robots.txt (metadata files) */ '/((?!api|_next/static|_next/image|favicon.ico|sitemap.xml|robots.txt).*)', ], } You can also bypass Middleware for certain requests by using the `missing` or `has` arrays, or a combination of both: export const config = { matcher: [ /* * Match all request paths except for the ones starting with: * - api (API routes) * - _next/static (static files) * - _next/image (image optimization files) * - favicon.ico, sitemap.xml, robots.txt (metadata files) */ { source: '/((?!api|_next/static|_next/image|favicon.ico|sitemap.xml|robots.txt).*)', missing: [ { type: 'header', key: 'next-router-prefetch' }, { type: 'header', key: 'purpose', value: 'prefetch' }, ], }, { source: '/((?!api|_next/static|_next/image|favicon.ico|sitemap.xml|robots.txt).*)', has: [ { type: 'header', key: 'next-router-prefetch' }, { type: 'header', key: 'purpose', value: 'prefetch' }, ], }, { source: '/((?!api|_next/static|_next/image|favicon.ico|sitemap.xml|robots.txt).*)', has: [{ type: 'header', key: 'x-present' }], missing: [{ type: 'header', key: 'x-missing', value: 'prefetch' }], }, ], } > **Good to know**: The `matcher` values need to be constants so they can be statically analyzed at build-time. Dynamic values such as variables will be ignored. Configured matchers: 1. MUST start with `/` 2. Can include named parameters: `/about/:path` matches `/about/a` and `/about/b` but not `/about/a/c` 3. Can have modifiers on named parameters (starting with `:`): `/about/:path*` matches `/about/a/b/c` because `*` is _zero or more_. `?` is _zero or one_ and `+` _one or more_ 4. Can use regular expression enclosed in parenthesis: `/about/(.*)` is the same as `/about/:path*` Read more details on path-to-regexp documentation. > **Good to know**: For backward compatibility, Next.js always considers `/public` as `/public/index`. Therefore, a matcher of `/public/:path` will match. ### Conditional Statements import { NextResponse } from 'next/server' import type { NextRequest } from 'next/server' export function middleware(request: NextRequest) { if (request.nextUrl.pathname.startsWith('/about')) { return NextResponse.rewrite(new URL('/about-2', request.url)) } if (request.nextUrl.pathname.startsWith('/dashboard')) { return NextResponse.rewrite(new URL('/dashboard/user', request.url)) } } ## NextResponse The `NextResponse` API allows you to: * `redirect` the incoming request to a different URL * `rewrite` the response by displaying a given URL * Set request headers for API Routes, `getServerSideProps`, and `rewrite` destinations * Set response cookies * Set response headers To produce a response from Middleware, you can: 1. `rewrite` to a route (Page or Route Handler) that produces a response 2. return a `NextResponse` directly. See Producing a Response ## Using Cookies Cookies are regular headers. On a `Request`, they are stored in the `Cookie` header. On a `Response` they are in the `Set-Cookie` header. Next.js provides a convenient way to access and manipulate these cookies through the `cookies` extension on `NextRequest` and `NextResponse`. 1. For incoming requests, `cookies` comes with the following methods: `get`, `getAll`, `set`, and `delete` cookies. You can check for the existence of a cookie with `has` or remove all cookies with `clear`. 2. For outgoing responses, `cookies` have the following methods `get`, `getAll`, `set`, and `delete`. import { NextResponse } from 'next/server' import type { NextRequest } from 'next/server' export function middleware(request: NextRequest) { // Assume a "Cookie:nextjs=fast" header to be present on the incoming request // Getting cookies from the request using the `RequestCookies` API let cookie = request.cookies.get('nextjs') console.log(cookie) // => { name: 'nextjs', value: 'fast', Path: '/' } const allCookies = request.cookies.getAll() console.log(allCookies) // => [{ name: 'nextjs', value: 'fast' }] request.cookies.has('nextjs') // => true request.cookies.delete('nextjs') request.cookies.has('nextjs') // => false // Setting cookies on the response using the `ResponseCookies` API const response = NextResponse.next() response.cookies.set('vercel', 'fast') response.cookies.set({ name: 'vercel', value: 'fast', path: '/', }) cookie = response.cookies.get('vercel') console.log(cookie) // => { name: 'vercel', value: 'fast', Path: '/' } // The outgoing response will have a `Set-Cookie:vercel=fast;path=/` header. return response } You can set request and response headers using the `NextResponse` API (setting _request_ headers is available since Next.js v13.0.0). import { NextResponse } from 'next/server' import type { NextRequest } from 'next/server' export function middleware(request: NextRequest) { // Clone the request headers and set a new header `x-hello-from-middleware1` const requestHeaders = new Headers(request.headers) requestHeaders.set('x-hello-from-middleware1', 'hello') // You can also set request headers in NextResponse.next const response = NextResponse.next({ request: { // New request headers headers: requestHeaders, }, }) // Set a new response header `x-hello-from-middleware2` response.headers.set('x-hello-from-middleware2', 'hello') return response } > **Good to know**: Avoid setting large headers as it might cause 431 Request Header Fields Too Large error depending on your backend web server configuration. ### CORS You can set CORS headers in Middleware to allow cross-origin requests, including simple and preflighted requests. import { NextRequest, NextResponse } from 'next/server' const allowedOrigins = ['https://acme.com', 'https://my-app.org'] const corsOptions = { 'Access-Control-Allow-Methods': 'GET, POST, PUT, DELETE, OPTIONS', 'Access-Control-Allow-Headers': 'Content-Type, Authorization', } export function middleware(request: NextRequest) { // Check the origin from the request const origin = request.headers.get('origin') ?? '' const isAllowedOrigin = allowedOrigins.includes(origin) // Handle preflighted requests const isPreflight = request.method === 'OPTIONS' if (isPreflight) { const preflightHeaders = { ...(isAllowedOrigin && { 'Access-Control-Allow-Origin': origin }), ...corsOptions, } return NextResponse.json({}, { headers: preflightHeaders }) } // Handle simple requests const response = NextResponse.next() if (isAllowedOrigin) { response.headers.set('Access-Control-Allow-Origin', origin) } Object.entries(corsOptions).forEach(([key, value]) => { response.headers.set(key, value) }) return response } export const config = { matcher: '/api/:path*', } > **Good to know:** You can configure CORS headers for individual routes in Route Handlers. ## Producing a Response You can respond from Middleware directly by returning a `Response` or `NextResponse` instance. (This is available since Next.js v13.1.0) import type { NextRequest } from 'next/server' import { isAuthenticated } from '@lib/auth' // Limit the middleware to paths starting with `/api/` export const config = { matcher: '/api/:function*', } export function middleware(request: NextRequest) { // Call our authentication function to check the request if (!isAuthenticated(request)) { // Respond with JSON indicating an error message return Response.json( { success: false, message: 'authentication failed' }, { status: 401 } ) } } ### `waitUntil` and `NextFetchEvent` The `NextFetchEvent` object extends the native `FetchEvent` object, and includes the `waitUntil()` method. The `waitUntil()` method takes a promise as an argument, and extends the lifetime of the Middleware until the promise settles. This is useful for performing work in the background. import { NextResponse } from 'next/server' import type { NextFetchEvent, NextRequest } from 'next/server' export function middleware(req: NextRequest, event: NextFetchEvent) { event.waitUntil( fetch('https://my-analytics-platform.com', { method: 'POST', body: JSON.stringify({ pathname: req.nextUrl.pathname }), }) ) return NextResponse.next() } ## Advanced Middleware Flags In `v13.1` of Next.js two additional flags were introduced for middleware, `skipMiddlewareUrlNormalize` and `skipTrailingSlashRedirect` to handle advanced use cases. `skipTrailingSlashRedirect` disables Next.js redirects for adding or removing trailing slashes. This allows custom handling inside middleware to maintain the trailing slash for some paths but not others, which can make incremental migrations easier. module.exports = { skipTrailingSlashRedirect: true, } const legacyPrefixes = ['/docs', '/blog'] export default async function middleware(req) { const { pathname } = req.nextUrl if (legacyPrefixes.some((prefix) => pathname.startsWith(prefix))) { return NextResponse.next() } // apply trailing slash handling if ( !pathname.endsWith('/') && !pathname.match(/((?!\.well-known(?:\/.*)?)(?:[^/]+\/)*[^/]+\.\w+)/) ) { return NextResponse.redirect( new URL(`${req.nextUrl.pathname}/`, req.nextUrl) ) } } `skipMiddlewareUrlNormalize` allows for disabling the URL normalization in Next.js to make handling direct visits and client-transitions the same. In some advanced cases, this option provides full control by using the original URL. module.exports = { skipMiddlewareUrlNormalize: true, } export default async function middleware(req) { const { pathname } = req.nextUrl // GET /_next/data/build-id/hello.json console.log(pathname) // with the flag this now /_next/data/build-id/hello.json // without the flag this would be normalized to /hello } ## Unit Testing (experimental) Starting in Next.js 15.1, the `next/experimental/testing/server` package contains utilities to help unit test middleware files. Unit testing middleware can help ensure that it's only run on desired paths and that custom routing logic works as intended before code reaches production. The `unstable_doesMiddlewareMatch` function can be used to assert whether middleware will run for the provided URL, headers, and cookies. import { unstable_doesMiddlewareMatch } from 'next/experimental/testing/server' expect( unstable_doesMiddlewareMatch({ config, nextConfig, url: '/test', }) ).toEqual(false) The entire middleware function can also be tested. import { isRewrite, getRewrittenUrl } from 'next/experimental/testing/server' const request = new NextRequest('https://nextjs.org/docs') const response = await middleware(request) expect(isRewrite(response)).toEqual(true) expect(getRewrittenUrl(response)).toEqual('https://other-domain.com/docs') // getRedirectUrl could also be used if the response were a redirect ## Runtime Middleware defaults to using the Edge runtime. As of v15.2 (canary), we have experimental support for using the Node.js runtime. To enable, add the flag to your `next.config` file: import type { NextConfig } from 'next' const nextConfig: NextConfig = { experimental: { nodeMiddleware: true, }, } export default nextConfig Then in your middleware file, set the runtime to `nodejs` in the `config` object: export const config = { runtime: 'nodejs', } > **Note**: This feature is not yet recommended for production use. Therefore, Next.js will throw an error unless you are using the next@canary release instead of the stable release. ## Version History | Version | Changes | | --- | --- | | `v15.2.0` | Middleware can now use the Node.js runtime (experimental) | | `v13.1.0` | Advanced Middleware flags added | | `v13.0.0` | Middleware can modify request headers, response headers, and send responses | | `v12.2.0` | Middleware is stable, please see the upgrade guide | | `v12.0.9` | Enforce absolute URLs in Edge Runtime (PR) | | `v12.0.0` | Middleware (Beta) added | --- ## Page: https://nextjs.org/docs/app/building-your-application/routing/internationalization Next.js enables you to configure the routing and rendering of content to support multiple languages. Making your site adaptive to different locales includes translated content (localization) and internationalized routes. ## Terminology * **Locale:** An identifier for a set of language and formatting preferences. This usually includes the preferred language of the user and possibly their geographic region. * `en-US`: English as spoken in the United States * `nl-NL`: Dutch as spoken in the Netherlands * `nl`: Dutch, no specific region ## Routing Overview It’s recommended to use the user’s language preferences in the browser to select which locale to use. Changing your preferred language will modify the incoming `Accept-Language` header to your application. For example, using the following libraries, you can look at an incoming `Request` to determine which locale to select, based on the `Headers`, locales you plan to support, and the default locale. import { match } from '@formatjs/intl-localematcher' import Negotiator from 'negotiator' let headers = { 'accept-language': 'en-US,en;q=0.5' } let languages = new Negotiator({ headers }).languages() let locales = ['en-US', 'nl-NL', 'nl'] let defaultLocale = 'en-US' match(languages, locales, defaultLocale) // -> 'en-US' Routing can be internationalized by either the sub-path (`/fr/products`) or domain (`my-site.fr/products`). With this information, you can now redirect the user based on the locale inside Middleware. import { NextResponse } from "next/server"; let locales = ['en-US', 'nl-NL', 'nl'] // Get the preferred locale, similar to the above or using a library function getLocale(request) { ... } export function middleware(request) { // Check if there is any supported locale in the pathname const { pathname } = request.nextUrl const pathnameHasLocale = locales.some( (locale) => pathname.startsWith(`/${locale}/`) || pathname === `/${locale}` ) if (pathnameHasLocale) return // Redirect if there is no locale const locale = getLocale(request) request.nextUrl.pathname = `/${locale}${pathname}` // e.g. incoming request is /products // The new URL is now /en-US/products return NextResponse.redirect(request.nextUrl) } export const config = { matcher: [ // Skip all internal paths (_next) '/((?!_next).*)', // Optional: only run on root (/) URL // '/' ], } Finally, ensure all special files inside `app/` are nested under `app/[lang]`. This enables the Next.js router to dynamically handle different locales in the route, and forward the `lang` parameter to every layout and page. For example: // You now have access to the current locale // e.g. /en-US/products -> `lang` is "en-US" export default async function Page({ params, }: { params: Promise<{ lang: string }> }) { const { lang } = await params return ... } The root layout can also be nested in the new folder (e.g. `app/[lang]/layout.js`). ## Localization Changing displayed content based on the user’s preferred locale, or localization, is not something specific to Next.js. The patterns described below would work the same with any web application. Let’s assume we want to support both English and Dutch content inside our application. We might maintain two different “dictionaries”, which are objects that give us a mapping from some key to a localized string. For example: { "products": { "cart": "Add to Cart" } } { "products": { "cart": "Toevoegen aan Winkelwagen" } } We can then create a `getDictionary` function to load the translations for the requested locale: import 'server-only' const dictionaries = { en: () => import('./dictionaries/en.json').then((module) => module.default), nl: () => import('./dictionaries/nl.json').then((module) => module.default), } export const getDictionary = async (locale: 'en' | 'nl') => dictionaries[locale]() Given the currently selected language, we can fetch the dictionary inside of a layout or page. import { getDictionary } from './dictionaries' export default async function Page({ params, }: { params: Promise<{ lang: 'en' | 'nl' }> }) { const { lang } = await params const dict = await getDictionary(lang) // en return <button>{dict.products.cart}</button> // Add to Cart } Because all layouts and pages in the `app/` directory default to Server Components, we do not need to worry about the size of the translation files affecting our client-side JavaScript bundle size. This code will **only run on the server**, and only the resulting HTML will be sent to the browser. ## Static Generation To generate static routes for a given set of locales, we can use `generateStaticParams` with any page or layout. This can be global, for example, in the root layout: export async function generateStaticParams() { return [{ lang: 'en-US' }, { lang: 'de' }] } export default async function RootLayout({ children, params, }: Readonly<{ children: React.ReactNode params: Promise<{ lang: 'en-US' | 'de' }> }>) { return ( <html lang={(await params).lang}> <body>{children}</body> </html> ) } ## Resources * Minimal i18n routing and translations * `next-intl` * `next-international` * `next-i18n-router` * `paraglide-next` * `lingui` --- ## Page: https://nextjs.org/docs/app/building-your-application/data-fetching #### Subscribe to our newsletter Stay updated on new releases and features, guides, and case studies. --- ## Page: https://nextjs.org/docs/app/building-your-application/data-fetching/fetching Examples * Next.js Commerce * On-Demand ISR * Next.js Forms This guide will walk you through the basics of data fetching and caching in Next.js, providing practical examples and best practices. Here's a minimal example of data fetching in Next.js: export default async function Page() { const data = await fetch('https://api.vercel.app/blog') const posts = await data.json() return ( <ul> {posts.map((post) => ( <li key={post.id}>{post.title}</li> ))} </ul> ) } This example demonstrates a basic server-side data fetch using the `fetch` API in an asynchronous React Server Component. ## Reference * `fetch` * React `cache` * Next.js `unstable_cache` ## Examples ### Fetching data on the server with the `fetch` API This component will fetch and display a list of blog posts. The response from `fetch` is not cached by default. export default async function Page() { const data = await fetch('https://api.vercel.app/blog') const posts = await data.json() return ( <ul> {posts.map((post) => ( <li key={post.id}>{post.title}</li> ))} </ul> ) } If you are not using any Dynamic APIs anywhere else in this route, it will be prerendered during `next build` to a static page. The data can then be updated using Incremental Static Regeneration. To prevent the page from prerendering, you can add the following to your file: export const dynamic = 'force-dynamic' However, you will commonly use functions like `cookies`, `headers`, or reading the incoming `searchParams` from the page props, which will automatically make the page render dynamically. In this case, you do _not_ need to explicitly use `force-dynamic`. ### Fetching data on the server with an ORM or database This component will fetch and display a list of blog posts. The response from the database is not cached by default but could be with additional configuration. import { db, posts } from '@/lib/db' export default async function Page() { const allPosts = await db.select().from(posts) return ( <ul> {allPosts.map((post) => ( <li key={post.id}>{post.title}</li> ))} </ul> ) } If you are not using any Dynamic APIs anywhere else in this route, it will be prerendered during `next build` to a static page. The data can then be updated using Incremental Static Regeneration. To prevent the page from prerendering, you can add the following to your file: export const dynamic = 'force-dynamic' However, you will commonly use functions like `cookies`, `headers`, or reading the incoming `searchParams` from the page props, which will automatically make the page render dynamically. In this case, you do _not_ need to explicitly use `force-dynamic`. ### Fetching data on the client We recommend first attempting to fetch data on the server-side. However, there are still cases where client-side data fetching makes sense. In these scenarios, you can manually call `fetch` in a `useEffect` (not recommended), or lean on popular React libraries in the community (such as SWR or React Query) for client fetching. 'use client' import { useState, useEffect } from 'react' export function Posts() { const [posts, setPosts] = useState(null) useEffect(() => { async function fetchPosts() { const res = await fetch('https://api.vercel.app/blog') const data = await res.json() setPosts(data) } fetchPosts() }, []) if (!posts) return <div>Loading...</div> return ( <ul> {posts.map((post) => ( <li key={post.id}>{post.title}</li> ))} </ul> ) } ### Caching data with an ORM or Database You can use the `unstable_cache` API to cache the response when running `next build`. import { unstable_cache } from 'next/cache' import { db, posts } from '@/lib/db' const getPosts = unstable_cache( async () => { return await db.select().from(posts) }, ['posts'], { revalidate: 3600, tags: ['posts'] } ) export default async function Page() { const allPosts = await getPosts() return ( <ul> {allPosts.map((post) => ( <li key={post.id}>{post.title}</li> ))} </ul> ) } This example caches the result of the database query for 1 hour (3600 seconds). It also adds the cache tag `posts` which can then be invalidated with Incremental Static Regeneration. ### Reusing data across multiple functions Next.js uses APIs like `generateMetadata` and `generateStaticParams` where you will need to use the same data fetched in the `page`. If you are using `fetch`, requests can be memoized by adding `cache: 'force-cache'`. This means you can safely call the same URL with the same options, and only one request will be made. > **Good to know:** > > * In previous versions of Next.js, using `fetch` would have a default `cache` value of `force-cache`. This changed in version 15, to a default of `cache: no-store`. import { notFound } from 'next/navigation' interface Post { id: string title: string content: string } async function getPost(id: string) { const res = await fetch(`https://api.vercel.app/blog/${id}`, { cache: 'force-cache', }) const post: Post = await res.json() if (!post) notFound() return post } export async function generateStaticParams() { const posts = await fetch('https://api.vercel.app/blog', { cache: 'force-cache', }).then((res) => res.json()) return posts.map((post: Post) => ({ id: String(post.id), })) } export async function generateMetadata({ params, }: { params: Promise<{ id: string }> }) { const { id } = await params const post = await getPost(id) return { title: post.title, } } export default async function Page({ params, }: { params: Promise<{ id: string }> }) { const { id } = await params const post = await getPost(id) return ( <article> <h1>{post.title}</h1> <p>{post.content}</p> </article> ) } If you are _not_ using `fetch`, and instead using an ORM or database directly, you can wrap your data fetch with the React `cache` function. This will de-duplicate and only make one query. import { cache } from 'react' import { db, posts, eq } from '@/lib/db' // Example with Drizzle ORM import { notFound } from 'next/navigation' export const getPost = cache(async (id) => { const post = await db.query.posts.findFirst({ where: eq(posts.id, parseInt(id)), }) if (!post) notFound() return post }) ### Revalidating cached data Learn more about revalidating cached data with Incremental Static Regeneration. ## Patterns ### Parallel and sequential data fetching When fetching data inside components, you need to be aware of two data fetching patterns: Parallel and Sequential. 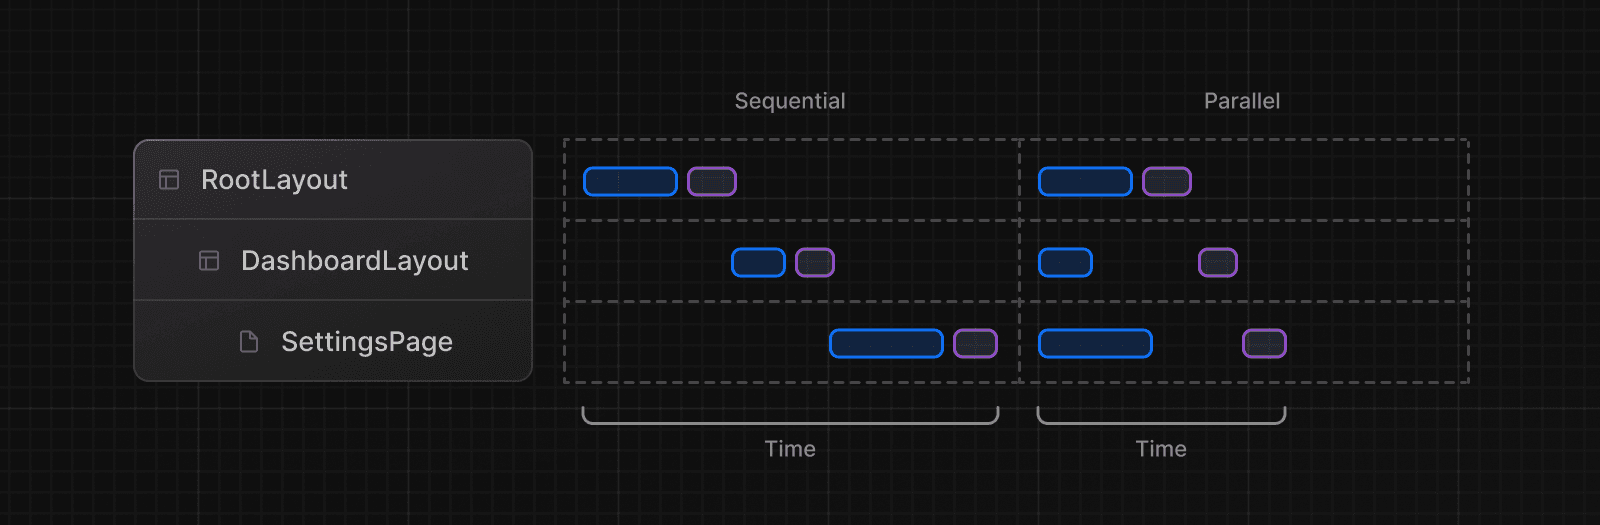 * **Sequential**: requests in a component tree are dependent on each other. This can lead to longer loading times. * **Parallel**: requests in a route are eagerly initiated and will load data at the same time. This reduces the total time it takes to load data. #### Sequential data fetching If you have nested components, and each component fetches its own data, then data fetching will happen sequentially if those data requests are not memoized. There may be cases where you want this pattern because one fetch depends on the result of the other. For example, the `Playlists` component will only start fetching data once the `Artist` component has finished fetching data because `Playlists` depends on the `artistID` prop: export default async function Page({ params, }: { params: Promise<{ username: string }> }) { const { username } = await params // Get artist information const artist = await getArtist(username) return ( <> <h1>{artist.name}</h1> {/* Show fallback UI while the Playlists component is loading */} <Suspense fallback={<div>Loading...</div>}> {/* Pass the artist ID to the Playlists component */} <Playlists artistID={artist.id} /> </Suspense> </> ) } async function Playlists({ artistID }: { artistID: string }) { // Use the artist ID to fetch playlists const playlists = await getArtistPlaylists(artistID) return ( <ul> {playlists.map((playlist) => ( <li key={playlist.id}>{playlist.name}</li> ))} </ul> ) } You can use `loading.js` (for route segments) or React `<Suspense>` (for nested components) to show an instant loading state while React streams in the result. This will prevent the whole route from being blocked by data requests, and the user will be able to interact with the parts of the page that are ready. #### Parallel Data Fetching By default, layout and page segments are rendered in parallel. This means requests will be initiated in parallel. However, due to the nature of `async`/`await`, an awaited request inside the same segment or component will block any requests below it. To fetch data in parallel, you can eagerly initiate requests by defining them outside the components that use the data. This saves time by initiating both requests in parallel, however, the user won't see the rendered result until both promises are resolved. In the example below, the `getArtist` and `getAlbums` functions are defined outside the `Page` component and initiated inside the component using `Promise.all`: import Albums from './albums' async function getArtist(username: string) { const res = await fetch(`https://api.example.com/artist/${username}`) return res.json() } async function getAlbums(username: string) { const res = await fetch(`https://api.example.com/artist/${username}/albums`) return res.json() } export default async function Page({ params, }: { params: Promise<{ username: string }> }) { const { username } = await params const artistData = getArtist(username) const albumsData = getAlbums(username) // Initiate both requests in parallel const [artist, albums] = await Promise.all([artistData, albumsData]) return ( <> <h1>{artist.name}</h1> <Albums list={albums} /> </> ) } In addition, you can add a Suspense Boundary to break up the rendering work and show part of the result as soon as possible. ### Preloading Data Another way to prevent waterfalls is to use the _preload_ pattern by creating an utility function that you eagerly call above blocking requests. For example, `checkIsAvailable()` blocks `<Item/>` from rendering, so you can call `preload()` before it to eagerly initiate `<Item/>` data dependencies. By the time `<Item/>` is rendered, its data has already been fetched. Note that `preload` function doesn't block `checkIsAvailable()` from running. import { getItem } from '@/utils/get-item' export const preload = (id: string) => { // void evaluates the given expression and returns undefined // https://developer.mozilla.org/docs/Web/JavaScript/Reference/Operators/void void getItem(id) } export default async function Item({ id }: { id: string }) { const result = await getItem(id) // ... } import Item, { preload, checkIsAvailable } from '@/components/Item' export default async function Page({ params, }: { params: Promise<{ id: string }> }) { const { id } = await params // starting loading item data preload(id) // perform another asynchronous task const isAvailable = await checkIsAvailable() return isAvailable ? <Item id={id} /> : null } > **Good to know:** The "preload" function can also have any name as it's a pattern, not an API. #### Using React `cache` and `server-only` with the Preload Pattern You can combine the `cache` function, the `preload` pattern, and the `server-only` package to create a data fetching utility that can be used throughout your app. import { cache } from 'react' import 'server-only' export const preload = (id: string) => { void getItem(id) } export const getItem = cache(async (id: string) => { // ... }) With this approach, you can eagerly fetch data, cache responses, and guarantee that this data fetching only happens on the server. The `utils/get-item` exports can be used by Layouts, Pages, or other components to give them control over when an item's data is fetched. > **Good to know:** > > * We recommend using the `server-only` package to make sure server data fetching functions are never used on the client. ### Preventing sensitive data from being exposed to the client We recommend using React's taint APIs, `taintObjectReference` and `taintUniqueValue`, to prevent whole object instances or sensitive values from being passed to the client. To enable tainting in your application, set the Next.js Config `experimental.taint` option to `true`: module.exports = { experimental: { taint: true, }, } Then pass the object or value you want to taint to the `experimental_taintObjectReference` or `experimental_taintUniqueValue` functions: import { queryDataFromDB } from './api' import { experimental_taintObjectReference, experimental_taintUniqueValue, } from 'react' export async function getUserData() { const data = await queryDataFromDB() experimental_taintObjectReference( 'Do not pass the whole user object to the client', data ) experimental_taintUniqueValue( "Do not pass the user's address to the client", data, data.address ) return data } import { getUserData } from './data' export async function Page() { const userData = getUserData() return ( <ClientComponent user={userData} // this will cause an error because of taintObjectReference address={userData.address} // this will cause an error because of taintUniqueValue /> ) } --- ## Page: https://nextjs.org/docs/app/building-your-application/data-fetching/server-actions-and-mutations Server Actions are **asynchronous functions** that are executed on the server. They can be called in Server and Client Components to handle form submissions and data mutations in Next.js applications. > **🎥 Watch:** Learn more about mutations with Server Actions → YouTube (10 minutes). ## Convention A Server Action can be defined with the React `"use server"` directive. You can place the directive at the top of an `async` function to mark the function as a Server Action, or at the top of a separate file to mark all exports of that file as Server Actions. ### Server Components Server Components can use the inline function level or module level `"use server"` directive. To inline a Server Action, add `"use server"` to the top of the function body: export default function Page() { // Server Action async function create() { 'use server' // Mutate data } return '...' } ### Client Components To call a Server Action in a Client Component, create a new file and add the `"use server"` directive at the top of it. All exported functions within the file will be marked as Server Actions that can be reused in both Client and Server Components: 'use server' export async function create() {} 'use client' import { create } from './actions' export function Button() { return <button onClick={() => create()}>Create</button> } ### Passing actions as props You can also pass a Server Action to a Client Component as a prop: <ClientComponent updateItemAction={updateItem} /> 'use client' export default function ClientComponent({ updateItemAction, }: { updateItemAction: (formData: FormData) => void }) { return <form action={updateItemAction}>{/* ... */}</form> } Usually, the Next.js TypeScript plugin would flag `updateItemAction` in `client-component.tsx` since it is a function which generally can't be serialized across client-server boundaries. However, props named `action` or ending with `Action` are assumed to receive Server Actions. This is only a heuristic since the TypeScript plugin doesn't actually know if it receives a Server Action or an ordinary function. Runtime type-checking will still ensure you don't accidentally pass a function to a Client Component. ## Behavior * Server actions can be invoked using the `action` attribute in a `<form>` element: * Server Components support progressive enhancement by default, meaning the form will be submitted even if JavaScript hasn't loaded yet or is disabled. * In Client Components, forms invoking Server Actions will queue submissions if JavaScript isn't loaded yet, prioritizing client hydration. * After hydration, the browser does not refresh on form submission. * Server Actions are not limited to `<form>` and can be invoked from event handlers, `useEffect`, third-party libraries, and other form elements like `<button>`. * Server Actions integrate with the Next.js caching and revalidation architecture. When an action is invoked, Next.js can return both the updated UI and new data in a single server roundtrip. * Behind the scenes, actions use the `POST` method, and only this HTTP method can invoke them. * The arguments and return value of Server Actions must be serializable by React. See the React docs for a list of serializable arguments and values. * Server Actions are functions. This means they can be reused anywhere in your application. * Server Actions inherit the runtime from the page or layout they are used on. * Server Actions inherit the Route Segment Config from the page or layout they are used on, including fields like `maxDuration`. ## Examples ### Forms React extends the HTML `<form>` element to allow Server Actions to be invoked with the `action` prop. When invoked in a form, the action automatically receives the `FormData` object. You don't need to use React `useState` to manage fields, instead, you can extract the data using the native `FormData` methods: export default function Page() { async function createInvoice(formData: FormData) { 'use server' const rawFormData = { customerId: formData.get('customerId'), amount: formData.get('amount'), status: formData.get('status'), } // mutate data // revalidate cache } return <form action={createInvoice}>...</form> } > **Good to know:** > > * Example: Form with Loading & Error States > * When working with forms that have many fields, you may want to consider using the `entries()` method with JavaScript's `Object.fromEntries()`. For example: `const rawFormData = Object.fromEntries(formData)`. One thing to note is that the `formData` will include additional `$ACTION_` properties. > * See React `<form>` documentation to learn more. ### Passing additional arguments You can pass additional arguments to a Server Action using the JavaScript `bind` method. 'use client' import { updateUser } from './actions' export function UserProfile({ userId }: { userId: string }) { const updateUserWithId = updateUser.bind(null, userId) return ( <form action={updateUserWithId}> <input type="text" name="name" /> <button type="submit">Update User Name</button> </form> ) } The Server Action will receive the `userId` argument, in addition to the form data: 'use server' export async function updateUser(userId: string, formData: FormData) {} > **Good to know**: > > * An alternative is to pass arguments as hidden input fields in the form (e.g. `<input type="hidden" name="userId" value={userId} />`). However, the value will be part of the rendered HTML and will not be encoded. > * `.bind` works in both Server and Client Components. It also supports progressive enhancement. ### Nested form elements You can also invoke a Server Action in elements nested inside `<form>` such as `<button>`, `<input type="submit">`, and `<input type="image">`. These elements accept the `formAction` prop or event handlers. This is useful in cases where you want to call multiple server actions within a form. For example, you can create a specific `<button>` element for saving a post draft in addition to publishing it. See the React `<form>` docs for more information. ### Programmatic form submission You can trigger a form submission programmatically using the `requestSubmit()` method. For example, when the user submits a form using the `⌘` + `Enter` keyboard shortcut, you can listen for the `onKeyDown` event: 'use client' export function Entry() { const handleKeyDown = (e: React.KeyboardEvent<HTMLTextAreaElement>) => { if ( (e.ctrlKey || e.metaKey) && (e.key === 'Enter' || e.key === 'NumpadEnter') ) { e.preventDefault() e.currentTarget.form?.requestSubmit() } } return ( <div> <textarea name="entry" rows={20} required onKeyDown={handleKeyDown} /> </div> ) } This will trigger the submission of the nearest `<form>` ancestor, which will invoke the Server Action. ### Server-side form validation You can use the HTML attributes like `required` and `type="email"` for basic client-side form validation. For more advanced server-side validation, you can use a library like zod to validate the form fields before mutating the data: 'use server' import { z } from 'zod' const schema = z.object({ email: z.string({ invalid_type_error: 'Invalid Email', }), }) export default async function createUser(formData: FormData) { const validatedFields = schema.safeParse({ email: formData.get('email'), }) // Return early if the form data is invalid if (!validatedFields.success) { return { errors: validatedFields.error.flatten().fieldErrors, } } // Mutate data } Once the fields have been validated on the server, you can return a serializable object in your action and use the React `useActionState` hook to show a message to the user. * By passing the action to `useActionState`, the action's function signature changes to receive a new `prevState` or `initialState` parameter as its first argument. * `useActionState` is a React hook and therefore must be used in a Client Component. 'use server' import { redirect } from 'next/navigation' export async function createUser(prevState: any, formData: FormData) { const res = await fetch('https://...') const json = await res.json() if (!res.ok) { return { message: 'Please enter a valid email' } } redirect('/dashboard') } Then, you can pass your action to the `useActionState` hook and use the returned `state` to display an error message. 'use client' import { useActionState } from 'react' import { createUser } from '@/app/actions' const initialState = { message: '', } export function Signup() { const [state, formAction, pending] = useActionState(createUser, initialState) return ( <form action={formAction}> <label htmlFor="email">Email</label> <input type="text" id="email" name="email" required /> {/* ... */} <p aria-live="polite">{state?.message}</p> <button disabled={pending}>Sign up</button> </form> ) } ### Pending states The `useActionState` hook exposes a `pending` boolean that can be used to show a loading indicator while the action is being executed. Alternatively, you can use the `useFormStatus` hook to show a loading indicator while the action is being executed. When using this hook, you'll need to create a separate component to render the loading indicator. For example, to disable the button when the action is pending: 'use client' import { useFormStatus } from 'react-dom' export function SubmitButton() { const { pending } = useFormStatus() return ( <button disabled={pending} type="submit"> Sign Up </button> ) } You can then nest the `SubmitButton` component inside the form: import { SubmitButton } from './button' import { createUser } from '@/app/actions' export function Signup() { return ( <form action={createUser}> {/* Other form elements */} <SubmitButton /> </form> ) } > **Good to know:** In React 19, `useFormStatus` includes additional keys on the returned object, like data, method, and action. If you are not using React 19, only the `pending` key is available. ### Optimistic updates You can use the React `useOptimistic` hook to optimistically update the UI before the Server Action finishes executing, rather than waiting for the response: 'use client' import { useOptimistic } from 'react' import { send } from './actions' type Message = { message: string } export function Thread({ messages }: { messages: Message[] }) { const [optimisticMessages, addOptimisticMessage] = useOptimistic< Message[], string >(messages, (state, newMessage) => [...state, { message: newMessage }]) const formAction = async (formData: FormData) => { const message = formData.get('message') as string addOptimisticMessage(message) await send(message) } return ( <div> {optimisticMessages.map((m, i) => ( <div key={i}>{m.message}</div> ))} <form action={formAction}> <input type="text" name="message" /> <button type="submit">Send</button> </form> </div> ) } ### Event handlers While it's common to use Server Actions within `<form>` elements, they can also be invoked with event handlers such as `onClick`. For example, to increment a like count: 'use client' import { incrementLike } from './actions' import { useState } from 'react' export default function LikeButton({ initialLikes }: { initialLikes: number }) { const [likes, setLikes] = useState(initialLikes) return ( <> <p>Total Likes: {likes}</p> <button onClick={async () => { const updatedLikes = await incrementLike() setLikes(updatedLikes) }} > Like </button> </> ) } You can also add event handlers to form elements, for example, to save a form field `onChange`: 'use client' import { publishPost, saveDraft } from './actions' export default function EditPost() { return ( <form action={publishPost}> <textarea name="content" onChange={async (e) => { await saveDraft(e.target.value) }} /> <button type="submit">Publish</button> </form> ) } For cases like this, where multiple events might be fired in quick succession, we recommend **debouncing** to prevent unnecessary Server Action invocations. ### `useEffect` You can use the React `useEffect` hook to invoke a Server Action when the component mounts or a dependency changes. This is useful for mutations that depend on global events or need to be triggered automatically. For example, `onKeyDown` for app shortcuts, an intersection observer hook for infinite scrolling, or when the component mounts to update a view count: 'use client' import { incrementViews } from './actions' import { useState, useEffect } from 'react' export default function ViewCount({ initialViews }: { initialViews: number }) { const [views, setViews] = useState(initialViews) useEffect(() => { const updateViews = async () => { const updatedViews = await incrementViews() setViews(updatedViews) } updateViews() }, []) return <p>Total Views: {views}</p> } Remember to consider the behavior and caveats of `useEffect`. ### Error Handling When an error is thrown, it'll be caught by the nearest `error.js` or `<Suspense>` boundary on the client. See Error Handling for more information. > **Good to know:** > > * Aside from throwing the error, you can also return an object to be handled by `useActionState`. See Server-side validation and error handling. ### Revalidating data You can revalidate the Next.js Cache inside your Server Actions with the `revalidatePath` API: 'use server' import { revalidatePath } from 'next/cache' export async function createPost() { try { // ... } catch (error) { // ... } revalidatePath('/posts') } Or invalidate a specific data fetch with a cache tag using `revalidateTag`: 'use server' import { revalidateTag } from 'next/cache' export async function createPost() { try { // ... } catch (error) { // ... } revalidateTag('posts') } ### Redirecting If you would like to redirect the user to a different route after the completion of a Server Action, you can use `redirect` API. `redirect` needs to be called outside of the `try/catch` block: 'use server' import { redirect } from 'next/navigation' import { revalidateTag } from 'next/cache' export async function createPost(id: string) { try { // ... } catch (error) { // ... } revalidateTag('posts') // Update cached posts redirect(`/post/${id}`) // Navigate to the new post page } ### Cookies You can `get`, `set`, and `delete` cookies inside a Server Action using the `cookies` API: 'use server' import { cookies } from 'next/headers' export async function exampleAction() { const cookieStore = await cookies() // Get cookie cookieStore.get('name')?.value // Set cookie cookieStore.set('name', 'Delba') // Delete cookie cookieStore.delete('name') } See additional examples for deleting cookies from Server Actions. ## Security By default, when a Server Action is created and exported, it creates a public HTTP endpoint and should be treated with the same security assumptions and authorization checks. This means, even if a Server Action or utility function is not imported elsewhere in your code, it’s still publicly accessible. To improve security, Next.js has the following built-in features: * **Secure action IDs:** Next.js creates encrypted, non-deterministic IDs to allow the client to reference and call the Server Action. These IDs are periodically recalculated between builds for enhanced security. * **Dead code elimination:** Unused Server Actions (referenced by their IDs) are removed from client bundle to avoid public access by third-party. > **Good to know**: > > The IDs are created during compilation and are cached for a maximum of 14 days. They will be regenerated when a new build is initiated or when the build cache is invalidated. This security improvement reduces the risk in cases where an authentication layer is missing. However, you should still treat Server Actions like public HTTP endpoints. // app/actions.js 'use server' // This action **is** used in our application, so Next.js // will create a secure ID to allow the client to reference // and call the Server Action. export async function updateUserAction(formData) {} // This action **is not** used in our application, so Next.js // will automatically remove this code during `next build` // and will not create a public endpoint. export async function deleteUserAction(formData) {} You should ensure that the user is authorized to perform the action. For example: 'use server' import { auth } from './lib' export function addItem() { const { user } = auth() if (!user) { throw new Error('You must be signed in to perform this action') } // ... } ### Closures and encryption Defining a Server Action inside a component creates a closure where the action has access to the outer function's scope. For example, the `publish` action has access to the `publishVersion` variable: export default async function Page() { const publishVersion = await getLatestVersion(); async function publish() { "use server"; if (publishVersion !== await getLatestVersion()) { throw new Error('The version has changed since pressing publish'); } ... } return ( <form> <button formAction={publish}>Publish</button> </form> ); } Closures are useful when you need to capture a _snapshot_ of data (e.g. `publishVersion`) at the time of rendering so that it can be used later when the action is invoked. However, for this to happen, the captured variables are sent to the client and back to the server when the action is invoked. To prevent sensitive data from being exposed to the client, Next.js automatically encrypts the closed-over variables. A new private key is generated for each action every time a Next.js application is built. This means actions can only be invoked for a specific build. > **Good to know:** We don't recommend relying on encryption alone to prevent sensitive values from being exposed on the client. Instead, you should use the React taint APIs to proactively prevent specific data from being sent to the client. ### Overwriting encryption keys (advanced) When self-hosting your Next.js application across multiple servers, each server instance may end up with a different encryption key, leading to potential inconsistencies. To mitigate this, you can overwrite the encryption key using the `process.env.NEXT_SERVER_ACTIONS_ENCRYPTION_KEY` environment variable. Specifying this variable ensures that your encryption keys are persistent across builds, and all server instances use the same key. This variable **must** be AES-GCM encrypted. This is an advanced use case where consistent encryption behavior across multiple deployments is critical for your application. You should consider standard security practices such key rotation and signing. > **Good to know:** Next.js applications deployed to Vercel automatically handle this. ### Allowed origins (advanced) Since Server Actions can be invoked in a `<form>` element, this opens them up to CSRF attacks. Behind the scenes, Server Actions use the `POST` method, and only this HTTP method is allowed to invoke them. This prevents most CSRF vulnerabilities in modern browsers, particularly with SameSite cookies being the default. As an additional protection, Server Actions in Next.js also compare the Origin header to the Host header (or `X-Forwarded-Host`). If these don't match, the request will be aborted. In other words, Server Actions can only be invoked on the same host as the page that hosts it. For large applications that use reverse proxies or multi-layered backend architectures (where the server API differs from the production domain), it's recommended to use the configuration option `serverActions.allowedOrigins` option to specify a list of safe origins. The option accepts an array of strings. /** @type {import('next').NextConfig} */ module.exports = { experimental: { serverActions: { allowedOrigins: ['my-proxy.com', '*.my-proxy.com'], }, }, } Learn more about Security and Server Actions. ## Additional resources For more information, check out the following React docs: * Server Actions * `"use server"` * `<form>` * `useFormStatus` * `useActionState` * `useOptimistic` --- ## Page: https://nextjs.org/docs/app/building-your-application/data-fetching/incremental-static-regeneration Examples * Next.js Commerce * On-Demand ISR * Next.js Forms Incremental Static Regeneration (ISR) enables you to: * Update static content without rebuilding the entire site * Reduce server load by serving prerendered, static pages for most requests * Ensure proper `cache-control` headers are automatically added to pages * Handle large amounts of content pages without long `next build` times Here's a minimal example: interface Post { id: string title: string content: string } // Next.js will invalidate the cache when a // request comes in, at most once every 60 seconds. export const revalidate = 60 // We'll prerender only the params from `generateStaticParams` at build time. // If a request comes in for a path that hasn't been generated, // Next.js will server-render the page on-demand. export const dynamicParams = true // or false, to 404 on unknown paths export async function generateStaticParams() { const posts: Post[] = await fetch('https://api.vercel.app/blog').then((res) => res.json() ) return posts.map((post) => ({ id: String(post.id), })) } export default async function Page({ params, }: { params: Promise<{ id: string }> }) { const { id } = await params const post: Post = await fetch(`https://api.vercel.app/blog/${id}`).then( (res) => res.json() ) return ( <main> <h1>{post.title}</h1> <p>{post.content}</p> </main> ) } Here's how this example works: 1. During `next build`, all known blog posts are generated (there are 25 in this example) 2. All requests made to these pages (e.g. `/blog/1`) are cached and instantaneous 3. After 60 seconds has passed, the next request will still show the cached (stale) page 4. The cache is invalidated and a new version of the page begins generating in the background 5. Once generated successfully, Next.js will display and cache the updated page 6. If `/blog/26` is requested, Next.js will generate and cache this page on-demand ## Reference ### Route segment config * `revalidate` * `dynamicParams` ### Functions * `revalidatePath` * `revalidateTag` ## Examples ### Time-based revalidation This fetches and displays a list of blog posts on `/blog`. After an hour, the cache for this page is invalidated on the next visit to the page. Then, in the background, a new version of the page is generated with the latest blog posts. interface Post { id: string title: string content: string } export const revalidate = 3600 // invalidate every hour export default async function Page() { const data = await fetch('https://api.vercel.app/blog') const posts: Post[] = await data.json() return ( <main> <h1>Blog Posts</h1> <ul> {posts.map((post) => ( <li key={post.id}>{post.title}</li> ))} </ul> </main> ) } We recommend setting a high revalidation time. For instance, 1 hour instead of 1 second. If you need more precision, consider using on-demand revalidation. If you need real-time data, consider switching to dynamic rendering. ### On-demand revalidation with `revalidatePath` For a more precise method of revalidation, invalidate pages on-demand with the `revalidatePath` function. For example, this Server Action would get called after adding a new post. Regardless of how you retrieve your data in your Server Component, either using `fetch` or connecting to a database, this will clear the cache for the entire route and allow the Server Component to fetch fresh data. 'use server' import { revalidatePath } from 'next/cache' export async function createPost() { // Invalidate the /posts route in the cache revalidatePath('/posts') } View a demo and explore the source code. ### On-demand revalidation with `revalidateTag` For most use cases, prefer revalidating entire paths. If you need more granular control, you can use the `revalidateTag` function. For example, you can tag individual `fetch` calls: export default async function Page() { const data = await fetch('https://api.vercel.app/blog', { next: { tags: ['posts'] }, }) const posts = await data.json() // ... } If you are using an ORM or connecting to a database, you can use `unstable_cache`: import { unstable_cache } from 'next/cache' import { db, posts } from '@/lib/db' const getCachedPosts = unstable_cache( async () => { return await db.select().from(posts) }, ['posts'], { revalidate: 3600, tags: ['posts'] } ) export default async function Page() { const posts = getCachedPosts() // ... } You can then use `revalidateTag` in a Server Actions or Route Handler: 'use server' import { revalidateTag } from 'next/cache' export async function createPost() { // Invalidate all data tagged with 'posts' in the cache revalidateTag('posts') } ### Handling uncaught exceptions If an error is thrown while attempting to revalidate data, the last successfully generated data will continue to be served from the cache. On the next subsequent request, Next.js will retry revalidating the data. Learn more about error handling. ### Customizing the cache location Caching and revalidating pages (with Incremental Static Regeneration) use the same shared cache. When deploying to Vercel, the ISR cache is automatically persisted to durable storage. When self-hosting, the ISR cache is stored to the filesystem (on disk) on your Next.js server. This works automatically when self-hosting using both the Pages and App Router. You can configure the Next.js cache location if you want to persist cached pages and data to durable storage, or share the cache across multiple containers or instances of your Next.js application. Learn more. ## Troubleshooting ### Debugging cached data in local development If you are using the `fetch` API, you can add additional logging to understand which requests are cached or uncached. Learn more about the `logging` option. module.exports = { logging: { fetches: { fullUrl: true, }, }, } ### Verifying correct production behavior To verify your pages are cached and revalidated correctly in production, you can test locally by running `next build` and then `next start` to run the production Next.js server. This will allow you to test ISR behavior as it would work in a production environment. For further debugging, add the following environment variable to your `.env` file: NEXT_PRIVATE_DEBUG_CACHE=1 This will make the Next.js server console log ISR cache hits and misses. You can inspect the output to see which pages are generated during `next build`, as well as how pages are updated as paths are accessed on-demand. ## Caveats * ISR is only supported when using the Node.js runtime (default). * ISR is not supported when creating a Static Export. * If you have multiple `fetch` requests in a statically rendered route, and each has a different `revalidate` frequency, the lowest time will be used for ISR. However, those revalidate frequencies will still be respected by the Data Cache. * If any of the `fetch` requests used on a route have a `revalidate` time of `0`, or an explicit `no-store`, the route will be dynamically rendered. * Middleware won't be executed for on-demand ISR requests, meaning any path rewrites or logic in Middleware will not be applied. Ensure you are revalidating the exact path. For example, `/post/1` instead of a rewritten `/post-1`. ## Version history | Version | Changes | | --- | --- | | `v14.1.0` | Custom `cacheHandler` is stable. | | `v13.0.0` | App Router is introduced. | | `v12.2.0` | Pages Router: On-Demand ISR is stable | | `v12.0.0` | Pages Router: Bot-aware ISR fallback added. | | `v9.5.0` | Pages Router: Stable ISR introduced. | --- ## Page: https://nextjs.org/docs/app/building-your-application/rendering Rendering converts the code you write into user interfaces. React and Next.js allow you to create hybrid web applications where parts of your code can be rendered on the server or the client. This section will help you understand the differences between these rendering environments, strategies, and runtimes. ## Fundamentals To start, it's helpful to be familiar with three foundational web concepts: * The Environments your application code can be executed in: the server and the client. * The Request-Response Lifecycle that's initiated when a user visits or interacts with your application. * The Network Boundary that separates server and client code. ### Rendering Environments There are two environments where web applications can be rendered: the client and the server. 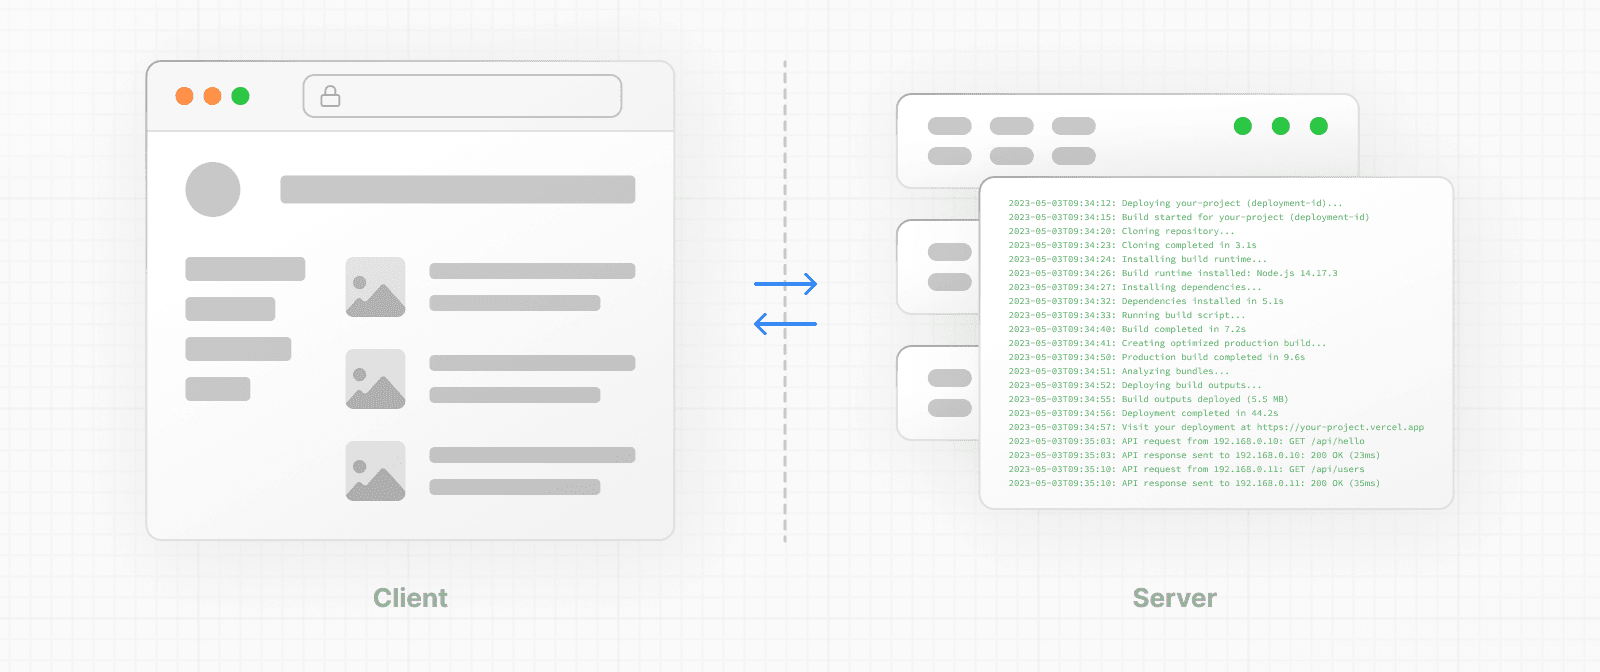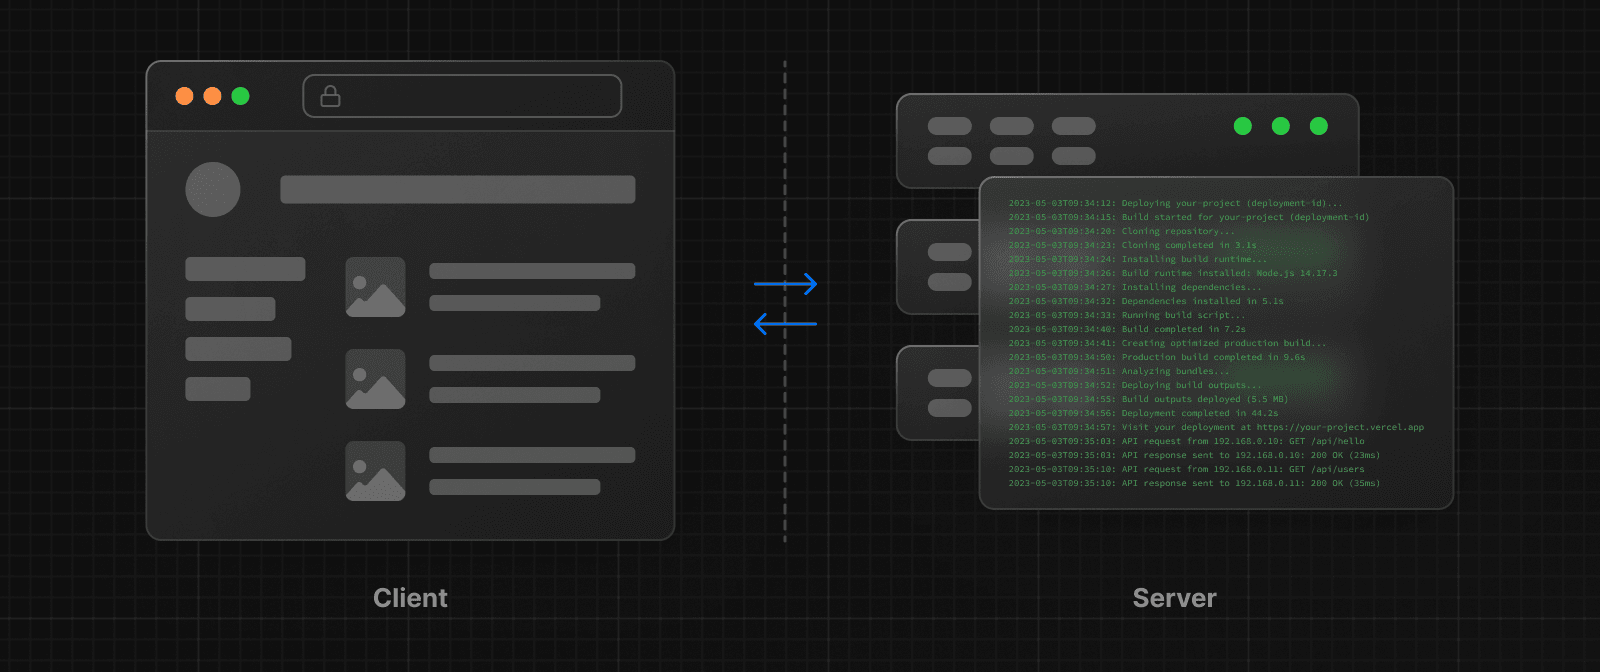 * The **client** refers to the browser on a user's device that sends a request to a server for your application code. It then turns the response from the server into a user interface. * The **server** refers to the computer in a data center that stores your application code, receives requests from a client, and sends back an appropriate response. Historically, developers had to use different languages (e.g. JavaScript, PHP) and frameworks when writing code for the server and the client. With React, developers can use the **same language** (JavaScript), and the **same framework** (e.g. Next.js or your framework of choice). This flexibility allows you to seamlessly write code for both environments without context switching. However, each environment has its own set of capabilities and constraints. Therefore, the code you write for the server and the client is not always the same. There are certain operations (e.g. data fetching or managing user state) that are better suited for one environment over the other. Understanding these differences is key to effectively using React and Next.js. We'll cover the differences and use cases in more detail on the Server and Client Components pages, for now, let's continue building on our foundation. ### Request-Response Lifecycle Broadly speaking, all websites follow the same **Request-Response Lifecycle**: 1. **User Action:** The user interacts with a web application. This could be clicking a link, submitting a form, or typing a URL directly into the browser's address bar. 2. **HTTP Request:** The client sends an HTTP request to the server that contains necessary information about what resources are being requested, what method is being used (e.g. `GET`, `POST`), and additional data if necessary. 3. **Server:** The server processes the request and responds with the appropriate resources. This process may take a couple of steps like routing, fetching data, etc. 4. **HTTP Response:** After processing the request, the server sends an HTTP response back to the client. This response contains a status code (which tells the client whether the request was successful or not) and requested resources (e.g. HTML, CSS, JavaScript, static assets, etc). 5. **Client:** The client parses the resources to render the user interface. 6. **User Action:** Once the user interface is rendered, the user can interact with it, and the whole process starts again. A major part of building a hybrid web application is deciding how to split the work in the lifecycle, and where to place the Network Boundary. ### Network Boundary In web development, the **Network Boundary** is a conceptual line that separates the different environments. For example, the client and the server, or the server and the data store. In React, you choose where to place the client-server network boundary wherever it makes the most sense. Behind the scenes, the work is split into two parts: the **client module graph** and the **server module graph**. The server module graph contains all the components that are rendered on the server, and the client module graph contains all components that are rendered on the client. It may be helpful to think about module graphs as a visual representation of how files in your application depend on each other. You can use the React `"use client"` convention to define the boundary. There's also a `"use server"` convention, which tells React to do some computational work on the server. ## Building Hybrid Applications When working in these environments, it's helpful to think of the flow of the code in your application as **unidirectional**. In other words, during a response, your application code flows in one direction: from the server to the client. If you need to access the server from the client, you send a **new** request to the server rather than re-use the same request. This makes it easier to understand where to render your components and where to place the Network Boundary. In practice, this model encourages developers to think about what they want to execute on the server first, before sending the result to the client and making the application interactive. This concept will become clearer when we look at how you can interleave client and server components in the same component tree. --- ## Page: https://nextjs.org/docs/app/building-your-application/rendering/server-components React Server Components allow you to write UI that can be rendered and optionally cached on the server. In Next.js, the rendering work is further split by route segments to enable streaming and partial rendering, and there are three different server rendering strategies: * Static Rendering * Dynamic Rendering * Streaming This page will go through how Server Components work, when you might use them, and the different server rendering strategies. ## Benefits of Server Rendering There are a couple of benefits to doing the rendering work on the server, including: * **Data Fetching**: Server Components allow you to move data fetching to the server, closer to your data source. This can improve performance by reducing time it takes to fetch data needed for rendering, and the number of requests the client needs to make. * **Security**: Server Components allow you to keep sensitive data and logic on the server, such as tokens and API keys, without the risk of exposing them to the client. * **Caching**: By rendering on the server, the result can be cached and reused on subsequent requests and across users. This can improve performance and reduce cost by reducing the amount of rendering and data fetching done on each request. * **Performance**: Server Components give you additional tools to optimize performance from the baseline. For example, if you start with an app composed of entirely Client Components, moving non-interactive pieces of your UI to Server Components can reduce the amount of client-side JavaScript needed. This is beneficial for users with slower internet or less powerful devices, as the browser has less client-side JavaScript to download, parse, and execute. * **Initial Page Load and First Contentful Paint (FCP)**: On the server, we can generate HTML to allow users to view the page immediately, without waiting for the client to download, parse and execute the JavaScript needed to render the page. * **Search Engine Optimization and Social Network Shareability**: The rendered HTML can be used by search engine bots to index your pages and social network bots to generate social card previews for your pages. * **Streaming**: Server Components allow you to split the rendering work into chunks and stream them to the client as they become ready. This allows the user to see parts of the page earlier without having to wait for the entire page to be rendered on the server. ## Using Server Components in Next.js By default, Next.js uses Server Components. This allows you to automatically implement server rendering with no additional configuration, and you can opt into using Client Components when needed, see Client Components. ## How are Server Components rendered? On the server, Next.js uses React's APIs to orchestrate rendering. The rendering work is split into chunks: by individual route segments and Suspense Boundaries. Each chunk is rendered in two steps: 1. React renders Server Components into a special data format called the **React Server Component Payload (RSC Payload)**. 2. Next.js uses the RSC Payload and Client Component JavaScript instructions to render **HTML** on the server. Then, on the client: 1. The HTML is used to immediately show a fast non-interactive preview of the route - this is for the initial page load only. 2. The React Server Components Payload is used to reconcile the Client and Server Component trees, and update the DOM. 3. The JavaScript instructions are used to hydrate Client Components and make the application interactive. > #### What is the React Server Component Payload (RSC)? > > The RSC Payload is a compact binary representation of the rendered React Server Components tree. It's used by React on the client to update the browser's DOM. The RSC Payload contains: > > * The rendered result of Server Components > * Placeholders for where Client Components should be rendered and references to their JavaScript files > * Any props passed from a Server Component to a Client Component ## Server Rendering Strategies There are three subsets of server rendering: Static, Dynamic, and Streaming. ### Static Rendering (Default) With Static Rendering, routes are rendered at **build time**, or in the background after data revalidation. The result is cached and can be pushed to a Content Delivery Network (CDN). This optimization allows you to share the result of the rendering work between users and server requests. Static rendering is useful when a route has data that is not personalized to the user and can be known at build time, such as a static blog post or a product page. ### Dynamic Rendering With Dynamic Rendering, routes are rendered for each user at **request time**. Dynamic rendering is useful when a route has data that is personalized to the user or has information that can only be known at request time, such as cookies or the URL's search params. > **Dynamic Routes with Cached Data** > > In most websites, routes are not fully static or fully dynamic - it's a spectrum. For example, you can have an e-commerce page that uses cached product data that's revalidated at an interval, but also has uncached, personalized customer data. > > In Next.js, you can have dynamically rendered routes that have both cached and uncached data. This is because the RSC Payload and data are cached separately. This allows you to opt into dynamic rendering without worrying about the performance impact of fetching all the data at request time. > > Learn more about the full-route cache and Data Cache. #### Switching to Dynamic Rendering During rendering, if a Dynamic API or a fetch option of `{ cache: 'no-store' }` is discovered, Next.js will switch to dynamically rendering the whole route. This table summarizes how Dynamic APIs and data caching affect whether a route is statically or dynamically rendered: | Dynamic APIs | Data | Route | | --- | --- | --- | | No | Cached | Statically Rendered | | Yes | Cached | Dynamically Rendered | | No | Not Cached | Dynamically Rendered | | Yes | Not Cached | Dynamically Rendered | In the table above, for a route to be fully static, all data must be cached. However, you can have a dynamically rendered route that uses both cached and uncached data fetches. As a developer, you do not need to choose between static and dynamic rendering as Next.js will automatically choose the best rendering strategy for each route based on the features and APIs used. Instead, you choose when to cache or revalidate specific data, and you may choose to stream parts of your UI. ### Dynamic APIs Dynamic APIs rely on information that can only be known at request time (and not ahead of time during prerendering). Using any of these APIs signals the developer's intention and will opt the whole route into dynamic rendering at the request time. These APIs include: * `cookies` * `headers` * `connection` * `draftMode` * `searchParams` prop * `unstable_noStore` ### Streaming  Streaming enables you to progressively render UI from the server. Work is split into chunks and streamed to the client as it becomes ready. This allows the user to see parts of the page immediately, before the entire content has finished rendering.  Streaming is built into the Next.js App Router by default. This helps improve both the initial page loading performance, as well as UI that depends on slower data fetches that would block rendering the whole route. For example, reviews on a product page. You can start streaming route segments using `loading.js` and UI components with React Suspense. See the Loading UI and Streaming section for more information. --- ## Page: https://nextjs.org/docs/app/building-your-application/rendering/client-components Client Components allow you to write interactive UI that is prerendered on the server and can use client JavaScript to run in the browser. This page will go through how Client Components work, how they're rendered, and when you might use them. ## Benefits of Client Rendering There are a couple of benefits to doing the rendering work on the client, including: * **Interactivity**: Client Components can use state, effects, and event listeners, meaning they can provide immediate feedback to the user and update the UI. * **Browser APIs**: Client Components have access to browser APIs, like geolocation or localStorage. ## Using Client Components in Next.js To use Client Components, you can add the React `"use client"` directive at the top of a file, above your imports. `"use client"` is used to declare a boundary between a Server and Client Component modules. This means that by defining a `"use client"` in a file, all other modules imported into it, including child components, are considered part of the client bundle. 'use client' import { useState } from 'react' export default function Counter() { const [count, setCount] = useState(0) return ( <div> <p>You clicked {count} times</p> <button onClick={() => setCount(count + 1)}>Click me</button> </div> ) } The diagram below shows that using `onClick` and `useState` in a nested component (`toggle.js`) will cause an error if the `"use client"` directive is not defined. This is because, by default, all components in the App Router are Server Components where these APIs are not available. By defining the `"use client"` directive in `toggle.js`, you can tell React to enter the client boundary where these APIs are available. 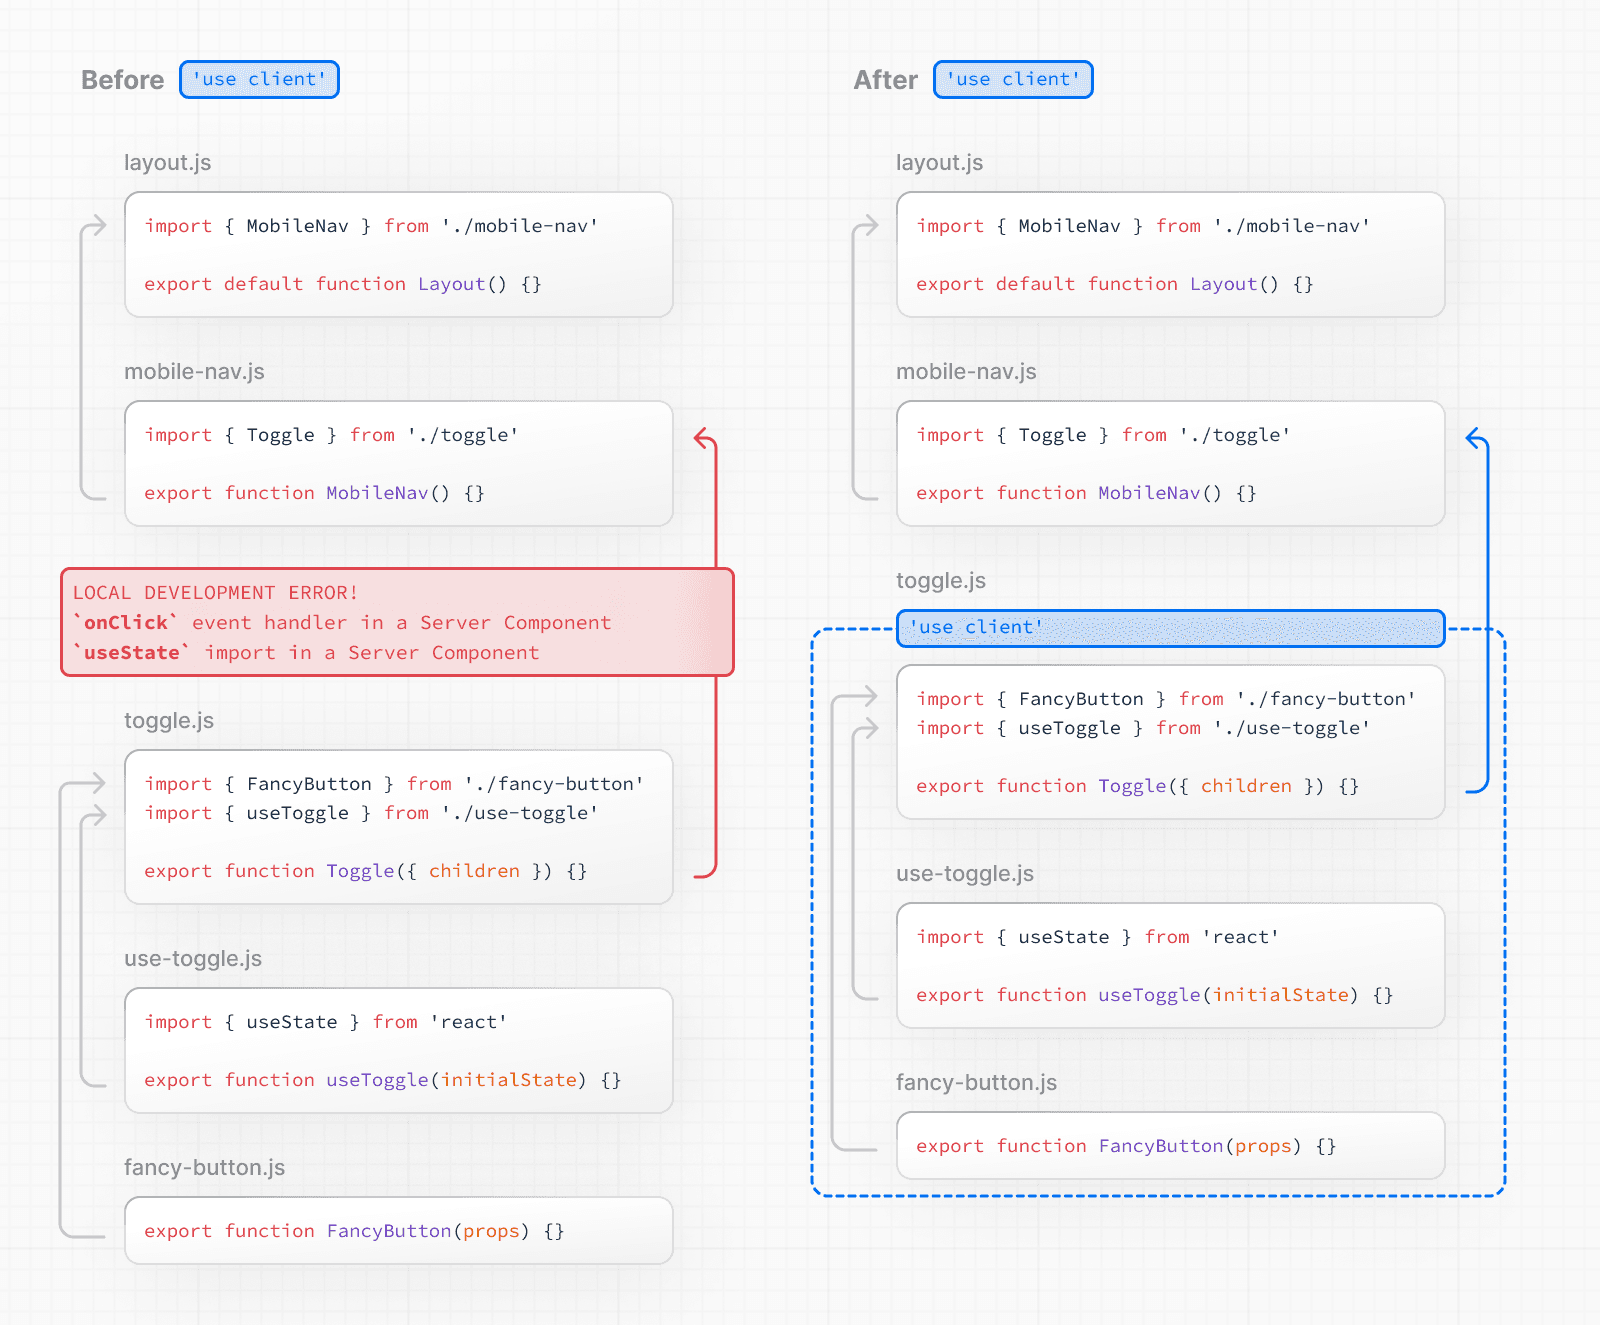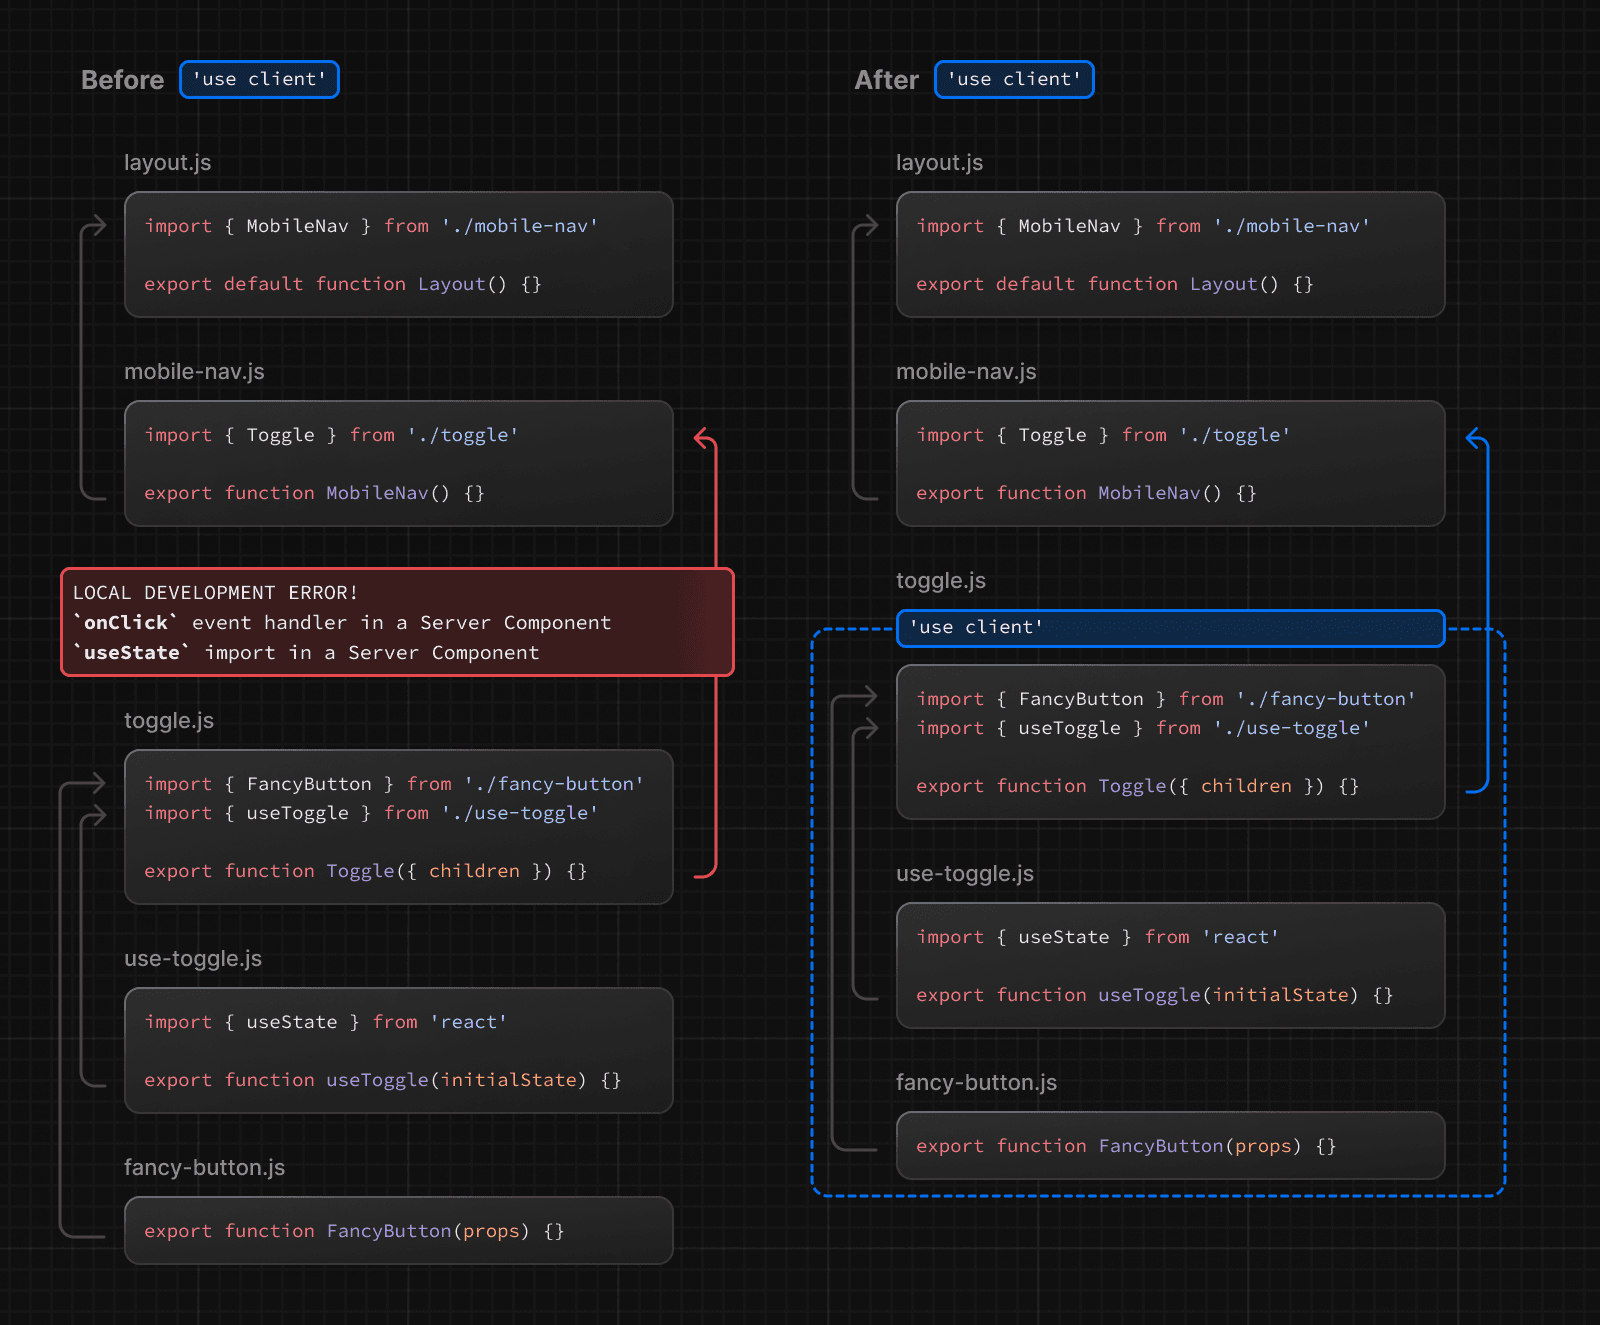 > **Defining multiple `use client` entry points**: > > You can define multiple "use client" entry points in your React Component tree. This allows you to split your application into multiple client bundles. > > However, `"use client"` doesn't need to be defined in every component that needs to be rendered on the client. Once you define the boundary, all child components and modules imported into it are considered part of the client bundle. ## How are Client Components Rendered? In Next.js, Client Components are rendered differently depending on whether the request is part of a full page load (an initial visit to your application or a page reload triggered by a browser refresh) or a subsequent navigation. ### Full page load To optimize the initial page load, Next.js will use React's APIs to render a static HTML preview on the server for both Client and Server Components. This means, when the user first visits your application, they will see the content of the page immediately, without having to wait for the client to download, parse, and execute the Client Component JavaScript bundle. On the server: 1. React renders Server Components into a special data format called the **React Server Component Payload (RSC Payload)**, which includes references to Client Components. 2. Next.js uses the RSC Payload and Client Component JavaScript instructions to render **HTML** for the route on the server. Then, on the client: 1. The HTML is used to immediately show a fast non-interactive initial preview of the route. 2. The React Server Components Payload is used to reconcile the Client and Server Component trees, and update the DOM. 3. The JavaScript instructions are used to hydrate Client Components and make their UI interactive. > **What is hydration?** > > Hydration is the process of attaching event listeners to the DOM, to make the static HTML interactive. Behind the scenes, hydration is done with the `hydrateRoot` React API. ### Subsequent Navigations On subsequent navigations, Client Components are rendered entirely on the client, without the server-rendered HTML. This means the Client Component JavaScript bundle is downloaded and parsed. Once the bundle is ready, React will use the RSC Payload to reconcile the Client and Server Component trees, and update the DOM. ## Going back to the Server Environment Sometimes, after you've declared the `"use client"` boundary, you may want to go back to the server environment. For example, you may want to reduce the client bundle size, fetch data on the server, or use an API that is only available on the server. You can keep code on the server even though it's theoretically nested inside Client Components by interleaving Client and Server Components and Server Actions. See the Composition Patterns page for more information. --- ## Page: https://nextjs.org/docs/app/building-your-application/rendering/composition-patterns ## Server and Client Composition Patterns When building React applications, you will need to consider what parts of your application should be rendered on the server or the client. This page covers some recommended composition patterns when using Server and Client Components. ## When to use Server and Client Components? Here's a quick summary of the different use cases for Server and Client Components: | What do you need to do? | Server Component | Client Component | | --- | --- | --- | | Fetch data | | | | Access backend resources (directly) | | | | Keep sensitive information on the server (access tokens, API keys, etc) | | | | Keep large dependencies on the server / Reduce client-side JavaScript | | | | Add interactivity and event listeners (`onClick()`, `onChange()`, etc) | | | | Use State and Lifecycle Effects (`useState()`, `useReducer()`, `useEffect()`, etc) | | | | Use browser-only APIs | | | | Use custom hooks that depend on state, effects, or browser-only APIs | | | | Use React Class components | | | ## Server Component Patterns Before opting into client-side rendering, you may wish to do some work on the server like fetching data, or accessing your database or backend services. Here are some common patterns when working with Server Components: ### Sharing data between components When fetching data on the server, there may be cases where you need to share data across different components. For example, you may have a layout and a page that depend on the same data. Instead of using React Context (which is not available on the server) or passing data as props, you can use `fetch` or React's `cache` function to fetch the same data in the components that need it, without worrying about making duplicate requests for the same data. This is because React extends `fetch` to automatically memoize data requests, and the `cache` function can be used when `fetch` is not available. View an example of this pattern. ### Keeping Server-only Code out of the Client Environment Since JavaScript modules can be shared between both Server and Client Components modules, it's possible for code that was only ever intended to be run on the server to sneak its way into the client. For example, take the following data-fetching function: export async function getData() { const res = await fetch('https://external-service.com/data', { headers: { authorization: process.env.API_KEY, }, }) return res.json() } At first glance, it appears that `getData` works on both the server and the client. However, this function contains an `API_KEY`, written with the intention that it would only ever be executed on the server. Since the environment variable `API_KEY` is not prefixed with `NEXT_PUBLIC`, it's a private variable that can only be accessed on the server. To prevent your environment variables from being leaked to the client, Next.js replaces private environment variables with an empty string. As a result, even though `getData()` can be imported and executed on the client, it won't work as expected. And while making the variable public would make the function work on the client, you may not want to expose sensitive information to the client. To prevent this sort of unintended client usage of server code, we can use the `server-only` package to give other developers a build-time error if they ever accidentally import one of these modules into a Client Component. To use `server-only`, first install the package: npm install server-only Then import the package into any module that contains server-only code: import 'server-only' export async function getData() { const res = await fetch('https://external-service.com/data', { headers: { authorization: process.env.API_KEY, }, }) return res.json() } Now, any Client Component that imports `getData()` will receive a build-time error explaining that this module can only be used on the server. The corresponding package `client-only` can be used to mark modules that contain client-only code – for example, code that accesses the `window` object. ### Using Third-party Packages and Providers Since Server Components are a new React feature, third-party packages and providers in the ecosystem are just beginning to add the `"use client"` directive to components that use client-only features like `useState`, `useEffect`, and `createContext`. Today, many components from `npm` packages that use client-only features do not yet have the directive. These third-party components will work as expected within Client Components since they have the `"use client"` directive, but they won't work within Server Components. For example, let's say you've installed the hypothetical `acme-carousel` package which has a `<Carousel />` component. This component uses `useState`, but it doesn't yet have the `"use client"` directive. If you use `<Carousel />` within a Client Component, it will work as expected: 'use client' import { useState } from 'react' import { Carousel } from 'acme-carousel' export default function Gallery() { const [isOpen, setIsOpen] = useState(false) return ( <div> <button onClick={() => setIsOpen(true)}>View pictures</button> {/* Works, since Carousel is used within a Client Component */} {isOpen && <Carousel />} </div> ) } However, if you try to use it directly within a Server Component, you'll see an error: import { Carousel } from 'acme-carousel' export default function Page() { return ( <div> <p>View pictures</p> {/* Error: `useState` can not be used within Server Components */} <Carousel /> </div> ) } This is because Next.js doesn't know `<Carousel />` is using client-only features. To fix this, you can wrap third-party components that rely on client-only features in your own Client Components: 'use client' import { Carousel } from 'acme-carousel' export default Carousel Now, you can use `<Carousel />` directly within a Server Component: import Carousel from './carousel' export default function Page() { return ( <div> <p>View pictures</p> {/* Works, since Carousel is a Client Component */} <Carousel /> </div> ) } We don't expect you to need to wrap most third-party components since it's likely you'll be using them within Client Components. However, one exception is providers, since they rely on React state and context, and are typically needed at the root of an application. Learn more about third-party context providers below. #### Using Context Providers Context providers are typically rendered near the root of an application to share global concerns, like the current theme. Since React context is not supported in Server Components, trying to create a context at the root of your application will cause an error: import { createContext } from 'react' // createContext is not supported in Server Components export const ThemeContext = createContext({}) export default function RootLayout({ children, }: { children: React.ReactNode }) { return ( <html> <body> <ThemeContext.Provider value="dark">{children}</ThemeContext.Provider> </body> </html> ) } To fix this, create your context and render its provider inside of a Client Component: 'use client' import { createContext } from 'react' export const ThemeContext = createContext({}) export default function ThemeProvider({ children, }: { children: React.ReactNode }) { return <ThemeContext.Provider value="dark">{children}</ThemeContext.Provider> } Your Server Component will now be able to directly render your provider since it's been marked as a Client Component: import ThemeProvider from './theme-provider' export default function RootLayout({ children, }: { children: React.ReactNode }) { return ( <html> <body> <ThemeProvider>{children}</ThemeProvider> </body> </html> ) } With the provider rendered at the root, all other Client Components throughout your app will be able to consume this context. > **Good to know**: You should render providers as deep as possible in the tree – notice how `ThemeProvider` only wraps `{children}` instead of the entire `<html>` document. This makes it easier for Next.js to optimize the static parts of your Server Components. In a similar fashion, library authors creating packages to be consumed by other developers can use the `"use client"` directive to mark client entry points of their package. This allows users of the package to import package components directly into their Server Components without having to create a wrapping boundary. You can optimize your package by using 'use client' deeper in the tree, allowing the imported modules to be part of the Server Component module graph. It's worth noting some bundlers might strip out `"use client"` directives. You can find an example of how to configure esbuild to include the `"use client"` directive in the React Wrap Balancer and Vercel Analytics repositories. ## Client Components ### Moving Client Components Down the Tree To reduce the Client JavaScript bundle size, we recommend moving Client Components down your component tree. For example, you may have a Layout that has static elements (e.g. logo, links, etc) and an interactive search bar that uses state. Instead of making the whole layout a Client Component, move the interactive logic to a Client Component (e.g. `<SearchBar />`) and keep your layout as a Server Component. This means you don't have to send all the component JavaScript of the layout to the client. // SearchBar is a Client Component import SearchBar from './searchbar' // Logo is a Server Component import Logo from './logo' // Layout is a Server Component by default export default function Layout({ children }: { children: React.ReactNode }) { return ( <> <nav> <Logo /> <SearchBar /> </nav> <main>{children}</main> </> ) } ### Passing props from Server to Client Components (Serialization) If you fetch data in a Server Component, you may want to pass data down as props to Client Components. Props passed from the Server to Client Components need to be serializable by React. If your Client Components depend on data that is _not_ serializable, you can fetch data on the client with a third party library or on the server with a Route Handler. ## Interleaving Server and Client Components When interleaving Client and Server Components, it may be helpful to visualize your UI as a tree of components. Starting with the root layout, which is a Server Component, you can then render certain subtrees of components on the client by adding the `"use client"` directive. Within those client subtrees, you can still nest Server Components or call Server Actions, however there are some things to keep in mind: * During a request-response lifecycle, your code moves from the server to the client. If you need to access data or resources on the server while on the client, you'll be making a **new** request to the server - not switching back and forth. * When a new request is made to the server, all Server Components are rendered first, including those nested inside Client Components. The rendered result (RSC Payload) will contain references to the locations of Client Components. Then, on the client, React uses the RSC Payload to reconcile Server and Client Components into a single tree. * Since Client Components are rendered after Server Components, you cannot import a Server Component into a Client Component module (since it would require a new request back to the server). Instead, you can pass a Server Component as `props` to a Client Component. See the unsupported pattern and supported pattern sections below. ### Unsupported Pattern: Importing Server Components into Client Components The following pattern is not supported. You cannot import a Server Component into a Client Component: 'use client' // You cannot import a Server Component into a Client Component. import ServerComponent from './Server-Component' export default function ClientComponent({ children, }: { children: React.ReactNode }) { const [count, setCount] = useState(0) return ( <> <button onClick={() => setCount(count + 1)}>{count}</button> <ServerComponent /> </> ) } ### Supported Pattern: Passing Server Components to Client Components as Props The following pattern is supported. You can pass Server Components as a prop to a Client Component. A common pattern is to use the React `children` prop to create a _"slot"_ in your Client Component. In the example below, `<ClientComponent>` accepts a `children` prop: 'use client' import { useState } from 'react' export default function ClientComponent({ children, }: { children: React.ReactNode }) { const [count, setCount] = useState(0) return ( <> <button onClick={() => setCount(count + 1)}>{count}</button> {children} </> ) } `<ClientComponent>` doesn't know that `children` will eventually be filled in by the result of a Server Component. The only responsibility `<ClientComponent>` has is to decide **where** `children` will eventually be placed. In a parent Server Component, you can import both the `<ClientComponent>` and `<ServerComponent>` and pass `<ServerComponent>` as a child of `<ClientComponent>`: // This pattern works: // You can pass a Server Component as a child or prop of a // Client Component. import ClientComponent from './client-component' import ServerComponent from './server-component' // Pages in Next.js are Server Components by default export default function Page() { return ( <ClientComponent> <ServerComponent /> </ClientComponent> ) } With this approach, `<ClientComponent>` and `<ServerComponent>` are decoupled and can be rendered independently. In this case, the child `<ServerComponent>` can be rendered on the server, well before `<ClientComponent>` is rendered on the client. > **Good to know:** > > * The pattern of "lifting content up" has been used to avoid re-rendering a nested child component when a parent component re-renders. > * You're not limited to the `children` prop. You can use any prop to pass JSX. --- ## Page: https://nextjs.org/docs/app/building-your-application/rendering/partial-prerendering > **Note:** Partial Prerendering is an **experimental** feature only available on canary and is subject to change. It is not ready for production use. Partial Prerendering (PPR) enables you to combine static and dynamic components together in the same route. During the build, Next.js prerenders as much of the route as possible. If dynamic code is detected, like reading from the incoming request, you can wrap the relevant component with a React Suspense boundary. The Suspense boundary fallback will then be included in the prerendered HTML. 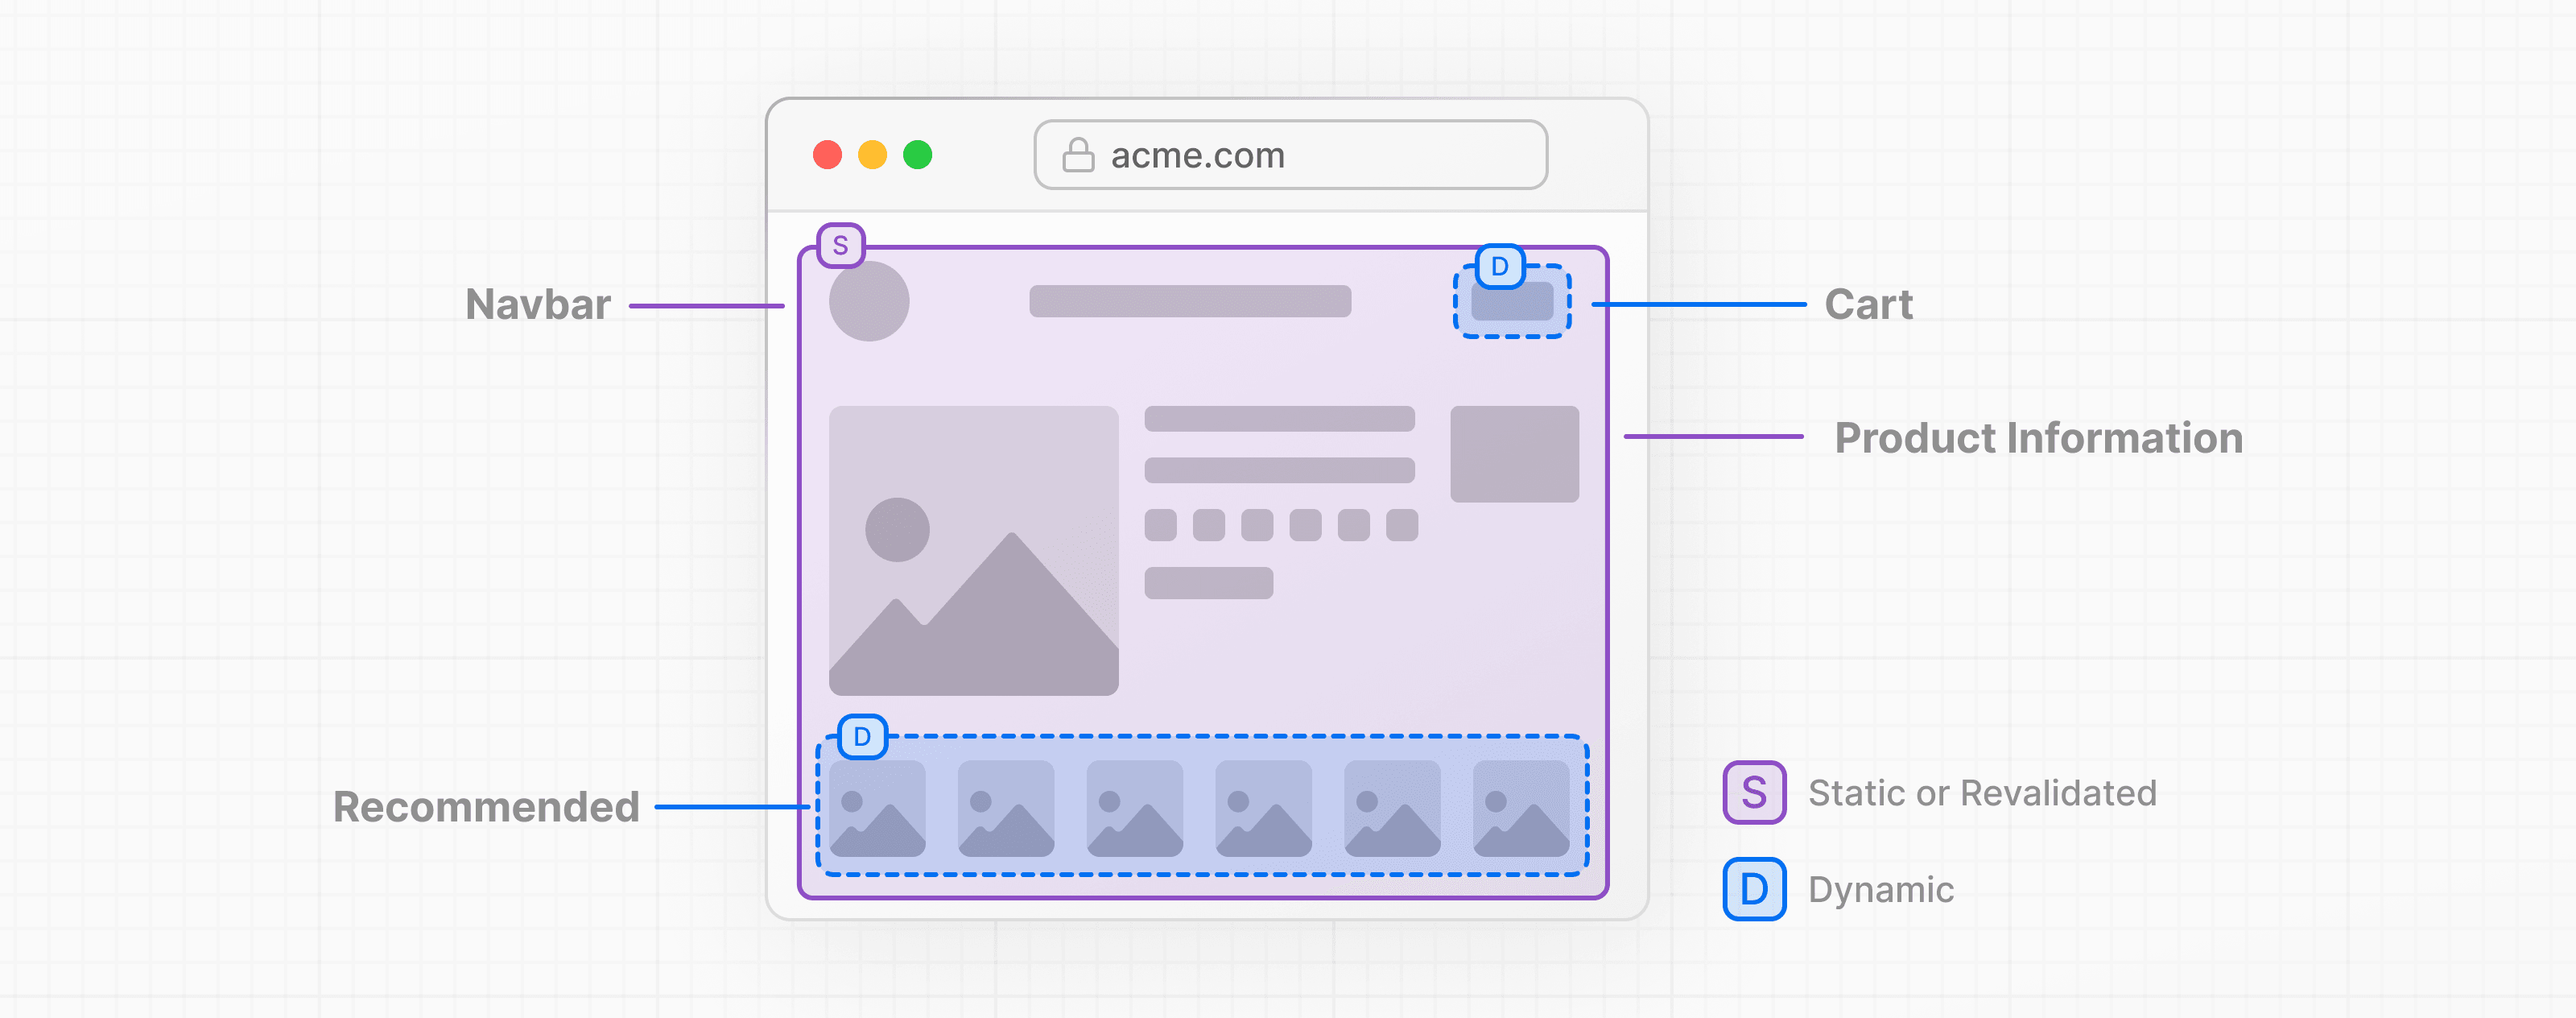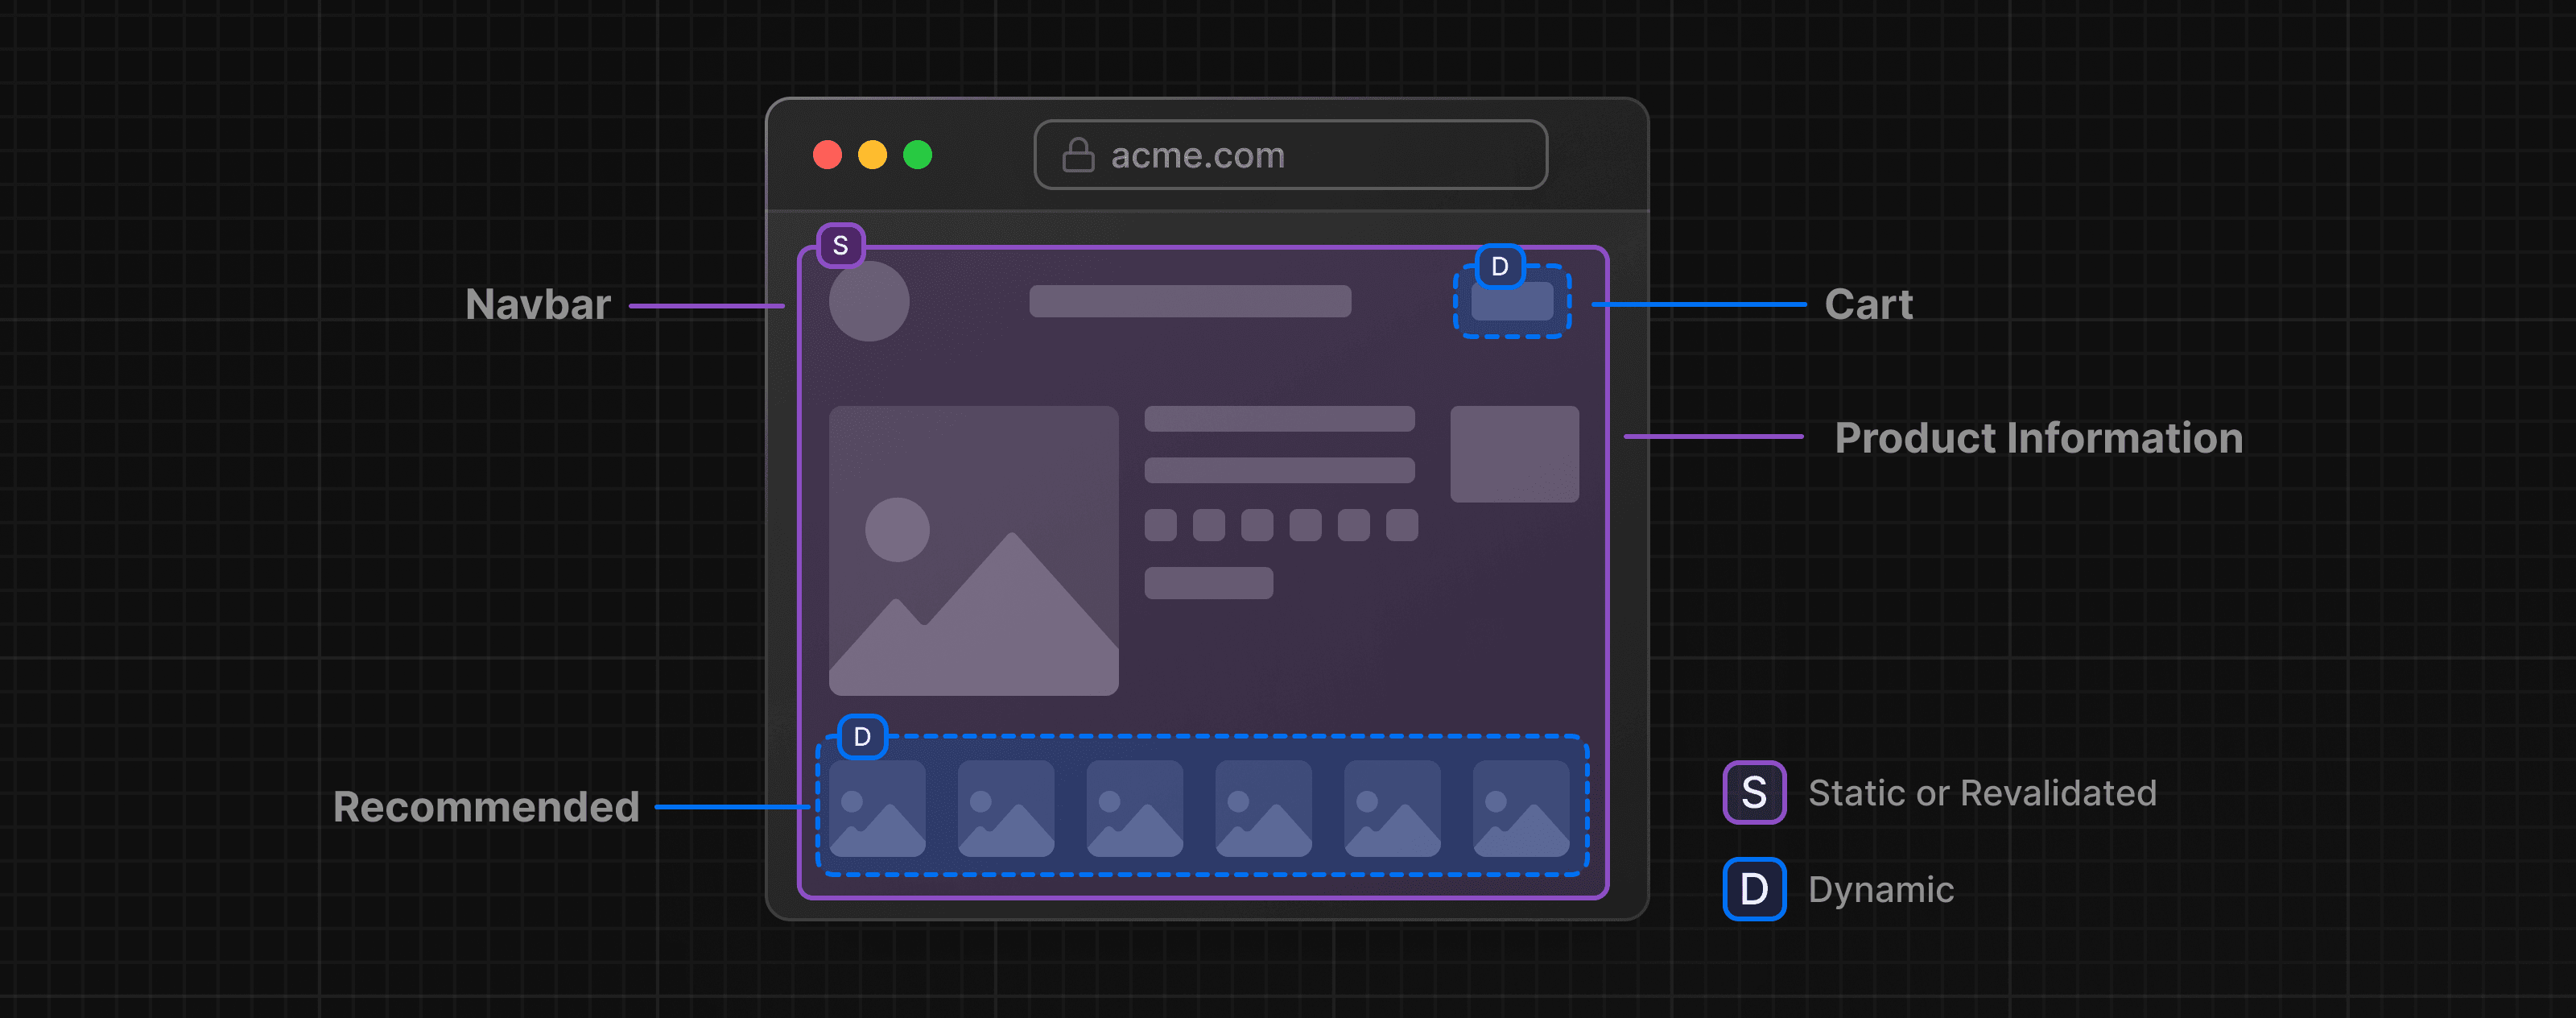 > **🎥 Watch:** Why PPR and how it works → YouTube (10 minutes). ## Background PPR enables your Next.js server to immediately send prerendered content. To prevent client to server waterfalls, dynamic components begin streaming from the server in parallel while serving the initial prerender. This ensures dynamic components can begin rendering before client JavaScript has been loaded in the browser. To prevent creating many HTTP requests for each dynamic component, PPR is able to combine the static prerender and dynamic components together into a single HTTP request. This ensures there are not multiple network roundtrips needed for each dynamic component. ## Using Partial Prerendering ### Incremental Adoption (Version 15 Canary Versions) In Next.js 15 canary versions, PPR is available as an experimental feature. It's not available in the stable versions yet. To install: npm install next@canary You can incrementally adopt Partial Prerendering in layouts and pages by setting the `ppr` option in `next.config.js` to `incremental`, and exporting the `experimental_ppr` route config option at the top of the file: import type { NextConfig } from 'next' const nextConfig: NextConfig = { experimental: { ppr: 'incremental', }, } export default nextConfig import { Suspense } from 'react' import { StaticComponent, DynamicComponent, Fallback } from '@/app/ui' export const experimental_ppr = true export default function Page() { return ( <> <StaticComponent /> <Suspense fallback={<Fallback />}> <DynamicComponent /> </Suspense> </> ) } > **Good to know**: > > * Routes that don't have `experimental_ppr` will default to `false` and will not be prerendered using PPR. You need to explicitly opt-in to PPR for each route. > * `experimental_ppr` will apply to all children of the route segment, including nested layouts and pages. You don't have to add it to every file, only the top segment of a route. > * To disable PPR for children segments, you can set `experimental_ppr` to `false` in the child segment. ## Dynamic Components When creating the prerender for your route during `next build`, Next.js requires that Dynamic APIs are wrapped with React Suspense. The `fallback` is then included in the prerender. For example, using functions like `cookies` or `headers`: import { cookies } from 'next/headers' export async function User() { const session = (await cookies()).get('session')?.value return '...' } This component requires looking at the incoming request to read cookies. To use this with PPR, you should wrap the component with Suspense: import { Suspense } from 'react' import { User, AvatarSkeleton } from './user' export const experimental_ppr = true export default function Page() { return ( <section> <h1>This will be prerendered</h1> <Suspense fallback={<AvatarSkeleton />}> <User /> </Suspense> </section> ) } Components only opt into dynamic rendering when the value is accessed. For example, if you are reading `searchParams` from a `page`, you can forward this value to another component as a prop: import { Table } from './table' export default function Page({ searchParams, }: { searchParams: Promise<{ sort: string }> }) { return ( <section> <h1>This will be prerendered</h1> <Table searchParams={searchParams} /> </section> ) } Inside of the table component, accessing the value from `searchParams` will make the component run dynamically: export async function Table({ searchParams, }: { searchParams: Promise<{ sort: string }> }) { const sort = (await searchParams).sort === 'true' return '...' } --- ## Page: https://nextjs.org/docs/app/building-your-application/rendering/edge-and-nodejs-runtimes #### Subscribe to our newsletter Stay updated on new releases and features, guides, and case studies. --- ## Page: https://nextjs.org/docs/app/building-your-application/caching Next.js improves your application's performance and reduces costs by caching rendering work and data requests. This page provides an in-depth look at Next.js caching mechanisms, the APIs you can use to configure them, and how they interact with each other. > **Good to know**: This page helps you understand how Next.js works under the hood but is **not** essential knowledge to be productive with Next.js. Most of Next.js' caching heuristics are determined by your API usage and have defaults for the best performance with zero or minimal configuration. If you instead want to jump to examples, start here. ## Overview Here's a high-level overview of the different caching mechanisms and their purpose: | Mechanism | What | Where | Purpose | Duration | | --- | --- | --- | --- | --- | | Request Memoization | Return values of functions | Server | Re-use data in a React Component tree | Per-request lifecycle | | Data Cache | Data | Server | Store data across user requests and deployments | Persistent (can be revalidated) | | Full Route Cache | HTML and RSC payload | Server | Reduce rendering cost and improve performance | Persistent (can be revalidated) | | Router Cache | RSC Payload | Client | Reduce server requests on navigation | User session or time-based | By default, Next.js will cache as much as possible to improve performance and reduce cost. This means routes are **statically rendered** and data requests are **cached** unless you opt out. The diagram below shows the default caching behavior: when a route is statically rendered at build time and when a static route is first visited. 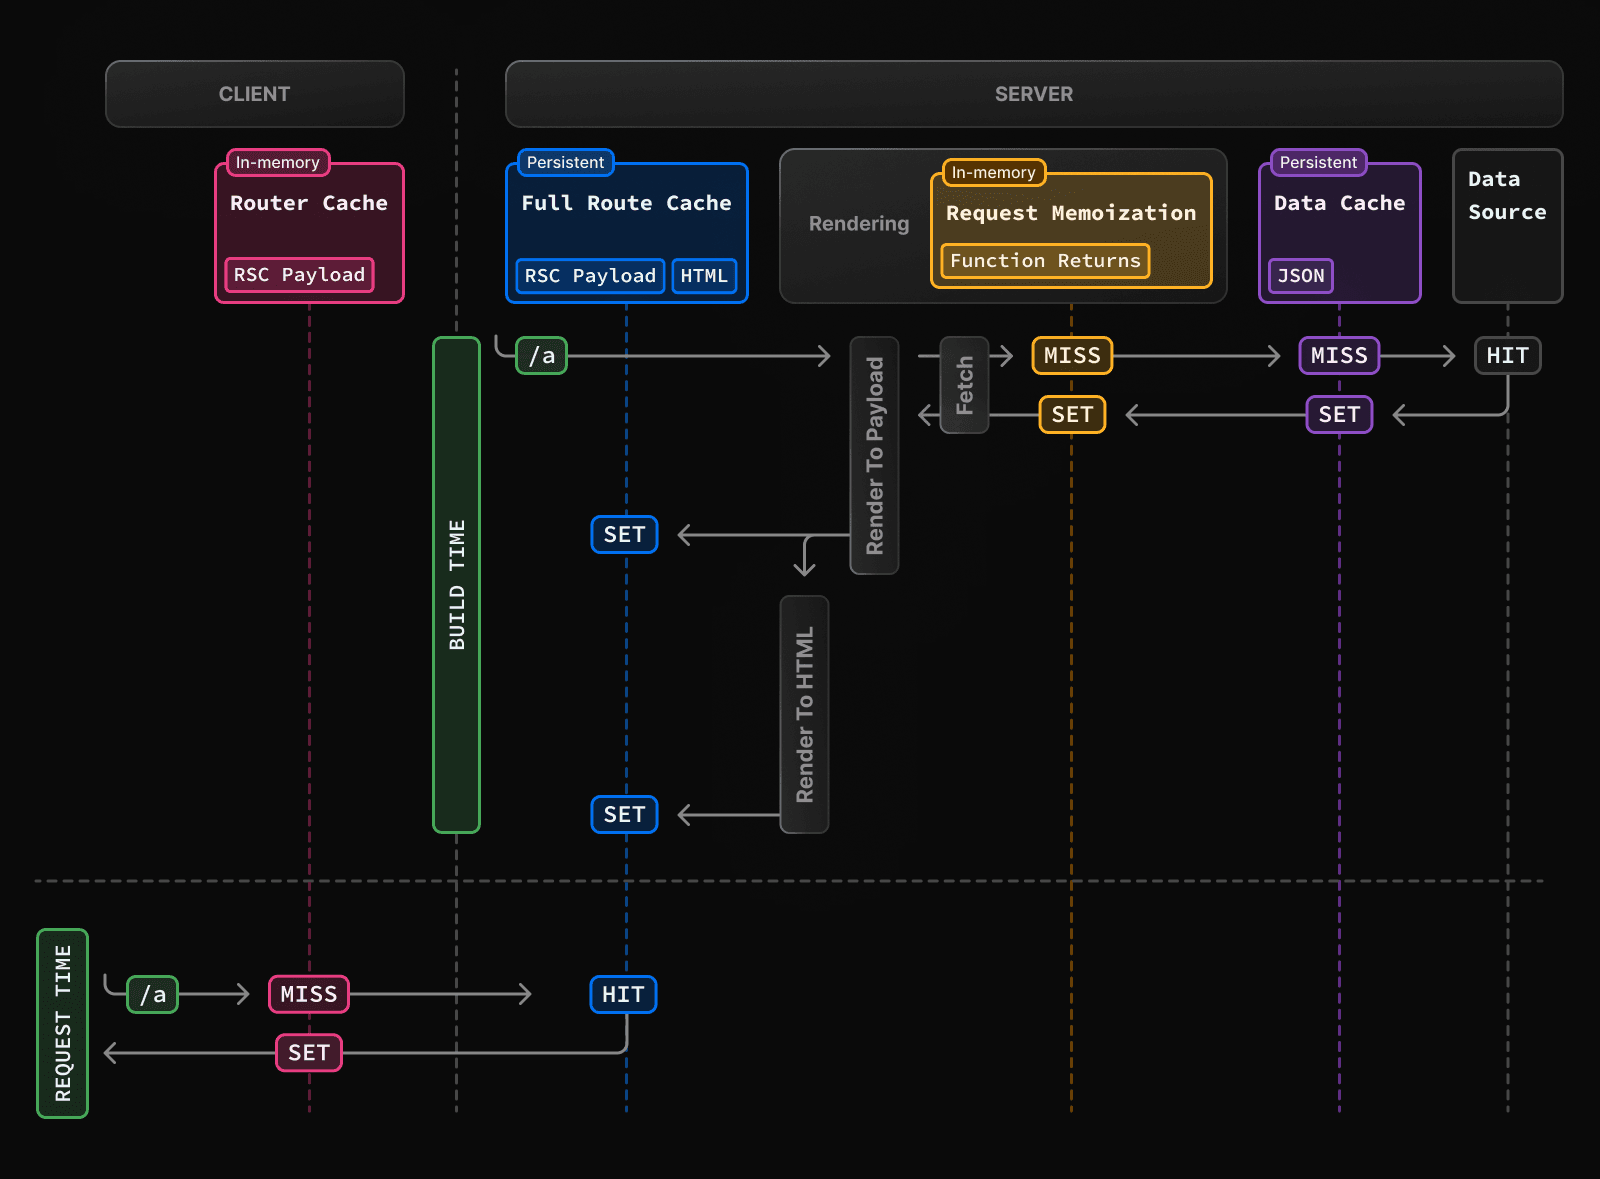 Caching behavior changes depending on whether the route is statically or dynamically rendered, data is cached or uncached, and whether a request is part of an initial visit or a subsequent navigation. Depending on your use case, you can configure the caching behavior for individual routes and data requests. ## Request Memoization Next.js extends the `fetch` API to automatically **memoize** requests that have the same URL and options. This means you can call a fetch function for the same data in multiple places in a React component tree while only executing it once. 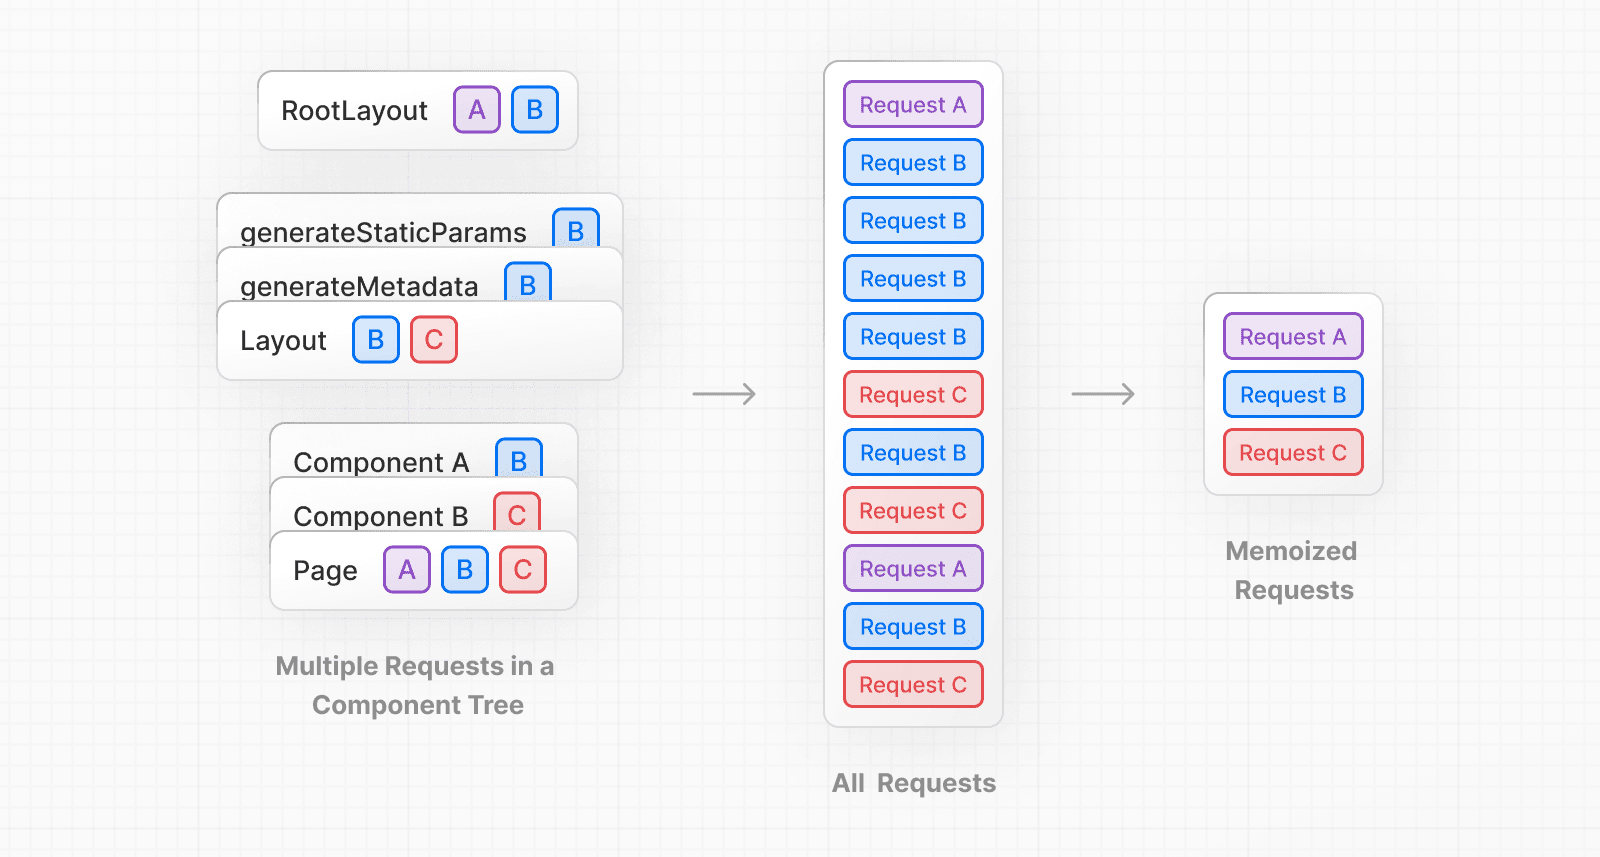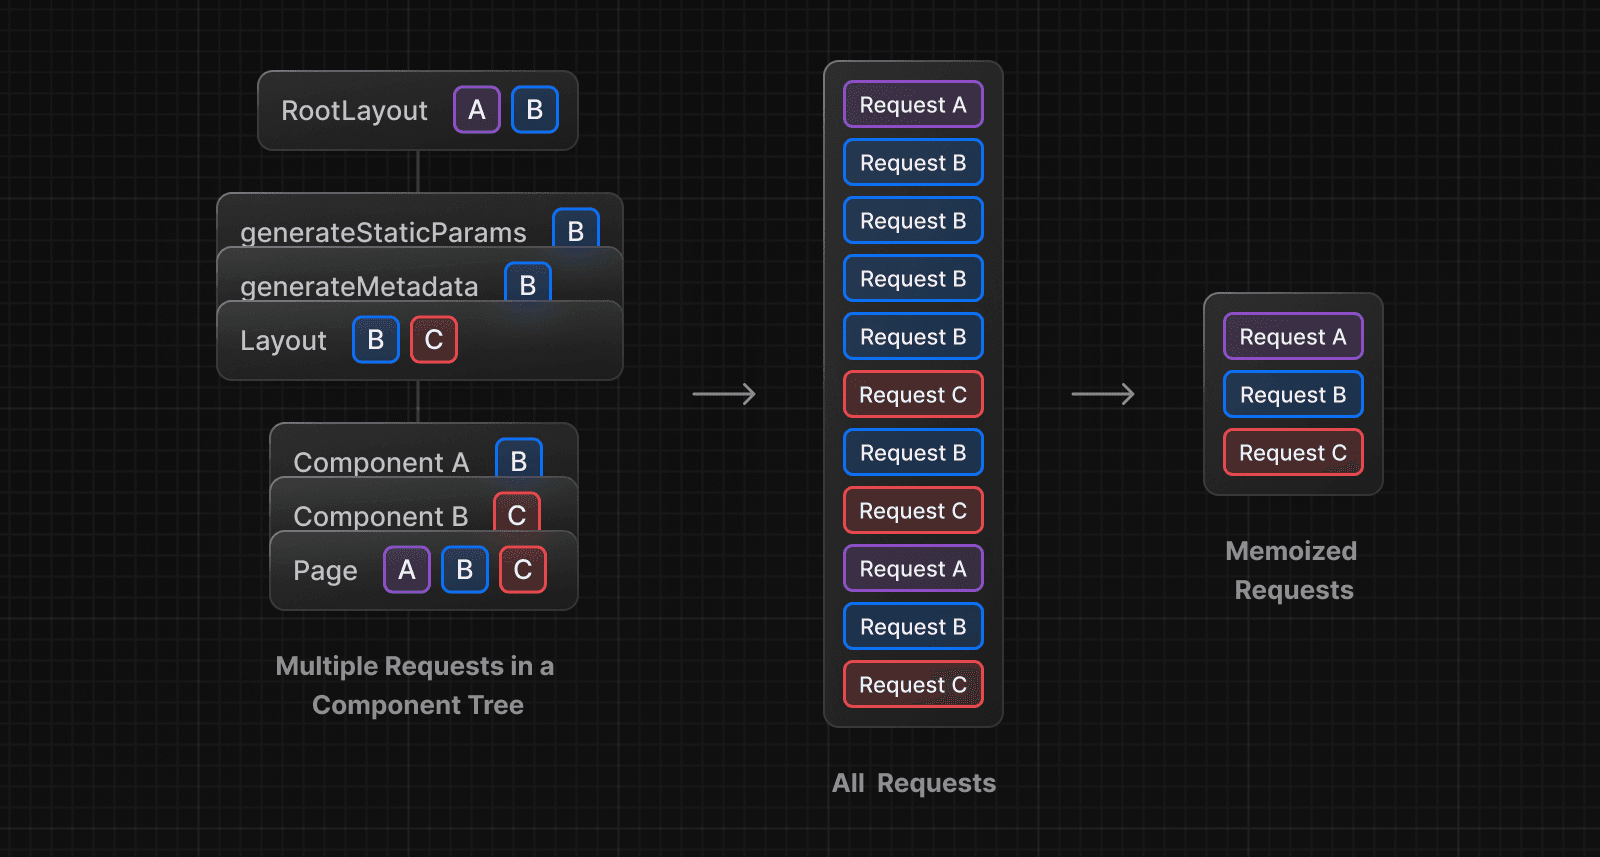 For example, if you need to use the same data across a route (e.g. in a Layout, Page, and multiple components), you do not have to fetch data at the top of the tree, and forward props between components. Instead, you can fetch data in the components that need it without worrying about the performance implications of making multiple requests across the network for the same data. async function getItem() { // The `fetch` function is automatically memoized and the result // is cached const res = await fetch('https://.../item/1') return res.json() } // This function is called twice, but only executed the first time const item = await getItem() // cache MISS // The second call could be anywhere in your route const item = await getItem() // cache HIT **How Request Memoization Works** 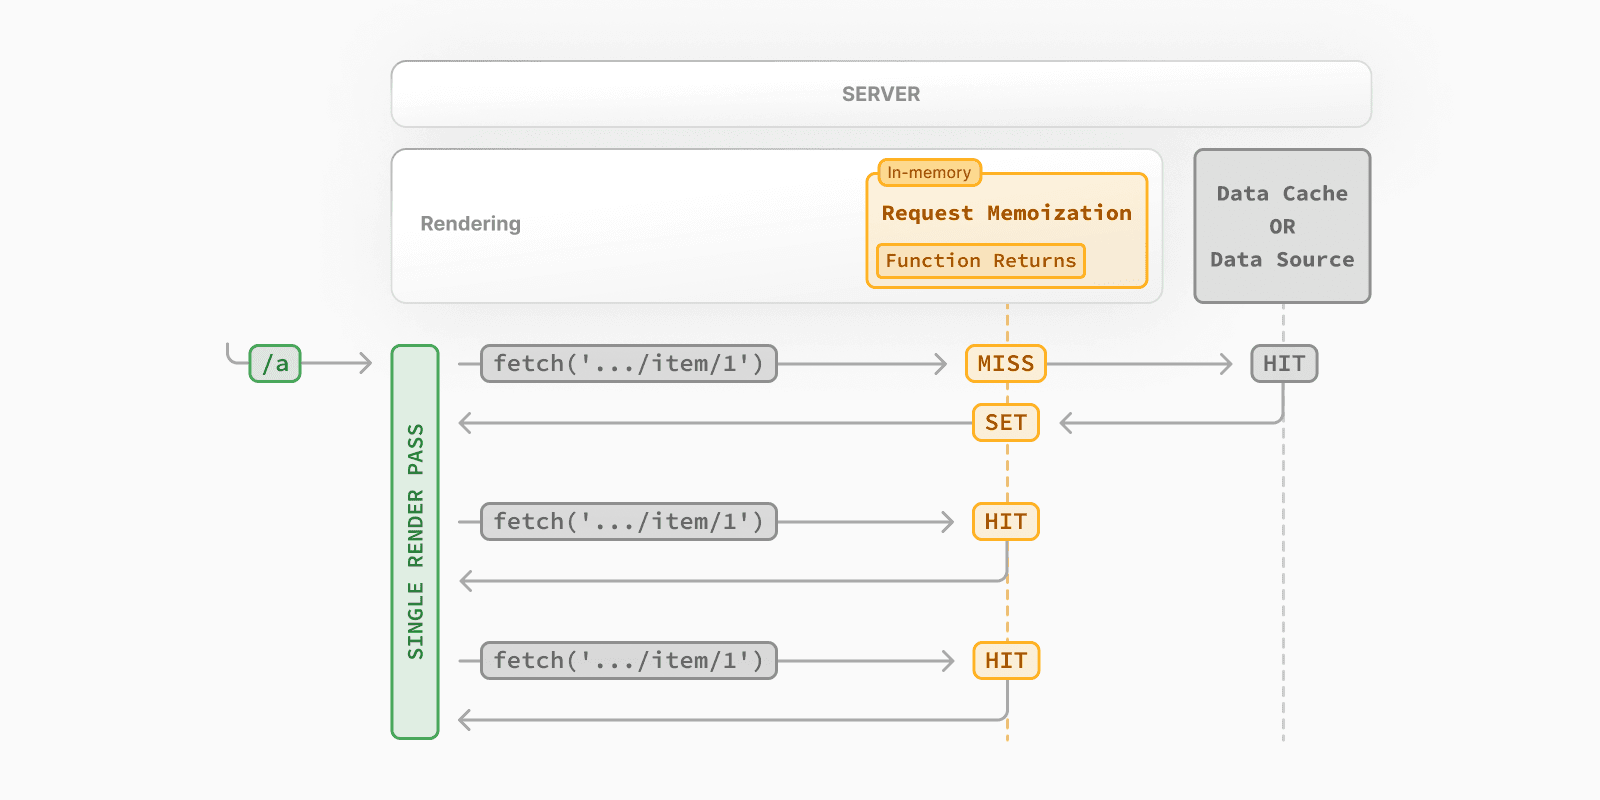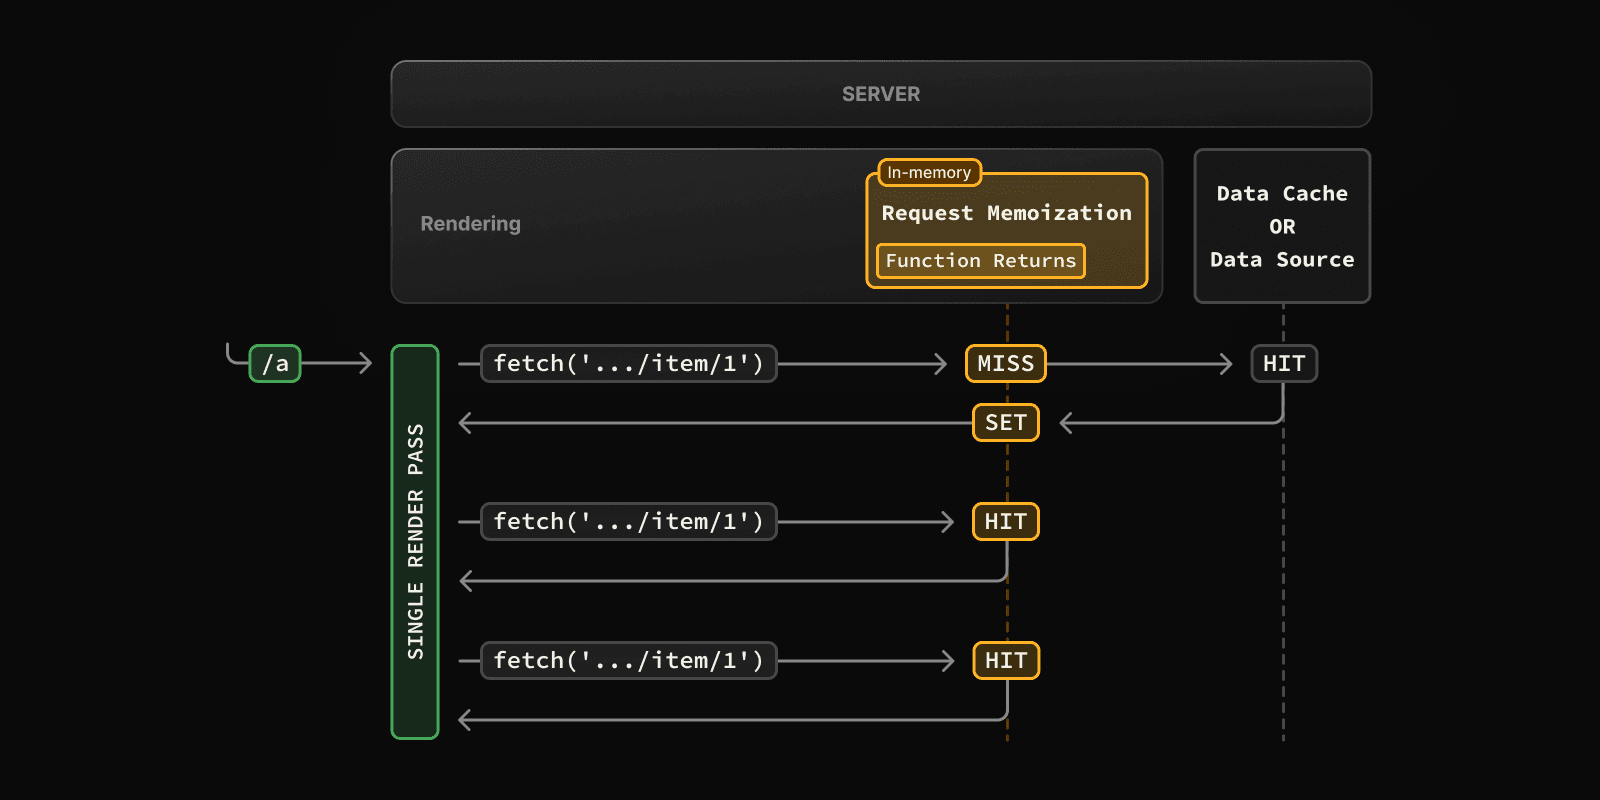 * While rendering a route, the first time a particular request is called, its result will not be in memory and it'll be a cache `MISS`. * Therefore, the function will be executed, and the data will be fetched from the external source, and the result will be stored in memory. * Subsequent function calls of the request in the same render pass will be a cache `HIT`, and the data will be returned from memory without executing the function. * Once the route has been rendered and the rendering pass is complete, memory is "reset" and all request memoization entries are cleared. > **Good to know**: > > * Request memoization is a React feature, not a Next.js feature. It's included here to show how it interacts with the other caching mechanisms. > * Memoization only applies to the `GET` method in `fetch` requests. > * Memoization only applies to the React Component tree, this means: > * It applies to `fetch` requests in `generateMetadata`, `generateStaticParams`, Layouts, Pages, and other Server Components. > * It doesn't apply to `fetch` requests in Route Handlers as they are not a part of the React component tree. > * For cases where `fetch` is not suitable (e.g. some database clients, CMS clients, or GraphQL clients), you can use the React `cache` function to memoize functions. ### Duration The cache lasts the lifetime of a server request until the React component tree has finished rendering. ### Revalidating Since the memoization is not shared across server requests and only applies during rendering, there is no need to revalidate it. ### Opting out Memoization only applies to the `GET` method in `fetch` requests, other methods, such as `POST` and `DELETE`, are not memoized. This default behavior is a React optimization and we do not recommend opting out of it. To manage individual requests, you can use the `signal` property from `AbortController`. However, this will not opt requests out of memoization, rather, abort in-flight requests. const { signal } = new AbortController() fetch(url, { signal }) ## Data Cache Next.js has a built-in Data Cache that **persists** the result of data fetches across incoming **server requests** and **deployments**. This is possible because Next.js extends the native `fetch` API to allow each request on the server to set its own persistent caching semantics. > **Good to know**: In the browser, the `cache` option of `fetch` indicates how a request will interact with the browser's HTTP cache, in Next.js, the `cache` option indicates how a server-side request will interact with the server's Data Cache. You can use the `cache` and `next.revalidate` options of `fetch` to configure the caching behavior. **How the Data Cache Works** 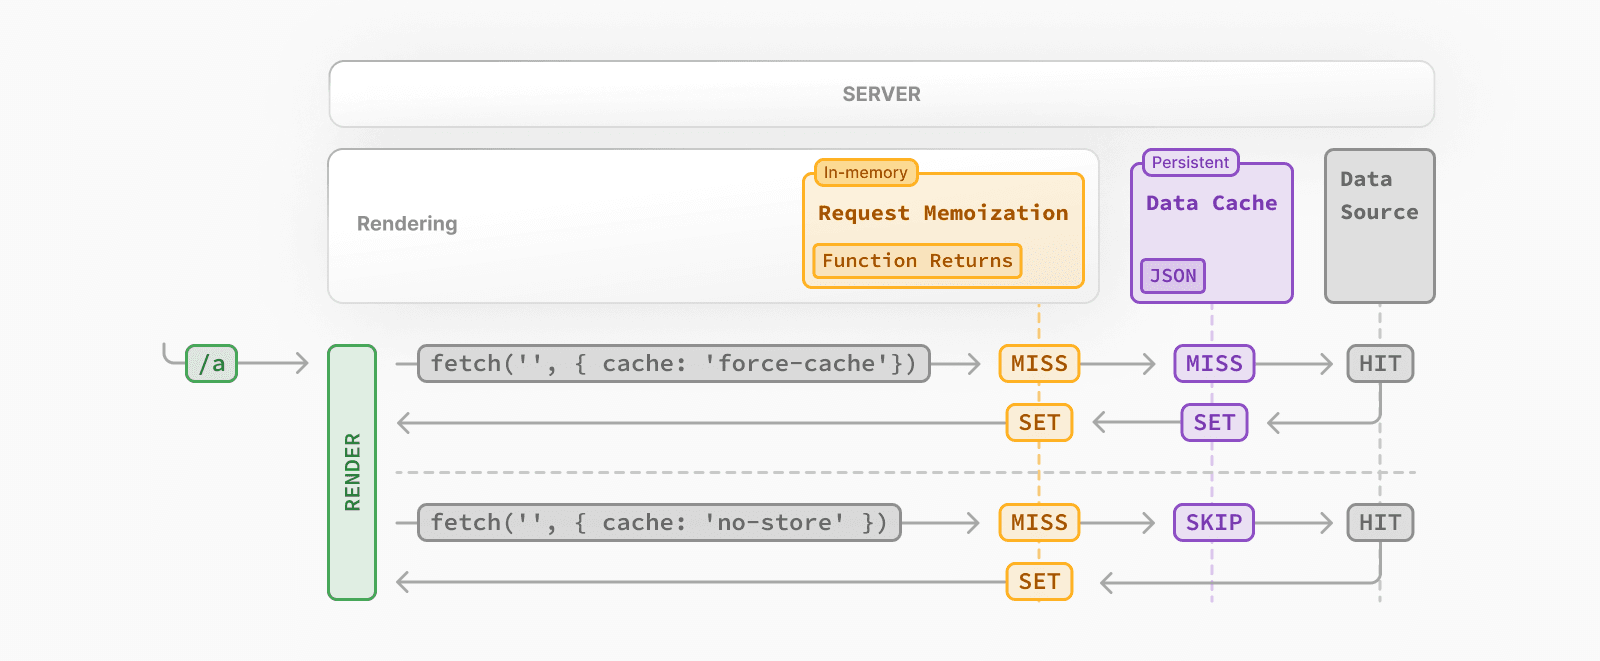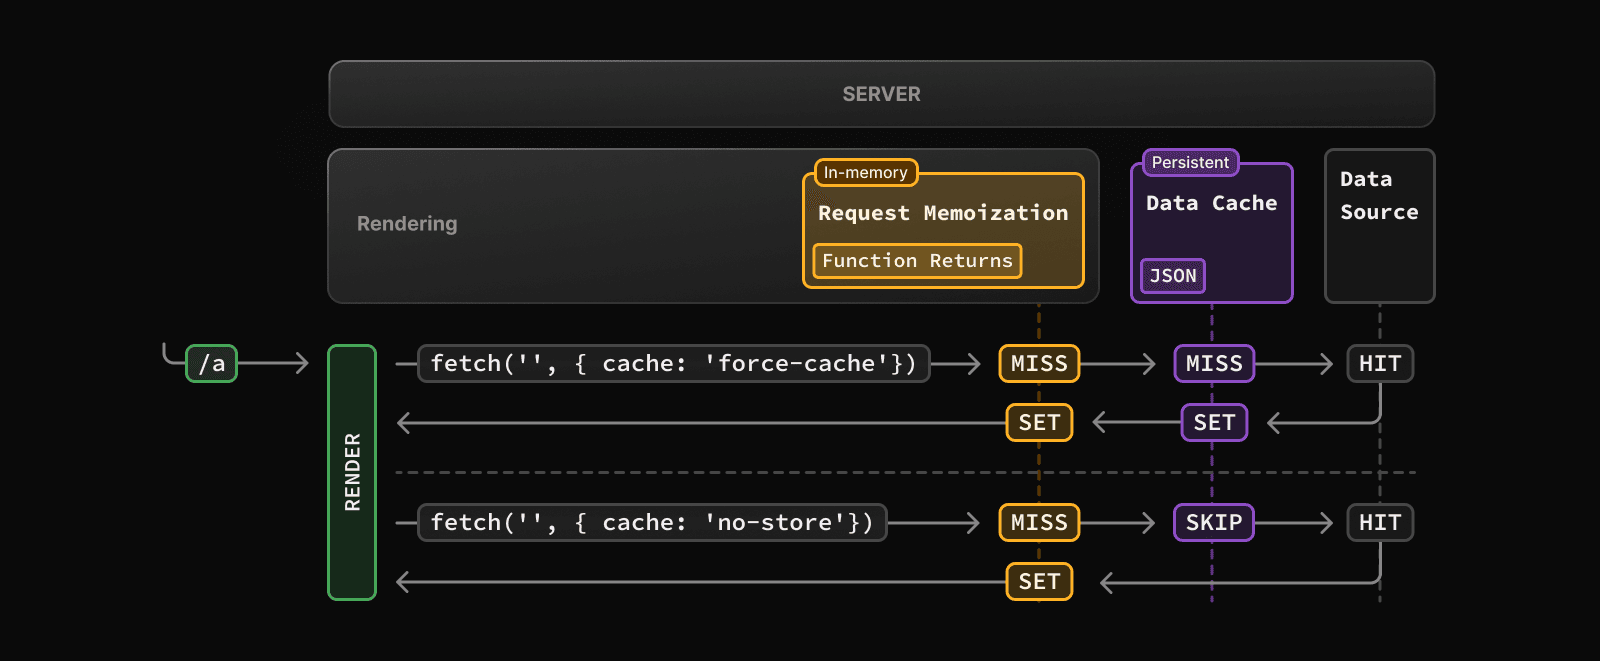 * The first time a `fetch` request with the `'force-cache'` option is called during rendering, Next.js checks the Data Cache for a cached response. * If a cached response is found, it's returned immediately and memoized. * If a cached response is not found, the request is made to the data source, the result is stored in the Data Cache, and memoized. * For uncached data (e.g. no `cache` option defined or using `{ cache: 'no-store' }`), the result is always fetched from the data source, and memoized. * Whether the data is cached or uncached, the requests are always memoized to avoid making duplicate requests for the same data during a React render pass. > **Differences between the Data Cache and Request Memoization** > > While both caching mechanisms help improve performance by re-using cached data, the Data Cache is persistent across incoming requests and deployments, whereas memoization only lasts the lifetime of a request. ### Duration The Data Cache is persistent across incoming requests and deployments unless you revalidate or opt-out. ### Revalidating Cached data can be revalidated in two ways, with: * **Time-based Revalidation**: Revalidate data after a certain amount of time has passed and a new request is made. This is useful for data that changes infrequently and freshness is not as critical. * **On-demand Revalidation:** Revalidate data based on an event (e.g. form submission). On-demand revalidation can use a tag-based or path-based approach to revalidate groups of data at once. This is useful when you want to ensure the latest data is shown as soon as possible (e.g. when content from your headless CMS is updated). #### Time-based Revalidation To revalidate data at a timed interval, you can use the `next.revalidate` option of `fetch` to set the cache lifetime of a resource (in seconds). // Revalidate at most every hour fetch('https://...', { next: { revalidate: 3600 } }) Alternatively, you can use Route Segment Config options to configure all `fetch` requests in a segment or for cases where you're not able to use `fetch`. **How Time-based Revalidation Works** 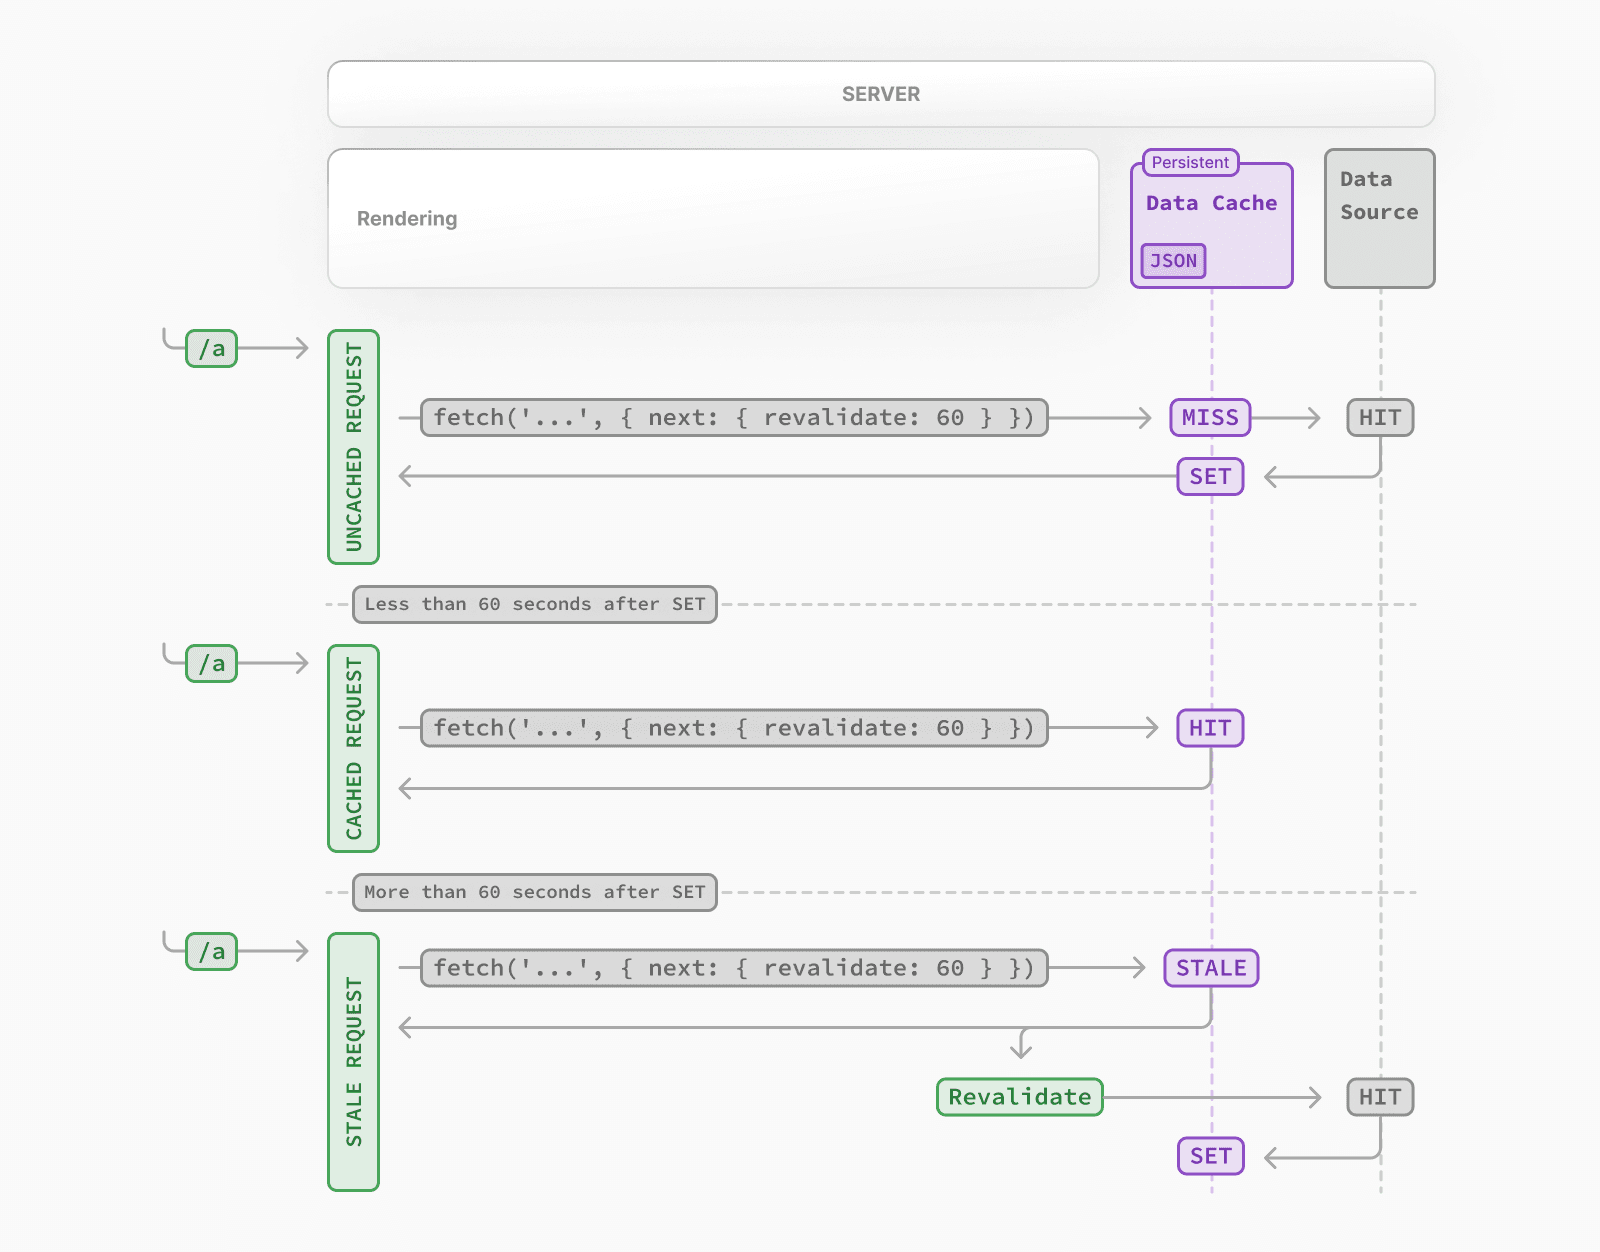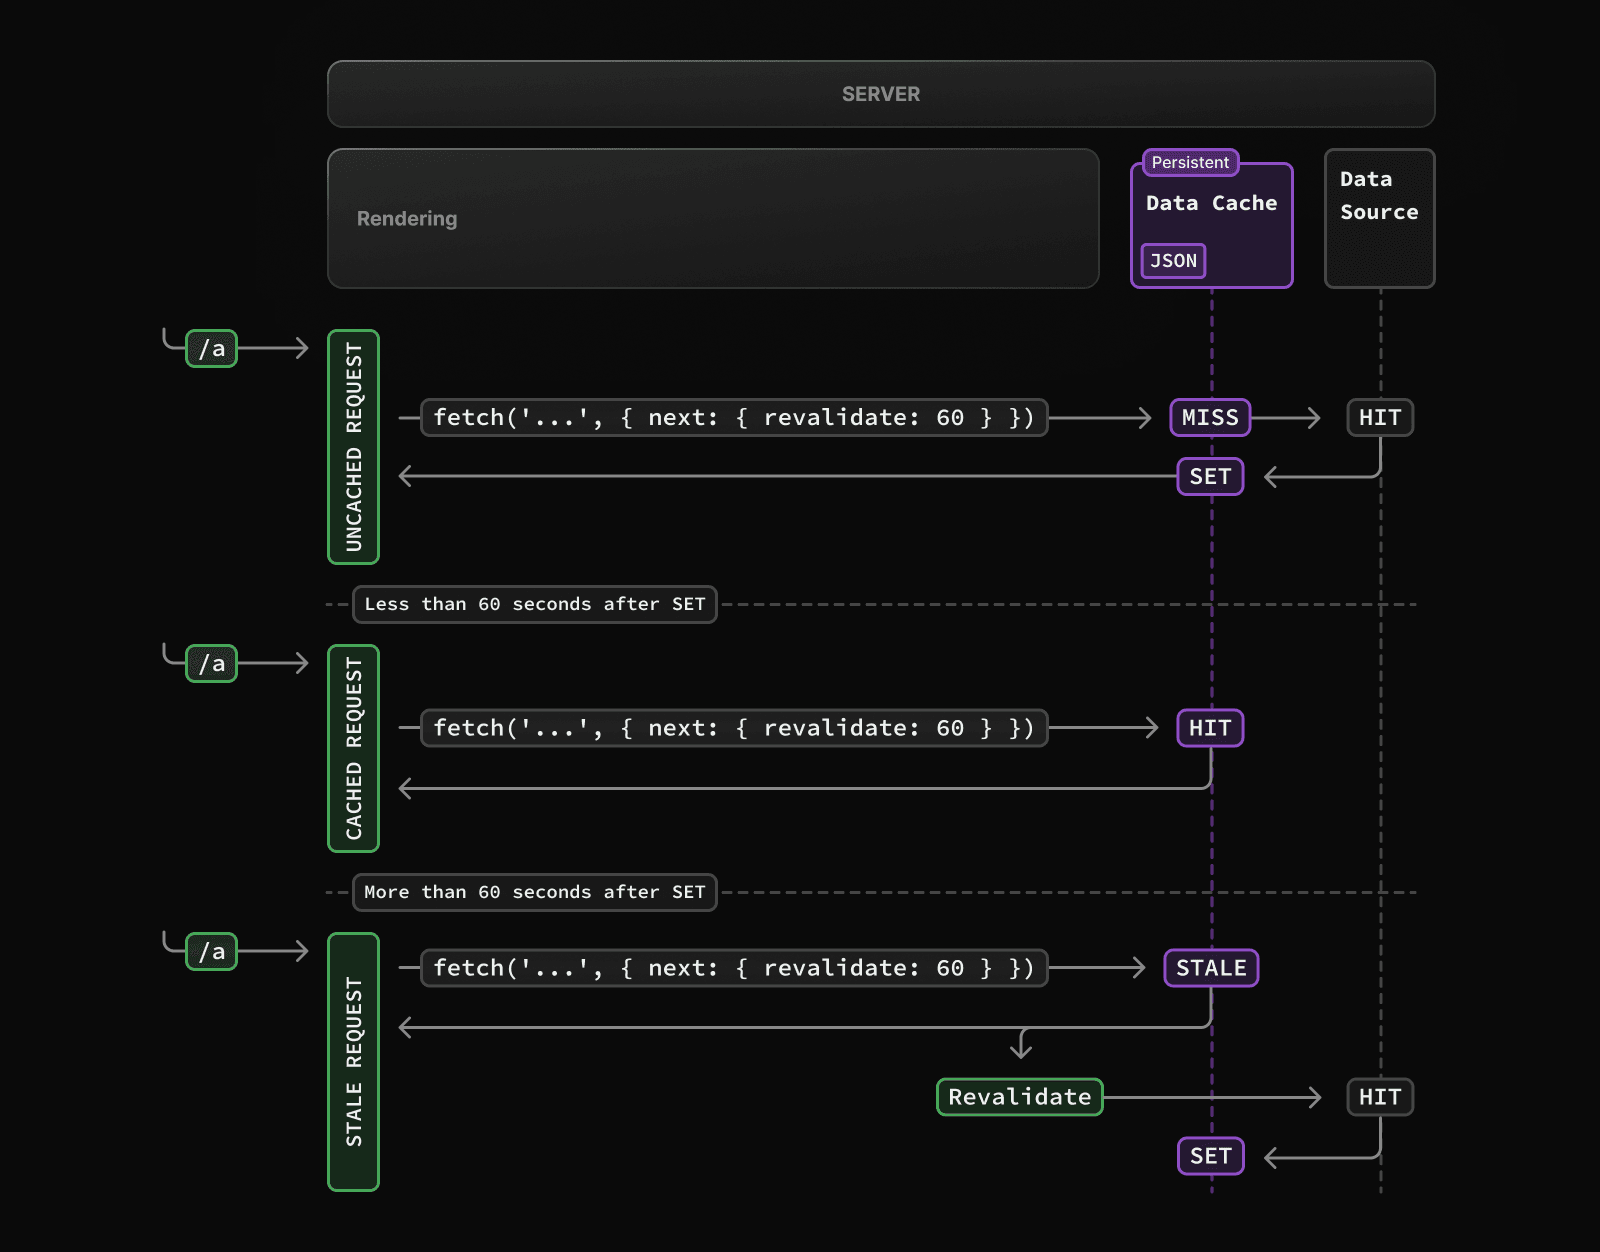 * The first time a fetch request with `revalidate` is called, the data will be fetched from the external data source and stored in the Data Cache. * Any requests that are called within the specified timeframe (e.g. 60-seconds) will return the cached data. * After the timeframe, the next request will still return the cached (now stale) data. * Next.js will trigger a revalidation of the data in the background. * Once the data is fetched successfully, Next.js will update the Data Cache with the fresh data. * If the background revalidation fails, the previous data will be kept unaltered. This is similar to **stale-while-revalidate** behavior. #### On-demand Revalidation Data can be revalidated on-demand by path (`revalidatePath`) or by cache tag (`revalidateTag`). **How On-Demand Revalidation Works** 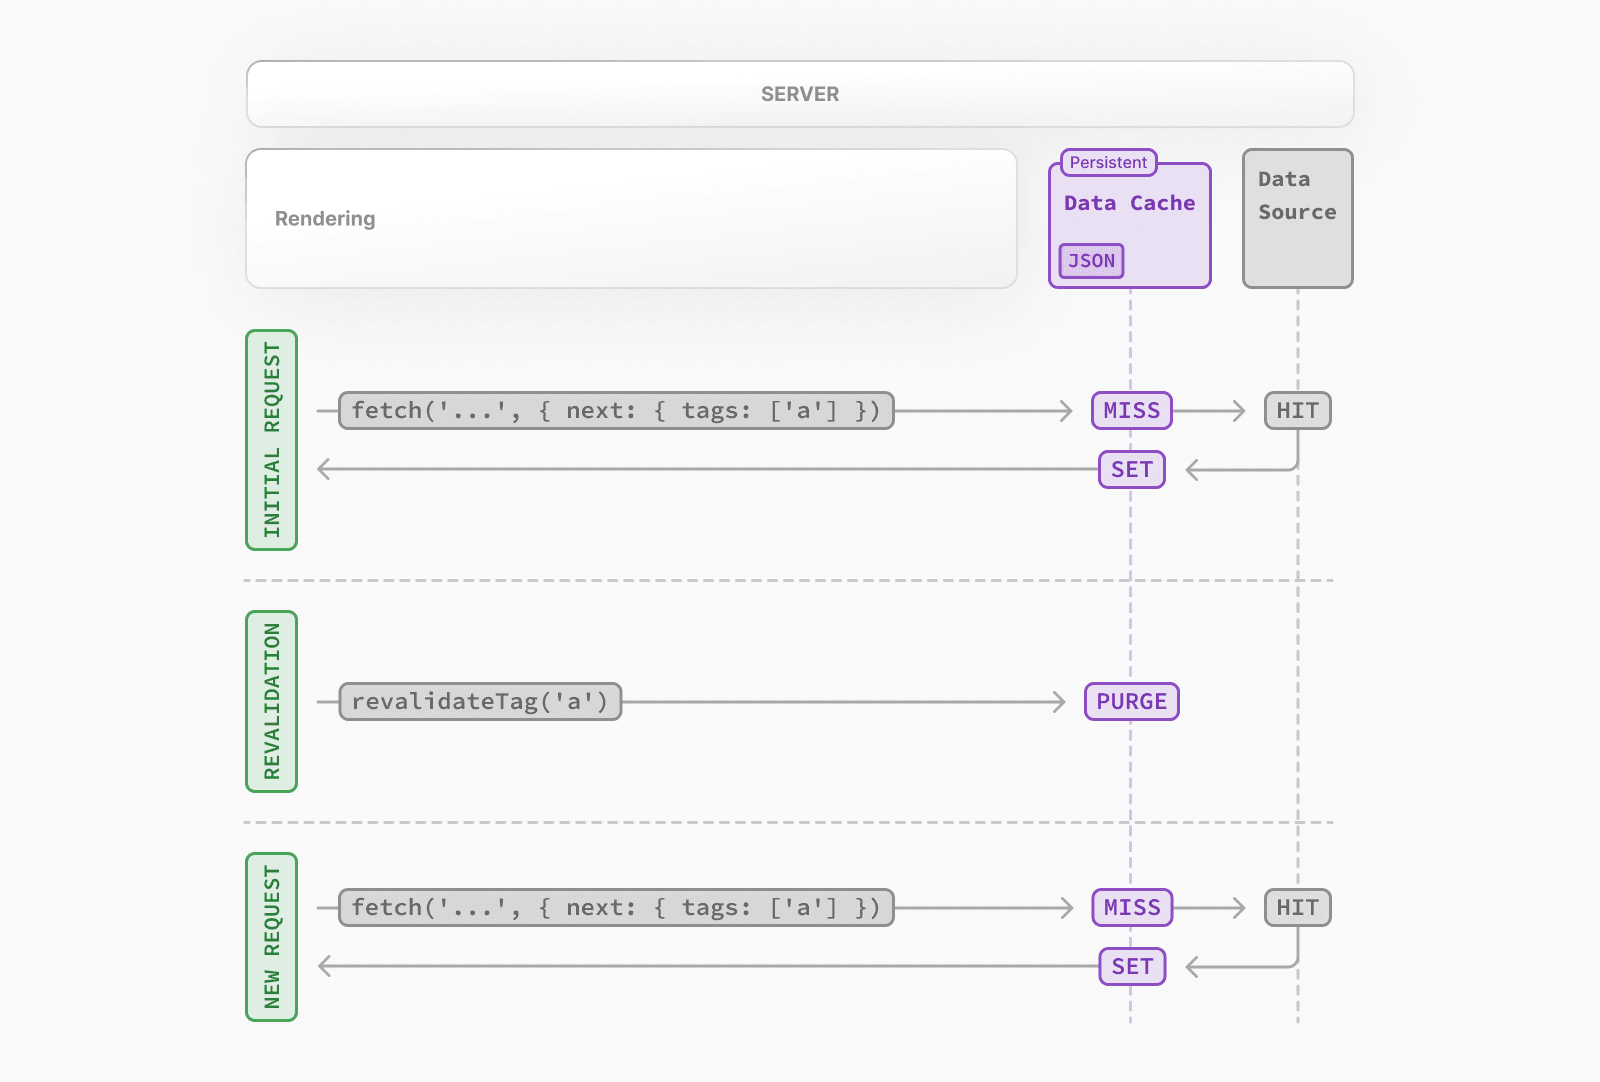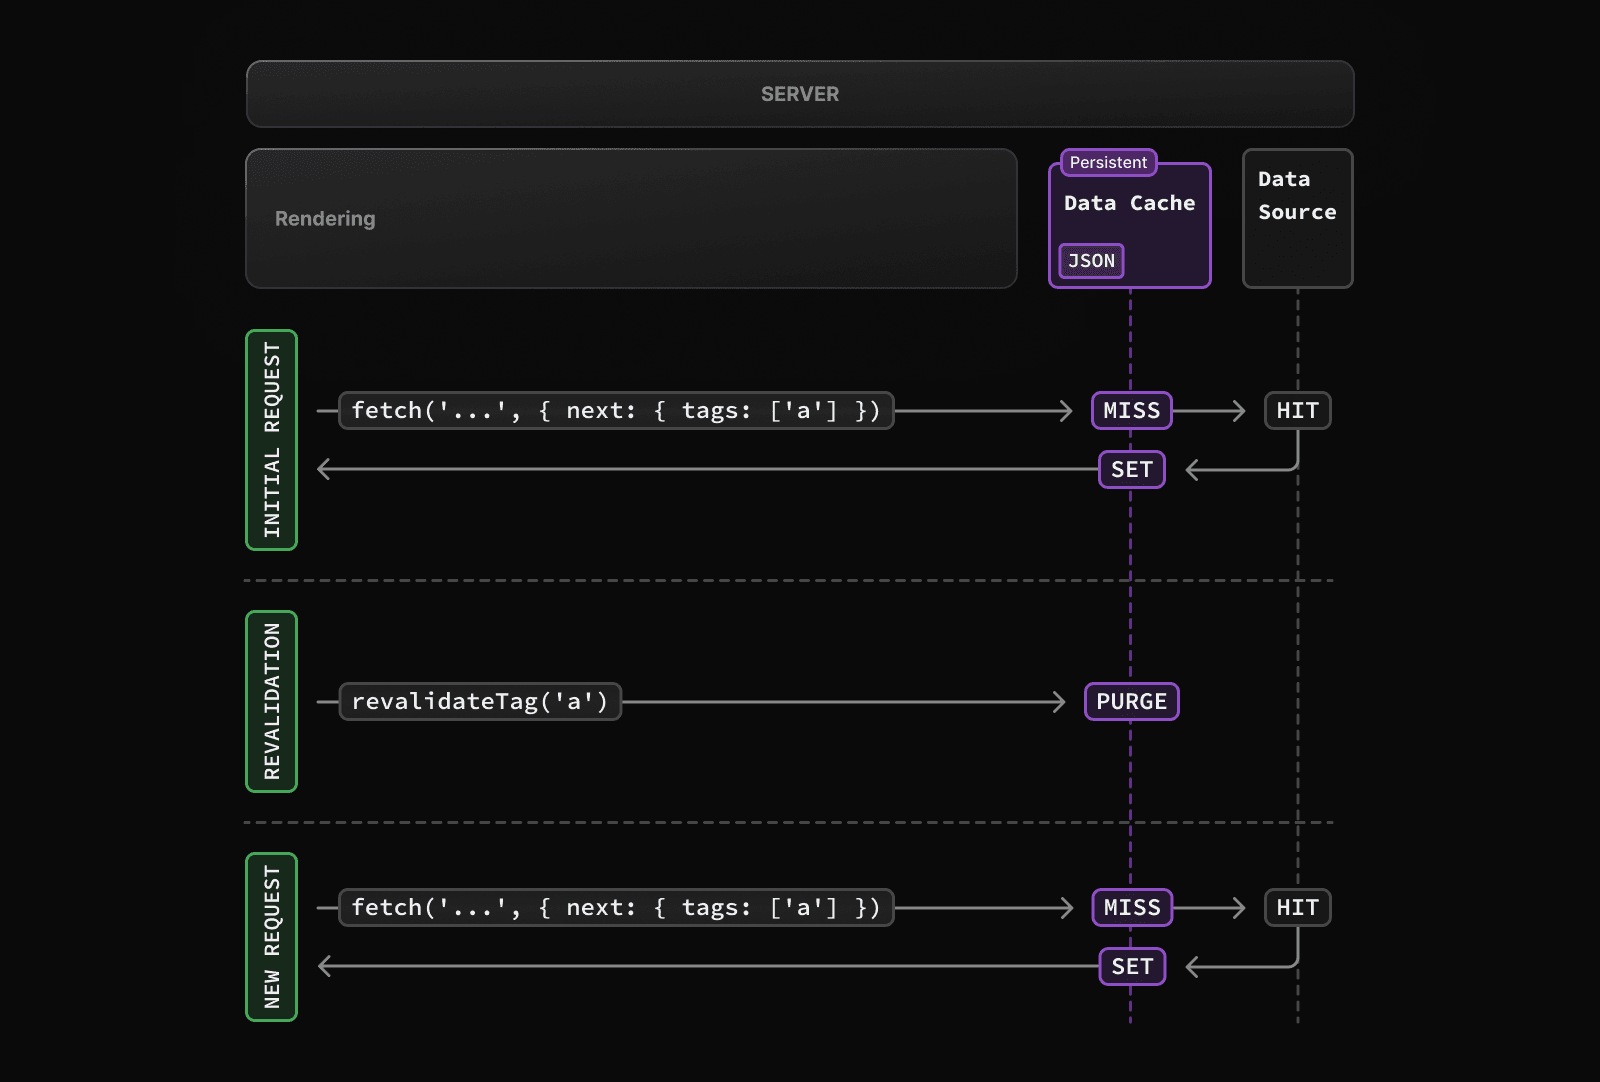 * The first time a `fetch` request is called, the data will be fetched from the external data source and stored in the Data Cache. * When an on-demand revalidation is triggered, the appropriate cache entries will be purged from the cache. * This is different from time-based revalidation, which keeps the stale data in the cache until the fresh data is fetched. * The next time a request is made, it will be a cache `MISS` again, and the data will be fetched from the external data source and stored in the Data Cache. ### Opting out If you do _not_ want to cache the response from `fetch`, you can do the following: let data = await fetch('https://api.vercel.app/blog', { cache: 'no-store' }) ## Full Route Cache > **Related terms**: > > You may see the terms **Automatic Static Optimization**, **Static Site Generation**, or **Static Rendering** being used interchangeably to refer to the process of rendering and caching routes of your application at build time. Next.js automatically renders and caches routes at build time. This is an optimization that allows you to serve the cached route instead of rendering on the server for every request, resulting in faster page loads. To understand how the Full Route Cache works, it's helpful to look at how React handles rendering, and how Next.js caches the result: ### 1\. React Rendering on the Server On the server, Next.js uses React's APIs to orchestrate rendering. The rendering work is split into chunks: by individual routes segments and Suspense boundaries. Each chunk is rendered in two steps: 1. React renders Server Components into a special data format, optimized for streaming, called the **React Server Component Payload**. 2. Next.js uses the React Server Component Payload and Client Component JavaScript instructions to render **HTML** on the server. This means we don't have to wait for everything to render before caching the work or sending a response. Instead, we can stream a response as work is completed. > **What is the React Server Component Payload?** > > The React Server Component Payload is a compact binary representation of the rendered React Server Components tree. It's used by React on the client to update the browser's DOM. The React Server Component Payload contains: > > * The rendered result of Server Components > * Placeholders for where Client Components should be rendered and references to their JavaScript files > * Any props passed from a Server Component to a Client Component > > To learn more, see the Server Components documentation. ### 2\. Next.js Caching on the Server (Full Route Cache) 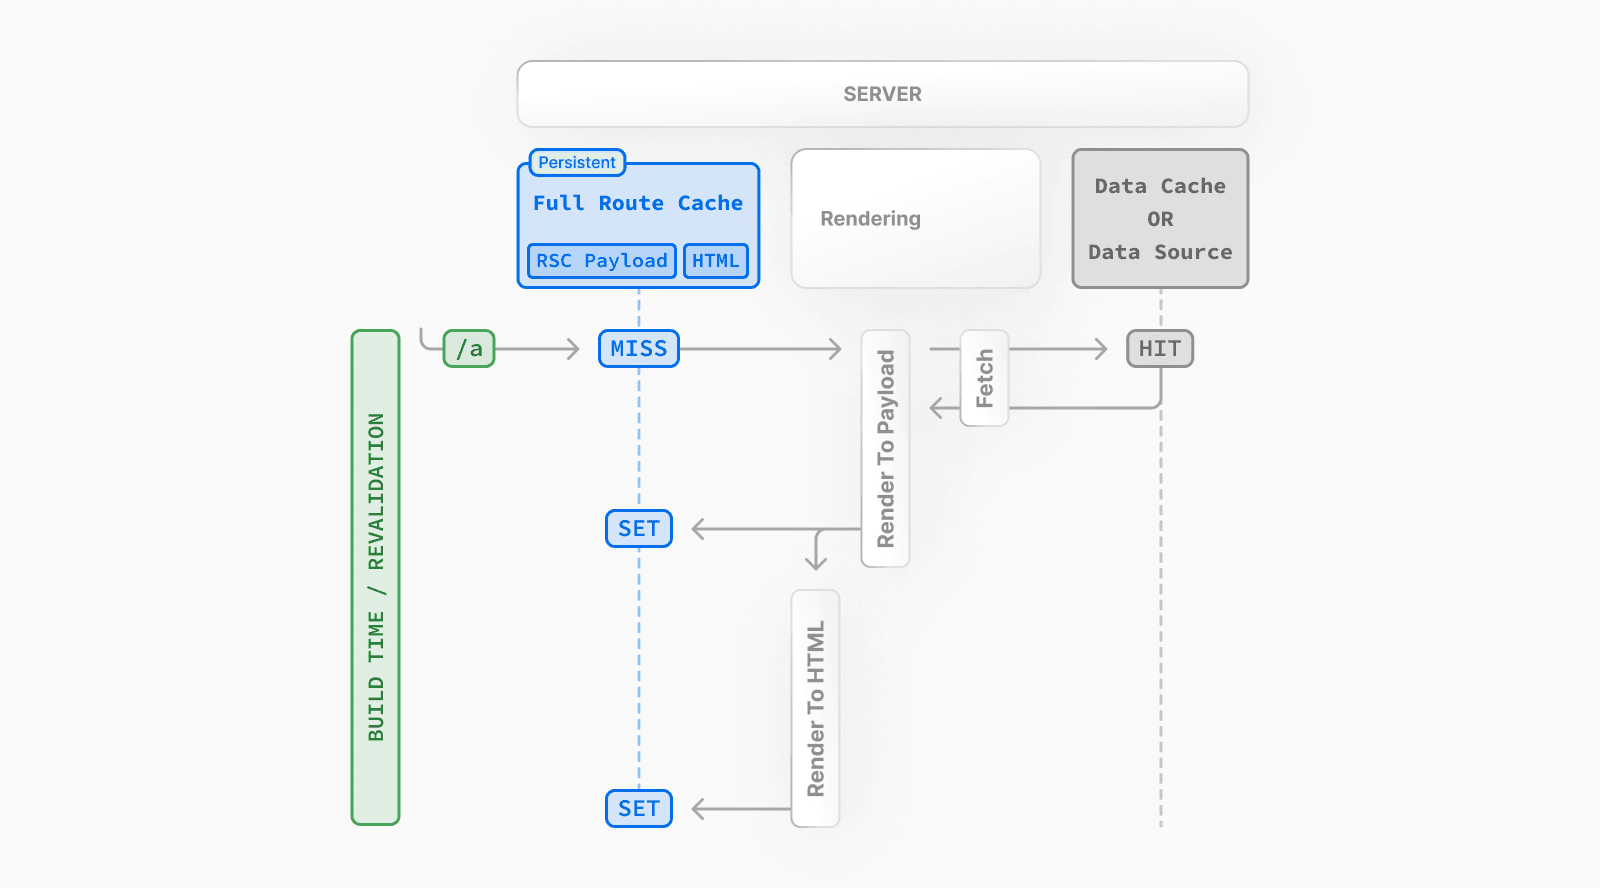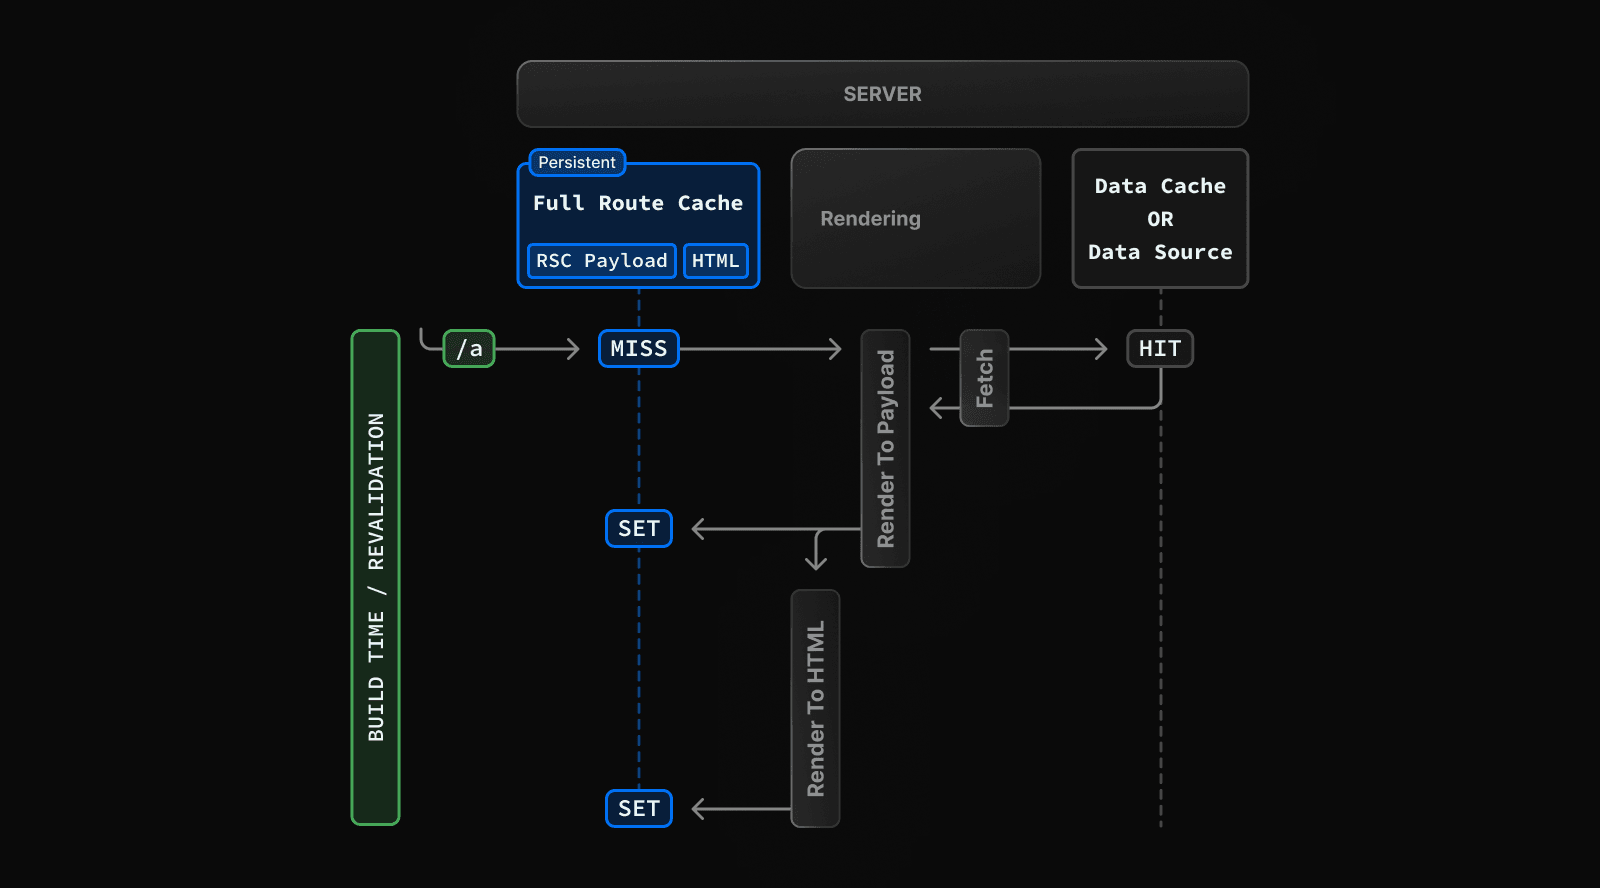 The default behavior of Next.js is to cache the rendered result (React Server Component Payload and HTML) of a route on the server. This applies to statically rendered routes at build time, or during revalidation. ### 3\. React Hydration and Reconciliation on the Client At request time, on the client: 1. The HTML is used to immediately show a fast non-interactive initial preview of the Client and Server Components. 2. The React Server Components Payload is used to reconcile the Client and rendered Server Component trees, and update the DOM. 3. The JavaScript instructions are used to hydrate Client Components and make the application interactive. ### 4\. Next.js Caching on the Client (Router Cache) The React Server Component Payload is stored in the client-side Router Cache - a separate in-memory cache, split by individual route segment. This Router Cache is used to improve the navigation experience by storing previously visited routes and prefetching future routes. ### 5\. Subsequent Navigations On subsequent navigations or during prefetching, Next.js will check if the React Server Components Payload is stored in the Router Cache. If so, it will skip sending a new request to the server. If the route segments are not in the cache, Next.js will fetch the React Server Components Payload from the server, and populate the Router Cache on the client. ### Static and Dynamic Rendering Whether a route is cached or not at build time depends on whether it's statically or dynamically rendered. Static routes are cached by default, whereas dynamic routes are rendered at request time, and not cached. This diagram shows the difference between statically and dynamically rendered routes, with cached and uncached data: 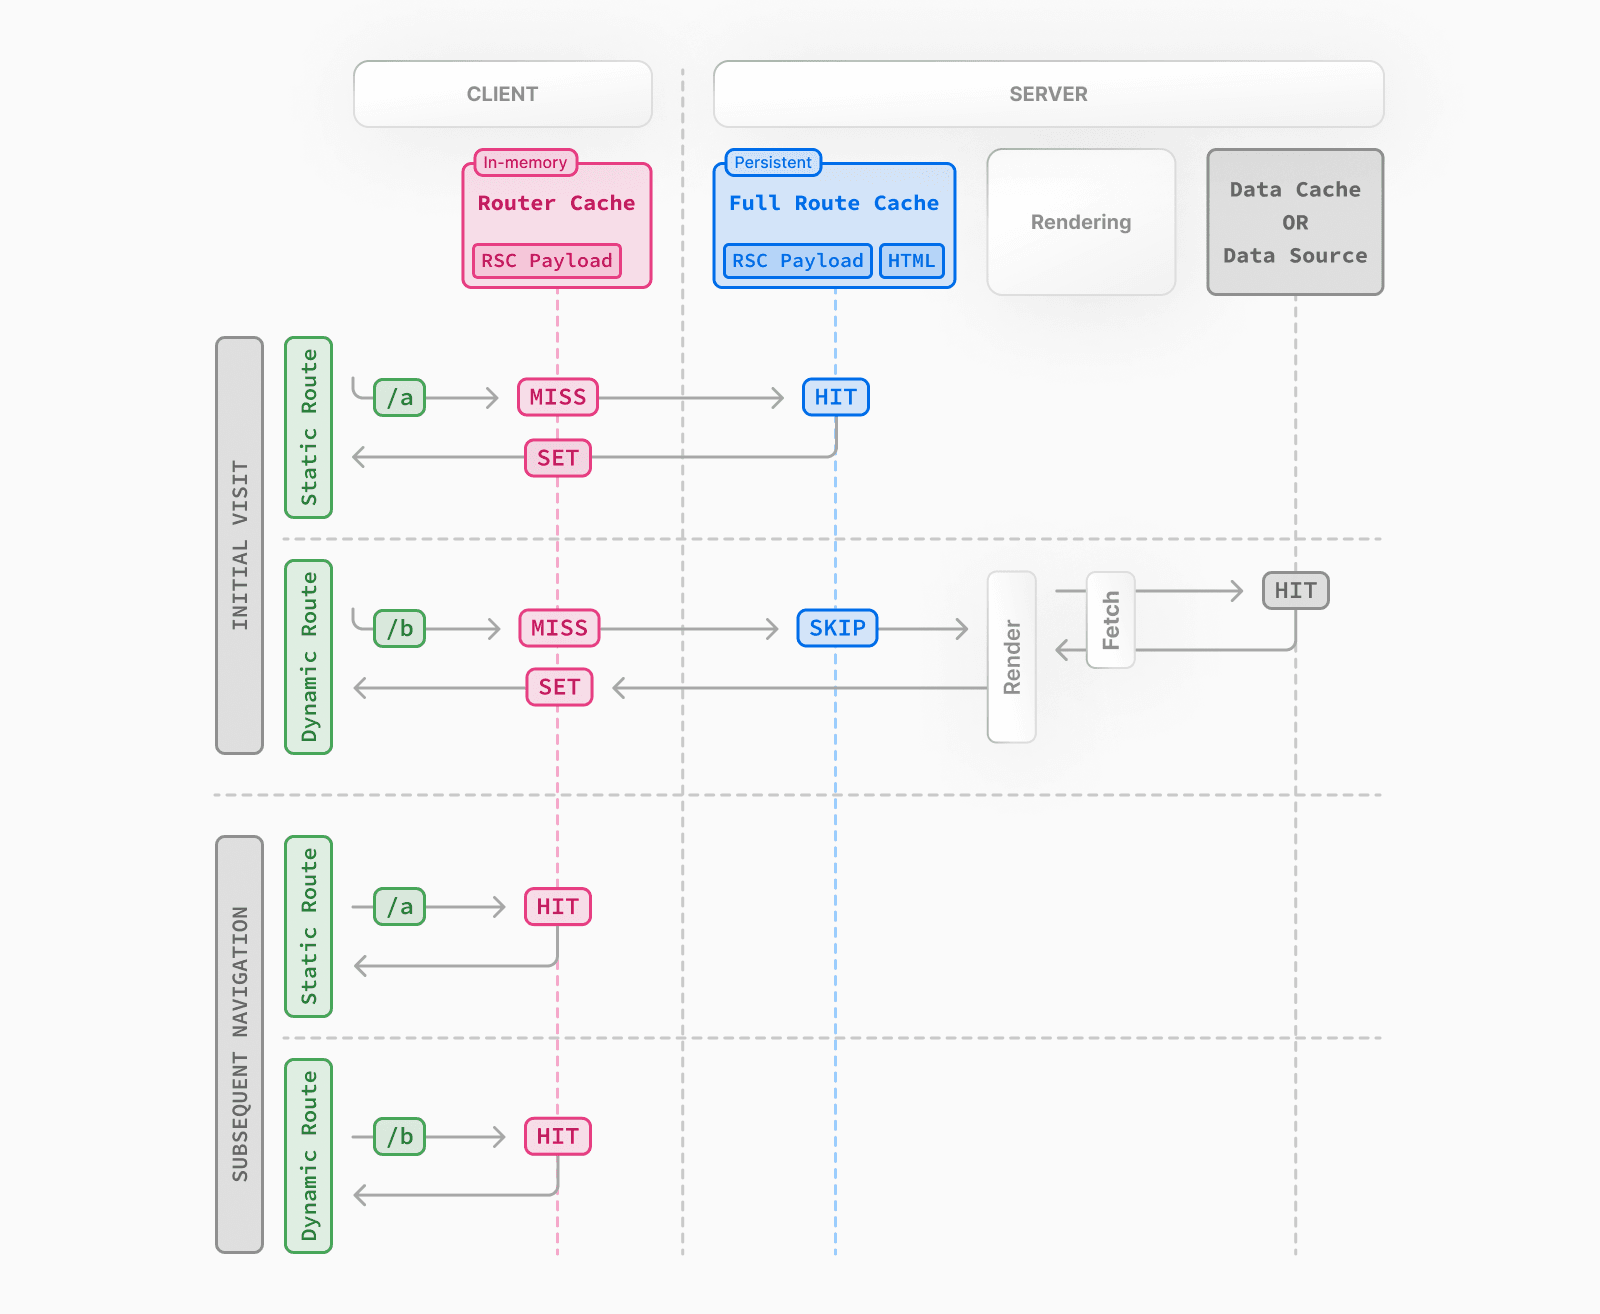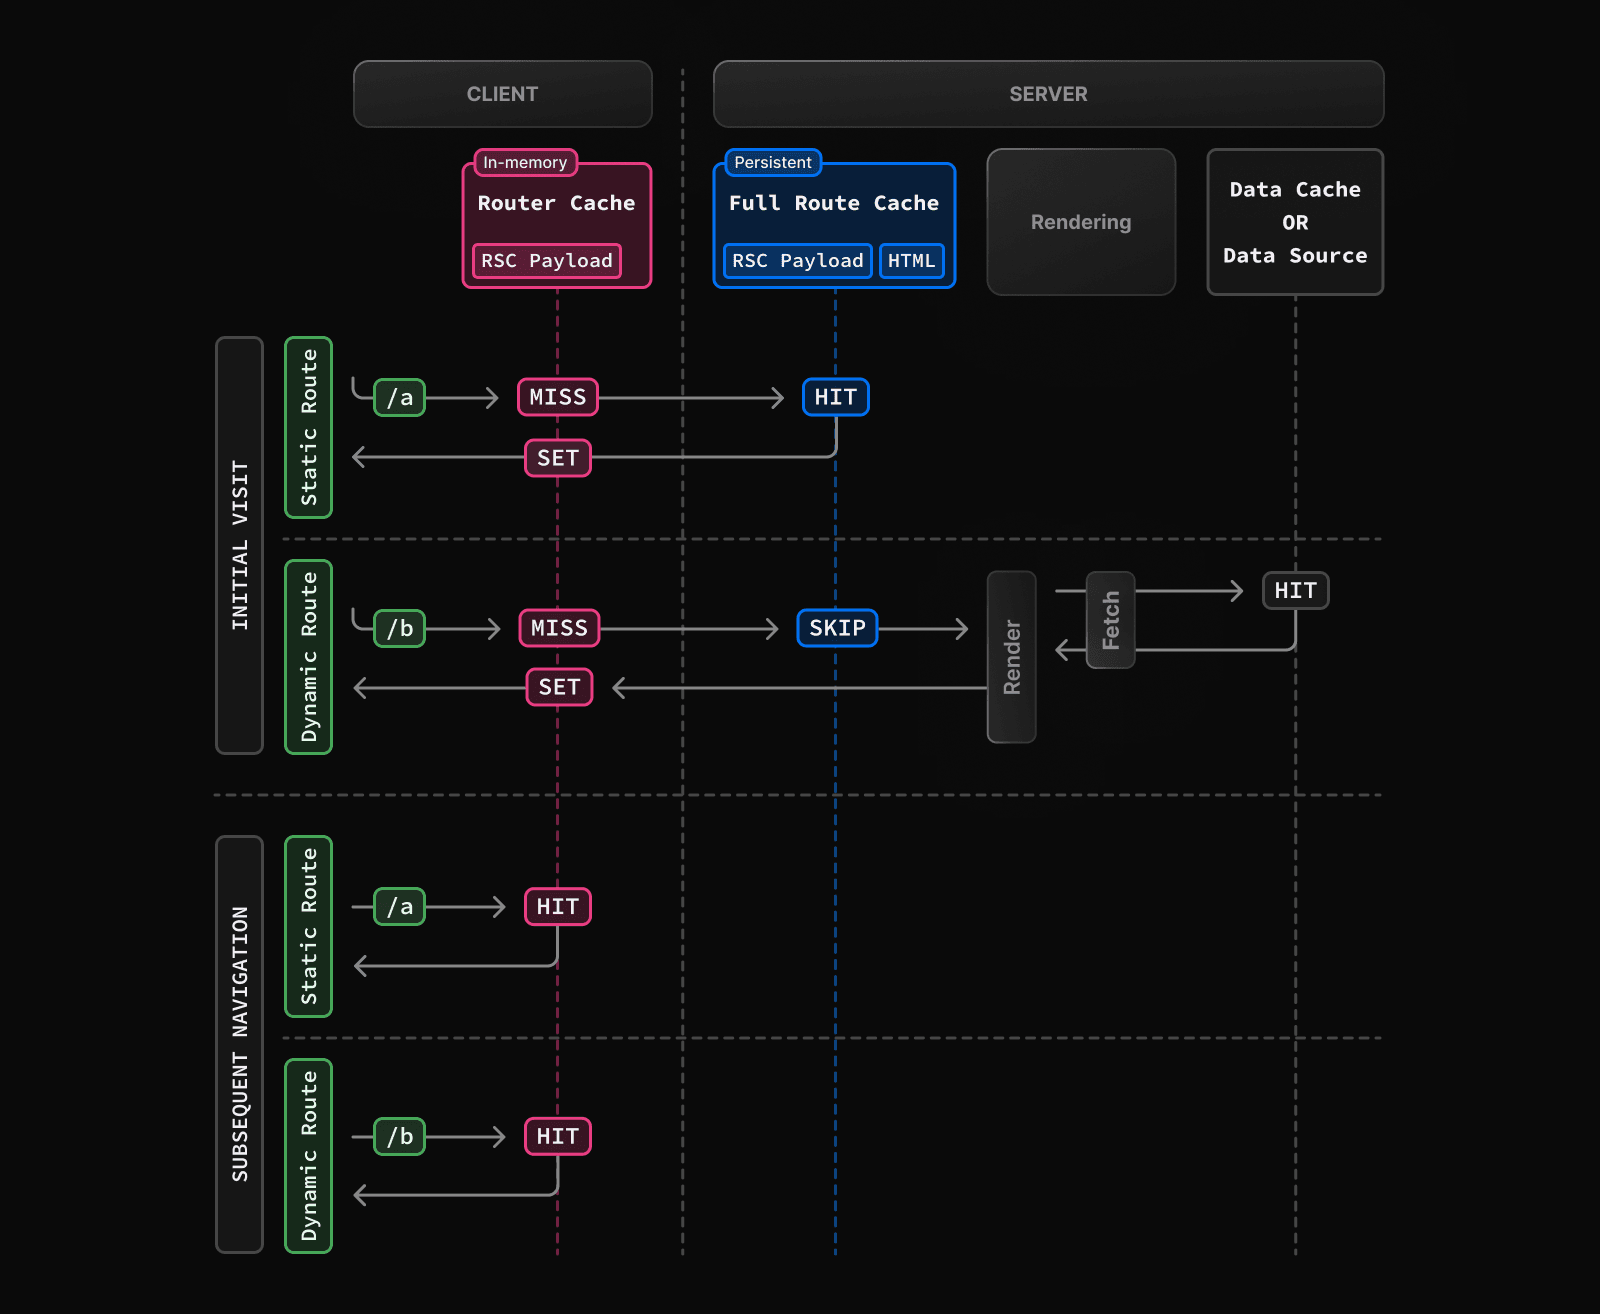 Learn more about static and dynamic rendering. ### Duration By default, the Full Route Cache is persistent. This means that the render output is cached across user requests. ### Invalidation There are two ways you can invalidate the Full Route Cache: * **Revalidating Data**: Revalidating the Data Cache, will in turn invalidate the Router Cache by re-rendering components on the server and caching the new render output. * **Redeploying**: Unlike the Data Cache, which persists across deployments, the Full Route Cache is cleared on new deployments. ### Opting out You can opt out of the Full Route Cache, or in other words, dynamically render components for every incoming request, by: * **Using a Dynamic API**: This will opt the route out from the Full Route Cache and dynamically render it at request time. The Data Cache can still be used. * **Using the `dynamic = 'force-dynamic'` or `revalidate = 0` route segment config options**: This will skip the Full Route Cache and the Data Cache. Meaning components will be rendered and data fetched on every incoming request to the server. The Router Cache will still apply as it's a client-side cache. * **Opting out of the Data Cache**: If a route has a `fetch` request that is not cached, this will opt the route out of the Full Route Cache. The data for the specific `fetch` request will be fetched for every incoming request. Other `fetch` requests that do not opt out of caching will still be cached in the Data Cache. This allows for a hybrid of cached and uncached data. ## Client-side Router Cache Next.js has an in-memory client-side router cache that stores the RSC payload of route segments, split by layouts, loading states, and pages. When a user navigates between routes, Next.js caches the visited route segments and prefetches the routes the user is likely to navigate to. This results in instant back/forward navigation, no full-page reload between navigations, and preservation of React state and browser state. With the Router Cache: * **Layouts** are cached and reused on navigation (partial rendering). * **Loading states** are cached and reused on navigation for instant navigation. * **Pages** are not cached by default, but are reused during browser backward and forward navigation. You can enable caching for page segments by using the experimental `staleTimes` config option. > **Good to know:** This cache specifically applies to Next.js and Server Components, and is different to the browser's bfcache, though it has a similar result. ### Duration The cache is stored in the browser's temporary memory. Two factors determine how long the router cache lasts: * **Session**: The cache persists across navigation. However, it's cleared on page refresh. * **Automatic Invalidation Period**: The cache of layouts and loading states is automatically invalidated after a specific time. The duration depends on how the resource was prefetched, and if the resource was statically generated: * **Default Prefetching** (`prefetch={null}` or unspecified): not cached for dynamic pages, 5 minutes for static pages. * **Full Prefetching** (`prefetch={true}` or `router.prefetch`): 5 minutes for both static & dynamic pages. While a page refresh will clear **all** cached segments, the automatic invalidation period only affects the individual segment from the time it was prefetched. > **Good to know**: The experimental `staleTimes` config option can be used to adjust the automatic invalidation times mentioned above. ### Invalidation There are two ways you can invalidate the Router Cache: * In a **Server Action**: * Revalidating data on-demand by path with (`revalidatePath`) or by cache tag with (`revalidateTag`) * Using `cookies.set` or `cookies.delete` invalidates the Router Cache to prevent routes that use cookies from becoming stale (e.g. authentication). * Calling `router.refresh` will invalidate the Router Cache and make a new request to the server for the current route. ### Opting out As of Next.js 15, page segments are opted out by default. > **Good to know:** You can also opt out of prefetching by setting the `prefetch` prop of the `<Link>` component to `false`. ## Cache Interactions When configuring the different caching mechanisms, it's important to understand how they interact with each other: ### Data Cache and Full Route Cache * Revalidating or opting out of the Data Cache **will** invalidate the Full Route Cache, as the render output depends on data. * Invalidating or opting out of the Full Route Cache **does not** affect the Data Cache. You can dynamically render a route that has both cached and uncached data. This is useful when most of your page uses cached data, but you have a few components that rely on data that needs to be fetched at request time. You can dynamically render without worrying about the performance impact of re-fetching all the data. ### Data Cache and Client-side Router cache * To immediately invalidate the Data Cache and Router cache, you can use `revalidatePath` or `revalidateTag` in a Server Action. * Revalidating the Data Cache in a Route Handler **will not** immediately invalidate the Router Cache as the Route Handler isn't tied to a specific route. This means Router Cache will continue to serve the previous payload until a hard refresh, or the automatic invalidation period has elapsed. ## APIs The following table provides an overview of how different Next.js APIs affect caching: | API | Router Cache | Full Route Cache | Data Cache | React Cache | | --- | --- | --- | --- | --- | | `<Link prefetch>` | Cache | | | | | `router.prefetch` | Cache | | | | | `router.refresh` | Revalidate | | | | | `fetch` | | | Cache | Cache | | `fetch` `options.cache` | | | Cache or Opt out | | | `fetch` `options.next.revalidate` | | Revalidate | Revalidate | | | `fetch` `options.next.tags` | | Cache | Cache | | | `revalidateTag` | Revalidate (Server Action) | Revalidate | Revalidate | | | `revalidatePath` | Revalidate (Server Action) | Revalidate | Revalidate | | | `const revalidate` | | Revalidate or Opt out | Revalidate or Opt out | | | `const dynamic` | | Cache or Opt out | Cache or Opt out | | | `cookies` | Revalidate (Server Action) | Opt out | | | | `headers`, `searchParams` | | Opt out | | | | `generateStaticParams` | | Cache | | | | `React.cache` | | | | Cache | | `unstable_cache` | | | Cache | | ### `<Link>` By default, the `<Link>` component automatically prefetches routes from the Full Route Cache and adds the React Server Component Payload to the Router Cache. To disable prefetching, you can set the `prefetch` prop to `false`. But this will not skip the cache permanently, the route segment will still be cached client-side when the user visits the route. Learn more about the `<Link>` component. ### `router.prefetch` The `prefetch` option of the `useRouter` hook can be used to manually prefetch a route. This adds the React Server Component Payload to the Router Cache. See the `useRouter` hook API reference. ### `router.refresh` The `refresh` option of the `useRouter` hook can be used to manually refresh a route. This completely clears the Router Cache, and makes a new request to the server for the current route. `refresh` does not affect the Data or Full Route Cache. The rendered result will be reconciled on the client while preserving React state and browser state. See the `useRouter` hook API reference. ### `fetch` Data returned from `fetch` is _not_ automatically cached in the Data Cache. The default caching behavior of `fetch` (e.g., when the `cache` option is not specified) is equal to setting the `cache` option to `no-store`: let data = await fetch('https://api.vercel.app/blog', { cache: 'no-store' }) See the `fetch` API Reference for more options. ### `fetch options.cache` You can opt individual `fetch` into caching by setting the `cache` option to `force-cache`: // Opt into caching fetch(`https://...`, { cache: 'force-cache' }) See the `fetch` API Reference for more options. ### `fetch options.next.revalidate` You can use the `next.revalidate` option of `fetch` to set the revalidation period (in seconds) of an individual `fetch` request. This will revalidate the Data Cache, which in turn will revalidate the Full Route Cache. Fresh data will be fetched, and components will be re-rendered on the server. // Revalidate at most after 1 hour fetch(`https://...`, { next: { revalidate: 3600 } }) See the `fetch` API reference for more options. ### `fetch options.next.tags` and `revalidateTag` Next.js has a cache tagging system for fine-grained data caching and revalidation. 1. When using `fetch` or `unstable_cache`, you have the option to tag cache entries with one or more tags. 2. Then, you can call `revalidateTag` to purge the cache entries associated with that tag. For example, you can set a tag when fetching data: // Cache data with a tag fetch(`https://...`, { next: { tags: ['a', 'b', 'c'] } }) Then, call `revalidateTag` with a tag to purge the cache entry: // Revalidate entries with a specific tag revalidateTag('a') There are two places you can use `revalidateTag`, depending on what you're trying to achieve: 1. Route Handlers - to revalidate data in response of a third party event (e.g. webhook). This will not invalidate the Router Cache immediately as the Router Handler isn't tied to a specific route. 2. Server Actions - to revalidate data after a user action (e.g. form submission). This will invalidate the Router Cache for the associated route. ### `revalidatePath` `revalidatePath` allows you manually revalidate data **and** re-render the route segments below a specific path in a single operation. Calling the `revalidatePath` method revalidates the Data Cache, which in turn invalidates the Full Route Cache. revalidatePath('/') There are two places you can use `revalidatePath`, depending on what you're trying to achieve: 1. Route Handlers - to revalidate data in response to a third party event (e.g. webhook). 2. Server Actions - to revalidate data after a user interaction (e.g. form submission, clicking a button). See the `revalidatePath` API reference for more information. > **`revalidatePath`** vs. **`router.refresh`**: > > Calling `router.refresh` will clear the Router cache, and re-render route segments on the server without invalidating the Data Cache or the Full Route Cache. > > The difference is that `revalidatePath` purges the Data Cache and Full Route Cache, whereas `router.refresh()` does not change the Data Cache and Full Route Cache, as it is a client-side API. ### Dynamic APIs Dynamic APIs like `cookies` and `headers`, and the `searchParams` prop in Pages depend on runtime incoming request information. Using them will opt a route out of the Full Route Cache, in other words, the route will be dynamically rendered. #### `cookies` Using `cookies.set` or `cookies.delete` in a Server Action invalidates the Router Cache to prevent routes that use cookies from becoming stale (e.g. to reflect authentication changes). See the `cookies` API reference. ### Segment Config Options The Route Segment Config options can be used to override the route segment defaults or when you're not able to use the `fetch` API (e.g. database client or 3rd party libraries). The following Route Segment Config options will opt out of the Full Route Cache: * `const dynamic = 'force-dynamic'` This config option will opt all fetches out of the Data Cache (i.e. `no-store`): * `const fetchCache = 'default-no-store'` See the `fetchCache` to see more advanced options. See the Route Segment Config documentation for more options. ### `generateStaticParams` For dynamic segments (e.g. `app/blog/[slug]/page.js`), paths provided by `generateStaticParams` are cached in the Full Route Cache at build time. At request time, Next.js will also cache paths that weren't known at build time the first time they're visited. To statically render all paths at build time, supply the full list of paths to `generateStaticParams`: export async function generateStaticParams() { const posts = await fetch('https://.../posts').then((res) => res.json()) return posts.map((post) => ({ slug: post.slug, })) } To statically render a subset of paths at build time, and the rest the first time they're visited at runtime, return a partial list of paths: export async function generateStaticParams() { const posts = await fetch('https://.../posts').then((res) => res.json()) // Render the first 10 posts at build time return posts.slice(0, 10).map((post) => ({ slug: post.slug, })) } To statically render all paths the first time they're visited, return an empty array (no paths will be rendered at build time) or utilize `export const dynamic = 'force-static'`: export async function generateStaticParams() { return [] } > **Good to know:** You must return an array from `generateStaticParams`, even if it's empty. Otherwise, the route will be dynamically rendered. export const dynamic = 'force-static' To disable caching at request time, add the `export const dynamicParams = false` option in a route segment. When this config option is used, only paths provided by `generateStaticParams` will be served, and other routes will 404 or match (in the case of catch-all routes). ### React `cache` function The React `cache` function allows you to memoize the return value of a function, allowing you to call the same function multiple times while only executing it once. Since `fetch` requests are automatically memoized, you do not need to wrap it in React `cache`. However, you can use `cache` to manually memoize data requests for use cases when the `fetch` API is not suitable. For example, some database clients, CMS clients, or GraphQL clients. import { cache } from 'react' import db from '@/lib/db' export const getItem = cache(async (id: string) => { const item = await db.item.findUnique({ id }) return item }) --- ## Page: https://nextjs.org/docs/app/building-your-application/styling #### Subscribe to our newsletter Stay updated on new releases and features, guides, and case studies. --- ## Page: https://nextjs.org/docs/app/building-your-application/styling/css Next.js supports multiple ways of handling CSS, including: * CSS Modules * Global Styles * External Stylesheets ## CSS Modules Next.js has built-in support for CSS Modules using the `.module.css` extension. CSS Modules locally scope CSS by automatically creating a unique class name. This allows you to use the same class name in different files without worrying about collisions. This behavior makes CSS Modules the ideal way to include component-level CSS. ### Example CSS Modules can be imported into any file inside the `app` directory: import styles from './styles.module.css' export default function DashboardLayout({ children, }: { children: React.ReactNode }) { return <section className={styles.dashboard}>{children}</section> } .dashboard { padding: 24px; } CSS Modules are **only enabled for files with the `.module.css` and `.module.sass` extensions**. In production, all CSS Module files will be automatically concatenated into **many minified and code-split** `.css` files. These `.css` files represent hot execution paths in your application, ensuring the minimal amount of CSS is loaded for your application to paint. ## Global Styles Global styles can be imported into any layout, page, or component inside the `app` directory. > **Good to know**: > > * This is different from the `pages` directory, where you can only import global styles inside the `_app.js` file. > * Next.js does not support usage of global styles unless they are actually global, meaning they can apply to all pages and can live for the lifetime of the application. This is because Next.js uses React's built-in support for stylesheets to integrate with Suspense. This built-in support currently does not remove stylesheets as you navigate between routes. Because of this, we recommend using CSS Modules over global styles. For example, consider a stylesheet named `app/global.css`: body { padding: 20px 20px 60px; max-width: 680px; margin: 0 auto; } Inside the root layout (`app/layout.js`), import the `global.css` stylesheet to apply the styles to every route in your application: // These styles apply to every route in the application import './global.css' export default function RootLayout({ children, }: { children: React.ReactNode }) { return ( <html lang="en"> <body>{children}</body> </html> ) } ## External Stylesheets Stylesheets published by external packages can be imported anywhere in the `app` directory, including colocated components: import 'bootstrap/dist/css/bootstrap.css' export default function RootLayout({ children, }: { children: React.ReactNode }) { return ( <html lang="en"> <body className="container">{children}</body> </html> ) } > **Good to know**: External stylesheets must be directly imported from an npm package or downloaded and colocated with your codebase. You cannot use `<link rel="stylesheet" />`. ## Ordering and Merging Next.js optimizes CSS during production builds by automatically chunking (merging) stylesheets. The CSS order is _determined by the order in which you import the stylesheets into your application code_. For example, `base-button.module.css` will be ordered before `page.module.css` since `<BaseButton>` is imported first in `<Page>`: import styles from './base-button.module.css' export function BaseButton() { return <button className={styles.primary} /> } import { BaseButton } from './base-button' import styles from './page.module.css' export default function Page() { return <BaseButton className={styles.primary} /> } To maintain a predictable order, we recommend the following: * Only import a CSS file in a single JS/TS file. * If using global class names, import the global styles in the same file in the order you want them to be applied. * Prefer CSS Modules over global styles. * Use a consistent naming convention for your CSS modules. For example, using `<name>.module.css` over `<name>.tsx`. * Extract shared styles into a separate shared component. * If using Tailwind, import the stylesheet at the top of the file, preferably in the Root Layout. * Turn off any linters/formatters (e.g., ESLint's `sort-import`) that automatically sort your imports. This can inadvertently affect your CSS since CSS import order _matters_. > **Good to know:** > > * CSS ordering can behave differently in development mode, always ensure to check the build (`next build`) to verify the final CSS order. > * You can use the `cssChunking` option in `next.config.js` to control how CSS is chunked. ## Additional Features Next.js includes additional features to improve the authoring experience of adding styles: * When running locally with `next dev`, local stylesheets (either global or CSS modules) will take advantage of Fast Refresh to instantly reflect changes as edits are saved. * When building for production with `next build`, CSS files will be bundled into fewer minified `.css` files to reduce the number of network requests needed to retrieve styles. * If you disable JavaScript, styles will still be loaded in the production build (`next start`). However, JavaScript is still required for `next dev` to enable Fast Refresh. --- ## Page: https://nextjs.org/docs/app/building-your-application/styling/tailwind-css Tailwind CSS is a utility-first CSS framework that is fully compatible with Next.js. ## Installing Tailwind Install the necessary Tailwind CSS packages: npm install -D tailwindcss @tailwindcss/postcss postcss ## Configuring Tailwind Create a `postcss.config.mjs` file in the root of your project and add the `@tailwindcss/postcss` plugin to your PostCSS configuration: /** @type {import('tailwindcss').Config} */ export default { plugins: { '@tailwindcss/postcss': {}, }, } As of Tailwind v4, there is zero configuration required by default. If you do need to configure Tailwind, you can follow the official documentation for configuring the global CSS file. There is also an upgrade CLI and guide if you have an existing Tailwind v3 project. ## Importing Styles Add the Tailwind CSS directives that Tailwind will use to inject its generated styles to a Global Stylesheet in your application, for example: @import 'tailwindcss'; Inside the root layout (`app/layout.tsx`), import the `globals.css` stylesheet to apply the styles to every route in your application. import type { Metadata } from 'next' // These styles apply to every route in the application import './globals.css' export const metadata: Metadata = { title: 'Create Next App', description: 'Generated by create next app', } export default function RootLayout({ children, }: { children: React.ReactNode }) { return ( <html lang="en"> <body>{children}</body> </html> ) } ## Using Classes After installing Tailwind CSS and adding the global styles, you can use Tailwind's utility classes in your application. export default function Page() { return <h1 className="text-3xl font-bold underline">Hello, Next.js!</h1> } ## Usage with Turbopack As of Next.js 13.1, Tailwind CSS and PostCSS are supported with Turbopack. --- ## Page: https://nextjs.org/docs/app/building-your-application/styling/sass Next.js has built-in support for integrating with Sass after the package is installed using both the `.scss` and `.sass` extensions. You can use component-level Sass via CSS Modules and the `.module.scss`or `.module.sass` extension. First, install `sass`: npm install --save-dev sass > **Good to know**: > > Sass supports two different syntaxes, each with their own extension. The `.scss` extension requires you use the SCSS syntax, while the `.sass` extension requires you use the Indented Syntax ("Sass"). > > If you're not sure which to choose, start with the `.scss` extension which is a superset of CSS, and doesn't require you learn the Indented Syntax ("Sass"). ### Customizing Sass Options If you want to configure your Sass options, use `sassOptions` in `next.config`. import type { NextConfig } from 'next' const nextConfig: NextConfig = { sassOptions: { additionalData: `$var: red;`, }, } export default nextConfig #### Implementation You can use the `implementation` property to specify the Sass implementation to use. By default, Next.js uses the `sass` package. import type { NextConfig } from 'next' const nextConfig: NextConfig = { sassOptions: { implementation: 'sass-embedded', }, } export default nextConfig ### Sass Variables Next.js supports Sass variables exported from CSS Module files. For example, using the exported `primaryColor` Sass variable: $primary-color: #64ff00; :export { primaryColor: $primary-color; } // maps to root `/` URL import variables from './variables.module.scss' export default function Page() { return <h1 style={{ color: variables.primaryColor }}>Hello, Next.js!</h1> } --- ## Page: https://nextjs.org/docs/app/building-your-application/styling/css-in-js > **Warning:** Using CSS-in-JS with newer React features like Server Components and Streaming requires library authors to support the latest version of React, including concurrent rendering. The following libraries are supported in Client Components in the `app` directory (alphabetical): * `ant-design` * `chakra-ui` * `@fluentui/react-components` * `kuma-ui` * `@mui/material` * `@mui/joy` * `pandacss` * `styled-jsx` * `styled-components` * `stylex` * `tamagui` * `tss-react` * `vanilla-extract` The following are currently working on support: * `emotion` > **Good to know**: We're testing out different CSS-in-JS libraries and we'll be adding more examples for libraries that support React 18 features and/or the `app` directory. If you want to style Server Components, we recommend using CSS Modules or other solutions that output CSS files, like PostCSS or Tailwind CSS. ## Configuring CSS-in-JS in `app` Configuring CSS-in-JS is a three-step opt-in process that involves: 1. A **style registry** to collect all CSS rules in a render. 2. The new `useServerInsertedHTML` hook to inject rules before any content that might use them. 3. A Client Component that wraps your app with the style registry during initial server-side rendering. ### `styled-jsx` Using `styled-jsx` in Client Components requires using `v5.1.0`. First, create a new registry: 'use client' import React, { useState } from 'react' import { useServerInsertedHTML } from 'next/navigation' import { StyleRegistry, createStyleRegistry } from 'styled-jsx' export default function StyledJsxRegistry({ children, }: { children: React.ReactNode }) { // Only create stylesheet once with lazy initial state // x-ref: https://reactjs.org/docs/hooks-reference.html#lazy-initial-state const [jsxStyleRegistry] = useState(() => createStyleRegistry()) useServerInsertedHTML(() => { const styles = jsxStyleRegistry.styles() jsxStyleRegistry.flush() return <>{styles}</> }) return <StyleRegistry registry={jsxStyleRegistry}>{children}</StyleRegistry> } Then, wrap your root layout with the registry: import StyledJsxRegistry from './registry' export default function RootLayout({ children, }: { children: React.ReactNode }) { return ( <html> <body> <StyledJsxRegistry>{children}</StyledJsxRegistry> </body> </html> ) } View an example here. ### Styled Components Below is an example of how to configure `styled-components@6` or newer: First, enable styled-components in `next.config.js`. module.exports = { compiler: { styledComponents: true, }, } Then, use the `styled-components` API to create a global registry component to collect all CSS style rules generated during a render, and a function to return those rules. Then use the `useServerInsertedHTML` hook to inject the styles collected in the registry into the `<head>` HTML tag in the root layout. 'use client' import React, { useState } from 'react' import { useServerInsertedHTML } from 'next/navigation' import { ServerStyleSheet, StyleSheetManager } from 'styled-components' export default function StyledComponentsRegistry({ children, }: { children: React.ReactNode }) { // Only create stylesheet once with lazy initial state // x-ref: https://reactjs.org/docs/hooks-reference.html#lazy-initial-state const [styledComponentsStyleSheet] = useState(() => new ServerStyleSheet()) useServerInsertedHTML(() => { const styles = styledComponentsStyleSheet.getStyleElement() styledComponentsStyleSheet.instance.clearTag() return <>{styles}</> }) if (typeof window !== 'undefined') return <>{children}</> return ( <StyleSheetManager sheet={styledComponentsStyleSheet.instance}> {children} </StyleSheetManager> ) } Wrap the `children` of the root layout with the style registry component: import StyledComponentsRegistry from './lib/registry' export default function RootLayout({ children, }: { children: React.ReactNode }) { return ( <html> <body> <StyledComponentsRegistry>{children}</StyledComponentsRegistry> </body> </html> ) } View an example here. > **Good to know**: > > * During server rendering, styles will be extracted to a global registry and flushed to the `<head>` of your HTML. This ensures the style rules are placed before any content that might use them. In the future, we may use an upcoming React feature to determine where to inject the styles. > * During streaming, styles from each chunk will be collected and appended to existing styles. After client-side hydration is complete, `styled-components` will take over as usual and inject any further dynamic styles. > * We specifically use a Client Component at the top level of the tree for the style registry because it's more efficient to extract CSS rules this way. It avoids re-generating styles on subsequent server renders, and prevents them from being sent in the Server Component payload. > * For advanced use cases where you need to configure individual properties of styled-components compilation, you can read our Next.js styled-components API reference to learn more. --- ## Page: https://nextjs.org/docs/app/building-your-application/optimizing ## Optimizations Next.js comes with a variety of built-in optimizations designed to improve your application's speed and Core Web Vitals. This guide will cover the optimizations you can leverage to enhance your user experience. ## Built-in Components Built-in components abstract away the complexity of implementing common UI optimizations. These components are: * **Images**: Built on the native `<img>` element. The Image Component optimizes images for performance by lazy loading and automatically resizing images based on device size. * **Link**: Built on the native `<a>` tags. The Link Component prefetches pages in the background, for faster and smoother page transitions. * **Scripts**: Built on the native `<script>` tags. The Script Component gives you control over loading and execution of third-party scripts. Metadata helps search engines understand your content better (which can result in better SEO), and allows you to customize how your content is presented on social media, helping you create a more engaging and consistent user experience across various platforms. The Metadata API in Next.js allows you to modify the `<head>` element of a page. You can configure metadata in two ways: * **Config-based Metadata**: Export a static `metadata` object or a dynamic `generateMetadata` function in a `layout.js` or `page.js` file. * **File-based Metadata**: Add static or dynamically generated special files to route segments. Additionally, you can create dynamic Open Graph Images using JSX and CSS with imageResponse constructor. ## Static Assets Next.js `/public` folder can be used to serve static assets like images, fonts, and other files. Files inside `/public` can also be cached by CDN providers so that they are delivered efficiently. ## Analytics and Monitoring For large applications, Next.js integrates with popular analytics and monitoring tools to help you understand how your application is performing. Learn more in the OpenTelemetry and Instrumentation guides. --- ## Page: https://nextjs.org/docs/app/building-your-application/optimizing/images ## Image Optimization Examples * Image Component According to Web Almanac, images account for a huge portion of the typical website’s page weight and can have a sizable impact on your website's LCP performance. The Next.js Image component extends the HTML `<img>` element with features for automatic image optimization: * **Size Optimization:** Automatically serve correctly sized images for each device, using modern image formats like WebP. * **Visual Stability:** Prevent layout shift automatically when images are loading. * **Faster Page Loads:** Images are only loaded when they enter the viewport using native browser lazy loading, with optional blur-up placeholders. * **Asset Flexibility:** On-demand image resizing, even for images stored on remote servers > **🎥 Watch:** Learn more about how to use `next/image` → YouTube (9 minutes). ## Usage import Image from 'next/image' You can then define the `src` for your image (either local or remote). ### Local Images To use a local image, `import` your `.jpg`, `.png`, or `.webp` image files. Next.js will automatically determine the intrinsic `width` and `height` of your image based on the imported file. These values are used to determine the image ratio and prevent Cumulative Layout Shift while your image is loading. import Image from 'next/image' import profilePic from './me.png' export default function Page() { return ( <Image src={profilePic} alt="Picture of the author" // width={500} automatically provided // height={500} automatically provided // blurDataURL="data:..." automatically provided // placeholder="blur" // Optional blur-up while loading /> ) } > **Warning:** Dynamic `await import()` or `require()` are _not_ supported. The `import` must be static so it can be analyzed at build time. You can optionally configure `localPatterns` in your `next.config.js` file in order to allow specific images and block all others. module.exports = { images: { localPatterns: [ { pathname: '/assets/images/**', search: '', }, ], }, } ### Remote Images To use a remote image, the `src` property should be a URL string. Since Next.js does not have access to remote files during the build process, you'll need to provide the `width`, `height` and optional `blurDataURL` props manually. The `width` and `height` attributes are used to infer the correct aspect ratio of image and avoid layout shift from the image loading in. The `width` and `height` do _not_ determine the rendered size of the image file. Learn more about Image Sizing. import Image from 'next/image' export default function Page() { return ( <Image src="https://s3.amazonaws.com/my-bucket/profile.png" alt="Picture of the author" width={500} height={500} /> ) } To safely allow optimizing images, define a list of supported URL patterns in `next.config.js`. Be as specific as possible to prevent malicious usage. For example, the following configuration will only allow images from a specific AWS S3 bucket: module.exports = { images: { remotePatterns: [ { protocol: 'https', hostname: 's3.amazonaws.com', port: '', pathname: '/my-bucket/**', search: '', }, ], }, } Learn more about `remotePatterns` configuration. If you want to use relative URLs for the image `src`, use a `loader`. ### Domains Sometimes you may want to optimize a remote image, but still use the built-in Next.js Image Optimization API. To do this, leave the `loader` at its default setting and enter an absolute URL for the Image `src` prop. To protect your application from malicious users, you must define a list of remote hostnames you intend to use with the `next/image` component. > Learn more about `remotePatterns` configuration. ### Loaders Note that in the example earlier, a partial URL (`"/me.png"`) is provided for a local image. This is possible because of the loader architecture. A loader is a function that generates the URLs for your image. It modifies the provided `src`, and generates multiple URLs to request the image at different sizes. These multiple URLs are used in the automatic srcset generation, so that visitors to your site will be served an image that is the right size for their viewport. The default loader for Next.js applications uses the built-in Image Optimization API, which optimizes images from anywhere on the web, and then serves them directly from the Next.js web server. If you would like to serve your images directly from a CDN or image server, you can write your own loader function with a few lines of JavaScript. You can define a loader per-image with the `loader` prop, or at the application level with the `loaderFile` configuration. ## Priority You should add the `priority` property to the image that will be the Largest Contentful Paint (LCP) element for each page. Doing so allows Next.js to preload the image, leading to a meaningful boost in LCP. The LCP element is typically the largest image or text block visible within the viewport of the page. When you run `next dev`, you'll see a console warning if the LCP element is an `<Image>` without the `priority` property. Once you've identified the LCP image, you can add the property like this: import Image from 'next/image' import profilePic from '../public/me.png' export default function Page() { return <Image src={profilePic} alt="Picture of the author" priority /> } See more about priority in the `next/image` component documentation. ## Image Sizing One of the ways that images most commonly hurt performance is through _layout shift_, where the image pushes other elements around on the page as it loads in. This performance problem is so annoying to users that it has its own Core Web Vital, called Cumulative Layout Shift. The way to avoid image-based layout shifts is to always size your images. This allows the browser to reserve precisely enough space for the image before it loads. Because `next/image` is designed to guarantee good performance results, it cannot be used in a way that will contribute to layout shift, and **must** be sized in one of three ways: 1. Automatically, using a static import 2. Manually, by including a `width` and `height` property used to determine the image's aspect ratio. 3. Implicitly, by using fill which causes the image to expand to fill its parent element. > **What if I don't know the size of my images?** > > If you are accessing images from a source without knowledge of the images' sizes, there are several things you can do: > > **Use `fill`** > > The `fill` prop allows your image to be sized by its parent element. Consider using CSS to give the image's parent element space on the page along `sizes` prop to match any media query break points. You can also use `object-fit` with `fill`, `contain`, or `cover`, and `object-position` to define how the image should occupy that space. > > **Normalize your images** > > If you're serving images from a source that you control, consider modifying your image pipeline to normalize the images to a specific size. > > **Modify your API calls** > > If your application is retrieving image URLs using an API call (such as to a CMS), you may be able to modify the API call to return the image dimensions along with the URL. If none of the suggested methods works for sizing your images, the `next/image` component is designed to work well on a page alongside standard `<img>` elements. ## Styling Styling the Image component is similar to styling a normal `<img>` element, but there are a few guidelines to keep in mind: * Use `className` or `style`, not `styled-jsx`. * In most cases, we recommend using the `className` prop. This can be an imported CSS Module, a global stylesheet, etc. * You can also use the `style` prop to assign inline styles. * You cannot use styled-jsx because it's scoped to the current component (unless you mark the style as `global`). * When using `fill`, the parent element must have `position: relative` * This is necessary for the proper rendering of the image element in that layout mode. * When using `fill`, the parent element must have `display: block` * This is the default for `<div>` elements but should be specified otherwise. ## Examples ### Responsive 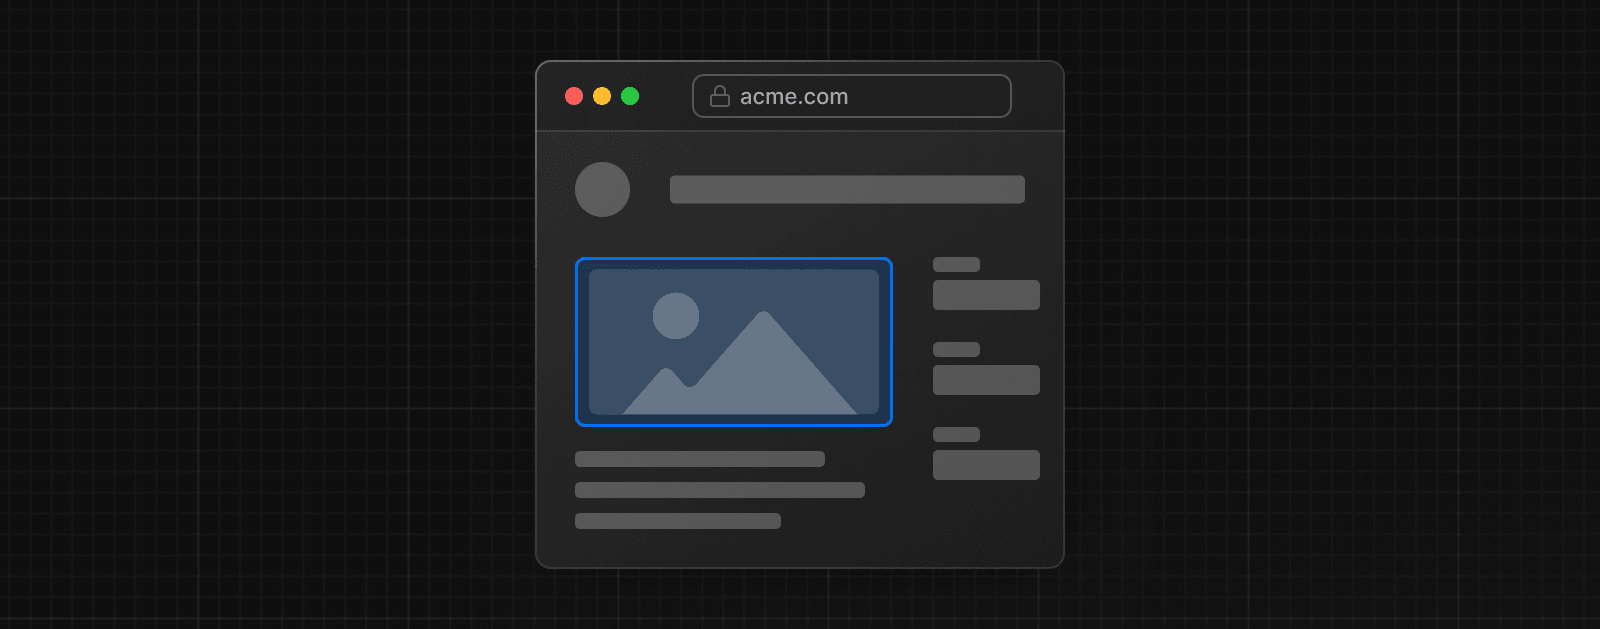 import Image from 'next/image' import mountains from '../public/mountains.jpg' export default function Responsive() { return ( <div style={{ display: 'flex', flexDirection: 'column' }}> <Image alt="Mountains" // Importing an image will // automatically set the width and height src={mountains} sizes="100vw" // Make the image display full width style={{ width: '100%', height: 'auto', }} /> </div> ) } ### Fill Container  import Image from 'next/image' import mountains from '../public/mountains.jpg' export default function Fill() { return ( <div style={{ display: 'grid', gridGap: '8px', gridTemplateColumns: 'repeat(auto-fit, minmax(400px, auto))', }} > <div style={{ position: 'relative', height: '400px' }}> <Image alt="Mountains" src={mountains} fill sizes="(min-width: 808px) 50vw, 100vw" style={{ objectFit: 'cover', // cover, contain, none }} /> </div> {/* And more images in the grid... */} </div> ) } ### Background Image  import Image from 'next/image' import mountains from '../public/mountains.jpg' export default function Background() { return ( <Image alt="Mountains" src={mountains} placeholder="blur" quality={100} fill sizes="100vw" style={{ objectFit: 'cover', }} /> ) } For examples of the Image component used with the various styles, see the Image Component Demo. ## Other Properties **View all properties available to the `next/image` component.** ## Configuration The `next/image` component and Next.js Image Optimization API can be configured in the `next.config.js` file. These configurations allow you to enable remote images, define custom image breakpoints, change caching behavior and more. **Read the full image configuration documentation for more information.** --- ## Page: https://nextjs.org/docs/app/building-your-application/optimizing/videos ## Video Optimization This page outlines how to use videos with Next.js applications, showing how to store and display video files without affecting performance. ## Using `<video>` and `<iframe>` Videos can be embedded on the page using the HTML **`<video>`** tag for direct video files and **`<iframe>`** for external platform-hosted videos. ### `<video>` The HTML `<video>` tag can embed self-hosted or directly served video content, allowing full control over the playback and appearance. export function Video() { return ( <video width="320" height="240" controls preload="none"> <source src="/path/to/video.mp4" type="video/mp4" /> <track src="/path/to/captions.vtt" kind="subtitles" srcLang="en" label="English" /> Your browser does not support the video tag. </video> ) } ### Common `<video>` tag attributes | Attribute | Description | Example Value | | --- | --- | --- | | `src` | Specifies the source of the video file. | `<video src="/path/to/video.mp4" />` | | `width` | Sets the width of the video player. | `<video width="320" />` | | `height` | Sets the height of the video player. | `<video height="240" />` | | `controls` | If present, it displays the default set of playback controls. | `<video controls />` | | `autoPlay` | Automatically starts playing the video when the page loads. Note: Autoplay policies vary across browsers. | `<video autoPlay />` | | `loop` | Loops the video playback. | `<video loop />` | | `muted` | Mutes the audio by default. Often used with `autoPlay`. | `<video muted />` | | `preload` | Specifies how the video is preloaded. Values: `none`, `metadata`, `auto`. | `<video preload="none" />` | | `playsInline` | Enables inline playback on iOS devices, often necessary for autoplay to work on iOS Safari. | `<video playsInline />` | > **Good to know**: When using the `autoPlay` attribute, it is important to also include the `muted` attribute to ensure the video plays automatically in most browsers and the `playsInline` attribute for compatibility with iOS devices. For a comprehensive list of video attributes, refer to the MDN documentation. ### Video best practices * **Fallback Content:** When using the `<video>` tag, include fallback content inside the tag for browsers that do not support video playback. * **Subtitles or Captions:** Include subtitles or captions for users who are deaf or hard of hearing. Utilize the `<track>` tag with your `<video>` elements to specify caption file sources. * **Accessible Controls:** Standard HTML5 video controls are recommended for keyboard navigation and screen reader compatibility. For advanced needs, consider third-party players like react-player or video.js, which offer accessible controls and consistent browser experience. ### `<iframe>` The HTML `<iframe>` tag allows you to embed videos from external platforms like YouTube or Vimeo. export default function Page() { return ( <iframe src="https://www.youtube.com/embed/19g66ezsKAg" allowFullScreen /> ) } ### Common `<iframe>` tag attributes | Attribute | Description | Example Value | | --- | --- | --- | | `src` | The URL of the page to embed. | `<iframe src="https://example.com" />` | | `width` | Sets the width of the iframe. | `<iframe width="500" />` | | `height` | Sets the height of the iframe. | `<iframe height="300" />` | | `allowFullScreen` | Allows the iframe content to be displayed in full-screen mode. | `<iframe allowFullScreen />` | | `sandbox` | Enables an extra set of restrictions on the content within the iframe. | `<iframe sandbox />` | | `loading` | Optimize loading behavior (e.g., lazy loading). | `<iframe loading="lazy" />` | | `title` | Provides a title for the iframe to support accessibility. | `<iframe title="Description" />` | For a comprehensive list of iframe attributes, refer to the MDN documentation. ### Choosing a video embedding method There are two ways you can embed videos in your Next.js application: * **Self-hosted or direct video files:** Embed self-hosted videos using the `<video>` tag for scenarios requiring detailed control over the player's functionality and appearance. This integration method within Next.js allows for customization and control of your video content. * **Using video hosting services (YouTube, Vimeo, etc.):** For video hosting services like YouTube or Vimeo, you'll embed their iframe-based players using the `<iframe>` tag. While this method limits some control over the player, it offers ease of use and features provided by these platforms. Choose the embedding method that aligns with your application's requirements and the user experience you aim to deliver. ### Embedding externally hosted videos To embed videos from external platforms, you can use Next.js to fetch the video information and React Suspense to handle the fallback state while loading. **1\. Create a Server Component for video embedding** The first step is to create a Server Component that generates the appropriate iframe for embedding the video. This component will fetch the source URL for the video and render the iframe. export default async function VideoComponent() { const src = await getVideoSrc() return <iframe src={src} allowFullScreen /> } **2\. Stream the video component using React Suspense** After creating the Server Component to embed the video, the next step is to stream the component using React Suspense. import { Suspense } from 'react' import VideoComponent from '../ui/VideoComponent.jsx' export default function Page() { return ( <section> <Suspense fallback={<p>Loading video...</p>}> <VideoComponent /> </Suspense> {/* Other content of the page */} </section> ) } > **Good to know**: When embedding videos from external platforms, consider the following best practices: > > * Ensure the video embeds are responsive. Use CSS to make the iframe or video player adapt to different screen sizes. > * Implement strategies for loading videos based on network conditions, especially for users with limited data plans. This approach results in a better user experience as it prevents the page from blocking, meaning the user can interact with the page while the video component streams in. For a more engaging and informative loading experience, consider using a loading skeleton as the fallback UI. So instead of showing a simple loading message, you can show a skeleton that resembles the video player like this: import { Suspense } from 'react' import VideoComponent from '../ui/VideoComponent.jsx' import VideoSkeleton from '../ui/VideoSkeleton.jsx' export default function Page() { return ( <section> <Suspense fallback={<VideoSkeleton />}> <VideoComponent /> </Suspense> {/* Other content of the page */} </section> ) } ## Self-hosted videos Self-hosting videos may be preferable for several reasons: * **Complete control and independence**: Self-hosting gives you direct management over your video content, from playback to appearance, ensuring full ownership and control, free from external platform constraints. * **Customization for specific needs**: Ideal for unique requirements, like dynamic background videos, it allows for tailored customization to align with design and functional needs. * **Performance and scalability considerations**: Choose storage solutions that are both high-performing and scalable, to support increasing traffic and content size effectively. * **Cost and integration**: Balance the costs of storage and bandwidth with the need for easy integration into your Next.js framework and broader tech ecosystem. ### Using Vercel Blob for video hosting Vercel Blob offers an efficient way to host videos, providing a scalable cloud storage solution that works well with Next.js. Here's how you can host a video using Vercel Blob: **1\. Uploading a video to Vercel Blob** In your Vercel dashboard, navigate to the "Storage" tab and select your Vercel Blob store. In the Blob table's upper-right corner, find and click the "Upload" button. Then, choose the video file you wish to upload. After the upload completes, the video file will appear in the Blob table. Alternatively, you can upload your video using a server action. For detailed instructions, refer to the Vercel documentation on server-side uploads. Vercel also supports client-side uploads. This method may be preferable for certain use cases. **2\. Displaying the video in Next.js** Once the video is uploaded and stored, you can display it in your Next.js application. Here's an example of how to do this using the `<video>` tag and React Suspense: import { Suspense } from 'react' import { list } from '@vercel/blob' export default function Page() { return ( <Suspense fallback={<p>Loading video...</p>}> <VideoComponent fileName="my-video.mp4" /> </Suspense> ) } async function VideoComponent({ fileName }) { const { blobs } = await list({ prefix: fileName, limit: 1, }) const { url } = blobs[0] return ( <video controls preload="none" aria-label="Video player"> <source src={url} type="video/mp4" /> Your browser does not support the video tag. </video> ) } In this approach, the page uses the video's `@vercel/blob` URL to display the video using the `VideoComponent`. React Suspense is used to show a fallback until the video URL is fetched and the video is ready to be displayed. ### Adding subtitles to your video If you have subtitles for your video, you can easily add them using the `<track>` element inside your `<video>` tag. You can fetch the subtitle file from Vercel Blob in a similar way as the video file. Here's how you can update the `<VideoComponent>` to include subtitles. async function VideoComponent({ fileName }) { const { blobs } = await list({ prefix: fileName, limit: 2, }) const { url } = blobs[0] const { url: captionsUrl } = blobs[1] return ( <video controls preload="none" aria-label="Video player"> <source src={url} type="video/mp4" /> <track src={captionsUrl} kind="subtitles" srcLang="en" label="English" /> Your browser does not support the video tag. </video> ) } By following this approach, you can effectively self-host and integrate videos into your Next.js applications. ## Resources To continue learning more about video optimization and best practices, please refer to the following resources: * **Understanding video formats and codecs**: Choose the right format and codec, like MP4 for compatibility or WebM for web optimization, for your video needs. For more details, see Mozilla's guide on video codecs. * **Video compression**: Use tools like FFmpeg to effectively compress videos, balancing quality with file size. Learn about compression techniques at FFmpeg's official website. * **Resolution and bitrate adjustment**: Adjust resolution and bitrate based on the viewing platform, with lower settings for mobile devices. * **Content Delivery Networks (CDNs)**: Utilize a CDN to enhance video delivery speed and manage high traffic. When using some storage solutions, such as Vercel Blob, CDN functionality is automatically handled for you. Learn more about CDNs and their benefits. Explore these video streaming platforms for integrating video into your Next.js projects: ### Open source `next-video` component * Provides a `<Video>` component for Next.js, compatible with various hosting services including Vercel Blob, S3, Backblaze, and Mux. * Detailed documentation for using `next-video.dev` with different hosting services. ### Cloudinary Integration * Official documentation and integration guide for using Cloudinary with Next.js. * Includes a `<CldVideoPlayer>` component for drop-in video support. * Find examples of integrating Cloudinary with Next.js including Adaptive Bitrate Streaming. * Other Cloudinary libraries including a Node.js SDK are also available. ### Mux Video API * Mux provides a starter template for creating a video course with Mux and Next.js. * Learn about Mux's recommendations for embedding high-performance video for your Next.js application. * Explore an example project demonstrating Mux with Next.js. ### Fastly * Learn more about integrating Fastly's solutions for video on demand and streaming media into Next.js. ### ImageKit.io Integration * Check out the official quick start guide for integrating ImageKit with Next.js. * The integration provides an `<IKVideo>` component, offering seamless video support. * You can also explore other ImageKit libraries, such as the Node.js SDK, which is also available. --- ## Page: https://nextjs.org/docs/app/building-your-application/optimizing/fonts ## Font Optimization **`next/font`** will automatically optimize your fonts (including custom fonts) and remove external network requests for improved privacy and performance. > **🎥 Watch:** Learn more about using `next/font` → YouTube (6 minutes). `next/font` includes **built-in automatic self-hosting** for _any_ font file. This means you can optimally load web fonts with zero layout shift, thanks to the underlying CSS `size-adjust` property used. This new font system also allows you to conveniently use all Google Fonts with performance and privacy in mind. CSS and font files are downloaded at build time and self-hosted with the rest of your static assets. **No requests are sent to Google by the browser.** ## Google Fonts Automatically self-host any Google Font. Fonts are included in the deployment and served from the same domain as your deployment. **No requests are sent to Google by the browser.** Get started by importing the font you would like to use from `next/font/google` as a function. We recommend using variable fonts for the best performance and flexibility. import { Inter } from 'next/font/google' // If loading a variable font, you don't need to specify the font weight const inter = Inter({ subsets: ['latin'], display: 'swap', }) export default function RootLayout({ children, }: { children: React.ReactNode }) { return ( <html lang="en" className={inter.className}> <body>{children}</body> </html> ) } If you can't use a variable font, you will **need to specify a weight**: import { Roboto } from 'next/font/google' const roboto = Roboto({ weight: '400', subsets: ['latin'], display: 'swap', }) export default function RootLayout({ children, }: { children: React.ReactNode }) { return ( <html lang="en" className={roboto.className}> <body>{children}</body> </html> ) } You can specify multiple weights and/or styles by using an array: const roboto = Roboto({ weight: ['400', '700'], style: ['normal', 'italic'], subsets: ['latin'], display: 'swap', }) > **Good to know**: Use an underscore (\_) for font names with multiple words. E.g. `Roboto Mono` should be imported as `Roboto_Mono`. ### Specifying a subset Google Fonts are automatically subset. This reduces the size of the font file and improves performance. You'll need to define which of these subsets you want to preload. Failing to specify any subsets while `preload` is `true` will result in a warning. This can be done by adding it to the function call: const inter = Inter({ subsets: ['latin'] }) View the Font API Reference for more information. ### Using Multiple Fonts You can import and use multiple fonts in your application. There are two approaches you can take. The first approach is to create a utility function that exports a font, imports it, and applies its `className` where needed. This ensures the font is preloaded only when it's rendered: import { Inter, Roboto_Mono } from 'next/font/google' export const inter = Inter({ subsets: ['latin'], display: 'swap', }) export const roboto_mono = Roboto_Mono({ subsets: ['latin'], display: 'swap', }) import { inter } from './fonts' export default function Layout({ children }: { children: React.ReactNode }) { return ( <html lang="en" className={inter.className}> <body> <div>{children}</div> </body> </html> ) } import { roboto_mono } from './fonts' export default function Page() { return ( <> <h1 className={roboto_mono.className}>My page</h1> </> ) } In the example above, `Inter` will be applied globally, and `Roboto Mono` can be imported and applied as needed. Alternatively, you can create a CSS variable and use it with your preferred CSS solution: import { Inter, Roboto_Mono } from 'next/font/google' import styles from './global.css' const inter = Inter({ subsets: ['latin'], variable: '--font-inter', display: 'swap', }) const roboto_mono = Roboto_Mono({ subsets: ['latin'], variable: '--font-roboto-mono', display: 'swap', }) export default function RootLayout({ children, }: { children: React.ReactNode }) { return ( <html lang="en" className={`${inter.variable} ${roboto_mono.variable}`}> <body> <h1>My App</h1> <div>{children}</div> </body> </html> ) } html { font-family: var(--font-inter); } h1 { font-family: var(--font-roboto-mono); } In the example above, `Inter` will be applied globally, and any `<h1>` tags will be styled with `Roboto Mono`. > **Recommendation**: Use multiple fonts conservatively since each new font is an additional resource the client has to download. ## Local Fonts Import `next/font/local` and specify the `src` of your local font file. We recommend using variable fonts for the best performance and flexibility. import localFont from 'next/font/local' // Font files can be colocated inside of `app` const myFont = localFont({ src: './my-font.woff2', display: 'swap', }) export default function RootLayout({ children, }: { children: React.ReactNode }) { return ( <html lang="en" className={myFont.className}> <body>{children}</body> </html> ) } If you want to use multiple files for a single font family, `src` can be an array: const roboto = localFont({ src: [ { path: './Roboto-Regular.woff2', weight: '400', style: 'normal', }, { path: './Roboto-Italic.woff2', weight: '400', style: 'italic', }, { path: './Roboto-Bold.woff2', weight: '700', style: 'normal', }, { path: './Roboto-BoldItalic.woff2', weight: '700', style: 'italic', }, ], }) View the Font API Reference for more information. ## With Tailwind CSS `next/font` integrates seamlessly with Tailwind CSS using CSS variables. In the example below, we use the `Inter` and `Roboto_Mono` fonts from `next/font/google` (you can use any Google Font or Local Font). Use the `variable` option to define a CSS variable name, such as `inter` and `roboto_mono` for these fonts, respectively. Then, apply `inter.variable` and `roboto_mono.variable` to include the CSS variables in your HTML document. > **Good to know**: You can add these variables to the `<html>` or `<body>` tag, depending on your preference, styling needs or project requirements. import { Inter, Roboto_Mono } from 'next/font/google' const inter = Inter({ subsets: ['latin'], display: 'swap', variable: '--font-inter', }) const roboto_mono = Roboto_Mono({ subsets: ['latin'], display: 'swap', variable: '--font-roboto-mono', }) export default function RootLayout({ children, }: { children: React.ReactNode }) { return ( <html lang="en" className={`${inter.variable} ${roboto_mono.variable} antialiased`} > <body>{children}</body> </html> ) } Finally, add the CSS variable to your Tailwind CSS config: ### Tailwind CSS v4 As of Tailwind v4, there is zero configuration required by default. If you do need to configure Tailwind, you can follow the official documentation for configuring the global CSS file. @import "tailwindcss"; @theme inline { --font-sans: var(--font-inter); --font-mono: var(--font-roboto-mono); } ### Tailwind CSS v3 /** @type {import('tailwindcss').Config} */ module.exports = { content: [ './pages/**/*.{js,ts,jsx,tsx}', './components/**/*.{js,ts,jsx,tsx}', './app/**/*.{js,ts,jsx,tsx}', ], theme: { extend: { fontFamily: { sans: ['var(--font-inter)'], mono: ['var(--font-roboto-mono)'], }, }, }, plugins: [], } You can now use the `font-sans` and `font-mono` utility classes to apply the font to your elements. <p class="font-sans ...">The quick brown fox ...</p> <p class="font-mono ...">The quick brown fox ...</p> ## Preloading When a font function is called on a page of your site, it is not globally available and preloaded on all routes. Rather, the font is only preloaded on the related routes based on the type of file where it is used: * If it's a unique page, it is preloaded on the unique route for that page. * If it's a layout, it is preloaded on all the routes wrapped by the layout. * If it's the root layout, it is preloaded on all routes. ## Reusing fonts Every time you call the `localFont` or Google font function, that font is hosted as one instance in your application. Therefore, if you load the same font function in multiple files, multiple instances of the same font are hosted. In this situation, it is recommended to do the following: * Call the font loader function in one shared file * Export it as a constant * Import the constant in each file where you would like to use this font --- ## Page: https://nextjs.org/docs/app/building-your-application/optimizing/metadata Next.js has a Metadata API that can be used to define your application metadata (e.g. `meta` and `link` tags inside your HTML `head` element) for improved SEO and web shareability. There are two ways you can add metadata to your application: * **Config-based Metadata**: Export a static `metadata` object or a dynamic `generateMetadata` function in a `layout.js` or `page.js` file. * **File-based Metadata**: Add static or dynamically generated special files to route segments. With both these options, Next.js will automatically generate the relevant `<head>` elements for your pages. You can also create dynamic OG images using the `ImageResponse` constructor. To define static metadata, export a `Metadata` object from a `layout.js` or static `page.js` file. import type { Metadata } from 'next' export const metadata: Metadata = { title: '...', description: '...', } export default function Page() {} For all the available options, see the API Reference. You can use `generateMetadata` function to `fetch` metadata that requires dynamic values. import type { Metadata, ResolvingMetadata } from 'next' type Props = { params: Promise<{ id: string }> searchParams: Promise<{ [key: string]: string | string[] | undefined }> } export async function generateMetadata( { params, searchParams }: Props, parent: ResolvingMetadata ): Promise<Metadata> { // read route params const { id } = await params // fetch data const product = await fetch(`https://.../${id}`).then((res) => res.json()) // optionally access and extend (rather than replace) parent metadata const previousImages = (await parent).openGraph?.images || [] return { title: product.title, openGraph: { images: ['/some-specific-page-image.jpg', ...previousImages], }, } } export default function Page({ params, searchParams }: Props) {} For all the available params, see the API Reference. > **Good to know**: > > * Both static and dynamic metadata through `generateMetadata` are **only supported in Server Components**. > * `fetch` requests are automatically memoized for the same data across `generateMetadata`, `generateStaticParams`, Layouts, Pages, and Server Components. React `cache` can be used if `fetch` is unavailable. > * Next.js will wait for data fetching inside `generateMetadata` to complete before streaming UI to the client. This guarantees the first part of a streamed response includes `<head>` tags. These special files are available for metadata: * favicon.ico, apple-icon.jpg, and icon.jpg * opengraph-image.jpg and twitter-image.jpg * robots.txt * sitemap.xml You can use these for static metadata, or you can programmatically generate these files with code. For implementation and examples, see the Metadata Files API Reference and Dynamic Image Generation. ## Behavior File-based metadata has the higher priority and will override any config-based metadata. ### Default Fields There are two default `meta` tags that are always added even if a route doesn't define metadata: * The meta charset tag sets the character encoding for the website. * The meta viewport tag sets the viewport width and scale for the website to adjust for different devices. <meta charset="utf-8" /> <meta name="viewport" content="width=device-width, initial-scale=1" /> > **Good to know**: You can overwrite the default `viewport` meta tag. ### Ordering Metadata is evaluated in order, starting from the root segment down to the segment closest to the final `page.js` segment. For example: 1. `app/layout.tsx` (Root Layout) 2. `app/blog/layout.tsx` (Nested Blog Layout) 3. `app/blog/[slug]/page.tsx` (Blog Page) ### Merging Following the evaluation order, Metadata objects exported from multiple segments in the same route are **shallowly** merged together to form the final metadata output of a route. Duplicate keys are **replaced** based on their ordering. This means metadata with nested fields such as `openGraph` and `robots` that are defined in an earlier segment are **overwritten** by the last segment to define them. #### Overwriting fields export const metadata = { title: 'Acme', openGraph: { title: 'Acme', description: 'Acme is a...', }, } export const metadata = { title: 'Blog', openGraph: { title: 'Blog', }, } // Output: // <title>Blog</title> // <meta property="og:title" content="Blog" /> In the example above: * `title` from `app/layout.js` is **replaced** by `title` in `app/blog/page.js`. * All `openGraph` fields from `app/layout.js` are **replaced** in `app/blog/page.js` because `app/blog/page.js` sets `openGraph` metadata. Note the absence of `openGraph.description`. If you'd like to share some nested fields between segments while overwriting others, you can pull them out into a separate variable: export const openGraphImage = { images: ['http://...'] } import { openGraphImage } from './shared-metadata' export const metadata = { openGraph: { ...openGraphImage, title: 'Home', }, } import { openGraphImage } from '../shared-metadata' export const metadata = { openGraph: { ...openGraphImage, title: 'About', }, } In the example above, the OG image is shared between `app/layout.js` and `app/about/page.js` while the titles are different. #### Inheriting fields export const metadata = { title: 'Acme', openGraph: { title: 'Acme', description: 'Acme is a...', }, } export const metadata = { title: 'About', } // Output: // <title>About</title> // <meta property="og:title" content="Acme" /> // <meta property="og:description" content="Acme is a..." /> **Notes** * `title` from `app/layout.js` is **replaced** by `title` in `app/about/page.js`. * All `openGraph` fields from `app/layout.js` are **inherited** in `app/about/page.js` because `app/about/page.js` doesn't set `openGraph` metadata. ## Dynamic Image Generation The `ImageResponse` constructor allows you to generate dynamic images using JSX and CSS. This is useful for creating social media images such as Open Graph images, Twitter cards, and more. To use it, you can import `ImageResponse` from `next/og`: import { ImageResponse } from 'next/og' export default function OG() { return new ImageResponse( ( <div style={{ fontSize: 128, background: 'white', width: '100%', height: '100%', display: 'flex', textAlign: 'center', alignItems: 'center', justifyContent: 'center', }} > Hello world! </div> ), { width: 1200, height: 600, } ) } `ImageResponse` integrates well with other Next.js APIs, including Route Handlers and file-based Metadata. For example, you can use `ImageResponse` in a `opengraph-image.tsx` file to generate Open Graph images at build time or dynamically at request time. `ImageResponse` supports common CSS properties including flexbox and absolute positioning, custom fonts, text wrapping, centering, and nested images. See the full list of supported CSS properties. > **Good to know**: > > * Examples are available in the Vercel OG Playground. > * `ImageResponse` uses @vercel/og, Satori, and Resvg to convert HTML and CSS into PNG. > * Only flexbox and a subset of CSS properties are supported. Advanced layouts (e.g. `display: grid`) will not work. > * Maximum bundle size of `500KB`. The bundle size includes your JSX, CSS, fonts, images, and any other assets. If you exceed the limit, consider reducing the size of any assets or fetching at runtime. > * Only `ttf`, `otf`, and `woff` font formats are supported. To maximize the font parsing speed, `ttf` or `otf` are preferred over `woff`. ## JSON-LD JSON-LD is a format for structured data that can be used by search engines to understand your content. For example, you can use it to describe a person, an event, an organization, a movie, a book, a recipe, and many other types of entities. Our current recommendation for JSON-LD is to render structured data as a `<script>` tag in your `layout.js` or `page.js` components. For example: export default async function Page({ params }) { const { id } = await params const product = await getProduct(id) const jsonLd = { '@context': 'https://schema.org', '@type': 'Product', name: product.name, image: product.image, description: product.description, } return ( <section> {/* Add JSON-LD to your page */} <script type="application/ld+json" dangerouslySetInnerHTML={{ __html: JSON.stringify(jsonLd) }} /> {/* ... */} </section> ) } You can validate and test your structured data with the Rich Results Test for Google or the generic Schema Markup Validator. You can type your JSON-LD with TypeScript using community packages like `schema-dts`: import { Product, WithContext } from 'schema-dts' const jsonLd: WithContext<Product> = { '@context': 'https://schema.org', '@type': 'Product', name: 'Next.js Sticker', image: 'https://nextjs.org/imgs/sticker.png', description: 'Dynamic at the speed of static.', } --- ## Page: https://nextjs.org/docs/app/building-your-application/optimizing/scripts ## Script Optimization ### Layout Scripts To load a third-party script for multiple routes, import `next/script` and include the script directly in your layout component: import Script from 'next/script' export default function DashboardLayout({ children, }: { children: React.ReactNode }) { return ( <> <section>{children}</section> <Script src="https://example.com/script.js" /> </> ) } The third-party script is fetched when the folder route (e.g. `dashboard/page.js`) or any nested route (e.g. `dashboard/settings/page.js`) is accessed by the user. Next.js will ensure the script will **only load once**, even if a user navigates between multiple routes in the same layout. ### Application Scripts To load a third-party script for all routes, import `next/script` and include the script directly in your root layout: import Script from 'next/script' export default function RootLayout({ children, }: { children: React.ReactNode }) { return ( <html lang="en"> <body>{children}</body> <Script src="https://example.com/script.js" /> </html> ) } This script will load and execute when _any_ route in your application is accessed. Next.js will ensure the script will **only load once**, even if a user navigates between multiple pages. > **Recommendation**: We recommend only including third-party scripts in specific pages or layouts in order to minimize any unnecessary impact to performance. ### Strategy Although the default behavior of `next/script` allows you to load third-party scripts in any page or layout, you can fine-tune its loading behavior by using the `strategy` property: * `beforeInteractive`: Load the script before any Next.js code and before any page hydration occurs. * `afterInteractive`: (**default**) Load the script early but after some hydration on the page occurs. * `lazyOnload`: Load the script later during browser idle time. * `worker`: (experimental) Load the script in a web worker. Refer to the `next/script` API reference documentation to learn more about each strategy and their use cases. ### Offloading Scripts To A Web Worker (experimental) > **Warning:** The `worker` strategy is not yet stable and does not yet work with the App Router. Use with caution. Scripts that use the `worker` strategy are offloaded and executed in a web worker with Partytown. This can improve the performance of your site by dedicating the main thread to the rest of your application code. This strategy is still experimental and can only be used if the `nextScriptWorkers` flag is enabled in `next.config.js`: module.exports = { experimental: { nextScriptWorkers: true, }, } Then, run `next` (normally `npm run dev` or `yarn dev`) and Next.js will guide you through the installation of the required packages to finish the setup: npm run dev You'll see instructions like these: Please install Partytown by running `npm install @builder.io/partytown` Once setup is complete, defining `strategy="worker"` will automatically instantiate Partytown in your application and offload the script to a web worker. import Script from 'next/script' export default function Home() { return ( <> <Script src="https://example.com/script.js" strategy="worker" /> </> ) } There are a number of trade-offs that need to be considered when loading a third-party script in a web worker. Please see Partytown's tradeoffs documentation for more information. ### Inline Scripts Inline scripts, or scripts not loaded from an external file, are also supported by the Script component. They can be written by placing the JavaScript within curly braces: <Script id="show-banner"> {`document.getElementById('banner').classList.remove('hidden')`} </Script> Or by using the `dangerouslySetInnerHTML` property: <Script id="show-banner" dangerouslySetInnerHTML={{ __html: `document.getElementById('banner').classList.remove('hidden')`, }} /> > **Warning**: An `id` property must be assigned for inline scripts in order for Next.js to track and optimize the script. ### Executing Additional Code Event handlers can be used with the Script component to execute additional code after a certain event occurs: * `onLoad`: Execute code after the script has finished loading. * `onReady`: Execute code after the script has finished loading and every time the component is mounted. * `onError`: Execute code if the script fails to load. These handlers will only work when `next/script` is imported and used inside of a Client Component where `"use client"` is defined as the first line of code: 'use client' import Script from 'next/script' export default function Page() { return ( <> <Script src="https://example.com/script.js" onLoad={() => { console.log('Script has loaded') }} /> </> ) } Refer to the `next/script` API reference to learn more about each event handler and view examples. ### Additional Attributes There are many DOM attributes that can be assigned to a `<script>` element that are not used by the Script component, like `nonce` or custom data attributes. Including any additional attributes will automatically forward it to the final, optimized `<script>` element that is included in the HTML. import Script from 'next/script' export default function Page() { return ( <> <Script src="https://example.com/script.js" id="example-script" nonce="XUENAJFW" data-test="script" /> </> ) } --- ## Page: https://nextjs.org/docs/app/building-your-application/optimizing/package-bundling Bundling external packages can significantly improve the performance of your application. By default, packages imported inside Server Components and Route Handlers are automatically bundled by Next.js. This page will guide you through how to analyze and further optimize package bundling. ## Analyzing JavaScript bundles `@next/bundle-analyzer` is a plugin for Next.js that helps you manage the size of your application bundles. It generates a visual report of the size of each package and their dependencies. You can use the information to remove large dependencies, split, or lazy-load your code. ### Installation Install the plugin by running the following command: npm i @next/bundle-analyzer # or yarn add @next/bundle-analyzer # or pnpm add @next/bundle-analyzer Then, add the bundle analyzer's settings to your `next.config.js`. /** @type {import('next').NextConfig} */ const nextConfig = {} const withBundleAnalyzer = require('@next/bundle-analyzer')({ enabled: process.env.ANALYZE === 'true', }) module.exports = withBundleAnalyzer(nextConfig) ### Generating a report Run the following command to analyze your bundles: ANALYZE=true npm run build # or ANALYZE=true yarn build # or ANALYZE=true pnpm build The report will open three new tabs in your browser, which you can inspect. Periodically evaluating your application's bundles can help you maintain application performance over time. ## Optimizing package imports Some packages, such as icon libraries, can export hundreds of modules, which can cause performance issues in development and production. You can optimize how these packages are imported by adding the `optimizePackageImports` option to your `next.config.js`. This option will only load the modules you _actually_ use, while still giving you the convenience of writing import statements with many named exports. /** @type {import('next').NextConfig} */ const nextConfig = { experimental: { optimizePackageImports: ['icon-library'], }, } module.exports = nextConfig Next.js also optimizes some libraries automatically, thus they do not need to be included in the optimizePackageImports list. See the full list. ## Opting specific packages out of bundling Since packages imported inside Server Components and Route Handlers are automatically bundled by Next.js, you can opt specific packages out of bundling using the `serverExternalPackages` option in your `next.config.js`. /** @type {import('next').NextConfig} */ const nextConfig = { serverExternalPackages: ['package-name'], } module.exports = nextConfig Next.js includes a list of popular packages that currently are working on compatibility and automatically opt-ed out. See the full list. --- ## Page: https://nextjs.org/docs/app/building-your-application/optimizing/lazy-loading Lazy loading in Next.js helps improve the initial loading performance of an application by decreasing the amount of JavaScript needed to render a route. It allows you to defer loading of **Client Components** and imported libraries, and only include them in the client bundle when they're needed. For example, you might want to defer loading a modal until a user clicks to open it. There are two ways you can implement lazy loading in Next.js: 1. Using Dynamic Imports with `next/dynamic` 2. Using `React.lazy()` with Suspense By default, Server Components are automatically code split, and you can use streaming to progressively send pieces of UI from the server to the client. Lazy loading applies to Client Components. ## `next/dynamic` `next/dynamic` is a composite of `React.lazy()` and Suspense. It behaves the same way in the `app` and `pages` directories to allow for incremental migration. ## Examples ### Importing Client Components 'use client' import { useState } from 'react' import dynamic from 'next/dynamic' // Client Components: const ComponentA = dynamic(() => import('../components/A')) const ComponentB = dynamic(() => import('../components/B')) const ComponentC = dynamic(() => import('../components/C'), { ssr: false }) export default function ClientComponentExample() { const [showMore, setShowMore] = useState(false) return ( <div> {/* Load immediately, but in a separate client bundle */} <ComponentA /> {/* Load on demand, only when/if the condition is met */} {showMore && <ComponentB />} <button onClick={() => setShowMore(!showMore)}>Toggle</button> {/* Load only on the client side */} <ComponentC /> </div> ) } > **Note:** When a Server Component dynamically imports a Client Component, automatic code splitting is currently **not** supported. ### Skipping SSR When using `React.lazy()` and Suspense, Client Components will be prerendered (SSR) by default. > **Note:** `ssr: false` option will only work for client components, move it into client components ensure the client code-splitting working properly. If you want to disable pre-rendering for a Client Component, you can use the `ssr` option set to `false`: const ComponentC = dynamic(() => import('../components/C'), { ssr: false }) ### Importing Server Components If you dynamically import a Server Component, only the Client Components that are children of the Server Component will be lazy-loaded - not the Server Component itself. It will also help preload the static assets such as CSS when you're using it in Server Components. import dynamic from 'next/dynamic' // Server Component: const ServerComponent = dynamic(() => import('../components/ServerComponent')) export default function ServerComponentExample() { return ( <div> <ServerComponent /> </div> ) } > **Note:** `ssr: false` option is not supported in Server Components. You will see an error if you try to use it in Server Components. `ssr: false` is not allowed with `next/dynamic` in Server Components. Please move it into a client component. ### Loading External Libraries External libraries can be loaded on demand using the `import()` function. This example uses the external library `fuse.js` for fuzzy search. The module is only loaded on the client after the user types in the search input. 'use client' import { useState } from 'react' const names = ['Tim', 'Joe', 'Bel', 'Lee'] export default function Page() { const [results, setResults] = useState() return ( <div> <input type="text" placeholder="Search" onChange={async (e) => { const { value } = e.currentTarget // Dynamically load fuse.js const Fuse = (await import('fuse.js')).default const fuse = new Fuse(names) setResults(fuse.search(value)) }} /> <pre>Results: {JSON.stringify(results, null, 2)}</pre> </div> ) } ### Adding a custom loading component 'use client' import dynamic from 'next/dynamic' const WithCustomLoading = dynamic( () => import('../components/WithCustomLoading'), { loading: () => <p>Loading...</p>, } ) export default function Page() { return ( <div> {/* The loading component will be rendered while <WithCustomLoading/> is loading */} <WithCustomLoading /> </div> ) } ### Importing Named Exports To dynamically import a named export, you can return it from the Promise returned by `import()` function: 'use client' export function Hello() { return <p>Hello!</p> } import dynamic from 'next/dynamic' const ClientComponent = dynamic(() => import('../components/hello').then((mod) => mod.Hello) ) --- ## Page: https://nextjs.org/docs/app/building-your-application/optimizing/analytics Next.js has built-in support for measuring and reporting performance metrics. You can either use the `useReportWebVitals` hook to manage reporting yourself, or alternatively, Vercel provides a managed service to automatically collect and visualize metrics for you. ## Client Instrumentation For more advanced analytics and monitoring needs, Next.js provides a `instrumentation-client.js|ts` file that runs before your application's frontend code starts executing. This is ideal for setting up global analytics, error tracking, or performance monitoring tools. To use it, create an `instrumentation-client.js` or `instrumentation-client.ts` file in your application's root directory: // Initialize analytics before the app starts console.log('Analytics initialized') // Set up global error tracking window.addEventListener('error', (event) => { // Send to your error tracking service reportError(event.error) }) ## Build Your Own 'use client' import { useReportWebVitals } from 'next/web-vitals' export function WebVitals() { useReportWebVitals((metric) => { console.log(metric) }) } import { WebVitals } from './_components/web-vitals' export default function Layout({ children }) { return ( <html> <body> <WebVitals /> {children} </body> </html> ) } > Since the `useReportWebVitals` hook requires the `"use client"` directive, the most performant approach is to create a separate component that the root layout imports. This confines the client boundary exclusively to the `WebVitals` component. View the API Reference for more information. ## Web Vitals Web Vitals are a set of useful metrics that aim to capture the user experience of a web page. The following web vitals are all included: * Time to First Byte (TTFB) * First Contentful Paint (FCP) * Largest Contentful Paint (LCP) * First Input Delay (FID) * Cumulative Layout Shift (CLS) * Interaction to Next Paint (INP) You can handle all the results of these metrics using the `name` property. 'use client' import { useReportWebVitals } from 'next/web-vitals' export function WebVitals() { useReportWebVitals((metric) => { switch (metric.name) { case 'FCP': { // handle FCP results } case 'LCP': { // handle LCP results } // ... } }) } ## Sending results to external systems You can send results to any endpoint to measure and track real user performance on your site. For example: useReportWebVitals((metric) => { const body = JSON.stringify(metric) const url = 'https://example.com/analytics' // Use `navigator.sendBeacon()` if available, falling back to `fetch()`. if (navigator.sendBeacon) { navigator.sendBeacon(url, body) } else { fetch(url, { body, method: 'POST', keepalive: true }) } }) > **Good to know**: If you use Google Analytics, using the `id` value can allow you to construct metric distributions manually (to calculate percentiles, etc.) > useReportWebVitals((metric) => { > // Use `window.gtag` if you initialized Google Analytics as this example: > // https://github.com/vercel/next.js/blob/canary/examples/with-google-analytics > window.gtag('event', metric.name, { > value: Math.round( > metric.name === 'CLS' ? metric.value * 1000 : metric.value > ), // values must be integers > event_label: metric.id, // id unique to current page load > non_interaction: true, // avoids affecting bounce rate. > }) > }) > > Read more about sending results to Google Analytics. --- ## Page: https://nextjs.org/docs/app/building-your-application/optimizing/instrumentation Instrumentation is the process of using code to integrate monitoring and logging tools into your application. This allows you to track the performance and behavior of your application, and to debug issues in production. ## Convention To set up instrumentation, create `instrumentation.ts|js` file in the **root directory** of your project (or inside the `src` folder if using one). Then, export a `register` function in the file. This function will be called **once** when a new Next.js server instance is initiated. For example, to use Next.js with OpenTelemetry and @vercel/otel: import { registerOTel } from '@vercel/otel' export function register() { registerOTel('next-app') } See the Next.js with OpenTelemetry example for a complete implementation. > **Good to know**: > > * The `instrumentation` file should be in the root of your project and not inside the `app` or `pages` directory. If you're using the `src` folder, then place the file inside `src` alongside `pages` and `app`. > * If you use the `pageExtensions` config option to add a suffix, you will also need to update the `instrumentation` filename to match. ## Examples ### Importing files with side effects Sometimes, it may be useful to import a file in your code because of the side effects it will cause. For example, you might import a file that defines a set of global variables, but never explicitly use the imported file in your code. You would still have access to the global variables the package has declared. We recommend importing files using JavaScript `import` syntax within your `register` function. The following example demonstrates a basic usage of `import` in a `register` function: export async function register() { await import('package-with-side-effect') } > **Good to know:** > > We recommend importing the file from within the `register` function, rather than at the top of the file. By doing this, you can colocate all of your side effects in one place in your code, and avoid any unintended consequences from importing globally at the top of the file. ### Importing runtime-specific code Next.js calls `register` in all environments, so it's important to conditionally import any code that doesn't support specific runtimes (e.g. Edge or Node.js). You can use the `NEXT_RUNTIME` environment variable to get the current environment: export async function register() { if (process.env.NEXT_RUNTIME === 'nodejs') { await import('./instrumentation-node') } if (process.env.NEXT_RUNTIME === 'edge') { await import('./instrumentation-edge') } } --- ## Page: https://nextjs.org/docs/app/building-your-application/optimizing/open-telemetry Observability is crucial for understanding and optimizing the behavior and performance of your Next.js app. As applications become more complex, it becomes increasingly difficult to identify and diagnose issues that may arise. By leveraging observability tools, such as logging and metrics, developers can gain insights into their application's behavior and identify areas for optimization. With observability, developers can proactively address issues before they become major problems and provide a better user experience. Therefore, it is highly recommended to use observability in your Next.js applications to improve performance, optimize resources, and enhance user experience. We recommend using OpenTelemetry for instrumenting your apps. It's a platform-agnostic way to instrument apps that allows you to change your observability provider without changing your code. Read Official OpenTelemetry docs for more information about OpenTelemetry and how it works. This documentation uses terms like _Span_, _Trace_ or _Exporter_ throughout this doc, all of which can be found in the OpenTelemetry Observability Primer. Next.js supports OpenTelemetry instrumentation out of the box, which means that we already instrumented Next.js itself. When you enable OpenTelemetry we will automatically wrap all your code like `getStaticProps` in _spans_ with helpful attributes. ## Getting Started OpenTelemetry is extensible but setting it up properly can be quite verbose. That's why we prepared a package `@vercel/otel` that helps you get started quickly. ### Using `@vercel/otel` To get started, install the following packages: npm install @vercel/otel @opentelemetry/sdk-logs @opentelemetry/api-logs @opentelemetry/instrumentation Next, create a custom `instrumentation.ts` (or `.js`) file in the **root directory** of the project (or inside `src` folder if using one): import { registerOTel } from '@vercel/otel' export function register() { registerOTel({ serviceName: 'next-app' }) } See the `@vercel/otel` documentation for additional configuration options. > **Good to know**: > > * The `instrumentation` file should be in the root of your project and not inside the `app` or `pages` directory. If you're using the `src` folder, then place the file inside `src` alongside `pages` and `app`. > * If you use the `pageExtensions` config option to add a suffix, you will also need to update the `instrumentation` filename to match. > * We have created a basic with-opentelemetry example that you can use. ### Manual OpenTelemetry configuration The `@vercel/otel` package provides many configuration options and should serve most of common use cases. But if it doesn't suit your needs, you can configure OpenTelemetry manually. Firstly you need to install OpenTelemetry packages: npm install @opentelemetry/sdk-node @opentelemetry/resources @opentelemetry/semantic-conventions @opentelemetry/sdk-trace-node @opentelemetry/exporter-trace-otlp-http Now you can initialize `NodeSDK` in your `instrumentation.ts`. Unlike `@vercel/otel`, `NodeSDK` is not compatible with edge runtime, so you need to make sure that you are importing them only when `process.env.NEXT_RUNTIME === 'nodejs'`. We recommend creating a new file `instrumentation.node.ts` which you conditionally import only when using node: export async function register() { if (process.env.NEXT_RUNTIME === 'nodejs') { await import('./instrumentation.node.ts') } } import { OTLPTraceExporter } from '@opentelemetry/exporter-trace-otlp-http' import { Resource } from '@opentelemetry/resources' import { NodeSDK } from '@opentelemetry/sdk-node' import { SimpleSpanProcessor } from '@opentelemetry/sdk-trace-node' import { ATTR_SERVICE_NAME } from '@opentelemetry/semantic-conventions' const sdk = new NodeSDK({ resource: new Resource({ [ATTR_SERVICE_NAME]: 'next-app', }), spanProcessor: new SimpleSpanProcessor(new OTLPTraceExporter()), }) sdk.start() Doing this is equivalent to using `@vercel/otel`, but it's possible to modify and extend some features that are not exposed by the `@vercel/otel`. If edge runtime support is necessary, you will have to use `@vercel/otel`. ## Testing your instrumentation You need an OpenTelemetry collector with a compatible backend to test OpenTelemetry traces locally. We recommend using our OpenTelemetry dev environment. If everything works well you should be able to see the root server span labeled as `GET /requested/pathname`. All other spans from that particular trace will be nested under it. Next.js traces more spans than are emitted by default. To see more spans, you must set `NEXT_OTEL_VERBOSE=1`. ## Deployment ### Using OpenTelemetry Collector When you are deploying with OpenTelemetry Collector, you can use `@vercel/otel`. It will work both on Vercel and when self-hosted. #### Deploying on Vercel We made sure that OpenTelemetry works out of the box on Vercel. Follow Vercel documentation to connect your project to an observability provider. #### Self-hosting Deploying to other platforms is also straightforward. You will need to spin up your own OpenTelemetry Collector to receive and process the telemetry data from your Next.js app. To do this, follow the OpenTelemetry Collector Getting Started guide, which will walk you through setting up the collector and configuring it to receive data from your Next.js app. Once you have your collector up and running, you can deploy your Next.js app to your chosen platform following their respective deployment guides. ### Custom Exporters OpenTelemetry Collector is not necessary. You can use a custom OpenTelemetry exporter with `@vercel/otel` or manual OpenTelemetry configuration. ## Custom Spans You can add a custom span with OpenTelemetry APIs. npm install @opentelemetry/api The following example demonstrates a function that fetches GitHub stars and adds a custom `fetchGithubStars` span to track the fetch request's result: import { trace } from '@opentelemetry/api' export async function fetchGithubStars() { return await trace .getTracer('nextjs-example') .startActiveSpan('fetchGithubStars', async (span) => { try { return await getValue() } finally { span.end() } }) } The `register` function will execute before your code runs in a new environment. You can start creating new spans, and they should be correctly added to the exported trace. ## Default Spans in Next.js Next.js automatically instruments several spans for you to provide useful insights into your application's performance. Attributes on spans follow OpenTelemetry semantic conventions. We also add some custom attributes under the `next` namespace: * `next.span_name` - duplicates span name * `next.span_type` - each span type has a unique identifier * `next.route` - The route pattern of the request (e.g., `/[param]/user`). * `next.rsc` (true/false) - Whether the request is an RSC request, such as prefetch. * `next.page` * This is an internal value used by an app router. * You can think about it as a route to a special file (like `page.ts`, `layout.ts`, `loading.ts` and others) * It can be used as a unique identifier only when paired with `next.route` because `/layout` can be used to identify both `/(groupA)/layout.ts` and `/(groupB)/layout.ts` ### `[http.method] [next.route]` * `next.span_type`: `BaseServer.handleRequest` This span represents the root span for each incoming request to your Next.js application. It tracks the HTTP method, route, target, and status code of the request. Attributes: * Common HTTP attributes * `http.method` * `http.status_code` * Server HTTP attributes * `http.route` * `http.target` * `next.span_name` * `next.span_type` * `next.route` ### `render route (app) [next.route]` * `next.span_type`: `AppRender.getBodyResult`. This span represents the process of rendering a route in the app router. Attributes: * `next.span_name` * `next.span_type` * `next.route` ### `fetch [http.method] [http.url]` * `next.span_type`: `AppRender.fetch` This span represents the fetch request executed in your code. Attributes: * Common HTTP attributes * `http.method` * Client HTTP attributes * `http.url` * `net.peer.name` * `net.peer.port` (only if specified) * `next.span_name` * `next.span_type` This span can be turned off by setting `NEXT_OTEL_FETCH_DISABLED=1` in your environment. This is useful when you want to use a custom fetch instrumentation library. ### `executing api route (app) [next.route]` * `next.span_type`: `AppRouteRouteHandlers.runHandler`. This span represents the execution of an API Route Handler in the app router. Attributes: * `next.span_name` * `next.span_type` * `next.route` ### `getServerSideProps [next.route]` * `next.span_type`: `Render.getServerSideProps`. This span represents the execution of `getServerSideProps` for a specific route. Attributes: * `next.span_name` * `next.span_type` * `next.route` ### `getStaticProps [next.route]` * `next.span_type`: `Render.getStaticProps`. This span represents the execution of `getStaticProps` for a specific route. Attributes: * `next.span_name` * `next.span_type` * `next.route` ### `render route (pages) [next.route]` * `next.span_type`: `Render.renderDocument`. This span represents the process of rendering the document for a specific route. Attributes: * `next.span_name` * `next.span_type` * `next.route` ### `generateMetadata [next.page]` * `next.span_type`: `ResolveMetadata.generateMetadata`. This span represents the process of generating metadata for a specific page (a single route can have multiple of these spans). Attributes: * `next.span_name` * `next.span_type` * `next.page` ### `resolve page components` * `next.span_type`: `NextNodeServer.findPageComponents`. This span represents the process of resolving page components for a specific page. Attributes: * `next.span_name` * `next.span_type` * `next.route` ### `resolve segment modules` * `next.span_type`: `NextNodeServer.getLayoutOrPageModule`. This span represents loading of code modules for a layout or a page. Attributes: * `next.span_name` * `next.span_type` * `next.segment` ### `start response` * `next.span_type`: `NextNodeServer.startResponse`. This zero-length span represents the time when the first byte has been sent in the response. --- ## Page: https://nextjs.org/docs/app/building-your-application/optimizing/static-assets ## Static Assets in \`public\` Next.js can serve static files, like images, under a folder called `public` in the root directory. Files inside `public` can then be referenced by your code starting from the base URL (`/`). For example, the file `public/avatars/me.png` can be viewed by visiting the `/avatars/me.png` path. The code to display that image might look like: avatar.js import Image from 'next/image' export function Avatar({ id, alt }) { return <Image src={`/avatars/${id}.png`} alt={alt} width="64" height="64" /> } export function AvatarOfMe() { return <Avatar id="me" alt="A portrait of me" /> } ## Caching Next.js cannot safely cache assets in the `public` folder because they may change. The default caching headers applied are: Cache-Control: public, max-age=0 ## Robots, Favicons, and others For static metadata files, such as `robots.txt`, `favicon.ico`, etc, you should use special metadata files inside the `app` folder. > Good to know: > > * The directory must be named `public`. The name cannot be changed and it's the only directory used to serve static assets. > * Only assets that are in the `public` directory at build time will be served by Next.js. Files added at request time won't be available. We recommend using a third-party service like Vercel Blob for persistent file storage. --- ## Page: https://nextjs.org/docs/app/building-your-application/optimizing/third-party-libraries **`@next/third-parties`** is a library that provides a collection of components and utilities that improve the performance and developer experience of loading popular third-party libraries in your Next.js application. All third-party integrations provided by `@next/third-parties` have been optimized for performance and ease of use. ## Getting Started To get started, install the `@next/third-parties` library: npm install @next/third-parties@latest next@latest `@next/third-parties` is currently an **experimental** library under active development. We recommend installing it with the **latest** or **canary** flags while we work on adding more third-party integrations. ## Google Third-Parties All supported third-party libraries from Google can be imported from `@next/third-parties/google`. ### Google Tag Manager The `GoogleTagManager` component can be used to instantiate a Google Tag Manager container to your page. By default, it fetches the original inline script after hydration occurs on the page. To load Google Tag Manager for all routes, include the component directly in your root layout and pass in your GTM container ID: import { GoogleTagManager } from '@next/third-parties/google' export default function RootLayout({ children, }: { children: React.ReactNode }) { return ( <html lang="en"> <GoogleTagManager gtmId="GTM-XYZ" /> <body>{children}</body> </html> ) } To load Google Tag Manager for a single route, include the component in your page file: import { GoogleTagManager } from '@next/third-parties/google' export default function Page() { return <GoogleTagManager gtmId="GTM-XYZ" /> } #### Sending Events The `sendGTMEvent` function can be used to track user interactions on your page by sending events using the `dataLayer` object. For this function to work, the `<GoogleTagManager />` component must be included in either a parent layout, page, or component, or directly in the same file. 'use client' import { sendGTMEvent } from '@next/third-parties/google' export function EventButton() { return ( <div> <button onClick={() => sendGTMEvent({ event: 'buttonClicked', value: 'xyz' })} > Send Event </button> </div> ) } Refer to the Tag Manager developer documentation to learn about the different variables and events that can be passed into the function. #### Server-side Tagging If you're using a server-side tag manager and serving `gtm.js` scripts from your tagging server you can use `gtmScriptUrl` option to specify the URL of the script. #### Options Options to pass to the Google Tag Manager. For a full list of options, read the Google Tag Manager docs. | Name | Type | Description | | --- | --- | --- | | `gtmId` | Required | Your GTM container ID. Usually starts with `GTM-`. | | `gtmScriptUrl` | Optional | GTM script URL. Defaults to `https://www.googletagmanager.com/gtm.js`. | | `dataLayer` | Optional | Data layer object to instantiate the container with. | | `dataLayerName` | Optional | Name of the data layer. Defaults to `dataLayer`. | | `auth` | Optional | Value of authentication parameter (`gtm_auth`) for environment snippets. | | `preview` | Optional | Value of preview parameter (`gtm_preview`) for environment snippets. | ### Google Analytics The `GoogleAnalytics` component can be used to include Google Analytics 4 to your page via the Google tag (`gtag.js`). By default, it fetches the original scripts after hydration occurs on the page. > **Recommendation**: If Google Tag Manager is already included in your application, you can configure Google Analytics directly using it, rather than including Google Analytics as a separate component. Refer to the documentation to learn more about the differences between Tag Manager and `gtag.js`. To load Google Analytics for all routes, include the component directly in your root layout and pass in your measurement ID: import { GoogleAnalytics } from '@next/third-parties/google' export default function RootLayout({ children, }: { children: React.ReactNode }) { return ( <html lang="en"> <body>{children}</body> <GoogleAnalytics gaId="G-XYZ" /> </html> ) } To load Google Analytics for a single route, include the component in your page file: import { GoogleAnalytics } from '@next/third-parties/google' export default function Page() { return <GoogleAnalytics gaId="G-XYZ" /> } #### Sending Events The `sendGAEvent` function can be used to measure user interactions on your page by sending events using the `dataLayer` object. For this function to work, the `<GoogleAnalytics />` component must be included in either a parent layout, page, or component, or directly in the same file. 'use client' import { sendGAEvent } from '@next/third-parties/google' export function EventButton() { return ( <div> <button onClick={() => sendGAEvent('event', 'buttonClicked', { value: 'xyz' })} > Send Event </button> </div> ) } Refer to the Google Analytics developer documentation to learn more about event parameters. #### Tracking Pageviews Google Analytics automatically tracks pageviews when the browser history state changes. This means that client-side navigations between Next.js routes will send pageview data without any configuration. To ensure that client-side navigations are being measured correctly, verify that the _“Enhanced Measurement”_ property is enabled in your Admin panel and the _“Page changes based on browser history events”_ checkbox is selected. > **Note**: If you decide to manually send pageview events, make sure to disable the default pageview measurement to avoid having duplicate data. Refer to the Google Analytics developer documentation to learn more. #### Options Options to pass to the `<GoogleAnalytics>` component. | Name | Type | Description | | --- | --- | --- | | `gaId` | Required | Your measurement ID. Usually starts with `G-`. | | `dataLayerName` | Optional | Name of the data layer. Defaults to `dataLayer`. | | `nonce` | Optional | A nonce. | ### Google Maps Embed The `GoogleMapsEmbed` component can be used to add a Google Maps Embed to your page. By default, it uses the `loading` attribute to lazy-load the embed below the fold. import { GoogleMapsEmbed } from '@next/third-parties/google' export default function Page() { return ( <GoogleMapsEmbed apiKey="XYZ" height={200} width="100%" mode="place" q="Brooklyn+Bridge,New+York,NY" /> ) } #### Options Options to pass to the Google Maps Embed. For a full list of options, read the Google Map Embed docs. | Name | Type | Description | | --- | --- | --- | | `apiKey` | Required | Your api key. | | `mode` | Required | Map mode | | `height` | Optional | Height of the embed. Defaults to `auto`. | | `width` | Optional | Width of the embed. Defaults to `auto`. | | `style` | Optional | Pass styles to the iframe. | | `allowfullscreen` | Optional | Property to allow certain map parts to go full screen. | | `loading` | Optional | Defaults to lazy. Consider changing if you know your embed will be above the fold. | | `q` | Optional | Defines map marker location. _This may be required depending on the map mode_. | | `center` | Optional | Defines the center of the map view. | | `zoom` | Optional | Sets initial zoom level of the map. | | `maptype` | Optional | Defines type of map tiles to load. | | `language` | Optional | Defines the language to use for UI elements and for the display of labels on map tiles. | | `region` | Optional | Defines the appropriate borders and labels to display, based on geo-political sensitivities. | ### YouTube Embed The `YouTubeEmbed` component can be used to load and display a YouTube embed. This component loads faster by using `lite-youtube-embed` under the hood. import { YouTubeEmbed } from '@next/third-parties/google' export default function Page() { return <YouTubeEmbed videoid="ogfYd705cRs" height={400} params="controls=0" /> } #### Options | Name | Type | Description | | --- | --- | --- | | `videoid` | Required | YouTube video id. | | `width` | Optional | Width of the video container. Defaults to `auto` | | `height` | Optional | Height of the video container. Defaults to `auto` | | `playlabel` | Optional | A visually hidden label for the play button for accessibility. | | `params` | Optional | The video player params defined here. Params are passed as a query param string. Eg: `params="controls=0&start=10&end=30"` | | `style` | Optional | Used to apply styles to the video container. | --- ## Page: https://nextjs.org/docs/app/building-your-application/optimizing/memory-usage As applications grow and become more feature rich, they can demand more resources when developing locally or creating production builds. Let's explore some strategies and techniques to optimize memory and address common memory issues in Next.js. ## Reduce number of dependencies Applications with a large amount of dependencies will use more memory. The Bundle Analyzer can help you investigate large dependencies in your application that may be able to be removed to improve performance and memory usage. ## Try `experimental.webpackMemoryOptimizations` Starting in `v15.0.0`, you can add `experimental.webpackMemoryOptimizations: true` to your `next.config.js` file to change behavior in Webpack that reduces max memory usage but may increase compilation times by a slight amount. > **Good to know**: This feature is currently experimental to test on more projects first, but it is considered to be low-risk. ## Run `next build` with `--experimental-debug-memory-usage` Starting in `14.2.0`, you can run `next build --experimental-debug-memory-usage` to run the build in a mode where Next.js will print out information about memory usage continuously throughout the build, such as heap usage and garbage collection statistics. Heap snapshots will also be taken automatically when memory usage gets close to the configured limit. > **Good to know**: This feature is not compatible with the Webpack build worker option which is auto-enabled unless you have custom webpack config. ## Record a heap profile To look for memory issues, you can record a heap profile from Node.js and load it in Chrome DevTools to identify potential sources of memory leaks. In your terminal, pass the `--heap-prof` flag to Node.js when starting your Next.js build: node --heap-prof node_modules/next/dist/bin/next build At the end of the build, a `.heapprofile` file will be created by Node.js. In Chrome DevTools, you can open the Memory tab and click on the "Load Profile" button to visualize the file. ## Analyze a snapshot of the heap You can use an inspector tool to analyze the memory usage of the application. When running the `next build` or `next dev` command, add `NODE_OPTIONS=--inspect` to the beginning of the command. This will expose the inspector agent on the default port. If you wish to break before any user code starts, you can pass `--inspect-brk` instead. While the process is running, you can use a tool such as Chrome DevTools to connect to the debugging port to record and analyze a snapshot of the heap to see what memory is being retained. Starting in `14.2.0`, you can also run `next build` with the `--experimental-debug-memory-usage` flag to make it easier to take heap snapshots. While running in this mode, you can send a `SIGUSR2` signal to the process at any point, and the process will take a heap snapshot. The heap snapshot will be saved to the project root of the Next.js application and can be loaded in any heap analyzer, such as Chrome DevTools, to see what memory is retained. This mode is not yet compatible with Webpack build workers. See how to record and analyze heap snapshots for more information. ## Webpack build worker The Webpack build worker allows you to run Webpack compilations inside a separate Node.js worker which will decrease memory usage of your application during builds. This option is enabled by default if your application does not have a custom Webpack configuration starting in `v14.1.0`. If you are using an older version of Next.js or you have a custom Webpack configuration, you can enable this option by setting `experimental.webpackBuildWorker: true` inside your `next.config.js`. > **Good to know**: This feature may not be compatible with all custom Webpack plugins. ## Disable Webpack cache The Webpack cache saves generated Webpack modules in memory and/or to disk to improve the speed of builds. This can help with performance, but it will also increase the memory usage of your application to store the cached data. You can disable this behavior by adding a custom Webpack configuration to your application: /** @type {import('next').NextConfig} */ const nextConfig = { webpack: ( config, { buildId, dev, isServer, defaultLoaders, nextRuntime, webpack } ) => { if (config.cache && !dev) { config.cache = Object.freeze({ type: 'memory', }) } // Important: return the modified config return config }, } export default nextConfig ## Disable static analysis Typechecking and linting may require a lot of memory, especially in large projects. However, most projects have a dedicated CI runner that already handles these tasks. When the build produces out-of-memory issues during the "Linting and checking validity of types" step, you can disable these task during builds: /** @type {import('next').NextConfig} */ const nextConfig = { eslint: { // Warning: This allows production builds to successfully complete even if // your project has ESLint errors. ignoreDuringBuilds: true, }, typescript: { // !! WARN !! // Dangerously allow production builds to successfully complete even if // your project has type errors. // !! WARN !! ignoreBuildErrors: true, }, } export default nextConfig * Ignoring TypeScript Errors * ESLint in Next.js config Keep in mind that this may produce faulty deploys due to type errors or linting issues. We strongly recommend only promoting builds to production after static analysis has completed. If you deploy to Vercel, you can check out the guide for staging deployments to learn how to promote builds to production after custom tasks have succeeded. ## Disable source maps Generating source maps consumes extra memory during the build process. You can disable source map generation by adding `productionBrowserSourceMaps: false` and `experimental.serverSourceMaps: false` to your Next.js configuration. > **Good to know**: Some plugins may turn on source maps and may require custom configuration to disable. ## Edge memory issues Next.js `v14.1.3` fixed a memory issue when using the Edge runtime. Please update to this version (or later) to see if it addresses your issue. --- ## Page: https://nextjs.org/docs/app/building-your-application/optimizing/local-development Next.js is designed to provide a great developer experience. As your application grows, you might notice slower compilation times during local development. This guide will help you identify and fix common compile-time performance issues. ## Local dev vs. production The development process with `next dev` is different than `next build` and `next start`. `next dev` compiles routes in your application as you open or navigate to them. This enables you to start the dev server without waiting for every route in your application to compile, which is both faster and uses less memory. Running a production build applies other optimizations, like minifying files and creating content hashes, which are not needed for local development. ## Improving local dev performance ### 1\. Check your computer's antivirus Antivirus software can slow down file access. Try adding your project folder to the antivirus exclusion list. While this is more common on Windows machines, we recommend this for any system with an antivirus tool installed. ### 2\. Update Next.js and enable Turbopack Make sure you're using the latest version of Next.js. Each new version often includes performance improvements. Turbopack is a new bundler integrated into Next.js that can improve local performance. npm install next@latest npm run dev --turbopack Learn more about Turbopack. See our upgrade guides and codemods for more information. ### 3\. Check your imports The way you import code can greatly affect compilation and bundling time. Learn more about optimizing package bundling and explore tools like Dependency Cruiser or Madge. ### Icon libraries Libraries like `@material-ui/icons` or `react-icons` can import thousands of icons, even if you only use a few. Try to import only the icons you need: // Instead of this: import { Icon1, Icon2 } from 'react-icons/md' // Do this: import Icon1 from 'react-icons/md/Icon1' import Icon2 from 'react-icons/md/Icon2' Libraries like `react-icons` includes many different icon sets. Choose one set and stick with that set. For example, if your application uses `react-icons` and imports all of these: * `pi` (Phosphor Icons) * `md` (Material Design Icons) * `tb` (tabler-icons) * `cg` (cssgg) Combined they will be tens of thousands of modules that the compiler has to handle, even if you only use a single import from each. ### Barrel files "Barrel files" are files that export many items from other files. They can slow down builds because the compiler has to parse them to find if there are side-effects in the module scope by using the import. Try to import directly from specific files when possible. Learn more about barrel files and the built-in optimizations in Next.js. ### Optimize package imports Next.js can automatically optimize imports for certain packages. If you are using packages that utilize barrel files, add them to your `next.config.js`: module.exports = { experimental: { optimizePackageImports: ['package-name'], }, } Turbopack automatically analyzes imports and optimizes them. It does not require this configuration. ### 4\. Check your Tailwind CSS setup If you're using Tailwind CSS, make sure it's set up correctly. A common mistake is configuring your `content` array in a way which includes `node_modules` or other large directories of files that should not be scanned. Tailwind CSS version 3.4.8 or newer will warn you about settings that might slow down your build. 1. In your `tailwind.config.js`, be specific about which files to scan: module.exports = { content: [ './src/**/*.{js,ts,jsx,tsx}', // Good // This might be too broad // It will match `packages/**/node_modules` too // '../../packages/**/*.{js,ts,jsx,tsx}', ], } 2. Avoid scanning unnecessary files: module.exports = { content: [ // Better - only scans the 'src' folder '../../packages/ui/src/**/*.{js,ts,jsx,tsx}', ], } ### 5\. Check custom webpack settings If you've added custom webpack settings, they might be slowing down compilation. Consider if you really need them for local development. You can optionally only include certain tools for production builds, or explore moving to Turbopack and using loaders. ### 6\. Optimize memory usage If your app is very large, it might need more memory. Learn more about optimizing memory usage. ### 7\. Server Components and data fetching Changes to Server Components cause the entire page to re-render locally in order to show the new changes, which includes fetching new data for the component. The experimental `serverComponentsHmrCache` option allows you to cache `fetch` responses in Server Components across Hot Module Replacement (HMR) refreshes in local development. This results in faster responses and reduced costs for billed API calls. Learn more about the experimental option. ## Tools for finding problems ### Detailed fetch logging Use this command to see more detailed information about what's happening during development: next dev --verbose ## Turbopack tracing Turbopack tracing is a tool that helps you understand the performance of your application during local development. It provides detailed information about the time taken for each module to compile and how they are related. 1. Make sure you have the latest version of Next.js installed. 2. Generate a Turbopack trace file: NEXT_TURBOPACK_TRACING=1 npm run dev 3. Navigate around your application or make edits to files to reproduce the problem. 4. Stop the Next.js development server. 5. A file called `trace-turbopack` will be available in the `.next` folder. 6. You can interpret the file using `next internal trace [path-to-file]`: next internal trace .next/trace-turbopack On versions where `trace` is not available, the command was named `turbo-trace-server`: next internal turbo-trace-server .next/trace-turbopack 7. Once the trace server is running you can view the trace at https://trace.nextjs.org/. 8. By default the trace viewer will aggregate timings, in order to see each individual time you can switch from "Aggregated in order" to "Spans in order" at the top right of the viewer. ## Still having problems? Share the trace file generated in the Turbopack Tracing section and share it on GitHub Discussions or Discord. --- ## Page: https://nextjs.org/docs/app/building-your-application/configuring Next.js allows you to customize your project to meet specific requirements. This includes integrations with TypeScript, ESlint, and more, as well as internal configuration options such as Absolute Imports and Environment Variables. --- ## Page: https://nextjs.org/docs/app/building-your-application/configuring/environment-variables Next.js comes with built-in support for environment variables, which allows you to do the following: * Use `.env` to load environment variables * Bundle environment variables for the browser by prefixing with `NEXT_PUBLIC_` > **Warning:** The default `create-next-app` template ensures all `.env` files are added to your `.gitignore`. You almost never want to commit these files to your repository. ## Loading Environment Variables Next.js has built-in support for loading environment variables from `.env*` files into `process.env`. DB_HOST=localhost DB_USER=myuser DB_PASS=mypassword > **Note**: Next.js also supports multiline variables inside of your `.env*` files: > > # .env > > # you can write with line breaks > PRIVATE_KEY="-----BEGIN RSA PRIVATE KEY----- > ... > Kh9NV... > ... > -----END DSA PRIVATE KEY-----" > > # or with `\n` inside double quotes > PRIVATE_KEY="-----BEGIN RSA PRIVATE KEY-----\nKh9NV...\n-----END DSA PRIVATE KEY-----\n" > **Note**: If you are using a `/src` folder, please note that Next.js will load the .env files **only** from the parent folder and **not** from the `/src` folder. This loads `process.env.DB_HOST`, `process.env.DB_USER`, and `process.env.DB_PASS` into the Node.js environment automatically allowing you to use them in Route Handlers. For example: export async function GET() { const db = await myDB.connect({ host: process.env.DB_HOST, username: process.env.DB_USER, password: process.env.DB_PASS, }) // ... } ### Loading Environment Variables with `@next/env` If you need to load environment variables outside of the Next.js runtime, such as in a root config file for an ORM or test runner, you can use the `@next/env` package. This package is used internally by Next.js to load environment variables from `.env*` files. To use it, install the package and use the `loadEnvConfig` function to load the environment variables: npm install @next/env import { loadEnvConfig } from '@next/env' const projectDir = process.cwd() loadEnvConfig(projectDir) Then, you can import the configuration where needed. For example: import './envConfig.ts' export default defineConfig({ dbCredentials: { connectionString: process.env.DATABASE_URL!, }, }) ### Referencing Other Variables Next.js will automatically expand variables that use `$` to reference other variables e.g. `$VARIABLE` inside of your `.env*` files. This allows you to reference other secrets. For example: TWITTER_USER=nextjs TWITTER_URL=https://x.com/$TWITTER_USER In the above example, `process.env.TWITTER_URL` would be set to `https://x.com/nextjs`. > **Good to know**: If you need to use variable with a `$` in the actual value, it needs to be escaped e.g. `\$`. ## Bundling Environment Variables for the Browser Non-`NEXT_PUBLIC_` environment variables are only available in the Node.js environment, meaning they aren't accessible to the browser (the client runs in a different _environment_). In order to make the value of an environment variable accessible in the browser, Next.js can "inline" a value, at build time, into the js bundle that is delivered to the client, replacing all references to `process.env.[variable]` with a hard-coded value. To tell it to do this, you just have to prefix the variable with `NEXT_PUBLIC_`. For example: NEXT_PUBLIC_ANALYTICS_ID=abcdefghijk This will tell Next.js to replace all references to `process.env.NEXT_PUBLIC_ANALYTICS_ID` in the Node.js environment with the value from the environment in which you run `next build`, allowing you to use it anywhere in your code. It will be inlined into any JavaScript sent to the browser. > **Note**: After being built, your app will no longer respond to changes to these environment variables. For instance, if you use a Heroku pipeline to promote slugs built in one environment to another environment, or if you build and deploy a single Docker image to multiple environments, all `NEXT_PUBLIC_` variables will be frozen with the value evaluated at build time, so these values need to be set appropriately when the project is built. If you need access to runtime environment values, you'll have to setup your own API to provide them to the client (either on demand or during initialization). import setupAnalyticsService from '../lib/my-analytics-service' // 'NEXT_PUBLIC_ANALYTICS_ID' can be used here as it's prefixed by 'NEXT_PUBLIC_'. // It will be transformed at build time to `setupAnalyticsService('abcdefghijk')`. setupAnalyticsService(process.env.NEXT_PUBLIC_ANALYTICS_ID) function HomePage() { return <h1>Hello World</h1> } export default HomePage Note that dynamic lookups will _not_ be inlined, such as: // This will NOT be inlined, because it uses a variable const varName = 'NEXT_PUBLIC_ANALYTICS_ID' setupAnalyticsService(process.env[varName]) // This will NOT be inlined, because it uses a variable const env = process.env setupAnalyticsService(env.NEXT_PUBLIC_ANALYTICS_ID) ### Runtime Environment Variables Next.js can support both build time and runtime environment variables. **By default, environment variables are only available on the server**. To expose an environment variable to the browser, it must be prefixed with `NEXT_PUBLIC_`. However, these public environment variables will be inlined into the JavaScript bundle during `next build`. You can safely read environment variables on the server during dynamic rendering: import { connection } from 'next/server' export default async function Component() { await connection() // cookies, headers, and other Dynamic APIs // will also opt into dynamic rendering, meaning // this env variable is evaluated at runtime const value = process.env.MY_VALUE // ... } This allows you to use a singular Docker image that can be promoted through multiple environments with different values. **Good to know:** * You can run code on server startup using the `register` function. * We do not recommend using the `runtimeConfig` option, as this does not work with the standalone output mode. Instead, we recommend incrementally adopting the App Router if you need this feature. ## Environment Variables on Vercel When deploying your Next.js application to Vercel, Environment Variables can be configured in the Project Settings. All types of Environment Variables should be configured there. Even Environment Variables used in Development – which can be downloaded onto your local device afterwards. If you've configured Development Environment Variables you can pull them into a `.env.local` for usage on your local machine using the following command: vercel env pull > **Good to know**: When deploying your Next.js application to Vercel, your environment variables in `.env*` files will not be made available to Edge Runtime, unless their name are prefixed with `NEXT_PUBLIC_`. We strongly recommend managing your environment variables in Project Settings instead, from where all environment variables are available. ## Test Environment Variables Apart from `development` and `production` environments, there is a 3rd option available: `test`. In the same way you can set defaults for development or production environments, you can do the same with a `.env.test` file for the `testing` environment (though this one is not as common as the previous two). Next.js will not load environment variables from `.env.development` or `.env.production` in the `testing` environment. This one is useful when running tests with tools like `jest` or `cypress` where you need to set specific environment vars only for testing purposes. Test default values will be loaded if `NODE_ENV` is set to `test`, though you usually don't need to do this manually as testing tools will address it for you. There is a small difference between `test` environment, and both `development` and `production` that you need to bear in mind: `.env.local` won't be loaded, as you expect tests to produce the same results for everyone. This way every test execution will use the same env defaults across different executions by ignoring your `.env.local` (which is intended to override the default set). > **Good to know**: similar to Default Environment Variables, `.env.test` file should be included in your repository, but `.env.test.local` shouldn't, as `.env*.local` are intended to be ignored through `.gitignore`. While running unit tests you can make sure to load your environment variables the same way Next.js does by leveraging the `loadEnvConfig` function from the `@next/env` package. // The below can be used in a Jest global setup file or similar for your testing set-up import { loadEnvConfig } from '@next/env' export default async () => { const projectDir = process.cwd() loadEnvConfig(projectDir) } ## Environment Variable Load Order Environment variables are looked up in the following places, in order, stopping once the variable is found. 1. `process.env` 2. `.env.$(NODE_ENV).local` 3. `.env.local` (Not checked when `NODE_ENV` is `test`.) 4. `.env.$(NODE_ENV)` 5. `.env` For example, if `NODE_ENV` is `development` and you define a variable in both `.env.development.local` and `.env`, the value in `.env.development.local` will be used. > **Good to know**: The allowed values for `NODE_ENV` are `production`, `development` and `test`. ## Good to know * If you are using a `/src` directory, `.env.*` files should remain in the root of your project. * If the environment variable `NODE_ENV` is unassigned, Next.js automatically assigns `development` when running the `next dev` command, or `production` for all other commands. ## Version History | Version | Changes | | --- | --- | | `v9.4.0` | Support `.env` and `NEXT_PUBLIC_` introduced. | --- ## Page: https://nextjs.org/docs/app/building-your-application/configuring/mdx ## Markdown and MDX Markdown is a lightweight markup language used to format text. It allows you to write using plain text syntax and convert it to structurally valid HTML. It's commonly used for writing content on websites and blogs. You write... I **love** using [Next.js](https://nextjs.org/) Output: <p>I <strong>love</strong> using <a href="https://nextjs.org/">Next.js</a></p> MDX is a superset of markdown that lets you write JSX directly in your markdown files. It is a powerful way to add dynamic interactivity and embed React components within your content. Next.js can support both local MDX content inside your application, as well as remote MDX files fetched dynamically on the server. The Next.js plugin handles transforming markdown and React components into HTML, including support for usage in Server Components (the default in App Router). > **Good to know**: View the Portfolio Starter Kit template for a complete working example. ## Install dependencies The `@next/mdx` package, and related packages, are used to configure Next.js so it can process markdown and MDX. **It sources data from local files**, allowing you to create pages with a `.md` or `.mdx` extension, directly in your `/pages` or `/app` directory. Install these packages to render MDX with Next.js: npm install @next/mdx @mdx-js/loader @mdx-js/react @types/mdx ## Configure `next.config.mjs` Update the `next.config.mjs` file at your project's root to configure it to use MDX: import createMDX from '@next/mdx' /** @type {import('next').NextConfig} */ const nextConfig = { // Configure `pageExtensions` to include markdown and MDX files pageExtensions: ['js', 'jsx', 'md', 'mdx', 'ts', 'tsx'], // Optionally, add any other Next.js config below } const withMDX = createMDX({ // Add markdown plugins here, as desired }) // Merge MDX config with Next.js config export default withMDX(nextConfig) This allows `.md` and `.mdx` files to act as pages, routes, or imports in your application. ## Add an `mdx-components.tsx` file Create an `mdx-components.tsx` (or `.js`) file in the root of your project to define global MDX Components. For example, at the same level as `pages` or `app`, or inside `src` if applicable. import type { MDXComponents } from 'mdx/types' export function useMDXComponents(components: MDXComponents): MDXComponents { return { ...components, } } > **Good to know**: > > * `mdx-components.tsx` is **required** to use `@next/mdx` with App Router and will not work without it. > * Learn more about the `mdx-components.tsx` file convention. > * Learn how to use custom styles and components. ## Rendering MDX You can render MDX using Next.js's file based routing or by importing MDX files into other pages. ### Using file based routing When using file based routing, you can use MDX pages like any other page. In App Router apps, that includes being able to use metadata. Create a new MDX page within the `/app` directory: my-project ├── app │ └── mdx-page │ └── page.(mdx/md) |── mdx-components.(tsx/js) └── package.json You can use MDX in these files, and even import React components, directly inside your MDX page: import { MyComponent } from 'my-component' # Welcome to my MDX page! This is some **bold** and _italics_ text. This is a list in markdown: - One - Two - Three Checkout my React component: <MyComponent /> Navigating to the `/mdx-page` route should display your rendered MDX page. ### Using imports Create a new page within the `/app` directory and an MDX file wherever you'd like: . ├── app/ │ └── mdx-page/ │ └── page.(tsx/js) ├── markdown/ │ └── welcome.(mdx/md) ├── mdx-components.(tsx/js) └── package.json You can use MDX in these files, and even import React components, directly inside your MDX page: Import the MDX file inside the page to display the content: import Welcome from '@/markdown/welcome.mdx' export default function Page() { return <Welcome /> } Navigating to the `/mdx-page` route should display your rendered MDX page. ### Using dynamic imports You can import dynamic MDX components instead of using filesystem routing for MDX files. For example, you can have a dynamic route segment which loads MDX components from a separate directory: 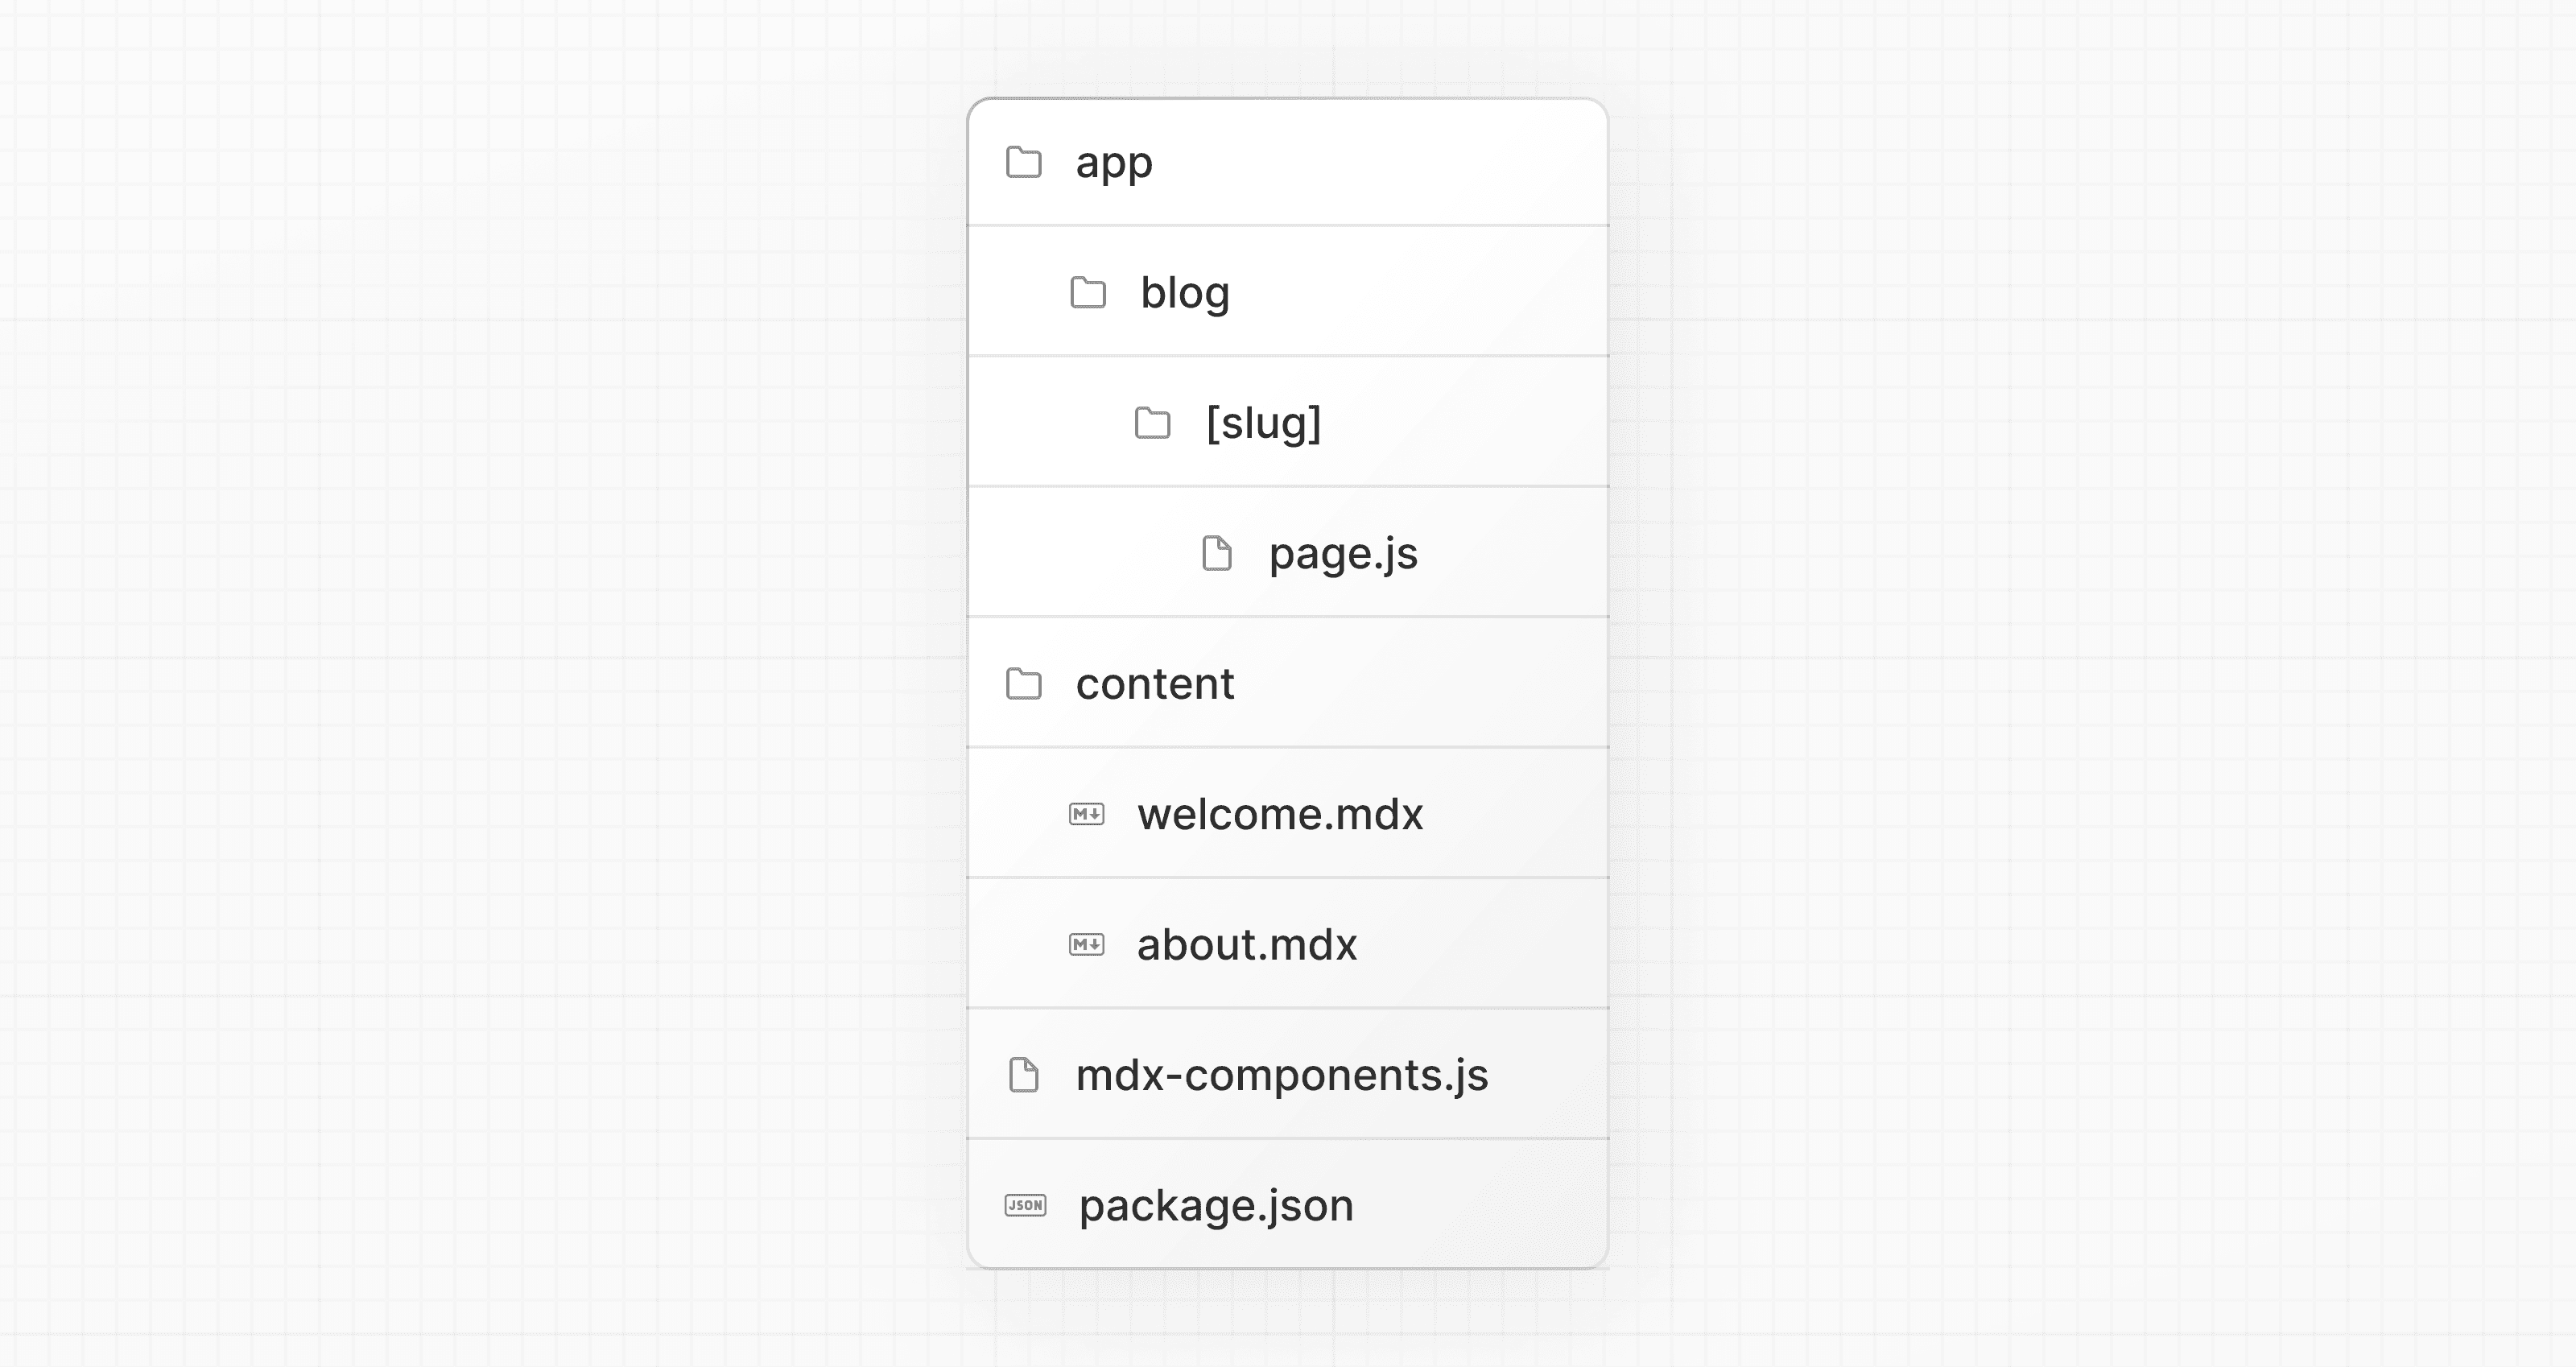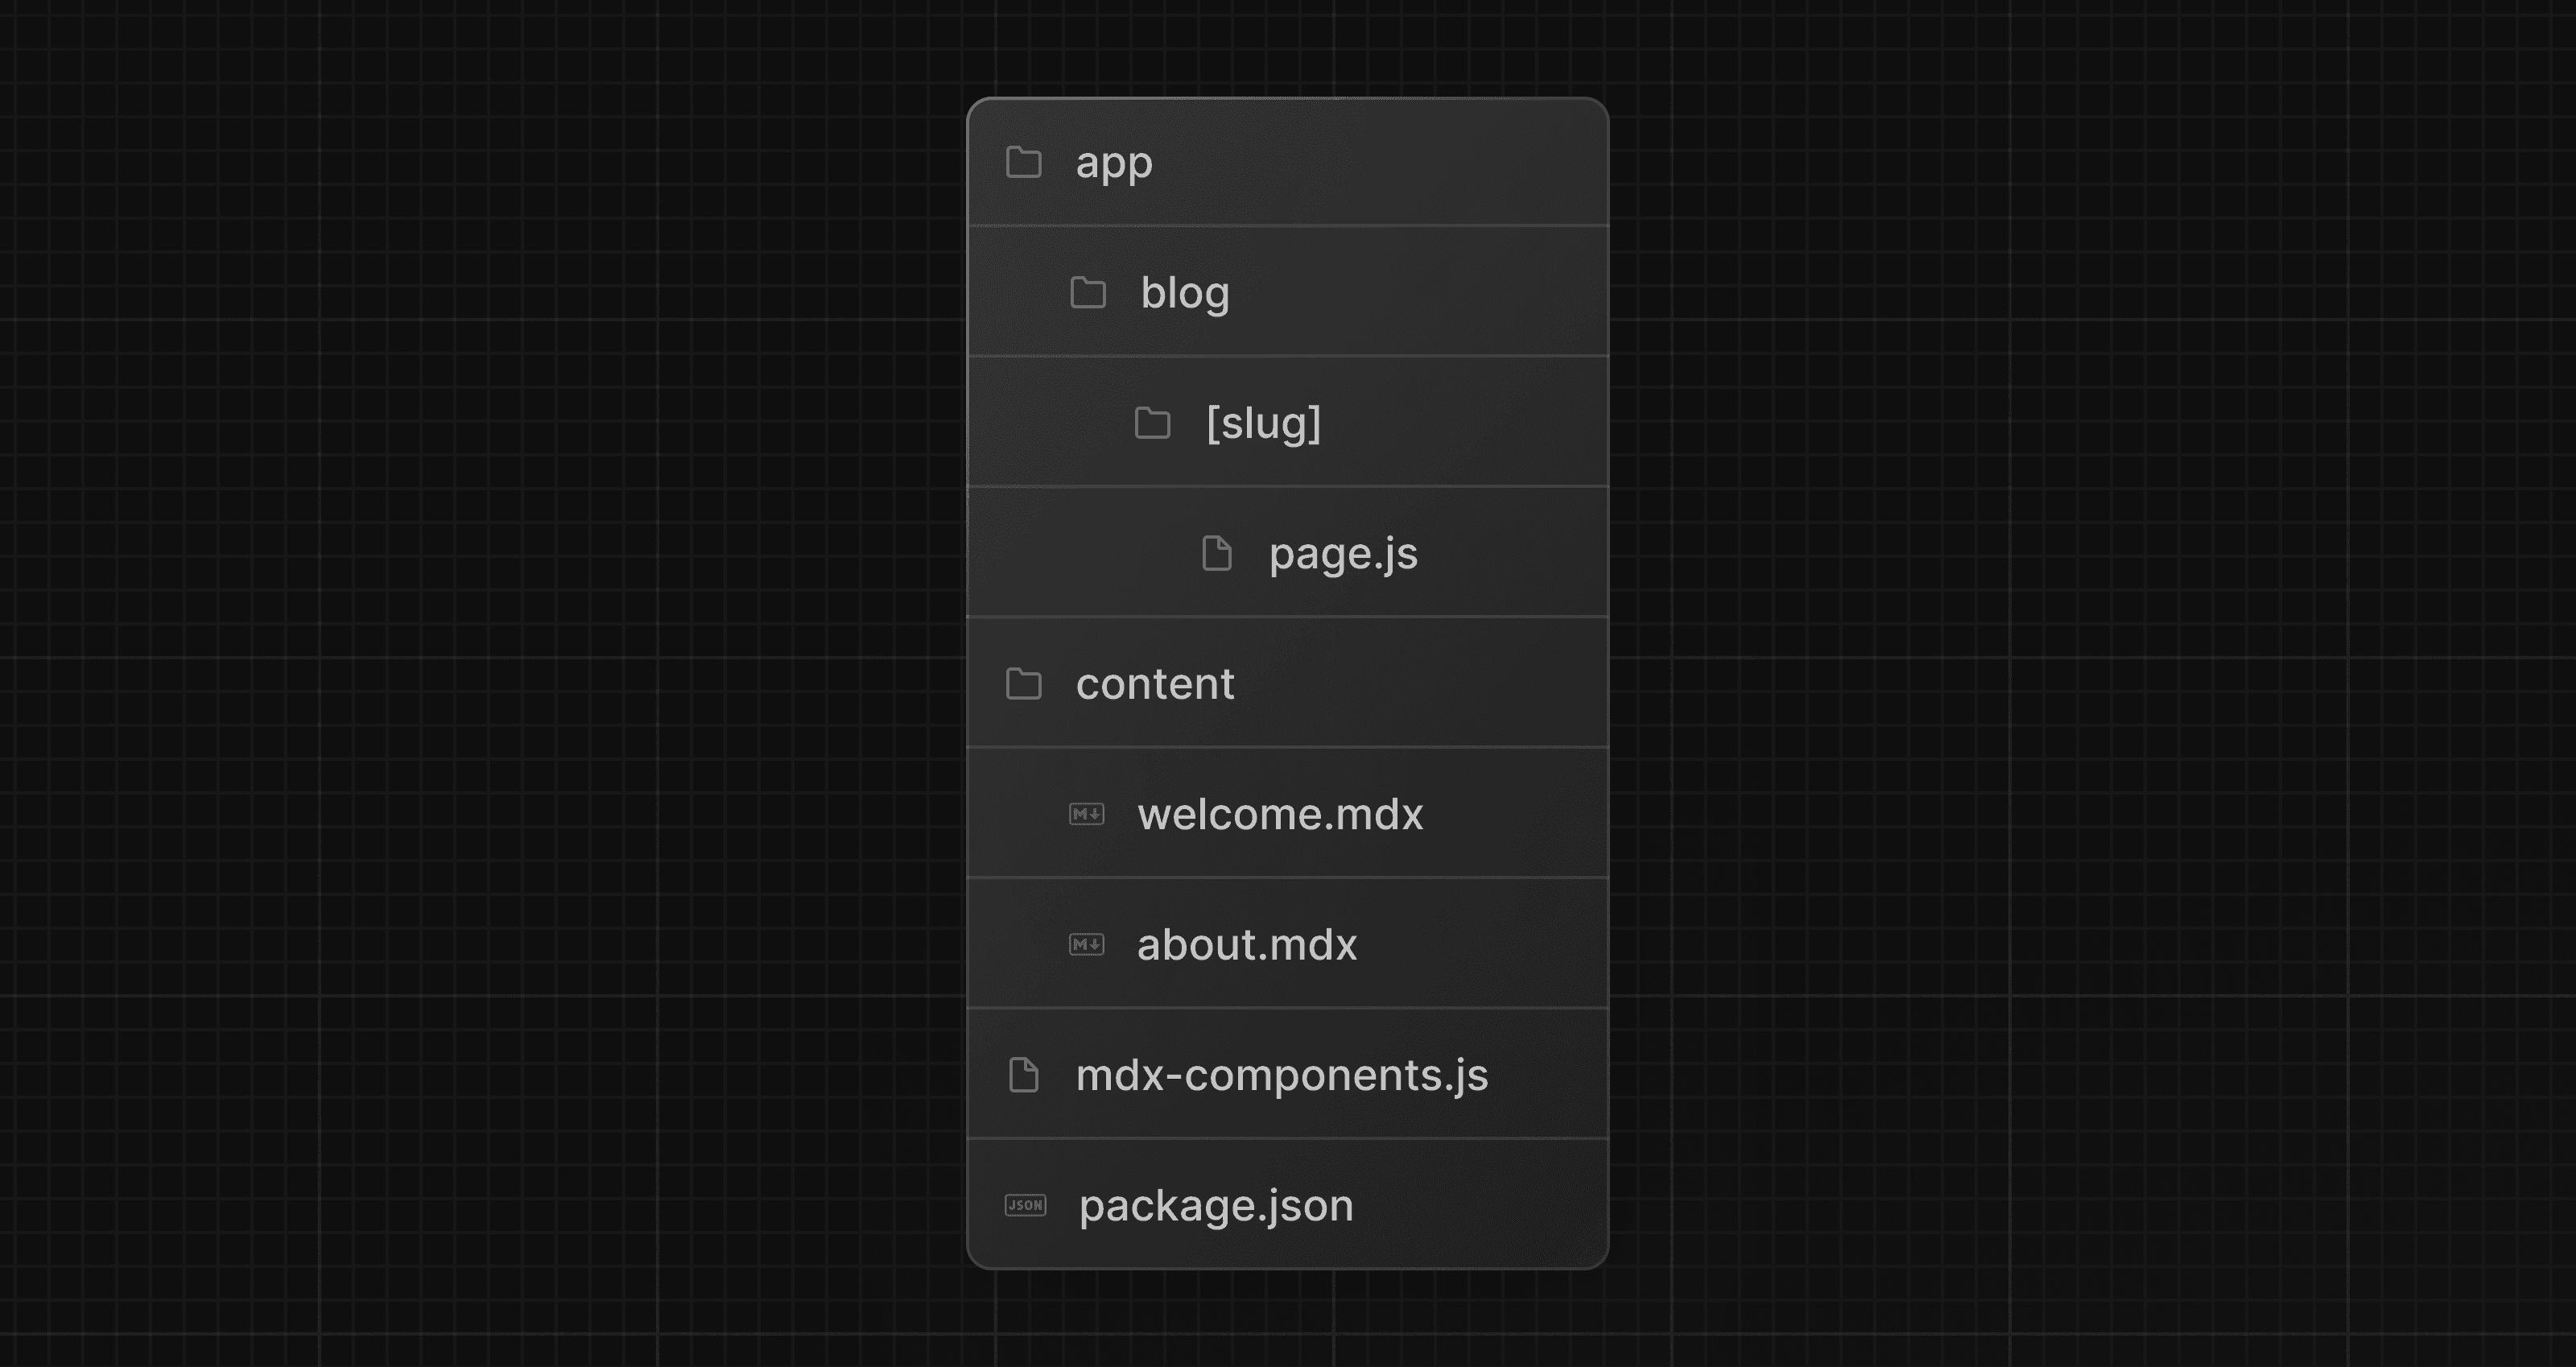 `generateStaticParams` can be used to prerender the provided routes. By marking `dynamicParams` as `false`, accessing a route not defined in `generateStaticParams` will 404. export default async function Page({ params, }: { params: Promise<{ slug: string }> }) { const { slug } = await params const { default: Post } = await import(`@/content/${slug}.mdx`) return <Post /> } export function generateStaticParams() { return [{ slug: 'welcome' }, { slug: 'about' }] } export const dynamicParams = false > **Good to know**: Ensure you specify the `.mdx` file extension in your import. While it is not required to use module path aliases (e.g., `@/content`), it does simplify your import path. ## Using custom styles and components Markdown, when rendered, maps to native HTML elements. For example, writing the following markdown: ## This is a heading This is a list in markdown: - One - Two - Three Generates the following HTML: <h2>This is a heading</h2> <p>This is a list in markdown:</p> <ul> <li>One</li> <li>Two</li> <li>Three</li> </ul> To style your markdown, you can provide custom components that map to the generated HTML elements. Styles and components can be implemented globally, locally, and with shared layouts. ### Global styles and components Adding styles and components in `mdx-components.tsx` will affect _all_ MDX files in your application. import type { MDXComponents } from 'mdx/types' import Image, { ImageProps } from 'next/image' // This file allows you to provide custom React components // to be used in MDX files. You can import and use any // React component you want, including inline styles, // components from other libraries, and more. export function useMDXComponents(components: MDXComponents): MDXComponents { return { // Allows customizing built-in components, e.g. to add styling. h1: ({ children }) => ( <h1 style={{ color: 'red', fontSize: '48px' }}>{children}</h1> ), img: (props) => ( <Image sizes="100vw" style={{ width: '100%', height: 'auto' }} {...(props as ImageProps)} /> ), ...components, } } ### Local styles and components You can apply local styles and components to specific pages by passing them into imported MDX components. These will merge with and override global styles and components. import Welcome from '@/markdown/welcome.mdx' function CustomH1({ children }) { return <h1 style={{ color: 'blue', fontSize: '100px' }}>{children}</h1> } const overrideComponents = { h1: CustomH1, } export default function Page() { return <Welcome components={overrideComponents} /> } ### Shared layouts To share a layout across MDX pages, you can use the built-in layouts support with the App Router. export default function MdxLayout({ children }: { children: React.ReactNode }) { // Create any shared layout or styles here return <div style={{ color: 'blue' }}>{children}</div> } ### Using Tailwind typography plugin If you are using Tailwind to style your application, using the `@tailwindcss/typography` plugin will allow you to reuse your Tailwind configuration and styles in your markdown files. The plugin adds a set of `prose` classes that can be used to add typographic styles to content blocks that come from sources, like markdown. Install Tailwind typography and use with shared layouts to add the `prose` you want. export default function MdxLayout({ children }: { children: React.ReactNode }) { // Create any shared layout or styles here return ( <div className="prose prose-headings:mt-8 prose-headings:font-semibold prose-headings:text-black prose-h1:text-5xl prose-h2:text-4xl prose-h3:text-3xl prose-h4:text-2xl prose-h5:text-xl prose-h6:text-lg dark:prose-headings:text-white"> {children} </div> ) } ## Frontmatter Frontmatter is a YAML like key/value pairing that can be used to store data about a page. `@next/mdx` does **not** support frontmatter by default, though there are many solutions for adding frontmatter to your MDX content, such as: * remark-frontmatter * remark-mdx-frontmatter * gray-matter `@next/mdx` **does** allow you to use exports like any other JavaScript component: Metadata can now be referenced outside of the MDX file: import BlogPost, { metadata } from '@/content/blog-post.mdx' export default function Page() { console.log('metadata: ', metadata) //=> { author: 'John Doe' } return <BlogPost /> } A common use case for this is when you want to iterate over a collection of MDX and extract data. For example, creating a blog index page from all blog posts. You can use packages like Node's `fs` module or globby to read a directory of posts and extract the metadata. > **Good to know**: > > * Using `fs`, `globby`, etc. can only be used server-side. > * View the Portfolio Starter Kit template for a complete working example. ## remark and rehype Plugins You can optionally provide remark and rehype plugins to transform the MDX content. For example, you can use `remark-gfm` to support GitHub Flavored Markdown. Since the remark and rehype ecosystem is ESM only, you'll need to use `next.config.mjs` or `next.config.ts` as the configuration file. import remarkGfm from 'remark-gfm' import createMDX from '@next/mdx' /** @type {import('next').NextConfig} */ const nextConfig = { // Allow .mdx extensions for files pageExtensions: ['js', 'jsx', 'md', 'mdx', 'ts', 'tsx'], // Optionally, add any other Next.js config below } const withMDX = createMDX({ // Add markdown plugins here, as desired options: { remarkPlugins: [remarkGfm], rehypePlugins: [], }, }) // Combine MDX and Next.js config export default withMDX(nextConfig) ### Using Plugins with Turbopack To use plugins with Turbopack, upgrade to the latest `@next/mdx` and specify plugin names using a string: import createMDX from '@next/mdx' /** @type {import('next').NextConfig} */ const nextConfig = { pageExtensions: ['js', 'jsx', 'md', 'mdx', 'ts', 'tsx'], } const withMDX = createMDX({ options: { remarkPlugins: [], rehypePlugins: [['rehype-katex', { strict: true, throwOnError: true }]], }, }) export default withMDX(nextConfig) > **Good to know**: > > remark and rehype plugins without serializable options cannot be used yet with Turbopack, due to inability to pass JavaScript functions to Rust ## Remote MDX If your MDX files or content lives _somewhere else_, you can fetch it dynamically on the server. This is useful for content stored in a CMS, database, or anywhere else. A popular community package for this use is `next-mdx-remote`. > **Good to know**: Please proceed with caution. MDX compiles to JavaScript and is executed on the server. You should only fetch MDX content from a trusted source, otherwise this can lead to remote code execution (RCE). The following example uses `next-mdx-remote`: import { MDXRemote } from 'next-mdx-remote/rsc' export default async function RemoteMdxPage() { // MDX text - can be from a database, CMS, fetch, anywhere... const res = await fetch('https://...') const markdown = await res.text() return <MDXRemote source={markdown} /> } Navigating to the `/mdx-page-remote` route should display your rendered MDX. ## Deep Dive: How do you transform markdown into HTML? React does not natively understand markdown. The markdown plaintext needs to first be transformed into HTML. This can be accomplished with `remark` and `rehype`. `remark` is an ecosystem of tools around markdown. `rehype` is the same, but for HTML. For example, the following code snippet transforms markdown into HTML: import { unified } from 'unified' import remarkParse from 'remark-parse' import remarkRehype from 'remark-rehype' import rehypeSanitize from 'rehype-sanitize' import rehypeStringify from 'rehype-stringify' main() async function main() { const file = await unified() .use(remarkParse) // Convert into markdown AST .use(remarkRehype) // Transform to HTML AST .use(rehypeSanitize) // Sanitize HTML input .use(rehypeStringify) // Convert AST into serialized HTML .process('Hello, Next.js!') console.log(String(file)) // <p>Hello, Next.js!</p> } The `remark` and `rehype` ecosystem contains plugins for syntax highlighting, linking headings, generating a table of contents, and more. When using `@next/mdx` as shown above, you **do not** need to use `remark` or `rehype` directly, as it is handled for you. We're describing it here for a deeper understanding of what the `@next/mdx` package is doing underneath. ## Using the Rust-based MDX compiler (experimental) Next.js supports a new MDX compiler written in Rust. This compiler is still experimental and is not recommended for production use. To use the new compiler, you need to configure `next.config.js` when you pass it to `withMDX`: module.exports = withMDX({ experimental: { mdxRs: true, }, }) `mdxRs` also accepts an object to configure how to transform mdx files. module.exports = withMDX({ experimental: { mdxRs: { jsxRuntime?: string // Custom jsx runtime jsxImportSource?: string // Custom jsx import source, mdxType?: 'gfm' | 'commonmark' // Configure what kind of mdx syntax will be used to parse & transform }, }, }) ## Helpful Links * MDX * `@next/mdx` * remark * rehype * Markdoc --- ## Page: https://nextjs.org/docs/app/building-your-application/configuring/src-directory As an alternative to having the special Next.js `app` or `pages` directories in the root of your project, Next.js also supports the common pattern of placing application code under the `src` directory. This separates application code from project configuration files which mostly live in the root of a project, which is preferred by some individuals and teams. To use the `src` directory, move the `app` Router folder or `pages` Router folder to `src/app` or `src/pages` respectively.  > **Good to know**: > > * The `/public` directory should remain in the root of your project. > * Config files like `package.json`, `next.config.js` and `tsconfig.json` should remain in the root of your project. > * `.env.*` files should remain in the root of your project. > * `src/app` or `src/pages` will be ignored if `app` or `pages` are present in the root directory. > * If you're using `src`, you'll probably also move other application folders such as `/components` or `/lib`. > * If you're using Middleware, ensure it is placed inside the `src` directory. > * If you're using Tailwind CSS, you'll need to add the `/src` prefix to the `tailwind.config.js` file in the content section. > * If you are using TypeScript paths for imports such as `@/*`, you should update the `paths` object in `tsconfig.json` to include `src/`. --- ## Page: https://nextjs.org/docs/app/building-your-application/configuring/custom-server Next.js includes its own server with `next start` by default. If you have an existing backend, you can still use it with Next.js (this is not a custom server). A custom Next.js server allows you to programmatically start a server for custom patterns. The majority of the time, you will not need this approach. However, it's available if you need to eject. > **Good to know**: > > * Before deciding to use a custom server, keep in mind that it should only be used when the integrated router of Next.js can't meet your app requirements. A custom server will remove important performance optimizations, like **Automatic Static Optimization.** > * A custom server **cannot** be deployed on Vercel. > * When using standalone output mode, it does not trace custom server files. This mode outputs a separate minimal `server.js` file, instead. These cannot be used together. Take a look at the following example of a custom server: import { createServer } from 'http' import { parse } from 'url' import next from 'next' const port = parseInt(process.env.PORT || '3000', 10) const dev = process.env.NODE_ENV !== 'production' const app = next({ dev }) const handle = app.getRequestHandler() app.prepare().then(() => { createServer((req, res) => { const parsedUrl = parse(req.url!, true) handle(req, res, parsedUrl) }).listen(port) console.log( `> Server listening at http://localhost:${port} as ${ dev ? 'development' : process.env.NODE_ENV }` ) }) > `server.js` does not run through the Next.js Compiler or bundling process. Make sure the syntax and source code this file requires are compatible with the current Node.js version you are using. View an example. To run the custom server, you'll need to update the `scripts` in `package.json` like so: { "scripts": { "dev": "node server.js", "build": "next build", "start": "NODE_ENV=production node server.js" } } Alternatively, you can set up `nodemon` (example). The custom server uses the following import to connect the server with the Next.js application: import next from 'next' const app = next({}) The above `next` import is a function that receives an object with the following options: | Option | Type | Description | | --- | --- | --- | | `conf` | `Object` | The same object you would use in `next.config.js`. Defaults to `{}` | | `dev` | `Boolean` | (_Optional_) Whether or not to launch Next.js in dev mode. Defaults to `false` | | `dir` | `String` | (_Optional_) Location of the Next.js project. Defaults to `'.'` | | `quiet` | `Boolean` | (_Optional_) Hide error messages containing server information. Defaults to `false` | | `hostname` | `String` | (_Optional_) The hostname the server is running behind | | `port` | `Number` | (_Optional_) The port the server is running behind | | `httpServer` | `node:http#Server` | (_Optional_) The HTTP Server that Next.js is running behind | | `turbo` | `Boolean` | (_Optional_) Enable Turbopack | The returned `app` can then be used to let Next.js handle requests as required. --- ## Page: https://nextjs.org/docs/app/building-your-application/configuring/draft-mode **Draft Mode** allows you to preview draft content from your headless CMS in your Next.js application. This is useful for static pages that are generated at build time as it allows you to switch to dynamic rendering and see the draft changes without having to rebuild your entire site. This page walks through how to enable and use Draft Mode. ## Step 1: Create a Route Handler Create a Route Handler. It can have any name, for example, `app/api/draft/route.ts`. export async function GET(request: Request) { return new Response('') } Then, import the `draftMode` function and call the `enable()` method. import { draftMode } from 'next/headers' export async function GET(request: Request) { const draft = await draftMode() draft.enable() return new Response('Draft mode is enabled') } This will set a **cookie** to enable draft mode. Subsequent requests containing this cookie will trigger draft mode and change the behavior of statically generated pages. You can test this manually by visiting `/api/draft` and looking at your browser’s developer tools. Notice the `Set-Cookie` response header with a cookie named `__prerender_bypass`. ## Step 2: Access the Route Handler from your Headless CMS > These steps assume that the headless CMS you’re using supports setting **custom draft URLs**. If it doesn’t, you can still use this method to secure your draft URLs, but you’ll need to construct and access the draft URL manually. The specific steps will vary depending on which headless CMS you’re using. To securely access the Route Handler from your headless CMS: 1. Create a **secret token string** using a token generator of your choice. This secret will only be known by your Next.js app and your headless CMS. 2. If your headless CMS supports setting custom draft URLs, specify a draft URL (this assumes that your Route Handler is located at `app/api/draft/route.ts`). For example: https://<your-site>/api/draft?secret=<token>&slug=<path> > * `<your-site>` should be your deployment domain. > * `<token>` should be replaced with the secret token you generated. > * `<path>` should be the path for the page that you want to view. If you want to view `/posts/one`, then you should use `&slug=/posts/one`. > > Your headless CMS might allow you to include a variable in the draft URL so that `<path>` can be set dynamically based on the CMS’s data like so: `&slug=/posts/{entry.fields.slug}` 3. In your Route Handler, check that the secret matches and that the `slug` parameter exists (if not, the request should fail), call `draftMode.enable()` to set the cookie. Then, redirect the browser to the path specified by `slug`: import { draftMode } from 'next/headers' import { redirect } from 'next/navigation' export async function GET(request: Request) { // Parse query string parameters const { searchParams } = new URL(request.url) const secret = searchParams.get('secret') const slug = searchParams.get('slug') // Check the secret and next parameters // This secret should only be known to this Route Handler and the CMS if (secret !== 'MY_SECRET_TOKEN' || !slug) { return new Response('Invalid token', { status: 401 }) } // Fetch the headless CMS to check if the provided `slug` exists // getPostBySlug would implement the required fetching logic to the headless CMS const post = await getPostBySlug(slug) // If the slug doesn't exist prevent draft mode from being enabled if (!post) { return new Response('Invalid slug', { status: 401 }) } // Enable Draft Mode by setting the cookie const draft = await draftMode() draft.enable() // Redirect to the path from the fetched post // We don't redirect to searchParams.slug as that might lead to open redirect vulnerabilities redirect(post.slug) } If it succeeds, then the browser will be redirected to the path you want to view with the draft mode cookie. ## Step 3: Preview the Draft Content The next step is to update your page to check the value of `draftMode().isEnabled`. If you request a page which has the cookie set, then data will be fetched at **request time** (instead of at build time). Furthermore, the value of `isEnabled` will be `true`. // page that fetches data import { draftMode } from 'next/headers' async function getData() { const { isEnabled } = await draftMode() const url = isEnabled ? 'https://draft.example.com' : 'https://production.example.com' const res = await fetch(url) return res.json() } export default async function Page() { const { title, desc } = await getData() return ( <main> <h1>{title}</h1> <p>{desc}</p> </main> ) } If you access the draft Route Handler (with `secret` and `slug`) from your headless CMS or manually using the URL, you should now be able to see the draft content. And, if you update your draft without publishing, you should be able to view the draft. --- ## Page: https://nextjs.org/docs/app/building-your-application/configuring/content-security-policy Content Security Policy (CSP) is important to guard your Next.js application against various security threats such as cross-site scripting (XSS), clickjacking, and other code injection attacks. By using CSP, developers can specify which origins are permissible for content sources, scripts, stylesheets, images, fonts, objects, media (audio, video), iframes, and more. Examples * Strict CSP ## Nonces A nonce is a unique, random string of characters created for a one-time use. It is used in conjunction with CSP to selectively allow certain inline scripts or styles to execute, bypassing strict CSP directives. ### Why use a nonce? Even though CSPs are designed to block malicious scripts, there are legitimate scenarios where inline scripts are necessary. In such cases, nonces offer a way to allow these scripts to execute if they have the correct nonce. ### Adding a nonce with Middleware Middleware enables you to add headers and generate nonces before the page renders. Every time a page is viewed, a fresh nonce should be generated. This means that you **must use dynamic rendering to add nonces**. For example: import { NextRequest, NextResponse } from 'next/server' export function middleware(request: NextRequest) { const nonce = Buffer.from(crypto.randomUUID()).toString('base64') const cspHeader = ` default-src 'self'; script-src 'self' 'nonce-${nonce}' 'strict-dynamic'; style-src 'self' 'nonce-${nonce}'; img-src 'self' blob: data:; font-src 'self'; object-src 'none'; base-uri 'self'; form-action 'self'; frame-ancestors 'none'; upgrade-insecure-requests; ` // Replace newline characters and spaces const contentSecurityPolicyHeaderValue = cspHeader .replace(/\s{2,}/g, ' ') .trim() const requestHeaders = new Headers(request.headers) requestHeaders.set('x-nonce', nonce) requestHeaders.set( 'Content-Security-Policy', contentSecurityPolicyHeaderValue ) const response = NextResponse.next({ request: { headers: requestHeaders, }, }) response.headers.set( 'Content-Security-Policy', contentSecurityPolicyHeaderValue ) return response } By default, Middleware runs on all requests. You can filter Middleware to run on specific paths using a `matcher`. We recommend ignoring matching prefetches (from `next/link`) and static assets that don't need the CSP header. export const config = { matcher: [ /* * Match all request paths except for the ones starting with: * - api (API routes) * - _next/static (static files) * - _next/image (image optimization files) * - favicon.ico (favicon file) */ { source: '/((?!api|_next/static|_next/image|favicon.ico).*)', missing: [ { type: 'header', key: 'next-router-prefetch' }, { type: 'header', key: 'purpose', value: 'prefetch' }, ], }, ], } ### Reading the nonce You can now read the nonce from a Server Component using `headers`: import { headers } from 'next/headers' import Script from 'next/script' export default async function Page() { const nonce = (await headers()).get('x-nonce') return ( <Script src="https://www.googletagmanager.com/gtag/js" strategy="afterInteractive" nonce={nonce} /> ) } ## Without Nonces For applications that do not require nonces, you can set the CSP header directly in your `next.config.js` file: const cspHeader = ` default-src 'self'; script-src 'self' 'unsafe-eval' 'unsafe-inline'; style-src 'self' 'unsafe-inline'; img-src 'self' blob: data:; font-src 'self'; object-src 'none'; base-uri 'self'; form-action 'self'; frame-ancestors 'none'; upgrade-insecure-requests; ` module.exports = { async headers() { return [ { source: '/(.*)', headers: [ { key: 'Content-Security-Policy', value: cspHeader.replace(/\n/g, ''), }, ], }, ] }, } ## Version History We recommend using `v13.4.20+` of Next.js to properly handle and apply nonces. --- ## Page: https://nextjs.org/docs/app/building-your-application/configuring/debugging This documentation explains how you can debug your Next.js frontend and backend code with full source maps support using the VS Code debugger, Chrome DevTools, or Firefox DevTools. Any debugger that can attach to Node.js can also be used to debug a Next.js application. You can find more details in the Node.js Debugging Guide. ## Debugging with VS Code Create a file named `.vscode/launch.json` at the root of your project with the following content: { "version": "0.2.0", "configurations": [ { "name": "Next.js: debug server-side", "type": "node-terminal", "request": "launch", "command": "npm run dev" }, { "name": "Next.js: debug client-side", "type": "chrome", "request": "launch", "url": "http://localhost:3000" }, { "name": "Next.js: debug client-side (Firefox)", "type": "firefox", "request": "launch", "url": "http://localhost:3000", "reAttach": true, "pathMappings": [ { "url": "webpack://_N_E", "path": "${workspaceFolder}" } ] }, { "name": "Next.js: debug full stack", "type": "node", "request": "launch", "program": "${workspaceFolder}/node_modules/next/dist/bin/next", "runtimeArgs": ["--inspect"], "skipFiles": ["<node_internals>/**"], "serverReadyAction": { "action": "debugWithEdge", "killOnServerStop": true, "pattern": "- Local:.+(https?://.+)", "uriFormat": "%s", "webRoot": "${workspaceFolder}" } } ] } > **Note**: To use Firefox debugging in VS Code, you'll need to install the Firefox Debugger extension. `npm run dev` can be replaced with `yarn dev` if you're using Yarn or `pnpm dev` if you're using pnpm. In the "Next.js: debug full stack" configuration, `serverReadyAction.action` specifies which browser to open when the server is ready. `debugWithEdge` means to launch the Edge browser. If you are using Chrome, change this value to `debugWithChrome`. If you're changing the port number your application starts on, replace the `3000` in `http://localhost:3000` with the port you're using instead. If you're running Next.js from a directory other than root (for example, if you're using Turborepo) then you need to add `cwd` to the server-side and full stack debugging tasks. For example, `"cwd": "${workspaceFolder}/apps/web"`. Now go to the Debug panel (`Ctrl+Shift+D` on Windows/Linux, `⇧+⌘+D` on macOS), select a launch configuration, then press `F5` or select **Debug: Start Debugging** from the Command Palette to start your debugging session. ## Using the Debugger in Jetbrains WebStorm Click the drop down menu listing the runtime configuration, and click `Edit Configurations...`. Create a `JavaScript Debug` debug configuration with `http://localhost:3000` as the URL. Customize to your liking (e.g. Browser for debugging, store as project file), and click `OK`. Run this debug configuration, and the selected browser should automatically open. At this point, you should have 2 applications in debug mode: the NextJS node application, and the client/browser application. ## Debugging with Browser DevTools ### Client-side code Start your development server as usual by running `next dev`, `npm run dev`, or `yarn dev`. Once the server starts, open `http://localhost:3000` (or your alternate URL) in your preferred browser. For Chrome: * Open Chrome's Developer Tools (`Ctrl+Shift+J` on Windows/Linux, `⌥+⌘+I` on macOS) * Go to the **Sources** tab For Firefox: * Open Firefox's Developer Tools (`Ctrl+Shift+I` on Windows/Linux, `⌥+⌘+I` on macOS) * Go to the **Debugger** tab In either browser, any time your client-side code reaches a `debugger` statement, code execution will pause and that file will appear in the debug area. You can also search for files to set breakpoints manually: * In Chrome: Press `Ctrl+P` on Windows/Linux or `⌘+P` on macOS * In Firefox: Press `Ctrl+P` on Windows/Linux or `⌘+P` on macOS, or use the file tree in the left panel Note that when searching, your source files will have paths starting with `webpack://_N_E/./`. ### Server-side code To debug server-side Next.js code with browser DevTools, you need to pass the `--inspect` flag to the underlying Node.js process: NODE_OPTIONS='--inspect' next dev > **Good to know**: Use `NODE_OPTIONS='--inspect=0.0.0.0'` to allow remote debugging access outside localhost, such as when running the app in a Docker container. If you're using `npm run dev` or `yarn dev` then you should update the `dev` script on your `package.json`: { "scripts": { "dev": "NODE_OPTIONS='--inspect' next dev" } } Launching the Next.js dev server with the `--inspect` flag will look something like this: Debugger listening on ws://127.0.0.1:9229/0cf90313-350d-4466-a748-cd60f4e47c95 For help, see: https://nodejs.org/en/docs/inspector ready - started server on 0.0.0.0:3000, url: http://localhost:3000 For Chrome: 1. Open a new tab and visit `chrome://inspect` 2. Click **Configure...** to ensure both debugging ports are listed 3. Add both `localhost:9229` and `localhost:9230` if they're not already present 4. Look for your Next.js application in the **Remote Target** section 5. Click **inspect** to open a separate DevTools window 6. Go to the **Sources** tab For Firefox: 1. Open a new tab and visit `about:debugging` 2. Click **This Firefox** in the left sidebar 3. Under **Remote Targets**, find your Next.js application 4. Click **Inspect** to open the debugger 5. Go to the **Debugger** tab Debugging server-side code works similarly to client-side debugging. When searching for files (`Ctrl+P`/`⌘+P`), your source files will have paths starting with `webpack://{application-name}/./` (where `{application-name}` will be replaced with the name of your application according to your `package.json` file). ### Inspect Server Errors with Browser DevTools When you encounter an error, inspecting the source code can help trace the root cause of errors. Next.js will display a Node.js icon underneath the Next.js version indicator on the error overlay. By clicking that icon, the DevTools URL is copied to your clipboard. You can open a new browser tab with that URL to inspect the Next.js server process. ### Debugging on Windows Windows users may run into an issue when using `NODE_OPTIONS='--inspect'` as that syntax is not supported on Windows platforms. To get around this, install the `cross-env` package as a development dependency (`-D` with `npm` and `yarn`) and replace the `dev` script with the following. { "scripts": { "dev": "cross-env NODE_OPTIONS='--inspect' next dev" } } `cross-env` will set the `NODE_OPTIONS` environment variable regardless of which platform you are on (including Mac, Linux, and Windows) and allow you to debug consistently across devices and operating systems. > **Good to know**: Ensure Windows Defender is disabled on your machine. This external service will check _every file read_, which has been reported to greatly increase Fast Refresh time with `next dev`. This is a known issue, not related to Next.js, but it does affect Next.js development. ## More information To learn more about how to use a JavaScript debugger, take a look at the following documentation: * Node.js debugging in VS Code: Breakpoints * Chrome DevTools: Debug JavaScript * Firefox DevTools: Debugger --- ## Page: https://nextjs.org/docs/app/building-your-application/configuring/progressive-web-apps Progressive Web Applications (PWAs) offer the reach and accessibility of web applications combined with the features and user experience of native mobile apps. With Next.js, you can create PWAs that provide a seamless, app-like experience across all platforms without the need for multiple codebases or app store approvals. PWAs allow you to: * Deploy updates instantly without waiting for app store approval * Create cross-platform applications with a single codebase * Provide native-like features such as home screen installation and push notifications ## Creating a PWA with Next.js ### 1\. Creating the Web App Manifest Next.js provides built-in support for creating a web app manifest using the App Router. You can create either a static or dynamic manifest file: For example, create a `app/manifest.ts` or `app/manifest.json` file: import type { MetadataRoute } from 'next' export default function manifest(): MetadataRoute.Manifest { return { name: 'Next.js PWA', short_name: 'NextPWA', description: 'A Progressive Web App built with Next.js', start_url: '/', display: 'standalone', background_color: '#ffffff', theme_color: '#000000', icons: [ { src: '/icon-192x192.png', sizes: '192x192', type: 'image/png', }, { src: '/icon-512x512.png', sizes: '512x512', type: 'image/png', }, ], } } This file should contain information about the name, icons, and how it should be displayed as an icon on the user's device. This will allow users to install your PWA on their home screen, providing a native app-like experience. You can use tools like favicon generators to create the different icon sets and place the generated files in your `public/` folder. ### 2\. Implementing Web Push Notifications Web Push Notifications are supported with all modern browsers, including: * iOS 16.4+ for applications installed to the home screen * Safari 16 for macOS 13 or later * Chromium based browsers * Firefox This makes PWAs a viable alternative to native apps. Notably, you can trigger install prompts without needing offline support. Web Push Notifications allow you to re-engage users even when they're not actively using your app. Here's how to implement them in a Next.js application: First, let's create the main page component in `app/page.tsx`. We'll break it down into smaller parts for better understanding. First, we’ll add some of the imports and utilities we’ll need. It’s okay that the referenced Server Actions do not yet exist: 'use client' import { useState, useEffect } from 'react' import { subscribeUser, unsubscribeUser, sendNotification } from './actions' function urlBase64ToUint8Array(base64String: string) { const padding = '='.repeat((4 - (base64String.length % 4)) % 4) const base64 = (base64String + padding).replace(/-/g, '+').replace(/_/g, '/') const rawData = window.atob(base64) const outputArray = new Uint8Array(rawData.length) for (let i = 0; i < rawData.length; ++i) { outputArray[i] = rawData.charCodeAt(i) } return outputArray } Let’s now add a component to manage subscribing, unsubscribing, and sending push notifications. function PushNotificationManager() { const [isSupported, setIsSupported] = useState(false) const [subscription, setSubscription] = useState<PushSubscription | null>( null ) const [message, setMessage] = useState('') useEffect(() => { if ('serviceWorker' in navigator && 'PushManager' in window) { setIsSupported(true) registerServiceWorker() } }, []) async function registerServiceWorker() { const registration = await navigator.serviceWorker.register('/sw.js', { scope: '/', updateViaCache: 'none', }) const sub = await registration.pushManager.getSubscription() setSubscription(sub) } async function subscribeToPush() { const registration = await navigator.serviceWorker.ready const sub = await registration.pushManager.subscribe({ userVisibleOnly: true, applicationServerKey: urlBase64ToUint8Array( process.env.NEXT_PUBLIC_VAPID_PUBLIC_KEY! ), }) setSubscription(sub) const serializedSub = JSON.parse(JSON.stringify(sub)) await subscribeUser(serializedSub) } async function unsubscribeFromPush() { await subscription?.unsubscribe() setSubscription(null) await unsubscribeUser() } async function sendTestNotification() { if (subscription) { await sendNotification(message) setMessage('') } } if (!isSupported) { return <p>Push notifications are not supported in this browser.</p> } return ( <div> <h3>Push Notifications</h3> {subscription ? ( <> <p>You are subscribed to push notifications.</p> <button onClick={unsubscribeFromPush}>Unsubscribe</button> <input type="text" placeholder="Enter notification message" value={message} onChange={(e) => setMessage(e.target.value)} /> <button onClick={sendTestNotification}>Send Test</button> </> ) : ( <> <p>You are not subscribed to push notifications.</p> <button onClick={subscribeToPush}>Subscribe</button> </> )} </div> ) } Finally, let’s create a component to show a message for iOS devices to instruct them to install to their home screen, and only show this if the app is not already installed. function InstallPrompt() { const [isIOS, setIsIOS] = useState(false) const [isStandalone, setIsStandalone] = useState(false) useEffect(() => { setIsIOS( /iPad|iPhone|iPod/.test(navigator.userAgent) && !(window as any).MSStream ) setIsStandalone(window.matchMedia('(display-mode: standalone)').matches) }, []) if (isStandalone) { return null // Don't show install button if already installed } return ( <div> <h3>Install App</h3> <button>Add to Home Screen</button> {isIOS && ( <p> To install this app on your iOS device, tap the share button <span role="img" aria-label="share icon"> {' '} ⎋{' '} </span> and then "Add to Home Screen" <span role="img" aria-label="plus icon"> {' '} ➕{' '} </span>. </p> )} </div> ) } export default function Page() { return ( <div> <PushNotificationManager /> <InstallPrompt /> </div> ) } Now, let’s create the Server Actions which this file calls. ### 3\. Implementing Server Actions Create a new file to contain your actions at `app/actions.ts`. This file will handle creating subscriptions, deleting subscriptions, and sending notifications. 'use server' import webpush from 'web-push' webpush.setVapidDetails( '<mailto:your-email@example.com>', process.env.NEXT_PUBLIC_VAPID_PUBLIC_KEY!, process.env.VAPID_PRIVATE_KEY! ) let subscription: PushSubscription | null = null export async function subscribeUser(sub: PushSubscription) { subscription = sub // In a production environment, you would want to store the subscription in a database // For example: await db.subscriptions.create({ data: sub }) return { success: true } } export async function unsubscribeUser() { subscription = null // In a production environment, you would want to remove the subscription from the database // For example: await db.subscriptions.delete({ where: { ... } }) return { success: true } } export async function sendNotification(message: string) { if (!subscription) { throw new Error('No subscription available') } try { await webpush.sendNotification( subscription, JSON.stringify({ title: 'Test Notification', body: message, icon: '/icon.png', }) ) return { success: true } } catch (error) { console.error('Error sending push notification:', error) return { success: false, error: 'Failed to send notification' } } } Sending a notification will be handled by our service worker, created in step 5. In a production environment, you would want to store the subscription in a database for persistence across server restarts and to manage multiple users' subscriptions. ### 4\. Generating VAPID Keys To use the Web Push API, you need to generate VAPID keys. The simplest way is to use the web-push CLI directly: First, install web-push globally: npm install -g web-push Generate the VAPID keys by running: web-push generate-vapid-keys Copy the output and paste the keys into your `.env` file: NEXT_PUBLIC_VAPID_PUBLIC_KEY=your_public_key_here VAPID_PRIVATE_KEY=your_private_key_here ### 5\. Creating a Service Worker Create a `public/sw.js` file for your service worker: self.addEventListener('push', function (event) { if (event.data) { const data = event.data.json() const options = { body: data.body, icon: data.icon || '/icon.png', badge: '/badge.png', vibrate: [100, 50, 100], data: { dateOfArrival: Date.now(), primaryKey: '2', }, } event.waitUntil(self.registration.showNotification(data.title, options)) } }) self.addEventListener('notificationclick', function (event) { console.log('Notification click received.') event.notification.close() event.waitUntil(clients.openWindow('<https://your-website.com>')) }) This service worker supports custom images and notifications. It handles incoming push events and notification clicks. * You can set custom icons for notifications using the `icon` and `badge` properties. * The `vibrate` pattern can be adjusted to create custom vibration alerts on supported devices. * Additional data can be attached to the notification using the `data` property. Remember to test your service worker thoroughly to ensure it behaves as expected across different devices and browsers. Also, make sure to update the `'https://your-website.com'` link in the `notificationclick` event listener to the appropriate URL for your application. ### 6\. Adding to Home Screen The `InstallPrompt` component defined in step 2 shows a message for iOS devices to instruct them to install to their home screen. To ensure your application can be installed to a mobile home screen, you must have: 1. A valid web app manifest (created in step 1) 2. The website served over HTTPS Modern browsers will automatically show an installation prompt to users when these criteria are met. You can provide a custom installation button with `beforeinstallprompt`, however, we do not recommend this as it is not cross browser and platform (does not work on Safari iOS). ### 7\. Testing Locally To ensure you can view notifications locally, ensure that: * You are running locally with HTTPS * Use `next dev --experimental-https` for testing * Your browser (Chrome, Safari, Firefox) has notifications enabled * When prompted locally, accept permissions to use notifications * Ensure notifications are not disabled globally for the entire browser * If you are still not seeing notifications, try using another browser to debug ### 8\. Securing your application Security is a crucial aspect of any web application, especially for PWAs. Next.js allows you to configure security headers using the `next.config.js` file. For example: module.exports = { async headers() { return [ { source: '/(.*)', headers: [ { key: 'X-Content-Type-Options', value: 'nosniff', }, { key: 'X-Frame-Options', value: 'DENY', }, { key: 'Referrer-Policy', value: 'strict-origin-when-cross-origin', }, ], }, { source: '/sw.js', headers: [ { key: 'Content-Type', value: 'application/javascript; charset=utf-8', }, { key: 'Cache-Control', value: 'no-cache, no-store, must-revalidate', }, { key: 'Content-Security-Policy', value: "default-src 'self'; script-src 'self'", }, ], }, ] }, } Let’s go over each of these options: 1. Global Headers (applied to all routes): 1. `X-Content-Type-Options: nosniff`: Prevents MIME type sniffing, reducing the risk of malicious file uploads. 2. `X-Frame-Options: DENY`: Protects against clickjacking attacks by preventing your site from being embedded in iframes. 3. `Referrer-Policy: strict-origin-when-cross-origin`: Controls how much referrer information is included with requests, balancing security and functionality. 2. Service Worker Specific Headers: 1. `Content-Type: application/javascript; charset=utf-8`: Ensures the service worker is interpreted correctly as JavaScript. 2. `Cache-Control: no-cache, no-store, must-revalidate`: Prevents caching of the service worker, ensuring users always get the latest version. 3. `Content-Security-Policy: default-src 'self'; script-src 'self'`: Implements a strict Content Security Policy for the service worker, only allowing scripts from the same origin. Learn more about defining Content Security Policies with Next.js. ## Next Steps 1. **Exploring PWA Capabilities**: PWAs can leverage various web APIs to provide advanced functionality. Consider exploring features like background sync, periodic background sync, or the File System Access API to enhance your application. For inspiration and up-to-date information on PWA capabilities, you can refer to resources like What PWA Can Do Today. 2. **Static Exports:** If your application requires not running a server, and instead using a static export of files, you can update the Next.js configuration to enable this change. Learn more in the Next.js Static Export documentation. However, you will need to move from Server Actions to calling an external API, as well as moving your defined headers to your proxy. 3. **Offline Support**: To provide offline functionality, one option is Serwist with Next.js. You can find an example of how to integrate Serwist with Next.js in their documentation. **Note:** this plugin currently requires webpack configuration. 4. **Security Considerations**: Ensure that your service worker is properly secured. This includes using HTTPS, validating the source of push messages, and implementing proper error handling. 5. **User Experience**: Consider implementing progressive enhancement techniques to ensure your app works well even when certain PWA features are not supported by the user's browser. --- ## Page: https://nextjs.org/docs/app/building-your-application/testing In React and Next.js, there are a few different types of tests you can write, each with its own purpose and use cases. This page provides an overview of types and commonly used tools you can use to test your application. ## Types of tests * **Unit Testing** involves testing individual units (or blocks of code) in isolation. In React, a unit can be a single function, hook, or component. * **Component Testing** is a more focused version of unit testing where the primary subject of the tests is React components. This may involve testing how components are rendered, their interaction with props, and their behavior in response to user events. * **Integration Testing** involves testing how multiple units work together. This can be a combination of components, hooks, and functions. * **End-to-End (E2E) Testing** involves testing user flows in an environment that simulates real user scenarios, like the browser. This means testing specific tasks (e.g. signup flow) in a production-like environment. * **Snapshot Testing** involves capturing the rendered output of a component and saving it to a snapshot file. When tests run, the current rendered output of the component is compared against the saved snapshot. Changes in the snapshot are used to indicate unexpected changes in behavior. ## Async Server Components Since `async` Server Components are new to the React ecosystem, some tools do not fully support them. In the meantime, we recommend using **End-to-End Testing** over **Unit Testing** for `async` components. ## Guides See the guides below to learn how to set up Next.js with these commonly used testing tools: --- ## Page: https://nextjs.org/docs/app/building-your-application/testing/vitest ## Setting up Vitest with Next.js Vite and React Testing Library are frequently used together for **Unit Testing**. This guide will show you how to setup Vitest with Next.js and write your first tests. > **Good to know:** Since `async` Server Components are new to the React ecosystem, Vitest currently does not support them. While you can still run **unit tests** for synchronous Server and Client Components, we recommend using an **E2E tests** for `async` components. ## Quickstart You can use `create-next-app` with the Next.js with-vitest example to quickly get started: npx create-next-app@latest --example with-vitest with-vitest-app ## Manual Setup To manually set up Vitest, install `vitest` and the following packages as dev dependencies: # Using TypeScript npm install -D vitest @vitejs/plugin-react jsdom @testing-library/react @testing-library/dom vite-tsconfig-paths # Using JavaScript npm install -D vitest @vitejs/plugin-react jsdom @testing-library/react @testing-library/dom Create a `vitest.config.mts|js` file in the root of your project, and add the following options: import { defineConfig } from 'vitest/config' import react from '@vitejs/plugin-react' import tsconfigPaths from 'vite-tsconfig-paths' export default defineConfig({ plugins: [tsconfigPaths(), react()], test: { environment: 'jsdom', }, }) For more information on configuring Vitest, please refer to the Vitest Configuration docs. Then, add a `test` script to your `package.json`: { "scripts": { "dev": "next dev", "build": "next build", "start": "next start", "test": "vitest" } } When you run `npm run test`, Vitest will **watch** for changes in your project by default. ## Creating your first Vitest Unit Test Check that everything is working by creating a test to check if the `<Page />` component successfully renders a heading: import Link from 'next/link' export default function Page() { return ( <div> <h1>Home</h1> <Link href="/about">About</Link> </div> ) } import { expect, test } from 'vitest' import { render, screen } from '@testing-library/react' import Page from '../app/page' test('Page', () => { render(<Page />) expect(screen.getByRole('heading', { level: 1, name: 'Home' })).toBeDefined() }) > **Good to know**: The example above uses the common `__tests__` convention, but test files can also be colocated inside the `app` router. ## Running your tests Then, run the following command to run your tests: npm run test # or yarn test # or pnpm test # or bun test ## Additional Resources You may find these resources helpful: * Next.js with Vitest example * Vitest Docs * React Testing Library Docs --- ## Page: https://nextjs.org/docs/app/building-your-application/testing/jest ## Setting up Jest with Next.js Jest and React Testing Library are frequently used together for **Unit Testing** and **Snapshot Testing**. This guide will show you how to set up Jest with Next.js and write your first tests. > **Good to know:** Since `async` Server Components are new to the React ecosystem, Jest currently does not support them. While you can still run **unit tests** for synchronous Server and Client Components, we recommend using an **E2E tests** for `async` components. ## Quickstart You can use `create-next-app` with the Next.js with-jest example to quickly get started: npx create-next-app@latest --example with-jest with-jest-app ## Manual setup Since the release of Next.js 12, Next.js now has built-in configuration for Jest. To set up Jest, install `jest` and the following packages as dev dependencies: npm install -D jest jest-environment-jsdom @testing-library/react @testing-library/dom @testing-library/jest-dom ts-node @types/jest # or yarn add -D jest jest-environment-jsdom @testing-library/react @testing-library/dom @testing-library/jest-dom ts-node @types/jest # or pnpm install -D jest jest-environment-jsdom @testing-library/react @testing-library/dom @testing-library/jest-dom ts-node @types/jest Generate a basic Jest configuration file by running the following command: npm init jest@latest # or yarn create jest@latest # or pnpm create jest@latest This will take you through a series of prompts to setup Jest for your project, including automatically creating a `jest.config.ts|js` file. Update your config file to use `next/jest`. This transformer has all the necessary configuration options for Jest to work with Next.js: import type { Config } from 'jest' import nextJest from 'next/jest.js' const createJestConfig = nextJest({ // Provide the path to your Next.js app to load next.config.js and .env files in your test environment dir: './', }) // Add any custom config to be passed to Jest const config: Config = { coverageProvider: 'v8', testEnvironment: 'jsdom', // Add more setup options before each test is run // setupFilesAfterEnv: ['<rootDir>/jest.setup.ts'], } // createJestConfig is exported this way to ensure that next/jest can load the Next.js config which is async export default createJestConfig(config) Under the hood, `next/jest` is automatically configuring Jest for you, including: * Setting up `transform` using the Next.js Compiler. * Auto mocking stylesheets (`.css`, `.module.css`, and their scss variants), image imports and `next/font`. * Loading `.env` (and all variants) into `process.env`. * Ignoring `node_modules` from test resolving and transforms. * Ignoring `.next` from test resolving. * Loading `next.config.js` for flags that enable SWC transforms. > **Good to know**: To test environment variables directly, load them manually in a separate setup script or in your `jest.config.ts` file. For more information, please see Test Environment Variables. ## Optional: Handling Absolute Imports and Module Path Aliases If your project is using Module Path Aliases, you will need to configure Jest to resolve the imports by matching the paths option in the `jsconfig.json` file with the `moduleNameMapper` option in the `jest.config.js` file. For example: { "compilerOptions": { "module": "esnext", "moduleResolution": "bundler", "baseUrl": "./", "paths": { "@/components/*": ["components/*"] } } } moduleNameMapper: { // ... '^@/components/(.*)$': '<rootDir>/components/$1', } ## Optional: Extend Jest with custom matchers `@testing-library/jest-dom` includes a set of convenient custom matchers such as `.toBeInTheDocument()` making it easier to write tests. You can import the custom matchers for every test by adding the following option to the Jest configuration file: setupFilesAfterEnv: ['<rootDir>/jest.setup.ts'] Then, inside `jest.setup`, add the following import: import '@testing-library/jest-dom' > **Good to know:** `extend-expect` was removed in `v6.0`, so if you are using `@testing-library/jest-dom` before version 6, you will need to import `@testing-library/jest-dom/extend-expect` instead. If you need to add more setup options before each test, you can add them to the `jest.setup` file above. ## Add a test script to `package.json` Finally, add a Jest `test` script to your `package.json` file: { "scripts": { "dev": "next dev", "build": "next build", "start": "next start", "test": "jest", "test:watch": "jest --watch" } } `jest --watch` will re-run tests when a file is changed. For more Jest CLI options, please refer to the Jest Docs. ### Creating your first test Your project is now ready to run tests. Create a folder called `__tests__` in your project's root directory. For example, we can add a test to check if the `<Page />` component successfully renders a heading: import Link from 'next/link' export default function Page() { return ( <div> <h1>Home</h1> <Link href="/about">About</Link> </div> ) } import '@testing-library/jest-dom' import { render, screen } from '@testing-library/react' import Page from '../app/page' describe('Page', () => { it('renders a heading', () => { render(<Page />) const heading = screen.getByRole('heading', { level: 1 }) expect(heading).toBeInTheDocument() }) }) Optionally, add a snapshot test to keep track of any unexpected changes in your component: import { render } from '@testing-library/react' import Page from '../app/page' it('renders homepage unchanged', () => { const { container } = render(<Page />) expect(container).toMatchSnapshot() }) ## Running your tests Then, run the following command to run your tests: npm run test # or yarn test # or pnpm test ## Additional Resources For further reading, you may find these resources helpful: * Next.js with Jest example * Jest Docs * React Testing Library Docs * Testing Playground - use good testing practices to match elements. --- ## Page: https://nextjs.org/docs/app/building-your-application/testing/playwright ## Setting up Playwright with Next.js Playwright is a testing framework that lets you automate Chromium, Firefox, and WebKit with a single API. You can use it to write **End-to-End (E2E)** testing. This guide will show you how to set up Playwright with Next.js and write your first tests. ## Quickstart The fastest way to get started is to use `create-next-app` with the with-playwright example. This will create a Next.js project complete with Playwright configured. npx create-next-app@latest --example with-playwright with-playwright-app ## Manual setup To install Playwright, run the following command: npm init playwright # or yarn create playwright # or pnpm create playwright This will take you through a series of prompts to setup and configure Playwright for your project, including adding a `playwright.config.ts` file. Please refer to the Playwright installation guide for the step-by-step guide. ## Creating your first Playwright E2E test Create two new Next.js pages: import Link from 'next/link' export default function Page() { return ( <div> <h1>Home</h1> <Link href="/about">About</Link> </div> ) } import Link from 'next/link' export default function Page() { return ( <div> <h1>About</h1> <Link href="/">Home</Link> </div> ) } Then, add a test to verify that your navigation is working correctly: import { test, expect } from '@playwright/test' test('should navigate to the about page', async ({ page }) => { // Start from the index page (the baseURL is set via the webServer in the playwright.config.ts) await page.goto('http://localhost:3000/') // Find an element with the text 'About' and click on it await page.click('text=About') // The new URL should be "/about" (baseURL is used there) await expect(page).toHaveURL('http://localhost:3000/about') // The new page should contain an h1 with "About" await expect(page.locator('h1')).toContainText('About') }) > **Good to know**: You can use `page.goto("/")` instead of `page.goto("http://localhost:3000/")`, if you add `"baseURL": "http://localhost:3000"` to the `playwright.config.ts` configuration file. ### Running your Playwright tests Playwright will simulate a user navigating your application using three browsers: Chromium, Firefox and Webkit, this requires your Next.js server to be running. We recommend running your tests against your production code to more closely resemble how your application will behave. Run `npm run build` and `npm run start`, then run `npx playwright test` in another terminal window to run the Playwright tests. > **Good to know**: Alternatively, you can use the `webServer` feature to let Playwright start the development server and wait until it's fully available. ### Running Playwright on Continuous Integration (CI) Playwright will by default run your tests in the headless mode. To install all the Playwright dependencies, run `npx playwright install-deps`. You can learn more about Playwright and Continuous Integration from these resources: * Next.js with Playwright example * Playwright on your CI provider * Playwright Discord --- ## Page: https://nextjs.org/docs/app/building-your-application/testing/cypress ## Setting up Cypress with Next.js Cypress is a test runner used for **End-to-End (E2E)** and **Component Testing**. This page will show you how to set up Cypress with Next.js and write your first tests. > **Warning:** > > * Cypress versions below 13.6.3 do not support TypeScript version 5 with `moduleResolution:"bundler"`. However, this issue has been resolved in Cypress version 13.6.3 and later. cypress v13.6.3 ## Quickstart You can use `create-next-app` with the with-cypress example to quickly get started. npx create-next-app@latest --example with-cypress with-cypress-app ## Manual setup To manually set up Cypress, install `cypress` as a dev dependency: npm install -D cypress # or yarn add -D cypress # or pnpm install -D cypress Add the Cypress `open` command to the `package.json` scripts field: { "scripts": { "dev": "next dev", "build": "next build", "start": "next start", "lint": "next lint", "cypress:open": "cypress open" } } Run Cypress for the first time to open the Cypress testing suite: npm run cypress:open You can choose to configure **E2E Testing** and/or **Component Testing**. Selecting any of these options will automatically create a `cypress.config.js` file and a `cypress` folder in your project. ## Creating your first Cypress E2E test Ensure your `cypress.config` file has the following configuration: import { defineConfig } from 'cypress' export default defineConfig({ e2e: { setupNodeEvents(on, config) {}, }, }) Then, create two new Next.js files: import Link from 'next/link' export default function Page() { return ( <div> <h1>Home</h1> <Link href="/about">About</Link> </div> ) } import Link from 'next/link' export default function Page() { return ( <div> <h1>About</h1> <Link href="/">Home</Link> </div> ) } Add a test to check your navigation is working correctly: describe('Navigation', () => { it('should navigate to the about page', () => { // Start from the index page cy.visit('http://localhost:3000/') // Find a link with an href attribute containing "about" and click it cy.get('a[href*="about"]').click() // The new url should include "/about" cy.url().should('include', '/about') // The new page should contain an h1 with "About" cy.get('h1').contains('About') }) }) ### Running E2E Tests Cypress will simulate a user navigating your application, this requires your Next.js server to be running. We recommend running your tests against your production code to more closely resemble how your application will behave. Run `npm run build && npm run start` to build your Next.js application, then run `npm run cypress:open` in another terminal window to start Cypress and run your E2E Testing suite. > **Good to know:** > > * You can use `cy.visit("/")` instead of `cy.visit("http://localhost:3000/")` by adding `baseUrl: 'http://localhost:3000'` to the `cypress.config.js` configuration file. > * Alternatively, you can install the `start-server-and-test` package to run the Next.js production server in conjunction with Cypress. After installation, add `"test": "start-server-and-test start http://localhost:3000 cypress"` to your `package.json` scripts field. Remember to rebuild your application after new changes. ## Creating your first Cypress component test Component tests build and mount a specific component without having to bundle your whole application or start a server. Select **Component Testing** in the Cypress app, then select **Next.js** as your front-end framework. A `cypress/component` folder will be created in your project, and a `cypress.config.js` file will be updated to enable Component Testing. Ensure your `cypress.config` file has the following configuration: import { defineConfig } from 'cypress' export default defineConfig({ component: { devServer: { framework: 'next', bundler: 'webpack', }, }, }) Assuming the same components from the previous section, add a test to validate a component is rendering the expected output: import Page from '../../app/page' describe('<Page />', () => { it('should render and display expected content', () => { // Mount the React component for the Home page cy.mount(<Page />) // The new page should contain an h1 with "Home" cy.get('h1').contains('Home') // Validate that a link with the expected URL is present // Following the link is better suited to an E2E test cy.get('a[href="/about"]').should('be.visible') }) }) > **Good to know**: > > * Cypress currently doesn't support Component Testing for `async` Server Components. We recommend using E2E testing. > * Since component tests do not require a Next.js server, features like `<Image />` that rely on a server being available may not function out-of-the-box. ### Running Component Tests Run `npm run cypress:open` in your terminal to start Cypress and run your Component Testing suite. ## Continuous Integration (CI) In addition to interactive testing, you can also run Cypress headlessly using the `cypress run` command, which is better suited for CI environments: { "scripts": { //... "e2e": "start-server-and-test dev http://localhost:3000 \"cypress open --e2e\"", "e2e:headless": "start-server-and-test dev http://localhost:3000 \"cypress run --e2e\"", "component": "cypress open --component", "component:headless": "cypress run --component" } } You can learn more about Cypress and Continuous Integration from these resources: * Next.js with Cypress example * Cypress Continuous Integration Docs * Cypress GitHub Actions Guide * Official Cypress GitHub Action * Cypress Discord --- ## Page: https://nextjs.org/docs/app/deep-dive #### Subscribe to our newsletter Stay updated on new releases and features, guides, and case studies. --- ## Page: https://nextjs.org/docs/app/api-reference #### Subscribe to our newsletter Stay updated on new releases and features, guides, and case studies. --- ## Page: https://nextjs.org/docs/app/api-reference/directives #### Subscribe to our newsletter Stay updated on new releases and features, guides, and case studies. --- ## Page: https://nextjs.org/docs/app/api-reference/directives/use-cache This feature is currently available in the canary channel and subject to change. Try it out by upgrading Next.js, and share your feedback on GitHub. The `use cache` directive allows you to mark a route, React component, or a function as cacheable. It can be used at the top of a file to indicate that all exports in the file should be cached, or inline at the top of function or component to cache the return value. ## Usage `use cache` is currently an experimental feature. To enable it, add the `useCache` option to your `next.config.ts` file: import type { NextConfig } from 'next' const nextConfig: NextConfig = { experimental: { useCache: true, }, } export default nextConfig > **Good to know:** `use cache` can also be enabled with the `dynamicIO` option. Then, add `use cache` at the file, component, or function level: // File level 'use cache' export default async function Page() { // ... } // Component level export async function MyComponent() { 'use cache' return <></> } // Function level export async function getData() { 'use cache' const data = await fetch('/api/data') return data } ## How `use cache` works ### Cache keys A cache entry's key is generated using a serialized version of its inputs, which includes: * Build ID (generated for each build) * Function ID (a secure identifier unique to the function) * The serializable function arguments (or props). The arguments passed to the cached function, as well as any values it reads from the parent scope automatically become a part of the key. This means, the same cache entry will be reused as long as its inputs are the same. ## Non-serializable arguments Any non-serializable arguments, props, or closed-over values will turn into references inside the cached function, and can be only passed through and not inspected nor modified. These non-serializable values will be filled in at the request time and won't become a part of the cache key. For example, a cached function can take in JSX as a `children` prop and return `<div>{children}</div>`, but it won't be able to introspect the actual `children` object. This allows you to nest uncached content inside a cached component. function CachedComponent({ children }: { children: ReactNode }) { 'use cache' return <div>{children}</div> } ## Return values The return value of the cacheable function must be serializable. This ensures that the cached data can be stored and retrieved correctly. ## `use cache` at build time When used at the top of a layout or page, the route segment will be prerendered, allowing it to later be revalidated. This means `use cache` cannot be used with request-time APIs like `cookies` or `headers`. ## `use cache` at runtime On the **server**, the cache entries of individual components or functions will be cached in-memory. Then, on the **client**, any content returned from the server cache will be stored in the browser's memory for the duration of the session or until revalidated. ## During revalidation By default, `use cache` has server-side revalidation period of **15 minutes**. While this period may be useful for content that doesn't require frequent updates, you can use the `cacheLife` and `cacheTag` APIs to configure when the individual cache entries should be revalidated. * `cacheLife`: Configure the cache entry lifetime. * `cacheTag`: Create tags for on-demand revalidation. Both of these APIs integrate across the client and server caching layers, meaning you can configure your caching semantics in one place and have them apply everywhere. See the `cacheLife` and `cacheTag` API docs for more information. ## Examples ### Caching an entire route with `use cache` To prerender an entire route, add `use cache` to the top of **both** the `layout` and `page` files. Each of these segments are treated as separate entry points in your application, and will be cached independently. 'use cache' export default function Layout({ children }: { children: ReactNode }) { return <div>{children}</div> } Any components imported and nested in `page` file will inherit the cache behavior of `page`. 'use cache' async function Users() { const users = await fetch('/api/users') // loop through users } export default function Page() { return ( <main> <Users /> </main> ) } > **Good to know**: > > * If `use cache` is added only to the `layout` or the `page`, only that route segment and any components imported into it will be cached. > * If any of the nested children in the route use Dynamic APIs, then the route will opt out of prerendering. ### Caching a component's output with `use cache` You can use `use cache` at the component level to cache any fetches or computations performed within that component. The cache entry will be reused as long as the serialized props produce the same value in each instance. export async function Bookings({ type = 'haircut' }: BookingsProps) { 'use cache' async function getBookingsData() { const data = await fetch(`/api/bookings?type=${encodeURIComponent(type)}`) return data } return //... } interface BookingsProps { type: string } ### Caching function output with `use cache` Since you can add `use cache` to any asynchronous function, you aren't limited to caching components or routes only. You might want to cache a network request, a database query, or a slow computation. export async function getData() { 'use cache' const data = await fetch('/api/data') return data } ### Interleaving If you need to pass non-serializable arguments to a cacheable function, you can pass them as `children`. This means the `children` reference can change without affecting the cache entry. export default async function Page() { const uncachedData = await getData() return ( <CacheComponent> <DynamicComponent data={uncachedData} /> </CacheComponent> ) } async function CacheComponent({ children }: { children: ReactNode }) { 'use cache' const cachedData = await fetch('/api/cached-data') return ( <div> <PrerenderedComponent data={cachedData} /> {children} </div> ) } You can also pass Server Actions through cached components to Client Components without invoking them inside the cacheable function. import ClientComponent from './ClientComponent' export default async function Page() { const performUpdate = async () => { 'use server' // Perform some server-side update await db.update(...) } return <CacheComponent performUpdate={performUpdate} /> } async function CachedComponent({ performUpdate, }: { performUpdate: () => Promise<void> }) { 'use cache' // Do not call performUpdate here return <ClientComponent action={performUpdate} /> } 'use client' export default function ClientComponent({ action, }: { action: () => Promise<void> }) { return <button onClick={action}>Update</button> } --- ## Page: https://nextjs.org/docs/app/api-reference/directives/use-client The `use client` directive designates a component to be rendered on the **client side** and should be used when creating interactive user interfaces (UI) that require client-side JavaScript capabilities, such as state management, event handling, and access to browser APIs. This is a React feature. ## Usage To designate a component as a Client Component, add the `use client` directive **at the top of the file**, before any imports: app/components/counter.tsx 'use client' import { useState } from 'react' export default function Counter() { const [count, setCount] = useState(0) return ( <div> <p>Count: {count}</p> <button onClick={() => setCount(count + 1)}>Increment</button> </div> ) } ## Nesting Client Components within Server Components Combining Server and Client Components allows you to build applications that are both performant and interactive: 1. **Server Components**: Use for static content, data fetching, and SEO-friendly elements. 2. **Client Components**: Use for interactive elements that require state, effects, or browser APIs. 3. **Component composition**: Nest Client Components within Server Components as needed for a clear separation of server and client logic. In the following example: * `Header` is a Server Component handling static content. * `Counter` is a Client Component enabling interactivity within the page. app/page.tsx import Header from './header' import Counter from './counter' // This is a Client Component export default function Page() { return ( <div> <Header /> <Counter /> </div> ) } ## Reference See the React documentation for more information on `use client`. --- ## Page: https://nextjs.org/docs/app/api-reference/directives/use-server The `use server` directive designates a function or file to be executed on the **server side**. It can be used at the top of a file to indicate that all functions in the file are server-side, or inline at the top of a function to mark the function as a Server Function. This is a React feature. ## Using `use server` at the top of a file The following example shows a file with a `use server` directive at the top. All functions in the file are executed on the server. 'use server' import { db } from '@/lib/db' // Your database client export async function createUser(data: { name: string; email: string }) { const user = await db.user.create({ data }) return user } ### Using Server Functions in a Client Component To use Server Functions in Client Components you need to create your Server Functions in a dedicated file using the `use server` directive at the top of the file. These Server Functions can then be imported into Client and Server Components and executed. Assuming you have a `fetchUsers` Server Function in `actions.ts`: 'use server' import { db } from '@/lib/db' // Your database client export async function fetchUsers() { const users = await db.user.findMany() return users } Then you can import the `fetchUsers` Server Function into a Client Component and execute it on the client-side. 'use client' import { fetchUsers } from '../actions' export default function MyButton() { return <button onClick={() => fetchUsers()}>Fetch Users</button> } ## Using `use server` inline In the following example, `use server` is used inline at the top of a function to mark it as a Server Function: import { db } from '@/lib/db' // Your database client export default function UserList() { async function fetchUsers() { 'use server' const users = await db.user.findMany() return users } return <button onClick={() => fetchUsers()}>Fetch Users</button> } ## Security considerations When using the `use server` directive, it's important to ensure that all server-side logic is secure and that sensitive data remains protected. Always authenticate and authorize users before performing sensitive server-side operations. 'use server' import { db } from '@/lib/db' // Your database client import { authenticate } from '@/lib/auth' // Your authentication library export async function createUser( data: { name: string; email: string }, token: string ) { const user = authenticate(token) if (!user) { throw new Error('Unauthorized') } const newUser = await db.user.create({ data }) return newUser } ## Reference See the React documentation for more information on `use server`. --- ## Page: https://nextjs.org/docs/app/api-reference/components #### Subscribe to our newsletter Stay updated on new releases and features, guides, and case studies. --- ## Page: https://nextjs.org/docs/app/api-reference/components/font ## Font Module This API reference will help you understand how to use `next/font/google` and `next/font/local`. For features and usage, please see the Optimizing Fonts page. ### Font Function Arguments For usage, review Google Fonts and Local Fonts. | Key | `font/google` | `font/local` | Type | Required | | --- | --- | --- | --- | --- | | `src` | | | String or Array of Objects | Yes | | `weight` | | | String or Array | Required/Optional | | `style` | | | String or Array | \- | | `subsets` | | | Array of Strings | \- | | `axes` | | | Array of Strings | \- | | `display` | | | String | \- | | `preload` | | | Boolean | \- | | `fallback` | | | Array of Strings | \- | | `adjustFontFallback` | | | Boolean or String | \- | | `variable` | | | String | \- | | `declarations` | | | Array of Objects | \- | ### `src` The path of the font file as a string or an array of objects (with type `Array<{path: string, weight?: string, style?: string}>`) relative to the directory where the font loader function is called. Used in `next/font/local` * Required Examples: * `src:'./fonts/my-font.woff2'` where `my-font.woff2` is placed in a directory named `fonts` inside the `app` directory * `src:[{path: './inter/Inter-Thin.ttf', weight: '100',},{path: './inter/Inter-Regular.ttf',weight: '400',},{path: './inter/Inter-Bold-Italic.ttf', weight: '700',style: 'italic',},]` * if the font loader function is called in `app/page.tsx` using `src:'../styles/fonts/my-font.ttf'`, then `my-font.ttf` is placed in `styles/fonts` at the root of the project ### `weight` The font `weight` with the following possibilities: * A string with possible values of the weights available for the specific font or a range of values if it's a variable font * An array of weight values if the font is not a variable google font. It applies to `next/font/google` only. Used in `next/font/google` and `next/font/local` * Required if the font being used is **not** variable Examples: * `weight: '400'`: A string for a single weight value - for the font `Inter`, the possible values are `'100'`, `'200'`, `'300'`, `'400'`, `'500'`, `'600'`, `'700'`, `'800'`, `'900'` or `'variable'` where `'variable'` is the default) * `weight: '100 900'`: A string for the range between `100` and `900` for a variable font * `weight: ['100','400','900']`: An array of 3 possible values for a non variable font ### `style` The font `style` with the following possibilities: * A string value with default value of `'normal'` * An array of style values if the font is not a variable google font. It applies to `next/font/google` only. Used in `next/font/google` and `next/font/local` * Optional Examples: * `style: 'italic'`: A string - it can be `normal` or `italic` for `next/font/google` * `style: 'oblique'`: A string - it can take any value for `next/font/local` but is expected to come from standard font styles * `style: ['italic','normal']`: An array of 2 values for `next/font/google` - the values are from `normal` and `italic` ### `subsets` The font `subsets` defined by an array of string values with the names of each subset you would like to be preloaded. Fonts specified via `subsets` will have a link preload tag injected into the head when the `preload` option is true, which is the default. Used in `next/font/google` * Optional Examples: * `subsets: ['latin']`: An array with the subset `latin` You can find a list of all subsets on the Google Fonts page for your font. ### `axes` Some variable fonts have extra `axes` that can be included. By default, only the font weight is included to keep the file size down. The possible values of `axes` depend on the specific font. Used in `next/font/google` * Optional Examples: * `axes: ['slnt']`: An array with value `slnt` for the `Inter` variable font which has `slnt` as additional `axes` as shown here. You can find the possible `axes` values for your font by using the filter on the Google variable fonts page and looking for axes other than `wght` ### `display` The font `display` with possible string values of `'auto'`, `'block'`, `'swap'`, `'fallback'` or `'optional'` with default value of `'swap'`. Used in `next/font/google` and `next/font/local` * Optional Examples: * `display: 'optional'`: A string assigned to the `optional` value ### `preload` A boolean value that specifies whether the font should be preloaded or not. The default is `true`. Used in `next/font/google` and `next/font/local` * Optional Examples: * `preload: false` ### `fallback` The fallback font to use if the font cannot be loaded. An array of strings of fallback fonts with no default. * Optional Used in `next/font/google` and `next/font/local` Examples: * `fallback: ['system-ui', 'arial']`: An array setting the fallback fonts to `system-ui` or `arial` ### `adjustFontFallback` * For `next/font/google`: A boolean value that sets whether an automatic fallback font should be used to reduce Cumulative Layout Shift. The default is `true`. * For `next/font/local`: A string or boolean `false` value that sets whether an automatic fallback font should be used to reduce Cumulative Layout Shift. The possible values are `'Arial'`, `'Times New Roman'` or `false`. The default is `'Arial'`. Used in `next/font/google` and `next/font/local` * Optional Examples: * `adjustFontFallback: false`: for `next/font/google` * `adjustFontFallback: 'Times New Roman'`: for `next/font/local` ### `variable` A string value to define the CSS variable name to be used if the style is applied with the CSS variable method. Used in `next/font/google` and `next/font/local` * Optional Examples: * `variable: '--my-font'`: The CSS variable `--my-font` is declared ### `declarations` An array of font face descriptor key-value pairs that define the generated `@font-face` further. Used in `next/font/local` * Optional Examples: * `declarations: [{ prop: 'ascent-override', value: '90%' }]` ## Applying Styles You can apply the font styles in three ways: * `className` * `style` * CSS Variables ### `className` Returns a read-only CSS `className` for the loaded font to be passed to an HTML element. <p className={inter.className}>Hello, Next.js!</p> ### `style` Returns a read-only CSS `style` object for the loaded font to be passed to an HTML element, including `style.fontFamily` to access the font family name and fallback fonts. <p style={inter.style}>Hello World</p> ### CSS Variables If you would like to set your styles in an external style sheet and specify additional options there, use the CSS variable method. In addition to importing the font, also import the CSS file where the CSS variable is defined and set the variable option of the font loader object as follows: import { Inter } from 'next/font/google' import styles from '../styles/component.module.css' const inter = Inter({ variable: '--font-inter', }) To use the font, set the `className` of the parent container of the text you would like to style to the font loader's `variable` value and the `className` of the text to the `styles` property from the external CSS file. <main className={inter.variable}> <p className={styles.text}>Hello World</p> </main> Define the `text` selector class in the `component.module.css` CSS file as follows: .text { font-family: var(--font-inter); font-weight: 200; font-style: italic; } In the example above, the text `Hello World` is styled using the `Inter` font and the generated font fallback with `font-weight: 200` and `font-style: italic`. ## Using a font definitions file Every time you call the `localFont` or Google font function, that font will be hosted as one instance in your application. Therefore, if you need to use the same font in multiple places, you should load it in one place and import the related font object where you need it. This is done using a font definitions file. For example, create a `fonts.ts` file in a `styles` folder at the root of your app directory. Then, specify your font definitions as follows: import { Inter, Lora, Source_Sans_3 } from 'next/font/google' import localFont from 'next/font/local' // define your variable fonts const inter = Inter() const lora = Lora() // define 2 weights of a non-variable font const sourceCodePro400 = Source_Sans_3({ weight: '400' }) const sourceCodePro700 = Source_Sans_3({ weight: '700' }) // define a custom local font where GreatVibes-Regular.ttf is stored in the styles folder const greatVibes = localFont({ src: './GreatVibes-Regular.ttf' }) export { inter, lora, sourceCodePro400, sourceCodePro700, greatVibes } You can now use these definitions in your code as follows: import { inter, lora, sourceCodePro700, greatVibes } from '../styles/fonts' export default function Page() { return ( <div> <p className={inter.className}>Hello world using Inter font</p> <p style={lora.style}>Hello world using Lora font</p> <p className={sourceCodePro700.className}> Hello world using Source_Sans_3 font with weight 700 </p> <p className={greatVibes.className}>My title in Great Vibes font</p> </div> ) } To make it easier to access the font definitions in your code, you can define a path alias in your `tsconfig.json` or `jsconfig.json` files as follows: { "compilerOptions": { "paths": { "@/fonts": ["./styles/fonts"] } } } You can now import any font definition as follows: import { greatVibes, sourceCodePro400 } from '@/fonts' ## Version Changes | Version | Changes | | --- | --- | | `v13.2.0` | `@next/font` renamed to `next/font`. Installation no longer required. | | `v13.0.0` | `@next/font` was added. | --- ## Page: https://nextjs.org/docs/app/api-reference/components/form The `<Form>` component extends the HTML `<form>` element to provide **prefetching** of loading UI, **client-side navigation** on submission, and **progressive enhancement**. It's useful for forms that update URL search params as it reduces the boilerplate code needed to achieve the above. Basic usage: import Form from 'next/form' export default function Page() { return ( <Form action="/search"> {/* On submission, the input value will be appended to the URL, e.g. /search?query=abc */} <input name="query" /> <button type="submit">Submit</button> </Form> ) } ## Reference The behavior of the `<Form>` component depends on whether the `action` prop is passed a `string` or `function`. * When `action` is a **string**, the `<Form>` behaves like a native HTML form that uses a **`GET`** method. The form data is encoded into the URL as search params, and when the form is submitted, it navigates to the specified URL. In addition, Next.js: * Prefetches the path when the form becomes visible, this preloads shared UI (e.g. `layout.js` and `loading.js`), resulting in faster navigation. * Performs a client-side navigation instead of a full page reload when the form is submitted. This retains shared UI and client-side state. * When `action` is a **function** (Server Action), `<Form>` behaves like a React form, executing the action when the form is submitted. ### `action` (string) Props When `action` is a string, the `<Form>` component supports the following props: | Prop | Example | Type | Required | | --- | --- | --- | --- | | `action` | `action="/search"` | `string` (URL or relative path) | Yes | | `replace` | `replace={false}` | `boolean` | \- | | `scroll` | `scroll={true}` | `boolean` | \- | | `prefetch` | `prefetch={true}` | `boolean` | \- | * **`action`**: The URL or path to navigate to when the form is submitted. * An empty string `""` will navigate to the same route with updated search params. * **`replace`**: Replaces the current history state instead of pushing a new one to the browser's history stack. Default is `false`. * **`scroll`**: Controls the scroll behavior during navigation. Defaults to `true`, this means it will scroll to the top of the new route, and maintain the scroll position for backwards and forwards navigation. * **`prefetch`**: Controls whether the path should be prefetched when the form becomes visible in the user's viewport. Defaults to `true`. ### `action` (function) Props When `action` is a function, the `<Form>` component supports the following prop: | Prop | Example | Type | Required | | --- | --- | --- | --- | | `action` | `action={myAction}` | `function` (Server Action) | Yes | * **`action`**: The Server Action to be called when the form is submitted. See the React docs for more. > **Good to know**: When `action` is a function, the `replace` and `scroll` props are ignored. ### Caveats * **`formAction`**: Can be used in a `<button>` or `<input type="submit">` fields to override the `action` prop. Next.js will perform a client-side navigation, however, this approach doesn't support prefetching. * When using `basePath`, you must also include it in the `formAction` path. e.g. `formAction="/base-path/search"`. * **`key`**: Passing a `key` prop to a string `action` is not supported. If you'd like to trigger a re-render or perform a mutation, consider using a function `action` instead. * **`onSubmit`**: Can be used to handle form submission logic. However, calling `event.preventDefault()` will override `<Form>` behavior such as navigating to the specified URL. * **`method`, `encType`, `target`**: Are not supported as they override `<Form>` behavior. * Similarly, `formMethod`, `formEncType`, and `formTarget` can be used to override the `method`, `encType`, and `target` props respectively, and using them will fallback to native browser behavior. * If you need to use these props, use the HTML `<form>` element instead. * **`<input type="file">`**: Using this input type when the `action` is a string will match browser behavior by submitting the filename instead of the file object. ## Examples ### Search form that leads to a search result page You can create a search form that navigates to a search results page by passing the path as an `action`: import Form from 'next/form' export default function Page() { return ( <Form action="/search"> <input name="query" /> <button type="submit">Submit</button> </Form> ) } When the user updates the query input field and submits the form, the form data will be encoded into the URL as search params, e.g. `/search?query=abc`. > **Good to know**: If you pass an empty string `""` to `action`, the form will navigate to the same route with updated search params. On the results page, you can access the query using the `searchParams` `page.js` prop and use it to fetch data from an external source. import { getSearchResults } from '@/lib/search' export default async function SearchPage({ searchParams, }: { searchParams: Promise<{ [key: string]: string | string[] | undefined }> }) { const results = await getSearchResults((await searchParams).query) return <div>...</div> } When the `<Form>` becomes visible in the user's viewport, shared UI (such as `layout.js` and `loading.js`) on the `/search` page will be prefetched. On submission, the form will immediately navigate to the new route and show loading UI while the results are being fetched. You can design the fallback UI using `loading.js`: export default function Loading() { return <div>Loading...</div> } To cover cases when shared UI hasn't yet loaded, you can show instant feedback to the user using `useFormStatus`. First, create a component that displays a loading state when the form is pending: 'use client' import { useFormStatus } from 'react-dom' export default function SearchButton() { const status = useFormStatus() return ( <button type="submit">{status.pending ? 'Searching...' : 'Search'}</button> ) } Then, update the search form page to use the `SearchButton` component: import Form from 'next/form' import { SearchButton } from '@/ui/search-button' export default function Page() { return ( <Form action="/search"> <input name="query" /> <SearchButton /> </Form> ) } ### Mutations with Server Actions You can perform mutations by passing a function to the `action` prop. import Form from 'next/form' import { createPost } from '@/posts/actions' export default function Page() { return ( <Form action={createPost}> <input name="title" /> {/* ... */} <button type="submit">Create Post</button> </Form> ) } After a mutation, it's common to redirect to the new resource. You can use the `redirect` function from `next/navigation` to navigate to the new post page. > **Good to know**: Since the "destination" of the form submission is not known until the action is executed, `<Form>` cannot automatically prefetch shared UI. 'use server' import { redirect } from 'next/navigation' export async function createPost(formData: FormData) { // Create a new post // ... // Redirect to the new post redirect(`/posts/${data.id}`) } Then, in the new page, you can fetch data using the `params` prop: import { getPost } from '@/posts/data' export default async function PostPage({ params, }: { params: Promise<{ id: string }> }) { const { id } = await params const data = await getPost(id) return ( <div> <h1>{data.title}</h1> {/* ... */} </div> ) } See the Server Actions docs for more examples. --- ## Page: https://nextjs.org/docs/app/api-reference/components/image Examples * Image Component This API reference will help you understand how to use props and configuration options available for the Image Component. For features and usage, please see the Image Component page. import Image from 'next/image' export default function Page() { return ( <Image src="/profile.png" width={500} height={500} alt="Picture of the author" /> ) } ## Props Here's a summary of the props available for the Image Component: | Prop | Example | Type | Status | | --- | --- | --- | --- | | `src` | `src="/profile.png"` | String | Required | | `width` | `width={500}` | Integer (px) | Required | | `height` | `height={500}` | Integer (px) | Required | | `alt` | `alt="Picture of the author"` | String | Required | | `loader` | `loader={imageLoader}` | Function | \- | | `fill` | `fill={true}` | Boolean | \- | | `sizes` | `sizes="(max-width: 768px) 100vw, 33vw"` | String | \- | | `quality` | `quality={80}` | Integer (1-100) | \- | | `priority` | `priority={true}` | Boolean | \- | | `placeholder` | `placeholder="blur"` | String | \- | | `style` | `style={{objectFit: "contain"}}` | Object | \- | | `onLoadingComplete` | `onLoadingComplete={img => done())}` | Function | Deprecated | | `onLoad` | `onLoad={event => done())}` | Function | \- | | `onError` | `onError(event => fail()}` | Function | \- | | `loading` | `loading="lazy"` | String | \- | | `blurDataURL` | `blurDataURL="data:image/jpeg..."` | String | \- | | `overrideSrc` | `overrideSrc="/seo.png"` | String | \- | ## Required Props The Image Component requires the following properties: `src`, `alt`, `width` and `height` (or `fill`). import Image from 'next/image' export default function Page() { return ( <div> <Image src="/profile.png" width={500} height={500} alt="Picture of the author" /> </div> ) } ### `src` Must be one of the following: * A statically imported image file * A path string. This can be either an absolute external URL, or an internal path depending on the loader prop. When using the default loader, also consider the following for source images: * When src is an external URL, you must also configure remotePatterns * When src is animated or not a known format (JPEG, PNG, WebP, AVIF, GIF, TIFF) the image will be served as-is * When src is SVG format, it will be blocked unless `unoptimized` or `dangerouslyAllowSVG` is enabled ### `width` The `width` property represents the _intrinsic_ image width in pixels. This property is used to infer the correct aspect ratio of the image and avoid layout shift during loading. It does not determine the rendered size of the image, which is controlled by CSS, similar to the `width` attribute in the HTML `<img>` tag. Required, except for statically imported images or images with the `fill` property. ### `height` The `height` property represents the _intrinsic_ image height in pixels. This property is used to infer the correct aspect ratio of the image and avoid layout shift during loading. It does not determine the rendered size of the image, which is controlled by CSS, similar to the `height` attribute in the HTML `<img>` tag. Required, except for statically imported images or images with the `fill` property. > **Good to know:** > > * Combined, both `width` and `height` properties are used to determine the aspect ratio of the image which used by browsers to reserve space for the image before it loads. > * The intrinsic size does not always mean the rendered size in the browser, which will be determined by the parent container. For example, if the parent container is smaller than the intrinsic size, the image will be scaled down to fit the container. > * You can use the `fill` property when the width and height are unknown. ### `alt` The `alt` property is used to describe the image for screen readers and search engines. It is also the fallback text if images have been disabled or an error occurs while loading the image. It should contain text that could replace the image without changing the meaning of the page. It is not meant to supplement the image and should not repeat information that is already provided in the captions above or below the image. If the image is purely decorative or not intended for the user, the `alt` property should be an empty string (`alt=""`). Learn more ## Optional Props The `<Image />` component accepts a number of additional properties beyond those which are required. This section describes the most commonly-used properties of the Image component. Find details about more rarely-used properties in the Advanced Props section. ### `loader` A custom function used to resolve image URLs. A `loader` is a function returning a URL string for the image, given the following parameters: * `src` * `width` * `quality` Here is an example of using a custom loader: 'use client' import Image from 'next/image' const imageLoader = ({ src, width, quality }) => { return `https://example.com/${src}?w=${width}&q=${quality || 75}` } export default function Page() { return ( <Image loader={imageLoader} src="me.png" alt="Picture of the author" width={500} height={500} /> ) } > **Good to know**: Using props like `loader`, which accept a function, requires using Client Components to serialize the provided function. Alternatively, you can use the loaderFile configuration in `next.config.js` to configure every instance of `next/image` in your application, without passing a prop. ### `fill` fill={true} // {true} | {false} A boolean that causes the image to fill the parent element, which is useful when the `width` and `height` are unknown. The parent element _must_ assign `position: "relative"`, `position: "fixed"`, or `position: "absolute"` style. By default, the img element will automatically be assigned the `position: "absolute"` style. If no styles are applied to the image, the image will stretch to fit the container. You may prefer to set `object-fit: "contain"` for an image which is letterboxed to fit the container and preserve aspect ratio. Alternatively, `object-fit: "cover"` will cause the image to fill the entire container and be cropped to preserve aspect ratio. For more information, see also: * `position` * `object-fit` * `object-position` ### `sizes` A string, similar to a media query, that provides information about how wide the image will be at different breakpoints. The value of `sizes` will greatly affect performance for images using `fill` or which are styled to have a responsive size. The `sizes` property serves two important purposes related to image performance: * First, the value of `sizes` is used by the browser to determine which size of the image to download, from `next/image`'s automatically generated `srcset`. When the browser chooses, it does not yet know the size of the image on the page, so it selects an image that is the same size or larger than the viewport. The `sizes` property allows you to tell the browser that the image will actually be smaller than full screen. If you don't specify a `sizes` value in an image with the `fill` property, a default value of `100vw` (full screen width) is used. * Second, the `sizes` property changes the behavior of the automatically generated `srcset` value. If no `sizes` value is present, a small `srcset` is generated, suitable for a fixed-size image (1x/2x/etc). If `sizes` is defined, a large `srcset` is generated, suitable for a responsive image (640w/750w/etc). If the `sizes` property includes sizes such as `50vw`, which represent a percentage of the viewport width, then the `srcset` is trimmed to not include any values which are too small to ever be necessary. For example, if you know your styling will cause an image to be full-width on mobile devices, in a 2-column layout on tablets, and a 3-column layout on desktop displays, you should include a sizes property such as the following: import Image from 'next/image' export default function Page() { return ( <div className="grid-element"> <Image fill src="/example.png" sizes="(max-width: 768px) 100vw, (max-width: 1200px) 50vw, 33vw" /> </div> ) } This example `sizes` could have a dramatic effect on performance metrics. Without the `33vw` sizes, the image selected from the server would be 3 times as wide as it needs to be. Because file size is proportional to the square of the width, without `sizes` the user would download an image that's 9 times larger than necessary. Learn more about `srcset` and `sizes`: * web.dev * mdn ### `quality` quality={75} // {number 1-100} The quality of the optimized image, an integer between `1` and `100`, where `100` is the best quality and therefore largest file size. Defaults to `75`. If the `qualities` configuration is defined in `next.config.js`, the `quality` prop must match one of the values defined in the configuration. > **Good to know**: If the original source image was already low quality, setting the quality prop too high could cause the resulting optimized image to be larger than the original source image. ### `priority` priority={false} // {false} | {true} When true, Next.js will preload the image. Lazy loading is automatically disabled for images using `priority`. If the `loading` property is also used and set to `lazy`, the `priority` property can't be used. The `loading` property is only meant for advanced use cases. Remove `loading` when `priority` is needed. You should use the `priority` property on any image detected as the Largest Contentful Paint (LCP) element. It may be appropriate to have multiple priority images, as different images may be the LCP element for different viewport sizes. Should only be used when the image is visible above the fold. Defaults to `false`. ### `placeholder` placeholder = 'empty' // "empty" | "blur" | "data:image/..." A placeholder to use while the image is loading. Possible values are `blur`, `empty`, or `data:image/...`. Defaults to `empty`. When `blur`, the `blurDataURL` property will be used as the placeholder. If `src` is an object from a static import and the imported image is `.jpg`, `.png`, `.webp`, or `.avif`, then `blurDataURL` will be automatically populated, except when the image is detected to be animated. For dynamic images, you must provide the `blurDataURL` property. Solutions such as Plaiceholder can help with `base64` generation. When `data:image/...`, the Data URL will be used as the placeholder while the image is loading. When `empty`, there will be no placeholder while the image is loading, only empty space. Try it out: * Demo the `blur` placeholder * Demo the shimmer effect with data URL `placeholder` prop * Demo the color effect with `blurDataURL` prop ## Advanced Props In some cases, you may need more advanced usage. The `<Image />` component optionally accepts the following advanced properties. ### `style` Allows passing CSS styles to the underlying image element. const imageStyle = { borderRadius: '50%', border: '1px solid #fff', } export default function ProfileImage() { return <Image src="..." style={imageStyle} /> } Remember that the required width and height props can interact with your styling. If you use styling to modify an image's width, you should also style its height to `auto` to preserve its intrinsic aspect ratio, or your image will be distorted. ### `onLoadingComplete` 'use client' <Image onLoadingComplete={(img) => console.log(img.naturalWidth)} /> > **Warning**: Deprecated since Next.js 14 in favor of `onLoad`. A callback function that is invoked once the image is completely loaded and the placeholder has been removed. The callback function will be called with one argument, a reference to the underlying `<img>` element. > **Good to know**: Using props like `onLoadingComplete`, which accept a function, requires using Client Components to serialize the provided function. ### `onLoad` <Image onLoad={(e) => console.log(e.target.naturalWidth)} /> A callback function that is invoked once the image is completely loaded and the placeholder has been removed. The callback function will be called with one argument, the Event which has a `target` that references the underlying `<img>` element. > **Good to know**: Using props like `onLoad`, which accept a function, requires using Client Components to serialize the provided function. ### `onError` <Image onError={(e) => console.error(e.target.id)} /> A callback function that is invoked if the image fails to load. > **Good to know**: Using props like `onError`, which accept a function, requires using Client Components to serialize the provided function. ### `loading` loading = 'lazy' // {lazy} | {eager} The loading behavior of the image. Defaults to `lazy`. When `lazy`, defer loading the image until it reaches a calculated distance from the viewport. When `eager`, load the image immediately. Learn more about the `loading` attribute. ### `blurDataURL` A Data URL to be used as a placeholder image before the `src` image successfully loads. Only takes effect when combined with `placeholder="blur"`. Must be a base64-encoded image. It will be enlarged and blurred, so a very small image (10px or less) is recommended. Including larger images as placeholders may harm your application performance. Try it out: * Demo the default `blurDataURL` prop * Demo the color effect with `blurDataURL` prop You can also generate a solid color Data URL to match the image. ### `unoptimized` unoptimized = {false} // {false} | {true} When true, the source image will be served as-is from the `src` instead of changing quality, size, or format. Defaults to `false`. This is useful for images that do not benefit from optimization such as small images (less than 1KB), vector images (SVG), or animated images (GIF). import Image from 'next/image' const UnoptimizedImage = (props) => { return <Image {...props} unoptimized /> } Since Next.js 12.3.0, this prop can be assigned to all images by updating `next.config.js` with the following configuration: module.exports = { images: { unoptimized: true, }, } ### `overrideSrc` When providing the `src` prop to the `<Image>` component, both the `srcset` and `src` attributes are generated automatically for the resulting `<img>`. <Image src="/me.jpg" /> <img srcset=" /_next/image?url=%2Fme.jpg&w=640&q=75 1x, /_next/image?url=%2Fme.jpg&w=828&q=75 2x " src="/_next/image?url=%2Fme.jpg&w=828&q=75" /> In some cases, it is not desirable to have the `src` attribute generated and you may wish to override it using the `overrideSrc` prop. For example, when upgrading an existing website from `<img>` to `<Image>`, you may wish to maintain the same `src` attribute for SEO purposes such as image ranking or avoiding recrawl. <Image src="/me.jpg" overrideSrc="/override.jpg" /> <img srcset=" /_next/image?url=%2Fme.jpg&w=640&q=75 1x, /_next/image?url=%2Fme.jpg&w=828&q=75 2x " src="/override.jpg" /> ### decoding A hint to the browser indicating if it should wait for the image to be decoded before presenting other content updates or not. Defaults to `async`. Possible values are the following: * `async` - Asynchronously decode the image and allow other content to be rendered before it completes. * `sync` - Synchronously decode the image for atomic presentation with other content. * `auto` - No preference for the decoding mode; the browser decides what's best. Learn more about the `decoding` attribute. ### Other Props Other properties on the `<Image />` component will be passed to the underlying `img` element with the exception of the following: * `srcSet`. Use Device Sizes instead. ## Configuration Options In addition to props, you can configure the Image Component in `next.config.js`. The following options are available: ### `localPatterns` You can optionally configure `localPatterns` in your `next.config.js` file in order to allow specific paths to be optimized and block all others paths. module.exports = { images: { localPatterns: [ { pathname: '/assets/images/**', search: '', }, ], }, } > **Good to know**: The example above will ensure the `src` property of `next/image` must start with `/assets/images/` and must not have a query string. Attempting to optimize any other path will respond with 400 Bad Request. ### `remotePatterns` To protect your application from malicious users, configuration is required in order to use external images. This ensures that only external images from your account can be served from the Next.js Image Optimization API. These external images can be configured with the `remotePatterns` property in your `next.config.js` file, as shown below: module.exports = { images: { remotePatterns: [new URL('https://example.com/account123/**')], }, } Versions of Next.js prior to 15.3.0 can configure `remotePatterns` using the object: module.exports = { images: { remotePatterns: [ { protocol: 'https', hostname: 'example.com', port: '', pathname: '/account123/**', search: '', }, ], }, } > **Good to know**: The example above will ensure the `src` property of `next/image` must start with `https://example.com/account123/` and must not have a query string. Any other protocol, hostname, port, or unmatched path will respond with 400 Bad Request. Below is an example of the `remotePatterns` property in the `next.config.js` file using a wildcard pattern in the `hostname`: module.exports = { images: { remotePatterns: [ { protocol: 'https', hostname: '**.example.com', port: '', search: '', }, ], }, } > **Good to know**: The example above will ensure the `src` property of `next/image` must start with `https://img1.example.com` or `https://me.avatar.example.com` or any number of subdomains. It cannot have a port or query string. Any other protocol or unmatched hostname will respond with 400 Bad Request. Wildcard patterns can be used for both `pathname` and `hostname` and have the following syntax: * `*` match a single path segment or subdomain * `**` match any number of path segments at the end or subdomains at the beginning The `**` syntax does not work in the middle of the pattern. > **Good to know**: When omitting `protocol`, `port`, `pathname`, or `search` then the wildcard `**` is implied. This is not recommended because it may allow malicious actors to optimize urls you did not intend. Below is an example of the `remotePatterns` property in the `next.config.js` file using `search`: module.exports = { images: { remotePatterns: [ { protocol: 'https', hostname: 'assets.example.com', search: '?v=1727111025337', }, ], }, } > **Good to know**: The example above will ensure the `src` property of `next/image` must start with `https://assets.example.com` and must have the exact query string `?v=1727111025337`. Any other protocol or query string will respond with 400 Bad Request. ### `domains` > **Warning**: Deprecated since Next.js 14 in favor of strict `remotePatterns` in order to protect your application from malicious users. Only use `domains` if you own all the content served from the domain. Similar to `remotePatterns`, the `domains` configuration can be used to provide a list of allowed hostnames for external images. However, the `domains` configuration does not support wildcard pattern matching and it cannot restrict protocol, port, or pathname. Below is an example of the `domains` property in the `next.config.js` file: module.exports = { images: { domains: ['assets.acme.com'], }, } ### `loaderFile` If you want to use a cloud provider to optimize images instead of using the Next.js built-in Image Optimization API, you can configure the `loaderFile` in your `next.config.js` like the following: module.exports = { images: { loader: 'custom', loaderFile: './my/image/loader.js', }, } This must point to a file relative to the root of your Next.js application. The file must export a default function that returns a string, for example: 'use client' export default function myImageLoader({ src, width, quality }) { return `https://example.com/${src}?w=${width}&q=${quality || 75}` } Alternatively, you can use the `loader` prop to configure each instance of `next/image`. Examples: * Custom Image Loader Configuration > **Good to know**: Customizing the image loader file, which accepts a function, requires using Client Components to serialize the provided function. ## Advanced The following configuration is for advanced use cases and is usually not necessary. If you choose to configure the properties below, you will override any changes to the Next.js defaults in future updates. ### `deviceSizes` If you know the expected device widths of your users, you can specify a list of device width breakpoints using the `deviceSizes` property in `next.config.js`. These widths are used when the `next/image` component uses `sizes` prop to ensure the correct image is served for user's device. If no configuration is provided, the default below is used. module.exports = { images: { deviceSizes: [640, 750, 828, 1080, 1200, 1920, 2048, 3840], }, } ### `imageSizes` You can specify a list of image widths using the `images.imageSizes` property in your `next.config.js` file. These widths are concatenated with the array of device sizes to form the full array of sizes used to generate image srcsets. The reason there are two separate lists is that imageSizes is only used for images which provide a `sizes` prop, which indicates that the image is less than the full width of the screen. **Therefore, the sizes in imageSizes should all be smaller than the smallest size in deviceSizes.** If no configuration is provided, the default below is used. module.exports = { images: { imageSizes: [16, 32, 48, 64, 96, 128, 256, 384], }, } ### `qualities` The default Image Optimization API will automatically allow all qualities from 1 to 100. If you wish to restrict the allowed qualities, you can add configuration to `next.config.js`. module.exports = { images: { qualities: [25, 50, 75], }, } In this example above, only three qualities are allowed: 25, 50, and 75. If the `quality` prop does not match a value in this array, the image will fail with 400 Bad Request. ### `formats` The default Image Optimization API will automatically detect the browser's supported image formats via the request's `Accept` header in order to determine the best output format. If the `Accept` header matches more than one of the configured formats, the first match in the array is used. Therefore, the array order matters. If there is no match (or the source image is animated), the Image Optimization API will fallback to the original image's format. If no configuration is provided, the default below is used. module.exports = { images: { formats: ['image/webp'], }, } You can enable AVIF support, which will fallback to the original format of the src image if the browser does not support AVIF: module.exports = { images: { formats: ['image/avif'], }, } > **Good to know**: > > * We still recommend using WebP for most use cases. > * AVIF generally takes 50% longer to encode but it compresses 20% smaller compared to WebP. This means that the first time an image is requested, it will typically be slower and then subsequent requests that are cached will be faster. > * If you self-host with a Proxy/CDN in front of Next.js, you must configure the Proxy to forward the `Accept` header. ## Caching Behavior The following describes the caching algorithm for the default loader. For all other loaders, please refer to your cloud provider's documentation. Images are optimized dynamically upon request and stored in the `<distDir>/cache/images` directory. The optimized image file will be served for subsequent requests until the expiration is reached. When a request is made that matches a cached but expired file, the expired image is served stale immediately. Then the image is optimized again in the background (also called revalidation) and saved to the cache with the new expiration date. The cache status of an image can be determined by reading the value of the `x-nextjs-cache` response header. The possible values are the following: * `MISS` - the path is not in the cache (occurs at most once, on the first visit) * `STALE` - the path is in the cache but exceeded the revalidate time so it will be updated in the background * `HIT` - the path is in the cache and has not exceeded the revalidate time The expiration (or rather Max Age) is defined by either the `minimumCacheTTL` configuration or the upstream image `Cache-Control` header, whichever is larger. Specifically, the `max-age` value of the `Cache-Control` header is used. If both `s-maxage` and `max-age` are found, then `s-maxage` is preferred. The `max-age` is also passed-through to any downstream clients including CDNs and browsers. * You can configure `minimumCacheTTL` to increase the cache duration when the upstream image does not include `Cache-Control` header or the value is very low. * You can configure `deviceSizes` and `imageSizes` to reduce the total number of possible generated images. * You can configure formats to disable multiple formats in favor of a single image format. ### `minimumCacheTTL` You can configure the Time to Live (TTL) in seconds for cached optimized images. In many cases, it's better to use a Static Image Import which will automatically hash the file contents and cache the image forever with a `Cache-Control` header of `immutable`. If no configuration is provided, the default below is used. module.exports = { images: { minimumCacheTTL: 60, // 1 minute }, } You can increase the TTL to reduce the number of revalidations and potentionally lower cost: module.exports = { images: { minimumCacheTTL: 2678400, // 31 days }, } The expiration (or rather Max Age) of the optimized image is defined by either the `minimumCacheTTL` or the upstream image `Cache-Control` header, whichever is larger. If you need to change the caching behavior per image, you can configure `headers` to set the `Cache-Control` header on the upstream image (e.g. `/some-asset.jpg`, not `/_next/image` itself). There is no mechanism to invalidate the cache at this time, so its best to keep `minimumCacheTTL` low. Otherwise you may need to manually change the `src` prop or delete `<distDir>/cache/images`. ### `disableStaticImages` The default behavior allows you to import static files such as `import icon from './icon.png'` and then pass that to the `src` property. In some cases, you may wish to disable this feature if it conflicts with other plugins that expect the import to behave differently. You can disable static image imports inside your `next.config.js`: module.exports = { images: { disableStaticImages: true, }, } ### `dangerouslyAllowSVG` The default loader does not optimize SVG images for a few reasons. First, SVG is a vector format meaning it can be resized losslessly. Second, SVG has many of the same features as HTML/CSS, which can lead to vulnerabilities without proper Content Security Policy (CSP) headers. Therefore, we recommended using the `unoptimized` prop when the `src` prop is known to be SVG. This happens automatically when `src` ends with `".svg"`. However, if you need to serve SVG images with the default Image Optimization API, you can set `dangerouslyAllowSVG` inside your `next.config.js`: module.exports = { images: { dangerouslyAllowSVG: true, contentDispositionType: 'attachment', contentSecurityPolicy: "default-src 'self'; script-src 'none'; sandbox;", }, } In addition, it is strongly recommended to also set `contentDispositionType` to force the browser to download the image, as well as `contentSecurityPolicy` to prevent scripts embedded in the image from executing. ### `contentDispositionType` The default loader sets the `Content-Disposition` header to `attachment` for added protection since the API can serve arbitrary remote images. The default value is `attachment` which forces the browser to download the image when visiting directly. This is particularly important when `dangerouslyAllowSVG` is true. You can optionally configure `inline` to allow the browser to render the image when visiting directly, without downloading it. module.exports = { images: { contentDispositionType: 'inline', }, } ## Animated Images The default loader will automatically bypass Image Optimization for animated images and serve the image as-is. Auto-detection for animated files is best-effort and supports GIF, APNG, and WebP. If you want to explicitly bypass Image Optimization for a given animated image, use the unoptimized prop. ## Responsive Images The default generated `srcset` contains `1x` and `2x` images in order to support different device pixel ratios. However, you may wish to render a responsive image that stretches with the viewport. In that case, you'll need to set `sizes` as well as `style` (or `className`). You can render a responsive image using one of the following methods below. ### Responsive image using a static import If the source image is not dynamic, you can statically import to create a responsive image: import Image from 'next/image' import me from '../photos/me.jpg' export default function Author() { return ( <Image src={me} alt="Picture of the author" sizes="100vw" style={{ width: '100%', height: 'auto', }} /> ) } Try it out: * Demo the image responsive to viewport ### Responsive image with aspect ratio If the source image is a dynamic or a remote url, you will also need to provide `width` and `height` to set the correct aspect ratio of the responsive image: import Image from 'next/image' export default function Page({ photoUrl }) { return ( <Image src={photoUrl} alt="Picture of the author" sizes="100vw" style={{ width: '100%', height: 'auto', }} width={500} height={300} /> ) } Try it out: * Demo the image responsive to viewport ### Responsive image with `fill` If you don't know the aspect ratio, you will need to set the `fill` prop and set `position: relative` on the parent. Optionally, you can set `object-fit` style depending on the desired stretch vs crop behavior: import Image from 'next/image' export default function Page({ photoUrl }) { return ( <div style={{ position: 'relative', width: '300px', height: '500px' }}> <Image src={photoUrl} alt="Picture of the author" sizes="300px" fill style={{ objectFit: 'contain', }} /> </div> ) } Try it out: * Demo the `fill` prop ## Theme Detection CSS If you want to display a different image for light and dark mode, you can create a new component that wraps two `<Image>` components and reveals the correct one based on a CSS media query. .imgDark { display: none; } @media (prefers-color-scheme: dark) { .imgLight { display: none; } .imgDark { display: unset; } } import styles from './theme-image.module.css' import Image, { ImageProps } from 'next/image' type Props = Omit<ImageProps, 'src' | 'priority' | 'loading'> & { srcLight: string srcDark: string } const ThemeImage = (props: Props) => { const { srcLight, srcDark, ...rest } = props return ( <> <Image {...rest} src={srcLight} className={styles.imgLight} /> <Image {...rest} src={srcDark} className={styles.imgDark} /> </> ) } > **Good to know**: The default behavior of `loading="lazy"` ensures that only the correct image is loaded. You cannot use `priority` or `loading="eager"` because that would cause both images to load. Instead, you can use `fetchPriority="high"`. Try it out: * Demo light/dark mode theme detection ## getImageProps For more advanced use cases, you can call `getImageProps()` to get the props that would be passed to the underlying `<img>` element, and instead pass to them to another component, style, canvas, etc. This also avoid calling React `useState()` so it can lead to better performance, but it cannot be used with the `placeholder` prop because the placeholder will never be removed. ### Theme Detection Picture If you want to display a different image for light and dark mode, you can use the `<picture>` element to display a different image based on the user's preferred color scheme. import { getImageProps } from 'next/image' export default function Page() { const common = { alt: 'Theme Example', width: 800, height: 400 } const { props: { srcSet: dark }, } = getImageProps({ ...common, src: '/dark.png' }) const { props: { srcSet: light, ...rest }, } = getImageProps({ ...common, src: '/light.png' }) return ( <picture> <source media="(prefers-color-scheme: dark)" srcSet={dark} /> <source media="(prefers-color-scheme: light)" srcSet={light} /> <img {...rest} /> </picture> ) } ### Art Direction If you want to display a different image for mobile and desktop, sometimes called Art Direction, you can provide different `src`, `width`, `height`, and `quality` props to `getImageProps()`. import { getImageProps } from 'next/image' export default function Home() { const common = { alt: 'Art Direction Example', sizes: '100vw' } const { props: { srcSet: desktop }, } = getImageProps({ ...common, width: 1440, height: 875, quality: 80, src: '/desktop.jpg', }) const { props: { srcSet: mobile, ...rest }, } = getImageProps({ ...common, width: 750, height: 1334, quality: 70, src: '/mobile.jpg', }) return ( <picture> <source media="(min-width: 1000px)" srcSet={desktop} /> <source media="(min-width: 500px)" srcSet={mobile} /> <img {...rest} style={{ width: '100%', height: 'auto' }} /> </picture> ) } ### Background CSS You can even convert the `srcSet` string to the `image-set()` CSS function to optimize a background image. import { getImageProps } from 'next/image' function getBackgroundImage(srcSet = '') { const imageSet = srcSet .split(', ') .map((str) => { const [url, dpi] = str.split(' ') return `url("${url}") ${dpi}` }) .join(', ') return `image-set(${imageSet})` } export default function Home() { const { props: { srcSet }, } = getImageProps({ alt: '', width: 128, height: 128, src: '/img.png' }) const backgroundImage = getBackgroundImage(srcSet) const style = { height: '100vh', width: '100vw', backgroundImage } return ( <main style={style}> <h1>Hello World</h1> </main> ) } ## Known Browser Bugs This `next/image` component uses browser native lazy loading, which may fallback to eager loading for older browsers before Safari 15.4. When using the blur-up placeholder, older browsers before Safari 12 will fallback to empty placeholder. When using styles with `width`/`height` of `auto`, it is possible to cause Layout Shift on older browsers before Safari 15 that don't preserve the aspect ratio. For more details, see this MDN video. * Safari 15 - 16.3 display a gray border while loading. Safari 16.4 fixed this issue. Possible solutions: * Use CSS `@supports (font: -apple-system-body) and (-webkit-appearance: none) { img[loading="lazy"] { clip-path: inset(0.6px) } }` * Use `priority` if the image is above the fold * Firefox 67+ displays a white background while loading. Possible solutions: * Enable AVIF `formats` * Use `placeholder` ## Version History | Version | Changes | | --- | --- | | `v15.3.0` | `remotePatterns` added support for array of `URL` objects. | | `v15.0.0` | `contentDispositionType` configuration default changed to `attachment`. | | `v14.2.23` | `qualities` configuration added. | | `v14.2.15` | `decoding` prop added and `localPatterns` configuration added. | | `v14.2.14` | `remotePatterns.search` prop added. | | `v14.2.0` | `overrideSrc` prop added. | | `v14.1.0` | `getImageProps()` is stable. | | `v14.0.0` | `onLoadingComplete` prop and `domains` config deprecated. | | `v13.4.14` | `placeholder` prop support for `data:/image...` | | `v13.2.0` | `contentDispositionType` configuration added. | | `v13.0.6` | `ref` prop added. | | `v13.0.0` | The `next/image` import was renamed to `next/legacy/image`. The `next/future/image` import was renamed to `next/image`. A codemod is available to safely and automatically rename your imports. `<span>` wrapper removed. `layout`, `objectFit`, `objectPosition`, `lazyBoundary`, `lazyRoot` props removed. `alt` is required. `onLoadingComplete` receives reference to `img` element. Built-in loader config removed. | | `v12.3.0` | `remotePatterns` and `unoptimized` configuration is stable. | | `v12.2.0` | Experimental `remotePatterns` and experimental `unoptimized` configuration added. `layout="raw"` removed. | | `v12.1.1` | `style` prop added. Experimental support for `layout="raw"` added. | | `v12.1.0` | `dangerouslyAllowSVG` and `contentSecurityPolicy` configuration added. | | `v12.0.9` | `lazyRoot` prop added. | | `v12.0.0` | `formats` configuration added. AVIF support added. Wrapper `<div>` changed to `<span>`. | | `v11.1.0` | `onLoadingComplete` and `lazyBoundary` props added. | | `v11.0.0` | `src` prop support for static import. `placeholder` prop added. `blurDataURL` prop added. | | `v10.0.5` | `loader` prop added. | | `v10.0.1` | `layout` prop added. | | `v10.0.0` | `next/image` introduced. | --- ## Page: https://nextjs.org/docs/app/api-reference/components/link `<Link>` is a React component that extends the HTML `<a>` element to provide prefetching and client-side navigation between routes. It is the primary way to navigate between routes in Next.js. Basic usage: import Link from 'next/link' export default function Page() { return <Link href="/dashboard">Dashboard</Link> } ## Reference The following props can be passed to the `<Link>` component: | Prop | Example | Type | Required | | --- | --- | --- | --- | | `href` | `href="/dashboard"` | String or Object | Yes | | `replace` | `replace={false}` | Boolean | \- | | `scroll` | `scroll={false}` | Boolean | \- | | `prefetch` | `prefetch={false}` | Boolean or null | \- | | `onNavigate` | `onNavigate={(e) => {}}` | Function | \- | > **Good to know**: `<a>` tag attributes such as `className` or `target="_blank"` can be added to `<Link>` as props and will be passed to the underlying `<a>` element. ### `href` (required) The path or URL to navigate to. import Link from 'next/link' // Navigate to /about?name=test export default function Page() { return ( <Link href={{ pathname: '/about', query: { name: 'test' }, }} > About </Link> ) } ### `replace` **Defaults to `false`.** When `true`, `next/link` will replace the current history state instead of adding a new URL into the browser's history stack. import Link from 'next/link' export default function Page() { return ( <Link href="/dashboard" replace> Dashboard </Link> ) } ### `scroll` **Defaults to `true`.** The default scrolling behavior of `<Link>` in Next.js **is to maintain scroll position**, similar to how browsers handle back and forwards navigation. When you navigate to a new Page, scroll position will stay the same as long as the Page is visible in the viewport. However, if the Page is not visible in the viewport, Next.js will scroll to the top of the first Page element. When `scroll = {false}`, Next.js will not attempt to scroll to the first Page element. > **Good to know**: Next.js checks if `scroll: false` before managing scroll behavior. If scrolling is enabled, it identifies the relevant DOM node for navigation and inspects each top-level element. All non-scrollable elements and those without rendered HTML are bypassed, this includes sticky or fixed positioned elements, and non-visible elements such as those calculated with `getBoundingClientRect`. Next.js then continues through siblings until it identifies a scrollable element that is visible in the viewport. import Link from 'next/link' export default function Page() { return ( <Link href="/dashboard" scroll={false}> Dashboard </Link> ) } ### `prefetch` Prefetching happens when a `<Link />` component enters the user's viewport (initially or through scroll). Next.js prefetches and loads the linked route (denoted by the `href`) and its data in the background to improve the performance of client-side navigations. If the prefetched data has expired by the time the user hovers over a `<Link />`, Next.js will attempt to prefetch it again. **Prefetching is only enabled in production**. The following values can be passed to the `prefetch` prop: * **`null` (default)**: Prefetch behavior depends on whether the route is static or dynamic. For static routes, the full route will be prefetched (including all its data). For dynamic routes, the partial route down to the nearest segment with a `loading.js` boundary will be prefetched. * `true`: The full route will be prefetched for both static and dynamic routes. * `false`: Prefetching will never happen both on entering the viewport and on hover. import Link from 'next/link' export default function Page() { return ( <Link href="/dashboard" prefetch={false}> Dashboard </Link> ) } ### `onNavigate` An event handler called during client-side navigation. The handler receives an event object that includes a `preventDefault()` method, allowing you to cancel the navigation if needed. import Link from 'next/link' export default function Page() { return ( <Link href="/dashboard" onNavigate={(e) => { // Only executes during SPA navigation console.log('Navigating...') // Optionally prevent navigation // e.preventDefault() }} > Dashboard </Link> ) } > **Good to know**: While `onClick` and `onNavigate` may seem similar, they serve different purposes. `onClick` executes for all click events, while `onNavigate` only runs during client-side navigation. Some key differences: > > * When using modifier keys (`Ctrl`/`Cmd` + Click), `onClick` executes but `onNavigate` doesn't since Next.js prevents default navigation for new tabs. > * External URLs won't trigger `onNavigate` since it's only for client-side and same-origin navigations. > * Links with the `download` attribute will work with `onClick` but not `onNavigate` since the browser will treat the linked URL as a download. ## Examples The following examples demonstrate how to use the `<Link>` component in different scenarios. ### Linking to dynamic segments When linking to dynamic segments, you can use template literals and interpolation to generate a list of links. For example, to generate a list of blog posts: import Link from 'next/link' interface Post { id: number title: string slug: string } export default function PostList({ posts }: { posts: Post[] }) { return ( <ul> {posts.map((post) => ( <li key={post.id}> <Link href={`/blog/${post.slug}`}>{post.title}</Link> </li> ))} </ul> ) } ### Checking active links You can use `usePathname()` to determine if a link is active. For example, to add a class to the active link, you can check if the current `pathname` matches the `href` of the link: 'use client' import { usePathname } from 'next/navigation' import Link from 'next/link' export function Links() { const pathname = usePathname() return ( <nav> <Link className={`link ${pathname === '/' ? 'active' : ''}`} href="/"> Home </Link> <Link className={`link ${pathname === '/about' ? 'active' : ''}`} href="/about" > About </Link> </nav> ) } ### Scrolling to an `id` If you'd like to scroll to a specific `id` on navigation, you can append your URL with a `#` hash link or just pass a hash link to the `href` prop. This is possible since `<Link>` renders to an `<a>` element. <Link href="/dashboard#settings">Settings</Link> // Output <a href="/dashboard#settings">Settings</a> > **Good to know**: > > * Next.js will scroll to the Page if it is not visible in the viewport upon navigation. ### Linking to dynamic route segments For dynamic route segments, it can be handy to use template literals to create the link's path. For example, you can generate a list of links to the dynamic route `app/blog/[slug]/page.js`: import Link from 'next/link' export default function Page({ posts }) { return ( <ul> {posts.map((post) => ( <li key={post.id}> <Link href={`/blog/${post.slug}`}>{post.title}</Link> </li> ))} </ul> ) } ### If the child is a custom component that wraps an `<a>` tag If the child of `Link` is a custom component that wraps an `<a>` tag, you must add `passHref` to `Link`. This is necessary if you’re using libraries like styled-components. Without this, the `<a>` tag will not have the `href` attribute, which hurts your site's accessibility and might affect SEO. If you're using ESLint, there is a built-in rule `next/link-passhref` to ensure correct usage of `passHref`. import Link from 'next/link' import styled from 'styled-components' // This creates a custom component that wraps an <a> tag const RedLink = styled.a` color: red; ` function NavLink({ href, name }) { return ( <Link href={href} passHref legacyBehavior> <RedLink>{name}</RedLink> </Link> ) } export default NavLink * If you’re using emotion’s JSX pragma feature (`@jsx jsx`), you must use `passHref` even if you use an `<a>` tag directly. * The component should support `onClick` property to trigger navigation correctly. ### Nesting a functional component If the child of `Link` is a functional component, in addition to using `passHref` and `legacyBehavior`, you must wrap the component in `React.forwardRef`: import Link from 'next/link' import React from 'react' // Define the props type for MyButton interface MyButtonProps { onClick?: React.MouseEventHandler<HTMLAnchorElement> href?: string } // Use React.ForwardRefRenderFunction to properly type the forwarded ref const MyButton: React.ForwardRefRenderFunction< HTMLAnchorElement, MyButtonProps > = ({ onClick, href }, ref) => { return ( <a href={href} onClick={onClick} ref={ref}> Click Me </a> ) } // Use React.forwardRef to wrap the component const ForwardedMyButton = React.forwardRef(MyButton) export default function Page() { return ( <Link href="/about" passHref legacyBehavior> <ForwardedMyButton /> </Link> ) } ### Replace the URL instead of push The default behavior of the `Link` component is to `push` a new URL into the `history` stack. You can use the `replace` prop to prevent adding a new entry, as in the following example: import Link from 'next/link' export default function Page() { return ( <Link href="/about" replace> About us </Link> ) } ### Disable scrolling to the top of the page The default scrolling behavior of `<Link>` in Next.js **is to maintain scroll position**, similar to how browsers handle back and forwards navigation. When you navigate to a new Page, scroll position will stay the same as long as the Page is visible in the viewport. However, if the Page is not visible in the viewport, Next.js will scroll to the top of the first Page element. If you'd like to disable this behavior, you can pass `scroll={false}` to the `<Link>` component, or `scroll: false` to `router.push()` or `router.replace()`. import Link from 'next/link' export default function Page() { return ( <Link href="/#hashid" scroll={false}> Disables scrolling to the top </Link> ) } Using `router.push()` or `router.replace()`: // useRouter import { useRouter } from 'next/navigation' const router = useRouter() router.push('/dashboard', { scroll: false }) ### Prefetching links in Middleware It's common to use Middleware for authentication or other purposes that involve rewriting the user to a different page. In order for the `<Link />` component to properly prefetch links with rewrites via Middleware, you need to tell Next.js both the URL to display and the URL to prefetch. This is required to avoid un-necessary fetches to middleware to know the correct route to prefetch. For example, if you want to serve a `/dashboard` route that has authenticated and visitor views, you can add the following in your Middleware to redirect the user to the correct page: import { NextResponse } from 'next/server' export function middleware(request: Request) { const nextUrl = request.nextUrl if (nextUrl.pathname === '/dashboard') { if (request.cookies.authToken) { return NextResponse.rewrite(new URL('/auth/dashboard', request.url)) } else { return NextResponse.rewrite(new URL('/public/dashboard', request.url)) } } } In this case, you would want to use the following code in your `<Link />` component: 'use client' import Link from 'next/link' import useIsAuthed from './hooks/useIsAuthed' // Your auth hook export default function Page() { const isAuthed = useIsAuthed() const path = isAuthed ? '/auth/dashboard' : '/public/dashboard' return ( <Link as="/dashboard" href={path}> Dashboard </Link> ) } ### Blocking navigation You can use the `onNavigate` prop to block navigation when certain conditions are met, such as when a form has unsaved changes. When you need to block navigation across multiple components in your app (like preventing navigation from any link while a form is being edited), React Context provides a clean way to share this blocking state. First, create a context to track the navigation blocking state: 'use client' import { createContext, useState, useContext } from 'react' interface NavigationBlockerContextType { isBlocked: boolean setIsBlocked: (isBlocked: boolean) => void } export const NavigationBlockerContext = createContext<NavigationBlockerContextType>({ isBlocked: false, setIsBlocked: () => {}, }) export function NavigationBlockerProvider({ children, }: { children: React.ReactNode }) { const [isBlocked, setIsBlocked] = useState(false) return ( <NavigationBlockerContext.Provider value={{ isBlocked, setIsBlocked }}> {children} </NavigationBlockerContext.Provider> ) } export function useNavigationBlocker() { return useContext(NavigationBlockerContext) } Create a form component that uses the context: 'use client' import { useNavigationBlocker } from '../contexts/navigation-blocker' export default function Form() { const { setIsBlocked } = useNavigationBlocker() return ( <form onSubmit={(e) => { e.preventDefault() setIsBlocked(false) }} onChange={() => setIsBlocked(true)} > <input type="text" name="name" /> <button type="submit">Save</button> </form> ) } Create a custom Link component that blocks navigation: 'use client' import Link from 'next/link' import { useNavigationBlocker } from '../contexts/navigation-blocker' interface CustomLinkProps extends React.ComponentProps<typeof Link> { children: React.ReactNode } export function CustomLink({ children, ...props }: CustomLinkProps) { const { isBlocked } = useNavigationBlocker() return ( <Link onNavigate={(e) => { if ( isBlocked && !window.confirm('You have unsaved changes. Leave anyway?') ) { e.preventDefault() } }} {...props} > {children} </Link> ) } Create a navigation component: 'use client' import { CustomLink as Link } from './custom-link' export default function Nav() { return ( <nav> <Link href="/">Home</Link> <Link href="/about">About</Link> </nav> ) } Finally, wrap your app with the `NavigationBlockerProvider` in the root layout and use the components in your page: import { NavigationBlockerProvider } from './contexts/navigation-blocker' export default function RootLayout({ children, }: { children: React.ReactNode }) { return ( <html lang="en"> <body> <NavigationBlockerProvider>{children}</NavigationBlockerProvider> </body> </html> ) } Then, use the `Nav` and `Form` components in your page: import Nav from './components/nav' import Form from './components/form' export default function Page() { return ( <div> <Nav /> <main> <h1>Welcome to the Dashboard</h1> <Form /> </main> </div> ) } When a user tries to navigate away using `CustomLink` while the form has unsaved changes, they'll be prompted to confirm before leaving. ## Version history | Version | Changes | | --- | --- | | `v15.3.0` | Add `onNavigate` API | | `v13.0.0` | No longer requires a child `<a>` tag. A codemod is provided to automatically update your codebase. | | `v10.0.0` | `href` props pointing to a dynamic route are automatically resolved and no longer require an `as` prop. | | `v8.0.0` | Improved prefetching performance. | | `v1.0.0` | `next/link` introduced. | --- ## Page: https://nextjs.org/docs/app/api-reference/components/script This API reference will help you understand how to use props available for the Script Component. For features and usage, please see the Optimizing Scripts page. import Script from 'next/script' export default function Dashboard() { return ( <> <Script src="https://example.com/script.js" /> </> ) } ## Props Here's a summary of the props available for the Script Component: | Prop | Example | Type | Required | | --- | --- | --- | --- | | `src` | `src="http://example.com/script"` | String | Required unless inline script is used | | `strategy` | `strategy="lazyOnload"` | String | \- | | `onLoad` | `onLoad={onLoadFunc}` | Function | \- | | `onReady` | `onReady={onReadyFunc}` | Function | \- | | `onError` | `onError={onErrorFunc}` | Function | \- | ## Required Props The `<Script />` component requires the following properties. ### `src` A path string specifying the URL of an external script. This can be either an absolute external URL or an internal path. The `src` property is required unless an inline script is used. ## Optional Props The `<Script />` component accepts a number of additional properties beyond those which are required. ### `strategy` The loading strategy of the script. There are four different strategies that can be used: * `beforeInteractive`: Load before any Next.js code and before any page hydration occurs. * `afterInteractive`: (**default**) Load early but after some hydration on the page occurs. * `lazyOnload`: Load during browser idle time. * `worker`: (experimental) Load in a web worker. ### `beforeInteractive` Scripts that load with the `beforeInteractive` strategy are injected into the initial HTML from the server, downloaded before any Next.js module, and executed in the order they are placed. Scripts denoted with this strategy are preloaded and fetched before any first-party code, but their execution **does not block page hydration from occurring**. `beforeInteractive` scripts must be placed inside the root layout (`app/layout.tsx`) and are designed to load scripts that are needed by the entire site (i.e. the script will load when any page in the application has been loaded server-side). **This strategy should only be used for critical scripts that need to be fetched as soon as possible.** import Script from 'next/script' export default function RootLayout({ children, }: { children: React.ReactNode }) { return ( <html lang="en"> <body> {children} <Script src="https://example.com/script.js" strategy="beforeInteractive" /> </body> </html> ) } > **Good to know**: Scripts with `beforeInteractive` will always be injected inside the `head` of the HTML document regardless of where it's placed in the component. Some examples of scripts that should be fetched as soon as possible with `beforeInteractive` include: * Bot detectors * Cookie consent managers ### `afterInteractive` Scripts that use the `afterInteractive` strategy are injected into the HTML client-side and will load after some (or all) hydration occurs on the page. **This is the default strategy** of the Script component and should be used for any script that needs to load as soon as possible but not before any first-party Next.js code. `afterInteractive` scripts can be placed inside of any page or layout and will only load and execute when that page (or group of pages) is opened in the browser. import Script from 'next/script' export default function Page() { return ( <> <Script src="https://example.com/script.js" strategy="afterInteractive" /> </> ) } Some examples of scripts that are good candidates for `afterInteractive` include: * Tag managers * Analytics ### `lazyOnload` Scripts that use the `lazyOnload` strategy are injected into the HTML client-side during browser idle time and will load after all resources on the page have been fetched. This strategy should be used for any background or low priority scripts that do not need to load early. `lazyOnload` scripts can be placed inside of any page or layout and will only load and execute when that page (or group of pages) is opened in the browser. import Script from 'next/script' export default function Page() { return ( <> <Script src="https://example.com/script.js" strategy="lazyOnload" /> </> ) } Examples of scripts that do not need to load immediately and can be fetched with `lazyOnload` include: * Chat support plugins * Social media widgets ### `worker` > **Warning:** The `worker` strategy is not yet stable and does not yet work with the App Router. Use with caution. Scripts that use the `worker` strategy are off-loaded to a web worker in order to free up the main thread and ensure that only critical, first-party resources are processed on it. While this strategy can be used for any script, it is an advanced use case that is not guaranteed to support all third-party scripts. To use `worker` as a strategy, the `nextScriptWorkers` flag must be enabled in `next.config.js`: module.exports = { experimental: { nextScriptWorkers: true, }, } `worker` scripts can **only currently be used in the `pages/` directory**: import Script from 'next/script' export default function Home() { return ( <> <Script src="https://example.com/script.js" strategy="worker" /> </> ) } ### `onLoad` > **Warning:** `onLoad` does not yet work with Server Components and can only be used in Client Components. Further, `onLoad` can't be used with `beforeInteractive` – consider using `onReady` instead. Some third-party scripts require users to run JavaScript code once after the script has finished loading in order to instantiate content or call a function. If you are loading a script with either `afterInteractive` or `lazyOnload` as a loading strategy, you can execute code after it has loaded using the `onLoad` property. Here's an example of executing a lodash method only after the library has been loaded. 'use client' import Script from 'next/script' export default function Page() { return ( <> <Script src="https://cdnjs.cloudflare.com/ajax/libs/lodash.js/4.17.20/lodash.min.js" onLoad={() => { console.log(_.sample([1, 2, 3, 4])) }} /> </> ) } ### `onReady` > **Warning:** `onReady` does not yet work with Server Components and can only be used in Client Components. Some third-party scripts require users to run JavaScript code after the script has finished loading and every time the component is mounted (after a route navigation for example). You can execute code after the script's load event when it first loads and then after every subsequent component re-mount using the `onReady` property. Here's an example of how to re-instantiate a Google Maps JS embed every time the component is mounted: 'use client' import { useRef } from 'react' import Script from 'next/script' export default function Page() { const mapRef = useRef() return ( <> <div ref={mapRef}></div> <Script id="google-maps" src="https://maps.googleapis.com/maps/api/js" onReady={() => { new google.maps.Map(mapRef.current, { center: { lat: -34.397, lng: 150.644 }, zoom: 8, }) }} /> </> ) } ### `onError` > **Warning:** `onError` does not yet work with Server Components and can only be used in Client Components. `onError` cannot be used with the `beforeInteractive` loading strategy. Sometimes it is helpful to catch when a script fails to load. These errors can be handled with the `onError` property: 'use client' import Script from 'next/script' export default function Page() { return ( <> <Script src="https://example.com/script.js" onError={(e: Error) => { console.error('Script failed to load', e) }} /> </> ) } ## Version History | Version | Changes | | --- | --- | | `v13.0.0` | `beforeInteractive` and `afterInteractive` is modified to support `app`. | | `v12.2.4` | `onReady` prop added. | | `v12.2.2` | Allow `next/script` with `beforeInteractive` to be placed in `_document`. | | `v11.0.0` | `next/script` introduced. | --- ## Page: https://nextjs.org/docs/app/api-reference/file-conventions #### Subscribe to our newsletter Stay updated on new releases and features, guides, and case studies. --- ## Page: https://nextjs.org/docs/app/api-reference/file-conventions/default The `default.js` file is used to render a fallback within Parallel Routes when Next.js cannot recover a slot's active state after a full-page load. During soft navigation, Next.js keeps track of the active _state_ (subpage) for each slot. However, for hard navigations (full-page load), Next.js cannot recover the active state. In this case, a `default.js` file can be rendered for subpages that don't match the current URL. Consider the following folder structure. The `@team` slot has a `settings` page, but `@analytics` does not.  When navigating to `/settings`, the `@team` slot will render the `settings` page while maintaining the currently active page for the `@analytics` slot. On refresh, Next.js will render a `default.js` for `@analytics`. If `default.js` doesn't exist, a `404` is rendered instead. Additionally, since `children` is an implicit slot, you also need to create a `default.js` file to render a fallback for `children` when Next.js cannot recover the active state of the parent page. ## Reference ### `params` (optional) A promise that resolves to an object containing the dynamic route parameters from the root segment down to the slot's subpages. For example: export default async function Default({ params, }: { params: Promise<{ artist: string }> }) { const { artist } = await params } | Example | URL | `params` | | --- | --- | --- | | `app/[artist]/@sidebar/default.js` | `/zack` | `Promise<{ artist: 'zack' }>` | | `app/[artist]/[album]/@sidebar/default.js` | `/zack/next` | `Promise<{ artist: 'zack', album: 'next' }>` | * Since the `params` prop is a promise. You must use `async/await` or React's `use` function to access the values. * In version 14 and earlier, `params` was a synchronous prop. To help with backwards compatibility, you can still access it synchronously in Next.js 15, but this behavior will be deprecated in the future. --- ## Page: https://nextjs.org/docs/app/api-reference/file-conventions/error An **error** file allows you to handle unexpected runtime errors and display fallback UI.  'use client' // Error boundaries must be Client Components import { useEffect } from 'react' export default function Error({ error, reset, }: { error: Error & { digest?: string } reset: () => void }) { useEffect(() => { // Log the error to an error reporting service console.error(error) }, [error]) return ( <div> <h2>Something went wrong!</h2> <button onClick={ // Attempt to recover by trying to re-render the segment () => reset() } > Try again </button> </div> ) } `error.js` wraps a route segment and its nested children in a React Error Boundary. When an error throws within the boundary, the `error` component shows as the fallback UI. 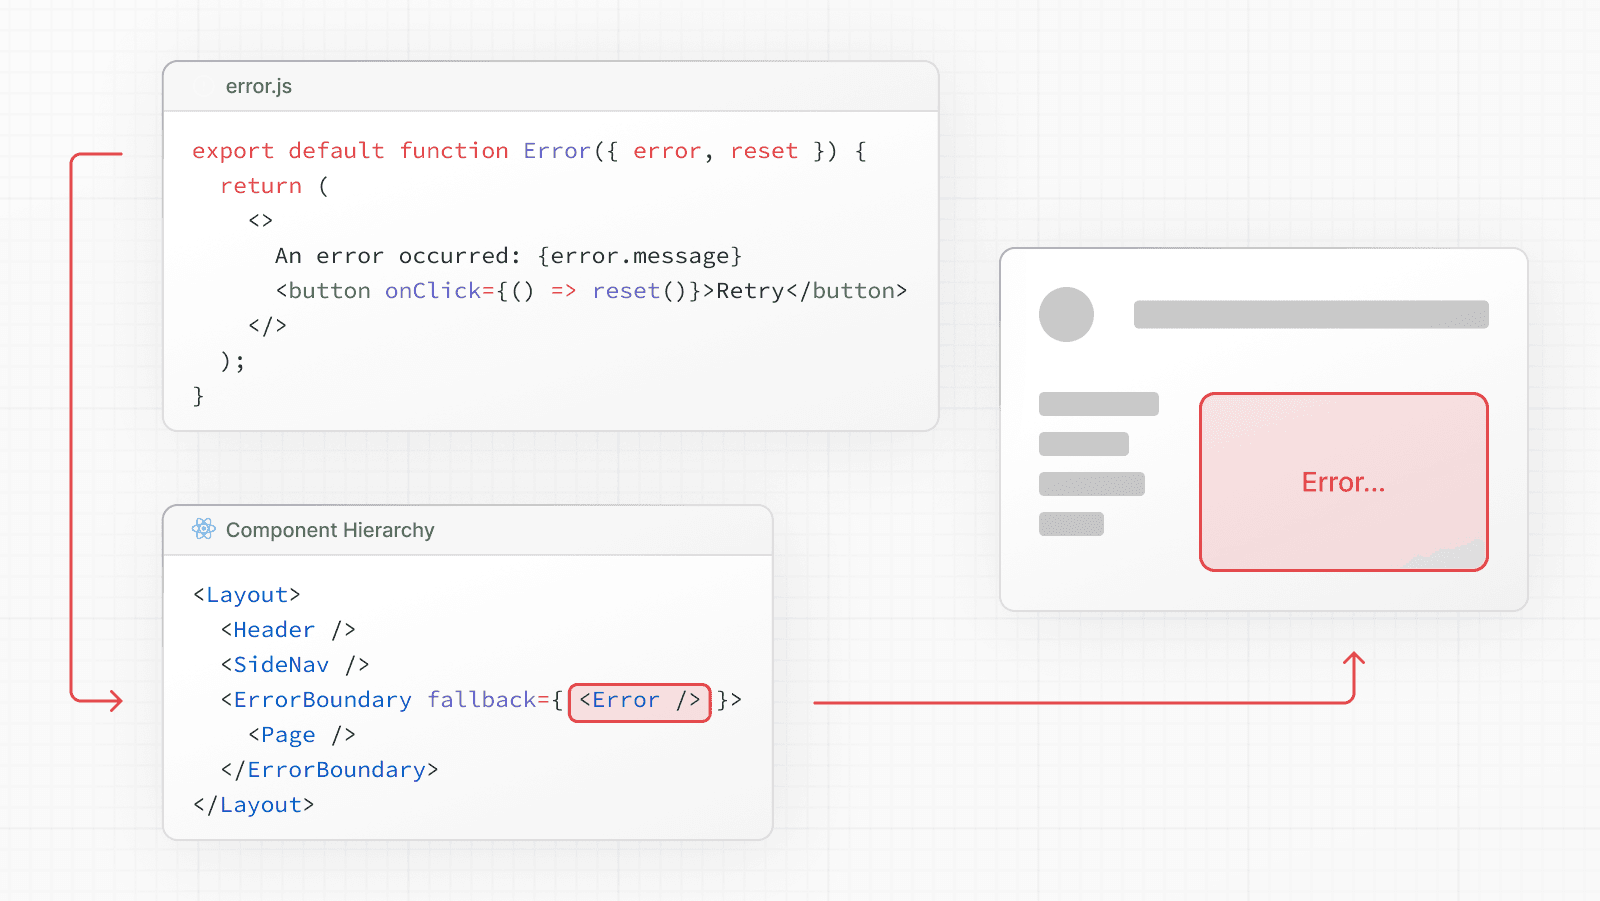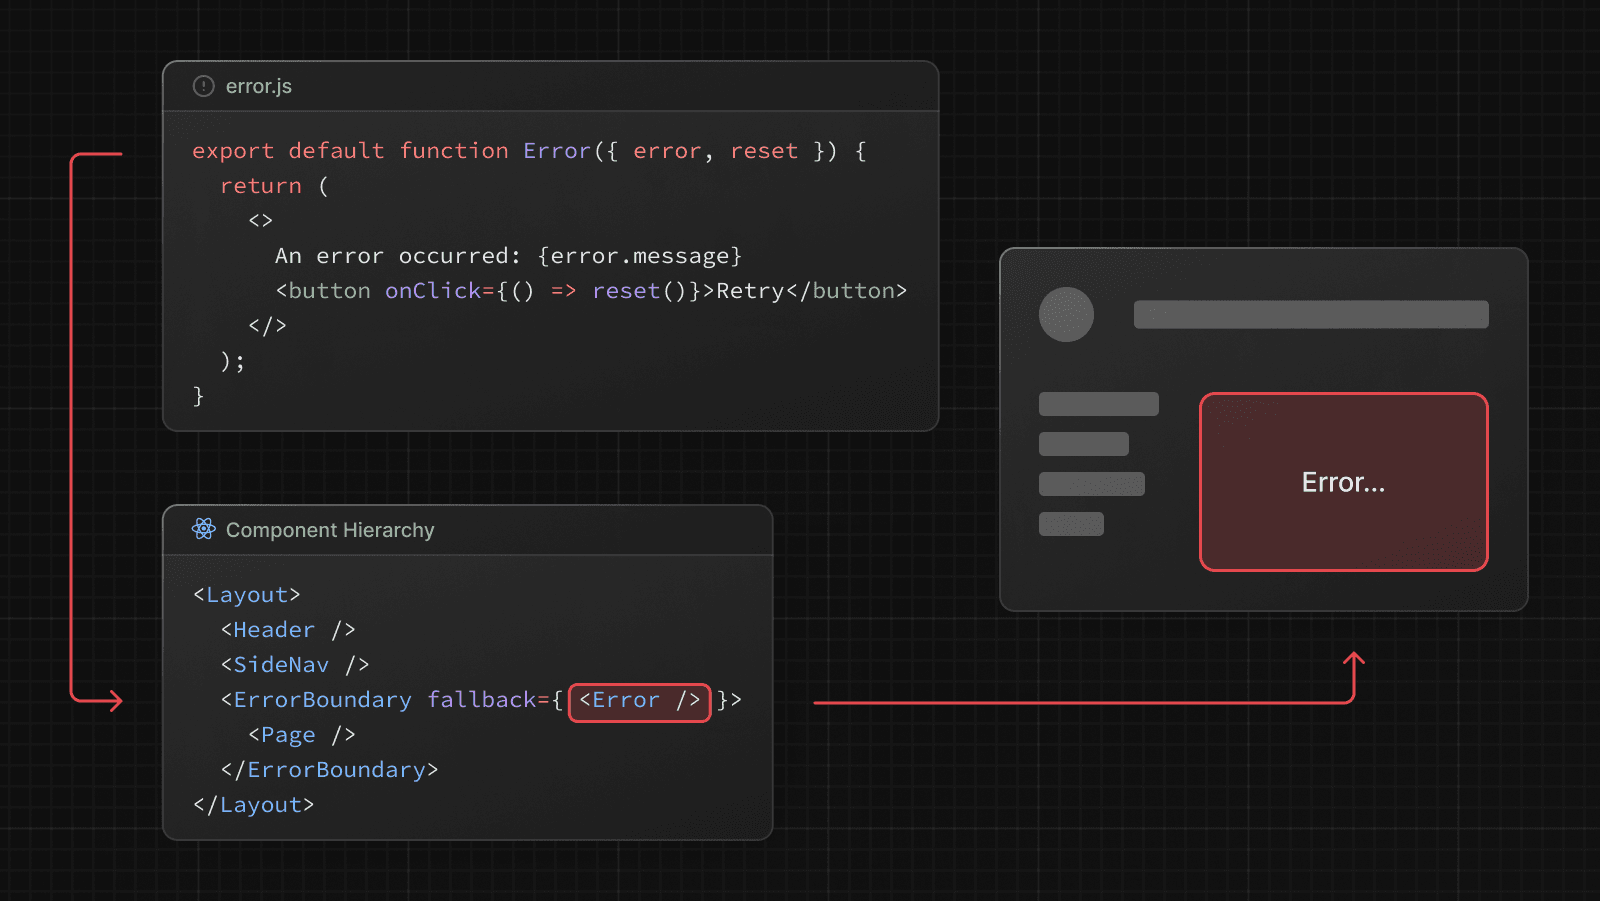 > **Good to know**: > > * The React DevTools allow you to toggle error boundaries to test error states. > * If you want errors to bubble up to the parent error boundary, you can `throw` when rendering the `error` component. ## Reference ### Props #### `error` An instance of an `Error` object forwarded to the `error.js` Client Component. > **Good to know:** During development, the `Error` object forwarded to the client will be serialized and include the `message` of the original error for easier debugging. However, **this behavior is different in production** to avoid leaking potentially sensitive details included in the error to the client. #### `error.message` * Errors forwarded from Client Components show the original `Error` message. * Errors forwarded from Server Components show a generic message with an identifier. This is to prevent leaking sensitive details. You can use the identifier, under `errors.digest`, to match the corresponding server-side logs. #### `error.digest` An automatically generated hash of the error thrown. It can be used to match the corresponding error in server-side logs. #### `reset` The cause of an error can sometimes be temporary. In these cases, trying again might resolve the issue. An error component can use the `reset()` function to prompt the user to attempt to recover from the error. When executed, the function will try to re-render the error boundary's contents. If successful, the fallback error component is replaced with the result of the re-render. 'use client' // Error boundaries must be Client Components export default function Error({ error, reset, }: { error: Error & { digest?: string } reset: () => void }) { return ( <div> <h2>Something went wrong!</h2> <button onClick={() => reset()}>Try again</button> </div> ) } ## Examples ### Global Error While less common, you can handle errors in the root layout or template using `global-error.js`, located in the root app directory, even when leveraging internationalization. Global error UI must define its own `<html>` and `<body>` tags. This file replaces the root layout or template when active. 'use client' // Error boundaries must be Client Components export default function GlobalError({ error, reset, }: { error: Error & { digest?: string } reset: () => void }) { return ( // global-error must include html and body tags <html> <body> <h2>Something went wrong!</h2> <button onClick={() => reset()}>Try again</button> </body> </html> ) } ## Version History | Version | Changes | | --- | --- | | `v15.2.0` | Also display `global-error` in development. | | `v13.1.0` | `global-error` introduced. | | `v13.0.0` | `error` introduced. | --- ## Page: https://nextjs.org/docs/app/api-reference/file-conventions/forbidden This feature is currently experimental and subject to change, it's not recommended for production. Try it out and share your feedback on GitHub. The **forbidden** file is used to render UI when the `forbidden` function is invoked during authentication. Along with allowing you to customize the UI, Next.js will return a `403` status code. app/forbidden.tsx import Link from 'next/link' export default function Forbidden() { return ( <div> <h2>Forbidden</h2> <p>You are not authorized to access this resource.</p> <Link href="/">Return Home</Link> </div> ) } ## Reference ### Props `forbidden.js` components do not accept any props. ## Version History | Version | Changes | | --- | --- | | `v15.1.0` | `forbidden.js` introduced. | --- ## Page: https://nextjs.org/docs/app/api-reference/file-conventions/instrumentation The `instrumentation.js|ts` file is used to integrate observability tools into your application, allowing you to track the performance and behavior, and to debug issues in production. To use it, place the file in the **root** of your application or inside a `src` folder if using one. ## Exports ### `register` (optional) The file exports a `register` function that is called **once** when a new Next.js server instance is initiated. `register` can be an async function. import { registerOTel } from '@vercel/otel' export function register() { registerOTel('next-app') } ### `onRequestError` (optional) You can optionally export an `onRequestError` function to track **server** errors to any custom observability provider. * If you're running any async tasks in `onRequestError`, make sure they're awaited. `onRequestError` will be triggered when the Next.js server captures the error. * The `error` instance might not be the original error instance thrown, as it may be processed by React if encountered during Server Components rendering. If this happens, you can use `digest` property on an error to identify the actual error type. import { type Instrumentation } from 'next' export const onRequestError: Instrumentation.onRequestError = async ( err, request, context ) => { await fetch('https://.../report-error', { method: 'POST', body: JSON.stringify({ message: err.message, request, context, }), headers: { 'Content-Type': 'application/json', }, }) } #### Parameters The function accepts three parameters: `error`, `request`, and `context`. export function onRequestError( error: { digest: string } & Error, request: { path: string // resource path, e.g. /blog?name=foo method: string // request method. e.g. GET, POST, etc headers: { [key: string]: string } }, context: { routerKind: 'Pages Router' | 'App Router' // the router type routePath: string // the route file path, e.g. /app/blog/[dynamic] routeType: 'render' | 'route' | 'action' | 'middleware' // the context in which the error occurred renderSource: | 'react-server-components' | 'react-server-components-payload' | 'server-rendering' revalidateReason: 'on-demand' | 'stale' | undefined // undefined is a normal request without revalidation renderType: 'dynamic' | 'dynamic-resume' // 'dynamic-resume' for PPR } ): void | Promise<void> * `error`: The caught error itself (type is always `Error`), and a `digest` property which is the unique ID of the error. * `request`: Read-only request information associated with the error. * `context`: The context in which the error occurred. This can be the type of router (App or Pages Router), and/or (Server Components (`'render'`), Route Handlers (`'route'`), Server Actions (`'action'`), or Middleware (`'middleware'`)). ### Specifying the runtime The `instrumentation.js` file works in both the Node.js and Edge runtime, however, you can use `process.env.NEXT_RUNTIME` to target a specific runtime. export function register() { if (process.env.NEXT_RUNTIME === 'edge') { return require('./register.edge') } else { return require('./register.node') } } export function onRequestError() { if (process.env.NEXT_RUNTIME === 'edge') { return require('./on-request-error.edge') } else { return require('./on-request-error.node') } } ## Version History | Version | Changes | | --- | --- | | `v15.0.0` | `onRequestError` introduced, `instrumentation` stable | | `v14.0.4` | Turbopack support for `instrumentation` | | `v13.2.0` | `instrumentation` introduced as an experimental feature | --- ## Page: https://nextjs.org/docs/app/api-reference/file-conventions/instrumentation-client The `instrumentation-client.js|ts` file allows you to add monitoring and analytics code that runs before your application's frontend code starts executing. This is useful for setting up performance tracking, error monitoring, or any other client-side observability tools. To use it, place the file in the **root** of your application or inside a `src` folder. ## Usage Unlike server-side instrumentation, you do not need to export any specific functions. You can write your monitoring code directly in the file: instrumentation-client.ts // Set up performance monitoring performance.mark('app-init') // Initialize analytics console.log('Analytics initialized') // Set up error tracking window.addEventListener('error', (event) => { // Send to your error tracking service reportError(event.error) }) ## Version History | Version | Changes | | --- | --- | | `v15.3` | `instrumentation-client` introduced | --- ## Page: https://nextjs.org/docs/app/api-reference/file-conventions/layout The `layout` file is used to define a layout in your Next.js application. export default function DashboardLayout({ children, }: { children: React.ReactNode }) { return <section>{children}</section> } A **root layout** is the top-most layout in the root `app` directory. It is used to define the `<html>` and `<body>` tags and other globally shared UI. export default function RootLayout({ children, }: { children: React.ReactNode }) { return ( <html lang="en"> <body>{children}</body> </html> ) } ## Reference ### Props #### `children` (required) Layout components should accept and use a `children` prop. During rendering, `children` will be populated with the route segments the layout is wrapping. These will primarily be the component of a child Layout (if it exists) or Page, but could also be other special files like Loading or Error when applicable. #### `params` (optional) A promise that resolves to an object containing the dynamic route parameters object from the root segment down to that layout. export default async function Layout({ params, }: { params: Promise<{ team: string }> }) { const { team } = await params } | Example Route | URL | `params` | | --- | --- | --- | | `app/dashboard/[team]/layout.js` | `/dashboard/1` | `Promise<{ team: '1' }>` | | `app/shop/[tag]/[item]/layout.js` | `/shop/1/2` | `Promise<{ tag: '1', item: '2' }>` | | `app/blog/[...slug]/layout.js` | `/blog/1/2` | `Promise<{ slug: ['1', '2'] }>` | * Since the `params` prop is a promise. You must use `async/await` or React's `use` function to access the values. * In version 14 and earlier, `params` was a synchronous prop. To help with backwards compatibility, you can still access it synchronously in Next.js 15, but this behavior will be deprecated in the future. ### Root Layouts The `app` directory **must** include a root `app/layout.js`. export default function RootLayout({ children, }: { children: React.ReactNode }) { return ( <html> <body>{children}</body> </html> ) } * The root layout **must** define `<html>` and `<body>` tags. * You should **not** manually add `<head>` tags such as `<title>` and `<meta>` to root layouts. Instead, you should use the Metadata API which automatically handles advanced requirements such as streaming and de-duplicating `<head>` elements. * You can use route groups to create multiple root layouts. * Navigating **across multiple root layouts** will cause a **full page load** (as opposed to a client-side navigation). For example, navigating from `/cart` that uses `app/(shop)/layout.js` to `/blog` that uses `app/(marketing)/layout.js` will cause a full page load. This **only** applies to multiple root layouts. ## Caveats ### How can I access the request object in a layout? You intentionally cannot access the raw request object in a layout. However, you can access `headers` and `cookies` through server-only functions. Layouts do not rerender. They can be cached and reused to avoid unnecessary computation when navigating between pages. By restricting layouts from accessing the raw request, Next.js can prevent the execution of potentially slow or expensive user code within the layout, which could negatively impact performance. This design also enforces consistent and predictable behavior for layouts across different pages, which simplifies development and debugging. ### Layouts do not receive `searchParams` Unlike Pages, Layout components **do not** receive the `searchParams` prop. This is because a shared layout is not re-rendered during navigation which could lead to stale `searchParams` between navigations. When using client-side navigation, Next.js automatically only renders the part of the page below the common layout between two routes. For example, in the following directory structure, `dashboard/layout.tsx` is the common layout for both `/dashboard/settings` and `/dashboard/analytics`: 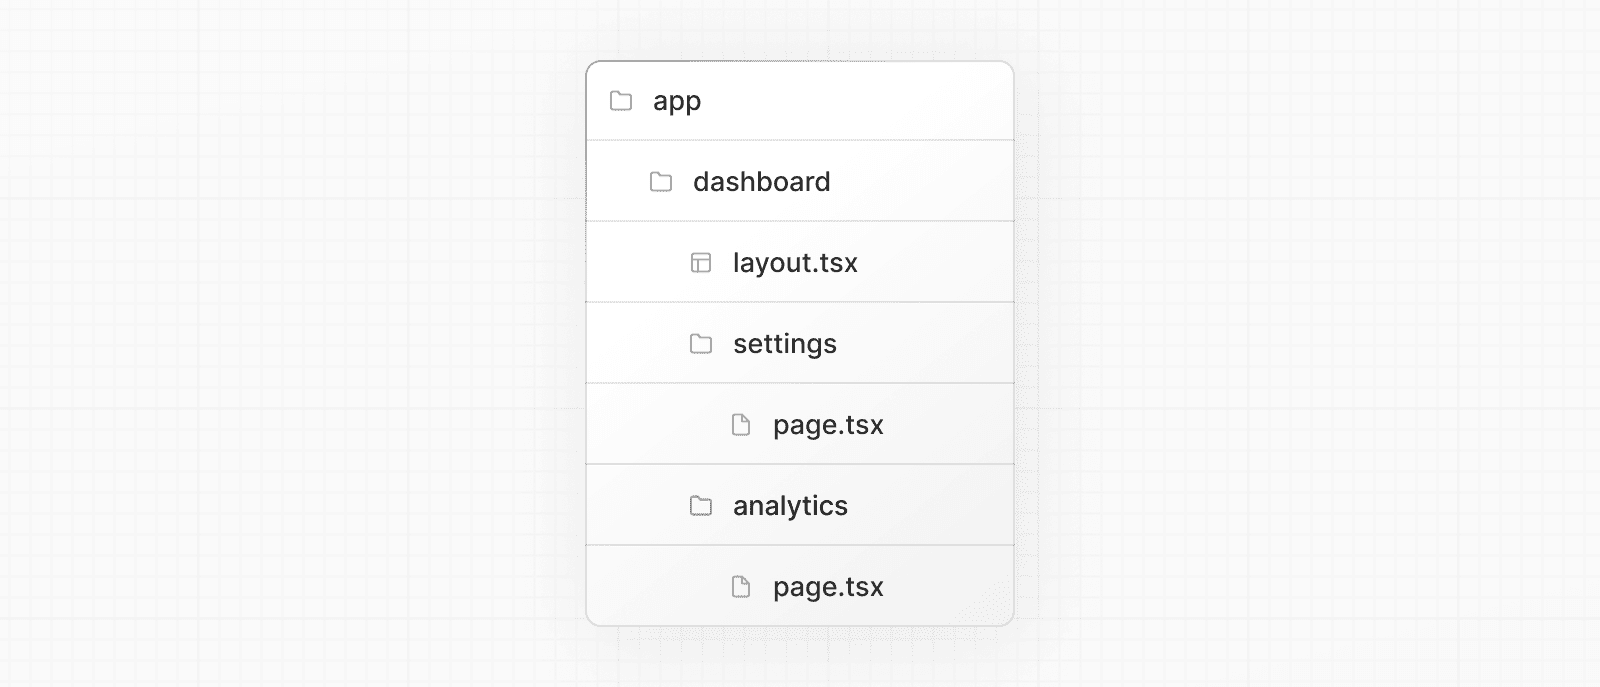 When navigating from `/dashboard/settings` to `/dashboard/analytics`, `page.tsx` in `/dashboard/analytics` will rerender on the server, while `dashboard/layout.tsx` will **not** rerender because it's a common UI shared between the two routes. This performance optimization allows navigation between pages that share a layout to be quicker as only the data fetching and rendering for the page has to run, instead of the entire route that could include shared layouts that fetch their own data. Because `dashboard/layout.tsx` doesn't re-render, the `searchParams` prop in the layout Server Component might become **stale** after navigation. Instead, use the Page `searchParams` prop or the `useSearchParams` hook in a Client Component within the layout, which is rerendered on the client with the latest `searchParams`. ### Layouts cannot access `pathname` Layouts cannot access `pathname`. This is because layouts are Server Components by default, and don't rerender during client-side navigation, which could lead to `pathname` becoming stale between navigations. To prevent staleness, Next.js would need to refetch all segments of a route, losing the benefits of caching and increasing the RSC payload size on navigation. Instead, you can extract the logic that depends on pathname into a Client Component and import it into your layouts. Since Client Components rerender (but are not refetched) during navigation, you can use Next.js hooks such as `usePathname` to access the current pathname and prevent staleness. import { ClientComponent } from '@/app/ui/ClientComponent' export default function Layout({ children }: { children: React.ReactNode }) { return ( <> <ClientComponent /> {/* Other Layout UI */} <main>{children}</main> </> ) } Common `pathname` patterns can also be implemented with `params` prop. See the examples section for more information. ## Examples ### Displaying content based on `params` Using dynamic route segments, you can display or fetch specific content based on the `params` prop. export default async function DashboardLayout({ children, params, }: { children: React.ReactNode params: Promise<{ team: string }> }) { const { team } = await params return ( <section> <header> <h1>Welcome to {team}'s Dashboard</h1> </header> <main>{children}</main> </section> ) } ### Reading `params` in Client Components To use `params` in a Client Component (which cannot be `async`), you can use React's `use` function to read the promise: 'use client' import { use } from 'react' export default function Page({ params, }: { params: Promise<{ slug: string }> }) { const { slug } = use(params) } ## Version History | Version | Changes | | --- | --- | | `v15.0.0-RC` | `params` is now a promise. A codemod is available. | | `v13.0.0` | `layout` introduced. | --- ## Page: https://nextjs.org/docs/app/api-reference/file-conventions/loading A **loading** file can create instant loading states built on Suspense. By default, this file is a Server Component - but can also be used as a Client Component through the `"use client"` directive. app/feed/loading.tsx export default function Loading() { // Or a custom loading skeleton component return <p>Loading...</p> } Loading UI components do not accept any parameters. > **Good to know**: > > * While designing loading UI, you may find it helpful to use the React Developer Tools to manually toggle Suspense boundaries. ## Version History | Version | Changes | | --- | --- | | `v13.0.0` | `loading` introduced. | --- ## Page: https://nextjs.org/docs/app/api-reference/file-conventions/mdx-components The `mdx-components.js|tsx` file is **required** to use `@next/mdx` with App Router and will not work without it. Additionally, you can use it to customize styles. Use the file `mdx-components.tsx` (or `.js`) in the root of your project to define MDX Components. For example, at the same level as `pages` or `app`, or inside `src` if applicable. mdx-components.tsx import type { MDXComponents } from 'mdx/types' export function useMDXComponents(components: MDXComponents): MDXComponents { return { ...components, } } ## Exports ### `useMDXComponents` function The file must export a single function, either as a default export or named `useMDXComponents`. mdx-components.tsx import type { MDXComponents } from 'mdx/types' export function useMDXComponents(components: MDXComponents): MDXComponents { return { ...components, } } ## Params ### `components` When defining MDX Components, the export function accepts a single parameter, `components`. This parameter is an instance of `MDXComponents`. * The key is the name of the HTML element to override. * The value is the component to render instead. > **Good to know**: Remember to pass all other components (i.e. `...components`) that do not have overrides. ## Version History | Version | Changes | | --- | --- | | `v13.1.2` | MDX Components added | --- ## Page: https://nextjs.org/docs/app/api-reference/file-conventions/middleware The `middleware.js|ts` file is used to write Middleware and run code on the server before a request is completed. Then, based on the incoming request, you can modify the response by rewriting, redirecting, modifying the request or response headers, or responding directly. Middleware executes before routes are rendered. It's particularly useful for implementing custom server-side logic like authentication, logging, or handling redirects. Use the file `middleware.ts` (or .js) in the root of your project to define Middleware. For example, at the same level as `app` or `pages`, or inside `src` if applicable. import { NextResponse, NextRequest } from 'next/server' // This function can be marked `async` if using `await` inside export function middleware(request: NextRequest) { return NextResponse.redirect(new URL('/home', request.url)) } export const config = { matcher: '/about/:path*', } ## Exports ### Middleware function The file must export a single function, either as a default export or named `middleware`. Note that multiple middleware from the same file are not supported. // Example of default export export default function middleware(request) { // Middleware logic } ### Config object (optional) Optionally, a config object can be exported alongside the Middleware function. This object includes the matcher to specify paths where the Middleware applies. #### Matcher The `matcher` option allows you to target specific paths for the Middleware to run on. You can specify these paths in several ways: * For a single path: Directly use a string to define the path, like `'/about'`. * For multiple paths: Use an array to list multiple paths, such as `matcher: ['/about', '/contact']`, which applies the Middleware to both `/about` and `/contact`. Additionally, `matcher` supports complex path specifications through regular expressions, such as `matcher: ['/((?!api|_next/static|_next/image|.*\\.png$).*)']`, enabling precise control over which paths to include or exclude. The `matcher` option also accepts an array of objects with the following keys: * `source`: The path or pattern used to match the request paths. It can be a string for direct path matching or a pattern for more complex matching. * `regexp` (optional): A regular expression string that fine-tunes the matching based on the source. It provides additional control over which paths are included or excluded. * `locale` (optional): A boolean that, when set to `false`, ignores locale-based routing in path matching. * `has` (optional): Specifies conditions based on the presence of specific request elements such as headers, query parameters, or cookies. * `missing` (optional): Focuses on conditions where certain request elements are absent, like missing headers or cookies. export const config = { matcher: [ { source: '/api/*', regexp: '^/api/(.*)', locale: false, has: [ { type: 'header', key: 'Authorization', value: 'Bearer Token' }, { type: 'query', key: 'userId', value: '123' }, ], missing: [{ type: 'cookie', key: 'session', value: 'active' }], }, ], } ## Params ### `request` When defining Middleware, the default export function accepts a single parameter, `request`. This parameter is an instance of `NextRequest`, which represents the incoming HTTP request. import type { NextRequest } from 'next/server' export function middleware(request: NextRequest) { // Middleware logic goes here } > **Good to know**: > > * `NextRequest` is a type that represents incoming HTTP requests in Next.js Middleware, whereas `NextResponse` is a class used to manipulate and send back HTTP responses. ## NextResponse Middleware can use the `NextResponse` object which extends the Web Response API. By returning a `NextResponse` object, you can directly manipulate cookies, set headers, implement redirects, and rewrite paths. > **Good to know**: For redirects, you can also use `Response.redirect` instead of `NextResponse.redirect`. ## Runtime Middleware only supports the Edge runtime. The Node.js runtime cannot be used. ## Version History | Version | Changes | | --- | --- | | `v13.1.0` | Advanced Middleware flags added | | `v13.0.0` | Middleware can modify request headers, response headers, and send responses | | `v12.2.0` | Middleware is stable, please see the upgrade guide | | `v12.0.9` | Enforce absolute URLs in Edge Runtime (PR) | | `v12.0.0` | Middleware (Beta) added | --- ## Page: https://nextjs.org/docs/app/api-reference/file-conventions/not-found The **not-found** file is used to render UI when the `notFound` function is thrown within a route segment. Along with serving a custom UI, Next.js will return a `200` HTTP status code for streamed responses, and `404` for non-streamed responses. `not-found.js` components do not accept any props. **Good to know**: In addition to catching expected `notFound()` errors, the root `app/not-found.js` file also handles any unmatched URLs for your whole application. This means users that visit a URL that is not handled by your app will be shown the UI exported by the `app/not-found.js` file. By default, `not-found` is a Server Component. You can mark it as `async` to fetch and display data: import Link from 'next/link' import { headers } from 'next/headers' export default async function NotFound() { const headersList = await headers() const domain = headersList.get('host') const data = await getSiteData(domain) return ( <div> <h2>Not Found: {data.name}</h2> <p>Could not find requested resource</p> <p> View <Link href="/blog">all posts</Link> </p> </div> ) } If you need to use Client Component hooks like `usePathname` to display content based on the path, you must fetch data on the client-side instead. --- ## Page: https://nextjs.org/docs/app/api-reference/file-conventions/page The `page` file allows you to define UI that is **unique** to a route. You can create a page by default exporting a component from the file: export default function Page({ params, searchParams, }: { params: Promise<{ slug: string }> searchParams: Promise<{ [key: string]: string | string[] | undefined }> }) { return <h1>My Page</h1> } ## Good to know * The `.js`, `.jsx`, or `.tsx` file extensions can be used for `page`. * A `page` is always the **leaf** of the route subtree. * A `page` file is required to make a route segment **publicly accessible**. * Pages are Server Components by default, but can be set to a Client Component. ## Reference ### Props #### `params` (optional) A promise that resolves to an object containing the dynamic route parameters from the root segment down to that page. export default async function Page({ params, }: { params: Promise<{ slug: string }> }) { const { slug } = await params } | Example Route | URL | `params` | | --- | --- | --- | | `app/shop/[slug]/page.js` | `/shop/1` | `Promise<{ slug: '1' }>` | | `app/shop/[category]/[item]/page.js` | `/shop/1/2` | `Promise<{ category: '1', item: '2' }>` | | `app/shop/[...slug]/page.js` | `/shop/1/2` | `Promise<{ slug: ['1', '2'] }>` | * Since the `params` prop is a promise. You must use `async/await` or React's `use` function to access the values. * In version 14 and earlier, `params` was a synchronous prop. To help with backwards compatibility, you can still access it synchronously in Next.js 15, but this behavior will be deprecated in the future. #### `searchParams` (optional) A promise that resolves to an object containing the search parameters of the current URL. For example: export default async function Page({ searchParams, }: { searchParams: Promise<{ [key: string]: string | string[] | undefined }> }) { const filters = (await searchParams).filters } | Example URL | `searchParams` | | --- | --- | | `/shop?a=1` | `Promise<{ a: '1' }>` | | `/shop?a=1&b=2` | `Promise<{ a: '1', b: '2' }>` | | `/shop?a=1&a=2` | `Promise<{ a: ['1', '2'] }>` | * Since the `searchParams` prop is a promise. You must use `async/await` or React's `use` function to access the values. * In version 14 and earlier, `searchParams` was a synchronous prop. To help with backwards compatibility, you can still access it synchronously in Next.js 15, but this behavior will be deprecated in the future. * `searchParams` is a **Dynamic API** whose values cannot be known ahead of time. Using it will opt the page into **dynamic rendering** at request time. * `searchParams` is a plain JavaScript object, not a `URLSearchParams` instance. ## Examples ### Displaying content based on `params` Using dynamic route segments, you can display or fetch specific content for the page based on the `params` prop. export default async function Page({ params, }: { params: Promise<{ slug: string }> }) { const { slug } = await params return <h1>Blog Post: {slug}</h1> } ### Handling filtering with `searchParams` You can use the `searchParams` prop to handle filtering, pagination, or sorting based on the query string of the URL. export default async function Page({ searchParams, }: { searchParams: Promise<{ [key: string]: string | string[] | undefined }> }) { const { page = '1', sort = 'asc', query = '' } = await searchParams return ( <div> <h1>Product Listing</h1> <p>Search query: {query}</p> <p>Current page: {page}</p> <p>Sort order: {sort}</p> </div> ) } ### Reading `searchParams` and `params` in Client Components To use `searchParams` and `params` in a Client Component (which cannot be `async`), you can use React's `use` function to read the promise: 'use client' import { use } from 'react' export default function Page({ params, searchParams, }: { params: Promise<{ slug: string }> searchParams: Promise<{ [key: string]: string | string[] | undefined }> }) { const { slug } = use(params) const { query } = use(searchParams) } ## Version History | Version | Changes | | --- | --- | | `v15.0.0-RC` | `params` and `searchParams` are now promises. A codemod is available. | | `v13.0.0` | `page` introduced. | --- ## Page: https://nextjs.org/docs/app/api-reference/file-conventions/route Route Handlers allow you to create custom request handlers for a given route using the Web Request and Response APIs. export async function GET() { return Response.json({ message: 'Hello World' }) } ## Reference ### HTTP Methods A **route** file allows you to create custom request handlers for a given route. The following HTTP methods are supported: `GET`, `POST`, `PUT`, `PATCH`, `DELETE`, `HEAD`, and `OPTIONS`. export async function GET(request: Request) {} export async function HEAD(request: Request) {} export async function POST(request: Request) {} export async function PUT(request: Request) {} export async function DELETE(request: Request) {} export async function PATCH(request: Request) {} // If `OPTIONS` is not defined, Next.js will automatically implement `OPTIONS` and set the appropriate Response `Allow` header depending on the other methods defined in the Route Handler. export async function OPTIONS(request: Request) {} ### Parameters #### `request` (optional) The `request` object is a NextRequest object, which is an extension of the Web Request API. `NextRequest` gives you further control over the incoming request, including easily accessing `cookies` and an extended, parsed, URL object `nextUrl`. import type { NextRequest } from 'next/server' export async function GET(request: NextRequest) { const url = request.nextUrl } #### `context` (optional) * **`params`**: a promise that resolves to an object containing the dynamic route parameters for the current route. export async function GET( request: Request, { params }: { params: Promise<{ team: string }> } ) { const { team } = await params } | Example | URL | `params` | | --- | --- | --- | | `app/dashboard/[team]/route.js` | `/dashboard/1` | `Promise<{ team: '1' }>` | | `app/shop/[tag]/[item]/route.js` | `/shop/1/2` | `Promise<{ tag: '1', item: '2' }>` | | `app/blog/[...slug]/route.js` | `/blog/1/2` | `Promise<{ slug: ['1', '2'] }>` | ## Examples ### Handling cookies import { cookies } from 'next/headers' export async function GET(request: NextRequest) { const cookieStore = await cookies() const a = cookieStore.get('a') const b = cookieStore.set('b', '1') const c = cookieStore.delete('c') } ## Version History | Version | Changes | | --- | --- | | `v15.0.0-RC` | `context.params` is now a promise. A codemod is available | | `v15.0.0-RC` | The default caching for `GET` handlers was changed from static to dynamic | | `v13.2.0` | Route Handlers are introduced. | --- ## Page: https://nextjs.org/docs/app/api-reference/file-conventions/route-segment-config > The options outlined on this page are disabled if the `dynamicIO` flag is on, and will eventually be deprecated in the future. The Route Segment options allows you to configure the behavior of a Page, Layout, or Route Handler by directly exporting the following variables: | Option | Type | Default | | --- | --- | --- | | `experimental_ppr` | `boolean` | | | `dynamic` | `'auto' | 'force-dynamic' | 'error' | 'force-static'` | `'auto'` | | `dynamicParams` | `boolean` | `true` | | `revalidate` | `false | 0 | number` | `false` | | `fetchCache` | `'auto' | 'default-cache' | 'only-cache' | 'force-cache' | 'force-no-store' | 'default-no-store' | 'only-no-store'` | `'auto'` | | `runtime` | `'nodejs' | 'edge'` | `'nodejs'` | | `preferredRegion` | `'auto' | 'global' | 'home' | string | string[]` | `'auto'` | | `maxDuration` | `number` | Set by deployment platform | ## Options ### `experimental_ppr` Enable Partial Prerendering (PPR) for a layout or page. export const experimental_ppr = true // true | false ### `dynamic` Change the dynamic behavior of a layout or page to fully static or fully dynamic. export const dynamic = 'auto' // 'auto' | 'force-dynamic' | 'error' | 'force-static' > **Good to know**: The new model in the `app` directory favors granular caching control at the `fetch` request level over the binary all-or-nothing model of `getServerSideProps` and `getStaticProps` at the page-level in the `pages` directory. The `dynamic` option is a way to opt back in to the previous model as a convenience and provides a simpler migration path. * **`'auto'`** (default): The default option to cache as much as possible without preventing any components from opting into dynamic behavior. * **`'force-dynamic'`**: Force dynamic rendering, which will result in routes being rendered for each user at request time. This option is equivalent to: * Setting the option of every `fetch()` request in a layout or page to `{ cache: 'no-store', next: { revalidate: 0 } }`. * Setting the segment config to `export const fetchCache = 'force-no-store'` * **`'error'`**: Force static rendering and cache the data of a layout or page by causing an error if any components use Dynamic APIs or uncached data. This option is equivalent to: * `getStaticProps()` in the `pages` directory. * Setting the option of every `fetch()` request in a layout or page to `{ cache: 'force-cache' }`. * Setting the segment config to `fetchCache = 'only-cache', dynamicParams = false`. * `dynamic = 'error'` changes the default of `dynamicParams` from `true` to `false`. You can opt back into dynamically rendering pages for dynamic params not generated by `generateStaticParams` by manually setting `dynamicParams = true`. * **`'force-static'`**: Force static rendering and cache the data of a layout or page by forcing `cookies`, `headers()` and `useSearchParams()` to return empty values. > **Good to know**: > > * Instructions on how to migrate from `getServerSideProps` and `getStaticProps` to `dynamic: 'force-dynamic'` and `dynamic: 'error'` can be found in the upgrade guide. ### `dynamicParams` Control what happens when a dynamic segment is visited that was not generated with generateStaticParams. export const dynamicParams = true // true | false, * **`true`** (default): Dynamic segments not included in `generateStaticParams` are generated on demand. * **`false`**: Dynamic segments not included in `generateStaticParams` will return a 404. > **Good to know**: > > * This option replaces the `fallback: true | false | blocking` option of `getStaticPaths` in the `pages` directory. > * To statically render all paths the first time they're visited, you'll need to return an empty array in `generateStaticParams` or utilize `export const dynamic = 'force-static'`. > * When `dynamicParams = true`, the segment uses Streaming Server Rendering. > * If the `dynamic = 'error'` and `dynamic = 'force-static'` are used, it'll change the default of `dynamicParams` to `false`. ### `revalidate` Set the default revalidation time for a layout or page. This option does not override the `revalidate` value set by individual `fetch` requests. export const revalidate = false // false | 0 | number * **`false`** (default): The default heuristic to cache any `fetch` requests that set their `cache` option to `'force-cache'` or are discovered before a Dynamic API is used. Semantically equivalent to `revalidate: Infinity` which effectively means the resource should be cached indefinitely. It is still possible for individual `fetch` requests to use `cache: 'no-store'` or `revalidate: 0` to avoid being cached and make the route dynamically rendered. Or set `revalidate` to a positive number lower than the route default to increase the revalidation frequency of a route. * **`0`**: Ensure a layout or page is always dynamically rendered even if no Dynamic APIs or uncached data fetches are discovered. This option changes the default of `fetch` requests that do not set a `cache` option to `'no-store'` but leaves `fetch` requests that opt into `'force-cache'` or use a positive `revalidate` as is. * **`number`**: (in seconds) Set the default revalidation frequency of a layout or page to `n` seconds. > **Good to know**: > > * The revalidate value needs to be statically analyzable. For example `revalidate = 600` is valid, but `revalidate = 60 * 10` is not. > * The revalidate value is not available when using `runtime = 'edge'`. > * In Development, Pages are _always_ rendered on-demand and are never cached. This allows you to see changes immediately without waiting for a revalidation period to pass. #### Revalidation Frequency * The lowest `revalidate` across each layout and page of a single route will determine the revalidation frequency of the _entire_ route. This ensures that child pages are revalidated as frequently as their parent layouts. * Individual `fetch` requests can set a lower `revalidate` than the route's default `revalidate` to increase the revalidation frequency of the entire route. This allows you to dynamically opt-in to more frequent revalidation for certain routes based on some criteria. ### `fetchCache` This is an advanced option that should only be used if you specifically need to override the default behavior. By default, Next.js **will cache** any `fetch()` requests that are reachable **before** any Dynamic APIs are used and **will not cache** `fetch` requests that are discovered **after** Dynamic APIs are used. `fetchCache` allows you to override the default `cache` option of all `fetch` requests in a layout or page. export const fetchCache = 'auto' // 'auto' | 'default-cache' | 'only-cache' // 'force-cache' | 'force-no-store' | 'default-no-store' | 'only-no-store' * **`'auto'`** (default): The default option to cache `fetch` requests before Dynamic APIs with the `cache` option they provide and not cache `fetch` requests after Dynamic APIs. * **`'default-cache'`**: Allow any `cache` option to be passed to `fetch` but if no option is provided then set the `cache` option to `'force-cache'`. This means that even `fetch` requests after Dynamic APIs are considered static. * **`'only-cache'`**: Ensure all `fetch` requests opt into caching by changing the default to `cache: 'force-cache'` if no option is provided and causing an error if any `fetch` requests use `cache: 'no-store'`. * **`'force-cache'`**: Ensure all `fetch` requests opt into caching by setting the `cache` option of all `fetch` requests to `'force-cache'`. * **`'default-no-store'`**: Allow any `cache` option to be passed to `fetch` but if no option is provided then set the `cache` option to `'no-store'`. This means that even `fetch` requests before Dynamic APIs are considered dynamic. * **`'only-no-store'`**: Ensure all `fetch` requests opt out of caching by changing the default to `cache: 'no-store'` if no option is provided and causing an error if any `fetch` requests use `cache: 'force-cache'` * **`'force-no-store'`**: Ensure all `fetch` requests opt out of caching by setting the `cache` option of all `fetch` requests to `'no-store'`. This forces all `fetch` requests to be re-fetched every request even if they provide a `'force-cache'` option. #### Cross-route segment behavior * Any options set across each layout and page of a single route need to be compatible with each other. * If both the `'only-cache'` and `'force-cache'` are provided, then `'force-cache'` wins. If both `'only-no-store'` and `'force-no-store'` are provided, then `'force-no-store'` wins. The force option changes the behavior across the route so a single segment with `'force-*'` would prevent any errors caused by `'only-*'`. * The intention of the `'only-*'` and `'force-*'` options is to guarantee the whole route is either fully static or fully dynamic. This means: * A combination of `'only-cache'` and `'only-no-store'` in a single route is not allowed. * A combination of `'force-cache'` and `'force-no-store'` in a single route is not allowed. * A parent cannot provide `'default-no-store'` if a child provides `'auto'` or `'*-cache'` since that could make the same fetch have different behavior. * It is generally recommended to leave shared parent layouts as `'auto'` and customize the options where child segments diverge. ### `runtime` We recommend using the Node.js runtime for rendering your application, and the Edge runtime for Middleware (only supported option). export const runtime = 'nodejs' // 'nodejs' | 'edge' * **`'nodejs'`** (default) * **`'edge'`** Learn more about the different runtimes. ### `preferredRegion` export const preferredRegion = 'auto' // 'auto' | 'global' | 'home' | ['iad1', 'sfo1'] Support for `preferredRegion`, and regions supported, is dependent on your deployment platform. > **Good to know**: > > * If a `preferredRegion` is not specified, it will inherit the option of the nearest parent layout. > * The root layout defaults to `all` regions. ### `maxDuration` By default, Next.js does not limit the execution of server-side logic (rendering a page or handling an API). Deployment platforms can use `maxDuration` from the Next.js build output to add specific execution limits. For example, on Vercel. **Note**: This setting requires Next.js `13.4.10` or higher. export const maxDuration = 5 > **Good to know**: > > * If using Server Actions, set the `maxDuration` at the page level to change the default timeout of all Server Actions used on the page. ### `generateStaticParams` The `generateStaticParams` function can be used in combination with dynamic route segments to define the list of route segment parameters that will be statically generated at build time instead of on-demand at request time. See the API reference for more details. ## Version History | Version | | | --- | --- | | `v15.0.0-RC` | `export const runtime = "experimental-edge"` deprecated. A codemod is available. | --- ## Page: https://nextjs.org/docs/app/api-reference/file-conventions/template A **template** file is similar to a layout in that it wraps a layout or page. Unlike layouts that persist across routes and maintain state, templates are given a unique key, meaning children Client Components reset their state on navigation. app/template.tsx export default function Template({ children }: { children: React.ReactNode }) { return <div>{children}</div> }  While less common, you might choose to use a template over a layout if you want: * Features that rely on `useEffect` (e.g logging page views) and `useState` (e.g a per-page feedback form). * To change the default framework behavior. For example, Suspense Boundaries inside layouts only show the fallback the first time the Layout is loaded and not when switching pages. For templates, the fallback is shown on each navigation. ## Props ### `children` (required) Template accepts a `children` prop. For example: Output <Layout> {/* Note that the template is automatically given a unique key. */} <Template key={routeParam}>{children}</Template> </Layout> > **Good to know**: > > * By default, `template` is a Server Component, but can also be used as a Client Component through the `"use client"` directive. > * When a user navigates between routes that share a `template`, a new instance of the component is mounted, DOM elements are recreated, state is **not** preserved in Client Components, and effects are re-synchronized. ## Version History | Version | Changes | | --- | --- | | `v13.0.0` | `template` introduced. | --- ## Page: https://nextjs.org/docs/app/api-reference/file-conventions/unauthorized This feature is currently experimental and subject to change, it's not recommended for production. Try it out and share your feedback on GitHub. The **unauthorized** file is used to render UI when the `unauthorized` function is invoked during authentication. Along with allowing you to customize the UI, Next.js will return a `401` status code. app/unauthorized.tsx import Login from '@/app/components/Login' export default function Unauthorized() { return ( <main> <h1>401 - Unauthorized</h1> <p>Please log in to access this page.</p> <Login /> </main> ) } ## Reference ### Props `unauthorized.js` components do not accept any props. ## Examples ### Displaying login UI to unauthenticated users You can use `unauthorized` function to render the `unauthorized.js` file with a login UI. app/dashboard/page.tsx import { verifySession } from '@/app/lib/dal' import { unauthorized } from 'next/navigation' export default async function DashboardPage() { const session = await verifySession() if (!session) { unauthorized() } return <div>Dashboard</div> } app/unauthorized.tsx import Login from '@/app/components/Login' export default function UnauthorizedPage() { return ( <main> <h1>401 - Unauthorized</h1> <p>Please log in to access this page.</p> <Login /> </main> ) } ## Version History | Version | Changes | | --- | --- | | `v15.1.0` | `unauthorized.js` introduced. | --- ## Page: https://nextjs.org/docs/app/api-reference/file-conventions/metadata ## Metadata Files API Reference This section of the docs covers **Metadata file conventions**. File-based metadata can be defined by adding special metadata files to route segments. Each file convention can be defined using a static file (e.g. `opengraph-image.jpg`), or a dynamic variant that uses code to generate the file (e.g. `opengraph-image.js`). Once a file is defined, Next.js will automatically serve the file (with hashes in production for caching) and update the relevant head elements with the correct metadata, such as the asset's URL, file type, and image size. > **Good to know**: > > * Special Route Handlers like `sitemap.ts`, `opengraph-image.tsx`, and `icon.tsx`, and other metadata files are cached by default. > * If using along with `middleware.ts`, configure the matcher to exclude the metadata files. --- ## Page: https://nextjs.org/docs/app/api-reference/file-conventions/metadata/app-icons The `favicon`, `icon`, or `apple-icon` file conventions allow you to set icons for your application. They are useful for adding app icons that appear in places like web browser tabs, phone home screens, and search engine results. There are two ways to set app icons: * Using image files (.ico, .jpg, .png) * Using code to generate an icon (.js, .ts, .tsx) ## Image files (.ico, .jpg, .png) Use an image file to set an app icon by placing a `favicon`, `icon`, or `apple-icon` image file within your `/app` directory. The `favicon` image can only be located in the top level of `app/`. Next.js will evaluate the file and automatically add the appropriate tags to your app's `<head>` element. | File convention | Supported file types | Valid locations | | --- | --- | --- | | `favicon` | `.ico` | `app/` | | `icon` | `.ico`, `.jpg`, `.jpeg`, `.png`, `.svg` | `app/**/*` | | `apple-icon` | `.jpg`, `.jpeg`, `.png` | `app/**/*` | ### `favicon` Add a `favicon.ico` image file to the root `/app` route segment. <link rel="icon" href="/favicon.ico" sizes="any" /> ### `icon` Add an `icon.(ico|jpg|jpeg|png|svg)` image file. <link rel="icon" href="/icon?<generated>" type="image/<generated>" sizes="<generated>" /> ### `apple-icon` Add an `apple-icon.(jpg|jpeg|png)` image file. <link rel="apple-touch-icon" href="/apple-icon?<generated>" type="image/<generated>" sizes="<generated>" /> > **Good to know**: > > * You can set multiple icons by adding a number suffix to the file name. For example, `icon1.png`, `icon2.png`, etc. Numbered files will sort lexically. > * Favicons can only be set in the root `/app` segment. If you need more granularity, you can use `icon`. > * The appropriate `<link>` tags and attributes such as `rel`, `href`, `type`, and `sizes` are determined by the icon type and metadata of the evaluated file. > * For example, a 32 by 32px `.png` file will have `type="image/png"` and `sizes="32x32"` attributes. > * `sizes="any"` is added to icons when the extension is `.svg` or the image size of the file is not determined. More details in this favicon handbook. ## Generate icons using code (.js, .ts, .tsx) In addition to using literal image files, you can programmatically **generate** icons using code. Generate an app icon by creating an `icon` or `apple-icon` route that default exports a function. | File convention | Supported file types | | --- | --- | | `icon` | `.js`, `.ts`, `.tsx` | | `apple-icon` | `.js`, `.ts`, `.tsx` | The easiest way to generate an icon is to use the `ImageResponse` API from `next/og`. import { ImageResponse } from 'next/og' // Image metadata export const size = { width: 32, height: 32, } export const contentType = 'image/png' // Image generation export default function Icon() { return new ImageResponse( ( // ImageResponse JSX element <div style={{ fontSize: 24, background: 'black', width: '100%', height: '100%', display: 'flex', alignItems: 'center', justifyContent: 'center', color: 'white', }} > A </div> ), // ImageResponse options { // For convenience, we can re-use the exported icons size metadata // config to also set the ImageResponse's width and height. ...size, } ) } <link rel="icon" href="/icon?<generated>" type="image/png" sizes="32x32" /> > **Good to know**: > > * By default, generated icons are **statically optimized** (generated at build time and cached) unless they use Dynamic APIs or uncached data. > * You can generate multiple icons in the same file using `generateImageMetadata`. > * You cannot generate a `favicon` icon. Use `icon` or a favicon.ico file instead. > * App icons are special Route Handlers that is cached by default unless it uses a Dynamic API or dynamic config option. ### Props The default export function receives the following props: #### `params` (optional) An object containing the dynamic route parameters object from the root segment down to the segment `icon` or `apple-icon` is colocated in. export default function Icon({ params }: { params: { slug: string } }) { // ... } | Route | URL | `params` | | --- | --- | --- | | `app/shop/icon.js` | `/shop` | `undefined` | | `app/shop/[slug]/icon.js` | `/shop/1` | `{ slug: '1' }` | | `app/shop/[tag]/[item]/icon.js` | `/shop/1/2` | `{ tag: '1', item: '2' }` | ### Returns The default export function should return a `Blob` | `ArrayBuffer` | `TypedArray` | `DataView` | `ReadableStream` | `Response`. > **Good to know**: `ImageResponse` satisfies this return type. ### Config exports You can optionally configure the icon's metadata by exporting `size` and `contentType` variables from the `icon` or `apple-icon` route. | Option | Type | | --- | --- | | `size` | `{ width: number; height: number }` | | `contentType` | `string` - image MIME type | #### `size` export const size = { width: 32, height: 32 } export default function Icon() {} <link rel="icon" sizes="32x32" /> #### `contentType` export const contentType = 'image/png' export default function Icon() {} <link rel="icon" type="image/png" /> #### Route Segment Config `icon` and `apple-icon` are specialized Route Handlers that can use the same route segment configuration options as Pages and Layouts. ## Version History | Version | Changes | | --- | --- | | `v13.3.0` | `favicon` `icon` and `apple-icon` introduced | --- ## Page: https://nextjs.org/docs/app/api-reference/file-conventions/metadata/manifest Add or generate a `manifest.(json|webmanifest)` file that matches the Web Manifest Specification in the **root** of `app` directory to provide information about your web application for the browser. ## Static Manifest file app/manifest.json | app/manifest.webmanifest { "name": "My Next.js Application", "short_name": "Next.js App", "description": "An application built with Next.js", "start_url": "/" // ... } ## Generate a Manifest file Add a `manifest.js` or `manifest.ts` file that returns a `Manifest` object. > Good to know: `manifest.js` is special Route Handlers that is cached by default unless it uses a Dynamic API or dynamic config option. app/manifest.ts import type { MetadataRoute } from 'next' export default function manifest(): MetadataRoute.Manifest { return { name: 'Next.js App', short_name: 'Next.js App', description: 'Next.js App', start_url: '/', display: 'standalone', background_color: '#fff', theme_color: '#fff', icons: [ { src: '/favicon.ico', sizes: 'any', type: 'image/x-icon', }, ], } } ### Manifest Object The manifest object contains an extensive list of options that may be updated due to new web standards. For information on all the current options, refer to the `MetadataRoute.Manifest` type in your code editor if using TypeScript or see the MDN docs. Previous favicon, icon, and apple-icon Next opengraph-image and twitter-image Was this helpful? supported. --- ## Page: https://nextjs.org/docs/app/api-reference/file-conventions/metadata/opengraph-image The `opengraph-image` and `twitter-image` file conventions allow you to set Open Graph and Twitter images for a route segment. They are useful for setting the images that appear on social networks and messaging apps when a user shares a link to your site. There are two ways to set Open Graph and Twitter images: * Using image files (.jpg, .png, .gif) * Using code to generate images (.js, .ts, .tsx) ## Image files (.jpg, .png, .gif) Use an image file to set a route segment's shared image by placing an `opengraph-image` or `twitter-image` image file in the segment. Next.js will evaluate the file and automatically add the appropriate tags to your app's `<head>` element. | File convention | Supported file types | | --- | --- | | `opengraph-image` | `.jpg`, `.jpeg`, `.png`, `.gif` | | `twitter-image` | `.jpg`, `.jpeg`, `.png`, `.gif` | | `opengraph-image.alt` | `.txt` | | `twitter-image.alt` | `.txt` | > **Good to know**: > > The `twitter-image` file size must not exceed 5MB, and the `opengraph-image` file size must not exceed 8MB. If the image file size exceeds these limits, the build will fail. ### `opengraph-image` Add an `opengraph-image.(jpg|jpeg|png|gif)` image file to any route segment. <meta property="og:image" content="<generated>" /> <meta property="og:image:type" content="<generated>" /> <meta property="og:image:width" content="<generated>" /> <meta property="og:image:height" content="<generated>" /> ### `twitter-image` Add a `twitter-image.(jpg|jpeg|png|gif)` image file to any route segment. <meta name="twitter:image" content="<generated>" /> <meta name="twitter:image:type" content="<generated>" /> <meta name="twitter:image:width" content="<generated>" /> <meta name="twitter:image:height" content="<generated>" /> ### `opengraph-image.alt.txt` Add an accompanying `opengraph-image.alt.txt` file in the same route segment as the `opengraph-image.(jpg|jpeg|png|gif)` image it's alt text. About Acme <meta property="og:image:alt" content="About Acme" /> ### `twitter-image.alt.txt` Add an accompanying `twitter-image.alt.txt` file in the same route segment as the `twitter-image.(jpg|jpeg|png|gif)` image it's alt text. About Acme <meta property="twitter:image:alt" content="About Acme" /> ## Generate images using code (.js, .ts, .tsx) In addition to using literal image files, you can programmatically **generate** images using code. Generate a route segment's shared image by creating an `opengraph-image` or `twitter-image` route that default exports a function. | File convention | Supported file types | | --- | --- | | `opengraph-image` | `.js`, `.ts`, `.tsx` | | `twitter-image` | `.js`, `.ts`, `.tsx` | > **Good to know**: > > * By default, generated images are **statically optimized** (generated at build time and cached) unless they use Dynamic APIs or uncached data. > * You can generate multiple Images in the same file using `generateImageMetadata`. > * `opengraph-image.js` and `twitter-image.js` are special Route Handlers that is cached by default unless it uses a Dynamic API or dynamic config option. The easiest way to generate an image is to use the ImageResponse API from `next/og`. import { ImageResponse } from 'next/og' import { readFile } from 'node:fs/promises' import { join } from 'node:path' // Image metadata export const alt = 'About Acme' export const size = { width: 1200, height: 630, } export const contentType = 'image/png' // Image generation export default async function Image() { // Font loading, process.cwd() is Next.js project directory const interSemiBold = await readFile( join(process.cwd(), 'assets/Inter-SemiBold.ttf') ) return new ImageResponse( ( // ImageResponse JSX element <div style={{ fontSize: 128, background: 'white', width: '100%', height: '100%', display: 'flex', alignItems: 'center', justifyContent: 'center', }} > About Acme </div> ), // ImageResponse options { // For convenience, we can re-use the exported opengraph-image // size config to also set the ImageResponse's width and height. ...size, fonts: [ { name: 'Inter', data: interSemiBold, style: 'normal', weight: 400, }, ], } ) } <meta property="og:image" content="<generated>" /> <meta property="og:image:alt" content="About Acme" /> <meta property="og:image:type" content="image/png" /> <meta property="og:image:width" content="1200" /> <meta property="og:image:height" content="630" /> ### Props The default export function receives the following props: #### `params` (optional) An object containing the dynamic route parameters object from the root segment down to the segment `opengraph-image` or `twitter-image` is colocated in. export default function Image({ params }: { params: { slug: string } }) { // ... } | Route | URL | `params` | | --- | --- | --- | | `app/shop/opengraph-image.js` | `/shop` | `undefined` | | `app/shop/[slug]/opengraph-image.js` | `/shop/1` | `{ slug: '1' }` | | `app/shop/[tag]/[item]/opengraph-image.js` | `/shop/1/2` | `{ tag: '1', item: '2' }` | ### Returns The default export function should return a `Blob` | `ArrayBuffer` | `TypedArray` | `DataView` | `ReadableStream` | `Response`. > **Good to know**: `ImageResponse` satisfies this return type. ### Config exports You can optionally configure the image's metadata by exporting `alt`, `size`, and `contentType` variables from `opengraph-image` or `twitter-image` route. | Option | Type | | --- | --- | | `alt` | `string` | | `size` | `{ width: number; height: number }` | | `contentType` | `string` - image MIME type | #### `alt` export const alt = 'My images alt text' export default function Image() {} <meta property="og:image:alt" content="My images alt text" /> #### `size` export const size = { width: 1200, height: 630 } export default function Image() {} <meta property="og:image:width" content="1200" /> <meta property="og:image:height" content="630" /> #### `contentType` export const contentType = 'image/png' export default function Image() {} <meta property="og:image:type" content="image/png" /> #### Route Segment Config `opengraph-image` and `twitter-image` are specialized Route Handlers that can use the same route segment configuration options as Pages and Layouts. ### Examples #### Using external data This example uses the `params` object and external data to generate the image. > **Good to know**: By default, this generated image will be statically optimized. You can configure the individual `fetch` `options` or route segments options to change this behavior. import { ImageResponse } from 'next/og' export const alt = 'About Acme' export const size = { width: 1200, height: 630, } export const contentType = 'image/png' export default async function Image({ params }: { params: { slug: string } }) { const post = await fetch(`https://.../posts/${params.slug}`).then((res) => res.json() ) return new ImageResponse( ( <div style={{ fontSize: 48, background: 'white', width: '100%', height: '100%', display: 'flex', alignItems: 'center', justifyContent: 'center', }} > {post.title} </div> ), { ...size, } ) } #### Using Node.js runtime with local assets This example uses the Node.js runtime to fetch a local image on the file system and passes it as an `ArrayBuffer` to the `src` attribute of an `<img>` element. The local asset should be placed relative to the root of your project, rather than the location of the example source file. import { ImageResponse } from 'next/og' import { join } from 'node:path' import { readFile } from 'node:fs/promises' export default async function Image() { const logoData = await readFile(join(process.cwd(), 'logo.png')) const logoSrc = Uint8Array.from(logoData).buffer return new ImageResponse( ( <div style={{ display: 'flex', alignItems: 'center', justifyContent: 'center', }} > <img src={logoSrc} height="100" /> </div> ) ) } ## Version History | Version | Changes | | --- | --- | | `v13.3.0` | `opengraph-image` and `twitter-image` introduced. | --- ## Page: https://nextjs.org/docs/app/api-reference/file-conventions/metadata/robots Add or generate a `robots.txt` file that matches the Robots Exclusion Standard in the **root** of `app` directory to tell search engine crawlers which URLs they can access on your site. ## Static `robots.txt` app/robots.txt User-Agent: * Allow: / Disallow: /private/ Sitemap: https://acme.com/sitemap.xml ## Generate a Robots file Add a `robots.js` or `robots.ts` file that returns a `Robots` object. > **Good to know**: `robots.js` is a special Route Handlers that is cached by default unless it uses a Dynamic API or dynamic config option. app/robots.ts import type { MetadataRoute } from 'next' export default function robots(): MetadataRoute.Robots { return { rules: { userAgent: '*', allow: '/', disallow: '/private/', }, sitemap: 'https://acme.com/sitemap.xml', } } Output: User-Agent: * Allow: / Disallow: /private/ Sitemap: https://acme.com/sitemap.xml ### Customizing specific user agents You can customise how individual search engine bots crawl your site by passing an array of user agents to the `rules` property. For example: app/robots.ts import type { MetadataRoute } from 'next' export default function robots(): MetadataRoute.Robots { return { rules: [ { userAgent: 'Googlebot', allow: ['/'], disallow: '/private/', }, { userAgent: ['Applebot', 'Bingbot'], disallow: ['/'], }, ], sitemap: 'https://acme.com/sitemap.xml', } } Output: User-Agent: Googlebot Allow: / Disallow: /private/ User-Agent: Applebot Disallow: / User-Agent: Bingbot Disallow: / Sitemap: https://acme.com/sitemap.xml ### Robots object type Robots = { rules: | { userAgent?: string | string[] allow?: string | string[] disallow?: string | string[] crawlDelay?: number } | Array<{ userAgent: string | string[] allow?: string | string[] disallow?: string | string[] crawlDelay?: number }> sitemap?: string | string[] host?: string } ## Version History | Version | Changes | | --- | --- | | `v13.3.0` | `robots` introduced. | Previous opengraph-image and twitter-image Next sitemap.xml Was this helpful? supported. --- ## Page: https://nextjs.org/docs/app/api-reference/file-conventions/metadata/sitemap `sitemap.(xml|js|ts)` is a special file that matches the Sitemaps XML format to help search engine crawlers index your site more efficiently. ### Sitemap files (.xml) For smaller applications, you can create a `sitemap.xml` file and place it in the root of your `app` directory. <urlset xmlns="http://www.sitemaps.org/schemas/sitemap/0.9"> <url> <loc>https://acme.com</loc> <lastmod>2023-04-06T15:02:24.021Z</lastmod> <changefreq>yearly</changefreq> <priority>1</priority> </url> <url> <loc>https://acme.com/about</loc> <lastmod>2023-04-06T15:02:24.021Z</lastmod> <changefreq>monthly</changefreq> <priority>0.8</priority> </url> <url> <loc>https://acme.com/blog</loc> <lastmod>2023-04-06T15:02:24.021Z</lastmod> <changefreq>weekly</changefreq> <priority>0.5</priority> </url> </urlset> ### Generating a sitemap using code (.js, .ts) You can use the `sitemap.(js|ts)` file convention to programmatically **generate** a sitemap by exporting a default function that returns an array of URLs. If using TypeScript, a `Sitemap` type is available. > **Good to know**: `sitemap.js` is a special Route Handler that is cached by default unless it uses a Dynamic API or dynamic config option. import type { MetadataRoute } from 'next' export default function sitemap(): MetadataRoute.Sitemap { return [ { url: 'https://acme.com', lastModified: new Date(), changeFrequency: 'yearly', priority: 1, }, { url: 'https://acme.com/about', lastModified: new Date(), changeFrequency: 'monthly', priority: 0.8, }, { url: 'https://acme.com/blog', lastModified: new Date(), changeFrequency: 'weekly', priority: 0.5, }, ] } Output: <urlset xmlns="http://www.sitemaps.org/schemas/sitemap/0.9"> <url> <loc>https://acme.com</loc> <lastmod>2023-04-06T15:02:24.021Z</lastmod> <changefreq>yearly</changefreq> <priority>1</priority> </url> <url> <loc>https://acme.com/about</loc> <lastmod>2023-04-06T15:02:24.021Z</lastmod> <changefreq>monthly</changefreq> <priority>0.8</priority> </url> <url> <loc>https://acme.com/blog</loc> <lastmod>2023-04-06T15:02:24.021Z</lastmod> <changefreq>weekly</changefreq> <priority>0.5</priority> </url> </urlset> ### Image Sitemaps You can use `images` property to create image sitemaps. Learn more details in the Google Developer Docs. import type { MetadataRoute } from 'next' export default function sitemap(): MetadataRoute.Sitemap { return [ { url: 'https://example.com', lastModified: '2021-01-01', changeFrequency: 'weekly', priority: 0.5, images: ['https://example.com/image.jpg'], }, ] } Output: <?xml version="1.0" encoding="UTF-8"?> <urlset xmlns="http://www.sitemaps.org/schemas/sitemap/0.9" xmlns:image="http://www.google.com/schemas/sitemap-image/1.1" > <url> <loc>https://example.com</loc> <image:image> <image:loc>https://example.com/image.jpg</image:loc> </image:image> <lastmod>2021-01-01</lastmod> <changefreq>weekly</changefreq> <priority>0.5</priority> </url> </urlset> ### Video Sitemaps You can use `videos` property to create video sitemaps. Learn more details in the Google Developer Docs. import type { MetadataRoute } from 'next' export default function sitemap(): MetadataRoute.Sitemap { return [ { url: 'https://example.com', lastModified: '2021-01-01', changeFrequency: 'weekly', priority: 0.5, videos: [ { title: 'example', thumbnail_loc: 'https://example.com/image.jpg', description: 'this is the description', }, ], }, ] } Output: <?xml version="1.0" encoding="UTF-8"?> <urlset xmlns="http://www.sitemaps.org/schemas/sitemap/0.9" xmlns:video="http://www.google.com/schemas/sitemap-video/1.1" > <url> <loc>https://example.com</loc> <video:video> <video:title>example</video:title> <video:thumbnail_loc>https://example.com/image.jpg</video:thumbnail_loc> <video:description>this is the description</video:description> </video:video> <lastmod>2021-01-01</lastmod> <changefreq>weekly</changefreq> <priority>0.5</priority> </url> </urlset> ### Generate a localized Sitemap import type { MetadataRoute } from 'next' export default function sitemap(): MetadataRoute.Sitemap { return [ { url: 'https://acme.com', lastModified: new Date(), alternates: { languages: { es: 'https://acme.com/es', de: 'https://acme.com/de', }, }, }, { url: 'https://acme.com/about', lastModified: new Date(), alternates: { languages: { es: 'https://acme.com/es/about', de: 'https://acme.com/de/about', }, }, }, { url: 'https://acme.com/blog', lastModified: new Date(), alternates: { languages: { es: 'https://acme.com/es/blog', de: 'https://acme.com/de/blog', }, }, }, ] } Output: <urlset xmlns="http://www.sitemaps.org/schemas/sitemap/0.9" xmlns:xhtml="http://www.w3.org/1999/xhtml"> <url> <loc>https://acme.com</loc> <xhtml:link rel="alternate" hreflang="es" href="https://acme.com/es"/> <xhtml:link rel="alternate" hreflang="de" href="https://acme.com/de"/> <lastmod>2023-04-06T15:02:24.021Z</lastmod> </url> <url> <loc>https://acme.com/about</loc> <xhtml:link rel="alternate" hreflang="es" href="https://acme.com/es/about"/> <xhtml:link rel="alternate" hreflang="de" href="https://acme.com/de/about"/> <lastmod>2023-04-06T15:02:24.021Z</lastmod> </url> <url> <loc>https://acme.com/blog</loc> <xhtml:link rel="alternate" hreflang="es" href="https://acme.com/es/blog"/> <xhtml:link rel="alternate" hreflang="de" href="https://acme.com/de/blog"/> <lastmod>2023-04-06T15:02:24.021Z</lastmod> </url> </urlset> ### Generating multiple sitemaps While a single sitemap will work for most applications. For large web applications, you may need to split a sitemap into multiple files. There are two ways you can create multiple sitemaps: * By nesting `sitemap.(xml|js|ts)` inside multiple route segments e.g. `app/sitemap.xml` and `app/products/sitemap.xml`. * By using the `generateSitemaps` function. For example, to split a sitemap using `generateSitemaps`, return an array of objects with the sitemap `id`. Then, use the `id` to generate the unique sitemaps. import type { MetadataRoute } from 'next' import { BASE_URL } from '@/app/lib/constants' export async function generateSitemaps() { // Fetch the total number of products and calculate the number of sitemaps needed return [{ id: 0 }, { id: 1 }, { id: 2 }, { id: 3 }] } export default async function sitemap({ id, }: { id: number }): Promise<MetadataRoute.Sitemap> { // Google's limit is 50,000 URLs per sitemap const start = id * 50000 const end = start + 50000 const products = await getProducts( `SELECT id, date FROM products WHERE id BETWEEN ${start} AND ${end}` ) return products.map((product) => ({ url: `${BASE_URL}/product/${product.id}`, lastModified: product.date, })) } Your generated sitemaps will be available at `/.../sitemap/[id]`. For example, `/product/sitemap/1.xml`. See the `generateSitemaps` API reference for more information. ## Returns The default function exported from `sitemap.(xml|ts|js)` should return an array of objects with the following properties: type Sitemap = Array<{ url: string lastModified?: string | Date changeFrequency?: | 'always' | 'hourly' | 'daily' | 'weekly' | 'monthly' | 'yearly' | 'never' priority?: number alternates?: { languages?: Languages<string> } }> ## Version History | Version | Changes | | --- | --- | | `v14.2.0` | Add localizations support. | | `v13.4.14` | Add `changeFrequency` and `priority` attributes to sitemaps. | | `v13.3.0` | `sitemap` introduced. | --- ## Page: https://nextjs.org/docs/app/api-reference/functions #### Subscribe to our newsletter Stay updated on new releases and features, guides, and case studies. --- ## Page: https://nextjs.org/docs/app/api-reference/functions/after `after` allows you to schedule work to be executed after a response (or prerender) is finished. This is useful for tasks and other side effects that should not block the response, such as logging and analytics. It can be used in Server Components (including `generateMetadata`), Server Actions, Route Handlers, and Middleware. The function accepts a callback that will be executed after the response (or prerender) is finished: import { after } from 'next/server' // Custom logging function import { log } from '@/app/utils' export default function Layout({ children }: { children: React.ReactNode }) { after(() => { // Execute after the layout is rendered and sent to the user log() }) return <>{children}</> } > **Good to know:** `after` is not a Dynamic API and calling it does not cause a route to become dynamic. If it's used within a static page, the callback will execute at build time, or whenever a page is revalidated. ## Reference ### Parameters * A callback function which will be executed after the response (or prerender) is finished. ### Duration `after` will run for the platform's default or configured max duration of your route. If your platform supports it, you can configure the timeout limit using the `maxDuration` route segment config. ## Good to know * `after` will be executed even if the response didn't complete successfully. Including when an error is thrown or when `notFound` or `redirect` is called. * You can use React `cache` to deduplicate functions called inside `after`. * `after` can be nested inside other `after` calls, for example, you can create utility functions that wrap `after` calls to add additional functionality. ## Alternatives The use case for `after` is to process secondary tasks without blocking the primary response. It's similar to using the platform's `waitUntil()` or removing `await` from a promise, but with the following differences: * **`waitUntil()`**: accepts a promise and enqueues a task to be executed during the lifecycle of the request, whereas `after` accepts a callback that will be executed **after** the response is finished. * **Removing `await`**: starts executing during the response, which uses resources. It's also not reliable in serverless environments as the function stops computation immediately after the response is sent, potentially interrupting the task. We recommend using `after` as it has been designed to consider other Next.js APIs and contexts. ## Examples ### With request APIs You can use request APIs such as `cookies` and `headers` inside `after` in Server Actions and Route Handlers. This is useful for logging activity after a mutation. For example: import { after } from 'next/server' import { cookies, headers } from 'next/headers' import { logUserAction } from '@/app/utils' export async function POST(request: Request) { // Perform mutation // ... // Log user activity for analytics after(async () => { const userAgent = (await headers().get('user-agent')) || 'unknown' const sessionCookie = (await cookies().get('session-id'))?.value || 'anonymous' logUserAction({ sessionCookie, userAgent }) }) return new Response(JSON.stringify({ status: 'success' }), { status: 200, headers: { 'Content-Type': 'application/json' }, }) } However, you cannot use these request APIs inside `after` in Server Components. This is because Next.js needs to know which part of the tree access the request APIs to support Partial Prerendering, but `after` runs after React's rendering lifecycle. | Version History | Description | | --- | --- | | `v15.1.0` | `after` became stable. | | `v15.0.0-rc` | `unstable_after` introduced. | --- ## Page: https://nextjs.org/docs/app/api-reference/functions/cacheLife This feature is currently available in the canary channel and subject to change. Try it out by upgrading Next.js, and share your feedback on GitHub. The `cacheLife` function is used to set the cache lifetime of a function or component. It should be used alongside the `use cache` directive, and within the scope of the function or component. ## Usage To use `cacheLife`, enable the `dynamicIO` flag in your `next.config.js` file: import type { NextConfig } from 'next' const nextConfig: NextConfig = { experimental: { dynamicIO: true, }, } export default nextConfig Then, import and invoke the `cacheLife` function within the scope of the function or component: 'use cache' import { unstable_cacheLife as cacheLife } from 'next/cache' export default async function Page() { cacheLife('hours') return <div>Page</div> } ## Reference ### Default cache profiles Next.js provides a set of named cache profiles modeled on various timescales. If you don't specify a cache profile in the `cacheLife` function alongside the `use cache` directive, Next.js will automatically apply the `default` cache profile. However, we recommend always adding a cache profile when using the `use cache` directive to explicitly define caching behavior. | **Profile** | `stale` | `revalidate` | `expire` | **Description** | | --- | --- | --- | --- | --- | | `default` | 5 minutes | 15 minutes | 1 year | Default profile, suitable for content that doesn't need frequent updates | | `seconds` | 0 | 1 second | 1 second | For rapidly changing content requiring near real-time updates | | `minutes` | 5 minutes | 1 minute | 1 hour | For content that updates frequently within an hour | | `hours` | 5 minutes | 1 hour | 1 day | For content that updates daily but can be slightly stale | | `days` | 5 minutes | 1 day | 1 week | For content that updates weekly but can be a day old | | `weeks` | 5 minutes | 1 week | 30 days | For content that updates monthly but can be a week old | | `max` | 5 minutes | 30 days | 1 year | For very stable content that rarely needs updating | The string values used to reference cache profiles don't carry inherent meaning; instead they serve as semantic labels. This allows you to better understand and manage your cached content within your codebase. > **Good to know:** Updating the `staleTimes` and `expireTime` config options also updates the `stale` and `expire` properties of the `default` cache profile. ### Custom cache profiles You can configure custom cache profiles by adding them to the `cacheLife` option in your `next.config.ts` file. Cache profiles are objects that contain the following properties: | **Property** | **Value** | **Description** | **Requirement** | | --- | --- | --- | --- | | `stale` | `number` | Duration the client should cache a value without checking the server. | Optional | | `revalidate` | `number` | Frequency at which the cache should refresh on the server; stale values may be served while revalidating. | Optional | | `expire` | `number` | Maximum duration for which a value can remain stale before switching to dynamic fetching; must be longer than `revalidate`. | Optional - Must be longer than `revalidate` | The "stale" property differs from the `staleTimes` setting in that it specifically controls client-side router caching. While `staleTimes` is a global setting that affects all instances of both dynamic and static data, the `cacheLife` configuration allows you to define "stale" times on a per-function or per-route basis. > **Good to know**: The “stale” property does not set the `Cache-control: max-age` header. It instead controls the client-side router cache. ## Examples ### Defining reusable cache profiles You can create a reusable cache profile by defining them in your `next.config.ts` file. Choose a name that suits your use case and set values for the `stale`, `revalidate`, and `expire` properties. You can create as many custom cache profiles as needed. Each profile can be referenced by its name as a string value passed to the `cacheLife` function. import type { NextConfig } from 'next' const nextConfig: NextConfig = { experimental: { dynamicIO: true, cacheLife: { biweekly: { stale: 60 * 60 * 24 * 14, // 14 days revalidate: 60 * 60 * 24, // 1 day expire: 60 * 60 * 24 * 14, // 14 days }, }, }, } module.exports = nextConfig The example above caches for 14 days, checks for updates daily, and expires the cache after 14 days. You can then reference this profile throughout your application by its name: 'use cache' import { unstable_cacheLife as cacheLife } from 'next/cache' export default async function Page() { cacheLife('biweekly') return <div>Page</div> } ### Overriding the default cache profiles While the default cache profiles provide a useful way to think about how fresh or stale any given part of cacheable output can be, you may prefer different named profiles to better align with your applications caching strategies. You can override the default named cache profiles by creating a new configuration with the same name as the defaults. The example below shows how to override the default “days” cache profile: const nextConfig = { experimental: { dynamicIO: true, cacheLife: { days: { stale: 3600, // 1 hour revalidate: 900, // 15 minutes expire: 86400, // 1 day }, }, }, } module.exports = nextConfig ### Defining cache profiles inline For specific use cases, you can set a custom cache profile by passing an object to the `cacheLife` function: 'use cache' import { unstable_cacheLife as cacheLife } from 'next/cache' export default async function Page() { cacheLife({ stale: 3600, // 1 hour revalidate: 900, // 15 minutes expire: 86400, // 1 day }) return <div>Page</div> } This inline cache profile will only be applied to the function or file it was created in. If you want to reuse the same profile throughout your application, you can add the configuration to the `cacheLife` property of your `next.config.ts` file. ### Nested usage of `use cache` and `cacheLife` When defining multiple caching behaviors in the same route or component tree, if the inner caches specify their own `cacheLife` profile, the outer cache will respect the shortest cache duration among them. **This applies only if the outer cache does not have its own explicit `cacheLife` profile defined.** For example, if you add the `use cache` directive to your page, without specifying a cache profile, the default cache profile will be applied implicitly (`cacheLife(”default”)`). If a component imported into the page also uses the `use cache` directive with its own cache profile, the outer and inner cache profiles are compared, and shortest duration set in the profiles will be applied. // Parent component import { unstable_cacheLife as cacheLife } from 'next/cache' import { ChildComponent } from './child' export async function ParentComponent() { 'use cache' cacheLife('days') return ( <div> <ChildComponent /> </div> ) } And in a separate file, we defined the Child component that was imported: // Child component import { unstable_cacheLife as cacheLife } from 'next/cache' export async function ChildComponent() { 'use cache' cacheLife('hours') return <div>Child Content</div> // This component's cache will respect the shorter 'hours' profile } --- ## Page: https://nextjs.org/docs/app/api-reference/functions/cacheTag This feature is currently available in the canary channel and subject to change. Try it out by upgrading Next.js, and share your feedback on GitHub. The `cacheTag` function allows you to tag cached data for on-demand invalidation. By associating tags with cache entries, you can selectively purge or revalidate specific cache entries without affecting other cached data. ## Usage To use `cacheTag`, enable the `dynamicIO` flag in your `next.config.js` file: import type { NextConfig } from 'next' const nextConfig: NextConfig = { experimental: { dynamicIO: true, }, } export default nextConfig The `cacheTag` function takes a single string value, or a string array. import { unstable_cacheTag as cacheTag } from 'next/cache' export async function getData() { 'use cache' cacheTag('my-data') const data = await fetch('/api/data') return data } You can then purge the cache on-demand using `revalidateTag` API in another function, for example, a route handler or Server Action: 'use server' import { revalidateTag } from 'next/cache' export default async function submit() { await addPost() revalidateTag('my-data') } ## Good to know * **Idempotent Tags**: Applying the same tag multiple times has no additional effect. * **Multiple Tags**: You can assign multiple tags to a single cache entry by passing an array to `cacheTag`. cacheTag('tag-one', 'tag-two') ## Examples ### Tagging components or functions Tag your cached data by calling `cacheTag` within a cached function or component: import { unstable_cacheTag as cacheTag } from 'next/cache' interface BookingsProps { type: string } export async function Bookings({ type = 'haircut' }: BookingsProps) { 'use cache' cacheTag('bookings-data') async function getBookingsData() { const data = await fetch(`/api/bookings?type=${encodeURIComponent(type)}`) return data } return //... } ### Creating tags from external data You can use the data returned from an async function to tag the cache entry. import { unstable_cacheTag as cacheTag } from 'next/cache' interface BookingsProps { type: string } export async function Bookings({ type = 'haircut' }: BookingsProps) { async function getBookingsData() { 'use cache' const data = await fetch(`/api/bookings?type=${encodeURIComponent(type)}`) cacheTag('bookings-data', data.id) return data } return //... } ### Invalidating tagged cache Using `revalidateTag`, you can invalidate the cache for a specific tag when needed: 'use server' import { revalidateTag } from 'next/cache' export async function updateBookings() { await updateBookingData() revalidateTag('bookings-data') } --- ## Page: https://nextjs.org/docs/app/api-reference/functions/connection The `connection()` function allows you to indicate rendering should wait for an incoming user request before continuing. It's useful when a component doesn’t use Dynamic APIs, but you want it to be dynamically rendered at runtime and not statically rendered at build time. This usually occurs when you access external information that you intentionally want to change the result of a render, such as `Math.random()` or `new Date()`. app/page.tsx import { connection } from 'next/server' export default async function Page() { await connection() // Everything below will be excluded from prerendering const rand = Math.random() return <span>{rand}</span> } ## Reference ### Type function connection(): Promise<void> ### Parameters * The function does not accept any parameters. ### Returns * The function returns a `void` Promise. It is not meant to be consumed. ## Good to know * `connection` replaces `unstable_noStore` to better align with the future of Next.js. * The function is only necessary when dynamic rendering is required and common Dynamic APIs are not used. ### Version History | Version | Changes | | --- | --- | | `v15.0.0` | `connection` stabilized. | | `v15.0.0-RC` | `connection` introduced. | --- ## Page: https://nextjs.org/docs/app/api-reference/functions/cookies `cookies` is an **async** function that allows you to read the HTTP incoming request cookies in Server Components, and read/write outgoing request cookies in Server Actions or Route Handlers. import { cookies } from 'next/headers' export default async function Page() { const cookieStore = await cookies() const theme = cookieStore.get('theme') return '...' } ## Reference ### Methods The following methods are available: | Method | Return Type | Description | | --- | --- | --- | | `get('name')` | Object | Accepts a cookie name and returns an object with the name and value. | | `getAll()` | Array of objects | Returns a list of all the cookies with a matching name. | | `has('name')` | Boolean | Accepts a cookie name and returns a boolean based on if the cookie exists. | | `set(name, value, options)` | \- | Accepts a cookie name, value, and options and sets the outgoing request cookie. | | `delete(name)` | \- | Accepts a cookie name and deletes the cookie. | | `clear()` | \- | Deletes all cookies. | | `toString()` | String | Returns a string representation of the cookies. | ### Options When setting a cookie, the following properties from the `options` object are supported: | Option | Type | Description | | --- | --- | --- | | `name` | String | Specifies the name of the cookie. | | `value` | String | Specifies the value to be stored in the cookie. | | `expires` | Date | Defines the exact date when the cookie will expire. | | `maxAge` | Number | Sets the cookie’s lifespan in seconds. | | `domain` | String | Specifies the domain where the cookie is available. | | `path` | String, default: `'/'` | Limits the cookie's scope to a specific path within the domain. | | `secure` | Boolean | Ensures the cookie is sent only over HTTPS connections for added security. | | `httpOnly` | Boolean | Restricts the cookie to HTTP requests, preventing client-side access. | | `sameSite` | Boolean, `'lax'`, `'strict'`, `'none'` | Controls the cookie's cross-site request behavior. | | `priority` | String (`"low"`, `"medium"`, `"high"`) | Specifies the cookie's priority | | `encode('value')` | Function | Specifies a function that will be used to encode a cookie's value. | | `partitioned` | Boolean | Indicates whether the cookie is partitioned. | The only option with a default value is `path`. To learn more about these options, see the MDN docs. ## Good to know * `cookies` is an **asynchronous** function that returns a promise. You must use `async/await` or React's `use` function to access cookies. * In version 14 and earlier, `cookies` was a synchronous function. To help with backwards compatibility, you can still access it synchronously in Next.js 15, but this behavior will be deprecated in the future. * `cookies` is a Dynamic API whose returned values cannot be known ahead of time. Using it in a layout or page will opt a route into dynamic rendering. * The `.delete` method can only be called: * In a Server Action or Route Handler. * If it belongs to the same domain from which `.set` is called. For wildcard domains, the specific subdomain must be an exact match. Additionally, the code must be executed on the same protocol (HTTP or HTTPS) as the cookie you want to delete. * HTTP does not allow setting cookies after streaming starts, so you must use `.set` in a Server Action or Route Handler. ## Understanding Cookie Behavior in Server Components When working with cookies in Server Components, it's important to understand that cookies are fundamentally a client-side storage mechanism: * **Reading cookies** works in Server Components because you're accessing the cookie data that the client's browser sends to the server in the HTTP request headers. * **Setting cookies** cannot be done directly in a Server Component, even when using a Route Handler or Server Action. This is because cookies are actually stored by the browser, not the server. The server can only send instructions (via `Set-Cookie` headers) to tell the browser to store cookies - the actual storage happens on the client side. This is why cookie operations that modify state (`.set`, `.delete`, `.clear`) must be performed in a Route Handler or Server Action where the response headers can be properly set. ## Examples ### Getting a cookie You can use the `(await cookies()).get('name')` method to get a single cookie: import { cookies } from 'next/headers' export default async function Page() { const cookieStore = await cookies() const theme = cookieStore.get('theme') return '...' } ### Getting all cookies You can use the `(await cookies()).getAll()` method to get all cookies with a matching name. If `name` is unspecified, it returns all the available cookies. import { cookies } from 'next/headers' export default async function Page() { const cookieStore = await cookies() return cookieStore.getAll().map((cookie) => ( <div key={cookie.name}> <p>Name: {cookie.name}</p> <p>Value: {cookie.value}</p> </div> )) } ### Setting a cookie You can use the `(await cookies()).set(name, value, options)` method in a Server Action or Route Handler to set a cookie. The `options` object is optional. 'use server' import { cookies } from 'next/headers' export async function create(data) { const cookieStore = await cookies() cookieStore.set('name', 'lee') // or cookieStore.set('name', 'lee', { secure: true }) // or cookieStore.set({ name: 'name', value: 'lee', httpOnly: true, path: '/', }) } ### Checking if a cookie exists You can use the `(await cookies()).has(name)` method to check if a cookie exists: import { cookies } from 'next/headers' export default async function Page() { const cookieStore = await cookies() const hasCookie = cookieStore.has('theme') return '...' } ### Deleting cookies There are three ways you can delete a cookie. Using the `delete()` method: 'use server' import { cookies } from 'next/headers' export async function delete(data) { (await cookies()).delete('name') } Setting a new cookie with the same name and an empty value: 'use server' import { cookies } from 'next/headers' export async function delete(data) { (await cookies()).set('name', '') } Setting the `maxAge` to 0 will immediately expire a cookie. `maxAge` accepts a value in seconds. 'use server' import { cookies } from 'next/headers' export async function delete(data) { (await cookies()).set('name', 'value', { maxAge: 0 }) } ## Version History | Version | Changes | | --- | --- | | `v15.0.0-RC` | `cookies` is now an async function. A codemod is available. | | `v13.0.0` | `cookies` introduced. | --- ## Page: https://nextjs.org/docs/app/api-reference/functions/draft-mode `draftMode` is an **async** function allows you to enable and disable Draft Mode, as well as check if Draft Mode is enabled in a Server Component. import { draftMode } from 'next/headers' export default async function Page() { const { isEnabled } = await draftMode() } ## Reference The following methods and properties are available: | Method | Description | | --- | --- | | `isEnabled` | A boolean value that indicates if Draft Mode is enabled. | | `enable()` | Enables Draft Mode in a Route Handler by setting a cookie (`__prerender_bypass`). | | `disable()` | Disables Draft Mode in a Route Handler by deleting a cookie. | ## Good to know * `draftMode` is an **asynchronous** function that returns a promise. You must use `async/await` or React's `use` function. * In version 14 and earlier, `draftMode` was a synchronous function. To help with backwards compatibility, you can still access it synchronously in Next.js 15, but this behavior will be deprecated in the future. * A new bypass cookie value will be generated each time you run `next build`. This ensures that the bypass cookie can’t be guessed. * To test Draft Mode locally over HTTP, your browser will need to allow third-party cookies and local storage access. ## Examples ### Enabling Draft Mode To enable Draft Mode, create a new Route Handler and call the `enable()` method: import { draftMode } from 'next/headers' export async function GET(request: Request) { const draft = await draftMode() draft.enable() return new Response('Draft mode is enabled') } ### Disabling Draft Mode By default, the Draft Mode session ends when the browser is closed. To disable Draft Mode manually, call the `disable()` method in your Route Handler: import { draftMode } from 'next/headers' export async function GET(request: Request) { const draft = await draftMode() draft.disable() return new Response('Draft mode is disabled') } Then, send a request to invoke the Route Handler. If calling the route using the `<Link>` component, you must pass `prefetch={false}` to prevent accidentally deleting the cookie on prefetch. ### Checking if Draft Mode is enabled You can check if Draft Mode is enabled in a Server Component with the `isEnabled` property: import { draftMode } from 'next/headers' export default async function Page() { const { isEnabled } = await draftMode() return ( <main> <h1>My Blog Post</h1> <p>Draft Mode is currently {isEnabled ? 'Enabled' : 'Disabled'}</p> </main> ) } ## Version History | Version | Changes | | --- | --- | | `v15.0.0-RC` | `draftMode` is now an async function. A codemod is available. | | `v13.4.0` | `draftMode` introduced. | --- ## Page: https://nextjs.org/docs/app/api-reference/functions/fetch Next.js extends the Web `fetch()` API to allow each request on the server to set its own persistent caching and revalidation semantics. In the browser, the `cache` option indicates how a fetch request will interact with the _browser's_ HTTP cache. With this extension, `cache` indicates how a _server-side_ fetch request will interact with the framework's persistent Data Cache. You can call `fetch` with `async` and `await` directly within Server Components. export default async function Page() { let data = await fetch('https://api.vercel.app/blog') let posts = await data.json() return ( <ul> {posts.map((post) => ( <li key={post.id}>{post.title}</li> ))} </ul> ) } ## `fetch(url, options)` Since Next.js extends the Web `fetch()` API, you can use any of the native options available. ### `options.cache` Configure how the request should interact with Next.js Data Cache. fetch(`https://...`, { cache: 'force-cache' | 'no-store' }) * **`auto no cache`** (default): Next.js fetches the resource from the remote server on every request in development, but will fetch once during `next build` because the route will be statically prerendered. If Dynamic APIs are detected on the route, Next.js will fetch the resource on every request. * **`no-store`**: Next.js fetches the resource from the remote server on every request, even if Dynamic APIs are not detected on the route. * **`force-cache`**: Next.js looks for a matching request in its Data Cache. * If there is a match and it is fresh, it will be returned from the cache. * If there is no match or a stale match, Next.js will fetch the resource from the remote server and update the cache with the downloaded resource. ### `options.next.revalidate` fetch(`https://...`, { next: { revalidate: false | 0 | number } }) Set the cache lifetime of a resource (in seconds). * **`false`** - Cache the resource indefinitely. Semantically equivalent to `revalidate: Infinity`. The HTTP cache may evict older resources over time. * **`0`** - Prevent the resource from being cached. * **`number`** - (in seconds) Specify the resource should have a cache lifetime of at most `n` seconds. > **Good to know**: > > * If an individual `fetch()` request sets a `revalidate` number lower than the default `revalidate` of a route, the whole route revalidation interval will be decreased. > * If two fetch requests with the same URL in the same route have different `revalidate` values, the lower value will be used. > * As a convenience, it is not necessary to set the `cache` option if `revalidate` is set to a number. > * Conflicting options such as `{ revalidate: 3600, cache: 'no-store' }` will cause an error. ### `options.next.tags` fetch(`https://...`, { next: { tags: ['collection'] } }) Set the cache tags of a resource. Data can then be revalidated on-demand using `revalidateTag`. The max length for a custom tag is 256 characters and the max tag items is 128. ## Troubleshooting ### Fetch default `auto no store` and `cache: 'no-store'` not showing fresh data in development Next.js caches `fetch` responses in Server Components across Hot Module Replacement (HMR) in local development for faster responses and to reduce costs for billed API calls. By default, the HMR cache applies to all fetch requests, including those with the default `auto no cache` and `cache: 'no-store'` option. This means uncached requests will not show fresh data between HMR refreshes. However, the cache will be cleared on navigation or full-page reloads. See the `serverComponentsHmrCache` docs for more information. ## Version History | Version | Changes | | --- | --- | | `v13.0.0` | `fetch` introduced. | --- ## Page: https://nextjs.org/docs/app/api-reference/functions/forbidden This feature is currently experimental and subject to change, it's not recommended for production. Try it out and share your feedback on GitHub. The `forbidden` function throws an error that renders a Next.js 403 error page. It's useful for handling authorization errors in your application. You can customize the UI using the `forbidden.js` file. To start using `forbidden`, enable the experimental `authInterrupts` configuration option in your `next.config.js` file: import type { NextConfig } from 'next' const nextConfig: NextConfig = { experimental: { authInterrupts: true, }, } export default nextConfig `forbidden` can be invoked in Server Components, Server Actions, and Route Handlers. import { verifySession } from '@/app/lib/dal' import { forbidden } from 'next/navigation' export default async function AdminPage() { const session = await verifySession() // Check if the user has the 'admin' role if (session.role !== 'admin') { forbidden() } // Render the admin page for authorized users return <></> } ## Good to know * The `forbidden` function cannot be called in the root layout. ## Examples ### Role-based route protection You can use `forbidden` to restrict access to certain routes based on user roles. This ensures that users who are authenticated but lack the required permissions cannot access the route. import { verifySession } from '@/app/lib/dal' import { forbidden } from 'next/navigation' export default async function AdminPage() { const session = await verifySession() // Check if the user has the 'admin' role if (session.role !== 'admin') { forbidden() } // Render the admin page for authorized users return ( <main> <h1>Admin Dashboard</h1> <p>Welcome, {session.user.name}!</p> </main> ) } ### Mutations with Server Actions When implementing mutations in Server Actions, you can use `forbidden` to only allow users with a specific role to update sensitive data. 'use server' import { verifySession } from '@/app/lib/dal' import { forbidden } from 'next/navigation' import db from '@/app/lib/db' export async function updateRole(formData: FormData) { const session = await verifySession() // Ensure only admins can update roles if (session.role !== 'admin') { forbidden() } // Perform the role update for authorized users // ... } ## Version History | Version | Changes | | --- | --- | | `v15.1.0` | `forbidden` introduced. | --- ## Page: https://nextjs.org/docs/app/api-reference/functions/generate-image-metadata You can use `generateImageMetadata` to generate different versions of one image or return multiple images for one route segment. This is useful for when you want to avoid hard-coding metadata values, such as for icons. ## Parameters `generateImageMetadata` function accepts the following parameters: #### `params` (optional) An object containing the dynamic route parameters object from the root segment down to the segment `generateImageMetadata` is called from. export function generateImageMetadata({ params, }: { params: { slug: string } }) { // ... } | Route | URL | `params` | | --- | --- | --- | | `app/shop/icon.js` | `/shop` | `undefined` | | `app/shop/[slug]/icon.js` | `/shop/1` | `{ slug: '1' }` | | `app/shop/[tag]/[item]/icon.js` | `/shop/1/2` | `{ tag: '1', item: '2' }` | ## Returns The `generateImageMetadata` function should return an `array` of objects containing the image's metadata such as `alt` and `size`. In addition, each item **must** include an `id` value which will be passed to the props of the image generating function. | Image Metadata Object | Type | | --- | --- | | `id` | `string` (required) | | `alt` | `string` | | `size` | `{ width: number; height: number }` | | `contentType` | `string` | import { ImageResponse } from 'next/og' export function generateImageMetadata() { return [ { contentType: 'image/png', size: { width: 48, height: 48 }, id: 'small', }, { contentType: 'image/png', size: { width: 72, height: 72 }, id: 'medium', }, ] } export default function Icon({ id }: { id: string }) { return new ImageResponse( ( <div style={{ width: '100%', height: '100%', display: 'flex', alignItems: 'center', justifyContent: 'center', fontSize: 88, background: '#000', color: '#fafafa', }} > Icon {id} </div> ) ) } ### Examples #### Using external data This example uses the `params` object and external data to generate multiple Open Graph images for a route segment. import { ImageResponse } from 'next/og' import { getCaptionForImage, getOGImages } from '@/app/utils/images' export async function generateImageMetadata({ params, }: { params: { id: string } }) { const images = await getOGImages(params.id) return images.map((image, idx) => ({ id: idx, size: { width: 1200, height: 600 }, alt: image.text, contentType: 'image/png', })) } export default async function Image({ params, id, }: { params: { id: string } id: number }) { const productId = (await params).id const imageId = id const text = await getCaptionForImage(productId, imageId) return new ImageResponse( ( <div style={ { // ... } } > {text} </div> ) ) } ## Version History | Version | Changes | | --- | --- | | `v13.3.0` | `generateImageMetadata` introduced. | --- ## Page: https://nextjs.org/docs/app/api-reference/functions/generate-metadata This page covers all **Config-based Metadata** options with `generateMetadata` and the static metadata object. import type { Metadata } from 'next' // either Static metadata export const metadata: Metadata = { title: '...', } // or Dynamic metadata export async function generateMetadata({ params }) { return { title: '...', } } > **Good to know**: > > * The `metadata` object and `generateMetadata` function exports are **only supported in Server Components**. > * You cannot export both the `metadata` object and `generateMetadata` function from the same route segment. To define static metadata, export a `Metadata` object from a `layout.js` or `page.js` file. import type { Metadata } from 'next' export const metadata: Metadata = { title: '...', description: '...', } export default function Page() {} See the Metadata Fields for a complete list of supported options. Dynamic metadata depends on **dynamic information**, such as the current route parameters, external data, or `metadata` in parent segments, can be set by exporting a `generateMetadata` function that returns a `Metadata` object. import type { Metadata, ResolvingMetadata } from 'next' type Props = { params: Promise<{ id: string }> searchParams: Promise<{ [key: string]: string | string[] | undefined }> } export async function generateMetadata( { params, searchParams }: Props, parent: ResolvingMetadata ): Promise<Metadata> { // read route params const { id } = await params // fetch data const product = await fetch(`https://.../${id}`).then((res) => res.json()) // optionally access and extend (rather than replace) parent metadata const previousImages = (await parent).openGraph?.images || [] return { title: product.title, openGraph: { images: ['/some-specific-page-image.jpg', ...previousImages], }, } } export default function Page({ params, searchParams }: Props) {} ### Parameters `generateMetadata` function accepts the following parameters: * `props` - An object containing the parameters of the current route: * `params` - An object containing the dynamic route parameters object from the root segment down to the segment `generateMetadata` is called from. Examples: | Route | URL | `params` | | --- | --- | --- | | `app/shop/[slug]/page.js` | `/shop/1` | `{ slug: '1' }` | | `app/shop/[tag]/[item]/page.js` | `/shop/1/2` | `{ tag: '1', item: '2' }` | | `app/shop/[...slug]/page.js` | `/shop/1/2` | `{ slug: ['1', '2'] }` | * `searchParams` - An object containing the current URL's search params. Examples: | URL | `searchParams` | | --- | --- | | `/shop?a=1` | `{ a: '1' }` | | `/shop?a=1&b=2` | `{ a: '1', b: '2' }` | | `/shop?a=1&a=2` | `{ a: ['1', '2'] }` | * `parent` - A promise of the resolved metadata from parent route segments. ### Returns `generateMetadata` should return a `Metadata` object containing one or more metadata fields. > **Good to know**: > > * If metadata doesn't depend on runtime information, it should be defined using the static `metadata` object rather than `generateMetadata`. > * `fetch` requests are automatically memoized for the same data across `generateMetadata`, `generateStaticParams`, Layouts, Pages, and Server Components. React `cache` can be used if `fetch` is unavailable. > * `searchParams` are only available in `page.js` segments. > * The `redirect()` and `notFound()` Next.js methods can also be used inside `generateMetadata`. ### `title` The `title` attribute is used to set the title of the document. It can be defined as a simple string or an optional template object. #### String export const metadata = { title: 'Next.js', } <title>Next.js</title> #### Template object import type { Metadata } from 'next' export const metadata: Metadata = { title: { template: '...', default: '...', absolute: '...', }, } ##### Default `title.default` can be used to provide a **fallback title** to child route segments that don't define a `title`. import type { Metadata } from 'next' export const metadata: Metadata = { title: { default: 'Acme', }, } import type { Metadata } from 'next' export const metadata: Metadata = {} // Output: <title>Acme</title> ##### Template `title.template` can be used to add a prefix or a suffix to `titles` defined in **child** route segments. import type { Metadata } from 'next' export const metadata: Metadata = { title: { template: '%s | Acme', default: 'Acme', // a default is required when creating a template }, } import type { Metadata } from 'next' export const metadata: Metadata = { title: 'About', } // Output: <title>About | Acme</title> > **Good to know**: > > * `title.template` applies to **child** route segments and **not** the segment it's defined in. This means: > > * `title.default` is **required** when you add a `title.template`. > * `title.template` defined in `layout.js` will not apply to a `title` defined in a `page.js` of the same route segment. > * `title.template` defined in `page.js` has no effect because a page is always the terminating segment (it doesn't have any children route segments). > * `title.template` has **no effect** if a route has not defined a `title` or `title.default`. > ##### Absolute `title.absolute` can be used to provide a title that **ignores** `title.template` set in parent segments. import type { Metadata } from 'next' export const metadata: Metadata = { title: { template: '%s | Acme', }, } import type { Metadata } from 'next' export const metadata: Metadata = { title: { absolute: 'About', }, } // Output: <title>About</title> > **Good to know**: > > * `layout.js` > > * `title` (string) and `title.default` define the default title for child segments (that do not define their own `title`). It will augment `title.template` from the closest parent segment if it exists. > * `title.absolute` defines the default title for child segments. It ignores `title.template` from parent segments. > * `title.template` defines a new title template for child segments. > * `page.js` > > * If a page does not define its own title the closest parents resolved title will be used. > * `title` (string) defines the routes title. It will augment `title.template` from the closest parent segment if it exists. > * `title.absolute` defines the route title. It ignores `title.template` from parent segments. > * `title.template` has no effect in `page.js` because a page is always the terminating segment of a route. ### `description` export const metadata = { description: 'The React Framework for the Web', } <meta name="description" content="The React Framework for the Web" /> ### Basic Fields export const metadata = { generator: 'Next.js', applicationName: 'Next.js', referrer: 'origin-when-cross-origin', keywords: ['Next.js', 'React', 'JavaScript'], authors: [{ name: 'Seb' }, { name: 'Josh', url: 'https://nextjs.org' }], creator: 'Jiachi Liu', publisher: 'Sebastian Markbåge', formatDetection: { email: false, address: false, telephone: false, }, } <meta name="application-name" content="Next.js" /> <meta name="author" content="Seb" /> <link rel="author" href="https://nextjs.org" /> <meta name="author" content="Josh" /> <meta name="generator" content="Next.js" /> <meta name="keywords" content="Next.js,React,JavaScript" /> <meta name="referrer" content="origin-when-cross-origin" /> <meta name="color-scheme" content="dark" /> <meta name="creator" content="Jiachi Liu" /> <meta name="publisher" content="Sebastian Markbåge" /> <meta name="format-detection" content="telephone=no, address=no, email=no" /> ### `metadataBase` `metadataBase` is a convenience option to set a base URL prefix for `metadata` fields that require a fully qualified URL. * `metadataBase` allows URL-based `metadata` fields defined in the **current route segment and below** to use a **relative path** instead of an otherwise required absolute URL. * The field's relative path will be composed with `metadataBase` to form a fully qualified URL. * If not configured, `metadataBase` is **automatically populated** with a default value. export const metadata = { metadataBase: new URL('https://acme.com'), alternates: { canonical: '/', languages: { 'en-US': '/en-US', 'de-DE': '/de-DE', }, }, openGraph: { images: '/og-image.png', }, } <link rel="canonical" href="https://acme.com" /> <link rel="alternate" hreflang="en-US" href="https://acme.com/en-US" /> <link rel="alternate" hreflang="de-DE" href="https://acme.com/de-DE" /> <meta property="og:image" content="https://acme.com/og-image.png" /> > **Good to know**: > > * `metadataBase` is typically set in root `app/layout.js` to apply to URL-based `metadata` fields across all routes. > * All URL-based `metadata` fields that require absolute URLs can be configured with a `metadataBase` option. > * `metadataBase` can contain a subdomain e.g. `https://app.acme.com` or base path e.g. `https://acme.com/start/from/here` > * If a `metadata` field provides an absolute URL, `metadataBase` will be ignored. > * Using a relative path in a URL-based `metadata` field without configuring a `metadataBase` will cause a build error. > * Next.js will normalize duplicate slashes between `metadataBase` (e.g. `https://acme.com/`) and a relative field (e.g. `/path`) to a single slash (e.g. `https://acme.com/path`) #### Default value If not configured, `metadataBase` has a **default value**. > On Vercel: > > * For production deployments, `VERCEL_PROJECT_PRODUCTION_URL` will be used. > * For preview deployments, `VERCEL_BRANCH_URL` will take priority, and fallback to `VERCEL_URL` if it's not present. > > If these values are present they will be used as the **default value** of `metadataBase`, otherwise it falls back to `http://localhost:${process.env.PORT || 3000}`. This allows Open Graph images to work on both local build and Vercel preview and production deployments. When overriding the default, we recommend using environment variables to compute the URL. This allows configuring a URL for local development, staging, and production environments. > > See more details about these environment variables in the System Environment Variables docs. #### URL Composition URL composition favors developer intent over default directory traversal semantics. * Trailing slashes between `metadataBase` and `metadata` fields are normalized. * An "absolute" path in a `metadata` field (that typically would replace the whole URL path) is treated as a "relative" path (starting from the end of `metadataBase`). For example, given the following `metadataBase`: import type { Metadata } from 'next' export const metadata: Metadata = { metadataBase: new URL('https://acme.com'), } Any `metadata` fields that inherit the above `metadataBase` and set their own value will be resolved as follows: | `metadata` field | Resolved URL | | --- | --- | | `/` | `https://acme.com` | | `./` | `https://acme.com` | | `payments` | `https://acme.com/payments` | | `/payments` | `https://acme.com/payments` | | `./payments` | `https://acme.com/payments` | | `../payments` | `https://acme.com/payments` | | `https://beta.acme.com/payments` | `https://beta.acme.com/payments` | ### `openGraph` export const metadata = { openGraph: { title: 'Next.js', description: 'The React Framework for the Web', url: 'https://nextjs.org', siteName: 'Next.js', images: [ { url: 'https://nextjs.org/og.png', // Must be an absolute URL width: 800, height: 600, }, { url: 'https://nextjs.org/og-alt.png', // Must be an absolute URL width: 1800, height: 1600, alt: 'My custom alt', }, ], videos: [ { url: 'https://nextjs.org/video.mp4', // Must be an absolute URL width: 800, height: 600, }, ], audio: [ { url: 'https://nextjs.org/audio.mp3', // Must be an absolute URL }, ], locale: 'en_US', type: 'website', }, } <meta property="og:title" content="Next.js" /> <meta property="og:description" content="The React Framework for the Web" /> <meta property="og:url" content="https://nextjs.org/" /> <meta property="og:site_name" content="Next.js" /> <meta property="og:locale" content="en_US" /> <meta property="og:image" content="https://nextjs.org/og.png" /> <meta property="og:image:width" content="800" /> <meta property="og:image:height" content="600" /> <meta property="og:image" content="https://nextjs.org/og-alt.png" /> <meta property="og:image:width" content="1800" /> <meta property="og:image:height" content="1600" /> <meta property="og:image:alt" content="My custom alt" /> <meta property="og:video" content="https://nextjs.org/video.mp4" /> <meta property="og:video:width" content="800" /> <meta property="og:video:height" content="600" /> <meta property="og:audio" content="https://nextjs.org/audio.mp3" /> <meta property="og:type" content="website" /> export const metadata = { openGraph: { title: 'Next.js', description: 'The React Framework for the Web', type: 'article', publishedTime: '2023-01-01T00:00:00.000Z', authors: ['Seb', 'Josh'], }, } <meta property="og:title" content="Next.js" /> <meta property="og:description" content="The React Framework for the Web" /> <meta property="og:type" content="article" /> <meta property="article:published_time" content="2023-01-01T00:00:00.000Z" /> <meta property="article:author" content="Seb" /> <meta property="article:author" content="Josh" /> > **Good to know**: > > * It may be more convenient to use the file-based Metadata API for Open Graph images. Rather than having to sync the config export with actual files, the file-based API will automatically generate the correct metadata for you. ### `robots` import type { Metadata } from 'next' export const metadata: Metadata = { robots: { index: true, follow: true, nocache: false, googleBot: { index: true, follow: true, noimageindex: false, 'max-video-preview': -1, 'max-image-preview': 'large', 'max-snippet': -1, }, }, } <meta name="robots" content="index, follow" /> <meta name="googlebot" content="index, follow, max-video-preview:-1, max-image-preview:large, max-snippet:-1" /> ### `icons` > **Good to know**: We recommend using the file-based Metadata API for icons where possible. Rather than having to sync the config export with actual files, the file-based API will automatically generate the correct metadata for you. export const metadata = { icons: { icon: '/icon.png', shortcut: '/shortcut-icon.png', apple: '/apple-icon.png', other: { rel: 'apple-touch-icon-precomposed', url: '/apple-touch-icon-precomposed.png', }, }, } <link rel="shortcut icon" href="/shortcut-icon.png" /> <link rel="icon" href="/icon.png" /> <link rel="apple-touch-icon" href="/apple-icon.png" /> <link rel="apple-touch-icon-precomposed" href="/apple-touch-icon-precomposed.png" /> export const metadata = { icons: { icon: [ { url: '/icon.png' }, new URL('/icon.png', 'https://example.com'), { url: '/icon-dark.png', media: '(prefers-color-scheme: dark)' }, ], shortcut: ['/shortcut-icon.png'], apple: [ { url: '/apple-icon.png' }, { url: '/apple-icon-x3.png', sizes: '180x180', type: 'image/png' }, ], other: [ { rel: 'apple-touch-icon-precomposed', url: '/apple-touch-icon-precomposed.png', }, ], }, } <link rel="shortcut icon" href="/shortcut-icon.png" /> <link rel="icon" href="/icon.png" /> <link rel="icon" href="https://example.com/icon.png" /> <link rel="icon" href="/icon-dark.png" media="(prefers-color-scheme: dark)" /> <link rel="apple-touch-icon" href="/apple-icon.png" /> <link rel="apple-touch-icon-precomposed" href="/apple-touch-icon-precomposed.png" /> <link rel="apple-touch-icon" href="/apple-icon-x3.png" sizes="180x180" type="image/png" /> > **Good to know**: The `msapplication-*` meta tags are no longer supported in Chromium builds of Microsoft Edge, and thus no longer needed. ### `themeColor` > **Deprecated**: The `themeColor` option in `metadata` is deprecated as of Next.js 14. Please use the `viewport` configuration instead. ### `colorScheme` > **Deprecated**: The `colorScheme` option in `metadata` is deprecated as of Next.js 14. Please use the `viewport` configuration instead. ### `manifest` A web application manifest, as defined in the Web Application Manifest specification. export const metadata = { manifest: 'https://nextjs.org/manifest.json', } <link rel="manifest" href="https://nextjs.org/manifest.json" /> ### `twitter` The Twitter specification is (surprisingly) used for more than just X (formerly known as Twitter). Learn more about the Twitter Card markup reference. export const metadata = { twitter: { card: 'summary_large_image', title: 'Next.js', description: 'The React Framework for the Web', siteId: '1467726470533754880', creator: '@nextjs', creatorId: '1467726470533754880', images: ['https://nextjs.org/og.png'], // Must be an absolute URL }, } <meta name="twitter:card" content="summary_large_image" /> <meta name="twitter:site:id" content="1467726470533754880" /> <meta name="twitter:creator" content="@nextjs" /> <meta name="twitter:creator:id" content="1467726470533754880" /> <meta name="twitter:title" content="Next.js" /> <meta name="twitter:description" content="The React Framework for the Web" /> <meta name="twitter:image" content="https://nextjs.org/og.png" /> export const metadata = { twitter: { card: 'app', title: 'Next.js', description: 'The React Framework for the Web', siteId: '1467726470533754880', creator: '@nextjs', creatorId: '1467726470533754880', images: { url: 'https://nextjs.org/og.png', alt: 'Next.js Logo', }, app: { name: 'twitter_app', id: { iphone: 'twitter_app://iphone', ipad: 'twitter_app://ipad', googleplay: 'twitter_app://googleplay', }, url: { iphone: 'https://iphone_url', ipad: 'https://ipad_url', }, }, }, } <meta name="twitter:site:id" content="1467726470533754880" /> <meta name="twitter:creator" content="@nextjs" /> <meta name="twitter:creator:id" content="1467726470533754880" /> <meta name="twitter:title" content="Next.js" /> <meta name="twitter:description" content="The React Framework for the Web" /> <meta name="twitter:card" content="app" /> <meta name="twitter:image" content="https://nextjs.org/og.png" /> <meta name="twitter:image:alt" content="Next.js Logo" /> <meta name="twitter:app:name:iphone" content="twitter_app" /> <meta name="twitter:app:id:iphone" content="twitter_app://iphone" /> <meta name="twitter:app:id:ipad" content="twitter_app://ipad" /> <meta name="twitter:app:id:googleplay" content="twitter_app://googleplay" /> <meta name="twitter:app:url:iphone" content="https://iphone_url" /> <meta name="twitter:app:url:ipad" content="https://ipad_url" /> <meta name="twitter:app:name:ipad" content="twitter_app" /> <meta name="twitter:app:name:googleplay" content="twitter_app" /> ### `viewport` > **Deprecated**: The `viewport` option in `metadata` is deprecated as of Next.js 14. Please use the `viewport` configuration instead. ### `verification` export const metadata = { verification: { google: 'google', yandex: 'yandex', yahoo: 'yahoo', other: { me: ['my-email', 'my-link'], }, }, } <meta name="google-site-verification" content="google" /> <meta name="y_key" content="yahoo" /> <meta name="yandex-verification" content="yandex" /> <meta name="me" content="my-email" /> <meta name="me" content="my-link" /> ### `appleWebApp` export const metadata = { itunes: { appId: 'myAppStoreID', appArgument: 'myAppArgument', }, appleWebApp: { title: 'Apple Web App', statusBarStyle: 'black-translucent', startupImage: [ '/assets/startup/apple-touch-startup-image-768x1004.png', { url: '/assets/startup/apple-touch-startup-image-1536x2008.png', media: '(device-width: 768px) and (device-height: 1024px)', }, ], }, } <meta name="apple-itunes-app" content="app-id=myAppStoreID, app-argument=myAppArgument" /> <meta name="mobile-web-app-capable" content="yes" /> <meta name="apple-mobile-web-app-title" content="Apple Web App" /> <link href="/assets/startup/apple-touch-startup-image-768x1004.png" rel="apple-touch-startup-image" /> <link href="/assets/startup/apple-touch-startup-image-1536x2008.png" media="(device-width: 768px) and (device-height: 1024px)" rel="apple-touch-startup-image" /> <meta name="apple-mobile-web-app-status-bar-style" content="black-translucent" /> ### `alternates` export const metadata = { alternates: { canonical: 'https://nextjs.org', languages: { 'en-US': 'https://nextjs.org/en-US', 'de-DE': 'https://nextjs.org/de-DE', }, media: { 'only screen and (max-width: 600px)': 'https://nextjs.org/mobile', }, types: { 'application/rss+xml': 'https://nextjs.org/rss', }, }, } <link rel="canonical" href="https://nextjs.org" /> <link rel="alternate" hreflang="en-US" href="https://nextjs.org/en-US" /> <link rel="alternate" hreflang="de-DE" href="https://nextjs.org/de-DE" /> <link rel="alternate" media="only screen and (max-width: 600px)" href="https://nextjs.org/mobile" /> <link rel="alternate" type="application/rss+xml" href="https://nextjs.org/rss" /> ### `appLinks` export const metadata = { appLinks: { ios: { url: 'https://nextjs.org/ios', app_store_id: 'app_store_id', }, android: { package: 'com.example.android/package', app_name: 'app_name_android', }, web: { url: 'https://nextjs.org/web', should_fallback: true, }, }, } <meta property="al:ios:url" content="https://nextjs.org/ios" /> <meta property="al:ios:app_store_id" content="app_store_id" /> <meta property="al:android:package" content="com.example.android/package" /> <meta property="al:android:app_name" content="app_name_android" /> <meta property="al:web:url" content="https://nextjs.org/web" /> <meta property="al:web:should_fallback" content="true" /> ### `archives` Describes a collection of records, documents, or other materials of historical interest (source). export const metadata = { archives: ['https://nextjs.org/13'], } <link rel="archives" href="https://nextjs.org/13" /> ### `assets` export const metadata = { assets: ['https://nextjs.org/assets'], } <link rel="assets" href="https://nextjs.org/assets" /> ### `bookmarks` export const metadata = { bookmarks: ['https://nextjs.org/13'], } <link rel="bookmarks" href="https://nextjs.org/13" /> ### `category` export const metadata = { category: 'technology', } <meta name="category" content="technology" /> ### `facebook` You can connect a Facebook app or Facebook account to you webpage for certain Facebook Social Plugins Facebook Documentation > **Good to know**: You can specify either appId or admins, but not both. export const metadata = { facebook: { appId: '12345678', }, } <meta property="fb:app_id" content="12345678" /> export const metadata = { facebook: { admins: '12345678', }, } <meta property="fb:admins" content="12345678" /> If you want to generate multiple fb:admins meta tags you can use array value. export const metadata = { facebook: { admins: ['12345678', '87654321'], }, } <meta property="fb:admins" content="12345678" /> <meta property="fb:admins" content="87654321" /> ### `pinterest` You can enable or disable Pinterest Rich Pins on your webpage. export const metadata = { pinterest: { richPin: true, }, } <meta name="pinterest-rich-pin" content="true" /> ### `other` All metadata options should be covered using the built-in support. However, there may be custom metadata tags specific to your site, or brand new metadata tags just released. You can use the `other` option to render any custom metadata tag. export const metadata = { other: { custom: 'meta', }, } <meta name="custom" content="meta" /> If you want to generate multiple same key meta tags you can use array value. export const metadata = { other: { custom: ['meta1', 'meta2'], }, } <meta name="custom" content="meta1" /> <meta name="custom" content="meta2" /> The following metadata types do not currently have built-in support. However, they can still be rendered in the layout or page itself. | Metadata | Recommendation | | --- | --- | | `<meta http-equiv="...">` | Use appropriate HTTP Headers via `redirect()`, Middleware, Security Headers | | `<base>` | Render the tag in the layout or page itself. | | `<noscript>` | Render the tag in the layout or page itself. | | `<style>` | Learn more about styling in Next.js. | | `<script>` | Learn more about using scripts. | | `<link rel="stylesheet" />` | `import` stylesheets directly in the layout or page itself. | | `<link rel="preload />` | Use ReactDOM preload method | | `<link rel="preconnect" />` | Use ReactDOM preconnect method | | `<link rel="dns-prefetch" />` | Use ReactDOM prefetchDNS method | ### Resource hints The `<link>` element has a number of `rel` keywords that can be used to hint to the browser that an external resource is likely to be needed. The browser uses this information to apply preloading optimizations depending on the keyword. While the Metadata API doesn't directly support these hints, you can use new `ReactDOM` methods to safely insert them into the `<head>` of the document. 'use client' import ReactDOM from 'react-dom' export function PreloadResources() { ReactDOM.preload('...', { as: '...' }) ReactDOM.preconnect('...', { crossOrigin: '...' }) ReactDOM.prefetchDNS('...') return '...' } ##### `<link rel="preload">` Start loading a resource early in the page rendering (browser) lifecycle. MDN Docs. ReactDOM.preload(href: string, options: { as: string }) <link rel="preload" href="..." as="..." /> ##### `<link rel="preconnect">` Preemptively initiate a connection to an origin. MDN Docs. ReactDOM.preconnect(href: string, options?: { crossOrigin?: string }) <link rel="preconnect" href="..." crossorigin /> ##### `<link rel="dns-prefetch">` Attempt to resolve a domain name before resources get requested. MDN Docs. ReactDOM.prefetchDNS(href: string) <link rel="dns-prefetch" href="..." /> > **Good to know**: > > * These methods are currently only supported in Client Components, which are still Server Side Rendered on initial page load. > * Next.js in-built features such as `next/font`, `next/image` and `next/script` automatically handle relevant resource hints. ## Types You can add type safety to your metadata by using the `Metadata` type. If you are using the built-in TypeScript plugin in your IDE, you do not need to manually add the type, but you can still explicitly add it if you want. ### `metadata` object import type { Metadata } from 'next' export const metadata: Metadata = { title: 'Next.js', } ### `generateMetadata` function #### Regular function import type { Metadata } from 'next' export function generateMetadata(): Metadata { return { title: 'Next.js', } } #### Async function import type { Metadata } from 'next' export async function generateMetadata(): Promise<Metadata> { return { title: 'Next.js', } } #### With segment props import type { Metadata } from 'next' type Props = { params: Promise<{ id: string }> searchParams: Promise<{ [key: string]: string | string[] | undefined }> } export function generateMetadata({ params, searchParams }: Props): Metadata { return { title: 'Next.js', } } export default function Page({ params, searchParams }: Props) {} #### With parent metadata import type { Metadata, ResolvingMetadata } from 'next' export async function generateMetadata( { params, searchParams }: Props, parent: ResolvingMetadata ): Promise<Metadata> { return { title: 'Next.js', } } #### JavaScript Projects For JavaScript projects, you can use JSDoc to add type safety. /** @type {import("next").Metadata} */ export const metadata = { title: 'Next.js', } Metadata returned by `generateMetadata` is streamed to the client. This allows Next.js to inject metadata into the HTML as soon as it's resolved. Since page metadata primarily targets bots and crawlers, Next.js will stream metadata for bots that can execute JavaScript and inspect the full page DOM (e.g. `Googlebot`). However, metadata will continue blocking the render of the page for **HTML-limited** bots (e.g. `Twitterbot`) as these cannot execute JavaScript while crawling. Next.js automatically detects the user agent of incoming requests to determine whether to serve streaming metadata or fallback to blocking metadata. If you need to customize this list, you can define them manually using the `htmlLimitedBots` option in `next.config.js`. Next.js will ensure user agents matching this regex receive blocking metadata when requesting your web page. import type { NextConfig } from 'next' const config: NextConfig = { htmlLimitedBots: 'MySpecialBot|MyAnotherSpecialBot|SimpleCrawler', } export default config Specifying a `htmlLimitedBots` config will override the Next.js' default list, allowing you full control over what user agents should opt into this behavior. This is advanced behavior, and the default should be sufficient for most cases. ## Version History | Version | Changes | | --- | --- | | `v15.2.0` | Introduced streaming support to `generateMetadata`. | | `v13.2.0` | `viewport`, `themeColor`, and `colorScheme` deprecated in favor of the `viewport` configuration. | | `v13.2.0` | `metadata` and `generateMetadata` introduced. | --- ## Page: https://nextjs.org/docs/app/api-reference/functions/generate-sitemaps You can use the `generateSitemaps` function to generate multiple sitemaps for your application. ## Returns The `generateSitemaps` returns an array of objects with an `id` property. ## URLs Your generated sitemaps will be available at `/.../sitemap/[id].xml`. For example, `/product/sitemap/1.xml`. ## Example For example, to split a sitemap using `generateSitemaps`, return an array of objects with the sitemap `id`. Then, use the `id` to generate the unique sitemaps. app/product/sitemap.ts import { BASE_URL } from '@/app/lib/constants' export async function generateSitemaps() { // Fetch the total number of products and calculate the number of sitemaps needed return [{ id: 0 }, { id: 1 }, { id: 2 }, { id: 3 }] } export default async function sitemap({ id, }: { id: number }): Promise<MetadataRoute.Sitemap> { // Google's limit is 50,000 URLs per sitemap const start = id * 50000 const end = start + 50000 const products = await getProducts( `SELECT id, date FROM products WHERE id BETWEEN ${start} AND ${end}` ) return products.map((product) => ({ url: `${BASE_URL}/product/${product.id}`, lastModified: product.date, })) } ## Version History | Version | Changes | | --- | --- | | `v15.0.0` | `generateSitemaps` now generates consistent URLs between development and production | | `v13.3.2` | `generateSitemaps` introduced. In development, you can view the generated sitemap on `/.../sitemap.xml/[id]`. For example, `/product/sitemap.xml/1`. | --- ## Page: https://nextjs.org/docs/app/api-reference/functions/generate-static-params The `generateStaticParams` function can be used in combination with dynamic route segments to **statically generate** routes at build time instead of on-demand at request time. // Return a list of `params` to populate the [slug] dynamic segment export async function generateStaticParams() { const posts = await fetch('https://.../posts').then((res) => res.json()) return posts.map((post) => ({ slug: post.slug, })) } // Multiple versions of this page will be statically generated // using the `params` returned by `generateStaticParams` export default async function Page({ params, }: { params: Promise<{ slug: string }> }) { const { slug } = await params // ... } > **Good to know**: > > * You can use the `dynamicParams` segment config option to control what happens when a dynamic segment is visited that was not generated with `generateStaticParams`. > * You must return an empty array from `generateStaticParams` or utilize `export const dynamic = 'force-static'` in order to revalidate (ISR) paths at runtime. > * During `next dev`, `generateStaticParams` will be called when you navigate to a route. > * During `next build`, `generateStaticParams` runs before the corresponding Layouts or Pages are generated. > * During revalidation (ISR), `generateStaticParams` will not be called again. > * `generateStaticParams` replaces the `getStaticPaths` function in the Pages Router. ## Parameters `options.params` (optional) If multiple dynamic segments in a route use `generateStaticParams`, the child `generateStaticParams` function is executed once for each set of `params` the parent generates. The `params` object contains the populated `params` from the parent `generateStaticParams`, which can be used to generate the `params` in a child segment. ## Returns `generateStaticParams` should return an array of objects where each object represents the populated dynamic segments of a single route. * Each property in the object is a dynamic segment to be filled in for the route. * The properties name is the segment's name, and the properties value is what that segment should be filled in with. | Example Route | `generateStaticParams` Return Type | | --- | --- | | `/product/[id]` | `{ id: string }[]` | | `/products/[category]/[product]` | `{ category: string, product: string }[]` | | `/products/[...slug]` | `{ slug: string[] }[]` | ## Single Dynamic Segment export function generateStaticParams() { return [{ id: '1' }, { id: '2' }, { id: '3' }] } // Three versions of this page will be statically generated // using the `params` returned by `generateStaticParams` // - /product/1 // - /product/2 // - /product/3 export default async function Page({ params, }: { params: Promise<{ id: string }> }) { const { id } = await params // ... } ## Multiple Dynamic Segments export function generateStaticParams() { return [ { category: 'a', product: '1' }, { category: 'b', product: '2' }, { category: 'c', product: '3' }, ] } // Three versions of this page will be statically generated // using the `params` returned by `generateStaticParams` // - /products/a/1 // - /products/b/2 // - /products/c/3 export default async function Page({ params, }: { params: Promise<{ category: string; product: string }> }) { const { category, product } = await params // ... } ## Catch-all Dynamic Segment export function generateStaticParams() { return [{ slug: ['a', '1'] }, { slug: ['b', '2'] }, { slug: ['c', '3'] }] } // Three versions of this page will be statically generated // using the `params` returned by `generateStaticParams` // - /product/a/1 // - /product/b/2 // - /product/c/3 export default async function Page({ params, }: { params: Promise<{ slug: string[] }> }) { const { slug } = await params // ... } ## Examples ### Static Rendering #### All paths at build time To statically render all paths at build time, supply the full list of paths to `generateStaticParams`: export async function generateStaticParams() { const posts = await fetch('https://.../posts').then((res) => res.json()) return posts.map((post) => ({ slug: post.slug, })) } #### Subset of paths at build time To statically render a subset of paths at build time, and the rest the first time they're visited at runtime, return a partial list of paths: export async function generateStaticParams() { const posts = await fetch('https://.../posts').then((res) => res.json()) // Render the first 10 posts at build time return posts.slice(0, 10).map((post) => ({ slug: post.slug, })) } Then, by using the `dynamicParams` segment config option, you can control what happens when a dynamic segment is visited that was not generated with `generateStaticParams`. // All posts besides the top 10 will be a 404 export const dynamicParams = false export async function generateStaticParams() { const posts = await fetch('https://.../posts').then((res) => res.json()) const topPosts = posts.slice(0, 10) return topPosts.map((post) => ({ slug: post.slug, })) } #### All paths at runtime To statically render all paths the first time they're visited, return an empty array (no paths will be rendered at build time) or utilize `export const dynamic = 'force-static'`: export async function generateStaticParams() { return [] } > **Good to know:** You must always return an array from `generateStaticParams`, even if it's empty. Otherwise, the route will be dynamically rendered. export const dynamic = 'force-static' ### Disable rendering for unspecified paths To prevent unspecified paths from being statically rendered at runtime, add the `export const dynamicParams = false` option in a route segment. When this config option is used, only paths provided by `generateStaticParams` will be served, and unspecified routes will 404 or match (in the case of catch-all routes). ### Multiple Dynamic Segments in a Route You can generate params for dynamic segments above the current layout or page, but **not below**. For example, given the `app/products/[category]/[product]` route: * `app/products/[category]/[product]/page.js` can generate params for **both** `[category]` and `[product]`. * `app/products/[category]/layout.js` can **only** generate params for `[category]`. There are two approaches to generating params for a route with multiple dynamic segments: #### Generate params from the bottom up Generate multiple dynamic segments from the child route segment. // Generate segments for both [category] and [product] export async function generateStaticParams() { const products = await fetch('https://.../products').then((res) => res.json()) return products.map((product) => ({ category: product.category.slug, product: product.id, })) } export default function Page({ params, }: { params: Promise<{ category: string; product: string }> }) { // ... } #### Generate params from the top down Generate the parent segments first and use the result to generate the child segments. // Generate segments for [category] export async function generateStaticParams() { const products = await fetch('https://.../products').then((res) => res.json()) return products.map((product) => ({ category: product.category.slug, })) } export default function Layout({ params, }: { params: Promise<{ category: string }> }) { // ... } A child route segment's `generateStaticParams` function is executed once for each segment a parent `generateStaticParams` generates. The child `generateStaticParams` function can use the `params` returned from the parent `generateStaticParams` function to dynamically generate its own segments. // Generate segments for [product] using the `params` passed from // the parent segment's `generateStaticParams` function export async function generateStaticParams({ params: { category }, }: { params: { category: string } }) { const products = await fetch( `https://.../products?category=${category}` ).then((res) => res.json()) return products.map((product) => ({ product: product.id, })) } export default function Page({ params, }: { params: Promise<{ category: string; product: string }> }) { // ... } > **Good to know**: `fetch` requests are automatically memoized for the same data across all `generate`\-prefixed functions, Layouts, Pages, and Server Components. React `cache` can be used if `fetch` is unavailable. ## Version History | Version | Changes | | --- | --- | | `v13.0.0` | `generateStaticParams` introduced. | --- ## Page: https://nextjs.org/docs/app/api-reference/functions/generate-viewport You can customize the initial viewport of the page with the static `viewport` object or the dynamic `generateViewport` function. > **Good to know**: > > * The `viewport` object and `generateViewport` function exports are **only supported in Server Components**. > * You cannot export both the `viewport` object and `generateViewport` function from the same route segment. > * If you're coming from migrating `metadata` exports, you can use metadata-to-viewport-export codemod to update your changes. ## The `viewport` object To define the viewport options, export a `viewport` object from a `layout.jsx` or `page.jsx` file. import type { Viewport } from 'next' export const viewport: Viewport = { themeColor: 'black', } export default function Page() {} ## `generateViewport` function `generateViewport` should return a `Viewport` object containing one or more viewport fields. export function generateViewport({ params }) { return { themeColor: '...', } } > **Good to know**: > > * If the viewport doesn't depend on runtime information, it should be defined using the static `viewport` object rather than `generateViewport`. ## Viewport Fields ### `themeColor` Learn more about `theme-color`. **Simple theme color** import type { Viewport } from 'next' export const viewport: Viewport = { themeColor: 'black', } <meta name="theme-color" content="black" /> **With media attribute** import type { Viewport } from 'next' export const viewport: Viewport = { themeColor: [ { media: '(prefers-color-scheme: light)', color: 'cyan' }, { media: '(prefers-color-scheme: dark)', color: 'black' }, ], } <meta name="theme-color" media="(prefers-color-scheme: light)" content="cyan" /> <meta name="theme-color" media="(prefers-color-scheme: dark)" content="black" /> ### `width`, `initialScale`, `maximumScale` and `userScalable` > **Good to know**: The `viewport` meta tag is automatically set, and manual configuration is usually unnecessary as the default is sufficient. However, the information is provided for completeness. import type { Viewport } from 'next' export const viewport: Viewport = { width: 'device-width', initialScale: 1, maximumScale: 1, userScalable: false, // Also supported but less commonly used // interactiveWidget: 'resizes-visual', } <meta name="viewport" content="width=device-width, initial-scale=1, maximum-scale=1, user-scalable=no" /> ### `colorScheme` Learn more about `color-scheme`. import type { Viewport } from 'next' export const viewport: Viewport = { colorScheme: 'dark', } <meta name="color-scheme" content="dark" /> ## Types You can add type safety to your viewport object by using the `Viewport` type. If you are using the built-in TypeScript plugin in your IDE, you do not need to manually add the type, but you can still explicitly add it if you want. ### `viewport` object import type { Viewport } from 'next' export const viewport: Viewport = { themeColor: 'black', } ### `generateViewport` function #### Regular function import type { Viewport } from 'next' export function generateViewport(): Viewport { return { themeColor: 'black', } } #### With segment props import type { Viewport } from 'next' type Props = { params: Promise<{ id: string }> searchParams: Promise<{ [key: string]: string | string[] | undefined }> } export function generateViewport({ params, searchParams }: Props): Viewport { return { themeColor: 'black', } } export default function Page({ params, searchParams }: Props) {} #### JavaScript Projects For JavaScript projects, you can use JSDoc to add type safety. /** @type {import("next").Viewport} */ export const viewport = { themeColor: 'black', } ## Version History | Version | Changes | | --- | --- | | `v14.0.0` | `viewport` and `generateViewport` introduced. | --- ## Page: https://nextjs.org/docs/app/api-reference/functions/headers `headers` is an **async** function that allows you to **read** the HTTP incoming request headers from a Server Component. app/page.tsx import { headers } from 'next/headers' export default async function Page() { const headersList = await headers() const userAgent = headersList.get('user-agent') } ## Reference ### Parameters `headers` does not take any parameters. ### Returns `headers` returns a **read-only** Web Headers object. * `Headers.entries()`: Returns an `iterator` allowing to go through all key/value pairs contained in this object. * `Headers.forEach()`: Executes a provided function once for each key/value pair in this `Headers` object. * `Headers.get()`: Returns a `String` sequence of all the values of a header within a `Headers` object with a given name. * `Headers.has()`: Returns a boolean stating whether a `Headers` object contains a certain header. * `Headers.keys()`: Returns an `iterator` allowing you to go through all keys of the key/value pairs contained in this object. * `Headers.values()`: Returns an `iterator` allowing you to go through all values of the key/value pairs contained in this object. ## Good to know * `headers` is an **asynchronous** function that returns a promise. You must use `async/await` or React's `use` function. * In version 14 and earlier, `headers` was a synchronous function. To help with backwards compatibility, you can still access it synchronously in Next.js 15, but this behavior will be deprecated in the future. * Since `headers` is read-only, you cannot `set` or `delete` the outgoing request headers. * `headers` is a Dynamic API whose returned values cannot be known ahead of time. Using it in will opt a route into **dynamic rendering**. ## Examples ### Using the Authorization header app/page.js import { headers } from 'next/headers' export default async function Page() { const authorization = (await headers()).get('authorization') const res = await fetch('...', { headers: { authorization }, // Forward the authorization header }) const user = await res.json() return <h1>{user.name}</h1> } ## Version History | Version | Changes | | --- | --- | | `v15.0.0-RC` | `headers` is now an async function. A codemod is available. | | `v13.0.0` | `headers` introduced. | --- ## Page: https://nextjs.org/docs/app/api-reference/functions/image-response The `ImageResponse` constructor allows you to generate dynamic images using JSX and CSS. This is useful for generating social media images such as Open Graph images, Twitter cards, and more. The following options are available for `ImageResponse`: import { ImageResponse } from 'next/og' new ImageResponse( element: ReactElement, options: { width?: number = 1200 height?: number = 630 emoji?: 'twemoji' | 'blobmoji' | 'noto' | 'openmoji' = 'twemoji', fonts?: { name: string, data: ArrayBuffer, weight: number, style: 'normal' | 'italic' }[] debug?: boolean = false // Options that will be passed to the HTTP response status?: number = 200 statusText?: string headers?: Record<string, string> }, ) ## Supported CSS Properties Please refer to Satori’s documentation for a list of supported HTML and CSS features. ## Version History | Version | Changes | | --- | --- | | `v14.0.0` | `ImageResponse` moved from `next/server` to `next/og` | | `v13.3.0` | `ImageResponse` can be imported from `next/server`. | | `v13.0.0` | `ImageResponse` introduced via `@vercel/og` package. | --- ## Page: https://nextjs.org/docs/app/api-reference/functions/next-request NextRequest extends the Web Request API with additional convenience methods. ## `cookies` Read or mutate the `Set-Cookie` header of the request. ### `set(name, value)` Given a name, set a cookie with the given value on the request. // Given incoming request /home // Set a cookie to hide the banner // request will have a `Set-Cookie:show-banner=false;path=/home` header request.cookies.set('show-banner', 'false') ### `get(name)` Given a cookie name, return the value of the cookie. If the cookie is not found, `undefined` is returned. If multiple cookies are found, the first one is returned. // Given incoming request /home // { name: 'show-banner', value: 'false', Path: '/home' } request.cookies.get('show-banner') ### `getAll()` Given a cookie name, return the values of the cookie. If no name is given, return all cookies on the request. // Given incoming request /home // [ // { name: 'experiments', value: 'new-pricing-page', Path: '/home' }, // { name: 'experiments', value: 'winter-launch', Path: '/home' }, // ] request.cookies.getAll('experiments') // Alternatively, get all cookies for the request request.cookies.getAll() ### `delete(name)` Given a cookie name, delete the cookie from the request. // Returns true for deleted, false is nothing is deleted request.cookies.delete('experiments') ### `has(name)` Given a cookie name, return `true` if the cookie exists on the request. // Returns true if cookie exists, false if it does not request.cookies.has('experiments') ### `clear()` Remove the `Set-Cookie` header from the request. request.cookies.clear() ## `nextUrl` Extends the native `URL` API with additional convenience methods, including Next.js specific properties. // Given a request to /home, pathname is /home request.nextUrl.pathname // Given a request to /home?name=lee, searchParams is { 'name': 'lee' } request.nextUrl.searchParams The following options are available: | Property | Type | Description | | --- | --- | --- | | `basePath` | `string` | The base path of the URL. | | `buildId` | `string` | `undefined` | The build identifier of the Next.js application. Can be customized. | | `pathname` | `string` | The pathname of the URL. | | `searchParams` | `Object` | The search parameters of the URL. | > **Note:** The internationalization properties from the Pages Router are not available for usage in the App Router. Learn more about internationalization with the App Router. ## Version History | Version | Changes | | --- | --- | | `v15.0.0` | `ip` and `geo` removed. | --- ## Page: https://nextjs.org/docs/app/api-reference/functions/next-response NextResponse extends the Web Response API with additional convenience methods. ## `cookies` Read or mutate the `Set-Cookie` header of the response. ### `set(name, value)` Given a name, set a cookie with the given value on the response. // Given incoming request /home let response = NextResponse.next() // Set a cookie to hide the banner response.cookies.set('show-banner', 'false') // Response will have a `Set-Cookie:show-banner=false;path=/home` header return response ### `get(name)` Given a cookie name, return the value of the cookie. If the cookie is not found, `undefined` is returned. If multiple cookies are found, the first one is returned. // Given incoming request /home let response = NextResponse.next() // { name: 'show-banner', value: 'false', Path: '/home' } response.cookies.get('show-banner') ### `getAll()` Given a cookie name, return the values of the cookie. If no name is given, return all cookies on the response. // Given incoming request /home let response = NextResponse.next() // [ // { name: 'experiments', value: 'new-pricing-page', Path: '/home' }, // { name: 'experiments', value: 'winter-launch', Path: '/home' }, // ] response.cookies.getAll('experiments') // Alternatively, get all cookies for the response response.cookies.getAll() ### `delete(name)` Given a cookie name, delete the cookie from the response. // Given incoming request /home let response = NextResponse.next() // Returns true for deleted, false is nothing is deleted response.cookies.delete('experiments') ## `json()` Produce a response with the given JSON body. import { NextResponse } from 'next/server' export async function GET(request: Request) { return NextResponse.json({ error: 'Internal Server Error' }, { status: 500 }) } ## `redirect()` Produce a response that redirects to a URL. import { NextResponse } from 'next/server' return NextResponse.redirect(new URL('/new', request.url)) The URL can be created and modified before being used in the `NextResponse.redirect()` method. For example, you can use the `request.nextUrl` property to get the current URL, and then modify it to redirect to a different URL. import { NextResponse } from 'next/server' // Given an incoming request... const loginUrl = new URL('/login', request.url) // Add ?from=/incoming-url to the /login URL loginUrl.searchParams.set('from', request.nextUrl.pathname) // And redirect to the new URL return NextResponse.redirect(loginUrl) ## `rewrite()` Produce a response that rewrites (proxies) the given URL while preserving the original URL. import { NextResponse } from 'next/server' // Incoming request: /about, browser shows /about // Rewritten request: /proxy, browser shows /about return NextResponse.rewrite(new URL('/proxy', request.url)) ## `next()` The `next()` method is useful for Middleware, as it allows you to return early and continue routing. import { NextResponse } from 'next/server' return NextResponse.next() You can also forward `headers` when producing the response: import { NextResponse } from 'next/server' // Given an incoming request... const newHeaders = new Headers(request.headers) // Add a new header newHeaders.set('x-version', '123') // And produce a response with the new headers return NextResponse.next({ request: { // New request headers headers: newHeaders, }, }) --- ## Page: https://nextjs.org/docs/app/api-reference/functions/not-found The `notFound` function allows you to render the `not-found file` within a route segment as well as inject a `<meta name="robots" content="noindex" />` tag. ## `notFound()` Invoking the `notFound()` function throws a `NEXT_HTTP_ERROR_FALLBACK;404` error and terminates rendering of the route segment in which it was thrown. Specifying a **not-found** file allows you to gracefully handle such errors by rendering a Not Found UI within the segment. app/user/\[id\]/page.js import { notFound } from 'next/navigation' async function fetchUser(id) { const res = await fetch('https://...') if (!res.ok) return undefined return res.json() } export default async function Profile({ params }) { const { id } = await params const user = await fetchUser(id) if (!user) { notFound() } // ... } > **Good to know**: `notFound()` does not require you to use `return notFound()` due to using the TypeScript `never` type. ## Version History | Version | Changes | | --- | --- | | `v13.0.0` | `notFound` introduced. | --- ## Page: https://nextjs.org/docs/app/api-reference/functions/permanentRedirect The `permanentRedirect` function allows you to redirect the user to another URL. `permanentRedirect` can be used in Server Components, Client Components, Route Handlers, and Server Actions. When used in a streaming context, this will insert a meta tag to emit the redirect on the client side. When used in a server action, it will serve a 303 HTTP redirect response to the caller. Otherwise, it will serve a 308 (Permanent) HTTP redirect response to the caller. If a resource doesn't exist, you can use the `notFound` function instead. > **Good to know**: If you prefer to return a 307 (Temporary) HTTP redirect instead of 308 (Permanent), you can use the `redirect` function instead. ## Parameters The `permanentRedirect` function accepts two arguments: permanentRedirect(path, type) | Parameter | Type | Description | | --- | --- | --- | | `path` | `string` | The URL to redirect to. Can be a relative or absolute path. | | `type` | `'replace'` (default) or `'push'` (default in Server Actions) | The type of redirect to perform. | By default, `permanentRedirect` will use `push` (adding a new entry to the browser history stack) in Server Actions and `replace` (replacing the current URL in the browser history stack) everywhere else. You can override this behavior by specifying the `type` parameter. The `type` parameter has no effect when used in Server Components. ## Returns `permanentRedirect` does not return a value. ## Example Invoking the `permanentRedirect()` function throws a `NEXT_REDIRECT` error and terminates rendering of the route segment in which it was thrown. import { permanentRedirect } from 'next/navigation' async function fetchTeam(id) { const res = await fetch('https://...') if (!res.ok) return undefined return res.json() } export default async function Profile({ params }) { const { id } = await params const team = await fetchTeam(id) if (!team) { permanentRedirect('/login') } // ... } > **Good to know**: `permanentRedirect` does not require you to use `return permanentRedirect()` as it uses the TypeScript `never` type. --- ## Page: https://nextjs.org/docs/app/api-reference/functions/redirect The `redirect` function allows you to redirect the user to another URL. `redirect` can be used in Server Components, Route Handlers, and Server Actions. When used in a streaming context, this will insert a meta tag to emit the redirect on the client side. When used in a server action, it will serve a 303 HTTP redirect response to the caller. Otherwise, it will serve a 307 HTTP redirect response to the caller. If a resource doesn't exist, you can use the `notFound` function instead. > **Good to know**: > > * In Server Actions and Route Handlers, `redirect` should be called after the `try/catch` block. > * If you prefer to return a 308 (Permanent) HTTP redirect instead of 307 (Temporary), you can use the `permanentRedirect` function instead. ## Parameters The `redirect` function accepts two arguments: redirect(path, type) | Parameter | Type | Description | | --- | --- | --- | | `path` | `string` | The URL to redirect to. Can be a relative or absolute path. | | `type` | `'replace'` (default) or `'push'` (default in Server Actions) | The type of redirect to perform. | By default, `redirect` will use `push` (adding a new entry to the browser history stack) in Server Actions and `replace` (replacing the current URL in the browser history stack) everywhere else. You can override this behavior by specifying the `type` parameter. The `type` parameter has no effect when used in Server Components. ## Returns `redirect` does not return a value. ## Example ### Server Component Invoking the `redirect()` function throws a `NEXT_REDIRECT` error and terminates rendering of the route segment in which it was thrown. import { redirect } from 'next/navigation' async function fetchTeam(id: string) { const res = await fetch('https://...') if (!res.ok) return undefined return res.json() } export default async function Profile({ params, }: { params: Promise<{ id: string }> }) { const { id } = await params const team = await fetchTeam(id) if (!team) { redirect('/login') } // ... } > **Good to know**: `redirect` does not require you to use `return redirect()` as it uses the TypeScript `never` type. ### Client Component `redirect` can be directly used in a Client Component. 'use client' import { redirect, usePathname } from 'next/navigation' export function ClientRedirect() { const pathname = usePathname() if (pathname.startsWith('/admin') && !pathname.includes('/login')) { redirect('/admin/login') } return <div>Login Page</div> } > **Good to know**: When using `redirect` in a Client Component on initial page load during Server-Side Rendering (SSR), it will perform a server-side redirect. `redirect` can be used in a Client Component through a Server Action. If you need to use an event handler to redirect the user, you can use the `useRouter` hook. 'use client' import { navigate } from './actions' export function ClientRedirect() { return ( <form action={navigate}> <input type="text" name="id" /> <button>Submit</button> </form> ) } 'use server' import { redirect } from 'next/navigation' export async function navigate(data: FormData) { redirect(`/posts/${data.get('id')}`) } ## FAQ ### Why does `redirect` use 307 and 308? When using `redirect()` you may notice that the status codes used are `307` for a temporary redirect, and `308` for a permanent redirect. While traditionally a `302` was used for a temporary redirect, and a `301` for a permanent redirect, many browsers changed the request method of the redirect, from a `POST` to `GET` request when using a `302`, regardless of the origins request method. Taking the following example of a redirect from `/users` to `/people`, if you make a `POST` request to `/users` to create a new user, and are conforming to a `302` temporary redirect, the request method will be changed from a `POST` to a `GET` request. This doesn't make sense, as to create a new user, you should be making a `POST` request to `/people`, and not a `GET` request. The introduction of the `307` status code means that the request method is preserved as `POST`. * `302` - Temporary redirect, will change the request method from `POST` to `GET` * `307` - Temporary redirect, will preserve the request method as `POST` The `redirect()` method uses a `307` by default, instead of a `302` temporary redirect, meaning your requests will _always_ be preserved as `POST` requests. Learn more about HTTP Redirects. ## Version History | Version | Changes | | --- | --- | | `v13.0.0` | `redirect` introduced. | --- ## Page: https://nextjs.org/docs/app/api-reference/functions/revalidatePath `revalidatePath` allows you to purge cached data on-demand for a specific path. > **Good to know**: > > * `revalidatePath` only invalidates the cache when the included path is next visited. This means calling `revalidatePath` with a dynamic route segment will not immediately trigger many revalidations at once. The invalidation only happens when the path is next visited. > * Currently, `revalidatePath` invalidates all the routes in the client-side Router Cache when used in a server action. This behavior is temporary and will be updated in the future to apply only to the specific path. > * Using `revalidatePath` invalidates **only the specific path** in the server-side Route Cache. ## Parameters revalidatePath(path: string, type?: 'page' | 'layout'): void; * `path`: Either a string representing the filesystem path associated with the data you want to revalidate (for example, `/product/[slug]/page`), or the literal route segment (for example, `/product/123`). Must be less than 1024 characters. This value is case-sensitive. * `type`: (optional) `'page'` or `'layout'` string to change the type of path to revalidate. If `path` contains a dynamic segment (for example, `/product/[slug]/page`), this parameter is required. If path refers to the literal route segment, e.g., `/product/1` for a dynamic page (e.g., `/product/[slug]/page`), you should not provide `type`. ## Returns `revalidatePath` does not return a value. ## Examples ### Revalidating A Specific URL import { revalidatePath } from 'next/cache' revalidatePath('/blog/post-1') This will revalidate one specific URL on the next page visit. ### Revalidating A Page Path import { revalidatePath } from 'next/cache' revalidatePath('/blog/[slug]', 'page') // or with route groups revalidatePath('/(main)/blog/[slug]', 'page') This will revalidate any URL that matches the provided `page` file on the next page visit. This will _not_ invalidate pages beneath the specific page. For example, `/blog/[slug]` won't invalidate `/blog/[slug]/[author]`. ### Revalidating A Layout Path import { revalidatePath } from 'next/cache' revalidatePath('/blog/[slug]', 'layout') // or with route groups revalidatePath('/(main)/post/[slug]', 'layout') This will revalidate any URL that matches the provided `layout` file on the next page visit. This will cause pages beneath with the same layout to revalidate on the next visit. For example, in the above case, `/blog/[slug]/[another]` would also revalidate on the next visit. ### Revalidating All Data import { revalidatePath } from 'next/cache' revalidatePath('/', 'layout') This will purge the Client-side Router Cache, and revalidate the Data Cache on the next page visit. ### Server Action 'use server' import { revalidatePath } from 'next/cache' export default async function submit() { await submitForm() revalidatePath('/') } ### Route Handler import { revalidatePath } from 'next/cache' import type { NextRequest } from 'next/server' export async function GET(request: NextRequest) { const path = request.nextUrl.searchParams.get('path') if (path) { revalidatePath(path) return Response.json({ revalidated: true, now: Date.now() }) } return Response.json({ revalidated: false, now: Date.now(), message: 'Missing path to revalidate', }) } --- ## Page: https://nextjs.org/docs/app/api-reference/functions/revalidateTag `revalidateTag` allows you to purge cached data on-demand for a specific cache tag. > **Good to know**: > > * `revalidateTag` only invalidates the cache when the path is next visited. This means calling `revalidateTag` with a dynamic route segment will not immediately trigger many revalidations at once. The invalidation only happens when the path is next visited. ## Parameters revalidateTag(tag: string): void; * `tag`: A string representing the cache tag associated with the data you want to revalidate. Must be less than or equal to 256 characters. This value is case-sensitive. You can add tags to `fetch` as follows: fetch(url, { next: { tags: [...] } }); ## Returns `revalidateTag` does not return a value. ## Examples ### Server Action app/actions.ts 'use server' import { revalidateTag } from 'next/cache' export default async function submit() { await addPost() revalidateTag('posts') } ### Route Handler app/api/revalidate/route.ts import type { NextRequest } from 'next/server' import { revalidateTag } from 'next/cache' export async function GET(request: NextRequest) { const tag = request.nextUrl.searchParams.get('tag') revalidateTag(tag) return Response.json({ revalidated: true, now: Date.now() }) } --- ## Page: https://nextjs.org/docs/app/api-reference/functions/unauthorized This feature is currently experimental and subject to change, it's not recommended for production. Try it out and share your feedback on GitHub. The `unauthorized` function throws an error that renders a Next.js 401 error page. It's useful for handling authorization errors in your application. You can customize the UI using the `unauthorized.js` file. To start using `unauthorized`, enable the experimental `authInterrupts` configuration option in your `next.config.js` file: import type { NextConfig } from 'next' const nextConfig: NextConfig = { experimental: { authInterrupts: true, }, } export default nextConfig `unauthorized` can be invoked in Server Components, Server Actions, and Route Handlers. import { verifySession } from '@/app/lib/dal' import { unauthorized } from 'next/navigation' export default async function DashboardPage() { const session = await verifySession() if (!session) { unauthorized() } // Render the dashboard for authenticated users return ( <main> <h1>Welcome to the Dashboard</h1> <p>Hi, {session.user.name}.</p> </main> ) } ## Good to know * The `unauthorized` function cannot be called in the root layout. ## Examples ### Displaying login UI to unauthenticated users You can use `unauthorized` function to display the `unauthorized.js` file with a login UI. import { verifySession } from '@/app/lib/dal' import { unauthorized } from 'next/navigation' export default async function DashboardPage() { const session = await verifySession() if (!session) { unauthorized() } return <div>Dashboard</div> } import Login from '@/app/components/Login' export default function UnauthorizedPage() { return ( <main> <h1>401 - Unauthorized</h1> <p>Please log in to access this page.</p> <Login /> </main> ) } ### Mutations with Server Actions You can invoke `unauthorized` in Server Actions to ensure only authenticated users can perform specific mutations. 'use server' import { verifySession } from '@/app/lib/dal' import { unauthorized } from 'next/navigation' import db from '@/app/lib/db' export async function updateProfile(data: FormData) { const session = await verifySession() // If the user is not authenticated, return a 401 if (!session) { unauthorized() } // Proceed with mutation // ... } ### Fetching data with Route Handlers You can use `unauthorized` in Route Handlers to ensure only authenticated users can access the endpoint. import { NextRequest, NextResponse } from 'next/server' import { verifySession } from '@/app/lib/dal' import { unauthorized } from 'next/navigation' export async function GET(req: NextRequest): Promise<NextResponse> { // Verify the user's session const session = await verifySession() // If no session exists, return a 401 and render unauthorized.tsx if (!session) { unauthorized() } // Fetch data // ... } ## Version History | Version | Changes | | --- | --- | | `v15.1.0` | `unauthorized` introduced. | --- ## Page: https://nextjs.org/docs/app/api-reference/functions/unstable_cache > **Note:** This API will be replaced by `use cache` when it reaches stability. `unstable_cache` allows you to cache the results of expensive operations, like database queries, and reuse them across multiple requests. import { getUser } from './data'; import { unstable_cache } from 'next/cache'; const getCachedUser = unstable_cache( async (id) => getUser(id), ['my-app-user'] ); export default async function Component({ userID }) { const user = await getCachedUser(userID); ... } > **Good to know**: > > * Accessing dynamic data sources such as `headers` or `cookies` inside a cache scope is not supported. If you need this data inside a cached function use `headers` outside of the cached function and pass the required dynamic data in as an argument. > * This API uses Next.js' built-in Data Cache to persist the result across requests and deployments. > **Warning**: This API is unstable and may change in the future. We will provide migration documentation and codemods, if needed, as this API stabilizes. ## Parameters const data = unstable_cache(fetchData, keyParts, options)() * `fetchData`: This is an asynchronous function that fetches the data you want to cache. It must be a function that returns a `Promise`. * `keyParts`: This is an extra array of keys that further adds identification to the cache. By default, `unstable_cache` already uses the arguments and the stringified version of your function as the cache key. It is optional in most cases; the only time you need to use it is when you use external variables without passing them as parameters. However, it is important to add closures used within the function if you do not pass them as parameters. * `options`: This is an object that controls how the cache behaves. It can contain the following properties: * `tags`: An array of tags that can be used to control cache invalidation. Next.js will not use this to uniquely identify the function. * `revalidate`: The number of seconds after which the cache should be revalidated. Omit or pass `false` to cache indefinitely or until matching `revalidateTag()` or `revalidatePath()` methods are called. ## Returns `unstable_cache` returns a function that when invoked, returns a Promise that resolves to the cached data. If the data is not in the cache, the provided function will be invoked, and its result will be cached and returned. ## Example import { unstable_cache } from 'next/cache' export default async function Page({ params, }: { params: Promise<{ userId: string }> }) { const { userId } = await params const getCachedUser = unstable_cache( async () => { return { id: userId } }, [userId], // add the user ID to the cache key { tags: ['users'], revalidate: 60, } ) //... } ## Version History | Version | Changes | | --- | --- | | `v14.0.0` | `unstable_cache` introduced. | Was this helpful? supported. --- ## Page: https://nextjs.org/docs/app/api-reference/functions/unstable_noStore This is a legacy API and no longer recommended. It's still supported for backward compatibility. **In version 15, we recommend using `connection` instead of `unstable_noStore`.** `unstable_noStore` can be used to declaratively opt out of static rendering and indicate a particular component should not be cached. import { unstable_noStore as noStore } from 'next/cache'; export default async function ServerComponent() { noStore(); const result = await db.query(...); ... } > **Good to know**: > > * `unstable_noStore` is equivalent to `cache: 'no-store'` on a `fetch` > * `unstable_noStore` is preferred over `export const dynamic = 'force-dynamic'` as it is more granular and can be used on a per-component basis * Using `unstable_noStore` inside `unstable_cache` will not opt out of static generation. Instead, it will defer to the cache configuration to determine whether to cache the result or not. ## Usage If you prefer not to pass additional options to `fetch`, like `cache: 'no-store'`, `next: { revalidate: 0 }` or in cases where `fetch` is not available, you can use `noStore()` as a replacement for all of these use cases. import { unstable_noStore as noStore } from 'next/cache'; export default async function ServerComponent() { noStore(); const result = await db.query(...); ... } ## Version History | Version | Changes | | --- | --- | | `v15.0.0` | `unstable_noStore` deprecated for `connection`. | | `v14.0.0` | `unstable_noStore` introduced. | --- ## Page: https://nextjs.org/docs/app/api-reference/functions/unstable_rethrow This feature is currently unstable and subject to change, it's not recommended for production. Try it out and share your feedback on GitHub. `unstable_rethrow` can be used to avoid catching internal errors thrown by Next.js when attempting to handle errors thrown in your application code. For example, calling the `notFound` function will throw an internal Next.js error and render the `not-found.js` component. However, if used inside a `try/catch` block, the error will be caught, preventing `not-found.js` from rendering: import { notFound } from 'next/navigation' export default async function Page() { try { const post = await fetch('https://.../posts/1').then((res) => { if (res.status === 404) notFound() if (!res.ok) throw new Error(res.statusText) return res.json() }) } catch (err) { console.error(err) } } You can use `unstable_rethrow` API to re-throw the internal error and continue with the expected behavior: import { notFound, unstable_rethrow } from 'next/navigation' export default async function Page() { try { const post = await fetch('https://.../posts/1').then((res) => { if (res.status === 404) notFound() if (!res.ok) throw new Error(res.statusText) return res.json() }) } catch (err) { unstable_rethrow(err) console.error(err) } } The following Next.js APIs rely on throwing an error which should be rethrown and handled by Next.js itself: * `notFound()` * `redirect()` * `permanentRedirect()` If a route segment is marked to throw an error unless it's static, a Dynamic API call will also throw an error that should similarly not be caught by the developer. Note that Partial Prerendering (PPR) affects this behavior as well. These APIs are: * `cookies` * `headers` * `searchParams` * `fetch(..., { cache: 'no-store' })` * `fetch(..., { next: { revalidate: 0 } })` > **Good to know**: > > * This method should be called at the top of the catch block, passing the error object as its only argument. It can also be used within a `.catch` handler of a promise. > * If you ensure that your calls to APIs that throw are not wrapped in a try/catch then you don't need to use `unstable_rethrow` > * Any resource cleanup (like clearing intervals, timers, etc) would have to either happen prior to the call to `unstable_rethrow` or within a `finally` block. --- ## Page: https://nextjs.org/docs/app/api-reference/functions/use-link-status The `useLinkStatus` hook lets you tracks the **pending** state of a `<Link>`. You can use it to show inline visual feedback to the user (like spinners or text glimmers) while a navigation to a new route completes. `useLinkStatus` is useful when: * Prefetching is disabled or in progress meaning navigation is blocked. * The destination route is dynamic **and** doesn't include a `loading.js` file that would allow an instant navigation. 'use client' import { useLinkStatus } from 'next/link' export default function LoadingIndicator() { const { pending } = useLinkStatus() return pending ? ( <div role="status" aria-label="Loading" className="spinner" /> ) : null } import Link from 'next/link' import LoadingIndicator from './loading-indicator' export default function Header() { return ( <header> <Link href="/dashboard" prefetch={false}> Dashboard <LoadingIndicator /> </Link> </header> ) } > **Good to know**: > > * `useLinkStatus` must be used within a descendant component of a `Link` component > * The hook is most useful when `prefetch={false}` is set on the `Link` component > * If the linked route has been prefetched, the pending state will be skipped > * When clicking multiple links in quick succession, only the last link's pending state is shown > * This hook is not supported in the Pages Router and will always return `{ pending: false }` ## Parameters const { pending } = useLinkStatus() `useLinkStatus` does not take any parameters. ## Returns `useLinkStatus` returns an object with a single property: | Property | Type | Description | | --- | --- | --- | | pending | boolean | `true` before history updates, `false` after | ## Example ### Inline loading indicator It's helpful to add visual feedback that navigation is happening in case the user clicks a link before prefetching is complete. 'use client' import { useLinkStatus } from 'next/link' export default function LoadingIndicator() { const { pending } = useLinkStatus() return pending ? ( <div role="status" aria-label="Loading" className="spinner" /> ) : null } import Link from 'next/link' import LoadingIndicator from './components/loading-indicator' const links = [ { href: '/shop/electronics', label: 'Electronics' }, { href: '/shop/clothing', label: 'Clothing' }, { href: '/shop/books', label: 'Books' }, ] function Menubar() { return ( <div> {links.map((link) => ( <Link key={link.label} href={link.href}> {link.label} <LoadingIndicator /> </Link> ))} </div> ) } export default function Layout({ children }: { children: React.ReactNode }) { return ( <div> <Menubar /> {children} </div> ) } ## Gracefully handling fast navigation If the navigation to a new route is fast, users may see an unecessary flash of the loading indicator. One way to improve the user experience and only show the loading indicator when the navigation takes time to complete is to add an initial animation delay (e.g. 100ms) and start the animation as invisible (e.g. `opacity: 0`). .spinner { /* ... */ opacity: 0; animation: fadeIn 500ms 100ms forwards, rotate 1s linear infinite; } @keyframes fadeIn { from { opacity: 0; } to { opacity: 1; } } @keyframes rotate { to { transform: rotate(360deg); } } | Version | Changes | | --- | --- | | `v15.3.0` | `useLinkStatus` introduced. | --- ## Page: https://nextjs.org/docs/app/api-reference/functions/use-params `useParams` is a **Client Component** hook that lets you read a route's dynamic params filled in by the current URL. app/example-client-component.tsx 'use client' import { useParams } from 'next/navigation' export default function ExampleClientComponent() { const params = useParams<{ tag: string; item: string }>() // Route -> /shop/[tag]/[item] // URL -> /shop/shoes/nike-air-max-97 // `params` -> { tag: 'shoes', item: 'nike-air-max-97' } console.log(params) return '...' } ## Parameters const params = useParams() `useParams` does not take any parameters. ## Returns `useParams` returns an object containing the current route's filled in dynamic parameters. * Each property in the object is an active dynamic segment. * The properties name is the segment's name, and the properties value is what the segment is filled in with. * The properties value will either be a `string` or array of `string`'s depending on the type of dynamic segment. * If the route contains no dynamic parameters, `useParams` returns an empty object. * If used in Pages Router, `useParams` will return `null` on the initial render and updates with properties following the rules above once the router is ready. For example: | Route | URL | `useParams()` | | --- | --- | --- | | `app/shop/page.js` | `/shop` | `{}` | | `app/shop/[slug]/page.js` | `/shop/1` | `{ slug: '1' }` | | `app/shop/[tag]/[item]/page.js` | `/shop/1/2` | `{ tag: '1', item: '2' }` | | `app/shop/[...slug]/page.js` | `/shop/1/2` | `{ slug: ['1', '2'] }` | ## Version History | Version | Changes | | --- | --- | | `v13.3.0` | `useParams` introduced. | --- ## Page: https://nextjs.org/docs/app/api-reference/functions/use-pathname `usePathname` is a **Client Component** hook that lets you read the current URL's **pathname**. app/example-client-component.tsx 'use client' import { usePathname } from 'next/navigation' export default function ExampleClientComponent() { const pathname = usePathname() return <p>Current pathname: {pathname}</p> } `usePathname` intentionally requires using a Client Component. It's important to note Client Components are not a de-optimization. They are an integral part of the Server Components architecture. For example, a Client Component with `usePathname` will be rendered into HTML on the initial page load. When navigating to a new route, this component does not need to be re-fetched. Instead, the component is downloaded once (in the client JavaScript bundle), and re-renders based on the current state. > **Good to know**: > > * Reading the current URL from a Server Component is not supported. This design is intentional to support layout state being preserved across page navigations. > * Compatibility mode: > * `usePathname` can return `null` when a fallback route is being rendered or when a `pages` directory page has been automatically statically optimized by Next.js and the router is not ready. > * When using `usePathname` with rewrites in `next.config` or `Middleware`, `useState` and `useEffect` must also be used in order to avoid hydration mismatch errors. > * Next.js will automatically update your types if it detects both an `app` and `pages` directory in your project. ## Parameters const pathname = usePathname() `usePathname` does not take any parameters. ## Returns `usePathname` returns a string of the current URL's pathname. For example: | URL | Returned value | | --- | --- | | `/` | `'/'` | | `/dashboard` | `'/dashboard'` | | `/dashboard?v=2` | `'/dashboard'` | | `/blog/hello-world` | `'/blog/hello-world'` | ## Examples ### Do something in response to a route change app/example-client-component.tsx 'use client' import { usePathname, useSearchParams } from 'next/navigation' function ExampleClientComponent() { const pathname = usePathname() const searchParams = useSearchParams() useEffect(() => { // Do something here... }, [pathname, searchParams]) } | Version | Changes | | --- | --- | | `v13.0.0` | `usePathname` introduced. | --- ## Page: https://nextjs.org/docs/app/api-reference/functions/use-report-web-vitals The `useReportWebVitals` hook allows you to report Core Web Vitals, and can be used in combination with your analytics service. 'use client' import { useReportWebVitals } from 'next/web-vitals' export function WebVitals() { useReportWebVitals((metric) => { console.log(metric) }) return null } import { WebVitals } from './_components/web-vitals' export default function Layout({ children }) { return ( <html> <body> <WebVitals /> {children} </body> </html> ) } > Since the `useReportWebVitals` hook requires the `"use client"` directive, the most performant approach is to create a separate component that the root layout imports. This confines the client boundary exclusively to the `WebVitals` component. ## useReportWebVitals The `metric` object passed as the hook's argument consists of a number of properties: * `id`: Unique identifier for the metric in the context of the current page load * `name`: The name of the performance metric. Possible values include names of Web Vitals metrics (TTFB, FCP, LCP, FID, CLS) specific to a web application. * `delta`: The difference between the current value and the previous value of the metric. The value is typically in milliseconds and represents the change in the metric's value over time. * `entries`: An array of Performance Entries associated with the metric. These entries provide detailed information about the performance events related to the metric. * `navigationType`: Indicates the type of navigation that triggered the metric collection. Possible values include `"navigate"`, `"reload"`, `"back_forward"`, and `"prerender"`. * `rating`: A qualitative rating of the metric value, providing an assessment of the performance. Possible values are `"good"`, `"needs-improvement"`, and `"poor"`. The rating is typically determined by comparing the metric value against predefined thresholds that indicate acceptable or suboptimal performance. * `value`: The actual value or duration of the performance entry, typically in milliseconds. The value provides a quantitative measure of the performance aspect being tracked by the metric. The source of the value depends on the specific metric being measured and can come from various Performance APIs. ## Web Vitals Web Vitals are a set of useful metrics that aim to capture the user experience of a web page. The following web vitals are all included: * Time to First Byte (TTFB) * First Contentful Paint (FCP) * Largest Contentful Paint (LCP) * First Input Delay (FID) * Cumulative Layout Shift (CLS) * Interaction to Next Paint (INP) You can handle all the results of these metrics using the `name` property. 'use client' import { useReportWebVitals } from 'next/web-vitals' export function WebVitals() { useReportWebVitals((metric) => { switch (metric.name) { case 'FCP': { // handle FCP results } case 'LCP': { // handle LCP results } // ... } }) } ## Usage on Vercel Vercel Speed Insights does not `useReportWebVitals`, but `@vercel/speed-insights` package instead. `useReportWebVitals` hook is useful in local development, or if you're using a different service for collecting Web Vitals. ## Sending results to external systems You can send results to any endpoint to measure and track real user performance on your site. For example: useReportWebVitals((metric) => { const body = JSON.stringify(metric) const url = 'https://example.com/analytics' // Use `navigator.sendBeacon()` if available, falling back to `fetch()`. if (navigator.sendBeacon) { navigator.sendBeacon(url, body) } else { fetch(url, { body, method: 'POST', keepalive: true }) } }) > **Good to know**: If you use Google Analytics, using the `id` value can allow you to construct metric distributions manually (to calculate percentiles, etc.) > useReportWebVitals(metric => { > // Use `window.gtag` if you initialized Google Analytics as this example: > // https://github.com/vercel/next.js/blob/canary/examples/with-google-analytics > window.gtag('event', metric.name, { > value: Math.round(metric.name === 'CLS' ? metric.value * 1000 : metric.value), // values must be integers > event_label: metric.id, // id unique to current page load > non_interaction: true, // avoids affecting bounce rate. > }); > } > > Read more about sending results to Google Analytics. Was this helpful? supported. --- ## Page: https://nextjs.org/docs/app/api-reference/functions/use-router The `useRouter` hook allows you to programmatically change routes inside Client Components. > **Recommendation:** Use the `<Link>` component for navigation unless you have a specific requirement for using `useRouter`. app/example-client-component.tsx 'use client' import { useRouter } from 'next/navigation' export default function Page() { const router = useRouter() return ( <button type="button" onClick={() => router.push('/dashboard')}> Dashboard </button> ) } ## `useRouter()` * `router.push(href: string, { scroll: boolean })`: Perform a client-side navigation to the provided route. Adds a new entry into the browser’s history stack. * `router.replace(href: string, { scroll: boolean })`: Perform a client-side navigation to the provided route without adding a new entry into the browser’s history stack. * `router.refresh()`: Refresh the current route. Making a new request to the server, re-fetching data requests, and re-rendering Server Components. The client will merge the updated React Server Component payload without losing unaffected client-side React (e.g. `useState`) or browser state (e.g. scroll position). * `router.prefetch(href: string)`: Prefetch the provided route for faster client-side transitions. * `router.back()`: Navigate back to the previous route in the browser’s history stack. * `router.forward()`: Navigate forwards to the next page in the browser’s history stack. > **Good to know**: > > * You must not send untrusted or unsanitized URLs to `router.push` or `router.replace`, as this can open your site to cross-site scripting (XSS) vulnerabilities. For example, `javascript:` URLs sent to `router.push` or `router.replace` will be executed in the context of your page. > * The `<Link>` component automatically prefetch routes as they become visible in the viewport. > * `refresh()` could re-produce the same result if fetch requests are cached. Other Dynamic APIs like `cookies` and `headers` could also change the response. ### Migrating from `next/router` * The `useRouter` hook should be imported from `next/navigation` and not `next/router` when using the App Router * The `pathname` string has been removed and is replaced by `usePathname()` * The `query` object has been removed and is replaced by `useSearchParams()` * `router.events` has been replaced. See below. View the full migration guide. ## Examples ### Router events You can listen for page changes by composing other Client Component hooks like `usePathname` and `useSearchParams`. app/components/navigation-events.js 'use client' import { useEffect } from 'react' import { usePathname, useSearchParams } from 'next/navigation' export function NavigationEvents() { const pathname = usePathname() const searchParams = useSearchParams() useEffect(() => { const url = `${pathname}?${searchParams}` console.log(url) // You can now use the current URL // ... }, [pathname, searchParams]) return '...' } Which can be imported into a layout. app/layout.js import { Suspense } from 'react' import { NavigationEvents } from './components/navigation-events' export default function Layout({ children }) { return ( <html lang="en"> <body> {children} <Suspense fallback={null}> <NavigationEvents /> </Suspense> </body> </html> ) } > **Good to know**: `<NavigationEvents>` is wrapped in a `Suspense` boundary because`useSearchParams()` causes client-side rendering up to the closest `Suspense` boundary during static rendering. Learn more. ### Disabling scroll to top By default, Next.js will scroll to the top of the page when navigating to a new route. You can disable this behavior by passing `scroll: false` to `router.push()` or `router.replace()`. app/example-client-component.tsx 'use client' import { useRouter } from 'next/navigation' export default function Page() { const router = useRouter() return ( <button type="button" onClick={() => router.push('/dashboard', { scroll: false })} > Dashboard </button> ) } ## Version History | Version | Changes | | --- | --- | | `v13.0.0` | `useRouter` from `next/navigation` introduced. | --- ## Page: https://nextjs.org/docs/app/api-reference/functions/use-search-params `useSearchParams` is a **Client Component** hook that lets you read the current URL's **query string**. `useSearchParams` returns a **read-only** version of the `URLSearchParams` interface. 'use client' import { useSearchParams } from 'next/navigation' export default function SearchBar() { const searchParams = useSearchParams() const search = searchParams.get('search') // URL -> `/dashboard?search=my-project` // `search` -> 'my-project' return <>Search: {search}</> } ## Parameters const searchParams = useSearchParams() `useSearchParams` does not take any parameters. ## Returns `useSearchParams` returns a **read-only** version of the `URLSearchParams` interface, which includes utility methods for reading the URL's query string: * `URLSearchParams.get()`: Returns the first value associated with the search parameter. For example: | URL | `searchParams.get("a")` | | --- | --- | | `/dashboard?a=1` | `'1'` | | `/dashboard?a=` | `''` | | `/dashboard?b=3` | `null` | | `/dashboard?a=1&a=2` | `'1'` _\- use `getAll()` to get all values_ | * `URLSearchParams.has()`: Returns a boolean value indicating if the given parameter exists. For example: | URL | `searchParams.has("a")` | | --- | --- | | `/dashboard?a=1` | `true` | | `/dashboard?b=3` | `false` | * Learn more about other **read-only** methods of `URLSearchParams`, including the `getAll()`, `keys()`, `values()`, `entries()`, `forEach()`, and `toString()`. > **Good to know**: > > * `useSearchParams` is a Client Component hook and is **not supported** in Server Components to prevent stale values during partial rendering. > * If an application includes the `/pages` directory, `useSearchParams` will return `ReadonlyURLSearchParams | null`. The `null` value is for compatibility during migration since search params cannot be known during pre-rendering of a page that doesn't use `getServerSideProps` ## Behavior ### Static Rendering If a route is statically rendered, calling `useSearchParams` will cause the Client Component tree up to the closest `Suspense` boundary to be client-side rendered. This allows a part of the route to be statically rendered while the dynamic part that uses `useSearchParams` is client-side rendered. We recommend wrapping the Client Component that uses `useSearchParams` in a `<Suspense/>` boundary. This will allow any Client Components above it to be statically rendered and sent as part of initial HTML. Example. For example: 'use client' import { useSearchParams } from 'next/navigation' export default function SearchBar() { const searchParams = useSearchParams() const search = searchParams.get('search') // This will not be logged on the server when using static rendering console.log(search) return <>Search: {search}</> } import { Suspense } from 'react' import SearchBar from './search-bar' // This component passed as a fallback to the Suspense boundary // will be rendered in place of the search bar in the initial HTML. // When the value is available during React hydration the fallback // will be replaced with the `<SearchBar>` component. function SearchBarFallback() { return <>placeholder</> } export default function Page() { return ( <> <nav> <Suspense fallback={<SearchBarFallback />}> <SearchBar /> </Suspense> </nav> <h1>Dashboard</h1> </> ) } ### Dynamic Rendering If a route is dynamically rendered, `useSearchParams` will be available on the server during the initial server render of the Client Component. For example: 'use client' import { useSearchParams } from 'next/navigation' export default function SearchBar() { const searchParams = useSearchParams() const search = searchParams.get('search') // This will be logged on the server during the initial render // and on the client on subsequent navigations. console.log(search) return <>Search: {search}</> } import SearchBar from './search-bar' export const dynamic = 'force-dynamic' export default function Page() { return ( <> <nav> <SearchBar /> </nav> <h1>Dashboard</h1> </> ) } > **Good to know**: Setting the `dynamic` route segment config option to `force-dynamic` can be used to force dynamic rendering. ### Server Components #### Pages To access search params in Pages (Server Components), use the `searchParams` prop. #### Layouts Unlike Pages, Layouts (Server Components) **do not** receive the `searchParams` prop. This is because a shared layout is not re-rendered during navigation which could lead to stale `searchParams` between navigations. View detailed explanation. Instead, use the Page `searchParams` prop or the `useSearchParams` hook in a Client Component, which is re-rendered on the client with the latest `searchParams`. ## Examples ### Updating `searchParams` You can use `useRouter` or `Link` to set new `searchParams`. After a navigation is performed, the current `page.js` will receive an updated `searchParams` prop. 'use client' export default function ExampleClientComponent() { const router = useRouter() const pathname = usePathname() const searchParams = useSearchParams() // Get a new searchParams string by merging the current // searchParams with a provided key/value pair const createQueryString = useCallback( (name: string, value: string) => { const params = new URLSearchParams(searchParams.toString()) params.set(name, value) return params.toString() }, [searchParams] ) return ( <> <p>Sort By</p> {/* using useRouter */} <button onClick={() => { // <pathname>?sort=asc router.push(pathname + '?' + createQueryString('sort', 'asc')) }} > ASC </button> {/* using <Link> */} <Link href={ // <pathname>?sort=desc pathname + '?' + createQueryString('sort', 'desc') } > DESC </Link> </> ) } ## Version History | Version | Changes | | --- | --- | | `v13.0.0` | `useSearchParams` introduced. | --- ## Page: https://nextjs.org/docs/app/api-reference/functions/use-selected-layout-segment `useSelectedLayoutSegment` is a **Client Component** hook that lets you read the active route segment **one level below** the Layout it is called from. It is useful for navigation UI, such as tabs inside a parent layout that change style depending on the active child segment. 'use client' import { useSelectedLayoutSegment } from 'next/navigation' export default function ExampleClientComponent() { const segment = useSelectedLayoutSegment() return <p>Active segment: {segment}</p> } > **Good to know**: > > * Since `useSelectedLayoutSegment` is a Client Component hook, and Layouts are Server Components by default, `useSelectedLayoutSegment` is usually called via a Client Component that is imported into a Layout. > * `useSelectedLayoutSegment` only returns the segment one level down. To return all active segments, see `useSelectedLayoutSegments` ## Parameters const segment = useSelectedLayoutSegment(parallelRoutesKey?: string) `useSelectedLayoutSegment` _optionally_ accepts a `parallelRoutesKey`, which allows you to read the active route segment within that slot. ## Returns `useSelectedLayoutSegment` returns a string of the active segment or `null` if one doesn't exist. For example, given the Layouts and URLs below, the returned segment would be: | Layout | Visited URL | Returned Segment | | --- | --- | --- | | `app/layout.js` | `/` | `null` | | `app/layout.js` | `/dashboard` | `'dashboard'` | | `app/dashboard/layout.js` | `/dashboard` | `null` | | `app/dashboard/layout.js` | `/dashboard/settings` | `'settings'` | | `app/dashboard/layout.js` | `/dashboard/analytics` | `'analytics'` | | `app/dashboard/layout.js` | `/dashboard/analytics/monthly` | `'analytics'` | ## Examples ### Creating an active link component You can use `useSelectedLayoutSegment` to create an active link component that changes style depending on the active segment. For example, a featured posts list in the sidebar of a blog: 'use client' import Link from 'next/link' import { useSelectedLayoutSegment } from 'next/navigation' // This *client* component will be imported into a blog layout export default function BlogNavLink({ slug, children, }: { slug: string children: React.ReactNode }) { // Navigating to `/blog/hello-world` will return 'hello-world' // for the selected layout segment const segment = useSelectedLayoutSegment() const isActive = slug === segment return ( <Link href={`/blog/${slug}`} // Change style depending on whether the link is active style={{ fontWeight: isActive ? 'bold' : 'normal' }} > {children} </Link> ) } // Import the Client Component into a parent Layout (Server Component) import { BlogNavLink } from './blog-nav-link' import getFeaturedPosts from './get-featured-posts' export default async function Layout({ children, }: { children: React.ReactNode }) { const featuredPosts = await getFeaturedPosts() return ( <div> {featuredPosts.map((post) => ( <div key={post.id}> <BlogNavLink slug={post.slug}>{post.title}</BlogNavLink> </div> ))} <div>{children}</div> </div> ) } ## Version History | Version | Changes | | --- | --- | | `v13.0.0` | `useSelectedLayoutSegment` introduced. | --- ## Page: https://nextjs.org/docs/app/api-reference/functions/use-selected-layout-segments `useSelectedLayoutSegments` is a **Client Component** hook that lets you read the active route segments **below** the Layout it is called from. It is useful for creating UI in parent Layouts that need knowledge of active child segments such as breadcrumbs. app/example-client-component.tsx 'use client' import { useSelectedLayoutSegments } from 'next/navigation' export default function ExampleClientComponent() { const segments = useSelectedLayoutSegments() return ( <ul> {segments.map((segment, index) => ( <li key={index}>{segment}</li> ))} </ul> ) } > **Good to know**: > > * Since `useSelectedLayoutSegments` is a Client Component hook, and Layouts are Server Components by default, `useSelectedLayoutSegments` is usually called via a Client Component that is imported into a Layout. > * The returned segments include Route Groups, which you might not want to be included in your UI. You can use the `filter()` array method to remove items that start with a bracket. ## Parameters const segments = useSelectedLayoutSegments(parallelRoutesKey?: string) `useSelectedLayoutSegments` _optionally_ accepts a `parallelRoutesKey`, which allows you to read the active route segment within that slot. ## Returns `useSelectedLayoutSegments` returns an array of strings containing the active segments one level down from the layout the hook was called from. Or an empty array if none exist. For example, given the Layouts and URLs below, the returned segments would be: | Layout | Visited URL | Returned Segments | | --- | --- | --- | | `app/layout.js` | `/` | `[]` | | `app/layout.js` | `/dashboard` | `['dashboard']` | | `app/layout.js` | `/dashboard/settings` | `['dashboard', 'settings']` | | `app/dashboard/layout.js` | `/dashboard` | `[]` | | `app/dashboard/layout.js` | `/dashboard/settings` | `['settings']` | ## Version History | Version | Changes | | --- | --- | | `v13.0.0` | `useSelectedLayoutSegments` introduced. | --- ## Page: https://nextjs.org/docs/app/api-reference/functions/userAgent The `userAgent` helper extends the Web Request API with additional properties and methods to interact with the user agent object from the request. middleware.ts import { NextRequest, NextResponse, userAgent } from 'next/server' export function middleware(request: NextRequest) { const url = request.nextUrl const { device } = userAgent(request) // device.type can be: 'mobile', 'tablet', 'console', 'smarttv', // 'wearable', 'embedded', or undefined (for desktop browsers) const viewport = device.type || 'desktop' url.searchParams.set('viewport', viewport) return NextResponse.rewrite(url) } ## `isBot` A boolean indicating whether the request comes from a known bot. ## `browser` An object containing information about the browser used in the request. * `name`: A string representing the browser's name, or `undefined` if not identifiable. * `version`: A string representing the browser's version, or `undefined`. ## `device` An object containing information about the device used in the request. * `model`: A string representing the model of the device, or `undefined`. * `type`: A string representing the type of the device, such as `console`, `mobile`, `tablet`, `smarttv`, `wearable`, `embedded`, or `undefined`. * `vendor`: A string representing the vendor of the device, or `undefined`. ## `engine` An object containing information about the browser's engine. * `name`: A string representing the engine's name. Possible values include: `Amaya`, `Blink`, `EdgeHTML`, `Flow`, `Gecko`, `Goanna`, `iCab`, `KHTML`, `Links`, `Lynx`, `NetFront`, `NetSurf`, `Presto`, `Tasman`, `Trident`, `w3m`, `WebKit` or `undefined`. * `version`: A string representing the engine's version, or `undefined`. ## `os` An object containing information about the operating system. * `name`: A string representing the name of the OS, or `undefined`. * `version`: A string representing the version of the OS, or `undefined`. ## `cpu` An object containing information about the CPU architecture. * `architecture`: A string representing the architecture of the CPU. Possible values include: `68k`, `amd64`, `arm`, `arm64`, `armhf`, `avr`, `ia32`, `ia64`, `irix`, `irix64`, `mips`, `mips64`, `pa-risc`, `ppc`, `sparc`, `sparc64` or `undefined` --- ## Page: https://nextjs.org/docs/app/api-reference/config #### Subscribe to our newsletter Stay updated on new releases and features, guides, and case studies. --- ## Page: https://nextjs.org/docs/app/api-reference/config/next-config-js Next.js can be configured through a `next.config.js` file in the root of your project directory (for example, by `package.json`) with a default export. // @ts-check /** @type {import('next').NextConfig} */ const nextConfig = { /* config options here */ } module.exports = nextConfig ## ECMAScript Modules `next.config.js` is a regular Node.js module, not a JSON file. It gets used by the Next.js server and build phases, and it's not included in the browser build. If you need ECMAScript modules, you can use `next.config.mjs`: // @ts-check /** * @type {import('next').NextConfig} */ const nextConfig = { /* config options here */ } export default nextConfig > **Good to know**: `next.config` with the `.cjs`, `.cts`, or `.mts` extensions are currently **not** supported. ## Configuration as a Function You can also use a function: // @ts-check export default (phase, { defaultConfig }) => { /** * @type {import('next').NextConfig} */ const nextConfig = { /* config options here */ } return nextConfig } ### Async Configuration Since Next.js 12.1.0, you can use an async function: // @ts-check module.exports = async (phase, { defaultConfig }) => { /** * @type {import('next').NextConfig} */ const nextConfig = { /* config options here */ } return nextConfig } ### Phase `phase` is the current context in which the configuration is loaded. You can see the available phases. Phases can be imported from `next/constants`: // @ts-check const { PHASE_DEVELOPMENT_SERVER } = require('next/constants') module.exports = (phase, { defaultConfig }) => { if (phase === PHASE_DEVELOPMENT_SERVER) { return { /* development only config options here */ } } return { /* config options for all phases except development here */ } } ## TypeScript If you are using TypeScript in your project, you can use `next.config.ts` to use TypeScript in your configuration: import type { NextConfig } from 'next' const nextConfig: NextConfig = { /* config options here */ } export default nextConfig The commented lines are the place where you can put the configs allowed by `next.config.js`, which are defined in this file. However, none of the configs are required, and it's not necessary to understand what each config does. Instead, search for the features you need to enable or modify in this section and they will show you what to do. > Avoid using new JavaScript features not available in your target Node.js version. `next.config.js` will not be parsed by Webpack or Babel. This page documents all the available configuration options: ## Unit Testing (experimental) Starting in Next.js 15.1, the `next/experimental/testing/server` package contains utilities to help unit test `next.config.js` files. The `unstable_getResponseFromNextConfig` function runs the `headers`, `redirects`, and `rewrites` functions from `next.config.js` with the provided request information and returns `NextResponse` with the results of the routing. > The response from `unstable_getResponseFromNextConfig` only considers `next.config.js` fields and does not consider middleware or filesystem routes, so the result in production may be different than the unit test. import { getRedirectUrl, unstable_getResponseFromNextConfig, } from 'next/experimental/testing/server' const response = await unstable_getResponseFromNextConfig({ url: 'https://nextjs.org/test', nextConfig: { async redirects() { return [{ source: '/test', destination: '/test2', permanent: false }] }, }, }) expect(response.status).toEqual(307) expect(getRedirectUrl(response)).toEqual('https://nextjs.org/test2') --- ## Page: https://nextjs.org/docs/app/api-reference/config/next-config-js/allowedDevOrigins Next.js does not automatically block cross-origin requests during development, but will block by default in a future major version of Next.js to prevent unauthorized requesting of internal assets/endpoints that are available in development mode. To configure a Next.js application to allow requests from origins other than the hostname the server was initialized with (`localhost` by default) you can use the `allowedDevOrigins` config option. `allowedDevOrigins` allows you to set additional origins that can be used in development mode. For example, to use `local-origin.dev` instead of only `localhost`, open `next.config.js` and add the `allowedDevOrigins` config: next.config.js module.exports = { allowedDevOrigins: ['local-origin.dev', '*.local-origin.dev'], } --- ## Page: https://nextjs.org/docs/app/api-reference/config/next-config-js/appDir #### Subscribe to our newsletter Stay updated on new releases and features, guides, and case studies. --- ## Page: https://nextjs.org/docs/app/api-reference/config/next-config-js/assetPrefix > **Attention**: Deploying to Vercel automatically configures a global CDN for your Next.js project. You do not need to manually setup an Asset Prefix. > **Good to know**: Next.js 9.5+ added support for a customizable Base Path, which is better suited for hosting your application on a sub-path like `/docs`. We do not suggest you use a custom Asset Prefix for this use case. ## Set up a CDN To set up a CDN, you can set up an asset prefix and configure your CDN's origin to resolve to the domain that Next.js is hosted on. Open `next.config.mjs` and add the `assetPrefix` config based on the phase: // @ts-check import { PHASE_DEVELOPMENT_SERVER } from 'next/constants' export default (phase) => { const isDev = phase === PHASE_DEVELOPMENT_SERVER /** * @type {import('next').NextConfig} */ const nextConfig = { assetPrefix: isDev ? undefined : 'https://cdn.mydomain.com', } return nextConfig } Next.js will automatically use your asset prefix for the JavaScript and CSS files it loads from the `/_next/` path (`.next/static/` folder). For example, with the above configuration, the following request for a JS chunk: /_next/static/chunks/4b9b41aaa062cbbfeff4add70f256968c51ece5d.4d708494b3aed70c04f0.js Would instead become: https://cdn.mydomain.com/_next/static/chunks/4b9b41aaa062cbbfeff4add70f256968c51ece5d.4d708494b3aed70c04f0.js The exact configuration for uploading your files to a given CDN will depend on your CDN of choice. The only folder you need to host on your CDN is the contents of `.next/static/`, which should be uploaded as `_next/static/` as the above URL request indicates. **Do not upload the rest of your `.next/` folder**, as you should not expose your server code and other configuration to the public. While `assetPrefix` covers requests to `_next/static`, it does not influence the following paths: * Files in the public folder; if you want to serve those assets over a CDN, you'll have to introduce the prefix yourself Was this helpful? supported. --- ## Page: https://nextjs.org/docs/app/api-reference/config/next-config-js/authInterrupts This feature is currently available in the canary channel and subject to change. Try it out by upgrading Next.js, and share your feedback on GitHub. The `authInterrupts` configuration option allows you to use `forbidden` and `unauthorized` APIs in your application. While these functions are experimental, you must enable the `authInterrupts` option in your `next.config.js` file to use them: next.config.ts import type { NextConfig } from 'next' const nextConfig: NextConfig = { experimental: { authInterrupts: true, }, } export default nextConfig --- ## Page: https://nextjs.org/docs/app/api-reference/config/next-config-js/basePath To deploy a Next.js application under a sub-path of a domain you can use the `basePath` config option. `basePath` allows you to set a path prefix for the application. For example, to use `/docs` instead of `''` (an empty string, the default), open `next.config.js` and add the `basePath` config: module.exports = { basePath: '/docs', } > **Good to know**: This value must be set at build time and cannot be changed without re-building as the value is inlined in the client-side bundles. ### Links When linking to other pages using `next/link` and `next/router` the `basePath` will be automatically applied. For example, using `/about` will automatically become `/docs/about` when `basePath` is set to `/docs`. export default function HomePage() { return ( <> <Link href="/about">About Page</Link> </> ) } Output html: <a href="/docs/about">About Page</a> This makes sure that you don't have to change all links in your application when changing the `basePath` value. ### Images When using the `next/image` component, you will need to add the `basePath` in front of `src`. For example, using `/docs/me.png` will properly serve your image when `basePath` is set to `/docs`. import Image from 'next/image' function Home() { return ( <> <h1>My Homepage</h1> <Image src="/docs/me.png" alt="Picture of the author" width={500} height={500} /> <p>Welcome to my homepage!</p> </> ) } export default Home --- ## Page: https://nextjs.org/docs/app/api-reference/config/next-config-js/cacheLife This feature is currently available in the canary channel and subject to change. Try it out by upgrading Next.js, and share your feedback on GitHub. The `cacheLife` option allows you to define **custom cache profiles** when using the `cacheLife` function inside components or functions, and within the scope of the `use cache` directive. ## Usage To define a profile, enable the `dynamicIO` flag and add the cache profile in the `cacheLife` object in the `next.config.js` file. For example, a `blog` profile: next.config.ts import type { NextConfig } from 'next' const nextConfig: NextConfig = { experimental: { dynamicIO: true, cacheLife: { blog: { stale: 3600, // 1 hour revalidate: 900, // 15 minutes expire: 86400, // 1 day }, }, }, } export default nextConfig You can now use this custom `blog` configuration in your component or function as follows: app/actions.ts import { unstable_cacheLife as cacheLife } from 'next/cache' export async function getCachedData() { 'use cache' cacheLife('blog') const data = await fetch('/api/data') return data } ## Reference The configuration object has key values with the following format: | **Property** | **Value** | **Description** | **Requirement** | | --- | --- | --- | --- | | `stale` | `number` | Duration the client should cache a value without checking the server. | Optional | | `revalidate` | `number` | Frequency at which the cache should refresh on the server; stale values may be served while revalidating. | Optional | | `expire` | `number` | Maximum duration for which a value can remain stale before switching to dynamic. | Optional - Must be longer than `revalidate` | --- ## Page: https://nextjs.org/docs/app/api-reference/config/next-config-js/compress By default, Next.js uses `gzip` to compress rendered content and static files when using `next start` or a custom server. This is an optimization for applications that do not have compression configured. If compression is _already_ configured in your application via a custom server, Next.js will not add compression. > **Good to know:** > > * When hosting your application on Vercel, compression uses `brotli` first, then `gzip`. > * You can check if compression is enabled and which algorithm is used by looking at the `Accept-Encoding` (browser accepted options) and `Content-Encoding` (currently used) headers in the response. ## Disabling compression To disable **compression**, set the `compress` config option to `false`: next.config.js module.exports = { compress: false, } We do not recommend disabling compression unless you have compression configured on your server, as compression reduces bandwidth usage and improves the performance of your application. ## Changing the compression algorithm To change your compression algorithm, you will need to configure your custom server and set the `compress` option to `false` in your `next.config.js` file. For example, you're using nginx and want to switch to `brotli`, set the `compress` option to `false` to allow nginx to handle compression. > **Good to know:** > > * For Next.js applications on Vercel, compression is handled by the Vercel's Edge Network and not Next.js. See the Vercel documentation for more information. --- ## Page: https://nextjs.org/docs/app/api-reference/config/next-config-js/crossOrigin #### Subscribe to our newsletter Stay updated on new releases and features, guides, and case studies. --- ## Page: https://nextjs.org/docs/app/api-reference/config/next-config-js/cssChunking This feature is currently experimental and subject to change, it's not recommended for production. Try it out and share your feedback on GitHub. CSS Chunking is a strategy used to improve the performance of your web application by splitting and re-ordering CSS files into chunks. This allows you to load only the CSS that is needed for a specific route, instead of loading all the application's CSS at once. You can control how CSS files are chunked using the `experimental.cssChunking` option in your `next.config.js` file: import type { NextConfig } from 'next' const nextConfig = { experimental: { cssChunking: true, // default }, } satisfies NextConfig export default nextConfig ## Options * **`true` (default)**: Next.js will try to merge CSS files whenever possible, determining explicit and implicit dependencies between files from import order to reduce the number of chunks and therefore the number of requests. * **`false`**: Next.js will not attempt to merge or re-order your CSS files. * **`'strict'`**: Next.js will load CSS files in the correct order they are imported into your files, which can lead to more chunks and requests. You may consider using `'strict'` if you run into unexpected CSS behavior. For example, if you import `a.css` and `b.css` in different files using a different `import` order (`a` before `b`, or `b` before `a`), `true` will merge the files in any order and assume there are no dependencies between them. However, if `b.css` depends on `a.css`, you may want to use `'strict'` to prevent the files from being merged, and instead, load them in the order they are imported - which can result in more chunks and requests. For most applications, we recommend `true` as it leads to fewer requests and better performance. --- ## Page: https://nextjs.org/docs/app/api-reference/config/next-config-js/devIndicators `devIndicators` allows you to configure the on-screen indicator that gives context about the current route you're viewing during development. devIndicators: false | { position?: 'bottom-right' | 'bottom-left' | 'top-right' | 'top-left', // defaults to 'bottom-left', }, Setting `devIndicators` to `false` will hide the indicator, however Next.js will continue to surface any build or runtime errors that were encountered. ## Troubleshooting ### Indicator not marking a route as static If you expect a route to be static and the indicator has marked it as dynamic, it's likely the route has opted out of static rendering. You can confirm if a route is static or dynamic by building your application using `next build --debug`, and checking the output in your terminal. Static (or prerendered) routes will display a `○` symbol, whereas dynamic routes will display a `ƒ` symbol. For example: Route (app) Size First Load JS ┌ ○ /_not-found 0 B 0 kB └ ƒ /products/[id] 0 B 0 kB ○ (Static) prerendered as static content ƒ (Dynamic) server-rendered on demand There are two reasons a route might opt out of static rendering: * The presence of Dynamic APIs which rely on runtime information. * An uncached data request, like a call to an ORM or database driver. Check your route for any of these conditions, and if you are not able to statically render the route, then consider using `loading.js` or `<Suspense />` to leverage streaming. ## Version History | Version | Changes | | --- | --- | | `v15.2.0` | Improved on-screen indicator with new `position` option. `appIsrStatus`, `buildActivity`, and `buildActivityPosition` options have been deprecated. | | `v15.0.0` | Static on-screen indicator added with `appIsrStatus` option. | --- ## Page: https://nextjs.org/docs/app/api-reference/config/next-config-js/distDir You can specify a name to use for a custom build directory to use instead of `.next`. Open `next.config.js` and add the `distDir` config: next.config.js module.exports = { distDir: 'build', } Now if you run `next build` Next.js will use `build` instead of the default `.next` folder. > `distDir` **should not** leave your project directory. For example, `../build` is an **invalid** directory. --- ## Page: https://nextjs.org/docs/app/api-reference/config/next-config-js/dynamicIO This feature is currently available in the canary channel and subject to change. Try it out by upgrading Next.js, and share your feedback on GitHub. The `dynamicIO` flag is an experimental feature in Next.js that causes data fetching operations in the App Router to be excluded from pre-renders unless they are explicitly cached. This can be useful for optimizing the performance of dynamic data fetching in server components. It is useful if your application requires fresh data fetching during runtime rather than serving from a pre-rendered cache. It is expected to be used in conjunction with `use cache` so that your data fetching happens at runtime by default unless you define specific parts of your application to be cached with `use cache` at the page, function, or component level. ## Usage To enable the `dynamicIO` flag, set it to `true` in the `experimental` section of your `next.config.ts` file: next.config.ts import type { NextConfig } from 'next' const nextConfig: NextConfig = { experimental: { dynamicIO: true, }, } export default nextConfig When `dynamicIO` is enabled, you can use the following cache functions and configurations: * The `use cache` directive * The `cacheLife` function with `use cache` * The `cacheTag` function ## Notes * While `dynamicIO` can optimize performance by ensuring fresh data fetching during runtime, it may also introduce additional latency compared to serving pre-rendered content. --- ## Page: https://nextjs.org/docs/app/api-reference/config/next-config-js/env > Since the release of Next.js 9.4 we now have a more intuitive and ergonomic experience for adding environment variables. Give it a try! > **Good to know**: environment variables specified in this way will **always** be included in the JavaScript bundle, prefixing the environment variable name with `NEXT_PUBLIC_` only has an effect when specifying them through the environment or .env files. To add environment variables to the JavaScript bundle, open `next.config.js` and add the `env` config: next.config.js module.exports = { env: { customKey: 'my-value', }, } Now you can access `process.env.customKey` in your code. For example: function Page() { return <h1>The value of customKey is: {process.env.customKey}</h1> } export default Page Next.js will replace `process.env.customKey` with `'my-value'` at build time. Trying to destructure `process.env` variables won't work due to the nature of webpack DefinePlugin. For example, the following line: return <h1>The value of customKey is: {process.env.customKey}</h1> Will end up being: return <h1>The value of customKey is: {'my-value'}</h1> --- ## Page: https://nextjs.org/docs/app/api-reference/config/next-config-js/eslint When ESLint is detected in your project, Next.js fails your **production build** (`next build`) when errors are present. If you'd like Next.js to produce production code even when your application has ESLint errors, you can disable the built-in linting step completely. This is not recommended unless you already have ESLint configured to run in a separate part of your workflow (for example, in CI or a pre-commit hook). Open `next.config.js` and enable the `ignoreDuringBuilds` option in the `eslint` config: next.config.js module.exports = { eslint: { // Warning: This allows production builds to successfully complete even if // your project has ESLint errors. ignoreDuringBuilds: true, }, } --- ## Page: https://nextjs.org/docs/app/api-reference/config/next-config-js/expireTime You can specify a custom `stale-while-revalidate` expire time for CDNs to consume in the `Cache-Control` header for ISR enabled pages. Open `next.config.js` and add the `expireTime` config: next.config.js module.exports = { // one hour in seconds expireTime: 3600, } Now when sending the `Cache-Control` header the expire time will be calculated depending on the specific revalidate period. For example, if you have a revalidate of 15 minutes on a path and the expire time is one hour the generated `Cache-Control` header will be `s-maxage=900, stale-while-revalidate=2700` so that it can stay stale for 15 minutes less than the configured expire time. --- ## Page: https://nextjs.org/docs/app/api-reference/config/next-config-js/exportPathMap This is a legacy API and no longer recommended. It's still supported for backward compatibility. > This feature is exclusive to `next export` and currently **deprecated** in favor of `getStaticPaths` with `pages` or `generateStaticParams` with `app`. `exportPathMap` allows you to specify a mapping of request paths to page destinations, to be used during export. Paths defined in `exportPathMap` will also be available when using `next dev`. Let's start with an example, to create a custom `exportPathMap` for an app with the following pages: * `pages/index.js` * `pages/about.js` * `pages/post.js` Open `next.config.js` and add the following `exportPathMap` config: module.exports = { exportPathMap: async function ( defaultPathMap, { dev, dir, outDir, distDir, buildId } ) { return { '/': { page: '/' }, '/about': { page: '/about' }, '/p/hello-nextjs': { page: '/post', query: { title: 'hello-nextjs' } }, '/p/learn-nextjs': { page: '/post', query: { title: 'learn-nextjs' } }, '/p/deploy-nextjs': { page: '/post', query: { title: 'deploy-nextjs' } }, } }, } > **Good to know**: the `query` field in `exportPathMap` cannot be used with automatically statically optimized pages or `getStaticProps` pages as they are rendered to HTML files at build-time and additional query information cannot be provided during `next export`. The pages will then be exported as HTML files, for example, `/about` will become `/about.html`. `exportPathMap` is an `async` function that receives 2 arguments: the first one is `defaultPathMap`, which is the default map used by Next.js. The second argument is an object with: * `dev` - `true` when `exportPathMap` is being called in development. `false` when running `next export`. In development `exportPathMap` is used to define routes. * `dir` - Absolute path to the project directory * `outDir` - Absolute path to the `out/` directory (configurable with `-o`). When `dev` is `true` the value of `outDir` will be `null`. * `distDir` - Absolute path to the `.next/` directory (configurable with the `distDir` config) * `buildId` - The generated build id The returned object is a map of pages where the `key` is the `pathname` and the `value` is an object that accepts the following fields: * `page`: `String` - the page inside the `pages` directory to render * `query`: `Object` - the `query` object passed to `getInitialProps` when prerendering. Defaults to `{}` > The exported `pathname` can also be a filename (for example, `/readme.md`), but you may need to set the `Content-Type` header to `text/html` when serving its content if it is different than `.html`. ## Adding a trailing slash It is possible to configure Next.js to export pages as `index.html` files and require trailing slashes, `/about` becomes `/about/index.html` and is routable via `/about/`. This was the default behavior prior to Next.js 9. To switch back and add a trailing slash, open `next.config.js` and enable the `trailingSlash` config: module.exports = { trailingSlash: true, } ## Customizing the output directory `next export` will use `out` as the default output directory, you can customize this using the `-o` argument, like so: next export -o outdir > **Warning**: Using `exportPathMap` is deprecated and is overridden by `getStaticPaths` inside `pages`. We don't recommend using them together. --- ## Page: https://nextjs.org/docs/app/api-reference/config/next-config-js/generateBuildId Next.js generates an ID during `next build` to identify which version of your application is being served. The same build should be used and boot up multiple containers. If you are rebuilding for each stage of your environment, you will need to generate a consistent build ID to use between containers. Use the `generateBuildId` command in `next.config.js`: next.config.js module.exports = { generateBuildId: async () => { // This could be anything, using the latest git hash return process.env.GIT_HASH }, } --- ## Page: https://nextjs.org/docs/app/api-reference/config/next-config-js/generateEtags Next.js will generate etags for every page by default. You may want to disable etag generation for HTML pages depending on your cache strategy. Open `next.config.js` and disable the `generateEtags` option: next.config.js module.exports = { generateEtags: false, } --- ## Page: https://nextjs.org/docs/app/api-reference/config/next-config-js/headers Headers allow you to set custom HTTP headers on the response to an incoming request on a given path. To set custom HTTP headers you can use the `headers` key in `next.config.js`: module.exports = { async headers() { return [ { source: '/about', headers: [ { key: 'x-custom-header', value: 'my custom header value', }, { key: 'x-another-custom-header', value: 'my other custom header value', }, ], }, ] }, } `headers` is an async function that expects an array to be returned holding objects with `source` and `headers` properties: * `source` is the incoming request path pattern. * `headers` is an array of response header objects, with `key` and `value` properties. * `basePath`: `false` or `undefined` - if false the basePath won't be included when matching, can be used for external rewrites only. * `locale`: `false` or `undefined` - whether the locale should not be included when matching. * `has` is an array of has objects with the `type`, `key` and `value` properties. * `missing` is an array of missing objects with the `type`, `key` and `value` properties. Headers are checked before the filesystem which includes pages and `/public` files. If two headers match the same path and set the same header key, the last header key will override the first. Using the below headers, the path `/hello` will result in the header `x-hello` being `world` due to the last header value set being `world`. module.exports = { async headers() { return [ { source: '/:path*', headers: [ { key: 'x-hello', value: 'there', }, ], }, { source: '/hello', headers: [ { key: 'x-hello', value: 'world', }, ], }, ] }, } ## Path Matching Path matches are allowed, for example `/blog/:slug` will match `/blog/hello-world` (no nested paths): module.exports = { async headers() { return [ { source: '/blog/:slug', headers: [ { key: 'x-slug', value: ':slug', // Matched parameters can be used in the value }, { key: 'x-slug-:slug', // Matched parameters can be used in the key value: 'my other custom header value', }, ], }, ] }, } ### Wildcard Path Matching To match a wildcard path you can use `*` after a parameter, for example `/blog/:slug*` will match `/blog/a/b/c/d/hello-world`: module.exports = { async headers() { return [ { source: '/blog/:slug*', headers: [ { key: 'x-slug', value: ':slug*', // Matched parameters can be used in the value }, { key: 'x-slug-:slug*', // Matched parameters can be used in the key value: 'my other custom header value', }, ], }, ] }, } ### Regex Path Matching To match a regex path you can wrap the regex in parenthesis after a parameter, for example `/blog/:slug(\\d{1,})` will match `/blog/123` but not `/blog/abc`: module.exports = { async headers() { return [ { source: '/blog/:post(\\d{1,})', headers: [ { key: 'x-post', value: ':post', }, ], }, ] }, } The following characters `(`, `)`, `{`, `}`, `:`, `*`, `+`, `?` are used for regex path matching, so when used in the `source` as non-special values they must be escaped by adding `\\` before them: module.exports = { async headers() { return [ { // this will match `/english(default)/something` being requested source: '/english\\(default\\)/:slug', headers: [ { key: 'x-header', value: 'value', }, ], }, ] }, } ## Header, Cookie, and Query Matching To only apply a header when header, cookie, or query values also match the `has` field or don't match the `missing` field can be used. Both the `source` and all `has` items must match and all `missing` items must not match for the header to be applied. `has` and `missing` items can have the following fields: * `type`: `String` - must be either `header`, `cookie`, `host`, or `query`. * `key`: `String` - the key from the selected type to match against. * `value`: `String` or `undefined` - the value to check for, if undefined any value will match. A regex like string can be used to capture a specific part of the value, e.g. if the value `first-(?<paramName>.*)` is used for `first-second` then `second` will be usable in the destination with `:paramName`. module.exports = { async headers() { return [ // if the header `x-add-header` is present, // the `x-another-header` header will be applied { source: '/:path*', has: [ { type: 'header', key: 'x-add-header', }, ], headers: [ { key: 'x-another-header', value: 'hello', }, ], }, // if the header `x-no-header` is not present, // the `x-another-header` header will be applied { source: '/:path*', missing: [ { type: 'header', key: 'x-no-header', }, ], headers: [ { key: 'x-another-header', value: 'hello', }, ], }, // if the source, query, and cookie are matched, // the `x-authorized` header will be applied { source: '/specific/:path*', has: [ { type: 'query', key: 'page', // the page value will not be available in the // header key/values since value is provided and // doesn't use a named capture group e.g. (?<page>home) value: 'home', }, { type: 'cookie', key: 'authorized', value: 'true', }, ], headers: [ { key: 'x-authorized', value: ':authorized', }, ], }, // if the header `x-authorized` is present and // contains a matching value, the `x-another-header` will be applied { source: '/:path*', has: [ { type: 'header', key: 'x-authorized', value: '(?<authorized>yes|true)', }, ], headers: [ { key: 'x-another-header', value: ':authorized', }, ], }, // if the host is `example.com`, // this header will be applied { source: '/:path*', has: [ { type: 'host', value: 'example.com', }, ], headers: [ { key: 'x-another-header', value: ':authorized', }, ], }, ] }, } When leveraging `basePath` support with headers each `source` is automatically prefixed with the `basePath` unless you add `basePath: false` to the header: module.exports = { basePath: '/docs', async headers() { return [ { source: '/with-basePath', // becomes /docs/with-basePath headers: [ { key: 'x-hello', value: 'world', }, ], }, { source: '/without-basePath', // is not modified since basePath: false is set headers: [ { key: 'x-hello', value: 'world', }, ], basePath: false, }, ] }, } When leveraging `i18n` support with headers each `source` is automatically prefixed to handle the configured `locales` unless you add `locale: false` to the header. If `locale: false` is used you must prefix the `source` with a locale for it to be matched correctly. module.exports = { i18n: { locales: ['en', 'fr', 'de'], defaultLocale: 'en', }, async headers() { return [ { source: '/with-locale', // automatically handles all locales headers: [ { key: 'x-hello', value: 'world', }, ], }, { // does not handle locales automatically since locale: false is set source: '/nl/with-locale-manual', locale: false, headers: [ { key: 'x-hello', value: 'world', }, ], }, { // this matches '/' since `en` is the defaultLocale source: '/en', locale: false, headers: [ { key: 'x-hello', value: 'world', }, ], }, { // this gets converted to /(en|fr|de)/(.*) so will not match the top-level // `/` or `/fr` routes like /:path* would source: '/(.*)', headers: [ { key: 'x-hello', value: 'world', }, ], }, ] }, } ## Cache-Control Next.js sets the `Cache-Control` header of `public, max-age=31536000, immutable` for truly immutable assets. It cannot be overridden. These immutable files contain a SHA-hash in the file name, so they can be safely cached indefinitely. For example, Static Image Imports. You cannot set `Cache-Control` headers in `next.config.js` for these assets. However, you can set `Cache-Control` headers for other responses or data. Learn more about caching with the App Router. ## Options ### CORS Cross-Origin Resource Sharing (CORS) is a security feature that allows you to control which sites can access your resources. You can set the `Access-Control-Allow-Origin` header to allow a specific origin to access your Route Handlers. async headers() { return [ { source: "/api/:path*", headers: [ { key: "Access-Control-Allow-Origin", value: "*", // Set your origin }, { key: "Access-Control-Allow-Methods", value: "GET, POST, PUT, DELETE, OPTIONS", }, { key: "Access-Control-Allow-Headers", value: "Content-Type, Authorization", }, ], }, ]; }, ### X-DNS-Prefetch-Control This header controls DNS prefetching, allowing browsers to proactively perform domain name resolution on external links, images, CSS, JavaScript, and more. This prefetching is performed in the background, so the DNS is more likely to be resolved by the time the referenced items are needed. This reduces latency when the user clicks a link. { key: 'X-DNS-Prefetch-Control', value: 'on' } ### Strict-Transport-Security This header informs browsers it should only be accessed using HTTPS, instead of using HTTP. Using the configuration below, all present and future subdomains will use HTTPS for a `max-age` of 2 years. This blocks access to pages or subdomains that can only be served over HTTP. If you're deploying to Vercel, this header is not necessary as it's automatically added to all deployments unless you declare `headers` in your `next.config.js`. { key: 'Strict-Transport-Security', value: 'max-age=63072000; includeSubDomains; preload' } ### X-Frame-Options This header indicates whether the site should be allowed to be displayed within an `iframe`. This can prevent against clickjacking attacks. **This header has been superseded by CSP's `frame-ancestors` option**, which has better support in modern browsers (see Content Security Policy for configuration details). { key: 'X-Frame-Options', value: 'SAMEORIGIN' } ### Permissions-Policy This header allows you to control which features and APIs can be used in the browser. It was previously named `Feature-Policy`. { key: 'Permissions-Policy', value: 'camera=(), microphone=(), geolocation=(), browsing-topics=()' } ### X-Content-Type-Options This header prevents the browser from attempting to guess the type of content if the `Content-Type` header is not explicitly set. This can prevent XSS exploits for websites that allow users to upload and share files. For example, a user trying to download an image, but having it treated as a different `Content-Type` like an executable, which could be malicious. This header also applies to downloading browser extensions. The only valid value for this header is `nosniff`. { key: 'X-Content-Type-Options', value: 'nosniff' } ### Referrer-Policy This header controls how much information the browser includes when navigating from the current website (origin) to another. { key: 'Referrer-Policy', value: 'origin-when-cross-origin' } ### Content-Security-Policy Learn more about adding a Content Security Policy to your application. ## Version History | Version | Changes | | --- | --- | | `v13.3.0` | `missing` added. | | `v10.2.0` | `has` added. | | `v9.5.0` | Headers added. | --- ## Page: https://nextjs.org/docs/app/api-reference/config/next-config-js/htmlLimitedBots The `htmlLimitedBots` config allows you to specify a list of user agents that should receive blocking metadata instead of streaming metadata. next.config.ts import type { NextConfig } from 'next' const config: NextConfig = { htmlLimitedBots: 'MySpecialBot|MyAnotherSpecialBot|SimpleCrawler', } export default config ## Default list Next.js includes a default list of HTML limited bots. Specifying a `htmlLimitedBots` config will override the Next.js' default list, allowing you full control over what user agents should opt into this behavior. However, this is advanced behavior, and the default should be sufficient for most cases. ## Version History | Version | Changes | | --- | --- | | 15.2.0 | `htmlLimitedBots` option introduced. | --- ## Page: https://nextjs.org/docs/app/api-reference/config/next-config-js/httpAgentOptions In Node.js versions prior to 18, Next.js automatically polyfills `fetch()` with undici and enables HTTP Keep-Alive by default. To disable HTTP Keep-Alive for all `fetch()` calls on the server-side, open `next.config.js` and add the `httpAgentOptions` config: next.config.js module.exports = { httpAgentOptions: { keepAlive: false, }, } --- ## Page: https://nextjs.org/docs/app/api-reference/config/next-config-js/images If you want to use a cloud provider to optimize images instead of using the Next.js built-in Image Optimization API, you can configure `next.config.js` with the following: module.exports = { images: { loader: 'custom', loaderFile: './my/image/loader.js', }, } This `loaderFile` must point to a file relative to the root of your Next.js application. The file must export a default function that returns a string, for example: 'use client' export default function myImageLoader({ src, width, quality }) { return `https://example.com/${src}?w=${width}&q=${quality || 75}` } Alternatively, you can use the `loader` prop to pass the function to each instance of `next/image`. > **Good to know**: Customizing the image loader file, which accepts a function, requires using Client Components to serialize the provided function. To learn more about configuring the behavior of the built-in Image Optimization API and the Image Component, see Image Configuration Options for available options. ## Example Loader Configuration * Akamai * AWS CloudFront * Cloudinary * Cloudflare * Contentful * Fastly * Gumlet * ImageEngine * Imgix * PixelBin * Sanity * Sirv * Supabase * Thumbor * Imagekit * Nitrogen AIO ### Akamai // Docs: https://techdocs.akamai.com/ivm/reference/test-images-on-demand export default function akamaiLoader({ src, width, quality }) { return `https://example.com/${src}?imwidth=${width}` } ### AWS CloudFront // Docs: https://aws.amazon.com/developer/application-security-performance/articles/image-optimization export default function cloudfrontLoader({ src, width, quality }) { const url = new URL(`https://example.com${src}`) url.searchParams.set('format', 'auto') url.searchParams.set('width', width.toString()) url.searchParams.set('quality', (quality || 75).toString()) return url.href } ### Cloudinary // Demo: https://res.cloudinary.com/demo/image/upload/w_300,c_limit,q_auto/turtles.jpg export default function cloudinaryLoader({ src, width, quality }) { const params = ['f_auto', 'c_limit', `w_${width}`, `q_${quality || 'auto'}`] return `https://example.com/${params.join(',')}${src}` } ### Cloudflare // Docs: https://developers.cloudflare.com/images/transform-images export default function cloudflareLoader({ src, width, quality }) { const params = [`width=${width}`, `quality=${quality || 75}`, 'format=auto'] return `https://example.com/cdn-cgi/image/${params.join(',')}/${src}` } ### Contentful // Docs: https://www.contentful.com/developers/docs/references/images-api/ export default function contentfulLoader({ src, width, quality }) { const url = new URL(`https://example.com${src}`) url.searchParams.set('fm', 'webp') url.searchParams.set('w', width.toString()) url.searchParams.set('q', (quality || 75).toString()) return url.href } ### Fastly // Docs: https://developer.fastly.com/reference/io/ export default function fastlyLoader({ src, width, quality }) { const url = new URL(`https://example.com${src}`) url.searchParams.set('auto', 'webp') url.searchParams.set('width', width.toString()) url.searchParams.set('quality', (quality || 75).toString()) return url.href } ### Gumlet // Docs: https://docs.gumlet.com/reference/image-transform-size export default function gumletLoader({ src, width, quality }) { const url = new URL(`https://example.com${src}`) url.searchParams.set('format', 'auto') url.searchParams.set('w', width.toString()) url.searchParams.set('q', (quality || 75).toString()) return url.href } ### ImageEngine // Docs: https://support.imageengine.io/hc/en-us/articles/360058880672-Directives export default function imageengineLoader({ src, width, quality }) { const compression = 100 - (quality || 50) const params = [`w_${width}`, `cmpr_${compression}`)] return `https://example.com${src}?imgeng=/${params.join('/')` } ### Imgix // Demo: https://static.imgix.net/daisy.png?format=auto&fit=max&w=300 export default function imgixLoader({ src, width, quality }) { const url = new URL(`https://example.com${src}`) const params = url.searchParams params.set('auto', params.getAll('auto').join(',') || 'format') params.set('fit', params.get('fit') || 'max') params.set('w', params.get('w') || width.toString()) params.set('q', (quality || 50).toString()) return url.href } ### PixelBin // Doc (Resize): https://www.pixelbin.io/docs/transformations/basic/resize/#width-w // Doc (Optimise): https://www.pixelbin.io/docs/optimizations/quality/#image-quality-when-delivering // Doc (Auto Format Delivery): https://www.pixelbin.io/docs/optimizations/format/#automatic-format-selection-with-f_auto-url-parameter export default function pixelBinLoader({ src, width, quality }) { const name = '<your-cloud-name>' const opt = `t.resize(w:${width})~t.compress(q:${quality || 75})` return `https://cdn.pixelbin.io/v2/${name}/${opt}/${src}?f_auto=true` } ### Sanity // Docs: https://www.sanity.io/docs/image-urls export default function sanityLoader({ src, width, quality }) { const prj = 'zp7mbokg' const dataset = 'production' const url = new URL(`https://cdn.sanity.io/images/${prj}/${dataset}${src}`) url.searchParams.set('auto', 'format') url.searchParams.set('fit', 'max') url.searchParams.set('w', width.toString()) if (quality) { url.searchParams.set('q', quality.toString()) } return url.href } ### Sirv // Docs: https://sirv.com/help/articles/dynamic-imaging/ export default function sirvLoader({ src, width, quality }) { const url = new URL(`https://example.com${src}`) const params = url.searchParams params.set('format', params.getAll('format').join(',') || 'optimal') params.set('w', params.get('w') || width.toString()) params.set('q', (quality || 85).toString()) return url.href } ### Supabase // Docs: https://supabase.com/docs/guides/storage/image-transformations#nextjs-loader export default function supabaseLoader({ src, width, quality }) { const url = new URL(`https://example.com${src}`) url.searchParams.set('width', width.toString()) url.searchParams.set('quality', (quality || 75).toString()) return url.href } ### Thumbor // Docs: https://thumbor.readthedocs.io/en/latest/ export default function thumborLoader({ src, width, quality }) { const params = [`${width}x0`, `filters:quality(${quality || 75})`] return `https://example.com${params.join('/')}${src}` } ### ImageKit.io // Docs: https://imagekit.io/docs/image-transformation export default function imageKitLoader({ src, width, quality }) { const params = [`w-${width}`, `q-${quality || 80}`] return `https://ik.imagekit.io/your_imagekit_id/${src}?tr=${params.join(',')}` } ### Nitrogen AIO // Docs: https://docs.n7.io/aio/intergrations/ export default function aioLoader({ src, width, quality }) { const url = new URL(src, window.location.href) const params = url.searchParams const aioParams = params.getAll('aio') aioParams.push(`w-${width}`) if (quality) { aioParams.push(`q-${quality.toString()}`) } params.set('aio', aioParams.join(';')) return url.href } --- ## Page: https://nextjs.org/docs/app/api-reference/config/next-config-js/incrementalCacheHandlerPath ## Custom Next.js Cache Handler Caching and revalidating pages (with Incremental Static Regeneration) use the same shared cache. When deploying to Vercel, the ISR cache is automatically persisted to durable storage. When self-hosting, the ISR cache is stored to the filesystem (on disk) on your Next.js server. This works automatically when self-hosting using both the Pages and App Router. You can configure the Next.js cache location if you want to persist cached pages and data to durable storage, or share the cache across multiple containers or instances of your Next.js application. next.config.js module.exports = { cacheHandler: require.resolve('./cache-handler.js'), cacheMaxMemorySize: 0, // disable default in-memory caching } View an example of a custom cache handler and learn more about implementation. ## API Reference The cache handler can implement the following methods: `get`, `set`, and `revalidateTag`. ### `get()` | Parameter | Type | Description | | --- | --- | --- | | `key` | `string` | The key to the cached value. | Returns the cached value or `null` if not found. ### `set()` | Parameter | Type | Description | | --- | --- | --- | | `key` | `string` | The key to store the data under. | | `data` | Data or `null` | The data to be cached. | | `ctx` | `{ tags: [] }` | The cache tags provided. | Returns `Promise<void>`. ### `revalidateTag()` | Parameter | Type | Description | | --- | --- | --- | | `tag` | `string` or `string[]` | The cache tags to revalidate. | Returns `Promise<void>`. Learn more about revalidating data or the `revalidateTag()` function. **Good to know:** * `revalidatePath` is a convenience layer on top of cache tags. Calling `revalidatePath` will call your `revalidateTag` function, which you can then choose if you want to tag cache keys based on the path. ## Version History | Version | Changes | | --- | --- | | `v14.1.0` | Renamed to `cacheHandler` and became stable. | | `v13.4.0` | `incrementalCacheHandlerPath` support for `revalidateTag`. | | `v13.4.0` | `incrementalCacheHandlerPath` support for standalone output. | | `v12.2.0` | Experimental `incrementalCacheHandlerPath` added. | --- ## Page: https://nextjs.org/docs/app/api-reference/config/next-config-js/inlineCss This feature is currently experimental and subject to change, it's not recommended for production. Try it out and share your feedback on GitHub. ## Usage Experimental support for inlining CSS in the `<head>`. When this flag is enabled, all places where we normally generate a `<link>` tag will instead have a generated `<style>` tag. import type { NextConfig } from 'next' const nextConfig: NextConfig = { experimental: { inlineCss: true, }, } export default nextConfig ## Trade-Offs ### When to Use Inline CSS Inlining CSS can be beneficial in several scenarios: * **First-Time Visitors**: Since CSS files are render-blocking resources, inlining eliminates the initial download delay that first-time visitors experience, improving page load performance. * **Performance Metrics**: By removing the additional network requests for CSS files, inlining can significantly improve key metrics like First Contentful Paint (FCP) and Largest Contentful Paint (LCP). * **Slow Connections**: For users on slower networks where each request adds considerable latency, inlining CSS can provide a noticeable performance boost by reducing network roundtrips. * **Atomic CSS Bundles (e.g., Tailwind)**: With utility-first frameworks like Tailwind CSS, the size of the styles required for a page is often O(1) relative to the complexity of the design. This makes inlining a compelling choice because the entire set of styles for the current page is lightweight and doesn’t grow with the page size. Inlining Tailwind styles ensures minimal payload and eliminates the need for additional network requests, which can further enhance performance. ### When Not to Use Inline CSS While inlining CSS offers significant benefits for performance, there are scenarios where it may not be the best choice: * **Large CSS Bundles**: If your CSS bundle is too large, inlining it may significantly increase the size of the HTML, resulting in slower Time to First Byte (TTFB) and potentially worse performance for users with slow connections. * **Dynamic or Page-Specific CSS**: For applications with highly dynamic styles or pages that use different sets of CSS, inlining may lead to redundancy and bloat, as the full CSS for all pages may need to be inlined repeatedly. * **Browser Caching**: In cases where visitors frequently return to your site, external CSS files allow browsers to cache styles efficiently, reducing data transfer for subsequent visits. Inlining CSS eliminates this benefit. Evaluate these trade-offs carefully, and consider combining inlining with other strategies, such as critical CSS extraction or a hybrid approach, for the best results tailored to your site's needs. > **Good to know**: > > This feature is currently experimental and has some known limitations: > > * CSS inlining is applied globally and cannot be configured on a per-page basis > * Styles are duplicated during initial page load - once within `<style>` tags for SSR and once in the RSC payload > * When navigating to statically rendered pages, styles will use `<link>` tags instead of inline CSS to avoid duplication > * This feature is not available in development mode and only works in production builds --- ## Page: https://nextjs.org/docs/app/api-reference/config/next-config-js/logging ## Options ### Fetching You can configure the logging level and whether the full URL is logged to the console when running Next.js in development mode. Currently, `logging` only applies to data fetching using the `fetch` API. It does not yet apply to other logs inside of Next.js. module.exports = { logging: { fetches: { fullUrl: true, }, }, } Any `fetch` requests that are restored from the Server Components HMR cache are not logged by default. However, this can be enabled by setting `logging.fetches.hmrRefreshes` to `true`. module.exports = { logging: { fetches: { hmrRefreshes: true, }, }, } ### Incoming Requests By default all the incoming requests will be logged in the console during development. You can use the `incomingRequests` option to decide which requests to ignore. Since this is only logged in development, this option doesn't affect production builds. module.exports = { logging: { incomingRequests: { ignore: [/\api\/v1\/health/], }, }, } Or you can disable incoming request logging by setting `incomingRequests` to `false`. module.exports = { logging: { incomingRequests: false, }, } ### Disabling Logging In addition, you can disable the development logging by setting `logging` to `false`. module.exports = { logging: false, } --- ## Page: https://nextjs.org/docs/app/api-reference/config/next-config-js/mdxRs For experimental use with `@next/mdx`. Compiles MDX files using the new Rust compiler. next.config.js const withMDX = require('@next/mdx')() /** @type {import('next').NextConfig} */ const nextConfig = { pageExtensions: ['ts', 'tsx', 'mdx'], experimental: { mdxRs: true, }, } module.exports = withMDX(nextConfig) --- ## Page: https://nextjs.org/docs/app/api-reference/config/next-config-js/onDemandEntries Next.js exposes some options that give you some control over how the server will dispose or keep in memory built pages in development. To change the defaults, open `next.config.js` and add the `onDemandEntries` config: next.config.js module.exports = { onDemandEntries: { // period (in ms) where the server will keep pages in the buffer maxInactiveAge: 25 * 1000, // number of pages that should be kept simultaneously without being disposed pagesBufferLength: 2, }, } --- ## Page: https://nextjs.org/docs/app/api-reference/config/next-config-js/optimizePackageImports Some packages can export hundreds or thousands of modules, which can cause performance issues in development and production. Adding a package to `experimental.optimizePackageImports` will only load the modules you are actually using, while still giving you the convenience of writing import statements with many named exports. next.config.js module.exports = { experimental: { optimizePackageImports: ['package-name'], }, } The following libraries are optimized by default: * `lucide-react` * `date-fns` * `lodash-es` * `ramda` * `antd` * `react-bootstrap` * `ahooks` * `@ant-design/icons` * `@headlessui/react` * `@headlessui-float/react` * `@heroicons/react/20/solid` * `@heroicons/react/24/solid` * `@heroicons/react/24/outline` * `@visx/visx` * `@tremor/react` * `rxjs` * `@mui/material` * `@mui/icons-material` * `recharts` * `react-use` * `@material-ui/core` * `@material-ui/icons` * `@tabler/icons-react` * `mui-core` * `react-icons/*` --- ## Page: https://nextjs.org/docs/app/api-reference/config/next-config-js/output During a build, Next.js will automatically trace each page and its dependencies to determine all of the files that are needed for deploying a production version of your application. This feature helps reduce the size of deployments drastically. Previously, when deploying with Docker you would need to have all files from your package's `dependencies` installed to run `next start`. Starting with Next.js 12, you can leverage Output File Tracing in the `.next/` directory to only include the necessary files. Furthermore, this removes the need for the deprecated `serverless` target which can cause various issues and also creates unnecessary duplication. ## How it Works During `next build`, Next.js will use `@vercel/nft` to statically analyze `import`, `require`, and `fs` usage to determine all files that a page might load. Next.js' production server is also traced for its needed files and output at `.next/next-server.js.nft.json` which can be leveraged in production. To leverage the `.nft.json` files emitted to the `.next` output directory, you can read the list of files in each trace that are relative to the `.nft.json` file and then copy them to your deployment location. ## Automatically Copying Traced Files Next.js can automatically create a `standalone` folder that copies only the necessary files for a production deployment including select files in `node_modules`. To leverage this automatic copying you can enable it in your `next.config.js`: module.exports = { output: 'standalone', } This will create a folder at `.next/standalone` which can then be deployed on its own without installing `node_modules`. Additionally, a minimal `server.js` file is also output which can be used instead of `next start`. This minimal server does not copy the `public` or `.next/static` folders by default as these should ideally be handled by a CDN instead, although these folders can be copied to the `standalone/public` and `standalone/.next/static` folders manually, after which `server.js` file will serve these automatically. To copy these manually, you can use the `cp` command-line tool after you `next build`: cp -r public .next/standalone/ && cp -r .next/static .next/standalone/.next/ To start your minimal `server.js` file locally, run the following command: node .next/standalone/server.js > **Good to know**: > > * If your project needs to listen to a specific port or hostname, you can define `PORT` or `HOSTNAME` environment variables before running `server.js`. For example, run `PORT=8080 HOSTNAME=0.0.0.0 node server.js` to start the server on `http://0.0.0.0:8080`. ## Caveats * While tracing in monorepo setups, the project directory is used for tracing by default. For `next build packages/web-app`, `packages/web-app` would be the tracing root and any files outside of that folder will not be included. To include files outside of this folder you can set `outputFileTracingRoot` in your `next.config.js`. module.exports = { // this includes files from the monorepo base two directories up outputFileTracingRoot: path.join(__dirname, '../../'), } * There are some cases in which Next.js might fail to include required files, or might incorrectly include unused files. In those cases, you can leverage `outputFileTracingExcludes` and `outputFileTracingIncludes` respectively in `next.config.js`. Each config accepts an object with minimatch globs for the key to match specific pages and a value of an array with globs relative to the project's root to either include or exclude in the trace. module.exports = { outputFileTracingExcludes: { '/api/hello': ['./un-necessary-folder/**/*'], }, outputFileTracingIncludes: { '/api/another': ['./necessary-folder/**/*'], '/api/login/\\[\\[\\.\\.\\.slug\\]\\]': [ './node_modules/aws-crt/dist/bin/**/*', ], }, } **Note:** The key of `outputFileTracingIncludes`/`outputFileTracingExcludes` is a glob, so special characters need to be escaped. * Currently, Next.js does not do anything with the emitted `.nft.json` files. The files must be read by your deployment platform, for example Vercel, to create a minimal deployment. In a future release, a new command is planned to utilize these `.nft.json` files. ## Experimental `turbotrace` Tracing dependencies can be slow because it requires very complex computations and analysis. We created `turbotrace` in Rust as a faster and smarter alternative to the JavaScript implementation. To enable it, you can add the following configuration to your `next.config.js`: module.exports = { experimental: { turbotrace: { // control the log level of the turbotrace, default is `error` logLevel?: | 'bug' | 'fatal' | 'error' | 'warning' | 'hint' | 'note' | 'suggestions' | 'info', // control if the log of turbotrace should contain the details of the analysis, default is `false` logDetail?: boolean // show all log messages without limit // turbotrace only show 1 log message for each categories by default logAll?: boolean // control the context directory of the turbotrace // files outside of the context directory will not be traced // set the `outputFileTracingRoot` has the same effect // if the `outputFileTracingRoot` and this option are both set, the `experimental.turbotrace.contextDirectory` will be used contextDirectory?: string // if there is `process.cwd()` expression in your code, you can set this option to tell `turbotrace` the value of `process.cwd()` while tracing. // for example the require(process.cwd() + '/package.json') will be traced as require('/path/to/cwd/package.json') processCwd?: string // control the maximum memory usage of the `turbotrace`, in `MB`, default is `6000`. memoryLimit?: number }, }, } --- ## Page: https://nextjs.org/docs/app/api-reference/config/next-config-js/pageExtensions By default, Next.js accepts files with the following extensions: `.tsx`, `.ts`, `.jsx`, `.js`. This can be modified to allow other extensions like markdown (`.md`, `.mdx`). next.config.js const withMDX = require('@next/mdx')() /** @type {import('next').NextConfig} */ const nextConfig = { pageExtensions: ['js', 'jsx', 'ts', 'tsx', 'md', 'mdx'], } module.exports = withMDX(nextConfig) --- ## Page: https://nextjs.org/docs/app/api-reference/config/next-config-js/poweredByHeader #### Subscribe to our newsletter Stay updated on new releases and features, guides, and case studies. --- ## Page: https://nextjs.org/docs/app/api-reference/config/next-config-js/ppr This feature is currently experimental and subject to change, it's not recommended for production. Try it out and share your feedback on GitHub. Partial Prerendering (PPR) enables you to combine static and dynamic components together in the same route. Learn more about PPR. ## Using Partial Prerendering ### Incremental Adoption (Version 15) In Next.js 15, you can incrementally adopt Partial Prerendering in layouts and pages by setting the `ppr` option in `next.config.js` to `incremental`, and exporting the `experimental_ppr` route config option at the top of the file: next.config.ts import type { NextConfig } from 'next' const nextConfig: NextConfig = { experimental: { ppr: 'incremental', }, } export default nextConfig app/page.tsx import { Suspense } from "react" import { StaticComponent, DynamicComponent, Fallback } from "@/app/ui" export const experimental_ppr = true export default function Page() { return { <> <StaticComponent /> <Suspense fallback={<Fallback />}> <DynamicComponent /> </Suspense> </> }; } > **Good to know**: > > * Routes that don't have `experimental_ppr` will default to `false` and will not be prerendered using PPR. You need to explicitly opt-in to PPR for each route. > * `experimental_ppr` will apply to all children of the route segment, including nested layouts and pages. You don't have to add it to every file, only the top segment of a route. > * To disable PPR for children segments, you can set `experimental_ppr` to `false` in the child segment. | Version | Changes | | --- | --- | | `v15.0.0` | experimental `incremental` value introduced | | `v14.0.0` | experimental `ppr` introduced | --- ## Page: https://nextjs.org/docs/app/api-reference/config/next-config-js/productionBrowserSourceMaps Source Maps are enabled by default during development. During production builds, they are disabled to prevent you leaking your source on the client, unless you specifically opt-in with the configuration flag. Next.js provides a configuration flag you can use to enable browser source map generation during the production build: next.config.js module.exports = { productionBrowserSourceMaps: true, } When the `productionBrowserSourceMaps` option is enabled, the source maps will be output in the same directory as the JavaScript files. Next.js will automatically serve these files when requested. * Adding source maps can increase `next build` time * Increases memory usage during `next build` --- ## Page: https://nextjs.org/docs/app/api-reference/config/next-config-js/reactCompiler This feature is currently experimental and subject to change, it's not recommended for production. Try it out and share your feedback on GitHub. Next.js includes support for the React Compiler, a tool designed to improve performance by automatically optimizing component rendering. This reduces the need for manual memoization using `useMemo` and `useCallback`. Next.js includes a custom performance optimization written in SWC that makes the React Compiler more efficient. Instead of running the compiler on every file, Next.js analyzes your project and only applies the React Compiler to relevant files. This avoids unnecessary work and leads to faster builds compared to using the Babel plugin on its own. ## How It Works The React Compiler runs through a Babel plugin. To keep builds fast, Next.js uses a custom SWC optimization that only applies the React Compiler to relevant files—like those with JSX or React hooks. This avoids compiling everything and keeps the performance cost minimal. You may still see slightly slower builds compared to the default Rust-based compiler, but the impact is small and localized. To use it, install the `babel-plugin-react-compiler`: npm install babel-plugin-react-compiler Then, add `experimental.reactCompiler` option in `next.config.js`: import type { NextConfig } from 'next' const nextConfig: NextConfig = { experimental: { reactCompiler: true, }, } export default nextConfig ## Annotations You can configure the compiler to run in "opt-in" mode as follows: import type { NextConfig } from 'next' const nextConfig: NextConfig = { experimental: { reactCompiler: { compilationMode: 'annotation', }, }, } export default nextConfig Then, you can annotate specific components or hooks with the `"use memo"` directive from React to opt-in: export default function Page() { 'use memo' // ... } > **Note:** You can also use the `"use no memo"` directive from React for the opposite effect, to opt-out a component or hook. --- ## Page: https://nextjs.org/docs/app/api-reference/config/next-config-js/reactMaxHeadersLength During static rendering, React can emit headers that can be added to the response. These can be used to improve performance by allowing the browser to preload resources like fonts, scripts, and stylesheets. The default value is `6000`, but you can override this value by configuring the `reactMaxHeadersLength` option in `next.config.js`: next.config.js module.exports = { reactMaxHeadersLength: 1000, } > **Good to know**: This option is only available in App Router. Depending on the type of proxy between the browser and the server, the headers can be truncated. For example, if you are using a reverse proxy that doesn't support long headers, you should set a lower value to ensure that the headers are not truncated. --- ## Page: https://nextjs.org/docs/app/api-reference/config/next-config-js/reactStrictMode **Good to know**: Since Next.js 13.5.1, Strict Mode is `true` by default with `app` router, so the above configuration is only necessary for `pages`. You can still disable Strict Mode by setting `reactStrictMode: false`. **Suggested**: We strongly suggest you enable Strict Mode in your Next.js application to better prepare your application for the future of React. React's Strict Mode is a development mode only feature for highlighting potential problems in an application. It helps to identify unsafe lifecycles, legacy API usage, and a number of other features. The Next.js runtime is Strict Mode-compliant. To opt-in to Strict Mode, configure the following option in your `next.config.js`: If you or your team are not ready to use Strict Mode in your entire application, that's OK! You can incrementally migrate on a page-by-page basis using `<React.StrictMode>`. --- ## Page: https://nextjs.org/docs/app/api-reference/config/next-config-js/redirects Redirects allow you to redirect an incoming request path to a different destination path. To use redirects you can use the `redirects` key in `next.config.js`: module.exports = { async redirects() { return [ { source: '/about', destination: '/', permanent: true, }, ] }, } `redirects` is an async function that expects an array to be returned holding objects with `source`, `destination`, and `permanent` properties: * `source` is the incoming request path pattern. * `destination` is the path you want to route to. * `permanent` `true` or `false` - if `true` will use the 308 status code which instructs clients/search engines to cache the redirect forever, if `false` will use the 307 status code which is temporary and is not cached. > **Why does Next.js use 307 and 308?** Traditionally a 302 was used for a temporary redirect, and a 301 for a permanent redirect, but many browsers changed the request method of the redirect to `GET`, regardless of the original method. For example, if the browser made a request to `POST /v1/users` which returned status code `302` with location `/v2/users`, the subsequent request might be `GET /v2/users` instead of the expected `POST /v2/users`. Next.js uses the 307 temporary redirect, and 308 permanent redirect status codes to explicitly preserve the request method used. * `basePath`: `false` or `undefined` - if false the `basePath` won't be included when matching, can be used for external redirects only. * `locale`: `false` or `undefined` - whether the locale should not be included when matching. * `has` is an array of has objects with the `type`, `key` and `value` properties. * `missing` is an array of missing objects with the `type`, `key` and `value` properties. Redirects are checked before the filesystem which includes pages and `/public` files. When using the Pages Router, redirects are not applied to client-side routing (`Link`, `router.push`) unless Middleware is present and matches the path. When a redirect is applied, any query values provided in the request will be passed through to the redirect destination. For example, see the following redirect configuration: { source: '/old-blog/:path*', destination: '/blog/:path*', permanent: false } > **Good to know**: Remember to include the forward slash `/` before the colon `:` in path parameters of the `source` and `destination` paths, otherwise the path will be treated as a literal string and you run the risk of causing infinite redirects. When `/old-blog/post-1?hello=world` is requested, the client will be redirected to `/blog/post-1?hello=world`. ## Path Matching Path matches are allowed, for example `/old-blog/:slug` will match `/old-blog/hello-world` (no nested paths): module.exports = { async redirects() { return [ { source: '/old-blog/:slug', destination: '/news/:slug', // Matched parameters can be used in the destination permanent: true, }, ] }, } ### Wildcard Path Matching To match a wildcard path you can use `*` after a parameter, for example `/blog/:slug*` will match `/blog/a/b/c/d/hello-world`: module.exports = { async redirects() { return [ { source: '/blog/:slug*', destination: '/news/:slug*', // Matched parameters can be used in the destination permanent: true, }, ] }, } ### Regex Path Matching To match a regex path you can wrap the regex in parentheses after a parameter, for example `/post/:slug(\\d{1,})` will match `/post/123` but not `/post/abc`: module.exports = { async redirects() { return [ { source: '/post/:slug(\\d{1,})', destination: '/news/:slug', // Matched parameters can be used in the destination permanent: false, }, ] }, } The following characters `(`, `)`, `{`, `}`, `:`, `*`, `+`, `?` are used for regex path matching, so when used in the `source` as non-special values they must be escaped by adding `\\` before them: module.exports = { async redirects() { return [ { // this will match `/english(default)/something` being requested source: '/english\\(default\\)/:slug', destination: '/en-us/:slug', permanent: false, }, ] }, } ## Header, Cookie, and Query Matching To only match a redirect when header, cookie, or query values also match the `has` field or don't match the `missing` field can be used. Both the `source` and all `has` items must match and all `missing` items must not match for the redirect to be applied. `has` and `missing` items can have the following fields: * `type`: `String` - must be either `header`, `cookie`, `host`, or `query`. * `key`: `String` - the key from the selected type to match against. * `value`: `String` or `undefined` - the value to check for, if undefined any value will match. A regex like string can be used to capture a specific part of the value, e.g. if the value `first-(?<paramName>.*)` is used for `first-second` then `second` will be usable in the destination with `:paramName`. module.exports = { async redirects() { return [ // if the header `x-redirect-me` is present, // this redirect will be applied { source: '/:path((?!another-page$).*)', has: [ { type: 'header', key: 'x-redirect-me', }, ], permanent: false, destination: '/another-page', }, // if the header `x-dont-redirect` is present, // this redirect will NOT be applied { source: '/:path((?!another-page$).*)', missing: [ { type: 'header', key: 'x-do-not-redirect', }, ], permanent: false, destination: '/another-page', }, // if the source, query, and cookie are matched, // this redirect will be applied { source: '/specific/:path*', has: [ { type: 'query', key: 'page', // the page value will not be available in the // destination since value is provided and doesn't // use a named capture group e.g. (?<page>home) value: 'home', }, { type: 'cookie', key: 'authorized', value: 'true', }, ], permanent: false, destination: '/another/:path*', }, // if the header `x-authorized` is present and // contains a matching value, this redirect will be applied { source: '/', has: [ { type: 'header', key: 'x-authorized', value: '(?<authorized>yes|true)', }, ], permanent: false, destination: '/home?authorized=:authorized', }, // if the host is `example.com`, // this redirect will be applied { source: '/:path((?!another-page$).*)', has: [ { type: 'host', value: 'example.com', }, ], permanent: false, destination: '/another-page', }, ] }, } ### Redirects with basePath support When leveraging `basePath` support with redirects each `source` and `destination` is automatically prefixed with the `basePath` unless you add `basePath: false` to the redirect: module.exports = { basePath: '/docs', async redirects() { return [ { source: '/with-basePath', // automatically becomes /docs/with-basePath destination: '/another', // automatically becomes /docs/another permanent: false, }, { // does not add /docs since basePath: false is set source: '/without-basePath', destination: 'https://example.com', basePath: false, permanent: false, }, ] }, } ### Redirects with i18n support When leveraging `i18n` support with redirects each `source` and `destination` is automatically prefixed to handle the configured `locales` unless you add `locale: false` to the redirect. If `locale: false` is used you must prefix the `source` and `destination` with a locale for it to be matched correctly. module.exports = { i18n: { locales: ['en', 'fr', 'de'], defaultLocale: 'en', }, async redirects() { return [ { source: '/with-locale', // automatically handles all locales destination: '/another', // automatically passes the locale on permanent: false, }, { // does not handle locales automatically since locale: false is set source: '/nl/with-locale-manual', destination: '/nl/another', locale: false, permanent: false, }, { // this matches '/' since `en` is the defaultLocale source: '/en', destination: '/en/another', locale: false, permanent: false, }, // it's possible to match all locales even when locale: false is set { source: '/:locale/page', destination: '/en/newpage', permanent: false, locale: false, }, { // this gets converted to /(en|fr|de)/(.*) so will not match the top-level // `/` or `/fr` routes like /:path* would source: '/(.*)', destination: '/another', permanent: false, }, ] }, } In some rare cases, you might need to assign a custom status code for older HTTP Clients to properly redirect. In these cases, you can use the `statusCode` property instead of the `permanent` property, but not both. To to ensure IE11 compatibility, a `Refresh` header is automatically added for the 308 status code. ## Other Redirects * Inside API Routes and Route Handlers, you can redirect based on the incoming request. * Inside `getStaticProps` and `getServerSideProps`, you can redirect specific pages at request-time. ## Version History | Version | Changes | | --- | --- | | `v13.3.0` | `missing` added. | | `v10.2.0` | `has` added. | | `v9.5.0` | `redirects` added. | --- ## Page: https://nextjs.org/docs/app/api-reference/config/next-config-js/rewrites Rewrites allow you to map an incoming request path to a different destination path. Rewrites act as a URL proxy and mask the destination path, making it appear the user hasn't changed their location on the site. In contrast, redirects will reroute to a new page and show the URL changes. To use rewrites you can use the `rewrites` key in `next.config.js`: module.exports = { async rewrites() { return [ { source: '/about', destination: '/', }, ] }, } Rewrites are applied to client-side routing, a `<Link href="/about">` will have the rewrite applied in the above example. `rewrites` is an async function that expects to return either an array or an object of arrays (see below) holding objects with `source` and `destination` properties: * `source`: `String` - is the incoming request path pattern. * `destination`: `String` is the path you want to route to. * `basePath`: `false` or `undefined` - if false the basePath won't be included when matching, can be used for external rewrites only. * `locale`: `false` or `undefined` - whether the locale should not be included when matching. * `has` is an array of has objects with the `type`, `key` and `value` properties. * `missing` is an array of missing objects with the `type`, `key` and `value` properties. When the `rewrites` function returns an array, rewrites are applied after checking the filesystem (pages and `/public` files) and before dynamic routes. When the `rewrites` function returns an object of arrays with a specific shape, this behavior can be changed and more finely controlled, as of `v10.1` of Next.js: module.exports = { async rewrites() { return { beforeFiles: [ // These rewrites are checked after headers/redirects // and before all files including _next/public files which // allows overriding page files { source: '/some-page', destination: '/somewhere-else', has: [{ type: 'query', key: 'overrideMe' }], }, ], afterFiles: [ // These rewrites are checked after pages/public files // are checked but before dynamic routes { source: '/non-existent', destination: '/somewhere-else', }, ], fallback: [ // These rewrites are checked after both pages/public files // and dynamic routes are checked { source: '/:path*', destination: `https://my-old-site.com/:path*`, }, ], } }, } > **Good to know**: rewrites in `beforeFiles` do not check the filesystem/dynamic routes immediately after matching a source, they continue until all `beforeFiles` have been checked. The order Next.js routes are checked is: 1. headers are checked/applied 2. redirects are checked/applied 3. `beforeFiles` rewrites are checked/applied 4. static files from the public directory, `_next/static` files, and non-dynamic pages are checked/served 5. `afterFiles` rewrites are checked/applied, if one of these rewrites is matched we check dynamic routes/static files after each match 6. `fallback` rewrites are checked/applied, these are applied before rendering the 404 page and after dynamic routes/all static assets have been checked. If you use fallback: true/'blocking' in `getStaticPaths`, the fallback `rewrites` defined in your `next.config.js` will _not_ be run. ## Rewrite parameters When using parameters in a rewrite the parameters will be passed in the query by default when none of the parameters are used in the `destination`. module.exports = { async rewrites() { return [ { source: '/old-about/:path*', destination: '/about', // The :path parameter isn't used here so will be automatically passed in the query }, ] }, } If a parameter is used in the destination none of the parameters will be automatically passed in the query. module.exports = { async rewrites() { return [ { source: '/docs/:path*', destination: '/:path*', // The :path parameter is used here so will not be automatically passed in the query }, ] }, } You can still pass the parameters manually in the query if one is already used in the destination by specifying the query in the `destination`. module.exports = { async rewrites() { return [ { source: '/:first/:second', destination: '/:first?second=:second', // Since the :first parameter is used in the destination the :second parameter // will not automatically be added in the query although we can manually add it // as shown above }, ] }, } > **Good to know**: Static pages from Automatic Static Optimization or prerendering params from rewrites will be parsed on the client after hydration and provided in the query. ## Path Matching Path matches are allowed, for example `/blog/:slug` will match `/blog/hello-world` (no nested paths): module.exports = { async rewrites() { return [ { source: '/blog/:slug', destination: '/news/:slug', // Matched parameters can be used in the destination }, ] }, } ### Wildcard Path Matching To match a wildcard path you can use `*` after a parameter, for example `/blog/:slug*` will match `/blog/a/b/c/d/hello-world`: module.exports = { async rewrites() { return [ { source: '/blog/:slug*', destination: '/news/:slug*', // Matched parameters can be used in the destination }, ] }, } ### Regex Path Matching To match a regex path you can wrap the regex in parenthesis after a parameter, for example `/blog/:slug(\\d{1,})` will match `/blog/123` but not `/blog/abc`: module.exports = { async rewrites() { return [ { source: '/old-blog/:post(\\d{1,})', destination: '/blog/:post', // Matched parameters can be used in the destination }, ] }, } The following characters `(`, `)`, `{`, `}`, `[`, `]`, `|`, `\`, `^`, `.`, `:`, `*`, `+`, `-`, `?`, `$` are used for regex path matching, so when used in the `source` as non-special values they must be escaped by adding `\\` before them: module.exports = { async rewrites() { return [ { // this will match `/english(default)/something` being requested source: '/english\\(default\\)/:slug', destination: '/en-us/:slug', }, ] }, } ## Header, Cookie, and Query Matching To only match a rewrite when header, cookie, or query values also match the `has` field or don't match the `missing` field can be used. Both the `source` and all `has` items must match and all `missing` items must not match for the rewrite to be applied. `has` and `missing` items can have the following fields: * `type`: `String` - must be either `header`, `cookie`, `host`, or `query`. * `key`: `String` - the key from the selected type to match against. * `value`: `String` or `undefined` - the value to check for, if undefined any value will match. A regex like string can be used to capture a specific part of the value, e.g. if the value `first-(?<paramName>.*)` is used for `first-second` then `second` will be usable in the destination with `:paramName`. module.exports = { async rewrites() { return [ // if the header `x-rewrite-me` is present, // this rewrite will be applied { source: '/:path*', has: [ { type: 'header', key: 'x-rewrite-me', }, ], destination: '/another-page', }, // if the header `x-rewrite-me` is not present, // this rewrite will be applied { source: '/:path*', missing: [ { type: 'header', key: 'x-rewrite-me', }, ], destination: '/another-page', }, // if the source, query, and cookie are matched, // this rewrite will be applied { source: '/specific/:path*', has: [ { type: 'query', key: 'page', // the page value will not be available in the // destination since value is provided and doesn't // use a named capture group e.g. (?<page>home) value: 'home', }, { type: 'cookie', key: 'authorized', value: 'true', }, ], destination: '/:path*/home', }, // if the header `x-authorized` is present and // contains a matching value, this rewrite will be applied { source: '/:path*', has: [ { type: 'header', key: 'x-authorized', value: '(?<authorized>yes|true)', }, ], destination: '/home?authorized=:authorized', }, // if the host is `example.com`, // this rewrite will be applied { source: '/:path*', has: [ { type: 'host', value: 'example.com', }, ], destination: '/another-page', }, ] }, } ## Rewriting to an external URL Examples * Using Multiple Zones Rewrites allow you to rewrite to an external URL. This is especially useful for incrementally adopting Next.js. The following is an example rewrite for redirecting the `/blog` route of your main app to an external site. module.exports = { async rewrites() { return [ { source: '/blog', destination: 'https://example.com/blog', }, { source: '/blog/:slug', destination: 'https://example.com/blog/:slug', // Matched parameters can be used in the destination }, ] }, } If you're using `trailingSlash: true`, you also need to insert a trailing slash in the `source` parameter. If the destination server is also expecting a trailing slash it should be included in the `destination` parameter as well. module.exports = { trailingSlash: true, async rewrites() { return [ { source: '/blog/', destination: 'https://example.com/blog/', }, { source: '/blog/:path*/', destination: 'https://example.com/blog/:path*/', }, ] }, } ### Incremental adoption of Next.js You can also have Next.js fall back to proxying to an existing website after checking all Next.js routes. This way you don't have to change the rewrites configuration when migrating more pages to Next.js module.exports = { async rewrites() { return { fallback: [ { source: '/:path*', destination: `https://custom-routes-proxying-endpoint.vercel.app/:path*`, }, ], } }, } ### Rewrites with basePath support When leveraging `basePath` support with rewrites each `source` and `destination` is automatically prefixed with the `basePath` unless you add `basePath: false` to the rewrite: module.exports = { basePath: '/docs', async rewrites() { return [ { source: '/with-basePath', // automatically becomes /docs/with-basePath destination: '/another', // automatically becomes /docs/another }, { // does not add /docs to /without-basePath since basePath: false is set // Note: this can not be used for internal rewrites e.g. `destination: '/another'` source: '/without-basePath', destination: 'https://example.com', basePath: false, }, ] }, } ## Version History | Version | Changes | | --- | --- | | `v13.3.0` | `missing` added. | | `v10.2.0` | `has` added. | | `v9.5.0` | Headers added. | --- ## Page: https://nextjs.org/docs/app/api-reference/config/next-config-js/sassOptions `sassOptions` allow you to configure the Sass compiler. next.config.ts import type { NextConfig } from 'next' const sassOptions = { additionalData: ` $var: red; `, } const nextConfig: NextConfig = { sassOptions: { ...sassOptions, implementation: 'sass-embedded', }, } export default nextConfig --- ## Page: https://nextjs.org/docs/app/api-reference/config/next-config-js/serverActions Options for configuring Server Actions behavior in your Next.js application. ## `allowedOrigins` A list of extra safe origin domains from which Server Actions can be invoked. Next.js compares the origin of a Server Action request with the host domain, ensuring they match to prevent CSRF attacks. If not provided, only the same origin is allowed. /** @type {import('next').NextConfig} */ module.exports = { experimental: { serverActions: { allowedOrigins: ['my-proxy.com', '*.my-proxy.com'], }, }, } ## `bodySizeLimit` By default, the maximum size of the request body sent to a Server Action is 1MB, to prevent the consumption of excessive server resources in parsing large amounts of data, as well as potential DDoS attacks. However, you can configure this limit using the `serverActions.bodySizeLimit` option. It can take the number of bytes or any string format supported by bytes, for example `1000`, `'500kb'` or `'3mb'`. /** @type {import('next').NextConfig} */ module.exports = { experimental: { serverActions: { bodySizeLimit: '2mb', }, }, } ## Enabling Server Actions (v13) Server Actions became a stable feature in Next.js 14, and are enabled by default. However, if you are using an earlier version of Next.js, you can enable them by setting `experimental.serverActions` to `true`. /** @type {import('next').NextConfig} */ const config = { experimental: { serverActions: true, }, } module.exports = config --- ## Page: https://nextjs.org/docs/app/api-reference/config/next-config-js/serverComponentsHmrCache This feature is currently experimental and subject to change, it's not recommended for production. Try it out and share your feedback on GitHub. The experimental `serverComponentsHmrCache` option allows you to cache `fetch` responses in Server Components across Hot Module Replacement (HMR) refreshes in local development. This results in faster responses and reduced costs for billed API calls. By default, the HMR cache applies to all `fetch` requests, including those with the `cache: 'no-store'` option. This means uncached requests will not show fresh data between HMR refreshes. However, the cache will be cleared on navigation or full-page reloads. You can disable the HMR cache by setting `serverComponentsHmrCache` to `false` in your `next.config.js` file: next.config.ts import type { NextConfig } from 'next' const nextConfig: NextConfig = { experimental: { serverComponentsHmrCache: false, // defaults to true }, } export default nextConfig > **Good to know:** For better observability, we recommend using the `logging.fetches` option which logs fetch cache hits and misses in the console during development. --- ## Page: https://nextjs.org/docs/app/api-reference/config/next-config-js/serverExternalPackages Dependencies used inside Server Components and Route Handlers will automatically be bundled by Next.js. If a dependency is using Node.js specific features, you can choose to opt-out specific dependencies from the Server Components bundling and use native Node.js `require`. next.config.js /** @type {import('next').NextConfig} */ const nextConfig = { serverExternalPackages: ['@acme/ui'], } module.exports = nextConfig Next.js includes a short list of popular packages that currently are working on compatibility and automatically opt-ed out: * `@appsignal/nodejs` * `@aws-sdk/client-s3` * `@aws-sdk/s3-presigned-post` * `@blockfrost/blockfrost-js` * `@highlight-run/node` * `@huggingface/transformers` * `@jpg-store/lucid-cardano` * `@libsql/client` * `@mikro-orm/core` * `@mikro-orm/knex` * `@node-rs/argon2` * `@node-rs/bcrypt` * `@prisma/client` * `@react-pdf/renderer` * `@sentry/profiling-node` * `@sparticuz/chromium` * `@swc/core` * `@xenova/transformers` * `argon2` * `autoprefixer` * `aws-crt` * `bcrypt` * `better-sqlite3` * `canvas` * `chromadb-default-embed` * `cpu-features` * `cypress` * `dd-trace` * `eslint` * `express` * `firebase-admin` * `import-in-the-middle` * `isolated-vm` * `jest` * `jsdom` * `keyv` * `libsql` * `mdx-bundler` * `mongodb` * `mongoose` * `newrelic` * `next-mdx-remote` * `next-seo` * `node-cron` * `node-pty` * `node-web-audio-api` * `onnxruntime-node` * `oslo` * `pg` * `playwright` * `playwright-core` * `postcss` * `prettier` * `prisma` * `puppeteer-core` * `puppeteer` * `require-in-the-middle` * `rimraf` * `sharp` * `shiki` * `sqlite3` * `ts-node` * `ts-morph` * `typescript` * `vscode-oniguruma` * `webpack` * `websocket` * `zeromq` | Version | Changes | | --- | --- | | `v15.0.0` | Moved from experimental to stable. Renamed from `serverComponentsExternalPackages` to `serverExternalPackages` | --- ## Page: https://nextjs.org/docs/app/api-reference/config/next-config-js/staleTimes This feature is currently experimental and subject to change, it's not recommended for production. Try it out and share your feedback on GitHub. `staleTimes` is an experimental feature that enables caching of page segments in the client-side router cache. You can enable this experimental feature and provide custom revalidation times by setting the experimental `staleTimes` flag: next.config.js /** @type {import('next').NextConfig} */ const nextConfig = { experimental: { staleTimes: { dynamic: 30, static: 180, }, }, } module.exports = nextConfig The `static` and `dynamic` properties correspond with the time period (in seconds) based on different types of link prefetching. * The `dynamic` property is used when the page is neither statically generated nor fully prefetched (e.g. with `prefetch={true}`). * Default: 0 seconds (not cached) * The `static` property is used for statically generated pages, or when the `prefetch` prop on `Link` is set to `true`, or when calling `router.prefetch`. * Default: 5 minutes > **Good to know:** > > * Loading boundaries are considered reusable for the `static` period defined in this configuration. > * This doesn't affect partial rendering, **meaning shared layouts won't automatically be refetched on every navigation, only the page segment that changes.** > * This doesn't change back/forward caching behavior to prevent layout shift and to prevent losing the browser scroll position. You can learn more about the Client Router Cache here. ### Version History | Version | Changes | | --- | --- | | `v15.0.0` | The `dynamic` `staleTimes` default changed from 30s to 0s. | | `v14.2.0` | Experimental `staleTimes` introduced. | --- ## Page: https://nextjs.org/docs/app/api-reference/config/next-config-js/staticGeneration This feature is currently experimental and subject to change, it's not recommended for production. Try it out and share your feedback on GitHub. The `staticGeneration*` options allow you to configure the Static Generation process for advanced use cases. next.config.ts import type { NextConfig } from 'next' const nextConfig: NextConfig = { experimental: { staticGenerationRetryCount: 1, staticGenerationMaxConcurrency: 8, staticGenerationMinPagesPerWorker: 25, }, } export default nextConfig ## Config Options The following options are available: * `staticGenerationRetryCount`: The number of times to retry a failed page generation before failing the build. * `staticGenerationMaxConcurrency`: The maximum number of pages to be processed per worker. * `staticGenerationMinPagesPerWorker`: The minimum number of pages to be processed before starting a new worker. --- ## Page: https://nextjs.org/docs/app/api-reference/config/next-config-js/trailingSlash By default Next.js will redirect URLs with trailing slashes to their counterpart without a trailing slash. For example `/about/` will redirect to `/about`. You can configure this behavior to act the opposite way, where URLs without trailing slashes are redirected to their counterparts with trailing slashes. Open `next.config.js` and add the `trailingSlash` config: next.config.js module.exports = { trailingSlash: true, } With this option set, URLs like `/about` will redirect to `/about/`. When using `trailingSlash: true`, certain URLs are exceptions and will not have a trailing slash appended: * Static file URLs, such as files with extensions. * Any paths under `.well-known/`. For example, the following URLs will remain unchanged: `/file.txt`, `images/photos/picture.png`, and `.well-known/subfolder/config.json`. When used with `output: "export"` configuration, the `/about` page will output `/about/index.html` (instead of the default `/about.html`). ## Version History | Version | Changes | | --- | --- | | `v9.5.0` | `trailingSlash` added. | --- ## Page: https://nextjs.org/docs/app/api-reference/config/next-config-js/transpilePackages #### Subscribe to our newsletter Stay updated on new releases and features, guides, and case studies. --- ## Page: https://nextjs.org/docs/app/api-reference/config/next-config-js/turbopack The `turbopack` option lets you customize Turbopack to transform different files and change how modules are resolved. import type { NextConfig } from 'next' const nextConfig: NextConfig = { turbopack: { // ... }, } export default nextConfig > **Good to know**: > > * Turbopack for Next.js does not require loaders or loader configuration for built-in functionality. Turbopack has built-in support for CSS and compiling modern JavaScript, so there's no need for `css-loader`, `postcss-loader`, or `babel-loader` if you're using `@babel/preset-env`. ## Reference ### Options The following options are available for the `turbo` configuration: | Option | Description | | --- | --- | | `root` | Sets the application root directory. Should be an absolute path. | | `rules` | List of supported webpack loaders to apply when running with Turbopack. | | `resolveAlias` | Map aliased imports to modules to load in their place. | | `resolveExtensions` | List of extensions to resolve when importing files. | ### Supported loaders The following loaders have been tested to work with Turbopack's webpack loader implementation: * `babel-loader` * `@svgr/webpack` * `svg-inline-loader` * `yaml-loader` * `string-replace-loader` * `raw-loader` * `sass-loader` ## Examples ### Root directory Turbopack uses the root directory to resolve modules. Files outside of the project root are not resolved. Next.js automatically detects the root directory of your project. It does so by looking for one of these files: * `pnpm-lock.yaml` * `package-lock.json` * `yarn.lock` * `bun.lock` * `bun.lockb` If you have a different project structure, for example if you don't use workspaces, you can manually set the `root` option: const path = require('path') module.exports = { turbopack: { root: path.join(__dirname, '..'), }, } ### Configuring webpack loaders If you need loader support beyond what's built in, many webpack loaders already work with Turbopack. There are currently some limitations: * Only a core subset of the webpack loader API is implemented. Currently, there is enough coverage for some popular loaders, and we'll expand our API support in the future. * Only loaders that return JavaScript code are supported. Loaders that transform files like stylesheets or images are not currently supported. * Options passed to webpack loaders must be plain JavaScript primitives, objects, and arrays. For example, it's not possible to pass `require()` plugin modules as option values. To configure loaders, add the names of the loaders you've installed and any options in `next.config.js`, mapping file extensions to a list of loaders. Here is an example below using the `@svgr/webpack` loader, which enables importing `.svg` files and rendering them as React components. module.exports = { turbopack: { rules: { '*.svg': { loaders: ['@svgr/webpack'], as: '*.js', }, }, }, } > **Good to know**: Prior to Next.js version 13.4.4, `turbo.rules` was named `turbo.loaders` and only accepted file extensions like `.mdx` instead of `*.mdx`. ### Resolving aliases Turbopack can be configured to modify module resolution through aliases, similar to webpack's `resolve.alias` configuration. To configure resolve aliases, map imported patterns to their new destination in `next.config.js`: module.exports = { turbopack: { resolveAlias: { underscore: 'lodash', mocha: { browser: 'mocha/browser-entry.js' }, }, }, } This aliases imports of the `underscore` package to the `lodash` package. In other words, `import underscore from 'underscore'` will load the `lodash` module instead of `underscore`. Turbopack also supports conditional aliasing through this field, similar to Node.js' conditional exports. At the moment only the `browser` condition is supported. In the case above, imports of the `mocha` module will be aliased to `mocha/browser-entry.js` when Turbopack targets browser environments. ### Resolving custom extensions Turbopack can be configured to resolve modules with custom extensions, similar to webpack's `resolve.extensions` configuration. To configure resolve extensions, use the `resolveExtensions` field in `next.config.js`: module.exports = { turbopack: { resolveExtensions: ['.mdx', '.tsx', '.ts', '.jsx', '.js', '.mjs', '.json'], }, } This overwrites the original resolve extensions with the provided list. Make sure to include the default extensions. For more information and guidance for how to migrate your app to Turbopack from webpack, see Turbopack's documentation on webpack compatibility. ## Version History | Version | Changes | | --- | --- | | `15.3.0` | `experimental.turbo` is changed to `turbopack`. | | `13.0.0` | `experimental.turbo` introduced. | --- ## Page: https://nextjs.org/docs/app/api-reference/config/next-config-js/typedRoutes This feature is currently experimental and subject to change, it's not recommended for production. Try it out and share your feedback on GitHub. Experimental support for statically typed links. This feature requires using the App Router as well as TypeScript in your project. next.config.js /** @type {import('next').NextConfig} */ const nextConfig = { experimental: { typedRoutes: true, }, } module.exports = nextConfig --- ## Page: https://nextjs.org/docs/app/api-reference/config/next-config-js/typescript Next.js fails your **production build** (`next build`) when TypeScript errors are present in your project. If you'd like Next.js to dangerously produce production code even when your application has errors, you can disable the built-in type checking step. If disabled, be sure you are running type checks as part of your build or deploy process, otherwise this can be very dangerous. Open `next.config.js` and enable the `ignoreBuildErrors` option in the `typescript` config: next.config.js module.exports = { typescript: { // !! WARN !! // Dangerously allow production builds to successfully complete even if // your project has type errors. // !! WARN !! ignoreBuildErrors: true, }, } --- ## Page: https://nextjs.org/docs/app/api-reference/config/next-config-js/urlImports This feature is currently experimental and subject to change, it's not recommended for production. Try it out and share your feedback on GitHub. URL imports are an experimental feature that allows you to import modules directly from external servers (instead of from the local disk). > **Warning**: Only use domains that you trust to download and execute on your machine. Please exercise discretion, and caution until the feature is flagged as stable. To opt-in, add the allowed URL prefixes inside `next.config.js`: module.exports = { experimental: { urlImports: ['https://example.com/assets/', 'https://cdn.skypack.dev'], }, } Then, you can import modules directly from URLs: import { a, b, c } from 'https://example.com/assets/some/module.js' URL Imports can be used everywhere normal package imports can be used. ## Security Model This feature is being designed with **security as the top priority**. To start, we added an experimental flag forcing you to explicitly allow the domains you accept URL imports from. We're working to take this further by limiting URL imports to execute in the browser sandbox using the Edge Runtime. ## Lockfile When using URL imports, Next.js will create a `next.lock` directory containing a lockfile and fetched assets. This directory **must be committed to Git**, not ignored by `.gitignore`. * When running `next dev`, Next.js will download and add all newly discovered URL Imports to your lockfile. * When running `next build`, Next.js will use only the lockfile to build the application for production. Typically, no network requests are needed and any outdated lockfile will cause the build to fail. One exception is resources that respond with `Cache-Control: no-cache`. These resources will have a `no-cache` entry in the lockfile and will always be fetched from the network on each build. ## Examples ### Skypack import confetti from 'https://cdn.skypack.dev/canvas-confetti' import { useEffect } from 'react' export default () => { useEffect(() => { confetti() }) return <p>Hello</p> } ### Static Image Imports import Image from 'next/image' import logo from 'https://example.com/assets/logo.png' export default () => ( <div> <Image src={logo} placeholder="blur" /> </div> ) ### URLs in CSS .className { background: url('https://example.com/assets/hero.jpg'); } ### Asset Imports const logo = new URL('https://example.com/assets/file.txt', import.meta.url) console.log(logo.pathname) // prints "/_next/static/media/file.a9727b5d.txt" --- ## Page: https://nextjs.org/docs/app/api-reference/config/next-config-js/useCache This feature is currently available in the canary channel and subject to change. Try it out by upgrading Next.js, and share your feedback on GitHub. The `useCache` flag is an experimental feature in Next.js that enables the `use cache` directive to be used independently of `dynamicIO`. When enabled, you can use `use cache` in your application even if `dynamicIO` is turned off. ## Usage To enable the `useCache` flag, set it to `true` in the `experimental` section of your `next.config.ts` file: next.config.ts import type { NextConfig } from 'next' const nextConfig: NextConfig = { experimental: { useCache: true, }, } export default nextConfig When `useCache` is enabled, you can use the following cache functions and configurations: * The `use cache` directive * The `cacheLife` function with `use cache` * The `cacheTag` function --- ## Page: https://nextjs.org/docs/app/api-reference/config/next-config-js/useLightningcss This feature is currently experimental and subject to change, it's not recommended for production. Try it out and share your feedback on GitHub. Experimental support for using Lightning CSS, a fast CSS bundler and minifier, written in Rust. next.config.ts import type { NextConfig } from 'next' const nextConfig: NextConfig = { experimental: { useLightningcss: true, }, } export default nextConfig --- ## Page: https://nextjs.org/docs/app/api-reference/config/next-config-js/viewTransition This feature is currently experimental and subject to change, it's not recommended for production. Try it out and share your feedback on GitHub. `viewTransition` is an experimental flag that enables the new experimental View Transitions API in React. This API allows you to leverage the native View Transitions browser API to create seamless transitions between UI states. To enable this feature, you need to set the `viewTransition` property to `true` in your `next.config.js` file. /** @type {import('next').NextConfig} */ const nextConfig = { experimental: { viewTransition: true, }, } module.exports = nextConfig > Important Notice: This feature is not developed or maintained by the Next.js team — it is an experimental API from the React team. It is still in **early stages** and **not recommended for production use**. The implementation is still being iterated on, and its behavior may change in future React releases. Enabling this feature requires understanding the experimental nature of the API. To fully grasp its behavior, refer to the React pull request and related discussions. ## Usage Once enabled, you can import the `ViewTransition` component from React in your application: import { unstable_ViewTransition as ViewTransition } from 'react' However, documentation and examples are currently limited, and you will need to refer directly to React’s source code and discussions to understand how this works. ### Live Demo Check out our Next.js View Transition Demo to see this feature in action. As this API evolves, we will update our documentation and share more examples. However, for now, we strongly advise against using this feature in production. --- ## Page: https://nextjs.org/docs/app/api-reference/config/next-config-js/webpack ## Custom Webpack Config > **Good to know**: changes to webpack config are not covered by semver so proceed at your own risk Before continuing to add custom webpack configuration to your application make sure Next.js doesn't already support your use-case: * CSS imports * CSS modules * Sass/SCSS imports * Sass/SCSS modules Some commonly asked for features are available as plugins: * @next/mdx * @next/bundle-analyzer In order to extend our usage of `webpack`, you can define a function that extends its config inside `next.config.js`, like so: module.exports = { webpack: ( config, { buildId, dev, isServer, defaultLoaders, nextRuntime, webpack } ) => { // Important: return the modified config return config }, } > The `webpack` function is executed three times, twice for the server (nodejs / edge runtime) and once for the client. This allows you to distinguish between client and server configuration using the `isServer` property. The second argument to the `webpack` function is an object with the following properties: * `buildId`: `String` - The build id, used as a unique identifier between builds. * `dev`: `Boolean` - Indicates if the compilation will be done in development. * `isServer`: `Boolean` - It's `true` for server-side compilation, and `false` for client-side compilation. * `nextRuntime`: `String | undefined` - The target runtime for server-side compilation; either `"edge"` or `"nodejs"`, it's `undefined` for client-side compilation. * `defaultLoaders`: `Object` - Default loaders used internally by Next.js: * `babel`: `Object` - Default `babel-loader` configuration. Example usage of `defaultLoaders.babel`: // Example config for adding a loader that depends on babel-loader // This source was taken from the @next/mdx plugin source: // https://github.com/vercel/next.js/tree/canary/packages/next-mdx module.exports = { webpack: (config, options) => { config.module.rules.push({ test: /\.mdx/, use: [ options.defaultLoaders.babel, { loader: '@mdx-js/loader', options: pluginOptions.options, }, ], }) return config }, } #### `nextRuntime` Notice that `isServer` is `true` when `nextRuntime` is `"edge"` or `"nodejs"`, `nextRuntime` `"edge"` is currently for middleware and Server Components in edge runtime only. Was this helpful? supported. --- ## Page: https://nextjs.org/docs/app/api-reference/config/next-config-js/webVitalsAttribution This feature is currently experimental and subject to change, it's not recommended for production. Try it out and share your feedback on GitHub. When debugging issues related to Web Vitals, it is often helpful if we can pinpoint the source of the problem. For example, in the case of Cumulative Layout Shift (CLS), we might want to know the first element that shifted when the single largest layout shift occurred. Or, in the case of Largest Contentful Paint (LCP), we might want to identify the element corresponding to the LCP for the page. If the LCP element is an image, knowing the URL of the image resource can help us locate the asset we need to optimize. Pinpointing the biggest contributor to the Web Vitals score, aka attribution, allows us to obtain more in-depth information like entries for PerformanceEventTiming, PerformanceNavigationTiming and PerformanceResourceTiming. Attribution is disabled by default in Next.js but can be enabled **per metric** by specifying the following in `next.config.js`. next.config.js module.exports = { experimental: { webVitalsAttribution: ['CLS', 'LCP'], }, } Valid attribution values are all `web-vitals` metrics specified in the `NextWebVitalsMetric` type. --- ## Page: https://nextjs.org/docs/app/api-reference/config/typescript Next.js comes with built-in TypeScript, automatically installing the necessary packages and configuring the proper settings when you create a new project with `create-next-app`. To add TypeScript to an existing project, rename a file to `.ts` / `.tsx`. Run `next dev` and `next build` to automatically install the necessary dependencies and add a `tsconfig.json` file with the recommended config options. > **Good to know**: If you already have a `jsconfig.json` file, copy the `paths` compiler option from the old `jsconfig.json` into the new `tsconfig.json` file, and delete the old `jsconfig.json` file. ## IDE Plugin Next.js includes a custom TypeScript plugin and type checker, which VSCode and other code editors can use for advanced type-checking and auto-completion. You can enable the plugin in VS Code by: 1. Opening the command palette (`Ctrl/⌘` + `Shift` + `P`) 2. Searching for "TypeScript: Select TypeScript Version" 3. Selecting "Use Workspace Version"  Now, when editing files, the custom plugin will be enabled. When running `next build`, the custom type checker will be used. The TypeScript plugin can help with: * Warning if the invalid values for segment config options are passed. * Showing available options and in-context documentation. * Ensuring the `use client` directive is used correctly. * Ensuring client hooks (like `useState`) are only used in Client Components. > **🎥 Watch:** Learn about the built-in TypeScript plugin → YouTube (3 minutes) ## End-to-End Type Safety The Next.js App Router has **enhanced type safety**. This includes: 1. **No serialization of data between fetching function and page**: You can `fetch` directly in components, layouts, and pages on the server. This data _does not_ need to be serialized (converted to a string) to be passed to the client side for consumption in React. Instead, since `app` uses Server Components by default, we can use values like `Date`, `Map`, `Set`, and more without any extra steps. Previously, you needed to manually type the boundary between server and client with Next.js-specific types. 2. **Streamlined data flow between components**: With the removal of `_app` in favor of root layouts, it is now easier to visualize the data flow between components and pages. Previously, data flowing between individual `pages` and `_app` were difficult to type and could introduce confusing bugs. With colocated data fetching in the App Router, this is no longer an issue. Data Fetching in Next.js now provides as close to end-to-end type safety as possible without being prescriptive about your database or content provider selection. We're able to type the response data as you would expect with normal TypeScript. For example: async function getData() { const res = await fetch('https://api.example.com/...') // The return value is *not* serialized // You can return Date, Map, Set, etc. return res.json() } export default async function Page() { const name = await getData() return '...' } For _complete_ end-to-end type safety, this also requires your database or content provider to support TypeScript. This could be through using an ORM or type-safe query builder. ## Examples ### Type checking `next.config.ts` You can use TypeScript and import types in your Next.js configuration by using `next.config.ts`. import type { NextConfig } from 'next' const nextConfig: NextConfig = { /* config options here */ } export default nextConfig > **Good to know**: Module resolution in `next.config.ts` is currently limited to `CommonJS`. This may cause incompatibilities with ESM only packages being loaded in `next.config.ts`. When using the `next.config.js` file, you can add some type checking in your IDE using JSDoc as below: // @ts-check /** @type {import('next').NextConfig} */ const nextConfig = { /* config options here */ } module.exports = nextConfig ### Statically Typed Links Next.js can statically type links to prevent typos and other errors when using `next/link`, improving type safety when navigating between pages. To opt-into this feature, `experimental.typedRoutes` need to be enabled and the project needs to be using TypeScript. import type { NextConfig } from 'next' const nextConfig: NextConfig = { experimental: { typedRoutes: true, }, } export default nextConfig Next.js will generate a link definition in `.next/types` that contains information about all existing routes in your application, which TypeScript can then use to provide feedback in your editor about invalid links. Currently, experimental support includes any string literal, including dynamic segments. For non-literal strings, you currently need to manually cast the `href` with `as Route`: import type { Route } from 'next'; import Link from 'next/link' // No TypeScript errors if href is a valid route <Link href="/about" /> <Link href="/blog/nextjs" /> <Link href={`/blog/${slug}`} /> <Link href={('/blog' + slug) as Route} /> // TypeScript errors if href is not a valid route <Link href="/aboot" /> To accept `href` in a custom component wrapping `next/link`, use a generic: import type { Route } from 'next' import Link from 'next/link' function Card<T extends string>({ href }: { href: Route<T> | URL }) { return ( <Link href={href}> <div>My Card</div> </Link> ) } > **How does it work?** > > When running `next dev` or `next build`, Next.js generates a hidden `.d.ts` file inside `.next` that contains information about all existing routes in your application (all valid routes as the `href` type of `Link`). This `.d.ts` file is included in `tsconfig.json` and the TypeScript compiler will check that `.d.ts` and provide feedback in your editor about invalid links. ### With Async Server Components To use an `async` Server Component with TypeScript, ensure you are using TypeScript `5.1.3` or higher and `@types/react` `18.2.8` or higher. If you are using an older version of TypeScript, you may see a `'Promise<Element>' is not a valid JSX element` type error. Updating to the latest version of TypeScript and `@types/react` should resolve this issue. ### Incremental type checking Since `v10.2.1` Next.js supports incremental type checking when enabled in your `tsconfig.json`, this can help speed up type checking in larger applications. ### Disabling TypeScript errors in production Next.js fails your **production build** (`next build`) when TypeScript errors are present in your project. If you'd like Next.js to dangerously produce production code even when your application has errors, you can disable the built-in type checking step. If disabled, be sure you are running type checks as part of your build or deploy process, otherwise this can be very dangerous. Open `next.config.ts` and enable the `ignoreBuildErrors` option in the `typescript` config: import type { NextConfig } from 'next' const nextConfig: NextConfig = { typescript: { // !! WARN !! // Dangerously allow production builds to successfully complete even if // your project has type errors. // !! WARN !! ignoreBuildErrors: true, }, } export default nextConfig > **Good to know**: You can run `tsc --noEmit` to check for TypeScript errors yourself before building. This is useful for CI/CD pipelines where you'd like to check for TypeScript errors before deploying. ### Custom type declarations When you need to declare custom types, you might be tempted to modify `next-env.d.ts`. However, this file is automatically generated, so any changes you make will be overwritten. Instead, you should create a new file, let's call it `new-types.d.ts`, and reference it in your `tsconfig.json`: { "compilerOptions": { "skipLibCheck": true //...truncated... }, "include": [ "new-types.d.ts", "next-env.d.ts", ".next/types/**/*.ts", "**/*.ts", "**/*.tsx" ], "exclude": ["node_modules"] } ## Version Changes | Version | Changes | | --- | --- | | `v15.0.0` | `next.config.ts` support added for TypeScript projects. | | `v13.2.0` | Statically typed links are available in beta. | | `v12.0.0` | SWC is now used by default to compile TypeScript and TSX for faster builds. | | `v10.2.1` | Incremental type checking support added when enabled in your `tsconfig.json`. | --- ## Page: https://nextjs.org/docs/app/api-reference/config/eslint ## ESLint Plugin Next.js provides an ESLint plugin, `eslint-plugin-next`, already bundled within the base configuration that makes it possible to catch common issues and problems in a Next.js application. ## Reference Recommended rule-sets from the following ESLint plugins are all used within `eslint-config-next`: * `eslint-plugin-react` * `eslint-plugin-react-hooks` * `eslint-plugin-next` This will take precedence over the configuration from `next.config.js`. ### Rules The full set of rules is as follows: | Enabled in recommended config | Rule | Description | | --- | --- | --- | | | @next/next/google-font-display | Enforce font-display behavior with Google Fonts. | | | @next/next/google-font-preconnect | Ensure `preconnect` is used with Google Fonts. | | | @next/next/inline-script-id | Enforce `id` attribute on `next/script` components with inline content. | | | @next/next/next-script-for-ga | Prefer `next/script` component when using the inline script for Google Analytics. | | | @next/next/no-assign-module-variable | Prevent assignment to the `module` variable. | | | @next/next/no-async-client-component | Prevent client components from being async functions. | | | @next/next/no-before-interactive-script-outside-document | Prevent usage of `next/script`'s `beforeInteractive` strategy outside of `pages/_document.js`. | | | @next/next/no-css-tags | Prevent manual stylesheet tags. | | | @next/next/no-document-import-in-page | Prevent importing `next/document` outside of `pages/_document.js`. | | | @next/next/no-duplicate-head | Prevent duplicate usage of `<Head>` in `pages/_document.js`. | | | @next/next/no-head-element | Prevent usage of `<head>` element. | | | @next/next/no-head-import-in-document | Prevent usage of `next/head` in `pages/_document.js`. | | | @next/next/no-html-link-for-pages | Prevent usage of `<a>` elements to navigate to internal Next.js pages. | | | @next/next/no-img-element | Prevent usage of `<img>` element due to slower LCP and higher bandwidth. | | | @next/next/no-page-custom-font | Prevent page-only custom fonts. | | | @next/next/no-script-component-in-head | Prevent usage of `next/script` in `next/head` component. | | | @next/next/no-styled-jsx-in-document | Prevent usage of `styled-jsx` in `pages/_document.js`. | | | @next/next/no-sync-scripts | Prevent synchronous scripts. | | | @next/next/no-title-in-document-head | Prevent usage of `<title>` with `Head` component from `next/document`. | | | @next/next/no-typos | Prevent common typos in Next.js's data fetching functions | | | @next/next/no-unwanted-polyfillio | Prevent duplicate polyfills from Polyfill.io. | We recommend using an appropriate integration to view warnings and errors directly in your code editor during development. ## Examples ### Linting custom directories and files By default, Next.js will run ESLint for all files in the `pages/`, `app/`, `components/`, `lib/`, and `src/` directories. However, you can specify which directories using the `dirs` option in the `eslint` config in `next.config.js` for production builds: module.exports = { eslint: { dirs: ['pages', 'utils'], // Only run ESLint on the 'pages' and 'utils' directories during production builds (next build) }, } Similarly, the `--dir` and `--file` flags can be used for `next lint` to lint specific directories and files: next lint --dir pages --dir utils --file bar.js ### Specifying a root directory within a monorepo If you're using `eslint-plugin-next` in a project where Next.js isn't installed in your root directory (such as a monorepo), you can tell `eslint-plugin-next` where to find your Next.js application using the `settings` property in your `.eslintrc`: import { FlatCompat } from '@eslint/eslintrc' const compat = new FlatCompat({ // import.meta.dirname is available after Node.js v20.11.0 baseDirectory: import.meta.dirname, }) const eslintConfig = [ ...compat.config({ extends: ['next'], settings: { next: { rootDir: 'packages/my-app/', }, }, }), ] export default eslintConfig `rootDir` can be a path (relative or absolute), a glob (i.e. `"packages/*/"`), or an array of paths and/or globs. ### Disabling the cache To improve performance, information of files processed by ESLint are cached by default. This is stored in `.next/cache` or in your defined build directory. If you include any ESLint rules that depend on more than the contents of a single source file and need to disable the cache, use the `--no-cache` flag with `next lint`. next lint --no-cache ### Disabling rules If you would like to modify or disable any rules provided by the supported plugins (`react`, `react-hooks`, `next`), you can directly change them using the `rules` property in your `.eslintrc`: import { FlatCompat } from '@eslint/eslintrc' const compat = new FlatCompat({ // import.meta.dirname is available after Node.js v20.11.0 baseDirectory: import.meta.dirname, }) const eslintConfig = [ ...compat.config({ extends: ['next'], rules: { 'react/no-unescaped-entities': 'off', '@next/next/no-page-custom-font': 'off', }, }), ] export default eslintConfig ### With Core Web Vitals The `next/core-web-vitals` rule set is enabled when `next lint` is run for the first time and the **strict** option is selected. import { FlatCompat } from '@eslint/eslintrc' const compat = new FlatCompat({ // import.meta.dirname is available after Node.js v20.11.0 baseDirectory: import.meta.dirname, }) const eslintConfig = [ ...compat.config({ extends: ['next/core-web-vitals'], }), ] export default eslintConfig `next/core-web-vitals` updates `eslint-plugin-next` to error on a number of rules that are warnings by default if they affect Core Web Vitals. > The `next/core-web-vitals` entry point is automatically included for new applications built with Create Next App. ### With TypeScript In addition to the Next.js ESLint rules, `create-next-app --typescript` will also add TypeScript-specific lint rules with `next/typescript` to your config: import { FlatCompat } from '@eslint/eslintrc' const compat = new FlatCompat({ // import.meta.dirname is available after Node.js v20.11.0 baseDirectory: import.meta.dirname, }) const eslintConfig = [ ...compat.config({ extends: ['next/core-web-vitals', 'next/typescript'], }), ] export default eslintConfig Those rules are based on `plugin:@typescript-eslint/recommended`. See typescript-eslint > Configs for more details. ### With Prettier ESLint also contains code formatting rules, which can conflict with your existing Prettier setup. We recommend including eslint-config-prettier in your ESLint config to make ESLint and Prettier work together. First, install the dependency: npm install --save-dev eslint-config-prettier yarn add --dev eslint-config-prettier pnpm add --save-dev eslint-config-prettier bun add --dev eslint-config-prettier Then, add `prettier` to your existing ESLint config: import { FlatCompat } from '@eslint/eslintrc' const compat = new FlatCompat({ // import.meta.dirname is available after Node.js v20.11.0 baseDirectory: import.meta.dirname, }) const eslintConfig = [ ...compat.config({ extends: ['next', 'prettier'], }), ] export default eslintConfig ### Running lint on staged files If you would like to use `next lint` with lint-staged to run the linter on staged git files, you'll have to add the following to the `.lintstagedrc.js` file in the root of your project in order to specify usage of the `--file` flag. const path = require('path') const buildEslintCommand = (filenames) => `next lint --fix --file ${filenames .map((f) => path.relative(process.cwd(), f)) .join(' --file ')}` module.exports = { '*.{js,jsx,ts,tsx}': [buildEslintCommand], } ## Disabling linting during production builds If you do not want ESLint to run during `next build`, you can set the `eslint.ignoreDuringBuilds` option in `next.config.js` to `true`: import type { NextConfig } from 'next' const nextConfig: NextConfig = { eslint: { // Warning: This allows production builds to successfully complete even if // your project has ESLint errors. ignoreDuringBuilds: true, }, } export default nextConfig ### Migrating existing config If you already have ESLint configured in your application, we recommend extending from this plugin directly instead of including `eslint-config-next` unless a few conditions are met. #### Recommended plugin ruleset If the following conditions are true: * You have one or more of the following plugins already installed (either separately or through a different config such as `airbnb` or `react-app`): * `react` * `react-hooks` * `jsx-a11y` * `import` * You've defined specific `parserOptions` that are different from how Babel is configured within Next.js (this is not recommended unless you have customized your Babel configuration) * You have `eslint-plugin-import` installed with Node.js and/or TypeScript resolvers defined to handle imports Then we recommend either removing these settings if you prefer how these properties have been configured within `eslint-config-next` or extending directly from the Next.js ESLint plugin instead: module.exports = { extends: [ //... 'plugin:@next/next/recommended', ], } The plugin can be installed normally in your project without needing to run `next lint`: npm install --save-dev @next/eslint-plugin-next yarn add --dev @next/eslint-plugin-next pnpm add --save-dev @next/eslint-plugin-next bun add --dev @next/eslint-plugin-next This eliminates the risk of collisions or errors that can occur due to importing the same plugin or parser across multiple configurations. #### Additional configurations If you already use a separate ESLint configuration and want to include `eslint-config-next`, ensure that it is extended last after other configurations. For example: import js from '@eslint/js' import { FlatCompat } from '@eslint/eslintrc' const compat = new FlatCompat({ // import.meta.dirname is available after Node.js v20.11.0 baseDirectory: import.meta.dirname, recommendedConfig: js.configs.recommended, }) const eslintConfig = [ ...compat.config({ extends: ['eslint:recommended', 'next'], }), ] export default eslintConfig The `next` configuration already handles setting default values for the `parser`, `plugins` and `settings` properties. There is no need to manually re-declare any of these properties unless you need a different configuration for your use case. If you include any other shareable configurations, **you will need to make sure that these properties are not overwritten or modified**. Otherwise, we recommend removing any configurations that share behavior with the `next` configuration or extending directly from the Next.js ESLint plugin as mentioned above. --- ## Page: https://nextjs.org/docs/app/api-reference/cli #### Subscribe to our newsletter Stay updated on new releases and features, guides, and case studies. --- ## Page: https://nextjs.org/docs/app/api-reference/cli/create-next-app The `create-next-app` CLI allow you to create a new Next.js application using the default template or an example from a public GitHub repository. It is the easiest way to get started with Next.js. Basic usage: npx create-next-app@latest [project-name] [options] ## Reference The following options are available: | Options | Description | | --- | --- | | `-h` or `--help` | Show all available options | | `-v` or `--version` | Output the version number | | `--no-*` | Negate default options. E.g. `--no-eslint` | | `--ts` or `--typescript` | Initialize as a TypeScript project (default) | | `--js` or `--javascript` | Initialize as a JavaScript project | | `--tailwind` | Initialize with Tailwind CSS config (default) | | `--eslint` | Initialize with ESLint config | | `--app` | Initialize as an App Router project | | `--api` | Initialize a project with only route handlers | | `--src-dir` | Initialize inside a `src/` directory | | `--turbopack` | Enable Turbopack by default for development | | `--import-alias <alias-to-configure>` | Specify import alias to use (default "@/\*") | | `--empty` | Initialize an empty project | | `--use-npm` | Explicitly tell the CLI to bootstrap the application using npm | | `--use-pnpm` | Explicitly tell the CLI to bootstrap the application using pnpm | | `--use-yarn` | Explicitly tell the CLI to bootstrap the application using Yarn | | `--use-bun` | Explicitly tell the CLI to bootstrap the application using Bun | | `-e` or `--example [name] [github-url]` | An example to bootstrap the app with | | `--example-path <path-to-example>` | Specify the path to the example separately | | `--reset-preferences` | Explicitly tell the CLI to reset any stored preferences | | `--skip-install` | Explicitly tell the CLI to skip installing packages | | `--yes` | Use previous preferences or defaults for all options | ## Examples ### With the default template To create a new app using the default template, run the following command in your terminal: npx create-next-app@latest You will then be asked the following prompts: What is your project named? my-app Would you like to use TypeScript? No / Yes Would you like to use ESLint? No / Yes Would you like to use Tailwind CSS? No / Yes Would you like your code inside a `src/` directory? No / Yes Would you like to use App Router? (recommended) No / Yes Would you like to use Turbopack for `next dev`? No / Yes Would you like to customize the import alias (`@/*` by default)? No / Yes Once you've answered the prompts, a new project will be created with your chosen configuration. ### With an official Next.js example To create a new app using an official Next.js example, use the `--example` flag. For example: npx create-next-app@latest --example [example-name] [your-project-name] You can view a list of all available examples along with setup instructions in the Next.js repository. ### With any public GitHub example To create a new app using any public GitHub example, use the `--example` option with the GitHub repo's URL. For example: npx create-next-app@latest --example "https://github.com/.../" [your-project-name] --- ## Page: https://nextjs.org/docs/app/api-reference/cli/next The Next.js CLI allows you to develop, build, start your application, and more. Basic usage: npx next [command] [options] ## Reference The following options are available: | Options | Description | | --- | --- | | `-h` or `--help` | Shows all available options | | `-v` or `--version` | Outputs the Next.js version number | ### Commands The following commands are available: | Command | Description | | --- | --- | | `dev` | Starts Next.js in development mode with Hot Module Reloading, error reporting, and more. | | `build` | Creates an optimized production build of your application. Displaying information about each route. | | `start` | Starts Next.js in production mode. The application should be compiled with `next build` first. | | `info` | Prints relevant details about the current system which can be used to report Next.js bugs. | | `lint` | Runs ESLint for all files in the `/src`, `/app`, `/pages`, `/components`, and `/lib` directories. It also provides a guided setup to install any required dependencies if ESLint it is not already configured in your application. | | `telemetry` | Allows you to enable or disable Next.js' completely anonymous telemetry collection. | > **Good to know**: Running `next` without a command is an alias for `next dev`. ### `next dev` options `next dev` starts the application in development mode with Hot Module Reloading (HMR), error reporting, and more. The following options are available when running `next dev`: | Option | Description | | --- | --- | | `-h, --help` | Show all available options. | | `[directory]` | A directory in which to build the application. If not provided, current directory is used. | | `--turbopack` | Starts development mode using Turbopack. | | `-p` or `--port <port>` | Specify a port number on which to start the application. Default: 3000, env: PORT | | `-H`or `--hostname <hostname>` | Specify a hostname on which to start the application. Useful for making the application available for other devices on the network. Default: 0.0.0.0 | | `--experimental-https` | Starts the server with HTTPS and generates a self-signed certificate. | | `--experimental-https-key <path>` | Path to a HTTPS key file. | | `--experimental-https-cert <path>` | Path to a HTTPS certificate file. | | `--experimental-https-ca <path>` | Path to a HTTPS certificate authority file. | | `--experimental-upload-trace <traceUrl>` | Reports a subset of the debugging trace to a remote HTTP URL. | ### `next build` options `next build` creates an optimized production build of your application. The output displays information about each route. For example: Route (app) Size First Load JS ┌ ○ /_not-found 0 B 0 kB └ ƒ /products/[id] 0 B 0 kB ○ (Static) prerendered as static content ƒ (Dynamic) server-rendered on demand * **Size**: The size of assets downloaded when navigating to the page client-side. The size for each route only includes its dependencies. * **First Load JS**: The size of assets downloaded when visiting the page from the server. The amount of JS shared by all is shown as a separate metric. Both of these values are **compressed with gzip**. The first load is indicated by green, yellow, or red. Aim for green for performant applications. The following options are available for the `next build` command: | Option | Description | | --- | --- | | `-h, --help` | Show all available options. | | `[directory]` | A directory on which to build the application. If not provided, the current directory will be used. | | `-d` or `--debug` | Enables a more verbose build output. With this flag enabled additional build output like rewrites, redirects, and headers will be shown. | | | | | `--profile` | Enables production profiling for React. | | `--no-lint` | Disables linting. | | `--no-mangling` | Disables mangling. This may affect performance and should only be used for debugging purposes. | | `--experimental-app-only` | Builds only App Router routes. | | `--experimental-build-mode [mode]` | Uses an experimental build mode. (choices: "compile", "generate", default: "default") | ### `next start` options `next start` starts the application in production mode. The application should be compiled with `next build` first. The following options are available for the `next start` command: | Option | Description | | --- | --- | | `-h` or `--help` | Show all available options. | | `[directory]` | A directory on which to start the application. If no directory is provided, the current directory will be used. | | `-p` or `--port <port>` | Specify a port number on which to start the application. (default: 3000, env: PORT) | | `-H` or `--hostname <hostname>` | Specify a hostname on which to start the application (default: 0.0.0.0). | | `--keepAliveTimeout <keepAliveTimeout>` | Specify the maximum amount of milliseconds to wait before closing the inactive connections. | ### `next info` options `next info` prints relevant details about the current system which can be used to report Next.js bugs when opening a GitHub issue. This information includes Operating System platform/arch/version, Binaries (Node.js, npm, Yarn, pnpm), package versions (`next`, `react`, `react-dom`), and more. The output should look like this: Operating System: Platform: darwin Arch: arm64 Version: Darwin Kernel Version 23.6.0 Available memory (MB): 65536 Available CPU cores: 10 Binaries: Node: 20.12.0 npm: 10.5.0 Yarn: 1.22.19 pnpm: 9.6.0 Relevant Packages: next: 15.0.0-canary.115 // Latest available version is detected (15.0.0-canary.115). eslint-config-next: 14.2.5 react: 19.0.0-rc react-dom: 19.0.0 typescript: 5.5.4 Next.js Config: output: N/A The following options are available for the `next info` command: | Option | Description | | --- | --- | | `-h` or `--help` | Show all available options | | `--verbose` | Collects additional information for debugging. | ### `next lint` options `next lint` runs ESLint for all files in the `pages/`, `app/`, `components/`, `lib/`, and `src/` directories. It also provides a guided setup to install any required dependencies if ESLint is not already configured in your application. The following options are available for the `next lint` command: | Option | Description | | --- | --- | | `[directory]` | A base directory on which to lint the application. If not provided, the current directory will be used. | | `-d, --dir, <dirs...>` | Include directory, or directories, to run ESLint. | | `--file, <files...>` | Include file, or files, to run ESLint. | | `--ext, [exts...]` | Specify JavaScript file extensions. (default: \[".js", ".mjs", ".cjs", ".jsx", ".ts", ".mts", ".cts", ".tsx"\]) | | `-c, --config, <config>` | Uses this configuration file, overriding all other configuration options. | | `--resolve-plugins-relative-to, <rprt>` | Specify a directory where plugins should be resolved from. | | `--strict` | Creates a `.eslintrc.json` file using the Next.js strict configuration. | | `--rulesdir, <rulesdir...>` | Uses additional rules from this directory(s). | | `--fix` | Automatically fix linting issues. | | `--fix-type <fixType>` | Specify the types of fixes to apply (e.g., problem, suggestion, layout). | | `--ignore-path <path>` | Specify a file to ignore. | | `--no-ignore <path>` | Disables the `--ignore-path` option. | | `--quiet` | Reports errors only. | | `--max-warnings [maxWarnings]` | Specify the number of warnings before triggering a non-zero exit code. (default: -1) | | `-o, --output-file, <outputFile>` | Specify a file to write report to. | | `-f, --format, <format>` | Uses a specific output format. | | `--no-inline-config` | Prevents comments from changing config or rules. | | `--report-unused-disable-directives-severity <level>` | Specify severity level for unused eslint-disable directives. (choices: "error", "off", "warn") | | `--no-cache` | Disables caching. | | `--cache-location, <cacheLocation>` | Specify a location for cache. | | `--cache-strategy, [cacheStrategy]` | Specify a strategy to use for detecting changed files in the cache. (default: "metadata") | | `--error-on-unmatched-pattern` | Reports errors when any file patterns are unmatched. | | `-h, --help` | Displays this message. | ### `next telemetry` options Next.js collects **completely anonymous** telemetry data about general usage. Participation in this anonymous program is optional, and you can opt-out if you prefer not to share information. The following options are available for the `next telemetry` command: | Option | Description | | --- | --- | | `-h, --help` | Show all available options. | | `--enable` | Enables Next.js' telemetry collection. | | `--disable` | Disables Next.js' telemetry collection. | Learn more about Telemetry. ## Examples ### Changing the default port By default, Next.js uses `http://localhost:3000` during development and with `next start`. The default port can be changed with the `-p` option, like so: next dev -p 4000 Or using the `PORT` environment variable: PORT=4000 next dev > **Good to know**: `PORT` cannot be set in `.env` as booting up the HTTP server happens before any other code is initialized. ### Using HTTPS during development For certain use cases like webhooks or authentication, you can use HTTPS to have a secure environment on `localhost`. Next.js can generate a self-signed certificate with `next dev` using the `--experimental-https` flag: next dev --experimental-https With the generated certificate, the Next.js development server will exist at `https://localhost:3000`. The default port `3000` is used unless a port is specified with `-p`, `--port`, or `PORT`. You can also provide a custom certificate and key with `--experimental-https-key` and `--experimental-https-cert`. Optionally, you can provide a custom CA certificate with `--experimental-https-ca` as well. next dev --experimental-https --experimental-https-key ./certificates/localhost-key.pem --experimental-https-cert ./certificates/localhost.pem `next dev --experimental-https` is only intended for development and creates a locally trusted certificate with `mkcert`. In production, use properly issued certificates from trusted authorities. > **Good to know**: When deploying to Vercel, HTTPS is automatically configured for your Next.js application. ### Configuring a timeout for downstream proxies When deploying Next.js behind a downstream proxy (e.g. a load-balancer like AWS ELB/ALB), it's important to configure Next's underlying HTTP server with keep-alive timeouts that are _larger_ than the downstream proxy's timeouts. Otherwise, once a keep-alive timeout is reached for a given TCP connection, Node.js will immediately terminate that connection without notifying the downstream proxy. This results in a proxy error whenever it attempts to reuse a connection that Node.js has already terminated. To configure the timeout values for the production Next.js server, pass `--keepAliveTimeout` (in milliseconds) to `next start`, like so: next start --keepAliveTimeout 70000 ### Passing Node.js arguments You can pass any node arguments to `next` commands. For example: NODE_OPTIONS='--throw-deprecation' next NODE_OPTIONS='-r esm' next NODE_OPTIONS='--inspect' next --- ## Page: https://nextjs.org/docs/app/api-reference/edge `AbortController`Allows you to abort one or more DOM requests as and when desired`Array`Represents an array of values`ArrayBuffer`Represents a generic, fixed-length raw binary data buffer`Atomics`Provides atomic operations as static methods`BigInt`Represents a whole number with arbitrary precision`BigInt64Array`Represents a typed array of 64-bit signed integers`BigUint64Array`Represents a typed array of 64-bit unsigned integers`Boolean`Represents a logical entity and can have two values: `true` and `false``clearInterval`Cancels a timed, repeating action which was previously established by a call to `setInterval()``clearTimeout`Cancels a timed, repeating action which was previously established by a call to `setTimeout()``console`Provides access to the browser's debugging console`DataView`Represents a generic view of an `ArrayBuffer``Date`Represents a single moment in time in a platform-independent format`decodeURI`Decodes a Uniform Resource Identifier (URI) previously created by `encodeURI` or by a similar routine`decodeURIComponent`Decodes a Uniform Resource Identifier (URI) component previously created by `encodeURIComponent` or by a similar routine`DOMException`Represents an error that occurs in the DOM`encodeURI`Encodes a Uniform Resource Identifier (URI) by replacing each instance of certain characters by one, two, three, or four escape sequences representing the UTF-8 encoding of the character`encodeURIComponent`Encodes a Uniform Resource Identifier (URI) component by replacing each instance of certain characters by one, two, three, or four escape sequences representing the UTF-8 encoding of the character`Error`Represents an error when trying to execute a statement or accessing a property`EvalError`Represents an error that occurs regarding the global function `eval()``Float32Array`Represents a typed array of 32-bit floating point numbers`Float64Array`Represents a typed array of 64-bit floating point numbers`Function`Represents a function`Infinity`Represents the mathematical Infinity value`Int8Array`Represents a typed array of 8-bit signed integers`Int16Array`Represents a typed array of 16-bit signed integers`Int32Array`Represents a typed array of 32-bit signed integers`Intl`Provides access to internationalization and localization functionality`isFinite`Determines whether a value is a finite number`isNaN`Determines whether a value is `NaN` or not`JSON`Provides functionality to convert JavaScript values to and from the JSON format`Map`Represents a collection of values, where each value may occur only once`Math`Provides access to mathematical functions and constants`Number`Represents a numeric value`Object`Represents the object that is the base of all JavaScript objects`parseFloat`Parses a string argument and returns a floating point number`parseInt`Parses a string argument and returns an integer of the specified radix`Promise`Represents the eventual completion (or failure) of an asynchronous operation, and its resulting value`Proxy`Represents an object that is used to define custom behavior for fundamental operations (e.g. property lookup, assignment, enumeration, function invocation, etc)`queueMicrotask`Queues a microtask to be executed`RangeError`Represents an error when a value is not in the set or range of allowed values`ReferenceError`Represents an error when a non-existent variable is referenced`Reflect`Provides methods for interceptable JavaScript operations`RegExp`Represents a regular expression, allowing you to match combinations of characters`Set`Represents a collection of values, where each value may occur only once`setInterval`Repeatedly calls a function, with a fixed time delay between each call`setTimeout`Calls a function or evaluates an expression after a specified number of milliseconds`SharedArrayBuffer`Represents a generic, fixed-length raw binary data buffer`String`Represents a sequence of characters`structuredClone`Creates a deep copy of a value`Symbol`Represents a unique and immutable data type that is used as the key of an object property`SyntaxError`Represents an error when trying to interpret syntactically invalid code`TypeError`Represents an error when a value is not of the expected type`Uint8Array`Represents a typed array of 8-bit unsigned integers`Uint8ClampedArray`Represents a typed array of 8-bit unsigned integers clamped to 0-255`Uint32Array`Represents a typed array of 32-bit unsigned integers`URIError`Represents an error when a global URI handling function was used in a wrong way`URL`Represents an object providing static methods used for creating object URLs`URLPattern`Represents a URL pattern`URLSearchParams`Represents a collection of key/value pairs`WeakMap`Represents a collection of key/value pairs in which the keys are weakly referenced`WeakSet`Represents a collection of objects in which each object may occur only once`WebAssembly`Provides access to WebAssembly --- ## Page: https://nextjs.org/docs/app/api-reference/turbopack Turbopack is an **incremental bundler** optimized for JavaScript and TypeScript, written in Rust, and built into **Next.js**. You can use Turbopack with both the Pages and App Router for a **much faster** local development experience. ## Why Turbopack? We built Turbopack to push the performance of Next.js, including: * **Unified Graph:** Next.js supports multiple output environments (e.g., client and server). Managing multiple compilers and stitching bundles together can be tedious. Turbopack uses a **single, unified graph** for all environments. * **Bundling vs Native ESM:** Some tools skip bundling in development and rely on the browser's native ESM. This works well for small apps but can slow down large apps due to excessive network requests. Turbopack **bundles** in dev, but in an optimized way to keep large apps fast. * **Incremental Computation:** Turbopack parallelizes work across cores and **caches** results down to the function level. Once a piece of work is done, Turbopack won’t repeat it. * **Lazy Bundling:** Turbopack only bundles what is actually requested by the dev server. This lazy approach can reduce initial compile times and memory usage. ## Getting started To enable Turbopack in your Next.js project, add the `--turbopack` flag to the `dev` and `build` scripts in your `package.json` file: { "scripts": { "dev": "next dev --turbopack", "build": "next build --turbopack", "start": "next start" } } Currently, Turbopack for `dev` is stable, while `build` is in alpha. We are actively working on production support as Turbopack moves closer to stability. ## Supported features Turbopack in Next.js has **zero-configuration** for the common use cases. Below is a summary of what is supported out of the box, plus some references to how you can configure Turbopack further when needed. ### Language features | Feature | Status | Notes | | --- | --- | --- | | **JavaScript & TypeScript** | **Supported** | Uses SWC under the hood. Type-checking is not done by Turbopack (run `tsc --watch` or rely on your IDE for type checks). | | **ECMAScript (ESNext)** | **Supported** | Turbopack supports the latest ECMAScript features, matching SWC’s coverage. | | **CommonJS** | **Supported** | `require()` syntax is handled out of the box. | | **ESM** | **Supported** | Static and dynamic `import` are fully supported. | | **Babel** | Partially Unsupported | Turbopack does not include Babel by default. However, you can configure `babel-loader` via the Turbopack config. | ### Framework and React features | Feature | Status | Notes | | --- | --- | --- | | **JSX / TSX** | **Supported** | SWC handles JSX/TSX compilation. | | **Fast Refresh** | **Supported** | No configuration needed. | | **React Server Components (RSC)** | **Supported** | For the Next.js App Router. Turbopack ensures correct server/client bundling. | | **Root layout creation** | Unsupported | Automatic creation of a root layout in App Router is not supported. Turbopack will instruct you to create it manually. | ### CSS and styling | Feature | Status | Notes | | --- | --- | --- | | **Global CSS** | **Supported** | Import `.css` files directly in your application. | | **CSS Modules** | **Supported** | `.module.css` files work natively (Lightning CSS). | | **CSS Nesting** | **Supported** | Lightning CSS supports modern CSS nesting. | | **@import syntax** | **Supported** | Combine multiple CSS files. | | **PostCSS** | **Supported** | Automatically processes `postcss.config.js` in a Node.js worker pool. Useful for Tailwind, Autoprefixer, etc. | | **Sass / SCSS** | **Supported** (Next.js) | For Next.js, Sass is supported out of the box. In the future, Turbopack standalone usage will likely require a loader config. | | **Less** | Planned via plugins | Not yet supported by default. Will likely require a loader config once custom loaders are stable. | | **Lightning CSS** | **In Use** | Handles CSS transformations. Some low-usage CSS Modules features (like `:local/:global` as standalone pseudo-classes) are not yet supported. See below for more details. | ### Assets | Feature | Status | Notes | | --- | --- | --- | | **Static Assets** (images, fonts) | **Supported** | Importing `import img from './img.png'` works out of the box. In Next.js, returns an object for the `<Image />` component. | | **JSON Imports** | **Supported** | Named or default imports from `.json` are supported. | ### Module resolution | Feature | Status | Notes | | --- | --- | --- | | **Path Aliases** | **Supported** | Reads `tsconfig.json`'s `paths` and `baseUrl`, matching Next.js behavior. | | **Manual Aliases** | **Supported** | Configure `resolveAlias` in `next.config.js` (similar to `webpack.resolve.alias`). | | **Custom Extensions** | **Supported** | Configure `resolveExtensions` in `next.config.js`. | | **AMD** | Partially Supported | Basic transforms work; advanced AMD usage is limited. | ### Performance and Fast Refresh | Feature | Status | Notes | | --- | --- | --- | | **Fast Refresh** | **Supported** | Updates JavaScript, TypeScript, and CSS without a full refresh. | | **Incremental Bundling** | **Supported** | Turbopack lazily builds only what’s requested by the dev server, speeding up large apps. | ## Unsupported and unplanned features Some features are not yet implemented or not planned: * **Legacy CSS Modules features** * Standalone `:local` and `:global` pseudo-classes (only the function variant `:global(...)` is supported). * The `@value` rule (superseded by CSS variables). * `:import` and `:export` ICSS rules. * **`webpack()` configuration** in `next.config.js` Turbopack replaces webpack, so `webpack()` configs are not recognized. Use the `experimental.turbo` config instead. * **AMP** Not planned for Turbopack support in Next.js. * **Yarn PnP** Not planned for Turbopack support in Next.js. * **`experimental.urlImports`** Not planned for Turbopack. * **`experimental.esmExternals`** Not planned. Turbopack does not support the legacy `esmExternals` configuration in Next.js. * **Some Next.js Experimental Flags** * `experimental.typedRoutes` * `experimental.nextScriptWorkers` * `experimental.sri.algorithm` * `experimental.fallbackNodePolyfills` We plan to implement these in the future. For a full, detailed breakdown of each feature flag and its status, see the Turbopack API Reference. ## Configuration Turbopack can be configured via `next.config.js` (or `next.config.ts`) under the `turbopack` key. Configuration options include: * **`rules`** Define additional webpack loaders for file transformations. * **`resolveAlias`** Create manual aliases (like `resolve.alias` in webpack). * **`resolveExtensions`** Change or extend file extensions for module resolution. * **`moduleIds`** Set how module IDs are generated (`'named'` vs `'deterministic'`). * **`treeShaking`** Enable or disable tree shaking in dev and future production builds. * **`memoryLimit`** Set a memory limit (in bytes) for Turbopack. module.exports = { turbopack: { // Example: adding an alias and custom file extension resolveAlias: { underscore: 'lodash', }, resolveExtensions: ['.mdx', '.tsx', '.ts', '.jsx', '.js', '.json'], }, } For more in-depth configuration examples, see the Turbopack config documentation. ## Generating trace files for performance debugging If you encounter performance or memory issues and want to help the Next.js team diagnose them, you can generate a trace file by appending `NEXT_TURBOPACK_TRACING=1` to your dev command: NEXT_TURBOPACK_TRACING=1 next dev --turbopack This will produce a `.next/trace-turbopack` file. Include that file when creating a GitHub issue on the Next.js repo to help us investigate. ## Summary Turbopack is a **Rust-based**, **incremental** bundler designed to make local development and builds fast—especially for large applications. It is integrated into Next.js, offering zero-config CSS, React, and TypeScript support. Stay tuned for more updates as we continue to improve Turbopack and add production build support. In the meantime, give it a try with `next dev --turbopack` and let us know your feedback. ## Version Changes | Version | Changes | | --- | --- | | `v15.3.0` | Experimental support for `build` | | `v15.0.0` | Turbopack for `dev` stable | --- ## Page: https://nextjs.org/docs/pages/getting-started #### Subscribe to our newsletter Stay updated on new releases and features, guides, and case studies. --- ## Page: https://nextjs.org/docs/pages/getting-started/installation ## Create a new Next.js application ## System requirements Before you begin, make sure your system meets the following requirements: * Node.js 18.18 or later. * macOS, Windows (including WSL), or Linux. ## Automatic installation The quickest way to create a new Next.js app is using `create-next-app`, which sets up everything automatically for you. To create a project, run: npx create-next-app@latest On installation, you'll see the following prompts: What is your project named? my-app Would you like to use TypeScript? No / Yes Would you like to use ESLint? No / Yes Would you like to use Tailwind CSS? No / Yes Would you like your code inside a `src/` directory? No / Yes Would you like to use App Router? (recommended) No / Yes Would you like to use Turbopack for `next dev`? No / Yes Would you like to customize the import alias (`@/*` by default)? No / Yes What import alias would you like configured? @/* After the prompts, `create-next-app` will create a folder with your project name and install the required dependencies. ## Manual installation To manually create a new Next.js app, install the required packages: npm install next@latest react@latest react-dom@latest Then, add the following scripts to your `package.json` file: { "scripts": { "dev": "next dev", "build": "next build", "start": "next start", "lint": "next lint" } } These scripts refer to the different stages of developing an application: * `next dev`: Starts the development server. * `next build`: Builds the application for production. * `next start`: Starts the production server. * `next lint`: Runs ESLint. ### Create the `pages` directory Next.js uses file-system routing, which means the routes in your application are determined by how you structure your files. Create a `pages` directory at the root of your project. Then, add an `index.tsx` file inside your `pages` folder. This will be your home page (`/`): export default function Page() { return <h1>Hello, Next.js!</h1> } Next, add an `_app.tsx` file inside `pages/` to define the global layout. Learn more about the custom App file. import type { AppProps } from 'next/app' export default function App({ Component, pageProps }: AppProps) { return <Component {...pageProps} /> } Finally, add a `_document.tsx` file inside `pages/` to control the initial response from the server. Learn more about the custom Document file. import { Html, Head, Main, NextScript } from 'next/document' export default function Document() { return ( <Html> <Head /> <body> <Main /> <NextScript /> </body> </Html> ) } ### Create the `public` folder (optional) Create a `public` folder at the root of your project to store static assets such as images, fonts, etc. Files inside `public` can then be referenced by your code starting from the base URL (`/`). You can then reference these assets using the root path (`/`). For example, `public/profile.png` can be referenced as `/profile.png`: import Image from 'next/image' export default function Page() { return <Image src="/profile.png" alt="Profile" width={100} height={100} /> } ## Run the development server 1. Run `npm run dev` to start the development server. 2. Visit `http://localhost:3000` to view your application. 3. Edit the `pages/index.tsx` file and save it to see the updated result in your browser. ## Set up TypeScript > Minimum TypeScript version: `v4.5.2` Next.js comes with built-in TypeScript support. To add TypeScript to your project, rename a file to `.ts` / `.tsx` and run `next dev`. Next.js will automatically install the necessary dependencies and add a `tsconfig.json` file with the recommended config options. See the TypeScript reference page for more information. ## Set up ESLint Next.js comes with built-in ESLint. It automatically installs the necessary packages and configures the proper settings when you create a new project with `create-next-app`. To manually add ESLint to an existing project, add `next lint` as a script to `package.json`: { "scripts": { "lint": "next lint" } } Then, run `npm run lint` and you will be guided through the installation and configuration process. npm run lint You'll see a prompt like this: > ? How would you like to configure ESLint? > > ❯ Strict (recommended) > Base > Cancel * **Strict**: Includes Next.js' base ESLint configuration along with a stricter Core Web Vitals rule-set. This is the recommended configuration for developers setting up ESLint for the first time. * **Base**: Includes Next.js' base ESLint configuration. * **Cancel**: Skip configuration. Select this option if you plan on setting up your own custom ESLint configuration. If `Strict` or `Base` are selected, Next.js will automatically install `eslint` and `eslint-config-next` as dependencies in your application and create an `.eslintrc.json` file in the root of your project that includes your selected configuration. You can now run `next lint` every time you want to run ESLint to catch errors. Once ESLint has been set up, it will also automatically run during every build (`next build`). Errors will fail the build, while warnings will not. See the ESLint Plugin page for more information. ## Set up Absolute Imports and Module Path Aliases Next.js has in-built support for the `"paths"` and `"baseUrl"` options of `tsconfig.json` and `jsconfig.json` files. These options allow you to alias project directories to absolute paths, making it easier and cleaner to import modules. For example: // Before import { Button } from '../../../components/button' // After import { Button } from '@/components/button' To configure absolute imports, add the `baseUrl` configuration option to your `tsconfig.json` or `jsconfig.json` file. For example: { "compilerOptions": { "baseUrl": "src/" } } In addition to configuring the `baseUrl` path, you can use the `"paths"` option to `"alias"` module paths. For example, the following configuration maps `@/components/*` to `components/*`: { "compilerOptions": { "baseUrl": "src/", "paths": { "@/styles/*": ["styles/*"], "@/components/*": ["components/*"] } } } Each of the `"paths"` are relative to the `baseUrl` location. --- ## Page: https://nextjs.org/docs/pages/getting-started/project-structure ## Project Structure and Organization This page provides an overview of **all** the folder and file conventions in Next.js, and recommendations for organizing your project. ## Folder and file conventions ### Top-level folders Top-level folders are used to organize your application's code and static assets.  | | | | --- | --- | | `app` | App Router | | `pages` | Pages Router | | `public` | Static assets to be served | | `src` | Optional application source folder | ### Top-level files Top-level files are used to configure your application, manage dependencies, run middleware, integrate monitoring tools, and define environment variables. | | | | --- | --- | | **Next.js** | | | `next.config.js` | Configuration file for Next.js | | `package.json` | Project dependencies and scripts | | `instrumentation.ts` | OpenTelemetry and Instrumentation file | | `middleware.ts` | Next.js request middleware | | `.env` | Environment variables | | `.env.local` | Local environment variables | | `.env.production` | Production environment variables | | `.env.development` | Development environment variables | | `.eslintrc.json` | Configuration file for ESLint | | `.gitignore` | Git files and folders to ignore | | `next-env.d.ts` | TypeScript declaration file for Next.js | | `tsconfig.json` | Configuration file for TypeScript | | `jsconfig.json` | Configuration file for JavaScript | ### Files conventions | | | | | --- | --- | --- | | `_app` | `.js` `.jsx` `.tsx` | Custom App | | `_document` | `.js` `.jsx` `.tsx` | Custom Document | | `_error` | `.js` `.jsx` `.tsx` | Custom Error Page | | `404` | `.js` `.jsx` `.tsx` | 404 Error Page | | `500` | `.js` `.jsx` `.tsx` | 500 Error Page | ### Routes | | | | | --- | --- | --- | | **Folder convention** | | | | `index` | `.js` `.jsx` `.tsx` | Home page | | `folder/index` | `.js` `.jsx` `.tsx` | Nested page | | **File convention** | | | | `index` | `.js` `.jsx` `.tsx` | Home page | | `file` | `.js` `.jsx` `.tsx` | Nested page | ### Dynamic routes | | | | | --- | --- | --- | | **Folder convention** | | | | `[folder]/index` | `.js` `.jsx` `.tsx` | Dynamic route segment | | `[...folder]/index` | `.js` `.jsx` `.tsx` | Catch-all route segment | | `[[...folder]]/index` | `.js` `.jsx` `.tsx` | Optional catch-all route segment | | **File convention** | | | | `[file]` | `.js` `.jsx` `.tsx` | Dynamic route segment | | `[...file]` | `.js` `.jsx` `.tsx` | Catch-all route segment | | `[[...file]]` | `.js` `.jsx` `.tsx` | Optional catch-all route segment | --- ## Page: https://nextjs.org/docs/pages/getting-started/deploying ## How to deploy your Next.js application Once you're ready to deploy your Next.js app, you can choose a managed infrastructure provider or self-host your application. ## Managed infrastructure providers A managed platform is a practical option for deploying your Next.js app, as these providers take care of hosting, scaling, and server configuration for you. Vercel, the creators and maintainers of Next.js, allows you to deploy your application with **full-feature support** and **zero-configuration**. * Learn more about Next.js on Vercel. * Try Next.js on Vercel by deploying a template. We also have community maintained deployment templates for: * Deno * Flightcontrol * Railway * Render * SST Please refer to each provider's documentation for information on supported Next.js features. ## Self-Hosting Self-hosting may mean you're responsible for provisioning your own servers, managing containers, and scaling. You can self-host Next.js in three different ways: * A Node.js server * A Docker container * A static export We have community maintained deployment examples with the following self-hosting providers: * DigitalOcean * Fly.io * GitHub Pages * Google Cloud Run > **🎥 Watch:** Learn more about self-hosting Next.js → YouTube (45 minutes). --- ## Page: https://nextjs.org/docs/pages/guides #### Subscribe to our newsletter Stay updated on new releases and features, guides, and case studies. --- ## Page: https://nextjs.org/docs/pages/guides/authentication ## How to implement authentication in Next.js Understanding authentication is crucial for protecting your application's data. This page will guide you through what React and Next.js features to use to implement auth. Before starting, it helps to break down the process into three concepts: 1. **Authentication**: Verifies if the user is who they say they are. It requires the user to prove their identity with something they have, such as a username and password. 2. **Session Management**: Tracks the user's auth state across requests. 3. **Authorization**: Decides what routes and data the user can access. This diagram shows the authentication flow using React and Next.js features:  The examples on this page walk through basic username and password auth for educational purposes. While you can implement a custom auth solution, for increased security and simplicity, we recommend using an authentication library. These offer built-in solutions for authentication, session management, and authorization, as well as additional features such as social logins, multi-factor authentication, and role-based access control. You can find a list in the Auth Libraries section. Here are the steps to implement a sign-up and/or login form: 1. The user submits their credentials through a form. 2. The form sends a request that is handled by an API route. 3. Upon successful verification, the process is completed, indicating the user's successful authentication. 4. If verification is unsuccessful, an error message is shown. Consider a login form where users can input their credentials: import { FormEvent } from 'react' import { useRouter } from 'next/router' export default function LoginPage() { const router = useRouter() async function handleSubmit(event: FormEvent<HTMLFormElement>) { event.preventDefault() const formData = new FormData(event.currentTarget) const email = formData.get('email') const password = formData.get('password') const response = await fetch('/api/auth/login', { method: 'POST', headers: { 'Content-Type': 'application/json' }, body: JSON.stringify({ email, password }), }) if (response.ok) { router.push('/profile') } else { // Handle errors } } return ( <form onSubmit={handleSubmit}> <input type="email" name="email" placeholder="Email" required /> <input type="password" name="password" placeholder="Password" required /> <button type="submit">Login</button> </form> ) } The form above has two input fields for capturing the user's email and password. On submission, it triggers a function that sends a POST request to an API route (`/api/auth/login`). You can then call your Authentication Provider's API in the API route to handle authentication: import type { NextApiRequest, NextApiResponse } from 'next' import { signIn } from '@/auth' export default async function handler( req: NextApiRequest, res: NextApiResponse ) { try { const { email, password } = req.body await signIn('credentials', { email, password }) res.status(200).json({ success: true }) } catch (error) { if (error.type === 'CredentialsSignin') { res.status(401).json({ error: 'Invalid credentials.' }) } else { res.status(500).json({ error: 'Something went wrong.' }) } } } ## Session Management Session management ensures that the user's authenticated state is preserved across requests. It involves creating, storing, refreshing, and deleting sessions or tokens. There are two types of sessions: 1. **Stateless**: Session data (or a token) is stored in the browser's cookies. The cookie is sent with each request, allowing the session to be verified on the server. This method is simpler, but can be less secure if not implemented correctly. 2. **Database**: Session data is stored in a database, with the user's browser only receiving the encrypted session ID. This method is more secure, but can be complex and use more server resources. > **Good to know:** While you can use either method, or both, we recommend using a session management library such as iron-session or Jose. ### Stateless Sessions #### Setting and deleting cookies You can use API Routes to set the session as a cookie on the server: import { serialize } from 'cookie' import type { NextApiRequest, NextApiResponse } from 'next' import { encrypt } from '@/app/lib/session' export default function handler(req: NextApiRequest, res: NextApiResponse) { const sessionData = req.body const encryptedSessionData = encrypt(sessionData) const cookie = serialize('session', encryptedSessionData, { httpOnly: true, secure: process.env.NODE_ENV === 'production', maxAge: 60 * 60 * 24 * 7, // One week path: '/', }) res.setHeader('Set-Cookie', cookie) res.status(200).json({ message: 'Successfully set cookie!' }) } ### Database Sessions To create and manage database sessions, you'll need to follow these steps: 1. Create a table in your database to store session and data (or check if your Auth Library handles this). 2. Implement functionality to insert, update, and delete sessions 3. Encrypt the session ID before storing it in the user's browser, and ensure the database and cookie stay in sync (this is optional, but recommended for optimistic auth checks in Middleware). **Creating a Session on the Server**: import db from '../../lib/db' import type { NextApiRequest, NextApiResponse } from 'next' export default async function handler( req: NextApiRequest, res: NextApiResponse ) { try { const user = req.body const sessionId = generateSessionId() await db.insertSession({ sessionId, userId: user.id, createdAt: new Date(), }) res.status(200).json({ sessionId }) } catch (error) { res.status(500).json({ error: 'Internal Server Error' }) } } Once a user is authenticated and a session is created, you can implement authorization to control what the user can access and do within your application. There are two main types of authorization checks: 1. **Optimistic**: Checks if the user is authorized to access a route or perform an action using the session data stored in the cookie. These checks are useful for quick operations, such as showing/hiding UI elements or redirecting users based on permissions or roles. 2. **Secure**: Checks if the user is authorized to access a route or perform an action using the session data stored in the database. These checks are more secure and are used for operations that require access to sensitive data or actions. For both cases, we recommend: * Creating a Data Access Layer to centralize your authorization logic * Using Data Transfer Objects (DTO) to only return the necessary data * Optionally use Middleware to perform optimistic checks. ### Optimistic checks with Middleware (Optional) There are some cases where you may want to use Middleware and redirect users based on permissions: * To perform optimistic checks. Since Middleware runs on every route, it's a good way to centralize redirect logic and pre-filter unauthorized users. * To protect static routes that share data between users (e.g. content behind a paywall). However, since Middleware runs on every route, including prefetched routes, it's important to only read the session from the cookie (optimistic checks), and avoid database checks to prevent performance issues. For example: import { NextRequest, NextResponse } from 'next/server' import { decrypt } from '@/app/lib/session' import { cookies } from 'next/headers' // 1. Specify protected and public routes const protectedRoutes = ['/dashboard'] const publicRoutes = ['/login', '/signup', '/'] export default async function middleware(req: NextRequest) { // 2. Check if the current route is protected or public const path = req.nextUrl.pathname const isProtectedRoute = protectedRoutes.includes(path) const isPublicRoute = publicRoutes.includes(path) // 3. Decrypt the session from the cookie const cookie = (await cookies()).get('session')?.value const session = await decrypt(cookie) // 4. Redirect to /login if the user is not authenticated if (isProtectedRoute && !session?.userId) { return NextResponse.redirect(new URL('/login', req.nextUrl)) } // 5. Redirect to /dashboard if the user is authenticated if ( isPublicRoute && session?.userId && !req.nextUrl.pathname.startsWith('/dashboard') ) { return NextResponse.redirect(new URL('/dashboard', req.nextUrl)) } return NextResponse.next() } // Routes Middleware should not run on export const config = { matcher: ['/((?!api|_next/static|_next/image|.*\\.png$).*)'], } While Middleware can be useful for initial checks, it should not be your only line of defense in protecting your data. The majority of security checks should be performed as close as possible to your data source, see Data Access Layer for more information. > **Tips**: > > * In Middleware, you can also read cookies using `req.cookies.get('session').value`. > * Middleware uses the Edge Runtime, check if your Auth library and session management library are compatible. > * You can use the `matcher` property in the Middleware to specify which routes Middleware should run on. Although, for auth, it's recommended Middleware runs on all routes. ### Creating a Data Access Layer (DAL) #### Protecting API Routes API Routes in Next.js are essential for handling server-side logic and data management. It's crucial to secure these routes to ensure that only authorized users can access specific functionalities. This typically involves verifying the user's authentication status and their role-based permissions. Here's an example of securing an API Route: import { NextApiRequest, NextApiResponse } from 'next' export default async function handler( req: NextApiRequest, res: NextApiResponse ) { const session = await getSession(req) // Check if the user is authenticated if (!session) { res.status(401).json({ error: 'User is not authenticated', }) return } // Check if the user has the 'admin' role if (session.user.role !== 'admin') { res.status(401).json({ error: 'Unauthorized access: User does not have admin privileges.', }) return } // Proceed with the route for authorized users // ... implementation of the API Route } This example demonstrates an API Route with a two-tier security check for authentication and authorization. It first checks for an active session, and then verifies if the logged-in user is an 'admin'. This approach ensures secure access, limited to authenticated and authorized users, maintaining robust security for request processing. ## Resources Now that you've learned about authentication in Next.js, here are Next.js-compatible libraries and resources to help you implement secure authentication and session management: ### Auth Libraries * Auth0 * Clerk * Kinde * Logto * NextAuth.js * Ory * Stack Auth * Supabase * Stytch * WorkOS ### Session Management Libraries * Iron Session * Jose ## Further Reading To continue learning about authentication and security, check out the following resources: * How to think about security in Next.js * Understanding XSS Attacks * Understanding CSRF Attacks * The Copenhagen Book --- ## Page: https://nextjs.org/docs/pages/guides/ci-build-caching ## How to configure Continuous Integration (CI) build caching To improve build performance, Next.js saves a cache to `.next/cache` that is shared between builds. To take advantage of this cache in Continuous Integration (CI) environments, your CI workflow will need to be configured to correctly persist the cache between builds. > If your CI is not configured to persist `.next/cache` between builds, you may see a No Cache Detected error. Here are some example cache configurations for common CI providers: ## Vercel Next.js caching is automatically configured for you. There's no action required on your part. If you are using Turborepo on Vercel, learn more here. ## CircleCI Edit your `save_cache` step in `.circleci/config.yml` to include `.next/cache`: steps: - save_cache: key: dependency-cache-{{ checksum "yarn.lock" }} paths: - ./node_modules - ./.next/cache If you do not have a `save_cache` key, please follow CircleCI's documentation on setting up build caching. ## Travis CI Add or merge the following into your `.travis.yml`: cache: directories: - $HOME/.cache/yarn - node_modules - .next/cache ## GitLab CI Add or merge the following into your `.gitlab-ci.yml`: cache: key: ${CI_COMMIT_REF_SLUG} paths: - node_modules/ - .next/cache/ ## Netlify CI Use Netlify Plugins with `@netlify/plugin-nextjs`. ## AWS CodeBuild Add (or merge in) the following to your `buildspec.yml`: cache: paths: - 'node_modules/**/*' # Cache `node_modules` for faster `yarn` or `npm i` - '.next/cache/**/*' # Cache Next.js for faster application rebuilds ## GitHub Actions Using GitHub's actions/cache, add the following step in your workflow file: uses: actions/cache@v4 with: # See here for caching with `yarn`, `bun` or other package managers https://github.com/actions/cache/blob/main/examples.md or you can leverage caching with actions/setup-node https://github.com/actions/setup-node path: | ~/.npm ${{ github.workspace }}/.next/cache # Generate a new cache whenever packages or source files change. key: ${{ runner.os }}-nextjs-${{ hashFiles('**/package-lock.json') }}-${{ hashFiles('**/*.js', '**/*.jsx', '**/*.ts', '**/*.tsx') }} # If source files changed but packages didn't, rebuild from a prior cache. restore-keys: | ${{ runner.os }}-nextjs-${{ hashFiles('**/package-lock.json') }}- ## Bitbucket Pipelines Add or merge the following into your `bitbucket-pipelines.yml` at the top level (same level as `pipelines`): definitions: caches: nextcache: .next/cache Then reference it in the `caches` section of your pipeline's `step`: - step: name: your_step_name caches: - node - nextcache ## Heroku Using Heroku's custom cache, add a `cacheDirectories` array in your top-level package.json: "cacheDirectories": [".next/cache"] ## Azure Pipelines Using Azure Pipelines' Cache task, add the following task to your pipeline yaml file somewhere prior to the task that executes `next build`: - task: Cache@2 displayName: 'Cache .next/cache' inputs: key: next | $(Agent.OS) | yarn.lock path: '$(System.DefaultWorkingDirectory)/.next/cache' ## Jenkins (Pipeline) Using Jenkins' Job Cacher plugin, add the following build step to your `Jenkinsfile` where you would normally run `next build` or `npm install`: stage("Restore npm packages") { steps { // Writes lock-file to cache based on the GIT_COMMIT hash writeFile file: "next-lock.cache", text: "$GIT_COMMIT" cache(caches: [ arbitraryFileCache( path: "node_modules", includes: "**/*", cacheValidityDecidingFile: "package-lock.json" ) ]) { sh "npm install" } } } stage("Build") { steps { // Writes lock-file to cache based on the GIT_COMMIT hash writeFile file: "next-lock.cache", text: "$GIT_COMMIT" cache(caches: [ arbitraryFileCache( path: ".next/cache", includes: "**/*", cacheValidityDecidingFile: "next-lock.cache" ) ]) { // aka `next build` sh "npm run build" } } } --- ## Page: https://nextjs.org/docs/pages/guides/migrating #### Subscribe to our newsletter Stay updated on new releases and features, guides, and case studies. --- ## Page: https://nextjs.org/docs/pages/guides/migrating/app-router-migration ## How to migrate from Pages to the App Router This guide will help you: * Update your Next.js application from version 12 to version 13 * Upgrade features that work in both the `pages` and the `app` directories * Incrementally migrate your existing application from `pages` to `app` ## Upgrading ### Node.js Version The minimum Node.js version is now **v18.17**. See the Node.js documentation for more information. ### Next.js Version To update to Next.js version 13, run the following command using your preferred package manager: npm install next@latest react@latest react-dom@latest ### ESLint Version If you're using ESLint, you need to upgrade your ESLint version: npm install -D eslint-config-next@latest > **Good to know**: You may need to restart the ESLint server in VS Code for the ESLint changes to take effect. Open the Command Palette (`cmd+shift+p` on Mac; `ctrl+shift+p` on Windows) and search for `ESLint: Restart ESLint Server`. ## Next Steps After you've updated, see the following sections for next steps: * Upgrade new features: A guide to help you upgrade to new features such as the improved Image and Link Components. * Migrate from the `pages` to `app` directory: A step-by-step guide to help you incrementally migrate from the `pages` to the `app` directory. ## Upgrading New Features Next.js 13 introduced the new App Router with new features and conventions. The new Router is available in the `app` directory and co-exists with the `pages` directory. Upgrading to Next.js 13 does **not** require using the App Router. You can continue using `pages` with new features that work in both directories, such as the updated Image component, Link component, Script component, and Font optimization. ### `<Image/>` Component Next.js 12 introduced new improvements to the Image Component with a temporary import: `next/future/image`. These improvements included less client-side JavaScript, easier ways to extend and style images, better accessibility, and native browser lazy loading. In version 13, this new behavior is now the default for `next/image`. There are two codemods to help you migrate to the new Image Component: * **`next-image-to-legacy-image` codemod**: Safely and automatically renames `next/image` imports to `next/legacy/image`. Existing components will maintain the same behavior. * **`next-image-experimental` codemod**: Dangerously adds inline styles and removes unused props. This will change the behavior of existing components to match the new defaults. To use this codemod, you need to run the `next-image-to-legacy-image` codemod first. ### `<Link>` Component The `<Link>` Component no longer requires manually adding an `<a>` tag as a child. This behavior was added as an experimental option in version 12.2 and is now the default. In Next.js 13, `<Link>` always renders `<a>` and allows you to forward props to the underlying tag. For example: import Link from 'next/link' // Next.js 12: `<a>` has to be nested otherwise it's excluded <Link href="/about"> <a>About</a> </Link> // Next.js 13: `<Link>` always renders `<a>` under the hood <Link href="/about"> About </Link> To upgrade your links to Next.js 13, you can use the `new-link` codemod. ### `<Script>` Component The behavior of `next/script` has been updated to support both `pages` and `app`, but some changes need to be made to ensure a smooth migration: * Move any `beforeInteractive` scripts you previously included in `_document.js` to the root layout file (`app/layout.tsx`). * The experimental `worker` strategy does not yet work in `app` and scripts denoted with this strategy will either have to be removed or modified to use a different strategy (e.g. `lazyOnload`). * `onLoad`, `onReady`, and `onError` handlers will not work in Server Components so make sure to move them to a Client Component or remove them altogether. ### Font Optimization Previously, Next.js helped you optimize fonts by inlining font CSS. Version 13 introduces the new `next/font` module which gives you the ability to customize your font loading experience while still ensuring great performance and privacy. `next/font` is supported in both the `pages` and `app` directories. While inlining CSS still works in `pages`, it does not work in `app`. You should use `next/font` instead. See the Font Optimization page to learn how to use `next/font`. ## Migrating from `pages` to `app` > **🎥 Watch:** Learn how to incrementally adopt the App Router → YouTube (16 minutes). Moving to the App Router may be the first time using React features that Next.js builds on top of such as Server Components, Suspense, and more. When combined with new Next.js features such as special files and layouts, migration means new concepts, mental models, and behavioral changes to learn. We recommend reducing the combined complexity of these updates by breaking down your migration into smaller steps. The `app` directory is intentionally designed to work simultaneously with the `pages` directory to allow for incremental page-by-page migration. * The `app` directory supports nested routes _and_ layouts. Learn more. * Use nested folders to define routes and a special `page.js` file to make a route segment publicly accessible. Learn more. * Special file conventions are used to create UI for each route segment. The most common special files are `page.js` and `layout.js`. * Use `page.js` to define UI unique to a route. * Use `layout.js` to define UI that is shared across multiple routes. * `.js`, `.jsx`, or `.tsx` file extensions can be used for special files. * You can colocate other files inside the `app` directory such as components, styles, tests, and more. Learn more. * Data fetching functions like `getServerSideProps` and `getStaticProps` have been replaced with a new API inside `app`. `getStaticPaths` has been replaced with `generateStaticParams`. * `pages/_app.js` and `pages/_document.js` have been replaced with a single `app/layout.js` root layout. Learn more. * `pages/_error.js` has been replaced with more granular `error.js` special files. Learn more. * `pages/404.js` has been replaced with the `not-found.js` file. * `pages/api/*` API Routes have been replaced with the `route.js` (Route Handler) special file. ### Step 1: Creating the `app` directory Update to the latest Next.js version (requires 13.4 or greater): npm install next@latest Then, create a new `app` directory at the root of your project (or `src/` directory). ### Step 2: Creating a Root Layout Create a new `app/layout.tsx` file inside the `app` directory. This is a root layout that will apply to all routes inside `app`. export default function RootLayout({ // Layouts must accept a children prop. // This will be populated with nested layouts or pages children, }: { children: React.ReactNode }) { return ( <html lang="en"> <body>{children}</body> </html> ) } * The `app` directory **must** include a root layout. * The root layout must define `<html>`, and `<body>` tags since Next.js does not automatically create them * The root layout replaces the `pages/_app.tsx` and `pages/_document.tsx` files. * `.js`, `.jsx`, or `.tsx` extensions can be used for layout files. To manage `<head>` HTML elements, you can use the built-in SEO support: import type { Metadata } from 'next' export const metadata: Metadata = { title: 'Home', description: 'Welcome to Next.js', } #### Migrating `_document.js` and `_app.js` If you have an existing `_app` or `_document` file, you can copy the contents (e.g. global styles) to the root layout (`app/layout.tsx`). Styles in `app/layout.tsx` will _not_ apply to `pages/*`. You should keep `_app`/`_document` while migrating to prevent your `pages/*` routes from breaking. Once fully migrated, you can then safely delete them. If you are using any React Context providers, they will need to be moved to a Client Component. #### Migrating the `getLayout()` pattern to Layouts (Optional) Next.js recommended adding a property to Page components to achieve per-page layouts in the `pages` directory. This pattern can be replaced with native support for nested layouts in the `app` directory. See before and after example **Before** export default function DashboardLayout({ children }) { return ( <div> <h2>My Dashboard</h2> {children} </div> ) } import DashboardLayout from '../components/DashboardLayout' export default function Page() { return <p>My Page</p> } Page.getLayout = function getLayout(page) { return <DashboardLayout>{page}</DashboardLayout> } **After** * Remove the `Page.getLayout` property from `pages/dashboard/index.js` and follow the steps for migrating pages to the `app` directory. export default function Page() { return <p>My Page</p> } * Move the contents of `DashboardLayout` into a new Client Component to retain `pages` directory behavior. 'use client' // this directive should be at top of the file, before any imports. // This is a Client Component export default function DashboardLayout({ children }) { return ( <div> <h2>My Dashboard</h2> {children} </div> ) } * Import the `DashboardLayout` into a new `layout.js` file inside the `app` directory. import DashboardLayout from './DashboardLayout' // This is a Server Component export default function Layout({ children }) { return <DashboardLayout>{children}</DashboardLayout> } * You can incrementally move non-interactive parts of `DashboardLayout.js` (Client Component) into `layout.js` (Server Component) to reduce the amount of component JavaScript you send to the client. ### Step 3: Migrating `next/head` In the `pages` directory, the `next/head` React component is used to manage `<head>` HTML elements such as `title` and `meta` . In the `app` directory, `next/head` is replaced with the new built-in SEO support. **Before:** import Head from 'next/head' export default function Page() { return ( <> <Head> <title>My page title</title> </Head> </> ) } **After:** import type { Metadata } from 'next' export const metadata: Metadata = { title: 'My Page Title', } export default function Page() { return '...' } See all metadata options. ### Step 4: Migrating Pages * Pages in the `app` directory are Server Components by default. This is different from the `pages` directory where pages are Client Components. * Data fetching has changed in `app`. `getServerSideProps`, `getStaticProps` and `getInitialProps` have been replaced with a simpler API. * The `app` directory uses nested folders to define routes and a special `page.js` file to make a route segment publicly accessible. * | `pages` Directory | `app` Directory | Route | | --- | --- | --- | | `index.js` | `page.js` | `/` | | `about.js` | `about/page.js` | `/about` | | `blog/[slug].js` | `blog/[slug]/page.js` | `/blog/post-1` | We recommend breaking down the migration of a page into two main steps: * Step 1: Move the default exported Page Component into a new Client Component. * Step 2: Import the new Client Component into a new `page.js` file inside the `app` directory. > **Good to know**: This is the easiest migration path because it has the most comparable behavior to the `pages` directory. **Step 1: Create a new Client Component** * Create a new separate file inside the `app` directory (i.e. `app/home-page.tsx` or similar) that exports a Client Component. To define Client Components, add the `'use client'` directive to the top of the file (before any imports). * Similar to the Pages Router, there is an optimization step to prerender Client Components to static HTML on the initial page load. * Move the default exported page component from `pages/index.js` to `app/home-page.tsx`. 'use client' // This is a Client Component (same as components in the `pages` directory) // It receives data as props, has access to state and effects, and is // prerendered on the server during the initial page load. export default function HomePage({ recentPosts }) { return ( <div> {recentPosts.map((post) => ( <div key={post.id}>{post.title}</div> ))} </div> ) } **Step 2: Create a new page** * Create a new `app/page.tsx` file inside the `app` directory. This is a Server Component by default. * Import the `home-page.tsx` Client Component into the page. * If you were fetching data in `pages/index.js`, move the data fetching logic directly into the Server Component using the new data fetching APIs. See the data fetching upgrade guide for more details. // Import your Client Component import HomePage from './home-page' async function getPosts() { const res = await fetch('https://...') const posts = await res.json() return posts } export default async function Page() { // Fetch data directly in a Server Component const recentPosts = await getPosts() // Forward fetched data to your Client Component return <HomePage recentPosts={recentPosts} /> } * If your previous page used `useRouter`, you'll need to update to the new routing hooks. Learn more. * Start your development server and visit `http://localhost:3000`. You should see your existing index route, now served through the app directory. ### Step 5: Migrating Routing Hooks A new router has been added to support the new behavior in the `app` directory. In `app`, you should use the three new hooks imported from `next/navigation`: `useRouter()`, `usePathname()`, and `useSearchParams()`. * The new `useRouter` hook is imported from `next/navigation` and has different behavior to the `useRouter` hook in `pages` which is imported from `next/router`. * The `useRouter` hook imported from `next/router` is not supported in the `app` directory but can continue to be used in the `pages` directory. * The new `useRouter` does not return the `pathname` string. Use the separate `usePathname` hook instead. * The new `useRouter` does not return the `query` object. Search parameters and dynamic route parameters are now separate. Use the `useSearchParams` and `useParams` hooks instead. * You can use `useSearchParams` and `usePathname` together to listen to page changes. See the Router Events section for more details. * These new hooks are only supported in Client Components. They cannot be used in Server Components. 'use client' import { useRouter, usePathname, useSearchParams } from 'next/navigation' export default function ExampleClientComponent() { const router = useRouter() const pathname = usePathname() const searchParams = useSearchParams() // ... } In addition, the new `useRouter` hook has the following changes: * `isFallback` has been removed because `fallback` has been replaced. * The `locale`, `locales`, `defaultLocales`, `domainLocales` values have been removed because built-in i18n Next.js features are no longer necessary in the `app` directory. Learn more about i18n. * `basePath` has been removed. The alternative will not be part of `useRouter`. It has not yet been implemented. * `asPath` has been removed because the concept of `as` has been removed from the new router. * `isReady` has been removed because it is no longer necessary. During static rendering, any component that uses the `useSearchParams()` hook will skip the prerendering step and instead be rendered on the client at runtime. * `route` has been removed. `usePathname` or `useSelectedLayoutSegments()` provide an alternative. View the `useRouter()` API reference. #### Sharing components between `pages` and `app` To keep components compatible between the `pages` and `app` routers, refer to the `useRouter` hook from `next/compat/router`. This is the `useRouter` hook from the `pages` directory, but intended to be used while sharing components between routers. Once you are ready to use it only on the `app` router, update to the new `useRouter` from `next/navigation`. ### Step 6: Migrating Data Fetching Methods The `pages` directory uses `getServerSideProps` and `getStaticProps` to fetch data for pages. Inside the `app` directory, these previous data fetching functions are replaced with a simpler API built on top of `fetch()` and `async` React Server Components. export default async function Page() { // This request should be cached until manually invalidated. // Similar to `getStaticProps`. // `force-cache` is the default and can be omitted. const staticData = await fetch(`https://...`, { cache: 'force-cache' }) // This request should be refetched on every request. // Similar to `getServerSideProps`. const dynamicData = await fetch(`https://...`, { cache: 'no-store' }) // This request should be cached with a lifetime of 10 seconds. // Similar to `getStaticProps` with the `revalidate` option. const revalidatedData = await fetch(`https://...`, { next: { revalidate: 10 }, }) return <div>...</div> } #### Server-side Rendering (`getServerSideProps`) In the `pages` directory, `getServerSideProps` is used to fetch data on the server and forward props to the default exported React component in the file. The initial HTML for the page is prerendered from the server, followed by "hydrating" the page in the browser (making it interactive). // `pages` directory export async function getServerSideProps() { const res = await fetch(`https://...`) const projects = await res.json() return { props: { projects } } } export default function Dashboard({ projects }) { return ( <ul> {projects.map((project) => ( <li key={project.id}>{project.name}</li> ))} </ul> ) } In the App Router, we can colocate our data fetching inside our React components using Server Components. This allows us to send less JavaScript to the client, while maintaining the rendered HTML from the server. By setting the `cache` option to `no-store`, we can indicate that the fetched data should never be cached. This is similar to `getServerSideProps` in the `pages` directory. // `app` directory // This function can be named anything async function getProjects() { const res = await fetch(`https://...`, { cache: 'no-store' }) const projects = await res.json() return projects } export default async function Dashboard() { const projects = await getProjects() return ( <ul> {projects.map((project) => ( <li key={project.id}>{project.name}</li> ))} </ul> ) } #### Accessing Request Object In the `pages` directory, you can retrieve request-based data based on the Node.js HTTP API. For example, you can retrieve the `req` object from `getServerSideProps` and use it to retrieve the request's cookies and headers. // `pages` directory export async function getServerSideProps({ req, query }) { const authHeader = req.getHeaders()['authorization']; const theme = req.cookies['theme']; return { props: { ... }} } export default function Page(props) { return ... } The `app` directory exposes new read-only functions to retrieve request data: * `headers`: Based on the Web Headers API, and can be used inside Server Components to retrieve request headers. * `cookies`: Based on the Web Cookies API, and can be used inside Server Components to retrieve cookies. // `app` directory import { cookies, headers } from 'next/headers' async function getData() { const authHeader = (await headers()).get('authorization') return '...' } export default async function Page() { // You can use `cookies` or `headers` inside Server Components // directly or in your data fetching function const theme = (await cookies()).get('theme') const data = await getData() return '...' } #### Static Site Generation (`getStaticProps`) In the `pages` directory, the `getStaticProps` function is used to pre-render a page at build time. This function can be used to fetch data from an external API or directly from a database, and pass this data down to the entire page as it's being generated during the build. // `pages` directory export async function getStaticProps() { const res = await fetch(`https://...`) const projects = await res.json() return { props: { projects } } } export default function Index({ projects }) { return projects.map((project) => <div>{project.name}</div>) } In the `app` directory, data fetching with `fetch()` will default to `cache: 'force-cache'`, which will cache the request data until manually invalidated. This is similar to `getStaticProps` in the `pages` directory. // `app` directory // This function can be named anything async function getProjects() { const res = await fetch(`https://...`) const projects = await res.json() return projects } export default async function Index() { const projects = await getProjects() return projects.map((project) => <div>{project.name}</div>) } #### Dynamic paths (`getStaticPaths`) In the `pages` directory, the `getStaticPaths` function is used to define the dynamic paths that should be pre-rendered at build time. // `pages` directory import PostLayout from '@/components/post-layout' export async function getStaticPaths() { return { paths: [{ params: { id: '1' } }, { params: { id: '2' } }], } } export async function getStaticProps({ params }) { const res = await fetch(`https://.../posts/${params.id}`) const post = await res.json() return { props: { post } } } export default function Post({ post }) { return <PostLayout post={post} /> } In the `app` directory, `getStaticPaths` is replaced with `generateStaticParams`. `generateStaticParams` behaves similarly to `getStaticPaths`, but has a simplified API for returning route parameters and can be used inside layouts. The return shape of `generateStaticParams` is an array of segments instead of an array of nested `param` objects or a string of resolved paths. // `app` directory import PostLayout from '@/components/post-layout' export async function generateStaticParams() { return [{ id: '1' }, { id: '2' }] } async function getPost(params) { const res = await fetch(`https://.../posts/${(await params).id}`) const post = await res.json() return post } export default async function Post({ params }) { const post = await getPost(params) return <PostLayout post={post} /> } Using the name `generateStaticParams` is more appropriate than `getStaticPaths` for the new model in the `app` directory. The `get` prefix is replaced with a more descriptive `generate`, which sits better alone now that `getStaticProps` and `getServerSideProps` are no longer necessary. The `Paths` suffix is replaced by `Params`, which is more appropriate for nested routing with multiple dynamic segments. * * * #### Replacing `fallback` In the `pages` directory, the `fallback` property returned from `getStaticPaths` is used to define the behavior of a page that isn't pre-rendered at build time. This property can be set to `true` to show a fallback page while the page is being generated, `false` to show a 404 page, or `blocking` to generate the page at request time. // `pages` directory export async function getStaticPaths() { return { paths: [], fallback: 'blocking' }; } export async function getStaticProps({ params }) { ... } export default function Post({ post }) { return ... } In the `app` directory the `config.dynamicParams` property controls how params outside of `generateStaticParams` are handled: * **`true`**: (default) Dynamic segments not included in `generateStaticParams` are generated on demand. * **`false`**: Dynamic segments not included in `generateStaticParams` will return a 404. This replaces the `fallback: true | false | 'blocking'` option of `getStaticPaths` in the `pages` directory. The `fallback: 'blocking'` option is not included in `dynamicParams` because the difference between `'blocking'` and `true` is negligible with streaming. // `app` directory export const dynamicParams = true; export async function generateStaticParams() { return [...] } async function getPost(params) { ... } export default async function Post({ params }) { const post = await getPost(params); return ... } With `dynamicParams` set to `true` (the default), when a route segment is requested that hasn't been generated, it will be server-rendered and cached. #### Incremental Static Regeneration (`getStaticProps` with `revalidate`) In the `pages` directory, the `getStaticProps` function allows you to add a `revalidate` field to automatically regenerate a page after a certain amount of time. // `pages` directory export async function getStaticProps() { const res = await fetch(`https://.../posts`) const posts = await res.json() return { props: { posts }, revalidate: 60, } } export default function Index({ posts }) { return ( <Layout> <PostList posts={posts} /> </Layout> ) } In the `app` directory, data fetching with `fetch()` can use `revalidate`, which will cache the request for the specified amount of seconds. // `app` directory async function getPosts() { const res = await fetch(`https://.../posts`, { next: { revalidate: 60 } }) const data = await res.json() return data.posts } export default async function PostList() { const posts = await getPosts() return posts.map((post) => <div>{post.name}</div>) } #### API Routes API Routes continue to work in the `pages/api` directory without any changes. However, they have been replaced by Route Handlers in the `app` directory. Route Handlers allow you to create custom request handlers for a given route using the Web Request and Response APIs. export async function GET(request: Request) {} > **Good to know**: If you previously used API routes to call an external API from the client, you can now use Server Components instead to securely fetch data. Learn more about data fetching. #### Single-Page Applications If you are also migrating to Next.js from a Single-Page Application (SPA) at the same time, see our documentation to learn more. ### Step 7: Styling In the `pages` directory, global stylesheets are restricted to only `pages/_app.js`. With the `app` directory, this restriction has been lifted. Global styles can be added to any layout, page, or component. * CSS Modules * Tailwind CSS * Global Styles * CSS-in-JS * External Stylesheets * Sass #### Tailwind CSS If you're using Tailwind CSS, you'll need to add the `app` directory to your `tailwind.config.js` file: module.exports = { content: [ './app/**/*.{js,ts,jsx,tsx,mdx}', // <-- Add this line './pages/**/*.{js,ts,jsx,tsx,mdx}', './components/**/*.{js,ts,jsx,tsx,mdx}', ], } You'll also need to import your global styles in your `app/layout.js` file: import '../styles/globals.css' export default function RootLayout({ children }) { return ( <html lang="en"> <body>{children}</body> </html> ) } Learn more about styling with Tailwind CSS ## Using App Router together with Pages Router When navigating between routes served by the different Next.js routers, there will be a hard navigation. Automatic link prefetching with `next/link` will not prefetch across routers. Instead, you can optimize navigations between App Router and Pages Router to retain the prefetched and fast page transitions. Learn more. ## Codemods Next.js provides Codemod transformations to help upgrade your codebase when a feature is deprecated. See Codemods for more information. --- ## Page: https://nextjs.org/docs/pages/guides/migrating/from-create-react-app ## How to migrate from Create React App to Next.js This guide will help you migrate an existing Create React App (CRA) site to Next.js. ## Why Switch? There are several reasons why you might want to switch from Create React App to Next.js: ### Slow initial page loading time Create React App uses purely client-side React. Client-side only applications, also known as single-page applications (SPAs), often experience slow initial page loading time. This happens due to a couple of reasons: 1. The browser needs to wait for the React code and your entire application bundle to download and run before your code is able to send requests to load data. 2. Your application code grows with every new feature and dependency you add. ### No automatic code splitting The previous issue of slow loading times can be somewhat mitigated with code splitting. However, if you try to do code splitting manually, you can inadvertently introduce network waterfalls. Next.js provides automatic code splitting and tree-shaking built into its router and build pipeline. ### Network waterfalls A common cause of poor performance occurs when applications make sequential client-server requests to fetch data. One pattern for data fetching in a SPA is to render a placeholder, and then fetch data after the component has mounted. Unfortunately, a child component can only begin fetching data after its parent has finished loading its own data, resulting in a “waterfall” of requests. While client-side data fetching is supported in Next.js, Next.js also lets you move data fetching to the server. This often eliminates client-server waterfalls altogether. ### Fast and intentional loading states With built-in support for streaming through React Suspense, you can define which parts of your UI load first and in what order, without creating network waterfalls. This enables you to build pages that are faster to load and eliminate layout shifts. ### Choose the data fetching strategy Depending on your needs, Next.js allows you to choose your data fetching strategy on a page or component-level basis. For example, you could fetch data from your CMS and render blog posts at build time (SSG) for quick load speeds, or fetch data at request time (SSR) when necessary. ### Middleware Next.js Middleware allows you to run code on the server before a request is completed. For instance, you can avoid a flash of unauthenticated content by redirecting a user to a login page in the middleware for authenticated-only pages. You can also use it for features like A/B testing, experimentation, and internationalization. ### Built-in Optimizations Images, fonts, and third-party scripts often have a large impact on an application’s performance. Next.js includes specialized components and APIs that automatically optimize them for you. ## Migration Steps Our goal is to get a working Next.js application as quickly as possible so that you can then adopt Next.js features incrementally. To begin with, we’ll treat your application as a purely client-side application (SPA) without immediately replacing your existing router. This reduces complexity and merge conflicts. > **Note**: If you are using advanced CRA configurations such as a custom `homepage` field in your `package.json`, a custom service worker, or specific Babel/webpack tweaks, please see the **Additional Considerations** section at the end of this guide for tips on replicating or adapting these features in Next.js. ### Step 1: Install the Next.js Dependency Install Next.js in your existing project: npm install next@latest ### Step 2: Create the Next.js Configuration File Create a `next.config.ts` at the root of your project (same level as your `package.json`). This file holds your Next.js configuration options. import type { NextConfig } from 'next' const nextConfig: NextConfig = { output: 'export', // Outputs a Single-Page Application (SPA) distDir: 'build', // Changes the build output directory to `build` } export default nextConfig > **Note**: Using `output: 'export'` means you’re doing a static export. You will **not** have access to server-side features like SSR or APIs. You can remove this line to leverage Next.js server features. ### Step 3: Create the Root Layout A Next.js App Router application must include a root layout file, which is a React Server Component that will wrap all your pages. The closest equivalent of the root layout file in a CRA application is `public/index.html`, which includes your `<html>`, `<head>`, and `<body>` tags. 1. Create a new `app` directory inside your `src` directory (or at your project root if you prefer `app` at the root). 2. Inside the `app` directory, create a `layout.tsx` (or `layout.js`) file: export default function RootLayout({ children, }: { children: React.ReactNode }) { return '...' } Now copy the content of your old `index.html` into this `<RootLayout>` component. Replace `body div#root` (and `body noscript`) with `<div id="root">{children}</div>`. export default function RootLayout({ children, }: { children: React.ReactNode }) { return ( <html lang="en"> <head> <meta charSet="UTF-8" /> <link rel="icon" href="%PUBLIC_URL%/favicon.ico" /> <meta name="viewport" content="width=device-width, initial-scale=1" /> <title>React App</title> <meta name="description" content="Web site created..." /> </head> <body> <div id="root">{children}</div> </body> </html> ) } > **Good to know**: Next.js ignores CRA’s `public/manifest.json`, additional iconography, and testing configuration by default. If you need these, Next.js has support with its Metadata API and Testing setup. ### Step 4: Metadata Next.js automatically includes the `<meta charset="UTF-8" />` and `<meta name="viewport" content="width=device-width, initial-scale=1" />` tags, so you can remove them from `<head>`: export default function RootLayout({ children, }: { children: React.ReactNode }) { return ( <html lang="en"> <head> <link rel="icon" href="%PUBLIC_URL%/favicon.ico" /> <title>React App</title> <meta name="description" content="Web site created..." /> </head> <body> <div id="root">{children}</div> </body> </html> ) } Any metadata files such as `favicon.ico`, `icon.png`, `robots.txt` are automatically added to the application `<head>` tag as long as you have them placed into the top level of the `app` directory. After moving all supported files into the `app` directory you can safely delete their `<link>` tags: export default function RootLayout({ children, }: { children: React.ReactNode }) { return ( <html lang="en"> <head> <title>React App</title> <meta name="description" content="Web site created..." /> </head> <body> <div id="root">{children}</div> </body> </html> ) } Finally, Next.js can manage your last `<head>` tags with the Metadata API. Move your final metadata info into an exported `metadata` object: import type { Metadata } from 'next' export const metadata: Metadata = { title: 'React App', description: 'Web site created with Next.js.', } export default function RootLayout({ children, }: { children: React.ReactNode }) { return ( <html lang="en"> <body> <div id="root">{children}</div> </body> </html> ) } With the above changes, you shifted from declaring everything in your `index.html` to using Next.js' convention-based approach built into the framework (Metadata API). This approach enables you to more easily improve your SEO and web shareability of your pages. ### Step 5: Styles Like CRA, Next.js supports CSS Modules out of the box. It also supports global CSS imports. If you have a global CSS file, import it into your `app/layout.tsx`: import '../index.css' export const metadata = { title: 'React App', description: 'Web site created with Next.js.', } export default function RootLayout({ children, }: { children: React.ReactNode }) { return ( <html lang="en"> <body> <div id="root">{children}</div> </body> </html> ) } If you’re using Tailwind CSS, see our installation docs. ### Step 6: Create the Entrypoint Page Create React App uses `src/index.tsx` (or `index.js`) as the entry point. In Next.js (App Router), each folder inside the `app` directory corresponds to a route, and each folder should have a `page.tsx`. Since we want to keep the app as an SPA for now and intercept **all** routes, we’ll use an optional catch-all route. 1. **Create a `[[...slug]]` directory inside `app`.** app ┣ [[...slug]] ┃ ┗ page.tsx ┣ layout.tsx 2. **Add the following to `page.tsx`**: export function generateStaticParams() { return [{ slug: [''] }] } export default function Page() { return '...' // We'll update this } This tells Next.js to generate a single route for the empty slug (`/`), effectively mapping **all** routes to the same page. This page is a Server Component, prerendered into static HTML. ### Step 7: Add a Client-Only Entrypoint Next, we’ll embed your CRA’s root App component inside a Client Component so that all logic remains client-side. If this is your first time using Next.js, it's worth knowing that clients components (by default) are still prerendered on the server. You can think about them as having the additional capability of running client-side JavaScript. Create a `client.tsx` (or `client.js`) in `app/[[...slug]]/`: 'use client' import dynamic from 'next/dynamic' const App = dynamic(() => import('../../App'), { ssr: false }) export function ClientOnly() { return <App /> } * The `'use client'` directive makes this file a **Client Component**. * The `dynamic` import with `ssr: false` disables server-side rendering for the `<App />` component, making it truly client-only (SPA). Now update your `page.tsx` (or `page.js`) to use your new component: import { ClientOnly } from './client' export function generateStaticParams() { return [{ slug: [''] }] } export default function Page() { return <ClientOnly /> } ### Step 8: Update Static Image Imports In CRA, importing an image file returns its public URL as a string: import image from './img.png' export default function App() { return <img src={image} /> } With Next.js, static image imports return an object. The object can then be used directly with the Next.js `<Image>` component, or you can use the object's `src` property with your existing `<img>` tag. The `<Image>` component has the added benefits of automatic image optimization. The `<Image>` component automatically sets the `width` and `height` attributes of the resulting `<img>` based on the image's dimensions. This prevents layout shifts when the image loads. However, this can cause issues if your app contains images with only one of their dimensions being styled without the other styled to `auto`. When not styled to `auto`, the dimension will default to the `<img>` dimension attribute's value, which can cause the image to appear distorted. Keeping the `<img>` tag will reduce the amount of changes in your application and prevent the above issues. You can then optionally later migrate to the `<Image>` component to take advantage of optimizing images by configuring a loader, or moving to the default Next.js server which has automatic image optimization. **Convert absolute import paths for images imported from `/public` into relative imports:** // Before import logo from '/logo.png' // After import logo from '../public/logo.png' **Pass the image `src` property instead of the whole image object to your `<img>` tag:** // Before <img src={logo} /> // After <img src={logo.src} /> Alternatively, you can reference the public URL for the image asset based on the filename. For example, `public/logo.png` will serve the image at `/logo.png` for your application, which would be the `src` value. > **Warning:** If you're using TypeScript, you might encounter type errors when accessing the `src` property. To fix them, you need to add `next-env.d.ts` to the `include` array of your `tsconfig.json` file. Next.js will automatically generate this file when you run your application on step 9. ### Step 9: Migrate Environment Variables Next.js supports environment variables similarly to CRA but **requires** a `NEXT_PUBLIC_` prefix for any variable you want to expose in the browser. The main difference is the prefix used to expose environment variables on the client-side. Change all environment variables with the `REACT_APP_` prefix to `NEXT_PUBLIC_`. ### Step 10: Update Scripts in `package.json` Update your `package.json` scripts to use Next.js commands. Also, add `.next` and `next-env.d.ts` to your `.gitignore`: { "scripts": { "dev": "next dev --turbopack", "build": "next build", "start": "npx serve@latest ./build" } } # ... .next next-env.d.ts Now you can run: npm run dev Open http://localhost:3000. You should see your application now running on Next.js (in SPA mode). ### Step 11: Clean Up You can now remove artifacts that are specific to Create React App: * `public/index.html` * `src/index.tsx` * `src/react-app-env.d.ts` * The `reportWebVitals` setup * The `react-scripts` dependency (uninstall it from `package.json`) ## Additional Considerations ### Using a Custom `homepage` in CRA If you used the `homepage` field in your CRA `package.json` to serve the app under a specific subpath, you can replicate that in Next.js using the `basePath` configuration in `next.config.ts`: import { NextConfig } from 'next' const nextConfig: NextConfig = { basePath: '/my-subpath', // ... } export default nextConfig ### Handling a Custom `Service Worker` If you used CRA’s service worker (e.g., `serviceWorker.js` from `create-react-app`), you can learn how to create Progressive Web Applications (PWAs) with Next.js. ### Proxying API Requests If your CRA app used the `proxy` field in `package.json` to forward requests to a backend server, you can replicate this with Next.js rewrites in `next.config.ts`: import { NextConfig } from 'next' const nextConfig: NextConfig = { async rewrites() { return [ { source: '/api/:path*', destination: 'https://your-backend.com/:path*', }, ] }, } ### Custom Webpack / Babel Config If you had a custom webpack or Babel configuration in CRA, you can extend Next.js’s config in `next.config.ts`: import { NextConfig } from 'next' const nextConfig: NextConfig = { webpack: (config, { isServer }) => { // Modify the webpack config here return config }, } export default nextConfig > **Note**: This will require disabling Turbopack by removing `--turbopack` from your `dev` script. ### TypeScript Setup Next.js automatically sets up TypeScript if you have a `tsconfig.json`. Make sure `next-env.d.ts` is listed in your `tsconfig.json` `include` array: { "include": ["next-env.d.ts", "app/**/*", "src/**/*"] } ## Bundler Compatibility Both Create React App and Next.js default to webpack for bundling. Next.js also offers Turbopack for faster local development with: next dev --turbopack You can still provide a custom webpack configuration if you need to migrate advanced webpack settings from CRA. ## Next Steps If everything worked, you now have a functioning Next.js application running as a single-page application. You aren’t yet leveraging Next.js features like server-side rendering or file-based routing, but you can now do so incrementally: * **Migrate from React Router** to the Next.js App Router for: * Automatic code splitting * Streaming server rendering * React Server Components * **Optimize images** with the `<Image>` component * **Optimize fonts** with `next/font` * **Optimize third-party scripts** with the `<Script>` component * **Enable ESLint** with Next.js recommended rules by running `npx next lint` and configuring it to match your project’s needs > **Note**: Using a static export (`output: 'export'`) does not currently support the `useParams` hook or other server features. To use all Next.js features, remove `output: 'export'` from your `next.config.ts`. --- ## Page: https://nextjs.org/docs/pages/guides/migrating/from-vite ## How to migrate from Vite to Next.js This guide will help you migrate an existing Vite application to Next.js. ## Why Switch? There are several reasons why you might want to switch from Vite to Next.js: ### Slow initial page loading time If you have built your application with the default Vite plugin for React, your application is a purely client-side application. Client-side only applications, also known as single-page applications (SPAs), often experience slow initial page loading time. This happens due to a couple of reasons: 1. The browser needs to wait for the React code and your entire application bundle to download and run before your code is able to send requests to load some data. 2. Your application code grows with every new feature and extra dependency you add. ### No automatic code splitting The previous issue of slow loading times can be somewhat managed with code splitting. However, if you try to do code splitting manually, you'll often make performance worse. It's easy to inadvertently introduce network waterfalls when code-splitting manually. Next.js provides automatic code splitting built into its router. ### Network waterfalls A common cause of poor performance occurs when applications make sequential client-server requests to fetch data. One common pattern for data fetching in an SPA is to initially render a placeholder, and then fetch data after the component has mounted. Unfortunately, this means that a child component that fetches data can't start fetching until the parent component has finished loading its own data. While fetching data on the client is supported with Next.js, it also gives you the option to shift data fetching to the server, which can eliminate client-server waterfalls. ### Fast and intentional loading states With built-in support for streaming through React Suspense, you can be more intentional about which parts of your UI you want to load first and in what order without introducing network waterfalls. This enables you to build pages that are faster to load and eliminate layout shifts. ### Choose the data fetching strategy Depending on your needs, Next.js allows you to choose your data fetching strategy on a page and component basis. You can decide to fetch at build time, at request time on the server, or on the client. For example, you can fetch data from your CMS and render your blog posts at build time, which can then be efficiently cached on a CDN. ### Middleware Next.js Middleware allows you to run code on the server before a request is completed. This is especially useful to avoid having a flash of unauthenticated content when the user visits an authenticated-only page by redirecting the user to a login page. The middleware is also useful for experimentation and internationalization. ### Built-in Optimizations Images, fonts, and third-party scripts often have significant impact on an application's performance. Next.js comes with built-in components that automatically optimize those for you. ## Migration Steps Our goal with this migration is to get a working Next.js application as quickly as possible, so that you can then adopt Next.js features incrementally. To begin with, we'll keep it as a purely client-side application (SPA) without migrating your existing router. This helps minimize the chances of encountering issues during the migration process and reduces merge conflicts. ### Step 1: Install the Next.js Dependency The first thing you need to do is to install `next` as a dependency: npm install next@latest ### Step 2: Create the Next.js Configuration File Create a `next.config.mjs` at the root of your project. This file will hold your Next.js configuration options. /** @type {import('next').NextConfig} */ const nextConfig = { output: 'export', // Outputs a Single-Page Application (SPA). distDir: './dist', // Changes the build output directory to `./dist/`. } export default nextConfig > **Good to know:** You can use either `.js` or `.mjs` for your Next.js configuration file. ### Step 3: Update TypeScript Configuration If you're using TypeScript, you need to update your `tsconfig.json` file with the following changes to make it compatible with Next.js. If you're not using TypeScript, you can skip this step. 1. Remove the project reference to `tsconfig.node.json` 2. Add `./dist/types/**/*.ts` and `./next-env.d.ts` to the `include` array 3. Add `./node_modules` to the `exclude` array 4. Add `{ "name": "next" }` to the `plugins` array in `compilerOptions`: `"plugins": [{ "name": "next" }]` 5. Set `esModuleInterop` to `true`: `"esModuleInterop": true` 6. Set `jsx` to `preserve`: `"jsx": "preserve"` 7. Set `allowJs` to `true`: `"allowJs": true` 8. Set `forceConsistentCasingInFileNames` to `true`: `"forceConsistentCasingInFileNames": true` 9. Set `incremental` to `true`: `"incremental": true` Here's an example of a working `tsconfig.json` with those changes: { "compilerOptions": { "target": "ES2020", "useDefineForClassFields": true, "lib": ["ES2020", "DOM", "DOM.Iterable"], "module": "ESNext", "esModuleInterop": true, "skipLibCheck": true, "moduleResolution": "bundler", "allowImportingTsExtensions": true, "resolveJsonModule": true, "isolatedModules": true, "noEmit": true, "jsx": "preserve", "strict": true, "noUnusedLocals": true, "noUnusedParameters": true, "noFallthroughCasesInSwitch": true, "allowJs": true, "forceConsistentCasingInFileNames": true, "incremental": true, "plugins": [{ "name": "next" }] }, "include": ["./src", "./dist/types/**/*.ts", "./next-env.d.ts"], "exclude": ["./node_modules"] } You can find more information about configuring TypeScript on the Next.js docs. ### Step 4: Create the Root Layout A Next.js App Router application must include a root layout file, which is a React Server Component that will wrap all pages in your application. This file is defined at the top level of the `app` directory. The closest equivalent to the root layout file in a Vite application is the `index.html` file, which contains your `<html>`, `<head>`, and `<body>` tags. In this step, you'll convert your `index.html` file into a root layout file: 1. Create a new `app` directory in your `src` directory. 2. Create a new `layout.tsx` file inside that `app` directory: export default function RootLayout({ children, }: { children: React.ReactNode }) { return '...' } > **Good to know**: `.js`, `.jsx`, or `.tsx` extensions can be used for Layout files. 3. Copy the content of your `index.html` file into the previously created `<RootLayout>` component while replacing the `body.div#root` and `body.script` tags with `<div id="root">{children}</div>`: export default function RootLayout({ children, }: { children: React.ReactNode }) { return ( <html lang="en"> <head> <meta charset="UTF-8" /> <link rel="icon" type="image/svg+xml" href="/icon.svg" /> <meta name="viewport" content="width=device-width, initial-scale=1.0" /> <title>My App</title> <meta name="description" content="My App is a..." /> </head> <body> <div id="root">{children}</div> </body> </html> ) } 4. Next.js already includes by default the meta charset and meta viewport tags, so you can safely remove those from your `<head>`: export default function RootLayout({ children, }: { children: React.ReactNode }) { return ( <html lang="en"> <head> <link rel="icon" type="image/svg+xml" href="/icon.svg" /> <title>My App</title> <meta name="description" content="My App is a..." /> </head> <body> <div id="root">{children}</div> </body> </html> ) } 5. Any metadata files such as `favicon.ico`, `icon.png`, `robots.txt` are automatically added to the application `<head>` tag as long as you have them placed into the top level of the `app` directory. After moving all supported files into the `app` directory you can safely delete their `<link>` tags: export default function RootLayout({ children, }: { children: React.ReactNode }) { return ( <html lang="en"> <head> <title>My App</title> <meta name="description" content="My App is a..." /> </head> <body> <div id="root">{children}</div> </body> </html> ) } 6. Finally, Next.js can manage your last `<head>` tags with the Metadata API. Move your final metadata info into an exported `metadata` object: import type { Metadata } from 'next' export const metadata: Metadata = { title: 'My App', description: 'My App is a...', } export default function RootLayout({ children, }: { children: React.ReactNode }) { return ( <html lang="en"> <body> <div id="root">{children}</div> </body> </html> ) } With the above changes, you shifted from declaring everything in your `index.html` to using Next.js' convention-based approach built into the framework (Metadata API). This approach enables you to more easily improve your SEO and web shareability of your pages. ### Step 5: Create the Entrypoint Page On Next.js you declare an entrypoint for your application by creating a `page.tsx` file. The closest equivalent of this file on Vite is your `main.tsx` file. In this step, you’ll set up the entrypoint of your application. 1. **Create a `[[...slug]]` directory in your `app` directory.** Since in this guide we're aiming first to set up our Next.js as an SPA (Single Page Application), you need your page entrypoint to catch all possible routes of your application. For that, create a new `[[...slug]]` directory in your `app` directory. This directory is what is called an optional catch-all route segment. Next.js uses a file-system based router where folders are used to define routes. This special directory will make sure that all routes of your application will be directed to its containing `page.tsx` file. 2. **Create a new `page.tsx` file inside the `app/[[...slug]]` directory with the following content:** import '../../index.css' export function generateStaticParams() { return [{ slug: [''] }] } export default function Page() { return '...' // We'll update this } > **Good to know**: `.js`, `.jsx`, or `.tsx` extensions can be used for Page files. This file is a Server Component. When you run `next build`, the file is prerendered into a static asset. It does _not_ require any dynamic code. This file imports our global CSS and tells `generateStaticParams` we are only going to generate one route, the index route at `/`. Now, let's move the rest of our Vite application which will run client-only. 'use client' import React from 'react' import dynamic from 'next/dynamic' const App = dynamic(() => import('../../App'), { ssr: false }) export function ClientOnly() { return <App /> } This file is a Client Component, defined by the `'use client'` directive. Client Components are still prerendered to HTML on the server before being sent to the client. Since we want a client-only application to start, we can configure Next.js to disable prerendering from the `App` component down. const App = dynamic(() => import('../../App'), { ssr: false }) Now, update your entrypoint page to use the new component: import '../../index.css' import { ClientOnly } from './client' export function generateStaticParams() { return [{ slug: [''] }] } export default function Page() { return <ClientOnly /> } ### Step 6: Update Static Image Imports Next.js handles static image imports slightly different from Vite. With Vite, importing an image file will return its public URL as a string: import image from './img.png' // `image` will be '/assets/img.2d8efhg.png' in production export default function App() { return <img src={image} /> } With Next.js, static image imports return an object. The object can then be used directly with the Next.js `<Image>` component, or you can use the object's `src` property with your existing `<img>` tag. The `<Image>` component has the added benefits of automatic image optimization. The `<Image>` component automatically sets the `width` and `height` attributes of the resulting `<img>` based on the image's dimensions. This prevents layout shifts when the image loads. However, this can cause issues if your app contains images with only one of their dimensions being styled without the other styled to `auto`. When not styled to `auto`, the dimension will default to the `<img>` dimension attribute's value, which can cause the image to appear distorted. Keeping the `<img>` tag will reduce the amount of changes in your application and prevent the above issues. You can then optionally later migrate to the `<Image>` component to take advantage of optimizing images by configuring a loader, or moving to the default Next.js server which has automatic image optimization. 1. **Convert absolute import paths for images imported from `/public` into relative imports:** // Before import logo from '/logo.png' // After import logo from '../public/logo.png' 2. **Pass the image `src` property instead of the whole image object to your `<img>` tag:** // Before <img src={logo} /> // After <img src={logo.src} /> Alternatively, you can reference the public URL for the image asset based on the filename. For example, `public/logo.png` will serve the image at `/logo.png` for your application, which would be the `src` value. > **Warning:** If you're using TypeScript, you might encounter type errors when accessing the `src` property. You can safely ignore those for now. They will be fixed by the end of this guide. ### Step 7: Migrate the Environment Variables Next.js has support for `.env` environment variables similar to Vite. The main difference is the prefix used to expose environment variables on the client-side. * Change all environment variables with the `VITE_` prefix to `NEXT_PUBLIC_`. Vite exposes a few built-in environment variables on the special `import.meta.env` object which aren’t supported by Next.js. You need to update their usage as follows: * `import.meta.env.MODE` ⇒ `process.env.NODE_ENV` * `import.meta.env.PROD` ⇒ `process.env.NODE_ENV === 'production'` * `import.meta.env.DEV` ⇒ `process.env.NODE_ENV !== 'production'` * `import.meta.env.SSR` ⇒ `typeof window !== 'undefined'` Next.js also doesn't provide a built-in `BASE_URL` environment variable. However, you can still configure one, if you need it: 1. **Add the following to your `.env` file:** # ... NEXT_PUBLIC_BASE_PATH="/some-base-path" 2. **Set `basePath` to `process.env.NEXT_PUBLIC_BASE_PATH` in your `next.config.mjs` file:** /** @type {import('next').NextConfig} */ const nextConfig = { output: 'export', // Outputs a Single-Page Application (SPA). distDir: './dist', // Changes the build output directory to `./dist/`. basePath: process.env.NEXT_PUBLIC_BASE_PATH, // Sets the base path to `/some-base-path`. } export default nextConfig 3. **Update `import.meta.env.BASE_URL` usages to `process.env.NEXT_PUBLIC_BASE_PATH`** ### Step 8: Update Scripts in `package.json` You should now be able to run your application to test if you successfully migrated to Next.js. But before that, you need to update your `scripts` in your `package.json` with Next.js related commands, and add `.next` and `next-env.d.ts` to your `.gitignore`: { "scripts": { "dev": "next dev", "build": "next build", "start": "next start" } } # ... .next next-env.d.ts dist Now run `npm run dev`, and open `http://localhost:3000`. You should see your application now running on Next.js. > **Example:** Check out this pull request for a working example of a Vite application migrated to Next.js. ### Step 9: Clean Up You can now clean up your codebase from Vite related artifacts: * Delete `main.tsx` * Delete `index.html` * Delete `vite-env.d.ts` * Delete `tsconfig.node.json` * Delete `vite.config.ts` * Uninstall Vite dependencies ## Next Steps If everything went according to plan, you now have a functioning Next.js application running as a single-page application. However, you aren't yet taking advantage of most of Next.js' benefits, but you can now start making incremental changes to reap all the benefits. Here's what you might want to do next: * Migrate from React Router to the Next.js App Router to get: * Automatic code splitting * Streaming Server-Rendering * React Server Components * Optimize images with the `<Image>` component * Optimize fonts with `next/font` * Optimize third-party scripts with the `<Script>` component * Update your ESLint configuration to support Next.js rules --- ## Page: https://nextjs.org/docs/pages/guides/multi-zones ## How to build micro-frontends using multi-zones and Next.js Examples * With Zones Multi-Zones are an approach to micro-frontends that separate a large application on a domain into smaller Next.js applications that each serve a set of paths. This is useful when there are collections of pages unrelated to the other pages in the application. By moving those pages to a separate zone (i.e., a separate application), you can reduce the size of each application which improves build times and removes code that is only necessary for one of the zones. Since applications are decoupled, Multi-Zones also allows other applications on the domain to use their own choice of framework. For example, let's say you have the following set of pages that you would like to split up: * `/blog/*` for all blog posts * `/dashboard/*` for all pages when the user is logged-in to the dashboard * `/*` for the rest of your website not covered by other zones With Multi-Zones support, you can create three applications that all are served on the same domain and look the same to the user, but you can develop and deploy each of the applications independently.  Navigating between pages in the same zone will perform soft navigations, a navigation that does not require reloading the page. For example, in this diagram, navigating from `/` to `/products` will be a soft navigation. Navigating from a page in one zone to a page in another zone, such as from `/` to `/dashboard`, will perform a hard navigation, unloading the resources of the current page and loading the resources of the new page. Pages that are frequently visited together should live in the same zone to avoid hard navigations. ## How to define a zone A zone is a normal Next.js application where you also configure an assetPrefix to avoid conflicts with pages and static files in other zones. /** @type {import('next').NextConfig} */ const nextConfig = { assetPrefix: '/blog-static', } Next.js assets, such as JavaScript and CSS, will be prefixed with `assetPrefix` to make sure that they don't conflict with assets from other zones. These assets will be served under `/assetPrefix/_next/...` for each of the zones. The default application handling all paths not routed to another more specific zone does not need an `assetPrefix`. In versions older than Next.js 15, you may also need an additional rewrite to handle the static assets. This is no longer necessary in Next.js 15. /** @type {import('next').NextConfig} */ const nextConfig = { assetPrefix: '/blog-static', async rewrites() { return { beforeFiles: [ { source: '/blog-static/_next/:path+', destination: '/_next/:path+', }, ], } }, } ## How to route requests to the right zone With the Multi Zones set-up, you need to route the paths to the correct zone since they are served by different applications. You can use any HTTP proxy to do this, but one of the Next.js applications can also be used to route requests for the entire domain. To route to the correct zone using a Next.js application, you can use `rewrites`. For each path served by a different zone, you would add a rewrite rule to send that path to the domain of the other zone. For example: async rewrites() { return [ { source: '/blog', destination: `${process.env.BLOG_DOMAIN}/blog`, }, { source: '/blog/:path+', destination: `${process.env.BLOG_DOMAIN}/blog/:path+`, } ]; } `destination` should be a URL that is served by the zone, including scheme and domain. This should point to the zone's production domain, but it can also be used to route requests to `localhost` in local development. > **Good to know**: URL paths should be unique to a zone. For example, two zones trying to serve `/blog` would create a routing conflict. ### Routing requests using middleware Routing requests through `rewrites` is recommended to minimize latency overhead for the requests, but middleware can also be used when there is a need for a dynamic decision when routing. For example, if you are using a feature flag to decide where a path should be routed such as during a migration, you can use middleware. export async function middleware(request) { const { pathname, search } = req.nextUrl; if (pathname === '/your-path' && myFeatureFlag.isEnabled()) { return NextResponse.rewrite(`${rewriteDomain}${pathname}${search}); } } ## Linking between zones Links to paths in a different zone should use an `a` tag instead of the Next.js `<Link>` component. This is because Next.js will try to prefetch and soft navigate to any relative path in `<Link>` component, which will not work across zones. ## Sharing code The Next.js applications that make up the different zones can live in any repository. However, it is often convenient to put these zones in a monorepo to more easily share code. For zones that live in different repositories, code can also be shared using public or private NPM packages. Since the pages in different zones may be released at different times, feature flags can be useful for enabling or disabling features in unison across the different zones. For Next.js on Vercel applications, you can use a monorepo to deploy all affected zones with a single `git push`. --- ## Page: https://nextjs.org/docs/pages/guides/production-checklist ## How to optimize your Next.js application for production Before taking your Next.js application to production, there are some optimizations and patterns you should consider implementing for the best user experience, performance, and security. This page provides best practices that you can use as a reference when building your application, before going to production, and after deployment - as well as the automatic Next.js optimizations you should be aware of. ## Automatic optimizations These Next.js optimizations are enabled by default and require no configuration: * **Code-splitting:** Next.js automatically code-splits your application code by pages. This means only the code needed for the current page is loaded on navigation. You may also consider lazy loading third-party libraries, where appropriate. * **Prefetching:** When a link to a new route enters the user's viewport, Next.js prefetches the route in background. This makes navigation to new routes almost instant. You can opt out of prefetching, where appropriate. * **Automatic Static Optimization:** Next.js automatically determines that a page is static (can be pre-rendered) if it has no blocking data requirements. Optimized pages can be cached, and served to the end-user from multiple CDN locations. You may opt into Server-side Rendering, where appropriate. These defaults aim to improve your application's performance, and reduce the cost and amount of data transferred on each network request. ## During development While building your application, we recommend using the following features to ensure the best performance and user experience: ### Routing and rendering * **`<Link>` component:** Use the `<Link>` component for client-side navigation and prefetching. * **Custom Errors:** Gracefully handle 500 and 404 errors ### Data fetching and caching * **API Routes:** Use Route Handlers to access your backend resources, and prevent sensitive secrets from being exposed to the client. * **Data Caching:** Verify whether your data requests are being cached or not, and opt into caching, where appropriate. Ensure requests that don't use `getStaticProps` are cached where appropriate. * **Incremental Static Regeneration:** Use Incremental Static Regeneration to update static pages after they've been built, without rebuilding your entire site. * **Static Images:** Use the `public` directory to automatically cache your application's static assets, e.g. images. ### UI and accessibility * **Font Module:** Optimize fonts by using the Font Module, which automatically hosts your font files with other static assets, removes external network requests, and reduces layout shift. * **`<Image>` Component:** Optimize images by using the Image Component, which automatically optimizes images, prevents layout shift, and serves them in modern formats like WebP. * **`<Script>` Component:** Optimize third-party scripts by using the Script Component, which automatically defers scripts and prevents them from blocking the main thread. * **ESLint:** Use the built-in `eslint-plugin-jsx-a11y` plugin to catch accessibility issues early. ### Security * **Environment Variables:** Ensure your `.env.*` files are added to `.gitignore` and only public variables are prefixed with `NEXT_PUBLIC_`. * **Content Security Policy:** Consider adding a Content Security Policy to protect your application against various security threats such as cross-site scripting, clickjacking, and other code injection attacks. ### Metadata and SEO * **`<Head>` Component:** Use the `next/head` component to add page titles, descriptions, and more. ### Type safety * **TypeScript and TS Plugin:** Use TypeScript and the TypeScript plugin for better type-safety, and to help you catch errors early. ## Before going to production Before going to production, you can run `next build` to build your application locally and catch any build errors, then run `next start` to measure the performance of your application in a production-like environment. ### Core Web Vitals * **Lighthouse:** Run lighthouse in incognito to gain a better understanding of how your users will experience your site, and to identify areas for improvement. This is a simulated test and should be paired with looking at field data (such as Core Web Vitals). ### Analyzing bundles Use the `@next/bundle-analyzer` plugin to analyze the size of your JavaScript bundles and identify large modules and dependencies that might be impacting your application's performance. Additionally, the following tools can help you understand the impact of adding new dependencies to your application: * Import Cost * Package Phobia * Bundle Phobia * bundlejs ## After deployment Depending on where you deploy your application, you might have access to additional tools and integrations to help you monitor and improve your application's performance. For Vercel deployments, we recommend the following: * **Analytics:** A built-in analytics dashboard to help you understand your application's traffic, including the number of unique visitors, page views, and more. * **Speed Insights:** Real-world performance insights based on visitor data, offering a practical view of how your website is performing in the field. * **Logging:** Runtime and Activity logs to help you debug issues and monitor your application in production. Alternatively, see the integrations page for a list of third-party tools and services. > **Good to know:** > > To get a comprehensive understanding of the best practices for production deployments on Vercel, including detailed strategies for improving website performance, refer to the Vercel Production Checklist. Following these recommendations will help you build a faster, more reliable, and secure application for your users. --- ## Page: https://nextjs.org/docs/pages/guides/self-hosting ## How to self-host your Next.js application You can self-host Next.js in three different ways: * A Node.js server * A Docker container * A static export > **🎥 Watch:** Learn more about self-hosting Next.js → YouTube (45 minutes). ## Production Builds Running `next build` generates an optimized version of your application for production. HTML, CSS, and JavaScript files are created based on your pages. JavaScript is **compiled** and browser bundles are **minified** using the Next.js Compiler to help achieve the best performance and support all modern browsers. ### Node.js Server Next.js can be deployed to any hosting provider that supports Node.js. Ensure your `package.json` has the `"build"` and `"start"` scripts: { "scripts": { "dev": "next dev", "build": "next build", "start": "next start" } } Then, run `npm run build` to build your application. Finally, run `npm run start` to start the Node.js server. This server supports all Next.js features. ### Docker Image Next.js can be deployed to any hosting provider that supports Docker containers. You can use this approach when deploying to container orchestrators such as Kubernetes or when running inside a container in any cloud provider. 1. Install Docker on your machine 2. Clone our example (or the multi-environment example) 3. Build your container: `docker build -t nextjs-docker .` 4. Run your container: `docker run -p 3000:3000 nextjs-docker` Next.js through Docker supports all Next.js features. ### Static HTML Export Next.js enables starting as a static site or Single-Page Application (SPA), then later optionally upgrading to use features that require a server. Since Next.js supports this static export, it can be deployed and hosted on any web server that can serve HTML/CSS/JS static assets. This includes tools like AWS S3, Nginx, or Apache. Running as a static export does not support Next.js features that require a server. Learn more. > **Good to know:** > > * Server Components are supported with static exports. ## Features ### Image Optimization Image Optimization through `next/image` works self-hosted with zero configuration when deploying using `next start`. If you would prefer to have a separate service to optimize images, you can configure an image loader. Image Optimization can be used with a static export by defining a custom image loader in `next.config.js`. Note that images are optimized at runtime, not during the build. > **Good to know:** > > * On glibc-based Linux systems, Image Optimization may require additional configuration to prevent excessive memory usage. > * Learn more about the caching behavior of optimized images and how to configure the TTL. > * You can also disable Image Optimization and still retain other benefits of using `next/image` if you prefer. For example, if you are optimizing images yourself separately. ### Middleware Middleware works self-hosted with zero configuration when deploying using `next start`. Since it requires access to the incoming request, it is not supported when using a static export. Middleware uses a runtime that is a subset of all available Node.js APIs to help ensure low latency, since it may run in front of every route or asset in your application. This runtime does not require running “at the edge” and works in a single-region server. Additional configuration and infrastructure are required to run Middleware in multiple regions. If you are looking to add logic (or use an external package) that requires all Node.js APIs, you might be able to move this logic to a layout as a Server Component. For example, checking headers and redirecting. You can also use headers, cookies, or query parameters to redirect or rewrite through `next.config.js`. If that does not work, you can also use a custom server. ### Environment Variables Next.js can support both build time and runtime environment variables. **By default, environment variables are only available on the server**. To expose an environment variable to the browser, it must be prefixed with `NEXT_PUBLIC_`. However, these public environment variables will be inlined into the JavaScript bundle during `next build`. To read runtime environment variables, we recommend using `getServerSideProps` or incrementally adopting the App Router. This allows you to use a singular Docker image that can be promoted through multiple environments with different values. > **Good to know:** > > * You can run code on server startup using the `register` function. > * We do not recommend using the runtimeConfig option, as this does not work with the standalone output mode. Instead, we recommend incrementally adopting the App Router. ### Caching and ISR Next.js can cache responses, generated static pages, build outputs, and other static assets like images, fonts, and scripts. Caching and revalidating pages (with Incremental Static Regeneration) use the **same shared cache**. By default, this cache is stored to the filesystem (on disk) on your Next.js server. **This works automatically when self-hosting** using both the Pages and App Router. You can configure the Next.js cache location if you want to persist cached pages and data to durable storage, or share the cache across multiple containers or instances of your Next.js application. #### Automatic Caching * Next.js sets the `Cache-Control` header of `public, max-age=31536000, immutable` to truly immutable assets. It cannot be overridden. These immutable files contain a SHA-hash in the file name, so they can be safely cached indefinitely. For example, Static Image Imports. You can configure the TTL for images. * Incremental Static Regeneration (ISR) sets the `Cache-Control` header of `s-maxage: <revalidate in getStaticProps>, stale-while-revalidate`. This revalidation time is defined in your `getStaticProps` function in seconds. If you set `revalidate: false`, it will default to a one-year cache duration. * Dynamically rendered pages set a `Cache-Control` header of `private, no-cache, no-store, max-age=0, must-revalidate` to prevent user-specific data from being cached. This applies to both the App Router and Pages Router. This also includes Draft Mode. #### Static Assets If you want to host static assets on a different domain or CDN, you can use the `assetPrefix` configuration in `next.config.js`. Next.js will use this asset prefix when retrieving JavaScript or CSS files. Separating your assets to a different domain does come with the downside of extra time spent on DNS and TLS resolution. Learn more about `assetPrefix`. #### Configuring Caching By default, generated cache assets will be stored in memory (defaults to 50mb) and on disk. If you are hosting Next.js using a container orchestration platform like Kubernetes, each pod will have a copy of the cache. To prevent stale data from being shown since the cache is not shared between pods by default, you can configure the Next.js cache to provide a cache handler and disable in-memory caching. To configure the ISR/Data Cache location when self-hosting, you can configure a custom handler in your `next.config.js` file: module.exports = { cacheHandler: require.resolve('./cache-handler.js'), cacheMaxMemorySize: 0, // disable default in-memory caching } Then, create `cache-handler.js` in the root of your project, for example: const cache = new Map() module.exports = class CacheHandler { constructor(options) { this.options = options } async get(key) { // This could be stored anywhere, like durable storage return cache.get(key) } async set(key, data, ctx) { // This could be stored anywhere, like durable storage cache.set(key, { value: data, lastModified: Date.now(), tags: ctx.tags, }) } async revalidateTag(tags) { // tags is either a string or an array of strings tags = [tags].flat() // Iterate over all entries in the cache for (let [key, value] of cache) { // If the value's tags include the specified tag, delete this entry if (value.tags.some((tag) => tags.includes(tag))) { cache.delete(key) } } } // If you want to have temporary in memory cache for a single request that is reset // before the next request you can leverage this method resetRequestCache() {} } Using a custom cache handler will allow you to ensure consistency across all pods hosting your Next.js application. For instance, you can save the cached values anywhere, like Redis or AWS S3. > **Good to know:** > > * `revalidatePath` is a convenience layer on top of cache tags. Calling `revalidatePath` will call the `revalidateTag` function with a special default tag for the provided page. ### Build Cache Next.js generates an ID during `next build` to identify which version of your application is being served. The same build should be used and boot up multiple containers. If you are rebuilding for each stage of your environment, you will need to generate a consistent build ID to use between containers. Use the `generateBuildId` command in `next.config.js`: module.exports = { generateBuildId: async () => { // This could be anything, using the latest git hash return process.env.GIT_HASH }, } ### Version Skew Next.js will automatically mitigate most instances of version skew and automatically reload the application to retrieve new assets when detected. For example, if there is a mismatch in the `deploymentId`, transitions between pages will perform a hard navigation versus using a prefetched value. When the application is reloaded, there may be a loss of application state if it's not designed to persist between page navigations. For example, using URL state or local storage would persist state after a page refresh. However, component state like `useState` would be lost in such navigations. Vercel provides additional skew protection for Next.js applications to ensure assets and functions from the previous version are still available to older clients, even after the new version is deployed. You can manually configure the `deploymentId` property in your `next.config.js` file to ensure each request uses either `?dpl` query string or `x-deployment-id` header. ## Manual Graceful Shutdowns When self-hosting, you might want to run code when the server shuts down on `SIGTERM` or `SIGINT` signals. You can set the env variable `NEXT_MANUAL_SIG_HANDLE` to `true` and then register a handler for that signal inside your `_document.js` file. You will need to register the environment variable directly in the `package.json` script, and not in the `.env` file. > **Good to know**: Manual signal handling is not available in `next dev`. { "scripts": { "dev": "next dev", "build": "next build", "start": "NEXT_MANUAL_SIG_HANDLE=true next start" } } if (process.env.NEXT_MANUAL_SIG_HANDLE) { process.on('SIGTERM', () => { console.log('Received SIGTERM: cleaning up') process.exit(0) }) process.on('SIGINT', () => { console.log('Received SIGINT: cleaning up') process.exit(0) }) } ## Examples We have community maintained deployment examples with the following providers: * Deno * DigitalOcean * Flightcontrol * Fly.io * GitHub Pages * Google Cloud Run * Railway * Render * SST --- ## Page: https://nextjs.org/docs/pages/guides/static-exports ## How to create an static export of your Next.js application Next.js enables starting as a static site or Single-Page Application (SPA), then later optionally upgrading to use features that require a server. When running `next build`, Next.js generates an HTML file per route. By breaking a strict SPA into individual HTML files, Next.js can avoid loading unnecessary JavaScript code on the client-side, reducing the bundle size and enabling faster page loads. Since Next.js supports this static export, it can be deployed and hosted on any web server that can serve HTML/CSS/JS static assets. ## Configuration To enable a static export, change the output mode inside `next.config.js`: /** * @type {import('next').NextConfig} */ const nextConfig = { output: 'export', // Optional: Change links `/me` -> `/me/` and emit `/me.html` -> `/me/index.html` // trailingSlash: true, // Optional: Prevent automatic `/me` -> `/me/`, instead preserve `href` // skipTrailingSlashRedirect: true, // Optional: Change the output directory `out` -> `dist` // distDir: 'dist', } module.exports = nextConfig After running `next build`, Next.js will create an `out` folder with the HTML/CSS/JS assets for your application. You can utilize `getStaticProps` and `getStaticPaths` to generate an HTML file for each page in your `pages` directory (or more for dynamic routes). ## Supported Features The majority of core Next.js features needed to build a static site are supported, including: * Dynamic Routes when using `getStaticPaths` * Prefetching with `next/link` * Preloading JavaScript * Dynamic Imports * Any styling options (e.g. CSS Modules, styled-jsx) * Client-side data fetching * `getStaticProps` * `getStaticPaths` ### Image Optimization Image Optimization through `next/image` can be used with a static export by defining a custom image loader in `next.config.js`. For example, you can optimize images with a service like Cloudinary: /** @type {import('next').NextConfig} */ const nextConfig = { output: 'export', images: { loader: 'custom', loaderFile: './my-loader.ts', }, } module.exports = nextConfig This custom loader will define how to fetch images from a remote source. For example, the following loader will construct the URL for Cloudinary: export default function cloudinaryLoader({ src, width, quality, }: { src: string width: number quality?: number }) { const params = ['f_auto', 'c_limit', `w_${width}`, `q_${quality || 'auto'}`] return `https://res.cloudinary.com/demo/image/upload/${params.join( ',' )}${src}` } You can then use `next/image` in your application, defining relative paths to the image in Cloudinary: import Image from 'next/image' export default function Page() { return <Image alt="turtles" src="/turtles.jpg" width={300} height={300} /> } ## Unsupported Features Features that require a Node.js server, or dynamic logic that cannot be computed during the build process, are **not** supported: * Internationalized Routing * API Routes * Rewrites * Redirects * Headers * Middleware * Incremental Static Regeneration * Image Optimization with the default `loader` * Draft Mode * `getStaticPaths` with `fallback: true` * `getStaticPaths` with `fallback: 'blocking'` * `getServerSideProps` ## Deploying With a static export, Next.js can be deployed and hosted on any web server that can serve HTML/CSS/JS static assets. When running `next build`, Next.js generates the static export into the `out` folder. For example, let's say you have the following routes: * `/` * `/blog/[id]` After running `next build`, Next.js will generate the following files: * `/out/index.html` * `/out/404.html` * `/out/blog/post-1.html` * `/out/blog/post-2.html` If you are using a static host like Nginx, you can configure rewrites from incoming requests to the correct files: server { listen 80; server_name acme.com; root /var/www/out; location / { try_files $uri $uri.html $uri/ =404; } # This is necessary when `trailingSlash: false`. # You can omit this when `trailingSlash: true`. location /blog/ { rewrite ^/blog/(.*)$ /blog/$1.html break; } error_page 404 /404.html; location = /404.html { internal; } } ## Version History | Version | Changes | | --- | --- | | `v14.0.0` | `next export` has been removed in favor of `"output": "export"` | | `v13.4.0` | App Router (Stable) adds enhanced static export support, including using React Server Components and Route Handlers. | | `v13.3.0` | `next export` is deprecated and replaced with `"output": "export"` | --- ## Page: https://nextjs.org/docs/pages/guides/upgrading #### Subscribe to our newsletter Stay updated on new releases and features, guides, and case studies. --- ## Page: https://nextjs.org/docs/pages/guides/upgrading/codemods Codemods are transformations that run on your codebase programmatically. This allows a large number of changes to be programmatically applied without having to manually go through every file. Next.js provides Codemod transformations to help upgrade your Next.js codebase when an API is updated or deprecated. ## Usage In your terminal, navigate (`cd`) into your project's folder, then run: npx @next/codemod <transform> <path> Replacing `<transform>` and `<path>` with appropriate values. * `transform` - name of transform * `path` - files or directory to transform * `--dry` Do a dry-run, no code will be edited * `--print` Prints the changed output for comparison ## Codemods ### 15.0 #### Transform App Router Route Segment Config `runtime` value from `experimental-edge` to `edge` ##### `app-dir-runtime-config-experimental-edge` > **Note**: This codemod is App Router specific. npx @next/codemod@latest app-dir-runtime-config-experimental-edge . This codemod transforms Route Segment Config `runtime` value `experimental-edge` to `edge`. For example: export const runtime = 'experimental-edge' Transforms into: export const runtime = 'edge' #### Migrate to async Dynamic APIs APIs that opted into dynamic rendering that previously supported synchronous access are now asynchronous. You can read more about this breaking change in the upgrade guide. ##### `next-async-request-api` npx @next/codemod@latest next-async-request-api . This codemod will transform dynamic APIs (`cookies()`, `headers()` and `draftMode()` from `next/headers`) that are now asynchronous to be properly awaited or wrapped with `React.use()` if applicable. When an automatic migration isn't possible, the codemod will either add a typecast (if a TypeScript file) or a comment to inform the user that it needs to be manually reviewed & updated. For example: import { cookies, headers } from 'next/headers' const token = cookies().get('token') function useToken() { const token = cookies().get('token') return token } export default function Page() { const name = cookies().get('name') } function getHeader() { return headers().get('x-foo') } Transforms into: import { use } from 'react' import { cookies, headers, type UnsafeUnwrappedCookies, type UnsafeUnwrappedHeaders, } from 'next/headers' const token = (cookies() as unknown as UnsafeUnwrappedCookies).get('token') function useToken() { const token = use(cookies()).get('token') return token } export default async function Page() { const name = (await cookies()).get('name') } function getHeader() { return (headers() as unknown as UnsafeUnwrappedHeaders).get('x-foo') } When we detect property access on the `params` or `searchParams` props in the page / route entries (`page.js`, `layout.js`, `route.js`, or `default.js`) or the `generateMetadata` / `generateViewport` APIs, it will attempt to transform the callsite from a sync to an async function, and await the property access. If it can't be made async (such as with a client component), it will use `React.use` to unwrap the promise . For example: // page.tsx export default function Page({ params, searchParams, }: { params: { slug: string } searchParams: { [key: string]: string | string[] | undefined } }) { const { value } = searchParams if (value === 'foo') { // ... } } export function generateMetadata({ params }: { params: { slug: string } }) { const { slug } = params return { title: `My Page - ${slug}`, } } Transforms into: // page.tsx export default async function Page(props: { params: Promise<{ slug: string }> searchParams: Promise<{ [key: string]: string | string[] | undefined }> }) { const searchParams = await props.searchParams const { value } = searchParams if (value === 'foo') { // ... } } export async function generateMetadata(props: { params: Promise<{ slug: string }> }) { const params = await props.params const { slug } = params return { title: `My Page - ${slug}`, } } > **Good to know:** When this codemod identifies a spot that might require manual intervention, but we aren't able to determine the exact fix, it will add a comment or typecast to the code to inform the user that it needs to be manually updated. These comments are prefixed with **@next/codemod**, and typecasts are prefixed with `UnsafeUnwrapped`. Your build will error until these comments are explicitly removed. Read more. #### Replace `geo` and `ip` properties of `NextRequest` with `@vercel/functions` ##### `next-request-geo-ip` npx @next/codemod@latest next-request-geo-ip . This codemod installs `@vercel/functions` and transforms `geo` and `ip` properties of `NextRequest` with corresponding `@vercel/functions` features. For example: import type { NextRequest } from 'next/server' export function GET(req: NextRequest) { const { geo, ip } = req } Transforms into: import type { NextRequest } from 'next/server' import { geolocation, ipAddress } from '@vercel/functions' export function GET(req: NextRequest) { const geo = geolocation(req) const ip = ipAddress(req) } ### 14.0 #### Migrate `ImageResponse` imports ##### `next-og-import` npx @next/codemod@latest next-og-import . This codemod moves transforms imports from `next/server` to `next/og` for usage of Dynamic OG Image Generation. For example: import { ImageResponse } from 'next/server' Transforms into: import { ImageResponse } from 'next/og' #### Use `viewport` export ##### `metadata-to-viewport-export` npx @next/codemod@latest metadata-to-viewport-export . This codemod migrates certain viewport metadata to `viewport` export. For example: export const metadata = { title: 'My App', themeColor: 'dark', viewport: { width: 1, }, } Transforms into: export const metadata = { title: 'My App', } export const viewport = { width: 1, themeColor: 'dark', } ### 13.2 #### Use Built-in Font ##### `built-in-next-font` npx @next/codemod@latest built-in-next-font . This codemod uninstalls the `@next/font` package and transforms `@next/font` imports into the built-in `next/font`. For example: import { Inter } from '@next/font/google' Transforms into: import { Inter } from 'next/font/google' ### 13.0 #### Rename Next Image Imports ##### `next-image-to-legacy-image` npx @next/codemod@latest next-image-to-legacy-image . Safely renames `next/image` imports in existing Next.js 10, 11, or 12 applications to `next/legacy/image` in Next.js 13. Also renames `next/future/image` to `next/image`. For example: import Image1 from 'next/image' import Image2 from 'next/future/image' export default function Home() { return ( <div> <Image1 src="/test.jpg" width="200" height="300" /> <Image2 src="/test.png" width="500" height="400" /> </div> ) } Transforms into: // 'next/image' becomes 'next/legacy/image' import Image1 from 'next/legacy/image' // 'next/future/image' becomes 'next/image' import Image2 from 'next/image' export default function Home() { return ( <div> <Image1 src="/test.jpg" width="200" height="300" /> <Image2 src="/test.png" width="500" height="400" /> </div> ) } #### Migrate to the New Image Component ##### `next-image-experimental` npx @next/codemod@latest next-image-experimental . Dangerously migrates from `next/legacy/image` to the new `next/image` by adding inline styles and removing unused props. * Removes `layout` prop and adds `style`. * Removes `objectFit` prop and adds `style`. * Removes `objectPosition` prop and adds `style`. * Removes `lazyBoundary` prop. * Removes `lazyRoot` prop. #### Remove `<a>` Tags From Link Components ##### `new-link` npx @next/codemod@latest new-link . Remove `<a>` tags inside Link Components, or add a `legacyBehavior` prop to Links that cannot be auto-fixed. For example: <Link href="/about"> <a>About</a> </Link> // transforms into <Link href="/about"> About </Link> <Link href="/about"> <a onClick={() => console.log('clicked')}>About</a> </Link> // transforms into <Link href="/about" onClick={() => console.log('clicked')}> About </Link> In cases where auto-fixing can't be applied, the `legacyBehavior` prop is added. This allows your app to keep functioning using the old behavior for that particular link. const Component = () => <a>About</a> <Link href="/about"> <Component /> </Link> // becomes <Link href="/about" legacyBehavior> <Component /> </Link> ### 11 #### Migrate from CRA ##### `cra-to-next` npx @next/codemod cra-to-next Migrates a Create React App project to Next.js; creating a Pages Router and necessary config to match behavior. Client-side only rendering is leveraged initially to prevent breaking compatibility due to `window` usage during SSR and can be enabled seamlessly to allow the gradual adoption of Next.js specific features. Please share any feedback related to this transform in this discussion. ### 10 #### Add React imports ##### `add-missing-react-import` npx @next/codemod add-missing-react-import Transforms files that do not import `React` to include the import in order for the new React JSX transform to work. For example: export default class Home extends React.Component { render() { return <div>Hello World</div> } } Transforms into: import React from 'react' export default class Home extends React.Component { render() { return <div>Hello World</div> } } ### 9 #### Transform Anonymous Components into Named Components ##### `name-default-component` npx @next/codemod name-default-component **Versions 9 and above.** Transforms anonymous components into named components to make sure they work with Fast Refresh. For example: export default function () { return <div>Hello World</div> } Transforms into: export default function MyComponent() { return <div>Hello World</div> } The component will have a camel-cased name based on the name of the file, and it also works with arrow functions. ### 8 #### Transform AMP HOC into page config ##### `withamp-to-config` npx @next/codemod withamp-to-config Transforms the `withAmp` HOC into Next.js 9 page configuration. For example: // Before import { withAmp } from 'next/amp' function Home() { return <h1>My AMP Page</h1> } export default withAmp(Home) // After export default function Home() { return <h1>My AMP Page</h1> } export const config = { amp: true, } ### 6 #### Use `withRouter` ##### `url-to-withrouter` npx @next/codemod url-to-withrouter Transforms the deprecated automatically injected `url` property on top level pages to using `withRouter` and the `router` property it injects. Read more here: https://nextjs.org/docs/messages/url-deprecated For example: import React from 'react' export default class extends React.Component { render() { const { pathname } = this.props.url return <div>Current pathname: {pathname}</div> } } import React from 'react' import { withRouter } from 'next/router' export default withRouter( class extends React.Component { render() { const { pathname } = this.props.router return <div>Current pathname: {pathname}</div> } } ) This is one case. All the cases that are transformed (and tested) can be found in the `__testfixtures__` directory. --- ## Page: https://nextjs.org/docs/pages/guides/upgrading/version-10 ## How to upgrade to version 10 There were no breaking changes between versions 9 and 10. To upgrade to version 10, run the following command: Terminal npm i next@10 Terminal yarn add next@10 Terminal pnpm up next@10 Terminal bun add next@10 > **Good to know:** If you are using TypeScript, ensure you also upgrade `@types/react` and `@types/react-dom` to their corresponding versions. --- ## Page: https://nextjs.org/docs/pages/guides/upgrading/version-11 ## How to upgrade to version 11 To upgrade to version 11, run the following command: npm i next@11 react@17 react-dom@17 yarn add next@11 react@17 react-dom@17 pnpm up next@11 react@17 react-dom@17 bun add next@11 react@17 react-dom@17 > **Good to know:** If you are using TypeScript, ensure you also upgrade `@types/react` and `@types/react-dom` to their corresponding versions. ### Webpack 5 Webpack 5 is now the default for all Next.js applications. If you did not have a custom webpack configuration, your application is already using webpack 5. If you do have a custom webpack configuration, you can refer to the Next.js webpack 5 documentation for upgrade guidance. ### Cleaning the `distDir` is now a default The build output directory (defaults to `.next`) is now cleared by default except for the Next.js caches. You can refer to the cleaning `distDir` RFC for more information. If your application was relying on this behavior previously you can disable the new default behavior by adding the `cleanDistDir: false` flag in `next.config.js`. ### `PORT` is now supported for `next dev` and `next start` Next.js 11 supports the `PORT` environment variable to set the port the application runs on. Using `-p`/`--port` is still recommended but if you were prohibited from using `-p` in any way you can now use `PORT` as an alternative: Example: PORT=4000 next start ### `next.config.js` customization to import images Next.js 11 supports static image imports with `next/image`. This new feature relies on being able to process image imports. If you previously added the `next-images` or `next-optimized-images` packages you can either move to the new built-in support using `next/image` or disable the feature: module.exports = { images: { disableStaticImages: true, }, } ### Remove `super.componentDidCatch()` from `pages/_app.js` The `next/app` component's `componentDidCatch` was deprecated in Next.js 9 as it's no longer needed and has since been a no-op. In Next.js 11, it was removed. If your `pages/_app.js` has a custom `componentDidCatch` method you can remove `super.componentDidCatch` as it is no longer needed. ### Remove `Container` from `pages/_app.js` This export was deprecated in Next.js 9 as it's no longer needed and has since been a no-op with a warning during development. In Next.js 11 it was removed. If your `pages/_app.js` imports `Container` from `next/app` you can remove `Container` as it was removed. Learn more in the documentation. ### Remove `props.url` usage from page components This property was deprecated in Next.js 4 and has since shown a warning during development. With the introduction of `getStaticProps` / `getServerSideProps` these methods already disallowed the usage of `props.url`. In Next.js 11, it was removed completely. You can learn more in the documentation. ### Remove `unsized` property on `next/image` The `unsized` property on `next/image` was deprecated in Next.js 10.0.1. You can use `layout="fill"` instead. In Next.js 11 `unsized` was removed. ### Remove `modules` property on `next/dynamic` The `modules` and `render` option for `next/dynamic` were deprecated in Next.js 9.5. This was done in order to make the `next/dynamic` API closer to `React.lazy`. In Next.js 11, the `modules` and `render` options were removed. This option hasn't been mentioned in the documentation since Next.js 8 so it's less likely that your application is using it. If your application does use `modules` and `render` you can refer to the documentation. ### Remove `Head.rewind` `Head.rewind` has been a no-op since Next.js 9.5, in Next.js 11 it was removed. You can safely remove your usage of `Head.rewind`. ### Moment.js locales excluded by default Moment.js includes translations for a lot of locales by default. Next.js now automatically excludes these locales by default to optimize bundle size for applications using Moment.js. To load a specific locale use this snippet: import moment from 'moment' import 'moment/locale/ja' moment.locale('ja') You can opt-out of this new default by adding `excludeDefaultMomentLocales: false` to `next.config.js` if you do not want the new behavior, do note it's highly recommended to not disable this new optimization as it significantly reduces the size of Moment.js. ### Update usage of `router.events` In case you're accessing `router.events` during rendering, in Next.js 11 `router.events` is no longer provided during pre-rendering. Ensure you're accessing `router.events` in `useEffect`: useEffect(() => { const handleRouteChange = (url, { shallow }) => { console.log( `App is changing to ${url} ${ shallow ? 'with' : 'without' } shallow routing` ) } router.events.on('routeChangeStart', handleRouteChange) // If the component is unmounted, unsubscribe // from the event with the `off` method: return () => { router.events.off('routeChangeStart', handleRouteChange) } }, [router]) If your application uses `router.router.events` which was an internal property that was not public please make sure to use `router.events` as well. ## React 16 to 17 React 17 introduced a new JSX Transform that brings a long-time Next.js feature to the wider React ecosystem: Not having to `import React from 'react'` when using JSX. When using React 17 Next.js will automatically use the new transform. This transform does not make the `React` variable global, which was an unintended side-effect of the previous Next.js implementation. A codemod is available to automatically fix cases where you accidentally used `React` without importing it. Most applications already use the latest version of React, with Next.js 11 the minimum React version has been updated to 17.0.2. To upgrade you can run the following command: npm install react@latest react-dom@latest Or using `yarn`: yarn add react@latest react-dom@latest --- ## Page: https://nextjs.org/docs/pages/guides/upgrading/version-12 ## How to upgrade to version 12 To upgrade to version 12, run the following command: npm i next@12 react@17 react-dom@17 eslint-config-next@12 yarn add next@12 react@17 react-dom@17 eslint-config-next@12 pnpm up next@12 react@17 react-dom@17 eslint-config-next@12 bun add next@12 react@17 react-dom@17 eslint-config-next@12 > **Good to know:** If you are using TypeScript, ensure you also upgrade `@types/react` and `@types/react-dom` to their corresponding versions. ### Upgrading to 12.2 Middleware - If you were using Middleware prior to `12.2`, please see the upgrade guide for more information. ### Upgrading to 12.0 Minimum Node.js Version - The minimum Node.js version has been bumped from `12.0.0` to `12.22.0` which is the first version of Node.js with native ES Modules support. Minimum React Version - The minimum required React version is `17.0.2`. To upgrade you can run the following command in the terminal: npm install react@latest react-dom@latest yarn add react@latest react-dom@latest pnpm update react@latest react-dom@latest bun add react@latest react-dom@latest #### SWC replacing Babel Next.js now uses the Rust-based compiler SWC to compile JavaScript/TypeScript. This new compiler is up to 17x faster than Babel when compiling individual files and up to 5x faster Fast Refresh. Next.js provides full backward compatibility with applications that have custom Babel configuration. All transformations that Next.js handles by default like styled-jsx and tree-shaking of `getStaticProps` / `getStaticPaths` / `getServerSideProps` have been ported to Rust. When an application has a custom Babel configuration, Next.js will automatically opt-out of using SWC for compiling JavaScript/Typescript and will fall back to using Babel in the same way that it was used in Next.js 11. Many of the integrations with external libraries that currently require custom Babel transformations will be ported to Rust-based SWC transforms in the near future. These include but are not limited to: * Styled Components * Emotion * Relay In order to prioritize transforms that will help you adopt SWC, please provide your `.babelrc` on this feedback thread. #### SWC replacing Terser for minification You can opt-in to replacing Terser with SWC for minifying JavaScript up to 7x faster using a flag in `next.config.js`: module.exports = { swcMinify: true, } Minification using SWC is an opt-in flag to ensure it can be tested against more real-world Next.js applications before it becomes the default in Next.js 12.1. If you have feedback about minification, please leave it on this feedback thread. #### Improvements to styled-jsx CSS parsing On top of the Rust-based compiler we've implemented a new CSS parser based on the one used for the styled-jsx Babel transform. This new parser has improved handling of CSS and now errors when invalid CSS is used that would previously slip through and cause unexpected behavior. Because of this change invalid CSS will throw an error during development and `next build`. This change only affects styled-jsx usage. #### `next/image` changed wrapping element `next/image` now renders the `<img>` inside a `<span>` instead of `<div>`. If your application has specific CSS targeting span such as `.container span`, upgrading to Next.js 12 might incorrectly match the wrapping element inside the `<Image>` component. You can avoid this by restricting the selector to a specific class such as `.container span.item` and updating the relevant component with that className, such as `<span className="item" />`. If your application has specific CSS targeting the `next/image` `<div>` tag, for example `.container div`, it may not match anymore. You can update the selector `.container span`, or preferably, add a new `<div className="wrapper">` wrapping the `<Image>` component and target that instead such as `.container .wrapper`. The `className` prop is unchanged and will still be passed to the underlying `<img>` element. See the documentation for more info. #### HMR connection now uses a WebSocket Previously, Next.js used a server-sent events connection to receive HMR events. Next.js 12 now uses a WebSocket connection. In some cases when proxying requests to the Next.js dev server, you will need to ensure the upgrade request is handled correctly. For example, in `nginx` you would need to add the following configuration: location /_next/webpack-hmr { proxy_pass http://localhost:3000/_next/webpack-hmr; proxy_http_version 1.1; proxy_set_header Upgrade $http_upgrade; proxy_set_header Connection "upgrade"; } If you are using Apache (2.x), you can add the following configuration to enable web sockets to the server. Review the port, host name and server names. <VirtualHost *:443> # ServerName yourwebsite.local ServerName "${WEBSITE_SERVER_NAME}" ProxyPass / http://localhost:3000/ ProxyPassReverse / http://localhost:3000/ # Next.js 12 uses websocket <Location /_next/webpack-hmr> RewriteEngine On RewriteCond %{QUERY_STRING} transport=websocket [NC] RewriteCond %{HTTP:Upgrade} websocket [NC] RewriteCond %{HTTP:Connection} upgrade [NC] RewriteRule /(.*) ws://localhost:3000/_next/webpack-hmr/$1 [P,L] ProxyPass ws://localhost:3000/_next/webpack-hmr retry=0 timeout=30 ProxyPassReverse ws://localhost:3000/_next/webpack-hmr </Location> </VirtualHost> For custom servers, such as `express`, you may need to use `app.all` to ensure the request is passed correctly, for example: app.all('/_next/webpack-hmr', (req, res) => { nextjsRequestHandler(req, res) }) #### Webpack 4 support has been removed If you are already using webpack 5 you can skip this section. Next.js has adopted webpack 5 as the default for compilation in Next.js 11. As communicated in the webpack 5 upgrading documentation Next.js 12 removes support for webpack 4. If your application is still using webpack 4 using the opt-out flag, you will now see an error linking to the webpack 5 upgrading documentation. #### `target` option deprecated If you do not have `target` in `next.config.js` you can skip this section. The target option has been deprecated in favor of built-in support for tracing what dependencies are needed to run a page. During `next build`, Next.js will automatically trace each page and its dependencies to determine all of the files that are needed for deploying a production version of your application. If you are currently using the `target` option set to `serverless`, please read the documentation on how to leverage the new output. --- ## Page: https://nextjs.org/docs/pages/guides/upgrading/version-13 ## How to upgrade to version 13 ## Upgrading from 12 to 13 To update to Next.js version 13, run the following command using your preferred package manager: npm i next@13 react@latest react-dom@latest eslint-config-next@13 yarn add next@13 react@latest react-dom@latest eslint-config-next@13 pnpm i next@13 react@latest react-dom@latest eslint-config-next@13 bun add next@13 react@latest react-dom@latest eslint-config-next@13 > **Good to know:** If you are using TypeScript, ensure you also upgrade `@types/react` and `@types/react-dom` to their latest versions. ### v13 Summary * The Supported Browsers have been changed to drop Internet Explorer and target modern browsers. * The minimum Node.js version has been bumped from 12.22.0 to 16.14.0, since 12.x and 14.x have reached end-of-life. * The minimum React version has been bumped from 17.0.2 to 18.2.0. * The `swcMinify` configuration property was changed from `false` to `true`. See Next.js Compiler for more info. * The `next/image` import was renamed to `next/legacy/image`. The `next/future/image` import was renamed to `next/image`. A codemod is available to safely and automatically rename your imports. * The `next/link` child can no longer be `<a>`. Add the `legacyBehavior` prop to use the legacy behavior or remove the `<a>` to upgrade. A codemod is available to automatically upgrade your code. * The `target` configuration property has been removed and superseded by Output File Tracing. Next.js 13 introduces a new `app` directory with new features and conventions. However, upgrading to Next.js 13 does **not** require using the new `app` Router. You can continue using `pages` with new features that work in both directories, such as the updated Image component, Link component, Script component, and Font optimization. ### `<Image/>` Component Next.js 12 introduced many improvements to the Image Component with a temporary import: `next/future/image`. These improvements included less client-side JavaScript, easier ways to extend and style images, better accessibility, and native browser lazy loading. Starting in Next.js 13, this new behavior is now the default for `next/image`. There are two codemods to help you migrate to the new Image Component: * next-image-to-legacy-image: This codemod will safely and automatically rename `next/image` imports to `next/legacy/image` to maintain the same behavior as Next.js 12. We recommend running this codemod to quickly update to Next.js 13 automatically. * next-image-experimental: After running the previous codemod, you can optionally run this experimental codemod to upgrade `next/legacy/image` to the new `next/image`, which will remove unused props and add inline styles. Please note this codemod is experimental and only covers static usage (such as `<Image src={img} layout="responsive" />`) but not dynamic usage (such as `<Image {...props} />`). Alternatively, you can manually update by following the migration guide and also see the legacy comparison. ### `<Link>` Component The `<Link>` Component no longer requires manually adding an `<a>` tag as a child. This behavior was added as an experimental option in version 12.2 and is now the default. In Next.js 13, `<Link>` always renders `<a>` and allows you to forward props to the underlying tag. For example: import Link from 'next/link' // Next.js 12: `<a>` has to be nested otherwise it's excluded <Link href="/about"> <a>About</a> </Link> // Next.js 13: `<Link>` always renders `<a>` under the hood <Link href="/about"> About </Link> To upgrade your links to Next.js 13, you can use the `new-link` codemod. ### `<Script>` Component The behavior of `next/script` has been updated to support both `pages` and `app`. If incrementally adopting `app`, read the upgrade guide. ### Font Optimization Previously, Next.js helped you optimize fonts by inlining font CSS. Version 13 introduces the new `next/font` module which gives you the ability to customize your font loading experience while still ensuring great performance and privacy. See Optimizing Fonts to learn how to use `next/font`. --- ## Page: https://nextjs.org/docs/pages/guides/upgrading/version-14 ## How to upgrade to version 14 ## Upgrading from 13 to 14 To update to Next.js version 14, run the following command using your preferred package manager: Terminal npm i next@next-14 react@18 react-dom@18 && npm i eslint-config-next@next-14 -D Terminal yarn add next@next-14 react@18 react-dom@18 && yarn add eslint-config-next@next-14 -D Terminal pnpm i next@next-14 react@18 react-dom@18 && pnpm i eslint-config-next@next-14 -D Terminal bun add next@next-14 react@18 react-dom@18 && bun add eslint-config-next@next-14 -D > **Good to know:** If you are using TypeScript, ensure you also upgrade `@types/react` and `@types/react-dom` to their latest versions. ### v14 Summary * The minimum Node.js version has been bumped from 16.14 to 18.17, since 16.x has reached end-of-life. * The `next export` command has been removed in favor of `output: 'export'` config. Please see the docs for more information. * The `next/server` import for `ImageResponse` was renamed to `next/og`. A codemod is available to safely and automatically rename your imports. * The `@next/font` package has been fully removed in favor of the built-in `next/font`. A codemod is available to safely and automatically rename your imports. * The WASM target for `next-swc` has been removed. --- ## Page: https://nextjs.org/docs/pages/guides/upgrading/version-9 ## How to upgrade to version 9 To upgrade to version 9, run the following command: npm i next@9 yarn add next@9 pnpm up next@9 bun add next@9 > **Good to know:** If you are using TypeScript, ensure you also upgrade `@types/react` and `@types/react-dom` to their corresponding versions. ## Production Deployment on Vercel If you previously configured `routes` in your `vercel.json` file for dynamic routes, these rules can be removed when leveraging Next.js 9's new Dynamic Routing feature. Next.js 9's dynamic routes are **automatically configured on Vercel** and do not require any `vercel.json` customization. You can read more about Dynamic Routing here. ## Check your Custom App File (`pages/_app.js`) If you previously copied the Custom `<App>` example, you may be able to remove your `getInitialProps`. Removing `getInitialProps` from `pages/_app.js` (when possible) is important to leverage new Next.js features! The following `getInitialProps` does nothing and may be removed: class MyApp extends App { // Remove me, I do nothing! static async getInitialProps({ Component, ctx }) { let pageProps = {} if (Component.getInitialProps) { pageProps = await Component.getInitialProps(ctx) } return { pageProps } } render() { // ... etc } } ## Breaking Changes ### `@zeit/next-typescript` is no longer necessary Next.js will now ignore usage `@zeit/next-typescript` and warn you to remove it. Please remove this plugin from your `next.config.js`. Remove references to `@zeit/next-typescript/babel` from your custom `.babelrc` (if present). The usage of `fork-ts-checker-webpack-plugin` should also be removed from your `next.config.js`. TypeScript Definitions are published with the `next` package, so you need to uninstall `@types/next` as they would conflict. The following types are different: > This list was created by the community to help you upgrade, if you find other differences please send a pull-request to this list to help other users. From: import { NextContext } from 'next' import { NextAppContext, DefaultAppIProps } from 'next/app' import { NextDocumentContext, DefaultDocumentIProps } from 'next/document' to import { NextPageContext } from 'next' import { AppContext, AppInitialProps } from 'next/app' import { DocumentContext, DocumentInitialProps } from 'next/document' ### The `config` key is now an export on a page You may no longer export a custom variable named `config` from a page (i.e. `export { config }` / `export const config ...`). This exported variable is now used to specify page-level Next.js configuration like Opt-in AMP and API Route features. You must rename a non-Next.js-purposed `config` export to something different. ### `next/dynamic` no longer renders "loading..." by default while loading Dynamic components will not render anything by default while loading. You can still customize this behavior by setting the `loading` property: import dynamic from 'next/dynamic' const DynamicComponentWithCustomLoading = dynamic( () => import('../components/hello2'), { loading: () => <p>Loading</p>, } ) ### `withAmp` has been removed in favor of an exported configuration object Next.js now has the concept of page-level configuration, so the `withAmp` higher-order component has been removed for consistency. This change can be **automatically migrated by running the following commands in the root of your Next.js project:** curl -L https://github.com/vercel/next-codemod/archive/master.tar.gz | tar -xz --strip=2 next-codemod-master/transforms/withamp-to-config.js npx jscodeshift -t ./withamp-to-config.js pages/**/*.js To perform this migration by hand, or view what the codemod will produce, see below: **Before** import { withAmp } from 'next/amp' function Home() { return <h1>My AMP Page</h1> } export default withAmp(Home) // or export default withAmp(Home, { hybrid: true }) **After** export default function Home() { return <h1>My AMP Page</h1> } export const config = { amp: true, // or amp: 'hybrid', } ### `next export` no longer exports pages as `index.html` Previously, exporting `pages/about.js` would result in `out/about/index.html`. This behavior has been changed to result in `out/about.html`. You can revert to the previous behavior by creating a `next.config.js` with the following content: module.exports = { trailingSlash: true, } ### `pages/api/` is treated differently Pages in `pages/api/` are now considered API Routes. Pages in this directory will no longer contain a client-side bundle. ## Deprecated Features ### `next/dynamic` has deprecated loading multiple modules at once The ability to load multiple modules at once has been deprecated in `next/dynamic` to be closer to React's implementation (`React.lazy` and `Suspense`). Updating code that relies on this behavior is relatively straightforward! We've provided an example of a before/after to help you migrate your application: **Before** import dynamic from 'next/dynamic' const HelloBundle = dynamic({ modules: () => { const components = { Hello1: () => import('../components/hello1').then((m) => m.default), Hello2: () => import('../components/hello2').then((m) => m.default), } return components }, render: (props, { Hello1, Hello2 }) => ( <div> <h1>{props.title}</h1> <Hello1 /> <Hello2 /> </div> ), }) function DynamicBundle() { return <HelloBundle title="Dynamic Bundle" /> } export default DynamicBundle **After** import dynamic from 'next/dynamic' const Hello1 = dynamic(() => import('../components/hello1')) const Hello2 = dynamic(() => import('../components/hello2')) function HelloBundle({ title }) { return ( <div> <h1>{title}</h1> <Hello1 /> <Hello2 /> </div> ) } function DynamicBundle() { return <HelloBundle title="Dynamic Bundle" /> } export default DynamicBundle --- ## Page: https://nextjs.org/docs/pages/building-your-application Next.js provides the building blocks to create flexible, full-stack web applications. The guides in **Building Your Application** explain how to use these features and how to customize your application's behavior. The sections and pages are organized sequentially, from basic to advanced, so you can follow them step-by-step when building your Next.js application. However, you can read them in any order or skip to the pages that apply to your use case. If you're new to Next.js, we recommend starting with the Routing, Rendering, Data Fetching and Styling sections, as they introduce the fundamental Next.js and web concepts to help you get started. Then, you can dive deeper into the other sections such as Optimizing and Configuring. Finally, once you're ready, checkout the Deploying and Upgrading sections. --- ## Page: https://nextjs.org/docs/pages/building-your-application/routing #### Subscribe to our newsletter Stay updated on new releases and features, guides, and case studies. --- ## Page: https://nextjs.org/docs/pages/building-your-application/routing/pages-and-layouts The Pages Router has a file-system based router built on the concept of pages. When a file is added to the `pages` directory, it's automatically available as a route. In Next.js, a **page** is a React Component exported from a `.js`, `.jsx`, `.ts`, or `.tsx` file in the `pages` directory. Each page is associated with a route based on its file name. **Example**: If you create `pages/about.js` that exports a React component like below, it will be accessible at `/about`. export default function About() { return <div>About</div> } ## Index routes The router will automatically route files named `index` to the root of the directory. * `pages/index.js` → `/` * `pages/blog/index.js` → `/blog` ## Nested routes The router supports nested files. If you create a nested folder structure, files will automatically be routed in the same way still. * `pages/blog/first-post.js` → `/blog/first-post` * `pages/dashboard/settings/username.js` → `/dashboard/settings/username` ## Pages with Dynamic Routes Next.js supports pages with dynamic routes. For example, if you create a file called `pages/posts/[id].js`, then it will be accessible at `posts/1`, `posts/2`, etc. > To learn more about dynamic routing, check the Dynamic Routing documentation. ## Layout Pattern The React model allows us to deconstruct a page into a series of components. Many of these components are often reused between pages. For example, you might have the same navigation bar and footer on every page. import Navbar from './navbar' import Footer from './footer' export default function Layout({ children }) { return ( <> <Navbar /> <main>{children}</main> <Footer /> </> ) } ## Examples ### Single Shared Layout with Custom App If you only have one layout for your entire application, you can create a Custom App and wrap your application with the layout. Since the `<Layout />` component is re-used when changing pages, its component state will be preserved (e.g. input values). import Layout from '../components/layout' export default function MyApp({ Component, pageProps }) { return ( <Layout> <Component {...pageProps} /> </Layout> ) } ### Per-Page Layouts If you need multiple layouts, you can add a property `getLayout` to your page, allowing you to return a React component for the layout. This allows you to define the layout on a _per-page basis_. Since we're returning a function, we can have complex nested layouts if desired. import Layout from '../components/layout' import NestedLayout from '../components/nested-layout' export default function Page() { return ( /** Your content */ ) } Page.getLayout = function getLayout(page) { return ( <Layout> <NestedLayout>{page}</NestedLayout> </Layout> ) } export default function MyApp({ Component, pageProps }) { // Use the layout defined at the page level, if available const getLayout = Component.getLayout ?? ((page) => page) return getLayout(<Component {...pageProps} />) } When navigating between pages, we want to _persist_ page state (input values, scroll position, etc.) for a Single-Page Application (SPA) experience. This layout pattern enables state persistence because the React component tree is maintained between page transitions. With the component tree, React can understand which elements have changed to preserve state. > **Good to know**: This process is called reconciliation, which is how React understands which elements have changed. ### With TypeScript When using TypeScript, you must first create a new type for your pages which includes a `getLayout` function. Then, you must create a new type for your `AppProps` which overrides the `Component` property to use the previously created type. import type { ReactElement } from 'react' import Layout from '../components/layout' import NestedLayout from '../components/nested-layout' import type { NextPageWithLayout } from './_app' const Page: NextPageWithLayout = () => { return <p>hello world</p> } Page.getLayout = function getLayout(page: ReactElement) { return ( <Layout> <NestedLayout>{page}</NestedLayout> </Layout> ) } export default Page import type { ReactElement, ReactNode } from 'react' import type { NextPage } from 'next' import type { AppProps } from 'next/app' export type NextPageWithLayout<P = {}, IP = P> = NextPage<P, IP> & { getLayout?: (page: ReactElement) => ReactNode } type AppPropsWithLayout = AppProps & { Component: NextPageWithLayout } export default function MyApp({ Component, pageProps }: AppPropsWithLayout) { // Use the layout defined at the page level, if available const getLayout = Component.getLayout ?? ((page) => page) return getLayout(<Component {...pageProps} />) } ### Data Fetching Inside your layout, you can fetch data on the client-side using `useEffect` or a library like SWR. Because this file is not a Page, you cannot use `getStaticProps` or `getServerSideProps` currently. import useSWR from 'swr' import Navbar from './navbar' import Footer from './footer' export default function Layout({ children }) { const { data, error } = useSWR('/api/navigation', fetcher) if (error) return <div>Failed to load</div> if (!data) return <div>Loading...</div> return ( <> <Navbar links={data.links} /> <main>{children}</main> <Footer /> </> ) } --- ## Page: https://nextjs.org/docs/pages/building-your-application/routing/dynamic-routes When you don't know the exact segment names ahead of time and want to create routes from dynamic data, you can use Dynamic Segments that are filled in at request time or prerendered at build time. ## Convention A Dynamic Segment can be created by wrapping a file or folder name in square brackets: `[segmentName]`. For example, `[id]` or `[slug]`. Dynamic Segments can be accessed from `useRouter`. ## Example For example, a blog could include the following route `pages/blog/[slug].js` where `[slug]` is the Dynamic Segment for blog posts. import { useRouter } from 'next/router' export default function Page() { const router = useRouter() return <p>Post: {router.query.slug}</p> } | Route | Example URL | `params` | | --- | --- | --- | | `pages/blog/[slug].js` | `/blog/a` | `{ slug: 'a' }` | | `pages/blog/[slug].js` | `/blog/b` | `{ slug: 'b' }` | | `pages/blog/[slug].js` | `/blog/c` | `{ slug: 'c' }` | ## Catch-all Segments Dynamic Segments can be extended to **catch-all** subsequent segments by adding an ellipsis inside the brackets `[...segmentName]`. For example, `pages/shop/[...slug].js` will match `/shop/clothes`, but also `/shop/clothes/tops`, `/shop/clothes/tops/t-shirts`, and so on. | Route | Example URL | `params` | | --- | --- | --- | | `pages/shop/[...slug].js` | `/shop/a` | `{ slug: ['a'] }` | | `pages/shop/[...slug].js` | `/shop/a/b` | `{ slug: ['a', 'b'] }` | | `pages/shop/[...slug].js` | `/shop/a/b/c` | `{ slug: ['a', 'b', 'c'] }` | ## Optional Catch-all Segments Catch-all Segments can be made **optional** by including the parameter in double square brackets: `[[...segmentName]]`. For example, `pages/shop/[[...slug]].js` will **also** match `/shop`, in addition to `/shop/clothes`, `/shop/clothes/tops`, `/shop/clothes/tops/t-shirts`. The difference between **catch-all** and **optional catch-all** segments is that with optional, the route without the parameter is also matched (`/shop` in the example above). | Route | Example URL | `params` | | --- | --- | --- | | `pages/shop/[[...slug]].js` | `/shop` | `{ slug: undefined }` | | `pages/shop/[[...slug]].js` | `/shop/a` | `{ slug: ['a'] }` | | `pages/shop/[[...slug]].js` | `/shop/a/b` | `{ slug: ['a', 'b'] }` | | `pages/shop/[[...slug]].js` | `/shop/a/b/c` | `{ slug: ['a', 'b', 'c'] }` | --- ## Page: https://nextjs.org/docs/pages/building-your-application/routing/linking-and-navigating The Next.js router allows you to do client-side route transitions between pages, similar to a single-page application. A React component called `Link` is provided to do this client-side route transition. import Link from 'next/link' function Home() { return ( <ul> <li> <Link href="/">Home</Link> </li> <li> <Link href="/about">About Us</Link> </li> <li> <Link href="/blog/hello-world">Blog Post</Link> </li> </ul> ) } export default Home The example above uses multiple links. Each one maps a path (`href`) to a known page: * `/` → `pages/index.js` * `/about` → `pages/about.js` * `/blog/hello-world` → `pages/blog/[slug].js` Any `<Link />` in the viewport (initially or through scroll) will be prefetched by default (including the corresponding data) for pages using Static Generation. The corresponding data for server-rendered routes is fetched _only when_ the `<Link />` is clicked. ## Linking to dynamic paths You can also use interpolation to create the path, which comes in handy for dynamic route segments. For example, to show a list of posts which have been passed to the component as a prop: import Link from 'next/link' function Posts({ posts }) { return ( <ul> {posts.map((post) => ( <li key={post.id}> <Link href={`/blog/${encodeURIComponent(post.slug)}`}> {post.title} </Link> </li> ))} </ul> ) } export default Posts > `encodeURIComponent` is used in the example to keep the path utf-8 compatible. Alternatively, using a URL Object: import Link from 'next/link' function Posts({ posts }) { return ( <ul> {posts.map((post) => ( <li key={post.id}> <Link href={{ pathname: '/blog/[slug]', query: { slug: post.slug }, }} > {post.title} </Link> </li> ))} </ul> ) } export default Posts Now, instead of using interpolation to create the path, we use a URL object in `href` where: * `pathname` is the name of the page in the `pages` directory. `/blog/[slug]` in this case. * `query` is an object with the dynamic segment. `slug` in this case. ## Injecting the router To access the `router` object in a React component you can use `useRouter` or `withRouter`. In general we recommend using `useRouter`. ## Imperative Routing `next/link` should be able to cover most of your routing needs, but you can also do client-side navigations without it, take a look at the documentation for `next/router`. The following example shows how to do basic page navigations with `useRouter`: import { useRouter } from 'next/router' export default function ReadMore() { const router = useRouter() return ( <button onClick={() => router.push('/about')}> Click here to read more </button> ) } ## Shallow Routing Examples * Shallow Routing Shallow routing allows you to change the URL without running data fetching methods again, that includes `getServerSideProps`, `getStaticProps`, and `getInitialProps`. You'll receive the updated `pathname` and the `query` via the `router` object (added by `useRouter` or `withRouter`), without losing state. To enable shallow routing, set the `shallow` option to `true`. Consider the following example: import { useEffect } from 'react' import { useRouter } from 'next/router' // Current URL is '/' function Page() { const router = useRouter() useEffect(() => { // Always do navigations after the first render router.push('/?counter=10', undefined, { shallow: true }) }, []) useEffect(() => { // The counter changed! }, [router.query.counter]) } export default Page The URL will get updated to `/?counter=10` and the page won't get replaced, only the state of the route is changed. You can also watch for URL changes via `componentDidUpdate` as shown below: componentDidUpdate(prevProps) { const { pathname, query } = this.props.router // verify props have changed to avoid an infinite loop if (query.counter !== prevProps.router.query.counter) { // fetch data based on the new query } } ### Caveats Shallow routing **only** works for URL changes in the current page. For example, let's assume we have another page called `pages/about.js`, and you run this: router.push('/?counter=10', '/about?counter=10', { shallow: true }) Since that's a new page, it'll unload the current page, load the new one and wait for data fetching even though we asked to do shallow routing. When shallow routing is used with middleware it will not ensure the new page matches the current page like previously done without middleware. This is due to middleware being able to rewrite dynamically and can't be verified client-side without a data fetch which is skipped with shallow, so a shallow route change must always be treated as shallow. --- ## Page: https://nextjs.org/docs/pages/building-your-application/routing/redirecting There are a few ways you can handle redirects in Next.js. This page will go through each available option, use cases, and how to manage large numbers of redirects. | API | Purpose | Where | Status Code | | --- | --- | --- | --- | | `useRouter` | Perform a client-side navigation | Components | N/A | | `redirects` in `next.config.js` | Redirect an incoming request based on a path | `next.config.js` file | 307 (Temporary) or 308 (Permanent) | | `NextResponse.redirect` | Redirect an incoming request based on a condition | Middleware | Any | ## `useRouter()` hook If you need to redirect inside a component, you can use the `push` method from the `useRouter` hook. For example: import { useRouter } from 'next/router' export default function Page() { const router = useRouter() return ( <button type="button" onClick={() => router.push('/dashboard')}> Dashboard </button> ) } > **Good to know**: > > * If you don't need to programmatically navigate a user, you should use a `<Link>` component. See the `useRouter` API reference for more information. ## `redirects` in `next.config.js` The `redirects` option in the `next.config.js` file allows you to redirect an incoming request path to a different destination path. This is useful when you change the URL structure of pages or have a list of redirects that are known ahead of time. `redirects` supports path, header, cookie, and query matching, giving you the flexibility to redirect users based on an incoming request. To use `redirects`, add the option to your `next.config.js` file: import type { NextConfig } from 'next' const nextConfig: NextConfig = { async redirects() { return [ // Basic redirect { source: '/about', destination: '/', permanent: true, }, // Wildcard path matching { source: '/blog/:slug', destination: '/news/:slug', permanent: true, }, ] }, } export default nextConfig See the `redirects` API reference for more information. > **Good to know**: > > * `redirects` can return a 307 (Temporary Redirect) or 308 (Permanent Redirect) status code with the `permanent` option. > * `redirects` may have a limit on platforms. For example, on Vercel, there's a limit of 1,024 redirects. To manage a large number of redirects (1000+), consider creating a custom solution using Middleware. See managing redirects at scale for more. > * `redirects` runs **before** Middleware. ## `NextResponse.redirect` in Middleware Middleware allows you to run code before a request is completed. Then, based on the incoming request, redirect to a different URL using `NextResponse.redirect`. This is useful if you want to redirect users based on a condition (e.g. authentication, session management, etc) or have a large number of redirects. For example, to redirect the user to a `/login` page if they are not authenticated: import { NextResponse, NextRequest } from 'next/server' import { authenticate } from 'auth-provider' export function middleware(request: NextRequest) { const isAuthenticated = authenticate(request) // If the user is authenticated, continue as normal if (isAuthenticated) { return NextResponse.next() } // Redirect to login page if not authenticated return NextResponse.redirect(new URL('/login', request.url)) } export const config = { matcher: '/dashboard/:path*', } > **Good to know**: > > * Middleware runs **after** `redirects` in `next.config.js` and **before** rendering. See the Middleware documentation for more information. ## Managing redirects at scale (advanced) To manage a large number of redirects (1000+), you may consider creating a custom solution using Middleware. This allows you to handle redirects programmatically without having to redeploy your application. To do this, you'll need to consider: 1. Creating and storing a redirect map. 2. Optimizing data lookup performance. > **Next.js Example**: See our Middleware with Bloom filter example for an implementation of the recommendations below. ### 1\. Creating and storing a redirect map A redirect map is a list of redirects that you can store in a database (usually a key-value store) or JSON file. Consider the following data structure: { "/old": { "destination": "/new", "permanent": true }, "/blog/post-old": { "destination": "/blog/post-new", "permanent": true } } In Middleware, you can read from a database such as Vercel's Edge Config or Redis, and redirect the user based on the incoming request: import { NextResponse, NextRequest } from 'next/server' import { get } from '@vercel/edge-config' type RedirectEntry = { destination: string permanent: boolean } export async function middleware(request: NextRequest) { const pathname = request.nextUrl.pathname const redirectData = await get(pathname) if (redirectData && typeof redirectData === 'string') { const redirectEntry: RedirectEntry = JSON.parse(redirectData) const statusCode = redirectEntry.permanent ? 308 : 307 return NextResponse.redirect(redirectEntry.destination, statusCode) } // No redirect found, continue without redirecting return NextResponse.next() } ### 2\. Optimizing data lookup performance Reading a large dataset for every incoming request can be slow and expensive. There are two ways you can optimize data lookup performance: * Use a database that is optimized for fast reads, such as Vercel Edge Config or Redis. * Use a data lookup strategy such as a Bloom filter to efficiently check if a redirect exists **before** reading the larger redirects file or database. Considering the previous example, you can import a generated bloom filter file into Middleware, then, check if the incoming request pathname exists in the bloom filter. If it does, forward the request to a API Routes which will check the actual file and redirect the user to the appropriate URL. This avoids importing a large redirects file into Middleware, which can slow down every incoming request. import { NextResponse, NextRequest } from 'next/server' import { ScalableBloomFilter } from 'bloom-filters' import GeneratedBloomFilter from './redirects/bloom-filter.json' type RedirectEntry = { destination: string permanent: boolean } // Initialize bloom filter from a generated JSON file const bloomFilter = ScalableBloomFilter.fromJSON(GeneratedBloomFilter as any) export async function middleware(request: NextRequest) { // Get the path for the incoming request const pathname = request.nextUrl.pathname // Check if the path is in the bloom filter if (bloomFilter.has(pathname)) { // Forward the pathname to the Route Handler const api = new URL( `/api/redirects?pathname=${encodeURIComponent(request.nextUrl.pathname)}`, request.nextUrl.origin ) try { // Fetch redirect data from the Route Handler const redirectData = await fetch(api) if (redirectData.ok) { const redirectEntry: RedirectEntry | undefined = await redirectData.json() if (redirectEntry) { // Determine the status code const statusCode = redirectEntry.permanent ? 308 : 307 // Redirect to the destination return NextResponse.redirect(redirectEntry.destination, statusCode) } } } catch (error) { console.error(error) } } // No redirect found, continue the request without redirecting return NextResponse.next() } Then, in the API Route: import type { NextApiRequest, NextApiResponse } from 'next' import redirects from '@/app/redirects/redirects.json' type RedirectEntry = { destination: string permanent: boolean } export default function handler(req: NextApiRequest, res: NextApiResponse) { const pathname = req.query.pathname if (!pathname) { return res.status(400).json({ message: 'Bad Request' }) } // Get the redirect entry from the redirects.json file const redirect = (redirects as Record<string, RedirectEntry>)[pathname] // Account for bloom filter false positives if (!redirect) { return res.status(400).json({ message: 'No redirect' }) } // Return the redirect entry return res.json(redirect) } > **Good to know:** > > * To generate a bloom filter, you can use a library like `bloom-filters`. > * You should validate requests made to your Route Handler to prevent malicious requests. --- ## Page: https://nextjs.org/docs/pages/building-your-application/routing/custom-app Next.js uses the `App` component to initialize pages. You can override it and control the page initialization and: * Create a shared layout between page changes * Inject additional data into pages * Add global CSS ## Usage To override the default `App`, create the file `pages/_app` as shown below: import type { AppProps } from 'next/app' export default function MyApp({ Component, pageProps }: AppProps) { return <Component {...pageProps} /> } The `Component` prop is the active `page`, so whenever you navigate between routes, `Component` will change to the new `page`. Therefore, any props you send to `Component` will be received by the `page`. `pageProps` is an object with the initial props that were preloaded for your page by one of our data fetching methods, otherwise it's an empty object. > **Good to know**: > > * If your app is running and you added a custom `App`, you'll need to restart the development server. Only required if `pages/_app.js` didn't exist before. > * `App` does not support Next.js Data Fetching methods like `getStaticProps` or `getServerSideProps`. ## `getInitialProps` with `App` Using `getInitialProps` in `App` will disable Automatic Static Optimization for pages without `getStaticProps`. **We do not recommend using this pattern.** Instead, consider incrementally adopting the App Router, which allows you to more easily fetch data for pages and layouts. import App, { AppContext, AppInitialProps, AppProps } from 'next/app' type AppOwnProps = { example: string } export default function MyApp({ Component, pageProps, example, }: AppProps & AppOwnProps) { return ( <> <p>Data: {example}</p> <Component {...pageProps} /> </> ) } MyApp.getInitialProps = async ( context: AppContext ): Promise<AppOwnProps & AppInitialProps> => { const ctx = await App.getInitialProps(context) return { ...ctx, example: 'data' } } --- ## Page: https://nextjs.org/docs/pages/building-your-application/routing/custom-document A custom `Document` can update the `<html>` and `<body>` tags used to render a Page. To override the default `Document`, create the file `pages/_document` as shown below: pages/\_document.tsx import { Html, Head, Main, NextScript } from 'next/document' export default function Document() { return ( <Html lang="en"> <Head /> <body> <Main /> <NextScript /> </body> </Html> ) } > **Good to know**: > > * `_document` is only rendered on the server, so event handlers like `onClick` cannot be used in this file. > * `<Html>`, `<Head />`, `<Main />` and `<NextScript />` are required for the page to be properly rendered. ## Caveats * The `<Head />` component used in `_document` is not the same as `next/head`. The `<Head />` component used here should only be used for any `<head>` code that is common for all pages. For all other cases, such as `<title>` tags, we recommend using `next/head` in your pages or components. * React components outside of `<Main />` will not be initialized by the browser. Do _not_ add application logic here or custom CSS (like `styled-jsx`). If you need shared components in all your pages (like a menu or a toolbar), read Layouts instead. * `Document` currently does not support Next.js Data Fetching methods like `getStaticProps` or `getServerSideProps`. ## Customizing `renderPage` Customizing `renderPage` is advanced and only needed for libraries like CSS-in-JS to support server-side rendering. This is not needed for built-in `styled-jsx` support. **We do not recommend using this pattern.** Instead, consider incrementally adopting the App Router, which allows you to more easily fetch data for pages and layouts. pages/\_document.tsx import Document, { Html, Head, Main, NextScript, DocumentContext, DocumentInitialProps, } from 'next/document' class MyDocument extends Document { static async getInitialProps( ctx: DocumentContext ): Promise<DocumentInitialProps> { const originalRenderPage = ctx.renderPage // Run the React rendering logic synchronously ctx.renderPage = () => originalRenderPage({ // Useful for wrapping the whole react tree enhanceApp: (App) => App, // Useful for wrapping in a per-page basis enhanceComponent: (Component) => Component, }) // Run the parent `getInitialProps`, it now includes the custom `renderPage` const initialProps = await Document.getInitialProps(ctx) return initialProps } render() { return ( <Html lang="en"> <Head /> <body> <Main /> <NextScript /> </body> </Html> ) } } export default MyDocument > **Good to know**: > > * `getInitialProps` in `_document` is not called during client-side transitions. > * The `ctx` object for `_document` is equivalent to the one received in `getInitialProps`, with the addition of `renderPage`. --- ## Page: https://nextjs.org/docs/pages/building-your-application/routing/api-routes Examples * API Routes Request Helpers * API Routes with GraphQL * API Routes with REST * API Routes with CORS > **Good to know**: If you are using the App Router, you can use Server Components or Route Handlers instead of API Routes. API routes provide a solution to build a **public API** with Next.js. Any file inside the folder `pages/api` is mapped to `/api/*` and will be treated as an API endpoint instead of a `page`. They are server-side only bundles and won't increase your client-side bundle size. For example, the following API route returns a JSON response with a status code of `200`: import type { NextApiRequest, NextApiResponse } from 'next' type ResponseData = { message: string } export default function handler( req: NextApiRequest, res: NextApiResponse<ResponseData> ) { res.status(200).json({ message: 'Hello from Next.js!' }) } > **Good to know**: > > * API Routes do not specify CORS headers, meaning they are **same-origin only** by default. You can customize such behavior by wrapping the request handler with the CORS request helpers. * API Routes can't be used with static exports. However, Route Handlers in the App Router can. > * API Routes will be affected by `pageExtensions` configuration in `next.config.js`. ## Parameters export default function handler(req: NextApiRequest, res: NextApiResponse) { // ... } * `req`: An instance of http.IncomingMessage * `res`: An instance of http.ServerResponse ## HTTP Methods To handle different HTTP methods in an API route, you can use `req.method` in your request handler, like so: import type { NextApiRequest, NextApiResponse } from 'next' export default function handler(req: NextApiRequest, res: NextApiResponse) { if (req.method === 'POST') { // Process a POST request } else { // Handle any other HTTP method } } ## Request Helpers API Routes provide built-in request helpers which parse the incoming request (`req`): * `req.cookies` - An object containing the cookies sent by the request. Defaults to `{}` * `req.query` - An object containing the query string. Defaults to `{}` * `req.body` - An object containing the body parsed by `content-type`, or `null` if no body was sent ### Custom config Every API Route can export a `config` object to change the default configuration, which is the following: export const config = { api: { bodyParser: { sizeLimit: '1mb', }, }, // Specifies the maximum allowed duration for this function to execute (in seconds) maxDuration: 5, } `bodyParser` is automatically enabled. If you want to consume the body as a `Stream` or with `raw-body`, you can set this to `false`. One use case for disabling the automatic `bodyParsing` is to allow you to verify the raw body of a **webhook** request, for example from GitHub. export const config = { api: { bodyParser: false, }, } `bodyParser.sizeLimit` is the maximum size allowed for the parsed body, in any format supported by bytes, like so: export const config = { api: { bodyParser: { sizeLimit: '500kb', }, }, } `externalResolver` is an explicit flag that tells the server that this route is being handled by an external resolver like _express_ or _connect_. Enabling this option disables warnings for unresolved requests. export const config = { api: { externalResolver: true, }, } `responseLimit` is automatically enabled, warning when an API Routes' response body is over 4MB. If you are not using Next.js in a serverless environment, and understand the performance implications of not using a CDN or dedicated media host, you can set this limit to `false`. export const config = { api: { responseLimit: false, }, } `responseLimit` can also take the number of bytes or any string format supported by `bytes`, for example `1000`, `'500kb'` or `'3mb'`. This value will be the maximum response size before a warning is displayed. Default is 4MB. (see above) export const config = { api: { responseLimit: '8mb', }, } ## Response Helpers The Server Response object, (often abbreviated as `res`) includes a set of Express.js-like helper methods to improve the developer experience and increase the speed of creating new API endpoints. The included helpers are: * `res.status(code)` - A function to set the status code. `code` must be a valid HTTP status code * `res.json(body)` - Sends a JSON response. `body` must be a serializable object * `res.send(body)` - Sends the HTTP response. `body` can be a `string`, an `object` or a `Buffer` * `res.redirect([status,] path)` - Redirects to a specified path or URL. `status` must be a valid HTTP status code. If not specified, `status` defaults to "307" "Temporary redirect". * `res.revalidate(urlPath)` - Revalidate a page on demand using `getStaticProps`. `urlPath` must be a `string`. ### Setting the status code of a response When sending a response back to the client, you can set the status code of the response. The following example sets the status code of the response to `200` (`OK`) and returns a `message` property with the value of `Hello from Next.js!` as a JSON response: import type { NextApiRequest, NextApiResponse } from 'next' type ResponseData = { message: string } export default function handler( req: NextApiRequest, res: NextApiResponse<ResponseData> ) { res.status(200).json({ message: 'Hello from Next.js!' }) } ### Sending a JSON response When sending a response back to the client you can send a JSON response, this must be a serializable object. In a real world application you might want to let the client know the status of the request depending on the result of the requested endpoint. The following example sends a JSON response with the status code `200` (`OK`) and the result of the async operation. It's contained in a try catch block to handle any errors that may occur, with the appropriate status code and error message caught and sent back to the client: import type { NextApiRequest, NextApiResponse } from 'next' export default async function handler( req: NextApiRequest, res: NextApiResponse ) { try { const result = await someAsyncOperation() res.status(200).json({ result }) } catch (err) { res.status(500).json({ error: 'failed to load data' }) } } ### Sending a HTTP response Sending an HTTP response works the same way as when sending a JSON response. The only difference is that the response body can be a `string`, an `object` or a `Buffer`. The following example sends a HTTP response with the status code `200` (`OK`) and the result of the async operation. import type { NextApiRequest, NextApiResponse } from 'next' export default async function handler( req: NextApiRequest, res: NextApiResponse ) { try { const result = await someAsyncOperation() res.status(200).send({ result }) } catch (err) { res.status(500).send({ error: 'failed to fetch data' }) } } ### Redirects to a specified path or URL Taking a form as an example, you may want to redirect your client to a specified path or URL once they have submitted the form. The following example redirects the client to the `/` path if the form is successfully submitted: import type { NextApiRequest, NextApiResponse } from 'next' export default async function handler( req: NextApiRequest, res: NextApiResponse ) { const { name, message } = req.body try { await handleFormInputAsync({ name, message }) res.redirect(307, '/') } catch (err) { res.status(500).send({ error: 'Failed to fetch data' }) } } ### Adding TypeScript types You can make your API Routes more type-safe by importing the `NextApiRequest` and `NextApiResponse` types from `next`, in addition to those, you can also type your response data: import type { NextApiRequest, NextApiResponse } from 'next' type ResponseData = { message: string } export default function handler( req: NextApiRequest, res: NextApiResponse<ResponseData> ) { res.status(200).json({ message: 'Hello from Next.js!' }) } > **Good to know**: The body of `NextApiRequest` is `any` because the client may include any payload. You should validate the type/shape of the body at runtime before using it. ## Dynamic API Routes API Routes support dynamic routes, and follow the same file naming rules used for `pages/`. import type { NextApiRequest, NextApiResponse } from 'next' export default function handler(req: NextApiRequest, res: NextApiResponse) { const { pid } = req.query res.end(`Post: ${pid}`) } Now, a request to `/api/post/abc` will respond with the text: `Post: abc`. ### Catch all API routes API Routes can be extended to catch all paths by adding three dots (`...`) inside the brackets. For example: * `pages/api/post/[...slug].js` matches `/api/post/a`, but also `/api/post/a/b`, `/api/post/a/b/c` and so on. > **Good to know**: You can use names other than `slug`, such as: `[...param]` Matched parameters will be sent as a query parameter (`slug` in the example) to the page, and it will always be an array, so, the path `/api/post/a` will have the following `query` object: { "slug": ["a"] } And in the case of `/api/post/a/b`, and any other matching path, new parameters will be added to the array, like so: { "slug": ["a", "b"] } For example: import type { NextApiRequest, NextApiResponse } from 'next' export default function handler(req: NextApiRequest, res: NextApiResponse) { const { slug } = req.query res.end(`Post: ${slug.join(', ')}`) } Now, a request to `/api/post/a/b/c` will respond with the text: `Post: a, b, c`. ### Optional catch all API routes Catch all routes can be made optional by including the parameter in double brackets (`[[...slug]]`). For example, `pages/api/post/[[...slug]].js` will match `/api/post`, `/api/post/a`, `/api/post/a/b`, and so on. The main difference between catch all and optional catch all routes is that with optional, the route without the parameter is also matched (`/api/post` in the example above). The `query` objects are as follows: { } // GET `/api/post` (empty object) { "slug": ["a"] } // `GET /api/post/a` (single-element array) { "slug": ["a", "b"] } // `GET /api/post/a/b` (multi-element array) ### Caveats * Predefined API routes take precedence over dynamic API routes, and dynamic API routes over catch all API routes. Take a look at the following examples: * `pages/api/post/create.js` - Will match `/api/post/create` * `pages/api/post/[pid].js` - Will match `/api/post/1`, `/api/post/abc`, etc. But not `/api/post/create` * `pages/api/post/[...slug].js` - Will match `/api/post/1/2`, `/api/post/a/b/c`, etc. But not `/api/post/create`, `/api/post/abc` ## Edge API Routes If you would like to use API Routes with the Edge Runtime, we recommend incrementally adopting the App Router and using Route Handlers instead. The Route Handlers function signature is isomorphic, meaning you can use the same function for both Edge and Node.js runtimes. --- ## Page: https://nextjs.org/docs/pages/building-your-application/routing/custom-error ## 404 Page A 404 page may be accessed very often. Server-rendering an error page for every visit increases the load of the Next.js server. This can result in increased costs and slow experiences. To avoid the above pitfalls, Next.js provides a static 404 page by default without having to add any additional files. ### Customizing The 404 Page To create a custom 404 page you can create a `pages/404.js` file. This file is statically generated at build time. export default function Custom404() { return <h1>404 - Page Not Found</h1> } > **Good to know**: You can use `getStaticProps` inside this page if you need to fetch data at build time. ## 500 Page Server-rendering an error page for every visit adds complexity to responding to errors. To help users get responses to errors as fast as possible, Next.js provides a static 500 page by default without having to add any additional files. ### Customizing The 500 Page To customize the 500 page you can create a `pages/500.js` file. This file is statically generated at build time. export default function Custom500() { return <h1>500 - Server-side error occurred</h1> } > **Good to know**: You can use `getStaticProps` inside this page if you need to fetch data at build time. ### More Advanced Error Page Customizing 500 errors are handled both client-side and server-side by the `Error` component. If you wish to override it, define the file `pages/_error.js` and add the following code: function Error({ statusCode }) { return ( <p> {statusCode ? `An error ${statusCode} occurred on server` : 'An error occurred on client'} </p> ) } Error.getInitialProps = ({ res, err }) => { const statusCode = res ? res.statusCode : err ? err.statusCode : 404 return { statusCode } } export default Error > `pages/_error.js` is only used in production. In development you’ll get an error with the call stack to know where the error originated from. ### Reusing the built-in error page If you want to render the built-in error page you can by importing the `Error` component: import Error from 'next/error' export async function getServerSideProps() { const res = await fetch('https://api.github.com/repos/vercel/next.js') const errorCode = res.ok ? false : res.status const json = await res.json() return { props: { errorCode, stars: json.stargazers_count }, } } export default function Page({ errorCode, stars }) { if (errorCode) { return <Error statusCode={errorCode} /> } return <div>Next stars: {stars}</div> } The `Error` component also takes `title` as a property if you want to pass in a text message along with a `statusCode`. If you have a custom `Error` component be sure to import that one instead. `next/error` exports the default component used by Next.js. ### Caveats * `Error` does not currently support Next.js Data Fetching methods like `getStaticProps` or `getServerSideProps`. * `_error`, like `_app`, is a reserved pathname. `_error` is used to define the customized layouts and behaviors of the error pages. `/_error` will render 404 when accessed directly via routing or rendering in a custom server. --- ## Page: https://nextjs.org/docs/pages/building-your-application/routing/internationalization Examples * i18n routing Next.js has built-in support for internationalized (i18n) routing since `v10.0.0`. You can provide a list of locales, the default locale, and domain-specific locales and Next.js will automatically handle the routing. The i18n routing support is currently meant to complement existing i18n library solutions like `react-intl`, `react-i18next`, `lingui`, `rosetta`, `next-intl`, `next-translate`, `next-multilingual`, `tolgee`, `paraglide-next`, `next-intlayer` and others by streamlining the routes and locale parsing. ## Getting started To get started, add the `i18n` config to your `next.config.js` file. Locales are UTS Locale Identifiers, a standardized format for defining locales. Generally a Locale Identifier is made up of a language, region, and script separated by a dash: `language-region-script`. The region and script are optional. An example: * `en-US` - English as spoken in the United States * `nl-NL` - Dutch as spoken in the Netherlands * `nl` - Dutch, no specific region If user locale is `nl-BE` and it is not listed in your configuration, they will be redirected to `nl` if available, or to the default locale otherwise. If you don't plan to support all regions of a country, it is therefore a good practice to include country locales that will act as fallbacks. module.exports = { i18n: { // These are all the locales you want to support in // your application locales: ['en-US', 'fr', 'nl-NL'], // This is the default locale you want to be used when visiting // a non-locale prefixed path e.g. `/hello` defaultLocale: 'en-US', // This is a list of locale domains and the default locale they // should handle (these are only required when setting up domain routing) // Note: subdomains must be included in the domain value to be matched e.g. "fr.example.com". domains: [ { domain: 'example.com', defaultLocale: 'en-US', }, { domain: 'example.nl', defaultLocale: 'nl-NL', }, { domain: 'example.fr', defaultLocale: 'fr', // an optional http field can also be used to test // locale domains locally with http instead of https http: true, }, ], }, } ## Locale Strategies There are two locale handling strategies: Sub-path Routing and Domain Routing. ### Sub-path Routing Sub-path Routing puts the locale in the url path. module.exports = { i18n: { locales: ['en-US', 'fr', 'nl-NL'], defaultLocale: 'en-US', }, } With the above configuration `en-US`, `fr`, and `nl-NL` will be available to be routed to, and `en-US` is the default locale. If you have a `pages/blog.js` the following urls would be available: * `/blog` * `/fr/blog` * `/nl-nl/blog` The default locale does not have a prefix. ### Domain Routing By using domain routing you can configure locales to be served from different domains: module.exports = { i18n: { locales: ['en-US', 'fr', 'nl-NL', 'nl-BE'], defaultLocale: 'en-US', domains: [ { // Note: subdomains must be included in the domain value to be matched // e.g. www.example.com should be used if that is the expected hostname domain: 'example.com', defaultLocale: 'en-US', }, { domain: 'example.fr', defaultLocale: 'fr', }, { domain: 'example.nl', defaultLocale: 'nl-NL', // specify other locales that should be redirected // to this domain locales: ['nl-BE'], }, ], }, } For example if you have `pages/blog.js` the following urls will be available: * `example.com/blog` * `www.example.com/blog` * `example.fr/blog` * `example.nl/blog` * `example.nl/nl-BE/blog` ## Automatic Locale Detection When a user visits the application root (generally `/`), Next.js will try to automatically detect which locale the user prefers based on the `Accept-Language` header and the current domain. If a locale other than the default locale is detected, the user will be redirected to either: * **When using Sub-path Routing:** The locale prefixed path * **When using Domain Routing:** The domain with that locale specified as the default When using Domain Routing, if a user with the `Accept-Language` header `fr;q=0.9` visits `example.com`, they will be redirected to `example.fr` since that domain handles the `fr` locale by default. When using Sub-path Routing, the user would be redirected to `/fr`. ### Prefixing the Default Locale With Next.js 12 and Middleware, we can add a prefix to the default locale with a workaround. For example, here's a `next.config.js` file with support for a few languages. Note the `"default"` locale has been added intentionally. module.exports = { i18n: { locales: ['default', 'en', 'de', 'fr'], defaultLocale: 'default', localeDetection: false, }, trailingSlash: true, } Next, we can use Middleware to add custom routing rules: import { NextRequest, NextResponse } from 'next/server' const PUBLIC_FILE = /\.(.*)$/ export async function middleware(req: NextRequest) { if ( req.nextUrl.pathname.startsWith('/_next') || req.nextUrl.pathname.includes('/api/') || PUBLIC_FILE.test(req.nextUrl.pathname) ) { return } if (req.nextUrl.locale === 'default') { const locale = req.cookies.get('NEXT_LOCALE')?.value || 'en' return NextResponse.redirect( new URL(`/${locale}${req.nextUrl.pathname}${req.nextUrl.search}`, req.url) ) } } This Middleware skips adding the default prefix to API Routes and public files like fonts or images. If a request is made to the default locale, we redirect to our prefix `/en`. ### Disabling Automatic Locale Detection The automatic locale detection can be disabled with: module.exports = { i18n: { localeDetection: false, }, } When `localeDetection` is set to `false` Next.js will no longer automatically redirect based on the user's preferred locale and will only provide locale information detected from either the locale based domain or locale path as described above. ## Accessing the locale information You can access the locale information via the Next.js router. For example, using the `useRouter()` hook the following properties are available: * `locale` contains the currently active locale. * `locales` contains all configured locales. * `defaultLocale` contains the configured default locale. When pre-rendering pages with `getStaticProps` or `getServerSideProps`, the locale information is provided in the context provided to the function. When leveraging `getStaticPaths`, the configured locales are provided in the context parameter of the function under `locales` and the configured defaultLocale under `defaultLocale`. ## Transition between locales You can use `next/link` or `next/router` to transition between locales. For `next/link`, a `locale` prop can be provided to transition to a different locale from the currently active one. If no `locale` prop is provided, the currently active `locale` is used during client-transitions. For example: import Link from 'next/link' export default function IndexPage(props) { return ( <Link href="/another" locale="fr"> To /fr/another </Link> ) } When using the `next/router` methods directly, you can specify the `locale` that should be used via the transition options. For example: import { useRouter } from 'next/router' export default function IndexPage(props) { const router = useRouter() return ( <div onClick={() => { router.push('/another', '/another', { locale: 'fr' }) }} > to /fr/another </div> ) } Note that to handle switching only the `locale` while preserving all routing information such as dynamic route query values or hidden href query values, you can provide the `href` parameter as an object: import { useRouter } from 'next/router' const router = useRouter() const { pathname, asPath, query } = router // change just the locale and maintain all other route information including href's query router.push({ pathname, query }, asPath, { locale: nextLocale }) See here for more information on the object structure for `router.push`. If you have a `href` that already includes the locale you can opt-out of automatically handling the locale prefixing: import Link from 'next/link' export default function IndexPage(props) { return ( <Link href="/fr/another" locale={false}> To /fr/another </Link> ) } ## Leveraging the `NEXT_LOCALE` cookie Next.js allows setting a `NEXT_LOCALE=the-locale` cookie, which takes priority over the accept-language header. This cookie can be set using a language switcher and then when a user comes back to the site it will leverage the locale specified in the cookie when redirecting from `/` to the correct locale location. For example, if a user prefers the locale `fr` in their accept-language header but a `NEXT_LOCALE=en` cookie is set the `en` locale when visiting `/` the user will be redirected to the `en` locale location until the cookie is removed or expired. ## Search Engine Optimization Since Next.js knows what language the user is visiting it will automatically add the `lang` attribute to the `<html>` tag. Next.js doesn't know about variants of a page so it's up to you to add the `hreflang` meta tags using `next/head`. You can learn more about `hreflang` in the Google Webmasters documentation. ## How does this work with Static Generation? > Note that Internationalized Routing does not integrate with `output: 'export'` as it does not leverage the Next.js routing layer. Hybrid Next.js applications that do not use `output: 'export'` are fully supported. ### Dynamic Routes and `getStaticProps` Pages For pages using `getStaticProps` with Dynamic Routes, all locale variants of the page desired to be prerendered need to be returned from `getStaticPaths`. Along with the `params` object returned for `paths`, you can also return a `locale` field specifying which locale you want to render. For example: export const getStaticPaths = ({ locales }) => { return { paths: [ // if no `locale` is provided only the defaultLocale will be generated { params: { slug: 'post-1' }, locale: 'en-US' }, { params: { slug: 'post-1' }, locale: 'fr' }, ], fallback: true, } } For Automatically Statically Optimized and non-dynamic `getStaticProps` pages, **a version of the page will be generated for each locale**. This is important to consider because it can increase build times depending on how many locales are configured inside `getStaticProps`. For example, if you have 50 locales configured with 10 non-dynamic pages using `getStaticProps`, this means `getStaticProps` will be called 500 times. 50 versions of the 10 pages will be generated during each build. To decrease the build time of dynamic pages with `getStaticProps`, use a `fallback` mode. This allows you to return only the most popular paths and locales from `getStaticPaths` for prerendering during the build. Then, Next.js will build the remaining pages at runtime as they are requested. ### Automatically Statically Optimized Pages For pages that are automatically statically optimized, a version of the page will be generated for each locale. ### Non-dynamic getStaticProps Pages For non-dynamic `getStaticProps` pages, a version is generated for each locale like above. `getStaticProps` is called with each `locale` that is being rendered. If you would like to opt-out of a certain locale from being pre-rendered, you can return `notFound: true` from `getStaticProps` and this variant of the page will not be generated. export async function getStaticProps({ locale }) { // Call an external API endpoint to get posts. // You can use any data fetching library const res = await fetch(`https://.../posts?locale=${locale}`) const posts = await res.json() if (posts.length === 0) { return { notFound: true, } } // By returning { props: posts }, the Blog component // will receive `posts` as a prop at build time return { props: { posts, }, } } ## Limits for the i18n config * `locales`: 100 total locales * `domains`: 100 total locale domain items > **Good to know**: These limits have been added initially to prevent potential performance issues at build time. You can workaround these limits with custom routing using Middleware in Next.js 12. --- ## Page: https://nextjs.org/docs/pages/building-your-application/routing/middleware Middleware allows you to run code before a request is completed. Then, based on the incoming request, you can modify the response by rewriting, redirecting, modifying the request or response headers, or responding directly. Middleware runs before cached content and routes are matched. See Matching Paths for more details. ## Use Cases Some common scenarios where Middleware is effective include: * Quick redirects after reading parts of the incoming request * Rewriting to different pages based on A/B tests or experiments * Modifying headers for all pages or a subset of pages Middleware is _not_ a good fit for: * Slow data fetching * Session management ## Convention Use the file `middleware.ts` (or `.js`) in the root of your project to define Middleware. For example, at the same level as `pages` or `app`, or inside `src` if applicable. > **Note**: While only one `middleware.ts` file is supported per project, you can still organize your middleware logic modularly. Break out middleware functionalities into separate `.ts` or `.js` files and import them into your main `middleware.ts` file. This allows for cleaner management of route-specific middleware, aggregated in the `middleware.ts` for centralized control. By enforcing a single middleware file, it simplifies configuration, prevents potential conflicts, and optimizes performance by avoiding multiple middleware layers. ## Example import { NextResponse } from 'next/server' import type { NextRequest } from 'next/server' // This function can be marked `async` if using `await` inside export function middleware(request: NextRequest) { return NextResponse.redirect(new URL('/home', request.url)) } // See "Matching Paths" below to learn more export const config = { matcher: '/about/:path*', } ## Matching Paths Middleware will be invoked for **every route in your project**. Given this, it's crucial to use matchers to precisely target or exclude specific routes. The following is the execution order: 1. `headers` from `next.config.js` 2. `redirects` from `next.config.js` 3. Middleware (`rewrites`, `redirects`, etc.) 4. `beforeFiles` (`rewrites`) from `next.config.js` 5. Filesystem routes (`public/`, `_next/static/`, `pages/`, `app/`, etc.) 6. `afterFiles` (`rewrites`) from `next.config.js` 7. Dynamic Routes (`/blog/[slug]`) 8. `fallback` (`rewrites`) from `next.config.js` There are two ways to define which paths Middleware will run on: 1. Custom matcher config 2. Conditional statements ### Matcher `matcher` allows you to filter Middleware to run on specific paths. export const config = { matcher: '/about/:path*', } You can match a single path or multiple paths with an array syntax: export const config = { matcher: ['/about/:path*', '/dashboard/:path*'], } The `matcher` config allows full regex so matching like negative lookaheads or character matching is supported. An example of a negative lookahead to match all except specific paths can be seen here: export const config = { matcher: [ /* * Match all request paths except for the ones starting with: * - api (API routes) * - _next/static (static files) * - _next/image (image optimization files) * - favicon.ico, sitemap.xml, robots.txt (metadata files) */ '/((?!api|_next/static|_next/image|favicon.ico|sitemap.xml|robots.txt).*)', ], } You can also bypass Middleware for certain requests by using the `missing` or `has` arrays, or a combination of both: export const config = { matcher: [ /* * Match all request paths except for the ones starting with: * - api (API routes) * - _next/static (static files) * - _next/image (image optimization files) * - favicon.ico, sitemap.xml, robots.txt (metadata files) */ { source: '/((?!api|_next/static|_next/image|favicon.ico|sitemap.xml|robots.txt).*)', missing: [ { type: 'header', key: 'next-router-prefetch' }, { type: 'header', key: 'purpose', value: 'prefetch' }, ], }, { source: '/((?!api|_next/static|_next/image|favicon.ico|sitemap.xml|robots.txt).*)', has: [ { type: 'header', key: 'next-router-prefetch' }, { type: 'header', key: 'purpose', value: 'prefetch' }, ], }, { source: '/((?!api|_next/static|_next/image|favicon.ico|sitemap.xml|robots.txt).*)', has: [{ type: 'header', key: 'x-present' }], missing: [{ type: 'header', key: 'x-missing', value: 'prefetch' }], }, ], } > **Good to know**: The `matcher` values need to be constants so they can be statically analyzed at build-time. Dynamic values such as variables will be ignored. Configured matchers: 1. MUST start with `/` 2. Can include named parameters: `/about/:path` matches `/about/a` and `/about/b` but not `/about/a/c` 3. Can have modifiers on named parameters (starting with `:`): `/about/:path*` matches `/about/a/b/c` because `*` is _zero or more_. `?` is _zero or one_ and `+` _one or more_ 4. Can use regular expression enclosed in parenthesis: `/about/(.*)` is the same as `/about/:path*` Read more details on path-to-regexp documentation. > **Good to know**: For backward compatibility, Next.js always considers `/public` as `/public/index`. Therefore, a matcher of `/public/:path` will match. ### Conditional Statements import { NextResponse } from 'next/server' import type { NextRequest } from 'next/server' export function middleware(request: NextRequest) { if (request.nextUrl.pathname.startsWith('/about')) { return NextResponse.rewrite(new URL('/about-2', request.url)) } if (request.nextUrl.pathname.startsWith('/dashboard')) { return NextResponse.rewrite(new URL('/dashboard/user', request.url)) } } ## NextResponse The `NextResponse` API allows you to: * `redirect` the incoming request to a different URL * `rewrite` the response by displaying a given URL * Set request headers for API Routes, `getServerSideProps`, and `rewrite` destinations * Set response cookies * Set response headers To produce a response from Middleware, you can: 1. `rewrite` to a route (Page or Edge API Route) that produces a response 2. return a `NextResponse` directly. See Producing a Response ## Using Cookies Cookies are regular headers. On a `Request`, they are stored in the `Cookie` header. On a `Response` they are in the `Set-Cookie` header. Next.js provides a convenient way to access and manipulate these cookies through the `cookies` extension on `NextRequest` and `NextResponse`. 1. For incoming requests, `cookies` comes with the following methods: `get`, `getAll`, `set`, and `delete` cookies. You can check for the existence of a cookie with `has` or remove all cookies with `clear`. 2. For outgoing responses, `cookies` have the following methods `get`, `getAll`, `set`, and `delete`. import { NextResponse } from 'next/server' import type { NextRequest } from 'next/server' export function middleware(request: NextRequest) { // Assume a "Cookie:nextjs=fast" header to be present on the incoming request // Getting cookies from the request using the `RequestCookies` API let cookie = request.cookies.get('nextjs') console.log(cookie) // => { name: 'nextjs', value: 'fast', Path: '/' } const allCookies = request.cookies.getAll() console.log(allCookies) // => [{ name: 'nextjs', value: 'fast' }] request.cookies.has('nextjs') // => true request.cookies.delete('nextjs') request.cookies.has('nextjs') // => false // Setting cookies on the response using the `ResponseCookies` API const response = NextResponse.next() response.cookies.set('vercel', 'fast') response.cookies.set({ name: 'vercel', value: 'fast', path: '/', }) cookie = response.cookies.get('vercel') console.log(cookie) // => { name: 'vercel', value: 'fast', Path: '/' } // The outgoing response will have a `Set-Cookie:vercel=fast;path=/` header. return response } You can set request and response headers using the `NextResponse` API (setting _request_ headers is available since Next.js v13.0.0). import { NextResponse } from 'next/server' import type { NextRequest } from 'next/server' export function middleware(request: NextRequest) { // Clone the request headers and set a new header `x-hello-from-middleware1` const requestHeaders = new Headers(request.headers) requestHeaders.set('x-hello-from-middleware1', 'hello') // You can also set request headers in NextResponse.next const response = NextResponse.next({ request: { // New request headers headers: requestHeaders, }, }) // Set a new response header `x-hello-from-middleware2` response.headers.set('x-hello-from-middleware2', 'hello') return response } > **Good to know**: Avoid setting large headers as it might cause 431 Request Header Fields Too Large error depending on your backend web server configuration. ### CORS You can set CORS headers in Middleware to allow cross-origin requests, including simple and preflighted requests. import { NextRequest, NextResponse } from 'next/server' const allowedOrigins = ['https://acme.com', 'https://my-app.org'] const corsOptions = { 'Access-Control-Allow-Methods': 'GET, POST, PUT, DELETE, OPTIONS', 'Access-Control-Allow-Headers': 'Content-Type, Authorization', } export function middleware(request: NextRequest) { // Check the origin from the request const origin = request.headers.get('origin') ?? '' const isAllowedOrigin = allowedOrigins.includes(origin) // Handle preflighted requests const isPreflight = request.method === 'OPTIONS' if (isPreflight) { const preflightHeaders = { ...(isAllowedOrigin && { 'Access-Control-Allow-Origin': origin }), ...corsOptions, } return NextResponse.json({}, { headers: preflightHeaders }) } // Handle simple requests const response = NextResponse.next() if (isAllowedOrigin) { response.headers.set('Access-Control-Allow-Origin', origin) } Object.entries(corsOptions).forEach(([key, value]) => { response.headers.set(key, value) }) return response } export const config = { matcher: '/api/:path*', } ## Producing a Response You can respond from Middleware directly by returning a `Response` or `NextResponse` instance. (This is available since Next.js v13.1.0) import type { NextRequest } from 'next/server' import { isAuthenticated } from '@lib/auth' // Limit the middleware to paths starting with `/api/` export const config = { matcher: '/api/:function*', } export function middleware(request: NextRequest) { // Call our authentication function to check the request if (!isAuthenticated(request)) { // Respond with JSON indicating an error message return Response.json( { success: false, message: 'authentication failed' }, { status: 401 } ) } } ### `waitUntil` and `NextFetchEvent` The `NextFetchEvent` object extends the native `FetchEvent` object, and includes the `waitUntil()` method. The `waitUntil()` method takes a promise as an argument, and extends the lifetime of the Middleware until the promise settles. This is useful for performing work in the background. import { NextResponse } from 'next/server' import type { NextFetchEvent, NextRequest } from 'next/server' export function middleware(req: NextRequest, event: NextFetchEvent) { event.waitUntil( fetch('https://my-analytics-platform.com', { method: 'POST', body: JSON.stringify({ pathname: req.nextUrl.pathname }), }) ) return NextResponse.next() } ## Advanced Middleware Flags In `v13.1` of Next.js two additional flags were introduced for middleware, `skipMiddlewareUrlNormalize` and `skipTrailingSlashRedirect` to handle advanced use cases. `skipTrailingSlashRedirect` disables Next.js redirects for adding or removing trailing slashes. This allows custom handling inside middleware to maintain the trailing slash for some paths but not others, which can make incremental migrations easier. module.exports = { skipTrailingSlashRedirect: true, } const legacyPrefixes = ['/docs', '/blog'] export default async function middleware(req) { const { pathname } = req.nextUrl if (legacyPrefixes.some((prefix) => pathname.startsWith(prefix))) { return NextResponse.next() } // apply trailing slash handling if ( !pathname.endsWith('/') && !pathname.match(/((?!\.well-known(?:\/.*)?)(?:[^/]+\/)*[^/]+\.\w+)/) ) { return NextResponse.redirect( new URL(`${req.nextUrl.pathname}/`, req.nextUrl) ) } } `skipMiddlewareUrlNormalize` allows for disabling the URL normalization in Next.js to make handling direct visits and client-transitions the same. In some advanced cases, this option provides full control by using the original URL. module.exports = { skipMiddlewareUrlNormalize: true, } export default async function middleware(req) { const { pathname } = req.nextUrl // GET /_next/data/build-id/hello.json console.log(pathname) // with the flag this now /_next/data/build-id/hello.json // without the flag this would be normalized to /hello } ## Unit Testing (experimental) Starting in Next.js 15.1, the `next/experimental/testing/server` package contains utilities to help unit test middleware files. Unit testing middleware can help ensure that it's only run on desired paths and that custom routing logic works as intended before code reaches production. The `unstable_doesMiddlewareMatch` function can be used to assert whether middleware will run for the provided URL, headers, and cookies. import { unstable_doesMiddlewareMatch } from 'next/experimental/testing/server' expect( unstable_doesMiddlewareMatch({ config, nextConfig, url: '/test', }) ).toEqual(false) The entire middleware function can also be tested. import { isRewrite, getRewrittenUrl } from 'next/experimental/testing/server' const request = new NextRequest('https://nextjs.org/docs') const response = await middleware(request) expect(isRewrite(response)).toEqual(true) expect(getRewrittenUrl(response)).toEqual('https://other-domain.com/docs') // getRedirectUrl could also be used if the response were a redirect ## Runtime Middleware defaults to using the Edge runtime. As of v15.2 (canary), we have experimental support for using the Node.js runtime. To enable, add the flag to your `next.config` file: import type { NextConfig } from 'next' const nextConfig: NextConfig = { experimental: { nodeMiddleware: true, }, } export default nextConfig Then in your middleware file, set the runtime to `nodejs` in the `config` object: export const config = { runtime: 'nodejs', } > **Note**: This feature is not yet recommended for production use. Therefore, Next.js will throw an error unless you are using the next@canary release instead of the stable release. ## Version History | Version | Changes | | --- | --- | | `v15.2.0` | Middleware can now use the Node.js runtime (experimental) | | `v13.1.0` | Advanced Middleware flags added | | `v13.0.0` | Middleware can modify request headers, response headers, and send responses | | `v12.2.0` | Middleware is stable, please see the upgrade guide | | `v12.0.9` | Enforce absolute URLs in Edge Runtime (PR) | | `v12.0.0` | Middleware (Beta) added | --- ## Page: https://nextjs.org/docs/pages/building-your-application/rendering By default, Next.js **pre-renders** every page. This means that Next.js generates HTML for each page in advance, instead of having it all done by client-side JavaScript. Pre-rendering can result in better performance and SEO. Each generated HTML is associated with minimal JavaScript code necessary for that page. When a page is loaded by the browser, its JavaScript code runs and makes the page fully interactive (this process is called hydration in React). ### Pre-rendering Next.js has two forms of pre-rendering: **Static Generation** and **Server-side Rendering**. The difference is in **when** it generates the HTML for a page. * Static Generation: The HTML is generated at **build time** and will be reused on each request. * Server-side Rendering: The HTML is generated on **each request**. Importantly, Next.js lets you choose which pre-rendering form you'd like to use for each page. You can create a "hybrid" Next.js app by using Static Generation for most pages and using Server-side Rendering for others. We recommend using Static Generation over Server-side Rendering for performance reasons. Statically generated pages can be cached by CDN with no extra configuration to boost performance. However, in some cases, Server-side Rendering might be the only option. You can also use client-side data fetching along with Static Generation or Server-side Rendering. That means some parts of a page can be rendered entirely by clientside JavaScript. To learn more, take a look at the Data Fetching documentation. --- ## Page: https://nextjs.org/docs/pages/building-your-application/rendering/server-side-rendering > Also referred to as "SSR" or "Dynamic Rendering". If a page uses **Server-side Rendering**, the page HTML is generated on **each request**. To use Server-side Rendering for a page, you need to `export` an `async` function called `getServerSideProps`. This function will be called by the server on every request. For example, suppose that your page needs to pre-render frequently updated data (fetched from an external API). You can write `getServerSideProps` which fetches this data and passes it to `Page` like below: export default function Page({ data }) { // Render data... } // This gets called on every request export async function getServerSideProps() { // Fetch data from external API const res = await fetch(`https://.../data`) const data = await res.json() // Pass data to the page via props return { props: { data } } } As you can see, `getServerSideProps` is similar to `getStaticProps`, but the difference is that `getServerSideProps` is run on every request instead of on build time. To learn more about how `getServerSideProps` works, check out our Data Fetching documentation. Previous Rendering Next Static Site Generation (SSG) Was this helpful? supported. --- ## Page: https://nextjs.org/docs/pages/building-your-application/rendering/static-site-generation Examples * Agility CMS Example (Demo) * Builder.io Example (Demo) * ButterCMS Example (Demo) * Contentful Example (Demo) * Cosmic Example (Demo) * DatoCMS Example (Demo) * DotCMS Example (Demo) * Drupal Example (Demo) * Enterspeed Example (Demo) * GraphCMS Example (Demo) * Keystone Example (Demo) * Kontent.ai Example (Demo) * Makeswift Example (Demo) * Plasmic Example (Demo) * Prepr Example (Demo) * Prismic Example (Demo) * Sanity Example (Demo) * Sitecore XM Cloud Example (Demo) * Storyblok Example (Demo) * Strapi Example (Demo) * TakeShape Example (Demo) * Tina Example (Demo) * Umbraco Example (Demo) * Umbraco Heartcore Example (Demo) * Webiny Example (Demo) * WordPress Example (Demo) * Blog Starter Example (Demo) * Static Tweet (Demo) If a page uses **Static Generation**, the page HTML is generated at **build time**. That means in production, the page HTML is generated when you run `next build`. This HTML will then be reused on each request. It can be cached by a CDN. In Next.js, you can statically generate pages **with or without data**. Let's take a look at each case. ### Static Generation without data By default, Next.js pre-renders pages using Static Generation without fetching data. Here's an example: function About() { return <div>About</div> } export default About Note that this page does not need to fetch any external data to be pre-rendered. In cases like this, Next.js generates a single HTML file per page during build time. ### Static Generation with data Some pages require fetching external data for pre-rendering. There are two scenarios, and one or both might apply. In each case, you can use these functions that Next.js provides: 1. Your page **content** depends on external data: Use `getStaticProps`. 2. Your page **paths** depend on external data: Use `getStaticPaths` (usually in addition to `getStaticProps`). #### Scenario 1: Your page content depends on external data **Example**: Your blog page might need to fetch the list of blog posts from a CMS (content management system). // TODO: Need to fetch `posts` (by calling some API endpoint) // before this page can be pre-rendered. export default function Blog({ posts }) { return ( <ul> {posts.map((post) => ( <li>{post.title}</li> ))} </ul> ) } To fetch this data on pre-render, Next.js allows you to `export` an `async` function called `getStaticProps` from the same file. This function gets called at build time and lets you pass fetched data to the page's `props` on pre-render. export default function Blog({ posts }) { // Render posts... } // This function gets called at build time export async function getStaticProps() { // Call an external API endpoint to get posts const res = await fetch('https://.../posts') const posts = await res.json() // By returning { props: { posts } }, the Blog component // will receive `posts` as a prop at build time return { props: { posts, }, } } To learn more about how `getStaticProps` works, check out the Data Fetching documentation. #### Scenario 2: Your page paths depend on external data Next.js allows you to create pages with **dynamic routes**. For example, you can create a file called `pages/posts/[id].js` to show a single blog post based on `id`. This will allow you to show a blog post with `id: 1` when you access `posts/1`. > To learn more about dynamic routing, check the Dynamic Routing documentation. However, which `id` you want to pre-render at build time might depend on external data. **Example**: suppose that you've only added one blog post (with `id: 1`) to the database. In this case, you'd only want to pre-render `posts/1` at build time. Later, you might add the second post with `id: 2`. Then you'd want to pre-render `posts/2` as well. So your page **paths** that are pre-rendered depend on external data. To handle this, Next.js lets you `export` an `async` function called `getStaticPaths` from a dynamic page (`pages/posts/[id].js` in this case). This function gets called at build time and lets you specify which paths you want to pre-render. // This function gets called at build time export async function getStaticPaths() { // Call an external API endpoint to get posts const res = await fetch('https://.../posts') const posts = await res.json() // Get the paths we want to pre-render based on posts const paths = posts.map((post) => ({ params: { id: post.id }, })) // We'll pre-render only these paths at build time. // { fallback: false } means other routes should 404. return { paths, fallback: false } } Also in `pages/posts/[id].js`, you need to export `getStaticProps` so that you can fetch the data about the post with this `id` and use it to pre-render the page: export default function Post({ post }) { // Render post... } export async function getStaticPaths() { // ... } // This also gets called at build time export async function getStaticProps({ params }) { // params contains the post `id`. // If the route is like /posts/1, then params.id is 1 const res = await fetch(`https://.../posts/${params.id}`) const post = await res.json() // Pass post data to the page via props return { props: { post } } } To learn more about how `getStaticPaths` works, check out the Data Fetching documentation. ### When should I use Static Generation? We recommend using **Static Generation** (with and without data) whenever possible because your page can be built once and served by CDN, which makes it much faster than having a server render the page on every request. You can use Static Generation for many types of pages, including: * Marketing pages * Blog posts and portfolios * E-commerce product listings * Help and documentation You should ask yourself: "Can I pre-render this page **ahead** of a user's request?" If the answer is yes, then you should choose Static Generation. On the other hand, Static Generation is **not** a good idea if you cannot pre-render a page ahead of a user's request. Maybe your page shows frequently updated data, and the page content changes on every request. In cases like this, you can do one of the following: * Use Static Generation with **Client-side data fetching:** You can skip pre-rendering some parts of a page and then use client-side JavaScript to populate them. To learn more about this approach, check out the Data Fetching documentation. * Use **Server-Side Rendering:** Next.js pre-renders a page on each request. It will be slower because the page cannot be cached by a CDN, but the pre-rendered page will always be up-to-date. We'll talk about this approach below. --- ## Page: https://nextjs.org/docs/pages/building-your-application/rendering/automatic-static-optimization Next.js automatically determines that a page is static (can be prerendered) if it has no blocking data requirements. This determination is made by the absence of `getServerSideProps` and `getInitialProps` in the page. This feature allows Next.js to emit hybrid applications that contain **both server-rendered and statically generated pages**. > **Good to know**: Statically generated pages are still reactive. Next.js will hydrate your application client-side to give it full interactivity. One of the main benefits of this feature is that optimized pages require no server-side computation, and can be instantly streamed to the end-user from multiple CDN locations. The result is an _ultra fast_ loading experience for your users. ## How it works If `getServerSideProps` or `getInitialProps` is present in a page, Next.js will switch to render the page on-demand, per-request (meaning Server-Side Rendering). If the above is not the case, Next.js will **statically optimize** your page automatically by prerendering the page to static HTML. During prerendering, the router's `query` object will be empty since we do not have `query` information to provide during this phase. After hydration, Next.js will trigger an update to your application to provide the route parameters in the `query` object. The cases where the query will be updated after hydration triggering another render are: * The page is a dynamic-route. * The page has query values in the URL. * Rewrites are configured in your `next.config.js` since these can have parameters that may need to be parsed and provided in the `query`. To be able to distinguish if the query is fully updated and ready for use, you can leverage the `isReady` field on `next/router`. > **Good to know**: Parameters added with dynamic routes to a page that's using `getStaticProps` will always be available inside the `query` object. `next build` will emit `.html` files for statically optimized pages. For example, the result for the page `pages/about.js` would be: .next/server/pages/about.html And if you add `getServerSideProps` to the page, it will then be JavaScript, like so: .next/server/pages/about.js ## Caveats * If you have a custom `App` with `getInitialProps` then this optimization will be turned off in pages without Static Generation. * If you have a custom `Document` with `getInitialProps` be sure you check if `ctx.req` is defined before assuming the page is server-side rendered. `ctx.req` will be `undefined` for pages that are prerendered. * Avoid using the `asPath` value on `next/router` in the rendering tree until the router's `isReady` field is `true`. Statically optimized pages only know `asPath` on the client and not the server, so using it as a prop may lead to mismatch errors. The `active-class-name` example demonstrates one way to use `asPath` as a prop. --- ## Page: https://nextjs.org/docs/pages/building-your-application/rendering/client-side-rendering In Client-Side Rendering (CSR) with React, the browser downloads a minimal HTML page and the JavaScript needed for the page. The JavaScript is then used to update the DOM and render the page. When the application is first loaded, the user may notice a slight delay before they can see the full page, this is because the page isn't fully rendered until all the JavaScript is downloaded, parsed, and executed. After the page has been loaded for the first time, navigating to other pages on the same website is typically faster, as only necessary data needs to be fetched, and JavaScript can re-render parts of the page without requiring a full page refresh. In Next.js, there are two ways you can implement client-side rendering: 1. Using React's `useEffect()` hook inside your pages instead of the server-side rendering methods (`getStaticProps` and `getServerSideProps`). 2. Using a data fetching library like SWR or TanStack Query to fetch data on the client (recommended). Here's an example of using `useEffect()` inside a Next.js page: import React, { useState, useEffect } from 'react' export function Page() { const [data, setData] = useState(null) useEffect(() => { const fetchData = async () => { const response = await fetch('https://api.example.com/data') if (!response.ok) { throw new Error(`HTTP error! status: ${response.status}`) } const result = await response.json() setData(result) } fetchData().catch((e) => { // handle the error as needed console.error('An error occurred while fetching the data: ', e) }) }, []) return <p>{data ? `Your data: ${data}` : 'Loading...'}</p> } In the example above, the component starts by rendering `Loading...`. Then, once the data is fetched, it re-renders and displays the data. Although fetching data in a `useEffect` is a pattern you may see in older React Applications, we recommend using a data-fetching library for better performance, caching, optimistic updates, and more. Here's a minimum example using SWR to fetch data on the client: import useSWR from 'swr' export function Page() { const { data, error, isLoading } = useSWR( 'https://api.example.com/data', fetcher ) if (error) return <p>Failed to load.</p> if (isLoading) return <p>Loading...</p> return <p>Your Data: {data}</p> } > **Good to know**: > > Keep in mind that CSR can impact SEO. Some search engine crawlers might not execute JavaScript and therefore only see the initial empty or loading state of your application. It can also lead to performance issues for users with slower internet connections or devices, as they need to wait for all the JavaScript to load and run before they can see the full page. Next.js promotes a hybrid approach that allows you to use a combination of server-side rendering, static site generation, and client-side rendering, **depending on the needs of each page** in your application. In the App Router, you can also use Loading UI with Suspense to show a loading indicator while the page is being rendered. --- ## Page: https://nextjs.org/docs/pages/building-your-application/rendering/edge-and-nodejs-runtimes #### Subscribe to our newsletter Stay updated on new releases and features, guides, and case studies. --- ## Page: https://nextjs.org/docs/pages/building-your-application/data-fetching #### Subscribe to our newsletter Stay updated on new releases and features, guides, and case studies. --- ## Page: https://nextjs.org/docs/pages/building-your-application/data-fetching/get-static-props If you export a function called `getStaticProps` (Static Site Generation) from a page, Next.js will pre-render this page at build time using the props returned by `getStaticProps`. import type { InferGetStaticPropsType, GetStaticProps } from 'next' type Repo = { name: string stargazers_count: number } export const getStaticProps = (async (context) => { const res = await fetch('https://api.github.com/repos/vercel/next.js') const repo = await res.json() return { props: { repo } } }) satisfies GetStaticProps<{ repo: Repo }> export default function Page({ repo, }: InferGetStaticPropsType<typeof getStaticProps>) { return repo.stargazers_count } > Note that irrespective of rendering type, any `props` will be passed to the page component and can be viewed on the client-side in the initial HTML. This is to allow the page to be hydrated correctly. Make sure that you don't pass any sensitive information that shouldn't be available on the client in `props`. The `getStaticProps` API reference covers all parameters and props that can be used with `getStaticProps`. ## When should I use getStaticProps? You should use `getStaticProps` if: * The data required to render the page is available at build time ahead of a user’s request * The data comes from a headless CMS * The page must be pre-rendered (for SEO) and be very fast — `getStaticProps` generates `HTML` and `JSON` files, both of which can be cached by a CDN for performance * The data can be publicly cached (not user-specific). This condition can be bypassed in certain specific situation by using a Middleware to rewrite the path. ## When does getStaticProps run `getStaticProps` always runs on the server and never on the client. You can validate code written inside `getStaticProps` is removed from the client-side bundle with this tool. * `getStaticProps` always runs during `next build` * `getStaticProps` runs in the background when using `fallback: true` * `getStaticProps` is called before initial render when using `fallback: blocking` * `getStaticProps` runs in the background when using `revalidate` * `getStaticProps` runs on-demand in the background when using `revalidate()` When combined with Incremental Static Regeneration, `getStaticProps` will run in the background while the stale page is being revalidated, and the fresh page served to the browser. `getStaticProps` does not have access to the incoming request (such as query parameters or HTTP headers) as it generates static HTML. If you need access to the request for your page, consider using Middleware in addition to `getStaticProps`. ## Using getStaticProps to fetch data from a CMS The following example shows how you can fetch a list of blog posts from a CMS. // posts will be populated at build time by getStaticProps() export default function Blog({ posts }) { return ( <ul> {posts.map((post) => ( <li>{post.title}</li> ))} </ul> ) } // This function gets called at build time on server-side. // It won't be called on client-side, so you can even do // direct database queries. export async function getStaticProps() { // Call an external API endpoint to get posts. // You can use any data fetching library const res = await fetch('https://.../posts') const posts = await res.json() // By returning { props: { posts } }, the Blog component // will receive `posts` as a prop at build time return { props: { posts, }, } } The `getStaticProps` API reference covers all parameters and props that can be used with `getStaticProps`. ## Write server-side code directly As `getStaticProps` runs only on the server-side, it will never run on the client-side. It won’t even be included in the JS bundle for the browser, so you can write direct database queries without them being sent to browsers. This means that instead of fetching an **API route** from `getStaticProps` (that itself fetches data from an external source), you can write the server-side code directly in `getStaticProps`. Take the following example. An API route is used to fetch some data from a CMS. That API route is then called directly from `getStaticProps`. This produces an additional call, reducing performance. Instead, the logic for fetching the data from the CMS can be shared by using a `lib/` directory. Then it can be shared with `getStaticProps`. // The following function is shared // with getStaticProps and API routes // from a `lib/` directory export async function loadPosts() { // Call an external API endpoint to get posts const res = await fetch('https://.../posts/') const data = await res.json() return data } // pages/blog.js import { loadPosts } from '../lib/load-posts' // This function runs only on the server side export async function getStaticProps() { // Instead of fetching your `/api` route you can call the same // function directly in `getStaticProps` const posts = await loadPosts() // Props returned will be passed to the page component return { props: { posts } } } Alternatively, if you are **not** using API routes to fetch data, then the `fetch()` API _can_ be used directly in `getStaticProps` to fetch data. To verify what Next.js eliminates from the client-side bundle, you can use the next-code-elimination tool. ## Statically generates both HTML and JSON When a page with `getStaticProps` is pre-rendered at build time, in addition to the page HTML file, Next.js generates a JSON file holding the result of running `getStaticProps`. This JSON file will be used in client-side routing through `next/link` or `next/router`. When you navigate to a page that’s pre-rendered using `getStaticProps`, Next.js fetches this JSON file (pre-computed at build time) and uses it as the props for the page component. This means that client-side page transitions will **not** call `getStaticProps` as only the exported JSON is used. When using Incremental Static Generation, `getStaticProps` will be executed in the background to generate the JSON needed for client-side navigation. You may see this in the form of multiple requests being made for the same page, however, this is intended and has no impact on end-user performance. ## Where can I use getStaticProps `getStaticProps` can only be exported from a **page**. You **cannot** export it from non-page files, `_app`, `_document`, or `_error`. One of the reasons for this restriction is that React needs to have all the required data before the page is rendered. Also, you must use export `getStaticProps` as a standalone function — it will **not** work if you add `getStaticProps` as a property of the page component. > **Good to know**: if you have created a custom app, ensure you are passing the `pageProps` to the page component as shown in the linked document, otherwise the props will be empty. ## Runs on every request in development In development (`next dev`), `getStaticProps` will be called on every request. ## Preview Mode You can temporarily bypass static generation and render the page at **request time** instead of build time using **Preview Mode**. For example, you might be using a headless CMS and want to preview drafts before they're published. --- ## Page: https://nextjs.org/docs/pages/building-your-application/data-fetching/get-static-paths If a page has Dynamic Routes and uses `getStaticProps`, it needs to define a list of paths to be statically generated. When you export a function called `getStaticPaths` (Static Site Generation) from a page that uses dynamic routes, Next.js will statically pre-render all the paths specified by `getStaticPaths`. import type { InferGetStaticPropsType, GetStaticProps, GetStaticPaths, } from 'next' type Repo = { name: string stargazers_count: number } export const getStaticPaths = (async () => { return { paths: [ { params: { name: 'next.js', }, }, // See the "paths" section below ], fallback: true, // false or "blocking" } }) satisfies GetStaticPaths export const getStaticProps = (async (context) => { const res = await fetch('https://api.github.com/repos/vercel/next.js') const repo = await res.json() return { props: { repo } } }) satisfies GetStaticProps<{ repo: Repo }> export default function Page({ repo, }: InferGetStaticPropsType<typeof getStaticProps>) { return repo.stargazers_count } The `getStaticPaths` API reference covers all parameters and props that can be used with `getStaticPaths`. ## When should I use getStaticPaths? You should use `getStaticPaths` if you’re statically pre-rendering pages that use dynamic routes and: * The data comes from a headless CMS * The data comes from a database * The data comes from the filesystem * The data can be publicly cached (not user-specific) * The page must be pre-rendered (for SEO) and be very fast — `getStaticProps` generates `HTML` and `JSON` files, both of which can be cached by a CDN for performance ## When does getStaticPaths run `getStaticPaths` will only run during build in production, it will not be called during runtime. You can validate code written inside `getStaticPaths` is removed from the client-side bundle with this tool. ### How does getStaticProps run with regards to getStaticPaths * `getStaticProps` runs during `next build` for any `paths` returned during build * `getStaticProps` runs in the background when using `fallback: true` * `getStaticProps` is called before initial render when using `fallback: blocking` ## Where can I use getStaticPaths * `getStaticPaths` **must** be used with `getStaticProps` * You **cannot** use `getStaticPaths` with `getServerSideProps` * You can export `getStaticPaths` from a Dynamic Route that also uses `getStaticProps` * You **cannot** export `getStaticPaths` from non-page file (e.g. your `components` folder) * You must export `getStaticPaths` as a standalone function, and not a property of the page component ## Runs on every request in development In development (`next dev`), `getStaticPaths` will be called on every request. ## Generating paths on-demand `getStaticPaths` allows you to control which pages are generated during the build instead of on-demand with `fallback`. Generating more pages during a build will cause slower builds. You can defer generating all pages on-demand by returning an empty array for `paths`. This can be especially helpful when deploying your Next.js application to multiple environments. For example, you can have faster builds by generating all pages on-demand for previews (but not production builds). This is helpful for sites with hundreds/thousands of static pages. export async function getStaticPaths() { // When this is true (in preview environments) don't // prerender any static pages // (faster builds, but slower initial page load) if (process.env.SKIP_BUILD_STATIC_GENERATION) { return { paths: [], fallback: 'blocking', } } // Call an external API endpoint to get posts const res = await fetch('https://.../posts') const posts = await res.json() // Get the paths we want to prerender based on posts // In production environments, prerender all pages // (slower builds, but faster initial page load) const paths = posts.map((post) => ({ params: { id: post.id }, })) // { fallback: false } means other routes should 404 return { paths, fallback: false } } --- ## Page: https://nextjs.org/docs/pages/building-your-application/data-fetching/forms-and-mutations Forms enable you to create and update data in web applications. Next.js provides a powerful way to handle form submissions and data mutations using **API Routes**. > **Good to know:** > > * We will soon recommend incrementally adopting the App Router and using Server Actions for handling form submissions and data mutations. Server Actions allow you to define asynchronous server functions that can be called directly from your components, without needing to manually create an API Route. > * API Routes do not specify CORS headers, meaning they are same-origin only by default. > * Since API Routes run on the server, we're able to use sensitive values (like API keys) through Environment Variables without exposing them to the client. This is critical for the security of your application. ## Examples ### Server-only form With the Pages Router, you need to manually create API endpoints to handle securely mutating data on the server. import type { NextApiRequest, NextApiResponse } from 'next' export default async function handler( req: NextApiRequest, res: NextApiResponse ) { const data = req.body const id = await createItem(data) res.status(200).json({ id }) } Then, call the API Route from the client with an event handler: import { FormEvent } from 'react' export default function Page() { async function onSubmit(event: FormEvent<HTMLFormElement>) { event.preventDefault() const formData = new FormData(event.currentTarget) const response = await fetch('/api/submit', { method: 'POST', body: formData, }) // Handle response if necessary const data = await response.json() // ... } return ( <form onSubmit={onSubmit}> <input type="text" name="name" /> <button type="submit">Submit</button> </form> ) } ## Form validation We recommend using HTML validation like `required` and `type="email"` for basic client-side form validation. For more advanced server-side validation, you can use a schema validation library like zod to validate the form fields before mutating the data: import type { NextApiRequest, NextApiResponse } from 'next' import { z } from 'zod' const schema = z.object({ // ... }) export default async function handler( req: NextApiRequest, res: NextApiResponse ) { const parsed = schema.parse(req.body) // ... } ### Error handling You can use React state to show an error message when a form submission fails: import React, { useState, FormEvent } from 'react' export default function Page() { const [isLoading, setIsLoading] = useState<boolean>(false) const [error, setError] = useState<string | null>(null) async function onSubmit(event: FormEvent<HTMLFormElement>) { event.preventDefault() setIsLoading(true) setError(null) // Clear previous errors when a new request starts try { const formData = new FormData(event.currentTarget) const response = await fetch('/api/submit', { method: 'POST', body: formData, }) if (!response.ok) { throw new Error('Failed to submit the data. Please try again.') } // Handle response if necessary const data = await response.json() // ... } catch (error) { // Capture the error message to display to the user setError(error.message) console.error(error) } finally { setIsLoading(false) } } return ( <div> {error && <div style={{ color: 'red' }}>{error}</div>} <form onSubmit={onSubmit}> <input type="text" name="name" /> <button type="submit" disabled={isLoading}> {isLoading ? 'Loading...' : 'Submit'} </button> </form> </div> ) } ## Displaying loading state You can use React state to show a loading state when a form is submitting on the server: import React, { useState, FormEvent } from 'react' export default function Page() { const [isLoading, setIsLoading] = useState<boolean>(false) async function onSubmit(event: FormEvent<HTMLFormElement>) { event.preventDefault() setIsLoading(true) // Set loading to true when the request starts try { const formData = new FormData(event.currentTarget) const response = await fetch('/api/submit', { method: 'POST', body: formData, }) // Handle response if necessary const data = await response.json() // ... } catch (error) { // Handle error if necessary console.error(error) } finally { setIsLoading(false) // Set loading to false when the request completes } } return ( <form onSubmit={onSubmit}> <input type="text" name="name" /> <button type="submit" disabled={isLoading}> {isLoading ? 'Loading...' : 'Submit'} </button> </form> ) } ### Redirecting If you would like to redirect the user to a different route after a mutation, you can `redirect` to any absolute or relative URL: import type { NextApiRequest, NextApiResponse } from 'next' export default async function handler( req: NextApiRequest, res: NextApiResponse ) { const id = await addPost() res.redirect(307, `/post/${id}`) } ### Setting cookies You can set cookies inside an API Route using the `setHeader` method on the response: import type { NextApiRequest, NextApiResponse } from 'next' export default async function handler( req: NextApiRequest, res: NextApiResponse ) { res.setHeader('Set-Cookie', 'username=lee; Path=/; HttpOnly') res.status(200).send('Cookie has been set.') } ### Reading cookies You can read cookies inside an API Route using the `cookies` request helper: import type { NextApiRequest, NextApiResponse } from 'next' export default async function handler( req: NextApiRequest, res: NextApiResponse ) { const auth = req.cookies.authorization // ... } ### Deleting cookies You can delete cookies inside an API Route using the `setHeader` method on the response: import type { NextApiRequest, NextApiResponse } from 'next' export default async function handler( req: NextApiRequest, res: NextApiResponse ) { res.setHeader('Set-Cookie', 'username=; Path=/; HttpOnly; Max-Age=0') res.status(200).send('Cookie has been deleted.') } --- ## Page: https://nextjs.org/docs/pages/building-your-application/data-fetching/get-server-side-props `getServerSideProps` is a Next.js function that can be used to fetch data and render the contents of a page at request time. ## Example You can use `getServerSideProps` by exporting it from a Page Component. The example below shows how you can fetch data from a 3rd party API in `getServerSideProps`, and pass the data to the page as props: import type { InferGetServerSidePropsType, GetServerSideProps } from 'next' type Repo = { name: string stargazers_count: number } export const getServerSideProps = (async () => { // Fetch data from external API const res = await fetch('https://api.github.com/repos/vercel/next.js') const repo: Repo = await res.json() // Pass data to the page via props return { props: { repo } } }) satisfies GetServerSideProps<{ repo: Repo }> export default function Page({ repo, }: InferGetServerSidePropsType<typeof getServerSideProps>) { return ( <main> <p>{repo.stargazers_count}</p> </main> ) } ## When should I use `getServerSideProps`? You should use `getServerSideProps` if you need to render a page that relies on personalized user data, or information that can only be known at request time. For example, `authorization` headers or a geolocation. If you do not need to fetch the data at request time, or would prefer to cache the data and pre-rendered HTML, we recommend using `getStaticProps`. ## Behavior * `getServerSideProps` runs on the server. * `getServerSideProps` can only be exported from a **page**. * `getServerSideProps` returns JSON. * When a user visits a page, `getServerSideProps` will be used to fetch data at request time, and the data is used to render the initial HTML of the page. * `props` passed to the page component can be viewed on the client as part of the initial HTML. This is to allow the page to be hydrated correctly. Make sure that you don't pass any sensitive information that shouldn't be available on the client in `props`. * When a user visits the page through `next/link` or `next/router`, Next.js sends an API request to the server, which runs `getServerSideProps`. * You do not have to call a Next.js API Route to fetch data when using `getServerSideProps` since the function runs on the server. Instead, you can call a CMS, database, or other third-party APIs directly from inside `getServerSideProps`. > **Good to know:** > > * See `getServerSideProps` API reference for parameters and props that can be used with `getServerSideProps`. > * You can use the next-code-elimination tool to verify what Next.js eliminates from the client-side bundle. ## Error Handling If an error is thrown inside `getServerSideProps`, it will show the `pages/500.js` file. Check out the documentation for 500 page to learn more on how to create it. During development, this file will not be used and the development error overlay will be shown instead. ## Edge Cases ### Caching with Server-Side Rendering (SSR) You can use caching headers (`Cache-Control`) inside `getServerSideProps` to cache dynamic responses. For example, using `stale-while-revalidate`. // This value is considered fresh for ten seconds (s-maxage=10). // If a request is repeated within the next 10 seconds, the previously // cached value will still be fresh. If the request is repeated before 59 seconds, // the cached value will be stale but still render (stale-while-revalidate=59). // // In the background, a revalidation request will be made to populate the cache // with a fresh value. If you refresh the page, you will see the new value. export async function getServerSideProps({ req, res }) { res.setHeader( 'Cache-Control', 'public, s-maxage=10, stale-while-revalidate=59' ) return { props: {}, } } However, before reaching for `cache-control`, we recommend seeing if `getStaticProps` with ISR is a better fit for your use case. --- ## Page: https://nextjs.org/docs/pages/building-your-application/data-fetching/incremental-static-regeneration Examples * Next.js Commerce * On-Demand ISR * Next.js Forms Incremental Static Regeneration (ISR) enables you to: * Update static content without rebuilding the entire site * Reduce server load by serving prerendered, static pages for most requests * Ensure proper `cache-control` headers are automatically added to pages * Handle large amounts of content pages without long `next build` times Here's a minimal example: import type { GetStaticPaths, GetStaticProps } from 'next' interface Post { id: string title: string content: string } interface Props { post: Post } export const getStaticPaths: GetStaticPaths = async () => { const posts = await fetch('https://api.vercel.app/blog').then((res) => res.json() ) const paths = posts.map((post: Post) => ({ params: { id: String(post.id) }, })) // We'll prerender only these paths at build time. // { fallback: 'blocking' } will server-render pages // on-demand if the path doesn't exist. return { paths, fallback: false } } export const getStaticProps: GetStaticProps<Props> = async ({ params, }: { params: { id: string } }) => { const post = await fetch(`https://api.vercel.app/blog/${params.id}`).then( (res) => res.json() ) return { props: { post }, // Next.js will invalidate the cache when a // request comes in, at most once every 60 seconds. revalidate: 60, } } export default function Page({ post }: Props) { return ( <main> <h1>{post.title}</h1> <p>{post.content}</p> </main> ) } Here's how this example works: 1. During `next build`, all known blog posts are generated (there are 25 in this example) 2. All requests made to these pages (e.g. `/blog/1`) are cached and instantaneous 3. After 60 seconds has passed, the next request will still show the cached (stale) page 4. The cache is invalidated and a new version of the page begins generating in the background 5. Once generated successfully, Next.js will display and cache the updated page 6. If `/blog/26` is requested, Next.js will generate and cache this page on-demand ## Reference ### Functions * `getStaticProps` * `res.revalidate` ## Examples ### On-demand validation with `res.revalidate()` For a more precise method of revalidation, use `res.revalidate` to generate a new page on-demand from an API Router. For example, this API Route can be called at `/api/revalidate?secret=<token>` to revalidate a given blog post. Create a secret token only known by your Next.js app. This secret will be used to prevent unauthorized access to the revalidation API Route. import type { NextApiRequest, NextApiResponse } from 'next' export default async function handler( req: NextApiRequest, res: NextApiResponse ) { // Check for secret to confirm this is a valid request if (req.query.secret !== process.env.MY_SECRET_TOKEN) { return res.status(401).json({ message: 'Invalid token' }) } try { // This should be the actual path not a rewritten path // e.g. for "/posts/[id]" this should be "/posts/1" await res.revalidate('/posts/1') return res.json({ revalidated: true }) } catch (err) { // If there was an error, Next.js will continue // to show the last successfully generated page return res.status(500).send('Error revalidating') } } If you are using on-demand revalidation, you do not need to specify a `revalidate` time inside of `getStaticProps`. Next.js will use the default value of `false` (no revalidation) and only revalidate the page on-demand when `res.revalidate()` is called. ### Handling uncaught exceptions If there is an error inside `getStaticProps` when handling background regeneration, or you manually throw an error, the last successfully generated page will continue to show. On the next subsequent request, Next.js will retry calling `getStaticProps`. import type { GetStaticProps } from 'next' interface Post { id: string title: string content: string } interface Props { post: Post } export const getStaticProps: GetStaticProps<Props> = async ({ params, }: { params: { id: string } }) => { // If this request throws an uncaught error, Next.js will // not invalidate the currently shown page and // retry getStaticProps on the next request. const res = await fetch(`https://api.vercel.app/blog/${params.id}`) const post: Post = await res.json() if (!res.ok) { // If there is a server error, you might want to // throw an error instead of returning so that the cache is not updated // until the next successful request. throw new Error(`Failed to fetch posts, received status ${res.status}`) } return { props: { post }, // Next.js will invalidate the cache when a // request comes in, at most once every 60 seconds. revalidate: 60, } } ### Customizing the cache location Caching and revalidating pages (with Incremental Static Regeneration) use the same shared cache. When deploying to Vercel, the ISR cache is automatically persisted to durable storage. When self-hosting, the ISR cache is stored to the filesystem (on disk) on your Next.js server. This works automatically when self-hosting using both the Pages and App Router. You can configure the Next.js cache location if you want to persist cached pages and data to durable storage, or share the cache across multiple containers or instances of your Next.js application. Learn more. ## Troubleshooting ### Debugging cached data in local development If you are using the `fetch` API, you can add additional logging to understand which requests are cached or uncached. Learn more about the `logging` option. module.exports = { logging: { fetches: { fullUrl: true, }, }, } ### Verifying correct production behavior To verify your pages are cached and revalidated correctly in production, you can test locally by running `next build` and then `next start` to run the production Next.js server. This will allow you to test ISR behavior as it would work in a production environment. For further debugging, add the following environment variable to your `.env` file: NEXT_PRIVATE_DEBUG_CACHE=1 This will make the Next.js server console log ISR cache hits and misses. You can inspect the output to see which pages are generated during `next build`, as well as how pages are updated as paths are accessed on-demand. ## Caveats * ISR is only supported when using the Node.js runtime (default). * ISR is not supported when creating a Static Export. * Middleware won't be executed for on-demand ISR requests, meaning any path rewrites or logic in Middleware will not be applied. Ensure you are revalidating the exact path. For example, `/post/1` instead of a rewritten `/post-1`. ## Version history | Version | Changes | | --- | --- | | `v14.1.0` | Custom `cacheHandler` is stable. | | `v13.0.0` | App Router is introduced. | | `v12.2.0` | Pages Router: On-Demand ISR is stable | | `v12.0.0` | Pages Router: Bot-aware ISR fallback added. | | `v9.5.0` | Pages Router: Stable ISR introduced. | --- ## Page: https://nextjs.org/docs/pages/building-your-application/data-fetching/client-side Client-side data fetching is useful when your page doesn't require SEO indexing, when you don't need to pre-render your data, or when the content of your pages needs to update frequently. Unlike the server-side rendering APIs, you can use client-side data fetching at the component level. If done at the page level, the data is fetched at runtime, and the content of the page is updated as the data changes. When used at the component level, the data is fetched at the time of the component mount, and the content of the component is updated as the data changes. It's important to note that using client-side data fetching can affect the performance of your application and the load speed of your pages. This is because the data fetching is done at the time of the component or pages mount, and the data is not cached. ## Client-side data fetching with useEffect The following example shows how you can fetch data on the client side using the useEffect hook. import { useState, useEffect } from 'react' function Profile() { const [data, setData] = useState(null) const [isLoading, setLoading] = useState(true) useEffect(() => { fetch('/api/profile-data') .then((res) => res.json()) .then((data) => { setData(data) setLoading(false) }) }, []) if (isLoading) return <p>Loading...</p> if (!data) return <p>No profile data</p> return ( <div> <h1>{data.name}</h1> <p>{data.bio}</p> </div> ) } ## Client-side data fetching with SWR The team behind Next.js has created a React hook library for data fetching called **SWR**. It is **highly recommended** if you are fetching data on the client-side. It handles caching, revalidation, focus tracking, refetching on intervals, and more. Using the same example as above, we can now use SWR to fetch the profile data. SWR will automatically cache the data for us and will revalidate the data if it becomes stale. For more information on using SWR, check out the SWR docs. import useSWR from 'swr' const fetcher = (...args) => fetch(...args).then((res) => res.json()) function Profile() { const { data, error } = useSWR('/api/profile-data', fetcher) if (error) return <div>Failed to load</div> if (!data) return <div>Loading...</div> return ( <div> <h1>{data.name}</h1> <p>{data.bio}</p> </div> ) } --- ## Page: https://nextjs.org/docs/pages/building-your-application/styling #### Subscribe to our newsletter Stay updated on new releases and features, guides, and case studies. --- ## Page: https://nextjs.org/docs/pages/building-your-application/styling/css Examples * Basic CSS Example Next.js supports multiple ways of handling CSS, including: * CSS Modules * Global Styles * External Stylesheets ## CSS Modules Next.js has built-in support for CSS Modules using the `.module.css` extension. CSS Modules locally scope CSS by automatically creating a unique class name. This allows you to use the same class name in different files without worrying about collisions. This behavior makes CSS Modules the ideal way to include component-level CSS. ### Example For example, consider a reusable `Button` component in the `components/` folder: First, create `components/Button.module.css` with the following content: /* You do not need to worry about .error {} colliding with any other `.css` or `.module.css` files! */ .error { color: white; background-color: red; } Then, create `components/Button.js`, importing and using the above CSS file: import styles from './Button.module.css' export function Button() { return ( <button type="button" // Note how the "error" class is accessed as a property on the imported // `styles` object. className={styles.error} > Destroy </button> ) } CSS Modules are **only enabled for files with the `.module.css` and `.module.sass` extensions**. In production, all CSS Module files will be automatically concatenated into **many minified and code-split** `.css` files. These `.css` files represent hot execution paths in your application, ensuring the minimal amount of CSS is loaded for your application to paint. ## Global Styles To add a stylesheet to your application, import the CSS file within `pages/_app.js`. For example, consider the following stylesheet named `styles.css`: body { font-family: 'SF Pro Text', 'SF Pro Icons', 'Helvetica Neue', 'Helvetica', 'Arial', sans-serif; padding: 20px 20px 60px; max-width: 680px; margin: 0 auto; } Create a `pages/_app.js` file if not already present. Then, `import` the `styles.css` file. import '../styles.css' // This default export is required in a new `pages/_app.js` file. export default function MyApp({ Component, pageProps }) { return <Component {...pageProps} /> } These styles (`styles.css`) will apply to all pages and components in your application. Due to the global nature of stylesheets, and to avoid conflicts, you may **only import them inside `pages/_app.js`**. In development, expressing stylesheets this way allows your styles to be hot reloaded as you edit them—meaning you can keep application state. In production, all CSS files will be automatically concatenated into a single minified `.css` file. The order that the CSS is concatenated will match the order the CSS is imported into the `_app.js` file. Pay special attention to imported JS modules that include their own CSS; the JS module's CSS will be concatenated following the same ordering rules as imported CSS files. For example: import '../styles.css' // The CSS in ErrorBoundary depends on the global CSS in styles.css, // so we import it after styles.css. import ErrorBoundary from '../components/ErrorBoundary' export default function MyApp({ Component, pageProps }) { return ( <ErrorBoundary> <Component {...pageProps} /> </ErrorBoundary> ) } ## External Stylesheets Next.js allows you to import CSS files from a JavaScript file. This is possible because Next.js extends the concept of `import` beyond JavaScript. ### Import styles from `node_modules` Since Next.js **9.5.4**, importing a CSS file from `node_modules` is permitted anywhere in your application. For global stylesheets, like `bootstrap` or `nprogress`, you should import the file inside `pages/_app.js`. For example: import 'bootstrap/dist/css/bootstrap.css' export default function MyApp({ Component, pageProps }) { return <Component {...pageProps} /> } For importing CSS required by a third-party component, you can do so in your component. For example: import { useState } from 'react' import { Dialog } from '@reach/dialog' import VisuallyHidden from '@reach/visually-hidden' import '@reach/dialog/styles.css' function ExampleDialog(props) { const [showDialog, setShowDialog] = useState(false) const open = () => setShowDialog(true) const close = () => setShowDialog(false) return ( <div> <button onClick={open}>Open Dialog</button> <Dialog isOpen={showDialog} onDismiss={close}> <button className="close-button" onClick={close}> <VisuallyHidden>Close</VisuallyHidden> <span aria-hidden>×</span> </button> <p>Hello there. I am a dialog</p> </Dialog> </div> ) } ## Additional Features Next.js includes additional features to improve the authoring experience of adding styles: * When running locally with `next dev`, local stylesheets (either global or CSS modules) will take advantage of Fast Refresh to instantly reflect changes as edits are saved. * When building for production with `next build`, CSS files will be bundled into fewer minified `.css` files to reduce the number of network requests needed to retrieve styles. * If you disable JavaScript, styles will still be loaded in the production build (`next start`). However, JavaScript is still required for `next dev` to enable Fast Refresh. --- ## Page: https://nextjs.org/docs/pages/building-your-application/styling/tailwind-css Tailwind CSS is a utility-first CSS framework that is fully compatible with Next.js. ## Installing Tailwind Install the necessary Tailwind CSS packages: npm install -D tailwindcss @tailwindcss/postcss postcss ## Configuring Tailwind Create a `postcss.config.mjs` file in the root of your project and add the `@tailwindcss/postcss` plugin to your PostCSS configuration: /** @type {import('tailwindcss').Config} */ export default { plugins: { '@tailwindcss/postcss': {}, }, } As of Tailwind v4, there is zero configuration required by default. If you do need to configure Tailwind, you can follow the official documentation for configuring the global CSS file. There is also an upgrade CLI and guide if you have an existing Tailwind v3 project. ## Importing Styles Add the Tailwind CSS directives that Tailwind will use to inject its generated styles to a Global Stylesheet in your application, for example: @import 'tailwindcss'; Inside the custom app file (`pages/_app.js`), import the `globals.css` stylesheet to apply the styles to every route in your application. // These styles apply to every route in the application import '@/styles/globals.css' import type { AppProps } from 'next/app' export default function App({ Component, pageProps }: AppProps) { return <Component {...pageProps} /> } ## Using Classes After installing Tailwind CSS and adding the global styles, you can use Tailwind's utility classes in your application. export default function Page() { return <h1 className="text-3xl font-bold underline">Hello, Next.js!</h1> } ## Usage with Turbopack As of Next.js 13.1, Tailwind CSS and PostCSS are supported with Turbopack. --- ## Page: https://nextjs.org/docs/pages/building-your-application/styling/css-in-js Examples * Styled JSX * Styled Components * Emotion * Linaria * Styletron * Cxs * Fela * Stitches It's possible to use any existing CSS-in-JS solution. The simplest one is inline styles: function HiThere() { return <p style={{ color: 'red' }}>hi there</p> } export default HiThere We bundle styled-jsx to provide support for isolated scoped CSS. The aim is to support "shadow CSS" similar to Web Components, which unfortunately do not support server-rendering and are JS-only. See the above examples for other popular CSS-in-JS solutions (like Styled Components). A component using `styled-jsx` looks like this: function HelloWorld() { return ( <div> Hello world <p>scoped!</p> <style jsx>{` p { color: blue; } div { background: red; } @media (max-width: 600px) { div { background: blue; } } `}</style> <style global jsx>{` body { background: black; } `}</style> </div> ) } export default HelloWorld Please see the styled-jsx documentation for more examples. ### Disabling JavaScript Yes, if you disable JavaScript the CSS will still be loaded in the production build (`next start`). During development, we require JavaScript to be enabled to provide the best developer experience with Fast Refresh. --- ## Page: https://nextjs.org/docs/pages/building-your-application/styling/sass Next.js has built-in support for integrating with Sass after the package is installed using both the `.scss` and `.sass` extensions. You can use component-level Sass via CSS Modules and the `.module.scss`or `.module.sass` extension. First, install `sass`: npm install --save-dev sass > **Good to know**: > > Sass supports two different syntaxes, each with their own extension. The `.scss` extension requires you use the SCSS syntax, while the `.sass` extension requires you use the Indented Syntax ("Sass"). > > If you're not sure which to choose, start with the `.scss` extension which is a superset of CSS, and doesn't require you learn the Indented Syntax ("Sass"). ### Customizing Sass Options If you want to configure your Sass options, use `sassOptions` in `next.config`. import type { NextConfig } from 'next' const nextConfig: NextConfig = { sassOptions: { additionalData: `$var: red;`, }, } export default nextConfig #### Implementation You can use the `implementation` property to specify the Sass implementation to use. By default, Next.js uses the `sass` package. import type { NextConfig } from 'next' const nextConfig: NextConfig = { sassOptions: { implementation: 'sass-embedded', }, } export default nextConfig ### Sass Variables Next.js supports Sass variables exported from CSS Module files. For example, using the exported `primaryColor` Sass variable: $primary-color: #64ff00; :export { primaryColor: $primary-color; } import variables from '../styles/variables.module.scss' export default function MyApp({ Component, pageProps }) { return ( <Layout color={variables.primaryColor}> <Component {...pageProps} /> </Layout> ) } --- ## Page: https://nextjs.org/docs/pages/building-your-application/optimizing ## Optimizations Next.js comes with a variety of built-in optimizations designed to improve your application's speed and Core Web Vitals. This guide will cover the optimizations you can leverage to enhance your user experience. ## Built-in Components Built-in components abstract away the complexity of implementing common UI optimizations. These components are: * **Images**: Built on the native `<img>` element. The Image Component optimizes images for performance by lazy loading and automatically resizing images based on device size. * **Link**: Built on the native `<a>` tags. The Link Component prefetches pages in the background, for faster and smoother page transitions. * **Scripts**: Built on the native `<script>` tags. The Script Component gives you control over loading and execution of third-party scripts. ## Metadata Metadata helps search engines understand your content better (which can result in better SEO), and allows you to customize how your content is presented on social media, helping you create a more engaging and consistent user experience across various platforms. The Head Component in Next.js allows you to modify the `<head>` of a page. Learn more in the Head Component documentation. ## Static Assets Next.js `/public` folder can be used to serve static assets like images, fonts, and other files. Files inside `/public` can also be cached by CDN providers so that they are delivered efficiently. ## Analytics and Monitoring For large applications, Next.js integrates with popular analytics and monitoring tools to help you understand how your application is performing. Learn more in the Analytics, OpenTelemetry, and Instrumentation guides. --- ## Page: https://nextjs.org/docs/pages/building-your-application/optimizing/images ## Image Optimization Examples * Image Component According to Web Almanac, images account for a huge portion of the typical website’s page weight and can have a sizable impact on your website's LCP performance. The Next.js Image component extends the HTML `<img>` element with features for automatic image optimization: * **Size Optimization:** Automatically serve correctly sized images for each device, using modern image formats like WebP. * **Visual Stability:** Prevent layout shift automatically when images are loading. * **Faster Page Loads:** Images are only loaded when they enter the viewport using native browser lazy loading, with optional blur-up placeholders. * **Asset Flexibility:** On-demand image resizing, even for images stored on remote servers > **🎥 Watch:** Learn more about how to use `next/image` → YouTube (9 minutes). ## Usage import Image from 'next/image' You can then define the `src` for your image (either local or remote). ### Local Images To use a local image, `import` your `.jpg`, `.png`, or `.webp` image files. Next.js will automatically determine the intrinsic `width` and `height` of your image based on the imported file. These values are used to determine the image ratio and prevent Cumulative Layout Shift while your image is loading. import Image from 'next/image' import profilePic from '../public/me.png' export default function Page() { return ( <Image src={profilePic} alt="Picture of the author" // width={500} automatically provided // height={500} automatically provided // blurDataURL="data:..." automatically provided // placeholder="blur" // Optional blur-up while loading /> ) } > **Warning:** Dynamic `await import()` or `require()` are _not_ supported. The `import` must be static so it can be analyzed at build time. You can optionally configure `localPatterns` in your `next.config.js` file in order to allow specific images and block all others. module.exports = { images: { localPatterns: [ { pathname: '/assets/images/**', search: '', }, ], }, } ### Remote Images To use a remote image, the `src` property should be a URL string. Since Next.js does not have access to remote files during the build process, you'll need to provide the `width`, `height` and optional `blurDataURL` props manually. The `width` and `height` attributes are used to infer the correct aspect ratio of image and avoid layout shift from the image loading in. The `width` and `height` do _not_ determine the rendered size of the image file. Learn more about Image Sizing. import Image from 'next/image' export default function Page() { return ( <Image src="https://s3.amazonaws.com/my-bucket/profile.png" alt="Picture of the author" width={500} height={500} /> ) } To safely allow optimizing images, define a list of supported URL patterns in `next.config.js`. Be as specific as possible to prevent malicious usage. For example, the following configuration will only allow images from a specific AWS S3 bucket: module.exports = { images: { remotePatterns: [ { protocol: 'https', hostname: 's3.amazonaws.com', port: '', pathname: '/my-bucket/**', search: '', }, ], }, } Learn more about `remotePatterns` configuration. If you want to use relative URLs for the image `src`, use a `loader`. ### Domains Sometimes you may want to optimize a remote image, but still use the built-in Next.js Image Optimization API. To do this, leave the `loader` at its default setting and enter an absolute URL for the Image `src` prop. To protect your application from malicious users, you must define a list of remote hostnames you intend to use with the `next/image` component. > Learn more about `remotePatterns` configuration. ### Loaders Note that in the example earlier, a partial URL (`"/me.png"`) is provided for a local image. This is possible because of the loader architecture. A loader is a function that generates the URLs for your image. It modifies the provided `src`, and generates multiple URLs to request the image at different sizes. These multiple URLs are used in the automatic srcset generation, so that visitors to your site will be served an image that is the right size for their viewport. The default loader for Next.js applications uses the built-in Image Optimization API, which optimizes images from anywhere on the web, and then serves them directly from the Next.js web server. If you would like to serve your images directly from a CDN or image server, you can write your own loader function with a few lines of JavaScript. You can define a loader per-image with the `loader` prop, or at the application level with the `loaderFile` configuration. ## Priority You should add the `priority` property to the image that will be the Largest Contentful Paint (LCP) element for each page. Doing so allows Next.js to preload the image, leading to a meaningful boost in LCP. The LCP element is typically the largest image or text block visible within the viewport of the page. When you run `next dev`, you'll see a console warning if the LCP element is an `<Image>` without the `priority` property. Once you've identified the LCP image, you can add the property like this: import Image from 'next/image' export default function Home() { return ( <> <h1>My Homepage</h1> <Image src="/me.png" alt="Picture of the author" width={500} height={500} priority /> <p>Welcome to my homepage!</p> </> ) } See more about priority in the `next/image` component documentation. ## Image Sizing One of the ways that images most commonly hurt performance is through _layout shift_, where the image pushes other elements around on the page as it loads in. This performance problem is so annoying to users that it has its own Core Web Vital, called Cumulative Layout Shift. The way to avoid image-based layout shifts is to always size your images. This allows the browser to reserve precisely enough space for the image before it loads. Because `next/image` is designed to guarantee good performance results, it cannot be used in a way that will contribute to layout shift, and **must** be sized in one of three ways: 1. Automatically, using a static import 2. Manually, by including a `width` and `height` property used to determine the image's aspect ratio. 3. Implicitly, by using fill which causes the image to expand to fill its parent element. > **What if I don't know the size of my images?** > > If you are accessing images from a source without knowledge of the images' sizes, there are several things you can do: > > **Use `fill`** > > The `fill` prop allows your image to be sized by its parent element. Consider using CSS to give the image's parent element space on the page along `sizes` prop to match any media query break points. You can also use `object-fit` with `fill`, `contain`, or `cover`, and `object-position` to define how the image should occupy that space. > > **Normalize your images** > > If you're serving images from a source that you control, consider modifying your image pipeline to normalize the images to a specific size. > > **Modify your API calls** > > If your application is retrieving image URLs using an API call (such as to a CMS), you may be able to modify the API call to return the image dimensions along with the URL. If none of the suggested methods works for sizing your images, the `next/image` component is designed to work well on a page alongside standard `<img>` elements. ## Styling Styling the Image component is similar to styling a normal `<img>` element, but there are a few guidelines to keep in mind: * Use `className` or `style`, not `styled-jsx`. * In most cases, we recommend using the `className` prop. This can be an imported CSS Module, a global stylesheet, etc. * You can also use the `style` prop to assign inline styles. * You cannot use styled-jsx because it's scoped to the current component (unless you mark the style as `global`). * When using `fill`, the parent element must have `position: relative` * This is necessary for the proper rendering of the image element in that layout mode. * When using `fill`, the parent element must have `display: block` * This is the default for `<div>` elements but should be specified otherwise. ## Examples ### Responsive  import Image from 'next/image' import mountains from '../public/mountains.jpg' export default function Responsive() { return ( <div style={{ display: 'flex', flexDirection: 'column' }}> <Image alt="Mountains" // Importing an image will // automatically set the width and height src={mountains} sizes="100vw" // Make the image display full width style={{ width: '100%', height: 'auto', }} /> </div> ) } ### Fill Container  import Image from 'next/image' import mountains from '../public/mountains.jpg' export default function Fill() { return ( <div style={{ display: 'grid', gridGap: '8px', gridTemplateColumns: 'repeat(auto-fit, minmax(400px, auto))', }} > <div style={{ position: 'relative', height: '400px' }}> <Image alt="Mountains" src={mountains} fill sizes="(min-width: 808px) 50vw, 100vw" style={{ objectFit: 'cover', // cover, contain, none }} /> </div> {/* And more images in the grid... */} </div> ) } ### Background Image  import Image from 'next/image' import mountains from '../public/mountains.jpg' export default function Background() { return ( <Image alt="Mountains" src={mountains} placeholder="blur" quality={100} fill sizes="100vw" style={{ objectFit: 'cover', }} /> ) } For examples of the Image component used with the various styles, see the Image Component Demo. ## Other Properties **View all properties available to the `next/image` component.** ## Configuration The `next/image` component and Next.js Image Optimization API can be configured in the `next.config.js` file. These configurations allow you to enable remote images, define custom image breakpoints, change caching behavior and more. **Read the full image configuration documentation for more information.** --- ## Page: https://nextjs.org/docs/pages/building-your-application/optimizing/fonts ## Font Optimization **`next/font`** will automatically optimize your fonts (including custom fonts) and remove external network requests for improved privacy and performance. > **🎥 Watch:** Learn more about using `next/font` → YouTube (6 minutes). `next/font` includes **built-in automatic self-hosting** for _any_ font file. This means you can optimally load web fonts with zero layout shift, thanks to the underlying CSS `size-adjust` property used. This new font system also allows you to conveniently use all Google Fonts with performance and privacy in mind. CSS and font files are downloaded at build time and self-hosted with the rest of your static assets. **No requests are sent to Google by the browser.** ## Google Fonts Automatically self-host any Google Font. Fonts are included in the deployment and served from the same domain as your deployment. **No requests are sent to Google by the browser.** Get started by importing the font you would like to use from `next/font/google` as a function. We recommend using variable fonts for the best performance and flexibility. To use the font in all your pages, add it to `_app.js` file under `/pages` as shown below: import { Inter } from 'next/font/google' // If loading a variable font, you don't need to specify the font weight const inter = Inter({ subsets: ['latin'] }) export default function MyApp({ Component, pageProps }) { return ( <main className={inter.className}> <Component {...pageProps} /> </main> ) } If you can't use a variable font, you will **need to specify a weight**: import { Roboto } from 'next/font/google' const roboto = Roboto({ weight: '400', subsets: ['latin'], }) export default function MyApp({ Component, pageProps }) { return ( <main className={roboto.className}> <Component {...pageProps} /> </main> ) } You can specify multiple weights and/or styles by using an array: const roboto = Roboto({ weight: ['400', '700'], style: ['normal', 'italic'], subsets: ['latin'], display: 'swap', }) > **Good to know**: Use an underscore (\_) for font names with multiple words. E.g. `Roboto Mono` should be imported as `Roboto_Mono`. ### Apply the font in `<head>` You can also use the font without a wrapper and `className` by injecting it inside the `<head>` as follows: import { Inter } from 'next/font/google' const inter = Inter({ subsets: ['latin'] }) export default function MyApp({ Component, pageProps }) { return ( <> <style jsx global>{` html { font-family: ${inter.style.fontFamily}; } `}</style> <Component {...pageProps} /> </> ) } ### Single page usage To use the font on a single page, add it to the specific page as shown below: import { Inter } from 'next/font/google' const inter = Inter({ subsets: ['latin'] }) export default function Home() { return ( <div className={inter.className}> <p>Hello World</p> </div> ) } ### Specifying a subset Google Fonts are automatically subset. This reduces the size of the font file and improves performance. You'll need to define which of these subsets you want to preload. Failing to specify any subsets while `preload` is `true` will result in a warning. This can be done by adding it to the function call: const inter = Inter({ subsets: ['latin'] }) View the Font API Reference for more information. ### Using Multiple Fonts You can import and use multiple fonts in your application. There are two approaches you can take. The first approach is to create a utility function that exports a font, imports it, and applies its `className` where needed. This ensures the font is preloaded only when it's rendered: import { Inter, Roboto_Mono } from 'next/font/google' export const inter = Inter({ subsets: ['latin'], display: 'swap', }) export const roboto_mono = Roboto_Mono({ subsets: ['latin'], display: 'swap', }) In the example above, `Inter` will be applied globally, and `Roboto Mono` can be imported and applied as needed. Alternatively, you can create a CSS variable and use it with your preferred CSS solution: html { font-family: var(--font-inter); } h1 { font-family: var(--font-roboto-mono); } In the example above, `Inter` will be applied globally, and any `<h1>` tags will be styled with `Roboto Mono`. > **Recommendation**: Use multiple fonts conservatively since each new font is an additional resource the client has to download. ## Local Fonts Import `next/font/local` and specify the `src` of your local font file. We recommend using variable fonts for the best performance and flexibility. import localFont from 'next/font/local' // Font files can be colocated inside of `pages` const myFont = localFont({ src: './my-font.woff2' }) export default function MyApp({ Component, pageProps }) { return ( <main className={myFont.className}> <Component {...pageProps} /> </main> ) } If you want to use multiple files for a single font family, `src` can be an array: const roboto = localFont({ src: [ { path: './Roboto-Regular.woff2', weight: '400', style: 'normal', }, { path: './Roboto-Italic.woff2', weight: '400', style: 'italic', }, { path: './Roboto-Bold.woff2', weight: '700', style: 'normal', }, { path: './Roboto-BoldItalic.woff2', weight: '700', style: 'italic', }, ], }) View the Font API Reference for more information. ## With Tailwind CSS `next/font` integrates seamlessly with Tailwind CSS using CSS variables. In the example below, we use the `Inter` and `Roboto_Mono` fonts from `next/font/google` (you can use any Google Font or Local Font). Use the `variable` option to define a CSS variable name, such as `inter` and `roboto_mono` for these fonts, respectively. Then, apply `inter.variable` and `roboto_mono.variable` to include the CSS variables in your HTML document. > **Good to know**: You can add these variables to the `<html>` or `<body>` tag, depending on your preference, styling needs or project requirements. import { Inter } from 'next/font/google' const inter = Inter({ subsets: ['latin'], variable: '--font-inter', }) const roboto_mono = Roboto_Mono({ subsets: ['latin'], display: 'swap', variable: '--font-roboto-mono', }) export default function MyApp({ Component, pageProps }) { return ( <main className={`${inter.variable} ${roboto_mono.variable} font-sans`}> <Component {...pageProps} /> </main> ) } Finally, add the CSS variable to your Tailwind CSS config: ### Tailwind CSS v4 As of Tailwind v4, there is zero configuration required by default. If you do need to configure Tailwind, you can follow the official documentation for configuring the global CSS file. @import "tailwindcss"; @theme inline { --font-sans: var(--font-inter); --font-mono: var(--font-roboto-mono); } ### Tailwind CSS v3 /** @type {import('tailwindcss').Config} */ module.exports = { content: [ './pages/**/*.{js,ts,jsx,tsx}', './components/**/*.{js,ts,jsx,tsx}', './app/**/*.{js,ts,jsx,tsx}', ], theme: { extend: { fontFamily: { sans: ['var(--font-inter)'], mono: ['var(--font-roboto-mono)'], }, }, }, plugins: [], } You can now use the `font-sans` and `font-mono` utility classes to apply the font to your elements. <p class="font-sans ...">The quick brown fox ...</p> <p class="font-mono ...">The quick brown fox ...</p> ## Preloading When a font function is called on a page of your site, it is not globally available and preloaded on all routes. Rather, the font is only preloaded on the related route/s based on the type of file where it is used: * if it's a unique page, it is preloaded on the unique route for that page * if it's in the custom App, it is preloaded on all the routes of the site under `/pages` ## Reusing fonts Every time you call the `localFont` or Google font function, that font is hosted as one instance in your application. Therefore, if you load the same font function in multiple files, multiple instances of the same font are hosted. In this situation, it is recommended to do the following: * Call the font loader function in one shared file * Export it as a constant * Import the constant in each file where you would like to use this font --- ## Page: https://nextjs.org/docs/pages/building-your-application/optimizing/scripts ## Script Optimization ### Application Scripts To load a third-party script for all routes, import `next/script` and include the script directly in your custom `_app`: import Script from 'next/script' export default function MyApp({ Component, pageProps }) { return ( <> <Component {...pageProps} /> <Script src="https://example.com/script.js" /> </> ) } This script will load and execute when _any_ route in your application is accessed. Next.js will ensure the script will **only load once**, even if a user navigates between multiple pages. > **Recommendation**: We recommend only including third-party scripts in specific pages or layouts in order to minimize any unnecessary impact to performance. ### Strategy Although the default behavior of `next/script` allows you to load third-party scripts in any page or layout, you can fine-tune its loading behavior by using the `strategy` property: * `beforeInteractive`: Load the script before any Next.js code and before any page hydration occurs. * `afterInteractive`: (**default**) Load the script early but after some hydration on the page occurs. * `lazyOnload`: Load the script later during browser idle time. * `worker`: (experimental) Load the script in a web worker. Refer to the `next/script` API reference documentation to learn more about each strategy and their use cases. ### Offloading Scripts To A Web Worker (experimental) > **Warning:** The `worker` strategy is not yet stable and does not yet work with the App Router. Use with caution. Scripts that use the `worker` strategy are offloaded and executed in a web worker with Partytown. This can improve the performance of your site by dedicating the main thread to the rest of your application code. This strategy is still experimental and can only be used if the `nextScriptWorkers` flag is enabled in `next.config.js`: module.exports = { experimental: { nextScriptWorkers: true, }, } Then, run `next` (normally `npm run dev` or `yarn dev`) and Next.js will guide you through the installation of the required packages to finish the setup: npm run dev You'll see instructions like these: Please install Partytown by running `npm install @builder.io/partytown` Once setup is complete, defining `strategy="worker"` will automatically instantiate Partytown in your application and offload the script to a web worker. import Script from 'next/script' export default function Home() { return ( <> <Script src="https://example.com/script.js" strategy="worker" /> </> ) } There are a number of trade-offs that need to be considered when loading a third-party script in a web worker. Please see Partytown's tradeoffs documentation for more information. #### Using custom Partytown configuration Although the `worker` strategy does not require any additional configuration to work, Partytown supports the use of a config object to modify some of its settings, including enabling `debug` mode and forwarding events and triggers. If you would like to add additional configuration options, you can include it within the `<Head />` component used in a custom `_document.js`: import { Html, Head, Main, NextScript } from 'next/document' export default function Document() { return ( <Html> <Head> <script data-partytown-config dangerouslySetInnerHTML={{ __html: ` partytown = { lib: "/_next/static/~partytown/", debug: true }; `, }} /> </Head> <body> <Main /> <NextScript /> </body> </Html> ) } In order to modify Partytown's configuration, the following conditions must be met: 1. The `data-partytown-config` attribute must be used in order to overwrite the default configuration used by Next.js 2. Unless you decide to save Partytown's library files in a separate directory, the `lib: "/_next/static/~partytown/"` property and value must be included in the configuration object in order to let Partytown know where Next.js stores the necessary static files. > **Note**: If you are using an asset prefix and would like to modify Partytown's default configuration, you must include it as part of the `lib` path. Take a look at Partytown's configuration options to see the full list of other properties that can be added. ### Inline Scripts Inline scripts, or scripts not loaded from an external file, are also supported by the Script component. They can be written by placing the JavaScript within curly braces: <Script id="show-banner"> {`document.getElementById('banner').classList.remove('hidden')`} </Script> Or by using the `dangerouslySetInnerHTML` property: <Script id="show-banner" dangerouslySetInnerHTML={{ __html: `document.getElementById('banner').classList.remove('hidden')`, }} /> > **Warning**: An `id` property must be assigned for inline scripts in order for Next.js to track and optimize the script. ### Executing Additional Code Event handlers can be used with the Script component to execute additional code after a certain event occurs: * `onLoad`: Execute code after the script has finished loading. * `onReady`: Execute code after the script has finished loading and every time the component is mounted. * `onError`: Execute code if the script fails to load. These handlers will only work when `next/script` is imported and used inside of a Client Component where `"use client"` is defined as the first line of code: import Script from 'next/script' export default function Page() { return ( <> <Script src="https://example.com/script.js" onLoad={() => { console.log('Script has loaded') }} /> </> ) } Refer to the `next/script` API reference to learn more about each event handler and view examples. ### Additional Attributes There are many DOM attributes that can be assigned to a `<script>` element that are not used by the Script component, like `nonce` or custom data attributes. Including any additional attributes will automatically forward it to the final, optimized `<script>` element that is included in the HTML. import Script from 'next/script' export default function Page() { return ( <> <Script src="https://example.com/script.js" id="example-script" nonce="XUENAJFW" data-test="script" /> </> ) } --- ## Page: https://nextjs.org/docs/pages/building-your-application/optimizing/static-assets Next.js can serve static files, like images, under a folder called `public` in the root directory. Files inside `public` can then be referenced by your code starting from the base URL (`/`). For example, the file `public/avatars/me.png` can be viewed by visiting the `/avatars/me.png` path. The code to display that image might look like: import Image from 'next/image' export function Avatar({ id, alt }) { return <Image src={`/avatars/${id}.png`} alt={alt} width="64" height="64" /> } export function AvatarOfMe() { return <Avatar id="me" alt="A portrait of me" /> } ## Caching Next.js cannot safely cache assets in the `public` folder because they may change. The default caching headers applied are: Cache-Control: public, max-age=0 ## Robots, Favicons, and others The folder is also useful for `robots.txt`, `favicon.ico`, Google Site Verification, and any other static files (including `.html`). But make sure to not have a static file with the same name as a file in the `pages/` directory, as this will result in an error. Read more. > Good to know: > > * The directory must be named `public`. The name cannot be changed and it's the only directory used to serve static assets. > * Only assets that are in the `public` directory at build time will be served by Next.js. Files added at request time won't be available. We recommend using a third-party service like Vercel Blob for persistent file storage. --- ## Page: https://nextjs.org/docs/pages/building-your-application/optimizing/package-bundling Bundling external packages can significantly improve the performance of your application. By default, packages imported into your application are not bundled. This can impact performance or might not work if external packages are not pre-bundled, for example, if imported from a monorepo or `node_modules`. This page will guide you through how to analyze and configure package bundling. ## Analyzing JavaScript bundles `@next/bundle-analyzer` is a plugin for Next.js that helps you manage the size of your application bundles. It generates a visual report of the size of each package and their dependencies. You can use the information to remove large dependencies, split, or lazy-load your code. ### Installation Install the plugin by running the following command: npm i @next/bundle-analyzer # or yarn add @next/bundle-analyzer # or pnpm add @next/bundle-analyzer Then, add the bundle analyzer's settings to your `next.config.js`. /** @type {import('next').NextConfig} */ const nextConfig = {} const withBundleAnalyzer = require('@next/bundle-analyzer')({ enabled: process.env.ANALYZE === 'true', }) module.exports = withBundleAnalyzer(nextConfig) ### Generating a report Run the following command to analyze your bundles: ANALYZE=true npm run build # or ANALYZE=true yarn build # or ANALYZE=true pnpm build The report will open three new tabs in your browser, which you can inspect. Periodically evaluating your application's bundles can help you maintain application performance over time. ## Optimizing package imports Some packages, such as icon libraries, can export hundreds of modules, which can cause performance issues in development and production. You can optimize how these packages are imported by adding the `optimizePackageImports` option to your `next.config.js`. This option will only load the modules you _actually_ use, while still giving you the convenience of writing import statements with many named exports. /** @type {import('next').NextConfig} */ const nextConfig = { experimental: { optimizePackageImports: ['icon-library'], }, } module.exports = nextConfig Next.js also optimizes some libraries automatically, thus they do not need to be included in the optimizePackageImports list. See the full list. ## Bundling specific packages To bundle specific packages, you can use the `transpilePackages` option in your `next.config.js`. This option is useful for bundling external packages that are not pre-bundled, for example, in a monorepo or imported from `node_modules`. /** @type {import('next').NextConfig} */ const nextConfig = { transpilePackages: ['package-name'], } module.exports = nextConfig ## Bundling all packages To automatically bundle all packages (default behavior in the App Router), you can use the `bundlePagesRouterDependencies` option in your `next.config.js`. /** @type {import('next').NextConfig} */ const nextConfig = { bundlePagesRouterDependencies: true, } module.exports = nextConfig ## Opting specific packages out of bundling If you have the `bundlePagesRouterDependencies` option enabled, you can opt specific packages out of automatic bundling using the `serverExternalPackages` option in your `next.config.js`: /** @type {import('next').NextConfig} */ const nextConfig = { // Automatically bundle external packages in the Pages Router: bundlePagesRouterDependencies: true, // Opt specific packages out of bundling for both App and Pages Router: serverExternalPackages: ['package-name'], } module.exports = nextConfig --- ## Page: https://nextjs.org/docs/pages/building-your-application/optimizing/analytics Next.js has built-in support for measuring and reporting performance metrics. You can either use the `useReportWebVitals` hook to manage reporting yourself, or alternatively, Vercel provides a managed service to automatically collect and visualize metrics for you. ## Client Instrumentation For more advanced analytics and monitoring needs, Next.js provides a `instrumentation-client.js|ts` file that runs before your application's frontend code starts executing. This is ideal for setting up global analytics, error tracking, or performance monitoring tools. To use it, create an `instrumentation-client.js` or `instrumentation-client.ts` file in your application's root directory: // Initialize analytics before the app starts console.log('Analytics initialized') // Set up global error tracking window.addEventListener('error', (event) => { // Send to your error tracking service reportError(event.error) }) ## Build Your Own import { useReportWebVitals } from 'next/web-vitals' function MyApp({ Component, pageProps }) { useReportWebVitals((metric) => { console.log(metric) }) return <Component {...pageProps} /> } View the API Reference for more information. ## Web Vitals Web Vitals are a set of useful metrics that aim to capture the user experience of a web page. The following web vitals are all included: * Time to First Byte (TTFB) * First Contentful Paint (FCP) * Largest Contentful Paint (LCP) * First Input Delay (FID) * Cumulative Layout Shift (CLS) * Interaction to Next Paint (INP) You can handle all the results of these metrics using the `name` property. import { useReportWebVitals } from 'next/web-vitals' function MyApp({ Component, pageProps }) { useReportWebVitals((metric) => { switch (metric.name) { case 'FCP': { // handle FCP results } case 'LCP': { // handle LCP results } // ... } }) return <Component {...pageProps} /> } ## Custom Metrics In addition to the core metrics listed above, there are some additional custom metrics that measure the time it takes for the page to hydrate and render: * `Next.js-hydration`: Length of time it takes for the page to start and finish hydrating (in ms) * `Next.js-route-change-to-render`: Length of time it takes for a page to start rendering after a route change (in ms) * `Next.js-render`: Length of time it takes for a page to finish render after a route change (in ms) You can handle all the results of these metrics separately: export function reportWebVitals(metric) { switch (metric.name) { case 'Next.js-hydration': // handle hydration results break case 'Next.js-route-change-to-render': // handle route-change to render results break case 'Next.js-render': // handle render results break default: break } } These metrics work in all browsers that support the User Timing API. ## Sending results to external systems You can send results to any endpoint to measure and track real user performance on your site. For example: useReportWebVitals((metric) => { const body = JSON.stringify(metric) const url = 'https://example.com/analytics' // Use `navigator.sendBeacon()` if available, falling back to `fetch()`. if (navigator.sendBeacon) { navigator.sendBeacon(url, body) } else { fetch(url, { body, method: 'POST', keepalive: true }) } }) > **Good to know**: If you use Google Analytics, using the `id` value can allow you to construct metric distributions manually (to calculate percentiles, etc.) > useReportWebVitals((metric) => { > // Use `window.gtag` if you initialized Google Analytics as this example: > // https://github.com/vercel/next.js/blob/canary/examples/with-google-analytics > window.gtag('event', metric.name, { > value: Math.round( > metric.name === 'CLS' ? metric.value * 1000 : metric.value > ), // values must be integers > event_label: metric.id, // id unique to current page load > non_interaction: true, // avoids affecting bounce rate. > }) > }) > > Read more about sending results to Google Analytics. --- ## Page: https://nextjs.org/docs/pages/building-your-application/optimizing/lazy-loading Lazy loading in Next.js helps improve the initial loading performance of an application by decreasing the amount of JavaScript needed to render a route. It allows you to defer loading of **Client Components** and imported libraries, and only include them in the client bundle when they're needed. For example, you might want to defer loading a modal until a user clicks to open it. There are two ways you can implement lazy loading in Next.js: 1. Using Dynamic Imports with `next/dynamic` 2. Using `React.lazy()` with Suspense By default, Server Components are automatically code split, and you can use streaming to progressively send pieces of UI from the server to the client. Lazy loading applies to Client Components. ## `next/dynamic` `next/dynamic` is a composite of `React.lazy()` and Suspense. It behaves the same way in the `app` and `pages` directories to allow for incremental migration. ## Examples By using `next/dynamic`, the header component will not be included in the page's initial JavaScript bundle. The page will render the Suspense `fallback` first, followed by the `Header` component when the `Suspense` boundary is resolved. import dynamic from 'next/dynamic' const DynamicHeader = dynamic(() => import('../components/header'), { loading: () => <p>Loading...</p>, }) export default function Home() { return <DynamicHeader /> } > **Good to know**: In `import('path/to/component')`, the path must be explicitly written. It can't be a template string nor a variable. Furthermore the `import()` has to be inside the `dynamic()` call for Next.js to be able to match webpack bundles / module ids to the specific `dynamic()` call and preload them before rendering. `dynamic()` can't be used inside of React rendering as it needs to be marked in the top level of the module for preloading to work, similar to `React.lazy`. ## With named exports To dynamically import a named export, you can return it from the Promise returned by `import()`: export function Hello() { return <p>Hello!</p> } // pages/index.js import dynamic from 'next/dynamic' const DynamicComponent = dynamic(() => import('../components/hello').then((mod) => mod.Hello) ) ## With no SSR To dynamically load a component on the client side, you can use the `ssr` option to disable server-rendering. This is useful if an external dependency or component relies on browser APIs like `window`. 'use client' import dynamic from 'next/dynamic' const DynamicHeader = dynamic(() => import('../components/header'), { ssr: false, }) ## With external libraries This example uses the external library `fuse.js` for fuzzy search. The module is only loaded in the browser after the user types in the search input. import { useState } from 'react' const names = ['Tim', 'Joe', 'Bel', 'Lee'] export default function Page() { const [results, setResults] = useState() return ( <div> <input type="text" placeholder="Search" onChange={async (e) => { const { value } = e.currentTarget // Dynamically load fuse.js const Fuse = (await import('fuse.js')).default const fuse = new Fuse(names) setResults(fuse.search(value)) }} /> <pre>Results: {JSON.stringify(results, null, 2)}</pre> </div> ) } --- ## Page: https://nextjs.org/docs/pages/building-your-application/optimizing/instrumentation Instrumentation is the process of using code to integrate monitoring and logging tools into your application. This allows you to track the performance and behavior of your application, and to debug issues in production. ## Convention To set up instrumentation, create `instrumentation.ts|js` file in the **root directory** of your project (or inside the `src` folder if using one). Then, export a `register` function in the file. This function will be called **once** when a new Next.js server instance is initiated. For example, to use Next.js with OpenTelemetry and @vercel/otel: import { registerOTel } from '@vercel/otel' export function register() { registerOTel('next-app') } See the Next.js with OpenTelemetry example for a complete implementation. > **Good to know**: > > * The `instrumentation` file should be in the root of your project and not inside the `app` or `pages` directory. If you're using the `src` folder, then place the file inside `src` alongside `pages` and `app`. > * If you use the `pageExtensions` config option to add a suffix, you will also need to update the `instrumentation` filename to match. ## Examples ### Importing files with side effects Sometimes, it may be useful to import a file in your code because of the side effects it will cause. For example, you might import a file that defines a set of global variables, but never explicitly use the imported file in your code. You would still have access to the global variables the package has declared. We recommend importing files using JavaScript `import` syntax within your `register` function. The following example demonstrates a basic usage of `import` in a `register` function: export async function register() { await import('package-with-side-effect') } > **Good to know:** > > We recommend importing the file from within the `register` function, rather than at the top of the file. By doing this, you can colocate all of your side effects in one place in your code, and avoid any unintended consequences from importing globally at the top of the file. ### Importing runtime-specific code Next.js calls `register` in all environments, so it's important to conditionally import any code that doesn't support specific runtimes (e.g. Edge or Node.js). You can use the `NEXT_RUNTIME` environment variable to get the current environment: export async function register() { if (process.env.NEXT_RUNTIME === 'nodejs') { await import('./instrumentation-node') } if (process.env.NEXT_RUNTIME === 'edge') { await import('./instrumentation-edge') } } --- ## Page: https://nextjs.org/docs/pages/building-your-application/optimizing/open-telemetry Observability is crucial for understanding and optimizing the behavior and performance of your Next.js app. As applications become more complex, it becomes increasingly difficult to identify and diagnose issues that may arise. By leveraging observability tools, such as logging and metrics, developers can gain insights into their application's behavior and identify areas for optimization. With observability, developers can proactively address issues before they become major problems and provide a better user experience. Therefore, it is highly recommended to use observability in your Next.js applications to improve performance, optimize resources, and enhance user experience. We recommend using OpenTelemetry for instrumenting your apps. It's a platform-agnostic way to instrument apps that allows you to change your observability provider without changing your code. Read Official OpenTelemetry docs for more information about OpenTelemetry and how it works. This documentation uses terms like _Span_, _Trace_ or _Exporter_ throughout this doc, all of which can be found in the OpenTelemetry Observability Primer. Next.js supports OpenTelemetry instrumentation out of the box, which means that we already instrumented Next.js itself. When you enable OpenTelemetry we will automatically wrap all your code like `getStaticProps` in _spans_ with helpful attributes. ## Getting Started OpenTelemetry is extensible but setting it up properly can be quite verbose. That's why we prepared a package `@vercel/otel` that helps you get started quickly. ### Using `@vercel/otel` To get started, install the following packages: npm install @vercel/otel @opentelemetry/sdk-logs @opentelemetry/api-logs @opentelemetry/instrumentation Next, create a custom `instrumentation.ts` (or `.js`) file in the **root directory** of the project (or inside `src` folder if using one): import { registerOTel } from '@vercel/otel' export function register() { registerOTel({ serviceName: 'next-app' }) } See the `@vercel/otel` documentation for additional configuration options. > **Good to know**: > > * The `instrumentation` file should be in the root of your project and not inside the `app` or `pages` directory. If you're using the `src` folder, then place the file inside `src` alongside `pages` and `app`. > * If you use the `pageExtensions` config option to add a suffix, you will also need to update the `instrumentation` filename to match. > * We have created a basic with-opentelemetry example that you can use. ### Manual OpenTelemetry configuration The `@vercel/otel` package provides many configuration options and should serve most of common use cases. But if it doesn't suit your needs, you can configure OpenTelemetry manually. Firstly you need to install OpenTelemetry packages: npm install @opentelemetry/sdk-node @opentelemetry/resources @opentelemetry/semantic-conventions @opentelemetry/sdk-trace-node @opentelemetry/exporter-trace-otlp-http Now you can initialize `NodeSDK` in your `instrumentation.ts`. Unlike `@vercel/otel`, `NodeSDK` is not compatible with edge runtime, so you need to make sure that you are importing them only when `process.env.NEXT_RUNTIME === 'nodejs'`. We recommend creating a new file `instrumentation.node.ts` which you conditionally import only when using node: export async function register() { if (process.env.NEXT_RUNTIME === 'nodejs') { await import('./instrumentation.node.ts') } } import { OTLPTraceExporter } from '@opentelemetry/exporter-trace-otlp-http' import { Resource } from '@opentelemetry/resources' import { NodeSDK } from '@opentelemetry/sdk-node' import { SimpleSpanProcessor } from '@opentelemetry/sdk-trace-node' import { ATTR_SERVICE_NAME } from '@opentelemetry/semantic-conventions' const sdk = new NodeSDK({ resource: new Resource({ [ATTR_SERVICE_NAME]: 'next-app', }), spanProcessor: new SimpleSpanProcessor(new OTLPTraceExporter()), }) sdk.start() Doing this is equivalent to using `@vercel/otel`, but it's possible to modify and extend some features that are not exposed by the `@vercel/otel`. If edge runtime support is necessary, you will have to use `@vercel/otel`. ## Testing your instrumentation You need an OpenTelemetry collector with a compatible backend to test OpenTelemetry traces locally. We recommend using our OpenTelemetry dev environment. If everything works well you should be able to see the root server span labeled as `GET /requested/pathname`. All other spans from that particular trace will be nested under it. Next.js traces more spans than are emitted by default. To see more spans, you must set `NEXT_OTEL_VERBOSE=1`. ## Deployment ### Using OpenTelemetry Collector When you are deploying with OpenTelemetry Collector, you can use `@vercel/otel`. It will work both on Vercel and when self-hosted. #### Deploying on Vercel We made sure that OpenTelemetry works out of the box on Vercel. Follow Vercel documentation to connect your project to an observability provider. #### Self-hosting Deploying to other platforms is also straightforward. You will need to spin up your own OpenTelemetry Collector to receive and process the telemetry data from your Next.js app. To do this, follow the OpenTelemetry Collector Getting Started guide, which will walk you through setting up the collector and configuring it to receive data from your Next.js app. Once you have your collector up and running, you can deploy your Next.js app to your chosen platform following their respective deployment guides. ### Custom Exporters OpenTelemetry Collector is not necessary. You can use a custom OpenTelemetry exporter with `@vercel/otel` or manual OpenTelemetry configuration. ## Custom Spans You can add a custom span with OpenTelemetry APIs. npm install @opentelemetry/api The following example demonstrates a function that fetches GitHub stars and adds a custom `fetchGithubStars` span to track the fetch request's result: import { trace } from '@opentelemetry/api' export async function fetchGithubStars() { return await trace .getTracer('nextjs-example') .startActiveSpan('fetchGithubStars', async (span) => { try { return await getValue() } finally { span.end() } }) } The `register` function will execute before your code runs in a new environment. You can start creating new spans, and they should be correctly added to the exported trace. ## Default Spans in Next.js Next.js automatically instruments several spans for you to provide useful insights into your application's performance. Attributes on spans follow OpenTelemetry semantic conventions. We also add some custom attributes under the `next` namespace: * `next.span_name` - duplicates span name * `next.span_type` - each span type has a unique identifier * `next.route` - The route pattern of the request (e.g., `/[param]/user`). * `next.rsc` (true/false) - Whether the request is an RSC request, such as prefetch. * `next.page` * This is an internal value used by an app router. * You can think about it as a route to a special file (like `page.ts`, `layout.ts`, `loading.ts` and others) * It can be used as a unique identifier only when paired with `next.route` because `/layout` can be used to identify both `/(groupA)/layout.ts` and `/(groupB)/layout.ts` ### `[http.method] [next.route]` * `next.span_type`: `BaseServer.handleRequest` This span represents the root span for each incoming request to your Next.js application. It tracks the HTTP method, route, target, and status code of the request. Attributes: * Common HTTP attributes * `http.method` * `http.status_code` * Server HTTP attributes * `http.route` * `http.target` * `next.span_name` * `next.span_type` * `next.route` ### `render route (app) [next.route]` * `next.span_type`: `AppRender.getBodyResult`. This span represents the process of rendering a route in the app router. Attributes: * `next.span_name` * `next.span_type` * `next.route` ### `fetch [http.method] [http.url]` * `next.span_type`: `AppRender.fetch` This span represents the fetch request executed in your code. Attributes: * Common HTTP attributes * `http.method` * Client HTTP attributes * `http.url` * `net.peer.name` * `net.peer.port` (only if specified) * `next.span_name` * `next.span_type` This span can be turned off by setting `NEXT_OTEL_FETCH_DISABLED=1` in your environment. This is useful when you want to use a custom fetch instrumentation library. ### `executing api route (app) [next.route]` * `next.span_type`: `AppRouteRouteHandlers.runHandler`. This span represents the execution of an API Route Handler in the app router. Attributes: * `next.span_name` * `next.span_type` * `next.route` ### `getServerSideProps [next.route]` * `next.span_type`: `Render.getServerSideProps`. This span represents the execution of `getServerSideProps` for a specific route. Attributes: * `next.span_name` * `next.span_type` * `next.route` ### `getStaticProps [next.route]` * `next.span_type`: `Render.getStaticProps`. This span represents the execution of `getStaticProps` for a specific route. Attributes: * `next.span_name` * `next.span_type` * `next.route` ### `render route (pages) [next.route]` * `next.span_type`: `Render.renderDocument`. This span represents the process of rendering the document for a specific route. Attributes: * `next.span_name` * `next.span_type` * `next.route` ### `generateMetadata [next.page]` * `next.span_type`: `ResolveMetadata.generateMetadata`. This span represents the process of generating metadata for a specific page (a single route can have multiple of these spans). Attributes: * `next.span_name` * `next.span_type` * `next.page` ### `resolve page components` * `next.span_type`: `NextNodeServer.findPageComponents`. This span represents the process of resolving page components for a specific page. Attributes: * `next.span_name` * `next.span_type` * `next.route` ### `resolve segment modules` * `next.span_type`: `NextNodeServer.getLayoutOrPageModule`. This span represents loading of code modules for a layout or a page. Attributes: * `next.span_name` * `next.span_type` * `next.segment` ### `start response` * `next.span_type`: `NextNodeServer.startResponse`. This zero-length span represents the time when the first byte has been sent in the response. --- ## Page: https://nextjs.org/docs/pages/building-your-application/optimizing/third-party-libraries **`@next/third-parties`** is a library that provides a collection of components and utilities that improve the performance and developer experience of loading popular third-party libraries in your Next.js application. All third-party integrations provided by `@next/third-parties` have been optimized for performance and ease of use. ## Getting Started To get started, install the `@next/third-parties` library: npm install @next/third-parties@latest next@latest `@next/third-parties` is currently an **experimental** library under active development. We recommend installing it with the **latest** or **canary** flags while we work on adding more third-party integrations. ## Google Third-Parties All supported third-party libraries from Google can be imported from `@next/third-parties/google`. ### Google Tag Manager The `GoogleTagManager` component can be used to instantiate a Google Tag Manager container to your page. By default, it fetches the original inline script after hydration occurs on the page. To load Google Tag Manager for all routes, include the component directly in your custom `_app` and pass in your GTM container ID: import { GoogleTagManager } from '@next/third-parties/google' export default function MyApp({ Component, pageProps }) { return ( <> <Component {...pageProps} /> <GoogleTagManager gtmId="GTM-XYZ" /> </> ) } To load Google Tag Manager for a single route, include the component in your page file: import { GoogleTagManager } from '@next/third-parties/google' export default function Page() { return <GoogleTagManager gtmId="GTM-XYZ" /> } #### Sending Events The `sendGTMEvent` function can be used to track user interactions on your page by sending events using the `dataLayer` object. For this function to work, the `<GoogleTagManager />` component must be included in either a parent layout, page, or component, or directly in the same file. import { sendGTMEvent } from '@next/third-parties/google' export function EventButton() { return ( <div> <button onClick={() => sendGTMEvent({ event: 'buttonClicked', value: 'xyz' })} > Send Event </button> </div> ) } Refer to the Tag Manager developer documentation to learn about the different variables and events that can be passed into the function. #### Server-side Tagging If you're using a server-side tag manager and serving `gtm.js` scripts from your tagging server you can use `gtmScriptUrl` option to specify the URL of the script. #### Options Options to pass to the Google Tag Manager. For a full list of options, read the Google Tag Manager docs. | Name | Type | Description | | --- | --- | --- | | `gtmId` | Required | Your GTM container ID. Usually starts with `GTM-`. | | `gtmScriptUrl` | Optional | GTM script URL. Defaults to `https://www.googletagmanager.com/gtm.js`. | | `dataLayer` | Optional | Data layer object to instantiate the container with. | | `dataLayerName` | Optional | Name of the data layer. Defaults to `dataLayer`. | | `auth` | Optional | Value of authentication parameter (`gtm_auth`) for environment snippets. | | `preview` | Optional | Value of preview parameter (`gtm_preview`) for environment snippets. | ### Google Analytics The `GoogleAnalytics` component can be used to include Google Analytics 4 to your page via the Google tag (`gtag.js`). By default, it fetches the original scripts after hydration occurs on the page. > **Recommendation**: If Google Tag Manager is already included in your application, you can configure Google Analytics directly using it, rather than including Google Analytics as a separate component. Refer to the documentation to learn more about the differences between Tag Manager and `gtag.js`. To load Google Analytics for all routes, include the component directly in your custom `_app` and pass in your measurement ID: import { GoogleAnalytics } from '@next/third-parties/google' export default function MyApp({ Component, pageProps }) { return ( <> <Component {...pageProps} /> <GoogleAnalytics gaId="G-XYZ" /> </> ) } To load Google Analytics for a single route, include the component in your page file: import { GoogleAnalytics } from '@next/third-parties/google' export default function Page() { return <GoogleAnalytics gaId="G-XYZ" /> } #### Sending Events The `sendGAEvent` function can be used to measure user interactions on your page by sending events using the `dataLayer` object. For this function to work, the `<GoogleAnalytics />` component must be included in either a parent layout, page, or component, or directly in the same file. import { sendGAEvent } from '@next/third-parties/google' export function EventButton() { return ( <div> <button onClick={() => sendGAEvent('event', 'buttonClicked', { value: 'xyz' })} > Send Event </button> </div> ) } Refer to the Google Analytics developer documentation to learn more about event parameters. #### Tracking Pageviews Google Analytics automatically tracks pageviews when the browser history state changes. This means that client-side navigations between Next.js routes will send pageview data without any configuration. To ensure that client-side navigations are being measured correctly, verify that the _“Enhanced Measurement”_ property is enabled in your Admin panel and the _“Page changes based on browser history events”_ checkbox is selected. > **Note**: If you decide to manually send pageview events, make sure to disable the default pageview measurement to avoid having duplicate data. Refer to the Google Analytics developer documentation to learn more. #### Options Options to pass to the `<GoogleAnalytics>` component. | Name | Type | Description | | --- | --- | --- | | `gaId` | Required | Your measurement ID. Usually starts with `G-`. | | `dataLayerName` | Optional | Name of the data layer. Defaults to `dataLayer`. | | `nonce` | Optional | A nonce. | ### Google Maps Embed The `GoogleMapsEmbed` component can be used to add a Google Maps Embed to your page. By default, it uses the `loading` attribute to lazy-load the embed below the fold. import { GoogleMapsEmbed } from '@next/third-parties/google' export default function Page() { return ( <GoogleMapsEmbed apiKey="XYZ" height={200} width="100%" mode="place" q="Brooklyn+Bridge,New+York,NY" /> ) } #### Options Options to pass to the Google Maps Embed. For a full list of options, read the Google Map Embed docs. | Name | Type | Description | | --- | --- | --- | | `apiKey` | Required | Your api key. | | `mode` | Required | Map mode | | `height` | Optional | Height of the embed. Defaults to `auto`. | | `width` | Optional | Width of the embed. Defaults to `auto`. | | `style` | Optional | Pass styles to the iframe. | | `allowfullscreen` | Optional | Property to allow certain map parts to go full screen. | | `loading` | Optional | Defaults to lazy. Consider changing if you know your embed will be above the fold. | | `q` | Optional | Defines map marker location. _This may be required depending on the map mode_. | | `center` | Optional | Defines the center of the map view. | | `zoom` | Optional | Sets initial zoom level of the map. | | `maptype` | Optional | Defines type of map tiles to load. | | `language` | Optional | Defines the language to use for UI elements and for the display of labels on map tiles. | | `region` | Optional | Defines the appropriate borders and labels to display, based on geo-political sensitivities. | ### YouTube Embed The `YouTubeEmbed` component can be used to load and display a YouTube embed. This component loads faster by using `lite-youtube-embed` under the hood. import { YouTubeEmbed } from '@next/third-parties/google' export default function Page() { return <YouTubeEmbed videoid="ogfYd705cRs" height={400} params="controls=0" /> } #### Options | Name | Type | Description | | --- | --- | --- | | `videoid` | Required | YouTube video id. | | `width` | Optional | Width of the video container. Defaults to `auto` | | `height` | Optional | Height of the video container. Defaults to `auto` | | `playlabel` | Optional | A visually hidden label for the play button for accessibility. | | `params` | Optional | The video player params defined here. Params are passed as a query param string. Eg: `params="controls=0&start=10&end=30"` | | `style` | Optional | Used to apply styles to the video container. | --- ## Page: https://nextjs.org/docs/pages/building-your-application/configuring Next.js allows you to customize your project to meet specific requirements. This includes integrations with TypeScript, ESlint, and more, as well as internal configuration options such as Absolute Imports and Environment Variables. --- ## Page: https://nextjs.org/docs/pages/building-your-application/configuring/environment-variables Next.js comes with built-in support for environment variables, which allows you to do the following: * Use `.env` to load environment variables * Bundle environment variables for the browser by prefixing with `NEXT_PUBLIC_` > **Warning:** The default `create-next-app` template ensures all `.env` files are added to your `.gitignore`. You almost never want to commit these files to your repository. ## Loading Environment Variables Next.js has built-in support for loading environment variables from `.env*` files into `process.env`. DB_HOST=localhost DB_USER=myuser DB_PASS=mypassword This loads `process.env.DB_HOST`, `process.env.DB_USER`, and `process.env.DB_PASS` into the Node.js environment automatically allowing you to use them in Next.js data fetching methods and API routes. For example, using `getStaticProps`: export async function getStaticProps() { const db = await myDB.connect({ host: process.env.DB_HOST, username: process.env.DB_USER, password: process.env.DB_PASS, }) // ... } ### Loading Environment Variables with `@next/env` If you need to load environment variables outside of the Next.js runtime, such as in a root config file for an ORM or test runner, you can use the `@next/env` package. This package is used internally by Next.js to load environment variables from `.env*` files. To use it, install the package and use the `loadEnvConfig` function to load the environment variables: npm install @next/env import { loadEnvConfig } from '@next/env' const projectDir = process.cwd() loadEnvConfig(projectDir) Then, you can import the configuration where needed. For example: import './envConfig.ts' export default defineConfig({ dbCredentials: { connectionString: process.env.DATABASE_URL!, }, }) ### Referencing Other Variables Next.js will automatically expand variables that use `$` to reference other variables e.g. `$VARIABLE` inside of your `.env*` files. This allows you to reference other secrets. For example: TWITTER_USER=nextjs TWITTER_URL=https://x.com/$TWITTER_USER In the above example, `process.env.TWITTER_URL` would be set to `https://x.com/nextjs`. > **Good to know**: If you need to use variable with a `$` in the actual value, it needs to be escaped e.g. `\$`. ## Bundling Environment Variables for the Browser Non-`NEXT_PUBLIC_` environment variables are only available in the Node.js environment, meaning they aren't accessible to the browser (the client runs in a different _environment_). In order to make the value of an environment variable accessible in the browser, Next.js can "inline" a value, at build time, into the js bundle that is delivered to the client, replacing all references to `process.env.[variable]` with a hard-coded value. To tell it to do this, you just have to prefix the variable with `NEXT_PUBLIC_`. For example: NEXT_PUBLIC_ANALYTICS_ID=abcdefghijk This will tell Next.js to replace all references to `process.env.NEXT_PUBLIC_ANALYTICS_ID` in the Node.js environment with the value from the environment in which you run `next build`, allowing you to use it anywhere in your code. It will be inlined into any JavaScript sent to the browser. > **Note**: After being built, your app will no longer respond to changes to these environment variables. For instance, if you use a Heroku pipeline to promote slugs built in one environment to another environment, or if you build and deploy a single Docker image to multiple environments, all `NEXT_PUBLIC_` variables will be frozen with the value evaluated at build time, so these values need to be set appropriately when the project is built. If you need access to runtime environment values, you'll have to setup your own API to provide them to the client (either on demand or during initialization). import setupAnalyticsService from '../lib/my-analytics-service' // 'NEXT_PUBLIC_ANALYTICS_ID' can be used here as it's prefixed by 'NEXT_PUBLIC_'. // It will be transformed at build time to `setupAnalyticsService('abcdefghijk')`. setupAnalyticsService(process.env.NEXT_PUBLIC_ANALYTICS_ID) function HomePage() { return <h1>Hello World</h1> } export default HomePage Note that dynamic lookups will _not_ be inlined, such as: // This will NOT be inlined, because it uses a variable const varName = 'NEXT_PUBLIC_ANALYTICS_ID' setupAnalyticsService(process.env[varName]) // This will NOT be inlined, because it uses a variable const env = process.env setupAnalyticsService(env.NEXT_PUBLIC_ANALYTICS_ID) ### Runtime Environment Variables Next.js can support both build time and runtime environment variables. **By default, environment variables are only available on the server**. To expose an environment variable to the browser, it must be prefixed with `NEXT_PUBLIC_`. However, these public environment variables will be inlined into the JavaScript bundle during `next build`. To read runtime environment variables, we recommend using `getServerSideProps` or incrementally adopting the App Router. This allows you to use a singular Docker image that can be promoted through multiple environments with different values. **Good to know:** * You can run code on server startup using the `register` function. * We do not recommend using the `runtimeConfig` option, as this does not work with the standalone output mode. Instead, we recommend incrementally adopting the App Router if you need this feature. ## Environment Variables on Vercel When deploying your Next.js application to Vercel, Environment Variables can be configured in the Project Settings. All types of Environment Variables should be configured there. Even Environment Variables used in Development – which can be downloaded onto your local device afterwards. If you've configured Development Environment Variables you can pull them into a `.env.local` for usage on your local machine using the following command: vercel env pull > **Good to know**: When deploying your Next.js application to Vercel, your environment variables in `.env*` files will not be made available to Edge Runtime, unless their name are prefixed with `NEXT_PUBLIC_`. We strongly recommend managing your environment variables in Project Settings instead, from where all environment variables are available. ## Test Environment Variables Apart from `development` and `production` environments, there is a 3rd option available: `test`. In the same way you can set defaults for development or production environments, you can do the same with a `.env.test` file for the `testing` environment (though this one is not as common as the previous two). Next.js will not load environment variables from `.env.development` or `.env.production` in the `testing` environment. This one is useful when running tests with tools like `jest` or `cypress` where you need to set specific environment vars only for testing purposes. Test default values will be loaded if `NODE_ENV` is set to `test`, though you usually don't need to do this manually as testing tools will address it for you. There is a small difference between `test` environment, and both `development` and `production` that you need to bear in mind: `.env.local` won't be loaded, as you expect tests to produce the same results for everyone. This way every test execution will use the same env defaults across different executions by ignoring your `.env.local` (which is intended to override the default set). > **Good to know**: similar to Default Environment Variables, `.env.test` file should be included in your repository, but `.env.test.local` shouldn't, as `.env*.local` are intended to be ignored through `.gitignore`. While running unit tests you can make sure to load your environment variables the same way Next.js does by leveraging the `loadEnvConfig` function from the `@next/env` package. // The below can be used in a Jest global setup file or similar for your testing set-up import { loadEnvConfig } from '@next/env' export default async () => { const projectDir = process.cwd() loadEnvConfig(projectDir) } ## Environment Variable Load Order Environment variables are looked up in the following places, in order, stopping once the variable is found. 1. `process.env` 2. `.env.$(NODE_ENV).local` 3. `.env.local` (Not checked when `NODE_ENV` is `test`.) 4. `.env.$(NODE_ENV)` 5. `.env` For example, if `NODE_ENV` is `development` and you define a variable in both `.env.development.local` and `.env`, the value in `.env.development.local` will be used. > **Good to know**: The allowed values for `NODE_ENV` are `production`, `development` and `test`. ## Good to know * If you are using a `/src` directory, `.env.*` files should remain in the root of your project. * If the environment variable `NODE_ENV` is unassigned, Next.js automatically assigns `development` when running the `next dev` command, or `production` for all other commands. ## Version History | Version | Changes | | --- | --- | | `v9.4.0` | Support `.env` and `NEXT_PUBLIC_` introduced. | --- ## Page: https://nextjs.org/docs/pages/building-your-application/configuring/src-directory As an alternative to having the special Next.js `app` or `pages` directories in the root of your project, Next.js also supports the common pattern of placing application code under the `src` directory. This separates application code from project configuration files which mostly live in the root of a project, which is preferred by some individuals and teams. To use the `src` directory, move the `app` Router folder or `pages` Router folder to `src/app` or `src/pages` respectively.  > **Good to know**: > > * The `/public` directory should remain in the root of your project. > * Config files like `package.json`, `next.config.js` and `tsconfig.json` should remain in the root of your project. > * `.env.*` files should remain in the root of your project. > * `src/app` or `src/pages` will be ignored if `app` or `pages` are present in the root directory. > * If you're using `src`, you'll probably also move other application folders such as `/components` or `/lib`. > * If you're using Middleware, ensure it is placed inside the `src` directory. > * If you're using Tailwind CSS, you'll need to add the `/src` prefix to the `tailwind.config.js` file in the content section. > * If you are using TypeScript paths for imports such as `@/*`, you should update the `paths` object in `tsconfig.json` to include `src/`. --- ## Page: https://nextjs.org/docs/pages/building-your-application/configuring/mdx ## Markdown and MDX Markdown is a lightweight markup language used to format text. It allows you to write using plain text syntax and convert it to structurally valid HTML. It's commonly used for writing content on websites and blogs. You write... I **love** using [Next.js](https://nextjs.org/) Output: <p>I <strong>love</strong> using <a href="https://nextjs.org/">Next.js</a></p> MDX is a superset of markdown that lets you write JSX directly in your markdown files. It is a powerful way to add dynamic interactivity and embed React components within your content. Next.js can support both local MDX content inside your application, as well as remote MDX files fetched dynamically on the server. The Next.js plugin handles transforming markdown and React components into HTML, including support for usage in Server Components (the default in App Router). > **Good to know**: View the Portfolio Starter Kit template for a complete working example. ## Install dependencies The `@next/mdx` package, and related packages, are used to configure Next.js so it can process markdown and MDX. **It sources data from local files**, allowing you to create pages with a `.md` or `.mdx` extension, directly in your `/pages` or `/app` directory. Install these packages to render MDX with Next.js: npm install @next/mdx @mdx-js/loader @mdx-js/react @types/mdx ## Configure `next.config.mjs` Update the `next.config.mjs` file at your project's root to configure it to use MDX: import createMDX from '@next/mdx' /** @type {import('next').NextConfig} */ const nextConfig = { // Configure `pageExtensions` to include markdown and MDX files pageExtensions: ['js', 'jsx', 'md', 'mdx', 'ts', 'tsx'], // Optionally, add any other Next.js config below } const withMDX = createMDX({ // Add markdown plugins here, as desired }) // Merge MDX config with Next.js config export default withMDX(nextConfig) This allows `.md` and `.mdx` files to act as pages, routes, or imports in your application. ## Add an `mdx-components.tsx` file Create an `mdx-components.tsx` (or `.js`) file in the root of your project to define global MDX Components. For example, at the same level as `pages` or `app`, or inside `src` if applicable. import type { MDXComponents } from 'mdx/types' export function useMDXComponents(components: MDXComponents): MDXComponents { return { ...components, } } > **Good to know**: > > * `mdx-components.tsx` is **required** to use `@next/mdx` with App Router and will not work without it. > * Learn more about the `mdx-components.tsx` file convention. > * Learn how to use custom styles and components. ## Rendering MDX You can render MDX using Next.js's file based routing or by importing MDX files into other pages. ### Using file based routing When using file based routing, you can use MDX pages like any other page. Create a new MDX page within the `/pages` directory: my-project |── mdx-components.(tsx/js) ├── pages │ └── mdx-page.(mdx/md) └── package.json You can use MDX in these files, and even import React components, directly inside your MDX page: import { MyComponent } from 'my-component' # Welcome to my MDX page! This is some **bold** and _italics_ text. This is a list in markdown: - One - Two - Three Checkout my React component: <MyComponent /> Navigating to the `/mdx-page` route should display your rendered MDX page. ### Using imports Create a new page within the `/pages` directory and an MDX file wherever you'd like: . ├── markdown/ │ └── welcome.(mdx/md) ├── pages/ │ └── mdx-page.(tsx/js) ├── mdx-components.(tsx/js) └── package.json You can use MDX in these files, and even import React components, directly inside your MDX page: Import the MDX file inside the page to display the content: import Welcome from '@/markdown/welcome.mdx' export default function Page() { return <Welcome /> } Navigating to the `/mdx-page` route should display your rendered MDX page. ## Using custom styles and components Markdown, when rendered, maps to native HTML elements. For example, writing the following markdown: ## This is a heading This is a list in markdown: - One - Two - Three Generates the following HTML: <h2>This is a heading</h2> <p>This is a list in markdown:</p> <ul> <li>One</li> <li>Two</li> <li>Three</li> </ul> To style your markdown, you can provide custom components that map to the generated HTML elements. Styles and components can be implemented globally, locally, and with shared layouts. ### Global styles and components Adding styles and components in `mdx-components.tsx` will affect _all_ MDX files in your application. import type { MDXComponents } from 'mdx/types' import Image, { ImageProps } from 'next/image' // This file allows you to provide custom React components // to be used in MDX files. You can import and use any // React component you want, including inline styles, // components from other libraries, and more. export function useMDXComponents(components: MDXComponents): MDXComponents { return { // Allows customizing built-in components, e.g. to add styling. h1: ({ children }) => ( <h1 style={{ color: 'red', fontSize: '48px' }}>{children}</h1> ), img: (props) => ( <Image sizes="100vw" style={{ width: '100%', height: 'auto' }} {...(props as ImageProps)} /> ), ...components, } } ### Local styles and components You can apply local styles and components to specific pages by passing them into imported MDX components. These will merge with and override global styles and components. import Welcome from '@/markdown/welcome.mdx' function CustomH1({ children }) { return <h1 style={{ color: 'blue', fontSize: '100px' }}>{children}</h1> } const overrideComponents = { h1: CustomH1, } export default function Page() { return <Welcome components={overrideComponents} /> } ### Shared layouts To share a layout around MDX pages, create a layout component: export default function MdxLayout({ children }: { children: React.ReactNode }) { // Create any shared layout or styles here return <div style={{ color: 'blue' }}>{children}</div> } Then, import the layout component into the MDX page, wrap the MDX content in the layout, and export it: import MdxLayout from '../components/mdx-layout' # Welcome to my MDX page! export default function MDXPage({ children }) { return <MdxLayout>{children}</MdxLayout> } ### Using Tailwind typography plugin If you are using Tailwind to style your application, using the `@tailwindcss/typography` plugin will allow you to reuse your Tailwind configuration and styles in your markdown files. The plugin adds a set of `prose` classes that can be used to add typographic styles to content blocks that come from sources, like markdown. Install Tailwind typography and use with shared layouts to add the `prose` you want. To share a layout around MDX pages, create a layout component: export default function MdxLayout({ children }: { children: React.ReactNode }) { // Create any shared layout or styles here return ( <div className="prose prose-headings:mt-8 prose-headings:font-semibold prose-headings:text-black prose-h1:text-5xl prose-h2:text-4xl prose-h3:text-3xl prose-h4:text-2xl prose-h5:text-xl prose-h6:text-lg dark:prose-headings:text-white"> {children} </div> ) } Then, import the layout component into the MDX page, wrap the MDX content in the layout, and export it: import MdxLayout from '../components/mdx-layout' # Welcome to my MDX page! export default function MDXPage({ children }) { return <MdxLayout>{children}</MdxLayout> } ## Frontmatter Frontmatter is a YAML like key/value pairing that can be used to store data about a page. `@next/mdx` does **not** support frontmatter by default, though there are many solutions for adding frontmatter to your MDX content, such as: * remark-frontmatter * remark-mdx-frontmatter * gray-matter `@next/mdx` **does** allow you to use exports like any other JavaScript component: Metadata can now be referenced outside of the MDX file: import BlogPost, { metadata } from '@/content/blog-post.mdx' export default function Page() { console.log('metadata: ', metadata) //=> { author: 'John Doe' } return <BlogPost /> } A common use case for this is when you want to iterate over a collection of MDX and extract data. For example, creating a blog index page from all blog posts. You can use packages like Node's `fs` module or globby to read a directory of posts and extract the metadata. > **Good to know**: > > * Using `fs`, `globby`, etc. can only be used server-side. > * View the Portfolio Starter Kit template for a complete working example. ## remark and rehype Plugins You can optionally provide remark and rehype plugins to transform the MDX content. For example, you can use `remark-gfm` to support GitHub Flavored Markdown. Since the remark and rehype ecosystem is ESM only, you'll need to use `next.config.mjs` or `next.config.ts` as the configuration file. import remarkGfm from 'remark-gfm' import createMDX from '@next/mdx' /** @type {import('next').NextConfig} */ const nextConfig = { // Allow .mdx extensions for files pageExtensions: ['js', 'jsx', 'md', 'mdx', 'ts', 'tsx'], // Optionally, add any other Next.js config below } const withMDX = createMDX({ // Add markdown plugins here, as desired options: { remarkPlugins: [remarkGfm], rehypePlugins: [], }, }) // Combine MDX and Next.js config export default withMDX(nextConfig) ### Using Plugins with Turbopack To use plugins with Turbopack, upgrade to the latest `@next/mdx` and specify plugin names using a string: import createMDX from '@next/mdx' /** @type {import('next').NextConfig} */ const nextConfig = { pageExtensions: ['js', 'jsx', 'md', 'mdx', 'ts', 'tsx'], } const withMDX = createMDX({ options: { remarkPlugins: [], rehypePlugins: [['rehype-katex', { strict: true, throwOnError: true }]], }, }) export default withMDX(nextConfig) > **Good to know**: > > remark and rehype plugins without serializable options cannot be used yet with Turbopack, due to inability to pass JavaScript functions to Rust ## Remote MDX If your MDX files or content lives _somewhere else_, you can fetch it dynamically on the server. This is useful for content stored in a CMS, database, or anywhere else. A popular community package for this use is `next-mdx-remote`. > **Good to know**: Please proceed with caution. MDX compiles to JavaScript and is executed on the server. You should only fetch MDX content from a trusted source, otherwise this can lead to remote code execution (RCE). The following example uses `next-mdx-remote`: import { serialize } from 'next-mdx-remote/serialize' import { MDXRemote, MDXRemoteSerializeResult } from 'next-mdx-remote' interface Props { mdxSource: MDXRemoteSerializeResult } export default function RemoteMdxPage({ mdxSource }: Props) { return <MDXRemote {...mdxSource} /> } export async function getStaticProps() { // MDX text - can be from a database, CMS, fetch, anywhere... const res = await fetch('https:...') const mdxText = await res.text() const mdxSource = await serialize(mdxText) return { props: { mdxSource } } } Navigating to the `/mdx-page-remote` route should display your rendered MDX. ## Deep Dive: How do you transform markdown into HTML? React does not natively understand markdown. The markdown plaintext needs to first be transformed into HTML. This can be accomplished with `remark` and `rehype`. `remark` is an ecosystem of tools around markdown. `rehype` is the same, but for HTML. For example, the following code snippet transforms markdown into HTML: import { unified } from 'unified' import remarkParse from 'remark-parse' import remarkRehype from 'remark-rehype' import rehypeSanitize from 'rehype-sanitize' import rehypeStringify from 'rehype-stringify' main() async function main() { const file = await unified() .use(remarkParse) // Convert into markdown AST .use(remarkRehype) // Transform to HTML AST .use(rehypeSanitize) // Sanitize HTML input .use(rehypeStringify) // Convert AST into serialized HTML .process('Hello, Next.js!') console.log(String(file)) // <p>Hello, Next.js!</p> } The `remark` and `rehype` ecosystem contains plugins for syntax highlighting, linking headings, generating a table of contents, and more. When using `@next/mdx` as shown above, you **do not** need to use `remark` or `rehype` directly, as it is handled for you. We're describing it here for a deeper understanding of what the `@next/mdx` package is doing underneath. ## Using the Rust-based MDX compiler (experimental) Next.js supports a new MDX compiler written in Rust. This compiler is still experimental and is not recommended for production use. To use the new compiler, you need to configure `next.config.js` when you pass it to `withMDX`: module.exports = withMDX({ experimental: { mdxRs: true, }, }) `mdxRs` also accepts an object to configure how to transform mdx files. module.exports = withMDX({ experimental: { mdxRs: { jsxRuntime?: string // Custom jsx runtime jsxImportSource?: string // Custom jsx import source, mdxType?: 'gfm' | 'commonmark' // Configure what kind of mdx syntax will be used to parse & transform }, }, }) ## Helpful Links * MDX * `@next/mdx` * remark * rehype * Markdoc --- ## Page: https://nextjs.org/docs/pages/building-your-application/configuring/amp Examples * AMP With Next.js you can turn any React page into an AMP page, with minimal config, and without leaving React. You can read more about AMP in the official amp.dev site. ## Enabling AMP To enable AMP support for a page, and to learn more about the different AMP configs, read the API documentation for `next/amp`. ## Caveats * Only CSS-in-JS is supported. CSS Modules aren't supported by AMP pages at the moment. You can contribute CSS Modules support to Next.js. ## Adding AMP Components The AMP community provides many components to make AMP pages more interactive. Next.js will automatically import all components used on a page and there is no need to manually import AMP component scripts: export const config = { amp: true } function MyAmpPage() { const date = new Date() return ( <div> <p>Some time: {date.toJSON()}</p> <amp-timeago width="0" height="15" datetime={date.toJSON()} layout="responsive" > . </amp-timeago> </div> ) } export default MyAmpPage The above example uses the `amp-timeago` component. By default, the latest version of a component is always imported. If you want to customize the version, you can use `next/head`, as in the following example: import Head from 'next/head' export const config = { amp: true } function MyAmpPage() { const date = new Date() return ( <div> <Head> <script async key="amp-timeago" custom-element="amp-timeago" src="https://cdn.ampproject.org/v0/amp-timeago-0.1.js" /> </Head> <p>Some time: {date.toJSON()}</p> <amp-timeago width="0" height="15" datetime={date.toJSON()} layout="responsive" > . </amp-timeago> </div> ) } export default MyAmpPage ## AMP Validation AMP pages are automatically validated with amphtml-validator during development. Errors and warnings will appear in the terminal where you started Next.js. Pages are also validated during Static HTML export and any warnings / errors will be printed to the terminal. Any AMP errors will cause the export to exit with status code `1` because the export is not valid AMP. ### Custom Validators You can set up custom AMP validator in `next.config.js` as shown below: module.exports = { amp: { validator: './custom_validator.js', }, } ### Skip AMP Validation To turn off AMP validation add the following code to `next.config.js` experimental: { amp: { skipValidation: true } } ### AMP in Static HTML Export When using Static HTML export statically prerender pages, Next.js will detect if the page supports AMP and change the exporting behavior based on that. For example, the hybrid AMP page `pages/about.js` would output: * `out/about.html` - HTML page with client-side React runtime * `out/about.amp.html` - AMP page And if `pages/about.js` is an AMP-only page, then it would output: * `out/about.html` - Optimized AMP page Next.js will automatically insert a link to the AMP version of your page in the HTML version, so you don't have to, like so: <link rel="amphtml" href="/about.amp.html" /> And the AMP version of your page will include a link to the HTML page: <link rel="canonical" href="/about" /> When `trailingSlash` is enabled the exported pages for `pages/about.js` would be: * `out/about/index.html` - HTML page * `out/about.amp/index.html` - AMP page ## TypeScript AMP currently doesn't have built-in types for TypeScript, but it's in their roadmap (#13791). As a workaround you can manually create a file called `amp.d.ts` inside your project and add these custom types. --- ## Page: https://nextjs.org/docs/pages/building-your-application/configuring/babel Examples * Customizing babel configuration Next.js includes the `next/babel` preset to your app, which includes everything needed to compile React applications and server-side code. But if you want to extend the default Babel configs, it's also possible. ## Adding Presets and Plugins To start, you only need to define a `.babelrc` file (or `babel.config.js`) in the root directory of your project. If such a file is found, it will be considered as the _source of truth_, and therefore it needs to define what Next.js needs as well, which is the `next/babel` preset. Here's an example `.babelrc` file: { "presets": ["next/babel"], "plugins": [] } You can take a look at this file to learn about the presets included by `next/babel`. To add presets/plugins **without configuring them**, you can do it this way: { "presets": ["next/babel"], "plugins": ["@babel/plugin-proposal-do-expressions"] } ## Customizing Presets and Plugins To add presets/plugins **with custom configuration**, do it on the `next/babel` preset like so: { "presets": [ [ "next/babel", { "preset-env": {}, "transform-runtime": {}, "styled-jsx": {}, "class-properties": {} } ] ], "plugins": [] } To learn more about the available options for each config, visit babel's documentation site. > **Good to know**: > > * Next.js uses the **current** Node.js version for server-side compilations. > * The `modules` option on `"preset-env"` should be kept to `false`, otherwise webpack code splitting is turned off. --- ## Page: https://nextjs.org/docs/pages/building-your-application/configuring/post-css ## Default Behavior Next.js compiles CSS for its built-in CSS support using PostCSS. Out of the box, with no configuration, Next.js compiles CSS with the following transformations: * Autoprefixer automatically adds vendor prefixes to CSS rules (back to IE11). * Cross-browser Flexbox bugs are corrected to behave like the spec. * New CSS features are automatically compiled for Internet Explorer 11 compatibility: * `all` Property * Break Properties * `font-variant` Property * Gap Properties * Media Query Ranges By default, CSS Grid and Custom Properties (CSS variables) are **not compiled** for IE11 support. To compile CSS Grid Layout for IE11, you can place the following comment at the top of your CSS file: /* autoprefixer grid: autoplace */ You can also enable IE11 support for CSS Grid Layout in your entire project by configuring autoprefixer with the configuration shown below (collapsed). See "Customizing Plugins" below for more information. Click to view the configuration to enable CSS Grid Layout { "plugins": [ "postcss-flexbugs-fixes", [ "postcss-preset-env", { "autoprefixer": { "flexbox": "no-2009", "grid": "autoplace" }, "stage": 3, "features": { "custom-properties": false } } ] ] } CSS variables are not compiled because it is not possible to safely do so. If you must use variables, consider using something like Sass variables which are compiled away by Sass. ## Customizing Target Browsers Next.js allows you to configure the target browsers (for Autoprefixer and compiled css features) through Browserslist. To customize browserslist, create a `browserslist` key in your `package.json` like so: { "browserslist": [">0.3%", "not dead", "not op_mini all"] } You can use the browsersl.ist tool to visualize what browsers you are targeting. ## CSS Modules No configuration is needed to support CSS Modules. To enable CSS Modules for a file, rename the file to have the extension `.module.css`. You can learn more about Next.js' CSS Module support here. ## Customizing Plugins > **Warning**: When you define a custom PostCSS configuration file, Next.js **completely disables** the default behavior. Be sure to manually configure all the features you need compiled, including Autoprefixer. You also need to install any plugins included in your custom configuration manually, i.e. `npm install postcss-flexbugs-fixes postcss-preset-env`. To customize the PostCSS configuration, create a `postcss.config.json` file in the root of your project. This is the default configuration used by Next.js: { "plugins": [ "postcss-flexbugs-fixes", [ "postcss-preset-env", { "autoprefixer": { "flexbox": "no-2009" }, "stage": 3, "features": { "custom-properties": false } } ] ] } > **Good to know**: Next.js also allows the file to be named `.postcssrc.json`, or, to be read from the `postcss` key in `package.json`. It is also possible to configure PostCSS with a `postcss.config.js` file, which is useful when you want to conditionally include plugins based on environment: module.exports = { plugins: process.env.NODE_ENV === 'production' ? [ 'postcss-flexbugs-fixes', [ 'postcss-preset-env', { autoprefixer: { flexbox: 'no-2009', }, stage: 3, features: { 'custom-properties': false, }, }, ], ] : [ // No transformations in development ], } > **Good to know**: Next.js also allows the file to be named `.postcssrc.js`. Do **not use `require()`** to import the PostCSS Plugins. Plugins must be provided as strings. > **Good to know**: If your `postcss.config.js` needs to support other non-Next.js tools in the same project, you must use the interoperable object-based format instead: > > module.exports = { > plugins: { > 'postcss-flexbugs-fixes': {}, > 'postcss-preset-env': { > autoprefixer: { > flexbox: 'no-2009', > }, > stage: 3, > features: { > 'custom-properties': false, > }, > }, > }, > } --- ## Page: https://nextjs.org/docs/pages/building-your-application/configuring/custom-server Next.js includes its own server with `next start` by default. If you have an existing backend, you can still use it with Next.js (this is not a custom server). A custom Next.js server allows you to programmatically start a server for custom patterns. The majority of the time, you will not need this approach. However, it's available if you need to eject. > **Good to know**: > > * Before deciding to use a custom server, keep in mind that it should only be used when the integrated router of Next.js can't meet your app requirements. A custom server will remove important performance optimizations, like **Automatic Static Optimization.** > * A custom server **cannot** be deployed on Vercel. > * When using standalone output mode, it does not trace custom server files. This mode outputs a separate minimal `server.js` file, instead. These cannot be used together. Take a look at the following example of a custom server: import { createServer } from 'http' import { parse } from 'url' import next from 'next' const port = parseInt(process.env.PORT || '3000', 10) const dev = process.env.NODE_ENV !== 'production' const app = next({ dev }) const handle = app.getRequestHandler() app.prepare().then(() => { createServer((req, res) => { const parsedUrl = parse(req.url!, true) handle(req, res, parsedUrl) }).listen(port) console.log( `> Server listening at http://localhost:${port} as ${ dev ? 'development' : process.env.NODE_ENV }` ) }) > `server.js` does not run through the Next.js Compiler or bundling process. Make sure the syntax and source code this file requires are compatible with the current Node.js version you are using. View an example. To run the custom server, you'll need to update the `scripts` in `package.json` like so: { "scripts": { "dev": "node server.js", "build": "next build", "start": "NODE_ENV=production node server.js" } } Alternatively, you can set up `nodemon` (example). The custom server uses the following import to connect the server with the Next.js application: import next from 'next' const app = next({}) The above `next` import is a function that receives an object with the following options: | Option | Type | Description | | --- | --- | --- | | `conf` | `Object` | The same object you would use in `next.config.js`. Defaults to `{}` | | `dev` | `Boolean` | (_Optional_) Whether or not to launch Next.js in dev mode. Defaults to `false` | | `dir` | `String` | (_Optional_) Location of the Next.js project. Defaults to `'.'` | | `quiet` | `Boolean` | (_Optional_) Hide error messages containing server information. Defaults to `false` | | `hostname` | `String` | (_Optional_) The hostname the server is running behind | | `port` | `Number` | (_Optional_) The port the server is running behind | | `httpServer` | `node:http#Server` | (_Optional_) The HTTP Server that Next.js is running behind | | `turbo` | `Boolean` | (_Optional_) Enable Turbopack | The returned `app` can then be used to let Next.js handle requests as required. ## Disabling file-system routing By default, `Next` will serve each file in the `pages` folder under a pathname matching the filename. If your project uses a custom server, this behavior may result in the same content being served from multiple paths, which can present problems with SEO and UX. To disable this behavior and prevent routing based on files in `pages`, open `next.config.js` and disable the `useFileSystemPublicRoutes` config: module.exports = { useFileSystemPublicRoutes: false, } > Note that `useFileSystemPublicRoutes` disables filename routes from SSR; client-side routing may still access those paths. When using this option, you should guard against navigation to routes you do not want programmatically. > You may also wish to configure the client-side router to disallow client-side redirects to filename routes; for that refer to `router.beforePopState`. --- ## Page: https://nextjs.org/docs/pages/building-your-application/configuring/draft-mode In the Pages documentation and the Data Fetching documentation, we talked about how to pre-render a page at build time (**Static Generation**) using `getStaticProps` and `getStaticPaths`. Static Generation is useful when your pages fetch data from a headless CMS. However, it’s not ideal when you’re writing a draft on your headless CMS and want to view the draft immediately on your page. You’d want Next.js to render these pages at **request time** instead of build time and fetch the draft content instead of the published content. You’d want Next.js to bypass Static Generation only for this specific case. Next.js has a feature called **Draft Mode** which solves this problem. Here are instructions on how to use it. ## Step 1: Create and access the API route > Take a look at the API Routes documentation first if you’re not familiar with Next.js API Routes. First, create the **API route**. It can have any name - e.g. `pages/api/draft.ts` In this API route, you need to call `setDraftMode` on the response object. export default function handler(req, res) { // ... res.setDraftMode({ enable: true }) // ... } This will set a **cookie** to enable draft mode. Subsequent requests containing this cookie will trigger **Draft Mode** changing the behavior for statically generated pages (more on this later). You can test this manually by creating an API route like below and accessing it from your browser manually: // simple example for testing it manually from your browser. export default function handler(req, res) { res.setDraftMode({ enable: true }) res.end('Draft mode is enabled') } If you open your browser’s developer tools and visit `/api/draft`, you’ll notice a `Set-Cookie` response header with a cookie named `__prerender_bypass`. ### Securely accessing it from your Headless CMS In practice, you’d want to call this API route _securely_ from your headless CMS. The specific steps will vary depending on which headless CMS you’re using, but here are some common steps you could take. These steps assume that the headless CMS you’re using supports setting **custom draft URLs**. If it doesn’t, you can still use this method to secure your draft URLs, but you’ll need to construct and access the draft URL manually. **First**, you should create a **secret token string** using a token generator of your choice. This secret will only be known by your Next.js app and your headless CMS. This secret prevents people who don’t have access to your CMS from accessing draft URLs. **Second**, if your headless CMS supports setting custom draft URLs, specify the following as the draft URL. This assumes that your draft API route is located at `pages/api/draft.ts`. https://<your-site>/api/draft?secret=<token>&slug=<path> * `<your-site>` should be your deployment domain. * `<token>` should be replaced with the secret token you generated. * `<path>` should be the path for the page that you want to view. If you want to view `/posts/foo`, then you should use `&slug=/posts/foo`. Your headless CMS might allow you to include a variable in the draft URL so that `<path>` can be set dynamically based on the CMS’s data like so: `&slug=/posts/{entry.fields.slug}` **Finally**, in the draft API route: * Check that the secret matches and that the `slug` parameter exists (if not, the request should fail). * Call `res.setDraftMode`. * Then redirect the browser to the path specified by `slug`. (The following example uses a 307 redirect). export default async (req, res) => { // Check the secret and next parameters // This secret should only be known to this API route and the CMS if (req.query.secret !== 'MY_SECRET_TOKEN' || !req.query.slug) { return res.status(401).json({ message: 'Invalid token' }) } // Fetch the headless CMS to check if the provided `slug` exists // getPostBySlug would implement the required fetching logic to the headless CMS const post = await getPostBySlug(req.query.slug) // If the slug doesn't exist prevent draft mode from being enabled if (!post) { return res.status(401).json({ message: 'Invalid slug' }) } // Enable Draft Mode by setting the cookie res.setDraftMode({ enable: true }) // Redirect to the path from the fetched post // We don't redirect to req.query.slug as that might lead to open redirect vulnerabilities res.redirect(post.slug) } If it succeeds, then the browser will be redirected to the path you want to view with the draft mode cookie. ## Step 2: Update `getStaticProps` The next step is to update `getStaticProps` to support draft mode. If you request a page which has `getStaticProps` with the cookie set (via `res.setDraftMode`), then `getStaticProps` will be called at **request time** (instead of at build time). Furthermore, it will be called with a `context` object where `context.draftMode` will be `true`. export async function getStaticProps(context) { if (context.draftMode) { // dynamic data } } We used `res.setDraftMode` in the draft API route, so `context.draftMode` will be `true`. If you’re also using `getStaticPaths`, then `context.params` will also be available. ### Fetch draft data You can update `getStaticProps` to fetch different data based on `context.draftMode`. For example, your headless CMS might have a different API endpoint for draft posts. If so, you can modify the API endpoint URL like below: export async function getStaticProps(context) { const url = context.draftMode ? 'https://draft.example.com' : 'https://production.example.com' const res = await fetch(url) // ... } That’s it! If you access the draft API route (with `secret` and `slug`) from your headless CMS or manually, you should now be able to see the draft content. And if you update your draft without publishing, you should be able to view the draft. Set this as the draft URL on your headless CMS or access manually, and you should be able to see the draft. https://<your-site>/api/draft?secret=<token>&slug=<path> ## More Details ### Clear the Draft Mode cookie By default, the Draft Mode session ends when the browser is closed. To clear the Draft Mode cookie manually, create an API route that calls `setDraftMode({ enable: false })`: export default function handler(req, res) { res.setDraftMode({ enable: false }) } Then, send a request to `/api/disable-draft` to invoke the API Route. If calling this route using `next/link`, you must pass `prefetch={false}` to prevent accidentally deleting the cookie on prefetch. ### Works with `getServerSideProps` Draft Mode works with `getServerSideProps`, and is available as a `draftMode` key in the `context` object. > **Good to know**: You shouldn't set the `Cache-Control` header when using Draft Mode because it cannot be bypassed. Instead, we recommend using ISR. ### Works with API Routes API Routes will have access to `draftMode` on the request object. For example: export default function myApiRoute(req, res) { if (req.draftMode) { // get draft data } } ### Unique per `next build` A new bypass cookie value will be generated each time you run `next build`. This ensures that the bypass cookie can’t be guessed. > **Good to know**: To test Draft Mode locally over HTTP, your browser will need to allow third-party cookies and local storage access. --- ## Page: https://nextjs.org/docs/pages/building-your-application/configuring/error-handling This documentation explains how you can handle development, server-side, and client-side errors. ## Handling Errors in Development When there is a runtime error during the development phase of your Next.js application, you will encounter an **overlay**. It is a modal that covers the webpage. It is **only** visible when the development server runs using `next dev` via `pnpm dev`, `npm run dev`, `yarn dev`, or `bun dev` and will not be shown in production. Fixing the error will automatically dismiss the overlay. Here is an example of an overlay: 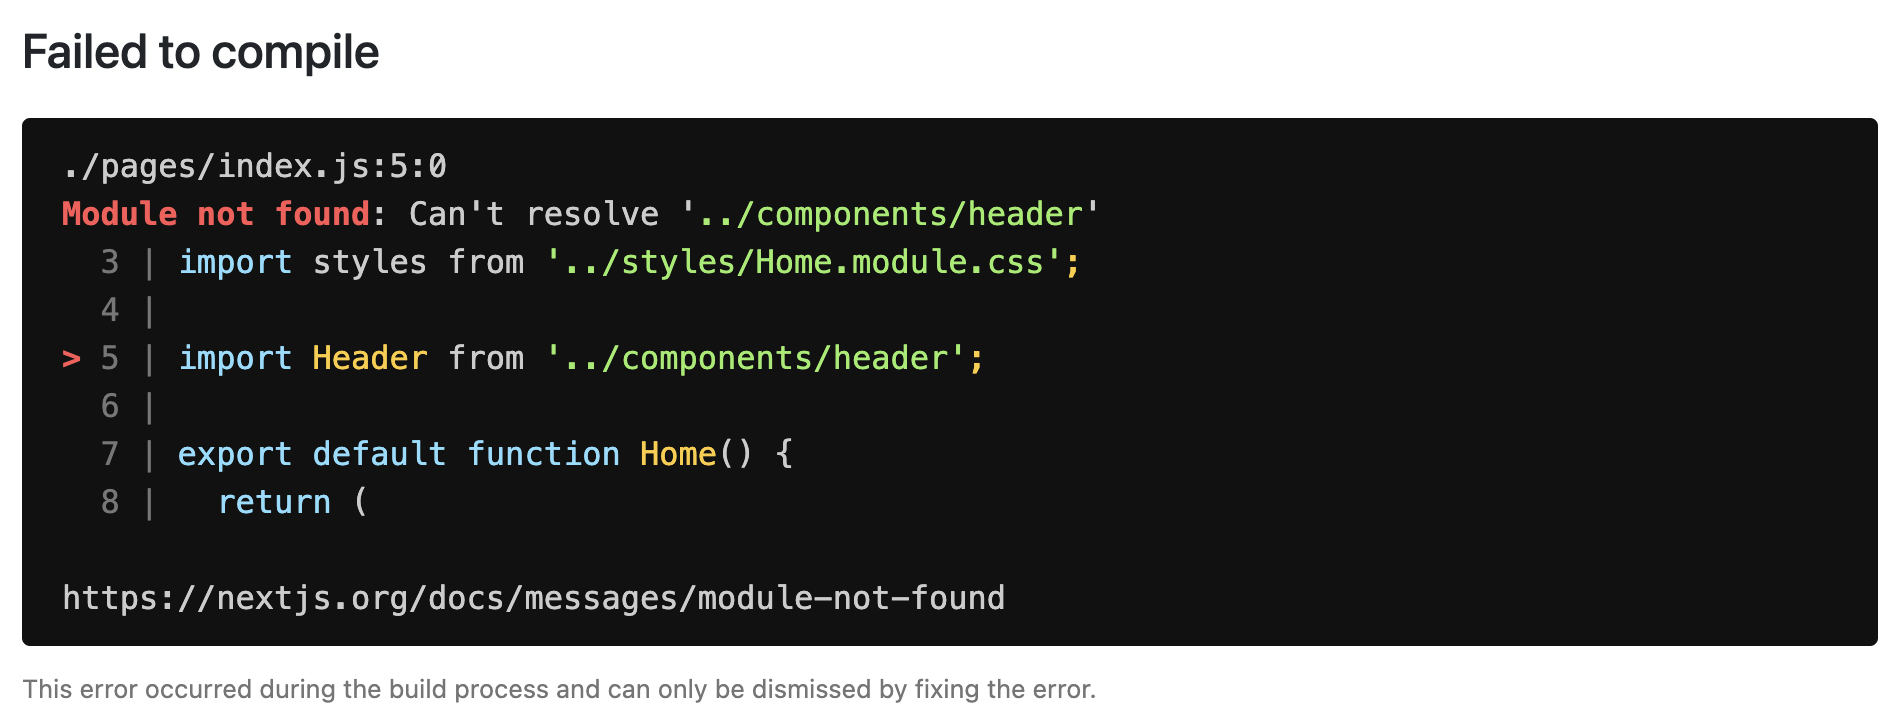 ## Handling Server Errors Next.js provides a static 500 page by default to handle server-side errors that occur in your application. You can also customize this page by creating a `pages/500.js` file. Having a 500 page in your application does not show specific errors to the app user. You can also use 404 page to handle specific runtime error like `file not found`. ## Handling Client Errors React Error Boundaries is a graceful way to handle a JavaScript error on the client so that the other parts of the application continue working. In addition to preventing the page from crashing, it allows you to provide a custom fallback component and even log error information. To use Error Boundaries for your Next.js application, you must create a class component `ErrorBoundary` and wrap the `Component` prop in the `pages/_app.js` file. This component will be responsible to: * Render a fallback UI after an error is thrown * Provide a way to reset the Application's state * Log error information You can create an `ErrorBoundary` class component by extending `React.Component`. For example: class ErrorBoundary extends React.Component { constructor(props) { super(props) // Define a state variable to track whether is an error or not this.state = { hasError: false } } static getDerivedStateFromError(error) { // Update state so the next render will show the fallback UI return { hasError: true } } componentDidCatch(error, errorInfo) { // You can use your own error logging service here console.log({ error, errorInfo }) } render() { // Check if the error is thrown if (this.state.hasError) { // You can render any custom fallback UI return ( <div> <h2>Oops, there is an error!</h2> <button type="button" onClick={() => this.setState({ hasError: false })} > Try again? </button> </div> ) } // Return children components in case of no error return this.props.children } } export default ErrorBoundary The `ErrorBoundary` component keeps track of an `hasError` state. The value of this state variable is a boolean. When the value of `hasError` is `true`, then the `ErrorBoundary` component will render a fallback UI. Otherwise, it will render the children components. After creating an `ErrorBoundary` component, import it in the `pages/_app.js` file to wrap the `Component` prop in your Next.js application. // Import the ErrorBoundary component import ErrorBoundary from '../components/ErrorBoundary' function MyApp({ Component, pageProps }) { return ( // Wrap the Component prop with ErrorBoundary component <ErrorBoundary> <Component {...pageProps} /> </ErrorBoundary> ) } export default MyApp You can learn more about Error Boundaries in React's documentation. ### Reporting Errors To monitor client errors, use a service like Sentry, Bugsnag or Datadog. --- ## Page: https://nextjs.org/docs/pages/building-your-application/configuring/preview-mode > **Note**: This feature is superseded by Draft Mode. Examples * Agility CMS Example (Demo) * Builder.io Example (Demo) * ButterCMS Example (Demo) * Contentful Example (Demo) * Cosmic Example (Demo) * DatoCMS Example (Demo) * DotCMS Example (Demo) * Drupal Example (Demo) * Enterspeed Example (Demo) * GraphCMS Example (Demo) * Keystone Example (Demo) * Kontent.ai Example (Demo) * Makeswift Example (Demo) * Plasmic Example (Demo) * Prepr Example (Demo) * Prismic Example (Demo) * Sanity Example (Demo) * Sitecore XM Cloud Example (Demo) * Storyblok Example (Demo) * Strapi Example (Demo) * TakeShape Example (Demo) * Tina Example (Demo) * Umbraco Example (Demo) * Umbraco Heartcore Example (Demo) * Webiny Example (Demo) * WordPress Example (Demo) * Blog Starter Example (Demo) In the Pages documentation and the Data Fetching documentation, we talked about how to pre-render a page at build time (**Static Generation**) using `getStaticProps` and `getStaticPaths`. Static Generation is useful when your pages fetch data from a headless CMS. However, it’s not ideal when you’re writing a draft on your headless CMS and want to **preview** the draft immediately on your page. You’d want Next.js to render these pages at **request time** instead of build time and fetch the draft content instead of the published content. You’d want Next.js to bypass Static Generation only for this specific case. Next.js has a feature called **Preview Mode** which solves this problem. Here are instructions on how to use it. ## Step 1: Create and access a preview API route > Take a look at the API Routes documentation first if you’re not familiar with Next.js API Routes. First, create a **preview API route**. It can have any name - e.g. `pages/api/preview.js` (or `.ts` if using TypeScript). In this API route, you need to call `setPreviewData` on the response object. The argument for `setPreviewData` should be an object, and this can be used by `getStaticProps` (more on this later). For now, we’ll use `{}`. export default function handler(req, res) { // ... res.setPreviewData({}) // ... } `res.setPreviewData` sets some **cookies** on the browser which turns on the preview mode. Any requests to Next.js containing these cookies will be considered as the **preview mode**, and the behavior for statically generated pages will change (more on this later). You can test this manually by creating an API route like below and accessing it from your browser manually: // simple example for testing it manually from your browser. export default function handler(req, res) { res.setPreviewData({}) res.end('Preview mode enabled') } If you open your browser’s developer tools and visit `/api/preview`, you’ll notice that the `__prerender_bypass` and `__next_preview_data` cookies will be set on this request. ### Securely accessing it from your Headless CMS In practice, you’d want to call this API route _securely_ from your headless CMS. The specific steps will vary depending on which headless CMS you’re using, but here are some common steps you could take. These steps assume that the headless CMS you’re using supports setting **custom preview URLs**. If it doesn’t, you can still use this method to secure your preview URLs, but you’ll need to construct and access the preview URL manually. **First**, you should create a **secret token string** using a token generator of your choice. This secret will only be known by your Next.js app and your headless CMS. This secret prevents people who don’t have access to your CMS from accessing preview URLs. **Second**, if your headless CMS supports setting custom preview URLs, specify the following as the preview URL. This assumes that your preview API route is located at `pages/api/preview.js`. https://<your-site>/api/preview?secret=<token>&slug=<path> * `<your-site>` should be your deployment domain. * `<token>` should be replaced with the secret token you generated. * `<path>` should be the path for the page that you want to preview. If you want to preview `/posts/foo`, then you should use `&slug=/posts/foo`. Your headless CMS might allow you to include a variable in the preview URL so that `<path>` can be set dynamically based on the CMS’s data like so: `&slug=/posts/{entry.fields.slug}` **Finally**, in the preview API route: * Check that the secret matches and that the `slug` parameter exists (if not, the request should fail). * Call `res.setPreviewData`. * Then redirect the browser to the path specified by `slug`. (The following example uses a 307 redirect). export default async (req, res) => { // Check the secret and next parameters // This secret should only be known to this API route and the CMS if (req.query.secret !== 'MY_SECRET_TOKEN' || !req.query.slug) { return res.status(401).json({ message: 'Invalid token' }) } // Fetch the headless CMS to check if the provided `slug` exists // getPostBySlug would implement the required fetching logic to the headless CMS const post = await getPostBySlug(req.query.slug) // If the slug doesn't exist prevent preview mode from being enabled if (!post) { return res.status(401).json({ message: 'Invalid slug' }) } // Enable Preview Mode by setting the cookies res.setPreviewData({}) // Redirect to the path from the fetched post // We don't redirect to req.query.slug as that might lead to open redirect vulnerabilities res.redirect(post.slug) } If it succeeds, then the browser will be redirected to the path you want to preview with the preview mode cookies being set. ## Step 2: Update `getStaticProps` The next step is to update `getStaticProps` to support the preview mode. If you request a page which has `getStaticProps` with the preview mode cookies set (via `res.setPreviewData`), then `getStaticProps` will be called at **request time** (instead of at build time). Furthermore, it will be called with a `context` object where: * `context.preview` will be `true`. * `context.previewData` will be the same as the argument used for `setPreviewData`. export async function getStaticProps(context) { // If you request this page with the preview mode cookies set: // // - context.preview will be true // - context.previewData will be the same as // the argument used for `setPreviewData`. } We used `res.setPreviewData({})` in the preview API route, so `context.previewData` will be `{}`. You can use this to pass session information from the preview API route to `getStaticProps` if necessary. If you’re also using `getStaticPaths`, then `context.params` will also be available. ### Fetch preview data You can update `getStaticProps` to fetch different data based on `context.preview` and/or `context.previewData`. For example, your headless CMS might have a different API endpoint for draft posts. If so, you can use `context.preview` to modify the API endpoint URL like below: export async function getStaticProps(context) { // If context.preview is true, append "/preview" to the API endpoint // to request draft data instead of published data. This will vary // based on which headless CMS you're using. const res = await fetch(`https://.../${context.preview ? 'preview' : ''}`) // ... } That’s it! If you access the preview API route (with `secret` and `slug`) from your headless CMS or manually, you should now be able to see the preview content. And if you update your draft without publishing, you should be able to preview the draft. Set this as the preview URL on your headless CMS or access manually, and you should be able to see the preview. https://<your-site>/api/preview?secret=<token>&slug=<path> ## More Details > **Good to know**: during rendering `next/router` exposes an `isPreview` flag, see the router object docs for more info. ### Specify the Preview Mode duration `setPreviewData` takes an optional second parameter which should be an options object. It accepts the following keys: * `maxAge`: Specifies the number (in seconds) for the preview session to last for. * `path`: Specifies the path the cookie should be applied under. Defaults to `/` enabling preview mode for all paths. setPreviewData(data, { maxAge: 60 * 60, // The preview mode cookies expire in 1 hour path: '/about', // The preview mode cookies apply to paths with /about }) ### Clear the Preview Mode cookies By default, no expiration date is set for Preview Mode cookies, so the preview session ends when the browser is closed. To clear the Preview Mode cookies manually, create an API route that calls `clearPreviewData()`: export default function handler(req, res) { res.clearPreviewData({}) } Then, send a request to `/api/clear-preview-mode-cookies` to invoke the API Route. If calling this route using `next/link`, you must pass `prefetch={false}` to prevent calling `clearPreviewData` during link prefetching. If a path was specified in the `setPreviewData` call, you must pass the same path to `clearPreviewData`: export default function handler(req, res) { const { path } = req.query res.clearPreviewData({ path }) } ### `previewData` size limits You can pass an object to `setPreviewData` and have it be available in `getStaticProps`. However, because the data will be stored in a cookie, there’s a size limitation. Currently, preview data is limited to 2KB. ### Works with `getServerSideProps` The preview mode works on `getServerSideProps` as well. It will also be available on the `context` object containing `preview` and `previewData`. > **Good to know**: You shouldn't set the `Cache-Control` header when using Preview Mode because it cannot be bypassed. Instead, we recommend using ISR. ### Works with API Routes API Routes will have access to `preview` and `previewData` under the request object. For example: export default function myApiRoute(req, res) { const isPreview = req.preview const previewData = req.previewData // ... } ### Unique per `next build` Both the bypass cookie value and the private key for encrypting the `previewData` change when `next build` is completed. This ensures that the bypass cookie can’t be guessed. > **Good to know**: To test Preview Mode locally over HTTP your browser will need to allow third-party cookies and local storage access. --- ## Page: https://nextjs.org/docs/pages/building-your-application/configuring/content-security-policy Content Security Policy (CSP) is important to guard your Next.js application against various security threats such as cross-site scripting (XSS), clickjacking, and other code injection attacks. By using CSP, developers can specify which origins are permissible for content sources, scripts, stylesheets, images, fonts, objects, media (audio, video), iframes, and more. Examples * Strict CSP ## Nonces A nonce is a unique, random string of characters created for a one-time use. It is used in conjunction with CSP to selectively allow certain inline scripts or styles to execute, bypassing strict CSP directives. ### Why use a nonce? Even though CSPs are designed to block malicious scripts, there are legitimate scenarios where inline scripts are necessary. In such cases, nonces offer a way to allow these scripts to execute if they have the correct nonce. ### Adding a nonce with Middleware Middleware enables you to add headers and generate nonces before the page renders. Every time a page is viewed, a fresh nonce should be generated. This means that you **must use dynamic rendering to add nonces**. For example: import { NextRequest, NextResponse } from 'next/server' export function middleware(request: NextRequest) { const nonce = Buffer.from(crypto.randomUUID()).toString('base64') const cspHeader = ` default-src 'self'; script-src 'self' 'nonce-${nonce}' 'strict-dynamic'; style-src 'self' 'nonce-${nonce}'; img-src 'self' blob: data:; font-src 'self'; object-src 'none'; base-uri 'self'; form-action 'self'; frame-ancestors 'none'; upgrade-insecure-requests; ` // Replace newline characters and spaces const contentSecurityPolicyHeaderValue = cspHeader .replace(/\s{2,}/g, ' ') .trim() const requestHeaders = new Headers(request.headers) requestHeaders.set('x-nonce', nonce) requestHeaders.set( 'Content-Security-Policy', contentSecurityPolicyHeaderValue ) const response = NextResponse.next({ request: { headers: requestHeaders, }, }) response.headers.set( 'Content-Security-Policy', contentSecurityPolicyHeaderValue ) return response } By default, Middleware runs on all requests. You can filter Middleware to run on specific paths using a `matcher`. We recommend ignoring matching prefetches (from `next/link`) and static assets that don't need the CSP header. export const config = { matcher: [ /* * Match all request paths except for the ones starting with: * - api (API routes) * - _next/static (static files) * - _next/image (image optimization files) * - favicon.ico (favicon file) */ { source: '/((?!api|_next/static|_next/image|favicon.ico).*)', missing: [ { type: 'header', key: 'next-router-prefetch' }, { type: 'header', key: 'purpose', value: 'prefetch' }, ], }, ], } ### Reading the nonce You can now read the nonce from a Server Component using `headers`: import { headers } from 'next/headers' import Script from 'next/script' export default async function Page() { const nonce = (await headers()).get('x-nonce') return ( <Script src="https://www.googletagmanager.com/gtag/js" strategy="afterInteractive" nonce={nonce} /> ) } ## Without Nonces For applications that do not require nonces, you can set the CSP header directly in your `next.config.js` file: const cspHeader = ` default-src 'self'; script-src 'self' 'unsafe-eval' 'unsafe-inline'; style-src 'self' 'unsafe-inline'; img-src 'self' blob: data:; font-src 'self'; object-src 'none'; base-uri 'self'; form-action 'self'; frame-ancestors 'none'; upgrade-insecure-requests; ` module.exports = { async headers() { return [ { source: '/(.*)', headers: [ { key: 'Content-Security-Policy', value: cspHeader.replace(/\n/g, ''), }, ], }, ] }, } ## Version History We recommend using `v13.4.20+` of Next.js to properly handle and apply nonces. --- ## Page: https://nextjs.org/docs/pages/building-your-application/configuring/debugging This documentation explains how you can debug your Next.js frontend and backend code with full source maps support using the VS Code debugger, Chrome DevTools, or Firefox DevTools. Any debugger that can attach to Node.js can also be used to debug a Next.js application. You can find more details in the Node.js Debugging Guide. ## Debugging with VS Code Create a file named `.vscode/launch.json` at the root of your project with the following content: { "version": "0.2.0", "configurations": [ { "name": "Next.js: debug server-side", "type": "node-terminal", "request": "launch", "command": "npm run dev" }, { "name": "Next.js: debug client-side", "type": "chrome", "request": "launch", "url": "http://localhost:3000" }, { "name": "Next.js: debug client-side (Firefox)", "type": "firefox", "request": "launch", "url": "http://localhost:3000", "reAttach": true, "pathMappings": [ { "url": "webpack://_N_E", "path": "${workspaceFolder}" } ] }, { "name": "Next.js: debug full stack", "type": "node", "request": "launch", "program": "${workspaceFolder}/node_modules/next/dist/bin/next", "runtimeArgs": ["--inspect"], "skipFiles": ["<node_internals>/**"], "serverReadyAction": { "action": "debugWithEdge", "killOnServerStop": true, "pattern": "- Local:.+(https?://.+)", "uriFormat": "%s", "webRoot": "${workspaceFolder}" } } ] } > **Note**: To use Firefox debugging in VS Code, you'll need to install the Firefox Debugger extension. `npm run dev` can be replaced with `yarn dev` if you're using Yarn or `pnpm dev` if you're using pnpm. In the "Next.js: debug full stack" configuration, `serverReadyAction.action` specifies which browser to open when the server is ready. `debugWithEdge` means to launch the Edge browser. If you are using Chrome, change this value to `debugWithChrome`. If you're changing the port number your application starts on, replace the `3000` in `http://localhost:3000` with the port you're using instead. If you're running Next.js from a directory other than root (for example, if you're using Turborepo) then you need to add `cwd` to the server-side and full stack debugging tasks. For example, `"cwd": "${workspaceFolder}/apps/web"`. Now go to the Debug panel (`Ctrl+Shift+D` on Windows/Linux, `⇧+⌘+D` on macOS), select a launch configuration, then press `F5` or select **Debug: Start Debugging** from the Command Palette to start your debugging session. ## Using the Debugger in Jetbrains WebStorm Click the drop down menu listing the runtime configuration, and click `Edit Configurations...`. Create a `JavaScript Debug` debug configuration with `http://localhost:3000` as the URL. Customize to your liking (e.g. Browser for debugging, store as project file), and click `OK`. Run this debug configuration, and the selected browser should automatically open. At this point, you should have 2 applications in debug mode: the NextJS node application, and the client/browser application. ## Debugging with Browser DevTools ### Client-side code Start your development server as usual by running `next dev`, `npm run dev`, or `yarn dev`. Once the server starts, open `http://localhost:3000` (or your alternate URL) in your preferred browser. For Chrome: * Open Chrome's Developer Tools (`Ctrl+Shift+J` on Windows/Linux, `⌥+⌘+I` on macOS) * Go to the **Sources** tab For Firefox: * Open Firefox's Developer Tools (`Ctrl+Shift+I` on Windows/Linux, `⌥+⌘+I` on macOS) * Go to the **Debugger** tab In either browser, any time your client-side code reaches a `debugger` statement, code execution will pause and that file will appear in the debug area. You can also search for files to set breakpoints manually: * In Chrome: Press `Ctrl+P` on Windows/Linux or `⌘+P` on macOS * In Firefox: Press `Ctrl+P` on Windows/Linux or `⌘+P` on macOS, or use the file tree in the left panel Note that when searching, your source files will have paths starting with `webpack://_N_E/./`. ### Server-side code To debug server-side Next.js code with browser DevTools, you need to pass the `--inspect` flag to the underlying Node.js process: NODE_OPTIONS='--inspect' next dev > **Good to know**: Use `NODE_OPTIONS='--inspect=0.0.0.0'` to allow remote debugging access outside localhost, such as when running the app in a Docker container. If you're using `npm run dev` or `yarn dev` then you should update the `dev` script on your `package.json`: { "scripts": { "dev": "NODE_OPTIONS='--inspect' next dev" } } Launching the Next.js dev server with the `--inspect` flag will look something like this: Debugger listening on ws://127.0.0.1:9229/0cf90313-350d-4466-a748-cd60f4e47c95 For help, see: https://nodejs.org/en/docs/inspector ready - started server on 0.0.0.0:3000, url: http://localhost:3000 For Chrome: 1. Open a new tab and visit `chrome://inspect` 2. Click **Configure...** to ensure both debugging ports are listed 3. Add both `localhost:9229` and `localhost:9230` if they're not already present 4. Look for your Next.js application in the **Remote Target** section 5. Click **inspect** to open a separate DevTools window 6. Go to the **Sources** tab For Firefox: 1. Open a new tab and visit `about:debugging` 2. Click **This Firefox** in the left sidebar 3. Under **Remote Targets**, find your Next.js application 4. Click **Inspect** to open the debugger 5. Go to the **Debugger** tab Debugging server-side code works similarly to client-side debugging. When searching for files (`Ctrl+P`/`⌘+P`), your source files will have paths starting with `webpack://{application-name}/./` (where `{application-name}` will be replaced with the name of your application according to your `package.json` file). ### Inspect Server Errors with Browser DevTools When you encounter an error, inspecting the source code can help trace the root cause of errors. Next.js will display a Node.js icon underneath the Next.js version indicator on the error overlay. By clicking that icon, the DevTools URL is copied to your clipboard. You can open a new browser tab with that URL to inspect the Next.js server process. ### Debugging on Windows Windows users may run into an issue when using `NODE_OPTIONS='--inspect'` as that syntax is not supported on Windows platforms. To get around this, install the `cross-env` package as a development dependency (`-D` with `npm` and `yarn`) and replace the `dev` script with the following. { "scripts": { "dev": "cross-env NODE_OPTIONS='--inspect' next dev" } } `cross-env` will set the `NODE_OPTIONS` environment variable regardless of which platform you are on (including Mac, Linux, and Windows) and allow you to debug consistently across devices and operating systems. > **Good to know**: Ensure Windows Defender is disabled on your machine. This external service will check _every file read_, which has been reported to greatly increase Fast Refresh time with `next dev`. This is a known issue, not related to Next.js, but it does affect Next.js development. ## More information To learn more about how to use a JavaScript debugger, take a look at the following documentation: * Node.js debugging in VS Code: Breakpoints * Chrome DevTools: Debug JavaScript * Firefox DevTools: Debugger --- ## Page: https://nextjs.org/docs/pages/building-your-application/testing In React and Next.js, there are a few different types of tests you can write, each with its own purpose and use cases. This page provides an overview of types and commonly used tools you can use to test your application. ## Types of tests * **Unit Testing** involves testing individual units (or blocks of code) in isolation. In React, a unit can be a single function, hook, or component. * **Component Testing** is a more focused version of unit testing where the primary subject of the tests is React components. This may involve testing how components are rendered, their interaction with props, and their behavior in response to user events. * **Integration Testing** involves testing how multiple units work together. This can be a combination of components, hooks, and functions. * **End-to-End (E2E) Testing** involves testing user flows in an environment that simulates real user scenarios, like the browser. This means testing specific tasks (e.g. signup flow) in a production-like environment. * **Snapshot Testing** involves capturing the rendered output of a component and saving it to a snapshot file. When tests run, the current rendered output of the component is compared against the saved snapshot. Changes in the snapshot are used to indicate unexpected changes in behavior. ## Guides See the guides below to learn how to set up Next.js with these commonly used testing tools: --- ## Page: https://nextjs.org/docs/pages/building-your-application/testing/vitest ## Setting up Vitest with Next.js Vite and React Testing Library are frequently used together for **Unit Testing**. This guide will show you how to setup Vitest with Next.js and write your first tests. > **Good to know:** Since `async` Server Components are new to the React ecosystem, Vitest currently does not support them. While you can still run **unit tests** for synchronous Server and Client Components, we recommend using an **E2E tests** for `async` components. ## Quickstart You can use `create-next-app` with the Next.js with-vitest example to quickly get started: npx create-next-app@latest --example with-vitest with-vitest-app ## Manual Setup To manually set up Vitest, install `vitest` and the following packages as dev dependencies: # Using TypeScript npm install -D vitest @vitejs/plugin-react jsdom @testing-library/react @testing-library/dom vite-tsconfig-paths # Using JavaScript npm install -D vitest @vitejs/plugin-react jsdom @testing-library/react @testing-library/dom Create a `vitest.config.mts|js` file in the root of your project, and add the following options: import { defineConfig } from 'vitest/config' import react from '@vitejs/plugin-react' import tsconfigPaths from 'vite-tsconfig-paths' export default defineConfig({ plugins: [tsconfigPaths(), react()], test: { environment: 'jsdom', }, }) For more information on configuring Vitest, please refer to the Vitest Configuration docs. Then, add a `test` script to your `package.json`: { "scripts": { "dev": "next dev", "build": "next build", "start": "next start", "test": "vitest" } } When you run `npm run test`, Vitest will **watch** for changes in your project by default. ## Creating your first Vitest Unit Test Check that everything is working by creating a test to check if the `<Page />` component successfully renders a heading: import Link from 'next/link' export default function Page() { return ( <div> <h1>Home</h1> <Link href="/about">About</Link> </div> ) } import { expect, test } from 'vitest' import { render, screen } from '@testing-library/react' import Page from '../pages/index' test('Page', () => { render(<Page />) expect(screen.getByRole('heading', { level: 1, name: 'Home' })).toBeDefined() }) ## Running your tests Then, run the following command to run your tests: npm run test # or yarn test # or pnpm test # or bun test ## Additional Resources You may find these resources helpful: * Next.js with Vitest example * Vitest Docs * React Testing Library Docs --- ## Page: https://nextjs.org/docs/pages/building-your-application/testing/jest ## Setting up Jest with Next.js Jest and React Testing Library are frequently used together for **Unit Testing** and **Snapshot Testing**. This guide will show you how to set up Jest with Next.js and write your first tests. > **Good to know:** Since `async` Server Components are new to the React ecosystem, Jest currently does not support them. While you can still run **unit tests** for synchronous Server and Client Components, we recommend using an **E2E tests** for `async` components. ## Quickstart You can use `create-next-app` with the Next.js with-jest example to quickly get started: npx create-next-app@latest --example with-jest with-jest-app ## Manual setup Since the release of Next.js 12, Next.js now has built-in configuration for Jest. To set up Jest, install `jest` and the following packages as dev dependencies: npm install -D jest jest-environment-jsdom @testing-library/react @testing-library/dom @testing-library/jest-dom ts-node @types/jest # or yarn add -D jest jest-environment-jsdom @testing-library/react @testing-library/dom @testing-library/jest-dom ts-node @types/jest # or pnpm install -D jest jest-environment-jsdom @testing-library/react @testing-library/dom @testing-library/jest-dom ts-node @types/jest Generate a basic Jest configuration file by running the following command: npm init jest@latest # or yarn create jest@latest # or pnpm create jest@latest This will take you through a series of prompts to setup Jest for your project, including automatically creating a `jest.config.ts|js` file. Update your config file to use `next/jest`. This transformer has all the necessary configuration options for Jest to work with Next.js: import type { Config } from 'jest' import nextJest from 'next/jest.js' const createJestConfig = nextJest({ // Provide the path to your Next.js app to load next.config.js and .env files in your test environment dir: './', }) // Add any custom config to be passed to Jest const config: Config = { coverageProvider: 'v8', testEnvironment: 'jsdom', // Add more setup options before each test is run // setupFilesAfterEnv: ['<rootDir>/jest.setup.ts'], } // createJestConfig is exported this way to ensure that next/jest can load the Next.js config which is async export default createJestConfig(config) Under the hood, `next/jest` is automatically configuring Jest for you, including: * Setting up `transform` using the Next.js Compiler. * Auto mocking stylesheets (`.css`, `.module.css`, and their scss variants), image imports and `next/font`. * Loading `.env` (and all variants) into `process.env`. * Ignoring `node_modules` from test resolving and transforms. * Ignoring `.next` from test resolving. * Loading `next.config.js` for flags that enable SWC transforms. > **Good to know**: To test environment variables directly, load them manually in a separate setup script or in your `jest.config.ts` file. For more information, please see Test Environment Variables. ## Setting up Jest (with Babel) If you opt out of the Next.js Compiler and use Babel instead, you will need to manually configure Jest and install `babel-jest` and `identity-obj-proxy` in addition to the packages above. Here are the recommended options to configure Jest for Next.js: module.exports = { collectCoverage: true, // on node 14.x coverage provider v8 offers good speed and more or less good report coverageProvider: 'v8', collectCoverageFrom: [ '**/*.{js,jsx,ts,tsx}', '!**/*.d.ts', '!**/node_modules/**', '!<rootDir>/out/**', '!<rootDir>/.next/**', '!<rootDir>/*.config.js', '!<rootDir>/coverage/**', ], moduleNameMapper: { // Handle CSS imports (with CSS modules) // https://jestjs.io/docs/webpack#mocking-css-modules '^.+\\.module\\.(css|sass|scss)$': 'identity-obj-proxy', // Handle CSS imports (without CSS modules) '^.+\\.(css|sass|scss)$': '<rootDir>/__mocks__/styleMock.js', // Handle image imports // https://jestjs.io/docs/webpack#handling-static-assets '^.+\\.(png|jpg|jpeg|gif|webp|avif|ico|bmp|svg)$': `<rootDir>/__mocks__/fileMock.js`, // Handle module aliases '^@/components/(.*)$': '<rootDir>/components/$1', // Handle @next/font '@next/font/(.*)': `<rootDir>/__mocks__/nextFontMock.js`, // Handle next/font 'next/font/(.*)': `<rootDir>/__mocks__/nextFontMock.js`, // Disable server-only 'server-only': `<rootDir>/__mocks__/empty.js`, }, // Add more setup options before each test is run // setupFilesAfterEnv: ['<rootDir>/jest.setup.js'], testPathIgnorePatterns: ['<rootDir>/node_modules/', '<rootDir>/.next/'], testEnvironment: 'jsdom', transform: { // Use babel-jest to transpile tests with the next/babel preset // https://jestjs.io/docs/configuration#transform-objectstring-pathtotransformer--pathtotransformer-object '^.+\\.(js|jsx|ts|tsx)$': ['babel-jest', { presets: ['next/babel'] }], }, transformIgnorePatterns: [ '/node_modules/', '^.+\\.module\\.(css|sass|scss)$', ], } You can learn more about each configuration option in the Jest docs. We also recommend reviewing `next/jest` configuration to see how Next.js configures Jest. ### Handling stylesheets and image imports Stylesheets and images aren't used in the tests but importing them may cause errors, so they will need to be mocked. Create the mock files referenced in the configuration above - `fileMock.js` and `styleMock.js` - inside a `__mocks__` directory: module.exports = 'test-file-stub' module.exports = {} For more information on handling static assets, please refer to the Jest Docs. ## Handling Fonts To handle fonts, create the `nextFontMock.js` file inside the `__mocks__` directory, and add the following configuration: module.exports = new Proxy( {}, { get: function getter() { return () => ({ className: 'className', variable: 'variable', style: { fontFamily: 'fontFamily' }, }) }, } ) ## Optional: Handling Absolute Imports and Module Path Aliases If your project is using Module Path Aliases, you will need to configure Jest to resolve the imports by matching the paths option in the `jsconfig.json` file with the `moduleNameMapper` option in the `jest.config.js` file. For example: { "compilerOptions": { "module": "esnext", "moduleResolution": "bundler", "baseUrl": "./", "paths": { "@/components/*": ["components/*"] } } } moduleNameMapper: { // ... '^@/components/(.*)$': '<rootDir>/components/$1', } ## Optional: Extend Jest with custom matchers `@testing-library/jest-dom` includes a set of convenient custom matchers such as `.toBeInTheDocument()` making it easier to write tests. You can import the custom matchers for every test by adding the following option to the Jest configuration file: setupFilesAfterEnv: ['<rootDir>/jest.setup.ts'] Then, inside `jest.setup`, add the following import: import '@testing-library/jest-dom' > **Good to know:** `extend-expect` was removed in `v6.0`, so if you are using `@testing-library/jest-dom` before version 6, you will need to import `@testing-library/jest-dom/extend-expect` instead. If you need to add more setup options before each test, you can add them to the `jest.setup` file above. ## Add a test script to `package.json` Finally, add a Jest `test` script to your `package.json` file: { "scripts": { "dev": "next dev", "build": "next build", "start": "next start", "test": "jest", "test:watch": "jest --watch" } } `jest --watch` will re-run tests when a file is changed. For more Jest CLI options, please refer to the Jest Docs. ### Creating your first test Your project is now ready to run tests. Create a folder called `__tests__` in your project's root directory. For example, we can add a test to check if the `<Home />` component successfully renders a heading: export default function Home() { return <h1>Home</h1> } import '@testing-library/jest-dom' import { render, screen } from '@testing-library/react' import Home from '../pages/index' describe('Home', () => { it('renders a heading', () => { render(<Home />) const heading = screen.getByRole('heading', { level: 1 }) expect(heading).toBeInTheDocument() }) }) Optionally, add a snapshot test to keep track of any unexpected changes in your component: import { render } from '@testing-library/react' import Home from '../pages/index' it('renders homepage unchanged', () => { const { container } = render(<Home />) expect(container).toMatchSnapshot() }) > **Good to know**: Test files should not be included inside the Pages Router because any files inside the Pages Router are considered routes. ## Running your tests Then, run the following command to run your tests: npm run test # or yarn test # or pnpm test ## Additional Resources For further reading, you may find these resources helpful: * Next.js with Jest example * Jest Docs * React Testing Library Docs * Testing Playground - use good testing practices to match elements. --- ## Page: https://nextjs.org/docs/pages/building-your-application/testing/playwright ## Setting up Playwright with Next.js Playwright is a testing framework that lets you automate Chromium, Firefox, and WebKit with a single API. You can use it to write **End-to-End (E2E)** testing. This guide will show you how to set up Playwright with Next.js and write your first tests. ## Quickstart The fastest way to get started is to use `create-next-app` with the with-playwright example. This will create a Next.js project complete with Playwright configured. npx create-next-app@latest --example with-playwright with-playwright-app ## Manual setup To install Playwright, run the following command: npm init playwright # or yarn create playwright # or pnpm create playwright This will take you through a series of prompts to setup and configure Playwright for your project, including adding a `playwright.config.ts` file. Please refer to the Playwright installation guide for the step-by-step guide. ## Creating your first Playwright E2E test Create two new Next.js pages: import Link from 'next/link' export default function Home() { return ( <div> <h1>Home</h1> <Link href="/about">About</Link> </div> ) } import Link from 'next/link' export default function About() { return ( <div> <h1>About</h1> <Link href="/">Home</Link> </div> ) } Then, add a test to verify that your navigation is working correctly: import { test, expect } from '@playwright/test' test('should navigate to the about page', async ({ page }) => { // Start from the index page (the baseURL is set via the webServer in the playwright.config.ts) await page.goto('http://localhost:3000/') // Find an element with the text 'About' and click on it await page.click('text=About') // The new URL should be "/about" (baseURL is used there) await expect(page).toHaveURL('http://localhost:3000/about') // The new page should contain an h1 with "About" await expect(page.locator('h1')).toContainText('About') }) > **Good to know**: You can use `page.goto("/")` instead of `page.goto("http://localhost:3000/")`, if you add `"baseURL": "http://localhost:3000"` to the `playwright.config.ts` configuration file. ### Running your Playwright tests Playwright will simulate a user navigating your application using three browsers: Chromium, Firefox and Webkit, this requires your Next.js server to be running. We recommend running your tests against your production code to more closely resemble how your application will behave. Run `npm run build` and `npm run start`, then run `npx playwright test` in another terminal window to run the Playwright tests. > **Good to know**: Alternatively, you can use the `webServer` feature to let Playwright start the development server and wait until it's fully available. ### Running Playwright on Continuous Integration (CI) Playwright will by default run your tests in the headless mode. To install all the Playwright dependencies, run `npx playwright install-deps`. You can learn more about Playwright and Continuous Integration from these resources: * Next.js with Playwright example * Playwright on your CI provider * Playwright Discord --- ## Page: https://nextjs.org/docs/pages/building-your-application/testing/cypress ## Setting up Cypress with Next.js Cypress is a test runner used for **End-to-End (E2E)** and **Component Testing**. This page will show you how to set up Cypress with Next.js and write your first tests. > **Warning:** > > * Cypress versions below 13.6.3 do not support TypeScript version 5 with `moduleResolution:"bundler"`. However, this issue has been resolved in Cypress version 13.6.3 and later. cypress v13.6.3 ## Manual setup To manually set up Cypress, install `cypress` as a dev dependency: npm install -D cypress # or yarn add -D cypress # or pnpm install -D cypress Add the Cypress `open` command to the `package.json` scripts field: { "scripts": { "dev": "next dev", "build": "next build", "start": "next start", "lint": "next lint", "cypress:open": "cypress open" } } Run Cypress for the first time to open the Cypress testing suite: npm run cypress:open You can choose to configure **E2E Testing** and/or **Component Testing**. Selecting any of these options will automatically create a `cypress.config.js` file and a `cypress` folder in your project. ## Creating your first Cypress E2E test Ensure your `cypress.config` file has the following configuration: import { defineConfig } from 'cypress' export default defineConfig({ e2e: { setupNodeEvents(on, config) {}, }, }) Then, create two new Next.js files: import Link from 'next/link' export default function Home() { return ( <div> <h1>Home</h1> <Link href="/about">About</Link> </div> ) } import Link from 'next/link' export default function About() { return ( <div> <h1>About</h1> <Link href="/">Home</Link> </div> ) } Add a test to check your navigation is working correctly: describe('Navigation', () => { it('should navigate to the about page', () => { // Start from the index page cy.visit('http://localhost:3000/') // Find a link with an href attribute containing "about" and click it cy.get('a[href*="about"]').click() // The new url should include "/about" cy.url().should('include', '/about') // The new page should contain an h1 with "About" cy.get('h1').contains('About') }) }) ### Running E2E Tests Cypress will simulate a user navigating your application, this requires your Next.js server to be running. We recommend running your tests against your production code to more closely resemble how your application will behave. Run `npm run build && npm run start` to build your Next.js application, then run `npm run cypress:open` in another terminal window to start Cypress and run your E2E Testing suite. > **Good to know:** > > * You can use `cy.visit("/")` instead of `cy.visit("http://localhost:3000/")` by adding `baseUrl: 'http://localhost:3000'` to the `cypress.config.js` configuration file. > * Alternatively, you can install the `start-server-and-test` package to run the Next.js production server in conjunction with Cypress. After installation, add `"test": "start-server-and-test start http://localhost:3000 cypress"` to your `package.json` scripts field. Remember to rebuild your application after new changes. ## Creating your first Cypress component test Component tests build and mount a specific component without having to bundle your whole application or start a server. Select **Component Testing** in the Cypress app, then select **Next.js** as your front-end framework. A `cypress/component` folder will be created in your project, and a `cypress.config.js` file will be updated to enable Component Testing. Ensure your `cypress.config` file has the following configuration: import { defineConfig } from 'cypress' export default defineConfig({ component: { devServer: { framework: 'next', bundler: 'webpack', }, }, }) Assuming the same components from the previous section, add a test to validate a component is rendering the expected output: import AboutPage from '../../pages/about' describe('<AboutPage />', () => { it('should render and display expected content', () => { // Mount the React component for the About page cy.mount(<AboutPage />) // The new page should contain an h1 with "About page" cy.get('h1').contains('About') // Validate that a link with the expected URL is present // *Following* the link is better suited to an E2E test cy.get('a[href="/"]').should('be.visible') }) }) > **Good to know**: > > * Cypress currently doesn't support Component Testing for `async` Server Components. We recommend using E2E testing. > * Since component tests do not require a Next.js server, features like `<Image />` that rely on a server being available may not function out-of-the-box. ### Running Component Tests Run `npm run cypress:open` in your terminal to start Cypress and run your Component Testing suite. ## Continuous Integration (CI) In addition to interactive testing, you can also run Cypress headlessly using the `cypress run` command, which is better suited for CI environments: { "scripts": { //... "e2e": "start-server-and-test dev http://localhost:3000 \"cypress open --e2e\"", "e2e:headless": "start-server-and-test dev http://localhost:3000 \"cypress run --e2e\"", "component": "cypress open --component", "component:headless": "cypress run --component" } } You can learn more about Cypress and Continuous Integration from these resources: * Next.js with Cypress example * Cypress Continuous Integration Docs * Cypress GitHub Actions Guide * Official Cypress GitHub Action * Cypress Discord --- ## Page: https://nextjs.org/docs/pages/api-reference #### Subscribe to our newsletter Stay updated on new releases and features, guides, and case studies. --- ## Page: https://nextjs.org/docs/pages/api-reference/components #### Subscribe to our newsletter Stay updated on new releases and features, guides, and case studies. --- ## Page: https://nextjs.org/docs/pages/api-reference/components/font ## Font Module This API reference will help you understand how to use `next/font/google` and `next/font/local`. For features and usage, please see the Optimizing Fonts page. ### Font Function Arguments For usage, review Google Fonts and Local Fonts. | Key | `font/google` | `font/local` | Type | Required | | --- | --- | --- | --- | --- | | `src` | | | String or Array of Objects | Yes | | `weight` | | | String or Array | Required/Optional | | `style` | | | String or Array | \- | | `subsets` | | | Array of Strings | \- | | `axes` | | | Array of Strings | \- | | `display` | | | String | \- | | `preload` | | | Boolean | \- | | `fallback` | | | Array of Strings | \- | | `adjustFontFallback` | | | Boolean or String | \- | | `variable` | | | String | \- | | `declarations` | | | Array of Objects | \- | ### `src` The path of the font file as a string or an array of objects (with type `Array<{path: string, weight?: string, style?: string}>`) relative to the directory where the font loader function is called. Used in `next/font/local` * Required Examples: * `src:'./fonts/my-font.woff2'` where `my-font.woff2` is placed in a directory named `fonts` inside the `app` directory * `src:[{path: './inter/Inter-Thin.ttf', weight: '100',},{path: './inter/Inter-Regular.ttf',weight: '400',},{path: './inter/Inter-Bold-Italic.ttf', weight: '700',style: 'italic',},]` * if the font loader function is called in `app/page.tsx` using `src:'../styles/fonts/my-font.ttf'`, then `my-font.ttf` is placed in `styles/fonts` at the root of the project ### `weight` The font `weight` with the following possibilities: * A string with possible values of the weights available for the specific font or a range of values if it's a variable font * An array of weight values if the font is not a variable google font. It applies to `next/font/google` only. Used in `next/font/google` and `next/font/local` * Required if the font being used is **not** variable Examples: * `weight: '400'`: A string for a single weight value - for the font `Inter`, the possible values are `'100'`, `'200'`, `'300'`, `'400'`, `'500'`, `'600'`, `'700'`, `'800'`, `'900'` or `'variable'` where `'variable'` is the default) * `weight: '100 900'`: A string for the range between `100` and `900` for a variable font * `weight: ['100','400','900']`: An array of 3 possible values for a non variable font ### `style` The font `style` with the following possibilities: * A string value with default value of `'normal'` * An array of style values if the font is not a variable google font. It applies to `next/font/google` only. Used in `next/font/google` and `next/font/local` * Optional Examples: * `style: 'italic'`: A string - it can be `normal` or `italic` for `next/font/google` * `style: 'oblique'`: A string - it can take any value for `next/font/local` but is expected to come from standard font styles * `style: ['italic','normal']`: An array of 2 values for `next/font/google` - the values are from `normal` and `italic` ### `subsets` The font `subsets` defined by an array of string values with the names of each subset you would like to be preloaded. Fonts specified via `subsets` will have a link preload tag injected into the head when the `preload` option is true, which is the default. Used in `next/font/google` * Optional Examples: * `subsets: ['latin']`: An array with the subset `latin` You can find a list of all subsets on the Google Fonts page for your font. ### `axes` Some variable fonts have extra `axes` that can be included. By default, only the font weight is included to keep the file size down. The possible values of `axes` depend on the specific font. Used in `next/font/google` * Optional Examples: * `axes: ['slnt']`: An array with value `slnt` for the `Inter` variable font which has `slnt` as additional `axes` as shown here. You can find the possible `axes` values for your font by using the filter on the Google variable fonts page and looking for axes other than `wght` ### `display` The font `display` with possible string values of `'auto'`, `'block'`, `'swap'`, `'fallback'` or `'optional'` with default value of `'swap'`. Used in `next/font/google` and `next/font/local` * Optional Examples: * `display: 'optional'`: A string assigned to the `optional` value ### `preload` A boolean value that specifies whether the font should be preloaded or not. The default is `true`. Used in `next/font/google` and `next/font/local` * Optional Examples: * `preload: false` ### `fallback` The fallback font to use if the font cannot be loaded. An array of strings of fallback fonts with no default. * Optional Used in `next/font/google` and `next/font/local` Examples: * `fallback: ['system-ui', 'arial']`: An array setting the fallback fonts to `system-ui` or `arial` ### `adjustFontFallback` * For `next/font/google`: A boolean value that sets whether an automatic fallback font should be used to reduce Cumulative Layout Shift. The default is `true`. * For `next/font/local`: A string or boolean `false` value that sets whether an automatic fallback font should be used to reduce Cumulative Layout Shift. The possible values are `'Arial'`, `'Times New Roman'` or `false`. The default is `'Arial'`. Used in `next/font/google` and `next/font/local` * Optional Examples: * `adjustFontFallback: false`: for `next/font/google` * `adjustFontFallback: 'Times New Roman'`: for `next/font/local` ### `variable` A string value to define the CSS variable name to be used if the style is applied with the CSS variable method. Used in `next/font/google` and `next/font/local` * Optional Examples: * `variable: '--my-font'`: The CSS variable `--my-font` is declared ### `declarations` An array of font face descriptor key-value pairs that define the generated `@font-face` further. Used in `next/font/local` * Optional Examples: * `declarations: [{ prop: 'ascent-override', value: '90%' }]` ## Applying Styles You can apply the font styles in three ways: * `className` * `style` * CSS Variables ### `className` Returns a read-only CSS `className` for the loaded font to be passed to an HTML element. <p className={inter.className}>Hello, Next.js!</p> ### `style` Returns a read-only CSS `style` object for the loaded font to be passed to an HTML element, including `style.fontFamily` to access the font family name and fallback fonts. <p style={inter.style}>Hello World</p> ### CSS Variables If you would like to set your styles in an external style sheet and specify additional options there, use the CSS variable method. In addition to importing the font, also import the CSS file where the CSS variable is defined and set the variable option of the font loader object as follows: import { Inter } from 'next/font/google' import styles from '../styles/component.module.css' const inter = Inter({ variable: '--font-inter', }) To use the font, set the `className` of the parent container of the text you would like to style to the font loader's `variable` value and the `className` of the text to the `styles` property from the external CSS file. <main className={inter.variable}> <p className={styles.text}>Hello World</p> </main> Define the `text` selector class in the `component.module.css` CSS file as follows: .text { font-family: var(--font-inter); font-weight: 200; font-style: italic; } In the example above, the text `Hello World` is styled using the `Inter` font and the generated font fallback with `font-weight: 200` and `font-style: italic`. ## Using a font definitions file Every time you call the `localFont` or Google font function, that font will be hosted as one instance in your application. Therefore, if you need to use the same font in multiple places, you should load it in one place and import the related font object where you need it. This is done using a font definitions file. For example, create a `fonts.ts` file in a `styles` folder at the root of your app directory. Then, specify your font definitions as follows: import { Inter, Lora, Source_Sans_3 } from 'next/font/google' import localFont from 'next/font/local' // define your variable fonts const inter = Inter() const lora = Lora() // define 2 weights of a non-variable font const sourceCodePro400 = Source_Sans_3({ weight: '400' }) const sourceCodePro700 = Source_Sans_3({ weight: '700' }) // define a custom local font where GreatVibes-Regular.ttf is stored in the styles folder const greatVibes = localFont({ src: './GreatVibes-Regular.ttf' }) export { inter, lora, sourceCodePro400, sourceCodePro700, greatVibes } You can now use these definitions in your code as follows: import { inter, lora, sourceCodePro700, greatVibes } from '../styles/fonts' export default function Page() { return ( <div> <p className={inter.className}>Hello world using Inter font</p> <p style={lora.style}>Hello world using Lora font</p> <p className={sourceCodePro700.className}> Hello world using Source_Sans_3 font with weight 700 </p> <p className={greatVibes.className}>My title in Great Vibes font</p> </div> ) } To make it easier to access the font definitions in your code, you can define a path alias in your `tsconfig.json` or `jsconfig.json` files as follows: { "compilerOptions": { "paths": { "@/fonts": ["./styles/fonts"] } } } You can now import any font definition as follows: import { greatVibes, sourceCodePro400 } from '@/fonts' ## Version Changes | Version | Changes | | --- | --- | | `v13.2.0` | `@next/font` renamed to `next/font`. Installation no longer required. | | `v13.0.0` | `@next/font` was added. | --- ## Page: https://nextjs.org/docs/pages/api-reference/components/form The `<Form>` component extends the HTML `<form>` element to provide **client-side navigation** on submission, and **progressive enhancement**. It's useful for forms that update URL search params as it reduces the boilerplate code needed to achieve the above. Basic usage: /ui/search.js import Form from 'next/form' export default function Page() { return ( <Form action="/search"> {/* On submission, the input value will be appended to the URL, e.g. /search?query=abc */} <input name="query" /> <button type="submit">Submit</button> </Form> ) } ## Reference The behavior of the `<Form>` component depends on whether the `action` prop is passed a `string` or `function`. * When `action` is a **string**, the `<Form>` behaves like a native HTML form that uses a **`GET`** method. The form data is encoded into the URL as search params, and when the form is submitted, it navigates to the specified URL. In addition, Next.js: * Performs a client-side navigation instead of a full page reload when the form is submitted. This retains shared UI and client-side state. ### `action` (string) Props When `action` is a string, the `<Form>` component supports the following props: | Prop | Example | Type | Required | | --- | --- | --- | --- | | `action` | `action="/search"` | `string` (URL or relative path) | Yes | | `replace` | `replace={false}` | `boolean` | \- | | `scroll` | `scroll={true}` | `boolean` | \- | * **`action`**: The URL or path to navigate to when the form is submitted. * An empty string `""` will navigate to the same route with updated search params. * **`replace`**: Replaces the current history state instead of pushing a new one to the browser's history stack. Default is `false`. * **`scroll`**: Controls the scroll behavior during navigation. Defaults to `true`, this means it will scroll to the top of the new route, and maintain the scroll position for backwards and forwards navigation. ### Caveats * **`onSubmit`**: Can be used to handle form submission logic. However, calling `event.preventDefault()` will override `<Form>` behavior such as navigating to the specified URL. * **`method`, `encType`, `target`**: Are not supported as they override `<Form>` behavior. * Similarly, `formMethod`, `formEncType`, and `formTarget` can be used to override the `method`, `encType`, and `target` props respectively, and using them will fallback to native browser behavior. * If you need to use these props, use the HTML `<form>` element instead. * **`<input type="file">`**: Using this input type when the `action` is a string will match browser behavior by submitting the filename instead of the file object. --- ## Page: https://nextjs.org/docs/pages/api-reference/components/head We expose a built-in component for appending elements to the `head` of the page: import Head from 'next/head' function IndexPage() { return ( <div> <Head> <title>My page title</title> </Head> <p>Hello world!</p> </div> ) } export default IndexPage To avoid duplicate tags in your `head` you can use the `key` property, which will make sure the tag is only rendered once, as in the following example: import Head from 'next/head' function IndexPage() { return ( <div> <Head> <title>My page title</title> <meta property="og:title" content="My page title" key="title" /> </Head> <Head> <meta property="og:title" content="My new title" key="title" /> </Head> <p>Hello world!</p> </div> ) } export default IndexPage In this case only the second `<meta property="og:title" />` is rendered. `meta` tags with duplicate `key` attributes are automatically handled. > **Good to know**: `<title>` and `<base>` tags are automatically checked for duplicates by Next.js, so using key is not necessary for these tags. > The contents of `head` get cleared upon unmounting the component, so make sure each page completely defines what it needs in `head`, without making assumptions about what other pages added. ## Use minimal nesting `title`, `meta` or any other elements (e.g. `script`) need to be contained as **direct** children of the `Head` element, or wrapped into maximum one level of `<React.Fragment>` or arrays—otherwise the tags won't be correctly picked up on client-side navigations. ## Use `next/script` for scripts We recommend using `next/script` in your component instead of manually creating a `<script>` in `next/head`. ## No `html` or `body` tags You **cannot** use `<Head>` to set attributes on `<html>` or `<body>` tags. This will result in an `next-head-count is missing` error. `next/head` can only handle tags inside the HTML `<head>` tag. Was this helpful? supported. --- ## Page: https://nextjs.org/docs/pages/api-reference/components/image Examples * Image Component > **Good to know**: If you are using a version of Next.js prior to 13, you'll want to use the next/legacy/image documentation since the component was renamed. This API reference will help you understand how to use props and configuration options available for the Image Component. For features and usage, please see the Image Component page. import Image from 'next/image' export default function Page() { return ( <Image src="/profile.png" width={500} height={500} alt="Picture of the author" /> ) } ## Props Here's a summary of the props available for the Image Component: | Prop | Example | Type | Status | | --- | --- | --- | --- | | `src` | `src="/profile.png"` | String | Required | | `width` | `width={500}` | Integer (px) | Required | | `height` | `height={500}` | Integer (px) | Required | | `alt` | `alt="Picture of the author"` | String | Required | | `loader` | `loader={imageLoader}` | Function | \- | | `fill` | `fill={true}` | Boolean | \- | | `sizes` | `sizes="(max-width: 768px) 100vw, 33vw"` | String | \- | | `quality` | `quality={80}` | Integer (1-100) | \- | | `priority` | `priority={true}` | Boolean | \- | | `placeholder` | `placeholder="blur"` | String | \- | | `style` | `style={{objectFit: "contain"}}` | Object | \- | | `onLoadingComplete` | `onLoadingComplete={img => done())}` | Function | Deprecated | | `onLoad` | `onLoad={event => done())}` | Function | \- | | `onError` | `onError(event => fail()}` | Function | \- | | `loading` | `loading="lazy"` | String | \- | | `blurDataURL` | `blurDataURL="data:image/jpeg..."` | String | \- | | `overrideSrc` | `overrideSrc="/seo.png"` | String | \- | ## Required Props The Image Component requires the following properties: `src`, `alt`, `width` and `height` (or `fill`). import Image from 'next/image' export default function Page() { return ( <div> <Image src="/profile.png" width={500} height={500} alt="Picture of the author" /> </div> ) } ### `src` Must be one of the following: * A statically imported image file * A path string. This can be either an absolute external URL, or an internal path depending on the loader prop. When using the default loader, also consider the following for source images: * When src is an external URL, you must also configure remotePatterns * When src is animated or not a known format (JPEG, PNG, WebP, AVIF, GIF, TIFF) the image will be served as-is * When src is SVG format, it will be blocked unless `unoptimized` or `dangerouslyAllowSVG` is enabled ### `width` The `width` property represents the _intrinsic_ image width in pixels. This property is used to infer the correct aspect ratio of the image and avoid layout shift during loading. It does not determine the rendered size of the image, which is controlled by CSS, similar to the `width` attribute in the HTML `<img>` tag. Required, except for statically imported images or images with the `fill` property. ### `height` The `height` property represents the _intrinsic_ image height in pixels. This property is used to infer the correct aspect ratio of the image and avoid layout shift during loading. It does not determine the rendered size of the image, which is controlled by CSS, similar to the `height` attribute in the HTML `<img>` tag. Required, except for statically imported images or images with the `fill` property. > **Good to know:** > > * Combined, both `width` and `height` properties are used to determine the aspect ratio of the image which used by browsers to reserve space for the image before it loads. > * The intrinsic size does not always mean the rendered size in the browser, which will be determined by the parent container. For example, if the parent container is smaller than the intrinsic size, the image will be scaled down to fit the container. > * You can use the `fill` property when the width and height are unknown. ### `alt` The `alt` property is used to describe the image for screen readers and search engines. It is also the fallback text if images have been disabled or an error occurs while loading the image. It should contain text that could replace the image without changing the meaning of the page. It is not meant to supplement the image and should not repeat information that is already provided in the captions above or below the image. If the image is purely decorative or not intended for the user, the `alt` property should be an empty string (`alt=""`). Learn more ## Optional Props The `<Image />` component accepts a number of additional properties beyond those which are required. This section describes the most commonly-used properties of the Image component. Find details about more rarely-used properties in the Advanced Props section. ### `loader` A custom function used to resolve image URLs. A `loader` is a function returning a URL string for the image, given the following parameters: * `src` * `width` * `quality` Here is an example of using a custom loader: import Image from 'next/image' const imageLoader = ({ src, width, quality }) => { return `https://example.com/${src}?w=${width}&q=${quality || 75}` } export default function Page() { return ( <Image loader={imageLoader} src="me.png" alt="Picture of the author" width={500} height={500} /> ) } Alternatively, you can use the loaderFile configuration in `next.config.js` to configure every instance of `next/image` in your application, without passing a prop. ### `fill` fill={true} // {true} | {false} A boolean that causes the image to fill the parent element, which is useful when the `width` and `height` are unknown. The parent element _must_ assign `position: "relative"`, `position: "fixed"`, or `position: "absolute"` style. By default, the img element will automatically be assigned the `position: "absolute"` style. If no styles are applied to the image, the image will stretch to fit the container. You may prefer to set `object-fit: "contain"` for an image which is letterboxed to fit the container and preserve aspect ratio. Alternatively, `object-fit: "cover"` will cause the image to fill the entire container and be cropped to preserve aspect ratio. For more information, see also: * `position` * `object-fit` * `object-position` ### `sizes` A string, similar to a media query, that provides information about how wide the image will be at different breakpoints. The value of `sizes` will greatly affect performance for images using `fill` or which are styled to have a responsive size. The `sizes` property serves two important purposes related to image performance: * First, the value of `sizes` is used by the browser to determine which size of the image to download, from `next/image`'s automatically generated `srcset`. When the browser chooses, it does not yet know the size of the image on the page, so it selects an image that is the same size or larger than the viewport. The `sizes` property allows you to tell the browser that the image will actually be smaller than full screen. If you don't specify a `sizes` value in an image with the `fill` property, a default value of `100vw` (full screen width) is used. * Second, the `sizes` property changes the behavior of the automatically generated `srcset` value. If no `sizes` value is present, a small `srcset` is generated, suitable for a fixed-size image (1x/2x/etc). If `sizes` is defined, a large `srcset` is generated, suitable for a responsive image (640w/750w/etc). If the `sizes` property includes sizes such as `50vw`, which represent a percentage of the viewport width, then the `srcset` is trimmed to not include any values which are too small to ever be necessary. For example, if you know your styling will cause an image to be full-width on mobile devices, in a 2-column layout on tablets, and a 3-column layout on desktop displays, you should include a sizes property such as the following: import Image from 'next/image' export default function Page() { return ( <div className="grid-element"> <Image fill src="/example.png" sizes="(max-width: 768px) 100vw, (max-width: 1200px) 50vw, 33vw" /> </div> ) } This example `sizes` could have a dramatic effect on performance metrics. Without the `33vw` sizes, the image selected from the server would be 3 times as wide as it needs to be. Because file size is proportional to the square of the width, without `sizes` the user would download an image that's 9 times larger than necessary. Learn more about `srcset` and `sizes`: * web.dev * mdn ### `quality` quality={75} // {number 1-100} The quality of the optimized image, an integer between `1` and `100`, where `100` is the best quality and therefore largest file size. Defaults to `75`. If the `qualities` configuration is defined in `next.config.js`, the `quality` prop must match one of the values defined in the configuration. > **Good to know**: If the original source image was already low quality, setting the quality prop too high could cause the resulting optimized image to be larger than the original source image. ### `priority` priority={false} // {false} | {true} When true, Next.js will preload the image. Lazy loading is automatically disabled for images using `priority`. If the `loading` property is also used and set to `lazy`, the `priority` property can't be used. The `loading` property is only meant for advanced use cases. Remove `loading` when `priority` is needed. You should use the `priority` property on any image detected as the Largest Contentful Paint (LCP) element. It may be appropriate to have multiple priority images, as different images may be the LCP element for different viewport sizes. Should only be used when the image is visible above the fold. Defaults to `false`. ### `placeholder` placeholder = 'empty' // "empty" | "blur" | "data:image/..." A placeholder to use while the image is loading. Possible values are `blur`, `empty`, or `data:image/...`. Defaults to `empty`. When `blur`, the `blurDataURL` property will be used as the placeholder. If `src` is an object from a static import and the imported image is `.jpg`, `.png`, `.webp`, or `.avif`, then `blurDataURL` will be automatically populated, except when the image is detected to be animated. For dynamic images, you must provide the `blurDataURL` property. Solutions such as Plaiceholder can help with `base64` generation. When `data:image/...`, the Data URL will be used as the placeholder while the image is loading. When `empty`, there will be no placeholder while the image is loading, only empty space. Try it out: * Demo the `blur` placeholder * Demo the shimmer effect with data URL `placeholder` prop * Demo the color effect with `blurDataURL` prop ## Advanced Props In some cases, you may need more advanced usage. The `<Image />` component optionally accepts the following advanced properties. ### `style` Allows passing CSS styles to the underlying image element. const imageStyle = { borderRadius: '50%', border: '1px solid #fff', } export default function ProfileImage() { return <Image src="..." style={imageStyle} /> } Remember that the required width and height props can interact with your styling. If you use styling to modify an image's width, you should also style its height to `auto` to preserve its intrinsic aspect ratio, or your image will be distorted. ### `onLoadingComplete` <Image onLoadingComplete={(img) => console.log(img.naturalWidth)} /> > **Warning**: Deprecated since Next.js 14 in favor of `onLoad`. A callback function that is invoked once the image is completely loaded and the placeholder has been removed. The callback function will be called with one argument, a reference to the underlying `<img>` element. ### `onLoad` <Image onLoad={(e) => console.log(e.target.naturalWidth)} /> A callback function that is invoked once the image is completely loaded and the placeholder has been removed. The callback function will be called with one argument, the Event which has a `target` that references the underlying `<img>` element. ### `onError` <Image onError={(e) => console.error(e.target.id)} /> A callback function that is invoked if the image fails to load. ### `loading` loading = 'lazy' // {lazy} | {eager} The loading behavior of the image. Defaults to `lazy`. When `lazy`, defer loading the image until it reaches a calculated distance from the viewport. When `eager`, load the image immediately. Learn more about the `loading` attribute. ### `blurDataURL` A Data URL to be used as a placeholder image before the `src` image successfully loads. Only takes effect when combined with `placeholder="blur"`. Must be a base64-encoded image. It will be enlarged and blurred, so a very small image (10px or less) is recommended. Including larger images as placeholders may harm your application performance. Try it out: * Demo the default `blurDataURL` prop * Demo the color effect with `blurDataURL` prop You can also generate a solid color Data URL to match the image. ### `unoptimized` unoptimized = {false} // {false} | {true} When true, the source image will be served as-is from the `src` instead of changing quality, size, or format. Defaults to `false`. This is useful for images that do not benefit from optimization such as small images (less than 1KB), vector images (SVG), or animated images (GIF). import Image from 'next/image' const UnoptimizedImage = (props) => { return <Image {...props} unoptimized /> } Since Next.js 12.3.0, this prop can be assigned to all images by updating `next.config.js` with the following configuration: module.exports = { images: { unoptimized: true, }, } ### `overrideSrc` When providing the `src` prop to the `<Image>` component, both the `srcset` and `src` attributes are generated automatically for the resulting `<img>`. <Image src="/me.jpg" /> <img srcset=" /_next/image?url=%2Fme.jpg&w=640&q=75 1x, /_next/image?url=%2Fme.jpg&w=828&q=75 2x " src="/_next/image?url=%2Fme.jpg&w=828&q=75" /> In some cases, it is not desirable to have the `src` attribute generated and you may wish to override it using the `overrideSrc` prop. For example, when upgrading an existing website from `<img>` to `<Image>`, you may wish to maintain the same `src` attribute for SEO purposes such as image ranking or avoiding recrawl. <Image src="/me.jpg" overrideSrc="/override.jpg" /> <img srcset=" /_next/image?url=%2Fme.jpg&w=640&q=75 1x, /_next/image?url=%2Fme.jpg&w=828&q=75 2x " src="/override.jpg" /> ### decoding A hint to the browser indicating if it should wait for the image to be decoded before presenting other content updates or not. Defaults to `async`. Possible values are the following: * `async` - Asynchronously decode the image and allow other content to be rendered before it completes. * `sync` - Synchronously decode the image for atomic presentation with other content. * `auto` - No preference for the decoding mode; the browser decides what's best. Learn more about the `decoding` attribute. ### Other Props Other properties on the `<Image />` component will be passed to the underlying `img` element with the exception of the following: * `srcSet`. Use Device Sizes instead. ## Configuration Options In addition to props, you can configure the Image Component in `next.config.js`. The following options are available: ### `localPatterns` You can optionally configure `localPatterns` in your `next.config.js` file in order to allow specific paths to be optimized and block all others paths. module.exports = { images: { localPatterns: [ { pathname: '/assets/images/**', search: '', }, ], }, } > **Good to know**: The example above will ensure the `src` property of `next/image` must start with `/assets/images/` and must not have a query string. Attempting to optimize any other path will respond with 400 Bad Request. ### `remotePatterns` To protect your application from malicious users, configuration is required in order to use external images. This ensures that only external images from your account can be served from the Next.js Image Optimization API. These external images can be configured with the `remotePatterns` property in your `next.config.js` file, as shown below: module.exports = { images: { remotePatterns: [new URL('https://example.com/account123/**')], }, } Versions of Next.js prior to 15.3.0 can configure `remotePatterns` using the object: module.exports = { images: { remotePatterns: [ { protocol: 'https', hostname: 'example.com', port: '', pathname: '/account123/**', search: '', }, ], }, } > **Good to know**: The example above will ensure the `src` property of `next/image` must start with `https://example.com/account123/` and must not have a query string. Any other protocol, hostname, port, or unmatched path will respond with 400 Bad Request. Below is an example of the `remotePatterns` property in the `next.config.js` file using a wildcard pattern in the `hostname`: module.exports = { images: { remotePatterns: [ { protocol: 'https', hostname: '**.example.com', port: '', search: '', }, ], }, } > **Good to know**: The example above will ensure the `src` property of `next/image` must start with `https://img1.example.com` or `https://me.avatar.example.com` or any number of subdomains. It cannot have a port or query string. Any other protocol or unmatched hostname will respond with 400 Bad Request. Wildcard patterns can be used for both `pathname` and `hostname` and have the following syntax: * `*` match a single path segment or subdomain * `**` match any number of path segments at the end or subdomains at the beginning The `**` syntax does not work in the middle of the pattern. > **Good to know**: When omitting `protocol`, `port`, `pathname`, or `search` then the wildcard `**` is implied. This is not recommended because it may allow malicious actors to optimize urls you did not intend. Below is an example of the `remotePatterns` property in the `next.config.js` file using `search`: module.exports = { images: { remotePatterns: [ { protocol: 'https', hostname: 'assets.example.com', search: '?v=1727111025337', }, ], }, } > **Good to know**: The example above will ensure the `src` property of `next/image` must start with `https://assets.example.com` and must have the exact query string `?v=1727111025337`. Any other protocol or query string will respond with 400 Bad Request. ### `domains` > **Warning**: Deprecated since Next.js 14 in favor of strict `remotePatterns` in order to protect your application from malicious users. Only use `domains` if you own all the content served from the domain. Similar to `remotePatterns`, the `domains` configuration can be used to provide a list of allowed hostnames for external images. However, the `domains` configuration does not support wildcard pattern matching and it cannot restrict protocol, port, or pathname. Below is an example of the `domains` property in the `next.config.js` file: module.exports = { images: { domains: ['assets.acme.com'], }, } ### `loaderFile` If you want to use a cloud provider to optimize images instead of using the Next.js built-in Image Optimization API, you can configure the `loaderFile` in your `next.config.js` like the following: module.exports = { images: { loader: 'custom', loaderFile: './my/image/loader.js', }, } This must point to a file relative to the root of your Next.js application. The file must export a default function that returns a string, for example: export default function myImageLoader({ src, width, quality }) { return `https://example.com/${src}?w=${width}&q=${quality || 75}` } Alternatively, you can use the `loader` prop to configure each instance of `next/image`. Examples: * Custom Image Loader Configuration ## Advanced The following configuration is for advanced use cases and is usually not necessary. If you choose to configure the properties below, you will override any changes to the Next.js defaults in future updates. ### `deviceSizes` If you know the expected device widths of your users, you can specify a list of device width breakpoints using the `deviceSizes` property in `next.config.js`. These widths are used when the `next/image` component uses `sizes` prop to ensure the correct image is served for user's device. If no configuration is provided, the default below is used. module.exports = { images: { deviceSizes: [640, 750, 828, 1080, 1200, 1920, 2048, 3840], }, } ### `imageSizes` You can specify a list of image widths using the `images.imageSizes` property in your `next.config.js` file. These widths are concatenated with the array of device sizes to form the full array of sizes used to generate image srcsets. The reason there are two separate lists is that imageSizes is only used for images which provide a `sizes` prop, which indicates that the image is less than the full width of the screen. **Therefore, the sizes in imageSizes should all be smaller than the smallest size in deviceSizes.** If no configuration is provided, the default below is used. module.exports = { images: { imageSizes: [16, 32, 48, 64, 96, 128, 256, 384], }, } ### `qualities` The default Image Optimization API will automatically allow all qualities from 1 to 100. If you wish to restrict the allowed qualities, you can add configuration to `next.config.js`. module.exports = { images: { qualities: [25, 50, 75], }, } In this example above, only three qualities are allowed: 25, 50, and 75. If the `quality` prop does not match a value in this array, the image will fail with 400 Bad Request. ### `formats` The default Image Optimization API will automatically detect the browser's supported image formats via the request's `Accept` header in order to determine the best output format. If the `Accept` header matches more than one of the configured formats, the first match in the array is used. Therefore, the array order matters. If there is no match (or the source image is animated), the Image Optimization API will fallback to the original image's format. If no configuration is provided, the default below is used. module.exports = { images: { formats: ['image/webp'], }, } You can enable AVIF support, which will fallback to the original format of the src image if the browser does not support AVIF: module.exports = { images: { formats: ['image/avif'], }, } > **Good to know**: > > * We still recommend using WebP for most use cases. > * AVIF generally takes 50% longer to encode but it compresses 20% smaller compared to WebP. This means that the first time an image is requested, it will typically be slower and then subsequent requests that are cached will be faster. > * If you self-host with a Proxy/CDN in front of Next.js, you must configure the Proxy to forward the `Accept` header. ## Caching Behavior The following describes the caching algorithm for the default loader. For all other loaders, please refer to your cloud provider's documentation. Images are optimized dynamically upon request and stored in the `<distDir>/cache/images` directory. The optimized image file will be served for subsequent requests until the expiration is reached. When a request is made that matches a cached but expired file, the expired image is served stale immediately. Then the image is optimized again in the background (also called revalidation) and saved to the cache with the new expiration date. The cache status of an image can be determined by reading the value of the `x-nextjs-cache` response header. The possible values are the following: * `MISS` - the path is not in the cache (occurs at most once, on the first visit) * `STALE` - the path is in the cache but exceeded the revalidate time so it will be updated in the background * `HIT` - the path is in the cache and has not exceeded the revalidate time The expiration (or rather Max Age) is defined by either the `minimumCacheTTL` configuration or the upstream image `Cache-Control` header, whichever is larger. Specifically, the `max-age` value of the `Cache-Control` header is used. If both `s-maxage` and `max-age` are found, then `s-maxage` is preferred. The `max-age` is also passed-through to any downstream clients including CDNs and browsers. * You can configure `minimumCacheTTL` to increase the cache duration when the upstream image does not include `Cache-Control` header or the value is very low. * You can configure `deviceSizes` and `imageSizes` to reduce the total number of possible generated images. * You can configure formats to disable multiple formats in favor of a single image format. ### `minimumCacheTTL` You can configure the Time to Live (TTL) in seconds for cached optimized images. In many cases, it's better to use a Static Image Import which will automatically hash the file contents and cache the image forever with a `Cache-Control` header of `immutable`. If no configuration is provided, the default below is used. module.exports = { images: { minimumCacheTTL: 60, // 1 minute }, } You can increase the TTL to reduce the number of revalidations and potentionally lower cost: module.exports = { images: { minimumCacheTTL: 2678400, // 31 days }, } The expiration (or rather Max Age) of the optimized image is defined by either the `minimumCacheTTL` or the upstream image `Cache-Control` header, whichever is larger. If you need to change the caching behavior per image, you can configure `headers` to set the `Cache-Control` header on the upstream image (e.g. `/some-asset.jpg`, not `/_next/image` itself). There is no mechanism to invalidate the cache at this time, so its best to keep `minimumCacheTTL` low. Otherwise you may need to manually change the `src` prop or delete `<distDir>/cache/images`. ### `disableStaticImages` The default behavior allows you to import static files such as `import icon from './icon.png'` and then pass that to the `src` property. In some cases, you may wish to disable this feature if it conflicts with other plugins that expect the import to behave differently. You can disable static image imports inside your `next.config.js`: module.exports = { images: { disableStaticImages: true, }, } ### `dangerouslyAllowSVG` The default loader does not optimize SVG images for a few reasons. First, SVG is a vector format meaning it can be resized losslessly. Second, SVG has many of the same features as HTML/CSS, which can lead to vulnerabilities without proper Content Security Policy (CSP) headers. Therefore, we recommended using the `unoptimized` prop when the `src` prop is known to be SVG. This happens automatically when `src` ends with `".svg"`. However, if you need to serve SVG images with the default Image Optimization API, you can set `dangerouslyAllowSVG` inside your `next.config.js`: module.exports = { images: { dangerouslyAllowSVG: true, contentDispositionType: 'attachment', contentSecurityPolicy: "default-src 'self'; script-src 'none'; sandbox;", }, } In addition, it is strongly recommended to also set `contentDispositionType` to force the browser to download the image, as well as `contentSecurityPolicy` to prevent scripts embedded in the image from executing. ### `contentDispositionType` The default loader sets the `Content-Disposition` header to `attachment` for added protection since the API can serve arbitrary remote images. The default value is `attachment` which forces the browser to download the image when visiting directly. This is particularly important when `dangerouslyAllowSVG` is true. You can optionally configure `inline` to allow the browser to render the image when visiting directly, without downloading it. module.exports = { images: { contentDispositionType: 'inline', }, } ## Animated Images The default loader will automatically bypass Image Optimization for animated images and serve the image as-is. Auto-detection for animated files is best-effort and supports GIF, APNG, and WebP. If you want to explicitly bypass Image Optimization for a given animated image, use the unoptimized prop. ## Responsive Images The default generated `srcset` contains `1x` and `2x` images in order to support different device pixel ratios. However, you may wish to render a responsive image that stretches with the viewport. In that case, you'll need to set `sizes` as well as `style` (or `className`). You can render a responsive image using one of the following methods below. ### Responsive image using a static import If the source image is not dynamic, you can statically import to create a responsive image: import Image from 'next/image' import me from '../photos/me.jpg' export default function Author() { return ( <Image src={me} alt="Picture of the author" sizes="100vw" style={{ width: '100%', height: 'auto', }} /> ) } Try it out: * Demo the image responsive to viewport ### Responsive image with aspect ratio If the source image is a dynamic or a remote url, you will also need to provide `width` and `height` to set the correct aspect ratio of the responsive image: import Image from 'next/image' export default function Page({ photoUrl }) { return ( <Image src={photoUrl} alt="Picture of the author" sizes="100vw" style={{ width: '100%', height: 'auto', }} width={500} height={300} /> ) } Try it out: * Demo the image responsive to viewport ### Responsive image with `fill` If you don't know the aspect ratio, you will need to set the `fill` prop and set `position: relative` on the parent. Optionally, you can set `object-fit` style depending on the desired stretch vs crop behavior: import Image from 'next/image' export default function Page({ photoUrl }) { return ( <div style={{ position: 'relative', width: '300px', height: '500px' }}> <Image src={photoUrl} alt="Picture of the author" sizes="300px" fill style={{ objectFit: 'contain', }} /> </div> ) } Try it out: * Demo the `fill` prop ## Theme Detection CSS If you want to display a different image for light and dark mode, you can create a new component that wraps two `<Image>` components and reveals the correct one based on a CSS media query. .imgDark { display: none; } @media (prefers-color-scheme: dark) { .imgLight { display: none; } .imgDark { display: unset; } } import styles from './theme-image.module.css' import Image, { ImageProps } from 'next/image' type Props = Omit<ImageProps, 'src' | 'priority' | 'loading'> & { srcLight: string srcDark: string } const ThemeImage = (props: Props) => { const { srcLight, srcDark, ...rest } = props return ( <> <Image {...rest} src={srcLight} className={styles.imgLight} /> <Image {...rest} src={srcDark} className={styles.imgDark} /> </> ) } > **Good to know**: The default behavior of `loading="lazy"` ensures that only the correct image is loaded. You cannot use `priority` or `loading="eager"` because that would cause both images to load. Instead, you can use `fetchPriority="high"`. Try it out: * Demo light/dark mode theme detection ## getImageProps For more advanced use cases, you can call `getImageProps()` to get the props that would be passed to the underlying `<img>` element, and instead pass to them to another component, style, canvas, etc. This also avoid calling React `useState()` so it can lead to better performance, but it cannot be used with the `placeholder` prop because the placeholder will never be removed. ### Theme Detection Picture If you want to display a different image for light and dark mode, you can use the `<picture>` element to display a different image based on the user's preferred color scheme. import { getImageProps } from 'next/image' export default function Page() { const common = { alt: 'Theme Example', width: 800, height: 400 } const { props: { srcSet: dark }, } = getImageProps({ ...common, src: '/dark.png' }) const { props: { srcSet: light, ...rest }, } = getImageProps({ ...common, src: '/light.png' }) return ( <picture> <source media="(prefers-color-scheme: dark)" srcSet={dark} /> <source media="(prefers-color-scheme: light)" srcSet={light} /> <img {...rest} /> </picture> ) } ### Art Direction If you want to display a different image for mobile and desktop, sometimes called Art Direction, you can provide different `src`, `width`, `height`, and `quality` props to `getImageProps()`. import { getImageProps } from 'next/image' export default function Home() { const common = { alt: 'Art Direction Example', sizes: '100vw' } const { props: { srcSet: desktop }, } = getImageProps({ ...common, width: 1440, height: 875, quality: 80, src: '/desktop.jpg', }) const { props: { srcSet: mobile, ...rest }, } = getImageProps({ ...common, width: 750, height: 1334, quality: 70, src: '/mobile.jpg', }) return ( <picture> <source media="(min-width: 1000px)" srcSet={desktop} /> <source media="(min-width: 500px)" srcSet={mobile} /> <img {...rest} style={{ width: '100%', height: 'auto' }} /> </picture> ) } ### Background CSS You can even convert the `srcSet` string to the `image-set()` CSS function to optimize a background image. import { getImageProps } from 'next/image' function getBackgroundImage(srcSet = '') { const imageSet = srcSet .split(', ') .map((str) => { const [url, dpi] = str.split(' ') return `url("${url}") ${dpi}` }) .join(', ') return `image-set(${imageSet})` } export default function Home() { const { props: { srcSet }, } = getImageProps({ alt: '', width: 128, height: 128, src: '/img.png' }) const backgroundImage = getBackgroundImage(srcSet) const style = { height: '100vh', width: '100vw', backgroundImage } return ( <main style={style}> <h1>Hello World</h1> </main> ) } ## Known Browser Bugs This `next/image` component uses browser native lazy loading, which may fallback to eager loading for older browsers before Safari 15.4. When using the blur-up placeholder, older browsers before Safari 12 will fallback to empty placeholder. When using styles with `width`/`height` of `auto`, it is possible to cause Layout Shift on older browsers before Safari 15 that don't preserve the aspect ratio. For more details, see this MDN video. * Safari 15 - 16.3 display a gray border while loading. Safari 16.4 fixed this issue. Possible solutions: * Use CSS `@supports (font: -apple-system-body) and (-webkit-appearance: none) { img[loading="lazy"] { clip-path: inset(0.6px) } }` * Use `priority` if the image is above the fold * Firefox 67+ displays a white background while loading. Possible solutions: * Enable AVIF `formats` * Use `placeholder` ## Version History | Version | Changes | | --- | --- | | `v15.3.0` | `remotePatterns` added support for array of `URL` objects. | | `v15.0.0` | `contentDispositionType` configuration default changed to `attachment`. | | `v14.2.23` | `qualities` configuration added. | | `v14.2.15` | `decoding` prop added and `localPatterns` configuration added. | | `v14.2.14` | `remotePatterns.search` prop added. | | `v14.2.0` | `overrideSrc` prop added. | | `v14.1.0` | `getImageProps()` is stable. | | `v14.0.0` | `onLoadingComplete` prop and `domains` config deprecated. | | `v13.4.14` | `placeholder` prop support for `data:/image...` | | `v13.2.0` | `contentDispositionType` configuration added. | | `v13.0.6` | `ref` prop added. | | `v13.0.0` | The `next/image` import was renamed to `next/legacy/image`. The `next/future/image` import was renamed to `next/image`. A codemod is available to safely and automatically rename your imports. `<span>` wrapper removed. `layout`, `objectFit`, `objectPosition`, `lazyBoundary`, `lazyRoot` props removed. `alt` is required. `onLoadingComplete` receives reference to `img` element. Built-in loader config removed. | | `v12.3.0` | `remotePatterns` and `unoptimized` configuration is stable. | | `v12.2.0` | Experimental `remotePatterns` and experimental `unoptimized` configuration added. `layout="raw"` removed. | | `v12.1.1` | `style` prop added. Experimental support for `layout="raw"` added. | | `v12.1.0` | `dangerouslyAllowSVG` and `contentSecurityPolicy` configuration added. | | `v12.0.9` | `lazyRoot` prop added. | | `v12.0.0` | `formats` configuration added. AVIF support added. Wrapper `<div>` changed to `<span>`. | | `v11.1.0` | `onLoadingComplete` and `lazyBoundary` props added. | | `v11.0.0` | `src` prop support for static import. `placeholder` prop added. `blurDataURL` prop added. | | `v10.0.5` | `loader` prop added. | | `v10.0.1` | `layout` prop added. | | `v10.0.0` | `next/image` introduced. | --- ## Page: https://nextjs.org/docs/pages/api-reference/components/image-legacy Starting with Next.js 13, the `next/image` component was rewritten to improve both the performance and developer experience. In order to provide a backwards compatible upgrade solution, the old `next/image` was renamed to `next/legacy/image`. View the **new** `next/image` API Reference ## Comparison Compared to `next/legacy/image`, the new `next/image` component has the following changes: * Removes `<span>` wrapper around `<img>` in favor of native computed aspect ratio * Adds support for canonical `style` prop * Removes `layout` prop in favor of `style` or `className` * Removes `objectFit` prop in favor of `style` or `className` * Removes `objectPosition` prop in favor of `style` or `className` * Removes `IntersectionObserver` implementation in favor of native lazy loading * Removes `lazyBoundary` prop since there is no native equivalent * Removes `lazyRoot` prop since there is no native equivalent * Removes `loader` config in favor of `loader` prop * Changed `alt` prop from optional to required * Changed `onLoadingComplete` callback to receive reference to `<img>` element ## Required Props The `<Image />` component requires the following properties. ### src Must be one of the following: * A statically imported image file * A path string. This can be either an absolute external URL, or an internal path depending on the loader prop or loader configuration. When using the default loader, also consider the following for source images: * When src is an external URL, you must also configure remotePatterns * When src is animated or not a known format (JPEG, PNG, WebP, AVIF, GIF, TIFF) the image will be served as-is * When src is SVG format, it will be blocked unless `unoptimized` or `dangerouslyAllowSVG` is enabled ### width The `width` property can represent either the _rendered_ width or _original_ width in pixels, depending on the `layout` and `sizes` properties. When using `layout="intrinsic"` or `layout="fixed"` the `width` property represents the _rendered_ width in pixels, so it will affect how large the image appears. When using `layout="responsive"`, `layout="fill"`, the `width` property represents the _original_ width in pixels, so it will only affect the aspect ratio. The `width` property is required, except for statically imported images, or those with `layout="fill"`. ### height The `height` property can represent either the _rendered_ height or _original_ height in pixels, depending on the `layout` and `sizes` properties. When using `layout="intrinsic"` or `layout="fixed"` the `height` property represents the _rendered_ height in pixels, so it will affect how large the image appears. When using `layout="responsive"`, `layout="fill"`, the `height` property represents the _original_ height in pixels, so it will only affect the aspect ratio. The `height` property is required, except for statically imported images, or those with `layout="fill"`. ## Optional Props The `<Image />` component accepts a number of additional properties beyond those which are required. This section describes the most commonly-used properties of the Image component. Find details about more rarely-used properties in the Advanced Props section. ### layout The layout behavior of the image as the viewport changes size. | `layout` | Behavior | `srcSet` | `sizes` | Has wrapper and sizer | | --- | --- | --- | --- | --- | | `intrinsic` (default) | Scale _down_ to fit width of container, up to image size | `1x`, `2x` (based on imageSizes) | N/A | yes | | `fixed` | Sized to `width` and `height` exactly | `1x`, `2x` (based on imageSizes) | N/A | yes | | `responsive` | Scale to fit width of container | `640w`, `750w`, ... `2048w`, `3840w` (based on imageSizes and deviceSizes) | `100vw` | yes | | `fill` | Grow in both X and Y axes to fill container | `640w`, `750w`, ... `2048w`, `3840w` (based on imageSizes and deviceSizes) | `100vw` | yes | * Demo the `intrinsic` layout (default) * When `intrinsic`, the image will scale the dimensions down for smaller viewports, but maintain the original dimensions for larger viewports. * Demo the `fixed` layout * When `fixed`, the image dimensions will not change as the viewport changes (no responsiveness) similar to the native `img` element. * Demo the `responsive` layout * When `responsive`, the image will scale the dimensions down for smaller viewports and scale up for larger viewports. * Ensure the parent element uses `display: block` in their stylesheet. * Demo the `fill` layout * When `fill`, the image will stretch both width and height to the dimensions of the parent element, provided the parent element is relative. * This is usually paired with the `objectFit` property. * Ensure the parent element has `position: relative` in their stylesheet. * Demo background image ### loader A custom function used to resolve URLs. Setting the loader as a prop on the Image component overrides the default loader defined in the `images` section of `next.config.js`. A `loader` is a function returning a URL string for the image, given the following parameters: * `src` * `width` * `quality` Here is an example of using a custom loader: import Image from 'next/legacy/image' const myLoader = ({ src, width, quality }) => { return `https://example.com/${src}?w=${width}&q=${quality || 75}` } const MyImage = (props) => { return ( <Image loader={myLoader} src="me.png" alt="Picture of the author" width={500} height={500} /> ) } ### sizes A string that provides information about how wide the image will be at different breakpoints. The value of `sizes` will greatly affect performance for images using `layout="responsive"` or `layout="fill"`. It will be ignored for images using `layout="intrinsic"` or `layout="fixed"`. The `sizes` property serves two important purposes related to image performance: First, the value of `sizes` is used by the browser to determine which size of the image to download, from `next/legacy/image`'s automatically-generated source set. When the browser chooses, it does not yet know the size of the image on the page, so it selects an image that is the same size or larger than the viewport. The `sizes` property allows you to tell the browser that the image will actually be smaller than full screen. If you don't specify a `sizes` value, a default value of `100vw` (full screen width) is used. Second, the `sizes` value is parsed and used to trim the values in the automatically-created source set. If the `sizes` property includes sizes such as `50vw`, which represent a percentage of the viewport width, then the source set is trimmed to not include any values which are too small to ever be necessary. For example, if you know your styling will cause an image to be full-width on mobile devices, in a 2-column layout on tablets, and a 3-column layout on desktop displays, you should include a sizes property such as the following: import Image from 'next/legacy/image' const Example = () => ( <div className="grid-element"> <Image src="/example.png" layout="fill" sizes="(max-width: 768px) 100vw, (max-width: 1200px) 50vw, 33vw" /> </div> ) This example `sizes` could have a dramatic effect on performance metrics. Without the `33vw` sizes, the image selected from the server would be 3 times as wide as it needs to be. Because file size is proportional to the square of the width, without `sizes` the user would download an image that's 9 times larger than necessary. Learn more about `srcset` and `sizes`: * web.dev * mdn ### quality The quality of the optimized image, an integer between `1` and `100` where `100` is the best quality. Defaults to `75`. ### priority When true, the image will be considered high priority and preload. Lazy loading is automatically disabled for images using `priority`. You should use the `priority` property on any image detected as the Largest Contentful Paint (LCP) element. It may be appropriate to have multiple priority images, as different images may be the LCP element for different viewport sizes. Should only be used when the image is visible above the fold. Defaults to `false`. ### placeholder A placeholder to use while the image is loading. Possible values are `blur` or `empty`. Defaults to `empty`. When `blur`, the `blurDataURL` property will be used as the placeholder. If `src` is an object from a static import and the imported image is `.jpg`, `.png`, `.webp`, or `.avif`, then `blurDataURL` will be automatically populated. For dynamic images, you must provide the `blurDataURL` property. Solutions such as Plaiceholder can help with `base64` generation. When `empty`, there will be no placeholder while the image is loading, only empty space. Try it out: * Demo the `blur` placeholder * Demo the shimmer effect with `blurDataURL` prop * Demo the color effect with `blurDataURL` prop ## Advanced Props In some cases, you may need more advanced usage. The `<Image />` component optionally accepts the following advanced properties. ### style Allows passing CSS styles to the underlying image element. Note that all `layout` modes apply their own styles to the image element, and these automatic styles take precedence over the `style` prop. Also keep in mind that the required `width` and `height` props can interact with your styling. If you use styling to modify an image's `width`, you must set the `height="auto"` style as well, or your image will be distorted. ### objectFit Defines how the image will fit into its parent container when using `layout="fill"`. This value is passed to the object-fit CSS property for the `src` image. ### objectPosition Defines how the image is positioned within its parent element when using `layout="fill"`. This value is passed to the object-position CSS property applied to the image. ### onLoadingComplete A callback function that is invoked once the image is completely loaded and the placeholder has been removed. The `onLoadingComplete` function accepts one parameter, an object with the following properties: * `naturalWidth` * `naturalHeight` ### loading The loading behavior of the image. Defaults to `lazy`. When `lazy`, defer loading the image until it reaches a calculated distance from the viewport. When `eager`, load the image immediately. Learn more ### blurDataURL A Data URL to be used as a placeholder image before the `src` image successfully loads. Only takes effect when combined with `placeholder="blur"`. Must be a base64-encoded image. It will be enlarged and blurred, so a very small image (10px or less) is recommended. Including larger images as placeholders may harm your application performance. Try it out: * Demo the default `blurDataURL` prop * Demo the shimmer effect with `blurDataURL` prop * Demo the color effect with `blurDataURL` prop You can also generate a solid color Data URL to match the image. ### lazyBoundary A string (with similar syntax to the margin property) that acts as the bounding box used to detect the intersection of the viewport with the image and trigger lazy loading. Defaults to `"200px"`. If the image is nested in a scrollable parent element other than the root document, you will also need to assign the lazyRoot prop. Learn more ### lazyRoot A React Ref pointing to the scrollable parent element. Defaults to `null` (the document viewport). The Ref must point to a DOM element or a React component that forwards the Ref to the underlying DOM element. **Example pointing to a DOM element** import Image from 'next/legacy/image' import React from 'react' const Example = () => { const lazyRoot = React.useRef(null) return ( <div ref={lazyRoot} style={{ overflowX: 'scroll', width: '500px' }}> <Image lazyRoot={lazyRoot} src="/one.jpg" width="500" height="500" /> <Image lazyRoot={lazyRoot} src="/two.jpg" width="500" height="500" /> </div> ) } **Example pointing to a React component** import Image from 'next/legacy/image' import React from 'react' const Container = React.forwardRef((props, ref) => { return ( <div ref={ref} style={{ overflowX: 'scroll', width: '500px' }}> {props.children} </div> ) }) const Example = () => { const lazyRoot = React.useRef(null) return ( <Container ref={lazyRoot}> <Image lazyRoot={lazyRoot} src="/one.jpg" width="500" height="500" /> <Image lazyRoot={lazyRoot} src="/two.jpg" width="500" height="500" /> </Container> ) } Learn more ### unoptimized When true, the source image will be served as-is from the `src` instead of changing quality, size, or format. Defaults to `false`. This is useful for images that do not benefit from optimization such as small images (less than 1KB), vector images (SVG), or animated images (GIF). import Image from 'next/image' const UnoptimizedImage = (props) => { return <Image {...props} unoptimized /> } Since Next.js 12.3.0, this prop can be assigned to all images by updating `next.config.js` with the following configuration: module.exports = { images: { unoptimized: true, }, } ## Other Props Other properties on the `<Image />` component will be passed to the underlying `img` element with the exception of the following: * `srcSet`. Use Device Sizes instead. * `ref`. Use `onLoadingComplete` instead. * `decoding`. It is always `"async"`. ## Configuration Options ### Remote Patterns To protect your application from malicious users, configuration is required in order to use external images. This ensures that only external images from your account can be served from the Next.js Image Optimization API. These external images can be configured with the `remotePatterns` property in your `next.config.js` file, as shown below: module.exports = { images: { remotePatterns: [ { protocol: 'https', hostname: 'example.com', port: '', pathname: '/account123/**', search: '', }, ], }, } > **Good to know**: The example above will ensure the `src` property of `next/legacy/image` must start with `https://example.com/account123/` and must not have a query string. Any other protocol, hostname, port, or unmatched path will respond with 400 Bad Request. Below is an example of the `remotePatterns` property in the `next.config.js` file using a wildcard pattern in the `hostname`: module.exports = { images: { remotePatterns: [ { protocol: 'https', hostname: '**.example.com', port: '', search: '', }, ], }, } > **Good to know**: The example above will ensure the `src` property of `next/legacy/image` must start with `https://img1.example.com` or `https://me.avatar.example.com` or any number of subdomains. It cannot have a port or query string. Any other protocol or unmatched hostname will respond with 400 Bad Request. Wildcard patterns can be used for both `pathname` and `hostname` and have the following syntax: * `*` match a single path segment or subdomain * `**` match any number of path segments at the end or subdomains at the beginning The `**` syntax does not work in the middle of the pattern. > **Good to know**: When omitting `protocol`, `port`, `pathname`, or `search` then the wildcard `**` is implied. This is not recommended because it may allow malicious actors to optimize urls you did not intend. Below is an example of the `remotePatterns` property in the `next.config.js` file using `search`: module.exports = { images: { remotePatterns: [ { protocol: 'https', hostname: 'assets.example.com', search: '?v=1727111025337', }, ], }, } > **Good to know**: The example above will ensure the `src` property of `next/legacy/image` must start with `https://assets.example.com` and must have the exact query string `?v=1727111025337`. Any other protocol or query string will respond with 400 Bad Request. ### Domains > **Warning**: Deprecated since Next.js 14 in favor of strict `remotePatterns` in order to protect your application from malicious users. Only use `domains` if you own all the content served from the domain. Similar to `remotePatterns`, the `domains` configuration can be used to provide a list of allowed hostnames for external images. However, the `domains` configuration does not support wildcard pattern matching and it cannot restrict protocol, port, or pathname. Below is an example of the `domains` property in the `next.config.js` file: module.exports = { images: { domains: ['assets.acme.com'], }, } ### Loader Configuration If you want to use a cloud provider to optimize images instead of using the Next.js built-in Image Optimization API, you can configure the `loader` and `path` prefix in your `next.config.js` file. This allows you to use relative URLs for the Image `src` and automatically generate the correct absolute URL for your provider. module.exports = { images: { loader: 'imgix', path: 'https://example.com/myaccount/', }, } ### Built-in Loaders The following Image Optimization cloud providers are included: * Default: Works automatically with `next dev`, `next start`, or a custom server * Vercel: Works automatically when you deploy on Vercel, no configuration necessary. Learn more * Imgix: `loader: 'imgix'` * Cloudinary: `loader: 'cloudinary'` * Akamai: `loader: 'akamai'` * Custom: `loader: 'custom'` use a custom cloud provider by implementing the `loader` prop on the `next/legacy/image` component If you need a different provider, you can use the `loader` prop with `next/legacy/image`. > Images can not be optimized at build time using `output: 'export'`, only on-demand. To use `next/legacy/image` with `output: 'export'`, you will need to use a different loader than the default. Read more in the discussion. ## Advanced The following configuration is for advanced use cases and is usually not necessary. If you choose to configure the properties below, you will override any changes to the Next.js defaults in future updates. ### Device Sizes If you know the expected device widths of your users, you can specify a list of device width breakpoints using the `deviceSizes` property in `next.config.js`. These widths are used when the `next/legacy/image` component uses `layout="responsive"` or `layout="fill"` to ensure the correct image is served for user's device. If no configuration is provided, the default below is used. module.exports = { images: { deviceSizes: [640, 750, 828, 1080, 1200, 1920, 2048, 3840], }, } ### Image Sizes You can specify a list of image widths using the `images.imageSizes` property in your `next.config.js` file. These widths are concatenated with the array of device sizes to form the full array of sizes used to generate image srcsets. The reason there are two separate lists is that imageSizes is only used for images which provide a `sizes` prop, which indicates that the image is less than the full width of the screen. **Therefore, the sizes in imageSizes should all be smaller than the smallest size in deviceSizes.** If no configuration is provided, the default below is used. module.exports = { images: { imageSizes: [16, 32, 48, 64, 96, 128, 256, 384], }, } ### Acceptable Formats The default Image Optimization API will automatically detect the browser's supported image formats via the request's `Accept` header in order to determine the best output format. If the `Accept` header matches more than one of the configured formats, the first match in the array is used. Therefore, the array order matters. If there is no match (or the source image is animated), the Image Optimization API will fallback to the original image's format. If no configuration is provided, the default below is used. module.exports = { images: { formats: ['image/webp'], }, } You can enable AVIF support, which will fallback to the original format of the src image if the browser does not support AVIF: module.exports = { images: { formats: ['image/avif'], }, } > **Good to know**: > > * We still recommend using WebP for most use cases. > * AVIF generally takes 50% longer to encode but it compresses 20% smaller compared to WebP. This means that the first time an image is requested, it will typically be slower and then subsequent requests that are cached will be faster. > * If you self-host with a Proxy/CDN in front of Next.js, you must configure the Proxy to forward the `Accept` header. ## Caching Behavior The following describes the caching algorithm for the default loader. For all other loaders, please refer to your cloud provider's documentation. Images are optimized dynamically upon request and stored in the `<distDir>/cache/images` directory. The optimized image file will be served for subsequent requests until the expiration is reached. When a request is made that matches a cached but expired file, the expired image is served stale immediately. Then the image is optimized again in the background (also called revalidation) and saved to the cache with the new expiration date. The cache status of an image can be determined by reading the value of the `x-nextjs-cache` (`x-vercel-cache` when deployed on Vercel) response header. The possible values are the following: * `MISS` - the path is not in the cache (occurs at most once, on the first visit) * `STALE` - the path is in the cache but exceeded the revalidate time so it will be updated in the background * `HIT` - the path is in the cache and has not exceeded the revalidate time The expiration (or rather Max Age) is defined by either the `minimumCacheTTL` configuration or the upstream image `Cache-Control` header, whichever is larger. Specifically, the `max-age` value of the `Cache-Control` header is used. If both `s-maxage` and `max-age` are found, then `s-maxage` is preferred. The `max-age` is also passed-through to any downstream clients including CDNs and browsers. * You can configure `minimumCacheTTL` to increase the cache duration when the upstream image does not include `Cache-Control` header or the value is very low. * You can configure `deviceSizes` and `imageSizes` to reduce the total number of possible generated images. * You can configure formats to disable multiple formats in favor of a single image format. ### Minimum Cache TTL You can configure the Time to Live (TTL) in seconds for cached optimized images. In many cases, it's better to use a Static Image Import which will automatically hash the file contents and cache the image forever with a `Cache-Control` header of `immutable`. If no configuration is provided, the default below is used. module.exports = { images: { minimumCacheTTL: 60, // 1 minute }, } You can increase the TTL to reduce the number of revalidations and potentionally lower cost: module.exports = { images: { minimumCacheTTL: 2678400, // 31 days }, } The expiration (or rather Max Age) of the optimized image is defined by either the `minimumCacheTTL` or the upstream image `Cache-Control` header, whichever is larger. If you need to change the caching behavior per image, you can configure `headers` to set the `Cache-Control` header on the upstream image (e.g. `/some-asset.jpg`, not `/_next/image` itself). There is no mechanism to invalidate the cache at this time, so its best to keep `minimumCacheTTL` low. Otherwise you may need to manually change the `src` prop or delete `<distDir>/cache/images`. ### Disable Static Imports The default behavior allows you to import static files such as `import icon from './icon.png'` and then pass that to the `src` property. In some cases, you may wish to disable this feature if it conflicts with other plugins that expect the import to behave differently. You can disable static image imports inside your `next.config.js`: module.exports = { images: { disableStaticImages: true, }, } ### Dangerously Allow SVG The default loader does not optimize SVG images for a few reasons. First, SVG is a vector format meaning it can be resized losslessly. Second, SVG has many of the same features as HTML/CSS, which can lead to vulnerabilities without proper Content Security Policy (CSP) headers. Therefore, we recommended using the `unoptimized` prop when the `src` prop is known to be SVG. This happens automatically when `src` ends with `".svg"`. However, if you need to serve SVG images with the default Image Optimization API, you can set `dangerouslyAllowSVG` inside your `next.config.js`: module.exports = { images: { dangerouslyAllowSVG: true, contentDispositionType: 'attachment', contentSecurityPolicy: "default-src 'self'; script-src 'none'; sandbox;", }, } In addition, it is strongly recommended to also set `contentDispositionType` to force the browser to download the image, as well as `contentSecurityPolicy` to prevent scripts embedded in the image from executing. ### `contentDispositionType` The default loader sets the `Content-Disposition` header to `attachment` for added protection since the API can serve arbitrary remote images. The default value is `attachment` which forces the browser to download the image when visiting directly. This is particularly important when `dangerouslyAllowSVG` is true. You can optionally configure `inline` to allow the browser to render the image when visiting directly, without downloading it. module.exports = { images: { contentDispositionType: 'inline', }, } ### Animated Images The default loader will automatically bypass Image Optimization for animated images and serve the image as-is. Auto-detection for animated files is best-effort and supports GIF, APNG, and WebP. If you want to explicitly bypass Image Optimization for a given animated image, use the unoptimized prop. ## Version History | Version | Changes | | --- | --- | | `v13.0.0` | `next/image` renamed to `next/legacy/image` | --- ## Page: https://nextjs.org/docs/pages/api-reference/components/link `<Link>` is a React component that extends the HTML `<a>` element to provide prefetching and client-side navigation between routes. It is the primary way to navigate between routes in Next.js. Basic usage: import Link from 'next/link' export default function Home() { return <Link href="/dashboard">Dashboard</Link> } ## Reference The following props can be passed to the `<Link>` component: | Prop | Example | Type | Required | | --- | --- | --- | --- | | `href` | `href="/dashboard"` | String or Object | Yes | | `replace` | `replace={false}` | Boolean | \- | | `scroll` | `scroll={false}` | Boolean | \- | | `prefetch` | `prefetch={false}` | Boolean | \- | | `legacyBehavior` | `legacyBehavior={true}` | Boolean | \- | | `passHref` | `passHref={true}` | Boolean | \- | | `shallow` | `shallow={false}` | Boolean | \- | | `locale` | `locale="fr"` | String or Boolean | \- | | `onNavigate` | `onNavigate={(e) => {}}` | Function | \- | > **Good to know**: `<a>` tag attributes such as `className` or `target="_blank"` can be added to `<Link>` as props and will be passed to the underlying `<a>` element. ### `href` (required) The path or URL to navigate to. import Link from 'next/link' // Navigate to /about?name=test export default function Home() { return ( <Link href={{ pathname: '/about', query: { name: 'test' }, }} > About </Link> ) } ### `replace` **Defaults to `false`.** When `true`, `next/link` will replace the current history state instead of adding a new URL into the browser's history stack. import Link from 'next/link' export default function Home() { return ( <Link href="/dashboard" replace> Dashboard </Link> ) } ### `scroll` **Defaults to `true`.** The default scrolling behavior of `<Link>` in Next.js **is to maintain scroll position**, similar to how browsers handle back and forwards navigation. When you navigate to a new Page, scroll position will stay the same as long as the Page is visible in the viewport. However, if the Page is not visible in the viewport, Next.js will scroll to the top of the first Page element. When `scroll = {false}`, Next.js will not attempt to scroll to the first Page element. > **Good to know**: Next.js checks if `scroll: false` before managing scroll behavior. If scrolling is enabled, it identifies the relevant DOM node for navigation and inspects each top-level element. All non-scrollable elements and those without rendered HTML are bypassed, this includes sticky or fixed positioned elements, and non-visible elements such as those calculated with `getBoundingClientRect`. Next.js then continues through siblings until it identifies a scrollable element that is visible in the viewport. import Link from 'next/link' export default function Home() { return ( <Link href="/dashboard" scroll={false}> Dashboard </Link> ) } ### `prefetch` Prefetching happens when a `<Link />` component enters the user's viewport (initially or through scroll). Next.js prefetches and loads the linked route (denoted by the `href`) and data in the background to improve the performance of client-side navigation's. **Prefetching is only enabled in production**. The following values can be passed to the `prefetch` prop: * **`true` (default)**: The full route and its data will be prefetched. * `false`: Prefetching will not happen when entering the viewport, but will happen on hover. If you want to completely remove fetching on hover as well, consider using an `<a>` tag or incrementally adopting the App Router, which enables disabling prefetching on hover too. import Link from 'next/link' export default function Home() { return ( <Link href="/dashboard" prefetch={false}> Dashboard </Link> ) } ### `legacyBehavior` An `<a>` element is no longer required as a child of `<Link>`. Add the `legacyBehavior` prop to use the legacy behavior or remove the `<a>` to upgrade. A codemod is available to automatically upgrade your code. > **Good to know**: when `legacyBehavior` is not set to `true`, all `anchor` tag properties can be passed to `next/link` as well such as, `className`, `onClick`, etc. ### `passHref` Forces `Link` to send the `href` property to its child. Defaults to `false`. See the passing a functional component example for more information. ### `shallow` Update the path of the current page without rerunning `getStaticProps`, `getServerSideProps` or `getInitialProps`. Defaults to `false`. import Link from 'next/link' export default function Home() { return ( <Link href="/dashboard" shallow={false}> Dashboard </Link> ) } ### `locale` The active locale is automatically prepended. `locale` allows for providing a different locale. When `false` `href` has to include the locale as the default behavior is disabled. import Link from 'next/link' export default function Home() { return ( <> {/* Default behavior: locale is prepended */} <Link href="/dashboard">Dashboard (with locale)</Link> {/* Disable locale prepending */} <Link href="/dashboard" locale={false}> Dashboard (without locale) </Link> {/* Specify a different locale */} <Link href="/dashboard" locale="fr"> Dashboard (French) </Link> </> ) } ### `onNavigate` An event handler called during client-side navigation. The handler receives an event object that includes a `preventDefault()` method, allowing you to cancel the navigation if needed. import Link from 'next/link' export default function Page() { return ( <Link href="/dashboard" onNavigate={(e) => { // Only executes during SPA navigation console.log('Navigating...') // Optionally prevent navigation // e.preventDefault() }} > Dashboard </Link> ) } > **Good to know**: While `onClick` and `onNavigate` may seem similar, they serve different purposes. `onClick` executes for all click events, while `onNavigate` only runs during client-side navigation. Some key differences: > > * When using modifier keys (`Ctrl`/`Cmd` + Click), `onClick` executes but `onNavigate` doesn't since Next.js prevents default navigation for new tabs. > * External URLs won't trigger `onNavigate` since it's only for client-side and same-origin navigations. > * Links with the `download` attribute will work with `onClick` but not `onNavigate` since the browser will treat the linked URL as a download. ## Examples The following examples demonstrate how to use the `<Link>` component in different scenarios. ### Linking to dynamic route segments For dynamic route segments, it can be handy to use template literals to create the link's path. For example, you can generate a list of links to the dynamic route `pages/blog/[slug].js` import Link from 'next/link' function Posts({ posts }) { return ( <ul> {posts.map((post) => ( <li key={post.id}> <Link href={`/blog/${post.slug}`}>{post.title}</Link> </li> ))} </ul> ) } ### If the child is a custom component that wraps an `<a>` tag If the child of `Link` is a custom component that wraps an `<a>` tag, you must add `passHref` to `Link`. This is necessary if you’re using libraries like styled-components. Without this, the `<a>` tag will not have the `href` attribute, which hurts your site's accessibility and might affect SEO. If you're using ESLint, there is a built-in rule `next/link-passhref` to ensure correct usage of `passHref`. import Link from 'next/link' import styled from 'styled-components' // This creates a custom component that wraps an <a> tag const RedLink = styled.a` color: red; ` function NavLink({ href, name }) { return ( <Link href={href} passHref legacyBehavior> <RedLink>{name}</RedLink> </Link> ) } export default NavLink * If you’re using emotion’s JSX pragma feature (`@jsx jsx`), you must use `passHref` even if you use an `<a>` tag directly. * The component should support `onClick` property to trigger navigation correctly. ### Nesting a functional component If the child of `Link` is a functional component, in addition to using `passHref` and `legacyBehavior`, you must wrap the component in `React.forwardRef`: import Link from 'next/link' import React from 'react' // Define the props type for MyButton interface MyButtonProps { onClick?: React.MouseEventHandler<HTMLAnchorElement> href?: string } // Use React.ForwardRefRenderFunction to properly type the forwarded ref const MyButton: React.ForwardRefRenderFunction< HTMLAnchorElement, MyButtonProps > = ({ onClick, href }, ref) => { return ( <a href={href} onClick={onClick} ref={ref}> Click Me </a> ) } // Use React.forwardRef to wrap the component const ForwardedMyButton = React.forwardRef(MyButton) export default function Home() { return ( <Link href="/about" passHref legacyBehavior> <ForwardedMyButton /> </Link> ) } ### Passing a URL Object `Link` can also receive a URL object and it will automatically format it to create the URL string: import Link from 'next/link' function Home() { return ( <ul> <li> <Link href={{ pathname: '/about', query: { name: 'test' }, }} > About us </Link> </li> <li> <Link href={{ pathname: '/blog/[slug]', query: { slug: 'my-post' }, }} > Blog Post </Link> </li> </ul> ) } export default Home The above example has a link to: * A predefined route: `/about?name=test` * A dynamic route: `/blog/my-post` You can use every property as defined in the Node.js URL module documentation. ### Replace the URL instead of push The default behavior of the `Link` component is to `push` a new URL into the `history` stack. You can use the `replace` prop to prevent adding a new entry, as in the following example: import Link from 'next/link' export default function Home() { return ( <Link href="/about" replace> About us </Link> ) } ### Disable scrolling to the top of the page The default behavior of `Link` is to scroll to the top of the page. When there is a hash defined it will scroll to the specific id, like a normal `<a>` tag. To prevent scrolling to the top / hash `scroll={false}` can be added to `Link`: import Link from 'next/link' export default function Home() { return ( <Link href="/#hashid" scroll={false}> Disables scrolling to the top </Link> ) } ### Prefetching links in Middleware It's common to use Middleware for authentication or other purposes that involve rewriting the user to a different page. In order for the `<Link />` component to properly prefetch links with rewrites via Middleware, you need to tell Next.js both the URL to display and the URL to prefetch. This is required to avoid un-necessary fetches to middleware to know the correct route to prefetch. For example, if you want to serve a `/dashboard` route that has authenticated and visitor views, you can add the following in your Middleware to redirect the user to the correct page: import { NextResponse } from 'next/server' export function middleware(request: Request) { const nextUrl = request.nextUrl if (nextUrl.pathname === '/dashboard') { if (request.cookies.authToken) { return NextResponse.rewrite(new URL('/auth/dashboard', request.url)) } else { return NextResponse.rewrite(new URL('/public/dashboard', request.url)) } } } In this case, you would want to use the following code in your `<Link />` component: 'use client' import Link from 'next/link' import useIsAuthed from './hooks/useIsAuthed' // Your auth hook export default function Home() { const isAuthed = useIsAuthed() const path = isAuthed ? '/auth/dashboard' : '/public/dashboard' return ( <Link as="/dashboard" href={path}> Dashboard </Link> ) } > **Good to know**: If you're using Dynamic Routes, you'll need to adapt your `as` and `href` props. For example, if you have a Dynamic Route like `/dashboard/authed/[user]` that you want to present differently via middleware, you would write: `<Link href={{ pathname: '/dashboard/authed/[user]', query: { user: username } }} as="/dashboard/[user]">Profile</Link>`. ### Blocking navigation You can use the `onNavigate` prop to block navigation when certain conditions are met, such as when a form has unsaved changes. When you need to block navigation across multiple components in your app (like preventing navigation from any link while a form is being edited), React Context provides a clean way to share this blocking state. First, create a context to track the navigation blocking state: 'use client' import { createContext, useState, useContext } from 'react' interface NavigationBlockerContextType { isBlocked: boolean setIsBlocked: (isBlocked: boolean) => void } export const NavigationBlockerContext = createContext<NavigationBlockerContextType>({ isBlocked: false, setIsBlocked: () => {}, }) export function NavigationBlockerProvider({ children, }: { children: React.ReactNode }) { const [isBlocked, setIsBlocked] = useState(false) return ( <NavigationBlockerContext.Provider value={{ isBlocked, setIsBlocked }}> {children} </NavigationBlockerContext.Provider> ) } export function useNavigationBlocker() { return useContext(NavigationBlockerContext) } Create a form component that uses the context: 'use client' import { useNavigationBlocker } from '../contexts/navigation-blocker' export default function Form() { const { setIsBlocked } = useNavigationBlocker() return ( <form onSubmit={(e) => { e.preventDefault() setIsBlocked(false) }} onChange={() => setIsBlocked(true)} > <input type="text" name="name" /> <button type="submit">Save</button> </form> ) } Create a custom Link component that blocks navigation: 'use client' import Link from 'next/link' import { useNavigationBlocker } from '../contexts/navigation-blocker' interface CustomLinkProps extends React.ComponentProps<typeof Link> { children: React.ReactNode } export function CustomLink({ children, ...props }: CustomLinkProps) { const { isBlocked } = useNavigationBlocker() return ( <Link onNavigate={(e) => { if ( isBlocked && !window.confirm('You have unsaved changes. Leave anyway?') ) { e.preventDefault() } }} {...props} > {children} </Link> ) } Create a navigation component: 'use client' import { CustomLink as Link } from './custom-link' export default function Nav() { return ( <nav> <Link href="/">Home</Link> <Link href="/about">About</Link> </nav> ) } Finally, wrap your app with the `NavigationBlockerProvider` in the root layout and use the components in your page: import { NavigationBlockerProvider } from './contexts/navigation-blocker' export default function RootLayout({ children, }: { children: React.ReactNode }) { return ( <html lang="en"> <body> <NavigationBlockerProvider>{children}</NavigationBlockerProvider> </body> </html> ) } Then, use the `Nav` and `Form` components in your page: import Nav from './components/nav' import Form from './components/form' export default function Page() { return ( <div> <Nav /> <main> <h1>Welcome to the Dashboard</h1> <Form /> </main> </div> ) } When a user tries to navigate away using `CustomLink` while the form has unsaved changes, they'll be prompted to confirm before leaving. ## Version history | Version | Changes | | --- | --- | | `v15.3.0` | Add `onNavigate` API | | `v13.0.0` | No longer requires a child `<a>` tag. A codemod is provided to automatically update your codebase. | | `v10.0.0` | `href` props pointing to a dynamic route are automatically resolved and no longer require an `as` prop. | | `v8.0.0` | Improved prefetching performance. | | `v1.0.0` | `next/link` introduced. | --- ## Page: https://nextjs.org/docs/pages/api-reference/components/script This API reference will help you understand how to use props available for the Script Component. For features and usage, please see the Optimizing Scripts page. import Script from 'next/script' export default function Dashboard() { return ( <> <Script src="https://example.com/script.js" /> </> ) } ## Props Here's a summary of the props available for the Script Component: | Prop | Example | Type | Required | | --- | --- | --- | --- | | `src` | `src="http://example.com/script"` | String | Required unless inline script is used | | `strategy` | `strategy="lazyOnload"` | String | \- | | `onLoad` | `onLoad={onLoadFunc}` | Function | \- | | `onReady` | `onReady={onReadyFunc}` | Function | \- | | `onError` | `onError={onErrorFunc}` | Function | \- | ## Required Props The `<Script />` component requires the following properties. ### `src` A path string specifying the URL of an external script. This can be either an absolute external URL or an internal path. The `src` property is required unless an inline script is used. ## Optional Props The `<Script />` component accepts a number of additional properties beyond those which are required. ### `strategy` The loading strategy of the script. There are four different strategies that can be used: * `beforeInteractive`: Load before any Next.js code and before any page hydration occurs. * `afterInteractive`: (**default**) Load early but after some hydration on the page occurs. * `lazyOnload`: Load during browser idle time. * `worker`: (experimental) Load in a web worker. ### `beforeInteractive` Scripts that load with the `beforeInteractive` strategy are injected into the initial HTML from the server, downloaded before any Next.js module, and executed in the order they are placed. Scripts denoted with this strategy are preloaded and fetched before any first-party code, but their execution **does not block page hydration from occurring**. `beforeInteractive` scripts must be placed inside the `Document` Component (`pages/_document.js`) and are designed to load scripts that are needed by the entire site (i.e. the script will load when any page in the application has been loaded server-side). **This strategy should only be used for critical scripts that need to be fetched as soon as possible.** import { Html, Head, Main, NextScript } from 'next/document' import Script from 'next/script' export default function Document() { return ( <Html> <Head /> <body> <Main /> <NextScript /> <Script src="https://example.com/script.js" strategy="beforeInteractive" /> </body> </Html> ) } > **Good to know**: Scripts with `beforeInteractive` will always be injected inside the `head` of the HTML document regardless of where it's placed in the component. Some examples of scripts that should be fetched as soon as possible with `beforeInteractive` include: * Bot detectors * Cookie consent managers ### `afterInteractive` Scripts that use the `afterInteractive` strategy are injected into the HTML client-side and will load after some (or all) hydration occurs on the page. **This is the default strategy** of the Script component and should be used for any script that needs to load as soon as possible but not before any first-party Next.js code. `afterInteractive` scripts can be placed inside of any page or layout and will only load and execute when that page (or group of pages) is opened in the browser. import Script from 'next/script' export default function Page() { return ( <> <Script src="https://example.com/script.js" strategy="afterInteractive" /> </> ) } Some examples of scripts that are good candidates for `afterInteractive` include: * Tag managers * Analytics ### `lazyOnload` Scripts that use the `lazyOnload` strategy are injected into the HTML client-side during browser idle time and will load after all resources on the page have been fetched. This strategy should be used for any background or low priority scripts that do not need to load early. `lazyOnload` scripts can be placed inside of any page or layout and will only load and execute when that page (or group of pages) is opened in the browser. import Script from 'next/script' export default function Page() { return ( <> <Script src="https://example.com/script.js" strategy="lazyOnload" /> </> ) } Examples of scripts that do not need to load immediately and can be fetched with `lazyOnload` include: * Chat support plugins * Social media widgets ### `worker` > **Warning:** The `worker` strategy is not yet stable and does not yet work with the App Router. Use with caution. Scripts that use the `worker` strategy are off-loaded to a web worker in order to free up the main thread and ensure that only critical, first-party resources are processed on it. While this strategy can be used for any script, it is an advanced use case that is not guaranteed to support all third-party scripts. To use `worker` as a strategy, the `nextScriptWorkers` flag must be enabled in `next.config.js`: module.exports = { experimental: { nextScriptWorkers: true, }, } `worker` scripts can **only currently be used in the `pages/` directory**: import Script from 'next/script' export default function Home() { return ( <> <Script src="https://example.com/script.js" strategy="worker" /> </> ) } ### `onLoad` > **Warning:** `onLoad` does not yet work with Server Components and can only be used in Client Components. Further, `onLoad` can't be used with `beforeInteractive` – consider using `onReady` instead. Some third-party scripts require users to run JavaScript code once after the script has finished loading in order to instantiate content or call a function. If you are loading a script with either `afterInteractive` or `lazyOnload` as a loading strategy, you can execute code after it has loaded using the `onLoad` property. Here's an example of executing a lodash method only after the library has been loaded. 'use client' import Script from 'next/script' export default function Page() { return ( <> <Script src="https://cdnjs.cloudflare.com/ajax/libs/lodash.js/4.17.20/lodash.min.js" onLoad={() => { console.log(_.sample([1, 2, 3, 4])) }} /> </> ) } ### `onReady` > **Warning:** `onReady` does not yet work with Server Components and can only be used in Client Components. Some third-party scripts require users to run JavaScript code after the script has finished loading and every time the component is mounted (after a route navigation for example). You can execute code after the script's load event when it first loads and then after every subsequent component re-mount using the `onReady` property. Here's an example of how to re-instantiate a Google Maps JS embed every time the component is mounted: import { useRef } from 'react' import Script from 'next/script' export default function Page() { const mapRef = useRef() return ( <> <div ref={mapRef}></div> <Script id="google-maps" src="https://maps.googleapis.com/maps/api/js" onReady={() => { new google.maps.Map(mapRef.current, { center: { lat: -34.397, lng: 150.644 }, zoom: 8, }) }} /> </> ) } ### `onError` > **Warning:** `onError` does not yet work with Server Components and can only be used in Client Components. `onError` cannot be used with the `beforeInteractive` loading strategy. Sometimes it is helpful to catch when a script fails to load. These errors can be handled with the `onError` property: import Script from 'next/script' export default function Page() { return ( <> <Script src="https://example.com/script.js" onError={(e: Error) => { console.error('Script failed to load', e) }} /> </> ) } ## Version History | Version | Changes | | --- | --- | | `v13.0.0` | `beforeInteractive` and `afterInteractive` is modified to support `app`. | | `v12.2.4` | `onReady` prop added. | | `v12.2.2` | Allow `next/script` with `beforeInteractive` to be placed in `_document`. | | `v11.0.0` | `next/script` introduced. | --- ## Page: https://nextjs.org/docs/pages/api-reference/functions #### Subscribe to our newsletter Stay updated on new releases and features, guides, and case studies. --- ## Page: https://nextjs.org/docs/pages/api-reference/functions/get-initial-props > **Good to know**: `getInitialProps` is a legacy API. We recommend using `getStaticProps` or `getServerSideProps` instead. `getInitialProps` is an `async` function that can be added to the default exported React component for the page. It will run on both the server-side and again on the client-side during page transitions. The result of the function will be forwarded to the React component as `props`. pages/index.tsx import { NextPageContext } from 'next' Page.getInitialProps = async (ctx: NextPageContext) => { const res = await fetch('https://api.github.com/repos/vercel/next.js') const json = await res.json() return { stars: json.stargazers_count } } export default function Page({ stars }: { stars: number }) { return stars } > **Good to know**: > > * Data returned from `getInitialProps` is serialized when server rendering. Ensure the returned object from `getInitialProps` is a plain `Object`, and not using `Date`, `Map` or `Set`. > * For the initial page load, `getInitialProps` will run on the server only. `getInitialProps` will then also run on the client when navigating to a different route with the `next/link` component or by using `next/router`. > * If `getInitialProps` is used in a custom `_app.js`, and the page being navigated to is using `getServerSideProps`, then `getInitialProps` will also run on the server. ## Context Object `getInitialProps` receives a single argument called `context`, which is an object with the following properties: | Name | Description | | --- | --- | | `pathname` | Current route, the path of the page in `/pages` | | `query` | Query string of the URL, parsed as an object | | `asPath` | `String` of the actual path (including the query) shown in the browser | | `req` | HTTP request object (server only) | | `res` | HTTP response object (server only) | | `err` | Error object if any error is encountered during the rendering | ## Caveats * `getInitialProps` can only be used in `pages/` top level files, and not in nested components. To have nested data fetching at the component level, consider exploring the App Router. * Regardless of whether your route is static or dynamic, any data returned from `getInitialProps` as `props` will be able to be examined on the client-side in the initial HTML. This is to allow the page to be hydrated correctly. Make sure that you don't pass any sensitive information that shouldn't be available on the client in `props`. --- ## Page: https://nextjs.org/docs/pages/api-reference/functions/get-server-side-props When exporting a function called `getServerSideProps` (Server-Side Rendering) from a page, Next.js will pre-render this page on each request using the data returned by `getServerSideProps`. This is useful if you want to fetch data that changes often, and have the page update to show the most current data. import type { InferGetServerSidePropsType, GetServerSideProps } from 'next' type Repo = { name: string stargazers_count: number } export const getServerSideProps = (async () => { // Fetch data from external API const res = await fetch('https://api.github.com/repos/vercel/next.js') const repo: Repo = await res.json() // Pass data to the page via props return { props: { repo } } }) satisfies GetServerSideProps<{ repo: Repo }> export default function Page({ repo, }: InferGetServerSidePropsType<typeof getServerSideProps>) { return ( <main> <p>{repo.stargazers_count}</p> </main> ) } You can import modules in top-level scope for use in `getServerSideProps`. Imports used will **not be bundled for the client-side**. This means you can write **server-side code directly in `getServerSideProps`**, including fetching data from your database. ## Context parameter The `context` parameter is an object containing the following keys: | Name | Description | | --- | --- | | `params` | If this page uses a dynamic route, `params` contains the route parameters. If the page name is `[id].js`, then `params` will look like `{ id: ... }`. | | `req` | The `HTTP` IncomingMessage object, with an additional `cookies` prop, which is an object with string keys mapping to string values of cookies. | | `res` | The `HTTP` response object. | | `query` | An object representing the query string, including dynamic route parameters. | | `preview` | (Deprecated for `draftMode`) `preview` is `true` if the page is in the Preview Mode and `false` otherwise. | | `previewData` | (Deprecated for `draftMode`) The preview data set by `setPreviewData`. | | `draftMode` | `draftMode` is `true` if the page is in the Draft Mode and `false` otherwise. | | `resolvedUrl` | A normalized version of the request `URL` that strips the `_next/data` prefix for client transitions and includes original query values. | | `locale` | Contains the active locale (if enabled). | | `locales` | Contains all supported locales (if enabled). | | `defaultLocale` | Contains the configured default locale (if enabled). | ## getServerSideProps return values The `getServerSideProps` function should return an object with **any one of the following** properties: ### `props` The `props` object is a key-value pair, where each value is received by the page component. It should be a serializable object so that any props passed, could be serialized with `JSON.stringify`. export async function getServerSideProps(context) { return { props: { message: `Next.js is awesome` }, // will be passed to the page component as props } } ### `notFound` The `notFound` boolean allows the page to return a `404` status and 404 Page. With `notFound: true`, the page will return a `404` even if there was a successfully generated page before. This is meant to support use cases like user-generated content getting removed by its author. export async function getServerSideProps(context) { const res = await fetch(`https://.../data`) const data = await res.json() if (!data) { return { notFound: true, } } return { props: { data }, // will be passed to the page component as props } } ### `redirect` The `redirect` object allows redirecting to internal and external resources. It should match the shape of `{ destination: string, permanent: boolean }`. In some rare cases, you might need to assign a custom status code for older `HTTP` clients to properly redirect. In these cases, you can use the `statusCode` property instead of the `permanent` property, but not both. export async function getServerSideProps(context) { const res = await fetch(`https://.../data`) const data = await res.json() if (!data) { return { redirect: { destination: '/', permanent: false, }, } } return { props: {}, // will be passed to the page component as props } } ## Version History | Version | Changes | | --- | --- | | `v13.4.0` | App Router is now stable with simplified data fetching | | `v10.0.0` | `locale`, `locales`, `defaultLocale`, and `notFound` options added. | | `v9.3.0` | `getServerSideProps` introduced. | --- ## Page: https://nextjs.org/docs/pages/api-reference/functions/get-static-paths When exporting a function called `getStaticPaths` from a page that uses Dynamic Routes, Next.js will statically pre-render all the paths specified by `getStaticPaths`. import type { InferGetStaticPropsType, GetStaticProps, GetStaticPaths, } from 'next' type Repo = { name: string stargazers_count: number } export const getStaticPaths = (async () => { return { paths: [ { params: { name: 'next.js', }, }, // See the "paths" section below ], fallback: true, // false or "blocking" } }) satisfies GetStaticPaths export const getStaticProps = (async (context) => { const res = await fetch('https://api.github.com/repos/vercel/next.js') const repo = await res.json() return { props: { repo } } }) satisfies GetStaticProps<{ repo: Repo }> export default function Page({ repo, }: InferGetStaticPropsType<typeof getStaticProps>) { return repo.stargazers_count } ## getStaticPaths return values The `getStaticPaths` function should return an object with the following **required** properties: ### `paths` The `paths` key determines which paths will be pre-rendered. For example, suppose that you have a page that uses Dynamic Routes named `pages/posts/[id].js`. If you export `getStaticPaths` from this page and return the following for `paths`: return { paths: [ { params: { id: '1' }}, { params: { id: '2' }, // with i18n configured the locale for the path can be returned as well locale: "en", }, ], fallback: ... } Then, Next.js will statically generate `/posts/1` and `/posts/2` during `next build` using the page component in `pages/posts/[id].js`. The value for each `params` object must match the parameters used in the page name: * If the page name is `pages/posts/[postId]/[commentId]`, then `params` should contain `postId` and `commentId`. * If the page name uses catch-all routes like `pages/[...slug]`, then `params` should contain `slug` (which is an array). If this array is `['hello', 'world']`, then Next.js will statically generate the page at `/hello/world`. * If the page uses an optional catch-all route, use `null`, `[]`, `undefined` or `false` to render the root-most route. For example, if you supply `slug: false` for `pages/[[...slug]]`, Next.js will statically generate the page `/`. The `params` strings are **case-sensitive** and ideally should be normalized to ensure the paths are generated correctly. For example, if `WoRLD` is returned for a param it will only match if `WoRLD` is the actual path visited, not `world` or `World`. Separate of the `params` object a `locale` field can be returned when i18n is configured, which configures the locale for the path being generated. ### `fallback: false` If `fallback` is `false`, then any paths not returned by `getStaticPaths` will result in a **404 page**. When `next build` is run, Next.js will check if `getStaticPaths` returned `fallback: false`, it will then build **only** the paths returned by `getStaticPaths`. This option is useful if you have a small number of paths to create, or new page data is not added often. If you find that you need to add more paths, and you have `fallback: false`, you will need to run `next build` again so that the new paths can be generated. The following example pre-renders one blog post per page called `pages/posts/[id].js`. The list of blog posts will be fetched from a CMS and returned by `getStaticPaths`. Then, for each page, it fetches the post data from a CMS using `getStaticProps`. function Post({ post }) { // Render post... } // This function gets called at build time export async function getStaticPaths() { // Call an external API endpoint to get posts const res = await fetch('https://.../posts') const posts = await res.json() // Get the paths we want to pre-render based on posts const paths = posts.map((post) => ({ params: { id: post.id }, })) // We'll pre-render only these paths at build time. // { fallback: false } means other routes should 404. return { paths, fallback: false } } // This also gets called at build time export async function getStaticProps({ params }) { // params contains the post `id`. // If the route is like /posts/1, then params.id is 1 const res = await fetch(`https://.../posts/${params.id}`) const post = await res.json() // Pass post data to the page via props return { props: { post } } } export default Post ### `fallback: true` Examples * Static generation of a large number of pages If `fallback` is `true`, then the behavior of `getStaticProps` changes in the following ways: * The paths returned from `getStaticPaths` will be rendered to `HTML` at build time by `getStaticProps`. * The paths that have not been generated at build time will **not** result in a 404 page. Instead, Next.js will serve a “fallback” version of the page on the first request to such a path. Web crawlers, such as Google, won't be served a fallback and instead the path will behave as in `fallback: 'blocking'`. * When a page with `fallback: true` is navigated to through `next/link` or `next/router` (client-side) Next.js will _not_ serve a fallback and instead the page will behave as `fallback: 'blocking'`. * In the background, Next.js will statically generate the requested path `HTML` and `JSON`. This includes running `getStaticProps`. * When complete, the browser receives the `JSON` for the generated path. This will be used to automatically render the page with the required props. From the user’s perspective, the page will be swapped from the fallback page to the full page. * At the same time, Next.js adds this path to the list of pre-rendered pages. Subsequent requests to the same path will serve the generated page, like other pages pre-rendered at build time. > **Good to know**: `fallback: true` is not supported when using `output: 'export'`. #### When is `fallback: true` useful? `fallback: true` is useful if your app has a very large number of static pages that depend on data (such as a very large e-commerce site). If you want to pre-render all product pages, the builds would take a very long time. Instead, you may statically generate a small subset of pages and use `fallback: true` for the rest. When someone requests a page that is not generated yet, the user will see the page with a loading indicator or skeleton component. Shortly after, `getStaticProps` finishes and the page will be rendered with the requested data. From now on, everyone who requests the same page will get the statically pre-rendered page. This ensures that users always have a fast experience while preserving fast builds and the benefits of Static Generation. `fallback: true` will not _update_ generated pages, for that take a look at Incremental Static Regeneration. ### `fallback: 'blocking'` If `fallback` is `'blocking'`, new paths not returned by `getStaticPaths` will wait for the `HTML` to be generated, identical to SSR (hence why _blocking_), and then be cached for future requests so it only happens once per path. `getStaticProps` will behave as follows: * The paths returned from `getStaticPaths` will be rendered to `HTML` at build time by `getStaticProps`. * The paths that have not been generated at build time will **not** result in a 404 page. Instead, Next.js will SSR on the first request and return the generated `HTML`. * When complete, the browser receives the `HTML` for the generated path. From the user’s perspective, it will transition from "the browser is requesting the page" to "the full page is loaded". There is no flash of loading/fallback state. * At the same time, Next.js adds this path to the list of pre-rendered pages. Subsequent requests to the same path will serve the generated page, like other pages pre-rendered at build time. `fallback: 'blocking'` will not _update_ generated pages by default. To update generated pages, use Incremental Static Regeneration in conjunction with `fallback: 'blocking'`. > **Good to know**: `fallback: 'blocking'` is not supported when using `output: 'export'`. ### Fallback pages In the “fallback” version of a page: * The page’s props will be empty. * Using the router, you can detect if the fallback is being rendered, `router.isFallback` will be `true`. The following example showcases using `isFallback`: import { useRouter } from 'next/router' function Post({ post }) { const router = useRouter() // If the page is not yet generated, this will be displayed // initially until getStaticProps() finishes running if (router.isFallback) { return <div>Loading...</div> } // Render post... } // This function gets called at build time export async function getStaticPaths() { return { // Only `/posts/1` and `/posts/2` are generated at build time paths: [{ params: { id: '1' } }, { params: { id: '2' } }], // Enable statically generating additional pages // For example: `/posts/3` fallback: true, } } // This also gets called at build time export async function getStaticProps({ params }) { // params contains the post `id`. // If the route is like /posts/1, then params.id is 1 const res = await fetch(`https://.../posts/${params.id}`) const post = await res.json() // Pass post data to the page via props return { props: { post }, // Re-generate the post at most once per second // if a request comes in revalidate: 1, } } export default Post ## Version History | Version | Changes | | --- | --- | | `v13.4.0` | App Router is now stable with simplified data fetching, including `generateStaticParams()` | | `v12.2.0` | On-Demand Incremental Static Regeneration is stable. | | `v12.1.0` | On-Demand Incremental Static Regeneration added (beta). | | `v9.5.0` | Stable Incremental Static Regeneration | | `v9.3.0` | `getStaticPaths` introduced. | --- ## Page: https://nextjs.org/docs/pages/api-reference/functions/get-static-props Exporting a function called `getStaticProps` will pre-render a page at build time using the props returned from the function: import type { InferGetStaticPropsType, GetStaticProps } from 'next' type Repo = { name: string stargazers_count: number } export const getStaticProps = (async (context) => { const res = await fetch('https://api.github.com/repos/vercel/next.js') const repo = await res.json() return { props: { repo } } }) satisfies GetStaticProps<{ repo: Repo }> export default function Page({ repo, }: InferGetStaticPropsType<typeof getStaticProps>) { return repo.stargazers_count } You can import modules in top-level scope for use in `getStaticProps`. Imports used will **not be bundled for the client-side**. This means you can write **server-side code directly in `getStaticProps`**, including fetching data from your database. ## Context parameter The `context` parameter is an object containing the following keys: | Name | Description | | --- | --- | | `params` | Contains the route parameters for pages using dynamic routes. For example, if the page name is `[id].js`, then `params` will look like `{ id: ... }`. You should use this together with `getStaticPaths`, which we'll explain later. | | `preview` | (Deprecated for `draftMode`) `preview` is `true` if the page is in the Preview Mode and `false` otherwise. | | `previewData` | (Deprecated for `draftMode`) The preview data set by `setPreviewData`. | | `draftMode` | `draftMode` is `true` if the page is in the Draft Mode and `false` otherwise. | | `locale` | Contains the active locale (if enabled). | | `locales` | Contains all supported locales (if enabled). | | `defaultLocale` | Contains the configured default locale (if enabled). | | `revalidateReason` | Provides a reason for why the function was called. Can be one of: "build" (run at build time), "stale" (revalidate period expired, or running in development mode), "on-demand" (triggered via on-demand revalidation) | ## getStaticProps return values The `getStaticProps` function should return an object containing either `props`, `redirect`, or `notFound` followed by an **optional** `revalidate` property. ### `props` The `props` object is a key-value pair, where each value is received by the page component. It should be a serializable object so that any props passed, could be serialized with `JSON.stringify`. export async function getStaticProps(context) { return { props: { message: `Next.js is awesome` }, // will be passed to the page component as props } } ### `revalidate` The `revalidate` property is the amount in seconds after which a page re-generation can occur (defaults to `false` or no revalidation). // This function gets called at build time on server-side. // It may be called again, on a serverless function, if // revalidation is enabled and a new request comes in export async function getStaticProps() { const res = await fetch('https://.../posts') const posts = await res.json() return { props: { posts, }, // Next.js will attempt to re-generate the page: // - When a request comes in // - At most once every 10 seconds revalidate: 10, // In seconds } } Learn more about Incremental Static Regeneration. The cache status of a page leveraging ISR can be determined by reading the value of the `x-nextjs-cache` response header. The possible values are the following: * `MISS` - the path is not in the cache (occurs at most once, on the first visit) * `STALE` - the path is in the cache but exceeded the revalidate time so it will be updated in the background * `HIT` - the path is in the cache and has not exceeded the revalidate time ### `notFound` The `notFound` boolean allows the page to return a `404` status and 404 Page. With `notFound: true`, the page will return a `404` even if there was a successfully generated page before. This is meant to support use cases like user-generated content getting removed by its author. Note, `notFound` follows the same `revalidate` behavior described here. export async function getStaticProps(context) { const res = await fetch(`https://.../data`) const data = await res.json() if (!data) { return { notFound: true, } } return { props: { data }, // will be passed to the page component as props } } > **Good to know**: `notFound` is not needed for `fallback: false` mode as only paths returned from `getStaticPaths` will be pre-rendered. ### `redirect` The `redirect` object allows redirecting to internal or external resources. It should match the shape of `{ destination: string, permanent: boolean }`. In some rare cases, you might need to assign a custom status code for older `HTTP` clients to properly redirect. In these cases, you can use the `statusCode` property instead of the `permanent` property, **but not both**. You can also set `basePath: false` similar to redirects in `next.config.js`. export async function getStaticProps(context) { const res = await fetch(`https://...`) const data = await res.json() if (!data) { return { redirect: { destination: '/', permanent: false, // statusCode: 301 }, } } return { props: { data }, // will be passed to the page component as props } } If the redirects are known at build-time, they should be added in `next.config.js` instead. ## Reading files: Use `process.cwd()` Files can be read directly from the filesystem in `getStaticProps`. In order to do so you have to get the full path to a file. Since Next.js compiles your code into a separate directory you can't use `__dirname` as the path it returns will be different from the Pages Router. Instead you can use `process.cwd()` which gives you the directory where Next.js is being executed. import { promises as fs } from 'fs' import path from 'path' // posts will be populated at build time by getStaticProps() function Blog({ posts }) { return ( <ul> {posts.map((post) => ( <li> <h3>{post.filename}</h3> <p>{post.content}</p> </li> ))} </ul> ) } // This function gets called at build time on server-side. // It won't be called on client-side, so you can even do // direct database queries. export async function getStaticProps() { const postsDirectory = path.join(process.cwd(), 'posts') const filenames = await fs.readdir(postsDirectory) const posts = filenames.map(async (filename) => { const filePath = path.join(postsDirectory, filename) const fileContents = await fs.readFile(filePath, 'utf8') // Generally you would parse/transform the contents // For example you can transform markdown to HTML here return { filename, content: fileContents, } }) // By returning { props: { posts } }, the Blog component // will receive `posts` as a prop at build time return { props: { posts: await Promise.all(posts), }, } } export default Blog ## Version History | Version | Changes | | --- | --- | | `v13.4.0` | App Router is now stable with simplified data fetching | | `v12.2.0` | On-Demand Incremental Static Regeneration is stable. | | `v12.1.0` | On-Demand Incremental Static Regeneration added (beta). | | `v10.0.0` | `locale`, `locales`, `defaultLocale`, and `notFound` options added. | | `v10.0.0` | `fallback: 'blocking'` return option added. | | `v9.5.0` | Stable Incremental Static Regeneration | | `v9.3.0` | `getStaticProps` introduced. | --- ## Page: https://nextjs.org/docs/pages/api-reference/functions/next-request NextRequest extends the Web Request API with additional convenience methods. ## `cookies` Read or mutate the `Set-Cookie` header of the request. ### `set(name, value)` Given a name, set a cookie with the given value on the request. // Given incoming request /home // Set a cookie to hide the banner // request will have a `Set-Cookie:show-banner=false;path=/home` header request.cookies.set('show-banner', 'false') ### `get(name)` Given a cookie name, return the value of the cookie. If the cookie is not found, `undefined` is returned. If multiple cookies are found, the first one is returned. // Given incoming request /home // { name: 'show-banner', value: 'false', Path: '/home' } request.cookies.get('show-banner') ### `getAll()` Given a cookie name, return the values of the cookie. If no name is given, return all cookies on the request. // Given incoming request /home // [ // { name: 'experiments', value: 'new-pricing-page', Path: '/home' }, // { name: 'experiments', value: 'winter-launch', Path: '/home' }, // ] request.cookies.getAll('experiments') // Alternatively, get all cookies for the request request.cookies.getAll() ### `delete(name)` Given a cookie name, delete the cookie from the request. // Returns true for deleted, false is nothing is deleted request.cookies.delete('experiments') ### `has(name)` Given a cookie name, return `true` if the cookie exists on the request. // Returns true if cookie exists, false if it does not request.cookies.has('experiments') ### `clear()` Remove the `Set-Cookie` header from the request. request.cookies.clear() ## `nextUrl` Extends the native `URL` API with additional convenience methods, including Next.js specific properties. // Given a request to /home, pathname is /home request.nextUrl.pathname // Given a request to /home?name=lee, searchParams is { 'name': 'lee' } request.nextUrl.searchParams The following options are available: | Property | Type | Description | | --- | --- | --- | | `basePath` | `string` | The base path of the URL. | | `buildId` | `string` | `undefined` | The build identifier of the Next.js application. Can be customized. | | `defaultLocale` | `string` | `undefined` | The default locale for internationalization. | | `domainLocale` | | | | \- `defaultLocale` | `string` | The default locale within a domain. | | \- `domain` | `string` | The domain associated with a specific locale. | | \- `http` | `boolean` | `undefined` | Indicates if the domain is using HTTP. | | `locales` | `string[]` | `undefined` | An array of available locales. | | `locale` | `string` | `undefined` | The currently active locale. | | `url` | `URL` | The URL object. | ## Version History | Version | Changes | | --- | --- | | `v15.0.0` | `ip` and `geo` removed. | --- ## Page: https://nextjs.org/docs/pages/api-reference/functions/next-response NextResponse extends the Web Response API with additional convenience methods. ## `cookies` Read or mutate the `Set-Cookie` header of the response. ### `set(name, value)` Given a name, set a cookie with the given value on the response. // Given incoming request /home let response = NextResponse.next() // Set a cookie to hide the banner response.cookies.set('show-banner', 'false') // Response will have a `Set-Cookie:show-banner=false;path=/home` header return response ### `get(name)` Given a cookie name, return the value of the cookie. If the cookie is not found, `undefined` is returned. If multiple cookies are found, the first one is returned. // Given incoming request /home let response = NextResponse.next() // { name: 'show-banner', value: 'false', Path: '/home' } response.cookies.get('show-banner') ### `getAll()` Given a cookie name, return the values of the cookie. If no name is given, return all cookies on the response. // Given incoming request /home let response = NextResponse.next() // [ // { name: 'experiments', value: 'new-pricing-page', Path: '/home' }, // { name: 'experiments', value: 'winter-launch', Path: '/home' }, // ] response.cookies.getAll('experiments') // Alternatively, get all cookies for the response response.cookies.getAll() ### `delete(name)` Given a cookie name, delete the cookie from the response. // Given incoming request /home let response = NextResponse.next() // Returns true for deleted, false is nothing is deleted response.cookies.delete('experiments') ## `json()` Produce a response with the given JSON body. import { NextResponse } from 'next/server' export async function GET(request: Request) { return NextResponse.json({ error: 'Internal Server Error' }, { status: 500 }) } ## `redirect()` Produce a response that redirects to a URL. import { NextResponse } from 'next/server' return NextResponse.redirect(new URL('/new', request.url)) The URL can be created and modified before being used in the `NextResponse.redirect()` method. For example, you can use the `request.nextUrl` property to get the current URL, and then modify it to redirect to a different URL. import { NextResponse } from 'next/server' // Given an incoming request... const loginUrl = new URL('/login', request.url) // Add ?from=/incoming-url to the /login URL loginUrl.searchParams.set('from', request.nextUrl.pathname) // And redirect to the new URL return NextResponse.redirect(loginUrl) ## `rewrite()` Produce a response that rewrites (proxies) the given URL while preserving the original URL. import { NextResponse } from 'next/server' // Incoming request: /about, browser shows /about // Rewritten request: /proxy, browser shows /about return NextResponse.rewrite(new URL('/proxy', request.url)) ## `next()` The `next()` method is useful for Middleware, as it allows you to return early and continue routing. import { NextResponse } from 'next/server' return NextResponse.next() You can also forward `headers` when producing the response: import { NextResponse } from 'next/server' // Given an incoming request... const newHeaders = new Headers(request.headers) // Add a new header newHeaders.set('x-version', '123') // And produce a response with the new headers return NextResponse.next({ request: { // New request headers headers: newHeaders, }, }) --- ## Page: https://nextjs.org/docs/pages/api-reference/functions/use-amp Examples * AMP > AMP support is one of our advanced features, you can read more about AMP here. To enable AMP, add the following config to your page: export const config = { amp: true } The `amp` config accepts the following values: * `true` - The page will be AMP-only * `'hybrid'` - The page will have two versions, one with AMP and another one with HTML To learn more about the `amp` config, read the sections below. ## AMP First Page Take a look at the following example: export const config = { amp: true } function About(props) { return <h3>My AMP About Page!</h3> } export default About The page above is an AMP-only page, which means: * The page has no Next.js or React client-side runtime * The page is automatically optimized with AMP Optimizer, an optimizer that applies the same transformations as AMP caches (improves performance by up to 42%) * The page has a user-accessible (optimized) version of the page and a search-engine indexable (unoptimized) version of the page ## Hybrid AMP Page Take a look at the following example: import { useAmp } from 'next/amp' export const config = { amp: 'hybrid' } function About(props) { const isAmp = useAmp() return ( <div> <h3>My AMP About Page!</h3> {isAmp ? ( <amp-img width="300" height="300" src="/my-img.jpg" alt="a cool image" layout="responsive" /> ) : ( <img width="300" height="300" src="/my-img.jpg" alt="a cool image" /> )} </div> ) } export default About The page above is a hybrid AMP page, which means: * The page is rendered as traditional HTML (default) and AMP HTML (by adding `?amp=1` to the URL) * The AMP version of the page only has valid optimizations applied with AMP Optimizer so that it is indexable by search-engines The page uses `useAmp` to differentiate between modes, it's a React Hook that returns `true` if the page is using AMP, and `false` otherwise. --- ## Page: https://nextjs.org/docs/pages/api-reference/functions/use-report-web-vitals The `useReportWebVitals` hook allows you to report Core Web Vitals, and can be used in combination with your analytics service. import { useReportWebVitals } from 'next/web-vitals' function MyApp({ Component, pageProps }) { useReportWebVitals((metric) => { console.log(metric) }) return <Component {...pageProps} /> } ## useReportWebVitals The `metric` object passed as the hook's argument consists of a number of properties: * `id`: Unique identifier for the metric in the context of the current page load * `name`: The name of the performance metric. Possible values include names of Web Vitals metrics (TTFB, FCP, LCP, FID, CLS) specific to a web application. * `delta`: The difference between the current value and the previous value of the metric. The value is typically in milliseconds and represents the change in the metric's value over time. * `entries`: An array of Performance Entries associated with the metric. These entries provide detailed information about the performance events related to the metric. * `navigationType`: Indicates the type of navigation that triggered the metric collection. Possible values include `"navigate"`, `"reload"`, `"back_forward"`, and `"prerender"`. * `rating`: A qualitative rating of the metric value, providing an assessment of the performance. Possible values are `"good"`, `"needs-improvement"`, and `"poor"`. The rating is typically determined by comparing the metric value against predefined thresholds that indicate acceptable or suboptimal performance. * `value`: The actual value or duration of the performance entry, typically in milliseconds. The value provides a quantitative measure of the performance aspect being tracked by the metric. The source of the value depends on the specific metric being measured and can come from various Performance APIs. ## Web Vitals Web Vitals are a set of useful metrics that aim to capture the user experience of a web page. The following web vitals are all included: * Time to First Byte (TTFB) * First Contentful Paint (FCP) * Largest Contentful Paint (LCP) * First Input Delay (FID) * Cumulative Layout Shift (CLS) * Interaction to Next Paint (INP) You can handle all the results of these metrics using the `name` property. import { useReportWebVitals } from 'next/web-vitals' function MyApp({ Component, pageProps }) { useReportWebVitals((metric) => { switch (metric.name) { case 'FCP': { // handle FCP results } case 'LCP': { // handle LCP results } // ... } }) return <Component {...pageProps} /> } ## Custom Metrics In addition to the core metrics listed above, there are some additional custom metrics that measure the time it takes for the page to hydrate and render: * `Next.js-hydration`: Length of time it takes for the page to start and finish hydrating (in ms) * `Next.js-route-change-to-render`: Length of time it takes for a page to start rendering after a route change (in ms) * `Next.js-render`: Length of time it takes for a page to finish render after a route change (in ms) You can handle all the results of these metrics separately: import { useReportWebVitals } from 'next/web-vitals' function MyApp({ Component, pageProps }) { useReportWebVitals((metric) => { switch (metric.name) { case 'Next.js-hydration': // handle hydration results break case 'Next.js-route-change-to-render': // handle route-change to render results break case 'Next.js-render': // handle render results break default: break } }) return <Component {...pageProps} /> } These metrics work in all browsers that support the User Timing API. ## Usage on Vercel Vercel Speed Insights does not `useReportWebVitals`, but `@vercel/speed-insights` package instead. `useReportWebVitals` hook is useful in local development, or if you're using a different service for collecting Web Vitals. ## Sending results to external systems You can send results to any endpoint to measure and track real user performance on your site. For example: useReportWebVitals((metric) => { const body = JSON.stringify(metric) const url = 'https://example.com/analytics' // Use `navigator.sendBeacon()` if available, falling back to `fetch()`. if (navigator.sendBeacon) { navigator.sendBeacon(url, body) } else { fetch(url, { body, method: 'POST', keepalive: true }) } }) > **Good to know**: If you use Google Analytics, using the `id` value can allow you to construct metric distributions manually (to calculate percentiles, etc.) > useReportWebVitals(metric => { > // Use `window.gtag` if you initialized Google Analytics as this example: > // https://github.com/vercel/next.js/blob/canary/examples/with-google-analytics > window.gtag('event', metric.name, { > value: Math.round(metric.name === 'CLS' ? metric.value * 1000 : metric.value), // values must be integers > event_label: metric.id, // id unique to current page load > non_interaction: true, // avoids affecting bounce rate. > }); > } > > Read more about sending results to Google Analytics. --- ## Page: https://nextjs.org/docs/pages/api-reference/functions/use-router If you want to access the `router` object inside any function component in your app, you can use the `useRouter` hook, take a look at the following example: import { useRouter } from 'next/router' function ActiveLink({ children, href }) { const router = useRouter() const style = { marginRight: 10, color: router.asPath === href ? 'red' : 'black', } const handleClick = (e) => { e.preventDefault() router.push(href) } return ( <a href={href} onClick={handleClick} style={style}> {children} </a> ) } export default ActiveLink > `useRouter` is a React Hook, meaning it cannot be used with classes. You can either use withRouter or wrap your class in a function component. ## `router` object The following is the definition of the `router` object returned by both `useRouter` and `withRouter`: * `pathname`: `String` - The path for current route file that comes after `/pages`. Therefore, `basePath`, `locale` and trailing slash (`trailingSlash: true`) are not included. * `query`: `Object` - The query string parsed to an object, including dynamic route parameters. It will be an empty object during prerendering if the page doesn't use Server-side Rendering. Defaults to `{}` * `asPath`: `String` - The path as shown in the browser including the search params and respecting the `trailingSlash` configuration. `basePath` and `locale` are not included. * `isFallback`: `boolean` - Whether the current page is in fallback mode. * `basePath`: `String` - The active basePath (if enabled). * `locale`: `String` - The active locale (if enabled). * `locales`: `String[]` - All supported locales (if enabled). * `defaultLocale`: `String` - The current default locale (if enabled). * `domainLocales`: `Array<{domain, defaultLocale, locales}>` - Any configured domain locales. * `isReady`: `boolean` - Whether the router fields are updated client-side and ready for use. Should only be used inside of `useEffect` methods and not for conditionally rendering on the server. See related docs for use case with automatically statically optimized pages * `isPreview`: `boolean` - Whether the application is currently in preview mode. > Using the `asPath` field may lead to a mismatch between client and server if the page is rendered using server-side rendering or automatic static optimization. Avoid using `asPath` until the `isReady` field is `true`. The following methods are included inside `router`: ### router.push Handles client-side transitions, this method is useful for cases where `next/link` is not enough. router.push(url, as, options) * `url`: `UrlObject | String` - The URL to navigate to (see Node.JS URL module documentation for `UrlObject` properties). * `as`: `UrlObject | String` - Optional decorator for the path that will be shown in the browser URL bar. Before Next.js 9.5.3 this was used for dynamic routes. * `options` - Optional object with the following configuration options: * `scroll` - Optional boolean, controls scrolling to the top of the page after navigation. Defaults to `true` * `shallow`: Update the path of the current page without rerunning `getStaticProps`, `getServerSideProps` or `getInitialProps`. Defaults to `false` * `locale` - Optional string, indicates locale of the new page > You don't need to use `router.push` for external URLs. window.location is better suited for those cases. Navigating to `pages/about.js`, which is a predefined route: import { useRouter } from 'next/router' export default function Page() { const router = useRouter() return ( <button type="button" onClick={() => router.push('/about')}> Click me </button> ) } Navigating `pages/post/[pid].js`, which is a dynamic route: import { useRouter } from 'next/router' export default function Page() { const router = useRouter() return ( <button type="button" onClick={() => router.push('/post/abc')}> Click me </button> ) } Redirecting the user to `pages/login.js`, useful for pages behind authentication: import { useEffect } from 'react' import { useRouter } from 'next/router' // Here you would fetch and return the user const useUser = () => ({ user: null, loading: false }) export default function Page() { const { user, loading } = useUser() const router = useRouter() useEffect(() => { if (!(user || loading)) { router.push('/login') } }, [user, loading]) return <p>Redirecting...</p> } #### Resetting state after navigation When navigating to the same page in Next.js, the page's state **will not** be reset by default as React does not unmount unless the parent component has changed. import Link from 'next/link' import { useState } from 'react' import { useRouter } from 'next/router' export default function Page(props) { const router = useRouter() const [count, setCount] = useState(0) return ( <div> <h1>Page: {router.query.slug}</h1> <p>Count: {count}</p> <button onClick={() => setCount(count + 1)}>Increase count</button> <Link href="/one">one</Link> <Link href="/two">two</Link> </div> ) } In the above example, navigating between `/one` and `/two` **will not** reset the count . The `useState` is maintained between renders because the top-level React component, `Page`, is the same. If you do not want this behavior, you have a couple of options: * Manually ensure each state is updated using `useEffect`. In the above example, that could look like: useEffect(() => { setCount(0) }, [router.query.slug]) * Use a React `key` to tell React to remount the component. To do this for all pages, you can use a custom app: import { useRouter } from 'next/router' export default function MyApp({ Component, pageProps }) { const router = useRouter() return <Component key={router.asPath} {...pageProps} /> } #### With URL object You can use a URL object in the same way you can use it for `next/link`. Works for both the `url` and `as` parameters: import { useRouter } from 'next/router' export default function ReadMore({ post }) { const router = useRouter() return ( <button type="button" onClick={() => { router.push({ pathname: '/post/[pid]', query: { pid: post.id }, }) }} > Click here to read more </button> ) } ### router.replace Similar to the `replace` prop in `next/link`, `router.replace` will prevent adding a new URL entry into the `history` stack. router.replace(url, as, options) * The API for `router.replace` is exactly the same as the API for `router.push`. Take a look at the following example: import { useRouter } from 'next/router' export default function Page() { const router = useRouter() return ( <button type="button" onClick={() => router.replace('/home')}> Click me </button> ) } ### router.prefetch Prefetch pages for faster client-side transitions. This method is only useful for navigations without `next/link`, as `next/link` takes care of prefetching pages automatically. > This is a production only feature. Next.js doesn't prefetch pages in development. router.prefetch(url, as, options) * `url` - The URL to prefetch, including explicit routes (e.g. `/dashboard`) and dynamic routes (e.g. `/product/[id]`) * `as` - Optional decorator for `url`. Before Next.js 9.5.3 this was used to prefetch dynamic routes. * `options` - Optional object with the following allowed fields: * `locale` - allows providing a different locale from the active one. If `false`, `url` has to include the locale as the active locale won't be used. Let's say you have a login page, and after a login, you redirect the user to the dashboard. For that case, we can prefetch the dashboard to make a faster transition, like in the following example: import { useCallback, useEffect } from 'react' import { useRouter } from 'next/router' export default function Login() { const router = useRouter() const handleSubmit = useCallback((e) => { e.preventDefault() fetch('/api/login', { method: 'POST', headers: { 'Content-Type': 'application/json' }, body: JSON.stringify({ /* Form data */ }), }).then((res) => { // Do a fast client-side transition to the already prefetched dashboard page if (res.ok) router.push('/dashboard') }) }, []) useEffect(() => { // Prefetch the dashboard page router.prefetch('/dashboard') }, [router]) return ( <form onSubmit={handleSubmit}> {/* Form fields */} <button type="submit">Login</button> </form> ) } ### router.beforePopState In some cases (for example, if using a Custom Server), you may wish to listen to popstate and do something before the router acts on it. router.beforePopState(cb) * `cb` - The function to run on incoming `popstate` events. The function receives the state of the event as an object with the following props: * `url`: `String` - the route for the new state. This is usually the name of a `page` * `as`: `String` - the url that will be shown in the browser * `options`: `Object` - Additional options sent by router.push If `cb` returns `false`, the Next.js router will not handle `popstate`, and you'll be responsible for handling it in that case. See Disabling file-system routing. You could use `beforePopState` to manipulate the request, or force a SSR refresh, as in the following example: import { useEffect } from 'react' import { useRouter } from 'next/router' export default function Page() { const router = useRouter() useEffect(() => { router.beforePopState(({ url, as, options }) => { // I only want to allow these two routes! if (as !== '/' && as !== '/other') { // Have SSR render bad routes as a 404. window.location.href = as return false } return true }) }, [router]) return <p>Welcome to the page</p> } ### router.back Navigate back in history. Equivalent to clicking the browser’s back button. It executes `window.history.back()`. import { useRouter } from 'next/router' export default function Page() { const router = useRouter() return ( <button type="button" onClick={() => router.back()}> Click here to go back </button> ) } ### router.reload Reload the current URL. Equivalent to clicking the browser’s refresh button. It executes `window.location.reload()`. import { useRouter } from 'next/router' export default function Page() { const router = useRouter() return ( <button type="button" onClick={() => router.reload()}> Click here to reload </button> ) } ### router.events You can listen to different events happening inside the Next.js Router. Here's a list of supported events: * `routeChangeStart(url, { shallow })` - Fires when a route starts to change * `routeChangeComplete(url, { shallow })` - Fires when a route changed completely * `routeChangeError(err, url, { shallow })` - Fires when there's an error when changing routes, or a route load is cancelled * `err.cancelled` - Indicates if the navigation was cancelled * `beforeHistoryChange(url, { shallow })` - Fires before changing the browser's history * `hashChangeStart(url, { shallow })` - Fires when the hash will change but not the page * `hashChangeComplete(url, { shallow })` - Fires when the hash has changed but not the page > **Good to know**: Here `url` is the URL shown in the browser, including the `basePath`. For example, to listen to the router event `routeChangeStart`, open or create `pages/_app.js` and subscribe to the event, like so: import { useEffect } from 'react' import { useRouter } from 'next/router' export default function MyApp({ Component, pageProps }) { const router = useRouter() useEffect(() => { const handleRouteChange = (url, { shallow }) => { console.log( `App is changing to ${url} ${ shallow ? 'with' : 'without' } shallow routing` ) } router.events.on('routeChangeStart', handleRouteChange) // If the component is unmounted, unsubscribe // from the event with the `off` method: return () => { router.events.off('routeChangeStart', handleRouteChange) } }, [router]) return <Component {...pageProps} /> } > We use a Custom App (`pages/_app.js`) for this example to subscribe to the event because it's not unmounted on page navigations, but you can subscribe to router events on any component in your application. Router events should be registered when a component mounts (useEffect or componentDidMount / componentWillUnmount) or imperatively when an event happens. If a route load is cancelled (for example, by clicking two links rapidly in succession), `routeChangeError` will fire. And the passed `err` will contain a `cancelled` property set to `true`, as in the following example: import { useEffect } from 'react' import { useRouter } from 'next/router' export default function MyApp({ Component, pageProps }) { const router = useRouter() useEffect(() => { const handleRouteChangeError = (err, url) => { if (err.cancelled) { console.log(`Route to ${url} was cancelled!`) } } router.events.on('routeChangeError', handleRouteChangeError) // If the component is unmounted, unsubscribe // from the event with the `off` method: return () => { router.events.off('routeChangeError', handleRouteChangeError) } }, [router]) return <Component {...pageProps} /> } ## The `next/compat/router` export This is the same `useRouter` hook, but can be used in both `app` and `pages` directories. It differs from `next/router` in that it does not throw an error when the pages router is not mounted, and instead has a return type of `NextRouter | null`. This allows developers to convert components to support running in both `app` and `pages` as they transition to the `app` router. A component that previously looked like this: import { useRouter } from 'next/router' const MyComponent = () => { const { isReady, query } = useRouter() // ... } Will error when converted over to `next/compat/router`, as `null` can not be destructured. Instead, developers will be able to take advantage of new hooks: import { useEffect } from 'react' import { useRouter } from 'next/compat/router' import { useSearchParams } from 'next/navigation' const MyComponent = () => { const router = useRouter() // may be null or a NextRouter instance const searchParams = useSearchParams() useEffect(() => { if (router && !router.isReady) { return } // In `app/`, searchParams will be ready immediately with the values, in // `pages/` it will be available after the router is ready. const search = searchParams.get('search') // ... }, [router, searchParams]) // ... } This component will now work in both `pages` and `app` directories. When the component is no longer used in `pages`, you can remove the references to the compat router: import { useSearchParams } from 'next/navigation' const MyComponent = () => { const searchParams = useSearchParams() // As this component is only used in `app/`, the compat router can be removed. const search = searchParams.get('search') // ... } ### Using `useRouter` outside of Next.js context in pages Another specific use case is when rendering components outside of a Next.js application context, such as inside `getServerSideProps` on the `pages` directory. In this case, the compat router can be used to avoid errors: import { renderToString } from 'react-dom/server' import { useRouter } from 'next/compat/router' const MyComponent = () => { const router = useRouter() // may be null or a NextRouter instance // ... } export async function getServerSideProps() { const renderedComponent = renderToString(<MyComponent />) return { props: { renderedComponent, }, } } ## Potential ESLint errors Certain methods accessible on the `router` object return a Promise. If you have the ESLint rule, no-floating-promises enabled, consider disabling it either globally, or for the affected line. If your application needs this rule, you should either `void` the promise – or use an `async` function, `await` the Promise, then void the function call. **This is not applicable when the method is called from inside an `onClick` handler**. The affected methods are: * `router.push` * `router.replace` * `router.prefetch` ### Potential solutions import { useEffect } from 'react' import { useRouter } from 'next/router' // Here you would fetch and return the user const useUser = () => ({ user: null, loading: false }) export default function Page() { const { user, loading } = useUser() const router = useRouter() useEffect(() => { // disable the linting on the next line - This is the cleanest solution // eslint-disable-next-line no-floating-promises router.push('/login') // void the Promise returned by router.push if (!(user || loading)) { void router.push('/login') } // or use an async function, await the Promise, then void the function call async function handleRouteChange() { if (!(user || loading)) { await router.push('/login') } } void handleRouteChange() }, [user, loading]) return <p>Redirecting...</p> } ## withRouter If `useRouter` is not the best fit for you, `withRouter` can also add the same `router` object to any component. ### Usage import { withRouter } from 'next/router' function Page({ router }) { return <p>{router.pathname}</p> } export default withRouter(Page) ### TypeScript To use class components with `withRouter`, the component needs to accept a router prop: import React from 'react' import { withRouter, NextRouter } from 'next/router' interface WithRouterProps { router: NextRouter } interface MyComponentProps extends WithRouterProps {} class MyComponent extends React.Component<MyComponentProps> { render() { return <p>{this.props.router.pathname}</p> } } export default withRouter(MyComponent) --- ## Page: https://nextjs.org/docs/pages/api-reference/functions/userAgent The `userAgent` helper extends the Web Request API with additional properties and methods to interact with the user agent object from the request. middleware.ts import { NextRequest, NextResponse, userAgent } from 'next/server' export function middleware(request: NextRequest) { const url = request.nextUrl const { device } = userAgent(request) // device.type can be: 'mobile', 'tablet', 'console', 'smarttv', // 'wearable', 'embedded', or undefined (for desktop browsers) const viewport = device.type || 'desktop' url.searchParams.set('viewport', viewport) return NextResponse.rewrite(url) } ## `isBot` A boolean indicating whether the request comes from a known bot. ## `browser` An object containing information about the browser used in the request. * `name`: A string representing the browser's name, or `undefined` if not identifiable. * `version`: A string representing the browser's version, or `undefined`. ## `device` An object containing information about the device used in the request. * `model`: A string representing the model of the device, or `undefined`. * `type`: A string representing the type of the device, such as `console`, `mobile`, `tablet`, `smarttv`, `wearable`, `embedded`, or `undefined`. * `vendor`: A string representing the vendor of the device, or `undefined`. ## `engine` An object containing information about the browser's engine. * `name`: A string representing the engine's name. Possible values include: `Amaya`, `Blink`, `EdgeHTML`, `Flow`, `Gecko`, `Goanna`, `iCab`, `KHTML`, `Links`, `Lynx`, `NetFront`, `NetSurf`, `Presto`, `Tasman`, `Trident`, `w3m`, `WebKit` or `undefined`. * `version`: A string representing the engine's version, or `undefined`. ## `os` An object containing information about the operating system. * `name`: A string representing the name of the OS, or `undefined`. * `version`: A string representing the version of the OS, or `undefined`. ## `cpu` An object containing information about the CPU architecture. * `architecture`: A string representing the architecture of the CPU. Possible values include: `68k`, `amd64`, `arm`, `arm64`, `armhf`, `avr`, `ia32`, `ia64`, `irix`, `irix64`, `mips`, `mips64`, `pa-risc`, `ppc`, `sparc`, `sparc64` or `undefined` --- ## Page: https://nextjs.org/docs/pages/api-reference/config #### Subscribe to our newsletter Stay updated on new releases and features, guides, and case studies. --- ## Page: https://nextjs.org/docs/pages/api-reference/config/next-config-js Next.js can be configured through a `next.config.js` file in the root of your project directory (for example, by `package.json`) with a default export. // @ts-check /** @type {import('next').NextConfig} */ const nextConfig = { /* config options here */ } module.exports = nextConfig ## ECMAScript Modules `next.config.js` is a regular Node.js module, not a JSON file. It gets used by the Next.js server and build phases, and it's not included in the browser build. If you need ECMAScript modules, you can use `next.config.mjs`: // @ts-check /** * @type {import('next').NextConfig} */ const nextConfig = { /* config options here */ } export default nextConfig > **Good to know**: `next.config` with the `.cjs`, `.cts`, or `.mts` extensions are currently **not** supported. ## Configuration as a Function You can also use a function: // @ts-check export default (phase, { defaultConfig }) => { /** * @type {import('next').NextConfig} */ const nextConfig = { /* config options here */ } return nextConfig } ### Async Configuration Since Next.js 12.1.0, you can use an async function: // @ts-check module.exports = async (phase, { defaultConfig }) => { /** * @type {import('next').NextConfig} */ const nextConfig = { /* config options here */ } return nextConfig } ### Phase `phase` is the current context in which the configuration is loaded. You can see the available phases. Phases can be imported from `next/constants`: // @ts-check const { PHASE_DEVELOPMENT_SERVER } = require('next/constants') module.exports = (phase, { defaultConfig }) => { if (phase === PHASE_DEVELOPMENT_SERVER) { return { /* development only config options here */ } } return { /* config options for all phases except development here */ } } ## TypeScript If you are using TypeScript in your project, you can use `next.config.ts` to use TypeScript in your configuration: import type { NextConfig } from 'next' const nextConfig: NextConfig = { /* config options here */ } export default nextConfig The commented lines are the place where you can put the configs allowed by `next.config.js`, which are defined in this file. However, none of the configs are required, and it's not necessary to understand what each config does. Instead, search for the features you need to enable or modify in this section and they will show you what to do. > Avoid using new JavaScript features not available in your target Node.js version. `next.config.js` will not be parsed by Webpack or Babel. This page documents all the available configuration options: ## Unit Testing (experimental) Starting in Next.js 15.1, the `next/experimental/testing/server` package contains utilities to help unit test `next.config.js` files. The `unstable_getResponseFromNextConfig` function runs the `headers`, `redirects`, and `rewrites` functions from `next.config.js` with the provided request information and returns `NextResponse` with the results of the routing. > The response from `unstable_getResponseFromNextConfig` only considers `next.config.js` fields and does not consider middleware or filesystem routes, so the result in production may be different than the unit test. import { getRedirectUrl, unstable_getResponseFromNextConfig, } from 'next/experimental/testing/server' const response = await unstable_getResponseFromNextConfig({ url: 'https://nextjs.org/test', nextConfig: { async redirects() { return [{ source: '/test', destination: '/test2', permanent: false }] }, }, }) expect(response.status).toEqual(307) expect(getRedirectUrl(response)).toEqual('https://nextjs.org/test2') --- ## Page: https://nextjs.org/docs/pages/api-reference/config/next-config-js/allowedDevOrigins Next.js does not automatically block cross-origin requests during development, but will block by default in a future major version of Next.js to prevent unauthorized requesting of internal assets/endpoints that are available in development mode. To configure a Next.js application to allow requests from origins other than the hostname the server was initialized with (`localhost` by default) you can use the `allowedDevOrigins` config option. `allowedDevOrigins` allows you to set additional origins that can be used in development mode. For example, to use `local-origin.dev` instead of only `localhost`, open `next.config.js` and add the `allowedDevOrigins` config: next.config.js module.exports = { allowedDevOrigins: ['local-origin.dev', '*.local-origin.dev'], } --- ## Page: https://nextjs.org/docs/pages/api-reference/config/next-config-js/assetPrefix > **Attention**: Deploying to Vercel automatically configures a global CDN for your Next.js project. You do not need to manually setup an Asset Prefix. > **Good to know**: Next.js 9.5+ added support for a customizable Base Path, which is better suited for hosting your application on a sub-path like `/docs`. We do not suggest you use a custom Asset Prefix for this use case. ## Set up a CDN To set up a CDN, you can set up an asset prefix and configure your CDN's origin to resolve to the domain that Next.js is hosted on. Open `next.config.mjs` and add the `assetPrefix` config based on the phase: // @ts-check import { PHASE_DEVELOPMENT_SERVER } from 'next/constants' export default (phase) => { const isDev = phase === PHASE_DEVELOPMENT_SERVER /** * @type {import('next').NextConfig} */ const nextConfig = { assetPrefix: isDev ? undefined : 'https://cdn.mydomain.com', } return nextConfig } Next.js will automatically use your asset prefix for the JavaScript and CSS files it loads from the `/_next/` path (`.next/static/` folder). For example, with the above configuration, the following request for a JS chunk: /_next/static/chunks/4b9b41aaa062cbbfeff4add70f256968c51ece5d.4d708494b3aed70c04f0.js Would instead become: https://cdn.mydomain.com/_next/static/chunks/4b9b41aaa062cbbfeff4add70f256968c51ece5d.4d708494b3aed70c04f0.js The exact configuration for uploading your files to a given CDN will depend on your CDN of choice. The only folder you need to host on your CDN is the contents of `.next/static/`, which should be uploaded as `_next/static/` as the above URL request indicates. **Do not upload the rest of your `.next/` folder**, as you should not expose your server code and other configuration to the public. While `assetPrefix` covers requests to `_next/static`, it does not influence the following paths: * Files in the public folder; if you want to serve those assets over a CDN, you'll have to introduce the prefix yourself * `/_next/data/` requests for `getServerSideProps` pages. These requests will always be made against the main domain since they're not static. * `/_next/data/` requests for `getStaticProps` pages. These requests will always be made against the main domain to support Incremental Static Generation, even if you're not using it (for consistency). Was this helpful? supported. --- ## Page: https://nextjs.org/docs/pages/api-reference/config/next-config-js/basePath To deploy a Next.js application under a sub-path of a domain you can use the `basePath` config option. `basePath` allows you to set a path prefix for the application. For example, to use `/docs` instead of `''` (an empty string, the default), open `next.config.js` and add the `basePath` config: module.exports = { basePath: '/docs', } > **Good to know**: This value must be set at build time and cannot be changed without re-building as the value is inlined in the client-side bundles. ### Links When linking to other pages using `next/link` and `next/router` the `basePath` will be automatically applied. For example, using `/about` will automatically become `/docs/about` when `basePath` is set to `/docs`. export default function HomePage() { return ( <> <Link href="/about">About Page</Link> </> ) } Output html: <a href="/docs/about">About Page</a> This makes sure that you don't have to change all links in your application when changing the `basePath` value. ### Images When using the `next/image` component, you will need to add the `basePath` in front of `src`. For example, using `/docs/me.png` will properly serve your image when `basePath` is set to `/docs`. import Image from 'next/image' function Home() { return ( <> <h1>My Homepage</h1> <Image src="/docs/me.png" alt="Picture of the author" width={500} height={500} /> <p>Welcome to my homepage!</p> </> ) } export default Home --- ## Page: https://nextjs.org/docs/pages/api-reference/config/next-config-js/bundlePagesRouterDependencies Enable automatic server-side dependency bundling for Pages Router applications. Matches the automatic dependency bundling in App Router. next.config.js /** @type {import('next').NextConfig} */ const nextConfig = { bundlePagesRouterDependencies: true, } module.exports = nextConfig Explicitly opt-out certain packages from being bundled using the `serverExternalPackages` option. ## Version History | Version | Changes | | --- | --- | | `v15.0.0` | Moved from experimental to stable. Renamed from `bundlePagesExternals` to `bundlePagesRouterDependencies` | --- ## Page: https://nextjs.org/docs/pages/api-reference/config/next-config-js/compress By default, Next.js uses `gzip` to compress rendered content and static files when using `next start` or a custom server. This is an optimization for applications that do not have compression configured. If compression is _already_ configured in your application via a custom server, Next.js will not add compression. > **Good to know:** > > * When hosting your application on Vercel, compression uses `brotli` first, then `gzip`. > * You can check if compression is enabled and which algorithm is used by looking at the `Accept-Encoding` (browser accepted options) and `Content-Encoding` (currently used) headers in the response. ## Disabling compression To disable **compression**, set the `compress` config option to `false`: next.config.js module.exports = { compress: false, } We do not recommend disabling compression unless you have compression configured on your server, as compression reduces bandwidth usage and improves the performance of your application. ## Changing the compression algorithm To change your compression algorithm, you will need to configure your custom server and set the `compress` option to `false` in your `next.config.js` file. For example, you're using nginx and want to switch to `brotli`, set the `compress` option to `false` to allow nginx to handle compression. > **Good to know:** > > * For Next.js applications on Vercel, compression is handled by the Vercel's Edge Network and not Next.js. See the Vercel documentation for more information. --- ## Page: https://nextjs.org/docs/pages/api-reference/config/next-config-js/crossOrigin #### Subscribe to our newsletter Stay updated on new releases and features, guides, and case studies. --- ## Page: https://nextjs.org/docs/pages/api-reference/config/next-config-js/devIndicators `devIndicators` allows you to configure the on-screen indicator that gives context about the current route you're viewing during development. Types devIndicators: false | { position?: 'bottom-right' | 'bottom-left' | 'top-right' | 'top-left', // defaults to 'bottom-left', }, Setting `devIndicators` to `false` will hide the indicator, however Next.js will continue to surface any build or runtime errors that were encountered. ## Troubleshooting ### Indicator not marking a route as static If you expect a route to be static and the indicator has marked it as dynamic, it's likely the route has opted out of static rendering. You can confirm if a route is static or dynamic by building your application using `next build --debug`, and checking the output in your terminal. Static (or prerendered) routes will display a `○` symbol, whereas dynamic routes will display a `ƒ` symbol. For example: Build Output Route (app) Size First Load JS ┌ ○ /_not-found 0 B 0 kB └ ƒ /products/[id] 0 B 0 kB ○ (Static) prerendered as static content ƒ (Dynamic) server-rendered on demand When exporting `getServerSideProps` or `getInitialProps` from a page, it will be marked as dynamic. ## Version History | Version | Changes | | --- | --- | | `v15.2.0` | Improved on-screen indicator with new `position` option. `appIsrStatus`, `buildActivity`, and `buildActivityPosition` options have been deprecated. | | `v15.0.0` | Static on-screen indicator added with `appIsrStatus` option. | --- ## Page: https://nextjs.org/docs/pages/api-reference/config/next-config-js/distDir You can specify a name to use for a custom build directory to use instead of `.next`. Open `next.config.js` and add the `distDir` config: next.config.js module.exports = { distDir: 'build', } Now if you run `next build` Next.js will use `build` instead of the default `.next` folder. > `distDir` **should not** leave your project directory. For example, `../build` is an **invalid** directory. --- ## Page: https://nextjs.org/docs/pages/api-reference/config/next-config-js/env > Since the release of Next.js 9.4 we now have a more intuitive and ergonomic experience for adding environment variables. Give it a try! > **Good to know**: environment variables specified in this way will **always** be included in the JavaScript bundle, prefixing the environment variable name with `NEXT_PUBLIC_` only has an effect when specifying them through the environment or .env files. To add environment variables to the JavaScript bundle, open `next.config.js` and add the `env` config: next.config.js module.exports = { env: { customKey: 'my-value', }, } Now you can access `process.env.customKey` in your code. For example: function Page() { return <h1>The value of customKey is: {process.env.customKey}</h1> } export default Page Next.js will replace `process.env.customKey` with `'my-value'` at build time. Trying to destructure `process.env` variables won't work due to the nature of webpack DefinePlugin. For example, the following line: return <h1>The value of customKey is: {process.env.customKey}</h1> Will end up being: return <h1>The value of customKey is: {'my-value'}</h1> --- ## Page: https://nextjs.org/docs/pages/api-reference/config/next-config-js/eslint When ESLint is detected in your project, Next.js fails your **production build** (`next build`) when errors are present. If you'd like Next.js to produce production code even when your application has ESLint errors, you can disable the built-in linting step completely. This is not recommended unless you already have ESLint configured to run in a separate part of your workflow (for example, in CI or a pre-commit hook). Open `next.config.js` and enable the `ignoreDuringBuilds` option in the `eslint` config: next.config.js module.exports = { eslint: { // Warning: This allows production builds to successfully complete even if // your project has ESLint errors. ignoreDuringBuilds: true, }, } --- ## Page: https://nextjs.org/docs/pages/api-reference/config/next-config-js/exportPathMap > This feature is exclusive to `next export` and currently **deprecated** in favor of `getStaticPaths` with `pages` or `generateStaticParams` with `app`. `exportPathMap` allows you to specify a mapping of request paths to page destinations, to be used during export. Paths defined in `exportPathMap` will also be available when using `next dev`. Let's start with an example, to create a custom `exportPathMap` for an app with the following pages: * `pages/index.js` * `pages/about.js` * `pages/post.js` Open `next.config.js` and add the following `exportPathMap` config: module.exports = { exportPathMap: async function ( defaultPathMap, { dev, dir, outDir, distDir, buildId } ) { return { '/': { page: '/' }, '/about': { page: '/about' }, '/p/hello-nextjs': { page: '/post', query: { title: 'hello-nextjs' } }, '/p/learn-nextjs': { page: '/post', query: { title: 'learn-nextjs' } }, '/p/deploy-nextjs': { page: '/post', query: { title: 'deploy-nextjs' } }, } }, } > **Good to know**: the `query` field in `exportPathMap` cannot be used with automatically statically optimized pages or `getStaticProps` pages as they are rendered to HTML files at build-time and additional query information cannot be provided during `next export`. The pages will then be exported as HTML files, for example, `/about` will become `/about.html`. `exportPathMap` is an `async` function that receives 2 arguments: the first one is `defaultPathMap`, which is the default map used by Next.js. The second argument is an object with: * `dev` - `true` when `exportPathMap` is being called in development. `false` when running `next export`. In development `exportPathMap` is used to define routes. * `dir` - Absolute path to the project directory * `outDir` - Absolute path to the `out/` directory (configurable with `-o`). When `dev` is `true` the value of `outDir` will be `null`. * `distDir` - Absolute path to the `.next/` directory (configurable with the `distDir` config) * `buildId` - The generated build id The returned object is a map of pages where the `key` is the `pathname` and the `value` is an object that accepts the following fields: * `page`: `String` - the page inside the `pages` directory to render * `query`: `Object` - the `query` object passed to `getInitialProps` when prerendering. Defaults to `{}` > The exported `pathname` can also be a filename (for example, `/readme.md`), but you may need to set the `Content-Type` header to `text/html` when serving its content if it is different than `.html`. ## Adding a trailing slash It is possible to configure Next.js to export pages as `index.html` files and require trailing slashes, `/about` becomes `/about/index.html` and is routable via `/about/`. This was the default behavior prior to Next.js 9. To switch back and add a trailing slash, open `next.config.js` and enable the `trailingSlash` config: module.exports = { trailingSlash: true, } ## Customizing the output directory `next export` will use `out` as the default output directory, you can customize this using the `-o` argument, like so: next export -o outdir > **Warning**: Using `exportPathMap` is deprecated and is overridden by `getStaticPaths` inside `pages`. We don't recommend using them together. --- ## Page: https://nextjs.org/docs/pages/api-reference/config/next-config-js/generateBuildId Next.js generates an ID during `next build` to identify which version of your application is being served. The same build should be used and boot up multiple containers. If you are rebuilding for each stage of your environment, you will need to generate a consistent build ID to use between containers. Use the `generateBuildId` command in `next.config.js`: next.config.js module.exports = { generateBuildId: async () => { // This could be anything, using the latest git hash return process.env.GIT_HASH }, } --- ## Page: https://nextjs.org/docs/pages/api-reference/config/next-config-js/generateEtags Next.js will generate etags for every page by default. You may want to disable etag generation for HTML pages depending on your cache strategy. Open `next.config.js` and disable the `generateEtags` option: next.config.js module.exports = { generateEtags: false, } --- ## Page: https://nextjs.org/docs/pages/api-reference/config/next-config-js/headers Headers allow you to set custom HTTP headers on the response to an incoming request on a given path. To set custom HTTP headers you can use the `headers` key in `next.config.js`: module.exports = { async headers() { return [ { source: '/about', headers: [ { key: 'x-custom-header', value: 'my custom header value', }, { key: 'x-another-custom-header', value: 'my other custom header value', }, ], }, ] }, } `headers` is an async function that expects an array to be returned holding objects with `source` and `headers` properties: * `source` is the incoming request path pattern. * `headers` is an array of response header objects, with `key` and `value` properties. * `basePath`: `false` or `undefined` - if false the basePath won't be included when matching, can be used for external rewrites only. * `locale`: `false` or `undefined` - whether the locale should not be included when matching. * `has` is an array of has objects with the `type`, `key` and `value` properties. * `missing` is an array of missing objects with the `type`, `key` and `value` properties. Headers are checked before the filesystem which includes pages and `/public` files. If two headers match the same path and set the same header key, the last header key will override the first. Using the below headers, the path `/hello` will result in the header `x-hello` being `world` due to the last header value set being `world`. module.exports = { async headers() { return [ { source: '/:path*', headers: [ { key: 'x-hello', value: 'there', }, ], }, { source: '/hello', headers: [ { key: 'x-hello', value: 'world', }, ], }, ] }, } ## Path Matching Path matches are allowed, for example `/blog/:slug` will match `/blog/hello-world` (no nested paths): module.exports = { async headers() { return [ { source: '/blog/:slug', headers: [ { key: 'x-slug', value: ':slug', // Matched parameters can be used in the value }, { key: 'x-slug-:slug', // Matched parameters can be used in the key value: 'my other custom header value', }, ], }, ] }, } ### Wildcard Path Matching To match a wildcard path you can use `*` after a parameter, for example `/blog/:slug*` will match `/blog/a/b/c/d/hello-world`: module.exports = { async headers() { return [ { source: '/blog/:slug*', headers: [ { key: 'x-slug', value: ':slug*', // Matched parameters can be used in the value }, { key: 'x-slug-:slug*', // Matched parameters can be used in the key value: 'my other custom header value', }, ], }, ] }, } ### Regex Path Matching To match a regex path you can wrap the regex in parenthesis after a parameter, for example `/blog/:slug(\\d{1,})` will match `/blog/123` but not `/blog/abc`: module.exports = { async headers() { return [ { source: '/blog/:post(\\d{1,})', headers: [ { key: 'x-post', value: ':post', }, ], }, ] }, } The following characters `(`, `)`, `{`, `}`, `:`, `*`, `+`, `?` are used for regex path matching, so when used in the `source` as non-special values they must be escaped by adding `\\` before them: module.exports = { async headers() { return [ { // this will match `/english(default)/something` being requested source: '/english\\(default\\)/:slug', headers: [ { key: 'x-header', value: 'value', }, ], }, ] }, } ## Header, Cookie, and Query Matching To only apply a header when header, cookie, or query values also match the `has` field or don't match the `missing` field can be used. Both the `source` and all `has` items must match and all `missing` items must not match for the header to be applied. `has` and `missing` items can have the following fields: * `type`: `String` - must be either `header`, `cookie`, `host`, or `query`. * `key`: `String` - the key from the selected type to match against. * `value`: `String` or `undefined` - the value to check for, if undefined any value will match. A regex like string can be used to capture a specific part of the value, e.g. if the value `first-(?<paramName>.*)` is used for `first-second` then `second` will be usable in the destination with `:paramName`. module.exports = { async headers() { return [ // if the header `x-add-header` is present, // the `x-another-header` header will be applied { source: '/:path*', has: [ { type: 'header', key: 'x-add-header', }, ], headers: [ { key: 'x-another-header', value: 'hello', }, ], }, // if the header `x-no-header` is not present, // the `x-another-header` header will be applied { source: '/:path*', missing: [ { type: 'header', key: 'x-no-header', }, ], headers: [ { key: 'x-another-header', value: 'hello', }, ], }, // if the source, query, and cookie are matched, // the `x-authorized` header will be applied { source: '/specific/:path*', has: [ { type: 'query', key: 'page', // the page value will not be available in the // header key/values since value is provided and // doesn't use a named capture group e.g. (?<page>home) value: 'home', }, { type: 'cookie', key: 'authorized', value: 'true', }, ], headers: [ { key: 'x-authorized', value: ':authorized', }, ], }, // if the header `x-authorized` is present and // contains a matching value, the `x-another-header` will be applied { source: '/:path*', has: [ { type: 'header', key: 'x-authorized', value: '(?<authorized>yes|true)', }, ], headers: [ { key: 'x-another-header', value: ':authorized', }, ], }, // if the host is `example.com`, // this header will be applied { source: '/:path*', has: [ { type: 'host', value: 'example.com', }, ], headers: [ { key: 'x-another-header', value: ':authorized', }, ], }, ] }, } When leveraging `basePath` support with headers each `source` is automatically prefixed with the `basePath` unless you add `basePath: false` to the header: module.exports = { basePath: '/docs', async headers() { return [ { source: '/with-basePath', // becomes /docs/with-basePath headers: [ { key: 'x-hello', value: 'world', }, ], }, { source: '/without-basePath', // is not modified since basePath: false is set headers: [ { key: 'x-hello', value: 'world', }, ], basePath: false, }, ] }, } When leveraging `i18n` support with headers each `source` is automatically prefixed to handle the configured `locales` unless you add `locale: false` to the header. If `locale: false` is used you must prefix the `source` with a locale for it to be matched correctly. module.exports = { i18n: { locales: ['en', 'fr', 'de'], defaultLocale: 'en', }, async headers() { return [ { source: '/with-locale', // automatically handles all locales headers: [ { key: 'x-hello', value: 'world', }, ], }, { // does not handle locales automatically since locale: false is set source: '/nl/with-locale-manual', locale: false, headers: [ { key: 'x-hello', value: 'world', }, ], }, { // this matches '/' since `en` is the defaultLocale source: '/en', locale: false, headers: [ { key: 'x-hello', value: 'world', }, ], }, { // this gets converted to /(en|fr|de)/(.*) so will not match the top-level // `/` or `/fr` routes like /:path* would source: '/(.*)', headers: [ { key: 'x-hello', value: 'world', }, ], }, ] }, } ## Cache-Control Next.js sets the `Cache-Control` header of `public, max-age=31536000, immutable` for truly immutable assets. It cannot be overridden. These immutable files contain a SHA-hash in the file name, so they can be safely cached indefinitely. For example, Static Image Imports. You cannot set `Cache-Control` headers in `next.config.js` for these assets. However, you can set `Cache-Control` headers for other responses or data. If you need to revalidate the cache of a page that has been statically generated, you can do so by setting the `revalidate` prop in the page's `getStaticProps` function. To cache the response from an API Route, you can use `res.setHeader`: import type { NextApiRequest, NextApiResponse } from 'next' type ResponseData = { message: string } export default function handler( req: NextApiRequest, res: NextApiResponse<ResponseData> ) { res.setHeader('Cache-Control', 's-maxage=86400') res.status(200).json({ message: 'Hello from Next.js!' }) } You can also use caching headers (`Cache-Control`) inside `getServerSideProps` to cache dynamic responses. For example, using `stale-while-revalidate`. import { GetStaticProps, GetStaticPaths, GetServerSideProps } from 'next' // This value is considered fresh for ten seconds (s-maxage=10). // If a request is repeated within the next 10 seconds, the previously // cached value will still be fresh. If the request is repeated before 59 seconds, // the cached value will be stale but still render (stale-while-revalidate=59). // // In the background, a revalidation request will be made to populate the cache // with a fresh value. If you refresh the page, you will see the new value. export const getServerSideProps = (async (context) => { context.res.setHeader( 'Cache-Control', 'public, s-maxage=10, stale-while-revalidate=59' ) return { props: {}, } }) satisfies GetServerSideProps ## Options ### CORS Cross-Origin Resource Sharing (CORS) is a security feature that allows you to control which sites can access your resources. You can set the `Access-Control-Allow-Origin` header to allow a specific origin to access your API Endpoints. async headers() { return [ { source: "/api/:path*", headers: [ { key: "Access-Control-Allow-Origin", value: "*", // Set your origin }, { key: "Access-Control-Allow-Methods", value: "GET, POST, PUT, DELETE, OPTIONS", }, { key: "Access-Control-Allow-Headers", value: "Content-Type, Authorization", }, ], }, ]; }, ### X-DNS-Prefetch-Control This header controls DNS prefetching, allowing browsers to proactively perform domain name resolution on external links, images, CSS, JavaScript, and more. This prefetching is performed in the background, so the DNS is more likely to be resolved by the time the referenced items are needed. This reduces latency when the user clicks a link. { key: 'X-DNS-Prefetch-Control', value: 'on' } ### Strict-Transport-Security This header informs browsers it should only be accessed using HTTPS, instead of using HTTP. Using the configuration below, all present and future subdomains will use HTTPS for a `max-age` of 2 years. This blocks access to pages or subdomains that can only be served over HTTP. If you're deploying to Vercel, this header is not necessary as it's automatically added to all deployments unless you declare `headers` in your `next.config.js`. { key: 'Strict-Transport-Security', value: 'max-age=63072000; includeSubDomains; preload' } ### X-Frame-Options This header indicates whether the site should be allowed to be displayed within an `iframe`. This can prevent against clickjacking attacks. **This header has been superseded by CSP's `frame-ancestors` option**, which has better support in modern browsers (see Content Security Policy for configuration details). { key: 'X-Frame-Options', value: 'SAMEORIGIN' } ### Permissions-Policy This header allows you to control which features and APIs can be used in the browser. It was previously named `Feature-Policy`. { key: 'Permissions-Policy', value: 'camera=(), microphone=(), geolocation=(), browsing-topics=()' } ### X-Content-Type-Options This header prevents the browser from attempting to guess the type of content if the `Content-Type` header is not explicitly set. This can prevent XSS exploits for websites that allow users to upload and share files. For example, a user trying to download an image, but having it treated as a different `Content-Type` like an executable, which could be malicious. This header also applies to downloading browser extensions. The only valid value for this header is `nosniff`. { key: 'X-Content-Type-Options', value: 'nosniff' } ### Referrer-Policy This header controls how much information the browser includes when navigating from the current website (origin) to another. { key: 'Referrer-Policy', value: 'origin-when-cross-origin' } ### Content-Security-Policy Learn more about adding a Content Security Policy to your application. ## Version History | Version | Changes | | --- | --- | | `v13.3.0` | `missing` added. | | `v10.2.0` | `has` added. | | `v9.5.0` | Headers added. | --- ## Page: https://nextjs.org/docs/pages/api-reference/config/next-config-js/httpAgentOptions In Node.js versions prior to 18, Next.js automatically polyfills `fetch()` with undici and enables HTTP Keep-Alive by default. To disable HTTP Keep-Alive for all `fetch()` calls on the server-side, open `next.config.js` and add the `httpAgentOptions` config: next.config.js module.exports = { httpAgentOptions: { keepAlive: false, }, } --- ## Page: https://nextjs.org/docs/pages/api-reference/config/next-config-js/images If you want to use a cloud provider to optimize images instead of using the Next.js built-in Image Optimization API, you can configure `next.config.js` with the following: module.exports = { images: { loader: 'custom', loaderFile: './my/image/loader.js', }, } This `loaderFile` must point to a file relative to the root of your Next.js application. The file must export a default function that returns a string, for example: export default function myImageLoader({ src, width, quality }) { return `https://example.com/${src}?w=${width}&q=${quality || 75}` } Alternatively, you can use the `loader` prop to pass the function to each instance of `next/image`. To learn more about configuring the behavior of the built-in Image Optimization API and the Image Component, see Image Configuration Options for available options. ## Example Loader Configuration * Akamai * AWS CloudFront * Cloudinary * Cloudflare * Contentful * Fastly * Gumlet * ImageEngine * Imgix * PixelBin * Sanity * Sirv * Supabase * Thumbor * Imagekit * Nitrogen AIO ### Akamai // Docs: https://techdocs.akamai.com/ivm/reference/test-images-on-demand export default function akamaiLoader({ src, width, quality }) { return `https://example.com/${src}?imwidth=${width}` } ### AWS CloudFront // Docs: https://aws.amazon.com/developer/application-security-performance/articles/image-optimization export default function cloudfrontLoader({ src, width, quality }) { const url = new URL(`https://example.com${src}`) url.searchParams.set('format', 'auto') url.searchParams.set('width', width.toString()) url.searchParams.set('quality', (quality || 75).toString()) return url.href } ### Cloudinary // Demo: https://res.cloudinary.com/demo/image/upload/w_300,c_limit,q_auto/turtles.jpg export default function cloudinaryLoader({ src, width, quality }) { const params = ['f_auto', 'c_limit', `w_${width}`, `q_${quality || 'auto'}`] return `https://example.com/${params.join(',')}${src}` } ### Cloudflare // Docs: https://developers.cloudflare.com/images/transform-images export default function cloudflareLoader({ src, width, quality }) { const params = [`width=${width}`, `quality=${quality || 75}`, 'format=auto'] return `https://example.com/cdn-cgi/image/${params.join(',')}/${src}` } ### Contentful // Docs: https://www.contentful.com/developers/docs/references/images-api/ export default function contentfulLoader({ src, width, quality }) { const url = new URL(`https://example.com${src}`) url.searchParams.set('fm', 'webp') url.searchParams.set('w', width.toString()) url.searchParams.set('q', (quality || 75).toString()) return url.href } ### Fastly // Docs: https://developer.fastly.com/reference/io/ export default function fastlyLoader({ src, width, quality }) { const url = new URL(`https://example.com${src}`) url.searchParams.set('auto', 'webp') url.searchParams.set('width', width.toString()) url.searchParams.set('quality', (quality || 75).toString()) return url.href } ### Gumlet // Docs: https://docs.gumlet.com/reference/image-transform-size export default function gumletLoader({ src, width, quality }) { const url = new URL(`https://example.com${src}`) url.searchParams.set('format', 'auto') url.searchParams.set('w', width.toString()) url.searchParams.set('q', (quality || 75).toString()) return url.href } ### ImageEngine // Docs: https://support.imageengine.io/hc/en-us/articles/360058880672-Directives export default function imageengineLoader({ src, width, quality }) { const compression = 100 - (quality || 50) const params = [`w_${width}`, `cmpr_${compression}`)] return `https://example.com${src}?imgeng=/${params.join('/')` } ### Imgix // Demo: https://static.imgix.net/daisy.png?format=auto&fit=max&w=300 export default function imgixLoader({ src, width, quality }) { const url = new URL(`https://example.com${src}`) const params = url.searchParams params.set('auto', params.getAll('auto').join(',') || 'format') params.set('fit', params.get('fit') || 'max') params.set('w', params.get('w') || width.toString()) params.set('q', (quality || 50).toString()) return url.href } ### PixelBin // Doc (Resize): https://www.pixelbin.io/docs/transformations/basic/resize/#width-w // Doc (Optimise): https://www.pixelbin.io/docs/optimizations/quality/#image-quality-when-delivering // Doc (Auto Format Delivery): https://www.pixelbin.io/docs/optimizations/format/#automatic-format-selection-with-f_auto-url-parameter export default function pixelBinLoader({ src, width, quality }) { const name = '<your-cloud-name>' const opt = `t.resize(w:${width})~t.compress(q:${quality || 75})` return `https://cdn.pixelbin.io/v2/${name}/${opt}/${src}?f_auto=true` } ### Sanity // Docs: https://www.sanity.io/docs/image-urls export default function sanityLoader({ src, width, quality }) { const prj = 'zp7mbokg' const dataset = 'production' const url = new URL(`https://cdn.sanity.io/images/${prj}/${dataset}${src}`) url.searchParams.set('auto', 'format') url.searchParams.set('fit', 'max') url.searchParams.set('w', width.toString()) if (quality) { url.searchParams.set('q', quality.toString()) } return url.href } ### Sirv // Docs: https://sirv.com/help/articles/dynamic-imaging/ export default function sirvLoader({ src, width, quality }) { const url = new URL(`https://example.com${src}`) const params = url.searchParams params.set('format', params.getAll('format').join(',') || 'optimal') params.set('w', params.get('w') || width.toString()) params.set('q', (quality || 85).toString()) return url.href } ### Supabase // Docs: https://supabase.com/docs/guides/storage/image-transformations#nextjs-loader export default function supabaseLoader({ src, width, quality }) { const url = new URL(`https://example.com${src}`) url.searchParams.set('width', width.toString()) url.searchParams.set('quality', (quality || 75).toString()) return url.href } ### Thumbor // Docs: https://thumbor.readthedocs.io/en/latest/ export default function thumborLoader({ src, width, quality }) { const params = [`${width}x0`, `filters:quality(${quality || 75})`] return `https://example.com${params.join('/')}${src}` } ### ImageKit.io // Docs: https://imagekit.io/docs/image-transformation export default function imageKitLoader({ src, width, quality }) { const params = [`w-${width}`, `q-${quality || 80}`] return `https://ik.imagekit.io/your_imagekit_id/${src}?tr=${params.join(',')}` } ### Nitrogen AIO // Docs: https://docs.n7.io/aio/intergrations/ export default function aioLoader({ src, width, quality }) { const url = new URL(src, window.location.href) const params = url.searchParams const aioParams = params.getAll('aio') aioParams.push(`w-${width}`) if (quality) { aioParams.push(`q-${quality.toString()}`) } params.set('aio', aioParams.join(';')) return url.href } --- ## Page: https://nextjs.org/docs/pages/api-reference/config/next-config-js/onDemandEntries Next.js exposes some options that give you some control over how the server will dispose or keep in memory built pages in development. To change the defaults, open `next.config.js` and add the `onDemandEntries` config: next.config.js module.exports = { onDemandEntries: { // period (in ms) where the server will keep pages in the buffer maxInactiveAge: 25 * 1000, // number of pages that should be kept simultaneously without being disposed pagesBufferLength: 2, }, } --- ## Page: https://nextjs.org/docs/pages/api-reference/config/next-config-js/optimizePackageImports Some packages can export hundreds or thousands of modules, which can cause performance issues in development and production. Adding a package to `experimental.optimizePackageImports` will only load the modules you are actually using, while still giving you the convenience of writing import statements with many named exports. next.config.js module.exports = { experimental: { optimizePackageImports: ['package-name'], }, } The following libraries are optimized by default: * `lucide-react` * `date-fns` * `lodash-es` * `ramda` * `antd` * `react-bootstrap` * `ahooks` * `@ant-design/icons` * `@headlessui/react` * `@headlessui-float/react` * `@heroicons/react/20/solid` * `@heroicons/react/24/solid` * `@heroicons/react/24/outline` * `@visx/visx` * `@tremor/react` * `rxjs` * `@mui/material` * `@mui/icons-material` * `recharts` * `react-use` * `@material-ui/core` * `@material-ui/icons` * `@tabler/icons-react` * `mui-core` * `react-icons/*` --- ## Page: https://nextjs.org/docs/pages/api-reference/config/next-config-js/output During a build, Next.js will automatically trace each page and its dependencies to determine all of the files that are needed for deploying a production version of your application. This feature helps reduce the size of deployments drastically. Previously, when deploying with Docker you would need to have all files from your package's `dependencies` installed to run `next start`. Starting with Next.js 12, you can leverage Output File Tracing in the `.next/` directory to only include the necessary files. Furthermore, this removes the need for the deprecated `serverless` target which can cause various issues and also creates unnecessary duplication. ## How it Works During `next build`, Next.js will use `@vercel/nft` to statically analyze `import`, `require`, and `fs` usage to determine all files that a page might load. Next.js' production server is also traced for its needed files and output at `.next/next-server.js.nft.json` which can be leveraged in production. To leverage the `.nft.json` files emitted to the `.next` output directory, you can read the list of files in each trace that are relative to the `.nft.json` file and then copy them to your deployment location. ## Automatically Copying Traced Files Next.js can automatically create a `standalone` folder that copies only the necessary files for a production deployment including select files in `node_modules`. To leverage this automatic copying you can enable it in your `next.config.js`: module.exports = { output: 'standalone', } This will create a folder at `.next/standalone` which can then be deployed on its own without installing `node_modules`. Additionally, a minimal `server.js` file is also output which can be used instead of `next start`. This minimal server does not copy the `public` or `.next/static` folders by default as these should ideally be handled by a CDN instead, although these folders can be copied to the `standalone/public` and `standalone/.next/static` folders manually, after which `server.js` file will serve these automatically. To copy these manually, you can use the `cp` command-line tool after you `next build`: cp -r public .next/standalone/ && cp -r .next/static .next/standalone/.next/ To start your minimal `server.js` file locally, run the following command: node .next/standalone/server.js > **Good to know**: > > * `next.config.js` is read during `next build` and serialized into the `server.js` output file. If the legacy `serverRuntimeConfig` or `publicRuntimeConfig` options are being used, the values will be specific to values at build time. > * If your project needs to listen to a specific port or hostname, you can define `PORT` or `HOSTNAME` environment variables before running `server.js`. For example, run `PORT=8080 HOSTNAME=0.0.0.0 node server.js` to start the server on `http://0.0.0.0:8080`. ## Caveats * While tracing in monorepo setups, the project directory is used for tracing by default. For `next build packages/web-app`, `packages/web-app` would be the tracing root and any files outside of that folder will not be included. To include files outside of this folder you can set `outputFileTracingRoot` in your `next.config.js`. module.exports = { // this includes files from the monorepo base two directories up outputFileTracingRoot: path.join(__dirname, '../../'), } * There are some cases in which Next.js might fail to include required files, or might incorrectly include unused files. In those cases, you can leverage `outputFileTracingExcludes` and `outputFileTracingIncludes` respectively in `next.config.js`. Each config accepts an object with minimatch globs for the key to match specific pages and a value of an array with globs relative to the project's root to either include or exclude in the trace. module.exports = { outputFileTracingExcludes: { '/api/hello': ['./un-necessary-folder/**/*'], }, outputFileTracingIncludes: { '/api/another': ['./necessary-folder/**/*'], '/api/login/\\[\\[\\.\\.\\.slug\\]\\]': [ './node_modules/aws-crt/dist/bin/**/*', ], }, } **Note:** The key of `outputFileTracingIncludes`/`outputFileTracingExcludes` is a glob, so special characters need to be escaped. * Currently, Next.js does not do anything with the emitted `.nft.json` files. The files must be read by your deployment platform, for example Vercel, to create a minimal deployment. In a future release, a new command is planned to utilize these `.nft.json` files. ## Experimental `turbotrace` Tracing dependencies can be slow because it requires very complex computations and analysis. We created `turbotrace` in Rust as a faster and smarter alternative to the JavaScript implementation. To enable it, you can add the following configuration to your `next.config.js`: module.exports = { experimental: { turbotrace: { // control the log level of the turbotrace, default is `error` logLevel?: | 'bug' | 'fatal' | 'error' | 'warning' | 'hint' | 'note' | 'suggestions' | 'info', // control if the log of turbotrace should contain the details of the analysis, default is `false` logDetail?: boolean // show all log messages without limit // turbotrace only show 1 log message for each categories by default logAll?: boolean // control the context directory of the turbotrace // files outside of the context directory will not be traced // set the `outputFileTracingRoot` has the same effect // if the `outputFileTracingRoot` and this option are both set, the `experimental.turbotrace.contextDirectory` will be used contextDirectory?: string // if there is `process.cwd()` expression in your code, you can set this option to tell `turbotrace` the value of `process.cwd()` while tracing. // for example the require(process.cwd() + '/package.json') will be traced as require('/path/to/cwd/package.json') processCwd?: string // control the maximum memory usage of the `turbotrace`, in `MB`, default is `6000`. memoryLimit?: number }, }, } --- ## Page: https://nextjs.org/docs/pages/api-reference/config/next-config-js/pageExtensions You can extend the default Page extensions (`.tsx`, `.ts`, `.jsx`, `.js`) used by Next.js. Inside `next.config.js`, add the `pageExtensions` config: module.exports = { pageExtensions: ['mdx', 'md', 'jsx', 'js', 'tsx', 'ts'], } Changing these values affects _all_ Next.js pages, including the following: * `middleware.js` * `instrumentation.js` * `pages/_document.js` * `pages/_app.js` * `pages/api/` For example, if you reconfigure `.ts` page extensions to `.page.ts`, you would need to rename pages like `middleware.page.ts`, `instrumentation.page.ts`, `_app.page.ts`. ## Including non-page files in the `pages` directory You can colocate test files or other files used by components in the `pages` directory. Inside `next.config.js`, add the `pageExtensions` config: module.exports = { pageExtensions: ['page.tsx', 'page.ts', 'page.jsx', 'page.js'], } Then, rename your pages to have a file extension that includes `.page` (e.g. rename `MyPage.tsx` to `MyPage.page.tsx`). Ensure you rename _all_ Next.js pages, including the files mentioned above. --- ## Page: https://nextjs.org/docs/pages/api-reference/config/next-config-js/poweredByHeader #### Subscribe to our newsletter Stay updated on new releases and features, guides, and case studies. --- ## Page: https://nextjs.org/docs/pages/api-reference/config/next-config-js/productionBrowserSourceMaps Source Maps are enabled by default during development. During production builds, they are disabled to prevent you leaking your source on the client, unless you specifically opt-in with the configuration flag. Next.js provides a configuration flag you can use to enable browser source map generation during the production build: next.config.js module.exports = { productionBrowserSourceMaps: true, } When the `productionBrowserSourceMaps` option is enabled, the source maps will be output in the same directory as the JavaScript files. Next.js will automatically serve these files when requested. * Adding source maps can increase `next build` time * Increases memory usage during `next build` --- ## Page: https://nextjs.org/docs/pages/api-reference/config/next-config-js/reactStrictMode **Good to know**: Since Next.js 13.5.1, Strict Mode is `true` by default with `app` router, so the above configuration is only necessary for `pages`. You can still disable Strict Mode by setting `reactStrictMode: false`. **Suggested**: We strongly suggest you enable Strict Mode in your Next.js application to better prepare your application for the future of React. React's Strict Mode is a development mode only feature for highlighting potential problems in an application. It helps to identify unsafe lifecycles, legacy API usage, and a number of other features. The Next.js runtime is Strict Mode-compliant. To opt-in to Strict Mode, configure the following option in your `next.config.js`: If you or your team are not ready to use Strict Mode in your entire application, that's OK! You can incrementally migrate on a page-by-page basis using `<React.StrictMode>`. --- ## Page: https://nextjs.org/docs/pages/api-reference/config/next-config-js/redirects Redirects allow you to redirect an incoming request path to a different destination path. To use redirects you can use the `redirects` key in `next.config.js`: module.exports = { async redirects() { return [ { source: '/about', destination: '/', permanent: true, }, ] }, } `redirects` is an async function that expects an array to be returned holding objects with `source`, `destination`, and `permanent` properties: * `source` is the incoming request path pattern. * `destination` is the path you want to route to. * `permanent` `true` or `false` - if `true` will use the 308 status code which instructs clients/search engines to cache the redirect forever, if `false` will use the 307 status code which is temporary and is not cached. > **Why does Next.js use 307 and 308?** Traditionally a 302 was used for a temporary redirect, and a 301 for a permanent redirect, but many browsers changed the request method of the redirect to `GET`, regardless of the original method. For example, if the browser made a request to `POST /v1/users` which returned status code `302` with location `/v2/users`, the subsequent request might be `GET /v2/users` instead of the expected `POST /v2/users`. Next.js uses the 307 temporary redirect, and 308 permanent redirect status codes to explicitly preserve the request method used. * `basePath`: `false` or `undefined` - if false the `basePath` won't be included when matching, can be used for external redirects only. * `locale`: `false` or `undefined` - whether the locale should not be included when matching. * `has` is an array of has objects with the `type`, `key` and `value` properties. * `missing` is an array of missing objects with the `type`, `key` and `value` properties. Redirects are checked before the filesystem which includes pages and `/public` files. When using the Pages Router, redirects are not applied to client-side routing (`Link`, `router.push`) unless Middleware is present and matches the path. When a redirect is applied, any query values provided in the request will be passed through to the redirect destination. For example, see the following redirect configuration: { source: '/old-blog/:path*', destination: '/blog/:path*', permanent: false } > **Good to know**: Remember to include the forward slash `/` before the colon `:` in path parameters of the `source` and `destination` paths, otherwise the path will be treated as a literal string and you run the risk of causing infinite redirects. When `/old-blog/post-1?hello=world` is requested, the client will be redirected to `/blog/post-1?hello=world`. ## Path Matching Path matches are allowed, for example `/old-blog/:slug` will match `/old-blog/hello-world` (no nested paths): module.exports = { async redirects() { return [ { source: '/old-blog/:slug', destination: '/news/:slug', // Matched parameters can be used in the destination permanent: true, }, ] }, } ### Wildcard Path Matching To match a wildcard path you can use `*` after a parameter, for example `/blog/:slug*` will match `/blog/a/b/c/d/hello-world`: module.exports = { async redirects() { return [ { source: '/blog/:slug*', destination: '/news/:slug*', // Matched parameters can be used in the destination permanent: true, }, ] }, } ### Regex Path Matching To match a regex path you can wrap the regex in parentheses after a parameter, for example `/post/:slug(\\d{1,})` will match `/post/123` but not `/post/abc`: module.exports = { async redirects() { return [ { source: '/post/:slug(\\d{1,})', destination: '/news/:slug', // Matched parameters can be used in the destination permanent: false, }, ] }, } The following characters `(`, `)`, `{`, `}`, `:`, `*`, `+`, `?` are used for regex path matching, so when used in the `source` as non-special values they must be escaped by adding `\\` before them: module.exports = { async redirects() { return [ { // this will match `/english(default)/something` being requested source: '/english\\(default\\)/:slug', destination: '/en-us/:slug', permanent: false, }, ] }, } ## Header, Cookie, and Query Matching To only match a redirect when header, cookie, or query values also match the `has` field or don't match the `missing` field can be used. Both the `source` and all `has` items must match and all `missing` items must not match for the redirect to be applied. `has` and `missing` items can have the following fields: * `type`: `String` - must be either `header`, `cookie`, `host`, or `query`. * `key`: `String` - the key from the selected type to match against. * `value`: `String` or `undefined` - the value to check for, if undefined any value will match. A regex like string can be used to capture a specific part of the value, e.g. if the value `first-(?<paramName>.*)` is used for `first-second` then `second` will be usable in the destination with `:paramName`. module.exports = { async redirects() { return [ // if the header `x-redirect-me` is present, // this redirect will be applied { source: '/:path((?!another-page$).*)', has: [ { type: 'header', key: 'x-redirect-me', }, ], permanent: false, destination: '/another-page', }, // if the header `x-dont-redirect` is present, // this redirect will NOT be applied { source: '/:path((?!another-page$).*)', missing: [ { type: 'header', key: 'x-do-not-redirect', }, ], permanent: false, destination: '/another-page', }, // if the source, query, and cookie are matched, // this redirect will be applied { source: '/specific/:path*', has: [ { type: 'query', key: 'page', // the page value will not be available in the // destination since value is provided and doesn't // use a named capture group e.g. (?<page>home) value: 'home', }, { type: 'cookie', key: 'authorized', value: 'true', }, ], permanent: false, destination: '/another/:path*', }, // if the header `x-authorized` is present and // contains a matching value, this redirect will be applied { source: '/', has: [ { type: 'header', key: 'x-authorized', value: '(?<authorized>yes|true)', }, ], permanent: false, destination: '/home?authorized=:authorized', }, // if the host is `example.com`, // this redirect will be applied { source: '/:path((?!another-page$).*)', has: [ { type: 'host', value: 'example.com', }, ], permanent: false, destination: '/another-page', }, ] }, } ### Redirects with basePath support When leveraging `basePath` support with redirects each `source` and `destination` is automatically prefixed with the `basePath` unless you add `basePath: false` to the redirect: module.exports = { basePath: '/docs', async redirects() { return [ { source: '/with-basePath', // automatically becomes /docs/with-basePath destination: '/another', // automatically becomes /docs/another permanent: false, }, { // does not add /docs since basePath: false is set source: '/without-basePath', destination: 'https://example.com', basePath: false, permanent: false, }, ] }, } ### Redirects with i18n support When leveraging `i18n` support with redirects each `source` and `destination` is automatically prefixed to handle the configured `locales` unless you add `locale: false` to the redirect. If `locale: false` is used you must prefix the `source` and `destination` with a locale for it to be matched correctly. module.exports = { i18n: { locales: ['en', 'fr', 'de'], defaultLocale: 'en', }, async redirects() { return [ { source: '/with-locale', // automatically handles all locales destination: '/another', // automatically passes the locale on permanent: false, }, { // does not handle locales automatically since locale: false is set source: '/nl/with-locale-manual', destination: '/nl/another', locale: false, permanent: false, }, { // this matches '/' since `en` is the defaultLocale source: '/en', destination: '/en/another', locale: false, permanent: false, }, // it's possible to match all locales even when locale: false is set { source: '/:locale/page', destination: '/en/newpage', permanent: false, locale: false, }, { // this gets converted to /(en|fr|de)/(.*) so will not match the top-level // `/` or `/fr` routes like /:path* would source: '/(.*)', destination: '/another', permanent: false, }, ] }, } In some rare cases, you might need to assign a custom status code for older HTTP Clients to properly redirect. In these cases, you can use the `statusCode` property instead of the `permanent` property, but not both. To to ensure IE11 compatibility, a `Refresh` header is automatically added for the 308 status code. ## Other Redirects * Inside API Routes and Route Handlers, you can redirect based on the incoming request. * Inside `getStaticProps` and `getServerSideProps`, you can redirect specific pages at request-time. ## Version History | Version | Changes | | --- | --- | | `v13.3.0` | `missing` added. | | `v10.2.0` | `has` added. | | `v9.5.0` | `redirects` added. | --- ## Page: https://nextjs.org/docs/pages/api-reference/config/next-config-js/rewrites Rewrites allow you to map an incoming request path to a different destination path. Rewrites act as a URL proxy and mask the destination path, making it appear the user hasn't changed their location on the site. In contrast, redirects will reroute to a new page and show the URL changes. To use rewrites you can use the `rewrites` key in `next.config.js`: module.exports = { async rewrites() { return [ { source: '/about', destination: '/', }, ] }, } Rewrites are applied to client-side routing, a `<Link href="/about">` will have the rewrite applied in the above example. `rewrites` is an async function that expects to return either an array or an object of arrays (see below) holding objects with `source` and `destination` properties: * `source`: `String` - is the incoming request path pattern. * `destination`: `String` is the path you want to route to. * `basePath`: `false` or `undefined` - if false the basePath won't be included when matching, can be used for external rewrites only. * `locale`: `false` or `undefined` - whether the locale should not be included when matching. * `has` is an array of has objects with the `type`, `key` and `value` properties. * `missing` is an array of missing objects with the `type`, `key` and `value` properties. When the `rewrites` function returns an array, rewrites are applied after checking the filesystem (pages and `/public` files) and before dynamic routes. When the `rewrites` function returns an object of arrays with a specific shape, this behavior can be changed and more finely controlled, as of `v10.1` of Next.js: module.exports = { async rewrites() { return { beforeFiles: [ // These rewrites are checked after headers/redirects // and before all files including _next/public files which // allows overriding page files { source: '/some-page', destination: '/somewhere-else', has: [{ type: 'query', key: 'overrideMe' }], }, ], afterFiles: [ // These rewrites are checked after pages/public files // are checked but before dynamic routes { source: '/non-existent', destination: '/somewhere-else', }, ], fallback: [ // These rewrites are checked after both pages/public files // and dynamic routes are checked { source: '/:path*', destination: `https://my-old-site.com/:path*`, }, ], } }, } > **Good to know**: rewrites in `beforeFiles` do not check the filesystem/dynamic routes immediately after matching a source, they continue until all `beforeFiles` have been checked. The order Next.js routes are checked is: 1. headers are checked/applied 2. redirects are checked/applied 3. `beforeFiles` rewrites are checked/applied 4. static files from the public directory, `_next/static` files, and non-dynamic pages are checked/served 5. `afterFiles` rewrites are checked/applied, if one of these rewrites is matched we check dynamic routes/static files after each match 6. `fallback` rewrites are checked/applied, these are applied before rendering the 404 page and after dynamic routes/all static assets have been checked. If you use fallback: true/'blocking' in `getStaticPaths`, the fallback `rewrites` defined in your `next.config.js` will _not_ be run. ## Rewrite parameters When using parameters in a rewrite the parameters will be passed in the query by default when none of the parameters are used in the `destination`. module.exports = { async rewrites() { return [ { source: '/old-about/:path*', destination: '/about', // The :path parameter isn't used here so will be automatically passed in the query }, ] }, } If a parameter is used in the destination none of the parameters will be automatically passed in the query. module.exports = { async rewrites() { return [ { source: '/docs/:path*', destination: '/:path*', // The :path parameter is used here so will not be automatically passed in the query }, ] }, } You can still pass the parameters manually in the query if one is already used in the destination by specifying the query in the `destination`. module.exports = { async rewrites() { return [ { source: '/:first/:second', destination: '/:first?second=:second', // Since the :first parameter is used in the destination the :second parameter // will not automatically be added in the query although we can manually add it // as shown above }, ] }, } > **Good to know**: Static pages from Automatic Static Optimization or prerendering params from rewrites will be parsed on the client after hydration and provided in the query. ## Path Matching Path matches are allowed, for example `/blog/:slug` will match `/blog/hello-world` (no nested paths): module.exports = { async rewrites() { return [ { source: '/blog/:slug', destination: '/news/:slug', // Matched parameters can be used in the destination }, ] }, } ### Wildcard Path Matching To match a wildcard path you can use `*` after a parameter, for example `/blog/:slug*` will match `/blog/a/b/c/d/hello-world`: module.exports = { async rewrites() { return [ { source: '/blog/:slug*', destination: '/news/:slug*', // Matched parameters can be used in the destination }, ] }, } ### Regex Path Matching To match a regex path you can wrap the regex in parenthesis after a parameter, for example `/blog/:slug(\\d{1,})` will match `/blog/123` but not `/blog/abc`: module.exports = { async rewrites() { return [ { source: '/old-blog/:post(\\d{1,})', destination: '/blog/:post', // Matched parameters can be used in the destination }, ] }, } The following characters `(`, `)`, `{`, `}`, `[`, `]`, `|`, `\`, `^`, `.`, `:`, `*`, `+`, `-`, `?`, `$` are used for regex path matching, so when used in the `source` as non-special values they must be escaped by adding `\\` before them: module.exports = { async rewrites() { return [ { // this will match `/english(default)/something` being requested source: '/english\\(default\\)/:slug', destination: '/en-us/:slug', }, ] }, } ## Header, Cookie, and Query Matching To only match a rewrite when header, cookie, or query values also match the `has` field or don't match the `missing` field can be used. Both the `source` and all `has` items must match and all `missing` items must not match for the rewrite to be applied. `has` and `missing` items can have the following fields: * `type`: `String` - must be either `header`, `cookie`, `host`, or `query`. * `key`: `String` - the key from the selected type to match against. * `value`: `String` or `undefined` - the value to check for, if undefined any value will match. A regex like string can be used to capture a specific part of the value, e.g. if the value `first-(?<paramName>.*)` is used for `first-second` then `second` will be usable in the destination with `:paramName`. module.exports = { async rewrites() { return [ // if the header `x-rewrite-me` is present, // this rewrite will be applied { source: '/:path*', has: [ { type: 'header', key: 'x-rewrite-me', }, ], destination: '/another-page', }, // if the header `x-rewrite-me` is not present, // this rewrite will be applied { source: '/:path*', missing: [ { type: 'header', key: 'x-rewrite-me', }, ], destination: '/another-page', }, // if the source, query, and cookie are matched, // this rewrite will be applied { source: '/specific/:path*', has: [ { type: 'query', key: 'page', // the page value will not be available in the // destination since value is provided and doesn't // use a named capture group e.g. (?<page>home) value: 'home', }, { type: 'cookie', key: 'authorized', value: 'true', }, ], destination: '/:path*/home', }, // if the header `x-authorized` is present and // contains a matching value, this rewrite will be applied { source: '/:path*', has: [ { type: 'header', key: 'x-authorized', value: '(?<authorized>yes|true)', }, ], destination: '/home?authorized=:authorized', }, // if the host is `example.com`, // this rewrite will be applied { source: '/:path*', has: [ { type: 'host', value: 'example.com', }, ], destination: '/another-page', }, ] }, } ## Rewriting to an external URL Examples * Using Multiple Zones Rewrites allow you to rewrite to an external URL. This is especially useful for incrementally adopting Next.js. The following is an example rewrite for redirecting the `/blog` route of your main app to an external site. module.exports = { async rewrites() { return [ { source: '/blog', destination: 'https://example.com/blog', }, { source: '/blog/:slug', destination: 'https://example.com/blog/:slug', // Matched parameters can be used in the destination }, ] }, } If you're using `trailingSlash: true`, you also need to insert a trailing slash in the `source` parameter. If the destination server is also expecting a trailing slash it should be included in the `destination` parameter as well. module.exports = { trailingSlash: true, async rewrites() { return [ { source: '/blog/', destination: 'https://example.com/blog/', }, { source: '/blog/:path*/', destination: 'https://example.com/blog/:path*/', }, ] }, } ### Incremental adoption of Next.js You can also have Next.js fall back to proxying to an existing website after checking all Next.js routes. This way you don't have to change the rewrites configuration when migrating more pages to Next.js module.exports = { async rewrites() { return { fallback: [ { source: '/:path*', destination: `https://custom-routes-proxying-endpoint.vercel.app/:path*`, }, ], } }, } ### Rewrites with basePath support When leveraging `basePath` support with rewrites each `source` and `destination` is automatically prefixed with the `basePath` unless you add `basePath: false` to the rewrite: module.exports = { basePath: '/docs', async rewrites() { return [ { source: '/with-basePath', // automatically becomes /docs/with-basePath destination: '/another', // automatically becomes /docs/another }, { // does not add /docs to /without-basePath since basePath: false is set // Note: this can not be used for internal rewrites e.g. `destination: '/another'` source: '/without-basePath', destination: 'https://example.com', basePath: false, }, ] }, } ### Rewrites with i18n support When leveraging `i18n` support with rewrites each `source` and `destination` is automatically prefixed to handle the configured `locales` unless you add `locale: false` to the rewrite. If `locale: false` is used you must prefix the `source` and `destination` with a locale for it to be matched correctly. module.exports = { i18n: { locales: ['en', 'fr', 'de'], defaultLocale: 'en', }, async rewrites() { return [ { source: '/with-locale', // automatically handles all locales destination: '/another', // automatically passes the locale on }, { // does not handle locales automatically since locale: false is set source: '/nl/with-locale-manual', destination: '/nl/another', locale: false, }, { // this matches '/' since `en` is the defaultLocale source: '/en', destination: '/en/another', locale: false, }, { // it's possible to match all locales even when locale: false is set source: '/:locale/api-alias/:path*', destination: '/api/:path*', locale: false, }, { // this gets converted to /(en|fr|de)/(.*) so will not match the top-level // `/` or `/fr` routes like /:path* would source: '/(.*)', destination: '/another', }, ] }, } ## Version History | Version | Changes | | --- | --- | | `v13.3.0` | `missing` added. | | `v10.2.0` | `has` added. | | `v9.5.0` | Headers added. | --- ## Page: https://nextjs.org/docs/pages/api-reference/config/next-config-js/runtime-configuration > **Warning:** > > * **This feature is deprecated.** We recommend using environment variables instead, which also can support reading runtime values. > * You can run code on server startup using the `register` function. > * This feature does not work with Automatic Static Optimization, Output File Tracing, or React Server Components. To add runtime configuration to your app, open `next.config.js` and add the `publicRuntimeConfig` and `serverRuntimeConfig` configs: next.config.js module.exports = { serverRuntimeConfig: { // Will only be available on the server side mySecret: 'secret', secondSecret: process.env.SECOND_SECRET, // Pass through env variables }, publicRuntimeConfig: { // Will be available on both server and client staticFolder: '/static', }, } Place any server-only runtime config under `serverRuntimeConfig`. Anything accessible to both client and server-side code should be under `publicRuntimeConfig`. > A page that relies on `publicRuntimeConfig` **must** use `getInitialProps` or `getServerSideProps` or your application must have a Custom App with `getInitialProps` to opt-out of Automatic Static Optimization. Runtime configuration won't be available to any page (or component in a page) without being server-side rendered. To get access to the runtime configs in your app use `next/config`, like so: import getConfig from 'next/config' import Image from 'next/image' // Only holds serverRuntimeConfig and publicRuntimeConfig const { serverRuntimeConfig, publicRuntimeConfig } = getConfig() // Will only be available on the server-side console.log(serverRuntimeConfig.mySecret) // Will be available on both server-side and client-side console.log(publicRuntimeConfig.staticFolder) function MyImage() { return ( <div> <Image src={`${publicRuntimeConfig.staticFolder}/logo.png`} alt="logo" layout="fill" /> </div> ) } export default MyImage --- ## Page: https://nextjs.org/docs/pages/api-reference/config/next-config-js/serverExternalPackages Opt-out specific dependencies from being included in the automatic bundling of the `bundlePagesRouterDependencies` option. These pages will then use native Node.js `require` to resolve the dependency. next.config.js /** @type {import('next').NextConfig} */ const nextConfig = { serverExternalPackages: ['@acme/ui'], } module.exports = nextConfig Next.js includes a short list of popular packages that currently are working on compatibility and automatically opt-ed out: * `@appsignal/nodejs` * `@aws-sdk/client-s3` * `@aws-sdk/s3-presigned-post` * `@blockfrost/blockfrost-js` * `@highlight-run/node` * `@huggingface/transformers` * `@jpg-store/lucid-cardano` * `@libsql/client` * `@mikro-orm/core` * `@mikro-orm/knex` * `@node-rs/argon2` * `@node-rs/bcrypt` * `@prisma/client` * `@react-pdf/renderer` * `@sentry/profiling-node` * `@sparticuz/chromium` * `@swc/core` * `@xenova/transformers` * `argon2` * `autoprefixer` * `aws-crt` * `bcrypt` * `better-sqlite3` * `canvas` * `chromadb-default-embed` * `cpu-features` * `cypress` * `dd-trace` * `eslint` * `express` * `firebase-admin` * `import-in-the-middle` * `isolated-vm` * `jest` * `jsdom` * `keyv` * `libsql` * `mdx-bundler` * `mongodb` * `mongoose` * `newrelic` * `next-mdx-remote` * `next-seo` * `node-cron` * `node-pty` * `node-web-audio-api` * `onnxruntime-node` * `oslo` * `pg` * `playwright` * `playwright-core` * `postcss` * `prettier` * `prisma` * `puppeteer-core` * `puppeteer` * `require-in-the-middle` * `rimraf` * `sharp` * `shiki` * `sqlite3` * `ts-node` * `ts-morph` * `typescript` * `vscode-oniguruma` * `webpack` * `websocket` * `zeromq` --- ## Page: https://nextjs.org/docs/pages/api-reference/config/next-config-js/trailingSlash By default Next.js will redirect URLs with trailing slashes to their counterpart without a trailing slash. For example `/about/` will redirect to `/about`. You can configure this behavior to act the opposite way, where URLs without trailing slashes are redirected to their counterparts with trailing slashes. Open `next.config.js` and add the `trailingSlash` config: next.config.js module.exports = { trailingSlash: true, } With this option set, URLs like `/about` will redirect to `/about/`. When using `trailingSlash: true`, certain URLs are exceptions and will not have a trailing slash appended: * Static file URLs, such as files with extensions. * Any paths under `.well-known/`. For example, the following URLs will remain unchanged: `/file.txt`, `images/photos/picture.png`, and `.well-known/subfolder/config.json`. When used with `output: "export"` configuration, the `/about` page will output `/about/index.html` (instead of the default `/about.html`). ## Version History | Version | Changes | | --- | --- | | `v9.5.0` | `trailingSlash` added. | --- ## Page: https://nextjs.org/docs/pages/api-reference/config/next-config-js/transpilePackages #### Subscribe to our newsletter Stay updated on new releases and features, guides, and case studies. --- ## Page: https://nextjs.org/docs/pages/api-reference/config/next-config-js/turbo This feature is currently experimental and subject to change, it's not recommended for production. Try it out and share your feedback on GitHub. The `turbopack` option lets you customize Turbopack to transform different files and change how modules are resolved. import type { NextConfig } from 'next' const nextConfig: NextConfig = { turbopack: { // ... }, } export default nextConfig > **Good to know**: > > * Turbopack for Next.js does not require loaders or loader configuration for built-in functionality. Turbopack has built-in support for CSS and compiling modern JavaScript, so there's no need for `css-loader`, `postcss-loader`, or `babel-loader` if you're using `@babel/preset-env`. ## Reference ### Options The following options are available for the `turbo` configuration: | Option | Description | | --- | --- | | `root` | Sets the application root directory. Should be an absolute path. | | `rules` | List of supported webpack loaders to apply when running with Turbopack. | | `resolveAlias` | Map aliased imports to modules to load in their place. | | `resolveExtensions` | List of extensions to resolve when importing files. | ### Supported loaders The following loaders have been tested to work with Turbopack's webpack loader implementation: * `babel-loader` * `@svgr/webpack` * `svg-inline-loader` * `yaml-loader` * `string-replace-loader` * `raw-loader` * `sass-loader` ## Examples ### Root directory Turbopack uses the root directory to resolve modules. Files outside of the project root are not resolved. Next.js automatically detects the root directory of your project. It does so by looking for one of these files: * `pnpm-lock.yaml` * `package-lock.json` * `yarn.lock` * `bun.lock` * `bun.lockb` If you have a different project structure, for example if you don't use workspaces, you can manually set the `root` option: const path = require('path') module.exports = { turbopack: { root: path.join(__dirname, '..'), }, } ### Configuring webpack loaders If you need loader support beyond what's built in, many webpack loaders already work with Turbopack. There are currently some limitations: * Only a core subset of the webpack loader API is implemented. Currently, there is enough coverage for some popular loaders, and we'll expand our API support in the future. * Only loaders that return JavaScript code are supported. Loaders that transform files like stylesheets or images are not currently supported. * Options passed to webpack loaders must be plain JavaScript primitives, objects, and arrays. For example, it's not possible to pass `require()` plugin modules as option values. To configure loaders, add the names of the loaders you've installed and any options in `next.config.js`, mapping file extensions to a list of loaders. Here is an example below using the `@svgr/webpack` loader, which enables importing `.svg` files and rendering them as React components. module.exports = { turbopack: { rules: { '*.svg': { loaders: ['@svgr/webpack'], as: '*.js', }, }, }, } > **Good to know**: Prior to Next.js version 13.4.4, `turbo.rules` was named `turbo.loaders` and only accepted file extensions like `.mdx` instead of `*.mdx`. ### Resolving aliases Turbopack can be configured to modify module resolution through aliases, similar to webpack's `resolve.alias` configuration. To configure resolve aliases, map imported patterns to their new destination in `next.config.js`: module.exports = { turbopack: { resolveAlias: { underscore: 'lodash', mocha: { browser: 'mocha/browser-entry.js' }, }, }, } This aliases imports of the `underscore` package to the `lodash` package. In other words, `import underscore from 'underscore'` will load the `lodash` module instead of `underscore`. Turbopack also supports conditional aliasing through this field, similar to Node.js' conditional exports. At the moment only the `browser` condition is supported. In the case above, imports of the `mocha` module will be aliased to `mocha/browser-entry.js` when Turbopack targets browser environments. ### Resolving custom extensions Turbopack can be configured to resolve modules with custom extensions, similar to webpack's `resolve.extensions` configuration. To configure resolve extensions, use the `resolveExtensions` field in `next.config.js`: module.exports = { turbopack: { resolveExtensions: ['.mdx', '.tsx', '.ts', '.jsx', '.js', '.mjs', '.json'], }, } This overwrites the original resolve extensions with the provided list. Make sure to include the default extensions. For more information and guidance for how to migrate your app to Turbopack from webpack, see Turbopack's documentation on webpack compatibility. ## Version History | Version | Changes | | --- | --- | | `15.3.0` | `experimental.turbo` is changed to `turbopack`. | | `13.0.0` | `experimental.turbo` introduced. | --- ## Page: https://nextjs.org/docs/pages/api-reference/config/next-config-js/typescript Next.js fails your **production build** (`next build`) when TypeScript errors are present in your project. If you'd like Next.js to dangerously produce production code even when your application has errors, you can disable the built-in type checking step. If disabled, be sure you are running type checks as part of your build or deploy process, otherwise this can be very dangerous. Open `next.config.js` and enable the `ignoreBuildErrors` option in the `typescript` config: next.config.js module.exports = { typescript: { // !! WARN !! // Dangerously allow production builds to successfully complete even if // your project has type errors. // !! WARN !! ignoreBuildErrors: true, }, } --- ## Page: https://nextjs.org/docs/pages/api-reference/config/next-config-js/urlImports This feature is currently experimental and subject to change, it's not recommended for production. Try it out and share your feedback on GitHub. URL imports are an experimental feature that allows you to import modules directly from external servers (instead of from the local disk). > **Warning**: Only use domains that you trust to download and execute on your machine. Please exercise discretion, and caution until the feature is flagged as stable. To opt-in, add the allowed URL prefixes inside `next.config.js`: module.exports = { experimental: { urlImports: ['https://example.com/assets/', 'https://cdn.skypack.dev'], }, } Then, you can import modules directly from URLs: import { a, b, c } from 'https://example.com/assets/some/module.js' URL Imports can be used everywhere normal package imports can be used. ## Security Model This feature is being designed with **security as the top priority**. To start, we added an experimental flag forcing you to explicitly allow the domains you accept URL imports from. We're working to take this further by limiting URL imports to execute in the browser sandbox using the Edge Runtime. ## Lockfile When using URL imports, Next.js will create a `next.lock` directory containing a lockfile and fetched assets. This directory **must be committed to Git**, not ignored by `.gitignore`. * When running `next dev`, Next.js will download and add all newly discovered URL Imports to your lockfile. * When running `next build`, Next.js will use only the lockfile to build the application for production. Typically, no network requests are needed and any outdated lockfile will cause the build to fail. One exception is resources that respond with `Cache-Control: no-cache`. These resources will have a `no-cache` entry in the lockfile and will always be fetched from the network on each build. ## Examples ### Skypack import confetti from 'https://cdn.skypack.dev/canvas-confetti' import { useEffect } from 'react' export default () => { useEffect(() => { confetti() }) return <p>Hello</p> } ### Static Image Imports import Image from 'next/image' import logo from 'https://example.com/assets/logo.png' export default () => ( <div> <Image src={logo} placeholder="blur" /> </div> ) ### URLs in CSS .className { background: url('https://example.com/assets/hero.jpg'); } ### Asset Imports const logo = new URL('https://example.com/assets/file.txt', import.meta.url) console.log(logo.pathname) // prints "/_next/static/media/file.a9727b5d.txt" --- ## Page: https://nextjs.org/docs/pages/api-reference/config/next-config-js/useLightningcss This feature is currently experimental and subject to change, it's not recommended for production. Try it out and share your feedback on GitHub. Experimental support for using Lightning CSS, a fast CSS bundler and minifier, written in Rust. next.config.ts import type { NextConfig } from 'next' const nextConfig: NextConfig = { experimental: { useLightningcss: true, }, } export default nextConfig --- ## Page: https://nextjs.org/docs/pages/api-reference/config/next-config-js/webpack ## Custom Webpack Config > **Good to know**: changes to webpack config are not covered by semver so proceed at your own risk Before continuing to add custom webpack configuration to your application make sure Next.js doesn't already support your use-case: * CSS imports * CSS modules * Sass/SCSS imports * Sass/SCSS modules * Customizing babel configuration Some commonly asked for features are available as plugins: * @next/mdx * @next/bundle-analyzer In order to extend our usage of `webpack`, you can define a function that extends its config inside `next.config.js`, like so: module.exports = { webpack: ( config, { buildId, dev, isServer, defaultLoaders, nextRuntime, webpack } ) => { // Important: return the modified config return config }, } > The `webpack` function is executed three times, twice for the server (nodejs / edge runtime) and once for the client. This allows you to distinguish between client and server configuration using the `isServer` property. The second argument to the `webpack` function is an object with the following properties: * `buildId`: `String` - The build id, used as a unique identifier between builds. * `dev`: `Boolean` - Indicates if the compilation will be done in development. * `isServer`: `Boolean` - It's `true` for server-side compilation, and `false` for client-side compilation. * `nextRuntime`: `String | undefined` - The target runtime for server-side compilation; either `"edge"` or `"nodejs"`, it's `undefined` for client-side compilation. * `defaultLoaders`: `Object` - Default loaders used internally by Next.js: * `babel`: `Object` - Default `babel-loader` configuration. Example usage of `defaultLoaders.babel`: // Example config for adding a loader that depends on babel-loader // This source was taken from the @next/mdx plugin source: // https://github.com/vercel/next.js/tree/canary/packages/next-mdx module.exports = { webpack: (config, options) => { config.module.rules.push({ test: /\.mdx/, use: [ options.defaultLoaders.babel, { loader: '@mdx-js/loader', options: pluginOptions.options, }, ], }) return config }, } #### `nextRuntime` Notice that `isServer` is `true` when `nextRuntime` is `"edge"` or `"nodejs"`, `nextRuntime` `"edge"` is currently for middleware and Server Components in edge runtime only. Was this helpful? supported. --- ## Page: https://nextjs.org/docs/pages/api-reference/config/next-config-js/webVitalsAttribution When debugging issues related to Web Vitals, it is often helpful if we can pinpoint the source of the problem. For example, in the case of Cumulative Layout Shift (CLS), we might want to know the first element that shifted when the single largest layout shift occurred. Or, in the case of Largest Contentful Paint (LCP), we might want to identify the element corresponding to the LCP for the page. If the LCP element is an image, knowing the URL of the image resource can help us locate the asset we need to optimize. Pinpointing the biggest contributor to the Web Vitals score, aka attribution, allows us to obtain more in-depth information like entries for PerformanceEventTiming, PerformanceNavigationTiming and PerformanceResourceTiming. Attribution is disabled by default in Next.js but can be enabled **per metric** by specifying the following in `next.config.js`. next.config.js module.exports = { experimental: { webVitalsAttribution: ['CLS', 'LCP'], }, } Valid attribution values are all `web-vitals` metrics specified in the `NextWebVitalsMetric` type. --- ## Page: https://nextjs.org/docs/pages/api-reference/config/typescript Next.js comes with built-in TypeScript, automatically installing the necessary packages and configuring the proper settings when you create a new project with `create-next-app`. To add TypeScript to an existing project, rename a file to `.ts` / `.tsx`. Run `next dev` and `next build` to automatically install the necessary dependencies and add a `tsconfig.json` file with the recommended config options. > **Good to know**: If you already have a `jsconfig.json` file, copy the `paths` compiler option from the old `jsconfig.json` into the new `tsconfig.json` file, and delete the old `jsconfig.json` file. ## Examples ### Type checking `next.config.ts` You can use TypeScript and import types in your Next.js configuration by using `next.config.ts`. import type { NextConfig } from 'next' const nextConfig: NextConfig = { /* config options here */ } export default nextConfig > **Good to know**: Module resolution in `next.config.ts` is currently limited to `CommonJS`. This may cause incompatibilities with ESM only packages being loaded in `next.config.ts`. When using the `next.config.js` file, you can add some type checking in your IDE using JSDoc as below: // @ts-check /** @type {import('next').NextConfig} */ const nextConfig = { /* config options here */ } module.exports = nextConfig ### Static Generation and Server-side Rendering For `getStaticProps`, `getStaticPaths`, and `getServerSideProps`, you can use the `GetStaticProps`, `GetStaticPaths`, and `GetServerSideProps` types respectively: import type { GetStaticProps, GetStaticPaths, GetServerSideProps } from 'next' export const getStaticProps = (async (context) => { // ... }) satisfies GetStaticProps export const getStaticPaths = (async () => { // ... }) satisfies GetStaticPaths export const getServerSideProps = (async (context) => { // ... }) satisfies GetServerSideProps > **Good to know:** `satisfies` was added to TypeScript in 4.9. We recommend upgrading to the latest version of TypeScript. ### With API Routes The following is an example of how to use the built-in types for API routes: import type { NextApiRequest, NextApiResponse } from 'next' export default function handler(req: NextApiRequest, res: NextApiResponse) { res.status(200).json({ name: 'John Doe' }) } You can also type the response data: import type { NextApiRequest, NextApiResponse } from 'next' type Data = { name: string } export default function handler( req: NextApiRequest, res: NextApiResponse<Data> ) { res.status(200).json({ name: 'John Doe' }) } ### With custom `App` If you have a custom `App`, you can use the built-in type `AppProps` and change file name to `./pages/_app.tsx` like so: import type { AppProps } from 'next/app' export default function MyApp({ Component, pageProps }: AppProps) { return <Component {...pageProps} /> } ### Incremental type checking Since `v10.2.1` Next.js supports incremental type checking when enabled in your `tsconfig.json`, this can help speed up type checking in larger applications. ### Disabling TypeScript errors in production Next.js fails your **production build** (`next build`) when TypeScript errors are present in your project. If you'd like Next.js to dangerously produce production code even when your application has errors, you can disable the built-in type checking step. If disabled, be sure you are running type checks as part of your build or deploy process, otherwise this can be very dangerous. Open `next.config.ts` and enable the `ignoreBuildErrors` option in the `typescript` config: import type { NextConfig } from 'next' const nextConfig: NextConfig = { typescript: { // !! WARN !! // Dangerously allow production builds to successfully complete even if // your project has type errors. // !! WARN !! ignoreBuildErrors: true, }, } export default nextConfig > **Good to know**: You can run `tsc --noEmit` to check for TypeScript errors yourself before building. This is useful for CI/CD pipelines where you'd like to check for TypeScript errors before deploying. ### Custom type declarations When you need to declare custom types, you might be tempted to modify `next-env.d.ts`. However, this file is automatically generated, so any changes you make will be overwritten. Instead, you should create a new file, let's call it `new-types.d.ts`, and reference it in your `tsconfig.json`: { "compilerOptions": { "skipLibCheck": true //...truncated... }, "include": [ "new-types.d.ts", "next-env.d.ts", ".next/types/**/*.ts", "**/*.ts", "**/*.tsx" ], "exclude": ["node_modules"] } ## Version Changes | Version | Changes | | --- | --- | | `v15.0.0` | `next.config.ts` support added for TypeScript projects. | | `v13.2.0` | Statically typed links are available in beta. | | `v12.0.0` | SWC is now used by default to compile TypeScript and TSX for faster builds. | | `v10.2.1` | Incremental type checking support added when enabled in your `tsconfig.json`. | --- ## Page: https://nextjs.org/docs/pages/api-reference/config/eslint Next.js provides an ESLint plugin, `eslint-plugin-next`, already bundled within the base configuration that makes it possible to catch common issues and problems in a Next.js application. ## Reference Recommended rule-sets from the following ESLint plugins are all used within `eslint-config-next`: * `eslint-plugin-react` * `eslint-plugin-react-hooks` * `eslint-plugin-next` This will take precedence over the configuration from `next.config.js`. ### Rules The full set of rules is as follows: | Enabled in recommended config | Rule | Description | | --- | --- | --- | | | @next/next/google-font-display | Enforce font-display behavior with Google Fonts. | | | @next/next/google-font-preconnect | Ensure `preconnect` is used with Google Fonts. | | | @next/next/inline-script-id | Enforce `id` attribute on `next/script` components with inline content. | | | @next/next/next-script-for-ga | Prefer `next/script` component when using the inline script for Google Analytics. | | | @next/next/no-assign-module-variable | Prevent assignment to the `module` variable. | | | @next/next/no-async-client-component | Prevent client components from being async functions. | | | @next/next/no-before-interactive-script-outside-document | Prevent usage of `next/script`'s `beforeInteractive` strategy outside of `pages/_document.js`. | | | @next/next/no-css-tags | Prevent manual stylesheet tags. | | | @next/next/no-document-import-in-page | Prevent importing `next/document` outside of `pages/_document.js`. | | | @next/next/no-duplicate-head | Prevent duplicate usage of `<Head>` in `pages/_document.js`. | | | @next/next/no-head-element | Prevent usage of `<head>` element. | | | @next/next/no-head-import-in-document | Prevent usage of `next/head` in `pages/_document.js`. | | | @next/next/no-html-link-for-pages | Prevent usage of `<a>` elements to navigate to internal Next.js pages. | | | @next/next/no-img-element | Prevent usage of `<img>` element due to slower LCP and higher bandwidth. | | | @next/next/no-page-custom-font | Prevent page-only custom fonts. | | | @next/next/no-script-component-in-head | Prevent usage of `next/script` in `next/head` component. | | | @next/next/no-styled-jsx-in-document | Prevent usage of `styled-jsx` in `pages/_document.js`. | | | @next/next/no-sync-scripts | Prevent synchronous scripts. | | | @next/next/no-title-in-document-head | Prevent usage of `<title>` with `Head` component from `next/document`. | | | @next/next/no-typos | Prevent common typos in Next.js's data fetching functions | | | @next/next/no-unwanted-polyfillio | Prevent duplicate polyfills from Polyfill.io. | We recommend using an appropriate integration to view warnings and errors directly in your code editor during development. ## Examples ### Linting custom directories and files By default, Next.js will run ESLint for all files in the `pages/`, `app/`, `components/`, `lib/`, and `src/` directories. However, you can specify which directories using the `dirs` option in the `eslint` config in `next.config.js` for production builds: module.exports = { eslint: { dirs: ['pages', 'utils'], // Only run ESLint on the 'pages' and 'utils' directories during production builds (next build) }, } Similarly, the `--dir` and `--file` flags can be used for `next lint` to lint specific directories and files: next lint --dir pages --dir utils --file bar.js ### Specifying a root directory within a monorepo If you're using `eslint-plugin-next` in a project where Next.js isn't installed in your root directory (such as a monorepo), you can tell `eslint-plugin-next` where to find your Next.js application using the `settings` property in your `.eslintrc`: import { FlatCompat } from '@eslint/eslintrc' const compat = new FlatCompat({ // import.meta.dirname is available after Node.js v20.11.0 baseDirectory: import.meta.dirname, }) const eslintConfig = [ ...compat.config({ extends: ['next'], settings: { next: { rootDir: 'packages/my-app/', }, }, }), ] export default eslintConfig `rootDir` can be a path (relative or absolute), a glob (i.e. `"packages/*/"`), or an array of paths and/or globs. ### Disabling the cache To improve performance, information of files processed by ESLint are cached by default. This is stored in `.next/cache` or in your defined build directory. If you include any ESLint rules that depend on more than the contents of a single source file and need to disable the cache, use the `--no-cache` flag with `next lint`. next lint --no-cache ### Disabling rules If you would like to modify or disable any rules provided by the supported plugins (`react`, `react-hooks`, `next`), you can directly change them using the `rules` property in your `.eslintrc`: import { FlatCompat } from '@eslint/eslintrc' const compat = new FlatCompat({ // import.meta.dirname is available after Node.js v20.11.0 baseDirectory: import.meta.dirname, }) const eslintConfig = [ ...compat.config({ extends: ['next'], rules: { 'react/no-unescaped-entities': 'off', '@next/next/no-page-custom-font': 'off', }, }), ] export default eslintConfig ### With Core Web Vitals The `next/core-web-vitals` rule set is enabled when `next lint` is run for the first time and the **strict** option is selected. import { FlatCompat } from '@eslint/eslintrc' const compat = new FlatCompat({ // import.meta.dirname is available after Node.js v20.11.0 baseDirectory: import.meta.dirname, }) const eslintConfig = [ ...compat.config({ extends: ['next/core-web-vitals'], }), ] export default eslintConfig `next/core-web-vitals` updates `eslint-plugin-next` to error on a number of rules that are warnings by default if they affect Core Web Vitals. > The `next/core-web-vitals` entry point is automatically included for new applications built with Create Next App. ### With TypeScript In addition to the Next.js ESLint rules, `create-next-app --typescript` will also add TypeScript-specific lint rules with `next/typescript` to your config: import { FlatCompat } from '@eslint/eslintrc' const compat = new FlatCompat({ // import.meta.dirname is available after Node.js v20.11.0 baseDirectory: import.meta.dirname, }) const eslintConfig = [ ...compat.config({ extends: ['next/core-web-vitals', 'next/typescript'], }), ] export default eslintConfig Those rules are based on `plugin:@typescript-eslint/recommended`. See typescript-eslint > Configs for more details. ### With Prettier ESLint also contains code formatting rules, which can conflict with your existing Prettier setup. We recommend including eslint-config-prettier in your ESLint config to make ESLint and Prettier work together. First, install the dependency: npm install --save-dev eslint-config-prettier yarn add --dev eslint-config-prettier pnpm add --save-dev eslint-config-prettier bun add --dev eslint-config-prettier Then, add `prettier` to your existing ESLint config: import { FlatCompat } from '@eslint/eslintrc' const compat = new FlatCompat({ // import.meta.dirname is available after Node.js v20.11.0 baseDirectory: import.meta.dirname, }) const eslintConfig = [ ...compat.config({ extends: ['next', 'prettier'], }), ] export default eslintConfig ### Running lint on staged files If you would like to use `next lint` with lint-staged to run the linter on staged git files, you'll have to add the following to the `.lintstagedrc.js` file in the root of your project in order to specify usage of the `--file` flag. const path = require('path') const buildEslintCommand = (filenames) => `next lint --fix --file ${filenames .map((f) => path.relative(process.cwd(), f)) .join(' --file ')}` module.exports = { '*.{js,jsx,ts,tsx}': [buildEslintCommand], } ## Disabling linting during production builds If you do not want ESLint to run during `next build`, you can set the `eslint.ignoreDuringBuilds` option in `next.config.js` to `true`: import type { NextConfig } from 'next' const nextConfig: NextConfig = { eslint: { // Warning: This allows production builds to successfully complete even if // your project has ESLint errors. ignoreDuringBuilds: true, }, } export default nextConfig ### Migrating existing config If you already have ESLint configured in your application, we recommend extending from this plugin directly instead of including `eslint-config-next` unless a few conditions are met. #### Recommended plugin ruleset If the following conditions are true: * You have one or more of the following plugins already installed (either separately or through a different config such as `airbnb` or `react-app`): * `react` * `react-hooks` * `jsx-a11y` * `import` * You've defined specific `parserOptions` that are different from how Babel is configured within Next.js (this is not recommended unless you have customized your Babel configuration) * You have `eslint-plugin-import` installed with Node.js and/or TypeScript resolvers defined to handle imports Then we recommend either removing these settings if you prefer how these properties have been configured within `eslint-config-next` or extending directly from the Next.js ESLint plugin instead: module.exports = { extends: [ //... 'plugin:@next/next/recommended', ], } The plugin can be installed normally in your project without needing to run `next lint`: npm install --save-dev @next/eslint-plugin-next yarn add --dev @next/eslint-plugin-next pnpm add --save-dev @next/eslint-plugin-next bun add --dev @next/eslint-plugin-next This eliminates the risk of collisions or errors that can occur due to importing the same plugin or parser across multiple configurations. #### Additional configurations If you already use a separate ESLint configuration and want to include `eslint-config-next`, ensure that it is extended last after other configurations. For example: import js from '@eslint/js' import { FlatCompat } from '@eslint/eslintrc' const compat = new FlatCompat({ // import.meta.dirname is available after Node.js v20.11.0 baseDirectory: import.meta.dirname, recommendedConfig: js.configs.recommended, }) const eslintConfig = [ ...compat.config({ extends: ['eslint:recommended', 'next'], }), ] export default eslintConfig The `next` configuration already handles setting default values for the `parser`, `plugins` and `settings` properties. There is no need to manually re-declare any of these properties unless you need a different configuration for your use case. If you include any other shareable configurations, **you will need to make sure that these properties are not overwritten or modified**. Otherwise, we recommend removing any configurations that share behavior with the `next` configuration or extending directly from the Next.js ESLint plugin as mentioned above. --- ## Page: https://nextjs.org/docs/pages/api-reference/cli #### Subscribe to our newsletter Stay updated on new releases and features, guides, and case studies. --- ## Page: https://nextjs.org/docs/pages/api-reference/cli/create-next-app The `create-next-app` CLI allow you to create a new Next.js application using the default template or an example from a public GitHub repository. It is the easiest way to get started with Next.js. Basic usage: npx create-next-app@latest [project-name] [options] ## Reference The following options are available: | Options | Description | | --- | --- | | `-h` or `--help` | Show all available options | | `-v` or `--version` | Output the version number | | `--no-*` | Negate default options. E.g. `--no-eslint` | | `--ts` or `--typescript` | Initialize as a TypeScript project (default) | | `--js` or `--javascript` | Initialize as a JavaScript project | | `--tailwind` | Initialize with Tailwind CSS config (default) | | `--eslint` | Initialize with ESLint config | | `--app` | Initialize as an App Router project | | `--api` | Initialize a project with only route handlers | | `--src-dir` | Initialize inside a `src/` directory | | `--turbopack` | Enable Turbopack by default for development | | `--import-alias <alias-to-configure>` | Specify import alias to use (default "@/\*") | | `--empty` | Initialize an empty project | | `--use-npm` | Explicitly tell the CLI to bootstrap the application using npm | | `--use-pnpm` | Explicitly tell the CLI to bootstrap the application using pnpm | | `--use-yarn` | Explicitly tell the CLI to bootstrap the application using Yarn | | `--use-bun` | Explicitly tell the CLI to bootstrap the application using Bun | | `-e` or `--example [name] [github-url]` | An example to bootstrap the app with | | `--example-path <path-to-example>` | Specify the path to the example separately | | `--reset-preferences` | Explicitly tell the CLI to reset any stored preferences | | `--skip-install` | Explicitly tell the CLI to skip installing packages | | `--yes` | Use previous preferences or defaults for all options | ## Examples ### With the default template To create a new app using the default template, run the following command in your terminal: npx create-next-app@latest You will then be asked the following prompts: What is your project named? my-app Would you like to use TypeScript? No / Yes Would you like to use ESLint? No / Yes Would you like to use Tailwind CSS? No / Yes Would you like your code inside a `src/` directory? No / Yes Would you like to use App Router? (recommended) No / Yes Would you like to use Turbopack for `next dev`? No / Yes Would you like to customize the import alias (`@/*` by default)? No / Yes Once you've answered the prompts, a new project will be created with your chosen configuration. ### With an official Next.js example To create a new app using an official Next.js example, use the `--example` flag. For example: npx create-next-app@latest --example [example-name] [your-project-name] You can view a list of all available examples along with setup instructions in the Next.js repository. ### With any public GitHub example To create a new app using any public GitHub example, use the `--example` option with the GitHub repo's URL. For example: npx create-next-app@latest --example "https://github.com/.../" [your-project-name] --- ## Page: https://nextjs.org/docs/pages/api-reference/cli/next The Next.js CLI allows you to develop, build, start your application, and more. Basic usage: npx next [command] [options] ## Reference The following options are available: | Options | Description | | --- | --- | | `-h` or `--help` | Shows all available options | | `-v` or `--version` | Outputs the Next.js version number | ### Commands The following commands are available: | Command | Description | | --- | --- | | `dev` | Starts Next.js in development mode with Hot Module Reloading, error reporting, and more. | | `build` | Creates an optimized production build of your application. Displaying information about each route. | | `start` | Starts Next.js in production mode. The application should be compiled with `next build` first. | | `info` | Prints relevant details about the current system which can be used to report Next.js bugs. | | `lint` | Runs ESLint for all files in the `/src`, `/app`, `/pages`, `/components`, and `/lib` directories. It also provides a guided setup to install any required dependencies if ESLint it is not already configured in your application. | | `telemetry` | Allows you to enable or disable Next.js' completely anonymous telemetry collection. | > **Good to know**: Running `next` without a command is an alias for `next dev`. ### `next dev` options `next dev` starts the application in development mode with Hot Module Reloading (HMR), error reporting, and more. The following options are available when running `next dev`: | Option | Description | | --- | --- | | `-h, --help` | Show all available options. | | `[directory]` | A directory in which to build the application. If not provided, current directory is used. | | `--turbopack` | Starts development mode using Turbopack. | | `-p` or `--port <port>` | Specify a port number on which to start the application. Default: 3000, env: PORT | | `-H`or `--hostname <hostname>` | Specify a hostname on which to start the application. Useful for making the application available for other devices on the network. Default: 0.0.0.0 | | `--experimental-https` | Starts the server with HTTPS and generates a self-signed certificate. | | `--experimental-https-key <path>` | Path to a HTTPS key file. | | `--experimental-https-cert <path>` | Path to a HTTPS certificate file. | | `--experimental-https-ca <path>` | Path to a HTTPS certificate authority file. | | `--experimental-upload-trace <traceUrl>` | Reports a subset of the debugging trace to a remote HTTP URL. | ### `next build` options `next build` creates an optimized production build of your application. The output displays information about each route. For example: Route (app) Size First Load JS ┌ ○ /_not-found 0 B 0 kB └ ƒ /products/[id] 0 B 0 kB ○ (Static) prerendered as static content ƒ (Dynamic) server-rendered on demand * **Size**: The size of assets downloaded when navigating to the page client-side. The size for each route only includes its dependencies. * **First Load JS**: The size of assets downloaded when visiting the page from the server. The amount of JS shared by all is shown as a separate metric. Both of these values are **compressed with gzip**. The first load is indicated by green, yellow, or red. Aim for green for performant applications. The following options are available for the `next build` command: | Option | Description | | --- | --- | | `-h, --help` | Show all available options. | | `[directory]` | A directory on which to build the application. If not provided, the current directory will be used. | | `-d` or `--debug` | Enables a more verbose build output. With this flag enabled additional build output like rewrites, redirects, and headers will be shown. | | | | | `--profile` | Enables production profiling for React. | | `--no-lint` | Disables linting. | | `--no-mangling` | Disables mangling. This may affect performance and should only be used for debugging purposes. | | `--experimental-app-only` | Builds only App Router routes. | | `--experimental-build-mode [mode]` | Uses an experimental build mode. (choices: "compile", "generate", default: "default") | ### `next start` options `next start` starts the application in production mode. The application should be compiled with `next build` first. The following options are available for the `next start` command: | Option | Description | | --- | --- | | `-h` or `--help` | Show all available options. | | `[directory]` | A directory on which to start the application. If no directory is provided, the current directory will be used. | | `-p` or `--port <port>` | Specify a port number on which to start the application. (default: 3000, env: PORT) | | `-H` or `--hostname <hostname>` | Specify a hostname on which to start the application (default: 0.0.0.0). | | `--keepAliveTimeout <keepAliveTimeout>` | Specify the maximum amount of milliseconds to wait before closing the inactive connections. | ### `next info` options `next info` prints relevant details about the current system which can be used to report Next.js bugs when opening a GitHub issue. This information includes Operating System platform/arch/version, Binaries (Node.js, npm, Yarn, pnpm), package versions (`next`, `react`, `react-dom`), and more. The output should look like this: Operating System: Platform: darwin Arch: arm64 Version: Darwin Kernel Version 23.6.0 Available memory (MB): 65536 Available CPU cores: 10 Binaries: Node: 20.12.0 npm: 10.5.0 Yarn: 1.22.19 pnpm: 9.6.0 Relevant Packages: next: 15.0.0-canary.115 // Latest available version is detected (15.0.0-canary.115). eslint-config-next: 14.2.5 react: 19.0.0-rc react-dom: 19.0.0 typescript: 5.5.4 Next.js Config: output: N/A The following options are available for the `next info` command: | Option | Description | | --- | --- | | `-h` or `--help` | Show all available options | | `--verbose` | Collects additional information for debugging. | ### `next lint` options `next lint` runs ESLint for all files in the `pages/`, `app/`, `components/`, `lib/`, and `src/` directories. It also provides a guided setup to install any required dependencies if ESLint is not already configured in your application. The following options are available for the `next lint` command: | Option | Description | | --- | --- | | `[directory]` | A base directory on which to lint the application. If not provided, the current directory will be used. | | `-d, --dir, <dirs...>` | Include directory, or directories, to run ESLint. | | `--file, <files...>` | Include file, or files, to run ESLint. | | `--ext, [exts...]` | Specify JavaScript file extensions. (default: \[".js", ".mjs", ".cjs", ".jsx", ".ts", ".mts", ".cts", ".tsx"\]) | | `-c, --config, <config>` | Uses this configuration file, overriding all other configuration options. | | `--resolve-plugins-relative-to, <rprt>` | Specify a directory where plugins should be resolved from. | | `--strict` | Creates a `.eslintrc.json` file using the Next.js strict configuration. | | `--rulesdir, <rulesdir...>` | Uses additional rules from this directory(s). | | `--fix` | Automatically fix linting issues. | | `--fix-type <fixType>` | Specify the types of fixes to apply (e.g., problem, suggestion, layout). | | `--ignore-path <path>` | Specify a file to ignore. | | `--no-ignore <path>` | Disables the `--ignore-path` option. | | `--quiet` | Reports errors only. | | `--max-warnings [maxWarnings]` | Specify the number of warnings before triggering a non-zero exit code. (default: -1) | | `-o, --output-file, <outputFile>` | Specify a file to write report to. | | `-f, --format, <format>` | Uses a specific output format. | | `--no-inline-config` | Prevents comments from changing config or rules. | | `--report-unused-disable-directives-severity <level>` | Specify severity level for unused eslint-disable directives. (choices: "error", "off", "warn") | | `--no-cache` | Disables caching. | | `--cache-location, <cacheLocation>` | Specify a location for cache. | | `--cache-strategy, [cacheStrategy]` | Specify a strategy to use for detecting changed files in the cache. (default: "metadata") | | `--error-on-unmatched-pattern` | Reports errors when any file patterns are unmatched. | | `-h, --help` | Displays this message. | ### `next telemetry` options Next.js collects **completely anonymous** telemetry data about general usage. Participation in this anonymous program is optional, and you can opt-out if you prefer not to share information. The following options are available for the `next telemetry` command: | Option | Description | | --- | --- | | `-h, --help` | Show all available options. | | `--enable` | Enables Next.js' telemetry collection. | | `--disable` | Disables Next.js' telemetry collection. | Learn more about Telemetry. ## Examples ### Changing the default port By default, Next.js uses `http://localhost:3000` during development and with `next start`. The default port can be changed with the `-p` option, like so: next dev -p 4000 Or using the `PORT` environment variable: PORT=4000 next dev > **Good to know**: `PORT` cannot be set in `.env` as booting up the HTTP server happens before any other code is initialized. ### Using HTTPS during development For certain use cases like webhooks or authentication, you can use HTTPS to have a secure environment on `localhost`. Next.js can generate a self-signed certificate with `next dev` using the `--experimental-https` flag: next dev --experimental-https With the generated certificate, the Next.js development server will exist at `https://localhost:3000`. The default port `3000` is used unless a port is specified with `-p`, `--port`, or `PORT`. You can also provide a custom certificate and key with `--experimental-https-key` and `--experimental-https-cert`. Optionally, you can provide a custom CA certificate with `--experimental-https-ca` as well. next dev --experimental-https --experimental-https-key ./certificates/localhost-key.pem --experimental-https-cert ./certificates/localhost.pem `next dev --experimental-https` is only intended for development and creates a locally trusted certificate with `mkcert`. In production, use properly issued certificates from trusted authorities. > **Good to know**: When deploying to Vercel, HTTPS is automatically configured for your Next.js application. ### Configuring a timeout for downstream proxies When deploying Next.js behind a downstream proxy (e.g. a load-balancer like AWS ELB/ALB), it's important to configure Next's underlying HTTP server with keep-alive timeouts that are _larger_ than the downstream proxy's timeouts. Otherwise, once a keep-alive timeout is reached for a given TCP connection, Node.js will immediately terminate that connection without notifying the downstream proxy. This results in a proxy error whenever it attempts to reuse a connection that Node.js has already terminated. To configure the timeout values for the production Next.js server, pass `--keepAliveTimeout` (in milliseconds) to `next start`, like so: next start --keepAliveTimeout 70000 ### Passing Node.js arguments You can pass any node arguments to `next` commands. For example: NODE_OPTIONS='--throw-deprecation' next NODE_OPTIONS='-r esm' next NODE_OPTIONS='--inspect' next --- ## Page: https://nextjs.org/docs/pages/api-reference/edge `AbortController`Allows you to abort one or more DOM requests as and when desired`Array`Represents an array of values`ArrayBuffer`Represents a generic, fixed-length raw binary data buffer`Atomics`Provides atomic operations as static methods`BigInt`Represents a whole number with arbitrary precision`BigInt64Array`Represents a typed array of 64-bit signed integers`BigUint64Array`Represents a typed array of 64-bit unsigned integers`Boolean`Represents a logical entity and can have two values: `true` and `false``clearInterval`Cancels a timed, repeating action which was previously established by a call to `setInterval()``clearTimeout`Cancels a timed, repeating action which was previously established by a call to `setTimeout()``console`Provides access to the browser's debugging console`DataView`Represents a generic view of an `ArrayBuffer``Date`Represents a single moment in time in a platform-independent format`decodeURI`Decodes a Uniform Resource Identifier (URI) previously created by `encodeURI` or by a similar routine`decodeURIComponent`Decodes a Uniform Resource Identifier (URI) component previously created by `encodeURIComponent` or by a similar routine`DOMException`Represents an error that occurs in the DOM`encodeURI`Encodes a Uniform Resource Identifier (URI) by replacing each instance of certain characters by one, two, three, or four escape sequences representing the UTF-8 encoding of the character`encodeURIComponent`Encodes a Uniform Resource Identifier (URI) component by replacing each instance of certain characters by one, two, three, or four escape sequences representing the UTF-8 encoding of the character`Error`Represents an error when trying to execute a statement or accessing a property`EvalError`Represents an error that occurs regarding the global function `eval()``Float32Array`Represents a typed array of 32-bit floating point numbers`Float64Array`Represents a typed array of 64-bit floating point numbers`Function`Represents a function`Infinity`Represents the mathematical Infinity value`Int8Array`Represents a typed array of 8-bit signed integers`Int16Array`Represents a typed array of 16-bit signed integers`Int32Array`Represents a typed array of 32-bit signed integers`Intl`Provides access to internationalization and localization functionality`isFinite`Determines whether a value is a finite number`isNaN`Determines whether a value is `NaN` or not`JSON`Provides functionality to convert JavaScript values to and from the JSON format`Map`Represents a collection of values, where each value may occur only once`Math`Provides access to mathematical functions and constants`Number`Represents a numeric value`Object`Represents the object that is the base of all JavaScript objects`parseFloat`Parses a string argument and returns a floating point number`parseInt`Parses a string argument and returns an integer of the specified radix`Promise`Represents the eventual completion (or failure) of an asynchronous operation, and its resulting value`Proxy`Represents an object that is used to define custom behavior for fundamental operations (e.g. property lookup, assignment, enumeration, function invocation, etc)`queueMicrotask`Queues a microtask to be executed`RangeError`Represents an error when a value is not in the set or range of allowed values`ReferenceError`Represents an error when a non-existent variable is referenced`Reflect`Provides methods for interceptable JavaScript operations`RegExp`Represents a regular expression, allowing you to match combinations of characters`Set`Represents a collection of values, where each value may occur only once`setInterval`Repeatedly calls a function, with a fixed time delay between each call`setTimeout`Calls a function or evaluates an expression after a specified number of milliseconds`SharedArrayBuffer`Represents a generic, fixed-length raw binary data buffer`String`Represents a sequence of characters`structuredClone`Creates a deep copy of a value`Symbol`Represents a unique and immutable data type that is used as the key of an object property`SyntaxError`Represents an error when trying to interpret syntactically invalid code`TypeError`Represents an error when a value is not of the expected type`Uint8Array`Represents a typed array of 8-bit unsigned integers`Uint8ClampedArray`Represents a typed array of 8-bit unsigned integers clamped to 0-255`Uint32Array`Represents a typed array of 32-bit unsigned integers`URIError`Represents an error when a global URI handling function was used in a wrong way`URL`Represents an object providing static methods used for creating object URLs`URLPattern`Represents a URL pattern`URLSearchParams`Represents a collection of key/value pairs`WeakMap`Represents a collection of key/value pairs in which the keys are weakly referenced`WeakSet`Represents a collection of objects in which each object may occur only once`WebAssembly`Provides access to WebAssembly --- ## Page: https://nextjs.org/docs/pages/api-reference/turbopack Turbopack is an **incremental bundler** optimized for JavaScript and TypeScript, written in Rust, and built into **Next.js**. You can use Turbopack with both the Pages and App Router for a **much faster** local development experience. ## Why Turbopack? We built Turbopack to push the performance of Next.js, including: * **Unified Graph:** Next.js supports multiple output environments (e.g., client and server). Managing multiple compilers and stitching bundles together can be tedious. Turbopack uses a **single, unified graph** for all environments. * **Bundling vs Native ESM:** Some tools skip bundling in development and rely on the browser's native ESM. This works well for small apps but can slow down large apps due to excessive network requests. Turbopack **bundles** in dev, but in an optimized way to keep large apps fast. * **Incremental Computation:** Turbopack parallelizes work across cores and **caches** results down to the function level. Once a piece of work is done, Turbopack won’t repeat it. * **Lazy Bundling:** Turbopack only bundles what is actually requested by the dev server. This lazy approach can reduce initial compile times and memory usage. ## Getting started To enable Turbopack in your Next.js project, add the `--turbopack` flag to the `dev` and `build` scripts in your `package.json` file: { "scripts": { "dev": "next dev --turbopack", "build": "next build --turbopack", "start": "next start" } } Currently, Turbopack for `dev` is stable, while `build` is in alpha. We are actively working on production support as Turbopack moves closer to stability. ## Supported features Turbopack in Next.js has **zero-configuration** for the common use cases. Below is a summary of what is supported out of the box, plus some references to how you can configure Turbopack further when needed. ### Language features | Feature | Status | Notes | | --- | --- | --- | | **JavaScript & TypeScript** | **Supported** | Uses SWC under the hood. Type-checking is not done by Turbopack (run `tsc --watch` or rely on your IDE for type checks). | | **ECMAScript (ESNext)** | **Supported** | Turbopack supports the latest ECMAScript features, matching SWC’s coverage. | | **CommonJS** | **Supported** | `require()` syntax is handled out of the box. | | **ESM** | **Supported** | Static and dynamic `import` are fully supported. | | **Babel** | Partially Unsupported | Turbopack does not include Babel by default. However, you can configure `babel-loader` via the Turbopack config. | ### Framework and React features | Feature | Status | Notes | | --- | --- | --- | | **JSX / TSX** | **Supported** | SWC handles JSX/TSX compilation. | | **Fast Refresh** | **Supported** | No configuration needed. | | **React Server Components (RSC)** | **Supported** | For the Next.js App Router. Turbopack ensures correct server/client bundling. | | **Root layout creation** | Unsupported | Automatic creation of a root layout in App Router is not supported. Turbopack will instruct you to create it manually. | ### CSS and styling | Feature | Status | Notes | | --- | --- | --- | | **Global CSS** | **Supported** | Import `.css` files directly in your application. | | **CSS Modules** | **Supported** | `.module.css` files work natively (Lightning CSS). | | **CSS Nesting** | **Supported** | Lightning CSS supports modern CSS nesting. | | **@import syntax** | **Supported** | Combine multiple CSS files. | | **PostCSS** | **Supported** | Automatically processes `postcss.config.js` in a Node.js worker pool. Useful for Tailwind, Autoprefixer, etc. | | **Sass / SCSS** | **Supported** (Next.js) | For Next.js, Sass is supported out of the box. In the future, Turbopack standalone usage will likely require a loader config. | | **Less** | Planned via plugins | Not yet supported by default. Will likely require a loader config once custom loaders are stable. | | **Lightning CSS** | **In Use** | Handles CSS transformations. Some low-usage CSS Modules features (like `:local/:global` as standalone pseudo-classes) are not yet supported. See below for more details. | ### Assets | Feature | Status | Notes | | --- | --- | --- | | **Static Assets** (images, fonts) | **Supported** | Importing `import img from './img.png'` works out of the box. In Next.js, returns an object for the `<Image />` component. | | **JSON Imports** | **Supported** | Named or default imports from `.json` are supported. | ### Module resolution | Feature | Status | Notes | | --- | --- | --- | | **Path Aliases** | **Supported** | Reads `tsconfig.json`'s `paths` and `baseUrl`, matching Next.js behavior. | | **Manual Aliases** | **Supported** | Configure `resolveAlias` in `next.config.js` (similar to `webpack.resolve.alias`). | | **Custom Extensions** | **Supported** | Configure `resolveExtensions` in `next.config.js`. | | **AMD** | Partially Supported | Basic transforms work; advanced AMD usage is limited. | ### Performance and Fast Refresh | Feature | Status | Notes | | --- | --- | --- | | **Fast Refresh** | **Supported** | Updates JavaScript, TypeScript, and CSS without a full refresh. | | **Incremental Bundling** | **Supported** | Turbopack lazily builds only what’s requested by the dev server, speeding up large apps. | ## Unsupported and unplanned features Some features are not yet implemented or not planned: * **Legacy CSS Modules features** * Standalone `:local` and `:global` pseudo-classes (only the function variant `:global(...)` is supported). * The `@value` rule (superseded by CSS variables). * `:import` and `:export` ICSS rules. * **`webpack()` configuration** in `next.config.js` Turbopack replaces webpack, so `webpack()` configs are not recognized. Use the `experimental.turbo` config instead. * **AMP** Not planned for Turbopack support in Next.js. * **Yarn PnP** Not planned for Turbopack support in Next.js. * **`experimental.urlImports`** Not planned for Turbopack. * **`experimental.esmExternals`** Not planned. Turbopack does not support the legacy `esmExternals` configuration in Next.js. * **Some Next.js Experimental Flags** * `experimental.typedRoutes` * `experimental.nextScriptWorkers` * `experimental.sri.algorithm` * `experimental.fallbackNodePolyfills` We plan to implement these in the future. For a full, detailed breakdown of each feature flag and its status, see the Turbopack API Reference. ## Configuration Turbopack can be configured via `next.config.js` (or `next.config.ts`) under the `turbopack` key. Configuration options include: * **`rules`** Define additional webpack loaders for file transformations. * **`resolveAlias`** Create manual aliases (like `resolve.alias` in webpack). * **`resolveExtensions`** Change or extend file extensions for module resolution. * **`moduleIds`** Set how module IDs are generated (`'named'` vs `'deterministic'`). * **`treeShaking`** Enable or disable tree shaking in dev and future production builds. * **`memoryLimit`** Set a memory limit (in bytes) for Turbopack. module.exports = { turbopack: { // Example: adding an alias and custom file extension resolveAlias: { underscore: 'lodash', }, resolveExtensions: ['.mdx', '.tsx', '.ts', '.jsx', '.js', '.json'], }, } For more in-depth configuration examples, see the Turbopack config documentation. ## Generating trace files for performance debugging If you encounter performance or memory issues and want to help the Next.js team diagnose them, you can generate a trace file by appending `NEXT_TURBOPACK_TRACING=1` to your dev command: NEXT_TURBOPACK_TRACING=1 next dev --turbopack This will produce a `.next/trace-turbopack` file. Include that file when creating a GitHub issue on the Next.js repo to help us investigate. ## Summary Turbopack is a **Rust-based**, **incremental** bundler designed to make local development and builds fast—especially for large applications. It is integrated into Next.js, offering zero-config CSS, React, and TypeScript support. Stay tuned for more updates as we continue to improve Turbopack and add production build support. In the meantime, give it a try with `next dev --turbopack` and let us know your feedback. ## Version Changes | Version | Changes | | --- | --- | | `v15.3.0` | Experimental support for `build` | | `v15.0.0` | Turbopack for `dev` stable | --- ## Page: https://nextjs.org/docs/architecture #### Subscribe to our newsletter Stay updated on new releases and features, guides, and case studies. --- ## Page: https://nextjs.org/docs/architecture/accessibility The Next.js team is committed to making Next.js accessible to all developers (and their end-users). By adding accessibility features to Next.js by default, we aim to make the Web more inclusive for everyone. ## Route Announcements When transitioning between pages rendered on the server (e.g. using the `<a href>` tag) screen readers and other assistive technology announce the page title when the page loads so that users understand that the page has changed. In addition to traditional page navigations, Next.js also supports client-side transitions for improved performance (using `next/link`). To ensure that client-side transitions are also announced to assistive technology, Next.js includes a route announcer by default. The Next.js route announcer looks for the page name to announce by first inspecting `document.title`, then the `<h1>` element, and finally the URL pathname. For the most accessible user experience, ensure that each page in your application has a unique and descriptive title. ## Linting Next.js provides an integrated ESLint experience out of the box, including custom rules for Next.js. By default, Next.js includes `eslint-plugin-jsx-a11y` to help catch accessibility issues early, including warning on: * aria-props * aria-proptypes * aria-unsupported-elements * role-has-required-aria-props * role-supports-aria-props For example, this plugin helps ensure you add alt text to `img` tags, use correct `aria-*` attributes, use correct `role` attributes, and more. ## Accessibility Resources * WebAIM WCAG checklist * WCAG 2.2 Guidelines * The A11y Project * Check color contrast ratios between foreground and background elements * Use `prefers-reduced-motion` when working with animations --- ## Page: https://nextjs.org/docs/architecture/fast-refresh Fast refresh is a React feature integrated into Next.js that allows you live reload the browser page while maintaining temporary client-side state when you save changes to a file. It's enabled by default in all Next.js applications on **9.4 or newer**. With Fast Refresh enabled, most edits should be visible within a second. ## How It Works * If you edit a file that **only exports React component(s)**, Fast Refresh will update the code only for that file, and re-render your component. You can edit anything in that file, including styles, rendering logic, event handlers, or effects. * If you edit a file with exports that _aren't_ React components, Fast Refresh will re-run both that file, and the other files importing it. So if both `Button.js` and `Modal.js` import `theme.js`, editing `theme.js` will update both components. * Finally, if you **edit a file** that's **imported by files outside of the React tree**, Fast Refresh **will fall back to doing a full reload**. You might have a file which renders a React component but also exports a value that is imported by a **non-React component**. For example, maybe your component also exports a constant, and a non-React utility file imports it. In that case, consider migrating the constant to a separate file and importing it into both files. This will re-enable Fast Refresh to work. Other cases can usually be solved in a similar way. ## Error Resilience ### Syntax Errors If you make a syntax error during development, you can fix it and save the file again. The error will disappear automatically, so you won't need to reload the app. **You will not lose component state**. ### Runtime Errors If you make a mistake that leads to a runtime error inside your component, you'll be greeted with a contextual overlay. Fixing the error will automatically dismiss the overlay, without reloading the app. Component state will be retained if the error did not occur during rendering. If the error did occur during rendering, React will remount your application using the updated code. If you have error boundaries in your app (which is a good idea for graceful failures in production), they will retry rendering on the next edit after a rendering error. This means having an error boundary can prevent you from always getting reset to the root app state. However, keep in mind that error boundaries shouldn't be _too_ granular. They are used by React in production, and should always be designed intentionally. ## Limitations Fast Refresh tries to preserve local React state in the component you're editing, but only if it's safe to do so. Here's a few reasons why you might see local state being reset on every edit to a file: * Local state is not preserved for class components (only function components and Hooks preserve state). * The file you're editing might have _other_ exports in addition to a React component. * Sometimes, a file would export the result of calling a higher-order component like `HOC(WrappedComponent)`. If the returned component is a class, its state will be reset. * Anonymous arrow functions like `export default () => <div />;` cause Fast Refresh to not preserve local component state. For large codebases you can use our `name-default-component` codemod. As more of your codebase moves to function components and Hooks, you can expect state to be preserved in more cases. ## Tips * Fast Refresh preserves React local state in function components (and Hooks) by default. * Sometimes you might want to _force_ the state to be reset, and a component to be remounted. For example, this can be handy if you're tweaking an animation that only happens on mount. To do this, you can add `// @refresh reset` anywhere in the file you're editing. This directive is local to the file, and instructs Fast Refresh to remount components defined in that file on every edit. * You can put `console.log` or `debugger;` into the components you edit during development. * Remember that imports are case sensitive. Both fast and full refresh can fail, when your import doesn't match the actual filename. For example, `'./header'` vs `'./Header'`. ## Fast Refresh and Hooks When possible, Fast Refresh attempts to preserve the state of your component between edits. In particular, `useState` and `useRef` preserve their previous values as long as you don't change their arguments or the order of the Hook calls. Hooks with dependencies—such as `useEffect`, `useMemo`, and `useCallback`—will _always_ update during Fast Refresh. Their list of dependencies will be ignored while Fast Refresh is happening. For example, when you edit `useMemo(() => x * 2, [x])` to `useMemo(() => x * 10, [x])`, it will re-run even though `x` (the dependency) has not changed. If React didn't do that, your edit wouldn't reflect on the screen! Sometimes, this can lead to unexpected results. For example, even a `useEffect` with an empty array of dependencies would still re-run once during Fast Refresh. However, writing code resilient to occasional re-running of `useEffect` is a good practice even without Fast Refresh. It will make it easier for you to introduce new dependencies to it later on and it's enforced by React Strict Mode, which we highly recommend enabling. --- ## Page: https://nextjs.org/docs/architecture/nextjs-compiler The Next.js Compiler, written in Rust using SWC, allows Next.js to transform and minify your JavaScript code for production. This replaces Babel for individual files and Terser for minifying output bundles. Compilation using the Next.js Compiler is 17x faster than Babel and enabled by default since Next.js version 12. If you have an existing Babel configuration or are using unsupported features, your application will opt-out of the Next.js Compiler and continue using Babel. ## Why SWC? SWC is an extensible Rust-based platform for the next generation of fast developer tools. SWC can be used for compilation, minification, bundling, and more – and is designed to be extended. It's something you can call to perform code transformations (either built-in or custom). Running those transformations happens through higher-level tools like Next.js. We chose to build on SWC for a few reasons: * **Extensibility:** SWC can be used as a Crate inside Next.js, without having to fork the library or workaround design constraints. * **Performance:** We were able to achieve ~3x faster Fast Refresh and ~5x faster builds in Next.js by switching to SWC, with more room for optimization still in progress. * **WebAssembly:** Rust's support for WASM is essential for supporting all possible platforms and taking Next.js development everywhere. * **Community:** The Rust community and ecosystem are amazing and still growing. ## Supported Features ### Styled Components We're working to port `babel-plugin-styled-components` to the Next.js Compiler. First, update to the latest version of Next.js: `npm install next@latest`. Then, update your `next.config.js` file: module.exports = { compiler: { styledComponents: true, }, } For advanced use cases, you can configure individual properties for styled-components compilation. > Note: `ssr` and `displayName` transforms are the main requirement for using `styled-components` in Next.js. module.exports = { compiler: { // see https://styled-components.com/docs/tooling#babel-plugin for more info on the options. styledComponents: { // Enabled by default in development, disabled in production to reduce file size, // setting this will override the default for all environments. displayName?: boolean, // Enabled by default. ssr?: boolean, // Enabled by default. fileName?: boolean, // Empty by default. topLevelImportPaths?: string[], // Defaults to ["index"]. meaninglessFileNames?: string[], // Enabled by default. minify?: boolean, // Enabled by default. transpileTemplateLiterals?: boolean, // Empty by default. namespace?: string, // Disabled by default. pure?: boolean, // Enabled by default. cssProp?: boolean, }, }, } ### Jest The Next.js Compiler transpiles your tests and simplifies configuring Jest together with Next.js including: * Auto mocking of `.css`, `.module.css` (and their `.scss` variants), and image imports * Automatically sets up `transform` using SWC * Loading `.env` (and all variants) into `process.env` * Ignores `node_modules` from test resolving and transforms * Ignoring `.next` from test resolving * Loads `next.config.js` for flags that enable experimental SWC transforms First, update to the latest version of Next.js: `npm install next@latest`. Then, update your `jest.config.js` file: const nextJest = require('next/jest') // Providing the path to your Next.js app which will enable loading next.config.js and .env files const createJestConfig = nextJest({ dir: './' }) // Any custom config you want to pass to Jest const customJestConfig = { setupFilesAfterEnv: ['<rootDir>/jest.setup.js'], } // createJestConfig is exported in this way to ensure that next/jest can load the Next.js configuration, which is async module.exports = createJestConfig(customJestConfig) ### Relay To enable Relay support: module.exports = { compiler: { relay: { // This should match relay.config.js src: './', artifactDirectory: './__generated__', language: 'typescript', eagerEsModules: false, }, }, } > **Good to know**: In Next.js, all JavaScript files in `pages` directory are considered routes. So, for `relay-compiler` you'll need to specify `artifactDirectory` configuration settings outside of the `pages`, otherwise `relay-compiler` will generate files next to the source file in the `__generated__` directory, and this file will be considered a route, which will break production builds. ### Remove React Properties Allows to remove JSX properties. This is often used for testing. Similar to `babel-plugin-react-remove-properties`. To remove properties matching the default regex `^data-test`: module.exports = { compiler: { reactRemoveProperties: true, }, } To remove custom properties: module.exports = { compiler: { // The regexes defined here are processed in Rust so the syntax is different from // JavaScript `RegExp`s. See https://docs.rs/regex. reactRemoveProperties: { properties: ['^data-custom$'] }, }, } ### Remove Console This transform allows for removing all `console.*` calls in application code (not `node_modules`). Similar to `babel-plugin-transform-remove-console`. Remove all `console.*` calls: module.exports = { compiler: { removeConsole: true, }, } Remove `console.*` output except `console.error`: module.exports = { compiler: { removeConsole: { exclude: ['error'], }, }, } ### Legacy Decorators Next.js will automatically detect `experimentalDecorators` in `jsconfig.json` or `tsconfig.json`. Legacy decorators are commonly used with older versions of libraries like `mobx`. This flag is only supported for compatibility with existing applications. We do not recommend using legacy decorators in new applications. First, update to the latest version of Next.js: `npm install next@latest`. Then, update your `jsconfig.json` or `tsconfig.json` file: { "compilerOptions": { "experimentalDecorators": true } } ### importSource Next.js will automatically detect `jsxImportSource` in `jsconfig.json` or `tsconfig.json` and apply that. This is commonly used with libraries like Theme UI. First, update to the latest version of Next.js: `npm install next@latest`. Then, update your `jsconfig.json` or `tsconfig.json` file: { "compilerOptions": { "jsxImportSource": "theme-ui" } } ### Emotion We're working to port `@emotion/babel-plugin` to the Next.js Compiler. First, update to the latest version of Next.js: `npm install next@latest`. Then, update your `next.config.js` file: module.exports = { compiler: { emotion: boolean | { // default is true. It will be disabled when build type is production. sourceMap?: boolean, // default is 'dev-only'. autoLabel?: 'never' | 'dev-only' | 'always', // default is '[local]'. // Allowed values: `[local]` `[filename]` and `[dirname]` // This option only works when autoLabel is set to 'dev-only' or 'always'. // It allows you to define the format of the resulting label. // The format is defined via string where variable parts are enclosed in square brackets []. // For example labelFormat: "my-classname--[local]", where [local] will be replaced with the name of the variable the result is assigned to. labelFormat?: string, // default is undefined. // This option allows you to tell the compiler what imports it should // look at to determine what it should transform so if you re-export // Emotion's exports, you can still use transforms. importMap?: { [packageName: string]: { [exportName: string]: { canonicalImport?: [string, string], styledBaseImport?: [string, string], } } }, }, }, } ### Minification Next.js' swc compiler is used for minification by default since v13. This is 7x faster than Terser. > **Good to know:** Starting with v15, minification cannot be customized using `next.config.js`. Support for the `swcMinify` flag has been removed. ### Module Transpilation Next.js can automatically transpile and bundle dependencies from local packages (like monorepos) or from external dependencies (`node_modules`). This replaces the `next-transpile-modules` package. module.exports = { transpilePackages: ['@acme/ui', 'lodash-es'], } ### Modularize Imports This option has been superseded by `optimizePackageImports` in Next.js 13.5. We recommend upgrading to use the new option that does not require manual configuration of import paths. ### Define (Replacing variables during build) The `define` option allows you to statically replace variables in your code at build-time. The option takes an object as key-value pairs, where the keys are the variables that should be replaced with the corresponding values. Use the `compiler.define` field in `next.config.js`: module.exports = { compiler: { define: { MY_STRING_VARIABLE: JSON.stringify('my-string'), MY_NUMBER_VARIABLE: '42', }, }, } ## Experimental Features ### SWC Trace profiling You can generate SWC's internal transform traces as chromium's trace event format. module.exports = { experimental: { swcTraceProfiling: true, }, } Once enabled, swc will generate trace named as `swc-trace-profile-${timestamp}.json` under `.next/`. Chromium's trace viewer (chrome://tracing/, https://ui.perfetto.dev/), or compatible flamegraph viewer (https://www.speedscope.app/) can load & visualize generated traces. ### SWC Plugins (experimental) You can configure swc's transform to use SWC's experimental plugin support written in wasm to customize transformation behavior. module.exports = { experimental: { swcPlugins: [ [ 'plugin', { ...pluginOptions, }, ], ], }, } `swcPlugins` accepts an array of tuples for configuring plugins. A tuple for the plugin contains the path to the plugin and an object for plugin configuration. The path to the plugin can be an npm module package name or an absolute path to the `.wasm` binary itself. ## Unsupported Features When your application has a `.babelrc` file, Next.js will automatically fall back to using Babel for transforming individual files. This ensures backwards compatibility with existing applications that leverage custom Babel plugins. If you're using a custom Babel setup, please share your configuration. We're working to port as many commonly used Babel transformations as possible, as well as supporting plugins in the future. ## Version History | Version | Changes | | --- | --- | | `v13.1.0` | Module Transpilation and Modularize Imports stable. | | `v13.0.0` | SWC Minifier enabled by default. | | `v12.3.0` | SWC Minifier stable. | | `v12.2.0` | SWC Plugins experimental support added. | | `v12.1.0` | Added support for Styled Components, Jest, Relay, Remove React Properties, Legacy Decorators, Remove Console, and jsxImportSource. | | `v12.0.0` | Next.js Compiler introduced. | --- ## Page: https://nextjs.org/docs/architecture/supported-browsers Next.js supports **modern browsers** with zero configuration. * Chrome 64+ * Edge 79+ * Firefox 67+ * Opera 51+ * Safari 12+ ## Browserslist If you would like to target specific browsers or features, Next.js supports Browserslist configuration in your `package.json` file. Next.js uses the following Browserslist configuration by default: { "browserslist": [ "chrome 64", "edge 79", "firefox 67", "opera 51", "safari 12" ] } ## Polyfills We inject widely used polyfills, including: * **fetch()** — Replacing: `whatwg-fetch` and `unfetch`. * **URL** — Replacing: the `url` package (Node.js API). * **Object.assign()** — Replacing: `object-assign`, `object.assign`, and `core-js/object/assign`. If any of your dependencies include these polyfills, they’ll be eliminated automatically from the production build to avoid duplication. In addition, to reduce bundle size, Next.js will only load these polyfills for browsers that require them. The majority of the web traffic globally will not download these polyfills. ### Custom Polyfills If your own code or any external npm dependencies require features not supported by your target browsers (such as IE 11), you need to add polyfills yourself. In this case, you should add a top-level import for the **specific polyfill** you need in your Custom `<App>` or the individual component. ## JavaScript Language Features Next.js allows you to use the latest JavaScript features out of the box. In addition to ES6 features, Next.js also supports: * Async/await (ES2017) * Object Rest/Spread Properties (ES2018) * Dynamic `import()` (ES2020) * Optional Chaining (ES2020) * Nullish Coalescing (ES2020) * Class Fields and Static Properties (ES2022) * and more! ### TypeScript Features Next.js has built-in TypeScript support. Learn more here. ### Customizing Babel Config (Advanced) You can customize babel configuration. Learn more here. --- ## Page: https://nextjs.org/docs/community With over 5 million weekly downloads, Next.js has a large and active community of developers across the world. Here's how you can get involved in our community: ## Contributing There are a couple of ways you can contribute to the development of Next.js: * Documentation: Suggest improvements or even write new sections to help our users understand how to use Next.js. * Examples: Help developers integrate Next.js with other tools and services by creating a new example or improving an existing one. * Codebase: Learn more about the underlying architecture, contribute to bug fixes, errors, and suggest new features. ## Discussions If you have a question about Next.js, or want to help others, you're always welcome to join the conversation: * GitHub Discussions * Discord * Reddit ## Social Media Follow Next.js on Twitter for the latest updates, and subscribe to the Vercel YouTube channel for Next.js videos. ## Code of Conduct We believe in creating an inclusive, welcoming community. As such, we ask all members to adhere to our Code of Conduct. This document outlines our expectations for participant behavior. We invite you to read it and help us maintain a safe and respectful environment. --- ## Page: https://nextjs.org/docs/community/contribution-guide Welcome to the Next.js Docs Contribution Guide! We're excited to have you here. This page provides instructions on how to edit the Next.js documentation. Our goal is to ensure that everyone in the community feels empowered to contribute and improve our docs. ## Why Contribute? Open-source work is never done, and neither is documentation. Contributing to docs is a good way for beginners to get involved in open-source and for experienced developers to clarify more complex topics while sharing their knowledge with the community. By contributing to the Next.js docs, you're helping us build a more robust learning resource for all developers. Whether you've found a typo, a confusing section, or you've realized that a particular topic is missing, your contributions are welcomed and appreciated. ## How to Contribute The docs content can be found on the Next.js repo. To contribute, you can edit the files directly on GitHub or clone the repo and edit the files locally. ### GitHub Workflow If you're new to GitHub, we recommend reading the GitHub Open Source Guide to learn how to fork a repository, create a branch, and submit a pull request. > **Good to know**: The underlying docs code lives in a private codebase that is synced to the Next.js public repo. This means that you can't preview the docs locally. However, you'll see your changes on nextjs.org after merging a pull request. ### Writing MDX The docs are written in MDX, a markdown format that supports JSX syntax. This allows us to embed React components in the docs. See the GitHub Markdown Guide for a quick overview of markdown syntax. ### VSCode #### Previewing Changes Locally VSCode has a built-in markdown previewer that you can use to see your edits locally. To enable the previewer for MDX files, you'll need to add a configuration option to your user settings. Open the command palette (`⌘ + ⇧ + P` on Mac or `Ctrl + Shift + P` on Windows) and search from `Preferences: Open User Settings (JSON)`. Then, add the following line to your `settings.json` file: { "files.associations": { "*.mdx": "markdown" } } Next, open the command palette again, and search for `Markdown: Preview File` or `Markdown: Open Preview to the Side`. This will open a preview window where you can see your formatted changes. #### Extensions We also recommend the following extensions for VSCode users: * MDX: Intellisense and syntax highlighting for MDX. * Prettier: Format MDX files on save. ### Review Process Once you've submitted your contribution, the Next.js or Developer Experience teams will review your changes, provide feedback, and merge the pull request when it's ready. Please let us know if you have any questions or need further assistance in your PR's comments. Thank you for contributing to the Next.js docs and being a part of our community! > **Tip:** Run `pnpm prettier-fix` to run Prettier before submitting your PR. ## File Structure The docs use **file-system routing**. Each folder and files inside `/docs` represent a route segment. These segments are used to generate the URL paths, navigation, and breadcrumbs. The file structure reflects the navigation that you see on the site, and by default, navigation items are sorted alphabetically. However, we can change the order of the items by prepending a two-digit number (`00-`) to the folder or file name. For example, in the functions API Reference, the pages are sorted alphabetically because it makes it easier for developers to find a specific function: 04-functions ├── after.mdx ├── cacheLife.mdx ├── cacheTag.mdx └── ... But, in the routing section, the files are prefixed with a two-digit number, sorted in the order developers should learn these concepts: 01-routing ├── 01-defining-routes.mdx ├── 02-pages.mdx ├── 03-layouts-and-templates.mdx └── ... To quickly find a page, you can use `⌘ + P` (Mac) or `Ctrl + P` (Windows) to open the search bar on VSCode. Then, type the slug of the page you're looking for. E.g. `defining-routes` > **Why not use a manifest?** > > We considered using a manifest file (another popular way to generate the docs navigation), but we found that a manifest would quickly get out of sync with the files. File-system routing forces us to think about the structure of the docs and feels more native to Next.js. Each page has a metadata block at the top of the file separated by three dashes. ### Required Fields The following fields are **required**: | Field | Description | | --- | --- | | `title` | The page's `<h1>` title, used for SEO and OG Images. | | `description` | The page's description, used in the `<meta name="description">` tag for SEO. | --- title: Page Title description: Page Description --- It's good practice to limit the page title to 2-3 words (e.g. Optimizing Images) and the description to 1-2 sentences (e.g. Learn how to optimize images in Next.js). ### Optional Fields The following fields are **optional**: | Field | Description | | --- | --- | | `nav_title` | Overrides the page's title in the navigation. This is useful when the page's title is too long to fit. If not provided, the `title` field is used. | | `source` | Pulls content into a shared page. See Shared Pages. | | `related` | A list of related pages at the bottom of the document. These will automatically be turned into cards. See Related Links. | | `version` | A stage of development. e.g. `experimental`,`legacy`,`unstable`,`RC` | --- nav_title: Nav Item Title source: app/building-your-application/optimizing/images related: description: See the image component API reference. links: - app/api-reference/components/image version: experimental --- ## `App` and `Pages` Docs Since most of the features in the **App Router** and **Pages Router** are completely different, their docs for each are kept in separate sections (`02-app` and `03-pages`). However, there are a few features that are shared between them. ### Shared Pages To avoid content duplication and risk the content becoming out of sync, we use the `source` field to pull content from one page into another. For example, the `<Link>` component behaves _mostly_ the same in **App** and **Pages**. Instead of duplicating the content, we can pull the content from `app/.../link.mdx` into `pages/.../link.mdx`: --- title: <Link> description: API reference for the <Link> component. --- This API reference will help you understand how to use the props and configuration options available for the Link Component. --- title: <Link> description: API reference for the <Link> component. source: app/api-reference/components/link --- {/* DO NOT EDIT THIS PAGE. */} {/* The content of this page is pulled from the source above. */} We can therefore edit the content in one place and have it reflected in both sections. ### Shared Content In shared pages, sometimes there might be content that is **App Router** or **Pages Router** specific. For example, the `<Link>` component has a `shallow` prop that is only available in **Pages** but not in **App**. To make sure the content only shows in the correct router, we can wrap content blocks in an `<AppOnly>` or `<PagesOnly>` components: This content is shared between App and Pages. <PagesOnly> This content will only be shown on the Pages docs. </PagesOnly> This content is shared between App and Pages. You'll likely use these components for examples and code blocks. ## Code Blocks Code blocks should contain a minimum working example that can be copied and pasted. This means that the code should be able to run without any additional configuration. For example, if you're showing how to use the `<Link>` component, you should include the `import` statement and the `<Link>` component itself. import Link from 'next/link' export default function Page() { return <Link href="/about">About</Link> } Always run examples locally before committing them. This will ensure that the code is up-to-date and working. ### Language and Filename Code blocks should have a header that includes the language and the `filename`. Add a `filename` prop to render a special Terminal icon that helps orientate users where to input the command. For example: ```bash filename="Terminal" npx create-next-app ``` Most examples in the docs are written in `tsx` and `jsx`, and a few in `bash`. However, you can use any supported language, here's the full list. When writing JavaScript code blocks, we use the following language and extension combinations. | | Language | Extension | | --- | --- | --- | | JavaScript files with JSX code | \`\`\`jsx | .js | | JavaScript files without JSX | \`\`\`js | .js | | TypeScript files with JSX | \`\`\`tsx | .tsx | | TypeScript files without JSX | \`\`\`ts | .ts | > **Good to know**: > > * Make sure to use **`js`** extension with **JSX** code at JavaScript files. > * For example, \`\`\`jsx filename="app/layout.js" ### TS and JS Switcher Add a language switcher to toggle between TypeScript and JavaScript. Code blocks should be TypeScript first with a JavaScript version to accommodate users. Currently, we write TS and JS examples one after the other, and link them with `switcher` prop: ```tsx filename="app/page.tsx" switcher ``` ```jsx filename="app/page.js" switcher ``` > **Good to know**: We plan to automatically compile TypeScript snippets to JavaScript in the future. In the meantime, you can use transform.tools. ### Line Highlighting Code lines can be highlighted. This is useful when you want to draw attention to a specific part of the code. You can highlight lines by passing a number to the `highlight` prop. **Single Line:** `highlight={1}` import Link from 'next/link' export default function Page() { return <Link href="/about">About</Link> } **Multiple Lines:** `highlight={1,3}` import Link from 'next/link' export default function Page() { return <Link href="/about">About</Link> } **Range of Lines:** `highlight={1-5}` import Link from 'next/link' export default function Page() { return <Link href="/about">About</Link> } ## Icons The following icons are available for use in the docs: <Check size={18} /> <Cross size={18} /> **Output:** We do not use emojis in the docs. ## Notes For information that is important but not critical, use notes. Notes are a good way to add information without distracting the user from the main content. > **Good to know**: This is a single line note. > **Good to know**: > > - We also use this format for multi-line notes. > - There are sometimes multiple items worth knowing or keeping in mind. **Output:** > **Good to know**: This is a single line note. > **Good to know**: > > * We also use this format for multi-line notes. > * There are sometimes multiple items worth knowing or keeping in mind. Related Links guide the user's learning journey by adding links to logical next steps. * Links will be displayed in cards under the main content of the page. * Links will be automatically generated for pages that have child pages. For example, the Optimizing section has links to all of its child pages. Create related links using the `related` field in the page's metadata. --- related: description: Learn how to quickly get started with your first application. links: - app/building-your-application/routing/defining-routes - app/building-your-application/data-fetching - app/api-reference/file-conventions/page --- ### Nested Fields | Field | Required? | Description | | --- | --- | --- | | `title` | Optional | The title of the card list. Defaults to **Next Steps**. | | `description` | Optional | The description of the card list. | | `links` | Required | A list of links to other doc pages. Each list item should be a relative URL path (without a leading slash) e.g. `app/api-reference/file-conventions/page` | ## Diagrams Diagrams are a great way to explain complex concepts. We use Figma to create diagrams, following Vercel's design guide. The diagrams currently live in the `/public` folder in our private Next.js site. If you'd like to update or add a diagram, please open a GitHub issue with your ideas. ## Custom Components and HTML These are the React Components available for the docs: `<Image />` (next/image), `<PagesOnly />`, `<AppOnly />`, `<Cross />`, and `<Check />`. We do not allow raw HTML in the docs besides the `<details>` tag. If you have ideas for new components, please open a GitHub issue. ## Style Guide This section contains guidelines for writing docs for those who are new to technical writing. ### Page Templates While we don't have a strict template for pages, there are page sections you'll see repeated across the docs: * **Overview:** The first paragraph of a page should tell the user what the feature is and what it's used for. Followed by a minimum working example or its API reference. * **Convention:** If the feature has a convention, it should be explained here. * **Examples**: Show how the feature can be used with different use cases. * **API Tables**: API Pages should have an overview table at the of the page with jump-to-section links (when possible). * **Next Steps (Related Links)**: Add links to related pages to guide the user's learning journey. Feel free to add these sections as needed. ### Page Types Docs pages are also split into two categories: Conceptual and Reference. * **Conceptual** pages are used to explain a concept or feature. They are usually longer and contain more information than reference pages. In the Next.js docs, conceptual pages are found in the **Building Your Application** section. * **Reference** pages are used to explain a specific API. They are usually shorter and more focused. In the Next.js docs, reference pages are found in the **API Reference** section. > **Good to know**: Depending on the page you're contributing to, you may need to follow a different voice and style. For example, conceptual pages are more instructional and use the word _you_ to address the user. Reference pages are more technical, they use more imperative words like "create, update, accept" and tend to omit the word _you_. ### Voice Here are some guidelines to maintain a consistent style and voice across the docs: * Write clear, concise sentences. Avoid tangents. * If you find yourself using a lot of commas, consider breaking the sentence into multiple sentences or use a list. * Swap out complex words for simpler ones. For example, _use_ instead of _utilize_. * Be mindful with the word _this_. It can be ambiguous and confusing, don't be afraid to repeat the subject of the sentence if unclear. * For example, _Next.js uses React_ instead of _Next.js uses this_. * Use an active voice instead of passive. An active sentence is easier to read. * For example, _Next.js uses React_ instead of _React is used by Next.js_. If you find yourself using words like _was_ and _by_ you may be using a passive voice. * Avoid using words like _easy_, _quick_, _simple_, _just_, etc. This is subjective and can be discouraging to users. * Avoid negative words like _don't_, _can't_, _won't_, etc. This can be discouraging to readers. * For example, _"You can use the `Link` component to create links between pages"_ instead of _"Don't use the `<a>` tag to create links between pages"_. * Write in second person (you/your). This is more personal and engaging. * Use gender-neutral language. Use _developers_, _users_, or _readers_, when referring to the audience. * If adding code examples, ensure they are properly formatted and working. While these guidelines are not exhaustive, they should help you get started. If you'd like to dive deeper into technical writing, check out the Google Technical Writing Course. * * * Thank you for contributing to the docs and being part of the Next.js community! --- ## Page: https://nextjs.org/docs/14/community/contribution-guide Welcome to the Next.js Docs Contribution Guide! We're excited to have you here. This page provides instructions on how to edit the Next.js documentation. Our goal is to ensure that everyone in the community feels empowered to contribute and improve our docs. ## Why Contribute? Open-source work is never done, and neither is documentation. Contributing to docs is a good way for beginners to get involved in open-source and for experienced developers to clarify more complex topics while sharing their knowledge with the community. By contributing to the Next.js docs, you're helping us build a more robust learning resource for all developers. Whether you've found a typo, a confusing section, or you've realized that a particular topic is missing, your contributions are welcomed and appreciated. ## How to Contribute The docs content can be found on the Next.js repo. To contribute, you can edit the files directly on GitHub or clone the repo and edit the files locally. ### GitHub Workflow If you're new to GitHub, we recommend reading the GitHub Open Source Guide to learn how to fork a repository, create a branch, and submit a pull request. > **Good to know**: The underlying docs code lives in a private codebase that is synced to the Next.js public repo. This means that you can't preview the docs locally. However, you'll see your changes on nextjs.org after merging a pull request. ### Writing MDX The docs are written in MDX, a markdown format that supports JSX syntax. This allows us to embed React components in the docs. See the GitHub Markdown Guide for a quick overview of markdown syntax. ### VSCode #### Previewing Changes Locally VSCode has a built-in markdown previewer that you can use to see your edits locally. To enable the previewer for MDX files, you'll need to add a configuration option to your user settings. Open the command palette (`⌘ + ⇧ + P` on Mac or `Ctrl + Shift + P` on Windows) and search from `Preferences: Open User Settings (JSON)`. Then, add the following line to your `settings.json` file: { "files.associations": { "*.mdx": "markdown" } } Next, open the command palette again, and search for `Markdown: Preview File` or `Markdown: Open Preview to the Side`. This will open a preview window where you can see your formatted changes. #### Extensions We also recommend the following extensions for VSCode users: * MDX: Intellisense and syntax highlighting for MDX. * Grammarly: Grammar and spell checker. * Prettier: Format MDX files on save. ### Review Process Once you've submitted your contribution, the Next.js or Developer Experience teams will review your changes, provide feedback, and merge the pull request when it's ready. Please let us know if you have any questions or need further assistance in your PR's comments. Thank you for contributing to the Next.js docs and being a part of our community! > **Tip:** Run `pnpm prettier-fix` to run Prettier before submitting your PR. ## File Structure The docs use **file-system routing**. Each folder and files inside `/docs` represent a route segment. These segments are used to generate the URL paths, navigation, and breadcrumbs. The file structure reflects the navigation that you see on the site, and by default, navigation items are sorted alphabetically. However, we can change the order of the items by prepending a two-digit number (`00-`) to the folder or file name. For example, in the functions API Reference, the pages are sorted alphabetically because it makes it easier for developers to find a specific function: 03-functions ├── cookies.mdx ├── draft-mode.mdx ├── fetch.mdx └── ... But, in the routing section, the files are prefixed with a two-digit number, sorted in the order developers should learn these concepts: 02-routing ├── 01-defining-routes.mdx ├── 02-pages-and-layouts.mdx ├── 03-linking-and-navigating.mdx └── ... To quickly find a page, you can use `⌘ + P` (Mac) or `Ctrl + P` (Windows) to open the search bar on VSCode. Then, type the slug of the page you're looking for. E.g. `defining-routes` > **Why not use a manifest?** > > We considered using a manifest file (another popular way to generate the docs navigation), but we found that a manifest would quickly get out of sync with the files. File-system routing forces us to think about the structure of the docs and feels more native to Next.js. Each page has a metadata block at the top of the file separated by three dashes. ### Required Fields The following fields are **required**: | Field | Description | | --- | --- | | `title` | The page's `<h1>` title, used for SEO and OG Images. | | `description` | The page's description, used in the `<meta name="description">` tag for SEO. | --- title: Page Title description: Page Description --- It's good practice to limit the page title to 2-3 words (e.g. Optimizing Images) and the description to 1-2 sentences (e.g. Learn how to optimize images in Next.js). ### Optional Fields The following fields are **optional**: | Field | Description | | --- | --- | | `nav_title` | Overrides the page's title in the navigation. This is useful when the page's title is too long to fit. If not provided, the `title` field is used. | | `source` | Pulls content into a shared page. See Shared Pages. | | `related` | A list of related pages at the bottom of the document. These will automatically be turned into cards. See Related Links. | --- nav_title: Nav Item Title source: app/building-your-application/optimizing/images related: description: See the image component API reference. links: - app/api-reference/components/image --- ## `App` and `Pages` Docs Since most of the features in the **App Router** and **Pages Router** are completely different, their docs for each are kept in separate sections (`02-app` and `03-pages`). However, there are a few features that are shared between them. ### Shared Pages To avoid content duplication and risk the content becoming out of sync, we use the `source` field to pull content from one page into another. For example, the `<Link>` component behaves _mostly_ the same in **App** and **Pages**. Instead of duplicating the content, we can pull the content from `app/.../link.mdx` into `pages/.../link.mdx`: --- title: <Link> description: API reference for the <Link> component. --- This API reference will help you understand how to use the props and configuration options available for the Link Component. --- title: <Link> description: API reference for the <Link> component. source: app/api-reference/components/link --- {/* DO NOT EDIT THIS PAGE. */} {/* The content of this page is pulled from the source above. */} We can therefore edit the content in one place and have it reflected in both sections. ### Shared Content In shared pages, sometimes there might be content that is **App Router** or **Pages Router** specific. For example, the `<Link>` component has a `shallow` prop that is only available in **Pages** but not in **App**. To make sure the content only shows in the correct router, we can wrap content blocks in an `<AppOnly>` or `<PagesOnly>` components: This content is shared between App and Pages. <PagesOnly> This content will only be shown on the Pages docs. </PagesOnly> This content is shared between App and Pages. You'll likely use these components for examples and code blocks. ## Code Blocks Code blocks should contain a minimum working example that can be copied and pasted. This means that the code should be able to run without any additional configuration. For example, if you're showing how to use the `<Link>` component, you should include the `import` statement and the `<Link>` component itself. import Link from 'next/link' export default function Page() { return <Link href="/about">About</Link> } Always run examples locally before committing them. This will ensure that the code is up-to-date and working. ### Language and Filename Code blocks should have a header that includes the language and the `filename`. Add a `filename` prop to render a special Terminal icon that helps orientate users where to input the command. For example: ```bash filename="Terminal" npx create-next-app ``` Most examples in the docs are written in `tsx` and `jsx`, and a few in `bash`. However, you can use any supported language, here's the full list. When writing JavaScript code blocks, we use the following language and extension combinations. | | Language | Extension | | --- | --- | --- | | JavaScript files with JSX code | \`\`\`jsx | .js | | JavaScript files without JSX | \`\`\`js | .js | | TypeScript files with JSX | \`\`\`tsx | .tsx | | TypeScript files without JSX | \`\`\`ts | .ts | ### TS and JS Switcher Add a language switcher to toggle between TypeScript and JavaScript. Code blocks should be TypeScript first with a JavaScript version to accommodate users. Currently, we write TS and JS examples one after the other, and link them with `switcher` prop: ```tsx filename="app/page.tsx" switcher ``` ```jsx filename="app/page.js" switcher ``` > **Good to know**: We plan to automatically compile TypeScript snippets to JavaScript in the future. In the meantime, you can use transform.tools. ### Line Highlighting Code lines can be highlighted. This is useful when you want to draw attention to a specific part of the code. You can highlight lines by passing a number to the `highlight` prop. **Single Line:** `highlight={1}` import Link from 'next/link' export default function Page() { return <Link href="/about">About</Link> } **Multiple Lines:** `highlight={1,3}` import Link from 'next/link' export default function Page() { return <Link href="/about">About</Link> } **Range of Lines:** `highlight={1-5}` import Link from 'next/link' export default function Page() { return <Link href="/about">About</Link> } ## Icons The following icons are available for use in the docs: <Check size={18} /> <Cross size={18} /> **Output:** We do not use emojis in the docs. ## Notes For information that is important but not critical, use notes. Notes are a good way to add information without distracting the user from the main content. > **Good to know**: This is a single line note. > **Good to know**: > > - We also use this format for multi-line notes. > - There are sometimes multiple items worth knowing or keeping in mind. **Output:** > **Good to know**: This is a single line note. > **Good to know**: > > * We also use this format for multi-line notes. > * There are sometimes multiple item worths knowing or keeping in mind. Related Links guide the user's learning journey by adding links to logical next steps. * Links will be displayed in cards under the main content of the page. * Links will be automatically generated for pages that have child pages. For example, the Optimizing section has links to all of its child pages. Create related links using the `related` field in the page's metadata. --- related: description: Learn how to quickly get started with your first application. links: - app/building-your-application/routing/defining-routes - app/building-your-application/data-fetching - app/api-reference/file-conventions/page --- ### Nested Fields | Field | Required? | Description | | --- | --- | --- | | `title` | Optional | The title of the card list. Defaults to **Next Steps**. | | `description` | Optional | The description of the card list. | | `links` | Required | A list of links to other doc pages. Each list item should be a relative URL path (without a leading slash) e.g. `app/api-reference/file-conventions/page` | ## Diagrams Diagrams are a great way to explain complex concepts. We use Figma to create diagrams, following Vercel's design guide. The diagrams currently live in the `/public` folder in our private Next.js site. If you'd like to update or add a diagram, please open a GitHub issue with your ideas. ## Custom Components and HTML These are the React Components available for the docs: `<Image />` (next/image), `<PagesOnly />`, `<AppOnly />`, `<Cross />`, and `<Check />`. We do not allow raw HTML in the docs besides the `<details>` tag. If you have ideas for new components, please open a GitHub issue. ## Style Guide This section contains guidelines for writing docs for those who are new to technical writing. ### Page Templates While we don't have a strict template for pages, there are page sections you'll see repeated across the docs: * **Overview:** The first paragraph of a page should tell the user what the feature is and what it's used for. Followed by a minimum working example or its API reference. * **Convention:** If the feature has a convention, it should be explained here. * **Examples**: Show how the feature can be used with different use cases. * **API Tables**: API Pages should have an overview table at the of the page with jump-to-section links (when possible). * **Next Steps (Related Links)**: Add links to related pages to guide the user's learning journey. Feel free to add these sections as needed. ### Page Types Docs pages are also split into two categories: Conceptual and Reference. * **Conceptual** pages are used to explain a concept or feature. They are usually longer and contain more information than reference pages. In the Next.js docs, conceptual pages are found in the **Building Your Application** section. * **Reference** pages are used to explain a specific API. They are usually shorter and more focused. In the Next.js docs, reference pages are found in the **API Reference** section. > **Good to know**: Depending on the page you're contributing to, you may need to follow a different voice and style. For example, conceptual pages are more instructional and use the word _you_ to address the user. Reference pages are more technical, they use more imperative words like "create, update, accept" and tend to omit the word _you_. ### Voice Here are some guidelines to maintain a consistent style and voice across the docs: * Write clear, concise sentences. Avoid tangents. * If you find yourself using a lot of commas, consider breaking the sentence into multiple sentences or use a list. * Swap out complex words for simpler ones. For example, _use_ instead of _utilize_. * Be mindful with the word _this_. It can be ambiguous and confusing, don't be afraid to repeat the subject of the sentence if unclear. * For example, _Next.js uses React_ instead of _Next.js uses this_. * Use an active voice instead of passive. An active sentence is easier to read. * For example, _Next.js uses React_ instead of _React is used by Next.js_. If you find yourself using words like _was_ and _by_ you may be using a passive voice. * Avoid using words like _easy_, _quick_, _simple_, _just_, etc. This is subjective and can be discouraging to users. * Avoid negative words like _don't_, _can't_, _won't_, etc. This can be discouraging to readers. * For example, _"You can use the `Link` component to create links between pages"_ instead of _"Don't use the `<a>` tag to create links between pages"_. * Write in second person (you/your). This is more personal and engaging. * Use gender-neutral language. Use _developers_, _users_, or _readers_, when referring to the audience. * If adding code examples, ensure they are properly formatted and working. While these guidelines are not exhaustive, they should help you get started. If you'd like to dive deeper into technical writing, check out the Google Technical Writing Course. * * * Thank you for contributing to the docs and being part of the Next.js community! --- ## Page: https://nextjs.org/docs/app #### Subscribe to our newsletter Stay updated on new releases and features, guides, and case studies. --- ## Page: https://nextjs.org/docs/messages/no-cache ## Why This Error Occurred A Next.js build was triggered in a continuous integration environment, but no cache was detected. This results in slower builds and can hurt Next.js' persistent caching of client-side bundles across builds. ## Possible Ways to Fix It > **Note**: If this is a new project, or being built for the first time in your CI, you can ignore this error. However, you'll want to make sure it doesn't continue to happen and fix it if it does! Follow the instructions in CI Build Caching to ensure your Next.js cache is persisted between builds. --- ## Page: https://nextjs.org/docs/messages/sync-dynamic-apis Learn more about why accessing certain APIs synchronously now warns. ## Why This Warning Occurred Somewhere in your code you used an API that opts into dynamic rendering. Dynamic APIs are: * The `params` and `searchParams` props that get provided to pages, layouts, metadata APIs, and route handlers. * `cookies()`, `draftMode()`, and `headers()` from `next/headers` In Next 15, these APIs have been made asynchronous. You can read more about this in the Next.js 15 Upgrade Guide. For example, the following code will issue a warning: function Page({ params }) { // direct access of `params.id`. return <p>ID: {params.id}</p> } This also includes enumerating (e.g. `{...params}`, or `Object.keys(params)`) or iterating over the return value of these APIs (e.g. `[...headers()]` or `for (const cookie of cookies())`, or explicitly with `cookies()[Symbol.iterator]()`). In the version of Next.js that issued this warning, access to these properties is still possible directly but will warn. In future versions, these APIs will be async and direct access will not work as expected. ## Possible Ways to Fix It The `next-async-request-api` codemod can fix many of these cases automatically: $ npx @next/codemod@canary next-async-request-api . The codemod cannot cover all cases, so you may need to manually adjust some code. If the warning occurred on the Server (e.g. a route handler, or a Server Component), you must `await` the dynamic API to access its properties: async function Page({ params }) { // asynchronous access of `params.id`. const { id } = await params return <p>ID: {id}</p> } If the warning occurred in a synchronous component (e.g. a Client component), you must use `React.use()` to unwrap the Promise first: 'use client' import * as React from 'react' function Page({ params }) { // asynchronous access of `params.id`. const { id } = React.use(params) return <p>ID: {id}</p> } ### Unmigratable Cases If Next.js codemod found anything that is not able to be migrated by the codemod, it will leave a comment with `@next-codemod-error` prefix and the suggested action, for example: In this case, you need to manually await the call to `cookies()`, and change the function to async. Then refactor the usages of the function to be properly awaited: export function MyCookiesComponent() { const c = /* @next-codemod-error Manually await this call and refactor the function to be async */ cookies() return c.get('name') } ### Enforced Migration with Linter If you didn't address the comments that starting with `@next-codemod-error` left by the codemod, Next.js will error in both dev and build to enforce you to address the issues. You can review the changes and follow the suggestion in the comments. You can either make the necessary changes and remove the comment, or replace the comment prefix `@next-codemod-error` with `@next-codemod-ignore` If there's no action to be taken, the comment prefix `@next-codemod-ignore` will bypass the build error. - /* @next-codemod-error <suggested message> */ + /* @next-codemod-ignore */ > **Good to know**: > > You can delay unwrapping the Promise (either with `await` or `React.use`) until you actually need to consume the value. This will allow Next.js to statically render more of your page. --- ## Page: https://nextjs.org/docs/messages/url-deprecated ## Why This Error Occurred In versions prior to 6.x the `url` property got magically injected into every `Page` component (every page inside the `pages` directory). The reason this is going away is that we want to make things very predictable and explicit. Having a magical url property coming out of nowhere doesn't aid that goal. > **Note**: ⚠️ In some cases using React Dev Tools may trigger this warning even if you do not reference `url` anywhere in your code. Try temporarily disabling the extension and see if the warning persists. ## Possible Ways to Fix It Since Next 5 we provide a way to explicitly inject the Next.js router object into pages and all their descending components. The `router` property that is injected will hold the same values as `url`, like `pathname`, `asPath`, and `query`. Here's an example of using `withRouter`: pages/index.js import { withRouter } from 'next/router' class Page extends React.Component { render() { const { router } = this.props console.log(router) return <div>{router.pathname}</div> } } export default withRouter(Page) We provide a codemod (a code to code transformation) to automatically change the `url` property usages to `withRouter`. You can find this codemod and instructions on how to run it here: Use `withRouter` --- ## Page: https://nextjs.org/docs/messages/middleware-upgrade-guide As we work on improving Middleware for General Availability (GA), we've made some changes to the Middleware APIs (and how you define Middleware in your application) based on your feedback. This upgrade guide will help you understand the changes, why they were made, and how to migrate your existing Middleware to the new API. The guide is for Next.js developers who: * Currently use the beta Next.js Middleware features * Choose to upgrade to the next stable version of Next.js (`v12.2`) You can start upgrading your Middleware usage today with the latest release (`npm i next@latest`). > **Note**: These changes described in this guide are included in Next.js `12.2`. You can keep your current site structure, including nested Middleware, until you move to `12.2` (or a `canary` build of Next.js). If you have ESLint configured, you will need to run `npm i eslint-config-next@latest --save-dev` to upgrade your ESLint configuration to ensure the same version is being used as the Next.js version. You might also need to restart VSCode for the changes to take effect. ## Using Next.js Middleware on Vercel If you're using Next.js on Vercel, your existing deploys using Middleware will continue to work, and you can continue to deploy your site using Middleware. When you upgrade your site to the next stable version of Next.js (`v12.2`), you will need to follow this upgrade guide to update your Middleware. ## Breaking changes 1. No Nested Middleware 2. No Response Body 3. Cookies API Revamped 4. New User-Agent Helper 5. No More Page Match Data 6. Executing Middleware on Internal Next.js Requests ## No Nested Middleware ### Summary of changes * Define a single Middleware file next to your `pages` folder * No need to prefix the file with an underscore * A custom matcher can be used to define matching routes using an exported config object ### Explanation Previously, you could create a `_middleware.ts` file under the `pages` directory at any level. Middleware execution was based on the file path where it was created. Based on customer feedback, we have replaced this API with a single root Middleware, which provides the following improvements: * **Faster execution with lower latency**: With nested Middleware, a single request could invoke multiple Middleware functions. A single Middleware means a single function execution, which is more efficient. * **Less expensive**: Middleware usage is billed per invocation. Using nested Middleware, a single request could invoke multiple Middleware functions, meaning multiple Middleware charges per request. A single Middleware means a single invocation per request and is more cost effective. * **Middleware can conveniently filter on things besides routes**: With nested Middleware, the Middleware files were located in the `pages` directory and Middleware was executed based on request paths. By moving to a single root Middleware, you can still execute code based on request paths, but you can now more conveniently execute Middleware based on other conditions, like `cookies` or the presence of a request header. * **Deterministic execution ordering**: With nested Middleware, a single request could match multiple Middleware functions. For example, a request to `/dashboard/users/*` would invoke Middleware defined in both `/dashboard/users/_middleware.ts` and `/dashboard/_middleware.js`. However, the execution order is difficult to reason about. Moving to a single, root Middleware more explicitly defines execution order. * **Supports Next.js Layouts (RFC)**: Moving to a single, root Middleware helps support the new Layouts (RFC) in Next.js. ### How to upgrade You should declare **one single Middleware file** in your application, which should be located next to the `pages` directory and named **without** an `_` prefix. Your Middleware file can still have either a `.ts` or `.js` extension. Middleware will be invoked for **every route in the app**, and a custom matcher can be used to define matching filters. The following is an example for a Middleware that triggers for `/about/*` and `/dashboard/:path*`, the custom matcher is defined in an exported config object: import { NextResponse } from 'next/server' import type { NextRequest } from 'next/server' export function middleware(request: NextRequest) { return NextResponse.rewrite(new URL('/about-2', request.url)) } // Supports both a single string value or an array of matchers export const config = { matcher: ['/about/:path*', '/dashboard/:path*'], } The matcher config also allows full regex so matching like negative lookaheads or character matching is supported. An example of a negative lookahead to match all except specific paths can be seen here: export const config = { matcher: [ /* * Match all request paths except for the ones starting with: * - api (API routes) * - _next/static (static files) * - favicon.ico (favicon file) */ '/((?!api|_next/static|favicon.ico).*)', ], } While the config option is preferred since it doesn't get invoked on every request, you can also use conditional statements to only run the Middleware when it matches specific paths. One advantage of using conditionals is defining explicit ordering for when Middleware executes. The following example shows how you can merge two previously nested Middleware: import type { NextRequest } from 'next/server' export function middleware(request: NextRequest) { if (request.nextUrl.pathname.startsWith('/about')) { // This logic is only applied to /about } if (request.nextUrl.pathname.startsWith('/dashboard')) { // This logic is only applied to /dashboard } } ## No Response Body ### Summary of changes * Middleware can no longer produce a response body * If your Middleware _does_ respond with a body, a runtime error will be thrown * Migrate to using `rewrite`/`redirect` to pages/APIs handling a response ### Explanation To respect the differences in client-side and server-side navigation, and to help ensure that developers do not build insecure Middleware, we are removing the ability to send response bodies in Middleware. This ensures that Middleware is only used to `rewrite`, `redirect`, or modify the incoming request (e.g. setting cookies). The following patterns will no longer work: new Response('a text value') new Response(streamOrBuffer) new Response(JSON.stringify(obj), { headers: 'application/json' }) NextResponse.json() ### How to upgrade For cases where Middleware is used to respond (such as authorization), you should migrate to use `rewrite`/`redirect` to pages that show an authorization error, login forms, or to an API Route. #### Before import { NextResponse } from 'next/server' import type { NextRequest } from 'next/server' import { isAuthValid } from './lib/auth' export function middleware(request: NextRequest) { // Example function to validate auth if (isAuthValid(request)) { return NextResponse.next() } return NextResponse.json({ message: 'Auth required' }, { status: 401 }) } #### After import { NextResponse } from 'next/server' import type { NextRequest } from 'next/server' import { isAuthValid } from './lib/auth' export function middleware(request: NextRequest) { // Example function to validate auth if (isAuthValid(request)) { return NextResponse.next() } const loginUrl = new URL('/login', request.url) loginUrl.searchParams.set('from', request.nextUrl.pathname) return NextResponse.redirect(loginUrl) } #### Edge API Routes If you were previously using Middleware to forward headers to an external API, you can now use Edge API Routes: import { type NextRequest } from 'next/server' export const config = { runtime: 'edge', } export default async function handler(req: NextRequest) { const authorization = req.cookies.get('authorization') return fetch('https://backend-api.com/api/protected', { method: req.method, headers: { authorization, }, redirect: 'manual', }) } ## Cookies API Revamped ### Summary of changes | Added | Removed | | --- | --- | | `cookies.set` | `cookie` | | `cookies.delete` | `clearCookie` | | `cookies.getWithOptions` | `cookies` | ### Explanation Based on beta feedback, we are changing the Cookies API in `NextRequest` and `NextResponse` to align more to a `get`/`set` model. The `Cookies` API extends Map, including methods like entries and values. ### How to upgrade `NextResponse` now has a `cookies` instance with: * `cookies.delete` * `cookies.set` * `cookies.getWithOptions` As well as other extended methods from `Map`. #### Before import { NextResponse } from 'next/server' import type { NextRequest } from 'next/server' export function middleware(request: NextRequest) { // create an instance of the class to access the public methods. This uses `next()`, // you could use `redirect()` or `rewrite()` as well let response = NextResponse.next() // get the cookies from the request let cookieFromRequest = request.cookies['my-cookie'] // set the `cookie` response.cookie('hello', 'world') // set the `cookie` with options const cookieWithOptions = response.cookie('hello', 'world', { path: '/', maxAge: 1000 * 60 * 60 * 24 * 7, httpOnly: true, sameSite: 'strict', domain: 'example.com', }) // clear the `cookie` response.clearCookie('hello') return response } #### After export function middleware() { const response = new NextResponse() // set a cookie response.cookies.set('vercel', 'fast') // set another cookie with options response.cookies.set('nextjs', 'awesome', { path: '/test' }) // get all the details of a cookie const { value, ...options } = response.cookies.getWithOptions('vercel') console.log(value) // => 'fast' console.log(options) // => { name: 'vercel', Path: '/test' } // deleting a cookie will mark it as expired response.cookies.delete('vercel') return response } ## New User-Agent Helper ### Summary of changes * Accessing the user agent is no longer available on the request object * We've added a new `userAgent` helper to reduce Middleware size by `17kb` ### Explanation To help reduce the size of your Middleware, we have extracted the user agent from the request object and created a new helper `userAgent`. The helper is imported from `next/server` and allows you to opt in to using the user agent. The helper gives you access to the same properties that were available from the request object. ### How to upgrade * Import the `userAgent` helper from `next/server` * Destructure the properties you need to work with #### Before import { NextRequest, NextResponse } from 'next/server' export function middleware(request: NextRequest) { const url = request.nextUrl const viewport = request.ua.device.type === 'mobile' ? 'mobile' : 'desktop' url.searchParams.set('viewport', viewport) return NextResponse.rewrite(url) } #### After import { NextRequest, NextResponse, userAgent } from 'next/server' export function middleware(request: NextRequest) { const url = request.nextUrl const { device } = userAgent(request) const viewport = device.type === 'mobile' ? 'mobile' : 'desktop' url.searchParams.set('viewport', viewport) return NextResponse.rewrite(url) } ## No More Page Match Data ### Summary of changes * Use `URLPattern` to check if a Middleware is being invoked for a certain page match ### Explanation Currently, Middleware estimates whether you are serving an asset of a Page based on the Next.js routes manifest (internal configuration). This value is surfaced through `request.page`. To make page and asset matching more accurate, we are now using the web standard `URLPattern` API. ### How to upgrade Use `URLPattern` to check if a Middleware is being invoked for a certain page match. #### Before import { NextResponse } from 'next/server' import type { NextRequest, NextFetchEvent } from 'next/server' export function middleware(request: NextRequest, event: NextFetchEvent) { const { params } = event.request.page const { locale, slug } = params if (locale && slug) { const { search, protocol, host } = request.nextUrl const url = new URL(`${protocol}//${locale}.${host}/${slug}${search}`) return NextResponse.redirect(url) } } #### After import { NextResponse } from 'next/server' import type { NextRequest } from 'next/server' const PATTERNS = [ [ new URLPattern({ pathname: '/:locale/:slug' }), ({ pathname }) => pathname.groups, ], ] const params = (url) => { const input = url.split('?')[0] let result = {} for (const [pattern, handler] of PATTERNS) { const patternResult = pattern.exec(input) if (patternResult !== null && 'pathname' in patternResult) { result = handler(patternResult) break } } return result } export function middleware(request: NextRequest) { const { locale, slug } = params(request.url) if (locale && slug) { const { search, protocol, host } = request.nextUrl const url = new URL(`${protocol}//${locale}.${host}/${slug}${search}`) return NextResponse.redirect(url) } } ## Executing Middleware on Internal Next.js Requests ### Summary of changes * Middleware will be executed for _all_ requests, including `_next` ### Explanation Prior to Next.js `v12.2`, Middleware was not executed for `_next` requests. For cases where Middleware is used for authorization, you should migrate to use `rewrite`/`redirect` to Pages that show an authorization error, login forms, or to an API Route. See No Response Body for an example of how to migrate to use `rewrite`/`redirect`. --- ## Page: https://nextjs.org/docs/app/building-your-application/upgrading/canary ## How to upgrade to version 15 ## Upgrading from 14 to 15 To update to Next.js version 15, you can use the `upgrade` codemod: npx @next/codemod@canary upgrade latest If you prefer to do it manually, ensure that you're installing the latest Next & React versions: npm i next@latest react@latest react-dom@latest eslint-config-next@latest > **Good to know:** > > * If you see a peer dependencies warning, you may need to update `react` and `react-dom` to the suggested versions, or you use the `--force` or `--legacy-peer-deps` flag to ignore the warning. This won't be necessary once both Next.js 15 and React 19 are stable. ## React 19 * The minimum versions of `react` and `react-dom` is now 19. * `useFormState` has been replaced by `useActionState`. The `useFormState` hook is still available in React 19, but it is deprecated and will be removed in a future release. `useActionState` is recommended and includes additional properties like reading the `pending` state directly. Learn more. * `useFormStatus` now includes additional keys like `data`, `method`, and `action`. If you are not using React 19, only the `pending` key is available. Learn more. * Read more in the React 19 upgrade guide. > **Good to know:** If you are using TypeScript, ensure you also upgrade `@types/react` and `@types/react-dom` to their latest versions. ## Async Request APIs (Breaking change) Previously synchronous Dynamic APIs that rely on runtime information are now **asynchronous**: * `cookies` * `headers` * `draftMode` * `params` in `layout.js`, `page.js`, `route.js`, `default.js`, `opengraph-image`, `twitter-image`, `icon`, and `apple-icon`. * `searchParams` in `page.js` To ease the burden of migration, a codemod is available to automate the process and the APIs can temporarily be accessed synchronously. ### `cookies` #### Recommended Async Usage import { cookies } from 'next/headers' // Before const cookieStore = cookies() const token = cookieStore.get('token') // After const cookieStore = await cookies() const token = cookieStore.get('token') #### Temporary Synchronous Usage import { cookies, type UnsafeUnwrappedCookies } from 'next/headers' // Before const cookieStore = cookies() const token = cookieStore.get('token') // After const cookieStore = cookies() as unknown as UnsafeUnwrappedCookies // will log a warning in dev const token = cookieStore.get('token') #### Recommended Async Usage import { headers } from 'next/headers' // Before const headersList = headers() const userAgent = headersList.get('user-agent') // After const headersList = await headers() const userAgent = headersList.get('user-agent') #### Temporary Synchronous Usage import { headers, type UnsafeUnwrappedHeaders } from 'next/headers' // Before const headersList = headers() const userAgent = headersList.get('user-agent') // After const headersList = headers() as unknown as UnsafeUnwrappedHeaders // will log a warning in dev const userAgent = headersList.get('user-agent') ### `draftMode` #### Recommended Async Usage import { draftMode } from 'next/headers' // Before const { isEnabled } = draftMode() // After const { isEnabled } = await draftMode() #### Temporary Synchronous Usage import { draftMode, type UnsafeUnwrappedDraftMode } from 'next/headers' // Before const { isEnabled } = draftMode() // After // will log a warning in dev const { isEnabled } = draftMode() as unknown as UnsafeUnwrappedDraftMode ### `params` & `searchParams` #### Asynchronous Layout // Before type Params = { slug: string } export function generateMetadata({ params }: { params: Params }) { const { slug } = params } export default async function Layout({ children, params, }: { children: React.ReactNode params: Params }) { const { slug } = params } // After type Params = Promise<{ slug: string }> export async function generateMetadata({ params }: { params: Params }) { const { slug } = await params } export default async function Layout({ children, params, }: { children: React.ReactNode params: Params }) { const { slug } = await params } #### Synchronous Layout // Before type Params = { slug: string } export default function Layout({ children, params, }: { children: React.ReactNode params: Params }) { const { slug } = params } // After import { use } from 'react' type Params = Promise<{ slug: string }> export default function Layout(props: { children: React.ReactNode params: Params }) { const params = use(props.params) const slug = params.slug } #### Asynchronous Page // Before type Params = { slug: string } type SearchParams = { [key: string]: string | string[] | undefined } export function generateMetadata({ params, searchParams, }: { params: Params searchParams: SearchParams }) { const { slug } = params const { query } = searchParams } export default async function Page({ params, searchParams, }: { params: Params searchParams: SearchParams }) { const { slug } = params const { query } = searchParams } // After type Params = Promise<{ slug: string }> type SearchParams = Promise<{ [key: string]: string | string[] | undefined }> export async function generateMetadata(props: { params: Params searchParams: SearchParams }) { const params = await props.params const searchParams = await props.searchParams const slug = params.slug const query = searchParams.query } export default async function Page(props: { params: Params searchParams: SearchParams }) { const params = await props.params const searchParams = await props.searchParams const slug = params.slug const query = searchParams.query } #### Synchronous Page 'use client' // Before type Params = { slug: string } type SearchParams = { [key: string]: string | string[] | undefined } export default function Page({ params, searchParams, }: { params: Params searchParams: SearchParams }) { const { slug } = params const { query } = searchParams } // After import { use } from 'react' type Params = Promise<{ slug: string }> type SearchParams = Promise<{ [key: string]: string | string[] | undefined }> export default function Page(props: { params: Params searchParams: SearchParams }) { const params = use(props.params) const searchParams = use(props.searchParams) const slug = params.slug const query = searchParams.query } // Before export default function Page({ params, searchParams }) { const { slug } = params const { query } = searchParams } // After import { use } from "react" export default function Page(props) { const params = use(props.params) const searchParams = use(props.searchParams) const slug = params.slug const query = searchParams.query } #### Route Handlers // Before type Params = { slug: string } export async function GET(request: Request, segmentData: { params: Params }) { const params = segmentData.params const slug = params.slug } // After type Params = Promise<{ slug: string }> export async function GET(request: Request, segmentData: { params: Params }) { const params = await segmentData.params const slug = params.slug } // Before export async function GET(request, segmentData) { const params = segmentData.params const slug = params.slug } // After export async function GET(request, segmentData) { const params = await segmentData.params const slug = params.slug } ## `runtime` configuration (Breaking change) The `runtime` segment configuration previously supported a value of `experimental-edge` in addition to `edge`. Both configurations refer to the same thing, and to simplify the options, we will now error if `experimental-edge` is used. To fix this, update your `runtime` configuration to `edge`. A codemod is available to automatically do this. ## `fetch` requests `fetch` requests are no longer cached by default. To opt specific `fetch` requests into caching, you can pass the `cache: 'force-cache'` option. export default async function RootLayout() { const a = await fetch('https://...') // Not Cached const b = await fetch('https://...', { cache: 'force-cache' }) // Cached // ... } To opt all `fetch` requests in a layout or page into caching, you can use the `export const fetchCache = 'default-cache'` segment config option. If individual `fetch` requests specify a `cache` option, that will be used instead. // Since this is the root layout, all fetch requests in the app // that don't set their own cache option will be cached. export const fetchCache = 'default-cache' export default async function RootLayout() { const a = await fetch('https://...') // Cached const b = await fetch('https://...', { cache: 'no-store' }) // Not cached // ... } ## Route Handlers `GET` functions in Route Handlers are no longer cached by default. To opt `GET` methods into caching, you can use a route config option such as `export const dynamic = 'force-static'` in your Route Handler file. export const dynamic = 'force-static' export async function GET() {} ## Client-side Router Cache When navigating between pages via `<Link>` or `useRouter`, page segments are no longer reused from the client-side router cache. However, they are still reused during browser backward and forward navigation and for shared layouts. To opt page segments into caching, you can use the `staleTimes` config option: /** @type {import('next').NextConfig} */ const nextConfig = { experimental: { staleTimes: { dynamic: 30, static: 180, }, }, } module.exports = nextConfig Layouts and loading states are still cached and reused on navigation. ## `next/font` The `@next/font` package has been removed in favor of the built-in `next/font`. A codemod is available to safely and automatically rename your imports. // Before import { Inter } from '@next/font/google' // After import { Inter } from 'next/font/google' ## bundlePagesRouterDependencies `experimental.bundlePagesExternals` is now stable and renamed to `bundlePagesRouterDependencies`. /** @type {import('next').NextConfig} */ const nextConfig = { // Before experimental: { bundlePagesExternals: true, }, // After bundlePagesRouterDependencies: true, } module.exports = nextConfig ## serverExternalPackages `experimental.serverComponentsExternalPackages` is now stable and renamed to `serverExternalPackages`. /** @type {import('next').NextConfig} */ const nextConfig = { // Before experimental: { serverComponentsExternalPackages: ['package-name'], }, // After serverExternalPackages: ['package-name'], } module.exports = nextConfig ## Speed Insights Auto instrumentation for Speed Insights was removed in Next.js 15. To continue using Speed Insights, follow the Vercel Speed Insights Quickstart guide. ## `NextRequest` Geolocation The `geo` and `ip` properties on `NextRequest` have been removed as these values are provided by your hosting provider. A codemod is available to automate this migration. If you are using Vercel, you can alternatively use the `geolocation` and `ipAddress` functions from `@vercel/functions` instead: import { geolocation } from '@vercel/functions' import type { NextRequest } from 'next/server' export function middleware(request: NextRequest) { const { city } = geolocation(request) // ... } import { ipAddress } from '@vercel/functions' import type { NextRequest } from 'next/server' export function middleware(request: NextRequest) { const ip = ipAddress(request) // ... } --- ## Page: https://nextjs.org/docs/messages/google-font-display > Enforce font-display behavior with Google Fonts. ## Why This Error Occurred For a Google Font, the font-display descriptor was either missing or set to `auto`, `block`, or `fallback`, which are not recommended. ## Possible Ways to Fix It For most cases, the best font display strategy for custom fonts is `optional`. pages/index.js import Head from 'next/head' export default function IndexPage() { return ( <div> <Head> <link href="https://fonts.googleapis.com/css2?family=Krona+One&display=optional" rel="stylesheet" /> </Head> </div> ) } Specifying `display=optional` minimizes the risk of invisible text or layout shift. If swapping to the custom font after it has loaded is important to you, then use `display=swap` instead. ### When Not To Use It If you want to specifically display a font using an `auto`, `block`, or `fallback` strategy, then you can disable this rule. ## Useful Links * Controlling Font Performance with font-display * Google Fonts API Docs * CSS `font-display` property --- ## Page: https://nextjs.org/docs/messages/google-font-preconnect > **Note**: Next.js automatically adds `<link rel="preconnect" />` after version `12.0.1`. > Ensure `preconnect` is used with Google Fonts. ## Why This Error Occurred A preconnect resource hint was not used with a request to the Google Fonts domain. Adding `preconnect` is recommended to initiate an early connection to the origin. ## Possible Ways to Fix It Add `rel="preconnect"` to the Google Font domain `<link>` tag: <link rel="preconnect" href="https://fonts.gstatic.com" /> > **Note**: a **separate** link with `dns-prefetch` can be used as a fallback for browsers that don't support `preconnect` although this is not required. ## Useful Links * Preconnect to required origins * Preconnect and dns-prefetch * Next.js Font Optimization Was this helpful? supported. --- ## Page: https://nextjs.org/docs/messages/inline-script-id > Enforce `id` attribute on `next/script` components with inline content. ## Why This Error Occurred `next/script` components with inline content require an `id` attribute to be defined to track and optimize the script. ## Possible Ways to Fix It Add an `id` attribute to the `next/script` component. pages/\_app.js import Script from 'next/script' export default function App({ Component, pageProps }) { return ( <> <Script id="my-script">{`console.log('Hello world!');`}</Script> <Component {...pageProps} /> </> ) } ## Useful links * Docs for Next.js Script component --- ## Page: https://nextjs.org/docs/messages/next-script-for-ga DocsErrorsUsing Google Analytics with Next.js (through \`next/script\`) > Prefer `next/script` component when using the inline script for Google Analytics. ## Why This Error Occurred An inline script was used for Google Analytics which might impact your webpage's performance. Instead, we recommend using `next/script` through the `@next/third-parties` library. ## Possible Ways to Fix It ### Use `@next/third-parties` to add Google Analytics **`@next/third-parties`** is a library that provides a collection of components and utilities that improve the performance and developer experience of loading popular third-party libraries in your Next.js application. It is available with Next.js 14 (install `next@latest`). The `GoogleAnalytics` component can be used to include Google Analytics 4 to your page via the Google tag (`gtag.js`). By default, it fetches the original scripts after hydration occurs on the page. > **Recommendation**: If Google Tag Manager is already included in your application, you can configure Google Analytics directly using it, rather than including Google Analytics as a separate component. Refer to the documentation to learn more about the differences between Tag Manager and `gtag.js`. To load Google Analytics for all routes, include the component directly in your root layout and pass in your measurement ID: import { GoogleAnalytics } from '@next/third-parties/google' export default function RootLayout({ children, }: { children: React.ReactNode }) { return ( <html lang="en"> <body>{children}</body> <GoogleAnalytics gaId="G-XYZ" /> </html> ) } To load Google Analytics for a single route, include the component in your page file: import { GoogleAnalytics } from '@next/third-parties/google' export default function Page() { return <GoogleAnalytics gaId="G-XYZ" /> } > **Good to know:** > > * If you are using the Pages Router, please refer to the `pages/` documentation. > * `@next/third-parties` also supports Google Tag Manager and other third parties. > * Using `@next/third-parties` is not required. You can also use the `next/script` component directly. Refer to the `next/script` documentation to learn more. ## Useful Links * `@next/third-parties` Documentation * `next/script` Documentation Was this helpful? supported. --- ## Page: https://nextjs.org/docs/messages/no-assign-module-variable #### Subscribe to our newsletter Stay updated on new releases and features, guides, and case studies. --- ## Page: https://nextjs.org/docs/messages/no-async-client-component > Client components cannot be async functions. ## Why This Error Occurred The error occurs when you try to define a client component as an async function. React client components do not support async functions. For example: 'use client' // This will cause an error async function ClientComponent() { // ... } ## Possible Ways to Fix It 1. **Convert to a Server Component**: If possible, convert your client component to a server component. This allows you to use `async`/`await` directly in your component. 2. **Remove the `async` keyword**: If you need to keep it as a client component, remove the `async` keyword and handle data fetching differently. 3. **Use React hooks for data fetching**: Utilize hooks like `useEffect` for client-side data fetching, or use third-party libraries. 4. **Leverage the `use` hook with a Context Provider**: Pass promises to child components using context, then resolve them with the `use` hook. ### Recommended: Server-side data fetching We recommend fetching data on the server. For example: export default async function Page() { const data = await fetch('https://api.vercel.app/blog') const posts = await data.json() return ( <ul> {posts.map((post) => ( <li key={post.id}>{post.title}</li> ))} </ul> ) } ### Using `use` with Context Provider Another pattern to explore is using the React `use` hook with a Context Provider. This allows you to pass Promises to child components and resolve them using the `use` hook . Here's an example: First, let's create a separate file for the context provider: 'use client' import { createContext, useContext } from 'react' export const BlogContext = createContext<Promise<any> | null>(null) export function BlogProvider({ children, blogPromise, }: { children: React.ReactNode blogPromise: Promise<any> }) { return ( <BlogContext.Provider value={blogPromise}>{children}</BlogContext.Provider> ) } export function useBlogContext() { const context = useContext(BlogContext) if (!context) { throw new Error('useBlogContext must be used within a BlogProvider') } return context } Now, let's create the Promise in a Server Component and stream it to the client: import { BlogProvider } from './context' export default function Page() { const blogPromise = fetch('https://api.vercel.app/blog').then((res) => res.json() ) return ( <BlogProvider blogPromise={blogPromise}> <BlogPosts /> </BlogProvider> ) } Here is the blog posts component: 'use client' import { use } from 'react' import { useBlogContext } from './context' export function BlogPosts() { const blogPromise = useBlogContext() const posts = use(blogPromise) return <div>{posts.length} blog posts</div> } This pattern allows you to start data fetching early and pass the Promise down to child components, which can then use the `use` hook to access the data when it's ready. ### Client-side data fetching In scenarios where client fetching is needed, you can call `fetch` in `useEffect` (not recommended), or lean on popular React libraries in the community (such as SWR or React Query) for client fetching. 'use client' import { useState, useEffect } from 'react' export function Posts() { const [posts, setPosts] = useState(null) useEffect(() => { async function fetchPosts() { const res = await fetch('https://api.vercel.app/blog') const data = await res.json() setPosts(data) } fetchPosts() }, []) if (!posts) return <div>Loading...</div> return ( <ul> {posts.map((post) => ( <li key={post.id}>{post.title}</li> ))} </ul> ) } --- ## Page: https://nextjs.org/docs/messages/no-before-interactive-script-outside-document > Prevent usage of `next/script`'s `beforeInteractive` strategy outside of `app/layout.jsx` or `pages/_document.js`. ## Why This Error Occurred You cannot use the `next/script` component with the `beforeInteractive` strategy outside `app/layout.jsx` or `pages/_document.js`. That's because `beforeInteractive` strategy only works inside **`app/layout.jsx`** or **`pages/_document.js`** and is designed to load scripts that are needed by the entire site (i.e. the script will load when any page in the application has been loaded server-side). ## Possible Ways to Fix It ### App Router If you want a global script, and you are using the App Router, move the script inside `app/layout.jsx`. app/layout.jsx import Script from 'next/script' export default function RootLayout({ children }) { return ( <html lang="en"> <body>{children}</body> <Script src="https://example.com/script.js" strategy="beforeInteractive" /> </html> ) } ### Pages Router If you want a global script, and you are using the Pages Router, move the script inside `pages/_document.js`. pages/\_document.js import { Html, Head, Main, NextScript } from 'next/document' import Script from 'next/script' export default function Document() { return ( <Html> <Head /> <body> <Main /> <NextScript /> <Script src="https://example.com/script.js" strategy="beforeInteractive" ></Script> </body> </Html> ) } ## Useful Links * App Router Script Optimization * Pages Router Script Optimization --- ## Page: https://nextjs.org/docs/messages/no-css-tags > Prevent manual stylesheet tags. ## Why This Error Occurred A `link` element was used to link to an external stylesheet. This can negatively affect CSS resource loading on your webpage. ## Possible Ways to Fix It There are multiple ways to include styles using Next.js' built-in CSS support, including the option to use `@import` within the root stylesheet that is imported in `pages/_app.js`: styles.css /* Root stylesheet */ @import 'extra.css'; body { /* ... */ } Another option is to use CSS Modules to import the CSS file scoped specifically to the component. pages/index.js import styles from './extra.module.css' export class Home { render() { return ( <div> <button type="button" className={styles.active}> Open </button> </div> ) } } Refer to the Built-In CSS Support documentation to learn about all the ways to include CSS to your application. --- ## Page: https://nextjs.org/docs/messages/no-document-import-in-page > Prevent importing `next/document` outside of `pages/_document.js`. ## Why This Error Occurred `next/document` was imported in a page outside of `pages/_document.js` (or `pages/_document.tsx` if you are using TypeScript). This can cause unexpected issues in your application. ## Possible Ways to Fix It Only import and use `next/document` within `pages/_document.js` (or `pages/_document.tsx`) to override the default `Document` component: pages/\_document.js import Document, { Html, Head, Main, NextScript } from 'next/document' class MyDocument extends Document { //... } export default MyDocument ## Useful Links * Custom Document --- ## Page: https://nextjs.org/docs/messages/no-duplicate-head > Prevent duplicate usage of `<Head>` in `pages/_document.js`. ## Why This Error Occurred More than a single instance of the `<Head />` component was used in a single custom document. This can cause unexpected behavior in your application. ## Possible Ways to Fix It Only use a single `<Head />` component in your custom document in `pages/_document.js`. pages/\_document.js import Document, { Html, Head, Main, NextScript } from 'next/document' class MyDocument extends Document { static async getInitialProps(ctx) { //... } render() { return ( <Html> <Head /> <body> <Main /> <NextScript /> </body> </Html> ) } } export default MyDocument ## Useful Links * Custom Document --- ## Page: https://nextjs.org/docs/messages/no-head-element > Prevent usage of `<head>` element. ## Why This Error Occurred A `<head>` element was used to include page-level metadata, but this can cause unexpected behavior in a Next.js application. Use Next.js' built-in `next/head` component instead. ## Possible Ways to Fix It Import and use the `<Head />` component: pages/index.js import Head from 'next/head' function Index() { return ( <> <Head> <title>My page title</title> <meta name="viewport" content="initial-scale=1.0, width=device-width" /> </Head> </> ) } export default Index ## Useful Links * next/head --- ## Page: https://nextjs.org/docs/messages/no-head-import-in-document > Prevent usage of `next/head` in `pages/_document.js`. ## Why This Error Occurred `next/head` was imported in `pages/_document.js`. This can cause unexpected issues in your application. ## Possible Ways to Fix It Only import and use `next/document` within `pages/_document.js` to override the default `Document` component. If you are importing `next/head` to use the `Head` component, import it from `next/document` instead in order to modify `<head>` code across all pages: pages/\_document.js import Document, { Html, Head, Main, NextScript } from 'next/document' class MyDocument extends Document { static async getInitialProps(ctx) { //... } render() { return ( <Html> <Head></Head> </Html> ) } } export default MyDocument ## Useful Links * Custom Document --- ## Page: https://nextjs.org/docs/messages/no-html-link-for-pages > Prevent usage of `<a>` elements to navigate to internal Next.js pages. ## Why This Error Occurred An `<a>` element was used to navigate to a page route without using the `next/link` component, causing unnecessary full-page refreshes. The `Link` component is required to enable client-side route transitions between pages and provide a single-page app experience. ## Possible Ways to Fix It Make sure to import the `Link` component and wrap anchor elements that route to different page routes. **Before:** pages/index.js function Home() { return ( <div> <a href="/about">About Us</a> </div> ) } **After:** pages/index.js import Link from 'next/link' function Home() { return ( <div> <Link href="/about">About Us</Link> </div> ) } export default Home ### Options #### `pagesDir` This rule can normally locate your `pages` directory automatically. If you're working in a monorepo, we recommend configuring the `rootDir` setting in `eslint-plugin-next`, which `pagesDir` will use to locate your `pages` directory. In some cases, you may also need to configure this rule directly by providing a `pages` directory. This can be a path or an array of paths. eslint.config.json { "rules": { "@next/next/no-html-link-for-pages": ["error", "packages/my-app/pages/"] } } ## Useful Links * next/link API Reference --- ## Page: https://nextjs.org/docs/messages/no-img-element > Prevent usage of `<img>` element due to slower LCP and higher bandwidth. ## Why This Error Occurred An `<img>` element was used to display an image instead of `<Image />` from `next/image`. ## Possible Ways to Fix It 1. Use `next/image` to improve performance with automatic Image Optimization. > **Note**: If deploying to a managed hosting provider, remember to check provider pricing since optimized images might be charged differently than the original images. > > Common image optimization platform pricing: > > * Vercel pricing > * Cloudinary pricing > * imgix pricing > **Note**: If self-hosting, remember to install `sharp` and check if your server has enough storage to cache the optimized images. import Image from 'next/image' function Home() { return ( <Image src="https://example.com/hero.jpg" alt="Landscape picture" width={800} height={500} /> ) } export default Home 2. If you would like to use `next/image` features such as blur-up placeholders but disable Image Optimization, you can do so using unoptimized: import Image from 'next/image' const UnoptimizedImage = (props) => { return <Image {...props} unoptimized /> } 3. You can also use the `<picture>` element with the nested `<img>` element: function Home() { return ( <picture> <source srcSet="https://example.com/hero.avif" type="image/avif" /> <source srcSet="https://example.com/hero.webp" type="image/webp" /> <img src="https://example.com/hero.jpg" alt="Landscape picture" width={800} height={500} /> </picture> ) } 4. You can use a custom image loader to optimize images. Set loaderFile to the path of your custom loader. module.exports = { images: { loader: 'custom', loaderFile: './my/image/loader.js', }, } ## Useful Links * Image Component and Image Optimization * next/image API Reference * Largest Contentful Paint (LCP) * Next.js config loaderFile option Was this helpful? supported. --- ## Page: https://nextjs.org/docs/messages/no-page-custom-font > Prevent page-only custom fonts. ## Why This Error Occurred * The custom font you're adding was added to a page - this only adds the font to the specific page and not the entire application. * The custom font you're adding was added to a separate component within `pages/_document.js` - this disables automatic font optimization. ## Possible Ways to Fix It Create the file `./pages/_document.js` and add the font to a custom Document: pages/\_document.js import Document, { Html, Head, Main, NextScript } from 'next/document' class MyDocument extends Document { render() { return ( <Html> <Head> <link href="https://fonts.googleapis.com/css2?family=Inter&display=optional" rel="stylesheet" /> </Head> <body> <Main /> <NextScript /> </body> </Html> ) } } export default MyDocument Or as a function component: pages/\_document.js import { Html, Head, Main, NextScript } from 'next/document' export default function Document() { return ( <Html> <Head> <link href="https://fonts.googleapis.com/css2?family=Inter&display=optional" rel="stylesheet" /> </Head> <body> <Main /> <NextScript /> </body> </Html> ) } ### When Not To Use It If you have a reason to only load a font for a particular page or don't care about font optimization, then you can disable this rule. ## Useful Links * Custom Document * Font Optimization --- ## Page: https://nextjs.org/docs/messages/no-script-component-in-head > Prevent usage of `next/script` in `next/head` component. ## Why This Error Occurred The `next/script` component should not be used in a `next/head` component. ## Possible Ways to Fix It Move the `<Script />` component outside of `<Head>` instead. **Before** pages/index.js import Script from 'next/script' import Head from 'next/head' export default function Index() { return ( <Head> <title>Next.js</title> <Script src="/my-script.js" /> </Head> ) } **After** pages/index.js import Script from 'next/script' import Head from 'next/head' export default function Index() { return ( <> <Head> <title>Next.js</title> </Head> <Script src="/my-script.js" /> </> ) } ## Useful Links * next/head * next/script --- ## Page: https://nextjs.org/docs/messages/no-styled-jsx-in-document > Prevent usage of `styled-jsx` in `pages/_document.js`. ## Why This Error Occurred Custom CSS like `styled-jsx` is not allowed in a Custom Document. ## Possible Ways to Fix It If you need shared CSS for all of your pages, take a look at the Custom `App` file or define a custom layout. For example, consider the following stylesheet named `styles.css`: body { font-family: 'SF Pro Text', 'SF Pro Icons', 'Helvetica Neue', 'Helvetica', 'Arial', sans-serif; padding: 20px 20px 60px; max-width: 680px; margin: 0 auto; } Create a `pages/_app.{js,tsx}` file if not already present. Then, import the `styles.css` file. import '../styles.css' // This default export is required in a new `pages/_app.js` file. export default function MyApp({ Component, pageProps }) { return <Component {...pageProps} /> } These styles (`styles.css`) will apply to all pages and components in your application. ## Useful Links * Custom Document Caveats * Layouts * Built in CSS Support * Custom `App` Was this helpful? supported. --- ## Page: https://nextjs.org/docs/messages/no-sync-scripts > Prevent synchronous scripts. ## Why This Error Occurred A synchronous script was used which can impact your webpage performance. ## Possible Ways to Fix It ### Script component (recommended) pages/index.js import Script from 'next/script' function Home() { return ( <div class="container"> <Script src="https://third-party-script.js"></Script> <div>Home Page</div> </div> ) } export default Home ### Use `async` or `defer` <script src="https://third-party-script.js" async /> <script src="https://third-party-script.js" defer /> ## Useful Links * Efficiently load third-party JavaScript --- ## Page: https://nextjs.org/docs/messages/no-title-in-document-head > Prevent usage of `<title>` with `Head` component from `next/document`. ## Why This Error Occurred A `<title>` element was defined within the `Head` component imported from `next/document`, which should only be used for any `<head>` code that is common for all pages. Title tags should be defined at the page-level using `next/head` instead. ## Possible Ways to Fix It Within a page or component, import and use `next/head` to define a page title: pages/index.js import Head from 'next/head' export function Home() { return ( <div> <Head> <title>My page title</title> </Head> </div> ) } ## Useful Links * next/head * Custom Document --- ## Page: https://nextjs.org/docs/messages/no-unwanted-polyfillio #### Subscribe to our newsletter Stay updated on new releases and features, guides, and case studies. --- ## Page: https://nextjs.org/docs/pages > You're viewing the documentation for the Pages Router. See the App Router documentation for the latest features. The **Pages Router** uses an intuitive file-system router to map each file to a route. Before Next.js 13, the Pages Router was the main way to create routes in Next.js. It's still supported in newer versions of Next.js, but we recommend migrating to the new App Router to leverage React's latest features. --- ## Page: https://nextjs.org/docs/messages/webpack5 ## Why This Message Occurred Next.js has adopted webpack 5 as the default for compilation. We've spent a lot of effort into ensuring the transition from webpack 4 to 5 will be as smooth as possible. Your application currently has webpack 5 disabled using the `webpack5: false` flag which has been removed in Next.js 12: next.config.js module.exports = { // Webpack 5 is enabled by default // You can still use webpack 4 while upgrading to the latest version of Next.js by adding the "webpack5: false" flag webpack5: false, } Using webpack 5 in your application has many benefits, notably: * Improved Disk Caching: `next build` is significantly faster on subsequent builds * Improved Fast Refresh: Fast Refresh work is prioritized * Improved Long Term Caching of Assets: Deterministic code output that is less likely to change between builds * Improved Tree Shaking * Support for assets using `new URL("file.png", import.meta.url)` * Support for web workers using `new Worker(new URL("worker.js", import.meta.url))` * Support for `exports`/`imports` field in `package.json` In the past releases we have gradually rolled out webpack 5 to Next.js applications: * In Next.js 10.2 we automatically opted-in applications without custom webpack configuration in `next.config.js` * In Next.js 10.2 we automatically opted-in applications that do not have a `next.config.js` * In Next.js 11 webpack 5 was enabled by default for all applications. You could still opt-out and use webpack 4 to help with backwards compatibility using `webpack5: false` in `next.config.js` * In Next.js 12 webpack 4 support was removed. ## Custom webpack configuration In case you do have custom webpack configuration, either through custom plugins or your own modifications you'll have to take a few steps to ensure your applications works with webpack 5. * When using `next-transpile-modules` make sure you use the latest version which includes this patch * When using `@zeit/next-css` / `@zeit/next-sass` make sure you use the built-in CSS/Sass support instead * When using `@zeit/next-preact` use this example instead * When using `@zeit/next-source-maps` use the built-in production Source Map support * When using webpack plugins make sure they're upgraded to the latest version, in most cases the latest version will include webpack 5 support. In some cases these upgraded webpack plugins will only support webpack 5. ## Useful Links In case you're running into issues you can connect with the community in this help discussion. --- ## Page: https://nextjs.org/docs/messages/app-container-deprecated This document guides developers on how to resolve the "App Container Deprecated" error in Next.js by updating their custom App component. ## Why This Error Occurred The "App Container Deprecated" error usually occurs when you are using the `<Container>` component in your custom `<App>` (`pages/_app.js`). Prior to version `9.0.4` of Next.js, the `<Container>` component was used to handle scrolling to hashes. From version `9.0.4` onwards, this functionality was moved up the component tree, rendering the `<Container>` component unnecessary in your custom `<App>`. ## Possible Ways to Fix It To resolve this issue, you need to remove the `<Container>` component from your custom `<App>` (`pages/_app.js`). **Before** pages/\_app.js import React from 'react' import App, { Container } from 'next/app' class MyApp extends App { render() { const { Component, pageProps } = this.props return ( <Container> <Component {...pageProps} /> </Container> ) } } export default MyApp **After** pages/\_app.js import React from 'react' import App from 'next/app' class MyApp extends App { render() { const { Component, pageProps } = this.props return <Component {...pageProps} /> } } export default MyApp After making this change, your custom `<App>` should work as expected without the `<Container>` component. ## Useful Links * Custom App --- ## Page: https://nextjs.org/docs/messages/next-dynamic-modules ## Why This Error Occurred The ability to load multiple modules at once has been deprecated in `next/dynamic` to be closer to React's implementation (`React.lazy` and `Suspense`). Updating code that relies on this behavior is relatively straightforward! We've provided an example of a before/after to help you migrate your application: ## Possible Ways to Fix It Migrate to using separate dynamic calls for each module. **Before** example.js import dynamic from 'next/dynamic' const HelloBundle = dynamic({ modules: () => { const components = { Hello1: () => import('../components/hello1').then((m) => m.default), Hello2: () => import('../components/hello2').then((m) => m.default), } return components }, render: (props, { Hello1, Hello2 }) => ( <div> <h1>{props.title}</h1> <Hello1 /> <Hello2 /> </div> ), }) function DynamicBundle() { return <HelloBundle title="Dynamic Bundle" /> } export default DynamicBundle **After** example.js import dynamic from 'next/dynamic' const Hello1 = dynamic(() => import('../components/hello1')) const Hello2 = dynamic(() => import('../components/hello2')) function HelloBundle({ title }) { return ( <div> <h1>{title}</h1> <Hello1 /> <Hello2 /> </div> ) } function DynamicBundle() { return <HelloBundle title="Dynamic Bundle" /> } export default DynamicBundle --- ## Page: https://nextjs.org/docs/messages/conflicting-public-file-page ## Why This Error Occurred One of your public files has the same path as a page file which is not supported. Since only one resource can reside at the URL both public files and page files must be unique. ## Possible Ways to Fix It Rename either the public file or page file that is causing the conflict. Example conflict between public file and page file Folder structure public/ hello pages/ hello.js Non-conflicting public file and page file Folder structure public/ hello.txt pages/ hello.js ## Useful Links * Static file serving docs --- ## Page: https://nextjs.org/docs/pages/api-reference/file-conventions/instrumentation The `instrumentation.js|ts` file is used to integrate observability tools into your application, allowing you to track the performance and behavior, and to debug issues in production. To use it, place the file in the **root** of your application or inside a `src` folder if using one. ## Exports ### `register` (optional) The file exports a `register` function that is called **once** when a new Next.js server instance is initiated. `register` can be an async function. import { registerOTel } from '@vercel/otel' export function register() { registerOTel('next-app') } ### `onRequestError` (optional) You can optionally export an `onRequestError` function to track **server** errors to any custom observability provider. * If you're running any async tasks in `onRequestError`, make sure they're awaited. `onRequestError` will be triggered when the Next.js server captures the error. * The `error` instance might not be the original error instance thrown, as it may be processed by React if encountered during Server Components rendering. If this happens, you can use `digest` property on an error to identify the actual error type. import { type Instrumentation } from 'next' export const onRequestError: Instrumentation.onRequestError = async ( err, request, context ) => { await fetch('https://.../report-error', { method: 'POST', body: JSON.stringify({ message: err.message, request, context, }), headers: { 'Content-Type': 'application/json', }, }) } #### Parameters The function accepts three parameters: `error`, `request`, and `context`. export function onRequestError( error: { digest: string } & Error, request: { path: string // resource path, e.g. /blog?name=foo method: string // request method. e.g. GET, POST, etc headers: { [key: string]: string } }, context: { routerKind: 'Pages Router' | 'App Router' // the router type routePath: string // the route file path, e.g. /app/blog/[dynamic] routeType: 'render' | 'route' | 'action' | 'middleware' // the context in which the error occurred renderSource: | 'react-server-components' | 'react-server-components-payload' | 'server-rendering' revalidateReason: 'on-demand' | 'stale' | undefined // undefined is a normal request without revalidation renderType: 'dynamic' | 'dynamic-resume' // 'dynamic-resume' for PPR } ): void | Promise<void> * `error`: The caught error itself (type is always `Error`), and a `digest` property which is the unique ID of the error. * `request`: Read-only request information associated with the error. * `context`: The context in which the error occurred. This can be the type of router (App or Pages Router), and/or (Server Components (`'render'`), Route Handlers (`'route'`), Server Actions (`'action'`), or Middleware (`'middleware'`)). ### Specifying the runtime The `instrumentation.js` file works in both the Node.js and Edge runtime, however, you can use `process.env.NEXT_RUNTIME` to target a specific runtime. export function register() { if (process.env.NEXT_RUNTIME === 'edge') { return require('./register.edge') } else { return require('./register.node') } } export function onRequestError() { if (process.env.NEXT_RUNTIME === 'edge') { return require('./on-request-error.edge') } else { return require('./on-request-error.node') } } ## Version History | Version | Changes | | --- | --- | | `v15.0.0` | `onRequestError` introduced, `instrumentation` stable | | `v14.0.4` | Turbopack support for `instrumentation` | | `v13.2.0` | `instrumentation` introduced as an experimental feature | --- ## Page: https://nextjs.org/docs/14/getting-started #### Subscribe to our newsletter Stay updated on new releases and features, guides, and case studies. --- ## Page: https://nextjs.org/docs/14/getting-started/installation System Requirements: * Node.js 18.17 or later. * macOS, Windows (including WSL), and Linux are supported. ## Automatic Installation We recommend starting a new Next.js app using `create-next-app`, which sets up everything automatically for you. To create a project, run: npx create-next-app@latest On installation, you'll see the following prompts: What is your project named? my-app Would you like to use TypeScript? No / Yes Would you like to use ESLint? No / Yes Would you like to use Tailwind CSS? No / Yes Would you like to use `src/` directory? No / Yes Would you like to use App Router? (recommended) No / Yes Would you like to customize the default import alias (@/*)? No / Yes What import alias would you like configured? @/* After the prompts, `create-next-app` will create a folder with your project name and install the required dependencies. If you're new to Next.js, see the project structure docs for an overview of all the possible files and folders in your application. > **Good to know**: > > * Next.js now ships with TypeScript, ESLint, and Tailwind CSS configuration by default. > * You can optionally use a `src` directory in the root of your project to separate your application's code from configuration files. ## Manual Installation To manually create a new Next.js app, install the required packages: npm install next@latest react@latest react-dom@latest Open your `package.json` file and add the following `scripts`: { "scripts": { "dev": "next dev", "build": "next build", "start": "next start", "lint": "next lint" } } These scripts refer to the different stages of developing an application: * `dev`: runs `next dev` to start Next.js in development mode. * `build`: runs `next build` to build the application for production usage. * `start`: runs `next start` to start a Next.js production server. * `lint`: runs `next lint` to set up Next.js' built-in ESLint configuration. ### Creating directories Next.js uses file-system routing, which means the routes in your application are determined by how you structure your files. #### The `app` directory For new applications, we recommend using the App Router. This router allows you to use React's latest features and is an evolution of the Pages Router based on community feedback. Create an `app/` folder, then add a `layout.tsx` and `page.tsx` file. These will be rendered when the user visits the root of your application (`/`).  Create a root layout inside `app/layout.tsx` with the required `<html>` and `<body>` tags: export default function RootLayout({ children, }: { children: React.ReactNode }) { return ( <html lang="en"> <body>{children}</body> </html> ) } Finally, create a home page `app/page.tsx` with some initial content: export default function Page() { return <h1>Hello, Next.js!</h1> } > **Good to know**: If you forget to create `layout.tsx`, Next.js will automatically create this file when running the development server with `next dev`. Learn more about using the App Router. #### The `pages` directory (optional) If you prefer to use the Pages Router instead of the App Router, you can create a `pages/` directory at the root of your project. Then, add an `index.tsx` file inside your `pages` folder. This will be your home page (`/`): export default function Page() { return <h1>Hello, Next.js!</h1> } Next, add an `_app.tsx` file inside `pages/` to define the global layout. Learn more about the custom App file. import type { AppProps } from 'next/app' export default function App({ Component, pageProps }: AppProps) { return <Component {...pageProps} /> } Finally, add a `_document.tsx` file inside `pages/` to control the initial response from the server. Learn more about the custom Document file. import { Html, Head, Main, NextScript } from 'next/document' export default function Document() { return ( <Html> <Head /> <body> <Main /> <NextScript /> </body> </Html> ) } Learn more about using the Pages Router. > **Good to know**: Although you can use both routers in the same project, routes in `app` will be prioritized over `pages`. We recommend using only one router in your new project to avoid confusion. #### The `public` folder (optional) Create a `public` folder to store static assets such as images, fonts, etc. Files inside `public` directory can then be referenced by your code starting from the base URL (`/`). ## Run the Development Server 1. Run `npm run dev` to start the development server. 2. Visit `http://localhost:3000` to view your application. 3. Edit `app/page.tsx` (or `pages/index.tsx`) file and save it to see the updated result in your browser. --- ## Page: https://nextjs.org/docs/14/getting-started/project-structure This page provides an overview of the project structure of a Next.js application. It covers top-level files and folders, configuration files, and routing conventions within the `app` and `pages` directories. Click the file and folder names to learn more about each convention. ## Top-level folders Top-level folders are used to organize your application's code and static assets.  | | | | --- | --- | | `app` | App Router | | `pages` | Pages Router | | `public` | Static assets to be served | | `src` | Optional application source folder | ## Top-level files Top-level files are used to configure your application, manage dependencies, run middleware, integrate monitoring tools, and define environment variables. | | | | --- | --- | | **Next.js** | | | `next.config.js` | Configuration file for Next.js | | `package.json` | Project dependencies and scripts | | `instrumentation.ts` | OpenTelemetry and Instrumentation file | | `middleware.ts` | Next.js request middleware | | `.env` | Environment variables | | `.env.local` | Local environment variables | | `.env.production` | Production environment variables | | `.env.development` | Development environment variables | | `.eslintrc.json` | Configuration file for ESLint | | `.gitignore` | Git files and folders to ignore | | `next-env.d.ts` | TypeScript declaration file for Next.js | | `tsconfig.json` | Configuration file for TypeScript | | `jsconfig.json` | Configuration file for JavaScript | ## `app` Routing Conventions The following file conventions are used to define routes and handle metadata in the `app` router. ### Routing Files | | | | | --- | --- | --- | | `layout` | `.js` `.jsx` `.tsx` | Layout | | `page` | `.js` `.jsx` `.tsx` | Page | | `loading` | `.js` `.jsx` `.tsx` | Loading UI | | `not-found` | `.js` `.jsx` `.tsx` | Not found UI | | `error` | `.js` `.jsx` `.tsx` | Error UI | | `global-error` | `.js` `.jsx` `.tsx` | Global error UI | | `route` | `.js` `.ts` | API endpoint | | `template` | `.js` `.jsx` `.tsx` | Re-rendered layout | | `default` | `.js` `.jsx` `.tsx` | Parallel route fallback page | ### Nested Routes | | | | --- | --- | | `folder` | Route segment | | `folder/folder` | Nested route segment | ### Dynamic Routes | | | | --- | --- | | `[folder]` | Dynamic route segment | | `[...folder]` | Catch-all route segment | | `[[...folder]]` | Optional catch-all route segment | ### Route Groups and Private Folders | | | | --- | --- | | `(folder)` | Group routes without affecting routing | | `_folder` | Opt folder and all child segments out of routing | ### Parallel and Intercepted Routes | | | | --- | --- | | `@folder` | Named slot | | `(.)folder` | Intercept same level | | `(..)folder` | Intercept one level above | | `(..)(..)folder` | Intercept two levels above | | `(...)folder` | Intercept from root | ### Metadata File Conventions #### App Icons | | | | | --- | --- | --- | | `favicon` | `.ico` | Favicon file | | `icon` | `.ico` `.jpg` `.jpeg` `.png` `.svg` | App Icon file | | `icon` | `.js` `.ts` `.tsx` | Generated App Icon | | `apple-icon` | `.jpg` `.jpeg`, `.png` | Apple App Icon file | | `apple-icon` | `.js` `.ts` `.tsx` | Generated Apple App Icon | #### Open Graph and Twitter Images | | | | | --- | --- | --- | | `opengraph-image` | `.jpg` `.jpeg` `.png` `.gif` | Open Graph image file | | `opengraph-image` | `.js` `.ts` `.tsx` | Generated Open Graph image | | `twitter-image` | `.jpg` `.jpeg` `.png` `.gif` | Twitter image file | | `twitter-image` | `.js` `.ts` `.tsx` | Generated Twitter image | #### SEO | | | | | --- | --- | --- | | `sitemap` | `.xml` | Sitemap file | | `sitemap` | `.js` `.ts` | Generated Sitemap | | `robots` | `.txt` | Robots file | | `robots` | `.js` `.ts` | Generated Robots file | ## `pages` Routing Conventions The following file conventions are used to define routes in the `pages` router. ### Special Files | | | | | --- | --- | --- | | `_app` | `.js` `.jsx` `.tsx` | Custom App | | `_document` | `.js` `.jsx` `.tsx` | Custom Document | | `_error` | `.js` `.jsx` `.tsx` | Custom Error Page | | `404` | `.js` `.jsx` `.tsx` | 404 Error Page | | `500` | `.js` `.jsx` `.tsx` | 500 Error Page | ### Routes | | | | | --- | --- | --- | | **Folder convention** | | | | `index` | `.js` `.jsx` `.tsx` | Home page | | `folder/index` | `.js` `.jsx` `.tsx` | Nested page | | **File convention** | | | | `index` | `.js` `.jsx` `.tsx` | Home page | | `file` | `.js` `.jsx` `.tsx` | Nested page | ### Dynamic Routes | | | | | --- | --- | --- | | **Folder convention** | | | | `[folder]/index` | `.js` `.jsx` `.tsx` | Dynamic route segment | | `[...folder]/index` | `.js` `.jsx` `.tsx` | Catch-all route segment | | `[[...folder]]/index` | `.js` `.jsx` `.tsx` | Optional catch-all route segment | | **File convention** | | | | `[file]` | `.js` `.jsx` `.tsx` | Dynamic route segment | | `[...file]` | `.js` `.jsx` `.tsx` | Catch-all route segment | | `[[...file]]` | `.js` `.jsx` `.tsx` | Optional catch-all route segment | --- ## Page: https://nextjs.org/docs/14/app/building-your-application You are currently viewing documentation for version 14 of Next.js. Next.js provides the building blocks to create flexible, full-stack web applications. The guides in **Building Your Application** explain how to use these features and how to customize your application's behavior. The sections and pages are organized sequentially, from basic to advanced, so you can follow them step-by-step when building your Next.js application. However, you can read them in any order or skip to the pages that apply to your use case. If you're new to Next.js, we recommend starting with the Routing, Rendering, Data Fetching and Styling sections, as they introduce the fundamental Next.js and web concepts to help you get started. Then, you can dive deeper into the other sections such as Optimizing and Configuring. Finally, once you're ready, checkout the Deploying and Upgrading sections. --- ## Page: https://nextjs.org/docs/14/app/building-your-application/routing ## Routing Fundamentals The skeleton of every application is routing. This page will introduce you to the **fundamental concepts** of routing for the web and how to handle routing in Next.js. ## Terminology First, you will see these terms being used throughout the documentation. Here's a quick reference: 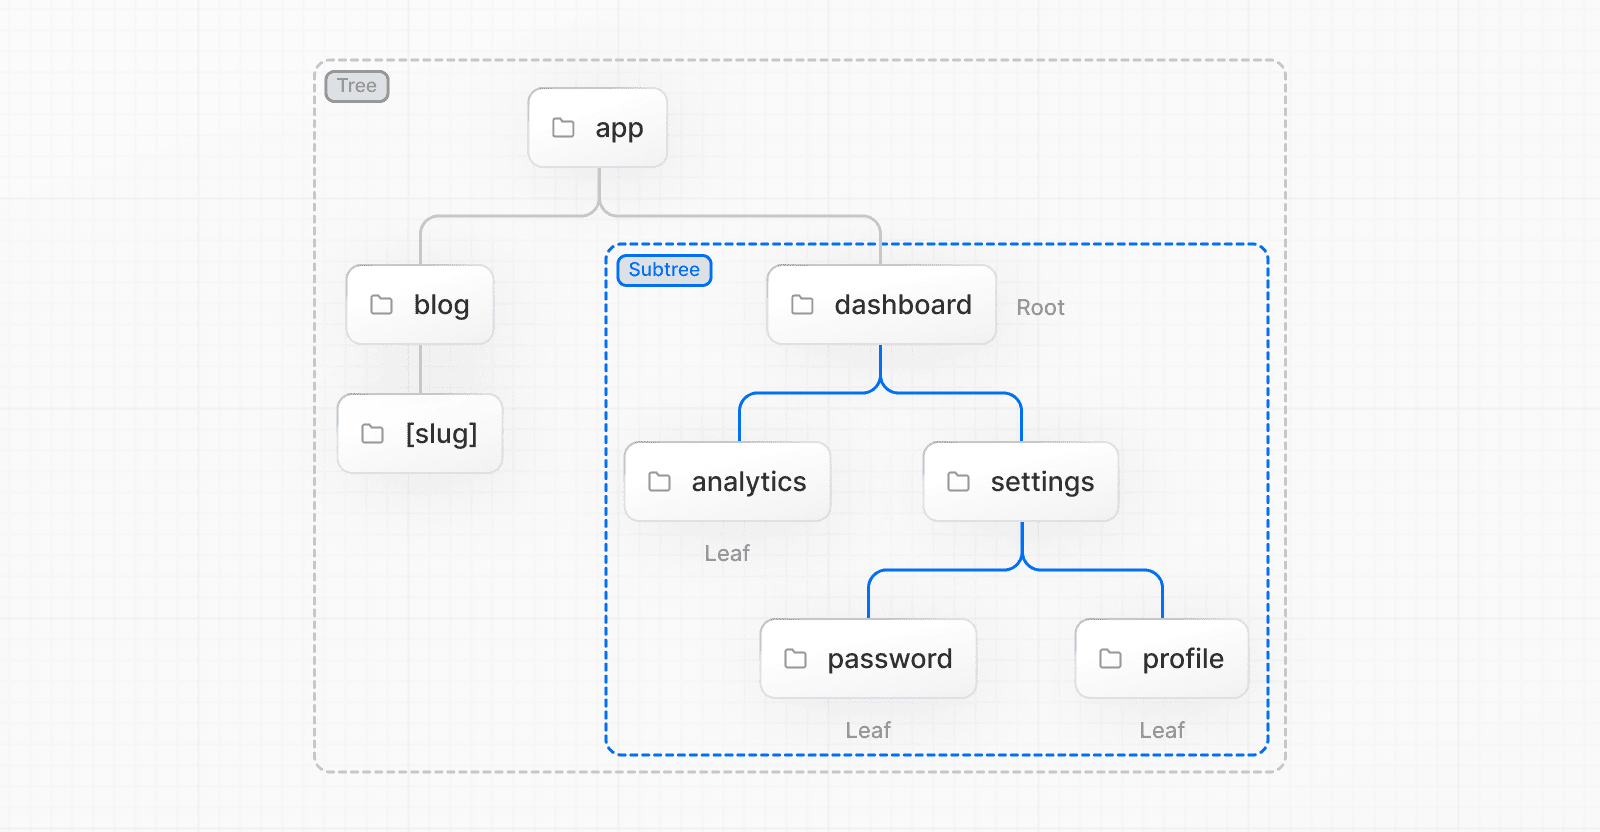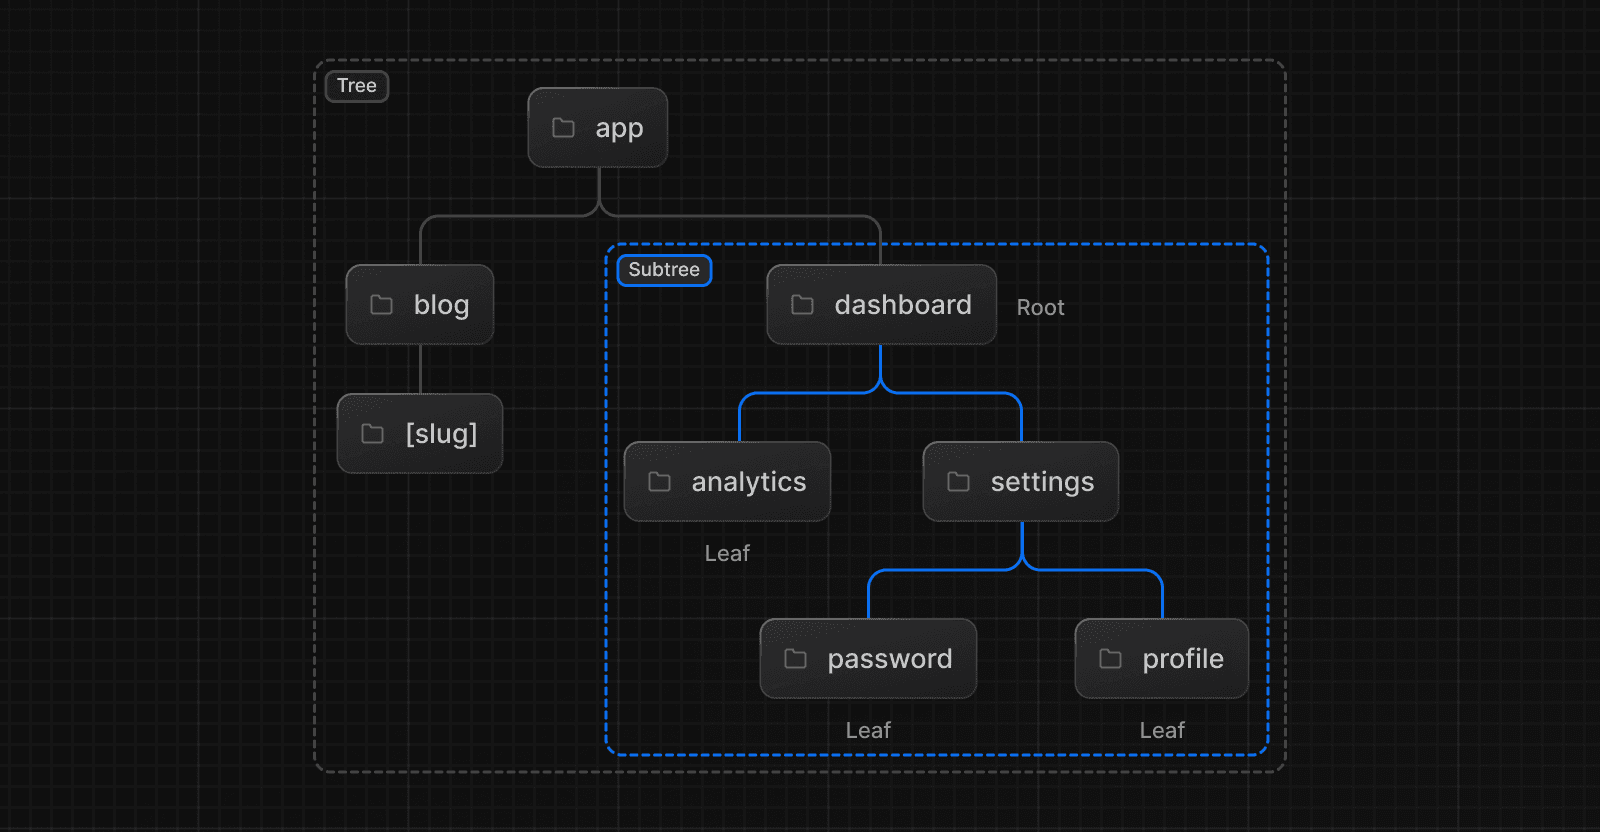 * **Tree:** A convention for visualizing a hierarchical structure. For example, a component tree with parent and children components, a folder structure, etc. * **Subtree:** Part of a tree, starting at a new root (first) and ending at the leaves (last). * **Root**: The first node in a tree or subtree, such as a root layout. * **Leaf:** Nodes in a subtree that have no children, such as the last segment in a URL path.  * **URL Segment:** Part of the URL path delimited by slashes. * **URL Path:** Part of the URL that comes after the domain (composed of segments). ## The `app` Router In version 13, Next.js introduced a new **App Router** built on React Server Components, which supports shared layouts, nested routing, loading states, error handling, and more. The App Router works in a new directory named `app`. The `app` directory works alongside the `pages` directory to allow for incremental adoption. This allows you to opt some routes of your application into the new behavior while keeping other routes in the `pages` directory for previous behavior. If your application uses the `pages` directory, please also see the Pages Router documentation. > **Good to know**: The App Router takes priority over the Pages Router. Routes across directories should not resolve to the same URL path and will cause a build-time error to prevent a conflict.  By default, components inside `app` are React Server Components. This is a performance optimization and allows you to easily adopt them, and you can also use Client Components. > **Recommendation:** Check out the Server page if you're new to Server Components. ## Roles of Folders and Files Next.js uses a file-system based router where: * **Folders** are used to define routes. A route is a single path of nested folders, following the file-system hierarchy from the **root folder** down to a final **leaf folder** that includes a `page.js` file. See Defining Routes. * **Files** are used to create UI that is shown for a route segment. See special files. ## Route Segments Each folder in a route represents a **route segment**. Each route segment is mapped to a corresponding **segment** in a **URL path**. 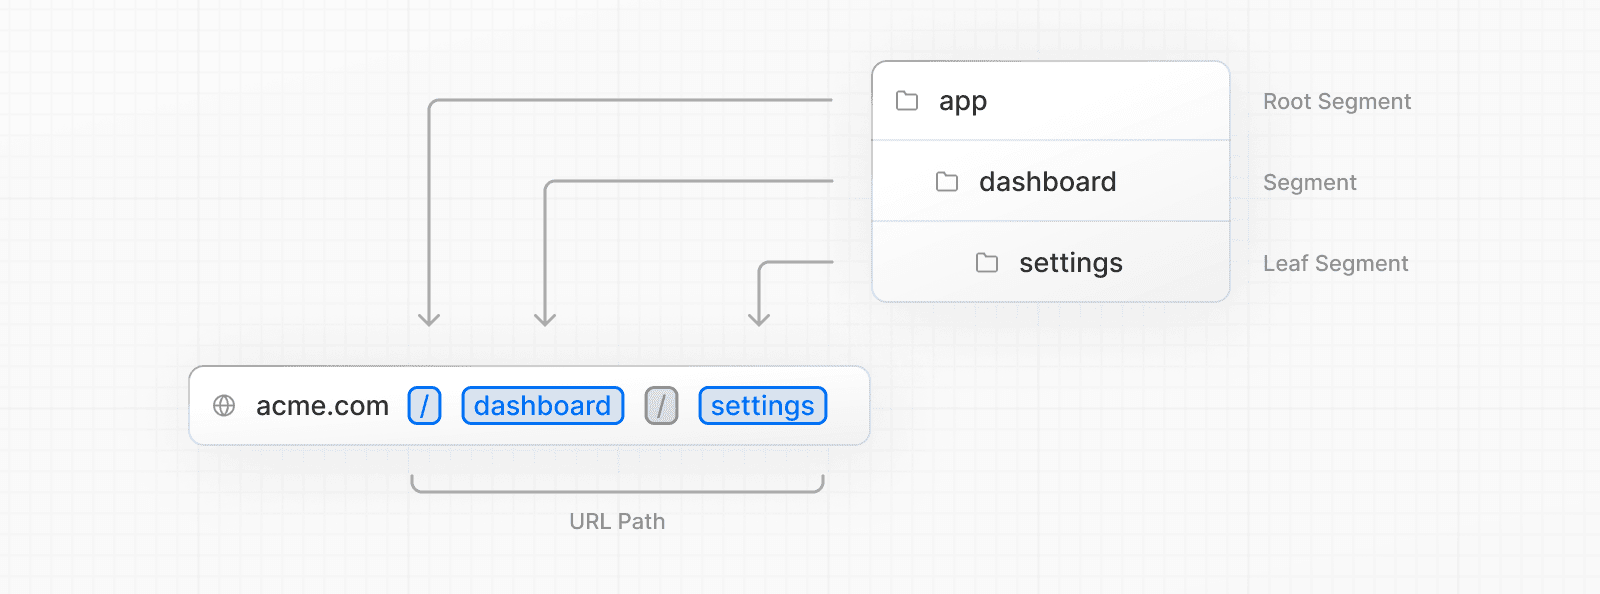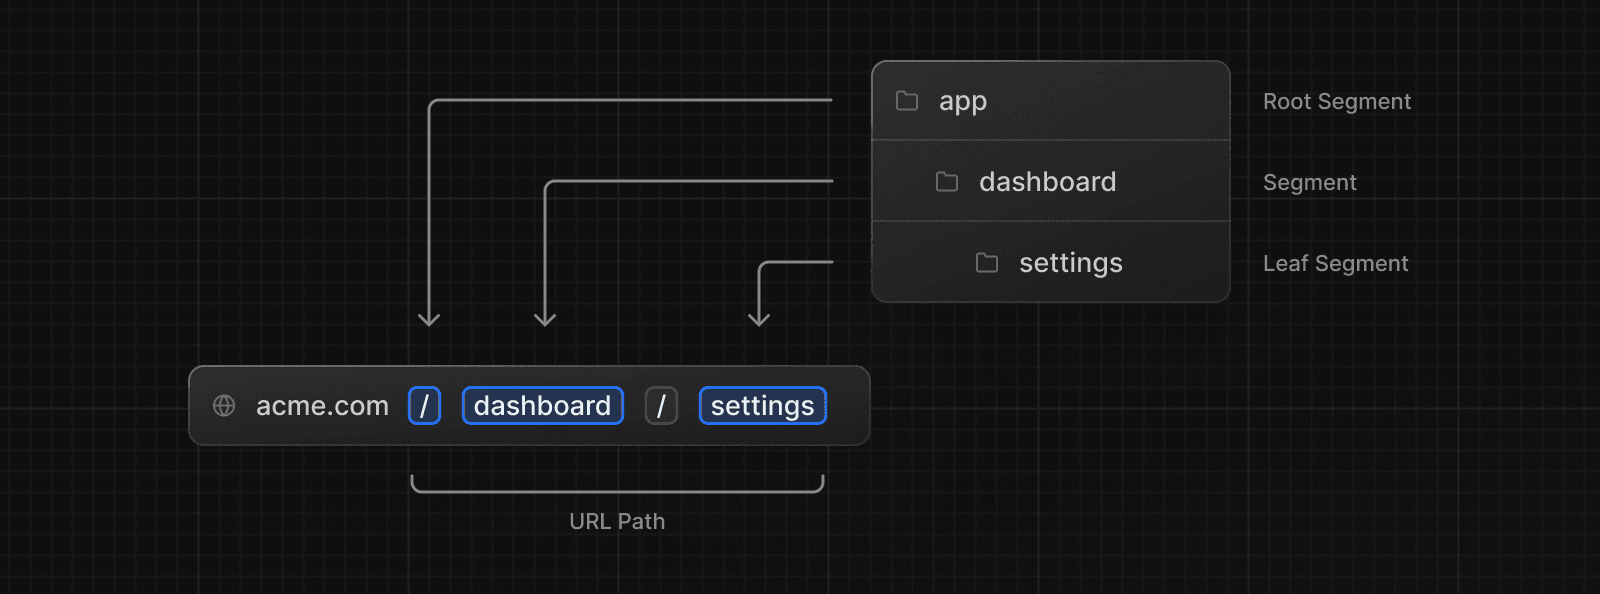 ## Nested Routes To create a nested route, you can nest folders inside each other. For example, you can add a new `/dashboard/settings` route by nesting two new folders in the `app` directory. The `/dashboard/settings` route is composed of three segments: * `/` (Root segment) * `dashboard` (Segment) * `settings` (Leaf segment) ## File Conventions Next.js provides a set of special files to create UI with specific behavior in nested routes: | | | | --- | --- | | `layout` | Shared UI for a segment and its children | | `page` | Unique UI of a route and make routes publicly accessible | | `loading` | Loading UI for a segment and its children | | `not-found` | Not found UI for a segment and its children | | `error` | Error UI for a segment and its children | | `global-error` | Global Error UI | | `route` | Server-side API endpoint | | `template` | Specialized re-rendered Layout UI | | `default` | Fallback UI for Parallel Routes | > **Good to know**: `.js`, `.jsx`, or `.tsx` file extensions can be used for special files. ## Component Hierarchy The React components defined in special files of a route segment are rendered in a specific hierarchy: * `layout.js` * `template.js` * `error.js` (React error boundary) * `loading.js` (React suspense boundary) * `not-found.js` (React error boundary) * `page.js` or nested `layout.js`  In a nested route, the components of a segment will be nested **inside** the components of its parent segment.  ## Colocation In addition to special files, you have the option to colocate your own files (e.g. components, styles, tests, etc) inside folders in the `app` directory. This is because while folders define routes, only the contents returned by `page.js` or `route.js` are publicly addressable.  Learn more about Project Organization and Colocation. ## Advanced Routing Patterns The App Router also provides a set of conventions to help you implement more advanced routing patterns. These include: * Parallel Routes: Allow you to simultaneously show two or more pages in the same view that can be navigated independently. You can use them for split views that have their own sub-navigation. E.g. Dashboards. * Intercepting Routes: Allow you to intercept a route and show it in the context of another route. You can use these when keeping the context for the current page is important. E.g. Seeing all tasks while editing one task or expanding a photo in a feed. These patterns allow you to build richer and more complex UIs, democratizing features that were historically complex for small teams and individual developers to implement. ## Next Steps Now that you understand the fundamentals of routing in Next.js, follow the links below to create your first routes: --- ## Page: https://nextjs.org/docs/14/app/building-your-application/routing/defining-routes > We recommend reading the Routing Fundamentals page before continuing. This page will guide you through how to define and organize routes in your Next.js application. ## Creating Routes Next.js uses a file-system based router where **folders** are used to define routes. Each folder represents a **route** segment that maps to a **URL** segment. To create a nested route, you can nest folders inside each other.  A special `page.js` file is used to make route segments publicly accessible. 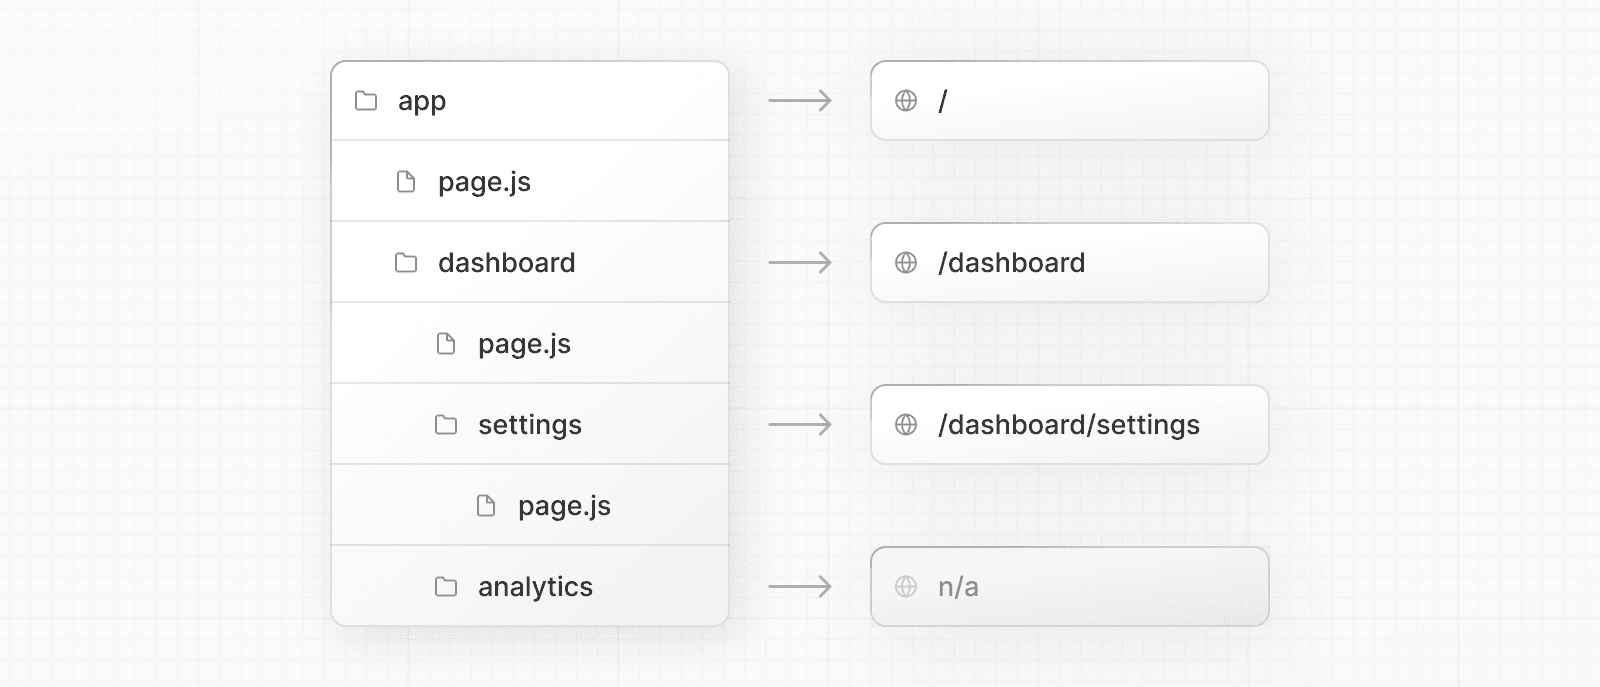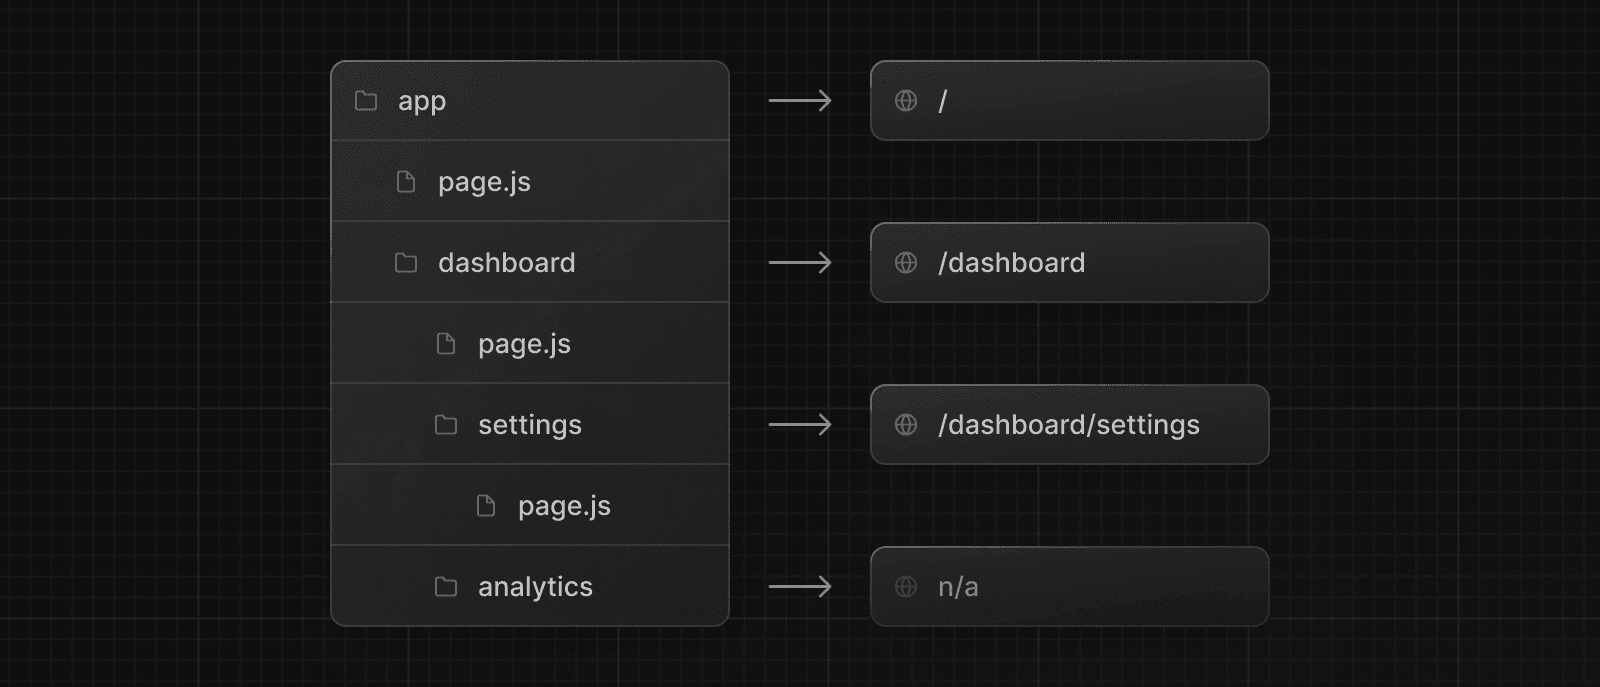 In this example, the `/dashboard/analytics` URL path is _not_ publicly accessible because it does not have a corresponding `page.js` file. This folder could be used to store components, stylesheets, images, or other colocated files. > **Good to know**: `.js`, `.jsx`, or `.tsx` file extensions can be used for special files. ## Creating UI Special file conventions are used to create UI for each route segment. The most common are pages to show UI unique to a route, and layouts to show UI that is shared across multiple routes. For example, to create your first page, add a `page.js` file inside the `app` directory and export a React component: export default function Page() { return <h1>Hello, Next.js!</h1> } --- ## Page: https://nextjs.org/docs/14/app/building-your-application/routing/pages-and-layouts > We recommend reading the Routing Fundamentals and Defining Routes pages before continuing. The special files layout.js, page.js, and template.js allow you to create UI for a route. This page will guide you through how and when to use these special files. ## Pages A page is UI that is **unique** to a route. You can define a page by default exporting a component from a `page.js` file. For example, to create your `index` page, add the `page.js` file inside the `app` directory:  // `app/page.tsx` is the UI for the `/` URL export default function Page() { return <h1>Hello, Home page!</h1> } Then, to create further pages, create a new folder and add the `page.js` file inside it. For example, to create a page for the `/dashboard` route, create a new folder called `dashboard`, and add the `page.js` file inside it: // `app/dashboard/page.tsx` is the UI for the `/dashboard` URL export default function Page() { return <h1>Hello, Dashboard Page!</h1> } > **Good to know**: > > * The `.js`, `.jsx`, or `.tsx` file extensions can be used for Pages. > * A page is always the leaf of the route subtree. > * A `page.js` file is required to make a route segment publicly accessible. > * Pages are Server Components by default, but can be set to a Client Component. > * Pages can fetch data. View the Data Fetching section for more information. ## Layouts A layout is UI that is **shared** between multiple routes. On navigation, layouts preserve state, remain interactive, and do not re-render. Layouts can also be nested. You can define a layout by default exporting a React component from a `layout.js` file. The component should accept a `children` prop that will be populated with a child layout (if it exists) or a page during rendering. For example, the layout will be shared with the `/dashboard` and `/dashboard/settings` pages:  export default function DashboardLayout({ children, // will be a page or nested layout }: { children: React.ReactNode }) { return ( <section> {/* Include shared UI here e.g. a header or sidebar */} <nav></nav> {children} </section> ) } ### Root Layout (Required) The root layout is defined at the top level of the `app` directory and applies to all routes. This layout is **required** and must contain `html` and `body` tags, allowing you to modify the initial HTML returned from the server. export default function RootLayout({ children, }: { children: React.ReactNode }) { return ( <html lang="en"> <body> {/* Layout UI */} <main>{children}</main> </body> </html> ) } ### Nesting Layouts By default, layouts in the folder hierarchy are **nested**, which means they wrap child layouts via their `children` prop. You can nest layouts by adding `layout.js` inside specific route segments (folders). For example, to create a layout for the `/dashboard` route, add a new `layout.js` file inside the `dashboard` folder: 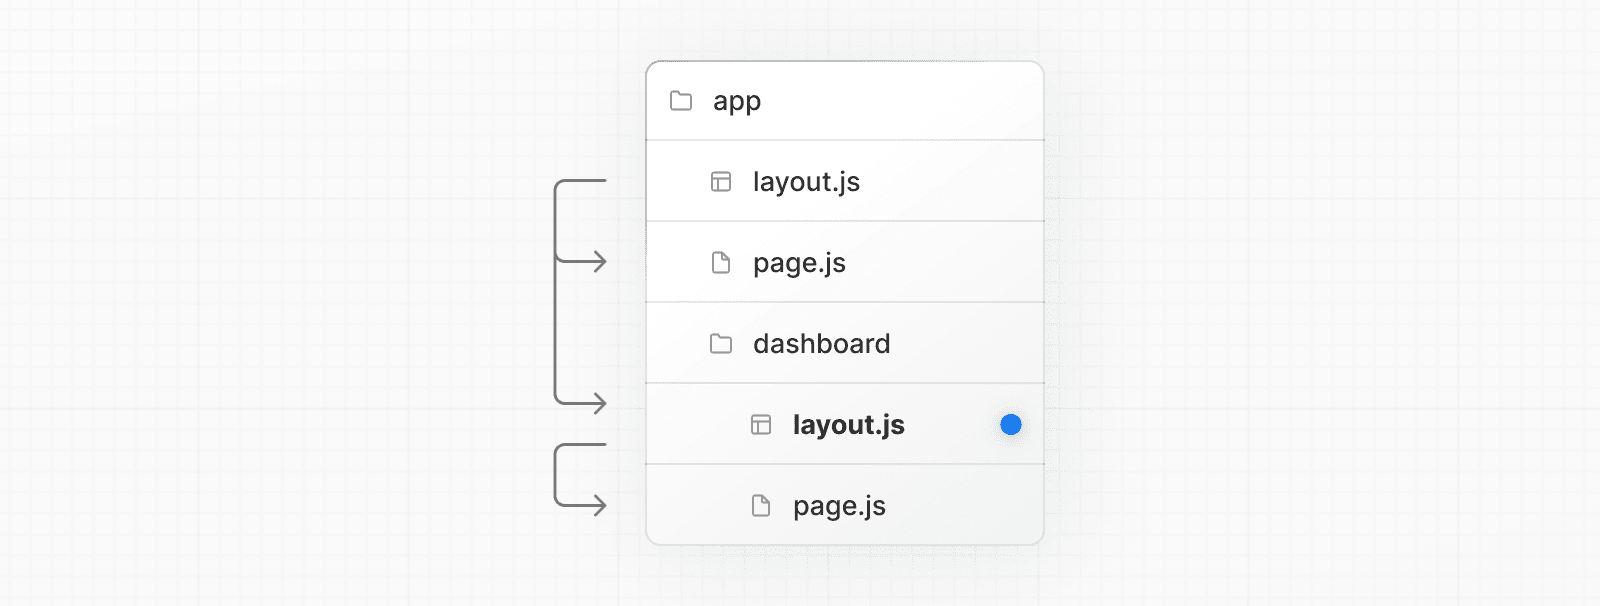 export default function DashboardLayout({ children, }: { children: React.ReactNode }) { return <section>{children}</section> } If you were to combine the two layouts above, the root layout (`app/layout.js`) would wrap the dashboard layout (`app/dashboard/layout.js`), which would wrap route segments inside `app/dashboard/*`. The two layouts would be nested as such: 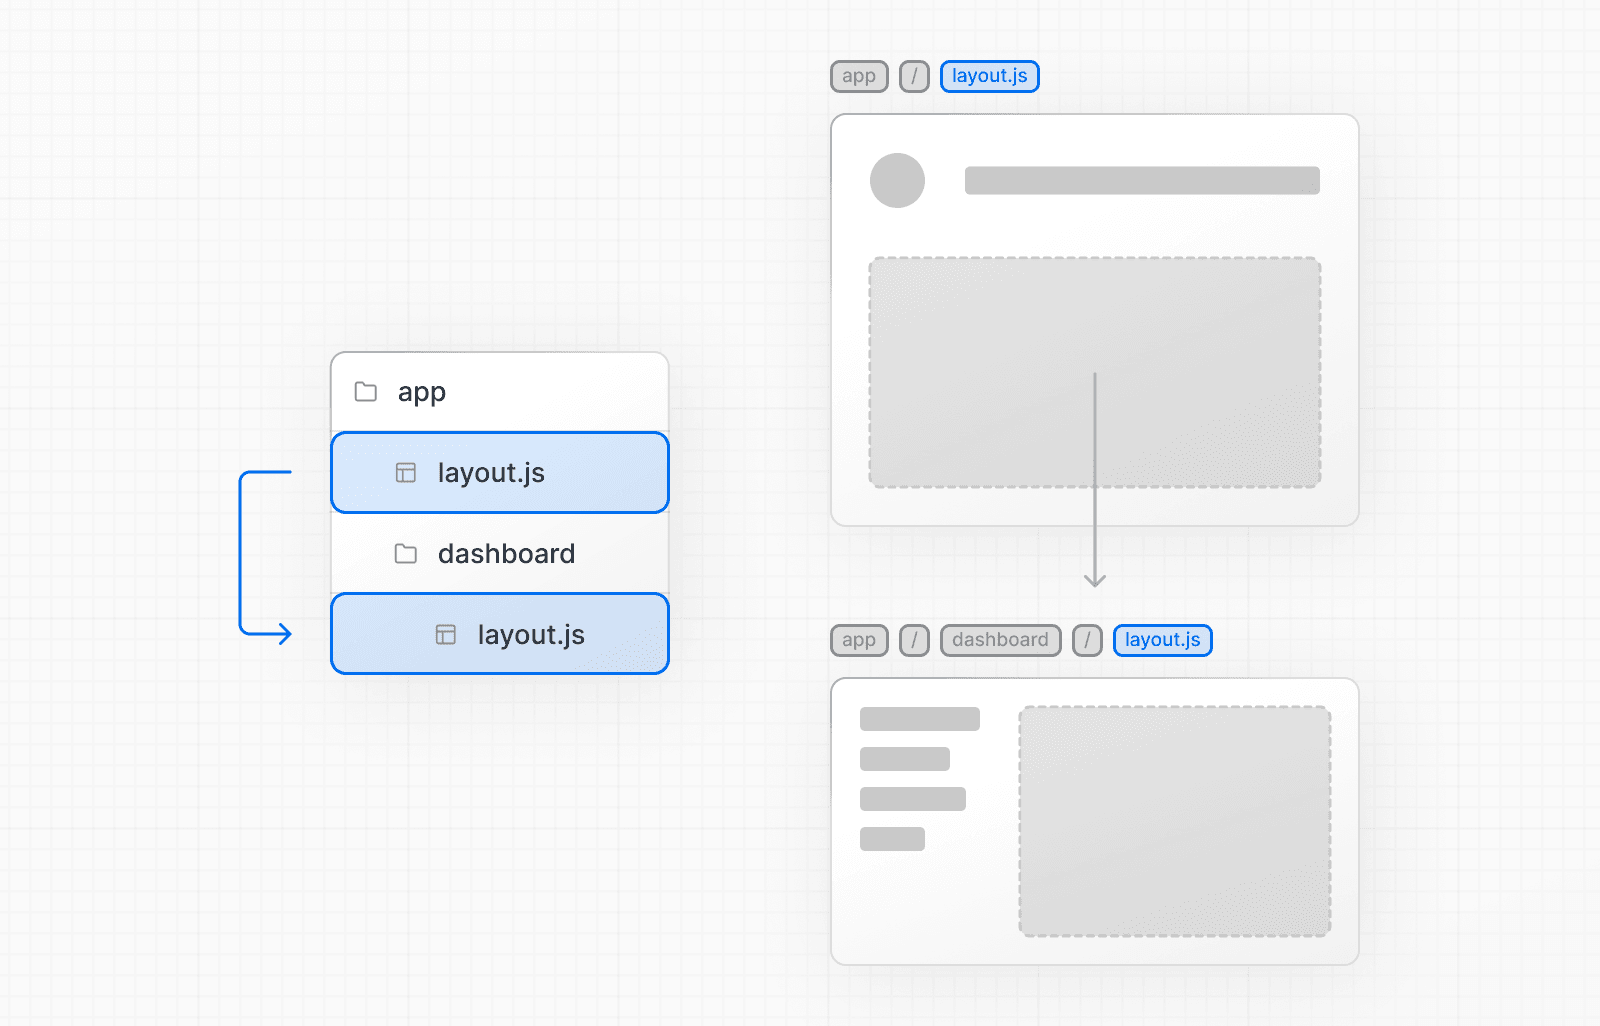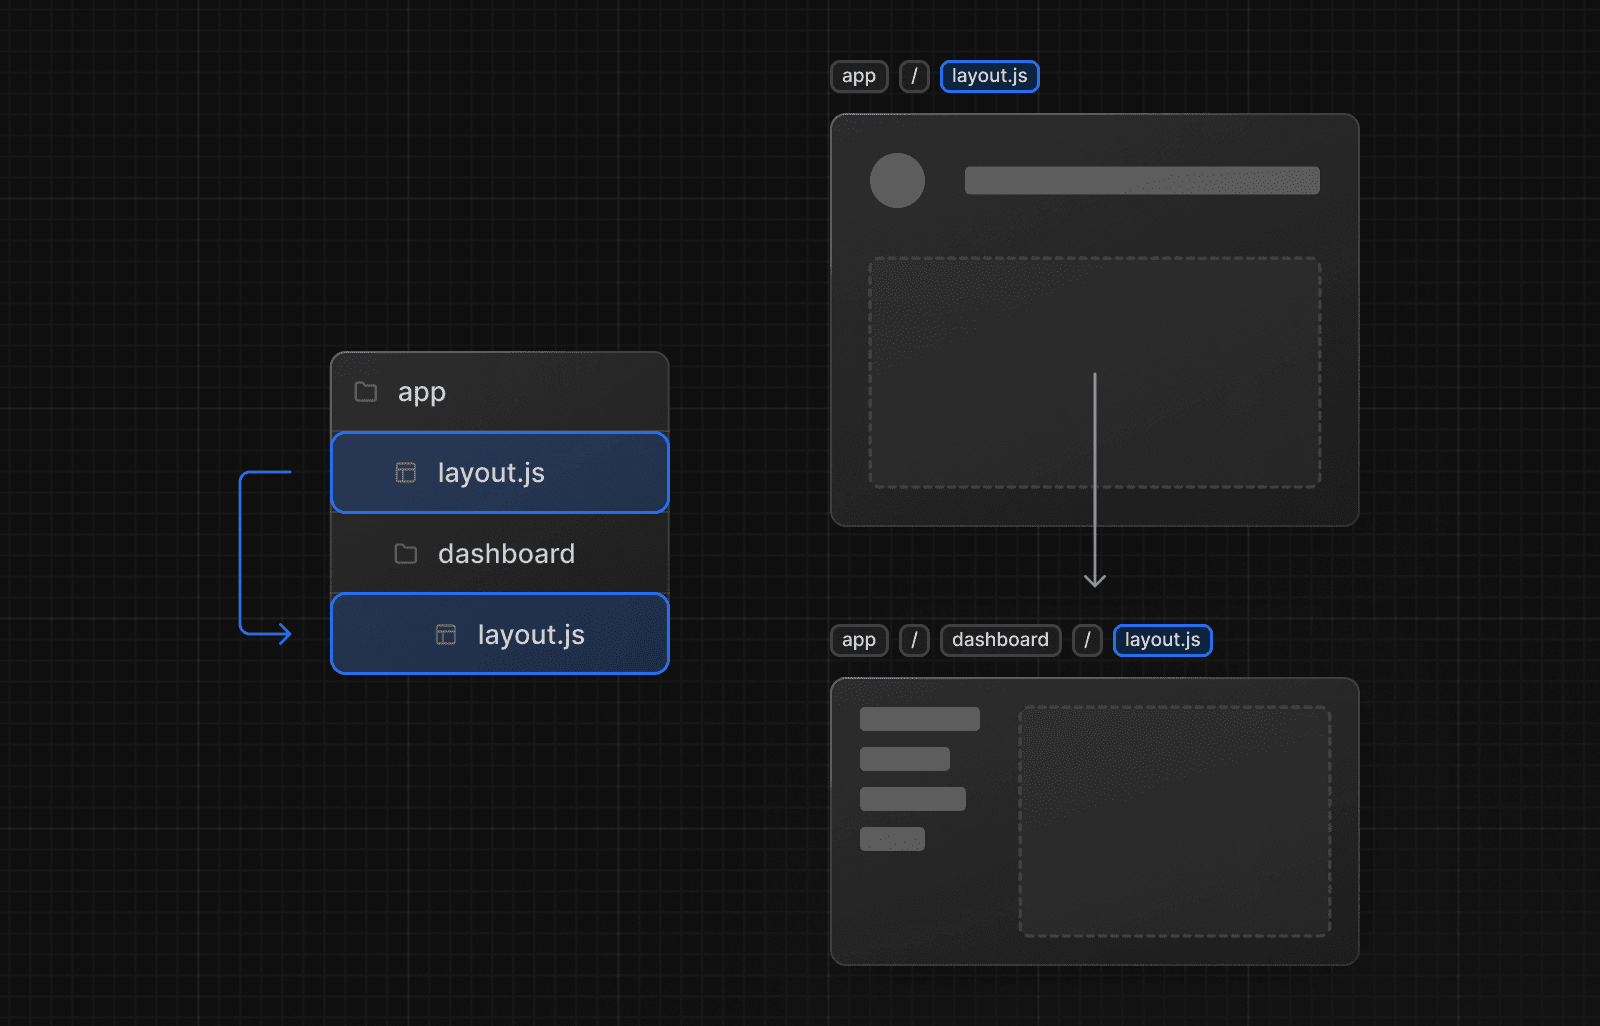 > **Good to know**: > > * `.js`, `.jsx`, or `.tsx` file extensions can be used for Layouts. > * Only the root layout can contain `<html>` and `<body>` tags. > * When a `layout.js` and `page.js` file are defined in the same folder, the layout will wrap the page. > * Layouts are Server Components by default but can be set to a Client Component. > * Layouts can fetch data. View the Data Fetching section for more information. > * Passing data between a parent layout and its children is not possible. However, you can fetch the same data in a route more than once, and React will automatically dedupe the requests without affecting performance. > * Layouts do not have access to the route segments below itself. To access all route segments, you can use `useSelectedLayoutSegment` or `useSelectedLayoutSegments` in a Client Component. > * You can use Route Groups to opt specific route segments in and out of shared layouts. > * You can use Route Groups to create multiple root layouts. See an example here. > * **Migrating from the `pages` directory:** The root layout replaces the `_app.js` and `_document.js` files. View the migration guide. ## Templates Templates are similar to layouts in that they wrap each child layout or page. Unlike layouts that persist across routes and maintain state, templates create a new instance for each of their children on navigation. This means that when a user navigates between routes that share a template, a new instance of the component is mounted, DOM elements are recreated, state is **not** preserved, and effects are re-synchronized. There may be cases where you need those specific behaviors, and templates would be a more suitable option than layouts. For example: * Features that rely on `useEffect` (e.g logging page views) and `useState` (e.g a per-page feedback form). * To change the default framework behavior. For example, Suspense Boundaries inside layouts only show the fallback the first time the Layout is loaded and not when switching pages. For templates, the fallback is shown on each navigation. A template can be defined by exporting a default React component from a `template.js` file. The component should accept a `children` prop.  export default function Template({ children }: { children: React.ReactNode }) { return <div>{children}</div> } In terms of nesting, `template.js` is rendered between a layout and its children. Here's a simplified output: <Layout> {/* Note that the template is given a unique key. */} <Template key={routeParam}>{children}</Template> </Layout> In the `app` directory, you can modify the `<head>` HTML elements such as `title` and `meta` using the Metadata APIs. Metadata can be defined by exporting a `metadata` object or `generateMetadata` function in a `layout.js` or `page.js` file. import { Metadata } from 'next' export const metadata: Metadata = { title: 'Next.js', } export default function Page() { return '...' } > **Good to know**: You should **not** manually add `<head>` tags such as `<title>` and `<meta>` to root layouts. Instead, you should use the Metadata API which automatically handles advanced requirements such as streaming and de-duplicating `<head>` elements. Learn more about available metadata options in the API reference --- ## Page: https://nextjs.org/docs/14/app/building-your-application/routing/linking-and-navigating There are four ways to navigate between routes in Next.js: * Using the `<Link>` Component * Using the `useRouter` hook (Client Components) * Using the `redirect` function (Server Components) * Using the native History API This page will go through how to use each of these options, and dive deeper into how navigation works. ## `<Link>` Component `<Link>` is a built-in component that extends the HTML `<a>` tag to provide prefetching and client-side navigation between routes. It is the primary and recommended way to navigate between routes in Next.js. You can use it by importing it from `next/link`, and passing a `href` prop to the component: import Link from 'next/link' export default function Page() { return <Link href="/dashboard">Dashboard</Link> } There are other optional props you can pass to `<Link>`. See the API reference for more. ### Examples #### Linking to Dynamic Segments When linking to dynamic segments, you can use template literals and interpolation to generate a list of links. For example, to generate a list of blog posts: import Link from 'next/link' export default function PostList({ posts }) { return ( <ul> {posts.map((post) => ( <li key={post.id}> <Link href={`/blog/${post.slug}`}>{post.title}</Link> </li> ))} </ul> ) } #### Checking Active Links You can use `usePathname()` to determine if a link is active. For example, to add a class to the active link, you can check if the current `pathname` matches the `href` of the link: 'use client' import { usePathname } from 'next/navigation' import Link from 'next/link' export function Links() { const pathname = usePathname() return ( <nav> <ul> <li> <Link className={`link ${pathname === '/' ? 'active' : ''}`} href="/"> Home </Link> </li> <li> <Link className={`link ${pathname === '/about' ? 'active' : ''}`} href="/about" > About </Link> </li> </ul> </nav> ) } #### Scrolling to an `id` The default behavior of the Next.js App Router is to **scroll to the top of a new route or to maintain the scroll position for backwards and forwards navigation.** If you'd like to scroll to a specific `id` on navigation, you can append your URL with a `#` hash link or just pass a hash link to the `href` prop. This is possible since `<Link>` renders to an `<a>` element. <Link href="/dashboard#settings">Settings</Link> // Output <a href="/dashboard#settings">Settings</a> > **Good to know**: > > * Next.js will scroll to the Page if it is not visible in the viewport upon navigation. #### Disabling scroll restoration The default behavior of the Next.js App Router is to **scroll to the top of a new route or to maintain the scroll position for backwards and forwards navigation.** If you'd like to disable this behavior, you can pass `scroll={false}` to the `<Link>` component, or `scroll: false` to `router.push()` or `router.replace()`. // next/link <Link href="/dashboard" scroll={false}> Dashboard </Link> // useRouter import { useRouter } from 'next/navigation' const router = useRouter() router.push('/dashboard', { scroll: false }) ## `useRouter()` hook The `useRouter` hook allows you to programmatically change routes from Client Components. 'use client' import { useRouter } from 'next/navigation' export default function Page() { const router = useRouter() return ( <button type="button" onClick={() => router.push('/dashboard')}> Dashboard </button> ) } For a full list of `useRouter` methods, see the API reference. > **Recommendation:** Use the `<Link>` component to navigate between routes unless you have a specific requirement for using `useRouter`. ## `redirect` function For Server Components, use the `redirect` function instead. import { redirect } from 'next/navigation' async function fetchTeam(id: string) { const res = await fetch('https://...') if (!res.ok) return undefined return res.json() } export default async function Profile({ params }: { params: { id: string } }) { const team = await fetchTeam(params.id) if (!team) { redirect('/login') } // ... } > **Good to know**: > > * `redirect` returns a 307 (Temporary Redirect) status code by default. When used in a Server Action, it returns a 303 (See Other), which is commonly used for redirecting to a success page as a result of a POST request. > * `redirect` internally throws an error so it should be called outside of `try/catch` blocks. > * `redirect` can be called in Client Components during the rendering process but not in event handlers. You can use the `useRouter` hook instead. > * `redirect` also accepts absolute URLs and can be used to redirect to external links. > * If you'd like to redirect before the render process, use `next.config.js` or Middleware. See the `redirect` API reference for more information. ## Using the native History API Next.js allows you to use the native `window.history.pushState` and `window.history.replaceState` methods to update the browser's history stack without reloading the page. `pushState` and `replaceState` calls integrate into the Next.js Router, allowing you to sync with `usePathname` and `useSearchParams`. ### `window.history.pushState` Use it to add a new entry to the browser's history stack. The user can navigate back to the previous state. For example, to sort a list of products: 'use client' import { useSearchParams } from 'next/navigation' export default function SortProducts() { const searchParams = useSearchParams() function updateSorting(sortOrder: string) { const params = new URLSearchParams(searchParams.toString()) params.set('sort', sortOrder) window.history.pushState(null, '', `?${params.toString()}`) } return ( <> <button onClick={() => updateSorting('asc')}>Sort Ascending</button> <button onClick={() => updateSorting('desc')}>Sort Descending</button> </> ) } ### `window.history.replaceState` Use it to replace the current entry on the browser's history stack. The user is not able to navigate back to the previous state. For example, to switch the application's locale: 'use client' import { usePathname } from 'next/navigation' export function LocaleSwitcher() { const pathname = usePathname() function switchLocale(locale: string) { // e.g. '/en/about' or '/fr/contact' const newPath = `/${locale}${pathname}` window.history.replaceState(null, '', newPath) } return ( <> <button onClick={() => switchLocale('en')}>English</button> <button onClick={() => switchLocale('fr')}>French</button> </> ) } ## How Routing and Navigation Works The App Router uses a hybrid approach for routing and navigation. On the server, your application code is automatically code-split by route segments. And on the client, Next.js prefetches and caches the route segments. This means, when a user navigates to a new route, the browser doesn't reload the page, and only the route segments that change re-render - improving the navigation experience and performance. ### 1\. Code Splitting Code splitting allows you to split your application code into smaller bundles to be downloaded and executed by the browser. This reduces the amount of data transferred and execution time for each request, leading to improved performance. Server Components allow your application code to be automatically code-split by route segments. This means only the code needed for the current route is loaded on navigation. ### 2\. Prefetching Prefetching is a way to preload a route in the background before the user visits it. There are two ways routes are prefetched in Next.js: * **`<Link>` component**: Routes are automatically prefetched as they become visible in the user's viewport. Prefetching happens when the page first loads or when it comes into view through scrolling. * **`router.prefetch()`**: The `useRouter` hook can be used to prefetch routes programmatically. The `<Link>`'s default prefetching behavior (i.e. when the `prefetch` prop is left unspecified or set to `null`) is different depending on your usage of `loading.js`. Only the shared layout, down the rendered "tree" of components until the first `loading.js` file, is prefetched and cached for `30s`. This reduces the cost of fetching an entire dynamic route, and it means you can show an instant loading state for better visual feedback to users. You can disable prefetching by setting the `prefetch` prop to `false`. Alternatively, you can prefetch the full page data beyond the loading boundaries by setting the `prefetch` prop to `true`. See the `<Link>` API reference for more information. > **Good to know**: > > * Prefetching is not enabled in development, only in production. ### 3\. Caching Next.js has an **in-memory client-side cache** called the Router Cache. As users navigate around the app, the React Server Component Payload of prefetched route segments and visited routes are stored in the cache. This means on navigation, the cache is reused as much as possible, instead of making a new request to the server - improving performance by reducing the number of requests and data transferred. Learn more about how the Router Cache works and how to configure it. ### 4\. Partial Rendering Partial rendering means only the route segments that change on navigation re-render on the client, and any shared segments are preserved. For example, when navigating between two sibling routes, `/dashboard/settings` and `/dashboard/analytics`, the `settings` and `analytics` pages will be rendered, and the shared `dashboard` layout will be preserved.  Without partial rendering, each navigation would cause the full page to re-render on the client. Rendering only the segment that changes reduces the amount of data transferred and execution time, leading to improved performance. ### 5\. Soft Navigation Browsers perform a "hard navigation" when navigating between pages. The Next.js App Router enables "soft navigation" between pages, ensuring only the route segments that have changed are re-rendered (partial rendering). This enables client React state to be preserved during navigation. ### 6\. Back and Forward Navigation By default, Next.js will maintain the scroll position for backwards and forwards navigation, and re-use route segments in the Router Cache. ### 7\. Routing between `pages/` and `app/` When incrementally migrating from `pages/` to `app/`, the Next.js router will automatically handle hard navigation between the two. To detect transitions from `pages/` to `app/`, there is a client router filter that leverages probabilistic checking of app routes, which can occasionally result in false positives. By default, such occurrences should be very rare, as we configure the false positive likelihood to be 0.01%. This likelihood can be customized via the `experimental.clientRouterFilterAllowedRate` option in `next.config.js`. It's important to note that lowering the false positive rate will increase the size of the generated filter in the client bundle. Alternatively, if you prefer to disable this handling completely and manage the routing between `pages/` and `app/` manually, you can set `experimental.clientRouterFilter` to false in `next.config.js`. When this feature is disabled, any dynamic routes in pages that overlap with app routes won't be navigated to properly by default. --- ## Page: https://nextjs.org/docs/14/app/building-your-application/routing/loading-ui-and-streaming The special file `loading.js` helps you create meaningful Loading UI with React Suspense. With this convention, you can show an instant loading state from the server while the content of a route segment loads. The new content is automatically swapped in once rendering is complete.  ## Instant Loading States An instant loading state is fallback UI that is shown immediately upon navigation. You can pre-render loading indicators such as skeletons and spinners, or a small but meaningful part of future screens such as a cover photo, title, etc. This helps users understand the app is responding and provides a better user experience. Create a loading state by adding a `loading.js` file inside a folder.  export default function Loading() { // You can add any UI inside Loading, including a Skeleton. return <LoadingSkeleton /> } In the same folder, `loading.js` will be nested inside `layout.js`. It will automatically wrap the `page.js` file and any children below in a `<Suspense>` boundary.  > **Good to know**: > > * Navigation is immediate, even with server-centric routing. > * Navigation is interruptible, meaning changing routes does not need to wait for the content of the route to fully load before navigating to another route. > * Shared layouts remain interactive while new route segments load. > **Recommendation:** Use the `loading.js` convention for route segments (layouts and pages) as Next.js optimizes this functionality. ## Streaming with Suspense In addition to `loading.js`, you can also manually create Suspense Boundaries for your own UI components. The App Router supports streaming with Suspense for both Node.js and Edge runtimes. > **Good to know**: > > * Some browsers buffer a streaming response. You may not see the streamed response until the exceeds 1024 bytes. This typically only affects “hello world” applications, but not real applications. ### What is Streaming? To learn how Streaming works in React and Next.js, it's helpful to understand **Server-Side Rendering (SSR)** and its limitations. With SSR, there's a series of steps that need to be completed before a user can see and interact with a page: 1. First, all data for a given page is fetched on the server. 2. The server then renders the HTML for the page. 3. The HTML, CSS, and JavaScript for the page are sent to the client. 4. A non-interactive user interface is shown using the generated HTML, and CSS. 5. Finally, React hydrates the user interface to make it interactive.  These steps are sequential and blocking, meaning the server can only render the HTML for a page once all the data has been fetched. And, on the client, React can only hydrate the UI once the code for all components in the page has been downloaded. SSR with React and Next.js helps improve the perceived loading performance by showing a non-interactive page to the user as soon as possible.  However, it can still be slow as all data fetching on server needs to be completed before the page can be shown to the user. **Streaming** allows you to break down the page's HTML into smaller chunks and progressively send those chunks from the server to the client.  This enables parts of the page to be displayed sooner, without waiting for all the data to load before any UI can be rendered. Streaming works well with React's component model because each component can be considered a chunk. Components that have higher priority (e.g. product information) or that don't rely on data can be sent first (e.g. layout), and React can start hydration earlier. Components that have lower priority (e.g. reviews, related products) can be sent in the same server request after their data has been fetched.  Streaming is particularly beneficial when you want to prevent long data requests from blocking the page from rendering as it can reduce the Time To First Byte (TTFB) and First Contentful Paint (FCP). It also helps improve Time to Interactive (TTI), especially on slower devices. ### Example `<Suspense>` works by wrapping a component that performs an asynchronous action (e.g. fetch data), showing fallback UI (e.g. skeleton, spinner) while it's happening, and then swapping in your component once the action completes. import { Suspense } from 'react' import { PostFeed, Weather } from './Components' export default function Posts() { return ( <section> <Suspense fallback={<p>Loading feed...</p>}> <PostFeed /> </Suspense> <Suspense fallback={<p>Loading weather...</p>}> <Weather /> </Suspense> </section> ) } By using Suspense, you get the benefits of: 1. **Streaming Server Rendering** - Progressively rendering HTML from the server to the client. 2. **Selective Hydration** - React prioritizes what components to make interactive first based on user interaction. For more Suspense examples and use cases, please see the React Documentation. ### SEO * Next.js will wait for data fetching inside `generateMetadata` to complete before streaming UI to the client. This guarantees the first part of a streamed response includes `<head>` tags. * Since streaming is server-rendered, it does not impact SEO. You can use the Rich Results Test tool from Google to see how your page appears to Google's web crawlers and view the serialized HTML (source). ### Status Codes When streaming, a `200` status code will be returned to signal that the request was successful. The server can still communicate errors or issues to the client within the streamed content itself, for example, when using `redirect` or `notFound`. Since the response headers have already been sent to the client, the status code of the response cannot be updated. This does not affect SEO. --- ## Page: https://nextjs.org/docs/14/app/building-your-application/routing/error-handling The `error.js` file convention allows you to gracefully handle unexpected runtime errors in nested routes. * Automatically wrap a route segment and its nested children in a React Error Boundary. * Create error UI tailored to specific segments using the file-system hierarchy to adjust granularity. * Isolate errors to affected segments while keeping the rest of the application functional. * Add functionality to attempt to recover from an error without a full page reload. Create error UI by adding an `error.js` file inside a route segment and exporting a React component:  'use client' // Error components must be Client Components import { useEffect } from 'react' export default function Error({ error, reset, }: { error: Error & { digest?: string } reset: () => void }) { useEffect(() => { // Log the error to an error reporting service console.error(error) }, [error]) return ( <div> <h2>Something went wrong!</h2> <button onClick={ // Attempt to recover by trying to re-render the segment () => reset() } > Try again </button> </div> ) } ### How `error.js` Works  * `error.js` automatically creates a React Error Boundary that **wraps** a nested child segment or `page.js` component. * The React component exported from the `error.js` file is used as the **fallback** component. * If an error is thrown within the error boundary, the error is **contained**, and the fallback component is **rendered**. * When the fallback error component is active, layouts **above** the error boundary **maintain** their state and **remain** interactive, and the error component can display functionality to recover from the error. ### Recovering From Errors The cause of an error can sometimes be temporary. In these cases, simply trying again might resolve the issue. An error component can use the `reset()` function to prompt the user to attempt to recover from the error. When executed, the function will try to re-render the Error boundary's contents. If successful, the fallback error component is replaced with the result of the re-render. 'use client' export default function Error({ error, reset, }: { error: Error & { digest?: string } reset: () => void }) { return ( <div> <h2>Something went wrong!</h2> <button onClick={() => reset()}>Try again</button> </div> ) } ### Nested Routes React components created through special files are rendered in a specific nested hierarchy. For example, a nested route with two segments that both include `layout.js` and `error.js` files are rendered in the following _simplified_ component hierarchy:  The nested component hierarchy has implications for the behavior of `error.js` files across a nested route: * Errors bubble up to the nearest parent error boundary. This means an `error.js` file will handle errors for all its nested child segments. More or less granular error UI can be achieved by placing `error.js` files at different levels in the nested folders of a route. * An `error.js` boundary will **not** handle errors thrown in a `layout.js` component in the **same** segment because the error boundary is nested **inside** that layout's component. ### Handling Errors in Layouts `error.js` boundaries do **not** catch errors thrown in `layout.js` or `template.js` components of the **same segment**. This intentional hierarchy keeps important UI that is shared between sibling routes (such as navigation) visible and functional when an error occurs. To handle errors within a specific layout or template, place an `error.js` file in the layout's parent segment. To handle errors within the root layout or template, use a variation of `error.js` called `global-error.js`. ### Handling Errors in Root Layouts The root `app/error.js` boundary does **not** catch errors thrown in the root `app/layout.js` or `app/template.js` component. To specifically handle errors in these root components, use a variation of `error.js` called `app/global-error.js` located in the root `app` directory. Unlike the root `error.js`, the `global-error.js` error boundary wraps the **entire** application, and its fallback component replaces the root layout when active. Because of this, it is important to note that `global-error.js` **must** define its own `<html>` and `<body>` tags. `global-error.js` is the least granular error UI and can be considered "catch-all" error handling for the whole application. It is unlikely to be triggered often as root components are typically less dynamic, and other `error.js` boundaries will catch most errors. Even if a `global-error.js` is defined, it is still recommended to define a root `error.js` whose fallback component will be rendered **within** the root layout, which includes globally shared UI and branding. 'use client' export default function GlobalError({ error, reset, }: { error: Error & { digest?: string } reset: () => void }) { return ( <html> <body> <h2>Something went wrong!</h2> <button onClick={() => reset()}>Try again</button> </body> </html> ) } > **Good to know**: > > * `global-error.js` is only enabled in production. In development, our error overlay will show instead. ### Handling Server Errors If an error is thrown inside a Server Component, Next.js will forward an `Error` object (stripped of sensitive error information in production) to the nearest `error.js` file as the `error` prop. #### Securing Sensitive Error Information During production, the `Error` object forwarded to the client only includes a generic `message` and `digest` property. This is a security precaution to avoid leaking potentially sensitive details included in the error to the client. The `message` property contains a generic message about the error and the `digest` property contains an automatically generated hash of the error that can be used to match the corresponding error in server-side logs. During development, the `Error` object forwarded to the client will be serialized and include the `message` of the original error for easier debugging. --- ## Page: https://nextjs.org/docs/14/app/building-your-application/routing/redirecting There are a few ways you can handle redirects in Next.js. This page will go through each available option, use cases, and how to manage large numbers of redirects. | API | Purpose | Where | Status Code | | --- | --- | --- | --- | | `redirect` | Redirect user after a mutation or event | Server Components, Server Actions, Route Handlers | 307 (Temporary) or 303 (Server Action) | | `permanentRedirect` | Redirect user after a mutation or event | Server Components, Server Actions, Route Handlers | 308 (Permanent) | | `useRouter` | Perform a client-side navigation | Event Handlers in Client Components | N/A | | `redirects` in `next.config.js` | Redirect an incoming request based on a path | `next.config.js` file | 307 (Temporary) or 308 (Permanent) | | `NextResponse.redirect` | Redirect an incoming request based on a condition | Middleware | Any | ## `redirect` function The `redirect` function allows you to redirect the user to another URL. You can call `redirect` in Server Components, Route Handlers, and Server Actions. `redirect` is often used after a mutation or event. For example, creating a post: 'use server' import { redirect } from 'next/navigation' import { revalidatePath } from 'next/cache' export async function createPost(id: string) { try { // Call database } catch (error) { // Handle errors } revalidatePath('/posts') // Update cached posts redirect(`/post/${id}`) // Navigate to the new post page } > **Good to know**: > > * `redirect` returns a 307 (Temporary Redirect) status code by default. When used in a Server Action, it returns a 303 (See Other), which is commonly used for redirecting to a success page as a result of a POST request. > * `redirect` internally throws an error so it should be called outside of `try/catch` blocks. > * `redirect` can be called in Client Components during the rendering process but not in event handlers. You can use the `useRouter` hook instead. > * `redirect` also accepts absolute URLs and can be used to redirect to external links. > * If you'd like to redirect before the render process, use `next.config.js` or Middleware. See the `redirect` API reference for more information. ## `permanentRedirect` function The `permanentRedirect` function allows you to **permanently** redirect the user to another URL. You can call `permanentRedirect` in Server Components, Route Handlers, and Server Actions. `permanentRedirect` is often used after a mutation or event that changes an entity's canonical URL, such as updating a user's profile URL after they change their username: 'use server' import { permanentRedirect } from 'next/navigation' import { revalidateTag } from 'next/cache' export async function updateUsername(username: string, formData: FormData) { try { // Call database } catch (error) { // Handle errors } revalidateTag('username') // Update all references to the username permanentRedirect(`/profile/${username}`) // Navigate to the new user profile } > **Good to know**: > > * `permanentRedirect` returns a 308 (permanent redirect) status code by default. > * `permanentRedirect` also accepts absolute URLs and can be used to redirect to external links. > * If you'd like to redirect before the render process, use `next.config.js` or Middleware. See the `permanentRedirect` API reference for more information. ## `useRouter()` hook If you need to redirect inside an event handler in a Client Component, you can use the `push` method from the `useRouter` hook. For example: 'use client' import { useRouter } from 'next/navigation' export default function Page() { const router = useRouter() return ( <button type="button" onClick={() => router.push('/dashboard')}> Dashboard </button> ) } > **Good to know**: > > * If you don't need to programmatically navigate a user, you should use a `<Link>` component. See the `useRouter` API reference for more information. ## `redirects` in `next.config.js` The `redirects` option in the `next.config.js` file allows you to redirect an incoming request path to a different destination path. This is useful when you change the URL structure of pages or have a list of redirects that are known ahead of time. `redirects` supports path, header, cookie, and query matching, giving you the flexibility to redirect users based on an incoming request. To use `redirects`, add the option to your `next.config.js` file: module.exports = { async redirects() { return [ // Basic redirect { source: '/about', destination: '/', permanent: true, }, // Wildcard path matching { source: '/blog/:slug', destination: '/news/:slug', permanent: true, }, ] }, } See the `redirects` API reference for more information. > **Good to know**: > > * `redirects` can return a 307 (Temporary Redirect) or 308 (Permanent Redirect) status code with the `permanent` option. > * `redirects` may have a limit on platforms. For example, on Vercel, there's a limit of 1,024 redirects. To manage a large number of redirects (1000+), consider creating a custom solution using Middleware. See managing redirects at scale for more. > * `redirects` runs **before** Middleware. ## `NextResponse.redirect` in Middleware Middleware allows you to run code before a request is completed. Then, based on the incoming request, redirect to a different URL using `NextResponse.redirect`. This is useful if you want to redirect users based on a condition (e.g. authentication, session management, etc) or have a large number of redirects. For example, to redirect the user to a `/login` page if they are not authenticated: import { NextResponse, NextRequest } from 'next/server' import { authenticate } from 'auth-provider' export function middleware(request: NextRequest) { const isAuthenticated = authenticate(request) // If the user is authenticated, continue as normal if (isAuthenticated) { return NextResponse.next() } // Redirect to login page if not authenticated return NextResponse.redirect(new URL('/login', request.url)) } export const config = { matcher: '/dashboard/:path*', } > **Good to know**: > > * Middleware runs **after** `redirects` in `next.config.js` and **before** rendering. See the Middleware documentation for more information. ## Managing redirects at scale (advanced) To manage a large number of redirects (1000+), you may consider creating a custom solution using Middleware. This allows you to handle redirects programmatically without having to redeploy your application. To do this, you'll need to consider: 1. Creating and storing a redirect map. 2. Optimizing data lookup performance. > **Next.js Example**: See our Middleware with Bloom filter example for an implementation of the recommendations below. ### 1\. Creating and storing a redirect map A redirect map is a list of redirects that you can store in a database (usually a key-value store) or JSON file. Consider the following data structure: { "/old": { "destination": "/new", "permanent": true }, "/blog/post-old": { "destination": "/blog/post-new", "permanent": true } } In Middleware, you can read from a database such as Vercel's Edge Config or Redis, and redirect the user based on the incoming request: import { NextResponse, NextRequest } from 'next/server' import { get } from '@vercel/edge-config' type RedirectEntry = { destination: string permanent: boolean } export async function middleware(request: NextRequest) { const pathname = request.nextUrl.pathname const redirectData = await get(pathname) if (redirectData && typeof redirectData === 'string') { const redirectEntry: RedirectEntry = JSON.parse(redirectData) const statusCode = redirectEntry.permanent ? 308 : 307 return NextResponse.redirect(redirectEntry.destination, statusCode) } // No redirect found, continue without redirecting return NextResponse.next() } ### 2\. Optimizing data lookup performance Reading a large dataset for every incoming request can be slow and expensive. There are two ways you can optimize data lookup performance: * Use a database that is optimized for fast reads, such as Vercel Edge Config or Redis. * Use a data lookup strategy such as a Bloom filter to efficiently check if a redirect exists **before** reading the larger redirects file or database. Considering the previous example, you can import a generated bloom filter file into Middleware, then, check if the incoming request pathname exists in the bloom filter. If it does, forward the request to a Route Handler which will check the actual file and redirect the user to the appropriate URL. This avoids importing a large redirects file into Middleware, which can slow down every incoming request. import { NextResponse, NextRequest } from 'next/server' import { ScalableBloomFilter } from 'bloom-filters' import GeneratedBloomFilter from './redirects/bloom-filter.json' type RedirectEntry = { destination: string permanent: boolean } // Initialize bloom filter from a generated JSON file const bloomFilter = ScalableBloomFilter.fromJSON(GeneratedBloomFilter as any) export async function middleware(request: NextRequest) { // Get the path for the incoming request const pathname = request.nextUrl.pathname // Check if the path is in the bloom filter if (bloomFilter.has(pathname)) { // Forward the pathname to the Route Handler const api = new URL( `/api/redirects?pathname=${encodeURIComponent(request.nextUrl.pathname)}`, request.nextUrl.origin ) try { // Fetch redirect data from the Route Handler const redirectData = await fetch(api) if (redirectData.ok) { const redirectEntry: RedirectEntry | undefined = await redirectData.json() if (redirectEntry) { // Determine the status code const statusCode = redirectEntry.permanent ? 308 : 307 // Redirect to the destination return NextResponse.redirect(redirectEntry.destination, statusCode) } } } catch (error) { console.error(error) } } // No redirect found, continue the request without redirecting return NextResponse.next() } Then, in the Route Handler: import { NextRequest, NextResponse } from 'next/server' import redirects from '@/app/redirects/redirects.json' type RedirectEntry = { destination: string permanent: boolean } export function GET(request: NextRequest) { const pathname = request.nextUrl.searchParams.get('pathname') if (!pathname) { return new Response('Bad Request', { status: 400 }) } // Get the redirect entry from the redirects.json file const redirect = (redirects as Record<string, RedirectEntry>)[pathname] // Account for bloom filter false positives if (!redirect) { return new Response('No redirect', { status: 400 }) } // Return the redirect entry return NextResponse.json(redirect) } > **Good to know:** > > * To generate a bloom filter, you can use a library like `bloom-filters`. > * You should validate requests made to your Route Handler to prevent malicious requests. --- ## Page: https://nextjs.org/docs/14/app/building-your-application/routing/route-groups In the `app` directory, nested folders are normally mapped to URL paths. However, you can mark a folder as a **Route Group** to prevent the folder from being included in the route's URL path. This allows you to organize your route segments and project files into logical groups without affecting the URL path structure. Route groups are useful for: * Organizing routes into groups e.g. by site section, intent, or team. * Enabling nested layouts in the same route segment level: * Creating multiple nested layouts in the same segment, including multiple root layouts * Adding a layout to a subset of routes in a common segment ## Convention A route group can be created by wrapping a folder's name in parenthesis: `(folderName)` ## Examples ### Organize routes without affecting the URL path To organize routes without affecting the URL, create a group to keep related routes together. The folders in parenthesis will be omitted from the URL (e.g. `(marketing)` or `(shop)`).  Even though routes inside `(marketing)` and `(shop)` share the same URL hierarchy, you can create a different layout for each group by adding a `layout.js` file inside their folders.  ### Opting specific segments into a layout To opt specific routes into a layout, create a new route group (e.g. `(shop)`) and move the routes that share the same layout into the group (e.g. `account` and `cart`). The routes outside of the group will not share the layout (e.g. `checkout`).  ### Creating multiple root layouts To create multiple root layouts, remove the top-level `layout.js` file, and add a `layout.js` file inside each route groups. This is useful for partitioning an application into sections that have a completely different UI or experience. The `<html>` and `<body>` tags need to be added to each root layout.  In the example above, both `(marketing)` and `(shop)` have their own root layout. * * * > **Good to know**: > > * The naming of route groups has no special significance other than for organization. They do not affect the URL path. > * Routes that include a route group **should not** resolve to the same URL path as other routes. For example, since route groups don't affect URL structure, `(marketing)/about/page.js` and `(shop)/about/page.js` would both resolve to `/about` and cause an error. > * If you use multiple root layouts without a top-level `layout.js` file, your home `page.js` file should be defined in one of the route groups, For example: `app/(marketing)/page.js`. > * Navigating **across multiple root layouts** will cause a **full page load** (as opposed to a client-side navigation). For example, navigating from `/cart` that uses `app/(shop)/layout.js` to `/blog` that uses `app/(marketing)/layout.js` will cause a full page load. This **only** applies to multiple root layouts. --- ## Page: https://nextjs.org/docs/14/app/building-your-application/routing/colocation ## Project Organization and File Colocation Apart from routing folder and file conventions, Next.js is **unopinionated** about how you organize and colocate your project files. This page shares default behavior and features you can use to organize your project. * Safe colocation by default * Project organization features * Project organization strategies ## Safe colocation by default In the `app` directory, nested folder hierarchy defines route structure. Each folder represents a route segment that is mapped to a corresponding segment in a URL path. However, even though route structure is defined through folders, a route is **not publicly accessible** until a `page.js` or `route.js` file is added to a route segment.  And, even when a route is made publicly accessible, only the **content returned** by `page.js` or `route.js` is sent to the client.  This means that **project files** can be **safely colocated** inside route segments in the `app` directory without accidentally being routable.  > **Good to know**: > > * This is different from the `pages` directory, where any file in `pages` is considered a route. > * While you **can** colocate your project files in `app` you don't **have** to. If you prefer, you can keep them outside the `app` directory. ## Project organization features Next.js provides several features to help you organize your project. ### Private Folders Private folders can be created by prefixing a folder with an underscore: `_folderName` This indicates the folder is a private implementation detail and should not be considered by the routing system, thereby **opting the folder and all its subfolders** out of routing.  Since files in the `app` directory can be safely colocated by default, private folders are not required for colocation. However, they can be useful for: * Separating UI logic from routing logic. * Consistently organizing internal files across a project and the Next.js ecosystem. * Sorting and grouping files in code editors. * Avoiding potential naming conflicts with future Next.js file conventions. > **Good to know** > > * While not a framework convention, you might also consider marking files outside private folders as "private" using the same underscore pattern. > * You can create URL segments that start with an underscore by prefixing the folder name with `%5F` (the URL-encoded form of an underscore): `%5FfolderName`. > * If you don't use private folders, it would be helpful to know Next.js special file conventions to prevent unexpected naming conflicts. ### Route Groups Route groups can be created by wrapping a folder in parenthesis: `(folderName)` This indicates the folder is for organizational purposes and should **not be included** in the route's URL path.  Route groups are useful for: * Organizing routes into groups e.g. by site section, intent, or team. * Enabling nested layouts in the same route segment level: * Creating multiple nested layouts in the same segment, including multiple root layouts * Adding a layout to a subset of routes in a common segment ### `src` Directory Next.js supports storing application code (including `app`) inside an optional `src` directory. This separates application code from project configuration files which mostly live in the root of a project.  ### Module Path Aliases Next.js supports Module Path Aliases which make it easier to read and maintain imports across deeply nested project files. // before import { Button } from '../../../components/button' // after import { Button } from '@/components/button' ## Project organization strategies There is no "right" or "wrong" way when it comes to organizing your own files and folders in a Next.js project. The following section lists a very high-level overview of common strategies. The simplest takeaway is to choose a strategy that works for you and your team and be consistent across the project. > **Good to know**: In our examples below, we're using `components` and `lib` folders as generalized placeholders, their naming has no special framework significance and your projects might use other folders like `ui`, `utils`, `hooks`, `styles`, etc. ### Store project files outside of `app` This strategy stores all application code in shared folders in the **root of your project** and keeps the `app` directory purely for routing purposes.  ### Store project files in top-level folders inside of `app` This strategy stores all application code in shared folders in the **root of the `app` directory**.  ### Split project files by feature or route This strategy stores globally shared application code in the root `app` directory and **splits** more specific application code into the route segments that use them.  --- ## Page: https://nextjs.org/docs/14/app/building-your-application/routing/dynamic-routes When you don't know the exact segment names ahead of time and want to create routes from dynamic data, you can use Dynamic Segments that are filled in at request time or prerendered at build time. ## Convention A Dynamic Segment can be created by wrapping a folder's name in square brackets: `[folderName]`. For example, `[id]` or `[slug]`. Dynamic Segments are passed as the `params` prop to `layout`, `page`, `route`, and `generateMetadata` functions. ## Example For example, a blog could include the following route `app/blog/[slug]/page.js` where `[slug]` is the Dynamic Segment for blog posts. export default function Page({ params }: { params: { slug: string } }) { return <div>My Post: {params.slug}</div> } | Route | Example URL | `params` | | --- | --- | --- | | `app/blog/[slug]/page.js` | `/blog/a` | `{ slug: 'a' }` | | `app/blog/[slug]/page.js` | `/blog/b` | `{ slug: 'b' }` | | `app/blog/[slug]/page.js` | `/blog/c` | `{ slug: 'c' }` | See the generateStaticParams() page to learn how to generate the params for the segment. > **Good to know**: Dynamic Segments are equivalent to Dynamic Routes in the `pages` directory. ## Generating Static Params The `generateStaticParams` function can be used in combination with dynamic route segments to **statically generate** routes at build time instead of on-demand at request time. export async function generateStaticParams() { const posts = await fetch('https://.../posts').then((res) => res.json()) return posts.map((post) => ({ slug: post.slug, })) } The primary benefit of the `generateStaticParams` function is its smart retrieval of data. If content is fetched within the `generateStaticParams` function using a `fetch` request, the requests are automatically memoized. This means a `fetch` request with the same arguments across multiple `generateStaticParams`, Layouts, and Pages will only be made once, which decreases build times. Use the migration guide if you are migrating from the `pages` directory. See `generateStaticParams` server function documentation for more information and advanced use cases. ## Catch-all Segments Dynamic Segments can be extended to **catch-all** subsequent segments by adding an ellipsis inside the brackets `[...folderName]`. For example, `app/shop/[...slug]/page.js` will match `/shop/clothes`, but also `/shop/clothes/tops`, `/shop/clothes/tops/t-shirts`, and so on. | Route | Example URL | `params` | | --- | --- | --- | | `app/shop/[...slug]/page.js` | `/shop/a` | `{ slug: ['a'] }` | | `app/shop/[...slug]/page.js` | `/shop/a/b` | `{ slug: ['a', 'b'] }` | | `app/shop/[...slug]/page.js` | `/shop/a/b/c` | `{ slug: ['a', 'b', 'c'] }` | ## Optional Catch-all Segments Catch-all Segments can be made **optional** by including the parameter in double square brackets: `[[...folderName]]`. For example, `app/shop/[[...slug]]/page.js` will **also** match `/shop`, in addition to `/shop/clothes`, `/shop/clothes/tops`, `/shop/clothes/tops/t-shirts`. The difference between **catch-all** and **optional catch-all** segments is that with optional, the route without the parameter is also matched (`/shop` in the example above). | Route | Example URL | `params` | | --- | --- | --- | | `app/shop/[[...slug]]/page.js` | `/shop` | `{}` | | `app/shop/[[...slug]]/page.js` | `/shop/a` | `{ slug: ['a'] }` | | `app/shop/[[...slug]]/page.js` | `/shop/a/b` | `{ slug: ['a', 'b'] }` | | `app/shop/[[...slug]]/page.js` | `/shop/a/b/c` | `{ slug: ['a', 'b', 'c'] }` | ## TypeScript When using TypeScript, you can add types for `params` depending on your configured route segment. export default function Page({ params }: { params: { slug: string } }) { return <h1>My Page</h1> } | Route | `params` Type Definition | | --- | --- | | `app/blog/[slug]/page.js` | `{ slug: string }` | | `app/shop/[...slug]/page.js` | `{ slug: string[] }` | | `app/shop/[[...slug]]/page.js` | `{ slug?: string[] }` | | `app/[categoryId]/[itemId]/page.js` | `{ categoryId: string, itemId: string }` | > **Good to know**: This may be done automatically by the TypeScript plugin in the future. --- ## Page: https://nextjs.org/docs/14/app/building-your-application/routing/parallel-routes Parallel Routes allows you to simultaneously or conditionally render one or more pages within the same layout. They are useful for highly dynamic sections of an app, such as dashboards and feeds on social sites. For example, considering a dashboard, you can use parallel routes to simultaneously render the `team` and `analytics` pages:  ## Slots Parallel routes are created using named **slots**. Slots are defined with the `@folder` convention. For example, the following file structure defines two slots: `@analytics` and `@team`:  Slots are passed as props to the shared parent layout. For the example above, the component in `app/layout.js` now accepts the `@analytics` and `@team` slots props, and can render them in parallel alongside the `children` prop: export default function Layout({ children, team, analytics, }: { children: React.ReactNode analytics: React.ReactNode team: React.ReactNode }) { return ( <> {children} {team} {analytics} </> ) } However, slots are **not** route segments and do not affect the URL structure. For example, for `/@analytics/views`, the URL will be `/views` since `@analytics` is a slot. > **Good to know**: > > * The `children` prop is an implicit slot that does not need to be mapped to a folder. This means `app/page.js` is equivalent to `app/@children/page.js`. ## Active state and navigation By default, Next.js keeps track of the active _state_ (or subpage) for each slot. However, the content rendered within a slot will depend on the type of navigation: * **Soft Navigation**: During client-side navigation, Next.js will perform a partial render, changing the subpage within the slot, while maintaining the other slot's active subpages, even if they don't match the current URL. * **Hard Navigation**: After a full-page load (browser refresh), Next.js cannot determine the active state for the slots that don't match the current URL. Instead, it will render a `default.js` file for the unmatched slots, or `404` if `default.js` doesn't exist. > **Good to know**: > > * The `404` for unmatched routes helps ensure that you don't accidentally render a parallel route on a page that it was not intended for. ### `default.js` You can define a `default.js` file to render as a fallback for unmatched slots during the initial load or full-page reload. Consider the following folder structure. The `@team` slot has a `/settings` page, but `@analytics` does not.  When navigating to `/settings`, the `@team` slot will render the `/settings` page while maintaining the currently active page for the `@analytics` slot. On refresh, Next.js will render a `default.js` for `@analytics`. If `default.js` doesn't exist, a `404` is rendered instead. Additionally, since `children` is an implicit slot, you also need to create a `default.js` file to render a fallback for `children` when Next.js cannot recover the active state of the parent page. ### `useSelectedLayoutSegment(s)` Both `useSelectedLayoutSegment` and `useSelectedLayoutSegments` accept a `parallelRoutesKey` parameter, which allows you to read the active route segment within a slot. 'use client' import { useSelectedLayoutSegment } from 'next/navigation' export default function Layout({ auth }: { auth: React.ReactNode }) { const loginSegment = useSelectedLayoutSegment('auth') // ... } When a user navigates to `app/@auth/login` (or `/login` in the URL bar), `loginSegment` will be equal to the string `"login"`. ## Examples ### Conditional Routes You can use Parallel Routes to conditionally render routes based on certain conditions, such as user role. For example, to render a different dashboard page for the `/admin` or `/user` roles:  import { checkUserRole } from '@/lib/auth' export default function Layout({ user, admin, }: { user: React.ReactNode admin: React.ReactNode }) { const role = checkUserRole() return <>{role === 'admin' ? admin : user}</> } ### Tab Groups You can add a `layout` inside a slot to allow users to navigate the slot independently. This is useful for creating tabs. For example, the `@analytics` slot has two subpages: `/page-views` and `/visitors`.  Within `@analytics`, create a `layout` file to share the tabs between the two pages: import Link from 'next/link' export default function Layout({ children }: { children: React.ReactNode }) { return ( <> <nav> <Link href="/page-views">Page Views</Link> <Link href="/visitors">Visitors</Link> </nav> <div>{children}</div> </> ) } ### Modals Parallel Routes can be used together with Intercepting Routes to create modals. This allows you to solve common challenges when building modals, such as: * Making the modal content **shareable through a URL**. * **Preserving context** when the page is refreshed, instead of closing the modal. * **Closing the modal on backwards navigation** rather than going to the previous route. * **Reopening the modal on forwards navigation**. Consider the following UI pattern, where a user can open a login modal from a layout using client-side navigation, or access a separate `/login` page:  To implement this pattern, start by creating a `/login` route that renders your **main** login page.  import { Login } from '@/app/ui/login' export default function Page() { return <Login /> } Then, inside the `@auth` slot, add `default.js` file that returns `null`. This ensures that the modal is not rendered when it's not active. export default function Default() { return null } Inside your `@auth` slot, intercept the `/login` route by updating the `/(.)login` folder. Import the `<Modal>` component and its children into the `/(.)login/page.tsx` file: import { Modal } from '@/app/ui/modal' import { Login } from '@/app/ui/login' export default function Page() { return ( <Modal> <Login /> </Modal> ) } > **Good to know:** > > * The convention used to intercept the route, e.g. `(.)`, depends on your file-system structure. See Intercepting Routes convention. > * By separating the `<Modal>` functionality from the modal content (`<Login>`), you can ensure any content inside the modal, e.g. forms, are Server Components. See Interleaving Client and Server Components for more information. #### Opening the modal Now, you can leverage the Next.js router to open and close the modal. This ensures the URL is correctly updated when the modal is open, and when navigating backwards and forwards. To open the modal, pass the `@auth` slot as a prop to the parent layout and render it alongside the `children` prop. import Link from 'next/link' export default function Layout({ auth, children, }: { auth: React.ReactNode children: React.ReactNode }) { return ( <> <nav> <Link href="/login">Open modal</Link> </nav> <div>{auth}</div> <div>{children}</div> </> ) } When the user clicks the `<Link>`, the modal will open instead of navigating to the `/login` page. However, on refresh or initial load, navigating to `/login` will take the user to the main login page. #### Closing the modal You can close the modal by calling `router.back()` or by using the `Link` component. 'use client' import { useRouter } from 'next/navigation' export function Modal({ children }: { children: React.ReactNode }) { const router = useRouter() return ( <> <button onClick={() => { router.back() }} > Close modal </button> <div>{children}</div> </> ) } When using the `Link` component to navigate away from a page that shouldn't render the `@auth` slot anymore, we use a catch-all route that returns `null`. import Link from 'next/link' export function Modal({ children }: { children: React.ReactNode }) { return ( <> <Link href="/">Close modal</Link> <div>{children}</div> </> ) } export default function CatchAll() { return null } > **Good to know:** > > * We use a catch-all route in our `@auth` slot to close the modal because of the behavior described in Active state and navigation. Since client-side navigations to a route that no longer match the slot will remain visible, we need to match the slot to a route that returns `null` to close the modal. > * Other examples could include opening a photo modal in a gallery while also having a dedicated `/photo/[id]` page, or opening a shopping cart in a side modal. > * View an example of modals with Intercepted and Parallel Routes. ### Loading and Error UI Parallel Routes can be streamed independently, allowing you to define independent error and loading states for each route:  See the Loading UI and Error Handling documentation for more information. --- ## Page: https://nextjs.org/docs/14/app/building-your-application/routing/intercepting-routes Intercepting routes allows you to load a route from another part of your application within the current layout. This routing paradigm can be useful when you want to display the content of a route without the user switching to a different context. For example, when clicking on a photo in a feed, you can display the photo in a modal, overlaying the feed. In this case, Next.js intercepts the `/photo/123` route, masks the URL, and overlays it over `/feed`.  However, when navigating to the photo by clicking a shareable URL or by refreshing the page, the entire photo page should render instead of the modal. No route interception should occur.  ## Convention Intercepting routes can be defined with the `(..)` convention, which is similar to relative path convention `../` but for segments. You can use: * `(.)` to match segments on the **same level** * `(..)` to match segments **one level above** * `(..)(..)` to match segments **two levels above** * `(...)` to match segments from the **root** `app` directory For example, you can intercept the `photo` segment from within the `feed` segment by creating a `(..)photo` directory.  > Note that the `(..)` convention is based on _route segments_, not the file-system. ## Examples ### Modals Intercepting Routes can be used together with Parallel Routes to create modals. This allows you to solve common challenges when building modals, such as: * Making the modal content **shareable through a URL**. * **Preserving context** when the page is refreshed, instead of closing the modal. * **Closing the modal on backwards navigation** rather than going to the previous route. * **Reopening the modal on forwards navigation**. Consider the following UI pattern, where a user can open a photo modal from a gallery using client-side navigation, or navigate to the photo page directly from a shareable URL:  In the above example, the path to the `photo` segment can use the `(..)` matcher since `@modal` is a slot and **not** a segment. This means that the `photo` route is only one segment level higher, despite being two file-system levels higher. See the Parallel Routes documentation for a step-by-step example, or see our image gallery example. > **Good to know:** > > * Other examples could include opening a login modal in a top navbar while also having a dedicated `/login` page, or opening a shopping cart in a side modal. --- ## Page: https://nextjs.org/docs/14/app/building-your-application/routing/route-handlers Route Handlers allow you to create custom request handlers for a given route using the Web Request and Response APIs.  > **Good to know**: Route Handlers are only available inside the `app` directory. They are the equivalent of API Routes inside the `pages` directory meaning you **do not** need to use API Routes and Route Handlers together. ## Convention Route Handlers are defined in a `route.js|ts` file inside the `app` directory: export const dynamic = 'force-dynamic' // defaults to auto export async function GET(request: Request) {} Route Handlers can be nested inside the `app` directory, similar to `page.js` and `layout.js`. But there **cannot** be a `route.js` file at the same route segment level as `page.js`. ### Supported HTTP Methods The following HTTP methods are supported: `GET`, `POST`, `PUT`, `PATCH`, `DELETE`, `HEAD`, and `OPTIONS`. If an unsupported method is called, Next.js will return a `405 Method Not Allowed` response. ### Extended `NextRequest` and `NextResponse` APIs In addition to supporting native Request and Response. Next.js extends them with `NextRequest` and `NextResponse` to provide convenient helpers for advanced use cases. ## Behavior ### Caching Route Handlers are cached by default when using the `GET` method with the `Response` object. export async function GET() { const res = await fetch('https://data.mongodb-api.com/...', { headers: { 'Content-Type': 'application/json', 'API-Key': process.env.DATA_API_KEY, }, }) const data = await res.json() return Response.json({ data }) } > **TypeScript Warning:** `Response.json()` is only valid from TypeScript 5.2. If you use a lower TypeScript version, you can use `NextResponse.json()` for typed responses instead. ### Opting out of caching You can opt out of caching by: * Using the `Request` object with the `GET` method. * Using any of the other HTTP methods. * Using Dynamic Functions like `cookies` and `headers`. * The Segment Config Options manually specifies dynamic mode. For example: export async function GET(request: Request) { const { searchParams } = new URL(request.url) const id = searchParams.get('id') const res = await fetch(`https://data.mongodb-api.com/product/${id}`, { headers: { 'Content-Type': 'application/json', 'API-Key': process.env.DATA_API_KEY!, }, }) const product = await res.json() return Response.json({ product }) } Similarly, the `POST` method will cause the Route Handler to be evaluated dynamically. export async function POST() { const res = await fetch('https://data.mongodb-api.com/...', { method: 'POST', headers: { 'Content-Type': 'application/json', 'API-Key': process.env.DATA_API_KEY!, }, body: JSON.stringify({ time: new Date().toISOString() }), }) const data = await res.json() return Response.json(data) } > **Good to know**: Like API Routes, Route Handlers can be used for cases like handling form submissions. A new abstraction for handling forms and mutations that integrates deeply with React is being worked on. ### Route Resolution You can consider a `route` the lowest level routing primitive. * They **do not** participate in layouts or client-side navigations like `page`. * There **cannot** be a `route.js` file at the same route as `page.js`. | Page | Route | Result | | --- | --- | --- | | `app/page.js` | `app/route.js` | Conflict | | `app/page.js` | `app/api/route.js` | Valid | | `app/[user]/page.js` | `app/api/route.js` | Valid | Each `route.js` or `page.js` file takes over all HTTP verbs for that route. export default function Page() { return <h1>Hello, Next.js!</h1> } // ❌ Conflict // `app/route.js` export async function POST(request) {} ## Examples The following examples show how to combine Route Handlers with other Next.js APIs and features. ### Revalidating Cached Data You can revalidate cached data using the `next.revalidate` option: export async function GET() { const res = await fetch('https://data.mongodb-api.com/...', { next: { revalidate: 60 }, // Revalidate every 60 seconds }) const data = await res.json() return Response.json(data) } Alternatively, you can use the `revalidate` segment config option: export const revalidate = 60 ### Dynamic Functions Route Handlers can be used with dynamic functions from Next.js, like `cookies` and `headers`. #### Cookies You can read or set cookies with `cookies` from `next/headers`. This server function can be called directly in a Route Handler, or nested inside of another function. Alternatively, you can return a new `Response` using the `Set-Cookie` header. import { cookies } from 'next/headers' export async function GET(request: Request) { const cookieStore = cookies() const token = cookieStore.get('token') return new Response('Hello, Next.js!', { status: 200, headers: { 'Set-Cookie': `token=${token.value}` }, }) } You can also use the underlying Web APIs to read cookies from the request (`NextRequest`): import { type NextRequest } from 'next/server' export async function GET(request: NextRequest) { const token = request.cookies.get('token') } You can read headers with `headers` from `next/headers`. This server function can be called directly in a Route Handler, or nested inside of another function. This `headers` instance is read-only. To set headers, you need to return a new `Response` with new `headers`. import { headers } from 'next/headers' export async function GET(request: Request) { const headersList = headers() const referer = headersList.get('referer') return new Response('Hello, Next.js!', { status: 200, headers: { referer: referer }, }) } You can also use the underlying Web APIs to read headers from the request (`NextRequest`): import { type NextRequest } from 'next/server' export async function GET(request: NextRequest) { const requestHeaders = new Headers(request.headers) } ### Redirects import { redirect } from 'next/navigation' export async function GET(request: Request) { redirect('https://nextjs.org/') } ### Dynamic Route Segments > We recommend reading the Defining Routes page before continuing. Route Handlers can use Dynamic Segments to create request handlers from dynamic data. export async function GET( request: Request, { params }: { params: { slug: string } } ) { const slug = params.slug // 'a', 'b', or 'c' } | Route | Example URL | `params` | | --- | --- | --- | | `app/items/[slug]/route.js` | `/items/a` | `{ slug: 'a' }` | | `app/items/[slug]/route.js` | `/items/b` | `{ slug: 'b' }` | | `app/items/[slug]/route.js` | `/items/c` | `{ slug: 'c' }` | ### URL Query Parameters The request object passed to the Route Handler is a `NextRequest` instance, which has some additional convenience methods, including for more easily handling query parameters. import { type NextRequest } from 'next/server' export function GET(request: NextRequest) { const searchParams = request.nextUrl.searchParams const query = searchParams.get('query') // query is "hello" for /api/search?query=hello } ### Streaming Streaming is commonly used in combination with Large Language Models (LLMs), such as OpenAI, for AI-generated content. Learn more about the AI SDK. import OpenAI from 'openai' import { OpenAIStream, StreamingTextResponse } from 'ai' const openai = new OpenAI({ apiKey: process.env.OPENAI_API_KEY, }) export const runtime = 'edge' export async function POST(req: Request) { const { messages } = await req.json() const response = await openai.chat.completions.create({ model: 'gpt-3.5-turbo', stream: true, messages, }) const stream = OpenAIStream(response) return new StreamingTextResponse(stream) } These abstractions use the Web APIs to create a stream. You can also use the underlying Web APIs directly. // https://developer.mozilla.org/docs/Web/API/ReadableStream#convert_async_iterator_to_stream function iteratorToStream(iterator: any) { return new ReadableStream({ async pull(controller) { const { value, done } = await iterator.next() if (done) { controller.close() } else { controller.enqueue(value) } }, }) } function sleep(time: number) { return new Promise((resolve) => { setTimeout(resolve, time) }) } const encoder = new TextEncoder() async function* makeIterator() { yield encoder.encode('<p>One</p>') await sleep(200) yield encoder.encode('<p>Two</p>') await sleep(200) yield encoder.encode('<p>Three</p>') } export async function GET() { const iterator = makeIterator() const stream = iteratorToStream(iterator) return new Response(stream) } ### Request Body You can read the `Request` body using the standard Web API methods: export async function POST(request: Request) { const res = await request.json() return Response.json({ res }) } ### Request Body FormData You can read the `FormData` using the `request.formData()` function: export async function POST(request: Request) { const formData = await request.formData() const name = formData.get('name') const email = formData.get('email') return Response.json({ name, email }) } Since `formData` data are all strings, you may want to use `zod-form-data` to validate the request and retrieve data in the format you prefer (e.g. `number`). ### CORS You can set CORS headers for a specific Route Handler using the standard Web API methods: export const dynamic = 'force-dynamic' // defaults to auto export async function GET(request: Request) { return new Response('Hello, Next.js!', { status: 200, headers: { 'Access-Control-Allow-Origin': '*', 'Access-Control-Allow-Methods': 'GET, POST, PUT, DELETE, OPTIONS', 'Access-Control-Allow-Headers': 'Content-Type, Authorization', }, }) } > **Good to know**: > > * To add CORS headers to multiple Route Handlers, you can use Middleware or the `next.config.js` file. > * Alternatively, see our CORS example package. ### Webhooks You can use a Route Handler to receive webhooks from third-party services: export async function POST(request: Request) { try { const text = await request.text() // Process the webhook payload } catch (error) { return new Response(`Webhook error: ${error.message}`, { status: 400, }) } return new Response('Success!', { status: 200, }) } Notably, unlike API Routes with the Pages Router, you do not need to use `bodyParser` to use any additional configuration. ### Edge and Node.js Runtimes Route Handlers have an isomorphic Web API to support both Edge and Node.js runtimes seamlessly, including support for streaming. Since Route Handlers use the same route segment configuration as Pages and Layouts, they support long-awaited features like general-purpose statically regenerated Route Handlers. You can use the `runtime` segment config option to specify the runtime: export const runtime = 'edge' // 'nodejs' is the default ### Non-UI Responses You can use Route Handlers to return non-UI content. Note that `sitemap.xml`, `robots.txt`, `app icons`, and open graph images all have built-in support. export const dynamic = 'force-dynamic' // defaults to auto export async function GET() { return new Response( `<?xml version="1.0" encoding="UTF-8" ?> <rss version="2.0"> <channel> <title>Next.js Documentation</title> <link>https://nextjs.org/docs</link> <description>The React Framework for the Web</description> </channel> </rss>`, { headers: { 'Content-Type': 'text/xml', }, } ) } ### Segment Config Options Route Handlers use the same route segment configuration as pages and layouts. export const dynamic = 'auto' export const dynamicParams = true export const revalidate = false export const fetchCache = 'auto' export const runtime = 'nodejs' export const preferredRegion = 'auto' See the API reference for more details. --- ## Page: https://nextjs.org/docs/14/app/building-your-application/routing/middleware Middleware allows you to run code before a request is completed. Then, based on the incoming request, you can modify the response by rewriting, redirecting, modifying the request or response headers, or responding directly. Middleware runs before cached content and routes are matched. See Matching Paths for more details. ## Use Cases Integrating Middleware into your application can lead to significant improvements in performance, security, and user experience. Some common scenarios where Middleware is particularly effective include: * Authentication and Authorization: Ensure user identity and check session cookies before granting access to specific pages or API routes. * Server-Side Redirects: Redirect users at the server level based on certain conditions (e.g., locale, user role). * Path Rewriting: Support A/B testing, feature rollouts, or legacy paths by dynamically rewriting paths to API routes or pages based on request properties. * Bot Detection: Protect your resources by detecting and blocking bot traffic. * Logging and Analytics: Capture and analyze request data for insights before processing by the page or API. * Feature Flagging: Enable or disable features dynamically for seamless feature rollouts or testing. Recognizing situations where middleware may not be the optimal approach is just as crucial. Here are some scenarios to be mindful of: * Complex Data Fetching and Manipulation: Middleware is not designed for direct data fetching or manipulation, this should be done within Route Handlers or server-side utilities instead. * Heavy Computational Tasks: Middleware should be lightweight and respond quickly or it can cause delays in page load. Heavy computational tasks or long-running processes should be done within dedicated Route Handlers. * Extensive Session Management: While Middleware can manage basic session tasks, extensive session management should be managed by dedicated authentication services or within Route Handlers. * Direct Database Operations: Performing direct database operations within Middleware is not recommended. Database interactions should done within Route Handlers or server-side utilities. ## Convention Use the file `middleware.ts` (or `.js`) in the root of your project to define Middleware. For example, at the same level as `pages` or `app`, or inside `src` if applicable. > **Note**: While only one `middleware.ts` file is supported per project, you can still organize your middleware logic modularly. Break out middleware functionalities into separate `.ts` or `.js` files and import them into your main `middleware.ts` file. This allows for cleaner management of route-specific middleware, aggregated in the `middleware.ts` for centralized control. By enforcing a single middleware file, it simplifies configuration, prevents potential conflicts, and optimizes performance by avoiding multiple middleware layers. ## Example import { NextResponse } from 'next/server' import type { NextRequest } from 'next/server' // This function can be marked `async` if using `await` inside export function middleware(request: NextRequest) { return NextResponse.redirect(new URL('/home', request.url)) } // See "Matching Paths" below to learn more export const config = { matcher: '/about/:path*', } ## Matching Paths Middleware will be invoked for **every route in your project**. Given this, it's crucial to use matchers to precisely target or exclude specific routes. The following is the execution order: 1. `headers` from `next.config.js` 2. `redirects` from `next.config.js` 3. Middleware (`rewrites`, `redirects`, etc.) 4. `beforeFiles` (`rewrites`) from `next.config.js` 5. Filesystem routes (`public/`, `_next/static/`, `pages/`, `app/`, etc.) 6. `afterFiles` (`rewrites`) from `next.config.js` 7. Dynamic Routes (`/blog/[slug]`) 8. `fallback` (`rewrites`) from `next.config.js` There are two ways to define which paths Middleware will run on: 1. Custom matcher config 2. Conditional statements ### Matcher `matcher` allows you to filter Middleware to run on specific paths. export const config = { matcher: '/about/:path*', } You can match a single path or multiple paths with an array syntax: export const config = { matcher: ['/about/:path*', '/dashboard/:path*'], } The `matcher` config allows full regex so matching like negative lookaheads or character matching is supported. An example of a negative lookahead to match all except specific paths can be seen here: export const config = { matcher: [ /* * Match all request paths except for the ones starting with: * - api (API routes) * - _next/static (static files) * - _next/image (image optimization files) * - favicon.ico (favicon file) */ '/((?!api|_next/static|_next/image|favicon.ico).*)', ], } You can also bypass Middleware for certain requests by using the `missing` or `has` arrays, or a combination of both: export const config = { matcher: [ /* * Match all request paths except for the ones starting with: * - api (API routes) * - _next/static (static files) * - _next/image (image optimization files) * - favicon.ico (favicon file) */ { source: '/((?!api|_next/static|_next/image|favicon.ico).*)', missing: [ { type: 'header', key: 'next-router-prefetch' }, { type: 'header', key: 'purpose', value: 'prefetch' }, ], }, { source: '/((?!api|_next/static|_next/image|favicon.ico).*)', has: [ { type: 'header', key: 'next-router-prefetch' }, { type: 'header', key: 'purpose', value: 'prefetch' }, ], }, { source: '/((?!api|_next/static|_next/image|favicon.ico).*)', has: [{ type: 'header', key: 'x-present' }], missing: [{ type: 'header', key: 'x-missing', value: 'prefetch' }], }, ], } > **Good to know**: The `matcher` values need to be constants so they can be statically analyzed at build-time. Dynamic values such as variables will be ignored. Configured matchers: 1. MUST start with `/` 2. Can include named parameters: `/about/:path` matches `/about/a` and `/about/b` but not `/about/a/c` 3. Can have modifiers on named parameters (starting with `:`): `/about/:path*` matches `/about/a/b/c` because `*` is _zero or more_. `?` is _zero or one_ and `+` _one or more_ 4. Can use regular expression enclosed in parenthesis: `/about/(.*)` is the same as `/about/:path*` Read more details on path-to-regexp documentation. > **Good to know**: For backward compatibility, Next.js always considers `/public` as `/public/index`. Therefore, a matcher of `/public/:path` will match. ### Conditional Statements import { NextResponse } from 'next/server' import type { NextRequest } from 'next/server' export function middleware(request: NextRequest) { if (request.nextUrl.pathname.startsWith('/about')) { return NextResponse.rewrite(new URL('/about-2', request.url)) } if (request.nextUrl.pathname.startsWith('/dashboard')) { return NextResponse.rewrite(new URL('/dashboard/user', request.url)) } } ## NextResponse The `NextResponse` API allows you to: * `redirect` the incoming request to a different URL * `rewrite` the response by displaying a given URL * Set request headers for API Routes, `getServerSideProps`, and `rewrite` destinations * Set response cookies * Set response headers To produce a response from Middleware, you can: 1. `rewrite` to a route (Page or Route Handler) that produces a response 2. return a `NextResponse` directly. See Producing a Response ## Using Cookies Cookies are regular headers. On a `Request`, they are stored in the `Cookie` header. On a `Response` they are in the `Set-Cookie` header. Next.js provides a convenient way to access and manipulate these cookies through the `cookies` extension on `NextRequest` and `NextResponse`. 1. For incoming requests, `cookies` comes with the following methods: `get`, `getAll`, `set`, and `delete` cookies. You can check for the existence of a cookie with `has` or remove all cookies with `clear`. 2. For outgoing responses, `cookies` have the following methods `get`, `getAll`, `set`, and `delete`. import { NextResponse } from 'next/server' import type { NextRequest } from 'next/server' export function middleware(request: NextRequest) { // Assume a "Cookie:nextjs=fast" header to be present on the incoming request // Getting cookies from the request using the `RequestCookies` API let cookie = request.cookies.get('nextjs') console.log(cookie) // => { name: 'nextjs', value: 'fast', Path: '/' } const allCookies = request.cookies.getAll() console.log(allCookies) // => [{ name: 'nextjs', value: 'fast' }] request.cookies.has('nextjs') // => true request.cookies.delete('nextjs') request.cookies.has('nextjs') // => false // Setting cookies on the response using the `ResponseCookies` API const response = NextResponse.next() response.cookies.set('vercel', 'fast') response.cookies.set({ name: 'vercel', value: 'fast', path: '/', }) cookie = response.cookies.get('vercel') console.log(cookie) // => { name: 'vercel', value: 'fast', Path: '/' } // The outgoing response will have a `Set-Cookie:vercel=fast;path=/` header. return response } You can set request and response headers using the `NextResponse` API (setting _request_ headers is available since Next.js v13.0.0). import { NextResponse } from 'next/server' import type { NextRequest } from 'next/server' export function middleware(request: NextRequest) { // Clone the request headers and set a new header `x-hello-from-middleware1` const requestHeaders = new Headers(request.headers) requestHeaders.set('x-hello-from-middleware1', 'hello') // You can also set request headers in NextResponse.rewrite const response = NextResponse.next({ request: { // New request headers headers: requestHeaders, }, }) // Set a new response header `x-hello-from-middleware2` response.headers.set('x-hello-from-middleware2', 'hello') return response } > **Good to know**: Avoid setting large headers as it might cause 431 Request Header Fields Too Large error depending on your backend web server configuration. ### CORS You can set CORS headers in Middleware to allow cross-origin requests, including simple and preflighted requests. import { NextRequest, NextResponse } from 'next/server' const allowedOrigins = ['https://acme.com', 'https://my-app.org'] const corsOptions = { 'Access-Control-Allow-Methods': 'GET, POST, PUT, DELETE, OPTIONS', 'Access-Control-Allow-Headers': 'Content-Type, Authorization', } export function middleware(request: NextRequest) { // Check the origin from the request const origin = request.headers.get('origin') ?? '' const isAllowedOrigin = allowedOrigins.includes(origin) // Handle preflighted requests const isPreflight = request.method === 'OPTIONS' if (isPreflight) { const preflightHeaders = { ...(isAllowedOrigin && { 'Access-Control-Allow-Origin': origin }), ...corsOptions, } return NextResponse.json({}, { headers: preflightHeaders }) } // Handle simple requests const response = NextResponse.next() if (isAllowedOrigin) { response.headers.set('Access-Control-Allow-Origin', origin) } Object.entries(corsOptions).forEach(([key, value]) => { response.headers.set(key, value) }) return response } export const config = { matcher: '/api/:path*', } > **Good to know:** You can configure CORS headers for individual routes in Route Handlers. ## Producing a Response You can respond from Middleware directly by returning a `Response` or `NextResponse` instance. (This is available since Next.js v13.1.0) import { NextRequest } from 'next/server' import { isAuthenticated } from '@lib/auth' // Limit the middleware to paths starting with `/api/` export const config = { matcher: '/api/:function*', } export function middleware(request: NextRequest) { // Call our authentication function to check the request if (!isAuthenticated(request)) { // Respond with JSON indicating an error message return Response.json( { success: false, message: 'authentication failed' }, { status: 401 } ) } } ### `waitUntil` and `NextFetchEvent` The `NextFetchEvent` object extends the native `FetchEvent` object, and includes the `waitUntil()` method. The `waitUntil()` method takes a promise as an argument, and extends the lifetime of the Middleware until the promise settles. This is useful for performing work in the background. import { NextResponse } from 'next/server' import type { NextFetchEvent, NextRequest } from 'next/server' export function middleware(req: NextRequest, event: NextFetchEvent) { event.waitUntil( fetch('https://my-analytics-platform.com', { method: 'POST', body: JSON.stringify({ pathname: req.nextUrl.pathname }), }) ) return NextResponse.next() } ## Advanced Middleware Flags In `v13.1` of Next.js two additional flags were introduced for middleware, `skipMiddlewareUrlNormalize` and `skipTrailingSlashRedirect` to handle advanced use cases. `skipTrailingSlashRedirect` disables Next.js redirects for adding or removing trailing slashes. This allows custom handling inside middleware to maintain the trailing slash for some paths but not others, which can make incremental migrations easier. module.exports = { skipTrailingSlashRedirect: true, } const legacyPrefixes = ['/docs', '/blog'] export default async function middleware(req) { const { pathname } = req.nextUrl if (legacyPrefixes.some((prefix) => pathname.startsWith(prefix))) { return NextResponse.next() } // apply trailing slash handling if ( !pathname.endsWith('/') && !pathname.match(/((?!\.well-known(?:\/.*)?)(?:[^/]+\/)*[^/]+\.\w+)/) ) { req.nextUrl.pathname += '/' return NextResponse.redirect(req.nextUrl) } } `skipMiddlewareUrlNormalize` allows for disabling the URL normalization in Next.js to make handling direct visits and client-transitions the same. In some advanced cases, this option provides full control by using the original URL. module.exports = { skipMiddlewareUrlNormalize: true, } export default async function middleware(req) { const { pathname } = req.nextUrl // GET /_next/data/build-id/hello.json console.log(pathname) // with the flag this now /_next/data/build-id/hello.json // without the flag this would be normalized to /hello } ## Runtime Middleware currently only supports the Edge runtime. The Node.js runtime can not be used. ## Version History | Version | Changes | | --- | --- | | `v13.1.0` | Advanced Middleware flags added | | `v13.0.0` | Middleware can modify request headers, response headers, and send responses | | `v12.2.0` | Middleware is stable, please see the upgrade guide | | `v12.0.9` | Enforce absolute URLs in Edge Runtime (PR) | | `v12.0.0` | Middleware (Beta) added | --- ## Page: https://nextjs.org/docs/14/app/building-your-application/routing/internationalization Next.js enables you to configure the routing and rendering of content to support multiple languages. Making your site adaptive to different locales includes translated content (localization) and internationalized routes. ## Terminology * **Locale:** An identifier for a set of language and formatting preferences. This usually includes the preferred language of the user and possibly their geographic region. * `en-US`: English as spoken in the United States * `nl-NL`: Dutch as spoken in the Netherlands * `nl`: Dutch, no specific region ## Routing Overview It’s recommended to use the user’s language preferences in the browser to select which locale to use. Changing your preferred language will modify the incoming `Accept-Language` header to your application. For example, using the following libraries, you can look at an incoming `Request` to determine which locale to select, based on the `Headers`, locales you plan to support, and the default locale. import { match } from '@formatjs/intl-localematcher' import Negotiator from 'negotiator' let headers = { 'accept-language': 'en-US,en;q=0.5' } let languages = new Negotiator({ headers }).languages() let locales = ['en-US', 'nl-NL', 'nl'] let defaultLocale = 'en-US' match(languages, locales, defaultLocale) // -> 'en-US' Routing can be internationalized by either the sub-path (`/fr/products`) or domain (`my-site.fr/products`). With this information, you can now redirect the user based on the locale inside Middleware. import { NextResponse } from "next/server"; let locales = ['en-US', 'nl-NL', 'nl'] // Get the preferred locale, similar to the above or using a library function getLocale(request) { ... } export function middleware(request) { // Check if there is any supported locale in the pathname const { pathname } = request.nextUrl const pathnameHasLocale = locales.some( (locale) => pathname.startsWith(`/${locale}/`) || pathname === `/${locale}` ) if (pathnameHasLocale) return // Redirect if there is no locale const locale = getLocale(request) request.nextUrl.pathname = `/${locale}${pathname}` // e.g. incoming request is /products // The new URL is now /en-US/products return NextResponse.redirect(request.nextUrl) } export const config = { matcher: [ // Skip all internal paths (_next) '/((?!_next).*)', // Optional: only run on root (/) URL // '/' ], } Finally, ensure all special files inside `app/` are nested under `app/[lang]`. This enables the Next.js router to dynamically handle different locales in the route, and forward the `lang` parameter to every layout and page. For example: // You now have access to the current locale // e.g. /en-US/products -> `lang` is "en-US" export default async function Page({ params: { lang } }) { return ... } The root layout can also be nested in the new folder (e.g. `app/[lang]/layout.js`). ## Localization Changing displayed content based on the user’s preferred locale, or localization, is not something specific to Next.js. The patterns described below would work the same with any web application. Let’s assume we want to support both English and Dutch content inside our application. We might maintain two different “dictionaries”, which are objects that give us a mapping from some key to a localized string. For example: { "products": { "cart": "Add to Cart" } } { "products": { "cart": "Toevoegen aan Winkelwagen" } } We can then create a `getDictionary` function to load the translations for the requested locale: import 'server-only' const dictionaries = { en: () => import('./dictionaries/en.json').then((module) => module.default), nl: () => import('./dictionaries/nl.json').then((module) => module.default), } export const getDictionary = async (locale) => dictionaries[locale]() Given the currently selected language, we can fetch the dictionary inside of a layout or page. import { getDictionary } from './dictionaries' export default async function Page({ params: { lang } }) { const dict = await getDictionary(lang) // en return <button>{dict.products.cart}</button> // Add to Cart } Because all layouts and pages in the `app/` directory default to Server Components, we do not need to worry about the size of the translation files affecting our client-side JavaScript bundle size. This code will **only run on the server**, and only the resulting HTML will be sent to the browser. ## Static Generation To generate static routes for a given set of locales, we can use `generateStaticParams` with any page or layout. This can be global, for example, in the root layout: export async function generateStaticParams() { return [{ lang: 'en-US' }, { lang: 'de' }] } export default function Root({ children, params }) { return ( <html lang={params.lang}> <body>{children}</body> </html> ) } ## Resources * Minimal i18n routing and translations * `next-intl` * `next-international` * `next-i18n-router` --- ## Page: https://nextjs.org/docs/14/app/building-your-application/data-fetching #### Subscribe to our newsletter Stay updated on new releases and features, guides, and case studies. --- ## Page: https://nextjs.org/docs/14/app/building-your-application/data-fetching/fetching-caching-and-revalidating Data fetching is a core part of any application. This page goes through how you can fetch, cache, and revalidate data in React and Next.js. There are four ways you can fetch data: 1. On the server, with `fetch` 2. On the server, with third-party libraries 3. On the client, via a Route Handler 4. On the client, with third-party libraries. ## Fetching Data on the Server with `fetch` Next.js extends the native `fetch` Web API to allow you to configure the caching and revalidating behavior for each fetch request on the server. React extends `fetch` to automatically memoize fetch requests while rendering a React component tree. You can use `fetch` with `async`/`await` in Server Components, in Route Handlers, and in Server Actions. For example: async function getData() { const res = await fetch('https://api.example.com/...') // The return value is *not* serialized // You can return Date, Map, Set, etc. if (!res.ok) { // This will activate the closest `error.js` Error Boundary throw new Error('Failed to fetch data') } return res.json() } export default async function Page() { const data = await getData() return <main></main> } > **Good to know**: > > * Next.js provides helpful functions you may need when fetching data in Server Components such as `cookies` and `headers`. These will cause the route to be dynamically rendered as they rely on request time information. > * In Route handlers, `fetch` requests are not memoized as Route Handlers are not part of the React component tree. > * In Server Actions, `fetch` requests are not cached (defaults `cache: no-store`). > * To use `async`/`await` in a Server Component with TypeScript, you'll need to use TypeScript `5.1.3` or higher and `@types/react` `18.2.8` or higher. ### Caching Data Caching stores data so it doesn't need to be re-fetched from your data source on every request. By default, Next.js automatically caches the returned values of `fetch` in the Data Cache on the server. This means that the data can be fetched at build time or request time, cached, and reused on each data request. // 'force-cache' is the default, and can be omitted fetch('https://...', { cache: 'force-cache' }) However, there are exceptions, `fetch` requests are not cached when: * Used inside a Server Action. * Used inside a Route Handler that uses the `POST` method. > **What is the Data Cache?** > > The Data Cache is a persistent HTTP cache. Depending on your platform, the cache can scale automatically and be shared across multiple regions. > > Learn more about the Data Cache. ### Revalidating Data Revalidation is the process of purging the Data Cache and re-fetching the latest data. This is useful when your data changes and you want to ensure you show the latest information. Cached data can be revalidated in two ways: * **Time-based revalidation**: Automatically revalidate data after a certain amount of time has passed. This is useful for data that changes infrequently and freshness is not as critical. * **On-demand revalidation**: Manually revalidate data based on an event (e.g. form submission). On-demand revalidation can use a tag-based or path-based approach to revalidate groups of data at once. This is useful when you want to ensure the latest data is shown as soon as possible (e.g. when content from your headless CMS is updated). #### Time-based Revalidation To revalidate data at a timed interval, you can use the `next.revalidate` option of `fetch` to set the cache lifetime of a resource (in seconds). fetch('https://...', { next: { revalidate: 3600 } }) Alternatively, to revalidate all `fetch` requests in a route segment, you can use the Segment Config Options. export const revalidate = 3600 // revalidate at most every hour If you have multiple fetch requests in a statically rendered route, and each has a different revalidation frequency. The lowest time will be used for all requests. For dynamically rendered routes, each `fetch` request will be revalidated independently. Learn more about time-based revalidation. #### On-demand Revalidation Data can be revalidated on-demand by path (`revalidatePath`) or by cache tag (`revalidateTag`) inside a Server Action or Route Handler. Next.js has a cache tagging system for invalidating `fetch` requests across routes. 1. When using `fetch`, you have the option to tag cache entries with one or more tags. 2. Then, you can call `revalidateTag` to revalidate all entries associated with that tag. For example, the following `fetch` request adds the cache tag `collection`: export default async function Page() { const res = await fetch('https://...', { next: { tags: ['collection'] } }) const data = await res.json() // ... } You can then revalidate this `fetch` call tagged with `collection` by calling `revalidateTag` in a Server Action: 'use server' import { revalidateTag } from 'next/cache' export default async function action() { revalidateTag('collection') } Learn more about on-demand revalidation. #### Error handling and revalidation If an error is thrown while attempting to revalidate data, the last successfully generated data will continue to be served from the cache. On the next subsequent request, Next.js will retry revalidating the data. ### Opting out of Data Caching `fetch` requests are **not** cached if: * The `cache: 'no-store'` is added to `fetch` requests. * The `revalidate: 0` option is added to individual `fetch` requests. * The `fetch` request is inside a Router Handler that uses the `POST` method. * The `fetch` request comes after the usage of `headers` or `cookies`. * The `const dynamic = 'force-dynamic'` route segment option is used. * The `fetchCache` route segment option is configured to skip cache by default. * The `fetch` request uses `Authorization` or `Cookie` headers and there's an uncached request above it in the component tree. #### Individual `fetch` Requests To opt out of caching for individual `fetch` requests, you can set the `cache` option in `fetch` to `'no-store'`. This will fetch data dynamically, on every request. fetch('https://...', { cache: 'no-store' }) View all the available `cache` options in the `fetch` API reference. #### Multiple `fetch` Requests If you have multiple `fetch` requests in a route segment (e.g. a Layout or Page), you can configure the caching behavior of all data requests in the segment using the Segment Config Options. However, we recommend configuring the caching behavior of each `fetch` request individually. This gives you more granular control over the caching behavior. ## Fetching data on the Server with third-party libraries In cases where you're using a third-party library that doesn't support or expose `fetch` (for example, a database, CMS, or ORM client), you can configure the caching and revalidating behavior of those requests using the Route Segment Config Option and React's `cache` function. Whether the data is cached or not will depend on whether the route segment is statically or dynamically rendered. If the segment is static (default), the output of the request will be cached and revalidated as part of the route segment. If the segment is dynamic, the output of the request will _not_ be cached and will be re-fetched on every request when the segment is rendered. You can also use the experimental `unstable_cache` API. ### Example In the example below: * The React `cache` function is used to memoize data requests. * The `revalidate` option is set to `3600` in the Layout and Page segments, meaning the data will be cached and revalidated at most every hour. import { cache } from 'react' export const getItem = cache(async (id: string) => { const item = await db.item.findUnique({ id }) return item }) Although the `getItem` function is called twice, only one query will be made to the database. import { getItem } from '@/utils/get-item' export const revalidate = 3600 // revalidate the data at most every hour export default async function Layout({ params: { id }, }: { params: { id: string } }) { const item = await getItem(id) // ... } import { getItem } from '@/utils/get-item' export const revalidate = 3600 // revalidate the data at most every hour export default async function Page({ params: { id }, }: { params: { id: string } }) { const item = await getItem(id) // ... } ## Fetching Data on the Client with Route Handlers If you need to fetch data in a client component, you can call a Route Handler from the client. Route Handlers execute on the server and return the data to the client. This is useful when you don't want to expose sensitive information to the client, such as API tokens. See the Route Handler documentation for examples. > **Server Components and Route Handlers** > > Since Server Components render on the server, you don't need to call a Route Handler from a Server Component to fetch data. Instead, you can fetch the data directly inside the Server Component. ## Fetching Data on the Client with third-party libraries You can also fetch data on the client using a third-party library such as SWR or TanStack Query. These libraries provide their own APIs for memoizing requests, caching, revalidating, and mutating data. > **Future APIs**: > > `use` is a React function that **accepts and handles a promise** returned by a function. Wrapping `fetch` in `use` is currently **not** recommended in Client Components and may trigger multiple re-renders. Learn more about `use` in the React docs. --- ## Page: https://nextjs.org/docs/14/app/building-your-application/data-fetching/server-actions-and-mutations Server Actions are **asynchronous functions** that are executed on the server. They can be used in Server and Client Components to handle form submissions and data mutations in Next.js applications. > **🎥 Watch:** Learn more about forms and mutations with Server Actions → YouTube (10 minutes). ## Convention A Server Action can be defined with the React `"use server"` directive. You can place the directive at the top of an `async` function to mark the function as a Server Action, or at the top of a separate file to mark all exports of that file as Server Actions. ### Server Components Server Components can use the inline function level or module level `"use server"` directive. To inline a Server Action, add `"use server"` to the top of the function body: // Server Component export default function Page() { // Server Action async function create() { 'use server' // ... } return ( // ... ) } ### Client Components Client Components can only import actions that use the module-level `"use server"` directive. To call a Server Action in a Client Component, create a new file and add the `"use server"` directive at the top of it. All functions within the file will be marked as Server Actions that can be reused in both Client and Server Components: 'use server' export async function create() { // ... } import { create } from '@/app/actions' export function Button() { return ( // ... ) } You can also pass a Server Action to a Client Component as a prop: <ClientComponent updateItem={updateItem} /> 'use client' export default function ClientComponent({ updateItem }) { return <form action={updateItem}>{/* ... */}</form> } ## Behavior * Server actions can be invoked using the `action` attribute in a `<form>` element: * Server Components support progressive enhancement by default, meaning the form will be submitted even if JavaScript hasn't loaded yet or is disabled. * In Client Components, forms invoking Server Actions will queue submissions if JavaScript isn't loaded yet, prioritizing client hydration. * After hydration, the browser does not refresh on form submission. * Server Actions are not limited to `<form>` and can be invoked from event handlers, `useEffect`, third-party libraries, and other form elements like `<button>`. * Server Actions integrate with the Next.js caching and revalidation architecture. When an action is invoked, Next.js can return both the updated UI and new data in a single server roundtrip. * Behind the scenes, actions use the `POST` method, and only this HTTP method can invoke them. * The arguments and return value of Server Actions must be serializable by React. See the React docs for a list of serializable arguments and values. * Server Actions are functions. This means they can be reused anywhere in your application. * Server Actions inherit the runtime from the page or layout they are used on. * Server Actions inherit the Route Segment Config from the page or layout they are used on, including fields like `maxDuration`. ## Examples ### Forms React extends the HTML `<form>` element to allow Server Actions to be invoked with the `action` prop. When invoked in a form, the action automatically receives the `FormData` object. You don't need to use React `useState` to manage fields, instead, you can extract the data using the native `FormData` methods: export default function Page() { async function createInvoice(formData: FormData) { 'use server' const rawFormData = { customerId: formData.get('customerId'), amount: formData.get('amount'), status: formData.get('status'), } // mutate data // revalidate cache } return <form action={createInvoice}>...</form> } > **Good to know:** > > * Example: Form with Loading & Error States > * When working with forms that have many fields, you may want to consider using the `entries()` method with JavaScript's `Object.fromEntries()`. For example: `const rawFormData = Object.fromEntries(formData)`. One thing to note is that the `formData` will include additional `$ACTION_` properties. > * See React `<form>` documentation to learn more. #### Passing Additional Arguments You can pass additional arguments to a Server Action using the JavaScript `bind` method. 'use client' import { updateUser } from './actions' export function UserProfile({ userId }: { userId: string }) { const updateUserWithId = updateUser.bind(null, userId) return ( <form action={updateUserWithId}> <input type="text" name="name" /> <button type="submit">Update User Name</button> </form> ) } The Server Action will receive the `userId` argument, in addition to the form data: 'use server' export async function updateUser(userId, formData) { // ... } > **Good to know**: > > * An alternative is to pass arguments as hidden input fields in the form (e.g. `<input type="hidden" name="userId" value={userId} />`). However, the value will be part of the rendered HTML and will not be encoded. > * `.bind` works in both Server and Client Components. It also supports progressive enhancement. #### Pending states You can use the React `useFormStatus` hook to show a pending state while the form is being submitted. * `useFormStatus` returns the status for a specific `<form>`, so it **must be defined as a child of the `<form>` element**. * `useFormStatus` is a React hook and therefore must be used in a Client Component. 'use client' import { useFormStatus } from 'react-dom' export function SubmitButton() { const { pending } = useFormStatus() return ( <button type="submit" disabled={pending}> Add </button> ) } `<SubmitButton />` can then be nested in any form: import { SubmitButton } from '@/app/submit-button' import { createItem } from '@/app/actions' // Server Component export default async function Home() { return ( <form action={createItem}> <input type="text" name="field-name" /> <SubmitButton /> </form> ) } #### Server-side validation and error handling We recommend using HTML validation like `required` and `type="email"` for basic client-side form validation. For more advanced server-side validation, you can use a library like zod to validate the form fields before mutating the data: 'use server' import { z } from 'zod' const schema = z.object({ email: z.string({ invalid_type_error: 'Invalid Email', }), }) export default async function createUser(formData: FormData) { const validatedFields = schema.safeParse({ email: formData.get('email'), }) // Return early if the form data is invalid if (!validatedFields.success) { return { errors: validatedFields.error.flatten().fieldErrors, } } // Mutate data } Once the fields have been validated on the server, you can return a serializable object in your action and use the React `useFormState` hook to show a message to the user. * By passing the action to `useFormState`, the action's function signature changes to receive a new `prevState` or `initialState` parameter as its first argument. * `useFormState` is a React hook and therefore must be used in a Client Component. 'use server' export async function createUser(prevState: any, formData: FormData) { // ... return { message: 'Please enter a valid email', } } Then, you can pass your action to the `useFormState` hook and use the returned `state` to display an error message. 'use client' import { useFormState } from 'react-dom' import { createUser } from '@/app/actions' const initialState = { message: '', } export function Signup() { const [state, formAction] = useFormState(createUser, initialState) return ( <form action={formAction}> <label htmlFor="email">Email</label> <input type="text" id="email" name="email" required /> {/* ... */} <p aria-live="polite" className="sr-only"> {state?.message} </p> <button>Sign up</button> </form> ) } > **Good to know:** > > * Before mutating data, you should always ensure a user is also authorized to perform the action. See Authentication and Authorization. #### Optimistic updates You can use the React `useOptimistic` hook to optimistically update the UI before the Server Action finishes, rather than waiting for the response: 'use client' import { useOptimistic } from 'react' import { send } from './actions' type Message = { message: string } export function Thread({ messages }: { messages: Message[] }) { const [optimisticMessages, addOptimisticMessage] = useOptimistic< Message[], string >(messages, (state, newMessage) => [...state, { message: newMessage }]) return ( <div> {optimisticMessages.map((m, k) => ( <div key={k}>{m.message}</div> ))} <form action={async (formData: FormData) => { const message = formData.get('message') addOptimisticMessage(message) await send(message) }} > <input type="text" name="message" /> <button type="submit">Send</button> </form> </div> ) } #### Nested elements You can invoke a Server Action in elements nested inside `<form>` such as `<button>`, `<input type="submit">`, and `<input type="image">`. These elements accept the `formAction` prop or event handlers. This is useful in cases where you want to call multiple server actions within a form. For example, you can create a specific `<button>` element for saving a post draft in addition to publishing it. See the React `<form>` docs for more information. #### Programmatic form submission You can trigger a form submission using the `requestSubmit()` method. For example, when the user presses `⌘` + `Enter`, you can listen for the `onKeyDown` event: 'use client' export function Entry() { const handleKeyDown = (e: React.KeyboardEvent<HTMLTextAreaElement>) => { if ( (e.ctrlKey || e.metaKey) && (e.key === 'Enter' || e.key === 'NumpadEnter') ) { e.preventDefault() e.currentTarget.form?.requestSubmit() } } return ( <div> <textarea name="entry" rows={20} required onKeyDown={handleKeyDown} /> </div> ) } This will trigger the submission of the nearest `<form>` ancestor, which will invoke the Server Action. ### Non-form Elements While it's common to use Server Actions within `<form>` elements, they can also be invoked from other parts of your code such as event handlers and `useEffect`. #### Event Handlers You can invoke a Server Action from event handlers such as `onClick`. For example, to increment a like count: 'use client' import { incrementLike } from './actions' import { useState } from 'react' export default function LikeButton({ initialLikes }: { initialLikes: number }) { const [likes, setLikes] = useState(initialLikes) return ( <> <p>Total Likes: {likes}</p> <button onClick={async () => { const updatedLikes = await incrementLike() setLikes(updatedLikes) }} > Like </button> </> ) } To improve the user experience, we recommend using other React APIs like `useOptimistic` and `useTransition` to update the UI before the Server Action finishes executing on the server, or to show a pending state. You can also add event handlers to form elements, for example, to save a form field `onChange`: 'use client' import { publishPost, saveDraft } from './actions' export default function EditPost() { return ( <form action={publishPost}> <textarea name="content" onChange={async (e) => { await saveDraft(e.target.value) }} /> <button type="submit">Publish</button> </form> ) } For cases like this, where multiple events might be fired in quick succession, we recommend **debouncing** to prevent unnecessary Server Action invocations. #### `useEffect` You can use the React `useEffect` hook to invoke a Server Action when the component mounts or a dependency changes. This is useful for mutations that depend on global events or need to be triggered automatically. For example, `onKeyDown` for app shortcuts, an intersection observer hook for infinite scrolling, or when the component mounts to update a view count: 'use client' import { incrementViews } from './actions' import { useState, useEffect } from 'react' export default function ViewCount({ initialViews }: { initialViews: number }) { const [views, setViews] = useState(initialViews) useEffect(() => { const updateViews = async () => { const updatedViews = await incrementViews() setViews(updatedViews) } updateViews() }, []) return <p>Total Views: {views}</p> } Remember to consider the behavior and caveats of `useEffect`. ### Error Handling When an error is thrown, it'll be caught by the nearest `error.js` or `<Suspense>` boundary on the client. We recommend using `try/catch` to return errors to be handled by your UI. For example, your Server Action might handle errors from creating a new item by returning a message: 'use server' export async function createTodo(prevState: any, formData: FormData) { try { // Mutate data } catch (e) { throw new Error('Failed to create task') } } > **Good to know:** > > * Aside from throwing the error, you can also return an object to be handled by `useFormState`. See Server-side validation and error handling. ### Revalidating data You can revalidate the Next.js Cache inside your Server Actions with the `revalidatePath` API: 'use server' import { revalidatePath } from 'next/cache' export async function createPost() { try { // ... } catch (error) { // ... } revalidatePath('/posts') } Or invalidate a specific data fetch with a cache tag using `revalidateTag`: 'use server' import { revalidateTag } from 'next/cache' export async function createPost() { try { // ... } catch (error) { // ... } revalidateTag('posts') } ### Redirecting If you would like to redirect the user to a different route after the completion of a Server Action, you can use `redirect` API. `redirect` needs to be called outside of the `try/catch` block: 'use server' import { redirect } from 'next/navigation' import { revalidateTag } from 'next/cache' export async function createPost(id: string) { try { // ... } catch (error) { // ... } revalidateTag('posts') // Update cached posts redirect(`/post/${id}`) // Navigate to the new post page } ### Cookies You can `get`, `set`, and `delete` cookies inside a Server Action using the `cookies` API: 'use server' import { cookies } from 'next/headers' export async function exampleAction() { // Get cookie const value = cookies().get('name')?.value // Set cookie cookies().set('name', 'Delba') // Delete cookie cookies().delete('name') } See additional examples for deleting cookies from Server Actions. ## Security You should treat Server Actions as you would public-facing API endpoints, and ensure that the user is authorized to perform the action. For example: 'use server' import { auth } from './lib' export function addItem() { const { user } = auth() if (!user) { throw new Error('You must be signed in to perform this action') } // ... } ### Closures and encryption Defining a Server Action inside a component creates a closure where the action has access to the outer function's scope. For example, the `publish` action has access to the `publishVersion` variable: export default function Page() { const publishVersion = await getLatestVersion(); async function publish(formData: FormData) { "use server"; if (publishVersion !== await getLatestVersion()) { throw new Error('The version has changed since pressing publish'); } ... } return <button action={publish}>Publish</button>; } Closures are useful when you need to capture a _snapshot_ of data (e.g. `publishVersion`) at the time of rendering so that it can be used later when the action is invoked. However, for this to happen, the captured variables are sent to the client and back to the server when the action is invoked. To prevent sensitive data from being exposed to the client, Next.js automatically encrypts the closed-over variables. A new private key is generated for each action every time a Next.js application is built. This means actions can only be invoked for a specific build. > **Good to know:** We don't recommend relying on encryption alone to prevent sensitive values from being exposed on the client. Instead, you should use the React taint APIs to proactively prevent specific data from being sent to the client. ### Overwriting encryption keys (advanced) When self-hosting your Next.js application across multiple servers, each server instance may end up with a different encryption key, leading to potential inconsistencies. To mitigate this, you can overwrite the encryption key using the `process.env.NEXT_SERVER_ACTIONS_ENCRYPTION_KEY` environment variable. Specifying this variable ensures that your encryption keys are persistent across builds, and all server instances use the same key. This is an advanced use case where consistent encryption behavior across multiple deployments is critical for your application. You should consider standard security practices such key rotation and signing. > **Good to know:** Next.js applications deployed to Vercel automatically handle this. ### Allowed origins (advanced) Since Server Actions can be invoked in a `<form>` element, this opens them up to CSRF attacks. Behind the scenes, Server Actions use the `POST` method, and only this HTTP method is allowed to invoke them. This prevents most CSRF vulnerabilities in modern browsers, particularly with SameSite cookies being the default. As an additional protection, Server Actions in Next.js also compare the Origin header to the Host header (or `X-Forwarded-Host`). If these don't match, the request will be aborted. In other words, Server Actions can only be invoked on the same host as the page that hosts it. For large applications that use reverse proxies or multi-layered backend architectures (where the server API differs from the production domain), it's recommended to use the configuration option `serverActions.allowedOrigins` option to specify a list of safe origins. The option accepts an array of strings. /** @type {import('next').NextConfig} */ module.exports = { experimental: { serverActions: { allowedOrigins: ['my-proxy.com', '*.my-proxy.com'], }, }, } Learn more about Security and Server Actions. ## Additional resources For more information on Server Actions, check out the following React docs: * `"use server"` * `<form>` * `useFormStatus` * `useFormState` * `useOptimistic` --- ## Page: https://nextjs.org/docs/14/app/building-your-application/data-fetching/patterns There are a few recommended patterns and best practices for fetching data in React and Next.js. This page will go over some of the most common patterns and how to use them. ## Fetching data on the server Whenever possible, we recommend fetching data on the server with Server Components. This allows you to: * Have direct access to backend data resources (e.g. databases). * Keep your application more secure by preventing sensitive information, such as access tokens and API keys, from being exposed to the client. * Fetch data and render in the same environment. This reduces both the back-and-forth communication between client and server, as well as the work on the main thread on the client. * Perform multiple data fetches with single round-trip instead of multiple individual requests on the client. * Reduce client-server waterfalls. * Depending on your region, data fetching can also happen closer to your data source, reducing latency and improving performance. Then, you can mutate or update data with Server Actions. ## Fetching data where it's needed If you need to use the same data (e.g. current user) in multiple components in a tree, you do not have to fetch data globally, nor forward props between components. Instead, you can use `fetch` or React `cache` in the component that needs the data without worrying about the performance implications of making multiple requests for the same data. This is possible because `fetch` requests are automatically memoized. Learn more about request memoization > **Good to know**: This also applies to layouts, since it's not possible to pass data between a parent layout and its children. ## Streaming Streaming and Suspense are React features that allow you to progressively render and incrementally stream rendered units of the UI to the client. With Server Components and nested layouts, you're able to instantly render parts of the page that do not specifically require data, and show a loading state for parts of the page that are fetching data. This means the user does not have to wait for the entire page to load before they can start interacting with it.  To learn more about Streaming and Suspense, see the Loading UI and Streaming and Suspense pages. ## Parallel and sequential data fetching When fetching data inside React components, you need to be aware of two data fetching patterns: Parallel and Sequential.  * With **sequential data fetching**, requests in a route are dependent on each other and therefore create waterfalls. There may be cases where you want this pattern because one fetch depends on the result of the other, or you want a condition to be satisfied before the next fetch to save resources. However, this behavior can also be unintentional and lead to longer loading times. * With **parallel data fetching**, requests in a route are eagerly initiated and will load data at the same time. This reduces client-server waterfalls and the total time it takes to load data. ### Sequential Data Fetching If you have nested components, and each component fetches its own data, then data fetching will happen sequentially if those data requests are different (this doesn't apply to requests for the same data as they are automatically memoized). For example, the `Playlists` component will only start fetching data once the `Artist` component has finished fetching data because `Playlists` depends on the `artistID` prop: // ... async function Playlists({ artistID }: { artistID: string }) { // Wait for the playlists const playlists = await getArtistPlaylists(artistID) return ( <ul> {playlists.map((playlist) => ( <li key={playlist.id}>{playlist.name}</li> ))} </ul> ) } export default async function Page({ params: { username }, }: { params: { username: string } }) { // Wait for the artist const artist = await getArtist(username) return ( <> <h1>{artist.name}</h1> <Suspense fallback={<div>Loading...</div>}> <Playlists artistID={artist.id} /> </Suspense> </> ) } In cases like this, you can use `loading.js` (for route segments) or React `<Suspense>` (for nested components) to show an instant loading state while React streams in the result. This will prevent the whole route from being blocked by data fetching, and the user will be able to interact with the parts of the page that are not blocked. > **Blocking Data Requests:** > > An alternative approach to prevent waterfalls is to fetch data globally, at the root of your application, but this will block rendering for all route segments beneath it until the data has finished loading. This can be described as "all or nothing" data fetching. Either you have the entire data for your page or application, or none. > > Any fetch requests with `await` will block rendering and data fetching for the entire tree beneath it, unless they are wrapped in a `<Suspense>` boundary or `loading.js` is used. Another alternative is to use parallel data fetching or the preload pattern. ### Parallel Data Fetching To fetch data in parallel, you can eagerly initiate requests by defining them outside the components that use the data, then calling them from inside the component. This saves time by initiating both requests in parallel, however, the user won't see the rendered result until both promises are resolved. In the example below, the `getArtist` and `getArtistAlbums` functions are defined outside the `Page` component, then called inside the component, and we wait for both promises to resolve: import Albums from './albums' async function getArtist(username: string) { const res = await fetch(`https://api.example.com/artist/${username}`) return res.json() } async function getArtistAlbums(username: string) { const res = await fetch(`https://api.example.com/artist/${username}/albums`) return res.json() } export default async function Page({ params: { username }, }: { params: { username: string } }) { // Initiate both requests in parallel const artistData = getArtist(username) const albumsData = getArtistAlbums(username) // Wait for the promises to resolve const [artist, albums] = await Promise.all([artistData, albumsData]) return ( <> <h1>{artist.name}</h1> <Albums list={albums}></Albums> </> ) } To improve the user experience, you can add a Suspense Boundary to break up the rendering work and show part of the result as soon as possible. ## Preloading Data Another way to prevent waterfalls is to use the preload pattern. You can optionally create a `preload` function to further optimize parallel data fetching. With this approach, you don't have to pass promises down as props. The `preload` function can also have any name as it's a pattern, not an API. import { getItem } from '@/utils/get-item' export const preload = (id: string) => { // void evaluates the given expression and returns undefined // https://developer.mozilla.org/docs/Web/JavaScript/Reference/Operators/void void getItem(id) } export default async function Item({ id }: { id: string }) { const result = await getItem(id) // ... } import Item, { preload, checkIsAvailable } from '@/components/Item' export default async function Page({ params: { id }, }: { params: { id: string } }) { // starting loading item data preload(id) // perform another asynchronous task const isAvailable = await checkIsAvailable() return isAvailable ? <Item id={id} /> : null } ### Using React `cache`, `server-only`, and the Preload Pattern You can combine the `cache` function, the `preload` pattern, and the `server-only` package to create a data fetching utility that can be used throughout your app. import { cache } from 'react' import 'server-only' export const preload = (id: string) => { void getItem(id) } export const getItem = cache(async (id: string) => { // ... }) With this approach, you can eagerly fetch data, cache responses, and guarantee that this data fetching only happens on the server. The `utils/get-item` exports can be used by Layouts, Pages, or other components to give them control over when an item's data is fetched. > **Good to know:** > > * We recommend using the `server-only` package to make sure server data fetching functions are never used on the client. ## Preventing sensitive data from being exposed to the client We recommend using React's taint APIs, `taintObjectReference` and `taintUniqueValue`, to prevent whole object instances or sensitive values from being passed to the client. To enable tainting in your application, set the Next.js Config `experimental.taint` option to `true`: module.exports = { experimental: { taint: true, }, } Then pass the object or value you want to taint to the `experimental_taintObjectReference` or `experimental_taintUniqueValue` functions: import { queryDataFromDB } from './api' import { experimental_taintObjectReference, experimental_taintUniqueValue, } from 'react' export async function getUserData() { const data = await queryDataFromDB() experimental_taintObjectReference( 'Do not pass the whole user object to the client', data ) experimental_taintUniqueValue( "Do not pass the user's address to the client", data, data.address ) return data } import { getUserData } from './data' export async function Page() { const userData = getUserData() return ( <ClientComponent user={userData} // this will cause an error because of taintObjectReference address={userData.address} // this will cause an error because of taintUniqueValue /> ) } Learn more about Security and Server Actions. --- ## Page: https://nextjs.org/docs/14/app/building-your-application/rendering Rendering converts the code you write into user interfaces. React and Next.js allow you to create hybrid web applications where parts of your code can be rendered on the server or the client. This section will help you understand the differences between these rendering environments, strategies, and runtimes. ## Fundamentals To start, it's helpful to be familiar with three foundational web concepts: * The Environments your application code can be executed in: the server and the client. * The Request-Response Lifecycle that's initiated when a user visits or interacts with your application. * The Network Boundary that separates server and client code. ### Rendering Environments There are two environments where web applications can be rendered: the client and the server.  * The **client** refers to the browser on a user's device that sends a request to a server for your application code. It then turns the response from the server into a user interface. * The **server** refers to the computer in a data center that stores your application code, receives requests from a client, and sends back an appropriate response. Historically, developers had to use different languages (e.g. JavaScript, PHP) and frameworks when writing code for the server and the client. With React, developers can use the **same language** (JavaScript), and the **same framework** (e.g. Next.js or your framework of choice). This flexibility allows you to seamlessly write code for both environments without context switching. However, each environment has its own set of capabilities and constraints. Therefore, the code you write for the server and the client is not always the same. There are certain operations (e.g. data fetching or managing user state) that are better suited for one environment over the other. Understanding these differences is key to effectively using React and Next.js. We'll cover the differences and use cases in more detail on the Server and Client Components pages, for now, let's continue building on our foundation. ### Request-Response Lifecycle Broadly speaking, all websites follow the same **Request-Response Lifecycle**: 1. **User Action:** The user interacts with a web application. This could be clicking a link, submitting a form, or typing a URL directly into the browser's address bar. 2. **HTTP Request:** The client sends an HTTP request to the server that contains necessary information about what resources are being requested, what method is being used (e.g. `GET`, `POST`), and additional data if necessary. 3. **Server:** The server processes the request and responds with the appropriate resources. This process may take a couple of steps like routing, fetching data, etc. 4. **HTTP Response:** After processing the request, the server sends an HTTP response back to the client. This response contains a status code (which tells the client whether the request was successful or not) and requested resources (e.g. HTML, CSS, JavaScript, static assets, etc). 5. **Client:** The client parses the resources to render the user interface. 6. **User Action:** Once the user interface is rendered, the user can interact with it, and the whole process starts again. A major part of building a hybrid web application is deciding how to split the work in the lifecycle, and where to place the Network Boundary. ### Network Boundary In web development, the **Network Boundary** is a conceptual line that separates the different environments. For example, the client and the server, or the server and the data store. In React, you choose where to place the client-server network boundary wherever it makes the most sense. Behind the scenes, the work is split into two parts: the **client module graph** and the **server module graph**. The server module graph contains all the components that are rendered on the server, and the client module graph contains all components that are rendered on the client. It may be helpful to think about module graphs as a visual representation of how files in your application depend on each other. You can use the React `"use client"` convention to define the boundary. There's also a `"use server"` convention, which tells React to do some computational work on the server. ## Building Hybrid Applications When working in these environments, it's helpful to think of the flow of the code in your application as **unidirectional**. In other words, during a response, your application code flows in one direction: from the server to the client. If you need to access the server from the client, you send a **new** request to the server rather than re-use the same request. This makes it easier to understand where to render your components and where to place the Network Boundary. In practice, this model encourages developers to think about what they want to execute on the server first, before sending the result to the client and making the application interactive. This concept will become clearer when we look at how you can interleave client and server components in the same component tree. --- ## Page: https://nextjs.org/docs/14/app/building-your-application/rendering/server-components React Server Components allow you to write UI that can be rendered and optionally cached on the server. In Next.js, the rendering work is further split by route segments to enable streaming and partial rendering, and there are three different server rendering strategies: * Static Rendering * Dynamic Rendering * Streaming This page will go through how Server Components work, when you might use them, and the different server rendering strategies. ## Benefits of Server Rendering There are a couple of benefits to doing the rendering work on the server, including: * **Data Fetching**: Server Components allow you to move data fetching to the server, closer to your data source. This can improve performance by reducing time it takes to fetch data needed for rendering, and the number of requests the client needs to make. * **Security**: Server Components allow you to keep sensitive data and logic on the server, such as tokens and API keys, without the risk of exposing them to the client. * **Caching**: By rendering on the server, the result can be cached and reused on subsequent requests and across users. This can improve performance and reduce cost by reducing the amount of rendering and data fetching done on each request. * **Performance**: Server Components give you additional tools to optimize performance from the baseline. For example, if you start with an app composed of entirely Client Components, moving non-interactive pieces of your UI to Server Components can reduce the amount of client-side JavaScript needed. This is beneficial for users with slower internet or less powerful devices, as the browser has less client-side JavaScript to download, parse, and execute. * **Initial Page Load and First Contentful Paint (FCP)**: On the server, we can generate HTML to allow users to view the page immediately, without waiting for the client to download, parse and execute the JavaScript needed to render the page. * **Search Engine Optimization and Social Network Shareability**: The rendered HTML can be used by search engine bots to index your pages and social network bots to generate social card previews for your pages. * **Streaming**: Server Components allow you to split the rendering work into chunks and stream them to the client as they become ready. This allows the user to see parts of the page earlier without having to wait for the entire page to be rendered on the server. ## Using Server Components in Next.js By default, Next.js uses Server Components. This allows you to automatically implement server rendering with no additional configuration, and you can opt into using Client Components when needed, see Client Components. ## How are Server Components rendered? On the server, Next.js uses React's APIs to orchestrate rendering. The rendering work is split into chunks: by individual route segments and Suspense Boundaries. Each chunk is rendered in two steps: 1. React renders Server Components into a special data format called the **React Server Component Payload (RSC Payload)**. 2. Next.js uses the RSC Payload and Client Component JavaScript instructions to render **HTML** on the server. Then, on the client: 1. The HTML is used to immediately show a fast non-interactive preview of the route - this is for the initial page load only. 2. The React Server Components Payload is used to reconcile the Client and Server Component trees, and update the DOM. 3. The JavaScript instructions are used to hydrate Client Components and make the application interactive. > **What is the React Server Component Payload (RSC)?** > > The RSC Payload is a compact binary representation of the rendered React Server Components tree. It's used by React on the client to update the browser's DOM. The RSC Payload contains: > > * The rendered result of Server Components > * Placeholders for where Client Components should be rendered and references to their JavaScript files > * Any props passed from a Server Component to a Client Component ## Server Rendering Strategies There are three subsets of server rendering: Static, Dynamic, and Streaming. ### Static Rendering (Default) With Static Rendering, routes are rendered at **build time**, or in the background after data revalidation. The result is cached and can be pushed to a Content Delivery Network (CDN). This optimization allows you to share the result of the rendering work between users and server requests. Static rendering is useful when a route has data that is not personalized to the user and can be known at build time, such as a static blog post or a product page. ### Dynamic Rendering With Dynamic Rendering, routes are rendered for each user at **request time**. Dynamic rendering is useful when a route has data that is personalized to the user or has information that can only be known at request time, such as cookies or the URL's search params. > **Dynamic Routes with Cached Data** > > In most websites, routes are not fully static or fully dynamic - it's a spectrum. For example, you can have an e-commerce page that uses cached product data that's revalidated at an interval, but also has uncached, personalized customer data. > > In Next.js, you can have dynamically rendered routes that have both cached and uncached data. This is because the RSC Payload and data are cached separately. This allows you to opt into dynamic rendering without worrying about the performance impact of fetching all the data at request time. > > Learn more about the full-route cache and Data Cache. #### Switching to Dynamic Rendering During rendering, if a dynamic function or uncached data request is discovered, Next.js will switch to dynamically rendering the whole route. This table summarizes how dynamic functions and data caching affect whether a route is statically or dynamically rendered: | Dynamic Functions | Data | Route | | --- | --- | --- | | No | Cached | Statically Rendered | | Yes | Cached | Dynamically Rendered | | No | Not Cached | Dynamically Rendered | | Yes | Not Cached | Dynamically Rendered | In the table above, for a route to be fully static, all data must be cached. However, you can have a dynamically rendered route that uses both cached and uncached data fetches. As a developer, you do not need to choose between static and dynamic rendering as Next.js will automatically choose the best rendering strategy for each route based on the features and APIs used. Instead, you choose when to cache or revalidate specific data, and you may choose to stream parts of your UI. #### Dynamic Functions Dynamic functions rely on information that can only be known at request time such as a user's cookies, current requests headers, or the URL's search params. In Next.js, these dynamic functions are: * **`cookies()` and `headers()`**: Using these in a Server Component will opt the whole route into dynamic rendering at request time. * **`searchParams`**: Using the `searchParams` prop on a Page will opt the page into dynamic rendering at request time. Using any of these functions will opt the whole route into dynamic rendering at request time. ### Streaming  Streaming enables you to progressively render UI from the server. Work is split into chunks and streamed to the client as it becomes ready. This allows the user to see parts of the page immediately, before the entire content has finished rendering.  Streaming is built into the Next.js App Router by default. This helps improve both the initial page loading performance, as well as UI that depends on slower data fetches that would block rendering the whole route. For example, reviews on a product page. You can start streaming route segments using `loading.js` and UI components with React Suspense. See the Loading UI and Streaming section for more information. --- ## Page: https://nextjs.org/docs/14/app/building-your-application/rendering/client-components Client Components allow you to write interactive UI that is prerendered on the server and can use client JavaScript to run in the browser. This page will go through how Client Components work, how they're rendered, and when you might use them. ## Benefits of Client Rendering There are a couple of benefits to doing the rendering work on the client, including: * **Interactivity**: Client Components can use state, effects, and event listeners, meaning they can provide immediate feedback to the user and update the UI. * **Browser APIs**: Client Components have access to browser APIs, like geolocation or localStorage. ## Using Client Components in Next.js To use Client Components, you can add the React `"use client"` directive at the top of a file, above your imports. `"use client"` is used to declare a boundary between a Server and Client Component modules. This means that by defining a `"use client"` in a file, all other modules imported into it, including child components, are considered part of the client bundle. 'use client' import { useState } from 'react' export default function Counter() { const [count, setCount] = useState(0) return ( <div> <p>You clicked {count} times</p> <button onClick={() => setCount(count + 1)}>Click me</button> </div> ) } The diagram below shows that using `onClick` and `useState` in a nested component (`toggle.js`) will cause an error if the `"use client"` directive is not defined. This is because, by default, all components in the App Router are Server Components where these APIs are not available. By defining the `"use client"` directive in `toggle.js`, you can tell React to enter the client boundary where these APIs are available.  > **Defining multiple `use client` entry points**: > > You can define multiple "use client" entry points in your React Component tree. This allows you to split your application into multiple client bundles. > > However, `"use client"` doesn't need to be defined in every component that needs to be rendered on the client. Once you define the boundary, all child components and modules imported into it are considered part of the client bundle. ## How are Client Components Rendered? In Next.js, Client Components are rendered differently depending on whether the request is part of a full page load (an initial visit to your application or a page reload triggered by a browser refresh) or a subsequent navigation. ### Full page load To optimize the initial page load, Next.js will use React's APIs to render a static HTML preview on the server for both Client and Server Components. This means, when the user first visits your application, they will see the content of the page immediately, without having to wait for the client to download, parse, and execute the Client Component JavaScript bundle. On the server: 1. React renders Server Components into a special data format called the **React Server Component Payload (RSC Payload)**, which includes references to Client Components. 2. Next.js uses the RSC Payload and Client Component JavaScript instructions to render **HTML** for the route on the server. Then, on the client: 1. The HTML is used to immediately show a fast non-interactive initial preview of the route. 2. The React Server Components Payload is used to reconcile the Client and Server Component trees, and update the DOM. 3. The JavaScript instructions are used to hydrate Client Components and make their UI interactive. > **What is hydration?** > > Hydration is the process of attaching event listeners to the DOM, to make the static HTML interactive. Behind the scenes, hydration is done with the `hydrateRoot` React API. ### Subsequent Navigations On subsequent navigations, Client Components are rendered entirely on the client, without the server-rendered HTML. This means the Client Component JavaScript bundle is downloaded and parsed. Once the bundle is ready, React will use the RSC Payload to reconcile the Client and Server Component trees, and update the DOM. ## Going back to the Server Environment Sometimes, after you've declared the `"use client"` boundary, you may want to go back to the server environment. For example, you may want to reduce the client bundle size, fetch data on the server, or use an API that is only available on the server. You can keep code on the server even though it's theoretically nested inside Client Components by interleaving Client and Server Components and Server Actions. See the Composition Patterns page for more information. --- ## Page: https://nextjs.org/docs/14/app/building-your-application/rendering/composition-patterns ## Server and Client Composition Patterns When building React applications, you will need to consider what parts of your application should be rendered on the server or the client. This page covers some recommended composition patterns when using Server and Client Components. ## When to use Server and Client Components? Here's a quick summary of the different use cases for Server and Client Components: | What do you need to do? | Server Component | Client Component | | --- | --- | --- | | Fetch data | | | | Access backend resources (directly) | | | | Keep sensitive information on the server (access tokens, API keys, etc) | | | | Keep large dependencies on the server / Reduce client-side JavaScript | | | | Add interactivity and event listeners (`onClick()`, `onChange()`, etc) | | | | Use State and Lifecycle Effects (`useState()`, `useReducer()`, `useEffect()`, etc) | | | | Use browser-only APIs | | | | Use custom hooks that depend on state, effects, or browser-only APIs | | | | Use React Class components | | | ## Server Component Patterns Before opting into client-side rendering, you may wish to do some work on the server like fetching data, or accessing your database or backend services. Here are some common patterns when working with Server Components: ### Sharing data between components When fetching data on the server, there may be cases where you need to share data across different components. For example, you may have a layout and a page that depend on the same data. Instead of using React Context (which is not available on the server) or passing data as props, you can use `fetch` or React's `cache` function to fetch the same data in the components that need it, without worrying about making duplicate requests for the same data. This is because React extends `fetch` to automatically memoize data requests, and the `cache` function can be used when `fetch` is not available. Learn more about memoization in React. ### Keeping Server-only Code out of the Client Environment Since JavaScript modules can be shared between both Server and Client Components modules, it's possible for code that was only ever intended to be run on the server to sneak its way into the client. For example, take the following data-fetching function: export async function getData() { const res = await fetch('https://external-service.com/data', { headers: { authorization: process.env.API_KEY, }, }) return res.json() } At first glance, it appears that `getData` works on both the server and the client. However, this function contains an `API_KEY`, written with the intention that it would only ever be executed on the server. Since the environment variable `API_KEY` is not prefixed with `NEXT_PUBLIC`, it's a private variable that can only be accessed on the server. To prevent your environment variables from being leaked to the client, Next.js replaces private environment variables with an empty string. As a result, even though `getData()` can be imported and executed on the client, it won't work as expected. And while making the variable public would make the function work on the client, you may not want to expose sensitive information to the client. To prevent this sort of unintended client usage of server code, we can use the `server-only` package to give other developers a build-time error if they ever accidentally import one of these modules into a Client Component. To use `server-only`, first install the package: npm install server-only Then import the package into any module that contains server-only code: import 'server-only' export async function getData() { const res = await fetch('https://external-service.com/data', { headers: { authorization: process.env.API_KEY, }, }) return res.json() } Now, any Client Component that imports `getData()` will receive a build-time error explaining that this module can only be used on the server. The corresponding package `client-only` can be used to mark modules that contain client-only code – for example, code that accesses the `window` object. ### Using Third-party Packages and Providers Since Server Components are a new React feature, third-party packages and providers in the ecosystem are just beginning to add the `"use client"` directive to components that use client-only features like `useState`, `useEffect`, and `createContext`. Today, many components from `npm` packages that use client-only features do not yet have the directive. These third-party components will work as expected within Client Components since they have the `"use client"` directive, but they won't work within Server Components. For example, let's say you've installed the hypothetical `acme-carousel` package which has a `<Carousel />` component. This component uses `useState`, but it doesn't yet have the `"use client"` directive. If you use `<Carousel />` within a Client Component, it will work as expected: 'use client' import { useState } from 'react' import { Carousel } from 'acme-carousel' export default function Gallery() { let [isOpen, setIsOpen] = useState(false) return ( <div> <button onClick={() => setIsOpen(true)}>View pictures</button> {/* Works, since Carousel is used within a Client Component */} {isOpen && <Carousel />} </div> ) } However, if you try to use it directly within a Server Component, you'll see an error: import { Carousel } from 'acme-carousel' export default function Page() { return ( <div> <p>View pictures</p> {/* Error: `useState` can not be used within Server Components */} <Carousel /> </div> ) } This is because Next.js doesn't know `<Carousel />` is using client-only features. To fix this, you can wrap third-party components that rely on client-only features in your own Client Components: 'use client' import { Carousel } from 'acme-carousel' export default Carousel Now, you can use `<Carousel />` directly within a Server Component: import Carousel from './carousel' export default function Page() { return ( <div> <p>View pictures</p> {/* Works, since Carousel is a Client Component */} <Carousel /> </div> ) } We don't expect you to need to wrap most third-party components since it's likely you'll be using them within Client Components. However, one exception is providers, since they rely on React state and context, and are typically needed at the root of an application. Learn more about third-party context providers below. #### Using Context Providers Context providers are typically rendered near the root of an application to share global concerns, like the current theme. Since React context is not supported in Server Components, trying to create a context at the root of your application will cause an error: import { createContext } from 'react' // createContext is not supported in Server Components export const ThemeContext = createContext({}) export default function RootLayout({ children }) { return ( <html> <body> <ThemeContext.Provider value="dark">{children}</ThemeContext.Provider> </body> </html> ) } To fix this, create your context and render its provider inside of a Client Component: 'use client' import { createContext } from 'react' export const ThemeContext = createContext({}) export default function ThemeProvider({ children, }: { children: React.ReactNode }) { return <ThemeContext.Provider value="dark">{children}</ThemeContext.Provider> } Your Server Component will now be able to directly render your provider since it's been marked as a Client Component: import ThemeProvider from './theme-provider' export default function RootLayout({ children, }: { children: React.ReactNode }) { return ( <html> <body> <ThemeProvider>{children}</ThemeProvider> </body> </html> ) } With the provider rendered at the root, all other Client Components throughout your app will be able to consume this context. > **Good to know**: You should render providers as deep as possible in the tree – notice how `ThemeProvider` only wraps `{children}` instead of the entire `<html>` document. This makes it easier for Next.js to optimize the static parts of your Server Components. In a similar fashion, library authors creating packages to be consumed by other developers can use the `"use client"` directive to mark client entry points of their package. This allows users of the package to import package components directly into their Server Components without having to create a wrapping boundary. You can optimize your package by using 'use client' deeper in the tree, allowing the imported modules to be part of the Server Component module graph. It's worth noting some bundlers might strip out `"use client"` directives. You can find an example of how to configure esbuild to include the `"use client"` directive in the React Wrap Balancer and Vercel Analytics repositories. ## Client Components ### Moving Client Components Down the Tree To reduce the Client JavaScript bundle size, we recommend moving Client Components down your component tree. For example, you may have a Layout that has static elements (e.g. logo, links, etc) and an interactive search bar that uses state. Instead of making the whole layout a Client Component, move the interactive logic to a Client Component (e.g. `<SearchBar />`) and keep your layout as a Server Component. This means you don't have to send all the component Javascript of the layout to the client. // SearchBar is a Client Component import SearchBar from './searchbar' // Logo is a Server Component import Logo from './logo' // Layout is a Server Component by default export default function Layout({ children }: { children: React.ReactNode }) { return ( <> <nav> <Logo /> <SearchBar /> </nav> <main>{children}</main> </> ) } ### Passing props from Server to Client Components (Serialization) If you fetch data in a Server Component, you may want to pass data down as props to Client Components. Props passed from the Server to Client Components need to be serializable by React. If your Client Components depend on data that is not serializable, you can fetch data on the client with a third party library or on the server via a Route Handler. ## Interleaving Server and Client Components When interleaving Client and Server Components, it may be helpful to visualize your UI as a tree of components. Starting with the root layout, which is a Server Component, you can then render certain subtrees of components on the client by adding the `"use client"` directive. Within those client subtrees, you can still nest Server Components or call Server Actions, however there are some things to keep in mind: * During a request-response lifecycle, your code moves from the server to the client. If you need to access data or resources on the server while on the client, you'll be making a **new** request to the server - not switching back and forth. * When a new request is made to the server, all Server Components are rendered first, including those nested inside Client Components. The rendered result (RSC Payload) will contain references to the locations of Client Components. Then, on the client, React uses the RSC Payload to reconcile Server and Client Components into a single tree. * Since Client Components are rendered after Server Components, you cannot import a Server Component into a Client Component module (since it would require a new request back to the server). Instead, you can pass a Server Component as `props` to a Client Component. See the unsupported pattern and supported pattern sections below. ### Unsupported Pattern: Importing Server Components into Client Components The following pattern is not supported. You cannot import a Server Component into a Client Component: 'use client' // You cannot import a Server Component into a Client Component. import ServerComponent from './Server-Component' export default function ClientComponent({ children, }: { children: React.ReactNode }) { const [count, setCount] = useState(0) return ( <> <button onClick={() => setCount(count + 1)}>{count}</button> <ServerComponent /> </> ) } ### Supported Pattern: Passing Server Components to Client Components as Props The following pattern is supported. You can pass Server Components as a prop to a Client Component. A common pattern is to use the React `children` prop to create a _"slot"_ in your Client Component. In the example below, `<ClientComponent>` accepts a `children` prop: 'use client' import { useState } from 'react' export default function ClientComponent({ children, }: { children: React.ReactNode }) { const [count, setCount] = useState(0) return ( <> <button onClick={() => setCount(count + 1)}>{count}</button> {children} </> ) } `<ClientComponent>` doesn't know that `children` will eventually be filled in by the result of a Server Component. The only responsibility `<ClientComponent>` has is to decide **where** `children` will eventually be placed. In a parent Server Component, you can import both the `<ClientComponent>` and `<ServerComponent>` and pass `<ServerComponent>` as a child of `<ClientComponent>`: // This pattern works: // You can pass a Server Component as a child or prop of a // Client Component. import ClientComponent from './client-component' import ServerComponent from './server-component' // Pages in Next.js are Server Components by default export default function Page() { return ( <ClientComponent> <ServerComponent /> </ClientComponent> ) } With this approach, `<ClientComponent>` and `<ServerComponent>` are decoupled and can be rendered independently. In this case, the child `<ServerComponent>` can be rendered on the server, well before `<ClientComponent>` is rendered on the client. > **Good to know:** > > * The pattern of "lifting content up" has been used to avoid re-rendering a nested child component when a parent component re-renders. > * You're not limited to the `children` prop. You can use any prop to pass JSX. --- ## Page: https://nextjs.org/docs/14/app/building-your-application/rendering/edge-and-nodejs-runtimes In the context of Next.js, runtime refers to the set of libraries, APIs, and general functionality available to your code during execution. On the server, there are two runtimes where parts of your application code can be rendered: * The **Node.js Runtime** (default) has access to all Node.js APIs and compatible packages from the ecosystem. * The **Edge Runtime** is based on Web APIs. ## Runtime Differences There are many considerations to make when choosing a runtime. This table shows the major differences at a glance. If you want a more in-depth analysis of the differences, check out the sections below. | | Node | Serverless | Edge | | --- | --- | --- | --- | | Cold Boot | / | Normal | Low | | HTTP Streaming | Yes | Yes | Yes | | IO | All | All | `fetch` | | Scalability | / | High | Highest | | Security | Normal | High | High | | Latency | Normal | Low | Lowest | | npm Packages | All | All | A smaller subset | | Static Rendering | Yes | Yes | No | | Dynamic Rendering | Yes | Yes | Yes | | Data Revalidation w/ `fetch` | Yes | Yes | Yes | ### Edge Runtime In Next.js, the lightweight Edge Runtime is a subset of available Node.js APIs. The Edge Runtime is ideal if you need to deliver dynamic, personalized content at low latency with small, simple functions. The Edge Runtime's speed comes from its minimal use of resources, but that can be limiting in many scenarios. For example, code executed in the Edge Runtime on Vercel cannot exceed between 1 MB and 4 MB, this limit includes imported packages, fonts and files, and will vary depending on your deployment infrastructure. In addition, the Edge Runtime does not support all Node.js APIs meaning some `npm` packages may not work. For example, "Module not found: Can't resolve 'fs'" or similar errors. We recommend using the Node.js runtime if you need to use these APIs or packages. ### Node.js Runtime Using the Node.js runtime gives you access to all Node.js APIs, and all npm packages that rely on them. However, it's not as fast to start up as routes using the Edge runtime. Deploying your Next.js application to a Node.js server will require managing, scaling, and configuring your infrastructure. Alternatively, you can consider deploying your Next.js application to a serverless platform like Vercel, which will handle this for you. ### Serverless Node.js Serverless is ideal if you need a scalable solution that can handle more complex computational loads than the Edge Runtime. With Serverless Functions on Vercel, for example, your overall code size is 50MB including imported packages, fonts, and files. The downside compared to routes using the Edge is that it can take hundreds of milliseconds for Serverless Functions to boot up before they begin processing requests. Depending on the amount of traffic your site receives, this could be a frequent occurrence as the functions are not frequently "warm". ## Examples ### Segment Runtime Option You can specify a runtime for individual route segments in your Next.js application. To do so, declare a variable called `runtime` and export it. The variable must be a string, and must have a value of either `'nodejs'` or `'edge'` runtime. The following example demonstrates a page route segment that exports a `runtime` with a value of `'edge'`: export const runtime = 'edge' // 'nodejs' (default) | 'edge' You can also define `runtime` on a layout level, which will make all routes under the layout run on the edge runtime: export const runtime = 'edge' // 'nodejs' (default) | 'edge' If the segment runtime is _not_ set, the default `nodejs` runtime will be used. You do not need to use the `runtime` option if you do not plan to change from the Node.js runtime. > Please refer to the Node.js Docs and Edge Docs for the full list of available APIs. Both runtimes can also support streaming depending on your deployment infrastructure. --- ## Page: https://nextjs.org/docs/14/app/building-your-application/caching Next.js improves your application's performance and reduces costs by caching rendering work and data requests. This page provides an in-depth look at Next.js caching mechanisms, the APIs you can use to configure them, and how they interact with each other. > **Good to know**: This page helps you understand how Next.js works under the hood but is **not** essential knowledge to be productive with Next.js. Most of Next.js' caching heuristics are determined by your API usage and have defaults for the best performance with zero or minimal configuration. ## Overview Here's a high-level overview of the different caching mechanisms and their purpose: | Mechanism | What | Where | Purpose | Duration | | --- | --- | --- | --- | --- | | Request Memoization | Return values of functions | Server | Re-use data in a React Component tree | Per-request lifecycle | | Data Cache | Data | Server | Store data across user requests and deployments | Persistent (can be revalidated) | | Full Route Cache | HTML and RSC payload | Server | Reduce rendering cost and improve performance | Persistent (can be revalidated) | | Router Cache | RSC Payload | Client | Reduce server requests on navigation | User session or time-based | By default, Next.js will cache as much as possible to improve performance and reduce cost. This means routes are **statically rendered** and data requests are **cached** unless you opt out. The diagram below shows the default caching behavior: when a route is statically rendered at build time and when a static route is first visited.  Caching behavior changes depending on whether the route is statically or dynamically rendered, data is cached or uncached, and whether a request is part of an initial visit or a subsequent navigation. Depending on your use case, you can configure the caching behavior for individual routes and data requests. ## Request Memoization React extends the `fetch` API to automatically **memoize** requests that have the same URL and options. This means you can call a fetch function for the same data in multiple places in a React component tree while only executing it once.  For example, if you need to use the same data across a route (e.g. in a Layout, Page, and multiple components), you do not have to fetch data at the top of the tree, and forward props between components. Instead, you can fetch data in the components that need it without worrying about the performance implications of making multiple requests across the network for the same data. async function getItem() { // The `fetch` function is automatically memoized and the result // is cached const res = await fetch('https://.../item/1') return res.json() } // This function is called twice, but only executed the first time const item = await getItem() // cache MISS // The second call could be anywhere in your route const item = await getItem() // cache HIT **How Request Memoization Works**  * While rendering a route, the first time a particular request is called, its result will not be in memory and it'll be a cache `MISS`. * Therefore, the function will be executed, and the data will be fetched from the external source, and the result will be stored in memory. * Subsequent function calls of the request in the same render pass will be a cache `HIT`, and the data will be returned from memory without executing the function. * Once the route has been rendered and the rendering pass is complete, memory is "reset" and all request memoization entries are cleared. > **Good to know**: > > * Request memoization is a React feature, not a Next.js feature. It's included here to show how it interacts with the other caching mechanisms. > * Memoization only applies to the `GET` method in `fetch` requests. > * Memoization only applies to the React Component tree, this means: > * It applies to `fetch` requests in `generateMetadata`, `generateStaticParams`, Layouts, Pages, and other Server Components. > * It doesn't apply to `fetch` requests in Route Handlers as they are not a part of the React component tree. > * For cases where `fetch` is not suitable (e.g. some database clients, CMS clients, or GraphQL clients), you can use the React `cache` function to memoize functions. ### Duration The cache lasts the lifetime of a server request until the React component tree has finished rendering. ### Revalidating Since the memoization is not shared across server requests and only applies during rendering, there is no need to revalidate it. ### Opting out Memoization only applies to the `GET` method in `fetch` requests, other methods, such as `POST` and `DELETE`, are not memoized. This default behavior is a React optimization and we do not recommend opting out of it. To manage individual requests, you can use the `signal` property from `AbortController`. However, this will not opt requests out of memoization, rather, abort in-flight requests. const { signal } = new AbortController() fetch(url, { signal }) ## Data Cache Next.js has a built-in Data Cache that **persists** the result of data fetches across incoming **server requests** and **deployments**. This is possible because Next.js extends the native `fetch` API to allow each request on the server to set its own persistent caching semantics. > **Good to know**: In the browser, the `cache` option of `fetch` indicates how a request will interact with the browser's HTTP cache, in Next.js, the `cache` option indicates how a server-side request will interact with the server's Data Cache. By default, data requests that use `fetch` are **cached**. You can use the `cache` and `next.revalidate` options of `fetch` to configure the caching behavior. **How the Data Cache Works**  * The first time a `fetch` request is called during rendering, Next.js checks the Data Cache for a cached response. * If a cached response is found, it's returned immediately and memoized. * If a cached response is not found, the request is made to the data source, the result is stored in the Data Cache, and memoized. * For uncached data (e.g. `{ cache: 'no-store' }`), the result is always fetched from the data source, and memoized. * Whether the data is cached or uncached, the requests are always memoized to avoid making duplicate requests for the same data during a React render pass. > **Differences between the Data Cache and Request Memoization** > > While both caching mechanisms help improve performance by re-using cached data, the Data Cache is persistent across incoming requests and deployments, whereas memoization only lasts the lifetime of a request. > > With memoization, we reduce the number of **duplicate** requests in the same render pass that have to cross the network boundary from the rendering server to the Data Cache server (e.g. a CDN or Edge Network) or data source (e.g. a database or CMS). With the Data Cache, we reduce the number of requests made to our origin data source. ### Duration The Data Cache is persistent across incoming requests and deployments unless you revalidate or opt-out. ### Revalidating Cached data can be revalidated in two ways, with: * **Time-based Revalidation**: Revalidate data after a certain amount of time has passed and a new request is made. This is useful for data that changes infrequently and freshness is not as critical. * **On-demand Revalidation:** Revalidate data based on an event (e.g. form submission). On-demand revalidation can use a tag-based or path-based approach to revalidate groups of data at once. This is useful when you want to ensure the latest data is shown as soon as possible (e.g. when content from your headless CMS is updated). #### Time-based Revalidation To revalidate data at a timed interval, you can use the `next.revalidate` option of `fetch` to set the cache lifetime of a resource (in seconds). // Revalidate at most every hour fetch('https://...', { next: { revalidate: 3600 } }) Alternatively, you can use Route Segment Config options to configure all `fetch` requests in a segment or for cases where you're not able to use `fetch`. **How Time-based Revalidation Works**  * The first time a fetch request with `revalidate` is called, the data will be fetched from the external data source and stored in the Data Cache. * Any requests that are called within the specified timeframe (e.g. 60-seconds) will return the cached data. * After the timeframe, the next request will still return the cached (now stale) data. * Next.js will trigger a revalidation of the data in the background. * Once the data is fetched successfully, Next.js will update the Data Cache with the fresh data. * If the background revalidation fails, the previous data will be kept unaltered. This is similar to **stale-while-revalidate** behavior. #### On-demand Revalidation Data can be revalidated on-demand by path (`revalidatePath`) or by cache tag (`revalidateTag`). **How On-Demand Revalidation Works**  * The first time a `fetch` request is called, the data will be fetched from the external data source and stored in the Data Cache. * When an on-demand revalidation is triggered, the appropriate cache entries will be purged from the cache. * This is different from time-based revalidation, which keeps the stale data in the cache until the fresh data is fetched. * The next time a request is made, it will be a cache `MISS` again, and the data will be fetched from the external data source and stored in the Data Cache. ### Opting out For individual data fetches, you can opt out of caching by setting the `cache` option to `no-store`. This means data will be fetched whenever `fetch` is called. // Opt out of caching for an individual `fetch` request fetch(`https://...`, { cache: 'no-store' }) Alternatively, you can also use the Route Segment Config options to opt out of caching for a specific route segment. This will affect all data requests in the route segment, including third-party libraries. // Opt out of caching for all data requests in the route segment export const dynamic = 'force-dynamic' > **Note**: Data Cache is currently only available in pages/routes, not middleware. Any fetches done inside of your middleware will be uncached by default. > **Vercel Data Cache** > > If your Next.js application is deployed to Vercel, we recommend reading the Vercel Data Cache documentation for a better understanding of Vercel specific features. ## Full Route Cache > **Related terms**: > > You may see the terms **Automatic Static Optimization**, **Static Site Generation**, or **Static Rendering** being used interchangeably to refer to the process of rendering and caching routes of your application at build time. Next.js automatically renders and caches routes at build time. This is an optimization that allows you to serve the cached route instead of rendering on the server for every request, resulting in faster page loads. To understand how the Full Route Cache works, it's helpful to look at how React handles rendering, and how Next.js caches the result: ### 1\. React Rendering on the Server On the server, Next.js uses React's APIs to orchestrate rendering. The rendering work is split into chunks: by individual routes segments and Suspense boundaries. Each chunk is rendered in two steps: 1. React renders Server Components into a special data format, optimized for streaming, called the **React Server Component Payload**. 2. Next.js uses the React Server Component Payload and Client Component JavaScript instructions to render **HTML** on the server. This means we don't have to wait for everything to render before caching the work or sending a response. Instead, we can stream a response as work is completed. > **What is the React Server Component Payload?** > > The React Server Component Payload is a compact binary representation of the rendered React Server Components tree. It's used by React on the client to update the browser's DOM. The React Server Component Payload contains: > > * The rendered result of Server Components > * Placeholders for where Client Components should be rendered and references to their JavaScript files > * Any props passed from a Server Component to a Client Component > > To learn more, see the Server Components documentation. ### 2\. Next.js Caching on the Server (Full Route Cache)  The default behavior of Next.js is to cache the rendered result (React Server Component Payload and HTML) of a route on the server. This applies to statically rendered routes at build time, or during revalidation. ### 3\. React Hydration and Reconciliation on the Client At request time, on the client: 1. The HTML is used to immediately show a fast non-interactive initial preview of the Client and Server Components. 2. The React Server Components Payload is used to reconcile the Client and rendered Server Component trees, and update the DOM. 3. The JavaScript instructions are used to hydrate Client Components and make the application interactive. ### 4\. Next.js Caching on the Client (Router Cache) The React Server Component Payload is stored in the client-side Router Cache - a separate in-memory cache, split by individual route segment. This Router Cache is used to improve the navigation experience by storing previously visited routes and prefetching future routes. ### 5\. Subsequent Navigations On subsequent navigations or during prefetching, Next.js will check if the React Server Components Payload is stored in the Router Cache. If so, it will skip sending a new request to the server. If the route segments are not in the cache, Next.js will fetch the React Server Components Payload from the server, and populate the Router Cache on the client. ### Static and Dynamic Rendering Whether a route is cached or not at build time depends on whether it's statically or dynamically rendered. Static routes are cached by default, whereas dynamic routes are rendered at request time, and not cached. This diagram shows the difference between statically and dynamically rendered routes, with cached and uncached data:  Learn more about static and dynamic rendering. ### Duration By default, the Full Route Cache is persistent. This means that the render output is cached across user requests. ### Invalidation There are two ways you can invalidate the Full Route Cache: * **Revalidating Data**: Revalidating the Data Cache, will in turn invalidate the Router Cache by re-rendering components on the server and caching the new render output. * **Redeploying**: Unlike the Data Cache, which persists across deployments, the Full Route Cache is cleared on new deployments. ### Opting out You can opt out of the Full Route Cache, or in other words, dynamically render components for every incoming request, by: * **Using a Dynamic Function**: This will opt the route out from the Full Route Cache and dynamically render it at request time. The Data Cache can still be used. * **Using the `dynamic = 'force-dynamic'` or `revalidate = 0` route segment config options**: This will skip the Full Route Cache and the Data Cache. Meaning components will be rendered and data fetched on every incoming request to the server. The Router Cache will still apply as it's a client-side cache. * **Opting out of the Data Cache**: If a route has a `fetch` request that is not cached, this will opt the route out of the Full Route Cache. The data for the specific `fetch` request will be fetched for every incoming request. Other `fetch` requests that do not opt out of caching will still be cached in the Data Cache. This allows for a hybrid of cached and uncached data. ## Router Cache > **Related Terms:** > > You may see the Router Cache being referred to as **Client-side Cache** or **Prefetch Cache**. While **Prefetch Cache** refers to the prefetched route segments, **Client-side Cache** refers to the whole Router cache, which includes both visited and prefetched segments. This cache specifically applies to Next.js and Server Components, and is different to the browser's bfcache, though it has a similar result. Next.js has an in-memory client-side cache that stores the React Server Component Payload, split by individual route segments, for the duration of a user session. This is called the Router Cache. **How the Router Cache Works** 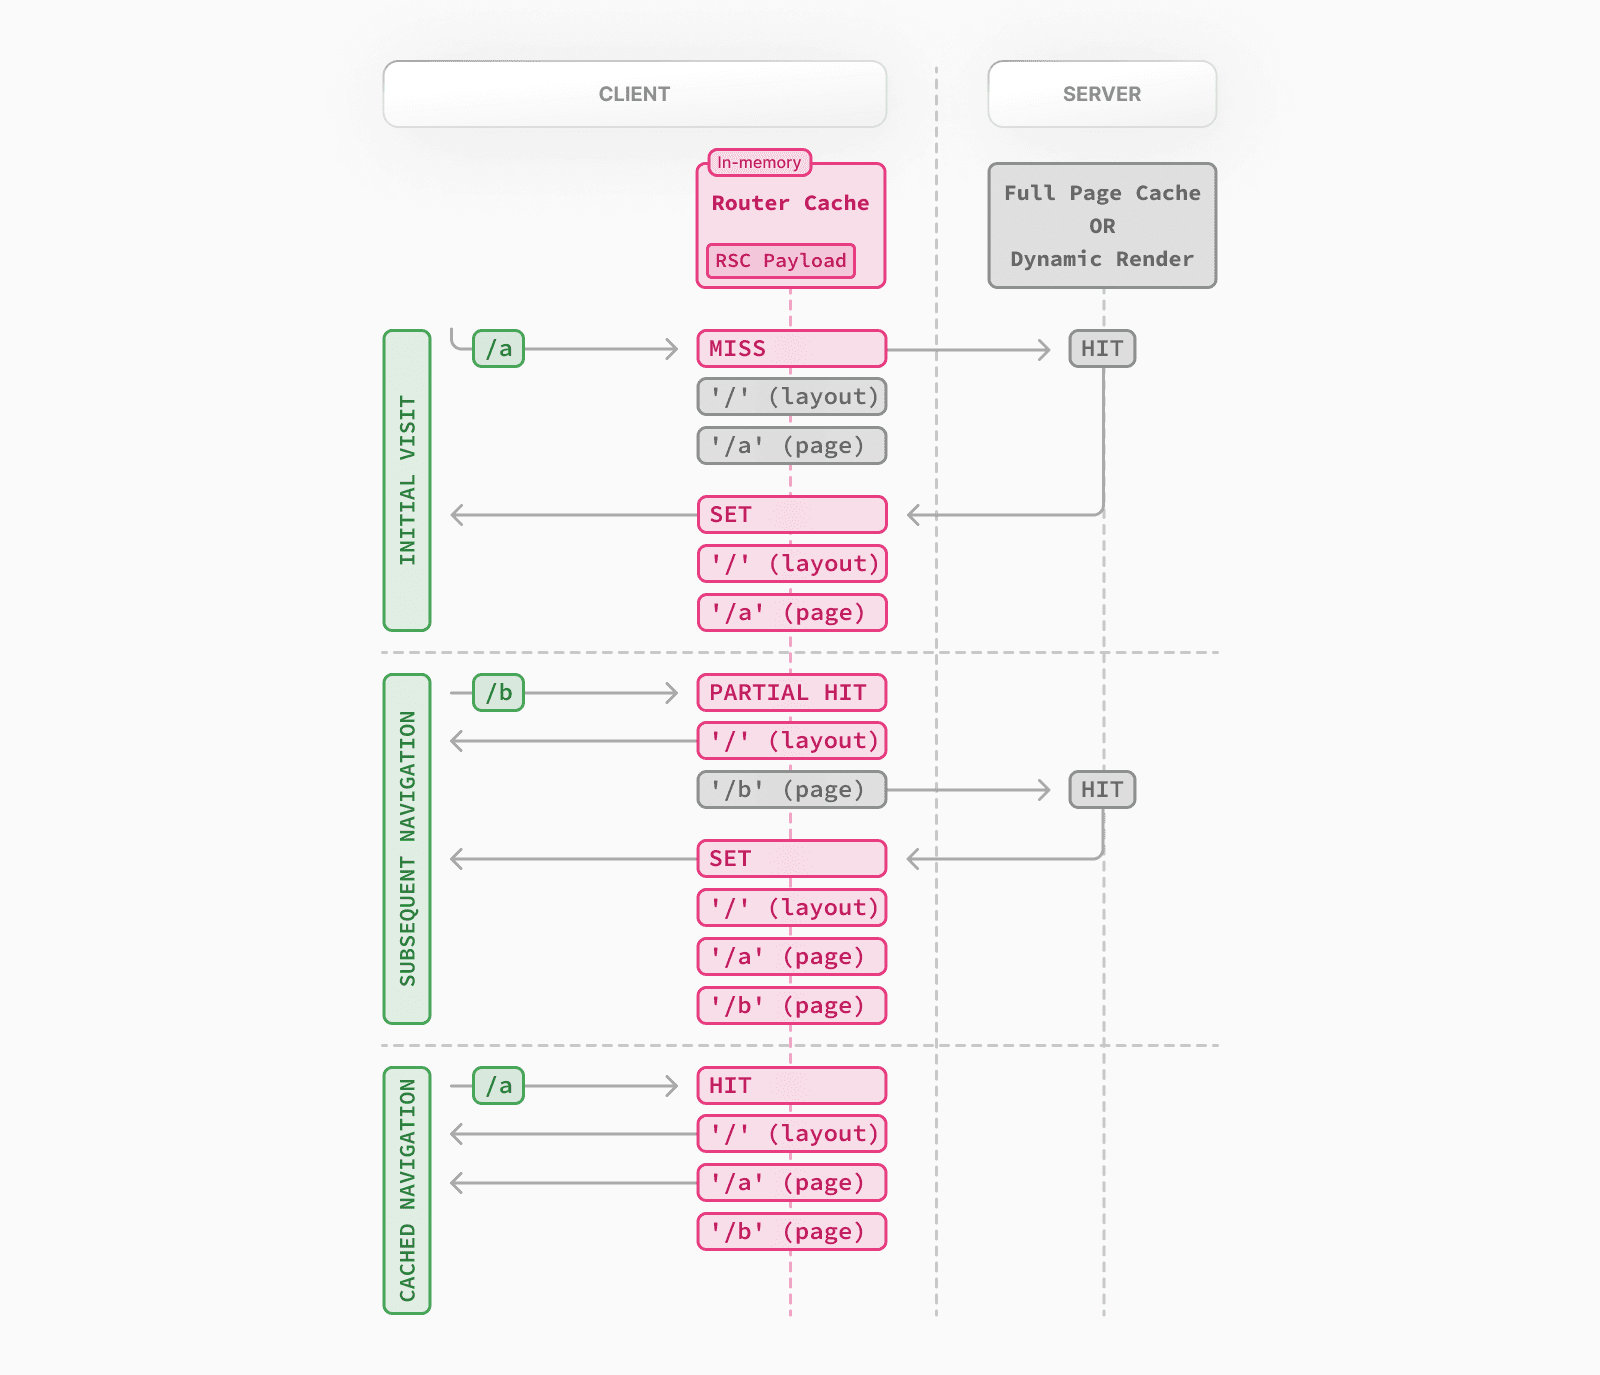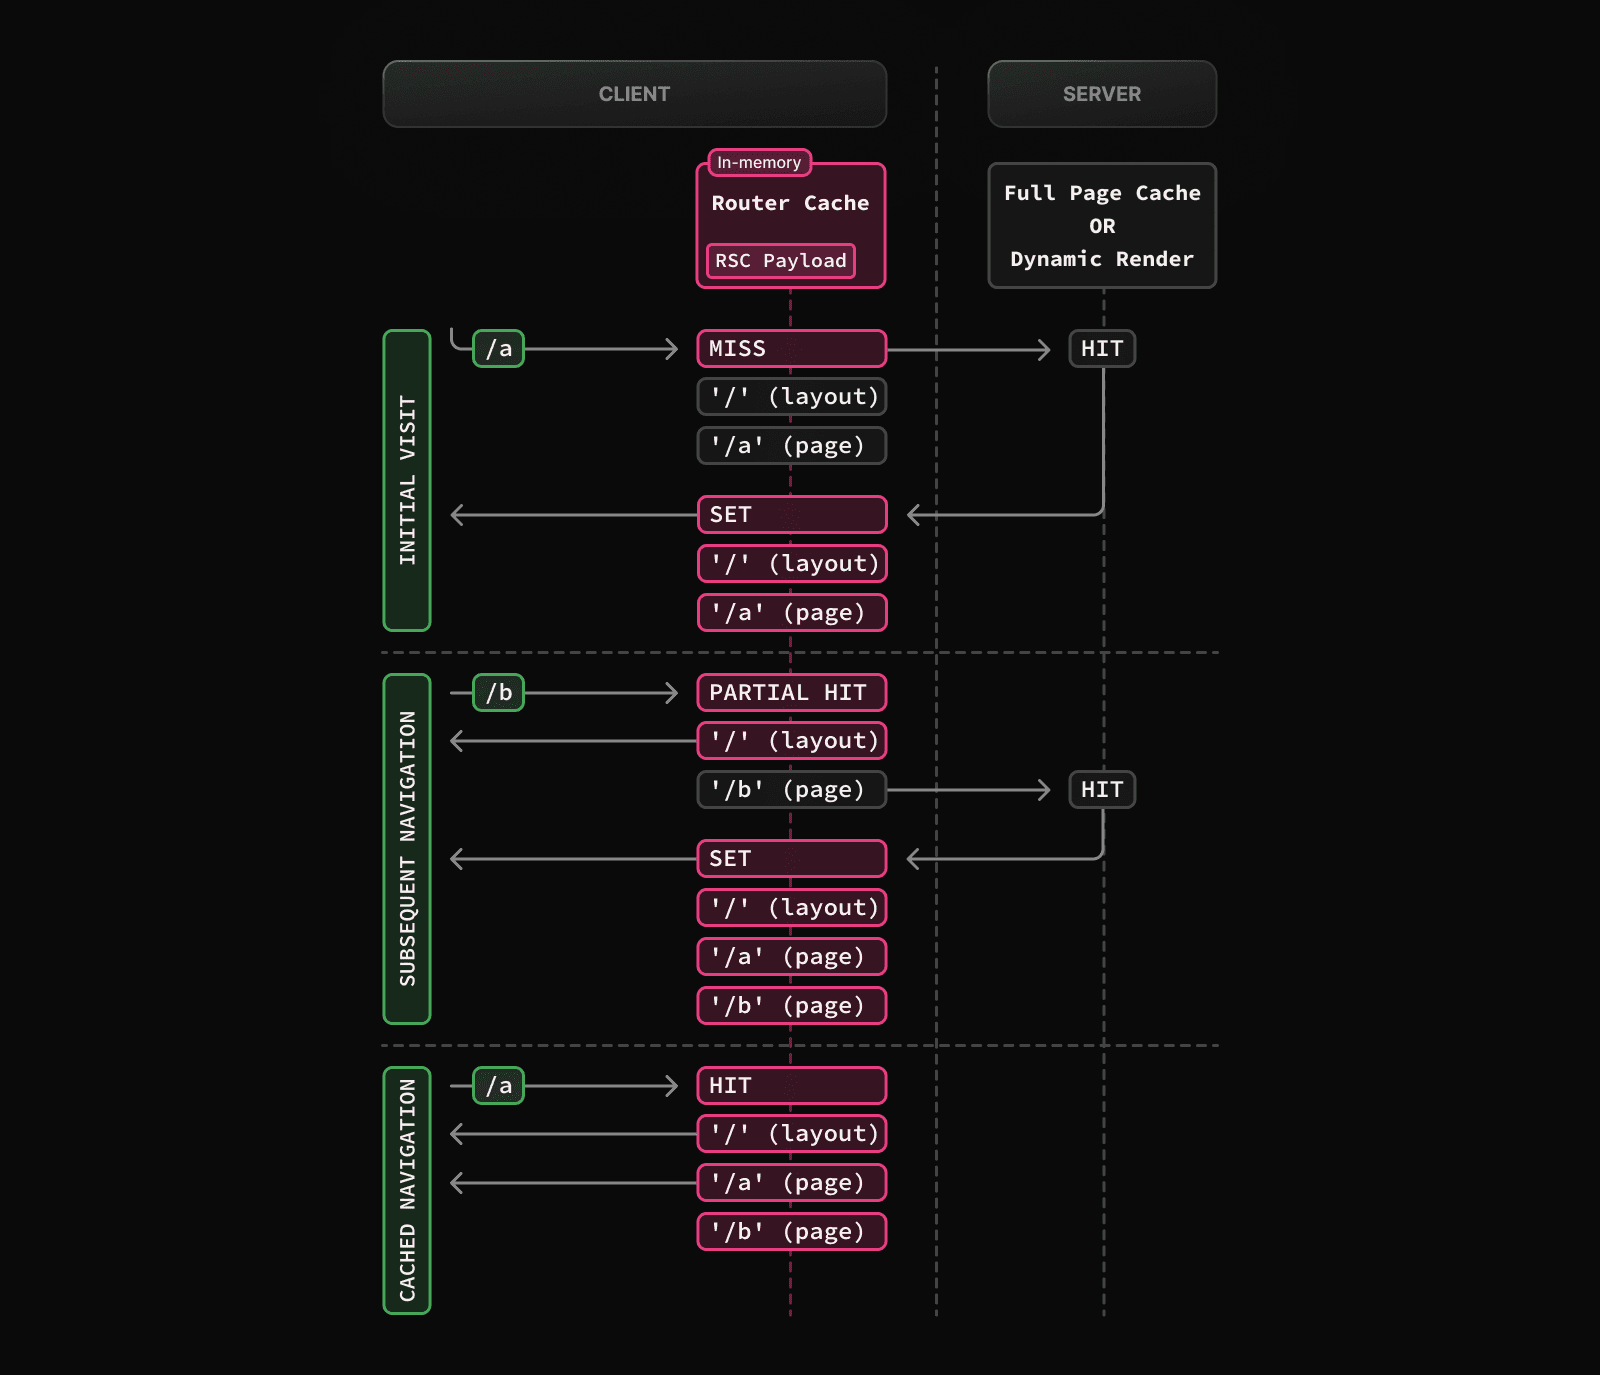 As a user navigates between routes, Next.js caches visited route segments and prefetches the routes the user is likely to navigate to (based on `<Link>` components in their viewport). This results in an improved navigation experience for the user: * Instant backward/forward navigation because visited routes are cached and fast navigation to new routes because of prefetching and partial rendering. * No full-page reload between navigations, and React state and browser state are preserved. > **Difference between the Router Cache and Full Route Cache**: > > The Router Cache temporarily stores the React Server Component Payload in the browser for the duration of a user session, whereas the Full Route Cache persistently stores the React Server Component Payload and HTML on the server across multiple user requests. > > While the Full Route Cache only caches statically rendered routes, the Router Cache applies to both statically and dynamically rendered routes. ### Duration The cache is stored in the browser's temporary memory. Two factors determine how long the router cache lasts: * **Session**: The cache persists across navigation. However, it's cleared on page refresh. * **Automatic Invalidation Period**: The cache of layouts and loading states is automatically invalidated after a specific time. The duration depends on how the resource was prefetched, and if the resource was statically generated: * **Default Prefetching** (`prefetch={null}` or unspecified): not cached for dynamic pages, 5 minutes for static pages. * **Full Prefetching** (`prefetch={true}` or `router.prefetch`): 5 minutes for both static & dynamic pages. While a page refresh will clear **all** cached segments, the automatic invalidation period only affects the individual segment from the time it was prefetched. > **Good to know**: The experimental `staleTimes` config option can be used to adjust the automatic invalidation times mentioned above. ### Invalidation There are two ways you can invalidate the Router Cache: * In a **Server Action**: * Revalidating data on-demand by path with (`revalidatePath`) or by cache tag with (`revalidateTag`) * Using `cookies.set` or `cookies.delete` invalidates the Router Cache to prevent routes that use cookies from becoming stale (e.g. authentication). * Calling `router.refresh` will invalidate the Router Cache and make a new request to the server for the current route. ### Opting out It's not possible to opt out of the Router Cache. However, you can invalidate it by calling `router.refresh`, `revalidatePath`, or `revalidateTag` (see above). This will clear the cache and make a new request to the server, ensuring the latest data is shown. You can also opt out of **prefetching** by setting the `prefetch` prop of the `<Link>` component to `false`. However, this will still temporarily store the route segments for 30s to allow instant navigation between nested segments, such as tab bars, or back and forward navigation. Visited routes will still be cached. ## Cache Interactions When configuring the different caching mechanisms, it's important to understand how they interact with each other: ### Data Cache and Full Route Cache * Revalidating or opting out of the Data Cache **will** invalidate the Full Route Cache, as the render output depends on data. * Invalidating or opting out of the Full Route Cache **does not** affect the Data Cache. You can dynamically render a route that has both cached and uncached data. This is useful when most of your page uses cached data, but you have a few components that rely on data that needs to be fetched at request time. You can dynamically render without worrying about the performance impact of re-fetching all the data. ### Data Cache and Client-side Router cache * Revalidating the Data Cache in a Route Handler **will not** immediately invalidate the Router Cache as the Route Handler isn't tied to a specific route. This means Router Cache will continue to serve the previous payload until a hard refresh, or the automatic invalidation period has elapsed. * To immediately invalidate the Data Cache and Router cache, you can use `revalidatePath` or `revalidateTag` in a Server Action. ## APIs The following table provides an overview of how different Next.js APIs affect caching: | API | Router Cache | Full Route Cache | Data Cache | React Cache | | --- | --- | --- | --- | --- | | `<Link prefetch>` | Cache | | | | | `router.prefetch` | Cache | | | | | `router.refresh` | Revalidate | | | | | `fetch` | | | Cache | Cache | | `fetch` `options.cache` | | | Cache or Opt out | | | `fetch` `options.next.revalidate` | | Revalidate | Revalidate | | | `fetch` `options.next.tags` | | Cache | Cache | | | `revalidateTag` | Revalidate (Server Action) | Revalidate | Revalidate | | | `revalidatePath` | Revalidate (Server Action) | Revalidate | Revalidate | | | `const revalidate` | | Revalidate or Opt out | Revalidate or Opt out | | | `const dynamic` | | Cache or Opt out | Cache or Opt out | | | `cookies` | Revalidate (Server Action) | Opt out | | | | `headers`, `searchParams` | | Opt out | | | | `generateStaticParams` | | Cache | | | | `React.cache` | | | | Cache | | `unstable_cache` | | | | | ### `<Link>` By default, the `<Link>` component automatically prefetches routes from the Full Route Cache and adds the React Server Component Payload to the Router Cache. To disable prefetching, you can set the `prefetch` prop to `false`. But this will not skip the cache permanently, the route segment will still be cached client-side when the user visits the route. Learn more about the `<Link>` component. ### `router.prefetch` The `prefetch` option of the `useRouter` hook can be used to manually prefetch a route. This adds the React Server Component Payload to the Router Cache. See the `useRouter` hook API reference. ### `router.refresh` The `refresh` option of the `useRouter` hook can be used to manually refresh a route. This completely clears the Router Cache, and makes a new request to the server for the current route. `refresh` does not affect the Data or Full Route Cache. The rendered result will be reconciled on the client while preserving React state and browser state. See the `useRouter` hook API reference. ### `fetch` Data returned from `fetch` is automatically cached in the Data Cache. // Cached by default. `force-cache` is the default option and can be omitted. fetch(`https://...`, { cache: 'force-cache' }) See the `fetch` API Reference for more options. ### `fetch options.cache` You can opt out individual `fetch` requests of data caching by setting the `cache` option to `no-store`: // Opt out of caching fetch(`https://...`, { cache: 'no-store' }) Since the render output depends on data, using `cache: 'no-store'` will also skip the Full Route Cache for the route where the `fetch` request is used. That is, the route will be dynamically rendered every request, but you can still have other cached data requests in the same route. See the `fetch` API Reference for more options. ### `fetch options.next.revalidate` You can use the `next.revalidate` option of `fetch` to set the revalidation period (in seconds) of an individual `fetch` request. This will revalidate the Data Cache, which in turn will revalidate the Full Route Cache. Fresh data will be fetched, and components will be re-rendered on the server. // Revalidate at most after 1 hour fetch(`https://...`, { next: { revalidate: 3600 } }) See the `fetch` API reference for more options. ### `fetch options.next.tags` and `revalidateTag` Next.js has a cache tagging system for fine-grained data caching and revalidation. 1. When using `fetch` or `unstable_cache`, you have the option to tag cache entries with one or more tags. 2. Then, you can call `revalidateTag` to purge the cache entries associated with that tag. For example, you can set a tag when fetching data: // Cache data with a tag fetch(`https://...`, { next: { tags: ['a', 'b', 'c'] } }) Then, call `revalidateTag` with a tag to purge the cache entry: // Revalidate entries with a specific tag revalidateTag('a') There are two places you can use `revalidateTag`, depending on what you're trying to achieve: 1. Route Handlers - to revalidate data in response of a third party event (e.g. webhook). This will not invalidate the Router Cache immediately as the Router Handler isn't tied to a specific route. 2. Server Actions - to revalidate data after a user action (e.g. form submission). This will invalidate the Router Cache for the associated route. ### `revalidatePath` `revalidatePath` allows you manually revalidate data **and** re-render the route segments below a specific path in a single operation. Calling the `revalidatePath` method revalidates the Data Cache, which in turn invalidates the Full Route Cache. revalidatePath('/') There are two places you can use `revalidatePath`, depending on what you're trying to achieve: 1. Route Handlers - to revalidate data in response to a third party event (e.g. webhook). 2. Server Actions - to revalidate data after a user interaction (e.g. form submission, clicking a button). See the `revalidatePath` API reference for more information. > **`revalidatePath`** vs. **`router.refresh`**: > > Calling `router.refresh` will clear the Router cache, and re-render route segments on the server without invalidating the Data Cache or the Full Route Cache. > > The difference is that `revalidatePath` purges the Data Cache and Full Route Cache, whereas `router.refresh()` does not change the Data Cache and Full Route Cache, as it is a client-side API. ### Dynamic Functions Dynamic functions like `cookies` and `headers`, and the `searchParams` prop in Pages depend on runtime incoming request information. Using them will opt a route out of the Full Route Cache, in other words, the route will be dynamically rendered. #### `cookies` Using `cookies.set` or `cookies.delete` in a Server Action invalidates the Router Cache to prevent routes that use cookies from becoming stale (e.g. to reflect authentication changes). See the `cookies` API reference. ### Segment Config Options The Route Segment Config options can be used to override the route segment defaults or when you're not able to use the `fetch` API (e.g. database client or 3rd party libraries). The following Route Segment Config options will opt out of the Data Cache and Full Route Cache: * `const dynamic = 'force-dynamic'` * `const revalidate = 0` See the Route Segment Config documentation for more options. ### `generateStaticParams` For dynamic segments (e.g. `app/blog/[slug]/page.js`), paths provided by `generateStaticParams` are cached in the Full Route Cache at build time. At request time, Next.js will also cache paths that weren't known at build time the first time they're visited. You can disable caching at request time by using `export const dynamicParams = false` option in a route segment. When this config option is used, only paths provided by `generateStaticParams` will be served, and other routes will 404 or match (in the case of catch-all routes). See the `generateStaticParams` API reference. ### React `cache` function The React `cache` function allows you to memoize the return value of a function, allowing you to call the same function multiple times while only executing it once. Since `fetch` requests are automatically memoized, you do not need to wrap it in React `cache`. However, you can use `cache` to manually memoize data requests for use cases when the `fetch` API is not suitable. For example, some database clients, CMS clients, or GraphQL clients. import { cache } from 'react' import db from '@/lib/db' export const getItem = cache(async (id: string) => { const item = await db.item.findUnique({ id }) return item }) --- ## Page: https://nextjs.org/docs/14/app/building-your-application/styling You are currently viewing documentation for version 14 of Next.js. Next.js supports different ways of styling your application, including: * **Global CSS**: Simple to use and familiar for those experienced with traditional CSS, but can lead to larger CSS bundles and difficulty managing styles as the application grows. * **CSS Modules**: Create locally scoped CSS classes to avoid naming conflicts and improve maintainability. * **Tailwind CSS**: A utility-first CSS framework that allows for rapid custom designs by composing utility classes. * **Sass**: A popular CSS preprocessor that extends CSS with features like variables, nested rules, and mixins. * **CSS-in-JS**: Embed CSS directly in your JavaScript components, enabling dynamic and scoped styling. Learn more about each approach by exploring their respective documentation: --- ## Page: https://nextjs.org/docs/14/app/building-your-application/styling/css-modules ## CSS Modules and Global Styles Next.js supports different types of stylesheets, including: * CSS Modules * Global Styles * External Stylesheets Next.js has built-in support for CSS Modules using the `.module.css` extension. CSS Modules locally scope CSS by automatically creating a unique class name. This allows you to use the same class name in different files without worrying about collisions. This behavior makes CSS Modules the ideal way to include component-level CSS. ## Example CSS Modules can be imported into any file inside the `app` directory: import styles from './styles.module.css' export default function DashboardLayout({ children, }: { children: React.ReactNode }) { return <section className={styles.dashboard}>{children}</section> } .dashboard { padding: 24px; } CSS Modules are **only enabled for files with the `.module.css` and `.module.sass` extensions**. In production, all CSS Module files will be automatically concatenated into **many minified and code-split** `.css` files. These `.css` files represent hot execution paths in your application, ensuring the minimal amount of CSS is loaded for your application to paint. ## Global Styles Global styles can be imported into any layout, page, or component inside the `app` directory. > **Good to know**: This is different from the `pages` directory, where you can only import global styles inside the `_app.js` file. For example, consider a stylesheet named `app/global.css`: body { padding: 20px 20px 60px; max-width: 680px; margin: 0 auto; } Inside the root layout (`app/layout.js`), import the `global.css` stylesheet to apply the styles to every route in your application: // These styles apply to every route in the application import './global.css' export default function RootLayout({ children, }: { children: React.ReactNode }) { return ( <html lang="en"> <body>{children}</body> </html> ) } ## External Stylesheets Stylesheets published by external packages can be imported anywhere in the `app` directory, including colocated components: import 'bootstrap/dist/css/bootstrap.css' export default function RootLayout({ children, }: { children: React.ReactNode }) { return ( <html lang="en"> <body className="container">{children}</body> </html> ) } > **Good to know**: External stylesheets must be directly imported from an npm package or downloaded and colocated with your codebase. You cannot use `<link rel="stylesheet" />`. ## Ordering and Merging Next.js optimizes CSS during production builds by automatically chunking (merging) stylesheets. The CSS order is determined by the order in which you import the stylesheets into your application code. For example, `base-button.module.css` will be ordered before `page.module.css` since `<BaseButton>` is imported first in `<Page>`: import styles from './base-button.module.css' export function BaseButton() { return <button className={styles.primary} /> } import { BaseButton } from './base-button' import styles from './page.module.css' export function Page() { return <BaseButton className={styles.primary} /> } To maintain a predictable order, we recommend the following: * Only import a CSS file in a single JS/TS file. * If using global class names, import the global styles in the same file in the order you want them to be applied. * Prefer CSS Modules over global styles. * Use a consistent naming convention for your CSS modules. For example, using `<name>.module.css` over `<name>.tsx`. * Extract shared styles into a separate shared component. * If using Tailwind, import the stylesheet at the top of the file, preferably in the Root Layout. > **Good to know:** CSS ordering behaves differently in development mode, always ensure to check preview deployments to verify the final CSS order in your production build. ## Additional Features Next.js includes additional features to improve the authoring experience of adding styles: * When running locally with `next dev`, local stylesheets (either global or CSS modules) will take advantage of Fast Refresh to instantly reflect changes as edits are saved. * When building for production with `next build`, CSS files will be bundled into fewer minified `.css` files to reduce the number of network requests needed to retrieve styles. * If you disable JavaScript, styles will still be loaded in the production build (`next start`). However, JavaScript is still required for `next dev` to enable Fast Refresh. --- ## Page: https://nextjs.org/docs/14/app/building-your-application/styling/tailwind-css Tailwind CSS is a utility-first CSS framework that works exceptionally well with Next.js. ## Installing Tailwind Install the Tailwind CSS packages and run the `init` command to generate both the `tailwind.config.js` and `postcss.config.js` files: npm install -D tailwindcss postcss autoprefixer npx tailwindcss init -p ## Configuring Tailwind Inside `tailwind.config.js`, add paths to the files that will use Tailwind CSS class names: /** @type {import('tailwindcss').Config} */ module.exports = { content: [ './app/**/*.{js,ts,jsx,tsx,mdx}', // Note the addition of the `app` directory. './pages/**/*.{js,ts,jsx,tsx,mdx}', './components/**/*.{js,ts,jsx,tsx,mdx}', // Or if using `src` directory: './src/**/*.{js,ts,jsx,tsx,mdx}', ], theme: { extend: {}, }, plugins: [], } You do not need to modify `postcss.config.js`. ## Importing Styles Add the Tailwind CSS directives that Tailwind will use to inject its generated styles to a Global Stylesheet in your application, for example: @tailwind base; @tailwind components; @tailwind utilities; Inside the root layout (`app/layout.tsx`), import the `globals.css` stylesheet to apply the styles to every route in your application. import type { Metadata } from 'next' // These styles apply to every route in the application import './globals.css' export const metadata: Metadata = { title: 'Create Next App', description: 'Generated by create next app', } export default function RootLayout({ children, }: { children: React.ReactNode }) { return ( <html lang="en"> <body>{children}</body> </html> ) } ## Using Classes After installing Tailwind CSS and adding the global styles, you can use Tailwind's utility classes in your application. export default function Page() { return <h1 className="text-3xl font-bold underline">Hello, Next.js!</h1> } ## Usage with Turbopack As of Next.js 13.1, Tailwind CSS and PostCSS are supported with Turbopack. --- ## Page: https://nextjs.org/docs/14/app/building-your-application/styling/css-in-js > **Warning:** CSS-in-JS libraries which require runtime JavaScript are not currently supported in Server Components. Using CSS-in-JS with newer React features like Server Components and Streaming requires library authors to support the latest version of React, including concurrent rendering. > > We're working with the React team on upstream APIs to handle CSS and JavaScript assets with support for React Server Components and streaming architecture. The following libraries are supported in Client Components in the `app` directory (alphabetical): * `chakra-ui` * `kuma-ui` * `@mui/material` * `@mui/joy` * `pandacss` * `styled-jsx` * `styled-components` * `stylex` * `tamagui` * `tss-react` * `vanilla-extract` The following are currently working on support: * `emotion` > **Good to know**: We're testing out different CSS-in-JS libraries and we'll be adding more examples for libraries that support React 18 features and/or the `app` directory. If you want to style Server Components, we recommend using CSS Modules or other solutions that output CSS files, like PostCSS or Tailwind CSS. ## Configuring CSS-in-JS in `app` Configuring CSS-in-JS is a three-step opt-in process that involves: 1. A **style registry** to collect all CSS rules in a render. 2. The new `useServerInsertedHTML` hook to inject rules before any content that might use them. 3. A Client Component that wraps your app with the style registry during initial server-side rendering. ### `styled-jsx` Using `styled-jsx` in Client Components requires using `v5.1.0`. First, create a new registry: 'use client' import React, { useState } from 'react' import { useServerInsertedHTML } from 'next/navigation' import { StyleRegistry, createStyleRegistry } from 'styled-jsx' export default function StyledJsxRegistry({ children, }: { children: React.ReactNode }) { // Only create stylesheet once with lazy initial state // x-ref: https://reactjs.org/docs/hooks-reference.html#lazy-initial-state const [jsxStyleRegistry] = useState(() => createStyleRegistry()) useServerInsertedHTML(() => { const styles = jsxStyleRegistry.styles() jsxStyleRegistry.flush() return <>{styles}</> }) return <StyleRegistry registry={jsxStyleRegistry}>{children}</StyleRegistry> } Then, wrap your root layout with the registry: import StyledJsxRegistry from './registry' export default function RootLayout({ children, }: { children: React.ReactNode }) { return ( <html> <body> <StyledJsxRegistry>{children}</StyledJsxRegistry> </body> </html> ) } View an example here. ### Styled Components Below is an example of how to configure `styled-components@6` or newer: First, enable styled-components in `next.config.js`. module.exports = { compiler: { styledComponents: true, }, } Then, use the `styled-components` API to create a global registry component to collect all CSS style rules generated during a render, and a function to return those rules. Then use the `useServerInsertedHTML` hook to inject the styles collected in the registry into the `<head>` HTML tag in the root layout. 'use client' import React, { useState } from 'react' import { useServerInsertedHTML } from 'next/navigation' import { ServerStyleSheet, StyleSheetManager } from 'styled-components' export default function StyledComponentsRegistry({ children, }: { children: React.ReactNode }) { // Only create stylesheet once with lazy initial state // x-ref: https://reactjs.org/docs/hooks-reference.html#lazy-initial-state const [styledComponentsStyleSheet] = useState(() => new ServerStyleSheet()) useServerInsertedHTML(() => { const styles = styledComponentsStyleSheet.getStyleElement() styledComponentsStyleSheet.instance.clearTag() return <>{styles}</> }) if (typeof window !== 'undefined') return <>{children}</> return ( <StyleSheetManager sheet={styledComponentsStyleSheet.instance}> {children} </StyleSheetManager> ) } Wrap the `children` of the root layout with the style registry component: import StyledComponentsRegistry from './lib/registry' export default function RootLayout({ children, }: { children: React.ReactNode }) { return ( <html> <body> <StyledComponentsRegistry>{children}</StyledComponentsRegistry> </body> </html> ) } View an example here. > **Good to know**: > > * During server rendering, styles will be extracted to a global registry and flushed to the `<head>` of your HTML. This ensures the style rules are placed before any content that might use them. In the future, we may use an upcoming React feature to determine where to inject the styles. > * During streaming, styles from each chunk will be collected and appended to existing styles. After client-side hydration is complete, `styled-components` will take over as usual and inject any further dynamic styles. > * We specifically use a Client Component at the top level of the tree for the style registry because it's more efficient to extract CSS rules this way. It avoids re-generating styles on subsequent server renders, and prevents them from being sent in the Server Component payload. > * For advanced use cases where you need to configure individual properties of styled-components compilation, you can read our Next.js styled-components API reference to learn more. --- ## Page: https://nextjs.org/docs/14/app/building-your-application/styling/sass Next.js has built-in support for integrating with Sass after the package is installed using both the `.scss` and `.sass` extensions. You can use component-level Sass via CSS Modules and the `.module.scss`or `.module.sass` extension. **Good to know**: Sass supports two different syntaxes, each with their own extension. The `.scss` extension requires you use the SCSS syntax, while the `.sass` extension requires you use the Indented Syntax ("Sass"). If you're not sure which to choose, start with the `.scss` extension which is a superset of CSS, and doesn't require you learn the Indented Syntax ("Sass"). If you want to configure the Sass compiler, use `sassOptions` in `next.config.js`. const path = require('path') module.exports = { sassOptions: { includePaths: [path.join(__dirname, 'styles')], }, } Next.js supports Sass variables exported from CSS Module files. --- ## Page: https://nextjs.org/docs/14/app/building-your-application/optimizing ## Optimizations Next.js comes with a variety of built-in optimizations designed to improve your application's speed and Core Web Vitals. This guide will cover the optimizations you can leverage to enhance your user experience. ## Built-in Components Built-in components abstract away the complexity of implementing common UI optimizations. These components are: * **Images**: Built on the native `<img>` element. The Image Component optimizes images for performance by lazy loading and automatically resizing images based on device size. * **Link**: Built on the native `<a>` tags. The Link Component prefetches pages in the background, for faster and smoother page transitions. * **Scripts**: Built on the native `<script>` tags. The Script Component gives you control over loading and execution of third-party scripts. Metadata helps search engines understand your content better (which can result in better SEO), and allows you to customize how your content is presented on social media, helping you create a more engaging and consistent user experience across various platforms. The Metadata API in Next.js allows you to modify the `<head>` element of a page. You can configure metadata in two ways: * **Config-based Metadata**: Export a static `metadata` object or a dynamic `generateMetadata` function in a `layout.js` or `page.js` file. * **File-based Metadata**: Add static or dynamically generated special files to route segments. Additionally, you can create dynamic Open Graph Images using JSX and CSS with imageResponse constructor. ## Static Assets Next.js `/public` folder can be used to serve static assets like images, fonts, and other files. Files inside `/public` can also be cached by CDN providers so that they are delivered efficiently. ## Analytics and Monitoring For large applications, Next.js integrates with popular analytics and monitoring tools to help you understand how your application is performing. Learn more in the OpenTelemetry and Instrumentation guides. --- ## Page: https://nextjs.org/docs/14/app/building-your-application/optimizing/images ## Image Optimization Examples * Image Component According to Web Almanac, images account for a huge portion of the typical website’s page weight and can have a sizable impact on your website's LCP performance. The Next.js Image component extends the HTML `<img>` element with features for automatic image optimization: * **Size Optimization:** Automatically serve correctly sized images for each device, using modern image formats like WebP and AVIF. * **Visual Stability:** Prevent layout shift automatically when images are loading. * **Faster Page Loads:** Images are only loaded when they enter the viewport using native browser lazy loading, with optional blur-up placeholders. * **Asset Flexibility:** On-demand image resizing, even for images stored on remote servers > **🎥 Watch:** Learn more about how to use `next/image` → YouTube (9 minutes). ## Usage import Image from 'next/image' You can then define the `src` for your image (either local or remote). ### Local Images To use a local image, `import` your `.jpg`, `.png`, or `.webp` image files. Next.js will automatically determine the `width` and `height` of your image based on the imported file. These values are used to prevent Cumulative Layout Shift while your image is loading. import Image from 'next/image' import profilePic from './me.png' export default function Page() { return ( <Image src={profilePic} alt="Picture of the author" // width={500} automatically provided // height={500} automatically provided // blurDataURL="data:..." automatically provided // placeholder="blur" // Optional blur-up while loading /> ) } > **Warning:** Dynamic `await import()` or `require()` are _not_ supported. The `import` must be static so it can be analyzed at build time. You can optionally configure `localPatterns` in your `next.config.js` file in order to allow specific images and block all others. module.exports = { images: { localPatterns: [ { pathname: '/assets/images/**', search: '', }, ], }, } ### Remote Images To use a remote image, the `src` property should be a URL string. Since Next.js does not have access to remote files during the build process, you'll need to provide the `width`, `height` and optional `blurDataURL` props manually. The `width` and `height` attributes are used to infer the correct aspect ratio of image and avoid layout shift from the image loading in. The `width` and `height` do _not_ determine the rendered size of the image file. Learn more about Image Sizing. import Image from 'next/image' export default function Page() { return ( <Image src="https://s3.amazonaws.com/my-bucket/profile.png" alt="Picture of the author" width={500} height={500} /> ) } To safely allow optimizing images, define a list of supported URL patterns in `next.config.js`. Be as specific as possible to prevent malicious usage. For example, the following configuration will only allow images from a specific AWS S3 bucket: module.exports = { images: { remotePatterns: [ { protocol: 'https', hostname: 's3.amazonaws.com', port: '', pathname: '/my-bucket/**', search: '', }, ], }, } Learn more about `remotePatterns` configuration. If you want to use relative URLs for the image `src`, use a `loader`. ### Domains Sometimes you may want to optimize a remote image, but still use the built-in Next.js Image Optimization API. To do this, leave the `loader` at its default setting and enter an absolute URL for the Image `src` prop. To protect your application from malicious users, you must define a list of remote hostnames you intend to use with the `next/image` component. > Learn more about `remotePatterns` configuration. ### Loaders Note that in the example earlier, a partial URL (`"/me.png"`) is provided for a local image. This is possible because of the loader architecture. A loader is a function that generates the URLs for your image. It modifies the provided `src`, and generates multiple URLs to request the image at different sizes. These multiple URLs are used in the automatic srcset generation, so that visitors to your site will be served an image that is the right size for their viewport. The default loader for Next.js applications uses the built-in Image Optimization API, which optimizes images from anywhere on the web, and then serves them directly from the Next.js web server. If you would like to serve your images directly from a CDN or image server, you can write your own loader function with a few lines of JavaScript. You can define a loader per-image with the `loader` prop, or at the application level with the `loaderFile` configuration. ## Priority You should add the `priority` property to the image that will be the Largest Contentful Paint (LCP) element for each page. Doing so allows Next.js to specially prioritize the image for loading (e.g. through preload tags or priority hints), leading to a meaningful boost in LCP. The LCP element is typically the largest image or text block visible within the viewport of the page. When you run `next dev`, you'll see a console warning if the LCP element is an `<Image>` without the `priority` property. Once you've identified the LCP image, you can add the property like this: import Image from 'next/image' import profilePic from '../public/me.png' export default function Page() { return <Image src={profilePic} alt="Picture of the author" priority /> } See more about priority in the `next/image` component documentation. ## Image Sizing One of the ways that images most commonly hurt performance is through _layout shift_, where the image pushes other elements around on the page as it loads in. This performance problem is so annoying to users that it has its own Core Web Vital, called Cumulative Layout Shift. The way to avoid image-based layout shifts is to always size your images. This allows the browser to reserve precisely enough space for the image before it loads. Because `next/image` is designed to guarantee good performance results, it cannot be used in a way that will contribute to layout shift, and **must** be sized in one of three ways: 1. Automatically, using a static import 2. Explicitly, by including a `width` and `height` property 3. Implicitly, by using fill which causes the image to expand to fill its parent element. > **What if I don't know the size of my images?** > > If you are accessing images from a source without knowledge of the images' sizes, there are several things you can do: > > **Use `fill`** > > The `fill` prop allows your image to be sized by its parent element. Consider using CSS to give the image's parent element space on the page along `sizes` prop to match any media query break points. You can also use `object-fit` with `fill`, `contain`, or `cover`, and `object-position` to define how the image should occupy that space. > > **Normalize your images** > > If you're serving images from a source that you control, consider modifying your image pipeline to normalize the images to a specific size. > > **Modify your API calls** > > If your application is retrieving image URLs using an API call (such as to a CMS), you may be able to modify the API call to return the image dimensions along with the URL. If none of the suggested methods works for sizing your images, the `next/image` component is designed to work well on a page alongside standard `<img>` elements. ## Styling Styling the Image component is similar to styling a normal `<img>` element, but there are a few guidelines to keep in mind: * Use `className` or `style`, not `styled-jsx`. * In most cases, we recommend using the `className` prop. This can be an imported CSS Module, a global stylesheet, etc. * You can also use the `style` prop to assign inline styles. * You cannot use styled-jsx because it's scoped to the current component (unless you mark the style as `global`). * When using `fill`, the parent element must have `position: relative` * This is necessary for the proper rendering of the image element in that layout mode. * When using `fill`, the parent element must have `display: block` * This is the default for `<div>` elements but should be specified otherwise. ## Examples ### Responsive  import Image from 'next/image' import mountains from '../public/mountains.jpg' export default function Responsive() { return ( <div style={{ display: 'flex', flexDirection: 'column' }}> <Image alt="Mountains" // Importing an image will // automatically set the width and height src={mountains} sizes="100vw" // Make the image display full width style={{ width: '100%', height: 'auto', }} /> </div> ) } ### Fill Container  import Image from 'next/image' import mountains from '../public/mountains.jpg' export default function Fill() { return ( <div style={{ display: 'grid', gridGap: '8px', gridTemplateColumns: 'repeat(auto-fit, minmax(400px, auto))', }} > <div style={{ position: 'relative', height: '400px' }}> <Image alt="Mountains" src={mountains} fill sizes="(min-width: 808px) 50vw, 100vw" style={{ objectFit: 'cover', // cover, contain, none }} /> </div> {/* And more images in the grid... */} </div> ) } ### Background Image  import Image from 'next/image' import mountains from '../public/mountains.jpg' export default function Background() { return ( <Image alt="Mountains" src={mountains} placeholder="blur" quality={100} fill sizes="100vw" style={{ objectFit: 'cover', }} /> ) } For examples of the Image component used with the various styles, see the Image Component Demo. ## Other Properties **View all properties available to the `next/image` component.** ## Configuration The `next/image` component and Next.js Image Optimization API can be configured in the `next.config.js` file. These configurations allow you to enable remote images, define custom image breakpoints, change caching behavior and more. **Read the full image configuration documentation for more information.** --- ## Page: https://nextjs.org/docs/14/app/building-your-application/optimizing/videos ## Video Optimization This page outlines how to use videos with Next.js applications, showing how to store and display video files without affecting performance. ## Using `<video>` and `<iframe>` Videos can be embedded on the page using the HTML **`<video>`** tag for direct video files and **`<iframe>`** for external platform-hosted videos. ### `<video>` The HTML `<video>` tag can embed self-hosted or directly served video content, allowing full control over the playback and appearance. export function Video() { return ( <video width="320" height="240" controls preload="none"> <source src="/path/to/video.mp4" type="video/mp4" /> <track src="/path/to/captions.vtt" kind="subtitles" srcLang="en" label="English" /> Your browser does not support the video tag. </video> ) } ### Common `<video>` tag attributes | Attribute | Description | Example Value | | --- | --- | --- | | `src` | Specifies the source of the video file. | `<video src="/path/to/video.mp4" />` | | `width` | Sets the width of the video player. | `<video width="320" />` | | `height` | Sets the height of the video player. | `<video height="240" />` | | `controls` | If present, it displays the default set of playback controls. | `<video controls />` | | `autoPlay` | Automatically starts playing the video when the page loads. Note: Autoplay policies vary across browsers. | `<video autoPlay />` | | `loop` | Loops the video playback. | `<video loop />` | | `muted` | Mutes the audio by default. Often used with `autoPlay`. | `<video muted />` | | `preload` | Specifies how the video is preloaded. Values: `none`, `metadata`, `auto`. | `<video preload="none" />` | | `playsInline` | Enables inline playback on iOS devices, often necessary for autoplay to work on iOS Safari. | `<video playsInline />` | > **Good to know**: When using the `autoPlay` attribute, it is important to also include the `muted` attribute to ensure the video plays automatically in most browsers and the `playsInline` attribute for compatibility with iOS devices. For a comprehensive list of video attributes, refer to the MDN documentation. ### Video best practices * **Fallback Content:** When using the `<video>` tag, include fallback content inside the tag for browsers that do not support video playback. * **Subtitles or Captions:** Include subtitles or captions for users who are deaf or hard of hearing. Utilize the `<track>` tag with your `<video>` elements to specify caption file sources. * **Accessible Controls:** Standard HTML5 video controls are recommended for keyboard navigation and screen reader compatibility. For advanced needs, consider third-party players like react-player or video.js, which offer accessible controls and consistent browser experience. ### `<iframe>` The HTML `<iframe>` tag allows you to embed videos from external platforms like YouTube or Vimeo. export default function Page() { return ( <iframe src="https://www.youtube.com/watch?v=gfU1iZnjRZM" frameborder="0" allowfullscreen /> ) } ### Common `<iframe>` tag attributes | Attribute | Description | Example Value | | --- | --- | --- | | `src` | The URL of the page to embed. | `<iframe src="https://example.com" />` | | `width` | Sets the width of the iframe. | `<iframe width="500" />` | | `height` | Sets the height of the iframe. | `<iframe height="300" />` | | `frameborder` | Specifies whether or not to display a border around the iframe. | `<iframe frameborder="0" />` | | `allowfullscreen` | Allows the iframe content to be displayed in full-screen mode. | `<iframe allowfullscreen />` | | `sandbox` | Enables an extra set of restrictions on the content within the iframe. | `<iframe sandbox />` | | `loading` | Optimize loading behavior (e.g., lazy loading). | `<iframe loading="lazy" />` | | `title` | Provides a title for the iframe to support accessibility. | `<iframe title="Description" />` | For a comprehensive list of iframe attributes, refer to the MDN documentation. ### Choosing a video embedding method There are two ways you can embed videos in your Next.js application: * **Self-hosted or direct video files:** Embed self-hosted videos using the `<video>` tag for scenarios requiring detailed control over the player's functionality and appearance. This integration method within Next.js allows for customization and control of your video content. * **Using video hosting services (YouTube, Vimeo, etc.):** For video hosting services like YouTube or Vimeo, you'll embed their iframe-based players using the `<iframe>` tag. While this method limits some control over the player, it offers ease of use and features provided by these platforms. Choose the embedding method that aligns with your application's requirements and the user experience you aim to deliver. ### Embedding externally hosted videos To embed videos from external platforms, you can use Next.js to fetch the video information and React Suspense to handle the fallback state while loading. **1\. Create a Server Component for video embedding** The first step is to create a Server Component that generates the appropriate iframe for embedding the video. This component will fetch the source URL for the video and render the iframe. export default async function VideoComponent() { const src = await getVideoSrc() return <iframe src={src} frameborder="0" allowfullscreen /> } **2\. Stream the video component using React Suspense** After creating the Server Component to embed the video, the next step is to stream the component using React Suspense. import { Suspense } from 'react' import VideoComponent from '../ui/VideoComponent.jsx' export default function Page() { return ( <section> <Suspense fallback={<p>Loading video...</p>}> <VideoComponent /> </Suspense> {/* Other content of the page */} </section> ) } > **Good to know**: When embedding videos from external platforms, consider the following best practices: > > * Ensure the video embeds are responsive. Use CSS to make the iframe or video player adapt to different screen sizes. > * Implement strategies for loading videos based on network conditions, especially for users with limited data plans. This approach results in a better user experience as it prevents the page from blocking, meaning the user can interact with the page while the video component streams in. For a more engaging and informative loading experience, consider using a loading skeleton as the fallback UI. So instead of showing a simple loading message, you can show a skeleton that resembles the video player like this: import { Suspense } from 'react' import VideoComponent from '../ui/VideoComponent.jsx' import VideoSkeleton from '../ui/VideoSkeleton.jsx' export default function Page() { return ( <section> <Suspense fallback={<VideoSkeleton />}> <VideoComponent /> </Suspense> {/* Other content of the page */} </section> ) } ## Self-hosted videos Self-hosting videos may be preferable for several reasons: * **Complete control and independence**: Self-hosting gives you direct management over your video content, from playback to appearance, ensuring full ownership and control, free from external platform constraints. * **Customization for specific needs**: Ideal for unique requirements, like dynamic background videos, it allows for tailored customization to align with design and functional needs. * **Performance and scalability considerations**: Choose storage solutions that are both high-performing and scalable, to support increasing traffic and content size effectively. * **Cost and integration**: Balance the costs of storage and bandwidth with the need for easy integration into your Next.js framework and broader tech ecosystem. ### Using Vercel Blob for video hosting Vercel Blob offers an efficient way to host videos, providing a scalable cloud storage solution that works well with Next.js. Here's how you can host a video using Vercel Blob: **1\. Uploading a video to Vercel Blob** In your Vercel dashboard, navigate to the "Storage" tab and select your Vercel Blob store. In the Blob table's upper-right corner, find and click the "Upload" button. Then, choose the video file you wish to upload. After the upload completes, the video file will appear in the Blob table. Alternatively, you can upload your video using a server action. For detailed instructions, refer to the Vercel documentation on server-side uploads. Vercel also supports client-side uploads. This method may be preferable for certain use cases. **2\. Displaying the video in Next.js** Once the video is uploaded and stored, you can display it in your Next.js application. Here's an example of how to do this using the `<video>` tag and React Suspense: import { Suspense } from 'react' import { list } from '@vercel/blob' export default function Page() { return ( <Suspense fallback={<p>Loading video...</p>}> <VideoComponent fileName="my-video.mp4" /> </Suspense> ) } async function VideoComponent({ fileName }) { const { blobs } = await list({ prefix: fileName, limit: 1, }) const { url } = blobs[0] return ( <video controls preload="none" aria-label="Video player"> <source src={url} type="video/mp4" /> Your browser does not support the video tag. </video> ) } In this approach, the page uses the video's `@vercel/blob` URL to display the video using the `VideoComponent`. React Suspense is used to show a fallback until the video URL is fetched and the video is ready to be displayed. ### Adding subtitles to your video If you have subtitles for your video, you can easily add them using the `<track>` element inside your `<video>` tag. You can fetch the subtitle file from Vercel Blob in a similar way as the video file. Here's how you can update the `<VideoComponent>` to include subtitles. async function VideoComponent({ fileName }) { const {blobs} = await list({ prefix: fileName, limit: 2 }); const { url } = blobs[0]; const { url: captionsUrl } = blobs[1]; return ( <video controls preload="none" aria-label="Video player"> <source src={url} type="video/mp4" /> <track src={captionsUrl} kind="subtitles" srcLang="en" label="English"> Your browser does not support the video tag. </video> ); }; By following this approach, you can effectively self-host and integrate videos into your Next.js applications. ## Resources To continue learning more about video optimization and best practices, please refer to the following resources: * **Understanding video formats and codecs**: Choose the right format and codec, like MP4 for compatibility or WebM for web optimization, for your video needs. For more details, see Mozilla's guide on video codecs. * **Video compression**: Use tools like FFmpeg to effectively compress videos, balancing quality with file size. Learn about compression techniques at FFmpeg's official website. * **Resolution and bitrate adjustment**: Adjust resolution and bitrate based on the viewing platform, with lower settings for mobile devices. * **Content Delivery Networks (CDNs)**: Utilize a CDN to enhance video delivery speed and manage high traffic. When using some storage solutions, such as Vercel Blob, CDN functionality is automatically handled for you. Learn more about CDNs and their benefits. Explore these video streaming platforms for integrating video into your Next.js projects: ### Open source `next-video` component * Provides a `<Video>` component for Next.js, compatible with various hosting services including Vercel Blob, S3, Backblaze, and Mux. * Detailed documentation for using `next-video.dev` with different hosting services. ### Cloudinary Integration * Official documentation and integration guide for using Cloudinary with Next.js. * Includes a `<CldVideoPlayer>` component for drop-in video support. * Find examples of integrating Cloudinary with Next.js including Adaptive Bitrate Streaming. * Other Cloudinary libraries including a Node.js SDK are also available. ### Mux Video API * Mux provides a starter template for creating a video course with Mux and Next.js. * Learn about Mux's recommendations for embedding high-performance video for your Next.js application. * Explore an example project demonstrating Mux with Next.js. ### Fastly * Learn more about integrating Fastly's solutions for video on demand and streaming media into Next.js. --- ## Page: https://nextjs.org/docs/14/app/building-your-application/optimizing/fonts ## Font Optimization **`next/font`** will automatically optimize your fonts (including custom fonts) and remove external network requests for improved privacy and performance. > **🎥 Watch:** Learn more about using `next/font` → YouTube (6 minutes). `next/font` includes **built-in automatic self-hosting** for _any_ font file. This means you can optimally load web fonts with zero layout shift, thanks to the underlying CSS `size-adjust` property used. This new font system also allows you to conveniently use all Google Fonts with performance and privacy in mind. CSS and font files are downloaded at build time and self-hosted with the rest of your static assets. **No requests are sent to Google by the browser.** ## Google Fonts Automatically self-host any Google Font. Fonts are included in the deployment and served from the same domain as your deployment. **No requests are sent to Google by the browser.** Get started by importing the font you would like to use from `next/font/google` as a function. We recommend using variable fonts for the best performance and flexibility. import { Inter } from 'next/font/google' // If loading a variable font, you don't need to specify the font weight const inter = Inter({ subsets: ['latin'], display: 'swap', }) export default function RootLayout({ children, }: { children: React.ReactNode }) { return ( <html lang="en" className={inter.className}> <body>{children}</body> </html> ) } If you can't use a variable font, you will **need to specify a weight**: import { Roboto } from 'next/font/google' const roboto = Roboto({ weight: '400', subsets: ['latin'], display: 'swap', }) export default function RootLayout({ children, }: { children: React.ReactNode }) { return ( <html lang="en" className={roboto.className}> <body>{children}</body> </html> ) } You can specify multiple weights and/or styles by using an array: const roboto = Roboto({ weight: ['400', '700'], style: ['normal', 'italic'], subsets: ['latin'], display: 'swap', }) > **Good to know**: Use an underscore (\_) for font names with multiple words. E.g. `Roboto Mono` should be imported as `Roboto_Mono`. ### Specifying a subset Google Fonts are automatically subset. This reduces the size of the font file and improves performance. You'll need to define which of these subsets you want to preload. Failing to specify any subsets while `preload` is `true` will result in a warning. This can be done by adding it to the function call: const inter = Inter({ subsets: ['latin'] }) View the Font API Reference for more information. ### Using Multiple Fonts You can import and use multiple fonts in your application. There are two approaches you can take. The first approach is to create a utility function that exports a font, imports it, and applies its `className` where needed. This ensures the font is preloaded only when it's rendered: import { Inter, Roboto_Mono } from 'next/font/google' export const inter = Inter({ subsets: ['latin'], display: 'swap', }) export const roboto_mono = Roboto_Mono({ subsets: ['latin'], display: 'swap', }) import { inter } from './fonts' export default function Layout({ children }: { children: React.ReactNode }) { return ( <html lang="en" className={inter.className}> <body> <div>{children}</div> </body> </html> ) } import { roboto_mono } from './fonts' export default function Page() { return ( <> <h1 className={roboto_mono.className}>My page</h1> </> ) } In the example above, `Inter` will be applied globally, and `Roboto Mono` can be imported and applied as needed. Alternatively, you can create a CSS variable and use it with your preferred CSS solution: import { Inter, Roboto_Mono } from 'next/font/google' import styles from './global.css' const inter = Inter({ subsets: ['latin'], variable: '--font-inter', display: 'swap', }) const roboto_mono = Roboto_Mono({ subsets: ['latin'], variable: '--font-roboto-mono', display: 'swap', }) export default function RootLayout({ children, }: { children: React.ReactNode }) { return ( <html lang="en" className={`${inter.variable} ${roboto_mono.variable}`}> <body> <h1>My App</h1> <div>{children}</div> </body> </html> ) } html { font-family: var(--font-inter); } h1 { font-family: var(--font-roboto-mono); } In the example above, `Inter` will be applied globally, and any `<h1>` tags will be styled with `Roboto Mono`. > **Recommendation**: Use multiple fonts conservatively since each new font is an additional resource the client has to download. ## Local Fonts Import `next/font/local` and specify the `src` of your local font file. We recommend using variable fonts for the best performance and flexibility. import localFont from 'next/font/local' // Font files can be colocated inside of `app` const myFont = localFont({ src: './my-font.woff2', display: 'swap', }) export default function RootLayout({ children, }: { children: React.ReactNode }) { return ( <html lang="en" className={myFont.className}> <body>{children}</body> </html> ) } If you want to use multiple files for a single font family, `src` can be an array: const roboto = localFont({ src: [ { path: './Roboto-Regular.woff2', weight: '400', style: 'normal', }, { path: './Roboto-Italic.woff2', weight: '400', style: 'italic', }, { path: './Roboto-Bold.woff2', weight: '700', style: 'normal', }, { path: './Roboto-BoldItalic.woff2', weight: '700', style: 'italic', }, ], }) View the Font API Reference for more information. ## With Tailwind CSS `next/font` can be used with Tailwind CSS through a CSS variable. In the example below, we use the font `Inter` from `next/font/google` (you can use any font from Google or Local Fonts). Load your font with the `variable` option to define your CSS variable name and assign it to `inter`. Then, use `inter.variable` to add the CSS variable to your HTML document. import { Inter, Roboto_Mono } from 'next/font/google' const inter = Inter({ subsets: ['latin'], display: 'swap', variable: '--font-inter', }) const roboto_mono = Roboto_Mono({ subsets: ['latin'], display: 'swap', variable: '--font-roboto-mono', }) export default function RootLayout({ children, }: { children: React.ReactNode }) { return ( <html lang="en" className={`${inter.variable} ${roboto_mono.variable}`}> <body>{children}</body> </html> ) } Finally, add the CSS variable to your Tailwind CSS config: /** @type {import('tailwindcss').Config} */ module.exports = { content: [ './pages/**/*.{js,ts,jsx,tsx}', './components/**/*.{js,ts,jsx,tsx}', './app/**/*.{js,ts,jsx,tsx}', ], theme: { extend: { fontFamily: { sans: ['var(--font-inter)'], mono: ['var(--font-roboto-mono)'], }, }, }, plugins: [], } You can now use the `font-sans` and `font-mono` utility classes to apply the font to your elements. ## Preloading When a font function is called on a page of your site, it is not globally available and preloaded on all routes. Rather, the font is only preloaded on the related routes based on the type of file where it is used: * If it's a unique page, it is preloaded on the unique route for that page. * If it's a layout, it is preloaded on all the routes wrapped by the layout. * If it's the root layout, it is preloaded on all routes. ## Reusing fonts Every time you call the `localFont` or Google font function, that font is hosted as one instance in your application. Therefore, if you load the same font function in multiple files, multiple instances of the same font are hosted. In this situation, it is recommended to do the following: * Call the font loader function in one shared file * Export it as a constant * Import the constant in each file where you would like to use this font --- ## Page: https://nextjs.org/docs/14/app/building-your-application/optimizing/metadata Next.js has a Metadata API that can be used to define your application metadata (e.g. `meta` and `link` tags inside your HTML `head` element) for improved SEO and web shareability. There are two ways you can add metadata to your application: * **Config-based Metadata**: Export a static `metadata` object or a dynamic `generateMetadata` function in a `layout.js` or `page.js` file. * **File-based Metadata**: Add static or dynamically generated special files to route segments. With both these options, Next.js will automatically generate the relevant `<head>` elements for your pages. You can also create dynamic OG images using the `ImageResponse` constructor. To define static metadata, export a `Metadata` object from a `layout.js` or static `page.js` file. import type { Metadata } from 'next' export const metadata: Metadata = { title: '...', description: '...', } export default function Page() {} For all the available options, see the API Reference. You can use `generateMetadata` function to `fetch` metadata that requires dynamic values. import type { Metadata, ResolvingMetadata } from 'next' type Props = { params: { id: string } searchParams: { [key: string]: string | string[] | undefined } } export async function generateMetadata( { params, searchParams }: Props, parent: ResolvingMetadata ): Promise<Metadata> { // read route params const id = params.id // fetch data const product = await fetch(`https://.../${id}`).then((res) => res.json()) // optionally access and extend (rather than replace) parent metadata const previousImages = (await parent).openGraph?.images || [] return { title: product.title, openGraph: { images: ['/some-specific-page-image.jpg', ...previousImages], }, } } export default function Page({ params, searchParams }: Props) {} For all the available params, see the API Reference. > **Good to know**: > > * Both static and dynamic metadata through `generateMetadata` are **only supported in Server Components**. > * `fetch` requests are automatically memoized for the same data across `generateMetadata`, `generateStaticParams`, Layouts, Pages, and Server Components. React `cache` can be used if `fetch` is unavailable. > * Next.js will wait for data fetching inside `generateMetadata` to complete before streaming UI to the client. This guarantees the first part of a streamed response includes `<head>` tags. These special files are available for metadata: * favicon.ico, apple-icon.jpg, and icon.jpg * opengraph-image.jpg and twitter-image.jpg * robots.txt * sitemap.xml You can use these for static metadata, or you can programmatically generate these files with code. For implementation and examples, see the Metadata Files API Reference and Dynamic Image Generation. ## Behavior File-based metadata has the higher priority and will override any config-based metadata. ### Default Fields There are two default `meta` tags that are always added even if a route doesn't define metadata: * The meta charset tag sets the character encoding for the website. * The meta viewport tag sets the viewport width and scale for the website to adjust for different devices. <meta charset="utf-8" /> <meta name="viewport" content="width=device-width, initial-scale=1" /> > **Good to know**: You can overwrite the default `viewport` meta tag. ### Ordering Metadata is evaluated in order, starting from the root segment down to the segment closest to the final `page.js` segment. For example: 1. `app/layout.tsx` (Root Layout) 2. `app/blog/layout.tsx` (Nested Blog Layout) 3. `app/blog/[slug]/page.tsx` (Blog Page) ### Merging Following the evaluation order, Metadata objects exported from multiple segments in the same route are **shallowly** merged together to form the final metadata output of a route. Duplicate keys are **replaced** based on their ordering. This means metadata with nested fields such as `openGraph` and `robots` that are defined in an earlier segment are **overwritten** by the last segment to define them. #### Overwriting fields export const metadata = { title: 'Acme', openGraph: { title: 'Acme', description: 'Acme is a...', }, } export const metadata = { title: 'Blog', openGraph: { title: 'Blog', }, } // Output: // <title>Blog</title> // <meta property="og:title" content="Blog" /> In the example above: * `title` from `app/layout.js` is **replaced** by `title` in `app/blog/page.js`. * All `openGraph` fields from `app/layout.js` are **replaced** in `app/blog/page.js` because `app/blog/page.js` sets `openGraph` metadata. Note the absence of `openGraph.description`. If you'd like to share some nested fields between segments while overwriting others, you can pull them out into a separate variable: export const openGraphImage = { images: ['http://...'] } import { openGraphImage } from './shared-metadata' export const metadata = { openGraph: { ...openGraphImage, title: 'Home', }, } import { openGraphImage } from '../shared-metadata' export const metadata = { openGraph: { ...openGraphImage, title: 'About', }, } In the example above, the OG image is shared between `app/layout.js` and `app/about/page.js` while the titles are different. #### Inheriting fields export const metadata = { title: 'Acme', openGraph: { title: 'Acme', description: 'Acme is a...', }, } export const metadata = { title: 'About', } // Output: // <title>About</title> // <meta property="og:title" content="Acme" /> // <meta property="og:description" content="Acme is a..." /> **Notes** * `title` from `app/layout.js` is **replaced** by `title` in `app/about/page.js`. * All `openGraph` fields from `app/layout.js` are **inherited** in `app/about/page.js` because `app/about/page.js` doesn't set `openGraph` metadata. ## Dynamic Image Generation The `ImageResponse` constructor allows you to generate dynamic images using JSX and CSS. This is useful for creating social media images such as Open Graph images, Twitter cards, and more. `ImageResponse` uses the Edge Runtime, and Next.js automatically adds the correct headers to cached images at the edge, helping improve performance and reducing recomputation. To use it, you can import `ImageResponse` from `next/og`: import { ImageResponse } from 'next/og' export const runtime = 'edge' export async function GET() { return new ImageResponse( ( <div style={{ fontSize: 128, background: 'white', width: '100%', height: '100%', display: 'flex', textAlign: 'center', alignItems: 'center', justifyContent: 'center', }} > Hello world! </div> ), { width: 1200, height: 600, } ) } `ImageResponse` integrates well with other Next.js APIs, including Route Handlers and file-based Metadata. For example, you can use `ImageResponse` in a `opengraph-image.tsx` file to generate Open Graph images at build time or dynamically at request time. `ImageResponse` supports common CSS properties including flexbox and absolute positioning, custom fonts, text wrapping, centering, and nested images. See the full list of supported CSS properties. > **Good to know**: > > * Examples are available in the Vercel OG Playground. > * `ImageResponse` uses @vercel/og, Satori, and Resvg to convert HTML and CSS into PNG. > * Only the Edge Runtime is supported. The default Node.js runtime will not work. > * Only flexbox and a subset of CSS properties are supported. Advanced layouts (e.g. `display: grid`) will not work. > * Maximum bundle size of `500KB`. The bundle size includes your JSX, CSS, fonts, images, and any other assets. If you exceed the limit, consider reducing the size of any assets or fetching at runtime. > * Only `ttf`, `otf`, and `woff` font formats are supported. To maximize the font parsing speed, `ttf` or `otf` are preferred over `woff`. ## JSON-LD JSON-LD is a format for structured data that can be used by search engines to understand your content. For example, you can use it to describe a person, an event, an organization, a movie, a book, a recipe, and many other types of entities. Our current recommendation for JSON-LD is to render structured data as a `<script>` tag in your `layout.js` or `page.js` components. For example: export default async function Page({ params }) { const product = await getProduct(params.id) const jsonLd = { '@context': 'https://schema.org', '@type': 'Product', name: product.name, image: product.image, description: product.description, } return ( <section> {/* Add JSON-LD to your page */} <script type="application/ld+json" dangerouslySetInnerHTML={{ __html: JSON.stringify(jsonLd) }} /> {/* ... */} </section> ) } You can validate and test your structured data with the Rich Results Test for Google or the generic Schema Markup Validator. You can type your JSON-LD with TypeScript using community packages like `schema-dts`: import { Product, WithContext } from 'schema-dts' const jsonLd: WithContext<Product> = { '@context': 'https://schema.org', '@type': 'Product', name: 'Next.js Sticker', image: 'https://nextjs.org/imgs/sticker.png', description: 'Dynamic at the speed of static.', } --- ## Page: https://nextjs.org/docs/14/app/building-your-application/optimizing/scripts ## Script Optimization ### Layout Scripts To load a third-party script for multiple routes, import `next/script` and include the script directly in your layout component: import Script from 'next/script' export default function DashboardLayout({ children, }: { children: React.ReactNode }) { return ( <> <section>{children}</section> <Script src="https://example.com/script.js" /> </> ) } The third-party script is fetched when the folder route (e.g. `dashboard/page.js`) or any nested route (e.g. `dashboard/settings/page.js`) is accessed by the user. Next.js will ensure the script will **only load once**, even if a user navigates between multiple routes in the same layout. ### Application Scripts To load a third-party script for all routes, import `next/script` and include the script directly in your root layout: import Script from 'next/script' export default function RootLayout({ children, }: { children: React.ReactNode }) { return ( <html lang="en"> <body>{children}</body> <Script src="https://example.com/script.js" /> </html> ) } This script will load and execute when _any_ route in your application is accessed. Next.js will ensure the script will **only load once**, even if a user navigates between multiple pages. > **Recommendation**: We recommend only including third-party scripts in specific pages or layouts in order to minimize any unnecessary impact to performance. ### Strategy Although the default behavior of `next/script` allows you to load third-party scripts in any page or layout, you can fine-tune its loading behavior by using the `strategy` property: * `beforeInteractive`: Load the script before any Next.js code and before any page hydration occurs. * `afterInteractive`: (**default**) Load the script early but after some hydration on the page occurs. * `lazyOnload`: Load the script later during browser idle time. * `worker`: (experimental) Load the script in a web worker. Refer to the `next/script` API reference documentation to learn more about each strategy and their use cases. ### Offloading Scripts To A Web Worker (Experimental) > **Warning:** The `worker` strategy is not yet stable and does not yet work with the `app` directory. Use with caution. Scripts that use the `worker` strategy are offloaded and executed in a web worker with Partytown. This can improve the performance of your site by dedicating the main thread to the rest of your application code. This strategy is still experimental and can only be used if the `nextScriptWorkers` flag is enabled in `next.config.js`: module.exports = { experimental: { nextScriptWorkers: true, }, } Then, run `next` (normally `npm run dev` or `yarn dev`) and Next.js will guide you through the installation of the required packages to finish the setup: npm run dev You'll see instructions like these: Please install Partytown by running `npm install @builder.io/partytown` Once setup is complete, defining `strategy="worker"` will automatically instantiate Partytown in your application and offload the script to a web worker. import Script from 'next/script' export default function Home() { return ( <> <Script src="https://example.com/script.js" strategy="worker" /> </> ) } There are a number of trade-offs that need to be considered when loading a third-party script in a web worker. Please see Partytown's tradeoffs documentation for more information. ### Inline Scripts Inline scripts, or scripts not loaded from an external file, are also supported by the Script component. They can be written by placing the JavaScript within curly braces: <Script id="show-banner"> {`document.getElementById('banner').classList.remove('hidden')`} </Script> Or by using the `dangerouslySetInnerHTML` property: <Script id="show-banner" dangerouslySetInnerHTML={{ __html: `document.getElementById('banner').classList.remove('hidden')`, }} /> > **Warning**: An `id` property must be assigned for inline scripts in order for Next.js to track and optimize the script. ### Executing Additional Code Event handlers can be used with the Script component to execute additional code after a certain event occurs: * `onLoad`: Execute code after the script has finished loading. * `onReady`: Execute code after the script has finished loading and every time the component is mounted. * `onError`: Execute code if the script fails to load. These handlers will only work when `next/script` is imported and used inside of a Client Component where `"use client"` is defined as the first line of code: 'use client' import Script from 'next/script' export default function Page() { return ( <> <Script src="https://example.com/script.js" onLoad={() => { console.log('Script has loaded') }} /> </> ) } Refer to the `next/script` API reference to learn more about each event handler and view examples. ### Additional Attributes There are many DOM attributes that can be assigned to a `<script>` element that are not used by the Script component, like `nonce` or custom data attributes. Including any additional attributes will automatically forward it to the final, optimized `<script>` element that is included in the HTML. import Script from 'next/script' export default function Page() { return ( <> <Script src="https://example.com/script.js" id="example-script" nonce="XUENAJFW" data-test="script" /> </> ) } --- ## Page: https://nextjs.org/docs/14/app/building-your-application/optimizing/bundle-analyzer You are currently viewing documentation for version 14 of Next.js. `@next/bundle-analyzer` is a plugin for Next.js that helps you manage the size of your JavaScript modules. It generates a visual report of the size of each module and their dependencies. You can use the information to remove large dependencies, split your code, or only load some parts when needed, reducing the amount of data transferred to the client. ## Installation Install the plugin by running the following command: npm i @next/bundle-analyzer # or yarn add @next/bundle-analyzer # or pnpm add @next/bundle-analyzer Then, add the bundle analyzer's settings to your `next.config.js`. next.config.js const withBundleAnalyzer = require('@next/bundle-analyzer')({ enabled: process.env.ANALYZE === 'true', }) /** @type {import('next').NextConfig} */ const nextConfig = {} module.exports = withBundleAnalyzer(nextConfig) ## Analyzing your bundles Run the following command to analyze your bundles: ANALYZE=true npm run build # or ANALYZE=true yarn build # or ANALYZE=true pnpm build The report will open three new tabs in your browser, which you can inspect. Doing this regularly while you develop and before deploying your site can help you identify large bundles earlier, and architect your application to be more performant. --- ## Page: https://nextjs.org/docs/14/app/building-your-application/optimizing/lazy-loading Lazy loading in Next.js helps improve the initial loading performance of an application by decreasing the amount of JavaScript needed to render a route. It allows you to defer loading of **Client Components** and imported libraries, and only include them in the client bundle when they're needed. For example, you might want to defer loading a modal until a user clicks to open it. There are two ways you can implement lazy loading in Next.js: 1. Using Dynamic Imports with `next/dynamic` 2. Using `React.lazy()` with Suspense By default, Server Components are automatically code split, and you can use streaming to progressively send pieces of UI from the server to the client. Lazy loading applies to Client Components. ## `next/dynamic` `next/dynamic` is a composite of `React.lazy()` and Suspense. It behaves the same way in the `app` and `pages` directories to allow for incremental migration. ## Examples ### Importing Client Components 'use client' import { useState } from 'react' import dynamic from 'next/dynamic' // Client Components: const ComponentA = dynamic(() => import('../components/A')) const ComponentB = dynamic(() => import('../components/B')) const ComponentC = dynamic(() => import('../components/C'), { ssr: false }) export default function ClientComponentExample() { const [showMore, setShowMore] = useState(false) return ( <div> {/* Load immediately, but in a separate client bundle */} <ComponentA /> {/* Load on demand, only when/if the condition is met */} {showMore && <ComponentB />} <button onClick={() => setShowMore(!showMore)}>Toggle</button> {/* Load only on the client side */} <ComponentC /> </div> ) } ### Skipping SSR When using `React.lazy()` and Suspense, Client Components will be pre-rendered (SSR) by default. If you want to disable pre-rendering for a Client Component, you can use the `ssr` option set to `false`: const ComponentC = dynamic(() => import('../components/C'), { ssr: false }) ### Importing Server Components If you dynamically import a Server Component, only the Client Components that are children of the Server Component will be lazy-loaded - not the Server Component itself. import dynamic from 'next/dynamic' // Server Component: const ServerComponent = dynamic(() => import('../components/ServerComponent')) export default function ServerComponentExample() { return ( <div> <ServerComponent /> </div> ) } ### Loading External Libraries External libraries can be loaded on demand using the `import()` function. This example uses the external library `fuse.js` for fuzzy search. The module is only loaded on the client after the user types in the search input. 'use client' import { useState } from 'react' const names = ['Tim', 'Joe', 'Bel', 'Lee'] export default function Page() { const [results, setResults] = useState() return ( <div> <input type="text" placeholder="Search" onChange={async (e) => { const { value } = e.currentTarget // Dynamically load fuse.js const Fuse = (await import('fuse.js')).default const fuse = new Fuse(names) setResults(fuse.search(value)) }} /> <pre>Results: {JSON.stringify(results, null, 2)}</pre> </div> ) } ### Adding a custom loading component import dynamic from 'next/dynamic' const WithCustomLoading = dynamic( () => import('../components/WithCustomLoading'), { loading: () => <p>Loading...</p>, } ) export default function Page() { return ( <div> {/* The loading component will be rendered while <WithCustomLoading/> is loading */} <WithCustomLoading /> </div> ) } ### Importing Named Exports To dynamically import a named export, you can return it from the Promise returned by `import()` function: 'use client' export function Hello() { return <p>Hello!</p> } import dynamic from 'next/dynamic' const ClientComponent = dynamic(() => import('../components/hello').then((mod) => mod.Hello) ) --- ## Page: https://nextjs.org/docs/14/app/building-your-application/optimizing/analytics Next.js has built-in support for measuring and reporting performance metrics. You can either use the `useReportWebVitals` hook to manage reporting yourself, or alternatively, Vercel provides a managed service to automatically collect and visualize metrics for you. ## Build Your Own 'use client' import { useReportWebVitals } from 'next/web-vitals' export function WebVitals() { useReportWebVitals((metric) => { console.log(metric) }) } import { WebVitals } from './_components/web-vitals' export default function Layout({ children }) { return ( <html> <body> <WebVitals /> {children} </body> </html> ) } > Since the `useReportWebVitals` hook requires the `"use client"` directive, the most performant approach is to create a separate component that the root layout imports. This confines the client boundary exclusively to the `WebVitals` component. View the API Reference for more information. ## Web Vitals Web Vitals are a set of useful metrics that aim to capture the user experience of a web page. The following web vitals are all included: * Time to First Byte (TTFB) * First Contentful Paint (FCP) * Largest Contentful Paint (LCP) * First Input Delay (FID) * Cumulative Layout Shift (CLS) * Interaction to Next Paint (INP) You can handle all the results of these metrics using the `name` property. 'use client' import { useReportWebVitals } from 'next/web-vitals' export function WebVitals() { useReportWebVitals((metric) => { switch (metric.name) { case 'FCP': { // handle FCP results } case 'LCP': { // handle LCP results } // ... } }) } ## Sending results to external systems You can send results to any endpoint to measure and track real user performance on your site. For example: useReportWebVitals((metric) => { const body = JSON.stringify(metric) const url = 'https://example.com/analytics' // Use `navigator.sendBeacon()` if available, falling back to `fetch()`. if (navigator.sendBeacon) { navigator.sendBeacon(url, body) } else { fetch(url, { body, method: 'POST', keepalive: true }) } }) > **Good to know**: If you use Google Analytics, using the `id` value can allow you to construct metric distributions manually (to calculate percentiles, etc.) > useReportWebVitals((metric) => { > // Use `window.gtag` if you initialized Google Analytics as this example: > // https://github.com/vercel/next.js/blob/canary/examples/with-google-analytics/pages/_app.js > window.gtag('event', metric.name, { > value: Math.round( > metric.name === 'CLS' ? metric.value * 1000 : metric.value > ), // values must be integers > event_label: metric.id, // id unique to current page load > non_interaction: true, // avoids affecting bounce rate. > }) > }) > > Read more about sending results to Google Analytics. Was this helpful? supported. --- ## Page: https://nextjs.org/docs/14/app/building-your-application/optimizing/instrumentation Instrumentation is the process of using code to integrate monitoring and logging tools into your application. This allows you to track the performance and behavior of your application, and to debug issues in production. ## Convention To set up instrumentation, create `instrumentation.ts|js` file in the **root directory** of your project (or inside the `src` folder if using one). Then, export a `register` function in the file. This function will be called **once** when a new Next.js server instance is initiated. For example, to use Next.js with OpenTelemetry and @vercel/otel: import { registerOTel } from '@vercel/otel' export function register() { registerOTel('next-app') } See the Next.js with OpenTelemetry example for a complete implementation. > **Good to know** > > * This feature is **experimental**. To use it, you must explicitly opt in by defining `experimental.instrumentationHook = true;` in your `next.config.js`. > * The `instrumentation` file should be in the root of your project and not inside the `app` or `pages` directory. If you're using the `src` folder, then place the file inside `src` alongside `pages` and `app`. > * If you use the `pageExtensions` config option to add a suffix, you will also need to update the `instrumentation` filename to match. ## Examples ### Importing files with side effects Sometimes, it may be useful to import a file in your code because of the side effects it will cause. For example, you might import a file that defines a set of global variables, but never explicitly use the imported file in your code. You would still have access to the global variables the package has declared. We recommend importing files using JavaScript `import` syntax within your `register` function. The following example demonstrates a basic usage of `import` in a `register` function: export async function register() { await import('package-with-side-effect') } > **Good to know:** > > We recommend importing the file from within the `register` function, rather than at the top of the file. By doing this, you can colocate all of your side effects in one place in your code, and avoid any unintended consequences from importing globally at the top of the file. ### Importing runtime-specific code Next.js calls `register` in all environments, so it's important to conditionally import any code that doesn't support specific runtimes (e.g. Edge or Node.js). You can use the `NEXT_RUNTIME` environment variable to get the current environment: export async function register() { if (process.env.NEXT_RUNTIME === 'nodejs') { await import('./instrumentation-node') } if (process.env.NEXT_RUNTIME === 'edge') { await import('./instrumentation-edge') } } --- ## Page: https://nextjs.org/docs/14/app/building-your-application/optimizing/open-telemetry > **Good to know**: This feature is **experimental**, you need to explicitly opt-in by providing `experimental.instrumentationHook = true;` in your `next.config.js`. Observability is crucial for understanding and optimizing the behavior and performance of your Next.js app. As applications become more complex, it becomes increasingly difficult to identify and diagnose issues that may arise. By leveraging observability tools, such as logging and metrics, developers can gain insights into their application's behavior and identify areas for optimization. With observability, developers can proactively address issues before they become major problems and provide a better user experience. Therefore, it is highly recommended to use observability in your Next.js applications to improve performance, optimize resources, and enhance user experience. We recommend using OpenTelemetry for instrumenting your apps. It's a platform-agnostic way to instrument apps that allows you to change your observability provider without changing your code. Read Official OpenTelemetry docs for more information about OpenTelemetry and how it works. This documentation uses terms like _Span_, _Trace_ or _Exporter_ throughout this doc, all of which can be found in the OpenTelemetry Observability Primer. Next.js supports OpenTelemetry instrumentation out of the box, which means that we already instrumented Next.js itself. When you enable OpenTelemetry we will automatically wrap all your code like `getStaticProps` in _spans_ with helpful attributes. ## Getting Started OpenTelemetry is extensible but setting it up properly can be quite verbose. That's why we prepared a package `@vercel/otel` that helps you get started quickly. ### Using `@vercel/otel` To get started, you must install `@vercel/otel`: npm install @vercel/otel Next, create a custom `instrumentation.ts` (or `.js`) file in the **root directory** of the project (or inside `src` folder if using one): import { registerOTel } from '@vercel/otel' export function register() { registerOTel({ serviceName: 'next-app' }) } See the `@vercel/otel` documentation for additional configuration options. > **Good to know** > > * The `instrumentation` file should be in the root of your project and not inside the `app` or `pages` directory. If you're using the `src` folder, then place the file inside `src` alongside `pages` and `app`. > * If you use the `pageExtensions` config option to add a suffix, you will also need to update the `instrumentation` filename to match. > * We have created a basic with-opentelemetry example that you can use. ### Manual OpenTelemetry configuration The `@vercel/otel` package provides many configuration options and should serve most of common use cases. But if it doesn't suit your needs, you can configure OpenTelemetry manually. Firstly you need to install OpenTelemetry packages: npm install @opentelemetry/sdk-node @opentelemetry/resources @opentelemetry/semantic-conventions @opentelemetry/sdk-trace-node @opentelemetry/exporter-trace-otlp-http Now you can initialize `NodeSDK` in your `instrumentation.ts`. Unlike `@vercel/otel`, `NodeSDK` is not compatible with edge runtime, so you need to make sure that you are importing them only when `process.env.NEXT_RUNTIME === 'nodejs'`. We recommend creating a new file `instrumentation.node.ts` which you conditionally import only when using node: export async function register() { if (process.env.NEXT_RUNTIME === 'nodejs') { await import('./instrumentation.node.ts') } } import { NodeSDK } from '@opentelemetry/sdk-node' import { OTLPTraceExporter } from '@opentelemetry/exporter-trace-otlp-http' import { Resource } from '@opentelemetry/resources' import { SEMRESATTRS_SERVICE_NAME } from '@opentelemetry/semantic-conventions' import { SimpleSpanProcessor } from '@opentelemetry/sdk-trace-node' const sdk = new NodeSDK({ resource: new Resource({ [SEMRESATTRS_SERVICE_NAME]: 'next-app', }), spanProcessor: new SimpleSpanProcessor(new OTLPTraceExporter()), }) sdk.start() Doing this is equivalent to using `@vercel/otel`, but it's possible to modify and extend some features that are not exposed by the `@vercel/otel`. If edge runtime support is necessary, you will have to use `@vercel/otel`. ## Testing your instrumentation You need an OpenTelemetry collector with a compatible backend to test OpenTelemetry traces locally. We recommend using our OpenTelemetry dev environment. If everything works well you should be able to see the root server span labeled as `GET /requested/pathname`. All other spans from that particular trace will be nested under it. Next.js traces more spans than are emitted by default. To see more spans, you must set `NEXT_OTEL_VERBOSE=1`. ## Deployment ### Using OpenTelemetry Collector When you are deploying with OpenTelemetry Collector, you can use `@vercel/otel`. It will work both on Vercel and when self-hosted. #### Deploying on Vercel We made sure that OpenTelemetry works out of the box on Vercel. Follow Vercel documentation to connect your project to an observability provider. #### Self-hosting Deploying to other platforms is also straightforward. You will need to spin up your own OpenTelemetry Collector to receive and process the telemetry data from your Next.js app. To do this, follow the OpenTelemetry Collector Getting Started guide, which will walk you through setting up the collector and configuring it to receive data from your Next.js app. Once you have your collector up and running, you can deploy your Next.js app to your chosen platform following their respective deployment guides. ### Custom Exporters OpenTelemetry Collector is not necessary. You can use a custom OpenTelemetry exporter with `@vercel/otel` or manual OpenTelemetry configuration. ## Custom Spans You can add a custom span with OpenTelemetry APIs. npm install @opentelemetry/api The following example demonstrates a function that fetches GitHub stars and adds a custom `fetchGithubStars` span to track the fetch request's result: import { trace } from '@opentelemetry/api' export async function fetchGithubStars() { return await trace .getTracer('nextjs-example') .startActiveSpan('fetchGithubStars', async (span) => { try { return await getValue() } finally { span.end() } }) } The `register` function will execute before your code runs in a new environment. You can start creating new spans, and they should be correctly added to the exported trace. ## Default Spans in Next.js Next.js automatically instruments several spans for you to provide useful insights into your application's performance. Attributes on spans follow OpenTelemetry semantic conventions. We also add some custom attributes under the `next` namespace: * `next.span_name` - duplicates span name * `next.span_type` - each span type has a unique identifier * `next.route` - The route pattern of the request (e.g., `/[param]/user`). * `next.rsc` (true/false) - Whether the request is an RSC request, such as prefetch. * `next.page` * This is an internal value used by an app router. * You can think about it as a route to a special file (like `page.ts`, `layout.ts`, `loading.ts` and others) * It can be used as a unique identifier only when paired with `next.route` because `/layout` can be used to identify both `/(groupA)/layout.ts` and `/(groupB)/layout.ts` ### `[http.method] [next.route]` * `next.span_type`: `BaseServer.handleRequest` This span represents the root span for each incoming request to your Next.js application. It tracks the HTTP method, route, target, and status code of the request. Attributes: * Common HTTP attributes * `http.method` * `http.status_code` * Server HTTP attributes * `http.route` * `http.target` * `next.span_name` * `next.span_type` * `next.route` ### `render route (app) [next.route]` * `next.span_type`: `AppRender.getBodyResult`. This span represents the process of rendering a route in the app router. Attributes: * `next.span_name` * `next.span_type` * `next.route` ### `fetch [http.method] [http.url]` * `next.span_type`: `AppRender.fetch` This span represents the fetch request executed in your code. Attributes: * Common HTTP attributes * `http.method` * Client HTTP attributes * `http.url` * `net.peer.name` * `net.peer.port` (only if specified) * `next.span_name` * `next.span_type` This span can be turned off by setting `NEXT_OTEL_FETCH_DISABLED=1` in your environment. This is useful when you want to use a custom fetch instrumentation library. ### `executing api route (app) [next.route]` * `next.span_type`: `AppRouteRouteHandlers.runHandler`. This span represents the execution of an API route handler in the app router. Attributes: * `next.span_name` * `next.span_type` * `next.route` ### `getServerSideProps [next.route]` * `next.span_type`: `Render.getServerSideProps`. This span represents the execution of `getServerSideProps` for a specific route. Attributes: * `next.span_name` * `next.span_type` * `next.route` ### `getStaticProps [next.route]` * `next.span_type`: `Render.getStaticProps`. This span represents the execution of `getStaticProps` for a specific route. Attributes: * `next.span_name` * `next.span_type` * `next.route` ### `render route (pages) [next.route]` * `next.span_type`: `Render.renderDocument`. This span represents the process of rendering the document for a specific route. Attributes: * `next.span_name` * `next.span_type` * `next.route` ### `generateMetadata [next.page]` * `next.span_type`: `ResolveMetadata.generateMetadata`. This span represents the process of generating metadata for a specific page (a single route can have multiple of these spans). Attributes: * `next.span_name` * `next.span_type` * `next.page` ### `resolve page components` * `next.span_type`: `NextNodeServer.findPageComponents`. This span represents the process of resolving page components for a specific page. Attributes: * `next.span_name` * `next.span_type` * `next.route` ### `resolve segment modules` * `next.span_type`: `NextNodeServer.getLayoutOrPageModule`. This span represents loading of code modules for a layout or a page. Attributes: * `next.span_name` * `next.span_type` * `next.segment` ### `start response` * `next.span_type`: `NextNodeServer.startResponse`. This zero-length span represents the time when the first byte has been sent in the response. --- ## Page: https://nextjs.org/docs/14/app/building-your-application/optimizing/static-assets You are currently viewing documentation for version 14 of Next.js. ## Static Assets in \`public\` Next.js can serve static files, like images, under a folder called `public` in the root directory. Files inside `public` can then be referenced by your code starting from the base URL (`/`). For example, the file `public/avatars/me.png` can be viewed by visiting the `/avatars/me.png` path. The code to display that image might look like: avatar.js import Image from 'next/image' export function Avatar({ id, alt }) { return <Image src={`/avatars/${id}.png`} alt={alt} width="64" height="64" /> } export function AvatarOfMe() { return <Avatar id="me" alt="A portrait of me" /> } ## Caching Next.js cannot safely cache assets in the `public` folder because they may change. The default caching headers applied are: Cache-Control: public, max-age=0 ## Robots, Favicons, and others For static metadata files, such as `robots.txt`, `favicon.ico`, etc, you should use special metadata files inside the `app` folder. > Good to know: > > * The directory must be named `public`. The name cannot be changed and it's the only directory used to serve static assets. > * Only assets that are in the `public` directory at build time will be served by Next.js. Files added at request time won't be available. We recommend using a third-party service like Vercel Blob for persistent file storage. --- ## Page: https://nextjs.org/docs/14/app/building-your-application/optimizing/third-party-libraries **`@next/third-parties`** is a library that provides a collection of components and utilities that improve the performance and developer experience of loading popular third-party libraries in your Next.js application. All third-party integrations provided by `@next/third-parties` have been optimized for performance and ease of use. ## Getting Started To get started, install the `@next/third-parties` library: npm install @next/third-parties@latest next@latest `@next/third-parties` is currently an **experimental** library under active development. We recommend installing it with the **latest** or **canary** flags while we work on adding more third-party integrations. ## Google Third-Parties All supported third-party libraries from Google can be imported from `@next/third-parties/google`. ### Google Tag Manager The `GoogleTagManager` component can be used to instantiate a Google Tag Manager container to your page. By default, it fetches the original inline script after hydration occurs on the page. To load Google Tag Manager for all routes, include the component directly in your root layout and pass in your GTM container ID: import { GoogleTagManager } from '@next/third-parties/google' export default function RootLayout({ children, }: { children: React.ReactNode }) { return ( <html lang="en"> <GoogleTagManager gtmId="GTM-XYZ" /> <body>{children}</body> </html> ) } To load Google Tag Manager for a single route, include the component in your page file: import { GoogleTagManager } from '@next/third-parties/google' export default function Page() { return <GoogleTagManager gtmId="GTM-XYZ" /> } #### Sending Events The `sendGTMEvent` function can be used to track user interactions on your page by sending events using the `dataLayer` object. For this function to work, the `<GoogleTagManager />` component must be included in either a parent layout, page, or component, or directly in the same file. 'use client' import { sendGTMEvent } from '@next/third-parties/google' export function EventButton() { return ( <div> <button onClick={() => sendGTMEvent({ event: 'buttonClicked', value: 'xyz' })} > Send Event </button> </div> ) } Refer to the Tag Manager developer documentation to learn about the different variables and events that can be passed into the function. #### Options Options to pass to the Google Tag Manager. For a full list of options, read the Google Tag Manager docs. | Name | Type | Description | | --- | --- | --- | | `gtmId` | Required | Your GTM container ID. Usually starts with `GTM-`. | | `dataLayer` | Optional | Data layer array to instantiate the container with. Defaults to an empty array. | | `dataLayerName` | Optional | Name of the data layer. Defaults to `dataLayer`. | | `auth` | Optional | Value of authentication parameter (`gtm_auth`) for environment snippets. | | `preview` | Optional | Value of preview parameter (`gtm_preview`) for environment snippets. | ### Google Analytics The `GoogleAnalytics` component can be used to include Google Analytics 4 to your page via the Google tag (`gtag.js`). By default, it fetches the original scripts after hydration occurs on the page. > **Recommendation**: If Google Tag Manager is already included in your application, you can configure Google Analytics directly using it, rather than including Google Analytics as a separate component. Refer to the documentation to learn more about the differences between Tag Manager and `gtag.js`. To load Google Analytics for all routes, include the component directly in your root layout and pass in your measurement ID: import { GoogleAnalytics } from '@next/third-parties/google' export default function RootLayout({ children, }: { children: React.ReactNode }) { return ( <html lang="en"> <body>{children}</body> <GoogleAnalytics gaId="G-XYZ" /> </html> ) } To load Google Analytics for a single route, include the component in your page file: import { GoogleAnalytics } from '@next/third-parties/google' export default function Page() { return <GoogleAnalytics gaId="G-XYZ" /> } #### Sending Events The `sendGAEvent` function can be used to measure user interactions on your page by sending events using the `dataLayer` object. For this function to work, the `<GoogleAnalytics />` component must be included in either a parent layout, page, or component, or directly in the same file. 'use client' import { sendGAEvent } from '@next/third-parties/google' export function EventButton() { return ( <div> <button onClick={() => sendGAEvent({ event: 'buttonClicked', value: 'xyz' })} > Send Event </button> </div> ) } Refer to the Google Analytics developer documentation to learn more about event parameters. #### Tracking Pageviews Google Analytics automatically tracks pageviews when the browser history state changes. This means that client-side navigations between Next.js routes will send pageview data without any configuration. To ensure that client-side navigations are being measured correctly, verify that the _“Enhanced Measurement”_ property is enabled in your Admin panel and the _“Page changes based on browser history events”_ checkbox is selected. > **Note**: If you decide to manually send pageview events, make sure to disable the default pageview measurement to avoid having duplicate data. Refer to the Google Analytics developer documentation to learn more. #### Options Options to pass to the `<GoogleAnalytics>` component. | Name | Type | Description | | --- | --- | --- | | `gaId` | Required | Your measurement ID. Usually starts with `G-`. | | `dataLayerName` | Optional | Name of the data layer. Defaults to `dataLayer`. | ### Google Maps Embed The `GoogleMapsEmbed` component can be used to add a Google Maps Embed to your page. By default, it uses the `loading` attribute to lazy-load the embed below the fold. import { GoogleMapsEmbed } from '@next/third-parties/google' export default function Page() { return ( <GoogleMapsEmbed apiKey="XYZ" height={200} width="100%" mode="place" q="Brooklyn+Bridge,New+York,NY" /> ) } #### Options Options to pass to the Google Maps Embed. For a full list of options, read the Google Map Embed docs. | Name | Type | Description | | --- | --- | --- | | `apiKey` | Required | Your api key. | | `mode` | Required | Map mode | | `height` | Optional | Height of the embed. Defaults to `auto`. | | `width` | Optional | Width of the embed. Defaults to `auto`. | | `style` | Optional | Pass styles to the iframe. | | `allowfullscreen` | Optional | Property to allow certain map parts to go full screen. | | `loading` | Optional | Defaults to lazy. Consider changing if you know your embed will be above the fold. | | `q` | Optional | Defines map marker location. _This may be required depending on the map mode_. | | `center` | Optional | Defines the center of the map view. | | `zoom` | Optional | Sets initial zoom level of the map. | | `maptype` | Optional | Defines type of map tiles to load. | | `language` | Optional | Defines the language to use for UI elements and for the display of labels on map tiles. | | `region` | Optional | Defines the appropriate borders and labels to display, based on geo-political sensitivities. | ### YouTube Embed The `YouTubeEmbed` component can be used to load and display a YouTube embed. This component loads faster by using `lite-youtube-embed` under the hood. import { YouTubeEmbed } from '@next/third-parties/google' export default function Page() { return <YouTubeEmbed videoid="ogfYd705cRs" height={400} params="controls=0" /> } #### Options | Name | Type | Description | | --- | --- | --- | | `videoid` | Required | YouTube video id. | | `width` | Optional | Width of the video container. Defaults to `auto` | | `height` | Optional | Height of the video container. Defaults to `auto` | | `playlabel` | Optional | A visually hidden label for the play button for accessibility. | | `params` | Optional | The video player params defined here. Params are passed as a query param string. Eg: `params="controls=0&start=10&end=30"` | | `style` | Optional | Used to apply styles to the video container. | --- ## Page: https://nextjs.org/docs/14/app/building-your-application/optimizing/memory-usage As applications grow and become more feature rich, they can demand more resources when developing locally or creating production builds. Let's explore some strategies and techniques to optimize memory and address common memory issues in Next.js. ## Reduce number of dependencies Applications with a large amount of dependencies will use more memory. The Bundle Analyzer can help you investigate large dependencies in your application that may be able to be removed to improve performance and memory usage. ## Run `next build` with `--experimental-debug-memory-usage` Starting in `14.2.0`, you can run `next build --experimental-debug-memory-usage` to run the build in a mode where Next.js will print out information about memory usage continuously throughout the build, such as heap usage and garbage collection statistics. Heap snapshots will also be taken automatically when memory usage gets close to the configured limit. > **Good to know**: This feature is not compatible with the Webpack build worker option which is auto-enabled unless you have custom webpack config. ## Record a heap profile To look for memory issues, you can record a heap profile from Node.js and load it in Chrome DevTools to identify potential sources of memory leaks. In your terminal, pass the `--heap-prof` flag to Node.js when starting your Next.js build: node --heap-prof node_modules/next/dist/bin/next build At the end of the build, a `.heapprofile` file will be created by Node.js. In Chrome DevTools, you can open the Memory tab and click on the "Load Profile" button to visualize the file. ## Analyze a snapshot of the heap You can use an inspector tool to analyze the memory usage of the application. When running the `next build` or `next dev` command, add `NODE_OPTIONS=--inspect` to the beginning of the command. This will expose the inspector agent on the default port. If you wish to break before any user code starts, you can pass `--inspect-brk` instead. While the process is running, you can use a tool such as Chrome DevTools to connect to the debugging port to record and analyze a snapshot of the heap to see what memory is being retained. Starting in `14.2.0`, you can also run `next build` with the `--experimental-debug-memory-usage` flag to make it easier to take heap snapshots. While running in this mode, you can send a `SIGUSR2` signal to the process at any point, and the process will take a heap snapshot. The heap snapshot will be saved to the project root of the Next.js application and can be loaded in any heap analyzer, such as Chrome DevTools, to see what memory is retained. This mode is not yet compatible with Webpack build workers. See how to record and analyze heap snapshots for more information. ## Webpack build worker The Webpack build worker allows you to run Webpack compilations inside a separate Node.js worker which will decrease memory usage of your application during builds. This option is enabled by default if your application does not have a custom Webpack configuration starting in `v14.1.0`. If you are using an older version of Next.js or you have a custom Webpack configuration, you can enable this option by setting `experimental.webpackBuildWorker: true` inside your `next.config.js`. > **Good to know**: This feature may not be compatible with all custom Webpack plugins. ## Disable Webpack cache The Webpack cache saves generated Webpack modules in memory and/or to disk to improve the speed of builds. This can help with performance, but it will also increase the memory usage of your application to store the cached data. You can disable this behavior by adding a custom Webpack configuration to your application: /** @type {import('next').NextConfig} */ const nextConfig = { webpack: ( config, { buildId, dev, isServer, defaultLoaders, nextRuntime, webpack } ) => { if (config.cache && !dev) { config.cache = Object.freeze({ type: 'memory', }) } // Important: return the modified config return config }, } export default nextConfig ## Disable source maps Generating source maps consumes extra memory during the build process. You can disable source map generation by adding `productionBrowserSourceMaps: false` and `experimental.serverSourceMaps: false` to your Next.js configuration. > **Good to know**: Some plugins may turn on source maps and may require custom configuration to disable. ## Edge memory issues Next.js `v14.1.3` fixed a memory issue when using the Edge runtime. Please update to this version (or later) to see if it addresses your issue. --- ## Page: https://nextjs.org/docs/14/app/building-your-application/configuring You are currently viewing documentation for version 14 of Next.js. Next.js allows you to customize your project to meet specific requirements. This includes integrations with TypeScript, ESlint, and more, as well as internal configuration options such as Absolute Imports and Environment Variables. --- ## Page: https://nextjs.org/docs/14/app/building-your-application/configuring/typescript Next.js provides a TypeScript-first development experience for building your React application. It comes with built-in TypeScript support for automatically installing the necessary packages and configuring the proper settings. As well as a TypeScript Plugin for your editor. > **🎥 Watch:** Learn about the built-in TypeScript plugin → YouTube (3 minutes) ## New Projects `create-next-app` now ships with TypeScript by default. npx create-next-app@latest ## Existing Projects Add TypeScript to your project by renaming a file to `.ts` / `.tsx`. Run `next dev` and `next build` to automatically install the necessary dependencies and add a `tsconfig.json` file with the recommended config options. If you already had a `jsconfig.json` file, copy the `paths` compiler option from the old `jsconfig.json` into the new `tsconfig.json` file, and delete the old `jsconfig.json` file. ## TypeScript Plugin Next.js includes a custom TypeScript plugin and type checker, which VSCode and other code editors can use for advanced type-checking and auto-completion. You can enable the plugin in VS Code by: 1. Opening the command palette (`Ctrl/⌘` + `Shift` + `P`) 2. Searching for "TypeScript: Select TypeScript Version" 3. Selecting "Use Workspace Version"  Now, when editing files, the custom plugin will be enabled. When running `next build`, the custom type checker will be used. ### Plugin Features The TypeScript plugin can help with: * Warning if the invalid values for segment config options are passed. * Showing available options and in-context documentation. * Ensuring the `use client` directive is used correctly. * Ensuring client hooks (like `useState`) are only used in Client Components. > **Good to know**: More features will be added in the future. ## Minimum TypeScript Version It is highly recommended to be on at least `v4.5.2` of TypeScript to get syntax features such as type modifiers on import names and performance improvements. ## Statically Typed Links Next.js can statically type links to prevent typos and other errors when using `next/link`, improving type safety when navigating between pages. To opt-into this feature, `experimental.typedRoutes` need to be enabled and the project needs to be using TypeScript. /** @type {import('next').NextConfig} */ const nextConfig = { experimental: { typedRoutes: true, }, } module.exports = nextConfig Next.js will generate a link definition in `.next/types` that contains information about all existing routes in your application, which TypeScript can then use to provide feedback in your editor about invalid links. Currently, experimental support includes any string literal, including dynamic segments. For non-literal strings, you currently need to manually cast the `href` with `as Route`: import type { Route } from 'next'; import Link from 'next/link' // No TypeScript errors if href is a valid route <Link href="/about" /> <Link href="/blog/nextjs" /> <Link href={`/blog/${slug}`} /> <Link href={('/blog' + slug) as Route} /> // TypeScript errors if href is not a valid route <Link href="/aboot" /> To accept `href` in a custom component wrapping `next/link`, use a generic: import type { Route } from 'next' import Link from 'next/link' function Card<T extends string>({ href }: { href: Route<T> | URL }) { return ( <Link href={href}> <div>My Card</div> </Link> ) } > **How does it work?** > > When running `next dev` or `next build`, Next.js generates a hidden `.d.ts` file inside `.next` that contains information about all existing routes in your application (all valid routes as the `href` type of `Link`). This `.d.ts` file is included in `tsconfig.json` and the TypeScript compiler will check that `.d.ts` and provide feedback in your editor about invalid links. ## End-to-End Type Safety The Next.js App Router has **enhanced type safety**. This includes: 1. **No serialization of data between fetching function and page**: You can `fetch` directly in components, layouts, and pages on the server. This data _does not_ need to be serialized (converted to a string) to be passed to the client side for consumption in React. Instead, since `app` uses Server Components by default, we can use values like `Date`, `Map`, `Set`, and more without any extra steps. Previously, you needed to manually type the boundary between server and client with Next.js-specific types. 2. **Streamlined data flow between components**: With the removal of `_app` in favor of root layouts, it is now easier to visualize the data flow between components and pages. Previously, data flowing between individual `pages` and `_app` were difficult to type and could introduce confusing bugs. With colocated data fetching in the App Router, this is no longer an issue. Data Fetching in Next.js now provides as close to end-to-end type safety as possible without being prescriptive about your database or content provider selection. We're able to type the response data as you would expect with normal TypeScript. For example: async function getData() { const res = await fetch('https://api.example.com/...') // The return value is *not* serialized // You can return Date, Map, Set, etc. return res.json() } export default async function Page() { const name = await getData() return '...' } For _complete_ end-to-end type safety, this also requires your database or content provider to support TypeScript. This could be through using an ORM or type-safe query builder. ## Async Server Component TypeScript Error To use an `async` Server Component with TypeScript, ensure you are using TypeScript `5.1.3` or higher and `@types/react` `18.2.8` or higher. If you are using an older version of TypeScript, you may see a `'Promise<Element>' is not a valid JSX element` type error. Updating to the latest version of TypeScript and `@types/react` should resolve this issue. ## Passing Data Between Server & Client Components When passing data between a Server and Client Component through props, the data is still serialized (converted to a string) for use in the browser. However, it does not need a special type. It’s typed the same as passing any other props between components. Further, there is less code to be serialized, as un-rendered data does not cross between the server and client (it remains on the server). This is only now possible through support for Server Components. ## Path aliases and baseUrl Next.js automatically supports the `tsconfig.json` `"paths"` and `"baseUrl"` options. You can learn more about this feature on the Module Path aliases documentation. ## Type checking next.config.js The `next.config.js` file must be a JavaScript file as it does not get parsed by Babel or TypeScript, however you can add some type checking in your IDE using JSDoc as below: // @ts-check /** * @type {import('next').NextConfig} **/ const nextConfig = { /* config options here */ } module.exports = nextConfig ## Incremental type checking Since `v10.2.1` Next.js supports incremental type checking when enabled in your `tsconfig.json`, this can help speed up type checking in larger applications. ## Ignoring TypeScript Errors Next.js fails your **production build** (`next build`) when TypeScript errors are present in your project. If you'd like Next.js to dangerously produce production code even when your application has errors, you can disable the built-in type checking step. If disabled, be sure you are running type checks as part of your build or deploy process, otherwise this can be very dangerous. Open `next.config.js` and enable the `ignoreBuildErrors` option in the `typescript` config: module.exports = { typescript: { // !! WARN !! // Dangerously allow production builds to successfully complete even if // your project has type errors. // !! WARN !! ignoreBuildErrors: true, }, } ## Custom Type Declarations When you need to declare custom types, you might be tempted to modify `next-env.d.ts`. However, this file is automatically generated, so any changes you make will be overwritten. Instead, you should create a new file, let's call it `new-types.d.ts`, and reference it in your `tsconfig.json`: { "compilerOptions": { "skipLibCheck": true //...truncated... }, "include": [ "new-types.d.ts", "next-env.d.ts", ".next/types/**/*.ts", "**/*.ts", "**/*.tsx" ], "exclude": ["node_modules"] } ## Version Changes | Version | Changes | | --- | --- | | `v13.2.0` | Statically typed links are available in beta. | | `v12.0.0` | SWC is now used by default to compile TypeScript and TSX for faster builds. | | `v10.2.1` | Incremental type checking support added when enabled in your `tsconfig.json`. | --- ## Page: https://nextjs.org/docs/14/app/building-your-application/configuring/eslint Next.js provides an integrated ESLint experience out of the box. Add `next lint` as a script to `package.json`: { "scripts": { "lint": "next lint" } } Then run `npm run lint` or `yarn lint`: yarn lint If you don't already have ESLint configured in your application, you will be guided through the installation and configuration process. yarn lint > You'll see a prompt like this: > > ? How would you like to configure ESLint? > > ❯ Strict (recommended) > Base > Cancel One of the following three options can be selected: * **Strict**: Includes Next.js' base ESLint configuration along with a stricter Core Web Vitals rule-set. This is the recommended configuration for developers setting up ESLint for the first time. { "extends": "next/core-web-vitals" } * **Base**: Includes Next.js' base ESLint configuration. { "extends": "next" } * **Cancel**: Does not include any ESLint configuration. Only select this option if you plan on setting up your own custom ESLint configuration. If either of the two configuration options are selected, Next.js will automatically install `eslint` and `eslint-config-next` as dependencies in your application and create an `.eslintrc.json` file in the root of your project that includes your selected configuration. You can now run `next lint` every time you want to run ESLint to catch errors. Once ESLint has been set up, it will also automatically run during every build (`next build`). Errors will fail the build, while warnings will not. > If you do not want ESLint to run during `next build`, refer to the documentation for Ignoring ESLint. We recommend using an appropriate integration to view warnings and errors directly in your code editor during development. ## ESLint Config The default configuration (`eslint-config-next`) includes everything you need to have an optimal out-of-the-box linting experience in Next.js. If you do not have ESLint already configured in your application, we recommend using `next lint` to set up ESLint along with this configuration. > If you would like to use `eslint-config-next` along with other ESLint configurations, refer to the Additional Configurations section to learn how to do so without causing any conflicts. Recommended rule-sets from the following ESLint plugins are all used within `eslint-config-next`: * `eslint-plugin-react` * `eslint-plugin-react-hooks` * `eslint-plugin-next` This will take precedence over the configuration from `next.config.js`. ## ESLint Plugin Next.js provides an ESLint plugin, `eslint-plugin-next`, already bundled within the base configuration that makes it possible to catch common issues and problems in a Next.js application. The full set of rules is as follows: Enabled in the recommended configuration | | Rule | Description | | --- | --- | --- | | | @next/next/google-font-display | Enforce font-display behavior with Google Fonts. | | | @next/next/google-font-preconnect | Ensure `preconnect` is used with Google Fonts. | | | @next/next/inline-script-id | Enforce `id` attribute on `next/script` components with inline content. | | | @next/next/next-script-for-ga | Prefer `next/script` component when using the inline script for Google Analytics. | | | @next/next/no-assign-module-variable | Prevent assignment to the `module` variable. | | | @next/next/no-async-client-component | Prevent client components from being async functions. | | | @next/next/no-before-interactive-script-outside-document | Prevent usage of `next/script`'s `beforeInteractive` strategy outside of `pages/_document.js`. | | | @next/next/no-css-tags | Prevent manual stylesheet tags. | | | @next/next/no-document-import-in-page | Prevent importing `next/document` outside of `pages/_document.js`. | | | @next/next/no-duplicate-head | Prevent duplicate usage of `<Head>` in `pages/_document.js`. | | | @next/next/no-head-element | Prevent usage of `<head>` element. | | | @next/next/no-head-import-in-document | Prevent usage of `next/head` in `pages/_document.js`. | | | @next/next/no-html-link-for-pages | Prevent usage of `<a>` elements to navigate to internal Next.js pages. | | | @next/next/no-img-element | Prevent usage of `<img>` element due to slower LCP and higher bandwidth. | | | @next/next/no-page-custom-font | Prevent page-only custom fonts. | | | @next/next/no-script-component-in-head | Prevent usage of `next/script` in `next/head` component. | | | @next/next/no-styled-jsx-in-document | Prevent usage of `styled-jsx` in `pages/_document.js`. | | | @next/next/no-sync-scripts | Prevent synchronous scripts. | | | @next/next/no-title-in-document-head | Prevent usage of `<title>` with `Head` component from `next/document`. | | | @next/next/no-typos | Prevent common typos in Next.js's data fetching functions | | | @next/next/no-unwanted-polyfillio | Prevent duplicate polyfills from Polyfill.io. | If you already have ESLint configured in your application, we recommend extending from this plugin directly instead of including `eslint-config-next` unless a few conditions are met. Refer to the Recommended Plugin Ruleset to learn more. ### Custom Settings #### `rootDir` If you're using `eslint-plugin-next` in a project where Next.js isn't installed in your root directory (such as a monorepo), you can tell `eslint-plugin-next` where to find your Next.js application using the `settings` property in your `.eslintrc`: { "extends": "next", "settings": { "next": { "rootDir": "packages/my-app/" } } } `rootDir` can be a path (relative or absolute), a glob (i.e. `"packages/*/"`), or an array of paths and/or globs. ## Linting Custom Directories and Files By default, Next.js will run ESLint for all files in the `pages/`, `app/`, `components/`, `lib/`, and `src/` directories. However, you can specify which directories using the `dirs` option in the `eslint` config in `next.config.js` for production builds: module.exports = { eslint: { dirs: ['pages', 'utils'], // Only run ESLint on the 'pages' and 'utils' directories during production builds (next build) }, } Similarly, the `--dir` and `--file` flags can be used for `next lint` to lint specific directories and files: next lint --dir pages --dir utils --file bar.js ## Caching To improve performance, information of files processed by ESLint are cached by default. This is stored in `.next/cache` or in your defined build directory. If you include any ESLint rules that depend on more than the contents of a single source file and need to disable the cache, use the `--no-cache` flag with `next lint`. next lint --no-cache ## Disabling Rules If you would like to modify or disable any rules provided by the supported plugins (`react`, `react-hooks`, `next`), you can directly change them using the `rules` property in your `.eslintrc`: { "extends": "next", "rules": { "react/no-unescaped-entities": "off", "@next/next/no-page-custom-font": "off" } } ### Core Web Vitals The `next/core-web-vitals` rule set is enabled when `next lint` is run for the first time and the **strict** option is selected. { "extends": "next/core-web-vitals" } `next/core-web-vitals` updates `eslint-plugin-next` to error on a number of rules that are warnings by default if they affect Core Web Vitals. > The `next/core-web-vitals` entry point is automatically included for new applications built with Create Next App. ### TypeScript In addition to the Next.js ESLint rules, `create-next-app --typescript` will also add TypeScript-specific lint rules with `next/typescript` to your config: { "extends": ["next/core-web-vitals", "next/typescript"] } Those rules are based on `plugin:@typescript-eslint/recommended`. See typescript-eslint > Configs for more details. ## Usage With Other Tools ### Prettier ESLint also contains code formatting rules, which can conflict with your existing Prettier setup. We recommend including eslint-config-prettier in your ESLint config to make ESLint and Prettier work together. First, install the dependency: npm install --save-dev eslint-config-prettier yarn add --dev eslint-config-prettier pnpm add --save-dev eslint-config-prettier bun add --dev eslint-config-prettier Then, add `prettier` to your existing ESLint config: { "extends": ["next", "prettier"] } ### lint-staged If you would like to use `next lint` with lint-staged to run the linter on staged git files, you'll have to add the following to the `.lintstagedrc.js` file in the root of your project in order to specify usage of the `--file` flag. const path = require('path') const buildEslintCommand = (filenames) => `next lint --fix --file ${filenames .map((f) => path.relative(process.cwd(), f)) .join(' --file ')}` module.exports = { '*.{js,jsx,ts,tsx}': [buildEslintCommand], } ## Migrating Existing Config ### Recommended Plugin Ruleset If you already have ESLint configured in your application and any of the following conditions are true: * You have one or more of the following plugins already installed (either separately or through a different config such as `airbnb` or `react-app`): * `react` * `react-hooks` * `jsx-a11y` * `import` * You've defined specific `parserOptions` that are different from how Babel is configured within Next.js (this is not recommended unless you have customized your Babel configuration) * You have `eslint-plugin-import` installed with Node.js and/or TypeScript resolvers defined to handle imports Then we recommend either removing these settings if you prefer how these properties have been configured within `eslint-config-next` or extending directly from the Next.js ESLint plugin instead: module.exports = { extends: [ //... 'plugin:@next/next/recommended', ], } The plugin can be installed normally in your project without needing to run `next lint`: npm install --save-dev @next/eslint-plugin-next yarn add --dev @next/eslint-plugin-next pnpm add --save-dev @next/eslint-plugin-next bun add --dev @next/eslint-plugin-next This eliminates the risk of collisions or errors that can occur due to importing the same plugin or parser across multiple configurations. ### Additional Configurations If you already use a separate ESLint configuration and want to include `eslint-config-next`, ensure that it is extended last after other configurations. For example: { "extends": ["eslint:recommended", "next"] } The `next` configuration already handles setting default values for the `parser`, `plugins` and `settings` properties. There is no need to manually re-declare any of these properties unless you need a different configuration for your use case. If you include any other shareable configurations, **you will need to make sure that these properties are not overwritten or modified**. Otherwise, we recommend removing any configurations that share behavior with the `next` configuration or extending directly from the Next.js ESLint plugin as mentioned above. --- ## Page: https://nextjs.org/docs/14/app/building-your-application/configuring/environment-variables Examples * Environment Variables Next.js comes with built-in support for environment variables, which allows you to do the following: * Use `.env.local` to load environment variables * Bundle environment variables for the browser by prefixing with `NEXT_PUBLIC_` ## Loading Environment Variables Next.js has built-in support for loading environment variables from `.env.local` into `process.env`. DB_HOST=localhost DB_USER=myuser DB_PASS=mypassword > **Note**: Next.js also supports multiline variables inside of your `.env*` files: > > # .env.local > > # you can write with line breaks > PRIVATE_KEY="-----BEGIN RSA PRIVATE KEY----- > ... > Kh9NV... > ... > -----END DSA PRIVATE KEY-----" > > # or with `\n` inside double quotes > PRIVATE_KEY="-----BEGIN RSA PRIVATE KEY-----\nKh9NV...\n-----END DSA PRIVATE KEY-----\n" > **Note**: If you are using a `/src` folder, please note that Next.js will load the .env files **only** from the parent folder and **not** from the `/src` folder. This loads `process.env.DB_HOST`, `process.env.DB_USER`, and `process.env.DB_PASS` into the Node.js environment automatically allowing you to use them in Route Handlers. For example: export async function GET() { const db = await myDB.connect({ host: process.env.DB_HOST, username: process.env.DB_USER, password: process.env.DB_PASS, }) // ... } ### Referencing Other Variables Next.js will automatically expand variables that use `$` to reference other variables e.g. `$VARIABLE` inside of your `.env*` files. This allows you to reference other secrets. For example: TWITTER_USER=nextjs TWITTER_URL=https://twitter.com/$TWITTER_USER In the above example, `process.env.TWITTER_URL` would be set to `https://twitter.com/nextjs`. > **Good to know**: If you need to use variable with a `$` in the actual value, it needs to be escaped e.g. `\$`. ## Bundling Environment Variables for the Browser Non-`NEXT_PUBLIC_` environment variables are only available in the Node.js environment, meaning they aren't accessible to the browser (the client runs in a different _environment_). In order to make the value of an environment variable accessible in the browser, Next.js can "inline" a value, at build time, into the js bundle that is delivered to the client, replacing all references to `process.env.[variable]` with a hard-coded value. To tell it to do this, you just have to prefix the variable with `NEXT_PUBLIC_`. For example: NEXT_PUBLIC_ANALYTICS_ID=abcdefghijk This will tell Next.js to replace all references to `process.env.NEXT_PUBLIC_ANALYTICS_ID` in the Node.js environment with the value from the environment in which you run `next build`, allowing you to use it anywhere in your code. It will be inlined into any JavaScript sent to the browser. > **Note**: After being built, your app will no longer respond to changes to these environment variables. For instance, if you use a Heroku pipeline to promote slugs built in one environment to another environment, or if you build and deploy a single Docker image to multiple environments, all `NEXT_PUBLIC_` variables will be frozen with the value evaluated at build time, so these values need to be set appropriately when the project is built. If you need access to runtime environment values, you'll have to setup your own API to provide them to the client (either on demand or during initialization). import setupAnalyticsService from '../lib/my-analytics-service' // 'NEXT_PUBLIC_ANALYTICS_ID' can be used here as it's prefixed by 'NEXT_PUBLIC_'. // It will be transformed at build time to `setupAnalyticsService('abcdefghijk')`. setupAnalyticsService(process.env.NEXT_PUBLIC_ANALYTICS_ID) function HomePage() { return <h1>Hello World</h1> } export default HomePage Note that dynamic lookups will _not_ be inlined, such as: // This will NOT be inlined, because it uses a variable const varName = 'NEXT_PUBLIC_ANALYTICS_ID' setupAnalyticsService(process.env[varName]) // This will NOT be inlined, because it uses a variable const env = process.env setupAnalyticsService(env.NEXT_PUBLIC_ANALYTICS_ID) ### Runtime Environment Variables Next.js can support both build time and runtime environment variables. **By default, environment variables are only available on the server**. To expose an environment variable to the browser, it must be prefixed with `NEXT_PUBLIC_`. However, these public environment variables will be inlined into the JavaScript bundle during `next build`. To read runtime environment variables, we recommend using `getServerSideProps` or incrementally adopting the App Router. With the App Router, we can safely read environment variables on the server during dynamic rendering. This allows you to use a singular Docker image that can be promoted through multiple environments with different values. import { unstable_noStore as noStore } from 'next/cache' export default function Component() { noStore() // cookies(), headers(), and other dynamic functions // will also opt into dynamic rendering, meaning // this env variable is evaluated at runtime const value = process.env.MY_VALUE // ... } **Good to know:** * You can run code on server startup using the `register` function. * We do not recommend using the runtimeConfig option, as this does not work with the standalone output mode. Instead, we recommend incrementally adopting the App Router. ## Default Environment Variables In general only one `.env.local` file is needed. However, sometimes you might want to add some defaults for the `development` (`next dev`) or `production` (`next start`) environment. Next.js allows you to set defaults in `.env` (all environments), `.env.development` (development environment), and `.env.production` (production environment). `.env.local` always overrides the defaults set. > **Good to know**: `.env`, `.env.development`, and `.env.production` files should be included in your repository as they define defaults. **`.env*.local` should be added to `.gitignore`**, as those files are intended to be ignored. `.env.local` is where secrets can be stored. ## Environment Variables on Vercel When deploying your Next.js application to Vercel, Environment Variables can be configured in the Project Settings. All types of Environment Variables should be configured there. Even Environment Variables used in Development – which can be downloaded onto your local device afterwards. If you've configured Development Environment Variables you can pull them into a `.env.local` for usage on your local machine using the following command: vercel env pull .env.local > **Good to know**: When deploying your Next.js application to Vercel, your environment variables in `.env*` files will not be made available to Edge Runtime, unless their name are prefixed with `NEXT_PUBLIC_`. We strongly recommend managing your environment variables in Project Settings instead, from where all environment variables are available. ## Test Environment Variables Apart from `development` and `production` environments, there is a 3rd option available: `test`. In the same way you can set defaults for development or production environments, you can do the same with a `.env.test` file for the `testing` environment (though this one is not as common as the previous two). Next.js will not load environment variables from `.env.development` or `.env.production` in the `testing` environment. This one is useful when running tests with tools like `jest` or `cypress` where you need to set specific environment vars only for testing purposes. Test default values will be loaded if `NODE_ENV` is set to `test`, though you usually don't need to do this manually as testing tools will address it for you. There is a small difference between `test` environment, and both `development` and `production` that you need to bear in mind: `.env.local` won't be loaded, as you expect tests to produce the same results for everyone. This way every test execution will use the same env defaults across different executions by ignoring your `.env.local` (which is intended to override the default set). > **Good to know**: similar to Default Environment Variables, `.env.test` file should be included in your repository, but `.env.test.local` shouldn't, as `.env*.local` are intended to be ignored through `.gitignore`. While running unit tests you can make sure to load your environment variables the same way Next.js does by leveraging the `loadEnvConfig` function from the `@next/env` package. // The below can be used in a Jest global setup file or similar for your testing set-up import { loadEnvConfig } from '@next/env' export default async () => { const projectDir = process.cwd() loadEnvConfig(projectDir) } ## Environment Variable Load Order Environment variables are looked up in the following places, in order, stopping once the variable is found. 1. `process.env` 2. `.env.$(NODE_ENV).local` 3. `.env.local` (Not checked when `NODE_ENV` is `test`.) 4. `.env.$(NODE_ENV)` 5. `.env` For example, if `NODE_ENV` is `development` and you define a variable in both `.env.development.local` and `.env`, the value in `.env.development.local` will be used. > **Good to know**: The allowed values for `NODE_ENV` are `production`, `development` and `test`. ## Good to know * If you are using a `/src` directory, `.env.*` files should remain in the root of your project. * If the environment variable `NODE_ENV` is unassigned, Next.js automatically assigns `development` when running the `next dev` command, or `production` for all other commands. ## Version History | Version | Changes | | --- | --- | | `v9.4.0` | Support `.env` and `NEXT_PUBLIC_` introduced. | --- ## Page: https://nextjs.org/docs/14/app/building-your-application/configuring/absolute-imports-and-module-aliases Examples * Absolute Imports and Aliases Next.js has in-built support for the `"paths"` and `"baseUrl"` options of `tsconfig.json` and `jsconfig.json` files. These options allow you to alias project directories to absolute paths, making it easier to import modules. For example: // before import { Button } from '../../../components/button' // after import { Button } from '@/components/button' > **Good to know**: `create-next-app` will prompt to configure these options for you. ## Absolute Imports The `baseUrl` configuration option allows you to import directly from the root of the project. An example of this configuration: { "compilerOptions": { "baseUrl": "." } } export default function Button() { return <button>Click me</button> } import Button from 'components/button' export default function HomePage() { return ( <> <h1>Hello World</h1> <Button /> </> ) } ## Module Aliases In addition to configuring the `baseUrl` path, you can use the `"paths"` option to "alias" module paths. For example, the following configuration maps `@/components/*` to `components/*`: { "compilerOptions": { "baseUrl": ".", "paths": { "@/components/*": ["components/*"] } } } export default function Button() { return <button>Click me</button> } import Button from '@/components/button' export default function HomePage() { return ( <> <h1>Hello World</h1> <Button /> </> ) } Each of the `"paths"` are relative to the `baseUrl` location. For example: // tsconfig.json or jsconfig.json { "compilerOptions": { "baseUrl": "src/", "paths": { "@/styles/*": ["styles/*"], "@/components/*": ["components/*"] } } } // pages/index.js import Button from '@/components/button' import '@/styles/styles.css' import Helper from 'utils/helper' export default function HomePage() { return ( <Helper> <h1>Hello World</h1> <Button /> </Helper> ) } --- ## Page: https://nextjs.org/docs/14/app/building-your-application/configuring/mdx ## Markdown and MDX Markdown is a lightweight markup language used to format text. It allows you to write using plain text syntax and convert it to structurally valid HTML. It's commonly used for writing content on websites and blogs. You write... I **love** using [Next.js](https://nextjs.org/) Output: <p>I <strong>love</strong> using <a href="https://nextjs.org/">Next.js</a></p> MDX is a superset of markdown that lets you write JSX directly in your markdown files. It is a powerful way to add dynamic interactivity and embed React components within your content. Next.js can support both local MDX content inside your application, as well as remote MDX files fetched dynamically on the server. The Next.js plugin handles transforming markdown and React components into HTML, including support for usage in Server Components (the default in App Router). The `@next/mdx` package is used to configure Next.js so it can process markdown and MDX. **It sources data from local files**, allowing you to create pages with a `.mdx` extension, directly in your `/pages` or `/app` directory. Let's walk through how to configure and use MDX with Next.js. ## Getting Started Install packages needed to render MDX: npm install @next/mdx @mdx-js/loader @mdx-js/react @types/mdx Create a `mdx-components.tsx` file at the root of your application (`src/` or the parent folder of `app/`): > **Good to know**: `mdx-components.tsx` is required to use MDX with App Router and will not work without it. import type { MDXComponents } from 'mdx/types' export function useMDXComponents(components: MDXComponents): MDXComponents { return { ...components, } } Update the `next.config.js` file at your project's root to configure it to use MDX: const withMDX = require('@next/mdx')() /** @type {import('next').NextConfig} */ const nextConfig = { // Configure `pageExtensions` to include MDX files pageExtensions: ['js', 'jsx', 'mdx', 'ts', 'tsx'], // Optionally, add any other Next.js config below } module.exports = withMDX(nextConfig) Then, create a new MDX page within the `/app` directory: your-project ├── app │ └── my-mdx-page │ └── page.mdx └── package.json Now you can use markdown and import React components directly inside your MDX page: import { MyComponent } from 'my-components' # Welcome to my MDX page! This is some **bold** and _italics_ text. This is a list in markdown: - One - Two - Three Checkout my React component: <MyComponent /> Navigating to the `/my-mdx-page` route should display your rendered MDX. ## Remote MDX If your markdown or MDX files or content lives _somewhere else_, you can fetch it dynamically on the server. This is useful for content stored in a separate local folder, CMS, database, or anywhere else. A popular community package for this use is `next-mdx-remote`. > **Good to know**: Please proceed with caution. MDX compiles to JavaScript and is executed on the server. You should only fetch MDX content from a trusted source, otherwise this can lead to remote code execution (RCE). The following example uses `next-mdx-remote`: import { MDXRemote } from 'next-mdx-remote/rsc' export default async function RemoteMdxPage() { // MDX text - can be from a local file, database, CMS, fetch, anywhere... const res = await fetch('https://...') const markdown = await res.text() return <MDXRemote source={markdown} /> } Navigating to the `/my-mdx-page-remote` route should display your rendered MDX. ## Layouts To share a layout across MDX pages, you can use the built-in layouts support with the App Router. export default function MdxLayout({ children }: { children: React.ReactNode }) { // Create any shared layout or styles here return <div style={{ color: 'blue' }}>{children}</div> } ## Remark and Rehype Plugins You can optionally provide `remark` and `rehype` plugins to transform the MDX content. For example, you can use `remark-gfm` to support GitHub Flavored Markdown. Since the `remark` and `rehype` ecosystem is ESM only, you'll need to use `next.config.mjs` as the configuration file. import remarkGfm from 'remark-gfm' import createMDX from '@next/mdx' /** @type {import('next').NextConfig} */ const nextConfig = { // Configure `pageExtensions`` to include MDX files pageExtensions: ['js', 'jsx', 'mdx', 'ts', 'tsx'], // Optionally, add any other Next.js config below } const withMDX = createMDX({ // Add markdown plugins here, as desired options: { remarkPlugins: [remarkGfm], rehypePlugins: [], }, }) // Wrap MDX and Next.js config with each other export default withMDX(nextConfig) ## Frontmatter Frontmatter is a YAML like key/value pairing that can be used to store data about a page. `@next/mdx` does **not** support frontmatter by default, though there are many solutions for adding frontmatter to your MDX content, such as: * remark-frontmatter * remark-mdx-frontmatter * gray-matter. To access page metadata with `@next/mdx`, you can export a metadata object from within the `.mdx` file: export const metadata = { author: 'John Doe', } # My MDX page ## Custom Elements One of the pleasant aspects of using markdown, is that it maps to native `HTML` elements, making writing fast, and intuitive: This is a list in markdown: - One - Two - Three The above generates the following `HTML`: <p>This is a list in markdown:</p> <ul> <li>One</li> <li>Two</li> <li>Three</li> </ul> When you want to style your own elements for a custom feel to your website or application, you can pass in shortcodes. These are your own custom components that map to `HTML` elements. To do this, open the `mdx-components.tsx` file at the root of your application and add custom elements: import type { MDXComponents } from 'mdx/types' import Image, { ImageProps } from 'next/image' // This file allows you to provide custom React components // to be used in MDX files. You can import and use any // React component you want, including inline styles, // components from other libraries, and more. export function useMDXComponents(components: MDXComponents): MDXComponents { return { // Allows customizing built-in components, e.g. to add styling. h1: ({ children }) => <h1 style={{ fontSize: '100px' }}>{children}</h1>, img: (props) => ( <Image sizes="100vw" style={{ width: '100%', height: 'auto' }} {...(props as ImageProps)} /> ), ...components, } } ## Deep Dive: How do you transform markdown into HTML? React does not natively understand markdown. The markdown plaintext needs to first be transformed into HTML. This can be accomplished with `remark` and `rehype`. `remark` is an ecosystem of tools around markdown. `rehype` is the same, but for HTML. For example, the following code snippet transforms markdown into HTML: import { unified } from 'unified' import remarkParse from 'remark-parse' import remarkRehype from 'remark-rehype' import rehypeSanitize from 'rehype-sanitize' import rehypeStringify from 'rehype-stringify' main() async function main() { const file = await unified() .use(remarkParse) // Convert into markdown AST .use(remarkRehype) // Transform to HTML AST .use(rehypeSanitize) // Sanitize HTML input .use(rehypeStringify) // Convert AST into serialized HTML .process('Hello, Next.js!') console.log(String(file)) // <p>Hello, Next.js!</p> } The `remark` and `rehype` ecosystem contains plugins for syntax highlighting, linking headings, generating a table of contents, and more. When using `@next/mdx` as shown above, you **do not** need to use `remark` or `rehype` directly, as it is handled for you. We're describing it here for a deeper understanding of what the `@next/mdx` package is doing underneath. ## Using the Rust-based MDX compiler (Experimental) Next.js supports a new MDX compiler written in Rust. This compiler is still experimental and is not recommended for production use. To use the new compiler, you need to configure `next.config.js` when you pass it to `withMDX`: module.exports = withMDX({ experimental: { mdxRs: true, }, }) ## Helpful Links * MDX * `@next/mdx` * remark * rehype * Markdoc --- ## Page: https://nextjs.org/docs/14/app/building-your-application/configuring/src-directory You are currently viewing documentation for version 14 of Next.js. As an alternative to having the special Next.js `app` or `pages` directories in the root of your project, Next.js also supports the common pattern of placing application code under the `src` directory. This separates application code from project configuration files which mostly live in the root of a project, which is preferred by some individuals and teams. To use the `src` directory, move the `app` Router folder or `pages` Router folder to `src/app` or `src/pages` respectively.  > **Good to know** > > * The `/public` directory should remain in the root of your project. > * Config files like `package.json`, `next.config.js` and `tsconfig.json` should remain in the root of your project. > * `.env.*` files should remain in the root of your project. > * `src/app` or `src/pages` will be ignored if `app` or `pages` are present in the root directory. > * If you're using `src`, you'll probably also move other application folders such as `/components` or `/lib`. > * If you're using Middleware, ensure it is placed inside the `src` directory. > * If you're using Tailwind CSS, you'll need to add the `/src` prefix to the `tailwind.config.js` file in the content section. > * If you are using TypeScript paths for imports such as `@/*`, you should update the `paths` object in `tsconfig.json` to include `src/`. --- ## Page: https://nextjs.org/docs/14/app/building-your-application/configuring/draft-mode Static rendering is useful when your pages fetch data from a headless CMS. However, it’s not ideal when you’re writing a draft on your headless CMS and want to view the draft immediately on your page. You’d want Next.js to render these pages at **request time** instead of build time and fetch the draft content instead of the published content. You’d want Next.js to switch to dynamic rendering only for this specific case. Next.js has a feature called **Draft Mode** which solves this problem. Here are instructions on how to use it. ## Step 1: Create and access the Route Handler First, create a Route Handler. It can have any name - e.g. `app/api/draft/route.ts` Then, import `draftMode` from `next/headers` and call the `enable()` method. // route handler enabling draft mode import { draftMode } from 'next/headers' export async function GET(request: Request) { draftMode().enable() return new Response('Draft mode is enabled') } This will set a **cookie** to enable draft mode. Subsequent requests containing this cookie will trigger **Draft Mode** changing the behavior for statically generated pages (more on this later). You can test this manually by visiting `/api/draft` and looking at your browser’s developer tools. Notice the `Set-Cookie` response header with a cookie named `__prerender_bypass`. ### Securely accessing it from your Headless CMS In practice, you’d want to call this Route Handler _securely_ from your headless CMS. The specific steps will vary depending on which headless CMS you’re using, but here are some common steps you could take. These steps assume that the headless CMS you’re using supports setting **custom draft URLs**. If it doesn’t, you can still use this method to secure your draft URLs, but you’ll need to construct and access the draft URL manually. **First**, you should create a **secret token string** using a token generator of your choice. This secret will only be known by your Next.js app and your headless CMS. This secret prevents people who don’t have access to your CMS from accessing draft URLs. **Second**, if your headless CMS supports setting custom draft URLs, specify the following as the draft URL. This assumes that your Route Handler is located at `app/api/draft/route.ts` https://<your-site>/api/draft?secret=<token>&slug=<path> * `<your-site>` should be your deployment domain. * `<token>` should be replaced with the secret token you generated. * `<path>` should be the path for the page that you want to view. If you want to view `/posts/foo`, then you should use `&slug=/posts/foo`. Your headless CMS might allow you to include a variable in the draft URL so that `<path>` can be set dynamically based on the CMS’s data like so: `&slug=/posts/{entry.fields.slug}` **Finally**, in the Route Handler: * Check that the secret matches and that the `slug` parameter exists (if not, the request should fail). * Call `draftMode.enable()` to set the cookie. * Then redirect the browser to the path specified by `slug`. // route handler with secret and slug import { draftMode } from 'next/headers' import { redirect } from 'next/navigation' export async function GET(request: Request) { // Parse query string parameters const { searchParams } = new URL(request.url) const secret = searchParams.get('secret') const slug = searchParams.get('slug') // Check the secret and next parameters // This secret should only be known to this route handler and the CMS if (secret !== 'MY_SECRET_TOKEN' || !slug) { return new Response('Invalid token', { status: 401 }) } // Fetch the headless CMS to check if the provided `slug` exists // getPostBySlug would implement the required fetching logic to the headless CMS const post = await getPostBySlug(slug) // If the slug doesn't exist prevent draft mode from being enabled if (!post) { return new Response('Invalid slug', { status: 401 }) } // Enable Draft Mode by setting the cookie draftMode().enable() // Redirect to the path from the fetched post // We don't redirect to searchParams.slug as that might lead to open redirect vulnerabilities redirect(post.slug) } If it succeeds, then the browser will be redirected to the path you want to view with the draft mode cookie. ## Step 2: Update page The next step is to update your page to check the value of `draftMode().isEnabled`. If you request a page which has the cookie set, then data will be fetched at **request time** (instead of at build time). Furthermore, the value of `isEnabled` will be `true`. // page that fetches data import { draftMode } from 'next/headers' async function getData() { const { isEnabled } = draftMode() const url = isEnabled ? 'https://draft.example.com' : 'https://production.example.com' const res = await fetch(url) return res.json() } export default async function Page() { const { title, desc } = await getData() return ( <main> <h1>{title}</h1> <p>{desc}</p> </main> ) } That's it! If you access the draft Route Handler (with `secret` and `slug`) from your headless CMS or manually, you should now be able to see the draft content. And if you update your draft without publishing, you should be able to view the draft. Set this as the draft URL on your headless CMS or access manually, and you should be able to see the draft. https://<your-site>/api/draft?secret=<token>&slug=<path> ## More Details ### Clear the Draft Mode cookie By default, the Draft Mode session ends when the browser is closed. To clear the Draft Mode cookie manually, create a Route Handler that calls `draftMode().disable()`: import { draftMode } from 'next/headers' export async function GET(request: Request) { draftMode().disable() return new Response('Draft mode is disabled') } Then, send a request to `/api/disable-draft` to invoke the Route Handler. If calling this route using `next/link`, you must pass `prefetch={false}` to prevent accidentally deleting the cookie on prefetch. ### Unique per `next build` A new bypass cookie value will be generated each time you run `next build`. This ensures that the bypass cookie can’t be guessed. > **Good to know**: To test Draft Mode locally over HTTP, your browser will need to allow third-party cookies and local storage access. --- ## Page: https://nextjs.org/docs/14/app/building-your-application/configuring/content-security-policy Content Security Policy (CSP) is important to guard your Next.js application against various security threats such as cross-site scripting (XSS), clickjacking, and other code injection attacks. By using CSP, developers can specify which origins are permissible for content sources, scripts, stylesheets, images, fonts, objects, media (audio, video), iframes, and more. Examples * Strict CSP ## Nonces A nonce is a unique, random string of characters created for a one-time use. It is used in conjunction with CSP to selectively allow certain inline scripts or styles to execute, bypassing strict CSP directives. ### Why use a nonce? Even though CSPs are designed to block malicious scripts, there are legitimate scenarios where inline scripts are necessary. In such cases, nonces offer a way to allow these scripts to execute if they have the correct nonce. ### Adding a nonce with Middleware Middleware enables you to add headers and generate nonces before the page renders. Every time a page is viewed, a fresh nonce should be generated. This means that you **must use dynamic rendering to add nonces**. For example: import { NextRequest, NextResponse } from 'next/server' export function middleware(request: NextRequest) { const nonce = Buffer.from(crypto.randomUUID()).toString('base64') const cspHeader = ` default-src 'self'; script-src 'self' 'nonce-${nonce}' 'strict-dynamic'; style-src 'self' 'nonce-${nonce}'; img-src 'self' blob: data:; font-src 'self'; object-src 'none'; base-uri 'self'; form-action 'self'; frame-ancestors 'none'; upgrade-insecure-requests; ` // Replace newline characters and spaces const contentSecurityPolicyHeaderValue = cspHeader .replace(/\s{2,}/g, ' ') .trim() const requestHeaders = new Headers(request.headers) requestHeaders.set('x-nonce', nonce) requestHeaders.set( 'Content-Security-Policy', contentSecurityPolicyHeaderValue ) const response = NextResponse.next({ request: { headers: requestHeaders, }, }) response.headers.set( 'Content-Security-Policy', contentSecurityPolicyHeaderValue ) return response } By default, Middleware runs on all requests. You can filter Middleware to run on specific paths using a `matcher`. We recommend ignoring matching prefetches (from `next/link`) and static assets that don't need the CSP header. export const config = { matcher: [ /* * Match all request paths except for the ones starting with: * - api (API routes) * - _next/static (static files) * - _next/image (image optimization files) * - favicon.ico (favicon file) */ { source: '/((?!api|_next/static|_next/image|favicon.ico).*)', missing: [ { type: 'header', key: 'next-router-prefetch' }, { type: 'header', key: 'purpose', value: 'prefetch' }, ], }, ], } ### Reading the nonce You can now read the nonce from a Server Component using `headers`: import { headers } from 'next/headers' import Script from 'next/script' export default function Page() { const nonce = headers().get('x-nonce') return ( <Script src="https://www.googletagmanager.com/gtag/js" strategy="afterInteractive" nonce={nonce} /> ) } ## Without Nonces For applications that do not require nonces, you can set the CSP header directly in your `next.config.js` file: const cspHeader = ` default-src 'self'; script-src 'self' 'unsafe-eval' 'unsafe-inline'; style-src 'self' 'unsafe-inline'; img-src 'self' blob: data:; font-src 'self'; object-src 'none'; base-uri 'self'; form-action 'self'; frame-ancestors 'none'; upgrade-insecure-requests; ` module.exports = { async headers() { return [ { source: '/(.*)', headers: [ { key: 'Content-Security-Policy', value: cspHeader.replace(/\n/g, ''), }, ], }, ] }, } ## Version History We recommend using `v13.4.20+` of Next.js to properly handle and apply nonces. --- ## Page: https://nextjs.org/docs/14/app/building-your-application/testing You are currently viewing documentation for version 14 of Next.js. In React and Next.js, there are a few different types of tests you can write, each with its own purpose and use cases. This page provides an overview of types and commonly used tools you can use to test your application. ## Types of tests * **Unit testing** involves testing individual units (or blocks of code) in isolation. In React, a unit can be a single function, hook, or component. * **Component testing** is a more focused version of unit testing where the primary subject of the tests is React components. This may involve testing how components are rendered, their interaction with props, and their behavior in response to user events. * **Integration testing** involves testing how multiple units work together. This can be a combination of components, hooks, and functions. * **End-to-End (E2E) Testing** involves testing user flows in an environment that simulates real user scenarios, like the browser. This means testing specific tasks (e.g. signup flow) in a production-like environment. * **Snapshot testing** involves capturing the rendered output of a component and saving it to a snapshot file. When tests run, the current rendered output of the component is compared against the saved snapshot. Changes in the snapshot are used to indicate unexpected changes in behavior. ## Async Server Components Since `async` Server Components are new to the React ecosystem, some tools do not fully support them. In the meantime, we recommend using **End-to-End Testing** over **Unit Testing** for `async` components. ## Guides See the guides below to learn how to set up Next.js with these commonly used testing tools: --- ## Page: https://nextjs.org/docs/14/app/building-your-application/testing/vitest ## Setting up Vitest with Next.js Vite and React Testing Library are frequently used together for **Unit Testing**. This guide will show you how to setup Vitest with Next.js and write your first tests. > **Good to know:** Since `async` Server Components are new to the React ecosystem, Vitest currently does not support them. While you can still run **unit tests** for synchronous Server and Client Components, we recommend using an **E2E tests** for `async` components. ## Quickstart You can use `create-next-app` with the Next.js with-vitest example to quickly get started: npx create-next-app@latest --example with-vitest with-vitest-app ## Manual Setup To manually set up Vitest, install `vitest` and the following packages as dev dependencies: npm install -D vitest @vitejs/plugin-react jsdom @testing-library/react # or yarn add -D vitest @vitejs/plugin-react jsdom @testing-library/react # or pnpm install -D vitest @vitejs/plugin-react jsdom @testing-library/react # or bun add -D vitest @vitejs/plugin-react jsdom @testing-library/react Create a `vitest.config.ts|js` file in the root of your project, and add the following options: import { defineConfig } from 'vitest/config' import react from '@vitejs/plugin-react' export default defineConfig({ plugins: [react()], test: { environment: 'jsdom', }, }) For more information on configuring Vitest, please refer to the Vitest Configuration docs. Then, add a `test` script to your `package.json`: { "scripts": { "dev": "next dev", "build": "next build", "start": "next start", "test": "vitest" } } When you run `npm run test`, Vitest will **watch** for changes in your project by default. ## Creating your first Vitest Unit Test Check that everything is working by creating a test to check if the `<Page />` component successfully renders a heading: import Link from 'next/link' export default function Page() { return ( <div> <h1>Home</h1> <Link href="/about">About</Link> </div> ) } import { expect, test } from 'vitest' import { render, screen } from '@testing-library/react' import Page from '../app/page' test('Page', () => { render(<Page />) expect(screen.getByRole('heading', { level: 1, name: 'Home' })).toBeDefined() }) > **Good to know**: The example above uses the common `__tests__` convention, but test files can also be colocated inside the `app` router. ## Running your tests Then, run the following command to run your tests: npm run test # or yarn test # or pnpm test # or bun test ## Additional Resources You may find these resources helpful: * Next.js with Vitest example * Vitest Docs * React Testing Library Docs --- ## Page: https://nextjs.org/docs/14/app/building-your-application/testing/jest ## Setting up Jest with Next.js Jest and React Testing Library are frequently used together for **Unit Testing** and **Snapshot Testing**. This guide will show you how to set up Jest with Next.js and write your first tests. > **Good to know:** Since `async` Server Components are new to the React ecosystem, Jest currently does not support them. While you can still run **unit tests** for synchronous Server and Client Components, we recommend using an **E2E tests** for `async` components. ## Quickstart You can use `create-next-app` with the Next.js with-jest example to quickly get started: npx create-next-app@latest --example with-jest with-jest-app ## Manual setup Since the release of Next.js 12, Next.js now has built-in configuration for Jest. To set up Jest, install `jest` and the following packages as dev dependencies: npm install -D jest jest-environment-jsdom @testing-library/react @testing-library/jest-dom # or yarn add -D jest jest-environment-jsdom @testing-library/react @testing-library/jest-dom # or pnpm install -D jest jest-environment-jsdom @testing-library/react @testing-library/jest-dom Generate a basic Jest configuration file by running the following command: npm init jest@latest # or yarn create jest@latest # or pnpm create jest@latest This will take you through a series of prompts to setup Jest for your project, including automatically creating a `jest.config.ts|js` file. Update your config file to use `next/jest`. This transformer has all the necessary configuration options for Jest to work with Next.js: import type { Config } from 'jest' import nextJest from 'next/jest.js' const createJestConfig = nextJest({ // Provide the path to your Next.js app to load next.config.js and .env files in your test environment dir: './', }) // Add any custom config to be passed to Jest const config: Config = { coverageProvider: 'v8', testEnvironment: 'jsdom', // Add more setup options before each test is run // setupFilesAfterEnv: ['<rootDir>/jest.setup.ts'], } // createJestConfig is exported this way to ensure that next/jest can load the Next.js config which is async export default createJestConfig(config) Under the hood, `next/jest` is automatically configuring Jest for you, including: * Setting up `transform` using the Next.js Compiler * Auto mocking stylesheets (`.css`, `.module.css`, and their scss variants), image imports and `next/font` * Loading `.env` (and all variants) into `process.env` * Ignoring `node_modules` from test resolving and transforms * Ignoring `.next` from test resolving * Loading `next.config.js` for flags that enable SWC transforms > **Good to know**: To test environment variables directly, load them manually in a separate setup script or in your `jest.config.ts` file. For more information, please see Test Environment Variables. ## Optional: Handling Absolute Imports and Module Path Aliases If your project is using Module Path Aliases, you will need to configure Jest to resolve the imports by matching the paths option in the `jsconfig.json` file with the `moduleNameMapper` option in the `jest.config.js` file. For example: { "compilerOptions": { "module": "esnext", "moduleResolution": "bundler", "baseUrl": "./", "paths": { "@/components/*": ["components/*"] } } } moduleNameMapper: { // ... '^@/components/(.*)$': '<rootDir>/components/$1', } ## Optional: Extend Jest with custom matchers `@testing-library/jest-dom` includes a set of convenient custom matchers such as `.toBeInTheDocument()` making it easier to write tests. You can import the custom matchers for every test by adding the following option to the Jest configuration file: setupFilesAfterEnv: ['<rootDir>/jest.setup.ts'] Then, inside `jest.setup.ts`, add the following import: import '@testing-library/jest-dom' > **Good to know:**`extend-expect` was removed in `v6.0`, so if you are using `@testing-library/jest-dom` before version 6, you will need to import `@testing-library/jest-dom/extend-expect` instead. If you need to add more setup options before each test, you can add them to the `jest.setup.js` file above. ## Add a test script to `package.json`: Finally, add a Jest `test` script to your `package.json` file: { "scripts": { "dev": "next dev", "build": "next build", "start": "next start", "test": "jest", "test:watch": "jest --watch" } } `jest --watch` will re-run tests when a file is changed. For more Jest CLI options, please refer to the Jest Docs. ### Creating your first test: Your project is now ready to run tests. Create a folder called `__tests__` in your project's root directory. For example, we can add a test to check if the `<Page />` component successfully renders a heading: import Link from 'next/link' export default function Home() { return ( <div> <h1>Home</h1> <Link href="/about">About</Link> </div> ) } import '@testing-library/jest-dom' import { render, screen } from '@testing-library/react' import Page from '../app/page' describe('Page', () => { it('renders a heading', () => { render(<Page />) const heading = screen.getByRole('heading', { level: 1 }) expect(heading).toBeInTheDocument() }) }) Optionally, add a snapshot test to keep track of any unexpected changes in your component: import { render } from '@testing-library/react' import Page from '../app/page' it('renders homepage unchanged', () => { const { container } = render(<Page />) expect(container).toMatchSnapshot() }) ## Running your tests Then, run the following command to run your tests: npm run test # or yarn test # or pnpm test ## Additional Resources For further reading, you may find these resources helpful: * Next.js with Jest example * Jest Docs * React Testing Library Docs * Testing Playground - use good testing practices to match elements. --- ## Page: https://nextjs.org/docs/14/app/building-your-application/testing/playwright ## Setting up Playwright with Next.js Playwright is a testing framework that lets you automate Chromium, Firefox, and WebKit with a single API. You can use it to write **End-to-End (E2E)** testing. This guide will show you how to set up Playwright with Next.js and write your first tests. ## Quickstart The fastest way to get started is to use `create-next-app` with the with-playwright example. This will create a Next.js project complete with Playwright configured. npx create-next-app@latest --example with-playwright with-playwright-app ## Manual setup To install Playwright, run the following command: npm init playwright # or yarn create playwright # or pnpm create playwright This will take you through a series of prompts to setup and configure Playwright for your project, including adding a `playwright.config.ts` file. Please refer to the Playwright installation guide for the step-by-step guide. ## Creating your first Playwright E2E test Create two new Next.js pages: import Link from 'next/link' export default function Page() { return ( <div> <h1>Home</h1> <Link href="/about">About</Link> </div> ) } import Link from 'next/link' export default function Page() { return ( <div> <h1>About</h1> <Link href="/">Home</Link> </div> ) } Then, add a test to verify that your navigation is working correctly: import { test, expect } from '@playwright/test' test('should navigate to the about page', async ({ page }) => { // Start from the index page (the baseURL is set via the webServer in the playwright.config.ts) await page.goto('http://localhost:3000/') // Find an element with the text 'About' and click on it await page.click('text=About') // The new URL should be "/about" (baseURL is used there) await expect(page).toHaveURL('http://localhost:3000/about') // The new page should contain an h1 with "About" await expect(page.locator('h1')).toContainText('About') }) > **Good to know**: > > You can use `page.goto("/")` instead of `page.goto("http://localhost:3000/")`, if you add `"baseURL": "http://localhost:3000"` to the `playwright.config.ts` configuration file. ### Running your Playwright tests Playwright will simulate a user navigating your application using three browsers: Chromium, Firefox and Webkit, this requires your Next.js server to be running. We recommend running your tests against your production code to more closely resemble how your application will behave. Run `npm run build` and `npm run start`, then run `npx playwright test` in another terminal window to run the Playwright tests. > **Good to know**: Alternatively, you can use the `webServer` feature to let Playwright start the development server and wait until it's fully available. ### Running Playwright on Continuous Integration (CI) Playwright will by default run your tests in the headless mode. To install all the Playwright dependencies, run `npx playwright install-deps`. You can learn more about Playwright and Continuous Integration from these resources: * Next.js with Playwright example * Playwright on your CI provider * Playwright Discord --- ## Page: https://nextjs.org/docs/14/app/building-your-application/testing/cypress ## Setting up Cypress with Next.js Cypress is a test runner used for **End-to-End (E2E)** and **Component Testing**. This page will show you how to set up Cypress with Next.js and write your first tests. > **Warning:** > > * For **component testing**, Cypress currently does not support Next.js version 14 and `async` Server Components. These issues are being tracked. For now, component testing works with Next.js version 13, and we recommend E2E testing for `async` Server Components. > * Cypress currently does not support TypeScript version 5 with `moduleResolution:"bundler"`. This issue is being tracked. ## Quickstart You can use `create-next-app` with the with-cypress example to quickly get started. npx create-next-app@latest --example with-cypress with-cypress-app ## Manual setup To manually set up Cypress, install `cypress` as a dev dependency: npm install -D cypress # or yarn add -D cypress # or pnpm install -D cypress Add the Cypress `open` command to the `package.json` scripts field: { "scripts": { "dev": "next dev", "build": "next build", "start": "next start", "lint": "next lint", "cypress:open": "cypress open" } } Run Cypress for the first time to open the Cypress testing suite: npm run cypress:open You can choose to configure **E2E Testing** and/or **Component Testing**. Selecting any of these options will automatically create a `cypress.config.js` file and a `cypress` folder in your project. ## Creating your first Cypress E2E test Ensure your `cypress.config.js` file has the following configuration: import { defineConfig } from 'cypress' export default defineConfig({ e2e: { setupNodeEvents(on, config) {}, }, }) const { defineConfig } = require('cypress') module.exports = defineConfig({ e2e: { setupNodeEvents(on, config) {}, }, }) Then, create two new Next.js files: import Link from 'next/link' export default function Page() { return ( <div> <h1>Home</h1> <Link href="/about">About</Link> </div> ) } import Link from 'next/link' export default function Page() { return ( <div> <h1>About</h1> <Link href="/">Home</Link> </div> ) } Add a test to check your navigation is working correctly: describe('Navigation', () => { it('should navigate to the about page', () => { // Start from the index page cy.visit('http://localhost:3000/') // Find a link with an href attribute containing "about" and click it cy.get('a[href*="about"]').click() // The new url should include "/about" cy.url().should('include', '/about') // The new page should contain an h1 with "About" cy.get('h1').contains('About') }) }) ### Running E2E Tests Cypress will simulate a user navigating your application, this requires your Next.js server to be running. We recommend running your tests against your production code to more closely resemble how your application will behave. Run `npm run build && npm run start` to build your Next.js application, then run `npm run cypress:open` in another terminal window to start Cypress and run your E2E testing suite. > **Good to know:** > > * You can use `cy.visit("/")` instead of `cy.visit("http://localhost:3000/")` by adding `baseUrl: 'http://localhost:3000'` to the `cypress.config.js` configuration file. > * Alternatively, you can install the `start-server-and-test` package to run the Next.js production server in conjunction with Cypress. After installation, add `"test": "start-server-and-test start http://localhost:3000 cypress"` to your `package.json` scripts field. Remember to rebuild your application after new changes. ## Creating your first Cypress component test Component tests build and mount a specific component without having to bundle your whole application or start a server. Select **Component Testing** in the Cypress app, then select **Next.js** as your front-end framework. A `cypress/component` folder will be created in your project, and a `cypress.config.js` file will be updated to enable component testing. Ensure your `cypress.config.js` file has the following configuration: import { defineConfig } from 'cypress' export default defineConfig({ component: { devServer: { framework: 'next', bundler: 'webpack', }, }, }) const { defineConfig } = require('cypress') module.exports = defineConfig({ component: { devServer: { framework: 'next', bundler: 'webpack', }, }, }) Assuming the same components from the previous section, add a test to validate a component is rendering the expected output: import Page from '../../app/page' describe('<Page />', () => { it('should render and display expected content', () => { // Mount the React component for the Home page cy.mount(<Page />) // The new page should contain an h1 with "Home" cy.get('h1').contains('Home') // Validate that a link with the expected URL is present // Following the link is better suited to an E2E test cy.get('a[href="/about"]').should('be.visible') }) }) > **Good to know**: > > * Cypress currently doesn't support component testing for `async` Server Components. We recommend using E2E testing. > * Since component tests do not require a Next.js server, features like `<Image />` that rely on a server being available may not function out-of-the-box. ### Running Component Tests Run `npm run cypress:open` in your terminal to start Cypress and run your component testing suite. ## Continuous Integration (CI) In addition to interactive testing, you can also run Cypress headlessly using the `cypress run` command, which is better suited for CI environments: { "scripts": { //... "e2e": "start-server-and-test dev http://localhost:3000 \"cypress open --e2e\"", "e2e:headless": "start-server-and-test dev http://localhost:3000 \"cypress run --e2e\"", "component": "cypress open --component", "component:headless": "cypress run --component" } } You can learn more about Cypress and Continuous Integration from these resources: * Next.js with Cypress example * Cypress Continuous Integration Docs * Cypress GitHub Actions Guide * Official Cypress GitHub Action * Cypress Discord --- ## Page: https://nextjs.org/docs/14/app/building-your-application/authentication To implement authentication in Next.js, familiarize yourself with three foundational concepts: * **Authentication** verifies if the user is who they say they are. It requires the user to prove their identity with something they have, such as a username and password. * **Session Management** tracks the user's state (e.g. logged in) across multiple requests. * **Authorization** decides what parts of the application the user is allowed to access. This page demonstrates how to use Next.js features to implement common authentication, authorization, and session management patterns so you can choose the best solutions based on your application's needs. ## Authentication Authentication verifies a user's identity. This happens when a user logs in, either with a username and password or through a service like Google. It's all about confirming that users are really who they claim to be, protecting both the user's data and the application from unauthorized access or fraudulent activities. ### Authentication Strategies Modern web applications commonly use several authentication strategies: 1. **OAuth/OpenID Connect (OIDC)**: Enable third-party access without sharing user credentials. Ideal for social media logins and Single Sign-On (SSO) solutions. They add an identity layer with OpenID Connect. 2. **Credentials-based login (Email + Password)**: A standard choice for web applications, where users log in with an email and password. Familiar and easy to implement, it requires robust security measures against threats like phishing. 3. **Passwordless/Token-based authentication**: Use email magic links or SMS one-time codes for secure, password-free access. Popular for its convenience and enhanced security, this method helps reduce password fatigue. Its limitation is the dependency on the user's email or phone availability. 4. **Passkeys/WebAuthn**: Use cryptographic credentials unique to each site, offering high security against phishing. Secure but new, this strategy can be difficult to implement. Selecting an authentication strategy should align with your application's specific requirements, user interface considerations, and security objectives. ### Implementing Authentication In this section, we'll explore the process of adding basic email-password authentication to a web application. While this method provides a fundamental level of security, it's worth considering more advanced options like OAuth or passwordless logins for enhanced protection against common security threats. The authentication flow we'll discuss is as follows: 1. The user submits their credentials through a login form. 2. The form calls a Server Action. 3. Upon successful verification, the process is completed, indicating the user's successful authentication. 4. If verification is unsuccessful, an error message is shown. Consider a login form where users can input their credentials: import { authenticate } from '@/app/lib/actions' export default function Page() { return ( <form action={authenticate}> <input type="email" name="email" placeholder="Email" required /> <input type="password" name="password" placeholder="Password" required /> <button type="submit">Login</button> </form> ) } The form above has two input fields for capturing the user's email and password. On submission, it calls the `authenticate` Server Action. You can then call your Authentication Provider's API in the Server Action to handle authentication: 'use server' import { signIn } from '@/auth' export async function authenticate(_currentState: unknown, formData: FormData) { try { await signIn('credentials', formData) } catch (error) { if (error) { switch (error.type) { case 'CredentialsSignin': return 'Invalid credentials.' default: return 'Something went wrong.' } } throw error } } In this code, the `signIn` method checks the credentials against stored user data. After the authentication provider processes the credentials, there are two possible outcomes: * **Successful Authentication**: This outcome implies that the login was successful. Further actions, such as accessing protected routes and fetching user information, can then be initiated. * **Failed Authentication**: In cases where the credentials are incorrect or an error is encountered, the function returns a corresponding error message to indicate the authentication failure. Finally, in your `login-form.tsx` component, you can use React's `useFormState` to call the Server Action and handle form errors, and use `useFormStatus` to handle the pending state of the form: 'use client' import { authenticate } from '@/app/lib/actions' import { useFormState, useFormStatus } from 'react-dom' export default function Page() { const [errorMessage, dispatch] = useFormState(authenticate, undefined) return ( <form action={dispatch}> <input type="email" name="email" placeholder="Email" required /> <input type="password" name="password" placeholder="Password" required /> <div>{errorMessage && <p>{errorMessage}</p>}</div> <LoginButton /> </form> ) } function LoginButton() { const { pending } = useFormStatus() const handleClick = (event) => { if (pending) { event.preventDefault() } } return ( <button aria-disabled={pending} type="submit" onClick={handleClick}> Login </button> ) } For a more streamlined authentication setup in Next.js projects, especially when offering multiple login methods, consider using a comprehensive authentication solution. Once a user is authenticated, you'll need to ensure the user is allowed to visit certain routes, and perform operations such as mutating data with Server Actions and calling Route Handlers. ### Protecting Routes with Middleware Middleware in Next.js helps you control who can access different parts of your website. This is important for keeping areas like the user dashboard protected while having other pages like marketing pages be public. It's recommended to apply Middleware across all routes and specify exclusions for public access. Here's how to implement Middleware for authentication in Next.js: #### Setting Up Middleware: * Create a `middleware.ts` or `.js` file in your project's root directory. * Include logic to authorize user access, such as checking for authentication tokens. #### Defining Protected Routes: * Not all routes require authorization. Use the `matcher` option in your Middleware to specify any routes that do not require authorization checks. #### Middleware Logic: * Write logic to verify if a user is authenticated. Check user roles or permissions for route authorization. #### Handling Unauthorized Access: * Redirect unauthorized users to a login or error page as appropriate. Example Middleware file: import type { NextRequest } from 'next/server' export function middleware(request: NextRequest) { const currentUser = request.cookies.get('currentUser')?.value if (currentUser && !request.nextUrl.pathname.startsWith('/dashboard')) { return Response.redirect(new URL('/dashboard', request.url)) } if (!currentUser && !request.nextUrl.pathname.startsWith('/login')) { return Response.redirect(new URL('/login', request.url)) } } export const config = { matcher: ['/((?!api|_next/static|_next/image|.*\\.png$).*)'], } This example uses `Response.redirect` for handling redirects early in the request pipeline, making it efficient and centralizing access control. For specific redirection needs, the `redirect` function can be used in Server Components, Route Handlers, and Server Actions to provide more control. This is useful for role-based navigation or context-sensitive scenarios. import { redirect } from 'next/navigation' export default function Page() { // Logic to determine if a redirect is needed const accessDenied = true if (accessDenied) { redirect('/login') } // Define other routes and logic } After successful authentication, it's important to manage user navigation based on their roles. For example, an admin user might be redirected to an admin dashboard, while a regular user is sent to a different page. This is important for role-specific experiences and conditional navigation, such as prompting users to complete their profile if needed. When setting up authorization, it's important to ensure that the main security checks happen where your app accesses or changes data. While Middleware can be useful for initial validation, it should not be the sole line of defense in protecting your data. The bulk of security checks should be performed in the Data Access Layer (DAL). This approach, highlighted in this security blog, advocates for consolidating all data access within a dedicated DAL. This strategy ensures consistent data access, minimizes authorization bugs, and simplifies maintenance. To ensure comprehensive security, consider the following key areas: * Server Actions: Implement security checks in server-side processes, especially for sensitive operations. * Route Handlers: Manage incoming requests with security measures to ensure access is limited to authorized users. * Data Access Layer (DAL): Directly interacts with the database and is crucial for validating and authorizing data transactions. It's vital to perform critical checks within the DAL to secure data at its most crucial interaction point—access or modification. For a detailed guide on securing the DAL, including example code snippets and advanced security practices, refer to our Data Access Layer section of the security guide. ### Protecting Server Actions It is important to treat Server Actions with the same security considerations as public-facing API endpoints. Verifying user authorization for each action is crucial. Implement checks within Server Actions to determine user permissions, such as restricting certain actions to admin users. In the example below, we check the user's role before allowing the action to proceed: 'use server' // ... export async function serverAction() { const session = await getSession() const userRole = session?.user?.role // Check if user is authorized to perform the action if (userRole !== 'admin') { throw new Error('Unauthorized access: User does not have admin privileges.') } // Proceed with the action for authorized users // ... implementation of the action } ### Protecting Route Handlers Route Handlers in Next.js play a vital role in managing incoming requests. Just like Server Actions, they should be secured to ensure that only authorized users can access certain functionalities. This often involves verifying the user's authentication status and their permissions. Here's an example of securing a Route Handler: export async function GET() { // User authentication and role verification const session = await getSession() // Check if the user is authenticated if (!session) { return new Response(null, { status: 401 }) // User is not authenticated } // Check if the user has the 'admin' role if (session.user.role !== 'admin') { return new Response(null, { status: 403 }) // User is authenticated but does not have the right permissions } // Data fetching for authorized users } This example demonstrates a Route Handler with a two-tier security check for authentication and authorization. It first checks for an active session, and then verifies if the logged-in user is an 'admin'. This approach ensures secure access, limited to authenticated and authorized users, maintaining robust security for request processing. ### Authorization Using Server Components Server Components in Next.js are designed for server-side execution and offer a secure environment for integrating complex logic like authorization. They enable direct access to back-end resources, optimizing performance for data-heavy tasks and enhancing security for sensitive operations. In Server Components, a common practice is to conditionally render UI elements based on the user's role. This approach enhances user experience and security by ensuring users only access content they are authorized to view. **Example:** export default async function Dashboard() { const session = await getSession() const userRole = session?.user?.role // Assuming 'role' is part of the session object if (userRole === 'admin') { return <AdminDashboard /> // Component for admin users } else if (userRole === 'user') { return <UserDashboard /> // Component for regular users } else { return <AccessDenied /> // Component shown for unauthorized access } } In this example, the Dashboard component renders different UIs for 'admin', 'user', and unauthorized roles. This pattern ensures that each user interacts only with components appropriate to their role, enhancing both security and user experience. ### Best Practices * **Secure Session Management**: Prioritize the security of session data to prevent unauthorized access and data breaches. Use encryption and secure storage practices. * **Dynamic Role Management**: Use a flexible system for user roles to easily adjust to changes in permissions and roles, avoiding hardcoded roles. * **Security-First Approach**: In all aspects of authorization logic, prioritize security to safeguard user data and maintain the integrity of your application. This includes thorough testing and considering potential security vulnerabilities. ## Session Management Session management involves tracking and managing a user's interaction with the application over time, ensuring that their authenticated state is preserved across different parts of the application. This prevents the need for repeated logins, enhancing both security and user convenience. There are two primary methods used for session management: cookie-based and database sessions. ### Cookie-Based Sessions > **🎥 Watch:** Learn more about cookie-based sessions and authentication with Next.js → YouTube (11 minutes). Cookie-based sessions manage user data by storing encrypted session information directly in browser cookies. Upon user login, this encrypted data is stored in the cookie. Each subsequent server request includes this cookie, minimizing the need for repeated server queries and enhancing client-side efficiency. However, this method requires careful encryption to protect sensitive data, as cookies are susceptible to client-side security risks. Encrypting session data in cookies is key to safeguarding user information from unauthorized access. It ensures that even if a cookie is stolen, the data inside remains unreadable. Additionally, while individual cookies are limited in size (typically around 4KB), techniques like cookie-chunking can overcome this limitation by dividing large session data into multiple cookies. Setting a cookie in a Next.js project might look something like this: **Setting a cookie on the server:** 'use server' import { cookies } from 'next/headers' export async function handleLogin(sessionData) { const encryptedSessionData = encrypt(sessionData) // Encrypt your session data cookies().set('session', encryptedSessionData, { httpOnly: true, secure: process.env.NODE_ENV === 'production', maxAge: 60 * 60 * 24 * 7, // One week path: '/', }) // Redirect or handle the response after setting the cookie } **Accessing the session data stored in the cookie in a server component:** import { cookies } from 'next/headers' export async function getSessionData(req) { const encryptedSessionData = cookies().get('session')?.value return encryptedSessionData ? JSON.parse(decrypt(encryptedSessionData)) : null } ### Database Sessions Database session management involves storing session data on the server, with the user's browser only receiving a session ID. This ID references the session data stored server-side, without containing the data itself. This method enhances security, as it keeps sensitive session data away from the client-side environment, reducing the risk of exposure to client-side attacks. Database sessions are also more scalable, accommodating larger data storage needs. However, this approach has its tradeoffs. It can increase performance overhead due to the need for database lookups at each user interaction. Strategies like session data caching can help mitigate this. Additionally, reliance on the database means that session management is as reliable as the database's performance and availability. Here's a simplified example of implementing database sessions in a Next.js application: **Creating a Session on the Server**: import db from './lib/db' export async function createSession(user) { const sessionId = generateSessionId() // Generate a unique session ID await db.insertSession({ sessionId, userId: user.id, createdAt: new Date() }) return sessionId } **Retrieving a Session in Middleware or Server-Side Logic**: import { cookies } from 'next/headers' import db from './lib/db' export async function getSession() { const sessionId = cookies().get('sessionId')?.value return sessionId ? await db.findSession(sessionId) : null } ### Selecting Session Management in Next.js Deciding between cookie-based and database sessions in Next.js depends on your application's needs. Cookie-based sessions are simpler and suit smaller applications with lower server load but may offer less security. Database sessions, while more complex, provide better security and scalability, ideal for larger, data-sensitive applications. With authentication solutions such as NextAuth.js, session management becomes more efficient, using either cookies or database storage. This automation simplifies the development process, but it's important to understand the session management method used by your chosen solution. Ensure it aligns with your application's security and performance requirements. Regardless of your choice, prioritize security in your session management strategy. For cookie-based sessions, using secure and HTTP-only cookies is crucial to protect session data. For database sessions, regular backups and secure handling of session data are essential. Implementing session expiry and cleanup mechanisms is vital in both approaches to prevent unauthorized access and maintain application performance and reliability. ## Examples Here are authentication solutions compatible with Next.js, please refer to the quickstart guides below to learn how to configure them in your Next.js application: * Auth0 * Clerk * Kinde * Lucia * NextAuth.js * Supabase * Stytch * Iron Session ## Further Reading To continue learning about authentication and security, check out the following resources: * Understanding XSS Attacks * Understanding CSRF Attacks --- ## Page: https://nextjs.org/docs/14/app/building-your-application/deploying Congratulations, it's time to ship to production. You can deploy managed Next.js with Vercel, or self-host on a Node.js server, Docker image, or even static HTML files. When deploying using `next start`, all Next.js features are supported. ## Production Builds Running `next build` generates an optimized version of your application for production. HTML, CSS, and JavaScript files are created based on your pages. JavaScript is **compiled** and browser bundles are **minified** using the Next.js Compiler to help achieve the best performance and support all modern browsers. Next.js produces a standard deployment output used by managed and self-hosted Next.js. This ensures all features are supported across both methods of deployment. In the next major version, we will be transforming this output into our Build Output API specification. ## Managed Next.js with Vercel Vercel, the creators and maintainers of Next.js, provide managed infrastructure and a developer experience platform for your Next.js applications. Deploying to Vercel is zero-configuration and provides additional enhancements for scalability, availability, and performance globally. However, all Next.js features are still supported when self-hosted. Learn more about Next.js on Vercel or deploy a template for free to try it out. ## Self-Hosting You can self-host Next.js in three different ways: * A Node.js server * A Docker container * A static export ### Node.js Server Next.js can be deployed to any hosting provider that supports Node.js. Ensure your `package.json` has the `"build"` and `"start"` scripts: { "scripts": { "dev": "next dev", "build": "next build", "start": "next start" } } Then, run `npm run build` to build your application. Finally, run `npm run start` to start the Node.js server. This server supports all Next.js features. ### Docker Image Next.js can be deployed to any hosting provider that supports Docker containers. You can use this approach when deploying to container orchestrators such as Kubernetes or when running inside a container in any cloud provider. 1. Install Docker on your machine 2. Clone our example (or the multi-environment example) 3. Build your container: `docker build -t nextjs-docker .` 4. Run your container: `docker run -p 3000:3000 nextjs-docker` Next.js through Docker supports all Next.js features. ### Static HTML Export Next.js enables starting as a static site or Single-Page Application (SPA), then later optionally upgrading to use features that require a server. Since Next.js supports this static export, it can be deployed and hosted on any web server that can serve HTML/CSS/JS static assets. This includes tools like AWS S3, Nginx, or Apache. Running as a static export does not support Next.js features that require a server. Learn more. > **Good to know:** > > * Server Components are supported with static exports. ## Features ### Image Optimization Image Optimization through `next/image` works self-hosted with zero configuration when deploying using `next start`. If you would prefer to have a separate service to optimize images, you can configure an image loader. Image Optimization can be used with a static export by defining a custom image loader in `next.config.js`. Note that images are optimized at runtime, not during the build. > **Good to know:** > > * When self-hosting, consider installing `sharp` for more performant Image Optimization in your production environment by running `npm install sharp` in your project directory. On Linux platforms, `sharp` may require additional configuration to prevent excessive memory usage. > * Learn more about the caching behavior of optimized images and how to configure the TTL. > * You can also disable Image Optimization and still retain other benefits of using `next/image` if you prefer. For example, if you are optimizing images yourself separately. ### Middleware Middleware works self-hosted with zero configuration when deploying using `next start`. Since it requires access to the incoming request, it is not supported when using a static export. Middleware uses a runtime that is a subset of all available Node.js APIs to help ensure low latency, since it may run in front of every route or asset in your application. This runtime does not require running “at the edge” and works in a single-region server. Additional configuration and infrastructure are required to run Middleware in multiple regions. If you are looking to add logic (or use an external package) that requires all Node.js APIs, you might be able to move this logic to a layout as a Server Component. For example, checking headers and redirecting. You can also use headers, cookies, or query parameters to redirect or rewrite through `next.config.js`. If that does not work, you can also use a custom server. ### Environment Variables Next.js can support both build time and runtime environment variables. **By default, environment variables are only available on the server**. To expose an environment variable to the browser, it must be prefixed with `NEXT_PUBLIC_`. However, these public environment variables will be inlined into the JavaScript bundle during `next build`. To read runtime environment variables, we recommend using `getServerSideProps` or incrementally adopting the App Router. With the App Router, we can safely read environment variables on the server during dynamic rendering. This allows you to use a singular Docker image that can be promoted through multiple environments with different values. import { unstable_noStore as noStore } from 'next/cache'; export default function Component() { noStore(); // cookies(), headers(), and other dynamic functions // will also opt into dynamic rendering, making // this env variable is evaluated at runtime const value = process.env.MY_VALUE ... } > **Good to know:** > > * You can run code on server startup using the `register` function. > * We do not recommend using the runtimeConfig option, as this does not work with the standalone output mode. Instead, we recommend incrementally adopting the App Router. ### Caching and ISR Next.js can cache responses, generated static pages, build outputs, and other static assets like images, fonts, and scripts. Caching and revalidating pages (using Incremental Static Regeneration (ISR) or newer functions in the App Router) use the **same shared cache**. By default, this cache is stored to the filesystem (on disk) on your Next.js server. **This works automatically when self-hosting** using both the Pages and App Router. You can configure the Next.js cache location if you want to persist cached pages and data to durable storage, or share the cache across multiple containers or instances of your Next.js application. #### Automatic Caching * Next.js sets the `Cache-Control` header of `public, max-age=31536000, immutable` to truly immutable assets. It cannot be overridden. These immutable files contain a SHA-hash in the file name, so they can be safely cached indefinitely. For example, Static Image Imports. You can configure the TTL for images. * Incremental Static Regeneration (ISR) sets the `Cache-Control` header of `s-maxage: <revalidate in getStaticProps>, stale-while-revalidate`. This revalidation time is defined in your `getStaticProps` function in seconds. If you set `revalidate: false`, it will default to a one-year cache duration. * Dynamically rendered pages set a `Cache-Control` header of `private, no-cache, no-store, max-age=0, must-revalidate` to prevent user-specific data from being cached. This applies to both the App Router and Pages Router. This also includes Draft Mode. #### Static Assets If you want to host static assets on a different domain or CDN, you can use the `assetPrefix` configuration in `next.config.js`. Next.js will use this asset prefix when retrieving JavaScript or CSS files. Separating your assets to a different domain does come with the downside of extra time spent on DNS and TLS resolution. Learn more about `assetPrefix`. #### Configuring Caching By default, generated cache assets will be stored in memory (defaults to 50mb) and on disk. If you are hosting Next.js using a container orchestration platform like Kubernetes, each pod will have a copy of the cache. To prevent stale data from being shown since the cache is not shared between pods by default, you can configure the Next.js cache to provide a cache handler and disable in-memory caching. To configure the ISR/Data Cache location when self-hosting, you can configure a custom handler in your `next.config.js` file: module.exports = { cacheHandler: require.resolve('./cache-handler.js'), cacheMaxMemorySize: 0, // disable default in-memory caching } Then, create `cache-handler.js` in the root of your project, for example: const cache = new Map() module.exports = class CacheHandler { constructor(options) { this.options = options } async get(key) { // This could be stored anywhere, like durable storage return cache.get(key) } async set(key, data, ctx) { // This could be stored anywhere, like durable storage cache.set(key, { value: data, lastModified: Date.now(), tags: ctx.tags, }) } async revalidateTag(tag) { // Iterate over all entries in the cache for (let [key, value] of cache) { // If the value's tags include the specified tag, delete this entry if (value.tags.includes(tag)) { cache.delete(key) } } } } Using a custom cache handler will allow you to ensure consistency across all pods hosting your Next.js application. For instance, you can save the cached values anywhere, like Redis or AWS S3. > **Good to know:** > > * `revalidatePath` is a convenience layer on top of cache tags. Calling `revalidatePath` will call the `revalidateTag` function with a special default tag for the provided page. ### Build Cache Next.js generates an ID during `next build` to identify which version of your application is being served. The same build should be used and boot up multiple containers. If you are rebuilding for each stage of your environment, you will need to generate a consistent build ID to use between containers. Use the `generateBuildId` command in `next.config.js`: module.exports = { generateBuildId: async () => { // This could be anything, using the latest git hash return process.env.GIT_HASH }, } ### Version Skew Next.js will automatically mitigate most instances of version skew and automatically reload the application to retrieve new assets when detected. For example, if there is a mismatch in the `deploymentId`, transitions between pages will perform a hard navigation versus using a prefetched value. When the application is reloaded, there may be a loss of application state if it's not designed to persist between page navigations. For example, using URL state or local storage would persist state after a page refresh. However, component state like `useState` would be lost in such navigations. Vercel provides additional skew protection for Next.js applications to ensure assets and functions from the previous version are still available to older clients, even after the new version is deployed. You can manually configure the `deploymentId` property in your `next.config.js` file to ensure each request uses either `?dpl` query string or `x-deployment-id` header. ### Streaming and Suspense The Next.js App Router supports streaming responses when self-hosting. If you are using Nginx or a similar proxy, you will need to configure it to disable buffering to enable streaming. For example, you can disable buffering in Nginx by setting `X-Accel-Buffering` to `no`: module.exports = { async headers() { return [ { source: '/:path*{/}?', headers: [ { key: 'X-Accel-Buffering', value: 'no', }, ], }, ] }, } --- ## Page: https://nextjs.org/docs/14/app/building-your-application/deploying/production-checklist Before taking your Next.js application to production, there are some optimizations and patterns you should consider implementing for the best user experience, performance, and security. This page provides best practices that you can use as a reference when building your application, before going to production, and after deployment - as well as the automatic Next.js optimizations you should be aware of. ## Automatic optimizations These Next.js optimizations are enabled by default and require no configuration: * **Server Components:** Next.js uses Server Components by default. Server Components run on the server, and don't require JavaScript to render on the client. As such, they have no impact on the size of your client-side JavaScript bundles. You can then use Client Components as needed for interactivity. * **Code-splitting:** Server Components enable automatic code-splitting by route segments. You may also consider lazy loading Client Components and third-party libraries, where appropriate. * **Prefetching:** When a link to a new route enters the user's viewport, Next.js prefetches the route in background. This makes navigation to new routes almost instant. You can opt out of prefetching, where appropriate. * **Static Rendering:** Next.js statically renders Server and Client Components on the server at build time and caches the rendered result to improve your application's performance. You can opt into Dynamic Rendering for specific routes, where appropriate. * **Caching:** Next.js caches data requests, the rendered result of Server and Client Components, static assets, and more, to reduce the number of network requests to your server, database, and backend services. You may opt out of caching, where appropriate. These defaults aim to improve your application's performance, and reduce the cost and amount of data transferred on each network request. ## During development While building your application, we recommend using the following features to ensure the best performance and user experience: ### Routing and rendering * **Layouts:** Use layouts to share UI across pages and enable partial rendering on navigation. * **`<Link>` component:** Use the `<Link>` component for client-side navigation and prefetching. * **Error Handling:** Gracefully handle catch-all errors and 404 errors in production by creating custom error pages. * **Composition Patterns:** Follow the recommended composition patterns for Server and Client Components, and check the placement of your `"use client"` boundaries to avoid unnecessarily increasing your client-side JavaScript bundle. * **Dynamic Functions:** Be aware that dynamic functions like `cookies()` and the `searchParams` prop will opt the entire route into Dynamic Rendering (or your whole application if used in the Root Layout). Ensure dynamic function usage is intentional and wrap them in `<Suspense>` boundaries where appropriate. > **Good to know**: Partial Prerendering (Experimental) will allow parts of a route to be dynamic without opting the whole route into dynamic rendering. ### Data fetching and caching * **Server Components:** Leverage the benefits of fetching data on the server using Server Components. * **Route Handlers:** Use Route Handlers to access your backend resources from Client Components. But do not call Route Handlers from Server Components to avoid an additional server request. * **Streaming:** Use Loading UI and React Suspense to progressively send UI from the server to the client, and prevent the whole route from blocking while data is being fetched. * **Parallel Data Fetching:** Reduce network waterfalls by fetching data in parallel, where appropriate. Also, consider preloading data where appropriate. * **Data Caching:** Verify whether your data requests are being cached or not, and opt into caching, where appropriate. Ensure requests that don't use `fetch` are cached. * **Static Images:** Use the `public` directory to automatically cache your application's static assets, e.g. images. ### UI and accessibility * **Forms and Validation:** Use Server Actions to handle form submissions, server-side validation, and handle errors. * **Font Module:** Optimize fonts by using the Font Module, which automatically hosts your font files with other static assets, removes external network requests, and reduces layout shift. * **`<Image>` Component:** Optimize images by using the Image Component, which automatically optimizes images, prevents layout shift, and serves them in modern formats like WebP or AVIF. * **`<Script>` Component:** Optimize third-party scripts by using the Script Component, which automatically defers scripts and prevents them from blocking the main thread. * **ESLint:** Use the built-in `eslint-plugin-jsx-a11y` plugin to catch accessibility issues early. ### Security * **Tainting:** Prevent sensitive data from being exposed to the client by tainting data objects and/or specific values. * **Server Actions:** Ensure users are authorized to call Server Actions. Review the the recommended security practices. * **Environment Variables:** Ensure your `.env.*` files are added to `.gitignore` and only public variables are prefixed with `NEXT_PUBLIC_`. * **Content Security Policy:** Consider adding a Content Security Policy to protect your application against various security threats such as cross-site scripting, clickjacking, and other code injection attacks. ### Metadata and SEO * **Metadata API:** Use the Metadata API to improve your application's Search Engine Optimization (SEO) by adding page titles, descriptions, and more. * **Open Graph (OG) images:** Create OG images to prepare your application for social sharing. * **Sitemaps and Robots:** Help Search Engines crawl and index your pages by generating sitemaps and robots files. ### Type safety * **TypeScript and TS Plugin:** Use TypeScript and the TypeScript plugin for better type-safety, and to help you catch errors early. ## Before going to production Before going to production, you can run `next build` to build your application locally and catch any build errors, then run `next start` to measure the performance of your application in a production-like environment. ### Core Web Vitals * **Lighthouse:** Run lighthouse in incognito to gain a better understanding of how your users will experience your site, and to identify areas for improvement. This is a simulated test and should be paired with looking at field data (such as Core Web Vitals). * **`useReportWebVitals` hook:** Use this hook to send Core Web Vitals data to analytics tools. ### Analyzing bundles Use the `@next/bundle-analyzer` plugin to analyze the size of your JavaScript bundles and identify large modules and dependencies that might be impacting your application's performance. Additionally, the following tools can you understand the impact of adding new dependencies to your application: * Import Cost * Package Phobia * Bundle Phobia * bundlejs ## After deployment Depending on where you deploy your application, you might have access to additional tools and integrations to help you monitor and improve your application's performance. For Vercel deployments, we recommend the following: * **Analytics:** A built-in analytics dashboard to help you understand your application's traffic, including the number of unique visitors, page views, and more. * **Speed Insights:** Real-world performance insights based on visitor data, offering a practical view of how your website is performing in the field. * **Logging:** Runtime and Activity logs to help you debug issues and monitor your application in production. Alternatively, see the integrations page for a list of third-party tools and services. > **Good to know:** > > To get a comprehensive understanding of the best practices for production deployments on Vercel, including detailed strategies for improving website performance, refer to the Vercel Production Checklist. Following these recommendations will help you build a faster, more reliable, and secure application for your users. --- ## Page: https://nextjs.org/docs/14/app/building-your-application/deploying/static-exports Next.js enables starting as a static site or Single-Page Application (SPA), then later optionally upgrading to use features that require a server. When running `next build`, Next.js generates an HTML file per route. By breaking a strict SPA into individual HTML files, Next.js can avoid loading unnecessary JavaScript code on the client-side, reducing the bundle size and enabling faster page loads. Since Next.js supports this static export, it can be deployed and hosted on any web server that can serve HTML/CSS/JS static assets. ## Configuration To enable a static export, change the output mode inside `next.config.js`: /** * @type {import('next').NextConfig} */ const nextConfig = { output: 'export', // Optional: Change links `/me` -> `/me/` and emit `/me.html` -> `/me/index.html` // trailingSlash: true, // Optional: Prevent automatic `/me` -> `/me/`, instead preserve `href` // skipTrailingSlashRedirect: true, // Optional: Change the output directory `out` -> `dist` // distDir: 'dist', } module.exports = nextConfig After running `next build`, Next.js will produce an `out` folder which contains the HTML/CSS/JS assets for your application. ## Supported Features The core of Next.js has been designed to support static exports. ### Server Components When you run `next build` to generate a static export, Server Components consumed inside the `app` directory will run during the build, similar to traditional static-site generation. The resulting component will be rendered into static HTML for the initial page load and a static payload for client navigation between routes. No changes are required for your Server Components when using the static export, unless they consume dynamic server functions. export default async function Page() { // This fetch will run on the server during `next build` const res = await fetch('https://api.example.com/...') const data = await res.json() return <main>...</main> } ### Client Components If you want to perform data fetching on the client, you can use a Client Component with SWR to memoize requests. 'use client' import useSWR from 'swr' const fetcher = (url: string) => fetch(url).then((r) => r.json()) export default function Page() { const { data, error } = useSWR( `https://jsonplaceholder.typicode.com/posts/1`, fetcher ) if (error) return 'Failed to load' if (!data) return 'Loading...' return data.title } Since route transitions happen client-side, this behaves like a traditional SPA. For example, the following index route allows you to navigate to different posts on the client: import Link from 'next/link' export default function Page() { return ( <> <h1>Index Page</h1> <hr /> <ul> <li> <Link href="/post/1">Post 1</Link> </li> <li> <Link href="/post/2">Post 2</Link> </li> </ul> </> ) } ### Image Optimization Image Optimization through `next/image` can be used with a static export by defining a custom image loader in `next.config.js`. For example, you can optimize images with a service like Cloudinary: /** @type {import('next').NextConfig} */ const nextConfig = { output: 'export', images: { loader: 'custom', loaderFile: './my-loader.ts', }, } module.exports = nextConfig This custom loader will define how to fetch images from a remote source. For example, the following loader will construct the URL for Cloudinary: export default function cloudinaryLoader({ src, width, quality, }: { src: string width: number quality?: number }) { const params = ['f_auto', 'c_limit', `w_${width}`, `q_${quality || 'auto'}`] return `https://res.cloudinary.com/demo/image/upload/${params.join( ',' )}${src}` } You can then use `next/image` in your application, defining relative paths to the image in Cloudinary: import Image from 'next/image' export default function Page() { return <Image alt="turtles" src="/turtles.jpg" width={300} height={300} /> } ### Route Handlers Route Handlers will render a static response when running `next build`. Only the `GET` HTTP verb is supported. This can be used to generate static HTML, JSON, TXT, or other files from cached or uncached data. For example: export async function GET() { return Response.json({ name: 'Lee' }) } The above file `app/data.json/route.ts` will render to a static file during `next build`, producing `data.json` containing `{ name: 'Lee' }`. If you need to read dynamic values from the incoming request, you cannot use a static export. ### Browser APIs Client Components are pre-rendered to HTML during `next build`. Because Web APIs like `window`, `localStorage`, and `navigator` are not available on the server, you need to safely access these APIs only when running in the browser. For example: 'use client'; import { useEffect } from 'react'; export default function ClientComponent() { useEffect(() => { // You now have access to `window` console.log(window.innerHeight); }, []) return ...; } ## Unsupported Features Features that require a Node.js server, or dynamic logic that cannot be computed during the build process, are **not** supported: * Dynamic Routes with `dynamicParams: true` * Dynamic Routes without `generateStaticParams()` * Route Handlers that rely on Request * Cookies * Rewrites * Redirects * Headers * Middleware * Incremental Static Regeneration * Image Optimization with the default `loader` * Draft Mode Attempting to use any of these features with `next dev` will result in an error, similar to setting the `dynamic` option to `error` in the root layout. export const dynamic = 'error' ## Deploying With a static export, Next.js can be deployed and hosted on any web server that can serve HTML/CSS/JS static assets. When running `next build`, Next.js generates the static export into the `out` folder. For example, let's say you have the following routes: * `/` * `/blog/[id]` After running `next build`, Next.js will generate the following files: * `/out/index.html` * `/out/404.html` * `/out/blog/post-1.html` * `/out/blog/post-2.html` If you are using a static host like Nginx, you can configure rewrites from incoming requests to the correct files: server { listen 80; server_name acme.com; root /var/www/out; location / { try_files $uri $uri.html $uri/ =404; } # This is necessary when `trailingSlash: false`. # You can omit this when `trailingSlash: true`. location /blog/ { rewrite ^/blog/(.*)$ /blog/$1.html break; } error_page 404 /404.html; location = /404.html { internal; } } ## Version History | Version | Changes | | --- | --- | | `v14.0.0` | `next export` has been removed in favor of `"output": "export"` | | `v13.4.0` | App Router (Stable) adds enhanced static export support, including using React Server Components and Route Handlers. | | `v13.3.0` | `next export` is deprecated and replaced with `"output": "export"` | --- ## Page: https://nextjs.org/docs/14/app/building-your-application/deploying/multi-zones Examples * With Zones Multi-Zones are an approach to micro-frontends that separate a large application on a domain into smaller Next.js applications that each serve a set of paths. This is useful when there are collections of pages unrelated to the other pages in the application. By moving those pages to a separate zone (i.e., a separate application), you can reduce the size of each application which improves build times and removes code that is only necessary for one of the zones. For example, let's say you have the following set of pages that you would like to split up: * `/blog/*` for all blog posts * `/dashboard/*` for all pages when the user is logged-in to the dashboard * `/*` for the rest of your website not covered by other zones With Multi-Zones support, you can create three applications that all are served on the same domain and look the same to the user, but you can develop and deploy each of the applications independently.  Navigating between pages in the same zone will perform soft navigations, a navigation that does not require reloading the page. For example, in this diagram, navigating from `/` to `/products` will be a soft navigation. Navigating from a page in one zone to a page in another zone, such as from `/` to `/dashboard`, will perform a hard navigation, unloading the resources of the current page and loading the resources of the new page. Pages that are frequently visited together should live in the same zone to avoid hard navigations. ## How to define a zone There are no special APIs to define a new zone. A zone is a normal Next.js application where you also configure a basePath to avoid conflicts with pages and static files in other zones. /** @type {import('next').NextConfig} */ const nextConfig = { basePath: '/blog', } The default application that will handle all paths not sent to a more specific zone does not need a `basePath`. Next.js assets, such as JavaScript and CSS, will also be prefixed with `basePath` to make sure that they don't conflict with assets from other zones. These assets will be served under `/basePath/_next/...` for each of the zones. If the zone serves pages that don't share a common path prefix, such as `/home` and `/blog`, then you can also set `assetPrefix` to ensure that all Next.js assets are served under a unique path prefix for the zone without adding a path prefix to the rest of the routes in your application. ## How to route requests to the right zone With the Multi Zones set-up, you need to route the paths to the correct zone since they are served by different applications. You can use any HTTP proxy to do this, but one of the Next.js applications can also be used to route requests for the entire domain. To route to the correct zone using a Next.js application, you can use `rewrites`. For each path served by a different zone, you would add a rewrite rule to send that path to the domain of the other zone. For example: async rewrites() { return [ { source: '/blog', destination: `${process.env.BLOG_DOMAIN}/blog`, }, { source: '/blog/:path+', destination: `${process.env.BLOG_DOMAIN}/blog/:path+`, } ]; } `destination` should be a URL that is served by the zone, including scheme and domain. This should point to the zone's production domain, but it can also be used to route requests to `localhost` in local development. > **Good to know**: URL paths should be unique to a zone. For example, two zones trying to serve `/blog` would create a routing conflict. ## Linking between zones Links to paths in a different zone should use an `a` tag instead of the Next.js `<Link>` component. This is because Next.js will try to prefetch and soft navigate to any relative path in `<Link>` component, which will not work across zones. ## Sharing code The Next.js applications that make up the different zones can live in any repository. However, it is often convenient to put these zones in a monorepo to more easily share code. For zones that live in different repositories, code can also be shared using public or private NPM packages. Since the pages in different zones may be released at different times, feature flags can be useful for enabling or disabling features in unison across the different zones. For Next.js on Vercel applications, you can use a monorepo to deploy all affected zones with a single `git push`. --- ## Page: https://nextjs.org/docs/14/app/building-your-application/upgrading #### Subscribe to our newsletter Stay updated on new releases and features, guides, and case studies. --- ## Page: https://nextjs.org/docs/14/app/building-your-application/upgrading/codemods Codemods are transformations that run on your codebase programmatically. This allows a large number of changes to be programmatically applied without having to manually go through every file. Next.js provides Codemod transformations to help upgrade your Next.js codebase when an API is updated or deprecated. ## Usage In your terminal, navigate (`cd`) into your project's folder, then run: npx @next/codemod <transform> <path> Replacing `<transform>` and `<path>` with appropriate values. * `transform` - name of transform * `path` - files or directory to transform * `--dry` Do a dry-run, no code will be edited * `--print` Prints the changed output for comparison ## Next.js Codemods ### 14.0 #### Migrate `ImageResponse` imports ##### `next-og-import` npx @next/codemod@latest next-og-import . This codemod moves transforms imports from `next/server` to `next/og` for usage of Dynamic OG Image Generation. For example: import { ImageResponse } from 'next/server' Transforms into: import { ImageResponse } from 'next/og' #### Use `viewport` export ##### `metadata-to-viewport-export` npx @next/codemod@latest metadata-to-viewport-export . This codemod migrates certain viewport metadata to `viewport` export. For example: export const metadata = { title: 'My App', themeColor: 'dark', viewport: { width: 1, }, } Transforms into: export const metadata = { title: 'My App', } export const viewport = { width: 1, themeColor: 'dark', } ### 13.2 #### Use Built-in Font ##### `built-in-next-font` npx @next/codemod@latest built-in-next-font . This codemod uninstalls the `@next/font` package and transforms `@next/font` imports into the built-in `next/font`. For example: import { Inter } from '@next/font/google' Transforms into: import { Inter } from 'next/font/google' ### 13.0 #### Rename Next Image Imports ##### `next-image-to-legacy-image` npx @next/codemod@latest next-image-to-legacy-image . Safely renames `next/image` imports in existing Next.js 10, 11, or 12 applications to `next/legacy/image` in Next.js 13. Also renames `next/future/image` to `next/image`. For example: import Image1 from 'next/image' import Image2 from 'next/future/image' export default function Home() { return ( <div> <Image1 src="/test.jpg" width="200" height="300" /> <Image2 src="/test.png" width="500" height="400" /> </div> ) } Transforms into: // 'next/image' becomes 'next/legacy/image' import Image1 from 'next/legacy/image' // 'next/future/image' becomes 'next/image' import Image2 from 'next/image' export default function Home() { return ( <div> <Image1 src="/test.jpg" width="200" height="300" /> <Image2 src="/test.png" width="500" height="400" /> </div> ) } #### Migrate to the New Image Component ##### `next-image-experimental` npx @next/codemod@latest next-image-experimental . Dangerously migrates from `next/legacy/image` to the new `next/image` by adding inline styles and removing unused props. * Removes `layout` prop and adds `style`. * Removes `objectFit` prop and adds `style`. * Removes `objectPosition` prop and adds `style`. * Removes `lazyBoundary` prop. * Removes `lazyRoot` prop. #### Remove `<a>` Tags From Link Components ##### `new-link` npx @next/codemod@latest new-link . Remove `<a>` tags inside Link Components, or add a `legacyBehavior` prop to Links that cannot be auto-fixed. For example: <Link href="/about"> <a>About</a> </Link> // transforms into <Link href="/about"> About </Link> <Link href="/about"> <a onClick={() => console.log('clicked')}>About</a> </Link> // transforms into <Link href="/about" onClick={() => console.log('clicked')}> About </Link> In cases where auto-fixing can't be applied, the `legacyBehavior` prop is added. This allows your app to keep functioning using the old behavior for that particular link. const Component = () => <a>About</a> <Link href="/about"> <Component /> </Link> // becomes <Link href="/about" legacyBehavior> <Component /> </Link> ### 11 #### Migrate from CRA ##### `cra-to-next` npx @next/codemod cra-to-next Migrates a Create React App project to Next.js; creating a Pages Router and necessary config to match behavior. Client-side only rendering is leveraged initially to prevent breaking compatibility due to `window` usage during SSR and can be enabled seamlessly to allow the gradual adoption of Next.js specific features. Please share any feedback related to this transform in this discussion. ### 10 #### Add React imports ##### `add-missing-react-import` npx @next/codemod add-missing-react-import Transforms files that do not import `React` to include the import in order for the new React JSX transform to work. For example: export default class Home extends React.Component { render() { return <div>Hello World</div> } } Transforms into: import React from 'react' export default class Home extends React.Component { render() { return <div>Hello World</div> } } ### 9 #### Transform Anonymous Components into Named Components ##### `name-default-component` npx @next/codemod name-default-component **Versions 9 and above.** Transforms anonymous components into named components to make sure they work with Fast Refresh. For example: export default function () { return <div>Hello World</div> } Transforms into: export default function MyComponent() { return <div>Hello World</div> } The component will have a camel-cased name based on the name of the file, and it also works with arrow functions. ### 8 #### Transform AMP HOC into page config ##### `withamp-to-config` npx @next/codemod withamp-to-config Transforms the `withAmp` HOC into Next.js 9 page configuration. For example: // Before import { withAmp } from 'next/amp' function Home() { return <h1>My AMP Page</h1> } export default withAmp(Home) // After export default function Home() { return <h1>My AMP Page</h1> } export const config = { amp: true, } ### 6 #### Use `withRouter` ##### `url-to-withrouter` npx @next/codemod url-to-withrouter Transforms the deprecated automatically injected `url` property on top level pages to using `withRouter` and the `router` property it injects. Read more here: https://nextjs.org/docs/messages/url-deprecated For example: import React from 'react' export default class extends React.Component { render() { const { pathname } = this.props.url return <div>Current pathname: {pathname}</div> } } import React from 'react' import { withRouter } from 'next/router' export default withRouter( class extends React.Component { render() { const { pathname } = this.props.router return <div>Current pathname: {pathname}</div> } } ) This is one case. All the cases that are transformed (and tested) can be found in the `__testfixtures__` directory. --- ## Page: https://nextjs.org/docs/14/app/building-your-application/upgrading/app-router-migration ## App Router Incremental Adoption Guide This guide will help you: * Update your Next.js application from version 12 to version 13 * Upgrade features that work in both the `pages` and the `app` directories * Incrementally migrate your existing application from `pages` to `app` ### Node.js Version The minimum Node.js version is now **v18.17**. See the Node.js documentation for more information. ### Next.js Version To update to Next.js version 13, run the following command using your preferred package manager: npm install next@latest react@latest react-dom@latest ### ESLint Version If you're using ESLint, you need to upgrade your ESLint version: npm install -D eslint-config-next@latest > **Good to know**: You may need to restart the ESLint server in VS Code for the ESLint changes to take effect. Open the Command Palette (`cmd+shift+p` on Mac; `ctrl+shift+p` on Windows) and search for `ESLint: Restart ESLint Server`. ## Next Steps After you've updated, see the following sections for next steps: * Upgrade new features: A guide to help you upgrade to new features such as the improved Image and Link Components. * Migrate from the `pages` to `app` directory: A step-by-step guide to help you incrementally migrate from the `pages` to the `app` directory. ## Upgrading New Features Next.js 13 introduced the new App Router with new features and conventions. The new Router is available in the `app` directory and co-exists with the `pages` directory. Upgrading to Next.js 13 does **not** require using the new App Router. You can continue using `pages` with new features that work in both directories, such as the updated Image component, Link component, Script component, and Font optimization. ### `<Image/>` Component Next.js 12 introduced new improvements to the Image Component with a temporary import: `next/future/image`. These improvements included less client-side JavaScript, easier ways to extend and style images, better accessibility, and native browser lazy loading. In version 13, this new behavior is now the default for `next/image`. There are two codemods to help you migrate to the new Image Component: * **`next-image-to-legacy-image` codemod**: Safely and automatically renames `next/image` imports to `next/legacy/image`. Existing components will maintain the same behavior. * **`next-image-experimental` codemod**: Dangerously adds inline styles and removes unused props. This will change the behavior of existing components to match the new defaults. To use this codemod, you need to run the `next-image-to-legacy-image` codemod first. ### `<Link>` Component The `<Link>` Component no longer requires manually adding an `<a>` tag as a child. This behavior was added as an experimental option in version 12.2 and is now the default. In Next.js 13, `<Link>` always renders `<a>` and allows you to forward props to the underlying tag. For example: import Link from 'next/link' // Next.js 12: `<a>` has to be nested otherwise it's excluded <Link href="/about"> <a>About</a> </Link> // Next.js 13: `<Link>` always renders `<a>` under the hood <Link href="/about"> About </Link> To upgrade your links to Next.js 13, you can use the `new-link` codemod. ### `<Script>` Component The behavior of `next/script` has been updated to support both `pages` and `app`, but some changes need to be made to ensure a smooth migration: * Move any `beforeInteractive` scripts you previously included in `_document.js` to the root layout file (`app/layout.tsx`). * The experimental `worker` strategy does not yet work in `app` and scripts denoted with this strategy will either have to be removed or modified to use a different strategy (e.g. `lazyOnload`). * `onLoad`, `onReady`, and `onError` handlers will not work in Server Components so make sure to move them to a Client Component or remove them altogether. ### Font Optimization Previously, Next.js helped you optimize fonts by inlining font CSS. Version 13 introduces the new `next/font` module which gives you the ability to customize your font loading experience while still ensuring great performance and privacy. `next/font` is supported in both the `pages` and `app` directories. While inlining CSS still works in `pages`, it does not work in `app`. You should use `next/font` instead. See the Font Optimization page to learn how to use `next/font`. ## Migrating from `pages` to `app` > **🎥 Watch:** Learn how to incrementally adopt the App Router → YouTube (16 minutes). Moving to the App Router may be the first time using React features that Next.js builds on top of such as Server Components, Suspense, and more. When combined with new Next.js features such as special files and layouts, migration means new concepts, mental models, and behavioral changes to learn. We recommend reducing the combined complexity of these updates by breaking down your migration into smaller steps. The `app` directory is intentionally designed to work simultaneously with the `pages` directory to allow for incremental page-by-page migration. * The `app` directory supports nested routes _and_ layouts. Learn more. * Use nested folders to define routes and a special `page.js` file to make a route segment publicly accessible. Learn more. * Special file conventions are used to create UI for each route segment. The most common special files are `page.js` and `layout.js`. * Use `page.js` to define UI unique to a route. * Use `layout.js` to define UI that is shared across multiple routes. * `.js`, `.jsx`, or `.tsx` file extensions can be used for special files. * You can colocate other files inside the `app` directory such as components, styles, tests, and more. Learn more. * Data fetching functions like `getServerSideProps` and `getStaticProps` have been replaced with a new API inside `app`. `getStaticPaths` has been replaced with `generateStaticParams`. * `pages/_app.js` and `pages/_document.js` have been replaced with a single `app/layout.js` root layout. Learn more. * `pages/_error.js` has been replaced with more granular `error.js` special files. Learn more. * `pages/404.js` has been replaced with the `not-found.js` file. * `pages/api/*` API Routes have been replaced with the `route.js` (Route Handler) special file. ### Step 1: Creating the `app` directory Update to the latest Next.js version (requires 13.4 or greater): npm install next@latest Then, create a new `app` directory at the root of your project (or `src/` directory). ### Step 2: Creating a Root Layout Create a new `app/layout.tsx` file inside the `app` directory. This is a root layout that will apply to all routes inside `app`. export default function RootLayout({ // Layouts must accept a children prop. // This will be populated with nested layouts or pages children, }: { children: React.ReactNode }) { return ( <html lang="en"> <body>{children}</body> </html> ) } * The `app` directory **must** include a root layout. * The root layout must define `<html>`, and `<body>` tags since Next.js does not automatically create them * The root layout replaces the `pages/_app.tsx` and `pages/_document.tsx` files. * `.js`, `.jsx`, or `.tsx` extensions can be used for layout files. To manage `<head>` HTML elements, you can use the built-in SEO support: import { Metadata } from 'next' export const metadata: Metadata = { title: 'Home', description: 'Welcome to Next.js', } #### Migrating `_document.js` and `_app.js` If you have an existing `_app` or `_document` file, you can copy the contents (e.g. global styles) to the root layout (`app/layout.tsx`). Styles in `app/layout.tsx` will _not_ apply to `pages/*`. You should keep `_app`/`_document` while migrating to prevent your `pages/*` routes from breaking. Once fully migrated, you can then safely delete them. If you are using any React Context providers, they will need to be moved to a Client Component. #### Migrating the `getLayout()` pattern to Layouts (Optional) Next.js recommended adding a property to Page components to achieve per-page layouts in the `pages` directory. This pattern can be replaced with native support for nested layouts in the `app` directory. See before and after example **Before** export default function DashboardLayout({ children }) { return ( <div> <h2>My Dashboard</h2> {children} </div> ) } import DashboardLayout from '../components/DashboardLayout' export default function Page() { return <p>My Page</p> } Page.getLayout = function getLayout(page) { return <DashboardLayout>{page}</DashboardLayout> } **After** * Remove the `Page.getLayout` property from `pages/dashboard/index.js` and follow the steps for migrating pages to the `app` directory. export default function Page() { return <p>My Page</p> } * Move the contents of `DashboardLayout` into a new Client Component to retain `pages` directory behavior. 'use client' // this directive should be at top of the file, before any imports. // This is a Client Component export default function DashboardLayout({ children }) { return ( <div> <h2>My Dashboard</h2> {children} </div> ) } * Import the `DashboardLayout` into a new `layout.js` file inside the `app` directory. import DashboardLayout from './DashboardLayout' // This is a Server Component export default function Layout({ children }) { return <DashboardLayout>{children}</DashboardLayout> } * You can incrementally move non-interactive parts of `DashboardLayout.js` (Client Component) into `layout.js` (Server Component) to reduce the amount of component JavaScript you send to the client. ### Step 3: Migrating `next/head` In the `pages` directory, the `next/head` React component is used to manage `<head>` HTML elements such as `title` and `meta` . In the `app` directory, `next/head` is replaced with the new built-in SEO support. **Before:** import Head from 'next/head' export default function Page() { return ( <> <Head> <title>My page title</title> </Head> </> ) } **After:** import { Metadata } from 'next' export const metadata: Metadata = { title: 'My Page Title', } export default function Page() { return '...' } See all metadata options. ### Step 4: Migrating Pages * Pages in the `app` directory are Server Components by default. This is different from the `pages` directory where pages are Client Components. * Data fetching has changed in `app`. `getServerSideProps`, `getStaticProps` and `getInitialProps` have been replaced with a simpler API. * The `app` directory uses nested folders to define routes and a special `page.js` file to make a route segment publicly accessible. * | `pages` Directory | `app` Directory | Route | | --- | --- | --- | | `index.js` | `page.js` | `/` | | `about.js` | `about/page.js` | `/about` | | `blog/[slug].js` | `blog/[slug]/page.js` | `/blog/post-1` | We recommend breaking down the migration of a page into two main steps: * Step 1: Move the default exported Page Component into a new Client Component. * Step 2: Import the new Client Component into a new `page.js` file inside the `app` directory. > **Good to know**: This is the easiest migration path because it has the most comparable behavior to the `pages` directory. **Step 1: Create a new Client Component** * Create a new separate file inside the `app` directory (i.e. `app/home-page.tsx` or similar) that exports a Client Component. To define Client Components, add the `'use client'` directive to the top of the file (before any imports). * Similar to the Pages Router, there is an optimization step to prerender Client Components to static HTML on the initial page load. * Move the default exported page component from `pages/index.js` to `app/home-page.tsx`. 'use client' // This is a Client Component (same as components in the `pages` directory) // It receives data as props, has access to state and effects, and is // prerendered on the server during the initial page load. export default function HomePage({ recentPosts }) { return ( <div> {recentPosts.map((post) => ( <div key={post.id}>{post.title}</div> ))} </div> ) } **Step 2: Create a new page** * Create a new `app/page.tsx` file inside the `app` directory. This is a Server Component by default. * Import the `home-page.tsx` Client Component into the page. * If you were fetching data in `pages/index.js`, move the data fetching logic directly into the Server Component using the new data fetching APIs. See the data fetching upgrade guide for more details. // Import your Client Component import HomePage from './home-page' async function getPosts() { const res = await fetch('https://...') const posts = await res.json() return posts } export default async function Page() { // Fetch data directly in a Server Component const recentPosts = await getPosts() // Forward fetched data to your Client Component return <HomePage recentPosts={recentPosts} /> } * If your previous page used `useRouter`, you'll need to update to the new routing hooks. Learn more. * Start your development server and visit `http://localhost:3000`. You should see your existing index route, now served through the app directory. ### Step 5: Migrating Routing Hooks A new router has been added to support the new behavior in the `app` directory. In `app`, you should use the three new hooks imported from `next/navigation`: `useRouter()`, `usePathname()`, and `useSearchParams()`. * The new `useRouter` hook is imported from `next/navigation` and has different behavior to the `useRouter` hook in `pages` which is imported from `next/router`. * The `useRouter` hook imported from `next/router` is not supported in the `app` directory but can continue to be used in the `pages` directory. * The new `useRouter` does not return the `pathname` string. Use the separate `usePathname` hook instead. * The new `useRouter` does not return the `query` object. Use the separate `useSearchParams` hook instead. * You can use `useSearchParams` and `usePathname` together to listen to page changes. See the Router Events section for more details. * These new hooks are only supported in Client Components. They cannot be used in Server Components. 'use client' import { useRouter, usePathname, useSearchParams } from 'next/navigation' export default function ExampleClientComponent() { const router = useRouter() const pathname = usePathname() const searchParams = useSearchParams() // ... } In addition, the new `useRouter` hook has the following changes: * `isFallback` has been removed because `fallback` has been replaced. * The `locale`, `locales`, `defaultLocales`, `domainLocales` values have been removed because built-in i18n Next.js features are no longer necessary in the `app` directory. Learn more about i18n. * `basePath` has been removed. The alternative will not be part of `useRouter`. It has not yet been implemented. * `asPath` has been removed because the concept of `as` has been removed from the new router. * `isReady` has been removed because it is no longer necessary. During static rendering, any component that uses the `useSearchParams()` hook will skip the prerendering step and instead be rendered on the client at runtime. View the `useRouter()` API reference. ### Step 6: Migrating Data Fetching Methods The `pages` directory uses `getServerSideProps` and `getStaticProps` to fetch data for pages. Inside the `app` directory, these previous data fetching functions are replaced with a simpler API built on top of `fetch()` and `async` React Server Components. export default async function Page() { // This request should be cached until manually invalidated. // Similar to `getStaticProps`. // `force-cache` is the default and can be omitted. const staticData = await fetch(`https://...`, { cache: 'force-cache' }) // This request should be refetched on every request. // Similar to `getServerSideProps`. const dynamicData = await fetch(`https://...`, { cache: 'no-store' }) // This request should be cached with a lifetime of 10 seconds. // Similar to `getStaticProps` with the `revalidate` option. const revalidatedData = await fetch(`https://...`, { next: { revalidate: 10 }, }) return <div>...</div> } #### Server-side Rendering (`getServerSideProps`) In the `pages` directory, `getServerSideProps` is used to fetch data on the server and forward props to the default exported React component in the file. The initial HTML for the page is prerendered from the server, followed by "hydrating" the page in the browser (making it interactive). // `pages` directory export async function getServerSideProps() { const res = await fetch(`https://...`) const projects = await res.json() return { props: { projects } } } export default function Dashboard({ projects }) { return ( <ul> {projects.map((project) => ( <li key={project.id}>{project.name}</li> ))} </ul> ) } In the `app` directory, we can colocate our data fetching inside our React components using Server Components. This allows us to send less JavaScript to the client, while maintaining the rendered HTML from the server. By setting the `cache` option to `no-store`, we can indicate that the fetched data should never be cached. This is similar to `getServerSideProps` in the `pages` directory. // `app` directory // This function can be named anything async function getProjects() { const res = await fetch(`https://...`, { cache: 'no-store' }) const projects = await res.json() return projects } export default async function Dashboard() { const projects = await getProjects() return ( <ul> {projects.map((project) => ( <li key={project.id}>{project.name}</li> ))} </ul> ) } #### Accessing Request Object In the `pages` directory, you can retrieve request-based data based on the Node.js HTTP API. For example, you can retrieve the `req` object from `getServerSideProps` and use it to retrieve the request's cookies and headers. // `pages` directory export async function getServerSideProps({ req, query }) { const authHeader = req.getHeaders()['authorization']; const theme = req.cookies['theme']; return { props: { ... }} } export default function Page(props) { return ... } The `app` directory exposes new read-only functions to retrieve request data: * `headers()`: Based on the Web Headers API, and can be used inside Server Components to retrieve request headers. * `cookies()`: Based on the Web Cookies API, and can be used inside Server Components to retrieve cookies. // `app` directory import { cookies, headers } from 'next/headers' async function getData() { const authHeader = headers().get('authorization') return '...' } export default async function Page() { // You can use `cookies()` or `headers()` inside Server Components // directly or in your data fetching function const theme = cookies().get('theme') const data = await getData() return '...' } #### Static Site Generation (`getStaticProps`) In the `pages` directory, the `getStaticProps` function is used to pre-render a page at build time. This function can be used to fetch data from an external API or directly from a database, and pass this data down to the entire page as it's being generated during the build. // `pages` directory export async function getStaticProps() { const res = await fetch(`https://...`) const projects = await res.json() return { props: { projects } } } export default function Index({ projects }) { return projects.map((project) => <div>{project.name}</div>) } In the `app` directory, data fetching with `fetch()` will default to `cache: 'force-cache'`, which will cache the request data until manually invalidated. This is similar to `getStaticProps` in the `pages` directory. // `app` directory // This function can be named anything async function getProjects() { const res = await fetch(`https://...`) const projects = await res.json() return projects } export default async function Index() { const projects = await getProjects() return projects.map((project) => <div>{project.name}</div>) } #### Dynamic paths (`getStaticPaths`) In the `pages` directory, the `getStaticPaths` function is used to define the dynamic paths that should be pre-rendered at build time. // `pages` directory import PostLayout from '@/components/post-layout' export async function getStaticPaths() { return { paths: [{ params: { id: '1' } }, { params: { id: '2' } }], } } export async function getStaticProps({ params }) { const res = await fetch(`https://.../posts/${params.id}`) const post = await res.json() return { props: { post } } } export default function Post({ post }) { return <PostLayout post={post} /> } In the `app` directory, `getStaticPaths` is replaced with `generateStaticParams`. `generateStaticParams` behaves similarly to `getStaticPaths`, but has a simplified API for returning route parameters and can be used inside layouts. The return shape of `generateStaticParams` is an array of segments instead of an array of nested `param` objects or a string of resolved paths. // `app` directory import PostLayout from '@/components/post-layout' export async function generateStaticParams() { return [{ id: '1' }, { id: '2' }] } async function getPost(params) { const res = await fetch(`https://.../posts/${params.id}`) const post = await res.json() return post } export default async function Post({ params }) { const post = await getPost(params) return <PostLayout post={post} /> } Using the name `generateStaticParams` is more appropriate than `getStaticPaths` for the new model in the `app` directory. The `get` prefix is replaced with a more descriptive `generate`, which sits better alone now that `getStaticProps` and `getServerSideProps` are no longer necessary. The `Paths` suffix is replaced by `Params`, which is more appropriate for nested routing with multiple dynamic segments. * * * #### Replacing `fallback` In the `pages` directory, the `fallback` property returned from `getStaticPaths` is used to define the behavior of a page that isn't pre-rendered at build time. This property can be set to `true` to show a fallback page while the page is being generated, `false` to show a 404 page, or `blocking` to generate the page at request time. // `pages` directory export async function getStaticPaths() { return { paths: [], fallback: 'blocking' }; } export async function getStaticProps({ params }) { ... } export default function Post({ post }) { return ... } In the `app` directory the `config.dynamicParams` property controls how params outside of `generateStaticParams` are handled: * **`true`**: (default) Dynamic segments not included in `generateStaticParams` are generated on demand. * **`false`**: Dynamic segments not included in `generateStaticParams` will return a 404. This replaces the `fallback: true | false | 'blocking'` option of `getStaticPaths` in the `pages` directory. The `fallback: 'blocking'` option is not included in `dynamicParams` because the difference between `'blocking'` and `true` is negligible with streaming. // `app` directory export const dynamicParams = true; export async function generateStaticParams() { return [...] } async function getPost(params) { ... } export default async function Post({ params }) { const post = await getPost(params); return ... } With `dynamicParams` set to `true` (the default), when a route segment is requested that hasn't been generated, it will be server-rendered and cached. #### Incremental Static Regeneration (`getStaticProps` with `revalidate`) In the `pages` directory, the `getStaticProps` function allows you to add a `revalidate` field to automatically regenerate a page after a certain amount of time. // `pages` directory export async function getStaticProps() { const res = await fetch(`https://.../posts`) const posts = await res.json() return { props: { posts }, revalidate: 60, } } export default function Index({ posts }) { return ( <Layout> <PostList posts={posts} /> </Layout> ) } In the `app` directory, data fetching with `fetch()` can use `revalidate`, which will cache the request for the specified amount of seconds. // `app` directory async function getPosts() { const res = await fetch(`https://.../posts`, { next: { revalidate: 60 } }) const data = await res.json() return data.posts } export default async function PostList() { const posts = await getPosts() return posts.map((post) => <div>{post.name}</div>) } #### API Routes API Routes continue to work in the `pages/api` directory without any changes. However, they have been replaced by Route Handlers in the `app` directory. Route Handlers allow you to create custom request handlers for a given route using the Web Request and Response APIs. export async function GET(request: Request) {} > **Good to know**: If you previously used API routes to call an external API from the client, you can now use Server Components instead to securely fetch data. Learn more about data fetching. ### Step 7: Styling In the `pages` directory, global stylesheets are restricted to only `pages/_app.js`. With the `app` directory, this restriction has been lifted. Global styles can be added to any layout, page, or component. * CSS Modules * Tailwind CSS * Global Styles * CSS-in-JS * External Stylesheets * Sass #### Tailwind CSS If you're using Tailwind CSS, you'll need to add the `app` directory to your `tailwind.config.js` file: module.exports = { content: [ './app/**/*.{js,ts,jsx,tsx,mdx}', // <-- Add this line './pages/**/*.{js,ts,jsx,tsx,mdx}', './components/**/*.{js,ts,jsx,tsx,mdx}', ], } You'll also need to import your global styles in your `app/layout.js` file: import '../styles/globals.css' export default function RootLayout({ children }) { return ( <html lang="en"> <body>{children}</body> </html> ) } Learn more about styling with Tailwind CSS ## Codemods Next.js provides Codemod transformations to help upgrade your codebase when a feature is deprecated. See Codemods for more information. --- ## Page: https://nextjs.org/docs/14/app/building-your-application/upgrading/version-14 You are currently viewing documentation for version 14 of Next.js. ## Upgrading from 13 to 14 To update to Next.js version 14, run the following command using your preferred package manager: Terminal npm i next@latest react@latest react-dom@latest eslint-config-next@latest Terminal yarn add next@latest react@latest react-dom@latest eslint-config-next@latest Terminal pnpm up next react react-dom eslint-config-next --latest Terminal bun add next@latest react@latest react-dom@latest eslint-config-next@latest > **Good to know:** If you are using TypeScript, ensure you also upgrade `@types/react` and `@types/react-dom` to their latest versions. ### v14 Summary * The minimum Node.js version has been bumped from 16.14 to 18.17, since 16.x has reached end-of-life. * The `next export` command has been removed in favor of `output: 'export'` config. Please see the docs for more information. * The `next/server` import for `ImageResponse` was renamed to `next/og`. A codemod is available to safely and automatically rename your imports. * The `@next/font` package has been fully removed in favor of the built-in `next/font`. A codemod is available to safely and automatically rename your imports. * The WASM target for `next-swc` has been removed. --- ## Page: https://nextjs.org/docs/14/app/building-your-application/upgrading/from-vite This guide will help you migrate an existing Vite application to Next.js. ## Why Switch? There are several reasons why you might want to switch from Vite to Next.js: ### Slow initial page loading time If you have built your application with the default Vite plugin for React, your application is a purely client-side application. Client-side only applications, also known as single-page applications (SPAs), often experience slow initial page loading time. This happens due to a couple of reasons: 1. The browser needs to wait for the React code and your entire application bundle to download and run before your code is able to send requests to load some data. 2. Your application code grows with every new feature and extra dependency you add. ### No automatic code splitting The previous issue of slow loading times can be somewhat managed with code splitting. However, if you try to do code splitting manually, you'll often make performance worse. It's easy to inadvertently introduce network waterfalls when code-splitting manually. Next.js provides automatic code splitting built into its router. ### Network waterfalls A common cause of poor performance occurs when applications make sequential client-server requests to fetch data. One common pattern for data fetching in an SPA is to initially render a placeholder, and then fetch data after the component has mounted. Unfortunately, this means that a child component that fetches data can't start fetching until the parent component has finished loading its own data. While fetching data on the client is supported with Next.js, it also gives you the option to shift data fetching to the server, which can eliminate client-server waterfalls. ### Fast and intentional loading states With built-in support for streaming through React Suspense, you can be more intentional about which parts of your UI you want to load first and in what order without introducing network waterfalls. This enables you to build pages that are faster to load and eliminate layout shifts. ### Choose the data fetching strategy Depending on your needs, Next.js allows you to choose your data fetching strategy on a page and component basis. You can decide to fetch at build time, at request time on the server, or on the client. For example, you can fetch data from your CMS and render your blog posts at build time, which can then be efficiently cached on a CDN. ### Middleware Next.js Middleware allows you to run code on the server before a request is completed. This is especially useful to avoid having a flash of unauthenticated content when the user visits an authenticated-only page by redirecting the user to a login page. The middleware is also useful for experimentation and internationalization. ### Built-in Optimizations Images, fonts, and third-party scripts often have significant impact on an application's performance. Next.js comes with built-in components that automatically optimize those for you. ## Migration Steps Our goal with this migration is to get a working Next.js application as quickly as possible, so that you can then adopt Next.js features incrementally. To begin with, we'll keep it as a purely client-side application (SPA) without migrating your existing router. This helps minimize the chances of encountering issues during the migration process and reduces merge conflicts. ### Step 1: Install the Next.js Dependency The first thing you need to do is to install `next` as a dependency: npm install next@latest ### Step 2: Create the Next.js Configuration File Create a `next.config.mjs` at the root of your project. This file will hold your Next.js configuration options. /** @type {import('next').NextConfig} */ const nextConfig = { output: 'export', // Outputs a Single-Page Application (SPA). distDir: './dist', // Changes the build output directory to `./dist/`. } export default nextConfig > **Good to know:** You can use either `.js` or `.mjs` for your Next.js configuration file. ### Step 3: Update TypeScript Configuration If you're using TypeScript, you need to update your `tsconfig.json` file with the following changes to make it compatible with Next.js. If you're not using TypeScript, you can skip this step. 1. Remove the project reference to `tsconfig.node.json` 2. Add `./dist/types/**/*.ts` and `./next-env.d.ts` to the `include` array 3. Add `./node_modules` to the `exclude` array 4. Add `{ "name": "next" }` to the `plugins` array in `compilerOptions`: `"plugins": [{ "name": "next" }]` 5. Set `esModuleInterop` to `true`: `"esModuleInterop": true` 6. Set `jsx` to `preserve`: `"jsx": "preserve"` 7. Set `allowJs` to `true`: `"allowJs": true` 8. Set `forceConsistentCasingInFileNames` to `true`: `"forceConsistentCasingInFileNames": true` 9. Set `incremental` to `true`: `"incremental": true` Here's an example of a working `tsconfig.json` with those changes: { "compilerOptions": { "target": "ES2020", "useDefineForClassFields": true, "lib": ["ES2020", "DOM", "DOM.Iterable"], "module": "ESNext", "esModuleInterop": true, "skipLibCheck": true, "moduleResolution": "bundler", "allowImportingTsExtensions": true, "resolveJsonModule": true, "isolatedModules": true, "noEmit": true, "jsx": "preserve", "strict": true, "noUnusedLocals": true, "noUnusedParameters": true, "noFallthroughCasesInSwitch": true, "allowJs": true, "forceConsistentCasingInFileNames": true, "incremental": true, "plugins": [{ "name": "next" }] }, "include": ["./src", "./dist/types/**/*.ts", "./next-env.d.ts"], "exclude": ["./node_modules"] } You can find more information about configuring TypeScript on the Next.js docs. ### Step 4: Create the Root Layout A Next.js App Router application must include a root layout file, which is a React Server Component that will wrap all pages in your application. This file is defined at the top level of the `app` directory. The closest equivalent to the root layout file in a Vite application is the `index.html` file, which contains your `<html>`, `<head>`, and `<body>` tags. In this step, you'll convert your `index.html` file into a root layout file: 1. Create a new `app` directory in your `src` directory. 2. Create a new `layout.tsx` file inside that `app` directory: export default function RootLayout({ children, }: { children: React.ReactNode }) { return null } > **Good to know**: `.js`, `.jsx`, or `.tsx` extensions can be used for Layout files. 3. Copy the content of your `index.html` file into the previously created `<RootLayout>` component while replacing the `body.div#root` and `body.script` tags with `<div id="root">{children}</div>`: export default function RootLayout({ children, }: { children: React.ReactNode }) { return ( <html lang="en"> <head> <meta charset="UTF-8" /> <link rel="icon" type="image/svg+xml" href="/icon.svg" /> <meta name="viewport" content="width=device-width, initial-scale=1.0" /> <title>My App</title> <meta name="description" content="My App is a..." /> </head> <body> <div id="root">{children}</div> </body> </html> ) } 4. Next.js already includes by default the meta charset and meta viewport tags, so you can safely remove those from your `<head>`: export default function RootLayout({ children, }: { children: React.ReactNode }) { return ( <html lang="en"> <head> <link rel="icon" type="image/svg+xml" href="/icon.svg" /> <title>My App</title> <meta name="description" content="My App is a..." /> </head> <body> <div id="root">{children}</div> </body> </html> ) } 5. Any metadata files such as `favicon.ico`, `icon.png`, `robots.txt` are automatically added to the application `<head>` tag as long as you have them placed into the top level of the `app` directory. After moving all supported files into the `app` directory you can safely delete their `<link>` tags: export default function RootLayout({ children, }: { children: React.ReactNode }) { return ( <html lang="en"> <head> <title>My App</title> <meta name="description" content="My App is a..." /> </head> <body> <div id="root">{children}</div> </body> </html> ) } 6. Finally, Next.js can manage your last `<head>` tags with the Metadata API. Move your final metadata info into an exported `metadata` object: import type { Metadata } from 'next' export const metadata: Metadata = { title: 'My App', description: 'My App is a...', } export default function RootLayout({ children, }: { children: React.ReactNode }) { return ( <html lang="en"> <body> <div id="root">{children}</div> </body> </html> ) } With the above changes, you shifted from declaring everything in your `index.html` to using Next.js' convention-based approach built into the framework (Metadata API). This approach enables you to more easily improve your SEO and web shareability of your pages. ### Step 5: Create the Entrypoint Page On Next.js you declare an entrypoint for your application by creating a `page.tsx` file. The closest equivalent of this file on Vite is your `main.tsx` file. In this step, you’ll set up the entrypoint of your application. 1. **Create a `[[...slug]]` directory in your `app` directory.** Since in this guide we're aiming first to set up our Next.js as an SPA (Single Page Application), you need your page entrypoint to catch all possible routes of your application. For that, create a new `[[...slug]]` directory in your `app` directory. This directory is what is called an optional catch-all route segment. Next.js uses a file-system based router where directories are used to define routes. This special directory will make sure that all routes of your application will be directed to its containing `page.tsx` file. 2. **Create a new `page.tsx` file inside the `app/[[...slug]]` directory with the following content:** import '../../index.css' export function generateStaticParams() { return [{ slug: [''] }] } export default function Page() { return '...' // We'll update this } > **Good to know**: `.js`, `.jsx`, or `.tsx` extensions can be used for Page files. This file is a Server Component. When you run `next build`, the file is prerendered into a static asset. It does _not_ require any dynamic code. This file imports our global CSS and tells `generateStaticParams` we are only going to generate one route, the index route at `/`. Now, let's move the rest of our Vite application which will run client-only. 'use client' import React from 'react' import dynamic from 'next/dynamic' const App = dynamic(() => import('../../App'), { ssr: false }) export function ClientOnly() { return <App /> } This file is a Client Component, defined by the `'use client'` directive. Client Components are still prerendered to HTML on the server before being sent to the client. Since we want a client-only application to start, we can configure Next.js to disable prerendering from the `App` component down. const App = dynamic(() => import('../../App'), { ssr: false }) Now, update your entrypoint page to use the new component: import '../../index.css' import { ClientOnly } from './client' export function generateStaticParams() { return [{ slug: [''] }] } export default function Page() { return <ClientOnly /> } ### Step 6: Update Static Image Imports Next.js handles static image imports slightly different from Vite. With Vite, importing an image file will return its public URL as a string: import image from './img.png' // `image` will be '/assets/img.2d8efhg.png' in production export default function App() { return <img src={image} /> } With Next.js, static image imports return an object. The object can then be used directly with the Next.js `<Image>` component, or you can use the object's `src` property with your existing `<img>` tag. The `<Image>` component has the added benefits of automatic image optimization. The `<Image>` component automatically sets the `width` and `height` attributes of the resulting `<img>` based on the image's dimensions. This prevents layout shifts when the image loads. However, this can cause issues if your app contains images with only one of their dimensions being styled without the other styled to `auto`. When not styled to `auto`, the dimension will default to the `<img>` dimension attribute's value, which can cause the image to appear distorted. Keeping the `<img>` tag will reduce the amount of changes in your application and prevent the above issues. You can then optionally later migrate to the `<Image>` component to take advantage of optimizing images by configuring a loader, or moving to the default Next.js server which has automatic image optimization. 1. **Convert absolute import paths for images imported from `/public` into relative imports:** // Before import logo from '/logo.png' // After import logo from '../public/logo.png' 2. **Pass the image `src` property instead of the whole image object to your `<img>` tag:** // Before <img src={logo} /> // After <img src={logo.src} /> Alternatively, you can reference the public URL for the image asset based on the filename. For example, `public/logo.png` will serve the image at `/logo.png` for your application, which would be the `src` value. > **Warning:** If you're using TypeScript, you might encounter type errors when accessing the `src` property. You can safely ignore those for now. They will be fixed by the end of this guide. ### Step 7: Migrate the Environment Variables Next.js has support for `.env` environment variables similar to Vite. The main difference is the prefix used to expose environment variables on the client-side. * Change all environment variables with the `VITE_` prefix to `NEXT_PUBLIC_`. Vite exposes a few built-in environment variables on the special `import.meta.env` object which aren’t supported by Next.js. You need to update their usage as follows: * `import.meta.env.MODE` ⇒ `process.env.NODE_ENV` * `import.meta.env.PROD` ⇒ `process.env.NODE_ENV === 'production'` * `import.meta.env.DEV` ⇒ `process.env.NODE_ENV !== 'production'` * `import.meta.env.SSR` ⇒ `typeof window !== 'undefined'` Next.js also doesn't provide a built-in `BASE_URL` environment variable. However, you can still configure one, if you need it: 1. **Add the following to your `.env` file:** # ... NEXT_PUBLIC_BASE_PATH="/some-base-path" 2. **Set `basePath` to `process.env.NEXT_PUBLIC_BASE_PATH` in your `next.config.mjs` file:** /** @type {import('next').NextConfig} */ const nextConfig = { output: 'export', // Outputs a Single-Page Application (SPA). distDir: './dist', // Changes the build output directory to `./dist/`. basePath: process.env.NEXT_PUBLIC_BASE_PATH, // Sets the base path to `/some-base-path`. } export default nextConfig 3. **Update `import.meta.env.BASE_URL` usages to `process.env.NEXT_PUBLIC_BASE_PATH`** ### Step 8: Update Scripts in `package.json` You should now be able to run your application to test if you successfully migrated to Next.js. But before that, you need to update your `scripts` in your `package.json` with Next.js related commands, and add `.next` and `next-env.d.ts` to your `.gitignore`: { "scripts": { "dev": "next dev", "build": "next build", "start": "next start" } } # ... .next next-env.d.ts dist Now run `npm run dev`, and open `http://localhost:3000`. You should see your application now running on Next.js. > **Example:** Check out this pull request for a working example of a Vite application migrated to Next.js. ### Step 9: Clean Up You can now clean up your codebase from Vite related artifacts: * Delete `main.tsx` * Delete `index.html` * Delete `vite-env.d.ts` * Delete `tsconfig.node.json` * Delete `vite.config.ts` * Uninstall Vite dependencies ## Next Steps If everything went according to plan, you now have a functioning Next.js application running as a single-page application. However, you aren't yet taking advantage of most of Next.js' benefits, but you can now start making incremental changes to reap all the benefits. Here's what you might want to do next: * Migrate from React Router to the Next.js App Router to get: * Automatic code splitting * Streaming Server-Rendering * React Server Components * Optimize images with the `<Image>` component * Optimize fonts with `next/font` * Optimize third-party scripts with the `<Script>` component * Update your ESLint configuration to support Next.js rules --- ## Page: https://nextjs.org/docs/14/app/building-your-application/upgrading/from-create-react-app This guide will help you migrate an existing Create React App site to Next.js. ## Why Switch? There are several reasons why you might want to switch from Create React App to Next.js: ### Slow initial page loading time Create React App uses purely client-side React. Client-side only applications, also known as single-page applications (SPAs), often experience slow initial page loading time. This happens due to a couple of reasons: 1. The browser needs to wait for the React code and your entire application bundle to download and run before your code is able to send requests to load data. 2. Your application code grows with every new feature and dependency you add. ### No automatic code splitting The previous issue of slow loading times can be somewhat managed with code splitting. However, if you try to do code splitting manually, you'll often make performance worse. It's easy to inadvertently introduce network waterfalls when code-splitting manually. Next.js provides automatic code splitting built into its router. ### Network waterfalls A common cause of poor performance occurs when applications make sequential client-server requests to fetch data. One common pattern for data fetching in an SPA is to initially render a placeholder, and then fetch data after the component has mounted. Unfortunately, this means that a child component that fetches data can't start fetching until the parent component has finished loading its own data. While fetching data on the client is supported with Next.js, it also gives you the option to shift data fetching to the server, which can eliminate client-server waterfalls. ### Fast and intentional loading states With built-in support for streaming through React Suspense, you can be more intentional about which parts of your UI you want to load first and in what order without introducing network waterfalls. This enables you to build pages that are faster to load and eliminate layout shifts. ### Choose the data fetching strategy Depending on your needs, Next.js allows you to choose your data fetching strategy on a page and component basis. You can decide to fetch at build time, at request time on the server, or on the client. For example, you can fetch data from your CMS and render your blog posts at build time, which can then be efficiently cached on a CDN. ### Middleware Next.js Middleware allows you to run code on the server before a request is completed. This is especially useful to avoid having a flash of unauthenticated content when the user visits an authenticated-only page by redirecting the user to a login page. The middleware is also useful for experimentation and internationalization. ### Built-in Optimizations Images, fonts, and third-party scripts often have significant impact on an application's performance. Next.js comes with built-in components that automatically optimize those for you. ## Migration Steps Our goal with this migration is to get a working Next.js application as quickly as possible, so that you can then adopt Next.js features incrementally. To begin with, we'll keep it as a purely client-side application (SPA) without migrating your existing router. This helps minimize the chances of encountering issues during the migration process and reduces merge conflicts. ### Step 1: Install the Next.js Dependency The first thing you need to do is to install `next` as a dependency: npm install next@latest ### Step 2: Create the Next.js Configuration File Create a `next.config.mjs` at the root of your project. This file will hold your Next.js configuration options. /** @type {import('next').NextConfig} */ const nextConfig = { output: 'export', // Outputs a Single-Page Application (SPA). distDir: './dist', // Changes the build output directory to `./dist/`. } export default nextConfig ### Step 3: Update TypeScript Configuration If you're using TypeScript, you need to update your `tsconfig.json` file with the following changes to make it compatible with Next.js: { "compilerOptions": { "target": "es5", "lib": ["dom", "dom.iterable", "esnext"], "allowJs": true, "skipLibCheck": true, "strict": false, "forceConsistentCasingInFileNames": true, "noEmit": true, "esModuleInterop": true, "module": "esnext", "moduleResolution": "node", "resolveJsonModule": true, "isolatedModules": true, "jsx": "preserve", "baseUrl": ".", "incremental": true, "plugins": [ { "name": "next" } ], "strictNullChecks": true }, "include": [ "next-env.d.ts", "**/*.ts", "**/*.tsx", ".next/types/**/*.ts", "./dist/types/**/*.ts" ], "exclude": ["node_modules"] } You can find more information about configuring TypeScript on the Next.js docs. ### Step 4: Create the Root Layout A Next.js App Router application must include a root layout file, which is a React Server Component that will wrap all pages in your application. This file is defined at the top level of the `app` directory. The closest equivalent to the root layout file in a CRA application is the `index.html` file, which contains your `<html>`, `<head>`, and `<body>` tags. In this step, you'll convert your `index.html` file into a root layout file: 1. Create a new `app` directory in your `src` directory. 2. Create a new `layout.tsx` file inside that `app` directory: export default function RootLayout({ children, }: { children: React.ReactNode }) { return null } > **Good to know**: `.js`, `.jsx`, or `.tsx` extensions can be used for Layout files. Copy the content of your `index.html` file into the previously created `<RootLayout>` component while replacing the `body.div#root` and `body.script` tags with `<div id="root">{children}</div>`: export default function RootLayout({ children, }: { children: React.ReactNode }) { return ( <html lang="en"> <head> <meta charset="UTF-8" /> <link rel="icon" href="%PUBLIC_URL%/favicon.ico" /> <meta name="viewport" content="width=device-width, initial-scale=1" /> <title>React App</title> <meta name="description" content="Web site created..." /> </head> <body> <div id="root">{children}</div> </body> </html> ) } > **Good to know**: We'll ignore the manifest file, additional iconography other than the favicon, and testing configuration, but if these are requirements, Next.js also supports these options. ### Step 5: Metadata Next.js already includes by default the meta charset and meta viewport tags, so you can safely remove those from your `<head>`: export default function RootLayout({ children, }: { children: React.ReactNode }) { return ( <html lang="en"> <head> <link rel="icon" href="%PUBLIC_URL%/favicon.ico" /> <title>React App</title> <meta name="description" content="Web site created..." /> </head> <body> <div id="root">{children}</div> </body> </html> ) } Any metadata files such as `favicon.ico`, `icon.png`, `robots.txt` are automatically added to the application `<head>` tag as long as you have them placed into the top level of the `app` directory. After moving all supported files into the `app` directory you can safely delete their `<link>` tags: export default function RootLayout({ children, }: { children: React.ReactNode }) { return ( <html lang="en"> <head> <title>React App</title> <meta name="description" content="Web site created..." /> </head> <body> <div id="root">{children}</div> </body> </html> ) } Finally, Next.js can manage your last `<head>` tags with the Metadata API. Move your final metadata info into an exported `metadata` object: import type { Metadata } from 'next' export const metadata: Metadata = { title: 'React App', description: 'Web site created with Next.js.', } export default function RootLayout({ children, }: { children: React.ReactNode }) { return ( <html lang="en"> <body> <div id="root">{children}</div> </body> </html> ) } With the above changes, you shifted from declaring everything in your `index.html` to using Next.js' convention-based approach built into the framework (Metadata API). This approach enables you to more easily improve your SEO and web shareability of your pages. ### Step 6: Styles Like Create React App, Next.js has built-in support for CSS Modules. If you're using a global CSS file, import it into your `app/layout.tsx` file: import '../index.css' // ... If you're using Tailwind, you'll need to install `postcss` and `autoprefixer`: npm install postcss autoprefixer Then, create a `postcss.config.js` file at the root of your project: module.exports = { plugins: { tailwindcss: {}, autoprefixer: {}, }, } ### Step 7: Create the Entrypoint Page On Next.js you declare an entrypoint for your application by creating a `page.tsx` file. The closest equivalent of this file on CRA is your `src/index.tsx` file. In this step, you’ll set up the entry point of your application. **Create a `[[...slug]]` directory in your `app` directory.** Since this guide is aiming to first set up our Next.js as an SPA (Single Page Application), you need your page entry point to catch all possible routes of your application. For that, create a new `[[...slug]]` directory in your `app` directory. This directory is what is called an optional catch-all route segment. Next.js uses a file-system based router where directories are used to define routes. This special directory will make sure that all routes of your application will be directed to its containing `page.tsx` file. **Create a new `page.tsx` file inside the `app/[[...slug]]` directory with the following content:** import '../../index.css' export function generateStaticParams() { return [{ slug: [''] }] } export default function Page() { return '...' // We'll update this } This file is a Server Component. When you run `next build`, the file is prerendered into a static asset. It does _not_ require any dynamic code. This file imports our global CSS and tells `generateStaticParams` we are only going to generate one route, the index route at `/`. Now, let's move the rest of our CRA application which will run client-only. 'use client' import React from 'react' import dynamic from 'next/dynamic' const App = dynamic(() => import('../../App'), { ssr: false }) export function ClientOnly() { return <App /> } This file is a Client Component, defined by the `'use client'` directive. Client Components are still prerendered to HTML on the server before being sent to the client. Since we want a client-only application to start, we can configure Next.js to disable prerendering from the `App` component down. const App = dynamic(() => import('../../App'), { ssr: false }) Now, update your entrypoint page to use the new component: import '../../index.css' import { ClientOnly } from './client' export function generateStaticParams() { return [{ slug: [''] }] } export default function Page() { return <ClientOnly /> } ### Step 8: Update Static Image Imports Next.js handles static image imports slightly different from CRA. With CRA, importing an image file will return its public URL as a string: import image from './img.png' export default function App() { return <img src={image} /> } With Next.js, static image imports return an object. The object can then be used directly with the Next.js `<Image>` component, or you can use the object's `src` property with your existing `<img>` tag. The `<Image>` component has the added benefits of automatic image optimization. The `<Image>` component automatically sets the `width` and `height` attributes of the resulting `<img>` based on the image's dimensions. This prevents layout shifts when the image loads. However, this can cause issues if your app contains images with only one of their dimensions being styled without the other styled to `auto`. When not styled to `auto`, the dimension will default to the `<img>` dimension attribute's value, which can cause the image to appear distorted. Keeping the `<img>` tag will reduce the amount of changes in your application and prevent the above issues. You can then optionally later migrate to the `<Image>` component to take advantage of optimizing images by configuring a loader, or moving to the default Next.js server which has automatic image optimization. **Convert absolute import paths for images imported from `/public` into relative imports:** // Before import logo from '/logo.png' // After import logo from '../public/logo.png' **Pass the image `src` property instead of the whole image object to your `<img>` tag:** // Before <img src={logo} /> // After <img src={logo.src} /> Alternatively, you can reference the public URL for the image asset based on the filename. For example, `public/logo.png` will serve the image at `/logo.png` for your application, which would be the `src` value. > **Warning:** If you're using TypeScript, you might encounter type errors when accessing the `src` property. You can safely ignore those for now. They will be fixed by the end of this guide. ### Step 9: Migrate the Environment Variables Next.js has support for `.env` environment variables similar to CRA. The main difference is the prefix used to expose environment variables on the client-side. Change all environment variables with the `REACT_APP_` prefix to `NEXT_PUBLIC_`. ### Step 10: Update Scripts in `package.json` You should now be able to run your application to test if you successfully migrated to Next.js. But before that, you need to update your `scripts` in your `package.json` with Next.js related commands, and add `.next`, `next-env.d.ts`, and `dist` to your `.gitignore` file: { "scripts": { "dev": "next dev", "build": "next build", "start": "next start" } } # ... .next next-env.d.ts dist Now run `npm run dev`, and open `http://localhost:3000`. You should see your application now running on Next.js. ### Step 11: Clean Up You can now clean up your codebase from Create React App related artifacts: * Delete `src/index.tsx` * Delete `public/index.html` * Delete `reportWebVitals` setup * Uninstall CRA dependencies (`react-scripts`) ## Bundler Compatibility Create React App and Next.js both default to using webpack for bundling. When migrating your CRA application to Next.js, you might have a custom webpack configuration you're looking to migrate. Next.js supports providing a custom webpack configuration. Further, Next.js has support for Turbopack through `next dev --turbo` to improve your local dev performance. Turbopack supports some webpack loaders as well for compatibility and incremental adoption. ## Next Steps If everything went according to plan, you now have a functioning Next.js application running as a single-page application. However, you aren't yet taking advantage of most of Next.js' benefits, but you can now start making incremental changes to reap all the benefits. Here's what you might want to do next: * Migrate from React Router to the Next.js App Router to get: * Automatic code splitting * Streaming Server-Rendering * React Server Components * Optimize images with the `<Image>` component * Optimize fonts with `next/font` * Optimize third-party scripts with the `<Script>` component * Update your ESLint configuration to support Next.js rules > **Good to know:** Using a static export does not currently support using the `useParams` hook. --- ## Page: https://nextjs.org/docs/14/app/api-reference #### Subscribe to our newsletter Stay updated on new releases and features, guides, and case studies. --- ## Page: https://nextjs.org/docs/14/app/api-reference/components #### Subscribe to our newsletter Stay updated on new releases and features, guides, and case studies. --- ## Page: https://nextjs.org/docs/14/app/api-reference/components/font ## Font Module This API reference will help you understand how to use `next/font/google` and `next/font/local`. For features and usage, please see the Optimizing Fonts page. ### Font Function Arguments For usage, review Google Fonts and Local Fonts. | Key | `font/google` | `font/local` | Type | Required | | --- | --- | --- | --- | --- | | `src` | | | String or Array of Objects | Yes | | `weight` | | | String or Array | Required/Optional | | `style` | | | String or Array | \- | | `subsets` | | | Array of Strings | \- | | `axes` | | | Array of Strings | \- | | `display` | | | String | \- | | `preload` | | | Boolean | \- | | `fallback` | | | Array of Strings | \- | | `adjustFontFallback` | | | Boolean or String | \- | | `variable` | | | String | \- | | `declarations` | | | Array of Objects | \- | ### `src` The path of the font file as a string or an array of objects (with type `Array<{path: string, weight?: string, style?: string}>`) relative to the directory where the font loader function is called. Used in `next/font/local` * Required Examples: * `src:'./fonts/my-font.woff2'` where `my-font.woff2` is placed in a directory named `fonts` inside the `app` directory * `src:[{path: './inter/Inter-Thin.ttf', weight: '100',},{path: './inter/Inter-Regular.ttf',weight: '400',},{path: './inter/Inter-Bold-Italic.ttf', weight: '700',style: 'italic',},]` * if the font loader function is called in `app/page.tsx` using `src:'../styles/fonts/my-font.ttf'`, then `my-font.ttf` is placed in `styles/fonts` at the root of the project ### `weight` The font `weight` with the following possibilities: * A string with possible values of the weights available for the specific font or a range of values if it's a variable font * An array of weight values if the font is not a variable google font. It applies to `next/font/google` only. Used in `next/font/google` and `next/font/local` * Required if the font being used is **not** variable Examples: * `weight: '400'`: A string for a single weight value - for the font `Inter`, the possible values are `'100'`, `'200'`, `'300'`, `'400'`, `'500'`, `'600'`, `'700'`, `'800'`, `'900'` or `'variable'` where `'variable'` is the default) * `weight: '100 900'`: A string for the range between `100` and `900` for a variable font * `weight: ['100','400','900']`: An array of 3 possible values for a non variable font ### `style` The font `style` with the following possibilities: * A string value with default value of `'normal'` * An array of style values if the font is not a variable google font. It applies to `next/font/google` only. Used in `next/font/google` and `next/font/local` * Optional Examples: * `style: 'italic'`: A string - it can be `normal` or `italic` for `next/font/google` * `style: 'oblique'`: A string - it can take any value for `next/font/local` but is expected to come from standard font styles * `style: ['italic','normal']`: An array of 2 values for `next/font/google` - the values are from `normal` and `italic` ### `subsets` The font `subsets` defined by an array of string values with the names of each subset you would like to be preloaded. Fonts specified via `subsets` will have a link preload tag injected into the head when the `preload` option is true, which is the default. Used in `next/font/google` * Optional Examples: * `subsets: ['latin']`: An array with the subset `latin` You can find a list of all subsets on the Google Fonts page for your font. ### `axes` Some variable fonts have extra `axes` that can be included. By default, only the font weight is included to keep the file size down. The possible values of `axes` depend on the specific font. Used in `next/font/google` * Optional Examples: * `axes: ['slnt']`: An array with value `slnt` for the `Inter` variable font which has `slnt` as additional `axes` as shown here. You can find the possible `axes` values for your font by using the filter on the Google variable fonts page and looking for axes other than `wght` ### `display` The font `display` with possible string values of `'auto'`, `'block'`, `'swap'`, `'fallback'` or `'optional'` with default value of `'swap'`. Used in `next/font/google` and `next/font/local` * Optional Examples: * `display: 'optional'`: A string assigned to the `optional` value ### `preload` A boolean value that specifies whether the font should be preloaded or not. The default is `true`. Used in `next/font/google` and `next/font/local` * Optional Examples: * `preload: false` ### `fallback` The fallback font to use if the font cannot be loaded. An array of strings of fallback fonts with no default. * Optional Used in `next/font/google` and `next/font/local` Examples: * `fallback: ['system-ui', 'arial']`: An array setting the fallback fonts to `system-ui` or `arial` ### `adjustFontFallback` * For `next/font/google`: A boolean value that sets whether an automatic fallback font should be used to reduce Cumulative Layout Shift. The default is `true`. * For `next/font/local`: A string or boolean `false` value that sets whether an automatic fallback font should be used to reduce Cumulative Layout Shift. The possible values are `'Arial'`, `'Times New Roman'` or `false`. The default is `'Arial'`. Used in `next/font/google` and `next/font/local` * Optional Examples: * `adjustFontFallback: false`: for `next/font/google` * `adjustFontFallback: 'Times New Roman'`: for `next/font/local` ### `variable` A string value to define the CSS variable name to be used if the style is applied with the CSS variable method. Used in `next/font/google` and `next/font/local` * Optional Examples: * `variable: '--my-font'`: The CSS variable `--my-font` is declared ### `declarations` An array of font face descriptor key-value pairs that define the generated `@font-face` further. Used in `next/font/local` * Optional Examples: * `declarations: [{ prop: 'ascent-override', value: '90%' }]` ## Applying Styles You can apply the font styles in three ways: * `className` * `style` * CSS Variables ### `className` Returns a read-only CSS `className` for the loaded font to be passed to an HTML element. <p className={inter.className}>Hello, Next.js!</p> ### `style` Returns a read-only CSS `style` object for the loaded font to be passed to an HTML element, including `style.fontFamily` to access the font family name and fallback fonts. <p style={inter.style}>Hello World</p> ### CSS Variables If you would like to set your styles in an external style sheet and specify additional options there, use the CSS variable method. In addition to importing the font, also import the CSS file where the CSS variable is defined and set the variable option of the font loader object as follows: import { Inter } from 'next/font/google' import styles from '../styles/component.module.css' const inter = Inter({ variable: '--font-inter', }) To use the font, set the `className` of the parent container of the text you would like to style to the font loader's `variable` value and the `className` of the text to the `styles` property from the external CSS file. <main className={inter.variable}> <p className={styles.text}>Hello World</p> </main> Define the `text` selector class in the `component.module.css` CSS file as follows: .text { font-family: var(--font-inter); font-weight: 200; font-style: italic; } In the example above, the text `Hello World` is styled using the `Inter` font and the generated font fallback with `font-weight: 200` and `font-style: italic`. ## Using a font definitions file Every time you call the `localFont` or Google font function, that font will be hosted as one instance in your application. Therefore, if you need to use the same font in multiple places, you should load it in one place and import the related font object where you need it. This is done using a font definitions file. For example, create a `fonts.ts` file in a `styles` folder at the root of your app directory. Then, specify your font definitions as follows: import { Inter, Lora, Source_Sans_3 } from 'next/font/google' import localFont from 'next/font/local' // define your variable fonts const inter = Inter() const lora = Lora() // define 2 weights of a non-variable font const sourceCodePro400 = Source_Sans_3({ weight: '400' }) const sourceCodePro700 = Source_Sans_3({ weight: '700' }) // define a custom local font where GreatVibes-Regular.ttf is stored in the styles folder const greatVibes = localFont({ src: './GreatVibes-Regular.ttf' }) export { inter, lora, sourceCodePro400, sourceCodePro700, greatVibes } You can now use these definitions in your code as follows: import { inter, lora, sourceCodePro700, greatVibes } from '../styles/fonts' export default function Page() { return ( <div> <p className={inter.className}>Hello world using Inter font</p> <p style={lora.style}>Hello world using Lora font</p> <p className={sourceCodePro700.className}> Hello world using Source_Sans_3 font with weight 700 </p> <p className={greatVibes.className}>My title in Great Vibes font</p> </div> ) } To make it easier to access the font definitions in your code, you can define a path alias in your `tsconfig.json` or `jsconfig.json` files as follows: { "compilerOptions": { "paths": { "@/fonts": ["./styles/fonts"] } } } You can now import any font definition as follows: import { greatVibes, sourceCodePro400 } from '@/fonts' ## Version Changes | Version | Changes | | --- | --- | | `v13.2.0` | `@next/font` renamed to `next/font`. Installation no longer required. | | `v13.0.0` | `@next/font` was added. | --- ## Page: https://nextjs.org/docs/14/app/api-reference/components/image Examples * Image Component This API reference will help you understand how to use props and configuration options available for the Image Component. For features and usage, please see the Image Component page. import Image from 'next/image' export default function Page() { return ( <Image src="/profile.png" width={500} height={500} alt="Picture of the author" /> ) } ## Props Here's a summary of the props available for the Image Component: | Prop | Example | Type | Status | | --- | --- | --- | --- | | `src` | `src="/profile.png"` | String | Required | | `width` | `width={500}` | Integer (px) | Required | | `height` | `height={500}` | Integer (px) | Required | | `alt` | `alt="Picture of the author"` | String | Required | | `loader` | `loader={imageLoader}` | Function | \- | | `fill` | `fill={true}` | Boolean | \- | | `sizes` | `sizes="(max-width: 768px) 100vw, 33vw"` | String | \- | | `quality` | `quality={80}` | Integer (1-100) | \- | | `priority` | `priority={true}` | Boolean | \- | | `placeholder` | `placeholder="blur"` | String | \- | | `style` | `style={{objectFit: "contain"}}` | Object | \- | | `onLoadingComplete` | `onLoadingComplete={img => done())}` | Function | Deprecated | | `onLoad` | `onLoad={event => done())}` | Function | \- | | `onError` | `onError(event => fail()}` | Function | \- | | `loading` | `loading="lazy"` | String | \- | | `blurDataURL` | `blurDataURL="data:image/jpeg..."` | String | \- | | `overrideSrc` | `overrideSrc="/seo.png"` | String | \- | ## Required Props The Image Component requires the following properties: `src`, `width`, `height`, and `alt`. import Image from 'next/image' export default function Page() { return ( <div> <Image src="/profile.png" width={500} height={500} alt="Picture of the author" /> </div> ) } ### `src` Must be one of the following: * A statically imported image file * A path string. This can be either an absolute external URL, or an internal path depending on the loader prop. When using an external URL, you must add it to remotePatterns in `next.config.js`. ### `width` The `width` property represents the _rendered_ width in pixels, so it will affect how large the image appears. Required, except for statically imported images or images with the `fill` property. ### `height` The `height` property represents the _rendered_ height in pixels, so it will affect how large the image appears. Required, except for statically imported images or images with the `fill` property. ### `alt` The `alt` property is used to describe the image for screen readers and search engines. It is also the fallback text if images have been disabled or an error occurs while loading the image. It should contain text that could replace the image without changing the meaning of the page. It is not meant to supplement the image and should not repeat information that is already provided in the captions above or below the image. If the image is purely decorative or not intended for the user, the `alt` property should be an empty string (`alt=""`). Learn more ## Optional Props The `<Image />` component accepts a number of additional properties beyond those which are required. This section describes the most commonly-used properties of the Image component. Find details about more rarely-used properties in the Advanced Props section. ### `loader` A custom function used to resolve image URLs. A `loader` is a function returning a URL string for the image, given the following parameters: * `src` * `width` * `quality` Here is an example of using a custom loader: 'use client' import Image from 'next/image' const imageLoader = ({ src, width, quality }) => { return `https://example.com/${src}?w=${width}&q=${quality || 75}` } export default function Page() { return ( <Image loader={imageLoader} src="me.png" alt="Picture of the author" width={500} height={500} /> ) } > **Good to know**: Using props like `loader`, which accept a function, requires using Client Components to serialize the provided function. Alternatively, you can use the loaderFile configuration in `next.config.js` to configure every instance of `next/image` in your application, without passing a prop. ### `fill` fill={true} // {true} | {false} A boolean that causes the image to fill the parent element, which is useful when the `width` and `height` are unknown. The parent element _must_ assign `position: "relative"`, `position: "fixed"`, or `position: "absolute"` style. By default, the img element will automatically be assigned the `position: "absolute"` style. If no styles are applied to the image, the image will stretch to fit the container. You may prefer to set `object-fit: "contain"` for an image which is letterboxed to fit the container and preserve aspect ratio. Alternatively, `object-fit: "cover"` will cause the image to fill the entire container and be cropped to preserve aspect ratio. For this to look correct, the `overflow: "hidden"` style should be assigned to the parent element. For more information, see also: * `position` * `object-fit` * `object-position` ### `sizes` A string, similar to a media query, that provides information about how wide the image will be at different breakpoints. The value of `sizes` will greatly affect performance for images using `fill` or which are styled to have a responsive size. The `sizes` property serves two important purposes related to image performance: * First, the value of `sizes` is used by the browser to determine which size of the image to download, from `next/image`'s automatically generated `srcset`. When the browser chooses, it does not yet know the size of the image on the page, so it selects an image that is the same size or larger than the viewport. The `sizes` property allows you to tell the browser that the image will actually be smaller than full screen. If you don't specify a `sizes` value in an image with the `fill` property, a default value of `100vw` (full screen width) is used. * Second, the `sizes` property changes the behavior of the automatically generated `srcset` value. If no `sizes` value is present, a small `srcset` is generated, suitable for a fixed-size image (1x/2x/etc). If `sizes` is defined, a large `srcset` is generated, suitable for a responsive image (640w/750w/etc). If the `sizes` property includes sizes such as `50vw`, which represent a percentage of the viewport width, then the `srcset` is trimmed to not include any values which are too small to ever be necessary. For example, if you know your styling will cause an image to be full-width on mobile devices, in a 2-column layout on tablets, and a 3-column layout on desktop displays, you should include a sizes property such as the following: import Image from 'next/image' export default function Page() { return ( <div className="grid-element"> <Image fill src="/example.png" sizes="(max-width: 768px) 100vw, (max-width: 1200px) 50vw, 33vw" /> </div> ) } This example `sizes` could have a dramatic effect on performance metrics. Without the `33vw` sizes, the image selected from the server would be 3 times as wide as it needs to be. Because file size is proportional to the square of the width, without `sizes` the user would download an image that's 9 times larger than necessary. Learn more about `srcset` and `sizes`: * web.dev * mdn ### `quality` quality={75} // {number 1-100} The quality of the optimized image, an integer between `1` and `100`, where `100` is the best quality and therefore largest file size. Defaults to `75`. If the `qualities` configuration is defined in `next.config.js`, the `quality` prop must match one of the values defined in the configuration. > **Good to know**: If the original source image was already low quality, setting the quality prop too high could cause the resulting optimized image to be larger than the original source image. ### `priority` priority={false} // {false} | {true} When true, the image will be considered high priority and preload. Lazy loading is automatically disabled for images using `priority`. You should use the `priority` property on any image detected as the Largest Contentful Paint (LCP) element. It may be appropriate to have multiple priority images, as different images may be the LCP element for different viewport sizes. Should only be used when the image is visible above the fold. Defaults to `false`. ### `placeholder` placeholder = 'empty' // "empty" | "blur" | "data:image/..." A placeholder to use while the image is loading. Possible values are `blur`, `empty`, or `data:image/...`. Defaults to `empty`. When `blur`, the `blurDataURL` property will be used as the placeholder. If `src` is an object from a static import and the imported image is `.jpg`, `.png`, `.webp`, or `.avif`, then `blurDataURL` will be automatically populated, except when the image is detected to be animated. For dynamic images, you must provide the `blurDataURL` property. Solutions such as Plaiceholder can help with `base64` generation. When `data:image/...`, the Data URL will be used as the placeholder while the image is loading. When `empty`, there will be no placeholder while the image is loading, only empty space. Try it out: * Demo the `blur` placeholder * Demo the shimmer effect with data URL `placeholder` prop * Demo the color effect with `blurDataURL` prop ## Advanced Props In some cases, you may need more advanced usage. The `<Image />` component optionally accepts the following advanced properties. ### `style` Allows passing CSS styles to the underlying image element. const imageStyle = { borderRadius: '50%', border: '1px solid #fff', } export default function ProfileImage() { return <Image src="..." style={imageStyle} /> } Remember that the required width and height props can interact with your styling. If you use styling to modify an image's width, you should also style its height to `auto` to preserve its intrinsic aspect ratio, or your image will be distorted. ### `onLoadingComplete` 'use client' <Image onLoadingComplete={(img) => console.log(img.naturalWidth)} /> > **Warning**: Deprecated since Next.js 14 in favor of `onLoad`. A callback function that is invoked once the image is completely loaded and the placeholder has been removed. The callback function will be called with one argument, a reference to the underlying `<img>` element. > **Good to know**: Using props like `onLoadingComplete`, which accept a function, requires using Client Components to serialize the provided function. ### `onLoad` <Image onLoad={(e) => console.log(e.target.naturalWidth)} /> A callback function that is invoked once the image is completely loaded and the placeholder has been removed. The callback function will be called with one argument, the Event which has a `target` that references the underlying `<img>` element. > **Good to know**: Using props like `onLoad`, which accept a function, requires using Client Components to serialize the provided function. ### `onError` <Image onError={(e) => console.error(e.target.id)} /> A callback function that is invoked if the image fails to load. > **Good to know**: Using props like `onError`, which accept a function, requires using Client Components to serialize the provided function. ### `loading` > **Recommendation**: This property is only meant for advanced use cases. Switching an image to load with `eager` will normally **hurt performance**. We recommend using the `priority` property instead, which will eagerly preload the image. loading = 'lazy' // {lazy} | {eager} The loading behavior of the image. Defaults to `lazy`. When `lazy`, defer loading the image until it reaches a calculated distance from the viewport. When `eager`, load the image immediately. Learn more about the `loading` attribute. ### `blurDataURL` A Data URL to be used as a placeholder image before the `src` image successfully loads. Only takes effect when combined with `placeholder="blur"`. Must be a base64-encoded image. It will be enlarged and blurred, so a very small image (10px or less) is recommended. Including larger images as placeholders may harm your application performance. Try it out: * Demo the default `blurDataURL` prop * Demo the color effect with `blurDataURL` prop You can also generate a solid color Data URL to match the image. ### `unoptimized` unoptimized = {false} // {false} | {true} When true, the source image will be served as-is instead of changing quality, size, or format. Defaults to `false`. import Image from 'next/image' const UnoptimizedImage = (props) => { return <Image {...props} unoptimized /> } Since Next.js 12.3.0, this prop can be assigned to all images by updating `next.config.js` with the following configuration: module.exports = { images: { unoptimized: true, }, } ### `overrideSrc` When providing the `src` prop to the `<Image>` component, both the `srcset` and `src` attributes are generated automatically for the resulting `<img>`. <Image src="/me.jpg" /> <img srcset=" /_next/image?url=%2Fme.jpg&w=640&q=75 1x, /_next/image?url=%2Fme.jpg&w=828&q=75 2x " src="/_next/image?url=%2Fme.jpg&w=828&q=75" /> In some cases, it is not desirable to have the `src` attribute generated and you may wish to override it using the `overrideSrc` prop. For example, when upgrading an existing website from `<img>` to `<Image>`, you may wish to maintain the same `src` attribute for SEO purposes such as image ranking or avoiding recrawl. <Image src="/me.jpg" overrideSrc="/override.jpg" /> <img srcset=" /_next/image?url=%2Fme.jpg&w=640&q=75 1x, /_next/image?url=%2Fme.jpg&w=828&q=75 2x " src="/override.jpg" /> ### decoding A hint to the browser indicating if it should wait for the image to be decoded before presenting other content updates or not. Defaults to `async`. Possible values are the following: * `async` - Asynchronously decode the image and allow other content to be rendered before it completes. * `sync` - Synchronously decode the image for atomic presentation with other content. * `auto` - No preference for the decoding mode; the browser decides what's best. Learn more about the `decoding` attribute. ### Other Props Other properties on the `<Image />` component will be passed to the underlying `img` element with the exception of the following: * `srcSet`. Use Device Sizes instead. ## Configuration Options In addition to props, you can configure the Image Component in `next.config.js`. The following options are available: ### `localPatterns` You can optionally configure `localPatterns` in your `next.config.js` file in order to allow specific paths to be optimized and block all others paths. module.exports = { images: { localPatterns: [ { pathname: '/assets/images/**', search: '', }, ], }, } > **Good to know**: The example above will ensure the `src` property of `next/image` must start with `/assets/images/` and must not have a query string. Attempting to optimize any other path will respond with 400 Bad Request. ### `remotePatterns` To protect your application from malicious users, configuration is required in order to use external images. This ensures that only external images from your account can be served from the Next.js Image Optimization API. These external images can be configured with the `remotePatterns` property in your `next.config.js` file, as shown below: module.exports = { images: { remotePatterns: [ { protocol: 'https', hostname: 'example.com', port: '', pathname: '/account123/**', search: '', }, ], }, } > **Good to know**: The example above will ensure the `src` property of `next/image` must start with `https://example.com/account123/` and must not have a query string. Any other protocol, hostname, port, or unmatched path will respond with 400 Bad Request. Below is an example of the `remotePatterns` property in the `next.config.js` file using a wildcard pattern in the `hostname`: module.exports = { images: { remotePatterns: [ { protocol: 'https', hostname: '**.example.com', port: '', search: '', }, ], }, } > **Good to know**: The example above will ensure the `src` property of `next/image` must start with `https://img1.example.com` or `https://me.avatar.example.com` or any number of subdomains. It cannot have a port or query string. Any other protocol or unmatched hostname will respond with 400 Bad Request. Wildcard patterns can be used for both `pathname` and `hostname` and have the following syntax: * `*` match a single path segment or subdomain * `**` match any number of path segments at the end or subdomains at the beginning The `**` syntax does not work in the middle of the pattern. > **Good to know**: When omitting `protocol`, `port`, `pathname`, or `search` then the wildcard `**` is implied. This is not recommended because it may allow malicious actors to optimize urls you did not intend. Below is an example of the `remotePatterns` property in the `next.config.js` file using `search`: module.exports = { images: { remotePatterns: [ { protocol: 'https', hostname: 'assets.example.com', search: '?v=1727111025337', }, ], }, } > **Good to know**: The example above will ensure the `src` property of `next/image` must start with `https://assets.example.com` and must have the exact query string `?v=1727111025337`. Any other protocol or query string will respond with 400 Bad Request. ### `domains` > **Warning**: Deprecated since Next.js 14 in favor of strict `remotePatterns` in order to protect your application from malicious users. Only use `domains` if you own all the content served from the domain. Similar to `remotePatterns`, the `domains` configuration can be used to provide a list of allowed hostnames for external images. However, the `domains` configuration does not support wildcard pattern matching and it cannot restrict protocol, port, or pathname. Below is an example of the `domains` property in the `next.config.js` file: module.exports = { images: { domains: ['assets.acme.com'], }, } ### `loaderFile` If you want to use a cloud provider to optimize images instead of using the Next.js built-in Image Optimization API, you can configure the `loaderFile` in your `next.config.js` like the following: module.exports = { images: { loader: 'custom', loaderFile: './my/image/loader.js', }, } This must point to a file relative to the root of your Next.js application. The file must export a default function that returns a string, for example: 'use client' export default function myImageLoader({ src, width, quality }) { return `https://example.com/${src}?w=${width}&q=${quality || 75}` } Alternatively, you can use the `loader` prop to configure each instance of `next/image`. Examples: * Custom Image Loader Configuration > **Good to know**: Customizing the image loader file, which accepts a function, requires using Client Components to serialize the provided function. ## Advanced The following configuration is for advanced use cases and is usually not necessary. If you choose to configure the properties below, you will override any changes to the Next.js defaults in future updates. ### `deviceSizes` If you know the expected device widths of your users, you can specify a list of device width breakpoints using the `deviceSizes` property in `next.config.js`. These widths are used when the `next/image` component uses `sizes` prop to ensure the correct image is served for user's device. If no configuration is provided, the default below is used. module.exports = { images: { deviceSizes: [640, 750, 828, 1080, 1200, 1920, 2048, 3840], }, } ### `imageSizes` You can specify a list of image widths using the `images.imageSizes` property in your `next.config.js` file. These widths are concatenated with the array of device sizes to form the full array of sizes used to generate image srcsets. The reason there are two separate lists is that imageSizes is only used for images which provide a `sizes` prop, which indicates that the image is less than the full width of the screen. **Therefore, the sizes in imageSizes should all be smaller than the smallest size in deviceSizes.** If no configuration is provided, the default below is used. module.exports = { images: { imageSizes: [16, 32, 48, 64, 96, 128, 256, 384], }, } ### `qualities` The default Image Optimization API will automatically allow all qualities from 1 to 100. If you wish to restrict the allowed qualities, you can add configuration to `next.config.js`. module.exports = { images: { qualities: [25, 50, 75], }, } In this example above, only three qualities are allowed: 25, 50, and 75. If the `quality` prop does not match a value in this array, the image will fail with 400 Bad Request. ### `formats` The default Image Optimization API will automatically detect the browser's supported image formats via the request's `Accept` header. If the `Accept` head matches more than one of the configured formats, the first match in the array is used. Therefore, the array order matters. If there is no match (or the source image is animated), the Image Optimization API will fallback to the original image's format. If no configuration is provided, the default below is used. module.exports = { images: { formats: ['image/webp'], }, } You can enable AVIF support with the following configuration. module.exports = { images: { formats: ['image/avif', 'image/webp'], }, } > **Good to know**: > > * AVIF generally takes 20% longer to encode but it compresses 20% smaller compared to WebP. This means that the first time an image is requested, it will typically be slower and then subsequent requests that are cached will be faster. > * If you self-host with a Proxy/CDN in front of Next.js, you must configure the Proxy to forward the `Accept` header. ## Caching Behavior The following describes the caching algorithm for the default loader. For all other loaders, please refer to your cloud provider's documentation. Images are optimized dynamically upon request and stored in the `<distDir>/cache/images` directory. The optimized image file will be served for subsequent requests until the expiration is reached. When a request is made that matches a cached but expired file, the expired image is served stale immediately. Then the image is optimized again in the background (also called revalidation) and saved to the cache with the new expiration date. The cache status of an image can be determined by reading the value of the `x-nextjs-cache` response header. The possible values are the following: * `MISS` - the path is not in the cache (occurs at most once, on the first visit) * `STALE` - the path is in the cache but exceeded the revalidate time so it will be updated in the background * `HIT` - the path is in the cache and has not exceeded the revalidate time The expiration (or rather Max Age) is defined by either the `minimumCacheTTL` configuration or the upstream image `Cache-Control` header, whichever is larger. Specifically, the `max-age` value of the `Cache-Control` header is used. If both `s-maxage` and `max-age` are found, then `s-maxage` is preferred. The `max-age` is also passed-through to any downstream clients including CDNs and browsers. * You can configure `minimumCacheTTL` to increase the cache duration when the upstream image does not include `Cache-Control` header or the value is very low. * You can configure `deviceSizes` and `imageSizes` to reduce the total number of possible generated images. * You can configure formats to disable multiple formats in favor of a single image format. ### `minimumCacheTTL` You can configure the Time to Live (TTL) in seconds for cached optimized images. In many cases, it's better to use a Static Image Import which will automatically hash the file contents and cache the image forever with a `Cache-Control` header of `immutable`. module.exports = { images: { minimumCacheTTL: 60, }, } The expiration (or rather Max Age) of the optimized image is defined by either the `minimumCacheTTL` or the upstream image `Cache-Control` header, whichever is larger. If you need to change the caching behavior per image, you can configure `headers` to set the `Cache-Control` header on the upstream image (e.g. `/some-asset.jpg`, not `/_next/image` itself). There is no mechanism to invalidate the cache at this time, so its best to keep `minimumCacheTTL` low. Otherwise you may need to manually change the `src` prop or delete `<distDir>/cache/images`. ### `disableStaticImages` The default behavior allows you to import static files such as `import icon from './icon.png'` and then pass that to the `src` property. In some cases, you may wish to disable this feature if it conflicts with other plugins that expect the import to behave differently. You can disable static image imports inside your `next.config.js`: module.exports = { images: { disableStaticImages: true, }, } ### `dangerouslyAllowSVG` The default loader does not optimize SVG images for a few reasons. First, SVG is a vector format meaning it can be resized losslessly. Second, SVG has many of the same features as HTML/CSS, which can lead to vulnerabilities without proper Content Security Policy (CSP) headers. Therefore, we recommended using the `unoptimized` prop when the `src` prop is known to be SVG. This happens automatically when `src` ends with `".svg"`. However, if you need to serve SVG images with the default Image Optimization API, you can set `dangerouslyAllowSVG` inside your `next.config.js`: module.exports = { images: { dangerouslyAllowSVG: true, contentDispositionType: 'attachment', contentSecurityPolicy: "default-src 'self'; script-src 'none'; sandbox;", }, } In addition, it is strongly recommended to also set `contentDispositionType` to force the browser to download the image, as well as `contentSecurityPolicy` to prevent scripts embedded in the image from executing. ## Animated Images The default loader will automatically bypass Image Optimization for animated images and serve the image as-is. Auto-detection for animated files is best-effort and supports GIF, APNG, and WebP. If you want to explicitly bypass Image Optimization for a given animated image, use the unoptimized prop. ## Responsive Images The default generated `srcset` contains `1x` and `2x` images in order to support different device pixel ratios. However, you may wish to render a responsive image that stretches with the viewport. In that case, you'll need to set `sizes` as well as `style` (or `className`). You can render a responsive image using one of the following methods below. ### Responsive image using a static import If the source image is not dynamic, you can statically import to create a responsive image: import Image from 'next/image' import me from '../photos/me.jpg' export default function Author() { return ( <Image src={me} alt="Picture of the author" sizes="100vw" style={{ width: '100%', height: 'auto', }} /> ) } Try it out: * Demo the image responsive to viewport ### Responsive image with aspect ratio If the source image is a dynamic or a remote url, you will also need to provide `width` and `height` to set the correct aspect ratio of the responsive image: import Image from 'next/image' export default function Page({ photoUrl }) { return ( <Image src={photoUrl} alt="Picture of the author" sizes="100vw" style={{ width: '100%', height: 'auto', }} width={500} height={300} /> ) } Try it out: * Demo the image responsive to viewport ### Responsive image with `fill` If you don't know the aspect ratio, you will need to set the `fill` prop and set `position: relative` on the parent. Optionally, you can set `object-fit` style depending on the desired stretch vs crop behavior: import Image from 'next/image' export default function Page({ photoUrl }) { return ( <div style={{ position: 'relative', width: '300px', height: '500px' }}> <Image src={photoUrl} alt="Picture of the author" sizes="300px" fill style={{ objectFit: 'contain', }} /> </div> ) } Try it out: * Demo the `fill` prop ## Theme Detection CSS If you want to display a different image for light and dark mode, you can create a new component that wraps two `<Image>` components and reveals the correct one based on a CSS media query. .imgDark { display: none; } @media (prefers-color-scheme: dark) { .imgLight { display: none; } .imgDark { display: unset; } } import styles from './theme-image.module.css' import Image, { ImageProps } from 'next/image' type Props = Omit<ImageProps, 'src' | 'priority' | 'loading'> & { srcLight: string srcDark: string } const ThemeImage = (props: Props) => { const { srcLight, srcDark, ...rest } = props return ( <> <Image {...rest} src={srcLight} className={styles.imgLight} /> <Image {...rest} src={srcDark} className={styles.imgDark} /> </> ) } > **Good to know**: The default behavior of `loading="lazy"` ensures that only the correct image is loaded. You cannot use `priority` or `loading="eager"` because that would cause both images to load. Instead, you can use `fetchPriority="high"`. Try it out: * Demo light/dark mode theme detection ## getImageProps For more advanced use cases, you can call `getImageProps()` to get the props that would be passed to the underlying `<img>` element, and instead pass to them to another component, style, canvas, etc. This also avoid calling React `useState()` so it can lead to better performance, but it cannot be used with the `placeholder` prop because the placeholder will never be removed. ### Theme Detection Picture If you want to display a different image for light and dark mode, you can use the `<picture>` element to display a different image based on the user's preferred color scheme. import { getImageProps } from 'next/image' export default function Page() { const common = { alt: 'Theme Example', width: 800, height: 400 } const { props: { srcSet: dark }, } = getImageProps({ ...common, src: '/dark.png' }) const { props: { srcSet: light, ...rest }, } = getImageProps({ ...common, src: '/light.png' }) return ( <picture> <source media="(prefers-color-scheme: dark)" srcSet={dark} /> <source media="(prefers-color-scheme: light)" srcSet={light} /> <img {...rest} /> </picture> ) } ### Art Direction If you want to display a different image for mobile and desktop, sometimes called Art Direction, you can provide different `src`, `width`, `height`, and `quality` props to `getImageProps()`. import { getImageProps } from 'next/image' export default function Home() { const common = { alt: 'Art Direction Example', sizes: '100vw' } const { props: { srcSet: desktop }, } = getImageProps({ ...common, width: 1440, height: 875, quality: 80, src: '/desktop.jpg', }) const { props: { srcSet: mobile, ...rest }, } = getImageProps({ ...common, width: 750, height: 1334, quality: 70, src: '/mobile.jpg', }) return ( <picture> <source media="(min-width: 1000px)" srcSet={desktop} /> <source media="(min-width: 500px)" srcSet={mobile} /> <img {...rest} style={{ width: '100%', height: 'auto' }} /> </picture> ) } ### Background CSS You can even convert the `srcSet` string to the `image-set()` CSS function to optimize a background image. import { getImageProps } from 'next/image' function getBackgroundImage(srcSet = '') { const imageSet = srcSet .split(', ') .map((str) => { const [url, dpi] = str.split(' ') return `url("${url}") ${dpi}` }) .join(', ') return `image-set(${imageSet})` } export default function Home() { const { props: { srcSet }, } = getImageProps({ alt: '', width: 128, height: 128, src: '/img.png' }) const backgroundImage = getBackgroundImage(srcSet) const style = { height: '100vh', width: '100vw', backgroundImage } return ( <main style={style}> <h1>Hello World</h1> </main> ) } ## Known Browser Bugs This `next/image` component uses browser native lazy loading, which may fallback to eager loading for older browsers before Safari 15.4. When using the blur-up placeholder, older browsers before Safari 12 will fallback to empty placeholder. When using styles with `width`/`height` of `auto`, it is possible to cause Layout Shift on older browsers before Safari 15 that don't preserve the aspect ratio. For more details, see this MDN video. * Safari 15 - 16.3 display a gray border while loading. Safari 16.4 fixed this issue. Possible solutions: * Use CSS `@supports (font: -apple-system-body) and (-webkit-appearance: none) { img[loading="lazy"] { clip-path: inset(0.6px) } }` * Use `priority` if the image is above the fold * Firefox 67+ displays a white background while loading. Possible solutions: * Enable AVIF `formats` * Use `placeholder` ## Version History | Version | Changes | | --- | --- | | `v14.2.23` | `qualities` configuration added. | | `v14.2.15` | `decoding` prop added and `localPatterns` configuration added. | | `v14.2.14` | `remotePatterns.search` prop added. | | `v14.2.0` | `overrideSrc` prop added. | | `v14.1.0` | `getImageProps()` is stable. | | `v14.0.0` | `onLoadingComplete` prop and `domains` config deprecated. | | `v13.4.14` | `placeholder` prop support for `data:/image...` | | `v13.2.0` | `contentDispositionType` configuration added. | | `v13.0.6` | `ref` prop added. | | `v13.0.0` | The `next/image` import was renamed to `next/legacy/image`. The `next/future/image` import was renamed to `next/image`. A codemod is available to safely and automatically rename your imports. `<span>` wrapper removed. `layout`, `objectFit`, `objectPosition`, `lazyBoundary`, `lazyRoot` props removed. `alt` is required. `onLoadingComplete` receives reference to `img` element. Built-in loader config removed. | | `v12.3.0` | `remotePatterns` and `unoptimized` configuration is stable. | | `v12.2.0` | Experimental `remotePatterns` and experimental `unoptimized` configuration added. `layout="raw"` removed. | | `v12.1.1` | `style` prop added. Experimental support for `layout="raw"` added. | | `v12.1.0` | `dangerouslyAllowSVG` and `contentSecurityPolicy` configuration added. | | `v12.0.9` | `lazyRoot` prop added. | | `v12.0.0` | `formats` configuration added. AVIF support added. Wrapper `<div>` changed to `<span>`. | | `v11.1.0` | `onLoadingComplete` and `lazyBoundary` props added. | | `v11.0.0` | `src` prop support for static import. `placeholder` prop added. `blurDataURL` prop added. | | `v10.0.5` | `loader` prop added. | | `v10.0.1` | `layout` prop added. | | `v10.0.0` | `next/image` introduced. | --- ## Page: https://nextjs.org/docs/14/app/api-reference/components/link `<Link>` is a React component that extends the HTML `<a>` element to provide prefetching and client-side navigation between routes. It is the primary way to navigate between routes in Next.js. import Link from 'next/link' export default function Page() { return <Link href="/dashboard">Dashboard</Link> } ## Props Here's a summary of the props available for the Link Component: | Prop | Example | Type | Required | | --- | --- | --- | --- | | `href` | `href="/dashboard"` | String or Object | Yes | | `replace` | `replace={false}` | Boolean | \- | | `scroll` | `scroll={false}` | Boolean | \- | | `prefetch` | `prefetch={false}` | Boolean or null | \- | > **Good to know**: `<a>` tag attributes such as `className` or `target="_blank"` can be added to `<Link>` as props and will be passed to the underlying `<a>` element. ### `href` (required) The path or URL to navigate to. <Link href="/dashboard">Dashboard</Link> `href` can also accept an object, for example: // Navigate to /about?name=test <Link href={{ pathname: '/about', query: { name: 'test' }, }} > About </Link> ### `replace` **Defaults to `false`.** When `true`, `next/link` will replace the current history state instead of adding a new URL into the browser’s history stack. import Link from 'next/link' export default function Page() { return ( <Link href="/dashboard" replace> Dashboard </Link> ) } ### `scroll` **Defaults to `true`.** The default behavior of `<Link>` **is to scroll to the top of a new route or to maintain the scroll position for backwards and forwards navigation.** When `false`, `next/link` will _not_ scroll to the top of the page after a navigation. import Link from 'next/link' export default function Page() { return ( <Link href="/dashboard" scroll={false}> Dashboard </Link> ) } > **Good to know**: > > * Next.js will scroll to the Page if it is not visible in the viewport upon navigation. ### `prefetch` Prefetching happens when a `<Link />` component enters the user's viewport (initially or through scroll). Next.js prefetches and loads the linked route (denoted by the `href`) and its data in the background to improve the performance of client-side navigations. Prefetching is only enabled in production. * **`null` (default)**: Prefetch behavior depends on whether the route is static or dynamic. For static routes, the full route will be prefetched (including all its data). For dynamic routes, the partial route down to the nearest segment with a `loading.js` boundary will be prefetched. * `true`: The full route will be prefetched for both static and dynamic routes. * `false`: Prefetching will never happen both on entering the viewport and on hover. import Link from 'next/link' export default function Page() { return ( <Link href="/dashboard" prefetch={false}> Dashboard </Link> ) } ## Examples ### Linking to Dynamic Routes For dynamic routes, it can be handy to use template literals to create the link's path. For example, you can generate a list of links to the dynamic route `app/blog/[slug]/page.js`: import Link from 'next/link' function Page({ posts }) { return ( <ul> {posts.map((post) => ( <li key={post.id}> <Link href={`/blog/${post.slug}`}>{post.title}</Link> </li> ))} </ul> ) } ### If the child is a custom component that wraps an `<a>` tag If the child of `Link` is a custom component that wraps an `<a>` tag, you must add `passHref` to `Link`. This is necessary if you’re using libraries like styled-components. Without this, the `<a>` tag will not have the `href` attribute, which hurts your site's accessibility and might affect SEO. If you're using ESLint, there is a built-in rule `next/link-passhref` to ensure correct usage of `passHref`. import Link from 'next/link' import styled from 'styled-components' // This creates a custom component that wraps an <a> tag const RedLink = styled.a` color: red; ` function NavLink({ href, name }) { return ( <Link href={href} passHref legacyBehavior> <RedLink>{name}</RedLink> </Link> ) } export default NavLink * If you’re using emotion’s JSX pragma feature (`@jsx jsx`), you must use `passHref` even if you use an `<a>` tag directly. * The component should support `onClick` property to trigger navigation correctly ### If the child is a functional component If the child of `Link` is a functional component, in addition to using `passHref` and `legacyBehavior`, you must wrap the component in `React.forwardRef`: import Link from 'next/link' // `onClick`, `href`, and `ref` need to be passed to the DOM element // for proper handling const MyButton = React.forwardRef(({ onClick, href }, ref) => { return ( <a href={href} onClick={onClick} ref={ref}> Click Me </a> ) }) function Home() { return ( <Link href="/about" passHref legacyBehavior> <MyButton /> </Link> ) } export default Home ### With URL Object `Link` can also receive a URL object and it will automatically format it to create the URL string. Here's how to do it: import Link from 'next/link' function Home() { return ( <ul> <li> <Link href={{ pathname: '/about', query: { name: 'test' }, }} > About us </Link> </li> <li> <Link href={{ pathname: '/blog/[slug]', query: { slug: 'my-post' }, }} > Blog Post </Link> </li> </ul> ) } export default Home The above example has a link to: * A predefined route: `/about?name=test` * A dynamic route: `/blog/my-post` You can use every property as defined in the Node.js URL module documentation. ### Replace the URL instead of push The default behavior of the `Link` component is to `push` a new URL into the `history` stack. You can use the `replace` prop to prevent adding a new entry, as in the following example: <Link href="/about" replace> About us </Link> ### Disable scrolling to the top of the page The default behavior of `Link` is to scroll to the top of the page. When there is a hash defined it will scroll to the specific id, like a normal `<a>` tag. To prevent scrolling to the top / hash `scroll={false}` can be added to `Link`: <Link href="/#hashid" scroll={false}> Disables scrolling to the top </Link> ### Middleware It's common to use Middleware for authentication or other purposes that involve rewriting the user to a different page. In order for the `<Link />` component to properly prefetch links with rewrites via Middleware, you need to tell Next.js both the URL to display and the URL to prefetch. This is required to avoid un-necessary fetches to middleware to know the correct route to prefetch. For example, if you want to serve a `/dashboard` route that has authenticated and visitor views, you may add something similar to the following in your Middleware to redirect the user to the correct page: export function middleware(req) { const nextUrl = req.nextUrl if (nextUrl.pathname === '/dashboard') { if (req.cookies.authToken) { return NextResponse.rewrite(new URL('/auth/dashboard', req.url)) } else { return NextResponse.rewrite(new URL('/public/dashboard', req.url)) } } } In this case, you would want to use the following code in your `<Link />` component: import Link from 'next/link' import useIsAuthed from './hooks/useIsAuthed' export default function Page() { const isAuthed = useIsAuthed() const path = isAuthed ? '/auth/dashboard' : '/public/dashboard' return ( <Link as="/dashboard" href={path}> Dashboard </Link> ) } ## Version History | Version | Changes | | --- | --- | | `v13.0.0` | No longer requires a child `<a>` tag. A codemod is provided to automatically update your codebase. | | `v10.0.0` | `href` props pointing to a dynamic route are automatically resolved and no longer require an `as` prop. | | `v8.0.0` | Improved prefetching performance. | | `v1.0.0` | `next/link` introduced. | --- ## Page: https://nextjs.org/docs/14/app/api-reference/components/script This API reference will help you understand how to use props available for the Script Component. For features and usage, please see the Optimizing Scripts page. import Script from 'next/script' export default function Dashboard() { return ( <> <Script src="https://example.com/script.js" /> </> ) } ## Props Here's a summary of the props available for the Script Component: | Prop | Example | Type | Required | | --- | --- | --- | --- | | `src` | `src="http://example.com/script"` | String | Required unless inline script is used | | `strategy` | `strategy="lazyOnload"` | String | \- | | `onLoad` | `onLoad={onLoadFunc}` | Function | \- | | `onReady` | `onReady={onReadyFunc}` | Function | \- | | `onError` | `onError={onErrorFunc}` | Function | \- | ## Required Props The `<Script />` component requires the following properties. ### `src` A path string specifying the URL of an external script. This can be either an absolute external URL or an internal path. The `src` property is required unless an inline script is used. ## Optional Props The `<Script />` component accepts a number of additional properties beyond those which are required. ### `strategy` The loading strategy of the script. There are four different strategies that can be used: * `beforeInteractive`: Load before any Next.js code and before any page hydration occurs. * `afterInteractive`: (**default**) Load early but after some hydration on the page occurs. * `lazyOnload`: Load during browser idle time. * `worker`: (experimental) Load in a web worker. ### `beforeInteractive` Scripts that load with the `beforeInteractive` strategy are injected into the initial HTML from the server, downloaded before any Next.js module, and executed in the order they are placed before _any_ hydration occurs on the page. Scripts denoted with this strategy are preloaded and fetched before any first-party code, but their execution does not block page hydration from occurring. `beforeInteractive` scripts must be placed inside the root layout (`app/layout.tsx`) and are designed to load scripts that are needed by the entire site (i.e. the script will load when any page in the application has been loaded server-side). **This strategy should only be used for critical scripts that need to be fetched before any part of the page becomes interactive.** import Script from 'next/script' export default function RootLayout({ children, }: { children: React.ReactNode }) { return ( <html lang="en"> <body> {children} <Script src="https://example.com/script.js" strategy="beforeInteractive" /> </body> </html> ) } > **Good to know**: Scripts with `beforeInteractive` will always be injected inside the `head` of the HTML document regardless of where it's placed in the component. Some examples of scripts that should be loaded as soon as possible with `beforeInteractive` include: * Bot detectors * Cookie consent managers ### `afterInteractive` Scripts that use the `afterInteractive` strategy are injected into the HTML client-side and will load after some (or all) hydration occurs on the page. **This is the default strategy** of the Script component and should be used for any script that needs to load as soon as possible but not before any first-party Next.js code. `afterInteractive` scripts can be placed inside of any page or layout and will only load and execute when that page (or group of pages) is opened in the browser. import Script from 'next/script' export default function Page() { return ( <> <Script src="https://example.com/script.js" strategy="afterInteractive" /> </> ) } Some examples of scripts that are good candidates for `afterInteractive` include: * Tag managers * Analytics ### `lazyOnload` Scripts that use the `lazyOnload` strategy are injected into the HTML client-side during browser idle time and will load after all resources on the page have been fetched. This strategy should be used for any background or low priority scripts that do not need to load early. `lazyOnload` scripts can be placed inside of any page or layout and will only load and execute when that page (or group of pages) is opened in the browser. import Script from 'next/script' export default function Page() { return ( <> <Script src="https://example.com/script.js" strategy="lazyOnload" /> </> ) } Examples of scripts that do not need to load immediately and can be fetched with `lazyOnload` include: * Chat support plugins * Social media widgets ### `worker` > **Warning:** The `worker` strategy is not yet stable and does not yet work with the `app` directory. Use with caution. Scripts that use the `worker` strategy are off-loaded to a web worker in order to free up the main thread and ensure that only critical, first-party resources are processed on it. While this strategy can be used for any script, it is an advanced use case that is not guaranteed to support all third-party scripts. To use `worker` as a strategy, the `nextScriptWorkers` flag must be enabled in `next.config.js`: module.exports = { experimental: { nextScriptWorkers: true, }, } `worker` scripts can **only currently be used in the `pages/` directory**: import Script from 'next/script' export default function Home() { return ( <> <Script src="https://example.com/script.js" strategy="worker" /> </> ) } ### `onLoad` > **Warning:** `onLoad` does not yet work with Server Components and can only be used in Client Components. Further, `onLoad` can't be used with `beforeInteractive` – consider using `onReady` instead. Some third-party scripts require users to run JavaScript code once after the script has finished loading in order to instantiate content or call a function. If you are loading a script with either afterInteractive or lazyOnload as a loading strategy, you can execute code after it has loaded using the onLoad property. Here's an example of executing a lodash method only after the library has been loaded. 'use client' import Script from 'next/script' export default function Page() { return ( <> <Script src="https://cdnjs.cloudflare.com/ajax/libs/lodash.js/4.17.20/lodash.min.js" onLoad={() => { console.log(_.sample([1, 2, 3, 4])) }} /> </> ) } ### `onReady` > **Warning:** `onReady` does not yet work with Server Components and can only be used in Client Components. Some third-party scripts require users to run JavaScript code after the script has finished loading and every time the component is mounted (after a route navigation for example). You can execute code after the script's load event when it first loads and then after every subsequent component re-mount using the onReady property. Here's an example of how to re-instantiate a Google Maps JS embed every time the component is mounted: 'use client' import { useRef } from 'react' import Script from 'next/script' export default function Page() { const mapRef = useRef() return ( <> <div ref={mapRef}></div> <Script id="google-maps" src="https://maps.googleapis.com/maps/api/js" onReady={() => { new google.maps.Map(mapRef.current, { center: { lat: -34.397, lng: 150.644 }, zoom: 8, }) }} /> </> ) } ### `onError` > **Warning:** `onError` does not yet work with Server Components and can only be used in Client Components. `onError` cannot be used with the `beforeInteractive` loading strategy. Sometimes it is helpful to catch when a script fails to load. These errors can be handled with the onError property: 'use client' import Script from 'next/script' export default function Page() { return ( <> <Script src="https://example.com/script.js" onError={(e: Error) => { console.error('Script failed to load', e) }} /> </> ) } ## Version History | Version | Changes | | --- | --- | | `v13.0.0` | `beforeInteractive` and `afterInteractive` is modified to support `app`. | | `v12.2.4` | `onReady` prop added. | | `v12.2.2` | Allow `next/script` with `beforeInteractive` to be placed in `_document`. | | `v11.0.0` | `next/script` introduced. | --- ## Page: https://nextjs.org/docs/14/app/api-reference/file-conventions #### Subscribe to our newsletter Stay updated on new releases and features, guides, and case studies. --- ## Page: https://nextjs.org/docs/14/app/api-reference/file-conventions/default The `default.js` file is used to render a fallback within Parallel Routes when Next.js cannot recover a slot's active state after a full-page load. During soft navigation, Next.js keeps track of the active _state_ (subpage) for each slot. However, for hard navigations (full-page load), Next.js cannot recover the active state. In this case, a `default.js` file can be rendered for subpages that don't match the current URL. Consider the following folder structure. The `@team` slot has a `settings` page, but `@analytics` does not.  When navigating to `/settings`, the `@team` slot will render the `settings` page while maintaining the currently active page for the `@analytics` slot. On refresh, Next.js will render a `default.js` for `@analytics`. If `default.js` doesn't exist, a `404` is rendered instead. Additionally, since `children` is an implicit slot, you also need to create a `default.js` file to render a fallback for `children` when Next.js cannot recover the active state of the parent page. ## Props ### `params` (optional) An object containing the dynamic route parameters from the root segment down to the slot's subpages. For example: | Example | URL | `params` | | --- | --- | --- | | `app/@sidebar/[artist]/default.js` | `/zack` | `{ artist: 'zack' }` | | `app/@sidebar/[artist]/[album]/default.js` | `/zack/next` | `{ artist: 'zack', album: 'next' }` | --- ## Page: https://nextjs.org/docs/14/app/api-reference/file-conventions/error An **error** file defines an error UI boundary for a route segment. It is useful for catching **unexpected** errors that occur in Server Components and Client Components and displaying a fallback UI. 'use client' // Error components must be Client Components import { useEffect } from 'react' export default function Error({ error, reset, }: { error: Error & { digest?: string } reset: () => void }) { useEffect(() => { // Log the error to an error reporting service console.error(error) }, [error]) return ( <div> <h2>Something went wrong!</h2> <button onClick={ // Attempt to recover by trying to re-render the segment () => reset() } > Try again </button> </div> ) } ## Props ### `error` An instance of an `Error` object forwarded to the `error.js` Client Component. #### `error.message` The error message. * For errors forwarded from Client Components, this will be the original Error's message. * For errors forwarded from Server Components, this will be a generic error message to avoid leaking sensitive details. `errors.digest` can be used to match the corresponding error in server-side logs. #### `error.digest` An automatically generated hash of the error thrown in a Server Component. It can be used to match the corresponding error in server-side logs. ### `reset` A function to reset the error boundary. When executed, the function will try to re-render the Error boundary's contents. If successful, the fallback error component is replaced with the result of the re-render. Can be used to prompt the user to attempt to recover from the error. > **Good to know**: > > * `error.js` boundaries must be **Client Components**. > * In Production builds, errors forwarded from Server Components will be stripped of specific error details to avoid leaking sensitive information. > * An `error.js` boundary will **not** handle errors thrown in a `layout.js` component in the **same** segment because the error boundary is nested **inside** that layouts component. > * To handle errors for a specific layout, place an `error.js` file in the layouts parent segment. > * To handle errors within the root layout or template, use a variation of `error.js` called `app/global-error.js`. ## `global-error.js` To specifically handle errors in root `layout.js`, use a variation of `error.js` called `app/global-error.js` located in the root `app` directory. 'use client' export default function GlobalError({ error, reset, }: { error: Error & { digest?: string } reset: () => void }) { return ( <html> <body> <h2>Something went wrong!</h2> <button onClick={() => reset()}>Try again</button> </body> </html> ) } > **Good to know**: > > * `global-error.js` replaces the root `layout.js` when active and so **must** define its own `<html>` and `<body>` tags. > * While designing error UI, you may find it helpful to use the React Developer Tools to manually toggle Error boundaries. ## not-found.js The `not-found` file is used to render UI when the `notFound()` function is thrown within a route segment. ## Version History | Version | Changes | | --- | --- | | `v13.1.0` | `global-error` introduced. | | `v13.0.0` | `error` introduced. | --- ## Page: https://nextjs.org/docs/14/app/api-reference/file-conventions/instrumentation You are currently viewing documentation for version 14 of Next.js. The `instrumentation.js|ts` file is used to integrate monitoring and logging tools into your application. This allows you to track the performance and behavior of your application, and to debug issues in production. To use it, place the file in the **root** of your application or inside a `src` folder if using one. ## Config Option Instrumentation is currently an experimental feature, to use the `instrumentation` file, you must explicitly opt-in by defining `experimental.instrumentationHook = true;` in your `next.config.js`: next.config.js module.exports = { experimental: { instrumentationHook: true, }, } ## Exports ### `register` (required) The file exports a `register` function that is called **once** when a new Next.js server instance is initiated. `register` can be an async function. instrumentation.ts import { registerOTel } from '@vercel/otel' export function register() { registerOTel('next-app') } ## Version History | Version | Changes | | --- | --- | | `v14.0.4` | Turbopack support for `instrumentation` | | `v13.2.0` | `instrumentation` introduced as an experimental feature | --- ## Page: https://nextjs.org/docs/14/app/api-reference/file-conventions/layout A **layout** is UI that is shared between routes. export default function DashboardLayout({ children, }: { children: React.ReactNode }) { return <section>{children}</section> } A **root layout** is the top-most layout in the root `app` directory. It is used to define the `<html>` and `<body>` tags and other globally shared UI. export default function RootLayout({ children, }: { children: React.ReactNode }) { return ( <html lang="en"> <body>{children}</body> </html> ) } ## Props ### `children` (required) Layout components should accept and use a `children` prop. During rendering, `children` will be populated with the route segments the layout is wrapping. These will primarily be the component of a child Layout (if it exists) or Page, but could also be other special files like Loading or Error when applicable. ### `params` (optional) The dynamic route parameters object from the root segment down to that layout. | Example | URL | `params` | | --- | --- | --- | | `app/dashboard/[team]/layout.js` | `/dashboard/1` | `{ team: '1' }` | | `app/shop/[tag]/[item]/layout.js` | `/shop/1/2` | `{ tag: '1', item: '2' }` | | `app/blog/[...slug]/layout.js` | `/blog/1/2` | `{ slug: ['1', '2'] }` | For example: export default function ShopLayout({ children, params, }: { children: React.ReactNode params: { tag: string item: string } }) { // URL -> /shop/shoes/nike-air-max-97 // `params` -> { tag: 'shoes', item: 'nike-air-max-97' } return <section>{children}</section> } ## Good to know ### Layouts do not receive `searchParams` Unlike Pages, Layout components **do not** receive the `searchParams` prop. This is because a shared layout is not re-rendered during navigation which could lead to stale `searchParams` between navigations. When using client-side navigation, Next.js automatically only renders the part of the page below the common layout between two routes. For example, in the following directory structure, `dashboard/layout.tsx` is the common layout for both `/dashboard/settings` and `/dashboard/analytics`:  When navigating from `/dashboard/settings` to `/dashboard/analytics`, `page.tsx` in `/dashboard/analytics` will rerender on the server, while `dashboard/layout.tsx` will **not** rerender because it's a common UI shared between the two routes. This performance optimization allows navigation between pages that share a layout to be quicker as only the data fetching and rendering for the page has to run, instead of the entire route that could include shared layouts that fetch their own data. Because `dashboard/layout.tsx` doesn't re-render, the `searchParams` prop in the layout Server Component might become **stale** after navigation. * Instead, use the Page `searchParams` prop or the `useSearchParams` hook in a Client Component, which is re-rendered on the client with the latest `searchParams`. ### Root Layouts * The `app` directory **must** include a root `app/layout.js`. * The root layout **must** define `<html>` and `<body>` tags. * You should **not** manually add `<head>` tags such as `<title>` and `<meta>` to root layouts. Instead, you should use the Metadata API which automatically handles advanced requirements such as streaming and de-duplicating `<head>` elements. * You can use route groups to create multiple root layouts. * Navigating **across multiple root layouts** will cause a **full page load** (as opposed to a client-side navigation). For example, navigating from `/cart` that uses `app/(shop)/layout.js` to `/blog` that uses `app/(marketing)/layout.js` will cause a full page load. This **only** applies to multiple root layouts. ## Version History | Version | Changes | | --- | --- | | `v13.0.0` | `layout` introduced. | --- ## Page: https://nextjs.org/docs/14/app/api-reference/file-conventions/loading You are currently viewing documentation for version 14 of Next.js. A **loading** file can create instant loading states built on Suspense. By default, this file is a Server Component - but can also be used as a Client Component through the `"use client"` directive. app/feed/loading.tsx export default function Loading() { // Or a custom loading skeleton component return <p>Loading...</p> } Loading UI components do not accept any parameters. > **Good to know** > > * While designing loading UI, you may find it helpful to use the React Developer Tools to manually toggle Suspense boundaries. ## Version History | Version | Changes | | --- | --- | | `v13.0.0` | `loading` introduced. | --- ## Page: https://nextjs.org/docs/14/app/api-reference/file-conventions/middleware The `middleware.js|ts` file is used to write Middleware and run code on the server before a request is completed. Then, based on the incoming request, you can modify the response by rewriting, redirecting, modifying the request or response headers, or responding directly. Middleware executes before routes are rendered. It's particularly useful for implementing custom server-side logic like authentication, logging, or handling redirects. Use the file `middleware.ts` (or .js) in the root of your project to define Middleware. For example, at the same level as `app` or `pages`, or inside `src` if applicable. import { NextResponse, NextRequest } from 'next/server' // This function can be marked `async` if using `await` inside export function middleware(request: NextRequest) { return NextResponse.redirect(new URL('/home', request.url)) } export const config = { matcher: '/about/:path*', } ## Exports ### Middleware function The file must export a single function, either as a default export or named `middleware`. Note that multiple middleware from the same file are not supported. // Example of default export export default function middleware(request) { // Middleware logic } ### Config object (optional) Optionally, a config object can be exported alongside the Middleware function. This object includes the matcher to specify paths where the Middleware applies. #### Matcher The `matcher` option allows you to target specific paths for the Middleware to run on. You can specify these paths in several ways: * For a single path: Directly use a string to define the path, like `'/about'`. * For multiple paths: Use an array to list multiple paths, such as `matcher: ['/about', '/contact']`, which applies the Middleware to both `/about` and `/contact`. Additionally, `matcher` supports complex path specifications through regular expressions, such as `matcher: ['/((?!api|_next/static|_next/image|.*\\.png$).*)']`, enabling precise control over which paths to include or exclude. The `matcher` option also accepts an array of objects with the following keys: * `source`: The path or pattern used to match the request paths. It can be a string for direct path matching or a pattern for more complex matching. * `regexp` (optional): A regular expression string that fine-tunes the matching based on the source. It provides additional control over which paths are included or excluded. * `locale` (optional): A boolean that, when set to `false`, ignores locale-based routing in path matching. * `has` (optional): Specifies conditions based on the presence of specific request elements such as headers, query parameters, or cookies. * `missing` (optional): Focuses on conditions where certain request elements are absent, like missing headers or cookies. export const config = { matcher: [ { source: '/api/*', regexp: '^/api/(.*)', locale: false, has: [ { type: 'header', key: 'Authorization', value: 'Bearer Token' }, { type: 'query', key: 'userId', value: '123' }, ], missing: [{ type: 'cookie', key: 'session', value: 'active' }], }, ], } ## Params ### `request` When defining Middleware, the default export function accepts a single parameter, `request`. This parameter is an instance of `NextRequest`, which represents the incoming HTTP request. import type { NextRequest } from 'next/server' export function middleware(request: NextRequest) { // Middleware logic goes here } > **Good to know**: > > * `NextRequest` is a type that represents incoming HTTP requests in Next.js Middleware, whereas `NextResponse` is a class used to manipulate and send back HTTP responses. ## NextResponse Middleware can use the `NextResponse` object which extends the Web Response API. By returning a `NextResponse` object, you can directly manipulate cookies, set headers, implement redirects, and rewrite paths. > **Good to know**: For redirects, you can also use `Response.redirect` instead of `NextResponse.redirect`. ## Runtime Middleware only supports the Edge runtime. The Node.js runtime cannot be used. ## Version History | Version | Changes | | --- | --- | | `v13.1.0` | Advanced Middleware flags added | | `v13.0.0` | Middleware can modify request headers, response headers, and send responses | | `v12.2.0` | Middleware is stable, please see the upgrade guide | | `v12.0.9` | Enforce absolute URLs in Edge Runtime (PR) | | `v12.0.0` | Middleware (Beta) added | --- ## Page: https://nextjs.org/docs/14/app/api-reference/file-conventions/not-found The **not-found** file is used to render UI when the `notFound` function is thrown within a route segment. Along with serving a custom UI, Next.js will return a `200` HTTP status code for streamed responses, and `404` for non-streamed responses. **Good to know**: In addition to catching expected `notFound()` errors, the root `app/not-found.js` file also handles any unmatched URLs for your whole application. This means users that visit a URL that is not handled by your app will be shown the UI exported by the `app/not-found.js` file. `not-found.js` components do not accept any props. By default, `not-found` is a Server Component. You can mark it as `async` to fetch and display data: import Link from 'next/link' import { headers } from 'next/headers' export default async function NotFound() { const headersList = headers() const domain = headersList.get('host') const data = await getSiteData(domain) return ( <div> <h2>Not Found: {data.name}</h2> <p>Could not find requested resource</p> <p> View <Link href="/blog">all posts</Link> </p> </div> ) } If you need to use Client Component hooks like `usePathname` to display content based on the path, you must fetch data on the client-side instead. --- ## Page: https://nextjs.org/docs/14/app/api-reference/file-conventions/page You are currently viewing documentation for version 14 of Next.js. A **page** is UI that is unique to a route. app/blog/\[slug\]/page.tsx export default function Page({ params, searchParams, }: { params: { slug: string } searchParams: { [key: string]: string | string[] | undefined } }) { return <h1>My Page</h1> } ## Props ### `params` (optional) An object containing the dynamic route parameters from the root segment down to that page. For example: | Example | URL | `params` | | --- | --- | --- | | `app/shop/[slug]/page.js` | `/shop/1` | `{ slug: '1' }` | | `app/shop/[category]/[item]/page.js` | `/shop/1/2` | `{ category: '1', item: '2' }` | | `app/shop/[...slug]/page.js` | `/shop/1/2` | `{ slug: ['1', '2'] }` | ### `searchParams` (optional) An object containing the search parameters of the current URL. For example: | URL | `searchParams` | | --- | --- | | `/shop?a=1` | `{ a: '1' }` | | `/shop?a=1&b=2` | `{ a: '1', b: '2' }` | | `/shop?a=1&a=2` | `{ a: ['1', '2'] }` | > **Good to know**: > > * `searchParams` is a **Dynamic API** whose values cannot be known ahead of time. Using it will opt the page into **dynamic rendering** at request time. > * `searchParams` returns a plain JavaScript object and not a `URLSearchParams` instance. ## Version History | Version | Changes | | --- | --- | | `v13.0.0` | `page` introduced. | --- ## Page: https://nextjs.org/docs/14/app/api-reference/file-conventions/route Route Handlers allow you to create custom request handlers for a given route using the Web Request and Response APIs. ## HTTP Methods A **route** file allows you to create custom request handlers for a given route. The following HTTP methods are supported: `GET`, `POST`, `PUT`, `PATCH`, `DELETE`, `HEAD`, and `OPTIONS`. export async function GET(request: Request) {} export async function HEAD(request: Request) {} export async function POST(request: Request) {} export async function PUT(request: Request) {} export async function DELETE(request: Request) {} export async function PATCH(request: Request) {} // If `OPTIONS` is not defined, Next.js will automatically implement `OPTIONS` and set the appropriate Response `Allow` header depending on the other methods defined in the route handler. export async function OPTIONS(request: Request) {} > **Good to know**: Route Handlers are only available inside the `app` directory. You **do not** need to use API Routes (`pages`) and Route Handlers (`app`) together, as Route Handlers should be able to handle all use cases. ## Parameters ### `request` (optional) The `request` object is a NextRequest object, which is an extension of the Web Request API. `NextRequest` gives you further control over the incoming request, including easily accessing `cookies` and an extended, parsed, URL object `nextUrl`. ### `context` (optional) type Params = { team: string } export async function GET(request: Request, context: { params: Params }) { const team = context.params.team // '1' } // Define params type according to your route parameters (see table below) Currently, the only value of `context` is `params`, which is an object containing the dynamic route parameters for the current route. | Example | URL | `params` | | --- | --- | --- | | `app/dashboard/[team]/route.js` | `/dashboard/1` | `{ team: '1' }` | | `app/shop/[tag]/[item]/route.js` | `/shop/1/2` | `{ tag: '1', item: '2' }` | | `app/blog/[...slug]/route.js` | `/blog/1/2` | `{ slug: ['1', '2'] }` | ## NextResponse Route Handlers can extend the Web Response API by returning a `NextResponse` object. This allows you to easily set cookies, headers, redirect, and rewrite. View the API reference. ## Version History | Version | Changes | | --- | --- | | `v13.2.0` | Route handlers are introduced. | --- ## Page: https://nextjs.org/docs/14/app/api-reference/file-conventions/route-segment-config The Route Segment options allows you to configure the behavior of a Page, Layout, or Route Handler by directly exporting the following variables: | Option | Type | Default | | --- | --- | --- | | `dynamic` | `'auto' | 'force-dynamic' | 'error' | 'force-static'` | `'auto'` | | `dynamicParams` | `boolean` | `true` | | `revalidate` | `false | 0 | number` | `false` | | `fetchCache` | `'auto' | 'default-cache' | 'only-cache' | 'force-cache' | 'force-no-store' | 'default-no-store' | 'only-no-store'` | `'auto'` | | `runtime` | `'nodejs' | 'edge'` | `'nodejs'` | | `preferredRegion` | `'auto' | 'global' | 'home' | string | string[]` | `'auto'` | | `maxDuration` | `number` | Set by deployment platform | export const dynamic = 'auto' export const dynamicParams = true export const revalidate = false export const fetchCache = 'auto' export const runtime = 'nodejs' export const preferredRegion = 'auto' export const maxDuration = 5 export default function MyComponent() {} > **Good to know**: > > * The values of the config options currently need be statically analyzable. For example `revalidate = 600` is valid, but `revalidate = 60 * 10` is not. ## Options ### `dynamic` Change the dynamic behavior of a layout or page to fully static or fully dynamic. export const dynamic = 'auto' // 'auto' | 'force-dynamic' | 'error' | 'force-static' > **Good to know**: The new model in the `app` directory favors granular caching control at the `fetch` request level over the binary all-or-nothing model of `getServerSideProps` and `getStaticProps` at the page-level in the `pages` directory. The `dynamic` option is a way to opt back in to the previous model as a convenience and provides a simpler migration path. * **`'auto'`** (default): The default option to cache as much as possible without preventing any components from opting into dynamic behavior. * **`'force-dynamic'`**: Force dynamic rendering, which will result in routes being rendered for each user at request time. This option is equivalent to `getServerSideProps()` in the `pages` directory. * **`'error'`**: Force static rendering and cache the data of a layout or page by causing an error if any components use dynamic functions or uncached data. This option is equivalent to: * `getStaticProps()` in the `pages` directory. * Setting the option of every `fetch()` request in a layout or page to `{ cache: 'force-cache' }`. * Setting the segment config to `fetchCache = 'only-cache', dynamicParams = false`. * `dynamic = 'error'` changes the default of `dynamicParams` from `true` to `false`. You can opt back into dynamically rendering pages for dynamic params not generated by `generateStaticParams` by manually setting `dynamicParams = true`. * **`'force-static'`**: Force static rendering and cache the data of a layout or page by forcing `cookies()`, `headers()` and `useSearchParams()` to return empty values. > **Good to know**: > > * Instructions on how to migrate from `getServerSideProps` and `getStaticProps` to `dynamic: 'force-dynamic'` and `dynamic: 'error'` can be found in the upgrade guide. ### `dynamicParams` Control what happens when a dynamic segment is visited that was not generated with generateStaticParams. export const dynamicParams = true // true | false, * **`true`** (default): Dynamic segments not included in `generateStaticParams` are generated on demand. * **`false`**: Dynamic segments not included in `generateStaticParams` will return a 404. > **Good to know**: > > * This option replaces the `fallback: true | false | blocking` option of `getStaticPaths` in the `pages` directory. > * When `dynamicParams = true`, the segment uses Streaming Server Rendering. > * If the `dynamic = 'error'` and `dynamic = 'force-static'` are used, it'll change the default of `dynamicParams` to `false`. ### `revalidate` Set the default revalidation time for a layout or page. This option does not override the `revalidate` value set by individual `fetch` requests. export const revalidate = false // false | 0 | number * **`false`** (default): The default heuristic to cache any `fetch` requests that set their `cache` option to `'force-cache'` or are discovered before a dynamic function is used. Semantically equivalent to `revalidate: Infinity` which effectively means the resource should be cached indefinitely. It is still possible for individual `fetch` requests to use `cache: 'no-store'` or `revalidate: 0` to avoid being cached and make the route dynamically rendered. Or set `revalidate` to a positive number lower than the route default to increase the revalidation frequency of a route. * **`0`**: Ensure a layout or page is always dynamically rendered even if no dynamic functions or uncached data fetches are discovered. This option changes the default of `fetch` requests that do not set a `cache` option to `'no-store'` but leaves `fetch` requests that opt into `'force-cache'` or use a positive `revalidate` as is. * **`number`**: (in seconds) Set the default revalidation frequency of a layout or page to `n` seconds. > **Good to know**: The `revalidate` option is only available when using the Node.js Runtime. This means using the `revalidate` option with `runtime = 'edge'` will not work. #### Revalidation Frequency * The lowest `revalidate` across each layout and page of a single route will determine the revalidation frequency of the _entire_ route. This ensures that child pages are revalidated as frequently as their parent layouts. * Individual `fetch` requests can set a lower `revalidate` than the route's default `revalidate` to increase the revalidation frequency of the entire route. This allows you to dynamically opt-in to more frequent revalidation for certain routes based on some criteria. ### `fetchCache` This is an advanced option that should only be used if you specifically need to override the default behavior. By default, Next.js **will cache** any `fetch()` requests that are reachable **before** any dynamic functions are used and **will not cache** `fetch` requests that are discovered **after** dynamic functions are used. `fetchCache` allows you to override the default `cache` option of all `fetch` requests in a layout or page. export const fetchCache = 'auto' // 'auto' | 'default-cache' | 'only-cache' // 'force-cache' | 'force-no-store' | 'default-no-store' | 'only-no-store' * **`'auto'`** (default): The default option to cache `fetch` requests before dynamic functions with the `cache` option they provide and not cache `fetch` requests after dynamic functions. * **`'default-cache'`**: Allow any `cache` option to be passed to `fetch` but if no option is provided then set the `cache` option to `'force-cache'`. This means that even `fetch` requests after dynamic functions are considered static. * **`'only-cache'`**: Ensure all `fetch` requests opt into caching by changing the default to `cache: 'force-cache'` if no option is provided and causing an error if any `fetch` requests use `cache: 'no-store'`. * **`'force-cache'`**: Ensure all `fetch` requests opt into caching by setting the `cache` option of all `fetch` requests to `'force-cache'`. * **`'default-no-store'`**: Allow any `cache` option to be passed to `fetch` but if no option is provided then set the `cache` option to `'no-store'`. This means that even `fetch` requests before dynamic functions are considered dynamic. * **`'only-no-store'`**: Ensure all `fetch` requests opt out of caching by changing the default to `cache: 'no-store'` if no option is provided and causing an error if any `fetch` requests use `cache: 'force-cache'` * **`'force-no-store'`**: Ensure all `fetch` requests opt out of caching by setting the `cache` option of all `fetch` requests to `'no-store'`. This forces all `fetch` requests to be re-fetched every request even if they provide a `'force-cache'` option. #### Cross-route segment behavior * Any options set across each layout and page of a single route need to be compatible with each other. * If both the `'only-cache'` and `'force-cache'` are provided, then `'force-cache'` wins. If both `'only-no-store'` and `'force-no-store'` are provided, then `'force-no-store'` wins. The force option changes the behavior across the route so a single segment with `'force-*'` would prevent any errors caused by `'only-*'`. * The intention of the `'only-*'` and `force-*'` options is to guarantee the whole route is either fully static or fully dynamic. This means: * A combination of `'only-cache'` and `'only-no-store'` in a single route is not allowed. * A combination of `'force-cache'` and `'force-no-store'` in a single route is not allowed. * A parent cannot provide `'default-no-store'` if a child provides `'auto'` or `'*-cache'` since that could make the same fetch have different behavior. * It is generally recommended to leave shared parent layouts as `'auto'` and customize the options where child segments diverge. ### `runtime` export const runtime = 'nodejs' // 'nodejs' | 'edge' * **`'nodejs'`** (default) * **`'edge'`** Learn more about the Edge and Node.js runtimes. ### `preferredRegion` export const preferredRegion = 'auto' // 'auto' | 'global' | 'home' | ['iad1', 'sfo1'] Support for `preferredRegion`, and regions supported, is dependent on your deployment platform. > **Good to know**: > > * If a `preferredRegion` is not specified, it will inherit the option of the nearest parent layout. > * The root layout defaults to `all` regions. ### `maxDuration` By default, Next.js does not limit the execution of server-side logic (rendering a page or handling an API). Deployment platforms can use `maxDuration` from the Next.js build output to add specific execution limits. For example, on Vercel. **Note**: This settings requires Next.js `13.4.10` or higher. export const maxDuration = 5 > **Good to know**: > > * If using Server Actions, set the `maxDuration` at the page level to change the default timeout of all Server Actions used on the page. ### `generateStaticParams` The `generateStaticParams` function can be used in combination with dynamic route segments to define the list of route segment parameters that will be statically generated at build time instead of on-demand at request time. See the API reference for more details. --- ## Page: https://nextjs.org/docs/14/app/api-reference/file-conventions/template You are currently viewing documentation for version 14 of Next.js. A **template** file is similar to a layout in that it wraps each child layout or page. Unlike layouts that persist across routes and maintain state, templates create a new instance for each of their children on navigation. app/template.tsx export default function Template({ children }: { children: React.ReactNode }) { return <div>{children}</div> }  While less common, you might choose a template over a layout if you want: * Features that rely on `useEffect` (e.g logging page views) and `useState` (e.g a per-page feedback form). * To change the default framework behavior. For example, Suspense Boundaries inside layouts only show the fallback the first time the Layout is loaded and not when switching pages. For templates, the fallback is shown on each navigation. ## Props ### `children` (required) Template components should accept and use a `children` prop. `template` is rendered between a layout and its children. For example: Output <Layout> {/* Note that the template is given a unique key. */} <Template key={routeParam}>{children}</Template> </Layout> > **Good to know**: > > * By default, `template` is a Server Component, but can also be used as a Client Component through the `"use client"` directive. > * When a user navigates between routes that share a `template`, a new instance of the component is mounted, DOM elements are recreated, state is **not** preserved, and effects are re-synchronized. ## Version History | Version | Changes | | --- | --- | | `v13.0.0` | `template` introduced. | --- ## Page: https://nextjs.org/docs/14/app/api-reference/file-conventions/metadata You are currently viewing documentation for version 14 of Next.js. ## Metadata Files API Reference This section of the docs covers **Metadata file conventions**. File-based metadata can be defined by adding special metadata files to route segments. Each file convention can be defined using a static file (e.g. `opengraph-image.jpg`), or a dynamic variant that uses code to generate the file (e.g. `opengraph-image.js`). Once a file is defined, Next.js will automatically serve the file (with hashes in production for caching) and update the relevant head elements with the correct metadata, such as the asset's URL, file type, and image size. --- ## Page: https://nextjs.org/docs/14/app/api-reference/file-conventions/metadata/app-icons The `favicon`, `icon`, or `apple-icon` file conventions allow you to set icons for your application. They are useful for adding app icons that appear in places like web browser tabs, phone home screens, and search engine results. There are two ways to set app icons: * Using image files (.ico, .jpg, .png) * Using code to generate an icon (.js, .ts, .tsx) ## Image files (.ico, .jpg, .png) Use an image file to set an app icon by placing a `favicon`, `icon`, or `apple-icon` image file within your `/app` directory. The `favicon` image can only be located in the top level of `app/`. Next.js will evaluate the file and automatically add the appropriate tags to your app's `<head>` element. | File convention | Supported file types | Valid locations | | --- | --- | --- | | `favicon` | `.ico` | `app/` | | `icon` | `.ico`, `.jpg`, `.jpeg`, `.png`, `.svg` | `app/**/*` | | `apple-icon` | `.jpg`, `.jpeg`, `.png` | `app/**/*` | ### `favicon` Add a `favicon.ico` image file to the root `/app` route segment. <link rel="icon" href="/favicon.ico" sizes="any" /> ### `icon` Add an `icon.(ico|jpg|jpeg|png|svg)` image file. <link rel="icon" href="/icon?<generated>" type="image/<generated>" sizes="<generated>" /> ### `apple-icon` Add an `apple-icon.(jpg|jpeg|png)` image file. <link rel="apple-touch-icon" href="/apple-icon?<generated>" type="image/<generated>" sizes="<generated>" /> > **Good to know** > > * You can set multiple icons by adding a number suffix to the file name. For example, `icon1.png`, `icon2.png`, etc. Numbered files will sort lexically. > * Favicons can only be set in the root `/app` segment. If you need more granularity, you can use `icon`. > * The appropriate `<link>` tags and attributes such as `rel`, `href`, `type`, and `sizes` are determined by the icon type and metadata of the evaluated file. > * For example, a 32 by 32px `.png` file will have `type="image/png"` and `sizes="32x32"` attributes. > * `sizes="any"` is added to `favicon.ico` output to avoid a browser bug where an `.ico` icon is favored over `.svg`. ## Generate icons using code (.js, .ts, .tsx) In addition to using literal image files, you can programmatically **generate** icons using code. Generate an app icon by creating an `icon` or `apple-icon` route that default exports a function. | File convention | Supported file types | | --- | --- | | `icon` | `.js`, `.ts`, `.tsx` | | `apple-icon` | `.js`, `.ts`, `.tsx` | The easiest way to generate an icon is to use the `ImageResponse` API from `next/og`. import { ImageResponse } from 'next/og' // Route segment config export const runtime = 'edge' // Image metadata export const size = { width: 32, height: 32, } export const contentType = 'image/png' // Image generation export default function Icon() { return new ImageResponse( ( // ImageResponse JSX element <div style={{ fontSize: 24, background: 'black', width: '100%', height: '100%', display: 'flex', alignItems: 'center', justifyContent: 'center', color: 'white', }} > A </div> ), // ImageResponse options { // For convenience, we can re-use the exported icons size metadata // config to also set the ImageResponse's width and height. ...size, } ) } <link rel="icon" href="/icon?<generated>" type="image/png" sizes="32x32" /> > **Good to know** > > * By default, generated icons are **statically optimized** (generated at build time and cached) unless they use dynamic functions or uncached data. > * You can generate multiple icons in the same file using `generateImageMetadata`. > * You cannot generate a `favicon` icon. Use `icon` or a favicon.ico file instead. ### Props The default export function receives the following props: #### `params` (optional) An object containing the dynamic route parameters object from the root segment down to the segment `icon` or `apple-icon` is colocated in. export default function Icon({ params }: { params: { slug: string } }) { // ... } | Route | URL | `params` | | --- | --- | --- | | `app/shop/icon.js` | `/shop` | `undefined` | | `app/shop/[slug]/icon.js` | `/shop/1` | `{ slug: '1' }` | | `app/shop/[tag]/[item]/icon.js` | `/shop/1/2` | `{ tag: '1', item: '2' }` | | `app/shop/[...slug]/icon.js` | `/shop/1/2` | `{ slug: ['1', '2'] }` | ### Returns The default export function should return a `Blob` | `ArrayBuffer` | `TypedArray` | `DataView` | `ReadableStream` | `Response`. > **Good to know**: `ImageResponse` satisfies this return type. ### Config exports You can optionally configure the icon's metadata by exporting `size` and `contentType` variables from the `icon` or `apple-icon` route. | Option | Type | | --- | --- | | `size` | `{ width: number; height: number }` | | `contentType` | `string` - image MIME type | #### `size` export const size = { width: 32, height: 32 } export default function Icon() {} <link rel="icon" sizes="32x32" /> #### `contentType` export const contentType = 'image/png' export default function Icon() {} <link rel="icon" type="image/png" /> #### Route Segment Config `icon` and `apple-icon` are specialized Route Handlers that can use the same route segment configuration options as Pages and Layouts. | Option | Type | Default | | --- | --- | --- | | `dynamic` | `'auto' | 'force-dynamic' | 'error' | 'force-static'` | `'auto'` | | `revalidate` | `false | 'force-cache' | 0 | number` | `false` | | `runtime` | `'nodejs' | 'edge'` | `'nodejs'` | | `preferredRegion` | `'auto' | 'global' | 'home' | string | string[]` | `'auto'` | export const runtime = 'edge' export default function Icon() {} ## Version History | Version | Changes | | --- | --- | | `v13.3.0` | `favicon` `icon` and `apple-icon` introduced | --- ## Page: https://nextjs.org/docs/14/app/api-reference/file-conventions/metadata/manifest You are currently viewing documentation for version 14 of Next.js. Add or generate a `manifest.(json|webmanifest)` file that matches the Web Manifest Specification in the **root** of `app` directory to provide information about your web application for the browser. ## Static Manifest file app/manifest.json | app/manifest.webmanifest { "name": "My Next.js Application", "short_name": "Next.js App", "description": "An application built with Next.js", "start_url": "/" // ... } ## Generate a Manifest file Add a `manifest.js` or `manifest.ts` file that returns a `Manifest` object. app/manifest.ts import { MetadataRoute } from 'next' export default function manifest(): MetadataRoute.Manifest { return { name: 'Next.js App', short_name: 'Next.js App', description: 'Next.js App', start_url: '/', display: 'standalone', background_color: '#fff', theme_color: '#fff', icons: [ { src: '/favicon.ico', sizes: 'any', type: 'image/x-icon', }, ], } } ### Manifest Object The manifest object contains an extensive list of options that may be updated due to new web standards. For information on all the current options, refer to the `MetadataRoute.Manifest` type in your code editor if using TypeScript or see the MDN docs. Previous favicon, icon, and apple-icon Next opengraph-image and twitter-image Was this helpful? supported. --- ## Page: https://nextjs.org/docs/14/app/api-reference/file-conventions/metadata/opengraph-image The `opengraph-image` and `twitter-image` file conventions allow you to set Open Graph and Twitter images for a route segment. They are useful for setting the images that appear on social networks and messaging apps when a user shares a link to your site. There are two ways to set Open Graph and Twitter images: * Using image files (.jpg, .png, .gif) * Using code to generate images (.js, .ts, .tsx) ## Image files (.jpg, .png, .gif) Use an image file to set a route segment's shared image by placing an `opengraph-image` or `twitter-image` image file in the segment. Next.js will evaluate the file and automatically add the appropriate tags to your app's `<head>` element. | File convention | Supported file types | | --- | --- | | `opengraph-image` | `.jpg`, `.jpeg`, `.png`, `.gif` | | `twitter-image` | `.jpg`, `.jpeg`, `.png`, `.gif` | | `opengraph-image.alt` | `.txt` | | `twitter-image.alt` | `.txt` | ### `opengraph-image` Add an `opengraph-image.(jpg|jpeg|png|gif)` image file to any route segment. <meta property="og:image" content="<generated>" /> <meta property="og:image:type" content="<generated>" /> <meta property="og:image:width" content="<generated>" /> <meta property="og:image:height" content="<generated>" /> ### `twitter-image` Add a `twitter-image.(jpg|jpeg|png|gif)` image file to any route segment. <meta name="twitter:image" content="<generated>" /> <meta name="twitter:image:type" content="<generated>" /> <meta name="twitter:image:width" content="<generated>" /> <meta name="twitter:image:height" content="<generated>" /> ### `opengraph-image.alt.txt` Add an accompanying `opengraph-image.alt.txt` file in the same route segment as the `opengraph-image.(jpg|jpeg|png|gif)` image it's alt text. About Acme <meta property="og:image:alt" content="About Acme" /> ### `twitter-image.alt.txt` Add an accompanying `twitter-image.alt.txt` file in the same route segment as the `twitter-image.(jpg|jpeg|png|gif)` image it's alt text. About Acme <meta property="twitter:image:alt" content="About Acme" /> ## Generate images using code (.js, .ts, .tsx) In addition to using literal image files, you can programmatically **generate** images using code. Generate a route segment's shared image by creating an `opengraph-image` or `twitter-image` route that default exports a function. | File convention | Supported file types | | --- | --- | | `opengraph-image` | `.js`, `.ts`, `.tsx` | | `twitter-image` | `.js`, `.ts`, `.tsx` | > **Good to know** > > * By default, generated images are **statically optimized** (generated at build time and cached) unless they use dynamic functions or uncached data. > * You can generate multiple Images in the same file using `generateImageMetadata`. The easiest way to generate an image is to use the ImageResponse API from `next/og`. import { ImageResponse } from 'next/og' // Route segment config export const runtime = 'edge' // Image metadata export const alt = 'About Acme' export const size = { width: 1200, height: 630, } export const contentType = 'image/png' // Image generation export default async function Image() { // Font const interSemiBold = fetch( new URL('./Inter-SemiBold.ttf', import.meta.url) ).then((res) => res.arrayBuffer()) return new ImageResponse( ( // ImageResponse JSX element <div style={{ fontSize: 128, background: 'white', width: '100%', height: '100%', display: 'flex', alignItems: 'center', justifyContent: 'center', }} > About Acme </div> ), // ImageResponse options { // For convenience, we can re-use the exported opengraph-image // size config to also set the ImageResponse's width and height. ...size, fonts: [ { name: 'Inter', data: await interSemiBold, style: 'normal', weight: 400, }, ], } ) } <meta property="og:image" content="<generated>" /> <meta property="og:image:alt" content="About Acme" /> <meta property="og:image:type" content="image/png" /> <meta property="og:image:width" content="1200" /> <meta property="og:image:height" content="630" /> ### Props The default export function receives the following props: #### `params` (optional) An object containing the dynamic route parameters object from the root segment down to the segment `opengraph-image` or `twitter-image` is colocated in. export default function Image({ params }: { params: { slug: string } }) { // ... } | Route | URL | `params` | | --- | --- | --- | | `app/shop/opengraph-image.js` | `/shop` | `undefined` | | `app/shop/[slug]/opengraph-image.js` | `/shop/1` | `{ slug: '1' }` | | `app/shop/[tag]/[item]/opengraph-image.js` | `/shop/1/2` | `{ tag: '1', item: '2' }` | | `app/shop/[...slug]/opengraph-image.js` | `/shop/1/2` | `{ slug: ['1', '2'] }` | ### Returns The default export function should return a `Blob` | `ArrayBuffer` | `TypedArray` | `DataView` | `ReadableStream` | `Response`. > **Good to know**: `ImageResponse` satisfies this return type. ### Config exports You can optionally configure the image's metadata by exporting `alt`, `size`, and `contentType` variables from `opengraph-image` or `twitter-image` route. | Option | Type | | --- | --- | | `alt` | `string` | | `size` | `{ width: number; height: number }` | | `contentType` | `string` - image MIME type | #### `alt` export const alt = 'My images alt text' export default function Image() {} <meta property="og:image:alt" content="My images alt text" /> #### `size` export const size = { width: 1200, height: 630 } export default function Image() {} <meta property="og:image:width" content="1200" /> <meta property="og:image:height" content="630" /> #### `contentType` export const contentType = 'image/png' export default function Image() {} <meta property="og:image:type" content="image/png" /> #### Route Segment Config `opengraph-image` and `twitter-image` are specialized Route Handlers that can use the same route segment configuration options as Pages and Layouts. | Option | Type | Default | | --- | --- | --- | | `dynamic` | `'auto' | 'force-dynamic' | 'error' | 'force-static'` | `'auto'` | | `revalidate` | `false | 'force-cache' | 0 | number` | `false` | | `runtime` | `'nodejs' | 'edge'` | `'nodejs'` | | `preferredRegion` | `'auto' | 'global' | 'home' | string | string[]` | `'auto'` | export const runtime = 'edge' export default function Image() {} ### Examples #### Using external data This example uses the `params` object and external data to generate the image. > **Good to know**: By default, this generated image will be statically optimized. You can configure the individual `fetch` `options` or route segments options to change this behavior. import { ImageResponse } from 'next/og' export const runtime = 'edge' export const alt = 'About Acme' export const size = { width: 1200, height: 630, } export const contentType = 'image/png' export default async function Image({ params }: { params: { slug: string } }) { const post = await fetch(`https://.../posts/${params.slug}`).then((res) => res.json() ) return new ImageResponse( ( <div style={{ fontSize: 48, background: 'white', width: '100%', height: '100%', display: 'flex', alignItems: 'center', justifyContent: 'center', }} > {post.title} </div> ), { ...size, } ) } ## Version History | Version | Changes | | --- | --- | | `v13.3.0` | `opengraph-image` and `twitter-image` introduced. | --- ## Page: https://nextjs.org/docs/14/app/api-reference/file-conventions/metadata/robots You are currently viewing documentation for version 14 of Next.js. Add or generate a `robots.txt` file that matches the Robots Exclusion Standard in the **root** of `app` directory to tell search engine crawlers which URLs they can access on your site. ## Static `robots.txt` app/robots.txt User-Agent: * Allow: / Disallow: /private/ Sitemap: https://acme.com/sitemap.xml ## Generate a Robots file Add a `robots.js` or `robots.ts` file that returns a `Robots` object. app/robots.ts import { MetadataRoute } from 'next' export default function robots(): MetadataRoute.Robots { return { rules: { userAgent: '*', allow: '/', disallow: '/private/', }, sitemap: 'https://acme.com/sitemap.xml', } } Output: User-Agent: * Allow: / Disallow: /private/ Sitemap: https://acme.com/sitemap.xml ### Customizing specific user agents You can customise how individual search engine bots crawl your site by passing an array of user agents to the `rules` property. For example: app/robots.ts import type { MetadataRoute } from 'next' export default function robots(): MetadataRoute.Robots { return { rules: [ { userAgent: 'Googlebot', allow: ['/'], disallow: '/private/', }, { userAgent: ['Applebot', 'Bingbot'], disallow: ['/'], }, ], sitemap: 'https://acme.com/sitemap.xml', } } Output: User-Agent: Googlebot Allow: / Disallow: /private/ User-Agent: Applebot Disallow: / User-Agent: Bingbot Disallow: / Sitemap: https://acme.com/sitemap.xml ### Robots object type Robots = { rules: | { userAgent?: string | string[] allow?: string | string[] disallow?: string | string[] crawlDelay?: number } | Array<{ userAgent: string | string[] allow?: string | string[] disallow?: string | string[] crawlDelay?: number }> sitemap?: string | string[] host?: string } ## Version History | Version | Changes | | --- | --- | | `v13.3.0` | `robots` introduced. | --- ## Page: https://nextjs.org/docs/14/app/api-reference/file-conventions/metadata/sitemap `sitemap.(xml|js|ts)` is a special file that matches the Sitemaps XML format to help search engine crawlers index your site more efficiently. ### Sitemap files (.xml) For smaller applications, you can create a `sitemap.xml` file and place it in the root of your `app` directory. <urlset xmlns="http://www.sitemaps.org/schemas/sitemap/0.9"> <url> <loc>https://acme.com</loc> <lastmod>2023-04-06T15:02:24.021Z</lastmod> <changefreq>yearly</changefreq> <priority>1</priority> </url> <url> <loc>https://acme.com/about</loc> <lastmod>2023-04-06T15:02:24.021Z</lastmod> <changefreq>monthly</changefreq> <priority>0.8</priority> </url> <url> <loc>https://acme.com/blog</loc> <lastmod>2023-04-06T15:02:24.021Z</lastmod> <changefreq>weekly</changefreq> <priority>0.5</priority> </url> </urlset> ### Generating a sitemap using code (.js, .ts) You can use the `sitemap.(js|ts)` file convention to programmatically **generate** a sitemap by exporting a default function that returns an array of URLs. If using TypeScript, a `Sitemap` type is available. import { MetadataRoute } from 'next' export default function sitemap(): MetadataRoute.Sitemap { return [ { url: 'https://acme.com', lastModified: new Date(), changeFrequency: 'yearly', priority: 1, }, { url: 'https://acme.com/about', lastModified: new Date(), changeFrequency: 'monthly', priority: 0.8, }, { url: 'https://acme.com/blog', lastModified: new Date(), changeFrequency: 'weekly', priority: 0.5, }, ] } Output: <urlset xmlns="http://www.sitemaps.org/schemas/sitemap/0.9"> <url> <loc>https://acme.com</loc> <lastmod>2023-04-06T15:02:24.021Z</lastmod> <changefreq>yearly</changefreq> <priority>1</priority> </url> <url> <loc>https://acme.com/about</loc> <lastmod>2023-04-06T15:02:24.021Z</lastmod> <changefreq>monthly</changefreq> <priority>0.8</priority> </url> <url> <loc>https://acme.com/blog</loc> <lastmod>2023-04-06T15:02:24.021Z</lastmod> <changefreq>weekly</changefreq> <priority>0.5</priority> </url> </urlset> ### Generate a localized Sitemap import { MetadataRoute } from 'next' export default function sitemap(): MetadataRoute.Sitemap { return [ { url: 'https://acme.com', lastModified: new Date(), alternates: { languages: { es: 'https://acme.com/es', de: 'https://acme.com/de', }, }, }, { url: 'https://acme.com/about', lastModified: new Date(), alternates: { languages: { es: 'https://acme.com/es/about', de: 'https://acme.com/de/about', }, }, }, { url: 'https://acme.com/blog', lastModified: new Date(), alternates: { languages: { es: 'https://acme.com/es/blog', de: 'https://acme.com/de/blog', }, }, }, ] } Output: <urlset xmlns="http://www.sitemaps.org/schemas/sitemap/0.9" xmlns:xhtml="http://www.w3.org/1999/xhtml"> <url> <loc>https://acme.com</loc> <xhtml:link rel="alternate" hreflang="es" href="https://acme.com/es"/> <xhtml:link rel="alternate" hreflang="de" href="https://acme.com/de"/> <lastmod>2023-04-06T15:02:24.021Z</lastmod> </url> <url> <loc>https://acme.com/about</loc> <xhtml:link rel="alternate" hreflang="es" href="https://acme.com/es/about"/> <xhtml:link rel="alternate" hreflang="de" href="https://acme.com/de/about"/> <lastmod>2023-04-06T15:02:24.021Z</lastmod> </url> <url> <loc>https://acme.com/blog</loc> <xhtml:link rel="alternate" hreflang="es" href="https://acme.com/es/blog"/> <xhtml:link rel="alternate" hreflang="de" href="https://acme.com/de/blog"/> <lastmod>2023-04-06T15:02:24.021Z</lastmod> </url> </urlset> ### Generating multiple sitemaps While a single sitemap will work for most applications. For large web applications, you may need to split a sitemap into multiple files. There are two ways you can create multiple sitemaps: * By nesting `sitemap.(xml|js|ts)` inside multiple route segments e.g. `app/sitemap.xml` and `app/products/sitemap.xml`. * By using the `generateSitemaps` function. For example, to split a sitemap using `generateSitemaps`, return an array of objects with the sitemap `id`. Then, use the `id` to generate the unique sitemaps. import { BASE_URL } from '@/app/lib/constants' export async function generateSitemaps() { // Fetch the total number of products and calculate the number of sitemaps needed return [{ id: 0 }, { id: 1 }, { id: 2 }, { id: 3 }] } export default async function sitemap({ id, }: { id: number }): Promise<MetadataRoute.Sitemap> { // Google's limit is 50,000 URLs per sitemap const start = id * 50000 const end = start + 50000 const products = await getProducts( `SELECT id, date FROM products WHERE id BETWEEN ${start} AND ${end}` ) return products.map((product) => ({ url: `${BASE_URL}/product/${id}`, lastModified: product.date, })) } In production, your generated sitemaps will be available at `/.../sitemap/[id].xml`. For example, `/product/sitemap/1.xml`. In development, you can view the generated sitemap on `/.../sitemap.xml/[id]`. For example, `/product/sitemap.xml/1`. This difference is temporary and will follow the production format. See the `generateSitemaps` API reference for more information. ## Returns The default function exported from `sitemap.(xml|ts|js)` should return an array of objects with the following properties: type Sitemap = Array<{ url: string lastModified?: string | Date changeFrequency?: | 'always' | 'hourly' | 'daily' | 'weekly' | 'monthly' | 'yearly' | 'never' priority?: number alternates?: { languages?: Languages<string> } }> ## Version History | Version | Changes | | --- | --- | | `v13.4.5` | Add `changeFrequency` and `priority` attributes to sitemaps. | | `v13.3.0` | `sitemap` introduced. | --- ## Page: https://nextjs.org/docs/14/app/api-reference/functions #### Subscribe to our newsletter Stay updated on new releases and features, guides, and case studies. --- ## Page: https://nextjs.org/docs/14/app/api-reference/functions/cookies The `cookies` function allows you to read the HTTP incoming request cookies from a Server Component or write outgoing request cookies in a Server Action or Route Handler. > **Good to know**: `cookies()` is a **Dynamic Function** whose returned values cannot be known ahead of time. Using it in a layout or page will opt a route into **dynamic rendering** at request time. ## `cookies().get(name)` A method that takes a cookie name and returns an object with name and value. If a cookie with `name` isn't found, it returns `undefined`. If multiple cookies match, it will only return the first match. import { cookies } from 'next/headers' export default function Page() { const cookieStore = cookies() const theme = cookieStore.get('theme') return '...' } ## `cookies().getAll()` A method that is similar to `get`, but returns a list of all the cookies with a matching `name`. If `name` is unspecified, it returns all the available cookies. import { cookies } from 'next/headers' export default function Page() { const cookieStore = cookies() return cookieStore.getAll().map((cookie) => ( <div key={cookie.name}> <p>Name: {cookie.name}</p> <p>Value: {cookie.value}</p> </div> )) } ## `cookies().has(name)` A method that takes a cookie name and returns a `boolean` based on if the cookie exists (`true`) or not (`false`). import { cookies } from 'next/headers' export default function Page() { const cookieStore = cookies() const hasCookie = cookieStore.has('theme') return '...' } ## `cookies().set(name, value, options)` A method that takes a cookie name, value, and options and sets the outgoing request cookie. > **Good to know**: HTTP does not allow setting cookies after streaming starts, so you must use `.set()` in a Server Action or Route Handler. 'use server' import { cookies } from 'next/headers' async function create(data) { cookies().set('name', 'lee') // or cookies().set('name', 'lee', { secure: true }) // or cookies().set({ name: 'name', value: 'lee', httpOnly: true, path: '/', }) } ## Deleting cookies > **Good to know**: You can only delete cookies in a Server Action or Route Handler. There are several options for deleting a cookie: ### `cookies().delete(name)` You can explicitly delete a cookie with a given name. 'use server' import { cookies } from 'next/headers' async function delete(data) { cookies().delete('name') } ### `cookies().set(name, '')` Alternatively, you can set a new cookie with the same name and an empty value. 'use server' import { cookies } from 'next/headers' async function delete(data) { cookies().set('name', '') } > **Good to know**: `.set()` is only available in a Server Action or Route Handler. ### `cookies().set(name, value, { maxAge: 0 })` Setting `maxAge` to 0 will immediately expire a cookie. 'use server' import { cookies } from 'next/headers' async function delete(data) { cookies().set('name', 'value', { maxAge: 0 }) } ### `cookies().set(name, value, { expires: timestamp })` Setting `expires` to any value in the past will immediately expire a cookie. 'use server' import { cookies } from 'next/headers' async function delete(data) { const oneDay = 24 * 60 * 60 * 1000 cookies().set('name', 'value', { expires: Date.now() - oneDay }) } > **Good to know**: You can only delete cookies that belong to the same domain from which `.set()` is called. Additionally, the code must be executed on the same protocol (HTTP or HTTPS) as the cookie you want to delete. ## Version History | Version | Changes | | --- | --- | | `v13.0.0` | `cookies` introduced. | --- ## Page: https://nextjs.org/docs/14/app/api-reference/functions/draft-mode #### Subscribe to our newsletter Stay updated on new releases and features, guides, and case studies. --- ## Page: https://nextjs.org/docs/14/app/api-reference/functions/fetch Next.js extends the native Web `fetch()` API to allow each request on the server to set its own persistent caching semantics. In the browser, the `cache` option indicates how a fetch request will interact with the _browser's_ HTTP cache. With this extension, `cache` indicates how a _server-side_ fetch request will interact with the framework's persistent HTTP cache. You can call `fetch` with `async` and `await` directly within Server Components. export default async function Page() { // This request should be cached until manually invalidated. // Similar to `getStaticProps`. // `force-cache` is the default and can be omitted. const staticData = await fetch(`https://...`, { cache: 'force-cache' }) // This request should be refetched on every request. // Similar to `getServerSideProps`. const dynamicData = await fetch(`https://...`, { cache: 'no-store' }) // This request should be cached with a lifetime of 10 seconds. // Similar to `getStaticProps` with the `revalidate` option. const revalidatedData = await fetch(`https://...`, { next: { revalidate: 10 }, }) return <div>...</div> } ## `fetch(url, options)` Since Next.js extends the Web `fetch()` API, you can use any of the native options available. ### `options.cache` Configure how the request should interact with Next.js Data Cache. fetch(`https://...`, { cache: 'force-cache' | 'no-store' }) * **`force-cache`** (default) - Next.js looks for a matching request in its Data Cache. * If there is a match and it is fresh, it will be returned from the cache. * If there is no match or a stale match, Next.js will fetch the resource from the remote server and update the cache with the downloaded resource. * **`no-store`** - Next.js fetches the resource from the remote server on every request without looking in the cache, and it will not update the cache with the downloaded resource. > **Good to know**: > > * If you don't provide a `cache` option, Next.js will default to `force-cache`, unless a dynamic function such as `cookies()` is used, in which case it will default to `no-store`. > * The `no-cache` option behaves the same way as `no-store` in Next.js. ### `options.next.revalidate` fetch(`https://...`, { next: { revalidate: false | 0 | number } }) Set the cache lifetime of a resource (in seconds). * **`false`** - Cache the resource indefinitely. Semantically equivalent to `revalidate: Infinity`. The HTTP cache may evict older resources over time. * **`0`** - Prevent the resource from being cached. * **`number`** - (in seconds) Specify the resource should have a cache lifetime of at most `n` seconds. > **Good to know**: > > * If an individual `fetch()` request sets a `revalidate` number lower than the default `revalidate` of a route, the whole route revalidation interval will be decreased. > * If two fetch requests with the same URL in the same route have different `revalidate` values, the lower value will be used. > * As a convenience, it is not necessary to set the `cache` option if `revalidate` is set to a number since `0` implies `cache: 'no-store'` and a positive value implies `cache: 'force-cache'`. > * Conflicting options such as `{ revalidate: 0, cache: 'force-cache' }` or `{ revalidate: 10, cache: 'no-store' }` will cause an error. ### `options.next.tags` fetch(`https://...`, { next: { tags: ['collection'] } }) Set the cache tags of a resource. Data can then be revalidated on-demand using `revalidateTag`. The max length for a custom tag is 256 characters and the max tag items is 128. ## Version History | Version | Changes | | --- | --- | | `v13.0.0` | `fetch` introduced. | --- ## Page: https://nextjs.org/docs/14/app/api-reference/functions/generate-image-metadata You can use `generateImageMetadata` to generate different versions of one image or return multiple images for one route segment. This is useful for when you want to avoid hard-coding metadata values, such as for icons. ## Parameters `generateImageMetadata` function accepts the following parameters: #### `params` (optional) An object containing the dynamic route parameters object from the root segment down to the segment `generateImageMetadata` is called from. export function generateImageMetadata({ params, }: { params: { slug: string } }) { // ... } | Route | URL | `params` | | --- | --- | --- | | `app/shop/icon.js` | `/shop` | `undefined` | | `app/shop/[slug]/icon.js` | `/shop/1` | `{ slug: '1' }` | | `app/shop/[tag]/[item]/icon.js` | `/shop/1/2` | `{ tag: '1', item: '2' }` | | `app/shop/[...slug]/icon.js` | `/shop/1/2` | `{ slug: ['1', '2'] }` | ## Returns The `generateImageMetadata` function should return an `array` of objects containing the image's metadata such as `alt` and `size`. In addition, each item **must** include an `id` value which will be passed to the props of the image generating function. | Image Metadata Object | Type | | --- | --- | | `id` | `string` (required) | | `alt` | `string` | | `size` | `{ width: number; height: number }` | | `contentType` | `string` | import { ImageResponse } from 'next/og' export function generateImageMetadata() { return [ { contentType: 'image/png', size: { width: 48, height: 48 }, id: 'small', }, { contentType: 'image/png', size: { width: 72, height: 72 }, id: 'medium', }, ] } export default function Icon({ id }: { id: string }) { return new ImageResponse( ( <div style={{ width: '100%', height: '100%', display: 'flex', alignItems: 'center', justifyContent: 'center', fontSize: 88, background: '#000', color: '#fafafa', }} > Icon {id} </div> ) ) } ### Examples #### Using external data This example uses the `params` object and external data to generate multiple Open Graph images for a route segment. import { ImageResponse } from 'next/og' import { getCaptionForImage, getOGImages } from '@/app/utils/images' export async function generateImageMetadata({ params, }: { params: { id: string } }) { const images = await getOGImages(params.id) return images.map((image, idx) => ({ id: idx, size: { width: 1200, height: 600 }, alt: image.text, contentType: 'image/png', })) } export default async function Image({ params, id, }: { params: { id: string } id: number }) { const productId = params.id const imageId = id const text = await getCaptionForImage(productId, imageId) return new ImageResponse( ( <div style={ { // ... } } > {text} </div> ) ) } ## Version History | Version | Changes | | --- | --- | | `v13.3.0` | `generateImageMetadata` introduced. | --- ## Page: https://nextjs.org/docs/14/app/api-reference/functions/generate-metadata ## Metadata Object and generateMetadata Options This page covers all **Config-based Metadata** options with `generateMetadata` and the static metadata object. import { Metadata } from 'next' // either Static metadata export const metadata: Metadata = { title: '...', } // or Dynamic metadata export async function generateMetadata({ params }) { return { title: '...', } } > **Good to know**: > > * The `metadata` object and `generateMetadata` function exports are **only supported in Server Components**. > * You cannot export both the `metadata` object and `generateMetadata` function from the same route segment. To define static metadata, export a `Metadata` object from a `layout.js` or `page.js` file. import { Metadata } from 'next' export const metadata: Metadata = { title: '...', description: '...', } export default function Page() {} See the Metadata Fields for a complete list of supported options. Dynamic metadata depends on **dynamic information**, such as the current route parameters, external data, or `metadata` in parent segments, can be set by exporting a `generateMetadata` function that returns a `Metadata` object. import { Metadata, ResolvingMetadata } from 'next' type Props = { params: { id: string } searchParams: { [key: string]: string | string[] | undefined } } export async function generateMetadata( { params, searchParams }: Props, parent: ResolvingMetadata ): Promise<Metadata> { // read route params const id = params.id // fetch data const product = await fetch(`https://.../${id}`).then((res) => res.json()) // optionally access and extend (rather than replace) parent metadata const previousImages = (await parent).openGraph?.images || [] return { title: product.title, openGraph: { images: ['/some-specific-page-image.jpg', ...previousImages], }, } } export default function Page({ params, searchParams }: Props) {} ### Parameters `generateMetadata` function accepts the following parameters: * `props` - An object containing the parameters of the current route: * `params` - An object containing the dynamic route parameters object from the root segment down to the segment `generateMetadata` is called from. Examples: | Route | URL | `params` | | --- | --- | --- | | `app/shop/[slug]/page.js` | `/shop/1` | `{ slug: '1' }` | | `app/shop/[tag]/[item]/page.js` | `/shop/1/2` | `{ tag: '1', item: '2' }` | | `app/shop/[...slug]/page.js` | `/shop/1/2` | `{ slug: ['1', '2'] }` | * `searchParams` - An object containing the current URL's search params. Examples: | URL | `searchParams` | | --- | --- | | `/shop?a=1` | `{ a: '1' }` | | `/shop?a=1&b=2` | `{ a: '1', b: '2' }` | | `/shop?a=1&a=2` | `{ a: ['1', '2'] }` | * `parent` - A promise of the resolved metadata from parent route segments. ### Returns `generateMetadata` should return a `Metadata` object containing one or more metadata fields. > **Good to know**: > > * If metadata doesn't depend on runtime information, it should be defined using the static `metadata` object rather than `generateMetadata`. > * `fetch` requests are automatically memoized for the same data across `generateMetadata`, `generateStaticParams`, Layouts, Pages, and Server Components. React `cache` can be used if `fetch` is unavailable. > * `searchParams` are only available in `page.js` segments. > * The `redirect()` and `notFound()` Next.js methods can also be used inside `generateMetadata`. ### `title` The `title` attribute is used to set the title of the document. It can be defined as a simple string or an optional template object. #### String export const metadata = { title: 'Next.js', } <title>Next.js</title> #### Template object import { Metadata } from 'next' export const metadata: Metadata = { title: { template: '...', default: '...', absolute: '...', }, } ##### Default `title.default` can be used to provide a **fallback title** to child route segments that don't define a `title`. import type { Metadata } from 'next' export const metadata: Metadata = { title: { default: 'Acme', }, } import type { Metadata } from 'next' export const metadata: Metadata = {} // Output: <title>Acme</title> ##### Template `title.template` can be used to add a prefix or a suffix to `titles` defined in **child** route segments. import { Metadata } from 'next' export const metadata: Metadata = { title: { template: '%s | Acme', default: 'Acme', // a default is required when creating a template }, } import { Metadata } from 'next' export const metadata: Metadata = { title: 'About', } // Output: <title>About | Acme</title> > **Good to know**: > > * `title.template` applies to **child** route segments and **not** the segment it's defined in. This means: > > * `title.default` is **required** when you add a `title.template`. > * `title.template` defined in `layout.js` will not apply to a `title` defined in a `page.js` of the same route segment. > * `title.template` defined in `page.js` has no effect because a page is always the terminating segment (it doesn't have any children route segments). > * `title.template` has **no effect** if a route has not defined a `title` or `title.default`. > ##### Absolute `title.absolute` can be used to provide a title that **ignores** `title.template` set in parent segments. import { Metadata } from 'next' export const metadata: Metadata = { title: { template: '%s | Acme', }, } import { Metadata } from 'next' export const metadata: Metadata = { title: { absolute: 'About', }, } // Output: <title>About</title> > **Good to know**: > > * `layout.js` > > * `title` (string) and `title.default` define the default title for child segments (that do not define their own `title`). It will augment `title.template` from the closest parent segment if it exists. > * `title.absolute` defines the default title for child segments. It ignores `title.template` from parent segments. > * `title.template` defines a new title template for child segments. > * `page.js` > > * If a page does not define its own title the closest parents resolved title will be used. > * `title` (string) defines the routes title. It will augment `title.template` from the closest parent segment if it exists. > * `title.absolute` defines the route title. It ignores `title.template` from parent segments. > * `title.template` has no effect in `page.js` because a page is always the terminating segment of a route. ### `description` export const metadata = { description: 'The React Framework for the Web', } <meta name="description" content="The React Framework for the Web" /> ### Basic Fields export const metadata = { generator: 'Next.js', applicationName: 'Next.js', referrer: 'origin-when-cross-origin', keywords: ['Next.js', 'React', 'JavaScript'], authors: [{ name: 'Seb' }, { name: 'Josh', url: 'https://nextjs.org' }], creator: 'Jiachi Liu', publisher: 'Sebastian Markbåge', formatDetection: { email: false, address: false, telephone: false, }, } <meta name="application-name" content="Next.js" /> <meta name="author" content="Seb" /> <link rel="author" href="https://nextjs.org" /> <meta name="author" content="Josh" /> <meta name="generator" content="Next.js" /> <meta name="keywords" content="Next.js,React,JavaScript" /> <meta name="referrer" content="origin-when-cross-origin" /> <meta name="color-scheme" content="dark" /> <meta name="creator" content="Jiachi Liu" /> <meta name="publisher" content="Sebastian Markbåge" /> <meta name="format-detection" content="telephone=no, address=no, email=no" /> ### `metadataBase` `metadataBase` is a convenience option to set a base URL prefix for `metadata` fields that require a fully qualified URL. * `metadataBase` allows URL-based `metadata` fields defined in the **current route segment and below** to use a **relative path** instead of an otherwise required absolute URL. * The field's relative path will be composed with `metadataBase` to form a fully qualified URL. * If not configured, `metadataBase` is **automatically populated** with a default value. export const metadata = { metadataBase: new URL('https://acme.com'), alternates: { canonical: '/', languages: { 'en-US': '/en-US', 'de-DE': '/de-DE', }, }, openGraph: { images: '/og-image.png', }, } <link rel="canonical" href="https://acme.com" /> <link rel="alternate" hreflang="en-US" href="https://acme.com/en-US" /> <link rel="alternate" hreflang="de-DE" href="https://acme.com/de-DE" /> <meta property="og:image" content="https://acme.com/og-image.png" /> > **Good to know**: > > * `metadataBase` is typically set in root `app/layout.js` to apply to URL-based `metadata` fields across all routes. > * All URL-based `metadata` fields that require absolute URLs can be configured with a `metadataBase` option. > * `metadataBase` can contain a subdomain e.g. `https://app.acme.com` or base path e.g. `https://acme.com/start/from/here` > * If a `metadata` field provides an absolute URL, `metadataBase` will be ignored. > * Using a relative path in a URL-based `metadata` field without configuring a `metadataBase` will cause a build error. > * Next.js will normalize duplicate slashes between `metadataBase` (e.g. `https://acme.com/`) and a relative field (e.g. `/path`) to a single slash (e.g. `https://acme.com/path`) #### Default value If not configured, `metadataBase` has a **default value** * When `VERCEL_URL` is detected: `https://${process.env.VERCEL_URL}` otherwise it falls back to `http://localhost:${process.env.PORT || 3000}`. * When overriding the default, we recommend using environment variables to compute the URL. This allows configuring a URL for local development, staging, and production environments. #### URL Composition URL composition favors developer intent over default directory traversal semantics. * Trailing slashes between `metadataBase` and `metadata` fields are normalized. * An "absolute" path in a `metadata` field (that typically would replace the whole URL path) is treated as a "relative" path (starting from the end of `metadataBase`). For example, given the following `metadataBase`: import { Metadata } from 'next' export const metadata: Metadata = { metadataBase: new URL('https://acme.com'), } Any `metadata` fields that inherit the above `metadataBase` and set their own value will be resolved as follows: | `metadata` field | Resolved URL | | --- | --- | | `/` | `https://acme.com` | | `./` | `https://acme.com` | | `payments` | `https://acme.com/payments` | | `/payments` | `https://acme.com/payments` | | `./payments` | `https://acme.com/payments` | | `../payments` | `https://acme.com/payments` | | `https://beta.acme.com/payments` | `https://beta.acme.com/payments` | ### `openGraph` export const metadata = { openGraph: { title: 'Next.js', description: 'The React Framework for the Web', url: 'https://nextjs.org', siteName: 'Next.js', images: [ { url: 'https://nextjs.org/og.png', // Must be an absolute URL width: 800, height: 600, }, { url: 'https://nextjs.org/og-alt.png', // Must be an absolute URL width: 1800, height: 1600, alt: 'My custom alt', }, ], videos: [ { url: 'https://nextjs.org/video.mp4', // Must be an absolute URL width: 800, height: 600, }, ], audio: [ { url: 'https://nextjs.org/audio.mp3', // Must be an absolute URL }, ], locale: 'en_US', type: 'website', }, } <meta property="og:title" content="Next.js" /> <meta property="og:description" content="The React Framework for the Web" /> <meta property="og:url" content="https://nextjs.org/" /> <meta property="og:site_name" content="Next.js" /> <meta property="og:locale" content="en_US" /> <meta property="og:image:url" content="https://nextjs.org/og.png" /> <meta property="og:image:width" content="800" /> <meta property="og:image:height" content="600" /> <meta property="og:image:url" content="https://nextjs.org/og-alt.png" /> <meta property="og:image:width" content="1800" /> <meta property="og:image:height" content="1600" /> <meta property="og:image:alt" content="My custom alt" /> <meta property="og:video" content="https://nextjs.org/video.mp4" /> <meta property="og:video:width" content="800" /> <meta property="og:video:height" content="600" /> <meta property="og:audio" content="https://nextjs.org/audio.mp3" /> <meta property="og:type" content="website" /> export const metadata = { openGraph: { title: 'Next.js', description: 'The React Framework for the Web', type: 'article', publishedTime: '2023-01-01T00:00:00.000Z', authors: ['Seb', 'Josh'], }, } <meta property="og:title" content="Next.js" /> <meta property="og:description" content="The React Framework for the Web" /> <meta property="og:type" content="article" /> <meta property="article:published_time" content="2023-01-01T00:00:00.000Z" /> <meta property="article:author" content="Seb" /> <meta property="article:author" content="Josh" /> > **Good to know**: > > * It may be more convenient to use the file-based Metadata API for Open Graph images. Rather than having to sync the config export with actual files, the file-based API will automatically generate the correct metadata for you. ### `robots` import type { Metadata } from 'next' export const metadata: Metadata = { robots: { index: false, follow: true, nocache: true, googleBot: { index: true, follow: false, noimageindex: true, 'max-video-preview': -1, 'max-image-preview': 'large', 'max-snippet': -1, }, }, } <meta name="robots" content="noindex, follow, nocache" /> <meta name="googlebot" content="index, nofollow, noimageindex, max-video-preview:-1, max-image-preview:large, max-snippet:-1" /> ### `icons` > **Good to know**: We recommend using the file-based Metadata API for icons where possible. Rather than having to sync the config export with actual files, the file-based API will automatically generate the correct metadata for you. export const metadata = { icons: { icon: '/icon.png', shortcut: '/shortcut-icon.png', apple: '/apple-icon.png', other: { rel: 'apple-touch-icon-precomposed', url: '/apple-touch-icon-precomposed.png', }, }, } <link rel="shortcut icon" href="/shortcut-icon.png" /> <link rel="icon" href="/icon.png" /> <link rel="apple-touch-icon" href="/apple-icon.png" /> <link rel="apple-touch-icon-precomposed" href="/apple-touch-icon-precomposed.png" /> export const metadata = { icons: { icon: [ { url: '/icon.png' }, new URL('/icon.png', 'https://example.com'), { url: '/icon-dark.png', media: '(prefers-color-scheme: dark)' }, ], shortcut: ['/shortcut-icon.png'], apple: [ { url: '/apple-icon.png' }, { url: '/apple-icon-x3.png', sizes: '180x180', type: 'image/png' }, ], other: [ { rel: 'apple-touch-icon-precomposed', url: '/apple-touch-icon-precomposed.png', }, ], }, } <link rel="shortcut icon" href="/shortcut-icon.png" /> <link rel="icon" href="/icon.png" /> <link rel="icon" href="https://example.com/icon.png" /> <link rel="icon" href="/icon-dark.png" media="(prefers-color-scheme: dark)" /> <link rel="apple-touch-icon" href="/apple-icon.png" /> <link rel="apple-touch-icon-precomposed" href="/apple-touch-icon-precomposed.png" /> <link rel="apple-touch-icon" href="/apple-icon-x3.png" sizes="180x180" type="image/png" /> > **Good to know**: The `msapplication-*` meta tags are no longer supported in Chromium builds of Microsoft Edge, and thus no longer needed. ### `themeColor` > **Deprecated**: The `themeColor` option in `metadata` is deprecated as of Next.js 14. Please use the `viewport` configuration instead. ### `manifest` A web application manifest, as defined in the Web Application Manifest specification. export const metadata = { manifest: 'https://nextjs.org/manifest.json', } <link rel="manifest" href="https://nextjs.org/manifest.json" /> ### `twitter` The Twitter specification is (surprisingly) used for more than just X (formerly known as Twitter). Learn more about the Twitter Card markup reference. export const metadata = { twitter: { card: 'summary_large_image', title: 'Next.js', description: 'The React Framework for the Web', siteId: '1467726470533754880', creator: '@nextjs', creatorId: '1467726470533754880', images: ['https://nextjs.org/og.png'], // Must be an absolute URL }, } <meta name="twitter:card" content="summary_large_image" /> <meta name="twitter:site:id" content="1467726470533754880" /> <meta name="twitter:creator" content="@nextjs" /> <meta name="twitter:creator:id" content="1467726470533754880" /> <meta name="twitter:title" content="Next.js" /> <meta name="twitter:description" content="The React Framework for the Web" /> <meta name="twitter:image" content="https://nextjs.org/og.png" /> export const metadata = { twitter: { card: 'app', title: 'Next.js', description: 'The React Framework for the Web', siteId: '1467726470533754880', creator: '@nextjs', creatorId: '1467726470533754880', images: { url: 'https://nextjs.org/og.png', alt: 'Next.js Logo', }, app: { name: 'twitter_app', id: { iphone: 'twitter_app://iphone', ipad: 'twitter_app://ipad', googleplay: 'twitter_app://googleplay', }, url: { iphone: 'https://iphone_url', ipad: 'https://ipad_url', }, }, }, } <meta name="twitter:site:id" content="1467726470533754880" /> <meta name="twitter:creator" content="@nextjs" /> <meta name="twitter:creator:id" content="1467726470533754880" /> <meta name="twitter:title" content="Next.js" /> <meta name="twitter:description" content="The React Framework for the Web" /> <meta name="twitter:card" content="app" /> <meta name="twitter:image" content="https://nextjs.org/og.png" /> <meta name="twitter:image:alt" content="Next.js Logo" /> <meta name="twitter:app:name:iphone" content="twitter_app" /> <meta name="twitter:app:id:iphone" content="twitter_app://iphone" /> <meta name="twitter:app:id:ipad" content="twitter_app://ipad" /> <meta name="twitter:app:id:googleplay" content="twitter_app://googleplay" /> <meta name="twitter:app:url:iphone" content="https://iphone_url" /> <meta name="twitter:app:url:ipad" content="https://ipad_url" /> <meta name="twitter:app:name:ipad" content="twitter_app" /> <meta name="twitter:app:name:googleplay" content="twitter_app" /> ### `viewport` > **Deprecated**: The `viewport` option in `metadata` is deprecated as of Next.js 14. Please use the `viewport` configuration instead. ### `verification` export const metadata = { verification: { google: 'google', yandex: 'yandex', yahoo: 'yahoo', other: { me: ['my-email', 'my-link'], }, }, } <meta name="google-site-verification" content="google" /> <meta name="y_key" content="yahoo" /> <meta name="yandex-verification" content="yandex" /> <meta name="me" content="my-email" /> <meta name="me" content="my-link" /> ### `appleWebApp` export const metadata = { itunes: { appId: 'myAppStoreID', appArgument: 'myAppArgument', }, appleWebApp: { title: 'Apple Web App', statusBarStyle: 'black-translucent', startupImage: [ '/assets/startup/apple-touch-startup-image-768x1004.png', { url: '/assets/startup/apple-touch-startup-image-1536x2008.png', media: '(device-width: 768px) and (device-height: 1024px)', }, ], }, } <meta name="apple-itunes-app" content="app-id=myAppStoreID, app-argument=myAppArgument" /> <meta name="apple-mobile-web-app-capable" content="yes" /> <meta name="apple-mobile-web-app-title" content="Apple Web App" /> <link href="/assets/startup/apple-touch-startup-image-768x1004.png" rel="apple-touch-startup-image" /> <link href="/assets/startup/apple-touch-startup-image-1536x2008.png" media="(device-width: 768px) and (device-height: 1024px)" rel="apple-touch-startup-image" /> <meta name="apple-mobile-web-app-status-bar-style" content="black-translucent" /> ### `alternates` export const metadata = { alternates: { canonical: 'https://nextjs.org', languages: { 'en-US': 'https://nextjs.org/en-US', 'de-DE': 'https://nextjs.org/de-DE', }, media: { 'only screen and (max-width: 600px)': 'https://nextjs.org/mobile', }, types: { 'application/rss+xml': 'https://nextjs.org/rss', }, }, } <link rel="canonical" href="https://nextjs.org" /> <link rel="alternate" hreflang="en-US" href="https://nextjs.org/en-US" /> <link rel="alternate" hreflang="de-DE" href="https://nextjs.org/de-DE" /> <link rel="alternate" media="only screen and (max-width: 600px)" href="https://nextjs.org/mobile" /> <link rel="alternate" type="application/rss+xml" href="https://nextjs.org/rss" /> ### `appLinks` export const metadata = { appLinks: { ios: { url: 'https://nextjs.org/ios', app_store_id: 'app_store_id', }, android: { package: 'com.example.android/package', app_name: 'app_name_android', }, web: { url: 'https://nextjs.org/web', should_fallback: true, }, }, } <meta property="al:ios:url" content="https://nextjs.org/ios" /> <meta property="al:ios:app_store_id" content="app_store_id" /> <meta property="al:android:package" content="com.example.android/package" /> <meta property="al:android:app_name" content="app_name_android" /> <meta property="al:web:url" content="https://nextjs.org/web" /> <meta property="al:web:should_fallback" content="true" /> ### `archives` Describes a collection of records, documents, or other materials of historical interest (source). export const metadata = { archives: ['https://nextjs.org/13'], } <link rel="archives" href="https://nextjs.org/13" /> ### `assets` export const metadata = { assets: ['https://nextjs.org/assets'], } <link rel="assets" href="https://nextjs.org/assets" /> ### `bookmarks` export const metadata = { bookmarks: ['https://nextjs.org/13'], } <link rel="bookmarks" href="https://nextjs.org/13" /> ### `category` export const metadata = { category: 'technology', } <meta name="category" content="technology" /> ### `facebook` You can connect a Facebook app or Facebook account to you webpage for certain Facebook Social Plugins Facebook Documentation > **Good to know**: You can specify either appId or admins, but not both. export const metadata = { facebook: { appId: '12345678', }, } <meta property="fb:app_id" content="12345678" /> export const metadata = { facebook: { admins: '12345678', }, } <meta property="fb:admins" content="12345678" /> If you want to generate multiple fb:admins meta tags you can use array value. export const metadata = { facebook: { admins: ['12345678', '87654321'], }, } <meta property="fb:admins" content="12345678" /> <meta property="fb:admins" content="87654321" /> ### `other` All metadata options should be covered using the built-in support. However, there may be custom metadata tags specific to your site, or brand new metadata tags just released. You can use the `other` option to render any custom metadata tag. export const metadata = { other: { custom: 'meta', }, } <meta name="custom" content="meta" /> If you want to generate multiple same key meta tags you can use array value. export const metadata = { other: { custom: ['meta1', 'meta2'], }, } <meta name="custom" content="meta1" /> <meta name="custom" content="meta2" /> The following metadata types do not currently have built-in support. However, they can still be rendered in the layout or page itself. | Metadata | Recommendation | | --- | --- | | `<meta http-equiv="...">` | Use appropriate HTTP Headers via `redirect()`, Middleware, Security Headers | | `<base>` | Render the tag in the layout or page itself. | | `<noscript>` | Render the tag in the layout or page itself. | | `<style>` | Learn more about styling in Next.js. | | `<script>` | Learn more about using scripts. | | `<link rel="stylesheet" />` | `import` stylesheets directly in the layout or page itself. | | `<link rel="preload />` | Use ReactDOM preload method | | `<link rel="preconnect" />` | Use ReactDOM preconnect method | | `<link rel="dns-prefetch" />` | Use ReactDOM prefetchDNS method | ### Resource hints The `<link>` element has a number of `rel` keywords that can be used to hint to the browser that an external resource is likely to be needed. The browser uses this information to apply preloading optimizations depending on the keyword. While the Metadata API doesn't directly support these hints, you can use new `ReactDOM` methods to safely insert them into the `<head>` of the document. 'use client' import ReactDOM from 'react-dom' export function PreloadResources() { ReactDOM.preload('...', { as: '...' }) ReactDOM.preconnect('...', { crossOrigin: '...' }) ReactDOM.prefetchDNS('...') return null } ##### `<link rel="preload">` Start loading a resource early in the page rendering (browser) lifecycle. MDN Docs. ReactDOM.preload(href: string, options: { as: string }) <link rel="preload" href="..." as="..." /> ##### `<link rel="preconnect">` Preemptively initiate a connection to an origin. MDN Docs. ReactDOM.preconnect(href: string, options?: { crossOrigin?: string }) <link rel="preconnect" href="..." crossorigin /> ##### `<link rel="dns-prefetch">` Attempt to resolve a domain name before resources get requested. MDN Docs. ReactDOM.prefetchDNS(href: string) <link rel="dns-prefetch" href="..." /> > **Good to know**: > > * These methods are currently only supported in Client Components, which are still Server Side Rendered on initial page load. > * Next.js in-built features such as `next/font`, `next/image` and `next/script` automatically handle relevant resource hints. > * React 18.3 does not yet include type definitions for `ReactDOM.preload`, `ReactDOM.preconnect`, and `ReactDOM.preconnectDNS`. You can use `// @ts-ignore` as a temporary solution to avoid type errors. ## Types You can add type safety to your metadata by using the `Metadata` type. If you are using the built-in TypeScript plugin in your IDE, you do not need to manually add the type, but you can still explicitly add it if you want. ### `metadata` object import type { Metadata } from 'next' export const metadata: Metadata = { title: 'Next.js', } ### `generateMetadata` function #### Regular function import type { Metadata } from 'next' export function generateMetadata(): Metadata { return { title: 'Next.js', } } #### Async function import type { Metadata } from 'next' export async function generateMetadata(): Promise<Metadata> { return { title: 'Next.js', } } #### With segment props import type { Metadata } from 'next' type Props = { params: { id: string } searchParams: { [key: string]: string | string[] | undefined } } export function generateMetadata({ params, searchParams }: Props): Metadata { return { title: 'Next.js', } } export default function Page({ params, searchParams }: Props) {} #### With parent metadata import type { Metadata, ResolvingMetadata } from 'next' export async function generateMetadata( { params, searchParams }: Props, parent: ResolvingMetadata ): Promise<Metadata> { return { title: 'Next.js', } } #### JavaScript Projects For JavaScript projects, you can use JSDoc to add type safety. /** @type {import("next").Metadata} */ export const metadata = { title: 'Next.js', } ## Version History | Version | Changes | | --- | --- | | `v13.2.0` | `viewport`, `themeColor`, and `colorScheme` deprecated in favor of the `viewport` configuration. | | `v13.2.0` | `metadata` and `generateMetadata` introduced. | --- ## Page: https://nextjs.org/docs/14/app/api-reference/functions/generate-sitemaps You are currently viewing documentation for version 14 of Next.js. You can use the `generateSitemaps` function to generate multiple sitemaps for your application. ## Returns The `generateSitemaps` returns an array of objects with an `id` property. ## URLs In production, your generated sitemaps will be available at `/.../sitemap/[id].xml`. For example, `/product/sitemap/1.xml`. In development, you can view the generated sitemap on `/.../sitemap.xml/[id]`. For example, `/product/sitemap.xml/1`. This difference is temporary and will follow the production format. ## Example For example, to split a sitemap using `generateSitemaps`, return an array of objects with the sitemap `id`. Then, use the `id` to generate the unique sitemaps. app/product/sitemap.ts import { BASE_URL } from '@/app/lib/constants' export async function generateSitemaps() { // Fetch the total number of products and calculate the number of sitemaps needed return [{ id: 0 }, { id: 1 }, { id: 2 }, { id: 3 }] } export default async function sitemap({ id, }: { id: number }): Promise<MetadataRoute.Sitemap> { // Google's limit is 50,000 URLs per sitemap const start = id * 50000 const end = start + 50000 const products = await getProducts( `SELECT id, date FROM products WHERE id BETWEEN ${start} AND ${end}` ) return products.map((product) => ({ url: `${BASE_URL}/product/${product.id}`, lastModified: product.date, })) } --- ## Page: https://nextjs.org/docs/14/app/api-reference/functions/generate-static-params The `generateStaticParams` function can be used in combination with dynamic route segments to **statically generate** routes at build time instead of on-demand at request time. // Return a list of `params` to populate the [slug] dynamic segment export async function generateStaticParams() { const posts = await fetch('https://.../posts').then((res) => res.json()) return posts.map((post) => ({ slug: post.slug, })) } // Multiple versions of this page will be statically generated // using the `params` returned by `generateStaticParams` export default function Page({ params }) { const { slug } = params // ... } > **Good to know** > > * You can use the `dynamicParams` segment config option to control what happens when a dynamic segment is visited that was not generated with `generateStaticParams`. > * During `next dev`, `generateStaticParams` will be called when you navigate to a route. > * During `next build`, `generateStaticParams` runs before the corresponding Layouts or Pages are generated. > * During revalidation (ISR), `generateStaticParams` will not be called again. > * `generateStaticParams` replaces the `getStaticPaths` function in the Pages Router. ## Parameters `options.params` (optional) If multiple dynamic segments in a route use `generateStaticParams`, the child `generateStaticParams` function is executed once for each set of `params` the parent generates. The `params` object contains the populated `params` from the parent `generateStaticParams`, which can be used to generate the `params` in a child segment. ## Returns `generateStaticParams` should return an array of objects where each object represents the populated dynamic segments of a single route. * Each property in the object is a dynamic segment to be filled in for the route. * The properties name is the segment's name, and the properties value is what that segment should be filled in with. | Example Route | `generateStaticParams` Return Type | | --- | --- | | `/product/[id]` | `{ id: string }[]` | | `/products/[category]/[product]` | `{ category: string, product: string }[]` | | `/products/[...slug]` | `{ slug: string[] }[]` | ## Single Dynamic Segment export function generateStaticParams() { return [{ id: '1' }, { id: '2' }, { id: '3' }] } // Three versions of this page will be statically generated // using the `params` returned by `generateStaticParams` // - /product/1 // - /product/2 // - /product/3 export default function Page({ params }: { params: { id: string } }) { const { id } = params // ... } ## Multiple Dynamic Segments export function generateStaticParams() { return [ { category: 'a', product: '1' }, { category: 'b', product: '2' }, { category: 'c', product: '3' }, ] } // Three versions of this page will be statically generated // using the `params` returned by `generateStaticParams` // - /products/a/1 // - /products/b/2 // - /products/c/3 export default function Page({ params, }: { params: { category: string; product: string } }) { const { category, product } = params // ... } ## Catch-all Dynamic Segment export function generateStaticParams() { return [{ slug: ['a', '1'] }, { slug: ['b', '2'] }, { slug: ['c', '3'] }] } // Three versions of this page will be statically generated // using the `params` returned by `generateStaticParams` // - /product/a/1 // - /product/b/2 // - /product/c/3 export default function Page({ params }: { params: { slug: string[] } }) { const { slug } = params // ... } ## Examples ### Multiple Dynamic Segments in a Route You can generate params for dynamic segments above the current layout or page, but **not below**. For example, given the `app/products/[category]/[product]` route: * `app/products/[category]/[product]/page.js` can generate params for **both** `[category]` and `[product]`. * `app/products/[category]/layout.js` can **only** generate params for `[category]`. There are two approaches to generating params for a route with multiple dynamic segments: ### Generate params from the bottom up Generate multiple dynamic segments from the child route segment. // Generate segments for both [category] and [product] export async function generateStaticParams() { const products = await fetch('https://.../products').then((res) => res.json()) return products.map((product) => ({ category: product.category.slug, product: product.id, })) } export default function Page({ params, }: { params: { category: string; product: string } }) { // ... } ### Generate params from the top down Generate the parent segments first and use the result to generate the child segments. // Generate segments for [category] export async function generateStaticParams() { const products = await fetch('https://.../products').then((res) => res.json()) return products.map((product) => ({ category: product.category.slug, })) } export default function Layout({ params }: { params: { category: string } }) { // ... } A child route segment's `generateStaticParams` function is executed once for each segment a parent `generateStaticParams` generates. The child `generateStaticParams` function can use the `params` returned from the parent `generateStaticParams` function to dynamically generate its own segments. // Generate segments for [product] using the `params` passed from // the parent segment's `generateStaticParams` function export async function generateStaticParams({ params: { category }, }: { params: { category: string } }) { const products = await fetch( `https://.../products?category=${category}` ).then((res) => res.json()) return products.map((product) => ({ product: product.id, })) } export default function Page({ params, }: { params: { category: string; product: string } }) { // ... } > **Good to know**: `fetch` requests are automatically memoized for the same data across all `generate`\-prefixed functions, Layouts, Pages, and Server Components. React `cache` can be used if `fetch` is unavailable. ### Generate only a subset of params You can generate a subset of params for a route by returning an array of objects with only the dynamic segments you want to generate. Then, by using the `dynamicParams` segment config option, you can control what happens when a dynamic segment is visited that was not generated with `generateStaticParams`. // All posts besides the top 10 will be a 404 export const dynamicParams = false export async function generateStaticParams() { const posts = await fetch('https://.../posts').then((res) => res.json()) const topPosts = posts.slice(0, 10) return topPosts.map((post) => ({ slug: post.slug, })) } ## Version History | Version | Changes | | --- | --- | | `v13.0.0` | `generateStaticParams` introduced. | --- ## Page: https://nextjs.org/docs/14/app/api-reference/functions/generate-viewport You can customize the initial viewport of the page with the static `viewport` object or the dynamic `generateViewport` function. > **Good to know**: > > * The `viewport` object and `generateViewport` function exports are **only supported in Server Components**. > * You cannot export both the `viewport` object and `generateViewport` function from the same route segment. > * If you're coming from migrating `metadata` exports, you can use metadata-to-viewport-export codemod to update your changes. ## The `viewport` object To define the viewport options, export a `viewport` object from a `layout.jsx` or `page.jsx` file. import type { Viewport } from 'next' export const viewport: Viewport = { themeColor: 'black', } export default function Page() {} ## `generateViewport` function `generateViewport` should return a `Viewport` object containing one or more viewport fields. export function generateViewport({ params }) { return { themeColor: '...', } } > **Good to know**: > > * If the viewport doesn't depend on runtime information, it should be defined using the static `viewport` object rather than `generateMetadata`. ## Viewport Fields ### `themeColor` Learn more about `theme-color`. **Simple theme color** import type { Viewport } from 'next' export const viewport: Viewport = { themeColor: 'black', } <meta name="theme-color" content="black" /> **With media attribute** import type { Viewport } from 'next' export const viewport: Viewport = { themeColor: [ { media: '(prefers-color-scheme: light)', color: 'cyan' }, { media: '(prefers-color-scheme: dark)', color: 'black' }, ], } <meta name="theme-color" media="(prefers-color-scheme: light)" content="cyan" /> <meta name="theme-color" media="(prefers-color-scheme: dark)" content="black" /> ### `width`, `initialScale`, `maximumScale` and `userScalable` > **Good to know**: The `viewport` meta tag is automatically set, and manual configuration is usually unnecessary as the default is sufficient. However, the information is provided for completeness. import type { Viewport } from 'next' export const viewport: Viewport = { width: 'device-width', initialScale: 1, maximumScale: 1, userScalable: false, // Also supported by less commonly used // interactiveWidget: 'resizes-visual', } <meta name="viewport" content="width=device-width, initial-scale=1, maximum-scale=1, user-scalable=no" /> ### `colorScheme` Learn more about `color-scheme`. import type { Viewport } from 'next' export const viewport: Viewport = { colorScheme: 'dark', } <meta name="color-scheme" content="dark" /> ## Types You can add type safety to your viewport object by using the `Viewport` type. If you are using the built-in TypeScript plugin in your IDE, you do not need to manually add the type, but you can still explicitly add it if you want. ### `viewport` object import type { Viewport } from 'next' export const viewport: Viewport = { themeColor: 'black', } ### `generateViewport` function #### Regular function import type { Viewport } from 'next' export function generateViewport(): Viewport { return { themeColor: 'black', } } #### With segment props import type { Viewport } from 'next' type Props = { params: { id: string } searchParams: { [key: string]: string | string[] | undefined } } export function generateViewport({ params, searchParams }: Props): Viewport { return { themeColor: 'black', } } export default function Page({ params, searchParams }: Props) {} #### JavaScript Projects For JavaScript projects, you can use JSDoc to add type safety. /** @type {import("next").Viewport} */ export const viewport = { themeColor: 'black', } ## Version History | Version | Changes | | --- | --- | | `v14.0.0` | `viewport` and `generateViewport` introduced. | --- ## Page: https://nextjs.org/docs/14/app/api-reference/functions/headers You are currently viewing documentation for version 14 of Next.js. The `headers` function allows you to read the HTTP incoming request headers from a Server Component. ## `headers()` This API extends the Web Headers API. It is **read-only**, meaning you cannot `set` / `delete` the outgoing request headers. app/page.tsx import { headers } from 'next/headers' export default function Page() { const headersList = headers() const referer = headersList.get('referer') return <div>Referer: {referer}</div> } > **Good to know**: > > * `headers()` is a **Dynamic Function** whose returned values cannot be known ahead of time. Using it in a layout or page will opt a route into **dynamic rendering** at request time. ### API Reference const headersList = headers() #### Parameters `headers` does not take any parameters. #### Returns `headers` returns a **read-only** Web Headers object. * `Headers.entries()`: Returns an `iterator` allowing to go through all key/value pairs contained in this object. * `Headers.forEach()`: Executes a provided function once for each key/value pair in this `Headers` object. * `Headers.get()`: Returns a `String` sequence of all the values of a header within a `Headers` object with a given name. * `Headers.has()`: Returns a boolean stating whether a `Headers` object contains a certain header. * `Headers.keys()`: Returns an `iterator` allowing you to go through all keys of the key/value pairs contained in this object. * `Headers.values()`: Returns an `iterator` allowing you to go through all values of the key/value pairs contained in this object. ### Examples #### Usage with Data Fetching `headers()` can be used in combination with Suspense for Data Fetching. app/page.js import { Suspense } from 'react' import { headers } from 'next/headers' async function User() { const authorization = headers().get('authorization') const res = await fetch('...', { headers: { authorization }, // Forward the authorization header }) const user = await res.json() return <h1>{user.name}</h1> } export default function Page() { return ( <Suspense fallback={null}> <User /> </Suspense> ) } #### IP Address `headers()` can be used to get the IP address of the client. app/page.js import { Suspense } from 'react' import { headers } from 'next/headers' function IP() { const FALLBACK_IP_ADDRESS = '0.0.0.0' const forwardedFor = headers().get('x-forwarded-for') if (forwardedFor) { return forwardedFor.split(',')[0] ?? FALLBACK_IP_ADDRESS } return headers().get('x-real-ip') ?? FALLBACK_IP_ADDRESS } export default function Page() { return ( <Suspense fallback={null}> <IP /> </Suspense> ) } In addition to `x-forwarded-for`, `headers()` can also read: * `x-real-ip` * `x-forwarded-host` * `x-forwarded-port` * `x-forwarded-proto` ## Version History | Version | Changes | | --- | --- | | `v13.0.0` | `headers` introduced. | --- ## Page: https://nextjs.org/docs/14/app/api-reference/functions/image-response You are currently viewing documentation for version 14 of Next.js. The `ImageResponse` constructor allows you to generate dynamic images using JSX and CSS. This is useful for generating social media images such as Open Graph images, Twitter cards, and more. The following options are available for `ImageResponse`: import { ImageResponse } from 'next/og' new ImageResponse( element: ReactElement, options: { width?: number = 1200 height?: number = 630 emoji?: 'twemoji' | 'blobmoji' | 'noto' | 'openmoji' = 'twemoji', fonts?: { name: string, data: ArrayBuffer, weight: number, style: 'normal' | 'italic' }[] debug?: boolean = false // Options that will be passed to the HTTP response status?: number = 200 statusText?: string headers?: Record<string, string> }, ) ## Supported CSS Properties Please refer to Satori’s documentation for a list of supported HTML and CSS features. ## Version History | Version | Changes | | --- | --- | | `v14.0.0` | `ImageResponse` moved from `next/server` to `next/og` | | `v13.3.0` | `ImageResponse` can be imported from `next/server`. | | `v13.0.0` | `ImageResponse` introduced via `@vercel/og` package. | --- ## Page: https://nextjs.org/docs/14/app/api-reference/functions/next-request NextRequest extends the Web Request API with additional convenience methods. ## `cookies` Read or mutate the `Set-Cookie` header of the request. ### `set(name, value)` Given a name, set a cookie with the given value on the request. // Given incoming request /home // Set a cookie to hide the banner // request will have a `Set-Cookie:show-banner=false;path=/home` header request.cookies.set('show-banner', 'false') ### `get(name)` Given a cookie name, return the value of the cookie. If the cookie is not found, `undefined` is returned. If multiple cookies are found, the first one is returned. // Given incoming request /home // { name: 'show-banner', value: 'false', Path: '/home' } request.cookies.get('show-banner') ### `getAll()` Given a cookie name, return the values of the cookie. If no name is given, return all cookies on the request. // Given incoming request /home // [ // { name: 'experiments', value: 'new-pricing-page', Path: '/home' }, // { name: 'experiments', value: 'winter-launch', Path: '/home' }, // ] request.cookies.getAll('experiments') // Alternatively, get all cookies for the request request.cookies.getAll() ### `delete(name)` Given a cookie name, delete the cookie from the request. // Returns true for deleted, false is nothing is deleted request.cookies.delete('experiments') ### `has(name)` Given a cookie name, return `true` if the cookie exists on the request. // Returns true if cookie exists, false if it does not request.cookies.has('experiments') ### `clear()` Remove the `Set-Cookie` header from the request. request.cookies.clear() ## `nextUrl` Extends the native `URL` API with additional convenience methods, including Next.js specific properties. // Given a request to /home, pathname is /home request.nextUrl.pathname // Given a request to /home?name=lee, searchParams is { 'name': 'lee' } request.nextUrl.searchParams The following options are available: | Property | Type | Description | | --- | --- | --- | | `basePath` | `string` | The base path of the URL. | | `buildId` | `string` | `undefined` | The build identifier of the Next.js application. Can be customized. | | `pathname` | `string` | The pathname of the URL. | | `searchParams` | `Object` | The search parameters of the URL. | > **Note:** The internationalization properties from the Pages Router are not available for usage in the App Router. Learn more about internationalization with the App Router. ## `ip` The `ip` property is a string that contains the IP address of the request. This value can optionally be provided by your hosting platform. > **Good to know:** On Vercel, this value is provided by default. On other platforms, you can use the `X-Forwarded-For` header to provide the IP address. // Provided by Vercel request.ip // Self-hosting request.headers.get('X-Forwarded-For') ## `geo` The `geo` property is an object that contains the geographic information of the request. This value can optionally be provided by your hosting platform. > **Good to know:** On Vercel, this value is provided by default. On other platforms, you can use the `X-Forwarded-For` header to provide the IP address, then use a third-party service to lookup the geographic information. // Provided by Vercel request.geo.city request.geo.country request.geo.region request.geo.latitude request.geo.longitude // Self-hosting function getGeo(request) { let ip = request.headers.get('X-Forwarded-For') // Use a third-party service to lookup the geographic information } --- ## Page: https://nextjs.org/docs/14/app/api-reference/functions/next-response NextResponse extends the Web Response API with additional convenience methods. ## `cookies` Read or mutate the `Set-Cookie` header of the response. ### `set(name, value)` Given a name, set a cookie with the given value on the response. // Given incoming request /home let response = NextResponse.next() // Set a cookie to hide the banner response.cookies.set('show-banner', 'false') // Response will have a `Set-Cookie:show-banner=false;path=/home` header return response ### `get(name)` Given a cookie name, return the value of the cookie. If the cookie is not found, `undefined` is returned. If multiple cookies are found, the first one is returned. // Given incoming request /home let response = NextResponse.next() // { name: 'show-banner', value: 'false', Path: '/home' } response.cookies.get('show-banner') ### `getAll()` Given a cookie name, return the values of the cookie. If no name is given, return all cookies on the response. // Given incoming request /home let response = NextResponse.next() // [ // { name: 'experiments', value: 'new-pricing-page', Path: '/home' }, // { name: 'experiments', value: 'winter-launch', Path: '/home' }, // ] response.cookies.getAll('experiments') // Alternatively, get all cookies for the response response.cookies.getAll() ### `delete(name)` Given a cookie name, delete the cookie from the response. // Given incoming request /home let response = NextResponse.next() // Returns true for deleted, false is nothing is deleted response.cookies.delete('experiments') ## `json()` Produce a response with the given JSON body. import { NextResponse } from 'next/server' export async function GET(request: Request) { return NextResponse.json({ error: 'Internal Server Error' }, { status: 500 }) } ## `redirect()` Produce a response that redirects to a URL. import { NextResponse } from 'next/server' return NextResponse.redirect(new URL('/new', request.url)) The URL can be created and modified before being used in the `NextResponse.redirect()` method. For example, you can use the `request.nextUrl` property to get the current URL, and then modify it to redirect to a different URL. import { NextResponse } from 'next/server' // Given an incoming request... const loginUrl = new URL('/login', request.url) // Add ?from=/incoming-url to the /login URL loginUrl.searchParams.set('from', request.nextUrl.pathname) // And redirect to the new URL return NextResponse.redirect(loginUrl) ## `rewrite()` Produce a response that rewrites (proxies) the given URL while preserving the original URL. import { NextResponse } from 'next/server' // Incoming request: /about, browser shows /about // Rewritten request: /proxy, browser shows /about return NextResponse.rewrite(new URL('/proxy', request.url)) ## `next()` The `next()` method is useful for Middleware, as it allows you to return early and continue routing. import { NextResponse } from 'next/server' return NextResponse.next() You can also forward `headers` when producing the response: import { NextResponse } from 'next/server' // Given an incoming request... const newHeaders = new Headers(request.headers) // Add a new header newHeaders.set('x-version', '123') // And produce a response with the new headers return NextResponse.next({ request: { // New request headers headers: newHeaders, }, }) --- ## Page: https://nextjs.org/docs/14/app/api-reference/functions/not-found You are currently viewing documentation for version 14 of Next.js. The `notFound` function allows you to render the `not-found file` within a route segment as well as inject a `<meta name="robots" content="noindex" />` tag. ## `notFound()` Invoking the `notFound()` function throws a `NEXT_NOT_FOUND` error and terminates rendering of the route segment in which it was thrown. Specifying a **not-found** file allows you to gracefully handle such errors by rendering a Not Found UI within the segment. app/user/\[id\]/page.js import { notFound } from 'next/navigation' async function fetchUser(id) { const res = await fetch('https://...') if (!res.ok) return undefined return res.json() } export default async function Profile({ params }) { const user = await fetchUser(params.id) if (!user) { notFound() } // ... } > **Good to know**: `notFound()` does not require you to use `return notFound()` due to using the TypeScript `never` type. ## Version History | Version | Changes | | --- | --- | | `v13.0.0` | `notFound` introduced. | --- ## Page: https://nextjs.org/docs/14/app/api-reference/functions/permanentRedirect The `permanentRedirect` function allows you to redirect the user to another URL. `permanentRedirect` can be used in Server Components, Client Components, Route Handlers, and Server Actions. When used in a streaming context, this will insert a meta tag to emit the redirect on the client side. When used in a server action, it will serve a 303 HTTP redirect response to the caller. Otherwise, it will serve a 308 (Permanent) HTTP redirect response to the caller. If a resource doesn't exist, you can use the `notFound` function instead. > **Good to know**: If you prefer to return a 307 (Temporary) HTTP redirect instead of 308 (Permanent), you can use the `redirect` function instead. ## Parameters The `permanentRedirect` function accepts two arguments: permanentRedirect(path, type) | Parameter | Type | Description | | --- | --- | --- | | `path` | `string` | The URL to redirect to. Can be a relative or absolute path. | | `type` | `'replace'` (default) or `'push'` (default in Server Actions) | The type of redirect to perform. | By default, `permanentRedirect` will use `push` (adding a new entry to the browser history stack) in Server Actions and `replace` (replacing the current URL in the browser history stack) everywhere else. You can override this behavior by specifying the `type` parameter. The `type` parameter has no effect when used in Server Components. ## Returns `permanentRedirect` does not return any value. ## Example Invoking the `permanentRedirect()` function throws a `NEXT_REDIRECT` error and terminates rendering of the route segment in which it was thrown. import { permanentRedirect } from 'next/navigation' async function fetchTeam(id) { const res = await fetch('https://...') if (!res.ok) return undefined return res.json() } export default async function Profile({ params }) { const team = await fetchTeam(params.id) if (!team) { permanentRedirect('/login') } // ... } > **Good to know**: `permanentRedirect` does not require you to use `return permanentRedirect()` as it uses the TypeScript `never` type. --- ## Page: https://nextjs.org/docs/14/app/api-reference/functions/redirect The `redirect` function allows you to redirect the user to another URL. `redirect` can be used in Server Components, Route Handlers, and Server Actions. When used in a streaming context, this will insert a meta tag to emit the redirect on the client side. When used in a server action, it will serve a 303 HTTP redirect response to the caller. Otherwise, it will serve a 307 HTTP redirect response to the caller. If a resource doesn't exist, you can use the `notFound` function instead. > **Good to know**: > > * In Server Actions and Route Handlers, `redirect` should be called after the `try/catch` block. > * If you prefer to return a 308 (Permanent) HTTP redirect instead of 307 (Temporary), you can use the `permanentRedirect` function instead. ## Parameters The `redirect` function accepts two arguments: redirect(path, type) | Parameter | Type | Description | | --- | --- | --- | | `path` | `string` | The URL to redirect to. Can be a relative or absolute path. | | `type` | `'replace'` (default) or `'push'` (default in Server Actions) | The type of redirect to perform. | By default, `redirect` will use `push` (adding a new entry to the browser history stack) in Server Actions and `replace` (replacing the current URL in the browser history stack) everywhere else. You can override this behavior by specifying the `type` parameter. The `type` parameter has no effect when used in Server Components. ## Returns `redirect` does not return any value. ## Example ### Server Component Invoking the `redirect()` function throws a `NEXT_REDIRECT` error and terminates rendering of the route segment in which it was thrown. import { redirect } from 'next/navigation' async function fetchTeam(id) { const res = await fetch('https://...') if (!res.ok) return undefined return res.json() } export default async function Profile({ params }) { const team = await fetchTeam(params.id) if (!team) { redirect('/login') } // ... } > **Good to know**: `redirect` does not require you to use `return redirect()` as it uses the TypeScript `never` type. ### Client Component `redirect` can be used in a Client Component through a Server Action. If you need to use an event handler to redirect the user, you can use the `useRouter` hook. 'use client' import { navigate } from './actions' export function ClientRedirect() { return ( <form action={navigate}> <input type="text" name="id" /> <button>Submit</button> </form> ) } 'use server' import { redirect } from 'next/navigation' export async function navigate(data: FormData) { redirect(`/posts/${data.get('id')}`) } ## FAQ ### Why does `redirect` use 307 and 308? When using `redirect()` you may notice that the status codes used are `307` for a temporary redirect, and `308` for a permanent redirect. While traditionally a `302` was used for a temporary redirect, and a `301` for a permanent redirect, many browsers changed the request method of the redirect, from a `POST` to `GET` request when using a `302`, regardless of the origins request method. Taking the following example of a redirect from `/users` to `/people`, if you make a `POST` request to `/users` to create a new user, and are conforming to a `302` temporary redirect, the request method will be changed from a `POST` to a `GET` request. This doesn't make sense, as to create a new user, you should be making a `POST` request to `/people`, and not a `GET` request. The introduction of the `307` status code means that the request method is preserved as `POST`. * `302` - Temporary redirect, will change the request method from `POST` to `GET` * `307` - Temporary redirect, will preserve the request method as `POST` The `redirect()` method uses a `307` by default, instead of a `302` temporary redirect, meaning your requests will _always_ be preserved as `POST` requests. Learn more about HTTP Redirects. ## Version History | Version | Changes | | --- | --- | | `v13.0.0` | `redirect` introduced. | --- ## Page: https://nextjs.org/docs/14/app/api-reference/functions/revalidatePath `revalidatePath` allows you to purge cached data on-demand for a specific path. > **Good to know**: > > * `revalidatePath` is available in both Node.js and Edge runtimes. > * `revalidatePath` only invalidates the cache when the included path is next visited. This means calling `revalidatePath` with a dynamic route segment will not immediately trigger many revalidations at once. The invalidation only happens when the path is next visited. > * Currently, `revalidatePath` invalidates all the routes in the client-side Router Cache. This behavior is temporary and will be updated in the future to apply only to the specific path. > * Using `revalidatePath` invalidates **only the specific path** in the server-side Route Cache. ## Parameters revalidatePath(path: string, type?: 'page' | 'layout'): void; * `path`: Either a string representing the filesystem path associated with the data you want to revalidate (for example, `/product/[slug]/page`), or the literal route segment (for example, `/product/123`). Must be less than 1024 characters. This value is case-sensitive. * `type`: (optional) `'page'` or `'layout'` string to change the type of path to revalidate. If `path` contains a dynamic segment (for example, `/product/[slug]/page`), this parameter is required. ## Returns `revalidatePath` does not return any value. ## Examples ### Revalidating A Specific URL import { revalidatePath } from 'next/cache' revalidatePath('/blog/post-1') This will revalidate one specific URL on the next page visit. ### Revalidating A Page Path import { revalidatePath } from 'next/cache' revalidatePath('/blog/[slug]', 'page') // or with route groups revalidatePath('/(main)/post/[slug]', 'page') This will revalidate any URL that matches the provided `page` file on the next page visit. This will _not_ invalidate pages beneath the specific page. For example, `/blog/[slug]` won't invalidate `/blog/[slug]/[author]`. ### Revalidating A Layout Path import { revalidatePath } from 'next/cache' revalidatePath('/blog/[slug]', 'layout') // or with route groups revalidatePath('/(main)/post/[slug]', 'layout') This will revalidate any URL that matches the provided `layout` file on the next page visit. This will cause pages beneath with the same layout to revalidate on the next visit. For example, in the above case, `/blog/[slug]/[another]` would also revalidate on the next visit. ### Revalidating All Data import { revalidatePath } from 'next/cache' revalidatePath('/', 'layout') This will purge the Client-side Router Cache, and revalidate the Data Cache on the next page visit. ### Server Action 'use server' import { revalidatePath } from 'next/cache' export default async function submit() { await submitForm() revalidatePath('/') } ### Route Handler import { revalidatePath } from 'next/cache' import { NextRequest } from 'next/server' export async function GET(request: NextRequest) { const path = request.nextUrl.searchParams.get('path') if (path) { revalidatePath(path) return Response.json({ revalidated: true, now: Date.now() }) } return Response.json({ revalidated: false, now: Date.now(), message: 'Missing path to revalidate', }) } --- ## Page: https://nextjs.org/docs/14/app/api-reference/functions/revalidateTag You are currently viewing documentation for version 14 of Next.js. `revalidateTag` allows you to purge cached data on-demand for a specific cache tag. > **Good to know**: > > * `revalidateTag` is available in both Node.js and Edge runtimes. > * `revalidateTag` only invalidates the cache when the path is next visited. This means calling `revalidateTag` with a dynamic route segment will not immediately trigger many revalidations at once. The invalidation only happens when the path is next visited. ## Parameters revalidateTag(tag: string): void; * `tag`: A string representing the cache tag associated with the data you want to revalidate. Must be less than or equal to 256 characters. This value is case-sensitive. You can add tags to `fetch` as follows: fetch(url, { next: { tags: [...] } }); ## Returns `revalidateTag` does not return any value. ## Examples ### Server Action app/actions.ts 'use server' import { revalidateTag } from 'next/cache' export default async function submit() { await addPost() revalidateTag('posts') } ### Route Handler app/api/revalidate/route.ts import { NextRequest } from 'next/server' import { revalidateTag } from 'next/cache' export async function GET(request: NextRequest) { const tag = request.nextUrl.searchParams.get('tag') revalidateTag(tag) return Response.json({ revalidated: true, now: Date.now() }) } --- ## Page: https://nextjs.org/docs/14/app/api-reference/functions/unstable_cache `unstable_cache` allows you to cache the results of expensive operations, like database queries, and reuse them across multiple requests. import { getUser } from './data'; import { unstable_cache } from 'next/cache'; const getCachedUser = unstable_cache( async (id) => getUser(id), ['my-app-user'] ); export default async function Component({ userID }) { const user = await getCachedUser(userID); ... } > **Good to know**: Accessing dynamic data sources such as `headers` or `cookies` inside a cache scope is not supported. If you need this data inside a cached function use `headers` outside of the cached function and pass the required dynamic data in as an argument. > **Warning**: This API is unstable and may change in the future. We will provide migration documentation and codemods, if needed, as this API stabilizes. ## Parameters const data = unstable_cache(fetchData, keyParts, options)() * `fetchData`: This is an asynchronous function that fetches the data you want to cache. It must be a function that returns a `Promise`. * `keyParts`: This is an array that identifies the cached key. It must contain globally unique values that together identify the key of the data being cached. The cache key also includes the arguments passed to the function. * `options`: This is an object that controls how the cache behaves. It can contain the following properties: * `tags`: An array of tags that can be used to control cache invalidation. * `revalidate`: The number of seconds after which the cache should be revalidated. Omit or pass `false` to cache indefinitely or until matching `revalidateTag()` or `revalidatePath()` methods are called. ## Returns `unstable_cache` returns a function that when invoked, returns a Promise that resolves to the cached data. If the data is not in the cache, the provided function will be invoked, and its result will be cached and returned. ## Version History | Version | Changes | | --- | --- | | `v14.0.0` | `unstable_cache` introduced. | Was this helpful? supported. --- ## Page: https://nextjs.org/docs/14/app/api-reference/functions/unstable_noStore You are currently viewing documentation for version 14 of Next.js. `unstable_noStore` can be used to declaratively opt out of static rendering and indicate a particular component should not be cached. import { unstable_noStore as noStore } from 'next/cache'; export default async function Component() { noStore(); const result = await db.query(...); ... } > **Good to know**: > > * `unstable_noStore` is equivalent to `cache: 'no-store'` on a `fetch` > * `unstable_noStore` is preferred over `export const dynamic = 'force-dynamic'` as it is more granular and can be used on a per-component basis * Using `unstable_noStore` inside `unstable_cache` will not opt out of static generation. Instead, it will defer to the cache configuration to determine whether to cache the result or not. ## Usage If you prefer not to pass additional options to `fetch`, like `cache: 'no-store'` or `next: { revalidate: 0 }`, you can use `noStore()` as a replacement for all of these use cases. import { unstable_noStore as noStore } from 'next/cache'; export default async function Component() { noStore(); const result = await db.query(...); ... } ## Version History | Version | Changes | | --- | --- | | `v14.0.0` | `unstable_noStore` introduced. | --- ## Page: https://nextjs.org/docs/14/app/api-reference/functions/use-params You are currently viewing documentation for version 14 of Next.js. `useParams` is a **Client Component** hook that lets you read a route's dynamic params filled in by the current URL. app/example-client-component.tsx 'use client' import { useParams } from 'next/navigation' export default function ExampleClientComponent() { const params = useParams<{ tag: string; item: string }>() // Route -> /shop/[tag]/[item] // URL -> /shop/shoes/nike-air-max-97 // `params` -> { tag: 'shoes', item: 'nike-air-max-97' } console.log(params) return <></> } ## Parameters const params = useParams() `useParams` does not take any parameters. ## Returns `useParams` returns an object containing the current route's filled in dynamic parameters. * Each property in the object is an active dynamic segment. * The properties name is the segment's name, and the properties value is what the segment is filled in with. * The properties value will either be a `string` or array of `string`'s depending on the type of dynamic segment. * If the route contains no dynamic parameters, `useParams` returns an empty object. * If used in Pages Router, `useParams` will return `null` on the initial render and updates with properties following the rules above once the router is ready. For example: | Route | URL | `useParams()` | | --- | --- | --- | | `app/shop/page.js` | `/shop` | `{}` | | `app/shop/[slug]/page.js` | `/shop/1` | `{ slug: '1' }` | | `app/shop/[tag]/[item]/page.js` | `/shop/1/2` | `{ tag: '1', item: '2' }` | | `app/shop/[...slug]/page.js` | `/shop/1/2` | `{ slug: ['1', '2'] }` | ## Version History | Version | Changes | | --- | --- | | `v13.3.0` | `useParams` introduced. | --- ## Page: https://nextjs.org/docs/14/app/api-reference/functions/use-pathname You are currently viewing documentation for version 14 of Next.js. `usePathname` is a **Client Component** hook that lets you read the current URL's **pathname**. app/example-client-component.tsx 'use client' import { usePathname } from 'next/navigation' export default function ExampleClientComponent() { const pathname = usePathname() return <p>Current pathname: {pathname}</p> } `usePathname` intentionally requires using a Client Component. It's important to note Client Components are not a de-optimization. They are an integral part of the Server Components architecture. For example, a Client Component with `usePathname` will be rendered into HTML on the initial page load. When navigating to a new route, this component does not need to be re-fetched. Instead, the component is downloaded once (in the client JavaScript bundle), and re-renders based on the current state. > **Good to know**: > > * Reading the current URL from a Server Component is not supported. This design is intentional to support layout state being preserved across page navigations. > * Compatibility mode: > * `usePathname` can return `null` when a fallback route is being rendered or when a `pages` directory page has been automatically statically optimized by Next.js and the router is not ready. > * Next.js will automatically update your types if it detects both an `app` and `pages` directory in your project. ## Parameters const pathname = usePathname() `usePathname` does not take any parameters. ## Returns `usePathname` returns a string of the current URL's pathname. For example: | URL | Returned value | | --- | --- | | `/` | `'/'` | | `/dashboard` | `'/dashboard'` | | `/dashboard?v=2` | `'/dashboard'` | | `/blog/hello-world` | `'/blog/hello-world'` | ## Examples ### Do something in response to a route change app/example-client-component.tsx 'use client' import { usePathname, useSearchParams } from 'next/navigation' function ExampleClientComponent() { const pathname = usePathname() const searchParams = useSearchParams() useEffect(() => { // Do something here... }, [pathname, searchParams]) } | Version | Changes | | --- | --- | | `v13.0.0` | `usePathname` introduced. | --- ## Page: https://nextjs.org/docs/14/app/api-reference/functions/use-report-web-vitals The `useReportWebVitals` hook allows you to report Core Web Vitals, and can be used in combination with your analytics service. 'use client' import { useReportWebVitals } from 'next/web-vitals' export function WebVitals() { useReportWebVitals((metric) => { console.log(metric) }) } import { WebVitals } from './_components/web-vitals' export default function Layout({ children }) { return ( <html> <body> <WebVitals /> {children} </body> </html> ) } > Since the `useReportWebVitals` hook requires the `"use client"` directive, the most performant approach is to create a separate component that the root layout imports. This confines the client boundary exclusively to the `WebVitals` component. ## useReportWebVitals The `metric` object passed as the hook's argument consists of a number of properties: * `id`: Unique identifier for the metric in the context of the current page load * `name`: The name of the performance metric. Possible values include names of Web Vitals metrics (TTFB, FCP, LCP, FID, CLS) specific to a web application. * `delta`: The difference between the current value and the previous value of the metric. The value is typically in milliseconds and represents the change in the metric's value over time. * `entries`: An array of Performance Entries associated with the metric. These entries provide detailed information about the performance events related to the metric. * `navigationType`: Indicates the type of navigation that triggered the metric collection. Possible values include `"navigate"`, `"reload"`, `"back_forward"`, and `"prerender"`. * `rating`: A qualitative rating of the metric value, providing an assessment of the performance. Possible values are `"good"`, `"needs-improvement"`, and `"poor"`. The rating is typically determined by comparing the metric value against predefined thresholds that indicate acceptable or suboptimal performance. * `value`: The actual value or duration of the performance entry, typically in milliseconds. The value provides a quantitative measure of the performance aspect being tracked by the metric. The source of the value depends on the specific metric being measured and can come from various Performance APIs. ## Web Vitals Web Vitals are a set of useful metrics that aim to capture the user experience of a web page. The following web vitals are all included: * Time to First Byte (TTFB) * First Contentful Paint (FCP) * Largest Contentful Paint (LCP) * First Input Delay (FID) * Cumulative Layout Shift (CLS) * Interaction to Next Paint (INP) You can handle all the results of these metrics using the `name` property. 'use client' import { useReportWebVitals } from 'next/web-vitals' export function WebVitals() { useReportWebVitals((metric) => { switch (metric.name) { case 'FCP': { // handle FCP results } case 'LCP': { // handle LCP results } // ... } }) } ## Usage on Vercel Vercel Speed Insights are automatically configured on Vercel deployments, and don't require the use of `useReportWebVitals`. This hook is useful in local development, or if you're using a different analytics service. ## Sending results to external systems You can send results to any endpoint to measure and track real user performance on your site. For example: useReportWebVitals((metric) => { const body = JSON.stringify(metric) const url = 'https://example.com/analytics' // Use `navigator.sendBeacon()` if available, falling back to `fetch()`. if (navigator.sendBeacon) { navigator.sendBeacon(url, body) } else { fetch(url, { body, method: 'POST', keepalive: true }) } }) > **Good to know**: If you use Google Analytics, using the `id` value can allow you to construct metric distributions manually (to calculate percentiles, etc.) > useReportWebVitals(metric => { > // Use `window.gtag` if you initialized Google Analytics as this example: > // https://github.com/vercel/next.js/blob/canary/examples/with-google-analytics/pages/_app.js > window.gtag('event', metric.name, { > value: Math.round(metric.name === 'CLS' ? metric.value * 1000 : metric.value), // values must be integers > event_label: metric.id, // id unique to current page load > non_interaction: true, // avoids affecting bounce rate. > }); > } > > Read more about sending results to Google Analytics. Was this helpful? supported. --- ## Page: https://nextjs.org/docs/14/app/api-reference/functions/use-router The `useRouter` hook allows you to programmatically change routes inside Client Components. > **Recommendation:** Use the `<Link>` component for navigation unless you have a specific requirement for using `useRouter`. 'use client' import { useRouter } from 'next/navigation' export default function Page() { const router = useRouter() return ( <button type="button" onClick={() => router.push('/dashboard')}> Dashboard </button> ) } ## `useRouter()` * `router.push(href: string, { scroll: boolean })`: Perform a client-side navigation to the provided route. Adds a new entry into the browser’s history stack. * `router.replace(href: string, { scroll: boolean })`: Perform a client-side navigation to the provided route without adding a new entry into the browser’s history stack. * `router.refresh()`: Refresh the current route. Making a new request to the server, re-fetching data requests, and re-rendering Server Components. The client will merge the updated React Server Component payload without losing unaffected client-side React (e.g. `useState`) or browser state (e.g. scroll position). * `router.prefetch(href: string)`: Prefetch the provided route for faster client-side transitions. * `router.back()`: Navigate back to the previous route in the browser’s history stack. * `router.forward()`: Navigate forwards to the next page in the browser’s history stack. > **Good to know**: > > * The `<Link>` component automatically prefetch routes as they become visible in the viewport. > * `refresh()` could re-produce the same result if fetch requests are cached. Other dynamic functions like `cookies` and `headers` could also change the response. ### Migrating from `next/router` * The `useRouter` hook should be imported from `next/navigation` and not `next/router` when using the App Router * The `pathname` string has been removed and is replaced by `usePathname()` * The `query` object has been removed and is replaced by `useSearchParams()` * `router.events` has been replaced. See below. View the full migration guide. ## Examples ### Router events You can listen for page changes by composing other Client Component hooks like `usePathname` and `useSearchParams`. 'use client' import { useEffect } from 'react' import { usePathname, useSearchParams } from 'next/navigation' export function NavigationEvents() { const pathname = usePathname() const searchParams = useSearchParams() useEffect(() => { const url = `${pathname}?${searchParams}` console.log(url) // You can now use the current URL // ... }, [pathname, searchParams]) return null } Which can be imported into a layout. import { Suspense } from 'react' import { NavigationEvents } from './components/navigation-events' export default function Layout({ children }) { return ( <html lang="en"> <body> {children} <Suspense fallback={null}> <NavigationEvents /> </Suspense> </body> </html> ) } > **Good to know**: `<NavigationEvents>` is wrapped in a `Suspense` boundary because`useSearchParams()` causes client-side rendering up to the closest `Suspense` boundary during static rendering. Learn more. ### Disabling scroll restoration By default, Next.js will scroll to the top of the page when navigating to a new route. You can disable this behavior by passing `scroll: false` to `router.push()` or `router.replace()`. 'use client' import { useRouter } from 'next/navigation' export default function Page() { const router = useRouter() return ( <button type="button" onClick={() => router.push('/dashboard', { scroll: false })} > Dashboard </button> ) } ## Version History | Version | Changes | | --- | --- | | `v13.0.0` | `useRouter` from `next/navigation` introduced. | --- ## Page: https://nextjs.org/docs/14/app/api-reference/functions/use-search-params `useSearchParams` is a **Client Component** hook that lets you read the current URL's **query string**. `useSearchParams` returns a **read-only** version of the `URLSearchParams` interface. 'use client' import { useSearchParams } from 'next/navigation' export default function SearchBar() { const searchParams = useSearchParams() const search = searchParams.get('search') // URL -> `/dashboard?search=my-project` // `search` -> 'my-project' return <>Search: {search}</> } ## Parameters const searchParams = useSearchParams() `useSearchParams` does not take any parameters. ## Returns `useSearchParams` returns a **read-only** version of the `URLSearchParams` interface, which includes utility methods for reading the URL's query string: * `URLSearchParams.get()`: Returns the first value associated with the search parameter. For example: | URL | `searchParams.get("a")` | | --- | --- | | `/dashboard?a=1` | `'1'` | | `/dashboard?a=` | `''` | | `/dashboard?b=3` | `null` | | `/dashboard?a=1&a=2` | `'1'` _\- use `getAll()` to get all values_ | * `URLSearchParams.has()`: Returns a boolean value indicating if the given parameter exists. For example: | URL | `searchParams.has("a")` | | --- | --- | | `/dashboard?a=1` | `true` | | `/dashboard?b=3` | `false` | * Learn more about other **read-only** methods of `URLSearchParams`, including the `getAll()`, `keys()`, `values()`, `entries()`, `forEach()`, and `toString()`. > **Good to know**: > > * `useSearchParams` is a Client Component hook and is **not supported** in Server Components to prevent stale values during partial rendering. > * If an application includes the `/pages` directory, `useSearchParams` will return `ReadonlyURLSearchParams | null`. The `null` value is for compatibility during migration since search params cannot be known during pre-rendering of a page that doesn't use `getServerSideProps` ### Static Rendering If a route is statically rendered, calling `useSearchParams` will cause the Client Component tree up to the closest `Suspense` boundary to be client-side rendered. This allows a part of the route to be statically rendered while the dynamic part that uses `useSearchParams` is client-side rendered. We recommend wrapping the Client Component that uses `useSearchParams` in a `<Suspense/>` boundary. This will allow any Client Components above it to be statically rendered and sent as part of initial HTML. Example. For example: 'use client' import { useSearchParams } from 'next/navigation' export default function SearchBar() { const searchParams = useSearchParams() const search = searchParams.get('search') // This will not be logged on the server when using static rendering console.log(search) return <>Search: {search}</> } import { Suspense } from 'react' import SearchBar from './search-bar' // This component passed as a fallback to the Suspense boundary // will be rendered in place of the search bar in the initial HTML. // When the value is available during React hydration the fallback // will be replaced with the `<SearchBar>` component. function SearchBarFallback() { return <>placeholder</> } export default function Page() { return ( <> <nav> <Suspense fallback={<SearchBarFallback />}> <SearchBar /> </Suspense> </nav> <h1>Dashboard</h1> </> ) } ## Behavior ### Dynamic Rendering If a route is dynamically rendered, `useSearchParams` will be available on the server during the initial server render of the Client Component. For example: 'use client' import { useSearchParams } from 'next/navigation' export default function SearchBar() { const searchParams = useSearchParams() const search = searchParams.get('search') // This will be logged on the server during the initial render // and on the client on subsequent navigations. console.log(search) return <>Search: {search}</> } import SearchBar from './search-bar' export const dynamic = 'force-dynamic' export default function Page() { return ( <> <nav> <SearchBar /> </nav> <h1>Dashboard</h1> </> ) } > **Good to know**: Setting the `dynamic` route segment config option to `force-dynamic` can be used to force dynamic rendering. ### Server Components #### Pages To access search params in Pages (Server Components), use the `searchParams` prop. #### Layouts Unlike Pages, Layouts (Server Components) **do not** receive the `searchParams` prop. This is because a shared layout is not re-rendered during navigation which could lead to stale `searchParams` between navigations. View detailed explanation. Instead, use the Page `searchParams` prop or the `useSearchParams` hook in a Client Component, which is re-rendered on the client with the latest `searchParams`. ## Examples ### Updating `searchParams` You can use `useRouter` or `Link` to set new `searchParams`. After a navigation is performed, the current `page.js` will receive an updated `searchParams` prop. export default function ExampleClientComponent() { const router = useRouter() const pathname = usePathname() const searchParams = useSearchParams() // Get a new searchParams string by merging the current // searchParams with a provided key/value pair const createQueryString = useCallback( (name: string, value: string) => { const params = new URLSearchParams(searchParams.toString()) params.set(name, value) return params.toString() }, [searchParams] ) return ( <> <p>Sort By</p> {/* using useRouter */} <button onClick={() => { // <pathname>?sort=asc router.push(pathname + '?' + createQueryString('sort', 'asc')) }} > ASC </button> {/* using <Link> */} <Link href={ // <pathname>?sort=desc pathname + '?' + createQueryString('sort', 'desc') } > DESC </Link> </> ) } ## Version History | Version | Changes | | --- | --- | | `v13.0.0` | `useSearchParams` introduced. | --- ## Page: https://nextjs.org/docs/14/app/api-reference/functions/use-selected-layout-segment `useSelectedLayoutSegment` is a **Client Component** hook that lets you read the active route segment **one level below** the Layout it is called from. It is useful for navigation UI, such as tabs inside a parent layout that change style depending on the active child segment. 'use client' import { useSelectedLayoutSegment } from 'next/navigation' export default function ExampleClientComponent() { const segment = useSelectedLayoutSegment() return <p>Active segment: {segment}</p> } > **Good to know**: > > * Since `useSelectedLayoutSegment` is a Client Component hook, and Layouts are Server Components by default, `useSelectedLayoutSegment` is usually called via a Client Component that is imported into a Layout. > * `useSelectedLayoutSegment` only returns the segment one level down. To return all active segments, see `useSelectedLayoutSegments` ## Parameters const segment = useSelectedLayoutSegment(parallelRoutesKey?: string) `useSelectedLayoutSegment` _optionally_ accepts a `parallelRoutesKey`, which allows you to read the active route segment within that slot. ## Returns `useSelectedLayoutSegment` returns a string of the active segment or `null` if one doesn't exist. For example, given the Layouts and URLs below, the returned segment would be: | Layout | Visited URL | Returned Segment | | --- | --- | --- | | `app/layout.js` | `/` | `null` | | `app/layout.js` | `/dashboard` | `'dashboard'` | | `app/dashboard/layout.js` | `/dashboard` | `null` | | `app/dashboard/layout.js` | `/dashboard/settings` | `'settings'` | | `app/dashboard/layout.js` | `/dashboard/analytics` | `'analytics'` | | `app/dashboard/layout.js` | `/dashboard/analytics/monthly` | `'analytics'` | ## Examples ### Creating an active link component You can use `useSelectedLayoutSegment` to create an active link component that changes style depending on the active segment. For example, a featured posts list in the sidebar of a blog: 'use client' import Link from 'next/link' import { useSelectedLayoutSegment } from 'next/navigation' // This *client* component will be imported into a blog layout export default function BlogNavLink({ slug, children, }: { slug: string children: React.ReactNode }) { // Navigating to `/blog/hello-world` will return 'hello-world' // for the selected layout segment const segment = useSelectedLayoutSegment() const isActive = slug === segment return ( <Link href={`/blog/${slug}`} // Change style depending on whether the link is active style={{ fontWeight: isActive ? 'bold' : 'normal' }} > {children} </Link> ) } // Import the Client Component into a parent Layout (Server Component) import { BlogNavLink } from './blog-nav-link' import getFeaturedPosts from './get-featured-posts' export default async function Layout({ children, }: { children: React.ReactNode }) { const featuredPosts = await getFeaturedPosts() return ( <div> {featuredPosts.map((post) => ( <div key={post.id}> <BlogNavLink slug={post.slug}>{post.title}</BlogNavLink> </div> ))} <div>{children}</div> </div> ) } ## Version History | Version | Changes | | --- | --- | | `v13.0.0` | `useSelectedLayoutSegment` introduced. | --- ## Page: https://nextjs.org/docs/14/app/api-reference/functions/use-selected-layout-segments You are currently viewing documentation for version 14 of Next.js. `useSelectedLayoutSegments` is a **Client Component** hook that lets you read the active route segments **below** the Layout it is called from. It is useful for creating UI in parent Layouts that need knowledge of active child segments such as breadcrumbs. app/example-client-component.tsx 'use client' import { useSelectedLayoutSegments } from 'next/navigation' export default function ExampleClientComponent() { const segments = useSelectedLayoutSegments() return ( <ul> {segments.map((segment, index) => ( <li key={index}>{segment}</li> ))} </ul> ) } > **Good to know**: > > * Since `useSelectedLayoutSegments` is a Client Component hook, and Layouts are Server Components by default, `useSelectedLayoutSegments` is usually called via a Client Component that is imported into a Layout. > * The returned segments include Route Groups, which you might not want to be included in your UI. You can use the `filter()` array method to remove items that start with a bracket. ## Parameters const segments = useSelectedLayoutSegments(parallelRoutesKey?: string) `useSelectedLayoutSegments` _optionally_ accepts a `parallelRoutesKey`, which allows you to read the active route segment within that slot. ## Returns `useSelectedLayoutSegments` returns an array of strings containing the active segments one level down from the layout the hook was called from. Or an empty array if none exist. For example, given the Layouts and URLs below, the returned segments would be: | Layout | Visited URL | Returned Segments | | --- | --- | --- | | `app/layout.js` | `/` | `[]` | | `app/layout.js` | `/dashboard` | `['dashboard']` | | `app/layout.js` | `/dashboard/settings` | `['dashboard', 'settings']` | | `app/dashboard/layout.js` | `/dashboard` | `[]` | | `app/dashboard/layout.js` | `/dashboard/settings` | `['settings']` | ## Version History | Version | Changes | | --- | --- | | `v13.0.0` | `useSelectedLayoutSegments` introduced. | --- ## Page: https://nextjs.org/docs/14/app/api-reference/functions/userAgent You are currently viewing documentation for version 14 of Next.js. The `userAgent` helper extends the Web Request API with additional properties and methods to interact with the user agent object from the request. middleware.ts import { NextRequest, NextResponse, userAgent } from 'next/server' export function middleware(request: NextRequest) { const url = request.nextUrl const { device } = userAgent(request) const viewport = device.type === 'mobile' ? 'mobile' : 'desktop' url.searchParams.set('viewport', viewport) return NextResponse.rewrite(url) } ## `isBot` A boolean indicating whether the request comes from a known bot. ## `browser` An object containing information about the browser used in the request. * `name`: A string representing the browser's name, or `undefined` if not identifiable. * `version`: A string representing the browser's version, or `undefined`. ## `device` An object containing information about the device used in the request. * `model`: A string representing the model of the device, or `undefined`. * `type`: A string representing the type of the device, such as `console`, `mobile`, `tablet`, `smarttv`, `wearable`, `embedded`, or `undefined`. * `vendor`: A string representing the vendor of the device, or `undefined`. ## `engine` An object containing information about the browser's engine. * `name`: A string representing the engine's name. Possible values include: `Amaya`, `Blink`, `EdgeHTML`, `Flow`, `Gecko`, `Goanna`, `iCab`, `KHTML`, `Links`, `Lynx`, `NetFront`, `NetSurf`, `Presto`, `Tasman`, `Trident`, `w3m`, `WebKit` or `undefined`. * `version`: A string representing the engine's version, or `undefined`. ## `os` An object containing information about the operating system. * `name`: A string representing the name of the OS, or `undefined`. * `version`: A string representing the version of the OS, or `undefined`. ## `cpu` An object containing information about the CPU architecture. * `architecture`: A string representing the architecture of the CPU. Possible values include: `68k`, `amd64`, `arm`, `arm64`, `armhf`, `avr`, `ia32`, `ia64`, `irix`, `irix64`, `mips`, `mips64`, `pa-risc`, `ppc`, `sparc`, `sparc64` or `undefined` --- ## Page: https://nextjs.org/docs/14/app/api-reference/next-config-js Next.js can be configured through a `next.config.js` file in the root of your project directory (for example, by `package.json`) with a default export. // @ts-check /** @type {import('next').NextConfig} */ const nextConfig = { /* config options here */ } module.exports = nextConfig `next.config.js` is a regular Node.js module, not a JSON file. It gets used by the Next.js server and build phases, and it's not included in the browser build. If you need ECMAScript modules, you can use `next.config.mjs`: // @ts-check /** * @type {import('next').NextConfig} */ const nextConfig = { /* config options here */ } export default nextConfig You can also use a function: // @ts-check export default (phase, { defaultConfig }) => { /** * @type {import('next').NextConfig} */ const nextConfig = { /* config options here */ } return nextConfig } Since Next.js 12.1.0, you can use an async function: // @ts-check module.exports = async (phase, { defaultConfig }) => { /** * @type {import('next').NextConfig} */ const nextConfig = { /* config options here */ } return nextConfig } `phase` is the current context in which the configuration is loaded. You can see the available phases. Phases can be imported from `next/constants`: // @ts-check const { PHASE_DEVELOPMENT_SERVER } = require('next/constants') module.exports = (phase, { defaultConfig }) => { if (phase === PHASE_DEVELOPMENT_SERVER) { return { /* development only config options here */ } } return { /* config options for all phases except development here */ } } The commented lines are the place where you can put the configs allowed by `next.config.js`, which are defined in this file. However, none of the configs are required, and it's not necessary to understand what each config does. Instead, search for the features you need to enable or modify in this section and they will show you what to do. > Avoid using new JavaScript features not available in your target Node.js version. `next.config.js` will not be parsed by Webpack, Babel or TypeScript. This page documents all the available configuration options: --- ## Page: https://nextjs.org/docs/14/app/api-reference/next-config-js/appDir You are currently viewing documentation for version 14 of Next.js. > **Good to know**: This option is **no longer** needed as of Next.js 13.4. The App Router is now stable. The App Router (`app` directory) enables support for layouts, Server Components, streaming, and colocated data fetching. Using the `app` directory will automatically enable React Strict Mode. Learn how to incrementally adopt `app`. --- ## Page: https://nextjs.org/docs/14/app/api-reference/next-config-js/assetPrefix > **Attention**: Deploying to Vercel automatically configures a global CDN for your Next.js project. You do not need to manually setup an Asset Prefix. > **Good to know**: Next.js 9.5+ added support for a customizable Base Path, which is better suited for hosting your application on a sub-path like `/docs`. We do not suggest you use a custom Asset Prefix for this use case. ## Set up a CDN To set up a CDN, you can set up an asset prefix and configure your CDN's origin to resolve to the domain that Next.js is hosted on. Open `next.config.mjs` and add the `assetPrefix` config based on the phase: // @ts-check import { PHASE_DEVELOPMENT_SERVER } from 'next/constants' export default (phase) => { const isDev = phase === PHASE_DEVELOPMENT_SERVER /** * @type {import('next').NextConfig} */ const nextConfig = { assetPrefix: isDev ? undefined : 'https://cdn.mydomain.com', } return nextConfig } Next.js will automatically use your asset prefix for the JavaScript and CSS files it loads from the `/_next/` path (`.next/static/` folder). For example, with the above configuration, the following request for a JS chunk: /_next/static/chunks/4b9b41aaa062cbbfeff4add70f256968c51ece5d.4d708494b3aed70c04f0.js Would instead become: https://cdn.mydomain.com/_next/static/chunks/4b9b41aaa062cbbfeff4add70f256968c51ece5d.4d708494b3aed70c04f0.js The exact configuration for uploading your files to a given CDN will depend on your CDN of choice. The only folder you need to host on your CDN is the contents of `.next/static/`, which should be uploaded as `_next/static/` as the above URL request indicates. **Do not upload the rest of your `.next/` folder**, as you should not expose your server code and other configuration to the public. While `assetPrefix` covers requests to `_next/static`, it does not influence the following paths: * Files in the public folder; if you want to serve those assets over a CDN, you'll have to introduce the prefix yourself Was this helpful? supported. --- ## Page: https://nextjs.org/docs/14/app/api-reference/next-config-js/basePath To deploy a Next.js application under a sub-path of a domain you can use the `basePath` config option. `basePath` allows you to set a path prefix for the application. For example, to use `/docs` instead of `''` (an empty string, the default), open `next.config.js` and add the `basePath` config: module.exports = { basePath: '/docs', } > **Good to know**: This value must be set at build time and cannot be changed without re-building as the value is inlined in the client-side bundles. ### Links When linking to other pages using `next/link` and `next/router` the `basePath` will be automatically applied. For example, using `/about` will automatically become `/docs/about` when `basePath` is set to `/docs`. export default function HomePage() { return ( <> <Link href="/about">About Page</Link> </> ) } Output html: <a href="/docs/about">About Page</a> This makes sure that you don't have to change all links in your application when changing the `basePath` value. ### Images When using the `next/image` component, you will need to add the `basePath` in front of `src`. For example, using `/docs/me.png` will properly serve your image when `basePath` is set to `/docs`. import Image from 'next/image' function Home() { return ( <> <h1>My Homepage</h1> <Image src="/docs/me.png" alt="Picture of the author" width={500} height={500} /> <p>Welcome to my homepage!</p> </> ) } export default Home --- ## Page: https://nextjs.org/docs/14/app/api-reference/next-config-js/compress You are currently viewing documentation for version 14 of Next.js. By default, Next.js uses `gzip` to compress rendered content and static files when using `next start` or a custom server. This is an optimization for applications that do not have compression configured. If compression is _already_ configured in your application via a custom server, Next.js will not add compression. > **Good to know:** > > * When hosting your application on Vercel, compression uses `brotli` first, then `gzip`. > * You can check if compression is enabled and which algorithm is used by looking at the `Accept-Encoding` (browser accepted options) and `Content-Encoding` (currently used) headers in the response. ## Disabling compression To disable **compression**, set the `compress` config option to `false`: next.config.js module.exports = { compress: false, } We do not recommend disabling compression unless you have compression configured on your server, as compression reduces bandwidth usage and improves the performance of your application. ## Changing the compression algorithm To change your compression algorithm, you will need to configure your custom server and set the `compress` option to `false` in your `next.config.js` file. For example, you're using nginx and want to switch to `brotli`, set the `compress` option to `false` to allow nginx to handle compression. > **Good to know:** > > * For Next.js applications on Vercel, compression is handled by the Vercel's Edge Network and not Next.js. See the Vercel documentation for more information. --- ## Page: https://nextjs.org/docs/14/app/api-reference/next-config-js/crossOrigin #### Subscribe to our newsletter Stay updated on new releases and features, guides, and case studies. --- ## Page: https://nextjs.org/docs/14/app/api-reference/next-config-js/devIndicators You are currently viewing documentation for version 14 of Next.js. When you edit your code, and Next.js is compiling the application, a compilation indicator appears in the bottom right corner of the page. > **Good to know**: This indicator is only present in development mode and will not appear when building and running the app in production mode. In some cases this indicator can be misplaced on your page, for example, when conflicting with a chat launcher. To change its position, open `next.config.js` and set the `buildActivityPosition` in the `devIndicators` object to `bottom-right` (default), `bottom-left`, `top-right` or `top-left`: next.config.js module.exports = { devIndicators: { buildActivityPosition: 'bottom-right', }, } In some cases this indicator might not be useful for you. To remove it, open `next.config.js` and disable the `buildActivity` config in `devIndicators` object: next.config.js module.exports = { devIndicators: { buildActivity: false, }, } --- ## Page: https://nextjs.org/docs/14/app/api-reference/next-config-js/distDir You are currently viewing documentation for version 14 of Next.js. You can specify a name to use for a custom build directory to use instead of `.next`. Open `next.config.js` and add the `distDir` config: next.config.js module.exports = { distDir: 'build', } Now if you run `next build` Next.js will use `build` instead of the default `.next` folder. > `distDir` **should not** leave your project directory. For example, `../build` is an **invalid** directory. --- ## Page: https://nextjs.org/docs/14/app/api-reference/next-config-js/env You are currently viewing documentation for version 14 of Next.js. > Since the release of Next.js 9.4 we now have a more intuitive and ergonomic experience for adding environment variables. Give it a try! > **Good to know**: environment variables specified in this way will **always** be included in the JavaScript bundle, prefixing the environment variable name with `NEXT_PUBLIC_` only has an effect when specifying them through the environment or .env files. To add environment variables to the JavaScript bundle, open `next.config.js` and add the `env` config: next.config.js module.exports = { env: { customKey: 'my-value', }, } Now you can access `process.env.customKey` in your code. For example: function Page() { return <h1>The value of customKey is: {process.env.customKey}</h1> } export default Page Next.js will replace `process.env.customKey` with `'my-value'` at build time. Trying to destructure `process.env` variables won't work due to the nature of webpack DefinePlugin. For example, the following line: return <h1>The value of customKey is: {process.env.customKey}</h1> Will end up being: return <h1>The value of customKey is: {'my-value'}</h1> --- ## Page: https://nextjs.org/docs/14/app/api-reference/next-config-js/eslint You are currently viewing documentation for version 14 of Next.js. When ESLint is detected in your project, Next.js fails your **production build** (`next build`) when errors are present. If you'd like Next.js to produce production code even when your application has ESLint errors, you can disable the built-in linting step completely. This is not recommended unless you already have ESLint configured to run in a separate part of your workflow (for example, in CI or a pre-commit hook). Open `next.config.js` and enable the `ignoreDuringBuilds` option in the `eslint` config: next.config.js module.exports = { eslint: { // Warning: This allows production builds to successfully complete even if // your project has ESLint errors. ignoreDuringBuilds: true, }, } --- ## Page: https://nextjs.org/docs/14/app/api-reference/next-config-js/exportPathMap ## exportPathMap (Deprecated) > This feature is exclusive to `next export` and currently **deprecated** in favor of `getStaticPaths` with `pages` or `generateStaticParams` with `app`. Examples * Static Export `exportPathMap` allows you to specify a mapping of request paths to page destinations, to be used during export. Paths defined in `exportPathMap` will also be available when using `next dev`. Let's start with an example, to create a custom `exportPathMap` for an app with the following pages: * `pages/index.js` * `pages/about.js` * `pages/post.js` Open `next.config.js` and add the following `exportPathMap` config: module.exports = { exportPathMap: async function ( defaultPathMap, { dev, dir, outDir, distDir, buildId } ) { return { '/': { page: '/' }, '/about': { page: '/about' }, '/p/hello-nextjs': { page: '/post', query: { title: 'hello-nextjs' } }, '/p/learn-nextjs': { page: '/post', query: { title: 'learn-nextjs' } }, '/p/deploy-nextjs': { page: '/post', query: { title: 'deploy-nextjs' } }, } }, } > **Good to know**: the `query` field in `exportPathMap` cannot be used with automatically statically optimized pages or `getStaticProps` pages as they are rendered to HTML files at build-time and additional query information cannot be provided during `next export`. The pages will then be exported as HTML files, for example, `/about` will become `/about.html`. `exportPathMap` is an `async` function that receives 2 arguments: the first one is `defaultPathMap`, which is the default map used by Next.js. The second argument is an object with: * `dev` - `true` when `exportPathMap` is being called in development. `false` when running `next export`. In development `exportPathMap` is used to define routes. * `dir` - Absolute path to the project directory * `outDir` - Absolute path to the `out/` directory (configurable with `-o`). When `dev` is `true` the value of `outDir` will be `null`. * `distDir` - Absolute path to the `.next/` directory (configurable with the `distDir` config) * `buildId` - The generated build id The returned object is a map of pages where the `key` is the `pathname` and the `value` is an object that accepts the following fields: * `page`: `String` - the page inside the `pages` directory to render * `query`: `Object` - the `query` object passed to `getInitialProps` when prerendering. Defaults to `{}` > The exported `pathname` can also be a filename (for example, `/readme.md`), but you may need to set the `Content-Type` header to `text/html` when serving its content if it is different than `.html`. ## Adding a trailing slash It is possible to configure Next.js to export pages as `index.html` files and require trailing slashes, `/about` becomes `/about/index.html` and is routable via `/about/`. This was the default behavior prior to Next.js 9. To switch back and add a trailing slash, open `next.config.js` and enable the `trailingSlash` config: module.exports = { trailingSlash: true, } ## Customizing the output directory `next export` will use `out` as the default output directory, you can customize this using the `-o` argument, like so: next export -o outdir > **Warning**: Using `exportPathMap` is deprecated and is overridden by `getStaticPaths` inside `pages`. We don't recommend using them together. --- ## Page: https://nextjs.org/docs/14/app/api-reference/next-config-js/generateBuildId You are currently viewing documentation for version 14 of Next.js. Next.js generates an ID during `next build` to identify which version of your application is being served. The same build should be used and boot up multiple containers. If you are rebuilding for each stage of your environment, you will need to generate a consistent build ID to use between containers. Use the `generateBuildId` command in `next.config.js`: next.config.js module.exports = { generateBuildId: async () => { // This could be anything, using the latest git hash return process.env.GIT_HASH }, } --- ## Page: https://nextjs.org/docs/14/app/api-reference/next-config-js/generateEtags You are currently viewing documentation for version 14 of Next.js. Next.js will generate etags for every page by default. You may want to disable etag generation for HTML pages depending on your cache strategy. Open `next.config.js` and disable the `generateEtags` option: next.config.js module.exports = { generateEtags: false, } --- ## Page: https://nextjs.org/docs/14/app/api-reference/next-config-js/headers Headers allow you to set custom HTTP headers on the response to an incoming request on a given path. To set custom HTTP headers you can use the `headers` key in `next.config.js`: module.exports = { async headers() { return [ { source: '/about', headers: [ { key: 'x-custom-header', value: 'my custom header value', }, { key: 'x-another-custom-header', value: 'my other custom header value', }, ], }, ] }, } `headers` is an async function that expects an array to be returned holding objects with `source` and `headers` properties: * `source` is the incoming request path pattern. * `headers` is an array of response header objects, with `key` and `value` properties. * `basePath`: `false` or `undefined` - if false the basePath won't be included when matching, can be used for external rewrites only. * `locale`: `false` or `undefined` - whether the locale should not be included when matching. * `has` is an array of has objects with the `type`, `key` and `value` properties. * `missing` is an array of missing objects with the `type`, `key` and `value` properties. Headers are checked before the filesystem which includes pages and `/public` files. If two headers match the same path and set the same header key, the last header key will override the first. Using the below headers, the path `/hello` will result in the header `x-hello` being `world` due to the last header value set being `world`. module.exports = { async headers() { return [ { source: '/:path*', headers: [ { key: 'x-hello', value: 'there', }, ], }, { source: '/hello', headers: [ { key: 'x-hello', value: 'world', }, ], }, ] }, } ## Path Matching Path matches are allowed, for example `/blog/:slug` will match `/blog/hello-world` (no nested paths): module.exports = { async headers() { return [ { source: '/blog/:slug', headers: [ { key: 'x-slug', value: ':slug', // Matched parameters can be used in the value }, { key: 'x-slug-:slug', // Matched parameters can be used in the key value: 'my other custom header value', }, ], }, ] }, } ### Wildcard Path Matching To match a wildcard path you can use `*` after a parameter, for example `/blog/:slug*` will match `/blog/a/b/c/d/hello-world`: module.exports = { async headers() { return [ { source: '/blog/:slug*', headers: [ { key: 'x-slug', value: ':slug*', // Matched parameters can be used in the value }, { key: 'x-slug-:slug*', // Matched parameters can be used in the key value: 'my other custom header value', }, ], }, ] }, } ### Regex Path Matching To match a regex path you can wrap the regex in parenthesis after a parameter, for example `/blog/:slug(\\d{1,})` will match `/blog/123` but not `/blog/abc`: module.exports = { async headers() { return [ { source: '/blog/:post(\\d{1,})', headers: [ { key: 'x-post', value: ':post', }, ], }, ] }, } The following characters `(`, `)`, `{`, `}`, `:`, `*`, `+`, `?` are used for regex path matching, so when used in the `source` as non-special values they must be escaped by adding `\\` before them: module.exports = { async headers() { return [ { // this will match `/english(default)/something` being requested source: '/english\\(default\\)/:slug', headers: [ { key: 'x-header', value: 'value', }, ], }, ] }, } ## Header, Cookie, and Query Matching To only apply a header when header, cookie, or query values also match the `has` field or don't match the `missing` field can be used. Both the `source` and all `has` items must match and all `missing` items must not match for the header to be applied. `has` and `missing` items can have the following fields: * `type`: `String` - must be either `header`, `cookie`, `host`, or `query`. * `key`: `String` - the key from the selected type to match against. * `value`: `String` or `undefined` - the value to check for, if undefined any value will match. A regex like string can be used to capture a specific part of the value, e.g. if the value `first-(?<paramName>.*)` is used for `first-second` then `second` will be usable in the destination with `:paramName`. module.exports = { async headers() { return [ // if the header `x-add-header` is present, // the `x-another-header` header will be applied { source: '/:path*', has: [ { type: 'header', key: 'x-add-header', }, ], headers: [ { key: 'x-another-header', value: 'hello', }, ], }, // if the header `x-no-header` is not present, // the `x-another-header` header will be applied { source: '/:path*', missing: [ { type: 'header', key: 'x-no-header', }, ], headers: [ { key: 'x-another-header', value: 'hello', }, ], }, // if the source, query, and cookie are matched, // the `x-authorized` header will be applied { source: '/specific/:path*', has: [ { type: 'query', key: 'page', // the page value will not be available in the // header key/values since value is provided and // doesn't use a named capture group e.g. (?<page>home) value: 'home', }, { type: 'cookie', key: 'authorized', value: 'true', }, ], headers: [ { key: 'x-authorized', value: ':authorized', }, ], }, // if the header `x-authorized` is present and // contains a matching value, the `x-another-header` will be applied { source: '/:path*', has: [ { type: 'header', key: 'x-authorized', value: '(?<authorized>yes|true)', }, ], headers: [ { key: 'x-another-header', value: ':authorized', }, ], }, // if the host is `example.com`, // this header will be applied { source: '/:path*', has: [ { type: 'host', value: 'example.com', }, ], headers: [ { key: 'x-another-header', value: ':authorized', }, ], }, ] }, } When leveraging `basePath` support with headers each `source` is automatically prefixed with the `basePath` unless you add `basePath: false` to the header: module.exports = { basePath: '/docs', async headers() { return [ { source: '/with-basePath', // becomes /docs/with-basePath headers: [ { key: 'x-hello', value: 'world', }, ], }, { source: '/without-basePath', // is not modified since basePath: false is set headers: [ { key: 'x-hello', value: 'world', }, ], basePath: false, }, ] }, } When leveraging `i18n` support with headers each `source` is automatically prefixed to handle the configured `locales` unless you add `locale: false` to the header. If `locale: false` is used you must prefix the `source` with a locale for it to be matched correctly. module.exports = { i18n: { locales: ['en', 'fr', 'de'], defaultLocale: 'en', }, async headers() { return [ { source: '/with-locale', // automatically handles all locales headers: [ { key: 'x-hello', value: 'world', }, ], }, { // does not handle locales automatically since locale: false is set source: '/nl/with-locale-manual', locale: false, headers: [ { key: 'x-hello', value: 'world', }, ], }, { // this matches '/' since `en` is the defaultLocale source: '/en', locale: false, headers: [ { key: 'x-hello', value: 'world', }, ], }, { // this gets converted to /(en|fr|de)/(.*) so will not match the top-level // `/` or `/fr` routes like /:path* would source: '/(.*)', headers: [ { key: 'x-hello', value: 'world', }, ], }, ] }, } ## Cache-Control You cannot set `Cache-Control` headers in `next.config.js` for pages or assets, as these headers will be overwritten in production to ensure that responses and static assets are cached effectively. Learn more about caching with the App Router. ## Options ### CORS Cross-Origin Resource Sharing (CORS) is a security feature that allows you to control which sites can access your resources. You can set the `Access-Control-Allow-Origin` header to allow a specific origin to access your Route Handlers. async headers() { return [ { source: "/api/:path*", headers: [ { key: "Access-Control-Allow-Origin", value: "*", // Set your origin }, { key: "Access-Control-Allow-Methods", value: "GET, POST, PUT, DELETE, OPTIONS", }, { key: "Access-Control-Allow-Headers", value: "Content-Type, Authorization", }, ], }, ]; }, ### X-DNS-Prefetch-Control This header controls DNS prefetching, allowing browsers to proactively perform domain name resolution on external links, images, CSS, JavaScript, and more. This prefetching is performed in the background, so the DNS is more likely to be resolved by the time the referenced items are needed. This reduces latency when the user clicks a link. { key: 'X-DNS-Prefetch-Control', value: 'on' } ### Strict-Transport-Security This header informs browsers it should only be accessed using HTTPS, instead of using HTTP. Using the configuration below, all present and future subdomains will use HTTPS for a `max-age` of 2 years. This blocks access to pages or subdomains that can only be served over HTTP. If you're deploying to Vercel, this header is not necessary as it's automatically added to all deployments unless you declare `headers` in your `next.config.js`. { key: 'Strict-Transport-Security', value: 'max-age=63072000; includeSubDomains; preload' } ### X-Frame-Options This header indicates whether the site should be allowed to be displayed within an `iframe`. This can prevent against clickjacking attacks. **This header has been superseded by CSP's `frame-ancestors` option**, which has better support in modern browsers (see Content Security Policy for configuration details). { key: 'X-Frame-Options', value: 'SAMEORIGIN' } ### Permissions-Policy This header allows you to control which features and APIs can be used in the browser. It was previously named `Feature-Policy`. { key: 'Permissions-Policy', value: 'camera=(), microphone=(), geolocation=(), browsing-topics=()' } ### X-Content-Type-Options This header prevents the browser from attempting to guess the type of content if the `Content-Type` header is not explicitly set. This can prevent XSS exploits for websites that allow users to upload and share files. For example, a user trying to download an image, but having it treated as a different `Content-Type` like an executable, which could be malicious. This header also applies to downloading browser extensions. The only valid value for this header is `nosniff`. { key: 'X-Content-Type-Options', value: 'nosniff' } ### Referrer-Policy This header controls how much information the browser includes when navigating from the current website (origin) to another. { key: 'Referrer-Policy', value: 'origin-when-cross-origin' } ### Content-Security-Policy Learn more about adding a Content Security Policy to your application. ## Version History | Version | Changes | | --- | --- | | `v13.3.0` | `missing` added. | | `v10.2.0` | `has` added. | | `v9.5.0` | Headers added. | --- ## Page: https://nextjs.org/docs/14/app/api-reference/next-config-js/httpAgentOptions You are currently viewing documentation for version 14 of Next.js. In Node.js versions prior to 18, Next.js automatically polyfills `fetch()` with undici and enables HTTP Keep-Alive by default. To disable HTTP Keep-Alive for all `fetch()` calls on the server-side, open `next.config.js` and add the `httpAgentOptions` config: next.config.js module.exports = { httpAgentOptions: { keepAlive: false, }, } --- ## Page: https://nextjs.org/docs/14/app/api-reference/next-config-js/images If you want to use a cloud provider to optimize images instead of using the Next.js built-in Image Optimization API, you can configure `next.config.js` with the following: module.exports = { images: { loader: 'custom', loaderFile: './my/image/loader.js', }, } This `loaderFile` must point to a file relative to the root of your Next.js application. The file must export a default function that returns a string, for example: 'use client' export default function myImageLoader({ src, width, quality }) { return `https://example.com/${src}?w=${width}&q=${quality || 75}` } Alternatively, you can use the `loader` prop to pass the function to each instance of `next/image`. > **Good to know**: Customizing the image loader file, which accepts a function, requires using Client Components to serialize the provided function. To learn more about configuring the behavior of the built-in Image Optimization API and the Image Component, see Image Configuration Options for available options. ## Example Loader Configuration * Akamai * AWS CloudFront * Cloudinary * Cloudflare * Contentful * Fastly * Gumlet * ImageEngine * Imgix * Thumbor * Sanity * Sirv * Supabase ### Akamai // Docs: https://techdocs.akamai.com/ivm/reference/test-images-on-demand export default function akamaiLoader({ src, width, quality }) { return `https://example.com/${src}?imwidth=${width}` } ### AWS CloudFront // Docs: https://aws.amazon.com/developer/application-security-performance/articles/image-optimization export default function cloudfrontLoader({ src, width, quality }) { const url = new URL(`https://example.com${src}`) url.searchParams.set('format', 'auto') url.searchParams.set('width', width.toString()) url.searchParams.set('quality', (quality || 75).toString()) return url.href ### Cloudinary // Demo: https://res.cloudinary.com/demo/image/upload/w_300,c_limit,q_auto/turtles.jpg export default function cloudinaryLoader({ src, width, quality }) { const params = ['f_auto', 'c_limit', `w_${width}`, `q_${quality || 'auto'}`] return `https://example.com/${params.join(',')}${src}` } ### Cloudflare // Docs: https://developers.cloudflare.com/images/url-format export default function cloudflareLoader({ src, width, quality }) { const params = [`width=${width}`, `quality=${quality || 75}`, 'format=auto'] return `https://example.com/cdn-cgi/image/${params.join(',')}/${src}` } ### Contentful // Docs: https://www.contentful.com/developers/docs/references/images-api/ export default function contentfulLoader({ src, width, quality }) { const url = new URL(`https://example.com${src}`) url.searchParams.set('fm', 'webp') url.searchParams.set('w', width.toString()) url.searchParams.set('q', (quality || 75).toString()) return url.href } ### Fastly // Docs: https://developer.fastly.com/reference/io/ export default function fastlyLoader({ src, width, quality }) { const url = new URL(`https://example.com${src}`) url.searchParams.set('auto', 'webp') url.searchParams.set('width', width.toString()) url.searchParams.set('quality', (quality || 75).toString()) return url.href } ### Gumlet // Docs: https://docs.gumlet.com/reference/image-transform-size export default function gumletLoader({ src, width, quality }) { const url = new URL(`https://example.com${src}`) url.searchParams.set('format', 'auto') url.searchParams.set('w', width.toString()) url.searchParams.set('q', (quality || 75).toString()) return url.href } ### ImageEngine // Docs: https://support.imageengine.io/hc/en-us/articles/360058880672-Directives export default function imageengineLoader({ src, width, quality }) { const compression = 100 - (quality || 50) const params = [`w_${width}`, `cmpr_${compression}`)] return `https://example.com${src}?imgeng=/${params.join('/')` } ### Imgix // Demo: https://static.imgix.net/daisy.png?format=auto&fit=max&w=300 export default function imgixLoader({ src, width, quality }) { const url = new URL(`https://example.com${src}`) const params = url.searchParams params.set('auto', params.getAll('auto').join(',') || 'format') params.set('fit', params.get('fit') || 'max') params.set('w', params.get('w') || width.toString()) params.set('q', (quality || 50).toString()) return url.href } ### Thumbor // Docs: https://thumbor.readthedocs.io/en/latest/ export default function thumborLoader({ src, width, quality }) { const params = [`${width}x0`, `filters:quality(${quality || 75})`] return `https://example.com${params.join('/')}${src}` } ### Sanity // Docs: https://www.sanity.io/docs/image-urls export default function sanityLoader({ src, width, quality }) { const prj = 'zp7mbokg' const dataset = 'production' const url = new URL(`https://cdn.sanity.io/images/${prj}/${dataset}${src}`) url.searchParams.set('auto', 'format') url.searchParams.set('fit', 'max') url.searchParams.set('w', width.toString()) if (quality) { url.searchParams.set('q', quality.toString()) } return url.href } ### Sirv // Docs: https://sirv.com/help/articles/dynamic-imaging/ export default function sirvLoader({ src, width, quality }) { const url = new URL(`https://example.com${src}`) const params = url.searchParams params.set('format', params.getAll('format').join(',') || 'optimal') params.set('w', params.get('w') || width.toString()) params.set('q', (quality || 85).toString()) return url.href } ### Supabase // Docs: https://supabase.com/docs/guides/storage/image-transformations#nextjs-loader export default function supabaseLoader({ src, width, quality }) { const url = new URL(`https://example.com${src}`) url.searchParams.set('width', width.toString()) url.searchParams.set('quality', (quality || 75).toString()) return url.href } --- ## Page: https://nextjs.org/docs/14/app/api-reference/next-config-js/incrementalCacheHandlerPath You are currently viewing documentation for version 14 of Next.js. ## Custom Next.js Cache Handler In Next.js, the default cache handler for the Pages and App Router uses the filesystem cache. This requires no configuration, however, you can customize the cache handler by using the `cacheHandler` field in `next.config.js`. next.config.js module.exports = { cacheHandler: require.resolve('./cache-handler.js'), cacheMaxMemorySize: 0, // disable default in-memory caching } View an example of a custom cache handler and learn more about implementation. ## API Reference The cache handler can implement the following methods: `get`, `set`, and `revalidateTag`. ### `get()` | Parameter | Type | Description | | --- | --- | --- | | `key` | `string` | The key to the cached value. | Returns the cached value or `null` if not found. ### `set()` | Parameter | Type | Description | | --- | --- | --- | | `key` | `string` | The key to store the data under. | | `data` | Data or `null` | The data to be cached. | | `ctx` | `{ tags: [] }` | The cache tags provided. | Returns `Promise<void>`. ### `revalidateTag()` | Parameter | Type | Description | | --- | --- | --- | | `tag` | `string` | The cache tag to revalidate. | Returns `Promise<void>`. Learn more about revalidating data or the `revalidateTag()` function. **Good to know:** * `revalidatePath` is a convenience layer on top of cache tags. Calling `revalidatePath` will call your `revalidateTag` function, which you can then choose if you want to tag cache keys based on the path. ## Version History | Version | Changes | | --- | --- | | `v14.1.0` | Renamed `cacheHandler` is stable. | | `v13.4.0` | `incrementalCacheHandlerPath` (experimental) supports `revalidateTag`. | | `v13.4.0` | `incrementalCacheHandlerPath` (experimental) supports standalone output. | | `v12.2.0` | `incrementalCacheHandlerPath` (experimental) is added. | --- ## Page: https://nextjs.org/docs/14/app/api-reference/next-config-js/instrumentationHook #### Subscribe to our newsletter Stay updated on new releases and features, guides, and case studies. --- ## Page: https://nextjs.org/docs/14/app/api-reference/next-config-js/logging You are currently viewing documentation for version 14 of Next.js. You can configure the logging level and whether the full URL is logged to the console when running Next.js in development mode. Currently, `logging` only applies to data fetching using the `fetch` API. It does not yet apply to other logs inside of Next.js. next.config.js module.exports = { logging: { fetches: { fullUrl: true, }, }, } --- ## Page: https://nextjs.org/docs/14/app/api-reference/next-config-js/mdxRs For use with `@next/mdx`. Compile MDX files using the new Rust compiler. next.config.js const withMDX = require('@next/mdx')() /** @type {import('next').NextConfig} */ const nextConfig = { pageExtensions: ['ts', 'tsx', 'mdx'], experimental: { mdxRs: true, }, } module.exports = withMDX(nextConfig) --- ## Page: https://nextjs.org/docs/14/app/api-reference/next-config-js/onDemandEntries You are currently viewing documentation for version 14 of Next.js. Next.js exposes some options that give you some control over how the server will dispose or keep in memory built pages in development. To change the defaults, open `next.config.js` and add the `onDemandEntries` config: next.config.js module.exports = { onDemandEntries: { // period (in ms) where the server will keep pages in the buffer maxInactiveAge: 25 * 1000, // number of pages that should be kept simultaneously without being disposed pagesBufferLength: 2, }, } --- ## Page: https://nextjs.org/docs/14/app/api-reference/next-config-js/optimizePackageImports You are currently viewing documentation for version 14 of Next.js. Some packages can export hundreds or thousands of modules, which can cause performance issues in development and production. Adding a package to `experimental.optimizePackageImports` will only load the modules you are actually using, while still giving you the convenience of writing import statements with many named exports. next.config.js module.exports = { experimental: { optimizePackageImports: ['package-name'], }, } The following libraries are optimized by default: * `lucide-react` * `date-fns` * `lodash-es` * `ramda` * `antd` * `react-bootstrap` * `ahooks` * `@ant-design/icons` * `@headlessui/react` * `@headlessui-float/react` * `@heroicons/react/20/solid` * `@heroicons/react/24/solid` * `@heroicons/react/24/outline` * `@visx/visx` * `@tremor/react` * `rxjs` * `@mui/material` * `@mui/icons-material` * `recharts` * `react-use` * `@material-ui/core` * `@material-ui/icons` * `@tabler/icons-react` * `mui-core` * `react-icons/*` --- ## Page: https://nextjs.org/docs/14/app/api-reference/next-config-js/output During a build, Next.js will automatically trace each page and its dependencies to determine all of the files that are needed for deploying a production version of your application. This feature helps reduce the size of deployments drastically. Previously, when deploying with Docker you would need to have all files from your package's `dependencies` installed to run `next start`. Starting with Next.js 12, you can leverage Output File Tracing in the `.next/` directory to only include the necessary files. Furthermore, this removes the need for the deprecated `serverless` target which can cause various issues and also creates unnecessary duplication. ## How it Works During `next build`, Next.js will use `@vercel/nft` to statically analyze `import`, `require`, and `fs` usage to determine all files that a page might load. Next.js' production server is also traced for its needed files and output at `.next/next-server.js.nft.json` which can be leveraged in production. To leverage the `.nft.json` files emitted to the `.next` output directory, you can read the list of files in each trace that are relative to the `.nft.json` file and then copy them to your deployment location. ## Automatically Copying Traced Files Next.js can automatically create a `standalone` folder that copies only the necessary files for a production deployment including select files in `node_modules`. To leverage this automatic copying you can enable it in your `next.config.js`: module.exports = { output: 'standalone', } This will create a folder at `.next/standalone` which can then be deployed on its own without installing `node_modules`. Additionally, a minimal `server.js` file is also output which can be used instead of `next start`. This minimal server does not copy the `public` or `.next/static` folders by default as these should ideally be handled by a CDN instead, although these folders can be copied to the `standalone/public` and `standalone/.next/static` folders manually, after which `server.js` file will serve these automatically. > **Good to know**: > > * If your project needs to listen to a specific port or hostname, you can define `PORT` or `HOSTNAME` environment variables before running `server.js`. For example, run `PORT=8080 HOSTNAME=0.0.0.0 node server.js` to start the server on `http://0.0.0.0:8080`. > * If your project uses Image Optimization with the default `loader`, you must install `sharp` as a dependency: npm i sharp yarn add sharp pnpm add sharp bun add sharp ## Caveats * While tracing in monorepo setups, the project directory is used for tracing by default. For `next build packages/web-app`, `packages/web-app` would be the tracing root and any files outside of that folder will not be included. To include files outside of this folder you can set `experimental.outputFileTracingRoot` in your `next.config.js`. module.exports = { experimental: { // this includes files from the monorepo base two directories up outputFileTracingRoot: path.join(__dirname, '../../'), }, } * There are some cases in which Next.js might fail to include required files, or might incorrectly include unused files. In those cases, you can leverage `experimental.outputFileTracingExcludes` and `experimental.outputFileTracingIncludes` respectively in `next.config.js`. Each config accepts an object with minimatch globs for the key to match specific pages and a value of an array with globs relative to the project's root to either include or exclude in the trace. module.exports = { experimental: { outputFileTracingExcludes: { '/api/hello': ['./un-necessary-folder/**/*'], }, outputFileTracingIncludes: { '/api/another': ['./necessary-folder/**/*'], }, }, } * Currently, Next.js does not do anything with the emitted `.nft.json` files. The files must be read by your deployment platform, for example Vercel, to create a minimal deployment. In a future release, a new command is planned to utilize these `.nft.json` files. ## Experimental `turbotrace` Tracing dependencies can be slow because it requires very complex computations and analysis. We created `turbotrace` in Rust as a faster and smarter alternative to the JavaScript implementation. To enable it, you can add the following configuration to your `next.config.js`: module.exports = { experimental: { turbotrace: { // control the log level of the turbotrace, default is `error` logLevel?: | 'bug' | 'fatal' | 'error' | 'warning' | 'hint' | 'note' | 'suggestions' | 'info', // control if the log of turbotrace should contain the details of the analysis, default is `false` logDetail?: boolean // show all log messages without limit // turbotrace only show 1 log message for each categories by default logAll?: boolean // control the context directory of the turbotrace // files outside of the context directory will not be traced // set the `experimental.outputFileTracingRoot` has the same effect // if the `experimental.outputFileTracingRoot` and this option are both set, the `experimental.turbotrace.contextDirectory` will be used contextDirectory?: string // if there is `process.cwd()` expression in your code, you can set this option to tell `turbotrace` the value of `process.cwd()` while tracing. // for example the require(process.cwd() + '/package.json') will be traced as require('/path/to/cwd/package.json') processCwd?: string // control the maximum memory usage of the `turbotrace`, in `MB`, default is `6000`. memoryLimit?: number }, }, } --- ## Page: https://nextjs.org/docs/14/app/api-reference/next-config-js/pageExtensions You are currently viewing documentation for version 14 of Next.js. By default, Next.js accepts files with the following extensions: `.tsx`, `.ts`, `.jsx`, `.js`. This can be modified to allow other extensions like markdown (`.md`, `.mdx`). next.config.js const withMDX = require('@next/mdx')() /** @type {import('next').NextConfig} */ const nextConfig = { pageExtensions: ['ts', 'tsx', 'mdx'], experimental: { mdxRs: true, }, } module.exports = withMDX(nextConfig) --- ## Page: https://nextjs.org/docs/14/app/api-reference/next-config-js/partial-prerendering You are currently viewing documentation for version 14 of Next.js. > **Warning**: Partial Prerendering is an experimental feature and is currently **not suitable for production environments**. Partial Prerendering is an experimental feature that allows static portions of a route to be prerendered and served from the cache with dynamic holes streamed in, all in a single HTTP request. Partial Prerendering is available in `next@canary`: Terminal npm install next@canary You can enable Partial Prerendering by setting the experimental `ppr` flag: next.config.js /** @type {import('next').NextConfig} */ const nextConfig = { experimental: { ppr: true, }, } module.exports = nextConfig > **Good to know:** > > * Partial Prerendering does not yet apply to client-side navigations. We are actively working on this. > * Partial Prerendering is designed for the Node.js runtime only. Using the subset of the Node.js runtime is not needed when you can instantly serve the static shell. Learn more about Partial Prerendering in the Next.js Learn course. --- ## Page: https://nextjs.org/docs/14/app/api-reference/next-config-js/poweredByHeader You are currently viewing documentation for version 14 of Next.js. By default Next.js will add the `x-powered-by` header. To opt-out of it, open `next.config.js` and disable the `poweredByHeader` config: next.config.js module.exports = { poweredByHeader: false, } --- ## Page: https://nextjs.org/docs/14/app/api-reference/next-config-js/productionBrowserSourceMaps You are currently viewing documentation for version 14 of Next.js. Source Maps are enabled by default during development. During production builds, they are disabled to prevent you leaking your source on the client, unless you specifically opt-in with the configuration flag. Next.js provides a configuration flag you can use to enable browser source map generation during the production build: next.config.js module.exports = { productionBrowserSourceMaps: true, } When the `productionBrowserSourceMaps` option is enabled, the source maps will be output in the same directory as the JavaScript files. Next.js will automatically serve these files when requested. * Adding source maps can increase `next build` time * Increases memory usage during `next build` --- ## Page: https://nextjs.org/docs/14/app/api-reference/next-config-js/reactStrictMode **Good to know**: Since Next.js 13.4, Strict Mode is `true` by default with `app` router, so the above configuration is only necessary for `pages`. You can still disable Strict Mode by setting `reactStrictMode: false`. **Suggested**: We strongly suggest you enable Strict Mode in your Next.js application to better prepare your application for the future of React. React's Strict Mode is a development mode only feature for highlighting potential problems in an application. It helps to identify unsafe lifecycles, legacy API usage, and a number of other features. The Next.js runtime is Strict Mode-compliant. To opt-in to Strict Mode, configure the following option in your `next.config.js`: If you or your team are not ready to use Strict Mode in your entire application, that's OK! You can incrementally migrate on a page-by-page basis using `<React.StrictMode>`. --- ## Page: https://nextjs.org/docs/14/app/api-reference/next-config-js/redirects Redirects allow you to redirect an incoming request path to a different destination path. To use redirects you can use the `redirects` key in `next.config.js`: module.exports = { async redirects() { return [ { source: '/about', destination: '/', permanent: true, }, ] }, } `redirects` is an async function that expects an array to be returned holding objects with `source`, `destination`, and `permanent` properties: * `source` is the incoming request path pattern. * `destination` is the path you want to route to. * `permanent` `true` or `false` - if `true` will use the 308 status code which instructs clients/search engines to cache the redirect forever, if `false` will use the 307 status code which is temporary and is not cached. > **Why does Next.js use 307 and 308?** Traditionally a 302 was used for a temporary redirect, and a 301 for a permanent redirect, but many browsers changed the request method of the redirect to `GET`, regardless of the original method. For example, if the browser made a request to `POST /v1/users` which returned status code `302` with location `/v2/users`, the subsequent request might be `GET /v2/users` instead of the expected `POST /v2/users`. Next.js uses the 307 temporary redirect, and 308 permanent redirect status codes to explicitly preserve the request method used. * `basePath`: `false` or `undefined` - if false the `basePath` won't be included when matching, can be used for external redirects only. * `locale`: `false` or `undefined` - whether the locale should not be included when matching. * `has` is an array of has objects with the `type`, `key` and `value` properties. * `missing` is an array of missing objects with the `type`, `key` and `value` properties. Redirects are checked before the filesystem which includes pages and `/public` files. When using the Pages Router, redirects are not applied to client-side routing (`Link`, `router.push`) unless Middleware is present and matches the path. When a redirect is applied, any query values provided in the request will be passed through to the redirect destination. For example, see the following redirect configuration: { source: '/old-blog/:path*', destination: '/blog/:path*', permanent: false } When `/old-blog/post-1?hello=world` is requested, the client will be redirected to `/blog/post-1?hello=world`. ## Path Matching Path matches are allowed, for example `/old-blog/:slug` will match `/old-blog/hello-world` (no nested paths): module.exports = { async redirects() { return [ { source: '/old-blog/:slug', destination: '/news/:slug', // Matched parameters can be used in the destination permanent: true, }, ] }, } ### Wildcard Path Matching To match a wildcard path you can use `*` after a parameter, for example `/blog/:slug*` will match `/blog/a/b/c/d/hello-world`: module.exports = { async redirects() { return [ { source: '/blog/:slug*', destination: '/news/:slug*', // Matched parameters can be used in the destination permanent: true, }, ] }, } ### Regex Path Matching To match a regex path you can wrap the regex in parentheses after a parameter, for example `/post/:slug(\\d{1,})` will match `/post/123` but not `/post/abc`: module.exports = { async redirects() { return [ { source: '/post/:slug(\\d{1,})', destination: '/news/:slug', // Matched parameters can be used in the destination permanent: false, }, ] }, } The following characters `(`, `)`, `{`, `}`, `:`, `*`, `+`, `?` are used for regex path matching, so when used in the `source` as non-special values they must be escaped by adding `\\` before them: module.exports = { async redirects() { return [ { // this will match `/english(default)/something` being requested source: '/english\\(default\\)/:slug', destination: '/en-us/:slug', permanent: false, }, ] }, } ## Header, Cookie, and Query Matching To only match a redirect when header, cookie, or query values also match the `has` field or don't match the `missing` field can be used. Both the `source` and all `has` items must match and all `missing` items must not match for the redirect to be applied. `has` and `missing` items can have the following fields: * `type`: `String` - must be either `header`, `cookie`, `host`, or `query`. * `key`: `String` - the key from the selected type to match against. * `value`: `String` or `undefined` - the value to check for, if undefined any value will match. A regex like string can be used to capture a specific part of the value, e.g. if the value `first-(?<paramName>.*)` is used for `first-second` then `second` will be usable in the destination with `:paramName`. module.exports = { async redirects() { return [ // if the header `x-redirect-me` is present, // this redirect will be applied { source: '/:path((?!another-page$).*)', has: [ { type: 'header', key: 'x-redirect-me', }, ], permanent: false, destination: '/another-page', }, // if the header `x-dont-redirect` is present, // this redirect will NOT be applied { source: '/:path((?!another-page$).*)', missing: [ { type: 'header', key: 'x-do-not-redirect', }, ], permanent: false, destination: '/another-page', }, // if the source, query, and cookie are matched, // this redirect will be applied { source: '/specific/:path*', has: [ { type: 'query', key: 'page', // the page value will not be available in the // destination since value is provided and doesn't // use a named capture group e.g. (?<page>home) value: 'home', }, { type: 'cookie', key: 'authorized', value: 'true', }, ], permanent: false, destination: '/another/:path*', }, // if the header `x-authorized` is present and // contains a matching value, this redirect will be applied { source: '/', has: [ { type: 'header', key: 'x-authorized', value: '(?<authorized>yes|true)', }, ], permanent: false, destination: '/home?authorized=:authorized', }, // if the host is `example.com`, // this redirect will be applied { source: '/:path((?!another-page$).*)', has: [ { type: 'host', value: 'example.com', }, ], permanent: false, destination: '/another-page', }, ] }, } ### Redirects with basePath support When leveraging `basePath` support with redirects each `source` and `destination` is automatically prefixed with the `basePath` unless you add `basePath: false` to the redirect: module.exports = { basePath: '/docs', async redirects() { return [ { source: '/with-basePath', // automatically becomes /docs/with-basePath destination: '/another', // automatically becomes /docs/another permanent: false, }, { // does not add /docs since basePath: false is set source: '/without-basePath', destination: 'https://example.com', basePath: false, permanent: false, }, ] }, } ### Redirects with i18n support When leveraging `i18n` support with redirects each `source` and `destination` is automatically prefixed to handle the configured `locales` unless you add `locale: false` to the redirect. If `locale: false` is used you must prefix the `source` and `destination` with a locale for it to be matched correctly. module.exports = { i18n: { locales: ['en', 'fr', 'de'], defaultLocale: 'en', }, async redirects() { return [ { source: '/with-locale', // automatically handles all locales destination: '/another', // automatically passes the locale on permanent: false, }, { // does not handle locales automatically since locale: false is set source: '/nl/with-locale-manual', destination: '/nl/another', locale: false, permanent: false, }, { // this matches '/' since `en` is the defaultLocale source: '/en', destination: '/en/another', locale: false, permanent: false, }, // it's possible to match all locales even when locale: false is set { source: '/:locale/page', destination: '/en/newpage', permanent: false, locale: false, }, { // this gets converted to /(en|fr|de)/(.*) so will not match the top-level // `/` or `/fr` routes like /:path* would source: '/(.*)', destination: '/another', permanent: false, }, ] }, } In some rare cases, you might need to assign a custom status code for older HTTP Clients to properly redirect. In these cases, you can use the `statusCode` property instead of the `permanent` property, but not both. To to ensure IE11 compatibility, a `Refresh` header is automatically added for the 308 status code. ## Other Redirects * Inside API Routes and Route Handlers, you can redirect based on the incoming request. * Inside `getStaticProps` and `getServerSideProps`, you can redirect specific pages at request-time. ## Version History | Version | Changes | | --- | --- | | `v13.3.0` | `missing` added. | | `v10.2.0` | `has` added. | | `v9.5.0` | `redirects` added. | --- ## Page: https://nextjs.org/docs/14/app/api-reference/next-config-js/rewrites Rewrites allow you to map an incoming request path to a different destination path. Rewrites act as a URL proxy and mask the destination path, making it appear the user hasn't changed their location on the site. In contrast, redirects will reroute to a new page and show the URL changes. To use rewrites you can use the `rewrites` key in `next.config.js`: module.exports = { async rewrites() { return [ { source: '/about', destination: '/', }, ] }, } Rewrites are applied to client-side routing, a `<Link href="/about">` will have the rewrite applied in the above example. `rewrites` is an async function that expects to return either an array or an object of arrays (see below) holding objects with `source` and `destination` properties: * `source`: `String` - is the incoming request path pattern. * `destination`: `String` is the path you want to route to. * `basePath`: `false` or `undefined` - if false the basePath won't be included when matching, can be used for external rewrites only. * `locale`: `false` or `undefined` - whether the locale should not be included when matching. * `has` is an array of has objects with the `type`, `key` and `value` properties. * `missing` is an array of missing objects with the `type`, `key` and `value` properties. When the `rewrites` function returns an array, rewrites are applied after checking the filesystem (pages and `/public` files) and before dynamic routes. When the `rewrites` function returns an object of arrays with a specific shape, this behavior can be changed and more finely controlled, as of `v10.1` of Next.js: module.exports = { async rewrites() { return { beforeFiles: [ // These rewrites are checked after headers/redirects // and before all files including _next/public files which // allows overriding page files { source: '/some-page', destination: '/somewhere-else', has: [{ type: 'query', key: 'overrideMe' }], }, ], afterFiles: [ // These rewrites are checked after pages/public files // are checked but before dynamic routes { source: '/non-existent', destination: '/somewhere-else', }, ], fallback: [ // These rewrites are checked after both pages/public files // and dynamic routes are checked { source: '/:path*', destination: `https://my-old-site.com/:path*`, }, ], } }, } > **Good to know**: rewrites in `beforeFiles` do not check the filesystem/dynamic routes immediately after matching a source, they continue until all `beforeFiles` have been checked. The order Next.js routes are checked is: 1. headers are checked/applied 2. redirects are checked/applied 3. `beforeFiles` rewrites are checked/applied 4. static files from the public directory, `_next/static` files, and non-dynamic pages are checked/served 5. `afterFiles` rewrites are checked/applied, if one of these rewrites is matched we check dynamic routes/static files after each match 6. `fallback` rewrites are checked/applied, these are applied before rendering the 404 page and after dynamic routes/all static assets have been checked. If you use fallback: true/'blocking' in `getStaticPaths`, the fallback `rewrites` defined in your `next.config.js` will _not_ be run. ## Rewrite parameters When using parameters in a rewrite the parameters will be passed in the query by default when none of the parameters are used in the `destination`. module.exports = { async rewrites() { return [ { source: '/old-about/:path*', destination: '/about', // The :path parameter isn't used here so will be automatically passed in the query }, ] }, } If a parameter is used in the destination none of the parameters will be automatically passed in the query. module.exports = { async rewrites() { return [ { source: '/docs/:path*', destination: '/:path*', // The :path parameter is used here so will not be automatically passed in the query }, ] }, } You can still pass the parameters manually in the query if one is already used in the destination by specifying the query in the `destination`. module.exports = { async rewrites() { return [ { source: '/:first/:second', destination: '/:first?second=:second', // Since the :first parameter is used in the destination the :second parameter // will not automatically be added in the query although we can manually add it // as shown above }, ] }, } > **Good to know**: Static pages from Automatic Static Optimization or prerendering params from rewrites will be parsed on the client after hydration and provided in the query. ## Path Matching Path matches are allowed, for example `/blog/:slug` will match `/blog/hello-world` (no nested paths): module.exports = { async rewrites() { return [ { source: '/blog/:slug', destination: '/news/:slug', // Matched parameters can be used in the destination }, ] }, } ### Wildcard Path Matching To match a wildcard path you can use `*` after a parameter, for example `/blog/:slug*` will match `/blog/a/b/c/d/hello-world`: module.exports = { async rewrites() { return [ { source: '/blog/:slug*', destination: '/news/:slug*', // Matched parameters can be used in the destination }, ] }, } ### Regex Path Matching To match a regex path you can wrap the regex in parenthesis after a parameter, for example `/blog/:slug(\\d{1,})` will match `/blog/123` but not `/blog/abc`: module.exports = { async rewrites() { return [ { source: '/old-blog/:post(\\d{1,})', destination: '/blog/:post', // Matched parameters can be used in the destination }, ] }, } The following characters `(`, `)`, `{`, `}`, `[`, `]`, `|`, `\`, `^`, `.`, `:`, `*`, `+`, `-`, `?`, `$` are used for regex path matching, so when used in the `source` as non-special values they must be escaped by adding `\\` before them: module.exports = { async rewrites() { return [ { // this will match `/english(default)/something` being requested source: '/english\\(default\\)/:slug', destination: '/en-us/:slug', }, ] }, } ## Header, Cookie, and Query Matching To only match a rewrite when header, cookie, or query values also match the `has` field or don't match the `missing` field can be used. Both the `source` and all `has` items must match and all `missing` items must not match for the rewrite to be applied. `has` and `missing` items can have the following fields: * `type`: `String` - must be either `header`, `cookie`, `host`, or `query`. * `key`: `String` - the key from the selected type to match against. * `value`: `String` or `undefined` - the value to check for, if undefined any value will match. A regex like string can be used to capture a specific part of the value, e.g. if the value `first-(?<paramName>.*)` is used for `first-second` then `second` will be usable in the destination with `:paramName`. module.exports = { async rewrites() { return [ // if the header `x-rewrite-me` is present, // this rewrite will be applied { source: '/:path*', has: [ { type: 'header', key: 'x-rewrite-me', }, ], destination: '/another-page', }, // if the header `x-rewrite-me` is not present, // this rewrite will be applied { source: '/:path*', missing: [ { type: 'header', key: 'x-rewrite-me', }, ], destination: '/another-page', }, // if the source, query, and cookie are matched, // this rewrite will be applied { source: '/specific/:path*', has: [ { type: 'query', key: 'page', // the page value will not be available in the // destination since value is provided and doesn't // use a named capture group e.g. (?<page>home) value: 'home', }, { type: 'cookie', key: 'authorized', value: 'true', }, ], destination: '/:path*/home', }, // if the header `x-authorized` is present and // contains a matching value, this rewrite will be applied { source: '/:path*', has: [ { type: 'header', key: 'x-authorized', value: '(?<authorized>yes|true)', }, ], destination: '/home?authorized=:authorized', }, // if the host is `example.com`, // this rewrite will be applied { source: '/:path*', has: [ { type: 'host', value: 'example.com', }, ], destination: '/another-page', }, ] }, } ## Rewriting to an external URL Examples * Incremental adoption of Next.js * Using Multiple Zones Rewrites allow you to rewrite to an external url. This is especially useful for incrementally adopting Next.js. The following is an example rewrite for redirecting the `/blog` route of your main app to an external site. module.exports = { async rewrites() { return [ { source: '/blog', destination: 'https://example.com/blog', }, { source: '/blog/:slug', destination: 'https://example.com/blog/:slug', // Matched parameters can be used in the destination }, ] }, } If you're using `trailingSlash: true`, you also need to insert a trailing slash in the `source` parameter. If the destination server is also expecting a trailing slash it should be included in the `destination` parameter as well. module.exports = { trailingSlash: true, async rewrites() { return [ { source: '/blog/', destination: 'https://example.com/blog/', }, { source: '/blog/:path*/', destination: 'https://example.com/blog/:path*/', }, ] }, } ### Incremental adoption of Next.js You can also have Next.js fall back to proxying to an existing website after checking all Next.js routes. This way you don't have to change the rewrites configuration when migrating more pages to Next.js module.exports = { async rewrites() { return { fallback: [ { source: '/:path*', destination: `https://custom-routes-proxying-endpoint.vercel.app/:path*`, }, ], } }, } ### Rewrites with basePath support When leveraging `basePath` support with rewrites each `source` and `destination` is automatically prefixed with the `basePath` unless you add `basePath: false` to the rewrite: module.exports = { basePath: '/docs', async rewrites() { return [ { source: '/with-basePath', // automatically becomes /docs/with-basePath destination: '/another', // automatically becomes /docs/another }, { // does not add /docs to /without-basePath since basePath: false is set // Note: this can not be used for internal rewrites e.g. `destination: '/another'` source: '/without-basePath', destination: 'https://example.com', basePath: false, }, ] }, } ### Rewrites with i18n support When leveraging `i18n` support with rewrites each `source` and `destination` is automatically prefixed to handle the configured `locales` unless you add `locale: false` to the rewrite. If `locale: false` is used you must prefix the `source` and `destination` with a locale for it to be matched correctly. module.exports = { i18n: { locales: ['en', 'fr', 'de'], defaultLocale: 'en', }, async rewrites() { return [ { source: '/with-locale', // automatically handles all locales destination: '/another', // automatically passes the locale on }, { // does not handle locales automatically since locale: false is set source: '/nl/with-locale-manual', destination: '/nl/another', locale: false, }, { // this matches '/' since `en` is the defaultLocale source: '/en', destination: '/en/another', locale: false, }, { // it's possible to match all locales even when locale: false is set source: '/:locale/api-alias/:path*', destination: '/api/:path*', locale: false, }, { // this gets converted to /(en|fr|de)/(.*) so will not match the top-level // `/` or `/fr` routes like /:path* would source: '/(.*)', destination: '/another', }, ] }, } ## Version History | Version | Changes | | --- | --- | | `v13.3.0` | `missing` added. | | `v10.2.0` | `has` added. | | `v9.5.0` | Headers added. | --- ## Page: https://nextjs.org/docs/14/app/api-reference/next-config-js/serverActions Options for configuring Server Actions behavior in your Next.js application. ## `allowedOrigins` A list of extra safe origin domains from which Server Actions can be invoked. Next.js compares the origin of a Server Action request with the host domain, ensuring they match to prevent CSRF attacks. If not provided, only the same origin is allowed. /** @type {import('next').NextConfig} */ module.exports = { experimental: { serverActions: { allowedOrigins: ['my-proxy.com', '*.my-proxy.com'], }, }, } ## `bodySizeLimit` By default, the maximum size of the request body sent to a Server Action is 1MB, to prevent the consumption of excessive server resources in parsing large amounts of data, as well as potential DDoS attacks. However, you can configure this limit using the `serverActions.bodySizeLimit` option. It can take the number of bytes or any string format supported by bytes, for example `1000`, `'500kb'` or `'3mb'`. /** @type {import('next').NextConfig} */ module.exports = { experimental: { serverActions: { bodySizeLimit: '2mb', }, }, } ## Enabling Server Actions (v13) Server Actions became a stable feature in Next.js 14, and are enabled by default. However, if you are using an earlier version of Next.js, you can enable them by setting `experimental.serverActions` to `true`. /** @type {import('next').NextConfig} */ const config = { experimental: { serverActions: true, }, } module.exports = config --- ## Page: https://nextjs.org/docs/14/app/api-reference/next-config-js/serverComponentsExternalPackages You are currently viewing documentation for version 14 of Next.js. Dependencies used inside Server Components and Route Handlers will automatically be bundled by Next.js. If a dependency is using Node.js specific features, you can choose to opt-out specific dependencies from the Server Components bundling and use native Node.js `require`. next.config.js /** @type {import('next').NextConfig} */ const nextConfig = { experimental: { serverComponentsExternalPackages: ['@acme/ui'], }, } module.exports = nextConfig Next.js includes a short list of popular packages that currently are working on compatibility and automatically opt-ed out: * `@aws-sdk/client-s3` * `@aws-sdk/s3-presigned-post` * `@blockfrost/blockfrost-js` * `@highlight-run/node` * `@jpg-store/lucid-cardano` * `@libsql/client` * `@mikro-orm/core` * `@mikro-orm/knex` * `@prisma/client` * `@react-pdf/renderer` * `@sentry/profiling-node` * `@swc/core` * `argon2` * `autoprefixer` * `aws-crt` * `bcrypt` * `better-sqlite3` * `canvas` * `cpu-features` * `cypress` * `eslint` * `express` * `firebase-admin` * `jest` * `jsdom` * `libsql` * `mdx-bundler` * `mongodb` * `mongoose` * `next-mdx-remote` * `next-seo` * `node-pty` * `node-web-audio-api` * `pg` * `playwright` * `postcss` * `prettier` * `prisma` * `puppeteer-core` * `puppeteer` * `rimraf` * `sharp` * `shiki` * `sqlite3` * `tailwindcss` * `ts-node` * `typescript` * `vscode-oniguruma` * `webpack` * `websocket` * `zeromq` --- ## Page: https://nextjs.org/docs/14/app/api-reference/next-config-js/staleTimes You are currently viewing documentation for version 14 of Next.js. > **Warning**: The `staleTimes` configuration is an experimental feature. This configuration strategy will likely change in the future. `staleTimes` is an experimental feature that allows configuring the invalidation period of the client router cache. This configuration option is available as of v14.2.0-canary.53. You can enable this experimental feature & provide custom revalidation times by setting the experimental `staleTimes` flag: next.config.js /** @type {import('next').NextConfig} */ const nextConfig = { experimental: { staleTimes: { dynamic: 30, static: 180, }, }, } module.exports = nextConfig The `static` and `dynamic` properties correspond with the time period (in seconds) based on different types of link prefetching. * The `dynamic` property is used when the page is neither statically generated nor fully prefetched (i.e., with prefetch=). * Default: 0 seconds (not cached) * The `static` property is used for statically generated pages, or when the `prefetch` prop on `Link` is set to `true`, or when calling `router.prefetch`. * Default: 5 minutes > **Good to know:** > > * Loading boundaries are considered reusable for the `static` period defined in this configuration. > * This doesn't affect partial rendering, **meaning shared layouts won't automatically be refetched on every navigation, only the page segment that changes.** > * This doesn't change back/forward caching behavior to prevent layout shift and to prevent losing the browser scroll position. You can learn more about the Client Router Cache here. ### Version History | Version | Changes | | --- | --- | | `v14.2.0` | experimental `staleTimes` introduced | --- ## Page: https://nextjs.org/docs/14/app/api-reference/next-config-js/trailingSlash You are currently viewing documentation for version 14 of Next.js. By default Next.js will redirect urls with trailing slashes to their counterpart without a trailing slash. For example `/about/` will redirect to `/about`. You can configure this behavior to act the opposite way, where urls without trailing slashes are redirected to their counterparts with trailing slashes. Open `next.config.js` and add the `trailingSlash` config: next.config.js module.exports = { trailingSlash: true, } With this option set, urls like `/about` will redirect to `/about/`. When used with `output: "export"` configuration, the `/about` page will output `/about/index.html` (instead of the default `/about.html`). ## Version History | Version | Changes | | --- | --- | | `v9.5.0` | `trailingSlash` added. | --- ## Page: https://nextjs.org/docs/14/app/api-reference/next-config-js/transpilePackages You are currently viewing documentation for version 14 of Next.js. Next.js can automatically transpile and bundle dependencies from local packages (like monorepos) or from external dependencies (`node_modules`). This replaces the `next-transpile-modules` package. next.config.js /** @type {import('next').NextConfig} */ const nextConfig = { transpilePackages: ['@acme/ui', 'lodash-es'], } module.exports = nextConfig ## Version History | Version | Changes | | --- | --- | | `v13.0.0` | `transpilePackages` added. | --- ## Page: https://nextjs.org/docs/14/app/api-reference/next-config-js/turbo ## turbo (Experimental) Turbopack can be customized to transform different files and change how modules are resolved. > **Good to know**: > > * These features are experimental and will only work with `next --turbo`. > * Turbopack for Next.js does not require loaders nor loader configuration for built-in functionality. Turbopack has built-in support for css and compiling modern JavaScript, so there's no need for `css-loader`, `postcss-loader`, or `babel-loader` if you're using `@babel/preset-env`. ## webpack loaders If you need loader support beyond what's built in, many webpack loaders already work with Turbopack. There are currently some limitations: * Only a core subset of the webpack loader API is implemented. Currently, there is enough coverage for some popular loaders, and we'll expand our API support in the future. * Only loaders that return JavaScript code are supported. Loaders that transform files like stylesheets or images are not currently supported. * Options passed to webpack loaders must be plain JavaScript primitives, objects, and arrays. For example, it's not possible to pass `require()`d plugin modules as option values. To configure loaders, add the names of the loaders you've installed and any options in `next.config.js`, mapping file extensions to a list of loaders: module.exports = { experimental: { turbo: { rules: { '*.svg': { loaders: ['@svgr/webpack'], as: '*.js', }, }, }, }, } > **Good to know**: Prior to Next.js version 13.4.4, `experimental.turbo.rules` was named `experimental.turbo.loaders` and only accepted file extensions like `.mdx` instead of `*.mdx`. ### Supported loaders The following loaders have been tested to work with Turbopack's webpack loader implementation: * `babel-loader` * `@svgr/webpack` * `svg-inline-loader` * `yaml-loader` * `string-replace-loader` * `raw-loader` * 'sass-loader' ## Resolve aliases Through `next.config.js`, Turbopack can be configured to modify module resolution through aliases, similar to webpack's `resolve.alias` configuration. To configure resolve aliases, map imported patterns to their new destination in `next.config.js`: module.exports = { experimental: { turbo: { resolveAlias: { underscore: 'lodash', mocha: { browser: 'mocha/browser-entry.js' }, }, }, }, } This aliases imports of the `underscore` package to the `lodash` package. In other words, `import underscore from 'underscore'` will load the `lodash` module instead of `underscore`. Turbopack also supports conditional aliasing through this field, similar to Node.js's conditional exports. At the moment only the `browser` condition is supported. In the case above, imports of the `mocha` module will be aliased to `mocha/browser-entry.js` when Turbopack targets browser environments. ## Resolve extensions Through `next.config.js`, Turbopack can be configured to resolve modules with custom extensions, similar to webpack's `resolve.extensions` configuration. To configure resolve extensions, use the `resolveExtensions` field in `next.config.js`: module.exports = { experimental: { turbo: { resolveExtensions: [ '.mdx', '.tsx', '.ts', '.jsx', '.js', '.mjs', '.json', ], }, }, } This overwrites the original resolve extensions with the provided list. Make sure to include the default extensions. For more information and guidance for how to migrate your app to Turbopack from webpack, see Turbopack's documentation on webpack compatibility. --- ## Page: https://nextjs.org/docs/14/app/api-reference/next-config-js/typedRoutes #### Subscribe to our newsletter Stay updated on new releases and features, guides, and case studies. --- ## Page: https://nextjs.org/docs/14/app/api-reference/next-config-js/typescript You are currently viewing documentation for version 14 of Next.js. Next.js fails your **production build** (`next build`) when TypeScript errors are present in your project. If you'd like Next.js to dangerously produce production code even when your application has errors, you can disable the built-in type checking step. If disabled, be sure you are running type checks as part of your build or deploy process, otherwise this can be very dangerous. Open `next.config.js` and enable the `ignoreBuildErrors` option in the `typescript` config: next.config.js module.exports = { typescript: { // !! WARN !! // Dangerously allow production builds to successfully complete even if // your project has type errors. // !! WARN !! ignoreBuildErrors: true, }, } --- ## Page: https://nextjs.org/docs/14/app/api-reference/next-config-js/urlImports URL imports are an experimental feature that allows you to import modules directly from external servers (instead of from the local disk). > **Warning**: This feature is experimental. Only use domains that you trust to download and execute on your machine. Please exercise discretion, and caution until the feature is flagged as stable. To opt-in, add the allowed URL prefixes inside `next.config.js`: module.exports = { experimental: { urlImports: ['https://example.com/assets/', 'https://cdn.skypack.dev'], }, } Then, you can import modules directly from URLs: import { a, b, c } from 'https://example.com/assets/some/module.js' URL Imports can be used everywhere normal package imports can be used. ## Security Model This feature is being designed with **security as the top priority**. To start, we added an experimental flag forcing you to explicitly allow the domains you accept URL imports from. We're working to take this further by limiting URL imports to execute in the browser sandbox using the Edge Runtime. ## Lockfile When using URL imports, Next.js will create a `next.lock` directory containing a lockfile and fetched assets. This directory **must be committed to Git**, not ignored by `.gitignore`. * When running `next dev`, Next.js will download and add all newly discovered URL Imports to your lockfile * When running `next build`, Next.js will use only the lockfile to build the application for production Typically, no network requests are needed and any outdated lockfile will cause the build to fail. One exception is resources that respond with `Cache-Control: no-cache`. These resources will have a `no-cache` entry in the lockfile and will always be fetched from the network on each build. ## Examples ### Skypack import confetti from 'https://cdn.skypack.dev/canvas-confetti' import { useEffect } from 'react' export default () => { useEffect(() => { confetti() }) return <p>Hello</p> } ### Static Image Imports import Image from 'next/image' import logo from 'https://example.com/assets/logo.png' export default () => ( <div> <Image src={logo} placeholder="blur" /> </div> ) ### URLs in CSS .className { background: url('https://example.com/assets/hero.jpg'); } ### Asset Imports const logo = new URL('https://example.com/assets/file.txt', import.meta.url) console.log(logo.pathname) // prints "/_next/static/media/file.a9727b5d.txt" --- ## Page: https://nextjs.org/docs/14/app/api-reference/next-config-js/webpack ## Custom Webpack Config > **Good to know**: changes to webpack config are not covered by semver so proceed at your own risk Before continuing to add custom webpack configuration to your application make sure Next.js doesn't already support your use-case: * CSS imports * CSS modules * Sass/SCSS imports * Sass/SCSS modules Some commonly asked for features are available as plugins: * @next/mdx * @next/bundle-analyzer In order to extend our usage of `webpack`, you can define a function that extends its config inside `next.config.js`, like so: module.exports = { webpack: ( config, { buildId, dev, isServer, defaultLoaders, nextRuntime, webpack } ) => { // Important: return the modified config return config }, } > The `webpack` function is executed three times, twice for the server (nodejs / edge runtime) and once for the client. This allows you to distinguish between client and server configuration using the `isServer` property. The second argument to the `webpack` function is an object with the following properties: * `buildId`: `String` - The build id, used as a unique identifier between builds * `dev`: `Boolean` - Indicates if the compilation will be done in development * `isServer`: `Boolean` - It's `true` for server-side compilation, and `false` for client-side compilation * `nextRuntime`: `String | undefined` - The target runtime for server-side compilation; either `"edge"` or `"nodejs"`, it's `undefined` for client-side compilation. * `defaultLoaders`: `Object` - Default loaders used internally by Next.js: * `babel`: `Object` - Default `babel-loader` configuration Example usage of `defaultLoaders.babel`: // Example config for adding a loader that depends on babel-loader // This source was taken from the @next/mdx plugin source: // https://github.com/vercel/next.js/tree/canary/packages/next-mdx module.exports = { webpack: (config, options) => { config.module.rules.push({ test: /\.mdx/, use: [ options.defaultLoaders.babel, { loader: '@mdx-js/loader', options: pluginOptions.options, }, ], }) return config }, } #### `nextRuntime` Notice that `isServer` is `true` when `nextRuntime` is `"edge"` or `"nodejs"`, nextRuntime "`edge`" is currently for middleware and Server Components in edge runtime only. Was this helpful? supported. --- ## Page: https://nextjs.org/docs/14/app/api-reference/next-config-js/webVitalsAttribution You are currently viewing documentation for version 14 of Next.js. When debugging issues related to Web Vitals, it is often helpful if we can pinpoint the source of the problem. For example, in the case of Cumulative Layout Shift (CLS), we might want to know the first element that shifted when the single largest layout shift occurred. Or, in the case of Largest Contentful Paint (LCP), we might want to identify the element corresponding to the LCP for the page. If the LCP element is an image, knowing the URL of the image resource can help us locate the asset we need to optimize. Pinpointing the biggest contributor to the Web Vitals score, aka attribution, allows us to obtain more in-depth information like entries for PerformanceEventTiming, PerformanceNavigationTiming and PerformanceResourceTiming. Attribution is disabled by default in Next.js but can be enabled **per metric** by specifying the following in `next.config.js`. next.config.js experimental: { webVitalsAttribution: ['CLS', 'LCP'] } Valid attribution values are all `web-vitals` metrics specified in the `NextWebVitalsMetric` type. --- ## Page: https://nextjs.org/docs/14/app/api-reference/cli #### Subscribe to our newsletter Stay updated on new releases and features, guides, and case studies. --- ## Page: https://nextjs.org/docs/14/app/api-reference/cli/create-next-app The `create-next-app` CLI allow you to quickly create a new Next.js application using the default template or an example from a public Github repository. It is the easiest way to get started with Next.js. Basic usage: npx create-next-app@latest [project-name] [options] ## Reference The following options are available: | Options | Description | | --- | --- | | `-h` or `--help` | Show all available options | | `-v` or `--version` | Output the version number | | `--no-*` | Negate default options. E.g. `--no-eslint` | | `--ts` or `--typescript` | Initialize as a TypeScript project (default) | | `--js` or `--javascript` | Initialize as a JavaScript project | | `--tailwind` | Initialize with Tailwind CSS config (default) | | `--eslint` | Initialize with ESLint config | | `--app` | Initialize as an App Router project | | `--src-dir` | Initialize inside a `src/` directory | | `--turbo` | Enable Turbopack by default for development | | `--import-alias <alias-to-configure>` | Specify import alias to use (default "@/\*") | | `--empty` | Initialize an empty project | | `--use-npm` | Explicitly tell the CLI to bootstrap the application using npm | | `--use-pnpm` | Explicitly tell the CLI to bootstrap the application using pnpm | | `--use-yarn` | Explicitly tell the CLI to bootstrap the application using Yarn | | `--use-bun` | Explicitly tell the CLI to bootstrap the application using Bun | | `-e` or `--example [name] [github-url]` | An example to bootstrap the app with | | `--example-path <path-to-example>` | Specify the path to the example separately | | `--reset-preferences` | Explicitly tell the CLI to reset any stored preferences | | `--skip-install` | Explicitly tell the CLI to skip installing packages | | `--yes` | Use previous preferences or defaults for all options | ## Examples ## With the default template To create a new app using the default template, run the following command in your terminal: npx create-next-app@latest You will then be asked the following prompts: What is your project named? my-app Would you like to use TypeScript? No / Yes Would you like to use ESLint? No / Yes Would you like to use Tailwind CSS? No / Yes Would you like your code inside a `src/` directory? No / Yes Would you like to use App Router? (recommended) No / Yes Would you like to use Turbopack for `next dev`? No / Yes Would you like to customize the import alias (`@/*` by default)? No / Yes Once you've answered the prompts, a new project will be created with your chosen configuration. ## With an official Next.js example To create a new app using an official Next.js example, use the `--example` flag with the following command: npx create-next-app@latest --example [your-project-name] [example-name] You can view a list of all available examples along with setup instructions in the Next.js repository. ## With any public Github example To create a new app using any public Github example, use the `--example` option with the Github repo's URL. For example: npx create-next-app@latest --example [your-project-name] "https://github.com/.../" --- ## Page: https://nextjs.org/docs/14/app/api-reference/cli/next The Next.js CLI allows you to develop, build, start your application, and more. Basic usage: npm run next [command] [options] ## Reference The following options are available: | Options | Description | | --- | --- | | `-h` or `--help` | Shows all available options | | `-v` or `--version` | Outputs the Next.js version number | ### Commands The following commands are available: | Command | Description | | --- | --- | | `dev` | Starts Next.js in development mode with Hot Module Reloading, error reporting, and more. | | `build` | Creates an optimized production build of your application. Displaying information about each route. | | `start` | Starts Next.js in production mode. The application should be compiled with `next build` first. | | `info` | Prints relevant details about the current system which can be used to report Next.js bugs. | | `lint` | Runs ESLint for all files in the `/src`, `/app`, `/pages`, `/components`, and `/lib` directories. It also provides a guided setup to install any required dependencies if ESLint it is not already configured in your application. | | `telemetry` | Allows you to enable or disable Next.js' completely anonymous telemetry collection. | > **Good to know**: Running `next` without a command is an alias for `next dev`. ### `next dev` options `next dev` starts the application in development mode with Hot Module Reloading (HMR), error reporting, and more. The following options are available when running `next dev`: | Option | Description | | --- | --- | | `-h, --help` | Show all available options. | | `[directory]` | A directory in which to build the application. If not provided, current directory is used. | | `--turbo` | Starts development mode using Turbopack. | | `-p` or `--port <port>` | Specify a port number on which to start the application. Default: 3000, env: PORT | | `-H`or `--hostname <hostname>` | Specify a hostname on which to start the application. Useful for making the application available for other devices on the network. Default: 0.0.0.0 | | `--experimental-https` | Starts the server with HTTPS and generates a self-signed certificate. | | `--experimental-https-key <path>` | Path to a HTTPS key file. | | `--experimental-https-cert <path>` | Path to a HTTPS certificate file. | | `--experimental-https-ca <path>` | Path to a HTTPS certificate authority file. | | `--experimental-upload-trace <traceUrl>` | Reports a subset of the debugging trace to a remote HTTP URL. | ### `next build` options `next build` creates an optimized production build of your application. The output displays information about each route. For example: Route (app) Size First Load JS ┌ ○ /_not-found 0 B 0 kB └ ƒ /products/[id] 0 B 0 kB ○ (Static) prerendered as static content ƒ (Dynamic) server-rendered on demand * **Size**: The size of assets downloaded when navigating to the page client-side. The size for each route only includes its dependencies. * **First Load JS**: The size of assets downloaded when visiting the page from the server. The amount of JS shared by all is shown as a separate metric. Both of these values are **compressed with gzip**. The first load is indicated by green, yellow, or red. Aim for green for performant applications. The following options are available for the `next build` command: | Option | Description | | --- | --- | | `-h, --help` | Show all available options. | | `[directory]` | A directory on which to build the application. If not provided, the current directory will be used. | | `-d` or `--debug` | Enables a more verbose build output. With this flag enabled additional build output like rewrites, redirects, and headers will be shown. | | | | | `--profile` | Enables production profiling for React. | | `--no-lint` | Disables linting. | | `--no-mangling` | Disables mangling. This may affect performance and should only be used for debugging purposes. | | `--experimental-app-only` | Builds only App Router routes. | | `--experimental-build-mode [mode]` | Uses an experimental build mode. (choices: "compile", "generate", default: "default") | ### `next start` options `next start` starts the application in production mode. The application should be compiled with `next build` first. The following options are available for the `next start` command: | Option | Description | | --- | --- | | `-h` or `--help` | Show all available options. | | `[directory]` | A directory on which to start the application. If no directory is provided, the current directory will be used. | | `-p` or `--port <port>` | Specify a port number on which to start the application. (default: 3000, env: PORT) | | `-H` or `--hostname <hostname>` | Specify a hostname on which to start the application (default: 0.0.0.0). | | `--keepAliveTimeout <keepAliveTimeout>` | Specify the maximum amount of milliseconds to wait before closing the inactive connections. | ### `next info` options `next info` prints relevant details about the current system which can be used to report Next.js bugs when opening a GitHub issue. This information includes Operating System platform/arch/version, Binaries (Node.js, npm, Yarn, pnpm), package versions (`next`, `react`, `react-dom`), and more. The output should look like this: Operating System: Platform: darwin Arch: arm64 Version: Darwin Kernel Version 23.6.0 Available memory (MB): 65536 Available CPU cores: 10 Binaries: Node: 20.12.0 npm: 10.5.0 Yarn: 1.22.19 pnpm: 9.6.0 Relevant Packages: next: 15.0.0-canary.115 // Latest available version is detected (15.0.0-canary.115). eslint-config-next: 14.2.5 react: 19.0.0-rc react-dom: 19.0.0 typescript: 5.5.4 Next.js Config: output: N/A The following options are available for the `next info` command: | Option | Description | | --- | --- | | `-h` or `--help` | Show all available options | | `--verbose` | Collects additional information for debugging. | ### `next lint` options `next lint` runs ESLint for all files in the `pages/`, `app/`, `components/`, `lib/`, and `src/` directories. It also provides a guided setup to install any required dependencies if ESLint is not already configured in your application. The following options are available for the `next lint` command: | Option | Description | | --- | --- | | `[directory]` | A base directory on which to lint the application. If not provided, the current directory will be used. | | `-d, --dir, <dirs...>` | Include directory, or directories, to run ESLint. | | `--file, <files...>` | Include file, or files, to run ESLint. | | `--ext, [exts...]` | Specify JavaScript file extensions. (default: \[".js", ".mjs", ".cjs", ".jsx", ".ts", ".mts", ".cts", ".tsx"\]) | | `-c, --config, <config>` | Uses this configuration file, overriding all other configuration options. | | `--resolve-plugins-relative-to, <rprt>` | Specify a directory where plugins should be resolved from. | | `--strict` | Creates a `.eslintrc.json` file using the Next.js strict configuration. | | `--rulesdir, <rulesdir...>` | Uses additional rules from this directory(s). | | `--fix` | Automatically fix linting issues. | | `--fix-type <fixType>` | Specify the types of fixes to apply (e.g., problem, suggestion, layout). | | `--ignore-path <path>` | Specify a file to ignore. | | `--no-ignore <path>` | Disables the `--ignore-path` option. | | `--quiet` | Reports errors only. | | `--max-warnings [maxWarnings]` | Specify the number of warnings before triggering a non-zero exit code. (default: -1) | | `-o, --output-file, <outputFile>` | Specify a file to write report to. | | `-f, --format, <format>` | Uses a specific output format. | | `--no-inline-config` | Prevents comments from changing config or rules. | | `--report-unused-disable-directives-severity <level>` | Specify severity level for unused eslint-disable directives. (choices: "error", "off", "warn") | | `--no-cache` | Disables caching. | | `--cache-location, <cacheLocation>` | Specify a location for cache. | | `--cache-strategy, [cacheStrategy]` | Specify a strategy to use for detecting changed files in the cache. (default: "metadata") | | `--error-on-unmatched-pattern` | Reports errors when any file patterns are unmatched. | | `-h, --help` | Displays this message. | ### `next telemetry` options Next.js collects **completely anonymous** telemetry data about general usage. Participation in this anonymous program is optional, and you can opt-out if you prefer not to share information. The following options are available for the `next telemetry` command: | Option | Description | | --- | --- | | `-h, --help` | Show all available options. | | `--enable` | Enables Next.js' telemetry collection. | | `--disable` | Disables Next.js' telemetry collection. | Learn more about Telemetry. ## Examples ### Changing the default port By default, Next.js uses `http://localhost:3000` during development and with `next start`. The default port can be changed with the `-p` option, like so: next dev -p 4000 Or using the `PORT` environment variable: PORT=4000 next dev > **Good to know**: `PORT` cannot be set in `.env` as booting up the HTTP server happens before any other code is initialized. ### Using HTTPS during development For certain use cases like webhooks or authentication, it may be required to use HTTPS to have a secure environment on `localhost`. Next.js can generate a self-signed certificate with `next dev` using the `--experimental-https` flag: next dev --experimental-https You can also provide a custom certificate and key with `--experimental-https-key` and `--experimental-https-cert`. Optionally, you can provide a custom CA certificate with `--experimental-https-ca` as well. next dev --experimental-https --experimental-https-key ./certificates/localhost-key.pem --experimental-https-cert ./certificates/localhost.pem `next dev --experimental-https` is only intended for development and creates a locally trusted certificate with `mkcert`. In production, use properly issued certificates from trusted authorities. > **Good to know**: When deploying to Vercel, HTTPS is automatically configured for your Next.js application. ### Configuring a timeout for downstream proxies When deploying Next.js behind a downstream proxy (e.g. a load-balancer like AWS ELB/ALB), it's important to configure Next's underlying HTTP server with keep-alive timeouts that are _larger_ than the downstream proxy's timeouts. Otherwise, once a keep-alive timeout is reached for a given TCP connection, Node.js will immediately terminate that connection without notifying the downstream proxy. This results in a proxy error whenever it attempts to reuse a connection that Node.js has already terminated. To configure the timeout values for the production Next.js server, pass `--keepAliveTimeout` (in milliseconds) to `next start`, like so: next start --keepAliveTimeout 70000 ### Passing Node.js arguments You can pass any node arguments to `next` commands. For example: NODE_OPTIONS='--throw-deprecation' next NODE_OPTIONS='-r esm' next NODE_OPTIONS='--inspect' next --- ## Page: https://nextjs.org/docs/14/app/api-reference/edge `AbortController`Allows you to abort one or more DOM requests as and when desired`Array`Represents an array of values`ArrayBuffer`Represents a generic, fixed-length raw binary data buffer`Atomics`Provides atomic operations as static methods`BigInt`Represents a whole number with arbitrary precision`BigInt64Array`Represents a typed array of 64-bit signed integers`BigUint64Array`Represents a typed array of 64-bit unsigned integers`Boolean`Represents a logical entity and can have two values: `true` and `false``clearInterval`Cancels a timed, repeating action which was previously established by a call to `setInterval()``clearTimeout`Cancels a timed, repeating action which was previously established by a call to `setTimeout()``console`Provides access to the browser's debugging console`DataView`Represents a generic view of an `ArrayBuffer``Date`Represents a single moment in time in a platform-independent format`decodeURI`Decodes a Uniform Resource Identifier (URI) previously created by `encodeURI` or by a similar routine`decodeURIComponent`Decodes a Uniform Resource Identifier (URI) component previously created by `encodeURIComponent` or by a similar routine`DOMException`Represents an error that occurs in the DOM`encodeURI`Encodes a Uniform Resource Identifier (URI) by replacing each instance of certain characters by one, two, three, or four escape sequences representing the UTF-8 encoding of the character`encodeURIComponent`Encodes a Uniform Resource Identifier (URI) component by replacing each instance of certain characters by one, two, three, or four escape sequences representing the UTF-8 encoding of the character`Error`Represents an error when trying to execute a statement or accessing a property`EvalError`Represents an error that occurs regarding the global function `eval()``Float32Array`Represents a typed array of 32-bit floating point numbers`Float64Array`Represents a typed array of 64-bit floating point numbers`Function`Represents a function`Infinity`Represents the mathematical Infinity value`Int8Array`Represents a typed array of 8-bit signed integers`Int16Array`Represents a typed array of 16-bit signed integers`Int32Array`Represents a typed array of 32-bit signed integers`Intl`Provides access to internationalization and localization functionality`isFinite`Determines whether a value is a finite number`isNaN`Determines whether a value is `NaN` or not`JSON`Provides functionality to convert JavaScript values to and from the JSON format`Map`Represents a collection of values, where each value may occur only once`Math`Provides access to mathematical functions and constants`Number`Represents a numeric value`Object`Represents the object that is the base of all JavaScript objects`parseFloat`Parses a string argument and returns a floating point number`parseInt`Parses a string argument and returns an integer of the specified radix`Promise`Represents the eventual completion (or failure) of an asynchronous operation, and its resulting value`Proxy`Represents an object that is used to define custom behavior for fundamental operations (e.g. property lookup, assignment, enumeration, function invocation, etc)`queueMicrotask`Queues a microtask to be executed`RangeError`Represents an error when a value is not in the set or range of allowed values`ReferenceError`Represents an error when a non-existent variable is referenced`Reflect`Provides methods for interceptable JavaScript operations`RegExp`Represents a regular expression, allowing you to match combinations of characters`Set`Represents a collection of values, where each value may occur only once`setInterval`Repeatedly calls a function, with a fixed time delay between each call`setTimeout`Calls a function or evaluates an expression after a specified number of milliseconds`SharedArrayBuffer`Represents a generic, fixed-length raw binary data buffer`String`Represents a sequence of characters`structuredClone`Creates a deep copy of a value`Symbol`Represents a unique and immutable data type that is used as the key of an object property`SyntaxError`Represents an error when trying to interpret syntactically invalid code`TypeError`Represents an error when a value is not of the expected type`Uint8Array`Represents a typed array of 8-bit unsigned integers`Uint8ClampedArray`Represents a typed array of 8-bit unsigned integers clamped to 0-255`Uint32Array`Represents a typed array of 32-bit unsigned integers`URIError`Represents an error when a global URI handling function was used in a wrong way`URL`Represents an object providing static methods used for creating object URLs`URLPattern`Represents a URL pattern`URLSearchParams`Represents a collection of key/value pairs`WeakMap`Represents a collection of key/value pairs in which the keys are weakly referenced`WeakSet`Represents a collection of objects in which each object may occur only once`WebAssembly`Provides access to WebAssembly --- ## Page: https://nextjs.org/docs/14/pages/building-your-application You are currently viewing documentation for version 14 of Next.js. Next.js provides the building blocks to create flexible, full-stack web applications. The guides in **Building Your Application** explain how to use these features and how to customize your application's behavior. The sections and pages are organized sequentially, from basic to advanced, so you can follow them step-by-step when building your Next.js application. However, you can read them in any order or skip to the pages that apply to your use case. If you're new to Next.js, we recommend starting with the Routing, Rendering, Data Fetching and Styling sections, as they introduce the fundamental Next.js and web concepts to help you get started. Then, you can dive deeper into the other sections such as Optimizing and Configuring. Finally, once you're ready, checkout the Deploying and Upgrading sections. --- ## Page: https://nextjs.org/docs/14/pages/building-your-application/routing #### Subscribe to our newsletter Stay updated on new releases and features, guides, and case studies. --- ## Page: https://nextjs.org/docs/14/pages/building-your-application/routing/pages-and-layouts The Pages Router has a file-system based router built on the concept of pages. When a file is added to the `pages` directory, it's automatically available as a route. In Next.js, a **page** is a React Component exported from a `.js`, `.jsx`, `.ts`, or `.tsx` file in the `pages` directory. Each page is associated with a route based on its file name. **Example**: If you create `pages/about.js` that exports a React component like below, it will be accessible at `/about`. export default function About() { return <div>About</div> } ## Index routes The router will automatically route files named `index` to the root of the directory. * `pages/index.js` → `/` * `pages/blog/index.js` → `/blog` ## Nested routes The router supports nested files. If you create a nested folder structure, files will automatically be routed in the same way still. * `pages/blog/first-post.js` → `/blog/first-post` * `pages/dashboard/settings/username.js` → `/dashboard/settings/username` ## Pages with Dynamic Routes Next.js supports pages with dynamic routes. For example, if you create a file called `pages/posts/[id].js`, then it will be accessible at `posts/1`, `posts/2`, etc. > To learn more about dynamic routing, check the Dynamic Routing documentation. ## Layout Pattern The React model allows us to deconstruct a page into a series of components. Many of these components are often reused between pages. For example, you might have the same navigation bar and footer on every page. import Navbar from './navbar' import Footer from './footer' export default function Layout({ children }) { return ( <> <Navbar /> <main>{children}</main> <Footer /> </> ) } ## Examples ### Single Shared Layout with Custom App If you only have one layout for your entire application, you can create a Custom App and wrap your application with the layout. Since the `<Layout />` component is re-used when changing pages, its component state will be preserved (e.g. input values). import Layout from '../components/layout' export default function MyApp({ Component, pageProps }) { return ( <Layout> <Component {...pageProps} /> </Layout> ) } ### Per-Page Layouts If you need multiple layouts, you can add a property `getLayout` to your page, allowing you to return a React component for the layout. This allows you to define the layout on a _per-page basis_. Since we're returning a function, we can have complex nested layouts if desired. import Layout from '../components/layout' import NestedLayout from '../components/nested-layout' export default function Page() { return ( /** Your content */ ) } Page.getLayout = function getLayout(page) { return ( <Layout> <NestedLayout>{page}</NestedLayout> </Layout> ) } export default function MyApp({ Component, pageProps }) { // Use the layout defined at the page level, if available const getLayout = Component.getLayout ?? ((page) => page) return getLayout(<Component {...pageProps} />) } When navigating between pages, we want to _persist_ page state (input values, scroll position, etc.) for a Single-Page Application (SPA) experience. This layout pattern enables state persistence because the React component tree is maintained between page transitions. With the component tree, React can understand which elements have changed to preserve state. > **Good to know**: This process is called reconciliation, which is how React understands which elements have changed. ### With TypeScript When using TypeScript, you must first create a new type for your pages which includes a `getLayout` function. Then, you must create a new type for your `AppProps` which overrides the `Component` property to use the previously created type. import type { ReactElement } from 'react' import Layout from '../components/layout' import NestedLayout from '../components/nested-layout' import type { NextPageWithLayout } from './_app' const Page: NextPageWithLayout = () => { return <p>hello world</p> } Page.getLayout = function getLayout(page: ReactElement) { return ( <Layout> <NestedLayout>{page}</NestedLayout> </Layout> ) } export default Page import type { ReactElement, ReactNode } from 'react' import type { NextPage } from 'next' import type { AppProps } from 'next/app' export type NextPageWithLayout<P = {}, IP = P> = NextPage<P, IP> & { getLayout?: (page: ReactElement) => ReactNode } type AppPropsWithLayout = AppProps & { Component: NextPageWithLayout } export default function MyApp({ Component, pageProps }: AppPropsWithLayout) { // Use the layout defined at the page level, if available const getLayout = Component.getLayout ?? ((page) => page) return getLayout(<Component {...pageProps} />) } ### Data Fetching Inside your layout, you can fetch data on the client-side using `useEffect` or a library like SWR. Because this file is not a Page, you cannot use `getStaticProps` or `getServerSideProps` currently. import useSWR from 'swr' import Navbar from './navbar' import Footer from './footer' export default function Layout({ children }) { const { data, error } = useSWR('/api/navigation', fetcher) if (error) return <div>Failed to load</div> if (!data) return <div>Loading...</div> return ( <> <Navbar links={data.links} /> <main>{children}</main> <Footer /> </> ) } --- ## Page: https://nextjs.org/docs/14/pages/building-your-application/routing/dynamic-routes When you don't know the exact segment names ahead of time and want to create routes from dynamic data, you can use Dynamic Segments that are filled in at request time or prerendered at build time. ## Convention A Dynamic Segment can be created by wrapping a file or folder name in square brackets: `[segmentName]`. For example, `[id]` or `[slug]`. Dynamic Segments can be accessed from `useRouter`. ## Example For example, a blog could include the following route `pages/blog/[slug].js` where `[slug]` is the Dynamic Segment for blog posts. import { useRouter } from 'next/router' export default function Page() { const router = useRouter() return <p>Post: {router.query.slug}</p> } | Route | Example URL | `params` | | --- | --- | --- | | `pages/blog/[slug].js` | `/blog/a` | `{ slug: 'a' }` | | `pages/blog/[slug].js` | `/blog/b` | `{ slug: 'b' }` | | `pages/blog/[slug].js` | `/blog/c` | `{ slug: 'c' }` | ## Catch-all Segments Dynamic Segments can be extended to **catch-all** subsequent segments by adding an ellipsis inside the brackets `[...segmentName]`. For example, `pages/shop/[...slug].js` will match `/shop/clothes`, but also `/shop/clothes/tops`, `/shop/clothes/tops/t-shirts`, and so on. | Route | Example URL | `params` | | --- | --- | --- | | `pages/shop/[...slug].js` | `/shop/a` | `{ slug: ['a'] }` | | `pages/shop/[...slug].js` | `/shop/a/b` | `{ slug: ['a', 'b'] }` | | `pages/shop/[...slug].js` | `/shop/a/b/c` | `{ slug: ['a', 'b', 'c'] }` | ## Optional Catch-all Segments Catch-all Segments can be made **optional** by including the parameter in double square brackets: `[[...segmentName]]`. For example, `pages/shop/[[...slug]].js` will **also** match `/shop`, in addition to `/shop/clothes`, `/shop/clothes/tops`, `/shop/clothes/tops/t-shirts`. The difference between **catch-all** and **optional catch-all** segments is that with optional, the route without the parameter is also matched (`/shop` in the example above). | Route | Example URL | `params` | | --- | --- | --- | | `pages/shop/[[...slug]].js` | `/shop` | `{ slug: [] }` | | `pages/shop/[[...slug]].js` | `/shop/a` | `{ slug: ['a'] }` | | `pages/shop/[[...slug]].js` | `/shop/a/b` | `{ slug: ['a', 'b'] }` | | `pages/shop/[[...slug]].js` | `/shop/a/b/c` | `{ slug: ['a', 'b', 'c'] }` | --- ## Page: https://nextjs.org/docs/14/pages/building-your-application/routing/linking-and-navigating The Next.js router allows you to do client-side route transitions between pages, similar to a single-page application. A React component called `Link` is provided to do this client-side route transition. import Link from 'next/link' function Home() { return ( <ul> <li> <Link href="/">Home</Link> </li> <li> <Link href="/about">About Us</Link> </li> <li> <Link href="/blog/hello-world">Blog Post</Link> </li> </ul> ) } export default Home The example above uses multiple links. Each one maps a path (`href`) to a known page: * `/` → `pages/index.js` * `/about` → `pages/about.js` * `/blog/hello-world` → `pages/blog/[slug].js` Any `<Link />` in the viewport (initially or through scroll) will be prefetched by default (including the corresponding data) for pages using Static Generation. The corresponding data for server-rendered routes is fetched _only when_ the `<Link />` is clicked. ## Linking to dynamic paths You can also use interpolation to create the path, which comes in handy for dynamic route segments. For example, to show a list of posts which have been passed to the component as a prop: import Link from 'next/link' function Posts({ posts }) { return ( <ul> {posts.map((post) => ( <li key={post.id}> <Link href={`/blog/${encodeURIComponent(post.slug)}`}> {post.title} </Link> </li> ))} </ul> ) } export default Posts > `encodeURIComponent` is used in the example to keep the path utf-8 compatible. Alternatively, using a URL Object: import Link from 'next/link' function Posts({ posts }) { return ( <ul> {posts.map((post) => ( <li key={post.id}> <Link href={{ pathname: '/blog/[slug]', query: { slug: post.slug }, }} > {post.title} </Link> </li> ))} </ul> ) } export default Posts Now, instead of using interpolation to create the path, we use a URL object in `href` where: * `pathname` is the name of the page in the `pages` directory. `/blog/[slug]` in this case. * `query` is an object with the dynamic segment. `slug` in this case. ## Injecting the router Examples * Dynamic Routing To access the `router` object in a React component you can use `useRouter` or `withRouter`. In general we recommend using `useRouter`. ## Imperative Routing `next/link` should be able to cover most of your routing needs, but you can also do client-side navigations without it, take a look at the documentation for `next/router`. The following example shows how to do basic page navigations with `useRouter`: import { useRouter } from 'next/router' export default function ReadMore() { const router = useRouter() return ( <button onClick={() => router.push('/about')}> Click here to read more </button> ) } ## Shallow Routing Examples * Shallow Routing Shallow routing allows you to change the URL without running data fetching methods again, that includes `getServerSideProps`, `getStaticProps`, and `getInitialProps`. You'll receive the updated `pathname` and the `query` via the `router` object (added by `useRouter` or `withRouter`), without losing state. To enable shallow routing, set the `shallow` option to `true`. Consider the following example: import { useEffect } from 'react' import { useRouter } from 'next/router' // Current URL is '/' function Page() { const router = useRouter() useEffect(() => { // Always do navigations after the first render router.push('/?counter=10', undefined, { shallow: true }) }, []) useEffect(() => { // The counter changed! }, [router.query.counter]) } export default Page The URL will get updated to `/?counter=10` and the page won't get replaced, only the state of the route is changed. You can also watch for URL changes via `componentDidUpdate` as shown below: componentDidUpdate(prevProps) { const { pathname, query } = this.props.router // verify props have changed to avoid an infinite loop if (query.counter !== prevProps.router.query.counter) { // fetch data based on the new query } } ### Caveats Shallow routing **only** works for URL changes in the current page. For example, let's assume we have another page called `pages/about.js`, and you run this: router.push('/?counter=10', '/about?counter=10', { shallow: true }) Since that's a new page, it'll unload the current page, load the new one and wait for data fetching even though we asked to do shallow routing. When shallow routing is used with middleware it will not ensure the new page matches the current page like previously done without middleware. This is due to middleware being able to rewrite dynamically and can't be verified client-side without a data fetch which is skipped with shallow, so a shallow route change must always be treated as shallow. --- ## Page: https://nextjs.org/docs/14/pages/building-your-application/routing/redirecting There are a few ways you can handle redirects in Next.js. This page will go through each available option, use cases, and how to manage large numbers of redirects. | API | Purpose | Where | Status Code | | --- | --- | --- | --- | | `useRouter` | Perform a client-side navigation | Components | N/A | | `redirects` in `next.config.js` | Redirect an incoming request based on a path | `next.config.js` file | 307 (Temporary) or 308 (Permanent) | | `NextResponse.redirect` | Redirect an incoming request based on a condition | Middleware | Any | ## `useRouter()` hook If you need to redirect inside a component, you can use the `push` method from the `useRouter` hook. For example: import { useRouter } from 'next/router' export default function Page() { const router = useRouter() return ( <button type="button" onClick={() => router.push('/dashboard')}> Dashboard </button> ) } > **Good to know**: > > * If you don't need to programmatically navigate a user, you should use a `<Link>` component. See the `useRouter` API reference for more information. ## `redirects` in `next.config.js` The `redirects` option in the `next.config.js` file allows you to redirect an incoming request path to a different destination path. This is useful when you change the URL structure of pages or have a list of redirects that are known ahead of time. `redirects` supports path, header, cookie, and query matching, giving you the flexibility to redirect users based on an incoming request. To use `redirects`, add the option to your `next.config.js` file: module.exports = { async redirects() { return [ // Basic redirect { source: '/about', destination: '/', permanent: true, }, // Wildcard path matching { source: '/blog/:slug', destination: '/news/:slug', permanent: true, }, ] }, } See the `redirects` API reference for more information. > **Good to know**: > > * `redirects` can return a 307 (Temporary Redirect) or 308 (Permanent Redirect) status code with the `permanent` option. > * `redirects` may have a limit on platforms. For example, on Vercel, there's a limit of 1,024 redirects. To manage a large number of redirects (1000+), consider creating a custom solution using Middleware. See managing redirects at scale for more. > * `redirects` runs **before** Middleware. ## `NextResponse.redirect` in Middleware Middleware allows you to run code before a request is completed. Then, based on the incoming request, redirect to a different URL using `NextResponse.redirect`. This is useful if you want to redirect users based on a condition (e.g. authentication, session management, etc) or have a large number of redirects. For example, to redirect the user to a `/login` page if they are not authenticated: import { NextResponse, NextRequest } from 'next/server' import { authenticate } from 'auth-provider' export function middleware(request: NextRequest) { const isAuthenticated = authenticate(request) // If the user is authenticated, continue as normal if (isAuthenticated) { return NextResponse.next() } // Redirect to login page if not authenticated return NextResponse.redirect(new URL('/login', request.url)) } export const config = { matcher: '/dashboard/:path*', } > **Good to know**: > > * Middleware runs **after** `redirects` in `next.config.js` and **before** rendering. See the Middleware documentation for more information. ## Managing redirects at scale (advanced) To manage a large number of redirects (1000+), you may consider creating a custom solution using Middleware. This allows you to handle redirects programmatically without having to redeploy your application. To do this, you'll need to consider: 1. Creating and storing a redirect map. 2. Optimizing data lookup performance. > **Next.js Example**: See our Middleware with Bloom filter example for an implementation of the recommendations below. ### 1\. Creating and storing a redirect map A redirect map is a list of redirects that you can store in a database (usually a key-value store) or JSON file. Consider the following data structure: { "/old": { "destination": "/new", "permanent": true }, "/blog/post-old": { "destination": "/blog/post-new", "permanent": true } } In Middleware, you can read from a database such as Vercel's Edge Config or Redis, and redirect the user based on the incoming request: import { NextResponse, NextRequest } from 'next/server' import { get } from '@vercel/edge-config' type RedirectEntry = { destination: string permanent: boolean } export async function middleware(request: NextRequest) { const pathname = request.nextUrl.pathname const redirectData = await get(pathname) if (redirectData && typeof redirectData === 'string') { const redirectEntry: RedirectEntry = JSON.parse(redirectData) const statusCode = redirectEntry.permanent ? 308 : 307 return NextResponse.redirect(redirectEntry.destination, statusCode) } // No redirect found, continue without redirecting return NextResponse.next() } ### 2\. Optimizing data lookup performance Reading a large dataset for every incoming request can be slow and expensive. There are two ways you can optimize data lookup performance: * Use a database that is optimized for fast reads, such as Vercel Edge Config or Redis. * Use a data lookup strategy such as a Bloom filter to efficiently check if a redirect exists **before** reading the larger redirects file or database. Considering the previous example, you can import a generated bloom filter file into Middleware, then, check if the incoming request pathname exists in the bloom filter. If it does, forward the request to a API Routes which will check the actual file and redirect the user to the appropriate URL. This avoids importing a large redirects file into Middleware, which can slow down every incoming request. import { NextResponse, NextRequest } from 'next/server' import { ScalableBloomFilter } from 'bloom-filters' import GeneratedBloomFilter from './redirects/bloom-filter.json' type RedirectEntry = { destination: string permanent: boolean } // Initialize bloom filter from a generated JSON file const bloomFilter = ScalableBloomFilter.fromJSON(GeneratedBloomFilter as any) export async function middleware(request: NextRequest) { // Get the path for the incoming request const pathname = request.nextUrl.pathname // Check if the path is in the bloom filter if (bloomFilter.has(pathname)) { // Forward the pathname to the Route Handler const api = new URL( `/api/redirects?pathname=${encodeURIComponent(request.nextUrl.pathname)}`, request.nextUrl.origin ) try { // Fetch redirect data from the Route Handler const redirectData = await fetch(api) if (redirectData.ok) { const redirectEntry: RedirectEntry | undefined = await redirectData.json() if (redirectEntry) { // Determine the status code const statusCode = redirectEntry.permanent ? 308 : 307 // Redirect to the destination return NextResponse.redirect(redirectEntry.destination, statusCode) } } } catch (error) { console.error(error) } } // No redirect found, continue the request without redirecting return NextResponse.next() } Then, in the API Route: import { NextApiRequest, NextApiResponse } from 'next' import redirects from '@/app/redirects/redirects.json' type RedirectEntry = { destination: string permanent: boolean } export default function handler(req: NextApiRequest, res: NextApiResponse) { const pathname = req.query.pathname if (!pathname) { return res.status(400).json({ message: 'Bad Request' }) } // Get the redirect entry from the redirects.json file const redirect = (redirects as Record<string, RedirectEntry>)[pathname] // Account for bloom filter false positives if (!redirect) { return res.status(400).json({ message: 'No redirect' }) } // Return the redirect entry return res.json(redirect) } > **Good to know:** > > * To generate a bloom filter, you can use a library like `bloom-filters`. > * You should validate requests made to your Route Handler to prevent malicious requests. --- ## Page: https://nextjs.org/docs/14/pages/building-your-application/routing/custom-app Next.js uses the `App` component to initialize pages. You can override it and control the page initialization and: * Create a shared layout between page changes * Inject additional data into pages * Add global CSS ## Usage To override the default `App`, create the file `pages/_app` as shown below: import type { AppProps } from 'next/app' export default function MyApp({ Component, pageProps }: AppProps) { return <Component {...pageProps} /> } The `Component` prop is the active `page`, so whenever you navigate between routes, `Component` will change to the new `page`. Therefore, any props you send to `Component` will be received by the `page`. `pageProps` is an object with the initial props that were preloaded for your page by one of our data fetching methods, otherwise it's an empty object. > **Good to know** > > * If your app is running and you added a custom `App`, you'll need to restart the development server. Only required if `pages/_app.js` didn't exist before. > * `App` does not support Next.js Data Fetching methods like `getStaticProps` or `getServerSideProps`. ## `getInitialProps` with `App` Using `getInitialProps` in `App` will disable Automatic Static Optimization for pages without `getStaticProps`. **We do not recommend using this pattern.** Instead, consider incrementally adopting the App Router, which allows you to more easily fetch data for pages and layouts. import App, { AppContext, AppInitialProps, AppProps } from 'next/app' type AppOwnProps = { example: string } export default function MyApp({ Component, pageProps, example, }: AppProps & AppOwnProps) { return ( <> <p>Data: {example}</p> <Component {...pageProps} /> </> ) } MyApp.getInitialProps = async ( context: AppContext ): Promise<AppOwnProps & AppInitialProps> => { const ctx = await App.getInitialProps(context) return { ...ctx, example: 'data' } } --- ## Page: https://nextjs.org/docs/14/pages/building-your-application/routing/custom-document You are currently viewing documentation for version 14 of Next.js. A custom `Document` can update the `<html>` and `<body>` tags used to render a Page. To override the default `Document`, create the file `pages/_document` as shown below: pages/\_document.tsx import { Html, Head, Main, NextScript } from 'next/document' export default function Document() { return ( <Html lang="en"> <Head /> <body> <Main /> <NextScript /> </body> </Html> ) } > **Good to know** > > * `_document` is only rendered on the server, so event handlers like `onClick` cannot be used in this file. > * `<Html>`, `<Head />`, `<Main />` and `<NextScript />` are required for the page to be properly rendered. ## Caveats * The `<Head />` component used in `_document` is not the same as `next/head`. The `<Head />` component used here should only be used for any `<head>` code that is common for all pages. For all other cases, such as `<title>` tags, we recommend using `next/head` in your pages or components. * React components outside of `<Main />` will not be initialized by the browser. Do _not_ add application logic here or custom CSS (like `styled-jsx`). If you need shared components in all your pages (like a menu or a toolbar), read Layouts instead. * `Document` currently does not support Next.js Data Fetching methods like `getStaticProps` or `getServerSideProps`. ## Customizing `renderPage` Customizing `renderPage` is advanced and only needed for libraries like CSS-in-JS to support server-side rendering. This is not needed for built-in `styled-jsx` support. **We do not recommend using this pattern.** Instead, consider incrementally adopting the App Router, which allows you to more easily fetch data for pages and layouts. pages/\_document.tsx import Document, { Html, Head, Main, NextScript, DocumentContext, DocumentInitialProps, } from 'next/document' class MyDocument extends Document { static async getInitialProps( ctx: DocumentContext ): Promise<DocumentInitialProps> { const originalRenderPage = ctx.renderPage // Run the React rendering logic synchronously ctx.renderPage = () => originalRenderPage({ // Useful for wrapping the whole react tree enhanceApp: (App) => App, // Useful for wrapping in a per-page basis enhanceComponent: (Component) => Component, }) // Run the parent `getInitialProps`, it now includes the custom `renderPage` const initialProps = await Document.getInitialProps(ctx) return initialProps } render() { return ( <Html lang="en"> <Head /> <body> <Main /> <NextScript /> </body> </Html> ) } } export default MyDocument > **Good to know** > > * `getInitialProps` in `_document` is not called during client-side transitions. > * The `ctx` object for `_document` is equivalent to the one received in `getInitialProps`, with the addition of `renderPage`. --- ## Page: https://nextjs.org/docs/14/pages/building-your-application/routing/api-routes Examples * Basic API Routes * API Routes Request Helpers * API Routes with GraphQL * API Routes with REST * API Routes with CORS > **Good to know**: If you are using the App Router, you can use Server Components or Route Handlers instead of API Routes. API routes provide a solution to build a **public API** with Next.js. Any file inside the folder `pages/api` is mapped to `/api/*` and will be treated as an API endpoint instead of a `page`. They are server-side only bundles and won't increase your client-side bundle size. For example, the following API route returns a JSON response with a status code of `200`: import type { NextApiRequest, NextApiResponse } from 'next' type ResponseData = { message: string } export default function handler( req: NextApiRequest, res: NextApiResponse<ResponseData> ) { res.status(200).json({ message: 'Hello from Next.js!' }) } > **Good to know**: > > * API Routes do not specify CORS headers, meaning they are **same-origin only** by default. You can customize such behavior by wrapping the request handler with the CORS request helpers. * API Routes can't be used with static exports. However, Route Handlers in the App Router can. > * API Routes will be affected by `pageExtensions` configuration in `next.config.js`. ## Parameters export default function handler(req: NextApiRequest, res: NextApiResponse) { // ... } * `req`: An instance of http.IncomingMessage * `res`: An instance of http.ServerResponse ## HTTP Methods To handle different HTTP methods in an API route, you can use `req.method` in your request handler, like so: import type { NextApiRequest, NextApiResponse } from 'next' export default function handler(req: NextApiRequest, res: NextApiResponse) { if (req.method === 'POST') { // Process a POST request } else { // Handle any other HTTP method } } ## Request Helpers API Routes provide built-in request helpers which parse the incoming request (`req`): * `req.cookies` - An object containing the cookies sent by the request. Defaults to `{}` * `req.query` - An object containing the query string. Defaults to `{}` * `req.body` - An object containing the body parsed by `content-type`, or `null` if no body was sent ### Custom config Every API Route can export a `config` object to change the default configuration, which is the following: export const config = { api: { bodyParser: { sizeLimit: '1mb', }, }, // Specifies the maximum allowed duration for this function to execute (in seconds) maxDuration: 5, } `bodyParser` is automatically enabled. If you want to consume the body as a `Stream` or with `raw-body`, you can set this to `false`. One use case for disabling the automatic `bodyParsing` is to allow you to verify the raw body of a **webhook** request, for example from GitHub. export const config = { api: { bodyParser: false, }, } `bodyParser.sizeLimit` is the maximum size allowed for the parsed body, in any format supported by bytes, like so: export const config = { api: { bodyParser: { sizeLimit: '500kb', }, }, } `externalResolver` is an explicit flag that tells the server that this route is being handled by an external resolver like _express_ or _connect_. Enabling this option disables warnings for unresolved requests. export const config = { api: { externalResolver: true, }, } `responseLimit` is automatically enabled, warning when an API Routes' response body is over 4MB. If you are not using Next.js in a serverless environment, and understand the performance implications of not using a CDN or dedicated media host, you can set this limit to `false`. export const config = { api: { responseLimit: false, }, } `responseLimit` can also take the number of bytes or any string format supported by `bytes`, for example `1000`, `'500kb'` or `'3mb'`. This value will be the maximum response size before a warning is displayed. Default is 4MB. (see above) export const config = { api: { responseLimit: '8mb', }, } ## Response Helpers The Server Response object, (often abbreviated as `res`) includes a set of Express.js-like helper methods to improve the developer experience and increase the speed of creating new API endpoints. The included helpers are: * `res.status(code)` - A function to set the status code. `code` must be a valid HTTP status code * `res.json(body)` - Sends a JSON response. `body` must be a serializable object * `res.send(body)` - Sends the HTTP response. `body` can be a `string`, an `object` or a `Buffer` * `res.redirect([status,] path)` - Redirects to a specified path or URL. `status` must be a valid HTTP status code. If not specified, `status` defaults to "307" "Temporary redirect". * `res.revalidate(urlPath)` - Revalidate a page on demand using `getStaticProps`. `urlPath` must be a `string`. ### Setting the status code of a response When sending a response back to the client, you can set the status code of the response. The following example sets the status code of the response to `200` (`OK`) and returns a `message` property with the value of `Hello from Next.js!` as a JSON response: import type { NextApiRequest, NextApiResponse } from 'next' type ResponseData = { message: string } export default function handler( req: NextApiRequest, res: NextApiResponse<ResponseData> ) { res.status(200).json({ message: 'Hello from Next.js!' }) } ### Sending a JSON response When sending a response back to the client you can send a JSON response, this must be a serializable object. In a real world application you might want to let the client know the status of the request depending on the result of the requested endpoint. The following example sends a JSON response with the status code `200` (`OK`) and the result of the async operation. It's contained in a try catch block to handle any errors that may occur, with the appropriate status code and error message caught and sent back to the client: import type { NextApiRequest, NextApiResponse } from 'next' export default async function handler( req: NextApiRequest, res: NextApiResponse ) { try { const result = await someAsyncOperation() res.status(200).json({ result }) } catch (err) { res.status(500).json({ error: 'failed to load data' }) } } ### Sending a HTTP response Sending an HTTP response works the same way as when sending a JSON response. The only difference is that the response body can be a `string`, an `object` or a `Buffer`. The following example sends a HTTP response with the status code `200` (`OK`) and the result of the async operation. import type { NextApiRequest, NextApiResponse } from 'next' export default async function handler( req: NextApiRequest, res: NextApiResponse ) { try { const result = await someAsyncOperation() res.status(200).send({ result }) } catch (err) { res.status(500).send({ error: 'failed to fetch data' }) } } ### Redirects to a specified path or URL Taking a form as an example, you may want to redirect your client to a specified path or URL once they have submitted the form. The following example redirects the client to the `/` path if the form is successfully submitted: import type { NextApiRequest, NextApiResponse } from 'next' export default async function handler( req: NextApiRequest, res: NextApiResponse ) { const { name, message } = req.body try { await handleFormInputAsync({ name, message }) res.redirect(307, '/') } catch (err) { res.status(500).send({ error: 'Failed to fetch data' }) } } ### Adding TypeScript types You can make your API Routes more type-safe by importing the `NextApiRequest` and `NextApiResponse` types from `next`, in addition to those, you can also type your response data: import type { NextApiRequest, NextApiResponse } from 'next' type ResponseData = { message: string } export default function handler( req: NextApiRequest, res: NextApiResponse<ResponseData> ) { res.status(200).json({ message: 'Hello from Next.js!' }) } > **Good to know**: The body of `NextApiRequest` is `any` because the client may include any payload. You should validate the type/shape of the body at runtime before using it. ## Dynamic API Routes API Routes support dynamic routes, and follow the same file naming rules used for `pages/`. import type { NextApiRequest, NextApiResponse } from 'next' export default function handler(req: NextApiRequest, res: NextApiResponse) { const { pid } = req.query res.end(`Post: ${pid}`) } Now, a request to `/api/post/abc` will respond with the text: `Post: abc`. ### Catch all API routes API Routes can be extended to catch all paths by adding three dots (`...`) inside the brackets. For example: * `pages/api/post/[...slug].js` matches `/api/post/a`, but also `/api/post/a/b`, `/api/post/a/b/c` and so on. > **Good to know**: You can use names other than `slug`, such as: `[...param]` Matched parameters will be sent as a query parameter (`slug` in the example) to the page, and it will always be an array, so, the path `/api/post/a` will have the following `query` object: { "slug": ["a"] } And in the case of `/api/post/a/b`, and any other matching path, new parameters will be added to the array, like so: { "slug": ["a", "b"] } For example: import type { NextApiRequest, NextApiResponse } from 'next' export default function handler(req: NextApiRequest, res: NextApiResponse) { const { slug } = req.query res.end(`Post: ${slug.join(', ')}`) } Now, a request to `/api/post/a/b/c` will respond with the text: `Post: a, b, c`. ### Optional catch all API routes Catch all routes can be made optional by including the parameter in double brackets (`[[...slug]]`). For example, `pages/api/post/[[...slug]].js` will match `/api/post`, `/api/post/a`, `/api/post/a/b`, and so on. The main difference between catch all and optional catch all routes is that with optional, the route without the parameter is also matched (`/api/post` in the example above). The `query` objects are as follows: { } // GET `/api/post` (empty object) { "slug": ["a"] } // `GET /api/post/a` (single-element array) { "slug": ["a", "b"] } // `GET /api/post/a/b` (multi-element array) ### Caveats * Predefined API routes take precedence over dynamic API routes, and dynamic API routes over catch all API routes. Take a look at the following examples: * `pages/api/post/create.js` - Will match `/api/post/create` * `pages/api/post/[pid].js` - Will match `/api/post/1`, `/api/post/abc`, etc. But not `/api/post/create` * `pages/api/post/[...slug].js` - Will match `/api/post/1/2`, `/api/post/a/b/c`, etc. But not `/api/post/create`, `/api/post/abc` ## Edge API Routes If you would like to use API Routes with the Edge Runtime, we recommend incrementally adopting the App Router and using Route Handlers instead. The Route Handlers function signature is isomorphic, meaning you can use the same function for both Edge and Node.js runtimes. --- ## Page: https://nextjs.org/docs/14/pages/building-your-application/routing/custom-error ## 404 Page A 404 page may be accessed very often. Server-rendering an error page for every visit increases the load of the Next.js server. This can result in increased costs and slow experiences. To avoid the above pitfalls, Next.js provides a static 404 page by default without having to add any additional files. ### Customizing The 404 Page To create a custom 404 page you can create a `pages/404.js` file. This file is statically generated at build time. export default function Custom404() { return <h1>404 - Page Not Found</h1> } > **Good to know**: You can use `getStaticProps` inside this page if you need to fetch data at build time. ## 500 Page Server-rendering an error page for every visit adds complexity to responding to errors. To help users get responses to errors as fast as possible, Next.js provides a static 500 page by default without having to add any additional files. ### Customizing The 500 Page To customize the 500 page you can create a `pages/500.js` file. This file is statically generated at build time. export default function Custom500() { return <h1>500 - Server-side error occurred</h1> } > **Good to know**: You can use `getStaticProps` inside this page if you need to fetch data at build time. ### More Advanced Error Page Customizing 500 errors are handled both client-side and server-side by the `Error` component. If you wish to override it, define the file `pages/_error.js` and add the following code: function Error({ statusCode }) { return ( <p> {statusCode ? `An error ${statusCode} occurred on server` : 'An error occurred on client'} </p> ) } Error.getInitialProps = ({ res, err }) => { const statusCode = res ? res.statusCode : err ? err.statusCode : 404 return { statusCode } } export default Error > `pages/_error.js` is only used in production. In development you’ll get an error with the call stack to know where the error originated from. ### Reusing the built-in error page If you want to render the built-in error page you can by importing the `Error` component: import Error from 'next/error' export async function getServerSideProps() { const res = await fetch('https://api.github.com/repos/vercel/next.js') const errorCode = res.ok ? false : res.status const json = await res.json() return { props: { errorCode, stars: json.stargazers_count }, } } export default function Page({ errorCode, stars }) { if (errorCode) { return <Error statusCode={errorCode} /> } return <div>Next stars: {stars}</div> } The `Error` component also takes `title` as a property if you want to pass in a text message along with a `statusCode`. If you have a custom `Error` component be sure to import that one instead. `next/error` exports the default component used by Next.js. ### Caveats * `Error` does not currently support Next.js Data Fetching methods like `getStaticProps` or `getServerSideProps`. * `_error`, like `_app`, is a reserved pathname. `_error` is used to define the customized layouts and behaviors of the error pages. `/_error` will render 404 when accessed directly via routing or rendering in a custom server. --- ## Page: https://nextjs.org/docs/14/pages/building-your-application/routing/internationalization Examples * i18n routing Next.js has built-in support for internationalized (i18n) routing since `v10.0.0`. You can provide a list of locales, the default locale, and domain-specific locales and Next.js will automatically handle the routing. The i18n routing support is currently meant to complement existing i18n library solutions like `react-intl`, `react-i18next`, `lingui`, `rosetta`, `next-intl`, `next-translate`, `next-multilingual`, `tolgee`, and others by streamlining the routes and locale parsing. ## Getting started To get started, add the `i18n` config to your `next.config.js` file. Locales are UTS Locale Identifiers, a standardized format for defining locales. Generally a Locale Identifier is made up of a language, region, and script separated by a dash: `language-region-script`. The region and script are optional. An example: * `en-US` - English as spoken in the United States * `nl-NL` - Dutch as spoken in the Netherlands * `nl` - Dutch, no specific region If user locale is `nl-BE` and it is not listed in your configuration, they will be redirected to `nl` if available, or to the default locale otherwise. If you don't plan to support all regions of a country, it is therefore a good practice to include country locales that will act as fallbacks. module.exports = { i18n: { // These are all the locales you want to support in // your application locales: ['en-US', 'fr', 'nl-NL'], // This is the default locale you want to be used when visiting // a non-locale prefixed path e.g. `/hello` defaultLocale: 'en-US', // This is a list of locale domains and the default locale they // should handle (these are only required when setting up domain routing) // Note: subdomains must be included in the domain value to be matched e.g. "fr.example.com". domains: [ { domain: 'example.com', defaultLocale: 'en-US', }, { domain: 'example.nl', defaultLocale: 'nl-NL', }, { domain: 'example.fr', defaultLocale: 'fr', // an optional http field can also be used to test // locale domains locally with http instead of https http: true, }, ], }, } ## Locale Strategies There are two locale handling strategies: Sub-path Routing and Domain Routing. ### Sub-path Routing Sub-path Routing puts the locale in the url path. module.exports = { i18n: { locales: ['en-US', 'fr', 'nl-NL'], defaultLocale: 'en-US', }, } With the above configuration `en-US`, `fr`, and `nl-NL` will be available to be routed to, and `en-US` is the default locale. If you have a `pages/blog.js` the following urls would be available: * `/blog` * `/fr/blog` * `/nl-nl/blog` The default locale does not have a prefix. ### Domain Routing By using domain routing you can configure locales to be served from different domains: module.exports = { i18n: { locales: ['en-US', 'fr', 'nl-NL', 'nl-BE'], defaultLocale: 'en-US', domains: [ { // Note: subdomains must be included in the domain value to be matched // e.g. www.example.com should be used if that is the expected hostname domain: 'example.com', defaultLocale: 'en-US', }, { domain: 'example.fr', defaultLocale: 'fr', }, { domain: 'example.nl', defaultLocale: 'nl-NL', // specify other locales that should be redirected // to this domain locales: ['nl-BE'], }, ], }, } For example if you have `pages/blog.js` the following urls will be available: * `example.com/blog` * `www.example.com/blog` * `example.fr/blog` * `example.nl/blog` * `example.nl/nl-BE/blog` ## Automatic Locale Detection When a user visits the application root (generally `/`), Next.js will try to automatically detect which locale the user prefers based on the `Accept-Language` header and the current domain. If a locale other than the default locale is detected, the user will be redirected to either: * **When using Sub-path Routing:** The locale prefixed path * **When using Domain Routing:** The domain with that locale specified as the default When using Domain Routing, if a user with the `Accept-Language` header `fr;q=0.9` visits `example.com`, they will be redirected to `example.fr` since that domain handles the `fr` locale by default. When using Sub-path Routing, the user would be redirected to `/fr`. ### Prefixing the Default Locale With Next.js 12 and Middleware, we can add a prefix to the default locale with a workaround. For example, here's a `next.config.js` file with support for a few languages. Note the `"default"` locale has been added intentionally. module.exports = { i18n: { locales: ['default', 'en', 'de', 'fr'], defaultLocale: 'default', localeDetection: false, }, trailingSlash: true, } Next, we can use Middleware to add custom routing rules: import { NextRequest, NextResponse } from 'next/server' const PUBLIC_FILE = /\.(.*)$/ export async function middleware(req: NextRequest) { if ( req.nextUrl.pathname.startsWith('/_next') || req.nextUrl.pathname.includes('/api/') || PUBLIC_FILE.test(req.nextUrl.pathname) ) { return } if (req.nextUrl.locale === 'default') { const locale = req.cookies.get('NEXT_LOCALE')?.value || 'en' return NextResponse.redirect( new URL(`/${locale}${req.nextUrl.pathname}${req.nextUrl.search}`, req.url) ) } } This Middleware skips adding the default prefix to API Routes and public files like fonts or images. If a request is made to the default locale, we redirect to our prefix `/en`. ### Disabling Automatic Locale Detection The automatic locale detection can be disabled with: module.exports = { i18n: { localeDetection: false, }, } When `localeDetection` is set to `false` Next.js will no longer automatically redirect based on the user's preferred locale and will only provide locale information detected from either the locale based domain or locale path as described above. ## Accessing the locale information You can access the locale information via the Next.js router. For example, using the `useRouter()` hook the following properties are available: * `locale` contains the currently active locale. * `locales` contains all configured locales. * `defaultLocale` contains the configured default locale. When pre-rendering pages with `getStaticProps` or `getServerSideProps`, the locale information is provided in the context provided to the function. When leveraging `getStaticPaths`, the configured locales are provided in the context parameter of the function under `locales` and the configured defaultLocale under `defaultLocale`. ## Transition between locales You can use `next/link` or `next/router` to transition between locales. For `next/link`, a `locale` prop can be provided to transition to a different locale from the currently active one. If no `locale` prop is provided, the currently active `locale` is used during client-transitions. For example: import Link from 'next/link' export default function IndexPage(props) { return ( <Link href="/another" locale="fr"> To /fr/another </Link> ) } When using the `next/router` methods directly, you can specify the `locale` that should be used via the transition options. For example: import { useRouter } from 'next/router' export default function IndexPage(props) { const router = useRouter() return ( <div onClick={() => { router.push('/another', '/another', { locale: 'fr' }) }} > to /fr/another </div> ) } Note that to handle switching only the `locale` while preserving all routing information such as dynamic route query values or hidden href query values, you can provide the `href` parameter as an object: import { useRouter } from 'next/router' const router = useRouter() const { pathname, asPath, query } = router // change just the locale and maintain all other route information including href's query router.push({ pathname, query }, asPath, { locale: nextLocale }) See here for more information on the object structure for `router.push`. If you have a `href` that already includes the locale you can opt-out of automatically handling the locale prefixing: import Link from 'next/link' export default function IndexPage(props) { return ( <Link href="/fr/another" locale={false}> To /fr/another </Link> ) } ## Leveraging the `NEXT_LOCALE` cookie Next.js supports overriding the accept-language header with a `NEXT_LOCALE=the-locale` cookie. This cookie can be set using a language switcher and then when a user comes back to the site it will leverage the locale specified in the cookie when redirecting from `/` to the correct locale location. For example, if a user prefers the locale `fr` in their accept-language header but a `NEXT_LOCALE=en` cookie is set the `en` locale when visiting `/` the user will be redirected to the `en` locale location until the cookie is removed or expired. ## Search Engine Optimization Since Next.js knows what language the user is visiting it will automatically add the `lang` attribute to the `<html>` tag. Next.js doesn't know about variants of a page so it's up to you to add the `hreflang` meta tags using `next/head`. You can learn more about `hreflang` in the Google Webmasters documentation. ## How does this work with Static Generation? > Note that Internationalized Routing does not integrate with `output: 'export'` as it does not leverage the Next.js routing layer. Hybrid Next.js applications that do not use `output: 'export'` are fully supported. ### Dynamic Routes and `getStaticProps` Pages For pages using `getStaticProps` with Dynamic Routes, all locale variants of the page desired to be prerendered need to be returned from `getStaticPaths`. Along with the `params` object returned for `paths`, you can also return a `locale` field specifying which locale you want to render. For example: export const getStaticPaths = ({ locales }) => { return { paths: [ // if no `locale` is provided only the defaultLocale will be generated { params: { slug: 'post-1' }, locale: 'en-US' }, { params: { slug: 'post-1' }, locale: 'fr' }, ], fallback: true, } } For Automatically Statically Optimized and non-dynamic `getStaticProps` pages, **a version of the page will be generated for each locale**. This is important to consider because it can increase build times depending on how many locales are configured inside `getStaticProps`. For example, if you have 50 locales configured with 10 non-dynamic pages using `getStaticProps`, this means `getStaticProps` will be called 500 times. 50 versions of the 10 pages will be generated during each build. To decrease the build time of dynamic pages with `getStaticProps`, use a `fallback` mode. This allows you to return only the most popular paths and locales from `getStaticPaths` for prerendering during the build. Then, Next.js will build the remaining pages at runtime as they are requested. ### Automatically Statically Optimized Pages For pages that are automatically statically optimized, a version of the page will be generated for each locale. ### Non-dynamic getStaticProps Pages For non-dynamic `getStaticProps` pages, a version is generated for each locale like above. `getStaticProps` is called with each `locale` that is being rendered. If you would like to opt-out of a certain locale from being pre-rendered, you can return `notFound: true` from `getStaticProps` and this variant of the page will not be generated. export async function getStaticProps({ locale }) { // Call an external API endpoint to get posts. // You can use any data fetching library const res = await fetch(`https://.../posts?locale=${locale}`) const posts = await res.json() if (posts.length === 0) { return { notFound: true, } } // By returning { props: posts }, the Blog component // will receive `posts` as a prop at build time return { props: { posts, }, } } ## Limits for the i18n config * `locales`: 100 total locales * `domains`: 100 total locale domain items > **Good to know**: These limits have been added initially to prevent potential performance issues at build time. You can workaround these limits with custom routing using Middleware in Next.js 12. --- ## Page: https://nextjs.org/docs/14/pages/building-your-application/routing/middleware Middleware allows you to run code before a request is completed. Then, based on the incoming request, you can modify the response by rewriting, redirecting, modifying the request or response headers, or responding directly. Middleware runs before cached content and routes are matched. See Matching Paths for more details. ## Use Cases Integrating Middleware into your application can lead to significant improvements in performance, security, and user experience. Some common scenarios where Middleware is particularly effective include: * Authentication and Authorization: Ensure user identity and check session cookies before granting access to specific pages or API routes. * Server-Side Redirects: Redirect users at the server level based on certain conditions (e.g., locale, user role). * Path Rewriting: Support A/B testing, feature rollouts, or legacy paths by dynamically rewriting paths to API routes or pages based on request properties. * Bot Detection: Protect your resources by detecting and blocking bot traffic. * Logging and Analytics: Capture and analyze request data for insights before processing by the page or API. * Feature Flagging: Enable or disable features dynamically for seamless feature rollouts or testing. Recognizing situations where middleware may not be the optimal approach is just as crucial. Here are some scenarios to be mindful of: * Complex Data Fetching and Manipulation: Middleware is not designed for direct data fetching or manipulation, this should be done within Route Handlers or server-side utilities instead. * Heavy Computational Tasks: Middleware should be lightweight and respond quickly or it can cause delays in page load. Heavy computational tasks or long-running processes should be done within dedicated Route Handlers. * Extensive Session Management: While Middleware can manage basic session tasks, extensive session management should be managed by dedicated authentication services or within Route Handlers. * Direct Database Operations: Performing direct database operations within Middleware is not recommended. Database interactions should done within Route Handlers or server-side utilities. ## Convention Use the file `middleware.ts` (or `.js`) in the root of your project to define Middleware. For example, at the same level as `pages` or `app`, or inside `src` if applicable. > **Note**: While only one `middleware.ts` file is supported per project, you can still organize your middleware logic modularly. Break out middleware functionalities into separate `.ts` or `.js` files and import them into your main `middleware.ts` file. This allows for cleaner management of route-specific middleware, aggregated in the `middleware.ts` for centralized control. By enforcing a single middleware file, it simplifies configuration, prevents potential conflicts, and optimizes performance by avoiding multiple middleware layers. ## Example import { NextResponse } from 'next/server' import type { NextRequest } from 'next/server' // This function can be marked `async` if using `await` inside export function middleware(request: NextRequest) { return NextResponse.redirect(new URL('/home', request.url)) } // See "Matching Paths" below to learn more export const config = { matcher: '/about/:path*', } ## Matching Paths Middleware will be invoked for **every route in your project**. Given this, it's crucial to use matchers to precisely target or exclude specific routes. The following is the execution order: 1. `headers` from `next.config.js` 2. `redirects` from `next.config.js` 3. Middleware (`rewrites`, `redirects`, etc.) 4. `beforeFiles` (`rewrites`) from `next.config.js` 5. Filesystem routes (`public/`, `_next/static/`, `pages/`, `app/`, etc.) 6. `afterFiles` (`rewrites`) from `next.config.js` 7. Dynamic Routes (`/blog/[slug]`) 8. `fallback` (`rewrites`) from `next.config.js` There are two ways to define which paths Middleware will run on: 1. Custom matcher config 2. Conditional statements ### Matcher `matcher` allows you to filter Middleware to run on specific paths. export const config = { matcher: '/about/:path*', } You can match a single path or multiple paths with an array syntax: export const config = { matcher: ['/about/:path*', '/dashboard/:path*'], } The `matcher` config allows full regex so matching like negative lookaheads or character matching is supported. An example of a negative lookahead to match all except specific paths can be seen here: export const config = { matcher: [ /* * Match all request paths except for the ones starting with: * - api (API routes) * - _next/static (static files) * - _next/image (image optimization files) * - favicon.ico (favicon file) */ '/((?!api|_next/static|_next/image|favicon.ico).*)', ], } You can also bypass Middleware for certain requests by using the `missing` or `has` arrays, or a combination of both: export const config = { matcher: [ /* * Match all request paths except for the ones starting with: * - api (API routes) * - _next/static (static files) * - _next/image (image optimization files) * - favicon.ico (favicon file) */ { source: '/((?!api|_next/static|_next/image|favicon.ico).*)', missing: [ { type: 'header', key: 'next-router-prefetch' }, { type: 'header', key: 'purpose', value: 'prefetch' }, ], }, { source: '/((?!api|_next/static|_next/image|favicon.ico).*)', has: [ { type: 'header', key: 'next-router-prefetch' }, { type: 'header', key: 'purpose', value: 'prefetch' }, ], }, { source: '/((?!api|_next/static|_next/image|favicon.ico).*)', has: [{ type: 'header', key: 'x-present' }], missing: [{ type: 'header', key: 'x-missing', value: 'prefetch' }], }, ], } > **Good to know**: The `matcher` values need to be constants so they can be statically analyzed at build-time. Dynamic values such as variables will be ignored. Configured matchers: 1. MUST start with `/` 2. Can include named parameters: `/about/:path` matches `/about/a` and `/about/b` but not `/about/a/c` 3. Can have modifiers on named parameters (starting with `:`): `/about/:path*` matches `/about/a/b/c` because `*` is _zero or more_. `?` is _zero or one_ and `+` _one or more_ 4. Can use regular expression enclosed in parenthesis: `/about/(.*)` is the same as `/about/:path*` Read more details on path-to-regexp documentation. > **Good to know**: For backward compatibility, Next.js always considers `/public` as `/public/index`. Therefore, a matcher of `/public/:path` will match. ### Conditional Statements import { NextResponse } from 'next/server' import type { NextRequest } from 'next/server' export function middleware(request: NextRequest) { if (request.nextUrl.pathname.startsWith('/about')) { return NextResponse.rewrite(new URL('/about-2', request.url)) } if (request.nextUrl.pathname.startsWith('/dashboard')) { return NextResponse.rewrite(new URL('/dashboard/user', request.url)) } } ## NextResponse The `NextResponse` API allows you to: * `redirect` the incoming request to a different URL * `rewrite` the response by displaying a given URL * Set request headers for API Routes, `getServerSideProps`, and `rewrite` destinations * Set response cookies * Set response headers To produce a response from Middleware, you can: 1. `rewrite` to a route (Page or Edge API Route) that produces a response 2. return a `NextResponse` directly. See Producing a Response ## Using Cookies Cookies are regular headers. On a `Request`, they are stored in the `Cookie` header. On a `Response` they are in the `Set-Cookie` header. Next.js provides a convenient way to access and manipulate these cookies through the `cookies` extension on `NextRequest` and `NextResponse`. 1. For incoming requests, `cookies` comes with the following methods: `get`, `getAll`, `set`, and `delete` cookies. You can check for the existence of a cookie with `has` or remove all cookies with `clear`. 2. For outgoing responses, `cookies` have the following methods `get`, `getAll`, `set`, and `delete`. import { NextResponse } from 'next/server' import type { NextRequest } from 'next/server' export function middleware(request: NextRequest) { // Assume a "Cookie:nextjs=fast" header to be present on the incoming request // Getting cookies from the request using the `RequestCookies` API let cookie = request.cookies.get('nextjs') console.log(cookie) // => { name: 'nextjs', value: 'fast', Path: '/' } const allCookies = request.cookies.getAll() console.log(allCookies) // => [{ name: 'nextjs', value: 'fast' }] request.cookies.has('nextjs') // => true request.cookies.delete('nextjs') request.cookies.has('nextjs') // => false // Setting cookies on the response using the `ResponseCookies` API const response = NextResponse.next() response.cookies.set('vercel', 'fast') response.cookies.set({ name: 'vercel', value: 'fast', path: '/', }) cookie = response.cookies.get('vercel') console.log(cookie) // => { name: 'vercel', value: 'fast', Path: '/' } // The outgoing response will have a `Set-Cookie:vercel=fast;path=/` header. return response } You can set request and response headers using the `NextResponse` API (setting _request_ headers is available since Next.js v13.0.0). import { NextResponse } from 'next/server' import type { NextRequest } from 'next/server' export function middleware(request: NextRequest) { // Clone the request headers and set a new header `x-hello-from-middleware1` const requestHeaders = new Headers(request.headers) requestHeaders.set('x-hello-from-middleware1', 'hello') // You can also set request headers in NextResponse.rewrite const response = NextResponse.next({ request: { // New request headers headers: requestHeaders, }, }) // Set a new response header `x-hello-from-middleware2` response.headers.set('x-hello-from-middleware2', 'hello') return response } > **Good to know**: Avoid setting large headers as it might cause 431 Request Header Fields Too Large error depending on your backend web server configuration. ### CORS You can set CORS headers in Middleware to allow cross-origin requests, including simple and preflighted requests. import { NextRequest, NextResponse } from 'next/server' const allowedOrigins = ['https://acme.com', 'https://my-app.org'] const corsOptions = { 'Access-Control-Allow-Methods': 'GET, POST, PUT, DELETE, OPTIONS', 'Access-Control-Allow-Headers': 'Content-Type, Authorization', } export function middleware(request: NextRequest) { // Check the origin from the request const origin = request.headers.get('origin') ?? '' const isAllowedOrigin = allowedOrigins.includes(origin) // Handle preflighted requests const isPreflight = request.method === 'OPTIONS' if (isPreflight) { const preflightHeaders = { ...(isAllowedOrigin && { 'Access-Control-Allow-Origin': origin }), ...corsOptions, } return NextResponse.json({}, { headers: preflightHeaders }) } // Handle simple requests const response = NextResponse.next() if (isAllowedOrigin) { response.headers.set('Access-Control-Allow-Origin', origin) } Object.entries(corsOptions).forEach(([key, value]) => { response.headers.set(key, value) }) return response } export const config = { matcher: '/api/:path*', } ## Producing a Response You can respond from Middleware directly by returning a `Response` or `NextResponse` instance. (This is available since Next.js v13.1.0) import { NextRequest } from 'next/server' import { isAuthenticated } from '@lib/auth' // Limit the middleware to paths starting with `/api/` export const config = { matcher: '/api/:function*', } export function middleware(request: NextRequest) { // Call our authentication function to check the request if (!isAuthenticated(request)) { // Respond with JSON indicating an error message return Response.json( { success: false, message: 'authentication failed' }, { status: 401 } ) } } ### `waitUntil` and `NextFetchEvent` The `NextFetchEvent` object extends the native `FetchEvent` object, and includes the `waitUntil()` method. The `waitUntil()` method takes a promise as an argument, and extends the lifetime of the Middleware until the promise settles. This is useful for performing work in the background. import { NextResponse } from 'next/server' import type { NextFetchEvent, NextRequest } from 'next/server' export function middleware(req: NextRequest, event: NextFetchEvent) { event.waitUntil( fetch('https://my-analytics-platform.com', { method: 'POST', body: JSON.stringify({ pathname: req.nextUrl.pathname }), }) ) return NextResponse.next() } ## Advanced Middleware Flags In `v13.1` of Next.js two additional flags were introduced for middleware, `skipMiddlewareUrlNormalize` and `skipTrailingSlashRedirect` to handle advanced use cases. `skipTrailingSlashRedirect` disables Next.js redirects for adding or removing trailing slashes. This allows custom handling inside middleware to maintain the trailing slash for some paths but not others, which can make incremental migrations easier. module.exports = { skipTrailingSlashRedirect: true, } const legacyPrefixes = ['/docs', '/blog'] export default async function middleware(req) { const { pathname } = req.nextUrl if (legacyPrefixes.some((prefix) => pathname.startsWith(prefix))) { return NextResponse.next() } // apply trailing slash handling if ( !pathname.endsWith('/') && !pathname.match(/((?!\.well-known(?:\/.*)?)(?:[^/]+\/)*[^/]+\.\w+)/) ) { req.nextUrl.pathname += '/' return NextResponse.redirect(req.nextUrl) } } `skipMiddlewareUrlNormalize` allows for disabling the URL normalization in Next.js to make handling direct visits and client-transitions the same. In some advanced cases, this option provides full control by using the original URL. module.exports = { skipMiddlewareUrlNormalize: true, } export default async function middleware(req) { const { pathname } = req.nextUrl // GET /_next/data/build-id/hello.json console.log(pathname) // with the flag this now /_next/data/build-id/hello.json // without the flag this would be normalized to /hello } ## Runtime Middleware currently only supports the Edge runtime. The Node.js runtime can not be used. ## Version History | Version | Changes | | --- | --- | | `v13.1.0` | Advanced Middleware flags added | | `v13.0.0` | Middleware can modify request headers, response headers, and send responses | | `v12.2.0` | Middleware is stable, please see the upgrade guide | | `v12.0.9` | Enforce absolute URLs in Edge Runtime (PR) | | `v12.0.0` | Middleware (Beta) added | --- ## Page: https://nextjs.org/docs/14/pages/building-your-application/rendering By default, Next.js **pre-renders** every page. This means that Next.js generates HTML for each page in advance, instead of having it all done by client-side JavaScript. Pre-rendering can result in better performance and SEO. Each generated HTML is associated with minimal JavaScript code necessary for that page. When a page is loaded by the browser, its JavaScript code runs and makes the page fully interactive (this process is called hydration in React). ### Pre-rendering Next.js has two forms of pre-rendering: **Static Generation** and **Server-side Rendering**. The difference is in **when** it generates the HTML for a page. * Static Generation: The HTML is generated at **build time** and will be reused on each request. * Server-side Rendering: The HTML is generated on **each request**. Importantly, Next.js lets you choose which pre-rendering form you'd like to use for each page. You can create a "hybrid" Next.js app by using Static Generation for most pages and using Server-side Rendering for others. We recommend using Static Generation over Server-side Rendering for performance reasons. Statically generated pages can be cached by CDN with no extra configuration to boost performance. However, in some cases, Server-side Rendering might be the only option. You can also use client-side data fetching along with Static Generation or Server-side Rendering. That means some parts of a page can be rendered entirely by clientside JavaScript. To learn more, take a look at the Data Fetching documentation. --- ## Page: https://nextjs.org/docs/14/pages/building-your-application/rendering/server-side-rendering You are currently viewing documentation for version 14 of Next.js. > Also referred to as "SSR" or "Dynamic Rendering". If a page uses **Server-side Rendering**, the page HTML is generated on **each request**. To use Server-side Rendering for a page, you need to `export` an `async` function called `getServerSideProps`. This function will be called by the server on every request. For example, suppose that your page needs to pre-render frequently updated data (fetched from an external API). You can write `getServerSideProps` which fetches this data and passes it to `Page` like below: export default function Page({ data }) { // Render data... } // This gets called on every request export async function getServerSideProps() { // Fetch data from external API const res = await fetch(`https://.../data`) const data = await res.json() // Pass data to the page via props return { props: { data } } } As you can see, `getServerSideProps` is similar to `getStaticProps`, but the difference is that `getServerSideProps` is run on every request instead of on build time. To learn more about how `getServerSideProps` works, check out our Data Fetching documentation. Previous Rendering Next Static Site Generation (SSG) Was this helpful? supported. --- ## Page: https://nextjs.org/docs/14/pages/building-your-application/rendering/static-site-generation Examples * WordPress Example(Demo) * Blog Starter using markdown files (Demo) * DatoCMS Example (Demo) * TakeShape Example (Demo) * Sanity Example (Demo) * Prismic Example (Demo) * Contentful Example (Demo) * Strapi Example (Demo) * Prepr Example (Demo) * Agility CMS Example (Demo) * Cosmic Example (Demo) * ButterCMS Example (Demo) * Storyblok Example (Demo) * GraphCMS Example (Demo) * Kontent Example (Demo) * Builder.io Example (Demo) * TinaCMS Example (Demo) * Static Tweet (Demo) * Enterspeed Example (Demo) If a page uses **Static Generation**, the page HTML is generated at **build time**. That means in production, the page HTML is generated when you run `next build`. This HTML will then be reused on each request. It can be cached by a CDN. In Next.js, you can statically generate pages **with or without data**. Let's take a look at each case. ### Static Generation without data By default, Next.js pre-renders pages using Static Generation without fetching data. Here's an example: function About() { return <div>About</div> } export default About Note that this page does not need to fetch any external data to be pre-rendered. In cases like this, Next.js generates a single HTML file per page during build time. ### Static Generation with data Some pages require fetching external data for pre-rendering. There are two scenarios, and one or both might apply. In each case, you can use these functions that Next.js provides: 1. Your page **content** depends on external data: Use `getStaticProps`. 2. Your page **paths** depend on external data: Use `getStaticPaths` (usually in addition to `getStaticProps`). #### Scenario 1: Your page content depends on external data **Example**: Your blog page might need to fetch the list of blog posts from a CMS (content management system). // TODO: Need to fetch `posts` (by calling some API endpoint) // before this page can be pre-rendered. export default function Blog({ posts }) { return ( <ul> {posts.map((post) => ( <li>{post.title}</li> ))} </ul> ) } To fetch this data on pre-render, Next.js allows you to `export` an `async` function called `getStaticProps` from the same file. This function gets called at build time and lets you pass fetched data to the page's `props` on pre-render. export default function Blog({ posts }) { // Render posts... } // This function gets called at build time export async function getStaticProps() { // Call an external API endpoint to get posts const res = await fetch('https://.../posts') const posts = await res.json() // By returning { props: { posts } }, the Blog component // will receive `posts` as a prop at build time return { props: { posts, }, } } To learn more about how `getStaticProps` works, check out the Data Fetching documentation. #### Scenario 2: Your page paths depend on external data Next.js allows you to create pages with **dynamic routes**. For example, you can create a file called `pages/posts/[id].js` to show a single blog post based on `id`. This will allow you to show a blog post with `id: 1` when you access `posts/1`. > To learn more about dynamic routing, check the Dynamic Routing documentation. However, which `id` you want to pre-render at build time might depend on external data. **Example**: suppose that you've only added one blog post (with `id: 1`) to the database. In this case, you'd only want to pre-render `posts/1` at build time. Later, you might add the second post with `id: 2`. Then you'd want to pre-render `posts/2` as well. So your page **paths** that are pre-rendered depend on external data. To handle this, Next.js lets you `export` an `async` function called `getStaticPaths` from a dynamic page (`pages/posts/[id].js` in this case). This function gets called at build time and lets you specify which paths you want to pre-render. // This function gets called at build time export async function getStaticPaths() { // Call an external API endpoint to get posts const res = await fetch('https://.../posts') const posts = await res.json() // Get the paths we want to pre-render based on posts const paths = posts.map((post) => ({ params: { id: post.id }, })) // We'll pre-render only these paths at build time. // { fallback: false } means other routes should 404. return { paths, fallback: false } } Also in `pages/posts/[id].js`, you need to export `getStaticProps` so that you can fetch the data about the post with this `id` and use it to pre-render the page: export default function Post({ post }) { // Render post... } export async function getStaticPaths() { // ... } // This also gets called at build time export async function getStaticProps({ params }) { // params contains the post `id`. // If the route is like /posts/1, then params.id is 1 const res = await fetch(`https://.../posts/${params.id}`) const post = await res.json() // Pass post data to the page via props return { props: { post } } } To learn more about how `getStaticPaths` works, check out the Data Fetching documentation. ### When should I use Static Generation? We recommend using **Static Generation** (with and without data) whenever possible because your page can be built once and served by CDN, which makes it much faster than having a server render the page on every request. You can use Static Generation for many types of pages, including: * Marketing pages * Blog posts and portfolios * E-commerce product listings * Help and documentation You should ask yourself: "Can I pre-render this page **ahead** of a user's request?" If the answer is yes, then you should choose Static Generation. On the other hand, Static Generation is **not** a good idea if you cannot pre-render a page ahead of a user's request. Maybe your page shows frequently updated data, and the page content changes on every request. In cases like this, you can do one of the following: * Use Static Generation with **Client-side data fetching:** You can skip pre-rendering some parts of a page and then use client-side JavaScript to populate them. To learn more about this approach, check out the Data Fetching documentation. * Use **Server-Side Rendering:** Next.js pre-renders a page on each request. It will be slower because the page cannot be cached by a CDN, but the pre-rendered page will always be up-to-date. We'll talk about this approach below. --- ## Page: https://nextjs.org/docs/14/pages/building-your-application/rendering/automatic-static-optimization Next.js automatically determines that a page is static (can be prerendered) if it has no blocking data requirements. This determination is made by the absence of `getServerSideProps` and `getInitialProps` in the page. This feature allows Next.js to emit hybrid applications that contain **both server-rendered and statically generated pages**. > Statically generated pages are still reactive: Next.js will hydrate your application client-side to give it full interactivity. One of the main benefits of this feature is that optimized pages require no server-side computation, and can be instantly streamed to the end-user from multiple CDN locations. The result is an _ultra fast_ loading experience for your users. ## How it works If `getServerSideProps` or `getInitialProps` is present in a page, Next.js will switch to render the page on-demand, per-request (meaning Server-Side Rendering). If the above is not the case, Next.js will **statically optimize** your page automatically by prerendering the page to static HTML. During prerendering, the router's `query` object will be empty since we do not have `query` information to provide during this phase. After hydration, Next.js will trigger an update to your application to provide the route parameters in the `query` object. The cases where the query will be updated after hydration triggering another render are: * The page is a dynamic-route. * The page has query values in the URL. * Rewrites are configured in your `next.config.js` since these can have parameters that may need to be parsed and provided in the `query`. To be able to distinguish if the query is fully updated and ready for use, you can leverage the `isReady` field on `next/router`. > **Good to know**: Parameters added with dynamic routes to a page that's using `getStaticProps` will always be available inside the `query` object. `next build` will emit `.html` files for statically optimized pages. For example, the result for the page `pages/about.js` would be: .next/server/pages/about.html And if you add `getServerSideProps` to the page, it will then be JavaScript, like so: .next/server/pages/about.js ## Caveats * If you have a custom `App` with `getInitialProps` then this optimization will be turned off in pages without Static Generation. * If you have a custom `Document` with `getInitialProps` be sure you check if `ctx.req` is defined before assuming the page is server-side rendered. `ctx.req` will be `undefined` for pages that are prerendered. * Avoid using the `asPath` value on `next/router` in the rendering tree until the router's `isReady` field is `true`. Statically optimized pages only know `asPath` on the client and not the server, so using it as a prop may lead to mismatch errors. The `active-class-name` example demonstrates one way to use `asPath` as a prop. --- ## Page: https://nextjs.org/docs/14/pages/building-your-application/rendering/client-side-rendering In Client-Side Rendering (CSR) with React, the browser downloads a minimal HTML page and the JavaScript needed for the page. The JavaScript is then used to update the DOM and render the page. When the application is first loaded, the user may notice a slight delay before they can see the full page, this is because the page isn't fully rendered until all the JavaScript is downloaded, parsed, and executed. After the page has been loaded for the first time, navigating to other pages on the same website is typically faster, as only necessary data needs to be fetched, and JavaScript can re-render parts of the page without requiring a full page refresh. In Next.js, there are two ways you can implement client-side rendering: 1. Using React's `useEffect()` hook inside your pages instead of the server-side rendering methods (`getStaticProps` and `getServerSideProps`). 2. Using a data fetching library like SWR or TanStack Query to fetch data on the client (recommended). Here's an example of using `useEffect()` inside a Next.js page: import React, { useState, useEffect } from 'react' export function Page() { const [data, setData] = useState(null) useEffect(() => { const fetchData = async () => { const response = await fetch('https://api.example.com/data') if (!response.ok) { throw new Error(`HTTP error! status: ${response.status}`) } const result = await response.json() setData(result) } fetchData().catch((e) => { // handle the error as needed console.error('An error occurred while fetching the data: ', e) }) }, []) return <p>{data ? `Your data: ${data}` : 'Loading...'}</p> } In the example above, the component starts by rendering `Loading...`. Then, once the data is fetched, it re-renders and displays the data. Although fetching data in a `useEffect` is a pattern you may see in older React Applications, we recommend using a data-fetching library for better performance, caching, optimistic updates, and more. Here's a minimum example using SWR to fetch data on the client: import useSWR from 'swr' export function Page() { const { data, error, isLoading } = useSWR( 'https://api.example.com/data', fetcher ) if (error) return <p>Failed to load.</p> if (isLoading) return <p>Loading...</p> return <p>Your Data: {data}</p> } > **Good to know**: > > Keep in mind that CSR can impact SEO. Some search engine crawlers might not execute JavaScript and therefore only see the initial empty or loading state of your application. It can also lead to performance issues for users with slower internet connections or devices, as they need to wait for all the JavaScript to load and run before they can see the full page. Next.js promotes a hybrid approach that allows you to use a combination of server-side rendering, static site generation, and client-side rendering, **depending on the needs of each page** in your application. In the App Router, you can also use Loading UI with Suspense to show a loading indicator while the page is being rendered. --- ## Page: https://nextjs.org/docs/14/pages/building-your-application/rendering/edge-and-nodejs-runtimes In the context of Next.js, runtime refers to the set of libraries, APIs, and general functionality available to your code during execution. On the server, there are two runtimes where parts of your application code can be rendered: * The **Node.js Runtime** (default) has access to all Node.js APIs and compatible packages from the ecosystem. * The **Edge Runtime** is based on Web APIs. ## Runtime Differences There are many considerations to make when choosing a runtime. This table shows the major differences at a glance. If you want a more in-depth analysis of the differences, check out the sections below. | | Node | Serverless | Edge | | --- | --- | --- | --- | | Cold Boot | / | Normal | Low | | HTTP Streaming | Yes | Yes | Yes | | IO | All | All | `fetch` | | Scalability | / | High | Highest | | Security | Normal | High | High | | Latency | Normal | Low | Lowest | | npm Packages | All | All | A smaller subset | | Static Rendering | Yes | Yes | No | | Dynamic Rendering | Yes | Yes | Yes | | Data Revalidation w/ `fetch` | Yes | Yes | Yes | ### Edge Runtime In Next.js, the lightweight Edge Runtime is a subset of available Node.js APIs. The Edge Runtime is ideal if you need to deliver dynamic, personalized content at low latency with small, simple functions. The Edge Runtime's speed comes from its minimal use of resources, but that can be limiting in many scenarios. For example, code executed in the Edge Runtime on Vercel cannot exceed between 1 MB and 4 MB, this limit includes imported packages, fonts and files, and will vary depending on your deployment infrastructure. In addition, the Edge Runtime does not support all Node.js APIs meaning some `npm` packages may not work. For example, "Module not found: Can't resolve 'fs'" or similar errors. We recommend using the Node.js runtime if you need to use these APIs or packages. ### Node.js Runtime Using the Node.js runtime gives you access to all Node.js APIs, and all npm packages that rely on them. However, it's not as fast to start up as routes using the Edge runtime. Deploying your Next.js application to a Node.js server will require managing, scaling, and configuring your infrastructure. Alternatively, you can consider deploying your Next.js application to a serverless platform like Vercel, which will handle this for you. ### Serverless Node.js Serverless is ideal if you need a scalable solution that can handle more complex computational loads than the Edge Runtime. With Serverless Functions on Vercel, for example, your overall code size is 50MB including imported packages, fonts, and files. The downside compared to routes using the Edge is that it can take hundreds of milliseconds for Serverless Functions to boot up before they begin processing requests. Depending on the amount of traffic your site receives, this could be a frequent occurrence as the functions are not frequently "warm". > Please refer to the Node.js Docs and Edge Docs for the full list of available APIs. Both runtimes can also support streaming depending on your deployment infrastructure. --- ## Page: https://nextjs.org/docs/14/pages/building-your-application/data-fetching #### Subscribe to our newsletter Stay updated on new releases and features, guides, and case studies. --- ## Page: https://nextjs.org/docs/14/pages/building-your-application/data-fetching/get-static-props If you export a function called `getStaticProps` (Static Site Generation) from a page, Next.js will pre-render this page at build time using the props returned by `getStaticProps`. import type { InferGetStaticPropsType, GetStaticProps } from 'next' type Repo = { name: string stargazers_count: number } export const getStaticProps = (async (context) => { const res = await fetch('https://api.github.com/repos/vercel/next.js') const repo = await res.json() return { props: { repo } } }) satisfies GetStaticProps<{ repo: Repo }> export default function Page({ repo, }: InferGetStaticPropsType<typeof getStaticProps>) { return repo.stargazers_count } > Note that irrespective of rendering type, any `props` will be passed to the page component and can be viewed on the client-side in the initial HTML. This is to allow the page to be hydrated correctly. Make sure that you don't pass any sensitive information that shouldn't be available on the client in `props`. The `getStaticProps` API reference covers all parameters and props that can be used with `getStaticProps`. ## When should I use getStaticProps? You should use `getStaticProps` if: * The data required to render the page is available at build time ahead of a user’s request * The data comes from a headless CMS * The page must be pre-rendered (for SEO) and be very fast — `getStaticProps` generates `HTML` and `JSON` files, both of which can be cached by a CDN for performance * The data can be publicly cached (not user-specific). This condition can be bypassed in certain specific situation by using a Middleware to rewrite the path. ## When does getStaticProps run `getStaticProps` always runs on the server and never on the client. You can validate code written inside `getStaticProps` is removed from the client-side bundle with this tool. * `getStaticProps` always runs during `next build` * `getStaticProps` runs in the background when using `fallback: true` * `getStaticProps` is called before initial render when using `fallback: blocking` * `getStaticProps` runs in the background when using `revalidate` * `getStaticProps` runs on-demand in the background when using `revalidate()` When combined with Incremental Static Regeneration, `getStaticProps` will run in the background while the stale page is being revalidated, and the fresh page served to the browser. `getStaticProps` does not have access to the incoming request (such as query parameters or HTTP headers) as it generates static HTML. If you need access to the request for your page, consider using Middleware in addition to `getStaticProps`. ## Using getStaticProps to fetch data from a CMS The following example shows how you can fetch a list of blog posts from a CMS. // posts will be populated at build time by getStaticProps() export default function Blog({ posts }) { return ( <ul> {posts.map((post) => ( <li>{post.title}</li> ))} </ul> ) } // This function gets called at build time on server-side. // It won't be called on client-side, so you can even do // direct database queries. export async function getStaticProps() { // Call an external API endpoint to get posts. // You can use any data fetching library const res = await fetch('https://.../posts') const posts = await res.json() // By returning { props: { posts } }, the Blog component // will receive `posts` as a prop at build time return { props: { posts, }, } } The `getStaticProps` API reference covers all parameters and props that can be used with `getStaticProps`. ## Write server-side code directly As `getStaticProps` runs only on the server-side, it will never run on the client-side. It won’t even be included in the JS bundle for the browser, so you can write direct database queries without them being sent to browsers. This means that instead of fetching an **API route** from `getStaticProps` (that itself fetches data from an external source), you can write the server-side code directly in `getStaticProps`. Take the following example. An API route is used to fetch some data from a CMS. That API route is then called directly from `getStaticProps`. This produces an additional call, reducing performance. Instead, the logic for fetching the data from the CMS can be shared by using a `lib/` directory. Then it can be shared with `getStaticProps`. // The following function is shared // with getStaticProps and API routes // from a `lib/` directory export async function loadPosts() { // Call an external API endpoint to get posts const res = await fetch('https://.../posts/') const data = await res.json() return data } // pages/blog.js import { loadPosts } from '../lib/load-posts' // This function runs only on the server side export async function getStaticProps() { // Instead of fetching your `/api` route you can call the same // function directly in `getStaticProps` const posts = await loadPosts() // Props returned will be passed to the page component return { props: { posts } } } Alternatively, if you are **not** using API routes to fetch data, then the `fetch()` API _can_ be used directly in `getStaticProps` to fetch data. To verify what Next.js eliminates from the client-side bundle, you can use the next-code-elimination tool. ## Statically generates both HTML and JSON When a page with `getStaticProps` is pre-rendered at build time, in addition to the page HTML file, Next.js generates a JSON file holding the result of running `getStaticProps`. This JSON file will be used in client-side routing through `next/link` or `next/router`. When you navigate to a page that’s pre-rendered using `getStaticProps`, Next.js fetches this JSON file (pre-computed at build time) and uses it as the props for the page component. This means that client-side page transitions will **not** call `getStaticProps` as only the exported JSON is used. When using Incremental Static Generation, `getStaticProps` will be executed in the background to generate the JSON needed for client-side navigation. You may see this in the form of multiple requests being made for the same page, however, this is intended and has no impact on end-user performance. ## Where can I use getStaticProps `getStaticProps` can only be exported from a **page**. You **cannot** export it from non-page files, `_app`, `_document`, or `_error`. One of the reasons for this restriction is that React needs to have all the required data before the page is rendered. Also, you must use export `getStaticProps` as a standalone function — it will **not** work if you add `getStaticProps` as a property of the page component. > **Good to know**: if you have created a custom app, ensure you are passing the `pageProps` to the page component as shown in the linked document, otherwise the props will be empty. ## Runs on every request in development In development (`next dev`), `getStaticProps` will be called on every request. ## Preview Mode You can temporarily bypass static generation and render the page at **request time** instead of build time using **Preview Mode**. For example, you might be using a headless CMS and want to preview drafts before they're published. --- ## Page: https://nextjs.org/docs/14/pages/building-your-application/data-fetching/get-static-paths If a page has Dynamic Routes and uses `getStaticProps`, it needs to define a list of paths to be statically generated. When you export a function called `getStaticPaths` (Static Site Generation) from a page that uses dynamic routes, Next.js will statically pre-render all the paths specified by `getStaticPaths`. import type { InferGetStaticPropsType, GetStaticProps, GetStaticPaths, } from 'next' type Repo = { name: string stargazers_count: number } export const getStaticPaths = (async () => { return { paths: [ { params: { name: 'next.js', }, }, // See the "paths" section below ], fallback: true, // false or "blocking" } }) satisfies GetStaticPaths export const getStaticProps = (async (context) => { const res = await fetch('https://api.github.com/repos/vercel/next.js') const repo = await res.json() return { props: { repo } } }) satisfies GetStaticProps<{ repo: Repo }> export default function Page({ repo, }: InferGetStaticPropsType<typeof getStaticProps>) { return repo.stargazers_count } The `getStaticPaths` API reference covers all parameters and props that can be used with `getStaticPaths`. ## When should I use getStaticPaths? You should use `getStaticPaths` if you’re statically pre-rendering pages that use dynamic routes and: * The data comes from a headless CMS * The data comes from a database * The data comes from the filesystem * The data can be publicly cached (not user-specific) * The page must be pre-rendered (for SEO) and be very fast — `getStaticProps` generates `HTML` and `JSON` files, both of which can be cached by a CDN for performance ## When does getStaticPaths run `getStaticPaths` will only run during build in production, it will not be called during runtime. You can validate code written inside `getStaticPaths` is removed from the client-side bundle with this tool. ### How does getStaticProps run with regards to getStaticPaths * `getStaticProps` runs during `next build` for any `paths` returned during build * `getStaticProps` runs in the background when using `fallback: true` * `getStaticProps` is called before initial render when using `fallback: blocking` ## Where can I use getStaticPaths * `getStaticPaths` **must** be used with `getStaticProps` * You **cannot** use `getStaticPaths` with `getServerSideProps` * You can export `getStaticPaths` from a Dynamic Route that also uses `getStaticProps` * You **cannot** export `getStaticPaths` from non-page file (e.g. your `components` folder) * You must export `getStaticPaths` as a standalone function, and not a property of the page component ## Runs on every request in development In development (`next dev`), `getStaticPaths` will be called on every request. ## Generating paths on-demand `getStaticPaths` allows you to control which pages are generated during the build instead of on-demand with `fallback`. Generating more pages during a build will cause slower builds. You can defer generating all pages on-demand by returning an empty array for `paths`. This can be especially helpful when deploying your Next.js application to multiple environments. For example, you can have faster builds by generating all pages on-demand for previews (but not production builds). This is helpful for sites with hundreds/thousands of static pages. export async function getStaticPaths() { // When this is true (in preview environments) don't // prerender any static pages // (faster builds, but slower initial page load) if (process.env.SKIP_BUILD_STATIC_GENERATION) { return { paths: [], fallback: 'blocking', } } // Call an external API endpoint to get posts const res = await fetch('https://.../posts') const posts = await res.json() // Get the paths we want to prerender based on posts // In production environments, prerender all pages // (slower builds, but faster initial page load) const paths = posts.map((post) => ({ params: { id: post.id }, })) // { fallback: false } means other routes should 404 return { paths, fallback: false } } --- ## Page: https://nextjs.org/docs/14/pages/building-your-application/data-fetching/forms-and-mutations Forms enable you to create and update data in web applications. Next.js provides a powerful way to handle form submissions and data mutations using **API Routes**. > **Good to know:** > > * We will soon recommend incrementally adopting the App Router and using Server Actions for handling form submissions and data mutations. Server Actions allow you to define asynchronous server functions that can be called directly from your components, without needing to manually create an API Route. > * API Routes do not specify CORS headers, meaning they are same-origin only by default. > * Since API Routes run on the server, we're able to use sensitive values (like API keys) through Environment Variables without exposing them to the client. This is critical for the security of your application. ## Examples ### Server-only form With the Pages Router, you need to manually create API endpoints to handle securely mutating data on the server. import type { NextApiRequest, NextApiResponse } from 'next' export default async function handler( req: NextApiRequest, res: NextApiResponse ) { const data = req.body const id = await createItem(data) res.status(200).json({ id }) } Then, call the API Route from the client with an event handler: import { FormEvent } from 'react' export default function Page() { async function onSubmit(event: FormEvent<HTMLFormElement>) { event.preventDefault() const formData = new FormData(event.currentTarget) const response = await fetch('/api/submit', { method: 'POST', body: formData, }) // Handle response if necessary const data = await response.json() // ... } return ( <form onSubmit={onSubmit}> <input type="text" name="name" /> <button type="submit">Submit</button> </form> ) } ## Form validation We recommend using HTML validation like `required` and `type="email"` for basic client-side form validation. For more advanced server-side validation, you can use a schema validation library like zod to validate the form fields before mutating the data: import type { NextApiRequest, NextApiResponse } from 'next' import { z } from 'zod' const schema = z.object({ // ... }) export default async function handler( req: NextApiRequest, res: NextApiResponse ) { const parsed = schema.parse(req.body) // ... } ### Error handling You can use React state to show an error message when a form submission fails: import React, { useState, FormEvent } from 'react' export default function Page() { const [isLoading, setIsLoading] = useState<boolean>(false) const [error, setError] = useState<string | null>(null) async function onSubmit(event: FormEvent<HTMLFormElement>) { event.preventDefault() setIsLoading(true) setError(null) // Clear previous errors when a new request starts try { const formData = new FormData(event.currentTarget) const response = await fetch('/api/submit', { method: 'POST', body: formData, }) if (!response.ok) { throw new Error('Failed to submit the data. Please try again.') } // Handle response if necessary const data = await response.json() // ... } catch (error) { // Capture the error message to display to the user setError(error.message) console.error(error) } finally { setIsLoading(false) } } return ( <div> {error && <div style={{ color: 'red' }}>{error}</div>} <form onSubmit={onSubmit}> <input type="text" name="name" /> <button type="submit" disabled={isLoading}> {isLoading ? 'Loading...' : 'Submit'} </button> </form> </div> ) } ## Displaying loading state You can use React state to show a loading state when a form is submitting on the server: import React, { useState, FormEvent } from 'react' export default function Page() { const [isLoading, setIsLoading] = useState<boolean>(false) async function onSubmit(event: FormEvent<HTMLFormElement>) { event.preventDefault() setIsLoading(true) // Set loading to true when the request starts try { const formData = new FormData(event.currentTarget) const response = await fetch('/api/submit', { method: 'POST', body: formData, }) // Handle response if necessary const data = await response.json() // ... } catch (error) { // Handle error if necessary console.error(error) } finally { setIsLoading(false) // Set loading to false when the request completes } } return ( <form onSubmit={onSubmit}> <input type="text" name="name" /> <button type="submit" disabled={isLoading}> {isLoading ? 'Loading...' : 'Submit'} </button> </form> ) } ### Redirecting If you would like to redirect the user to a different route after a mutation, you can `redirect` to any absolute or relative URL: import type { NextApiRequest, NextApiResponse } from 'next' export default async function handler( req: NextApiRequest, res: NextApiResponse ) { const id = await addPost() res.redirect(307, `/post/${id}`) } ### Setting cookies You can set cookies inside an API Route using the `setHeader` method on the response: import type { NextApiRequest, NextApiResponse } from 'next' export default async function handler( req: NextApiRequest, res: NextApiResponse ) { res.setHeader('Set-Cookie', 'username=lee; Path=/; HttpOnly') res.status(200).send('Cookie has been set.') } ### Reading cookies You can read cookies inside an API Route using the `cookies` request helper: import type { NextApiRequest, NextApiResponse } from 'next' export default async function handler( req: NextApiRequest, res: NextApiResponse ) { const auth = req.cookies.authorization // ... } ### Deleting cookies You can delete cookies inside an API Route using the `setHeader` method on the response: import type { NextApiRequest, NextApiResponse } from 'next' export default async function handler( req: NextApiRequest, res: NextApiResponse ) { res.setHeader('Set-Cookie', 'username=; Path=/; HttpOnly; Max-Age=0') res.status(200).send('Cookie has been deleted.') } --- ## Page: https://nextjs.org/docs/14/pages/building-your-application/data-fetching/get-server-side-props `getServerSideProps` is a Next.js function that can be used to fetch data and render the contents of a page at request time. ## Example You can use `getServerSideProps` by exporting it from a Page Component. The example below shows how you can fetch data from a 3rd party API in `getServerSideProps`, and pass the data to the page as props: import type { InferGetServerSidePropsType, GetServerSideProps } from 'next' type Repo = { name: string stargazers_count: number } export const getServerSideProps = (async () => { // Fetch data from external API const res = await fetch('https://api.github.com/repos/vercel/next.js') const repo: Repo = await res.json() // Pass data to the page via props return { props: { repo } } }) satisfies GetServerSideProps<{ repo: Repo }> export default function Page({ repo, }: InferGetServerSidePropsType<typeof getServerSideProps>) { return ( <main> <p>{repo.stargazers_count}</p> </main> ) } ## When should I use `getServerSideProps`? You should use `getServerSideProps` if you need to render a page that relies on personalized user data, or information that can only be known at request time. For example, `authorization` headers or a geolocation. If you do not need to fetch the data at request time, or would prefer to cache the data and pre-rendered HTML, we recommend using `getStaticProps`. ## Behavior * `getServerSideProps` runs on the server. * `getServerSideProps` can only be exported from a **page**. * `getServerSideProps` returns JSON. * When a user visits a page, `getServerSideProps` will be used to fetch data at request time, and the data is used to render the initial HTML of the page. * `props` passed to the page component can be viewed on the client as part of the initial HTML. This is to allow the page to be hydrated correctly. Make sure that you don't pass any sensitive information that shouldn't be available on the client in `props`. * When a user visits the page through `next/link` or `next/router`, Next.js sends an API request to the server, which runs `getServerSideProps`. * You do not have to call a Next.js API Route to fetch data when using `getServerSideProps` since the function runs on the server. Instead, you can call a CMS, database, or other third-party APIs directly from inside `getServerSideProps`. > **Good to know:** > > * See `getServerSideProps` API reference for parameters and props that can be used with `getServerSideProps`. > * You can use the next-code-elimination tool to verify what Next.js eliminates from the client-side bundle. ## Error Handling If an error is thrown inside `getServerSideProps`, it will show the `pages/500.js` file. Check out the documentation for 500 page to learn more on how to create it. During development, this file will not be used and the development error overlay will be shown instead. ## Edge Cases ### Edge Runtime `getServerSideProps` can be used with both Serverless and Edge Runtimes, and you can set props in both. However, currently in the Edge Runtime, you do not have access to the response object. This means that you cannot — for example — add cookies in `getServerSideProps`. To have access to the response object, you should **continue to use the Node.js runtime**, which is the default runtime. You can explicitly set the runtime on a per-page basis by modifying the `config`, for example: export const config = { runtime: 'nodejs', // or "edge" } export const getServerSideProps = async () => {} ### Caching with Server-Side Rendering (SSR) You can use caching headers (`Cache-Control`) inside `getServerSideProps` to cache dynamic responses. For example, using `stale-while-revalidate`. // This value is considered fresh for ten seconds (s-maxage=10). // If a request is repeated within the next 10 seconds, the previously // cached value will still be fresh. If the request is repeated before 59 seconds, // the cached value will be stale but still render (stale-while-revalidate=59). // // In the background, a revalidation request will be made to populate the cache // with a fresh value. If you refresh the page, you will see the new value. export async function getServerSideProps({ req, res }) { res.setHeader( 'Cache-Control', 'public, s-maxage=10, stale-while-revalidate=59' ) return { props: {}, } } However, before reaching for `cache-control`, we recommend seeing if `getStaticProps` with ISR is a better fit for your use case. --- ## Page: https://nextjs.org/docs/14/pages/building-your-application/data-fetching/incremental-static-regeneration Examples * Next.js Commerce * GitHub Reactions Demo * Static Tweet Demo Next.js allows you to create or update static pages _after_ you’ve built your site. Incremental Static Regeneration (ISR) enables you to use static-generation on a per-page basis, **without needing to rebuild the entire site**. With ISR, you can retain the benefits of static while scaling to millions of pages. > **Good to know**: The `edge` runtime is currently not compatible with ISR, although you can leverage `stale-while-revalidate` by setting the `cache-control` header manually. To use ISR, add the `revalidate` prop to `getStaticProps`: function Blog({ posts }) { return ( <ul> {posts.map((post) => ( <li key={post.id}>{post.title}</li> ))} </ul> ) } // This function gets called at build time on server-side. // It may be called again, on a serverless function, if // revalidation is enabled and a new request comes in export async function getStaticProps() { const res = await fetch('https://.../posts') const posts = await res.json() return { props: { posts, }, // Next.js will attempt to re-generate the page: // - When a request comes in // - At most once every 10 seconds revalidate: 10, // In seconds } } // This function gets called at build time on server-side. // It may be called again, on a serverless function, if // the path has not been generated. export async function getStaticPaths() { const res = await fetch('https://.../posts') const posts = await res.json() // Get the paths we want to pre-render based on posts const paths = posts.map((post) => ({ params: { id: post.id }, })) // We'll pre-render only these paths at build time. // { fallback: 'blocking' } will server-render pages // on-demand if the path doesn't exist. return { paths, fallback: 'blocking' } } export default Blog When a request is made to a page that was pre-rendered at build time, it will initially show the cached page. * Any requests to the page after the initial request and before 10 seconds are also cached and instantaneous. * After the 10-second window, the next request will still show the cached (stale) page * Next.js triggers a regeneration of the page in the background. * Once the page generates successfully, Next.js will invalidate the cache and show the updated page. If the background regeneration fails, the old page would still be unaltered. When a request is made to a path that hasn’t been generated, Next.js will server-render the page on the first request. Future requests will serve the static file from the cache. ISR on Vercel persists the cache globally and handles rollbacks. > **Good to know**: Check if your upstream data provider has caching enabled by default. You might need to disable (e.g. `useCdn: false`), otherwise a revalidation won't be able to pull fresh data to update the ISR cache. Caching can occur at a CDN (for an endpoint being requested) when it returns the `Cache-Control` header. ## On-Demand Revalidation If you set a `revalidate` time of `60`, all visitors will see the same generated version of your site for one minute. The only way to invalidate the cache is from someone visiting that page after the minute has passed. Starting with `v12.2.0`, Next.js supports On-Demand Incremental Static Regeneration to manually purge the Next.js cache for a specific page. This makes it easier to update your site when: * Content from your headless CMS is created or updated * Ecommerce metadata changes (price, description, category, reviews, etc.) Inside `getStaticProps`, you do not need to specify `revalidate` to use on-demand revalidation. If `revalidate` is omitted, Next.js will use the default value of `false` (no revalidation) and only revalidate the page on-demand when `revalidate()` is called. > **Good to know**: Middleware won't be executed for On-Demand ISR requests. Instead, call `revalidate()` on the _exact_ path that you want revalidated. For example, if you have `pages/blog/[slug].js` and a rewrite from `/post-1` -> `/blog/post-1`, you would need to call `res.revalidate('/blog/post-1')`. ### Using On-Demand Revalidation First, create a secret token only known by your Next.js app. This secret will be used to prevent unauthorized access to the revalidation API Route. You can access the route (either manually or with a webhook) with the following URL structure: https://<your-site.com>/api/revalidate?secret=<token> Next, add the secret as an Environment Variable to your application. Finally, create the revalidation API Route: export default async function handler(req, res) { // Check for secret to confirm this is a valid request if (req.query.secret !== process.env.MY_SECRET_TOKEN) { return res.status(401).json({ message: 'Invalid token' }) } try { // this should be the actual path not a rewritten path // e.g. for "/blog/[slug]" this should be "/blog/post-1" await res.revalidate('/path-to-revalidate') return res.json({ revalidated: true }) } catch (err) { // If there was an error, Next.js will continue // to show the last successfully generated page return res.status(500).send('Error revalidating') } } View our demo to see on-demand revalidation in action and provide feedback. ### Testing on-Demand ISR during development When running locally with `next dev`, `getStaticProps` is invoked on every request. To verify your on-demand ISR configuration is correct, you will need to create a production build and start the production server: $ next build $ next start Then, you can confirm that static pages have successfully revalidated. ## Error handling and revalidation If there is an error inside `getStaticProps` when handling background regeneration, or you manually throw an error, the last successfully generated page will continue to show. On the next subsequent request, Next.js will retry calling `getStaticProps`. export async function getStaticProps() { // If this request throws an uncaught error, Next.js will // not invalidate the currently shown page and // retry getStaticProps on the next request. const res = await fetch('https://.../posts') const posts = await res.json() if (!res.ok) { // If there is a server error, you might want to // throw an error instead of returning so that the cache is not updated // until the next successful request. throw new Error(`Failed to fetch posts, received status ${res.status}`) } // If the request was successful, return the posts // and revalidate every 10 seconds. return { props: { posts, }, revalidate: 10, } } ## Self-hosting ISR Incremental Static Regeneration (ISR) works on self-hosted Next.js sites out of the box when you use `next start`. Learn more about self-hosting Next.js. ## Version History | Version | Changes | | --- | --- | | `v14.1.0` | Custom `cacheHandler` is stable. | | `v12.2.0` | On-Demand ISR is stable | | `v12.1.0` | On-Demand ISR added (beta). | | `v12.0.0` | Bot-aware ISR fallback added. | | `v9.5.0` | Base Path added. | --- ## Page: https://nextjs.org/docs/14/pages/building-your-application/data-fetching/client-side Client-side data fetching is useful when your page doesn't require SEO indexing, when you don't need to pre-render your data, or when the content of your pages needs to update frequently. Unlike the server-side rendering APIs, you can use client-side data fetching at the component level. If done at the page level, the data is fetched at runtime, and the content of the page is updated as the data changes. When used at the component level, the data is fetched at the time of the component mount, and the content of the component is updated as the data changes. It's important to note that using client-side data fetching can affect the performance of your application and the load speed of your pages. This is because the data fetching is done at the time of the component or pages mount, and the data is not cached. ## Client-side data fetching with useEffect The following example shows how you can fetch data on the client side using the useEffect hook. import { useState, useEffect } from 'react' function Profile() { const [data, setData] = useState(null) const [isLoading, setLoading] = useState(true) useEffect(() => { fetch('/api/profile-data') .then((res) => res.json()) .then((data) => { setData(data) setLoading(false) }) }, []) if (isLoading) return <p>Loading...</p> if (!data) return <p>No profile data</p> return ( <div> <h1>{data.name}</h1> <p>{data.bio}</p> </div> ) } ## Client-side data fetching with SWR The team behind Next.js has created a React hook library for data fetching called **SWR**. It is **highly recommended** if you are fetching data on the client-side. It handles caching, revalidation, focus tracking, refetching on intervals, and more. Using the same example as above, we can now use SWR to fetch the profile data. SWR will automatically cache the data for us and will revalidate the data if it becomes stale. For more information on using SWR, check out the SWR docs. import useSWR from 'swr' const fetcher = (...args) => fetch(...args).then((res) => res.json()) function Profile() { const { data, error } = useSWR('/api/profile-data', fetcher) if (error) return <div>Failed to load</div> if (!data) return <div>Loading...</div> return ( <div> <h1>{data.name}</h1> <p>{data.bio}</p> </div> ) } --- ## Page: https://nextjs.org/docs/14/pages/building-your-application/styling You are currently viewing documentation for version 14 of Next.js. Next.js supports different ways of styling your application, including: * **Global CSS**: Simple to use and familiar for those experienced with traditional CSS, but can lead to larger CSS bundles and difficulty managing styles as the application grows. * **CSS Modules**: Create locally scoped CSS classes to avoid naming conflicts and improve maintainability. * **Tailwind CSS**: A utility-first CSS framework that allows for rapid custom designs by composing utility classes. * **Sass**: A popular CSS preprocessor that extends CSS with features like variables, nested rules, and mixins. * **CSS-in-JS**: Embed CSS directly in your JavaScript components, enabling dynamic and scoped styling. Learn more about each approach by exploring their respective documentation: --- ## Page: https://nextjs.org/docs/14/pages/building-your-application/styling/css-modules Examples * Basic CSS Example Next.js supports different types of stylesheets, including: * CSS Modules * Global Styles * External Stylesheets ## CSS Modules Next.js has built-in support for CSS Modules using the `.module.css` extension. CSS Modules locally scope CSS by automatically creating a unique class name. This allows you to use the same class name in different files without worrying about collisions. This behavior makes CSS Modules the ideal way to include component-level CSS. ## Example For example, consider a reusable `Button` component in the `components/` folder: First, create `components/Button.module.css` with the following content: /* You do not need to worry about .error {} colliding with any other `.css` or `.module.css` files! */ .error { color: white; background-color: red; } Then, create `components/Button.js`, importing and using the above CSS file: import styles from './Button.module.css' export function Button() { return ( <button type="button" // Note how the "error" class is accessed as a property on the imported // `styles` object. className={styles.error} > Destroy </button> ) } CSS Modules are **only enabled for files with the `.module.css` and `.module.sass` extensions**. In production, all CSS Module files will be automatically concatenated into **many minified and code-split** `.css` files. These `.css` files represent hot execution paths in your application, ensuring the minimal amount of CSS is loaded for your application to paint. ## Global Styles To add a stylesheet to your application, import the CSS file within `pages/_app.js`. For example, consider the following stylesheet named `styles.css`: body { font-family: 'SF Pro Text', 'SF Pro Icons', 'Helvetica Neue', 'Helvetica', 'Arial', sans-serif; padding: 20px 20px 60px; max-width: 680px; margin: 0 auto; } Create a `pages/_app.js` file if not already present. Then, `import` the `styles.css` file. import '../styles.css' // This default export is required in a new `pages/_app.js` file. export default function MyApp({ Component, pageProps }) { return <Component {...pageProps} /> } These styles (`styles.css`) will apply to all pages and components in your application. Due to the global nature of stylesheets, and to avoid conflicts, you may **only import them inside `pages/_app.js`**. In development, expressing stylesheets this way allows your styles to be hot reloaded as you edit them—meaning you can keep application state. In production, all CSS files will be automatically concatenated into a single minified `.css` file. The order that the CSS is concatenated will match the order the CSS is imported into the `_app.js` file. Pay special attention to imported JS modules that include their own CSS; the JS module's CSS will be concatenated following the same ordering rules as imported CSS files. For example: import '../styles.css' // The CSS in ErrorBoundary depends on the global CSS in styles.css, // so we import it after styles.css. import ErrorBoundary from '../components/ErrorBoundary' export default function MyApp({ Component, pageProps }) { return ( <ErrorBoundary> <Component {...pageProps} /> </ErrorBoundary> ) } ## External Stylesheets Next.js allows you to import CSS files from a JavaScript file. This is possible because Next.js extends the concept of `import` beyond JavaScript. ### Import styles from `node_modules` Since Next.js **9.5.4**, importing a CSS file from `node_modules` is permitted anywhere in your application. For global stylesheets, like `bootstrap` or `nprogress`, you should import the file inside `pages/_app.js`. For example: import 'bootstrap/dist/css/bootstrap.css' export default function MyApp({ Component, pageProps }) { return <Component {...pageProps} /> } For importing CSS required by a third-party component, you can do so in your component. For example: import { useState } from 'react' import { Dialog } from '@reach/dialog' import VisuallyHidden from '@reach/visually-hidden' import '@reach/dialog/styles.css' function ExampleDialog(props) { const [showDialog, setShowDialog] = useState(false) const open = () => setShowDialog(true) const close = () => setShowDialog(false) return ( <div> <button onClick={open}>Open Dialog</button> <Dialog isOpen={showDialog} onDismiss={close}> <button className="close-button" onClick={close}> <VisuallyHidden>Close</VisuallyHidden> <span aria-hidden>×</span> </button> <p>Hello there. I am a dialog</p> </Dialog> </div> ) } ## Additional Features Next.js includes additional features to improve the authoring experience of adding styles: * When running locally with `next dev`, local stylesheets (either global or CSS modules) will take advantage of Fast Refresh to instantly reflect changes as edits are saved. * When building for production with `next build`, CSS files will be bundled into fewer minified `.css` files to reduce the number of network requests needed to retrieve styles. * If you disable JavaScript, styles will still be loaded in the production build (`next start`). However, JavaScript is still required for `next dev` to enable Fast Refresh. --- ## Page: https://nextjs.org/docs/14/pages/building-your-application/styling/tailwind-css Examples * With Tailwind CSS Tailwind CSS is a utility-first CSS framework that works exceptionally well with Next.js. ## Installing Tailwind Install the Tailwind CSS packages and run the `init` command to generate both the `tailwind.config.js` and `postcss.config.js` files: npm install -D tailwindcss postcss autoprefixer npx tailwindcss init -p ## Configuring Tailwind Inside `tailwind.config.js`, add paths to the files that will use Tailwind CSS class names: /** @type {import('tailwindcss').Config} */ module.exports = { content: [ './app/**/*.{js,ts,jsx,tsx,mdx}', // Note the addition of the `app` directory. './pages/**/*.{js,ts,jsx,tsx,mdx}', './components/**/*.{js,ts,jsx,tsx,mdx}', // Or if using `src` directory: './src/**/*.{js,ts,jsx,tsx,mdx}', ], theme: { extend: {}, }, plugins: [], } You do not need to modify `postcss.config.js`. ## Importing Styles Add the Tailwind CSS directives that Tailwind will use to inject its generated styles to a Global Stylesheet in your application, for example: @tailwind base; @tailwind components; @tailwind utilities; Inside the custom app file (`pages/_app.js`), import the `globals.css` stylesheet to apply the styles to every route in your application. // These styles apply to every route in the application import '@/styles/globals.css' import type { AppProps } from 'next/app' export default function App({ Component, pageProps }: AppProps) { return <Component {...pageProps} /> } ## Using Classes After installing Tailwind CSS and adding the global styles, you can use Tailwind's utility classes in your application. export default function Page() { return <h1 className="text-3xl font-bold underline">Hello, Next.js!</h1> } ## Usage with Turbopack As of Next.js 13.1, Tailwind CSS and PostCSS are supported with Turbopack. --- ## Page: https://nextjs.org/docs/14/pages/building-your-application/styling/css-in-js You are currently viewing documentation for version 14 of Next.js. Examples * Styled JSX * Styled Components * Emotion * Linaria * Styletron * Cxs * Fela * Stitches It's possible to use any existing CSS-in-JS solution. The simplest one is inline styles: function HiThere() { return <p style={{ color: 'red' }}>hi there</p> } export default HiThere We bundle styled-jsx to provide support for isolated scoped CSS. The aim is to support "shadow CSS" similar to Web Components, which unfortunately do not support server-rendering and are JS-only. See the above examples for other popular CSS-in-JS solutions (like Styled Components). A component using `styled-jsx` looks like this: function HelloWorld() { return ( <div> Hello world <p>scoped!</p> <style jsx>{` p { color: blue; } div { background: red; } @media (max-width: 600px) { div { background: blue; } } `}</style> <style global jsx>{` body { background: black; } `}</style> </div> ) } export default HelloWorld Please see the styled-jsx documentation for more examples. ### Disabling JavaScript Yes, if you disable JavaScript the CSS will still be loaded in the production build (`next start`). During development, we require JavaScript to be enabled to provide the best developer experience with Fast Refresh. --- ## Page: https://nextjs.org/docs/14/pages/building-your-application/styling/sass Next.js has built-in support for integrating with Sass after the package is installed using both the `.scss` and `.sass` extensions. You can use component-level Sass via CSS Modules and the `.module.scss`or `.module.sass` extension. **Good to know**: Sass supports two different syntaxes, each with their own extension. The `.scss` extension requires you use the SCSS syntax, while the `.sass` extension requires you use the Indented Syntax ("Sass"). If you're not sure which to choose, start with the `.scss` extension which is a superset of CSS, and doesn't require you learn the Indented Syntax ("Sass"). If you want to configure the Sass compiler, use `sassOptions` in `next.config.js`. const path = require('path') module.exports = { sassOptions: { includePaths: [path.join(__dirname, 'styles')], }, } Next.js supports Sass variables exported from CSS Module files. import variables from '../styles/variables.module.scss' export default function MyApp({ Component, pageProps }) { return ( <Layout color={variables.primaryColor}> <Component {...pageProps} /> </Layout> ) } --- ## Page: https://nextjs.org/docs/14/pages/building-your-application/optimizing You are currently viewing documentation for version 14 of Next.js. ## Optimizations Next.js comes with a variety of built-in optimizations designed to improve your application's speed and Core Web Vitals. This guide will cover the optimizations you can leverage to enhance your user experience. ## Built-in Components Built-in components abstract away the complexity of implementing common UI optimizations. These components are: * **Images**: Built on the native `<img>` element. The Image Component optimizes images for performance by lazy loading and automatically resizing images based on device size. * **Link**: Built on the native `<a>` tags. The Link Component prefetches pages in the background, for faster and smoother page transitions. * **Scripts**: Built on the native `<script>` tags. The Script Component gives you control over loading and execution of third-party scripts. Metadata helps search engines understand your content better (which can result in better SEO), and allows you to customize how your content is presented on social media, helping you create a more engaging and consistent user experience across various platforms. The Head Component in Next.js allows you to modify the `<head>` of a page. Learn more in the Head Component documentation. ## Static Assets Next.js `/public` folder can be used to serve static assets like images, fonts, and other files. Files inside `/public` can also be cached by CDN providers so that they are delivered efficiently. ## Analytics and Monitoring For large applications, Next.js integrates with popular analytics and monitoring tools to help you understand how your application is performing. Learn more in the Analytics, OpenTelemetry, and Instrumentation guides. --- ## Page: https://nextjs.org/docs/14/pages/building-your-application/optimizing/images ## Image Optimization Examples * Image Component According to Web Almanac, images account for a huge portion of the typical website’s page weight and can have a sizable impact on your website's LCP performance. The Next.js Image component extends the HTML `<img>` element with features for automatic image optimization: * **Size Optimization:** Automatically serve correctly sized images for each device, using modern image formats like WebP and AVIF. * **Visual Stability:** Prevent layout shift automatically when images are loading. * **Faster Page Loads:** Images are only loaded when they enter the viewport using native browser lazy loading, with optional blur-up placeholders. * **Asset Flexibility:** On-demand image resizing, even for images stored on remote servers > **🎥 Watch:** Learn more about how to use `next/image` → YouTube (9 minutes). ## Usage import Image from 'next/image' You can then define the `src` for your image (either local or remote). ### Local Images To use a local image, `import` your `.jpg`, `.png`, or `.webp` image files. Next.js will automatically determine the `width` and `height` of your image based on the imported file. These values are used to prevent Cumulative Layout Shift while your image is loading. import Image from 'next/image' import profilePic from '../public/me.png' export default function Page() { return ( <Image src={profilePic} alt="Picture of the author" // width={500} automatically provided // height={500} automatically provided // blurDataURL="data:..." automatically provided // placeholder="blur" // Optional blur-up while loading /> ) } > **Warning:** Dynamic `await import()` or `require()` are _not_ supported. The `import` must be static so it can be analyzed at build time. You can optionally configure `localPatterns` in your `next.config.js` file in order to allow specific images and block all others. module.exports = { images: { localPatterns: [ { pathname: '/assets/images/**', search: '', }, ], }, } ### Remote Images To use a remote image, the `src` property should be a URL string. Since Next.js does not have access to remote files during the build process, you'll need to provide the `width`, `height` and optional `blurDataURL` props manually. The `width` and `height` attributes are used to infer the correct aspect ratio of image and avoid layout shift from the image loading in. The `width` and `height` do _not_ determine the rendered size of the image file. Learn more about Image Sizing. import Image from 'next/image' export default function Page() { return ( <Image src="https://s3.amazonaws.com/my-bucket/profile.png" alt="Picture of the author" width={500} height={500} /> ) } To safely allow optimizing images, define a list of supported URL patterns in `next.config.js`. Be as specific as possible to prevent malicious usage. For example, the following configuration will only allow images from a specific AWS S3 bucket: module.exports = { images: { remotePatterns: [ { protocol: 'https', hostname: 's3.amazonaws.com', port: '', pathname: '/my-bucket/**', search: '', }, ], }, } Learn more about `remotePatterns` configuration. If you want to use relative URLs for the image `src`, use a `loader`. ### Domains Sometimes you may want to optimize a remote image, but still use the built-in Next.js Image Optimization API. To do this, leave the `loader` at its default setting and enter an absolute URL for the Image `src` prop. To protect your application from malicious users, you must define a list of remote hostnames you intend to use with the `next/image` component. > Learn more about `remotePatterns` configuration. ### Loaders Note that in the example earlier, a partial URL (`"/me.png"`) is provided for a local image. This is possible because of the loader architecture. A loader is a function that generates the URLs for your image. It modifies the provided `src`, and generates multiple URLs to request the image at different sizes. These multiple URLs are used in the automatic srcset generation, so that visitors to your site will be served an image that is the right size for their viewport. The default loader for Next.js applications uses the built-in Image Optimization API, which optimizes images from anywhere on the web, and then serves them directly from the Next.js web server. If you would like to serve your images directly from a CDN or image server, you can write your own loader function with a few lines of JavaScript. You can define a loader per-image with the `loader` prop, or at the application level with the `loaderFile` configuration. ## Priority You should add the `priority` property to the image that will be the Largest Contentful Paint (LCP) element for each page. Doing so allows Next.js to specially prioritize the image for loading (e.g. through preload tags or priority hints), leading to a meaningful boost in LCP. The LCP element is typically the largest image or text block visible within the viewport of the page. When you run `next dev`, you'll see a console warning if the LCP element is an `<Image>` without the `priority` property. Once you've identified the LCP image, you can add the property like this: import Image from 'next/image' export default function Home() { return ( <> <h1>My Homepage</h1> <Image src="/me.png" alt="Picture of the author" width={500} height={500} priority /> <p>Welcome to my homepage!</p> </> ) } See more about priority in the `next/image` component documentation. ## Image Sizing One of the ways that images most commonly hurt performance is through _layout shift_, where the image pushes other elements around on the page as it loads in. This performance problem is so annoying to users that it has its own Core Web Vital, called Cumulative Layout Shift. The way to avoid image-based layout shifts is to always size your images. This allows the browser to reserve precisely enough space for the image before it loads. Because `next/image` is designed to guarantee good performance results, it cannot be used in a way that will contribute to layout shift, and **must** be sized in one of three ways: 1. Automatically, using a static import 2. Explicitly, by including a `width` and `height` property 3. Implicitly, by using fill which causes the image to expand to fill its parent element. > **What if I don't know the size of my images?** > > If you are accessing images from a source without knowledge of the images' sizes, there are several things you can do: > > **Use `fill`** > > The `fill` prop allows your image to be sized by its parent element. Consider using CSS to give the image's parent element space on the page along `sizes` prop to match any media query break points. You can also use `object-fit` with `fill`, `contain`, or `cover`, and `object-position` to define how the image should occupy that space. > > **Normalize your images** > > If you're serving images from a source that you control, consider modifying your image pipeline to normalize the images to a specific size. > > **Modify your API calls** > > If your application is retrieving image URLs using an API call (such as to a CMS), you may be able to modify the API call to return the image dimensions along with the URL. If none of the suggested methods works for sizing your images, the `next/image` component is designed to work well on a page alongside standard `<img>` elements. ## Styling Styling the Image component is similar to styling a normal `<img>` element, but there are a few guidelines to keep in mind: * Use `className` or `style`, not `styled-jsx`. * In most cases, we recommend using the `className` prop. This can be an imported CSS Module, a global stylesheet, etc. * You can also use the `style` prop to assign inline styles. * You cannot use styled-jsx because it's scoped to the current component (unless you mark the style as `global`). * When using `fill`, the parent element must have `position: relative` * This is necessary for the proper rendering of the image element in that layout mode. * When using `fill`, the parent element must have `display: block` * This is the default for `<div>` elements but should be specified otherwise. ## Examples ### Responsive  import Image from 'next/image' import mountains from '../public/mountains.jpg' export default function Responsive() { return ( <div style={{ display: 'flex', flexDirection: 'column' }}> <Image alt="Mountains" // Importing an image will // automatically set the width and height src={mountains} sizes="100vw" // Make the image display full width style={{ width: '100%', height: 'auto', }} /> </div> ) } ### Fill Container  import Image from 'next/image' import mountains from '../public/mountains.jpg' export default function Fill() { return ( <div style={{ display: 'grid', gridGap: '8px', gridTemplateColumns: 'repeat(auto-fit, minmax(400px, auto))', }} > <div style={{ position: 'relative', height: '400px' }}> <Image alt="Mountains" src={mountains} fill sizes="(min-width: 808px) 50vw, 100vw" style={{ objectFit: 'cover', // cover, contain, none }} /> </div> {/* And more images in the grid... */} </div> ) } ### Background Image  import Image from 'next/image' import mountains from '../public/mountains.jpg' export default function Background() { return ( <Image alt="Mountains" src={mountains} placeholder="blur" quality={100} fill sizes="100vw" style={{ objectFit: 'cover', }} /> ) } For examples of the Image component used with the various styles, see the Image Component Demo. ## Other Properties **View all properties available to the `next/image` component.** ## Configuration The `next/image` component and Next.js Image Optimization API can be configured in the `next.config.js` file. These configurations allow you to enable remote images, define custom image breakpoints, change caching behavior and more. **Read the full image configuration documentation for more information.** --- ## Page: https://nextjs.org/docs/14/pages/building-your-application/optimizing/fonts ## Font Optimization **`next/font`** will automatically optimize your fonts (including custom fonts) and remove external network requests for improved privacy and performance. > **🎥 Watch:** Learn more about using `next/font` → YouTube (6 minutes). `next/font` includes **built-in automatic self-hosting** for _any_ font file. This means you can optimally load web fonts with zero layout shift, thanks to the underlying CSS `size-adjust` property used. This new font system also allows you to conveniently use all Google Fonts with performance and privacy in mind. CSS and font files are downloaded at build time and self-hosted with the rest of your static assets. **No requests are sent to Google by the browser.** ## Google Fonts Automatically self-host any Google Font. Fonts are included in the deployment and served from the same domain as your deployment. **No requests are sent to Google by the browser.** Get started by importing the font you would like to use from `next/font/google` as a function. We recommend using variable fonts for the best performance and flexibility. To use the font in all your pages, add it to `_app.js` file under `/pages` as shown below: import { Inter } from 'next/font/google' // If loading a variable font, you don't need to specify the font weight const inter = Inter({ subsets: ['latin'] }) export default function MyApp({ Component, pageProps }) { return ( <main className={inter.className}> <Component {...pageProps} /> </main> ) } If you can't use a variable font, you will **need to specify a weight**: import { Roboto } from 'next/font/google' const roboto = Roboto({ weight: '400', subsets: ['latin'], }) export default function MyApp({ Component, pageProps }) { return ( <main className={roboto.className}> <Component {...pageProps} /> </main> ) } You can specify multiple weights and/or styles by using an array: const roboto = Roboto({ weight: ['400', '700'], style: ['normal', 'italic'], subsets: ['latin'], display: 'swap', }) > **Good to know**: Use an underscore (\_) for font names with multiple words. E.g. `Roboto Mono` should be imported as `Roboto_Mono`. ### Apply the font in `<head>` You can also use the font without a wrapper and `className` by injecting it inside the `<head>` as follows: import { Inter } from 'next/font/google' const inter = Inter({ subsets: ['latin'] }) export default function MyApp({ Component, pageProps }) { return ( <> <style jsx global>{` html { font-family: ${inter.style.fontFamily}; } `}</style> <Component {...pageProps} /> </> ) } ### Single page usage To use the font on a single page, add it to the specific page as shown below: import { Inter } from 'next/font/google' const inter = Inter({ subsets: ['latin'] }) export default function Home() { return ( <div className={inter.className}> <p>Hello World</p> </div> ) } ### Specifying a subset Google Fonts are automatically subset. This reduces the size of the font file and improves performance. You'll need to define which of these subsets you want to preload. Failing to specify any subsets while `preload` is `true` will result in a warning. This can be done by adding it to the function call: const inter = Inter({ subsets: ['latin'] }) View the Font API Reference for more information. ### Using Multiple Fonts You can import and use multiple fonts in your application. There are two approaches you can take. The first approach is to create a utility function that exports a font, imports it, and applies its `className` where needed. This ensures the font is preloaded only when it's rendered: import { Inter, Roboto_Mono } from 'next/font/google' export const inter = Inter({ subsets: ['latin'], display: 'swap', }) export const roboto_mono = Roboto_Mono({ subsets: ['latin'], display: 'swap', }) In the example above, `Inter` will be applied globally, and `Roboto Mono` can be imported and applied as needed. Alternatively, you can create a CSS variable and use it with your preferred CSS solution: html { font-family: var(--font-inter); } h1 { font-family: var(--font-roboto-mono); } In the example above, `Inter` will be applied globally, and any `<h1>` tags will be styled with `Roboto Mono`. > **Recommendation**: Use multiple fonts conservatively since each new font is an additional resource the client has to download. ## Local Fonts Import `next/font/local` and specify the `src` of your local font file. We recommend using variable fonts for the best performance and flexibility. import localFont from 'next/font/local' // Font files can be colocated inside of `pages` const myFont = localFont({ src: './my-font.woff2' }) export default function MyApp({ Component, pageProps }) { return ( <main className={myFont.className}> <Component {...pageProps} /> </main> ) } If you want to use multiple files for a single font family, `src` can be an array: const roboto = localFont({ src: [ { path: './Roboto-Regular.woff2', weight: '400', style: 'normal', }, { path: './Roboto-Italic.woff2', weight: '400', style: 'italic', }, { path: './Roboto-Bold.woff2', weight: '700', style: 'normal', }, { path: './Roboto-BoldItalic.woff2', weight: '700', style: 'italic', }, ], }) View the Font API Reference for more information. ## With Tailwind CSS `next/font` can be used with Tailwind CSS through a CSS variable. In the example below, we use the font `Inter` from `next/font/google` (you can use any font from Google or Local Fonts). Load your font with the `variable` option to define your CSS variable name and assign it to `inter`. Then, use `inter.variable` to add the CSS variable to your HTML document. import { Inter } from 'next/font/google' const inter = Inter({ subsets: ['latin'], variable: '--font-inter', }) export default function MyApp({ Component, pageProps }) { return ( <main className={`${inter.variable} font-sans`}> <Component {...pageProps} /> </main> ) } Finally, add the CSS variable to your Tailwind CSS config: /** @type {import('tailwindcss').Config} */ module.exports = { content: [ './pages/**/*.{js,ts,jsx,tsx}', './components/**/*.{js,ts,jsx,tsx}', './app/**/*.{js,ts,jsx,tsx}', ], theme: { extend: { fontFamily: { sans: ['var(--font-inter)'], mono: ['var(--font-roboto-mono)'], }, }, }, plugins: [], } You can now use the `font-sans` and `font-mono` utility classes to apply the font to your elements. ## Preloading When a font function is called on a page of your site, it is not globally available and preloaded on all routes. Rather, the font is only preloaded on the related route/s based on the type of file where it is used: * if it's a unique page, it is preloaded on the unique route for that page * if it's in the custom App, it is preloaded on all the routes of the site under `/pages` ## Reusing fonts Every time you call the `localFont` or Google font function, that font is hosted as one instance in your application. Therefore, if you load the same font function in multiple files, multiple instances of the same font are hosted. In this situation, it is recommended to do the following: * Call the font loader function in one shared file * Export it as a constant * Import the constant in each file where you would like to use this font --- ## Page: https://nextjs.org/docs/14/pages/building-your-application/optimizing/scripts ## Script Optimization ### Application Scripts To load a third-party script for all routes, import `next/script` and include the script directly in your custom `_app`: import Script from 'next/script' export default function MyApp({ Component, pageProps }) { return ( <> <Component {...pageProps} /> <Script src="https://example.com/script.js" /> </> ) } This script will load and execute when _any_ route in your application is accessed. Next.js will ensure the script will **only load once**, even if a user navigates between multiple pages. > **Recommendation**: We recommend only including third-party scripts in specific pages or layouts in order to minimize any unnecessary impact to performance. ### Strategy Although the default behavior of `next/script` allows you to load third-party scripts in any page or layout, you can fine-tune its loading behavior by using the `strategy` property: * `beforeInteractive`: Load the script before any Next.js code and before any page hydration occurs. * `afterInteractive`: (**default**) Load the script early but after some hydration on the page occurs. * `lazyOnload`: Load the script later during browser idle time. * `worker`: (experimental) Load the script in a web worker. Refer to the `next/script` API reference documentation to learn more about each strategy and their use cases. ### Offloading Scripts To A Web Worker (Experimental) > **Warning:** The `worker` strategy is not yet stable and does not yet work with the `app` directory. Use with caution. Scripts that use the `worker` strategy are offloaded and executed in a web worker with Partytown. This can improve the performance of your site by dedicating the main thread to the rest of your application code. This strategy is still experimental and can only be used if the `nextScriptWorkers` flag is enabled in `next.config.js`: module.exports = { experimental: { nextScriptWorkers: true, }, } Then, run `next` (normally `npm run dev` or `yarn dev`) and Next.js will guide you through the installation of the required packages to finish the setup: npm run dev You'll see instructions like these: Please install Partytown by running `npm install @builder.io/partytown` Once setup is complete, defining `strategy="worker"` will automatically instantiate Partytown in your application and offload the script to a web worker. import Script from 'next/script' export default function Home() { return ( <> <Script src="https://example.com/script.js" strategy="worker" /> </> ) } There are a number of trade-offs that need to be considered when loading a third-party script in a web worker. Please see Partytown's tradeoffs documentation for more information. ### Inline Scripts Inline scripts, or scripts not loaded from an external file, are also supported by the Script component. They can be written by placing the JavaScript within curly braces: <Script id="show-banner"> {`document.getElementById('banner').classList.remove('hidden')`} </Script> Or by using the `dangerouslySetInnerHTML` property: <Script id="show-banner" dangerouslySetInnerHTML={{ __html: `document.getElementById('banner').classList.remove('hidden')`, }} /> > **Warning**: An `id` property must be assigned for inline scripts in order for Next.js to track and optimize the script. ### Executing Additional Code Event handlers can be used with the Script component to execute additional code after a certain event occurs: * `onLoad`: Execute code after the script has finished loading. * `onReady`: Execute code after the script has finished loading and every time the component is mounted. * `onError`: Execute code if the script fails to load. These handlers will only work when `next/script` is imported and used inside of a Client Component where `"use client"` is defined as the first line of code: import Script from 'next/script' export default function Page() { return ( <> <Script src="https://example.com/script.js" onLoad={() => { console.log('Script has loaded') }} /> </> ) } Refer to the `next/script` API reference to learn more about each event handler and view examples. ### Additional Attributes There are many DOM attributes that can be assigned to a `<script>` element that are not used by the Script component, like `nonce` or custom data attributes. Including any additional attributes will automatically forward it to the final, optimized `<script>` element that is included in the HTML. import Script from 'next/script' export default function Page() { return ( <> <Script src="https://example.com/script.js" id="example-script" nonce="XUENAJFW" data-test="script" /> </> ) } --- ## Page: https://nextjs.org/docs/14/pages/building-your-application/optimizing/static-assets Next.js can serve static files, like images, under a folder called `public` in the root directory. Files inside `public` can then be referenced by your code starting from the base URL (`/`). For example, the file `public/avatars/me.png` can be viewed by visiting the `/avatars/me.png` path. The code to display that image might look like: import Image from 'next/image' export function Avatar({ id, alt }) { return <Image src={`/avatars/${id}.png`} alt={alt} width="64" height="64" /> } export function AvatarOfMe() { return <Avatar id="me" alt="A portrait of me" /> } ## Caching Next.js cannot safely cache assets in the `public` folder because they may change. The default caching headers applied are: Cache-Control: public, max-age=0 ## Robots, Favicons, and others The folder is also useful for `robots.txt`, `favicon.ico`, Google Site Verification, and any other static files (including `.html`). But make sure to not have a static file with the same name as a file in the `pages/` directory, as this will result in an error. Read more. > Good to know: > > * The directory must be named `public`. The name cannot be changed and it's the only directory used to serve static assets. > * Only assets that are in the `public` directory at build time will be served by Next.js. Files added at request time won't be available. We recommend using a third-party service like Vercel Blob for persistent file storage. --- ## Page: https://nextjs.org/docs/14/pages/building-your-application/optimizing/bundle-analyzer You are currently viewing documentation for version 14 of Next.js. `@next/bundle-analyzer` is a plugin for Next.js that helps you manage the size of your JavaScript modules. It generates a visual report of the size of each module and their dependencies. You can use the information to remove large dependencies, split your code, or only load some parts when needed, reducing the amount of data transferred to the client. ## Installation Install the plugin by running the following command: npm i @next/bundle-analyzer # or yarn add @next/bundle-analyzer # or pnpm add @next/bundle-analyzer Then, add the bundle analyzer's settings to your `next.config.js`. next.config.js const withBundleAnalyzer = require('@next/bundle-analyzer')({ enabled: process.env.ANALYZE === 'true', }) /** @type {import('next').NextConfig} */ const nextConfig = {} module.exports = withBundleAnalyzer(nextConfig) ## Analyzing your bundles Run the following command to analyze your bundles: ANALYZE=true npm run build # or ANALYZE=true yarn build # or ANALYZE=true pnpm build The report will open three new tabs in your browser, which you can inspect. Doing this regularly while you develop and before deploying your site can help you identify large bundles earlier, and architect your application to be more performant. --- ## Page: https://nextjs.org/docs/14/pages/building-your-application/optimizing/analytics Next.js has built-in support for measuring and reporting performance metrics. You can either use the `useReportWebVitals` hook to manage reporting yourself, or alternatively, Vercel provides a managed service to automatically collect and visualize metrics for you. ## Build Your Own import { useReportWebVitals } from 'next/web-vitals' function MyApp({ Component, pageProps }) { useReportWebVitals((metric) => { console.log(metric) }) return <Component {...pageProps} /> } View the API Reference for more information. ## Web Vitals Web Vitals are a set of useful metrics that aim to capture the user experience of a web page. The following web vitals are all included: * Time to First Byte (TTFB) * First Contentful Paint (FCP) * Largest Contentful Paint (LCP) * First Input Delay (FID) * Cumulative Layout Shift (CLS) * Interaction to Next Paint (INP) You can handle all the results of these metrics using the `name` property. import { useReportWebVitals } from 'next/web-vitals' function MyApp({ Component, pageProps }) { useReportWebVitals((metric) => { switch (metric.name) { case 'FCP': { // handle FCP results } case 'LCP': { // handle LCP results } // ... } }) return <Component {...pageProps} /> } ## Custom Metrics In addition to the core metrics listed above, there are some additional custom metrics that measure the time it takes for the page to hydrate and render: * `Next.js-hydration`: Length of time it takes for the page to start and finish hydrating (in ms) * `Next.js-route-change-to-render`: Length of time it takes for a page to start rendering after a route change (in ms) * `Next.js-render`: Length of time it takes for a page to finish render after a route change (in ms) You can handle all the results of these metrics separately: export function reportWebVitals(metric) { switch (metric.name) { case 'Next.js-hydration': // handle hydration results break case 'Next.js-route-change-to-render': // handle route-change to render results break case 'Next.js-render': // handle render results break default: break } } These metrics work in all browsers that support the User Timing API. ## Sending results to external systems You can send results to any endpoint to measure and track real user performance on your site. For example: useReportWebVitals((metric) => { const body = JSON.stringify(metric) const url = 'https://example.com/analytics' // Use `navigator.sendBeacon()` if available, falling back to `fetch()`. if (navigator.sendBeacon) { navigator.sendBeacon(url, body) } else { fetch(url, { body, method: 'POST', keepalive: true }) } }) > **Good to know**: If you use Google Analytics, using the `id` value can allow you to construct metric distributions manually (to calculate percentiles, etc.) > useReportWebVitals((metric) => { > // Use `window.gtag` if you initialized Google Analytics as this example: > // https://github.com/vercel/next.js/blob/canary/examples/with-google-analytics/pages/_app.js > window.gtag('event', metric.name, { > value: Math.round( > metric.name === 'CLS' ? metric.value * 1000 : metric.value > ), // values must be integers > event_label: metric.id, // id unique to current page load > non_interaction: true, // avoids affecting bounce rate. > }) > }) > > Read more about sending results to Google Analytics. --- ## Page: https://nextjs.org/docs/14/pages/building-your-application/optimizing/lazy-loading Lazy loading in Next.js helps improve the initial loading performance of an application by decreasing the amount of JavaScript needed to render a route. It allows you to defer loading of **Client Components** and imported libraries, and only include them in the client bundle when they're needed. For example, you might want to defer loading a modal until a user clicks to open it. There are two ways you can implement lazy loading in Next.js: 1. Using Dynamic Imports with `next/dynamic` 2. Using `React.lazy()` with Suspense By default, Server Components are automatically code split, and you can use streaming to progressively send pieces of UI from the server to the client. Lazy loading applies to Client Components. ## `next/dynamic` `next/dynamic` is a composite of `React.lazy()` and Suspense. It behaves the same way in the `app` and `pages` directories to allow for incremental migration. ## Examples By using `next/dynamic`, the header component will not be included in the page's initial JavaScript bundle. The page will render the Suspense `fallback` first, followed by the `Header` component when the `Suspense` boundary is resolved. import dynamic from 'next/dynamic' const DynamicHeader = dynamic(() => import('../components/header'), { loading: () => <p>Loading...</p>, }) export default function Home() { return <DynamicHeader /> } > **Good to know**: In `import('path/to/component')`, the path must be explicitly written. It can't be a template string nor a variable. Furthermore the `import()` has to be inside the `dynamic()` call for Next.js to be able to match webpack bundles / module ids to the specific `dynamic()` call and preload them before rendering. `dynamic()` can't be used inside of React rendering as it needs to be marked in the top level of the module for preloading to work, similar to `React.lazy`. ## With named exports To dynamically import a named export, you can return it from the Promise returned by `import()`: export function Hello() { return <p>Hello!</p> } // pages/index.js import dynamic from 'next/dynamic' const DynamicComponent = dynamic(() => import('../components/hello').then((mod) => mod.Hello) ) ## With no SSR To dynamically load a component on the client side, you can use the `ssr` option to disable server-rendering. This is useful if an external dependency or component relies on browser APIs like `window`. import dynamic from 'next/dynamic' const DynamicHeader = dynamic(() => import('../components/header'), { ssr: false, }) ## With external libraries This example uses the external library `fuse.js` for fuzzy search. The module is only loaded in the browser after the user types in the search input. import { useState } from 'react' const names = ['Tim', 'Joe', 'Bel', 'Lee'] export default function Page() { const [results, setResults] = useState() return ( <div> <input type="text" placeholder="Search" onChange={async (e) => { const { value } = e.currentTarget // Dynamically load fuse.js const Fuse = (await import('fuse.js')).default const fuse = new Fuse(names) setResults(fuse.search(value)) }} /> <pre>Results: {JSON.stringify(results, null, 2)}</pre> </div> ) } --- ## Page: https://nextjs.org/docs/14/pages/building-your-application/optimizing/instrumentation Instrumentation is the process of using code to integrate monitoring and logging tools into your application. This allows you to track the performance and behavior of your application, and to debug issues in production. ## Convention To set up instrumentation, create `instrumentation.ts|js` file in the **root directory** of your project (or inside the `src` folder if using one). Then, export a `register` function in the file. This function will be called **once** when a new Next.js server instance is initiated. For example, to use Next.js with OpenTelemetry and @vercel/otel: import { registerOTel } from '@vercel/otel' export function register() { registerOTel('next-app') } See the Next.js with OpenTelemetry example for a complete implementation. > **Good to know** > > * This feature is **experimental**. To use it, you must explicitly opt in by defining `experimental.instrumentationHook = true;` in your `next.config.js`. > * The `instrumentation` file should be in the root of your project and not inside the `app` or `pages` directory. If you're using the `src` folder, then place the file inside `src` alongside `pages` and `app`. > * If you use the `pageExtensions` config option to add a suffix, you will also need to update the `instrumentation` filename to match. ## Examples ### Importing files with side effects Sometimes, it may be useful to import a file in your code because of the side effects it will cause. For example, you might import a file that defines a set of global variables, but never explicitly use the imported file in your code. You would still have access to the global variables the package has declared. We recommend importing files using JavaScript `import` syntax within your `register` function. The following example demonstrates a basic usage of `import` in a `register` function: export async function register() { await import('package-with-side-effect') } > **Good to know:** > > We recommend importing the file from within the `register` function, rather than at the top of the file. By doing this, you can colocate all of your side effects in one place in your code, and avoid any unintended consequences from importing globally at the top of the file. ### Importing runtime-specific code Next.js calls `register` in all environments, so it's important to conditionally import any code that doesn't support specific runtimes (e.g. Edge or Node.js). You can use the `NEXT_RUNTIME` environment variable to get the current environment: export async function register() { if (process.env.NEXT_RUNTIME === 'nodejs') { await import('./instrumentation-node') } if (process.env.NEXT_RUNTIME === 'edge') { await import('./instrumentation-edge') } } --- ## Page: https://nextjs.org/docs/14/pages/building-your-application/optimizing/open-telemetry > **Good to know**: This feature is **experimental**, you need to explicitly opt-in by providing `experimental.instrumentationHook = true;` in your `next.config.js`. Observability is crucial for understanding and optimizing the behavior and performance of your Next.js app. As applications become more complex, it becomes increasingly difficult to identify and diagnose issues that may arise. By leveraging observability tools, such as logging and metrics, developers can gain insights into their application's behavior and identify areas for optimization. With observability, developers can proactively address issues before they become major problems and provide a better user experience. Therefore, it is highly recommended to use observability in your Next.js applications to improve performance, optimize resources, and enhance user experience. We recommend using OpenTelemetry for instrumenting your apps. It's a platform-agnostic way to instrument apps that allows you to change your observability provider without changing your code. Read Official OpenTelemetry docs for more information about OpenTelemetry and how it works. This documentation uses terms like _Span_, _Trace_ or _Exporter_ throughout this doc, all of which can be found in the OpenTelemetry Observability Primer. Next.js supports OpenTelemetry instrumentation out of the box, which means that we already instrumented Next.js itself. When you enable OpenTelemetry we will automatically wrap all your code like `getStaticProps` in _spans_ with helpful attributes. ## Getting Started OpenTelemetry is extensible but setting it up properly can be quite verbose. That's why we prepared a package `@vercel/otel` that helps you get started quickly. ### Using `@vercel/otel` To get started, you must install `@vercel/otel`: npm install @vercel/otel Next, create a custom `instrumentation.ts` (or `.js`) file in the **root directory** of the project (or inside `src` folder if using one): import { registerOTel } from '@vercel/otel' export function register() { registerOTel({ serviceName: 'next-app' }) } See the `@vercel/otel` documentation for additional configuration options. > **Good to know** > > * The `instrumentation` file should be in the root of your project and not inside the `app` or `pages` directory. If you're using the `src` folder, then place the file inside `src` alongside `pages` and `app`. > * If you use the `pageExtensions` config option to add a suffix, you will also need to update the `instrumentation` filename to match. > * We have created a basic with-opentelemetry example that you can use. ### Manual OpenTelemetry configuration The `@vercel/otel` package provides many configuration options and should serve most of common use cases. But if it doesn't suit your needs, you can configure OpenTelemetry manually. Firstly you need to install OpenTelemetry packages: npm install @opentelemetry/sdk-node @opentelemetry/resources @opentelemetry/semantic-conventions @opentelemetry/sdk-trace-node @opentelemetry/exporter-trace-otlp-http Now you can initialize `NodeSDK` in your `instrumentation.ts`. Unlike `@vercel/otel`, `NodeSDK` is not compatible with edge runtime, so you need to make sure that you are importing them only when `process.env.NEXT_RUNTIME === 'nodejs'`. We recommend creating a new file `instrumentation.node.ts` which you conditionally import only when using node: export async function register() { if (process.env.NEXT_RUNTIME === 'nodejs') { await import('./instrumentation.node.ts') } } import { NodeSDK } from '@opentelemetry/sdk-node' import { OTLPTraceExporter } from '@opentelemetry/exporter-trace-otlp-http' import { Resource } from '@opentelemetry/resources' import { SEMRESATTRS_SERVICE_NAME } from '@opentelemetry/semantic-conventions' import { SimpleSpanProcessor } from '@opentelemetry/sdk-trace-node' const sdk = new NodeSDK({ resource: new Resource({ [SEMRESATTRS_SERVICE_NAME]: 'next-app', }), spanProcessor: new SimpleSpanProcessor(new OTLPTraceExporter()), }) sdk.start() Doing this is equivalent to using `@vercel/otel`, but it's possible to modify and extend some features that are not exposed by the `@vercel/otel`. If edge runtime support is necessary, you will have to use `@vercel/otel`. ## Testing your instrumentation You need an OpenTelemetry collector with a compatible backend to test OpenTelemetry traces locally. We recommend using our OpenTelemetry dev environment. If everything works well you should be able to see the root server span labeled as `GET /requested/pathname`. All other spans from that particular trace will be nested under it. Next.js traces more spans than are emitted by default. To see more spans, you must set `NEXT_OTEL_VERBOSE=1`. ## Deployment ### Using OpenTelemetry Collector When you are deploying with OpenTelemetry Collector, you can use `@vercel/otel`. It will work both on Vercel and when self-hosted. #### Deploying on Vercel We made sure that OpenTelemetry works out of the box on Vercel. Follow Vercel documentation to connect your project to an observability provider. #### Self-hosting Deploying to other platforms is also straightforward. You will need to spin up your own OpenTelemetry Collector to receive and process the telemetry data from your Next.js app. To do this, follow the OpenTelemetry Collector Getting Started guide, which will walk you through setting up the collector and configuring it to receive data from your Next.js app. Once you have your collector up and running, you can deploy your Next.js app to your chosen platform following their respective deployment guides. ### Custom Exporters OpenTelemetry Collector is not necessary. You can use a custom OpenTelemetry exporter with `@vercel/otel` or manual OpenTelemetry configuration. ## Custom Spans You can add a custom span with OpenTelemetry APIs. npm install @opentelemetry/api The following example demonstrates a function that fetches GitHub stars and adds a custom `fetchGithubStars` span to track the fetch request's result: import { trace } from '@opentelemetry/api' export async function fetchGithubStars() { return await trace .getTracer('nextjs-example') .startActiveSpan('fetchGithubStars', async (span) => { try { return await getValue() } finally { span.end() } }) } The `register` function will execute before your code runs in a new environment. You can start creating new spans, and they should be correctly added to the exported trace. ## Default Spans in Next.js Next.js automatically instruments several spans for you to provide useful insights into your application's performance. Attributes on spans follow OpenTelemetry semantic conventions. We also add some custom attributes under the `next` namespace: * `next.span_name` - duplicates span name * `next.span_type` - each span type has a unique identifier * `next.route` - The route pattern of the request (e.g., `/[param]/user`). * `next.rsc` (true/false) - Whether the request is an RSC request, such as prefetch. * `next.page` * This is an internal value used by an app router. * You can think about it as a route to a special file (like `page.ts`, `layout.ts`, `loading.ts` and others) * It can be used as a unique identifier only when paired with `next.route` because `/layout` can be used to identify both `/(groupA)/layout.ts` and `/(groupB)/layout.ts` ### `[http.method] [next.route]` * `next.span_type`: `BaseServer.handleRequest` This span represents the root span for each incoming request to your Next.js application. It tracks the HTTP method, route, target, and status code of the request. Attributes: * Common HTTP attributes * `http.method` * `http.status_code` * Server HTTP attributes * `http.route` * `http.target` * `next.span_name` * `next.span_type` * `next.route` ### `render route (app) [next.route]` * `next.span_type`: `AppRender.getBodyResult`. This span represents the process of rendering a route in the app router. Attributes: * `next.span_name` * `next.span_type` * `next.route` ### `fetch [http.method] [http.url]` * `next.span_type`: `AppRender.fetch` This span represents the fetch request executed in your code. Attributes: * Common HTTP attributes * `http.method` * Client HTTP attributes * `http.url` * `net.peer.name` * `net.peer.port` (only if specified) * `next.span_name` * `next.span_type` This span can be turned off by setting `NEXT_OTEL_FETCH_DISABLED=1` in your environment. This is useful when you want to use a custom fetch instrumentation library. ### `executing api route (app) [next.route]` * `next.span_type`: `AppRouteRouteHandlers.runHandler`. This span represents the execution of an API route handler in the app router. Attributes: * `next.span_name` * `next.span_type` * `next.route` ### `getServerSideProps [next.route]` * `next.span_type`: `Render.getServerSideProps`. This span represents the execution of `getServerSideProps` for a specific route. Attributes: * `next.span_name` * `next.span_type` * `next.route` ### `getStaticProps [next.route]` * `next.span_type`: `Render.getStaticProps`. This span represents the execution of `getStaticProps` for a specific route. Attributes: * `next.span_name` * `next.span_type` * `next.route` ### `render route (pages) [next.route]` * `next.span_type`: `Render.renderDocument`. This span represents the process of rendering the document for a specific route. Attributes: * `next.span_name` * `next.span_type` * `next.route` ### `generateMetadata [next.page]` * `next.span_type`: `ResolveMetadata.generateMetadata`. This span represents the process of generating metadata for a specific page (a single route can have multiple of these spans). Attributes: * `next.span_name` * `next.span_type` * `next.page` ### `resolve page components` * `next.span_type`: `NextNodeServer.findPageComponents`. This span represents the process of resolving page components for a specific page. Attributes: * `next.span_name` * `next.span_type` * `next.route` ### `resolve segment modules` * `next.span_type`: `NextNodeServer.getLayoutOrPageModule`. This span represents loading of code modules for a layout or a page. Attributes: * `next.span_name` * `next.span_type` * `next.segment` ### `start response` * `next.span_type`: `NextNodeServer.startResponse`. This zero-length span represents the time when the first byte has been sent in the response. --- ## Page: https://nextjs.org/docs/14/pages/building-your-application/optimizing/third-party-libraries **`@next/third-parties`** is a library that provides a collection of components and utilities that improve the performance and developer experience of loading popular third-party libraries in your Next.js application. All third-party integrations provided by `@next/third-parties` have been optimized for performance and ease of use. ## Getting Started To get started, install the `@next/third-parties` library: npm install @next/third-parties@latest next@latest `@next/third-parties` is currently an **experimental** library under active development. We recommend installing it with the **latest** or **canary** flags while we work on adding more third-party integrations. ## Google Third-Parties All supported third-party libraries from Google can be imported from `@next/third-parties/google`. ### Google Tag Manager The `GoogleTagManager` component can be used to instantiate a Google Tag Manager container to your page. By default, it fetches the original inline script after hydration occurs on the page. To load Google Tag Manager for all routes, include the component directly in your custom `_app` and pass in your GTM container ID: import { GoogleTagManager } from '@next/third-parties/google' export default function MyApp({ Component, pageProps }) { return ( <> <Component {...pageProps} /> <GoogleTagManager gtmId="GTM-XYZ" /> </> ) } To load Google Tag Manager for a single route, include the component in your page file: import { GoogleTagManager } from '@next/third-parties/google' export default function Page() { return <GoogleTagManager gtmId="GTM-XYZ" /> } #### Sending Events The `sendGTMEvent` function can be used to track user interactions on your page by sending events using the `dataLayer` object. For this function to work, the `<GoogleTagManager />` component must be included in either a parent layout, page, or component, or directly in the same file. import { sendGTMEvent } from '@next/third-parties/google' export function EventButton() { return ( <div> <button onClick={() => sendGTMEvent({ event: 'buttonClicked', value: 'xyz' })} > Send Event </button> </div> ) } Refer to the Tag Manager developer documentation to learn about the different variables and events that can be passed into the function. #### Options Options to pass to the Google Tag Manager. For a full list of options, read the Google Tag Manager docs. | Name | Type | Description | | --- | --- | --- | | `gtmId` | Required | Your GTM container ID. Usually starts with `GTM-`. | | `dataLayer` | Optional | Data layer array to instantiate the container with. Defaults to an empty array. | | `dataLayerName` | Optional | Name of the data layer. Defaults to `dataLayer`. | | `auth` | Optional | Value of authentication parameter (`gtm_auth`) for environment snippets. | | `preview` | Optional | Value of preview parameter (`gtm_preview`) for environment snippets. | ### Google Analytics The `GoogleAnalytics` component can be used to include Google Analytics 4 to your page via the Google tag (`gtag.js`). By default, it fetches the original scripts after hydration occurs on the page. > **Recommendation**: If Google Tag Manager is already included in your application, you can configure Google Analytics directly using it, rather than including Google Analytics as a separate component. Refer to the documentation to learn more about the differences between Tag Manager and `gtag.js`. To load Google Analytics for all routes, include the component directly in your custom `_app` and pass in your measurement ID: import { GoogleAnalytics } from '@next/third-parties/google' export default function MyApp({ Component, pageProps }) { return ( <> <Component {...pageProps} /> <GoogleAnalytics gaId="G-XYZ" /> </> ) } To load Google Analytics for a single route, include the component in your page file: import { GoogleAnalytics } from '@next/third-parties/google' export default function Page() { return <GoogleAnalytics gaId="G-XYZ" /> } #### Sending Events The `sendGAEvent` function can be used to measure user interactions on your page by sending events using the `dataLayer` object. For this function to work, the `<GoogleAnalytics />` component must be included in either a parent layout, page, or component, or directly in the same file. import { sendGAEvent } from '@next/third-parties/google' export function EventButton() { return ( <div> <button onClick={() => sendGAEvent({ event: 'buttonClicked', value: 'xyz' })} > Send Event </button> </div> ) } Refer to the Google Analytics developer documentation to learn more about event parameters. #### Tracking Pageviews Google Analytics automatically tracks pageviews when the browser history state changes. This means that client-side navigations between Next.js routes will send pageview data without any configuration. To ensure that client-side navigations are being measured correctly, verify that the _“Enhanced Measurement”_ property is enabled in your Admin panel and the _“Page changes based on browser history events”_ checkbox is selected. > **Note**: If you decide to manually send pageview events, make sure to disable the default pageview measurement to avoid having duplicate data. Refer to the Google Analytics developer documentation to learn more. #### Options Options to pass to the `<GoogleAnalytics>` component. | Name | Type | Description | | --- | --- | --- | | `gaId` | Required | Your measurement ID. Usually starts with `G-`. | | `dataLayerName` | Optional | Name of the data layer. Defaults to `dataLayer`. | ### Google Maps Embed The `GoogleMapsEmbed` component can be used to add a Google Maps Embed to your page. By default, it uses the `loading` attribute to lazy-load the embed below the fold. import { GoogleMapsEmbed } from '@next/third-parties/google' export default function Page() { return ( <GoogleMapsEmbed apiKey="XYZ" height={200} width="100%" mode="place" q="Brooklyn+Bridge,New+York,NY" /> ) } #### Options Options to pass to the Google Maps Embed. For a full list of options, read the Google Map Embed docs. | Name | Type | Description | | --- | --- | --- | | `apiKey` | Required | Your api key. | | `mode` | Required | Map mode | | `height` | Optional | Height of the embed. Defaults to `auto`. | | `width` | Optional | Width of the embed. Defaults to `auto`. | | `style` | Optional | Pass styles to the iframe. | | `allowfullscreen` | Optional | Property to allow certain map parts to go full screen. | | `loading` | Optional | Defaults to lazy. Consider changing if you know your embed will be above the fold. | | `q` | Optional | Defines map marker location. _This may be required depending on the map mode_. | | `center` | Optional | Defines the center of the map view. | | `zoom` | Optional | Sets initial zoom level of the map. | | `maptype` | Optional | Defines type of map tiles to load. | | `language` | Optional | Defines the language to use for UI elements and for the display of labels on map tiles. | | `region` | Optional | Defines the appropriate borders and labels to display, based on geo-political sensitivities. | ### YouTube Embed The `YouTubeEmbed` component can be used to load and display a YouTube embed. This component loads faster by using `lite-youtube-embed` under the hood. import { YouTubeEmbed } from '@next/third-parties/google' export default function Page() { return <YouTubeEmbed videoid="ogfYd705cRs" height={400} params="controls=0" /> } #### Options | Name | Type | Description | | --- | --- | --- | | `videoid` | Required | YouTube video id. | | `width` | Optional | Width of the video container. Defaults to `auto` | | `height` | Optional | Height of the video container. Defaults to `auto` | | `playlabel` | Optional | A visually hidden label for the play button for accessibility. | | `params` | Optional | The video player params defined here. Params are passed as a query param string. Eg: `params="controls=0&start=10&end=30"` | | `style` | Optional | Used to apply styles to the video container. | --- ## Page: https://nextjs.org/docs/14/pages/building-your-application/configuring You are currently viewing documentation for version 14 of Next.js. Next.js allows you to customize your project to meet specific requirements. This includes integrations with TypeScript, ESlint, and more, as well as internal configuration options such as Absolute Imports and Environment Variables. --- ## Page: https://nextjs.org/docs/14/pages/building-your-application/configuring/typescript Next.js provides a TypeScript-first development experience for building your React application. It comes with built-in TypeScript support for automatically installing the necessary packages and configuring the proper settings. ## New Projects `create-next-app` now ships with TypeScript by default. npx create-next-app@latest ## Existing Projects Add TypeScript to your project by renaming a file to `.ts` / `.tsx`. Run `next dev` and `next build` to automatically install the necessary dependencies and add a `tsconfig.json` file with the recommended config options. If you already had a `jsconfig.json` file, copy the `paths` compiler option from the old `jsconfig.json` into the new `tsconfig.json` file, and delete the old `jsconfig.json` file. ## Minimum TypeScript Version It is highly recommended to be on at least `v4.5.2` of TypeScript to get syntax features such as type modifiers on import names and performance improvements. ## Static Generation and Server-side Rendering For `getStaticProps`, `getStaticPaths`, and `getServerSideProps`, you can use the `GetStaticProps`, `GetStaticPaths`, and `GetServerSideProps` types respectively: import { GetStaticProps, GetStaticPaths, GetServerSideProps } from 'next' export const getStaticProps = (async (context) => { // ... }) satisfies GetStaticProps export const getStaticPaths = (async () => { // ... }) satisfies GetStaticPaths export const getServerSideProps = (async (context) => { // ... }) satisfies GetServerSideProps > **Good to know:** `satisfies` was added to TypeScript in 4.9. We recommend upgrading to the latest version of TypeScript. ## API Routes The following is an example of how to use the built-in types for API routes: import type { NextApiRequest, NextApiResponse } from 'next' export default function handler(req: NextApiRequest, res: NextApiResponse) { res.status(200).json({ name: 'John Doe' }) } You can also type the response data: import type { NextApiRequest, NextApiResponse } from 'next' type Data = { name: string } export default function handler( req: NextApiRequest, res: NextApiResponse<Data> ) { res.status(200).json({ name: 'John Doe' }) } ## Custom `App` If you have a custom `App`, you can use the built-in type `AppProps` and change file name to `./pages/_app.tsx` like so: import type { AppProps } from 'next/app' export default function MyApp({ Component, pageProps }: AppProps) { return <Component {...pageProps} /> } ## Path aliases and baseUrl Next.js automatically supports the `tsconfig.json` `"paths"` and `"baseUrl"` options. You can learn more about this feature on the Module Path aliases documentation. ## Type checking next.config.js The `next.config.js` file must be a JavaScript file as it does not get parsed by Babel or TypeScript, however you can add some type checking in your IDE using JSDoc as below: // @ts-check /** * @type {import('next').NextConfig} **/ const nextConfig = { /* config options here */ } module.exports = nextConfig ## Incremental type checking Since `v10.2.1` Next.js supports incremental type checking when enabled in your `tsconfig.json`, this can help speed up type checking in larger applications. ## Ignoring TypeScript Errors Next.js fails your **production build** (`next build`) when TypeScript errors are present in your project. If you'd like Next.js to dangerously produce production code even when your application has errors, you can disable the built-in type checking step. If disabled, be sure you are running type checks as part of your build or deploy process, otherwise this can be very dangerous. Open `next.config.js` and enable the `ignoreBuildErrors` option in the `typescript` config: module.exports = { typescript: { // !! WARN !! // Dangerously allow production builds to successfully complete even if // your project has type errors. // !! WARN !! ignoreBuildErrors: true, }, } ## Custom Type Declarations When you need to declare custom types, you might be tempted to modify `next-env.d.ts`. However, this file is automatically generated, so any changes you make will be overwritten. Instead, you should create a new file, let's call it `new-types.d.ts`, and reference it in your `tsconfig.json`: { "compilerOptions": { "skipLibCheck": true //...truncated... }, "include": [ "new-types.d.ts", "next-env.d.ts", ".next/types/**/*.ts", "**/*.ts", "**/*.tsx" ], "exclude": ["node_modules"] } ## Version Changes | Version | Changes | | --- | --- | | `v13.2.0` | Statically typed links are available in beta. | | `v12.0.0` | SWC is now used by default to compile TypeScript and TSX for faster builds. | | `v10.2.1` | Incremental type checking support added when enabled in your `tsconfig.json`. | --- ## Page: https://nextjs.org/docs/14/pages/building-your-application/configuring/eslint Next.js provides an integrated ESLint experience out of the box. Add `next lint` as a script to `package.json`: { "scripts": { "lint": "next lint" } } Then run `npm run lint` or `yarn lint`: yarn lint If you don't already have ESLint configured in your application, you will be guided through the installation and configuration process. yarn lint > You'll see a prompt like this: > > ? How would you like to configure ESLint? > > ❯ Strict (recommended) > Base > Cancel One of the following three options can be selected: * **Strict**: Includes Next.js' base ESLint configuration along with a stricter Core Web Vitals rule-set. This is the recommended configuration for developers setting up ESLint for the first time. { "extends": "next/core-web-vitals" } * **Base**: Includes Next.js' base ESLint configuration. { "extends": "next" } * **Cancel**: Does not include any ESLint configuration. Only select this option if you plan on setting up your own custom ESLint configuration. If either of the two configuration options are selected, Next.js will automatically install `eslint` and `eslint-config-next` as dependencies in your application and create an `.eslintrc.json` file in the root of your project that includes your selected configuration. You can now run `next lint` every time you want to run ESLint to catch errors. Once ESLint has been set up, it will also automatically run during every build (`next build`). Errors will fail the build, while warnings will not. > If you do not want ESLint to run during `next build`, refer to the documentation for Ignoring ESLint. We recommend using an appropriate integration to view warnings and errors directly in your code editor during development. ## ESLint Config The default configuration (`eslint-config-next`) includes everything you need to have an optimal out-of-the-box linting experience in Next.js. If you do not have ESLint already configured in your application, we recommend using `next lint` to set up ESLint along with this configuration. > If you would like to use `eslint-config-next` along with other ESLint configurations, refer to the Additional Configurations section to learn how to do so without causing any conflicts. Recommended rule-sets from the following ESLint plugins are all used within `eslint-config-next`: * `eslint-plugin-react` * `eslint-plugin-react-hooks` * `eslint-plugin-next` This will take precedence over the configuration from `next.config.js`. ## ESLint Plugin Next.js provides an ESLint plugin, `eslint-plugin-next`, already bundled within the base configuration that makes it possible to catch common issues and problems in a Next.js application. The full set of rules is as follows: Enabled in the recommended configuration | | Rule | Description | | --- | --- | --- | | | @next/next/google-font-display | Enforce font-display behavior with Google Fonts. | | | @next/next/google-font-preconnect | Ensure `preconnect` is used with Google Fonts. | | | @next/next/inline-script-id | Enforce `id` attribute on `next/script` components with inline content. | | | @next/next/next-script-for-ga | Prefer `next/script` component when using the inline script for Google Analytics. | | | @next/next/no-assign-module-variable | Prevent assignment to the `module` variable. | | | @next/next/no-async-client-component | Prevent client components from being async functions. | | | @next/next/no-before-interactive-script-outside-document | Prevent usage of `next/script`'s `beforeInteractive` strategy outside of `pages/_document.js`. | | | @next/next/no-css-tags | Prevent manual stylesheet tags. | | | @next/next/no-document-import-in-page | Prevent importing `next/document` outside of `pages/_document.js`. | | | @next/next/no-duplicate-head | Prevent duplicate usage of `<Head>` in `pages/_document.js`. | | | @next/next/no-head-element | Prevent usage of `<head>` element. | | | @next/next/no-head-import-in-document | Prevent usage of `next/head` in `pages/_document.js`. | | | @next/next/no-html-link-for-pages | Prevent usage of `<a>` elements to navigate to internal Next.js pages. | | | @next/next/no-img-element | Prevent usage of `<img>` element due to slower LCP and higher bandwidth. | | | @next/next/no-page-custom-font | Prevent page-only custom fonts. | | | @next/next/no-script-component-in-head | Prevent usage of `next/script` in `next/head` component. | | | @next/next/no-styled-jsx-in-document | Prevent usage of `styled-jsx` in `pages/_document.js`. | | | @next/next/no-sync-scripts | Prevent synchronous scripts. | | | @next/next/no-title-in-document-head | Prevent usage of `<title>` with `Head` component from `next/document`. | | | @next/next/no-typos | Prevent common typos in Next.js's data fetching functions | | | @next/next/no-unwanted-polyfillio | Prevent duplicate polyfills from Polyfill.io. | If you already have ESLint configured in your application, we recommend extending from this plugin directly instead of including `eslint-config-next` unless a few conditions are met. Refer to the Recommended Plugin Ruleset to learn more. ### Custom Settings #### `rootDir` If you're using `eslint-plugin-next` in a project where Next.js isn't installed in your root directory (such as a monorepo), you can tell `eslint-plugin-next` where to find your Next.js application using the `settings` property in your `.eslintrc`: { "extends": "next", "settings": { "next": { "rootDir": "packages/my-app/" } } } `rootDir` can be a path (relative or absolute), a glob (i.e. `"packages/*/"`), or an array of paths and/or globs. ## Linting Custom Directories and Files By default, Next.js will run ESLint for all files in the `pages/`, `app/`, `components/`, `lib/`, and `src/` directories. However, you can specify which directories using the `dirs` option in the `eslint` config in `next.config.js` for production builds: module.exports = { eslint: { dirs: ['pages', 'utils'], // Only run ESLint on the 'pages' and 'utils' directories during production builds (next build) }, } Similarly, the `--dir` and `--file` flags can be used for `next lint` to lint specific directories and files: next lint --dir pages --dir utils --file bar.js ## Caching To improve performance, information of files processed by ESLint are cached by default. This is stored in `.next/cache` or in your defined build directory. If you include any ESLint rules that depend on more than the contents of a single source file and need to disable the cache, use the `--no-cache` flag with `next lint`. next lint --no-cache ## Disabling Rules If you would like to modify or disable any rules provided by the supported plugins (`react`, `react-hooks`, `next`), you can directly change them using the `rules` property in your `.eslintrc`: { "extends": "next", "rules": { "react/no-unescaped-entities": "off", "@next/next/no-page-custom-font": "off" } } ### Core Web Vitals The `next/core-web-vitals` rule set is enabled when `next lint` is run for the first time and the **strict** option is selected. { "extends": "next/core-web-vitals" } `next/core-web-vitals` updates `eslint-plugin-next` to error on a number of rules that are warnings by default if they affect Core Web Vitals. > The `next/core-web-vitals` entry point is automatically included for new applications built with Create Next App. ### TypeScript In addition to the Next.js ESLint rules, `create-next-app --typescript` will also add TypeScript-specific lint rules with `next/typescript` to your config: { "extends": ["next/core-web-vitals", "next/typescript"] } Those rules are based on `plugin:@typescript-eslint/recommended`. See typescript-eslint > Configs for more details. ## Usage With Other Tools ### Prettier ESLint also contains code formatting rules, which can conflict with your existing Prettier setup. We recommend including eslint-config-prettier in your ESLint config to make ESLint and Prettier work together. First, install the dependency: npm install --save-dev eslint-config-prettier yarn add --dev eslint-config-prettier pnpm add --save-dev eslint-config-prettier bun add --dev eslint-config-prettier Then, add `prettier` to your existing ESLint config: { "extends": ["next", "prettier"] } ### lint-staged If you would like to use `next lint` with lint-staged to run the linter on staged git files, you'll have to add the following to the `.lintstagedrc.js` file in the root of your project in order to specify usage of the `--file` flag. const path = require('path') const buildEslintCommand = (filenames) => `next lint --fix --file ${filenames .map((f) => path.relative(process.cwd(), f)) .join(' --file ')}` module.exports = { '*.{js,jsx,ts,tsx}': [buildEslintCommand], } ## Migrating Existing Config ### Recommended Plugin Ruleset If you already have ESLint configured in your application and any of the following conditions are true: * You have one or more of the following plugins already installed (either separately or through a different config such as `airbnb` or `react-app`): * `react` * `react-hooks` * `jsx-a11y` * `import` * You've defined specific `parserOptions` that are different from how Babel is configured within Next.js (this is not recommended unless you have customized your Babel configuration) * You have `eslint-plugin-import` installed with Node.js and/or TypeScript resolvers defined to handle imports Then we recommend either removing these settings if you prefer how these properties have been configured within `eslint-config-next` or extending directly from the Next.js ESLint plugin instead: module.exports = { extends: [ //... 'plugin:@next/next/recommended', ], } The plugin can be installed normally in your project without needing to run `next lint`: npm install --save-dev @next/eslint-plugin-next yarn add --dev @next/eslint-plugin-next pnpm add --save-dev @next/eslint-plugin-next bun add --dev @next/eslint-plugin-next This eliminates the risk of collisions or errors that can occur due to importing the same plugin or parser across multiple configurations. ### Additional Configurations If you already use a separate ESLint configuration and want to include `eslint-config-next`, ensure that it is extended last after other configurations. For example: { "extends": ["eslint:recommended", "next"] } The `next` configuration already handles setting default values for the `parser`, `plugins` and `settings` properties. There is no need to manually re-declare any of these properties unless you need a different configuration for your use case. If you include any other shareable configurations, **you will need to make sure that these properties are not overwritten or modified**. Otherwise, we recommend removing any configurations that share behavior with the `next` configuration or extending directly from the Next.js ESLint plugin as mentioned above. --- ## Page: https://nextjs.org/docs/14/pages/building-your-application/configuring/environment-variables Examples * Environment Variables Next.js comes with built-in support for environment variables, which allows you to do the following: * Use `.env.local` to load environment variables * Bundle environment variables for the browser by prefixing with `NEXT_PUBLIC_` ## Loading Environment Variables Next.js has built-in support for loading environment variables from `.env.local` into `process.env`. DB_HOST=localhost DB_USER=myuser DB_PASS=mypassword This loads `process.env.DB_HOST`, `process.env.DB_USER`, and `process.env.DB_PASS` into the Node.js environment automatically allowing you to use them in Next.js data fetching methods and API routes. For example, using `getStaticProps`: export async function getStaticProps() { const db = await myDB.connect({ host: process.env.DB_HOST, username: process.env.DB_USER, password: process.env.DB_PASS, }) // ... } ### Referencing Other Variables Next.js will automatically expand variables that use `$` to reference other variables e.g. `$VARIABLE` inside of your `.env*` files. This allows you to reference other secrets. For example: TWITTER_USER=nextjs TWITTER_URL=https://twitter.com/$TWITTER_USER In the above example, `process.env.TWITTER_URL` would be set to `https://twitter.com/nextjs`. > **Good to know**: If you need to use variable with a `$` in the actual value, it needs to be escaped e.g. `\$`. ## Bundling Environment Variables for the Browser Non-`NEXT_PUBLIC_` environment variables are only available in the Node.js environment, meaning they aren't accessible to the browser (the client runs in a different _environment_). In order to make the value of an environment variable accessible in the browser, Next.js can "inline" a value, at build time, into the js bundle that is delivered to the client, replacing all references to `process.env.[variable]` with a hard-coded value. To tell it to do this, you just have to prefix the variable with `NEXT_PUBLIC_`. For example: NEXT_PUBLIC_ANALYTICS_ID=abcdefghijk This will tell Next.js to replace all references to `process.env.NEXT_PUBLIC_ANALYTICS_ID` in the Node.js environment with the value from the environment in which you run `next build`, allowing you to use it anywhere in your code. It will be inlined into any JavaScript sent to the browser. > **Note**: After being built, your app will no longer respond to changes to these environment variables. For instance, if you use a Heroku pipeline to promote slugs built in one environment to another environment, or if you build and deploy a single Docker image to multiple environments, all `NEXT_PUBLIC_` variables will be frozen with the value evaluated at build time, so these values need to be set appropriately when the project is built. If you need access to runtime environment values, you'll have to setup your own API to provide them to the client (either on demand or during initialization). import setupAnalyticsService from '../lib/my-analytics-service' // 'NEXT_PUBLIC_ANALYTICS_ID' can be used here as it's prefixed by 'NEXT_PUBLIC_'. // It will be transformed at build time to `setupAnalyticsService('abcdefghijk')`. setupAnalyticsService(process.env.NEXT_PUBLIC_ANALYTICS_ID) function HomePage() { return <h1>Hello World</h1> } export default HomePage Note that dynamic lookups will _not_ be inlined, such as: // This will NOT be inlined, because it uses a variable const varName = 'NEXT_PUBLIC_ANALYTICS_ID' setupAnalyticsService(process.env[varName]) // This will NOT be inlined, because it uses a variable const env = process.env setupAnalyticsService(env.NEXT_PUBLIC_ANALYTICS_ID) ### Runtime Environment Variables Next.js can support both build time and runtime environment variables. **By default, environment variables are only available on the server**. To expose an environment variable to the browser, it must be prefixed with `NEXT_PUBLIC_`. However, these public environment variables will be inlined into the JavaScript bundle during `next build`. To read runtime environment variables, we recommend using `getServerSideProps` or incrementally adopting the App Router. With the App Router, we can safely read environment variables on the server during dynamic rendering. This allows you to use a singular Docker image that can be promoted through multiple environments with different values. import { unstable_noStore as noStore } from 'next/cache' export default function Component() { noStore() // cookies(), headers(), and other dynamic functions // will also opt into dynamic rendering, meaning // this env variable is evaluated at runtime const value = process.env.MY_VALUE // ... } **Good to know:** * You can run code on server startup using the `register` function. * We do not recommend using the runtimeConfig option, as this does not work with the standalone output mode. Instead, we recommend incrementally adopting the App Router. ## Default Environment Variables In general only one `.env.local` file is needed. However, sometimes you might want to add some defaults for the `development` (`next dev`) or `production` (`next start`) environment. Next.js allows you to set defaults in `.env` (all environments), `.env.development` (development environment), and `.env.production` (production environment). `.env.local` always overrides the defaults set. > **Good to know**: `.env`, `.env.development`, and `.env.production` files should be included in your repository as they define defaults. **`.env*.local` should be added to `.gitignore`**, as those files are intended to be ignored. `.env.local` is where secrets can be stored. ## Environment Variables on Vercel When deploying your Next.js application to Vercel, Environment Variables can be configured in the Project Settings. All types of Environment Variables should be configured there. Even Environment Variables used in Development – which can be downloaded onto your local device afterwards. If you've configured Development Environment Variables you can pull them into a `.env.local` for usage on your local machine using the following command: vercel env pull .env.local > **Good to know**: When deploying your Next.js application to Vercel, your environment variables in `.env*` files will not be made available to Edge Runtime, unless their name are prefixed with `NEXT_PUBLIC_`. We strongly recommend managing your environment variables in Project Settings instead, from where all environment variables are available. ## Test Environment Variables Apart from `development` and `production` environments, there is a 3rd option available: `test`. In the same way you can set defaults for development or production environments, you can do the same with a `.env.test` file for the `testing` environment (though this one is not as common as the previous two). Next.js will not load environment variables from `.env.development` or `.env.production` in the `testing` environment. This one is useful when running tests with tools like `jest` or `cypress` where you need to set specific environment vars only for testing purposes. Test default values will be loaded if `NODE_ENV` is set to `test`, though you usually don't need to do this manually as testing tools will address it for you. There is a small difference between `test` environment, and both `development` and `production` that you need to bear in mind: `.env.local` won't be loaded, as you expect tests to produce the same results for everyone. This way every test execution will use the same env defaults across different executions by ignoring your `.env.local` (which is intended to override the default set). > **Good to know**: similar to Default Environment Variables, `.env.test` file should be included in your repository, but `.env.test.local` shouldn't, as `.env*.local` are intended to be ignored through `.gitignore`. While running unit tests you can make sure to load your environment variables the same way Next.js does by leveraging the `loadEnvConfig` function from the `@next/env` package. // The below can be used in a Jest global setup file or similar for your testing set-up import { loadEnvConfig } from '@next/env' export default async () => { const projectDir = process.cwd() loadEnvConfig(projectDir) } ## Environment Variable Load Order Environment variables are looked up in the following places, in order, stopping once the variable is found. 1. `process.env` 2. `.env.$(NODE_ENV).local` 3. `.env.local` (Not checked when `NODE_ENV` is `test`.) 4. `.env.$(NODE_ENV)` 5. `.env` For example, if `NODE_ENV` is `development` and you define a variable in both `.env.development.local` and `.env`, the value in `.env.development.local` will be used. > **Good to know**: The allowed values for `NODE_ENV` are `production`, `development` and `test`. ## Good to know * If you are using a `/src` directory, `.env.*` files should remain in the root of your project. * If the environment variable `NODE_ENV` is unassigned, Next.js automatically assigns `development` when running the `next dev` command, or `production` for all other commands. ## Version History | Version | Changes | | --- | --- | | `v9.4.0` | Support `.env` and `NEXT_PUBLIC_` introduced. | --- ## Page: https://nextjs.org/docs/14/pages/building-your-application/configuring/absolute-imports-and-module-aliases Examples * Absolute Imports and Aliases Next.js has in-built support for the `"paths"` and `"baseUrl"` options of `tsconfig.json` and `jsconfig.json` files. These options allow you to alias project directories to absolute paths, making it easier to import modules. For example: // before import { Button } from '../../../components/button' // after import { Button } from '@/components/button' > **Good to know**: `create-next-app` will prompt to configure these options for you. ## Absolute Imports The `baseUrl` configuration option allows you to import directly from the root of the project. An example of this configuration: { "compilerOptions": { "baseUrl": "." } } export default function Button() { return <button>Click me</button> } import Button from 'components/button' export default function HomePage() { return ( <> <h1>Hello World</h1> <Button /> </> ) } ## Module Aliases In addition to configuring the `baseUrl` path, you can use the `"paths"` option to "alias" module paths. For example, the following configuration maps `@/components/*` to `components/*`: { "compilerOptions": { "baseUrl": ".", "paths": { "@/components/*": ["components/*"] } } } export default function Button() { return <button>Click me</button> } import Button from '@/components/button' export default function HomePage() { return ( <> <h1>Hello World</h1> <Button /> </> ) } Each of the `"paths"` are relative to the `baseUrl` location. For example: // tsconfig.json or jsconfig.json { "compilerOptions": { "baseUrl": "src/", "paths": { "@/styles/*": ["styles/*"], "@/components/*": ["components/*"] } } } // pages/index.js import Button from '@/components/button' import '@/styles/styles.css' import Helper from 'utils/helper' export default function HomePage() { return ( <Helper> <h1>Hello World</h1> <Button /> </Helper> ) } --- ## Page: https://nextjs.org/docs/14/pages/building-your-application/configuring/src-directory You are currently viewing documentation for version 14 of Next.js. As an alternative to having the special Next.js `app` or `pages` directories in the root of your project, Next.js also supports the common pattern of placing application code under the `src` directory. This separates application code from project configuration files which mostly live in the root of a project, which is preferred by some individuals and teams. To use the `src` directory, move the `app` Router folder or `pages` Router folder to `src/app` or `src/pages` respectively.  > **Good to know** > > * The `/public` directory should remain in the root of your project. > * Config files like `package.json`, `next.config.js` and `tsconfig.json` should remain in the root of your project. > * `.env.*` files should remain in the root of your project. > * `src/app` or `src/pages` will be ignored if `app` or `pages` are present in the root directory. > * If you're using `src`, you'll probably also move other application folders such as `/components` or `/lib`. > * If you're using Middleware, ensure it is placed inside the `src` directory. > * If you're using Tailwind CSS, you'll need to add the `/src` prefix to the `tailwind.config.js` file in the content section. > * If you are using TypeScript paths for imports such as `@/*`, you should update the `paths` object in `tsconfig.json` to include `src/`. --- ## Page: https://nextjs.org/docs/14/pages/building-your-application/configuring/mdx ## Markdown and MDX Markdown is a lightweight markup language used to format text. It allows you to write using plain text syntax and convert it to structurally valid HTML. It's commonly used for writing content on websites and blogs. You write... I **love** using [Next.js](https://nextjs.org/) Output: <p>I <strong>love</strong> using <a href="https://nextjs.org/">Next.js</a></p> MDX is a superset of markdown that lets you write JSX directly in your markdown files. It is a powerful way to add dynamic interactivity and embed React components within your content. Next.js can support both local MDX content inside your application, as well as remote MDX files fetched dynamically on the server. The Next.js plugin handles transforming markdown and React components into HTML, including support for usage in Server Components (the default in App Router). The `@next/mdx` package is used to configure Next.js so it can process markdown and MDX. **It sources data from local files**, allowing you to create pages with a `.mdx` extension, directly in your `/pages` or `/app` directory. Let's walk through how to configure and use MDX with Next.js. ## Getting Started Install packages needed to render MDX: npm install @next/mdx @mdx-js/loader @mdx-js/react @types/mdx Update the `next.config.js` file at your project's root to configure it to use MDX: const withMDX = require('@next/mdx')() /** @type {import('next').NextConfig} */ const nextConfig = { // Configure `pageExtensions` to include MDX files pageExtensions: ['js', 'jsx', 'mdx', 'ts', 'tsx'], // Optionally, add any other Next.js config below } module.exports = withMDX(nextConfig) Then, create a new MDX page within the `/pages` directory: your-project ├── pages │ └── my-mdx-page.mdx └── package.json Now you can use markdown and import React components directly inside your MDX page: import { MyComponent } from 'my-components' # Welcome to my MDX page! This is some **bold** and _italics_ text. This is a list in markdown: - One - Two - Three Checkout my React component: <MyComponent /> Navigating to the `/my-mdx-page` route should display your rendered MDX. ## Remote MDX If your markdown or MDX files or content lives _somewhere else_, you can fetch it dynamically on the server. This is useful for content stored in a separate local folder, CMS, database, or anywhere else. A popular community package for this use is `next-mdx-remote`. > **Good to know**: Please proceed with caution. MDX compiles to JavaScript and is executed on the server. You should only fetch MDX content from a trusted source, otherwise this can lead to remote code execution (RCE). The following example uses `next-mdx-remote`: import { serialize } from 'next-mdx-remote/serialize' import { MDXRemote, MDXRemoteSerializeResult } from 'next-mdx-remote' interface Props { mdxSource: MDXRemoteSerializeResult } export default function RemoteMdxPage({ mdxSource }: Props) { return <MDXRemote {...mdxSource} /> } export async function getStaticProps() { // MDX text - can be from a local file, database, CMS, fetch, anywhere... const res = await fetch('https:...') const mdxText = await res.text() const mdxSource = await serialize(mdxText) return { props: { mdxSource } } } Navigating to the `/my-mdx-page-remote` route should display your rendered MDX. ## Layouts To share a layout around MDX pages, create a layout component: export default function MdxLayout({ children }: { children: React.ReactNode }) { // Create any shared layout or styles here return <div style={{ color: 'blue' }}>{children}</div> } Then, import the layout component into the MDX page, wrap the MDX content in the layout, and export it: import MdxLayout from '../components/mdx-layout' # Welcome to my MDX page! export default function MDXPage({ children }) { return <MdxLayout>{children}</MdxLayout> } ## Remark and Rehype Plugins You can optionally provide `remark` and `rehype` plugins to transform the MDX content. For example, you can use `remark-gfm` to support GitHub Flavored Markdown. Since the `remark` and `rehype` ecosystem is ESM only, you'll need to use `next.config.mjs` as the configuration file. import remarkGfm from 'remark-gfm' import createMDX from '@next/mdx' /** @type {import('next').NextConfig} */ const nextConfig = { // Configure `pageExtensions`` to include MDX files pageExtensions: ['js', 'jsx', 'mdx', 'ts', 'tsx'], // Optionally, add any other Next.js config below } const withMDX = createMDX({ // Add markdown plugins here, as desired options: { remarkPlugins: [remarkGfm], rehypePlugins: [], }, }) // Wrap MDX and Next.js config with each other export default withMDX(nextConfig) ## Frontmatter Frontmatter is a YAML like key/value pairing that can be used to store data about a page. `@next/mdx` does **not** support frontmatter by default, though there are many solutions for adding frontmatter to your MDX content, such as: * remark-frontmatter * remark-mdx-frontmatter * gray-matter. To access page metadata with `@next/mdx`, you can export a metadata object from within the `.mdx` file: export const metadata = { author: 'John Doe', } # My MDX page ## Custom Elements One of the pleasant aspects of using markdown, is that it maps to native `HTML` elements, making writing fast, and intuitive: This is a list in markdown: - One - Two - Three The above generates the following `HTML`: <p>This is a list in markdown:</p> <ul> <li>One</li> <li>Two</li> <li>Three</li> </ul> When you want to style your own elements for a custom feel to your website or application, you can pass in shortcodes. These are your own custom components that map to `HTML` elements. To do this, create a `mdx-components.tsx` file at the root of your application (the parent folder of `pages/` or `src/`) and add custom elements: import type { MDXComponents } from 'mdx/types' import Image, { ImageProps } from 'next/image' // This file allows you to provide custom React components // to be used in MDX files. You can import and use any // React component you want, including inline styles, // components from other libraries, and more. export function useMDXComponents(components: MDXComponents): MDXComponents { return { // Allows customizing built-in components, e.g. to add styling. h1: ({ children }) => <h1 style={{ fontSize: '100px' }}>{children}</h1>, img: (props) => ( <Image sizes="100vw" style={{ width: '100%', height: 'auto' }} {...(props as ImageProps)} /> ), ...components, } } ## Deep Dive: How do you transform markdown into HTML? React does not natively understand markdown. The markdown plaintext needs to first be transformed into HTML. This can be accomplished with `remark` and `rehype`. `remark` is an ecosystem of tools around markdown. `rehype` is the same, but for HTML. For example, the following code snippet transforms markdown into HTML: import { unified } from 'unified' import remarkParse from 'remark-parse' import remarkRehype from 'remark-rehype' import rehypeSanitize from 'rehype-sanitize' import rehypeStringify from 'rehype-stringify' main() async function main() { const file = await unified() .use(remarkParse) // Convert into markdown AST .use(remarkRehype) // Transform to HTML AST .use(rehypeSanitize) // Sanitize HTML input .use(rehypeStringify) // Convert AST into serialized HTML .process('Hello, Next.js!') console.log(String(file)) // <p>Hello, Next.js!</p> } The `remark` and `rehype` ecosystem contains plugins for syntax highlighting, linking headings, generating a table of contents, and more. When using `@next/mdx` as shown above, you **do not** need to use `remark` or `rehype` directly, as it is handled for you. We're describing it here for a deeper understanding of what the `@next/mdx` package is doing underneath. ## Using the Rust-based MDX compiler (Experimental) Next.js supports a new MDX compiler written in Rust. This compiler is still experimental and is not recommended for production use. To use the new compiler, you need to configure `next.config.js` when you pass it to `withMDX`: module.exports = withMDX({ experimental: { mdxRs: true, }, }) ## Helpful Links * MDX * `@next/mdx` * remark * rehype * Markdoc --- ## Page: https://nextjs.org/docs/14/pages/building-your-application/configuring/amp Examples * AMP With Next.js you can turn any React page into an AMP page, with minimal config, and without leaving React. You can read more about AMP in the official amp.dev site. ## Enabling AMP To enable AMP support for a page, and to learn more about the different AMP configs, read the API documentation for `next/amp`. ## Caveats * Only CSS-in-JS is supported. CSS Modules aren't supported by AMP pages at the moment. You can contribute CSS Modules support to Next.js. ## Adding AMP Components The AMP community provides many components to make AMP pages more interactive. Next.js will automatically import all components used on a page and there is no need to manually import AMP component scripts: export const config = { amp: true } function MyAmpPage() { const date = new Date() return ( <div> <p>Some time: {date.toJSON()}</p> <amp-timeago width="0" height="15" datetime={date.toJSON()} layout="responsive" > . </amp-timeago> </div> ) } export default MyAmpPage The above example uses the `amp-timeago` component. By default, the latest version of a component is always imported. If you want to customize the version, you can use `next/head`, as in the following example: import Head from 'next/head' export const config = { amp: true } function MyAmpPage() { const date = new Date() return ( <div> <Head> <script async key="amp-timeago" custom-element="amp-timeago" src="https://cdn.ampproject.org/v0/amp-timeago-0.1.js" /> </Head> <p>Some time: {date.toJSON()}</p> <amp-timeago width="0" height="15" datetime={date.toJSON()} layout="responsive" > . </amp-timeago> </div> ) } export default MyAmpPage ## AMP Validation AMP pages are automatically validated with amphtml-validator during development. Errors and warnings will appear in the terminal where you started Next.js. Pages are also validated during Static HTML export and any warnings / errors will be printed to the terminal. Any AMP errors will cause the export to exit with status code `1` because the export is not valid AMP. ### Custom Validators You can set up custom AMP validator in `next.config.js` as shown below: module.exports = { amp: { validator: './custom_validator.js', }, } ### Skip AMP Validation To turn off AMP validation add the following code to `next.config.js` experimental: { amp: { skipValidation: true } } ### AMP in Static HTML Export When using Static HTML export statically prerender pages, Next.js will detect if the page supports AMP and change the exporting behavior based on that. For example, the hybrid AMP page `pages/about.js` would output: * `out/about.html` - HTML page with client-side React runtime * `out/about.amp.html` - AMP page And if `pages/about.js` is an AMP-only page, then it would output: * `out/about.html` - Optimized AMP page Next.js will automatically insert a link to the AMP version of your page in the HTML version, so you don't have to, like so: <link rel="amphtml" href="/about.amp.html" /> And the AMP version of your page will include a link to the HTML page: <link rel="canonical" href="/about" /> When `trailingSlash` is enabled the exported pages for `pages/about.js` would be: * `out/about/index.html` - HTML page * `out/about.amp/index.html` - AMP page ## TypeScript AMP currently doesn't have built-in types for TypeScript, but it's in their roadmap (#13791). As a workaround you can manually create a file called `amp.d.ts` inside your project and add these custom types. --- ## Page: https://nextjs.org/docs/14/pages/building-your-application/configuring/babel Examples * Customizing babel configuration Next.js includes the `next/babel` preset to your app, which includes everything needed to compile React applications and server-side code. But if you want to extend the default Babel configs, it's also possible. ## Adding Presets and Plugins To start, you only need to define a `.babelrc` file (or `babel.config.js`) in the root directory of your project. If such a file is found, it will be considered as the _source of truth_, and therefore it needs to define what Next.js needs as well, which is the `next/babel` preset. Here's an example `.babelrc` file: { "presets": ["next/babel"], "plugins": [] } You can take a look at this file to learn about the presets included by `next/babel`. To add presets/plugins **without configuring them**, you can do it this way: { "presets": ["next/babel"], "plugins": ["@babel/plugin-proposal-do-expressions"] } ## Customizing Presets and Plugins To add presets/plugins **with custom configuration**, do it on the `next/babel` preset like so: { "presets": [ [ "next/babel", { "preset-env": {}, "transform-runtime": {}, "styled-jsx": {}, "class-properties": {} } ] ], "plugins": [] } To learn more about the available options for each config, visit babel's documentation site. > **Good to know**: > > * Next.js uses the **current** Node.js version for server-side compilations. > * The `modules` option on `"preset-env"` should be kept to `false`, otherwise webpack code splitting is turned off. --- ## Page: https://nextjs.org/docs/14/pages/building-your-application/configuring/post-css Examples * Tailwind CSS Example ## Default Behavior Next.js compiles CSS for its built-in CSS support using PostCSS. Out of the box, with no configuration, Next.js compiles CSS with the following transformations: * Autoprefixer automatically adds vendor prefixes to CSS rules (back to IE11). * Cross-browser Flexbox bugs are corrected to behave like the spec. * New CSS features are automatically compiled for Internet Explorer 11 compatibility: * `all` Property * Break Properties * `font-variant` Property * Gap Properties * Media Query Ranges By default, CSS Grid and Custom Properties (CSS variables) are **not compiled** for IE11 support. To compile CSS Grid Layout for IE11, you can place the following comment at the top of your CSS file: /* autoprefixer grid: autoplace */ You can also enable IE11 support for CSS Grid Layout in your entire project by configuring autoprefixer with the configuration shown below (collapsed). See "Customizing Plugins" below for more information. Click to view the configuration to enable CSS Grid Layout { "plugins": [ "postcss-flexbugs-fixes", [ "postcss-preset-env", { "autoprefixer": { "flexbox": "no-2009", "grid": "autoplace" }, "stage": 3, "features": { "custom-properties": false } } ] ] } CSS variables are not compiled because it is not possible to safely do so. If you must use variables, consider using something like Sass variables which are compiled away by Sass. ## Customizing Target Browsers Next.js allows you to configure the target browsers (for Autoprefixer and compiled css features) through Browserslist. To customize browserslist, create a `browserslist` key in your `package.json` like so: { "browserslist": [">0.3%", "not dead", "not op_mini all"] } You can use the browsersl.ist tool to visualize what browsers you are targeting. ## CSS Modules No configuration is needed to support CSS Modules. To enable CSS Modules for a file, rename the file to have the extension `.module.css`. You can learn more about Next.js' CSS Module support here. ## Customizing Plugins > **Warning**: When you define a custom PostCSS configuration file, Next.js **completely disables** the default behavior. Be sure to manually configure all the features you need compiled, including Autoprefixer. You also need to install any plugins included in your custom configuration manually, i.e. `npm install postcss-flexbugs-fixes postcss-preset-env`. To customize the PostCSS configuration, create a `postcss.config.json` file in the root of your project. This is the default configuration used by Next.js: { "plugins": [ "postcss-flexbugs-fixes", [ "postcss-preset-env", { "autoprefixer": { "flexbox": "no-2009" }, "stage": 3, "features": { "custom-properties": false } } ] ] } > **Good to know**: Next.js also allows the file to be named `.postcssrc.json`, or, to be read from the `postcss` key in `package.json`. It is also possible to configure PostCSS with a `postcss.config.js` file, which is useful when you want to conditionally include plugins based on environment: module.exports = { plugins: process.env.NODE_ENV === 'production' ? [ 'postcss-flexbugs-fixes', [ 'postcss-preset-env', { autoprefixer: { flexbox: 'no-2009', }, stage: 3, features: { 'custom-properties': false, }, }, ], ] : [ // No transformations in development ], } > **Good to know**: Next.js also allows the file to be named `.postcssrc.js`. Do **not use `require()`** to import the PostCSS Plugins. Plugins must be provided as strings. > **Good to know**: If your `postcss.config.js` needs to support other non-Next.js tools in the same project, you must use the interoperable object-based format instead: > > module.exports = { > plugins: { > 'postcss-flexbugs-fixes': {}, > 'postcss-preset-env': { > autoprefixer: { > flexbox: 'no-2009', > }, > stage: 3, > features: { > 'custom-properties': false, > }, > }, > }, > } --- ## Page: https://nextjs.org/docs/14/pages/building-your-application/configuring/custom-server Examples * Custom Server * SSR Caching By default, Next.js includes its own server with `next start`. If you have an existing backend, you can still use it with Next.js (this is not a custom server). A custom Next.js server allows you to start a server 100% programmatically in order to use custom server patterns. Most of the time, you will not need this - but it's available for complete customization. > **Good to know**: > > * Before deciding to use a custom server, please keep in mind that it should only be used when the integrated router of Next.js can't meet your app requirements. A custom server will remove important performance optimizations, like **serverless functions** and **Automatic Static Optimization.** > * A custom server **cannot** be deployed on Vercel. > * Standalone output mode, does not trace custom server files and this mode outputs a separate minimal `server.js` file instead. Take a look at the following example of a custom server: const { createServer } = require('http') const { parse } = require('url') const next = require('next') const dev = process.env.NODE_ENV !== 'production' const hostname = 'localhost' const port = 3000 // when using middleware `hostname` and `port` must be provided below const app = next({ dev, hostname, port }) const handle = app.getRequestHandler() app.prepare().then(() => { createServer(async (req, res) => { try { // Be sure to pass `true` as the second argument to `url.parse`. // This tells it to parse the query portion of the URL. const parsedUrl = parse(req.url, true) const { pathname, query } = parsedUrl if (pathname === '/a') { await app.render(req, res, '/a', query) } else if (pathname === '/b') { await app.render(req, res, '/b', query) } else { await handle(req, res, parsedUrl) } } catch (err) { console.error('Error occurred handling', req.url, err) res.statusCode = 500 res.end('internal server error') } }) .once('error', (err) => { console.error(err) process.exit(1) }) .listen(port, () => { console.log(`> Ready on http://${hostname}:${port}`) }) }) > `server.js` doesn't go through babel or webpack. Make sure the syntax and sources this file requires are compatible with the current node version you are running. To run the custom server you'll need to update the `scripts` in `package.json` like so: { "scripts": { "dev": "node server.js", "build": "next build", "start": "NODE_ENV=production node server.js" } } * * * The custom server uses the following import to connect the server with the Next.js application: const next = require('next') const app = next({}) The above `next` import is a function that receives an object with the following options: | Option | Type | Description | | --- | --- | --- | | `conf` | `Object` | The same object you would use in next.config.js. Defaults to `{}` | | `customServer` | `Boolean` | (_Optional_) Set to false when the server was created by Next.js | | `dev` | `Boolean` | (_Optional_) Whether or not to launch Next.js in dev mode. Defaults to `false` | | `dir` | `String` | (_Optional_) Location of the Next.js project. Defaults to `'.'` | | `quiet` | `Boolean` | (_Optional_) Hide error messages containing server information. Defaults to `false` | | `hostname` | `String` | (_Optional_) The hostname the server is running behind | | `port` | `Number` | (_Optional_) The port the server is running behind | | `httpServer` | `node:http#Server` | (_Optional_) The HTTP Server that Next.js is running behind | The returned `app` can then be used to let Next.js handle requests as required. ## Disabling file-system routing By default, `Next` will serve each file in the `pages` folder under a pathname matching the filename. If your project uses a custom server, this behavior may result in the same content being served from multiple paths, which can present problems with SEO and UX. To disable this behavior and prevent routing based on files in `pages`, open `next.config.js` and disable the `useFileSystemPublicRoutes` config: module.exports = { useFileSystemPublicRoutes: false, } > Note that `useFileSystemPublicRoutes` disables filename routes from SSR; client-side routing may still access those paths. When using this option, you should guard against navigation to routes you do not want programmatically. > You may also wish to configure the client-side router to disallow client-side redirects to filename routes; for that refer to `router.beforePopState`. --- ## Page: https://nextjs.org/docs/14/pages/building-your-application/configuring/draft-mode In the Pages documentation and the Data Fetching documentation, we talked about how to pre-render a page at build time (**Static Generation**) using `getStaticProps` and `getStaticPaths`. Static Generation is useful when your pages fetch data from a headless CMS. However, it’s not ideal when you’re writing a draft on your headless CMS and want to view the draft immediately on your page. You’d want Next.js to render these pages at **request time** instead of build time and fetch the draft content instead of the published content. You’d want Next.js to bypass Static Generation only for this specific case. Next.js has a feature called **Draft Mode** which solves this problem. Here are instructions on how to use it. ## Step 1: Create and access the API route > Take a look at the API Routes documentation first if you’re not familiar with Next.js API Routes. First, create the **API route**. It can have any name - e.g. `pages/api/draft.ts` In this API route, you need to call `setDraftMode` on the response object. export default function handler(req, res) { // ... res.setDraftMode({ enable: true }) // ... } This will set a **cookie** to enable draft mode. Subsequent requests containing this cookie will trigger **Draft Mode** changing the behavior for statically generated pages (more on this later). You can test this manually by creating an API route like below and accessing it from your browser manually: // simple example for testing it manually from your browser. export default function handler(req, res) { res.setDraftMode({ enable: true }) res.end('Draft mode is enabled') } If you open your browser’s developer tools and visit `/api/draft`, you’ll notice a `Set-Cookie` response header with a cookie named `__prerender_bypass`. ### Securely accessing it from your Headless CMS In practice, you’d want to call this API route _securely_ from your headless CMS. The specific steps will vary depending on which headless CMS you’re using, but here are some common steps you could take. These steps assume that the headless CMS you’re using supports setting **custom draft URLs**. If it doesn’t, you can still use this method to secure your draft URLs, but you’ll need to construct and access the draft URL manually. **First**, you should create a **secret token string** using a token generator of your choice. This secret will only be known by your Next.js app and your headless CMS. This secret prevents people who don’t have access to your CMS from accessing draft URLs. **Second**, if your headless CMS supports setting custom draft URLs, specify the following as the draft URL. This assumes that your draft API route is located at `pages/api/draft.ts`. https://<your-site>/api/draft?secret=<token>&slug=<path> * `<your-site>` should be your deployment domain. * `<token>` should be replaced with the secret token you generated. * `<path>` should be the path for the page that you want to view. If you want to view `/posts/foo`, then you should use `&slug=/posts/foo`. Your headless CMS might allow you to include a variable in the draft URL so that `<path>` can be set dynamically based on the CMS’s data like so: `&slug=/posts/{entry.fields.slug}` **Finally**, in the draft API route: * Check that the secret matches and that the `slug` parameter exists (if not, the request should fail). * Call `res.setDraftMode`. * Then redirect the browser to the path specified by `slug`. (The following example uses a 307 redirect). export default async (req, res) => { // Check the secret and next parameters // This secret should only be known to this API route and the CMS if (req.query.secret !== 'MY_SECRET_TOKEN' || !req.query.slug) { return res.status(401).json({ message: 'Invalid token' }) } // Fetch the headless CMS to check if the provided `slug` exists // getPostBySlug would implement the required fetching logic to the headless CMS const post = await getPostBySlug(req.query.slug) // If the slug doesn't exist prevent draft mode from being enabled if (!post) { return res.status(401).json({ message: 'Invalid slug' }) } // Enable Draft Mode by setting the cookie res.setDraftMode({ enable: true }) // Redirect to the path from the fetched post // We don't redirect to req.query.slug as that might lead to open redirect vulnerabilities res.redirect(post.slug) } If it succeeds, then the browser will be redirected to the path you want to view with the draft mode cookie. ## Step 2: Update `getStaticProps` The next step is to update `getStaticProps` to support draft mode. If you request a page which has `getStaticProps` with the cookie set (via `res.setDraftMode`), then `getStaticProps` will be called at **request time** (instead of at build time). Furthermore, it will be called with a `context` object where `context.draftMode` will be `true`. export async function getStaticProps(context) { if (context.draftMode) { // dynamic data } } We used `res.setDraftMode` in the draft API route, so `context.draftMode` will be `true`. If you’re also using `getStaticPaths`, then `context.params` will also be available. ### Fetch draft data You can update `getStaticProps` to fetch different data based on `context.draftMode`. For example, your headless CMS might have a different API endpoint for draft posts. If so, you can modify the API endpoint URL like below: export async function getStaticProps(context) { const url = context.draftMode ? 'https://draft.example.com' : 'https://production.example.com' const res = await fetch(url) // ... } That’s it! If you access the draft API route (with `secret` and `slug`) from your headless CMS or manually, you should now be able to see the draft content. And if you update your draft without publishing, you should be able to view the draft. Set this as the draft URL on your headless CMS or access manually, and you should be able to see the draft. https://<your-site>/api/draft?secret=<token>&slug=<path> ## More Details ### Clear the Draft Mode cookie By default, the Draft Mode session ends when the browser is closed. To clear the Draft Mode cookie manually, create an API route that calls `setDraftMode({ enable: false })`: export default function handler(req, res) { res.setDraftMode({ enable: false }) } Then, send a request to `/api/disable-draft` to invoke the API Route. If calling this route using `next/link`, you must pass `prefetch={false}` to prevent accidentally deleting the cookie on prefetch. ### Works with `getServerSideProps` Draft Mode works with `getServerSideProps`, and is available as a `draftMode` key in the `context` object. > **Good to know**: You shouldn't set the `Cache-Control` header when using Draft Mode because it cannot be bypassed. Instead, we recommend using ISR. ### Works with API Routes API Routes will have access to `draftMode` on the request object. For example: export default function myApiRoute(req, res) { if (req.draftMode) { // get draft data } } ### Unique per `next build` A new bypass cookie value will be generated each time you run `next build`. This ensures that the bypass cookie can’t be guessed. > **Good to know**: To test Draft Mode locally over HTTP, your browser will need to allow third-party cookies and local storage access. --- ## Page: https://nextjs.org/docs/14/pages/building-your-application/configuring/error-handling This documentation explains how you can handle development, server-side, and client-side errors. ## Handling Errors in Development When there is a runtime error during the development phase of your Next.js application, you will encounter an **overlay**. It is a modal that covers the webpage. It is **only** visible when the development server runs using `next dev` via `pnpm dev`, `npm run dev`, `yarn dev`, or `bun dev` and will not be shown in production. Fixing the error will automatically dismiss the overlay. Here is an example of an overlay:  ## Handling Server Errors Next.js provides a static 500 page by default to handle server-side errors that occur in your application. You can also customize this page by creating a `pages/500.js` file. Having a 500 page in your application does not show specific errors to the app user. You can also use 404 page to handle specific runtime error like `file not found`. ## Handling Client Errors React Error Boundaries is a graceful way to handle a JavaScript error on the client so that the other parts of the application continue working. In addition to preventing the page from crashing, it allows you to provide a custom fallback component and even log error information. To use Error Boundaries for your Next.js application, you must create a class component `ErrorBoundary` and wrap the `Component` prop in the `pages/_app.js` file. This component will be responsible to: * Render a fallback UI after an error is thrown * Provide a way to reset the Application's state * Log error information You can create an `ErrorBoundary` class component by extending `React.Component`. For example: class ErrorBoundary extends React.Component { constructor(props) { super(props) // Define a state variable to track whether is an error or not this.state = { hasError: false } } static getDerivedStateFromError(error) { // Update state so the next render will show the fallback UI return { hasError: true } } componentDidCatch(error, errorInfo) { // You can use your own error logging service here console.log({ error, errorInfo }) } render() { // Check if the error is thrown if (this.state.hasError) { // You can render any custom fallback UI return ( <div> <h2>Oops, there is an error!</h2> <button type="button" onClick={() => this.setState({ hasError: false })} > Try again? </button> </div> ) } // Return children components in case of no error return this.props.children } } export default ErrorBoundary The `ErrorBoundary` component keeps track of an `hasError` state. The value of this state variable is a boolean. When the value of `hasError` is `true`, then the `ErrorBoundary` component will render a fallback UI. Otherwise, it will render the children components. After creating an `ErrorBoundary` component, import it in the `pages/_app.js` file to wrap the `Component` prop in your Next.js application. // Import the ErrorBoundary component import ErrorBoundary from '../components/ErrorBoundary' function MyApp({ Component, pageProps }) { return ( // Wrap the Component prop with ErrorBoundary component <ErrorBoundary> <Component {...pageProps} /> </ErrorBoundary> ) } export default MyApp You can learn more about Error Boundaries in React's documentation. ### Reporting Errors To monitor client errors, use a service like Sentry, Bugsnag or Datadog. --- ## Page: https://nextjs.org/docs/14/pages/building-your-application/configuring/debugging This documentation explains how you can debug your Next.js frontend and backend code with full source maps support using either the VS Code debugger or Chrome DevTools. Any debugger that can attach to Node.js can also be used to debug a Next.js application. You can find more details in the Node.js Debugging Guide. ## Debugging with VS Code Create a file named `.vscode/launch.json` at the root of your project with the following content: { "version": "0.2.0", "configurations": [ { "name": "Next.js: debug server-side", "type": "node-terminal", "request": "launch", "command": "npm run dev" }, { "name": "Next.js: debug client-side", "type": "chrome", "request": "launch", "url": "http://localhost:3000" }, { "name": "Next.js: debug full stack", "type": "node-terminal", "request": "launch", "command": "npm run dev", "serverReadyAction": { "pattern": "- Local:.+(https?://.+)", "uriFormat": "%s", "action": "debugWithChrome" } } ] } `npm run dev` can be replaced with `yarn dev` if you're using Yarn or `pnpm dev` if you're using pnpm. If you're changing the port number your application starts on, replace the `3000` in `http://localhost:3000` with the port you're using instead. If you're running Next.js from a directory other than root (for example, if you're using Turborepo) then you need to add `cwd` to the server-side and full stack debugging tasks. For example, `"cwd": "${workspaceFolder}/apps/web"`. Now go to the Debug panel (`Ctrl+Shift+D` on Windows/Linux, `⇧+⌘+D` on macOS), select a launch configuration, then press `F5` or select **Debug: Start Debugging** from the Command Palette to start your debugging session. ## Using the Debugger in Jetbrains WebStorm Click the drop down menu listing the runtime configuration, and click `Edit Configurations...`. Create a `Javascript Debug` debug configuration with `http://localhost:3000` as the URL. Customize to your liking (e.g. Browser for debugging, store as project file), and click `OK`. Run this debug configuration, and the selected browser should automatically open. At this point, you should have 2 applications in debug mode: the NextJS node application, and the client/ browser application. ## Debugging with Chrome DevTools ### Client-side code Start your development server as usual by running `next dev`, `npm run dev`, or `yarn dev`. Once the server starts, open `http://localhost:3000` (or your alternate URL) in Chrome. Next, open Chrome's Developer Tools (`Ctrl+Shift+J` on Windows/Linux, `⌥+⌘+I` on macOS), then go to the **Sources** tab. Now, any time your client-side code reaches a `debugger` statement, code execution will pause and that file will appear in the debug area. You can also press `Ctrl+P` on Windows/Linux or `⌘+P` on macOS to search for a file and set breakpoints manually. Note that when searching here, your source files will have paths starting with `webpack://_N_E/./`. ### Server-side code To debug server-side Next.js code with Chrome DevTools, you need to pass the `--inspect` flag to the underlying Node.js process: NODE_OPTIONS='--inspect' next dev If you're using `npm run dev` or `yarn dev` then you should update the `dev` script on your `package.json`: { "scripts": { "dev": "NODE_OPTIONS='--inspect' next dev" } } Launching the Next.js dev server with the `--inspect` flag will look something like this: Debugger listening on ws://127.0.0.1:9229/0cf90313-350d-4466-a748-cd60f4e47c95 For help, see: https://nodejs.org/en/docs/inspector ready - started server on 0.0.0.0:3000, url: http://localhost:3000 > Be aware that running `NODE_OPTIONS='--inspect' npm run dev` or `NODE_OPTIONS='--inspect' yarn dev` won't work. This would try to start multiple debuggers on the same port: one for the npm/yarn process and one for Next.js. You would then get an error like `Starting inspector on 127.0.0.1:9229 failed: address already in use` in your console. Once the server starts, open a new tab in Chrome and visit `chrome://inspect`, where you should see your Next.js application inside the **Remote Target** section. Click **inspect** under your application to open a separate DevTools window, then go to the **Sources** tab. Debugging server-side code here works much like debugging client-side code with Chrome DevTools, except that when you search for files here with `Ctrl+P` or `⌘+P`, your source files will have paths starting with `webpack://{application-name}/./` (where `{application-name}` will be replaced with the name of your application according to your `package.json` file). ### Debugging on Windows Windows users may run into an issue when using `NODE_OPTIONS='--inspect'` as that syntax is not supported on Windows platforms. To get around this, install the `cross-env` package as a development dependency (`-D` with `npm` and `yarn`) and replace the `dev` script with the following. { "scripts": { "dev": "cross-env NODE_OPTIONS='--inspect' next dev" } } `cross-env` will set the `NODE_OPTIONS` environment variable regardless of which platform you are on (including Mac, Linux, and Windows) and allow you to debug consistently across devices and operating systems. > **Good to know**: Ensure Windows Defender is disabled on your machine. This external service will check _every file read_, which has been reported to greatly increase Fast Refresh time with `next dev`. This is a known issue, not related to Next.js, but it does affect Next.js development. ## More information To learn more about how to use a JavaScript debugger, take a look at the following documentation: * Node.js debugging in VS Code: Breakpoints * Chrome DevTools: Debug JavaScript --- ## Page: https://nextjs.org/docs/14/pages/building-your-application/configuring/preview-mode > **Note**: This feature is superseded by Draft Mode. Examples * WordPress Example (Demo) * DatoCMS Example (Demo) * TakeShape Example (Demo) * Sanity Example (Demo) * Prismic Example (Demo) * Contentful Example (Demo) * Strapi Example (Demo) * Prepr Example (Demo) * Agility CMS Example (Demo) * Cosmic Example (Demo) * ButterCMS Example (Demo) * Storyblok Example (Demo) * GraphCMS Example (Demo) * Kontent Example (Demo) * Umbraco Heartcore Example (Demo) * Plasmic Example (Demo) * Enterspeed Example (Demo) * Makeswift Example (Demo) In the Pages documentation and the Data Fetching documentation, we talked about how to pre-render a page at build time (**Static Generation**) using `getStaticProps` and `getStaticPaths`. Static Generation is useful when your pages fetch data from a headless CMS. However, it’s not ideal when you’re writing a draft on your headless CMS and want to **preview** the draft immediately on your page. You’d want Next.js to render these pages at **request time** instead of build time and fetch the draft content instead of the published content. You’d want Next.js to bypass Static Generation only for this specific case. Next.js has a feature called **Preview Mode** which solves this problem. Here are instructions on how to use it. ## Step 1: Create and access a preview API route > Take a look at the API Routes documentation first if you’re not familiar with Next.js API Routes. First, create a **preview API route**. It can have any name - e.g. `pages/api/preview.js` (or `.ts` if using TypeScript). In this API route, you need to call `setPreviewData` on the response object. The argument for `setPreviewData` should be an object, and this can be used by `getStaticProps` (more on this later). For now, we’ll use `{}`. export default function handler(req, res) { // ... res.setPreviewData({}) // ... } `res.setPreviewData` sets some **cookies** on the browser which turns on the preview mode. Any requests to Next.js containing these cookies will be considered as the **preview mode**, and the behavior for statically generated pages will change (more on this later). You can test this manually by creating an API route like below and accessing it from your browser manually: // simple example for testing it manually from your browser. export default function handler(req, res) { res.setPreviewData({}) res.end('Preview mode enabled') } If you open your browser’s developer tools and visit `/api/preview`, you’ll notice that the `__prerender_bypass` and `__next_preview_data` cookies will be set on this request. ### Securely accessing it from your Headless CMS In practice, you’d want to call this API route _securely_ from your headless CMS. The specific steps will vary depending on which headless CMS you’re using, but here are some common steps you could take. These steps assume that the headless CMS you’re using supports setting **custom preview URLs**. If it doesn’t, you can still use this method to secure your preview URLs, but you’ll need to construct and access the preview URL manually. **First**, you should create a **secret token string** using a token generator of your choice. This secret will only be known by your Next.js app and your headless CMS. This secret prevents people who don’t have access to your CMS from accessing preview URLs. **Second**, if your headless CMS supports setting custom preview URLs, specify the following as the preview URL. This assumes that your preview API route is located at `pages/api/preview.js`. https://<your-site>/api/preview?secret=<token>&slug=<path> * `<your-site>` should be your deployment domain. * `<token>` should be replaced with the secret token you generated. * `<path>` should be the path for the page that you want to preview. If you want to preview `/posts/foo`, then you should use `&slug=/posts/foo`. Your headless CMS might allow you to include a variable in the preview URL so that `<path>` can be set dynamically based on the CMS’s data like so: `&slug=/posts/{entry.fields.slug}` **Finally**, in the preview API route: * Check that the secret matches and that the `slug` parameter exists (if not, the request should fail). * Call `res.setPreviewData`. * Then redirect the browser to the path specified by `slug`. (The following example uses a 307 redirect). export default async (req, res) => { // Check the secret and next parameters // This secret should only be known to this API route and the CMS if (req.query.secret !== 'MY_SECRET_TOKEN' || !req.query.slug) { return res.status(401).json({ message: 'Invalid token' }) } // Fetch the headless CMS to check if the provided `slug` exists // getPostBySlug would implement the required fetching logic to the headless CMS const post = await getPostBySlug(req.query.slug) // If the slug doesn't exist prevent preview mode from being enabled if (!post) { return res.status(401).json({ message: 'Invalid slug' }) } // Enable Preview Mode by setting the cookies res.setPreviewData({}) // Redirect to the path from the fetched post // We don't redirect to req.query.slug as that might lead to open redirect vulnerabilities res.redirect(post.slug) } If it succeeds, then the browser will be redirected to the path you want to preview with the preview mode cookies being set. ## Step 2: Update `getStaticProps` The next step is to update `getStaticProps` to support the preview mode. If you request a page which has `getStaticProps` with the preview mode cookies set (via `res.setPreviewData`), then `getStaticProps` will be called at **request time** (instead of at build time). Furthermore, it will be called with a `context` object where: * `context.preview` will be `true`. * `context.previewData` will be the same as the argument used for `setPreviewData`. export async function getStaticProps(context) { // If you request this page with the preview mode cookies set: // // - context.preview will be true // - context.previewData will be the same as // the argument used for `setPreviewData`. } We used `res.setPreviewData({})` in the preview API route, so `context.previewData` will be `{}`. You can use this to pass session information from the preview API route to `getStaticProps` if necessary. If you’re also using `getStaticPaths`, then `context.params` will also be available. ### Fetch preview data You can update `getStaticProps` to fetch different data based on `context.preview` and/or `context.previewData`. For example, your headless CMS might have a different API endpoint for draft posts. If so, you can use `context.preview` to modify the API endpoint URL like below: export async function getStaticProps(context) { // If context.preview is true, append "/preview" to the API endpoint // to request draft data instead of published data. This will vary // based on which headless CMS you're using. const res = await fetch(`https://.../${context.preview ? 'preview' : ''}`) // ... } That’s it! If you access the preview API route (with `secret` and `slug`) from your headless CMS or manually, you should now be able to see the preview content. And if you update your draft without publishing, you should be able to preview the draft. Set this as the preview URL on your headless CMS or access manually, and you should be able to see the preview. https://<your-site>/api/preview?secret=<token>&slug=<path> ## More Details > **Good to know**: during rendering `next/router` exposes an `isPreview` flag, see the router object docs for more info. ### Specify the Preview Mode duration `setPreviewData` takes an optional second parameter which should be an options object. It accepts the following keys: * `maxAge`: Specifies the number (in seconds) for the preview session to last for. * `path`: Specifies the path the cookie should be applied under. Defaults to `/` enabling preview mode for all paths. setPreviewData(data, { maxAge: 60 * 60, // The preview mode cookies expire in 1 hour path: '/about', // The preview mode cookies apply to paths with /about }) ### Clear the Preview Mode cookies By default, no expiration date is set for Preview Mode cookies, so the preview session ends when the browser is closed. To clear the Preview Mode cookies manually, create an API route that calls `clearPreviewData()`: export default function handler(req, res) { res.clearPreviewData({}) } Then, send a request to `/api/clear-preview-mode-cookies` to invoke the API Route. If calling this route using `next/link`, you must pass `prefetch={false}` to prevent calling `clearPreviewData` during link prefetching. If a path was specified in the `setPreviewData` call, you must pass the same path to `clearPreviewData`: export default function handler(req, res) { const { path } = req.query res.clearPreviewData({ path }) } ### `previewData` size limits You can pass an object to `setPreviewData` and have it be available in `getStaticProps`. However, because the data will be stored in a cookie, there’s a size limitation. Currently, preview data is limited to 2KB. ### Works with `getServerSideProps` The preview mode works on `getServerSideProps` as well. It will also be available on the `context` object containing `preview` and `previewData`. > **Good to know**: You shouldn't set the `Cache-Control` header when using Preview Mode because it cannot be bypassed. Instead, we recommend using ISR. ### Works with API Routes API Routes will have access to `preview` and `previewData` under the request object. For example: export default function myApiRoute(req, res) { const isPreview = req.preview const previewData = req.previewData // ... } ### Unique per `next build` Both the bypass cookie value and the private key for encrypting the `previewData` change when `next build` is completed. This ensures that the bypass cookie can’t be guessed. > **Good to know**: To test Preview Mode locally over HTTP your browser will need to allow third-party cookies and local storage access. --- ## Page: https://nextjs.org/docs/14/pages/building-your-application/configuring/content-security-policy Content Security Policy (CSP) is important to guard your Next.js application against various security threats such as cross-site scripting (XSS), clickjacking, and other code injection attacks. By using CSP, developers can specify which origins are permissible for content sources, scripts, stylesheets, images, fonts, objects, media (audio, video), iframes, and more. Examples * Strict CSP ## Nonces A nonce is a unique, random string of characters created for a one-time use. It is used in conjunction with CSP to selectively allow certain inline scripts or styles to execute, bypassing strict CSP directives. ### Why use a nonce? Even though CSPs are designed to block malicious scripts, there are legitimate scenarios where inline scripts are necessary. In such cases, nonces offer a way to allow these scripts to execute if they have the correct nonce. ### Adding a nonce with Middleware Middleware enables you to add headers and generate nonces before the page renders. Every time a page is viewed, a fresh nonce should be generated. This means that you **must use dynamic rendering to add nonces**. For example: import { NextRequest, NextResponse } from 'next/server' export function middleware(request: NextRequest) { const nonce = Buffer.from(crypto.randomUUID()).toString('base64') const cspHeader = ` default-src 'self'; script-src 'self' 'nonce-${nonce}' 'strict-dynamic'; style-src 'self' 'nonce-${nonce}'; img-src 'self' blob: data:; font-src 'self'; object-src 'none'; base-uri 'self'; form-action 'self'; frame-ancestors 'none'; upgrade-insecure-requests; ` // Replace newline characters and spaces const contentSecurityPolicyHeaderValue = cspHeader .replace(/\s{2,}/g, ' ') .trim() const requestHeaders = new Headers(request.headers) requestHeaders.set('x-nonce', nonce) requestHeaders.set( 'Content-Security-Policy', contentSecurityPolicyHeaderValue ) const response = NextResponse.next({ request: { headers: requestHeaders, }, }) response.headers.set( 'Content-Security-Policy', contentSecurityPolicyHeaderValue ) return response } By default, Middleware runs on all requests. You can filter Middleware to run on specific paths using a `matcher`. We recommend ignoring matching prefetches (from `next/link`) and static assets that don't need the CSP header. export const config = { matcher: [ /* * Match all request paths except for the ones starting with: * - api (API routes) * - _next/static (static files) * - _next/image (image optimization files) * - favicon.ico (favicon file) */ { source: '/((?!api|_next/static|_next/image|favicon.ico).*)', missing: [ { type: 'header', key: 'next-router-prefetch' }, { type: 'header', key: 'purpose', value: 'prefetch' }, ], }, ], } ### Reading the nonce You can now read the nonce from a Server Component using `headers`: import { headers } from 'next/headers' import Script from 'next/script' export default function Page() { const nonce = headers().get('x-nonce') return ( <Script src="https://www.googletagmanager.com/gtag/js" strategy="afterInteractive" nonce={nonce} /> ) } ## Without Nonces For applications that do not require nonces, you can set the CSP header directly in your `next.config.js` file: const cspHeader = ` default-src 'self'; script-src 'self' 'unsafe-eval' 'unsafe-inline'; style-src 'self' 'unsafe-inline'; img-src 'self' blob: data:; font-src 'self'; object-src 'none'; base-uri 'self'; form-action 'self'; frame-ancestors 'none'; upgrade-insecure-requests; ` module.exports = { async headers() { return [ { source: '/(.*)', headers: [ { key: 'Content-Security-Policy', value: cspHeader.replace(/\n/g, ''), }, ], }, ] }, } ## Version History We recommend using `v13.4.20+` of Next.js to properly handle and apply nonces. --- ## Page: https://nextjs.org/docs/14/pages/building-your-application/testing You are currently viewing documentation for version 14 of Next.js. In React and Next.js, there are a few different types of tests you can write, each with its own purpose and use cases. This page provides an overview of types and commonly used tools you can use to test your application. ## Types of tests * **Unit testing** involves testing individual units (or blocks of code) in isolation. In React, a unit can be a single function, hook, or component. * **Component testing** is a more focused version of unit testing where the primary subject of the tests is React components. This may involve testing how components are rendered, their interaction with props, and their behavior in response to user events. * **Integration testing** involves testing how multiple units work together. This can be a combination of components, hooks, and functions. * **End-to-End (E2E) Testing** involves testing user flows in an environment that simulates real user scenarios, like the browser. This means testing specific tasks (e.g. signup flow) in a production-like environment. * **Snapshot testing** involves capturing the rendered output of a component and saving it to a snapshot file. When tests run, the current rendered output of the component is compared against the saved snapshot. Changes in the snapshot are used to indicate unexpected changes in behavior. ## Guides See the guides below to learn how to set up Next.js with these commonly used testing tools: --- ## Page: https://nextjs.org/docs/14/pages/building-your-application/testing/vitest ## Setting up Vitest with Next.js Vite and React Testing Library are frequently used together for **Unit Testing**. This guide will show you how to setup Vitest with Next.js and write your first tests. > **Good to know:** Since `async` Server Components are new to the React ecosystem, Vitest currently does not support them. While you can still run **unit tests** for synchronous Server and Client Components, we recommend using an **E2E tests** for `async` components. ## Quickstart You can use `create-next-app` with the Next.js with-vitest example to quickly get started: npx create-next-app@latest --example with-vitest with-vitest-app ## Manual Setup To manually set up Vitest, install `vitest` and the following packages as dev dependencies: npm install -D vitest @vitejs/plugin-react jsdom @testing-library/react # or yarn add -D vitest @vitejs/plugin-react jsdom @testing-library/react # or pnpm install -D vitest @vitejs/plugin-react jsdom @testing-library/react # or bun add -D vitest @vitejs/plugin-react jsdom @testing-library/react Create a `vitest.config.ts|js` file in the root of your project, and add the following options: import { defineConfig } from 'vitest/config' import react from '@vitejs/plugin-react' export default defineConfig({ plugins: [react()], test: { environment: 'jsdom', }, }) For more information on configuring Vitest, please refer to the Vitest Configuration docs. Then, add a `test` script to your `package.json`: { "scripts": { "dev": "next dev", "build": "next build", "start": "next start", "test": "vitest" } } When you run `npm run test`, Vitest will **watch** for changes in your project by default. ## Creating your first Vitest Unit Test Check that everything is working by creating a test to check if the `<Page />` component successfully renders a heading: import Link from 'next/link' export default function Page() { return ( <div> <h1>Home</h1> <Link href="/about">About</Link> </div> ) } import { expect, test } from 'vitest' import { render, screen } from '@testing-library/react' import Page from '../pages/index' test('Page', () => { render(<Page />) expect(screen.getByRole('heading', { level: 1, name: 'Home' })).toBeDefined() }) ## Running your tests Then, run the following command to run your tests: npm run test # or yarn test # or pnpm test # or bun test ## Additional Resources You may find these resources helpful: * Next.js with Vitest example * Vitest Docs * React Testing Library Docs --- ## Page: https://nextjs.org/docs/14/pages/building-your-application/testing/jest ## Setting up Jest with Next.js Jest and React Testing Library are frequently used together for **Unit Testing** and **Snapshot Testing**. This guide will show you how to set up Jest with Next.js and write your first tests. > **Good to know:** Since `async` Server Components are new to the React ecosystem, Jest currently does not support them. While you can still run **unit tests** for synchronous Server and Client Components, we recommend using an **E2E tests** for `async` components. ## Quickstart You can use `create-next-app` with the Next.js with-jest example to quickly get started: npx create-next-app@latest --example with-jest with-jest-app ## Manual setup Since the release of Next.js 12, Next.js now has built-in configuration for Jest. To set up Jest, install `jest` and the following packages as dev dependencies: npm install -D jest jest-environment-jsdom @testing-library/react @testing-library/jest-dom # or yarn add -D jest jest-environment-jsdom @testing-library/react @testing-library/jest-dom # or pnpm install -D jest jest-environment-jsdom @testing-library/react @testing-library/jest-dom Generate a basic Jest configuration file by running the following command: npm init jest@latest # or yarn create jest@latest # or pnpm create jest@latest This will take you through a series of prompts to setup Jest for your project, including automatically creating a `jest.config.ts|js` file. Update your config file to use `next/jest`. This transformer has all the necessary configuration options for Jest to work with Next.js: import type { Config } from 'jest' import nextJest from 'next/jest.js' const createJestConfig = nextJest({ // Provide the path to your Next.js app to load next.config.js and .env files in your test environment dir: './', }) // Add any custom config to be passed to Jest const config: Config = { coverageProvider: 'v8', testEnvironment: 'jsdom', // Add more setup options before each test is run // setupFilesAfterEnv: ['<rootDir>/jest.setup.ts'], } // createJestConfig is exported this way to ensure that next/jest can load the Next.js config which is async export default createJestConfig(config) Under the hood, `next/jest` is automatically configuring Jest for you, including: * Setting up `transform` using the Next.js Compiler * Auto mocking stylesheets (`.css`, `.module.css`, and their scss variants), image imports and `next/font` * Loading `.env` (and all variants) into `process.env` * Ignoring `node_modules` from test resolving and transforms * Ignoring `.next` from test resolving * Loading `next.config.js` for flags that enable SWC transforms > **Good to know**: To test environment variables directly, load them manually in a separate setup script or in your `jest.config.ts` file. For more information, please see Test Environment Variables. ## Setting up Jest (with Babel) If you opt out of the Next.js Compiler and use Babel instead, you will need to manually configure Jest and install `babel-jest` and `identity-obj-proxy` in addition to the packages above. Here are the recommended options to configure Jest for Next.js: module.exports = { collectCoverage: true, // on node 14.x coverage provider v8 offers good speed and more or less good report coverageProvider: 'v8', collectCoverageFrom: [ '**/*.{js,jsx,ts,tsx}', '!**/*.d.ts', '!**/node_modules/**', '!<rootDir>/out/**', '!<rootDir>/.next/**', '!<rootDir>/*.config.js', '!<rootDir>/coverage/**', ], moduleNameMapper: { // Handle CSS imports (with CSS modules) // https://jestjs.io/docs/webpack#mocking-css-modules '^.+\\.module\\.(css|sass|scss)$': 'identity-obj-proxy', // Handle CSS imports (without CSS modules) '^.+\\.(css|sass|scss)$': '<rootDir>/__mocks__/styleMock.js', // Handle image imports // https://jestjs.io/docs/webpack#handling-static-assets '^.+\\.(png|jpg|jpeg|gif|webp|avif|ico|bmp|svg)$/i': `<rootDir>/__mocks__/fileMock.js`, // Handle module aliases '^@/components/(.*)$': '<rootDir>/components/$1', // Handle @next/font '@next/font/(.*)': `<rootDir>/__mocks__/nextFontMock.js`, // Handle next/font 'next/font/(.*)': `<rootDir>/__mocks__/nextFontMock.js`, // Disable server-only 'server-only': `<rootDir>/__mocks__/empty.js`, }, // Add more setup options before each test is run // setupFilesAfterEnv: ['<rootDir>/jest.setup.js'], testPathIgnorePatterns: ['<rootDir>/node_modules/', '<rootDir>/.next/'], testEnvironment: 'jsdom', transform: { // Use babel-jest to transpile tests with the next/babel preset // https://jestjs.io/docs/configuration#transform-objectstring-pathtotransformer--pathtotransformer-object '^.+\\.(js|jsx|ts|tsx)$': ['babel-jest', { presets: ['next/babel'] }], }, transformIgnorePatterns: [ '/node_modules/', '^.+\\.module\\.(css|sass|scss)$', ], } You can learn more about each configuration option in the Jest docs. We also recommend reviewing `next/jest` configuration to see how Next.js configures Jest. ### Handling stylesheets and image imports Stylesheets and images aren't used in the tests but importing them may cause errors, so they will need to be mocked. Create the mock files referenced in the configuration above - `fileMock.js` and `styleMock.js` - inside a `__mocks__` directory: module.exports = 'test-file-stub' module.exports = {} For more information on handling static assets, please refer to the Jest Docs. ## Handling Fonts To handle fonts, create the `nextFontMock.js` file inside the `__mocks__` directory, and add the following configuration: module.exports = new Proxy( {}, { get: function getter() { return () => ({ className: 'className', variable: 'variable', style: { fontFamily: 'fontFamily' }, }) }, } ) ## Optional: Handling Absolute Imports and Module Path Aliases If your project is using Module Path Aliases, you will need to configure Jest to resolve the imports by matching the paths option in the `jsconfig.json` file with the `moduleNameMapper` option in the `jest.config.js` file. For example: { "compilerOptions": { "module": "esnext", "moduleResolution": "bundler", "baseUrl": "./", "paths": { "@/components/*": ["components/*"] } } } moduleNameMapper: { // ... '^@/components/(.*)$': '<rootDir>/components/$1', } ## Optional: Extend Jest with custom matchers `@testing-library/jest-dom` includes a set of convenient custom matchers such as `.toBeInTheDocument()` making it easier to write tests. You can import the custom matchers for every test by adding the following option to the Jest configuration file: setupFilesAfterEnv: ['<rootDir>/jest.setup.ts'] Then, inside `jest.setup.ts`, add the following import: import '@testing-library/jest-dom' > **Good to know:**`extend-expect` was removed in `v6.0`, so if you are using `@testing-library/jest-dom` before version 6, you will need to import `@testing-library/jest-dom/extend-expect` instead. If you need to add more setup options before each test, you can add them to the `jest.setup.js` file above. ## Add a test script to `package.json`: Finally, add a Jest `test` script to your `package.json` file: { "scripts": { "dev": "next dev", "build": "next build", "start": "next start", "test": "jest", "test:watch": "jest --watch" } } `jest --watch` will re-run tests when a file is changed. For more Jest CLI options, please refer to the Jest Docs. ### Creating your first test: Your project is now ready to run tests. Create a folder called `__tests__` in your project's root directory. For example, we can add a test to check if the `<Home />` component successfully renders a heading: export default function Home() { return <h1>Home</h1> } import '@testing-library/jest-dom' import { render, screen } from '@testing-library/react' import Home from '../pages/index' describe('Home', () => { it('renders a heading', () => { render(<Home />) const heading = screen.getByRole('heading', { level: 1 }) expect(heading).toBeInTheDocument() }) }) Optionally, add a snapshot test to keep track of any unexpected changes in your component: import { render } from '@testing-library/react' import Home from '../pages/index' it('renders homepage unchanged', () => { const { container } = render(<Home />) expect(container).toMatchSnapshot() }) > **Good to know**: Test files should not be included inside the Pages Router because any files inside the Pages Router are considered routes. ## Running your tests Then, run the following command to run your tests: npm run test # or yarn test # or pnpm test ## Additional Resources For further reading, you may find these resources helpful: * Next.js with Jest example * Jest Docs * React Testing Library Docs * Testing Playground - use good testing practices to match elements. --- ## Page: https://nextjs.org/docs/14/pages/building-your-application/testing/playwright ## Setting up Playwright with Next.js Playwright is a testing framework that lets you automate Chromium, Firefox, and WebKit with a single API. You can use it to write **End-to-End (E2E)** testing. This guide will show you how to set up Playwright with Next.js and write your first tests. ## Quickstart The fastest way to get started is to use `create-next-app` with the with-playwright example. This will create a Next.js project complete with Playwright configured. npx create-next-app@latest --example with-playwright with-playwright-app ## Manual setup To install Playwright, run the following command: npm init playwright # or yarn create playwright # or pnpm create playwright This will take you through a series of prompts to setup and configure Playwright for your project, including adding a `playwright.config.ts` file. Please refer to the Playwright installation guide for the step-by-step guide. ## Creating your first Playwright E2E test Create two new Next.js pages: import Link from 'next/link' export default function Home() { return ( <div> <h1>Home</h1> <Link href="/about">About</Link> </div> ) } import Link from 'next/link' export default function About() { return ( <div> <h1>About</h1> <Link href="/">Home</Link> </div> ) } Then, add a test to verify that your navigation is working correctly: import { test, expect } from '@playwright/test' test('should navigate to the about page', async ({ page }) => { // Start from the index page (the baseURL is set via the webServer in the playwright.config.ts) await page.goto('http://localhost:3000/') // Find an element with the text 'About' and click on it await page.click('text=About') // The new URL should be "/about" (baseURL is used there) await expect(page).toHaveURL('http://localhost:3000/about') // The new page should contain an h1 with "About" await expect(page.locator('h1')).toContainText('About') }) > **Good to know**: > > You can use `page.goto("/")` instead of `page.goto("http://localhost:3000/")`, if you add `"baseURL": "http://localhost:3000"` to the `playwright.config.ts` configuration file. ### Running your Playwright tests Playwright will simulate a user navigating your application using three browsers: Chromium, Firefox and Webkit, this requires your Next.js server to be running. We recommend running your tests against your production code to more closely resemble how your application will behave. Run `npm run build` and `npm run start`, then run `npx playwright test` in another terminal window to run the Playwright tests. > **Good to know**: Alternatively, you can use the `webServer` feature to let Playwright start the development server and wait until it's fully available. ### Running Playwright on Continuous Integration (CI) Playwright will by default run your tests in the headless mode. To install all the Playwright dependencies, run `npx playwright install-deps`. You can learn more about Playwright and Continuous Integration from these resources: * Next.js with Playwright example * Playwright on your CI provider * Playwright Discord --- ## Page: https://nextjs.org/docs/14/pages/building-your-application/testing/cypress ## Setting up Cypress with Next.js Cypress is a test runner used for **End-to-End (E2E)** and **Component Testing**. This page will show you how to set up Cypress with Next.js and write your first tests. > **Warning:** > > * For **component testing**, Cypress currently does not support Next.js version 14 and `async` Server Components. These issues are being tracked. For now, component testing works with Next.js version 13, and we recommend E2E testing for `async` Server Components. > * Cypress currently does not support TypeScript version 5 with `moduleResolution:"bundler"`. This issue is being tracked. ## Manual setup To manually set up Cypress, install `cypress` as a dev dependency: npm install -D cypress # or yarn add -D cypress # or pnpm install -D cypress Add the Cypress `open` command to the `package.json` scripts field: { "scripts": { "dev": "next dev", "build": "next build", "start": "next start", "lint": "next lint", "cypress:open": "cypress open" } } Run Cypress for the first time to open the Cypress testing suite: npm run cypress:open You can choose to configure **E2E Testing** and/or **Component Testing**. Selecting any of these options will automatically create a `cypress.config.js` file and a `cypress` folder in your project. ## Creating your first Cypress E2E test Ensure your `cypress.config.js` file has the following configuration: import { defineConfig } from 'cypress' export default defineConfig({ e2e: { setupNodeEvents(on, config) {}, }, }) const { defineConfig } = require('cypress') module.exports = defineConfig({ e2e: { setupNodeEvents(on, config) {}, }, }) Then, create two new Next.js files: import Link from 'next/link' export default function Home() { return ( <div> <h1>Home</h1> <Link href="/about">About</Link> </div> ) } import Link from 'next/link' export default function About() { return ( <div> <h1>About</h1> <Link href="/">Home</Link> </div> ) } Add a test to check your navigation is working correctly: describe('Navigation', () => { it('should navigate to the about page', () => { // Start from the index page cy.visit('http://localhost:3000/') // Find a link with an href attribute containing "about" and click it cy.get('a[href*="about"]').click() // The new url should include "/about" cy.url().should('include', '/about') // The new page should contain an h1 with "About" cy.get('h1').contains('About') }) }) ### Running E2E Tests Cypress will simulate a user navigating your application, this requires your Next.js server to be running. We recommend running your tests against your production code to more closely resemble how your application will behave. Run `npm run build && npm run start` to build your Next.js application, then run `npm run cypress:open` in another terminal window to start Cypress and run your E2E testing suite. > **Good to know:** > > * You can use `cy.visit("/")` instead of `cy.visit("http://localhost:3000/")` by adding `baseUrl: 'http://localhost:3000'` to the `cypress.config.js` configuration file. > * Alternatively, you can install the `start-server-and-test` package to run the Next.js production server in conjunction with Cypress. After installation, add `"test": "start-server-and-test start http://localhost:3000 cypress"` to your `package.json` scripts field. Remember to rebuild your application after new changes. ## Creating your first Cypress component test Component tests build and mount a specific component without having to bundle your whole application or start a server. Select **Component Testing** in the Cypress app, then select **Next.js** as your front-end framework. A `cypress/component` folder will be created in your project, and a `cypress.config.js` file will be updated to enable component testing. Ensure your `cypress.config.js` file has the following configuration: import { defineConfig } from 'cypress' export default defineConfig({ component: { devServer: { framework: 'next', bundler: 'webpack', }, }, }) const { defineConfig } = require('cypress') module.exports = defineConfig({ component: { devServer: { framework: 'next', bundler: 'webpack', }, }, }) Assuming the same components from the previous section, add a test to validate a component is rendering the expected output: import AboutPage from '../../pages/about' describe('<AboutPage />', () => { it('should render and display expected content', () => { // Mount the React component for the About page cy.mount(<AboutPage />) // The new page should contain an h1 with "About page" cy.get('h1').contains('About') // Validate that a link with the expected URL is present // *Following* the link is better suited to an E2E test cy.get('a[href="/"]').should('be.visible') }) }) > **Good to know**: > > * Cypress currently doesn't support component testing for `async` Server Components. We recommend using E2E testing. > * Since component tests do not require a Next.js server, features like `<Image />` that rely on a server being available may not function out-of-the-box. ### Running Component Tests Run `npm run cypress:open` in your terminal to start Cypress and run your component testing suite. ## Continuous Integration (CI) In addition to interactive testing, you can also run Cypress headlessly using the `cypress run` command, which is better suited for CI environments: { "scripts": { //... "e2e": "start-server-and-test dev http://localhost:3000 \"cypress open --e2e\"", "e2e:headless": "start-server-and-test dev http://localhost:3000 \"cypress run --e2e\"", "component": "cypress open --component", "component:headless": "cypress run --component" } } You can learn more about Cypress and Continuous Integration from these resources: * Next.js with Cypress example * Cypress Continuous Integration Docs * Cypress GitHub Actions Guide * Official Cypress GitHub Action * Cypress Discord --- ## Page: https://nextjs.org/docs/14/pages/building-your-application/authentication To implement authentication in Next.js, familiarize yourself with three foundational concepts: * **Authentication** verifies if the user is who they say they are. It requires the user to prove their identity with something they have, such as a username and password. * **Session Management** tracks the user's state (e.g. logged in) across multiple requests. * **Authorization** decides what parts of the application the user is allowed to access. This page demonstrates how to use Next.js features to implement common authentication, authorization, and session management patterns so you can choose the best solutions based on your application's needs. ## Authentication Authentication verifies a user's identity. This happens when a user logs in, either with a username and password or through a service like Google. It's all about confirming that users are really who they claim to be, protecting both the user's data and the application from unauthorized access or fraudulent activities. ### Authentication Strategies Modern web applications commonly use several authentication strategies: 1. **OAuth/OpenID Connect (OIDC)**: Enable third-party access without sharing user credentials. Ideal for social media logins and Single Sign-On (SSO) solutions. They add an identity layer with OpenID Connect. 2. **Credentials-based login (Email + Password)**: A standard choice for web applications, where users log in with an email and password. Familiar and easy to implement, it requires robust security measures against threats like phishing. 3. **Passwordless/Token-based authentication**: Use email magic links or SMS one-time codes for secure, password-free access. Popular for its convenience and enhanced security, this method helps reduce password fatigue. Its limitation is the dependency on the user's email or phone availability. 4. **Passkeys/WebAuthn**: Use cryptographic credentials unique to each site, offering high security against phishing. Secure but new, this strategy can be difficult to implement. Selecting an authentication strategy should align with your application's specific requirements, user interface considerations, and security objectives. ### Implementing Authentication In this section, we'll explore the process of adding basic email-password authentication to a web application. While this method provides a fundamental level of security, it's worth considering more advanced options like OAuth or passwordless logins for enhanced protection against common security threats. The authentication flow we'll discuss is as follows: 1. The user submits their credentials through a login form. 2. The form sends a request that is handled by an API route. 3. Upon successful verification, the process is completed, indicating the user's successful authentication. 4. If verification is unsuccessful, an error message is shown. Consider a login form where users can input their credentials: import { FormEvent } from 'react' import { useRouter } from 'next/router' export default function LoginPage() { const router = useRouter() async function handleSubmit(event: FormEvent<HTMLFormElement>) { event.preventDefault() const formData = new FormData(event.currentTarget) const email = formData.get('email') const password = formData.get('password') const response = await fetch('/api/auth/login', { method: 'POST', headers: { 'Content-Type': 'application/json' }, body: JSON.stringify({ email, password }), }) if (response.ok) { router.push('/profile') } else { // Handle errors } } return ( <form onSubmit={handleSubmit}> <input type="email" name="email" placeholder="Email" required /> <input type="password" name="password" placeholder="Password" required /> <button type="submit">Login</button> </form> ) } The form above has two input fields for capturing the user's email and password. On submission, it triggers a function that sends a POST request to an API route (`/api/auth/login`). You can then call your Authentication Provider's API in the API route to handle authentication: import { NextApiRequest, NextApiResponse } from 'next' import { signIn } from '@/auth' export default async function handler( req: NextApiRequest, res: NextApiResponse ) { try { const { email, password } = req.body await signIn('credentials', { email, password }) res.status(200).json({ success: true }) } catch (error) { if (error.type === 'CredentialsSignin') { res.status(401).json({ error: 'Invalid credentials.' }) } else { res.status(500).json({ error: 'Something went wrong.' }) } } } In this code, the `signIn` method checks the credentials against stored user data. After the authentication provider processes the credentials, there are two possible outcomes: * **Successful Authentication**: This outcome implies that the login was successful. Further actions, such as accessing protected routes and fetching user information, can then be initiated. * **Failed Authentication**: In cases where the credentials are incorrect or an error is encountered, the function returns a corresponding error message to indicate the authentication failure. For a more streamlined authentication setup in Next.js projects, especially when offering multiple login methods, consider using a comprehensive authentication solution. Once a user is authenticated, you'll need to ensure the user is allowed to visit certain routes, and perform operations such as mutating data with Server Actions and calling Route Handlers. ### Protecting Routes with Middleware Middleware in Next.js helps you control who can access different parts of your website. This is important for keeping areas like the user dashboard protected while having other pages like marketing pages be public. It's recommended to apply Middleware across all routes and specify exclusions for public access. Here's how to implement Middleware for authentication in Next.js: #### Setting Up Middleware: * Create a `middleware.ts` or `.js` file in your project's root directory. * Include logic to authorize user access, such as checking for authentication tokens. #### Defining Protected Routes: * Not all routes require authorization. Use the `matcher` option in your Middleware to specify any routes that do not require authorization checks. #### Middleware Logic: * Write logic to verify if a user is authenticated. Check user roles or permissions for route authorization. #### Handling Unauthorized Access: * Redirect unauthorized users to a login or error page as appropriate. Example Middleware file: import type { NextRequest } from 'next/server' export function middleware(request: NextRequest) { const currentUser = request.cookies.get('currentUser')?.value if (currentUser && !request.nextUrl.pathname.startsWith('/dashboard')) { return Response.redirect(new URL('/dashboard', request.url)) } if (!currentUser && !request.nextUrl.pathname.startsWith('/login')) { return Response.redirect(new URL('/login', request.url)) } } export const config = { matcher: ['/((?!api|_next/static|_next/image|.*\\.png$).*)'], } This example uses `Response.redirect` for handling redirects early in the request pipeline, making it efficient and centralizing access control. After successful authentication, it's important to manage user navigation based on their roles. For example, an admin user might be redirected to an admin dashboard, while a regular user is sent to a different page. This is important for role-specific experiences and conditional navigation, such as prompting users to complete their profile if needed. When setting up authorization, it's important to ensure that the main security checks happen where your app accesses or changes data. While Middleware can be useful for initial validation, it should not be the sole line of defense in protecting your data. The bulk of security checks should be performed in the Data Access Layer (DAL). ### Protecting API Routes API Routes in Next.js are essential for handling server-side logic and data management. It's crucial to secure these routes to ensure that only authorized users can access specific functionalities. This typically involves verifying the user's authentication status and their role-based permissions. Here's an example of securing an API Route: import { NextApiRequest, NextApiResponse } from 'next' export default async function handler( req: NextApiRequest, res: NextApiResponse ) { const session = await getSession(req) // Check if the user is authenticated if (!session) { res.status(401).json({ error: 'User is not authenticated', }) return } // Check if the user has the 'admin' role if (session.user.role !== 'admin') { res.status(401).json({ error: 'Unauthorized access: User does not have admin privileges.', }) return } // Proceed with the route for authorized users // ... implementation of the API Route } This example demonstrates an API Route with a two-tier security check for authentication and authorization. It first checks for an active session, and then verifies if the logged-in user is an 'admin'. This approach ensures secure access, limited to authenticated and authorized users, maintaining robust security for request processing. ### Best Practices * **Secure Session Management**: Prioritize the security of session data to prevent unauthorized access and data breaches. Use encryption and secure storage practices. * **Dynamic Role Management**: Use a flexible system for user roles to easily adjust to changes in permissions and roles, avoiding hardcoded roles. * **Security-First Approach**: In all aspects of authorization logic, prioritize security to safeguard user data and maintain the integrity of your application. This includes thorough testing and considering potential security vulnerabilities. ## Session Management Session management involves tracking and managing a user's interaction with the application over time, ensuring that their authenticated state is preserved across different parts of the application. This prevents the need for repeated logins, enhancing both security and user convenience. There are two primary methods used for session management: cookie-based and database sessions. ### Cookie-Based Sessions > **🎥 Watch:** Learn more about cookie-based sessions and authentication with Next.js → YouTube (11 minutes). Cookie-based sessions manage user data by storing encrypted session information directly in browser cookies. Upon user login, this encrypted data is stored in the cookie. Each subsequent server request includes this cookie, minimizing the need for repeated server queries and enhancing client-side efficiency. However, this method requires careful encryption to protect sensitive data, as cookies are susceptible to client-side security risks. Encrypting session data in cookies is key to safeguarding user information from unauthorized access. It ensures that even if a cookie is stolen, the data inside remains unreadable. Additionally, while individual cookies are limited in size (typically around 4KB), techniques like cookie-chunking can overcome this limitation by dividing large session data into multiple cookies. Setting a cookie in a Next.js project might look something like this: **Setting a cookie on the server:** import { serialize } from 'cookie' import type { NextApiRequest, NextApiResponse } from 'next' export default function handler(req: NextApiRequest, res: NextApiResponse) { const sessionData = req.body const encryptedSessionData = encrypt(sessionData) const cookie = serialize('session', encryptedSessionData, { httpOnly: true, secure: process.env.NODE_ENV === 'production', maxAge: 60 * 60 * 24 * 7, // One week path: '/', }) res.setHeader('Set-Cookie', cookie) res.status(200).json({ message: 'Successfully set cookie!' }) } ### Database Sessions Database session management involves storing session data on the server, with the user's browser only receiving a session ID. This ID references the session data stored server-side, without containing the data itself. This method enhances security, as it keeps sensitive session data away from the client-side environment, reducing the risk of exposure to client-side attacks. Database sessions are also more scalable, accommodating larger data storage needs. However, this approach has its tradeoffs. It can increase performance overhead due to the need for database lookups at each user interaction. Strategies like session data caching can help mitigate this. Additionally, reliance on the database means that session management is as reliable as the database's performance and availability. Here's a simplified example of implementing database sessions in a Next.js application: **Creating a Session on the Server**: import db from '../../lib/db' import { NextApiRequest, NextApiResponse } from 'next' export default async function handler( req: NextApiRequest, res: NextApiResponse ) { try { const user = req.body const sessionId = generateSessionId() await db.insertSession({ sessionId, userId: user.id, createdAt: new Date(), }) res.status(200).json({ sessionId }) } catch (error) { res.status(500).json({ error: 'Internal Server Error' }) } } ### Selecting Session Management in Next.js Deciding between cookie-based and database sessions in Next.js depends on your application's needs. Cookie-based sessions are simpler and suit smaller applications with lower server load but may offer less security. Database sessions, while more complex, provide better security and scalability, ideal for larger, data-sensitive applications. With authentication solutions such as NextAuth.js, session management becomes more efficient, using either cookies or database storage. This automation simplifies the development process, but it's important to understand the session management method used by your chosen solution. Ensure it aligns with your application's security and performance requirements. Regardless of your choice, prioritize security in your session management strategy. For cookie-based sessions, using secure and HTTP-only cookies is crucial to protect session data. For database sessions, regular backups and secure handling of session data are essential. Implementing session expiry and cleanup mechanisms is vital in both approaches to prevent unauthorized access and maintain application performance and reliability. ## Examples Here are authentication solutions compatible with Next.js, please refer to the quickstart guides below to learn how to configure them in your Next.js application: * Auth0 * Clerk * Kinde * Lucia * NextAuth.js * Supabase * Stytch * Iron Session ## Further Reading To continue learning about authentication and security, check out the following resources: * Understanding XSS Attacks * Understanding CSRF Attacks --- ## Page: https://nextjs.org/docs/14/pages/building-your-application/deploying Congratulations, it's time to ship to production. You can deploy managed Next.js with Vercel, or self-host on a Node.js server, Docker image, or even static HTML files. When deploying using `next start`, all Next.js features are supported. ## Production Builds Running `next build` generates an optimized version of your application for production. HTML, CSS, and JavaScript files are created based on your pages. JavaScript is **compiled** and browser bundles are **minified** using the Next.js Compiler to help achieve the best performance and support all modern browsers. Next.js produces a standard deployment output used by managed and self-hosted Next.js. This ensures all features are supported across both methods of deployment. In the next major version, we will be transforming this output into our Build Output API specification. ## Managed Next.js with Vercel Vercel, the creators and maintainers of Next.js, provide managed infrastructure and a developer experience platform for your Next.js applications. Deploying to Vercel is zero-configuration and provides additional enhancements for scalability, availability, and performance globally. However, all Next.js features are still supported when self-hosted. Learn more about Next.js on Vercel or deploy a template for free to try it out. ## Self-Hosting You can self-host Next.js in three different ways: * A Node.js server * A Docker container * A static export ### Node.js Server Next.js can be deployed to any hosting provider that supports Node.js. Ensure your `package.json` has the `"build"` and `"start"` scripts: { "scripts": { "dev": "next dev", "build": "next build", "start": "next start" } } Then, run `npm run build` to build your application. Finally, run `npm run start` to start the Node.js server. This server supports all Next.js features. ### Docker Image Next.js can be deployed to any hosting provider that supports Docker containers. You can use this approach when deploying to container orchestrators such as Kubernetes or when running inside a container in any cloud provider. 1. Install Docker on your machine 2. Clone our example (or the multi-environment example) 3. Build your container: `docker build -t nextjs-docker .` 4. Run your container: `docker run -p 3000:3000 nextjs-docker` Next.js through Docker supports all Next.js features. ### Static HTML Export Next.js enables starting as a static site or Single-Page Application (SPA), then later optionally upgrading to use features that require a server. Since Next.js supports this static export, it can be deployed and hosted on any web server that can serve HTML/CSS/JS static assets. This includes tools like AWS S3, Nginx, or Apache. Running as a static export does not support Next.js features that require a server. Learn more. > **Good to know:** > > * Server Components are supported with static exports. ## Features ### Image Optimization Image Optimization through `next/image` works self-hosted with zero configuration when deploying using `next start`. If you would prefer to have a separate service to optimize images, you can configure an image loader. Image Optimization can be used with a static export by defining a custom image loader in `next.config.js`. Note that images are optimized at runtime, not during the build. > **Good to know:** > > * When self-hosting, consider installing `sharp` for more performant Image Optimization in your production environment by running `npm install sharp` in your project directory. On Linux platforms, `sharp` may require additional configuration to prevent excessive memory usage. > * Learn more about the caching behavior of optimized images and how to configure the TTL. > * You can also disable Image Optimization and still retain other benefits of using `next/image` if you prefer. For example, if you are optimizing images yourself separately. ### Middleware Middleware works self-hosted with zero configuration when deploying using `next start`. Since it requires access to the incoming request, it is not supported when using a static export. Middleware uses a runtime that is a subset of all available Node.js APIs to help ensure low latency, since it may run in front of every route or asset in your application. This runtime does not require running “at the edge” and works in a single-region server. Additional configuration and infrastructure are required to run Middleware in multiple regions. If you are looking to add logic (or use an external package) that requires all Node.js APIs, you might be able to move this logic to a layout as a Server Component. For example, checking headers and redirecting. You can also use headers, cookies, or query parameters to redirect or rewrite through `next.config.js`. If that does not work, you can also use a custom server. ### Environment Variables Next.js can support both build time and runtime environment variables. **By default, environment variables are only available on the server**. To expose an environment variable to the browser, it must be prefixed with `NEXT_PUBLIC_`. However, these public environment variables will be inlined into the JavaScript bundle during `next build`. To read runtime environment variables, we recommend using `getServerSideProps` or incrementally adopting the App Router. With the App Router, we can safely read environment variables on the server during dynamic rendering. This allows you to use a singular Docker image that can be promoted through multiple environments with different values. import { unstable_noStore as noStore } from 'next/cache'; export default function Component() { noStore(); // cookies(), headers(), and other dynamic functions // will also opt into dynamic rendering, making // this env variable is evaluated at runtime const value = process.env.MY_VALUE ... } > **Good to know:** > > * You can run code on server startup using the `register` function. > * We do not recommend using the runtimeConfig option, as this does not work with the standalone output mode. Instead, we recommend incrementally adopting the App Router. ### Caching and ISR Next.js can cache responses, generated static pages, build outputs, and other static assets like images, fonts, and scripts. Caching and revalidating pages (using Incremental Static Regeneration (ISR) or newer functions in the App Router) use the **same shared cache**. By default, this cache is stored to the filesystem (on disk) on your Next.js server. **This works automatically when self-hosting** using both the Pages and App Router. You can configure the Next.js cache location if you want to persist cached pages and data to durable storage, or share the cache across multiple containers or instances of your Next.js application. #### Automatic Caching * Next.js sets the `Cache-Control` header of `public, max-age=31536000, immutable` to truly immutable assets. It cannot be overridden. These immutable files contain a SHA-hash in the file name, so they can be safely cached indefinitely. For example, Static Image Imports. You can configure the TTL for images. * Incremental Static Regeneration (ISR) sets the `Cache-Control` header of `s-maxage: <revalidate in getStaticProps>, stale-while-revalidate`. This revalidation time is defined in your `getStaticProps` function in seconds. If you set `revalidate: false`, it will default to a one-year cache duration. * Dynamically rendered pages set a `Cache-Control` header of `private, no-cache, no-store, max-age=0, must-revalidate` to prevent user-specific data from being cached. This applies to both the App Router and Pages Router. This also includes Draft Mode. #### Static Assets If you want to host static assets on a different domain or CDN, you can use the `assetPrefix` configuration in `next.config.js`. Next.js will use this asset prefix when retrieving JavaScript or CSS files. Separating your assets to a different domain does come with the downside of extra time spent on DNS and TLS resolution. Learn more about `assetPrefix`. #### Configuring Caching By default, generated cache assets will be stored in memory (defaults to 50mb) and on disk. If you are hosting Next.js using a container orchestration platform like Kubernetes, each pod will have a copy of the cache. To prevent stale data from being shown since the cache is not shared between pods by default, you can configure the Next.js cache to provide a cache handler and disable in-memory caching. To configure the ISR/Data Cache location when self-hosting, you can configure a custom handler in your `next.config.js` file: module.exports = { cacheHandler: require.resolve('./cache-handler.js'), cacheMaxMemorySize: 0, // disable default in-memory caching } Then, create `cache-handler.js` in the root of your project, for example: const cache = new Map() module.exports = class CacheHandler { constructor(options) { this.options = options } async get(key) { // This could be stored anywhere, like durable storage return cache.get(key) } async set(key, data, ctx) { // This could be stored anywhere, like durable storage cache.set(key, { value: data, lastModified: Date.now(), tags: ctx.tags, }) } async revalidateTag(tag) { // Iterate over all entries in the cache for (let [key, value] of cache) { // If the value's tags include the specified tag, delete this entry if (value.tags.includes(tag)) { cache.delete(key) } } } } Using a custom cache handler will allow you to ensure consistency across all pods hosting your Next.js application. For instance, you can save the cached values anywhere, like Redis or AWS S3. > **Good to know:** > > * `revalidatePath` is a convenience layer on top of cache tags. Calling `revalidatePath` will call the `revalidateTag` function with a special default tag for the provided page. ### Build Cache Next.js generates an ID during `next build` to identify which version of your application is being served. The same build should be used and boot up multiple containers. If you are rebuilding for each stage of your environment, you will need to generate a consistent build ID to use between containers. Use the `generateBuildId` command in `next.config.js`: module.exports = { generateBuildId: async () => { // This could be anything, using the latest git hash return process.env.GIT_HASH }, } ### Version Skew Next.js will automatically mitigate most instances of version skew and automatically reload the application to retrieve new assets when detected. For example, if there is a mismatch in the `deploymentId`, transitions between pages will perform a hard navigation versus using a prefetched value. When the application is reloaded, there may be a loss of application state if it's not designed to persist between page navigations. For example, using URL state or local storage would persist state after a page refresh. However, component state like `useState` would be lost in such navigations. Vercel provides additional skew protection for Next.js applications to ensure assets and functions from the previous version are still available to older clients, even after the new version is deployed. You can manually configure the `deploymentId` property in your `next.config.js` file to ensure each request uses either `?dpl` query string or `x-deployment-id` header. ## Manual Graceful Shutdowns When self-hosting, you might want to run code when the server shuts down on `SIGTERM` or `SIGINT` signals. You can set the env variable `NEXT_MANUAL_SIG_HANDLE` to `true` and then register a handler for that signal inside your `_document.js` file. You will need to register the environment variable directly in the `package.json` script, and not in the `.env` file. > **Good to know**: Manual signal handling is not available in `next dev`. { "scripts": { "dev": "next dev", "build": "next build", "start": "NEXT_MANUAL_SIG_HANDLE=true next start" } } if (process.env.NEXT_MANUAL_SIG_HANDLE) { process.on('SIGTERM', () => { console.log('Received SIGTERM: cleaning up') process.exit(0) }) process.on('SIGINT', () => { console.log('Received SIGINT: cleaning up') process.exit(0) }) } --- ## Page: https://nextjs.org/docs/14/pages/building-your-application/deploying/production-checklist Before taking your Next.js application to production, there are some optimizations and patterns you should consider implementing for the best user experience, performance, and security. This page provides best practices that you can use as a reference when building your application, before going to production, and after deployment - as well as the automatic Next.js optimizations you should be aware of. ## Automatic optimizations These Next.js optimizations are enabled by default and require no configuration: * **Code-splitting:** Next.js automatically code-splits your application code by pages. This means only the code needed for the current page is loaded on navigation. You may also consider lazy loading third-party libraries, where appropriate. * **Prefetching:** When a link to a new route enters the user's viewport, Next.js prefetches the route in background. This makes navigation to new routes almost instant. You can opt out of prefetching, where appropriate. * **Automatic Static Optimization:** Next.js automatically determines that a page is static (can be pre-rendered) if it has no blocking data requirements. Optimized pages can be cached, and served to the end-user from multiple CDN locations. You may opt into Server-side Rendering, where appropriate. These defaults aim to improve your application's performance, and reduce the cost and amount of data transferred on each network request. ## During development While building your application, we recommend using the following features to ensure the best performance and user experience: ### Routing and rendering * **`<Link>` component:** Use the `<Link>` component for client-side navigation and prefetching. * **Custom Errors:** Gracefully handle 500 and 404 errors ### Data fetching and caching * **API Routes:** Use Route Handlers to access your backend resources, and prevent sensitive secrets from being exposed to the client. * **Data Caching:** Verify whether your data requests are being cached or not, and opt into caching, where appropriate. Ensure requests that don't use `getStaticProps` are cached where appropriate. * **Incremental Static Regeneration:** Use Incremental Static Regeneration to update static pages after they've been built, without rebuilding your entire site. * **Static Images:** Use the `public` directory to automatically cache your application's static assets, e.g. images. ### UI and accessibility * **Font Module:** Optimize fonts by using the Font Module, which automatically hosts your font files with other static assets, removes external network requests, and reduces layout shift. * **`<Image>` Component:** Optimize images by using the Image Component, which automatically optimizes images, prevents layout shift, and serves them in modern formats like WebP or AVIF. * **`<Script>` Component:** Optimize third-party scripts by using the Script Component, which automatically defers scripts and prevents them from blocking the main thread. * **ESLint:** Use the built-in `eslint-plugin-jsx-a11y` plugin to catch accessibility issues early. ### Security * **Environment Variables:** Ensure your `.env.*` files are added to `.gitignore` and only public variables are prefixed with `NEXT_PUBLIC_`. * **Content Security Policy:** Consider adding a Content Security Policy to protect your application against various security threats such as cross-site scripting, clickjacking, and other code injection attacks. ### Metadata and SEO * **`<Head>` Component:** Use the `next/head` component to add page titles, descriptions, and more. ### Type safety * **TypeScript and TS Plugin:** Use TypeScript and the TypeScript plugin for better type-safety, and to help you catch errors early. ## Before going to production Before going to production, you can run `next build` to build your application locally and catch any build errors, then run `next start` to measure the performance of your application in a production-like environment. ### Core Web Vitals * **Lighthouse:** Run lighthouse in incognito to gain a better understanding of how your users will experience your site, and to identify areas for improvement. This is a simulated test and should be paired with looking at field data (such as Core Web Vitals). ### Analyzing bundles Use the `@next/bundle-analyzer` plugin to analyze the size of your JavaScript bundles and identify large modules and dependencies that might be impacting your application's performance. Additionally, the following tools can you understand the impact of adding new dependencies to your application: * Import Cost * Package Phobia * Bundle Phobia * bundlejs ## After deployment Depending on where you deploy your application, you might have access to additional tools and integrations to help you monitor and improve your application's performance. For Vercel deployments, we recommend the following: * **Analytics:** A built-in analytics dashboard to help you understand your application's traffic, including the number of unique visitors, page views, and more. * **Speed Insights:** Real-world performance insights based on visitor data, offering a practical view of how your website is performing in the field. * **Logging:** Runtime and Activity logs to help you debug issues and monitor your application in production. Alternatively, see the integrations page for a list of third-party tools and services. > **Good to know:** > > To get a comprehensive understanding of the best practices for production deployments on Vercel, including detailed strategies for improving website performance, refer to the Vercel Production Checklist. Following these recommendations will help you build a faster, more reliable, and secure application for your users. --- ## Page: https://nextjs.org/docs/14/pages/building-your-application/deploying/static-exports Next.js enables starting as a static site or Single-Page Application (SPA), then later optionally upgrading to use features that require a server. When running `next build`, Next.js generates an HTML file per route. By breaking a strict SPA into individual HTML files, Next.js can avoid loading unnecessary JavaScript code on the client-side, reducing the bundle size and enabling faster page loads. Since Next.js supports this static export, it can be deployed and hosted on any web server that can serve HTML/CSS/JS static assets. > **Good to know**: We recommend using the App Router for enhanced static export support. ## Configuration To enable a static export, change the output mode inside `next.config.js`: /** * @type {import('next').NextConfig} */ const nextConfig = { output: 'export', // Optional: Change links `/me` -> `/me/` and emit `/me.html` -> `/me/index.html` // trailingSlash: true, // Optional: Prevent automatic `/me` -> `/me/`, instead preserve `href` // skipTrailingSlashRedirect: true, // Optional: Change the output directory `out` -> `dist` // distDir: 'dist', } module.exports = nextConfig After running `next build`, Next.js will produce an `out` folder which contains the HTML/CSS/JS assets for your application. You can utilize `getStaticProps` and `getStaticPaths` to generate an HTML file for each page in your `pages` directory (or more for dynamic routes). ## Supported Features The majority of core Next.js features needed to build a static site are supported, including: * Dynamic Routes when using `getStaticPaths` * Prefetching with `next/link` * Preloading JavaScript * Dynamic Imports * Any styling options (e.g. CSS Modules, styled-jsx) * Client-side data fetching * `getStaticProps` * `getStaticPaths` ### Image Optimization Image Optimization through `next/image` can be used with a static export by defining a custom image loader in `next.config.js`. For example, you can optimize images with a service like Cloudinary: /** @type {import('next').NextConfig} */ const nextConfig = { output: 'export', images: { loader: 'custom', loaderFile: './my-loader.ts', }, } module.exports = nextConfig This custom loader will define how to fetch images from a remote source. For example, the following loader will construct the URL for Cloudinary: export default function cloudinaryLoader({ src, width, quality, }: { src: string width: number quality?: number }) { const params = ['f_auto', 'c_limit', `w_${width}`, `q_${quality || 'auto'}`] return `https://res.cloudinary.com/demo/image/upload/${params.join( ',' )}${src}` } You can then use `next/image` in your application, defining relative paths to the image in Cloudinary: import Image from 'next/image' export default function Page() { return <Image alt="turtles" src="/turtles.jpg" width={300} height={300} /> } ## Unsupported Features Features that require a Node.js server, or dynamic logic that cannot be computed during the build process, are **not** supported: * Internationalized Routing * API Routes * Rewrites * Redirects * Headers * Middleware * Incremental Static Regeneration * Image Optimization with the default `loader` * Draft Mode * `getStaticPaths` with `fallback: true` * `getStaticPaths` with `fallback: 'blocking'` * `getServerSideProps` ## Deploying With a static export, Next.js can be deployed and hosted on any web server that can serve HTML/CSS/JS static assets. When running `next build`, Next.js generates the static export into the `out` folder. For example, let's say you have the following routes: * `/` * `/blog/[id]` After running `next build`, Next.js will generate the following files: * `/out/index.html` * `/out/404.html` * `/out/blog/post-1.html` * `/out/blog/post-2.html` If you are using a static host like Nginx, you can configure rewrites from incoming requests to the correct files: server { listen 80; server_name acme.com; root /var/www/out; location / { try_files $uri $uri.html $uri/ =404; } # This is necessary when `trailingSlash: false`. # You can omit this when `trailingSlash: true`. location /blog/ { rewrite ^/blog/(.*)$ /blog/$1.html break; } error_page 404 /404.html; location = /404.html { internal; } } ## Version History | Version | Changes | | --- | --- | | `v14.0.0` | `next export` has been removed in favor of `"output": "export"` | | `v13.4.0` | App Router (Stable) adds enhanced static export support, including using React Server Components and Route Handlers. | | `v13.3.0` | `next export` is deprecated and replaced with `"output": "export"` | --- ## Page: https://nextjs.org/docs/14/pages/building-your-application/deploying/multi-zones Examples * With Zones Multi-Zones are an approach to micro-frontends that separate a large application on a domain into smaller Next.js applications that each serve a set of paths. This is useful when there are collections of pages unrelated to the other pages in the application. By moving those pages to a separate zone (i.e., a separate application), you can reduce the size of each application which improves build times and removes code that is only necessary for one of the zones. For example, let's say you have the following set of pages that you would like to split up: * `/blog/*` for all blog posts * `/dashboard/*` for all pages when the user is logged-in to the dashboard * `/*` for the rest of your website not covered by other zones With Multi-Zones support, you can create three applications that all are served on the same domain and look the same to the user, but you can develop and deploy each of the applications independently.  Navigating between pages in the same zone will perform soft navigations, a navigation that does not require reloading the page. For example, in this diagram, navigating from `/` to `/products` will be a soft navigation. Navigating from a page in one zone to a page in another zone, such as from `/` to `/dashboard`, will perform a hard navigation, unloading the resources of the current page and loading the resources of the new page. Pages that are frequently visited together should live in the same zone to avoid hard navigations. ## How to define a zone There are no special APIs to define a new zone. A zone is a normal Next.js application where you also configure a basePath to avoid conflicts with pages and static files in other zones. /** @type {import('next').NextConfig} */ const nextConfig = { basePath: '/blog', } The default application that will handle all paths not sent to a more specific zone does not need a `basePath`. Next.js assets, such as JavaScript and CSS, will also be prefixed with `basePath` to make sure that they don't conflict with assets from other zones. These assets will be served under `/basePath/_next/...` for each of the zones. If the zone serves pages that don't share a common path prefix, such as `/home` and `/blog`, then you can also set `assetPrefix` to ensure that all Next.js assets are served under a unique path prefix for the zone without adding a path prefix to the rest of the routes in your application. ## How to route requests to the right zone With the Multi Zones set-up, you need to route the paths to the correct zone since they are served by different applications. You can use any HTTP proxy to do this, but one of the Next.js applications can also be used to route requests for the entire domain. To route to the correct zone using a Next.js application, you can use `rewrites`. For each path served by a different zone, you would add a rewrite rule to send that path to the domain of the other zone. For example: async rewrites() { return [ { source: '/blog', destination: `${process.env.BLOG_DOMAIN}/blog`, }, { source: '/blog/:path+', destination: `${process.env.BLOG_DOMAIN}/blog/:path+`, } ]; } `destination` should be a URL that is served by the zone, including scheme and domain. This should point to the zone's production domain, but it can also be used to route requests to `localhost` in local development. > **Good to know**: URL paths should be unique to a zone. For example, two zones trying to serve `/blog` would create a routing conflict. ## Linking between zones Links to paths in a different zone should use an `a` tag instead of the Next.js `<Link>` component. This is because Next.js will try to prefetch and soft navigate to any relative path in `<Link>` component, which will not work across zones. ## Sharing code The Next.js applications that make up the different zones can live in any repository. However, it is often convenient to put these zones in a monorepo to more easily share code. For zones that live in different repositories, code can also be shared using public or private NPM packages. Since the pages in different zones may be released at different times, feature flags can be useful for enabling or disabling features in unison across the different zones. For Next.js on Vercel applications, you can use a monorepo to deploy all affected zones with a single `git push`. --- ## Page: https://nextjs.org/docs/14/pages/building-your-application/deploying/ci-build-caching To improve build performance, Next.js saves a cache to `.next/cache` that is shared between builds. To take advantage of this cache in Continuous Integration (CI) environments, your CI workflow will need to be configured to correctly persist the cache between builds. > If your CI is not configured to persist `.next/cache` between builds, you may see a No Cache Detected error. Here are some example cache configurations for common CI providers: ## Vercel Next.js caching is automatically configured for you. There's no action required on your part. ## CircleCI Edit your `save_cache` step in `.circleci/config.yml` to include `.next/cache`: steps: - save_cache: key: dependency-cache-{{ checksum "yarn.lock" }} paths: - ./node_modules - ./.next/cache If you do not have a `save_cache` key, please follow CircleCI's documentation on setting up build caching. ## Travis CI Add or merge the following into your `.travis.yml`: cache: directories: - $HOME/.cache/yarn - node_modules - .next/cache ## GitLab CI Add or merge the following into your `.gitlab-ci.yml`: cache: key: ${CI_COMMIT_REF_SLUG} paths: - node_modules/ - .next/cache/ ## Netlify CI Use Netlify Plugins with `@netlify/plugin-nextjs`. ## AWS CodeBuild Add (or merge in) the following to your `buildspec.yml`: cache: paths: - 'node_modules/**/*' # Cache `node_modules` for faster `yarn` or `npm i` - '.next/cache/**/*' # Cache Next.js for faster application rebuilds ## GitHub Actions Using GitHub's actions/cache, add the following step in your workflow file: uses: actions/cache@v4 with: # See here for caching with `yarn` https://github.com/actions/cache/blob/main/examples.md#node---yarn or you can leverage caching with actions/setup-node https://github.com/actions/setup-node path: | ~/.npm ${{ github.workspace }}/.next/cache # Generate a new cache whenever packages or source files change. key: ${{ runner.os }}-nextjs-${{ hashFiles('**/package-lock.json') }}-${{ hashFiles('**/*.js', '**/*.jsx', '**/*.ts', '**/*.tsx') }} # If source files changed but packages didn't, rebuild from a prior cache. restore-keys: | ${{ runner.os }}-nextjs-${{ hashFiles('**/package-lock.json') }}- ## Bitbucket Pipelines Add or merge the following into your `bitbucket-pipelines.yml` at the top level (same level as `pipelines`): definitions: caches: nextcache: .next/cache Then reference it in the `caches` section of your pipeline's `step`: - step: name: your_step_name caches: - node - nextcache ## Heroku Using Heroku's custom cache, add a `cacheDirectories` array in your top-level package.json: "cacheDirectories": [".next/cache"] ## Azure Pipelines Using Azure Pipelines' Cache task, add the following task to your pipeline yaml file somewhere prior to the task that executes `next build`: - task: Cache@2 displayName: 'Cache .next/cache' inputs: key: next | $(Agent.OS) | yarn.lock path: '$(System.DefaultWorkingDirectory)/.next/cache' ## Jenkins (Pipeline) Using Jenkins' Job Cacher plugin, add the following build step to your `Jenkinsfile` where you would normally run `next build` or `npm install`: stage("Restore npm packages") { steps { // Writes lock-file to cache based on the GIT_COMMIT hash writeFile file: "next-lock.cache", text: "$GIT_COMMIT" cache(caches: [ arbitraryFileCache( path: "node_modules", includes: "**/*", cacheValidityDecidingFile: "package-lock.json" ) ]) { sh "npm install" } } } stage("Build") { steps { // Writes lock-file to cache based on the GIT_COMMIT hash writeFile file: "next-lock.cache", text: "$GIT_COMMIT" cache(caches: [ arbitraryFileCache( path: ".next/cache", includes: "**/*", cacheValidityDecidingFile: "next-lock.cache" ) ]) { // aka `next build` sh "npm run build" } } } --- ## Page: https://nextjs.org/docs/14/pages/building-your-application/upgrading #### Subscribe to our newsletter Stay updated on new releases and features, guides, and case studies. --- ## Page: https://nextjs.org/docs/14/pages/building-your-application/upgrading/codemods Codemods are transformations that run on your codebase programmatically. This allows a large number of changes to be programmatically applied without having to manually go through every file. Next.js provides Codemod transformations to help upgrade your Next.js codebase when an API is updated or deprecated. ## Usage In your terminal, navigate (`cd`) into your project's folder, then run: npx @next/codemod <transform> <path> Replacing `<transform>` and `<path>` with appropriate values. * `transform` - name of transform * `path` - files or directory to transform * `--dry` Do a dry-run, no code will be edited * `--print` Prints the changed output for comparison ## Next.js Codemods ### 14.0 #### Migrate `ImageResponse` imports ##### `next-og-import` npx @next/codemod@latest next-og-import . This codemod moves transforms imports from `next/server` to `next/og` for usage of Dynamic OG Image Generation. For example: import { ImageResponse } from 'next/server' Transforms into: import { ImageResponse } from 'next/og' #### Use `viewport` export ##### `metadata-to-viewport-export` npx @next/codemod@latest metadata-to-viewport-export . This codemod migrates certain viewport metadata to `viewport` export. For example: export const metadata = { title: 'My App', themeColor: 'dark', viewport: { width: 1, }, } Transforms into: export const metadata = { title: 'My App', } export const viewport = { width: 1, themeColor: 'dark', } ### 13.2 #### Use Built-in Font ##### `built-in-next-font` npx @next/codemod@latest built-in-next-font . This codemod uninstalls the `@next/font` package and transforms `@next/font` imports into the built-in `next/font`. For example: import { Inter } from '@next/font/google' Transforms into: import { Inter } from 'next/font/google' ### 13.0 #### Rename Next Image Imports ##### `next-image-to-legacy-image` npx @next/codemod@latest next-image-to-legacy-image . Safely renames `next/image` imports in existing Next.js 10, 11, or 12 applications to `next/legacy/image` in Next.js 13. Also renames `next/future/image` to `next/image`. For example: import Image1 from 'next/image' import Image2 from 'next/future/image' export default function Home() { return ( <div> <Image1 src="/test.jpg" width="200" height="300" /> <Image2 src="/test.png" width="500" height="400" /> </div> ) } Transforms into: // 'next/image' becomes 'next/legacy/image' import Image1 from 'next/legacy/image' // 'next/future/image' becomes 'next/image' import Image2 from 'next/image' export default function Home() { return ( <div> <Image1 src="/test.jpg" width="200" height="300" /> <Image2 src="/test.png" width="500" height="400" /> </div> ) } #### Migrate to the New Image Component ##### `next-image-experimental` npx @next/codemod@latest next-image-experimental . Dangerously migrates from `next/legacy/image` to the new `next/image` by adding inline styles and removing unused props. * Removes `layout` prop and adds `style`. * Removes `objectFit` prop and adds `style`. * Removes `objectPosition` prop and adds `style`. * Removes `lazyBoundary` prop. * Removes `lazyRoot` prop. #### Remove `<a>` Tags From Link Components ##### `new-link` npx @next/codemod@latest new-link . Remove `<a>` tags inside Link Components, or add a `legacyBehavior` prop to Links that cannot be auto-fixed. For example: <Link href="/about"> <a>About</a> </Link> // transforms into <Link href="/about"> About </Link> <Link href="/about"> <a onClick={() => console.log('clicked')}>About</a> </Link> // transforms into <Link href="/about" onClick={() => console.log('clicked')}> About </Link> In cases where auto-fixing can't be applied, the `legacyBehavior` prop is added. This allows your app to keep functioning using the old behavior for that particular link. const Component = () => <a>About</a> <Link href="/about"> <Component /> </Link> // becomes <Link href="/about" legacyBehavior> <Component /> </Link> ### 11 #### Migrate from CRA ##### `cra-to-next` npx @next/codemod cra-to-next Migrates a Create React App project to Next.js; creating a Pages Router and necessary config to match behavior. Client-side only rendering is leveraged initially to prevent breaking compatibility due to `window` usage during SSR and can be enabled seamlessly to allow the gradual adoption of Next.js specific features. Please share any feedback related to this transform in this discussion. ### 10 #### Add React imports ##### `add-missing-react-import` npx @next/codemod add-missing-react-import Transforms files that do not import `React` to include the import in order for the new React JSX transform to work. For example: export default class Home extends React.Component { render() { return <div>Hello World</div> } } Transforms into: import React from 'react' export default class Home extends React.Component { render() { return <div>Hello World</div> } } ### 9 #### Transform Anonymous Components into Named Components ##### `name-default-component` npx @next/codemod name-default-component **Versions 9 and above.** Transforms anonymous components into named components to make sure they work with Fast Refresh. For example: export default function () { return <div>Hello World</div> } Transforms into: export default function MyComponent() { return <div>Hello World</div> } The component will have a camel-cased name based on the name of the file, and it also works with arrow functions. ### 8 #### Transform AMP HOC into page config ##### `withamp-to-config` npx @next/codemod withamp-to-config Transforms the `withAmp` HOC into Next.js 9 page configuration. For example: // Before import { withAmp } from 'next/amp' function Home() { return <h1>My AMP Page</h1> } export default withAmp(Home) // After export default function Home() { return <h1>My AMP Page</h1> } export const config = { amp: true, } ### 6 #### Use `withRouter` ##### `url-to-withrouter` npx @next/codemod url-to-withrouter Transforms the deprecated automatically injected `url` property on top level pages to using `withRouter` and the `router` property it injects. Read more here: https://nextjs.org/docs/messages/url-deprecated For example: import React from 'react' export default class extends React.Component { render() { const { pathname } = this.props.url return <div>Current pathname: {pathname}</div> } } import React from 'react' import { withRouter } from 'next/router' export default withRouter( class extends React.Component { render() { const { pathname } = this.props.router return <div>Current pathname: {pathname}</div> } } ) This is one case. All the cases that are transformed (and tested) can be found in the `__testfixtures__` directory. --- ## Page: https://nextjs.org/docs/14/pages/building-your-application/upgrading/app-router-migration This guide will help you: * Update your Next.js application from version 12 to version 13 * Upgrade features that work in both the `pages` and the `app` directories * Incrementally migrate your existing application from `pages` to `app` ## Upgrading ### Node.js Version The minimum Node.js version is now **v18.17**. See the Node.js documentation for more information. ### Next.js Version To update to Next.js version 13, run the following command using your preferred package manager: npm install next@latest react@latest react-dom@latest ### ESLint Version If you're using ESLint, you need to upgrade your ESLint version: npm install -D eslint-config-next@latest > **Good to know**: You may need to restart the ESLint server in VS Code for the ESLint changes to take effect. Open the Command Palette (`cmd+shift+p` on Mac; `ctrl+shift+p` on Windows) and search for `ESLint: Restart ESLint Server`. ## Next Steps After you've updated, see the following sections for next steps: * Upgrade new features: A guide to help you upgrade to new features such as the improved Image and Link Components. * Migrate from the `pages` to `app` directory: A step-by-step guide to help you incrementally migrate from the `pages` to the `app` directory. ## Upgrading New Features Next.js 13 introduced the new App Router with new features and conventions. The new Router is available in the `app` directory and co-exists with the `pages` directory. Upgrading to Next.js 13 does **not** require using the new App Router. You can continue using `pages` with new features that work in both directories, such as the updated Image component, Link component, Script component, and Font optimization. ### `<Image/>` Component Next.js 12 introduced new improvements to the Image Component with a temporary import: `next/future/image`. These improvements included less client-side JavaScript, easier ways to extend and style images, better accessibility, and native browser lazy loading. In version 13, this new behavior is now the default for `next/image`. There are two codemods to help you migrate to the new Image Component: * **`next-image-to-legacy-image` codemod**: Safely and automatically renames `next/image` imports to `next/legacy/image`. Existing components will maintain the same behavior. * **`next-image-experimental` codemod**: Dangerously adds inline styles and removes unused props. This will change the behavior of existing components to match the new defaults. To use this codemod, you need to run the `next-image-to-legacy-image` codemod first. ### `<Link>` Component The `<Link>` Component no longer requires manually adding an `<a>` tag as a child. This behavior was added as an experimental option in version 12.2 and is now the default. In Next.js 13, `<Link>` always renders `<a>` and allows you to forward props to the underlying tag. For example: import Link from 'next/link' // Next.js 12: `<a>` has to be nested otherwise it's excluded <Link href="/about"> <a>About</a> </Link> // Next.js 13: `<Link>` always renders `<a>` under the hood <Link href="/about"> About </Link> To upgrade your links to Next.js 13, you can use the `new-link` codemod. ### `<Script>` Component The behavior of `next/script` has been updated to support both `pages` and `app`, but some changes need to be made to ensure a smooth migration: * Move any `beforeInteractive` scripts you previously included in `_document.js` to the root layout file (`app/layout.tsx`). * The experimental `worker` strategy does not yet work in `app` and scripts denoted with this strategy will either have to be removed or modified to use a different strategy (e.g. `lazyOnload`). * `onLoad`, `onReady`, and `onError` handlers will not work in Server Components so make sure to move them to a Client Component or remove them altogether. ### Font Optimization Previously, Next.js helped you optimize fonts by inlining font CSS. Version 13 introduces the new `next/font` module which gives you the ability to customize your font loading experience while still ensuring great performance and privacy. `next/font` is supported in both the `pages` and `app` directories. While inlining CSS still works in `pages`, it does not work in `app`. You should use `next/font` instead. See the Font Optimization page to learn how to use `next/font`. ## Migrating from `pages` to `app` > **🎥 Watch:** Learn how to incrementally adopt the App Router → YouTube (16 minutes). Moving to the App Router may be the first time using React features that Next.js builds on top of such as Server Components, Suspense, and more. When combined with new Next.js features such as special files and layouts, migration means new concepts, mental models, and behavioral changes to learn. We recommend reducing the combined complexity of these updates by breaking down your migration into smaller steps. The `app` directory is intentionally designed to work simultaneously with the `pages` directory to allow for incremental page-by-page migration. * The `app` directory supports nested routes _and_ layouts. Learn more. * Use nested folders to define routes and a special `page.js` file to make a route segment publicly accessible. Learn more. * Special file conventions are used to create UI for each route segment. The most common special files are `page.js` and `layout.js`. * Use `page.js` to define UI unique to a route. * Use `layout.js` to define UI that is shared across multiple routes. * `.js`, `.jsx`, or `.tsx` file extensions can be used for special files. * You can colocate other files inside the `app` directory such as components, styles, tests, and more. Learn more. * Data fetching functions like `getServerSideProps` and `getStaticProps` have been replaced with a new API inside `app`. `getStaticPaths` has been replaced with `generateStaticParams`. * `pages/_app.js` and `pages/_document.js` have been replaced with a single `app/layout.js` root layout. Learn more. * `pages/_error.js` has been replaced with more granular `error.js` special files. Learn more. * `pages/404.js` has been replaced with the `not-found.js` file. * `pages/api/*` API Routes have been replaced with the `route.js` (Route Handler) special file. ### Step 1: Creating the `app` directory Update to the latest Next.js version (requires 13.4 or greater): npm install next@latest Then, create a new `app` directory at the root of your project (or `src/` directory). ### Step 2: Creating a Root Layout Create a new `app/layout.tsx` file inside the `app` directory. This is a root layout that will apply to all routes inside `app`. export default function RootLayout({ // Layouts must accept a children prop. // This will be populated with nested layouts or pages children, }: { children: React.ReactNode }) { return ( <html lang="en"> <body>{children}</body> </html> ) } * The `app` directory **must** include a root layout. * The root layout must define `<html>`, and `<body>` tags since Next.js does not automatically create them * The root layout replaces the `pages/_app.tsx` and `pages/_document.tsx` files. * `.js`, `.jsx`, or `.tsx` extensions can be used for layout files. To manage `<head>` HTML elements, you can use the built-in SEO support: import { Metadata } from 'next' export const metadata: Metadata = { title: 'Home', description: 'Welcome to Next.js', } #### Migrating `_document.js` and `_app.js` If you have an existing `_app` or `_document` file, you can copy the contents (e.g. global styles) to the root layout (`app/layout.tsx`). Styles in `app/layout.tsx` will _not_ apply to `pages/*`. You should keep `_app`/`_document` while migrating to prevent your `pages/*` routes from breaking. Once fully migrated, you can then safely delete them. If you are using any React Context providers, they will need to be moved to a Client Component. #### Migrating the `getLayout()` pattern to Layouts (Optional) Next.js recommended adding a property to Page components to achieve per-page layouts in the `pages` directory. This pattern can be replaced with native support for nested layouts in the `app` directory. See before and after example **Before** export default function DashboardLayout({ children }) { return ( <div> <h2>My Dashboard</h2> {children} </div> ) } import DashboardLayout from '../components/DashboardLayout' export default function Page() { return <p>My Page</p> } Page.getLayout = function getLayout(page) { return <DashboardLayout>{page}</DashboardLayout> } **After** * Remove the `Page.getLayout` property from `pages/dashboard/index.js` and follow the steps for migrating pages to the `app` directory. export default function Page() { return <p>My Page</p> } * Move the contents of `DashboardLayout` into a new Client Component to retain `pages` directory behavior. 'use client' // this directive should be at top of the file, before any imports. // This is a Client Component export default function DashboardLayout({ children }) { return ( <div> <h2>My Dashboard</h2> {children} </div> ) } * Import the `DashboardLayout` into a new `layout.js` file inside the `app` directory. import DashboardLayout from './DashboardLayout' // This is a Server Component export default function Layout({ children }) { return <DashboardLayout>{children}</DashboardLayout> } * You can incrementally move non-interactive parts of `DashboardLayout.js` (Client Component) into `layout.js` (Server Component) to reduce the amount of component JavaScript you send to the client. ### Step 3: Migrating `next/head` In the `pages` directory, the `next/head` React component is used to manage `<head>` HTML elements such as `title` and `meta` . In the `app` directory, `next/head` is replaced with the new built-in SEO support. **Before:** import Head from 'next/head' export default function Page() { return ( <> <Head> <title>My page title</title> </Head> </> ) } **After:** import { Metadata } from 'next' export const metadata: Metadata = { title: 'My Page Title', } export default function Page() { return '...' } See all metadata options. ### Step 4: Migrating Pages * Pages in the `app` directory are Server Components by default. This is different from the `pages` directory where pages are Client Components. * Data fetching has changed in `app`. `getServerSideProps`, `getStaticProps` and `getInitialProps` have been replaced with a simpler API. * The `app` directory uses nested folders to define routes and a special `page.js` file to make a route segment publicly accessible. * | `pages` Directory | `app` Directory | Route | | --- | --- | --- | | `index.js` | `page.js` | `/` | | `about.js` | `about/page.js` | `/about` | | `blog/[slug].js` | `blog/[slug]/page.js` | `/blog/post-1` | We recommend breaking down the migration of a page into two main steps: * Step 1: Move the default exported Page Component into a new Client Component. * Step 2: Import the new Client Component into a new `page.js` file inside the `app` directory. > **Good to know**: This is the easiest migration path because it has the most comparable behavior to the `pages` directory. **Step 1: Create a new Client Component** * Create a new separate file inside the `app` directory (i.e. `app/home-page.tsx` or similar) that exports a Client Component. To define Client Components, add the `'use client'` directive to the top of the file (before any imports). * Similar to the Pages Router, there is an optimization step to prerender Client Components to static HTML on the initial page load. * Move the default exported page component from `pages/index.js` to `app/home-page.tsx`. 'use client' // This is a Client Component (same as components in the `pages` directory) // It receives data as props, has access to state and effects, and is // prerendered on the server during the initial page load. export default function HomePage({ recentPosts }) { return ( <div> {recentPosts.map((post) => ( <div key={post.id}>{post.title}</div> ))} </div> ) } **Step 2: Create a new page** * Create a new `app/page.tsx` file inside the `app` directory. This is a Server Component by default. * Import the `home-page.tsx` Client Component into the page. * If you were fetching data in `pages/index.js`, move the data fetching logic directly into the Server Component using the new data fetching APIs. See the data fetching upgrade guide for more details. // Import your Client Component import HomePage from './home-page' async function getPosts() { const res = await fetch('https://...') const posts = await res.json() return posts } export default async function Page() { // Fetch data directly in a Server Component const recentPosts = await getPosts() // Forward fetched data to your Client Component return <HomePage recentPosts={recentPosts} /> } * If your previous page used `useRouter`, you'll need to update to the new routing hooks. Learn more. * Start your development server and visit `http://localhost:3000`. You should see your existing index route, now served through the app directory. ### Step 5: Migrating Routing Hooks A new router has been added to support the new behavior in the `app` directory. In `app`, you should use the three new hooks imported from `next/navigation`: `useRouter()`, `usePathname()`, and `useSearchParams()`. * The new `useRouter` hook is imported from `next/navigation` and has different behavior to the `useRouter` hook in `pages` which is imported from `next/router`. * The `useRouter` hook imported from `next/router` is not supported in the `app` directory but can continue to be used in the `pages` directory. * The new `useRouter` does not return the `pathname` string. Use the separate `usePathname` hook instead. * The new `useRouter` does not return the `query` object. Use the separate `useSearchParams` hook instead. * You can use `useSearchParams` and `usePathname` together to listen to page changes. See the Router Events section for more details. * These new hooks are only supported in Client Components. They cannot be used in Server Components. 'use client' import { useRouter, usePathname, useSearchParams } from 'next/navigation' export default function ExampleClientComponent() { const router = useRouter() const pathname = usePathname() const searchParams = useSearchParams() // ... } In addition, the new `useRouter` hook has the following changes: * `isFallback` has been removed because `fallback` has been replaced. * The `locale`, `locales`, `defaultLocales`, `domainLocales` values have been removed because built-in i18n Next.js features are no longer necessary in the `app` directory. Learn more about i18n. * `basePath` has been removed. The alternative will not be part of `useRouter`. It has not yet been implemented. * `asPath` has been removed because the concept of `as` has been removed from the new router. * `isReady` has been removed because it is no longer necessary. During static rendering, any component that uses the `useSearchParams()` hook will skip the prerendering step and instead be rendered on the client at runtime. View the `useRouter()` API reference. ### Step 6: Migrating Data Fetching Methods The `pages` directory uses `getServerSideProps` and `getStaticProps` to fetch data for pages. Inside the `app` directory, these previous data fetching functions are replaced with a simpler API built on top of `fetch()` and `async` React Server Components. export default async function Page() { // This request should be cached until manually invalidated. // Similar to `getStaticProps`. // `force-cache` is the default and can be omitted. const staticData = await fetch(`https://...`, { cache: 'force-cache' }) // This request should be refetched on every request. // Similar to `getServerSideProps`. const dynamicData = await fetch(`https://...`, { cache: 'no-store' }) // This request should be cached with a lifetime of 10 seconds. // Similar to `getStaticProps` with the `revalidate` option. const revalidatedData = await fetch(`https://...`, { next: { revalidate: 10 }, }) return <div>...</div> } #### Server-side Rendering (`getServerSideProps`) In the `pages` directory, `getServerSideProps` is used to fetch data on the server and forward props to the default exported React component in the file. The initial HTML for the page is prerendered from the server, followed by "hydrating" the page in the browser (making it interactive). // `pages` directory export async function getServerSideProps() { const res = await fetch(`https://...`) const projects = await res.json() return { props: { projects } } } export default function Dashboard({ projects }) { return ( <ul> {projects.map((project) => ( <li key={project.id}>{project.name}</li> ))} </ul> ) } In the `app` directory, we can colocate our data fetching inside our React components using Server Components. This allows us to send less JavaScript to the client, while maintaining the rendered HTML from the server. By setting the `cache` option to `no-store`, we can indicate that the fetched data should never be cached. This is similar to `getServerSideProps` in the `pages` directory. // `app` directory // This function can be named anything async function getProjects() { const res = await fetch(`https://...`, { cache: 'no-store' }) const projects = await res.json() return projects } export default async function Dashboard() { const projects = await getProjects() return ( <ul> {projects.map((project) => ( <li key={project.id}>{project.name}</li> ))} </ul> ) } #### Accessing Request Object In the `pages` directory, you can retrieve request-based data based on the Node.js HTTP API. For example, you can retrieve the `req` object from `getServerSideProps` and use it to retrieve the request's cookies and headers. // `pages` directory export async function getServerSideProps({ req, query }) { const authHeader = req.getHeaders()['authorization']; const theme = req.cookies['theme']; return { props: { ... }} } export default function Page(props) { return ... } The `app` directory exposes new read-only functions to retrieve request data: * `headers()`: Based on the Web Headers API, and can be used inside Server Components to retrieve request headers. * `cookies()`: Based on the Web Cookies API, and can be used inside Server Components to retrieve cookies. // `app` directory import { cookies, headers } from 'next/headers' async function getData() { const authHeader = headers().get('authorization') return '...' } export default async function Page() { // You can use `cookies()` or `headers()` inside Server Components // directly or in your data fetching function const theme = cookies().get('theme') const data = await getData() return '...' } #### Static Site Generation (`getStaticProps`) In the `pages` directory, the `getStaticProps` function is used to pre-render a page at build time. This function can be used to fetch data from an external API or directly from a database, and pass this data down to the entire page as it's being generated during the build. // `pages` directory export async function getStaticProps() { const res = await fetch(`https://...`) const projects = await res.json() return { props: { projects } } } export default function Index({ projects }) { return projects.map((project) => <div>{project.name}</div>) } In the `app` directory, data fetching with `fetch()` will default to `cache: 'force-cache'`, which will cache the request data until manually invalidated. This is similar to `getStaticProps` in the `pages` directory. // `app` directory // This function can be named anything async function getProjects() { const res = await fetch(`https://...`) const projects = await res.json() return projects } export default async function Index() { const projects = await getProjects() return projects.map((project) => <div>{project.name}</div>) } #### Dynamic paths (`getStaticPaths`) In the `pages` directory, the `getStaticPaths` function is used to define the dynamic paths that should be pre-rendered at build time. // `pages` directory import PostLayout from '@/components/post-layout' export async function getStaticPaths() { return { paths: [{ params: { id: '1' } }, { params: { id: '2' } }], } } export async function getStaticProps({ params }) { const res = await fetch(`https://.../posts/${params.id}`) const post = await res.json() return { props: { post } } } export default function Post({ post }) { return <PostLayout post={post} /> } In the `app` directory, `getStaticPaths` is replaced with `generateStaticParams`. `generateStaticParams` behaves similarly to `getStaticPaths`, but has a simplified API for returning route parameters and can be used inside layouts. The return shape of `generateStaticParams` is an array of segments instead of an array of nested `param` objects or a string of resolved paths. // `app` directory import PostLayout from '@/components/post-layout' export async function generateStaticParams() { return [{ id: '1' }, { id: '2' }] } async function getPost(params) { const res = await fetch(`https://.../posts/${params.id}`) const post = await res.json() return post } export default async function Post({ params }) { const post = await getPost(params) return <PostLayout post={post} /> } Using the name `generateStaticParams` is more appropriate than `getStaticPaths` for the new model in the `app` directory. The `get` prefix is replaced with a more descriptive `generate`, which sits better alone now that `getStaticProps` and `getServerSideProps` are no longer necessary. The `Paths` suffix is replaced by `Params`, which is more appropriate for nested routing with multiple dynamic segments. * * * #### Replacing `fallback` In the `pages` directory, the `fallback` property returned from `getStaticPaths` is used to define the behavior of a page that isn't pre-rendered at build time. This property can be set to `true` to show a fallback page while the page is being generated, `false` to show a 404 page, or `blocking` to generate the page at request time. // `pages` directory export async function getStaticPaths() { return { paths: [], fallback: 'blocking' }; } export async function getStaticProps({ params }) { ... } export default function Post({ post }) { return ... } In the `app` directory the `config.dynamicParams` property controls how params outside of `generateStaticParams` are handled: * **`true`**: (default) Dynamic segments not included in `generateStaticParams` are generated on demand. * **`false`**: Dynamic segments not included in `generateStaticParams` will return a 404. This replaces the `fallback: true | false | 'blocking'` option of `getStaticPaths` in the `pages` directory. The `fallback: 'blocking'` option is not included in `dynamicParams` because the difference between `'blocking'` and `true` is negligible with streaming. // `app` directory export const dynamicParams = true; export async function generateStaticParams() { return [...] } async function getPost(params) { ... } export default async function Post({ params }) { const post = await getPost(params); return ... } With `dynamicParams` set to `true` (the default), when a route segment is requested that hasn't been generated, it will be server-rendered and cached. #### Incremental Static Regeneration (`getStaticProps` with `revalidate`) In the `pages` directory, the `getStaticProps` function allows you to add a `revalidate` field to automatically regenerate a page after a certain amount of time. // `pages` directory export async function getStaticProps() { const res = await fetch(`https://.../posts`) const posts = await res.json() return { props: { posts }, revalidate: 60, } } export default function Index({ posts }) { return ( <Layout> <PostList posts={posts} /> </Layout> ) } In the `app` directory, data fetching with `fetch()` can use `revalidate`, which will cache the request for the specified amount of seconds. // `app` directory async function getPosts() { const res = await fetch(`https://.../posts`, { next: { revalidate: 60 } }) const data = await res.json() return data.posts } export default async function PostList() { const posts = await getPosts() return posts.map((post) => <div>{post.name}</div>) } #### API Routes API Routes continue to work in the `pages/api` directory without any changes. However, they have been replaced by Route Handlers in the `app` directory. Route Handlers allow you to create custom request handlers for a given route using the Web Request and Response APIs. export async function GET(request: Request) {} > **Good to know**: If you previously used API routes to call an external API from the client, you can now use Server Components instead to securely fetch data. Learn more about data fetching. ### Step 7: Styling In the `pages` directory, global stylesheets are restricted to only `pages/_app.js`. With the `app` directory, this restriction has been lifted. Global styles can be added to any layout, page, or component. * CSS Modules * Tailwind CSS * Global Styles * CSS-in-JS * External Stylesheets * Sass #### Tailwind CSS If you're using Tailwind CSS, you'll need to add the `app` directory to your `tailwind.config.js` file: module.exports = { content: [ './app/**/*.{js,ts,jsx,tsx,mdx}', // <-- Add this line './pages/**/*.{js,ts,jsx,tsx,mdx}', './components/**/*.{js,ts,jsx,tsx,mdx}', ], } You'll also need to import your global styles in your `app/layout.js` file: import '../styles/globals.css' export default function RootLayout({ children }) { return ( <html lang="en"> <body>{children}</body> </html> ) } Learn more about styling with Tailwind CSS ## Codemods Next.js provides Codemod transformations to help upgrade your codebase when a feature is deprecated. See Codemods for more information. --- ## Page: https://nextjs.org/docs/14/pages/building-your-application/upgrading/from-vite This guide will help you migrate an existing Vite application to Next.js. ## Why Switch? There are several reasons why you might want to switch from Vite to Next.js: ### Slow initial page loading time If you have built your application with the default Vite plugin for React, your application is a purely client-side application. Client-side only applications, also known as single-page applications (SPAs), often experience slow initial page loading time. This happens due to a couple of reasons: 1. The browser needs to wait for the React code and your entire application bundle to download and run before your code is able to send requests to load some data. 2. Your application code grows with every new feature and extra dependency you add. ### No automatic code splitting The previous issue of slow loading times can be somewhat managed with code splitting. However, if you try to do code splitting manually, you'll often make performance worse. It's easy to inadvertently introduce network waterfalls when code-splitting manually. Next.js provides automatic code splitting built into its router. ### Network waterfalls A common cause of poor performance occurs when applications make sequential client-server requests to fetch data. One common pattern for data fetching in an SPA is to initially render a placeholder, and then fetch data after the component has mounted. Unfortunately, this means that a child component that fetches data can't start fetching until the parent component has finished loading its own data. While fetching data on the client is supported with Next.js, it also gives you the option to shift data fetching to the server, which can eliminate client-server waterfalls. ### Fast and intentional loading states With built-in support for streaming through React Suspense, you can be more intentional about which parts of your UI you want to load first and in what order without introducing network waterfalls. This enables you to build pages that are faster to load and eliminate layout shifts. ### Choose the data fetching strategy Depending on your needs, Next.js allows you to choose your data fetching strategy on a page and component basis. You can decide to fetch at build time, at request time on the server, or on the client. For example, you can fetch data from your CMS and render your blog posts at build time, which can then be efficiently cached on a CDN. ### Middleware Next.js Middleware allows you to run code on the server before a request is completed. This is especially useful to avoid having a flash of unauthenticated content when the user visits an authenticated-only page by redirecting the user to a login page. The middleware is also useful for experimentation and internationalization. ### Built-in Optimizations Images, fonts, and third-party scripts often have significant impact on an application's performance. Next.js comes with built-in components that automatically optimize those for you. ## Migration Steps Our goal with this migration is to get a working Next.js application as quickly as possible, so that you can then adopt Next.js features incrementally. To begin with, we'll keep it as a purely client-side application (SPA) without migrating your existing router. This helps minimize the chances of encountering issues during the migration process and reduces merge conflicts. ### Step 1: Install the Next.js Dependency The first thing you need to do is to install `next` as a dependency: npm install next@latest ### Step 2: Create the Next.js Configuration File Create a `next.config.mjs` at the root of your project. This file will hold your Next.js configuration options. /** @type {import('next').NextConfig} */ const nextConfig = { output: 'export', // Outputs a Single-Page Application (SPA). distDir: './dist', // Changes the build output directory to `./dist/`. } export default nextConfig > **Good to know:** You can use either `.js` or `.mjs` for your Next.js configuration file. ### Step 3: Update TypeScript Configuration If you're using TypeScript, you need to update your `tsconfig.json` file with the following changes to make it compatible with Next.js. If you're not using TypeScript, you can skip this step. 1. Remove the project reference to `tsconfig.node.json` 2. Add `./dist/types/**/*.ts` and `./next-env.d.ts` to the `include` array 3. Add `./node_modules` to the `exclude` array 4. Add `{ "name": "next" }` to the `plugins` array in `compilerOptions`: `"plugins": [{ "name": "next" }]` 5. Set `esModuleInterop` to `true`: `"esModuleInterop": true` 6. Set `jsx` to `preserve`: `"jsx": "preserve"` 7. Set `allowJs` to `true`: `"allowJs": true` 8. Set `forceConsistentCasingInFileNames` to `true`: `"forceConsistentCasingInFileNames": true` 9. Set `incremental` to `true`: `"incremental": true` Here's an example of a working `tsconfig.json` with those changes: { "compilerOptions": { "target": "ES2020", "useDefineForClassFields": true, "lib": ["ES2020", "DOM", "DOM.Iterable"], "module": "ESNext", "esModuleInterop": true, "skipLibCheck": true, "moduleResolution": "bundler", "allowImportingTsExtensions": true, "resolveJsonModule": true, "isolatedModules": true, "noEmit": true, "jsx": "preserve", "strict": true, "noUnusedLocals": true, "noUnusedParameters": true, "noFallthroughCasesInSwitch": true, "allowJs": true, "forceConsistentCasingInFileNames": true, "incremental": true, "plugins": [{ "name": "next" }] }, "include": ["./src", "./dist/types/**/*.ts", "./next-env.d.ts"], "exclude": ["./node_modules"] } You can find more information about configuring TypeScript on the Next.js docs. ### Step 4: Create the Root Layout A Next.js App Router application must include a root layout file, which is a React Server Component that will wrap all pages in your application. This file is defined at the top level of the `app` directory. The closest equivalent to the root layout file in a Vite application is the `index.html` file, which contains your `<html>`, `<head>`, and `<body>` tags. In this step, you'll convert your `index.html` file into a root layout file: 1. Create a new `app` directory in your `src` directory. 2. Create a new `layout.tsx` file inside that `app` directory: export default function RootLayout({ children, }: { children: React.ReactNode }) { return null } > **Good to know**: `.js`, `.jsx`, or `.tsx` extensions can be used for Layout files. 3. Copy the content of your `index.html` file into the previously created `<RootLayout>` component while replacing the `body.div#root` and `body.script` tags with `<div id="root">{children}</div>`: export default function RootLayout({ children, }: { children: React.ReactNode }) { return ( <html lang="en"> <head> <meta charset="UTF-8" /> <link rel="icon" type="image/svg+xml" href="/icon.svg" /> <meta name="viewport" content="width=device-width, initial-scale=1.0" /> <title>My App</title> <meta name="description" content="My App is a..." /> </head> <body> <div id="root">{children}</div> </body> </html> ) } 4. Next.js already includes by default the meta charset and meta viewport tags, so you can safely remove those from your `<head>`: export default function RootLayout({ children, }: { children: React.ReactNode }) { return ( <html lang="en"> <head> <link rel="icon" type="image/svg+xml" href="/icon.svg" /> <title>My App</title> <meta name="description" content="My App is a..." /> </head> <body> <div id="root">{children}</div> </body> </html> ) } 5. Any metadata files such as `favicon.ico`, `icon.png`, `robots.txt` are automatically added to the application `<head>` tag as long as you have them placed into the top level of the `app` directory. After moving all supported files into the `app` directory you can safely delete their `<link>` tags: export default function RootLayout({ children, }: { children: React.ReactNode }) { return ( <html lang="en"> <head> <title>My App</title> <meta name="description" content="My App is a..." /> </head> <body> <div id="root">{children}</div> </body> </html> ) } 6. Finally, Next.js can manage your last `<head>` tags with the Metadata API. Move your final metadata info into an exported `metadata` object: import type { Metadata } from 'next' export const metadata: Metadata = { title: 'My App', description: 'My App is a...', } export default function RootLayout({ children, }: { children: React.ReactNode }) { return ( <html lang="en"> <body> <div id="root">{children}</div> </body> </html> ) } With the above changes, you shifted from declaring everything in your `index.html` to using Next.js' convention-based approach built into the framework (Metadata API). This approach enables you to more easily improve your SEO and web shareability of your pages. ### Step 5: Create the Entrypoint Page On Next.js you declare an entrypoint for your application by creating a `page.tsx` file. The closest equivalent of this file on Vite is your `main.tsx` file. In this step, you’ll set up the entrypoint of your application. 1. **Create a `[[...slug]]` directory in your `app` directory.** Since in this guide we're aiming first to set up our Next.js as an SPA (Single Page Application), you need your page entrypoint to catch all possible routes of your application. For that, create a new `[[...slug]]` directory in your `app` directory. This directory is what is called an optional catch-all route segment. Next.js uses a file-system based router where directories are used to define routes. This special directory will make sure that all routes of your application will be directed to its containing `page.tsx` file. 2. **Create a new `page.tsx` file inside the `app/[[...slug]]` directory with the following content:** import '../../index.css' export function generateStaticParams() { return [{ slug: [''] }] } export default function Page() { return '...' // We'll update this } > **Good to know**: `.js`, `.jsx`, or `.tsx` extensions can be used for Page files. This file is a Server Component. When you run `next build`, the file is prerendered into a static asset. It does _not_ require any dynamic code. This file imports our global CSS and tells `generateStaticParams` we are only going to generate one route, the index route at `/`. Now, let's move the rest of our Vite application which will run client-only. 'use client' import React from 'react' import dynamic from 'next/dynamic' const App = dynamic(() => import('../../App'), { ssr: false }) export function ClientOnly() { return <App /> } This file is a Client Component, defined by the `'use client'` directive. Client Components are still prerendered to HTML on the server before being sent to the client. Since we want a client-only application to start, we can configure Next.js to disable prerendering from the `App` component down. const App = dynamic(() => import('../../App'), { ssr: false }) Now, update your entrypoint page to use the new component: import '../../index.css' import { ClientOnly } from './client' export function generateStaticParams() { return [{ slug: [''] }] } export default function Page() { return <ClientOnly /> } ### Step 6: Update Static Image Imports Next.js handles static image imports slightly different from Vite. With Vite, importing an image file will return its public URL as a string: import image from './img.png' // `image` will be '/assets/img.2d8efhg.png' in production export default function App() { return <img src={image} /> } With Next.js, static image imports return an object. The object can then be used directly with the Next.js `<Image>` component, or you can use the object's `src` property with your existing `<img>` tag. The `<Image>` component has the added benefits of automatic image optimization. The `<Image>` component automatically sets the `width` and `height` attributes of the resulting `<img>` based on the image's dimensions. This prevents layout shifts when the image loads. However, this can cause issues if your app contains images with only one of their dimensions being styled without the other styled to `auto`. When not styled to `auto`, the dimension will default to the `<img>` dimension attribute's value, which can cause the image to appear distorted. Keeping the `<img>` tag will reduce the amount of changes in your application and prevent the above issues. You can then optionally later migrate to the `<Image>` component to take advantage of optimizing images by configuring a loader, or moving to the default Next.js server which has automatic image optimization. 1. **Convert absolute import paths for images imported from `/public` into relative imports:** // Before import logo from '/logo.png' // After import logo from '../public/logo.png' 2. **Pass the image `src` property instead of the whole image object to your `<img>` tag:** // Before <img src={logo} /> // After <img src={logo.src} /> Alternatively, you can reference the public URL for the image asset based on the filename. For example, `public/logo.png` will serve the image at `/logo.png` for your application, which would be the `src` value. > **Warning:** If you're using TypeScript, you might encounter type errors when accessing the `src` property. You can safely ignore those for now. They will be fixed by the end of this guide. ### Step 7: Migrate the Environment Variables Next.js has support for `.env` environment variables similar to Vite. The main difference is the prefix used to expose environment variables on the client-side. * Change all environment variables with the `VITE_` prefix to `NEXT_PUBLIC_`. Vite exposes a few built-in environment variables on the special `import.meta.env` object which aren’t supported by Next.js. You need to update their usage as follows: * `import.meta.env.MODE` ⇒ `process.env.NODE_ENV` * `import.meta.env.PROD` ⇒ `process.env.NODE_ENV === 'production'` * `import.meta.env.DEV` ⇒ `process.env.NODE_ENV !== 'production'` * `import.meta.env.SSR` ⇒ `typeof window !== 'undefined'` Next.js also doesn't provide a built-in `BASE_URL` environment variable. However, you can still configure one, if you need it: 1. **Add the following to your `.env` file:** # ... NEXT_PUBLIC_BASE_PATH="/some-base-path" 2. **Set `basePath` to `process.env.NEXT_PUBLIC_BASE_PATH` in your `next.config.mjs` file:** /** @type {import('next').NextConfig} */ const nextConfig = { output: 'export', // Outputs a Single-Page Application (SPA). distDir: './dist', // Changes the build output directory to `./dist/`. basePath: process.env.NEXT_PUBLIC_BASE_PATH, // Sets the base path to `/some-base-path`. } export default nextConfig 3. **Update `import.meta.env.BASE_URL` usages to `process.env.NEXT_PUBLIC_BASE_PATH`** ### Step 8: Update Scripts in `package.json` You should now be able to run your application to test if you successfully migrated to Next.js. But before that, you need to update your `scripts` in your `package.json` with Next.js related commands, and add `.next` and `next-env.d.ts` to your `.gitignore`: { "scripts": { "dev": "next dev", "build": "next build", "start": "next start" } } # ... .next next-env.d.ts dist Now run `npm run dev`, and open `http://localhost:3000`. You should see your application now running on Next.js. > **Example:** Check out this pull request for a working example of a Vite application migrated to Next.js. ### Step 9: Clean Up You can now clean up your codebase from Vite related artifacts: * Delete `main.tsx` * Delete `index.html` * Delete `vite-env.d.ts` * Delete `tsconfig.node.json` * Delete `vite.config.ts` * Uninstall Vite dependencies ## Next Steps If everything went according to plan, you now have a functioning Next.js application running as a single-page application. However, you aren't yet taking advantage of most of Next.js' benefits, but you can now start making incremental changes to reap all the benefits. Here's what you might want to do next: * Migrate from React Router to the Next.js App Router to get: * Automatic code splitting * Streaming Server-Rendering * React Server Components * Optimize images with the `<Image>` component * Optimize fonts with `next/font` * Optimize third-party scripts with the `<Script>` component * Update your ESLint configuration to support Next.js rules --- ## Page: https://nextjs.org/docs/14/pages/building-your-application/upgrading/from-create-react-app This guide will help you migrate an existing Create React App site to Next.js. ## Why Switch? There are several reasons why you might want to switch from Create React App to Next.js: ### Slow initial page loading time Create React App uses purely client-side React. Client-side only applications, also known as single-page applications (SPAs), often experience slow initial page loading time. This happens due to a couple of reasons: 1. The browser needs to wait for the React code and your entire application bundle to download and run before your code is able to send requests to load data. 2. Your application code grows with every new feature and dependency you add. ### No automatic code splitting The previous issue of slow loading times can be somewhat managed with code splitting. However, if you try to do code splitting manually, you'll often make performance worse. It's easy to inadvertently introduce network waterfalls when code-splitting manually. Next.js provides automatic code splitting built into its router. ### Network waterfalls A common cause of poor performance occurs when applications make sequential client-server requests to fetch data. One common pattern for data fetching in an SPA is to initially render a placeholder, and then fetch data after the component has mounted. Unfortunately, this means that a child component that fetches data can't start fetching until the parent component has finished loading its own data. While fetching data on the client is supported with Next.js, it also gives you the option to shift data fetching to the server, which can eliminate client-server waterfalls. ### Fast and intentional loading states With built-in support for streaming through React Suspense, you can be more intentional about which parts of your UI you want to load first and in what order without introducing network waterfalls. This enables you to build pages that are faster to load and eliminate layout shifts. ### Choose the data fetching strategy Depending on your needs, Next.js allows you to choose your data fetching strategy on a page and component basis. You can decide to fetch at build time, at request time on the server, or on the client. For example, you can fetch data from your CMS and render your blog posts at build time, which can then be efficiently cached on a CDN. ### Middleware Next.js Middleware allows you to run code on the server before a request is completed. This is especially useful to avoid having a flash of unauthenticated content when the user visits an authenticated-only page by redirecting the user to a login page. The middleware is also useful for experimentation and internationalization. ### Built-in Optimizations Images, fonts, and third-party scripts often have significant impact on an application's performance. Next.js comes with built-in components that automatically optimize those for you. ## Migration Steps Our goal with this migration is to get a working Next.js application as quickly as possible, so that you can then adopt Next.js features incrementally. To begin with, we'll keep it as a purely client-side application (SPA) without migrating your existing router. This helps minimize the chances of encountering issues during the migration process and reduces merge conflicts. ### Step 1: Install the Next.js Dependency The first thing you need to do is to install `next` as a dependency: npm install next@latest ### Step 2: Create the Next.js Configuration File Create a `next.config.mjs` at the root of your project. This file will hold your Next.js configuration options. /** @type {import('next').NextConfig} */ const nextConfig = { output: 'export', // Outputs a Single-Page Application (SPA). distDir: './dist', // Changes the build output directory to `./dist/`. } export default nextConfig ### Step 3: Update TypeScript Configuration If you're using TypeScript, you need to update your `tsconfig.json` file with the following changes to make it compatible with Next.js: { "compilerOptions": { "target": "es5", "lib": ["dom", "dom.iterable", "esnext"], "allowJs": true, "skipLibCheck": true, "strict": false, "forceConsistentCasingInFileNames": true, "noEmit": true, "esModuleInterop": true, "module": "esnext", "moduleResolution": "node", "resolveJsonModule": true, "isolatedModules": true, "jsx": "preserve", "baseUrl": ".", "incremental": true, "plugins": [ { "name": "next" } ], "strictNullChecks": true }, "include": [ "next-env.d.ts", "**/*.ts", "**/*.tsx", ".next/types/**/*.ts", "./dist/types/**/*.ts" ], "exclude": ["node_modules"] } You can find more information about configuring TypeScript on the Next.js docs. ### Step 4: Create the Root Layout A Next.js App Router application must include a root layout file, which is a React Server Component that will wrap all pages in your application. This file is defined at the top level of the `app` directory. The closest equivalent to the root layout file in a CRA application is the `index.html` file, which contains your `<html>`, `<head>`, and `<body>` tags. In this step, you'll convert your `index.html` file into a root layout file: 1. Create a new `app` directory in your `src` directory. 2. Create a new `layout.tsx` file inside that `app` directory: export default function RootLayout({ children, }: { children: React.ReactNode }) { return null } > **Good to know**: `.js`, `.jsx`, or `.tsx` extensions can be used for Layout files. Copy the content of your `index.html` file into the previously created `<RootLayout>` component while replacing the `body.div#root` and `body.script` tags with `<div id="root">{children}</div>`: export default function RootLayout({ children, }: { children: React.ReactNode }) { return ( <html lang="en"> <head> <meta charset="UTF-8" /> <link rel="icon" href="%PUBLIC_URL%/favicon.ico" /> <meta name="viewport" content="width=device-width, initial-scale=1" /> <title>React App</title> <meta name="description" content="Web site created..." /> </head> <body> <div id="root">{children}</div> </body> </html> ) } > **Good to know**: We'll ignore the manifest file, additional iconography other than the favicon, and testing configuration, but if these are requirements, Next.js also supports these options. ### Step 5: Metadata Next.js already includes by default the meta charset and meta viewport tags, so you can safely remove those from your `<head>`: export default function RootLayout({ children, }: { children: React.ReactNode }) { return ( <html lang="en"> <head> <link rel="icon" href="%PUBLIC_URL%/favicon.ico" /> <title>React App</title> <meta name="description" content="Web site created..." /> </head> <body> <div id="root">{children}</div> </body> </html> ) } Any metadata files such as `favicon.ico`, `icon.png`, `robots.txt` are automatically added to the application `<head>` tag as long as you have them placed into the top level of the `app` directory. After moving all supported files into the `app` directory you can safely delete their `<link>` tags: export default function RootLayout({ children, }: { children: React.ReactNode }) { return ( <html lang="en"> <head> <title>React App</title> <meta name="description" content="Web site created..." /> </head> <body> <div id="root">{children}</div> </body> </html> ) } Finally, Next.js can manage your last `<head>` tags with the Metadata API. Move your final metadata info into an exported `metadata` object: import type { Metadata } from 'next' export const metadata: Metadata = { title: 'React App', description: 'Web site created with Next.js.', } export default function RootLayout({ children, }: { children: React.ReactNode }) { return ( <html lang="en"> <body> <div id="root">{children}</div> </body> </html> ) } With the above changes, you shifted from declaring everything in your `index.html` to using Next.js' convention-based approach built into the framework (Metadata API). This approach enables you to more easily improve your SEO and web shareability of your pages. ### Step 6: Styles Like Create React App, Next.js has built-in support for CSS Modules. If you're using a global CSS file, import it into your `app/layout.tsx` file: import '../index.css' // ... If you're using Tailwind, you'll need to install `postcss` and `autoprefixer`: npm install postcss autoprefixer Then, create a `postcss.config.js` file at the root of your project: module.exports = { plugins: { tailwindcss: {}, autoprefixer: {}, }, } ### Step 7: Create the Entrypoint Page On Next.js you declare an entrypoint for your application by creating a `page.tsx` file. The closest equivalent of this file on CRA is your `src/index.tsx` file. In this step, you’ll set up the entry point of your application. **Create a `[[...slug]]` directory in your `app` directory.** Since this guide is aiming to first set up our Next.js as an SPA (Single Page Application), you need your page entry point to catch all possible routes of your application. For that, create a new `[[...slug]]` directory in your `app` directory. This directory is what is called an optional catch-all route segment. Next.js uses a file-system based router where directories are used to define routes. This special directory will make sure that all routes of your application will be directed to its containing `page.tsx` file. **Create a new `page.tsx` file inside the `app/[[...slug]]` directory with the following content:** import '../../index.css' export function generateStaticParams() { return [{ slug: [''] }] } export default function Page() { return '...' // We'll update this } This file is a Server Component. When you run `next build`, the file is prerendered into a static asset. It does _not_ require any dynamic code. This file imports our global CSS and tells `generateStaticParams` we are only going to generate one route, the index route at `/`. Now, let's move the rest of our CRA application which will run client-only. 'use client' import React from 'react' import dynamic from 'next/dynamic' const App = dynamic(() => import('../../App'), { ssr: false }) export function ClientOnly() { return <App /> } This file is a Client Component, defined by the `'use client'` directive. Client Components are still prerendered to HTML on the server before being sent to the client. Since we want a client-only application to start, we can configure Next.js to disable prerendering from the `App` component down. const App = dynamic(() => import('../../App'), { ssr: false }) Now, update your entrypoint page to use the new component: import '../../index.css' import { ClientOnly } from './client' export function generateStaticParams() { return [{ slug: [''] }] } export default function Page() { return <ClientOnly /> } ### Step 8: Update Static Image Imports Next.js handles static image imports slightly different from CRA. With CRA, importing an image file will return its public URL as a string: import image from './img.png' export default function App() { return <img src={image} /> } With Next.js, static image imports return an object. The object can then be used directly with the Next.js `<Image>` component, or you can use the object's `src` property with your existing `<img>` tag. The `<Image>` component has the added benefits of automatic image optimization. The `<Image>` component automatically sets the `width` and `height` attributes of the resulting `<img>` based on the image's dimensions. This prevents layout shifts when the image loads. However, this can cause issues if your app contains images with only one of their dimensions being styled without the other styled to `auto`. When not styled to `auto`, the dimension will default to the `<img>` dimension attribute's value, which can cause the image to appear distorted. Keeping the `<img>` tag will reduce the amount of changes in your application and prevent the above issues. You can then optionally later migrate to the `<Image>` component to take advantage of optimizing images by configuring a loader, or moving to the default Next.js server which has automatic image optimization. **Convert absolute import paths for images imported from `/public` into relative imports:** // Before import logo from '/logo.png' // After import logo from '../public/logo.png' **Pass the image `src` property instead of the whole image object to your `<img>` tag:** // Before <img src={logo} /> // After <img src={logo.src} /> Alternatively, you can reference the public URL for the image asset based on the filename. For example, `public/logo.png` will serve the image at `/logo.png` for your application, which would be the `src` value. > **Warning:** If you're using TypeScript, you might encounter type errors when accessing the `src` property. You can safely ignore those for now. They will be fixed by the end of this guide. ### Step 9: Migrate the Environment Variables Next.js has support for `.env` environment variables similar to CRA. The main difference is the prefix used to expose environment variables on the client-side. Change all environment variables with the `REACT_APP_` prefix to `NEXT_PUBLIC_`. ### Step 10: Update Scripts in `package.json` You should now be able to run your application to test if you successfully migrated to Next.js. But before that, you need to update your `scripts` in your `package.json` with Next.js related commands, and add `.next`, `next-env.d.ts`, and `dist` to your `.gitignore` file: { "scripts": { "dev": "next dev", "build": "next build", "start": "next start" } } # ... .next next-env.d.ts dist Now run `npm run dev`, and open `http://localhost:3000`. You should see your application now running on Next.js. ### Step 11: Clean Up You can now clean up your codebase from Create React App related artifacts: * Delete `src/index.tsx` * Delete `public/index.html` * Delete `reportWebVitals` setup * Uninstall CRA dependencies (`react-scripts`) ## Bundler Compatibility Create React App and Next.js both default to using webpack for bundling. When migrating your CRA application to Next.js, you might have a custom webpack configuration you're looking to migrate. Next.js supports providing a custom webpack configuration. Further, Next.js has support for Turbopack through `next dev --turbo` to improve your local dev performance. Turbopack supports some webpack loaders as well for compatibility and incremental adoption. ## Next Steps If everything went according to plan, you now have a functioning Next.js application running as a single-page application. However, you aren't yet taking advantage of most of Next.js' benefits, but you can now start making incremental changes to reap all the benefits. Here's what you might want to do next: * Migrate from React Router to the Next.js App Router to get: * Automatic code splitting * Streaming Server-Rendering * React Server Components * Optimize images with the `<Image>` component * Optimize fonts with `next/font` * Optimize third-party scripts with the `<Script>` component * Update your ESLint configuration to support Next.js rules > **Good to know:** Using a static export does not currently support using the `useParams` hook. --- ## Page: https://nextjs.org/docs/14/pages/building-your-application/upgrading/version-14 You are currently viewing documentation for version 14 of Next.js. ## Upgrading from 13 to 14 To update to Next.js version 14, run the following command using your preferred package manager: Terminal npm i next@latest react@latest react-dom@latest eslint-config-next@latest Terminal yarn add next@latest react@latest react-dom@latest eslint-config-next@latest Terminal pnpm up next react react-dom eslint-config-next --latest Terminal bun add next@latest react@latest react-dom@latest eslint-config-next@latest > **Good to know:** If you are using TypeScript, ensure you also upgrade `@types/react` and `@types/react-dom` to their latest versions. ### v14 Summary * The minimum Node.js version has been bumped from 16.14 to 18.17, since 16.x has reached end-of-life. * The `next export` command has been removed in favor of `output: 'export'` config. Please see the docs for more information. * The `next/server` import for `ImageResponse` was renamed to `next/og`. A codemod is available to safely and automatically rename your imports. * The `@next/font` package has been fully removed in favor of the built-in `next/font`. A codemod is available to safely and automatically rename your imports. * The WASM target for `next-swc` has been removed. --- ## Page: https://nextjs.org/docs/14/pages/building-your-application/upgrading/version-13 ## Upgrading from 12 to 13 To update to Next.js version 13, run the following command using your preferred package manager: npm i next@13 react@latest react-dom@latest eslint-config-next@13 yarn add next@13 react@latest react-dom@latest eslint-config-next@13 pnpm i next@13 react@latest react-dom@latest eslint-config-next@13 bun add next@13 react@latest react-dom@latest eslint-config-next@13 > **Good to know:** If you are using TypeScript, ensure you also upgrade `@types/react` and `@types/react-dom` to their latest versions. ### v13 Summary * The Supported Browsers have been changed to drop Internet Explorer and target modern browsers. * The minimum Node.js version has been bumped from 12.22.0 to 16.14.0, since 12.x and 14.x have reached end-of-life. * The minimum React version has been bumped from 17.0.2 to 18.2.0. * The `swcMinify` configuration property was changed from `false` to `true`. See Next.js Compiler for more info. * The `next/image` import was renamed to `next/legacy/image`. The `next/future/image` import was renamed to `next/image`. A codemod is available to safely and automatically rename your imports. * The `next/link` child can no longer be `<a>`. Add the `legacyBehavior` prop to use the legacy behavior or remove the `<a>` to upgrade. A codemod is available to automatically upgrade your code. * The `target` configuration property has been removed and superseded by Output File Tracing. Next.js 13 introduces a new `app` directory with new features and conventions. However, upgrading to Next.js 13 does **not** require using the new `app` directory. You can continue using `pages` with new features that work in both directories, such as the updated Image component, Link component, Script component, and Font optimization. ### `<Image/>` Component Next.js 12 introduced many improvements to the Image Component with a temporary import: `next/future/image`. These improvements included less client-side JavaScript, easier ways to extend and style images, better accessibility, and native browser lazy loading. Starting in Next.js 13, this new behavior is now the default for `next/image`. There are two codemods to help you migrate to the new Image Component: * next-image-to-legacy-image: This codemod will safely and automatically rename `next/image` imports to `next/legacy/image` to maintain the same behavior as Next.js 12. We recommend running this codemod to quickly update to Next.js 13 automatically. * next-image-experimental: After running the previous codemod, you can optionally run this experimental codemod to upgrade `next/legacy/image` to the new `next/image`, which will remove unused props and add inline styles. Please note this codemod is experimental and only covers static usage (such as `<Image src={img} layout="responsive" />`) but not dynamic usage (such as `<Image {...props} />`). Alternatively, you can manually update by following the migration guide and also see the legacy comparison. ### `<Link>` Component The `<Link>` Component no longer requires manually adding an `<a>` tag as a child. This behavior was added as an experimental option in version 12.2 and is now the default. In Next.js 13, `<Link>` always renders `<a>` and allows you to forward props to the underlying tag. For example: import Link from 'next/link' // Next.js 12: `<a>` has to be nested otherwise it's excluded <Link href="/about"> <a>About</a> </Link> // Next.js 13: `<Link>` always renders `<a>` under the hood <Link href="/about"> About </Link> To upgrade your links to Next.js 13, you can use the `new-link` codemod. ### `<Script>` Component The behavior of `next/script` has been updated to support both `pages` and `app`. If incrementally adopting `app`, read the upgrade guide. ### Font Optimization Previously, Next.js helped you optimize fonts by inlining font CSS. Version 13 introduces the new `next/font` module which gives you the ability to customize your font loading experience while still ensuring great performance and privacy. See Optimizing Fonts to learn how to use `next/font`. --- ## Page: https://nextjs.org/docs/14/pages/building-your-application/upgrading/version-12 To upgrade to version 12, run the following command: npm i next@12 react@17 react-dom@17 eslint-config-next@12 yarn add next@12 react@17 react-dom@17 eslint-config-next@12 pnpm up next@12 react@17 react-dom@17 eslint-config-next@12 bun add next@12 react@17 react-dom@17 eslint-config-next@12 > **Good to know:** If you are using TypeScript, ensure you also upgrade `@types/react` and `@types/react-dom` to their corresponding versions. ### Upgrading to 12.2 Middleware - If you were using Middleware prior to `12.2`, please see the upgrade guide for more information. ### Upgrading to 12.0 Minimum Node.js Version - The minimum Node.js version has been bumped from `12.0.0` to `12.22.0` which is the first version of Node.js with native ES Modules support. Minimum React Version - The minimum required React version is `17.0.2`. To upgrade you can run the following command in the terminal: npm install react@latest react-dom@latest yarn add react@latest react-dom@latest pnpm update react@latest react-dom@latest bun add react@latest react-dom@latest #### SWC replacing Babel Next.js now uses the Rust-based compiler SWC to compile JavaScript/TypeScript. This new compiler is up to 17x faster than Babel when compiling individual files and up to 5x faster Fast Refresh. Next.js provides full backward compatibility with applications that have custom Babel configuration. All transformations that Next.js handles by default like styled-jsx and tree-shaking of `getStaticProps` / `getStaticPaths` / `getServerSideProps` have been ported to Rust. When an application has a custom Babel configuration, Next.js will automatically opt-out of using SWC for compiling JavaScript/Typescript and will fall back to using Babel in the same way that it was used in Next.js 11. Many of the integrations with external libraries that currently require custom Babel transformations will be ported to Rust-based SWC transforms in the near future. These include but are not limited to: * Styled Components * Emotion * Relay In order to prioritize transforms that will help you adopt SWC, please provide your `.babelrc` on this feedback thread. #### SWC replacing Terser for minification You can opt-in to replacing Terser with SWC for minifying JavaScript up to 7x faster using a flag in `next.config.js`: module.exports = { swcMinify: true, } Minification using SWC is an opt-in flag to ensure it can be tested against more real-world Next.js applications before it becomes the default in Next.js 12.1. If you have feedback about minification, please leave it on this feedback thread. #### Improvements to styled-jsx CSS parsing On top of the Rust-based compiler we've implemented a new CSS parser based on the one used for the styled-jsx Babel transform. This new parser has improved handling of CSS and now errors when invalid CSS is used that would previously slip through and cause unexpected behavior. Because of this change invalid CSS will throw an error during development and `next build`. This change only affects styled-jsx usage. #### `next/image` changed wrapping element `next/image` now renders the `<img>` inside a `<span>` instead of `<div>`. If your application has specific CSS targeting span such as `.container span`, upgrading to Next.js 12 might incorrectly match the wrapping element inside the `<Image>` component. You can avoid this by restricting the selector to a specific class such as `.container span.item` and updating the relevant component with that className, such as `<span className="item" />`. If your application has specific CSS targeting the `next/image` `<div>` tag, for example `.container div`, it may not match anymore. You can update the selector `.container span`, or preferably, add a new `<div className="wrapper">` wrapping the `<Image>` component and target that instead such as `.container .wrapper`. The `className` prop is unchanged and will still be passed to the underlying `<img>` element. See the documentation for more info. #### HMR connection now uses a WebSocket Previously, Next.js used a server-sent events connection to receive HMR events. Next.js 12 now uses a WebSocket connection. In some cases when proxying requests to the Next.js dev server, you will need to ensure the upgrade request is handled correctly. For example, in `nginx` you would need to add the following configuration: location /_next/webpack-hmr { proxy_pass http://localhost:3000/_next/webpack-hmr; proxy_http_version 1.1; proxy_set_header Upgrade $http_upgrade; proxy_set_header Connection "upgrade"; } If you are using Apache (2.x), you can add the following configuration to enable web sockets to the server. Review the port, host name and server names. <VirtualHost *:443> # ServerName yourwebsite.local ServerName "${WEBSITE_SERVER_NAME}" ProxyPass / http://localhost:3000/ ProxyPassReverse / http://localhost:3000/ # Next.js 12 uses websocket <Location /_next/webpack-hmr> RewriteEngine On RewriteCond %{QUERY_STRING} transport=websocket [NC] RewriteCond %{HTTP:Upgrade} websocket [NC] RewriteCond %{HTTP:Connection} upgrade [NC] RewriteRule /(.*) ws://localhost:3000/_next/webpack-hmr/$1 [P,L] ProxyPass ws://localhost:3000/_next/webpack-hmr retry=0 timeout=30 ProxyPassReverse ws://localhost:3000/_next/webpack-hmr </Location> </VirtualHost> For custom servers, such as `express`, you may need to use `app.all` to ensure the request is passed correctly, for example: app.all('/_next/webpack-hmr', (req, res) => { nextjsRequestHandler(req, res) }) #### Webpack 4 support has been removed If you are already using webpack 5 you can skip this section. Next.js has adopted webpack 5 as the default for compilation in Next.js 11. As communicated in the webpack 5 upgrading documentation Next.js 12 removes support for webpack 4. If your application is still using webpack 4 using the opt-out flag, you will now see an error linking to the webpack 5 upgrading documentation. #### `target` option deprecated If you do not have `target` in `next.config.js` you can skip this section. The target option has been deprecated in favor of built-in support for tracing what dependencies are needed to run a page. During `next build`, Next.js will automatically trace each page and its dependencies to determine all of the files that are needed for deploying a production version of your application. If you are currently using the `target` option set to `serverless`, please read the documentation on how to leverage the new output. --- ## Page: https://nextjs.org/docs/14/pages/building-your-application/upgrading/version-11 To upgrade to version 11, run the following command: npm i next@11 react@17 react-dom@17 yarn add next@11 react@17 react-dom@17 pnpm up next@11 react@17 react-dom@17 bun add next@11 react@17 react-dom@17 > **Good to know:** If you are using TypeScript, ensure you also upgrade `@types/react` and `@types/react-dom` to their corresponding versions. ### Webpack 5 Webpack 5 is now the default for all Next.js applications. If you did not have a custom webpack configuration, your application is already using webpack 5. If you do have a custom webpack configuration, you can refer to the Next.js webpack 5 documentation for upgrade guidance. ### Cleaning the `distDir` is now a default The build output directory (defaults to `.next`) is now cleared by default except for the Next.js caches. You can refer to the cleaning `distDir` RFC for more information. If your application was relying on this behavior previously you can disable the new default behavior by adding the `cleanDistDir: false` flag in `next.config.js`. ### `PORT` is now supported for `next dev` and `next start` Next.js 11 supports the `PORT` environment variable to set the port the application runs on. Using `-p`/`--port` is still recommended but if you were prohibited from using `-p` in any way you can now use `PORT` as an alternative: Example: PORT=4000 next start ### `next.config.js` customization to import images Next.js 11 supports static image imports with `next/image`. This new feature relies on being able to process image imports. If you previously added the `next-images` or `next-optimized-images` packages you can either move to the new built-in support using `next/image` or disable the feature: module.exports = { images: { disableStaticImages: true, }, } ### Remove `super.componentDidCatch()` from `pages/_app.js` The `next/app` component's `componentDidCatch` was deprecated in Next.js 9 as it's no longer needed and has since been a no-op. In Next.js 11, it was removed. If your `pages/_app.js` has a custom `componentDidCatch` method you can remove `super.componentDidCatch` as it is no longer needed. ### Remove `Container` from `pages/_app.js` This export was deprecated in Next.js 9 as it's no longer needed and has since been a no-op with a warning during development. In Next.js 11 it was removed. If your `pages/_app.js` imports `Container` from `next/app` you can remove `Container` as it was removed. Learn more in the documentation. ### Remove `props.url` usage from page components This property was deprecated in Next.js 4 and has since shown a warning during development. With the introduction of `getStaticProps` / `getServerSideProps` these methods already disallowed the usage of `props.url`. In Next.js 11, it was removed completely. You can learn more in the documentation. ### Remove `unsized` property on `next/image` The `unsized` property on `next/image` was deprecated in Next.js 10.0.1. You can use `layout="fill"` instead. In Next.js 11 `unsized` was removed. ### Remove `modules` property on `next/dynamic` The `modules` and `render` option for `next/dynamic` were deprecated in Next.js 9.5. This was done in order to make the `next/dynamic` API closer to `React.lazy`. In Next.js 11, the `modules` and `render` options were removed. This option hasn't been mentioned in the documentation since Next.js 8 so it's less likely that your application is using it. If your application does use `modules` and `render` you can refer to the documentation. ### Remove `Head.rewind` `Head.rewind` has been a no-op since Next.js 9.5, in Next.js 11 it was removed. You can safely remove your usage of `Head.rewind`. ### Moment.js locales excluded by default Moment.js includes translations for a lot of locales by default. Next.js now automatically excludes these locales by default to optimize bundle size for applications using Moment.js. To load a specific locale use this snippet: import moment from 'moment' import 'moment/locale/ja' moment.locale('ja') You can opt-out of this new default by adding `excludeDefaultMomentLocales: false` to `next.config.js` if you do not want the new behavior, do note it's highly recommended to not disable this new optimization as it significantly reduces the size of Moment.js. ### Update usage of `router.events` In case you're accessing `router.events` during rendering, in Next.js 11 `router.events` is no longer provided during pre-rendering. Ensure you're accessing `router.events` in `useEffect`: useEffect(() => { const handleRouteChange = (url, { shallow }) => { console.log( `App is changing to ${url} ${ shallow ? 'with' : 'without' } shallow routing` ) } router.events.on('routeChangeStart', handleRouteChange) // If the component is unmounted, unsubscribe // from the event with the `off` method: return () => { router.events.off('routeChangeStart', handleRouteChange) } }, [router]) If your application uses `router.router.events` which was an internal property that was not public please make sure to use `router.events` as well. ## React 16 to 17 React 17 introduced a new JSX Transform that brings a long-time Next.js feature to the wider React ecosystem: Not having to `import React from 'react'` when using JSX. When using React 17 Next.js will automatically use the new transform. This transform does not make the `React` variable global, which was an unintended side-effect of the previous Next.js implementation. A codemod is available to automatically fix cases where you accidentally used `React` without importing it. Most applications already use the latest version of React, with Next.js 11 the minimum React version has been updated to 17.0.2. To upgrade you can run the following command: npm install react@latest react-dom@latest Or using `yarn`: yarn add react@latest react-dom@latest --- ## Page: https://nextjs.org/docs/14/pages/building-your-application/upgrading/version-10 You are currently viewing documentation for version 14 of Next.js. There were no breaking changes between versions 9 and 10. To upgrade to version 10, run the following command: Terminal npm i next@10 Terminal yarn add next@10 Terminal pnpm up next@10 Terminal bun add next@10 > **Good to know:** If you are using TypeScript, ensure you also upgrade `@types/react` and `@types/react-dom` to their corresponding versions. --- ## Page: https://nextjs.org/docs/14/pages/building-your-application/upgrading/version-9 To upgrade to version 9, run the following command: npm i next@9 yarn add next@9 pnpm up next@9 bun add next@9 > **Good to know:** If you are using TypeScript, ensure you also upgrade `@types/react` and `@types/react-dom` to their corresponding versions. ## Production Deployment on Vercel If you previously configured `routes` in your `vercel.json` file for dynamic routes, these rules can be removed when leveraging Next.js 9's new Dynamic Routing feature. Next.js 9's dynamic routes are **automatically configured on Vercel** and do not require any `vercel.json` customization. You can read more about Dynamic Routing here. ## Check your Custom App File (`pages/_app.js`) If you previously copied the Custom `<App>` example, you may be able to remove your `getInitialProps`. Removing `getInitialProps` from `pages/_app.js` (when possible) is important to leverage new Next.js features! The following `getInitialProps` does nothing and may be removed: class MyApp extends App { // Remove me, I do nothing! static async getInitialProps({ Component, ctx }) { let pageProps = {} if (Component.getInitialProps) { pageProps = await Component.getInitialProps(ctx) } return { pageProps } } render() { // ... etc } } ## Breaking Changes ### `@zeit/next-typescript` is no longer necessary Next.js will now ignore usage `@zeit/next-typescript` and warn you to remove it. Please remove this plugin from your `next.config.js`. Remove references to `@zeit/next-typescript/babel` from your custom `.babelrc` (if present). The usage of `fork-ts-checker-webpack-plugin` should also be removed from your `next.config.js`. TypeScript Definitions are published with the `next` package, so you need to uninstall `@types/next` as they would conflict. The following types are different: > This list was created by the community to help you upgrade, if you find other differences please send a pull-request to this list to help other users. From: import { NextContext } from 'next' import { NextAppContext, DefaultAppIProps } from 'next/app' import { NextDocumentContext, DefaultDocumentIProps } from 'next/document' to import { NextPageContext } from 'next' import { AppContext, AppInitialProps } from 'next/app' import { DocumentContext, DocumentInitialProps } from 'next/document' ### The `config` key is now an export on a page You may no longer export a custom variable named `config` from a page (i.e. `export { config }` / `export const config ...`). This exported variable is now used to specify page-level Next.js configuration like Opt-in AMP and API Route features. You must rename a non-Next.js-purposed `config` export to something different. ### `next/dynamic` no longer renders "loading..." by default while loading Dynamic components will not render anything by default while loading. You can still customize this behavior by setting the `loading` property: import dynamic from 'next/dynamic' const DynamicComponentWithCustomLoading = dynamic( () => import('../components/hello2'), { loading: () => <p>Loading</p>, } ) ### `withAmp` has been removed in favor of an exported configuration object Next.js now has the concept of page-level configuration, so the `withAmp` higher-order component has been removed for consistency. This change can be **automatically migrated by running the following commands in the root of your Next.js project:** curl -L https://github.com/vercel/next-codemod/archive/master.tar.gz | tar -xz --strip=2 next-codemod-master/transforms/withamp-to-config.js npx jscodeshift -t ./withamp-to-config.js pages/**/*.js To perform this migration by hand, or view what the codemod will produce, see below: **Before** import { withAmp } from 'next/amp' function Home() { return <h1>My AMP Page</h1> } export default withAmp(Home) // or export default withAmp(Home, { hybrid: true }) **After** export default function Home() { return <h1>My AMP Page</h1> } export const config = { amp: true, // or amp: 'hybrid', } ### `next export` no longer exports pages as `index.html` Previously, exporting `pages/about.js` would result in `out/about/index.html`. This behavior has been changed to result in `out/about.html`. You can revert to the previous behavior by creating a `next.config.js` with the following content: module.exports = { trailingSlash: true, } ### `pages/api/` is treated differently Pages in `pages/api/` are now considered API Routes. Pages in this directory will no longer contain a client-side bundle. ## Deprecated Features ### `next/dynamic` has deprecated loading multiple modules at once The ability to load multiple modules at once has been deprecated in `next/dynamic` to be closer to React's implementation (`React.lazy` and `Suspense`). Updating code that relies on this behavior is relatively straightforward! We've provided an example of a before/after to help you migrate your application: **Before** import dynamic from 'next/dynamic' const HelloBundle = dynamic({ modules: () => { const components = { Hello1: () => import('../components/hello1').then((m) => m.default), Hello2: () => import('../components/hello2').then((m) => m.default), } return components }, render: (props, { Hello1, Hello2 }) => ( <div> <h1>{props.title}</h1> <Hello1 /> <Hello2 /> </div> ), }) function DynamicBundle() { return <HelloBundle title="Dynamic Bundle" /> } export default DynamicBundle **After** import dynamic from 'next/dynamic' const Hello1 = dynamic(() => import('../components/hello1')) const Hello2 = dynamic(() => import('../components/hello2')) function HelloBundle({ title }) { return ( <div> <h1>{title}</h1> <Hello1 /> <Hello2 /> </div> ) } function DynamicBundle() { return <HelloBundle title="Dynamic Bundle" /> } export default DynamicBundle --- ## Page: https://nextjs.org/docs/14/pages/api-reference #### Subscribe to our newsletter Stay updated on new releases and features, guides, and case studies. --- ## Page: https://nextjs.org/docs/14/pages/api-reference/components #### Subscribe to our newsletter Stay updated on new releases and features, guides, and case studies. --- ## Page: https://nextjs.org/docs/14/pages/api-reference/components/font ## Font Module This API reference will help you understand how to use `next/font/google` and `next/font/local`. For features and usage, please see the Optimizing Fonts page. ### Font Function Arguments For usage, review Google Fonts and Local Fonts. | Key | `font/google` | `font/local` | Type | Required | | --- | --- | --- | --- | --- | | `src` | | | String or Array of Objects | Yes | | `weight` | | | String or Array | Required/Optional | | `style` | | | String or Array | \- | | `subsets` | | | Array of Strings | \- | | `axes` | | | Array of Strings | \- | | `display` | | | String | \- | | `preload` | | | Boolean | \- | | `fallback` | | | Array of Strings | \- | | `adjustFontFallback` | | | Boolean or String | \- | | `variable` | | | String | \- | | `declarations` | | | Array of Objects | \- | ### `src` The path of the font file as a string or an array of objects (with type `Array<{path: string, weight?: string, style?: string}>`) relative to the directory where the font loader function is called. Used in `next/font/local` * Required Examples: * `src:'./fonts/my-font.woff2'` where `my-font.woff2` is placed in a directory named `fonts` inside the `app` directory * `src:[{path: './inter/Inter-Thin.ttf', weight: '100',},{path: './inter/Inter-Regular.ttf',weight: '400',},{path: './inter/Inter-Bold-Italic.ttf', weight: '700',style: 'italic',},]` * if the font loader function is called in `app/page.tsx` using `src:'../styles/fonts/my-font.ttf'`, then `my-font.ttf` is placed in `styles/fonts` at the root of the project ### `weight` The font `weight` with the following possibilities: * A string with possible values of the weights available for the specific font or a range of values if it's a variable font * An array of weight values if the font is not a variable google font. It applies to `next/font/google` only. Used in `next/font/google` and `next/font/local` * Required if the font being used is **not** variable Examples: * `weight: '400'`: A string for a single weight value - for the font `Inter`, the possible values are `'100'`, `'200'`, `'300'`, `'400'`, `'500'`, `'600'`, `'700'`, `'800'`, `'900'` or `'variable'` where `'variable'` is the default) * `weight: '100 900'`: A string for the range between `100` and `900` for a variable font * `weight: ['100','400','900']`: An array of 3 possible values for a non variable font ### `style` The font `style` with the following possibilities: * A string value with default value of `'normal'` * An array of style values if the font is not a variable google font. It applies to `next/font/google` only. Used in `next/font/google` and `next/font/local` * Optional Examples: * `style: 'italic'`: A string - it can be `normal` or `italic` for `next/font/google` * `style: 'oblique'`: A string - it can take any value for `next/font/local` but is expected to come from standard font styles * `style: ['italic','normal']`: An array of 2 values for `next/font/google` - the values are from `normal` and `italic` ### `subsets` The font `subsets` defined by an array of string values with the names of each subset you would like to be preloaded. Fonts specified via `subsets` will have a link preload tag injected into the head when the `preload` option is true, which is the default. Used in `next/font/google` * Optional Examples: * `subsets: ['latin']`: An array with the subset `latin` You can find a list of all subsets on the Google Fonts page for your font. ### `axes` Some variable fonts have extra `axes` that can be included. By default, only the font weight is included to keep the file size down. The possible values of `axes` depend on the specific font. Used in `next/font/google` * Optional Examples: * `axes: ['slnt']`: An array with value `slnt` for the `Inter` variable font which has `slnt` as additional `axes` as shown here. You can find the possible `axes` values for your font by using the filter on the Google variable fonts page and looking for axes other than `wght` ### `display` The font `display` with possible string values of `'auto'`, `'block'`, `'swap'`, `'fallback'` or `'optional'` with default value of `'swap'`. Used in `next/font/google` and `next/font/local` * Optional Examples: * `display: 'optional'`: A string assigned to the `optional` value ### `preload` A boolean value that specifies whether the font should be preloaded or not. The default is `true`. Used in `next/font/google` and `next/font/local` * Optional Examples: * `preload: false` ### `fallback` The fallback font to use if the font cannot be loaded. An array of strings of fallback fonts with no default. * Optional Used in `next/font/google` and `next/font/local` Examples: * `fallback: ['system-ui', 'arial']`: An array setting the fallback fonts to `system-ui` or `arial` ### `adjustFontFallback` * For `next/font/google`: A boolean value that sets whether an automatic fallback font should be used to reduce Cumulative Layout Shift. The default is `true`. * For `next/font/local`: A string or boolean `false` value that sets whether an automatic fallback font should be used to reduce Cumulative Layout Shift. The possible values are `'Arial'`, `'Times New Roman'` or `false`. The default is `'Arial'`. Used in `next/font/google` and `next/font/local` * Optional Examples: * `adjustFontFallback: false`: for `next/font/google` * `adjustFontFallback: 'Times New Roman'`: for `next/font/local` ### `variable` A string value to define the CSS variable name to be used if the style is applied with the CSS variable method. Used in `next/font/google` and `next/font/local` * Optional Examples: * `variable: '--my-font'`: The CSS variable `--my-font` is declared ### `declarations` An array of font face descriptor key-value pairs that define the generated `@font-face` further. Used in `next/font/local` * Optional Examples: * `declarations: [{ prop: 'ascent-override', value: '90%' }]` ## Applying Styles You can apply the font styles in three ways: * `className` * `style` * CSS Variables ### `className` Returns a read-only CSS `className` for the loaded font to be passed to an HTML element. <p className={inter.className}>Hello, Next.js!</p> ### `style` Returns a read-only CSS `style` object for the loaded font to be passed to an HTML element, including `style.fontFamily` to access the font family name and fallback fonts. <p style={inter.style}>Hello World</p> ### CSS Variables If you would like to set your styles in an external style sheet and specify additional options there, use the CSS variable method. In addition to importing the font, also import the CSS file where the CSS variable is defined and set the variable option of the font loader object as follows: import { Inter } from 'next/font/google' import styles from '../styles/component.module.css' const inter = Inter({ variable: '--font-inter', }) To use the font, set the `className` of the parent container of the text you would like to style to the font loader's `variable` value and the `className` of the text to the `styles` property from the external CSS file. <main className={inter.variable}> <p className={styles.text}>Hello World</p> </main> Define the `text` selector class in the `component.module.css` CSS file as follows: .text { font-family: var(--font-inter); font-weight: 200; font-style: italic; } In the example above, the text `Hello World` is styled using the `Inter` font and the generated font fallback with `font-weight: 200` and `font-style: italic`. ## Using a font definitions file Every time you call the `localFont` or Google font function, that font will be hosted as one instance in your application. Therefore, if you need to use the same font in multiple places, you should load it in one place and import the related font object where you need it. This is done using a font definitions file. For example, create a `fonts.ts` file in a `styles` folder at the root of your app directory. Then, specify your font definitions as follows: import { Inter, Lora, Source_Sans_3 } from 'next/font/google' import localFont from 'next/font/local' // define your variable fonts const inter = Inter() const lora = Lora() // define 2 weights of a non-variable font const sourceCodePro400 = Source_Sans_3({ weight: '400' }) const sourceCodePro700 = Source_Sans_3({ weight: '700' }) // define a custom local font where GreatVibes-Regular.ttf is stored in the styles folder const greatVibes = localFont({ src: './GreatVibes-Regular.ttf' }) export { inter, lora, sourceCodePro400, sourceCodePro700, greatVibes } You can now use these definitions in your code as follows: import { inter, lora, sourceCodePro700, greatVibes } from '../styles/fonts' export default function Page() { return ( <div> <p className={inter.className}>Hello world using Inter font</p> <p style={lora.style}>Hello world using Lora font</p> <p className={sourceCodePro700.className}> Hello world using Source_Sans_3 font with weight 700 </p> <p className={greatVibes.className}>My title in Great Vibes font</p> </div> ) } To make it easier to access the font definitions in your code, you can define a path alias in your `tsconfig.json` or `jsconfig.json` files as follows: { "compilerOptions": { "paths": { "@/fonts": ["./styles/fonts"] } } } You can now import any font definition as follows: import { greatVibes, sourceCodePro400 } from '@/fonts' ## Version Changes | Version | Changes | | --- | --- | | `v13.2.0` | `@next/font` renamed to `next/font`. Installation no longer required. | | `v13.0.0` | `@next/font` was added. | --- ## Page: https://nextjs.org/docs/14/pages/api-reference/components/head Examples * Head Elements * Layout Component We expose a built-in component for appending elements to the `head` of the page: import Head from 'next/head' function IndexPage() { return ( <div> <Head> <title>My page title</title> </Head> <p>Hello world!</p> </div> ) } export default IndexPage To avoid duplicate tags in your `head` you can use the `key` property, which will make sure the tag is only rendered once, as in the following example: import Head from 'next/head' function IndexPage() { return ( <div> <Head> <title>My page title</title> <meta property="og:title" content="My page title" key="title" /> </Head> <Head> <meta property="og:title" content="My new title" key="title" /> </Head> <p>Hello world!</p> </div> ) } export default IndexPage In this case only the second `<meta property="og:title" />` is rendered. `meta` tags with duplicate `key` attributes are automatically handled. > The contents of `head` get cleared upon unmounting the component, so make sure each page completely defines what it needs in `head`, without making assumptions about what other pages added. ## Use minimal nesting `title`, `meta` or any other elements (e.g. `script`) need to be contained as **direct** children of the `Head` element, or wrapped into maximum one level of `<React.Fragment>` or arrays—otherwise the tags won't be correctly picked up on client-side navigations. ## Use `next/script` for scripts We recommend using `next/script` in your component instead of manually creating a `<script>` in `next/head`. ## No `html` or `body` tags You **cannot** use `<Head>` to set attributes on `<html>` or `<body>` tags. This will result in an `next-head-count is missing` error. `next/head` can only handle tags inside the HTML `<head>` tag. --- ## Page: https://nextjs.org/docs/14/pages/api-reference/components/image Examples * Image Component > **Good to know**: If you are using a version of Next.js prior to 13, you'll want to use the next/legacy/image documentation since the component was renamed. This API reference will help you understand how to use props and configuration options available for the Image Component. For features and usage, please see the Image Component page. import Image from 'next/image' export default function Page() { return ( <Image src="/profile.png" width={500} height={500} alt="Picture of the author" /> ) } ## Props Here's a summary of the props available for the Image Component: | Prop | Example | Type | Status | | --- | --- | --- | --- | | `src` | `src="/profile.png"` | String | Required | | `width` | `width={500}` | Integer (px) | Required | | `height` | `height={500}` | Integer (px) | Required | | `alt` | `alt="Picture of the author"` | String | Required | | `loader` | `loader={imageLoader}` | Function | \- | | `fill` | `fill={true}` | Boolean | \- | | `sizes` | `sizes="(max-width: 768px) 100vw, 33vw"` | String | \- | | `quality` | `quality={80}` | Integer (1-100) | \- | | `priority` | `priority={true}` | Boolean | \- | | `placeholder` | `placeholder="blur"` | String | \- | | `style` | `style={{objectFit: "contain"}}` | Object | \- | | `onLoadingComplete` | `onLoadingComplete={img => done())}` | Function | Deprecated | | `onLoad` | `onLoad={event => done())}` | Function | \- | | `onError` | `onError(event => fail()}` | Function | \- | | `loading` | `loading="lazy"` | String | \- | | `blurDataURL` | `blurDataURL="data:image/jpeg..."` | String | \- | | `overrideSrc` | `overrideSrc="/seo.png"` | String | \- | ## Required Props The Image Component requires the following properties: `src`, `width`, `height`, and `alt`. import Image from 'next/image' export default function Page() { return ( <div> <Image src="/profile.png" width={500} height={500} alt="Picture of the author" /> </div> ) } ### `src` Must be one of the following: * A statically imported image file * A path string. This can be either an absolute external URL, or an internal path depending on the loader prop. When using an external URL, you must add it to remotePatterns in `next.config.js`. ### `width` The `width` property represents the _rendered_ width in pixels, so it will affect how large the image appears. Required, except for statically imported images or images with the `fill` property. ### `height` The `height` property represents the _rendered_ height in pixels, so it will affect how large the image appears. Required, except for statically imported images or images with the `fill` property. ### `alt` The `alt` property is used to describe the image for screen readers and search engines. It is also the fallback text if images have been disabled or an error occurs while loading the image. It should contain text that could replace the image without changing the meaning of the page. It is not meant to supplement the image and should not repeat information that is already provided in the captions above or below the image. If the image is purely decorative or not intended for the user, the `alt` property should be an empty string (`alt=""`). Learn more ## Optional Props The `<Image />` component accepts a number of additional properties beyond those which are required. This section describes the most commonly-used properties of the Image component. Find details about more rarely-used properties in the Advanced Props section. ### `loader` A custom function used to resolve image URLs. A `loader` is a function returning a URL string for the image, given the following parameters: * `src` * `width` * `quality` Here is an example of using a custom loader: import Image from 'next/image' const imageLoader = ({ src, width, quality }) => { return `https://example.com/${src}?w=${width}&q=${quality || 75}` } export default function Page() { return ( <Image loader={imageLoader} src="me.png" alt="Picture of the author" width={500} height={500} /> ) } Alternatively, you can use the loaderFile configuration in `next.config.js` to configure every instance of `next/image` in your application, without passing a prop. ### `fill` fill={true} // {true} | {false} A boolean that causes the image to fill the parent element, which is useful when the `width` and `height` are unknown. The parent element _must_ assign `position: "relative"`, `position: "fixed"`, or `position: "absolute"` style. By default, the img element will automatically be assigned the `position: "absolute"` style. If no styles are applied to the image, the image will stretch to fit the container. You may prefer to set `object-fit: "contain"` for an image which is letterboxed to fit the container and preserve aspect ratio. Alternatively, `object-fit: "cover"` will cause the image to fill the entire container and be cropped to preserve aspect ratio. For this to look correct, the `overflow: "hidden"` style should be assigned to the parent element. For more information, see also: * `position` * `object-fit` * `object-position` ### `sizes` A string, similar to a media query, that provides information about how wide the image will be at different breakpoints. The value of `sizes` will greatly affect performance for images using `fill` or which are styled to have a responsive size. The `sizes` property serves two important purposes related to image performance: * First, the value of `sizes` is used by the browser to determine which size of the image to download, from `next/image`'s automatically generated `srcset`. When the browser chooses, it does not yet know the size of the image on the page, so it selects an image that is the same size or larger than the viewport. The `sizes` property allows you to tell the browser that the image will actually be smaller than full screen. If you don't specify a `sizes` value in an image with the `fill` property, a default value of `100vw` (full screen width) is used. * Second, the `sizes` property changes the behavior of the automatically generated `srcset` value. If no `sizes` value is present, a small `srcset` is generated, suitable for a fixed-size image (1x/2x/etc). If `sizes` is defined, a large `srcset` is generated, suitable for a responsive image (640w/750w/etc). If the `sizes` property includes sizes such as `50vw`, which represent a percentage of the viewport width, then the `srcset` is trimmed to not include any values which are too small to ever be necessary. For example, if you know your styling will cause an image to be full-width on mobile devices, in a 2-column layout on tablets, and a 3-column layout on desktop displays, you should include a sizes property such as the following: import Image from 'next/image' export default function Page() { return ( <div className="grid-element"> <Image fill src="/example.png" sizes="(max-width: 768px) 100vw, (max-width: 1200px) 50vw, 33vw" /> </div> ) } This example `sizes` could have a dramatic effect on performance metrics. Without the `33vw` sizes, the image selected from the server would be 3 times as wide as it needs to be. Because file size is proportional to the square of the width, without `sizes` the user would download an image that's 9 times larger than necessary. Learn more about `srcset` and `sizes`: * web.dev * mdn ### `quality` quality={75} // {number 1-100} The quality of the optimized image, an integer between `1` and `100`, where `100` is the best quality and therefore largest file size. Defaults to `75`. If the `qualities` configuration is defined in `next.config.js`, the `quality` prop must match one of the values defined in the configuration. > **Good to know**: If the original source image was already low quality, setting the quality prop too high could cause the resulting optimized image to be larger than the original source image. ### `priority` priority={false} // {false} | {true} When true, the image will be considered high priority and preload. Lazy loading is automatically disabled for images using `priority`. You should use the `priority` property on any image detected as the Largest Contentful Paint (LCP) element. It may be appropriate to have multiple priority images, as different images may be the LCP element for different viewport sizes. Should only be used when the image is visible above the fold. Defaults to `false`. ### `placeholder` placeholder = 'empty' // "empty" | "blur" | "data:image/..." A placeholder to use while the image is loading. Possible values are `blur`, `empty`, or `data:image/...`. Defaults to `empty`. When `blur`, the `blurDataURL` property will be used as the placeholder. If `src` is an object from a static import and the imported image is `.jpg`, `.png`, `.webp`, or `.avif`, then `blurDataURL` will be automatically populated, except when the image is detected to be animated. For dynamic images, you must provide the `blurDataURL` property. Solutions such as Plaiceholder can help with `base64` generation. When `data:image/...`, the Data URL will be used as the placeholder while the image is loading. When `empty`, there will be no placeholder while the image is loading, only empty space. Try it out: * Demo the `blur` placeholder * Demo the shimmer effect with data URL `placeholder` prop * Demo the color effect with `blurDataURL` prop ## Advanced Props In some cases, you may need more advanced usage. The `<Image />` component optionally accepts the following advanced properties. ### `style` Allows passing CSS styles to the underlying image element. const imageStyle = { borderRadius: '50%', border: '1px solid #fff', } export default function ProfileImage() { return <Image src="..." style={imageStyle} /> } Remember that the required width and height props can interact with your styling. If you use styling to modify an image's width, you should also style its height to `auto` to preserve its intrinsic aspect ratio, or your image will be distorted. ### `onLoadingComplete` <Image onLoadingComplete={(img) => console.log(img.naturalWidth)} /> > **Warning**: Deprecated since Next.js 14 in favor of `onLoad`. A callback function that is invoked once the image is completely loaded and the placeholder has been removed. The callback function will be called with one argument, a reference to the underlying `<img>` element. ### `onLoad` <Image onLoad={(e) => console.log(e.target.naturalWidth)} /> A callback function that is invoked once the image is completely loaded and the placeholder has been removed. The callback function will be called with one argument, the Event which has a `target` that references the underlying `<img>` element. ### `onError` <Image onError={(e) => console.error(e.target.id)} /> A callback function that is invoked if the image fails to load. ### `loading` > **Recommendation**: This property is only meant for advanced use cases. Switching an image to load with `eager` will normally **hurt performance**. We recommend using the `priority` property instead, which will eagerly preload the image. loading = 'lazy' // {lazy} | {eager} The loading behavior of the image. Defaults to `lazy`. When `lazy`, defer loading the image until it reaches a calculated distance from the viewport. When `eager`, load the image immediately. Learn more about the `loading` attribute. ### `blurDataURL` A Data URL to be used as a placeholder image before the `src` image successfully loads. Only takes effect when combined with `placeholder="blur"`. Must be a base64-encoded image. It will be enlarged and blurred, so a very small image (10px or less) is recommended. Including larger images as placeholders may harm your application performance. Try it out: * Demo the default `blurDataURL` prop * Demo the color effect with `blurDataURL` prop You can also generate a solid color Data URL to match the image. ### `unoptimized` unoptimized = {false} // {false} | {true} When true, the source image will be served as-is instead of changing quality, size, or format. Defaults to `false`. import Image from 'next/image' const UnoptimizedImage = (props) => { return <Image {...props} unoptimized /> } Since Next.js 12.3.0, this prop can be assigned to all images by updating `next.config.js` with the following configuration: module.exports = { images: { unoptimized: true, }, } ### `overrideSrc` When providing the `src` prop to the `<Image>` component, both the `srcset` and `src` attributes are generated automatically for the resulting `<img>`. <Image src="/me.jpg" /> <img srcset=" /_next/image?url=%2Fme.jpg&w=640&q=75 1x, /_next/image?url=%2Fme.jpg&w=828&q=75 2x " src="/_next/image?url=%2Fme.jpg&w=828&q=75" /> In some cases, it is not desirable to have the `src` attribute generated and you may wish to override it using the `overrideSrc` prop. For example, when upgrading an existing website from `<img>` to `<Image>`, you may wish to maintain the same `src` attribute for SEO purposes such as image ranking or avoiding recrawl. <Image src="/me.jpg" overrideSrc="/override.jpg" /> <img srcset=" /_next/image?url=%2Fme.jpg&w=640&q=75 1x, /_next/image?url=%2Fme.jpg&w=828&q=75 2x " src="/override.jpg" /> ### decoding A hint to the browser indicating if it should wait for the image to be decoded before presenting other content updates or not. Defaults to `async`. Possible values are the following: * `async` - Asynchronously decode the image and allow other content to be rendered before it completes. * `sync` - Synchronously decode the image for atomic presentation with other content. * `auto` - No preference for the decoding mode; the browser decides what's best. Learn more about the `decoding` attribute. ### Other Props Other properties on the `<Image />` component will be passed to the underlying `img` element with the exception of the following: * `srcSet`. Use Device Sizes instead. ## Configuration Options In addition to props, you can configure the Image Component in `next.config.js`. The following options are available: ### `localPatterns` You can optionally configure `localPatterns` in your `next.config.js` file in order to allow specific paths to be optimized and block all others paths. module.exports = { images: { localPatterns: [ { pathname: '/assets/images/**', search: '', }, ], }, } > **Good to know**: The example above will ensure the `src` property of `next/image` must start with `/assets/images/` and must not have a query string. Attempting to optimize any other path will respond with 400 Bad Request. ### `remotePatterns` To protect your application from malicious users, configuration is required in order to use external images. This ensures that only external images from your account can be served from the Next.js Image Optimization API. These external images can be configured with the `remotePatterns` property in your `next.config.js` file, as shown below: module.exports = { images: { remotePatterns: [ { protocol: 'https', hostname: 'example.com', port: '', pathname: '/account123/**', search: '', }, ], }, } > **Good to know**: The example above will ensure the `src` property of `next/image` must start with `https://example.com/account123/` and must not have a query string. Any other protocol, hostname, port, or unmatched path will respond with 400 Bad Request. Below is an example of the `remotePatterns` property in the `next.config.js` file using a wildcard pattern in the `hostname`: module.exports = { images: { remotePatterns: [ { protocol: 'https', hostname: '**.example.com', port: '', search: '', }, ], }, } > **Good to know**: The example above will ensure the `src` property of `next/image` must start with `https://img1.example.com` or `https://me.avatar.example.com` or any number of subdomains. It cannot have a port or query string. Any other protocol or unmatched hostname will respond with 400 Bad Request. Wildcard patterns can be used for both `pathname` and `hostname` and have the following syntax: * `*` match a single path segment or subdomain * `**` match any number of path segments at the end or subdomains at the beginning The `**` syntax does not work in the middle of the pattern. > **Good to know**: When omitting `protocol`, `port`, `pathname`, or `search` then the wildcard `**` is implied. This is not recommended because it may allow malicious actors to optimize urls you did not intend. Below is an example of the `remotePatterns` property in the `next.config.js` file using `search`: module.exports = { images: { remotePatterns: [ { protocol: 'https', hostname: 'assets.example.com', search: '?v=1727111025337', }, ], }, } > **Good to know**: The example above will ensure the `src` property of `next/image` must start with `https://assets.example.com` and must have the exact query string `?v=1727111025337`. Any other protocol or query string will respond with 400 Bad Request. ### `domains` > **Warning**: Deprecated since Next.js 14 in favor of strict `remotePatterns` in order to protect your application from malicious users. Only use `domains` if you own all the content served from the domain. Similar to `remotePatterns`, the `domains` configuration can be used to provide a list of allowed hostnames for external images. However, the `domains` configuration does not support wildcard pattern matching and it cannot restrict protocol, port, or pathname. Below is an example of the `domains` property in the `next.config.js` file: module.exports = { images: { domains: ['assets.acme.com'], }, } ### `loaderFile` If you want to use a cloud provider to optimize images instead of using the Next.js built-in Image Optimization API, you can configure the `loaderFile` in your `next.config.js` like the following: module.exports = { images: { loader: 'custom', loaderFile: './my/image/loader.js', }, } This must point to a file relative to the root of your Next.js application. The file must export a default function that returns a string, for example: export default function myImageLoader({ src, width, quality }) { return `https://example.com/${src}?w=${width}&q=${quality || 75}` } Alternatively, you can use the `loader` prop to configure each instance of `next/image`. Examples: * Custom Image Loader Configuration ## Advanced The following configuration is for advanced use cases and is usually not necessary. If you choose to configure the properties below, you will override any changes to the Next.js defaults in future updates. ### `deviceSizes` If you know the expected device widths of your users, you can specify a list of device width breakpoints using the `deviceSizes` property in `next.config.js`. These widths are used when the `next/image` component uses `sizes` prop to ensure the correct image is served for user's device. If no configuration is provided, the default below is used. module.exports = { images: { deviceSizes: [640, 750, 828, 1080, 1200, 1920, 2048, 3840], }, } ### `imageSizes` You can specify a list of image widths using the `images.imageSizes` property in your `next.config.js` file. These widths are concatenated with the array of device sizes to form the full array of sizes used to generate image srcsets. The reason there are two separate lists is that imageSizes is only used for images which provide a `sizes` prop, which indicates that the image is less than the full width of the screen. **Therefore, the sizes in imageSizes should all be smaller than the smallest size in deviceSizes.** If no configuration is provided, the default below is used. module.exports = { images: { imageSizes: [16, 32, 48, 64, 96, 128, 256, 384], }, } ### `qualities` The default Image Optimization API will automatically allow all qualities from 1 to 100. If you wish to restrict the allowed qualities, you can add configuration to `next.config.js`. module.exports = { images: { qualities: [25, 50, 75], }, } In this example above, only three qualities are allowed: 25, 50, and 75. If the `quality` prop does not match a value in this array, the image will fail with 400 Bad Request. ### `formats` The default Image Optimization API will automatically detect the browser's supported image formats via the request's `Accept` header. If the `Accept` head matches more than one of the configured formats, the first match in the array is used. Therefore, the array order matters. If there is no match (or the source image is animated), the Image Optimization API will fallback to the original image's format. If no configuration is provided, the default below is used. module.exports = { images: { formats: ['image/webp'], }, } You can enable AVIF support with the following configuration. module.exports = { images: { formats: ['image/avif', 'image/webp'], }, } > **Good to know**: > > * AVIF generally takes 20% longer to encode but it compresses 20% smaller compared to WebP. This means that the first time an image is requested, it will typically be slower and then subsequent requests that are cached will be faster. > * If you self-host with a Proxy/CDN in front of Next.js, you must configure the Proxy to forward the `Accept` header. ## Caching Behavior The following describes the caching algorithm for the default loader. For all other loaders, please refer to your cloud provider's documentation. Images are optimized dynamically upon request and stored in the `<distDir>/cache/images` directory. The optimized image file will be served for subsequent requests until the expiration is reached. When a request is made that matches a cached but expired file, the expired image is served stale immediately. Then the image is optimized again in the background (also called revalidation) and saved to the cache with the new expiration date. The cache status of an image can be determined by reading the value of the `x-nextjs-cache` response header. The possible values are the following: * `MISS` - the path is not in the cache (occurs at most once, on the first visit) * `STALE` - the path is in the cache but exceeded the revalidate time so it will be updated in the background * `HIT` - the path is in the cache and has not exceeded the revalidate time The expiration (or rather Max Age) is defined by either the `minimumCacheTTL` configuration or the upstream image `Cache-Control` header, whichever is larger. Specifically, the `max-age` value of the `Cache-Control` header is used. If both `s-maxage` and `max-age` are found, then `s-maxage` is preferred. The `max-age` is also passed-through to any downstream clients including CDNs and browsers. * You can configure `minimumCacheTTL` to increase the cache duration when the upstream image does not include `Cache-Control` header or the value is very low. * You can configure `deviceSizes` and `imageSizes` to reduce the total number of possible generated images. * You can configure formats to disable multiple formats in favor of a single image format. ### `minimumCacheTTL` You can configure the Time to Live (TTL) in seconds for cached optimized images. In many cases, it's better to use a Static Image Import which will automatically hash the file contents and cache the image forever with a `Cache-Control` header of `immutable`. module.exports = { images: { minimumCacheTTL: 60, }, } The expiration (or rather Max Age) of the optimized image is defined by either the `minimumCacheTTL` or the upstream image `Cache-Control` header, whichever is larger. If you need to change the caching behavior per image, you can configure `headers` to set the `Cache-Control` header on the upstream image (e.g. `/some-asset.jpg`, not `/_next/image` itself). There is no mechanism to invalidate the cache at this time, so its best to keep `minimumCacheTTL` low. Otherwise you may need to manually change the `src` prop or delete `<distDir>/cache/images`. ### `disableStaticImages` The default behavior allows you to import static files such as `import icon from './icon.png'` and then pass that to the `src` property. In some cases, you may wish to disable this feature if it conflicts with other plugins that expect the import to behave differently. You can disable static image imports inside your `next.config.js`: module.exports = { images: { disableStaticImages: true, }, } ### `dangerouslyAllowSVG` The default loader does not optimize SVG images for a few reasons. First, SVG is a vector format meaning it can be resized losslessly. Second, SVG has many of the same features as HTML/CSS, which can lead to vulnerabilities without proper Content Security Policy (CSP) headers. Therefore, we recommended using the `unoptimized` prop when the `src` prop is known to be SVG. This happens automatically when `src` ends with `".svg"`. However, if you need to serve SVG images with the default Image Optimization API, you can set `dangerouslyAllowSVG` inside your `next.config.js`: module.exports = { images: { dangerouslyAllowSVG: true, contentDispositionType: 'attachment', contentSecurityPolicy: "default-src 'self'; script-src 'none'; sandbox;", }, } In addition, it is strongly recommended to also set `contentDispositionType` to force the browser to download the image, as well as `contentSecurityPolicy` to prevent scripts embedded in the image from executing. ## Animated Images The default loader will automatically bypass Image Optimization for animated images and serve the image as-is. Auto-detection for animated files is best-effort and supports GIF, APNG, and WebP. If you want to explicitly bypass Image Optimization for a given animated image, use the unoptimized prop. ## Responsive Images The default generated `srcset` contains `1x` and `2x` images in order to support different device pixel ratios. However, you may wish to render a responsive image that stretches with the viewport. In that case, you'll need to set `sizes` as well as `style` (or `className`). You can render a responsive image using one of the following methods below. ### Responsive image using a static import If the source image is not dynamic, you can statically import to create a responsive image: import Image from 'next/image' import me from '../photos/me.jpg' export default function Author() { return ( <Image src={me} alt="Picture of the author" sizes="100vw" style={{ width: '100%', height: 'auto', }} /> ) } Try it out: * Demo the image responsive to viewport ### Responsive image with aspect ratio If the source image is a dynamic or a remote url, you will also need to provide `width` and `height` to set the correct aspect ratio of the responsive image: import Image from 'next/image' export default function Page({ photoUrl }) { return ( <Image src={photoUrl} alt="Picture of the author" sizes="100vw" style={{ width: '100%', height: 'auto', }} width={500} height={300} /> ) } Try it out: * Demo the image responsive to viewport ### Responsive image with `fill` If you don't know the aspect ratio, you will need to set the `fill` prop and set `position: relative` on the parent. Optionally, you can set `object-fit` style depending on the desired stretch vs crop behavior: import Image from 'next/image' export default function Page({ photoUrl }) { return ( <div style={{ position: 'relative', width: '300px', height: '500px' }}> <Image src={photoUrl} alt="Picture of the author" sizes="300px" fill style={{ objectFit: 'contain', }} /> </div> ) } Try it out: * Demo the `fill` prop ## Theme Detection CSS If you want to display a different image for light and dark mode, you can create a new component that wraps two `<Image>` components and reveals the correct one based on a CSS media query. .imgDark { display: none; } @media (prefers-color-scheme: dark) { .imgLight { display: none; } .imgDark { display: unset; } } import styles from './theme-image.module.css' import Image, { ImageProps } from 'next/image' type Props = Omit<ImageProps, 'src' | 'priority' | 'loading'> & { srcLight: string srcDark: string } const ThemeImage = (props: Props) => { const { srcLight, srcDark, ...rest } = props return ( <> <Image {...rest} src={srcLight} className={styles.imgLight} /> <Image {...rest} src={srcDark} className={styles.imgDark} /> </> ) } > **Good to know**: The default behavior of `loading="lazy"` ensures that only the correct image is loaded. You cannot use `priority` or `loading="eager"` because that would cause both images to load. Instead, you can use `fetchPriority="high"`. Try it out: * Demo light/dark mode theme detection ## getImageProps For more advanced use cases, you can call `getImageProps()` to get the props that would be passed to the underlying `<img>` element, and instead pass to them to another component, style, canvas, etc. This also avoid calling React `useState()` so it can lead to better performance, but it cannot be used with the `placeholder` prop because the placeholder will never be removed. ### Theme Detection Picture If you want to display a different image for light and dark mode, you can use the `<picture>` element to display a different image based on the user's preferred color scheme. import { getImageProps } from 'next/image' export default function Page() { const common = { alt: 'Theme Example', width: 800, height: 400 } const { props: { srcSet: dark }, } = getImageProps({ ...common, src: '/dark.png' }) const { props: { srcSet: light, ...rest }, } = getImageProps({ ...common, src: '/light.png' }) return ( <picture> <source media="(prefers-color-scheme: dark)" srcSet={dark} /> <source media="(prefers-color-scheme: light)" srcSet={light} /> <img {...rest} /> </picture> ) } ### Art Direction If you want to display a different image for mobile and desktop, sometimes called Art Direction, you can provide different `src`, `width`, `height`, and `quality` props to `getImageProps()`. import { getImageProps } from 'next/image' export default function Home() { const common = { alt: 'Art Direction Example', sizes: '100vw' } const { props: { srcSet: desktop }, } = getImageProps({ ...common, width: 1440, height: 875, quality: 80, src: '/desktop.jpg', }) const { props: { srcSet: mobile, ...rest }, } = getImageProps({ ...common, width: 750, height: 1334, quality: 70, src: '/mobile.jpg', }) return ( <picture> <source media="(min-width: 1000px)" srcSet={desktop} /> <source media="(min-width: 500px)" srcSet={mobile} /> <img {...rest} style={{ width: '100%', height: 'auto' }} /> </picture> ) } ### Background CSS You can even convert the `srcSet` string to the `image-set()` CSS function to optimize a background image. import { getImageProps } from 'next/image' function getBackgroundImage(srcSet = '') { const imageSet = srcSet .split(', ') .map((str) => { const [url, dpi] = str.split(' ') return `url("${url}") ${dpi}` }) .join(', ') return `image-set(${imageSet})` } export default function Home() { const { props: { srcSet }, } = getImageProps({ alt: '', width: 128, height: 128, src: '/img.png' }) const backgroundImage = getBackgroundImage(srcSet) const style = { height: '100vh', width: '100vw', backgroundImage } return ( <main style={style}> <h1>Hello World</h1> </main> ) } ## Known Browser Bugs This `next/image` component uses browser native lazy loading, which may fallback to eager loading for older browsers before Safari 15.4. When using the blur-up placeholder, older browsers before Safari 12 will fallback to empty placeholder. When using styles with `width`/`height` of `auto`, it is possible to cause Layout Shift on older browsers before Safari 15 that don't preserve the aspect ratio. For more details, see this MDN video. * Safari 15 - 16.3 display a gray border while loading. Safari 16.4 fixed this issue. Possible solutions: * Use CSS `@supports (font: -apple-system-body) and (-webkit-appearance: none) { img[loading="lazy"] { clip-path: inset(0.6px) } }` * Use `priority` if the image is above the fold * Firefox 67+ displays a white background while loading. Possible solutions: * Enable AVIF `formats` * Use `placeholder` ## Version History | Version | Changes | | --- | --- | | `v14.2.23` | `qualities` configuration added. | | `v14.2.15` | `decoding` prop added and `localPatterns` configuration added. | | `v14.2.14` | `remotePatterns.search` prop added. | | `v14.2.0` | `overrideSrc` prop added. | | `v14.1.0` | `getImageProps()` is stable. | | `v14.0.0` | `onLoadingComplete` prop and `domains` config deprecated. | | `v13.4.14` | `placeholder` prop support for `data:/image...` | | `v13.2.0` | `contentDispositionType` configuration added. | | `v13.0.6` | `ref` prop added. | | `v13.0.0` | The `next/image` import was renamed to `next/legacy/image`. The `next/future/image` import was renamed to `next/image`. A codemod is available to safely and automatically rename your imports. `<span>` wrapper removed. `layout`, `objectFit`, `objectPosition`, `lazyBoundary`, `lazyRoot` props removed. `alt` is required. `onLoadingComplete` receives reference to `img` element. Built-in loader config removed. | | `v12.3.0` | `remotePatterns` and `unoptimized` configuration is stable. | | `v12.2.0` | Experimental `remotePatterns` and experimental `unoptimized` configuration added. `layout="raw"` removed. | | `v12.1.1` | `style` prop added. Experimental support for `layout="raw"` added. | | `v12.1.0` | `dangerouslyAllowSVG` and `contentSecurityPolicy` configuration added. | | `v12.0.9` | `lazyRoot` prop added. | | `v12.0.0` | `formats` configuration added. AVIF support added. Wrapper `<div>` changed to `<span>`. | | `v11.1.0` | `onLoadingComplete` and `lazyBoundary` props added. | | `v11.0.0` | `src` prop support for static import. `placeholder` prop added. `blurDataURL` prop added. | | `v10.0.5` | `loader` prop added. | | `v10.0.1` | `layout` prop added. | | `v10.0.0` | `next/image` introduced. | --- ## Page: https://nextjs.org/docs/14/pages/api-reference/components/image-legacy Examples * Legacy Image Component Starting with Next.js 13, the `next/image` component was rewritten to improve both the performance and developer experience. In order to provide a backwards compatible upgrade solution, the old `next/image` was renamed to `next/legacy/image`. View the **new** `next/image` API Reference ## Comparison Compared to `next/legacy/image`, the new `next/image` component has the following changes: * Removes `<span>` wrapper around `<img>` in favor of native computed aspect ratio * Adds support for canonical `style` prop * Removes `layout` prop in favor of `style` or `className` * Removes `objectFit` prop in favor of `style` or `className` * Removes `objectPosition` prop in favor of `style` or `className` * Removes `IntersectionObserver` implementation in favor of native lazy loading * Removes `lazyBoundary` prop since there is no native equivalent * Removes `lazyRoot` prop since there is no native equivalent * Removes `loader` config in favor of `loader` prop * Changed `alt` prop from optional to required * Changed `onLoadingComplete` callback to receive reference to `<img>` element ## Required Props The `<Image />` component requires the following properties. ### src Must be one of the following: * A statically imported image file * A path string. This can be either an absolute external URL, or an internal path depending on the loader prop or loader configuration. When using an external URL, you must add it to remotePatterns in `next.config.js`. ### width The `width` property can represent either the _rendered_ width or _original_ width in pixels, depending on the `layout` and `sizes` properties. When using `layout="intrinsic"` or `layout="fixed"` the `width` property represents the _rendered_ width in pixels, so it will affect how large the image appears. When using `layout="responsive"`, `layout="fill"`, the `width` property represents the _original_ width in pixels, so it will only affect the aspect ratio. The `width` property is required, except for statically imported images, or those with `layout="fill"`. ### height The `height` property can represent either the _rendered_ height or _original_ height in pixels, depending on the `layout` and `sizes` properties. When using `layout="intrinsic"` or `layout="fixed"` the `height` property represents the _rendered_ height in pixels, so it will affect how large the image appears. When using `layout="responsive"`, `layout="fill"`, the `height` property represents the _original_ height in pixels, so it will only affect the aspect ratio. The `height` property is required, except for statically imported images, or those with `layout="fill"`. ## Optional Props The `<Image />` component accepts a number of additional properties beyond those which are required. This section describes the most commonly-used properties of the Image component. Find details about more rarely-used properties in the Advanced Props section. ### layout The layout behavior of the image as the viewport changes size. | `layout` | Behavior | `srcSet` | `sizes` | Has wrapper and sizer | | --- | --- | --- | --- | --- | | `intrinsic` (default) | Scale _down_ to fit width of container, up to image size | `1x`, `2x` (based on imageSizes) | N/A | yes | | `fixed` | Sized to `width` and `height` exactly | `1x`, `2x` (based on imageSizes) | N/A | yes | | `responsive` | Scale to fit width of container | `640w`, `750w`, ... `2048w`, `3840w` (based on imageSizes and deviceSizes) | `100vw` | yes | | `fill` | Grow in both X and Y axes to fill container | `640w`, `750w`, ... `2048w`, `3840w` (based on imageSizes and deviceSizes) | `100vw` | yes | * Demo the `intrinsic` layout (default) * When `intrinsic`, the image will scale the dimensions down for smaller viewports, but maintain the original dimensions for larger viewports. * Demo the `fixed` layout * When `fixed`, the image dimensions will not change as the viewport changes (no responsiveness) similar to the native `img` element. * Demo the `responsive` layout * When `responsive`, the image will scale the dimensions down for smaller viewports and scale up for larger viewports. * Ensure the parent element uses `display: block` in their stylesheet. * Demo the `fill` layout * When `fill`, the image will stretch both width and height to the dimensions of the parent element, provided the parent element is relative. * This is usually paired with the `objectFit` property. * Ensure the parent element has `position: relative` in their stylesheet. * Demo background image ### loader A custom function used to resolve URLs. Setting the loader as a prop on the Image component overrides the default loader defined in the `images` section of `next.config.js`. A `loader` is a function returning a URL string for the image, given the following parameters: * `src` * `width` * `quality` Here is an example of using a custom loader: import Image from 'next/legacy/image' const myLoader = ({ src, width, quality }) => { return `https://example.com/${src}?w=${width}&q=${quality || 75}` } const MyImage = (props) => { return ( <Image loader={myLoader} src="me.png" alt="Picture of the author" width={500} height={500} /> ) } ### sizes A string that provides information about how wide the image will be at different breakpoints. The value of `sizes` will greatly affect performance for images using `layout="responsive"` or `layout="fill"`. It will be ignored for images using `layout="intrinsic"` or `layout="fixed"`. The `sizes` property serves two important purposes related to image performance: First, the value of `sizes` is used by the browser to determine which size of the image to download, from `next/legacy/image`'s automatically-generated source set. When the browser chooses, it does not yet know the size of the image on the page, so it selects an image that is the same size or larger than the viewport. The `sizes` property allows you to tell the browser that the image will actually be smaller than full screen. If you don't specify a `sizes` value, a default value of `100vw` (full screen width) is used. Second, the `sizes` value is parsed and used to trim the values in the automatically-created source set. If the `sizes` property includes sizes such as `50vw`, which represent a percentage of the viewport width, then the source set is trimmed to not include any values which are too small to ever be necessary. For example, if you know your styling will cause an image to be full-width on mobile devices, in a 2-column layout on tablets, and a 3-column layout on desktop displays, you should include a sizes property such as the following: import Image from 'next/legacy/image' const Example = () => ( <div className="grid-element"> <Image src="/example.png" layout="fill" sizes="(max-width: 768px) 100vw, (max-width: 1200px) 50vw, 33vw" /> </div> ) This example `sizes` could have a dramatic effect on performance metrics. Without the `33vw` sizes, the image selected from the server would be 3 times as wide as it needs to be. Because file size is proportional to the square of the width, without `sizes` the user would download an image that's 9 times larger than necessary. Learn more about `srcset` and `sizes`: * web.dev * mdn ### quality The quality of the optimized image, an integer between `1` and `100` where `100` is the best quality. Defaults to `75`. ### priority When true, the image will be considered high priority and preload. Lazy loading is automatically disabled for images using `priority`. You should use the `priority` property on any image detected as the Largest Contentful Paint (LCP) element. It may be appropriate to have multiple priority images, as different images may be the LCP element for different viewport sizes. Should only be used when the image is visible above the fold. Defaults to `false`. ### placeholder A placeholder to use while the image is loading. Possible values are `blur` or `empty`. Defaults to `empty`. When `blur`, the `blurDataURL` property will be used as the placeholder. If `src` is an object from a static import and the imported image is `.jpg`, `.png`, `.webp`, or `.avif`, then `blurDataURL` will be automatically populated. For dynamic images, you must provide the `blurDataURL` property. Solutions such as Plaiceholder can help with `base64` generation. When `empty`, there will be no placeholder while the image is loading, only empty space. Try it out: * Demo the `blur` placeholder * Demo the shimmer effect with `blurDataURL` prop * Demo the color effect with `blurDataURL` prop ## Advanced Props In some cases, you may need more advanced usage. The `<Image />` component optionally accepts the following advanced properties. ### style Allows passing CSS styles to the underlying image element. Note that all `layout` modes apply their own styles to the image element, and these automatic styles take precedence over the `style` prop. Also keep in mind that the required `width` and `height` props can interact with your styling. If you use styling to modify an image's `width`, you must set the `height="auto"` style as well, or your image will be distorted. ### objectFit Defines how the image will fit into its parent container when using `layout="fill"`. This value is passed to the object-fit CSS property for the `src` image. ### objectPosition Defines how the image is positioned within its parent element when using `layout="fill"`. This value is passed to the object-position CSS property applied to the image. ### onLoadingComplete A callback function that is invoked once the image is completely loaded and the placeholder has been removed. The `onLoadingComplete` function accepts one parameter, an object with the following properties: * `naturalWidth` * `naturalHeight` ### loading > **Attention**: This property is only meant for advanced usage. Switching an image to load with `eager` will normally **hurt performance**. > > We recommend using the `priority` property instead, which properly loads the image eagerly for nearly all use cases. The loading behavior of the image. Defaults to `lazy`. When `lazy`, defer loading the image until it reaches a calculated distance from the viewport. When `eager`, load the image immediately. Learn more ### blurDataURL A Data URL to be used as a placeholder image before the `src` image successfully loads. Only takes effect when combined with `placeholder="blur"`. Must be a base64-encoded image. It will be enlarged and blurred, so a very small image (10px or less) is recommended. Including larger images as placeholders may harm your application performance. Try it out: * Demo the default `blurDataURL` prop * Demo the shimmer effect with `blurDataURL` prop * Demo the color effect with `blurDataURL` prop You can also generate a solid color Data URL to match the image. ### lazyBoundary A string (with similar syntax to the margin property) that acts as the bounding box used to detect the intersection of the viewport with the image and trigger lazy loading. Defaults to `"200px"`. If the image is nested in a scrollable parent element other than the root document, you will also need to assign the lazyRoot prop. Learn more ### lazyRoot A React Ref pointing to the scrollable parent element. Defaults to `null` (the document viewport). The Ref must point to a DOM element or a React component that forwards the Ref to the underlying DOM element. **Example pointing to a DOM element** import Image from 'next/legacy/image' import React from 'react' const Example = () => { const lazyRoot = React.useRef(null) return ( <div ref={lazyRoot} style={{ overflowX: 'scroll', width: '500px' }}> <Image lazyRoot={lazyRoot} src="/one.jpg" width="500" height="500" /> <Image lazyRoot={lazyRoot} src="/two.jpg" width="500" height="500" /> </div> ) } **Example pointing to a React component** import Image from 'next/legacy/image' import React from 'react' const Container = React.forwardRef((props, ref) => { return ( <div ref={ref} style={{ overflowX: 'scroll', width: '500px' }}> {props.children} </div> ) }) const Example = () => { const lazyRoot = React.useRef(null) return ( <Container ref={lazyRoot}> <Image lazyRoot={lazyRoot} src="/one.jpg" width="500" height="500" /> <Image lazyRoot={lazyRoot} src="/two.jpg" width="500" height="500" /> </Container> ) } Learn more ### unoptimized When true, the source image will be served as-is instead of changing quality, size, or format. Defaults to `false`. import Image from 'next/image' const UnoptimizedImage = (props) => { return <Image {...props} unoptimized /> } Since Next.js 12.3.0, this prop can be assigned to all images by updating `next.config.js` with the following configuration: module.exports = { images: { unoptimized: true, }, } ## Other Props Other properties on the `<Image />` component will be passed to the underlying `img` element with the exception of the following: * `srcSet`. Use Device Sizes instead. * `ref`. Use `onLoadingComplete` instead. * `decoding`. It is always `"async"`. ## Configuration Options ### Remote Patterns To protect your application from malicious users, configuration is required in order to use external images. This ensures that only external images from your account can be served from the Next.js Image Optimization API. These external images can be configured with the `remotePatterns` property in your `next.config.js` file, as shown below: module.exports = { images: { remotePatterns: [ { protocol: 'https', hostname: 'example.com', port: '', pathname: '/account123/**', search: '', }, ], }, } > **Good to know**: The example above will ensure the `src` property of `next/legacy/image` must start with `https://example.com/account123/` and must not have a query string. Any other protocol, hostname, port, or unmatched path will respond with 400 Bad Request. Below is an example of the `remotePatterns` property in the `next.config.js` file using a wildcard pattern in the `hostname`: module.exports = { images: { remotePatterns: [ { protocol: 'https', hostname: '**.example.com', port: '', search: '', }, ], }, } > **Good to know**: The example above will ensure the `src` property of `next/legacy/image` must start with `https://img1.example.com` or `https://me.avatar.example.com` or any number of subdomains. It cannot have a port or query string. Any other protocol or unmatched hostname will respond with 400 Bad Request. Wildcard patterns can be used for both `pathname` and `hostname` and have the following syntax: * `*` match a single path segment or subdomain * `**` match any number of path segments at the end or subdomains at the beginning The `**` syntax does not work in the middle of the pattern. > **Good to know**: When omitting `protocol`, `port`, `pathname`, or `search` then the wildcard `**` is implied. This is not recommended because it may allow malicious actors to optimize urls you did not intend. Below is an example of the `remotePatterns` property in the `next.config.js` file using `search`: module.exports = { images: { remotePatterns: [ { protocol: 'https', hostname: 'assets.example.com', search: '?v=1727111025337', }, ], }, } > **Good to know**: The example above will ensure the `src` property of `next/legacy/image` must start with `https://assets.example.com` and must have the exact query string `?v=1727111025337`. Any other protocol or query string will respond with 400 Bad Request. ### Domains > **Warning**: Deprecated since Next.js 14 in favor of strict `remotePatterns` in order to protect your application from malicious users. Only use `domains` if you own all the content served from the domain. Similar to `remotePatterns`, the `domains` configuration can be used to provide a list of allowed hostnames for external images. However, the `domains` configuration does not support wildcard pattern matching and it cannot restrict protocol, port, or pathname. Below is an example of the `domains` property in the `next.config.js` file: module.exports = { images: { domains: ['assets.acme.com'], }, } ### Loader Configuration If you want to use a cloud provider to optimize images instead of using the Next.js built-in Image Optimization API, you can configure the `loader` and `path` prefix in your `next.config.js` file. This allows you to use relative URLs for the Image `src` and automatically generate the correct absolute URL for your provider. module.exports = { images: { loader: 'imgix', path: 'https://example.com/myaccount/', }, } ### Built-in Loaders The following Image Optimization cloud providers are included: * Default: Works automatically with `next dev`, `next start`, or a custom server * Vercel: Works automatically when you deploy on Vercel, no configuration necessary. Learn more * Imgix: `loader: 'imgix'` * Cloudinary: `loader: 'cloudinary'` * Akamai: `loader: 'akamai'` * Custom: `loader: 'custom'` use a custom cloud provider by implementing the `loader` prop on the `next/legacy/image` component If you need a different provider, you can use the `loader` prop with `next/legacy/image`. > Images can not be optimized at build time using `output: 'export'`, only on-demand. To use `next/legacy/image` with `output: 'export'`, you will need to use a different loader than the default. Read more in the discussion. > The `next/legacy/image` component's default loader uses `squoosh` because it is quick to install and suitable for a development environment. When using `next start` in your production environment, it is strongly recommended that you install `sharp` by running `npm i sharp` in your project directory. This is not necessary for Vercel deployments, as `sharp` is installed automatically. ## Advanced The following configuration is for advanced use cases and is usually not necessary. If you choose to configure the properties below, you will override any changes to the Next.js defaults in future updates. ### Device Sizes If you know the expected device widths of your users, you can specify a list of device width breakpoints using the `deviceSizes` property in `next.config.js`. These widths are used when the `next/legacy/image` component uses `layout="responsive"` or `layout="fill"` to ensure the correct image is served for user's device. If no configuration is provided, the default below is used. module.exports = { images: { deviceSizes: [640, 750, 828, 1080, 1200, 1920, 2048, 3840], }, } ### Image Sizes You can specify a list of image widths using the `images.imageSizes` property in your `next.config.js` file. These widths are concatenated with the array of device sizes to form the full array of sizes used to generate image srcsets. The reason there are two separate lists is that imageSizes is only used for images which provide a `sizes` prop, which indicates that the image is less than the full width of the screen. **Therefore, the sizes in imageSizes should all be smaller than the smallest size in deviceSizes.** If no configuration is provided, the default below is used. module.exports = { images: { imageSizes: [16, 32, 48, 64, 96, 128, 256, 384], }, } ### Acceptable Formats The default Image Optimization API will automatically detect the browser's supported image formats via the request's `Accept` header. If the `Accept` head matches more than one of the configured formats, the first match in the array is used. Therefore, the array order matters. If there is no match (or the source image is animated), the Image Optimization API will fallback to the original image's format. If no configuration is provided, the default below is used. module.exports = { images: { formats: ['image/webp'], }, } You can enable AVIF support with the following configuration. module.exports = { images: { formats: ['image/avif', 'image/webp'], }, } > **Good to know**: AVIF generally takes 20% longer to encode but it compresses 20% smaller compared to WebP. This means that the first time an image is requested, it will typically be slower and then subsequent requests that are cached will be faster. ## Caching Behavior The following describes the caching algorithm for the default loader. For all other loaders, please refer to your cloud provider's documentation. Images are optimized dynamically upon request and stored in the `<distDir>/cache/images` directory. The optimized image file will be served for subsequent requests until the expiration is reached. When a request is made that matches a cached but expired file, the expired image is served stale immediately. Then the image is optimized again in the background (also called revalidation) and saved to the cache with the new expiration date. The cache status of an image can be determined by reading the value of the `x-nextjs-cache` (`x-vercel-cache` when deployed on Vercel) response header. The possible values are the following: * `MISS` - the path is not in the cache (occurs at most once, on the first visit) * `STALE` - the path is in the cache but exceeded the revalidate time so it will be updated in the background * `HIT` - the path is in the cache and has not exceeded the revalidate time The expiration (or rather Max Age) is defined by either the `minimumCacheTTL` configuration or the upstream image `Cache-Control` header, whichever is larger. Specifically, the `max-age` value of the `Cache-Control` header is used. If both `s-maxage` and `max-age` are found, then `s-maxage` is preferred. The `max-age` is also passed-through to any downstream clients including CDNs and browsers. * You can configure `minimumCacheTTL` to increase the cache duration when the upstream image does not include `Cache-Control` header or the value is very low. * You can configure `deviceSizes` and `imageSizes` to reduce the total number of possible generated images. * You can configure formats to disable multiple formats in favor of a single image format. ### Minimum Cache TTL You can configure the Time to Live (TTL) in seconds for cached optimized images. In many cases, it's better to use a Static Image Import which will automatically hash the file contents and cache the image forever with a `Cache-Control` header of `immutable`. module.exports = { images: { minimumCacheTTL: 60, }, } The expiration (or rather Max Age) of the optimized image is defined by either the `minimumCacheTTL` or the upstream image `Cache-Control` header, whichever is larger. If you need to change the caching behavior per image, you can configure `headers` to set the `Cache-Control` header on the upstream image (e.g. `/some-asset.jpg`, not `/_next/image` itself). There is no mechanism to invalidate the cache at this time, so its best to keep `minimumCacheTTL` low. Otherwise you may need to manually change the `src` prop or delete `<distDir>/cache/images`. ### Disable Static Imports The default behavior allows you to import static files such as `import icon from './icon.png'` and then pass that to the `src` property. In some cases, you may wish to disable this feature if it conflicts with other plugins that expect the import to behave differently. You can disable static image imports inside your `next.config.js`: module.exports = { images: { disableStaticImages: true, }, } ### Dangerously Allow SVG The default loader does not optimize SVG images for a few reasons. First, SVG is a vector format meaning it can be resized losslessly. Second, SVG has many of the same features as HTML/CSS, which can lead to vulnerabilities without proper Content Security Policy (CSP) headers. Therefore, we recommended using the `unoptimized` prop when the `src` prop is known to be SVG. This happens automatically when `src` ends with `".svg"`. However, if you need to serve SVG images with the default Image Optimization API, you can set `dangerouslyAllowSVG` inside your `next.config.js`: module.exports = { images: { dangerouslyAllowSVG: true, contentDispositionType: 'attachment', contentSecurityPolicy: "default-src 'self'; script-src 'none'; sandbox;", }, } In addition, it is strongly recommended to also set `contentDispositionType` to force the browser to download the image, as well as `contentSecurityPolicy` to prevent scripts embedded in the image from executing. ### Animated Images The default loader will automatically bypass Image Optimization for animated images and serve the image as-is. Auto-detection for animated files is best-effort and supports GIF, APNG, and WebP. If you want to explicitly bypass Image Optimization for a given animated image, use the unoptimized prop. ## Version History | Version | Changes | | --- | --- | | `v13.0.0` | `next/image` renamed to `next/legacy/image` | --- ## Page: https://nextjs.org/docs/14/pages/api-reference/components/link Examples * Hello World * Active className on Link `<Link>` is a React component that extends the HTML `<a>` element to provide prefetching and client-side navigation between routes. It is the primary way to navigate between routes in Next.js. For an example, consider a `pages` directory with the following files: * `pages/index.js` * `pages/about.js` * `pages/blog/[slug].js` We can have a link to each of these pages like so: import Link from 'next/link' function Home() { return ( <ul> <li> <Link href="/">Home</Link> </li> <li> <Link href="/about">About Us</Link> </li> <li> <Link href="/blog/hello-world">Blog Post</Link> </li> </ul> ) } export default Home ## Props Here's a summary of the props available for the Link Component: | Prop | Example | Type | Required | | --- | --- | --- | --- | | `href` | `href="/dashboard"` | String or Object | Yes | | `replace` | `replace={false}` | Boolean | \- | | `scroll` | `scroll={false}` | Boolean | \- | | `prefetch` | `prefetch={false}` | Boolean | \- | > **Good to know**: `<a>` tag attributes such as `className` or `target="_blank"` can be added to `<Link>` as props and will be passed to the underlying `<a>` element. ### `href` (required) The path or URL to navigate to. <Link href="/dashboard">Dashboard</Link> `href` can also accept an object, for example: // Navigate to /about?name=test <Link href={{ pathname: '/about', query: { name: 'test' }, }} > About </Link> ### `replace` **Defaults to `false`.** When `true`, `next/link` will replace the current history state instead of adding a new URL into the browser’s history stack. import Link from 'next/link' export default function Page() { return ( <Link href="/dashboard" replace> Dashboard </Link> ) } ### `scroll` **Defaults to `true`.** The default behavior of `<Link>` **is to scroll to the top of a new route or to maintain the scroll position for backwards and forwards navigation.** When `false`, `next/link` will _not_ scroll to the top of the page after a navigation. import Link from 'next/link' export default function Page() { return ( <Link href="/dashboard" scroll={false}> Dashboard </Link> ) } > **Good to know**: > > * Next.js will scroll to the Page if it is not visible in the viewport upon navigation. ### `prefetch` Prefetching happens when a `<Link />` component enters the user's viewport (initially or through scroll). Next.js prefetches and loads the linked route (denoted by the `href`) and data in the background to improve the performance of client-side navigations. Prefetching is only enabled in production. * **`true` (default)**: The full route and its data will be prefetched. * `false`: Prefetching will not happen when entering the viewport, but will happen on hover. If you want to completely remove fetching on hover as well, consider using an `<a>` tag or incrementally adopting the App Router, which enables disabling prefetching on hover too. import Link from 'next/link' export default function Page() { return ( <Link href="/dashboard" prefetch={false}> Dashboard </Link> ) } ## Other Props ### `legacyBehavior` An `<a>` element is no longer required as a child of `<Link>`. Add the `legacyBehavior` prop to use the legacy behavior or remove the `<a>` to upgrade. A codemod is available to automatically upgrade your code. > **Good to know**: when `legacyBehavior` is not set to `true`, all `anchor` tag properties can be passed to `next/link` as well such as, `className`, `onClick`, etc. ### `passHref` Forces `Link` to send the `href` property to its child. Defaults to `false` ### `scroll` Scroll to the top of the page after a navigation. Defaults to `true` ### `shallow` Update the path of the current page without rerunning `getStaticProps`, `getServerSideProps` or `getInitialProps`. Defaults to `false` ### `locale` The active locale is automatically prepended. `locale` allows for providing a different locale. When `false` `href` has to include the locale as the default behavior is disabled. ## Examples ### Linking to Dynamic Routes For dynamic routes, it can be handy to use template literals to create the link's path. For example, you can generate a list of links to the dynamic route `pages/blog/[slug].js` import Link from 'next/link' function Posts({ posts }) { return ( <ul> {posts.map((post) => ( <li key={post.id}> <Link href={`/blog/${post.slug}`}>{post.title}</Link> </li> ))} </ul> ) } export default Posts ### If the child is a custom component that wraps an `<a>` tag If the child of `Link` is a custom component that wraps an `<a>` tag, you must add `passHref` to `Link`. This is necessary if you’re using libraries like styled-components. Without this, the `<a>` tag will not have the `href` attribute, which hurts your site's accessibility and might affect SEO. If you're using ESLint, there is a built-in rule `next/link-passhref` to ensure correct usage of `passHref`. import Link from 'next/link' import styled from 'styled-components' // This creates a custom component that wraps an <a> tag const RedLink = styled.a` color: red; ` function NavLink({ href, name }) { return ( <Link href={href} passHref legacyBehavior> <RedLink>{name}</RedLink> </Link> ) } export default NavLink * If you’re using emotion’s JSX pragma feature (`@jsx jsx`), you must use `passHref` even if you use an `<a>` tag directly. * The component should support `onClick` property to trigger navigation correctly ### If the child is a functional component If the child of `Link` is a functional component, in addition to using `passHref` and `legacyBehavior`, you must wrap the component in `React.forwardRef`: import Link from 'next/link' // `onClick`, `href`, and `ref` need to be passed to the DOM element // for proper handling const MyButton = React.forwardRef(({ onClick, href }, ref) => { return ( <a href={href} onClick={onClick} ref={ref}> Click Me </a> ) }) function Home() { return ( <Link href="/about" passHref legacyBehavior> <MyButton /> </Link> ) } export default Home ### With URL Object `Link` can also receive a URL object and it will automatically format it to create the URL string. Here's how to do it: import Link from 'next/link' function Home() { return ( <ul> <li> <Link href={{ pathname: '/about', query: { name: 'test' }, }} > About us </Link> </li> <li> <Link href={{ pathname: '/blog/[slug]', query: { slug: 'my-post' }, }} > Blog Post </Link> </li> </ul> ) } export default Home The above example has a link to: * A predefined route: `/about?name=test` * A dynamic route: `/blog/my-post` You can use every property as defined in the Node.js URL module documentation. ### Replace the URL instead of push The default behavior of the `Link` component is to `push` a new URL into the `history` stack. You can use the `replace` prop to prevent adding a new entry, as in the following example: <Link href="/about" replace> About us </Link> ### Disable scrolling to the top of the page The default behavior of `Link` is to scroll to the top of the page. When there is a hash defined it will scroll to the specific id, like a normal `<a>` tag. To prevent scrolling to the top / hash `scroll={false}` can be added to `Link`: <Link href="/#hashid" scroll={false}> Disables scrolling to the top </Link> ### Middleware It's common to use Middleware for authentication or other purposes that involve rewriting the user to a different page. In order for the `<Link />` component to properly prefetch links with rewrites via Middleware, you need to tell Next.js both the URL to display and the URL to prefetch. This is required to avoid un-necessary fetches to middleware to know the correct route to prefetch. For example, if you want to serve a `/dashboard` route that has authenticated and visitor views, you may add something similar to the following in your Middleware to redirect the user to the correct page: export function middleware(req) { const nextUrl = req.nextUrl if (nextUrl.pathname === '/dashboard') { if (req.cookies.authToken) { return NextResponse.rewrite(new URL('/auth/dashboard', req.url)) } else { return NextResponse.rewrite(new URL('/public/dashboard', req.url)) } } } In this case, you would want to use the following code in your `<Link />` component: import Link from 'next/link' import useIsAuthed from './hooks/useIsAuthed' export default function Page() { const isAuthed = useIsAuthed() const path = isAuthed ? '/auth/dashboard' : '/public/dashboard' return ( <Link as="/dashboard" href={path}> Dashboard </Link> ) } > **Good to know**: If you're using Dynamic Routes, you'll need to adapt your `as` and `href` props. For example, if you have a Dynamic Route like `/dashboard/authed/[user]` that you want to present differently via middleware, you would write: `<Link href={{ pathname: '/dashboard/authed/[user]', query: { user: username } }} as="/dashboard/[user]">Profile</Link>`. ## Version History | Version | Changes | | --- | --- | | `v13.0.0` | No longer requires a child `<a>` tag. A codemod is provided to automatically update your codebase. | | `v10.0.0` | `href` props pointing to a dynamic route are automatically resolved and no longer require an `as` prop. | | `v8.0.0` | Improved prefetching performance. | | `v1.0.0` | `next/link` introduced. | --- ## Page: https://nextjs.org/docs/14/pages/api-reference/components/script This API reference will help you understand how to use props available for the Script Component. For features and usage, please see the Optimizing Scripts page. import Script from 'next/script' export default function Dashboard() { return ( <> <Script src="https://example.com/script.js" /> </> ) } ## Props Here's a summary of the props available for the Script Component: | Prop | Example | Type | Required | | --- | --- | --- | --- | | `src` | `src="http://example.com/script"` | String | Required unless inline script is used | | `strategy` | `strategy="lazyOnload"` | String | \- | | `onLoad` | `onLoad={onLoadFunc}` | Function | \- | | `onReady` | `onReady={onReadyFunc}` | Function | \- | | `onError` | `onError={onErrorFunc}` | Function | \- | ## Required Props The `<Script />` component requires the following properties. ### `src` A path string specifying the URL of an external script. This can be either an absolute external URL or an internal path. The `src` property is required unless an inline script is used. ## Optional Props The `<Script />` component accepts a number of additional properties beyond those which are required. ### `strategy` The loading strategy of the script. There are four different strategies that can be used: * `beforeInteractive`: Load before any Next.js code and before any page hydration occurs. * `afterInteractive`: (**default**) Load early but after some hydration on the page occurs. * `lazyOnload`: Load during browser idle time. * `worker`: (experimental) Load in a web worker. ### `beforeInteractive` Scripts that load with the `beforeInteractive` strategy are injected into the initial HTML from the server, downloaded before any Next.js module, and executed in the order they are placed before _any_ hydration occurs on the page. Scripts denoted with this strategy are preloaded and fetched before any first-party code, but their execution does not block page hydration from occurring. `beforeInteractive` scripts must be placed inside the `Document` Component (`pages/_document.js`) and are designed to load scripts that are needed by the entire site (i.e. the script will load when any page in the application has been loaded server-side). **This strategy should only be used for critical scripts that need to be fetched before any part of the page becomes interactive.** import { Html, Head, Main, NextScript } from 'next/document' import Script from 'next/script' export default function Document() { return ( <Html> <Head /> <body> <Main /> <NextScript /> <Script src="https://example.com/script.js" strategy="beforeInteractive" /> </body> </Html> ) } > **Good to know**: Scripts with `beforeInteractive` will always be injected inside the `head` of the HTML document regardless of where it's placed in the component. Some examples of scripts that should be loaded as soon as possible with `beforeInteractive` include: * Bot detectors * Cookie consent managers ### `afterInteractive` Scripts that use the `afterInteractive` strategy are injected into the HTML client-side and will load after some (or all) hydration occurs on the page. **This is the default strategy** of the Script component and should be used for any script that needs to load as soon as possible but not before any first-party Next.js code. `afterInteractive` scripts can be placed inside of any page or layout and will only load and execute when that page (or group of pages) is opened in the browser. import Script from 'next/script' export default function Page() { return ( <> <Script src="https://example.com/script.js" strategy="afterInteractive" /> </> ) } Some examples of scripts that are good candidates for `afterInteractive` include: * Tag managers * Analytics ### `lazyOnload` Scripts that use the `lazyOnload` strategy are injected into the HTML client-side during browser idle time and will load after all resources on the page have been fetched. This strategy should be used for any background or low priority scripts that do not need to load early. `lazyOnload` scripts can be placed inside of any page or layout and will only load and execute when that page (or group of pages) is opened in the browser. import Script from 'next/script' export default function Page() { return ( <> <Script src="https://example.com/script.js" strategy="lazyOnload" /> </> ) } Examples of scripts that do not need to load immediately and can be fetched with `lazyOnload` include: * Chat support plugins * Social media widgets ### `worker` > **Warning:** The `worker` strategy is not yet stable and does not yet work with the `app` directory. Use with caution. Scripts that use the `worker` strategy are off-loaded to a web worker in order to free up the main thread and ensure that only critical, first-party resources are processed on it. While this strategy can be used for any script, it is an advanced use case that is not guaranteed to support all third-party scripts. To use `worker` as a strategy, the `nextScriptWorkers` flag must be enabled in `next.config.js`: module.exports = { experimental: { nextScriptWorkers: true, }, } `worker` scripts can **only currently be used in the `pages/` directory**: import Script from 'next/script' export default function Home() { return ( <> <Script src="https://example.com/script.js" strategy="worker" /> </> ) } ### `onLoad` > **Warning:** `onLoad` does not yet work with Server Components and can only be used in Client Components. Further, `onLoad` can't be used with `beforeInteractive` – consider using `onReady` instead. Some third-party scripts require users to run JavaScript code once after the script has finished loading in order to instantiate content or call a function. If you are loading a script with either afterInteractive or lazyOnload as a loading strategy, you can execute code after it has loaded using the onLoad property. Here's an example of executing a lodash method only after the library has been loaded. 'use client' import Script from 'next/script' export default function Page() { return ( <> <Script src="https://cdnjs.cloudflare.com/ajax/libs/lodash.js/4.17.20/lodash.min.js" onLoad={() => { console.log(_.sample([1, 2, 3, 4])) }} /> </> ) } ### `onReady` > **Warning:** `onReady` does not yet work with Server Components and can only be used in Client Components. Some third-party scripts require users to run JavaScript code after the script has finished loading and every time the component is mounted (after a route navigation for example). You can execute code after the script's load event when it first loads and then after every subsequent component re-mount using the onReady property. Here's an example of how to re-instantiate a Google Maps JS embed every time the component is mounted: import { useRef } from 'react' import Script from 'next/script' export default function Page() { const mapRef = useRef() return ( <> <div ref={mapRef}></div> <Script id="google-maps" src="https://maps.googleapis.com/maps/api/js" onReady={() => { new google.maps.Map(mapRef.current, { center: { lat: -34.397, lng: 150.644 }, zoom: 8, }) }} /> </> ) } ### `onError` > **Warning:** `onError` does not yet work with Server Components and can only be used in Client Components. `onError` cannot be used with the `beforeInteractive` loading strategy. Sometimes it is helpful to catch when a script fails to load. These errors can be handled with the onError property: import Script from 'next/script' export default function Page() { return ( <> <Script src="https://example.com/script.js" onError={(e: Error) => { console.error('Script failed to load', e) }} /> </> ) } ## Version History | Version | Changes | | --- | --- | | `v13.0.0` | `beforeInteractive` and `afterInteractive` is modified to support `app`. | | `v12.2.4` | `onReady` prop added. | | `v12.2.2` | Allow `next/script` with `beforeInteractive` to be placed in `_document`. | | `v11.0.0` | `next/script` introduced. | --- ## Page: https://nextjs.org/docs/14/pages/api-reference/functions #### Subscribe to our newsletter Stay updated on new releases and features, guides, and case studies. --- ## Page: https://nextjs.org/docs/14/pages/api-reference/functions/get-initial-props You are currently viewing documentation for version 14 of Next.js. > **Good to know**: `getInitialProps` is a legacy API. We recommend using `getStaticProps` or `getServerSideProps` instead. `getInitialProps` is an `async` function that can be added to the default exported React component for the page. It will run on both the server-side and again on the client-side during page transitions. The result of the function will be forwarded to the React component as `props`. pages/index.tsx import { NextPageContext } from 'next' Page.getInitialProps = async (ctx: NextPageContext) => { const res = await fetch('https://api.github.com/repos/vercel/next.js') const json = await res.json() return { stars: json.stargazers_count } } export default function Page({ stars }: { stars: number }) { return stars } > **Good to know**: > > * Data returned from `getInitialProps` is serialized when server rendering. Ensure the returned object from `getInitialProps` is a plain `Object`, and not using `Date`, `Map` or `Set`. > * For the initial page load, `getInitialProps` will run on the server only. `getInitialProps` will then also run on the client when navigating to a different route with the `next/link` component or by using `next/router`. > * If `getInitialProps` is used in a custom `_app.js`, and the page being navigated to is using `getServerSideProps`, then `getInitialProps` will also run on the server. ## Context Object `getInitialProps` receives a single argument called `context`, which is an object with the following properties: | Name | Description | | --- | --- | | `pathname` | Current route, the path of the page in `/pages` | | `query` | Query string of the URL, parsed as an object | | `asPath` | `String` of the actual path (including the query) shown in the browser | | `req` | HTTP request object (server only) | | `res` | HTTP response object (server only) | | `err` | Error object if any error is encountered during the rendering | ## Caveats * `getInitialProps` can only be used in `pages/` top level files, and not in nested components. To have nested data fetching at the component level, consider exploring the App Router. * Regardless of whether your route is static or dynamic, any data returned from `getInitialProps` as `props` will be able to be examined on the client-side in the initial HTML. This is to allow the page to be hydrated correctly. Make sure that you don't pass any sensitive information that shouldn't be available on the client in `props`. --- ## Page: https://nextjs.org/docs/14/pages/api-reference/functions/get-server-side-props When exporting a function called `getServerSideProps` (Server-Side Rendering) from a page, Next.js will pre-render this page on each request using the data returned by `getServerSideProps`. This is useful if you want to fetch data that changes often, and have the page update to show the most current data. import type { InferGetServerSidePropsType, GetServerSideProps } from 'next' type Repo = { name: string stargazers_count: number } export const getServerSideProps = (async () => { // Fetch data from external API const res = await fetch('https://api.github.com/repos/vercel/next.js') const repo: Repo = await res.json() // Pass data to the page via props return { props: { repo } } }) satisfies GetServerSideProps<{ repo: Repo }> export default function Page({ repo, }: InferGetServerSidePropsType<typeof getServerSideProps>) { return ( <main> <p>{repo.stargazers_count}</p> </main> ) } You can import modules in top-level scope for use in `getServerSideProps`. Imports used will **not be bundled for the client-side**. This means you can write **server-side code directly in `getServerSideProps`**, including fetching data from your database. ## Context parameter The `context` parameter is an object containing the following keys: | Name | Description | | --- | --- | | `params` | If this page uses a dynamic route, `params` contains the route parameters. If the page name is `[id].js`, then `params` will look like `{ id: ... }`. | | `req` | The `HTTP` IncomingMessage object, with an additional `cookies` prop, which is an object with string keys mapping to string values of cookies. | | `res` | The `HTTP` response object. | | `query` | An object representing the query string, including dynamic route parameters. | | `preview` | (Deprecated for `draftMode`) `preview` is `true` if the page is in the Preview Mode and `false` otherwise. | | `previewData` | (Deprecated for `draftMode`) The preview data set by `setPreviewData`. | | `draftMode` | `draftMode` is `true` if the page is in the Draft Mode and `false` otherwise. | | `resolvedUrl` | A normalized version of the request `URL` that strips the `_next/data` prefix for client transitions and includes original query values. | | `locale` | Contains the active locale (if enabled). | | `locales` | Contains all supported locales (if enabled). | | `defaultLocale` | Contains the configured default locale (if enabled). | ## getServerSideProps return values The `getServerSideProps` function should return an object with **any one of the following** properties: ### `props` The `props` object is a key-value pair, where each value is received by the page component. It should be a serializable object so that any props passed, could be serialized with `JSON.stringify`. export async function getServerSideProps(context) { return { props: { message: `Next.js is awesome` }, // will be passed to the page component as props } } ### `notFound` The `notFound` boolean allows the page to return a `404` status and 404 Page. With `notFound: true`, the page will return a `404` even if there was a successfully generated page before. This is meant to support use cases like user-generated content getting removed by its author. export async function getServerSideProps(context) { const res = await fetch(`https://.../data`) const data = await res.json() if (!data) { return { notFound: true, } } return { props: { data }, // will be passed to the page component as props } } ### `redirect` The `redirect` object allows redirecting to internal and external resources. It should match the shape of `{ destination: string, permanent: boolean }`. In some rare cases, you might need to assign a custom status code for older `HTTP` clients to properly redirect. In these cases, you can use the `statusCode` property instead of the `permanent` property, but not both. export async function getServerSideProps(context) { const res = await fetch(`https://.../data`) const data = await res.json() if (!data) { return { redirect: { destination: '/', permanent: false, }, } } return { props: {}, // will be passed to the page component as props } } ## Version History | Version | Changes | | --- | --- | | `v13.4.0` | App Router is now stable with simplified data fetching | | `v10.0.0` | `locale`, `locales`, `defaultLocale`, and `notFound` options added. | | `v9.3.0` | `getServerSideProps` introduced. | --- ## Page: https://nextjs.org/docs/14/pages/api-reference/functions/get-static-paths When exporting a function called `getStaticPaths` from a page that uses Dynamic Routes, Next.js will statically pre-render all the paths specified by `getStaticPaths`. import type { InferGetStaticPropsType, GetStaticProps, GetStaticPaths, } from 'next' type Repo = { name: string stargazers_count: number } export const getStaticPaths = (async () => { return { paths: [ { params: { name: 'next.js', }, }, // See the "paths" section below ], fallback: true, // false or "blocking" } }) satisfies GetStaticPaths export const getStaticProps = (async (context) => { const res = await fetch('https://api.github.com/repos/vercel/next.js') const repo = await res.json() return { props: { repo } } }) satisfies GetStaticProps<{ repo: Repo }> export default function Page({ repo, }: InferGetStaticPropsType<typeof getStaticProps>) { return repo.stargazers_count } ## getStaticPaths return values The `getStaticPaths` function should return an object with the following **required** properties: ### `paths` The `paths` key determines which paths will be pre-rendered. For example, suppose that you have a page that uses Dynamic Routes named `pages/posts/[id].js`. If you export `getStaticPaths` from this page and return the following for `paths`: return { paths: [ { params: { id: '1' }}, { params: { id: '2' }, // with i18n configured the locale for the path can be returned as well locale: "en", }, ], fallback: ... } Then, Next.js will statically generate `/posts/1` and `/posts/2` during `next build` using the page component in `pages/posts/[id].js`. The value for each `params` object must match the parameters used in the page name: * If the page name is `pages/posts/[postId]/[commentId]`, then `params` should contain `postId` and `commentId`. * If the page name uses catch-all routes like `pages/[...slug]`, then `params` should contain `slug` (which is an array). If this array is `['hello', 'world']`, then Next.js will statically generate the page at `/hello/world`. * If the page uses an optional catch-all route, use `null`, `[]`, `undefined` or `false` to render the root-most route. For example, if you supply `slug: false` for `pages/[[...slug]]`, Next.js will statically generate the page `/`. The `params` strings are **case-sensitive** and ideally should be normalized to ensure the paths are generated correctly. For example, if `WoRLD` is returned for a param it will only match if `WoRLD` is the actual path visited, not `world` or `World`. Separate of the `params` object a `locale` field can be returned when i18n is configured, which configures the locale for the path being generated. ### `fallback: false` If `fallback` is `false`, then any paths not returned by `getStaticPaths` will result in a **404 page**. When `next build` is run, Next.js will check if `getStaticPaths` returned `fallback: false`, it will then build **only** the paths returned by `getStaticPaths`. This option is useful if you have a small number of paths to create, or new page data is not added often. If you find that you need to add more paths, and you have `fallback: false`, you will need to run `next build` again so that the new paths can be generated. The following example pre-renders one blog post per page called `pages/posts/[id].js`. The list of blog posts will be fetched from a CMS and returned by `getStaticPaths`. Then, for each page, it fetches the post data from a CMS using `getStaticProps`. function Post({ post }) { // Render post... } // This function gets called at build time export async function getStaticPaths() { // Call an external API endpoint to get posts const res = await fetch('https://.../posts') const posts = await res.json() // Get the paths we want to pre-render based on posts const paths = posts.map((post) => ({ params: { id: post.id }, })) // We'll pre-render only these paths at build time. // { fallback: false } means other routes should 404. return { paths, fallback: false } } // This also gets called at build time export async function getStaticProps({ params }) { // params contains the post `id`. // If the route is like /posts/1, then params.id is 1 const res = await fetch(`https://.../posts/${params.id}`) const post = await res.json() // Pass post data to the page via props return { props: { post } } } export default Post ### `fallback: true` Examples * Static generation of a large number of pages If `fallback` is `true`, then the behavior of `getStaticProps` changes in the following ways: * The paths returned from `getStaticPaths` will be rendered to `HTML` at build time by `getStaticProps`. * The paths that have not been generated at build time will **not** result in a 404 page. Instead, Next.js will serve a “fallback” version of the page on the first request to such a path. Web crawlers, such as Google, won't be served a fallback and instead the path will behave as in `fallback: 'blocking'`. * When a page with `fallback: true` is navigated to through `next/link` or `next/router` (client-side) Next.js will _not_ serve a fallback and instead the page will behave as `fallback: 'blocking'`. * In the background, Next.js will statically generate the requested path `HTML` and `JSON`. This includes running `getStaticProps`. * When complete, the browser receives the `JSON` for the generated path. This will be used to automatically render the page with the required props. From the user’s perspective, the page will be swapped from the fallback page to the full page. * At the same time, Next.js adds this path to the list of pre-rendered pages. Subsequent requests to the same path will serve the generated page, like other pages pre-rendered at build time. > **Good to know**: `fallback: true` is not supported when using `output: 'export'`. #### When is `fallback: true` useful? `fallback: true` is useful if your app has a very large number of static pages that depend on data (such as a very large e-commerce site). If you want to pre-render all product pages, the builds would take a very long time. Instead, you may statically generate a small subset of pages and use `fallback: true` for the rest. When someone requests a page that is not generated yet, the user will see the page with a loading indicator or skeleton component. Shortly after, `getStaticProps` finishes and the page will be rendered with the requested data. From now on, everyone who requests the same page will get the statically pre-rendered page. This ensures that users always have a fast experience while preserving fast builds and the benefits of Static Generation. `fallback: true` will not _update_ generated pages, for that take a look at Incremental Static Regeneration. ### `fallback: 'blocking'` If `fallback` is `'blocking'`, new paths not returned by `getStaticPaths` will wait for the `HTML` to be generated, identical to SSR (hence why _blocking_), and then be cached for future requests so it only happens once per path. `getStaticProps` will behave as follows: * The paths returned from `getStaticPaths` will be rendered to `HTML` at build time by `getStaticProps`. * The paths that have not been generated at build time will **not** result in a 404 page. Instead, Next.js will SSR on the first request and return the generated `HTML`. * When complete, the browser receives the `HTML` for the generated path. From the user’s perspective, it will transition from "the browser is requesting the page" to "the full page is loaded". There is no flash of loading/fallback state. * At the same time, Next.js adds this path to the list of pre-rendered pages. Subsequent requests to the same path will serve the generated page, like other pages pre-rendered at build time. `fallback: 'blocking'` will not _update_ generated pages by default. To update generated pages, use Incremental Static Regeneration in conjunction with `fallback: 'blocking'`. > **Good to know**: `fallback: 'blocking'` is not supported when using `output: 'export'`. ### Fallback pages In the “fallback” version of a page: * The page’s props will be empty. * Using the router, you can detect if the fallback is being rendered, `router.isFallback` will be `true`. The following example showcases using `isFallback`: import { useRouter } from 'next/router' function Post({ post }) { const router = useRouter() // If the page is not yet generated, this will be displayed // initially until getStaticProps() finishes running if (router.isFallback) { return <div>Loading...</div> } // Render post... } // This function gets called at build time export async function getStaticPaths() { return { // Only `/posts/1` and `/posts/2` are generated at build time paths: [{ params: { id: '1' } }, { params: { id: '2' } }], // Enable statically generating additional pages // For example: `/posts/3` fallback: true, } } // This also gets called at build time export async function getStaticProps({ params }) { // params contains the post `id`. // If the route is like /posts/1, then params.id is 1 const res = await fetch(`https://.../posts/${params.id}`) const post = await res.json() // Pass post data to the page via props return { props: { post }, // Re-generate the post at most once per second // if a request comes in revalidate: 1, } } export default Post ## Version History | Version | Changes | | --- | --- | | `v13.4.0` | App Router is now stable with simplified data fetching, including `generateStaticParams()` | | `v12.2.0` | On-Demand Incremental Static Regeneration is stable. | | `v12.1.0` | On-Demand Incremental Static Regeneration added (beta). | | `v9.5.0` | Stable Incremental Static Regeneration | | `v9.3.0` | `getStaticPaths` introduced. | --- ## Page: https://nextjs.org/docs/14/pages/api-reference/functions/get-static-props Exporting a function called `getStaticProps` will pre-render a page at build time using the props returned from the function: import type { InferGetStaticPropsType, GetStaticProps } from 'next' type Repo = { name: string stargazers_count: number } export const getStaticProps = (async (context) => { const res = await fetch('https://api.github.com/repos/vercel/next.js') const repo = await res.json() return { props: { repo } } }) satisfies GetStaticProps<{ repo: Repo }> export default function Page({ repo, }: InferGetStaticPropsType<typeof getStaticProps>) { return repo.stargazers_count } You can import modules in top-level scope for use in `getStaticProps`. Imports used will **not be bundled for the client-side**. This means you can write **server-side code directly in `getStaticProps`**, including fetching data from your database. ## Context parameter The `context` parameter is an object containing the following keys: | Name | Description | | --- | --- | | `params` | Contains the route parameters for pages using dynamic routes. For example, if the page name is `[id].js`, then `params` will look like `{ id: ... }`. You should use this together with `getStaticPaths`, which we'll explain later. | | `preview` | (Deprecated for `draftMode`) `preview` is `true` if the page is in the Preview Mode and `false` otherwise. | | `previewData` | (Deprecated for `draftMode`) The preview data set by `setPreviewData`. | | `draftMode` | `draftMode` is `true` if the page is in the Draft Mode and `false` otherwise. | | `locale` | Contains the active locale (if enabled). | | `locales` | Contains all supported locales (if enabled). | | `defaultLocale` | Contains the configured default locale (if enabled). | | `revalidateReason` | Provides a reason for why the function was called. Can be one of: "build" (run at build time), "stale" (revalidate period expired, or running in development mode), "on-demand" (triggered via on-demand revalidation) | ## getStaticProps return values The `getStaticProps` function should return an object containing either `props`, `redirect`, or `notFound` followed by an **optional** `revalidate` property. ### `props` The `props` object is a key-value pair, where each value is received by the page component. It should be a serializable object so that any props passed, could be serialized with `JSON.stringify`. export async function getStaticProps(context) { return { props: { message: `Next.js is awesome` }, // will be passed to the page component as props } } ### `revalidate` The `revalidate` property is the amount in seconds after which a page re-generation can occur (defaults to `false` or no revalidation). // This function gets called at build time on server-side. // It may be called again, on a serverless function, if // revalidation is enabled and a new request comes in export async function getStaticProps() { const res = await fetch('https://.../posts') const posts = await res.json() return { props: { posts, }, // Next.js will attempt to re-generate the page: // - When a request comes in // - At most once every 10 seconds revalidate: 10, // In seconds } } Learn more about Incremental Static Regeneration. The cache status of a page leveraging ISR can be determined by reading the value of the `x-nextjs-cache` response header. The possible values are the following: * `MISS` - the path is not in the cache (occurs at most once, on the first visit) * `STALE` - the path is in the cache but exceeded the revalidate time so it will be updated in the background * `HIT` - the path is in the cache and has not exceeded the revalidate time ### `notFound` The `notFound` boolean allows the page to return a `404` status and 404 Page. With `notFound: true`, the page will return a `404` even if there was a successfully generated page before. This is meant to support use cases like user-generated content getting removed by its author. Note, `notFound` follows the same `revalidate` behavior described here. export async function getStaticProps(context) { const res = await fetch(`https://.../data`) const data = await res.json() if (!data) { return { notFound: true, } } return { props: { data }, // will be passed to the page component as props } } > **Good to know**: `notFound` is not needed for `fallback: false` mode as only paths returned from `getStaticPaths` will be pre-rendered. ### `redirect` The `redirect` object allows redirecting to internal or external resources. It should match the shape of `{ destination: string, permanent: boolean }`. In some rare cases, you might need to assign a custom status code for older `HTTP` clients to properly redirect. In these cases, you can use the `statusCode` property instead of the `permanent` property, **but not both**. You can also set `basePath: false` similar to redirects in `next.config.js`. export async function getStaticProps(context) { const res = await fetch(`https://...`) const data = await res.json() if (!data) { return { redirect: { destination: '/', permanent: false, // statusCode: 301 }, } } return { props: { data }, // will be passed to the page component as props } } If the redirects are known at build-time, they should be added in `next.config.js` instead. ## Reading files: Use `process.cwd()` Files can be read directly from the filesystem in `getStaticProps`. In order to do so you have to get the full path to a file. Since Next.js compiles your code into a separate directory you can't use `__dirname` as the path it returns will be different from the Pages Router. Instead you can use `process.cwd()` which gives you the directory where Next.js is being executed. import { promises as fs } from 'fs' import path from 'path' // posts will be populated at build time by getStaticProps() function Blog({ posts }) { return ( <ul> {posts.map((post) => ( <li> <h3>{post.filename}</h3> <p>{post.content}</p> </li> ))} </ul> ) } // This function gets called at build time on server-side. // It won't be called on client-side, so you can even do // direct database queries. export async function getStaticProps() { const postsDirectory = path.join(process.cwd(), 'posts') const filenames = await fs.readdir(postsDirectory) const posts = filenames.map(async (filename) => { const filePath = path.join(postsDirectory, filename) const fileContents = await fs.readFile(filePath, 'utf8') // Generally you would parse/transform the contents // For example you can transform markdown to HTML here return { filename, content: fileContents, } }) // By returning { props: { posts } }, the Blog component // will receive `posts` as a prop at build time return { props: { posts: await Promise.all(posts), }, } } export default Blog ## Version History | Version | Changes | | --- | --- | | `v13.4.0` | App Router is now stable with simplified data fetching | | `v12.2.0` | On-Demand Incremental Static Regeneration is stable. | | `v12.1.0` | On-Demand Incremental Static Regeneration added (beta). | | `v10.0.0` | `locale`, `locales`, `defaultLocale`, and `notFound` options added. | | `v10.0.0` | `fallback: 'blocking'` return option added. | | `v9.5.0` | Stable Incremental Static Regeneration | | `v9.3.0` | `getStaticProps` introduced. | --- ## Page: https://nextjs.org/docs/14/pages/api-reference/functions/next-request NextRequest extends the Web Request API with additional convenience methods. ## `cookies` Read or mutate the `Set-Cookie` header of the request. ### `set(name, value)` Given a name, set a cookie with the given value on the request. // Given incoming request /home // Set a cookie to hide the banner // request will have a `Set-Cookie:show-banner=false;path=/home` header request.cookies.set('show-banner', 'false') ### `get(name)` Given a cookie name, return the value of the cookie. If the cookie is not found, `undefined` is returned. If multiple cookies are found, the first one is returned. // Given incoming request /home // { name: 'show-banner', value: 'false', Path: '/home' } request.cookies.get('show-banner') ### `getAll()` Given a cookie name, return the values of the cookie. If no name is given, return all cookies on the request. // Given incoming request /home // [ // { name: 'experiments', value: 'new-pricing-page', Path: '/home' }, // { name: 'experiments', value: 'winter-launch', Path: '/home' }, // ] request.cookies.getAll('experiments') // Alternatively, get all cookies for the request request.cookies.getAll() ### `delete(name)` Given a cookie name, delete the cookie from the request. // Returns true for deleted, false is nothing is deleted request.cookies.delete('experiments') ### `has(name)` Given a cookie name, return `true` if the cookie exists on the request. // Returns true if cookie exists, false if it does not request.cookies.has('experiments') ### `clear()` Remove the `Set-Cookie` header from the request. request.cookies.clear() ## `nextUrl` Extends the native `URL` API with additional convenience methods, including Next.js specific properties. // Given a request to /home, pathname is /home request.nextUrl.pathname // Given a request to /home?name=lee, searchParams is { 'name': 'lee' } request.nextUrl.searchParams The following options are available: | Property | Type | Description | | --- | --- | --- | | `basePath` | `string` | The base path of the URL. | | `buildId` | `string` | `undefined` | The build identifier of the Next.js application. Can be customized. | | `defaultLocale` | `string` | `undefined` | The default locale for internationalization. | | `domainLocale` | | | | \- `defaultLocale` | `string` | The default locale within a domain. | | \- `domain` | `string` | The domain associated with a specific locale. | | \- `http` | `boolean` | `undefined` | Indicates if the domain is using HTTP. | | `locales` | `string[]` | `undefined` | An array of available locales. | | `locale` | `string` | `undefined` | The currently active locale. | | `url` | `URL` | The URL object. | ## `ip` The `ip` property is a string that contains the IP address of the request. This value can optionally be provided by your hosting platform. > **Good to know:** On Vercel, this value is provided by default. On other platforms, you can use the `X-Forwarded-For` header to provide the IP address. // Provided by Vercel request.ip // Self-hosting request.headers.get('X-Forwarded-For') ## `geo` The `geo` property is an object that contains the geographic information of the request. This value can optionally be provided by your hosting platform. > **Good to know:** On Vercel, this value is provided by default. On other platforms, you can use the `X-Forwarded-For` header to provide the IP address, then use a third-party service to lookup the geographic information. // Provided by Vercel request.geo.city request.geo.country request.geo.region request.geo.latitude request.geo.longitude // Self-hosting function getGeo(request) { let ip = request.headers.get('X-Forwarded-For') // Use a third-party service to lookup the geographic information } --- ## Page: https://nextjs.org/docs/14/pages/api-reference/functions/next-response NextResponse extends the Web Response API with additional convenience methods. ## `cookies` Read or mutate the `Set-Cookie` header of the response. ### `set(name, value)` Given a name, set a cookie with the given value on the response. // Given incoming request /home let response = NextResponse.next() // Set a cookie to hide the banner response.cookies.set('show-banner', 'false') // Response will have a `Set-Cookie:show-banner=false;path=/home` header return response ### `get(name)` Given a cookie name, return the value of the cookie. If the cookie is not found, `undefined` is returned. If multiple cookies are found, the first one is returned. // Given incoming request /home let response = NextResponse.next() // { name: 'show-banner', value: 'false', Path: '/home' } response.cookies.get('show-banner') ### `getAll()` Given a cookie name, return the values of the cookie. If no name is given, return all cookies on the response. // Given incoming request /home let response = NextResponse.next() // [ // { name: 'experiments', value: 'new-pricing-page', Path: '/home' }, // { name: 'experiments', value: 'winter-launch', Path: '/home' }, // ] response.cookies.getAll('experiments') // Alternatively, get all cookies for the response response.cookies.getAll() ### `delete(name)` Given a cookie name, delete the cookie from the response. // Given incoming request /home let response = NextResponse.next() // Returns true for deleted, false is nothing is deleted response.cookies.delete('experiments') ## `json()` Produce a response with the given JSON body. import { NextResponse } from 'next/server' export async function GET(request: Request) { return NextResponse.json({ error: 'Internal Server Error' }, { status: 500 }) } ## `redirect()` Produce a response that redirects to a URL. import { NextResponse } from 'next/server' return NextResponse.redirect(new URL('/new', request.url)) The URL can be created and modified before being used in the `NextResponse.redirect()` method. For example, you can use the `request.nextUrl` property to get the current URL, and then modify it to redirect to a different URL. import { NextResponse } from 'next/server' // Given an incoming request... const loginUrl = new URL('/login', request.url) // Add ?from=/incoming-url to the /login URL loginUrl.searchParams.set('from', request.nextUrl.pathname) // And redirect to the new URL return NextResponse.redirect(loginUrl) ## `rewrite()` Produce a response that rewrites (proxies) the given URL while preserving the original URL. import { NextResponse } from 'next/server' // Incoming request: /about, browser shows /about // Rewritten request: /proxy, browser shows /about return NextResponse.rewrite(new URL('/proxy', request.url)) ## `next()` The `next()` method is useful for Middleware, as it allows you to return early and continue routing. import { NextResponse } from 'next/server' return NextResponse.next() You can also forward `headers` when producing the response: import { NextResponse } from 'next/server' // Given an incoming request... const newHeaders = new Headers(request.headers) // Add a new header newHeaders.set('x-version', '123') // And produce a response with the new headers return NextResponse.next({ request: { // New request headers headers: newHeaders, }, }) --- ## Page: https://nextjs.org/docs/14/pages/api-reference/functions/use-amp Examples * AMP > AMP support is one of our advanced features, you can read more about AMP here. To enable AMP, add the following config to your page: export const config = { amp: true } The `amp` config accepts the following values: * `true` - The page will be AMP-only * `'hybrid'` - The page will have two versions, one with AMP and another one with HTML To learn more about the `amp` config, read the sections below. ## AMP First Page Take a look at the following example: export const config = { amp: true } function About(props) { return <h3>My AMP About Page!</h3> } export default About The page above is an AMP-only page, which means: * The page has no Next.js or React client-side runtime * The page is automatically optimized with AMP Optimizer, an optimizer that applies the same transformations as AMP caches (improves performance by up to 42%) * The page has a user-accessible (optimized) version of the page and a search-engine indexable (unoptimized) version of the page ## Hybrid AMP Page Take a look at the following example: import { useAmp } from 'next/amp' export const config = { amp: 'hybrid' } function About(props) { const isAmp = useAmp() return ( <div> <h3>My AMP About Page!</h3> {isAmp ? ( <amp-img width="300" height="300" src="/my-img.jpg" alt="a cool image" layout="responsive" /> ) : ( <img width="300" height="300" src="/my-img.jpg" alt="a cool image" /> )} </div> ) } export default About The page above is a hybrid AMP page, which means: * The page is rendered as traditional HTML (default) and AMP HTML (by adding `?amp=1` to the URL) * The AMP version of the page only has valid optimizations applied with AMP Optimizer so that it is indexable by search-engines The page uses `useAmp` to differentiate between modes, it's a React Hook that returns `true` if the page is using AMP, and `false` otherwise. --- ## Page: https://nextjs.org/docs/14/pages/api-reference/functions/use-report-web-vitals The `useReportWebVitals` hook allows you to report Core Web Vitals, and can be used in combination with your analytics service. import { useReportWebVitals } from 'next/web-vitals' function MyApp({ Component, pageProps }) { useReportWebVitals((metric) => { console.log(metric) }) return <Component {...pageProps} /> } ## useReportWebVitals The `metric` object passed as the hook's argument consists of a number of properties: * `id`: Unique identifier for the metric in the context of the current page load * `name`: The name of the performance metric. Possible values include names of Web Vitals metrics (TTFB, FCP, LCP, FID, CLS) specific to a web application. * `delta`: The difference between the current value and the previous value of the metric. The value is typically in milliseconds and represents the change in the metric's value over time. * `entries`: An array of Performance Entries associated with the metric. These entries provide detailed information about the performance events related to the metric. * `navigationType`: Indicates the type of navigation that triggered the metric collection. Possible values include `"navigate"`, `"reload"`, `"back_forward"`, and `"prerender"`. * `rating`: A qualitative rating of the metric value, providing an assessment of the performance. Possible values are `"good"`, `"needs-improvement"`, and `"poor"`. The rating is typically determined by comparing the metric value against predefined thresholds that indicate acceptable or suboptimal performance. * `value`: The actual value or duration of the performance entry, typically in milliseconds. The value provides a quantitative measure of the performance aspect being tracked by the metric. The source of the value depends on the specific metric being measured and can come from various Performance APIs. ## Web Vitals Web Vitals are a set of useful metrics that aim to capture the user experience of a web page. The following web vitals are all included: * Time to First Byte (TTFB) * First Contentful Paint (FCP) * Largest Contentful Paint (LCP) * First Input Delay (FID) * Cumulative Layout Shift (CLS) * Interaction to Next Paint (INP) You can handle all the results of these metrics using the `name` property. import { useReportWebVitals } from 'next/web-vitals' function MyApp({ Component, pageProps }) { useReportWebVitals((metric) => { switch (metric.name) { case 'FCP': { // handle FCP results } case 'LCP': { // handle LCP results } // ... } }) return <Component {...pageProps} /> } ## Custom Metrics In addition to the core metrics listed above, there are some additional custom metrics that measure the time it takes for the page to hydrate and render: * `Next.js-hydration`: Length of time it takes for the page to start and finish hydrating (in ms) * `Next.js-route-change-to-render`: Length of time it takes for a page to start rendering after a route change (in ms) * `Next.js-render`: Length of time it takes for a page to finish render after a route change (in ms) You can handle all the results of these metrics separately: import { useReportWebVitals } from 'next/web-vitals' function MyApp({ Component, pageProps }) { useReportWebVitals((metric) => { switch (metric.name) { case 'Next.js-hydration': // handle hydration results break case 'Next.js-route-change-to-render': // handle route-change to render results break case 'Next.js-render': // handle render results break default: break } }) return <Component {...pageProps} /> } These metrics work in all browsers that support the User Timing API. ## Usage on Vercel Vercel Speed Insights are automatically configured on Vercel deployments, and don't require the use of `useReportWebVitals`. This hook is useful in local development, or if you're using a different analytics service. ## Sending results to external systems You can send results to any endpoint to measure and track real user performance on your site. For example: useReportWebVitals((metric) => { const body = JSON.stringify(metric) const url = 'https://example.com/analytics' // Use `navigator.sendBeacon()` if available, falling back to `fetch()`. if (navigator.sendBeacon) { navigator.sendBeacon(url, body) } else { fetch(url, { body, method: 'POST', keepalive: true }) } }) > **Good to know**: If you use Google Analytics, using the `id` value can allow you to construct metric distributions manually (to calculate percentiles, etc.) > useReportWebVitals(metric => { > // Use `window.gtag` if you initialized Google Analytics as this example: > // https://github.com/vercel/next.js/blob/canary/examples/with-google-analytics/pages/_app.js > window.gtag('event', metric.name, { > value: Math.round(metric.name === 'CLS' ? metric.value * 1000 : metric.value), // values must be integers > event_label: metric.id, // id unique to current page load > non_interaction: true, // avoids affecting bounce rate. > }); > } > > Read more about sending results to Google Analytics. --- ## Page: https://nextjs.org/docs/14/pages/api-reference/functions/use-router If you want to access the `router` object inside any function component in your app, you can use the `useRouter` hook, take a look at the following example: import { useRouter } from 'next/router' function ActiveLink({ children, href }) { const router = useRouter() const style = { marginRight: 10, color: router.asPath === href ? 'red' : 'black', } const handleClick = (e) => { e.preventDefault() router.push(href) } return ( <a href={href} onClick={handleClick} style={style}> {children} </a> ) } export default ActiveLink > `useRouter` is a React Hook, meaning it cannot be used with classes. You can either use withRouter or wrap your class in a function component. ## `router` object The following is the definition of the `router` object returned by both `useRouter` and `withRouter`: * `pathname`: `String` - The path for current route file that comes after `/pages`. Therefore, `basePath`, `locale` and trailing slash (`trailingSlash: true`) are not included. * `query`: `Object` - The query string parsed to an object, including dynamic route parameters. It will be an empty object during prerendering if the page doesn't use Server-side Rendering. Defaults to `{}` * `asPath`: `String` - The path as shown in the browser including the search params and respecting the `trailingSlash` configuration. `basePath` and `locale` are not included. * `isFallback`: `boolean` - Whether the current page is in fallback mode. * `basePath`: `String` - The active basePath (if enabled). * `locale`: `String` - The active locale (if enabled). * `locales`: `String[]` - All supported locales (if enabled). * `defaultLocale`: `String` - The current default locale (if enabled). * `domainLocales`: `Array<{domain, defaultLocale, locales}>` - Any configured domain locales. * `isReady`: `boolean` - Whether the router fields are updated client-side and ready for use. Should only be used inside of `useEffect` methods and not for conditionally rendering on the server. See related docs for use case with automatically statically optimized pages * `isPreview`: `boolean` - Whether the application is currently in preview mode. > Using the `asPath` field may lead to a mismatch between client and server if the page is rendered using server-side rendering or automatic static optimization. Avoid using `asPath` until the `isReady` field is `true`. The following methods are included inside `router`: ### router.push Handles client-side transitions, this method is useful for cases where `next/link` is not enough. router.push(url, as, options) * `url`: `UrlObject | String` - The URL to navigate to (see Node.JS URL module documentation for `UrlObject` properties). * `as`: `UrlObject | String` - Optional decorator for the path that will be shown in the browser URL bar. Before Next.js 9.5.3 this was used for dynamic routes. * `options` - Optional object with the following configuration options: * `scroll` - Optional boolean, controls scrolling to the top of the page after navigation. Defaults to `true` * `shallow`: Update the path of the current page without rerunning `getStaticProps`, `getServerSideProps` or `getInitialProps`. Defaults to `false` * `locale` - Optional string, indicates locale of the new page > You don't need to use `router.push` for external URLs. window.location is better suited for those cases. Navigating to `pages/about.js`, which is a predefined route: import { useRouter } from 'next/router' export default function Page() { const router = useRouter() return ( <button type="button" onClick={() => router.push('/about')}> Click me </button> ) } Navigating `pages/post/[pid].js`, which is a dynamic route: import { useRouter } from 'next/router' export default function Page() { const router = useRouter() return ( <button type="button" onClick={() => router.push('/post/abc')}> Click me </button> ) } Redirecting the user to `pages/login.js`, useful for pages behind authentication: import { useEffect } from 'react' import { useRouter } from 'next/router' // Here you would fetch and return the user const useUser = () => ({ user: null, loading: false }) export default function Page() { const { user, loading } = useUser() const router = useRouter() useEffect(() => { if (!(user || loading)) { router.push('/login') } }, [user, loading]) return <p>Redirecting...</p> } #### Resetting state after navigation When navigating to the same page in Next.js, the page's state **will not** be reset by default as React does not unmount unless the parent component has changed. import Link from 'next/link' import { useState } from 'react' import { useRouter } from 'next/router' export default function Page(props) { const router = useRouter() const [count, setCount] = useState(0) return ( <div> <h1>Page: {router.query.slug}</h1> <p>Count: {count}</p> <button onClick={() => setCount(count + 1)}>Increase count</button> <Link href="/one">one</Link> <Link href="/two">two</Link> </div> ) } In the above example, navigating between `/one` and `/two` **will not** reset the count . The `useState` is maintained between renders because the top-level React component, `Page`, is the same. If you do not want this behavior, you have a couple of options: * Manually ensure each state is updated using `useEffect`. In the above example, that could look like: useEffect(() => { setCount(0) }, [router.query.slug]) * Use a React `key` to tell React to remount the component. To do this for all pages, you can use a custom app: import { useRouter } from 'next/router' export default function MyApp({ Component, pageProps }) { const router = useRouter() return <Component key={router.asPath} {...pageProps} /> } #### With URL object You can use a URL object in the same way you can use it for `next/link`. Works for both the `url` and `as` parameters: import { useRouter } from 'next/router' export default function ReadMore({ post }) { const router = useRouter() return ( <button type="button" onClick={() => { router.push({ pathname: '/post/[pid]', query: { pid: post.id }, }) }} > Click here to read more </button> ) } ### router.replace Similar to the `replace` prop in `next/link`, `router.replace` will prevent adding a new URL entry into the `history` stack. router.replace(url, as, options) * The API for `router.replace` is exactly the same as the API for `router.push`. Take a look at the following example: import { useRouter } from 'next/router' export default function Page() { const router = useRouter() return ( <button type="button" onClick={() => router.replace('/home')}> Click me </button> ) } ### router.prefetch Prefetch pages for faster client-side transitions. This method is only useful for navigations without `next/link`, as `next/link` takes care of prefetching pages automatically. > This is a production only feature. Next.js doesn't prefetch pages in development. router.prefetch(url, as, options) * `url` - The URL to prefetch, including explicit routes (e.g. `/dashboard`) and dynamic routes (e.g. `/product/[id]`) * `as` - Optional decorator for `url`. Before Next.js 9.5.3 this was used to prefetch dynamic routes. * `options` - Optional object with the following allowed fields: * `locale` - allows providing a different locale from the active one. If `false`, `url` has to include the locale as the active locale won't be used. Let's say you have a login page, and after a login, you redirect the user to the dashboard. For that case, we can prefetch the dashboard to make a faster transition, like in the following example: import { useCallback, useEffect } from 'react' import { useRouter } from 'next/router' export default function Login() { const router = useRouter() const handleSubmit = useCallback((e) => { e.preventDefault() fetch('/api/login', { method: 'POST', headers: { 'Content-Type': 'application/json' }, body: JSON.stringify({ /* Form data */ }), }).then((res) => { // Do a fast client-side transition to the already prefetched dashboard page if (res.ok) router.push('/dashboard') }) }, []) useEffect(() => { // Prefetch the dashboard page router.prefetch('/dashboard') }, [router]) return ( <form onSubmit={handleSubmit}> {/* Form fields */} <button type="submit">Login</button> </form> ) } ### router.beforePopState In some cases (for example, if using a Custom Server), you may wish to listen to popstate and do something before the router acts on it. router.beforePopState(cb) * `cb` - The function to run on incoming `popstate` events. The function receives the state of the event as an object with the following props: * `url`: `String` - the route for the new state. This is usually the name of a `page` * `as`: `String` - the url that will be shown in the browser * `options`: `Object` - Additional options sent by router.push If `cb` returns `false`, the Next.js router will not handle `popstate`, and you'll be responsible for handling it in that case. See Disabling file-system routing. You could use `beforePopState` to manipulate the request, or force a SSR refresh, as in the following example: import { useEffect } from 'react' import { useRouter } from 'next/router' export default function Page() { const router = useRouter() useEffect(() => { router.beforePopState(({ url, as, options }) => { // I only want to allow these two routes! if (as !== '/' && as !== '/other') { // Have SSR render bad routes as a 404. window.location.href = as return false } return true }) }, [router]) return <p>Welcome to the page</p> } ### router.back Navigate back in history. Equivalent to clicking the browser’s back button. It executes `window.history.back()`. import { useRouter } from 'next/router' export default function Page() { const router = useRouter() return ( <button type="button" onClick={() => router.back()}> Click here to go back </button> ) } ### router.reload Reload the current URL. Equivalent to clicking the browser’s refresh button. It executes `window.location.reload()`. import { useRouter } from 'next/router' export default function Page() { const router = useRouter() return ( <button type="button" onClick={() => router.reload()}> Click here to reload </button> ) } ### router.events You can listen to different events happening inside the Next.js Router. Here's a list of supported events: * `routeChangeStart(url, { shallow })` - Fires when a route starts to change * `routeChangeComplete(url, { shallow })` - Fires when a route changed completely * `routeChangeError(err, url, { shallow })` - Fires when there's an error when changing routes, or a route load is cancelled * `err.cancelled` - Indicates if the navigation was cancelled * `beforeHistoryChange(url, { shallow })` - Fires before changing the browser's history * `hashChangeStart(url, { shallow })` - Fires when the hash will change but not the page * `hashChangeComplete(url, { shallow })` - Fires when the hash has changed but not the page > **Good to know**: Here `url` is the URL shown in the browser, including the `basePath`. For example, to listen to the router event `routeChangeStart`, open or create `pages/_app.js` and subscribe to the event, like so: import { useEffect } from 'react' import { useRouter } from 'next/router' export default function MyApp({ Component, pageProps }) { const router = useRouter() useEffect(() => { const handleRouteChange = (url, { shallow }) => { console.log( `App is changing to ${url} ${ shallow ? 'with' : 'without' } shallow routing` ) } router.events.on('routeChangeStart', handleRouteChange) // If the component is unmounted, unsubscribe // from the event with the `off` method: return () => { router.events.off('routeChangeStart', handleRouteChange) } }, [router]) return <Component {...pageProps} /> } > We use a Custom App (`pages/_app.js`) for this example to subscribe to the event because it's not unmounted on page navigations, but you can subscribe to router events on any component in your application. Router events should be registered when a component mounts (useEffect or componentDidMount / componentWillUnmount) or imperatively when an event happens. If a route load is cancelled (for example, by clicking two links rapidly in succession), `routeChangeError` will fire. And the passed `err` will contain a `cancelled` property set to `true`, as in the following example: import { useEffect } from 'react' import { useRouter } from 'next/router' export default function MyApp({ Component, pageProps }) { const router = useRouter() useEffect(() => { const handleRouteChangeError = (err, url) => { if (err.cancelled) { console.log(`Route to ${url} was cancelled!`) } } router.events.on('routeChangeError', handleRouteChangeError) // If the component is unmounted, unsubscribe // from the event with the `off` method: return () => { router.events.off('routeChangeError', handleRouteChangeError) } }, [router]) return <Component {...pageProps} /> } ## Potential ESLint errors Certain methods accessible on the `router` object return a Promise. If you have the ESLint rule, no-floating-promises enabled, consider disabling it either globally, or for the affected line. If your application needs this rule, you should either `void` the promise – or use an `async` function, `await` the Promise, then void the function call. **This is not applicable when the method is called from inside an `onClick` handler**. The affected methods are: * `router.push` * `router.replace` * `router.prefetch` ### Potential solutions import { useEffect } from 'react' import { useRouter } from 'next/router' // Here you would fetch and return the user const useUser = () => ({ user: null, loading: false }) export default function Page() { const { user, loading } = useUser() const router = useRouter() useEffect(() => { // disable the linting on the next line - This is the cleanest solution // eslint-disable-next-line no-floating-promises router.push('/login') // void the Promise returned by router.push if (!(user || loading)) { void router.push('/login') } // or use an async function, await the Promise, then void the function call async function handleRouteChange() { if (!(user || loading)) { await router.push('/login') } } void handleRouteChange() }, [user, loading]) return <p>Redirecting...</p> } ## withRouter If `useRouter` is not the best fit for you, `withRouter` can also add the same `router` object to any component. ### Usage import { withRouter } from 'next/router' function Page({ router }) { return <p>{router.pathname}</p> } export default withRouter(Page) ### TypeScript To use class components with `withRouter`, the component needs to accept a router prop: import React from 'react' import { withRouter, NextRouter } from 'next/router' interface WithRouterProps { router: NextRouter } interface MyComponentProps extends WithRouterProps {} class MyComponent extends React.Component<MyComponentProps> { render() { return <p>{this.props.router.pathname}</p> } } export default withRouter(MyComponent) --- ## Page: https://nextjs.org/docs/14/pages/api-reference/functions/userAgent You are currently viewing documentation for version 14 of Next.js. The `userAgent` helper extends the Web Request API with additional properties and methods to interact with the user agent object from the request. middleware.ts import { NextRequest, NextResponse, userAgent } from 'next/server' export function middleware(request: NextRequest) { const url = request.nextUrl const { device } = userAgent(request) const viewport = device.type === 'mobile' ? 'mobile' : 'desktop' url.searchParams.set('viewport', viewport) return NextResponse.rewrite(url) } ## `isBot` A boolean indicating whether the request comes from a known bot. ## `browser` An object containing information about the browser used in the request. * `name`: A string representing the browser's name, or `undefined` if not identifiable. * `version`: A string representing the browser's version, or `undefined`. ## `device` An object containing information about the device used in the request. * `model`: A string representing the model of the device, or `undefined`. * `type`: A string representing the type of the device, such as `console`, `mobile`, `tablet`, `smarttv`, `wearable`, `embedded`, or `undefined`. * `vendor`: A string representing the vendor of the device, or `undefined`. ## `engine` An object containing information about the browser's engine. * `name`: A string representing the engine's name. Possible values include: `Amaya`, `Blink`, `EdgeHTML`, `Flow`, `Gecko`, `Goanna`, `iCab`, `KHTML`, `Links`, `Lynx`, `NetFront`, `NetSurf`, `Presto`, `Tasman`, `Trident`, `w3m`, `WebKit` or `undefined`. * `version`: A string representing the engine's version, or `undefined`. ## `os` An object containing information about the operating system. * `name`: A string representing the name of the OS, or `undefined`. * `version`: A string representing the version of the OS, or `undefined`. ## `cpu` An object containing information about the CPU architecture. * `architecture`: A string representing the architecture of the CPU. Possible values include: `68k`, `amd64`, `arm`, `arm64`, `armhf`, `avr`, `ia32`, `ia64`, `irix`, `irix64`, `mips`, `mips64`, `pa-risc`, `ppc`, `sparc`, `sparc64` or `undefined` --- ## Page: https://nextjs.org/docs/14/pages/api-reference/next-config-js Next.js can be configured through a `next.config.js` file in the root of your project directory (for example, by `package.json`) with a default export. // @ts-check /** @type {import('next').NextConfig} */ const nextConfig = { /* config options here */ } module.exports = nextConfig `next.config.js` is a regular Node.js module, not a JSON file. It gets used by the Next.js server and build phases, and it's not included in the browser build. If you need ECMAScript modules, you can use `next.config.mjs`: // @ts-check /** * @type {import('next').NextConfig} */ const nextConfig = { /* config options here */ } export default nextConfig You can also use a function: // @ts-check export default (phase, { defaultConfig }) => { /** * @type {import('next').NextConfig} */ const nextConfig = { /* config options here */ } return nextConfig } Since Next.js 12.1.0, you can use an async function: // @ts-check module.exports = async (phase, { defaultConfig }) => { /** * @type {import('next').NextConfig} */ const nextConfig = { /* config options here */ } return nextConfig } `phase` is the current context in which the configuration is loaded. You can see the available phases. Phases can be imported from `next/constants`: // @ts-check const { PHASE_DEVELOPMENT_SERVER } = require('next/constants') module.exports = (phase, { defaultConfig }) => { if (phase === PHASE_DEVELOPMENT_SERVER) { return { /* development only config options here */ } } return { /* config options for all phases except development here */ } } The commented lines are the place where you can put the configs allowed by `next.config.js`, which are defined in this file. However, none of the configs are required, and it's not necessary to understand what each config does. Instead, search for the features you need to enable or modify in this section and they will show you what to do. > Avoid using new JavaScript features not available in your target Node.js version. `next.config.js` will not be parsed by Webpack, Babel or TypeScript. This page documents all the available configuration options: --- ## Page: https://nextjs.org/docs/14/pages/api-reference/next-config-js/assetPrefix > **Attention**: Deploying to Vercel automatically configures a global CDN for your Next.js project. You do not need to manually setup an Asset Prefix. > **Good to know**: Next.js 9.5+ added support for a customizable Base Path, which is better suited for hosting your application on a sub-path like `/docs`. We do not suggest you use a custom Asset Prefix for this use case. ## Set up a CDN To set up a CDN, you can set up an asset prefix and configure your CDN's origin to resolve to the domain that Next.js is hosted on. Open `next.config.mjs` and add the `assetPrefix` config based on the phase: // @ts-check import { PHASE_DEVELOPMENT_SERVER } from 'next/constants' export default (phase) => { const isDev = phase === PHASE_DEVELOPMENT_SERVER /** * @type {import('next').NextConfig} */ const nextConfig = { assetPrefix: isDev ? undefined : 'https://cdn.mydomain.com', } return nextConfig } Next.js will automatically use your asset prefix for the JavaScript and CSS files it loads from the `/_next/` path (`.next/static/` folder). For example, with the above configuration, the following request for a JS chunk: /_next/static/chunks/4b9b41aaa062cbbfeff4add70f256968c51ece5d.4d708494b3aed70c04f0.js Would instead become: https://cdn.mydomain.com/_next/static/chunks/4b9b41aaa062cbbfeff4add70f256968c51ece5d.4d708494b3aed70c04f0.js The exact configuration for uploading your files to a given CDN will depend on your CDN of choice. The only folder you need to host on your CDN is the contents of `.next/static/`, which should be uploaded as `_next/static/` as the above URL request indicates. **Do not upload the rest of your `.next/` folder**, as you should not expose your server code and other configuration to the public. While `assetPrefix` covers requests to `_next/static`, it does not influence the following paths: * Files in the public folder; if you want to serve those assets over a CDN, you'll have to introduce the prefix yourself * `/_next/data/` requests for `getServerSideProps` pages. These requests will always be made against the main domain since they're not static. * `/_next/data/` requests for `getStaticProps` pages. These requests will always be made against the main domain to support Incremental Static Generation, even if you're not using it (for consistency). Was this helpful? supported. --- ## Page: https://nextjs.org/docs/14/pages/api-reference/next-config-js/basePath To deploy a Next.js application under a sub-path of a domain you can use the `basePath` config option. `basePath` allows you to set a path prefix for the application. For example, to use `/docs` instead of `''` (an empty string, the default), open `next.config.js` and add the `basePath` config: module.exports = { basePath: '/docs', } > **Good to know**: This value must be set at build time and cannot be changed without re-building as the value is inlined in the client-side bundles. ### Links When linking to other pages using `next/link` and `next/router` the `basePath` will be automatically applied. For example, using `/about` will automatically become `/docs/about` when `basePath` is set to `/docs`. export default function HomePage() { return ( <> <Link href="/about">About Page</Link> </> ) } Output html: <a href="/docs/about">About Page</a> This makes sure that you don't have to change all links in your application when changing the `basePath` value. ### Images When using the `next/image` component, you will need to add the `basePath` in front of `src`. For example, using `/docs/me.png` will properly serve your image when `basePath` is set to `/docs`. import Image from 'next/image' function Home() { return ( <> <h1>My Homepage</h1> <Image src="/docs/me.png" alt="Picture of the author" width={500} height={500} /> <p>Welcome to my homepage!</p> </> ) } export default Home --- ## Page: https://nextjs.org/docs/14/pages/api-reference/next-config-js/compress You are currently viewing documentation for version 14 of Next.js. By default, Next.js uses `gzip` to compress rendered content and static files when using `next start` or a custom server. This is an optimization for applications that do not have compression configured. If compression is _already_ configured in your application via a custom server, Next.js will not add compression. > **Good to know:** > > * When hosting your application on Vercel, compression uses `brotli` first, then `gzip`. > * You can check if compression is enabled and which algorithm is used by looking at the `Accept-Encoding` (browser accepted options) and `Content-Encoding` (currently used) headers in the response. ## Disabling compression To disable **compression**, set the `compress` config option to `false`: next.config.js module.exports = { compress: false, } We do not recommend disabling compression unless you have compression configured on your server, as compression reduces bandwidth usage and improves the performance of your application. ## Changing the compression algorithm To change your compression algorithm, you will need to configure your custom server and set the `compress` option to `false` in your `next.config.js` file. For example, you're using nginx and want to switch to `brotli`, set the `compress` option to `false` to allow nginx to handle compression. > **Good to know:** > > * For Next.js applications on Vercel, compression is handled by the Vercel's Edge Network and not Next.js. See the Vercel documentation for more information. --- ## Page: https://nextjs.org/docs/14/pages/api-reference/next-config-js/crossOrigin #### Subscribe to our newsletter Stay updated on new releases and features, guides, and case studies. --- ## Page: https://nextjs.org/docs/14/pages/api-reference/next-config-js/devIndicators You are currently viewing documentation for version 14 of Next.js. > **Good to know**: This indicator was removed in Next.js version 10.0.1. We recommend upgrading to the latest version of Next.js. When a page qualifies for Automatic Static Optimization we show an indicator to let you know. This is helpful since automatic static optimization can be very beneficial and knowing immediately in development if the page qualifies can be useful. In some cases this indicator might not be useful, like when working on electron applications. To remove it open `next.config.js` and disable the `autoPrerender` config in `devIndicators`: next.config.js module.exports = { devIndicators: { autoPrerender: false, }, } --- ## Page: https://nextjs.org/docs/14/pages/api-reference/next-config-js/distDir You are currently viewing documentation for version 14 of Next.js. You can specify a name to use for a custom build directory to use instead of `.next`. Open `next.config.js` and add the `distDir` config: next.config.js module.exports = { distDir: 'build', } Now if you run `next build` Next.js will use `build` instead of the default `.next` folder. > `distDir` **should not** leave your project directory. For example, `../build` is an **invalid** directory. --- ## Page: https://nextjs.org/docs/14/pages/api-reference/next-config-js/env You are currently viewing documentation for version 14 of Next.js. > Since the release of Next.js 9.4 we now have a more intuitive and ergonomic experience for adding environment variables. Give it a try! > **Good to know**: environment variables specified in this way will **always** be included in the JavaScript bundle, prefixing the environment variable name with `NEXT_PUBLIC_` only has an effect when specifying them through the environment or .env files. To add environment variables to the JavaScript bundle, open `next.config.js` and add the `env` config: next.config.js module.exports = { env: { customKey: 'my-value', }, } Now you can access `process.env.customKey` in your code. For example: function Page() { return <h1>The value of customKey is: {process.env.customKey}</h1> } export default Page Next.js will replace `process.env.customKey` with `'my-value'` at build time. Trying to destructure `process.env` variables won't work due to the nature of webpack DefinePlugin. For example, the following line: return <h1>The value of customKey is: {process.env.customKey}</h1> Will end up being: return <h1>The value of customKey is: {'my-value'}</h1> --- ## Page: https://nextjs.org/docs/14/pages/api-reference/next-config-js/eslint You are currently viewing documentation for version 14 of Next.js. When ESLint is detected in your project, Next.js fails your **production build** (`next build`) when errors are present. If you'd like Next.js to produce production code even when your application has ESLint errors, you can disable the built-in linting step completely. This is not recommended unless you already have ESLint configured to run in a separate part of your workflow (for example, in CI or a pre-commit hook). Open `next.config.js` and enable the `ignoreDuringBuilds` option in the `eslint` config: next.config.js module.exports = { eslint: { // Warning: This allows production builds to successfully complete even if // your project has ESLint errors. ignoreDuringBuilds: true, }, } --- ## Page: https://nextjs.org/docs/14/pages/api-reference/next-config-js/exportPathMap > This feature is exclusive to `next export` and currently **deprecated** in favor of `getStaticPaths` with `pages` or `generateStaticParams` with `app`. Examples * Static Export `exportPathMap` allows you to specify a mapping of request paths to page destinations, to be used during export. Paths defined in `exportPathMap` will also be available when using `next dev`. Let's start with an example, to create a custom `exportPathMap` for an app with the following pages: * `pages/index.js` * `pages/about.js` * `pages/post.js` Open `next.config.js` and add the following `exportPathMap` config: module.exports = { exportPathMap: async function ( defaultPathMap, { dev, dir, outDir, distDir, buildId } ) { return { '/': { page: '/' }, '/about': { page: '/about' }, '/p/hello-nextjs': { page: '/post', query: { title: 'hello-nextjs' } }, '/p/learn-nextjs': { page: '/post', query: { title: 'learn-nextjs' } }, '/p/deploy-nextjs': { page: '/post', query: { title: 'deploy-nextjs' } }, } }, } > **Good to know**: the `query` field in `exportPathMap` cannot be used with automatically statically optimized pages or `getStaticProps` pages as they are rendered to HTML files at build-time and additional query information cannot be provided during `next export`. The pages will then be exported as HTML files, for example, `/about` will become `/about.html`. `exportPathMap` is an `async` function that receives 2 arguments: the first one is `defaultPathMap`, which is the default map used by Next.js. The second argument is an object with: * `dev` - `true` when `exportPathMap` is being called in development. `false` when running `next export`. In development `exportPathMap` is used to define routes. * `dir` - Absolute path to the project directory * `outDir` - Absolute path to the `out/` directory (configurable with `-o`). When `dev` is `true` the value of `outDir` will be `null`. * `distDir` - Absolute path to the `.next/` directory (configurable with the `distDir` config) * `buildId` - The generated build id The returned object is a map of pages where the `key` is the `pathname` and the `value` is an object that accepts the following fields: * `page`: `String` - the page inside the `pages` directory to render * `query`: `Object` - the `query` object passed to `getInitialProps` when prerendering. Defaults to `{}` > The exported `pathname` can also be a filename (for example, `/readme.md`), but you may need to set the `Content-Type` header to `text/html` when serving its content if it is different than `.html`. ## Adding a trailing slash It is possible to configure Next.js to export pages as `index.html` files and require trailing slashes, `/about` becomes `/about/index.html` and is routable via `/about/`. This was the default behavior prior to Next.js 9. To switch back and add a trailing slash, open `next.config.js` and enable the `trailingSlash` config: module.exports = { trailingSlash: true, } ## Customizing the output directory `next export` will use `out` as the default output directory, you can customize this using the `-o` argument, like so: next export -o outdir > **Warning**: Using `exportPathMap` is deprecated and is overridden by `getStaticPaths` inside `pages`. We don't recommend using them together. --- ## Page: https://nextjs.org/docs/14/pages/api-reference/next-config-js/generateBuildId You are currently viewing documentation for version 14 of Next.js. Next.js generates an ID during `next build` to identify which version of your application is being served. The same build should be used and boot up multiple containers. If you are rebuilding for each stage of your environment, you will need to generate a consistent build ID to use between containers. Use the `generateBuildId` command in `next.config.js`: next.config.js module.exports = { generateBuildId: async () => { // This could be anything, using the latest git hash return process.env.GIT_HASH }, } --- ## Page: https://nextjs.org/docs/14/pages/api-reference/next-config-js/generateEtags You are currently viewing documentation for version 14 of Next.js. Next.js will generate etags for every page by default. You may want to disable etag generation for HTML pages depending on your cache strategy. Open `next.config.js` and disable the `generateEtags` option: next.config.js module.exports = { generateEtags: false, } --- ## Page: https://nextjs.org/docs/14/pages/api-reference/next-config-js/headers Headers allow you to set custom HTTP headers on the response to an incoming request on a given path. To set custom HTTP headers you can use the `headers` key in `next.config.js`: module.exports = { async headers() { return [ { source: '/about', headers: [ { key: 'x-custom-header', value: 'my custom header value', }, { key: 'x-another-custom-header', value: 'my other custom header value', }, ], }, ] }, } `headers` is an async function that expects an array to be returned holding objects with `source` and `headers` properties: * `source` is the incoming request path pattern. * `headers` is an array of response header objects, with `key` and `value` properties. * `basePath`: `false` or `undefined` - if false the basePath won't be included when matching, can be used for external rewrites only. * `locale`: `false` or `undefined` - whether the locale should not be included when matching. * `has` is an array of has objects with the `type`, `key` and `value` properties. * `missing` is an array of missing objects with the `type`, `key` and `value` properties. Headers are checked before the filesystem which includes pages and `/public` files. If two headers match the same path and set the same header key, the last header key will override the first. Using the below headers, the path `/hello` will result in the header `x-hello` being `world` due to the last header value set being `world`. module.exports = { async headers() { return [ { source: '/:path*', headers: [ { key: 'x-hello', value: 'there', }, ], }, { source: '/hello', headers: [ { key: 'x-hello', value: 'world', }, ], }, ] }, } ## Path Matching Path matches are allowed, for example `/blog/:slug` will match `/blog/hello-world` (no nested paths): module.exports = { async headers() { return [ { source: '/blog/:slug', headers: [ { key: 'x-slug', value: ':slug', // Matched parameters can be used in the value }, { key: 'x-slug-:slug', // Matched parameters can be used in the key value: 'my other custom header value', }, ], }, ] }, } ### Wildcard Path Matching To match a wildcard path you can use `*` after a parameter, for example `/blog/:slug*` will match `/blog/a/b/c/d/hello-world`: module.exports = { async headers() { return [ { source: '/blog/:slug*', headers: [ { key: 'x-slug', value: ':slug*', // Matched parameters can be used in the value }, { key: 'x-slug-:slug*', // Matched parameters can be used in the key value: 'my other custom header value', }, ], }, ] }, } ### Regex Path Matching To match a regex path you can wrap the regex in parenthesis after a parameter, for example `/blog/:slug(\\d{1,})` will match `/blog/123` but not `/blog/abc`: module.exports = { async headers() { return [ { source: '/blog/:post(\\d{1,})', headers: [ { key: 'x-post', value: ':post', }, ], }, ] }, } The following characters `(`, `)`, `{`, `}`, `:`, `*`, `+`, `?` are used for regex path matching, so when used in the `source` as non-special values they must be escaped by adding `\\` before them: module.exports = { async headers() { return [ { // this will match `/english(default)/something` being requested source: '/english\\(default\\)/:slug', headers: [ { key: 'x-header', value: 'value', }, ], }, ] }, } ## Header, Cookie, and Query Matching To only apply a header when header, cookie, or query values also match the `has` field or don't match the `missing` field can be used. Both the `source` and all `has` items must match and all `missing` items must not match for the header to be applied. `has` and `missing` items can have the following fields: * `type`: `String` - must be either `header`, `cookie`, `host`, or `query`. * `key`: `String` - the key from the selected type to match against. * `value`: `String` or `undefined` - the value to check for, if undefined any value will match. A regex like string can be used to capture a specific part of the value, e.g. if the value `first-(?<paramName>.*)` is used for `first-second` then `second` will be usable in the destination with `:paramName`. module.exports = { async headers() { return [ // if the header `x-add-header` is present, // the `x-another-header` header will be applied { source: '/:path*', has: [ { type: 'header', key: 'x-add-header', }, ], headers: [ { key: 'x-another-header', value: 'hello', }, ], }, // if the header `x-no-header` is not present, // the `x-another-header` header will be applied { source: '/:path*', missing: [ { type: 'header', key: 'x-no-header', }, ], headers: [ { key: 'x-another-header', value: 'hello', }, ], }, // if the source, query, and cookie are matched, // the `x-authorized` header will be applied { source: '/specific/:path*', has: [ { type: 'query', key: 'page', // the page value will not be available in the // header key/values since value is provided and // doesn't use a named capture group e.g. (?<page>home) value: 'home', }, { type: 'cookie', key: 'authorized', value: 'true', }, ], headers: [ { key: 'x-authorized', value: ':authorized', }, ], }, // if the header `x-authorized` is present and // contains a matching value, the `x-another-header` will be applied { source: '/:path*', has: [ { type: 'header', key: 'x-authorized', value: '(?<authorized>yes|true)', }, ], headers: [ { key: 'x-another-header', value: ':authorized', }, ], }, // if the host is `example.com`, // this header will be applied { source: '/:path*', has: [ { type: 'host', value: 'example.com', }, ], headers: [ { key: 'x-another-header', value: ':authorized', }, ], }, ] }, } When leveraging `basePath` support with headers each `source` is automatically prefixed with the `basePath` unless you add `basePath: false` to the header: module.exports = { basePath: '/docs', async headers() { return [ { source: '/with-basePath', // becomes /docs/with-basePath headers: [ { key: 'x-hello', value: 'world', }, ], }, { source: '/without-basePath', // is not modified since basePath: false is set headers: [ { key: 'x-hello', value: 'world', }, ], basePath: false, }, ] }, } When leveraging `i18n` support with headers each `source` is automatically prefixed to handle the configured `locales` unless you add `locale: false` to the header. If `locale: false` is used you must prefix the `source` with a locale for it to be matched correctly. module.exports = { i18n: { locales: ['en', 'fr', 'de'], defaultLocale: 'en', }, async headers() { return [ { source: '/with-locale', // automatically handles all locales headers: [ { key: 'x-hello', value: 'world', }, ], }, { // does not handle locales automatically since locale: false is set source: '/nl/with-locale-manual', locale: false, headers: [ { key: 'x-hello', value: 'world', }, ], }, { // this matches '/' since `en` is the defaultLocale source: '/en', locale: false, headers: [ { key: 'x-hello', value: 'world', }, ], }, { // this gets converted to /(en|fr|de)/(.*) so will not match the top-level // `/` or `/fr` routes like /:path* would source: '/(.*)', headers: [ { key: 'x-hello', value: 'world', }, ], }, ] }, } ## Cache-Control You cannot set `Cache-Control` headers in `next.config.js` for pages or assets, as these headers will be overwritten in production to ensure that responses and static assets are cached effectively. If you need to revalidate the cache of a page that has been statically generated, you can do so by setting the `revalidate` prop in the page's `getStaticProps` function. You can set the `Cache-Control` header in your API Routes by using the `res.setHeader` method: import type { NextApiRequest, NextApiResponse } from 'next' type ResponseData = { message: string } export default function handler( req: NextApiRequest, res: NextApiResponse<ResponseData> ) { res.setHeader('Cache-Control', 's-maxage=86400') res.status(200).json({ message: 'Hello from Next.js!' }) } ## Options ### CORS Cross-Origin Resource Sharing (CORS) is a security feature that allows you to control which sites can access your resources. You can set the `Access-Control-Allow-Origin` header to allow a specific origin to access your API Endpoints. async headers() { return [ { source: "/api/:path*", headers: [ { key: "Access-Control-Allow-Origin", value: "*", // Set your origin }, { key: "Access-Control-Allow-Methods", value: "GET, POST, PUT, DELETE, OPTIONS", }, { key: "Access-Control-Allow-Headers", value: "Content-Type, Authorization", }, ], }, ]; }, ### X-DNS-Prefetch-Control This header controls DNS prefetching, allowing browsers to proactively perform domain name resolution on external links, images, CSS, JavaScript, and more. This prefetching is performed in the background, so the DNS is more likely to be resolved by the time the referenced items are needed. This reduces latency when the user clicks a link. { key: 'X-DNS-Prefetch-Control', value: 'on' } ### Strict-Transport-Security This header informs browsers it should only be accessed using HTTPS, instead of using HTTP. Using the configuration below, all present and future subdomains will use HTTPS for a `max-age` of 2 years. This blocks access to pages or subdomains that can only be served over HTTP. If you're deploying to Vercel, this header is not necessary as it's automatically added to all deployments unless you declare `headers` in your `next.config.js`. { key: 'Strict-Transport-Security', value: 'max-age=63072000; includeSubDomains; preload' } ### X-Frame-Options This header indicates whether the site should be allowed to be displayed within an `iframe`. This can prevent against clickjacking attacks. **This header has been superseded by CSP's `frame-ancestors` option**, which has better support in modern browsers (see Content Security Policy for configuration details). { key: 'X-Frame-Options', value: 'SAMEORIGIN' } ### Permissions-Policy This header allows you to control which features and APIs can be used in the browser. It was previously named `Feature-Policy`. { key: 'Permissions-Policy', value: 'camera=(), microphone=(), geolocation=(), browsing-topics=()' } ### X-Content-Type-Options This header prevents the browser from attempting to guess the type of content if the `Content-Type` header is not explicitly set. This can prevent XSS exploits for websites that allow users to upload and share files. For example, a user trying to download an image, but having it treated as a different `Content-Type` like an executable, which could be malicious. This header also applies to downloading browser extensions. The only valid value for this header is `nosniff`. { key: 'X-Content-Type-Options', value: 'nosniff' } ### Referrer-Policy This header controls how much information the browser includes when navigating from the current website (origin) to another. { key: 'Referrer-Policy', value: 'origin-when-cross-origin' } ### Content-Security-Policy Learn more about adding a Content Security Policy to your application. ## Version History | Version | Changes | | --- | --- | | `v13.3.0` | `missing` added. | | `v10.2.0` | `has` added. | | `v9.5.0` | Headers added. | --- ## Page: https://nextjs.org/docs/14/pages/api-reference/next-config-js/httpAgentOptions You are currently viewing documentation for version 14 of Next.js. In Node.js versions prior to 18, Next.js automatically polyfills `fetch()` with undici and enables HTTP Keep-Alive by default. To disable HTTP Keep-Alive for all `fetch()` calls on the server-side, open `next.config.js` and add the `httpAgentOptions` config: next.config.js module.exports = { httpAgentOptions: { keepAlive: false, }, } --- ## Page: https://nextjs.org/docs/14/pages/api-reference/next-config-js/images If you want to use a cloud provider to optimize images instead of using the Next.js built-in Image Optimization API, you can configure `next.config.js` with the following: module.exports = { images: { loader: 'custom', loaderFile: './my/image/loader.js', }, } This `loaderFile` must point to a file relative to the root of your Next.js application. The file must export a default function that returns a string, for example: export default function myImageLoader({ src, width, quality }) { return `https://example.com/${src}?w=${width}&q=${quality || 75}` } Alternatively, you can use the `loader` prop to pass the function to each instance of `next/image`. To learn more about configuring the behavior of the built-in Image Optimization API and the Image Component, see Image Configuration Options for available options. ## Example Loader Configuration * Akamai * AWS CloudFront * Cloudinary * Cloudflare * Contentful * Fastly * Gumlet * ImageEngine * Imgix * Thumbor * Sanity * Sirv * Supabase ### Akamai // Docs: https://techdocs.akamai.com/ivm/reference/test-images-on-demand export default function akamaiLoader({ src, width, quality }) { return `https://example.com/${src}?imwidth=${width}` } ### AWS CloudFront // Docs: https://aws.amazon.com/developer/application-security-performance/articles/image-optimization export default function cloudfrontLoader({ src, width, quality }) { const url = new URL(`https://example.com${src}`) url.searchParams.set('format', 'auto') url.searchParams.set('width', width.toString()) url.searchParams.set('quality', (quality || 75).toString()) return url.href ### Cloudinary // Demo: https://res.cloudinary.com/demo/image/upload/w_300,c_limit,q_auto/turtles.jpg export default function cloudinaryLoader({ src, width, quality }) { const params = ['f_auto', 'c_limit', `w_${width}`, `q_${quality || 'auto'}`] return `https://example.com/${params.join(',')}${src}` } ### Cloudflare // Docs: https://developers.cloudflare.com/images/url-format export default function cloudflareLoader({ src, width, quality }) { const params = [`width=${width}`, `quality=${quality || 75}`, 'format=auto'] return `https://example.com/cdn-cgi/image/${params.join(',')}/${src}` } ### Contentful // Docs: https://www.contentful.com/developers/docs/references/images-api/ export default function contentfulLoader({ src, width, quality }) { const url = new URL(`https://example.com${src}`) url.searchParams.set('fm', 'webp') url.searchParams.set('w', width.toString()) url.searchParams.set('q', (quality || 75).toString()) return url.href } ### Fastly // Docs: https://developer.fastly.com/reference/io/ export default function fastlyLoader({ src, width, quality }) { const url = new URL(`https://example.com${src}`) url.searchParams.set('auto', 'webp') url.searchParams.set('width', width.toString()) url.searchParams.set('quality', (quality || 75).toString()) return url.href } ### Gumlet // Docs: https://docs.gumlet.com/reference/image-transform-size export default function gumletLoader({ src, width, quality }) { const url = new URL(`https://example.com${src}`) url.searchParams.set('format', 'auto') url.searchParams.set('w', width.toString()) url.searchParams.set('q', (quality || 75).toString()) return url.href } ### ImageEngine // Docs: https://support.imageengine.io/hc/en-us/articles/360058880672-Directives export default function imageengineLoader({ src, width, quality }) { const compression = 100 - (quality || 50) const params = [`w_${width}`, `cmpr_${compression}`)] return `https://example.com${src}?imgeng=/${params.join('/')` } ### Imgix // Demo: https://static.imgix.net/daisy.png?format=auto&fit=max&w=300 export default function imgixLoader({ src, width, quality }) { const url = new URL(`https://example.com${src}`) const params = url.searchParams params.set('auto', params.getAll('auto').join(',') || 'format') params.set('fit', params.get('fit') || 'max') params.set('w', params.get('w') || width.toString()) params.set('q', (quality || 50).toString()) return url.href } ### Thumbor // Docs: https://thumbor.readthedocs.io/en/latest/ export default function thumborLoader({ src, width, quality }) { const params = [`${width}x0`, `filters:quality(${quality || 75})`] return `https://example.com${params.join('/')}${src}` } ### Sanity // Docs: https://www.sanity.io/docs/image-urls export default function sanityLoader({ src, width, quality }) { const prj = 'zp7mbokg' const dataset = 'production' const url = new URL(`https://cdn.sanity.io/images/${prj}/${dataset}${src}`) url.searchParams.set('auto', 'format') url.searchParams.set('fit', 'max') url.searchParams.set('w', width.toString()) if (quality) { url.searchParams.set('q', quality.toString()) } return url.href } ### Sirv // Docs: https://sirv.com/help/articles/dynamic-imaging/ export default function sirvLoader({ src, width, quality }) { const url = new URL(`https://example.com${src}`) const params = url.searchParams params.set('format', params.getAll('format').join(',') || 'optimal') params.set('w', params.get('w') || width.toString()) params.set('q', (quality || 85).toString()) return url.href } ### Supabase // Docs: https://supabase.com/docs/guides/storage/image-transformations#nextjs-loader export default function supabaseLoader({ src, width, quality }) { const url = new URL(`https://example.com${src}`) url.searchParams.set('width', width.toString()) url.searchParams.set('quality', (quality || 75).toString()) return url.href } --- ## Page: https://nextjs.org/docs/14/pages/api-reference/next-config-js/instrumentationHook #### Subscribe to our newsletter Stay updated on new releases and features, guides, and case studies. --- ## Page: https://nextjs.org/docs/14/pages/api-reference/next-config-js/onDemandEntries You are currently viewing documentation for version 14 of Next.js. Next.js exposes some options that give you some control over how the server will dispose or keep in memory built pages in development. To change the defaults, open `next.config.js` and add the `onDemandEntries` config: next.config.js module.exports = { onDemandEntries: { // period (in ms) where the server will keep pages in the buffer maxInactiveAge: 25 * 1000, // number of pages that should be kept simultaneously without being disposed pagesBufferLength: 2, }, } --- ## Page: https://nextjs.org/docs/14/pages/api-reference/next-config-js/optimizePackageImports You are currently viewing documentation for version 14 of Next.js. By default, Next.js uses `gzip` to compress rendered content and static files when using `next start` or a custom server. This is an optimization for applications that do not have compression configured. If compression is _already_ configured in your application via a custom server, Next.js will not add compression. > **Good to know:** > > * When hosting your application on Vercel, compression uses `brotli` first, then `gzip`. > * You can check if compression is enabled and which algorithm is used by looking at the `Accept-Encoding` (browser accepted options) and `Content-Encoding` (currently used) headers in the response. ## Disabling compression To disable **compression**, set the `compress` config option to `false`: next.config.js module.exports = { compress: false, } We do not recommend disabling compression unless you have compression configured on your server, as compression reduces bandwidth usage and improves the performance of your application. ## Changing the compression algorithm To change your compression algorithm, you will need to configure your custom server and set the `compress` option to `false` in your `next.config.js` file. For example, you're using nginx and want to switch to `brotli`, set the `compress` option to `false` to allow nginx to handle compression. > **Good to know:** > > * For Next.js applications on Vercel, compression is handled by the Vercel's Edge Network and not Next.js. See the Vercel documentation for more information. --- ## Page: https://nextjs.org/docs/14/pages/api-reference/next-config-js/output During a build, Next.js will automatically trace each page and its dependencies to determine all of the files that are needed for deploying a production version of your application. This feature helps reduce the size of deployments drastically. Previously, when deploying with Docker you would need to have all files from your package's `dependencies` installed to run `next start`. Starting with Next.js 12, you can leverage Output File Tracing in the `.next/` directory to only include the necessary files. Furthermore, this removes the need for the deprecated `serverless` target which can cause various issues and also creates unnecessary duplication. ## How it Works During `next build`, Next.js will use `@vercel/nft` to statically analyze `import`, `require`, and `fs` usage to determine all files that a page might load. Next.js' production server is also traced for its needed files and output at `.next/next-server.js.nft.json` which can be leveraged in production. To leverage the `.nft.json` files emitted to the `.next` output directory, you can read the list of files in each trace that are relative to the `.nft.json` file and then copy them to your deployment location. ## Automatically Copying Traced Files Next.js can automatically create a `standalone` folder that copies only the necessary files for a production deployment including select files in `node_modules`. To leverage this automatic copying you can enable it in your `next.config.js`: module.exports = { output: 'standalone', } This will create a folder at `.next/standalone` which can then be deployed on its own without installing `node_modules`. Additionally, a minimal `server.js` file is also output which can be used instead of `next start`. This minimal server does not copy the `public` or `.next/static` folders by default as these should ideally be handled by a CDN instead, although these folders can be copied to the `standalone/public` and `standalone/.next/static` folders manually, after which `server.js` file will serve these automatically. > **Good to know**: > > * `next.config.js` is read during `next build` and serialized into the `server.js` output file. If the legacy `serverRuntimeConfig` or `publicRuntimeConfig` options are being used, the values will be specific to values at build time. > * If your project needs to listen to a specific port or hostname, you can define `PORT` or `HOSTNAME` environment variables before running `server.js`. For example, run `PORT=8080 HOSTNAME=0.0.0.0 node server.js` to start the server on `http://0.0.0.0:8080`. > * If your project uses Image Optimization with the default `loader`, you must install `sharp` as a dependency: npm i sharp yarn add sharp pnpm add sharp bun add sharp ## Caveats * While tracing in monorepo setups, the project directory is used for tracing by default. For `next build packages/web-app`, `packages/web-app` would be the tracing root and any files outside of that folder will not be included. To include files outside of this folder you can set `experimental.outputFileTracingRoot` in your `next.config.js`. module.exports = { experimental: { // this includes files from the monorepo base two directories up outputFileTracingRoot: path.join(__dirname, '../../'), }, } * There are some cases in which Next.js might fail to include required files, or might incorrectly include unused files. In those cases, you can leverage `experimental.outputFileTracingExcludes` and `experimental.outputFileTracingIncludes` respectively in `next.config.js`. Each config accepts an object with minimatch globs for the key to match specific pages and a value of an array with globs relative to the project's root to either include or exclude in the trace. module.exports = { experimental: { outputFileTracingExcludes: { '/api/hello': ['./un-necessary-folder/**/*'], }, outputFileTracingIncludes: { '/api/another': ['./necessary-folder/**/*'], }, }, } * Currently, Next.js does not do anything with the emitted `.nft.json` files. The files must be read by your deployment platform, for example Vercel, to create a minimal deployment. In a future release, a new command is planned to utilize these `.nft.json` files. ## Experimental `turbotrace` Tracing dependencies can be slow because it requires very complex computations and analysis. We created `turbotrace` in Rust as a faster and smarter alternative to the JavaScript implementation. To enable it, you can add the following configuration to your `next.config.js`: module.exports = { experimental: { turbotrace: { // control the log level of the turbotrace, default is `error` logLevel?: | 'bug' | 'fatal' | 'error' | 'warning' | 'hint' | 'note' | 'suggestions' | 'info', // control if the log of turbotrace should contain the details of the analysis, default is `false` logDetail?: boolean // show all log messages without limit // turbotrace only show 1 log message for each categories by default logAll?: boolean // control the context directory of the turbotrace // files outside of the context directory will not be traced // set the `experimental.outputFileTracingRoot` has the same effect // if the `experimental.outputFileTracingRoot` and this option are both set, the `experimental.turbotrace.contextDirectory` will be used contextDirectory?: string // if there is `process.cwd()` expression in your code, you can set this option to tell `turbotrace` the value of `process.cwd()` while tracing. // for example the require(process.cwd() + '/package.json') will be traced as require('/path/to/cwd/package.json') processCwd?: string // control the maximum memory usage of the `turbotrace`, in `MB`, default is `6000`. memoryLimit?: number }, }, } --- ## Page: https://nextjs.org/docs/14/pages/api-reference/next-config-js/pageExtensions You can extend the default Page extensions (`.tsx`, `.ts`, `.jsx`, `.js`) used by Next.js. Inside `next.config.js`, add the `pageExtensions` config: module.exports = { pageExtensions: ['mdx', 'md', 'jsx', 'js', 'tsx', 'ts'], } Changing these values affects _all_ Next.js pages, including the following: * `middleware.js` * `instrumentation.js` * `pages/_document.js` * `pages/_app.js` * `pages/api/` For example, if you reconfigure `.ts` page extensions to `.page.ts`, you would need to rename pages like `middleware.page.ts`, `instrumentation.page.ts`, `_app.page.ts`. ## Including non-page files in the `pages` directory You can colocate test files or other files used by components in the `pages` directory. Inside `next.config.js`, add the `pageExtensions` config: module.exports = { pageExtensions: ['page.tsx', 'page.ts', 'page.jsx', 'page.js'], } Then, rename your pages to have a file extension that includes `.page` (e.g. rename `MyPage.tsx` to `MyPage.page.tsx`). Ensure you rename _all_ Next.js pages, including the files mentioned above. --- ## Page: https://nextjs.org/docs/14/pages/api-reference/next-config-js/poweredByHeader You are currently viewing documentation for version 14 of Next.js. By default Next.js will add the `x-powered-by` header. To opt-out of it, open `next.config.js` and disable the `poweredByHeader` config: next.config.js module.exports = { poweredByHeader: false, } --- ## Page: https://nextjs.org/docs/14/pages/api-reference/next-config-js/productionBrowserSourceMaps You are currently viewing documentation for version 14 of Next.js. Source Maps are enabled by default during development. During production builds, they are disabled to prevent you leaking your source on the client, unless you specifically opt-in with the configuration flag. Next.js provides a configuration flag you can use to enable browser source map generation during the production build: next.config.js module.exports = { productionBrowserSourceMaps: true, } When the `productionBrowserSourceMaps` option is enabled, the source maps will be output in the same directory as the JavaScript files. Next.js will automatically serve these files when requested. * Adding source maps can increase `next build` time * Increases memory usage during `next build` --- ## Page: https://nextjs.org/docs/14/pages/api-reference/next-config-js/reactStrictMode **Good to know**: Since Next.js 13.4, Strict Mode is `true` by default with `app` router, so the above configuration is only necessary for `pages`. You can still disable Strict Mode by setting `reactStrictMode: false`. **Suggested**: We strongly suggest you enable Strict Mode in your Next.js application to better prepare your application for the future of React. React's Strict Mode is a development mode only feature for highlighting potential problems in an application. It helps to identify unsafe lifecycles, legacy API usage, and a number of other features. The Next.js runtime is Strict Mode-compliant. To opt-in to Strict Mode, configure the following option in your `next.config.js`: If you or your team are not ready to use Strict Mode in your entire application, that's OK! You can incrementally migrate on a page-by-page basis using `<React.StrictMode>`. --- ## Page: https://nextjs.org/docs/14/pages/api-reference/next-config-js/redirects Redirects allow you to redirect an incoming request path to a different destination path. To use redirects you can use the `redirects` key in `next.config.js`: module.exports = { async redirects() { return [ { source: '/about', destination: '/', permanent: true, }, ] }, } `redirects` is an async function that expects an array to be returned holding objects with `source`, `destination`, and `permanent` properties: * `source` is the incoming request path pattern. * `destination` is the path you want to route to. * `permanent` `true` or `false` - if `true` will use the 308 status code which instructs clients/search engines to cache the redirect forever, if `false` will use the 307 status code which is temporary and is not cached. > **Why does Next.js use 307 and 308?** Traditionally a 302 was used for a temporary redirect, and a 301 for a permanent redirect, but many browsers changed the request method of the redirect to `GET`, regardless of the original method. For example, if the browser made a request to `POST /v1/users` which returned status code `302` with location `/v2/users`, the subsequent request might be `GET /v2/users` instead of the expected `POST /v2/users`. Next.js uses the 307 temporary redirect, and 308 permanent redirect status codes to explicitly preserve the request method used. * `basePath`: `false` or `undefined` - if false the `basePath` won't be included when matching, can be used for external redirects only. * `locale`: `false` or `undefined` - whether the locale should not be included when matching. * `has` is an array of has objects with the `type`, `key` and `value` properties. * `missing` is an array of missing objects with the `type`, `key` and `value` properties. Redirects are checked before the filesystem which includes pages and `/public` files. When using the Pages Router, redirects are not applied to client-side routing (`Link`, `router.push`) unless Middleware is present and matches the path. When a redirect is applied, any query values provided in the request will be passed through to the redirect destination. For example, see the following redirect configuration: { source: '/old-blog/:path*', destination: '/blog/:path*', permanent: false } When `/old-blog/post-1?hello=world` is requested, the client will be redirected to `/blog/post-1?hello=world`. ## Path Matching Path matches are allowed, for example `/old-blog/:slug` will match `/old-blog/hello-world` (no nested paths): module.exports = { async redirects() { return [ { source: '/old-blog/:slug', destination: '/news/:slug', // Matched parameters can be used in the destination permanent: true, }, ] }, } ### Wildcard Path Matching To match a wildcard path you can use `*` after a parameter, for example `/blog/:slug*` will match `/blog/a/b/c/d/hello-world`: module.exports = { async redirects() { return [ { source: '/blog/:slug*', destination: '/news/:slug*', // Matched parameters can be used in the destination permanent: true, }, ] }, } ### Regex Path Matching To match a regex path you can wrap the regex in parentheses after a parameter, for example `/post/:slug(\\d{1,})` will match `/post/123` but not `/post/abc`: module.exports = { async redirects() { return [ { source: '/post/:slug(\\d{1,})', destination: '/news/:slug', // Matched parameters can be used in the destination permanent: false, }, ] }, } The following characters `(`, `)`, `{`, `}`, `:`, `*`, `+`, `?` are used for regex path matching, so when used in the `source` as non-special values they must be escaped by adding `\\` before them: module.exports = { async redirects() { return [ { // this will match `/english(default)/something` being requested source: '/english\\(default\\)/:slug', destination: '/en-us/:slug', permanent: false, }, ] }, } ## Header, Cookie, and Query Matching To only match a redirect when header, cookie, or query values also match the `has` field or don't match the `missing` field can be used. Both the `source` and all `has` items must match and all `missing` items must not match for the redirect to be applied. `has` and `missing` items can have the following fields: * `type`: `String` - must be either `header`, `cookie`, `host`, or `query`. * `key`: `String` - the key from the selected type to match against. * `value`: `String` or `undefined` - the value to check for, if undefined any value will match. A regex like string can be used to capture a specific part of the value, e.g. if the value `first-(?<paramName>.*)` is used for `first-second` then `second` will be usable in the destination with `:paramName`. module.exports = { async redirects() { return [ // if the header `x-redirect-me` is present, // this redirect will be applied { source: '/:path((?!another-page$).*)', has: [ { type: 'header', key: 'x-redirect-me', }, ], permanent: false, destination: '/another-page', }, // if the header `x-dont-redirect` is present, // this redirect will NOT be applied { source: '/:path((?!another-page$).*)', missing: [ { type: 'header', key: 'x-do-not-redirect', }, ], permanent: false, destination: '/another-page', }, // if the source, query, and cookie are matched, // this redirect will be applied { source: '/specific/:path*', has: [ { type: 'query', key: 'page', // the page value will not be available in the // destination since value is provided and doesn't // use a named capture group e.g. (?<page>home) value: 'home', }, { type: 'cookie', key: 'authorized', value: 'true', }, ], permanent: false, destination: '/another/:path*', }, // if the header `x-authorized` is present and // contains a matching value, this redirect will be applied { source: '/', has: [ { type: 'header', key: 'x-authorized', value: '(?<authorized>yes|true)', }, ], permanent: false, destination: '/home?authorized=:authorized', }, // if the host is `example.com`, // this redirect will be applied { source: '/:path((?!another-page$).*)', has: [ { type: 'host', value: 'example.com', }, ], permanent: false, destination: '/another-page', }, ] }, } ### Redirects with basePath support When leveraging `basePath` support with redirects each `source` and `destination` is automatically prefixed with the `basePath` unless you add `basePath: false` to the redirect: module.exports = { basePath: '/docs', async redirects() { return [ { source: '/with-basePath', // automatically becomes /docs/with-basePath destination: '/another', // automatically becomes /docs/another permanent: false, }, { // does not add /docs since basePath: false is set source: '/without-basePath', destination: 'https://example.com', basePath: false, permanent: false, }, ] }, } ### Redirects with i18n support When leveraging `i18n` support with redirects each `source` and `destination` is automatically prefixed to handle the configured `locales` unless you add `locale: false` to the redirect. If `locale: false` is used you must prefix the `source` and `destination` with a locale for it to be matched correctly. module.exports = { i18n: { locales: ['en', 'fr', 'de'], defaultLocale: 'en', }, async redirects() { return [ { source: '/with-locale', // automatically handles all locales destination: '/another', // automatically passes the locale on permanent: false, }, { // does not handle locales automatically since locale: false is set source: '/nl/with-locale-manual', destination: '/nl/another', locale: false, permanent: false, }, { // this matches '/' since `en` is the defaultLocale source: '/en', destination: '/en/another', locale: false, permanent: false, }, // it's possible to match all locales even when locale: false is set { source: '/:locale/page', destination: '/en/newpage', permanent: false, locale: false, }, { // this gets converted to /(en|fr|de)/(.*) so will not match the top-level // `/` or `/fr` routes like /:path* would source: '/(.*)', destination: '/another', permanent: false, }, ] }, } In some rare cases, you might need to assign a custom status code for older HTTP Clients to properly redirect. In these cases, you can use the `statusCode` property instead of the `permanent` property, but not both. To to ensure IE11 compatibility, a `Refresh` header is automatically added for the 308 status code. ## Other Redirects * Inside API Routes and Route Handlers, you can redirect based on the incoming request. * Inside `getStaticProps` and `getServerSideProps`, you can redirect specific pages at request-time. ## Version History | Version | Changes | | --- | --- | | `v13.3.0` | `missing` added. | | `v10.2.0` | `has` added. | | `v9.5.0` | `redirects` added. | --- ## Page: https://nextjs.org/docs/14/pages/api-reference/next-config-js/rewrites Rewrites allow you to map an incoming request path to a different destination path. Rewrites act as a URL proxy and mask the destination path, making it appear the user hasn't changed their location on the site. In contrast, redirects will reroute to a new page and show the URL changes. To use rewrites you can use the `rewrites` key in `next.config.js`: module.exports = { async rewrites() { return [ { source: '/about', destination: '/', }, ] }, } Rewrites are applied to client-side routing, a `<Link href="/about">` will have the rewrite applied in the above example. `rewrites` is an async function that expects to return either an array or an object of arrays (see below) holding objects with `source` and `destination` properties: * `source`: `String` - is the incoming request path pattern. * `destination`: `String` is the path you want to route to. * `basePath`: `false` or `undefined` - if false the basePath won't be included when matching, can be used for external rewrites only. * `locale`: `false` or `undefined` - whether the locale should not be included when matching. * `has` is an array of has objects with the `type`, `key` and `value` properties. * `missing` is an array of missing objects with the `type`, `key` and `value` properties. When the `rewrites` function returns an array, rewrites are applied after checking the filesystem (pages and `/public` files) and before dynamic routes. When the `rewrites` function returns an object of arrays with a specific shape, this behavior can be changed and more finely controlled, as of `v10.1` of Next.js: module.exports = { async rewrites() { return { beforeFiles: [ // These rewrites are checked after headers/redirects // and before all files including _next/public files which // allows overriding page files { source: '/some-page', destination: '/somewhere-else', has: [{ type: 'query', key: 'overrideMe' }], }, ], afterFiles: [ // These rewrites are checked after pages/public files // are checked but before dynamic routes { source: '/non-existent', destination: '/somewhere-else', }, ], fallback: [ // These rewrites are checked after both pages/public files // and dynamic routes are checked { source: '/:path*', destination: `https://my-old-site.com/:path*`, }, ], } }, } > **Good to know**: rewrites in `beforeFiles` do not check the filesystem/dynamic routes immediately after matching a source, they continue until all `beforeFiles` have been checked. The order Next.js routes are checked is: 1. headers are checked/applied 2. redirects are checked/applied 3. `beforeFiles` rewrites are checked/applied 4. static files from the public directory, `_next/static` files, and non-dynamic pages are checked/served 5. `afterFiles` rewrites are checked/applied, if one of these rewrites is matched we check dynamic routes/static files after each match 6. `fallback` rewrites are checked/applied, these are applied before rendering the 404 page and after dynamic routes/all static assets have been checked. If you use fallback: true/'blocking' in `getStaticPaths`, the fallback `rewrites` defined in your `next.config.js` will _not_ be run. ## Rewrite parameters When using parameters in a rewrite the parameters will be passed in the query by default when none of the parameters are used in the `destination`. module.exports = { async rewrites() { return [ { source: '/old-about/:path*', destination: '/about', // The :path parameter isn't used here so will be automatically passed in the query }, ] }, } If a parameter is used in the destination none of the parameters will be automatically passed in the query. module.exports = { async rewrites() { return [ { source: '/docs/:path*', destination: '/:path*', // The :path parameter is used here so will not be automatically passed in the query }, ] }, } You can still pass the parameters manually in the query if one is already used in the destination by specifying the query in the `destination`. module.exports = { async rewrites() { return [ { source: '/:first/:second', destination: '/:first?second=:second', // Since the :first parameter is used in the destination the :second parameter // will not automatically be added in the query although we can manually add it // as shown above }, ] }, } > **Good to know**: Static pages from Automatic Static Optimization or prerendering params from rewrites will be parsed on the client after hydration and provided in the query. ## Path Matching Path matches are allowed, for example `/blog/:slug` will match `/blog/hello-world` (no nested paths): module.exports = { async rewrites() { return [ { source: '/blog/:slug', destination: '/news/:slug', // Matched parameters can be used in the destination }, ] }, } ### Wildcard Path Matching To match a wildcard path you can use `*` after a parameter, for example `/blog/:slug*` will match `/blog/a/b/c/d/hello-world`: module.exports = { async rewrites() { return [ { source: '/blog/:slug*', destination: '/news/:slug*', // Matched parameters can be used in the destination }, ] }, } ### Regex Path Matching To match a regex path you can wrap the regex in parenthesis after a parameter, for example `/blog/:slug(\\d{1,})` will match `/blog/123` but not `/blog/abc`: module.exports = { async rewrites() { return [ { source: '/old-blog/:post(\\d{1,})', destination: '/blog/:post', // Matched parameters can be used in the destination }, ] }, } The following characters `(`, `)`, `{`, `}`, `[`, `]`, `|`, `\`, `^`, `.`, `:`, `*`, `+`, `-`, `?`, `$` are used for regex path matching, so when used in the `source` as non-special values they must be escaped by adding `\\` before them: module.exports = { async rewrites() { return [ { // this will match `/english(default)/something` being requested source: '/english\\(default\\)/:slug', destination: '/en-us/:slug', }, ] }, } ## Header, Cookie, and Query Matching To only match a rewrite when header, cookie, or query values also match the `has` field or don't match the `missing` field can be used. Both the `source` and all `has` items must match and all `missing` items must not match for the rewrite to be applied. `has` and `missing` items can have the following fields: * `type`: `String` - must be either `header`, `cookie`, `host`, or `query`. * `key`: `String` - the key from the selected type to match against. * `value`: `String` or `undefined` - the value to check for, if undefined any value will match. A regex like string can be used to capture a specific part of the value, e.g. if the value `first-(?<paramName>.*)` is used for `first-second` then `second` will be usable in the destination with `:paramName`. module.exports = { async rewrites() { return [ // if the header `x-rewrite-me` is present, // this rewrite will be applied { source: '/:path*', has: [ { type: 'header', key: 'x-rewrite-me', }, ], destination: '/another-page', }, // if the header `x-rewrite-me` is not present, // this rewrite will be applied { source: '/:path*', missing: [ { type: 'header', key: 'x-rewrite-me', }, ], destination: '/another-page', }, // if the source, query, and cookie are matched, // this rewrite will be applied { source: '/specific/:path*', has: [ { type: 'query', key: 'page', // the page value will not be available in the // destination since value is provided and doesn't // use a named capture group e.g. (?<page>home) value: 'home', }, { type: 'cookie', key: 'authorized', value: 'true', }, ], destination: '/:path*/home', }, // if the header `x-authorized` is present and // contains a matching value, this rewrite will be applied { source: '/:path*', has: [ { type: 'header', key: 'x-authorized', value: '(?<authorized>yes|true)', }, ], destination: '/home?authorized=:authorized', }, // if the host is `example.com`, // this rewrite will be applied { source: '/:path*', has: [ { type: 'host', value: 'example.com', }, ], destination: '/another-page', }, ] }, } ## Rewriting to an external URL Examples * Incremental adoption of Next.js * Using Multiple Zones Rewrites allow you to rewrite to an external url. This is especially useful for incrementally adopting Next.js. The following is an example rewrite for redirecting the `/blog` route of your main app to an external site. module.exports = { async rewrites() { return [ { source: '/blog', destination: 'https://example.com/blog', }, { source: '/blog/:slug', destination: 'https://example.com/blog/:slug', // Matched parameters can be used in the destination }, ] }, } If you're using `trailingSlash: true`, you also need to insert a trailing slash in the `source` parameter. If the destination server is also expecting a trailing slash it should be included in the `destination` parameter as well. module.exports = { trailingSlash: true, async rewrites() { return [ { source: '/blog/', destination: 'https://example.com/blog/', }, { source: '/blog/:path*/', destination: 'https://example.com/blog/:path*/', }, ] }, } ### Incremental adoption of Next.js You can also have Next.js fall back to proxying to an existing website after checking all Next.js routes. This way you don't have to change the rewrites configuration when migrating more pages to Next.js module.exports = { async rewrites() { return { fallback: [ { source: '/:path*', destination: `https://custom-routes-proxying-endpoint.vercel.app/:path*`, }, ], } }, } ### Rewrites with basePath support When leveraging `basePath` support with rewrites each `source` and `destination` is automatically prefixed with the `basePath` unless you add `basePath: false` to the rewrite: module.exports = { basePath: '/docs', async rewrites() { return [ { source: '/with-basePath', // automatically becomes /docs/with-basePath destination: '/another', // automatically becomes /docs/another }, { // does not add /docs to /without-basePath since basePath: false is set // Note: this can not be used for internal rewrites e.g. `destination: '/another'` source: '/without-basePath', destination: 'https://example.com', basePath: false, }, ] }, } ### Rewrites with i18n support When leveraging `i18n` support with rewrites each `source` and `destination` is automatically prefixed to handle the configured `locales` unless you add `locale: false` to the rewrite. If `locale: false` is used you must prefix the `source` and `destination` with a locale for it to be matched correctly. module.exports = { i18n: { locales: ['en', 'fr', 'de'], defaultLocale: 'en', }, async rewrites() { return [ { source: '/with-locale', // automatically handles all locales destination: '/another', // automatically passes the locale on }, { // does not handle locales automatically since locale: false is set source: '/nl/with-locale-manual', destination: '/nl/another', locale: false, }, { // this matches '/' since `en` is the defaultLocale source: '/en', destination: '/en/another', locale: false, }, { // it's possible to match all locales even when locale: false is set source: '/:locale/api-alias/:path*', destination: '/api/:path*', locale: false, }, { // this gets converted to /(en|fr|de)/(.*) so will not match the top-level // `/` or `/fr` routes like /:path* would source: '/(.*)', destination: '/another', }, ] }, } ## Version History | Version | Changes | | --- | --- | | `v13.3.0` | `missing` added. | | `v10.2.0` | `has` added. | | `v9.5.0` | Headers added. | --- ## Page: https://nextjs.org/docs/14/pages/api-reference/next-config-js/runtime-configuration You are currently viewing documentation for version 14 of Next.js. > **Warning:** > > * **This feature is deprecated.** We recommend using environment variables instead, which also can support reading runtime values. > * You can run code on server startup using the `register` function. > * This feature does not work with Automatic Static Optimization, Output File Tracing, or React Server Components. To add runtime configuration to your app, open `next.config.js` and add the `publicRuntimeConfig` and `serverRuntimeConfig` configs: next.config.js module.exports = { serverRuntimeConfig: { // Will only be available on the server side mySecret: 'secret', secondSecret: process.env.SECOND_SECRET, // Pass through env variables }, publicRuntimeConfig: { // Will be available on both server and client staticFolder: '/static', }, } Place any server-only runtime config under `serverRuntimeConfig`. Anything accessible to both client and server-side code should be under `publicRuntimeConfig`. > A page that relies on `publicRuntimeConfig` **must** use `getInitialProps` or `getServerSideProps` or your application must have a Custom App with `getInitialProps` to opt-out of Automatic Static Optimization. Runtime configuration won't be available to any page (or component in a page) without being server-side rendered. To get access to the runtime configs in your app use `next/config`, like so: import getConfig from 'next/config' import Image from 'next/image' // Only holds serverRuntimeConfig and publicRuntimeConfig const { serverRuntimeConfig, publicRuntimeConfig } = getConfig() // Will only be available on the server-side console.log(serverRuntimeConfig.mySecret) // Will be available on both server-side and client-side console.log(publicRuntimeConfig.staticFolder) function MyImage() { return ( <div> <Image src={`${publicRuntimeConfig.staticFolder}/logo.png`} alt="logo" layout="fill" /> </div> ) } export default MyImage --- ## Page: https://nextjs.org/docs/14/pages/api-reference/next-config-js/trailingSlash You are currently viewing documentation for version 14 of Next.js. By default Next.js will redirect urls with trailing slashes to their counterpart without a trailing slash. For example `/about/` will redirect to `/about`. You can configure this behavior to act the opposite way, where urls without trailing slashes are redirected to their counterparts with trailing slashes. Open `next.config.js` and add the `trailingSlash` config: next.config.js module.exports = { trailingSlash: true, } With this option set, urls like `/about` will redirect to `/about/`. When used with `output: "export"` configuration, the `/about` page will output `/about/index.html` (instead of the default `/about.html`). ## Version History | Version | Changes | | --- | --- | | `v9.5.0` | `trailingSlash` added. | --- ## Page: https://nextjs.org/docs/14/pages/api-reference/next-config-js/transpilePackages You are currently viewing documentation for version 14 of Next.js. Next.js can automatically transpile and bundle dependencies from local packages (like monorepos) or from external dependencies (`node_modules`). This replaces the `next-transpile-modules` package. next.config.js /** @type {import('next').NextConfig} */ const nextConfig = { transpilePackages: ['@acme/ui', 'lodash-es'], } module.exports = nextConfig ## Version History | Version | Changes | | --- | --- | | `v13.0.0` | `transpilePackages` added. | --- ## Page: https://nextjs.org/docs/14/pages/api-reference/next-config-js/turbo ## turbo (experimental) Turbopack can be customized to transform different files and change how modules are resolved. > **Good to know**: > > * These features are experimental and will only work with `next --turbo`. > * Turbopack for Next.js does not require loaders nor loader configuration for built-in functionality. Turbopack has built-in support for css and compiling modern JavaScript, so there's no need for `css-loader`, `postcss-loader`, or `babel-loader` if you're using `@babel/preset-env`. ## webpack loaders If you need loader support beyond what's built in, many webpack loaders already work with Turbopack. There are currently some limitations: * Only a core subset of the webpack loader API is implemented. Currently, there is enough coverage for some popular loaders, and we'll expand our API support in the future. * Only loaders that return JavaScript code are supported. Loaders that transform files like stylesheets or images are not currently supported. * Options passed to webpack loaders must be plain JavaScript primitives, objects, and arrays. For example, it's not possible to pass `require()`d plugin modules as option values. To configure loaders, add the names of the loaders you've installed and any options in `next.config.js`, mapping file extensions to a list of loaders: module.exports = { experimental: { turbo: { rules: { '*.svg': { loaders: ['@svgr/webpack'], as: '*.js', }, }, }, }, } > **Good to know**: Prior to Next.js version 13.4.4, `experimental.turbo.rules` was named `experimental.turbo.loaders` and only accepted file extensions like `.mdx` instead of `*.mdx`. ### Supported loaders The following loaders have been tested to work with Turbopack's webpack loader implementation: * `babel-loader` * `@svgr/webpack` * `svg-inline-loader` * `yaml-loader` * `string-replace-loader` * `raw-loader` * 'sass-loader' ## Resolve aliases Through `next.config.js`, Turbopack can be configured to modify module resolution through aliases, similar to webpack's `resolve.alias` configuration. To configure resolve aliases, map imported patterns to their new destination in `next.config.js`: module.exports = { experimental: { turbo: { resolveAlias: { underscore: 'lodash', mocha: { browser: 'mocha/browser-entry.js' }, }, }, }, } This aliases imports of the `underscore` package to the `lodash` package. In other words, `import underscore from 'underscore'` will load the `lodash` module instead of `underscore`. Turbopack also supports conditional aliasing through this field, similar to Node.js's conditional exports. At the moment only the `browser` condition is supported. In the case above, imports of the `mocha` module will be aliased to `mocha/browser-entry.js` when Turbopack targets browser environments. ## Resolve extensions Through `next.config.js`, Turbopack can be configured to resolve modules with custom extensions, similar to webpack's `resolve.extensions` configuration. To configure resolve extensions, use the `resolveExtensions` field in `next.config.js`: module.exports = { experimental: { turbo: { resolveExtensions: [ '.mdx', '.tsx', '.ts', '.jsx', '.js', '.mjs', '.json', ], }, }, } This overwrites the original resolve extensions with the provided list. Make sure to include the default extensions. For more information and guidance for how to migrate your app to Turbopack from webpack, see Turbopack's documentation on webpack compatibility. --- ## Page: https://nextjs.org/docs/14/pages/api-reference/next-config-js/typescript You are currently viewing documentation for version 14 of Next.js. Next.js fails your **production build** (`next build`) when TypeScript errors are present in your project. If you'd like Next.js to dangerously produce production code even when your application has errors, you can disable the built-in type checking step. If disabled, be sure you are running type checks as part of your build or deploy process, otherwise this can be very dangerous. Open `next.config.js` and enable the `ignoreBuildErrors` option in the `typescript` config: next.config.js module.exports = { typescript: { // !! WARN !! // Dangerously allow production builds to successfully complete even if // your project has type errors. // !! WARN !! ignoreBuildErrors: true, }, } --- ## Page: https://nextjs.org/docs/14/pages/api-reference/next-config-js/urlImports URL imports are an experimental feature that allows you to import modules directly from external servers (instead of from the local disk). > **Warning**: This feature is experimental. Only use domains that you trust to download and execute on your machine. Please exercise discretion, and caution until the feature is flagged as stable. To opt-in, add the allowed URL prefixes inside `next.config.js`: module.exports = { experimental: { urlImports: ['https://example.com/assets/', 'https://cdn.skypack.dev'], }, } Then, you can import modules directly from URLs: import { a, b, c } from 'https://example.com/assets/some/module.js' URL Imports can be used everywhere normal package imports can be used. ## Security Model This feature is being designed with **security as the top priority**. To start, we added an experimental flag forcing you to explicitly allow the domains you accept URL imports from. We're working to take this further by limiting URL imports to execute in the browser sandbox using the Edge Runtime. ## Lockfile When using URL imports, Next.js will create a `next.lock` directory containing a lockfile and fetched assets. This directory **must be committed to Git**, not ignored by `.gitignore`. * When running `next dev`, Next.js will download and add all newly discovered URL Imports to your lockfile * When running `next build`, Next.js will use only the lockfile to build the application for production Typically, no network requests are needed and any outdated lockfile will cause the build to fail. One exception is resources that respond with `Cache-Control: no-cache`. These resources will have a `no-cache` entry in the lockfile and will always be fetched from the network on each build. ## Examples ### Skypack import confetti from 'https://cdn.skypack.dev/canvas-confetti' import { useEffect } from 'react' export default () => { useEffect(() => { confetti() }) return <p>Hello</p> } ### Static Image Imports import Image from 'next/image' import logo from 'https://example.com/assets/logo.png' export default () => ( <div> <Image src={logo} placeholder="blur" /> </div> ) ### URLs in CSS .className { background: url('https://example.com/assets/hero.jpg'); } ### Asset Imports const logo = new URL('https://example.com/assets/file.txt', import.meta.url) console.log(logo.pathname) // prints "/_next/static/media/file.a9727b5d.txt" --- ## Page: https://nextjs.org/docs/14/pages/api-reference/next-config-js/webpack ## Custom Webpack Config > **Good to know**: changes to webpack config are not covered by semver so proceed at your own risk Before continuing to add custom webpack configuration to your application make sure Next.js doesn't already support your use-case: * CSS imports * CSS modules * Sass/SCSS imports * Sass/SCSS modules * Customizing babel configuration Some commonly asked for features are available as plugins: * @next/mdx * @next/bundle-analyzer In order to extend our usage of `webpack`, you can define a function that extends its config inside `next.config.js`, like so: module.exports = { webpack: ( config, { buildId, dev, isServer, defaultLoaders, nextRuntime, webpack } ) => { // Important: return the modified config return config }, } > The `webpack` function is executed three times, twice for the server (nodejs / edge runtime) and once for the client. This allows you to distinguish between client and server configuration using the `isServer` property. The second argument to the `webpack` function is an object with the following properties: * `buildId`: `String` - The build id, used as a unique identifier between builds * `dev`: `Boolean` - Indicates if the compilation will be done in development * `isServer`: `Boolean` - It's `true` for server-side compilation, and `false` for client-side compilation * `nextRuntime`: `String | undefined` - The target runtime for server-side compilation; either `"edge"` or `"nodejs"`, it's `undefined` for client-side compilation. * `defaultLoaders`: `Object` - Default loaders used internally by Next.js: * `babel`: `Object` - Default `babel-loader` configuration Example usage of `defaultLoaders.babel`: // Example config for adding a loader that depends on babel-loader // This source was taken from the @next/mdx plugin source: // https://github.com/vercel/next.js/tree/canary/packages/next-mdx module.exports = { webpack: (config, options) => { config.module.rules.push({ test: /\.mdx/, use: [ options.defaultLoaders.babel, { loader: '@mdx-js/loader', options: pluginOptions.options, }, ], }) return config }, } #### `nextRuntime` Notice that `isServer` is `true` when `nextRuntime` is `"edge"` or `"nodejs"`, nextRuntime "`edge`" is currently for middleware and Server Components in edge runtime only. Was this helpful? supported. --- ## Page: https://nextjs.org/docs/14/pages/api-reference/next-config-js/webVitalsAttribution You are currently viewing documentation for version 14 of Next.js. When debugging issues related to Web Vitals, it is often helpful if we can pinpoint the source of the problem. For example, in the case of Cumulative Layout Shift (CLS), we might want to know the first element that shifted when the single largest layout shift occurred. Or, in the case of Largest Contentful Paint (LCP), we might want to identify the element corresponding to the LCP for the page. If the LCP element is an image, knowing the URL of the image resource can help us locate the asset we need to optimize. Pinpointing the biggest contributor to the Web Vitals score, aka attribution, allows us to obtain more in-depth information like entries for PerformanceEventTiming, PerformanceNavigationTiming and PerformanceResourceTiming. Attribution is disabled by default in Next.js but can be enabled **per metric** by specifying the following in `next.config.js`. next.config.js experimental: { webVitalsAttribution: ['CLS', 'LCP'] } Valid attribution values are all `web-vitals` metrics specified in the `NextWebVitalsMetric` type. --- ## Page: https://nextjs.org/docs/14/pages/api-reference/edge `AbortController`Allows you to abort one or more DOM requests as and when desired`Array`Represents an array of values`ArrayBuffer`Represents a generic, fixed-length raw binary data buffer`Atomics`Provides atomic operations as static methods`BigInt`Represents a whole number with arbitrary precision`BigInt64Array`Represents a typed array of 64-bit signed integers`BigUint64Array`Represents a typed array of 64-bit unsigned integers`Boolean`Represents a logical entity and can have two values: `true` and `false``clearInterval`Cancels a timed, repeating action which was previously established by a call to `setInterval()``clearTimeout`Cancels a timed, repeating action which was previously established by a call to `setTimeout()``console`Provides access to the browser's debugging console`DataView`Represents a generic view of an `ArrayBuffer``Date`Represents a single moment in time in a platform-independent format`decodeURI`Decodes a Uniform Resource Identifier (URI) previously created by `encodeURI` or by a similar routine`decodeURIComponent`Decodes a Uniform Resource Identifier (URI) component previously created by `encodeURIComponent` or by a similar routine`DOMException`Represents an error that occurs in the DOM`encodeURI`Encodes a Uniform Resource Identifier (URI) by replacing each instance of certain characters by one, two, three, or four escape sequences representing the UTF-8 encoding of the character`encodeURIComponent`Encodes a Uniform Resource Identifier (URI) component by replacing each instance of certain characters by one, two, three, or four escape sequences representing the UTF-8 encoding of the character`Error`Represents an error when trying to execute a statement or accessing a property`EvalError`Represents an error that occurs regarding the global function `eval()``Float32Array`Represents a typed array of 32-bit floating point numbers`Float64Array`Represents a typed array of 64-bit floating point numbers`Function`Represents a function`Infinity`Represents the mathematical Infinity value`Int8Array`Represents a typed array of 8-bit signed integers`Int16Array`Represents a typed array of 16-bit signed integers`Int32Array`Represents a typed array of 32-bit signed integers`Intl`Provides access to internationalization and localization functionality`isFinite`Determines whether a value is a finite number`isNaN`Determines whether a value is `NaN` or not`JSON`Provides functionality to convert JavaScript values to and from the JSON format`Map`Represents a collection of values, where each value may occur only once`Math`Provides access to mathematical functions and constants`Number`Represents a numeric value`Object`Represents the object that is the base of all JavaScript objects`parseFloat`Parses a string argument and returns a floating point number`parseInt`Parses a string argument and returns an integer of the specified radix`Promise`Represents the eventual completion (or failure) of an asynchronous operation, and its resulting value`Proxy`Represents an object that is used to define custom behavior for fundamental operations (e.g. property lookup, assignment, enumeration, function invocation, etc)`queueMicrotask`Queues a microtask to be executed`RangeError`Represents an error when a value is not in the set or range of allowed values`ReferenceError`Represents an error when a non-existent variable is referenced`Reflect`Provides methods for interceptable JavaScript operations`RegExp`Represents a regular expression, allowing you to match combinations of characters`Set`Represents a collection of values, where each value may occur only once`setInterval`Repeatedly calls a function, with a fixed time delay between each call`setTimeout`Calls a function or evaluates an expression after a specified number of milliseconds`SharedArrayBuffer`Represents a generic, fixed-length raw binary data buffer`String`Represents a sequence of characters`structuredClone`Creates a deep copy of a value`Symbol`Represents a unique and immutable data type that is used as the key of an object property`SyntaxError`Represents an error when trying to interpret syntactically invalid code`TypeError`Represents an error when a value is not of the expected type`Uint8Array`Represents a typed array of 8-bit unsigned integers`Uint8ClampedArray`Represents a typed array of 8-bit unsigned integers clamped to 0-255`Uint32Array`Represents a typed array of 32-bit unsigned integers`URIError`Represents an error when a global URI handling function was used in a wrong way`URL`Represents an object providing static methods used for creating object URLs`URLPattern`Represents a URL pattern`URLSearchParams`Represents a collection of key/value pairs`WeakMap`Represents a collection of key/value pairs in which the keys are weakly referenced`WeakSet`Represents a collection of objects in which each object may occur only once`WebAssembly`Provides access to WebAssembly --- ## Page: https://nextjs.org/docs/14/pages/api-reference/cli #### Subscribe to our newsletter Stay updated on new releases and features, guides, and case studies. --- ## Page: https://nextjs.org/docs/14/pages/api-reference/cli/create-next-app The `create-next-app` CLI allow you to quickly create a new Next.js application using the default template or an example from a public Github repository. It is the easiest way to get started with Next.js. Basic usage: npx create-next-app@latest [project-name] [options] ## Reference The following options are available: | Options | Description | | --- | --- | | `-h` or `--help` | Show all available options | | `-v` or `--version` | Output the version number | | `--no-*` | Negate default options. E.g. `--no-eslint` | | `--ts` or `--typescript` | Initialize as a TypeScript project (default) | | `--js` or `--javascript` | Initialize as a JavaScript project | | `--tailwind` | Initialize with Tailwind CSS config (default) | | `--eslint` | Initialize with ESLint config | | `--app` | Initialize as an App Router project | | `--src-dir` | Initialize inside a `src/` directory | | `--turbo` | Enable Turbopack by default for development | | `--import-alias <alias-to-configure>` | Specify import alias to use (default "@/\*") | | `--empty` | Initialize an empty project | | `--use-npm` | Explicitly tell the CLI to bootstrap the application using npm | | `--use-pnpm` | Explicitly tell the CLI to bootstrap the application using pnpm | | `--use-yarn` | Explicitly tell the CLI to bootstrap the application using Yarn | | `--use-bun` | Explicitly tell the CLI to bootstrap the application using Bun | | `-e` or `--example [name] [github-url]` | An example to bootstrap the app with | | `--example-path <path-to-example>` | Specify the path to the example separately | | `--reset-preferences` | Explicitly tell the CLI to reset any stored preferences | | `--skip-install` | Explicitly tell the CLI to skip installing packages | | `--yes` | Use previous preferences or defaults for all options | ## Examples ## With the default template To create a new app using the default template, run the following command in your terminal: npx create-next-app@latest You will then be asked the following prompts: What is your project named? my-app Would you like to use TypeScript? No / Yes Would you like to use ESLint? No / Yes Would you like to use Tailwind CSS? No / Yes Would you like your code inside a `src/` directory? No / Yes Would you like to use App Router? (recommended) No / Yes Would you like to use Turbopack for `next dev`? No / Yes Would you like to customize the import alias (`@/*` by default)? No / Yes Once you've answered the prompts, a new project will be created with your chosen configuration. ## With an official Next.js example To create a new app using an official Next.js example, use the `--example` flag with the following command: npx create-next-app@latest --example [your-project-name] [example-name] You can view a list of all available examples along with setup instructions in the Next.js repository. ## With any public Github example To create a new app using any public Github example, use the `--example` option with the Github repo's URL. For example: npx create-next-app@latest --example [your-project-name] "https://github.com/.../" --- ## Page: https://nextjs.org/docs/14/pages/api-reference/cli/next The Next.js CLI allows you to develop, build, start your application, and more. Basic usage: npm run next [command] [options] ## Reference The following options are available: | Options | Description | | --- | --- | | `-h` or `--help` | Shows all available options | | `-v` or `--version` | Outputs the Next.js version number | ### Commands The following commands are available: | Command | Description | | --- | --- | | `dev` | Starts Next.js in development mode with Hot Module Reloading, error reporting, and more. | | `build` | Creates an optimized production build of your application. Displaying information about each route. | | `start` | Starts Next.js in production mode. The application should be compiled with `next build` first. | | `info` | Prints relevant details about the current system which can be used to report Next.js bugs. | | `lint` | Runs ESLint for all files in the `/src`, `/app`, `/pages`, `/components`, and `/lib` directories. It also provides a guided setup to install any required dependencies if ESLint it is not already configured in your application. | | `telemetry` | Allows you to enable or disable Next.js' completely anonymous telemetry collection. | > **Good to know**: Running `next` without a command is an alias for `next dev`. ### `next dev` options `next dev` starts the application in development mode with Hot Module Reloading (HMR), error reporting, and more. The following options are available when running `next dev`: | Option | Description | | --- | --- | | `-h, --help` | Show all available options. | | `[directory]` | A directory in which to build the application. If not provided, current directory is used. | | `--turbo` | Starts development mode using Turbopack. | | `-p` or `--port <port>` | Specify a port number on which to start the application. Default: 3000, env: PORT | | `-H`or `--hostname <hostname>` | Specify a hostname on which to start the application. Useful for making the application available for other devices on the network. Default: 0.0.0.0 | | `--experimental-https` | Starts the server with HTTPS and generates a self-signed certificate. | | `--experimental-https-key <path>` | Path to a HTTPS key file. | | `--experimental-https-cert <path>` | Path to a HTTPS certificate file. | | `--experimental-https-ca <path>` | Path to a HTTPS certificate authority file. | | `--experimental-upload-trace <traceUrl>` | Reports a subset of the debugging trace to a remote HTTP URL. | ### `next build` options `next build` creates an optimized production build of your application. The output displays information about each route. For example: Route (app) Size First Load JS ┌ ○ /_not-found 0 B 0 kB └ ƒ /products/[id] 0 B 0 kB ○ (Static) prerendered as static content ƒ (Dynamic) server-rendered on demand * **Size**: The size of assets downloaded when navigating to the page client-side. The size for each route only includes its dependencies. * **First Load JS**: The size of assets downloaded when visiting the page from the server. The amount of JS shared by all is shown as a separate metric. Both of these values are **compressed with gzip**. The first load is indicated by green, yellow, or red. Aim for green for performant applications. The following options are available for the `next build` command: | Option | Description | | --- | --- | | `-h, --help` | Show all available options. | | `[directory]` | A directory on which to build the application. If not provided, the current directory will be used. | | `-d` or `--debug` | Enables a more verbose build output. With this flag enabled additional build output like rewrites, redirects, and headers will be shown. | | | | | `--profile` | Enables production profiling for React. | | `--no-lint` | Disables linting. | | `--no-mangling` | Disables mangling. This may affect performance and should only be used for debugging purposes. | | `--experimental-app-only` | Builds only App Router routes. | | `--experimental-build-mode [mode]` | Uses an experimental build mode. (choices: "compile", "generate", default: "default") | ### `next start` options `next start` starts the application in production mode. The application should be compiled with `next build` first. The following options are available for the `next start` command: | Option | Description | | --- | --- | | `-h` or `--help` | Show all available options. | | `[directory]` | A directory on which to start the application. If no directory is provided, the current directory will be used. | | `-p` or `--port <port>` | Specify a port number on which to start the application. (default: 3000, env: PORT) | | `-H` or `--hostname <hostname>` | Specify a hostname on which to start the application (default: 0.0.0.0). | | `--keepAliveTimeout <keepAliveTimeout>` | Specify the maximum amount of milliseconds to wait before closing the inactive connections. | ### `next info` options `next info` prints relevant details about the current system which can be used to report Next.js bugs when opening a GitHub issue. This information includes Operating System platform/arch/version, Binaries (Node.js, npm, Yarn, pnpm), package versions (`next`, `react`, `react-dom`), and more. The output should look like this: Operating System: Platform: darwin Arch: arm64 Version: Darwin Kernel Version 23.6.0 Available memory (MB): 65536 Available CPU cores: 10 Binaries: Node: 20.12.0 npm: 10.5.0 Yarn: 1.22.19 pnpm: 9.6.0 Relevant Packages: next: 15.0.0-canary.115 // Latest available version is detected (15.0.0-canary.115). eslint-config-next: 14.2.5 react: 19.0.0-rc react-dom: 19.0.0 typescript: 5.5.4 Next.js Config: output: N/A The following options are available for the `next info` command: | Option | Description | | --- | --- | | `-h` or `--help` | Show all available options | | `--verbose` | Collects additional information for debugging. | ### `next lint` options `next lint` runs ESLint for all files in the `pages/`, `app/`, `components/`, `lib/`, and `src/` directories. It also provides a guided setup to install any required dependencies if ESLint is not already configured in your application. The following options are available for the `next lint` command: | Option | Description | | --- | --- | | `[directory]` | A base directory on which to lint the application. If not provided, the current directory will be used. | | `-d, --dir, <dirs...>` | Include directory, or directories, to run ESLint. | | `--file, <files...>` | Include file, or files, to run ESLint. | | `--ext, [exts...]` | Specify JavaScript file extensions. (default: \[".js", ".mjs", ".cjs", ".jsx", ".ts", ".mts", ".cts", ".tsx"\]) | | `-c, --config, <config>` | Uses this configuration file, overriding all other configuration options. | | `--resolve-plugins-relative-to, <rprt>` | Specify a directory where plugins should be resolved from. | | `--strict` | Creates a `.eslintrc.json` file using the Next.js strict configuration. | | `--rulesdir, <rulesdir...>` | Uses additional rules from this directory(s). | | `--fix` | Automatically fix linting issues. | | `--fix-type <fixType>` | Specify the types of fixes to apply (e.g., problem, suggestion, layout). | | `--ignore-path <path>` | Specify a file to ignore. | | `--no-ignore <path>` | Disables the `--ignore-path` option. | | `--quiet` | Reports errors only. | | `--max-warnings [maxWarnings]` | Specify the number of warnings before triggering a non-zero exit code. (default: -1) | | `-o, --output-file, <outputFile>` | Specify a file to write report to. | | `-f, --format, <format>` | Uses a specific output format. | | `--no-inline-config` | Prevents comments from changing config or rules. | | `--report-unused-disable-directives-severity <level>` | Specify severity level for unused eslint-disable directives. (choices: "error", "off", "warn") | | `--no-cache` | Disables caching. | | `--cache-location, <cacheLocation>` | Specify a location for cache. | | `--cache-strategy, [cacheStrategy]` | Specify a strategy to use for detecting changed files in the cache. (default: "metadata") | | `--error-on-unmatched-pattern` | Reports errors when any file patterns are unmatched. | | `-h, --help` | Displays this message. | ### `next telemetry` options Next.js collects **completely anonymous** telemetry data about general usage. Participation in this anonymous program is optional, and you can opt-out if you prefer not to share information. The following options are available for the `next telemetry` command: | Option | Description | | --- | --- | | `-h, --help` | Show all available options. | | `--enable` | Enables Next.js' telemetry collection. | | `--disable` | Disables Next.js' telemetry collection. | Learn more about Telemetry. ## Examples ### Changing the default port By default, Next.js uses `http://localhost:3000` during development and with `next start`. The default port can be changed with the `-p` option, like so: next dev -p 4000 Or using the `PORT` environment variable: PORT=4000 next dev > **Good to know**: `PORT` cannot be set in `.env` as booting up the HTTP server happens before any other code is initialized. ### Using HTTPS during development For certain use cases like webhooks or authentication, it may be required to use HTTPS to have a secure environment on `localhost`. Next.js can generate a self-signed certificate with `next dev` using the `--experimental-https` flag: next dev --experimental-https You can also provide a custom certificate and key with `--experimental-https-key` and `--experimental-https-cert`. Optionally, you can provide a custom CA certificate with `--experimental-https-ca` as well. next dev --experimental-https --experimental-https-key ./certificates/localhost-key.pem --experimental-https-cert ./certificates/localhost.pem `next dev --experimental-https` is only intended for development and creates a locally trusted certificate with `mkcert`. In production, use properly issued certificates from trusted authorities. > **Good to know**: When deploying to Vercel, HTTPS is automatically configured for your Next.js application. ### Configuring a timeout for downstream proxies When deploying Next.js behind a downstream proxy (e.g. a load-balancer like AWS ELB/ALB), it's important to configure Next's underlying HTTP server with keep-alive timeouts that are _larger_ than the downstream proxy's timeouts. Otherwise, once a keep-alive timeout is reached for a given TCP connection, Node.js will immediately terminate that connection without notifying the downstream proxy. This results in a proxy error whenever it attempts to reuse a connection that Node.js has already terminated. To configure the timeout values for the production Next.js server, pass `--keepAliveTimeout` (in milliseconds) to `next start`, like so: next start --keepAliveTimeout 70000 ### Passing Node.js arguments You can pass any node arguments to `next` commands. For example: NODE_OPTIONS='--throw-deprecation' next NODE_OPTIONS='-r esm' next NODE_OPTIONS='--inspect' next --- ## Page: https://nextjs.org/docs/14/architecture #### Subscribe to our newsletter Stay updated on new releases and features, guides, and case studies. --- ## Page: https://nextjs.org/docs/14/architecture/accessibility The Next.js team is committed to making Next.js accessible to all developers (and their end-users). By adding accessibility features to Next.js by default, we aim to make the Web more inclusive for everyone. ## Route Announcements When transitioning between pages rendered on the server (e.g. using the `<a href>` tag) screen readers and other assistive technology announce the page title when the page loads so that users understand that the page has changed. In addition to traditional page navigations, Next.js also supports client-side transitions for improved performance (using `next/link`). To ensure that client-side transitions are also announced to assistive technology, Next.js includes a route announcer by default. The Next.js route announcer looks for the page name to announce by first inspecting `document.title`, then the `<h1>` element, and finally the URL pathname. For the most accessible user experience, ensure that each page in your application has a unique and descriptive title. ## Linting Next.js provides an integrated ESLint experience out of the box, including custom rules for Next.js. By default, Next.js includes `eslint-plugin-jsx-a11y` to help catch accessibility issues early, including warning on: * aria-props * aria-proptypes * aria-unsupported-elements * role-has-required-aria-props * role-supports-aria-props For example, this plugin helps ensure you add alt text to `img` tags, use correct `aria-*` attributes, use correct `role` attributes, and more. ## Accessibility Resources * WebAIM WCAG checklist * WCAG 2.2 Guidelines * The A11y Project * Check color contrast ratios between foreground and background elements * Use `prefers-reduced-motion` when working with animations --- ## Page: https://nextjs.org/docs/14/architecture/fast-refresh Fast Refresh is a Next.js feature that gives you instantaneous feedback on edits made to your React components. Fast Refresh is enabled by default in all Next.js applications on **9.4 or newer**. With Next.js Fast Refresh enabled, most edits should be visible within a second, **without losing component state**. ## How It Works * If you edit a file that **only exports React component(s)**, Fast Refresh will update the code only for that file, and re-render your component. You can edit anything in that file, including styles, rendering logic, event handlers, or effects. * If you edit a file with exports that _aren't_ React components, Fast Refresh will re-run both that file, and the other files importing it. So if both `Button.js` and `Modal.js` import `theme.js`, editing `theme.js` will update both components. * Finally, if you **edit a file** that's **imported by files outside of the React tree**, Fast Refresh **will fall back to doing a full reload**. You might have a file which renders a React component but also exports a value that is imported by a **non-React component**. For example, maybe your component also exports a constant, and a non-React utility file imports it. In that case, consider migrating the constant to a separate file and importing it into both files. This will re-enable Fast Refresh to work. Other cases can usually be solved in a similar way. ## Error Resilience ### Syntax Errors If you make a syntax error during development, you can fix it and save the file again. The error will disappear automatically, so you won't need to reload the app. **You will not lose component state**. ### Runtime Errors If you make a mistake that leads to a runtime error inside your component, you'll be greeted with a contextual overlay. Fixing the error will automatically dismiss the overlay, without reloading the app. Component state will be retained if the error did not occur during rendering. If the error did occur during rendering, React will remount your application using the updated code. If you have error boundaries in your app (which is a good idea for graceful failures in production), they will retry rendering on the next edit after a rendering error. This means having an error boundary can prevent you from always getting reset to the root app state. However, keep in mind that error boundaries shouldn't be _too_ granular. They are used by React in production, and should always be designed intentionally. ## Limitations Fast Refresh tries to preserve local React state in the component you're editing, but only if it's safe to do so. Here's a few reasons why you might see local state being reset on every edit to a file: * Local state is not preserved for class components (only function components and Hooks preserve state). * The file you're editing might have _other_ exports in addition to a React component. * Sometimes, a file would export the result of calling a higher-order component like `HOC(WrappedComponent)`. If the returned component is a class, its state will be reset. * Anonymous arrow functions like `export default () => <div />;` cause Fast Refresh to not preserve local component state. For large codebases you can use our `name-default-component` codemod. As more of your codebase moves to function components and Hooks, you can expect state to be preserved in more cases. ## Tips * Fast Refresh preserves React local state in function components (and Hooks) by default. * Sometimes you might want to _force_ the state to be reset, and a component to be remounted. For example, this can be handy if you're tweaking an animation that only happens on mount. To do this, you can add `// @refresh reset` anywhere in the file you're editing. This directive is local to the file, and instructs Fast Refresh to remount components defined in that file on every edit. * You can put `console.log` or `debugger;` into the components you edit during development. * Remember that imports are case sensitive. Both fast and full refresh can fail, when your import doesn't match the actual filename. For example, `'./header'` vs `'./Header'`. ## Fast Refresh and Hooks When possible, Fast Refresh attempts to preserve the state of your component between edits. In particular, `useState` and `useRef` preserve their previous values as long as you don't change their arguments or the order of the Hook calls. Hooks with dependencies—such as `useEffect`, `useMemo`, and `useCallback`—will _always_ update during Fast Refresh. Their list of dependencies will be ignored while Fast Refresh is happening. For example, when you edit `useMemo(() => x * 2, [x])` to `useMemo(() => x * 10, [x])`, it will re-run even though `x` (the dependency) has not changed. If React didn't do that, your edit wouldn't reflect on the screen! Sometimes, this can lead to unexpected results. For example, even a `useEffect` with an empty array of dependencies would still re-run once during Fast Refresh. However, writing code resilient to occasional re-running of `useEffect` is a good practice even without Fast Refresh. It will make it easier for you to introduce new dependencies to it later on and it's enforced by React Strict Mode, which we highly recommend enabling. --- ## Page: https://nextjs.org/docs/14/architecture/nextjs-compiler The Next.js Compiler, written in Rust using SWC, allows Next.js to transform and minify your JavaScript code for production. This replaces Babel for individual files and Terser for minifying output bundles. Compilation using the Next.js Compiler is 17x faster than Babel and enabled by default since Next.js version 12. If you have an existing Babel configuration or are using unsupported features, your application will opt-out of the Next.js Compiler and continue using Babel. ## Why SWC? SWC is an extensible Rust-based platform for the next generation of fast developer tools. SWC can be used for compilation, minification, bundling, and more – and is designed to be extended. It's something you can call to perform code transformations (either built-in or custom). Running those transformations happens through higher-level tools like Next.js. We chose to build on SWC for a few reasons: * **Extensibility:** SWC can be used as a Crate inside Next.js, without having to fork the library or workaround design constraints. * **Performance:** We were able to achieve ~3x faster Fast Refresh and ~5x faster builds in Next.js by switching to SWC, with more room for optimization still in progress. * **WebAssembly:** Rust's support for WASM is essential for supporting all possible platforms and taking Next.js development everywhere. * **Community:** The Rust community and ecosystem are amazing and still growing. ## Supported Features ### Styled Components We're working to port `babel-plugin-styled-components` to the Next.js Compiler. First, update to the latest version of Next.js: `npm install next@latest`. Then, update your `next.config.js` file: module.exports = { compiler: { styledComponents: true, }, } For advanced use cases, you can configure individual properties for styled-components compilation. > Note: `minify`, `transpileTemplateLiterals` and `pure` are not yet implemented. You can follow the progress here. `ssr` and `displayName` transforms are the main requirement for using `styled-components` in Next.js. module.exports = { compiler: { // see https://styled-components.com/docs/tooling#babel-plugin for more info on the options. styledComponents: { // Enabled by default in development, disabled in production to reduce file size, // setting this will override the default for all environments. displayName?: boolean, // Enabled by default. ssr?: boolean, // Enabled by default. fileName?: boolean, // Empty by default. topLevelImportPaths?: string[], // Defaults to ["index"]. meaninglessFileNames?: string[], // Enabled by default. cssProp?: boolean, // Empty by default. namespace?: string, // Not supported yet. minify?: boolean, // Not supported yet. transpileTemplateLiterals?: boolean, // Not supported yet. pure?: boolean, }, }, } ### Jest The Next.js Compiler transpiles your tests and simplifies configuring Jest together with Next.js including: * Auto mocking of `.css`, `.module.css` (and their `.scss` variants), and image imports * Automatically sets up `transform` using SWC * Loading `.env` (and all variants) into `process.env` * Ignores `node_modules` from test resolving and transforms * Ignoring `.next` from test resolving * Loads `next.config.js` for flags that enable experimental SWC transforms First, update to the latest version of Next.js: `npm install next@latest`. Then, update your `jest.config.js` file: const nextJest = require('next/jest') // Providing the path to your Next.js app which will enable loading next.config.js and .env files const createJestConfig = nextJest({ dir: './' }) // Any custom config you want to pass to Jest const customJestConfig = { setupFilesAfterEnv: ['<rootDir>/jest.setup.js'], } // createJestConfig is exported in this way to ensure that next/jest can load the Next.js configuration, which is async module.exports = createJestConfig(customJestConfig) ### Relay To enable Relay support: module.exports = { compiler: { relay: { // This should match relay.config.js src: './', artifactDirectory: './__generated__', language: 'typescript', eagerEsModules: false, }, }, } > **Good to know**: In Next.js, all JavaScript files in `pages` directory are considered routes. So, for `relay-compiler` you'll need to specify `artifactDirectory` configuration settings outside of the `pages`, otherwise `relay-compiler` will generate files next to the source file in the `__generated__` directory, and this file will be considered a route, which will break production builds. ### Remove React Properties Allows to remove JSX properties. This is often used for testing. Similar to `babel-plugin-react-remove-properties`. To remove properties matching the default regex `^data-test`: module.exports = { compiler: { reactRemoveProperties: true, }, } To remove custom properties: module.exports = { compiler: { // The regexes defined here are processed in Rust so the syntax is different from // JavaScript `RegExp`s. See https://docs.rs/regex. reactRemoveProperties: { properties: ['^data-custom$'] }, }, } ### Remove Console This transform allows for removing all `console.*` calls in application code (not `node_modules`). Similar to `babel-plugin-transform-remove-console`. Remove all `console.*` calls: module.exports = { compiler: { removeConsole: true, }, } Remove `console.*` output except `console.error`: module.exports = { compiler: { removeConsole: { exclude: ['error'], }, }, } ### Legacy Decorators Next.js will automatically detect `experimentalDecorators` in `jsconfig.json` or `tsconfig.json`. Legacy decorators are commonly used with older versions of libraries like `mobx`. This flag is only supported for compatibility with existing applications. We do not recommend using legacy decorators in new applications. First, update to the latest version of Next.js: `npm install next@latest`. Then, update your `jsconfig.json` or `tsconfig.json` file: { "compilerOptions": { "experimentalDecorators": true } } ### importSource Next.js will automatically detect `jsxImportSource` in `jsconfig.json` or `tsconfig.json` and apply that. This is commonly used with libraries like Theme UI. First, update to the latest version of Next.js: `npm install next@latest`. Then, update your `jsconfig.json` or `tsconfig.json` file: { "compilerOptions": { "jsxImportSource": "theme-ui" } } ### Emotion We're working to port `@emotion/babel-plugin` to the Next.js Compiler. First, update to the latest version of Next.js: `npm install next@latest`. Then, update your `next.config.js` file: module.exports = { compiler: { emotion: boolean | { // default is true. It will be disabled when build type is production. sourceMap?: boolean, // default is 'dev-only'. autoLabel?: 'never' | 'dev-only' | 'always', // default is '[local]'. // Allowed values: `[local]` `[filename]` and `[dirname]` // This option only works when autoLabel is set to 'dev-only' or 'always'. // It allows you to define the format of the resulting label. // The format is defined via string where variable parts are enclosed in square brackets []. // For example labelFormat: "my-classname--[local]", where [local] will be replaced with the name of the variable the result is assigned to. labelFormat?: string, // default is undefined. // This option allows you to tell the compiler what imports it should // look at to determine what it should transform so if you re-export // Emotion's exports, you can still use transforms. importMap?: { [packageName: string]: { [exportName: string]: { canonicalImport?: [string, string], styledBaseImport?: [string, string], } } }, }, }, } ### Minification Next.js' swc compiler is used for minification by default since v13. This is 7x faster than Terser. If Terser is still needed for any reason this can be configured. module.exports = { swcMinify: false, } ### Module Transpilation Next.js can automatically transpile and bundle dependencies from local packages (like monorepos) or from external dependencies (`node_modules`). This replaces the `next-transpile-modules` package. module.exports = { transpilePackages: ['@acme/ui', 'lodash-es'], } ### Modularize Imports This option has been superseded by `optimizePackageImports` in Next.js 13.5. We recommend upgrading to use the new option that does not require manual configuration of import paths. ## Experimental Features ### SWC Trace profiling You can generate SWC's internal transform traces as chromium's trace event format. module.exports = { experimental: { swcTraceProfiling: true, }, } Once enabled, swc will generate trace named as `swc-trace-profile-${timestamp}.json` under `.next/`. Chromium's trace viewer (chrome://tracing/, https://ui.perfetto.dev/), or compatible flamegraph viewer (https://www.speedscope.app/) can load & visualize generated traces. ### SWC Plugins (Experimental) You can configure swc's transform to use SWC's experimental plugin support written in wasm to customize transformation behavior. module.exports = { experimental: { swcPlugins: [ [ 'plugin', { ...pluginOptions, }, ], ], }, } `swcPlugins` accepts an array of tuples for configuring plugins. A tuple for the plugin contains the path to the plugin and an object for plugin configuration. The path to the plugin can be an npm module package name or an absolute path to the `.wasm` binary itself. ## Unsupported Features When your application has a `.babelrc` file, Next.js will automatically fall back to using Babel for transforming individual files. This ensures backwards compatibility with existing applications that leverage custom Babel plugins. If you're using a custom Babel setup, please share your configuration. We're working to port as many commonly used Babel transformations as possible, as well as supporting plugins in the future. ## Version History | Version | Changes | | --- | --- | | `v13.1.0` | Module Transpilation and Modularize Imports stable. | | `v13.0.0` | SWC Minifier enabled by default. | | `v12.3.0` | SWC Minifier stable. | | `v12.2.0` | SWC Plugins experimental support added. | | `v12.1.0` | Added support for Styled Components, Jest, Relay, Remove React Properties, Legacy Decorators, Remove Console, and jsxImportSource. | | `v12.0.0` | Next.js Compiler introduced. | --- ## Page: https://nextjs.org/docs/14/architecture/supported-browsers Next.js supports **modern browsers** with zero configuration. * Chrome 64+ * Edge 79+ * Firefox 67+ * Opera 51+ * Safari 12+ ## Browserslist If you would like to target specific browsers or features, Next.js supports Browserslist configuration in your `package.json` file. Next.js uses the following Browserslist configuration by default: { "browserslist": [ "chrome 64", "edge 79", "firefox 67", "opera 51", "safari 12" ] } ## Polyfills We inject widely used polyfills, including: * **fetch()** — Replacing: `whatwg-fetch` and `unfetch`. * **URL** — Replacing: the `url` package (Node.js API). * **Object.assign()** — Replacing: `object-assign`, `object.assign`, and `core-js/object/assign`. If any of your dependencies include these polyfills, they’ll be eliminated automatically from the production build to avoid duplication. In addition, to reduce bundle size, Next.js will only load these polyfills for browsers that require them. The majority of the web traffic globally will not download these polyfills. ### Custom Polyfills If your own code or any external npm dependencies require features not supported by your target browsers (such as IE 11), you need to add polyfills yourself. In this case, you should add a top-level import for the **specific polyfill** you need in your Custom `<App>` or the individual component. ## JavaScript Language Features Next.js allows you to use the latest JavaScript features out of the box. In addition to ES6 features, Next.js also supports: * Async/await (ES2017) * Object Rest/Spread Properties (ES2018) * Dynamic `import()` (ES2020) * Optional Chaining (ES2020) * Nullish Coalescing (ES2020) * Class Fields and Static Properties (ES2022) * and more! ### TypeScript Features Next.js has built-in TypeScript support. Learn more here. ### Customizing Babel Config (Advanced) You can customize babel configuration. Learn more here. --- ## Page: https://nextjs.org/docs/14/architecture/turbopack Turbopack (beta) is an incremental bundler optimized for JavaScript and TypeScript, written in Rust, and built into Next.js. ## Usage Turbopack can be used in Next.js in both the `pages` and `app` directories for faster local development. To enable Turbopack, use the `--turbo` flag when running the Next.js development server. { "scripts": { "dev": "next dev --turbo", "build": "next build", "start": "next start", "lint": "next lint" } } ## Supported features Turbopack in Next.js requires zero-configuration for most users and can be extended for more advanced use cases. To learn more about the currently supported features for Turbopack, view the API Reference. ## Unsupported features Turbopack currently only supports `next dev` and does not support `next build`. We are currently working on support for builds as we move closer towards stability. These features are currently not supported: * `webpack()` configuration in `next.config.js` * Turbopack replaces Webpack, this means that webpack configuration is not supported. * To configure Turbopack, see the documentation. * A subset of Webpack loaders are supported in Turbopack. * Babel (`.babelrc`) * Turbopack leverages the SWC compiler for all transpilation and optimizations. This means that Babel is not included by default. * If you have a `.babelrc` file, you might no longer need it because Next.js includes common Babel plugins as SWC transforms that can be enabled. You can read more about this in the compiler documentation. * If you still need to use Babel after verifying your particular use case is not covered, you can leverage Turbopack's support for custom webpack loaders to include `babel-loader`. * Creating a root layout automatically in App Router. * This behavior is currently not supported since it changes input files, instead, an error will be shown for you manually add a root layout in the desired location. * `@next/font` (legacy font support). * `@next/font` is deprecated in favor of `next/font`. `next/font` is fully supported with Turbopack. * `new Worker('file', import.meta.url)`. * We are planning to implement this in the future. * Relay transforms * We are planning to implement this in the future. * `experimental.nextScriptWorkers` * We are planning to implement this in the future. * AMP. * We are currently not planning to support AMP in Next.js with Turbopack. * Yarn PnP * We are currently not planning to support Yarn PnP in Next.js with Turbopack. * `experimental.urlImports` * We are currently not planning to support `experimental.urlImports` in Next.js with Turbopack. ## Generating Trace Files Trace files allow the Next.js team to investigate and improve performance metrics and memory usage. To generate a trace file, append `NEXT_TURBOPACK_TRACING=1` to the `next dev --turbo` command, this will generate a `.next/trace.log` file. When reporting issues related to Turbopack performance and memory usage, please include the trace file in your GitHub issue. --- ## Page: https://nextjs.org/docs/14/community You are currently viewing documentation for version 14 of Next.js. With over 5 million weekly downloads, Next.js has a large and active community of developers across the world. Here's how you can get involved in our community: ## Contributing There are a couple of ways you can contribute to the development of Next.js: * Documentation: Suggest improvements or even write new sections to help our users understand how to use Next.js. * Examples: Help developers integrate Next.js with other tools and services by creating a new example or improving an existing one. * Codebase: Learn more about the underlying architecture, contribute to bug fixes, errors, and suggest new features. ## Discussions If you have a question about Next.js, or want to help others, you're always welcome to join the conversation: * GitHub Discussions * Discord * Reddit ## Social Media Follow Next.js on Twitter for the latest updates, and subscribe to the Vercel YouTube channel for Next.js videos. ## Code of Conduct We believe in creating an inclusive, welcoming community. As such, we ask all members to adhere to our Code of Conduct. This document outlines our expectations for participant behavior. We invite you to read it and help us maintain a safe and respectful environment. --- ## Page: https://nextjs.org/docs/14 Welcome to the Next.js documentation! ## What is Next.js? Next.js is a React framework for building full-stack web applications. You use React Components to build user interfaces, and Next.js for additional features and optimizations. Under the hood, Next.js also abstracts and automatically configures tooling needed for React, like bundling, compiling, and more. This allows you to focus on building your application instead of spending time with configuration. Whether you're an individual developer or part of a larger team, Next.js can help you build interactive, dynamic, and fast React applications. ## Main Features Some of the main Next.js features include: | Feature | Description | | --- | --- | | Routing | A file-system based router built on top of Server Components that supports layouts, nested routing, loading states, error handling, and more. | | Rendering | Client-side and Server-side Rendering with Client and Server Components. Further optimized with Static and Dynamic Rendering on the server with Next.js. Streaming on Edge and Node.js runtimes. | | Data Fetching | Simplified data fetching with async/await in Server Components, and an extended `fetch` API for request memoization, data caching and revalidation. | | Styling | Support for your preferred styling methods, including CSS Modules, Tailwind CSS, and CSS-in-JS | | Optimizations | Image, Fonts, and Script Optimizations to improve your application's Core Web Vitals and User Experience. | | TypeScript | Improved support for TypeScript, with better type checking and more efficient compilation, as well as custom TypeScript Plugin and type checker. | ## How to Use These Docs On the left side of the screen, you'll find the docs navbar. The pages of the docs are organized sequentially, from basic to advanced, so you can follow them step-by-step when building your application. However, you can read them in any order or skip to the pages that apply to your use case. On the right side of the screen, you'll see a table of contents that makes it easier to navigate between sections of a page. If you need to quickly find a page, you can use the search bar at the top, or the search shortcut (`Ctrl+K` or `Cmd+K`). To get started, checkout the Installation guide. ## App Router vs Pages Router Next.js has two different routers: the App Router and the Pages Router. The App Router is a newer router that allows you to use React's latest features, such as Server Components and Streaming. The Pages Router is the original Next.js router, which allowed you to build server-rendered React applications and continues to be supported for older Next.js applications. At the top of the sidebar, you'll notice a dropdown menu that allows you to switch between the **App Router** and the **Pages Router** features. Since there are features that are unique to each directory, it's important to keep track of which tab is selected. The breadcrumbs at the top of the page will also indicate whether you're viewing App Router docs or Pages Router docs. ## Pre-Requisite Knowledge Although our docs are designed to be beginner-friendly, we need to establish a baseline so that the docs can stay focused on Next.js functionality. We'll make sure to provide links to relevant documentation whenever we introduce a new concept. To get the most out of our docs, it's recommended that you have a basic understanding of HTML, CSS, and React. If you need to brush up on your React skills, check out our React Foundations Course, which will introduce you to the fundamentals. Then, learn more about Next.js by building a dashboard application. ## Accessibility For optimal accessibility when using a screen reader while reading the docs, we recommend using Firefox and NVDA, or Safari and VoiceOver. If you have questions about anything related to Next.js, you're always welcome to ask our community on GitHub Discussions, Discord, Twitter, and Reddit. --- ## Page: https://nextjs.org/docs/canary Welcome to the Next.js documentation! ## What is Next.js? Next.js is a React framework for building full-stack web applications. You use React Components to build user interfaces, and Next.js for additional features and optimizations. Under the hood, Next.js also abstracts and automatically configures tooling needed for React, like bundling, compiling, and more. This allows you to focus on building your application instead of spending time with configuration. Whether you're an individual developer or part of a larger team, Next.js can help you build interactive, dynamic, and fast React applications. ## Main Features Some of the main Next.js features include: | Feature | Description | | --- | --- | | Routing | A file-system based router built on top of Server Components that supports layouts, nested routing, loading states, error handling, and more. | | Rendering | Client-side and Server-side Rendering with Client and Server Components. Further optimized with Static and Dynamic Rendering on the server with Next.js. Streaming on Edge and Node.js runtimes. | | Data Fetching | Simplified data fetching with async/await in Server Components, and an extended `fetch` API for request memoization, data caching and revalidation. | | Styling | Support for your preferred styling methods, including CSS Modules, Tailwind CSS, and CSS-in-JS | | Optimizations | Image, Fonts, and Script Optimizations to improve your application's Core Web Vitals and User Experience. | | TypeScript | Improved support for TypeScript, with better type checking and more efficient compilation, as well as custom TypeScript Plugin and type checker. | ## How to Use These Docs On the left side of the screen, you'll find the docs navbar. The pages of the docs are organized sequentially, from basic to advanced, so you can follow them step-by-step when building your application. However, you can read them in any order or skip to the pages that apply to your use case. On the right side of the screen, you'll see a table of contents that makes it easier to navigate between sections of a page. If you need to quickly find a page, you can use the search bar at the top, or the search shortcut (`Ctrl+K` or `Cmd+K`). To get started, check out the Installation guide. ## App Router vs Pages Router Next.js has two different routers: the App Router and the Pages Router. The App Router is a newer router that allows you to use React's latest features, such as Server Components and Streaming. The Pages Router is the original Next.js router, which allowed you to build server-rendered React applications and continues to be supported for older Next.js applications. At the top of the sidebar, you'll notice a dropdown menu that allows you to switch between the **App Router** and the **Pages Router** features. Since there are features that are unique to each directory, it's important to keep track of which tab is selected. The breadcrumbs at the top of the page will also indicate whether you're viewing App Router docs or Pages Router docs. ## Pre-Requisite Knowledge Although our docs are designed to be beginner-friendly, we need to establish a baseline so that the docs can stay focused on Next.js functionality. We'll make sure to provide links to relevant documentation whenever we introduce a new concept. To get the most out of our docs, it's recommended that you have a basic understanding of HTML, CSS, and React. If you need to brush up on your React skills, check out our React Foundations Course, which will introduce you to the fundamentals. Then, learn more about Next.js by building a dashboard application. ## Accessibility For optimal accessibility when using a screen reader while reading the docs, we recommend using Firefox and NVDA, or Safari and VoiceOver. If you have questions about anything related to Next.js, you're always welcome to ask our community on GitHub Discussions, Discord, X (Twitter), and Reddit. --- ## Page: https://nextjs.org/docs/14/app The Next.js App Router introduces a new model for building applications using React's latest features such as Server Components, Streaming with Suspense, and Server Actions. Get started with the App Router by creating your first page. ## Frequently Asked Questions ### How can I access the request object in a layout? You intentionally cannot access the raw request object. However, you can access `headers` and `cookies` through server-only functions. You can also set cookies. Layouts do not rerender. They can be cached and reused to avoid unnecessary computation when navigating between pages. By restricting layouts from accessing the raw request, Next.js can prevent the execution of potentially slow or expensive user code within the layout, which could negatively impact performance. This design also enforces consistent and predictable behavior for layouts across different pages, which simplifies development and debugging. Depending on the UI pattern you're building, Parallel Routes allow you to render multiple pages in the same layout, and pages have access to the route segments as well as the URL search params. ### How can I access the URL on a page? By default, pages are Server Components. You can access the route segments through the `params` prop and the URL search params through the `searchParams` prop for a given page. If you are using Client Components, you can use `usePathname`, `useSelectedLayoutSegment`, and `useSelectedLayoutSegments` for more complex routes. Further, depending on the UI pattern you're building, Parallel Routes allow you to render multiple pages in the same layout, and pages have access to the route segments as well as the URL search params. ### How can I redirect from a Server Component? You can use `redirect` to redirect from a page to a relative or absolute URL. `redirect` is a temporary (307) redirect, while `permanentRedirect` is a permanent (308) redirect. When these functions are used while streaming UI, they will insert a meta tag to emit the redirect on the client side. ### How can I handle authentication with the App Router? Here are some common authentication solutions that support the App Router: * NextAuth.js * Clerk * Lucia * Auth0 * Stytch * Kinde * Or manually handling sessions or JWTs ### How can I set cookies? You can set cookies in Server Actions or Route Handlers using the `cookies` function. Since HTTP does not allow setting cookies after streaming starts, you cannot set cookies from a page or layout directly. You can also set cookies from Middleware. ### How can I build multi-tenant apps? If you are looking to build a single Next.js application that serves multiple tenants, we have built an example showing our recommended architecture. ### How can I invalidate the App Router cache? There are multiple layers of caching in Next.js, and thus, multiple ways to invalidate different parts of the cache. Learn more about caching. ### Are there any comprehensive, open-source applications built on the App Router? Yes. You can view Next.js Commerce or the Platforms Starter Kit for two larger examples of using the App Router that are open-source. ## Learn More * Routing Fundamentals * Data Fetching, Caching, and Revalidating * Forms and Mutations * Caching * Rendering Fundamentals * Server Components * Client Components --- ## Page: https://nextjs.org/docs/14/pages You are currently viewing documentation for version 14 of Next.js. Before Next.js 13, the Pages Router was the main way to create routes in Next.js. It used an intuitive file-system router to map each file to a route. The Pages Router is still supported in newer versions of Next.js, but we recommend migrating to the new App Router to leverage React's latest features. Use this section of the documentation for existing applications that use the Pages Router. --- ## Page: https://nextjs.org/docs/14/messages/middleware-upgrade-guide As we work on improving Middleware for General Availability (GA), we've made some changes to the Middleware APIs (and how you define Middleware in your application) based on your feedback. This upgrade guide will help you understand the changes, why they were made, and how to migrate your existing Middleware to the new API. The guide is for Next.js developers who: * Currently use the beta Next.js Middleware features * Choose to upgrade to the next stable version of Next.js (`v12.2`) You can start upgrading your Middleware usage today with the latest release (`npm i next@latest`). > **Note**: These changes described in this guide are included in Next.js `12.2`. You can keep your current site structure, including nested Middleware, until you move to `12.2` (or a `canary` build of Next.js). If you have ESLint configured, you will need to run `npm i eslint-config-next@latest --save-dev` to upgrade your ESLint configuration to ensure the same version is being used as the Next.js version. You might also need to restart VSCode for the changes to take effect. ## Using Next.js Middleware on Vercel If you're using Next.js on Vercel, your existing deploys using Middleware will continue to work, and you can continue to deploy your site using Middleware. When you upgrade your site to the next stable version of Next.js (`v12.2`), you will need to follow this upgrade guide to update your Middleware. ## Breaking changes 1. No Nested Middleware 2. No Response Body 3. Cookies API Revamped 4. New User-Agent Helper 5. No More Page Match Data 6. Executing Middleware on Internal Next.js Requests ## No Nested Middleware ### Summary of changes * Define a single Middleware file next to your `pages` folder * No need to prefix the file with an underscore * A custom matcher can be used to define matching routes using an exported config object ### Explanation Previously, you could create a `_middleware.ts` file under the `pages` directory at any level. Middleware execution was based on the file path where it was created. Based on customer feedback, we have replaced this API with a single root Middleware, which provides the following improvements: * **Faster execution with lower latency**: With nested Middleware, a single request could invoke multiple Middleware functions. A single Middleware means a single function execution, which is more efficient. * **Less expensive**: Middleware usage is billed per invocation. Using nested Middleware, a single request could invoke multiple Middleware functions, meaning multiple Middleware charges per request. A single Middleware means a single invocation per request and is more cost effective. * **Middleware can conveniently filter on things besides routes**: With nested Middleware, the Middleware files were located in the `pages` directory and Middleware was executed based on request paths. By moving to a single root Middleware, you can still execute code based on request paths, but you can now more conveniently execute Middleware based on other conditions, like `cookies` or the presence of a request header. * **Deterministic execution ordering**: With nested Middleware, a single request could match multiple Middleware functions. For example, a request to `/dashboard/users/*` would invoke Middleware defined in both `/dashboard/users/_middleware.ts` and `/dashboard/_middleware.js`. However, the execution order is difficult to reason about. Moving to a single, root Middleware more explicitly defines execution order. * **Supports Next.js Layouts (RFC)**: Moving to a single, root Middleware helps support the new Layouts (RFC) in Next.js. ### How to upgrade You should declare **one single Middleware file** in your application, which should be located next to the `pages` directory and named **without** an `_` prefix. Your Middleware file can still have either a `.ts` or `.js` extension. Middleware will be invoked for **every route in the app**, and a custom matcher can be used to define matching filters. The following is an example for a Middleware that triggers for `/about/*` and `/dashboard/:path*`, the custom matcher is defined in an exported config object: import { NextResponse } from 'next/server' import type { NextRequest } from 'next/server' export function middleware(request: NextRequest) { return NextResponse.rewrite(new URL('/about-2', request.url)) } // Supports both a single string value or an array of matchers export const config = { matcher: ['/about/:path*', '/dashboard/:path*'], } The matcher config also allows full regex so matching like negative lookaheads or character matching is supported. An example of a negative lookahead to match all except specific paths can be seen here: export const config = { matcher: [ /* * Match all request paths except for the ones starting with: * - api (API routes) * - _next/static (static files) * - favicon.ico (favicon file) */ '/((?!api|_next/static|favicon.ico).*)', ], } While the config option is preferred since it doesn't get invoked on every request, you can also use conditional statements to only run the Middleware when it matches specific paths. One advantage of using conditionals is defining explicit ordering for when Middleware executes. The following example shows how you can merge two previously nested Middleware: import type { NextRequest } from 'next/server' export function middleware(request: NextRequest) { if (request.nextUrl.pathname.startsWith('/about')) { // This logic is only applied to /about } if (request.nextUrl.pathname.startsWith('/dashboard')) { // This logic is only applied to /dashboard } } ## No Response Body ### Summary of changes * Middleware can no longer produce a response body * If your Middleware _does_ respond with a body, a runtime error will be thrown * Migrate to using `rewrite`/`redirect` to pages/APIs handling a response ### Explanation To respect the differences in client-side and server-side navigation, and to help ensure that developers do not build insecure Middleware, we are removing the ability to send response bodies in Middleware. This ensures that Middleware is only used to `rewrite`, `redirect`, or modify the incoming request (e.g. setting cookies). The following patterns will no longer work: new Response('a text value') new Response(streamOrBuffer) new Response(JSON.stringify(obj), { headers: 'application/json' }) NextResponse.json() ### How to upgrade For cases where Middleware is used to respond (such as authorization), you should migrate to use `rewrite`/`redirect` to pages that show an authorization error, login forms, or to an API Route. #### Before import { NextResponse } from 'next/server' import type { NextRequest } from 'next/server' import { isAuthValid } from './lib/auth' export function middleware(request: NextRequest) { // Example function to validate auth if (isAuthValid(request)) { return NextResponse.next() } return NextResponse.json({ message: 'Auth required' }, { status: 401 }) } #### After import { NextResponse } from 'next/server' import type { NextRequest } from 'next/server' import { isAuthValid } from './lib/auth' export function middleware(request: NextRequest) { // Example function to validate auth if (isAuthValid(request)) { return NextResponse.next() } const loginUrl = new URL('/login', request.url) loginUrl.searchParams.set('from', request.nextUrl.pathname) return NextResponse.redirect(loginUrl) } #### Edge API Routes If you were previously using Middleware to forward headers to an external API, you can now use Edge API Routes: import { type NextRequest } from 'next/server' export const config = { runtime: 'edge', } export default async function handler(req: NextRequest) { const authorization = req.cookies.get('authorization') return fetch('https://backend-api.com/api/protected', { method: req.method, headers: { authorization, }, redirect: 'manual', }) } ## Cookies API Revamped ### Summary of changes | Added | Removed | | --- | --- | | `cookies.set` | `cookie` | | `cookies.delete` | `clearCookie` | | `cookies.getWithOptions` | `cookies` | ### Explanation Based on beta feedback, we are changing the Cookies API in `NextRequest` and `NextResponse` to align more to a `get`/`set` model. The `Cookies` API extends Map, including methods like entries and values. ### How to upgrade `NextResponse` now has a `cookies` instance with: * `cookies.delete` * `cookies.set` * `cookies.getWithOptions` As well as other extended methods from `Map`. #### Before import { NextResponse } from 'next/server' import type { NextRequest } from 'next/server' export function middleware(request: NextRequest) { // create an instance of the class to access the public methods. This uses `next()`, // you could use `redirect()` or `rewrite()` as well let response = NextResponse.next() // get the cookies from the request let cookieFromRequest = request.cookies['my-cookie'] // set the `cookie` response.cookie('hello', 'world') // set the `cookie` with options const cookieWithOptions = response.cookie('hello', 'world', { path: '/', maxAge: 1000 * 60 * 60 * 24 * 7, httpOnly: true, sameSite: 'strict', domain: 'example.com', }) // clear the `cookie` response.clearCookie('hello') return response } #### After export function middleware() { const response = new NextResponse() // set a cookie response.cookies.set('vercel', 'fast') // set another cookie with options response.cookies.set('nextjs', 'awesome', { path: '/test' }) // get all the details of a cookie const { value, ...options } = response.cookies.getWithOptions('vercel') console.log(value) // => 'fast' console.log(options) // => { name: 'vercel', Path: '/test' } // deleting a cookie will mark it as expired response.cookies.delete('vercel') return response } ## New User-Agent Helper ### Summary of changes * Accessing the user agent is no longer available on the request object * We've added a new `userAgent` helper to reduce Middleware size by `17kb` ### Explanation To help reduce the size of your Middleware, we have extracted the user agent from the request object and created a new helper `userAgent`. The helper is imported from `next/server` and allows you to opt in to using the user agent. The helper gives you access to the same properties that were available from the request object. ### How to upgrade * Import the `userAgent` helper from `next/server` * Destructure the properties you need to work with #### Before import { NextRequest, NextResponse } from 'next/server' export function middleware(request: NextRequest) { const url = request.nextUrl const viewport = request.ua.device.type === 'mobile' ? 'mobile' : 'desktop' url.searchParams.set('viewport', viewport) return NextResponse.rewrite(url) } #### After import { NextRequest, NextResponse, userAgent } from 'next/server' export function middleware(request: NextRequest) { const url = request.nextUrl const { device } = userAgent(request) const viewport = device.type === 'mobile' ? 'mobile' : 'desktop' url.searchParams.set('viewport', viewport) return NextResponse.rewrite(url) } ## No More Page Match Data ### Summary of changes * Use `URLPattern` to check if a Middleware is being invoked for a certain page match ### Explanation Currently, Middleware estimates whether you are serving an asset of a Page based on the Next.js routes manifest (internal configuration). This value is surfaced through `request.page`. To make page and asset matching more accurate, we are now using the web standard `URLPattern` API. ### How to upgrade Use `URLPattern` to check if a Middleware is being invoked for a certain page match. #### Before import { NextResponse } from 'next/server' import type { NextRequest, NextFetchEvent } from 'next/server' export function middleware(request: NextRequest, event: NextFetchEvent) { const { params } = event.request.page const { locale, slug } = params if (locale && slug) { const { search, protocol, host } = request.nextUrl const url = new URL(`${protocol}//${locale}.${host}/${slug}${search}`) return NextResponse.redirect(url) } } #### After import { NextResponse } from 'next/server' import type { NextRequest } from 'next/server' const PATTERNS = [ [ new URLPattern({ pathname: '/:locale/:slug' }), ({ pathname }) => pathname.groups, ], ] const params = (url) => { const input = url.split('?')[0] let result = {} for (const [pattern, handler] of PATTERNS) { const patternResult = pattern.exec(input) if (patternResult !== null && 'pathname' in patternResult) { result = handler(patternResult) break } } return result } export function middleware(request: NextRequest) { const { locale, slug } = params(request.url) if (locale && slug) { const { search, protocol, host } = request.nextUrl const url = new URL(`${protocol}//${locale}.${host}/${slug}${search}`) return NextResponse.redirect(url) } } ## Executing Middleware on Internal Next.js Requests ### Summary of changes * Middleware will be executed for _all_ requests, including `_next` ### Explanation Prior to Next.js `v12.2`, Middleware was not executed for `_next` requests. For cases where Middleware is used for authorization, you should migrate to use `rewrite`/`redirect` to Pages that show an authorization error, login forms, or to an API Route. See No Response Body for an example of how to migrate to use `rewrite`/`redirect`. --- ## Page: https://nextjs.org/docs/14/app/building-your-application/optimizing/package-bundling#analyzing-javascript-bundles Bundling external packages can significantly improve the performance of your application. By default, packages imported inside Server Components and Route Handlers are automatically bundled by Next.js. This page will guide you through how to analyze and further optimize package bundling. ## Analyzing JavaScript bundles `@next/bundle-analyzer` is a plugin for Next.js that helps you manage the size of your application bundles. It generates a visual report of the size of each package and their dependencies. You can use the information to remove large dependencies, split, or lazy-load your code. ### Installation Install the plugin by running the following command: npm i @next/bundle-analyzer # or yarn add @next/bundle-analyzer # or pnpm add @next/bundle-analyzer Then, add the bundle analyzer's settings to your `next.config.js`. /** @type {import('next').NextConfig} */ const nextConfig = {} const withBundleAnalyzer = require('@next/bundle-analyzer')({ enabled: process.env.ANALYZE === 'true', }) module.exports = withBundleAnalyzer(nextConfig) ### Generating a report Run the following command to analyze your bundles: ANALYZE=true npm run build # or ANALYZE=true yarn build # or ANALYZE=true pnpm build The report will open three new tabs in your browser, which you can inspect. Periodically evaluating your application's bundles can help you maintain application performance over time. ## Optimizing package imports Some packages, such as icon libraries, can export hundreds of modules, which can cause performance issues in development and production. You can optimize how these packages are imported by adding the `optimizePackageImports` option to your `next.config.js`. This option will only load the modules you _actually_ use, while still giving you the convenience of writing import statements with many named exports. /** @type {import('next').NextConfig} */ const nextConfig = { experimental: { optimizePackageImports: ['icon-library'], }, } module.exports = nextConfig Next.js also optimizes some libraries automatically, thus they do not need to be included in the optimizePackageImports list. See the full list. ## Opting specific packages out of bundling Since packages imported inside Server Components and Route Handlers are automatically bundled by Next.js, you can opt specific packages out of bundling using the `serverExternalPackages` option in your `next.config.js`. /** @type {import('next').NextConfig} */ const nextConfig = { serverExternalPackages: ['package-name'], } module.exports = nextConfig Next.js includes a list of popular packages that currently are working on compatibility and automatically opt-ed out. See the full list. --- ## Page: https://nextjs.org/docs/app/building-your-application/deploying/static-exports ## How to create an static export of your Next.js application Next.js enables starting as a static site or Single-Page Application (SPA), then later optionally upgrading to use features that require a server. When running `next build`, Next.js generates an HTML file per route. By breaking a strict SPA into individual HTML files, Next.js can avoid loading unnecessary JavaScript code on the client-side, reducing the bundle size and enabling faster page loads. Since Next.js supports this static export, it can be deployed and hosted on any web server that can serve HTML/CSS/JS static assets. ## Configuration To enable a static export, change the output mode inside `next.config.js`: /** * @type {import('next').NextConfig} */ const nextConfig = { output: 'export', // Optional: Change links `/me` -> `/me/` and emit `/me.html` -> `/me/index.html` // trailingSlash: true, // Optional: Prevent automatic `/me` -> `/me/`, instead preserve `href` // skipTrailingSlashRedirect: true, // Optional: Change the output directory `out` -> `dist` // distDir: 'dist', } module.exports = nextConfig After running `next build`, Next.js will create an `out` folder with the HTML/CSS/JS assets for your application. ## Supported Features The core of Next.js has been designed to support static exports. ### Server Components When you run `next build` to generate a static export, Server Components consumed inside the `app` directory will run during the build, similar to traditional static-site generation. The resulting component will be rendered into static HTML for the initial page load and a static payload for client navigation between routes. No changes are required for your Server Components when using the static export, unless they consume dynamic server functions. export default async function Page() { // This fetch will run on the server during `next build` const res = await fetch('https://api.example.com/...') const data = await res.json() return <main>...</main> } ### Client Components If you want to perform data fetching on the client, you can use a Client Component with SWR to memoize requests. 'use client' import useSWR from 'swr' const fetcher = (url: string) => fetch(url).then((r) => r.json()) export default function Page() { const { data, error } = useSWR( `https://jsonplaceholder.typicode.com/posts/1`, fetcher ) if (error) return 'Failed to load' if (!data) return 'Loading...' return data.title } Since route transitions happen client-side, this behaves like a traditional SPA. For example, the following index route allows you to navigate to different posts on the client: import Link from 'next/link' export default function Page() { return ( <> <h1>Index Page</h1> <hr /> <ul> <li> <Link href="/post/1">Post 1</Link> </li> <li> <Link href="/post/2">Post 2</Link> </li> </ul> </> ) } ### Image Optimization Image Optimization through `next/image` can be used with a static export by defining a custom image loader in `next.config.js`. For example, you can optimize images with a service like Cloudinary: /** @type {import('next').NextConfig} */ const nextConfig = { output: 'export', images: { loader: 'custom', loaderFile: './my-loader.ts', }, } module.exports = nextConfig This custom loader will define how to fetch images from a remote source. For example, the following loader will construct the URL for Cloudinary: export default function cloudinaryLoader({ src, width, quality, }: { src: string width: number quality?: number }) { const params = ['f_auto', 'c_limit', `w_${width}`, `q_${quality || 'auto'}`] return `https://res.cloudinary.com/demo/image/upload/${params.join( ',' )}${src}` } You can then use `next/image` in your application, defining relative paths to the image in Cloudinary: import Image from 'next/image' export default function Page() { return <Image alt="turtles" src="/turtles.jpg" width={300} height={300} /> } ### Route Handlers Route Handlers will render a static response when running `next build`. Only the `GET` HTTP verb is supported. This can be used to generate static HTML, JSON, TXT, or other files from cached or uncached data. For example: export async function GET() { return Response.json({ name: 'Lee' }) } The above file `app/data.json/route.ts` will render to a static file during `next build`, producing `data.json` containing `{ name: 'Lee' }`. If you need to read dynamic values from the incoming request, you cannot use a static export. ### Browser APIs Client Components are pre-rendered to HTML during `next build`. Because Web APIs like `window`, `localStorage`, and `navigator` are not available on the server, you need to safely access these APIs only when running in the browser. For example: 'use client'; import { useEffect } from 'react'; export default function ClientComponent() { useEffect(() => { // You now have access to `window` console.log(window.innerHeight); }, []) return ...; } ## Unsupported Features Features that require a Node.js server, or dynamic logic that cannot be computed during the build process, are **not** supported: * Dynamic Routes with `dynamicParams: true` * Dynamic Routes without `generateStaticParams()` * Route Handlers that rely on Request * Cookies * Rewrites * Redirects * Headers * Middleware * Incremental Static Regeneration * Image Optimization with the default `loader` * Draft Mode * Server Actions * Intercepting Routes Attempting to use any of these features with `next dev` will result in an error, similar to setting the `dynamic` option to `error` in the root layout. export const dynamic = 'error' ## Deploying With a static export, Next.js can be deployed and hosted on any web server that can serve HTML/CSS/JS static assets. When running `next build`, Next.js generates the static export into the `out` folder. For example, let's say you have the following routes: * `/` * `/blog/[id]` After running `next build`, Next.js will generate the following files: * `/out/index.html` * `/out/404.html` * `/out/blog/post-1.html` * `/out/blog/post-2.html` If you are using a static host like Nginx, you can configure rewrites from incoming requests to the correct files: server { listen 80; server_name acme.com; root /var/www/out; location / { try_files $uri $uri.html $uri/ =404; } # This is necessary when `trailingSlash: false`. # You can omit this when `trailingSlash: true`. location /blog/ { rewrite ^/blog/(.*)$ /blog/$1.html break; } error_page 404 /404.html; location = /404.html { internal; } } ## Version History | Version | Changes | | --- | --- | | `v14.0.0` | `next export` has been removed in favor of `"output": "export"` | | `v13.4.0` | App Router (Stable) adds enhanced static export support, including using React Server Components and Route Handlers. | | `v13.3.0` | `next export` is deprecated and replaced with `"output": "export"` | --- ## Page: https://nextjs.org/docs/app/building-your-application/configuring/typescript#typescript-plugin Next.js comes with built-in TypeScript, automatically installing the necessary packages and configuring the proper settings when you create a new project with `create-next-app`. To add TypeScript to an existing project, rename a file to `.ts` / `.tsx`. Run `next dev` and `next build` to automatically install the necessary dependencies and add a `tsconfig.json` file with the recommended config options. > **Good to know**: If you already have a `jsconfig.json` file, copy the `paths` compiler option from the old `jsconfig.json` into the new `tsconfig.json` file, and delete the old `jsconfig.json` file. ## IDE Plugin Next.js includes a custom TypeScript plugin and type checker, which VSCode and other code editors can use for advanced type-checking and auto-completion. You can enable the plugin in VS Code by: 1. Opening the command palette (`Ctrl/⌘` + `Shift` + `P`) 2. Searching for "TypeScript: Select TypeScript Version" 3. Selecting "Use Workspace Version"  Now, when editing files, the custom plugin will be enabled. When running `next build`, the custom type checker will be used. The TypeScript plugin can help with: * Warning if the invalid values for segment config options are passed. * Showing available options and in-context documentation. * Ensuring the `use client` directive is used correctly. * Ensuring client hooks (like `useState`) are only used in Client Components. > **🎥 Watch:** Learn about the built-in TypeScript plugin → YouTube (3 minutes) ## End-to-End Type Safety The Next.js App Router has **enhanced type safety**. This includes: 1. **No serialization of data between fetching function and page**: You can `fetch` directly in components, layouts, and pages on the server. This data _does not_ need to be serialized (converted to a string) to be passed to the client side for consumption in React. Instead, since `app` uses Server Components by default, we can use values like `Date`, `Map`, `Set`, and more without any extra steps. Previously, you needed to manually type the boundary between server and client with Next.js-specific types. 2. **Streamlined data flow between components**: With the removal of `_app` in favor of root layouts, it is now easier to visualize the data flow between components and pages. Previously, data flowing between individual `pages` and `_app` were difficult to type and could introduce confusing bugs. With colocated data fetching in the App Router, this is no longer an issue. Data Fetching in Next.js now provides as close to end-to-end type safety as possible without being prescriptive about your database or content provider selection. We're able to type the response data as you would expect with normal TypeScript. For example: async function getData() { const res = await fetch('https://api.example.com/...') // The return value is *not* serialized // You can return Date, Map, Set, etc. return res.json() } export default async function Page() { const name = await getData() return '...' } For _complete_ end-to-end type safety, this also requires your database or content provider to support TypeScript. This could be through using an ORM or type-safe query builder. ## Examples ### Type checking `next.config.ts` You can use TypeScript and import types in your Next.js configuration by using `next.config.ts`. import type { NextConfig } from 'next' const nextConfig: NextConfig = { /* config options here */ } export default nextConfig > **Good to know**: Module resolution in `next.config.ts` is currently limited to `CommonJS`. This may cause incompatibilities with ESM only packages being loaded in `next.config.ts`. When using the `next.config.js` file, you can add some type checking in your IDE using JSDoc as below: // @ts-check /** @type {import('next').NextConfig} */ const nextConfig = { /* config options here */ } module.exports = nextConfig ### Statically Typed Links Next.js can statically type links to prevent typos and other errors when using `next/link`, improving type safety when navigating between pages. To opt-into this feature, `experimental.typedRoutes` need to be enabled and the project needs to be using TypeScript. import type { NextConfig } from 'next' const nextConfig: NextConfig = { experimental: { typedRoutes: true, }, } export default nextConfig Next.js will generate a link definition in `.next/types` that contains information about all existing routes in your application, which TypeScript can then use to provide feedback in your editor about invalid links. Currently, experimental support includes any string literal, including dynamic segments. For non-literal strings, you currently need to manually cast the `href` with `as Route`: import type { Route } from 'next'; import Link from 'next/link' // No TypeScript errors if href is a valid route <Link href="/about" /> <Link href="/blog/nextjs" /> <Link href={`/blog/${slug}`} /> <Link href={('/blog' + slug) as Route} /> // TypeScript errors if href is not a valid route <Link href="/aboot" /> To accept `href` in a custom component wrapping `next/link`, use a generic: import type { Route } from 'next' import Link from 'next/link' function Card<T extends string>({ href }: { href: Route<T> | URL }) { return ( <Link href={href}> <div>My Card</div> </Link> ) } > **How does it work?** > > When running `next dev` or `next build`, Next.js generates a hidden `.d.ts` file inside `.next` that contains information about all existing routes in your application (all valid routes as the `href` type of `Link`). This `.d.ts` file is included in `tsconfig.json` and the TypeScript compiler will check that `.d.ts` and provide feedback in your editor about invalid links. ### With Async Server Components To use an `async` Server Component with TypeScript, ensure you are using TypeScript `5.1.3` or higher and `@types/react` `18.2.8` or higher. If you are using an older version of TypeScript, you may see a `'Promise<Element>' is not a valid JSX element` type error. Updating to the latest version of TypeScript and `@types/react` should resolve this issue. ### Incremental type checking Since `v10.2.1` Next.js supports incremental type checking when enabled in your `tsconfig.json`, this can help speed up type checking in larger applications. ### Disabling TypeScript errors in production Next.js fails your **production build** (`next build`) when TypeScript errors are present in your project. If you'd like Next.js to dangerously produce production code even when your application has errors, you can disable the built-in type checking step. If disabled, be sure you are running type checks as part of your build or deploy process, otherwise this can be very dangerous. Open `next.config.ts` and enable the `ignoreBuildErrors` option in the `typescript` config: import type { NextConfig } from 'next' const nextConfig: NextConfig = { typescript: { // !! WARN !! // Dangerously allow production builds to successfully complete even if // your project has type errors. // !! WARN !! ignoreBuildErrors: true, }, } export default nextConfig > **Good to know**: You can run `tsc --noEmit` to check for TypeScript errors yourself before building. This is useful for CI/CD pipelines where you'd like to check for TypeScript errors before deploying. ### Custom type declarations When you need to declare custom types, you might be tempted to modify `next-env.d.ts`. However, this file is automatically generated, so any changes you make will be overwritten. Instead, you should create a new file, let's call it `new-types.d.ts`, and reference it in your `tsconfig.json`: { "compilerOptions": { "skipLibCheck": true //...truncated... }, "include": [ "new-types.d.ts", "next-env.d.ts", ".next/types/**/*.ts", "**/*.ts", "**/*.tsx" ], "exclude": ["node_modules"] } ## Version Changes | Version | Changes | | --- | --- | | `v15.0.0` | `next.config.ts` support added for TypeScript projects. | | `v13.2.0` | Statically typed links are available in beta. | | `v12.0.0` | SWC is now used by default to compile TypeScript and TSX for faster builds. | | `v10.2.1` | Incremental type checking support added when enabled in your `tsconfig.json`. | --- ## Page: https://nextjs.org/docs/architecture/turbopack Turbopack is an **incremental bundler** optimized for JavaScript and TypeScript, written in Rust, and built into **Next.js**. You can use Turbopack with both the Pages and App Router for a **much faster** local development experience. ## Why Turbopack? We built Turbopack to push the performance of Next.js, including: * **Unified Graph:** Next.js supports multiple output environments (e.g., client and server). Managing multiple compilers and stitching bundles together can be tedious. Turbopack uses a **single, unified graph** for all environments. * **Bundling vs Native ESM:** Some tools skip bundling in development and rely on the browser's native ESM. This works well for small apps but can slow down large apps due to excessive network requests. Turbopack **bundles** in dev, but in an optimized way to keep large apps fast. * **Incremental Computation:** Turbopack parallelizes work across cores and **caches** results down to the function level. Once a piece of work is done, Turbopack won’t repeat it. * **Lazy Bundling:** Turbopack only bundles what is actually requested by the dev server. This lazy approach can reduce initial compile times and memory usage. ## Getting started To enable Turbopack in your Next.js project, add the `--turbopack` flag to the `dev` and `build` scripts in your `package.json` file: { "scripts": { "dev": "next dev --turbopack", "build": "next build --turbopack", "start": "next start" } } Currently, Turbopack for `dev` is stable, while `build` is in alpha. We are actively working on production support as Turbopack moves closer to stability. ## Supported features Turbopack in Next.js has **zero-configuration** for the common use cases. Below is a summary of what is supported out of the box, plus some references to how you can configure Turbopack further when needed. ### Language features | Feature | Status | Notes | | --- | --- | --- | | **JavaScript & TypeScript** | **Supported** | Uses SWC under the hood. Type-checking is not done by Turbopack (run `tsc --watch` or rely on your IDE for type checks). | | **ECMAScript (ESNext)** | **Supported** | Turbopack supports the latest ECMAScript features, matching SWC’s coverage. | | **CommonJS** | **Supported** | `require()` syntax is handled out of the box. | | **ESM** | **Supported** | Static and dynamic `import` are fully supported. | | **Babel** | Partially Unsupported | Turbopack does not include Babel by default. However, you can configure `babel-loader` via the Turbopack config. | ### Framework and React features | Feature | Status | Notes | | --- | --- | --- | | **JSX / TSX** | **Supported** | SWC handles JSX/TSX compilation. | | **Fast Refresh** | **Supported** | No configuration needed. | | **React Server Components (RSC)** | **Supported** | For the Next.js App Router. Turbopack ensures correct server/client bundling. | | **Root layout creation** | Unsupported | Automatic creation of a root layout in App Router is not supported. Turbopack will instruct you to create it manually. | ### CSS and styling | Feature | Status | Notes | | --- | --- | --- | | **Global CSS** | **Supported** | Import `.css` files directly in your application. | | **CSS Modules** | **Supported** | `.module.css` files work natively (Lightning CSS). | | **CSS Nesting** | **Supported** | Lightning CSS supports modern CSS nesting. | | **@import syntax** | **Supported** | Combine multiple CSS files. | | **PostCSS** | **Supported** | Automatically processes `postcss.config.js` in a Node.js worker pool. Useful for Tailwind, Autoprefixer, etc. | | **Sass / SCSS** | **Supported** (Next.js) | For Next.js, Sass is supported out of the box. In the future, Turbopack standalone usage will likely require a loader config. | | **Less** | Planned via plugins | Not yet supported by default. Will likely require a loader config once custom loaders are stable. | | **Lightning CSS** | **In Use** | Handles CSS transformations. Some low-usage CSS Modules features (like `:local/:global` as standalone pseudo-classes) are not yet supported. See below for more details. | ### Assets | Feature | Status | Notes | | --- | --- | --- | | **Static Assets** (images, fonts) | **Supported** | Importing `import img from './img.png'` works out of the box. In Next.js, returns an object for the `<Image />` component. | | **JSON Imports** | **Supported** | Named or default imports from `.json` are supported. | ### Module resolution | Feature | Status | Notes | | --- | --- | --- | | **Path Aliases** | **Supported** | Reads `tsconfig.json`'s `paths` and `baseUrl`, matching Next.js behavior. | | **Manual Aliases** | **Supported** | Configure `resolveAlias` in `next.config.js` (similar to `webpack.resolve.alias`). | | **Custom Extensions** | **Supported** | Configure `resolveExtensions` in `next.config.js`. | | **AMD** | Partially Supported | Basic transforms work; advanced AMD usage is limited. | ### Performance and Fast Refresh | Feature | Status | Notes | | --- | --- | --- | | **Fast Refresh** | **Supported** | Updates JavaScript, TypeScript, and CSS without a full refresh. | | **Incremental Bundling** | **Supported** | Turbopack lazily builds only what’s requested by the dev server, speeding up large apps. | ## Unsupported and unplanned features Some features are not yet implemented or not planned: * **Legacy CSS Modules features** * Standalone `:local` and `:global` pseudo-classes (only the function variant `:global(...)` is supported). * The `@value` rule (superseded by CSS variables). * `:import` and `:export` ICSS rules. * **`webpack()` configuration** in `next.config.js` Turbopack replaces webpack, so `webpack()` configs are not recognized. Use the `experimental.turbo` config instead. * **AMP** Not planned for Turbopack support in Next.js. * **Yarn PnP** Not planned for Turbopack support in Next.js. * **`experimental.urlImports`** Not planned for Turbopack. * **`experimental.esmExternals`** Not planned. Turbopack does not support the legacy `esmExternals` configuration in Next.js. * **Some Next.js Experimental Flags** * `experimental.typedRoutes` * `experimental.nextScriptWorkers` * `experimental.sri.algorithm` * `experimental.fallbackNodePolyfills` We plan to implement these in the future. For a full, detailed breakdown of each feature flag and its status, see the Turbopack API Reference. ## Configuration Turbopack can be configured via `next.config.js` (or `next.config.ts`) under the `turbopack` key. Configuration options include: * **`rules`** Define additional webpack loaders for file transformations. * **`resolveAlias`** Create manual aliases (like `resolve.alias` in webpack). * **`resolveExtensions`** Change or extend file extensions for module resolution. * **`moduleIds`** Set how module IDs are generated (`'named'` vs `'deterministic'`). * **`treeShaking`** Enable or disable tree shaking in dev and future production builds. * **`memoryLimit`** Set a memory limit (in bytes) for Turbopack. module.exports = { turbopack: { // Example: adding an alias and custom file extension resolveAlias: { underscore: 'lodash', }, resolveExtensions: ['.mdx', '.tsx', '.ts', '.jsx', '.js', '.json'], }, } For more in-depth configuration examples, see the Turbopack config documentation. ## Generating trace files for performance debugging If you encounter performance or memory issues and want to help the Next.js team diagnose them, you can generate a trace file by appending `NEXT_TURBOPACK_TRACING=1` to your dev command: NEXT_TURBOPACK_TRACING=1 next dev --turbopack This will produce a `.next/trace-turbopack` file. Include that file when creating a GitHub issue on the Next.js repo to help us investigate. ## Summary Turbopack is a **Rust-based**, **incremental** bundler designed to make local development and builds fast—especially for large applications. It is integrated into Next.js, offering zero-config CSS, React, and TypeScript support. Stay tuned for more updates as we continue to improve Turbopack and add production build support. In the meantime, give it a try with `next dev --turbopack` and let us know your feedback. ## Version Changes | Version | Changes | | --- | --- | | `v15.3.0` | Experimental support for `build` | | `v15.0.0` | Turbopack for `dev` stable | --- ## Page: https://nextjs.org/docs/13/community/contribution-guide Welcome to the Next.js Docs Contribution Guide! We're excited to have you here. This page provides instructions on how to edit the Next.js documentation. Our goal is to ensure that everyone in the community feels empowered to contribute and improve our docs. ## Why Contribute? Open-source work is never done, and neither is documentation. Contributing to docs is a good way for beginners to get involved in open-source and for experienced developers to clarify more complex topics while sharing their knowledge with the community. By contributing to the Next.js docs, you're helping us build a more robust learning resource for all developers. Whether you've found a typo, a confusing section, or you've realized that a particular topic is missing, your contributions are welcomed and appreciated. ## How to Contribute The docs content can be found on the Next.js repo. To contribute, you can edit the files directly on GitHub or clone the repo and edit the files locally. ### GitHub Workflow If you're new to GitHub, we recommend reading the GitHub Open Source Guide to learn how to fork a repository, create a branch, and submit a pull request. > **Good to know**: The underlying docs code lives in a private codebase that is synced to the Next.js public repo. This means that you can't preview the docs locally. However, you'll see your changes on nextjs.org after merging a pull request. ### Writing MDX The docs are written in MDX, a markdown format that supports JSX syntax. This allows us to embed React components in the docs. See the GitHub Markdown Guide for a quick overview of markdown syntax. ### VSCode #### Previewing Changes Locally VSCode has a built-in markdown previewer that you can use to see your edits locally. To enable the previewer for MDX files, you'll need to add a configuration option to your user settings. Open the command palette (`⌘ + ⇧ + P` on Mac or `Ctrl + Shift + P` on Windows) and search from `Preferences: Open User Settings (JSON)`. Then, add the following line to your `settings.json` file: { "files.associations": { "*.mdx": "markdown" } } Next, open the command palette again, and search for `Markdown: Preview File` or `Markdown: Open Preview to the Side`. This will open a preview window where you can see your formatted changes. #### Extensions We also recommend the following extensions for VSCode users: * MDX: Intellisense and syntax highlighting for MDX. * Grammarly: Grammar and spell checker. * Prettier: Format MDX files on save. ### Review Process Once you've submitted your contribution, the Next.js or Developer Experience teams will review your changes, provide feedback, and merge the pull request when it's ready. Please let us know if you have any questions or need further assistance in your PR's comments. Thank you for contributing to the Next.js docs and being a part of our community! > **Tip:** Run `pnpm prettier-fix` to run Prettier before submitting your PR. ## File Structure The docs use **file-system routing**. Each folder and files inside `/docs` represent a route segment. These segments are used to generate the URL paths, navigation, and breadcrumbs. The file structure reflects the navigation that you see on the site, and by default, navigation items are sorted alphabetically. However, we can change the order of the items by prepending a two-digit number (`00-`) to the folder or file name. For example, in the functions API Reference, the pages are sorted alphabetically because it makes it easier for developers to find a specific function: 03-functions ├── cookies.mdx ├── draft-mode.mdx ├── fetch.mdx └── ... But, in the routing section, the files are prefixed with a two-digit number, sorted in the order developers should learn these concepts: 02-routing ├── 01-defining-routes.mdx ├── 02-pages-and-layouts.mdx ├── 03-linking-and-navigating.mdx └── ... To quickly find a page, you can use `⌘ + P` (Mac) or `Ctrl + P` (Windows) to open the search bar on VSCode. Then, type the slug of the page you're looking for. E.g. `defining-routes` > **Why not use a manifest?** > > We considered using a manifest file (another popular way to generate the docs navigation), but we found that a manifest would quickly get out of sync with the files. File-system routing forces us to think about the structure of the docs and feels more native to Next.js. Each page has a metadata block at the top of the file separated by three dashes. ### Required Fields The following fields are **required**: | Field | Description | | --- | --- | | `title` | The page's `<h1>` title, used for SEO and OG Images. | | `description` | The page's description, used in the `<meta name="description">` tag for SEO. | --- title: Page Title description: Page Description --- It's good practice to limit the page title to 2-3 words (e.g. Optimizing Images) and the description to 1-2 sentences (e.g. Learn how to optimize images in Next.js). ### Optional Fields The following fields are **optional**: | Field | Description | | --- | --- | | `nav_title` | Overrides the page's title in the navigation. This is useful when the page's title is too long to fit. If not provided, the `title` field is used. | | `source` | Pulls content into a shared page. See Shared Pages. | | `related` | A list of related pages at the bottom of the document. These will automatically be turned into cards. See Related Links. | --- nav_title: Nav Item Title source: app/building-your-application/optimizing/images related: description: See the image component API reference. links: - app/api-reference/components/image --- ## `App` and `Pages` Docs Since most of the features in the **App Router** and **Pages Router** are completely different, their docs for each are kept in separate sections (`02-app` and `03-pages`). However, there are a few features that are shared between them. ### Shared Pages To avoid content duplication and risk the content becoming out of sync, we use the `source` field to pull content from one page into another. For example, the `<Link>` component behaves _mostly_ the same in **App** and **Pages**. Instead of duplicating the content, we can pull the content from `app/.../link.mdx` into `pages/.../link.mdx`: --- title: <Link> description: API reference for the <Link> component. --- This API reference will help you understand how to use the props and configuration options available for the Link Component. --- title: <Link> description: API reference for the <Link> component. source: app/api-reference/components/link --- {/* DO NOT EDIT THIS PAGE. */} {/* The content of this page is pulled from the source above. */} We can therefore edit the content in one place and have it reflected in both sections. ### Shared Content In shared pages, sometimes there might be content that is **App Router** or **Pages Router** specific. For example, the `<Link>` component has a `shallow` prop that is only available in **Pages** but not in **App**. To make sure the content only shows in the correct router, we can wrap content blocks in an `<AppOnly>` or `<PagesOnly>` components: This content is shared between App and Pages. <PagesOnly> This content will only be shown on the Pages docs. </PagesOnly> This content is shared between App and Pages. You'll likely use these components for examples and code blocks. ## Code Blocks Code blocks should contain a minimum working example that can be copied and pasted. This means that the code should be able to run without any additional configuration. For example, if you're showing how to use the `<Link>` component, you should include the `import` statement and the `<Link>` component itself. import Link from 'next/link' export default function Page() { return <Link href="/about">About</Link> } Always run examples locally before committing them. This will ensure that the code is up-to-date and working. ### Language and Filename Code blocks should have a header that includes the language and the `filename`. Add a `filename` prop to render a special Terminal icon that helps orientate users where to input the command. For example: ```bash filename="Terminal" npx create-next-app ``` Most examples in the docs are written in `tsx` and `jsx`, and a few in `bash`. However, you can use any supported language, here's the full list. When writing JavaScript code blocks, we use the following language and extension combinations. | | Language | Extension | | --- | --- | --- | | JavaScript files with JSX code | \`\`\`jsx | .js | | JavaScript files without JSX | \`\`\`js | .js | | TypeScript files with JSX | \`\`\`tsx | .tsx | | TypeScript files without JSX | \`\`\`ts | .ts | ### TS and JS Switcher Add a language switcher to toggle between TypeScript and JavaScript. Code blocks should be TypeScript first with a JavaScript version to accommodate users. Currently, we write TS and JS examples one after the other, and link them with `switcher` prop: ```tsx filename="app/page.tsx" switcher ``` ```jsx filename="app/page.js" switcher ``` > **Good to know**: We plan to automatically compile TypeScript snippets to JavaScript in the future. In the meantime, you can use transform.tools. ### Line Highlighting Code lines can be highlighted. This is useful when you want to draw attention to a specific part of the code. You can highlight lines by passing a number to the `highlight` prop. **Single Line:** `highlight={1}` import Link from 'next/link' export default function Page() { return <Link href="/about">About</Link> } **Multiple Lines:** `highlight={1,3}` import Link from 'next/link' export default function Page() { return <Link href="/about">About</Link> } **Range of Lines:** `highlight={1-5}` import Link from 'next/link' export default function Page() { return <Link href="/about">About</Link> } ## Icons The following icons are available for use in the docs: <Check size={18} /> <Cross size={18} /> **Output:** We do not use emojis in the docs. ## Notes For information that is important but not critical, use notes. Notes are a good way to add information without distracting the user from the main content. > **Good to know**: This is a single line note. > **Good to know**: > > - We also use this format for multi-line notes. > - There are sometimes multiple items worth knowing or keeping in mind. **Output:** > **Good to know**: This is a single line note. > **Good to know**: > > * We also use this format for multi-line notes. > * There are sometimes multiple item worths knowing or keeping in mind. Related Links guide the user's learning journey by adding links to logical next steps. * Links will be displayed in cards under the main content of the page. * Links will be automatically generated for pages that have child pages. For example, the Optimizing section has links to all of its child pages. Create related links using the `related` field in the page's metadata. --- related: description: Learn how to quickly get started with your first application. links: - app/building-your-application/routing/defining-routes - app/building-your-application/data-fetching - app/api-reference/file-conventions/page --- ### Nested Fields | Field | Required? | Description | | --- | --- | --- | | `title` | Optional | The title of the card list. Defaults to **Next Steps**. | | `description` | Optional | The description of the card list. | | `links` | Required | A list of links to other doc pages. Each list item should be a relative URL path (without a leading slash) e.g. `app/api-reference/file-conventions/page` | ## Diagrams Diagrams are a great way to explain complex concepts. We use Figma to create diagrams, following Vercel's design guide. The diagrams currently live in a `/public` folder in our private Next.js site. If you'd like to update or add a diagram, please open a GitHub issue with your ideas. ## Custom Components and HTML These are the React Components available for the docs: `<Image />` (next/image), `<PagesOnly />`, `<AppOnly />`, `<Cross />`, and `<Check />`. We do not allow raw HTML in the docs besides the `<details>` tag. If you have ideas for new components, please open a GitHub issue. ## Style Guide This section contains guidelines for writing docs for those who are new to technical writing. ### Page Templates While we don't have a strict template for pages, there are page sections you'll see repeated across the docs: * **Overview:** The first paragraph of a page should tell the user what the feature is and what it's used for. Followed by a minimum working example or its API reference. * **Convention:** If the feature has a convention, it should be explained here. * **Examples**: Show how the feature can be used with different use cases. * **API Tables**: API Pages should have an overview table at the of the page with jump-to-section links (when possible). * **Next Steps (Related Links)**: Add links to related pages to guide the user's learning journey. Feel free to add these sections as needed. ### Page Types Docs pages are also split into two categories: Conceptual and Reference. * **Conceptual** pages are used to explain a concept or feature. They are usually longer and contain more information than reference pages. In the Next.js docs, conceptual pages are found in the **Building Your Application** section. * **Reference** pages are used to explain a specific API. They are usually shorter and more focused. In the Next.js docs, reference pages are found in the **API Reference** section. > **Good to know**: Depending on the page you're contributing to, you may need to follow a different voice and style. For example, conceptual pages are more instructional and use the word _you_ to address the user. Reference pages are more technical, they use more imperative words like "create, update, accept" and tend to omit the word _you_. ### Voice Here are some guidelines to maintain a consistent style and voice across the docs: * Write clear, concise sentences. Avoid tangents. * If you find yourself using a lot of commas, consider breaking the sentence into multiple sentences or use a list. * Swap out complex words for simpler ones. For example, _use_ instead of _utilize_. * Be mindful with the word _this_. It can be ambiguous and confusing, don't be afraid to repeat the subject of the sentence if unclear. * For example, _Next.js uses React_ instead of _Next.js uses this_. * Use an active voice instead of passive. An active sentence is easier to read. * For example, _Next.js uses React_ instead of _React is used by Next.js_. If you find yourself using words like _was_ and _by_ you may be using a passive voice. * Avoid using words like _easy_, _quick_, _simple_, _just_, etc. This is subjective and can be discouraging to users. * Avoid negative words like _don't_, _can't_, _won't_, etc. This can be discouraging to readers. * For example, _"You can use the `Link` component to create links between pages"_ instead of _"Don't use the `<a>` tag to create links between pages"_. * Write in second person (you/your). This is more personal and engaging. * Use gender-neutral language. Use _developers_, _users_, or _readers_, when referring to the audience. * If adding code examples, ensure they are properly formatted and working. While these guidelines are not exhaustive, they should help you get started. If you'd like to dive deeper into technical writing, check out the Google Technical Writing Course. * * * Thank you for contributing to the docs and being part of the Next.js community! --- ## Page: https://nextjs.org/docs/13/getting-started #### Subscribe to our newsletter Stay updated on new releases and features, guides, and case studies. --- ## Page: https://nextjs.org/docs/13/getting-started/installation System Requirements: * Node.js 16.14 or later. * macOS, Windows (including WSL), and Linux are supported. ## Automatic Installation We recommend starting a new Next.js app using `create-next-app`, which sets up everything automatically for you. To create a project, run: npx create-next-app@latest On installation, you'll see the following prompts: What is your project named? my-app Would you like to use TypeScript? No / Yes Would you like to use ESLint? No / Yes Would you like to use Tailwind CSS? No / Yes Would you like to use `src/` directory? No / Yes Would you like to use App Router? (recommended) No / Yes Would you like to customize the default import alias (@/*)? No / Yes What import alias would you like configured? @/* After the prompts, `create-next-app` will create a folder with your project name and install the required dependencies. > **Good to know**: > > * Next.js now ships with TypeScript, ESLint, and Tailwind CSS configuration by default. > * You can optionally use a `src` directory in the root of your project to separate your application's code from configuration files. ## Manual Installation To manually create a new Next.js app, install the required packages: npm install next@latest react@latest react-dom@latest Open your `package.json` file and add the following `scripts`: { "scripts": { "dev": "next dev", "build": "next build", "start": "next start", "lint": "next lint" } } These scripts refer to the different stages of developing an application: * `dev`: runs `next dev` to start Next.js in development mode. * `build`: runs `next build` to build the application for production usage. * `start`: runs `next start` to start a Next.js production server. * `lint`: runs `next lint` to set up Next.js' built-in ESLint configuration. ### Creating directories Next.js uses file-system routing, which means the routes in your application are determined by how you structure your files. #### The `app` directory For new applications, we recommend using the App Router. This router allows you to use React's latest features and is an evolution of the Pages Router based on community feedback. Create an `app/` folder, then add a `layout.tsx` and `page.tsx` file. These will be rendered when the user visits the root of your application (`/`).  Create a root layout inside `app/layout.tsx` with the required `<html>` and `<body>` tags: export default function RootLayout({ children, }: { children: React.ReactNode }) { return ( <html lang="en"> <body>{children}</body> </html> ) } Finally, create a home page `app/page.tsx` with some initial content: export default function Page() { return <h1>Hello, Next.js!</h1> } > **Good to know**: If you forget to create `layout.tsx`, Next.js will automatically create this file when running the development server with `next dev`. Learn more about using the App Router. #### The `pages` directory (optional) If you prefer to use the Pages Router instead of the App Router, you can create a `pages/` directory at the root of your project. Then, add an `index.tsx` file inside your `pages` folder. This will be your home page (`/`): export default function Page() { return <h1>Hello, Next.js!</h1> } Next, add an `_app.tsx` file inside `pages/` to define the global layout. Learn more about the custom App file. import type { AppProps } from 'next/app' export default function App({ Component, pageProps }: AppProps) { return <Component {...pageProps} /> } Finally, add a `_document.tsx` file inside `pages/` to control the initial response from the server. Learn more about the custom Document file. import { Html, Head, Main, NextScript } from 'next/document' export default function Document() { return ( <Html> <Head /> <body> <Main /> <NextScript /> </body> </Html> ) } Learn more about using the Pages Router. > **Good to know**: Although you can use both routers in the same project, routes in `app` will be prioritized over `pages`. We recommend using only one router in your new project to avoid confusion. #### The `public` folder (optional) Create a `public` folder to store static assets such as images, fonts, etc. Files inside `public` directory can then be referenced by your code starting from the base URL (`/`). ## Run the Development Server 1. Run `npm run dev` to start the development server. 2. Visit `http://localhost:3000` to view your application. 3. Edit `app/layout.tsx` (or `pages/index.tsx`) file and save it to see the updated result in your browser. --- ## Page: https://nextjs.org/docs/13/getting-started/project-structure You are currently viewing documentation for version 13 of Next.js. This page provides an overview of the file and folder structure of a Next.js project. It covers top-level files and folders, configuration files, and routing conventions within the `app` and `pages` directories. ## Top-level folders | | | | --- | --- | | `app` | App Router | | `pages` | Pages Router | | `public` | Static assets to be served | | `src` | Optional application source folder | ## Top-level files | | | | --- | --- | | **Next.js** | | | `next.config.js` | Configuration file for Next.js | | `package.json` | Project dependencies and scripts | | `instrumentation.ts` | OpenTelemetry and Instrumentation file | | `middleware.ts` | Next.js request middleware | | `.env` | Environment variables | | `.env.local` | Local environment variables | | `.env.production` | Production environment variables | | `.env.development` | Development environment variables | | `.eslintrc.json` | Configuration file for ESLint | | `.gitignore` | Git files and folders to ignore | | `next-env.d.ts` | TypeScript declaration file for Next.js | | `tsconfig.json` | Configuration file for TypeScript | | `jsconfig.json` | Configuration file for JavaScript | ## `app` Routing Conventions ### Routing Files | | | | | --- | --- | --- | | `layout` | `.js` `.jsx` `.tsx` | Layout | | `page` | `.js` `.jsx` `.tsx` | Page | | `loading` | `.js` `.jsx` `.tsx` | Loading UI | | `not-found` | `.js` `.jsx` `.tsx` | Not found UI | | `error` | `.js` `.jsx` `.tsx` | Error UI | | `global-error` | `.js` `.jsx` `.tsx` | Global error UI | | `route` | `.js` `.ts` | API endpoint | | `template` | `.js` `.jsx` `.tsx` | Re-rendered layout | | `default` | `.js` `.jsx` `.tsx` | Parallel route fallback page | ### Nested Routes | | | | --- | --- | | `folder` | Route segment | | `folder/folder` | Nested route segment | ### Dynamic Routes | | | | --- | --- | | `[folder]` | Dynamic route segment | | `[...folder]` | Catch-all route segment | | `[[...folder]]` | Optional catch-all route segment | ### Route Groups and Private Folders | | | | --- | --- | | `(folder)` | Group routes without affecting routing | | `_folder` | Opt folder and all child segments out of routing | ### Parallel and Intercepted Routes | | | | --- | --- | | `@folder` | Named slot | | `(.)folder` | Intercept same level | | `(..)folder` | Intercept one level above | | `(..)(..)folder` | Intercept two levels above | | `(...)folder` | Intercept from root | ### Metadata File Conventions #### App Icons | | | | | --- | --- | --- | | `favicon` | `.ico` | Favicon file | | `icon` | `.ico` `.jpg` `.jpeg` `.png` `.svg` | App Icon file | | `icon` | `.js` `.ts` `.tsx` | Generated App Icon | | `apple-icon` | `.jpg` `.jpeg`, `.png` | Apple App Icon file | | `apple-icon` | `.js` `.ts` `.tsx` | Generated Apple App Icon | #### Open Graph and Twitter Images | | | | | --- | --- | --- | | `opengraph-image` | `.jpg` `.jpeg` `.png` `.gif` | Open Graph image file | | `opengraph-image` | `.js` `.ts` `.tsx` | Generated Open Graph image | | `twitter-image` | `.jpg` `.jpeg` `.png` `.gif` | Twitter image file | | `twitter-image` | `.js` `.ts` `.tsx` | Generated Twitter image | #### SEO | | | | | --- | --- | --- | | `sitemap` | `.xml` | Sitemap file | | `sitemap` | `.js` `.ts` | Generated Sitemap | | `robots` | `.txt` | Robots file | | `robots` | `.js` `.ts` | Generated Robots file | ## `pages` Routing Conventions ### Special Files | | | | | --- | --- | --- | | `_app` | `.js` `.jsx` `.tsx` | Custom App | | `_document` | `.js` `.jsx` `.tsx` | Custom Document | | `_error` | `.js` `.jsx` `.tsx` | Custom Error Page | | `404` | `.js` `.jsx` `.tsx` | 404 Error Page | | `500` | `.js` `.jsx` `.tsx` | 500 Error Page | ### Routes | | | | | --- | --- | --- | | **Folder convention** | | | | `index` | `.js` `.jsx` `.tsx` | Home page | | `folder/index` | `.js` `.jsx` `.tsx` | Nested page | | **File convention** | | | | `index` | `.js` `.jsx` `.tsx` | Home page | | `file` | `.js` `.jsx` `.tsx` | Nested page | ### Dynamic Routes | | | | | --- | --- | --- | | **Folder convention** | | | | `[folder]/index` | `.js` `.jsx` `.tsx` | Dynamic route segment | | `[...folder]/index` | `.js` `.jsx` `.tsx` | Catch-all route segment | | `[[...folder]]/index` | `.js` `.jsx` `.tsx` | Optional catch-all route segment | | **File convention** | | | | `[file]` | `.js` `.jsx` `.tsx` | Dynamic route segment | | `[...file]` | `.js` `.jsx` `.tsx` | Catch-all route segment | | `[[...file]]` | `.js` `.jsx` `.tsx` | Optional catch-all route segment | --- ## Page: https://nextjs.org/docs/13/app/building-your-application You are currently viewing documentation for version 13 of Next.js. Next.js provides the building blocks to create flexible, full-stack web applications. The guides in **Building Your Application** explain how to use these features and how to customize your application's behavior. The sections and pages are organized sequentially, from basic to advanced, so you can follow them step-by-step when building your Next.js application. However, you can read them in any order or skip to the pages that apply to your use case. If you're new to Next.js, we recommend starting with the Routing, Rendering, Data Fetching and Styling sections, as they introduce the fundamental Next.js and web concepts to help you get started. Then, you can dive deeper into the other sections such as Optimizing and Configuring. Finally, once you're ready, checkout the Deploying and Upgrading sections. --- ## Page: https://nextjs.org/docs/13/app/building-your-application/routing ## Routing Fundamentals The skeleton of every application is routing. This page will introduce you to the **fundamental concepts** of routing for the web and how to handle routing in Next.js. ## Terminology First, you will see these terms being used throughout the documentation. Here's a quick reference:  * **Tree:** A convention for visualizing a hierarchical structure. For example, a component tree with parent and children components, a folder structure, etc. * **Subtree:** Part of a tree, starting at a new root (first) and ending at the leaves (last). * **Root**: The first node in a tree or subtree, such as a root layout. * **Leaf:** Nodes in a subtree that have no children, such as the last segment in a URL path.  * **URL Segment:** Part of the URL path delimited by slashes. * **URL Path:** Part of the URL that comes after the domain (composed of segments). ## The `app` Router In version 13, Next.js introduced a new **App Router** built on React Server Components, which supports shared layouts, nested routing, loading states, error handling, and more. The App Router works in a new directory named `app`. The `app` directory works alongside the `pages` directory to allow for incremental adoption. This allows you to opt some routes of your application into the new behavior while keeping other routes in the `pages` directory for previous behavior. If your application uses the `pages` directory, please also see the Pages Router documentation. > **Good to know**: The App Router takes priority over the Pages Router. Routes across directories should not resolve to the same URL path and will cause a build-time error to prevent a conflict.  By default, components inside `app` are React Server Components. This is a performance optimization and allows you to easily adopt them, and you can also use Client Components. > **Recommendation:** Check out the Server page if you're new to Server Components. ## Roles of Folders and Files Next.js uses a file-system based router where: * **Folders** are used to define routes. A route is a single path of nested folders, following the file-system hierarchy from the **root folder** down to a final **leaf folder** that includes a `page.js` file. See Defining Routes. * **Files** are used to create UI that is shown for a route segment. See special files. ## Route Segments Each folder in a route represents a **route segment**. Each route segment is mapped to a corresponding **segment** in a **URL path**.  ## Nested Routes To create a nested route, you can nest folders inside each other. For example, you can add a new `/dashboard/settings` route by nesting two new folders in the `app` directory. The `/dashboard/settings` route is composed of three segments: * `/` (Root segment) * `dashboard` (Segment) * `settings` (Leaf segment) ## File Conventions Next.js provides a set of special files to create UI with specific behavior in nested routes: | | | | --- | --- | | `layout` | Shared UI for a segment and its children | | `page` | Unique UI of a route and make routes publicly accessible | | `loading` | Loading UI for a segment and its children | | `not-found` | Not found UI for a segment and its children | | `error` | Error UI for a segment and its children | | `global-error` | Global Error UI | | `route` | Server-side API endpoint | | `template` | Specialized re-rendered Layout UI | | `default` | Fallback UI for Parallel Routes | > **Good to know**: `.js`, `.jsx`, or `.tsx` file extensions can be used for special files. ## Component Hierarchy The React components defined in special files of a route segment are rendered in a specific hierarchy: * `layout.js` * `template.js` * `error.js` (React error boundary) * `loading.js` (React suspense boundary) * `not-found.js` (React error boundary) * `page.js` or nested `layout.js`  In a nested route, the components of a segment will be nested **inside** the components of its parent segment.  ## Colocation In addition to special files, you have the option to colocate your own files (e.g. components, styles, tests, etc) inside folders in the `app` directory. This is because while folders define routes, only the contents returned by `page.js` or `route.js` are publicly addressable.  Learn more about Project Organization and Colocation. ## Advanced Routing Patterns The App Router also provides a set of conventions to help you implement more advanced routing patterns. These include: * Parallel Routes: Allow you to simultaneously show two or more pages in the same view that can be navigated independently. You can use them for split views that have their own sub-navigation. E.g. Dashboards. * Intercepting Routes: Allow you to intercept a route and show it in the context of another route. You can use these when keeping the context for the current page is important. E.g. Seeing all tasks while editing one task or expanding a photo in a feed. These patterns allow you to build richer and more complex UIs, democratizing features that were historically complex for small teams and individual developers to implement. ## Next Steps Now that you understand the fundamentals of routing in Next.js, follow the links below to create your first routes: --- ## Page: https://nextjs.org/docs/13/app/building-your-application/routing/defining-routes > We recommend reading the Routing Fundamentals page before continuing. This page will guide you through how to define and organize routes in your Next.js application. ## Creating Routes Next.js uses a file-system based router where **folders** are used to define routes. Each folder represents a **route** segment that maps to a **URL** segment. To create a nested route, you can nest folders inside each other.  A special `page.js` file is used to make route segments publicly accessible.  In this example, the `/dashboard/analytics` URL path is _not_ publicly accessible because it does not have a corresponding `page.js` file. This folder could be used to store components, stylesheets, images, or other colocated files. > **Good to know**: `.js`, `.jsx`, or `.tsx` file extensions can be used for special files. ## Creating UI Special file conventions are used to create UI for each route segment. The most common are pages to show UI unique to a route, and layouts to show UI that is shared across multiple routes. For example, to create your first page, add a `page.js` file inside the `app` directory and export a React component: export default function Page() { return <h1>Hello, Next.js!</h1> } --- ## Page: https://nextjs.org/docs/13/app/building-your-application/routing/pages-and-layouts > We recommend reading the Routing Fundamentals and Defining Routes pages before continuing. The App Router inside Next.js 13 introduced new file conventions to easily create pages, shared layouts, and templates. This page will guide you through how to use these special files in your Next.js application. ## Pages A page is UI that is **unique** to a route. You can define pages by exporting a component from a `page.js` file. Use nested folders to define a route and a `page.js` file to make the route publicly accessible. Create your first page by adding a `page.js` file inside the `app` directory:  // `app/page.tsx` is the UI for the `/` URL export default function Page() { return <h1>Hello, Home page!</h1> } // `app/dashboard/page.tsx` is the UI for the `/dashboard` URL export default function Page() { return <h1>Hello, Dashboard Page!</h1> } > **Good to know**: > > * A page is always the leaf of the route subtree. > * `.js`, `.jsx`, or `.tsx` file extensions can be used for Pages. > * A `page.js` file is required to make a route segment publicly accessible. > * Pages are Server Components by default but can be set to a Client Component. > * Pages can fetch data. View the Data Fetching section for more information. ## Layouts A layout is UI that is **shared** between multiple pages. On navigation, layouts preserve state, remain interactive, and do not re-render. Layouts can also be nested. You can define a layout by `default` exporting a React component from a `layout.js` file. The component should accept a `children` prop that will be populated with a child layout (if it exists) or a child page during rendering.  export default function DashboardLayout({ children, // will be a page or nested layout }: { children: React.ReactNode }) { return ( <section> {/* Include shared UI here e.g. a header or sidebar */} <nav></nav> {children} </section> ) } > **Good to know**: > > * The top-most layout is called the Root Layout. This **required** layout is shared across all pages in an application. Root layouts must contain `html` and `body` tags. > * Any route segment can optionally define its own Layout. These layouts will be shared across all pages in that segment. > * Layouts in a route are **nested** by default. Each parent layout wraps child layouts below it using the React `children` prop. > * You can use Route Groups to opt specific route segments in and out of shared layouts. > * Layouts are Server Components by default but can be set to a Client Component. > * Layouts can fetch data. View the Data Fetching section for more information. > * Passing data between a parent layout and its children is not possible. However, you can fetch the same data in a route more than once, and React will automatically dedupe the requests without affecting performance. > * Layouts do not have access to the route segments below itself. To access all route segments, you can use `useSelectedLayoutSegment` or `useSelectedLayoutSegments` in a Client Component. > * `.js`, `.jsx`, or `.tsx` file extensions can be used for Layouts. > * A `layout.js` and `page.js` file can be defined in the same folder. The layout will wrap the page. ### Root Layout (Required) The root layout is defined at the top level of the `app` directory and applies to all routes. This layout enables you to modify the initial HTML returned from the server. export default function RootLayout({ children, }: { children: React.ReactNode }) { return ( <html lang="en"> <body>{children}</body> </html> ) } > **Good to know**: > > * The `app` directory **must** include a root layout. > * The root layout must define `<html>` and `<body>` tags since Next.js does not automatically create them. > * You can use the built-in SEO support to manage `<head>` HTML elements, for example, the `<title>` element. > * You can use route groups to create multiple root layouts. See an example here. > * The root layout is a Server Component by default and **can not** be set to a Client Component. > **Migrating from the `pages` directory:** The root layout replaces the `_app.js` and `_document.js` files. View the migration guide. ### Nesting Layouts Layouts defined inside a folder (e.g. `app/dashboard/layout.js`) apply to specific route segments (e.g. `acme.com/dashboard`) and render when those segments are active. By default, layouts in the file hierarchy are **nested**, which means they wrap child layouts via their `children` prop.  export default function DashboardLayout({ children, }: { children: React.ReactNode }) { return <section>{children}</section> } > **Good to know**: > > * Only the root layout can contain `<html>` and `<body>` tags. If you were to combine the two layouts above, the root layout (`app/layout.js`) would wrap the dashboard layout (`app/dashboard/layout.js`), which would wrap route segments inside `app/dashboard/*`. The two layouts would be nested as such:  You can use Route Groups to opt specific route segments in and out of shared layouts. ## Templates Templates are similar to layouts in that they wrap each child layout or page. Unlike layouts that persist across routes and maintain state, templates create a new instance for each of their children on navigation. This means that when a user navigates between routes that share a template, a new instance of the component is mounted, DOM elements are recreated, state is **not** preserved, and effects are re-synchronized. There may be cases where you need those specific behaviors, and templates would be a more suitable option than layouts. For example: * Features that rely on `useEffect` (e.g logging page views) and `useState` (e.g a per-page feedback form). * To change the default framework behavior. For example, Suspense Boundaries inside layouts only show the fallback the first time the Layout is loaded and not when switching pages. For templates, the fallback is shown on each navigation. A template can be defined by exporting a default React component from a `template.js` file. The component should accept a `children` prop.  export default function Template({ children }: { children: React.ReactNode }) { return <div>{children}</div> } In terms of nesting, `template.js` is rendered between a layout and its children. Here's a simplified output: <Layout> {/* Note that the template is given a unique key. */} <Template key={routeParam}>{children}</Template> </Layout> ## Modifying `<head>` In the `app` directory, you can modify the `<head>` HTML elements such as `title` and `meta` using the built-in SEO support. Metadata can be defined by exporting a `metadata` object or `generateMetadata` function in a `layout.js` or `page.js` file. import { Metadata } from 'next' export const metadata: Metadata = { title: 'Next.js', } export default function Page() { return '...' } > **Good to know**: You should **not** manually add `<head>` tags such as `<title>` and `<meta>` to root layouts. Instead, you should use the Metadata API which automatically handles advanced requirements such as streaming and de-duplicating `<head>` elements. Learn more about available metadata options in the API reference. --- ## Page: https://nextjs.org/docs/13/app/building-your-application/routing/linking-and-navigating There are two ways to navigate between routes in Next.js: * Using the `<Link>` Component * Using the `useRouter` Hook This page will go through how to use `<Link>`, `useRouter()`, and dive deeper into how navigation works. ## `<Link>` Component `<Link>` is a built-in component that extends the HTML `<a>` tag to provide prefetching and client-side navigation between routes. It is the primary way to navigate between routes in Next.js. You can use it by importing it from `next/link`, and passing a `href` prop to the component: import Link from 'next/link' export default function Page() { return <Link href="/dashboard">Dashboard</Link> } There are other optional props you can pass to `<Link>`. See the API reference for more. ### Examples #### Linking to Dynamic Segments When linking to dynamic segments, you can use template literals and interpolation to generate a list of links. For example, to generate a list of blog posts: import Link from 'next/link' export default function PostList({ posts }) { return ( <ul> {posts.map((post) => ( <li key={post.id}> <Link href={`/blog/${post.slug}`}>{post.title}</Link> </li> ))} </ul> ) } #### Checking Active Links You can use `usePathname()` to determine if a link is active. For example, to add a class to the active link, you can check if the current `pathname` matches the `href` of the link: 'use client' import { usePathname } from 'next/navigation' import Link from 'next/link' export function Links() { const pathname = usePathname() return ( <nav> <ul> <li> <Link className={`link ${pathname === '/' ? 'active' : ''}`} href="/"> Home </Link> </li> <li> <Link className={`link ${pathname === '/about' ? 'active' : ''}`} href="/about" > About </Link> </li> </ul> </nav> ) } #### Scrolling to an `id` The default behavior of the Next.js App Router is to scroll to the top of a new route or to maintain the scroll position for backwards and forwards navigation. If you'd like to scroll to a specific `id` on navigation, you can append your URL with a `#` hash link or just pass a hash link to the `href` prop. This is possible since `<Link>` renders to an `<a>` element. <Link href="/dashboard#settings">Settings</Link> // Output <a href="/dashboard#settings">Settings</a> #### Disabling scroll restoration The default behavior of the Next.js App Router is to scroll to the top of a new route or to maintain the scroll position for backwards and forwards navigation. If you'd like to disable this behavior, you can pass `scroll={false}` to the `<Link>` component, or `scroll: false` to `router.push()` or `router.replace()`. // next/link <Link href="/dashboard" scroll={false}> Dashboard </Link> // useRouter import { useRouter } from 'next/navigation' const router = useRouter() router.push('/dashboard', { scroll: false }) ## `useRouter()` Hook The `useRouter` hook allows you to programmatically change routes. This hook can only be used inside Client Components and is imported from `next/navigation`. 'use client' import { useRouter } from 'next/navigation' export default function Page() { const router = useRouter() return ( <button type="button" onClick={() => router.push('/dashboard')}> Dashboard </button> ) } For a full list of `useRouter` methods, see the API reference. > **Recommendation:** Use the `<Link>` component to navigate between routes unless you have a specific requirement for using `useRouter`. ## How Routing and Navigation Works The App Router uses a hybrid approach for routing and navigation. On the server, your application code is automatically code-split by route segments. And on the client, Next.js prefetches and caches the route segments. This means, when a user navigates to a new route, the browser doesn't reload the page, and only the route segments that change re-render - improving the navigation experience and performance. ### 1\. Prefetching Prefetching is a way to preload a route in the background before the user visits it. There are two ways routes are prefetched in Next.js: * **`<Link>` component**: Routes are automatically prefetched as they become visible in the user's viewport. Prefetching happens when the page first loads or when it comes into view through scrolling. * **`router.prefetch()`**: The `useRouter` hook can be used to prefetch routes programmatically. The`<Link>`'s prefetching behavior is different for static and dynamic routes: * **Static Routes**: `prefetch` defaults to `true`. The entire route is prefetched and cached. * **Dynamic Routes**: `prefetch` default to automatic. Only the shared layout down until the first `loading.js` file is prefetched and cached for `30s`. This reduces the cost of fetching an entire dynamic route, and it means you can show an instant loading state for better visual feedback to users. You can disable prefetching by setting the `prefetch` prop to `false`. See the `<Link>` API reference for more information. > **Good to know**: > > * Prefetching is not enabled in development, only in production. ### 2\. Caching Next.js has an **in-memory client-side cache** called the Router Cache. As users navigate around the app, the React Server Component Payload of prefetched route segments and visited routes are stored in the cache. This means on navigation, the cache is reused as much as possible, instead of making a new request to the server - improving performance by reducing the number of requests and data transferred. Learn more about how the Router Cache works and how to configure it. ### 3\. Partial Rendering Partial rendering means only the route segments that change on navigation re-render on the client, and any shared segments are preserved. For example, when navigating between two sibling routes, `/dashboard/settings` and `/dashboard/analytics`, the `settings` and `analytics` pages will be rendered, and the shared `dashboard` layout will be preserved.  Without partial rendering, each navigation would cause the full page to re-render on the server. Rendering only the segment that changes reduces the amount of data transferred and execution time, leading to improved performance. ### 4\. Soft Navigation By default, the browser performs a hard navigation between pages. This means the browser reloads the page and resets React state such as `useState` hooks in your app and browser state such as the user's scroll position or focused element. However, in Next.js, the App Router uses soft navigation. This means React only renders the segments that have changed while preserving React and browser state, and there is no full page reload. ### 5\. Back and Forward Navigation By default, Next.js will maintain the scroll position for backwards and forwards navigation, and re-use route segments in the Router Cache. --- ## Page: https://nextjs.org/docs/13/app/building-your-application/routing/route-groups In the `app` directory, nested folders are normally mapped to URL paths. However, you can mark a folder as a **Route Group** to prevent the folder from being included in the route's URL path. This allows you to organize your route segments and project files into logical groups without affecting the URL path structure. Route groups are useful for: * Organizing routes into groups e.g. by site section, intent, or team. * Enabling nested layouts in the same route segment level: * Creating multiple nested layouts in the same segment, including multiple root layouts * Adding a layout to a subset of routes in a common segment ## Convention A route group can be created by wrapping a folder's name in parenthesis: `(folderName)` ## Examples ### Organize routes without affecting the URL path To organize routes without affecting the URL, create a group to keep related routes together. The folders in parenthesis will be omitted from the URL (e.g. `(marketing)` or `(shop)`).  Even though routes inside `(marketing)` and `(shop)` share the same URL hierarchy, you can create a different layout for each group by adding a `layout.js` file inside their folders.  ### Opting specific segments into a layout To opt specific routes into a layout, create a new route group (e.g. `(shop)`) and move the routes that share the same layout into the group (e.g. `account` and `cart`). The routes outside of the group will not share the layout (e.g. `checkout`).  ### Creating multiple root layouts To create multiple root layouts, remove the top-level `layout.js` file, and add a `layout.js` file inside each route groups. This is useful for partitioning an application into sections that have a completely different UI or experience. The `<html>` and `<body>` tags need to be added to each root layout.  In the example above, both `(marketing)` and `(shop)` have their own root layout. * * * > **Good to know**: > > * The naming of route groups has no special significance other than for organization. They do not affect the URL path. > * Routes that include a route group **should not** resolve to the same URL path as other routes. For example, since route groups don't affect URL structure, `(marketing)/about/page.js` and `(shop)/about/page.js` would both resolve to `/about` and cause an error. > * If you use multiple root layouts without a top-level `layout.js` file, your home `page.js` file should be defined in one of the route groups, For example: `app/(marketing)/page.js`. > * Navigating **across multiple root layouts** will cause a **full page load** (as opposed to a client-side navigation). For example, navigating from `/cart` that uses `app/(shop)/layout.js` to `/blog` that uses `app/(marketing)/layout.js` will cause a full page load. This **only** applies to multiple root layouts. --- ## Page: https://nextjs.org/docs/13/app/building-your-application/routing/dynamic-routes When you don't know the exact segment names ahead of time and want to create routes from dynamic data, you can use Dynamic Segments that are filled in at request time or prerendered at build time. ## Convention A Dynamic Segment can be created by wrapping a folder's name in square brackets: `[folderName]`. For example, `[id]` or `[slug]`. Dynamic Segments are passed as the `params` prop to `layout`, `page`, `route`, and `generateMetadata` functions. ## Example For example, a blog could include the following route `app/blog/[slug]/page.js` where `[slug]` is the Dynamic Segment for blog posts. export default function Page({ params }: { params: { slug: string } }) { return <div>My Post: {params.slug}</div> } | Route | Example URL | `params` | | --- | --- | --- | | `app/blog/[slug]/page.js` | `/blog/a` | `{ slug: 'a' }` | | `app/blog/[slug]/page.js` | `/blog/b` | `{ slug: 'b' }` | | `app/blog/[slug]/page.js` | `/blog/c` | `{ slug: 'c' }` | See the generateStaticParams() page to learn how to generate the params for the segment. > **Good to know**: Dynamic Segments are equivalent to Dynamic Routes in the `pages` directory. ## Generating Static Params The `generateStaticParams` function can be used in combination with dynamic route segments to **statically generate** routes at build time instead of on-demand at request time. export async function generateStaticParams() { const posts = await fetch('https://.../posts').then((res) => res.json()) return posts.map((post) => ({ slug: post.slug, })) } The primary benefit of the `generateStaticParams` function is its smart retrieval of data. If content is fetched within the `generateStaticParams` function using a `fetch` request, the requests are automatically memoized. This means a `fetch` request with the same arguments across multiple `generateStaticParams`, Layouts, and Pages will only be made once, which decreases build times. Use the migration guide if you are migrating from the `pages` directory. See `generateStaticParams` server function documentation for more information and advanced use cases. ## Catch-all Segments Dynamic Segments can be extended to **catch-all** subsequent segments by adding an ellipsis inside the brackets `[...folderName]`. For example, `app/shop/[...slug]/page.js` will match `/shop/clothes`, but also `/shop/clothes/tops`, `/shop/clothes/tops/t-shirts`, and so on. | Route | Example URL | `params` | | --- | --- | --- | | `app/shop/[...slug]/page.js` | `/shop/a` | `{ slug: ['a'] }` | | `app/shop/[...slug]/page.js` | `/shop/a/b` | `{ slug: ['a', 'b'] }` | | `app/shop/[...slug]/page.js` | `/shop/a/b/c` | `{ slug: ['a', 'b', 'c'] }` | ## Optional Catch-all Segments Catch-all Segments can be made **optional** by including the parameter in double square brackets: `[[...folderName]]`. For example, `app/shop/[[...slug]]/page.js` will **also** match `/shop`, in addition to `/shop/clothes`, `/shop/clothes/tops`, `/shop/clothes/tops/t-shirts`. The difference between **catch-all** and **optional catch-all** segments is that with optional, the route without the parameter is also matched (`/shop` in the example above). | Route | Example URL | `params` | | --- | --- | --- | | `app/shop/[[...slug]]/page.js` | `/shop` | `{}` | | `app/shop/[[...slug]]/page.js` | `/shop/a` | `{ slug: ['a'] }` | | `app/shop/[[...slug]]/page.js` | `/shop/a/b` | `{ slug: ['a', 'b'] }` | | `app/shop/[[...slug]]/page.js` | `/shop/a/b/c` | `{ slug: ['a', 'b', 'c'] }` | ## TypeScript When using TypeScript, you can add types for `params` depending on your configured route segment. export default function Page({ params }: { params: { slug: string } }) { return <h1>My Page</h1> } | Route | `params` Type Definition | | --- | --- | | `app/blog/[slug]/page.js` | `{ slug: string }` | | `app/shop/[...slug]/page.js` | `{ slug: string[] }` | | `app/[categoryId]/[itemId]/page.js` | `{ categoryId: string, itemId: string }` | > **Good to know**: This may be done automatically by the TypeScript plugin in the future. --- ## Page: https://nextjs.org/docs/13/app/building-your-application/routing/loading-ui-and-streaming The special file `loading.js` helps you create meaningful Loading UI with React Suspense. With this convention, you can show an instant loading state from the server while the content of a route segment loads. The new content is automatically swapped in once rendering is complete.  ## Instant Loading States An instant loading state is fallback UI that is shown immediately upon navigation. You can pre-render loading indicators such as skeletons and spinners, or a small but meaningful part of future screens such as a cover photo, title, etc. This helps users understand the app is responding and provides a better user experience. Create a loading state by adding a `loading.js` file inside a folder.  export default function Loading() { // You can add any UI inside Loading, including a Skeleton. return <LoadingSkeleton /> } In the same folder, `loading.js` will be nested inside `layout.js`. It will automatically wrap the `page.js` file and any children below in a `<Suspense>` boundary.  > **Good to know**: > > * Navigation is immediate, even with server-centric routing. > * Navigation is interruptible, meaning changing routes does not need to wait for the content of the route to fully load before navigating to another route. > * Shared layouts remain interactive while new route segments load. > **Recommendation:** Use the `loading.js` convention for route segments (layouts and pages) as Next.js optimizes this functionality. ## Streaming with Suspense In addition to `loading.js`, you can also manually create Suspense Boundaries for your own UI components. The App Router supports streaming with Suspense for both Node.js and Edge runtimes. ### What is Streaming? To learn how Streaming works in React and Next.js, it's helpful to understand **Server-Side Rendering (SSR)** and its limitations. With SSR, there's a series of steps that need to be completed before a user can see and interact with a page: 1. First, all data for a given page is fetched on the server. 2. The server then renders the HTML for the page. 3. The HTML, CSS, and JavaScript for the page are sent to the client. 4. A non-interactive user interface is shown using the generated HTML, and CSS. 5. Finally, React hydrates the user interface to make it interactive.  These steps are sequential and blocking, meaning the server can only render the HTML for a page once all the data has been fetched. And, on the client, React can only hydrate the UI once the code for all components in the page has been downloaded. SSR with React and Next.js helps improve the perceived loading performance by showing a non-interactive page to the user as soon as possible.  However, it can still be slow as all data fetching on server needs to be completed before the page can be shown to the user. **Streaming** allows you to break down the page's HTML into smaller chunks and progressively send those chunks from the server to the client.  This enables parts of the page to be displayed sooner, without waiting for all the data to load before any UI can be rendered. Streaming works well with React's component model because each component can be considered a chunk. Components that have higher priority (e.g. product information) or that don't rely on data can be sent first (e.g. layout), and React can start hydration earlier. Components that have lower priority (e.g. reviews, related products) can be sent in the same server request after their data has been fetched.  Streaming is particularly beneficial when you want to prevent long data requests from blocking the page from rendering as it can reduce the Time To First Byte (TTFB) and First Contentful Paint (FCP). It also helps improve Time to Interactive (TTI), especially on slower devices. ### Example `<Suspense>` works by wrapping a component that performs an asynchronous action (e.g. fetch data), showing fallback UI (e.g. skeleton, spinner) while it's happening, and then swapping in your component once the action completes. import { Suspense } from 'react' import { PostFeed, Weather } from './Components' export default function Posts() { return ( <section> <Suspense fallback={<p>Loading feed...</p>}> <PostFeed /> </Suspense> <Suspense fallback={<p>Loading weather...</p>}> <Weather /> </Suspense> </section> ) } By using Suspense, you get the benefits of: 1. **Streaming Server Rendering** - Progressively rendering HTML from the server to the client. 2. **Selective Hydration** - React prioritizes what components to make interactive first based on user interaction. For more Suspense examples and use cases, please see the React Documentation. ### SEO * Next.js will wait for data fetching inside `generateMetadata` to complete before streaming UI to the client. This guarantees the first part of a streamed response includes `<head>` tags. * Since streaming is server-rendered, it does not impact SEO. You can use the Mobile Friendly Test tool from Google to see how your page appears to Google's web crawlers and view the serialized HTML (source). ### Status Codes When streaming, a `200` status code will be returned to signal that the request was successful. The server can still communicate errors or issues to the client within the streamed content itself, for example, when using `redirect` or `notFound`. Since the response headers have already been sent to the client, the status code of the response cannot be updated. This does not affect SEO. --- ## Page: https://nextjs.org/docs/13/app/building-your-application/routing/error-handling The `error.js` file convention allows you to gracefully handle unexpected runtime errors in nested routes. * Automatically wrap a route segment and its nested children in a React Error Boundary. * Create error UI tailored to specific segments using the file-system hierarchy to adjust granularity. * Isolate errors to affected segments while keeping the rest of the application functional. * Add functionality to attempt to recover from an error without a full page reload. Create error UI by adding an `error.js` file inside a route segment and exporting a React component:  'use client' // Error components must be Client Components import { useEffect } from 'react' export default function Error({ error, reset, }: { error: Error & { digest?: string } reset: () => void }) { useEffect(() => { // Log the error to an error reporting service console.error(error) }, [error]) return ( <div> <h2>Something went wrong!</h2> <button onClick={ // Attempt to recover by trying to re-render the segment () => reset() } > Try again </button> </div> ) } ### How `error.js` Works  * `error.js` automatically creates a React Error Boundary that **wraps** a nested child segment or `page.js` component. * The React component exported from the `error.js` file is used as the **fallback** component. * If an error is thrown within the error boundary, the error is **contained**, and the fallback component is **rendered**. * When the fallback error component is active, layouts **above** the error boundary **maintain** their state and **remain** interactive, and the error component can display functionality to recover from the error. ### Recovering From Errors The cause of an error can sometimes be temporary. In these cases, simply trying again might resolve the issue. An error component can use the `reset()` function to prompt the user to attempt to recover from the error. When executed, the function will try to re-render the Error boundary's contents. If successful, the fallback error component is replaced with the result of the re-render. 'use client' export default function Error({ error, reset, }: { error: Error & { digest?: string } reset: () => void }) { return ( <div> <h2>Something went wrong!</h2> <button onClick={() => reset()}>Try again</button> </div> ) } ### Nested Routes React components created through special files are rendered in a specific nested hierarchy. For example, a nested route with two segments that both include `layout.js` and `error.js` files are rendered in the following _simplified_ component hierarchy:  The nested component hierarchy has implications for the behavior of `error.js` files across a nested route: * Errors bubble up to the nearest parent error boundary. This means an `error.js` file will handle errors for all its nested child segments. More or less granular error UI can be achieved by placing `error.js` files at different levels in the nested folders of a route. * An `error.js` boundary will **not** handle errors thrown in a `layout.js` component in the **same** segment because the error boundary is nested **inside** that layouts component. ### Handling Errors in Layouts `error.js` boundaries do **not** catch errors thrown in `layout.js` or `template.js` components of the **same segment**. This intentional hierarchy keeps important UI that is shared between sibling routes (such as navigation) visible and functional when an error occurs. To handle errors within a specific layout or template, place an `error.js` file in the layouts parent segment. To handle errors within the root layout or template, use a variation of `error.js` called `global-error.js`. ### Handling Errors in Root Layouts The root `app/error.js` boundary does **not** catch errors thrown in the root `app/layout.js` or `app/template.js` component. To specifically handle errors in these root components, use a variation of `error.js` called `app/global-error.js` located in the root `app` directory. Unlike the root `error.js`, the `global-error.js` error boundary wraps the **entire** application, and its fallback component replaces the root layout when active. Because of this, it is important to note that `global-error.js` **must** define its own `<html>` and `<body>` tags. `global-error.js` is the least granular error UI and can be considered "catch-all" error handling for the whole application. It is unlikely to be triggered often as root components are typically less dynamic, and other `error.js` boundaries will catch most errors. Even if a `global-error.js` is defined, it is still recommended to define a root `error.js` whose fallback component will be rendered **within** the root layout, which includes globally shared UI and branding. 'use client' export default function GlobalError({ error, reset, }: { error: Error & { digest?: string } reset: () => void }) { return ( <html> <body> <h2>Something went wrong!</h2> <button onClick={() => reset()}>Try again</button> </body> </html> ) } ### Handling Server Errors If an error is thrown inside a Server Component, Next.js will forward an `Error` object (stripped of sensitive error information in production) to the nearest `error.js` file as the `error` prop. #### Securing Sensitive Error Information During production, the `Error` object forwarded to the client only includes a generic `message` and `digest` property. This is a security precaution to avoid leaking potentially sensitive details included in the error to the client. The `message` property contains a generic message about the error and the `digest` property contains an automatically generated hash of the error that can be used to match the corresponding error in server-side logs. During development, the `Error` object forwarded to the client will be serialized and include the `message` of the original error for easier debugging. --- ## Page: https://nextjs.org/docs/13/app/building-your-application/routing/parallel-routes Parallel Routing allows you to simultaneously or conditionally render one or more pages in the same layout. For highly dynamic sections of an app, such as dashboards and feeds on social sites, Parallel Routing can be used to implement complex routing patterns. For example, you can simultaneously render the team and analytics pages.  Parallel Routing allows you to define independent error and loading states for each route as they're being streamed in independently.  Parallel Routing also allows you to conditionally render a slot based on certain conditions, such as authentication state. This enables fully separated code on the same URL.  ## Convention Parallel routes are created using named **slots**. Slots are defined with the `@folder` convention, and are passed to the same-level layout as props. > Slots are _not_ route segments and _do not affect the URL structure_. The file path `/@team/members` would be accessible at `/members`. For example, the following file structure defines two explicit slots: `@analytics` and `@team`.  The folder structure above means that the component in `app/layout.js` now accepts the `@analytics` and `@team` slots props, and can render them in parallel alongside the `children` prop: export default function Layout(props: { children: React.ReactNode analytics: React.ReactNode team: React.ReactNode }) { return ( <> {props.children} {props.team} {props.analytics} </> ) } > **Good to know**: The `children` prop is an implicit slot that does not need to be mapped to a folder. This means `app/page.js` is equivalent to `app/@children/page.js`. ## Unmatched Routes By default, the content rendered within a slot will match the current URL. In the case of an unmatched slot, the content that Next.js renders differs based on the routing technique and folder structure. ### `default.js` You can define a `default.js` file to render as a fallback when Next.js cannot recover a slot's active state based on the current URL. Consider the following folder structure. The `@team` slot has a `settings` directory, but `@analytics` does not.  #### Navigation On navigation, Next.js will render the slot's previously active state, even if it doesn't match the current URL. #### Reload On reload, Next.js will first try to render the unmatched slot's `default.js` file. If that's not available, a 404 gets rendered. > The 404 for unmatched routes helps ensure that you don't accidentally render a route that shouldn't be parallel rendered. ## `useSelectedLayoutSegment(s)` Both `useSelectedLayoutSegment` and `useSelectedLayoutSegments` accept a `parallelRoutesKey`, which allows you read the active route segment within that slot. 'use client' import { useSelectedLayoutSegment } from 'next/navigation' export default async function Layout(props: { //... auth: React.ReactNode }) { const loginSegments = useSelectedLayoutSegment('auth') // ... } When a user navigates to `@auth/login`, or `/login` in the URL bar, `loginSegments` will be equal to the string `"login"`. ## Examples ### Modals Parallel Routing can be used to render modals.  The `@auth` slot renders a `<Modal>` component that can be shown by navigating to a matching route, for example `/login`. export default async function Layout(props: { // ... auth: React.ReactNode }) { return ( <> {/* ... */} {props.auth} </> ) } import { Modal } from 'components/modal' export default function Login() { return ( <Modal> <h1>Login</h1> {/* ... */} </Modal> ) } To ensure that the contents of the modal don't get rendered when it's not active, you can create a `default.js` file that returns `null`. export default function Default() { return null } #### Dismissing a modal If a modal was initiated through client navigation, e.g. by using `<Link href="/login">`, you can dismiss the modal by calling `router.back()` or by using a `Link` component. 'use client' import { useRouter } from 'next/navigation' import { Modal } from 'components/modal' export default async function Login() { const router = useRouter() return ( <Modal> <span onClick={() => router.back()}>Close modal</span> <h1>Login</h1> ... </Modal> ) } > More information on modals is covered in the Intercepting Routes section. If you want to navigate elsewhere and dismiss a modal, you can also use a catch-all route. 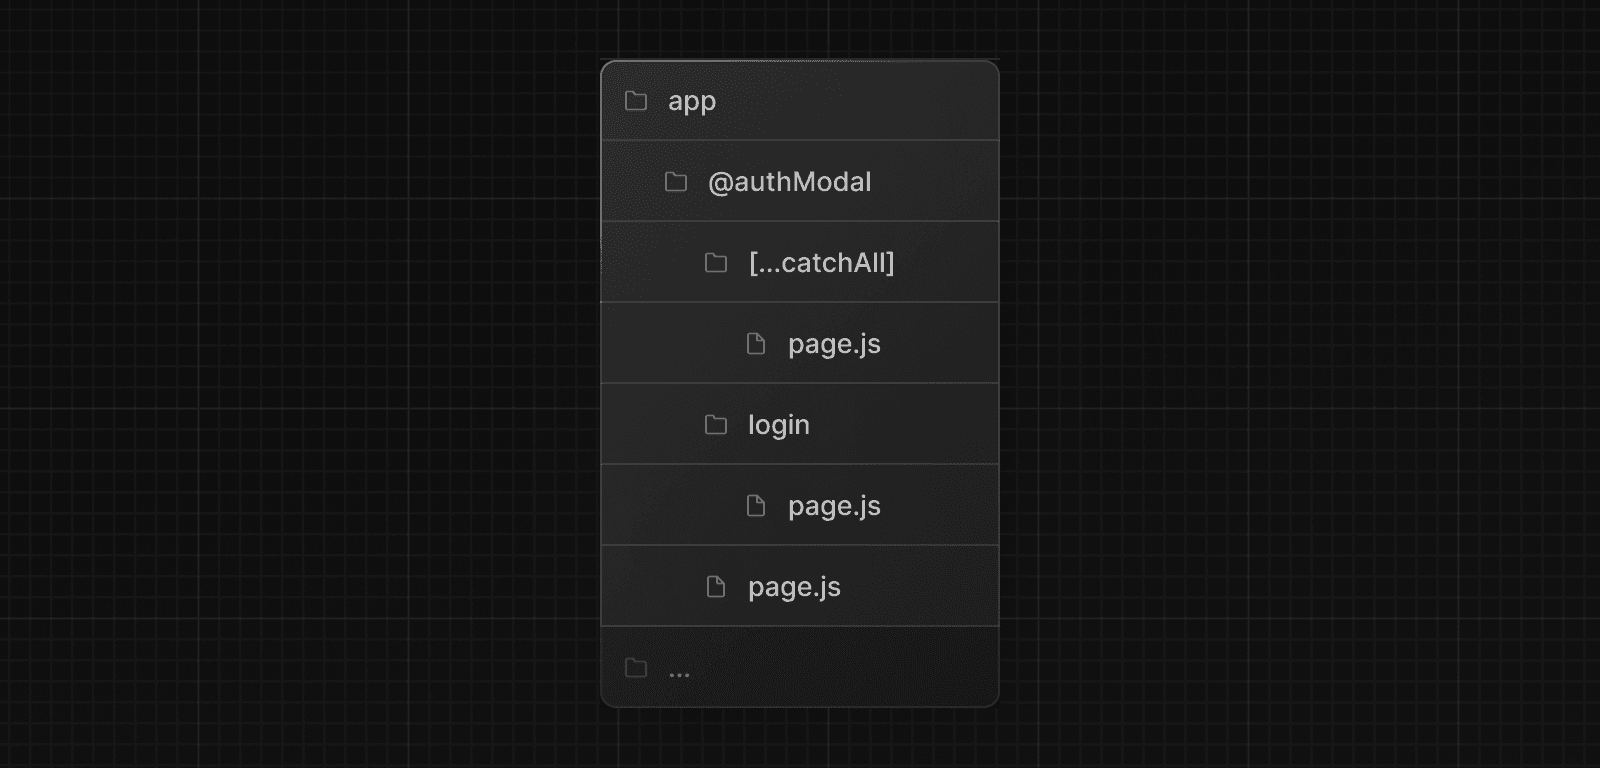 export default function CatchAll() { return null } > Catch-all routes take precedence over `default.js`. ### Conditional Routes Parallel Routes can be used to implement conditional routing. For example, you can render a `@dashboard` or `@login` route depending on the authentication state. import { getUser } from '@/lib/auth' export default function Layout({ dashboard, login, }: { dashboard: React.ReactNode login: React.ReactNode }) { const isLoggedIn = getUser() return isLoggedIn ? dashboard : login }  --- ## Page: https://nextjs.org/docs/13/app/building-your-application/routing/intercepting-routes Intercepting routes allows you to load a route from another part of your application within the current layout. This routing paradigm can be useful when you want to display the content of a route without the user switching to a different context. For example, when clicking on a photo in a feed, you can display the photo in a modal, overlaying the feed. In this case, Next.js intercepts the `/photo/123` route, masks the URL, and overlays it over `/feed`.  However, when navigating to the photo by clicking a shareable URL or by refreshing the page, the entire photo page should render instead of the modal. No route interception should occur.  ## Convention Intercepting routes can be defined with the `(..)` convention, which is similar to relative path convention `../` but for segments. You can use: * `(.)` to match segments on the **same level** * `(..)` to match segments **one level above** * `(..)(..)` to match segments **two levels above** * `(...)` to match segments from the **root** `app` directory For example, you can intercept the `photo` segment from within the `feed` segment by creating a `(..)photo` directory.  > Note that the `(..)` convention is based on _route segments_, not the file-system. ## Examples ### Modals Intercepting Routes can be used together with Parallel Routes to create modals. Using this pattern to create modals overcomes some common challenges when working with modals, by allowing you to: * Make the modal content **shareable through a URL** * **Preserve context** when the page is refreshed, instead of closing the modal * **Close the modal on backwards navigation** rather than going to the previous route * **Reopen the modal on forwards navigation**  > In the above example, the path to the `photo` segment can use the `(..)` matcher since `@modal` is a _slot_ and not a _segment_. This means that the `photo` route is only one _segment_ level higher, despite being two _file-system_ levels higher. Other examples could include opening a login modal in a top navbar while also having a dedicated `/login` page, or opening a shopping cart in a side modal. View an example of modals with Intercepted and Parallel Routes. --- ## Page: https://nextjs.org/docs/13/app/building-your-application/routing/route-handlers Route Handlers allow you to create custom request handlers for a given route using the Web Request and Response APIs.  > **Good to know**: Route Handlers are only available inside the `app` directory. They are the equivalent of API Routes inside the `pages` directory meaning you **do not** need to use API Routes and Route Handlers together. ## Convention Route Handlers are defined in a `route.js|ts` file inside the `app` directory: export async function GET(request: Request) {} Route Handlers can be nested inside the `app` directory, similar to `page.js` and `layout.js`. But there **cannot** be a `route.js` file at the same route segment level as `page.js`. ### Supported HTTP Methods The following HTTP methods are supported: `GET`, `POST`, `PUT`, `PATCH`, `DELETE`, `HEAD`, and `OPTIONS`. If an unsupported method is called, Next.js will return a `405 Method Not Allowed` response. ### Extended `NextRequest` and `NextResponse` APIs In addition to supporting native Request and Response. Next.js extends them with `NextRequest` and `NextResponse` to provide convenient helpers for advanced use cases. ## Behavior ### Caching Route Handlers are cached by default when using the `GET` method with the `Response` object. export async function GET() { const res = await fetch('https://data.mongodb-api.com/...', { headers: { 'Content-Type': 'application/json', 'API-Key': process.env.DATA_API_KEY, }, }) const data = await res.json() return Response.json({ data }) } > **TypeScript Warning:** `Response.json()` is only valid from TypeScript 5.2. If you use a lower TypeScript version, you can use `NextResponse.json()` for typed responses instead. ### Opting out of caching You can opt out of caching by: * Using the `Request` object with the `GET` method. * Using any of the other HTTP methods. * Using Dynamic Functions like `cookies` and `headers`. * The Segment Config Options manually specifies dynamic mode. For example: export async function GET(request: Request) { const { searchParams } = new URL(request.url) const id = searchParams.get('id') const res = await fetch(`https://data.mongodb-api.com/product/${id}`, { headers: { 'Content-Type': 'application/json', 'API-Key': process.env.DATA_API_KEY, }, }) const product = await res.json() return Response.json({ product }) } Similarly, the `POST` method will cause the Route Handler to be evaluated dynamically. export async function POST() { const res = await fetch('https://data.mongodb-api.com/...', { method: 'POST', headers: { 'Content-Type': 'application/json', 'API-Key': process.env.DATA_API_KEY, }, body: JSON.stringify({ time: new Date().toISOString() }), }) const data = await res.json() return Response.json(data) } > **Good to know**: Like API Routes, Route Handlers can be used for cases like handling form submissions. A new abstraction for handling forms and mutations that integrates deeply with React is being worked on. ### Route Resolution You can consider a `route` the lowest level routing primitive. * They **do not** participate in layouts or client-side navigations like `page`. * There **cannot** be a `route.js` file at the same route as `page.js`. | Page | Route | Result | | --- | --- | --- | | `app/page.js` | `app/route.js` | Conflict | | `app/page.js` | `app/api/route.js` | Valid | | `app/[user]/page.js` | `app/api/route.js` | Valid | Each `route.js` or `page.js` file takes over all HTTP verbs for that route. export default function Page() { return <h1>Hello, Next.js!</h1> } // ❌ Conflict // `app/route.js` export async function POST(request) {} ## Examples The following examples show how to combine Route Handlers with other Next.js APIs and features. ### Revalidating Cached Data You can revalidate cached data using the `next.revalidate` option: export async function GET() { const res = await fetch('https://data.mongodb-api.com/...', { next: { revalidate: 60 }, // Revalidate every 60 seconds }) const data = await res.json() return Response.json(data) } Alternatively, you can use the `revalidate` segment config option: export const revalidate = 60 ### Dynamic Functions Route Handlers can be used with dynamic functions from Next.js, like `cookies` and `headers`. #### Cookies You can read cookies with `cookies` from `next/headers`. This server function can be called directly in a Route Handler, or nested inside of another function. This `cookies` instance is read-only. To set cookies, you need to return a new `Response` using the `Set-Cookie` header. import { cookies } from 'next/headers' export async function GET(request: Request) { const cookieStore = cookies() const token = cookieStore.get('token') return new Response('Hello, Next.js!', { status: 200, headers: { 'Set-Cookie': `token=${token.value}` }, }) } Alternatively, you can use abstractions on top of the underlying Web APIs to read cookies (`NextRequest`): import { type NextRequest } from 'next/server' export async function GET(request: NextRequest) { const token = request.cookies.get('token') } You can read headers with `headers` from `next/headers`. This server function can be called directly in a Route Handler, or nested inside of another function. This `headers` instance is read-only. To set headers, you need to return a new `Response` with new `headers`. import { headers } from 'next/headers' export async function GET(request: Request) { const headersList = headers() const referer = headersList.get('referer') return new Response('Hello, Next.js!', { status: 200, headers: { referer: referer }, }) } Alternatively, you can use abstractions on top of the underlying Web APIs to read headers (`NextRequest`): import { type NextRequest } from 'next/server' export async function GET(request: NextRequest) { const requestHeaders = new Headers(request.headers) } ### Redirects import { redirect } from 'next/navigation' export async function GET(request: Request) { redirect('https://nextjs.org/') } ### Dynamic Route Segments > We recommend reading the Defining Routes page before continuing. Route Handlers can use Dynamic Segments to create request handlers from dynamic data. export async function GET( request: Request, { params }: { params: { slug: string } } ) { const slug = params.slug // 'a', 'b', or 'c' } | Route | Example URL | `params` | | --- | --- | --- | | `app/items/[slug]/route.js` | `/items/a` | `{ slug: 'a' }` | | `app/items/[slug]/route.js` | `/items/b` | `{ slug: 'b' }` | | `app/items/[slug]/route.js` | `/items/c` | `{ slug: 'c' }` | ### URL Query Parameters The request object passed to the Route Handler is a `NextRequest` instance, which has some additional convenience methods, including for more easily handling query parameters. import { type NextRequest } from 'next/server' export function GET(request: NextRequest) { const searchParams = request.nextUrl.searchParams const query = searchParams.get('query') // query is "hello" for /api/search?query=hello } ### Streaming Streaming is commonly used in combination with Large Language Models (LLMs), such as OpenAI, for AI-generated content. Learn more about the AI SDK. import { Configuration, OpenAIApi } from 'openai-edge' import { OpenAIStream, StreamingTextResponse } from 'ai' export const runtime = 'edge' const apiConfig = new Configuration({ apiKey: process.env.OPENAI_API_KEY!, }) const openai = new OpenAIApi(apiConfig) export async function POST(req: Request) { // Extract the `messages` from the body of the request const { messages } = await req.json() // Request the OpenAI API for the response based on the prompt const response = await openai.createChatCompletion({ model: 'gpt-3.5-turbo', stream: true, messages: messages, max_tokens: 500, temperature: 0.7, top_p: 1, frequency_penalty: 1, presence_penalty: 1, }) // Convert the response into a friendly text-stream const stream = OpenAIStream(response) // Respond with the stream return new StreamingTextResponse(stream) } These abstractions use the Web APIs to create a stream. You can also use the underlying Web APIs directly. // https://developer.mozilla.org/docs/Web/API/ReadableStream#convert_async_iterator_to_stream function iteratorToStream(iterator: any) { return new ReadableStream({ async pull(controller) { const { value, done } = await iterator.next() if (done) { controller.close() } else { controller.enqueue(value) } }, }) } function sleep(time: number) { return new Promise((resolve) => { setTimeout(resolve, time) }) } const encoder = new TextEncoder() async function* makeIterator() { yield encoder.encode('<p>One</p>') await sleep(200) yield encoder.encode('<p>Two</p>') await sleep(200) yield encoder.encode('<p>Three</p>') } export async function GET() { const iterator = makeIterator() const stream = iteratorToStream(iterator) return new Response(stream) } ### Request Body You can read the `Request` body using the standard Web API methods: export async function POST(request: Request) { const res = await request.json() return Response.json({ res }) } ### Request Body FormData You can read the `FormData` using the `request.formData()` function: export async function POST(request: Request) { const formData = await request.formData() const name = formData.get('name') const email = formData.get('email') return Response.json({ name, email }) } Since `formData` data are all strings, you may want to use `zod-form-data` to validate the request and retrieve data in the format you prefer (e.g. `number`). ### CORS You can set CORS headers on a `Response` using the standard Web API methods: export async function GET(request: Request) { return new Response('Hello, Next.js!', { status: 200, headers: { 'Access-Control-Allow-Origin': '*', 'Access-Control-Allow-Methods': 'GET, POST, PUT, DELETE, OPTIONS', 'Access-Control-Allow-Headers': 'Content-Type, Authorization', }, }) } ### Edge and Node.js Runtimes Route Handlers have an isomorphic Web API to support both Edge and Node.js runtimes seamlessly, including support for streaming. Since Route Handlers use the same route segment configuration as Pages and Layouts, they support long-awaited features like general-purpose statically regenerated Route Handlers. You can use the `runtime` segment config option to specify the runtime: export const runtime = 'edge' // 'nodejs' is the default ### Non-UI Responses You can use Route Handlers to return non-UI content. Note that `sitemap.xml`, `robots.txt`, `app icons`, and open graph images all have built-in support. export async function GET() { return new Response(`<?xml version="1.0" encoding="UTF-8" ?> <rss version="2.0"> <channel> <title>Next.js Documentation</title> <link>https://nextjs.org/docs</link> <description>The React Framework for the Web</description> </channel> </rss>`) } ### Segment Config Options Route Handlers use the same route segment configuration as pages and layouts. export const dynamic = 'auto' export const dynamicParams = true export const revalidate = false export const fetchCache = 'auto' export const runtime = 'nodejs' export const preferredRegion = 'auto' See the API reference for more details. --- ## Page: https://nextjs.org/docs/13/app/building-your-application/routing/middleware Middleware allows you to run code before a request is completed. Then, based on the incoming request, you can modify the response by rewriting, redirecting, modifying the request or response headers, or responding directly. Middleware runs before cached content and routes are matched. See Matching Paths for more details. ## Convention Use the file `middleware.ts` (or `.js`) in the root of your project to define Middleware. For example, at the same level as `pages` or `app`, or inside `src` if applicable. ## Example import { NextResponse } from 'next/server' import type { NextRequest } from 'next/server' // This function can be marked `async` if using `await` inside export function middleware(request: NextRequest) { return NextResponse.redirect(new URL('/home', request.url)) } // See "Matching Paths" below to learn more export const config = { matcher: '/about/:path*', } ## Matching Paths Middleware will be invoked for **every route in your project**. The following is the execution order: 1. `headers` from `next.config.js` 2. `redirects` from `next.config.js` 3. Middleware (`rewrites`, `redirects`, etc.) 4. `beforeFiles` (`rewrites`) from `next.config.js` 5. Filesystem routes (`public/`, `_next/static/`, `pages/`, `app/`, etc.) 6. `afterFiles` (`rewrites`) from `next.config.js` 7. Dynamic Routes (`/blog/[slug]`) 8. `fallback` (`rewrites`) from `next.config.js` There are two ways to define which paths Middleware will run on: 1. Custom matcher config 2. Conditional statements ### Matcher `matcher` allows you to filter Middleware to run on specific paths. export const config = { matcher: '/about/:path*', } You can match a single path or multiple paths with an array syntax: export const config = { matcher: ['/about/:path*', '/dashboard/:path*'], } The `matcher` config allows full regex so matching like negative lookaheads or character matching is supported. An example of a negative lookahead to match all except specific paths can be seen here: export const config = { matcher: [ /* * Match all request paths except for the ones starting with: * - api (API routes) * - _next/static (static files) * - _next/image (image optimization files) * - favicon.ico (favicon file) */ '/((?!api|_next/static|_next/image|favicon.ico).*)', ], } > **Good to know**: The `matcher` values need to be constants so they can be statically analyzed at build-time. Dynamic values such as variables will be ignored. Configured matchers: 1. MUST start with `/` 2. Can include named parameters: `/about/:path` matches `/about/a` and `/about/b` but not `/about/a/c` 3. Can have modifiers on named parameters (starting with `:`): `/about/:path*` matches `/about/a/b/c` because `*` is _zero or more_. `?` is _zero or one_ and `+` _one or more_ 4. Can use regular expression enclosed in parenthesis: `/about/(.*)` is the same as `/about/:path*` Read more details on path-to-regexp documentation. > **Good to know**: For backward compatibility, Next.js always considers `/public` as `/public/index`. Therefore, a matcher of `/public/:path` will match. ### Conditional Statements import { NextResponse } from 'next/server' import type { NextRequest } from 'next/server' export function middleware(request: NextRequest) { if (request.nextUrl.pathname.startsWith('/about')) { return NextResponse.rewrite(new URL('/about-2', request.url)) } if (request.nextUrl.pathname.startsWith('/dashboard')) { return NextResponse.rewrite(new URL('/dashboard/user', request.url)) } } ## NextResponse The `NextResponse` API allows you to: * `redirect` the incoming request to a different URL * `rewrite` the response by displaying a given URL * Set request headers for API Routes, `getServerSideProps`, and `rewrite` destinations * Set response cookies * Set response headers To produce a response from Middleware, you can: 1. `rewrite` to a route (Page or Route Handler) that produces a response 2. return a `NextResponse` directly. See Producing a Response ## Using Cookies Cookies are regular headers. On a `Request`, they are stored in the `Cookie` header. On a `Response` they are in the `Set-Cookie` header. Next.js provides a convenient way to access and manipulate these cookies through the `cookies` extension on `NextRequest` and `NextResponse`. 1. For incoming requests, `cookies` comes with the following methods: `get`, `getAll`, `set`, and `delete` cookies. You can check for the existence of a cookie with `has` or remove all cookies with `clear`. 2. For outgoing responses, `cookies` have the following methods `get`, `getAll`, `set`, and `delete`. import { NextResponse } from 'next/server' import type { NextRequest } from 'next/server' export function middleware(request: NextRequest) { // Assume a "Cookie:nextjs=fast" header to be present on the incoming request // Getting cookies from the request using the `RequestCookies` API let cookie = request.cookies.get('nextjs') console.log(cookie) // => { name: 'nextjs', value: 'fast', Path: '/' } const allCookies = request.cookies.getAll() console.log(allCookies) // => [{ name: 'nextjs', value: 'fast' }] request.cookies.has('nextjs') // => true request.cookies.delete('nextjs') request.cookies.has('nextjs') // => false // Setting cookies on the response using the `ResponseCookies` API const response = NextResponse.next() response.cookies.set('vercel', 'fast') response.cookies.set({ name: 'vercel', value: 'fast', path: '/', }) cookie = response.cookies.get('vercel') console.log(cookie) // => { name: 'vercel', value: 'fast', Path: '/' } // The outgoing response will have a `Set-Cookie:vercel=fast;path=/test` header. return response } You can set request and response headers using the `NextResponse` API (setting _request_ headers is available since Next.js v13.0.0). import { NextResponse } from 'next/server' import type { NextRequest } from 'next/server' export function middleware(request: NextRequest) { // Clone the request headers and set a new header `x-hello-from-middleware1` const requestHeaders = new Headers(request.headers) requestHeaders.set('x-hello-from-middleware1', 'hello') // You can also set request headers in NextResponse.rewrite const response = NextResponse.next({ request: { // New request headers headers: requestHeaders, }, }) // Set a new response header `x-hello-from-middleware2` response.headers.set('x-hello-from-middleware2', 'hello') return response } > **Good to know**: Avoid setting large headers as it might cause 431 Request Header Fields Too Large error depending on your backend web server configuration. ## Producing a Response You can respond from Middleware directly by returning a `Response` or `NextResponse` instance. (This is available since Next.js v13.1.0) import { NextRequest } from 'next/server' import { isAuthenticated } from '@lib/auth' // Limit the middleware to paths starting with `/api/` export const config = { matcher: '/api/:function*', } export function middleware(request: NextRequest) { // Call our authentication function to check the request if (!isAuthenticated(request)) { // Respond with JSON indicating an error message return Response.json( { success: false, message: 'authentication failed' }, { status: 401 } ) } } ## Advanced Middleware Flags In `v13.1` of Next.js two additional flags were introduced for middleware, `skipMiddlewareUrlNormalize` and `skipTrailingSlashRedirect` to handle advanced use cases. `skipTrailingSlashRedirect` allows disabling Next.js default redirects for adding or removing trailing slashes allowing custom handling inside middleware which can allow maintaining the trailing slash for some paths but not others allowing easier incremental migrations. module.exports = { skipTrailingSlashRedirect: true, } const legacyPrefixes = ['/docs', '/blog'] export default async function middleware(req) { const { pathname } = req.nextUrl if (legacyPrefixes.some((prefix) => pathname.startsWith(prefix))) { return NextResponse.next() } // apply trailing slash handling if ( !pathname.endsWith('/') && !pathname.match(/((?!\.well-known(?:\/.*)?)(?:[^/]+\/)*[^/]+\.\w+)/) ) { req.nextUrl.pathname += '/' return NextResponse.redirect(req.nextUrl) } } `skipMiddlewareUrlNormalize` allows disabling the URL normalizing Next.js does to make handling direct visits and client-transitions the same. There are some advanced cases where you need full control using the original URL which this unlocks. module.exports = { skipMiddlewareUrlNormalize: true, } export default async function middleware(req) { const { pathname } = req.nextUrl // GET /_next/data/build-id/hello.json console.log(pathname) // with the flag this now /_next/data/build-id/hello.json // without the flag this would be normalized to /hello } ## Version History | Version | Changes | | --- | --- | | `v13.1.0` | Advanced Middleware flags added | | `v13.0.0` | Middleware can modify request headers, response headers, and send responses | | `v12.2.0` | Middleware is stable, please see the upgrade guide | | `v12.0.9` | Enforce absolute URLs in Edge Runtime (PR) | | `v12.0.0` | Middleware (Beta) added | --- ## Page: https://nextjs.org/docs/13/app/building-your-application/routing/colocation ## Project Organization and File Colocation Apart from routing folder and file conventions, Next.js is **unopinionated** about how you organize and colocate your project files. This page shares default behavior and features you can use to organize your project. * Safe colocation by default * Project organization features * Project organization strategies ## Safe colocation by default In the `app` directory, nested folder hierarchy defines route structure. Each folder represents a route segment that is mapped to a corresponding segment in a URL path. However, even though route structure is defined through folders, a route is **not publicly accessible** until a `page.js` or `route.js` file is added to a route segment.  And, even when a route is made publicly accessible, only the **content returned** by `page.js` or `route.js` is sent to the client.  This means that **project files** can be **safely colocated** inside route segments in the `app` directory without accidentally being routable.  > **Good to know**: > > * This is different from the `pages` directory, where any file in `pages` is considered a route. > * While you **can** colocate your project files in `app` you don't **have** to. If you prefer, you can keep them outside the `app` directory. ## Project organization features Next.js provides several features to help you organize your project. ### Private Folders Private folders can be created by prefixing a folder with an underscore: `_folderName` This indicates the folder is a private implementation detail and should not be considered by the routing system, thereby **opting the folder and all its subfolders** out of routing.  Since files in the `app` directory can be safely colocated by default, private folders are not required for colocation. However, they can be useful for: * Separating UI logic from routing logic. * Consistently organizing internal files across a project and the Next.js ecosystem. * Sorting and grouping files in code editors. * Avoiding potential naming conflicts with future Next.js file conventions. > **Good to know** > > * While not a framework convention, you might also consider marking files outside private folders as "private" using the same underscore pattern. > * You can create URL segments that start with an underscore by prefixing the folder name with `%5F` (the URL-encoded form of an underscore): `%5FfolderName`. > * If you don't use private folders, it would be helpful to know Next.js special file conventions to prevent unexpected naming conflicts. ### Route Groups Route groups can be created by wrapping a folder in parenthesis: `(folderName)` This indicates the folder is for organizational purposes and should **not be included** in the route's URL path.  Route groups are useful for: * Organizing routes into groups e.g. by site section, intent, or team. * Enabling nested layouts in the same route segment level: * Creating multiple nested layouts in the same segment, including multiple root layouts * Adding a layout to a subset of routes in a common segment ### `src` Directory Next.js supports storing application code (including `app`) inside an optional `src` directory. This separates application code from project configuration files which mostly live in the root of a project.  ### Module Path Aliases Next.js supports Module Path Aliases which make it easier to read and maintain imports across deeply nested project files. // before import { Button } from '../../../components/button' // after import { Button } from '@/components/button' ## Project organization strategies There is no "right" or "wrong" way when it comes to organizing your own files and folders in a Next.js project. The following section lists a very high-level overview of common strategies. The simplest takeaway is to choose a strategy that works for you and your team and be consistent across the project. > **Good to know**: In our examples below, we're using `components` and `lib` folders as generalized placeholders, their naming has no special framework significance and your projects might use other folders like `ui`, `utils`, `hooks`, `styles`, etc. ### Store project files outside of `app` This strategy stores all application code in shared folders in the **root of your project** and keeps the `app` directory purely for routing purposes.  ### Store project files in top-level folders inside of `app` This strategy stores all application code in shared folders in the **root of the `app` directory**.  ### Split project files by feature or route This strategy stores globally shared application code in the root `app` directory and **splits** more specific application code into the route segments that use them.  --- ## Page: https://nextjs.org/docs/13/app/building-your-application/routing/internationalization Next.js enables you to configure the routing and rendering of content to support multiple languages. Making your site adaptive to different locales includes translated content (localization) and internationalized routes. ## Terminology * **Locale:** An identifier for a set of language and formatting preferences. This usually includes the preferred language of the user and possibly their geographic region. * `en-US`: English as spoken in the United States * `nl-NL`: Dutch as spoken in the Netherlands * `nl`: Dutch, no specific region ## Routing Overview It’s recommended to use the user’s language preferences in the browser to select which locale to use. Changing your preferred language will modify the incoming `Accept-Language` header to your application. For example, using the following libraries, you can look at an incoming `Request` to determine which locale to select, based on the `Headers`, locales you plan to support, and the default locale. import { match } from '@formatjs/intl-localematcher' import Negotiator from 'negotiator' let headers = { 'accept-language': 'en-US,en;q=0.5' } let languages = new Negotiator({ headers }).languages() let locales = ['en-US', 'nl-NL', 'nl'] let defaultLocale = 'en-US' match(languages, locales, defaultLocale) // -> 'en-US' Routing can be internationalized by either the sub-path (`/fr/products`) or domain (`my-site.fr/products`). With this information, you can now redirect the user based on the locale inside Middleware. let locales = ['en-US', 'nl-NL', 'nl'] // Get the preferred locale, similar to the above or using a library function getLocale(request) { ... } export function middleware(request) { // Check if there is any supported locale in the pathname const { pathname } = request.nextUrl const pathnameHasLocale = locales.some( (locale) => pathname.startsWith(`/${locale}/`) || pathname === `/${locale}` ) if (pathnameHasLocale) return // Redirect if there is no locale const locale = getLocale(request) request.nextUrl.pathname = `/${locale}${pathname}` // e.g. incoming request is /products // The new URL is now /en-US/products return Response.redirect(request.nextUrl) } export const config = { matcher: [ // Skip all internal paths (_next) '/((?!_next).*)', // Optional: only run on root (/) URL // '/' ], } Finally, ensure all special files inside `app/` are nested under `app/[lang]`. This enables the Next.js router to dynamically handle different locales in the route, and forward the `lang` parameter to every layout and page. For example: // You now have access to the current locale // e.g. /en-US/products -> `lang` is "en-US" export default async function Page({ params: { lang } }) { return ... } The root layout can also be nested in the new folder (e.g. `app/[lang]/layout.js`). ## Localization Changing displayed content based on the user’s preferred locale, or localization, is not something specific to Next.js. The patterns described below would work the same with any web application. Let’s assume we want to support both English and Dutch content inside our application. We might maintain two different “dictionaries”, which are objects that give us a mapping from some key to a localized string. For example: { "products": { "cart": "Add to Cart" } } { "products": { "cart": "Toevoegen aan Winkelwagen" } } We can then create a `getDictionary` function to load the translations for the requested locale: import 'server-only' const dictionaries = { en: () => import('./dictionaries/en.json').then((module) => module.default), nl: () => import('./dictionaries/nl.json').then((module) => module.default), } export const getDictionary = async (locale) => dictionaries[locale]() Given the currently selected language, we can fetch the dictionary inside of a layout or page. import { getDictionary } from './dictionaries' export default async function Page({ params: { lang } }) { const dict = await getDictionary(lang) // en return <button>{dict.products.cart}</button> // Add to Cart } Because all layouts and pages in the `app/` directory default to Server Components, we do not need to worry about the size of the translation files affecting our client-side JavaScript bundle size. This code will **only run on the server**, and only the resulting HTML will be sent to the browser. ## Static Generation To generate static routes for a given set of locales, we can use `generateStaticParams` with any page or layout. This can be global, for example, in the root layout: export async function generateStaticParams() { return [{ lang: 'en-US' }, { lang: 'de' }] } export default function Root({ children, params }) { return ( <html lang={params.lang}> <body>{children}</body> </html> ) } ## Resources * Minimal i18n routing and translations * `next-intl` * `next-international` * `next-i18n-router` --- ## Page: https://nextjs.org/docs/13/app/building-your-application/data-fetching #### Subscribe to our newsletter Stay updated on new releases and features, guides, and case studies. --- ## Page: https://nextjs.org/docs/13/app/building-your-application/data-fetching/fetching-caching-and-revalidating Data fetching is a core part of any application. This page goes through how you can fetch, cache, and revalidate data in React and Next.js. There are four ways you can fetch data: 1. On the server, with `fetch` 2. On the server, with third-party libraries 3. On the client, via a Route Handler 4. On the client, with third-party libraries. ## Fetching Data on the Server with `fetch` Next.js extends the native `fetch` Web API to allow you to configure the caching and revalidating behavior for each fetch request on the server. React extends `fetch` to automatically memoize fetch requests while rendering a React component tree. You can use `fetch` with `async`/`await` in Server Components, in Route Handlers, and in Server Actions. For example: async function getData() { const res = await fetch('https://api.example.com/...') // The return value is *not* serialized // You can return Date, Map, Set, etc. if (!res.ok) { // This will activate the closest `error.js` Error Boundary throw new Error('Failed to fetch data') } return res.json() } export default async function Page() { const data = await getData() return <main></main> } > **Good to know**: > > * Next.js provides helpful functions you may need when fetching data in Server Components such as `cookies` and `headers`. These will cause the route to be dynamically rendered as they rely on request time information. > * In Route handlers, `fetch` requests are not memoized as Route Handlers are not part of the React component tree. > * To use `async`/`await` in a Server Component with TypeScript, you'll need to use TypeScript `5.1.3` or higher and `@types/react` `18.2.8` or higher. ### Caching Data Caching stores data so it doesn't need to be re-fetched from your data source on every request. By default, Next.js automatically caches the returned values of `fetch` in the Data Cache on the server. This means that the data can be fetched at build time or request time, cached, and reused on each data request. // 'force-cache' is the default, and can be omitted fetch('https://...', { cache: 'force-cache' }) `fetch` requests that use the `POST` method are also automatically cached. Unless it's inside a Route Handler that uses the `POST` method, then it will not be cached. > **What is the Data Cache?** > > The Data Cache is a persistent HTTP cache. Depending on your platform, the cache can scale automatically and be shared across multiple regions. > > Learn more about the Data Cache. ### Revalidating Data Revalidation is the process of purging the Data Cache and re-fetching the latest data. This is useful when your data changes and you want to ensure you show the latest information. Cached data can be revalidated in two ways: * **Time-based revalidation**: Automatically revalidate data after a certain amount of time has passed. This is useful for data that changes infrequently and freshness is not as critical. * **On-demand revalidation**: Manually revalidate data based on an event (e.g. form submission). On-demand revalidation can use a tag-based or path-based approach to revalidate groups of data at once. This is useful when you want to ensure the latest data is shown as soon as possible (e.g. when content from your headless CMS is updated). #### Time-based Revalidation To revalidate data at a timed interval, you can use the `next.revalidate` option of `fetch` to set the cache lifetime of a resource (in seconds). fetch('https://...', { next: { revalidate: 3600 } }) Alternatively, to revalidate all `fetch` requests in a route segment, you can use the Segment Config Options. export const revalidate = 3600 // revalidate at most every hour If you have multiple fetch requests in a statically rendered route, and each has a different revalidation frequency. The lowest time will be used for all requests. For dynamically rendered routes, each `fetch` request will be revalidated independently. Learn more about time-based revalidation. #### On-demand Revalidation Data can be revalidated on-demand by path (`revalidatePath`) or by cache tag (`revalidateTag`) inside a Route Handler or a Server Action. Next.js has a cache tagging system for invalidating `fetch` requests across routes. 1. When using `fetch`, you have the option to tag cache entries with one or more tags. 2. Then, you can call `revalidateTag` to revalidate all entries associated with that tag. For example, the following `fetch` request adds the cache tag `collection`: export default async function Page() { const res = await fetch('https://...', { next: { tags: ['collection'] } }) const data = await res.json() // ... } If using a Route Handler, you should create a secret token only known by your Next.js app. This secret will be used to prevent unauthorized revalidation attempts. For example, you can access the route (either manually or with a webhook) with the following URL structure: https://<your-site.com>/api/revalidate?tag=collection&secret=<token> import { NextRequest } from 'next/server' import { revalidateTag } from 'next/cache' // e.g a webhook to `your-website.com/api/revalidate?tag=collection&secret=<token>` export async function POST(request: NextRequest) { const secret = request.nextUrl.searchParams.get('secret') const tag = request.nextUrl.searchParams.get('tag') if (secret !== process.env.MY_SECRET_TOKEN) { return Response.json({ message: 'Invalid secret' }, { status: 401 }) } if (!tag) { return Response.json({ message: 'Missing tag param' }, { status: 400 }) } revalidateTag(tag) return Response.json({ revalidated: true, now: Date.now() }) } Alternatively, you can use `revalidatePath` to revalidate all data associated with a path. import { NextRequest } from 'next/server' import { revalidatePath } from 'next/cache' export async function POST(request: NextRequest) { const path = request.nextUrl.searchParams.get('path') if (!path) { return Response.json({ message: 'Missing path param' }, { status: 400 }) } revalidatePath(path) return Response.json({ revalidated: true, now: Date.now() }) } Learn more about on-demand revalidation. #### Error handling and revalidation If an error is thrown while attempting to revalidate data, the last successfully generated data will continue to be served from the cache. On the next subsequent request, Next.js will retry revalidating the data. ### Opting out of Data Caching `fetch` requests are **not** cached if: * The `cache: 'no-store'` is added to `fetch` requests. * The `revalidate: 0` option is added to individual `fetch` requests. * The `fetch` request is inside a Router Handler that uses the `POST` method. * The `fetch` request comes after the usage of `headers` or `cookies`. * The `const dynamic = 'force-dynamic'` route segment option is used. * The `fetchCache` route segment option is configured to skip cache by default. * The `fetch` request uses `Authorization` or `Cookie` headers and there's an uncached request above it in the component tree. #### Individual `fetch` Requests To opt out of caching for individual `fetch` requests, you can set the `cache` option in `fetch` to `'no-store'`. This will fetch data dynamically, on every request. fetch('https://...', { cache: 'no-store' }) View all the available `cache` options in the `fetch` API reference. #### Multiple `fetch` Requests If you have multiple `fetch` requests in a route segment (e.g. a Layout or Page), you can configure the caching behavior of all data requests in the segment using the Segment Config Options. For example, using `const dynamic = 'force-dynamic'` will cause all data to be fetched at request time, and the segment to be rendered dynamically. // Add export const dynamic = 'force-dynamic' There's an extensive list of Segment Config options, giving you fine-grained control of static and dynamic behavior of a route segment. See the API reference for more. ## Fetching data on the Server with third-party libraries In cases where you're using a third-party library that doesn't support or expose `fetch` (for example, a database, CMS, or ORM client), you can configure the caching and revalidating behavior of those requests using the Route Segment Config Option and React's `cache` function. Whether the data is cached or not will depend on whether the route segment is statically or dynamically rendered. If the segment is static (default), the output of the request will be cached and revalidated as part of the route segment. If the segment is dynamic, the output of the request will _not_ be cached and will be re-fetched on every request when the segment is rendered. > **Good to know:** > > Next.js is working on an API, `unstable_cache`, for configuring the caching and revalidating behavior of individual third-party requests. ### Example In the example below: * The `revalidate` option is set to `3600`, meaning the data will be cached and revalidated at most every hour. * The React `cache` function is used to memoize data requests. import { cache } from 'react' export const revalidate = 3600 // revalidate the data at most every hour export const getItem = cache(async (id: string) => { const item = await db.item.findUnique({ id }) return item }) Although the `getItem` function is called twice, only one query will be made to the database. import { getItem } from '@/utils/get-item' export default async function Layout({ params: { id }, }: { params: { id: string } }) { const item = await getItem(id) // ... } import { getItem } from '@/utils/get-item' export default async function Page({ params: { id }, }: { params: { id: string } }) { const item = await getItem(id) // ... } ## Fetching Data on the Client with Route Handlers If you need to fetch data in a client component, you can call a Route Handler from the client. Route Handlers execute on the server and return the data to the client. This is useful when you don't want to expose sensitive information to the client, such as API tokens. See the Route Handler documentation for examples. > **Server Components and Route Handlers** > > Since Server Components render on the server, you don't need to call a Route Handler from a Server Component to fetch data. Instead, you can fetch the data directly inside the Server Component. ## Fetching Data on the Client with third-party libraries You can also fetch data on the client using a third-party library such as SWR or React Query. These libraries provide their own APIs for memoizing requests, caching, revalidating, and mutating data. > **Future APIs**: > > `use` is a React function that **accepts and handles a promise** returned by a function. Wrapping `fetch` in `use` is currently **not** recommended in Client Components and may trigger multiple re-renders. Learn more about `use` in the React RFC. --- ## Page: https://nextjs.org/docs/13/app/building-your-application/data-fetching/patterns There are a few recommended patterns and best practices for fetching data in React and Next.js. This page will go over some of the most common patterns and how to use them. ### Fetching Data on the Server Whenever possible, we recommend fetching data on the server. This allows you to: * Have direct access to backend data resources (e.g. databases). * Keep your application more secure by preventing sensitive information, such as access tokens and API keys, from being exposed to the client. * Fetch data and render in the same environment. This reduces both the back-and-forth communication between client and server, as well as the work on the main thread on the client. * Perform multiple data fetches with single round-trip instead of multiple individual requests on the client. * Reduce client-server waterfalls. * Depending on your region, data fetching can also happen closer to your data source, reducing latency and improving performance. You can fetch data on the server using Server Components, Route Handlers, and Server Actions. ### Fetching Data Where It's Needed If you need to use the same data (e.g. current user) in multiple components in a tree, you do not have to fetch data globally, nor forward props between components. Instead, you can use `fetch` or React `cache` in the component that needs the data without worrying about the performance implications of making multiple requests for the same data. This is possible because `fetch` requests are automatically memoized. Learn more about request memoization > **Good to know**: This also applies to layouts, since it's not possible to pass data between a parent layout and its children. ### Streaming Streaming and Suspense are React features that allow you to progressively render and incrementally stream rendered units of the UI to the client. With Server Components and nested layouts, you're able to instantly render parts of the page that do not specifically require data, and show a loading state for parts of the page that are fetching data. This means the user does not have to wait for the entire page to load before they can start interacting with it.  To learn more about Streaming and Suspense, see the Loading UI and Streaming and Suspense pages. ### Parallel and Sequential Data Fetching When fetching data inside React components, you need to be aware of two data fetching patterns: Parallel and Sequential.  * With **sequential data fetching**, requests in a route are dependent on each other and therefore create waterfalls. There may be cases where you want this pattern because one fetch depends on the result of the other, or you want a condition to be satisfied before the next fetch to save resources. However, this behavior can also be unintentional and lead to longer loading times. * With **parallel data fetching**, requests in a route are eagerly initiated and will load data at the same time. This reduces client-server waterfalls and the total time it takes to load data. #### Sequential Data Fetching If you have nested components, and each component fetches its own data, Then, data fetching will happen sequentially if those data requests are different (this doesn't apply to requests for the same data as they are automatically memoized). For example, the `Playlists` component will only start fetching data once the `Artist` component has finished fetching data because `Playlists` depends on the `artistID` prop: // ... async function Playlists({ artistID }: { artistID: string }) { // Wait for the playlists const playlists = await getArtistPlaylists(artistID) return ( <ul> {playlists.map((playlist) => ( <li key={playlist.id}>{playlist.name}</li> ))} </ul> ) } export default async function Page({ params: { username }, }: { params: { username: string } }) { // Wait for the artist const artist = await getArtist(username) return ( <> <h1>{artist.name}</h1> <Suspense fallback={<div>Loading...</div>}> <Playlists artistID={artist.id} /> </Suspense> </> ) } In cases like this, you can use `loading.js` (for route segments) or React `<Suspense>` (for nested components) to show an instant loading state while React streams in the result. This will prevent the whole route from being blocked by data fetching, and the user will be able to interact with the parts of the page that are not blocked. > **Blocking Data Requests:** > > An alternative approach to prevent waterfalls is to fetch data globally, at the root of your application, but this will block rendering for all route segments beneath it until the data has finished loading. This can be described as "all or nothing" data fetching. Either you have the entire data for your page or application, or none. > > Any fetch requests with `await` will block rendering and data fetching for the entire tree beneath it, unless they are wrapped in a `<Suspense>` boundary or `loading.js` is used. Another alternative is use parallel data fetching or the preload pattern. #### Parallel Data Fetching To fetch data in parallel, you can eagerly initiate requests by defining them outside the components that use the data, then calling them from inside the component. This saves time by initiating both requests in parallel, however, the user won't see the rendered result until both promises are resolved. In the example below, the `getArtist` and `getArtistAlbums` functions are defined outside the `Page` component, then called inside the component, and we wait for both promises to resolve: import Albums from './albums' async function getArtist(username: string) { const res = await fetch(`https://api.example.com/artist/${username}`) return res.json() } async function getArtistAlbums(username: string) { const res = await fetch(`https://api.example.com/artist/${username}/albums`) return res.json() } export default async function Page({ params: { username }, }: { params: { username: string } }) { // Initiate both requests in parallel const artistData = getArtist(username) const albumsData = getArtistAlbums(username) // Wait for the promises to resolve const [artist, albums] = await Promise.all([artistData, albumsData]) return ( <> <h1>{artist.name}</h1> <Albums list={albums}></Albums> </> ) } To improve the user experience, you can add a Suspense Boundary to break up the rendering work and show part of the result as soon as possible. ### Preloading Data Another way to prevent waterfalls is to use the preload pattern. You can optionally create a `preload` function to further optimize parallel data fetching. With this approach, you don't have to pass promises down as props. The `preload` function can also have any name as it's a pattern, not an API. import { getItem } from '@/utils/get-item' export const preload = (id: string) => { // void evaluates the given expression and returns undefined // https://developer.mozilla.org/docs/Web/JavaScript/Reference/Operators/void void getItem(id) } export default async function Item({ id }: { id: string }) { const result = await getItem(id) // ... } import Item, { preload, checkIsAvailable } from '@/components/Item' export default async function Page({ params: { id }, }: { params: { id: string } }) { // starting loading item data preload(id) // perform another asynchronous task const isAvailable = await checkIsAvailable() return isAvailable ? <Item id={id} /> : null } ### Using React `cache`, `server-only`, and the Preload Pattern You can combine the `cache` function, the `preload` pattern, and the `server-only` package to create a data fetching utility that can be used throughout your app. import { cache } from 'react' import 'server-only' export const preload = (id: string) => { void getItem(id) } export const getItem = cache(async (id: string) => { // ... }) With this approach, you can eagerly fetch data, cache responses, and guarantee that this data fetching only happens on the server. The `utils/get-item` exports can be used by Layouts, Pages, or other components to give them control over when an item's data is fetched. > **Good to know:** > > * We recommend using the `server-only` package to make sure server data fetching functions are never used on the client. --- ## Page: https://nextjs.org/docs/13/app/building-your-application/data-fetching/server-actions-and-mutations Server Actions are **asynchronous functions** that are executed on the server. They can be used in Server and Client Components to handle form submissions and data mutations in Next.js applications. > **🎥 Watch:** Learn more about forms and mutations with Server Actions → YouTube (10 minutes). ## Convention A Server Action can be defined with the React `"use server"` directive. You can place the directive at the top of an `async` function to mark the function as a Server Action, or at the top of a separate file to mark all exports of that file as Server Actions. ### Server Components Server Components can use the inline function level or module level `"use server"` directive. To inline a Server Action, add `"use server"` to the top of the function body: // Server Component export default function Page() { // Server Action async function create() { 'use server' // ... } return ( // ... ) } ### Client Components Client Components can only import actions that use the module-level `"use server"` directive. To call a Server Action in a Client Component, create a new file and add the `"use server"` directive at the top of it. All functions within the file will be marked as Server Actions that can be reused in both Client and Server Components: 'use server' export async function create() { // ... } import { create } from '@/app/actions' export function Button() { return ( // ... ) } You can also pass a Server Action to a Client Component as a prop: <ClientComponent updateItem={updateItem} /> 'use client' export default function ClientComponent({ updateItem }) { return <form action={updateItem}>{/* ... */}</form> } ## Behavior * Server actions can be invoked using the `action` attribute in a `<form>` element: * Server Components support progressive enhancement by default, meaning the form will be submitted even if JavaScript hasn't loaded yet or is disabled. * In Client Components, forms invoking Server Actions will queue submissions if JavaScript isn't loaded yet, prioritizing client hydration. * After hydration, the browser does not refresh on form submission. * Server Actions are not limited to `<form>` and can be invoked from event handlers, `useEffect`, third-party libraries, and other form elements like `<button>`. * Server Actions integrate with the Next.js caching and revalidation architecture. When an action is invoked, Next.js can return both the updated UI and new data in a single server roundtrip. * Behind the scenes, actions use the `POST` method, and only this HTTP method can invoke them. * The arguments and return value of Server Actions must be serializable by React. See the React docs for a list of serializable arguments and values. * Server Actions are functions. This means they can be reused anywhere in your application. * Server Actions inherit the runtime from the page or layout they are used on. * Server Actions inherit the Route Segment Config from the page or layout they are used on, including fields like `maxDuration`. ## Examples ### Forms React extends the HTML `<form>` element to allow Server Actions to be invoked with the `action` prop. When invoked in a form, the action automatically receives the `FormData` object. You don't need to use React `useState` to manage fields, instead, you can extract the data using the native `FormData` methods: export default function Page() { async function createInvoice(formData: FormData) { 'use server' const rawFormData = { customerId: formData.get('customerId'), amount: formData.get('amount'), status: formData.get('status'), } // mutate data // revalidate cache } return <form action={createInvoice}>...</form> } > **Good to know:** > > * Example: Form with Loading & Error States > * When working with forms that have many fields, you may want to consider using the `entries()` method with JavaScript's `Object.fromEntries()`. For example: `const rawFormData = Object.fromEntries(formData)`. One thing to note is that the `formData` will include additional `$ACTION_` properties. > * See React `<form>` documentation to learn more. #### Passing Additional Arguments You can pass additional arguments to a Server Action using the JavaScript `bind` method. 'use client' import { updateUser } from './actions' export function UserProfile({ userId }: { userId: string }) { const updateUserWithId = updateUser.bind(null, userId) return ( <form action={updateUserWithId}> <input type="text" name="name" /> <button type="submit">Update User Name</button> </form> ) } The Server Action will receive the `userId` argument, in addition to the form data: 'use server' export async function updateUser(userId, formData) { // ... } > **Good to know**: > > * An alternative is to pass arguments as hidden input fields in the form (e.g. `<input type="hidden" name="userId" value={userId} />`). However, the value will be part of the rendered HTML and will not be encoded. > * `.bind` works in both Server and Client Components. It also supports progressive enhancement. #### Pending states You can use the React `useFormStatus` hook to show a pending state while the form is being submitted. * `useFormStatus` returns the status for a specific `<form>`, so it **must be defined as a child of the `<form>` element**. * `useFormStatus` is a React hook and therefore must be used in a Client Component. 'use client' import { useFormStatus } from 'react-dom' export function SubmitButton() { const { pending } = useFormStatus() return ( <button type="submit" disabled={pending}> Add </button> ) } `<SubmitButton />` can then be nested in any form: import { SubmitButton } from '@/app/submit-button' import { createItem } from '@/app/actions' // Server Component export default async function Home() { return ( <form action={createItem}> <input type="text" name="field-name" /> <SubmitButton /> </form> ) } #### Server-side validation and error handling We recommend using HTML validation like `required` and `type="email"` for basic client-side form validation. For more advanced server-side validation, you can use a library like zod to validate the form fields before mutating the data: 'use server' import { z } from 'zod' const schema = z.object({ email: z.string({ invalid_type_error: 'Invalid Email', }), }) export default async function createUser(formData: FormData) { const validatedFields = schema.safeParse({ email: formData.get('email'), }) // Return early if the form data is invalid if (!validatedFields.success) { return { errors: validatedFields.error.flatten().fieldErrors, } } // Mutate data } Once the fields have been validated on the server, you can return a serializable object in your action and use the React `useFormState` hook to show a message to the user. * By passing the action to `useFormState`, the action's function signature changes to receive a new `prevState` or `initialState` parameter as its first argument. * `useFormState` is a React hook and therefore must be used in a Client Component. 'use server' export async function createUser(prevState: any, formData: FormData) { // ... return { message: 'Please enter a valid email', } } Then, you can pass your action to the `useFormState` hook and use the returned `state` to display an error message. 'use client' import { useFormState } from 'react-dom' import { createUser } from '@/app/actions' const initialState = { message: '', } export function Signup() { const [state, formAction] = useFormState(createUser, initialState) return ( <form action={formAction}> <label htmlFor="email">Email</label> <input type="text" id="email" name="email" required /> {/* ... */} <p aria-live="polite" className="sr-only"> {state?.message} </p> <button>Sign up</button> </form> ) } > **Good to know:** > > * Before mutating data, you should always ensure a user is also authorized to perform the action. See Authentication and Authorization. #### Optimistic updates You can use the React `useOptimistic` hook to optimistically update the UI before the Server Action finishes, rather than waiting for the response: 'use client' import { useOptimistic } from 'react' import { send } from './actions' type Message = { message: string } export function Thread({ messages }: { messages: Message[] }) { const [optimisticMessages, addOptimisticMessage] = useOptimistic< Message[], string >(messages, (state, newMessage) => [...state, { message: newMessage }]) return ( <div> {optimisticMessages.map((m, k) => ( <div key={k}>{m.message}</div> ))} <form action={async (formData: FormData) => { const message = formData.get('message') addOptimisticMessage(message) await send(message) }} > <input type="text" name="message" /> <button type="submit">Send</button> </form> </div> ) } #### Nested elements You can invoke a Server Action in elements nested inside `<form>` such as `<button>`, `<input type="submit">`, and `<input type="image">`. These elements accept the `formAction` prop or event handlers. This is useful in cases where you want to call multiple server actions within a form. For example, you can create a specific `<button>` element for saving a post draft in addition to publishing it. See the React `<form>` docs for more information. #### Programmatic form submission You can trigger a form submission using the `requestSubmit()` method. For example, when the user presses `⌘` + `Enter`, you can listen for the `onKeyDown` event: 'use client' export function Entry() { const handleKeyDown = (e: React.KeyboardEvent<HTMLTextAreaElement>) => { if ( (e.ctrlKey || e.metaKey) && (e.key === 'Enter' || e.key === 'NumpadEnter') ) { e.preventDefault() e.currentTarget.form?.requestSubmit() } } return ( <div> <textarea name="entry" rows={20} required onKeyDown={handleKeyDown} /> </div> ) } This will trigger the submission of the nearest `<form>` ancestor, which will invoke the Server Action. ### Non-form Elements While it's common to use Server Actions within `<form>` elements, they can also be invoked from other parts of your code such as event handlers and `useEffect`. #### Event Handlers You can invoke a Server Action from event handlers such as `onClick`. For example, to increment a like count: 'use client' import { incrementLike } from './actions' import { useState } from 'react' export default function LikeButton({ initialLikes }: { initialLikes: number }) { const [likes, setLikes] = useState(initialLikes) return ( <> <p>Total Likes: {likes}</p> <button onClick={async () => { const updatedLikes = await incrementLike() setLikes(updatedLikes) }} > Like </button> </> ) } To improve the user experience, we recommend using other React APIs like `useOptimistic` and `useTransition` to update the UI before the Server Action finishes executing on the server, or to show a pending state. You can also add event handlers to form elements, for example, to save a form field `onChange`: 'use client' import { publishPost, saveDraft } from './actions' export default function EditPost() { return ( <form action={publishPost}> <textarea name="content" onChange={async (e) => { await saveDraft(e.target.value) }} /> <button type="submit">Publish</button> </form> ) } For cases like this, where multiple events might be fired in quick succession, we recommend **debouncing** to prevent unnecessary Server Action invocations. #### `useEffect` You can use the React `useEffect` hook to invoke a Server Action when the component mounts or a dependency changes. This is useful for mutations that depend on global events or need to be triggered automatically. For example, `onKeyDown` for app shortcuts, an intersection observer hook for infinite scrolling, or when the component mounts to update a view count: 'use client' import { incrementViews } from './actions' import { useState, useEffect } from 'react' export default function ViewCount({ initialViews }: { initialViews: number }) { const [views, setViews] = useState(initialViews) useEffect(() => { const updateViews = async () => { const updatedViews = await incrementViews() setViews(updatedViews) } updateViews() }, []) return <p>Total Views: {views}</p> } Remember to consider the behavior and caveats of `useEffect`. ### Error Handling When an error is thrown, it'll be caught by the nearest `error.js` or `<Suspense>` boundary on the client. We recommend using `try/catch` to return errors to be handled by your UI. For example, your Server Action might handle errors from creating a new item by returning a message: 'use server' export async function createTodo(prevState: any, formData: FormData) { try { // Mutate data } catch (e) { throw new Error('Failed to create task') } } > **Good to know:** > > * Aside from throwing the error, you can also return an object to be handled by `useFormState`. See Server-side validation and error handling. ### Revalidating data You can revalidate the Next.js Cache inside your Server Actions with the `revalidatePath` API: 'use server' import { revalidatePath } from 'next/cache' export async function createPost() { try { // ... } catch (error) { // ... } revalidatePath('/posts') } Or invalidate a specific data fetch with a cache tag using `revalidateTag`: 'use server' import { revalidateTag } from 'next/cache' export async function createPost() { try { // ... } catch (error) { // ... } revalidateTag('posts') } ### Redirecting If you would like to redirect the user to a different route after the completion of a Server Action, you can use `redirect` API. `redirect` needs to be called outside of the `try/catch` block: 'use server' import { redirect } from 'next/navigation' import { revalidateTag } from 'next/cache' export async function createPost(id: string) { try { // ... } catch (error) { // ... } revalidateTag('posts') // Update cached posts redirect(`/post/${id}`) // Navigate to the new post page } ### Cookies You can `get`, `set`, and `delete` cookies inside a Server Action using the `cookies` API: 'use server' import { cookies } from 'next/headers' export async function exampleAction() { // Get cookie const value = cookies().get('name')?.value // Set cookie cookies().set('name', 'Delba') // Delete cookie cookies().delete('name') } See additional examples for deleting cookies from Server Actions. ## Security You should treat Server Actions as you would public-facing API endpoints, and ensure that the user is authorized to perform the action. For example: 'use server' import { auth } from './lib' export function addItem() { const { user } = auth() if (!user) { throw new Error('You must be signed in to perform this action') } // ... } ### Closures and encryption Defining a Server Action inside a component creates a closure where the action has access to the outer function's scope. For example, the `publish` action has access to the `publishVersion` variable: export default function Page() { const publishVersion = await getLatestVersion(); async function publish(formData: FormData) { "use server"; if (publishVersion !== await getLatestVersion()) { throw new Error('The version has changed since pressing publish'); } ... } return <button action={publish}>Publish</button>; } Closures are useful when you need to capture a _snapshot_ of data (e.g. `publishVersion`) at the time of rendering so that it can be used later when the action is invoked. However, for this to happen, the captured variables are sent to the client and back to the server when the action is invoked. To prevent sensitive data from being exposed to the client, Next.js automatically encrypts the closed-over variables. A new private key is generated for each action every time a Next.js application is built. This means actions can only be invoked for a specific build. > **Good to know:** We don't recommend relying on encryption alone to prevent sensitive values from being exposed on the client. Instead, you should use the React taint APIs to proactively prevent specific data from being sent to the client. ### Overwriting encryption keys (advanced) When self-hosting your Next.js application across multiple servers, each server instance may end up with a different encryption key, leading to potential inconsistencies. To mitigate this, you can overwrite the encryption key using the `process.env.NEXT_SERVER_ACTIONS_ENCRYPTION_KEY` environment variable. Specifying this variable ensures that your encryption keys are persistent across builds, and all server instances use the same key. This is an advanced use case where consistent encryption behavior across multiple deployments is critical for your application. You should consider standard security practices such key rotation and signing. > **Good to know:** Next.js applications deployed to Vercel automatically handle this. ### Allowed origins (advanced) Since Server Actions can be invoked in a `<form>` element, this opens them up to CSRF attacks. Behind the scenes, Server Actions use the `POST` method, and only this HTTP method is allowed to invoke them. This prevents most CSRF vulnerabilities in modern browsers, particularly with SameSite cookies being the default. As an additional protection, Server Actions in Next.js also compare the Origin header to the Host header (or `X-Forwarded-Host`). If these don't match, the request will be aborted. In other words, Server Actions can only be invoked on the same host as the page that hosts it. For large applications that use reverse proxies or multi-layered backend architectures (where the server API differs from the production domain), it's recommended to use the configuration option `serverActions.allowedOrigins` option to specify a list of safe origins. The option accepts an array of strings. /** @type {import('next').NextConfig} */ module.exports = { experimental: { serverActions: { allowedOrigins: ['my-proxy.com', '*.my-proxy.com'], }, }, } Learn more about Security and Server Actions. ## Additional resources For more information on Server Actions, check out the following React docs: * `"use server"` * `<form>` * `useFormStatus` * `useFormState` * `useOptimistic` --- ## Page: https://nextjs.org/docs/13/app/building-your-application/data-fetching/forms-and-mutations Forms enable you to create and update data in web applications. Next.js provides a powerful way to handle form submissions and data mutations using **Server Actions**. Examples * Form with Loading & Error States ## How Server Actions Work With Server Actions, you don't need to manually create API endpoints. Instead, you define asynchronous server functions that can be called directly from your components. > **🎥 Watch:** Learn more about forms and mutations with the App Router → YouTube (10 minutes). Server Actions can be defined in Server Components or called from Client Components. Defining the action in a Server Component allows the form to function without JavaScript, providing progressive enhancement. Enable Server Actions in your `next.config.js` file: module.exports = { experimental: { serverActions: true, }, } > **Good to know:** > > * Forms calling Server Actions from Server Components can function without JavaScript. > * Forms calling Server Actions from Client Components will queue submissions if JavaScript isn't loaded yet, prioritizing client hydration. > * Server Actions inherit the runtime from the page or layout they are used on. > * Server Actions work with fully static routes (including revalidating data with ISR). ## Revalidating Cached Data Server Actions integrate deeply with the Next.js caching and revalidation architecture. When a form is submitted, the Server Action can update cached data and revalidate any cache keys that should change. Rather than being limited to a single form per route like traditional applications, Server Actions enable having multiple actions per route. Further, the browser does not need to refresh on form submission. In a single network roundtrip, Next.js can return both the updated UI and the refreshed data. View the examples below for revalidating data from Server Actions. ## Examples ### Server-only Forms To create a server-only form, define the Server Action in a Server Component. The action can either be defined inline with the `"use server"` directive at the top of the function, or in a separate file with the directive at the top of the file. export default function Page() { async function create(formData: FormData) { 'use server' // mutate data // revalidate cache } return <form action={create}>...</form> } > **Good to know**: `<form action={create}>` takes the FormData data type. In the example above, the FormData submitted via the HTML `form` is accessible in the server action `create`. ### Revalidating Data Server Actions allow you to invalidate the Next.js Cache on demand. You can invalidate an entire route segment with `revalidatePath`: 'use server' import { revalidatePath } from 'next/cache' export default async function submit() { await submitForm() revalidatePath('/') } Or invalidate a specific data fetch with a cache tag using `revalidateTag`: 'use server' import { revalidateTag } from 'next/cache' export default async function submit() { await addPost() revalidateTag('posts') } ### Redirecting If you would like to redirect the user to a different route after the completion of a Server Action, you can use `redirect` and any absolute or relative URL: 'use server' import { redirect } from 'next/navigation' import { revalidateTag } from 'next/cache' export default async function submit() { const id = await addPost() revalidateTag('posts') // Update cached posts redirect(`/post/${id}`) // Navigate to new route } ### Form Validation We recommend using HTML validation like `required` and `type="email"` for basic form validation. For more advanced server-side validation, use a schema validation library like zod to validate the structure of the parsed form data: import { z } from 'zod' const schema = z.object({ // ... }) export default async function submit(formData: FormData) { const parsed = schema.parse({ id: formData.get('id'), }) // ... } ### Displaying Loading State Use the `useFormStatus` hook to show a loading state when a form is submitting on the server. The `useFormStatus` hook can only be used as a child of a `form` element using a Server Action. For example, the following submit button: 'use client' import { experimental_useFormStatus as useFormStatus } from 'react-dom' export function SubmitButton() { const { pending } = useFormStatus() return ( <button type="submit" aria-disabled={pending}> Add </button> ) } `<SubmitButton />` can then be used in a form with a Server Action: import { SubmitButton } from '@/app/submit-button' export default async function Home() { return ( <form action={...}> <input type="text" name="field-name" /> <SubmitButton /> </form> ) } ### Error Handling Server Actions can also return serializable objects. For example, your Server Action might handle errors from creating a new item: 'use server' export async function createTodo(prevState: any, formData: FormData) { try { await createItem(formData.get('todo')) return revalidatePath('/') } catch (e) { return { message: 'Failed to create' } } } Then, from a Client Component, you can read this value and display an error message. 'use client' import { experimental_useFormState as useFormState } from 'react-dom' import { experimental_useFormStatus as useFormStatus } from 'react-dom' import { createTodo } from '@/app/actions' const initialState = { message: null, } function SubmitButton() { const { pending } = useFormStatus() return ( <button type="submit" aria-disabled={pending}> Add </button> ) } export function AddForm() { const [state, formAction] = useFormState(createTodo, initialState) return ( <form action={formAction}> <label htmlFor="todo">Enter Task</label> <input type="text" id="todo" name="todo" required /> <SubmitButton /> <p aria-live="polite" className="sr-only"> {state?.message} </p> </form> ) } ### Optimistic Updates Use `useOptimistic` to optimistically update the UI before the Server Action finishes, rather than waiting for the response: 'use client' import { experimental_useOptimistic as useOptimistic } from 'react' import { send } from './actions' type Message = { message: string } export function Thread({ messages }: { messages: Message[] }) { const [optimisticMessages, addOptimisticMessage] = useOptimistic<Message[]>( messages, (state: Message[], newMessage: string) => [ ...state, { message: newMessage }, ] ) return ( <div> {optimisticMessages.map((m, k) => ( <div key={k}>{m.message}</div> ))} <form action={async (formData: FormData) => { const message = formData.get('message') addOptimisticMessage(message) await send(message) }} > <input type="text" name="message" /> <button type="submit">Send</button> </form> </div> ) } ### Setting Cookies You can set cookies inside a Server Action using the `cookies` function: 'use server' import { cookies } from 'next/headers' export async function create() { const cart = await createCart() cookies().set('cartId', cart.id) } ### Reading Cookies You can read cookies inside a Server Action using the `cookies` function: 'use server' import { cookies } from 'next/headers' export async function read() { const auth = cookies().get('authorization')?.value // ... } ### Deleting Cookies You can delete cookies inside a Server Action using the `cookies` function: 'use server' import { cookies } from 'next/headers' export async function delete() { cookies().delete('name') // ... } See additional examples for deleting cookies from Server Actions. --- ## Page: https://nextjs.org/docs/13/app/building-your-application/rendering Rendering converts the code you write into user interfaces. React and Next.js allow you to create hybrid web applications where parts of your code can be rendered on the server or the client. This section will help you understand the differences between these rendering environments, strategies, and runtimes. ## Fundamentals To start, it's helpful to be familiar with three foundational web concepts: * The Environments your application code can be executed in: the server and the client. * The Request-Response Lifecycle that's initiated when a user visits or interacts with your application. * The Network Boundary that separates server and client code. ### Rendering Environments There are two environments where web applications can be rendered: the client and the server.  * The **client** refers to the browser on a user's device that sends a request to a server for your application code. It then turns the response from the server into a user interface. * The **server** refers to the computer in a data center that stores your application code, receives requests from a client, and sends back an appropriate response. Historically, developers had to use different languages (e.g. JavaScript, PHP) and frameworks when writing code for the server and the client. With React, developers can use the **same language** (JavaScript), and the **same framework** (e.g. Next.js or your framework of choice). This flexibility allows you to seamlessly write code for both environments without context switching. However, each environment has its own set of capabilities and constraints. Therefore, the code you write for the server and the client is not always the same. There are certain operations (e.g. data fetching or managing user state) that are better suited for one environment over the other. Understanding these differences is key to effectively using React and Next.js. We'll cover the differences and use cases in more detail on the Server and Client Components pages, for now, let's continue building on our foundation. ### Request-Response Lifecycle Broadly speaking, all websites follow the same **Request-Response Lifecycle**: 1. **User Action:** The user interacts with a web application. This could be clicking a link, submitting a form, or typing a URL directly into the browser's address bar. 2. **HTTP Request:** The client sends an HTTP request to the server that contains necessary information about what resources are being requested, what method is being used (e.g. `GET`, `POST`), and additional data if necessary. 3. **Server:** The server processes the request and responds with the appropriate resources. This process may take a couple of steps like routing, fetching data, etc. 4. **HTTP Response:** After processing the request, the server sends an HTTP response back to the client. This response contains a status code (which tells the client whether the request was successful or not) and requested resources (e.g. HTML, CSS, JavaScript, static assets, etc). 5. **Client:** The client parses the resources to render the user interface. 6. **User Action:** Once the user interface is rendered, the user can interact with it, and the whole process starts again. A major part of building a hybrid web application is deciding how to split the work in the lifecycle, and where to place the Network Boundary. ### Network Boundary In web development, the **Network Boundary** is a conceptual line that separates the different environments. For example, the client and the server, or the server and the data store. In React, you choose where to place the client-server network boundary wherever it makes the most sense. Behind the scenes, the work is split into two parts: the **client module graph** and the **server module graph**. The server module graph contains all the components that are rendered on the server, and the client module graph contains all components that are rendered on the client. It may be helpful to think about module graphs as a visual representation of how files in your application depend on each other. You can use the React `"use client"` convention to define the boundary. There's also a `"use server"` convention, which tells React to do some computational work on the server while on the client. ## Building Hybrid Applications When working in these environments, it's helpful to think of the flow of the code in your application as **unidirectional**. In other words, during a response, your application code flows in one direction: from the server to the client. If you need to access the server from the client, you send a **new** request to the server rather than re-use the same request. This makes it easier to understand where to render your components and where to place the Network Boundary. In practice, this model encourages developers to think about what they want to execute on the server first, before sending the result to the client and making the application interactive. This concept will become clearer when we look at how you can interleave client and server components in the same component tree. --- ## Page: https://nextjs.org/docs/13/app/building-your-application/rendering/server-components React Server Components allow you to write UI that can be rendered and optionally cached on the server. In Next.js, the rendering work is further split by route segments to enable streaming and partial rendering, and there are three different server rendering strategies: * Static Rendering * Dynamic Rendering * Streaming This page will go through how Server Components work, when you might use them, and the different server rendering strategies. ## Benefits of Server Rendering There are a couple of benefits to doing the rendering work on the server, including: * **Data Fetching**: Server Components allow you to move data fetching to the server, closer to your data source. This can improve performance by reducing time it takes to fetch data needed for rendering, and the amount of requests the client needs to make. * **Security**: Server Components allow you to keep sensitive data and logic on the server, such as tokens and API keys, without the risk of exposing them to the client. * **Caching**: By rendering on the server, the result can be cached and reused on subsequent requests and across users. This can improve performance and reduce cost by reducing the amount of rendering and data fetching done on each request. * **Bundle Sizes**: Server Components allow you to keep large dependencies that previously would impact the client JavaScript bundle size on the server. This is beneficial for users with slower internet or less powerful devices, as the client does not have to download, parse and execute any JavaScript for Server Components. * **Initial Page Load and First Contentful Paint (FCP)**: On the server, we can generate HTML to allow users to view the page immediately, without waiting for the client to download, parse and execute the JavaScript needed to render the page. * **Search Engine Optimization and Social Network Shareability**: The rendered HTML can be used by search engine bots to index your pages and social network bots to generate social card previews for your pages. * **Streaming**: Server Components allow you to split the rendering work into chunks and stream them to the client as they become ready. This allows the user to see parts of the page earlier without having to wait for the entire page to be rendered on the server. ## Using Server Components in Next.js By default, Next.js uses Server Components. This allows you to automatically implement server rendering with no additional configuration, and you can opt into using Client Components when needed, see Client Components. ## How are Server Components rendered? On the server, Next.js uses React's APIs to orchestrate rendering. The rendering work is split into chunks: by individual route segments and Suspense Boundaries. Each chunk is rendered in two steps: 1. React renders Server Components into a special data format called the **React Server Component Payload (RSC Payload)**. 2. Next.js uses the RSC Payload and Client Component JavaScript instructions to render **HTML** on the server. Then, on the client: 1. The HTML is used to immediately show a fast non-interactive preview of the route - this is for the initial page load only. 2. The React Server Components Payload is used to reconcile the Client and Server Component trees, and update the DOM. 3. The JavaScript instructions are used to hydrate Client Components and make the application interactive. > **What is the React Server Component Payload (RSC)?** > > The RSC Payload is a compact binary representation of the rendered React Server Components tree. It's used by React on the client to update the browser's DOM. The RSC Payload contains: > > * The rendered result of Server Components > * Placeholders for where Client Components should be rendered and references to their JavaScript files > * Any props passed from a Server Component to a Client Component ## Server Rendering Strategies There are three subsets of server rendering: Static, Dynamic, and Streaming. ### Static Rendering (Default) With Static Rendering, routes are rendered at **build time**, or in the background after data revalidation. The result is cached and can be pushed to a Content Delivery Network (CDN). This optimization allows you to share the result of the rendering work between users and server requests. Static rendering is useful when a route has data that is not personalized to the user and can be known at build time, such as a static blog post or a product page. ### Dynamic Rendering With Dynamic Rendering, routes are rendered for each user at **request time**. Dynamic rendering is useful when a route has data that is personalized to the user or has information that can only be known at request time, such as cookies or the URL's search params. > **Dynamic Routes with Cached Data** > > In most websites, routes are not fully static or fully dynamic - it's a spectrum. For example, you can have e-commerce page that uses cached product data that's revalidated at an interval, but also has uncached, personalized customer data. > > In Next.js, you can have dynamically rendered routes that have both cached and uncached data. This is because the RSC Payload and data are cached separately. This allows you to opt into dynamic rendering without worrying about the performance impact of fetching all the data at request time. > > Learn more about the full-route cache and Data Cache. #### Switching to Dynamic Rendering During rendering, if a dynamic function or uncached data request is discovered, Next.js will switch to dynamically rendering the whole route. This table summarizes how dynamic functions and data caching affect whether a route is statically or dynamically rendered: | Dynamic Functions | Data | Route | | --- | --- | --- | | No | Cached | Statically Rendered | | Yes | Cached | Dynamically Rendered | | No | Not Cached | Dynamically Rendered | | Yes | Not Cached | Dynamically Rendered | In the table above, for a route to be fully static, all data must be cached. However, you can have a dynamically rendered route that uses both cached and uncached data fetches. As a developer, you do not need to choose between static and dynamic rendering as Next.js will automatically choose the best rendering strategy for each route based on the features and APIs used. Instead, you choose when to cache or revalidate specific data, and you may choose to stream parts of your UI. #### Dynamic Functions Dynamic functions rely on information that can only be known at request time such as a user's cookies, current requests headers, or the URL's search params. In Next.js, these dynamic functions are: * **`cookies()` and `headers()`**: Using these in a Server Component will opt the whole route into dynamic rendering at request time. * **`useSearchParams()`**: * In Client Components, it'll skip static rendering and instead render all Client Components up to the nearest parent Suspense boundary on the client. * We recommend wrapping the Client Component that uses `useSearchParams()` in a `<Suspense/>` boundary. This will allow any Client Components above it to be statically rendered. Example. * **`searchParams`**: Using the Pages prop will opt the page into dynamic rendering at request time. Using any of these functions will opt the whole route into dynamic rendering at request time. ### Streaming  Streaming enables you to progressively render UI from the server. Work is split into chunks and streamed to the client as it becomes ready. This allows the user to see parts of the page immediately, before the entire content has finished rendering.  Streaming is built into the Next.js App Router by default. This helps improve both the initial page loading performance, as well as UI that depends on slower data fetches that would block rendering the whole route. For example, reviews on a product page. You can start streaming route segments using `loading.js` and UI components with React Suspense. See the Loading UI and Streaming section for more information. --- ## Page: https://nextjs.org/docs/13/app/building-your-application/rendering/client-components Client Components allows you to write interactive UI that can be rendered on the client at request time. In Next.js, client rendering is **opt-in**, meaning you have to explicitly decide what components React should render on the client. This page will go through how Client Components work, how they're rendered, and when you might use them. ## Benefits of Client Rendering There are a couple of benefits to doing the rendering work on the client, including: * **Interactivity**: Client Components can use state, effects, and event listeners, meaning they can provide immediate feedback to the user and update the UI. * **Browser APIs**: Client Components have access to browser APIs, like geolocation or localStorage, allowing you to build UI for specific use cases. ## Using Client Components in Next.js To use Client Components, you can add the React `"use client"` directive at the top of a file, above your imports. `"use client"` is used to declare a boundary between a Server and Client Component modules. This means that by defining a `"use client"` in a file, all other modules imported into it, including child components, are considered part of the client bundle. 'use client' import { useState } from 'react' export default function Counter() { const [count, setCount] = useState(0) return ( <div> <p>You clicked {count} times</p> <button onClick={() => setCount(count + 1)}>Click me</button> </div> ) } The diagram below shows nested components, using `onClick` and `useState` in `toggle.js` will cause an error if the `"use client"` directive is not defined. This is because, by default, the components are rendered on the server where these APIs are not available. By defining the `"use client"` directive to `toggle.js`, you can tell React to render the component and its children on the client, where the APIs are available.  > **Defining multiple `use client` entry points**: > > You can define multiple "use client" entry points in your React Component tree. This allows you to split your application into multiple client bundles (or branches). > > However, `"use client"` doesn't need to be defined in every component that needs to be rendered on the client. Once you define the boundary, all child components and modules imported into it are considered part of the client bundle. ## How are Client Components Rendered? In Next.js, Client Components are rendered differently depending on whether the request is part of a full page load (an initial visit to your application or a page reload triggered by a browser refresh) or a subsequent navigation. ### Full page load To optimize the initial page load, Next.js will use React's APIs to render a static HTML preview on the server for both Client and Server Components. This means, when the user first visits your application, they will see the content of the page immediately, without having to wait for the client to download, parse, and execute the Client Component JavaScript bundle. On the server: 1. React renders Server Components into a special data format called the **React Server Component Payload (RSC Payload)**, which includes references to Client Components. 2. Next.js uses the RSC Payload and Client Component JavaScript instructions to render **HTML** for the route on the server. Then, on the client: 1. The HTML is used to immediately show a fast non-interactive initial preview of the route. 2. The React Server Components Payload is used to reconcile the Client and Server Component trees, and update the DOM. 3. The JavaScript instructions are used to hydrate Client Components and make their UI interactive. > **What is hydration?** > > Hydration is the process of attaching event listeners to the DOM, to make the static HTML interactive. Behind the scenes, hydration is done with the `hydrateRoot` React API. ### Subsequent Navigations On subsequent navigations, Client Components are rendered entirely on the client, without the server-rendered HTML. This means the Client Component JavaScript bundle is downloaded and parsed. Once the bundle is ready, React will use the RSC Payload to reconcile the Client and Server Component trees, and update the DOM. ## Going back to the Server Environment Sometimes, after you've declared the `"use client"` boundary, you may want to go back to the server environment. For example, you may want to reduce the client bundle size, fetch data on the server, or use an API that is only available on the server. You can keep code on the server even though it's theoretically nested inside Client Components by interleaving Client and Server Components and Server Actions. See the Composition Patterns page for more information. --- ## Page: https://nextjs.org/docs/13/app/building-your-application/rendering/composition-patterns ## Server and Client Composition Patterns When building React applications, you will need to consider what parts of your application should be rendered on the server or the client. This page covers some recommended composition patterns when using Server and Client Components. ## When to use Server and Client Components? Here's a quick summary of the different use cases for Server and Client Components: | What do you need to do? | Server Component | Client Component | | --- | --- | --- | | Fetch data | | | | Access backend resources (directly) | | | | Keep sensitive information on the server (access tokens, API keys, etc) | | | | Keep large dependencies on the server / Reduce client-side JavaScript | | | | Add interactivity and event listeners (`onClick()`, `onChange()`, etc) | | | | Use State and Lifecycle Effects (`useState()`, `useReducer()`, `useEffect()`, etc) | | | | Use browser-only APIs | | | | Use custom hooks that depend on state, effects, or browser-only APIs | | | | Use React Class components | | | ## Server Component Patterns Before opting into client-side rendering, you may wish to do some work on the server like fetching data, or accessing your database or backend services. Here are some common patterns when working with Server Components: ### Sharing data between components When fetching data on the server, there may be cases where you need to share data across different components. For example, you may have a layout and a page that depend on the same data. Instead of using React Context (which is not available on the server) or passing data as props, you can use `fetch` or React's `cache` function to fetch the same data in the components that need it, without worrying about making duplicate requests for the same data. This is because React extends `fetch` to automatically memoize data requests, and the `cache` function can be used when `fetch` is not available. Learn more about memoization in React. ### Keeping Server-only Code out of the Client Environment Since JavaScript modules can be shared between both Server and Client Components modules, it's possible for code that was only ever intended to be run on the server to sneak its way into the client. For example, take the following data-fetching function: export async function getData() { const res = await fetch('https://external-service.com/data', { headers: { authorization: process.env.API_KEY, }, }) return res.json() } At first glance, it appears that `getData` works on both the server and the client. However, this function contains an `API_KEY`, written with the intention that it would only ever be executed on the server. Since the environment variable `API_KEY` is not prefixed with `NEXT_PUBLIC`, it's a private variable that can only be accessed on the server. To prevent your environment variables from being leaked to the client, Next.js replaces private environment variables with an empty string. As a result, even though `getData()` can be imported and executed on the client, it won't work as expected. And while making the variable public would make the function work on the client, you may not want to expose sensitive information to the client. To prevent this sort of unintended client usage of server code, we can use the `server-only` package to give other developers a build-time error if they ever accidentally import one of these modules into a Client Component. To use `server-only`, first install the package: npm install server-only Then import the package into any module that contains server-only code: import 'server-only' export async function getData() { const res = await fetch('https://external-service.com/data', { headers: { authorization: process.env.API_KEY, }, }) return res.json() } Now, any Client Component that imports `getData()` will receive a build-time error explaining that this module can only be used on the server. The corresponding package `client-only` can be used to mark modules that contain client-only code – for example, code that accesses the `window` object. ### Using Third-party Packages and Providers Since Server Components are a new React feature, third-party packages and providers in the ecosystem are just beginning to add the `"use client"` directive to components that use client-only features like `useState`, `useEffect`, and `createContext`. Today, many components from `npm` packages that use client-only features do not yet have the directive. These third-party components will work as expected within Client Components since they have the `"use client"` directive, but they won't work within Server Components. For example, let's say you've installed the hypothetical `acme-carousel` package which has a `<Carousel />` component. This component uses `useState`, but it doesn't yet have the `"use client"` directive. If you use `<Carousel />` within a Client Component, it will work as expected: 'use client' import { useState } from 'react' import { Carousel } from 'acme-carousel' export default function Gallery() { let [isOpen, setIsOpen] = useState(false) return ( <div> <button onClick={() => setIsOpen(true)}>View pictures</button> {/* Works, since Carousel is used within a Client Component */} {isOpen && <Carousel />} </div> ) } However, if you try to use it directly within a Server Component, you'll see an error: import { Carousel } from 'acme-carousel' export default function Page() { return ( <div> <p>View pictures</p> {/* Error: `useState` can not be used within Server Components */} <Carousel /> </div> ) } This is because Next.js doesn't know `<Carousel />` is using client-only features. To fix this, you can wrap third-party components that rely on client-only features in your own Client Components: 'use client' import { Carousel } from 'acme-carousel' export default Carousel Now, you can use `<Carousel />` directly within a Server Component: import Carousel from './carousel' export default function Page() { return ( <div> <p>View pictures</p> {/* Works, since Carousel is a Client Component */} <Carousel /> </div> ) } We don't expect you to need to wrap most third-party components since it's likely you'll be using them within Client Components. However, one exception is providers, since they rely on React state and context, and are typically needed at the root of an application. Learn more about third-party context providers below. #### Using Context Providers Context providers are typically rendered near the root of an application to share global concerns, like the current theme. Since React context is not supported in Server Components, trying to create a context at the root of your application will cause an error: import { createContext } from 'react' // createContext is not supported in Server Components export const ThemeContext = createContext({}) export default function RootLayout({ children }) { return ( <html> <body> <ThemeContext.Provider value="dark">{children}</ThemeContext.Provider> </body> </html> ) } To fix this, create your context and render its provider inside of a Client Component: 'use client' import { createContext } from 'react' export const ThemeContext = createContext({}) export default function ThemeProvider({ children }) { return <ThemeContext.Provider value="dark">{children}</ThemeContext.Provider> } Your Server Component will now be able to directly render your provider since it's been marked as a Client Component: import ThemeProvider from './theme-provider' export default function RootLayout({ children, }: { children: React.ReactNode }) { return ( <html> <body> <ThemeProvider>{children}</ThemeProvider> </body> </html> ) } With the provider rendered at the root, all other Client Components throughout your app will be able to consume this context. > **Good to know**: You should render providers as deep as possible in the tree – notice how `ThemeProvider` only wraps `{children}` instead of the entire `<html>` document. This makes it easier for Next.js to optimize the static parts of your Server Components. In a similar fashion, library authors creating packages to be consumed by other developers can use the `"use client"` directive to mark client entry points of their package. This allows users of the package to import package components directly into their Server Components without having to create a wrapping boundary. You can optimize your package by using 'use client' deeper in the tree, allowing the imported modules to be part of the Server Component module graph. It's worth noting some bundlers might strip out `"use client"` directives. You can find an example of how to configure esbuild to include the `"use client"` directive in the React Wrap Balancer and Vercel Analytics repositories. ## Client Components ### Moving Client Components Down the Tree To reduce the Client JavaScript bundle size, we recommend moving Client Components down your component tree. For example, you may have a Layout that has static elements (e.g. logo, links, etc) and an interactive search bar that uses state. Instead of making the whole layout a Client Component, move the interactive logic to a Client Component (e.g. `<SearchBar />`) and keep your layout as a Server Component. This means you don't have to send all the component Javascript of the layout to the client. // SearchBar is a Client Component import SearchBar from './searchbar' // Logo is a Server Component import Logo from './logo' // Layout is a Server Component by default export default function Layout({ children }: { children: React.ReactNode }) { return ( <> <nav> <Logo /> <SearchBar /> </nav> <main>{children}</main> </> ) } ### Passing props from Server to Client Components (Serialization) If you fetch data in a Server Component, you may want to pass data down as props to Client Components. Props passed from the Server to Client Components need to be serializable by React. If your Client Components depend on data that is not serializable, you can fetch data on the client with a third party library or on the server via a Route Handler. ## Interleaving Server and Client Components When interleaving Client and Server Components, it may be helpful to visualize your UI as a tree of components. Starting with the root layout, which is a Server Component, you can then render certain subtrees of components on the client by adding the `"use client"` directive. Within those client subtrees, you can still nest Server Components or call Server Actions, however there are some things to keep in mind: * During a request-response lifecycle, your code moves from the server to the client. If you need to access data or resources on the server while on the client, you'll be making a **new** request to the server - not switching back and forth. * When a new request is made to the server, all Server Components are rendered first, including those nested inside Client Components. The rendered result (RSC Payload) will contain references to the locations of Client Components. Then, on the client, React uses the RSC Payload to reconcile Server and Client Components into a single tree. * Since Client Components are rendered after Server Components, you cannot import a Server Component into a Client Component module (since it would require a new request back to the server). Instead, you can pass a Server Component as `props` to a Client Component. See the unsupported pattern and supported pattern sections below. ### Unsupported Pattern: Importing Server Components into Client Components The following pattern is not supported. You cannot import a Server Component into a Client Component: 'use client' // You cannot import a Server Component into a Client Component. import ServerComponent from './Server-Component' export default function ClientComponent({ children, }: { children: React.ReactNode }) { const [count, setCount] = useState(0) return ( <> <button onClick={() => setCount(count + 1)}>{count}</button> <ServerComponent /> </> ) } ### Supported Pattern: Passing Server Components to Client Components as Props The following pattern is supported. You can pass Server Components as a prop to a Client Component. A common pattern is to use the React `children` prop to create a _"slot"_ in your Client Component. In the example below, `<ClientComponent>` accepts a `children` prop: 'use client' import { useState } from 'react' export default function ClientComponent({ children, }: { children: React.ReactNode }) { const [count, setCount] = useState(0) return ( <> <button onClick={() => setCount(count + 1)}>{count}</button> {children} </> ) } `<ClientComponent>` doesn't know that `children` will eventually be filled in by the result of a Server Component. The only responsibility `<ClientComponent>` has is to decide **where** `children` will eventually be placed. In a parent Server Component, you can import both the `<ClientComponent>` and `<ServerComponent>` and pass `<ServerComponent>` as a child of `<ClientComponent>`: // This pattern works: // You can pass a Server Component as a child or prop of a // Client Component. import ClientComponent from './client-component' import ServerComponent from './server-component' // Pages in Next.js are Server Components by default export default function Page() { return ( <ClientComponent> <ServerComponent /> </ClientComponent> ) } With this approach, `<ClientComponent>` and `<ServerComponent>` are decoupled and can be rendered independently. In this case, the child `<ServerComponent>` can be rendered on the server, well before `<ClientComponent>` is rendered on the client. > **Good to know:** > > * The pattern of "lifting content up" has been used to avoid re-rendering a nested child component when a parent to re-renders. > * You're not limited to the `children` prop. You can use any prop to pass JSX. --- ## Page: https://nextjs.org/docs/13/app/building-your-application/rendering/edge-and-nodejs-runtimes In the context of Next.js, runtime refers to the set of libraries, APIs, and general functionality available to your code during execution. On the server, there are two runtimes where parts of your application code can be rendered: * The **Node.js Runtime** (default) has access to all Node.js APIs and compatible packages from the ecosystem. * The **Edge Runtime** is based on Web APIs. ## Runtime Differences There are many considerations to make when choosing a runtime. This table shows the major differences at a glance. If you want a more in-depth analysis of the differences, check out the sections below. | | Node | Serverless | Edge | | --- | --- | --- | --- | | Cold Boot | / | ~250ms | Instant | | HTTP Streaming | Yes | Yes | Yes | | IO | All | All | `fetch` | | Scalability | / | High | Highest | | Security | Normal | High | High | | Latency | Normal | Low | Lowest | | npm Packages | All | All | A smaller subset | | Static Rendering | Yes | Yes | No | | Dynamic Rendering | Yes | Yes | Yes | | Data Revalidation w/ `fetch` | Yes | Yes | Yes | ### Edge Runtime In Next.js, the lightweight Edge Runtime is a subset of available Node.js APIs. The Edge Runtime is ideal if you need to deliver dynamic, personalized content at low latency with small, simple functions. The Edge Runtime's speed comes from its minimal use of resources, but that can be limiting in many scenarios. For example, code executed in the Edge Runtime on Vercel cannot exceed between 1 MB and 4 MB, this limit includes imported packages, fonts and files, and will vary depending on your deployment infrastructure. ### Node.js Runtime Using the Node.js runtime gives you access to all Node.js APIs, and all npm packages that rely on them. However, it's not as fast to start up as routes using the Edge runtime. Deploying your Next.js application to a Node.js server will require managing, scaling, and configuring your infrastructure. Alternatively, you can consider deploying your Next.js application to a serverless platform like Vercel, which will handle this for you. ### Serverless Node.js Serverless is ideal if you need a scalable solution that can handle more complex computational loads than the Edge Runtime. With Serverless Functions on Vercel, for example, your overall code size is 50MB including imported packages, fonts, and files. The downside compared to routes using the Edge is that it can take hundreds of milliseconds for Serverless Functions to boot up before they begin processing requests. Depending on the amount of traffic your site receives, this could be a frequent occurrence as the functions are not frequently "warm". ## Examples ### Segment Runtime Option You can specify a runtime for individual route segments in your Next.js application. To do so, declare a variable called `runtime` and export it. The variable must be a string, and must have a value of either `'nodejs'` or `'edge'` runtime. The following example demonstrates a page route segment that exports a `runtime` with a value of `'edge'`: export const runtime = 'edge' // 'nodejs' (default) | 'edge' You can also define `runtime` on a layout level, which will make all routes under the layout run on the edge runtime: export const runtime = 'edge' // 'nodejs' (default) | 'edge' If the segment runtime is _not_ set, the default `nodejs` runtime will be used. You do not need to use the `runtime` option if you do not plan to change from the Node.js runtime. > Please refer to the Node.js Docs and Edge Docs for the full list of available APIs. Both runtimes can also support streaming depending on your deployment infrastructure. --- ## Page: https://nextjs.org/docs/13/app/building-your-application/caching Next.js improves your application's performance and reduces costs by caching rendering work and data requests. This page provides an in-depth look at Next.js caching mechanisms, the APIs you can use to configure them, and how they interact with each other. > **Good to know**: This page helps you understand how Next.js works under the hood but is **not** essential knowledge to be productive with Next.js. Most of Next.js' caching heuristics are determined by your API usage and have defaults for the best performance with zero or minimal configuration. ## Overview Here's a high-level overview of the different caching mechanisms and their purpose: | Mechanism | What | Where | Purpose | Duration | | --- | --- | --- | --- | --- | | Request Memoization | Return values of functions | Server | Re-use data in a React Component tree | Per-request lifecycle | | Data Cache | Data | Server | Store data across user requests and deployments | Persistent (can be revalidated) | | Full Route Cache | HTML and RSC payload | Server | Reduce rendering cost and improve performance | Persistent (can be revalidated) | | Router Cache | RSC Payload | Client | Reduce server requests on navigation | User session or time-based | By default, Next.js will cache as much as possible to improve performance and reduce cost. This means routes are **statically rendered** and data requests are **cached** unless you opt out. The diagram below shows the default caching behavior: when a route is statically rendered at build time and when a static route is first visited.  Caching behavior changes depending on whether the route is statically or dynamically rendered, data is cached or uncached, and whether a request is part of an initial visit or a subsequent navigation. Depending on your use case, you can configure the caching behavior for individual routes and data requests. ## Request Memoization React extends the `fetch` API to automatically **memoize** requests that have the same URL and options. This means you can call a fetch function for the same data in multiple places in a React component tree while only executing it once.  For example, if you need to use the same data across a route (e.g. in a Layout, Page, and multiple components), you do not have to fetch data at the top of the tree then forward props between components. Instead, you can fetch data in the components that need it without worrying about the performance implications of making multiple requests across the network for the same data. async function getItem() { // The `fetch` function is automatically memoized and the result // is cached const res = await fetch('https://.../item/1') return res.json() } // This function is called twice, but only executed the first time const item = await getItem() // cache MISS // The second call could be anywhere in your route const item = await getItem() // cache HIT **How Request Memoization Works**  * While rendering a route, the first time a particular request is called, its result will not be in memory and it'll be a cache `MISS`. * Therefore, the function will be executed, and the data will be fetched from the external source, and the result will be stored in memory. * Subsequent function calls of the request in the same render pass will be a cache `HIT`, and the data will be returned from memory without executing the function. * Once the route has been rendered and the rendering pass is complete, memory is "reset" and all request memoization entries are cleared. > **Good to know**: > > * Request memoization is a React feature, not a Next.js feature. It's included here to show how it interacts with the other caching mechanisms. > * Memoization only applies to the `GET` method in `fetch` requests. > * Memoization only applies to the React Component tree, this means: > * It applies to `fetch` requests in `generateMetadata`, `generateStaticParams`, Layouts, Pages, and other Server Components. > * It doesn't apply to `fetch` requests in Route Handlers as they are not a part of the React component tree. > * For cases where `fetch` is not suitable (e.g. some database clients, CMS clients, or GraphQL clients), you can use the React `cache` function to memoize functions. ### Duration The cache lasts the lifetime of a server request until the React component tree has finished rendering. ### Revalidating Since the memoization is not shared across server requests and only applies during rendering, there is no need to revalidate it. ### Opting out To opt out of memoization in `fetch` requests, you can pass an `AbortController` `signal` to the request. const { signal } = new AbortController() fetch(url, { signal }) ## Data Cache Next.js has a built-in Data Cache that **persists** the result of data fetches across incoming **server requests** and **deployments**. This is possible because Next.js extends the native `fetch` API to allow each request on the server to set its own persistent caching semantics. > **Good to know**: In the browser, the `cache` option of `fetch` indicates how a request will interact with the browser's HTTP cache, in Next.js, the `cache` option indicates how a server-side request will interact with the servers Data Cache. By default, data requests that use `fetch` are **cached**. You can use the `cache` and `next.revalidate` options of `fetch` to configure the caching behavior. **How the Data Cache Works**  * The first time a `fetch` request is called during rendering, Next.js checks the Data Cache for a cached response. * If a cached response is found, it's returned immediately and memoized. * If a cached response is not found, the request is made to the data source, the result is stored in the Data Cache, and memoized. * For uncached data (e.g. `{ cache: 'no-store' }`), the result is always fetched from the data source, and memoized. * Whether the data is cached or uncached, the requests are always memoized to avoid making duplicate requests for the same data during a React render pass. > **Differences between the Data Cache and Request Memoization** > > While both caching mechanisms help improve performance by re-using cached data, the Data Cache is persistent across incoming requests and deployments, whereas memoization only lasts the lifetime of a request. > > With memoization, we reduce the number of **duplicate** requests in the same render pass that have to cross the network boundary from the rendering server to the Data Cache server (e.g. a CDN or Edge Network) or data source (e.g. a database or CMS). With the Data Cache, we reduce the number of requests made to our origin data source. ### Duration The Data Cache is persistent across incoming requests and deployments unless you revalidate or opt-out. ### Revalidating Cached data can be revalidated in two ways, with: * **Time-based Revalidation**: Revalidate data after a certain amount of time has passed and a new request is made. This is useful for data that changes infrequently and freshness is not as critical. * **On-demand Revalidation:** Revalidate data based on an event (e.g. form submission). On-demand revalidation can use a tag-based or path-based approach to revalidate groups of data at once. This is useful when you want to ensure the latest data is shown as soon as possible (e.g. when content from your headless CMS is updated). #### Time-based Revalidation To revalidate data at a timed interval, you can use the `next.revalidate` option of `fetch` to set the cache lifetime of a resource (in seconds). // Revalidate at most every hour fetch('https://...', { next: { revalidate: 3600 } }) Alternatively, you can use Route Segment Config options to configure all `fetch` requests in a segment or for cases where you're not able to use `fetch`. **How Time-based Revalidation Works**  * The first time a fetch request with `revalidate` is called, the data will be fetched from the external data source and stored in the Data Cache. * Any requests that are called within the specified timeframe (e.g. 60-seconds) will return the cached data. * After the timeframe, the next request will still return the cached (now stale) data. * Next.js will trigger a revalidation of the data in the background. * Once the data is fetched successfully, Next.js will update the Data Cache with the fresh data. * If the background revalidation fails, the previous data will be kept unaltered. This is similar to **stale-while-revalidate** behavior. #### On-demand Revalidation Data can be revalidated on-demand by path (`revalidatePath`) or by cache tag (`revalidateTag`). **How On-Demand Revalidation Works**  * The first time a `fetch` request is called, the data will be fetched from the external data source and stored in the Data Cache. * When an on-demand revalidation is triggered, the appropriate cache entries will be purged from the cache. * This is different from time-based revalidation, which keeps the stale data in the cache until the fresh data is fetched. * The next time a request is made, it will be a cache `MISS` again, and the data will be fetched from the external data source and stored in the Data Cache. ### Opting out For individual data fetches, you can opt out of caching by setting the `cache` option to `no-store`. This means data will be fetched whenever `fetch` is called. // Opt out of caching for an individual `fetch` request fetch(`https://...`, { cache: 'no-store' }) Alternatively, you can also use the Route Segment Config options to opt out of caching for a specific route segment. This will affect all data requests in the route segment, including third-party libraries. // Opt out of caching for all data requests in the route segment export const dynamic = 'force-dynamic' > **Vercel Data Cache** > > If your Next.js application is deployed to Vercel, we recommend reading the Vercel Data Cache documentation for a better understanding of Vercel specific features. ## Full Route Cache > **Related terms**: > > You may see the terms **Automatic Static Optimization**, **Static Site Generation**, or **Static Rendering** being used interchangeably to refer to the process of rendering and caching routes of your application at build time. Next.js automatically renders and caches routes at build time. This is an optimization that allows you to serve the cached route instead of rendering on the server for every request, resulting in faster page loads. To understand how the Full Route Cache works, it's helpful to look at how React handles rendering, and how Next.js caches the result: ### 1\. React Rendering on the Server On the server, Next.js uses React's APIs to orchestrate rendering. The rendering work is split into chunks: by individual routes segments and Suspense boundaries. Each chunk is rendered in two steps: 1. React renders Server Components into a special data format, optimized for streaming, called the **React Server Component Payload**. 2. Next.js uses the React Server Component Payload and Client Component JavaScript instructions to render **HTML** on the server. This means we don't have to wait for everything to render before caching the work or sending a response. Instead, we can stream a response as work is completed. > **What is the React Server Component Payload?** > > The React Server Component Payload is a compact binary representation of the rendered React Server Components tree. It's used by React on the client to update the browser's DOM. The React Server Component Payload contains: > > * The rendered result of Server Components > * Placeholders for where Client Components should be rendered and references to their JavaScript files > * Any props passed from a Server Component to a Client Component > > To learn more, see the Server Components documentation. ### 2\. Next.js Caching on the Server (Full Route Cache)  The default behavior of Next.js is to cache the rendered result (React Server Component Payload and HTML) of a route on the server. This applies to statically rendered routes at build time, or during revalidation. ### 3\. React Hydration and Reconciliation on the Client At request time, on the client: 1. The HTML is used to immediately show a fast non-interactive initial preview of the Client and Server Components. 2. The React Server Components Payload is used to reconcile the Client and rendered Server Component trees, and update the DOM. 3. The JavaScript instructions are used to hydrate Client Components and make the application interactive. ### 4\. Next.js Caching on the Client (Router Cache) The React Server Component Payload is stored in the client-side Router Cache - a separate in-memory cache, split by individual route segment. This Router Cache is used to improve the navigation experience by storing previously visited routes and prefetching future routes. ### 5\. Subsequent Navigations On subsequent navigations or during prefetching, Next.js will check if the React Server Components Payload is stored in Router Cache. If so, it will skip sending a new request to the server. If the route segments are not in the cache, Next.js will fetch the React Server Components Payload from the server, and populate the Router Cache on the client. ### Static and Dynamic Rendering Whether a route is cached or not at build time depends on whether it's statically or dynamically rendered. Static routes are cached by default, whereas dynamic routes are rendered at request time, and not cached. This diagram shows the difference between statically and dynamically rendered routes, with cached and uncached data:  Learn more about static and dynamic rendering. ### Duration By default, the Full Route Cache is persistent. This means that the render output is cached across user requests. ### Invalidation There are two ways you can invalidate the Full Route Cache: * **Revalidating Data**: Revalidating the Data Cache, will in turn invalidate the Router Cache by re-rendering components on the server and caching the new render output. * **Redeploying**: Unlike the Data Cache, which persists across deployments, the Full Route Cache is cleared on new deployments. ### Opting out You can opt out of the Full Route Cache, or in other words, dynamically render components for every incoming request, by: * **Using a Dynamic Function**: This will opt the route out from the Full Route Cache and dynamically render it at request time. The Data Cache can still be used. * **Using the `dynamic = 'force-dynamic'` or `revalidate = 0` route segment config options**: This will skip the Full Route Cache and the Data Cache. Meaning components will be rendered and data fetched on every incoming request to the server. The Router Cache will still apply as it's a client-side cache. * **Opting out of the Data Cache**: If a route has a `fetch` request that is not cached, this will opt the route out of the Full Route Cache. The data for the specific `fetch` request will be fetched for every incoming request. Other `fetch` requests that do not opt out of caching will still be cached in the Data Cache. This allows for a hybrid of cached and uncached data. ## Router Cache > **Related Terms:** > > You may see the Router Cache being referred to as **Client-side Cache** or **Prefetch Cache**. While **Prefetch Cache** refers to the prefetched route segments, **Client-side Cache** refers to the whole Router cache, which includes both visited and prefetched segments. This cache specifically applies to Next.js and Server Components, and is different to the browser's bfcache, though it has a similar result. Next.js has an in-memory client-side cache that stores the React Server Component Payload, split by individual route segments, for the duration of a user session. This is called the Router Cache. **How the Router Cache Works**  As users navigate between routes, Next.js caches visited route segments and prefetches the routes the user is likely to navigate to (based on `<Link>` components in their viewport). This results in an improved navigation experience for the user: * Instant backward/forward navigation because visited routes are cached and fast navigation to new routes because of prefetching and partial rendering. * No full-page reload between navigations and React state and browser state is preserved. > **Difference between the Router Cache and Full Route Cache**: > > The Router Cache temporarily stores the React Server Component Payload in the browser for the duration of a user session, whereas the Full Route Cache persistently stores the React Server Component Payload and HTML on the server across multiple user requests. > > While the Full Route Cache only caches statically rendered routes, the Router Cache applies to both statically and dynamically rendered routes. ### Duration The cache is stored in the browser's temporary memory. Two factors determine how long the router cache lasts: * **Session**: The cache persists across navigation. However, it's cleared on page refresh. * **Automatic Invalidation Period**: The cache of an individual segment is automatically invalidated after a specific time. The duration depends on whether the route is statically or dynamically rendered: * **Dynamically Rendered**: 30 seconds * **Statically Rendered**: 5 minutes While a page refresh will clear **all** cached segments, the automatic invalidation period only affects the individual segment from the time it was last accessed or created. By adding `prefetch={true}` or calling `router.prefetch` for a dynamically rendered route, you can opt into caching for 5 minutes. ### Invalidation There are two ways you can invalidate the Router Cache: * In a **Server Action**: * Revalidating data on-demand by path with (`revalidatePath`) or by cache tag with (`revalidateTag`) * Using `cookies.set` or `cookies.delete` invalidates the Router Cache to prevent routes that use cookies from becoming stale (e.g. authentication). * Calling `router.refresh` will invalidate the Router Cache and make a new request to the server for the current route. ### Opting out It's not possible to opt out of the Router Cache. You can opt out of **prefetching** by setting the `prefetch` prop of the `<Link>` component to `false`. However, this will still temporarily store the route segments for 30s to allow instant navigation between nested segments, such as tab bars, or back and forward navigation. Visited routes will still be cached. ## Cache Interactions When configuring the different caching mechanisms, it's important to understand how they interact with each other: ### Data Cache and Full Route Cache * Revalidating or opting out of the Data Cache **will** invalidate the Full Route Cache, as the render output depends on data. * Invalidating or opting out of the Full Route Cache **does not** affect the Data Cache. You can dynamically render a route that has both cached and uncached data. This is useful when most of your page uses cached data, but you have a few components that rely on data that needs to be fetched at request time. You can dynamically render without worrying about the performance impact of re-fetching all the data. ### Data Cache and Client-side Router cache * Revalidating the Data Cache in a Route Handler **will not** immediately invalidate the Router Cache as the Router Handler isn't tied to a specific route. This means Router Cache will continue to serve the previous payload until a hard refresh, or the automatic invalidation period has elapsed. * To immediately invalidate the Data Cache and Router cache, you can use `revalidatePath` or `revalidateTag` in a Server Action. ## APIs The following table provides an overview of how different Next.js APIs affect caching: | API | Router Cache | Full Route Cache | Data Cache | React Cache | | --- | --- | --- | --- | --- | | `<Link prefetch>` | Cache | | | | | `router.prefetch` | Cache | | | | | `router.refresh` | Revalidate | | | | | `fetch` | | | Cache | Cache | | `fetch` `options.cache` | | | Cache or Opt out | | | `fetch` `options.next.revalidate` | | Revalidate | Revalidate | | | `fetch` `options.next.tags` | | Cache | Cache | | | `revalidateTag` | Revalidate (Server Action) | Revalidate | Revalidate | | | `revalidatePath` | Revalidate (Server Action) | Revalidate | Revalidate | | | `const revalidate` | | Revalidate or Opt out | Revalidate or Opt out | | | `const dynamic` | | Cache or Opt out | Cache or Opt out | | | `cookies` | Revalidate (Server Action) | Opt out | | | | `headers`, `useSearchParams`, `searchParams` | | Opt out | | | | `generateStaticParams` | | Cache | | | | `React.cache` | | | | Cache | | `unstable_cache` (Coming Soon) | | | | | ### `<Link>` By default, the `<Link>` component automatically prefetches routes from the Full Route Cache and adds the React Server Component Payload to the Router Cache. To disable prefetching, you can set the `prefetch` prop to `false`. But this will not skip the cache permanently, the route segment will still be cached client-side when the user visits the route. Learn more about the `<Link>` component. ### `router.prefetch` The `prefetch` option of the `useRouter` hook can be used to manually prefetch a route. This adds the React Server Component Payload to the Router Cache. See the `useRouter` hook API reference. ### `router.refresh` The `refresh` option of the `useRouter` hook can be used to manually refresh a route. This completely clears the Router Cache, and makes a new request to the server for the current route. `refresh` does not affect the Data or Full Route Cache. The rendered result will be reconciled on the client while preserving React state and browser state. See the `useRouter` hook API reference. ### `fetch` Data returned from `fetch` is automatically cached in the Data Cache. // Cached by default. `force-cache` is the default option and can be ommitted. fetch(`https://...`, { cache: 'force-cache' }) See the `fetch` API Reference for more options. ### `fetch options.cache` You can opt out individual `fetch` requests of data caching by setting the `cache` option to `no-store`: // Opt out of caching fetch(`https://...`, { cache: 'no-store' }) Since the render output depends on data, using `cache: 'no-store'` will also skip the Full Route Cache for the route where the `fetch` request is used. That is, the route will be dynamically rendered every request, but you can still have other cached data requests in the same route. See the `fetch` API Reference for more options. ### `fetch options.next.revalidate` You can use the `next.revalidate` option of `fetch` to set the revalidation period (in seconds) of an individual `fetch` request. This will revalidate the Data Cache, which in turn will revalidate the Full Route Cache. Fresh data will be fetched, and components will be re-rendered on the server. // Revalidate at most after 1 hour fetch(`https://...`, { next: { revalidate: 3600 } }) See the `fetch` API reference for more options. ### `fetch options.next.tags` and `revalidateTag` Next.js has a cache tagging system for fine-grained data caching and revalidation. 1. When using `fetch` or `unstable_cache`, you have the option to tag cache entries with one or more tags. 2. Then, you can call `revalidateTag` to purge the cache entries associated with that tag. For example, you can set a tag when fetching data: // Cache data with a tag fetch(`https://...`, { next: { tags: ['a', 'b', 'c'] } }) Then, call `revalidateTag` with a tag to purge the cache entry: // Revalidate entries with a specific tag revalidateTag('a') There are two places you can use `revalidateTag`, depending on what you're trying to achieve: 1. Route Handlers - to revalidate data in response of a third party event (e.g. webhook). This will not invalidate the Router Cache immediately as the Router Handler isn't tied to a specific route. 2. Server Actions - to revalidate data after a user action (e.g. form submission). This will invalidate the Router Cache for the associated route. ### `revalidatePath` `revalidatePath` allows you manually revalidate data **and** re-render the route segments below a specific path in a single operation. Calling `revalidatePath` methods revalidate the Data Cache, which in turn invalidates the Full Route Cache. revalidatePath('/') There are two places you can use `revalidatePath`, depending on what you're trying to achieve: 1. Route Handlers - to revalidate data in response to a third party event (e.g. webhook). 2. Server Actions - to revalidate data after a user interaction (e.g. form submission, clicking a button). See the `revalidatePath` API reference for more information. > **`revalidatePath`** vs. **`router.refresh`**: > > Calling `router.refresh` will clear the Router cache, and re-render route segments on the server without invalidating the Data Cache or the Full Route Cache. > > The difference is that `revalidatePath` purges the Data Cache and Full Route Cache, whereas `router.refresh()` does not change the Data Cache and Full Route Cache, as it is a client-side API. ### Dynamic Functions `cookies`, `headers`, `useSearchParams`, and `searchParams` are all dynamic functions that depend on runtime incoming request information. Using them will opt a route out of the Full Route Cache, in other words, the route will be dynamically rendered. #### `cookies` Using `cookies.set` or `cookies.delete` in a Server Action invalidates the Router Cache to prevent routes that use cookies from becoming stale (e.g. to reflect authentication changes). See the `cookies` API reference. ### Segment Config Options The Route Segment Config options can be used to override the route segment defaults or when you're not able to use the `fetch` API (e.g. database client or 3rd party libraries). The following Route Segment Config options will opt out of the Data Cache and Full Route Cache: * `const dynamic = 'force-dynamic'` * `const revalidate = 0` See the Route Segment Config documentation for more options. ### `generateStaticParams` For dynamic segments (e.g. `app/blog/[slug]/page.js`), paths provided by `generateStaticParams` are cached in the Full Route Cache at build time. At request time, Next.js will also cache paths that weren't known at build time the first time they're visited. You can disable caching at request time by using `export const dynamicParams = false` option in a route segment. When this config option is used, only paths provided by `generateStaticParams` will be served, and other routes will 404 or match (in the case of catch-all routes). See the `generateStaticParams` API reference. ### React `cache` function The React `cache` function allows you to memoize the return value of a function, allowing you to call the same function multiple times while only executing it once. Since `fetch` requests are automatically memoized, you do not need to wrap it in React `cache`. However, you can use `cache` to manually memoize data requests for use cases when the `fetch` API is not suitable. For example, some database clients, CMS clients, or GraphQL clients. import { cache } from 'react' import db from '@/lib/db' export const getItem = cache(async (id: string) => { const item = await db.item.findUnique({ id }) return item }) ### `unstable_cache` `unstable_cache` is an experimental API for adding values to the Data Cache when the `fetch` API is not suitable. For example, when using database clients, CMS clients, or GraphQL. import { unstable_cache } from 'next/cache' export default async function Page() { const cachedData = await unstable_cache( async () => { const data = await db.query('...') return data }, ['cache-key'], { tags: ['a', 'b', 'c'], revalidate: 10, } )() } > **Warning**: This API is being developed, and we do not recommend using it in production. It's listed here to show the future direction of the Data Cache. --- ## Page: https://nextjs.org/docs/13/app/building-your-application/styling You are currently viewing documentation for version 13 of Next.js. Next.js supports different ways of styling your application, including: * **Global CSS**: Simple to use and familiar for those experienced with traditional CSS, but can lead to larger CSS bundles and difficulty managing styles as the application grows. * **CSS Modules**: Create locally scoped CSS classes to avoid naming conflicts and improve maintainability. * **Tailwind CSS**: A utility-first CSS framework that allows for rapid custom designs by composing utility classes. * **Sass**: A popular CSS preprocessor that extends CSS with features like variables, nested rules, and mixins. * **CSS-in-JS**: Embed CSS directly in your JavaScript components, enabling dynamic and scoped styling. Learn more about each approach by exploring their respective documentation: --- ## Page: https://nextjs.org/docs/13/app/building-your-application/styling/css-modules Next.js has built-in support for CSS Modules using the `.module.css` extension. CSS Modules locally scope CSS by automatically creating a unique class name. This allows you to use the same class name in different files without worrying about collisions. This behavior makes CSS Modules the ideal way to include component-level CSS. ## Example CSS Modules can be imported into any file inside the `app` directory: import styles from './styles.module.css' export default function DashboardLayout({ children, }: { children: React.ReactNode }) { return <section className={styles.dashboard}>{children}</section> } .dashboard { padding: 24px; } CSS Modules are an _optional feature_ and are **only enabled for files with the `.module.css` extension**. Regular `<link>` stylesheets and global CSS files are still supported. In production, all CSS Module files will be automatically concatenated into **many minified and code-split** `.css` files. These `.css` files represent hot execution paths in your application, ensuring the minimal amount of CSS is loaded for your application to paint. ## Global Styles Global styles can be imported into any layout, page, or component inside the `app` directory. > **Good to know**: This is different from the `pages` directory, where you can only import global styles inside the `_app.js` file. For example, consider a stylesheet named `app/global.css`: body { padding: 20px 20px 60px; max-width: 680px; margin: 0 auto; } Inside the root layout (`app/layout.js`), import the `global.css` stylesheet to apply the styles to every route in your application: // These styles apply to every route in the application import './global.css' export default function RootLayout({ children, }: { children: React.ReactNode }) { return ( <html lang="en"> <body>{children}</body> </html> ) } ## External Stylesheets Stylesheets published by external packages can be imported anywhere in the `app` directory, including colocated components: import 'bootstrap/dist/css/bootstrap.css' export default function RootLayout({ children, }: { children: React.ReactNode }) { return ( <html lang="en"> <body className="container">{children}</body> </html> ) } > **Good to know**: External stylesheets must be directly imported from an npm package or downloaded and colocated with your codebase. You cannot use `<link rel="stylesheet" />`. ## Additional Features Next.js includes additional features to improve the authoring experience of adding styles: * When running locally with `next dev`, local stylesheets (either global or CSS modules) will take advantage of Fast Refresh to instantly reflect changes as edits are saved. * When building for production with `next build`, CSS files will be bundled into fewer minified `.css` files to reduce the number of network requests needed to retrieve styles. * If you disable JavaScript, styles will still be loaded in the production build (`next start`). However, JavaScript is still required for `next dev` to enable Fast Refresh. --- ## Page: https://nextjs.org/docs/13/app/building-your-application/styling/tailwind-css Tailwind CSS is a utility-first CSS framework that works exceptionally well with Next.js. ## Installing Tailwind Install the Tailwind CSS packages and run the `init` command to generate both the `tailwind.config.js` and `postcss.config.js` files: npm install -D tailwindcss postcss autoprefixer npx tailwindcss init -p ## Configuring Tailwind Inside `tailwind.config.js`, add paths to the files that will use Tailwind CSS class names: /** @type {import('tailwindcss').Config} */ module.exports = { content: [ './app/**/*.{js,ts,jsx,tsx,mdx}', // Note the addition of the `app` directory. './pages/**/*.{js,ts,jsx,tsx,mdx}', './components/**/*.{js,ts,jsx,tsx,mdx}', // Or if using `src` directory: './src/**/*.{js,ts,jsx,tsx,mdx}', ], theme: { extend: {}, }, plugins: [], } You do not need to modify `postcss.config.js`. ## Importing Styles Add the Tailwind CSS directives that Tailwind will use to inject its generated styles to a Global Stylesheet in your application, for example: @tailwind base; @tailwind components; @tailwind utilities; Inside the root layout (`app/layout.tsx`), import the `globals.css` stylesheet to apply the styles to every route in your application. import type { Metadata } from 'next' // These styles apply to every route in the application import './globals.css' export const metadata: Metadata = { title: 'Create Next App', description: 'Generated by create next app', } export default function RootLayout({ children, }: { children: React.ReactNode }) { return ( <html lang="en"> <body>{children}</body> </html> ) } ## Using Classes After installing Tailwind CSS and adding the global styles, you can use Tailwind's utility classes in your application. export default function Page() { return <h1 className="text-3xl font-bold underline">Hello, Next.js!</h1> } ## Usage with Turbopack As of Next.js 13.1, Tailwind CSS and PostCSS are supported with Turbopack. --- ## Page: https://nextjs.org/docs/13/app/building-your-application/styling/css-in-js > **Warning:** CSS-in-JS libraries which require runtime JavaScript are not currently supported in Server Components. Using CSS-in-JS with newer React features like Server Components and Streaming requires library authors to support the latest version of React, including concurrent rendering. > > We're working with the React team on upstream APIs to handle CSS and JavaScript assets with support for React Server Components and streaming architecture. The following libraries are supported in Client Components in the `app` directory (alphabetical): * `kuma-ui` * `@mui/material` * `pandacss` * `styled-jsx` * `styled-components` * `style9` * `tamagui` * `tss-react` * `vanilla-extract` The following are currently working on support: * `emotion` > **Good to know**: We're testing out different CSS-in-JS libraries and we'll be adding more examples for libraries that support React 18 features and/or the `app` directory. If you want to style Server Components, we recommend using CSS Modules or other solutions that output CSS files, like PostCSS or Tailwind CSS. ## Configuring CSS-in-JS in `app` Configuring CSS-in-JS is a three-step opt-in process that involves: 1. A **style registry** to collect all CSS rules in a render. 2. The new `useServerInsertedHTML` hook to inject rules before any content that might use them. 3. A Client Component that wraps your app with the style registry during initial server-side rendering. ### `styled-jsx` Using `styled-jsx` in Client Components requires using `v5.1.0`. First, create a new registry: 'use client' import React, { useState } from 'react' import { useServerInsertedHTML } from 'next/navigation' import { StyleRegistry, createStyleRegistry } from 'styled-jsx' export default function StyledJsxRegistry({ children, }: { children: React.ReactNode }) { // Only create stylesheet once with lazy initial state // x-ref: https://reactjs.org/docs/hooks-reference.html#lazy-initial-state const [jsxStyleRegistry] = useState(() => createStyleRegistry()) useServerInsertedHTML(() => { const styles = jsxStyleRegistry.styles() jsxStyleRegistry.flush() return <>{styles}</> }) return <StyleRegistry registry={jsxStyleRegistry}>{children}</StyleRegistry> } Then, wrap your root layout with the registry: import StyledJsxRegistry from './registry' export default function RootLayout({ children, }: { children: React.ReactNode }) { return ( <html> <body> <StyledJsxRegistry>{children}</StyledJsxRegistry> </body> </html> ) } View an example here. ### Styled Components Below is an example of how to configure `styled-components@6` or newer: First, use the `styled-components` API to create a global registry component to collect all CSS style rules generated during a render, and a function to return those rules. Then use the `useServerInsertedHTML` hook to inject the styles collected in the registry into the `<head>` HTML tag in the root layout. 'use client' import React, { useState } from 'react' import { useServerInsertedHTML } from 'next/navigation' import { ServerStyleSheet, StyleSheetManager } from 'styled-components' export default function StyledComponentsRegistry({ children, }: { children: React.ReactNode }) { // Only create stylesheet once with lazy initial state // x-ref: https://reactjs.org/docs/hooks-reference.html#lazy-initial-state const [styledComponentsStyleSheet] = useState(() => new ServerStyleSheet()) useServerInsertedHTML(() => { const styles = styledComponentsStyleSheet.getStyleElement() styledComponentsStyleSheet.instance.clearTag() return <>{styles}</> }) if (typeof window !== 'undefined') return <>{children}</> return ( <StyleSheetManager sheet={styledComponentsStyleSheet.instance}> {children} </StyleSheetManager> ) } Wrap the `children` of the root layout with the style registry component: import StyledComponentsRegistry from './lib/registry' export default function RootLayout({ children, }: { children: React.ReactNode }) { return ( <html> <body> <StyledComponentsRegistry>{children}</StyledComponentsRegistry> </body> </html> ) } View an example here. > **Good to know**: > > * During server rendering, styles will be extracted to a global registry and flushed to the `<head>` of your HTML. This ensures the style rules are placed before any content that might use them. In the future, we may use an upcoming React feature to determine where to inject the styles. > * During streaming, styles from each chunk will be collected and appended to existing styles. After client-side hydration is complete, `styled-components` will take over as usual and inject any further dynamic styles. > * We specifically use a Client Component at the top level of the tree for the style registry because it's more efficient to extract CSS rules this way. It avoids re-generating styles on subsequent server renders, and prevents them from being sent in the Server Component payload. --- ## Page: https://nextjs.org/docs/13/app/building-your-application/styling/sass Next.js has built-in support for Sass using both the `.scss` and `.sass` extensions. You can use component-level Sass via CSS Modules and the `.module.scss`or `.module.sass` extension. **Good to know**: Sass supports two different syntax, each with their own extension. The `.scss` extension requires you use the SCSS syntax, while the `.sass` extension requires you use the Indented Syntax ("Sass"). If you're not sure which to choose, start with the `.scss` extension which is a superset of CSS, and doesn't require you learn the Indented Syntax ("Sass"). If you want to configure the Sass compiler, use `sassOptions` in `next.config.js`. const path = require('path') module.exports = { sassOptions: { includePaths: [path.join(__dirname, 'styles')], }, } Next.js supports Sass variables exported from CSS Module files. --- ## Page: https://nextjs.org/docs/13/app/building-your-application/optimizing ## Optimizations Next.js comes with a variety of built-in optimizations designed to improve your application's speed and Core Web Vitals. This guide will cover the optimizations you can leverage to enhance your user experience. ## Built-in Components Built-in components abstract away the complexity of implementing common UI optimizations. These components are: * **Images**: Built on the native `<img>` element. The Image Component optimizes images for performance by lazy loading and automatically resizing images based on device size. * **Link**: Built on the native `<a>` tags. The Link Component prefetches pages in the background, for faster and smoother page transitions. * **Scripts**: Built on the native `<script>` tags. The Script Component gives you control over loading and execution of third-party scripts. Metadata helps search engines understand your content better (which can result in better SEO), and allows you to customize how your content is presented on social media, helping you create a more engaging and consistent user experience across various platforms. The Metadata API in Next.js allows you to modify the `<head>` element of a page. You can configure metadata in two ways: * **Config-based Metadata**: Export a static metadata object or a dynamic generateMetadata function in a `layout.js` or `page.js` file. * **File-based Metadata**: Add static or dynamically generated special files to route segments. Additionally, you can create dynamic Open Graph Images using JSX and CSS with imageResponse constructor. ## Static Assets Next.js `/public` folder can be used to serve static assets like images, fonts, and other files. Files inside `/public` can also be cached by CDN providers so that they are delivered efficiently. ## Analytics and Monitoring For large applications, Next.js integrates with popular analytics and monitoring tools to help you understand how your application is performing. Learn more in the OpenTelemetry and Instrumentation guides. --- ## Page: https://nextjs.org/docs/13/app/building-your-application/optimizing/images ## Image Optimization Examples * Image Component According to Web Almanac, images account for a huge portion of the typical website’s page weight and can have a sizable impact on your website's LCP performance. The Next.js Image component extends the HTML `<img>` element with features for automatic image optimization: * **Size Optimization:** Automatically serve correctly sized images for each device, using modern image formats like WebP and AVIF. * **Visual Stability:** Prevent layout shift automatically when images are loading. * **Faster Page Loads:** Images are only loaded when they enter the viewport using native browser lazy loading, with optional blur-up placeholders. * **Asset Flexibility:** On-demand image resizing, even for images stored on remote servers > **🎥 Watch:** Learn more about how to use `next/image` → YouTube (9 minutes). ## Usage import Image from 'next/image' You can then define the `src` for your image (either local or remote). ### Local Images To use a local image, `import` your `.jpg`, `.png`, or `.webp` image files. Next.js will automatically determine the `width` and `height` of your image based on the imported file. These values are used to prevent Cumulative Layout Shift while your image is loading. import Image from 'next/image' import profilePic from './me.png' export default function Page() { return ( <Image src={profilePic} alt="Picture of the author" // width={500} automatically provided // height={500} automatically provided // blurDataURL="data:..." automatically provided // placeholder="blur" // Optional blur-up while loading /> ) } > **Warning:** Dynamic `await import()` or `require()` are _not_ supported. The `import` must be static so it can be analyzed at build time. ### Remote Images To use a remote image, the `src` property should be a URL string. Since Next.js does not have access to remote files during the build process, you'll need to provide the `width`, `height` and optional `blurDataURL` props manually. The `width` and `height` attributes are used to infer the correct aspect ratio of image and avoid layout shift from the image loading in. The `width` and `height` do _not_ determine the rendered size of the image file. Learn more about Image Sizing. import Image from 'next/image' export default function Page() { return ( <Image src="https://s3.amazonaws.com/my-bucket/profile.png" alt="Picture of the author" width={500} height={500} /> ) } To safely allow optimizing images, define a list of supported URL patterns in `next.config.js`. Be as specific as possible to prevent malicious usage. For example, the following configuration will only allow images from a specific AWS S3 bucket: module.exports = { images: { remotePatterns: [ { protocol: 'https', hostname: 's3.amazonaws.com', port: '', pathname: '/my-bucket/**', }, ], }, } Learn more about `remotePatterns` configuration. If you want to use relative URLs for the image `src`, use a `loader`. ### Domains Sometimes you may want to optimize a remote image, but still use the built-in Next.js Image Optimization API. To do this, leave the `loader` at its default setting and enter an absolute URL for the Image `src` prop. To protect your application from malicious users, you must define a list of remote hostnames you intend to use with the `next/image` component. > Learn more about `remotePatterns` configuration. ### Loaders Note that in the example earlier, a partial URL (`"/me.png"`) is provided for a local image. This is possible because of the loader architecture. A loader is a function that generates the URLs for your image. It modifies the provided `src`, and generates multiple URLs to request the image at different sizes. These multiple URLs are used in the automatic srcset generation, so that visitors to your site will be served an image that is the right size for their viewport. The default loader for Next.js applications uses the built-in Image Optimization API, which optimizes images from anywhere on the web, and then serves them directly from the Next.js web server. If you would like to serve your images directly from a CDN or image server, you can write your own loader function with a few lines of JavaScript. You can define a loader per-image with the `loader` prop, or at the application level with the `loaderFile` configuration. ## Priority You should add the `priority` property to the image that will be the Largest Contentful Paint (LCP) element for each page. Doing so allows Next.js to specially prioritize the image for loading (e.g. through preload tags or priority hints), leading to a meaningful boost in LCP. The LCP element is typically the largest image or text block visible within the viewport of the page. When you run `next dev`, you'll see a console warning if the LCP element is an `<Image>` without the `priority` property. Once you've identified the LCP image, you can add the property like this: import Image from 'next/image' import profilePic from '../public/me.png' export default function Page() { return <Image src={profilePic} alt="Picture of the author" priority /> } See more about priority in the `next/image` component documentation. ## Image Sizing One of the ways that images most commonly hurt performance is through _layout shift_, where the image pushes other elements around on the page as it loads in. This performance problem is so annoying to users that it has its own Core Web Vital, called Cumulative Layout Shift. The way to avoid image-based layout shifts is to always size your images. This allows the browser to reserve precisely enough space for the image before it loads. Because `next/image` is designed to guarantee good performance results, it cannot be used in a way that will contribute to layout shift, and **must** be sized in one of three ways: 1. Automatically, using a static import 2. Explicitly, by including a `width` and `height` property 3. Implicitly, by using fill which causes the image to expand to fill its parent element. > **What if I don't know the size of my images?** > > If you are accessing images from a source without knowledge of the images' sizes, there are several things you can do: > > **Use `fill`** > > The `fill` prop allows your image to be sized by its parent element. Consider using CSS to give the image's parent element space on the page along `sizes` prop to match any media query break points. You can also use `object-fit` with `fill`, `contain`, or `cover`, and `object-position` to define how the image should occupy that space. > > **Normalize your images** > > If you're serving images from a source that you control, consider modifying your image pipeline to normalize the images to a specific size. > > **Modify your API calls** > > If your application is retrieving image URLs using an API call (such as to a CMS), you may be able to modify the API call to return the image dimensions along with the URL. If none of the suggested methods works for sizing your images, the `next/image` component is designed to work well on a page alongside standard `<img>` elements. ## Styling Styling the Image component is similar to styling a normal `<img>` element, but there are a few guidelines to keep in mind: * Use `className` or `style`, not `styled-jsx`. * In most cases, we recommend using the `className` prop. This can be an imported CSS Module, a global stylesheet, etc. * You can also use the `style` prop to assign inline styles. * You cannot use styled-jsx because it's scoped to the current component (unless you mark the style as `global`). * When using `fill`, the parent element must have `position: relative` * This is necessary for the proper rendering of the image element in that layout mode. * When using `fill`, the parent element must have `display: block` * This is the default for `<div>` elements but should be specified otherwise. ## Examples ### Responsive  import Image from 'next/image' import mountains from '../public/mountains.jpg' export default function Responsive() { return ( <div style={{ display: 'flex', flexDirection: 'column' }}> <Image alt="Mountains" // Importing an image will // automatically set the width and height src={mountains} sizes="100vw" // Make the image display full width style={{ width: '100%', height: 'auto', }} /> </div> ) } ### Fill Container  import Image from 'next/image' import mountains from '../public/mountains.jpg' export default function Fill() { return ( <div style={{ display: 'grid', gridGap: '8px', gridTemplateColumns: 'repeat(auto-fit, minmax(400px, auto))', }} > <div style={{ position: 'relative', height: '400px' }}> <Image alt="Mountains" src={mountains} fill sizes="(min-width: 808px) 50vw, 100vw" style={{ objectFit: 'cover', // cover, contain, none }} /> </div> {/* And more images in the grid... */} </div> ) } ### Background Image  import Image from 'next/image' import mountains from '../public/mountains.jpg' export default function Background() { return ( <Image alt="Mountains" src={mountains} placeholder="blur" quality={100} fill sizes="100vw" style={{ objectFit: 'cover', }} /> ) } For examples of the Image component used with the various styles, see the Image Component Demo. ## Other Properties **View all properties available to the `next/image` component.** ## Configuration The `next/image` component and Next.js Image Optimization API can be configured in the `next.config.js` file. These configurations allow you to enable remote images, define custom image breakpoints, change caching behavior and more. **Read the full image configuration documentation for more information.** --- ## Page: https://nextjs.org/docs/13/app/building-your-application/optimizing/fonts ## Font Optimization **`next/font`** will automatically optimize your fonts (including custom fonts) and remove external network requests for improved privacy and performance. > **🎥 Watch:** Learn more about how to use `next/font` → YouTube (6 minutes). `next/font` includes **built-in automatic self-hosting** for _any_ font file. This means you can optimally load web fonts with zero layout shift, thanks to the underlying CSS `size-adjust` property used. This new font system also allows you to conveniently use all Google Fonts with performance and privacy in mind. CSS and font files are downloaded at build time and self-hosted with the rest of your static assets. **No requests are sent to Google by the browser.** ## Google Fonts Automatically self-host any Google Font. Fonts are included in the deployment and served from the same domain as your deployment. **No requests are sent to Google by the browser.** Get started by importing the font you would like to use from `next/font/google` as a function. We recommend using variable fonts for the best performance and flexibility. import { Inter } from 'next/font/google' // If loading a variable font, you don't need to specify the font weight const inter = Inter({ subsets: ['latin'], display: 'swap', }) export default function RootLayout({ children, }: { children: React.ReactNode }) { return ( <html lang="en" className={inter.className}> <body>{children}</body> </html> ) } If you can't use a variable font, you will **need to specify a weight**: import { Roboto } from 'next/font/google' const roboto = Roboto({ weight: '400', subsets: ['latin'], display: 'swap', }) export default function RootLayout({ children, }: { children: React.ReactNode }) { return ( <html lang="en" className={roboto.className}> <body>{children}</body> </html> ) } You can specify multiple weights and/or styles by using an array: const roboto = Roboto({ weight: ['400', '700'], style: ['normal', 'italic'], subsets: ['latin'], display: 'swap', }) > **Good to know**: Use an underscore (\_) for font names with multiple words. E.g. `Roboto Mono` should be imported as `Roboto_Mono`. ### Specifying a subset Google Fonts are automatically subset. This reduces the size of the font file and improves performance. You'll need to define which of these subsets you want to preload. Failing to specify any subsets while `preload` is `true` will result in a warning. This can be done by adding it to the function call: const inter = Inter({ subsets: ['latin'] }) View the Font API Reference for more information. ### Using Multiple Fonts You can import and use multiple fonts in your application. There are two approaches you can take. The first approach is to create a utility function that exports a font, imports it, and applies its `className` where needed. This ensures the font is preloaded only when it's rendered: import { Inter, Roboto_Mono } from 'next/font/google' export const inter = Inter({ subsets: ['latin'], display: 'swap', }) export const roboto_mono = Roboto_Mono({ subsets: ['latin'], display: 'swap', }) import { inter } from './fonts' export default function Layout({ children }: { children: React.ReactNode }) { return ( <html lang="en" className={inter.className}> <body> <div>{children}</div> </body> </html> ) } import { roboto_mono } from './fonts' export default function Page() { return ( <> <h1 className={roboto_mono.className}>My page</h1> </> ) } In the example above, `Inter` will be applied globally, and `Roboto Mono` can be imported and applied as needed. Alternatively, you can create a CSS variable and use it with your preferred CSS solution: import { Inter, Roboto_Mono } from 'next/font/google' import styles from './global.css' const inter = Inter({ subsets: ['latin'], variable: '--font-inter', display: 'swap', }) const roboto_mono = Roboto_Mono({ subsets: ['latin'], variable: '--font-roboto-mono', display: 'swap', }) export default function RootLayout({ children, }: { children: React.ReactNode }) { return ( <html lang="en" className={`${inter.variable} ${roboto_mono.variable}`}> <body> <h1>My App</h1> <div>{children}</div> </body> </html> ) } html { font-family: var(--font-inter); } h1 { font-family: var(--font-roboto-mono); } In the example above, `Inter` will be applied globally, and any `<h1>` tags will be styled with `Roboto Mono`. > **Recommendation**: Use multiple fonts conservatively since each new font is an additional resource the client has to download. ## Local Fonts Import `next/font/local` and specify the `src` of your local font file. We recommend using variable fonts for the best performance and flexibility. import localFont from 'next/font/local' // Font files can be colocated inside of `app` const myFont = localFont({ src: './my-font.woff2', display: 'swap', }) export default function RootLayout({ children, }: { children: React.ReactNode }) { return ( <html lang="en" className={myFont.className}> <body>{children}</body> </html> ) } If you want to use multiple files for a single font family, `src` can be an array: const roboto = localFont({ src: [ { path: './Roboto-Regular.woff2', weight: '400', style: 'normal', }, { path: './Roboto-Italic.woff2', weight: '400', style: 'italic', }, { path: './Roboto-Bold.woff2', weight: '700', style: 'normal', }, { path: './Roboto-BoldItalic.woff2', weight: '700', style: 'italic', }, ], }) View the Font API Reference for more information. ## With Tailwind CSS `next/font` can be used with Tailwind CSS through a CSS variable. In the example below, we use the font `Inter` from `next/font/google` (you can use any font from Google or Local Fonts). Load your font with the `variable` option to define your CSS variable name and assign it to `inter`. Then, use `inter.variable` to add the CSS variable to your HTML document. import { Inter, Roboto_Mono } from 'next/font/google' const inter = Inter({ subsets: ['latin'], display: 'swap', variable: '--font-inter', }) const roboto_mono = Roboto_Mono({ subsets: ['latin'], display: 'swap', variable: '--font-roboto-mono', }) export default function RootLayout({ children, }: { children: React.ReactNode }) { return ( <html lang="en" className={`${inter.variable} ${roboto_mono.variable}`}> <body>{children}</body> </html> ) } Finally, add the CSS variable to your Tailwind CSS config: /** @type {import('tailwindcss').Config} */ module.exports = { content: [ './pages/**/*.{js,ts,jsx,tsx}', './components/**/*.{js,ts,jsx,tsx}', './app/**/*.{js,ts,jsx,tsx}', ], theme: { extend: { fontFamily: { sans: ['var(--font-inter)'], mono: ['var(--font-roboto-mono)'], }, }, }, plugins: [], } You can now use the `font-sans` and `font-mono` utility classes to apply the font to your elements. ## Preloading When a font function is called on a page of your site, it is not globally available and preloaded on all routes. Rather, the font is only preloaded on the related routes based on the type of file where it is used: * If it's a unique page, it is preloaded on the unique route for that page. * If it's a layout, it is preloaded on all the routes wrapped by the layout. * If it's the root layout, it is preloaded on all routes. ## Reusing fonts Every time you call the `localFont` or Google font function, that font is hosted as one instance in your application. Therefore, if you load the same font function in multiple files, multiple instances of the same font are hosted. In this situation, it is recommended to do the following: * Call the font loader function in one shared file * Export it as a constant * Import the constant in each file where you would like to use this font --- ## Page: https://nextjs.org/docs/13/app/building-your-application/optimizing/scripts ## Script Optimization ### Layout Scripts To load a third-party script for multiple routes, import `next/script` and include the script directly in your layout component: import Script from 'next/script' export default function DashboardLayout({ children, }: { children: React.ReactNode }) { return ( <> <section>{children}</section> <Script src="https://example.com/script.js" /> </> ) } The third-party script is fetched when the folder route (e.g. `dashboard/page.js`) or any nested route (e.g. `dashboard/settings/page.js`) is accessed by the user. Next.js will ensure the script will **only load once**, even if a user navigates between multiple routes in the same layout. ### Application Scripts To load a third-party script for all routes, import `next/script` and include the script directly in your root layout: import Script from 'next/script' export default function RootLayout({ children, }: { children: React.ReactNode }) { return ( <html lang="en"> <body>{children}</body> <Script src="https://example.com/script.js" /> </html> ) } This script will load and execute when _any_ route in your application is accessed. Next.js will ensure the script will **only load once**, even if a user navigates between multiple pages. > **Recommendation**: We recommend only including third-party scripts in specific pages or layouts in order to minimize any unnecessary impact to performance. ### Strategy Although the default behavior of `next/script` allows you to load third-party scripts in any page or layout, you can fine-tune its loading behavior by using the `strategy` property: * `beforeInteractive`: Load the script before any Next.js code and before any page hydration occurs. * `afterInteractive`: (**default**) Load the script early but after some hydration on the page occurs. * `lazyOnload`: Load the script later during browser idle time. * `worker`: (experimental) Load the script in a web worker. Refer to the `next/script` API reference documentation to learn more about each strategy and their use cases. ### Offloading Scripts To A Web Worker (Experimental) > **Warning:** The `worker` strategy is not yet stable and does not yet work with the `app` directory. Use with caution. Scripts that use the `worker` strategy are offloaded and executed in a web worker with Partytown. This can improve the performance of your site by dedicating the main thread to the rest of your application code. This strategy is still experimental and can only be used if the `nextScriptWorkers` flag is enabled in `next.config.js`: module.exports = { experimental: { nextScriptWorkers: true, }, } Then, run `next` (normally `npm run dev` or `yarn dev`) and Next.js will guide you through the installation of the required packages to finish the setup: npm run dev You'll see instructions like these: Please install Partytown by running `npm install @builder.io/partytown` Once setup is complete, defining `strategy="worker"` will automatically instantiate Partytown in your application and offload the script to a web worker. import Script from 'next/script' export default function Home() { return ( <> <Script src="https://example.com/script.js" strategy="worker" /> </> ) } There are a number of trade-offs that need to be considered when loading a third-party script in a web worker. Please see Partytown's tradeoffs documentation for more information. ### Inline Scripts Inline scripts, or scripts not loaded from an external file, are also supported by the Script component. They can be written by placing the JavaScript within curly braces: <Script id="show-banner"> {`document.getElementById('banner').classList.remove('hidden')`} </Script> Or by using the `dangerouslySetInnerHTML` property: <Script id="show-banner" dangerouslySetInnerHTML={{ __html: `document.getElementById('banner').classList.remove('hidden')`, }} /> > **Warning**: An `id` property must be assigned for inline scripts in order for Next.js to track and optimize the script. ### Executing Additional Code Event handlers can be used with the Script component to execute additional code after a certain event occurs: * `onLoad`: Execute code after the script has finished loading. * `onReady`: Execute code after the script has finished loading and every time the component is mounted. * `onError`: Execute code if the script fails to load. These handlers will only work when `next/script` is imported and used inside of a Client Component where `"use client"` is defined as the first line of code: 'use client' import Script from 'next/script' export default function Page() { return ( <> <Script src="https://example.com/script.js" onLoad={() => { console.log('Script has loaded') }} /> </> ) } Refer to the `next/script` API reference to learn more about each event handler and view examples. ### Additional Attributes There are many DOM attributes that can be assigned to a `<script>` element that are not used by the Script component, like `nonce` or custom data attributes. Including any additional attributes will automatically forward it to the final, optimized `<script>` element that is included in the HTML. import Script from 'next/script' export default function Page() { return ( <> <Script src="https://example.com/script.js" id="example-script" nonce="XUENAJFW" data-test="script" /> </> ) } --- ## Page: https://nextjs.org/docs/13/app/building-your-application/optimizing/metadata Next.js has a Metadata API that can be used to define your application metadata (e.g. `meta` and `link` tags inside your HTML `head` element) for improved SEO and web shareability. There are two ways you can add metadata to your application: * **Config-based Metadata**: Export a static `metadata` object or a dynamic `generateMetadata` function in a `layout.js` or `page.js` file. * **File-based Metadata**: Add static or dynamically generated special files to route segments. With both these options, Next.js will automatically generate the relevant `<head>` elements for your pages. You can also create dynamic OG images using the `ImageResponse` constructor. To define static metadata, export a `Metadata` object from a `layout.js` or static `page.js` file. import type { Metadata } from 'next' export const metadata: Metadata = { title: '...', description: '...', } export default function Page() {} For all the available options, see the API Reference. You can use `generateMetadata` function to `fetch` metadata that requires dynamic values. import type { Metadata, ResolvingMetadata } from 'next' type Props = { params: { id: string } searchParams: { [key: string]: string | string[] | undefined } } export async function generateMetadata( { params, searchParams }: Props, parent: ResolvingMetadata ): Promise<Metadata> { // read route params const id = params.id // fetch data const product = await fetch(`https://.../${id}`).then((res) => res.json()) // optionally access and extend (rather than replace) parent metadata const previousImages = (await parent).openGraph?.images || [] return { title: product.title, openGraph: { images: ['/some-specific-page-image.jpg', ...previousImages], }, } } export default function Page({ params, searchParams }: Props) {} For all the available params, see the API Reference. > **Good to know**: > > * Both static and dynamic metadata through `generateMetadata` are **only supported in Server Components**. > * `fetch` requests are automatically memoized for the same data across `generateMetadata`, `generateStaticParams`, Layouts, Pages, and Server Components. React `cache` can be used if `fetch` is unavailable. > * Next.js will wait for data fetching inside `generateMetadata` to complete before streaming UI to the client. This guarantees the first part of a streamed response includes `<head>` tags. These special files are available for metadata: * favicon.ico, apple-icon.jpg, and icon.jpg * opengraph-image.jpg and twitter-image.jpg * robots.txt * sitemap.xml You can use these for static metadata, or you can programmatically generate these files with code. For implementation and examples, see the Metadata Files API Reference and Dynamic Image Generation. ## Behavior File-based metadata has the higher priority and will override any config-based metadata. ### Default Fields There are two default `meta` tags that are always added even if a route doesn't define metadata: * The meta charset tag sets the character encoding for the website. * The meta viewport tag sets the viewport width and scale for the website to adjust for different devices. <meta charset="utf-8" /> <meta name="viewport" content="width=device-width, initial-scale=1" /> > **Good to know**: You can overwrite the default `viewport` meta tag. ### Ordering Metadata is evaluated in order, starting from the root segment down to the segment closest to the final `page.js` segment. For example: 1. `app/layout.tsx` (Root Layout) 2. `app/blog/layout.tsx` (Nested Blog Layout) 3. `app/blog/[slug]/page.tsx` (Blog Page) ### Merging Following the evaluation order, Metadata objects exported from multiple segments in the same route are **shallowly** merged together to form the final metadata output of a route. Duplicate keys are **replaced** based on their ordering. This means metadata with nested fields such as `openGraph` and `robots` that are defined in an earlier segment are **overwritten** by the last segment to define them. #### Overwriting fields export const metadata = { title: 'Acme', openGraph: { title: 'Acme', description: 'Acme is a...', }, } export const metadata = { title: 'Blog', openGraph: { title: 'Blog', }, } // Output: // <title>Blog</title> // <meta property="og:title" content="Blog" /> In the example above: * `title` from `app/layout.js` is **replaced** by `title` in `app/blog/page.js`. * All `openGraph` fields from `app/layout.js` are **replaced** in `app/blog/page.js` because `app/blog/page.js` sets `openGraph` metadata. Note the absence of `openGraph.description`. If you'd like to share some nested fields between segments while overwriting others, you can pull them out into a separate variable: export const openGraphImage = { images: ['http://...'] } import { openGraphImage } from './shared-metadata' export const metadata = { openGraph: { ...openGraphImage, title: 'Home', }, } import { openGraphImage } from '../shared-metadata' export const metadata = { openGraph: { ...openGraphImage, title: 'About', }, } In the example above, the OG image is shared between `app/layout.js` and `app/about/page.js` while the titles are different. #### Inheriting fields export const metadata = { title: 'Acme', openGraph: { title: 'Acme', description: 'Acme is a...', }, } export const metadata = { title: 'About', } // Output: // <title>About</title> // <meta property="og:title" content="Acme" /> // <meta property="og:description" content="Acme is a..." /> **Notes** * `title` from `app/layout.js` is **replaced** by `title` in `app/about/page.js`. * All `openGraph` fields from `app/layout.js` are **inherited** in `app/about/page.js` because `app/about/page.js` doesn't set `openGraph` metadata. ## Dynamic Image Generation The `ImageResponse` constructor allows you to generate dynamic images using JSX and CSS. This is useful for creating social media images such as Open Graph images, Twitter cards, and more. `ImageResponse` uses the Edge Runtime, and Next.js automatically adds the correct headers to cached images at the edge, helping improve performance and reducing recomputation. To use it, you can import `ImageResponse` from `next/server`: import { ImageResponse } from 'next/server' export const runtime = 'edge' export async function GET() { return new ImageResponse( ( <div style={{ fontSize: 128, background: 'white', width: '100%', height: '100%', display: 'flex', textAlign: 'center', alignItems: 'center', justifyContent: 'center', }} > Hello world! </div> ), { width: 1200, height: 600, } ) } `ImageResponse` integrates well with other Next.js APIs, including Route Handlers and file-based Metadata. For example, you can use `ImageResponse` in a `opengraph-image.tsx` file to generate Open Graph images at build time or dynamically at request time. `ImageResponse` supports common CSS properties including flexbox and absolute positioning, custom fonts, text wrapping, centering, and nested images. See the full list of supported CSS properties. > **Good to know**: > > * Examples are available in the Vercel OG Playground. > * `ImageResponse` uses @vercel/og, Satori, and Resvg to convert HTML and CSS into PNG. > * Only the Edge Runtime is supported. The default Node.js runtime will not work. > * Only flexbox and a subset of CSS properties are supported. Advanced layouts (e.g. `display: grid`) will not work. > * Maximum bundle size of `500KB`. The bundle size includes your JSX, CSS, fonts, images, and any other assets. If you exceed the limit, consider reducing the size of any assets or fetching at runtime. > * Only `ttf`, `otf`, and `woff` font formats are supported. To maximize the font parsing speed, `ttf` or `otf` are preferred over `woff`. ## JSON-LD JSON-LD is a format for structured data that can be used by search engines to understand your content. For example, you can use it to describe a person, an event, an organization, a movie, a book, a recipe, and many other types of entities. Our current recommendation for JSON-LD is to render structured data as a `<script>` tag in your `layout.js` or `page.js` components. For example: export default async function Page({ params }) { const product = await getProduct(params.id) const jsonLd = { '@context': 'https://schema.org', '@type': 'Product', name: product.name, image: product.image, description: product.description, } return ( <section> {/* Add JSON-LD to your page */} <script type="application/ld+json" dangerouslySetInnerHTML={{ __html: JSON.stringify(jsonLd) }} /> {/* ... */} </section> ) } You can validate and test your structured data with the Rich Results Test for Google or the generic Schema Markup Validator. You can type your JSON-LD with TypeScript using community packages like `schema-dts`: import { Product, WithContext } from 'schema-dts' const jsonLd: WithContext<Product> = { '@context': 'https://schema.org', '@type': 'Product', name: 'Next.js Sticker', image: 'https://nextjs.org/imgs/sticker.png', description: 'Dynamic at the speed of static.', } --- ## Page: https://nextjs.org/docs/13/app/building-your-application/optimizing/static-assets You are currently viewing documentation for version 13 of Next.js. Next.js can serve static files, like images, under a folder called `public` in the root directory. Files inside `public` can then be referenced by your code starting from the base URL (`/`). For example, if you add `me.png` inside `public`, the following code will access the image: Avatar.js import Image from 'next/image' export function Avatar() { return <Image src="/me.png" alt="me" width="64" height="64" /> } For static metadata files, such as `robots.txt`, `favicon.ico`, etc, you should use special metadata files inside the `app` folder. > Good to know: > > * The directory must be named `public`. The name cannot be changed and it's the only directory used to serve static assets. > * Only assets that are in the `public` directory at build time will be served by Next.js. Files added at request time won't be available. We recommend using a third-party service like AWS S3 for persistent file storage. --- ## Page: https://nextjs.org/docs/13/app/building-your-application/optimizing/lazy-loading Lazy loading in Next.js helps improve the initial loading performance of an application by decreasing the amount of JavaScript needed to render a route. It allows you to defer loading of **Client Components** and imported libraries, and only include them in the client bundle when they're needed. For example, you might want to defer loading a modal until a user clicks to open it. There are two ways you can implement lazy loading in Next.js: 1. Using Dynamic Imports with `next/dynamic` 2. Using `React.lazy()` with Suspense By default, Server Components are automatically code split, and you can use streaming to progressively send pieces of UI from the server to the client. Lazy loading applies to Client Components. ## `next/dynamic` `next/dynamic` is a composite of `React.lazy()` and Suspense. It behaves the same way in the `app` and `pages` directories to allow for incremental migration. ## Examples ### Importing Client Components 'use client' import { useState } from 'react' import dynamic from 'next/dynamic' // Client Components: const ComponentA = dynamic(() => import('../components/A')) const ComponentB = dynamic(() => import('../components/B')) const ComponentC = dynamic(() => import('../components/C'), { ssr: false }) export default function ClientComponentExample() { const [showMore, setShowMore] = useState(false) return ( <div> {/* Load immediately, but in a separate client bundle */} <ComponentA /> {/* Load on demand, only when/if the condition is met */} {showMore && <ComponentB />} <button onClick={() => setShowMore(!showMore)}>Toggle</button> {/* Load only on the client side */} <ComponentC /> </div> ) } ### Skipping SSR When using `React.lazy()` and Suspense, Client Components will be pre-rendered (SSR) by default. If you want to disable pre-rendering for a Client Component, you can use the `ssr` option set to `false`: const ComponentC = dynamic(() => import('../components/C'), { ssr: false }) ### Importing Server Components If you dynamically import a Server Component, only the Client Components that are children of the Server Component will be lazy-loaded - not the Server Component itself. import dynamic from 'next/dynamic' // Server Component: const ServerComponent = dynamic(() => import('../components/ServerComponent')) export default function ServerComponentExample() { return ( <div> <ServerComponent /> </div> ) } ### Loading External Libraries External libraries can be loaded on demand using the `import()` function. This example uses the external library `fuse.js` for fuzzy search. The module is only loaded on the client after the user types in the search input. 'use client' import { useState } from 'react' const names = ['Tim', 'Joe', 'Bel', 'Lee'] export default function Page() { const [results, setResults] = useState() return ( <div> <input type="text" placeholder="Search" onChange={async (e) => { const { value } = e.currentTarget // Dynamically load fuse.js const Fuse = (await import('fuse.js')).default const fuse = new Fuse(names) setResults(fuse.search(value)) }} /> <pre>Results: {JSON.stringify(results, null, 2)}</pre> </div> ) } ### Adding a custom loading component import dynamic from 'next/dynamic' const WithCustomLoading = dynamic( () => import('../components/WithCustomLoading'), { loading: () => <p>Loading...</p>, } ) export default function Page() { return ( <div> {/* The loading component will be rendered while <WithCustomLoading/> is loading */} <WithCustomLoading /> </div> ) } ### Importing Named Exports To dynamically import a named export, you can return it from the Promise returned by `import()` function: 'use client' export function Hello() { return <p>Hello!</p> } import dynamic from 'next/dynamic' const ClientComponent = dynamic(() => import('../components/hello').then((mod) => mod.Hello) ) --- ## Page: https://nextjs.org/docs/13/app/building-your-application/optimizing/analytics You are currently viewing documentation for version 13 of Next.js. Next.js Speed Insights allows you to analyze and measure the performance of pages using different metrics. You can start collecting your Real Experience Score with zero-configuration on Vercel deployments. The rest of this documentation describes the built-in relayer Next.js Speed Insights uses. ## Web Vitals Web Vitals are a set of useful metrics that aim to capture the user experience of a web page. The following web vitals are all included: * Time to First Byte (TTFB) * First Contentful Paint (FCP) * Largest Contentful Paint (LCP) * First Input Delay (FID) * Cumulative Layout Shift (CLS) * Interaction to Next Paint (INP) _(experimental)_ --- ## Page: https://nextjs.org/docs/13/app/building-your-application/optimizing/open-telemetry > **Good to know**: This feature is **experimental**, you need to explicitly opt-in by providing `experimental.instrumentationHook = true;` in your `next.config.js`. Observability is crucial for understanding and optimizing the behavior and performance of your Next.js app. As applications become more complex, it becomes increasingly difficult to identify and diagnose issues that may arise. By leveraging observability tools, such as logging and metrics, developers can gain insights into their application's behavior and identify areas for optimization. With observability, developers can proactively address issues before they become major problems and provide a better user experience. Therefore, it is highly recommended to use observability in your Next.js applications to improve performance, optimize resources, and enhance user experience. We recommend using OpenTelemetry for instrumenting your apps. It's a platform-agnostic way to instrument apps that allows you to change your observability provider without changing your code. Read Official OpenTelemetry docs for more information about OpenTelemetry and how it works. This documentation uses terms like _Span_, _Trace_ or _Exporter_ throughout this doc, all of which can be found in the OpenTelemetry Observability Primer. Next.js supports OpenTelemetry instrumentation out of the box, which means that we already instrumented Next.js itself. When you enable OpenTelemetry we will automatically wrap all your code like `getStaticProps` in _spans_ with helpful attributes. > **Good to know**: We currently support OpenTelemetry bindings only in serverless functions. We don't provide any for `edge` or client side code. ## Getting Started OpenTelemetry is extensible but setting it up properly can be quite verbose. That's why we prepared a package `@vercel/otel` that helps you get started quickly. It's not extensible and you should configure OpenTelemetry manually if you need to customize your setup. ### Using `@vercel/otel` To get started, you must install `@vercel/otel`: npm install @vercel/otel Next, create a custom `instrumentation.ts` (or `.js`) file in the **root directory** of the project (or inside `src` folder if using one): import { registerOTel } from '@vercel/otel' export function register() { registerOTel('next-app') } > **Good to know** > > * The `instrumentation` file should be in the root of your project and not inside the `app` or `pages` directory. If you're using the `src` folder, then place the file inside `src` alongside `pages` and `app`. > * If you use the `pageExtensions` config option to add a suffix, you will also need to update the `instrumentation` filename to match. > * We have created a basic with-opentelemetry example that you can use. ### Manual OpenTelemetry configuration If our wrapper `@vercel/otel` doesn't suit your needs, you can configure OpenTelemetry manually. Firstly you need to install OpenTelemetry packages: npm install @opentelemetry/sdk-node @opentelemetry/resources @opentelemetry/semantic-conventions @opentelemetry/sdk-trace-node @opentelemetry/exporter-trace-otlp-http Now you can initialize `NodeSDK` in your `instrumentation.ts`. OpenTelemetry APIs are not compatible with edge runtime, so you need to make sure that you are importing them only when `process.env.NEXT_RUNTIME === 'nodejs'`. We recommend creating a new file `instrumentation.node.ts` which you conditionally import only when using node: export async function register() { if (process.env.NEXT_RUNTIME === 'nodejs') { await import('./instrumentation.node.ts') } } import { NodeSDK } from '@opentelemetry/sdk-node' import { OTLPTraceExporter } from '@opentelemetry/exporter-trace-otlp-http' import { Resource } from '@opentelemetry/resources' import { SemanticResourceAttributes } from '@opentelemetry/semantic-conventions' import { SimpleSpanProcessor } from '@opentelemetry/sdk-trace-node' const sdk = new NodeSDK({ resource: new Resource({ [SemanticResourceAttributes.SERVICE_NAME]: 'next-app', }), spanProcessor: new SimpleSpanProcessor(new OTLPTraceExporter()), }) sdk.start() Doing this is equivalent to using `@vercel/otel`, but it's possible to modify and extend. For example, you could use `@opentelemetry/exporter-trace-otlp-grpc` instead of `@opentelemetry/exporter-trace-otlp-http` or you can specify more resource attributes. ## Testing your instrumentation You need an OpenTelemetry collector with a compatible backend to test OpenTelemetry traces locally. We recommend using our OpenTelemetry dev environment. If everything works well you should be able to see the root server span labeled as `GET /requested/pathname`. All other spans from that particular trace will be nested under it. Next.js traces more spans than are emitted by default. To see more spans, you must set `NEXT_OTEL_VERBOSE=1`. ## Deployment ### Using OpenTelemetry Collector When you are deploying with OpenTelemetry Collector, you can use `@vercel/otel`. It will work both on Vercel and when self-hosted. #### Deploying on Vercel We made sure that OpenTelemetry works out of the box on Vercel. Follow Vercel documentation to connect your project to an observability provider. #### Self-hosting Deploying to other platforms is also straightforward. You will need to spin up your own OpenTelemetry Collector to receive and process the telemetry data from your Next.js app. To do this, follow the OpenTelemetry Collector Getting Started guide, which will walk you through setting up the collector and configuring it to receive data from your Next.js app. Once you have your collector up and running, you can deploy your Next.js app to your chosen platform following their respective deployment guides. ### Custom Exporters We recommend using OpenTelemetry Collector. If that is not possible on your platform, you can use a custom OpenTelemetry exporter with manual OpenTelemetry configuration ## Custom Spans You can add a custom span with OpenTelemetry APIs. npm install @opentelemetry/api The following example demonstrates a function that fetches GitHub stars and adds a custom `fetchGithubStars` span to track the fetch request's result: import { trace } from '@opentelemetry/api' export async function fetchGithubStars() { return await trace .getTracer('nextjs-example') .startActiveSpan('fetchGithubStars', async (span) => { try { return await getValue() } finally { span.end() } }) } The `register` function will execute before your code runs in a new environment. You can start creating new spans, and they should be correctly added to the exported trace. ## Default Spans in Next.js Next.js automatically instruments several spans for you to provide useful insights into your application's performance. Attributes on spans follow OpenTelemetry semantic conventions. We also add some custom attributes under the `next` namespace: * `next.span_name` - duplicates span name * `next.span_type` - each span type has a unique identifier * `next.route` - The route pattern of the request (e.g., `/[param]/user`). * `next.page` * This is an internal value used by an app router. * You can think about it as a route to a special file (like `page.ts`, `layout.ts`, `loading.ts` and others) * It can be used as a unique identifier only when paired with `next.route` because `/layout` can be used to identify both `/(groupA)/layout.ts` and `/(groupB)/layout.ts` ### `[http.method] [next.route]` * `next.span_type`: `BaseServer.handleRequest` This span represents the root span for each incoming request to your Next.js application. It tracks the HTTP method, route, target, and status code of the request. Attributes: * Common HTTP attributes * `http.method` * `http.status_code` * Server HTTP attributes * `http.route` * `http.target` * `next.span_name` * `next.span_type` * `next.route` ### `render route (app) [next.route]` * `next.span_type`: `AppRender.getBodyResult`. This span represents the process of rendering a route in the app router. Attributes: * `next.span_name` * `next.span_type` * `next.route` ### `fetch [http.method] [http.url]` * `next.span_type`: `AppRender.fetch` This span represents the fetch request executed in your code. Attributes: * Common HTTP attributes * `http.method` * Client HTTP attributes * `http.url` * `net.peer.name` * `net.peer.port` (only if specified) * `next.span_name` * `next.span_type` ### `executing api route (app) [next.route]` * `next.span_type`: `AppRouteRouteHandlers.runHandler`. This span represents the execution of an API route handler in the app router. Attributes: * `next.span_name` * `next.span_type` * `next.route` ### `getServerSideProps [next.route]` * `next.span_type`: `Render.getServerSideProps`. This span represents the execution of `getServerSideProps` for a specific route. Attributes: * `next.span_name` * `next.span_type` * `next.route` ### `getStaticProps [next.route]` * `next.span_type`: `Render.getStaticProps`. This span represents the execution of `getStaticProps` for a specific route. Attributes: * `next.span_name` * `next.span_type` * `next.route` ### `render route (pages) [next.route]` * `next.span_type`: `Render.renderDocument`. This span represents the process of rendering the document for a specific route. Attributes: * `next.span_name` * `next.span_type` * `next.route` ### `generateMetadata [next.page]` * `next.span_type`: `ResolveMetadata.generateMetadata`. This span represents the process of generating metadata for a specific page (a single route can have multiple of these spans). Attributes: * `next.span_name` * `next.span_type` * `next.page` --- ## Page: https://nextjs.org/docs/13/app/building-your-application/optimizing/instrumentation If you export a function named `register` from a `instrumentation.ts` (or `.js`) file in the **root directory** of your project (or inside the `src` folder if using one), we will call that function whenever a new Next.js server instance is bootstrapped. > **Good to know** > > * This feature is **experimental**. To use it, you must explicitly opt in by defining `experimental.instrumentationHook = true;` in your `next.config.js`. > * The `instrumentation` file should be in the root of your project and not inside the `app` or `pages` directory. If you're using the `src` folder, then place the file inside `src` alongside `pages` and `app`. > * If you use the `pageExtensions` config option to add a suffix, you will also need to update the `instrumentation` filename to match. > * We have created a basic with-opentelemetry example that you can use. When your `register` function is deployed, it will be called on each cold boot (but exactly once in each environment). Sometimes, it may be useful to import a file in your code because of the side effects it will cause. For example, you might import a file that defines a set of global variables, but never explicitly use the imported file in your code. You would still have access to the global variables the package has declared. You can import files with side effects in `instrumentation.ts`, which you might want to use in your `register` function as demonstrated in the following example: import { init } from 'package-init' export function register() { init() } However, we recommend importing files with side effects using `import` from within your `register` function instead. The following example demonstrates a basic usage of `import` in a `register` function: export async function register() { await import('package-with-side-effect') } By doing this, you can colocate all of your side effects in one place in your code, and avoid any unintended consequences from importing files. We call `register` in all environments, so it's necessary to conditionally import any code that doesn't support both `edge` and `nodejs`. You can use the environment variable `NEXT_RUNTIME` to get the current environment. Importing an environment-specific code would look like this: export async function register() { if (process.env.NEXT_RUNTIME === 'nodejs') { await import('./instrumentation-node') } if (process.env.NEXT_RUNTIME === 'edge') { await import('./instrumentation-edge') } } --- ## Page: https://nextjs.org/docs/13/app/building-your-application/configuring You are currently viewing documentation for version 13 of Next.js. Next.js allows you to customize your project to meet specific requirements. This includes integrations with TypeScript, ESlint, and more, as well as internal configuration options such as Absolute Imports and Environment Variables. --- ## Page: https://nextjs.org/docs/13/app/building-your-application/configuring/typescript Next.js provides a TypeScript-first development experience for building your React application. It comes with built-in TypeScript support for automatically installing the necessary packages and configuring the proper settings. As well as a TypeScript Plugin for your editor. > **🎥 Watch:** Learn about the built-in TypeScript plugin → YouTube (3 minutes) ## New Projects `create-next-app` now ships with TypeScript by default. npx create-next-app@latest ## Existing Projects Add TypeScript to your project by renaming a file to `.ts` / `.tsx`. Run `next dev` and `next build` to automatically install the necessary dependencies and add a `tsconfig.json` file with the recommended config options. If you already had a `jsconfig.json` file, copy the `paths` compiler option from the old `jsconfig.json` into the new `tsconfig.json` file, and delete the old `jsconfig.json` file. ## TypeScript Plugin Next.js includes a custom TypeScript plugin and type checker, which VSCode and other code editors can use for advanced type-checking and auto-completion. You can enable the plugin in VS Code by: 1. Opening the command palette (`Ctrl/⌘` + `Shift` + `P`) 2. Searching for "TypeScript: Select TypeScript Version" 3. Selecting "Use Workspace Version"  Now, when editing files, the custom plugin will be enabled. When running `next build`, the custom type checker will be used. ### Plugin Features The TypeScript plugin can help with: * Warning if the invalid values for segment config options are passed. * Showing available options and in-context documentation. * Ensuring the `use client` directive is used correctly. * Ensuring client hooks (like `useState`) are only used in Client Components. > **Good to know**: More features will be added in the future. ## Minimum TypeScript Version It is highly recommended to be on at least `v4.5.2` of TypeScript to get syntax features such as type modifiers on import names and performance improvements. ## Statically Typed Links Next.js can statically type links to prevent typos and other errors when using `next/link`, improving type safety when navigating between pages. To opt-into this feature, `experimental.typedRoutes` need to be enabled and the project needs to be using TypeScript. /** @type {import('next').NextConfig} */ const nextConfig = { experimental: { typedRoutes: true, }, } module.exports = nextConfig Next.js will generate a link definition in `.next/types` that contains information about all existing routes in your application, which TypeScript can then use to provide feedback in your editor about invalid links. Currently, experimental support includes any string literal, including dynamic segments. For non-literal strings, you currently need to manually cast the `href` with `as Route`: import type { Route } from 'next'; import Link from 'next/link' // No TypeScript errors if href is a valid route <Link href="/about" /> <Link href="/blog/nextjs" /> <Link href={`/blog/${slug}`} /> <Link href={('/blog' + slug) as Route} /> // TypeScript errors if href is not a valid route <Link href="/aboot" /> To accept `href` in a custom component wrapping `next/link`, use a generic: import type { Route } from 'next' import Link from 'next/link' function Card<T extends string>({ href }: { href: Route<T> | URL }) { return ( <Link href={href}> <div>My Card</div> </Link> ) } > **How does it work?** > > When running `next dev` or `next build`, Next.js generates a hidden `.d.ts` file inside `.next` that contains information about all existing routes in your application (all valid routes as the `href` type of `Link`). This `.d.ts` file is included in `tsconfig.json` and the TypeScript compiler will check that `.d.ts` and provide feedback in your editor about invalid links. ## End-to-End Type Safety Next.js 13 has **enhanced type safety**. This includes: 1. **No serialization of data between fetching function and page**: You can `fetch` directly in components, layouts, and pages on the server. This data _does not_ need to be serialized (converted to a string) to be passed to the client side for consumption in React. Instead, since `app` uses Server Components by default, we can use values like `Date`, `Map`, `Set`, and more without any extra steps. Previously, you needed to manually type the boundary between server and client with Next.js-specific types. 2. **Streamlined data flow between components**: With the removal of `_app` in favor of root layouts, it is now easier to visualize the data flow between components and pages. Previously, data flowing between individual `pages` and `_app` were difficult to type and could introduce confusing bugs. With colocated data fetching in Next.js 13, this is no longer an issue. Data Fetching in Next.js now provides as close to end-to-end type safety as possible without being prescriptive about your database or content provider selection. We're able to type the response data as you would expect with normal TypeScript. For example: async function getData() { const res = await fetch('https://api.example.com/...') // The return value is *not* serialized // You can return Date, Map, Set, etc. return res.json() } export default async function Page() { const name = await getData() return '...' } For _complete_ end-to-end type safety, this also requires your database or content provider to support TypeScript. This could be through using an ORM or type-safe query builder. ## Async Server Component TypeScript Error To use an `async` Server Component with TypeScript, ensure you are using TypeScript `5.1.3` or higher and `@types/react` `18.2.8` or higher. If you are using an older version of TypeScript, you may see a `'Promise<Element>' is not a valid JSX element` type error. Updating to the latest version of TypeScript and `@types/react` should resolve this issue. ## Passing Data Between Server & Client Components When passing data between a Server and Client Component through props, the data is still serialized (converted to a string) for use in the browser. However, it does not need a special type. It’s typed the same as passing any other props between components. Further, there is less code to be serialized, as un-rendered data does not cross between the server and client (it remains on the server). This is only now possible through support for Server Components. ## Path aliases and baseUrl Next.js automatically supports the `tsconfig.json` `"paths"` and `"baseUrl"` options. You can learn more about this feature on the Module Path aliases documentation. ## Type checking next.config.js The `next.config.js` file must be a JavaScript file as it does not get parsed by Babel or TypeScript, however you can add some type checking in your IDE using JSDoc as below: // @ts-check /** * @type {import('next').NextConfig} **/ const nextConfig = { /* config options here */ } module.exports = nextConfig ## Incremental type checking Since `v10.2.1` Next.js supports incremental type checking when enabled in your `tsconfig.json`, this can help speed up type checking in larger applications. ## Ignoring TypeScript Errors Next.js fails your **production build** (`next build`) when TypeScript errors are present in your project. If you'd like Next.js to dangerously produce production code even when your application has errors, you can disable the built-in type checking step. If disabled, be sure you are running type checks as part of your build or deploy process, otherwise this can be very dangerous. Open `next.config.js` and enable the `ignoreBuildErrors` option in the `typescript` config: module.exports = { typescript: { // !! WARN !! // Dangerously allow production builds to successfully complete even if // your project has type errors. // !! WARN !! ignoreBuildErrors: true, }, } ## Version Changes | Version | Changes | | --- | --- | | `v13.2.0` | Statically typed links are available in beta. | | `v12.0.0` | SWC is now used by default to compile TypeScript and TSX for faster builds. | | `v10.2.1` | Incremental type checking support added when enabled in your `tsconfig.json`. | --- ## Page: https://nextjs.org/docs/13/app/building-your-application/configuring/eslint Next.js provides an integrated ESLint experience out of the box. Add `next lint` as a script to `package.json`: { "scripts": { "lint": "next lint" } } Then run `npm run lint` or `yarn lint`: yarn lint If you don't already have ESLint configured in your application, you will be guided through the installation and configuration process. yarn lint > You'll see a prompt like this: > > ? How would you like to configure ESLint? > > ❯ Strict (recommended) > Base > Cancel One of the following three options can be selected: * **Strict**: Includes Next.js' base ESLint configuration along with a stricter Core Web Vitals rule-set. This is the recommended configuration for developers setting up ESLint for the first time. { "extends": "next/core-web-vitals" } * **Base**: Includes Next.js' base ESLint configuration. { "extends": "next" } * **Cancel**: Does not include any ESLint configuration. Only select this option if you plan on setting up your own custom ESLint configuration. If either of the two configuration options are selected, Next.js will automatically install `eslint` and `eslint-config-next` as dependencies in your application and create an `.eslintrc.json` file in the root of your project that includes your selected configuration. You can now run `next lint` every time you want to run ESLint to catch errors. Once ESLint has been set up, it will also automatically run during every build (`next build`). Errors will fail the build, while warnings will not. > If you do not want ESLint to run during `next build`, refer to the documentation for Ignoring ESLint. We recommend using an appropriate integration to view warnings and errors directly in your code editor during development. ## ESLint Config The default configuration (`eslint-config-next`) includes everything you need to have an optimal out-of-the-box linting experience in Next.js. If you do not have ESLint already configured in your application, we recommend using `next lint` to set up ESLint along with this configuration. > If you would like to use `eslint-config-next` along with other ESLint configurations, refer to the Additional Configurations section to learn how to do so without causing any conflicts. Recommended rule-sets from the following ESLint plugins are all used within `eslint-config-next`: * `eslint-plugin-react` * `eslint-plugin-react-hooks` * `eslint-plugin-next` This will take precedence over the configuration from `next.config.js`. ## ESLint Plugin Next.js provides an ESLint plugin, `eslint-plugin-next`, already bundled within the base configuration that makes it possible to catch common issues and problems in a Next.js application. The full set of rules is as follows: Enabled in the recommended configuration | | Rule | Description | | --- | --- | --- | | | @next/next/google-font-display | Enforce font-display behavior with Google Fonts. | | | @next/next/google-font-preconnect | Ensure `preconnect` is used with Google Fonts. | | | @next/next/inline-script-id | Enforce `id` attribute on `next/script` components with inline content. | | | @next/next/next-script-for-ga | Prefer `next/script` component when using the inline script for Google Analytics. | | | @next/next/no-assign-module-variable | Prevent assignment to the `module` variable. | | | @next/next/no-async-client-component | Prevent client components from being async functions. | | | @next/next/no-before-interactive-script-outside-document | Prevent usage of `next/script`'s `beforeInteractive` strategy outside of `pages/_document.js`. | | | @next/next/no-css-tags | Prevent manual stylesheet tags. | | | @next/next/no-document-import-in-page | Prevent importing `next/document` outside of `pages/_document.js`. | | | @next/next/no-duplicate-head | Prevent duplicate usage of `<Head>` in `pages/_document.js`. | | | @next/next/no-head-element | Prevent usage of `<head>` element. | | | @next/next/no-head-import-in-document | Prevent usage of `next/head` in `pages/_document.js`. | | | @next/next/no-html-link-for-pages | Prevent usage of `<a>` elements to navigate to internal Next.js pages. | | | @next/next/no-img-element | Prevent usage of `<img>` element due to slower LCP and higher bandwidth. | | | @next/next/no-page-custom-font | Prevent page-only custom fonts. | | | @next/next/no-script-component-in-head | Prevent usage of `next/script` in `next/head` component. | | | @next/next/no-styled-jsx-in-document | Prevent usage of `styled-jsx` in `pages/_document.js`. | | | @next/next/no-sync-scripts | Prevent synchronous scripts. | | | @next/next/no-title-in-document-head | Prevent usage of `<title>` with `Head` component from `next/document`. | | | @next/next/no-typos | Prevent common typos in Next.js's data fetching functions | | | @next/next/no-unwanted-polyfillio | Prevent duplicate polyfills from Polyfill.io. | If you already have ESLint configured in your application, we recommend extending from this plugin directly instead of including `eslint-config-next` unless a few conditions are met. Refer to the Recommended Plugin Ruleset to learn more. ### Custom Settings #### `rootDir` If you're using `eslint-plugin-next` in a project where Next.js isn't installed in your root directory (such as a monorepo), you can tell `eslint-plugin-next` where to find your Next.js application using the `settings` property in your `.eslintrc`: { "extends": "next", "settings": { "next": { "rootDir": "packages/my-app/" } } } `rootDir` can be a path (relative or absolute), a glob (i.e. `"packages/*/"`), or an array of paths and/or globs. ## Linting Custom Directories and Files By default, Next.js will run ESLint for all files in the `pages/`, `app/`, `components/`, `lib/`, and `src/` directories. However, you can specify which directories using the `dirs` option in the `eslint` config in `next.config.js` for production builds: module.exports = { eslint: { dirs: ['pages', 'utils'], // Only run ESLint on the 'pages' and 'utils' directories during production builds (next build) }, } Similarly, the `--dir` and `--file` flags can be used for `next lint` to lint specific directories and files: next lint --dir pages --dir utils --file bar.js ## Caching To improve performance, information of files processed by ESLint are cached by default. This is stored in `.next/cache` or in your defined build directory. If you include any ESLint rules that depend on more than the contents of a single source file and need to disable the cache, use the `--no-cache` flag with `next lint`. next lint --no-cache ## Disabling Rules If you would like to modify or disable any rules provided by the supported plugins (`react`, `react-hooks`, `next`), you can directly change them using the `rules` property in your `.eslintrc`: { "extends": "next", "rules": { "react/no-unescaped-entities": "off", "@next/next/no-page-custom-font": "off" } } ### Core Web Vitals The `next/core-web-vitals` rule set is enabled when `next lint` is run for the first time and the **strict** option is selected. { "extends": "next/core-web-vitals" } `next/core-web-vitals` updates `eslint-plugin-next` to error on a number of rules that are warnings by default if they affect Core Web Vitals. > The `next/core-web-vitals` entry point is automatically included for new applications built with Create Next App. ## Usage With Other Tools ### Prettier ESLint also contains code formatting rules, which can conflict with your existing Prettier setup. We recommend including eslint-config-prettier in your ESLint config to make ESLint and Prettier work together. First, install the dependency: npm install --save-dev eslint-config-prettier yarn add --dev eslint-config-prettier pnpm add --save-dev eslint-config-prettier bun add --dev eslint-config-prettier Then, add `prettier` to your existing ESLint config: { "extends": ["next", "prettier"] } ### lint-staged If you would like to use `next lint` with lint-staged to run the linter on staged git files, you'll have to add the following to the `.lintstagedrc.js` file in the root of your project in order to specify usage of the `--file` flag. const path = require('path') const buildEslintCommand = (filenames) => `next lint --fix --file ${filenames .map((f) => path.relative(process.cwd(), f)) .join(' --file ')}` module.exports = { '*.{js,jsx,ts,tsx}': [buildEslintCommand], } ## Migrating Existing Config ### Recommended Plugin Ruleset If you already have ESLint configured in your application and any of the following conditions are true: * You have one or more of the following plugins already installed (either separately or through a different config such as `airbnb` or `react-app`): * `react` * `react-hooks` * `jsx-a11y` * `import` * You've defined specific `parserOptions` that are different from how Babel is configured within Next.js (this is not recommended unless you have customized your Babel configuration) * You have `eslint-plugin-import` installed with Node.js and/or TypeScript resolvers defined to handle imports Then we recommend either removing these settings if you prefer how these properties have been configured within `eslint-config-next` or extending directly from the Next.js ESLint plugin instead: module.exports = { extends: [ //... 'plugin:@next/next/recommended', ], } The plugin can be installed normally in your project without needing to run `next lint`: npm install --save-dev @next/eslint-plugin-next yarn add --dev @next/eslint-plugin-next pnpm add --save-dev @next/eslint-plugin-next bun add --dev @next/eslint-plugin-next This eliminates the risk of collisions or errors that can occur due to importing the same plugin or parser across multiple configurations. ### Additional Configurations If you already use a separate ESLint configuration and want to include `eslint-config-next`, ensure that it is extended last after other configurations. For example: { "extends": ["eslint:recommended", "next"] } The `next` configuration already handles setting default values for the `parser`, `plugins` and `settings` properties. There is no need to manually re-declare any of these properties unless you need a different configuration for your use case. If you include any other shareable configurations, **you will need to make sure that these properties are not overwritten or modified**. Otherwise, we recommend removing any configurations that share behavior with the `next` configuration or extending directly from the Next.js ESLint plugin as mentioned above. --- ## Page: https://nextjs.org/docs/13/app/building-your-application/configuring/environment-variables Examples * Environment Variables Next.js comes with built-in support for environment variables, which allows you to do the following: * Use `.env.local` to load environment variables * Bundle environment variables for the browser by prefixing with `NEXT_PUBLIC_` ## Loading Environment Variables Next.js has built-in support for loading environment variables from `.env.local` into `process.env`. DB_HOST=localhost DB_USER=myuser DB_PASS=mypassword This loads `process.env.DB_HOST`, `process.env.DB_USER`, and `process.env.DB_PASS` into the Node.js environment automatically allowing you to use them in Route Handlers. For example: export async function GET() { const db = await myDB.connect({ host: process.env.DB_HOST, username: process.env.DB_USER, password: process.env.DB_PASS, }) // ... } ### Referencing Other Variables Next.js will automatically expand variables that use `$` to reference other variables e.g. `$VARIABLE` inside of your `.env*` files. This allows you to reference other secrets. For example: TWITTER_USER=nextjs TWITTER_URL=https://twitter.com/$TWITTER_USER In the above example, `process.env.TWITTER_URL` would be set to `https://twitter.com/nextjs`. > **Good to know**: If you need to use variable with a `$` in the actual value, it needs to be escaped e.g. `\$`. ## Bundling Environment Variables for the Browser Non-`NEXT_PUBLIC_` environment variables are only available in the Node.js environment, meaning they aren't accessible to the browser (the client runs in a different _environment_). In order to make the value of an environment variable accessible in the browser, Next.js can "inline" a value, at build time, into the js bundle that is delivered to the client, replacing all references to `process.env.[variable]` with a hard-coded value. To tell it to do this, you just have to prefix the variable with `NEXT_PUBLIC_`. For example: NEXT_PUBLIC_ANALYTICS_ID=abcdefghijk This will tell Next.js to replace all references to `process.env.NEXT_PUBLIC_ANALYTICS_ID` in the Node.js environment with the value from the environment in which you run `next build`, allowing you to use it anywhere in your code. It will be inlined into any JavaScript sent to the browser. > **Note**: After being built, your app will no longer respond to changes to these environment variables. For instance, if you use a Heroku pipeline to promote slugs built in one environment to another environment, or if you build and deploy a single Docker image to multiple environments, all `NEXT_PUBLIC_` variables will be frozen with the value evaluated at build time, so these values need to be set appropriately when the project is built. If you need access to runtime environment values, you'll have to setup your own API to provide them to the client (either on demand or during initialization). import setupAnalyticsService from '../lib/my-analytics-service' // 'NEXT_PUBLIC_ANALYTICS_ID' can be used here as it's prefixed by 'NEXT_PUBLIC_'. // It will be transformed at build time to `setupAnalyticsService('abcdefghijk')`. setupAnalyticsService(process.env.NEXT_PUBLIC_ANALYTICS_ID) function HomePage() { return <h1>Hello World</h1> } export default HomePage Note that dynamic lookups will _not_ be inlined, such as: // This will NOT be inlined, because it uses a variable const varName = 'NEXT_PUBLIC_ANALYTICS_ID' setupAnalyticsService(process.env[varName]) // This will NOT be inlined, because it uses a variable const env = process.env setupAnalyticsService(env.NEXT_PUBLIC_ANALYTICS_ID) ## Default Environment Variables In general only one `.env.local` file is needed. However, sometimes you might want to add some defaults for the `development` (`next dev`) or `production` (`next start`) environment. Next.js allows you to set defaults in `.env` (all environments), `.env.development` (development environment), and `.env.production` (production environment). `.env.local` always overrides the defaults set. > **Good to know**: `.env`, `.env.development`, and `.env.production` files should be included in your repository as they define defaults. **`.env*.local` should be added to `.gitignore`**, as those files are intended to be ignored. `.env.local` is where secrets can be stored. ## Environment Variables on Vercel When deploying your Next.js application to Vercel, Environment Variables can be configured in the Project Settings. All types of Environment Variables should be configured there. Even Environment Variables used in Development – which can be downloaded onto your local device afterwards. If you've configured Development Environment Variables you can pull them into a `.env.local` for usage on your local machine using the following command: vercel env pull .env.local ## Test Environment Variables Apart from `development` and `production` environments, there is a 3rd option available: `test`. In the same way you can set defaults for development or production environments, you can do the same with a `.env.test` file for the `testing` environment (though this one is not as common as the previous two). Next.js will not load environment variables from `.env.development` or `.env.production` in the `testing` environment. This one is useful when running tests with tools like `jest` or `cypress` where you need to set specific environment vars only for testing purposes. Test default values will be loaded if `NODE_ENV` is set to `test`, though you usually don't need to do this manually as testing tools will address it for you. There is a small difference between `test` environment, and both `development` and `production` that you need to bear in mind: `.env.local` won't be loaded, as you expect tests to produce the same results for everyone. This way every test execution will use the same env defaults across different executions by ignoring your `.env.local` (which is intended to override the default set). > **Good to know**: similar to Default Environment Variables, `.env.test` file should be included in your repository, but `.env.test.local` shouldn't, as `.env*.local` are intended to be ignored through `.gitignore`. While running unit tests you can make sure to load your environment variables the same way Next.js does by leveraging the `loadEnvConfig` function from the `@next/env` package. // The below can be used in a Jest global setup file or similar for your testing set-up import { loadEnvConfig } from '@next/env' export default async () => { const projectDir = process.cwd() loadEnvConfig(projectDir) } ## Environment Variable Load Order Environment variables are looked up in the following places, in order, stopping once the variable is found. 1. `process.env` 2. `.env.$(NODE_ENV).local` 3. `.env.local` (Not checked when `NODE_ENV` is `test`.) 4. `.env.$(NODE_ENV)` 5. `.env` For example, if `NODE_ENV` is `development` and you define a variable in both `.env.development.local` and `.env`, the value in `.env.development.local` will be used. > **Good to know**: The allowed values for `NODE_ENV` are `production`, `development` and `test`. ## Good to know * If you are using a `/src` directory, `.env.*` files should remain in the root of your project. * If the environment variable `NODE_ENV` is unassigned, Next.js automatically assigns `development` when running the `next dev` command, or `production` for all other commands. --- ## Page: https://nextjs.org/docs/13/app/building-your-application/configuring/absolute-imports-and-module-aliases Examples * Absolute Imports and Aliases Next.js has in-built support for the `"paths"` and `"baseUrl"` options of `tsconfig.json` and `jsconfig.json` files. These options allow you to alias project directories to absolute paths, making it easier to import modules. For example: // before import { Button } from '../../../components/button' // after import { Button } from '@/components/button' > **Good to know**: `create-next-app` will prompt to configure these options for you. ## Absolute Imports The `baseUrl` configuration option allows you to import directly from the root of the project. An example of this configuration: { "compilerOptions": { "baseUrl": "." } } export default function Button() { return <button>Click me</button> } import Button from 'components/button' export default function HomePage() { return ( <> <h1>Hello World</h1> <Button /> </> ) } ## Module Aliases In addition to configuring the `baseUrl` path, you can use the `"paths"` option to "alias" module paths. For example, the following configuration maps `@/components/*` to `components/*`: { "compilerOptions": { "baseUrl": ".", "paths": { "@/components/*": ["components/*"] } } } export default function Button() { return <button>Click me</button> } import Button from '@/components/button' export default function HomePage() { return ( <> <h1>Hello World</h1> <Button /> </> ) } Each of the `"paths"` are relative to the `baseUrl` location. For example: // tsconfig.json or jsconfig.json { "compilerOptions": { "baseUrl": "src/", "paths": { "@/styles/*": ["styles/*"], "@/components/*": ["components/*"] } } } // pages/index.js import Button from '@/components/button' import '@/styles/styles.css' import Helper from 'utils/helper' export default function HomePage() { return ( <Helper> <h1>Hello World</h1> <Button /> </Helper> ) } --- ## Page: https://nextjs.org/docs/13/app/building-your-application/configuring/mdx Markdown is a lightweight markup language used to format text. It allows you to write using plain text syntax and convert it to structurally valid HTML. It's commonly used for writing content on websites and blogs. You write... I **love** using [Next.js](https://nextjs.org/) Output: <p>I <strong>love</strong> using <a href="https://nextjs.org/">Next.js</a></p> MDX is a superset of markdown that lets you write JSX directly in your markdown files. It is a powerful way to add dynamic interactivity and embed React components within your content. Next.js can support both local MDX content inside your application, as well as remote MDX files fetched dynamically on the server. The Next.js plugin handles transforming markdown and React components into HTML, including support for usage in Server Components (the default in App Router). ## `@next/mdx` The `@next/mdx` package is used to configure Next.js so it can process markdown and MDX. **It sources data from local files**, allowing you to create pages with a `.mdx` extension, directly in your `/pages` or `/app` directory. Let's walk through how to configure and use MDX with Next.js. ## Getting Started Install packages needed to render MDX: npm install @next/mdx @mdx-js/loader @mdx-js/react @types/mdx Create a `mdx-components.tsx` file at the root of your application (the parent folder of `app/` or `src/`): > **Good to know**: `mdx-components.tsx` is required to use MDX with App Router and will not work without it. import type { MDXComponents } from 'mdx/types' export function useMDXComponents(components: MDXComponents): MDXComponents { return { ...components, } } Update the `next.config.js` file at your project's root to configure it to use MDX: const withMDX = require('@next/mdx')() /** @type {import('next').NextConfig} */ const nextConfig = { // Configure `pageExtensions`` to include MDX files pageExtensions: ['js', 'jsx', 'mdx', 'ts', 'tsx'], // Optionally, add any other Next.js config below } module.exports = withMDX(nextConfig) Then, create a new MDX page within the `/app` directory: your-project ├── app │ └── my-mdx-page │ └── page.mdx └── package.json Now you can use markdown and import React components directly inside your MDX page: import { MyComponent } from 'my-components' # Welcome to my MDX page! This is some **bold** and _italics_ text. This is a list in markdown: - One - Two - Three Checkout my React component: <MyComponent /> Navigating to the `/my-mdx-page` route should display your rendered MDX. ## Remote MDX If your markdown or MDX files or content lives _somewhere else_, you can fetch it dynamically on the server. This is useful for content stored in a separate local folder, CMS, database, or anywhere else. There are two popular community packages for fetching MDX content: * `next-mdx-remote` * `contentlayer` > **Good to know**: Please proceed with caution. MDX compiles to JavaScript and is executed on the server. You should only fetch MDX content from a trusted source, otherwise this can lead to remote code execution (RCE). The following example uses `next-mdx-remote`: import { MDXRemote } from 'next-mdx-remote/rsc' export default async function RemoteMdxPage() { // MDX text - can be from a local file, database, CMS, fetch, anywhere... const res = await fetch('https://...') const markdown = await res.text() return <MDXRemote source={markdown} /> } Navigating to the `/my-mdx-page-remote` route should display your rendered MDX. ## Layouts To share a layout amongst MDX pages, you can use the built-in layouts support with the App Router. export default function MdxLayout({ children }: { children: React.ReactNode }) { // Create any shared layout or styles here return <div style={{ color: 'blue' }}>{children}</div> } ## Remark and Rehype Plugins You can optionally provide `remark` and `rehype` plugins to transform the MDX content. For example, you can use `remark-gfm` to support GitHub Flavored Markdown. Since the `remark` and `rehype` ecosystem is ESM only, you'll need to use `next.config.mjs` as the configuration file. import remarkGfm from 'remark-gfm' import createMDX from '@next/mdx' /** @type {import('next').NextConfig} */ const nextConfig = { // Configure `pageExtensions`` to include MDX files pageExtensions: ['js', 'jsx', 'mdx', 'ts', 'tsx'], // Optionally, add any other Next.js config below } const withMDX = createMDX({ // Add markdown plugins here, as desired options: { remarkPlugins: [remarkGfm], rehypePlugins: [], }, }) // Merge MDX config with Next.js config export default withMDX(nextConfig) ## Frontmatter Frontmatter is a YAML like key/value pairing that can be used to store data about a page. `@next/mdx` does **not** support frontmatter by default, though there are many solutions for adding frontmatter to your MDX content, such as: * remark-frontmatter * gray-matter. To access page metadata with `@next/mdx`, you can export a meta object from within the `.mdx` file: export const meta = { author: 'John Doe', } # My MDX page ## Custom Elements One of the pleasant aspects of using markdown, is that it maps to native `HTML` elements, making writing fast, and intuitive: This is a list in markdown: - One - Two - Three The above generates the following `HTML`: <p>This is a list in markdown:</p> <ul> <li>One</li> <li>Two</li> <li>Three</li> </ul> When you want to style your own elements for a custom feel to your website or application, you can pass in shortcodes. These are your own custom components that map to `HTML` elements. To do this, open the `mdx-components.tsx` file at the root of your application and add custom elements: import type { MDXComponents } from 'mdx/types' import Image from 'next/image' // This file allows you to provide custom React components // to be used in MDX files. You can import and use any // React component you want, including inline styles, // components from other libraries, and more. export function useMDXComponents(components: MDXComponents): MDXComponents { return { // Allows customizing built-in components, e.g. to add styling. h1: ({ children }) => <h1 style={{ fontSize: '100px' }}>{children}</h1>, img: (props) => ( <Image sizes="100vw" style={{ width: '100%', height: 'auto' }} {...props} /> ), ...components, } } ## Deep Dive: How do you transform markdown into HTML? React does not natively understand markdown. The markdown plaintext needs to first be transformed into HTML. This can be accomplished with `remark` and `rehype`. `remark` is an ecosystem of tools around markdown. `rehype` is the same, but for HTML. For example, the following code snippet transforms markdown into HTML: import { unified } from 'unified' import remarkParse from 'remark-parse' import remarkRehype from 'remark-rehype' import rehypeSanitize from 'rehype-sanitize' import rehypeStringify from 'rehype-stringify' main() async function main() { const file = await unified() .use(remarkParse) // Convert into markdown AST .use(remarkRehype) // Transform to HTML AST .use(rehypeSanitize) // Sanitize HTML input .use(rehypeStringify) // Convert AST into serialized HTML .process('Hello, Next.js!') console.log(String(file)) // <p>Hello, Next.js!</p> } The `remark` and `rehype` ecosystem contains plugins for syntax highlighting, linking headings, generating a table of contents, and more. When using `@next/mdx` as shown above, you **do not** need to use `remark` or `rehype` directly, as it is handled for you. We're describing it here for a deeper understanding of what the `@next/mdx` package is doing underneath. ## Using the Rust-based MDX compiler (Experimental) Next.js supports a new MDX compiler written in Rust. This compiler is still experimental and is not recommended for production use. To use the new compiler, you need to configure `next.config.js` when you pass it to `withMDX`: module.exports = withMDX({ experimental: { mdxRs: true, }, }) ## Helpful Links * MDX * `@next/mdx` * remark * rehype --- ## Page: https://nextjs.org/docs/13/app/building-your-application/configuring/src-directory You are currently viewing documentation for version 13 of Next.js. As an alternative to having the special Next.js `app` or `pages` directories in the root of your project, Next.js also supports the common pattern of placing application code under the `src` directory. This separates application code from project configuration files which mostly live in the root of a project, which is preferred by some individuals and teams. To use the `src` directory, move the `app` Router folder or `pages` Router folder to `src/app` or `src/pages` respectively.  > **Good to know** > > * The `/public` directory should remain in the root of your project. > * Config files like `package.json`, `next.config.js` and `tsconfig.json` should remain in the root of your project. > * `.env.*` files should remain in the root of your project. > * `src/app` or `src/pages` will be ignored if `app` or `pages` are present in the root directory. > * If you're using `src`, you'll probably also move other application folders such as `/components` or `/lib`. > * If you're using Tailwind CSS, you'll need to add the `/src` prefix to the `tailwind.config.js` file in the content section. --- ## Page: https://nextjs.org/docs/13/app/building-your-application/configuring/draft-mode Static rendering is useful when your pages fetch data from a headless CMS. However, it’s not ideal when you’re writing a draft on your headless CMS and want to view the draft immediately on your page. You’d want Next.js to render these pages at **request time** instead of build time and fetch the draft content instead of the published content. You’d want Next.js to switch to dynamic rendering only for this specific case. Next.js has a feature called **Draft Mode** which solves this problem. Here are instructions on how to use it. ## Step 1: Create and access the Route Handler First, create a Route Handler. It can have any name - e.g. `app/api/draft/route.ts` Then, import `draftMode` from `next/headers` and call the `enable()` method. // route handler enabling draft mode import { draftMode } from 'next/headers' export async function GET(request: Request) { draftMode().enable() return new Response('Draft mode is enabled') } This will set a **cookie** to enable draft mode. Subsequent requests containing this cookie will trigger **Draft Mode** changing the behavior for statically generated pages (more on this later). You can test this manually by visiting `/api/draft` and looking at your browser’s developer tools. Notice the `Set-Cookie` response header with a cookie named `__prerender_bypass`. ### Securely accessing it from your Headless CMS In practice, you’d want to call this Route Handler _securely_ from your headless CMS. The specific steps will vary depending on which headless CMS you’re using, but here are some common steps you could take. These steps assume that the headless CMS you’re using supports setting **custom draft URLs**. If it doesn’t, you can still use this method to secure your draft URLs, but you’ll need to construct and access the draft URL manually. **First**, you should create a **secret token string** using a token generator of your choice. This secret will only be known by your Next.js app and your headless CMS. This secret prevents people who don’t have access to your CMS from accessing draft URLs. **Second**, if your headless CMS supports setting custom draft URLs, specify the following as the draft URL. This assumes that your Route Handler is located at `app/api/draft/route.ts` https://<your-site>/api/draft?secret=<token>&slug=<path> * `<your-site>` should be your deployment domain. * `<token>` should be replaced with the secret token you generated. * `<path>` should be the path for the page that you want to view. If you want to view `/posts/foo`, then you should use `&slug=/posts/foo`. Your headless CMS might allow you to include a variable in the draft URL so that `<path>` can be set dynamically based on the CMS’s data like so: `&slug=/posts/{entry.fields.slug}` **Finally**, in the Route Handler: * Check that the secret matches and that the `slug` parameter exists (if not, the request should fail). * Call `draftMode.enable()` to set the cookie. * Then redirect the browser to the path specified by `slug`. // route handler with secret and slug import { draftMode } from 'next/headers' import { redirect } from 'next/navigation' export async function GET(request: Request) { // Parse query string parameters const { searchParams } = new URL(request.url) const secret = searchParams.get('secret') const slug = searchParams.get('slug') // Check the secret and next parameters // This secret should only be known to this route handler and the CMS if (secret !== 'MY_SECRET_TOKEN' || !slug) { return new Response('Invalid token', { status: 401 }) } // Fetch the headless CMS to check if the provided `slug` exists // getPostBySlug would implement the required fetching logic to the headless CMS const post = await getPostBySlug(slug) // If the slug doesn't exist prevent draft mode from being enabled if (!post) { return new Response('Invalid slug', { status: 401 }) } // Enable Draft Mode by setting the cookie draftMode().enable() // Redirect to the path from the fetched post // We don't redirect to searchParams.slug as that might lead to open redirect vulnerabilities redirect(post.slug) } If it succeeds, then the browser will be redirected to the path you want to view with the draft mode cookie. ## Step 2: Update page The next step is to update your page to check the value of `draftMode().isEnabled`. If you request a page which has the cookie set, then data will be fetched at **request time** (instead of at build time). Furthermore, the value of `isEnabled` will be `true`. // page that fetches data import { draftMode } from 'next/headers' async function getData() { const { isEnabled } = draftMode() const url = isEnabled ? 'https://draft.example.com' : 'https://production.example.com' const res = await fetch(url) return res.json() } export default async function Page() { const { title, desc } = await getData() return ( <main> <h1>{title}</h1> <p>{desc}</p> </main> ) } That's it! If you access the draft Route Handler (with `secret` and `slug`) from your headless CMS or manually, you should now be able to see the draft content. And if you update your draft without publishing, you should be able to view the draft. Set this as the draft URL on your headless CMS or access manually, and you should be able to see the draft. https://<your-site>/api/draft?secret=<token>&slug=<path> ## More Details ### Clear the Draft Mode cookie By default, the Draft Mode session ends when the browser is closed. To clear the Draft Mode cookie manually, create a Route Handler that calls `draftMode().disable()`: import { draftMode } from 'next/headers' export async function GET(request: Request) { draftMode().disable() return new Response('Draft mode is disabled') } Then, send a request to `/api/disable-draft` to invoke the Route Handler. If calling this route using `next/link`, you must pass `prefetch={false}` to prevent accidentally deleting the cookie on prefetch. ### Unique per `next build` A new bypass cookie value will be generated each time you run `next build`. This ensures that the bypass cookie can’t be guessed. > **Good to know**: To test Draft Mode locally over HTTP, your browser will need to allow third-party cookies and local storage access. --- ## Page: https://nextjs.org/docs/13/app/building-your-application/configuring/content-security-policy Content Security Policy (CSP) is important to guard your Next.js application against various security threats such as cross-site scripting (XSS), clickjacking, and other code injection attacks. By using CSP, developers can specify which origins are permissible for content sources, scripts, stylesheets, images, fonts, objects, media (audio, video), iframes, and more. Examples * Strict CSP ## Nonces A nonce is a unique, random string of characters created for a one-time use. It is used in conjunction with CSP to selectively allow certain inline scripts or styles to execute, bypassing strict CSP directives. ### Why use a nonce? Even though CSPs are designed to block malicious scripts, there are legitimate scenarios where inline scripts are necessary. In such cases, nonces offer a way to allow these scripts to execute if they have the correct nonce. ### Adding a nonce with Middleware Middleware enables you to add headers and generate nonces before the page renders. Every time a page is viewed, a fresh nonce should be generated. This means that you **must use dynamic rendering to add nonces**. For example: import { NextRequest, NextResponse } from 'next/server' export function middleware(request: NextRequest) { const nonce = Buffer.from(crypto.randomUUID()).toString('base64') const cspHeader = ` default-src 'self'; script-src 'self' 'nonce-${nonce}' 'strict-dynamic'; style-src 'self' 'nonce-${nonce}'; img-src 'self' blob: data:; font-src 'self'; object-src 'none'; base-uri 'self'; form-action 'self'; frame-ancestors 'none'; block-all-mixed-content; upgrade-insecure-requests; ` const requestHeaders = new Headers(request.headers) requestHeaders.set('x-nonce', nonce) requestHeaders.set( 'Content-Security-Policy', // Replace newline characters and spaces cspHeader.replace(/\s{2,}/g, ' ').trim() ) return NextResponse.next({ headers: requestHeaders, request: { headers: requestHeaders, }, }) } By default, Middleware runs on all requests. You can filter Middleware to run on specific paths using a `matcher`. We recommend ignoring matching prefetches (from `next/link`) and static assets that don't need the CSP header. export const config = { matcher: [ /* * Match all request paths except for the ones starting with: * - api (API routes) * - _next/static (static files) * - _next/image (image optimization files) * - favicon.ico (favicon file) */ { source: '/((?!api|_next/static|_next/image|favicon.ico).*)', missing: [ { type: 'header', key: 'next-router-prefetch' }, { type: 'header', key: 'purpose', value: 'prefetch' }, ], }, ], } ### Reading the nonce You can now read the nonce from a Server Component using `headers`: import { headers } from 'next/headers' import Script from 'next/script' export default function Page() { const nonce = headers().get('x-nonce') return ( <Script src="https://www.googletagmanager.com/gtag/js" strategy="afterInteractive" nonce={nonce} /> ) } ## Version History We recommend using `v13.4.20+` of Next.js to properly handle and apply nonces. --- ## Page: https://nextjs.org/docs/13/app/building-your-application/deploying Congratulations! You're here because you are ready to deploy your Next.js application. This page will show how to deploy either managed or self-hosted using the Next.js Build API. ## Next.js Build API `next build` generates an optimized version of your application for production. This standard output includes: * HTML files for pages using `getStaticProps` or Automatic Static Optimization * CSS files for global styles or for individually scoped styles * JavaScript for pre-rendering dynamic content from the Next.js server * JavaScript for interactivity on the client-side through React This output is generated inside the `.next` folder: * `.next/static/chunks/pages` – Each JavaScript file inside this folder relates to the route with the same name. For example, `.next/static/chunks/pages/about.js` would be the JavaScript file loaded when viewing the `/about` route in your application * `.next/static/media` – Statically imported images from `next/image` are hashed and copied here * `.next/static/css` – Global CSS files for all pages in your application * `.next/server/pages` – The HTML and JavaScript entry points prerendered from the server. The `.nft.json` files are created when Output File Tracing is enabled and contain all the file paths that depend on a given page. * `.next/server/chunks` – Shared JavaScript chunks used in multiple places throughout your application * `.next/cache` – Output for the build cache and cached images, responses, and pages from the Next.js server. Using a cache helps decrease build times and improve performance of loading images All JavaScript code inside `.next` has been **compiled** and browser bundles have been **minified** to help achieve the best performance and support all modern browsers. ## Managed Next.js with Vercel Vercel is the fastest way to deploy your Next.js application with zero configuration. When deploying to Vercel, the platform automatically detects Next.js, runs `next build`, and optimizes the build output for you, including: * Persisting cached assets across deployments if unchanged * Immutable deployments with a unique URL for every commit * Pages are automatically statically optimized, if possible * Assets (JavaScript, CSS, images, fonts) are compressed and served from a Global Edge Network * API Routes are automatically optimized as isolated Serverless Functions that can scale infinitely * Middleware is automatically optimized as Edge Functions that have zero cold starts and boot instantly In addition, Vercel provides features like: * Automatic performance monitoring with Next.js Speed Insights * Automatic HTTPS and SSL certificates * Automatic CI/CD (through GitHub, GitLab, Bitbucket, etc.) * Support for Environment Variables * Support for Custom Domains * Support for Image Optimization with `next/image` * Instant global deployments via `git push` Deploy a Next.js application to Vercel for free to try it out. ## Self-Hosting You can self-host Next.js with support for all features using Node.js or Docker. You can also do a Static HTML Export, which has some limitations. ### Node.js Server Next.js can be deployed to any hosting provider that supports Node.js. For example, AWS EC2 or a DigitalOcean Droplet. First, ensure your `package.json` has the `"build"` and `"start"` scripts: { "scripts": { "dev": "next dev", "build": "next build", "start": "next start" } } Then, run `npm run build` to build your application. Finally, run `npm run start` to start the Node.js server. This server supports all features of Next.js. > If you are using `next/image`, consider adding `sharp` for more performant Image Optimization in your production environment by running `npm install sharp` in your project directory. On Linux platforms, `sharp` may require additional configuration to prevent excessive memory usage. ### Docker Image Next.js can be deployed to any hosting provider that supports Docker containers. You can use this approach when deploying to container orchestrators such as Kubernetes or HashiCorp Nomad, or when running inside a single node in any cloud provider. 1. Install Docker on your machine 2. Clone the with-docker example 3. Build your container: `docker build -t nextjs-docker .` 4. Run your container: `docker run -p 3000:3000 nextjs-docker` If you need to use different Environment Variables across multiple environments, check out our with-docker-multi-env example. ### Static HTML Export If you’d like to do a static HTML export of your Next.js app, follow the directions on our Static HTML Export documentation. ## Other Services The following services support Next.js `v12+`. Below, you’ll find examples or guides to deploy Next.js to each service. ### Managed Server * AWS Copilot * Digital Ocean App Platform * Google Cloud Run * Heroku * Railway * Render > **Good to know**: There are also managed platforms that allow you to use a Dockerfile as shown in the example above. ### Static Only The following services only support deploying Next.js using `output: 'export'`. * GitHub Pages You can also manually deploy the output from `output: 'export'` to any static hosting provider, often through your CI/CD pipeline like GitHub Actions, Jenkins, AWS CodeBuild, Circle CI, Azure Pipelines, and more. ### Serverless * AWS Amplify * Azure Static Web Apps * Cloudflare Pages * Firebase * Netlify * Terraform * SST > **Good to know**: Not all serverless providers implement the Next.js Build API from `next start`. Please check with the provider to see what features are supported. ## Automatic Updates When you deploy your Next.js application, you want to see the latest version without needing to reload. Next.js will automatically load the latest version of your application in the background when routing. For client-side navigations, `next/link` will temporarily function as a normal `<a>` tag. > **Good to know**: If a new page (with an old version) has already been prefetched by `next/link`, Next.js will use the old version. Navigating to a page that has _not_ been prefetched (and is not cached at the CDN level) will load the latest version. ## Manual Graceful shutdowns When self-hosting, you might want to run code when the server shuts down on `SIGTERM` or `SIGINT` signals. You can set the env variable `NEXT_MANUAL_SIG_HANDLE` to `true` and then register a handler for that signal inside your `_document.js` file. You will need to register the env variable directly in the `package.json` script, not in the `.env` file. > **Good to know**: Manual signal handling is not available in `next dev`. { "scripts": { "dev": "next dev", "build": "next build", "start": "NEXT_MANUAL_SIG_HANDLE=true next start" } } if (process.env.NEXT_MANUAL_SIG_HANDLE) { // this should be added in your custom _document process.on('SIGTERM', () => { console.log('Received SIGTERM: ', 'cleaning up') process.exit(0) }) process.on('SIGINT', () => { console.log('Received SIGINT: ', 'cleaning up') process.exit(0) }) } --- ## Page: https://nextjs.org/docs/13/app/building-your-application/deploying/static-exports Next.js enables starting as a static site or Single-Page Application (SPA), then later optionally upgrading to use features that require a server. When running `next build`, Next.js generates an HTML file per route. By breaking a strict SPA into individual HTML files, Next.js can avoid loading unnecessary JavaScript code on the client-side, reducing the bundle size and enabling faster page loads. Since Next.js supports this static export, it can be deployed and hosted on any web server that can serve HTML/CSS/JS static assets. ## Configuration To enable a static export, change the output mode inside `next.config.js`: /** * @type {import('next').NextConfig} */ const nextConfig = { output: 'export', // Optional: Change links `/me` -> `/me/` and emit `/me.html` -> `/me/index.html` // trailingSlash: true, // Optional: Prevent automatic `/me` -> `/me/`, instead preserve `href` // skipTrailingSlashRedirect: true, // Optional: Change the output directory `out` -> `dist` // distDir: 'dist', } module.exports = nextConfig After running `next build`, Next.js will produce an `out` folder which contains the HTML/CSS/JS assets for your application. ## Supported Features The core of Next.js has been designed to support static exports. ### Server Components When you run `next build` to generate a static export, Server Components consumed inside the `app` directory will run during the build, similar to traditional static-site generation. The resulting component will be rendered into static HTML for the initial page load and a static payload for client navigation between routes. No changes are required for your Server Components when using the static export, unless they consume dynamic server functions. export default async function Page() { // This fetch will run on the server during `next build` const res = await fetch('https://api.example.com/...') const data = await res.json() return <main>...</main> } ### Client Components If you want to perform data fetching on the client, you can use a Client Component with SWR to memoize requests. 'use client' import useSWR from 'swr' const fetcher = (url: string) => fetch(url).then((r) => r.json()) export default function Page() { const { data, error } = useSWR( `https://jsonplaceholder.typicode.com/posts/1`, fetcher ) if (error) return 'Failed to load' if (!data) return 'Loading...' return data.title } Since route transitions happen client-side, this behaves like a traditional SPA. For example, the following index route allows you to navigate to different posts on the client: import Link from 'next/link' export default function Page() { return ( <> <h1>Index Page</h1> <hr /> <ul> <li> <Link href="/post/1">Post 1</Link> </li> <li> <Link href="/post/2">Post 2</Link> </li> </ul> </> ) } ### Image Optimization Image Optimization through `next/image` can be used with a static export by defining a custom image loader in `next.config.js`. For example, you can optimize images with a service like Cloudinary: /** @type {import('next').NextConfig} */ const nextConfig = { output: 'export', images: { loader: 'custom', loaderFile: './my-loader.ts', }, } module.exports = nextConfig This custom loader will define how to fetch images from a remote source. For example, the following loader will construct the URL for Cloudinary: export default function cloudinaryLoader({ src, width, quality, }: { src: string width: number quality?: number }) { const params = ['f_auto', 'c_limit', `w_${width}`, `q_${quality || 'auto'}`] return `https://res.cloudinary.com/demo/image/upload/${params.join( ',' )}${src}` } You can then use `next/image` in your application, defining relative paths to the image in Cloudinary: import Image from 'next/image' export default function Page() { return <Image alt="turtles" src="/turtles.jpg" width={300} height={300} /> } ### Route Handlers Route Handlers will render a static response when running `next build`. Only the `GET` HTTP verb is supported. This can be used to generate static HTML, JSON, TXT, or other files from cached or uncached data. For example: export async function GET() { return Response.json({ name: 'Lee' }) } The above file `app/data.json/route.ts` will render to a static file during `next build`, producing `data.json` containing `{ name: 'Lee' }`. If you need to read dynamic values from the incoming request, you cannot use a static export. ### Browser APIs Client Components are pre-rendered to HTML during `next build`. Because Web APIs like `window`, `localStorage`, and `navigator` are not available on the server, you need to safely access these APIs only when running in the browser. For example: 'use client'; import { useEffect } from 'react'; export default function ClientComponent() { useEffect(() => { // You now have access to `window` console.log(window.innerHeight); }, []) return ...; } ## Unsupported Features Features that require a Node.js server, or dynamic logic that cannot be computed during the build process, are **not** supported: * Dynamic Routes with `dynamicParams: true` * Dynamic Routes without `generateStaticParams()` * Route Handlers that rely on Request * Cookies * Rewrites * Redirects * Headers * Middleware * Incremental Static Regeneration * Image Optimization with the default `loader` * Draft Mode Attempting to use any of these features with `next dev` will result in an error, similar to setting the `dynamic` option to `error` in the root layout. export const dynamic = 'error' ## Deploying With a static export, Next.js can be deployed and hosted on any web server that can serve HTML/CSS/JS static assets. When running `next build`, Next.js generates the static export into the `out` folder. Using `next export` is no longer needed. For example, let's say you have the following routes: * `/` * `/blog/[id]` After running `next build`, Next.js will generate the following files: * `/out/index.html` * `/out/404.html` * `/out/blog/post-1.html` * `/out/blog/post-2.html` If you are using a static host like Nginx, you can configure rewrites from incoming requests to the correct files: server { listen 80; server_name acme.com; root /var/www/out; location / { try_files $uri $uri.html $uri/ =404; } # This is necessary when `trailingSlash: false`. # You can omit this when `trailingSlash: true`. location /blog/ { rewrite ^/blog/(.*)$ /blog/$1.html break; } error_page 404 /404.html; location = /404.html { internal; } } ## Version History | Version | Changes | | --- | --- | | `v13.4.0` | App Router (Stable) adds enhanced static export support, including using React Server Components and Route Handlers. | | `v13.3.0` | `next export` is deprecated and replaced with `"output": "export"` | --- ## Page: https://nextjs.org/docs/13/app/building-your-application/upgrading #### Subscribe to our newsletter Stay updated on new releases and features, guides, and case studies. --- ## Page: https://nextjs.org/docs/13/app/building-your-application/upgrading/codemods Codemods are transformations that run on your codebase programmatically. This allows a large number of changes to be programmatically applied without having to manually go through every file. Next.js provides Codemod transformations to help upgrade your Next.js codebase when an API is updated or deprecated. ## Usage In your terminal, navigate (`cd`) into your project's folder, then run: npx @next/codemod <transform> <path> Replacing `<transform>` and `<path>` with appropriate values. * `transform` - name of transform * `path` - files or directory to transform * `--dry` Do a dry-run, no code will be edited * `--print` Prints the changed output for comparison ## Next.js Codemods ### 13.2 #### Use Built-in Font ##### `built-in-next-font` npx @next/codemod@latest built-in-next-font . This codemod uninstalls the `@next/font` package and transforms `@next/font` imports into the built-in `next/font`. For example: import { Inter } from '@next/font/google' Transforms into: import { Inter } from 'next/font/google' ### 13.0 #### Rename Next Image Imports ##### `next-image-to-legacy-image` npx @next/codemod@latest next-image-to-legacy-image . Safely renames `next/image` imports in existing Next.js 10, 11, or 12 applications to `next/legacy/image` in Next.js 13. Also renames `next/future/image` to `next/image`. For example: import Image1 from 'next/image' import Image2 from 'next/future/image' export default function Home() { return ( <div> <Image1 src="/test.jpg" width="200" height="300" /> <Image2 src="/test.png" width="500" height="400" /> </div> ) } Transforms into: // 'next/image' becomes 'next/legacy/image' import Image1 from 'next/legacy/image' // 'next/future/image' becomes 'next/image' import Image2 from 'next/image' export default function Home() { return ( <div> <Image1 src="/test.jpg" width="200" height="300" /> <Image2 src="/test.png" width="500" height="400" /> </div> ) } #### Migrate to the New Image Component ##### `next-image-experimental` npx @next/codemod@latest next-image-experimental . Dangerously migrates from `next/legacy/image` to the new `next/image` by adding inline styles and removing unused props. * Removes `layout` prop and adds `style`. * Removes `objectFit` prop and adds `style`. * Removes `objectPosition` prop and adds `style`. * Removes `lazyBoundary` prop. * Removes `lazyRoot` prop. #### Remove `<a>` Tags From Link Components ##### `new-link` npx @next/codemod@latest new-link . Remove `<a>` tags inside Link Components, or add a `legacyBehavior` prop to Links that cannot be auto-fixed. For example: <Link href="/about"> <a>About</a> </Link> // transforms into <Link href="/about"> About </Link> <Link href="/about"> <a onClick={() => console.log('clicked')}>About</a> </Link> // transforms into <Link href="/about" onClick={() => console.log('clicked')}> About </Link> In cases where auto-fixing can't be applied, the `legacyBehavior` prop is added. This allows your app to keep functioning using the old behavior for that particular link. const Component = () => <a>About</a> <Link href="/about"> <Component /> </Link> // becomes <Link href="/about" legacyBehavior> <Component /> </Link> ### 11 #### Migrate from CRA ##### `cra-to-next` npx @next/codemod cra-to-next Migrates a Create React App project to Next.js; creating a Pages Router and necessary config to match behavior. Client-side only rendering is leveraged initially to prevent breaking compatibility due to `window` usage during SSR and can be enabled seamlessly to allow the gradual adoption of Next.js specific features. Please share any feedback related to this transform in this discussion. ### 10 #### Add React imports ##### `add-missing-react-import` npx @next/codemod add-missing-react-import Transforms files that do not import `React` to include the import in order for the new React JSX transform to work. For example: export default class Home extends React.Component { render() { return <div>Hello World</div> } } Transforms into: import React from 'react' export default class Home extends React.Component { render() { return <div>Hello World</div> } } ### 9 #### Transform Anonymous Components into Named Components ##### `name-default-component` npx @next/codemod name-default-component **Versions 9 and above.** Transforms anonymous components into named components to make sure they work with Fast Refresh. For example: export default function () { return <div>Hello World</div> } Transforms into: export default function MyComponent() { return <div>Hello World</div> } The component will have a camel-cased name based on the name of the file, and it also works with arrow functions. ### 8 #### Transform AMP HOC into page config ##### `withamp-to-config` npx @next/codemod withamp-to-config Transforms the `withAmp` HOC into Next.js 9 page configuration. For example: // Before import { withAmp } from 'next/amp' function Home() { return <h1>My AMP Page</h1> } export default withAmp(Home) // After export default function Home() { return <h1>My AMP Page</h1> } export const config = { amp: true, } ### 6 #### Use `withRouter` ##### `url-to-withrouter` npx @next/codemod url-to-withrouter Transforms the deprecated automatically injected `url` property on top level pages to using `withRouter` and the `router` property it injects. Read more here: https://nextjs.org/docs/messages/url-deprecated For example: import React from 'react' export default class extends React.Component { render() { const { pathname } = this.props.url return <div>Current pathname: {pathname}</div> } } import React from 'react' import { withRouter } from 'next/router' export default withRouter( class extends React.Component { render() { const { pathname } = this.props.router return <div>Current pathname: {pathname}</div> } } ) This is one case. All the cases that are transformed (and tested) can be found in the `__testfixtures__` directory. --- ## Page: https://nextjs.org/docs/13/app/building-your-application/upgrading/app-router-migration ## App Router Incremental Adoption Guide This guide will help you: * Update your Next.js application from version 12 to version 13 * Upgrade features that work in both the `pages` and the `app` directories * Incrementally migrate your existing application from `pages` to `app` ### Node.js Version The minimum Node.js version is now **v16.14**. See the Node.js documentation for more information. ### Next.js Version To update to Next.js version 13, run the following command using your preferred package manager: npm install next@latest react@latest react-dom@latest ### ESLint Version If you're using ESLint, you need to upgrade your ESLint version: npm install -D eslint-config-next@latest > **Good to know**: You may need to restart the ESLint server in VS Code for the ESLint changes to take effect. Open the Command Palette (`cmd+shift+p` on Mac; `ctrl+shift+p` on Windows) and search for `ESLint: Restart ESLint Server`. ## Next Steps After you've updated, see the following sections for next steps: * Upgrade new features: A guide to help you upgrade to new features such as the improved Image and Link Components. * Migrate from the `pages` to `app` directory: A step-by-step guide to help you incrementally migrate from the `pages` to the `app` directory. ## Upgrading New Features Next.js 13 introduced the new App Router with new features and conventions. The new Router is available in the `app` directory and co-exists with the `pages` directory. Upgrading to Next.js 13 does **not** require using the new App Router. You can continue using `pages` with new features that work in both directories, such as the updated Image component, Link component, Script component, and Font optimization. ### `<Image/>` Component Next.js 12 introduced new improvements to the Image Component with a temporary import: `next/future/image`. These improvements included less client-side JavaScript, easier ways to extend and style images, better accessibility, and native browser lazy loading. In version 13, this new behavior is now the default for `next/image`. There are two codemods to help you migrate to the new Image Component: * **`next-image-to-legacy-image` codemod**: Safely and automatically renames `next/image` imports to `next/legacy/image`. Existing components will maintain the same behavior. * **`next-image-experimental` codemod**: Dangerously adds inline styles and removes unused props. This will change the behavior of existing components to match the new defaults. To use this codemod, you need to run the `next-image-to-legacy-image` codemod first. ### `<Link>` Component The `<Link>` Component no longer requires manually adding an `<a>` tag as a child. This behavior was added as an experimental option in version 12.2 and is now the default. In Next.js 13, `<Link>` always renders `<a>` and allows you to forward props to the underlying tag. For example: import Link from 'next/link' // Next.js 12: `<a>` has to be nested otherwise it's excluded <Link href="/about"> <a>About</a> </Link> // Next.js 13: `<Link>` always renders `<a>` under the hood <Link href="/about"> About </Link> To upgrade your links to Next.js 13, you can use the `new-link` codemod. ### `<Script>` Component The behavior of `next/script` has been updated to support both `pages` and `app`, but some changes need to be made to ensure a smooth migration: * Move any `beforeInteractive` scripts you previously included in `_document.js` to the root layout file (`app/layout.tsx`). * The experimental `worker` strategy does not yet work in `app` and scripts denoted with this strategy will either have to be removed or modified to use a different strategy (e.g. `lazyOnload`). * `onLoad`, `onReady`, and `onError` handlers will not work in Server Components so make sure to move them to a Client Component or remove them altogether. ### Font Optimization Previously, Next.js helped you optimize fonts by inlining font CSS. Version 13 introduces the new `next/font` module which gives you the ability to customize your font loading experience while still ensuring great performance and privacy. `next/font` is supported in both the `pages` and `app` directories. While inlining CSS still works in `pages`, it does not work in `app`. You should use `next/font` instead. See the Font Optimization page to learn how to use `next/font`. ## Migrating from `pages` to `app` > **🎥 Watch:** Learn how to incrementally adopt the App Router → YouTube (16 minutes). Moving to the App Router may be the first time using React features that Next.js builds on top of such as Server Components, Suspense, and more. When combined with new Next.js features such as special files and layouts, migration means new concepts, mental models, and behavioral changes to learn. We recommend reducing the combined complexity of these updates by breaking down your migration into smaller steps. The `app` directory is intentionally designed to work simultaneously with the `pages` directory to allow for incremental page-by-page migration. * The `app` directory supports nested routes _and_ layouts. Learn more. * Use nested folders to define routes and a special `page.js` file to make a route segment publicly accessible. Learn more. * Special file conventions are used to create UI for each route segment. The most common special files are `page.js` and `layout.js`. * Use `page.js` to define UI unique to a route. * Use `layout.js` to define UI that is shared across multiple routes. * `.js`, `.jsx`, or `.tsx` file extensions can be used for special files. * You can colocate other files inside the `app` directory such as components, styles, tests, and more. Learn more. * Data fetching functions like `getServerSideProps` and `getStaticProps` have been replaced with a new API inside `app`. `getStaticPaths` has been replaced with `generateStaticParams`. * `pages/_app.js` and `pages/_document.js` have been replaced with a single `app/layout.js` root layout. Learn more. * `pages/_error.js` has been replaced with more granular `error.js` special files. Learn more. * `pages/404.js` has been replaced with the `not-found.js` file. * `pages/api/*` currently remain inside the `pages` directory. ### Step 1: Creating the `app` directory Update to the latest Next.js version (requires 13.4 or greater): npm install next@latest Then, create a new `app` directory at the root of your project (or `src/` directory). ### Step 2: Creating a Root Layout Create a new `app/layout.tsx` file inside the `app` directory. This is a root layout that will apply to all routes inside `app`. export default function RootLayout({ // Layouts must accept a children prop. // This will be populated with nested layouts or pages children, }: { children: React.ReactNode }) { return ( <html lang="en"> <body>{children}</body> </html> ) } * The `app` directory **must** include a root layout. * The root layout must define `<html>`, and `<body>` tags since Next.js does not automatically create them * The root layout replaces the `pages/_app.tsx` and `pages/_document.tsx` files. * `.js`, `.jsx`, or `.tsx` extensions can be used for layout files. To manage `<head>` HTML elements, you can use the built-in SEO support: import { Metadata } from 'next' export const metadata: Metadata = { title: 'Home', description: 'Welcome to Next.js', } #### Migrating `_document.js` and `_app.js` If you have an existing `_app` or `_document` file, you can copy the contents (e.g. global styles) to the root layout (`app/layout.tsx`). Styles in `app/layout.tsx` will _not_ apply to `pages/*`. You should keep `_app`/`_document` while migrating to prevent your `pages/*` routes from breaking. Once fully migrated, you can then safely delete them. If you are using any React Context providers, they will need to be moved to a Client Component. #### Migrating the `getLayout()` pattern to Layouts (Optional) Next.js recommended adding a property to Page components to achieve per-page layouts in the `pages` directory. This pattern can be replaced with native support for nested layouts in the `app` directory. See before and after example **Before** export default function DashboardLayout({ children }) { return ( <div> <h2>My Dashboard</h2> {children} </div> ) } import DashboardLayout from '../components/DashboardLayout' export default function Page() { return <p>My Page</p> } Page.getLayout = function getLayout(page) { return <DashboardLayout>{page}</DashboardLayout> } **After** * Remove the `Page.getLayout` property from `pages/dashboard/index.js` and follow the steps for migrating pages to the `app` directory. export default function Page() { return <p>My Page</p> } * Move the contents of `DashboardLayout` into a new Client Component to retain `pages` directory behavior. 'use client' // this directive should be at top of the file, before any imports. // This is a Client Component export default function DashboardLayout({ children }) { return ( <div> <h2>My Dashboard</h2> {children} </div> ) } * Import the `DashboardLayout` into a new `layout.js` file inside the `app` directory. import DashboardLayout from './DashboardLayout' // This is a Server Component export default function Layout({ children }) { return <DashboardLayout>{children}</DashboardLayout> } * You can incrementally move non-interactive parts of `DashboardLayout.js` (Client Component) into `layout.js` (Server Component) to reduce the amount of component JavaScript you send to the client. ### Step 3: Migrating `next/head` In the `pages` directory, the `next/head` React component is used to manage `<head>` HTML elements such as `title` and `meta` . In the `app` directory, `next/head` is replaced with the new built-in SEO support. **Before:** import Head from 'next/head' export default function Page() { return ( <> <Head> <title>My page title</title> </Head> </> ) } **After:** import { Metadata } from 'next' export const metadata: Metadata = { title: 'My Page Title', } export default function Page() { return '...' } See all metadata options. ### Step 4: Migrating Pages * Pages in the `app` directory are Server Components by default. This is different from the `pages` directory where pages are Client Components. * Data fetching has changed in `app`. `getServerSideProps`, `getStaticProps` and `getInitialProps` have been replaced with a simpler API. * The `app` directory uses nested folders to define routes and a special `page.js` file to make a route segment publicly accessible. * | `pages` Directory | `app` Directory | Route | | --- | --- | --- | | `index.js` | `page.js` | `/` | | `about.js` | `about/page.js` | `/about` | | `blog/[slug].js` | `blog/[slug]/page.js` | `/blog/post-1` | We recommend breaking down the migration of a page into two main steps: * Step 1: Move the default exported Page Component into a new Client Component. * Step 2: Import the new Client Component into a new `page.js` file inside the `app` directory. > **Good to know**: This is the easiest migration path because it has the most comparable behavior to the `pages` directory. **Step 1: Create a new Client Component** * Create a new separate file inside the `app` directory (i.e. `app/home-page.tsx` or similar) that exports a Client Component. To define Client Components, add the `'use client'` directive to the top of the file (before any imports). * Move the default exported page component from `pages/index.js` to `app/home-page.tsx`. 'use client' // This is a Client Component. It receives data as props and // has access to state and effects just like Page components // in the `pages` directory. export default function HomePage({ recentPosts }) { return ( <div> {recentPosts.map((post) => ( <div key={post.id}>{post.title}</div> ))} </div> ) } **Step 2: Create a new page** * Create a new `app/page.tsx` file inside the `app` directory. This is a Server Component by default. * Import the `home-page.tsx` Client Component into the page. * If you were fetching data in `pages/index.js`, move the data fetching logic directly into the Server Component using the new data fetching APIs. See the data fetching upgrade guide for more details. // Import your Client Component import HomePage from './home-page' async function getPosts() { const res = await fetch('https://...') const posts = await res.json() return posts } export default async function Page() { // Fetch data directly in a Server Component const recentPosts = await getPosts() // Forward fetched data to your Client Component return <HomePage recentPosts={recentPosts} /> } * If your previous page used `useRouter`, you'll need to update to the new routing hooks. Learn more. * Start your development server and visit `http://localhost:3000`. You should see your existing index route, now served through the app directory. ### Step 5: Migrating Routing Hooks A new router has been added to support the new behavior in the `app` directory. In `app`, you should use the three new hooks imported from `next/navigation`: `useRouter()`, `usePathname()`, and `useSearchParams()`. * The new `useRouter` hook is imported from `next/navigation` and has different behavior to the `useRouter` hook in `pages` which is imported from `next/router`. * The `useRouter` hook imported from `next/router` is not supported in the `app` directory but can continue to be used in the `pages` directory. * The new `useRouter` does not return the `pathname` string. Use the separate `usePathname` hook instead. * The new `useRouter` does not return the `query` object. Use the separate `useSearchParams` hook instead. * You can use `useSearchParams` and `usePathname` together to listen to page changes. See the Router Events section for more details. * These new hooks are only supported in Client Components. They cannot be used in Server Components. 'use client' import { useRouter, usePathname, useSearchParams } from 'next/navigation' export default function ExampleClientComponent() { const router = useRouter() const pathname = usePathname() const searchParams = useSearchParams() // ... } In addition, the new `useRouter` hook has the following changes: * `isFallback` has been removed because `fallback` has been replaced. * The `locale`, `locales`, `defaultLocales`, `domainLocales` values have been removed because built-in i18n Next.js features are no longer necessary in the `app` directory. Learn more about i18n. * `basePath` has been removed. The alternative will not be part of `useRouter`. It has not yet been implemented. * `asPath` has been removed because the concept of `as` has been removed from the new router. * `isReady` has been removed because it is no longer necessary. During static rendering, any component that uses the `useSearchParams()` hook will skip the prerendering step and instead be rendered on the client at runtime. View the `useRouter()` API reference. ### Step 6: Migrating Data Fetching Methods The `pages` directory uses `getServerSideProps` and `getStaticProps` to fetch data for pages. Inside the `app` directory, these previous data fetching functions are replaced with a simpler API built on top of `fetch()` and `async` React Server Components. export default async function Page() { // This request should be cached until manually invalidated. // Similar to `getStaticProps`. // `force-cache` is the default and can be omitted. const staticData = await fetch(`https://...`, { cache: 'force-cache' }) // This request should be refetched on every request. // Similar to `getServerSideProps`. const dynamicData = await fetch(`https://...`, { cache: 'no-store' }) // This request should be cached with a lifetime of 10 seconds. // Similar to `getStaticProps` with the `revalidate` option. const revalidatedData = await fetch(`https://...`, { next: { revalidate: 10 }, }) return <div>...</div> } #### Server-side Rendering (`getServerSideProps`) In the `pages` directory, `getServerSideProps` is used to fetch data on the server and forward props to the default exported React component in the file. The initial HTML for the page is prerendered from the server, followed by "hydrating" the page in the browser (making it interactive). // `pages` directory export async function getServerSideProps() { const res = await fetch(`https://...`) const projects = await res.json() return { props: { projects } } } export default function Dashboard({ projects }) { return ( <ul> {projects.map((project) => ( <li key={project.id}>{project.name}</li> ))} </ul> ) } In the `app` directory, we can colocate our data fetching inside our React components using Server Components. This allows us to send less JavaScript to the client, while maintaining the rendered HTML from the server. By setting the `cache` option to `no-store`, we can indicate that the fetched data should never be cached. This is similar to `getServerSideProps` in the `pages` directory. // `app` directory // This function can be named anything async function getProjects() { const res = await fetch(`https://...`, { cache: 'no-store' }) const projects = await res.json() return projects } export default async function Dashboard() { const projects = await getProjects() return ( <ul> {projects.map((project) => ( <li key={project.id}>{project.name}</li> ))} </ul> ) } #### Accessing Request Object In the `pages` directory, you can retrieve request-based data based on the Node.js HTTP API. For example, you can retrieve the `req` object from `getServerSideProps` and use it to retrieve the request's cookies and headers. // `pages` directory export async function getServerSideProps({ req, query }) { const authHeader = req.getHeaders()['authorization']; const theme = req.cookies['theme']; return { props: { ... }} } export default function Page(props) { return ... } The `app` directory exposes new read-only functions to retrieve request data: * `headers()`: Based on the Web Headers API, and can be used inside Server Components to retrieve request headers. * `cookies()`: Based on the Web Cookies API, and can be used inside Server Components to retrieve cookies. // `app` directory import { cookies, headers } from 'next/headers' async function getData() { const authHeader = headers().get('authorization') return '...' } export default async function Page() { // You can use `cookies()` or `headers()` inside Server Components // directly or in your data fetching function const theme = cookies().get('theme') const data = await getData() return '...' } #### Static Site Generation (`getStaticProps`) In the `pages` directory, the `getStaticProps` function is used to pre-render a page at build time. This function can be used to fetch data from an external API or directly from a database, and pass this data down to the entire page as it's being generated during the build. // `pages` directory export async function getStaticProps() { const res = await fetch(`https://...`) const projects = await res.json() return { props: { projects } } } export default function Index({ projects }) { return projects.map((project) => <div>{project.name}</div>) } In the `app` directory, data fetching with `fetch()` will default to `cache: 'force-cache'`, which will cache the request data until manually invalidated. This is similar to `getStaticProps` in the `pages` directory. // `app` directory // This function can be named anything async function getProjects() { const res = await fetch(`https://...`) const projects = await res.json() return projects } export default async function Index() { const projects = await getProjects() return projects.map((project) => <div>{project.name}</div>) } #### Dynamic paths (`getStaticPaths`) In the `pages` directory, the `getStaticPaths` function is used to define the dynamic paths that should be pre-rendered at build time. // `pages` directory import PostLayout from '@/components/post-layout' export async function getStaticPaths() { return { paths: [{ params: { id: '1' } }, { params: { id: '2' } }], } } export async function getStaticProps({ params }) { const res = await fetch(`https://.../posts/${params.id}`) const post = await res.json() return { props: { post } } } export default function Post({ post }) { return <PostLayout post={post} /> } In the `app` directory, `getStaticPaths` is replaced with `generateStaticParams`. `generateStaticParams` behaves similarly to `getStaticPaths`, but has a simplified API for returning route parameters and can be used inside layouts. The return shape of `generateStaticParams` is an array of segments instead of an array of nested `param` objects or a string of resolved paths. // `app` directory import PostLayout from '@/components/post-layout' export async function generateStaticParams() { return [{ id: '1' }, { id: '2' }] } async function getPost(params) { const res = await fetch(`https://.../posts/${params.id}`) const post = await res.json() return post } export default async function Post({ params }) { const post = await getPost(params) return <PostLayout post={post} /> } Using the name `generateStaticParams` is more appropriate than `getStaticPaths` for the new model in the `app` directory. The `get` prefix is replaced with a more descriptive `generate`, which sits better alone now that `getStaticProps` and `getServerSideProps` are no longer necessary. The `Paths` suffix is replaced by `Params`, which is more appropriate for nested routing with multiple dynamic segments. * * * #### Replacing `fallback` In the `pages` directory, the `fallback` property returned from `getStaticPaths` is used to define the behavior of a page that isn't pre-rendered at build time. This property can be set to `true` to show a fallback page while the page is being generated, `false` to show a 404 page, or `blocking` to generate the page at request time. // `pages` directory export async function getStaticPaths() { return { paths: [], fallback: 'blocking' }; } export async function getStaticProps({ params }) { ... } export default function Post({ post }) { return ... } In the `app` directory the `config.dynamicParams` property controls how params outside of `generateStaticParams` are handled: * **`true`**: (default) Dynamic segments not included in `generateStaticParams` are generated on demand. * **`false`**: Dynamic segments not included in `generateStaticParams` will return a 404. This replaces the `fallback: true | false | 'blocking'` option of `getStaticPaths` in the `pages` directory. The `fallback: 'blocking'` option is not included in `dynamicParams` because the difference between `'blocking'` and `true` is negligible with streaming. // `app` directory export const dynamicParams = true; export async function generateStaticParams() { return [...] } async function getPost(params) { ... } export default async function Post({ params }) { const post = await getPost(params); return ... } With `dynamicParams` set to `true` (the default), when a route segment is requested that hasn't been generated, it will be server-rendered and cached. #### Incremental Static Regeneration (`getStaticProps` with `revalidate`) In the `pages` directory, the `getStaticProps` function allows you to add a `revalidate` field to automatically regenerate a page after a certain amount of time. // `pages` directory export async function getStaticProps() { const res = await fetch(`https://.../posts`) const posts = await res.json() return { props: { posts }, revalidate: 60, } } export default function Index({ posts }) { return ( <Layout> <PostList posts={posts} /> </Layout> ) } In the `app` directory, data fetching with `fetch()` can use `revalidate`, which will cache the request for the specified amount of seconds. // `app` directory async function getPosts() { const res = await fetch(`https://.../posts`, { next: { revalidate: 60 } }) const data = await res.json() return data.posts } export default async function PostList() { const posts = await getPosts() return posts.map((post) => <div>{post.name}</div>) } #### API Routes API Routes continue to work in the `pages/api` directory without any changes. However, they have been replaced by Route Handlers in the `app` directory. Route Handlers allow you to create custom request handlers for a given route using the Web Request and Response APIs. export async function GET(request: Request) {} > **Good to know**: If you previously used API routes to call an external API from the client, you can now use Server Components instead to securely fetch data. Learn more about data fetching. ### Step 7: Styling In the `pages` directory, global stylesheets are restricted to only `pages/_app.js`. With the `app` directory, this restriction has been lifted. Global styles can be added to any layout, page, or component. * CSS Modules * Tailwind CSS * Global Styles * CSS-in-JS * External Stylesheets * Sass #### Tailwind CSS If you're using Tailwind CSS, you'll need to add the `app` directory to your `tailwind.config.js` file: module.exports = { content: [ './app/**/*.{js,ts,jsx,tsx,mdx}', // <-- Add this line './pages/**/*.{js,ts,jsx,tsx,mdx}', './components/**/*.{js,ts,jsx,tsx,mdx}', ], } You'll also need to import your global styles in your `app/layout.js` file: import '../styles/globals.css' export default function RootLayout({ children }) { return ( <html lang="en"> <body>{children}</body> </html> ) } Learn more about styling with Tailwind CSS ## Codemods Next.js provides Codemod transformations to help upgrade your codebase when a feature is deprecated. See Codemods for more information. --- ## Page: https://nextjs.org/docs/13/app/building-your-application/upgrading/from-vite This guide will help you migrate an existing Vite application to Next.js. ## Why Switch? There are several reasons why you might want to switch from Vite to Next.js: 1. **Slow initial page loading time**: If you have built your application with the default Vite plugin for React, your application is a purely client-side application. Client-side only applications, also known as single-page applications (SPAs), often experience slow initial page loading time. This happens due to a couple of reasons: 1. The browser needs to wait for the React code and your entire application bundle to download and run before your code is able to send requests to load some data. 2. Your application code grows with every new feature and extra dependency you add. 2. **No automatic code splitting**: The previous issue of slow loading times can be somewhat managed with code splitting. However, if you try to do code splitting manually, you'll often make performance worse. It's easy to inadvertently introduce network waterfalls when code-splitting manually. Next.js provides automatic code splitting built into its router. 3. **Network waterfalls**: A common cause of poor performance occurs when applications make sequential client-server requests to fetch data. One common pattern for data fetching in an SPA is to initially render a placeholder, and then fetch data after the component has mounted. Unfortunately, this means that a child component that fetches data can't start fetching until the parent component has finished loading its own data. On Next.js, this issue is resolved by fetching data in Server Components. 4. **Fast and intentional loading states**: Thanks to built-in support for Streaming with Suspense, with Next.js, you can be more intentional about which parts of your UI you want to load first and in what order without introducing network waterfalls. This enables you to build pages that are faster to load and also eliminate layout shifts. 5. **Choose the data fetching strategy**: Depending on your needs, Next.js allows you to choose your data fetching strategy on a page and component basis. You can decide to fetch at build time, at request time on the server, or on the client. For example, you can fetch data from your CMS and render your blog posts at build time, which can then be efficiently cached on a CDN. 6. **Middleware**: Next.js Middleware allows you to run code on the server before a request is completed. This is especially useful to avoid having a flash of unauthenticated content when the user visits an authenticated-only page by redirecting the user to a login page. The middleware is also useful for experimentation and internationalization. 7. **Built-in Optimizations**: Images, fonts, and third-party scripts often have significant impact on an application's performance. Next.js comes with built-in components that automatically optimize those for you. ## Migration Steps Our goal with this migration is to get a working Next.js application as quickly as possible, so that you can then adopt Next.js features incrementally. To begin with, we'll keep it as a purely client-side application (SPA) without migrating your existing router. This helps minimize the chances of encountering issues during the migration process and reduces merge conflicts. ### Step 1: Install the Next.js Dependency The first thing you need to do is to install `next` as a dependency: npm install next@latest ### Step 2: Create the Next.js Configuration File Create a `next.config.mjs` at the root of your project. This file will hold your Next.js configuration options. /** @type {import('next').NextConfig} */ const nextConfig = { output: 'export', // Outputs a Single-Page Application (SPA). distDir: './dist', // Changes the build output directory to `./dist/`. } export default nextConfig > **Good to know:** You can use either `.js` or `.mjs` for your Next.js configuration file. ### Step 3: Update TypeScript Configuration If you're using TypeScript, you need to update your `tsconfig.json` file with the following changes to make it compatible with Next.js. If you're not using TypeScript, you can skip this step. 1. Remove the project reference to `tsconfig.node.json` 2. Add `./dist/types/**/*.ts` and `./next-env.d.ts` to the `include` array 3. Add `./node_modules` to the `exclude` array 4. Add `{ "name": "next" }` to the `plugins` array in `compilerOptions`: `"plugins": [{ "name": "next" }]` 5. Set `esModuleInterop` to `true`: `"esModuleInterop": true` 6. Set `jsx` to `preserve`: `"jsx": "preserve"` 7. Set `allowJs` to `true`: `"allowJs": true` 8. Set `forceConsistentCasingInFileNames` to `true`: `"forceConsistentCasingInFileNames": true` 9. Set `incremental` to `true`: `"incremental": true` Here's an example of a working `tsconfig.json` with those changes: { "compilerOptions": { "target": "ES2020", "useDefineForClassFields": true, "lib": ["ES2020", "DOM", "DOM.Iterable"], "module": "ESNext", "esModuleInterop": true, "skipLibCheck": true, "moduleResolution": "bundler", "allowImportingTsExtensions": true, "resolveJsonModule": true, "isolatedModules": true, "noEmit": true, "jsx": "preserve", "strict": true, "noUnusedLocals": true, "noUnusedParameters": true, "noFallthroughCasesInSwitch": true, "allowJs": true, "forceConsistentCasingInFileNames": true, "incremental": true, "plugins": [{ "name": "next" }] }, "include": ["./src", "./dist/types/**/*.ts", "./next-env.d.ts"], "exclude": ["./node_modules"] } You can find more information about configuring TypeScript on the Next.js docs. ### Step 4: Create the Root Layout A Next.js App Router application must include a root layout file, which is a React Server Component that will wrap all pages in your application. This file is defined at the top level of the `app` directory. The closest equivalent to the root layout file in a Vite application is the `index.html` file, which contains your `<html>`, `<head>`, and `<body>` tags. In this step, you'll convert your `index.html` file into a root layout file: 1. Create a new `app` directory in your `src` directory. 2. Create a new `layout.tsx` file inside that `app` directory: export default function RootLayout({ children, }: { children: React.ReactNode }) { return null } > **Good to know**: `.js`, `.jsx`, or `.tsx` extensions can be used for Layout files. 3. Copy the content of your `index.html` file into the previously created `<RootLayout>` component while replacing the `body.div#root` and `body.script` tags with `<div id="root">{children}</div>`: export default function RootLayout({ children, }: { children: React.ReactNode }) { return ( <html lang="en"> <head> <meta charset="UTF-8" /> <link rel="icon" type="image/svg+xml" href="/icon.svg" /> <meta name="viewport" content="width=device-width, initial-scale=1.0" /> <title>My App</title> <meta name="description" content="My App is a..." /> </head> <body> <div id="root">{children}</div> </body> </html> ) } 4. Next.js already includes by default the meta charset and meta viewport tags, so you can safely remove those from your `<head>`: export default function RootLayout({ children, }: { children: React.ReactNode }) { return ( <html lang="en"> <head> <link rel="icon" type="image/svg+xml" href="/icon.svg" /> <title>My App</title> <meta name="description" content="My App is a..." /> </head> <body> <div id="root">{children}</div> </body> </html> ) } 5. Any metadata files such as `favicon.ico`, `icon.png`, `robots.txt` are automatically added to the application `<head>` tag as long as you have them placed into the top level of the `app` directory. After moving all supported files into the `app` directory you can safely delete their `<link>` tags: export default function RootLayout({ children, }: { children: React.ReactNode }) { return ( <html lang="en"> <head> <title>My App</title> <meta name="description" content="My App is a..." /> </head> <body> <div id="root">{children}</div> </body> </html> ) } 6. Finally, Next.js can manage your last `<head>` tags with the Metadata API. Move your final metadata info into an exported `metadata` object: import type { Metadata } from 'next' export const metadata: Metadata = { title: 'My App', description: 'My App is a...', } export default function RootLayout({ children, }: { children: React.ReactNode }) { return ( <html lang="en"> <body> <div id="root">{children}</div> </body> </html> ) } With the above changes, you shifted from declaring everything in your `index.html` to using Next.js' convention-based approach built into the framework (Metadata API). This approach enables you to more easily improve your SEO and web shareability of your pages. ### Step 5: Create the Entrypoint Page On Next.js you declare an entrypoint for your application by creating a `page.tsx` file. The closest equivalent of this file on Vite is your `main.tsx` file. In this step, you’ll set up the entrypoint of your application. 1. **Create a `[[...slug]]` directory in your `app` directory.** Since in this guide we're aiming first to set up our Next.js as an SPA (Single Page Application), you need your page entrypoint to catch all possible routes of your application. For that, create a new `[[...slug]]` directory in your `app` directory. This directory is what is called an optional catch-all route segment. Next.js uses a file-system based router where directories are used to define routes. This special directory will make sure that all routes of your application will be directed to its containing `page.tsx` file. 2. **Create a new `page.tsx` file inside the `app/[[...slug]]` directory with the following content:** 'use client' import dynamic from 'next/dynamic' import '../../index.css' const App = dynamic(() => import('../../App'), { ssr: false }) export default function Page() { return <App /> } > **Good to know**: `.js`, `.jsx`, or `.tsx` extensions can be used for Page files. This file contains a `<Page>` component which is marked as a Client Component by the `'use client'` directive. Without that directive, the component would have been a Server Component. In Next.js, Client Components are prerendered to HTML on the server before being sent to the client, but since we want to first have a purely client-side application, you need to tell Next.js to disable the prerendering for the `<App>` component by dynamically importing it with the `ssr` option set to `false`: const App = dynamic(() => import('../../App'), { ssr: false }) ### Step 6: Update Static Image Imports Next.js handles static image imports slightly different from Vite. With Vite, importing an image file will return its public URL as a string: import image from './img.png' // `image` will be '/assets/img.2d8efhg.png' in production export default function App() { return <img src={image} /> } With Next.js, static image imports return an object. The object can then be used directly with the Next.js `<Image>` component, or you can use the object's `src` property with your existing `<img>` tag. The `<Image>` component has the added benefits of automatic image optimization. The `<Image>` component automatically sets the `width` and `height` attributes of the resulting `<img>` based on the image's dimensions. This prevents layout shifts when the image loads. However, this can cause issues if your app contains images with only one of their dimensions being styled without the other styled to `auto`. When not styled to `auto`, the dimension will default to the `<img>` dimension attribute's value, which can cause the image to appear distorted. Keeping the `<img>` tag will reduce the amount of changes in your application and prevent the above issues. However, you'll still want to later migrate to the `<Image>` component to take advantage of the automatic optimizations. 1. **Convert absolute import paths for images imported from `/public` into relative imports:** // Before import logo from '/logo.png' // After import logo from '../public/logo.png' 2. **Pass the image `src` property instead of the whole image object to your `<img>` tag:** // Before <img src={logo} /> // After <img src={logo.src} /> > **Warning:** If you're using TypeScript, you might encounter type errors when accessing the `src` property. You can safely ignore those for now. They will be fixed by the end of this guide. ### Step 7: Migrate the Environment Variables Next.js has support for `.env` environment variables similar to Vite. The main difference is the prefix used to expose environment variables on the client-side. * Change all environment variables with the `VITE_` prefix to `NEXT_PUBLIC_`. Vite exposes a few built-in environment variables on the special `import.meta.env` object which aren’t supported by Next.js. You need to update their usage as follows: * `import.meta.env.MODE` ⇒ `process.env.NODE_ENV` * `import.meta.env.PROD` ⇒ `process.env.NODE_ENV === 'production'` * `import.meta.env.DEV` ⇒ `process.env.NODE_ENV !== 'production'` * `import.meta.env.SSR` ⇒ `typeof window !== 'undefined'` Next.js also doesn't provide a built-in `BASE_URL` environment variable. However, you can still configure one, if you need it: 1. **Add the following to your `.env` file:** # ... NEXT_PUBLIC_BASE_PATH="/some-base-path" 2. **Set `basePath` to `process.env.NEXT_PUBLIC_BASE_PATH` in your `next.config.mjs` file:** /** @type {import('next').NextConfig} */ const nextConfig = { output: 'export', // Outputs a Single-Page Application (SPA). distDir: './dist', // Changes the build output directory to `./dist/`. basePath: process.env.NEXT_PUBLIC_BASE_PATH, // Sets the base path to `/some-base-path`. } export default nextConfig 3. **Update `import.meta.env.BASE_URL` usages to `process.env.NEXT_PUBLIC_BASE_PATH`** ### Step 8: Update Scripts in `package.json` You should now be able to run your application to test if you successfully migrated to Next.js. But before that, you need to update your `scripts` in your `package.json` with Next.js related commands, and add `.next` and `next-env.d.ts` to your `.gitignore`: { "scripts": { "dev": "next dev", "build": "next build", "start": "next start" } } # ... .next next-env.d.ts Now run `npm run dev`, and open `http://localhost:3000`. You should hopefully see your application now running on Next.js. If your application followed a conventional Vite configuration, this is all you would need to do to have a working version of your application. > **Example:** Check out this pull request for a working example of a Vite application migrated to Next.js. ### Step 9: Clean Up You can now clean up your codebase from Vite related artifacts: * Delete `main.tsx` * Delete `index.html` * Delete `vite-env.d.ts` * Delete `tsconfig.node.json` * Delete `vite.config.ts` * Uninstall Vite dependencies ## Next Steps If everything went according to plan, you now have a functioning Next.js application running as a single-page application. However, you aren't yet taking advantage of most of Next.js' benefits, but you can now start making incremental changes to reap all the benefits. Here's what you might want to do next: * Migrate from React Router to the Next.js App Router to get: * Automatic code splitting * Streaming Server-Rendering * React Server Components * Optimize images with the `<Image>` component * Optimize fonts with `next/font` * Optimize third-party scripts with the `<Script>` component * Update your ESLint configuration to support Next.js rules --- ## Page: https://nextjs.org/docs/13/app/api-reference #### Subscribe to our newsletter Stay updated on new releases and features, guides, and case studies. --- ## Page: https://nextjs.org/docs/13/app/api-reference/components #### Subscribe to our newsletter Stay updated on new releases and features, guides, and case studies. --- ## Page: https://nextjs.org/docs/13/app/api-reference/components/font ## Font Module This API reference will help you understand how to use `next/font/google` and `next/font/local`. For features and usage, please see the Optimizing Fonts page. ### Font Function Arguments For usage, review Google Fonts and Local Fonts. | Key | `font/google` | `font/local` | Type | Required | | --- | --- | --- | --- | --- | | `src` | | | String or Array of Objects | Yes | | `weight` | | | String or Array | Required/Optional | | `style` | | | String or Array | \- | | `subsets` | | | Array of Strings | \- | | `axes` | | | Array of Strings | \- | | `display` | | | String | \- | | `preload` | | | Boolean | \- | | `fallback` | | | Array of Strings | \- | | `adjustFontFallback` | | | Boolean or String | \- | | `variable` | | | String | \- | | `declarations` | | | Array of Objects | \- | ### `src` The path of the font file as a string or an array of objects (with type `Array<{path: string, weight?: string, style?: string}>`) relative to the directory where the font loader function is called. Used in `next/font/local` * Required Examples: * `src:'./fonts/my-font.woff2'` where `my-font.woff2` is placed in a directory named `fonts` inside the `app` directory * `src:[{path: './inter/Inter-Thin.ttf', weight: '100',},{path: './inter/Inter-Regular.ttf',weight: '400',},{path: './inter/Inter-Bold-Italic.ttf', weight: '700',style: 'italic',},]` * if the font loader function is called in `app/page.tsx` using `src:'../styles/fonts/my-font.ttf'`, then `my-font.ttf` is placed in `styles/fonts` at the root of the project ### `weight` The font `weight` with the following possibilities: * A string with possible values of the weights available for the specific font or a range of values if it's a variable font * An array of weight values if the font is not a variable google font. It applies to `next/font/google` only. Used in `next/font/google` and `next/font/local` * Required if the font being used is **not** variable Examples: * `weight: '400'`: A string for a single weight value - for the font `Inter`, the possible values are `'100'`, `'200'`, `'300'`, `'400'`, `'500'`, `'600'`, `'700'`, `'800'`, `'900'` or `'variable'` where `'variable'` is the default) * `weight: '100 900'`: A string for the range between `100` and `900` for a variable font * `weight: ['100','400','900']`: An array of 3 possible values for a non variable font ### `style` The font `style` with the following possibilities: * A string value with default value of `'normal'` * An array of style values if the font is not a variable google font. It applies to `next/font/google` only. Used in `next/font/google` and `next/font/local` * Optional Examples: * `style: 'italic'`: A string - it can be `normal` or `italic` for `next/font/google` * `style: 'oblique'`: A string - it can take any value for `next/font/local` but is expected to come from standard font styles * `style: ['italic','normal']`: An array of 2 values for `next/font/google` - the values are from `normal` and `italic` ### `subsets` The font `subsets` defined by an array of string values with the names of each subset you would like to be preloaded. Fonts specified via `subsets` will have a link preload tag injected into the head when the `preload` option is true, which is the default. Used in `next/font/google` * Optional Examples: * `subsets: ['latin']`: An array with the subset `latin` You can find a list of all subsets on the Google Fonts page for your font. ### `axes` Some variable fonts have extra `axes` that can be included. By default, only the font weight is included to keep the file size down. The possible values of `axes` depend on the specific font. Used in `next/font/google` * Optional Examples: * `axes: ['slnt']`: An array with value `slnt` for the `Inter` variable font which has `slnt` as additional `axes` as shown here. You can find the possible `axes` values for your font by using the filter on the Google variable fonts page and looking for axes other than `wght` ### `display` The font `display` with possible string values of `'auto'`, `'block'`, `'swap'`, `'fallback'` or `'optional'` with default value of `'swap'`. Used in `next/font/google` and `next/font/local` * Optional Examples: * `display: 'optional'`: A string assigned to the `optional` value ### `preload` A boolean value that specifies whether the font should be preloaded or not. The default is `true`. Used in `next/font/google` and `next/font/local` * Optional Examples: * `preload: false` ### `fallback` The fallback font to use if the font cannot be loaded. An array of strings of fallback fonts with no default. * Optional Used in `next/font/google` and `next/font/local` Examples: * `fallback: ['system-ui', 'arial']`: An array setting the fallback fonts to `system-ui` or `arial` ### `adjustFontFallback` * For `next/font/google`: A boolean value that sets whether an automatic fallback font should be used to reduce Cumulative Layout Shift. The default is `true`. * For `next/font/local`: A string or boolean `false` value that sets whether an automatic fallback font should be used to reduce Cumulative Layout Shift. The possible values are `'Arial'`, `'Times New Roman'` or `false`. The default is `'Arial'`. Used in `next/font/google` and `next/font/local` * Optional Examples: * `adjustFontFallback: false`: for `next/font/google` * `adjustFontFallback: 'Times New Roman'`: for `next/font/local` ### `variable` A string value to define the CSS variable name to be used if the style is applied with the CSS variable method. Used in `next/font/google` and `next/font/local` * Optional Examples: * `variable: '--my-font'`: The CSS variable `--my-font` is declared ### `declarations` An array of font face descriptor key-value pairs that define the generated `@font-face` further. Used in `next/font/local` * Optional Examples: * `declarations: [{ prop: 'ascent-override', value: '90%' }]` ## Applying Styles You can apply the font styles in three ways: * `className` * `style` * CSS Variables ### `className` Returns a read-only CSS `className` for the loaded font to be passed to an HTML element. <p className={inter.className}>Hello, Next.js!</p> ### `style` Returns a read-only CSS `style` object for the loaded font to be passed to an HTML element, including `style.fontFamily` to access the font family name and fallback fonts. <p style={inter.style}>Hello World</p> ### CSS Variables If you would like to set your styles in an external style sheet and specify additional options there, use the CSS variable method. In addition to importing the font, also import the CSS file where the CSS variable is defined and set the variable option of the font loader object as follows: import { Inter } from 'next/font/google' import styles from '../styles/component.module.css' const inter = Inter({ variable: '--font-inter', }) To use the font, set the `className` of the parent container of the text you would like to style to the font loader's `variable` value and the `className` of the text to the `styles` property from the external CSS file. <main className={inter.variable}> <p className={styles.text}>Hello World</p> </main> Define the `text` selector class in the `component.module.css` CSS file as follows: .text { font-family: var(--font-inter); font-weight: 200; font-style: italic; } In the example above, the text `Hello World` is styled using the `Inter` font and the generated font fallback with `font-weight: 200` and `font-style: italic`. ## Using a font definitions file Every time you call the `localFont` or Google font function, that font will be hosted as one instance in your application. Therefore, if you need to use the same font in multiple places, you should load it in one place and import the related font object where you need it. This is done using a font definitions file. For example, create a `fonts.ts` file in a `styles` folder at the root of your app directory. Then, specify your font definitions as follows: import { Inter, Lora, Source_Sans_3 } from 'next/font/google' import localFont from 'next/font/local' // define your variable fonts const inter = Inter() const lora = Lora() // define 2 weights of a non-variable font const sourceCodePro400 = Source_Sans_3({ weight: '400' }) const sourceCodePro700 = Source_Sans_3({ weight: '700' }) // define a custom local font where GreatVibes-Regular.ttf is stored in the styles folder const greatVibes = localFont({ src: './GreatVibes-Regular.ttf' }) export { inter, lora, sourceCodePro400, sourceCodePro700, greatVibes } You can now use these definitions in your code as follows: import { inter, lora, sourceCodePro700, greatVibes } from '../styles/fonts' export default function Page() { return ( <div> <p className={inter.className}>Hello world using Inter font</p> <p style={lora.style}>Hello world using Lora font</p> <p className={sourceCodePro700.className}> Hello world using Source_Sans_3 font with weight 700 </p> <p className={greatVibes.className}>My title in Great Vibes font</p> </div> ) } To make it easier to access the font definitions in your code, you can define a path alias in your `tsconfig.json` or `jsconfig.json` files as follows: { "compilerOptions": { "paths": { "@/fonts": ["./styles/fonts"] } } } You can now import any font definition as follows: import { greatVibes, sourceCodePro400 } from '@/fonts' ## Version Changes | Version | Changes | | --- | --- | | `v13.2.0` | `@next/font` renamed to `next/font`. Installation no longer required. | | `v13.0.0` | `@next/font` was added. | --- ## Page: https://nextjs.org/docs/13/app/api-reference/components/image Examples * Image Component This API reference will help you understand how to use props and configuration options available for the Image Component. For features and usage, please see the Image Component page. import Image from 'next/image' export default function Page() { return ( <Image src="/profile.png" width={500} height={500} alt="Picture of the author" /> ) } ## Props Here's a summary of the props available for the Image Component: | Prop | Example | Type | Required | | --- | --- | --- | --- | | `src` | `src="/profile.png"` | String | Yes | | `width` | `width={500}` | Integer (px) | Yes | | `height` | `height={500}` | Integer (px) | Yes | | `alt` | `alt="Picture of the author"` | String | Yes | | `loader` | `loader={imageLoader}` | Function | \- | | `fill` | `fill={true}` | Boolean | \- | | `sizes` | `sizes="(max-width: 768px) 100vw"` | String | \- | | `quality` | `quality={80}` | Integer (1-100) | \- | | `priority` | `priority={true}` | Boolean | \- | | `placeholder` | `placeholder="blur"` | String | \- | | `style` | `style={{objectFit: "contain"}}` | Object | \- | | `onLoadingComplete` | `onLoadingComplete={img => done())}` | Function | \- | | `onLoad` | `onLoad={event => done())}` | Function | \- | | `onError` | `onError(event => fail()}` | Function | \- | | `loading` | `loading="lazy"` | String | \- | | `blurDataURL` | `blurDataURL="data:image/jpeg..."` | String | \- | ## Required Props The Image Component requires the following properties: `src`, `width`, `height`, and `alt`. import Image from 'next/image' export default function Page() { return ( <div> <Image src="/profile.png" width={500} height={500} alt="Picture of the author" /> </div> ) } ### `src` Must be one of the following: * A statically imported image file * A path string. This can be either an absolute external URL, or an internal path depending on the loader prop. When using an external URL, you must add it to remotePatterns in `next.config.js`. ### `width` The `width` property represents the _rendered_ width in pixels, so it will affect how large the image appears. Required, except for statically imported images or images with the `fill` property. ### `height` The `height` property represents the _rendered_ height in pixels, so it will affect how large the image appears. Required, except for statically imported images or images with the `fill` property. ### `alt` The `alt` property is used to describe the image for screen readers and search engines. It is also the fallback text if images have been disabled or an error occurs while loading the image. It should contain text that could replace the image without changing the meaning of the page. It is not meant to supplement the image and should not repeat information that is already provided in the captions above or below the image. If the image is purely decorative or not intended for the user, the `alt` property should be an empty string (`alt=""`). Learn more ## Optional Props The `<Image />` component accepts a number of additional properties beyond those which are required. This section describes the most commonly-used properties of the Image component. Find details about more rarely-used properties in the Advanced Props section. ### `loader` A custom function used to resolve image URLs. A `loader` is a function returning a URL string for the image, given the following parameters: * `src` * `width` * `quality` Here is an example of using a custom loader: 'use client' import Image from 'next/image' const imageLoader = ({ src, width, quality }) => { return `https://example.com/${src}?w=${width}&q=${quality || 75}` } export default function Page() { return ( <Image loader={imageLoader} src="me.png" alt="Picture of the author" width={500} height={500} /> ) } > **Good to know**: Using props like `loader`, which accept a function, require using Client Components to serialize the provided function. Alternatively, you can use the loaderFile configuration in `next.config.js` to configure every instance of `next/image` in your application, without passing a prop. ### `fill` fill={true} // {true} | {false} A boolean that causes the image to fill the parent element, which is useful when the `width` and `height` are unknown. The parent element _must_ assign `position: "relative"`, `position: "fixed"`, or `position: "absolute"` style. By default, the img element will automatically be assigned the `position: "absolute"` style. If no styles are applied to the image, the image will stretch to fit the container. You may prefer to set `object-fit: "contain"` for an image which is letterboxed to fit the container and preserve aspect ratio. Alternatively, `object-fit: "cover"` will cause the image to fill the entire container and be cropped to preserve aspect ratio. For this to look correct, the `overflow: "hidden"` style should be assigned to the parent element. For more information, see also: * `position` * `object-fit` * `object-position` ### `sizes` A string, similar to a media query, that provides information about how wide the image will be at different breakpoints. The value of `sizes` will greatly affect performance for images using `fill` or which are styled to have a responsive size. The `sizes` property serves two important purposes related to image performance: * First, the value of `sizes` is used by the browser to determine which size of the image to download, from `next/image`'s automatically generated `srcset`. When the browser chooses, it does not yet know the size of the image on the page, so it selects an image that is the same size or larger than the viewport. The `sizes` property allows you to tell the browser that the image will actually be smaller than full screen. If you don't specify a `sizes` value in an image with the `fill` property, a default value of `100vw` (full screen width) is used. * Second, the `sizes` property changes the behavior of the automatically generated `srcset` value. If no `sizes` value is present, a small `srcset` is generated, suitable for a fixed-size image (1x/2x/etc). If `sizes` is defined, a large `srcset` is generated, suitable for a responsive image (640w/750w/etc). If the `sizes` property includes sizes such as `50vw`, which represent a percentage of the viewport width, then the `srcset` is trimmed to not include any values which are too small to ever be necessary. For example, if you know your styling will cause an image to be full-width on mobile devices, in a 2-column layout on tablets, and a 3-column layout on desktop displays, you should include a sizes property such as the following: import Image from 'next/image' export default function Page() { return ( <div className="grid-element"> <Image fill src="/example.png" sizes="(max-width: 768px) 100vw, (max-width: 1200px) 50vw, 33vw" /> </div> ) } This example `sizes` could have a dramatic effect on performance metrics. Without the `33vw` sizes, the image selected from the server would be 3 times as wide as it needs to be. Because file size is proportional to the square of the width, without `sizes` the user would download an image that's 9 times larger than necessary. Learn more about `srcset` and `sizes`: * web.dev * mdn ### `quality` quality={75} // {number 1-100} The quality of the optimized image, an integer between `1` and `100`, where `100` is the best quality and therefore largest file size. Defaults to `75`. ### `priority` priority={false} // {false} | {true} When true, the image will be considered high priority and preload. Lazy loading is automatically disabled for images using `priority`. You should use the `priority` property on any image detected as the Largest Contentful Paint (LCP) element. It may be appropriate to have multiple priority images, as different images may be the LCP element for different viewport sizes. Should only be used when the image is visible above the fold. Defaults to `false`. ### `placeholder` placeholder = 'empty' // "empty" | "blur" | "data:image/..." A placeholder to use while the image is loading. Possible values are `blur`, `empty`, or `data:image/...`. Defaults to `empty`. When `blur`, the `blurDataURL` property will be used as the placeholder. If `src` is an object from a static import and the imported image is `.jpg`, `.png`, `.webp`, or `.avif`, then `blurDataURL` will be automatically populated, except when the image is detected to be animated. For dynamic images, you must provide the `blurDataURL` property. Solutions such as Plaiceholder can help with `base64` generation. When `data:image/...`, the Data URL will be used as the placeholder while the image is loading. When `empty`, there will be no placeholder while the image is loading, only empty space. Try it out: * Demo the `blur` placeholder * Demo the shimmer effect with data URL `placeholder` prop * Demo the color effect with `blurDataURL` prop ## Advanced Props In some cases, you may need more advanced usage. The `<Image />` component optionally accepts the following advanced properties. ### `style` Allows passing CSS styles to the underlying image element. const imageStyle = { borderRadius: '50%', border: '1px solid #fff', } export default function ProfileImage() { return <Image src="..." style={imageStyle} /> } Remember that the required width and height props can interact with your styling. If you use styling to modify an image's width, you should also style its height to `auto` to preserve its intrinsic aspect ratio, or your image will be distorted. ### `onLoadingComplete` 'use client' <Image onLoadingComplete={(img) => console.log(img.naturalWidth)} /> A callback function that is invoked once the image is completely loaded and the placeholder has been removed. The callback function will be called with one argument, a reference to the underlying `<img>` element. > **Good to know**: Using props like `onLoadingComplete`, which accept a function, require using Client Components to serialize the provided function. ### `onLoad` <Image onLoad={(e) => console.log(e.target.naturalWidth)} /> A callback function that is invoked when the image is loaded. The load event might occur before the image placeholder is removed and the image is fully decoded. If you want to wait until the image has fully loaded, use `onLoadingComplete` instead. > **Good to know**: Using props like `onLoad`, which accept a function, require using Client Components to serialize the provided function. ### `onError` <Image onError={(e) => console.error(e.target.id)} /> A callback function that is invoked if the image fails to load. > **Good to know**: Using props like `onError`, which accept a function, require using Client Components to serialize the provided function. ### `loading` > **Recommendation**: This property is only meant for advanced use cases. Switching an image to load with `eager` will normally **hurt performance**. We recommend using the `priority` property instead, which will eagerly preload the image. loading = 'lazy' // {lazy} | {eager} The loading behavior of the image. Defaults to `lazy`. When `lazy`, defer loading the image until it reaches a calculated distance from the viewport. When `eager`, load the image immediately. Learn more about the `loading` attribute. ### `blurDataURL` A Data URL to be used as a placeholder image before the `src` image successfully loads. Only takes effect when combined with `placeholder="blur"`. Must be a base64-encoded image. It will be enlarged and blurred, so a very small image (10px or less) is recommended. Including larger images as placeholders may harm your application performance. Try it out: * Demo the default `blurDataURL` prop * Demo the color effect with `blurDataURL` prop You can also generate a solid color Data URL to match the image. ### `unoptimized` unoptimized = {false} // {false} | {true} When true, the source image will be served as-is instead of changing quality, size, or format. Defaults to `false`. import Image from 'next/image' const UnoptimizedImage = (props) => { return <Image {...props} unoptimized /> } Since Next.js 12.3.0, this prop can be assigned to all images by updating `next.config.js` with the following configuration: module.exports = { images: { unoptimized: true, }, } ### Other Props Other properties on the `<Image />` component will be passed to the underlying `img` element with the exception of the following: * `srcSet`. Use Device Sizes instead. * `decoding`. It is always `"async"`. ## Configuration Options In addition to props, you can configure the Image Component in `next.config.js`. The following options are available: ### `remotePatterns` To protect your application from malicious users, configuration is required in order to use external images. This ensures that only external images from your account can be served from the Next.js Image Optimization API. These external images can be configured with the `remotePatterns` property in your `next.config.js` file, as shown below: module.exports = { images: { remotePatterns: [ { protocol: 'https', hostname: 'example.com', port: '', pathname: '/account123/**', }, ], }, } > **Good to know**: The example above will ensure the `src` property of `next/image` must start with `https://example.com/account123/`. Any other protocol, hostname, port, or unmatched path will respond with 400 Bad Request. Below is another example of the `remotePatterns` property in the `next.config.js` file: module.exports = { images: { remotePatterns: [ { protocol: 'https', hostname: '**.example.com', }, ], }, } > **Good to know**: The example above will ensure the `src` property of `next/image` must start with `https://img1.example.com` or `https://me.avatar.example.com` or any number of subdomains. Any other protocol or unmatched hostname will respond with 400 Bad Request. Wildcard patterns can be used for both `pathname` and `hostname` and have the following syntax: * `*` match a single path segment or subdomain * `**` match any number of path segments at the end or subdomains at the beginning The `**` syntax does not work in the middle of the pattern. ### `domains` > **Warning**: We recommend configuring strict `remotePatterns` instead of `domains` in order to protect your application from malicious users. Only use `domains` if you own all the content served from the domain. Similar to `remotePatterns`, the `domains` configuration can be used to provide a list of allowed hostnames for external images. However, the `domains` configuration does not support wildcard pattern matching and it cannot restrict protocol, port, or pathname. Below is an example of the `domains` property in the `next.config.js` file: module.exports = { images: { domains: ['assets.acme.com'], }, } ### `loaderFile` If you want to use a cloud provider to optimize images instead of using the Next.js built-in Image Optimization API, you can configure the `loaderFile` in your `next.config.js` like the following: module.exports = { images: { loader: 'custom', loaderFile: './my/image/loader.js', }, } This must point to a file relative to the root of your Next.js application. The file must export a default function that returns a string, for example: 'use client' export default function myImageLoader({ src, width, quality }) { return `https://example.com/${src}?w=${width}&q=${quality || 75}` } Alternatively, you can use the `loader` prop to configure each instance of `next/image`. Examples: * Custom Image Loader Configuration > **Good to know**: Customizing the image loader file, which accepts a function, require using Client Components to serialize the provided function. ## Advanced The following configuration is for advanced use cases and is usually not necessary. If you choose to configure the properties below, you will override any changes to the Next.js defaults in future updates. ### `deviceSizes` If you know the expected device widths of your users, you can specify a list of device width breakpoints using the `deviceSizes` property in `next.config.js`. These widths are used when the `next/image` component uses `sizes` prop to ensure the correct image is served for user's device. If no configuration is provided, the default below is used. module.exports = { images: { deviceSizes: [640, 750, 828, 1080, 1200, 1920, 2048, 3840], }, } ### `imageSizes` You can specify a list of image widths using the `images.imageSizes` property in your `next.config.js` file. These widths are concatenated with the array of device sizes to form the full array of sizes used to generate image srcsets. The reason there are two separate lists is that imageSizes is only used for images which provide a `sizes` prop, which indicates that the image is less than the full width of the screen. **Therefore, the sizes in imageSizes should all be smaller than the smallest size in deviceSizes.** If no configuration is provided, the default below is used. module.exports = { images: { imageSizes: [16, 32, 48, 64, 96, 128, 256, 384], }, } ### `formats` The default Image Optimization API will automatically detect the browser's supported image formats via the request's `Accept` header. If the `Accept` head matches more than one of the configured formats, the first match in the array is used. Therefore, the array order matters. If there is no match (or the source image is animated), the Image Optimization API will fallback to the original image's format. If no configuration is provided, the default below is used. module.exports = { images: { formats: ['image/webp'], }, } You can enable AVIF support with the following configuration. module.exports = { images: { formats: ['image/avif', 'image/webp'], }, } > **Good to know**: > > * AVIF generally takes 20% longer to encode but it compresses 20% smaller compared to WebP. This means that the first time an image is requested, it will typically be slower and then subsequent requests that are cached will be faster. > * If you self-host with a Proxy/CDN in front of Next.js, you must configure the Proxy to forward the `Accept` header. ## Caching Behavior The following describes the caching algorithm for the default loader. For all other loaders, please refer to your cloud provider's documentation. Images are optimized dynamically upon request and stored in the `<distDir>/cache/images` directory. The optimized image file will be served for subsequent requests until the expiration is reached. When a request is made that matches a cached but expired file, the expired image is served stale immediately. Then the image is optimized again in the background (also called revalidation) and saved to the cache with the new expiration date. The cache status of an image can be determined by reading the value of the `x-nextjs-cache` response header. The possible values are the following: * `MISS` - the path is not in the cache (occurs at most once, on the first visit) * `STALE` - the path is in the cache but exceeded the revalidate time so it will be updated in the background * `HIT` - the path is in the cache and has not exceeded the revalidate time The expiration (or rather Max Age) is defined by either the `minimumCacheTTL` configuration or the upstream image `Cache-Control` header, whichever is larger. Specifically, the `max-age` value of the `Cache-Control` header is used. If both `s-maxage` and `max-age` are found, then `s-maxage` is preferred. The `max-age` is also passed-through to any downstream clients including CDNs and browsers. * You can configure `minimumCacheTTL` to increase the cache duration when the upstream image does not include `Cache-Control` header or the value is very low. * You can configure `deviceSizes` and `imageSizes` to reduce the total number of possible generated images. * You can configure formats to disable multiple formats in favor of a single image format. ### `minimumCacheTTL` You can configure the Time to Live (TTL) in seconds for cached optimized images. In many cases, it's better to use a Static Image Import which will automatically hash the file contents and cache the image forever with a `Cache-Control` header of `immutable`. module.exports = { images: { minimumCacheTTL: 60, }, } The expiration (or rather Max Age) of the optimized image is defined by either the `minimumCacheTTL` or the upstream image `Cache-Control` header, whichever is larger. If you need to change the caching behavior per image, you can configure `headers` to set the `Cache-Control` header on the upstream image (e.g. `/some-asset.jpg`, not `/_next/image` itself). There is no mechanism to invalidate the cache at this time, so its best to keep `minimumCacheTTL` low. Otherwise you may need to manually change the `src` prop or delete `<distDir>/cache/images`. ### `disableStaticImages` The default behavior allows you to import static files such as `import icon from './icon.png'` and then pass that to the `src` property. In some cases, you may wish to disable this feature if it conflicts with other plugins that expect the import to behave differently. You can disable static image imports inside your `next.config.js`: module.exports = { images: { disableStaticImages: true, }, } ### `dangerouslyAllowSVG` The default loader does not optimize SVG images for a few reasons. First, SVG is a vector format meaning it can be resized losslessly. Second, SVG has many of the same features as HTML/CSS, which can lead to vulnerabilities without a proper Content Security Policy. If you need to serve SVG images with the default Image Optimization API, you can set `dangerouslyAllowSVG` inside your `next.config.js`: module.exports = { images: { dangerouslyAllowSVG: true, contentDispositionType: 'attachment', contentSecurityPolicy: "default-src 'self'; script-src 'none'; sandbox;", }, } In addition, it is strongly recommended to also set `contentDispositionType` to force the browser to download the image, as well as `contentSecurityPolicy` to prevent scripts embedded in the image from executing. ## Animated Images The default loader will automatically bypass Image Optimization for animated images and serve the image as-is. Auto-detection for animated files is best-effort and supports GIF, APNG, and WebP. If you want to explicitly bypass Image Optimization for a given animated image, use the unoptimized prop. ## Responsive Images The default generated `srcset` contains `1x` and `2x` images in order to support different device pixel ratios. However, you may wish to render a responsive image that stretches with the viewport. In that case, you'll need to set `sizes` as well as `style` (or `className`). You can render a responsive image using one of the following methods below. ### Responsive image using a static import If the source image is not dynamic, you can statically import to create a responsive image: import Image from 'next/image' import me from '../photos/me.jpg' export default function Author() { return ( <Image src={me} alt="Picture of the author" sizes="100vw" style={{ width: '100%', height: 'auto', }} /> ) } Try it out: * Demo the image responsive to viewport ### Responsive image with aspect ratio If the source image is a dynamic or a remote url, you will also need to provide `width` and `height` to set the correct aspect ratio of the responsive image: import Image from 'next/image' export default function Page({ photoUrl }) { return ( <Image src={photoUrl} alt="Picture of the author" sizes="100vw" style={{ width: '100%', height: 'auto', }} width={500} height={300} /> ) } Try it out: * Demo the image responsive to viewport ### Responsive image with `fill` If you don't know the aspect ratio, you will need to set the `fill` prop and set `position: relative` on the parent. Optionally, you can set `object-fit` style depending on the desired stretch vs crop behavior: import Image from 'next/image' export default function Page({ photoUrl }) { return ( <div style={{ position: 'relative', width: '500px', height: '300px' }}> <Image src={photoUrl} alt="Picture of the author" sizes="500px" fill style={{ objectFit: 'contain', }} /> </div> ) } Try it out: * Demo the `fill` prop ## Theme Detection If you want to display a different image for light and dark mode, you can create a new component that wraps two `<Image>` components and reveals the correct one based on a CSS media query. .imgDark { display: none; } @media (prefers-color-scheme: dark) { .imgLight { display: none; } .imgDark { display: unset; } } import styles from './theme-image.module.css' import Image, { ImageProps } from 'next/image' type Props = Omit<ImageProps, 'src' | 'priority' | 'loading'> & { srcLight: string srcDark: string } const ThemeImage = (props: Props) => { const { srcLight, srcDark, ...rest } = props return ( <> <Image {...rest} src={srcLight} className={styles.imgLight} /> <Image {...rest} src={srcDark} className={styles.imgDark} /> </> ) } > **Good to know**: The default behavior of `loading="lazy"` ensures that only the correct image is loaded. You cannot use `priority` or `loading="eager"` because that would cause both images to load. Instead, you can use `fetchPriority="high"`. Try it out: * Demo light/dark mode theme detection ## Known Browser Bugs This `next/image` component uses browser native lazy loading, which may fallback to eager loading for older browsers before Safari 15.4. When using the blur-up placeholder, older browsers before Safari 12 will fallback to empty placeholder. When using styles with `width`/`height` of `auto`, it is possible to cause Layout Shift on older browsers before Safari 15 that don't preserve the aspect ratio. For more details, see this MDN video. * Safari 15 - 16.3 display a gray border while loading. Safari 16.4 fixed this issue. Possible solutions: * Use CSS `@supports (font: -apple-system-body) and (-webkit-appearance: none) { img[loading="lazy"] { clip-path: inset(0.6px) } }` * Use `priority` if the image is above the fold * Firefox 67+ displays a white background while loading. Possible solutions: * Enable AVIF `formats` * Use `placeholder` ## Version History | Version | Changes | | --- | --- | | `v13.4.14` | `placeholder` prop support for `data:/image...` | | `v13.2.0` | `contentDispositionType` configuration added. | | `v13.0.6` | `ref` prop added. | | `v13.0.0` | The `next/image` import was renamed to `next/legacy/image`. The `next/future/image` import was renamed to `next/image`. A codemod is available to safely and automatically rename your imports. `<span>` wrapper removed. `layout`, `objectFit`, `objectPosition`, `lazyBoundary`, `lazyRoot` props removed. `alt` is required. `onLoadingComplete` receives reference to `img` element. Built-in loader config removed. | | `v12.3.0` | `remotePatterns` and `unoptimized` configuration is stable. | | `v12.2.0` | Experimental `remotePatterns` and experimental `unoptimized` configuration added. `layout="raw"` removed. | | `v12.1.1` | `style` prop added. Experimental support for `layout="raw"` added. | | `v12.1.0` | `dangerouslyAllowSVG` and `contentSecurityPolicy` configuration added. | | `v12.0.9` | `lazyRoot` prop added. | | `v12.0.0` | `formats` configuration added. AVIF support added. Wrapper `<div>` changed to `<span>`. | | `v11.1.0` | `onLoadingComplete` and `lazyBoundary` props added. | | `v11.0.0` | `src` prop support for static import. `placeholder` prop added. `blurDataURL` prop added. | | `v10.0.5` | `loader` prop added. | | `v10.0.1` | `layout` prop added. | | `v10.0.0` | `next/image` introduced. | --- ## Page: https://nextjs.org/docs/13/app/api-reference/components/link Examples * Hello World * Active className on Link `<Link>` is a React component that extends the HTML `<a>` element to provide prefetching and client-side navigation between routes. It is the primary way to navigate between routes in Next.js. import Link from 'next/link' export default function Page() { return <Link href="/dashboard">Dashboard</Link> } ## Props Here's a summary of the props available for the Link Component: | Prop | Example | Type | Required | | --- | --- | --- | --- | | `href` | `href="/dashboard"` | String or Object | Yes | | `replace` | `replace={false}` | Boolean | \- | | `scroll` | `scroll={false}` | Boolean | \- | | `prefetch` | `prefetch={false}` | Boolean | \- | > **Good to know**: `<a>` tag attributes such as `className` or `target="_blank"` can be added to `<Link>` as props and will be passed to the underlying `<a>` element. ### `href` (required) The path or URL to navigate to. <Link href="/dashboard">Dashboard</Link> `href` can also accept an object, for example: // Navigate to /about?name=test <Link href={{ pathname: '/about', query: { name: 'test' }, }} > About </Link> ### `replace` **Defaults to `false`.** When `true`, `next/link` will replace the current history state instead of adding a new URL into the browser’s history stack. import Link from 'next/link' export default function Page() { return ( <Link href="/dashboard" replace> Dashboard </Link> ) } ### `scroll` **Defaults to `true`.** The default behavior of `<Link>` is to scroll to the top of a new route or to maintain the scroll position for backwards and forwards navigation. When `false`, `next/link` will _not_ scroll to the top of the page after a navigation. import Link from 'next/link' export default function Page() { return ( <Link href="/dashboard" scroll={false}> Dashboard </Link> ) } ### `prefetch` **Defaults to `true`.** When `true`, `next/link` will prefetch the page (denoted by the `href`) in the background. This is useful for improving the performance of client-side navigations. Any `<Link />` in the viewport (initially or through scroll) will be preloaded. Prefetch can be disabled by passing `prefetch={false}`. Prefetching is only enabled in production. import Link from 'next/link' export default function Page() { return ( <Link href="/dashboard" prefetch={false}> Dashboard </Link> ) } ## Examples ### Linking to Dynamic Routes For dynamic routes, it can be handy to use template literals to create the link's path. For example, you can generate a list of links to the dynamic route `app/blog/[slug]/page.js`: import Link from 'next/link' function Page({ posts }) { return ( <ul> {posts.map((post) => ( <li key={post.id}> <Link href={`/blog/${post.slug}`}>{post.title}</Link> </li> ))} </ul> ) } ### Middleware It's common to use Middleware for authentication or other purposes that involve rewriting the user to a different page. In order for the `<Link />` component to properly prefetch links with rewrites via Middleware, you need to tell Next.js both the URL to display and the URL to prefetch. This is required to avoid un-necessary fetches to middleware to know the correct route to prefetch. For example, if you want to serve a `/dashboard` route that has authenticated and visitor views, you may add something similar to the following in your Middleware to redirect the user to the correct page: export function middleware(req) { const nextUrl = req.nextUrl if (nextUrl.pathname === '/dashboard') { if (req.cookies.authToken) { return NextResponse.rewrite(new URL('/auth/dashboard', req.url)) } else { return NextResponse.rewrite(new URL('/public/dashboard', req.url)) } } } In this case, you would want to use the following code in your `<Link />` component: import Link from 'next/link' import useIsAuthed from './hooks/useIsAuthed' export default function Page() { const isAuthed = useIsAuthed() const path = isAuthed ? '/auth/dashboard' : '/dashboard' return ( <Link as="/dashboard" href={path}> Dashboard </Link> ) } ## Version History | Version | Changes | | --- | --- | | `v13.0.0` | No longer requires a child `<a>` tag. A codemod is provided to automatically update your codebase. | | `v10.0.0` | `href` props pointing to a dynamic route are automatically resolved and no longer require an `as` prop. | | `v8.0.0` | Improved prefetching performance. | | `v1.0.0` | `next/link` introduced. | --- ## Page: https://nextjs.org/docs/13/app/api-reference/components/script This API reference will help you understand how to use props available for the Script Component. For features and usage, please see the Optimizing Scripts page. import Script from 'next/script' export default function Dashboard() { return ( <> <Script src="https://example.com/script.js" /> </> ) } ## Props Here's a summary of the props available for the Script Component: | Prop | Example | Type | Required | | --- | --- | --- | --- | | `src` | `src="http://example.com/script"` | String | Required unless inline script is used | | `strategy` | `strategy="lazyOnload"` | String | \- | | `onLoad` | `onLoad={onLoadFunc}` | Function | \- | | `onReady` | `onReady={onReadyFunc}` | Function | \- | | `onError` | `onError={onErrorFunc}` | Function | \- | ## Required Props The `<Script />` component requires the following properties. ### `src` A path string specifying the URL of an external script. This can be either an absolute external URL or an internal path. The `src` property is required unless an inline script is used. ## Optional Props The `<Script />` component accepts a number of additional properties beyond those which are required. ### `strategy` The loading strategy of the script. There are four different strategies that can be used: * `beforeInteractive`: Load before any Next.js code and before any page hydration occurs. * `afterInteractive`: (**default**) Load early but after some hydration on the page occurs. * `lazyOnload`: Load during browser idle time. * `worker`: (experimental) Load in a web worker. ### `beforeInteractive` Scripts that load with the `beforeInteractive` strategy are injected into the initial HTML from the server, downloaded before any Next.js module, and executed in the order they are placed before _any_ hydration occurs on the page. Scripts denoted with this strategy are preloaded and fetched before any first-party code, but their execution does not block page hydration from occurring. `beforeInteractive` scripts must be placed inside the root layout (`app/layout.tsx)` and are designed to load scripts that are needed by the entire site (i.e. the script will load when any page in the application has been loaded server-side). **This strategy should only be used for critical scripts that need to be fetched before any part of the page becomes interactive.** import Script from 'next/script' export default function RootLayout({ children, }: { children: React.ReactNode }) { return ( <html lang="en"> <body>{children}</body> <Script src="https://example.com/script.js" strategy="beforeInteractive" /> </html> ) } > **Good to know**: Scripts with `beforeInteractive` will always be injected inside the `head` of the HTML document regardless of where it's placed in the component. Some examples of scripts that should be loaded as soon as possible with `beforeInteractive` include: * Bot detectors * Cookie consent managers ### `afterInteractive` Scripts that use the `afterInteractive` strategy are injected into the HTML client-side and will load after some (or all) hydration occurs on the page. **This is the default strategy** of the Script component and should be used for any script that needs to load as soon as possible but not before any first-party Next.js code. `afterInteractive` scripts can be placed inside of any page or layout and will only load and execute when that page (or group of pages) is opened in the browser. import Script from 'next/script' export default function Page() { return ( <> <Script src="https://example.com/script.js" strategy="afterInteractive" /> </> ) } Some examples of scripts that are good candidates for `afterInteractive` include: * Tag managers * Analytics ### `lazyOnload` Scripts that use the `lazyOnload` strategy are injected into the HTML client-side during browser idle time and will load after all resources on the page have been fetched. This strategy should be used for any background or low priority scripts that do not need to load early. `lazyOnload` scripts can be placed inside of any page or layout and will only load and execute when that page (or group of pages) is opened in the browser. import Script from 'next/script' export default function Page() { return ( <> <Script src="https://example.com/script.js" strategy="lazyOnload" /> </> ) } Examples of scripts that do not need to load immediately and can be fetched with `lazyOnload` include: * Chat support plugins * Social media widgets ### `worker` > **Warning:** The `worker` strategy is not yet stable and does not yet work with the `app` directory. Use with caution. Scripts that use the `worker` strategy are off-loaded to a web worker in order to free up the main thread and ensure that only critical, first-party resources are processed on it. While this strategy can be used for any script, it is an advanced use case that is not guaranteed to support all third-party scripts. To use `worker` as a strategy, the `nextScriptWorkers` flag must be enabled in `next.config.js`: module.exports = { experimental: { nextScriptWorkers: true, }, } `worker` scripts can **only currently be used in the `pages/` directory**: import Script from 'next/script' export default function Home() { return ( <> <Script src="https://example.com/script.js" strategy="worker" /> </> ) } ### `onLoad` > **Warning:** `onLoad` does not yet work with Server Components and can only be used in Client Components. Further, `onLoad` can't be used with `beforeInteractive` – consider using `onReady` instead. Some third-party scripts require users to run JavaScript code once after the script has finished loading in order to instantiate content or call a function. If you are loading a script with either afterInteractive or lazyOnload as a loading strategy, you can execute code after it has loaded using the onLoad property. Here's an example of executing a lodash method only after the library has been loaded. 'use client' import Script from 'next/script' export default function Page() { return ( <> <Script src="https://cdnjs.cloudflare.com/ajax/libs/lodash.js/4.17.20/lodash.min.js" onLoad={() => { console.log(_.sample([1, 2, 3, 4])) }} /> </> ) } ### `onReady` > **Warning:** `onReady` does not yet work with Server Components and can only be used in Client Components. Some third-party scripts require users to run JavaScript code after the script has finished loading and every time the component is mounted (after a route navigation for example). You can execute code after the script's load event when it first loads and then after every subsequent component re-mount using the onReady property. Here's an example of how to re-instantiate a Google Maps JS embed every time the component is mounted: 'use client' import { useRef } from 'react' import Script from 'next/script' export default function Page() { const mapRef = useRef() return ( <> <div ref={mapRef}></div> <Script id="google-maps" src="https://maps.googleapis.com/maps/api/js" onReady={() => { new google.maps.Map(mapRef.current, { center: { lat: -34.397, lng: 150.644 }, zoom: 8, }) }} /> </> ) } ### `onError` > **Warning:** `onError` does not yet work with Server Components and can only be used in Client Components. `onError` cannot be used with the `beforeInteractive` loading strategy. Sometimes it is helpful to catch when a script fails to load. These errors can be handled with the onError property: 'use client' import Script from 'next/script' export default function Page() { return ( <> <Script src="https://example.com/script.js" onError={(e: Error) => { console.error('Script failed to load', e) }} /> </> ) } ## Version History | Version | Changes | | --- | --- | | `v13.0.0` | `beforeInteractive` and `afterInteractive` is modified to support `app`. | | `v12.2.4` | `onReady` prop added. | | `v12.2.2` | Allow `next/script` with `beforeInteractive` to be placed in `_document`. | | `v11.0.0` | `next/script` introduced. | --- ## Page: https://nextjs.org/docs/13/app/api-reference/file-conventions #### Subscribe to our newsletter Stay updated on new releases and features, guides, and case studies. --- ## Page: https://nextjs.org/docs/13/app/api-reference/file-conventions/default #### Subscribe to our newsletter Stay updated on new releases and features, guides, and case studies. --- ## Page: https://nextjs.org/docs/13/app/api-reference/file-conventions/error An **error** file defines an error UI boundary for a route segment. It is useful for catching **unexpected** errors that occur in Server Components and Client Components and displaying a fallback UI. 'use client' // Error components must be Client Components import { useEffect } from 'react' export default function Error({ error, reset, }: { error: Error & { digest?: string } reset: () => void }) { useEffect(() => { // Log the error to an error reporting service console.error(error) }, [error]) return ( <div> <h2>Something went wrong!</h2> <button onClick={ // Attempt to recover by trying to re-render the segment () => reset() } > Try again </button> </div> ) } ## Props ### `error` An instance of an `Error` object forwarded to the `error.js` Client Component. #### `error.message` The error message. * For errors forwarded from Client Components, this will be the original Error's message. * For errors forwarded from Server Components, this will be a generic error message to avoid leaking sensitive details. `errors.digest` can be used to match the corresponding error in server-side logs. #### `error.digest` An automatically generated hash of the error thrown in a Server Component. It can be used to match the corresponding error in server-side logs. ### `reset` A function to reset the error boundary. When executed, the function will try to re-render the Error boundary's contents. If successful, the fallback error component is replaced with the result of the re-render. Can be used to prompt the user to attempt to recover from the error. > **Good to know**: > > * `error.js` boundaries must be **Client Components**. > * In Production builds, errors forwarded from Server Components will be stripped of specific error details to avoid leaking sensitive information. > * An `error.js` boundary will **not** handle errors thrown in a `layout.js` component in the **same** segment because the error boundary is nested **inside** that layouts component. > * To handle errors for a specific layout, place an `error.js` file in the layouts parent segment. > * To handle errors within the root layout or template, use a variation of `error.js` called `app/global-error.js`. ## `global-error.js` To specifically handle errors in root `layout.js`, use a variation of `error.js` called `app/global-error.js` located in the root `app` directory. 'use client' export default function GlobalError({ error, reset, }: { error: Error & { digest?: string } reset: () => void }) { return ( <html> <body> <h2>Something went wrong!</h2> <button onClick={() => reset()}>Try again</button> </body> </html> ) } > **Good to know**: > > * `global-error.js` replaces the root `layout.js` when active and so **must** define its own `<html>` and `<body>` tags. > * While designing error UI, you may find it helpful to use the React Developer Tools to manually toggle Error boundaries. ## not-found.js The `not-found` file is used to render UI when the `notFound()` function is thrown within a route segment. ## Version History | Version | Changes | | --- | --- | | `v13.1.0` | `global-error` introduced. | | `v13.0.0` | `error` introduced. | --- ## Page: https://nextjs.org/docs/13/app/api-reference/file-conventions/layout A **layout** is UI that is shared between routes. export default function DashboardLayout({ children, }: { children: React.ReactNode }) { return <section>{children}</section> } A **root layout** is the top-most layout in the root `app` directory. It is used to define the `<html>` and `<body>` tags and other globally shared UI. export default function RootLayout({ children, }: { children: React.ReactNode }) { return ( <html lang="en"> <body>{children}</body> </html> ) } ## Props ### `children` (required) Layout components should accept and use a `children` prop. During rendering, `children` will be populated with the route segments the layout is wrapping. These will primarily be the component of a child Layout (if it exists) or Page, but could also be other special files like Loading or Error when applicable. ### `params` (optional) The dynamic route parameters object from the root segment down to that layout. | Example | URL | `params` | | --- | --- | --- | | `app/dashboard/[team]/layout.js` | `/dashboard/1` | `{ team: '1' }` | | `app/shop/[tag]/[item]/layout.js` | `/shop/1/2` | `{ tag: '1', item: '2' }` | | `app/blog/[...slug]/layout.js` | `/blog/1/2` | `{ slug: ['1', '2'] }` | For example: export default function ShopLayout({ children, params, }: { children: React.ReactNode params: { tag: string item: string } }) { // URL -> /shop/shoes/nike-air-max-97 // `params` -> { tag: 'shoes', item: 'nike-air-max-97' } return <section>{children}</section> } ## Good to know ### Layouts do not receive `searchParams` Unlike Pages, Layout components **do not** receive the `searchParams` prop. This is because a shared layout is not re-rendered during navigation which could lead to stale `searchParams` between navigations. When using client-side navigation, Next.js automatically only renders the part of the page below the common layout between two routes. For example, in the following directory structure, `dashboard/layout.tsx` is the common layout for both `/dashboard/settings` and `/dashboard/analytics`: app └── dashboard ├── layout.tsx ├── settings │ └── page.tsx └── analytics └── page.js When navigating from `/dashboard/settings` to `/dashboard/analytics`, `page.tsx` in `/dashboard/analytics` will be rendered on the server because it is UI that changed, while `dashboard/layout.tsx` will **not** be re-rendered because it is a common UI between the two routes. This performance optimization allows navigation between pages that share a layout to be quicker as only the data fetching and rendering for the page has to run, instead of the entire route that could include shared layouts that fetch their own data. Because `dashboard/layout.tsx` doesn't re-render, the `searchParams` prop in the layout Server Component might become **stale** after navigation. * Instead, use the Page `searchParams` prop or the `useSearchParams` hook in a Client Component, which is re-rendered on the client with the latest `searchParams`. ### Root Layouts * The `app` directory **must** include a root `app/layout.js`. * The root layout **must** define `<html>` and `<body>` tags. * You should **not** manually add `<head>` tags such as `<title>` and `<meta>` to root layouts. Instead, you should use the Metadata API which automatically handles advanced requirements such as streaming and de-duplicating `<head>` elements. * You can use route groups to create multiple root layouts. * Navigating **across multiple root layouts** will cause a **full page load** (as opposed to a client-side navigation). For example, navigating from `/cart` that uses `app/(shop)/layout.js` to `/blog` that uses `app/(marketing)/layout.js` will cause a full page load. This **only** applies to multiple root layouts. ## Version History | Version | Changes | | --- | --- | | `v13.0.0` | `layout` introduced. | --- ## Page: https://nextjs.org/docs/13/app/api-reference/file-conventions/loading You are currently viewing documentation for version 13 of Next.js. A **loading** file can create instant loading states built on Suspense. By default, this file is a Server Component - but can also be used as a Client Component through the `"use client"` directive. app/feed/loading.tsx export default function Loading() { // Or a custom loading skeleton component return <p>'Loading...'</p> } Loading UI components do not accept any parameters. > **Good to know** > > * While designing loading UI, you may find it helpful to use the React Developer Tools to manually toggle Suspense boundaries. ## Version History | Version | Changes | | --- | --- | | `v13.0.0` | `loading` introduced. | --- ## Page: https://nextjs.org/docs/13/app/api-reference/file-conventions/not-found The **not-found** file is used to render UI when the `notFound` function is thrown within a route segment. Along with serving a custom UI, Next.js will return a `200` HTTP status code for streamed responses, and `404` for non-streamed responses. **Good to know**: In addition to catching expected `notFound()` errors, the root `app/not-found.js` file also handles any unmatched URLs for your whole application. This means users that visit a URL that is not handled by your app will be shown the UI exported by the `app/not-found.js` file. `not-found.js` components do not accept any props. By default, `not-found` is a Server Component. You can mark it as `async` to fetch and display data: import Link from 'next/link' import { headers } from 'next/headers' export default async function NotFound() { const headersList = headers() const domain = headersList.get('host') const data = await getSiteData(domain) return ( <div> <h2>Not Found: {data.name}</h2> <p>Could not find requested resource</p> <p> View <Link href="/blog">all posts</Link> </p> </div> ) } --- ## Page: https://nextjs.org/docs/13/app/api-reference/file-conventions/page You are currently viewing documentation for version 13 of Next.js. A **page** is UI that is unique to a route. app/blog/\[slug\]/page.tsx export default function Page({ params, searchParams, }: { params: { slug: string } searchParams: { [key: string]: string | string[] | undefined } }) { return <h1>My Page</h1> } ## Props ### `params` (optional) An object containing the dynamic route parameters from the root segment down to that page. For example: | Example | URL | `params` | | --- | --- | --- | | `app/shop/[slug]/page.js` | `/shop/1` | `{ slug: '1' }` | | `app/shop/[category]/[item]/page.js` | `/shop/1/2` | `{ category: '1', item: '2' }` | | `app/shop/[...slug]/page.js` | `/shop/1/2` | `{ slug: ['1', '2'] }` | ### `searchParams` (optional) An object containing the search parameters of the current URL. For example: | URL | `searchParams` | | --- | --- | | `/shop?a=1` | `{ a: '1' }` | | `/shop?a=1&b=2` | `{ a: '1', b: '2' }` | | `/shop?a=1&a=2` | `{ a: ['1', '2'] }` | > **Good to know**: > > * `searchParams` is a **Dynamic API** whose values cannot be known ahead of time. Using it will opt the page into **dynamic rendering** at request time. > * `searchParams` returns a plain JavaScript object and not a `URLSearchParams` instance. ## Version History | Version | Changes | | --- | --- | | `v13.0.0` | `page` introduced. | --- ## Page: https://nextjs.org/docs/13/app/api-reference/file-conventions/route Route Handlers allow you to create custom request handlers for a given route using the Web Request and Response APIs. ## HTTP Methods A **route** file allows you to create custom request handlers for a given route. The following HTTP methods are supported: `GET`, `POST`, `PUT`, `PATCH`, `DELETE`, `HEAD`, and `OPTIONS`. export async function GET(request: Request) {} export async function HEAD(request: Request) {} export async function POST(request: Request) {} export async function PUT(request: Request) {} export async function DELETE(request: Request) {} export async function PATCH(request: Request) {} // If `OPTIONS` is not defined, Next.js will automatically implement `OPTIONS` and set the appropriate Response `Allow` header depending on the other methods defined in the route handler. export async function OPTIONS(request: Request) {} > **Good to know**: Route Handlers are only available inside the `app` directory. You **do not** need to use API Routes (`pages`) and Route Handlers (`app`) together, as Route Handlers should be able to handle all use cases. ## Parameters ### `request` (optional) The `request` object is a NextRequest object, which is an extension of the Web Request API. `NextRequest` gives you further control over the incoming request, including easily accessing `cookies` and an extended, parsed, URL object `nextUrl`. ### `context` (optional) export async function GET(request, context: { params }) { const team = params.team // '1' } Currently, the only value of `context` is `params`, which is an object containing the dynamic route parameters for the current route. | Example | URL | `params` | | --- | --- | --- | | `app/dashboard/[team]/route.js` | `/dashboard/1` | `{ team: '1' }` | | `app/shop/[tag]/[item]/route.js` | `/shop/1/2` | `{ tag: '1', item: '2' }` | | `app/blog/[...slug]/route.js` | `/blog/1/2` | `{ slug: ['1', '2'] }` | ## NextResponse Route Handlers can extend the Web Response API by returning a `NextResponse` object. This allows you to easily set cookies, headers, redirect, and rewrite. View the API reference. ## Version History | Version | Changes | | --- | --- | | `v13.2.0` | Route handlers are introduced. | --- ## Page: https://nextjs.org/docs/13/app/api-reference/file-conventions/route-segment-config The Route Segment options allows you configure the behavior of a Page, Layout, or Route Handler by directly exporting the following variables: | Option | Type | Default | | --- | --- | --- | | `dynamic` | `'auto' | 'force-dynamic' | 'error' | 'force-static'` | `'auto'` | | `dynamicParams` | `boolean` | `true` | | `revalidate` | `false | 'force-cache' | 0 | number` | `false` | | `fetchCache` | `'auto' | 'default-cache' | 'only-cache' | 'force-cache' | 'force-no-store' | 'default-no-store' | 'only-no-store'` | `'auto'` | | `runtime` | `'nodejs' | 'edge'` | `'nodejs'` | | `preferredRegion` | `'auto' | 'global' | 'home' | string | string[]` | `'auto'` | | `maxDuration` | `number` | Set by deployment platform | export const dynamic = 'auto' export const dynamicParams = true export const revalidate = false export const fetchCache = 'auto' export const runtime = 'nodejs' export const preferredRegion = 'auto' export const maxDuration = 5 export default function MyComponent() {} > **Good to know**: > > * The values of the config options currently need be statically analyzable. For example `revalidate = 600` is valid, but `revalidate = 60 * 10` is not. ## Options ### `dynamic` Change the dynamic behavior of a layout or page to fully static or fully dynamic. export const dynamic = 'auto' // 'auto' | 'force-dynamic' | 'error' | 'force-static' > **Good to know**: The new model in the `app` directory favors granular caching control at the `fetch` request level over the binary all-or-nothing model of `getServerSideProps` and `getStaticProps` at the page-level in the `pages` directory. The `dynamic` option is a way to opt back in to the previous model as a convenience and provides a simpler migration path. * **`'auto'`** (default): The default option to cache as much as possible without preventing any components from opting into dynamic behavior. * **`'force-dynamic'`**: Force dynamic rendering and uncached data fetching of a layout or page by disabling all caching of `fetch` requests and always revalidating. This option is equivalent to: * `getServerSideProps()` in the `pages` directory. * Setting the option of every `fetch()` request in a layout or page to `{ cache: 'no-store', next: { revalidate: 0 } }`. * Setting the segment config to `export const fetchCache = 'force-no-store'` * **`'error'`**: Force static rendering and cache the data of a layout or page by causing an error if any components use dynamic functions or uncached data. This option is equivalent to: * `getStaticProps()` in the `pages` directory. * Setting the option of every `fetch()` request in a layout or page to `{ cache: 'force-cache' }`. * Setting the segment config to `fetchCache = 'only-cache', dynamicParams = false`. * `dynamic = 'error'` changes the default of `dynamicParams` from `true` to `false`. You can opt back into dynamically rendering pages for dynamic params not generated by `generateStaticParams` by manually setting `dynamicParams = true`. * **`'force-static'`**: Force static rendering and cache the data of a layout or page by forcing `cookies()`, `headers()` and `useSearchParams()` to return empty values. > **Good to know**: > > * Instructions on how to migrate from `getServerSideProps` and `getStaticProps` to `dynamic: 'force-dynamic'` and `dynamic: 'error'` can be found in the upgrade guide. ### `dynamicParams` Control what happens when a dynamic segment is visited that was not generated with generateStaticParams. export const dynamicParams = true // true | false, * **`true`** (default): Dynamic segments not included in `generateStaticParams` are generated on demand. * **`false`**: Dynamic segments not included in `generateStaticParams` will return a 404. > **Good to know**: > > * This option replaces the `fallback: true | false | blocking` option of `getStaticPaths` in the `pages` directory. > * When `dynamicParams = true`, the segment uses Streaming Server Rendering. > * If the `dynamic = 'error'` and `dynamic = 'force-static'` are used, it'll change the default of `dynamicParams` to `false`. ### `revalidate` Set the default revalidation time for a layout or page. This option does not override the `revalidate` value set by individual `fetch` requests. export const revalidate = false // false | 'force-cache' | 0 | number * **`false`**: (default) The default heuristic to cache any `fetch` requests that set their `cache` option to `'force-cache'` or are discovered before a dynamic function is used. Semantically equivalent to `revalidate: Infinity` which effectively means the resource should be cached indefinitely. It is still possible for individual `fetch` requests to use `cache: 'no-store'` or `revalidate: 0` to avoid being cached and make the route dynamically rendered. Or set `revalidate` to a positive number lower than the route default to increase the revalidation frequency of a route. * **`0`**: Ensure a layout or page is always dynamically rendered even if no dynamic functions or uncached data fetches are discovered. This option changes the default of `fetch` requests that do not set a `cache` option to `'no-store'` but leaves `fetch` requests that opt into `'force-cache'` or use a positive `revalidate` as is. * **`number`**: (in seconds) Set the default revalidation frequency of a layout or page to `n` seconds. > **Good to know**: The `revalidate` option is only available when using the Node.js Runtime. This means using the `revalidate` option with `runtime = 'edge'` will not work. #### Revalidation Frequency * The lowest `revalidate` across each layout and page of a single route will determine the revalidation frequency of the _entire_ route. This ensures that child pages are revalidated as frequently as their parent layouts. * Individual `fetch` requests can set a lower `revalidate` than the route's default `revalidate` to increase the revalidation frequency of the entire route. This allows you to dynamically opt-in to more frequent revalidation for certain routes based on some criteria. ### `fetchCache` This is an advanced option that should only be used if you specifically need to override the default behavior. By default, Next.js **will cache** any `fetch()` requests that are reachable **before** any dynamic functions are used and **will not cache** `fetch` requests that are discovered **after** dynamic functions are used. `fetchCache` allows you to override the default `cache` option of all `fetch` requests in a layout or page. export const fetchCache = 'auto' // 'auto' | 'default-cache' | 'only-cache' // 'force-cache' | 'force-no-store' | 'default-no-store' | 'only-no-store' * **`'auto'`** (default)- The default option to cache `fetch` requests before dynamic functions with the `cache` option they provide and not cache `fetch` requests after dynamic functions. * **`'default-cache'`**: Allow any `cache` option to be passed to `fetch` but if no option is provided then set the `cache` option to `'force-cache'`. This means that even `fetch` requests after dynamic functions are considered static. * **`'only-cache'`**: Ensure all `fetch` requests opt into caching by changing the default to `cache: 'force-cache'` if no option is provided and causing an error if any `fetch` requests use `cache: 'no-store'`. * **`'force-cache'`**: Ensure all `fetch` requests opt into caching by setting the `cache` option of all `fetch` requests to `'force-cache'`. * **`'default-no-store'`**: Allow any `cache` option to be passed to `fetch` but if no option is provided then set the `cache` option to `'no-store'`. This means that even `fetch` requests before dynamic functions are considered dynamic. * **`'only-no-store'`**: Ensure all `fetch` requests opt out of caching by changing the default to `cache: 'no-store'` if no option is provided and causing an error if any `fetch` requests use `cache: 'force-cache'` * **`'force-no-store'`**: Ensure all `fetch` requests opt out of caching by setting the `cache` option of all `fetch` requests to `'no-store'`. This forces all `fetch` requests to be re-fetched every request even if they provide a `'force-cache'` option. #### Cross-route segment behavior * Any options set across each layout and page of a single route need to be compatible with each other. * If both the `'only-cache'` and `'force-cache'` are provided, then `'force-cache'` wins. If both `'only-no-store'` and `'force-no-store'` are provided, then `'force-no-store'` wins. The force option changes the behavior across the route so a single segment with `'force-*'` would prevent any errors caused by `'only-*'`. * The intention of the `'only-*'` and `force-*'` options is to guarantee the whole route is either fully static or fully dynamic. This means: * A combination of `'only-cache'` and `'only-no-store'` in a single route is not allowed. * A combination of `'force-cache'` and `'force-no-store'` in a single route is not allowed. * A parent cannot provide `'default-no-store'` if a child provides `'auto'` or `'*-cache'` since that could make the same fetch have different behavior. * It is generally recommended to leave shared parent layouts as `'auto'` and customize the options where child segments diverge. ### `runtime` export const runtime = 'nodejs' // 'edge' | 'nodejs' * **`nodejs`** (default) * **`edge`** Learn more about the Edge and Node.js runtimes. ### `preferredRegion` export const preferredRegion = 'auto' // 'auto' | 'global' | 'home' | ['iad1', 'sfo1'] Support for `preferredRegion`, and regions supported, is dependent on your deployment platform. > **Good to know**: > > * If a `preferredRegion` is not specified, it will inherit the option of the nearest parent layout. > * The root layout defaults to `all` regions. ### `maxDuration` Based on your deployment platform, you may be able to use a higher default execution time for your function. This setting allows you to opt into a higher execution time within your plans limit. **Note**: This settings requires Next.js `13.4.10` or higher. export const maxDuration = 5 > **Good to know**: > > * If a `maxDuration` is not specified, the default value is dependent on your deployment platform and plan. ### `generateStaticParams` The `generateStaticParams` function can be used in combination with dynamic route segments to define the list of route segment parameters that will be statically generated at build time instead of on-demand at request time. See the API reference for more details. --- ## Page: https://nextjs.org/docs/13/app/api-reference/file-conventions/template You are currently viewing documentation for version 13 of Next.js. A **template** file is similar to a layout in that it wraps each child layout or page. Unlike layouts that persist across routes and maintain state, templates create a new instance for each of their children on navigation. app/template.tsx export default function Template({ children }: { children: React.ReactNode }) { return <div>{children}</div> }  While less common, you might choose a template over a layout if you want: * Features that rely on `useEffect` (e.g logging page views) and `useState` (e.g a per-page feedback form). * To change the default framework behavior. For example, Suspense Boundaries inside layouts only show the fallback the first time the Layout is loaded and not when switching pages. For templates, the fallback is shown on each navigation. ## Props ### `children` (required) Template components should accept and use a `children` prop. `template` is rendered between a layout and its children. For example: Output <Layout> {/* Note that the template is given a unique key. */} <Template key={routeParam}>{children}</Template> </Layout> > **Good to know**: > > * By default, `template` is a Server Component, but can also be used as a Client Component through the `"use client"` directive. > * When a user navigates between routes that share a `template`, a new instance of the component is mounted, DOM elements are recreated, state is **not** preserved, and effects are re-synchronized. ## Version History | Version | Changes | | --- | --- | | `v13.0.0` | `template` introduced. | --- ## Page: https://nextjs.org/docs/13/app/api-reference/file-conventions/metadata You are currently viewing documentation for version 13 of Next.js. ## Metadata Files API Reference This section of the docs covers **Metadata file conventions**. File-based metadata can be defined by adding special metadata files to route segments. Each file convention can be defined using a static file (e.g. `opengraph-image.jpg`), or a dynamic variant that uses code to generate the file (e.g. `opengraph-image.js`). Once a file is defined, Next.js will automatically serve the file (with hashes in production for caching) and update the relevant head elements with the correct metadata, such as the asset's URL, file type, and image size. --- ## Page: https://nextjs.org/docs/13/app/api-reference/file-conventions/metadata/app-icons The `favicon`, `icon`, or `apple-icon` file conventions allow you to set icons for your application. They are useful for adding app icons that appear in places like web browser tabs, phone home screens, and search engine results. There are two ways to set app icons: * Using image files (.ico, .jpg, .png) * Using code to generate an icon (.js, .ts, .tsx) ## Image files (.ico, .jpg, .png) Use an image file to set an app icon by placing a `favicon`, `icon`, or `apple-icon` image file within your `/app` directory. The `favicon` image can only be located in the top level of `app/`. Next.js will evaluate the file and automatically add the appropriate tags to your app's `<head>` element. | File convention | Supported file types | Valid locations | | --- | --- | --- | | `favicon` | `.ico` | `app/` | | `icon` | `.ico`, `.jpg`, `.jpeg`, `.png`, `.svg` | `app/**/*` | | `apple-icon` | `.jpg`, `.jpeg`, `.png` | `app/**/*` | ### `favicon` Add a `favicon.ico` image file to the root `/app` route segment. <link rel="icon" href="/favicon.ico" sizes="any" /> ### `icon` Add an `icon.(ico|jpg|jpeg|png|svg)` image file. <link rel="icon" href="/icon?<generated>" type="image/<generated>" sizes="<generated>" /> ### `apple-icon` Add an `apple-icon.(jpg|jpeg|png)` image file. <link rel="apple-touch-icon" href="/apple-icon?<generated>" type="image/<generated>" sizes="<generated>" /> > **Good to know** > > * You can set multiple icons by adding a number suffix to the file name. For example, `icon1.png`, `icon2.png`, etc. Numbered files will sort lexically. > * Favicons can only be set in the root `/app` segment. If you need more granularity, you can use `icon`. > * The appropriate `<link>` tags and attributes such as `rel`, `href`, `type`, and `sizes` are determined by the icon type and metadata of the evaluated file. > * For example, a 32 by 32px `.png` file will have `type="image/png"` and `sizes="32x32"` attributes. > * `sizes="any"` is added to `favicon.ico` output to avoid a browser bug where an `.ico` icon is favored over `.svg`. ## Generate icons using code (.js, .ts, .tsx) In addition to using literal image files, you can programmatically **generate** icons using code. Generate an app icon by creating an `icon` or `apple-icon` route that default exports a function. | File convention | Supported file types | | --- | --- | | `icon` | `.js`, `.ts`, `.tsx` | | `apple-icon` | `.js`, `.ts`, `.tsx` | The easiest way to generate an icon is to use the `ImageResponse` API from `next/server`. import { ImageResponse } from 'next/server' // Route segment config export const runtime = 'edge' // Image metadata export const size = { width: 32, height: 32, } export const contentType = 'image/png' // Image generation export default function Icon() { return new ImageResponse( ( // ImageResponse JSX element <div style={{ fontSize: 24, background: 'black', width: '100%', height: '100%', display: 'flex', alignItems: 'center', justifyContent: 'center', color: 'white', }} > A </div> ), // ImageResponse options { // For convenience, we can re-use the exported icons size metadata // config to also set the ImageResponse's width and height. ...size, } ) } <link rel="icon" href="/icon?<generated>" type="image/png" sizes="32x32" /> > **Good to know** > > * By default, generated icons are **statically optimized** (generated at build time and cached) unless they use dynamic functions or uncached data. > * You can generate multiple icons in the same file using `generateImageMetadata`. > * You cannot generate a `favicon` icon. Use `icon` or a favicon.ico file instead. ### Props The default export function receives the following props: #### `params` (optional) An object containing the dynamic route parameters object from the root segment down to the segment `icon` or `apple-icon` is colocated in. export default function Icon({ params }: { params: { slug: string } }) { // ... } | Route | URL | `params` | | --- | --- | --- | | `app/shop/icon.js` | `/shop` | `undefined` | | `app/shop/[slug]/icon.js` | `/shop/1` | `{ slug: '1' }` | | `app/shop/[tag]/[item]/icon.js` | `/shop/1/2` | `{ tag: '1', item: '2' }` | | `app/shop/[...slug]/icon.js` | `/shop/1/2` | `{ slug: ['1', '2'] }` | ### Returns The default export function should return a `Blob` | `ArrayBuffer` | `TypedArray` | `DataView` | `ReadableStream` | `Response`. > **Good to know**: `ImageResponse` satisfies this return type. ### Config exports You can optionally configure the icon's metadata by exporting `size` and `contentType` variables from the `icon` or `apple-icon` route. | Option | Type | | --- | --- | | `size` | `{ width: number; height: number }` | | `contentType` | `string` - image MIME type | #### `size` export const size = { width: 32, height: 32 } export default function Icon() {} <link rel="icon" sizes="32x32" /> #### `contentType` export const contentType = 'image/png' export default function Icon() {} <link rel="icon" type="image/png" /> #### Route Segment Config `icon` and `apple-icon` are specialized Route Handlers that can use the same route segment configuration options as Pages and Layouts. | Option | Type | Default | | --- | --- | --- | | `dynamic` | `'auto' | 'force-dynamic' | 'error' | 'force-static'` | `'auto'` | | `revalidate` | `false | 'force-cache' | 0 | number` | `false` | | `runtime` | `'nodejs' | 'edge'` | `'nodejs'` | | `preferredRegion` | `'auto' | 'global' | 'home' | string | string[]` | `'auto'` | export const runtime = 'edge' export default function Icon() {} ## Version History | Version | Changes | | --- | --- | | `v13.3.0` | `favicon` `icon` and `apple-icon` introduced | --- ## Page: https://nextjs.org/docs/13/app/api-reference/file-conventions/metadata/manifest You are currently viewing documentation for version 13 of Next.js. Add or generate a `manifest.(json|webmanifest)` file that matches the Web Manifest Specification in the **root** of `app` directory to provide information about your web application for the browser. ## Static Manifest file app/manifest.json | app/manifest.webmanifest { "name": "My Next.js Application", "short_name": "Next.js App", "description": "An application built with Next.js", "start_url": "/" // ... } ## Generate a Manifest file Add a `manifest.js` or `manifest.ts` file that returns a `Manifest` object. app/manifest.ts import { MetadataRoute } from 'next' export default function manifest(): MetadataRoute.Manifest { return { name: 'Next.js App', short_name: 'Next.js App', description: 'Next.js App', start_url: '/', display: 'standalone', background_color: '#fff', theme_color: '#fff', icons: [ { src: '/favicon.ico', sizes: 'any', type: 'image/x-icon', }, ], } } ### Manifest Object The manifest object contains an extensive list of options that may be updated due to new web standards. For information on all the current options, refer to the `MetadataRoute.Manifest` type in your code editor if using TypeScript or see the MDN docs. Previous favicon, icon, and apple-icon Next opengraph-image and twitter-image Was this helpful? supported. --- ## Page: https://nextjs.org/docs/13/app/api-reference/file-conventions/metadata/opengraph-image The `opengraph-image` and `twitter-image` file conventions allow you to set Open Graph and Twitter images for a route segment. They are useful for setting the images that appear on social networks and messaging apps when a user shares a link to your site. There are two ways to set Open Graph and Twitter images: * Using image files (.jpg, .png, .gif) * Using code to generate images (.js, .ts, .tsx) ## Image files (.jpg, .png, .gif) Use an image file to set a route segment's shared image by placing an `opengraph-image` or `twitter-image` image file in the segment. Next.js will evaluate the file and automatically add the appropriate tags to your app's `<head>` element. | File convention | Supported file types | | --- | --- | | `opengraph-image` | `.jpg`, `.jpeg`, `.png`, `.gif` | | `twitter-image` | `.jpg`, `.jpeg`, `.png`, `.gif` | | `opengraph-image.alt` | `.txt` | | `twitter-image.alt` | `.txt` | ### `opengraph-image` Add an `opengraph-image.(jpg|jpeg|png|gif)` image file to any route segment. <meta property="og:image" content="<generated>" /> <meta property="og:image:type" content="<generated>" /> <meta property="og:image:width" content="<generated>" /> <meta property="og:image:height" content="<generated>" /> ### `twitter-image` Add a `twitter-image.(jpg|jpeg|png|gif)` image file to any route segment. <meta name="twitter:image" content="<generated>" /> <meta name="twitter:image:type" content="<generated>" /> <meta name="twitter:image:width" content="<generated>" /> <meta name="twitter:image:height" content="<generated>" /> ### `opengraph-image.alt.txt` Add an accompanying `opengraph-image.alt.txt` file in the same route segment as the `opengraph-image.(jpg|jpeg|png|gif)` image it's alt text. About Acme <meta property="og:image:alt" content="About Acme" /> ### `twitter-image.alt.txt` Add an accompanying `twitter-image.alt.txt` file in the same route segment as the `twitter-image.(jpg|jpeg|png|gif)` image it's alt text. About Acme <meta property="twitter:image:alt" content="About Acme" /> ## Generate images using code (.js, .ts, .tsx) In addition to using literal image files, you can programmatically **generate** images using code. Generate a route segment's shared image by creating an `opengraph-image` or `twitter-image` route that default exports a function. | File convention | Supported file types | | --- | --- | | `opengraph-image` | `.js`, `.ts`, `.tsx` | | `twitter-image` | `.js`, `.ts`, `.tsx` | > **Good to know** > > * By default, generated images are **statically optimized** (generated at build time and cached) unless they use dynamic functions or uncached data. > * You can generate multiple Images in the same file using `generateImageMetadata`. The easiest way to generate an image is to use the ImageResponse API from `next/server`. import { ImageResponse } from 'next/server' // Route segment config export const runtime = 'edge' // Image metadata export const alt = 'About Acme' export const size = { width: 1200, height: 630, } export const contentType = 'image/png' // Image generation export default async function Image() { // Font const interSemiBold = fetch( new URL('./Inter-SemiBold.ttf', import.meta.url) ).then((res) => res.arrayBuffer()) return new ImageResponse( ( // ImageResponse JSX element <div style={{ fontSize: 128, background: 'white', width: '100%', height: '100%', display: 'flex', alignItems: 'center', justifyContent: 'center', }} > About Acme </div> ), // ImageResponse options { // For convenience, we can re-use the exported opengraph-image // size config to also set the ImageResponse's width and height. ...size, fonts: [ { name: 'Inter', data: await interSemiBold, style: 'normal', weight: 400, }, ], } ) } <meta property="og:image" content="<generated>" /> <meta property="og:image:alt" content="About Acme" /> <meta property="og:image:type" content="image/png" /> <meta property="og:image:width" content="1200" /> <meta property="og:image:height" content="630" /> ### Props The default export function receives the following props: #### `params` (optional) An object containing the dynamic route parameters object from the root segment down to the segment `opengraph-image` or `twitter-image` is colocated in. export default function Image({ params }: { params: { slug: string } }) { // ... } | Route | URL | `params` | | --- | --- | --- | | `app/shop/opengraph-image.js` | `/shop` | `undefined` | | `app/shop/[slug]/opengraph-image.js` | `/shop/1` | `{ slug: '1' }` | | `app/shop/[tag]/[item]/opengraph-image.js` | `/shop/1/2` | `{ tag: '1', item: '2' }` | | `app/shop/[...slug]/opengraph-image.js` | `/shop/1/2` | `{ slug: ['1', '2'] }` | ### Returns The default export function should return a `Blob` | `ArrayBuffer` | `TypedArray` | `DataView` | `ReadableStream` | `Response`. > **Good to know**: `ImageResponse` satisfies this return type. ### Config exports You can optionally configure the image's metadata by exporting `alt`, `size`, and `contentType` variables from `opengraph-image` or `twitter-image` route. | Option | Type | | --- | --- | | `alt` | `string` | | `size` | `{ width: number; height: number }` | | `contentType` | `string` - image MIME type | #### `alt` export const alt = 'My images alt text' export default function Image() {} <meta property="og:image:alt" content="My images alt text" /> #### `size` export const size = { width: 1200, height: 630 } export default function Image() {} <meta property="og:image:width" content="1200" /> <meta property="og:image:height" content="630" /> #### `contentType` export const contentType = 'image/png' export default function Image() {} <meta property="og:image:type" content="image/png" /> #### Route Segment Config `opengraph-image` and `twitter-image` are specialized Route Handlers that can use the same route segment configuration options as Pages and Layouts. | Option | Type | Default | | --- | --- | --- | | `dynamic` | `'auto' | 'force-dynamic' | 'error' | 'force-static'` | `'auto'` | | `revalidate` | `false | 'force-cache' | 0 | number` | `false` | | `runtime` | `'nodejs' | 'edge'` | `'nodejs'` | | `preferredRegion` | `'auto' | 'global' | 'home' | string | string[]` | `'auto'` | export const runtime = 'edge' export default function Image() {} ### Examples #### Using external data This example uses the `params` object and external data to generate the image. > **Good to know**: By default, this generated image will be statically optimized. You can configure the individual `fetch` `options` or route segments options to change this behavior. import { ImageResponse } from 'next/server' export const runtime = 'edge' export const alt = 'About Acme' export const size = { width: 1200, height: 630, } export const contentType = 'image/png' export default async function Image({ params }: { params: { slug: string } }) { const post = await fetch(`https://.../posts/${params.slug}`).then((res) => res.json() ) return new ImageResponse( ( <div style={{ fontSize: 48, background: 'white', width: '100%', height: '100%', display: 'flex', alignItems: 'center', justifyContent: 'center', }} > {post.title} </div> ), { ...size, } ) } ## Version History | Version | Changes | | --- | --- | | `v13.3.0` | `opengraph-image` and `twitter-image` introduced. | --- ## Page: https://nextjs.org/docs/13/app/api-reference/file-conventions/metadata/robots You are currently viewing documentation for version 13 of Next.js. Add or generate a `robots.txt` file that matches the Robots Exclusion Standard in the **root** of `app` directory to tell search engine crawlers which URLs they can access on your site. ## Static `robots.txt` app/robots.txt User-Agent: * Allow: / Disallow: /private/ Sitemap: https://acme.com/sitemap.xml ## Generate a Robots file Add a `robots.js` or `robots.ts` file that returns a `Robots` object. app/robots.ts import { MetadataRoute } from 'next' export default function robots(): MetadataRoute.Robots { return { rules: { userAgent: '*', allow: '/', disallow: '/private/', }, sitemap: 'https://acme.com/sitemap.xml', } } Output: User-Agent: * Allow: / Disallow: /private/ Sitemap: https://acme.com/sitemap.xml ### Robots object type Robots = { rules: | { userAgent?: string | string[] allow?: string | string[] disallow?: string | string[] crawlDelay?: number } | Array<{ userAgent: string | string[] allow?: string | string[] disallow?: string | string[] crawlDelay?: number }> sitemap?: string | string[] host?: string } ## Version History | Version | Changes | | --- | --- | | `v13.3.0` | `robots` introduced. | --- ## Page: https://nextjs.org/docs/13/app/api-reference/file-conventions/metadata/sitemap You are currently viewing documentation for version 13 of Next.js. Add or generate a `sitemap.xml` file that matches the Sitemaps XML format in the **root** of `app` directory to help search engine crawlers crawl your site more efficiently. ## Static `sitemap.xml` app/sitemap.xml <urlset xmlns="http://www.sitemaps.org/schemas/sitemap/0.9"> <url> <loc>https://acme.com</loc> <lastmod>2023-04-06T15:02:24.021Z</lastmod> <changefreq>yearly</changefreq> <priority>1</priority> </url> <url> <loc>https://acme.com/about</loc> <lastmod>2023-04-06T15:02:24.021Z</lastmod> <changefreq>monthly</changefreq> <priority>0.8</priority> </url> <url> <loc>https://acme.com/blog</loc> <lastmod>2023-04-06T15:02:24.021Z</lastmod> <changefreq>weekly</changefreq> <priority>0.5</priority> </url> </urlset> ## Generate a Sitemap Add a `sitemap.js` or `sitemap.ts` file that returns `Sitemap`. app/sitemap.ts import { MetadataRoute } from 'next' export default function sitemap(): MetadataRoute.Sitemap { return [ { url: 'https://acme.com', lastModified: new Date(), changeFrequency: 'yearly', priority: 1, }, { url: 'https://acme.com/about', lastModified: new Date(), changeFrequency: 'monthly', priority: 0.8, }, { url: 'https://acme.com/blog', lastModified: new Date(), changeFrequency: 'weekly', priority: 0.5, }, ] } Output: acme.com/sitemap.xml <urlset xmlns="http://www.sitemaps.org/schemas/sitemap/0.9"> <url> <loc>https://acme.com</loc> <lastmod>2023-04-06T15:02:24.021Z</lastmod> <changefreq>yearly</changefreq> <priority>1</priority> </url> <url> <loc>https://acme.com/about</loc> <lastmod>2023-04-06T15:02:24.021Z</lastmod> <changefreq>monthly</changefreq> <priority>0.8</priority> </url> <url> <loc>https://acme.com/blog</loc> <lastmod>2023-04-06T15:02:24.021Z</lastmod> <changefreq>weekly</changefreq> <priority>0.5</priority> </url> </urlset> ### Sitemap Return Type type Sitemap = Array<{ url: string lastModified?: string | Date changeFrequency?: | 'always' | 'hourly' | 'daily' | 'weekly' | 'monthly' | 'yearly' | 'never' priority?: number }> > **Good to know** > > * In the future, we will support multiple sitemaps and sitemap indexes. ## Version History | Version | Changes | | --- | --- | | `v13.3.0` | `sitemap` introduced. | | `v13.4.5` | Add `changeFrequency` and `priority` attributes to sitemaps. | --- ## Page: https://nextjs.org/docs/13/app/api-reference/functions #### Subscribe to our newsletter Stay updated on new releases and features, guides, and case studies. --- ## Page: https://nextjs.org/docs/13/app/api-reference/functions/cookies The `cookies` function allows you to read the HTTP incoming request cookies from a Server Component or write outgoing request cookies in a Server Action or Route Handler. > **Good to know**: `cookies()` is a **Dynamic Function** whose returned values cannot be known ahead of time. Using it in a layout or page will opt a route into **dynamic rendering** at request time. ## `cookies().get(name)` A method that takes a cookie name and returns an object with name and value. If a cookie with `name` isn't found, it returns `undefined`. If multiple cookies match, it will only return the first match. import { cookies } from 'next/headers' export default function Page() { const cookieStore = cookies() const theme = cookieStore.get('theme') return '...' } ## `cookies().getAll()` A method that is similar to `get`, but returns a list of all the cookies with a matching `name`. If `name` is unspecified, it returns all the available cookies. import { cookies } from 'next/headers' export default function Page() { const cookieStore = cookies() return cookieStore.getAll().map((cookie) => ( <div key={cookie.name}> <p>Name: {cookie.name}</p> <p>Value: {cookie.value}</p> </div> )) } ## `cookies().has(name)` A method that takes a cookie name and returns a `boolean` based on if the cookie exists (`true`) or not (`false`). import { cookies } from 'next/headers' export default function Page() { const cookiesList = cookies() const hasCookie = cookiesList.has('theme') return '...' } ## `cookies().set(name, value, options)` A method that takes a cookie name, value, and options and sets the outgoing request cookie. > **Good to know**: HTTP does not allow setting cookies after streaming starts, so you must use `.set()` in a Server Action or Route Handler. 'use server' import { cookies } from 'next/headers' async function create(data) { cookies().set('name', 'lee') // or cookies().set('name', 'lee', { secure: true }) // or cookies().set({ name: 'name', value: 'lee', httpOnly: true, path: '/', }) } ## Deleting cookies > **Good to know**: You can only delete cookies in a Server Action or Route Handler. There are several options for deleting a cookie: ### `cookies().delete(name)` You can explicitly delete a cookie with a given name. 'use server' import { cookies } from 'next/headers' async function create(data) { cookies().delete('name') } ### `cookies().set(name, '')` Alternatively, you can set a new cookie with the same name and an empty value. 'use server' import { cookies } from 'next/headers' async function create(data) { cookies().set('name', '') } > **Good to know**: `.set()` is only available in a Server Action or Route Handler. ### `cookies().set(name, value, { maxAge: 0 })` Setting `maxAge` to 0 will immediately expire a cookie. 'use server' import { cookies } from 'next/headers' async function create(data) { cookies().set('name', 'value', { maxAge: 0 }) } ### `cookies().set(name, value, { expires: timestamp })` Setting `expires` to any value in the past will immediately expire a cookie. 'use server' import { cookies } from 'next/headers' async function create(data) { const oneDay = 24 * 60 * 60 * 1000 cookies().set('name', 'value', { expires: Date.now() - oneDay }) } > **Good to know**: You can only delete cookies that belong to the same domain from which `.set()` is called. Additionally, the code must be executed on the same protocol (HTTP or HTTPS) as the cookie you want to delete. ## Version History | Version | Changes | | --- | --- | | `v13.0.0` | `cookies` introduced. | --- ## Page: https://nextjs.org/docs/13/app/api-reference/functions/draft-mode #### Subscribe to our newsletter Stay updated on new releases and features, guides, and case studies. --- ## Page: https://nextjs.org/docs/13/app/api-reference/functions/fetch Next.js extends the native Web `fetch()` API to allow each request on the server to set its own persistent caching semantics. In the browser, the `cache` option indicates how a fetch request will interact with the _browser's_ HTTP cache. With this extension, `cache` indicates how a _server-side_ fetch request will interact with the framework's persistent HTTP cache. You can call `fetch` with `async` and `await` directly within Server Components. export default async function Page() { // This request should be cached until manually invalidated. // Similar to `getStaticProps`. // `force-cache` is the default and can be omitted. const staticData = await fetch(`https://...`, { cache: 'force-cache' }) // This request should be refetched on every request. // Similar to `getServerSideProps`. const dynamicData = await fetch(`https://...`, { cache: 'no-store' }) // This request should be cached with a lifetime of 10 seconds. // Similar to `getStaticProps` with the `revalidate` option. const revalidatedData = await fetch(`https://...`, { next: { revalidate: 10 }, }) return <div>...</div> } ## `fetch(url, options)` Since Next.js extends the Web `fetch()` API, you can use any of the native options available. ### `options.cache` Configure how the request should interact with Next.js Data Cache. fetch(`https://...`, { cache: 'force-cache' | 'no-store' }) * **`force-cache`** (default) - Next.js looks for a matching request in its Data Cache. * If there is a match and it is fresh, it will be returned from the cache. * If there is no match or a stale match, Next.js will fetch the resource from the remote server and update the cache with the downloaded resource. * **`no-store`** - Next.js fetches the resource from the remote server on every request without looking in the cache, and it will not update the cache with the downloaded resource. > **Good to know**: > > * If you don't provide a `cache` option, Next.js will default to `force-cache`, unless a dynamic function such as `cookies()` is used, in which case it will default to `no-store`. > * The `no-cache` option behaves the same way as `no-store` in Next.js. ### `options.next.revalidate` fetch(`https://...`, { next: { revalidate: false | 0 | number } }) Set the cache lifetime of a resource (in seconds). * **`false`** - Cache the resource indefinitely. Semantically equivalent to `revalidate: Infinity`. The HTTP cache may evict older resources over time. * **`0`** - Prevent the resource from being cached. * **`number`** - (in seconds) Specify the resource should have a cache lifetime of at most `n` seconds. > **Good to know**: > > * If an individual `fetch()` request sets a `revalidate` number lower than the default `revalidate` of a route, the whole route revalidation interval will be decreased. > * If two fetch requests with the same URL in the same route have different `revalidate` values, the lower value will be used. > * As a convenience, it is not necessary to set the `cache` option if `revalidate` is set to a number since `0` implies `cache: 'no-store'` and a positive value implies `cache: 'force-cache'`. > * Conflicting options such as `{ revalidate: 0, cache: 'force-cache' }` or `{ revalidate: 10, cache: 'no-store' }` will cause an error. ### `options.next.tags` fetch(`https://...`, { next: { tags: ['collection'] } }) Set the cache tags of a resource. Data can then be revalidated on-demand using `revalidateTag`. The max length for a custom tag is 256 characters. ## Version History | Version | Changes | | --- | --- | | `v13.0.0` | `fetch` introduced. | --- ## Page: https://nextjs.org/docs/13/app/api-reference/functions/generate-image-metadata You can use `generateImageMetadata` to generate different versions of one image or return multiple images for one route segment. This is useful for when you want to avoid hard-coding metadata values, such as for icons. ## Parameters `generateImageMetadata` function accepts the following parameters: #### `params` (optional) An object containing the dynamic route parameters object from the root segment down to the segment `generateImageMetadata` is called from. export function generateImageMetadata({ params, }: { params: { slug: string } }) { // ... } | Route | URL | `params` | | --- | --- | --- | | `app/shop/icon.js` | `/shop` | `undefined` | | `app/shop/[slug]/icon.js` | `/shop/1` | `{ slug: '1' }` | | `app/shop/[tag]/[item]/icon.js` | `/shop/1/2` | `{ tag: '1', item: '2' }` | | `app/shop/[...slug]/icon.js` | `/shop/1/2` | `{ slug: ['1', '2'] }` | ## Returns The `generateImageMetadata` function should return an `array` of objects containing the image's metadata such as `alt` and `size`. In addition, each item **must** include an `id` value will be passed to the props of the image generating function. | Image Metadata Object | Type | | --- | --- | | `id` | `string` (required) | | `alt` | `string` | | `size` | `{ width: number; height: number }` | | `contentType` | `string` | import { ImageResponse } from 'next/server' export function generateImageMetadata() { return [ { contentType: 'image/png', size: { width: 48, height: 48 }, id: 'small', }, { contentType: 'image/png', size: { width: 72, height: 72 }, id: 'medium', }, ] } export default function Icon({ id }: { id: string }) { return new ImageResponse( ( <div style={{ width: '100%', height: '100%', display: 'flex', alignItems: 'center', justifyContent: 'center', fontSize: 88, background: '#000', color: '#fafafa', }} > Icon {id} </div> ) ) } ### Examples #### Using external data This example uses the `params` object and external data to generate multiple Open Graph images for a route segment. import { ImageResponse } from 'next/server' import { getCaptionForImage, getOGImages } from '@/app/utils/images' export async function generateImageMetadata({ params, }: { params: { id: string } }) { const images = await getOGImages(params.id) return images.map((image, idx) => ({ id: idx, size: { width: 1200, height: 600 }, alt: image.text, contentType: 'image/png', })) } export default async function Image({ params, id, }: { params: { id: string } id: number }) { const productId = params.id const imageId = id const text = await getCaptionForImage(productId, imageId) return new ImageResponse( ( <div style={ { // ... } } > {text} </div> ) ) } ## Version History | Version | Changes | | --- | --- | | `v13.3.0` | `generateImageMetadata` introduced. | --- ## Page: https://nextjs.org/docs/13/app/api-reference/functions/generate-metadata ## Metadata Object and generateMetadata Options This page covers all **Config-based Metadata** options with `generateMetadata` and the static metadata object. import { Metadata } from 'next' // either Static metadata export const metadata: Metadata = { title: '...', } // or Dynamic metadata export async function generateMetadata({ params }) { return { title: '...', } } > **Good to know**: > > * The `metadata` object and `generateMetadata` function exports are **only supported in Server Components**. > * You cannot export both the `metadata` object and `generateMetadata` function from the same route segment. To define static metadata, export a `Metadata` object from a `layout.js` or `page.js` file. import { Metadata } from 'next' export const metadata: Metadata = { title: '...', description: '...', } export default function Page() {} See the Metadata Fields for a complete list of supported options. Dynamic metadata depends on **dynamic information**, such as the current route parameters, external data, or `metadata` in parent segments, can be set by exporting a `generateMetadata` function that returns a `Metadata` object. import { Metadata, ResolvingMetadata } from 'next' type Props = { params: { id: string } searchParams: { [key: string]: string | string[] | undefined } } export async function generateMetadata( { params, searchParams }: Props, parent: ResolvingMetadata ): Promise<Metadata> { // read route params const id = params.id // fetch data const product = await fetch(`https://.../${id}`).then((res) => res.json()) // optionally access and extend (rather than replace) parent metadata const previousImages = (await parent).openGraph?.images || [] return { title: product.title, openGraph: { images: ['/some-specific-page-image.jpg', ...previousImages], }, } } export default function Page({ params, searchParams }: Props) {} ### Parameters `generateMetadata` function accepts the following parameters: * `props` - An object containing the parameters of the current route: * `params` - An object containing the dynamic route parameters object from the root segment down to the segment `generateMetadata` is called from. Examples: | Route | URL | `params` | | --- | --- | --- | | `app/shop/[slug]/page.js` | `/shop/1` | `{ slug: '1' }` | | `app/shop/[tag]/[item]/page.js` | `/shop/1/2` | `{ tag: '1', item: '2' }` | | `app/shop/[...slug]/page.js` | `/shop/1/2` | `{ slug: ['1', '2'] }` | * `searchParams` - An object containing the current URL's search params. Examples: | URL | `searchParams` | | --- | --- | | `/shop?a=1` | `{ a: '1' }` | | `/shop?a=1&b=2` | `{ a: '1', b: '2' }` | | `/shop?a=1&a=2` | `{ a: ['1', '2'] }` | * `parent` - A promise of the resolved metadata from parent route segments. ### Returns `generateMetadata` should return a `Metadata` object containing one or more metadata fields. > **Good to know**: > > * If metadata doesn't depend on runtime information, it should be defined using the static `metadata` object rather than `generateMetadata`. > * `fetch` requests are automatically memoized for the same data across `generateMetadata`, `generateStaticParams`, Layouts, Pages, and Server Components. React `cache` can be used if `fetch` is unavailable. > * `searchParams` are only available in `page.js` segments. > * The `redirect()` and `notFound()` Next.js methods can also be used inside `generateMetadata`. ### `title` The `title` attribute is used to set the title of the document. It can be defined as a simple string or an optional template object. #### String export const metadata = { title: 'Next.js', } <title>Next.js</title> #### Template object import { Metadata } from 'next' export const metadata: Metadata = { title: { template: '...', default: '...', absolute: '...', }, } ##### Default `title.default` can be used to provide a **fallback title** to child route segments that don't define a `title`. import type { Metadata } from 'next' export const metadata: Metadata = { title: { default: 'Acme', }, } import type { Metadata } from 'next' export const metadata: Metadata = {} // Output: <title>Acme</title> ##### Template `title.template` can be used to add a prefix or a suffix to `titles` defined in **child** route segments. import { Metadata } from 'next' export const metadata: Metadata = { title: { template: '%s | Acme', default: 'Acme', // a default is required when creating a template }, } import { Metadata } from 'next' export const metadata: Metadata = { title: 'About', } // Output: <title>About | Acme</title> > **Good to know**: > > * `title.template` applies to **child** route segments and **not** the segment it's defined in. This means: > > * `title.default` is **required** when you add a `title.template`. > * `title.template` defined in `layout.js` will not apply to a `title` defined in a `page.js` of the same route segment. > * `title.template` defined in `page.js` has no effect because a page is always the terminating segment (it doesn't have any children route segments). > * `title.template` has **no effect** if a route has not defined a `title` or `title.default`. > ##### Absolute `title.absolute` can be used to provide a title that **ignores** `title.template` set in parent segments. import { Metadata } from 'next' export const metadata: Metadata = { title: { template: '%s | Acme', }, } import { Metadata } from 'next' export const metadata: Metadata = { title: { absolute: 'About', }, } // Output: <title>About</title> > **Good to know**: > > * `layout.js` > > * `title` (string) and `title.default` define the default title for child segments (that do not define their own `title`). It will augment `title.template` from the closest parent segment if it exists. > * `title.absolute` defines the default title for child segments. It ignores `title.template` from parent segments. > * `title.template` defines a new title template for child segments. > * `page.js` > > * If a page does not define its own title the closest parents resolved title will be used. > * `title` (string) defines the routes title. It will augment `title.template` from the closest parent segment if it exists. > * `title.absolute` defines the route title. It ignores `title.template` from parent segments. > * `title.template` has no effect in `page.js` because a page is always the terminating segment of a route. ### `description` export const metadata = { description: 'The React Framework for the Web', } <meta name="description" content="The React Framework for the Web" /> ### Basic Fields export const metadata = { generator: 'Next.js', applicationName: 'Next.js', referrer: 'origin-when-cross-origin', keywords: ['Next.js', 'React', 'JavaScript'], authors: [{ name: 'Seb' }, { name: 'Josh', url: 'https://nextjs.org' }], colorScheme: 'dark', creator: 'Jiachi Liu', publisher: 'Sebastian Markbåge', formatDetection: { email: false, address: false, telephone: false, }, } <meta name="application-name" content="Next.js" /> <meta name="author" content="Seb" /> <link rel="author" href="https://nextjs.org" /> <meta name="author" content="Josh" /> <meta name="generator" content="Next.js" /> <meta name="keywords" content="Next.js,React,JavaScript" /> <meta name="referrer" content="origin-when-cross-origin" /> <meta name="color-scheme" content="dark" /> <meta name="creator" content="Jiachi Liu" /> <meta name="publisher" content="Sebastian Markbåge" /> <meta name="format-detection" content="telephone=no, address=no, email=no" /> ### `metadataBase` `metadataBase` is a convenience option to set a base URL prefix for `metadata` fields that require a fully qualified URL. * `metadataBase` allows URL-based `metadata` fields defined in the **current route segment and below** to use a **relative path** instead of an otherwise required absolute URL. * The field's relative path will be composed with `metadataBase` to form a fully qualified URL. * If not configured, `metadataBase` is **automatically populated** with a default value. export const metadata = { metadataBase: new URL('https://acme.com'), alternates: { canonical: '/', languages: { 'en-US': '/en-US', 'de-DE': '/de-DE', }, }, openGraph: { images: '/og-image.png', }, } <link rel="canonical" href="https://acme.com" /> <link rel="alternate" hreflang="en-US" href="https://acme.com/en-US" /> <link rel="alternate" hreflang="de-DE" href="https://acme.com/de-DE" /> <meta property="og:image" content="https://acme.com/og-image.png" /> > **Good to know**: > > * `metadataBase` is typically set in root `app/layout.js` to apply to URL-based `metadata` fields across all routes. > * All URL-based `metadata` fields that require absolute URLs can be configured with a `metadataBase` option. > * `metadataBase` can contain a subdomain e.g. `https://app.acme.com` or base path e.g. `https://acme.com/start/from/here` > * If a `metadata` field provides an absolute URL, `metadataBase` will be ignored. > * Using a relative path in a URL-based `metadata` field without configuring a `metadataBase` will cause a build error. > * Next.js will normalize duplicate slashes between `metadataBase` (e.g. `https://acme.com/`) and a relative field (e.g. `/path`) to a single slash (e.g. `https://acme.com/path`) #### Default value If not configured, `metadataBase` has a **default value** * When `VERCEL_URL` is detected: `https://${process.env.VERCEL_URL}` otherwise it falls back to `http://localhost:${process.env.PORT || 3000}`. * When overriding the default, we recommend using environment variables to compute the URL. This allows configuring a URL for local development, staging, and production environments. #### URL Composition URL composition favors developer intent over default directory traversal semantics. * Trailing slashes between `metadataBase` and `metadata` fields are normalized. * An "absolute" path in a `metadata` field (that typically would replace the whole URL path) is treated as a "relative" path (starting from the end of `metadataBase`). For example, given the following `metadataBase`: import { Metadata } from 'next' export const metadata: Metadata = { metadataBase: new URL('https://acme.com'), } Any `metadata` fields that inherit the above `metadataBase` and set their own value will be resolved as follows: | `metadata` field | Resolved URL | | --- | --- | | `/` | `https://acme.com` | | `./` | `https://acme.com` | | `payments` | `https://acme.com/payments` | | `/payments` | `https://acme.com/payments` | | `./payments` | `https://acme.com/payments` | | `../payments` | `https://acme.com/payments` | | `https://beta.acme.com/payments` | `https://beta.acme.com/payments` | ### `openGraph` export const metadata = { openGraph: { title: 'Next.js', description: 'The React Framework for the Web', url: 'https://nextjs.org', siteName: 'Next.js', images: [ { url: 'https://nextjs.org/og.png', width: 800, height: 600, }, { url: 'https://nextjs.org/og-alt.png', width: 1800, height: 1600, alt: 'My custom alt', }, ], locale: 'en_US', type: 'website', }, } <meta property="og:title" content="Next.js" /> <meta property="og:description" content="The React Framework for the Web" /> <meta property="og:url" content="https://nextjs.org/" /> <meta property="og:site_name" content="Next.js" /> <meta property="og:locale" content="en_US" /> <meta property="og:image:url" content="https://nextjs.org/og.png" /> <meta property="og:image:width" content="800" /> <meta property="og:image:height" content="600" /> <meta property="og:image:url" content="https://nextjs.org/og-alt.png" /> <meta property="og:image:width" content="1800" /> <meta property="og:image:height" content="1600" /> <meta property="og:image:alt" content="My custom alt" /> <meta property="og:type" content="website" /> export const metadata = { openGraph: { title: 'Next.js', description: 'The React Framework for the Web', type: 'article', publishedTime: '2023-01-01T00:00:00.000Z', authors: ['Seb', 'Josh'], }, } <meta property="og:title" content="Next.js" /> <meta property="og:description" content="The React Framework for the Web" /> <meta property="og:type" content="article" /> <meta property="article:published_time" content="2023-01-01T00:00:00.000Z" /> <meta property="article:author" content="Seb" /> <meta property="article:author" content="Josh" /> > **Good to know**: > > * It may be more convenient to use the file-based Metadata API for Open Graph images. Rather than having to sync the config export with actual files, the file-based API will automatically generate the correct metadata for you. ### `robots` import type { Metadata } from 'next' export const metadata: Metadata = { robots: { index: false, follow: true, nocache: true, googleBot: { index: true, follow: false, noimageindex: true, 'max-video-preview': -1, 'max-image-preview': 'large', 'max-snippet': -1, }, }, } <meta name="robots" content="noindex, follow, nocache" /> <meta name="googlebot" content="index, nofollow, noimageindex, max-video-preview:-1, max-image-preview:large, max-snippet:-1" /> ### `icons` > **Good to know**: We recommend using the file-based Metadata API for icons where possible. Rather than having to sync the config export with actual files, the file-based API will automatically generate the correct metadata for you. export const metadata = { icons: { icon: '/icon.png', shortcut: '/shortcut-icon.png', apple: '/apple-icon.png', other: { rel: 'apple-touch-icon-precomposed', url: '/apple-touch-icon-precomposed.png', }, }, } <link rel="shortcut icon" href="/shortcut-icon.png" /> <link rel="icon" href="/icon.png" /> <link rel="apple-touch-icon" href="/apple-icon.png" /> <link rel="apple-touch-icon-precomposed" href="/apple-touch-icon-precomposed.png" /> export const metadata = { icons: { icon: [{ url: '/icon.png' }, new URL('/icon.png', 'https://example.com')], shortcut: ['/shortcut-icon.png'], apple: [ { url: '/apple-icon.png' }, { url: '/apple-icon-x3.png', sizes: '180x180', type: 'image/png' }, ], other: [ { rel: 'apple-touch-icon-precomposed', url: '/apple-touch-icon-precomposed.png', }, ], }, } <link rel="shortcut icon" href="/shortcut-icon.png" /> <link rel="icon" href="/icon.png" /> <link rel="apple-touch-icon" href="/apple-icon.png" /> <link rel="apple-touch-icon-precomposed" href="/apple-touch-icon-precomposed.png" /> <link rel="icon" href="https://example.com/icon.png" /> <link rel="apple-touch-icon" href="/apple-icon-x3.png" sizes="180x180" type="image/png" /> > **Good to know**: The `msapplication-*` meta tags are no longer supported in Chromium builds of Microsoft Edge, and thus no longer needed. ### `themeColor` Learn more about theme-color. **Simple theme color** export const metadata = { themeColor: 'black', } <meta name="theme-color" content="black" /> **With media attribute** export const metadata = { themeColor: [ { media: '(prefers-color-scheme: light)', color: 'cyan' }, { media: '(prefers-color-scheme: dark)', color: 'black' }, ], } <meta name="theme-color" media="(prefers-color-scheme: light)" content="cyan" /> <meta name="theme-color" media="(prefers-color-scheme: dark)" content="black" /> ### `manifest` A web application manifest, as defined in the Web Application Manifest specification. export const metadata = { manifest: 'https://nextjs.org/manifest.json', } <link rel="manifest" href="https://nextjs.org/manifest.json" /> ### `twitter` Learn more about the Twitter Card markup reference. export const metadata = { twitter: { card: 'summary_large_image', title: 'Next.js', description: 'The React Framework for the Web', siteId: '1467726470533754880', creator: '@nextjs', creatorId: '1467726470533754880', images: ['https://nextjs.org/og.png'], }, } <meta name="twitter:card" content="summary_large_image" /> <meta name="twitter:site:id" content="1467726470533754880" /> <meta name="twitter:creator" content="@nextjs" /> <meta name="twitter:creator:id" content="1467726470533754880" /> <meta name="twitter:title" content="Next.js" /> <meta name="twitter:description" content="The React Framework for the Web" /> <meta name="twitter:image" content="https://nextjs.org/og.png" /> export const metadata = { twitter: { card: 'app', title: 'Next.js', description: 'The React Framework for the Web', siteId: '1467726470533754880', creator: '@nextjs', creatorId: '1467726470533754880', images: { url: 'https://nextjs.org/og.png', alt: 'Next.js Logo', }, app: { name: 'twitter_app', id: { iphone: 'twitter_app://iphone', ipad: 'twitter_app://ipad', googleplay: 'twitter_app://googleplay', }, url: { iphone: 'https://iphone_url', ipad: 'https://ipad_url', }, }, }, } <meta name="twitter:site:id" content="1467726470533754880" /> <meta name="twitter:creator" content="@nextjs" /> <meta name="twitter:creator:id" content="1467726470533754880" /> <meta name="twitter:title" content="Next.js" /> <meta name="twitter:description" content="The React Framework for the Web" /> <meta name="twitter:card" content="app" /> <meta name="twitter:image" content="https://nextjs.org/og.png" /> <meta name="twitter:image:alt" content="Next.js Logo" /> <meta name="twitter:app:name:iphone" content="twitter_app" /> <meta name="twitter:app:id:iphone" content="twitter_app://iphone" /> <meta name="twitter:app:id:ipad" content="twitter_app://ipad" /> <meta name="twitter:app:id:googleplay" content="twitter_app://googleplay" /> <meta name="twitter:app:url:iphone" content="https://iphone_url" /> <meta name="twitter:app:url:ipad" content="https://ipad_url" /> <meta name="twitter:app:name:ipad" content="twitter_app" /> <meta name="twitter:app:name:googleplay" content="twitter_app" /> ### `viewport` > **Good to know**: The `viewport` meta tag is automatically set with the following default values. Usually, manual configuration is unnecessary as the default is sufficient. However, the information is provided for completeness. export const metadata = { viewport: { width: 'device-width', initialScale: 1, maximumScale: 1, }, } <meta name="viewport" content="width=device-width, initial-scale=1, maximum-scale=1" /> ### `verification` export const metadata = { verification: { google: 'google', yandex: 'yandex', yahoo: 'yahoo', other: { me: ['my-email', 'my-link'], }, }, } <meta name="google-site-verification" content="google" /> <meta name="y_key" content="yahoo" /> <meta name="yandex-verification" content="yandex" /> <meta name="me" content="my-email" /> <meta name="me" content="my-link" /> ### `appleWebApp` export const metadata = { itunes: { appId: 'myAppStoreID', appArgument: 'myAppArgument', }, appleWebApp: { title: 'Apple Web App', statusBarStyle: 'black-translucent', startupImage: [ '/assets/startup/apple-touch-startup-image-768x1004.png', { url: '/assets/startup/apple-touch-startup-image-1536x2008.png', media: '(device-width: 768px) and (device-height: 1024px)', }, ], }, } <meta name="apple-itunes-app" content="app-id=myAppStoreID, app-argument=myAppArgument" /> <meta name="apple-mobile-web-app-capable" content="yes" /> <meta name="apple-mobile-web-app-title" content="Apple Web App" /> <link href="/assets/startup/apple-touch-startup-image-768x1004.png" rel="apple-touch-startup-image" /> <link href="/assets/startup/apple-touch-startup-image-1536x2008.png" media="(device-width: 768px) and (device-height: 1024px)" rel="apple-touch-startup-image" /> <meta name="apple-mobile-web-app-status-bar-style" content="black-translucent" /> ### `alternates` export const metadata = { alternates: { canonical: 'https://nextjs.org', languages: { 'en-US': 'https://nextjs.org/en-US', 'de-DE': 'https://nextjs.org/de-DE', }, media: { 'only screen and (max-width: 600px)': 'https://nextjs.org/mobile', }, types: { 'application/rss+xml': 'https://nextjs.org/rss', }, }, } <link rel="canonical" href="https://nextjs.org" /> <link rel="alternate" hreflang="en-US" href="https://nextjs.org/en-US" /> <link rel="alternate" hreflang="de-DE" href="https://nextjs.org/de-DE" /> <link rel="alternate" media="only screen and (max-width: 600px)" href="https://nextjs.org/mobile" /> <link rel="alternate" type="application/rss+xml" href="https://nextjs.org/rss" /> ### `appLinks` export const metadata = { appLinks: { ios: { url: 'https://nextjs.org/ios', app_store_id: 'app_store_id', }, android: { package: 'com.example.android/package', app_name: 'app_name_android', }, web: { url: 'https://nextjs.org/web', should_fallback: true, }, }, } <meta property="al:ios:url" content="https://nextjs.org/ios" /> <meta property="al:ios:app_store_id" content="app_store_id" /> <meta property="al:android:package" content="com.example.android/package" /> <meta property="al:android:app_name" content="app_name_android" /> <meta property="al:web:url" content="https://nextjs.org/web" /> <meta property="al:web:should_fallback" content="true" /> ### `archives` Describes a collection of records, documents, or other materials of historical interest (source). export const metadata = { archives: ['https://nextjs.org/13'], } <link rel="archives" href="https://nextjs.org/13" /> ### `assets` export const metadata = { assets: ['https://nextjs.org/assets'], } <link rel="assets" href="https://nextjs.org/assets" /> ### `bookmarks` export const metadata = { bookmarks: ['https://nextjs.org/13'], } <link rel="bookmarks" href="https://nextjs.org/13" /> ### `category` export const metadata = { category: 'technology', } <meta name="category" content="technology" /> ### `other` All metadata options should be covered using the built-in support. However, there may be custom metadata tags specific to your site, or brand new metadata tags just released. You can use the `other` option to render any custom metadata tag. export const metadata = { other: { custom: 'meta', }, } <meta name="custom" content="meta" /> The following metadata types do not currently have built-in support. However, they can still be rendered in the layout or page itself. | Metadata | Recommendation | | --- | --- | | `<meta http-equiv="...">` | Use appropriate HTTP Headers via `redirect()`, Middleware, Security Headers | | `<base>` | Render the tag in the layout or page itself. | | `<noscript>` | Render the tag in the layout or page itself. | | `<style>` | Learn more about styling in Next.js. | | `<script>` | Learn more about using scripts. | | `<link rel="stylesheet" />` | `import` stylesheets directly in the layout or page itself. | | `<link rel="preload />` | Use ReactDOM preload method | | `<link rel="preconnect" />` | Use ReactDOM preconnect method | | `<link rel="dns-prefetch" />` | Use ReactDOM prefetchDNS method | ### Resource hints The `<link>` element has a number of `rel` keywords that can be used to hint to the browser that an external resource is likely to be needed. The browser uses this information to apply preloading optimizations depending on the keyword. While the Metadata API doesn't directly support these hints, you can use new `ReactDOM` methods to safely insert them into the `<head>` of the document. 'use client' import ReactDOM from 'react-dom' export function PreloadResources() { ReactDOM.preload('...', { as: '...' }) ReactDOM.preconnect('...', { crossOrigin: '...' }) ReactDOM.prefetchDNS('...') return null } ##### `<link rel="preload">` Start loading a resource early in the page rendering (browser) lifecycle. MDN Docs. ReactDOM.preload(href: string, options: { as: string }) <link rel="preload" href="..." as="..." /> ##### `<link rel="preconnect">` Preemptively initiate a connection to an origin. MDN Docs. ReactDOM.preconnect(href: string, options?: { crossOrigin?: string }) <link rel="preconnect" href="..." crossorigin /> ##### `<link rel="dns-prefetch">` Attempt to resolve a domain name before resources get requested. MDN Docs. ReactDOM.prefetchDNS(href: string) <link rel="dns-prefetch" href="..." /> > **Good to know**: > > * These methods are currently only supported in Client Components, which are still Server Side Rendered on initial page load. > * Next.js in-built features such as `next/font`, `next/image` and `next/script` automatically handle relevant resource hints. > * React 18.3 does not yet include type definitions for `ReactDOM.preload`, `ReactDOM.preconnect`, and `ReactDOM.preconnectDNS`. You can use `// @ts-ignore` as a temporary solution to avoid type errors. ## Types You can add type safety to your metadata by using the `Metadata` type. If you are using the built-in TypeScript plugin in your IDE, you do not need to manually add the type, but you can still explicitly add it if you want. ### `metadata` object import type { Metadata } from 'next' export const metadata: Metadata = { title: 'Next.js', } ### `generateMetadata` function #### Regular function import type { Metadata } from 'next' export function generateMetadata(): Metadata { return { title: 'Next.js', } } #### Async function import type { Metadata } from 'next' export async function generateMetadata(): Promise<Metadata> { return { title: 'Next.js', } } #### With segment props import type { Metadata } from 'next' type Props = { params: { id: string } searchParams: { [key: string]: string | string[] | undefined } } export function generateMetadata({ params, searchParams }: Props): Metadata { return { title: 'Next.js', } } export default function Page({ params, searchParams }: Props) {} #### With parent metadata import type { Metadata, ResolvingMetadata } from 'next' export async function generateMetadata( { params, searchParams }: Props, parent: ResolvingMetadata ): Promise<Metadata> { return { title: 'Next.js', } } #### JavaScript Projects For JavaScript projects, you can use JSDoc to add type safety. /** @type {import("next").Metadata} */ export const metadata = { title: 'Next.js', } ## Version History | Version | Changes | | --- | --- | | `v13.2.0` | `metadata` and `generateMetadata` introduced. | --- ## Page: https://nextjs.org/docs/13/app/api-reference/functions/generate-static-params The `generateStaticParams` function can be used in combination with dynamic route segments to **statically generate** routes at build time instead of on-demand at request time. // Return a list of `params` to populate the [slug] dynamic segment export async function generateStaticParams() { const posts = await fetch('https://.../posts').then((res) => res.json()) return posts.map((post) => ({ slug: post.slug, })) } // Multiple versions of this page will be statically generated // using the `params` returned by `generateStaticParams` export default function Page({ params }) { const { slug } = params // ... } > **Good to know** > > * You can use the `dynamicParams` segment config option to control what happens when a dynamic segment is visited that was not generated with `generateStaticParams`. > * During `next dev`, `generateStaticParams` will be called when you navigate to a route. > * During `next build`, `generateStaticParams` runs before the corresponding Layouts or Pages are generated. > * During revalidation (ISR), `generateStaticParams` will not be called again. > * `generateStaticParams` replaces the `getStaticPaths` function in the Pages Router. ## Parameters `options.params` (optional) If multiple dynamic segments in a route use `generateStaticParams`, the child `generateStaticParams` function is executed once for each set of `params` the parent generates. The `params` object contains the populated `params` from the parent `generateStaticParams`, which can be used to generate the `params` in a child segment. ## Returns `generateStaticParams` should return an array of objects where each object represents the populated dynamic segments of a single route. * Each property in the object is a dynamic segment to be filled in for the route. * The properties name is the segment's name, and the properties value is what that segment should be filled in with. | Example Route | `generateStaticParams` Return Type | | --- | --- | | `/product/[id]` | `{ id: string }[]` | | `/products/[category]/[product]` | `{ category: string, product: string }[]` | | `/products/[...slug]` | `{ slug: string[] }[]` | ## Single Dynamic Segment export function generateStaticParams() { return [{ id: '1' }, { id: '2' }, { id: '3' }] } // Three versions of this page will be statically generated // using the `params` returned by `generateStaticParams` // - /product/1 // - /product/2 // - /product/3 export default function Page({ params }: { params: { id: string } }) { const { id } = params // ... } ## Multiple Dynamic Segments export function generateStaticParams() { return [ { category: 'a', product: '1' }, { category: 'b', product: '2' }, { category: 'c', product: '3' }, ] } // Three versions of this page will be statically generated // using the `params` returned by `generateStaticParams` // - /products/a/1 // - /products/b/2 // - /products/c/3 export default function Page({ params, }: { params: { category: string; product: string } }) { const { category, product } = params // ... } ## Catch-all Dynamic Segment export function generateStaticParams() { return [{ slug: ['a', '1'] }, { slug: ['b', '2'] }, { slug: ['c', '3'] }] } // Three versions of this page will be statically generated // using the `params` returned by `generateStaticParams` // - /product/a/1 // - /product/b/2 // - /product/c/3 export default function Page({ params }: { params: { slug: string[] } }) { const { slug } = params // ... } ## Examples ### Multiple Dynamic Segments in a Route You can generate params for dynamic segments above the current layout or page, but **not below**. For example, given the `app/products/[category]/[product]` route: * `app/products/[category]/[product]/page.js` can generate params for **both** `[category]` and `[product]`. * `app/products/[category]/layout.js` can **only** generate params for `[category]`. There are two approaches to generating params for a route with multiple dynamic segments: ### Generate params from the bottom up Generate multiple dynamic segments from the child route segment. // Generate segments for both [category] and [product] export async function generateStaticParams() { const products = await fetch('https://.../products').then((res) => res.json()) return products.map((product) => ({ category: product.category.slug, product: product.id, })) } export default function Page({ params, }: { params: { category: string; product: string } }) { // ... } ### Generate params from the top down Generate the parent segments first and use the result to generate the child segments. // Generate segments for [category] export async function generateStaticParams() { const products = await fetch('https://.../products').then((res) => res.json()) return products.map((product) => ({ category: product.category.slug, })) } export default function Layout({ params }: { params: { category: string } }) { // ... } A child route segment's `generateStaticParams` function is executed once for each segment a parent `generateStaticParams` generates. The child `generateStaticParams` function can use the `params` returned from the parent `generateStaticParams` function to dynamically generate its own segments. // Generate segments for [product] using the `params` passed from // the parent segment's `generateStaticParams` function export async function generateStaticParams({ params: { category }, }: { params: { category: string } }) { const products = await fetch( `https://.../products?category=${category}` ).then((res) => res.json()) return products.map((product) => ({ product: product.id, })) } export default function Page({ params, }: { params: { category: string; product: string } }) { // ... } > **Good to know**: `fetch` requests are automatically memoized for the same data across `generateMetadata`, `generateStaticParams`, Layouts, Pages, and Server Components. React `cache` can be used if `fetch` is unavailable. ## Version History | Version | Changes | | --- | --- | | `v13.0.0` | `generateStaticParams` introduced. | --- ## Page: https://nextjs.org/docs/13/app/api-reference/functions/headers You are currently viewing documentation for version 13 of Next.js. The `headers` function allows you to read the HTTP incoming request headers from a Server Component. ## `headers()` This API extends the Web Headers API. It is **read-only**, meaning you cannot `set` / `delete` the outgoing request headers. app/page.tsx import { headers } from 'next/headers' export default function Page() { const headersList = headers() const referer = headersList.get('referer') return <div>Referer: {referer}</div> } > **Good to know**: > > * `headers()` is a **Dynamic Function** whose returned values cannot be known ahead of time. Using it in a layout or page will opt a route into **dynamic rendering** at request time. ### API Reference const headersList = headers() #### Parameters `headers` does not take any parameters. #### Returns `headers` returns a **read-only** Web Headers object. * `Headers.entries()`: Returns an `iterator` allowing to go through all key/value pairs contained in this object. * `Headers.forEach()`: Executes a provided function once for each key/value pair in this `Headers` object. * `Headers.get()`: Returns a `String` sequence of all the values of a header within a `Headers` object with a given name. * `Headers.has()`: Returns a boolean stating whether a `Headers` object contains a certain header. * `Headers.keys()`: Returns an `iterator` allowing you to go through all keys of the key/value pairs contained in this object. * `Headers.values()`: Returns an `iterator` allowing you to go through all values of the key/value pairs contained in this object. ### Examples #### Usage with Data Fetching `headers()` can be used in combination with Suspense for Data Fetching. app/page.js import { headers } from 'next/headers' async function getUser() { const headersInstance = headers() const authorization = headersInstance.get('authorization') // Forward the authorization header const res = await fetch('...', { headers: { authorization }, }) return res.json() } export default async function UserPage() { const user = await getUser() return <h1>{user.name}</h1> } ## Version History | Version | Changes | | --- | --- | | `v13.0.0` | `headers` introduced. | --- ## Page: https://nextjs.org/docs/13/app/api-reference/functions/image-response You are currently viewing documentation for version 13 of Next.js. The `ImageResponse` constructor allows you to generate dynamic images using JSX and CSS. This is useful for generating social media images such as Open Graph images, Twitter cards, and more. The following options are available for `ImageResponse`: import { ImageResponse } from 'next/server' new ImageResponse( element: ReactElement, options: { width?: number = 1200 height?: number = 630 emoji?: 'twemoji' | 'blobmoji' | 'noto' | 'openmoji' = 'twemoji', fonts?: { name: string, data: ArrayBuffer, weight: number, style: 'normal' | 'italic' }[] debug?: boolean = false // Options that will be passed to the HTTP response status?: number = 200 statusText?: string headers?: Record<string, string> }, ) ## Supported CSS Properties Please refer to Satori’s documentation for a list of supported HTML and CSS features. ## Version History | Version | Changes | | --- | --- | | `v13.3.0` | `ImageResponse` can be imported from `next/server`. | | `v13.0.0` | `ImageResponse` introduced via `@vercel/og` package. | --- ## Page: https://nextjs.org/docs/13/app/api-reference/functions/next-request NextRequest extends the Web Request API with additional convenience methods. ## `cookies` Read or mutate the `Set-Cookie` header of the request. ### `set(name, value)` Given a name, set a cookie with the given value on the request. // Given incoming request /home // Set a cookie to hide the banner // request will have a `Set-Cookie:show-banner=false;path=/home` header request.cookies.set('show-banner', 'false') ### `get(name)` Given a cookie name, return the value of the cookie. If the cookie is not found, `undefined` is returned. If multiple cookies are found, the first one is returned. // Given incoming request /home // { name: 'show-banner', value: 'false', Path: '/home' } request.cookies.get('show-banner') ### `getAll()` Given a cookie name, return the values of the cookie. If no name is given, return all cookies on the request. // Given incoming request /home // [ // { name: 'experiments', value: 'new-pricing-page', Path: '/home' }, // { name: 'experiments', value: 'winter-launch', Path: '/home' }, // ] request.cookies.getAll('experiments') // Alternatively, get all cookies for the request request.cookies.getAll() ### `delete(name)` Given a cookie name, delete the cookie from the request. // Returns true for deleted, false is nothing is deleted request.cookies.delete('experiments') ### `has(name)` Given a cookie name, return `true` if the cookie exists on the request. // Returns true if cookie exists, false if it does not request.cookies.has('experiments') ### `clear()` Remove the `Set-Cookie` header from the request. request.cookies.clear() ## `nextUrl` Extends the native `URL` API with additional convenience methods, including Next.js specific properties. // Given a request to /home, pathname is /home request.nextUrl.pathname // Given a request to /home?name=lee, searchParams is { 'name': 'lee' } request.nextUrl.searchParams ## Version History | Version | Changes | | --- | --- | | `v13.0.0` | `useSearchParams` introduced. | --- ## Page: https://nextjs.org/docs/13/app/api-reference/functions/next-response NextResponse extends the Web Response API with additional convenience methods. ## `cookies` Read or mutate the `Set-Cookie` header of the response. ### `set(name, value)` Given a name, set a cookie with the given value on the response. // Given incoming request /home let response = NextResponse.next() // Set a cookie to hide the banner response.cookies.set('show-banner', 'false') // Response will have a `Set-Cookie:show-banner=false;path=/home` header return response ### `get(name)` Given a cookie name, return the value of the cookie. If the cookie is not found, `undefined` is returned. If multiple cookies are found, the first one is returned. // Given incoming request /home let response = NextResponse.next() // { name: 'show-banner', value: 'false', Path: '/home' } response.cookies.get('show-banner') ### `getAll()` Given a cookie name, return the values of the cookie. If no name is given, return all cookies on the response. // Given incoming request /home let response = NextResponse.next() // [ // { name: 'experiments', value: 'new-pricing-page', Path: '/home' }, // { name: 'experiments', value: 'winter-launch', Path: '/home' }, // ] response.cookies.getAll('experiments') // Alternatively, get all cookies for the response response.cookies.getAll() ### `delete(name)` Given a cookie name, delete the cookie from the response. // Given incoming request /home let response = NextResponse.next() // Returns true for deleted, false is nothing is deleted response.cookies.delete('experiments') ## `json()` Produce a response with the given JSON body. import { NextResponse } from 'next/server' export async function GET(request: Request) { return NextResponse.json({ error: 'Internal Server Error' }, { status: 500 }) } ## `redirect()` Produce a response that redirects to a URL. import { NextResponse } from 'next/server' return NextResponse.redirect(new URL('/new', request.url)) The URL can be created and modified before being used in the `NextResponse.redirect()` method. For example, you can use the `request.nextUrl` property to get the current URL, and then modify it to redirect to a different URL. import { NextResponse } from 'next/server' // Given an incoming request... const loginUrl = new URL('/login', request.url) // Add ?from=/incoming-url to the /login URL loginUrl.searchParams.set('from', request.nextUrl.pathname) // And redirect to the new URL return NextResponse.redirect(loginUrl) ## `rewrite()` Produce a response that rewrites (proxies) the given URL while preserving the original URL. import { NextResponse } from 'next/server' // Incoming request: /about, browser shows /about // Rewritten request: /proxy, browser shows /about return NextResponse.rewrite(new URL('/proxy', request.url)) ## `next()` The `next()` method is useful for Middleware, as it allows you to return early and continue routing. import { NextResponse } from 'next/server' return NextResponse.next() You can also forward `headers` when producing the response: import { NextResponse } from 'next/server' // Given an incoming request... const newHeaders = new Headers(request.headers) // Add a new header newHeaders.set('x-version', '123') // And produce a response with the new headers return NextResponse.next({ request: { // New request headers headers: newHeaders, }, }) --- ## Page: https://nextjs.org/docs/13/app/api-reference/functions/not-found You are currently viewing documentation for version 13 of Next.js. The `notFound` function allows you to render the `not-found file` within a route segment as well as inject a `<meta name="robots" content="noindex" />` tag. ## `notFound()` Invoking the `notFound()` function throws a `NEXT_NOT_FOUND` error and terminates rendering of the route segment in which it was thrown. Specifying a **not-found** file allows you to gracefully handle such errors by rendering a Not Found UI within the segment. app/user/\[id\]/page.js import { notFound } from 'next/navigation' async function fetchUser(id) { const res = await fetch('https://...') if (!res.ok) return undefined return res.json() } export default async function Profile({ params }) { const user = await fetchUser(params.id) if (!user) { notFound() } // ... } > **Good to know**: `notFound()` does not require you to use `return notFound()` due to using the TypeScript `never` type. ## Version History | Version | Changes | | --- | --- | | `v13.0.0` | `notFound` introduced. | --- ## Page: https://nextjs.org/docs/13/app/api-reference/functions/permanentRedirect The `permanentRedirect` function allows you to redirect the user to another URL. `permanentRedirect` can be used in Server Components, Client Components, Route Handlers, and Server Actions. When used in a streaming context, this will insert a meta tag to emit the redirect on the client side. Otherwise, it will serve a 308 (Permanent) HTTP redirect response to the caller. If a resource doesn't exist, you can use the `notFound` function instead. > **Good to know**: If you prefer to return a 307 (Temporary) HTTP redirect instead of 308 (Permanent), you can use the `redirect` function instead. ## Parameters The `permanentRedirect` function accepts two arguments: permanentRedirect(path, type) | Parameter | Type | Description | | --- | --- | --- | | `path` | `string` | The URL to redirect to. Can be a relative or absolute path. | | `type` | `'replace'` (default) or `'push'` (default in Server Actions) | The type of redirect to perform. | By default, `permanentRedirect` will use `push` (adding a new entry to the browser history stack) in Server Actions and `replace` (replacing the current URL in the browser history stack) everywhere else. You can override this behavior by specifying the `type` parameter. The `type` parameter has no effect when used in Server Components. ## Returns `permanentRedirect` does not return any value. ## Example Invoking the `permanentRedirect()` function throws a `NEXT_REDIRECT` error and terminates rendering of the route segment in which it was thrown. import { permanentRedirect } from 'next/navigation' async function fetchTeam(id) { const res = await fetch('https://...') if (!res.ok) return undefined return res.json() } export default async function Profile({ params }) { const team = await fetchTeam(params.id) if (!team) { permanentRedirect('/login') } // ... } > **Good to know**: `permanentRedirect` does not require you to use `return permanentRedirect()` as it uses the TypeScript `never` type. --- ## Page: https://nextjs.org/docs/13/app/api-reference/functions/redirect The `redirect` function allows you to redirect the user to another URL. `redirect` can be used in Server Components, Client Components, Route Handlers, and Server Actions. When used in a streaming context, this will insert a meta tag to emit the redirect on the client side. Otherwise, it will serve a 307 HTTP redirect response to the caller. If a resource doesn't exist, you can use the `notFound` function instead. > **Good to know**: If you prefer to return a 308 (Permanent) HTTP redirect instead of 307 (Temporary), you can use the `permanentRedirect` function instead. ## Parameters The `redirect` function accepts two arguments: redirect(path, type) | Parameter | Type | Description | | --- | --- | --- | | `path` | `string` | The URL to redirect to. Can be a relative or absolute path. | | `type` | `'replace'` (default) or `'push'` (default in Server Actions) | The type of redirect to perform. | By default, `redirect` will use `push` (adding a new entry to the browser history stack) in Server Actions and `replace` (replacing the current URL in the browser history stack) everywhere else. You can override this behavior by specifying the `type` parameter. The `type` parameter has no effect when used in Server Components. ## Returns `redirect` does not return any value. ## Example Invoking the `redirect()` function throws a `NEXT_REDIRECT` error and terminates rendering of the route segment in which it was thrown. import { redirect } from 'next/navigation' async function fetchTeam(id) { const res = await fetch('https://...') if (!res.ok) return undefined return res.json() } export default async function Profile({ params }) { const team = await fetchTeam(params.id) if (!team) { redirect('/login') } // ... } > **Good to know**: `redirect` does not require you to use `return redirect()` as it uses the TypeScript `never` type. | Version | Changes | | --- | --- | | `v13.0.0` | `redirect` introduced. | --- ## Page: https://nextjs.org/docs/13/app/api-reference/functions/revalidatePath `revalidatePath` allows you to purge cached data on-demand for a specific path. > **Good to know**: > > * `revalidatePath` is available in both Node.js and Edge runtimes. > * `revalidatePath` only invalidates the cache when the included path is next visited. This means calling `revalidatePath` with a dynamic route segment will not immediately trigger many revalidations at once. The invalidation only happens when the path is next visited. ## Parameters revalidatePath(path: string, type?: 'page' | 'layout'): void; * `path`: Either a string representing the filesystem path associated with the data you want to revalidate (for example, `/product/[slug]/page`), or the literal route segment (for example, `/product/123`). Must be less than 1024 characters. * `type`: (optional) `'page'` or `'layout'` string to change the type of path to revalidate. ## Returns `revalidatePath` does not return any value. ## Examples ### Revalidating A Specific URL import { revalidatePath } from 'next/cache' revalidatePath('/blog/post-1') This will revalidate one specific URL on the next page visit. ### Revalidating A Page Path import { revalidatePath } from 'next/cache' revalidatePath('/blog/[slug]', 'page') // or with route groups revalidatePath('/(main)/post/[slug]', 'page') This will revalidate any URL that matches the provided `page` file on the next page visit. This will _not_ invalidate pages beneath the specific page. For example, `/blog/[slug]` won't invalidate `/blog/[slug]/[author]`. ### Revalidating A Layout Path import { revalidatePath } from 'next/cache' revalidatePath('/blog/[slug]', 'layout') // or with route groups revalidatePath('/(main)/post/[slug]', 'layout') This will revalidate any URL that matches the provided `layout` file on the next page visit. This will cause pages beneath with the same layout to revalidate on the next visit. For example, in the above case, `/blog/[slug]/[another]` would also revalidate on the next visit. ### Server Action 'use server' import { revalidatePath } from 'next/cache' export default async function submit() { await submitForm() revalidatePath('/') } ### Route Handler import { revalidatePath } from 'next/cache' import { NextRequest } from 'next/server' export async function GET(request: NextRequest) { const path = request.nextUrl.searchParams.get('path') if (path) { revalidatePath(path) return Response.json({ revalidated: true, now: Date.now() }) } return Response.json({ revalidated: false, now: Date.now(), message: 'Missing path to revalidate', }) } --- ## Page: https://nextjs.org/docs/13/app/api-reference/functions/revalidateTag You are currently viewing documentation for version 13 of Next.js. `revalidateTag` allows you to purge cached data on-demand for a specific cache tag. > **Good to know**: > > * `revalidateTag` is available in both Node.js and Edge runtimes. > * `revalidateTag` only invalidates the cache when the path is next visited. This means calling `revalidateTag` with a dynamic route segment will not immediately trigger many revalidations at once. The invalidation only happens when the path is next visited. ## Parameters revalidateTag(tag: string): void; * `tag`: A string representing the cache tag associated with the data you want to revalidate. Must be less than or equal to 256 characters. You can add tags to `fetch` as follows: fetch(url, { next: { tags: [...] } }); ## Returns `revalidateTag` does not return any value. ## Examples ### Server Action app/actions.ts 'use server' import { revalidateTag } from 'next/cache' export default async function submit() { await addPost() revalidateTag('posts') } ### Route Handler app/api/revalidate/route.ts import { NextRequest } from 'next/server' import { revalidateTag } from 'next/cache' export async function GET(request: NextRequest) { const tag = request.nextUrl.searchParams.get('tag') revalidateTag(tag) return Response.json({ revalidated: true, now: Date.now() }) } --- ## Page: https://nextjs.org/docs/13/app/api-reference/functions/server-actions Next.js integrates with React Actions to provide a built-in solution for server mutations. ## Convention You can enable Server Actions in your Next.js project by enabling the **experimental** `serverActions` flag. module.exports = { experimental: { serverActions: true, }, } Server Actions can be defined in two places: * Inside the component that uses it (Server Components only). * In a separate file (Client and Server Components), for reusability. You can define multiple Server Actions in a single file. ### With Server Components Create a Server Action by defining an asynchronous function with the `"use server"` directive at the top of the function body. `"use server"` ensures this function is only ever executed on the server. This function should have serializable arguments and a serializable return value. export default function ServerComponent() { async function myAction() { 'use server' // ... } } ### With Client Components #### Import Create your Server Action in a separate file with the `"use server"` directive at the top of the file. Then, import the Server Action into your Client Component: 'use server' export async function myAction() { // ... } 'use client' import { myAction } from './actions' export default function ClientComponent() { return ( <form action={myAction}> <button type="submit">Add to Cart</button> </form> ) } > **Good to know**: When using a top-level `"use server"` directive, all exports below will be considered Server Actions. You can have multiple Server Actions in a single file. #### Props In some cases, you might want to pass down a Server Action to a Client Component as a prop. <ClientComponent updateItem={updateItem} /> 'use client' export default function ClientComponent({ myAction }) { return ( <form action={myAction}> <input type="text" name="name" /> <button type="submit">Update Item</button> </form> ) } ### Binding Arguments You can bind arguments to a Server Action using the `bind` method. This allows you to create a new Server Action with some arguments already bound. This is beneficial when you want to pass extra arguments to a Server Action. 'use client' import { updateUser } from './actions' export function UserProfile({ userId }) { const updateUserWithId = updateUser.bind(null, userId) return ( <form action={updateUserWithId}> <input type="text" name="name" /> <button type="submit">Update User Name</button> </form> ) } And then, the `updateUser` Server Action will always receive the `userId` argument, in addition to the form data: 'use server' export async function updateUser(userId, formData) { // ... } > **Good to know**: `.bind` of a Server Action works in both Server and Client Components. It also supports Progressive Enhancement. ## Invocation You can invoke Server Actions using the following methods: * Using `action`: React's `action` prop allows invoking a Server Action on a `<form>` element. * Using `formAction`: React's `formAction` prop allows handling `<button>`, `<input type="submit">`, and `<input type="image">` elements in a `<form>`. * Custom Invocation with `startTransition`: Invoke Server Actions without using `action` or `formAction` by using `startTransition`. This method **disables Progressive Enhancement**. ## Progressive Enhancement Progressive enhancement allows a `<form>` to function properly without JavaScript, or with JavaScript disabled. This allows users to interact with the form and submit data even if the JavaScript for the form hasn't been loaded yet or if it fails to load. React Actions (both server and client) support progressive enhancement, using one of two strategies: * If a **Server Action** is passed directly to a `<form>`, the form is interactive **even if JavaScript is disabled**. * If a **Client Action** is passed to a `<form>`, the form is still interactive, but the action will be placed in a queue until the form has hydrated. React prioritizes the action, so it still happens quickly. In both cases, the form is interactive before hydration occurs. Although Server Actions have the additional benefit of not relying on client JavaScript, you can still compose additional behavior with Client Actions where desired without sacrificing interactivity. ## Size Limitation By default, the maximum size of the request body sent to a Server Action is 1MB, to prevent the consumption of excessive server resources in parsing large amounts of data. However, you can configure this limit using the `serverActionsBodySizeLimit` option. It can take the number of bytes or any string format supported by bytes, for example `1000`, `'500kb'` or `'3mb'`. module.exports = { experimental: { serverActions: true, serverActionsBodySizeLimit: '2mb', }, } ## Additional Resources The following React API pages are currently being documented: * `"use server"` * `action` (🚧) * `formAction` (🚧) * `useFormStatus` (🚧) * `useFormState` (🚧) * `useOptimistic` (🚧) --- ## Page: https://nextjs.org/docs/13/app/api-reference/functions/use-params You are currently viewing documentation for version 13 of Next.js. `useParams` is a **Client Component** hook that lets you read a route's dynamic params filled in by the current URL. app/example-client-component.tsx 'use client' import { useParams } from 'next/navigation' export default function ExampleClientComponent() { const params = useParams() // Route -> /shop/[tag]/[item] // URL -> /shop/shoes/nike-air-max-97 // `params` -> { tag: 'shoes', item: 'nike-air-max-97' } console.log(params) return <></> } ## Parameters const params = useParams() `useParams` does not take any parameters. ## Returns `useParams` returns an object containing the current route's filled in dynamic parameters. * Each property in the object is an active dynamic segment. * The properties name is the segment's name, and the properties value is what the segment is filled in with. * The properties value will either be a `string` or array of `string`'s depending on the type of dynamic segment. * If the route contains no dynamic parameters, `useParams` returns an empty object. * If used in `pages`, `useParams` will return `null`. For example: | Route | URL | `useParams()` | | --- | --- | --- | | `app/shop/page.js` | `/shop` | `null` | | `app/shop/[slug]/page.js` | `/shop/1` | `{ slug: '1' }` | | `app/shop/[tag]/[item]/page.js` | `/shop/1/2` | `{ tag: '1', item: '2' }` | | `app/shop/[...slug]/page.js` | `/shop/1/2` | `{ slug: ['1', '2'] }` | ## Version History | Version | Changes | | --- | --- | | `v13.3.0` | `useParams` introduced. | --- ## Page: https://nextjs.org/docs/13/app/api-reference/functions/use-pathname You are currently viewing documentation for version 13 of Next.js. `usePathname` is a **Client Component** hook that lets you read the current URL's **pathname**. app/example-client-component.tsx 'use client' import { usePathname } from 'next/navigation' export default function ExampleClientComponent() { const pathname = usePathname() return <p>Current pathname: {pathname}</p> } `usePathname` intentionally requires using a Client Component. It's important to note Client Components are not a de-optimization. They are an integral part of the Server Components architecture. For example, a Client Component with `usePathname` will be rendered into HTML on the initial page load. When navigating to a new route, this component does not need to be re-fetched. Instead, the component is downloaded once (in the client JavaScript bundle), and re-renders based on the current state. > **Good to know**: > > * Reading the current URL from a Server Component is not supported. This design is intentional to support layout state being preserved across page navigations. > * Compatibility mode: > * `usePathname` can return `null` when a fallback route is being rendered or when a `pages` directory page has been automatically statically optimized by Next.js and the router is not ready. > * Next.js will automatically update your types if it detects both an `app` and `pages` directory in your project. ## Parameters const pathname = usePathname() `usePathname` does not take any parameters. ## Returns `usePathname` returns a string of the current URL's pathname. For example: | URL | Returned value | | --- | --- | | `/` | `'/'` | | `/dashboard` | `'/dashboard'` | | `/dashboard?v=2` | `'/dashboard'` | | `/blog/hello-world` | `'/blog/hello-world'` | ## Examples ### Do something in response to a route change app/example-client-component.tsx 'use client' import { usePathname, useSearchParams } from 'next/navigation' function ExampleClientComponent() { const pathname = usePathname() const searchParams = useSearchParams() useEffect(() => { // Do something here... }, [pathname, searchParams]) } | Version | Changes | | --- | --- | | `v13.0.0` | `usePathname` introduced. | --- ## Page: https://nextjs.org/docs/13/app/api-reference/functions/use-report-web-vitals The `useReportWebVitals` hook allows you to report Core Web Vitals, and can be used in combination with your analytics service. 'use client' import { useReportWebVitals } from 'next/web-vitals' export function WebVitals() { useReportWebVitals((metric) => { console.log(metric) }) } import { WebVitals } from './_components/web-vitals' export default function Layout({ children }) { return ( <html> <body> <WebVitals /> {children} </body> </html> ) } > Since the `useReportWebVitals` hook requires the `"use client"` directive, the most performant approach is to create a separate component that the root layout imports. This confines the client boundary exclusively to the `WebVitals` component. ## useReportWebVitals The `metric` object passed as the hook's argument consists of a number of properties: * `id`: Unique identifier for the metric in the context of the current page load * `name`: The name of the performance metric. Possible values include names of Web Vitals metrics (TTFB, FCP, LCP, FID, CLS) specific to a web application. * `delta`: The difference between the current value and the previous value of the metric. The value is typically in milliseconds and represents the change in the metric's value over time. * `entries`: An array of Performance Entries associated with the metric. These entries provide detailed information about the performance events related to the metric. * `navigationType`: Indicates the type of navigation that triggered the metric collection. Possible values include `"navigate"`, `"reload"`, `"back_forward"`, and `"prerender"`. * `rating`: A qualitative rating of the metric value, providing an assessment of the performance. Possible values are `"good"`, `"needs-improvement"`, and `"poor"`. The rating is typically determined by comparing the metric value against predefined thresholds that indicate acceptable or suboptimal performance. * `value`: The actual value or duration of the performance entry, typically in milliseconds. The value provides a quantitative measure of the performance aspect being tracked by the metric. The source of the value depends on the specific metric being measured and can come from various Performance APIs. ## Web Vitals Web Vitals are a set of useful metrics that aim to capture the user experience of a web page. The following web vitals are all included: * Time to First Byte (TTFB) * First Contentful Paint (FCP) * Largest Contentful Paint (LCP) * First Input Delay (FID) * Cumulative Layout Shift (CLS) * Interaction to Next Paint (INP) You can handle all the results of these metrics using the `name` property. 'use client' import { useReportWebVitals } from 'next/web-vitals' export function WebVitals() { useReportWebVitals((metric) => { switch (metric.name) { case 'FCP': { // handle FCP results } case 'LCP': { // handle LCP results } // ... } }) } ## Usage on Vercel Vercel Speed Insights are automatically configured on Vercel deployments, and don't require the use of `useReportWebVitals`. This hook is useful in local development, or if you're using a different analytics service. ## Sending results to external systems You can send results to any endpoint to measure and track real user performance on your site. For example: useReportWebVitals((metric) => { const body = JSON.stringify(metric) const url = 'https://example.com/analytics' // Use `navigator.sendBeacon()` if available, falling back to `fetch()`. if (navigator.sendBeacon) { navigator.sendBeacon(url, body) } else { fetch(url, { body, method: 'POST', keepalive: true }) } }) > **Good to know**: If you use Google Analytics, using the `id` value can allow you to construct metric distributions manually (to calculate percentiles, etc.) > useReportWebVitals(metric => { > // Use `window.gtag` if you initialized Google Analytics as this example: > // https://github.com/vercel/next.js/blob/canary/examples/with-google-analytics/pages/_app.js > window.gtag('event', metric.name, { > value: Math.round(metric.name === 'CLS' ? metric.value * 1000 : metric.value), // values must be integers > event_label: metric.id, // id unique to current page load > non_interaction: true, // avoids affecting bounce rate. > }); > } > > Read more about sending results to Google Analytics. Was this helpful? supported. --- ## Page: https://nextjs.org/docs/13/app/api-reference/functions/use-router The `useRouter` hook allows you to programmatically change routes inside Client Components. > **Recommendation:** Use the `<Link>` component for navigation unless you have a specific requirement for using `useRouter`. 'use client' import { useRouter } from 'next/navigation' export default function Page() { const router = useRouter() return ( <button type="button" onClick={() => router.push('/dashboard')}> Dashboard </button> ) } ## `useRouter()` * `router.push(href: string, { scroll: boolean })`: Perform a client-side navigation to the provided route. Adds a new entry into the browser’s history stack. * `router.replace(href: string, { scroll: boolean })`: Perform a client-side navigation to the provided route without adding a new entry into the browser’s history stack. * `router.refresh()`: Refresh the current route. Making a new request to the server, re-fetching data requests, and re-rendering Server Components. The client will merge the updated React Server Component payload without losing unaffected client-side React (e.g. `useState`) or browser state (e.g. scroll position). * `router.prefetch(href: string)`: Prefetch the provided route for faster client-side transitions. * `router.back()`: Navigate back to the previous route in the browser’s history stack. * `router.forward()`: Navigate forwards to the next page in the browser’s history stack. > **Good to know**: > > * The `<Link>` component automatically prefetch routes as they become visible in the viewport. > * `refresh()` could re-produce the same result if fetch requests are cached. Other dynamic functions like `cookies` and `headers` could also change the response. ### Migrating from `next/router` * The `useRouter` hook should be imported from `next/navigation` and not `next/router` when using the App Router * The `pathname` string has been removed and is replaced by `usePathname()` * The `query` object has been removed and is replaced by `useSearchParams()` * `router.events` has been replaced. See below. View the full migration guide. ## Examples ### Router events You can listen for page changes by composing other Client Component hooks like `usePathname` and `useSearchParams`. 'use client' import { useEffect } from 'react' import { usePathname, useSearchParams } from 'next/navigation' export function NavigationEvents() { const pathname = usePathname() const searchParams = useSearchParams() useEffect(() => { const url = `${pathname}?${searchParams}` console.log(url) // You can now use the current URL // ... }, [pathname, searchParams]) return null } Which can be imported into a layout. import { Suspense } from 'react' import { NavigationEvents } from './components/navigation-events' export default function Layout({ children }) { return ( <html lang="en"> <body> {children} <Suspense fallback={null}> <NavigationEvents /> </Suspense> </body> </html> ) } > **Good to know**: `<NavigationEvents>` is wrapped in a `Suspense` boundary because`useSearchParams()` causes client-side rendering up to the closest `Suspense` boundary during static rendering. Learn more. ### Disabling scroll restoration By default, Next.js will scroll to the top of the page when navigating to a new route. You can disable this behavior by passing `scroll: false` to `router.push()` or `router.replace()`. 'use client' import { useRouter } from 'next/navigation' export default function Page() { const router = useRouter() return ( <button type="button" onClick={() => router.push('/dashboard', { scroll: false })} > Dashboard </button> ) } ## Version History | Version | Changes | | --- | --- | | `v13.0.0` | `useRouter` from `next/navigation` introduced. | --- ## Page: https://nextjs.org/docs/13/app/api-reference/functions/use-search-params `useSearchParams` is a **Client Component** hook that lets you read the current URL's **query string**. `useSearchParams` returns a **read-only** version of the `URLSearchParams` interface. 'use client' import { useSearchParams } from 'next/navigation' export default function SearchBar() { const searchParams = useSearchParams() const search = searchParams.get('search') // URL -> `/dashboard?search=my-project` // `search` -> 'my-project' return <>Search: {search}</> } ## Parameters const searchParams = useSearchParams() `useSearchParams` does not take any parameters. ## Returns `useSearchParams` returns a **read-only** version of the `URLSearchParams` interface, which includes utility methods for reading the URL's query string: * `URLSearchParams.get()`: Returns the first value associated with the search parameter. For example: | URL | `searchParams.get("a")` | | --- | --- | | `/dashboard?a=1` | `'1'` | | `/dashboard?a=` | `''` | | `/dashboard?b=3` | `null` | | `/dashboard?a=1&a=2` | `'1'` _\- use `getAll()` to get all values_ | * `URLSearchParams.has()`: Returns a boolean value indicating if the given parameter exists. For example: | URL | `searchParams.has("a")` | | --- | --- | | `/dashboard?a=1` | `true` | | `/dashboard?b=3` | `false` | * Learn more about other **read-only** methods of `URLSearchParams`, including the `getAll()`, `keys()`, `values()`, `entries()`, `forEach()`, and `toString()`. > **Good to know**: > > * `useSearchParams` is a Client Component hook and is **not supported** in Server Components to prevent stale values during partial rendering. > * If an application includes the `/pages` directory, `useSearchParams` will return `ReadonlyURLSearchParams | null`. The `null` value is for compatibility during migration since search params cannot be known during pre-rendering of a page that doesn't use `getServerSideProps` ## Behavior ### Static Rendering If a route is statically rendered, calling `useSearchParams()` will cause the tree up to the closest `Suspense` boundary to be client-side rendered. This allows a part of the page to be statically rendered while the dynamic part that uses `searchParams` is client-side rendered. You can reduce the portion of the route that is client-side rendered by wrapping the component that uses `useSearchParams` in a `Suspense` boundary. For example: 'use client' import { useSearchParams } from 'next/navigation' export default function SearchBar() { const searchParams = useSearchParams() const search = searchParams.get('search') // This will not be logged on the server when using static rendering console.log(search) return <>Search: {search}</> } import { Suspense } from 'react' import SearchBar from './search-bar' // This component passed as a fallback to the Suspense boundary // will be rendered in place of the search bar in the initial HTML. // When the value is available during React hydration the fallback // will be replaced with the `<SearchBar>` component. function SearchBarFallback() { return <>placeholder</> } export default function Page() { return ( <> <nav> <Suspense fallback={<SearchBarFallback />}> <SearchBar /> </Suspense> </nav> <h1>Dashboard</h1> </> ) } ### Dynamic Rendering If a route is dynamically rendered, `useSearchParams` will be available on the server during the initial server render of the Client Component. > **Good to know**: Setting the `dynamic` route segment config option to `force-dynamic` can be used to force dynamic rendering. For example: 'use client' import { useSearchParams } from 'next/navigation' export default function SearchBar() { const searchParams = useSearchParams() const search = searchParams.get('search') // This will be logged on the server during the initial render // and on the client on subsequent navigations. console.log(search) return <>Search: {search}</> } import SearchBar from './search-bar' export const dynamic = 'force-dynamic' export default function Page() { return ( <> <nav> <SearchBar /> </nav> <h1>Dashboard</h1> </> ) } ### Server Components #### Pages To access search params in Pages (Server Components), use the `searchParams` prop. #### Layouts Unlike Pages, Layouts (Server Components) **do not** receive the `searchParams` prop. This is because a shared layout is not re-rendered during navigation which could lead to stale `searchParams` between navigations. View detailed explanation. Instead, use the Page `searchParams` prop or the `useSearchParams` hook in a Client Component, which is re-rendered on the client with the latest `searchParams`. ## Examples ### Updating `searchParams` You can use `useRouter` or `Link` to set new `searchParams`. After a navigation is performed, the current `page.js` will receive an updated `searchParams` prop. export default function ExampleClientComponent() { const router = useRouter() const pathname = usePathname() const searchParams = useSearchParams()! // Get a new searchParams string by merging the current // searchParams with a provided key/value pair const createQueryString = useCallback( (name: string, value: string) => { const params = new URLSearchParams(searchParams) params.set(name, value) return params.toString() }, [searchParams] ) return ( <> <p>Sort By</p> {/* using useRouter */} <button onClick={() => { // <pathname>?sort=asc router.push(pathname + '?' + createQueryString('sort', 'asc')) }} > ASC </button> {/* using <Link> */} <Link href={ // <pathname>?sort=desc pathname + '?' + createQueryString('sort', 'desc') } > DESC </Link> </> ) } ## Version History | Version | Changes | | --- | --- | | `v13.0.0` | `useSearchParams` introduced. | --- ## Page: https://nextjs.org/docs/13/app/api-reference/functions/use-selected-layout-segment `useSelectedLayoutSegment` is a **Client Component** hook that lets you read the active route segment **one level below** the Layout it is called from. It is useful for navigation UI, such as tabs inside a parent layout that change style depending on the active child segment. 'use client' import { useSelectedLayoutSegment } from 'next/navigation' export default function ExampleClientComponent() { const segment = useSelectedLayoutSegment() return <p>Active segment: {segment}</p> } > **Good to know**: > > * Since `useSelectedLayoutSegment` is a Client Component hook, and Layouts are Server Components by default, `useSelectedLayoutSegment` is usually called via a Client Component that is imported into a Layout. > * `useSelectedLayoutSegment` only returns the segment one level down. To return all active segments, see `useSelectedLayoutSegments` ## Parameters const segment = useSelectedLayoutSegment(parallelRoutesKey?: string) `useSelectedLayoutSegment` _optionally_ accepts a `parallelRoutesKey`, which allows you to read the active route segment within that slot. ## Returns `useSelectedLayoutSegment` returns a string of the active segment or `null` if one doesn't exist. For example, given the Layouts and URLs below, the returned segment would be: | Layout | Visited URL | Returned Segment | | --- | --- | --- | | `app/layout.js` | `/` | `null` | | `app/layout.js` | `/dashboard` | `'dashboard'` | | `app/dashboard/layout.js` | `/dashboard` | `null` | | `app/dashboard/layout.js` | `/dashboard/settings` | `'settings'` | | `app/dashboard/layout.js` | `/dashboard/analytics` | `'analytics'` | | `app/dashboard/layout.js` | `/dashboard/analytics/monthly` | `'analytics'` | ## Examples ### Creating an active link component You can use `useSelectedLayoutSegment` to create an active link component that changes style depending on the active segment. For example, a featured posts list in the sidebar of a blog: 'use client' import Link from 'next/link' import { useSelectedLayoutSegment } from 'next/navigation' // This *client* component will be imported into a blog layout export default function BlogNavLink({ slug, children, }: { slug: string children: React.ReactNode }) { // Navigating to `/blog/hello-world` will return 'hello-world' // for the selected layout segment const segment = useSelectedLayoutSegment() const isActive = slug === segment return ( <Link href={`/blog/${slug}`} // Change style depending on whether the link is active style={{ fontWeight: isActive ? 'bold' : 'normal' }} > {children} </Link> ) } // Import the Client Component into a parent Layout (Server Component) import { BlogNavLink } from './blog-nav-link' import getFeaturedPosts from './get-featured-posts' export default async function Layout({ children, }: { children: React.ReactNode }) { const featuredPosts = await getFeaturedPosts() return ( <div> {featuredPosts.map((post) => ( <div key={post.id}> <BlogNavLink slug={post.slug}>{post.title}</BlogNavLink> </div> ))} <div>{children}</div> </div> ) } ## Version History | Version | Changes | | --- | --- | | `v13.0.0` | `useSelectedLayoutSegment` introduced. | --- ## Page: https://nextjs.org/docs/13/app/api-reference/functions/use-selected-layout-segments You are currently viewing documentation for version 13 of Next.js. `useSelectedLayoutSegments` is a **Client Component** hook that lets you read the active route segments **below** the Layout it is called from. It is useful for creating UI in parent Layouts that need knowledge of active child segments such as breadcrumbs. app/example-client-component.tsx 'use client' import { useSelectedLayoutSegments } from 'next/navigation' export default function ExampleClientComponent() { const segments = useSelectedLayoutSegments() return ( <ul> {segments.map((segment, index) => ( <li key={index}>{segment}</li> ))} </ul> ) } > **Good to know**: > > * Since `useSelectedLayoutSegments` is a Client Component hook, and Layouts are Server Components by default, `useSelectedLayoutSegments` is usually called via a Client Component that is imported into a Layout. > * The returned segments include Route Groups, which you might not want to be included in your UI. You can use the `filter()` array method to remove items that start with a bracket. ## Parameters const segments = useSelectedLayoutSegments(parallelRoutesKey?: string) `useSelectedLayoutSegments` _optionally_ accepts a `parallelRoutesKey`, which allows you to read the active route segment within that slot. ## Returns `useSelectedLayoutSegments` returns an array of strings containing the active segments one level down from the layout the hook was called from. Or an empty array if none exist. For example, given the Layouts and URLs below, the returned segments would be: | Layout | Visited URL | Returned Segments | | --- | --- | --- | | `app/layout.js` | `/` | `[]` | | `app/layout.js` | `/dashboard` | `['dashboard']` | | `app/layout.js` | `/dashboard/settings` | `['dashboard', 'settings']` | | `app/dashboard/layout.js` | `/dashboard` | `[]` | | `app/dashboard/layout.js` | `/dashboard/settings` | `['settings']` | ## Version History | Version | Changes | | --- | --- | | `v13.0.0` | `useSelectedLayoutSegments` introduced. | --- ## Page: https://nextjs.org/docs/13/app/api-reference/next-config-js Next.js can be configured through a `next.config.js` file in the root of your project directory (for example, by `package.json`). /** @type {import('next').NextConfig} */ const nextConfig = { /* config options here */ } module.exports = nextConfig `next.config.js` is a regular Node.js module, not a JSON file. It gets used by the Next.js server and build phases, and it's not included in the browser build. If you need ECMAScript modules, you can use `next.config.mjs`: /** * @type {import('next').NextConfig} */ const nextConfig = { /* config options here */ } export default nextConfig You can also use a function: module.exports = (phase, { defaultConfig }) => { /** * @type {import('next').NextConfig} */ const nextConfig = { /* config options here */ } return nextConfig } Since Next.js 12.1.0, you can use an async function: module.exports = async (phase, { defaultConfig }) => { /** * @type {import('next').NextConfig} */ const nextConfig = { /* config options here */ } return nextConfig } `phase` is the current context in which the configuration is loaded. You can see the available phases. Phases can be imported from `next/constants`: const { PHASE_DEVELOPMENT_SERVER } = require('next/constants') module.exports = (phase, { defaultConfig }) => { if (phase === PHASE_DEVELOPMENT_SERVER) { return { /* development only config options here */ } } return { /* config options for all phases except development here */ } } The commented lines are the place where you can put the configs allowed by `next.config.js`, which are defined in this file. However, none of the configs are required, and it's not necessary to understand what each config does. Instead, search for the features you need to enable or modify in this section and they will show you what to do. > Avoid using new JavaScript features not available in your target Node.js version. `next.config.js` will not be parsed by Webpack, Babel or TypeScript. This page documents all the available configuration options: --- ## Page: https://nextjs.org/docs/13/app/api-reference/next-config-js/appDir You are currently viewing documentation for version 13 of Next.js. > **Good to know**: This option is **no longer** needed as of Next.js 13.4. The App Router is now stable. The App Router (`app` directory) enables support for layouts, Server Components, streaming, and colocated data fetching. Using the `app` directory will automatically enable React Strict Mode. Learn how to incrementally adopt `app`. --- ## Page: https://nextjs.org/docs/13/app/api-reference/next-config-js/assetPrefix > **Attention**: Deploying to Vercel automatically configures a global CDN for your Next.js project. You do not need to manually setup an Asset Prefix. > **Good to know**: Next.js 9.5+ added support for a customizable Base Path, which is better suited for hosting your application on a sub-path like `/docs`. We do not suggest you use a custom Asset Prefix for this use case. To set up a CDN, you can set up an asset prefix and configure your CDN's origin to resolve to the domain that Next.js is hosted on. Open `next.config.js` and add the `assetPrefix` config: const isProd = process.env.NODE_ENV === 'production' module.exports = { // Use the CDN in production and localhost for development. assetPrefix: isProd ? 'https://cdn.mydomain.com' : undefined, } Next.js will automatically use your asset prefix for the JavaScript and CSS files it loads from the `/_next/` path (`.next/static/` folder). For example, with the above configuration, the following request for a JS chunk: /_next/static/chunks/4b9b41aaa062cbbfeff4add70f256968c51ece5d.4d708494b3aed70c04f0.js Would instead become: https://cdn.mydomain.com/_next/static/chunks/4b9b41aaa062cbbfeff4add70f256968c51ece5d.4d708494b3aed70c04f0.js The exact configuration for uploading your files to a given CDN will depend on your CDN of choice. The only folder you need to host on your CDN is the contents of `.next/static/`, which should be uploaded as `_next/static/` as the above URL request indicates. **Do not upload the rest of your `.next/` folder**, as you should not expose your server code and other configuration to the public. While `assetPrefix` covers requests to `_next/static`, it does not influence the following paths: * Files in the public folder; if you want to serve those assets over a CDN, you'll have to introduce the prefix yourself Was this helpful? supported. --- ## Page: https://nextjs.org/docs/13/app/api-reference/next-config-js/basePath To deploy a Next.js application under a sub-path of a domain you can use the `basePath` config option. `basePath` allows you to set a path prefix for the application. For example, to use `/docs` instead of `''` (an empty string, the default), open `next.config.js` and add the `basePath` config: module.exports = { basePath: '/docs', } > **Good to know**: This value must be set at build time and cannot be changed without re-building as the value is inlined in the client-side bundles. ### Links When linking to other pages using `next/link` and `next/router` the `basePath` will be automatically applied. For example, using `/about` will automatically become `/docs/about` when `basePath` is set to `/docs`. export default function HomePage() { return ( <> <Link href="/about">About Page</Link> </> ) } Output html: <a href="/docs/about">About Page</a> This makes sure that you don't have to change all links in your application when changing the `basePath` value. ### Images When using the `next/image` component, you will need to add the `basePath` in front of `src`. For example, using `/docs/me.png` will properly serve your image when `basePath` is set to `/docs`. import Image from 'next/image' function Home() { return ( <> <h1>My Homepage</h1> <Image src="/docs/me.png" alt="Picture of the author" width={500} height={500} /> <p>Welcome to my homepage!</p> </> ) } export default Home --- ## Page: https://nextjs.org/docs/13/app/api-reference/next-config-js/compress You are currently viewing documentation for version 13 of Next.js. Next.js provides **gzip** compression to compress rendered content and static files. In general you will want to enable compression on a HTTP proxy like nginx, to offload load from the `Node.js` process. To disable **compression**, open `next.config.js` and disable the `compress` config: next.config.js module.exports = { compress: false, } --- ## Page: https://nextjs.org/docs/13/app/api-reference/next-config-js/devIndicators You are currently viewing documentation for version 13 of Next.js. When you edit your code, and Next.js is compiling the application, a compilation indicator appears in the bottom right corner of the page. > **Good to know**: This indicator is only present in development mode and will not appear when building and running the app in production mode. In some cases this indicator can be misplaced on your page, for example, when conflicting with a chat launcher. To change its position, open `next.config.js` and set the `buildActivityPosition` in the `devIndicators` object to `bottom-right` (default), `bottom-left`, `top-right` or `top-left`: next.config.js module.exports = { devIndicators: { buildActivityPosition: 'bottom-right', }, } In some cases this indicator might not be useful for you. To remove it, open `next.config.js` and disable the `buildActivity` config in `devIndicators` object: next.config.js module.exports = { devIndicators: { buildActivity: false, }, } --- ## Page: https://nextjs.org/docs/13/app/api-reference/next-config-js/distDir You are currently viewing documentation for version 13 of Next.js. You can specify a name to use for a custom build directory to use instead of `.next`. Open `next.config.js` and add the `distDir` config: next.config.js module.exports = { distDir: 'build', } Now if you run `next build` Next.js will use `build` instead of the default `.next` folder. > `distDir` **should not** leave your project directory. For example, `../build` is an **invalid** directory. --- ## Page: https://nextjs.org/docs/13/app/api-reference/next-config-js/env You are currently viewing documentation for version 13 of Next.js. > Since the release of Next.js 9.4 we now have a more intuitive and ergonomic experience for adding environment variables. Give it a try! Examples * With env > **Good to know**: environment variables specified in this way will **always** be included in the JavaScript bundle, prefixing the environment variable name with `NEXT_PUBLIC_` only has an effect when specifying them through the environment or .env files. To add environment variables to the JavaScript bundle, open `next.config.js` and add the `env` config: next.config.js module.exports = { env: { customKey: 'my-value', }, } Now you can access `process.env.customKey` in your code. For example: function Page() { return <h1>The value of customKey is: {process.env.customKey}</h1> } export default Page Next.js will replace `process.env.customKey` with `'my-value'` at build time. Trying to destructure `process.env` variables won't work due to the nature of webpack DefinePlugin. For example, the following line: return <h1>The value of customKey is: {process.env.customKey}</h1> Will end up being: return <h1>The value of customKey is: {'my-value'}</h1> --- ## Page: https://nextjs.org/docs/13/app/api-reference/next-config-js/eslint You are currently viewing documentation for version 13 of Next.js. When ESLint is detected in your project, Next.js fails your **production build** (`next build`) when errors are present. If you'd like Next.js to produce production code even when your application has ESLint errors, you can disable the built-in linting step completely. This is not recommended unless you already have ESLint configured to run in a separate part of your workflow (for example, in CI or a pre-commit hook). Open `next.config.js` and enable the `ignoreDuringBuilds` option in the `eslint` config: next.config.js module.exports = { eslint: { // Warning: This allows production builds to successfully complete even if // your project has ESLint errors. ignoreDuringBuilds: true, }, } --- ## Page: https://nextjs.org/docs/13/app/api-reference/next-config-js/exportPathMap ## exportPathMap (Deprecated) > This feature is exclusive to `next export` and currently **deprecated** in favor of `getStaticPaths` with `pages` or `generateStaticParams` with `app`. Examples * Static Export `exportPathMap` allows you to specify a mapping of request paths to page destinations, to be used during export. Paths defined in `exportPathMap` will also be available when using `next dev`. Let's start with an example, to create a custom `exportPathMap` for an app with the following pages: * `pages/index.js` * `pages/about.js` * `pages/post.js` Open `next.config.js` and add the following `exportPathMap` config: module.exports = { exportPathMap: async function ( defaultPathMap, { dev, dir, outDir, distDir, buildId } ) { return { '/': { page: '/' }, '/about': { page: '/about' }, '/p/hello-nextjs': { page: '/post', query: { title: 'hello-nextjs' } }, '/p/learn-nextjs': { page: '/post', query: { title: 'learn-nextjs' } }, '/p/deploy-nextjs': { page: '/post', query: { title: 'deploy-nextjs' } }, } }, } > **Good to know**: the `query` field in `exportPathMap` cannot be used with automatically statically optimized pages or `getStaticProps` pages as they are rendered to HTML files at build-time and additional query information cannot be provided during `next export`. The pages will then be exported as HTML files, for example, `/about` will become `/about.html`. `exportPathMap` is an `async` function that receives 2 arguments: the first one is `defaultPathMap`, which is the default map used by Next.js. The second argument is an object with: * `dev` - `true` when `exportPathMap` is being called in development. `false` when running `next export`. In development `exportPathMap` is used to define routes. * `dir` - Absolute path to the project directory * `outDir` - Absolute path to the `out/` directory (configurable with `-o`). When `dev` is `true` the value of `outDir` will be `null`. * `distDir` - Absolute path to the `.next/` directory (configurable with the `distDir` config) * `buildId` - The generated build id The returned object is a map of pages where the `key` is the `pathname` and the `value` is an object that accepts the following fields: * `page`: `String` - the page inside the `pages` directory to render * `query`: `Object` - the `query` object passed to `getInitialProps` when prerendering. Defaults to `{}` > The exported `pathname` can also be a filename (for example, `/readme.md`), but you may need to set the `Content-Type` header to `text/html` when serving its content if it is different than `.html`. ## Adding a trailing slash It is possible to configure Next.js to export pages as `index.html` files and require trailing slashes, `/about` becomes `/about/index.html` and is routable via `/about/`. This was the default behavior prior to Next.js 9. To switch back and add a trailing slash, open `next.config.js` and enable the `trailingSlash` config: module.exports = { trailingSlash: true, } ## Customizing the output directory `next export` will use `out` as the default output directory, you can customize this using the `-o` argument, like so: next export -o outdir > **Warning**: Using `exportPathMap` is deprecated and is overridden by `getStaticPaths` inside `pages`. We don't recommend using them together. --- ## Page: https://nextjs.org/docs/13/app/api-reference/next-config-js/generateBuildId You are currently viewing documentation for version 13 of Next.js. Next.js uses a constant id generated at build time to identify which version of your application is being served. This can cause problems in multi-server deployments when `next build` is run on every server. In order to keep a consistent build id between builds you can provide your own build id. Open `next.config.js` and add the `generateBuildId` function: next.config.js module.exports = { generateBuildId: async () => { // You can, for example, get the latest git commit hash here return 'my-build-id' }, } --- ## Page: https://nextjs.org/docs/13/app/api-reference/next-config-js/generateEtags You are currently viewing documentation for version 13 of Next.js. Next.js will generate etags for every page by default. You may want to disable etag generation for HTML pages depending on your cache strategy. Open `next.config.js` and disable the `generateEtags` option: next.config.js module.exports = { generateEtags: false, } --- ## Page: https://nextjs.org/docs/13/app/api-reference/next-config-js/headers Headers allow you to set custom HTTP headers on the response to an incoming request on a given path. To set custom HTTP headers you can use the `headers` key in `next.config.js`: module.exports = { async headers() { return [ { source: '/about', headers: [ { key: 'x-custom-header', value: 'my custom header value', }, { key: 'x-another-custom-header', value: 'my other custom header value', }, ], }, ] }, } `headers` is an async function that expects an array to be returned holding objects with `source` and `headers` properties: * `source` is the incoming request path pattern. * `headers` is an array of response header objects, with `key` and `value` properties. * `basePath`: `false` or `undefined` - if false the basePath won't be included when matching, can be used for external rewrites only. * `locale`: `false` or `undefined` - whether the locale should not be included when matching. * `has` is an array of has objects with the `type`, `key` and `value` properties. * `missing` is an array of missing objects with the `type`, `key` and `value` properties. Headers are checked before the filesystem which includes pages and `/public` files. If two headers match the same path and set the same header key, the last header key will override the first. Using the below headers, the path `/hello` will result in the header `x-hello` being `world` due to the last header value set being `world`. module.exports = { async headers() { return [ { source: '/:path*', headers: [ { key: 'x-hello', value: 'there', }, ], }, { source: '/hello', headers: [ { key: 'x-hello', value: 'world', }, ], }, ] }, } ## Path Matching Path matches are allowed, for example `/blog/:slug` will match `/blog/hello-world` (no nested paths): module.exports = { async headers() { return [ { source: '/blog/:slug', headers: [ { key: 'x-slug', value: ':slug', // Matched parameters can be used in the value }, { key: 'x-slug-:slug', // Matched parameters can be used in the key value: 'my other custom header value', }, ], }, ] }, } ### Wildcard Path Matching To match a wildcard path you can use `*` after a parameter, for example `/blog/:slug*` will match `/blog/a/b/c/d/hello-world`: module.exports = { async headers() { return [ { source: '/blog/:slug*', headers: [ { key: 'x-slug', value: ':slug*', // Matched parameters can be used in the value }, { key: 'x-slug-:slug*', // Matched parameters can be used in the key value: 'my other custom header value', }, ], }, ] }, } ### Regex Path Matching To match a regex path you can wrap the regex in parenthesis after a parameter, for example `/blog/:slug(\\d{1,})` will match `/blog/123` but not `/blog/abc`: module.exports = { async headers() { return [ { source: '/blog/:post(\\d{1,})', headers: [ { key: 'x-post', value: ':post', }, ], }, ] }, } The following characters `(`, `)`, `{`, `}`, `:`, `*`, `+`, `?` are used for regex path matching, so when used in the `source` as non-special values they must be escaped by adding `\\` before them: module.exports = { async headers() { return [ { // this will match `/english(default)/something` being requested source: '/english\\(default\\)/:slug', headers: [ { key: 'x-header', value: 'value', }, ], }, ] }, } ## Header, Cookie, and Query Matching To only apply a header when header, cookie, or query values also match the `has` field or don't match the `missing` field can be used. Both the `source` and all `has` items must match and all `missing` items must not match for the header to be applied. `has` and `missing` items can have the following fields: * `type`: `String` - must be either `header`, `cookie`, `host`, or `query`. * `key`: `String` - the key from the selected type to match against. * `value`: `String` or `undefined` - the value to check for, if undefined any value will match. A regex like string can be used to capture a specific part of the value, e.g. if the value `first-(?<paramName>.*)` is used for `first-second` then `second` will be usable in the destination with `:paramName`. module.exports = { async headers() { return [ // if the header `x-add-header` is present, // the `x-another-header` header will be applied { source: '/:path*', has: [ { type: 'header', key: 'x-add-header', }, ], headers: [ { key: 'x-another-header', value: 'hello', }, ], }, // if the header `x-no-header` is not present, // the `x-another-header` header will be applied { source: '/:path*', missing: [ { type: 'header', key: 'x-no-header', }, ], headers: [ { key: 'x-another-header', value: 'hello', }, ], }, // if the source, query, and cookie are matched, // the `x-authorized` header will be applied { source: '/specific/:path*', has: [ { type: 'query', key: 'page', // the page value will not be available in the // header key/values since value is provided and // doesn't use a named capture group e.g. (?<page>home) value: 'home', }, { type: 'cookie', key: 'authorized', value: 'true', }, ], headers: [ { key: 'x-authorized', value: ':authorized', }, ], }, // if the header `x-authorized` is present and // contains a matching value, the `x-another-header` will be applied { source: '/:path*', has: [ { type: 'header', key: 'x-authorized', value: '(?<authorized>yes|true)', }, ], headers: [ { key: 'x-another-header', value: ':authorized', }, ], }, // if the host is `example.com`, // this header will be applied { source: '/:path*', has: [ { type: 'host', value: 'example.com', }, ], headers: [ { key: 'x-another-header', value: ':authorized', }, ], }, ] }, } When leveraging `basePath` support with headers each `source` is automatically prefixed with the `basePath` unless you add `basePath: false` to the header: module.exports = { basePath: '/docs', async headers() { return [ { source: '/with-basePath', // becomes /docs/with-basePath headers: [ { key: 'x-hello', value: 'world', }, ], }, { source: '/without-basePath', // is not modified since basePath: false is set headers: [ { key: 'x-hello', value: 'world', }, ], basePath: false, }, ] }, } When leveraging `i18n` support with headers each `source` is automatically prefixed to handle the configured `locales` unless you add `locale: false` to the header. If `locale: false` is used you must prefix the `source` with a locale for it to be matched correctly. module.exports = { i18n: { locales: ['en', 'fr', 'de'], defaultLocale: 'en', }, async headers() { return [ { source: '/with-locale', // automatically handles all locales headers: [ { key: 'x-hello', value: 'world', }, ], }, { // does not handle locales automatically since locale: false is set source: '/nl/with-locale-manual', locale: false, headers: [ { key: 'x-hello', value: 'world', }, ], }, { // this matches '/' since `en` is the defaultLocale source: '/en', locale: false, headers: [ { key: 'x-hello', value: 'world', }, ], }, { // this gets converted to /(en|fr|de)/(.*) so will not match the top-level // `/` or `/fr` routes like /:path* would source: '/(.*)', headers: [ { key: 'x-hello', value: 'world', }, ], }, ] }, } ## Cache-Control You cannot set `Cache-Control` headers in `next.config.js` for pages or assets, as these headers will be overwritten in production to ensure that responses and static assets are cached effectively. Learn more about caching with the App Router. ## Options ### X-DNS-Prefetch-Control This header controls DNS prefetching, allowing browsers to proactively perform domain name resolution on external links, images, CSS, JavaScript, and more. This prefetching is performed in the background, so the DNS is more likely to be resolved by the time the referenced items are needed. This reduces latency when the user clicks a link. { key: 'X-DNS-Prefetch-Control', value: 'on' } ### Strict-Transport-Security This header informs browsers it should only be accessed using HTTPS, instead of using HTTP. Using the configuration below, all present and future subdomains will use HTTPS for a `max-age` of 2 years. This blocks access to pages or subdomains that can only be served over HTTP. If you're deploying to Vercel, this header is not necessary as it's automatically added to all deployments unless you declare `headers` in your `next.config.js`. { key: 'Strict-Transport-Security', value: 'max-age=63072000; includeSubDomains; preload' } ### X-Frame-Options This header indicates whether the site should be allowed to be displayed within an `iframe`. This can prevent against clickjacking attacks. **This header has been superseded by CSP's `frame-ancestors` option**, which has better support in modern browsers. { key: 'X-Frame-Options', value: 'SAMEORIGIN' } ### Permissions-Policy This header allows you to control which features and APIs can be used in the browser. It was previously named `Feature-Policy`. { key: 'Permissions-Policy', value: 'camera=(), microphone=(), geolocation=(), browsing-topics=()' } ### X-Content-Type-Options This header prevents the browser from attempting to guess the type of content if the `Content-Type` header is not explicitly set. This can prevent XSS exploits for websites that allow users to upload and share files. For example, a user trying to download an image, but having it treated as a different `Content-Type` like an executable, which could be malicious. This header also applies to downloading browser extensions. The only valid value for this header is `nosniff`. { key: 'X-Content-Type-Options', value: 'nosniff' } ### Referrer-Policy This header controls how much information the browser includes when navigating from the current website (origin) to another. { key: 'Referrer-Policy', value: 'origin-when-cross-origin' } ### Content-Security-Policy Learn more about adding a Content Security Policy to your application. ## Version History | Version | Changes | | --- | --- | | `v13.3.0` | `missing` added. | | `v10.2.0` | `has` added. | | `v9.5.0` | Headers added. | --- ## Page: https://nextjs.org/docs/13/app/api-reference/next-config-js/httpAgentOptions You are currently viewing documentation for version 13 of Next.js. In Node.js versions prior to 18, Next.js automatically polyfills `fetch()` with undici and enables HTTP Keep-Alive by default. To disable HTTP Keep-Alive for all `fetch()` calls on the server-side, open `next.config.js` and add the `httpAgentOptions` config: next.config.js module.exports = { httpAgentOptions: { keepAlive: false, }, } --- ## Page: https://nextjs.org/docs/13/app/api-reference/next-config-js/images If you want to use a cloud provider to optimize images instead of using the Next.js built-in Image Optimization API, you can configure `next.config.js` with the following: module.exports = { images: { loader: 'custom', loaderFile: './my/image/loader.js', }, } This `loaderFile` must point to a file relative to the root of your Next.js application. The file must export a default function that returns a string, for example: export default function myImageLoader({ src, width, quality }) { return `https://example.com/${src}?w=${width}&q=${quality || 75}` } Alternatively, you can use the `loader` prop to pass the function to each instance of `next/image`. ## Example Loader Configuration * Akamai * Cloudinary * Cloudflare * Contentful * Fastly * Gumlet * ImageEngine * Imgix * Thumbor * Sanity * Supabase ### Akamai // Docs: https://techdocs.akamai.com/ivm/reference/test-images-on-demand export default function akamaiLoader({ src, width, quality }) { return `https://example.com/${src}?imwidth=${width}` } ### Cloudinary // Demo: https://res.cloudinary.com/demo/image/upload/w_300,c_limit,q_auto/turtles.jpg export default function cloudinaryLoader({ src, width, quality }) { const params = ['f_auto', 'c_limit', `w_${width}`, `q_${quality || 'auto'}`] return `https://example.com/${params.join(',')}${src}` } ### Cloudflare // Docs: https://developers.cloudflare.com/images/url-format export default function cloudflareLoader({ src, width, quality }) { const params = [`width=${width}`, `quality=${quality || 75}`, 'format=auto'] return `https://example.com/cdn-cgi/image/${params.join(',')}/${src}` } ### Contentful // Docs: https://www.contentful.com/developers/docs/references/images-api/ export default function contentfulLoader({ src, width, quality }) { const url = new URL(`https://example.com${src}`) url.searchParams.set('fm', 'webp') url.searchParams.set('w', width.toString()) url.searchParams.set('q', (quality || 75).toString()) return url.href } ### Fastly // Docs: https://developer.fastly.com/reference/io/ export default function fastlyLoader({ src, width, quality }) { const url = new URL(`https://example.com${src}`) url.searchParams.set('auto', 'webp') url.searchParams.set('width', width.toString()) url.searchParams.set('quality', (quality || 75).toString()) return url.href } ### Gumlet // Docs: https://docs.gumlet.com/reference/image-transform-size export default function gumletLoader({ src, width, quality }) { const url = new URL(`https://example.com${src}`) url.searchParams.set('format', 'auto') url.searchParams.set('w', width.toString()) url.searchParams.set('q', (quality || 75).toString()) return url.href } ### ImageEngine // Docs: https://support.imageengine.io/hc/en-us/articles/360058880672-Directives export default function imageengineLoader({ src, width, quality }) { const compression = 100 - (quality || 50) const params = [`w_${width}`, `cmpr_${compression}`)] return `https://example.com${src}?imgeng=/${params.join('/')` } ### Imgix // Demo: https://static.imgix.net/daisy.png?format=auto&fit=max&w=300 export default function imgixLoader({ src, width, quality }) { const url = new URL(`https://example.com${src}`) const params = url.searchParams params.set('auto', params.getAll('auto').join(',') || 'format') params.set('fit', params.get('fit') || 'max') params.set('w', params.get('w') || width.toString()) params.set('q', (quality || 50).toString()) return url.href } ### Thumbor // Docs: https://thumbor.readthedocs.io/en/latest/ export default function thumborLoader({ src, width, quality }) { const params = [`${width}x0`, `filters:quality(${quality || 75})`] return `https://example.com${params.join('/')}${src}` } ### Sanity // Docs: https://www.sanity.io/docs/image-urls export default function sanityLoader({ src, width, quality }) { const prj = 'zp7mbokg' const dataset = 'production' const url = new URL(`https://cdn.sanity.io/images/${prj}/${dataset}${src}`) url.searchParams.set('auto', 'format') url.searchParams.set('fit', 'max') url.searchParams.set('w', width.toString()) if (quality) { url.searchParams.set('q', quality.toString()) } return url.href } ### Supabase // Docs: https://supabase.com/docs/guides/storage/image-transformations#nextjs-loader export default function supabaseLoader({ src, width, quality }) { const url = new URL(`https://example.com${src}`) url.searchParams.set('width', width.toString()) url.searchParams.set('quality', (quality || 75).toString()) return url.href } --- ## Page: https://nextjs.org/docs/13/app/api-reference/next-config-js/incrementalCacheHandlerPath You are currently viewing documentation for version 13 of Next.js. In Next.js, the default cache handler uses the filesystem cache. This requires no configuration, however, you can customize the cache handler by using the `incrementalCacheHandlerPath` field in `next.config.js`. next.config.js module.exports = { experimental: { incrementalCacheHandlerPath: require.resolve('./cache-handler.js'), }, } Here's an example of a custom cache handler: cache-handler.js const cache = new Map() module.exports = class CacheHandler { constructor(options) { this.options = options this.cache = {} } async get(key) { return cache.get(key) } async set(key, data) { cache.set(key, { value: data, lastModified: Date.now(), }) } } ## API Reference The cache handler can implement the following methods: `get`, `set`, and `revalidateTag`. ### `get()` | Parameter | Type | Description | | --- | --- | --- | | `key` | `string` | The key to the cached value. | Returns the cached value or `null` if not found. ### `set()` | Parameter | Type | Description | | --- | --- | --- | | `key` | `string` | The key to store the data under. | | `data` | Data or `null` | The data to be cached. | Returns `Promise<void>`. ### `revalidateTag()` | Parameter | Type | Description | | --- | --- | --- | | `tag` | `string` | The cache tag to revalidate. | Returns `Promise<void>`. Learn more about revalidating data or the `revalidateTag()` function. --- ## Page: https://nextjs.org/docs/13/app/api-reference/next-config-js/mdxRs For use with `@next/mdx`. Compile MDX files using the new Rust compiler. next.config.js const withMDX = require('@next/mdx')() /** @type {import('next').NextConfig} */ const nextConfig = { pageExtensions: ['ts', 'tsx', 'mdx'], experimental: { mdxRs: true, }, } module.exports = withMDX(nextConfig) --- ## Page: https://nextjs.org/docs/13/app/api-reference/next-config-js/onDemandEntries You are currently viewing documentation for version 13 of Next.js. Next.js exposes some options that give you some control over how the server will dispose or keep in memory built pages in development. To change the defaults, open `next.config.js` and add the `onDemandEntries` config: next.config.js module.exports = { onDemandEntries: { // period (in ms) where the server will keep pages in the buffer maxInactiveAge: 25 * 1000, // number of pages that should be kept simultaneously without being disposed pagesBufferLength: 2, }, } --- ## Page: https://nextjs.org/docs/13/app/api-reference/next-config-js/optimizePackageImports You are currently viewing documentation for version 13 of Next.js. Some packages can export hundreds or thousands of modules, which can cause performance issues in development and production. Adding a package to `experimental.optimizePackageImports` will only load the modules you are actually using, while still giving you the convenience of writing import statements with many named exports. next.config.js module.exports = { experimental: { optimizePackageImports: ['package-name'], }, } Libraries like `@mui/icons-material`, `@mui/material`, `date-fns`, `lodash`, `lodash-es`, `react-bootstrap`, `@headlessui/react`, `@heroicons/react`, and `lucide-react` are already optimized by default. --- ## Page: https://nextjs.org/docs/13/app/api-reference/next-config-js/output During a build, Next.js will automatically trace each page and its dependencies to determine all of the files that are needed for deploying a production version of your application. This feature helps reduce the size of deployments drastically. Previously, when deploying with Docker you would need to have all files from your package's `dependencies` installed to run `next start`. Starting with Next.js 12, you can leverage Output File Tracing in the `.next/` directory to only include the necessary files. Furthermore, this removes the need for the deprecated `serverless` target which can cause various issues and also creates unnecessary duplication. ## How it Works During `next build`, Next.js will use `@vercel/nft` to statically analyze `import`, `require`, and `fs` usage to determine all files that a page might load. Next.js' production server is also traced for its needed files and output at `.next/next-server.js.nft.json` which can be leveraged in production. To leverage the `.nft.json` files emitted to the `.next` output directory, you can read the list of files in each trace that are relative to the `.nft.json` file and then copy them to your deployment location. ## Automatically Copying Traced Files Next.js can automatically create a `standalone` folder that copies only the necessary files for a production deployment including select files in `node_modules`. To leverage this automatic copying you can enable it in your `next.config.js`: module.exports = { output: 'standalone', } This will create a folder at `.next/standalone` which can then be deployed on its own without installing `node_modules`. Additionally, a minimal `server.js` file is also output which can be used instead of `next start`. This minimal server does not copy the `public` or `.next/static` folders by default as these should ideally be handled by a CDN instead, although these folders can be copied to the `standalone/public` and `standalone/.next/static` folders manually, after which `server.js` file will serve these automatically. > **Good to know**: > > * If your project needs to listen to a specific port or hostname, you can define `PORT` or `HOSTNAME` environment variables before running `server.js`. For example, run `PORT=8080 HOSTNAME=0.0.0.0 node server.js` to start the server on `http://0.0.0.0:8080`. > * If your project uses Image Optimization with the default `loader`, you must install `sharp` as a dependency: npm i sharp yarn add sharp pnpm add sharp bun add sharp ## Caveats * While tracing in monorepo setups, the project directory is used for tracing by default. For `next build packages/web-app`, `packages/web-app` would be the tracing root and any files outside of that folder will not be included. To include files outside of this folder you can set `experimental.outputFileTracingRoot` in your `next.config.js`. module.exports = { experimental: { // this includes files from the monorepo base two directories up outputFileTracingRoot: path.join(__dirname, '../../'), }, } * There are some cases in which Next.js might fail to include required files, or might incorrectly include unused files. In those cases, you can leverage `experimental.outputFileTracingExcludes` and `experimental.outputFileTracingIncludes` respectively in `next.config.js`. Each config accepts an object with minimatch globs for the key to match specific pages and a value of an array with globs relative to the project's root to either include or exclude in the trace. module.exports = { experimental: { outputFileTracingExcludes: { '/api/hello': ['./un-necessary-folder/**/*'], }, outputFileTracingIncludes: { '/api/another': ['./necessary-folder/**/*'], }, }, } * Currently, Next.js does not do anything with the emitted `.nft.json` files. The files must be read by your deployment platform, for example Vercel, to create a minimal deployment. In a future release, a new command is planned to utilize these `.nft.json` files. ## Experimental `turbotrace` Tracing dependencies can be slow because it requires very complex computations and analysis. We created `turbotrace` in Rust as a faster and smarter alternative to the JavaScript implementation. To enable it, you can add the following configuration to your `next.config.js`: module.exports = { experimental: { turbotrace: { // control the log level of the turbotrace, default is `error` logLevel?: | 'bug' | 'fatal' | 'error' | 'warning' | 'hint' | 'note' | 'suggestions' | 'info', // control if the log of turbotrace should contain the details of the analysis, default is `false` logDetail?: boolean // show all log messages without limit // turbotrace only show 1 log message for each categories by default logAll?: boolean // control the context directory of the turbotrace // files outside of the context directory will not be traced // set the `experimental.outputFileTracingRoot` has the same effect // if the `experimental.outputFileTracingRoot` and this option are both set, the `experimental.turbotrace.contextDirectory` will be used contextDirectory?: string // if there is `process.cwd()` expression in your code, you can set this option to tell `turbotrace` the value of `process.cwd()` while tracing. // for example the require(process.cwd() + '/package.json') will be traced as require('/path/to/cwd/package.json') processCwd?: string // control the maximum memory usage of the `turbotrace`, in `MB`, default is `6000`. memoryLimit?: number }, }, } --- ## Page: https://nextjs.org/docs/13/app/api-reference/next-config-js/pageExtensions You are currently viewing documentation for version 13 of Next.js. By default, Next.js accepts files with the following extensions: `.tsx`, `.ts`, `.jsx`, `.js`. This can be modified to allow other extensions like markdown (`.md`, `.mdx`). next.config.js const withMDX = require('@next/mdx')() /** @type {import('next').NextConfig} */ const nextConfig = { pageExtensions: ['ts', 'tsx', 'mdx'], experimental: { mdxRs: true, }, } module.exports = withMDX(nextConfig) --- ## Page: https://nextjs.org/docs/13/app/api-reference/next-config-js/poweredByHeader You are currently viewing documentation for version 13 of Next.js. By default Next.js will add the `x-powered-by` header. To opt-out of it, open `next.config.js` and disable the `poweredByHeader` config: next.config.js module.exports = { poweredByHeader: false, } --- ## Page: https://nextjs.org/docs/13/app/api-reference/next-config-js/productionBrowserSourceMaps You are currently viewing documentation for version 13 of Next.js. Source Maps are enabled by default during development. During production builds, they are disabled to prevent you leaking your source on the client, unless you specifically opt-in with the configuration flag. Next.js provides a configuration flag you can use to enable browser source map generation during the production build: next.config.js module.exports = { productionBrowserSourceMaps: true, } When the `productionBrowserSourceMaps` option is enabled, the source maps will be output in the same directory as the JavaScript files. Next.js will automatically serve these files when requested. * Adding source maps can increase `next build` time * Increases memory usage during `next build` --- ## Page: https://nextjs.org/docs/13/app/api-reference/next-config-js/reactStrictMode **Good to know**: Since Next.js 13.4, Strict Mode is `true` by default with `app` router, so the above configuration is only necessary for `pages`. You can still disable Strict Mode by setting `reactStrictMode: false`. **Suggested**: We strongly suggest you enable Strict Mode in your Next.js application to better prepare your application for the future of React. React's Strict Mode is a development mode only feature for highlighting potential problems in an application. It helps to identify unsafe lifecycles, legacy API usage, and a number of other features. The Next.js runtime is Strict Mode-compliant. To opt-in to Strict Mode, configure the following option in your `next.config.js`: If you or your team are not ready to use Strict Mode in your entire application, that's OK! You can incrementally migrate on a page-by-page basis using `<React.StrictMode>`. --- ## Page: https://nextjs.org/docs/13/app/api-reference/next-config-js/redirects Redirects allow you to redirect an incoming request path to a different destination path. To use redirects you can use the `redirects` key in `next.config.js`: module.exports = { async redirects() { return [ { source: '/about', destination: '/', permanent: true, }, ] }, } `redirects` is an async function that expects an array to be returned holding objects with `source`, `destination`, and `permanent` properties: * `source` is the incoming request path pattern. * `destination` is the path you want to route to. * `permanent` `true` or `false` - if `true` will use the 308 status code which instructs clients/search engines to cache the redirect forever, if `false` will use the 307 status code which is temporary and is not cached. > **Why does Next.js use 307 and 308?** Traditionally a 302 was used for a temporary redirect, and a 301 for a permanent redirect, but many browsers changed the request method of the redirect to `GET`, regardless of the original method. For example, if the browser made a request to `POST /v1/users` which returned status code `302` with location `/v2/users`, the subsequent request might be `GET /v2/users` instead of the expected `POST /v2/users`. Next.js uses the 307 temporary redirect, and 308 permanent redirect status codes to explicitly preserve the request method used. * `basePath`: `false` or `undefined` - if false the `basePath` won't be included when matching, can be used for external redirects only. * `locale`: `false` or `undefined` - whether the locale should not be included when matching. * `has` is an array of has objects with the `type`, `key` and `value` properties. * `missing` is an array of missing objects with the `type`, `key` and `value` properties. Redirects are checked before the filesystem which includes pages and `/public` files. Redirects are not applied to client-side routing (`Link`, `router.push`), unless Middleware is present and matches the path. When a redirect is applied, any query values provided in the request will be passed through to the redirect destination. For example, see the following redirect configuration: { source: '/old-blog/:path*', destination: '/blog/:path*', permanent: false } When `/old-blog/post-1?hello=world` is requested, the client will be redirected to `/blog/post-1?hello=world`. ## Path Matching Path matches are allowed, for example `/old-blog/:slug` will match `/old-blog/hello-world` (no nested paths): module.exports = { async redirects() { return [ { source: '/old-blog/:slug', destination: '/news/:slug', // Matched parameters can be used in the destination permanent: true, }, ] }, } ### Wildcard Path Matching To match a wildcard path you can use `*` after a parameter, for example `/blog/:slug*` will match `/blog/a/b/c/d/hello-world`: module.exports = { async redirects() { return [ { source: '/blog/:slug*', destination: '/news/:slug*', // Matched parameters can be used in the destination permanent: true, }, ] }, } ### Regex Path Matching To match a regex path you can wrap the regex in parentheses after a parameter, for example `/post/:slug(\\d{1,})` will match `/post/123` but not `/post/abc`: module.exports = { async redirects() { return [ { source: '/post/:slug(\\d{1,})', destination: '/news/:slug', // Matched parameters can be used in the destination permanent: false, }, ] }, } The following characters `(`, `)`, `{`, `}`, `:`, `*`, `+`, `?` are used for regex path matching, so when used in the `source` as non-special values they must be escaped by adding `\\` before them: module.exports = { async redirects() { return [ { // this will match `/english(default)/something` being requested source: '/english\\(default\\)/:slug', destination: '/en-us/:slug', permanent: false, }, ] }, } ## Header, Cookie, and Query Matching To only match a redirect when header, cookie, or query values also match the `has` field or don't match the `missing` field can be used. Both the `source` and all `has` items must match and all `missing` items must not match for the redirect to be applied. `has` and `missing` items can have the following fields: * `type`: `String` - must be either `header`, `cookie`, `host`, or `query`. * `key`: `String` - the key from the selected type to match against. * `value`: `String` or `undefined` - the value to check for, if undefined any value will match. A regex like string can be used to capture a specific part of the value, e.g. if the value `first-(?<paramName>.*)` is used for `first-second` then `second` will be usable in the destination with `:paramName`. module.exports = { async redirects() { return [ // if the header `x-redirect-me` is present, // this redirect will be applied { source: '/:path((?!another-page$).*)', has: [ { type: 'header', key: 'x-redirect-me', }, ], permanent: false, destination: '/another-page', }, // if the header `x-dont-redirect` is present, // this redirect will NOT be applied { source: '/:path((?!another-page$).*)', missing: [ { type: 'header', key: 'x-do-not-redirect', }, ], permanent: false, destination: '/another-page', }, // if the source, query, and cookie are matched, // this redirect will be applied { source: '/specific/:path*', has: [ { type: 'query', key: 'page', // the page value will not be available in the // destination since value is provided and doesn't // use a named capture group e.g. (?<page>home) value: 'home', }, { type: 'cookie', key: 'authorized', value: 'true', }, ], permanent: false, destination: '/another/:path*', }, // if the header `x-authorized` is present and // contains a matching value, this redirect will be applied { source: '/', has: [ { type: 'header', key: 'x-authorized', value: '(?<authorized>yes|true)', }, ], permanent: false, destination: '/home?authorized=:authorized', }, // if the host is `example.com`, // this redirect will be applied { source: '/:path((?!another-page$).*)', has: [ { type: 'host', value: 'example.com', }, ], permanent: false, destination: '/another-page', }, ] }, } ### Redirects with basePath support When leveraging `basePath` support with redirects each `source` and `destination` is automatically prefixed with the `basePath` unless you add `basePath: false` to the redirect: module.exports = { basePath: '/docs', async redirects() { return [ { source: '/with-basePath', // automatically becomes /docs/with-basePath destination: '/another', // automatically becomes /docs/another permanent: false, }, { // does not add /docs since basePath: false is set source: '/without-basePath', destination: 'https://example.com', basePath: false, permanent: false, }, ] }, } ### Redirects with i18n support When leveraging `i18n` support with redirects each `source` and `destination` is automatically prefixed to handle the configured `locales` unless you add `locale: false` to the redirect. If `locale: false` is used you must prefix the `source` and `destination` with a locale for it to be matched correctly. module.exports = { i18n: { locales: ['en', 'fr', 'de'], defaultLocale: 'en', }, async redirects() { return [ { source: '/with-locale', // automatically handles all locales destination: '/another', // automatically passes the locale on permanent: false, }, { // does not handle locales automatically since locale: false is set source: '/nl/with-locale-manual', destination: '/nl/another', locale: false, permanent: false, }, { // this matches '/' since `en` is the defaultLocale source: '/en', destination: '/en/another', locale: false, permanent: false, }, // it's possible to match all locales even when locale: false is set { source: '/:locale/page', destination: '/en/newpage', permanent: false, locale: false, }, { // this gets converted to /(en|fr|de)/(.*) so will not match the top-level // `/` or `/fr` routes like /:path* would source: '/(.*)', destination: '/another', permanent: false, }, ] }, } In some rare cases, you might need to assign a custom status code for older HTTP Clients to properly redirect. In these cases, you can use the `statusCode` property instead of the `permanent` property, but not both. To to ensure IE11 compatibility, a `Refresh` header is automatically added for the 308 status code. ## Other Redirects * Inside API Routes, you can use `res.redirect()`. * Inside `getStaticProps` and `getServerSideProps`, you can redirect specific pages at request-time. ## Version History | Version | Changes | | --- | --- | | `v13.3.0` | `missing` added. | | `v10.2.0` | `has` added. | | `v9.5.0` | `redirects` added. | --- ## Page: https://nextjs.org/docs/13/app/api-reference/next-config-js/rewrites Rewrites allow you to map an incoming request path to a different destination path. Rewrites act as a URL proxy and mask the destination path, making it appear the user hasn't changed their location on the site. In contrast, redirects will reroute to a new page and show the URL changes. To use rewrites you can use the `rewrites` key in `next.config.js`: module.exports = { async rewrites() { return [ { source: '/about', destination: '/', }, ] }, } Rewrites are applied to client-side routing, a `<Link href="/about">` will have the rewrite applied in the above example. `rewrites` is an async function that expects to return either an array or an object of arrays (see below) holding objects with `source` and `destination` properties: * `source`: `String` - is the incoming request path pattern. * `destination`: `String` is the path you want to route to. * `basePath`: `false` or `undefined` - if false the basePath won't be included when matching, can be used for external rewrites only. * `locale`: `false` or `undefined` - whether the locale should not be included when matching. * `has` is an array of has objects with the `type`, `key` and `value` properties. * `missing` is an array of missing objects with the `type`, `key` and `value` properties. When the `rewrites` function returns an array, rewrites are applied after checking the filesystem (pages and `/public` files) and before dynamic routes. When the `rewrites` function returns an object of arrays with a specific shape, this behavior can be changed and more finely controlled, as of `v10.1` of Next.js: module.exports = { async rewrites() { return { beforeFiles: [ // These rewrites are checked after headers/redirects // and before all files including _next/public files which // allows overriding page files { source: '/some-page', destination: '/somewhere-else', has: [{ type: 'query', key: 'overrideMe' }], }, ], afterFiles: [ // These rewrites are checked after pages/public files // are checked but before dynamic routes { source: '/non-existent', destination: '/somewhere-else', }, ], fallback: [ // These rewrites are checked after both pages/public files // and dynamic routes are checked { source: '/:path*', destination: `https://my-old-site.com/:path*`, }, ], } }, } > **Good to know**: rewrites in `beforeFiles` do not check the filesystem/dynamic routes immediately after matching a source, they continue until all `beforeFiles` have been checked. The order Next.js routes are checked is: 1. headers are checked/applied 2. redirects are checked/applied 3. `beforeFiles` rewrites are checked/applied 4. static files from the public directory, `_next/static` files, and non-dynamic pages are checked/served 5. `afterFiles` rewrites are checked/applied, if one of these rewrites is matched we check dynamic routes/static files after each match 6. `fallback` rewrites are checked/applied, these are applied before rendering the 404 page and after dynamic routes/all static assets have been checked. If you use fallback: true/'blocking' in `getStaticPaths`, the fallback `rewrites` defined in your `next.config.js` will _not_ be run. ## Rewrite parameters When using parameters in a rewrite the parameters will be passed in the query by default when none of the parameters are used in the `destination`. module.exports = { async rewrites() { return [ { source: '/old-about/:path*', destination: '/about', // The :path parameter isn't used here so will be automatically passed in the query }, ] }, } If a parameter is used in the destination none of the parameters will be automatically passed in the query. module.exports = { async rewrites() { return [ { source: '/docs/:path*', destination: '/:path*', // The :path parameter is used here so will not be automatically passed in the query }, ] }, } You can still pass the parameters manually in the query if one is already used in the destination by specifying the query in the `destination`. module.exports = { async rewrites() { return [ { source: '/:first/:second', destination: '/:first?second=:second', // Since the :first parameter is used in the destination the :second parameter // will not automatically be added in the query although we can manually add it // as shown above }, ] }, } > **Good to know**: Static pages from Automatic Static Optimization or prerendering params from rewrites will be parsed on the client after hydration and provided in the query. ## Path Matching Path matches are allowed, for example `/blog/:slug` will match `/blog/hello-world` (no nested paths): module.exports = { async rewrites() { return [ { source: '/blog/:slug', destination: '/news/:slug', // Matched parameters can be used in the destination }, ] }, } ### Wildcard Path Matching To match a wildcard path you can use `*` after a parameter, for example `/blog/:slug*` will match `/blog/a/b/c/d/hello-world`: module.exports = { async rewrites() { return [ { source: '/blog/:slug*', destination: '/news/:slug*', // Matched parameters can be used in the destination }, ] }, } ### Regex Path Matching To match a regex path you can wrap the regex in parenthesis after a parameter, for example `/blog/:slug(\\d{1,})` will match `/blog/123` but not `/blog/abc`: module.exports = { async rewrites() { return [ { source: '/old-blog/:post(\\d{1,})', destination: '/blog/:post', // Matched parameters can be used in the destination }, ] }, } The following characters `(`, `)`, `{`, `}`, `:`, `*`, `+`, `?` are used for regex path matching, so when used in the `source` as non-special values they must be escaped by adding `\\` before them: module.exports = { async rewrites() { return [ { // this will match `/english(default)/something` being requested source: '/english\\(default\\)/:slug', destination: '/en-us/:slug', }, ] }, } ## Header, Cookie, and Query Matching To only match a rewrite when header, cookie, or query values also match the `has` field or don't match the `missing` field can be used. Both the `source` and all `has` items must match and all `missing` items must not match for the rewrite to be applied. `has` and `missing` items can have the following fields: * `type`: `String` - must be either `header`, `cookie`, `host`, or `query`. * `key`: `String` - the key from the selected type to match against. * `value`: `String` or `undefined` - the value to check for, if undefined any value will match. A regex like string can be used to capture a specific part of the value, e.g. if the value `first-(?<paramName>.*)` is used for `first-second` then `second` will be usable in the destination with `:paramName`. module.exports = { async rewrites() { return [ // if the header `x-rewrite-me` is present, // this rewrite will be applied { source: '/:path*', has: [ { type: 'header', key: 'x-rewrite-me', }, ], destination: '/another-page', }, // if the header `x-rewrite-me` is not present, // this rewrite will be applied { source: '/:path*', missing: [ { type: 'header', key: 'x-rewrite-me', }, ], destination: '/another-page', }, // if the source, query, and cookie are matched, // this rewrite will be applied { source: '/specific/:path*', has: [ { type: 'query', key: 'page', // the page value will not be available in the // destination since value is provided and doesn't // use a named capture group e.g. (?<page>home) value: 'home', }, { type: 'cookie', key: 'authorized', value: 'true', }, ], destination: '/:path*/home', }, // if the header `x-authorized` is present and // contains a matching value, this rewrite will be applied { source: '/:path*', has: [ { type: 'header', key: 'x-authorized', value: '(?<authorized>yes|true)', }, ], destination: '/home?authorized=:authorized', }, // if the host is `example.com`, // this rewrite will be applied { source: '/:path*', has: [ { type: 'host', value: 'example.com', }, ], destination: '/another-page', }, ] }, } ## Rewriting to an external URL Examples * Incremental adoption of Next.js * Using Multiple Zones Rewrites allow you to rewrite to an external url. This is especially useful for incrementally adopting Next.js. The following is an example rewrite for redirecting the `/blog` route of your main app to an external site. module.exports = { async rewrites() { return [ { source: '/blog', destination: 'https://example.com/blog', }, { source: '/blog/:slug', destination: 'https://example.com/blog/:slug', // Matched parameters can be used in the destination }, ] }, } If you're using `trailingSlash: true`, you also need to insert a trailing slash in the `source` parameter. If the destination server is also expecting a trailing slash it should be included in the `destination` parameter as well. module.exports = { trailingSlash: true, async rewrites() { return [ { source: '/blog/', destination: 'https://example.com/blog/', }, { source: '/blog/:path*/', destination: 'https://example.com/blog/:path*/', }, ] }, } ### Incremental adoption of Next.js You can also have Next.js fall back to proxying to an existing website after checking all Next.js routes. This way you don't have to change the rewrites configuration when migrating more pages to Next.js module.exports = { async rewrites() { return { fallback: [ { source: '/:path*', destination: `https://custom-routes-proxying-endpoint.vercel.app/:path*`, }, ], } }, } ### Rewrites with basePath support When leveraging `basePath` support with rewrites each `source` and `destination` is automatically prefixed with the `basePath` unless you add `basePath: false` to the rewrite: module.exports = { basePath: '/docs', async rewrites() { return [ { source: '/with-basePath', // automatically becomes /docs/with-basePath destination: '/another', // automatically becomes /docs/another }, { // does not add /docs to /without-basePath since basePath: false is set // Note: this can not be used for internal rewrites e.g. `destination: '/another'` source: '/without-basePath', destination: 'https://example.com', basePath: false, }, ] }, } ### Rewrites with i18n support When leveraging `i18n` support with rewrites each `source` and `destination` is automatically prefixed to handle the configured `locales` unless you add `locale: false` to the rewrite. If `locale: false` is used you must prefix the `source` and `destination` with a locale for it to be matched correctly. module.exports = { i18n: { locales: ['en', 'fr', 'de'], defaultLocale: 'en', }, async rewrites() { return [ { source: '/with-locale', // automatically handles all locales destination: '/another', // automatically passes the locale on }, { // does not handle locales automatically since locale: false is set source: '/nl/with-locale-manual', destination: '/nl/another', locale: false, }, { // this matches '/' since `en` is the defaultLocale source: '/en', destination: '/en/another', locale: false, }, { // it's possible to match all locales even when locale: false is set source: '/:locale/api-alias/:path*', destination: '/api/:path*', locale: false, }, { // this gets converted to /(en|fr|de)/(.*) so will not match the top-level // `/` or `/fr` routes like /:path* would source: '/(.*)', destination: '/another', }, ] }, } ## Version History | Version | Changes | | --- | --- | | `v13.3.0` | `missing` added. | | `v10.2.0` | `has` added. | | `v9.5.0` | Headers added. | --- ## Page: https://nextjs.org/docs/13/app/api-reference/next-config-js/serverComponentsExternalPackages You are currently viewing documentation for version 13 of Next.js. Dependencies used inside Server Components and Route Handlers will automatically be bundled by Next.js. If a dependency is using Node.js specific features, you can choose to opt-out specific dependencies from the Server Components bundling and use native Node.js `require`. next.config.js /** @type {import('next').NextConfig} */ const nextConfig = { experimental: { serverComponentsExternalPackages: ['@acme/ui'], }, } module.exports = nextConfig Next.js includes a short list of popular packages that currently are working on compatibility and automatically opt-ed out: * `@aws-sdk/client-s3` * `@aws-sdk/s3-presigned-post` * `@blockfrost/blockfrost-js` * `@libsql/client` * `@jpg-store/lucid-cardano` * `@mikro-orm/core` * `@mikro-orm/knex` * `@prisma/client` * `@sentry/nextjs` * `@sentry/node` * `@swc/core` * `argon2` * `autoprefixer` * `aws-crt` * `bcrypt` * `better-sqlite3` * `canvas` * `cpu-features` * `cypress` * `eslint` * `express` * `firebase-admin` * `jest` * `jsdom` * `libsql` * `lodash` * `mdx-bundler` * `mongodb` * `mongoose` * `next-mdx-remote` * `next-seo` * `payload` * `pg` * `playwright` * `postcss` * `prettier` * `prisma` * `puppeteer` * `rimraf` * `sharp` * `shiki` * `sqlite3` * `tailwindcss` * `ts-node` * `typescript` * `vscode-oniguruma` * `webpack` --- ## Page: https://nextjs.org/docs/13/app/api-reference/next-config-js/trailingSlash You are currently viewing documentation for version 13 of Next.js. By default Next.js will redirect urls with trailing slashes to their counterpart without a trailing slash. For example `/about/` will redirect to `/about`. You can configure this behavior to act the opposite way, where urls without trailing slashes are redirected to their counterparts with trailing slashes. Open `next.config.js` and add the `trailingSlash` config: next.config.js module.exports = { trailingSlash: true, } With this option set, urls like `/about` will redirect to `/about/`. ## Version History | Version | Changes | | --- | --- | | `v9.5.0` | `trailingSlash` added. | --- ## Page: https://nextjs.org/docs/13/app/api-reference/next-config-js/transpilePackages You are currently viewing documentation for version 13 of Next.js. Next.js can automatically transpile and bundle dependencies from local packages (like monorepos) or from external dependencies (`node_modules`). This replaces the `next-transpile-modules` package. next.config.js /** @type {import('next').NextConfig} */ const nextConfig = { transpilePackages: ['@acme/ui', 'lodash-es'], } module.exports = nextConfig ## Version History | Version | Changes | | --- | --- | | `v13.0.0` | `transpilePackages` added. | --- ## Page: https://nextjs.org/docs/13/app/api-reference/next-config-js/turbo ## turbo (Experimental) > **Warning**: These features are experimental and will only work with `next --turbo`. ## webpack loaders Currently, Turbopack supports a subset of webpack's loader API, allowing you to use some webpack loaders to transform code in Turbopack. To configure loaders, add the names of the loaders you've installed and any options in `next.config.js`, mapping file extensions to a list of loaders: module.exports = { experimental: { turbo: { rules: { // Option format '*.md': [ { loader: '@mdx-js/loader', options: { format: 'md', }, }, ], // Option-less format '*.mdx': ['@mdx-js/loader'], }, }, }, } Then, given the above configuration, you can use transformed code from your app: import MyDoc from './my-doc.mdx' export default function Home() { return <MyDoc /> } ## Resolve Alias Through `next.config.js`, Turbopack can be configured to modify module resolution through aliases, similar to webpack's `resolve.alias` configuration. To configure resolve aliases, map imported patterns to their new destination in `next.config.js`: module.exports = { experimental: { turbo: { resolveAlias: { underscore: 'lodash', mocha: { browser: 'mocha/browser-entry.js' }, }, }, }, } This aliases imports of the `underscore` package to the `lodash` package. In other words, `import underscore from 'underscore'` will load the `lodash` module instead of `underscore`. Turbopack also supports conditional aliasing through this field, similar to Node.js's conditional exports. At the moment only the `browser` condition is supported. In the case above, imports of the `mocha` module will be aliased to `mocha/browser-entry.js` when Turbopack targets browser environments. For more information and guidance for how to migrate your app to Turbopack from webpack, see Turbopack's documentation on webpack compatibility. --- ## Page: https://nextjs.org/docs/13/app/api-reference/next-config-js/typedRoutes #### Subscribe to our newsletter Stay updated on new releases and features, guides, and case studies. --- ## Page: https://nextjs.org/docs/13/app/api-reference/next-config-js/typescript You are currently viewing documentation for version 13 of Next.js. Next.js fails your **production build** (`next build`) when TypeScript errors are present in your project. If you'd like Next.js to dangerously produce production code even when your application has errors, you can disable the built-in type checking step. If disabled, be sure you are running type checks as part of your build or deploy process, otherwise this can be very dangerous. Open `next.config.js` and enable the `ignoreBuildErrors` option in the `typescript` config: next.config.js module.exports = { typescript: { // !! WARN !! // Dangerously allow production builds to successfully complete even if // your project has type errors. // !! WARN !! ignoreBuildErrors: true, }, } --- ## Page: https://nextjs.org/docs/13/app/api-reference/next-config-js/urlImports URL imports are an experimental feature that allows you to import modules directly from external servers (instead of from the local disk). > **Warning**: This feature is experimental. Only use domains that you trust to download and execute on your machine. Please exercise discretion, and caution until the feature is flagged as stable. To opt-in, add the allowed URL prefixes inside `next.config.js`: module.exports = { experimental: { urlImports: ['https://example.com/assets/', 'https://cdn.skypack.dev'], }, } Then, you can import modules directly from URLs: import { a, b, c } from 'https://example.com/assets/some/module.js' URL Imports can be used everywhere normal package imports can be used. ## Security Model This feature is being designed with **security as the top priority**. To start, we added an experimental flag forcing you to explicitly allow the domains you accept URL imports from. We're working to take this further by limiting URL imports to execute in the browser sandbox using the Edge Runtime. ## Lockfile When using URL imports, Next.js will create a `next.lock` directory containing a lockfile and fetched assets. This directory **must be committed to Git**, not ignored by `.gitignore`. * When running `next dev`, Next.js will download and add all newly discovered URL Imports to your lockfile * When running `next build`, Next.js will use only the lockfile to build the application for production Typically, no network requests are needed and any outdated lockfile will cause the build to fail. One exception is resources that respond with `Cache-Control: no-cache`. These resources will have a `no-cache` entry in the lockfile and will always be fetched from the network on each build. ## Examples ### Skypack import confetti from 'https://cdn.skypack.dev/canvas-confetti' import { useEffect } from 'react' export default () => { useEffect(() => { confetti() }) return <p>Hello</p> } ### Static Image Imports import Image from 'next/image' import logo from 'https://example.com/assets/logo.png' export default () => ( <div> <Image src={logo} placeholder="blur" /> </div> ) ### URLs in CSS .className { background: url('https://example.com/assets/hero.jpg'); } ### Asset Imports const logo = new URL('https://example.com/assets/file.txt', import.meta.url) console.log(logo.pathname) // prints "/_next/static/media/file.a9727b5d.txt" --- ## Page: https://nextjs.org/docs/13/app/api-reference/next-config-js/webpack ## Custom Webpack Config > **Good to know**: changes to webpack config are not covered by semver so proceed at your own risk Before continuing to add custom webpack configuration to your application make sure Next.js doesn't already support your use-case: * CSS imports * CSS modules * Sass/SCSS imports * Sass/SCSS modules * preact Some commonly asked for features are available as plugins: * @next/mdx * @next/bundle-analyzer In order to extend our usage of `webpack`, you can define a function that extends its config inside `next.config.js`, like so: module.exports = { webpack: ( config, { buildId, dev, isServer, defaultLoaders, nextRuntime, webpack } ) => { // Important: return the modified config return config }, } > The `webpack` function is executed twice, once for the server and once for the client. This allows you to distinguish between client and server configuration using the `isServer` property. The second argument to the `webpack` function is an object with the following properties: * `buildId`: `String` - The build id, used as a unique identifier between builds * `dev`: `Boolean` - Indicates if the compilation will be done in development * `isServer`: `Boolean` - It's `true` for server-side compilation, and `false` for client-side compilation * `nextRuntime`: `String | undefined` - The target runtime for server-side compilation; either `"edge"` or `"nodejs"`, it's `undefined` for client-side compilation. * `defaultLoaders`: `Object` - Default loaders used internally by Next.js: * `babel`: `Object` - Default `babel-loader` configuration Example usage of `defaultLoaders.babel`: // Example config for adding a loader that depends on babel-loader // This source was taken from the @next/mdx plugin source: // https://github.com/vercel/next.js/tree/canary/packages/next-mdx module.exports = { webpack: (config, options) => { config.module.rules.push({ test: /\.mdx/, use: [ options.defaultLoaders.babel, { loader: '@mdx-js/loader', options: pluginOptions.options, }, ], }) return config }, } #### `nextRuntime` Notice that `isServer` is `true` when `nextRuntime` is `"edge"` or `"nodejs"`, nextRuntime "`edge`" is currently for middleware and Server Components in edge runtime only. Was this helpful? supported. --- ## Page: https://nextjs.org/docs/13/app/api-reference/next-config-js/webVitalsAttribution You are currently viewing documentation for version 13 of Next.js. When debugging issues related to Web Vitals, it is often helpful if we can pinpoint the source of the problem. For example, in the case of Cumulative Layout Shift (CLS), we might want to know the first element that shifted when the single largest layout shift occurred. Or, in the case of Largest Contentful Paint (LCP), we might want to identify the element corresponding to the LCP for the page. If the LCP element is an image, knowing the URL of the image resource can help us locate the asset we need to optimize. Pinpointing the biggest contributor to the Web Vitals score, aka attribution, allows us to obtain more in-depth information like entries for PerformanceEventTiming, PerformanceNavigationTiming and PerformanceResourceTiming. Attribution is disabled by default in Next.js but can be enabled **per metric** by specifying the following in `next.config.js`. next.config.js experimental: { webVitalsAttribution: ['CLS', 'LCP'] } Valid attribution values are all `web-vitals` metrics specified in the `NextWebVitalsMetric` type. --- ## Page: https://nextjs.org/docs/13/app/api-reference/create-next-app The easiest way to get started with Next.js is by using `create-next-app`. This CLI tool enables you to quickly start building a new Next.js application, with everything set up for you. You can create a new app using the default Next.js template, or by using one of the official Next.js examples. ### Interactive You can create a new project interactively by running: npx create-next-app@latest yarn create next-app pnpm create next-app bunx create-next-app You will then be asked the following prompts: What is your project named? my-app Would you like to use TypeScript? No / Yes Would you like to use ESLint? No / Yes Would you like to use Tailwind CSS? No / Yes Would you like to use `src/` directory? No / Yes Would you like to use App Router? (recommended) No / Yes Would you like to customize the default import alias (@/*)? No / Yes Once you've answered the prompts, a new project will be created with the correct configuration depending on your answers. ### Non-interactive You can also pass command line arguments to set up a new project non-interactively. Further, you can negate default options by prefixing them with `--no-` (e.g. `--no-eslint`). See `create-next-app --help`: Usage: create-next-app <project-directory> [options] Options: -V, --version output the version number --ts, --typescript Initialize as a TypeScript project. (default) --js, --javascript Initialize as a JavaScript project. --tailwind Initialize with Tailwind CSS config. (default) --eslint Initialize with ESLint config. --app Initialize as an App Router project. --src-dir Initialize inside a `src/` directory. --import-alias <alias-to-configure> Specify import alias to use (default "@/*"). --use-npm Explicitly tell the CLI to bootstrap the app using npm --use-pnpm Explicitly tell the CLI to bootstrap the app using pnpm --use-yarn Explicitly tell the CLI to bootstrap the app using Yarn --use-bun Explicitly tell the CLI to bootstrap the app using Bun -e, --example [name]|[github-url] An example to bootstrap the app with. You can use an example name from the official Next.js repo or a public GitHub URL. The URL can use any branch and/or subdirectory --example-path <path-to-example> In a rare case, your GitHub URL might contain a branch name with a slash (e.g. bug/fix-1) and the path to the example (e.g. foo/bar). In this case, you must specify the path to the example separately: --example-path foo/bar --reset-preferences Explicitly tell the CLI to reset any stored preferences -h, --help output usage information ### Why use Create Next App? `create-next-app` allows you to create a new Next.js app within seconds. It is officially maintained by the creators of Next.js, and includes a number of benefits: * **Interactive Experience**: Running `npx create-next-app@latest` (with no arguments) launches an interactive experience that guides you through setting up a project. * **Zero Dependencies**: Initializing a project is as quick as one second. Create Next App has zero dependencies. * **Offline Support**: Create Next App will automatically detect if you're offline and bootstrap your project using your local package cache. * **Support for Examples**: Create Next App can bootstrap your application using an example from the Next.js examples collection (e.g. `npx create-next-app --example api-routes`) or any public GitHub repository. * **Tested**: The package is part of the Next.js monorepo and tested using the same integration test suite as Next.js itself, ensuring it works as expected with every release. --- ## Page: https://nextjs.org/docs/13/app/api-reference/edge `AbortController`Allows you to abort one or more DOM requests as and when desired`Array`Represents an array of values`ArrayBuffer`Represents a generic, fixed-length raw binary data buffer`Atomics`Provides atomic operations as static methods`BigInt`Represents a whole number with arbitrary precision`BigInt64Array`Represents a typed array of 64-bit signed integers`BigUint64Array`Represents a typed array of 64-bit unsigned integers`Boolean`Represents a logical entity and can have two values: `true` and `false``clearInterval`Cancels a timed, repeating action which was previously established by a call to `setInterval()``clearTimeout`Cancels a timed, repeating action which was previously established by a call to `setTimeout()``console`Provides access to the browser's debugging console`DataView`Represents a generic view of an `ArrayBuffer``Date`Represents a single moment in time in a platform-independent format`decodeURI`Decodes a Uniform Resource Identifier (URI) previously created by `encodeURI` or by a similar routine`decodeURIComponent`Decodes a Uniform Resource Identifier (URI) component previously created by `encodeURIComponent` or by a similar routine`DOMException`Represents an error that occurs in the DOM`encodeURI`Encodes a Uniform Resource Identifier (URI) by replacing each instance of certain characters by one, two, three, or four escape sequences representing the UTF-8 encoding of the character`encodeURIComponent`Encodes a Uniform Resource Identifier (URI) component by replacing each instance of certain characters by one, two, three, or four escape sequences representing the UTF-8 encoding of the character`Error`Represents an error when trying to execute a statement or accessing a property`EvalError`Represents an error that occurs regarding the global function `eval()``Float32Array`Represents a typed array of 32-bit floating point numbers`Float64Array`Represents a typed array of 64-bit floating point numbers`Function`Represents a function`Infinity`Represents the mathematical Infinity value`Int8Array`Represents a typed array of 8-bit signed integers`Int16Array`Represents a typed array of 16-bit signed integers`Int32Array`Represents a typed array of 32-bit signed integers`Intl`Provides access to internationalization and localization functionality`isFinite`Determines whether a value is a finite number`isNaN`Determines whether a value is `NaN` or not`JSON`Provides functionality to convert JavaScript values to and from the JSON format`Map`Represents a collection of values, where each value may occur only once`Math`Provides access to mathematical functions and constants`Number`Represents a numeric value`Object`Represents the object that is the base of all JavaScript objects`parseFloat`Parses a string argument and returns a floating point number`parseInt`Parses a string argument and returns an integer of the specified radix`Promise`Represents the eventual completion (or failure) of an asynchronous operation, and its resulting value`Proxy`Represents an object that is used to define custom behavior for fundamental operations (e.g. property lookup, assignment, enumeration, function invocation, etc)`queueMicrotask`Queues a microtask to be executed`RangeError`Represents an error when a value is not in the set or range of allowed values`ReferenceError`Represents an error when a non-existent variable is referenced`Reflect`Provides methods for interceptable JavaScript operations`RegExp`Represents a regular expression, allowing you to match combinations of characters`Set`Represents a collection of values, where each value may occur only once`setInterval`Repeatedly calls a function, with a fixed time delay between each call`setTimeout`Calls a function or evaluates an expression after a specified number of milliseconds`SharedArrayBuffer`Represents a generic, fixed-length raw binary data buffer`String`Represents a sequence of characters`structuredClone`Creates a deep copy of a value`Symbol`Represents a unique and immutable data type that is used as the key of an object property`SyntaxError`Represents an error when trying to interpret syntactically invalid code`TypeError`Represents an error when a value is not of the expected type`Uint8Array`Represents a typed array of 8-bit unsigned integers`Uint8ClampedArray`Represents a typed array of 8-bit unsigned integers clamped to 0-255`Uint32Array`Represents a typed array of 32-bit unsigned integers`URIError`Represents an error when a global URI handling function was used in a wrong way`URL`Represents an object providing static methods used for creating object URLs`URLPattern`Represents a URL pattern`URLSearchParams`Represents a collection of key/value pairs`WeakMap`Represents a collection of key/value pairs in which the keys are weakly referenced`WeakSet`Represents a collection of objects in which each object may occur only once`WebAssembly`Provides access to WebAssembly --- ## Page: https://nextjs.org/docs/13/app/api-reference/next-cli The Next.js CLI allows you to start, build, and export your application. To get a list of the available CLI commands, run the following command inside your project directory: npx next -h _(npx comes with npm 5.2+ and higher)_ The output should look like this: Usage $ next <command> Available commands build, start, export, dev, lint, telemetry, info Options --version, -v Version number --help, -h Displays this message For more information run a command with the --help flag $ next build --help You can pass any node arguments to `next` commands: NODE_OPTIONS='--throw-deprecation' next NODE_OPTIONS='-r esm' next NODE_OPTIONS='--inspect' next > **Good to know**: Running `next` without a command is the same as running `next dev` ## Build `next build` creates an optimized production build of your application. The output displays information about each route. * **Size** – The number of assets downloaded when navigating to the page client-side. The size for each route only includes its dependencies. * **First Load JS** – The number of assets downloaded when visiting the page from the server. The amount of JS shared by all is shown as a separate metric. Both of these values are **compressed with gzip**. The first load is indicated by green, yellow, or red. Aim for green for performant applications. You can enable production profiling for React with the `--profile` flag in `next build`. This requires Next.js 9.5: next build --profile After that, you can use the profiler in the same way as you would in development. You can enable more verbose build output with the `--debug` flag in `next build`. This requires Next.js 9.5.3: next build --debug With this flag enabled additional build output like rewrites, redirects, and headers will be shown. ## Development `next dev` starts the application in development mode with hot-code reloading, error reporting, and more: The application will start at `http://localhost:3000` by default. The default port can be changed with `-p`, like so: npx next dev -p 4000 Or using the `PORT` environment variable: PORT=4000 npx next dev > **Good to know**: `PORT` cannot be set in `.env` as booting up the HTTP server happens before any other code is initialized. You can also set the hostname to be different from the default of `0.0.0.0`, this can be useful for making the application available for other devices on the network. The default hostname can be changed with `-H`, like so: npx next dev -H 192.168.1.2 ## Production `next start` starts the application in production mode. The application should be compiled with `next build` first. The application will start at `http://localhost:3000` by default. The default port can be changed with `-p`, like so: npx next start -p 4000 Or using the `PORT` environment variable: PORT=4000 npx next start > **Good to know**: > > \-`PORT` cannot be set in `.env` as booting up the HTTP server happens before any other code is initialized. > > * `next start` cannot be used with `output: 'standalone'` or `output: 'export'`. ### Keep Alive Timeout When deploying Next.js behind a downstream proxy (e.g. a load-balancer like AWS ELB/ALB) it's important to configure Next's underlying HTTP server with keep-alive timeouts that are _larger_ than the downstream proxy's timeouts. Otherwise, once a keep-alive timeout is reached for a given TCP connection, Node.js will immediately terminate that connection without notifying the downstream proxy. This results in a proxy error whenever it attempts to reuse a connection that Node.js has already terminated. To configure the timeout values for the production Next.js server, pass `--keepAliveTimeout` (in milliseconds) to `next start`, like so: npx next start --keepAliveTimeout 70000 ## Lint `next lint` runs ESLint for all files in the `pages/`, `app/`, `components/`, `lib/`, and `src/` directories. It also provides a guided setup to install any required dependencies if ESLint is not already configured in your application. If you have other directories that you would like to lint, you can specify them using the `--dir` flag: next lint --dir utils ## Telemetry Next.js collects **completely anonymous** telemetry data about general usage. Participation in this anonymous program is optional, and you may opt-out if you'd not like to share any information. To learn more about Telemetry, please read this document. ## Next Info `next info` prints relevant details about the current system which can be used to report Next.js bugs. This information includes Operating System platform/arch/version, Binaries (Node.js, npm, Yarn, pnpm) and npm package versions (`next`, `react`, `react-dom`). Running the following in your project's root directory: next info will give you information like this example: Operating System: Platform: linux Arch: x64 Version: #22-Ubuntu SMP Fri Nov 5 13:21:36 UTC 2021 Binaries: Node: 16.13.0 npm: 8.1.0 Yarn: 1.22.17 pnpm: 6.24.2 Relevant packages: next: 12.0.8 react: 17.0.2 react-dom: 17.0.2 This information should then be pasted into GitHub Issues. In order to diagnose installation issues, you can run `next info --verbose` to print additional information about system and the installation of next-related packages. --- ## Page: https://nextjs.org/docs/13/pages/building-your-application You are currently viewing documentation for version 13 of Next.js. Next.js provides the building blocks to create flexible, full-stack web applications. The guides in **Building Your Application** explain how to use these features and how to customize your application's behavior. The sections and pages are organized sequentially, from basic to advanced, so you can follow them step-by-step when building your Next.js application. However, you can read them in any order or skip to the pages that apply to your use case. If you're new to Next.js, we recommend starting with the Routing, Rendering, Data Fetching and Styling sections, as they introduce the fundamental Next.js and web concepts to help you get started. Then, you can dive deeper into the other sections such as Optimizing and Configuring. Finally, once you're ready, checkout the Deploying and Upgrading sections. --- ## Page: https://nextjs.org/docs/13/pages/building-your-application/routing #### Subscribe to our newsletter Stay updated on new releases and features, guides, and case studies. --- ## Page: https://nextjs.org/docs/13/pages/building-your-application/routing/pages-and-layouts The Pages Router has a file-system based router built on the concept of pages. When a file is added to the `pages` directory, it's automatically available as a route. In Next.js, a **page** is a React Component exported from a `.js`, `.jsx`, `.ts`, or `.tsx` file in the `pages` directory. Each page is associated with a route based on its file name. **Example**: If you create `pages/about.js` that exports a React component like below, it will be accessible at `/about`. export default function About() { return <div>About</div> } ## Index routes The router will automatically route files named `index` to the root of the directory. * `pages/index.js` → `/` * `pages/blog/index.js` → `/blog` ## Nested routes The router supports nested files. If you create a nested folder structure, files will automatically be routed in the same way still. * `pages/blog/first-post.js` → `/blog/first-post` * `pages/dashboard/settings/username.js` → `/dashboard/settings/username` ## Pages with Dynamic Routes Next.js supports pages with dynamic routes. For example, if you create a file called `pages/posts/[id].js`, then it will be accessible at `posts/1`, `posts/2`, etc. > To learn more about dynamic routing, check the Dynamic Routing documentation. ## Layout Pattern The React model allows us to deconstruct a page into a series of components. Many of these components are often reused between pages. For example, you might have the same navigation bar and footer on every page. import Navbar from './navbar' import Footer from './footer' export default function Layout({ children }) { return ( <> <Navbar /> <main>{children}</main> <Footer /> </> ) } ## Examples ### Single Shared Layout with Custom App If you only have one layout for your entire application, you can create a Custom App and wrap your application with the layout. Since the `<Layout />` component is re-used when changing pages, its component state will be preserved (e.g. input values). import Layout from '../components/layout' export default function MyApp({ Component, pageProps }) { return ( <Layout> <Component {...pageProps} /> </Layout> ) } ### Per-Page Layouts If you need multiple layouts, you can add a property `getLayout` to your page, allowing you to return a React component for the layout. This allows you to define the layout on a _per-page basis_. Since we're returning a function, we can have complex nested layouts if desired. import Layout from '../components/layout' import NestedLayout from '../components/nested-layout' export default function Page() { return ( /** Your content */ ) } Page.getLayout = function getLayout(page) { return ( <Layout> <NestedLayout>{page}</NestedLayout> </Layout> ) } export default function MyApp({ Component, pageProps }) { // Use the layout defined at the page level, if available const getLayout = Component.getLayout || ((page) => page) return getLayout(<Component {...pageProps} />) } When navigating between pages, we want to _persist_ page state (input values, scroll position, etc.) for a Single-Page Application (SPA) experience. This layout pattern enables state persistence because the React component tree is maintained between page transitions. With the component tree, React can understand which elements have changed to preserve state. > **Good to know**: This process is called reconciliation, which is how React understands which elements have changed. ### With TypeScript When using TypeScript, you must first create a new type for your pages which includes a `getLayout` function. Then, you must create a new type for your `AppProps` which overrides the `Component` property to use the previously created type. import type { ReactElement } from 'react' import Layout from '../components/layout' import NestedLayout from '../components/nested-layout' import type { NextPageWithLayout } from './_app' const Page: NextPageWithLayout = () => { return <p>hello world</p> } Page.getLayout = function getLayout(page: ReactElement) { return ( <Layout> <NestedLayout>{page}</NestedLayout> </Layout> ) } export default Page import type { ReactElement, ReactNode } from 'react' import type { NextPage } from 'next' import type { AppProps } from 'next/app' export type NextPageWithLayout<P = {}, IP = P> = NextPage<P, IP> & { getLayout?: (page: ReactElement) => ReactNode } type AppPropsWithLayout = AppProps & { Component: NextPageWithLayout } export default function MyApp({ Component, pageProps }: AppPropsWithLayout) { // Use the layout defined at the page level, if available const getLayout = Component.getLayout ?? ((page) => page) return getLayout(<Component {...pageProps} />) } ### Data Fetching Inside your layout, you can fetch data on the client-side using `useEffect` or a library like SWR. Because this file is not a Page, you cannot use `getStaticProps` or `getServerSideProps` currently. import useSWR from 'swr' import Navbar from './navbar' import Footer from './footer' export default function Layout({ children }) { const { data, error } = useSWR('/api/navigation', fetcher) if (error) return <div>Failed to load</div> if (!data) return <div>Loading...</div> return ( <> <Navbar links={data.links} /> <main>{children}</main> <Footer /> </> ) } --- ## Page: https://nextjs.org/docs/13/pages/building-your-application/routing/dynamic-routes When you don't know the exact segment names ahead of time and want to create routes from dynamic data, you can use Dynamic Segments that are filled in at request time or prerendered at build time. ## Convention A Dynamic Segment can be created by wrapping a file or folder name in square brackets: `[segmentName]`. For example, `[id]` or `[slug]`. Dynamic Segments can be accessed from `useRouter`. ## Example For example, a blog could include the following route `pages/blog/[slug].js` where `[slug]` is the Dynamic Segment for blog posts. import { useRouter } from 'next/router' export default function Page() { const router = useRouter() return <p>Post: {router.query.slug}</p> } | Route | Example URL | `params` | | --- | --- | --- | | `pages/blog/[slug].js` | `/blog/a` | `{ slug: 'a' }` | | `pages/blog/[slug].js` | `/blog/b` | `{ slug: 'b' }` | | `pages/blog/[slug].js` | `/blog/c` | `{ slug: 'c' }` | ## Catch-all Segments Dynamic Segments can be extended to **catch-all** subsequent segments by adding an ellipsis inside the brackets `[...segmentName]`. For example, `pages/shop/[...slug].js` will match `/shop/clothes`, but also `/shop/clothes/tops`, `/shop/clothes/tops/t-shirts`, and so on. | Route | Example URL | `params` | | --- | --- | --- | | `pages/shop/[...slug].js` | `/shop/a` | `{ slug: ['a'] }` | | `pages/shop/[...slug].js` | `/shop/a/b` | `{ slug: ['a', 'b'] }` | | `pages/shop/[...slug].js` | `/shop/a/b/c` | `{ slug: ['a', 'b', 'c'] }` | ## Optional Catch-all Segments Catch-all Segments can be made **optional** by including the parameter in double square brackets: `[[...segmentName]]`. For example, `pages/shop/[[...slug]].js` will **also** match `/shop`, in addition to `/shop/clothes`, `/shop/clothes/tops`, `/shop/clothes/tops/t-shirts`. The difference between **catch-all** and **optional catch-all** segments is that with optional, the route without the parameter is also matched (`/shop` in the example above). | Route | Example URL | `params` | | --- | --- | --- | | `pages/shop/[[...slug]].js` | `/shop` | `{}` | | `pages/shop/[[...slug]].js` | `/shop/a` | `{ slug: ['a'] }` | | `pages/shop/[[...slug]].js` | `/shop/a/b` | `{ slug: ['a', 'b'] }` | | `pages/shop/[[...slug]].js` | `/shop/a/b/c` | `{ slug: ['a', 'b', 'c'] }` | --- ## Page: https://nextjs.org/docs/13/pages/building-your-application/routing/linking-and-navigating The Next.js router allows you to do client-side route transitions between pages, similar to a single-page application. A React component called `Link` is provided to do this client-side route transition. import Link from 'next/link' function Home() { return ( <ul> <li> <Link href="/">Home</Link> </li> <li> <Link href="/about">About Us</Link> </li> <li> <Link href="/blog/hello-world">Blog Post</Link> </li> </ul> ) } export default Home The example above uses multiple links. Each one maps a path (`href`) to a known page: * `/` → `pages/index.js` * `/about` → `pages/about.js` * `/blog/hello-world` → `pages/blog/[slug].js` Any `<Link />` in the viewport (initially or through scroll) will be prefetched by default (including the corresponding data) for pages using Static Generation. The corresponding data for server-rendered routes is fetched _only when_ the `<Link />` is clicked. ## Linking to dynamic paths You can also use interpolation to create the path, which comes in handy for dynamic route segments. For example, to show a list of posts which have been passed to the component as a prop: import Link from 'next/link' function Posts({ posts }) { return ( <ul> {posts.map((post) => ( <li key={post.id}> <Link href={`/blog/${encodeURIComponent(post.slug)}`}> {post.title} </Link> </li> ))} </ul> ) } export default Posts > `encodeURIComponent` is used in the example to keep the path utf-8 compatible. Alternatively, using a URL Object: import Link from 'next/link' function Posts({ posts }) { return ( <ul> {posts.map((post) => ( <li key={post.id}> <Link href={{ pathname: '/blog/[slug]', query: { slug: post.slug }, }} > {post.title} </Link> </li> ))} </ul> ) } export default Posts Now, instead of using interpolation to create the path, we use a URL object in `href` where: * `pathname` is the name of the page in the `pages` directory. `/blog/[slug]` in this case. * `query` is an object with the dynamic segment. `slug` in this case. ## Injecting the router Examples * Dynamic Routing To access the `router` object in a React component you can use `useRouter` or `withRouter`. In general we recommend using `useRouter`. ## Imperative Routing Examples * Using Router `next/link` should be able to cover most of your routing needs, but you can also do client-side navigations without it, take a look at the documentation for `next/router`. The following example shows how to do basic page navigations with `useRouter`: import { useRouter } from 'next/router' export default function ReadMore() { const router = useRouter() return ( <button onClick={() => router.push('/about')}> Click here to read more </button> ) } ## Shallow Routing Examples * Shallow Routing Shallow routing allows you to change the URL without running data fetching methods again, that includes `getServerSideProps`, `getStaticProps`, and `getInitialProps`. You'll receive the updated `pathname` and the `query` via the `router` object (added by `useRouter` or `withRouter`), without losing state. To enable shallow routing, set the `shallow` option to `true`. Consider the following example: import { useEffect } from 'react' import { useRouter } from 'next/router' // Current URL is '/' function Page() { const router = useRouter() useEffect(() => { // Always do navigations after the first render router.push('/?counter=10', undefined, { shallow: true }) }, []) useEffect(() => { // The counter changed! }, [router.query.counter]) } export default Page The URL will get updated to `/?counter=10` and the page won't get replaced, only the state of the route is changed. You can also watch for URL changes via `componentDidUpdate` as shown below: componentDidUpdate(prevProps) { const { pathname, query } = this.props.router // verify props have changed to avoid an infinite loop if (query.counter !== prevProps.router.query.counter) { // fetch data based on the new query } } ### Caveats Shallow routing **only** works for URL changes in the current page. For example, let's assume we have another page called `pages/about.js`, and you run this: router.push('/?counter=10', '/about?counter=10', { shallow: true }) Since that's a new page, it'll unload the current page, load the new one and wait for data fetching even though we asked to do shallow routing. When shallow routing is used with middleware it will not ensure the new page matches the current page like previously done without middleware. This is due to middleware being able to rewrite dynamically and can't be verified client-side without a data fetch which is skipped with shallow, so a shallow route change must always be treated as shallow. --- ## Page: https://nextjs.org/docs/13/pages/building-your-application/routing/custom-app Next.js uses the `App` component to initialize pages. You can override it and control the page initialization and: * Create a shared layout between page changes * Inject additional data into pages * Add global CSS ## Usage To override the default `App`, create the file `pages/_app` as shown below: import type { AppProps } from 'next/app' export default function MyApp({ Component, pageProps }: AppProps) { return <Component {...pageProps} /> } The `Component` prop is the active `page`, so whenever you navigate between routes, `Component` will change to the new `page`. Therefore, any props you send to `Component` will be received by the `page`. `pageProps` is an object with the initial props that were preloaded for your page by one of our data fetching methods, otherwise it's an empty object. > **Good to know** > > * If your app is running and you added a custom `App`, you'll need to restart the development server. Only required if `pages/_app.js` didn't exist before. > * `App` does not support Next.js Data Fetching methods like `getStaticProps` or `getServerSideProps`. ## `getInitialProps` with `App` Using `getInitialProps` in `App` will disable Automatic Static Optimization for pages without `getStaticProps`. **We do not recommend using this pattern.** Instead, consider incrementally adopting the App Router, which allows you to more easily fetch data for pages and layouts. import App, { AppContext, AppInitialProps, AppProps } from 'next/app' type AppOwnProps = { example: string } export default function MyApp({ Component, pageProps, example, }: AppProps & AppOwnProps) { return ( <> <p>Data: {example}</p> <Component {...pageProps} /> </> ) } MyApp.getInitialProps = async ( context: AppContext ): Promise<AppOwnProps & AppInitialProps> => { const ctx = await App.getInitialProps(context) return { ...ctx, example: 'data' } } --- ## Page: https://nextjs.org/docs/13/pages/building-your-application/routing/custom-document You are currently viewing documentation for version 13 of Next.js. A custom `Document` can update the `<html>` and `<body>` tags used to render a Page. To override the default `Document`, create the file `pages/_document` as shown below: pages/\_document.tsx import { Html, Head, Main, NextScript } from 'next/document' export default function Document() { return ( <Html lang="en"> <Head /> <body> <Main /> <NextScript /> </body> </Html> ) } > **Good to know** > > * `_document` is only rendered on the server, so event handlers like `onClick` cannot be used in this file. > * `<Html>`, `<Head />`, `<Main />` and `<NextScript />` are required for the page to be properly rendered. ## Caveats * The `<Head />` component used in `_document` is not the same as `next/head`. The `<Head />` component used here should only be used for any `<head>` code that is common for all pages. For all other cases, such as `<title>` tags, we recommend using `next/head` in your pages or components. * React components outside of `<Main />` will not be initialized by the browser. Do _not_ add application logic here or custom CSS (like `styled-jsx`). If you need shared components in all your pages (like a menu or a toolbar), read Layouts instead. * `Document` currently does not support Next.js Data Fetching methods like `getStaticProps` or `getServerSideProps`. ## Customizing `renderPage` Customizing `renderPage` is advanced and only needed for libraries like CSS-in-JS to support server-side rendering. This is not needed for built-in `styled-jsx` support. **We do not recommend using this pattern.** Instead, consider incrementally adopting the App Router, which allows you to more easily fetch data for pages and layouts. pages/\_document.tsx import Document, { Html, Head, Main, NextScript, DocumentContext, DocumentInitialProps, } from 'next/document' class MyDocument extends Document { static async getInitialProps( ctx: DocumentContext ): Promise<DocumentInitialProps> { const originalRenderPage = ctx.renderPage // Run the React rendering logic synchronously ctx.renderPage = () => originalRenderPage({ // Useful for wrapping the whole react tree enhanceApp: (App) => App, // Useful for wrapping in a per-page basis enhanceComponent: (Component) => Component, }) // Run the parent `getInitialProps`, it now includes the custom `renderPage` const initialProps = await Document.getInitialProps(ctx) return initialProps } render() { return ( <Html lang="en"> <Head /> <body> <Main /> <NextScript /> </body> </Html> ) } } export default MyDocument > **Good to know** > > * `getInitialProps` in `_document` is not called during client-side transitions. > * The `ctx` object for `_document` is equivalent to the one received in `getInitialProps`, with the addition of `renderPage`. --- ## Page: https://nextjs.org/docs/13/pages/building-your-application/routing/custom-error ## 404 Page A 404 page may be accessed very often. Server-rendering an error page for every visit increases the load of the Next.js server. This can result in increased costs and slow experiences. To avoid the above pitfalls, Next.js provides a static 404 page by default without having to add any additional files. ### Customizing The 404 Page To create a custom 404 page you can create a `pages/404.js` file. This file is statically generated at build time. export default function Custom404() { return <h1>404 - Page Not Found</h1> } > **Good to know**: You can use `getStaticProps` inside this page if you need to fetch data at build time. ## 500 Page Server-rendering an error page for every visit adds complexity to responding to errors. To help users get responses to errors as fast as possible, Next.js provides a static 500 page by default without having to add any additional files. ### Customizing The 500 Page To customize the 500 page you can create a `pages/500.js` file. This file is statically generated at build time. export default function Custom500() { return <h1>500 - Server-side error occurred</h1> } > **Good to know**: You can use `getStaticProps` inside this page if you need to fetch data at build time. ### More Advanced Error Page Customizing 500 errors are handled both client-side and server-side by the `Error` component. If you wish to override it, define the file `pages/_error.js` and add the following code: function Error({ statusCode }) { return ( <p> {statusCode ? `An error ${statusCode} occurred on server` : 'An error occurred on client'} </p> ) } Error.getInitialProps = ({ res, err }) => { const statusCode = res ? res.statusCode : err ? err.statusCode : 404 return { statusCode } } export default Error > `pages/_error.js` is only used in production. In development you’ll get an error with the call stack to know where the error originated from. ### Reusing the built-in error page If you want to render the built-in error page you can by importing the `Error` component: import Error from 'next/error' export async function getServerSideProps() { const res = await fetch('https://api.github.com/repos/vercel/next.js') const errorCode = res.ok ? false : res.status const json = await res.json() return { props: { errorCode, stars: json.stargazers_count }, } } export default function Page({ errorCode, stars }) { if (errorCode) { return <Error statusCode={errorCode} /> } return <div>Next stars: {stars}</div> } The `Error` component also takes `title` as a property if you want to pass in a text message along with a `statusCode`. If you have a custom `Error` component be sure to import that one instead. `next/error` exports the default component used by Next.js. ### Caveats * `Error` does not currently support Next.js Data Fetching methods like `getStaticProps` or `getServerSideProps`. * `_error`, like `_app`, is a reserved pathname. `_error` is used to define the customized layouts and behaviors of the error pages. `/_error` will render 404 when accessed directly via routing or rendering in a custom server. --- ## Page: https://nextjs.org/docs/13/pages/building-your-application/routing/api-routes Examples * Basic API Routes * API Routes Request Helpers * API Routes with GraphQL * API Routes with REST * API Routes with CORS > **Good to know**: If you are using the App Router, you can use Server Components or Route Handlers instead of API Routes. API routes provide a solution to build a **public API** with Next.js. Any file inside the folder `pages/api` is mapped to `/api/*` and will be treated as an API endpoint instead of a `page`. They are server-side only bundles and won't increase your client-side bundle size. For example, the following API route returns a JSON response with a status code of `200`: import type { NextApiRequest, NextApiResponse } from 'next' type ResponseData = { message: string } export default function handler( req: NextApiRequest, res: NextApiResponse<ResponseData> ) { res.status(200).json({ message: 'Hello from Next.js!' }) } > **Good to know**: > > * API Routes do not specify CORS headers, meaning they are **same-origin only** by default. You can customize such behavior by wrapping the request handler with the CORS request helpers. * API Routes can't be used with static exports. However, Route Handlers in the App Router can. > * API Routes will be affected by `pageExtensions` configuration in `next.config.js`. ## Parameters export default function handler(req: NextApiRequest, res: NextApiResponse) { // ... } * `req`: An instance of http.IncomingMessage, plus some pre-built middlewares * `res`: An instance of http.ServerResponse, plus some helper functions ## HTTP Methods To handle different HTTP methods in an API route, you can use `req.method` in your request handler, like so: import type { NextApiRequest, NextApiResponse } from 'next' export default function handler(req: NextApiRequest, res: NextApiResponse) { if (req.method === 'POST') { // Process a POST request } else { // Handle any other HTTP method } } ## Request Helpers API Routes provide built-in request helpers which parse the incoming request (`req`): * `req.cookies` - An object containing the cookies sent by the request. Defaults to `{}` * `req.query` - An object containing the query string. Defaults to `{}` * `req.body` - An object containing the body parsed by `content-type`, or `null` if no body was sent ### Custom config Every API Route can export a `config` object to change the default configuration, which is the following: export const config = { api: { bodyParser: { sizeLimit: '1mb', }, }, // Specifies the maximum allowed duration for this function to execute (in seconds) maxDuration: 5, } `bodyParser` is automatically enabled. If you want to consume the body as a `Stream` or with `raw-body`, you can set this to `false`. One use case for disabling the automatic `bodyParsing` is to allow you to verify the raw body of a **webhook** request, for example from GitHub. export const config = { api: { bodyParser: false, }, } `bodyParser.sizeLimit` is the maximum size allowed for the parsed body, in any format supported by bytes, like so: export const config = { api: { bodyParser: { sizeLimit: '500kb', }, }, } `externalResolver` is an explicit flag that tells the server that this route is being handled by an external resolver like _express_ or _connect_. Enabling this option disables warnings for unresolved requests. export const config = { api: { externalResolver: true, }, } `responseLimit` is automatically enabled, warning when an API Routes' response body is over 4MB. If you are not using Next.js in a serverless environment, and understand the performance implications of not using a CDN or dedicated media host, you can set this limit to `false`. export const config = { api: { responseLimit: false, }, } `responseLimit` can also take the number of bytes or any string format supported by `bytes`, for example `1000`, `'500kb'` or `'3mb'`. This value will be the maximum response size before a warning is displayed. Default is 4MB. (see above) export const config = { api: { responseLimit: '8mb', }, } ## Response Helpers The Server Response object, (often abbreviated as `res`) includes a set of Express.js-like helper methods to improve the developer experience and increase the speed of creating new API endpoints. The included helpers are: * `res.status(code)` - A function to set the status code. `code` must be a valid HTTP status code * `res.json(body)` - Sends a JSON response. `body` must be a serializable object * `res.send(body)` - Sends the HTTP response. `body` can be a `string`, an `object` or a `Buffer` * `res.redirect([status,] path)` - Redirects to a specified path or URL. `status` must be a valid HTTP status code. If not specified, `status` defaults to "307" "Temporary redirect". * `res.revalidate(urlPath)` - Revalidate a page on demand using `getStaticProps`. `urlPath` must be a `string`. ### Setting the status code of a response When sending a response back to the client, you can set the status code of the response. The following example sets the status code of the response to `200` (`OK`) and returns a `message` property with the value of `Hello from Next.js!` as a JSON response: import type { NextApiRequest, NextApiResponse } from 'next' type ResponseData = { message: string } export default function handler( req: NextApiRequest, res: NextApiResponse<ResponseData> ) { res.status(200).json({ message: 'Hello from Next.js!' }) } ### Sending a JSON response When sending a response back to the client you can send a JSON response, this must be a serializable object. In a real world application you might want to let the client know the status of the request depending on the result of the requested endpoint. The following example sends a JSON response with the status code `200` (`OK`) and the result of the async operation. It's contained in a try catch block to handle any errors that may occur, with the appropriate status code and error message caught and sent back to the client: import type { NextApiRequest, NextApiResponse } from 'next' export default async function handler( req: NextApiRequest, res: NextApiResponse ) { try { const result = await someAsyncOperation() res.status(200).json({ result }) } catch (err) { res.status(500).json({ error: 'failed to load data' }) } } ### Sending a HTTP response Sending an HTTP response works the same way as when sending a JSON response. The only difference is that the response body can be a `string`, an `object` or a `Buffer`. The following example sends a HTTP response with the status code `200` (`OK`) and the result of the async operation. import type { NextApiRequest, NextApiResponse } from 'next' export default async function handler( req: NextApiRequest, res: NextApiResponse ) { try { const result = await someAsyncOperation() res.status(200).send({ result }) } catch (err) { res.status(500).send({ error: 'failed to fetch data' }) } } ### Redirects to a specified path or URL Taking a form as an example, you may want to redirect your client to a specified path or URL once they have submitted the form. The following example redirects the client to the `/` path if the form is successfully submitted: import type { NextApiRequest, NextApiResponse } from 'next' export default async function handler( req: NextApiRequest, res: NextApiResponse ) { const { name, message } = req.body try { await handleFormInputAsync({ name, message }) res.redirect(307, '/') } catch (err) { res.status(500).send({ error: 'Failed to fetch data' }) } } ### Adding TypeScript types You can make your API Routes more type-safe by importing the `NextApiRequest` and `NextApiResponse` types from `next`, in addition to those, you can also type your response data: import type { NextApiRequest, NextApiResponse } from 'next' type ResponseData = { message: string } export default function handler( req: NextApiRequest, res: NextApiResponse<ResponseData> ) { res.status(200).json({ message: 'Hello from Next.js!' }) } > **Good to know**: The body of `NextApiRequest` is `any` because the client may include any payload. You should validate the type/shape of the body at runtime before using it. ## Dynamic API Routes API Routes support dynamic routes, and follow the same file naming rules used for `pages/`. import type { NextApiRequest, NextApiResponse } from 'next' export default function handler(req: NextApiRequest, res: NextApiResponse) { const { pid } = req.query res.end(`Post: ${pid}`) } Now, a request to `/api/post/abc` will respond with the text: `Post: abc`. ### Catch all API routes API Routes can be extended to catch all paths by adding three dots (`...`) inside the brackets. For example: * `pages/api/post/[...slug].js` matches `/api/post/a`, but also `/api/post/a/b`, `/api/post/a/b/c` and so on. > **Good to know**: You can use names other than `slug`, such as: `[...param]` Matched parameters will be sent as a query parameter (`slug` in the example) to the page, and it will always be an array, so, the path `/api/post/a` will have the following `query` object: { "slug": ["a"] } And in the case of `/api/post/a/b`, and any other matching path, new parameters will be added to the array, like so: { "slug": ["a", "b"] } For example: import type { NextApiRequest, NextApiResponse } from 'next' export default function handler(req: NextApiRequest, res: NextApiResponse) { const { slug } = req.query res.end(`Post: ${slug.join(', ')}`) } Now, a request to `/api/post/a/b/c` will respond with the text: `Post: a, b, c`. ### Optional catch all API routes Catch all routes can be made optional by including the parameter in double brackets (`[[...slug]]`). For example, `pages/api/post/[[...slug]].js` will match `/api/post`, `/api/post/a`, `/api/post/a/b`, and so on. The main difference between catch all and optional catch all routes is that with optional, the route without the parameter is also matched (`/api/post` in the example above). The `query` objects are as follows: { } // GET `/api/post` (empty object) { "slug": ["a"] } // `GET /api/post/a` (single-element array) { "slug": ["a", "b"] } // `GET /api/post/a/b` (multi-element array) ### Caveats * Predefined API routes take precedence over dynamic API routes, and dynamic API routes over catch all API routes. Take a look at the following examples: * `pages/api/post/create.js` - Will match `/api/post/create` * `pages/api/post/[pid].js` - Will match `/api/post/1`, `/api/post/abc`, etc. But not `/api/post/create` * `pages/api/post/[...slug].js` - Will match `/api/post/1/2`, `/api/post/a/b/c`, etc. But not `/api/post/create`, `/api/post/abc` ## Edge API Routes If you would like to use API Routes with the Edge Runtime, we recommend incrementally adopting the App Router and using Route Handlers instead. The Route Handlers function signature is isomorphic, meaning you can use the same function for both Edge and Node.js runtimes. --- ## Page: https://nextjs.org/docs/13/pages/building-your-application/routing/internationalization Examples * i18n routing Next.js has built-in support for internationalized (i18n) routing since `v10.0.0`. You can provide a list of locales, the default locale, and domain-specific locales and Next.js will automatically handle the routing. The i18n routing support is currently meant to complement existing i18n library solutions like `react-intl`, `react-i18next`, `lingui`, `rosetta`, `next-intl`, `next-translate`, `next-multilingual`, `typesafe-i18n`, `tolgee`, and others by streamlining the routes and locale parsing. ## Getting started To get started, add the `i18n` config to your `next.config.js` file. Locales are UTS Locale Identifiers, a standardized format for defining locales. Generally a Locale Identifier is made up of a language, region, and script separated by a dash: `language-region-script`. The region and script are optional. An example: * `en-US` - English as spoken in the United States * `nl-NL` - Dutch as spoken in the Netherlands * `nl` - Dutch, no specific region If user locale is `nl-BE` and it is not listed in your configuration, they will be redirected to `nl` if available, or to the default locale otherwise. If you don't plan to support all regions of a country, it is therefore a good practice to include country locales that will act as fallbacks. module.exports = { i18n: { // These are all the locales you want to support in // your application locales: ['en-US', 'fr', 'nl-NL'], // This is the default locale you want to be used when visiting // a non-locale prefixed path e.g. `/hello` defaultLocale: 'en-US', // This is a list of locale domains and the default locale they // should handle (these are only required when setting up domain routing) // Note: subdomains must be included in the domain value to be matched e.g. "fr.example.com". domains: [ { domain: 'example.com', defaultLocale: 'en-US', }, { domain: 'example.nl', defaultLocale: 'nl-NL', }, { domain: 'example.fr', defaultLocale: 'fr', // an optional http field can also be used to test // locale domains locally with http instead of https http: true, }, ], }, } ## Locale Strategies There are two locale handling strategies: Sub-path Routing and Domain Routing. ### Sub-path Routing Sub-path Routing puts the locale in the url path. module.exports = { i18n: { locales: ['en-US', 'fr', 'nl-NL'], defaultLocale: 'en-US', }, } With the above configuration `en-US`, `fr`, and `nl-NL` will be available to be routed to, and `en-US` is the default locale. If you have a `pages/blog.js` the following urls would be available: * `/blog` * `/fr/blog` * `/nl-nl/blog` The default locale does not have a prefix. ### Domain Routing By using domain routing you can configure locales to be served from different domains: module.exports = { i18n: { locales: ['en-US', 'fr', 'nl-NL', 'nl-BE'], defaultLocale: 'en-US', domains: [ { // Note: subdomains must be included in the domain value to be matched // e.g. www.example.com should be used if that is the expected hostname domain: 'example.com', defaultLocale: 'en-US', }, { domain: 'example.fr', defaultLocale: 'fr', }, { domain: 'example.nl', defaultLocale: 'nl-NL', // specify other locales that should be redirected // to this domain locales: ['nl-BE'], }, ], }, } For example if you have `pages/blog.js` the following urls will be available: * `example.com/blog` * `www.example.com/blog` * `example.fr/blog` * `example.nl/blog` * `example.nl/nl-BE/blog` ## Automatic Locale Detection When a user visits the application root (generally `/`), Next.js will try to automatically detect which locale the user prefers based on the `Accept-Language` header and the current domain. If a locale other than the default locale is detected, the user will be redirected to either: * **When using Sub-path Routing:** The locale prefixed path * **When using Domain Routing:** The domain with that locale specified as the default When using Domain Routing, if a user with the `Accept-Language` header `fr;q=0.9` visits `example.com`, they will be redirected to `example.fr` since that domain handles the `fr` locale by default. When using Sub-path Routing, the user would be redirected to `/fr`. ### Prefixing the Default Locale With Next.js 12 and Middleware, we can add a prefix to the default locale with a workaround. For example, here's a `next.config.js` file with support for a few languages. Note the `"default"` locale has been added intentionally. module.exports = { i18n: { locales: ['default', 'en', 'de', 'fr'], defaultLocale: 'default', localeDetection: false, }, trailingSlash: true, } Next, we can use Middleware to add custom routing rules: import { NextRequest, NextResponse } from 'next/server' const PUBLIC_FILE = /\.(.*)$/ export async function middleware(req: NextRequest) { if ( req.nextUrl.pathname.startsWith('/_next') || req.nextUrl.pathname.includes('/api/') || PUBLIC_FILE.test(req.nextUrl.pathname) ) { return } if (req.nextUrl.locale === 'default') { const locale = req.cookies.get('NEXT_LOCALE')?.value || 'en' return NextResponse.redirect( new URL(`/${locale}${req.nextUrl.pathname}${req.nextUrl.search}`, req.url) ) } } This Middleware skips adding the default prefix to API Routes and public files like fonts or images. If a request is made to the default locale, we redirect to our prefix `/en`. ### Disabling Automatic Locale Detection The automatic locale detection can be disabled with: module.exports = { i18n: { localeDetection: false, }, } When `localeDetection` is set to `false` Next.js will no longer automatically redirect based on the user's preferred locale and will only provide locale information detected from either the locale based domain or locale path as described above. ## Accessing the locale information You can access the locale information via the Next.js router. For example, using the `useRouter()` hook the following properties are available: * `locale` contains the currently active locale. * `locales` contains all configured locales. * `defaultLocale` contains the configured default locale. When pre-rendering pages with `getStaticProps` or `getServerSideProps`, the locale information is provided in the context provided to the function. When leveraging `getStaticPaths`, the configured locales are provided in the context parameter of the function under `locales` and the configured defaultLocale under `defaultLocale`. ## Transition between locales You can use `next/link` or `next/router` to transition between locales. For `next/link`, a `locale` prop can be provided to transition to a different locale from the currently active one. If no `locale` prop is provided, the currently active `locale` is used during client-transitions. For example: import Link from 'next/link' export default function IndexPage(props) { return ( <Link href="/another" locale="fr"> To /fr/another </Link> ) } When using the `next/router` methods directly, you can specify the `locale` that should be used via the transition options. For example: import { useRouter } from 'next/router' export default function IndexPage(props) { const router = useRouter() return ( <div onClick={() => { router.push('/another', '/another', { locale: 'fr' }) }} > to /fr/another </div> ) } Note that to handle switching only the `locale` while preserving all routing information such as dynamic route query values or hidden href query values, you can provide the `href` parameter as an object: import { useRouter } from 'next/router' const router = useRouter() const { pathname, asPath, query } = router // change just the locale and maintain all other route information including href's query router.push({ pathname, query }, asPath, { locale: nextLocale }) See here for more information on the object structure for `router.push`. If you have a `href` that already includes the locale you can opt-out of automatically handling the locale prefixing: import Link from 'next/link' export default function IndexPage(props) { return ( <Link href="/fr/another" locale={false}> To /fr/another </Link> ) } ## Leveraging the `NEXT_LOCALE` cookie Next.js supports overriding the accept-language header with a `NEXT_LOCALE=the-locale` cookie. This cookie can be set using a language switcher and then when a user comes back to the site it will leverage the locale specified in the cookie when redirecting from `/` to the correct locale location. For example, if a user prefers the locale `fr` in their accept-language header but a `NEXT_LOCALE=en` cookie is set the `en` locale when visiting `/` the user will be redirected to the `en` locale location until the cookie is removed or expired. ## Search Engine Optimization Since Next.js knows what language the user is visiting it will automatically add the `lang` attribute to the `<html>` tag. Next.js doesn't know about variants of a page so it's up to you to add the `hreflang` meta tags using `next/head`. You can learn more about `hreflang` in the Google Webmasters documentation. ## How does this work with Static Generation? > Note that Internationalized Routing does not integrate with `output: 'export'` as it does not leverage the Next.js routing layer. Hybrid Next.js applications that do not use `output: 'export'` are fully supported. ### Dynamic Routes and `getStaticProps` Pages For pages using `getStaticProps` with Dynamic Routes, all locale variants of the page desired to be prerendered need to be returned from `getStaticPaths`. Along with the `params` object returned for `paths`, you can also return a `locale` field specifying which locale you want to render. For example: export const getStaticPaths = ({ locales }) => { return { paths: [ // if no `locale` is provided only the defaultLocale will be generated { params: { slug: 'post-1' }, locale: 'en-US' }, { params: { slug: 'post-1' }, locale: 'fr' }, ], fallback: true, } } For Automatically Statically Optimized and non-dynamic `getStaticProps` pages, **a version of the page will be generated for each locale**. This is important to consider because it can increase build times depending on how many locales are configured inside `getStaticProps`. For example, if you have 50 locales configured with 10 non-dynamic pages using `getStaticProps`, this means `getStaticProps` will be called 500 times. 50 versions of the 10 pages will be generated during each build. To decrease the build time of dynamic pages with `getStaticProps`, use a `fallback` mode. This allows you to return only the most popular paths and locales from `getStaticPaths` for prerendering during the build. Then, Next.js will build the remaining pages at runtime as they are requested. ### Automatically Statically Optimized Pages For pages that are automatically statically optimized, a version of the page will be generated for each locale. ### Non-dynamic getStaticProps Pages For non-dynamic `getStaticProps` pages, a version is generated for each locale like above. `getStaticProps` is called with each `locale` that is being rendered. If you would like to opt-out of a certain locale from being pre-rendered, you can return `notFound: true` from `getStaticProps` and this variant of the page will not be generated. export async function getStaticProps({ locale }) { // Call an external API endpoint to get posts. // You can use any data fetching library const res = await fetch(`https://.../posts?locale=${locale}`) const posts = await res.json() if (posts.length === 0) { return { notFound: true, } } // By returning { props: posts }, the Blog component // will receive `posts` as a prop at build time return { props: { posts, }, } } ## Limits for the i18n config * `locales`: 100 total locales * `domains`: 100 total locale domain items > **Good to know**: These limits have been added initially to prevent potential performance issues at build time. You can workaround these limits with custom routing using Middleware in Next.js 12. --- ## Page: https://nextjs.org/docs/13/pages/building-your-application/routing/authenticating Authentication verifies who a user is, while authorization controls what a user can access. Next.js supports multiple authentication patterns, each designed for different use cases. This page will go through each case so that you can choose based on your constraints. ## Authentication Patterns The first step to identifying which authentication pattern you need is understanding the data-fetching strategy you want. We can then determine which authentication providers support this strategy. There are two main patterns: * Use static generation to server-render a loading state, followed by fetching user data client-side. * Fetch user data server-side to eliminate a flash of unauthenticated content. ### Authenticating Statically Generated Pages Next.js automatically determines that a page is static if there are no blocking data requirements. This means the absence of `getServerSideProps` and `getInitialProps` in the page. Instead, your page can render a loading state from the server, followed by fetching the user client-side. One advantage of this pattern is it allows pages to be served from a global CDN and preloaded using `next/link`. In practice, this results in a faster TTI (Time to Interactive). Let's look at an example for a profile page. This will initially render a loading skeleton. Once the request for a user has finished, it will show the user's name: import useUser from '../lib/useUser' import Layout from '../components/Layout' const Profile = () => { // Fetch the user client-side const { user } = useUser({ redirectTo: '/login' }) // Server-render loading state if (!user || user.isLoggedIn === false) { return <Layout>Loading...</Layout> } // Once the user request finishes, show the user return ( <Layout> <h1>Your Profile</h1> <pre>{JSON.stringify(user, null, 2)}</pre> </Layout> ) } export default Profile You can view this example in action. Check out the `with-iron-session` example to see how it works. ### Authenticating Server-Rendered Pages If you export an `async` function called `getServerSideProps` from a page, Next.js will pre-render this page on each request using the data returned by `getServerSideProps`. export async function getServerSideProps(context) { return { props: {}, // Will be passed to the page component as props } } Let's transform the profile example to use server-side rendering. If there's a session, return `user` as a prop to the `Profile` component in the page. Notice there is not a loading skeleton in this example. import withSession from '../lib/session' import Layout from '../components/Layout' export const getServerSideProps = withSession(async function ({ req, res }) { const { user } = req.session if (!user) { return { redirect: { destination: '/login', permanent: false, }, } } return { props: { user }, } }) const Profile = ({ user }) => { // Show the user. No loading state is required return ( <Layout> <h1>Your Profile</h1> <pre>{JSON.stringify(user, null, 2)}</pre> </Layout> ) } export default Profile An advantage of this pattern is preventing a flash of unauthenticated content before redirecting. It's important to note fetching user data in `getServerSideProps` will block rendering until the request to your authentication provider resolves. To prevent creating a bottleneck and increasing your TTFB (Time to First Byte), you should ensure your authentication lookup is fast. Otherwise, consider static generation. ## Authentication Providers Now that we've discussed authentication patterns, let's look at specific providers and explore how they're used with Next.js. ### Bring Your Own Database Examples * with-iron-session * next-auth-example If you have an existing database with user data, you'll likely want to utilize an open-source solution that's provider agnostic. * If you want a low-level, encrypted, and stateless session utility use `iron-session`. * If you want a full-featured authentication system with built-in providers (Google, Facebook, GitHub…), JWT, JWE, email/password, magic links and more… use `next-auth`. Both of these libraries support either authentication pattern. If you're interested in Passport, we also have examples for it using secure and encrypted cookies: * with-passport * with-passport-and-next-connect ### Other Providers To see examples with other authentication providers, check out the examples folder. Examples * Auth0 * Clerk * Firebase * Magic * Nhost * Ory * Supabase * Supertokens * Userbase --- ## Page: https://nextjs.org/docs/13/pages/building-your-application/routing/middleware Middleware allows you to run code before a request is completed. Then, based on the incoming request, you can modify the response by rewriting, redirecting, modifying the request or response headers, or responding directly. Middleware runs before cached content and routes are matched. See Matching Paths for more details. ## Convention Use the file `middleware.ts` (or `.js`) in the root of your project to define Middleware. For example, at the same level as `pages` or `app`, or inside `src` if applicable. ## Example import { NextResponse } from 'next/server' import type { NextRequest } from 'next/server' // This function can be marked `async` if using `await` inside export function middleware(request: NextRequest) { return NextResponse.redirect(new URL('/home', request.url)) } // See "Matching Paths" below to learn more export const config = { matcher: '/about/:path*', } ## Matching Paths Middleware will be invoked for **every route in your project**. The following is the execution order: 1. `headers` from `next.config.js` 2. `redirects` from `next.config.js` 3. Middleware (`rewrites`, `redirects`, etc.) 4. `beforeFiles` (`rewrites`) from `next.config.js` 5. Filesystem routes (`public/`, `_next/static/`, `pages/`, `app/`, etc.) 6. `afterFiles` (`rewrites`) from `next.config.js` 7. Dynamic Routes (`/blog/[slug]`) 8. `fallback` (`rewrites`) from `next.config.js` There are two ways to define which paths Middleware will run on: 1. Custom matcher config 2. Conditional statements ### Matcher `matcher` allows you to filter Middleware to run on specific paths. export const config = { matcher: '/about/:path*', } You can match a single path or multiple paths with an array syntax: export const config = { matcher: ['/about/:path*', '/dashboard/:path*'], } The `matcher` config allows full regex so matching like negative lookaheads or character matching is supported. An example of a negative lookahead to match all except specific paths can be seen here: export const config = { matcher: [ /* * Match all request paths except for the ones starting with: * - api (API routes) * - _next/static (static files) * - _next/image (image optimization files) * - favicon.ico (favicon file) */ '/((?!api|_next/static|_next/image|favicon.ico).*)', ], } > **Good to know**: The `matcher` values need to be constants so they can be statically analyzed at build-time. Dynamic values such as variables will be ignored. Configured matchers: 1. MUST start with `/` 2. Can include named parameters: `/about/:path` matches `/about/a` and `/about/b` but not `/about/a/c` 3. Can have modifiers on named parameters (starting with `:`): `/about/:path*` matches `/about/a/b/c` because `*` is _zero or more_. `?` is _zero or one_ and `+` _one or more_ 4. Can use regular expression enclosed in parenthesis: `/about/(.*)` is the same as `/about/:path*` Read more details on path-to-regexp documentation. > **Good to know**: For backward compatibility, Next.js always considers `/public` as `/public/index`. Therefore, a matcher of `/public/:path` will match. ### Conditional Statements import { NextResponse } from 'next/server' import type { NextRequest } from 'next/server' export function middleware(request: NextRequest) { if (request.nextUrl.pathname.startsWith('/about')) { return NextResponse.rewrite(new URL('/about-2', request.url)) } if (request.nextUrl.pathname.startsWith('/dashboard')) { return NextResponse.rewrite(new URL('/dashboard/user', request.url)) } } ## NextResponse The `NextResponse` API allows you to: * `redirect` the incoming request to a different URL * `rewrite` the response by displaying a given URL * Set request headers for API Routes, `getServerSideProps`, and `rewrite` destinations * Set response cookies * Set response headers To produce a response from Middleware, you can: 1. `rewrite` to a route (Page or Edge API Route) that produces a response 2. return a `NextResponse` directly. See Producing a Response ## Using Cookies Cookies are regular headers. On a `Request`, they are stored in the `Cookie` header. On a `Response` they are in the `Set-Cookie` header. Next.js provides a convenient way to access and manipulate these cookies through the `cookies` extension on `NextRequest` and `NextResponse`. 1. For incoming requests, `cookies` comes with the following methods: `get`, `getAll`, `set`, and `delete` cookies. You can check for the existence of a cookie with `has` or remove all cookies with `clear`. 2. For outgoing responses, `cookies` have the following methods `get`, `getAll`, `set`, and `delete`. import { NextResponse } from 'next/server' import type { NextRequest } from 'next/server' export function middleware(request: NextRequest) { // Assume a "Cookie:nextjs=fast" header to be present on the incoming request // Getting cookies from the request using the `RequestCookies` API let cookie = request.cookies.get('nextjs') console.log(cookie) // => { name: 'nextjs', value: 'fast', Path: '/' } const allCookies = request.cookies.getAll() console.log(allCookies) // => [{ name: 'nextjs', value: 'fast' }] request.cookies.has('nextjs') // => true request.cookies.delete('nextjs') request.cookies.has('nextjs') // => false // Setting cookies on the response using the `ResponseCookies` API const response = NextResponse.next() response.cookies.set('vercel', 'fast') response.cookies.set({ name: 'vercel', value: 'fast', path: '/', }) cookie = response.cookies.get('vercel') console.log(cookie) // => { name: 'vercel', value: 'fast', Path: '/' } // The outgoing response will have a `Set-Cookie:vercel=fast;path=/test` header. return response } You can set request and response headers using the `NextResponse` API (setting _request_ headers is available since Next.js v13.0.0). import { NextResponse } from 'next/server' import type { NextRequest } from 'next/server' export function middleware(request: NextRequest) { // Clone the request headers and set a new header `x-hello-from-middleware1` const requestHeaders = new Headers(request.headers) requestHeaders.set('x-hello-from-middleware1', 'hello') // You can also set request headers in NextResponse.rewrite const response = NextResponse.next({ request: { // New request headers headers: requestHeaders, }, }) // Set a new response header `x-hello-from-middleware2` response.headers.set('x-hello-from-middleware2', 'hello') return response } > **Good to know**: Avoid setting large headers as it might cause 431 Request Header Fields Too Large error depending on your backend web server configuration. ## Producing a Response You can respond from Middleware directly by returning a `Response` or `NextResponse` instance. (This is available since Next.js v13.1.0) import { NextRequest } from 'next/server' import { isAuthenticated } from '@lib/auth' // Limit the middleware to paths starting with `/api/` export const config = { matcher: '/api/:function*', } export function middleware(request: NextRequest) { // Call our authentication function to check the request if (!isAuthenticated(request)) { // Respond with JSON indicating an error message return Response.json( { success: false, message: 'authentication failed' }, { status: 401 } ) } } ## Advanced Middleware Flags In `v13.1` of Next.js two additional flags were introduced for middleware, `skipMiddlewareUrlNormalize` and `skipTrailingSlashRedirect` to handle advanced use cases. `skipTrailingSlashRedirect` allows disabling Next.js default redirects for adding or removing trailing slashes allowing custom handling inside middleware which can allow maintaining the trailing slash for some paths but not others allowing easier incremental migrations. module.exports = { skipTrailingSlashRedirect: true, } const legacyPrefixes = ['/docs', '/blog'] export default async function middleware(req) { const { pathname } = req.nextUrl if (legacyPrefixes.some((prefix) => pathname.startsWith(prefix))) { return NextResponse.next() } // apply trailing slash handling if ( !pathname.endsWith('/') && !pathname.match(/((?!\.well-known(?:\/.*)?)(?:[^/]+\/)*[^/]+\.\w+)/) ) { req.nextUrl.pathname += '/' return NextResponse.redirect(req.nextUrl) } } `skipMiddlewareUrlNormalize` allows disabling the URL normalizing Next.js does to make handling direct visits and client-transitions the same. There are some advanced cases where you need full control using the original URL which this unlocks. module.exports = { skipMiddlewareUrlNormalize: true, } export default async function middleware(req) { const { pathname } = req.nextUrl // GET /_next/data/build-id/hello.json console.log(pathname) // with the flag this now /_next/data/build-id/hello.json // without the flag this would be normalized to /hello } ## Version History | Version | Changes | | --- | --- | | `v13.1.0` | Advanced Middleware flags added | | `v13.0.0` | Middleware can modify request headers, response headers, and send responses | | `v12.2.0` | Middleware is stable, please see the upgrade guide | | `v12.0.9` | Enforce absolute URLs in Edge Runtime (PR) | | `v12.0.0` | Middleware (Beta) added | --- ## Page: https://nextjs.org/docs/13/pages/building-your-application/rendering By default, Next.js **pre-renders** every page. This means that Next.js generates HTML for each page in advance, instead of having it all done by client-side JavaScript. Pre-rendering can result in better performance and SEO. Each generated HTML is associated with minimal JavaScript code necessary for that page. When a page is loaded by the browser, its JavaScript code runs and makes the page fully interactive (this process is called hydration in React). ### Pre-rendering Next.js has two forms of pre-rendering: **Static Generation** and **Server-side Rendering**. The difference is in **when** it generates the HTML for a page. * Static Generation: The HTML is generated at **build time** and will be reused on each request. * Server-side Rendering: The HTML is generated on **each request**. Importantly, Next.js lets you choose which pre-rendering form you'd like to use for each page. You can create a "hybrid" Next.js app by using Static Generation for most pages and using Server-side Rendering for others. We recommend using Static Generation over Server-side Rendering for performance reasons. Statically generated pages can be cached by CDN with no extra configuration to boost performance. However, in some cases, Server-side Rendering might be the only option. You can also use client-side data fetching along with Static Generation or Server-side Rendering. That means some parts of a page can be rendered entirely by clientside JavaScript. To learn more, take a look at the Data Fetching documentation. --- ## Page: https://nextjs.org/docs/13/pages/building-your-application/rendering/server-side-rendering You are currently viewing documentation for version 13 of Next.js. > Also referred to as "SSR" or "Dynamic Rendering". If a page uses **Server-side Rendering**, the page HTML is generated on **each request**. To use Server-side Rendering for a page, you need to `export` an `async` function called `getServerSideProps`. This function will be called by the server on every request. For example, suppose that your page needs to pre-render frequently updated data (fetched from an external API). You can write `getServerSideProps` which fetches this data and passes it to `Page` like below: export default function Page({ data }) { // Render data... } // This gets called on every request export async function getServerSideProps() { // Fetch data from external API const res = await fetch(`https://.../data`) const data = await res.json() // Pass data to the page via props return { props: { data } } } As you can see, `getServerSideProps` is similar to `getStaticProps`, but the difference is that `getServerSideProps` is run on every request instead of on build time. To learn more about how `getServerSideProps` works, check out our Data Fetching documentation. Previous Rendering Next Static Site Generation (SSG) Was this helpful? supported. --- ## Page: https://nextjs.org/docs/13/pages/building-your-application/rendering/static-site-generation Examples * WordPress Example(Demo) * Blog Starter using markdown files (Demo) * DatoCMS Example (Demo) * TakeShape Example (Demo) * Sanity Example (Demo) * Prismic Example (Demo) * Contentful Example (Demo) * Strapi Example (Demo) * Prepr Example (Demo) * Agility CMS Example (Demo) * Cosmic Example (Demo) * ButterCMS Example (Demo) * Storyblok Example (Demo) * GraphCMS Example (Demo) * Kontent Example (Demo) * Builder.io Example (Demo) * TinaCMS Example (Demo) * Static Tweet (Demo) * Enterspeed Example (Demo) If a page uses **Static Generation**, the page HTML is generated at **build time**. That means in production, the page HTML is generated when you run `next build`. This HTML will then be reused on each request. It can be cached by a CDN. In Next.js, you can statically generate pages **with or without data**. Let's take a look at each case. ### Static Generation without data By default, Next.js pre-renders pages using Static Generation without fetching data. Here's an example: function About() { return <div>About</div> } export default About Note that this page does not need to fetch any external data to be pre-rendered. In cases like this, Next.js generates a single HTML file per page during build time. ### Static Generation with data Some pages require fetching external data for pre-rendering. There are two scenarios, and one or both might apply. In each case, you can use these functions that Next.js provides: 1. Your page **content** depends on external data: Use `getStaticProps`. 2. Your page **paths** depend on external data: Use `getStaticPaths` (usually in addition to `getStaticProps`). #### Scenario 1: Your page content depends on external data **Example**: Your blog page might need to fetch the list of blog posts from a CMS (content management system). // TODO: Need to fetch `posts` (by calling some API endpoint) // before this page can be pre-rendered. export default function Blog({ posts }) { return ( <ul> {posts.map((post) => ( <li>{post.title}</li> ))} </ul> ) } To fetch this data on pre-render, Next.js allows you to `export` an `async` function called `getStaticProps` from the same file. This function gets called at build time and lets you pass fetched data to the page's `props` on pre-render. export default function Blog({ posts }) { // Render posts... } // This function gets called at build time export async function getStaticProps() { // Call an external API endpoint to get posts const res = await fetch('https://.../posts') const posts = await res.json() // By returning { props: { posts } }, the Blog component // will receive `posts` as a prop at build time return { props: { posts, }, } } To learn more about how `getStaticProps` works, check out the Data Fetching documentation. #### Scenario 2: Your page paths depend on external data Next.js allows you to create pages with **dynamic routes**. For example, you can create a file called `pages/posts/[id].js` to show a single blog post based on `id`. This will allow you to show a blog post with `id: 1` when you access `posts/1`. > To learn more about dynamic routing, check the Dynamic Routing documentation. However, which `id` you want to pre-render at build time might depend on external data. **Example**: suppose that you've only added one blog post (with `id: 1`) to the database. In this case, you'd only want to pre-render `posts/1` at build time. Later, you might add the second post with `id: 2`. Then you'd want to pre-render `posts/2` as well. So your page **paths** that are pre-rendered depend on external data. To handle this, Next.js lets you `export` an `async` function called `getStaticPaths` from a dynamic page (`pages/posts/[id].js` in this case). This function gets called at build time and lets you specify which paths you want to pre-render. // This function gets called at build time export async function getStaticPaths() { // Call an external API endpoint to get posts const res = await fetch('https://.../posts') const posts = await res.json() // Get the paths we want to pre-render based on posts const paths = posts.map((post) => ({ params: { id: post.id }, })) // We'll pre-render only these paths at build time. // { fallback: false } means other routes should 404. return { paths, fallback: false } } Also in `pages/posts/[id].js`, you need to export `getStaticProps` so that you can fetch the data about the post with this `id` and use it to pre-render the page: export default function Post({ post }) { // Render post... } export async function getStaticPaths() { // ... } // This also gets called at build time export async function getStaticProps({ params }) { // params contains the post `id`. // If the route is like /posts/1, then params.id is 1 const res = await fetch(`https://.../posts/${params.id}`) const post = await res.json() // Pass post data to the page via props return { props: { post } } } To learn more about how `getStaticPaths` works, check out the Data Fetching documentation. ### When should I use Static Generation? We recommend using **Static Generation** (with and without data) whenever possible because your page can be built once and served by CDN, which makes it much faster than having a server render the page on every request. You can use Static Generation for many types of pages, including: * Marketing pages * Blog posts and portfolios * E-commerce product listings * Help and documentation You should ask yourself: "Can I pre-render this page **ahead** of a user's request?" If the answer is yes, then you should choose Static Generation. On the other hand, Static Generation is **not** a good idea if you cannot pre-render a page ahead of a user's request. Maybe your page shows frequently updated data, and the page content changes on every request. In cases like this, you can do one of the following: * Use Static Generation with **Client-side data fetching:** You can skip pre-rendering some parts of a page and then use client-side JavaScript to populate them. To learn more about this approach, check out the Data Fetching documentation. * Use **Server-Side Rendering:** Next.js pre-renders a page on each request. It will be slower because the page cannot be cached by a CDN, but the pre-rendered page will always be up-to-date. We'll talk about this approach below. --- ## Page: https://nextjs.org/docs/13/pages/building-your-application/rendering/incremental-static-regeneration Examples * Next.js Commerce * GitHub Reactions Demo * Static Tweet Demo Next.js allows you to create or update static pages _after_ you’ve built your site. Incremental Static Regeneration (ISR) enables you to use static-generation on a per-page basis, **without needing to rebuild the entire site**. With ISR, you can retain the benefits of static while scaling to millions of pages. > **Good to know**: The `edge` runtime is currently not compatible with ISR, although you can leverage `stale-while-revalidate` by setting the `cache-control` header manually. To use ISR, add the `revalidate` prop to `getStaticProps`: function Blog({ posts }) { return ( <ul> {posts.map((post) => ( <li key={post.id}>{post.title}</li> ))} </ul> ) } // This function gets called at build time on server-side. // It may be called again, on a serverless function, if // revalidation is enabled and a new request comes in export async function getStaticProps() { const res = await fetch('https://.../posts') const posts = await res.json() return { props: { posts, }, // Next.js will attempt to re-generate the page: // - When a request comes in // - At most once every 10 seconds revalidate: 10, // In seconds } } // This function gets called at build time on server-side. // It may be called again, on a serverless function, if // the path has not been generated. export async function getStaticPaths() { const res = await fetch('https://.../posts') const posts = await res.json() // Get the paths we want to pre-render based on posts const paths = posts.map((post) => ({ params: { id: post.id }, })) // We'll pre-render only these paths at build time. // { fallback: 'blocking' } will server-render pages // on-demand if the path doesn't exist. return { paths, fallback: 'blocking' } } export default Blog When a request is made to a page that was pre-rendered at build time, it will initially show the cached page. * Any requests to the page after the initial request and before 10 seconds are also cached and instantaneous. * After the 10-second window, the next request will still show the cached (stale) page * Next.js triggers a regeneration of the page in the background. * Once the page generates successfully, Next.js will invalidate the cache and show the updated page. If the background regeneration fails, the old page would still be unaltered. When a request is made to a path that hasn’t been generated, Next.js will server-render the page on the first request. Future requests will serve the static file from the cache. ISR on Vercel persists the cache globally and handles rollbacks. > **Good to know**: Check if your upstream data provider has caching enabled by default. You might need to disable (e.g. `useCdn: false`), otherwise a revalidation won't be able to pull fresh data to update the ISR cache. Caching can occur at a CDN (for an endpoint being requested) when it returns the `Cache-Control` header. ## On-Demand Revalidation If you set a `revalidate` time of `60`, all visitors will see the same generated version of your site for one minute. The only way to invalidate the cache is from someone visiting that page after the minute has passed. Starting with `v12.2.0`, Next.js supports On-Demand Incremental Static Regeneration to manually purge the Next.js cache for a specific page. This makes it easier to update your site when: * Content from your headless CMS is created or updated * Ecommerce metadata changes (price, description, category, reviews, etc.) Inside `getStaticProps`, you do not need to specify `revalidate` to use on-demand revalidation. If `revalidate` is omitted, Next.js will use the default value of `false` (no revalidation) and only revalidate the page on-demand when `revalidate()` is called. > **Good to know**: Middleware won't be executed for On-Demand ISR requests. Instead, call `revalidate()` on the _exact_ path that you want revalidated. For example, if you have `pages/blog/[slug].js` and a rewrite from `/post-1` -> `/blog/post-1`, you would need to call `res.revalidate('/blog/post-1')`. ### Using On-Demand Revalidation First, create a secret token only known by your Next.js app. This secret will be used to prevent unauthorized access to the revalidation API Route. You can access the route (either manually or with a webhook) with the following URL structure: https://<your-site.com>/api/revalidate?secret=<token> Next, add the secret as an Environment Variable to your application. Finally, create the revalidation API Route: export default async function handler(req, res) { // Check for secret to confirm this is a valid request if (req.query.secret !== process.env.MY_SECRET_TOKEN) { return res.status(401).json({ message: 'Invalid token' }) } try { // this should be the actual path not a rewritten path // e.g. for "/blog/[slug]" this should be "/blog/post-1" await res.revalidate('/path-to-revalidate') return res.json({ revalidated: true }) } catch (err) { // If there was an error, Next.js will continue // to show the last successfully generated page return res.status(500).send('Error revalidating') } } View our demo to see on-demand revalidation in action and provide feedback. ### Testing on-Demand ISR during development When running locally with `next dev`, `getStaticProps` is invoked on every request. To verify your on-demand ISR configuration is correct, you will need to create a production build and start the production server: $ next build $ next start Then, you can confirm that static pages have successfully revalidated. ## Error handling and revalidation If there is an error inside `getStaticProps` when handling background regeneration, or you manually throw an error, the last successfully generated page will continue to show. On the next subsequent request, Next.js will retry calling `getStaticProps`. export async function getStaticProps() { // If this request throws an uncaught error, Next.js will // not invalidate the currently shown page and // retry getStaticProps on the next request. const res = await fetch('https://.../posts') const posts = await res.json() if (!res.ok) { // If there is a server error, you might want to // throw an error instead of returning so that the cache is not updated // until the next successful request. throw new Error(`Failed to fetch posts, received status ${res.status}`) } // If the request was successful, return the posts // and revalidate every 10 seconds. return { props: { posts, }, revalidate: 10, } } ## Self-hosting ISR Incremental Static Regeneration (ISR) works on self-hosted Next.js sites out of the box when you use `next start`. You can use this approach when deploying to container orchestrators such as Kubernetes or HashiCorp Nomad. By default, generated assets will be stored in-memory on each pod. This means that each pod will have its own copy of the static files. Stale data may be shown until that specific pod is hit by a request. To ensure consistency across all pods, you can disable in-memory caching. This will inform the Next.js server to only leverage assets generated by ISR in the file system. You can use a shared network mount in your Kubernetes pods (or similar setup) to reuse the same file-system cache between different containers. By sharing the same mount, the `.next` folder which contains the `next/image` cache will also be shared and re-used. To disable in-memory caching, set `isrMemoryCacheSize` to `0` in your `next.config.js` file: module.exports = { experimental: { // Defaults to 50MB isrMemoryCacheSize: 0, // cache size in bytes }, } > **Good to know**: You might need to consider a race condition between multiple pods trying to update the cache at the same time, depending on how your shared mount is configured. ## Version History | Version | Changes | | --- | --- | | `v12.2.0` | On-Demand ISR is stable | | `v12.1.0` | On-Demand ISR added (beta). | | `v12.0.0` | Bot-aware ISR fallback added. | | `v9.5.0` | Base Path added. | --- ## Page: https://nextjs.org/docs/13/pages/building-your-application/rendering/automatic-static-optimization Next.js automatically determines that a page is static (can be prerendered) if it has no blocking data requirements. This determination is made by the absence of `getServerSideProps` and `getInitialProps` in the page. This feature allows Next.js to emit hybrid applications that contain **both server-rendered and statically generated pages**. > Statically generated pages are still reactive: Next.js will hydrate your application client-side to give it full interactivity. One of the main benefits of this feature is that optimized pages require no server-side computation, and can be instantly streamed to the end-user from multiple CDN locations. The result is an _ultra fast_ loading experience for your users. ## How it works If `getServerSideProps` or `getInitialProps` is present in a page, Next.js will switch to render the page on-demand, per-request (meaning Server-Side Rendering). If the above is not the case, Next.js will **statically optimize** your page automatically by prerendering the page to static HTML. During prerendering, the router's `query` object will be empty since we do not have `query` information to provide during this phase. After hydration, Next.js will trigger an update to your application to provide the route parameters in the `query` object. The cases where the query will be updated after hydration triggering another render are: * The page is a dynamic-route. * The page has query values in the URL. * Rewrites are configured in your `next.config.js` since these can have parameters that may need to be parsed and provided in the `query`. To be able to distinguish if the query is fully updated and ready for use, you can leverage the `isReady` field on `next/router`. > **Good to know**: Parameters added with dynamic routes to a page that's using `getStaticProps` will always be available inside the `query` object. `next build` will emit `.html` files for statically optimized pages. For example, the result for the page `pages/about.js` would be: .next/server/pages/about.html And if you add `getServerSideProps` to the page, it will then be JavaScript, like so: .next/server/pages/about.js ## Caveats * If you have a custom `App` with `getInitialProps` then this optimization will be turned off in pages without Static Generation. * If you have a custom `Document` with `getInitialProps` be sure you check if `ctx.req` is defined before assuming the page is server-side rendered. `ctx.req` will be `undefined` for pages that are prerendered. * Avoid using the `asPath` value on `next/router` in the rendering tree until the router's `isReady` field is `true`. Statically optimized pages only know `asPath` on the client and not the server, so using it as a prop may lead to mismatch errors. The `active-class-name` example demonstrates one way to use `asPath` as a prop. --- ## Page: https://nextjs.org/docs/13/pages/building-your-application/rendering/client-side-rendering In Client-Side Rendering (CSR) with React, the browser downloads a minimal HTML page and the JavaScript needed for the page. The JavaScript is then used to update the DOM and render the page. When the application is first loaded, the user may notice a slight delay before they can see the full page, this is because the page isn't fully rendered until all the JavaScript is downloaded, parsed, and executed. After the page has been loaded for the first time, navigating to other pages on the same website is typically faster, as only necessary data needs to be fetched, and JavaScript can re-render parts of the page without requiring a full page refresh. In Next.js, there are two ways you can implement client-side rendering: 1. Using React's `useEffect()` hook inside your pages instead of the server-side rendering methods (`getStaticProps` and `getServerSideProps`). 2. Using a data fetching library like SWR or TanStack Query to fetch data on the client (recommended). Here's an example of using `useEffect()` inside a Next.js page: import React, { useState, useEffect } from 'react' export function Page() { const [data, setData] = useState(null) useEffect(() => { const fetchData = async () => { const response = await fetch('https://api.example.com/data') if (!response.ok) { throw new Error(`HTTP error! status: ${response.status}`) } const result = await response.json() setData(result) } fetchData().catch((e) => { // handle the error as needed console.error('An error occurred while fetching the data: ', e) }) }, []) return <p>{data ? `Your data: ${data}` : 'Loading...'}</p> } In the example above, the component starts by rendering `Loading...`. Then, once the data is fetched, it re-renders and displays the data. Although fetching data in a `useEffect` is a pattern you may see in older React Applications, we recommend using a data-fetching library for better performance, caching, optimistic updates, and more. Here's a minimum example using SWR to fetch data on the client: import useSWR from 'swr' export function Page() { const { data, error, isLoading } = useSWR( 'https://api.example.com/data', fetcher ) if (error) return <p>Failed to load.</p> if (isLoading) return <p>Loading...</p> return <p>Your Data: {data}</p> } > **Good to know**: > > Keep in mind that CSR can impact SEO. Some search engine crawlers might not execute JavaScript and therefore only see the initial empty or loading state of your application. It can also lead to performance issues for users with slower internet connections or devices, as they need to wait for all the JavaScript to load and run before they can see the full page. Next.js promotes a hybrid approach that allows you to use a combination of server-side rendering, static site generation, and client-side rendering, **depending on the needs of each page** in your application. In the App Router, you can also use Loading UI with Suspense to show a loading indicator while the page is being rendered. --- ## Page: https://nextjs.org/docs/13/pages/building-your-application/rendering/edge-and-nodejs-runtimes In the context of Next.js, runtime refers to the set of libraries, APIs, and general functionality available to your code during execution. On the server, there are two runtimes where parts of your application code can be rendered: * The **Node.js Runtime** (default) has access to all Node.js APIs and compatible packages from the ecosystem. * The **Edge Runtime** is based on Web APIs. ## Runtime Differences There are many considerations to make when choosing a runtime. This table shows the major differences at a glance. If you want a more in-depth analysis of the differences, check out the sections below. | | Node | Serverless | Edge | | --- | --- | --- | --- | | Cold Boot | / | ~250ms | Instant | | HTTP Streaming | Yes | Yes | Yes | | IO | All | All | `fetch` | | Scalability | / | High | Highest | | Security | Normal | High | High | | Latency | Normal | Low | Lowest | | npm Packages | All | All | A smaller subset | | Static Rendering | Yes | Yes | No | | Dynamic Rendering | Yes | Yes | Yes | | Data Revalidation w/ `fetch` | Yes | Yes | Yes | ### Edge Runtime In Next.js, the lightweight Edge Runtime is a subset of available Node.js APIs. The Edge Runtime is ideal if you need to deliver dynamic, personalized content at low latency with small, simple functions. The Edge Runtime's speed comes from its minimal use of resources, but that can be limiting in many scenarios. For example, code executed in the Edge Runtime on Vercel cannot exceed between 1 MB and 4 MB, this limit includes imported packages, fonts and files, and will vary depending on your deployment infrastructure. ### Node.js Runtime Using the Node.js runtime gives you access to all Node.js APIs, and all npm packages that rely on them. However, it's not as fast to start up as routes using the Edge runtime. Deploying your Next.js application to a Node.js server will require managing, scaling, and configuring your infrastructure. Alternatively, you can consider deploying your Next.js application to a serverless platform like Vercel, which will handle this for you. ### Serverless Node.js Serverless is ideal if you need a scalable solution that can handle more complex computational loads than the Edge Runtime. With Serverless Functions on Vercel, for example, your overall code size is 50MB including imported packages, fonts, and files. The downside compared to routes using the Edge is that it can take hundreds of milliseconds for Serverless Functions to boot up before they begin processing requests. Depending on the amount of traffic your site receives, this could be a frequent occurrence as the functions are not frequently "warm". > Please refer to the Node.js Docs and Edge Docs for the full list of available APIs. Both runtimes can also support streaming depending on your deployment infrastructure. --- ## Page: https://nextjs.org/docs/13/pages/building-your-application/data-fetching #### Subscribe to our newsletter Stay updated on new releases and features, guides, and case studies. --- ## Page: https://nextjs.org/docs/13/pages/building-your-application/data-fetching/get-static-props If you export a function called `getStaticProps` (Static Site Generation) from a page, Next.js will pre-render this page at build time using the props returned by `getStaticProps`. import type { InferGetStaticPropsType, GetStaticProps } from 'next' type Repo = { name: string stargazers_count: number } export const getStaticProps = (async (context) => { const res = await fetch('https://api.github.com/repos/vercel/next.js') const repo = await res.json() return { props: { repo } } }) satisfies GetStaticProps<{ repo: Repo }> export default function Page({ repo, }: InferGetStaticPropsType<typeof getStaticProps>) { return repo.stargazers_count } > Note that irrespective of rendering type, any `props` will be passed to the page component and can be viewed on the client-side in the initial HTML. This is to allow the page to be hydrated correctly. Make sure that you don't pass any sensitive information that shouldn't be available on the client in `props`. ## When should I use getStaticProps? You should use `getStaticProps` if: * The data required to render the page is available at build time ahead of a user’s request * The data comes from a headless CMS * The page must be pre-rendered (for SEO) and be very fast — `getStaticProps` generates `HTML` and `JSON` files, both of which can be cached by a CDN for performance * The data can be publicly cached (not user-specific). This condition can be bypassed in certain specific situation by using a Middleware to rewrite the path. ## When does getStaticProps run `getStaticProps` always runs on the server and never on the client. You can validate code written inside `getStaticProps` is removed from the client-side bundle with this tool. * `getStaticProps` always runs during `next build` * `getStaticProps` runs in the background when using `fallback: true` * `getStaticProps` is called before initial render when using `fallback: blocking` * `getStaticProps` runs in the background when using `revalidate` * `getStaticProps` runs on-demand in the background when using `revalidate()` When combined with Incremental Static Regeneration, `getStaticProps` will run in the background while the stale page is being revalidated, and the fresh page served to the browser. `getStaticProps` does not have access to the incoming request (such as query parameters or HTTP headers) as it generates static HTML. If you need access to the request for your page, consider using Middleware in addition to `getStaticProps`. ## Using getStaticProps to fetch data from a CMS The following example shows how you can fetch a list of blog posts from a CMS. // posts will be populated at build time by getStaticProps() export default function Blog({ posts }) { return ( <ul> {posts.map((post) => ( <li>{post.title}</li> ))} </ul> ) } // This function gets called at build time on server-side. // It won't be called on client-side, so you can even do // direct database queries. export async function getStaticProps() { // Call an external API endpoint to get posts. // You can use any data fetching library const res = await fetch('https://.../posts') const posts = await res.json() // By returning { props: { posts } }, the Blog component // will receive `posts` as a prop at build time return { props: { posts, }, } } The `getStaticProps` API reference covers all parameters and props that can be used with `getStaticProps`. ## Write server-side code directly As `getStaticProps` runs only on the server-side, it will never run on the client-side. It won’t even be included in the JS bundle for the browser, so you can write direct database queries without them being sent to browsers. This means that instead of fetching an **API route** from `getStaticProps` (that itself fetches data from an external source), you can write the server-side code directly in `getStaticProps`. Take the following example. An API route is used to fetch some data from a CMS. That API route is then called directly from `getStaticProps`. This produces an additional call, reducing performance. Instead, the logic for fetching the data from the CMS can be shared by using a `lib/` directory. Then it can be shared with `getStaticProps`. // The following function is shared // with getStaticProps and API routes // from a `lib/` directory export async function loadPosts() { // Call an external API endpoint to get posts const res = await fetch('https://.../posts/') const data = await res.json() return data } // pages/blog.js import { loadPosts } from '../lib/load-posts' // This function runs only on the server side export async function getStaticProps() { // Instead of fetching your `/api` route you can call the same // function directly in `getStaticProps` const posts = await loadPosts() // Props returned will be passed to the page component return { props: { posts } } } Alternatively, if you are **not** using API routes to fetch data, then the `fetch()` API _can_ be used directly in `getStaticProps` to fetch data. To verify what Next.js eliminates from the client-side bundle, you can use the next-code-elimination tool. ## Statically generates both HTML and JSON When a page with `getStaticProps` is pre-rendered at build time, in addition to the page HTML file, Next.js generates a JSON file holding the result of running `getStaticProps`. This JSON file will be used in client-side routing through `next/link` or `next/router`. When you navigate to a page that’s pre-rendered using `getStaticProps`, Next.js fetches this JSON file (pre-computed at build time) and uses it as the props for the page component. This means that client-side page transitions will **not** call `getStaticProps` as only the exported JSON is used. When using Incremental Static Generation, `getStaticProps` will be executed in the background to generate the JSON needed for client-side navigation. You may see this in the form of multiple requests being made for the same page, however, this is intended and has no impact on end-user performance. ## Where can I use getStaticProps `getStaticProps` can only be exported from a **page**. You **cannot** export it from non-page files, `_app`, `_document`, or `_error`. One of the reasons for this restriction is that React needs to have all the required data before the page is rendered. Also, you must use export `getStaticProps` as a standalone function — it will **not** work if you add `getStaticProps` as a property of the page component. > **Good to know**: if you have created a custom app, ensure you are passing the `pageProps` to the page component as shown in the linked document, otherwise the props will be empty. ## Runs on every request in development In development (`next dev`), `getStaticProps` will be called on every request. ## Preview Mode You can temporarily bypass static generation and render the page at **request time** instead of build time using **Preview Mode**. For example, you might be using a headless CMS and want to preview drafts before they're published. --- ## Page: https://nextjs.org/docs/13/pages/building-your-application/data-fetching/get-static-paths If a page has Dynamic Routes and uses `getStaticProps`, it needs to define a list of paths to be statically generated. When you export a function called `getStaticPaths` (Static Site Generation) from a page that uses dynamic routes, Next.js will statically pre-render all the paths specified by `getStaticPaths`. import type { InferGetStaticPropsType, GetStaticProps, GetStaticPaths, } from 'next' type Repo = { name: string stargazers_count: number } export const getStaticPaths = (async () => { return { paths: [ { params: { name: 'next.js', }, }, // See the "paths" section below ], fallback: true, // false or "blocking" } }) satisfies GetStaticPaths export const getStaticProps = (async (context) => { const res = await fetch('https://api.github.com/repos/vercel/next.js') const repo = await res.json() return { props: { repo } } }) satisfies GetStaticProps<{ repo: Repo }> export default function Page({ repo, }: InferGetStaticPropsType<typeof getStaticProps>) { return repo.stargazers_count } The `getStaticPaths` API reference covers all parameters and props that can be used with `getStaticPaths`. ## When should I use getStaticPaths? You should use `getStaticPaths` if you’re statically pre-rendering pages that use dynamic routes and: * The data comes from a headless CMS * The data comes from a database * The data comes from the filesystem * The data can be publicly cached (not user-specific) * The page must be pre-rendered (for SEO) and be very fast — `getStaticProps` generates `HTML` and `JSON` files, both of which can be cached by a CDN for performance ## When does getStaticPaths run `getStaticPaths` will only run during build in production, it will not be called during runtime. You can validate code written inside `getStaticPaths` is removed from the client-side bundle with this tool. ### How does getStaticProps run with regards to getStaticPaths * `getStaticProps` runs during `next build` for any `paths` returned during build * `getStaticProps` runs in the background when using `fallback: true` * `getStaticProps` is called before initial render when using `fallback: blocking` ## Where can I use getStaticPaths * `getStaticPaths` **must** be used with `getStaticProps` * You **cannot** use `getStaticPaths` with `getServerSideProps` * You can export `getStaticPaths` from a Dynamic Route that also uses `getStaticProps` * You **cannot** export `getStaticPaths` from non-page file (e.g. your `components` folder) * You must export `getStaticPaths` as a standalone function, and not a property of the page component ## Runs on every request in development In development (`next dev`), `getStaticPaths` will be called on every request. ## Generating paths on-demand `getStaticPaths` allows you to control which pages are generated during the build instead of on-demand with `fallback`. Generating more pages during a build will cause slower builds. You can defer generating all pages on-demand by returning an empty array for `paths`. This can be especially helpful when deploying your Next.js application to multiple environments. For example, you can have faster builds by generating all pages on-demand for previews (but not production builds). This is helpful for sites with hundreds/thousands of static pages. export async function getStaticPaths() { // When this is true (in preview environments) don't // prerender any static pages // (faster builds, but slower initial page load) if (process.env.SKIP_BUILD_STATIC_GENERATION) { return { paths: [], fallback: 'blocking', } } // Call an external API endpoint to get posts const res = await fetch('https://.../posts') const posts = await res.json() // Get the paths we want to prerender based on posts // In production environments, prerender all pages // (slower builds, but faster initial page load) const paths = posts.map((post) => ({ params: { id: post.id }, })) // { fallback: false } means other routes should 404 return { paths, fallback: false } } --- ## Page: https://nextjs.org/docs/13/pages/building-your-application/data-fetching/forms-and-mutations Forms enable you to create and update data in web applications. Next.js provides a powerful way to handle form submissions and data mutations using **API Routes**. > **Good to know:** > > * We will soon recommend incrementally adopting the App Router and using Server Actions for handling form submissions and data mutations. Server Actions allow you to define asynchronous server functions that can be called directly from your components, without needing to manually create an API Route. > * API Routes do not specify CORS headers, meaning they are same-origin only by default. > * Since API Routes run on the server, we're able to use sensitive values (like API keys) through Environment Variables without exposing them to the client. This is critical for the security of your application. ## Examples ### Server-only Forms With the Pages Router, you need to manually create API endpoints to handle securely mutating data on the server. import type { NextApiRequest, NextApiResponse } from 'next' export default async function handler( req: NextApiRequest, res: NextApiResponse ) { const data = req.body const id = await createItem(data) res.status(200).json({ id }) } Then, call the API Route from the client with an event handler: import { FormEvent } from 'react' export default function Page() { async function onSubmit(event: FormEvent<HTMLFormElement>) { event.preventDefault() const formData = new FormData(event.currentTarget) const response = await fetch('/api/submit', { method: 'POST', body: formData, }) // Handle response if necessary const data = await response.json() // ... } return ( <form onSubmit={onSubmit}> <input type="text" name="name" /> <button type="submit">Submit</button> </form> ) } ### Redirecting If you would like to redirect the user to a different route after a mutation, you can `redirect` to any absolute or relative URL: import type { NextApiRequest, NextApiResponse } from 'next' export default async function handler( req: NextApiRequest, res: NextApiResponse ) { const id = await addPost() res.redirect(307, `/post/${id}`) } ### Form Validation We recommend using HTML validation like `required` and `type="email"` for basic form validation. For more advanced server-side validation, use a schema validation library like zod to validate the structure of the parsed form data: import type { NextApiRequest, NextApiResponse } from 'next' import { z } from 'zod' const schema = z.object({ // ... }) export default async function handler( req: NextApiRequest, res: NextApiResponse ) { const parsed = schema.parse(req.body) // ... } ### Displaying Loading State You can use React state to show a loading state when a form is submitting on the server: import React, { useState, FormEvent } from 'react' export default function Page() { const [isLoading, setIsLoading] = useState<boolean>(false) async function onSubmit(event: FormEvent<HTMLFormElement>) { event.preventDefault() setIsLoading(true) // Set loading to true when the request starts try { const formData = new FormData(event.currentTarget) const response = await fetch('/api/submit', { method: 'POST', body: formData, }) // Handle response if necessary const data = await response.json() // ... } catch (error) { // Handle error if necessary console.error(error) } finally { setIsLoading(false) // Set loading to false when the request completes } } return ( <form onSubmit={onSubmit}> <input type="text" name="name" /> <button type="submit" disabled={isLoading}> {isLoading ? 'Loading...' : 'Submit'} </button> </form> ) } ### Error Handling You can use React state to show an error message when a form submission fails: import React, { useState, FormEvent } from 'react' export default function Page() { const [isLoading, setIsLoading] = useState<boolean>(false) const [error, setError] = useState<string | null>(null) async function onSubmit(event: FormEvent<HTMLFormElement>) { event.preventDefault() setIsLoading(true) setError(null) // Clear previous errors when a new request starts try { const formData = new FormData(event.currentTarget) const response = await fetch('/api/submit', { method: 'POST', body: formData, }) if (!response.ok) { throw new Error('Failed to submit the data. Please try again.') } // Handle response if necessary const data = await response.json() // ... } catch (error) { // Capture the error message to display to the user setError(error.message) console.error(error) } finally { setIsLoading(false) } } return ( <div> {error && <div style={{ color: 'red' }}>{error}</div>} <form onSubmit={onSubmit}> <input type="text" name="name" /> <button type="submit" disabled={isLoading}> {isLoading ? 'Loading...' : 'Submit'} </button> </form> </div> ) } ### Setting Cookies You can set cookies inside an API Route using the `setHeader` method on the response: import type { NextApiRequest, NextApiResponse } from 'next' export default async function handler( req: NextApiRequest, res: NextApiResponse ) { res.setHeader('Set-Cookie', 'username=lee; Path=/; HttpOnly') res.status(200).send('Cookie has been set.') } ### Reading Cookies You can read cookies inside an API Route using the `cookies` request helper: import type { NextApiRequest, NextApiResponse } from 'next' export default async function handler( req: NextApiRequest, res: NextApiResponse ) { const auth = req.cookies.authorization // ... } ### Deleting Cookies You can delete cookies inside an API Route using the `setHeader` method on the response: import type { NextApiRequest, NextApiResponse } from 'next' export default async function handler( req: NextApiRequest, res: NextApiResponse ) { res.setHeader('Set-Cookie', 'username=; Path=/; HttpOnly; Max-Age=0') res.status(200).send('Cookie has been deleted.') } --- ## Page: https://nextjs.org/docs/13/pages/building-your-application/data-fetching/get-server-side-props If you export a function called `getServerSideProps` (Server-Side Rendering) from a page, Next.js will pre-render this page on each request using the data returned by `getServerSideProps`. import type { InferGetServerSidePropsType, GetServerSideProps } from 'next' type Repo = { name: string stargazers_count: number } export const getServerSideProps = (async (context) => { const res = await fetch('https://api.github.com/repos/vercel/next.js') const repo = await res.json() return { props: { repo } } }) satisfies GetServerSideProps<{ repo: Repo }> export default function Page({ repo, }: InferGetServerSidePropsType<typeof getServerSideProps>) { return repo.stargazers_count } > Note that irrespective of rendering type, any `props` will be passed to the page component and can be viewed on the client-side in the initial HTML. This is to allow the page to be hydrated correctly. Make sure that you don't pass any sensitive information that shouldn't be available on the client in `props`. ## When does getServerSideProps run `getServerSideProps` only runs on server-side and never runs on the browser. If a page uses `getServerSideProps`, then: * When you request this page directly, `getServerSideProps` runs at request time, and this page will be pre-rendered with the returned props * When you request this page on client-side page transitions through `next/link` or `next/router`, Next.js sends an API request to the server, which runs `getServerSideProps` `getServerSideProps` returns JSON which will be used to render the page. All this work will be handled automatically by Next.js, so you don’t need to do anything extra as long as you have `getServerSideProps` defined. You can use the next-code-elimination tool to verify what Next.js eliminates from the client-side bundle. `getServerSideProps` can only be exported from a **page**. You can’t export it from non-page files. Note that you must export `getServerSideProps` as a standalone function — it will **not** work if you add `getServerSideProps` as a property of the page component. The `getServerSideProps` API reference covers all parameters and props that can be used with `getServerSideProps`. ## When should I use getServerSideProps You should use `getServerSideProps` only if you need to render a page whose data must be fetched at request time. This could be due to the nature of the data or properties of the request (such as `authorization` headers or geo location). Pages using `getServerSideProps` will be server side rendered at request time and only be cached if cache-control headers are configured. If you do not need to render the data during the request, then you should consider fetching data on the client side or `getStaticProps`. ### getServerSideProps or API Routes It can be tempting to reach for an API Route when you want to fetch data from the server, then call that API route from `getServerSideProps`. This is an unnecessary and inefficient approach, as it will cause an extra request to be made due to both `getServerSideProps` and API Routes running on the server. Take the following example. An API route is used to fetch some data from a CMS. That API route is then called directly from `getServerSideProps`. This produces an additional call, reducing performance. Instead, directly import the logic used inside your API Route into `getServerSideProps`. This could mean calling a CMS, database, or other API directly from inside `getServerSideProps`. ### getServerSideProps with Edge API Routes `getServerSideProps` can be used with both Serverless and Edge Runtimes, and you can set props in both. However, currently in the Edge Runtime, you do not have access to the response object. This means that you cannot — for example — add cookies in `getServerSideProps`. To have access to the response object, you should **continue to use the Node.js runtime**, which is the default runtime. You can explicitly set the runtime on a per-page basis by modifying the `config`, for example: export const config = { runtime: 'nodejs', // or "edge" } export const getServerSideProps = async () => {} ## Fetching data on the client side If your page contains frequently updating data, and you don’t need to pre-render the data, you can fetch the data on the client side. An example of this is user-specific data: * First, immediately show the page without data. Parts of the page can be pre-rendered using Static Generation. You can show loading states for missing data * Then, fetch the data on the client side and display it when ready This approach works well for user dashboard pages, for example. Because a dashboard is a private, user-specific page, SEO is not relevant and the page doesn’t need to be pre-rendered. The data is frequently updated, which requires request-time data fetching. ## Using getServerSideProps to fetch data at request time The following example shows how to fetch data at request time and pre-render the result. // This gets called on every request export async function getServerSideProps() { // Fetch data from external API const res = await fetch(`https://.../data`) const data = await res.json() // Pass data to the page via props return { props: { data } } } export default function Page({ data }) { // Render data... } ## Caching with Server-Side Rendering (SSR) You can use caching headers (`Cache-Control`) inside `getServerSideProps` to cache dynamic responses. For example, using `stale-while-revalidate`. // This value is considered fresh for ten seconds (s-maxage=10). // If a request is repeated within the next 10 seconds, the previously // cached value will still be fresh. If the request is repeated before 59 seconds, // the cached value will be stale but still render (stale-while-revalidate=59). // // In the background, a revalidation request will be made to populate the cache // with a fresh value. If you refresh the page, you will see the new value. export async function getServerSideProps({ req, res }) { res.setHeader( 'Cache-Control', 'public, s-maxage=10, stale-while-revalidate=59' ) return { props: {}, } } Learn more about caching. ## Does getServerSideProps render an error page If an error is thrown inside `getServerSideProps`, it will show the `pages/500.js` file. Check out the documentation for 500 page to learn more on how to create it. During development this file will not be used and the dev overlay will be shown instead. --- ## Page: https://nextjs.org/docs/13/pages/building-your-application/data-fetching/incremental-static-regeneration Examples * Next.js Commerce * GitHub Reactions Demo * Static Tweet Demo Next.js allows you to create or update static pages _after_ you’ve built your site. Incremental Static Regeneration (ISR) enables you to use static-generation on a per-page basis, **without needing to rebuild the entire site**. With ISR, you can retain the benefits of static while scaling to millions of pages. > **Good to know**: The `edge` runtime is currently not compatible with ISR, although you can leverage `stale-while-revalidate` by setting the `cache-control` header manually. To use ISR, add the `revalidate` prop to `getStaticProps`: function Blog({ posts }) { return ( <ul> {posts.map((post) => ( <li key={post.id}>{post.title}</li> ))} </ul> ) } // This function gets called at build time on server-side. // It may be called again, on a serverless function, if // revalidation is enabled and a new request comes in export async function getStaticProps() { const res = await fetch('https://.../posts') const posts = await res.json() return { props: { posts, }, // Next.js will attempt to re-generate the page: // - When a request comes in // - At most once every 10 seconds revalidate: 10, // In seconds } } // This function gets called at build time on server-side. // It may be called again, on a serverless function, if // the path has not been generated. export async function getStaticPaths() { const res = await fetch('https://.../posts') const posts = await res.json() // Get the paths we want to pre-render based on posts const paths = posts.map((post) => ({ params: { id: post.id }, })) // We'll pre-render only these paths at build time. // { fallback: 'blocking' } will server-render pages // on-demand if the path doesn't exist. return { paths, fallback: 'blocking' } } export default Blog When a request is made to a page that was pre-rendered at build time, it will initially show the cached page. * Any requests to the page after the initial request and before 10 seconds are also cached and instantaneous. * After the 10-second window, the next request will still show the cached (stale) page * Next.js triggers a regeneration of the page in the background. * Once the page generates successfully, Next.js will invalidate the cache and show the updated page. If the background regeneration fails, the old page would still be unaltered. When a request is made to a path that hasn’t been generated, Next.js will server-render the page on the first request. Future requests will serve the static file from the cache. ISR on Vercel persists the cache globally and handles rollbacks. > **Good to know**: Check if your upstream data provider has caching enabled by default. You might need to disable (e.g. `useCdn: false`), otherwise a revalidation won't be able to pull fresh data to update the ISR cache. Caching can occur at a CDN (for an endpoint being requested) when it returns the `Cache-Control` header. ## On-Demand Revalidation If you set a `revalidate` time of `60`, all visitors will see the same generated version of your site for one minute. The only way to invalidate the cache is from someone visiting that page after the minute has passed. Starting with `v12.2.0`, Next.js supports On-Demand Incremental Static Regeneration to manually purge the Next.js cache for a specific page. This makes it easier to update your site when: * Content from your headless CMS is created or updated * Ecommerce metadata changes (price, description, category, reviews, etc.) Inside `getStaticProps`, you do not need to specify `revalidate` to use on-demand revalidation. If `revalidate` is omitted, Next.js will use the default value of `false` (no revalidation) and only revalidate the page on-demand when `revalidate()` is called. > **Good to know**: Middleware won't be executed for On-Demand ISR requests. Instead, call `revalidate()` on the _exact_ path that you want revalidated. For example, if you have `pages/blog/[slug].js` and a rewrite from `/post-1` -> `/blog/post-1`, you would need to call `res.revalidate('/blog/post-1')`. ### Using On-Demand Revalidation First, create a secret token only known by your Next.js app. This secret will be used to prevent unauthorized access to the revalidation API Route. You can access the route (either manually or with a webhook) with the following URL structure: https://<your-site.com>/api/revalidate?secret=<token> Next, add the secret as an Environment Variable to your application. Finally, create the revalidation API Route: export default async function handler(req, res) { // Check for secret to confirm this is a valid request if (req.query.secret !== process.env.MY_SECRET_TOKEN) { return res.status(401).json({ message: 'Invalid token' }) } try { // this should be the actual path not a rewritten path // e.g. for "/blog/[slug]" this should be "/blog/post-1" await res.revalidate('/path-to-revalidate') return res.json({ revalidated: true }) } catch (err) { // If there was an error, Next.js will continue // to show the last successfully generated page return res.status(500).send('Error revalidating') } } View our demo to see on-demand revalidation in action and provide feedback. ### Testing on-Demand ISR during development When running locally with `next dev`, `getStaticProps` is invoked on every request. To verify your on-demand ISR configuration is correct, you will need to create a production build and start the production server: $ next build $ next start Then, you can confirm that static pages have successfully revalidated. ## Error handling and revalidation If there is an error inside `getStaticProps` when handling background regeneration, or you manually throw an error, the last successfully generated page will continue to show. On the next subsequent request, Next.js will retry calling `getStaticProps`. export async function getStaticProps() { // If this request throws an uncaught error, Next.js will // not invalidate the currently shown page and // retry getStaticProps on the next request. const res = await fetch('https://.../posts') const posts = await res.json() if (!res.ok) { // If there is a server error, you might want to // throw an error instead of returning so that the cache is not updated // until the next successful request. throw new Error(`Failed to fetch posts, received status ${res.status}`) } // If the request was successful, return the posts // and revalidate every 10 seconds. return { props: { posts, }, revalidate: 10, } } ## Self-hosting ISR Incremental Static Regeneration (ISR) works on self-hosted Next.js sites out of the box when you use `next start`. You can use this approach when deploying to container orchestrators such as Kubernetes or HashiCorp Nomad. By default, generated assets will be stored in-memory on each pod. This means that each pod will have its own copy of the static files. Stale data may be shown until that specific pod is hit by a request. To ensure consistency across all pods, you can disable in-memory caching. This will inform the Next.js server to only leverage assets generated by ISR in the file system. You can use a shared network mount in your Kubernetes pods (or similar setup) to reuse the same file-system cache between different containers. By sharing the same mount, the `.next` folder which contains the `next/image` cache will also be shared and re-used. To disable in-memory caching, set `isrMemoryCacheSize` to `0` in your `next.config.js` file: module.exports = { experimental: { // Defaults to 50MB isrMemoryCacheSize: 0, // cache size in bytes }, } > **Good to know**: You might need to consider a race condition between multiple pods trying to update the cache at the same time, depending on how your shared mount is configured. ## Version History | Version | Changes | | --- | --- | | `v12.2.0` | On-Demand ISR is stable | | `v12.1.0` | On-Demand ISR added (beta). | | `v12.0.0` | Bot-aware ISR fallback added. | | `v9.5.0` | Base Path added. | --- ## Page: https://nextjs.org/docs/13/pages/building-your-application/data-fetching/client-side Client-side data fetching is useful when your page doesn't require SEO indexing, when you don't need to pre-render your data, or when the content of your pages needs to update frequently. Unlike the server-side rendering APIs, you can use client-side data fetching at the component level. If done at the page level, the data is fetched at runtime, and the content of the page is updated as the data changes. When used at the component level, the data is fetched at the time of the component mount, and the content of the component is updated as the data changes. It's important to note that using client-side data fetching can affect the performance of your application and the load speed of your pages. This is because the data fetching is done at the time of the component or pages mount, and the data is not cached. ## Client-side data fetching with useEffect The following example shows how you can fetch data on the client side using the useEffect hook. import { useState, useEffect } from 'react' function Profile() { const [data, setData] = useState(null) const [isLoading, setLoading] = useState(true) useEffect(() => { fetch('/api/profile-data') .then((res) => res.json()) .then((data) => { setData(data) setLoading(false) }) }, []) if (isLoading) return <p>Loading...</p> if (!data) return <p>No profile data</p> return ( <div> <h1>{data.name}</h1> <p>{data.bio}</p> </div> ) } ## Client-side data fetching with SWR The team behind Next.js has created a React hook library for data fetching called **SWR**. It is **highly recommended** if you are fetching data on the client-side. It handles caching, revalidation, focus tracking, refetching on intervals, and more. Using the same example as above, we can now use SWR to fetch the profile data. SWR will automatically cache the data for us and will revalidate the data if it becomes stale. For more information on using SWR, check out the SWR docs. import useSWR from 'swr' const fetcher = (...args) => fetch(...args).then((res) => res.json()) function Profile() { const { data, error } = useSWR('/api/profile-data', fetcher) if (error) return <div>Failed to load</div> if (!data) return <div>Loading...</div> return ( <div> <h1>{data.name}</h1> <p>{data.bio}</p> </div> ) } --- ## Page: https://nextjs.org/docs/13/pages/building-your-application/styling You are currently viewing documentation for version 13 of Next.js. Next.js supports different ways of styling your application, including: * **Global CSS**: Simple to use and familiar for those experienced with traditional CSS, but can lead to larger CSS bundles and difficulty managing styles as the application grows. * **CSS Modules**: Create locally scoped CSS classes to avoid naming conflicts and improve maintainability. * **Tailwind CSS**: A utility-first CSS framework that allows for rapid custom designs by composing utility classes. * **Sass**: A popular CSS preprocessor that extends CSS with features like variables, nested rules, and mixins. * **CSS-in-JS**: Embed CSS directly in your JavaScript components, enabling dynamic and scoped styling. Learn more about each approach by exploring their respective documentation: --- ## Page: https://nextjs.org/docs/13/pages/building-your-application/styling/css-modules Examples * Basic CSS Example Next.js has built-in support for CSS Modules using the `.module.css` extension. CSS Modules locally scope CSS by automatically creating a unique class name. This allows you to use the same class name in different files without worrying about collisions. This behavior makes CSS Modules the ideal way to include component-level CSS. ## Example For example, consider a reusable `Button` component in the `components/` folder: First, create `components/Button.module.css` with the following content: /* You do not need to worry about .error {} colliding with any other `.css` or `.module.css` files! */ .error { color: white; background-color: red; } Then, create `components/Button.js`, importing and using the above CSS file: import styles from './Button.module.css' export function Button() { return ( <button type="button" // Note how the "error" class is accessed as a property on the imported // `styles` object. className={styles.error} > Destroy </button> ) } CSS Modules are an _optional feature_ and are **only enabled for files with the `.module.css` extension**. Regular `<link>` stylesheets and global CSS files are still supported. In production, all CSS Module files will be automatically concatenated into **many minified and code-split** `.css` files. These `.css` files represent hot execution paths in your application, ensuring the minimal amount of CSS is loaded for your application to paint. ## Global Styles To add a stylesheet to your application, import the CSS file within `pages/_app.js`. For example, consider the following stylesheet named `styles.css`: body { font-family: 'SF Pro Text', 'SF Pro Icons', 'Helvetica Neue', 'Helvetica', 'Arial', sans-serif; padding: 20px 20px 60px; max-width: 680px; margin: 0 auto; } Create a `pages/_app.js` file if not already present. Then, `import` the `styles.css` file. import '../styles.css' // This default export is required in a new `pages/_app.js` file. export default function MyApp({ Component, pageProps }) { return <Component {...pageProps} /> } These styles (`styles.css`) will apply to all pages and components in your application. Due to the global nature of stylesheets, and to avoid conflicts, you may **only import them inside `pages/_app.js`**. In development, expressing stylesheets this way allows your styles to be hot reloaded as you edit them—meaning you can keep application state. In production, all CSS files will be automatically concatenated into a single minified `.css` file. The order that the CSS is concatenated will match the order the CSS is imported into the `_app.js` file. Pay special attention to imported JS modules that include their own CSS; the JS module's CSS will be concatenated following the same ordering rules as imported CSS files. For example: import '../styles.css' // The CSS in ErrorBoundary depends on the global CSS in styles.css, // so we import it after styles.css. import ErrorBoundary from '../components/ErrorBoundary' export default function MyApp({ Component, pageProps }) { return ( <ErrorBoundary> <Component {...pageProps} /> </ErrorBoundary> ) } ## External Stylesheets Next.js allows you to import CSS files from a JavaScript file. This is possible because Next.js extends the concept of `import` beyond JavaScript. ### Import styles from `node_modules` Since Next.js **9.5.4**, importing a CSS file from `node_modules` is permitted anywhere in your application. For global stylesheets, like `bootstrap` or `nprogress`, you should import the file inside `pages/_app.js`. For example: import 'bootstrap/dist/css/bootstrap.css' export default function MyApp({ Component, pageProps }) { return <Component {...pageProps} /> } For importing CSS required by a third-party component, you can do so in your component. For example: import { useState } from 'react' import { Dialog } from '@reach/dialog' import VisuallyHidden from '@reach/visually-hidden' import '@reach/dialog/styles.css' function ExampleDialog(props) { const [showDialog, setShowDialog] = useState(false) const open = () => setShowDialog(true) const close = () => setShowDialog(false) return ( <div> <button onClick={open}>Open Dialog</button> <Dialog isOpen={showDialog} onDismiss={close}> <button className="close-button" onClick={close}> <VisuallyHidden>Close</VisuallyHidden> <span aria-hidden>×</span> </button> <p>Hello there. I am a dialog</p> </Dialog> </div> ) } ## Additional Features Next.js includes additional features to improve the authoring experience of adding styles: * When running locally with `next dev`, local stylesheets (either global or CSS modules) will take advantage of Fast Refresh to instantly reflect changes as edits are saved. * When building for production with `next build`, CSS files will be bundled into fewer minified `.css` files to reduce the number of network requests needed to retrieve styles. * If you disable JavaScript, styles will still be loaded in the production build (`next start`). However, JavaScript is still required for `next dev` to enable Fast Refresh. --- ## Page: https://nextjs.org/docs/13/pages/building-your-application/styling/tailwind-css Examples * With Tailwind CSS Tailwind CSS is a utility-first CSS framework that works exceptionally well with Next.js. ## Installing Tailwind Install the Tailwind CSS packages and run the `init` command to generate both the `tailwind.config.js` and `postcss.config.js` files: npm install -D tailwindcss postcss autoprefixer npx tailwindcss init -p ## Configuring Tailwind Inside `tailwind.config.js`, add paths to the files that will use Tailwind CSS class names: /** @type {import('tailwindcss').Config} */ module.exports = { content: [ './app/**/*.{js,ts,jsx,tsx,mdx}', // Note the addition of the `app` directory. './pages/**/*.{js,ts,jsx,tsx,mdx}', './components/**/*.{js,ts,jsx,tsx,mdx}', // Or if using `src` directory: './src/**/*.{js,ts,jsx,tsx,mdx}', ], theme: { extend: {}, }, plugins: [], } You do not need to modify `postcss.config.js`. ## Importing Styles Add the Tailwind CSS directives that Tailwind will use to inject its generated styles to a Global Stylesheet in your application, for example: @tailwind base; @tailwind components; @tailwind utilities; Inside the custom app file (`pages/_app.js`), import the `globals.css` stylesheet to apply the styles to every route in your application. // These styles apply to every route in the application import '@/styles/globals.css' import type { AppProps } from 'next/app' export default function App({ Component, pageProps }: AppProps) { return <Component {...pageProps} /> } ## Using Classes After installing Tailwind CSS and adding the global styles, you can use Tailwind's utility classes in your application. export default function Page() { return <h1 className="text-3xl font-bold underline">Hello, Next.js!</h1> } ## Usage with Turbopack As of Next.js 13.1, Tailwind CSS and PostCSS are supported with Turbopack. --- ## Page: https://nextjs.org/docs/13/pages/building-your-application/styling/css-in-js You are currently viewing documentation for version 13 of Next.js. Examples * Styled JSX * Styled Components * Emotion * Linaria * Tailwind CSS + Emotion * Styletron * Cxs * Aphrodite * Fela * Stitches It's possible to use any existing CSS-in-JS solution.The simplest one is inline styles: function HiThere() { return <p style={{ color: 'red' }}>hi there</p> } export default HiThere We bundle styled-jsx to provide support for isolated scoped CSS. The aim is to support "shadow CSS" similar to Web Components, which unfortunately do not support server-rendering and are JS-only. See the above examples for other popular CSS-in-JS solutions (like Styled Components). A component using `styled-jsx` looks like this: function HelloWorld() { return ( <div> Hello world <p>scoped!</p> <style jsx>{` p { color: blue; } div { background: red; } @media (max-width: 600px) { div { background: blue; } } `}</style> <style global jsx>{` body { background: black; } `}</style> </div> ) } export default HelloWorld Please see the styled-jsx documentation for more examples. ### Disabling JavaScript Yes, if you disable JavaScript the CSS will still be loaded in the production build (`next start`). During development, we require JavaScript to be enabled to provide the best developer experience with Fast Refresh. --- ## Page: https://nextjs.org/docs/13/pages/building-your-application/styling/sass Next.js has built-in support for Sass using both the `.scss` and `.sass` extensions. You can use component-level Sass via CSS Modules and the `.module.scss`or `.module.sass` extension. **Good to know**: Sass supports two different syntax, each with their own extension. The `.scss` extension requires you use the SCSS syntax, while the `.sass` extension requires you use the Indented Syntax ("Sass"). If you're not sure which to choose, start with the `.scss` extension which is a superset of CSS, and doesn't require you learn the Indented Syntax ("Sass"). If you want to configure the Sass compiler, use `sassOptions` in `next.config.js`. const path = require('path') module.exports = { sassOptions: { includePaths: [path.join(__dirname, 'styles')], }, } Next.js supports Sass variables exported from CSS Module files. import variables from '../styles/variables.module.scss' export default function MyApp({ Component, pageProps }) { return ( <Layout color={variables.primaryColor}> <Component {...pageProps} /> </Layout> ) } --- ## Page: https://nextjs.org/docs/13/pages/building-your-application/optimizing You are currently viewing documentation for version 13 of Next.js. ## Optimizations Next.js comes with a variety of built-in optimizations designed to improve your application's speed and Core Web Vitals. This guide will cover the optimizations you can leverage to enhance your user experience. ## Built-in Components Built-in components abstract away the complexity of implementing common UI optimizations. These components are: * **Images**: Built on the native `<img>` element. The Image Component optimizes images for performance by lazy loading and automatically resizing images based on device size. * **Link**: Built on the native `<a>` tags. The Link Component prefetches pages in the background, for faster and smoother page transitions. * **Scripts**: Built on the native `<script>` tags. The Script Component gives you control over loading and execution of third-party scripts. Metadata helps search engines understand your content better (which can result in better SEO), and allows you to customize how your content is presented on social media, helping you create a more engaging and consistent user experience across various platforms. The Head Component in Next.js allows you to modify the `<head>` of a page. Learn more in the Head Component documentation. ## Static Assets Next.js `/public` folder can be used to serve static assets like images, fonts, and other files. Files inside `/public` can also be cached by CDN providers so that they are delivered efficiently. ## Analytics and Monitoring For large applications, Next.js integrates with popular analytics and monitoring tools to help you understand how your application is performing. Learn more in the Analytics, OpenTelemetry, and Instrumentation guides. --- ## Page: https://nextjs.org/docs/13/pages/building-your-application/optimizing/images ## Image Optimization Examples * Image Component According to Web Almanac, images account for a huge portion of the typical website’s page weight and can have a sizable impact on your website's LCP performance. The Next.js Image component extends the HTML `<img>` element with features for automatic image optimization: * **Size Optimization:** Automatically serve correctly sized images for each device, using modern image formats like WebP and AVIF. * **Visual Stability:** Prevent layout shift automatically when images are loading. * **Faster Page Loads:** Images are only loaded when they enter the viewport using native browser lazy loading, with optional blur-up placeholders. * **Asset Flexibility:** On-demand image resizing, even for images stored on remote servers > **🎥 Watch:** Learn more about how to use `next/image` → YouTube (9 minutes). ## Usage import Image from 'next/image' You can then define the `src` for your image (either local or remote). ### Local Images To use a local image, `import` your `.jpg`, `.png`, or `.webp` image files. Next.js will automatically determine the `width` and `height` of your image based on the imported file. These values are used to prevent Cumulative Layout Shift while your image is loading. import Image from 'next/image' import profilePic from '../public/me.png' export default function Page() { return ( <Image src={profilePic} alt="Picture of the author" // width={500} automatically provided // height={500} automatically provided // blurDataURL="data:..." automatically provided // placeholder="blur" // Optional blur-up while loading /> ) } > **Warning:** Dynamic `await import()` or `require()` are _not_ supported. The `import` must be static so it can be analyzed at build time. ### Remote Images To use a remote image, the `src` property should be a URL string. Since Next.js does not have access to remote files during the build process, you'll need to provide the `width`, `height` and optional `blurDataURL` props manually. The `width` and `height` attributes are used to infer the correct aspect ratio of image and avoid layout shift from the image loading in. The `width` and `height` do _not_ determine the rendered size of the image file. Learn more about Image Sizing. import Image from 'next/image' export default function Page() { return ( <Image src="https://s3.amazonaws.com/my-bucket/profile.png" alt="Picture of the author" width={500} height={500} /> ) } To safely allow optimizing images, define a list of supported URL patterns in `next.config.js`. Be as specific as possible to prevent malicious usage. For example, the following configuration will only allow images from a specific AWS S3 bucket: module.exports = { images: { remotePatterns: [ { protocol: 'https', hostname: 's3.amazonaws.com', port: '', pathname: '/my-bucket/**', }, ], }, } Learn more about `remotePatterns` configuration. If you want to use relative URLs for the image `src`, use a `loader`. ### Domains Sometimes you may want to optimize a remote image, but still use the built-in Next.js Image Optimization API. To do this, leave the `loader` at its default setting and enter an absolute URL for the Image `src` prop. To protect your application from malicious users, you must define a list of remote hostnames you intend to use with the `next/image` component. > Learn more about `remotePatterns` configuration. ### Loaders Note that in the example earlier, a partial URL (`"/me.png"`) is provided for a local image. This is possible because of the loader architecture. A loader is a function that generates the URLs for your image. It modifies the provided `src`, and generates multiple URLs to request the image at different sizes. These multiple URLs are used in the automatic srcset generation, so that visitors to your site will be served an image that is the right size for their viewport. The default loader for Next.js applications uses the built-in Image Optimization API, which optimizes images from anywhere on the web, and then serves them directly from the Next.js web server. If you would like to serve your images directly from a CDN or image server, you can write your own loader function with a few lines of JavaScript. You can define a loader per-image with the `loader` prop, or at the application level with the `loaderFile` configuration. ## Priority You should add the `priority` property to the image that will be the Largest Contentful Paint (LCP) element for each page. Doing so allows Next.js to specially prioritize the image for loading (e.g. through preload tags or priority hints), leading to a meaningful boost in LCP. The LCP element is typically the largest image or text block visible within the viewport of the page. When you run `next dev`, you'll see a console warning if the LCP element is an `<Image>` without the `priority` property. Once you've identified the LCP image, you can add the property like this: import Image from 'next/image' export default function Home() { return ( <> <h1>My Homepage</h1> <Image src="/me.png" alt="Picture of the author" width={500} height={500} priority /> <p>Welcome to my homepage!</p> </> ) } See more about priority in the `next/image` component documentation. ## Image Sizing One of the ways that images most commonly hurt performance is through _layout shift_, where the image pushes other elements around on the page as it loads in. This performance problem is so annoying to users that it has its own Core Web Vital, called Cumulative Layout Shift. The way to avoid image-based layout shifts is to always size your images. This allows the browser to reserve precisely enough space for the image before it loads. Because `next/image` is designed to guarantee good performance results, it cannot be used in a way that will contribute to layout shift, and **must** be sized in one of three ways: 1. Automatically, using a static import 2. Explicitly, by including a `width` and `height` property 3. Implicitly, by using fill which causes the image to expand to fill its parent element. > **What if I don't know the size of my images?** > > If you are accessing images from a source without knowledge of the images' sizes, there are several things you can do: > > **Use `fill`** > > The `fill` prop allows your image to be sized by its parent element. Consider using CSS to give the image's parent element space on the page along `sizes` prop to match any media query break points. You can also use `object-fit` with `fill`, `contain`, or `cover`, and `object-position` to define how the image should occupy that space. > > **Normalize your images** > > If you're serving images from a source that you control, consider modifying your image pipeline to normalize the images to a specific size. > > **Modify your API calls** > > If your application is retrieving image URLs using an API call (such as to a CMS), you may be able to modify the API call to return the image dimensions along with the URL. If none of the suggested methods works for sizing your images, the `next/image` component is designed to work well on a page alongside standard `<img>` elements. ## Styling Styling the Image component is similar to styling a normal `<img>` element, but there are a few guidelines to keep in mind: * Use `className` or `style`, not `styled-jsx`. * In most cases, we recommend using the `className` prop. This can be an imported CSS Module, a global stylesheet, etc. * You can also use the `style` prop to assign inline styles. * You cannot use styled-jsx because it's scoped to the current component (unless you mark the style as `global`). * When using `fill`, the parent element must have `position: relative` * This is necessary for the proper rendering of the image element in that layout mode. * When using `fill`, the parent element must have `display: block` * This is the default for `<div>` elements but should be specified otherwise. ## Examples ### Responsive  import Image from 'next/image' import mountains from '../public/mountains.jpg' export default function Responsive() { return ( <div style={{ display: 'flex', flexDirection: 'column' }}> <Image alt="Mountains" // Importing an image will // automatically set the width and height src={mountains} sizes="100vw" // Make the image display full width style={{ width: '100%', height: 'auto', }} /> </div> ) } ### Fill Container  import Image from 'next/image' import mountains from '../public/mountains.jpg' export default function Fill() { return ( <div style={{ display: 'grid', gridGap: '8px', gridTemplateColumns: 'repeat(auto-fit, minmax(400px, auto))', }} > <div style={{ position: 'relative', height: '400px' }}> <Image alt="Mountains" src={mountains} fill sizes="(min-width: 808px) 50vw, 100vw" style={{ objectFit: 'cover', // cover, contain, none }} /> </div> {/* And more images in the grid... */} </div> ) } ### Background Image  import Image from 'next/image' import mountains from '../public/mountains.jpg' export default function Background() { return ( <Image alt="Mountains" src={mountains} placeholder="blur" quality={100} fill sizes="100vw" style={{ objectFit: 'cover', }} /> ) } For examples of the Image component used with the various styles, see the Image Component Demo. ## Other Properties **View all properties available to the `next/image` component.** ## Configuration The `next/image` component and Next.js Image Optimization API can be configured in the `next.config.js` file. These configurations allow you to enable remote images, define custom image breakpoints, change caching behavior and more. **Read the full image configuration documentation for more information.** --- ## Page: https://nextjs.org/docs/13/pages/building-your-application/optimizing/fonts ## Font Optimization **`next/font`** will automatically optimize your fonts (including custom fonts) and remove external network requests for improved privacy and performance. > **🎥 Watch:** Learn more about how to use `next/font` → YouTube (6 minutes). `next/font` includes **built-in automatic self-hosting** for _any_ font file. This means you can optimally load web fonts with zero layout shift, thanks to the underlying CSS `size-adjust` property used. This new font system also allows you to conveniently use all Google Fonts with performance and privacy in mind. CSS and font files are downloaded at build time and self-hosted with the rest of your static assets. **No requests are sent to Google by the browser.** ## Google Fonts Automatically self-host any Google Font. Fonts are included in the deployment and served from the same domain as your deployment. **No requests are sent to Google by the browser.** Get started by importing the font you would like to use from `next/font/google` as a function. We recommend using variable fonts for the best performance and flexibility. To use the font in all your pages, add it to `_app.js` file under `/pages` as shown below: import { Inter } from 'next/font/google' // If loading a variable font, you don't need to specify the font weight const inter = Inter({ subsets: ['latin'] }) export default function MyApp({ Component, pageProps }) { return ( <main className={inter.className}> <Component {...pageProps} /> </main> ) } If you can't use a variable font, you will **need to specify a weight**: import { Roboto } from 'next/font/google' const roboto = Roboto({ weight: '400', subsets: ['latin'], }) export default function MyApp({ Component, pageProps }) { return ( <main className={roboto.className}> <Component {...pageProps} /> </main> ) } You can specify multiple weights and/or styles by using an array: const roboto = Roboto({ weight: ['400', '700'], style: ['normal', 'italic'], subsets: ['latin'], display: 'swap', }) > **Good to know**: Use an underscore (\_) for font names with multiple words. E.g. `Roboto Mono` should be imported as `Roboto_Mono`. ### Apply the font in `<head>` You can also use the font without a wrapper and `className` by injecting it inside the `<head>` as follows: import { Inter } from 'next/font/google' const inter = Inter({ subsets: ['latin'] }) export default function MyApp({ Component, pageProps }) { return ( <> <style jsx global>{` html { font-family: ${inter.style.fontFamily}; } `}</style> <Component {...pageProps} /> </> ) } ### Single page usage To use the font on a single page, add it to the specific page as shown below: import { Inter } from 'next/font/google' const inter = Inter({ subsets: ['latin'] }) export default function Home() { return ( <div className={inter.className}> <p>Hello World</p> </div> ) } ### Specifying a subset Google Fonts are automatically subset. This reduces the size of the font file and improves performance. You'll need to define which of these subsets you want to preload. Failing to specify any subsets while `preload` is `true` will result in a warning. This can be done by adding it to the function call: const inter = Inter({ subsets: ['latin'] }) View the Font API Reference for more information. ### Using Multiple Fonts You can import and use multiple fonts in your application. There are two approaches you can take. The first approach is to create a utility function that exports a font, imports it, and applies its `className` where needed. This ensures the font is preloaded only when it's rendered: import { Inter, Roboto_Mono } from 'next/font/google' export const inter = Inter({ subsets: ['latin'], display: 'swap', }) export const roboto_mono = Roboto_Mono({ subsets: ['latin'], display: 'swap', }) In the example above, `Inter` will be applied globally, and `Roboto Mono` can be imported and applied as needed. Alternatively, you can create a CSS variable and use it with your preferred CSS solution: html { font-family: var(--font-inter); } h1 { font-family: var(--font-roboto-mono); } In the example above, `Inter` will be applied globally, and any `<h1>` tags will be styled with `Roboto Mono`. > **Recommendation**: Use multiple fonts conservatively since each new font is an additional resource the client has to download. ## Local Fonts Import `next/font/local` and specify the `src` of your local font file. We recommend using variable fonts for the best performance and flexibility. import localFont from 'next/font/local' // Font files can be colocated inside of `pages` const myFont = localFont({ src: './my-font.woff2' }) export default function MyApp({ Component, pageProps }) { return ( <main className={myFont.className}> <Component {...pageProps} /> </main> ) } If you want to use multiple files for a single font family, `src` can be an array: const roboto = localFont({ src: [ { path: './Roboto-Regular.woff2', weight: '400', style: 'normal', }, { path: './Roboto-Italic.woff2', weight: '400', style: 'italic', }, { path: './Roboto-Bold.woff2', weight: '700', style: 'normal', }, { path: './Roboto-BoldItalic.woff2', weight: '700', style: 'italic', }, ], }) View the Font API Reference for more information. ## With Tailwind CSS `next/font` can be used with Tailwind CSS through a CSS variable. In the example below, we use the font `Inter` from `next/font/google` (you can use any font from Google or Local Fonts). Load your font with the `variable` option to define your CSS variable name and assign it to `inter`. Then, use `inter.variable` to add the CSS variable to your HTML document. import { Inter } from 'next/font/google' const inter = Inter({ subsets: ['latin'], variable: '--font-inter', }) export default function MyApp({ Component, pageProps }) { return ( <main className={`${inter.variable} font-sans`}> <Component {...pageProps} /> </main> ) } Finally, add the CSS variable to your Tailwind CSS config: /** @type {import('tailwindcss').Config} */ module.exports = { content: [ './pages/**/*.{js,ts,jsx,tsx}', './components/**/*.{js,ts,jsx,tsx}', './app/**/*.{js,ts,jsx,tsx}', ], theme: { extend: { fontFamily: { sans: ['var(--font-inter)'], mono: ['var(--font-roboto-mono)'], }, }, }, plugins: [], } You can now use the `font-sans` and `font-mono` utility classes to apply the font to your elements. ## Preloading When a font function is called on a page of your site, it is not globally available and preloaded on all routes. Rather, the font is only preloaded on the related route/s based on the type of file where it is used: * if it's a unique page, it is preloaded on the unique route for that page * if it's in the custom App, it is preloaded on all the routes of the site under `/pages` ## Reusing fonts Every time you call the `localFont` or Google font function, that font is hosted as one instance in your application. Therefore, if you load the same font function in multiple files, multiple instances of the same font are hosted. In this situation, it is recommended to do the following: * Call the font loader function in one shared file * Export it as a constant * Import the constant in each file where you would like to use this font --- ## Page: https://nextjs.org/docs/13/pages/building-your-application/optimizing/scripts ## Script Optimization ### Application Scripts To load a third-party script for all routes, import `next/script` and include the script directly in your custom `_app`: import Script from 'next/script' export default function MyApp({ Component, pageProps }) { return ( <> <Component {...pageProps} /> <Script src="https://example.com/script.js" /> </> ) } This script will load and execute when _any_ route in your application is accessed. Next.js will ensure the script will **only load once**, even if a user navigates between multiple pages. > **Recommendation**: We recommend only including third-party scripts in specific pages or layouts in order to minimize any unnecessary impact to performance. ### Strategy Although the default behavior of `next/script` allows you to load third-party scripts in any page or layout, you can fine-tune its loading behavior by using the `strategy` property: * `beforeInteractive`: Load the script before any Next.js code and before any page hydration occurs. * `afterInteractive`: (**default**) Load the script early but after some hydration on the page occurs. * `lazyOnload`: Load the script later during browser idle time. * `worker`: (experimental) Load the script in a web worker. Refer to the `next/script` API reference documentation to learn more about each strategy and their use cases. ### Offloading Scripts To A Web Worker (Experimental) > **Warning:** The `worker` strategy is not yet stable and does not yet work with the `app` directory. Use with caution. Scripts that use the `worker` strategy are offloaded and executed in a web worker with Partytown. This can improve the performance of your site by dedicating the main thread to the rest of your application code. This strategy is still experimental and can only be used if the `nextScriptWorkers` flag is enabled in `next.config.js`: module.exports = { experimental: { nextScriptWorkers: true, }, } Then, run `next` (normally `npm run dev` or `yarn dev`) and Next.js will guide you through the installation of the required packages to finish the setup: npm run dev You'll see instructions like these: Please install Partytown by running `npm install @builder.io/partytown` Once setup is complete, defining `strategy="worker"` will automatically instantiate Partytown in your application and offload the script to a web worker. import Script from 'next/script' export default function Home() { return ( <> <Script src="https://example.com/script.js" strategy="worker" /> </> ) } There are a number of trade-offs that need to be considered when loading a third-party script in a web worker. Please see Partytown's tradeoffs documentation for more information. ### Inline Scripts Inline scripts, or scripts not loaded from an external file, are also supported by the Script component. They can be written by placing the JavaScript within curly braces: <Script id="show-banner"> {`document.getElementById('banner').classList.remove('hidden')`} </Script> Or by using the `dangerouslySetInnerHTML` property: <Script id="show-banner" dangerouslySetInnerHTML={{ __html: `document.getElementById('banner').classList.remove('hidden')`, }} /> > **Warning**: An `id` property must be assigned for inline scripts in order for Next.js to track and optimize the script. ### Executing Additional Code Event handlers can be used with the Script component to execute additional code after a certain event occurs: * `onLoad`: Execute code after the script has finished loading. * `onReady`: Execute code after the script has finished loading and every time the component is mounted. * `onError`: Execute code if the script fails to load. These handlers will only work when `next/script` is imported and used inside of a Client Component where `"use client"` is defined as the first line of code: import Script from 'next/script' export default function Page() { return ( <> <Script src="https://example.com/script.js" onLoad={() => { console.log('Script has loaded') }} /> </> ) } Refer to the `next/script` API reference to learn more about each event handler and view examples. ### Additional Attributes There are many DOM attributes that can be assigned to a `<script>` element that are not used by the Script component, like `nonce` or custom data attributes. Including any additional attributes will automatically forward it to the final, optimized `<script>` element that is included in the HTML. import Script from 'next/script' export default function Page() { return ( <> <Script src="https://example.com/script.js" id="example-script" nonce="XUENAJFW" data-test="script" /> </> ) } --- ## Page: https://nextjs.org/docs/13/pages/building-your-application/optimizing/static-assets You are currently viewing documentation for version 13 of Next.js. Next.js can serve static files, like images, under a folder called `public` in the root directory. Files inside `public` can then be referenced by your code starting from the base URL (`/`). For example, if you add `me.png` inside `public`, the following code will access the image: Avatar.js import Image from 'next/image' export function Avatar() { return <Image src="/me.png" alt="me" width="64" height="64" /> } This folder is also useful for `robots.txt`, `favicon.ico`, Google Site Verification, and any other static files (including `.html`). But make sure to not have a static file with the same name as a file in the `pages/` directory, as this will result in an error. Read more. > Good to know: > > * The directory must be named `public`. The name cannot be changed and it's the only directory used to serve static assets. > * Only assets that are in the `public` directory at build time will be served by Next.js. Files added at request time won't be available. We recommend using a third-party service like AWS S3 for persistent file storage. --- ## Page: https://nextjs.org/docs/13/pages/building-your-application/optimizing/lazy-loading Lazy loading in Next.js helps improve the initial loading performance of an application by decreasing the amount of JavaScript needed to render a route. It allows you to defer loading of **Client Components** and imported libraries, and only include them in the client bundle when they're needed. For example, you might want to defer loading a modal until a user clicks to open it. There are two ways you can implement lazy loading in Next.js: 1. Using Dynamic Imports with `next/dynamic` 2. Using `React.lazy()` with Suspense By default, Server Components are automatically code split, and you can use streaming to progressively send pieces of UI from the server to the client. Lazy loading applies to Client Components. ## `next/dynamic` `next/dynamic` is a composite of `React.lazy()` and Suspense. It behaves the same way in the `app` and `pages` directories to allow for incremental migration. ## Examples By using `next/dynamic`, the header component will not be included in the page's initial JavaScript bundle. The page will render the Suspense `fallback` first, followed by the `Header` component when the `Suspense` boundary is resolved. import dynamic from 'next/dynamic' const DynamicHeader = dynamic(() => import('../components/header'), { loading: () => <p>Loading...</p>, }) export default function Home() { return <DynamicHeader /> } > **Good to know**: In `import('path/to/component')`, the path must be explicitly written. It can't be a template string nor a variable. Furthermore the `import()` has to be inside the `dynamic()` call for Next.js to be able to match webpack bundles / module ids to the specific `dynamic()` call and preload them before rendering. `dynamic()` can't be used inside of React rendering as it needs to be marked in the top level of the module for preloading to work, similar to `React.lazy`. ## With named exports To dynamically import a named export, you can return it from the Promise returned by `import()`: export function Hello() { return <p>Hello!</p> } // pages/index.js import dynamic from 'next/dynamic' const DynamicComponent = dynamic(() => import('../components/hello').then((mod) => mod.Hello) ) ## With no SSR To dynamically load a component on the client side, you can use the `ssr` option to disable server-rendering. This is useful if an external dependency or component relies on browser APIs like `window`. import dynamic from 'next/dynamic' const DynamicHeader = dynamic(() => import('../components/header'), { ssr: false, }) ## With external libraries This example uses the external library `fuse.js` for fuzzy search. The module is only loaded in the browser after the user types in the search input. import { useState } from 'react' const names = ['Tim', 'Joe', 'Bel', 'Lee'] export default function Page() { const [results, setResults] = useState() return ( <div> <input type="text" placeholder="Search" onChange={async (e) => { const { value } = e.currentTarget // Dynamically load fuse.js const Fuse = (await import('fuse.js')).default const fuse = new Fuse(names) setResults(fuse.search(value)) }} /> <pre>Results: {JSON.stringify(results, null, 2)}</pre> </div> ) } --- ## Page: https://nextjs.org/docs/13/pages/building-your-application/optimizing/analytics Next.js Speed Insights allows you to analyze and measure the performance of pages using different metrics. You can start collecting your Real Experience Score with zero-configuration on Vercel deployments. The rest of this documentation describes the built-in relayer Next.js Speed Insights uses. ## Build Your Own First, you will need to create a custom App component and define a `reportWebVitals` function: export function reportWebVitals(metric) { console.log(metric) } function MyApp({ Component, pageProps }) { return <Component {...pageProps} /> } export default MyApp This function is fired when the final values for any of the metrics have finished calculating on the page. You can use to log any of the results to the console or send to a particular endpoint. The `metric` object returned to the function consists of a number of properties: * `id`: Unique identifier for the metric in the context of the current page load * `name`: Metric name * `startTime`: First recorded timestamp of the performance entry in milliseconds (if applicable) * `value`: Value, or duration in milliseconds, of the performance entry * `label`: Type of metric (`web-vital` or `custom`) There are two types of metrics that are tracked: * Web Vitals * Custom metrics ## Web Vitals Web Vitals are a set of useful metrics that aim to capture the user experience of a web page. The following web vitals are all included: * Time to First Byte (TTFB) * First Contentful Paint (FCP) * Largest Contentful Paint (LCP) * First Input Delay (FID) * Cumulative Layout Shift (CLS) * Interaction to Next Paint (INP) _(experimental)_ You can handle all the results of these metrics using the `web-vital` label: export function reportWebVitals(metric) { if (metric.label === 'web-vital') { console.log(metric) // The metric object ({ id, name, startTime, value, label }) is logged to the console } } There's also the option of handling each of the metrics separately: export function reportWebVitals(metric) { switch (metric.name) { case 'FCP': // handle FCP results break case 'LCP': // handle LCP results break case 'CLS': // handle CLS results break case 'FID': // handle FID results break case 'TTFB': // handle TTFB results break case 'INP': // handle INP results (note: INP is still an experimental metric) break default: break } } A third-party library, web-vitals, is used to measure these metrics. Browser compatibility depends on the particular metric, so refer to the Browser Support section to find out which browsers are supported. ## Custom metrics In addition to the core metrics listed above, there are some additional custom metrics that measure the time it takes for the page to hydrate and render: * `Next.js-hydration`: Length of time it takes for the page to start and finish hydrating (in ms) * `Next.js-route-change-to-render`: Length of time it takes for a page to start rendering after a route change (in ms) * `Next.js-render`: Length of time it takes for a page to finish render after a route change (in ms) You can handle all the results of these metrics using the `custom` label: export function reportWebVitals(metric) { if (metric.label === 'custom') { console.log(metric) // The metric object ({ id, name, startTime, value, label }) is logged to the console } } There's also the option of handling each of the metrics separately: export function reportWebVitals(metric) { switch (metric.name) { case 'Next.js-hydration': // handle hydration results break case 'Next.js-route-change-to-render': // handle route-change to render results break case 'Next.js-render': // handle render results break default: break } } These metrics work in all browsers that support the User Timing API. ## Sending results to external systems With the relay function, you can send results to any endpoint to measure and track real user performance on your site. For example: export function reportWebVitals(metric) { const body = JSON.stringify(metric) const url = 'https://example.com/analytics' // Use `navigator.sendBeacon()` if available, falling back to `fetch()`. if (navigator.sendBeacon) { navigator.sendBeacon(url, body) } else { fetch(url, { body, method: 'POST', keepalive: true }) } } > **Good to know**: If you use Google Analytics, using the `id` value can allow you to construct metric distributions manually (to calculate percentiles, etc.) > > export function reportWebVitals({ id, name, label, value }) { > // Use `window.gtag` if you initialized Google Analytics as this example: > // https://github.com/vercel/next.js/blob/canary/examples/with-google-analytics/pages/_app.js > window.gtag('event', name, { > event_category: > label === 'web-vital' ? 'Web Vitals' : 'Next.js custom metric', > value: Math.round(name === 'CLS' ? value * 1000 : value), // values must be integers > event_label: id, // id unique to current page load > non_interaction: true, // avoids affecting bounce rate. > }) > } > > Read more about sending results to Google Analytics. ## TypeScript If you are using TypeScript, you can use the built-in type `NextWebVitalsMetric`: import type { AppProps, NextWebVitalsMetric } from 'next/app' function MyApp({ Component, pageProps }: AppProps) { return <Component {...pageProps} /> } export function reportWebVitals(metric: NextWebVitalsMetric) { console.log(metric) } export default MyApp --- ## Page: https://nextjs.org/docs/13/pages/building-your-application/optimizing/open-telemetry > **Good to know**: This feature is **experimental**, you need to explicitly opt-in by providing `experimental.instrumentationHook = true;` in your `next.config.js`. Observability is crucial for understanding and optimizing the behavior and performance of your Next.js app. As applications become more complex, it becomes increasingly difficult to identify and diagnose issues that may arise. By leveraging observability tools, such as logging and metrics, developers can gain insights into their application's behavior and identify areas for optimization. With observability, developers can proactively address issues before they become major problems and provide a better user experience. Therefore, it is highly recommended to use observability in your Next.js applications to improve performance, optimize resources, and enhance user experience. We recommend using OpenTelemetry for instrumenting your apps. It's a platform-agnostic way to instrument apps that allows you to change your observability provider without changing your code. Read Official OpenTelemetry docs for more information about OpenTelemetry and how it works. This documentation uses terms like _Span_, _Trace_ or _Exporter_ throughout this doc, all of which can be found in the OpenTelemetry Observability Primer. Next.js supports OpenTelemetry instrumentation out of the box, which means that we already instrumented Next.js itself. When you enable OpenTelemetry we will automatically wrap all your code like `getStaticProps` in _spans_ with helpful attributes. > **Good to know**: We currently support OpenTelemetry bindings only in serverless functions. We don't provide any for `edge` or client side code. ## Getting Started OpenTelemetry is extensible but setting it up properly can be quite verbose. That's why we prepared a package `@vercel/otel` that helps you get started quickly. It's not extensible and you should configure OpenTelemetry manually if you need to customize your setup. ### Using `@vercel/otel` To get started, you must install `@vercel/otel`: npm install @vercel/otel Next, create a custom `instrumentation.ts` (or `.js`) file in the **root directory** of the project (or inside `src` folder if using one): import { registerOTel } from '@vercel/otel' export function register() { registerOTel('next-app') } > **Good to know** > > * The `instrumentation` file should be in the root of your project and not inside the `app` or `pages` directory. If you're using the `src` folder, then place the file inside `src` alongside `pages` and `app`. > * If you use the `pageExtensions` config option to add a suffix, you will also need to update the `instrumentation` filename to match. > * We have created a basic with-opentelemetry example that you can use. ### Manual OpenTelemetry configuration If our wrapper `@vercel/otel` doesn't suit your needs, you can configure OpenTelemetry manually. Firstly you need to install OpenTelemetry packages: npm install @opentelemetry/sdk-node @opentelemetry/resources @opentelemetry/semantic-conventions @opentelemetry/sdk-trace-node @opentelemetry/exporter-trace-otlp-http Now you can initialize `NodeSDK` in your `instrumentation.ts`. OpenTelemetry APIs are not compatible with edge runtime, so you need to make sure that you are importing them only when `process.env.NEXT_RUNTIME === 'nodejs'`. We recommend creating a new file `instrumentation.node.ts` which you conditionally import only when using node: export async function register() { if (process.env.NEXT_RUNTIME === 'nodejs') { await import('./instrumentation.node.ts') } } import { NodeSDK } from '@opentelemetry/sdk-node' import { OTLPTraceExporter } from '@opentelemetry/exporter-trace-otlp-http' import { Resource } from '@opentelemetry/resources' import { SemanticResourceAttributes } from '@opentelemetry/semantic-conventions' import { SimpleSpanProcessor } from '@opentelemetry/sdk-trace-node' const sdk = new NodeSDK({ resource: new Resource({ [SemanticResourceAttributes.SERVICE_NAME]: 'next-app', }), spanProcessor: new SimpleSpanProcessor(new OTLPTraceExporter()), }) sdk.start() Doing this is equivalent to using `@vercel/otel`, but it's possible to modify and extend. For example, you could use `@opentelemetry/exporter-trace-otlp-grpc` instead of `@opentelemetry/exporter-trace-otlp-http` or you can specify more resource attributes. ## Testing your instrumentation You need an OpenTelemetry collector with a compatible backend to test OpenTelemetry traces locally. We recommend using our OpenTelemetry dev environment. If everything works well you should be able to see the root server span labeled as `GET /requested/pathname`. All other spans from that particular trace will be nested under it. Next.js traces more spans than are emitted by default. To see more spans, you must set `NEXT_OTEL_VERBOSE=1`. ## Deployment ### Using OpenTelemetry Collector When you are deploying with OpenTelemetry Collector, you can use `@vercel/otel`. It will work both on Vercel and when self-hosted. #### Deploying on Vercel We made sure that OpenTelemetry works out of the box on Vercel. Follow Vercel documentation to connect your project to an observability provider. #### Self-hosting Deploying to other platforms is also straightforward. You will need to spin up your own OpenTelemetry Collector to receive and process the telemetry data from your Next.js app. To do this, follow the OpenTelemetry Collector Getting Started guide, which will walk you through setting up the collector and configuring it to receive data from your Next.js app. Once you have your collector up and running, you can deploy your Next.js app to your chosen platform following their respective deployment guides. ### Custom Exporters We recommend using OpenTelemetry Collector. If that is not possible on your platform, you can use a custom OpenTelemetry exporter with manual OpenTelemetry configuration ## Custom Spans You can add a custom span with OpenTelemetry APIs. npm install @opentelemetry/api The following example demonstrates a function that fetches GitHub stars and adds a custom `fetchGithubStars` span to track the fetch request's result: import { trace } from '@opentelemetry/api' export async function fetchGithubStars() { return await trace .getTracer('nextjs-example') .startActiveSpan('fetchGithubStars', async (span) => { try { return await getValue() } finally { span.end() } }) } The `register` function will execute before your code runs in a new environment. You can start creating new spans, and they should be correctly added to the exported trace. ## Default Spans in Next.js Next.js automatically instruments several spans for you to provide useful insights into your application's performance. Attributes on spans follow OpenTelemetry semantic conventions. We also add some custom attributes under the `next` namespace: * `next.span_name` - duplicates span name * `next.span_type` - each span type has a unique identifier * `next.route` - The route pattern of the request (e.g., `/[param]/user`). * `next.page` * This is an internal value used by an app router. * You can think about it as a route to a special file (like `page.ts`, `layout.ts`, `loading.ts` and others) * It can be used as a unique identifier only when paired with `next.route` because `/layout` can be used to identify both `/(groupA)/layout.ts` and `/(groupB)/layout.ts` ### `[http.method] [next.route]` * `next.span_type`: `BaseServer.handleRequest` This span represents the root span for each incoming request to your Next.js application. It tracks the HTTP method, route, target, and status code of the request. Attributes: * Common HTTP attributes * `http.method` * `http.status_code` * Server HTTP attributes * `http.route` * `http.target` * `next.span_name` * `next.span_type` * `next.route` ### `render route (app) [next.route]` * `next.span_type`: `AppRender.getBodyResult`. This span represents the process of rendering a route in the app router. Attributes: * `next.span_name` * `next.span_type` * `next.route` ### `fetch [http.method] [http.url]` * `next.span_type`: `AppRender.fetch` This span represents the fetch request executed in your code. Attributes: * Common HTTP attributes * `http.method` * Client HTTP attributes * `http.url` * `net.peer.name` * `net.peer.port` (only if specified) * `next.span_name` * `next.span_type` ### `executing api route (app) [next.route]` * `next.span_type`: `AppRouteRouteHandlers.runHandler`. This span represents the execution of an API route handler in the app router. Attributes: * `next.span_name` * `next.span_type` * `next.route` ### `getServerSideProps [next.route]` * `next.span_type`: `Render.getServerSideProps`. This span represents the execution of `getServerSideProps` for a specific route. Attributes: * `next.span_name` * `next.span_type` * `next.route` ### `getStaticProps [next.route]` * `next.span_type`: `Render.getStaticProps`. This span represents the execution of `getStaticProps` for a specific route. Attributes: * `next.span_name` * `next.span_type` * `next.route` ### `render route (pages) [next.route]` * `next.span_type`: `Render.renderDocument`. This span represents the process of rendering the document for a specific route. Attributes: * `next.span_name` * `next.span_type` * `next.route` ### `generateMetadata [next.page]` * `next.span_type`: `ResolveMetadata.generateMetadata`. This span represents the process of generating metadata for a specific page (a single route can have multiple of these spans). Attributes: * `next.span_name` * `next.span_type` * `next.page` --- ## Page: https://nextjs.org/docs/13/pages/building-your-application/optimizing/instrumentation If you export a function named `register` from a `instrumentation.ts` (or `.js`) file in the **root directory** of your project (or inside the `src` folder if using one), we will call that function whenever a new Next.js server instance is bootstrapped. > **Good to know** > > * This feature is **experimental**. To use it, you must explicitly opt in by defining `experimental.instrumentationHook = true;` in your `next.config.js`. > * The `instrumentation` file should be in the root of your project and not inside the `app` or `pages` directory. If you're using the `src` folder, then place the file inside `src` alongside `pages` and `app`. > * If you use the `pageExtensions` config option to add a suffix, you will also need to update the `instrumentation` filename to match. > * We have created a basic with-opentelemetry example that you can use. When your `register` function is deployed, it will be called on each cold boot (but exactly once in each environment). Sometimes, it may be useful to import a file in your code because of the side effects it will cause. For example, you might import a file that defines a set of global variables, but never explicitly use the imported file in your code. You would still have access to the global variables the package has declared. You can import files with side effects in `instrumentation.ts`, which you might want to use in your `register` function as demonstrated in the following example: import { init } from 'package-init' export function register() { init() } However, we recommend importing files with side effects using `import` from within your `register` function instead. The following example demonstrates a basic usage of `import` in a `register` function: export async function register() { await import('package-with-side-effect') } By doing this, you can colocate all of your side effects in one place in your code, and avoid any unintended consequences from importing files. We call `register` in all environments, so it's necessary to conditionally import any code that doesn't support both `edge` and `nodejs`. You can use the environment variable `NEXT_RUNTIME` to get the current environment. Importing an environment-specific code would look like this: export async function register() { if (process.env.NEXT_RUNTIME === 'nodejs') { await import('./instrumentation-node') } if (process.env.NEXT_RUNTIME === 'edge') { await import('./instrumentation-edge') } } --- ## Page: https://nextjs.org/docs/13/pages/building-your-application/optimizing/testing Examples * Next.js with Cypress * Next.js with Playwright * Next.js with Jest and React Testing Library * Next.js with Vitest Learn how to set up Next.js with commonly used testing tools: Cypress, Playwright, and Jest with React Testing Library. ## Cypress Cypress is a test runner used for **End-to-End (E2E)** and **Component Testing**. ### Quickstart You can use `create-next-app` with the with-cypress example to quickly get started. npx create-next-app@latest --example with-cypress with-cypress-app ### Manual setup To get started with Cypress, install the `cypress` package: npm install --save-dev cypress Add Cypress to the `package.json` scripts field: { "scripts": { "dev": "next dev", "build": "next build", "start": "next start", "cypress:open": "cypress open" } } Run Cypress for the first time to generate examples that use their recommended folder structure: npm run cypress:open You can look through the generated examples and the Writing Your First Test section of the Cypress Documentation to help you get familiar with Cypress. ### Should I use E2E or Component Tests? The Cypress docs contain a guide on the difference between these two types of tests and when it is appropriate to use each. ### Creating your first Cypress E2E test Assuming the following two Next.js pages: import Link from 'next/link' export default function Home() { return ( <nav> <h1>Homepage</h1> <Link href="/about">About</Link> </nav> ) } export default function About() { return ( <div> <h1>About Page</h1> <Link href="/">Homepage</Link> </div> ) } Add a test to check your navigation is working correctly: describe('Navigation', () => { it('should navigate to the about page', () => { // Start from the index page cy.visit('http://localhost:3000/') // Find a link with an href attribute containing "about" and click it cy.get('a[href*="about"]').click() // The new url should include "/about" cy.url().should('include', '/about') // The new page should contain an h1 with "About page" cy.get('h1').contains('About Page') }) }) You can use `cy.visit("/")` instead of `cy.visit("http://localhost:3000/")` if you add `baseUrl: 'http://localhost:3000'` to the `cypress.config.js` configuration file. ### Creating your first Cypress component test Component tests build and mount a specific component without having to bundle your whole application or launch a server. This allows for more performant tests that still provide visual feedback and the same API used for Cypress E2E tests. > **Good to know**: Since component tests do not launch a Next.js server, capabilities like `<Image />` and `getServerSideProps` which rely on a server being available will not function out-of-the-box. See the Cypress Next.js docs for examples of getting these features working within component tests. Assuming the same components from the previous section, add a test to validate a component is rendering the expected output: import AboutPage from './about.js' describe('<AboutPage />', () => { it('should render and display expected content', () => { // Mount the React component for the About page cy.mount(<AboutPage />) // The new page should contain an h1 with "About page" cy.get('h1').contains('About Page') // Validate that a link with the expected URL is present // *Following* the link is better suited to an E2E test cy.get('a[href="/"]').should('be.visible') }) }) ### Running your Cypress tests #### E2E Tests Since Cypress E2E tests are testing a real Next.js application they require the Next.js server to be running prior to starting Cypress. We recommend running your tests against your production code to more closely resemble how your application will behave. Run `npm run build` and `npm run start`, then run `npm run cypress -- --e2e` in another terminal window to start Cypress and run your E2E testing suite. > **Good to know**: Alternatively, you can install the `start-server-and-test` package and add it to the `package.json` scripts field: `"test": "start-server-and-test start http://localhost:3000 cypress"` to start the Next.js production server in conjunction with Cypress. Remember to rebuild your application after new changes. #### Component Tests Run `npm run cypress -- --component` to start Cypress and execute your component testing suite. ### Getting ready for Continuous Integration (CI) You will have noticed that running Cypress so far has opened an interactive browser which is not ideal for CI environments. You can also run Cypress headlessly using the `cypress run` command: { "scripts": { //... "e2e": "start-server-and-test dev http://localhost:3000 \"cypress open --e2e\"", "e2e:headless": "start-server-and-test dev http://localhost:3000 \"cypress run --e2e\"", "component": "cypress open --component", "component:headless": "cypress run --component" } } You can learn more about Cypress and Continuous Integration from these resources: * Cypress Continuous Integration Docs * Cypress GitHub Actions Guide * Official Cypress GitHub Action * Cypress Discord ## Playwright Playwright is a testing framework that lets you automate Chromium, Firefox, and WebKit with a single API. You can use it to write **End-to-End (E2E)** and **Integration** tests across all platforms. ### Quickstart The fastest way to get started is to use `create-next-app` with the with-playwright example. This will create a Next.js project complete with Playwright all set up. npx create-next-app@latest --example with-playwright with-playwright-app ### Manual setup You can also use `npm init playwright` to add Playwright to an existing `NPM` project. To manually get started with Playwright, install the `@playwright/test` package: npm install --save-dev @playwright/test Add Playwright to the `package.json` scripts field: { "scripts": { "dev": "next dev", "build": "next build", "start": "next start", "test:e2e": "playwright test" } } ### Creating your first Playwright end-to-end test Assuming the following two Next.js pages: import Link from 'next/link' export default function Home() { return ( <nav> <Link href="/about">About</Link> </nav> ) } export default function About() { return ( <div> <h1>About Page</h1> </div> ) } Add a test to verify that your navigation is working correctly: import { test, expect } from '@playwright/test' test('should navigate to the about page', async ({ page }) => { // Start from the index page (the baseURL is set via the webServer in the playwright.config.ts) await page.goto('http://localhost:3000/') // Find an element with the text 'About Page' and click on it await page.click('text=About') // The new URL should be "/about" (baseURL is used there) await expect(page).toHaveURL('http://localhost:3000/about') // The new page should contain an h1 with "About Page" await expect(page.locator('h1')).toContainText('About Page') }) You can use `page.goto("/")` instead of `page.goto("http://localhost:3000/")`, if you add `"baseURL": "http://localhost:3000"` to the `playwright.config.ts` configuration file. ### Running your Playwright tests Since Playwright is testing a real Next.js application, it requires the Next.js server to be running prior to starting Playwright. It is recommended to run your tests against your production code to more closely resemble how your application will behave. Run `npm run build` and `npm run start`, then run `npm run test:e2e` in another terminal window to run the Playwright tests. > **Good to know**: Alternatively, you can use the `webServer` feature to let Playwright start the development server and wait until it's fully available. ### Running Playwright on Continuous Integration (CI) Playwright will by default run your tests in the headless mode. To install all the Playwright dependencies, run `npx playwright install-deps`. You can learn more about Playwright and Continuous Integration from these resources: * Getting started with Playwright * Use a development server * Playwright on your CI provider * Playwright Discord ## Jest and React Testing Library Jest and React Testing Library are frequently used together for **Unit Testing**. There are three ways you can start using Jest within your Next.js application: 1. Using one of our quickstart examples 2. With the Next.js Rust Compiler 3. With Babel The following sections will go through how you can set up Jest with each of these options: ### Quickstart You can use `create-next-app` with the with-jest example to quickly get started with Jest and React Testing Library: npx create-next-app@latest --example with-jest with-jest-app ### Setting up Jest (with the Rust Compiler) Since the release of Next.js 12, Next.js now has built-in configuration for Jest. To set up Jest, install `jest`, `jest-environment-jsdom`, `@testing-library/react`, `@testing-library/jest-dom`: npm install --save-dev jest jest-environment-jsdom @testing-library/react @testing-library/jest-dom Create a `jest.config.mjs` file in your project's root directory and add the following: import nextJest from 'next/jest.js' const createJestConfig = nextJest({ // Provide the path to your Next.js app to load next.config.js and .env files in your test environment dir: './', }) // Add any custom config to be passed to Jest /** @type {import('jest').Config} */ const config = { // Add more setup options before each test is run // setupFilesAfterEnv: ['<rootDir>/jest.setup.js'], testEnvironment: 'jest-environment-jsdom', } // createJestConfig is exported this way to ensure that next/jest can load the Next.js config which is async export default createJestConfig(config) Under the hood, `next/jest` is automatically configuring Jest for you, including: * Setting up `transform` using SWC * Auto mocking stylesheets (`.css`, `.module.css`, and their scss variants), image imports and `next/font` * Loading `.env` (and all variants) into `process.env` * Ignoring `node_modules` from test resolving and transforms * Ignoring `.next` from test resolving * Loading `next.config.js` for flags that enable SWC transforms > **Good to know**: To test environment variables directly, load them manually in a separate setup script or in your `jest.config.js` file. For more information, please see Test Environment Variables. ### Setting up Jest (with Babel) If you opt out of the Rust Compiler, you will need to manually configure Jest and install `babel-jest` and `identity-obj-proxy` in addition to the packages above. Here are the recommended options to configure Jest for Next.js: module.exports = { collectCoverage: true, // on node 14.x coverage provider v8 offers good speed and more or less good report coverageProvider: 'v8', collectCoverageFrom: [ '**/*.{js,jsx,ts,tsx}', '!**/*.d.ts', '!**/node_modules/**', '!<rootDir>/out/**', '!<rootDir>/.next/**', '!<rootDir>/*.config.js', '!<rootDir>/coverage/**', ], moduleNameMapper: { // Handle CSS imports (with CSS modules) // https://jestjs.io/docs/webpack#mocking-css-modules '^.+\\.module\\.(css|sass|scss)$': 'identity-obj-proxy', // Handle CSS imports (without CSS modules) '^.+\\.(css|sass|scss)$': '<rootDir>/__mocks__/styleMock.js', // Handle image imports // https://jestjs.io/docs/webpack#handling-static-assets '^.+\\.(png|jpg|jpeg|gif|webp|avif|ico|bmp|svg)$/i': `<rootDir>/__mocks__/fileMock.js`, // Handle module aliases '^@/components/(.*)$': '<rootDir>/components/$1', }, // Add more setup options before each test is run // setupFilesAfterEnv: ['<rootDir>/jest.setup.js'], testPathIgnorePatterns: ['<rootDir>/node_modules/', '<rootDir>/.next/'], testEnvironment: 'jsdom', transform: { // Use babel-jest to transpile tests with the next/babel preset // https://jestjs.io/docs/configuration#transform-objectstring-pathtotransformer--pathtotransformer-object '^.+\\.(js|jsx|ts|tsx)$': ['babel-jest', { presets: ['next/babel'] }], }, transformIgnorePatterns: [ '/node_modules/', '^.+\\.module\\.(css|sass|scss)$', ], } You can learn more about each configuration option in the Jest docs. **Handling stylesheets and image imports** Stylesheets and images aren't used in the tests but importing them may cause errors, so they will need to be mocked. Create the mock files referenced in the configuration above - `fileMock.js` and `styleMock.js` - inside a `__mocks__` directory: module.exports = { src: '/img.jpg', height: 24, width: 24, blurDataURL: 'data:image/png;base64,imagedata', } module.exports = {} For more information on handling static assets, please refer to the Jest Docs. **Optional: Extend Jest with custom matchers** `@testing-library/jest-dom` includes a set of convenient custom matchers such as `.toBeInTheDocument()` making it easier to write tests. You can import the custom matchers for every test by adding the following option to the Jest configuration file: setupFilesAfterEnv: ['<rootDir>/jest.setup.js'] Then, inside `jest.setup.js`, add the following import: import '@testing-library/jest-dom' > `extend-expect` was removed in `v6.0`, so if you are using `@testing-library/jest-dom` before version 6, you will need to import `@testing-library/jest-dom/extend-expect` instead. If you need to add more setup options before each test, it's common to add them to the `jest.setup.js` file above. **Optional: Absolute Imports and Module Path Aliases** If your project is using Module Path Aliases, you will need to configure Jest to resolve the imports by matching the paths option in the `jsconfig.json` file with the `moduleNameMapper` option in the `jest.config.js` file. For example: { "compilerOptions": { "module": "esnext", "moduleResolution": "node", "baseUrl": "./", "paths": { "@/components/*": ["components/*"] } } } moduleNameMapper: { '^@/components/(.*)$': '<rootDir>/components/$1', } ### Creating your tests: **Add a test script to package.json** Add the Jest executable in watch mode to the `package.json` scripts: { "scripts": { "dev": "next dev", "build": "next build", "start": "next start", "test": "jest --watch" } } `jest --watch` will re-run tests when a file is changed. For more Jest CLI options, please refer to the Jest Docs. **Create your first tests** Your project is now ready to run tests. Follow Jest's convention by adding tests to the `__tests__` folder in your project's root directory. For example, we can add a test to check if the `<Home />` component successfully renders a heading: import { render, screen } from '@testing-library/react' import Home from '../pages/index' import '@testing-library/jest-dom' describe('Home', () => { it('renders a heading', () => { render(<Home />) const heading = screen.getByRole('heading', { name: /welcome to next\.js!/i, }) expect(heading).toBeInTheDocument() }) }) Optionally, add a snapshot test to keep track of any unexpected changes to your `<Home />` component: import { render } from '@testing-library/react' import Home from '../pages/index' it('renders homepage unchanged', () => { const { container } = render(<Home />) expect(container).toMatchSnapshot() }) > **Good to know**: Test files should not be included inside the Pages Router because any files inside the Pages Router are considered routes. **Running your test suite** Run `npm run test` to run your test suite. After your tests pass or fail, you will notice a list of interactive Jest commands that will be helpful as you add more tests. For further reading, you may find these resources helpful: * Jest Docs * React Testing Library Docs * Testing Playground - use good testing practices to match elements. ## Community Packages and Examples The Next.js community has created packages and articles you may find helpful: * next-router-mock for Storybook. * Test Preview Vercel Deploys with Cypress by Gleb Bahmutov. For more information on what to read next, we recommend: * pages/basic-features/environment-variables#test-environment-variables --- ## Page: https://nextjs.org/docs/13/pages/building-your-application/configuring You are currently viewing documentation for version 13 of Next.js. Next.js allows you to customize your project to meet specific requirements. This includes integrations with TypeScript, ESlint, and more, as well as internal configuration options such as Absolute Imports and Environment Variables. --- ## Page: https://nextjs.org/docs/13/pages/building-your-application/configuring/typescript Next.js provides a TypeScript-first development experience for building your React application. It comes with built-in TypeScript support for automatically installing the necessary packages and configuring the proper settings. ## New Projects `create-next-app` now ships with TypeScript by default. npx create-next-app@latest ## Existing Projects Add TypeScript to your project by renaming a file to `.ts` / `.tsx`. Run `next dev` and `next build` to automatically install the necessary dependencies and add a `tsconfig.json` file with the recommended config options. If you already had a `jsconfig.json` file, copy the `paths` compiler option from the old `jsconfig.json` into the new `tsconfig.json` file, and delete the old `jsconfig.json` file. ## Minimum TypeScript Version It is highly recommended to be on at least `v4.5.2` of TypeScript to get syntax features such as type modifiers on import names and performance improvements. ## Static Generation and Server-side Rendering For `getStaticProps`, `getStaticPaths`, and `getServerSideProps`, you can use the `GetStaticProps`, `GetStaticPaths`, and `GetServerSideProps` types respectively: import { GetStaticProps, GetStaticPaths, GetServerSideProps } from 'next' export const getStaticProps = (async (context) => { // ... }) satisfies GetStaticProps export const getStaticPaths = (async () => { // ... }) satisfies GetStaticPaths export const getServerSideProps = (async (context) => { // ... }) satisfies GetServerSideProps > **Good to know:** `satisfies` was added to TypeScript in 4.9. We recommend upgrading to the latest version of TypeScript. ## API Routes The following is an example of how to use the built-in types for API routes: import type { NextApiRequest, NextApiResponse } from 'next' export default function handler(req: NextApiRequest, res: NextApiResponse) { res.status(200).json({ name: 'John Doe' }) } You can also type the response data: import type { NextApiRequest, NextApiResponse } from 'next' type Data = { name: string } export default function handler( req: NextApiRequest, res: NextApiResponse<Data> ) { res.status(200).json({ name: 'John Doe' }) } ## Custom `App` If you have a custom `App`, you can use the built-in type `AppProps` and change file name to `./pages/_app.tsx` like so: import type { AppProps } from 'next/app' export default function MyApp({ Component, pageProps }: AppProps) { return <Component {...pageProps} /> } ## Path aliases and baseUrl Next.js automatically supports the `tsconfig.json` `"paths"` and `"baseUrl"` options. You can learn more about this feature on the Module Path aliases documentation. ## Type checking next.config.js The `next.config.js` file must be a JavaScript file as it does not get parsed by Babel or TypeScript, however you can add some type checking in your IDE using JSDoc as below: // @ts-check /** * @type {import('next').NextConfig} **/ const nextConfig = { /* config options here */ } module.exports = nextConfig ## Incremental type checking Since `v10.2.1` Next.js supports incremental type checking when enabled in your `tsconfig.json`, this can help speed up type checking in larger applications. ## Ignoring TypeScript Errors Next.js fails your **production build** (`next build`) when TypeScript errors are present in your project. If you'd like Next.js to dangerously produce production code even when your application has errors, you can disable the built-in type checking step. If disabled, be sure you are running type checks as part of your build or deploy process, otherwise this can be very dangerous. Open `next.config.js` and enable the `ignoreBuildErrors` option in the `typescript` config: module.exports = { typescript: { // !! WARN !! // Dangerously allow production builds to successfully complete even if // your project has type errors. // !! WARN !! ignoreBuildErrors: true, }, } ## Version Changes | Version | Changes | | --- | --- | | `v13.2.0` | Statically typed links are available in beta. | | `v12.0.0` | SWC is now used by default to compile TypeScript and TSX for faster builds. | | `v10.2.1` | Incremental type checking support added when enabled in your `tsconfig.json`. | --- ## Page: https://nextjs.org/docs/13/pages/building-your-application/configuring/eslint Next.js provides an integrated ESLint experience out of the box. Add `next lint` as a script to `package.json`: { "scripts": { "lint": "next lint" } } Then run `npm run lint` or `yarn lint`: yarn lint If you don't already have ESLint configured in your application, you will be guided through the installation and configuration process. yarn lint > You'll see a prompt like this: > > ? How would you like to configure ESLint? > > ❯ Strict (recommended) > Base > Cancel One of the following three options can be selected: * **Strict**: Includes Next.js' base ESLint configuration along with a stricter Core Web Vitals rule-set. This is the recommended configuration for developers setting up ESLint for the first time. { "extends": "next/core-web-vitals" } * **Base**: Includes Next.js' base ESLint configuration. { "extends": "next" } * **Cancel**: Does not include any ESLint configuration. Only select this option if you plan on setting up your own custom ESLint configuration. If either of the two configuration options are selected, Next.js will automatically install `eslint` and `eslint-config-next` as dependencies in your application and create an `.eslintrc.json` file in the root of your project that includes your selected configuration. You can now run `next lint` every time you want to run ESLint to catch errors. Once ESLint has been set up, it will also automatically run during every build (`next build`). Errors will fail the build, while warnings will not. > If you do not want ESLint to run during `next build`, refer to the documentation for Ignoring ESLint. We recommend using an appropriate integration to view warnings and errors directly in your code editor during development. ## ESLint Config The default configuration (`eslint-config-next`) includes everything you need to have an optimal out-of-the-box linting experience in Next.js. If you do not have ESLint already configured in your application, we recommend using `next lint` to set up ESLint along with this configuration. > If you would like to use `eslint-config-next` along with other ESLint configurations, refer to the Additional Configurations section to learn how to do so without causing any conflicts. Recommended rule-sets from the following ESLint plugins are all used within `eslint-config-next`: * `eslint-plugin-react` * `eslint-plugin-react-hooks` * `eslint-plugin-next` This will take precedence over the configuration from `next.config.js`. ## ESLint Plugin Next.js provides an ESLint plugin, `eslint-plugin-next`, already bundled within the base configuration that makes it possible to catch common issues and problems in a Next.js application. The full set of rules is as follows: Enabled in the recommended configuration | | Rule | Description | | --- | --- | --- | | | @next/next/google-font-display | Enforce font-display behavior with Google Fonts. | | | @next/next/google-font-preconnect | Ensure `preconnect` is used with Google Fonts. | | | @next/next/inline-script-id | Enforce `id` attribute on `next/script` components with inline content. | | | @next/next/next-script-for-ga | Prefer `next/script` component when using the inline script for Google Analytics. | | | @next/next/no-assign-module-variable | Prevent assignment to the `module` variable. | | | @next/next/no-async-client-component | Prevent client components from being async functions. | | | @next/next/no-before-interactive-script-outside-document | Prevent usage of `next/script`'s `beforeInteractive` strategy outside of `pages/_document.js`. | | | @next/next/no-css-tags | Prevent manual stylesheet tags. | | | @next/next/no-document-import-in-page | Prevent importing `next/document` outside of `pages/_document.js`. | | | @next/next/no-duplicate-head | Prevent duplicate usage of `<Head>` in `pages/_document.js`. | | | @next/next/no-head-element | Prevent usage of `<head>` element. | | | @next/next/no-head-import-in-document | Prevent usage of `next/head` in `pages/_document.js`. | | | @next/next/no-html-link-for-pages | Prevent usage of `<a>` elements to navigate to internal Next.js pages. | | | @next/next/no-img-element | Prevent usage of `<img>` element due to slower LCP and higher bandwidth. | | | @next/next/no-page-custom-font | Prevent page-only custom fonts. | | | @next/next/no-script-component-in-head | Prevent usage of `next/script` in `next/head` component. | | | @next/next/no-styled-jsx-in-document | Prevent usage of `styled-jsx` in `pages/_document.js`. | | | @next/next/no-sync-scripts | Prevent synchronous scripts. | | | @next/next/no-title-in-document-head | Prevent usage of `<title>` with `Head` component from `next/document`. | | | @next/next/no-typos | Prevent common typos in Next.js's data fetching functions | | | @next/next/no-unwanted-polyfillio | Prevent duplicate polyfills from Polyfill.io. | If you already have ESLint configured in your application, we recommend extending from this plugin directly instead of including `eslint-config-next` unless a few conditions are met. Refer to the Recommended Plugin Ruleset to learn more. ### Custom Settings #### `rootDir` If you're using `eslint-plugin-next` in a project where Next.js isn't installed in your root directory (such as a monorepo), you can tell `eslint-plugin-next` where to find your Next.js application using the `settings` property in your `.eslintrc`: { "extends": "next", "settings": { "next": { "rootDir": "packages/my-app/" } } } `rootDir` can be a path (relative or absolute), a glob (i.e. `"packages/*/"`), or an array of paths and/or globs. ## Linting Custom Directories and Files By default, Next.js will run ESLint for all files in the `pages/`, `app/`, `components/`, `lib/`, and `src/` directories. However, you can specify which directories using the `dirs` option in the `eslint` config in `next.config.js` for production builds: module.exports = { eslint: { dirs: ['pages', 'utils'], // Only run ESLint on the 'pages' and 'utils' directories during production builds (next build) }, } Similarly, the `--dir` and `--file` flags can be used for `next lint` to lint specific directories and files: next lint --dir pages --dir utils --file bar.js ## Caching To improve performance, information of files processed by ESLint are cached by default. This is stored in `.next/cache` or in your defined build directory. If you include any ESLint rules that depend on more than the contents of a single source file and need to disable the cache, use the `--no-cache` flag with `next lint`. next lint --no-cache ## Disabling Rules If you would like to modify or disable any rules provided by the supported plugins (`react`, `react-hooks`, `next`), you can directly change them using the `rules` property in your `.eslintrc`: { "extends": "next", "rules": { "react/no-unescaped-entities": "off", "@next/next/no-page-custom-font": "off" } } ### Core Web Vitals The `next/core-web-vitals` rule set is enabled when `next lint` is run for the first time and the **strict** option is selected. { "extends": "next/core-web-vitals" } `next/core-web-vitals` updates `eslint-plugin-next` to error on a number of rules that are warnings by default if they affect Core Web Vitals. > The `next/core-web-vitals` entry point is automatically included for new applications built with Create Next App. ## Usage With Other Tools ### Prettier ESLint also contains code formatting rules, which can conflict with your existing Prettier setup. We recommend including eslint-config-prettier in your ESLint config to make ESLint and Prettier work together. First, install the dependency: npm install --save-dev eslint-config-prettier yarn add --dev eslint-config-prettier pnpm add --save-dev eslint-config-prettier bun add --dev eslint-config-prettier Then, add `prettier` to your existing ESLint config: { "extends": ["next", "prettier"] } ### lint-staged If you would like to use `next lint` with lint-staged to run the linter on staged git files, you'll have to add the following to the `.lintstagedrc.js` file in the root of your project in order to specify usage of the `--file` flag. const path = require('path') const buildEslintCommand = (filenames) => `next lint --fix --file ${filenames .map((f) => path.relative(process.cwd(), f)) .join(' --file ')}` module.exports = { '*.{js,jsx,ts,tsx}': [buildEslintCommand], } ## Migrating Existing Config ### Recommended Plugin Ruleset If you already have ESLint configured in your application and any of the following conditions are true: * You have one or more of the following plugins already installed (either separately or through a different config such as `airbnb` or `react-app`): * `react` * `react-hooks` * `jsx-a11y` * `import` * You've defined specific `parserOptions` that are different from how Babel is configured within Next.js (this is not recommended unless you have customized your Babel configuration) * You have `eslint-plugin-import` installed with Node.js and/or TypeScript resolvers defined to handle imports Then we recommend either removing these settings if you prefer how these properties have been configured within `eslint-config-next` or extending directly from the Next.js ESLint plugin instead: module.exports = { extends: [ //... 'plugin:@next/next/recommended', ], } The plugin can be installed normally in your project without needing to run `next lint`: npm install --save-dev @next/eslint-plugin-next yarn add --dev @next/eslint-plugin-next pnpm add --save-dev @next/eslint-plugin-next bun add --dev @next/eslint-plugin-next This eliminates the risk of collisions or errors that can occur due to importing the same plugin or parser across multiple configurations. ### Additional Configurations If you already use a separate ESLint configuration and want to include `eslint-config-next`, ensure that it is extended last after other configurations. For example: { "extends": ["eslint:recommended", "next"] } The `next` configuration already handles setting default values for the `parser`, `plugins` and `settings` properties. There is no need to manually re-declare any of these properties unless you need a different configuration for your use case. If you include any other shareable configurations, **you will need to make sure that these properties are not overwritten or modified**. Otherwise, we recommend removing any configurations that share behavior with the `next` configuration or extending directly from the Next.js ESLint plugin as mentioned above. --- ## Page: https://nextjs.org/docs/13/pages/building-your-application/configuring/environment-variables Examples * Environment Variables Next.js comes with built-in support for environment variables, which allows you to do the following: * Use `.env.local` to load environment variables * Bundle environment variables for the browser by prefixing with `NEXT_PUBLIC_` ## Loading Environment Variables Next.js has built-in support for loading environment variables from `.env.local` into `process.env`. DB_HOST=localhost DB_USER=myuser DB_PASS=mypassword This loads `process.env.DB_HOST`, `process.env.DB_USER`, and `process.env.DB_PASS` into the Node.js environment automatically allowing you to use them in Next.js data fetching methods and API routes. For example, using `getStaticProps`: export async function getStaticProps() { const db = await myDB.connect({ host: process.env.DB_HOST, username: process.env.DB_USER, password: process.env.DB_PASS, }) // ... } ### Referencing Other Variables Next.js will automatically expand variables that use `$` to reference other variables e.g. `$VARIABLE` inside of your `.env*` files. This allows you to reference other secrets. For example: TWITTER_USER=nextjs TWITTER_URL=https://twitter.com/$TWITTER_USER In the above example, `process.env.TWITTER_URL` would be set to `https://twitter.com/nextjs`. > **Good to know**: If you need to use variable with a `$` in the actual value, it needs to be escaped e.g. `\$`. ## Bundling Environment Variables for the Browser Non-`NEXT_PUBLIC_` environment variables are only available in the Node.js environment, meaning they aren't accessible to the browser (the client runs in a different _environment_). In order to make the value of an environment variable accessible in the browser, Next.js can "inline" a value, at build time, into the js bundle that is delivered to the client, replacing all references to `process.env.[variable]` with a hard-coded value. To tell it to do this, you just have to prefix the variable with `NEXT_PUBLIC_`. For example: NEXT_PUBLIC_ANALYTICS_ID=abcdefghijk This will tell Next.js to replace all references to `process.env.NEXT_PUBLIC_ANALYTICS_ID` in the Node.js environment with the value from the environment in which you run `next build`, allowing you to use it anywhere in your code. It will be inlined into any JavaScript sent to the browser. > **Note**: After being built, your app will no longer respond to changes to these environment variables. For instance, if you use a Heroku pipeline to promote slugs built in one environment to another environment, or if you build and deploy a single Docker image to multiple environments, all `NEXT_PUBLIC_` variables will be frozen with the value evaluated at build time, so these values need to be set appropriately when the project is built. If you need access to runtime environment values, you'll have to setup your own API to provide them to the client (either on demand or during initialization). import setupAnalyticsService from '../lib/my-analytics-service' // 'NEXT_PUBLIC_ANALYTICS_ID' can be used here as it's prefixed by 'NEXT_PUBLIC_'. // It will be transformed at build time to `setupAnalyticsService('abcdefghijk')`. setupAnalyticsService(process.env.NEXT_PUBLIC_ANALYTICS_ID) function HomePage() { return <h1>Hello World</h1> } export default HomePage Note that dynamic lookups will _not_ be inlined, such as: // This will NOT be inlined, because it uses a variable const varName = 'NEXT_PUBLIC_ANALYTICS_ID' setupAnalyticsService(process.env[varName]) // This will NOT be inlined, because it uses a variable const env = process.env setupAnalyticsService(env.NEXT_PUBLIC_ANALYTICS_ID) ## Default Environment Variables In general only one `.env.local` file is needed. However, sometimes you might want to add some defaults for the `development` (`next dev`) or `production` (`next start`) environment. Next.js allows you to set defaults in `.env` (all environments), `.env.development` (development environment), and `.env.production` (production environment). `.env.local` always overrides the defaults set. > **Good to know**: `.env`, `.env.development`, and `.env.production` files should be included in your repository as they define defaults. **`.env*.local` should be added to `.gitignore`**, as those files are intended to be ignored. `.env.local` is where secrets can be stored. ## Environment Variables on Vercel When deploying your Next.js application to Vercel, Environment Variables can be configured in the Project Settings. All types of Environment Variables should be configured there. Even Environment Variables used in Development – which can be downloaded onto your local device afterwards. If you've configured Development Environment Variables you can pull them into a `.env.local` for usage on your local machine using the following command: vercel env pull .env.local ## Test Environment Variables Apart from `development` and `production` environments, there is a 3rd option available: `test`. In the same way you can set defaults for development or production environments, you can do the same with a `.env.test` file for the `testing` environment (though this one is not as common as the previous two). Next.js will not load environment variables from `.env.development` or `.env.production` in the `testing` environment. This one is useful when running tests with tools like `jest` or `cypress` where you need to set specific environment vars only for testing purposes. Test default values will be loaded if `NODE_ENV` is set to `test`, though you usually don't need to do this manually as testing tools will address it for you. There is a small difference between `test` environment, and both `development` and `production` that you need to bear in mind: `.env.local` won't be loaded, as you expect tests to produce the same results for everyone. This way every test execution will use the same env defaults across different executions by ignoring your `.env.local` (which is intended to override the default set). > **Good to know**: similar to Default Environment Variables, `.env.test` file should be included in your repository, but `.env.test.local` shouldn't, as `.env*.local` are intended to be ignored through `.gitignore`. While running unit tests you can make sure to load your environment variables the same way Next.js does by leveraging the `loadEnvConfig` function from the `@next/env` package. // The below can be used in a Jest global setup file or similar for your testing set-up import { loadEnvConfig } from '@next/env' export default async () => { const projectDir = process.cwd() loadEnvConfig(projectDir) } ## Environment Variable Load Order Environment variables are looked up in the following places, in order, stopping once the variable is found. 1. `process.env` 2. `.env.$(NODE_ENV).local` 3. `.env.local` (Not checked when `NODE_ENV` is `test`.) 4. `.env.$(NODE_ENV)` 5. `.env` For example, if `NODE_ENV` is `development` and you define a variable in both `.env.development.local` and `.env`, the value in `.env.development.local` will be used. > **Good to know**: The allowed values for `NODE_ENV` are `production`, `development` and `test`. ## Good to know * If you are using a `/src` directory, `.env.*` files should remain in the root of your project. * If the environment variable `NODE_ENV` is unassigned, Next.js automatically assigns `development` when running the `next dev` command, or `production` for all other commands. --- ## Page: https://nextjs.org/docs/13/pages/building-your-application/configuring/absolute-imports-and-module-aliases Examples * Absolute Imports and Aliases Next.js has in-built support for the `"paths"` and `"baseUrl"` options of `tsconfig.json` and `jsconfig.json` files. These options allow you to alias project directories to absolute paths, making it easier to import modules. For example: // before import { Button } from '../../../components/button' // after import { Button } from '@/components/button' > **Good to know**: `create-next-app` will prompt to configure these options for you. ## Absolute Imports The `baseUrl` configuration option allows you to import directly from the root of the project. An example of this configuration: { "compilerOptions": { "baseUrl": "." } } export default function Button() { return <button>Click me</button> } import Button from 'components/button' export default function HomePage() { return ( <> <h1>Hello World</h1> <Button /> </> ) } ## Module Aliases In addition to configuring the `baseUrl` path, you can use the `"paths"` option to "alias" module paths. For example, the following configuration maps `@/components/*` to `components/*`: { "compilerOptions": { "baseUrl": ".", "paths": { "@/components/*": ["components/*"] } } } export default function Button() { return <button>Click me</button> } import Button from '@/components/button' export default function HomePage() { return ( <> <h1>Hello World</h1> <Button /> </> ) } Each of the `"paths"` are relative to the `baseUrl` location. For example: // tsconfig.json or jsconfig.json { "compilerOptions": { "baseUrl": "src/", "paths": { "@/styles/*": ["styles/*"], "@/components/*": ["components/*"] } } } // pages/index.js import Button from '@/components/button' import '@/styles/styles.css' import Helper from 'utils/helper' export default function HomePage() { return ( <Helper> <h1>Hello World</h1> <Button /> </Helper> ) } --- ## Page: https://nextjs.org/docs/13/pages/building-your-application/configuring/src-directory You are currently viewing documentation for version 13 of Next.js. As an alternative to having the special Next.js `app` or `pages` directories in the root of your project, Next.js also supports the common pattern of placing application code under the `src` directory. This separates application code from project configuration files which mostly live in the root of a project, which is preferred by some individuals and teams. To use the `src` directory, move the `app` Router folder or `pages` Router folder to `src/app` or `src/pages` respectively.  > **Good to know** > > * The `/public` directory should remain in the root of your project. > * Config files like `package.json`, `next.config.js` and `tsconfig.json` should remain in the root of your project. > * `.env.*` files should remain in the root of your project. > * `src/app` or `src/pages` will be ignored if `app` or `pages` are present in the root directory. > * If you're using `src`, you'll probably also move other application folders such as `/components` or `/lib`. > * If you're using Tailwind CSS, you'll need to add the `/src` prefix to the `tailwind.config.js` file in the content section. --- ## Page: https://nextjs.org/docs/13/pages/building-your-application/configuring/mdx Markdown is a lightweight markup language used to format text. It allows you to write using plain text syntax and convert it to structurally valid HTML. It's commonly used for writing content on websites and blogs. You write... I **love** using [Next.js](https://nextjs.org/) Output: <p>I <strong>love</strong> using <a href="https://nextjs.org/">Next.js</a></p> MDX is a superset of markdown that lets you write JSX directly in your markdown files. It is a powerful way to add dynamic interactivity and embed React components within your content. Next.js can support both local MDX content inside your application, as well as remote MDX files fetched dynamically on the server. The Next.js plugin handles transforming markdown and React components into HTML, including support for usage in Server Components (the default in App Router). ## `@next/mdx` The `@next/mdx` package is used to configure Next.js so it can process markdown and MDX. **It sources data from local files**, allowing you to create pages with a `.mdx` extension, directly in your `/pages` or `/app` directory. Let's walk through how to configure and use MDX with Next.js. ## Getting Started Install packages needed to render MDX: npm install @next/mdx @mdx-js/loader @mdx-js/react @types/mdx Update the `next.config.js` file at your project's root to configure it to use MDX: const withMDX = require('@next/mdx')() /** @type {import('next').NextConfig} */ const nextConfig = { // Configure `pageExtensions`` to include MDX files pageExtensions: ['js', 'jsx', 'mdx', 'ts', 'tsx'], // Optionally, add any other Next.js config below } module.exports = withMDX(nextConfig) Then, create a new MDX page within the `/pages` directory: your-project ├── pages │ └── my-mdx-page.mdx └── package.json Now you can use markdown and import React components directly inside your MDX page: import { MyComponent } from 'my-components' # Welcome to my MDX page! This is some **bold** and _italics_ text. This is a list in markdown: - One - Two - Three Checkout my React component: <MyComponent /> Navigating to the `/my-mdx-page` route should display your rendered MDX. ## Remote MDX If your markdown or MDX files or content lives _somewhere else_, you can fetch it dynamically on the server. This is useful for content stored in a separate local folder, CMS, database, or anywhere else. There are two popular community packages for fetching MDX content: * `next-mdx-remote` * `contentlayer` > **Good to know**: Please proceed with caution. MDX compiles to JavaScript and is executed on the server. You should only fetch MDX content from a trusted source, otherwise this can lead to remote code execution (RCE). The following example uses `next-mdx-remote`: import { serialize } from 'next-mdx-remote/serialize' import { MDXRemote, MDXRemoteSerializeResult } from 'next-mdx-remote' interface Props { mdxSource: MDXRemoteSerializeResult } export default function RemoteMdxPage({ mdxSource }: Props) { return <MDXRemote {...mdxSource} /> } export async function getStaticProps() { // MDX text - can be from a local file, database, CMS, fetch, anywhere... const res = await fetch('https:...') const mdxText = await res.text() const mdxSource = await serialize(mdxText) return { props: { source: mdxSource } } } Navigating to the `/my-mdx-page-remote` route should display your rendered MDX. ## Layouts To share a layout around MDX pages, create a layout component: export default function MdxLayout({ children }: { children: React.ReactNode }) { // Create any shared layout or styles here return <div style={{ color: 'blue' }}>{children}</div> } Then, import the layout component into the MDX page, wrap the MDX content in the layout, and export it: import MdxLayout from '../components/mdx-layout' # Welcome to my MDX page! export default function MDXPage({ children }) { return <MdxLayout>{children}</MdxLayout>; } ## Remark and Rehype Plugins You can optionally provide `remark` and `rehype` plugins to transform the MDX content. For example, you can use `remark-gfm` to support GitHub Flavored Markdown. Since the `remark` and `rehype` ecosystem is ESM only, you'll need to use `next.config.mjs` as the configuration file. import remarkGfm from 'remark-gfm' import createMDX from '@next/mdx' /** @type {import('next').NextConfig} */ const nextConfig = { // Configure `pageExtensions`` to include MDX files pageExtensions: ['js', 'jsx', 'mdx', 'ts', 'tsx'], // Optionally, add any other Next.js config below } const withMDX = createMDX({ // Add markdown plugins here, as desired options: { remarkPlugins: [remarkGfm], rehypePlugins: [], }, }) // Merge MDX config with Next.js config export default withMDX(nextConfig) ## Frontmatter Frontmatter is a YAML like key/value pairing that can be used to store data about a page. `@next/mdx` does **not** support frontmatter by default, though there are many solutions for adding frontmatter to your MDX content, such as: * remark-frontmatter * gray-matter. To access page metadata with `@next/mdx`, you can export a meta object from within the `.mdx` file: export const meta = { author: 'John Doe', } # My MDX page ## Custom Elements One of the pleasant aspects of using markdown, is that it maps to native `HTML` elements, making writing fast, and intuitive: This is a list in markdown: - One - Two - Three The above generates the following `HTML`: <p>This is a list in markdown:</p> <ul> <li>One</li> <li>Two</li> <li>Three</li> </ul> When you want to style your own elements for a custom feel to your website or application, you can pass in shortcodes. These are your own custom components that map to `HTML` elements. To do this, create a `mdx-components.tsx` file at the root of your application (the parent folder of `pages/` or `src/`) and add custom elements: import type { MDXComponents } from 'mdx/types' import Image from 'next/image' // This file allows you to provide custom React components // to be used in MDX files. You can import and use any // React component you want, including inline styles, // components from other libraries, and more. export function useMDXComponents(components: MDXComponents): MDXComponents { return { // Allows customizing built-in components, e.g. to add styling. h1: ({ children }) => <h1 style={{ fontSize: '100px' }}>{children}</h1>, img: (props) => ( <Image sizes="100vw" style={{ width: '100%', height: 'auto' }} {...props} /> ), ...components, } } ## Deep Dive: How do you transform markdown into HTML? React does not natively understand markdown. The markdown plaintext needs to first be transformed into HTML. This can be accomplished with `remark` and `rehype`. `remark` is an ecosystem of tools around markdown. `rehype` is the same, but for HTML. For example, the following code snippet transforms markdown into HTML: import { unified } from 'unified' import remarkParse from 'remark-parse' import remarkRehype from 'remark-rehype' import rehypeSanitize from 'rehype-sanitize' import rehypeStringify from 'rehype-stringify' main() async function main() { const file = await unified() .use(remarkParse) // Convert into markdown AST .use(remarkRehype) // Transform to HTML AST .use(rehypeSanitize) // Sanitize HTML input .use(rehypeStringify) // Convert AST into serialized HTML .process('Hello, Next.js!') console.log(String(file)) // <p>Hello, Next.js!</p> } The `remark` and `rehype` ecosystem contains plugins for syntax highlighting, linking headings, generating a table of contents, and more. When using `@next/mdx` as shown above, you **do not** need to use `remark` or `rehype` directly, as it is handled for you. We're describing it here for a deeper understanding of what the `@next/mdx` package is doing underneath. ## Using the Rust-based MDX compiler (Experimental) Next.js supports a new MDX compiler written in Rust. This compiler is still experimental and is not recommended for production use. To use the new compiler, you need to configure `next.config.js` when you pass it to `withMDX`: module.exports = withMDX({ experimental: { mdxRs: true, }, }) ## Helpful Links * MDX * `@next/mdx` * remark * rehype --- ## Page: https://nextjs.org/docs/13/pages/building-your-application/configuring/amp Examples * AMP With Next.js you can turn any React page into an AMP page, with minimal config, and without leaving React. You can read more about AMP in the official amp.dev site. ## Enabling AMP To enable AMP support for a page, and to learn more about the different AMP configs, read the API documentation for `next/amp`. ## Caveats * Only CSS-in-JS is supported. CSS Modules aren't supported by AMP pages at the moment. You can contribute CSS Modules support to Next.js. ## Adding AMP Components The AMP community provides many components to make AMP pages more interactive. Next.js will automatically import all components used on a page and there is no need to manually import AMP component scripts: export const config = { amp: true } function MyAmpPage() { const date = new Date() return ( <div> <p>Some time: {date.toJSON()}</p> <amp-timeago width="0" height="15" datetime={date.toJSON()} layout="responsive" > . </amp-timeago> </div> ) } export default MyAmpPage The above example uses the `amp-timeago` component. By default, the latest version of a component is always imported. If you want to customize the version, you can use `next/head`, as in the following example: import Head from 'next/head' export const config = { amp: true } function MyAmpPage() { const date = new Date() return ( <div> <Head> <script async key="amp-timeago" custom-element="amp-timeago" src="https://cdn.ampproject.org/v0/amp-timeago-0.1.js" /> </Head> <p>Some time: {date.toJSON()}</p> <amp-timeago width="0" height="15" datetime={date.toJSON()} layout="responsive" > . </amp-timeago> </div> ) } export default MyAmpPage ## AMP Validation AMP pages are automatically validated with amphtml-validator during development. Errors and warnings will appear in the terminal where you started Next.js. Pages are also validated during Static HTML export and any warnings / errors will be printed to the terminal. Any AMP errors will cause the export to exit with status code `1` because the export is not valid AMP. ### Custom Validators You can set up custom AMP validator in `next.config.js` as shown below: module.exports = { amp: { validator: './custom_validator.js', }, } ### Skip AMP Validation To turn off AMP validation add the following code to `next.config.js` experimental: { amp: { skipValidation: true } } ### AMP in Static HTML Export When using Static HTML export statically prerender pages, Next.js will detect if the page supports AMP and change the exporting behavior based on that. For example, the hybrid AMP page `pages/about.js` would output: * `out/about.html` - HTML page with client-side React runtime * `out/about.amp.html` - AMP page And if `pages/about.js` is an AMP-only page, then it would output: * `out/about.html` - Optimized AMP page Next.js will automatically insert a link to the AMP version of your page in the HTML version, so you don't have to, like so: <link rel="amphtml" href="/about.amp.html" /> And the AMP version of your page will include a link to the HTML page: <link rel="canonical" href="/about" /> When `trailingSlash` is enabled the exported pages for `pages/about.js` would be: * `out/about/index.html` - HTML page * `out/about.amp/index.html` - AMP page ## TypeScript AMP currently doesn't have built-in types for TypeScript, but it's in their roadmap (#13791). As a workaround you can manually create a file called `amp.d.ts` inside your project and add these custom types. --- ## Page: https://nextjs.org/docs/13/pages/building-your-application/configuring/babel Examples * Customizing babel configuration Next.js includes the `next/babel` preset to your app, which includes everything needed to compile React applications and server-side code. But if you want to extend the default Babel configs, it's also possible. ## Adding Presets and Plugins To start, you only need to define a `.babelrc` file (or `babel.config.js`) in the root directory of your project. If such a file is found, it will be considered as the _source of truth_, and therefore it needs to define what Next.js needs as well, which is the `next/babel` preset. Here's an example `.babelrc` file: { "presets": ["next/babel"], "plugins": [] } You can take a look at this file to learn about the presets included by `next/babel`. To add presets/plugins **without configuring them**, you can do it this way: { "presets": ["next/babel"], "plugins": ["@babel/plugin-proposal-do-expressions"] } ## Customizing Presets and Plugins To add presets/plugins **with custom configuration**, do it on the `next/babel` preset like so: { "presets": [ [ "next/babel", { "preset-env": {}, "transform-runtime": {}, "styled-jsx": {}, "class-properties": {} } ] ], "plugins": [] } To learn more about the available options for each config, visit babel's documentation site. > **Good to know**: > > * Next.js uses the **current** Node.js version for server-side compilations. > * The `modules` option on `"preset-env"` should be kept to `false`, otherwise webpack code splitting is turned off. --- ## Page: https://nextjs.org/docs/13/pages/building-your-application/configuring/post-css Examples * Tailwind CSS Example ## Default Behavior Next.js compiles CSS for its built-in CSS support using PostCSS. Out of the box, with no configuration, Next.js compiles CSS with the following transformations: * Autoprefixer automatically adds vendor prefixes to CSS rules (back to IE11). * Cross-browser Flexbox bugs are corrected to behave like the spec. * New CSS features are automatically compiled for Internet Explorer 11 compatibility: * `all` Property * Break Properties * `font-variant` Property * Gap Properties * Media Query Ranges By default, CSS Grid and Custom Properties (CSS variables) are **not compiled** for IE11 support. To compile CSS Grid Layout for IE11, you can place the following comment at the top of your CSS file: /* autoprefixer grid: autoplace */ You can also enable IE11 support for CSS Grid Layout in your entire project by configuring autoprefixer with the configuration shown below (collapsed). See "Customizing Plugins" below for more information. Click to view the configuration to enable CSS Grid Layout { "plugins": [ "postcss-flexbugs-fixes", [ "postcss-preset-env", { "autoprefixer": { "flexbox": "no-2009", "grid": "autoplace" }, "stage": 3, "features": { "custom-properties": false } } ] ] } CSS variables are not compiled because it is not possible to safely do so. If you must use variables, consider using something like Sass variables which are compiled away by Sass. ## Customizing Target Browsers Next.js allows you to configure the target browsers (for Autoprefixer and compiled css features) through Browserslist. To customize browserslist, create a `browserslist` key in your `package.json` like so: { "browserslist": [">0.3%", "not dead", "not op_mini all"] } You can use the browsersl.ist tool to visualize what browsers you are targeting. ## CSS Modules No configuration is needed to support CSS Modules. To enable CSS Modules for a file, rename the file to have the extension `.module.css`. You can learn more about Next.js' CSS Module support here. ## Customizing Plugins > **Warning**: When you define a custom PostCSS configuration file, Next.js **completely disables** the default behavior. Be sure to manually configure all the features you need compiled, including Autoprefixer. You also need to install any plugins included in your custom configuration manually, i.e. `npm install postcss-flexbugs-fixes postcss-preset-env`. To customize the PostCSS configuration, create a `postcss.config.json` file in the root of your project. This is the default configuration used by Next.js: { "plugins": [ "postcss-flexbugs-fixes", [ "postcss-preset-env", { "autoprefixer": { "flexbox": "no-2009" }, "stage": 3, "features": { "custom-properties": false } } ] ] } > **Good to know**: Next.js also allows the file to be named `.postcssrc.json`, or, to be read from the `postcss` key in `package.json`. It is also possible to configure PostCSS with a `postcss.config.js` file, which is useful when you want to conditionally include plugins based on environment: module.exports = { plugins: process.env.NODE_ENV === 'production' ? [ 'postcss-flexbugs-fixes', [ 'postcss-preset-env', { autoprefixer: { flexbox: 'no-2009', }, stage: 3, features: { 'custom-properties': false, }, }, ], ] : [ // No transformations in development ], } > **Good to know**: Next.js also allows the file to be named `.postcssrc.js`. Do **not use `require()`** to import the PostCSS Plugins. Plugins must be provided as strings. > **Good to know**: If your `postcss.config.js` needs to support other non-Next.js tools in the same project, you must use the interoperable object-based format instead: > > module.exports = { > plugins: { > 'postcss-flexbugs-fixes': {}, > 'postcss-preset-env': { > autoprefixer: { > flexbox: 'no-2009', > }, > stage: 3, > features: { > 'custom-properties': false, > }, > }, > }, > } --- ## Page: https://nextjs.org/docs/13/pages/building-your-application/configuring/custom-server Examples * Custom Server * SSR Caching By default, Next.js includes its own server with `next start`. If you have an existing backend, you can still use it with Next.js (this is not a custom server). A custom Next.js server allows you to start a server 100% programmatically in order to use custom server patterns. Most of the time, you will not need this - but it's available for complete customization. > **Good to know**: > > * Before deciding to use a custom server, please keep in mind that it should only be used when the integrated router of Next.js can't meet your app requirements. A custom server will remove important performance optimizations, like **serverless functions** and **Automatic Static Optimization.** > * A custom server **cannot** be deployed on Vercel. Take a look at the following example of a custom server: const { createServer } = require('http') const { parse } = require('url') const next = require('next') const dev = process.env.NODE_ENV !== 'production' const hostname = 'localhost' const port = 3000 // when using middleware `hostname` and `port` must be provided below const app = next({ dev, hostname, port }) const handle = app.getRequestHandler() app.prepare().then(() => { createServer(async (req, res) => { try { // Be sure to pass `true` as the second argument to `url.parse`. // This tells it to parse the query portion of the URL. const parsedUrl = parse(req.url, true) const { pathname, query } = parsedUrl if (pathname === '/a') { await app.render(req, res, '/a', query) } else if (pathname === '/b') { await app.render(req, res, '/b', query) } else { await handle(req, res, parsedUrl) } } catch (err) { console.error('Error occurred handling', req.url, err) res.statusCode = 500 res.end('internal server error') } }) .once('error', (err) => { console.error(err) process.exit(1) }) .listen(port, () => { console.log(`> Ready on http://${hostname}:${port}`) }) }) > `server.js` doesn't go through babel or webpack. Make sure the syntax and sources this file requires are compatible with the current node version you are running. To run the custom server you'll need to update the `scripts` in `package.json` like so: { "scripts": { "dev": "node server.js", "build": "next build", "start": "NODE_ENV=production node server.js" } } * * * The custom server uses the following import to connect the server with the Next.js application: const next = require('next') const app = next({}) The above `next` import is a function that receives an object with the following options: | Option | Type | Description | | --- | --- | --- | | `conf` | `Object` | The same object you would use in next.config.js. Defaults to `{}` | | `customServer` | `Boolean` | (_Optional_) Set to false when the server was created by Next.js | | `dev` | `Boolean` | (_Optional_) Whether or not to launch Next.js in dev mode. Defaults to `false` | | `dir` | `String` | (_Optional_) Location of the Next.js project. Defaults to `'.'` | | `quiet` | `Boolean` | (_Optional_) Hide error messages containing server information. Defaults to `false` | | `hostname` | `String` | (_Optional_) The hostname the server is running behind | | `port` | `Number` | (_Optional_) The port the server is running behind | | `httpServer` | `node:http#Server` | (_Optional_) The HTTP Server that Next.js is running behind | The returned `app` can then be used to let Next.js handle requests as required. ## Disabling file-system routing By default, `Next` will serve each file in the `pages` folder under a pathname matching the filename. If your project uses a custom server, this behavior may result in the same content being served from multiple paths, which can present problems with SEO and UX. To disable this behavior and prevent routing based on files in `pages`, open `next.config.js` and disable the `useFileSystemPublicRoutes` config: module.exports = { useFileSystemPublicRoutes: false, } > Note that `useFileSystemPublicRoutes` disables filename routes from SSR; client-side routing may still access those paths. When using this option, you should guard against navigation to routes you do not want programmatically. > You may also wish to configure the client-side router to disallow client-side redirects to filename routes; for that refer to `router.beforePopState`. --- ## Page: https://nextjs.org/docs/13/pages/building-your-application/configuring/draft-mode In the Pages documentation and the Data Fetching documentation, we talked about how to pre-render a page at build time (**Static Generation**) using `getStaticProps` and `getStaticPaths`. Static Generation is useful when your pages fetch data from a headless CMS. However, it’s not ideal when you’re writing a draft on your headless CMS and want to view the draft immediately on your page. You’d want Next.js to render these pages at **request time** instead of build time and fetch the draft content instead of the published content. You’d want Next.js to bypass Static Generation only for this specific case. Next.js has a feature called **Draft Mode** which solves this problem. Here are instructions on how to use it. ## Step 1: Create and access the API route > Take a look at the API Routes documentation first if you’re not familiar with Next.js API Routes. First, create the **API route**. It can have any name - e.g. `pages/api/draft.ts` In this API route, you need to call `setDraftMode` on the response object. export default function handler(req, res) { // ... res.setDraftMode({ enable: true }) // ... } This will set a **cookie** to enable draft mode. Subsequent requests containing this cookie will trigger **Draft Mode** changing the behavior for statically generated pages (more on this later). You can test this manually by creating an API route like below and accessing it from your browser manually: // simple example for testing it manually from your browser. export default function handler(req, res) { res.setDraftMode({ enable: true }) res.end('Draft mode is enabled') } If you open your browser’s developer tools and visit `/api/draft`, you’ll notice a `Set-Cookie` response header with a cookie named `__prerender_bypass`. ### Securely accessing it from your Headless CMS In practice, you’d want to call this API route _securely_ from your headless CMS. The specific steps will vary depending on which headless CMS you’re using, but here are some common steps you could take. These steps assume that the headless CMS you’re using supports setting **custom draft URLs**. If it doesn’t, you can still use this method to secure your draft URLs, but you’ll need to construct and access the draft URL manually. **First**, you should create a **secret token string** using a token generator of your choice. This secret will only be known by your Next.js app and your headless CMS. This secret prevents people who don’t have access to your CMS from accessing draft URLs. **Second**, if your headless CMS supports setting custom draft URLs, specify the following as the draft URL. This assumes that your draft API route is located at `pages/api/draft.ts`. https://<your-site>/api/draft?secret=<token>&slug=<path> * `<your-site>` should be your deployment domain. * `<token>` should be replaced with the secret token you generated. * `<path>` should be the path for the page that you want to view. If you want to view `/posts/foo`, then you should use `&slug=/posts/foo`. Your headless CMS might allow you to include a variable in the draft URL so that `<path>` can be set dynamically based on the CMS’s data like so: `&slug=/posts/{entry.fields.slug}` **Finally**, in the draft API route: * Check that the secret matches and that the `slug` parameter exists (if not, the request should fail). * Call `res.setDraftMode`. * Then redirect the browser to the path specified by `slug`. (The following example uses a 307 redirect). export default async (req, res) => { // Check the secret and next parameters // This secret should only be known to this API route and the CMS if (req.query.secret !== 'MY_SECRET_TOKEN' || !req.query.slug) { return res.status(401).json({ message: 'Invalid token' }) } // Fetch the headless CMS to check if the provided `slug` exists // getPostBySlug would implement the required fetching logic to the headless CMS const post = await getPostBySlug(req.query.slug) // If the slug doesn't exist prevent draft mode from being enabled if (!post) { return res.status(401).json({ message: 'Invalid slug' }) } // Enable Draft Mode by setting the cookie res.setDraftMode({ enable: true }) // Redirect to the path from the fetched post // We don't redirect to req.query.slug as that might lead to open redirect vulnerabilities res.redirect(post.slug) } If it succeeds, then the browser will be redirected to the path you want to view with the draft mode cookie. ## Step 2: Update `getStaticProps` The next step is to update `getStaticProps` to support draft mode. If you request a page which has `getStaticProps` with the cookie set (via `res.setDraftMode`), then `getStaticProps` will be called at **request time** (instead of at build time). Furthermore, it will be called with a `context` object where `context.draftMode` will be `true`. export async function getStaticProps(context) { if (context.draftMode) { // dynamic data } } We used `res.setDraftMode` in the draft API route, so `context.draftMode` will be `true`. If you’re also using `getStaticPaths`, then `context.params` will also be available. ### Fetch draft data You can update `getStaticProps` to fetch different data based on `context.draftMode`. For example, your headless CMS might have a different API endpoint for draft posts. If so, you can modify the API endpoint URL like below: export async function getStaticProps(context) { const url = context.draftMode ? 'https://draft.example.com' : 'https://production.example.com' const res = await fetch(url) // ... } That’s it! If you access the draft API route (with `secret` and `slug`) from your headless CMS or manually, you should now be able to see the draft content. And if you update your draft without publishing, you should be able to view the draft. Set this as the draft URL on your headless CMS or access manually, and you should be able to see the draft. https://<your-site>/api/draft?secret=<token>&slug=<path> ## More Details ### Clear the Draft Mode cookie By default, the Draft Mode session ends when the browser is closed. To clear the Draft Mode cookie manually, create an API route that calls `setDraftMode({ enable: false })`: export default function handler(req, res) { res.setDraftMode({ enable: false }) } Then, send a request to `/api/disable-draft` to invoke the API Route. If calling this route using `next/link`, you must pass `prefetch={false}` to prevent accidentally deleting the cookie on prefetch. ### Works with `getServerSideProps` Draft Mode works with `getServerSideProps`, and is available as a `draftMode` key in the `context` object. > **Good to know**: You shouldn't set the `Cache-Control` header when using Draft Mode because it cannot be bypassed. Instead, we recommend using ISR. ### Works with API Routes API Routes will have access to `draftMode` on the request object. For example: export default function myApiRoute(req, res) { if (req.draftMode) { // get draft data } } ### Unique per `next build` A new bypass cookie value will be generated each time you run `next build`. This ensures that the bypass cookie can’t be guessed. > **Good to know**: To test Draft Mode locally over HTTP, your browser will need to allow third-party cookies and local storage access. --- ## Page: https://nextjs.org/docs/13/pages/building-your-application/configuring/error-handling This documentation explains how you can handle development, server-side, and client-side errors. ## Handling Errors in Development When there is a runtime error during the development phase of your Next.js application, you will encounter an **overlay**. It is a modal that covers the webpage. It is **only** visible when the development server runs using `next dev` via `pnpm dev`, `npm run dev`, `yarn dev`, or `bun dev` and will not be shown in production. Fixing the error will automatically dismiss the overlay. Here is an example of an overlay:  ## Handling Server Errors Next.js provides a static 500 page by default to handle server-side errors that occur in your application. You can also customize this page by creating a `pages/500.js` file. Having a 500 page in your application does not show specific errors to the app user. You can also use 404 page to handle specific runtime error like `file not found`. ## Handling Client Errors React Error Boundaries is a graceful way to handle a JavaScript error on the client so that the other parts of the application continue working. In addition to preventing the page from crashing, it allows you to provide a custom fallback component and even log error information. To use Error Boundaries for your Next.js application, you must create a class component `ErrorBoundary` and wrap the `Component` prop in the `pages/_app.js` file. This component will be responsible to: * Render a fallback UI after an error is thrown * Provide a way to reset the Application's state * Log error information You can create an `ErrorBoundary` class component by extending `React.Component`. For example: class ErrorBoundary extends React.Component { constructor(props) { super(props) // Define a state variable to track whether is an error or not this.state = { hasError: false } } static getDerivedStateFromError(error) { // Update state so the next render will show the fallback UI return { hasError: true } } componentDidCatch(error, errorInfo) { // You can use your own error logging service here console.log({ error, errorInfo }) } render() { // Check if the error is thrown if (this.state.hasError) { // You can render any custom fallback UI return ( <div> <h2>Oops, there is an error!</h2> <button type="button" onClick={() => this.setState({ hasError: false })} > Try again? </button> </div> ) } // Return children components in case of no error return this.props.children } } export default ErrorBoundary The `ErrorBoundary` component keeps track of an `hasError` state. The value of this state variable is a boolean. When the value of `hasError` is `true`, then the `ErrorBoundary` component will render a fallback UI. Otherwise, it will render the children components. After creating an `ErrorBoundary` component, import it in the `pages/_app.js` file to wrap the `Component` prop in your Next.js application. // Import the ErrorBoundary component import ErrorBoundary from '../components/ErrorBoundary' function MyApp({ Component, pageProps }) { return ( // Wrap the Component prop with ErrorBoundary component <ErrorBoundary> <Component {...pageProps} /> </ErrorBoundary> ) } export default MyApp You can learn more about Error Boundaries in React's documentation. ### Reporting Errors To monitor client errors, use a service like Sentry, Bugsnag or Datadog. --- ## Page: https://nextjs.org/docs/13/pages/building-your-application/configuring/debugging This documentation explains how you can debug your Next.js frontend and backend code with full source maps support using either the VS Code debugger or Chrome DevTools. Any debugger that can attach to Node.js can also be used to debug a Next.js application. You can find more details in the Node.js Debugging Guide. ## Debugging with VS Code Create a file named `.vscode/launch.json` at the root of your project with the following content: { "version": "0.2.0", "configurations": [ { "name": "Next.js: debug server-side", "type": "node-terminal", "request": "launch", "command": "npm run dev" }, { "name": "Next.js: debug client-side", "type": "chrome", "request": "launch", "url": "http://localhost:3000" }, { "name": "Next.js: debug full stack", "type": "node-terminal", "request": "launch", "command": "npm run dev", "serverReadyAction": { "pattern": "- Local:.+(https?://.+)", "uriFormat": "%s", "action": "debugWithChrome" } } ] } `npm run dev` can be replaced with `yarn dev` if you're using Yarn. If you're changing the port number your application starts on, replace the `3000` in `http://localhost:3000` with the port you're using instead. Now go to the Debug panel (`Ctrl+Shift+D` on Windows/Linux, `⇧+⌘+D` on macOS), select a launch configuration, then press `F5` or select **Debug: Start Debugging** from the Command Palette to start your debugging session. ## Using the Debugger in Jetbrains WebStorm Click the drop down menu listing the runtime configuration, and click `Edit Configurations...`. Create a `Javascript Debug` debug configuration with `http://localhost:3000` as the URL. Customize to your liking (e.g. Browser for debugging, store as project file), and click `OK`. Run this debug configuration, and the selected browser should automatically open. At this point, you should have 2 applications in debug mode: the NextJS node application, and the client/ browser application. ## Debugging with Chrome DevTools ### Client-side code Start your development server as usual by running `next dev`, `npm run dev`, or `yarn dev`. Once the server starts, open `http://localhost:3000` (or your alternate URL) in Chrome. Next, open Chrome's Developer Tools (`Ctrl+Shift+J` on Windows/Linux, `⌥+⌘+I` on macOS), then go to the **Sources** tab. Now, any time your client-side code reaches a `debugger` statement, code execution will pause and that file will appear in the debug area. You can also press `Ctrl+P` on Windows/Linux or `⌘+P` on macOS to search for a file and set breakpoints manually. Note that when searching here, your source files will have paths starting with `webpack://_N_E/./`. ### Server-side code To debug server-side Next.js code with Chrome DevTools, you need to pass the `--inspect` flag to the underlying Node.js process: NODE_OPTIONS='--inspect' next dev If you're using `npm run dev` or `yarn dev` then you should update the `dev` script on your `package.json`: { "scripts": { "dev": "NODE_OPTIONS='--inspect' next dev" } } Launching the Next.js dev server with the `--inspect` flag will look something like this: Debugger listening on ws://127.0.0.1:9229/0cf90313-350d-4466-a748-cd60f4e47c95 For help, see: https://nodejs.org/en/docs/inspector ready - started server on 0.0.0.0:3000, url: http://localhost:3000 > Be aware that running `NODE_OPTIONS='--inspect' npm run dev` or `NODE_OPTIONS='--inspect' yarn dev` won't work. This would try to start multiple debuggers on the same port: one for the npm/yarn process and one for Next.js. You would then get an error like `Starting inspector on 127.0.0.1:9229 failed: address already in use` in your console. Once the server starts, open a new tab in Chrome and visit `chrome://inspect`, where you should see your Next.js application inside the **Remote Target** section. Click **inspect** under your application to open a separate DevTools window, then go to the **Sources** tab. Debugging server-side code here works much like debugging client-side code with Chrome DevTools, except that when you search for files here with `Ctrl+P` or `⌘+P`, your source files will have paths starting with `webpack://{application-name}/./` (where `{application-name}` will be replaced with the name of your application according to your `package.json` file). ### Debugging on Windows Windows users may run into an issue when using `NODE_OPTIONS='--inspect'` as that syntax is not supported on Windows platforms. To get around this, install the `cross-env` package as a development dependency (`-D` with `npm` and `yarn`) and replace the `dev` script with the following. { "scripts": { "dev": "cross-env NODE_OPTIONS='--inspect' next dev" } } `cross-env` will set the `NODE_OPTIONS` environment variable regardless of which platform you are on (including Mac, Linux, and Windows) and allow you to debug consistently across devices and operating systems. > **Good to know**: Ensure Windows Defender is disabled on your machine. This external service will check _every file read_, which has been reported to greatly increase Fast Refresh time with `next dev`. This is a known issue, not related to Next.js, but it does affect Next.js development. ## More information To learn more about how to use a JavaScript debugger, take a look at the following documentation: * Node.js debugging in VS Code: Breakpoints * Chrome DevTools: Debug JavaScript --- ## Page: https://nextjs.org/docs/13/pages/building-your-application/configuring/preview-mode > **Note**: This feature is superseded by Draft Mode. Examples * WordPress Example (Demo) * DatoCMS Example (Demo) * TakeShape Example (Demo) * Sanity Example (Demo) * Prismic Example (Demo) * Contentful Example (Demo) * Strapi Example (Demo) * Prepr Example (Demo) * Agility CMS Example (Demo) * Cosmic Example (Demo) * ButterCMS Example (Demo) * Storyblok Example (Demo) * GraphCMS Example (Demo) * Kontent Example (Demo) * Umbraco Heartcore Example (Demo) * Plasmic Example (Demo) * Enterspeed Example (Demo) * Makeswift Example (Demo) In the Pages documentation and the Data Fetching documentation, we talked about how to pre-render a page at build time (**Static Generation**) using `getStaticProps` and `getStaticPaths`. Static Generation is useful when your pages fetch data from a headless CMS. However, it’s not ideal when you’re writing a draft on your headless CMS and want to **preview** the draft immediately on your page. You’d want Next.js to render these pages at **request time** instead of build time and fetch the draft content instead of the published content. You’d want Next.js to bypass Static Generation only for this specific case. Next.js has a feature called **Preview Mode** which solves this problem. Here are instructions on how to use it. ## Step 1: Create and access a preview API route > Take a look at the API Routes documentation first if you’re not familiar with Next.js API Routes. First, create a **preview API route**. It can have any name - e.g. `pages/api/preview.js` (or `.ts` if using TypeScript). In this API route, you need to call `setPreviewData` on the response object. The argument for `setPreviewData` should be an object, and this can be used by `getStaticProps` (more on this later). For now, we’ll use `{}`. export default function handler(req, res) { // ... res.setPreviewData({}) // ... } `res.setPreviewData` sets some **cookies** on the browser which turns on the preview mode. Any requests to Next.js containing these cookies will be considered as the **preview mode**, and the behavior for statically generated pages will change (more on this later). You can test this manually by creating an API route like below and accessing it from your browser manually: // simple example for testing it manually from your browser. export default function handler(req, res) { res.setPreviewData({}) res.end('Preview mode enabled') } If you open your browser’s developer tools and visit `/api/preview`, you’ll notice that the `__prerender_bypass` and `__next_preview_data` cookies will be set on this request. ### Securely accessing it from your Headless CMS In practice, you’d want to call this API route _securely_ from your headless CMS. The specific steps will vary depending on which headless CMS you’re using, but here are some common steps you could take. These steps assume that the headless CMS you’re using supports setting **custom preview URLs**. If it doesn’t, you can still use this method to secure your preview URLs, but you’ll need to construct and access the preview URL manually. **First**, you should create a **secret token string** using a token generator of your choice. This secret will only be known by your Next.js app and your headless CMS. This secret prevents people who don’t have access to your CMS from accessing preview URLs. **Second**, if your headless CMS supports setting custom preview URLs, specify the following as the preview URL. This assumes that your preview API route is located at `pages/api/preview.js`. https://<your-site>/api/preview?secret=<token>&slug=<path> * `<your-site>` should be your deployment domain. * `<token>` should be replaced with the secret token you generated. * `<path>` should be the path for the page that you want to preview. If you want to preview `/posts/foo`, then you should use `&slug=/posts/foo`. Your headless CMS might allow you to include a variable in the preview URL so that `<path>` can be set dynamically based on the CMS’s data like so: `&slug=/posts/{entry.fields.slug}` **Finally**, in the preview API route: * Check that the secret matches and that the `slug` parameter exists (if not, the request should fail). * Call `res.setPreviewData`. * Then redirect the browser to the path specified by `slug`. (The following example uses a 307 redirect). export default async (req, res) => { // Check the secret and next parameters // This secret should only be known to this API route and the CMS if (req.query.secret !== 'MY_SECRET_TOKEN' || !req.query.slug) { return res.status(401).json({ message: 'Invalid token' }) } // Fetch the headless CMS to check if the provided `slug` exists // getPostBySlug would implement the required fetching logic to the headless CMS const post = await getPostBySlug(req.query.slug) // If the slug doesn't exist prevent preview mode from being enabled if (!post) { return res.status(401).json({ message: 'Invalid slug' }) } // Enable Preview Mode by setting the cookies res.setPreviewData({}) // Redirect to the path from the fetched post // We don't redirect to req.query.slug as that might lead to open redirect vulnerabilities res.redirect(post.slug) } If it succeeds, then the browser will be redirected to the path you want to preview with the preview mode cookies being set. ## Step 2: Update `getStaticProps` The next step is to update `getStaticProps` to support the preview mode. If you request a page which has `getStaticProps` with the preview mode cookies set (via `res.setPreviewData`), then `getStaticProps` will be called at **request time** (instead of at build time). Furthermore, it will be called with a `context` object where: * `context.preview` will be `true`. * `context.previewData` will be the same as the argument used for `setPreviewData`. export async function getStaticProps(context) { // If you request this page with the preview mode cookies set: // // - context.preview will be true // - context.previewData will be the same as // the argument used for `setPreviewData`. } We used `res.setPreviewData({})` in the preview API route, so `context.previewData` will be `{}`. You can use this to pass session information from the preview API route to `getStaticProps` if necessary. If you’re also using `getStaticPaths`, then `context.params` will also be available. ### Fetch preview data You can update `getStaticProps` to fetch different data based on `context.preview` and/or `context.previewData`. For example, your headless CMS might have a different API endpoint for draft posts. If so, you can use `context.preview` to modify the API endpoint URL like below: export async function getStaticProps(context) { // If context.preview is true, append "/preview" to the API endpoint // to request draft data instead of published data. This will vary // based on which headless CMS you're using. const res = await fetch(`https://.../${context.preview ? 'preview' : ''}`) // ... } That’s it! If you access the preview API route (with `secret` and `slug`) from your headless CMS or manually, you should now be able to see the preview content. And if you update your draft without publishing, you should be able to preview the draft. Set this as the preview URL on your headless CMS or access manually, and you should be able to see the preview. https://<your-site>/api/preview?secret=<token>&slug=<path> ## More Details > **Good to know**: during rendering `next/router` exposes an `isPreview` flag, see the router object docs for more info. ### Specify the Preview Mode duration `setPreviewData` takes an optional second parameter which should be an options object. It accepts the following keys: * `maxAge`: Specifies the number (in seconds) for the preview session to last for. * `path`: Specifies the path the cookie should be applied under. Defaults to `/` enabling preview mode for all paths. setPreviewData(data, { maxAge: 60 * 60, // The preview mode cookies expire in 1 hour path: '/about', // The preview mode cookies apply to paths with /about }) ### Clear the Preview Mode cookies By default, no expiration date is set for Preview Mode cookies, so the preview session ends when the browser is closed. To clear the Preview Mode cookies manually, create an API route that calls `clearPreviewData()`: export default function handler(req, res) { res.clearPreviewData({}) } Then, send a request to `/api/clear-preview-mode-cookies` to invoke the API Route. If calling this route using `next/link`, you must pass `prefetch={false}` to prevent calling `clearPreviewData` during link prefetching. If a path was specified in the `setPreviewData` call, you must pass the same path to `clearPreviewData`: export default function handler(req, res) { const { path } = req.query res.clearPreviewData({ path }) } ### `previewData` size limits You can pass an object to `setPreviewData` and have it be available in `getStaticProps`. However, because the data will be stored in a cookie, there’s a size limitation. Currently, preview data is limited to 2KB. ### Works with `getServerSideProps` The preview mode works on `getServerSideProps` as well. It will also be available on the `context` object containing `preview` and `previewData`. > **Good to know**: You shouldn't set the `Cache-Control` header when using Preview Mode because it cannot be bypassed. Instead, we recommend using ISR. ### Works with API Routes API Routes will have access to `preview` and `previewData` under the request object. For example: export default function myApiRoute(req, res) { const isPreview = req.preview const previewData = req.previewData // ... } ### Unique per `next build` Both the bypass cookie value and the private key for encrypting the `previewData` change when `next build` is completed. This ensures that the bypass cookie can’t be guessed. > **Good to know**: To test Preview Mode locally over HTTP your browser will need to allow third-party cookies and local storage access. --- ## Page: https://nextjs.org/docs/13/pages/building-your-application/configuring/content-security-policy Content Security Policy (CSP) is important to guard your Next.js application against various security threats such as cross-site scripting (XSS), clickjacking, and other code injection attacks. By using CSP, developers can specify which origins are permissible for content sources, scripts, stylesheets, images, fonts, objects, media (audio, video), iframes, and more. Examples * Strict CSP ## Nonces A nonce is a unique, random string of characters created for a one-time use. It is used in conjunction with CSP to selectively allow certain inline scripts or styles to execute, bypassing strict CSP directives. ### Why use a nonce? Even though CSPs are designed to block malicious scripts, there are legitimate scenarios where inline scripts are necessary. In such cases, nonces offer a way to allow these scripts to execute if they have the correct nonce. ### Adding a nonce with Middleware Middleware enables you to add headers and generate nonces before the page renders. Every time a page is viewed, a fresh nonce should be generated. This means that you **must use dynamic rendering to add nonces**. For example: import { NextRequest, NextResponse } from 'next/server' export function middleware(request: NextRequest) { const nonce = Buffer.from(crypto.randomUUID()).toString('base64') const cspHeader = ` default-src 'self'; script-src 'self' 'nonce-${nonce}' 'strict-dynamic'; style-src 'self' 'nonce-${nonce}'; img-src 'self' blob: data:; font-src 'self'; object-src 'none'; base-uri 'self'; form-action 'self'; frame-ancestors 'none'; block-all-mixed-content; upgrade-insecure-requests; ` const requestHeaders = new Headers(request.headers) requestHeaders.set('x-nonce', nonce) requestHeaders.set( 'Content-Security-Policy', // Replace newline characters and spaces cspHeader.replace(/\s{2,}/g, ' ').trim() ) return NextResponse.next({ headers: requestHeaders, request: { headers: requestHeaders, }, }) } By default, Middleware runs on all requests. You can filter Middleware to run on specific paths using a `matcher`. We recommend ignoring matching prefetches (from `next/link`) and static assets that don't need the CSP header. export const config = { matcher: [ /* * Match all request paths except for the ones starting with: * - api (API routes) * - _next/static (static files) * - _next/image (image optimization files) * - favicon.ico (favicon file) */ { source: '/((?!api|_next/static|_next/image|favicon.ico).*)', missing: [ { type: 'header', key: 'next-router-prefetch' }, { type: 'header', key: 'purpose', value: 'prefetch' }, ], }, ], } ### Reading the nonce You can now read the nonce from a Server Component using `headers`: import { headers } from 'next/headers' import Script from 'next/script' export default function Page() { const nonce = headers().get('x-nonce') return ( <Script src="https://www.googletagmanager.com/gtag/js" strategy="afterInteractive" nonce={nonce} /> ) } ## Version History We recommend using `v13.4.20+` of Next.js to properly handle and apply nonces. --- ## Page: https://nextjs.org/docs/13/pages/building-your-application/deploying Congratulations! You're here because you are ready to deploy your Next.js application. This page will show how to deploy either managed or self-hosted using the Next.js Build API. ## Next.js Build API `next build` generates an optimized version of your application for production. This standard output includes: * HTML files for pages using `getStaticProps` or Automatic Static Optimization * CSS files for global styles or for individually scoped styles * JavaScript for pre-rendering dynamic content from the Next.js server * JavaScript for interactivity on the client-side through React This output is generated inside the `.next` folder: * `.next/static/chunks/pages` – Each JavaScript file inside this folder relates to the route with the same name. For example, `.next/static/chunks/pages/about.js` would be the JavaScript file loaded when viewing the `/about` route in your application * `.next/static/media` – Statically imported images from `next/image` are hashed and copied here * `.next/static/css` – Global CSS files for all pages in your application * `.next/server/pages` – The HTML and JavaScript entry points prerendered from the server. The `.nft.json` files are created when Output File Tracing is enabled and contain all the file paths that depend on a given page. * `.next/server/chunks` – Shared JavaScript chunks used in multiple places throughout your application * `.next/cache` – Output for the build cache and cached images, responses, and pages from the Next.js server. Using a cache helps decrease build times and improve performance of loading images All JavaScript code inside `.next` has been **compiled** and browser bundles have been **minified** to help achieve the best performance and support all modern browsers. ## Managed Next.js with Vercel Vercel is the fastest way to deploy your Next.js application with zero configuration. When deploying to Vercel, the platform automatically detects Next.js, runs `next build`, and optimizes the build output for you, including: * Persisting cached assets across deployments if unchanged * Immutable deployments with a unique URL for every commit * Pages are automatically statically optimized, if possible * Assets (JavaScript, CSS, images, fonts) are compressed and served from a Global Edge Network * API Routes are automatically optimized as isolated Serverless Functions that can scale infinitely * Middleware is automatically optimized as Edge Functions that have zero cold starts and boot instantly In addition, Vercel provides features like: * Automatic performance monitoring with Next.js Speed Insights * Automatic HTTPS and SSL certificates * Automatic CI/CD (through GitHub, GitLab, Bitbucket, etc.) * Support for Environment Variables * Support for Custom Domains * Support for Image Optimization with `next/image` * Instant global deployments via `git push` Deploy a Next.js application to Vercel for free to try it out. ## Self-Hosting You can self-host Next.js with support for all features using Node.js or Docker. You can also do a Static HTML Export, which has some limitations. ### Node.js Server Next.js can be deployed to any hosting provider that supports Node.js. For example, AWS EC2 or a DigitalOcean Droplet. First, ensure your `package.json` has the `"build"` and `"start"` scripts: { "scripts": { "dev": "next dev", "build": "next build", "start": "next start" } } Then, run `npm run build` to build your application. Finally, run `npm run start` to start the Node.js server. This server supports all features of Next.js. > If you are using `next/image`, consider adding `sharp` for more performant Image Optimization in your production environment by running `npm install sharp` in your project directory. On Linux platforms, `sharp` may require additional configuration to prevent excessive memory usage. ### Docker Image Next.js can be deployed to any hosting provider that supports Docker containers. You can use this approach when deploying to container orchestrators such as Kubernetes or HashiCorp Nomad, or when running inside a single node in any cloud provider. 1. Install Docker on your machine 2. Clone the with-docker example 3. Build your container: `docker build -t nextjs-docker .` 4. Run your container: `docker run -p 3000:3000 nextjs-docker` If you need to use different Environment Variables across multiple environments, check out our with-docker-multi-env example. ### Static HTML Export If you’d like to do a static HTML export of your Next.js app, follow the directions on our Static HTML Export documentation. ## Other Services The following services support Next.js `v12+`. Below, you’ll find examples or guides to deploy Next.js to each service. ### Managed Server * AWS Copilot * Digital Ocean App Platform * Google Cloud Run * Heroku * Railway * Render > **Good to know**: There are also managed platforms that allow you to use a Dockerfile as shown in the example above. ### Static Only The following services only support deploying Next.js using `output: 'export'`. * GitHub Pages You can also manually deploy the output from `output: 'export'` to any static hosting provider, often through your CI/CD pipeline like GitHub Actions, Jenkins, AWS CodeBuild, Circle CI, Azure Pipelines, and more. ### Serverless * AWS Amplify * Azure Static Web Apps * Cloudflare Pages * Firebase * Netlify * Terraform * SST > **Good to know**: Not all serverless providers implement the Next.js Build API from `next start`. Please check with the provider to see what features are supported. ## Automatic Updates When you deploy your Next.js application, you want to see the latest version without needing to reload. Next.js will automatically load the latest version of your application in the background when routing. For client-side navigations, `next/link` will temporarily function as a normal `<a>` tag. > **Good to know**: If a new page (with an old version) has already been prefetched by `next/link`, Next.js will use the old version. Navigating to a page that has _not_ been prefetched (and is not cached at the CDN level) will load the latest version. ## Manual Graceful shutdowns When self-hosting, you might want to run code when the server shuts down on `SIGTERM` or `SIGINT` signals. You can set the env variable `NEXT_MANUAL_SIG_HANDLE` to `true` and then register a handler for that signal inside your `_document.js` file. You will need to register the env variable directly in the `package.json` script, not in the `.env` file. > **Good to know**: Manual signal handling is not available in `next dev`. { "scripts": { "dev": "next dev", "build": "next build", "start": "NEXT_MANUAL_SIG_HANDLE=true next start" } } if (process.env.NEXT_MANUAL_SIG_HANDLE) { // this should be added in your custom _document process.on('SIGTERM', () => { console.log('Received SIGTERM: ', 'cleaning up') process.exit(0) }) process.on('SIGINT', () => { console.log('Received SIGINT: ', 'cleaning up') process.exit(0) }) } --- ## Page: https://nextjs.org/docs/13/pages/building-your-application/deploying/production-checklist Before taking your Next.js application to production, here are some recommendations to ensure the best user experience. ## In General * Use caching wherever possible. * Ensure your database and backend are deployed in the same region. * Aim to ship the least amount of JavaScript possible. * Defer loading heavy JavaScript bundles until needed. * Ensure logging is set up. * Ensure error handling is set up. * Configure the 404 (Not Found) and 500 (Error) pages. * Ensure you are measuring performance. * Run Lighthouse to check for performance, best practices, accessibility, and SEO. For best results, use a production build of Next.js and use incognito in your browser so results aren't affected by extensions. * Review Supported Browsers and Features. * Improve performance using: * `next/image` and Automatic Image Optimization * Automatic Font Optimization * Script Optimization * Improve loading performance * Consider adding a Content Security Policy ## Caching Examples * ssr-caching Caching improves response times and reduces the number of requests to external services. Next.js automatically adds caching headers to immutable assets served from `/_next/static` including JavaScript, CSS, static images, and other media. Cache-Control: public, max-age=31536000, immutable `Cache-Control` headers set in `next.config.js` will be overwritten in production to ensure that static assets can be cached effectively. If you need to revalidate the cache of a page that has been statically generated, you can do so by setting `revalidate` in the page's `getStaticProps` function. If you're using `next/image`, you can configure the `minimumCacheTTL` for the default Image Optimization loader. > **Good to know**: When running your application locally with `next dev`, your headers are overwritten to prevent caching locally. Cache-Control: no-cache, no-store, max-age=0, must-revalidate You can also use caching headers inside `getServerSideProps` and API Routes for dynamic responses. For example, using `stale-while-revalidate`. // This value is considered fresh for ten seconds (s-maxage=10). // If a request is repeated within the next 10 seconds, the previously // cached value will still be fresh. If the request is repeated before 59 seconds, // the cached value will be stale but still render (stale-while-revalidate=59). // // In the background, a revalidation request will be made to populate the cache // with a fresh value. If you refresh the page, you will see the new value. export async function getServerSideProps({ req, res }) { res.setHeader( 'Cache-Control', 'public, s-maxage=10, stale-while-revalidate=59' ) return { props: {}, } } By default, `Cache-Control` headers will be set differently depending on how your page fetches data. * If the page uses `getServerSideProps` or `getInitialProps`, it will use the default `Cache-Control` header set by `next start` in order to prevent accidental caching of responses that cannot be cached. If you want a different cache behavior while using `getServerSideProps`, use `res.setHeader('Cache-Control', 'value_you_prefer')` inside of the function as shown above. * If the page is using `getStaticProps`, it will have a `Cache-Control` header of `s-maxage=REVALIDATE_SECONDS, stale-while-revalidate`, or if `revalidate` is _not_ used, `s-maxage=31536000, stale-while-revalidate` to cache for the maximum age possible. > **Good to know**: Your deployment provider must support caching for dynamic responses. If you are self-hosting, you will need to add this logic yourself using a key/value store like Redis. If you are using Vercel, Edge Caching works without configuration. ## Reducing JavaScript Size Examples * with-dynamic-import To reduce the amount of JavaScript sent to the browser, you can use the following tools to understand what is included inside each JavaScript bundle: * Import Cost – Display the size of the imported package inside VSCode. * Package Phobia – Find the cost of adding a new dev dependency to your project. * Bundle Phobia - Analyze how much a dependency can increase bundle sizes. * Webpack Bundle Analyzer – Visualize the size of webpack output files with an interactive, zoomable treemap. * bundlejs - An online tool to quickly bundle & minify your projects, while viewing the compressed gzip/brotli bundle size, all running locally on your browser. Each file inside your `pages/` directory will automatically be code split into its own JavaScript bundle during `next build`. You can also use Dynamic Imports to lazy-load components and libraries. For example, you might want to defer loading your modal code until a user clicks the open button. ## Logging Examples * Pino and Logflare Example Since Next.js runs on both the client and server, there are multiple forms of logging supported: * `console.log` in the browser * `stdout` on the server If you want a structured logging package, we recommend Pino. If you're using Vercel, there are pre-built logging integrations compatible with Next.js. ## Error Handling Examples * with-sentry When an unhandled exception occurs, you can control the experience for your users with the 500 page. We recommend customizing this to your brand instead of the default Next.js theme. You can also log and track exceptions with a tool like Sentry. This example shows how to catch & report errors on both the client and server-side, using the Sentry SDK for Next.js. There's also a Sentry integration for Vercel. ## Loading Performance To improve loading performance, you first need to determine what to measure and how to measure it. Core Web Vitals is a good industry standard that is measured using your own web browser. If you are not familiar with the metrics of Core Web Vitals, review this blog post and determine which specific metric/s will be your drivers for loading performance. Ideally, you would want to measure the loading performance in the following environments: * In the lab, using your own computer or a simulator. * In the field, using real-world data from actual visitors. * Local, using a test that runs on your device. * Remote, using a test that runs in the cloud. Once you are able to measure the loading performance, use the following strategies to improve it iteratively so that you apply one strategy, measure the new performance and continue tweaking until you do not see much improvement. Then, you can move on to the next strategy. * Use caching regions that are close to the regions where your database or API is deployed. * As described in the caching section, use a `stale-while-revalidate` value that will not overload your backend. * Use Incremental Static Regeneration to reduce the number of requests to your backend. * Remove unused JavaScript. Review this blog post to understand what Core Web Vitals metrics bundle size affects and what strategies you can use to reduce it, such as: * Setting up your Code Editor to view import costs and sizes * Finding alternative smaller packages * Dynamically loading components and dependencies --- ## Page: https://nextjs.org/docs/13/pages/building-your-application/deploying/static-exports Next.js enables starting as a static site or Single-Page Application (SPA), then later optionally upgrading to use features that require a server. When running `next build`, Next.js generates an HTML file per route. By breaking a strict SPA into individual HTML files, Next.js can avoid loading unnecessary JavaScript code on the client-side, reducing the bundle size and enabling faster page loads. Since Next.js supports this static export, it can be deployed and hosted on any web server that can serve HTML/CSS/JS static assets. > **Good to know**: We recommend using the App Router for enhanced static export support. ## Configuration To enable a static export, change the output mode inside `next.config.js`: /** * @type {import('next').NextConfig} */ const nextConfig = { output: 'export', // Optional: Change links `/me` -> `/me/` and emit `/me.html` -> `/me/index.html` // trailingSlash: true, // Optional: Prevent automatic `/me` -> `/me/`, instead preserve `href` // skipTrailingSlashRedirect: true, // Optional: Change the output directory `out` -> `dist` // distDir: 'dist', } module.exports = nextConfig After running `next build`, Next.js will produce an `out` folder which contains the HTML/CSS/JS assets for your application. You can utilize `getStaticProps` and `getStaticPaths` to generate an HTML file for each page in your `pages` directory (or more for dynamic routes). ## Supported Features The majority of core Next.js features needed to build a static site are supported, including: * Dynamic Routes when using `getStaticPaths` * Prefetching with `next/link` * Preloading JavaScript * Dynamic Imports * Any styling options (e.g. CSS Modules, styled-jsx) * Client-side data fetching * `getStaticProps` * `getStaticPaths` ### Image Optimization Image Optimization through `next/image` can be used with a static export by defining a custom image loader in `next.config.js`. For example, you can optimize images with a service like Cloudinary: /** @type {import('next').NextConfig} */ const nextConfig = { output: 'export', images: { loader: 'custom', loaderFile: './my-loader.ts', }, } module.exports = nextConfig This custom loader will define how to fetch images from a remote source. For example, the following loader will construct the URL for Cloudinary: export default function cloudinaryLoader({ src, width, quality, }: { src: string width: number quality?: number }) { const params = ['f_auto', 'c_limit', `w_${width}`, `q_${quality || 'auto'}`] return `https://res.cloudinary.com/demo/image/upload/${params.join( ',' )}${src}` } You can then use `next/image` in your application, defining relative paths to the image in Cloudinary: import Image from 'next/image' export default function Page() { return <Image alt="turtles" src="/turtles.jpg" width={300} height={300} /> } ## Unsupported Features Features that require a Node.js server, or dynamic logic that cannot be computed during the build process, are **not** supported: * Internationalized Routing * API Routes * Rewrites * Redirects * Headers * Middleware * Incremental Static Regeneration * Image Optimization with the default `loader` * Draft Mode * `getStaticPaths` with `fallback: true` * `getStaticPaths` with `fallback: 'blocking'` * `getServerSideProps` ## Deploying With a static export, Next.js can be deployed and hosted on any web server that can serve HTML/CSS/JS static assets. When running `next build`, Next.js generates the static export into the `out` folder. Using `next export` is no longer needed. For example, let's say you have the following routes: * `/` * `/blog/[id]` After running `next build`, Next.js will generate the following files: * `/out/index.html` * `/out/404.html` * `/out/blog/post-1.html` * `/out/blog/post-2.html` If you are using a static host like Nginx, you can configure rewrites from incoming requests to the correct files: server { listen 80; server_name acme.com; root /var/www/out; location / { try_files $uri $uri.html $uri/ =404; } # This is necessary when `trailingSlash: false`. # You can omit this when `trailingSlash: true`. location /blog/ { rewrite ^/blog/(.*)$ /blog/$1.html break; } error_page 404 /404.html; location = /404.html { internal; } } ## Version History | Version | Changes | | --- | --- | | `v13.4.0` | App Router (Stable) adds enhanced static export support, including using React Server Components and Route Handlers. | | `v13.3.0` | `next export` is deprecated and replaced with `"output": "export"` | --- ## Page: https://nextjs.org/docs/13/pages/building-your-application/deploying/multi-zones You are currently viewing documentation for version 13 of Next.js. Examples * With Zones A zone is a single deployment of a Next.js app. You can have multiple zones and merge them as a single app. For example, let's say you have the following apps: * An app for serving `/blog/**` * Another app for serving all other pages With multi zones support, you can merge both these apps into a single one allowing your customers to browse it using a single URL, but you can develop and deploy both apps independently. ## How to define a zone There are no zone related APIs. You only need to do the following: * Make sure to keep only the pages you need in your app, meaning that an app can't have pages from another app, if app `A` has `/blog` then app `B` shouldn't have it too. * Make sure to configure a basePath to avoid conflicts with pages and static files. ## How to merge zones You can merge zones using `rewrites` in one of the apps or any HTTP proxy. For Next.js on Vercel applications, you can use a monorepo to deploy both apps with a single `git push`. --- ## Page: https://nextjs.org/docs/13/pages/building-your-application/deploying/ci-build-caching To improve build performance, Next.js saves a cache to `.next/cache` that is shared between builds. To take advantage of this cache in Continuous Integration (CI) environments, your CI workflow will need to be configured to correctly persist the cache between builds. > If your CI is not configured to persist `.next/cache` between builds, you may see a No Cache Detected error. Here are some example cache configurations for common CI providers: ## Vercel Next.js caching is automatically configured for you. There's no action required on your part. ## CircleCI Edit your `save_cache` step in `.circleci/config.yml` to include `.next/cache`: steps: - save_cache: key: dependency-cache-{{ checksum "yarn.lock" }} paths: - ./node_modules - ./.next/cache If you do not have a `save_cache` key, please follow CircleCI's documentation on setting up build caching. ## Travis CI Add or merge the following into your `.travis.yml`: cache: directories: - $HOME/.cache/yarn - node_modules - .next/cache ## GitLab CI Add or merge the following into your `.gitlab-ci.yml`: cache: key: ${CI_COMMIT_REF_SLUG} paths: - node_modules/ - .next/cache/ ## Netlify CI Use Netlify Plugins with `@netlify/plugin-nextjs`. ## AWS CodeBuild Add (or merge in) the following to your `buildspec.yml`: cache: paths: - 'node_modules/**/*' # Cache `node_modules` for faster `yarn` or `npm i` - '.next/cache/**/*' # Cache Next.js for faster application rebuilds ## GitHub Actions Using GitHub's actions/cache, add the following step in your workflow file: uses: actions/cache@v3 with: # See here for caching with `yarn` https://github.com/actions/cache/blob/main/examples.md#node---yarn or you can leverage caching with actions/setup-node https://github.com/actions/setup-node path: | ~/.npm ${{ github.workspace }}/.next/cache # Generate a new cache whenever packages or source files change. key: ${{ runner.os }}-nextjs-${{ hashFiles('**/package-lock.json') }}-${{ hashFiles('**/*.js', '**/*.jsx', '**/*.ts', '**/*.tsx') }} # If source files changed but packages didn't, rebuild from a prior cache. restore-keys: | ${{ runner.os }}-nextjs-${{ hashFiles('**/package-lock.json') }}- ## Bitbucket Pipelines Add or merge the following into your `bitbucket-pipelines.yml` at the top level (same level as `pipelines`): definitions: caches: nextcache: .next/cache Then reference it in the `caches` section of your pipeline's `step`: - step: name: your_step_name caches: - node - nextcache ## Heroku Using Heroku's custom cache, add a `cacheDirectories` array in your top-level package.json: "cacheDirectories": [".next/cache"] ## Azure Pipelines Using Azure Pipelines' Cache task, add the following task to your pipeline yaml file somewhere prior to the task that executes `next build`: - task: Cache@2 displayName: 'Cache .next/cache' inputs: key: next | $(Agent.OS) | yarn.lock path: '$(System.DefaultWorkingDirectory)/.next/cache' --- ## Page: https://nextjs.org/docs/13/pages/building-your-application/upgrading #### Subscribe to our newsletter Stay updated on new releases and features, guides, and case studies. --- ## Page: https://nextjs.org/docs/13/pages/building-your-application/upgrading/codemods Codemods are transformations that run on your codebase programmatically. This allows a large number of changes to be programmatically applied without having to manually go through every file. Next.js provides Codemod transformations to help upgrade your Next.js codebase when an API is updated or deprecated. ## Usage In your terminal, navigate (`cd`) into your project's folder, then run: npx @next/codemod <transform> <path> Replacing `<transform>` and `<path>` with appropriate values. * `transform` - name of transform * `path` - files or directory to transform * `--dry` Do a dry-run, no code will be edited * `--print` Prints the changed output for comparison ## Next.js Codemods ### 13.2 #### Use Built-in Font ##### `built-in-next-font` npx @next/codemod@latest built-in-next-font . This codemod uninstalls the `@next/font` package and transforms `@next/font` imports into the built-in `next/font`. For example: import { Inter } from '@next/font/google' Transforms into: import { Inter } from 'next/font/google' ### 13.0 #### Rename Next Image Imports ##### `next-image-to-legacy-image` npx @next/codemod@latest next-image-to-legacy-image . Safely renames `next/image` imports in existing Next.js 10, 11, or 12 applications to `next/legacy/image` in Next.js 13. Also renames `next/future/image` to `next/image`. For example: import Image1 from 'next/image' import Image2 from 'next/future/image' export default function Home() { return ( <div> <Image1 src="/test.jpg" width="200" height="300" /> <Image2 src="/test.png" width="500" height="400" /> </div> ) } Transforms into: // 'next/image' becomes 'next/legacy/image' import Image1 from 'next/legacy/image' // 'next/future/image' becomes 'next/image' import Image2 from 'next/image' export default function Home() { return ( <div> <Image1 src="/test.jpg" width="200" height="300" /> <Image2 src="/test.png" width="500" height="400" /> </div> ) } #### Migrate to the New Image Component ##### `next-image-experimental` npx @next/codemod@latest next-image-experimental . Dangerously migrates from `next/legacy/image` to the new `next/image` by adding inline styles and removing unused props. * Removes `layout` prop and adds `style`. * Removes `objectFit` prop and adds `style`. * Removes `objectPosition` prop and adds `style`. * Removes `lazyBoundary` prop. * Removes `lazyRoot` prop. #### Remove `<a>` Tags From Link Components ##### `new-link` npx @next/codemod@latest new-link . Remove `<a>` tags inside Link Components, or add a `legacyBehavior` prop to Links that cannot be auto-fixed. For example: <Link href="/about"> <a>About</a> </Link> // transforms into <Link href="/about"> About </Link> <Link href="/about"> <a onClick={() => console.log('clicked')}>About</a> </Link> // transforms into <Link href="/about" onClick={() => console.log('clicked')}> About </Link> In cases where auto-fixing can't be applied, the `legacyBehavior` prop is added. This allows your app to keep functioning using the old behavior for that particular link. const Component = () => <a>About</a> <Link href="/about"> <Component /> </Link> // becomes <Link href="/about" legacyBehavior> <Component /> </Link> ### 11 #### Migrate from CRA ##### `cra-to-next` npx @next/codemod cra-to-next Migrates a Create React App project to Next.js; creating a Pages Router and necessary config to match behavior. Client-side only rendering is leveraged initially to prevent breaking compatibility due to `window` usage during SSR and can be enabled seamlessly to allow the gradual adoption of Next.js specific features. Please share any feedback related to this transform in this discussion. ### 10 #### Add React imports ##### `add-missing-react-import` npx @next/codemod add-missing-react-import Transforms files that do not import `React` to include the import in order for the new React JSX transform to work. For example: export default class Home extends React.Component { render() { return <div>Hello World</div> } } Transforms into: import React from 'react' export default class Home extends React.Component { render() { return <div>Hello World</div> } } ### 9 #### Transform Anonymous Components into Named Components ##### `name-default-component` npx @next/codemod name-default-component **Versions 9 and above.** Transforms anonymous components into named components to make sure they work with Fast Refresh. For example: export default function () { return <div>Hello World</div> } Transforms into: export default function MyComponent() { return <div>Hello World</div> } The component will have a camel-cased name based on the name of the file, and it also works with arrow functions. ### 8 #### Transform AMP HOC into page config ##### `withamp-to-config` npx @next/codemod withamp-to-config Transforms the `withAmp` HOC into Next.js 9 page configuration. For example: // Before import { withAmp } from 'next/amp' function Home() { return <h1>My AMP Page</h1> } export default withAmp(Home) // After export default function Home() { return <h1>My AMP Page</h1> } export const config = { amp: true, } ### 6 #### Use `withRouter` ##### `url-to-withrouter` npx @next/codemod url-to-withrouter Transforms the deprecated automatically injected `url` property on top level pages to using `withRouter` and the `router` property it injects. Read more here: https://nextjs.org/docs/messages/url-deprecated For example: import React from 'react' export default class extends React.Component { render() { const { pathname } = this.props.url return <div>Current pathname: {pathname}</div> } } import React from 'react' import { withRouter } from 'next/router' export default withRouter( class extends React.Component { render() { const { pathname } = this.props.router return <div>Current pathname: {pathname}</div> } } ) This is one case. All the cases that are transformed (and tested) can be found in the `__testfixtures__` directory. --- ## Page: https://nextjs.org/docs/13/pages/building-your-application/upgrading/app-router-migration This guide will help you: * Update your Next.js application from version 12 to version 13 * Upgrade features that work in both the `pages` and the `app` directories * Incrementally migrate your existing application from `pages` to `app` ## Upgrading ### Node.js Version The minimum Node.js version is now **v16.14**. See the Node.js documentation for more information. ### Next.js Version To update to Next.js version 13, run the following command using your preferred package manager: npm install next@latest react@latest react-dom@latest ### ESLint Version If you're using ESLint, you need to upgrade your ESLint version: npm install -D eslint-config-next@latest > **Good to know**: You may need to restart the ESLint server in VS Code for the ESLint changes to take effect. Open the Command Palette (`cmd+shift+p` on Mac; `ctrl+shift+p` on Windows) and search for `ESLint: Restart ESLint Server`. ## Next Steps After you've updated, see the following sections for next steps: * Upgrade new features: A guide to help you upgrade to new features such as the improved Image and Link Components. * Migrate from the `pages` to `app` directory: A step-by-step guide to help you incrementally migrate from the `pages` to the `app` directory. ## Upgrading New Features Next.js 13 introduced the new App Router with new features and conventions. The new Router is available in the `app` directory and co-exists with the `pages` directory. Upgrading to Next.js 13 does **not** require using the new App Router. You can continue using `pages` with new features that work in both directories, such as the updated Image component, Link component, Script component, and Font optimization. ### `<Image/>` Component Next.js 12 introduced new improvements to the Image Component with a temporary import: `next/future/image`. These improvements included less client-side JavaScript, easier ways to extend and style images, better accessibility, and native browser lazy loading. In version 13, this new behavior is now the default for `next/image`. There are two codemods to help you migrate to the new Image Component: * **`next-image-to-legacy-image` codemod**: Safely and automatically renames `next/image` imports to `next/legacy/image`. Existing components will maintain the same behavior. * **`next-image-experimental` codemod**: Dangerously adds inline styles and removes unused props. This will change the behavior of existing components to match the new defaults. To use this codemod, you need to run the `next-image-to-legacy-image` codemod first. ### `<Link>` Component The `<Link>` Component no longer requires manually adding an `<a>` tag as a child. This behavior was added as an experimental option in version 12.2 and is now the default. In Next.js 13, `<Link>` always renders `<a>` and allows you to forward props to the underlying tag. For example: import Link from 'next/link' // Next.js 12: `<a>` has to be nested otherwise it's excluded <Link href="/about"> <a>About</a> </Link> // Next.js 13: `<Link>` always renders `<a>` under the hood <Link href="/about"> About </Link> To upgrade your links to Next.js 13, you can use the `new-link` codemod. ### `<Script>` Component The behavior of `next/script` has been updated to support both `pages` and `app`, but some changes need to be made to ensure a smooth migration: * Move any `beforeInteractive` scripts you previously included in `_document.js` to the root layout file (`app/layout.tsx`). * The experimental `worker` strategy does not yet work in `app` and scripts denoted with this strategy will either have to be removed or modified to use a different strategy (e.g. `lazyOnload`). * `onLoad`, `onReady`, and `onError` handlers will not work in Server Components so make sure to move them to a Client Component or remove them altogether. ### Font Optimization Previously, Next.js helped you optimize fonts by inlining font CSS. Version 13 introduces the new `next/font` module which gives you the ability to customize your font loading experience while still ensuring great performance and privacy. `next/font` is supported in both the `pages` and `app` directories. While inlining CSS still works in `pages`, it does not work in `app`. You should use `next/font` instead. See the Font Optimization page to learn how to use `next/font`. ## Migrating from `pages` to `app` > **🎥 Watch:** Learn how to incrementally adopt the App Router → YouTube (16 minutes). Moving to the App Router may be the first time using React features that Next.js builds on top of such as Server Components, Suspense, and more. When combined with new Next.js features such as special files and layouts, migration means new concepts, mental models, and behavioral changes to learn. We recommend reducing the combined complexity of these updates by breaking down your migration into smaller steps. The `app` directory is intentionally designed to work simultaneously with the `pages` directory to allow for incremental page-by-page migration. * The `app` directory supports nested routes _and_ layouts. Learn more. * Use nested folders to define routes and a special `page.js` file to make a route segment publicly accessible. Learn more. * Special file conventions are used to create UI for each route segment. The most common special files are `page.js` and `layout.js`. * Use `page.js` to define UI unique to a route. * Use `layout.js` to define UI that is shared across multiple routes. * `.js`, `.jsx`, or `.tsx` file extensions can be used for special files. * You can colocate other files inside the `app` directory such as components, styles, tests, and more. Learn more. * Data fetching functions like `getServerSideProps` and `getStaticProps` have been replaced with a new API inside `app`. `getStaticPaths` has been replaced with `generateStaticParams`. * `pages/_app.js` and `pages/_document.js` have been replaced with a single `app/layout.js` root layout. Learn more. * `pages/_error.js` has been replaced with more granular `error.js` special files. Learn more. * `pages/404.js` has been replaced with the `not-found.js` file. * `pages/api/*` currently remain inside the `pages` directory. ### Step 1: Creating the `app` directory Update to the latest Next.js version (requires 13.4 or greater): npm install next@latest Then, create a new `app` directory at the root of your project (or `src/` directory). ### Step 2: Creating a Root Layout Create a new `app/layout.tsx` file inside the `app` directory. This is a root layout that will apply to all routes inside `app`. export default function RootLayout({ // Layouts must accept a children prop. // This will be populated with nested layouts or pages children, }: { children: React.ReactNode }) { return ( <html lang="en"> <body>{children}</body> </html> ) } * The `app` directory **must** include a root layout. * The root layout must define `<html>`, and `<body>` tags since Next.js does not automatically create them * The root layout replaces the `pages/_app.tsx` and `pages/_document.tsx` files. * `.js`, `.jsx`, or `.tsx` extensions can be used for layout files. To manage `<head>` HTML elements, you can use the built-in SEO support: import { Metadata } from 'next' export const metadata: Metadata = { title: 'Home', description: 'Welcome to Next.js', } #### Migrating `_document.js` and `_app.js` If you have an existing `_app` or `_document` file, you can copy the contents (e.g. global styles) to the root layout (`app/layout.tsx`). Styles in `app/layout.tsx` will _not_ apply to `pages/*`. You should keep `_app`/`_document` while migrating to prevent your `pages/*` routes from breaking. Once fully migrated, you can then safely delete them. If you are using any React Context providers, they will need to be moved to a Client Component. #### Migrating the `getLayout()` pattern to Layouts (Optional) Next.js recommended adding a property to Page components to achieve per-page layouts in the `pages` directory. This pattern can be replaced with native support for nested layouts in the `app` directory. See before and after example **Before** export default function DashboardLayout({ children }) { return ( <div> <h2>My Dashboard</h2> {children} </div> ) } import DashboardLayout from '../components/DashboardLayout' export default function Page() { return <p>My Page</p> } Page.getLayout = function getLayout(page) { return <DashboardLayout>{page}</DashboardLayout> } **After** * Remove the `Page.getLayout` property from `pages/dashboard/index.js` and follow the steps for migrating pages to the `app` directory. export default function Page() { return <p>My Page</p> } * Move the contents of `DashboardLayout` into a new Client Component to retain `pages` directory behavior. 'use client' // this directive should be at top of the file, before any imports. // This is a Client Component export default function DashboardLayout({ children }) { return ( <div> <h2>My Dashboard</h2> {children} </div> ) } * Import the `DashboardLayout` into a new `layout.js` file inside the `app` directory. import DashboardLayout from './DashboardLayout' // This is a Server Component export default function Layout({ children }) { return <DashboardLayout>{children}</DashboardLayout> } * You can incrementally move non-interactive parts of `DashboardLayout.js` (Client Component) into `layout.js` (Server Component) to reduce the amount of component JavaScript you send to the client. ### Step 3: Migrating `next/head` In the `pages` directory, the `next/head` React component is used to manage `<head>` HTML elements such as `title` and `meta` . In the `app` directory, `next/head` is replaced with the new built-in SEO support. **Before:** import Head from 'next/head' export default function Page() { return ( <> <Head> <title>My page title</title> </Head> </> ) } **After:** import { Metadata } from 'next' export const metadata: Metadata = { title: 'My Page Title', } export default function Page() { return '...' } See all metadata options. ### Step 4: Migrating Pages * Pages in the `app` directory are Server Components by default. This is different from the `pages` directory where pages are Client Components. * Data fetching has changed in `app`. `getServerSideProps`, `getStaticProps` and `getInitialProps` have been replaced with a simpler API. * The `app` directory uses nested folders to define routes and a special `page.js` file to make a route segment publicly accessible. * | `pages` Directory | `app` Directory | Route | | --- | --- | --- | | `index.js` | `page.js` | `/` | | `about.js` | `about/page.js` | `/about` | | `blog/[slug].js` | `blog/[slug]/page.js` | `/blog/post-1` | We recommend breaking down the migration of a page into two main steps: * Step 1: Move the default exported Page Component into a new Client Component. * Step 2: Import the new Client Component into a new `page.js` file inside the `app` directory. > **Good to know**: This is the easiest migration path because it has the most comparable behavior to the `pages` directory. **Step 1: Create a new Client Component** * Create a new separate file inside the `app` directory (i.e. `app/home-page.tsx` or similar) that exports a Client Component. To define Client Components, add the `'use client'` directive to the top of the file (before any imports). * Move the default exported page component from `pages/index.js` to `app/home-page.tsx`. 'use client' // This is a Client Component. It receives data as props and // has access to state and effects just like Page components // in the `pages` directory. export default function HomePage({ recentPosts }) { return ( <div> {recentPosts.map((post) => ( <div key={post.id}>{post.title}</div> ))} </div> ) } **Step 2: Create a new page** * Create a new `app/page.tsx` file inside the `app` directory. This is a Server Component by default. * Import the `home-page.tsx` Client Component into the page. * If you were fetching data in `pages/index.js`, move the data fetching logic directly into the Server Component using the new data fetching APIs. See the data fetching upgrade guide for more details. // Import your Client Component import HomePage from './home-page' async function getPosts() { const res = await fetch('https://...') const posts = await res.json() return posts } export default async function Page() { // Fetch data directly in a Server Component const recentPosts = await getPosts() // Forward fetched data to your Client Component return <HomePage recentPosts={recentPosts} /> } * If your previous page used `useRouter`, you'll need to update to the new routing hooks. Learn more. * Start your development server and visit `http://localhost:3000`. You should see your existing index route, now served through the app directory. ### Step 5: Migrating Routing Hooks A new router has been added to support the new behavior in the `app` directory. In `app`, you should use the three new hooks imported from `next/navigation`: `useRouter()`, `usePathname()`, and `useSearchParams()`. * The new `useRouter` hook is imported from `next/navigation` and has different behavior to the `useRouter` hook in `pages` which is imported from `next/router`. * The `useRouter` hook imported from `next/router` is not supported in the `app` directory but can continue to be used in the `pages` directory. * The new `useRouter` does not return the `pathname` string. Use the separate `usePathname` hook instead. * The new `useRouter` does not return the `query` object. Use the separate `useSearchParams` hook instead. * You can use `useSearchParams` and `usePathname` together to listen to page changes. See the Router Events section for more details. * These new hooks are only supported in Client Components. They cannot be used in Server Components. 'use client' import { useRouter, usePathname, useSearchParams } from 'next/navigation' export default function ExampleClientComponent() { const router = useRouter() const pathname = usePathname() const searchParams = useSearchParams() // ... } In addition, the new `useRouter` hook has the following changes: * `isFallback` has been removed because `fallback` has been replaced. * The `locale`, `locales`, `defaultLocales`, `domainLocales` values have been removed because built-in i18n Next.js features are no longer necessary in the `app` directory. Learn more about i18n. * `basePath` has been removed. The alternative will not be part of `useRouter`. It has not yet been implemented. * `asPath` has been removed because the concept of `as` has been removed from the new router. * `isReady` has been removed because it is no longer necessary. During static rendering, any component that uses the `useSearchParams()` hook will skip the prerendering step and instead be rendered on the client at runtime. View the `useRouter()` API reference. ### Step 6: Migrating Data Fetching Methods The `pages` directory uses `getServerSideProps` and `getStaticProps` to fetch data for pages. Inside the `app` directory, these previous data fetching functions are replaced with a simpler API built on top of `fetch()` and `async` React Server Components. export default async function Page() { // This request should be cached until manually invalidated. // Similar to `getStaticProps`. // `force-cache` is the default and can be omitted. const staticData = await fetch(`https://...`, { cache: 'force-cache' }) // This request should be refetched on every request. // Similar to `getServerSideProps`. const dynamicData = await fetch(`https://...`, { cache: 'no-store' }) // This request should be cached with a lifetime of 10 seconds. // Similar to `getStaticProps` with the `revalidate` option. const revalidatedData = await fetch(`https://...`, { next: { revalidate: 10 }, }) return <div>...</div> } #### Server-side Rendering (`getServerSideProps`) In the `pages` directory, `getServerSideProps` is used to fetch data on the server and forward props to the default exported React component in the file. The initial HTML for the page is prerendered from the server, followed by "hydrating" the page in the browser (making it interactive). // `pages` directory export async function getServerSideProps() { const res = await fetch(`https://...`) const projects = await res.json() return { props: { projects } } } export default function Dashboard({ projects }) { return ( <ul> {projects.map((project) => ( <li key={project.id}>{project.name}</li> ))} </ul> ) } In the `app` directory, we can colocate our data fetching inside our React components using Server Components. This allows us to send less JavaScript to the client, while maintaining the rendered HTML from the server. By setting the `cache` option to `no-store`, we can indicate that the fetched data should never be cached. This is similar to `getServerSideProps` in the `pages` directory. // `app` directory // This function can be named anything async function getProjects() { const res = await fetch(`https://...`, { cache: 'no-store' }) const projects = await res.json() return projects } export default async function Dashboard() { const projects = await getProjects() return ( <ul> {projects.map((project) => ( <li key={project.id}>{project.name}</li> ))} </ul> ) } #### Accessing Request Object In the `pages` directory, you can retrieve request-based data based on the Node.js HTTP API. For example, you can retrieve the `req` object from `getServerSideProps` and use it to retrieve the request's cookies and headers. // `pages` directory export async function getServerSideProps({ req, query }) { const authHeader = req.getHeaders()['authorization']; const theme = req.cookies['theme']; return { props: { ... }} } export default function Page(props) { return ... } The `app` directory exposes new read-only functions to retrieve request data: * `headers()`: Based on the Web Headers API, and can be used inside Server Components to retrieve request headers. * `cookies()`: Based on the Web Cookies API, and can be used inside Server Components to retrieve cookies. // `app` directory import { cookies, headers } from 'next/headers' async function getData() { const authHeader = headers().get('authorization') return '...' } export default async function Page() { // You can use `cookies()` or `headers()` inside Server Components // directly or in your data fetching function const theme = cookies().get('theme') const data = await getData() return '...' } #### Static Site Generation (`getStaticProps`) In the `pages` directory, the `getStaticProps` function is used to pre-render a page at build time. This function can be used to fetch data from an external API or directly from a database, and pass this data down to the entire page as it's being generated during the build. // `pages` directory export async function getStaticProps() { const res = await fetch(`https://...`) const projects = await res.json() return { props: { projects } } } export default function Index({ projects }) { return projects.map((project) => <div>{project.name}</div>) } In the `app` directory, data fetching with `fetch()` will default to `cache: 'force-cache'`, which will cache the request data until manually invalidated. This is similar to `getStaticProps` in the `pages` directory. // `app` directory // This function can be named anything async function getProjects() { const res = await fetch(`https://...`) const projects = await res.json() return projects } export default async function Index() { const projects = await getProjects() return projects.map((project) => <div>{project.name}</div>) } #### Dynamic paths (`getStaticPaths`) In the `pages` directory, the `getStaticPaths` function is used to define the dynamic paths that should be pre-rendered at build time. // `pages` directory import PostLayout from '@/components/post-layout' export async function getStaticPaths() { return { paths: [{ params: { id: '1' } }, { params: { id: '2' } }], } } export async function getStaticProps({ params }) { const res = await fetch(`https://.../posts/${params.id}`) const post = await res.json() return { props: { post } } } export default function Post({ post }) { return <PostLayout post={post} /> } In the `app` directory, `getStaticPaths` is replaced with `generateStaticParams`. `generateStaticParams` behaves similarly to `getStaticPaths`, but has a simplified API for returning route parameters and can be used inside layouts. The return shape of `generateStaticParams` is an array of segments instead of an array of nested `param` objects or a string of resolved paths. // `app` directory import PostLayout from '@/components/post-layout' export async function generateStaticParams() { return [{ id: '1' }, { id: '2' }] } async function getPost(params) { const res = await fetch(`https://.../posts/${params.id}`) const post = await res.json() return post } export default async function Post({ params }) { const post = await getPost(params) return <PostLayout post={post} /> } Using the name `generateStaticParams` is more appropriate than `getStaticPaths` for the new model in the `app` directory. The `get` prefix is replaced with a more descriptive `generate`, which sits better alone now that `getStaticProps` and `getServerSideProps` are no longer necessary. The `Paths` suffix is replaced by `Params`, which is more appropriate for nested routing with multiple dynamic segments. * * * #### Replacing `fallback` In the `pages` directory, the `fallback` property returned from `getStaticPaths` is used to define the behavior of a page that isn't pre-rendered at build time. This property can be set to `true` to show a fallback page while the page is being generated, `false` to show a 404 page, or `blocking` to generate the page at request time. // `pages` directory export async function getStaticPaths() { return { paths: [], fallback: 'blocking' }; } export async function getStaticProps({ params }) { ... } export default function Post({ post }) { return ... } In the `app` directory the `config.dynamicParams` property controls how params outside of `generateStaticParams` are handled: * **`true`**: (default) Dynamic segments not included in `generateStaticParams` are generated on demand. * **`false`**: Dynamic segments not included in `generateStaticParams` will return a 404. This replaces the `fallback: true | false | 'blocking'` option of `getStaticPaths` in the `pages` directory. The `fallback: 'blocking'` option is not included in `dynamicParams` because the difference between `'blocking'` and `true` is negligible with streaming. // `app` directory export const dynamicParams = true; export async function generateStaticParams() { return [...] } async function getPost(params) { ... } export default async function Post({ params }) { const post = await getPost(params); return ... } With `dynamicParams` set to `true` (the default), when a route segment is requested that hasn't been generated, it will be server-rendered and cached. #### Incremental Static Regeneration (`getStaticProps` with `revalidate`) In the `pages` directory, the `getStaticProps` function allows you to add a `revalidate` field to automatically regenerate a page after a certain amount of time. // `pages` directory export async function getStaticProps() { const res = await fetch(`https://.../posts`) const posts = await res.json() return { props: { posts }, revalidate: 60, } } export default function Index({ posts }) { return ( <Layout> <PostList posts={posts} /> </Layout> ) } In the `app` directory, data fetching with `fetch()` can use `revalidate`, which will cache the request for the specified amount of seconds. // `app` directory async function getPosts() { const res = await fetch(`https://.../posts`, { next: { revalidate: 60 } }) const data = await res.json() return data.posts } export default async function PostList() { const posts = await getPosts() return posts.map((post) => <div>{post.name}</div>) } #### API Routes API Routes continue to work in the `pages/api` directory without any changes. However, they have been replaced by Route Handlers in the `app` directory. Route Handlers allow you to create custom request handlers for a given route using the Web Request and Response APIs. export async function GET(request: Request) {} > **Good to know**: If you previously used API routes to call an external API from the client, you can now use Server Components instead to securely fetch data. Learn more about data fetching. ### Step 7: Styling In the `pages` directory, global stylesheets are restricted to only `pages/_app.js`. With the `app` directory, this restriction has been lifted. Global styles can be added to any layout, page, or component. * CSS Modules * Tailwind CSS * Global Styles * CSS-in-JS * External Stylesheets * Sass #### Tailwind CSS If you're using Tailwind CSS, you'll need to add the `app` directory to your `tailwind.config.js` file: module.exports = { content: [ './app/**/*.{js,ts,jsx,tsx,mdx}', // <-- Add this line './pages/**/*.{js,ts,jsx,tsx,mdx}', './components/**/*.{js,ts,jsx,tsx,mdx}', ], } You'll also need to import your global styles in your `app/layout.js` file: import '../styles/globals.css' export default function RootLayout({ children }) { return ( <html lang="en"> <body>{children}</body> </html> ) } Learn more about styling with Tailwind CSS ## Codemods Next.js provides Codemod transformations to help upgrade your codebase when a feature is deprecated. See Codemods for more information. --- ## Page: https://nextjs.org/docs/13/pages/building-your-application/upgrading/version-13 ## Upgrading from 12 to 13 To update to Next.js version 13, run the following command using your preferred package manager: npm i next@latest react@latest react-dom@latest eslint-config-next@latest # or yarn add next@latest react@latest react-dom@latest eslint-config-next@latest # or pnpm up next react react-dom eslint-config-next --latest # or bun add next@latest react@latest react-dom@latest eslint-config-next@latest ### v13 Summary * The Supported Browsers have been changed to drop Internet Explorer and target modern browsers. * The minimum Node.js version has been bumped from 12.22.0 to 16.14.0, since 12.x and 14.x have reached end-of-life. * The minimum React version has been bumped from 17.0.2 to 18.2.0. * The `swcMinify` configuration property was changed from `false` to `true`. See Next.js Compiler for more info. * The `next/image` import was renamed to `next/legacy/image`. The `next/future/image` import was renamed to `next/image`. A codemod is available to safely and automatically rename your imports. * The `next/link` child can no longer be `<a>`. Add the `legacyBehavior` prop to use the legacy behavior or remove the `<a>` to upgrade. A codemod is available to automatically upgrade your code. * The `target` configuration property has been removed and superseded by Output File Tracing. Next.js 13 introduces a new `app` directory with new features and conventions. However, upgrading to Next.js 13 does **not** require using the new `app` directory. You can continue using `pages` with new features that work in both directories, such as the updated Image component, Link component, Script component, and Font optimization. ### `<Image/>` Component Next.js 12 introduced many improvements to the Image Component with a temporary import: `next/future/image`. These improvements included less client-side JavaScript, easier ways to extend and style images, better accessibility, and native browser lazy loading. Starting in Next.js 13, this new behavior is now the default for `next/image`. There are two codemods to help you migrate to the new Image Component: * next-image-to-legacy-image: This codemod will safely and automatically rename `next/image` imports to `next/legacy/image` to maintain the same behavior as Next.js 12. We recommend running this codemod to quickly update to Next.js 13 automatically. * next-image-experimental: After running the previous codemod, you can optionally run this experimental codemod to upgrade `next/legacy/image` to the new `next/image`, which will remove unused props and add inline styles. Please note this codemod is experimental and only covers static usage (such as `<Image src={img} layout="responsive" />`) but not dynamic usage (such as `<Image {...props} />`). Alternatively, you can manually update by following the migration guide and also see the legacy comparison. ### `<Link>` Component The `<Link>` Component no longer requires manually adding an `<a>` tag as a child. This behavior was added as an experimental option in version 12.2 and is now the default. In Next.js 13, `<Link>` always renders `<a>` and allows you to forward props to the underlying tag. For example: import Link from 'next/link' // Next.js 12: `<a>` has to be nested otherwise it's excluded <Link href="/about"> <a>About</a> </Link> // Next.js 13: `<Link>` always renders `<a>` under the hood <Link href="/about"> About </Link> To upgrade your links to Next.js 13, you can use the `new-link` codemod. ### `<Script>` Component The behavior of `next/script` has been updated to support both `pages` and `app`. If incrementally adopting `app`, read the upgrade guide. ### Font Optimization Previously, Next.js helped you optimize fonts by inlining font CSS. Version 13 introduces the new `next/font` module which gives you the ability to customize your font loading experience while still ensuring great performance and privacy. See Optimizing Fonts to learn how to use `next/font`. --- ## Page: https://nextjs.org/docs/13/pages/building-your-application/upgrading/version-12 To upgrade to version 12, run the following command: npm install next@12 yarn add next@12 pnpm update next@12 bun add next@12 ### Upgrading to 12.2 Middleware - If you were using Middleware prior to `12.2`, please see the upgrade guide for more information. ### Upgrading to 12.0 Minimum Node.js Version - The minimum Node.js version has been bumped from `12.0.0` to `12.22.0` which is the first version of Node.js with native ES Modules support. Minimum React Version - The minimum required React version is `17.0.2`. To upgrade you can run the following command in the terminal: npm install react@latest react-dom@latest yarn add react@latest react-dom@latest pnpm update react@latest react-dom@latest bun add react@latest react-dom@latest #### SWC replacing Babel Next.js now uses the Rust-based compiler SWC to compile JavaScript/TypeScript. This new compiler is up to 17x faster than Babel when compiling individual files and up to 5x faster Fast Refresh. Next.js provides full backward compatibility with applications that have custom Babel configuration. All transformations that Next.js handles by default like styled-jsx and tree-shaking of `getStaticProps` / `getStaticPaths` / `getServerSideProps` have been ported to Rust. When an application has a custom Babel configuration, Next.js will automatically opt-out of using SWC for compiling JavaScript/Typescript and will fall back to using Babel in the same way that it was used in Next.js 11. Many of the integrations with external libraries that currently require custom Babel transformations will be ported to Rust-based SWC transforms in the near future. These include but are not limited to: * Styled Components * Emotion * Relay In order to prioritize transforms that will help you adopt SWC, please provide your `.babelrc` on this feedback thread. #### SWC replacing Terser for minification You can opt-in to replacing Terser with SWC for minifying JavaScript up to 7x faster using a flag in `next.config.js`: module.exports = { swcMinify: true, } Minification using SWC is an opt-in flag to ensure it can be tested against more real-world Next.js applications before it becomes the default in Next.js 12.1. If you have feedback about minification, please leave it on this feedback thread. #### Improvements to styled-jsx CSS parsing On top of the Rust-based compiler we've implemented a new CSS parser based on the one used for the styled-jsx Babel transform. This new parser has improved handling of CSS and now errors when invalid CSS is used that would previously slip through and cause unexpected behavior. Because of this change invalid CSS will throw an error during development and `next build`. This change only affects styled-jsx usage. #### `next/image` changed wrapping element `next/image` now renders the `<img>` inside a `<span>` instead of `<div>`. If your application has specific CSS targeting span such as `.container span`, upgrading to Next.js 12 might incorrectly match the wrapping element inside the `<Image>` component. You can avoid this by restricting the selector to a specific class such as `.container span.item` and updating the relevant component with that className, such as `<span className="item" />`. If your application has specific CSS targeting the `next/image` `<div>` tag, for example `.container div`, it may not match anymore. You can update the selector `.container span`, or preferably, add a new `<div className="wrapper">` wrapping the `<Image>` component and target that instead such as `.container .wrapper`. The `className` prop is unchanged and will still be passed to the underlying `<img>` element. See the documentation for more info. #### HMR connection now uses a WebSocket Previously, Next.js used a server-sent events connection to receive HMR events. Next.js 12 now uses a WebSocket connection. In some cases when proxying requests to the Next.js dev server, you will need to ensure the upgrade request is handled correctly. For example, in `nginx` you would need to add the following configuration: location /_next/webpack-hmr { proxy_pass http://localhost:3000/_next/webpack-hmr; proxy_http_version 1.1; proxy_set_header Upgrade $http_upgrade; proxy_set_header Connection "upgrade"; } If you are using Apache (2.x), you can add the following configuration to enable web sockets to the server. Review the port, host name and server names. <VirtualHost *:443> # ServerName yourwebsite.local ServerName "${WEBSITE_SERVER_NAME}" ProxyPass / http://localhost:3000/ ProxyPassReverse / http://localhost:3000/ # Next.js 12 uses websocket <Location /_next/webpack-hmr> RewriteEngine On RewriteCond %{QUERY_STRING} transport=websocket [NC] RewriteCond %{HTTP:Upgrade} websocket [NC] RewriteCond %{HTTP:Connection} upgrade [NC] RewriteRule /(.*) ws://localhost:3000/_next/webpack-hmr/$1 [P,L] ProxyPass ws://localhost:3000/_next/webpack-hmr retry=0 timeout=30 ProxyPassReverse ws://localhost:3000/_next/webpack-hmr </Location> </VirtualHost> For custom servers, such as `express`, you may need to use `app.all` to ensure the request is passed correctly, for example: app.all('/_next/webpack-hmr', (req, res) => { nextjsRequestHandler(req, res) }) #### Webpack 4 support has been removed If you are already using webpack 5 you can skip this section. Next.js has adopted webpack 5 as the default for compilation in Next.js 11. As communicated in the webpack 5 upgrading documentation Next.js 12 removes support for webpack 4. If your application is still using webpack 4 using the opt-out flag, you will now see an error linking to the webpack 5 upgrading documentation. #### `target` option deprecated If you do not have `target` in `next.config.js` you can skip this section. The target option has been deprecated in favor of built-in support for tracing what dependencies are needed to run a page. During `next build`, Next.js will automatically trace each page and its dependencies to determine all of the files that are needed for deploying a production version of your application. If you are currently using the `target` option set to `serverless`, please read the documentation on how to leverage the new output. --- ## Page: https://nextjs.org/docs/13/pages/building-your-application/upgrading/version-11 To upgrade to version 11, run the following command: npm install next@11 yarn add next@11 ### Webpack 5 Webpack 5 is now the default for all Next.js applications. If you did not have a custom webpack configuration, your application is already using webpack 5. If you do have a custom webpack configuration, you can refer to the Next.js webpack 5 documentation for upgrade guidance. ### Cleaning the `distDir` is now a default The build output directory (defaults to `.next`) is now cleared by default except for the Next.js caches. You can refer to the cleaning `distDir` RFC for more information. If your application was relying on this behavior previously you can disable the new default behavior by adding the `cleanDistDir: false` flag in `next.config.js`. ### `PORT` is now supported for `next dev` and `next start` Next.js 11 supports the `PORT` environment variable to set the port the application runs on. Using `-p`/`--port` is still recommended but if you were prohibited from using `-p` in any way you can now use `PORT` as an alternative: Example: PORT=4000 next start ### `next.config.js` customization to import images Next.js 11 supports static image imports with `next/image`. This new feature relies on being able to process image imports. If you previously added the `next-images` or `next-optimized-images` packages you can either move to the new built-in support using `next/image` or disable the feature: module.exports = { images: { disableStaticImages: true, }, } ### Remove `super.componentDidCatch()` from `pages/_app.js` The `next/app` component's `componentDidCatch` was deprecated in Next.js 9 as it's no longer needed and has since been a no-op. In Next.js 11, it was removed. If your `pages/_app.js` has a custom `componentDidCatch` method you can remove `super.componentDidCatch` as it is no longer needed. ### Remove `Container` from `pages/_app.js` This export was deprecated in Next.js 9 as it's no longer needed and has since been a no-op with a warning during development. In Next.js 11 it was removed. If your `pages/_app.js` imports `Container` from `next/app` you can remove `Container` as it was removed. Learn more in the documentation. ### Remove `props.url` usage from page components This property was deprecated in Next.js 4 and has since shown a warning during development. With the introduction of `getStaticProps` / `getServerSideProps` these methods already disallowed the usage of `props.url`. In Next.js 11, it was removed completely. You can learn more in the documentation. ### Remove `unsized` property on `next/image` The `unsized` property on `next/image` was deprecated in Next.js 10.0.1. You can use `layout="fill"` instead. In Next.js 11 `unsized` was removed. ### Remove `modules` property on `next/dynamic` The `modules` and `render` option for `next/dynamic` were deprecated in Next.js 9.5. This was done in order to make the `next/dynamic` API closer to `React.lazy`. In Next.js 11, the `modules` and `render` options were removed. This option hasn't been mentioned in the documentation since Next.js 8 so it's less likely that your application is using it. If your application does use `modules` and `render` you can refer to the documentation. ### Remove `Head.rewind` `Head.rewind` has been a no-op since Next.js 9.5, in Next.js 11 it was removed. You can safely remove your usage of `Head.rewind`. ### Moment.js locales excluded by default Moment.js includes translations for a lot of locales by default. Next.js now automatically excludes these locales by default to optimize bundle size for applications using Moment.js. To load a specific locale use this snippet: import moment from 'moment' import 'moment/locale/ja' moment.locale('ja') You can opt-out of this new default by adding `excludeDefaultMomentLocales: false` to `next.config.js` if you do not want the new behavior, do note it's highly recommended to not disable this new optimization as it significantly reduces the size of Moment.js. ### Update usage of `router.events` In case you're accessing `router.events` during rendering, in Next.js 11 `router.events` is no longer provided during pre-rendering. Ensure you're accessing `router.events` in `useEffect`: useEffect(() => { const handleRouteChange = (url, { shallow }) => { console.log( `App is changing to ${url} ${ shallow ? 'with' : 'without' } shallow routing` ) } router.events.on('routeChangeStart', handleRouteChange) // If the component is unmounted, unsubscribe // from the event with the `off` method: return () => { router.events.off('routeChangeStart', handleRouteChange) } }, [router]) If your application uses `router.router.events` which was an internal property that was not public please make sure to use `router.events` as well. ## React 16 to 17 React 17 introduced a new JSX Transform that brings a long-time Next.js feature to the wider React ecosystem: Not having to `import React from 'react'` when using JSX. When using React 17 Next.js will automatically use the new transform. This transform does not make the `React` variable global, which was an unintended side-effect of the previous Next.js implementation. A codemod is available to automatically fix cases where you accidentally used `React` without importing it. Most applications already use the latest version of React, with Next.js 11 the minimum React version has been updated to 17.0.2. To upgrade you can run the following command: npm install react@latest react-dom@latest Or using `yarn`: yarn add react@latest react-dom@latest --- ## Page: https://nextjs.org/docs/13/pages/building-your-application/upgrading/version-10 You are currently viewing documentation for version 13 of Next.js. There were no breaking changes between versions 9 and 10. To upgrade to version 10, run the following command: Terminal npm install next@10 yarn add next@10 --- ## Page: https://nextjs.org/docs/13/pages/building-your-application/upgrading/version-9 To upgrade to version 9, run the following command: npm install next@9 yarn add next@9 ## Production Deployment on Vercel If you previously configured `routes` in your `vercel.json` file for dynamic routes, these rules can be removed when leveraging Next.js 9's new Dynamic Routing feature. Next.js 9's dynamic routes are **automatically configured on Vercel** and do not require any `vercel.json` customization. You can read more about Dynamic Routing here. ## Check your Custom App File (`pages/_app.js`) If you previously copied the Custom `<App>` example, you may be able to remove your `getInitialProps`. Removing `getInitialProps` from `pages/_app.js` (when possible) is important to leverage new Next.js features! The following `getInitialProps` does nothing and may be removed: class MyApp extends App { // Remove me, I do nothing! static async getInitialProps({ Component, ctx }) { let pageProps = {} if (Component.getInitialProps) { pageProps = await Component.getInitialProps(ctx) } return { pageProps } } render() { // ... etc } } ## Breaking Changes ### `@zeit/next-typescript` is no longer necessary Next.js will now ignore usage `@zeit/next-typescript` and warn you to remove it. Please remove this plugin from your `next.config.js`. Remove references to `@zeit/next-typescript/babel` from your custom `.babelrc` (if present). The usage of `fork-ts-checker-webpack-plugin` should also be removed from your `next.config.js`. TypeScript Definitions are published with the `next` package, so you need to uninstall `@types/next` as they would conflict. The following types are different: > This list was created by the community to help you upgrade, if you find other differences please send a pull-request to this list to help other users. From: import { NextContext } from 'next' import { NextAppContext, DefaultAppIProps } from 'next/app' import { NextDocumentContext, DefaultDocumentIProps } from 'next/document' to import { NextPageContext } from 'next' import { AppContext, AppInitialProps } from 'next/app' import { DocumentContext, DocumentInitialProps } from 'next/document' ### The `config` key is now an export on a page You may no longer export a custom variable named `config` from a page (i.e. `export { config }` / `export const config ...`). This exported variable is now used to specify page-level Next.js configuration like Opt-in AMP and API Route features. You must rename a non-Next.js-purposed `config` export to something different. ### `next/dynamic` no longer renders "loading..." by default while loading Dynamic components will not render anything by default while loading. You can still customize this behavior by setting the `loading` property: import dynamic from 'next/dynamic' const DynamicComponentWithCustomLoading = dynamic( () => import('../components/hello2'), { loading: () => <p>Loading</p>, } ) ### `withAmp` has been removed in favor of an exported configuration object Next.js now has the concept of page-level configuration, so the `withAmp` higher-order component has been removed for consistency. This change can be **automatically migrated by running the following commands in the root of your Next.js project:** curl -L https://github.com/vercel/next-codemod/archive/master.tar.gz | tar -xz --strip=2 next-codemod-master/transforms/withamp-to-config.js npx jscodeshift -t ./withamp-to-config.js pages/**/*.js To perform this migration by hand, or view what the codemod will produce, see below: **Before** import { withAmp } from 'next/amp' function Home() { return <h1>My AMP Page</h1> } export default withAmp(Home) // or export default withAmp(Home, { hybrid: true }) **After** export default function Home() { return <h1>My AMP Page</h1> } export const config = { amp: true, // or amp: 'hybrid', } ### `next export` no longer exports pages as `index.html` Previously, exporting `pages/about.js` would result in `out/about/index.html`. This behavior has been changed to result in `out/about.html`. You can revert to the previous behavior by creating a `next.config.js` with the following content: module.exports = { trailingSlash: true, } ### `pages/api/` is treated differently Pages in `pages/api/` are now considered API Routes. Pages in this directory will no longer contain a client-side bundle. ## Deprecated Features ### `next/dynamic` has deprecated loading multiple modules at once The ability to load multiple modules at once has been deprecated in `next/dynamic` to be closer to React's implementation (`React.lazy` and `Suspense`). Updating code that relies on this behavior is relatively straightforward! We've provided an example of a before/after to help you migrate your application: **Before** import dynamic from 'next/dynamic' const HelloBundle = dynamic({ modules: () => { const components = { Hello1: () => import('../components/hello1').then((m) => m.default), Hello2: () => import('../components/hello2').then((m) => m.default), } return components }, render: (props, { Hello1, Hello2 }) => ( <div> <h1>{props.title}</h1> <Hello1 /> <Hello2 /> </div> ), }) function DynamicBundle() { return <HelloBundle title="Dynamic Bundle" /> } export default DynamicBundle **After** import dynamic from 'next/dynamic' const Hello1 = dynamic(() => import('../components/hello1')) const Hello2 = dynamic(() => import('../components/hello2')) function HelloBundle({ title }) { return ( <div> <h1>{title}</h1> <Hello1 /> <Hello2 /> </div> ) } function DynamicBundle() { return <HelloBundle title="Dynamic Bundle" /> } export default DynamicBundle --- ## Page: https://nextjs.org/docs/13/pages/api-reference #### Subscribe to our newsletter Stay updated on new releases and features, guides, and case studies. --- ## Page: https://nextjs.org/docs/13/pages/api-reference/components #### Subscribe to our newsletter Stay updated on new releases and features, guides, and case studies. --- ## Page: https://nextjs.org/docs/13/pages/api-reference/components/font ## Font Module This API reference will help you understand how to use `next/font/google` and `next/font/local`. For features and usage, please see the Optimizing Fonts page. ### Font Function Arguments For usage, review Google Fonts and Local Fonts. | Key | `font/google` | `font/local` | Type | Required | | --- | --- | --- | --- | --- | | `src` | | | String or Array of Objects | Yes | | `weight` | | | String or Array | Required/Optional | | `style` | | | String or Array | \- | | `subsets` | | | Array of Strings | \- | | `axes` | | | Array of Strings | \- | | `display` | | | String | \- | | `preload` | | | Boolean | \- | | `fallback` | | | Array of Strings | \- | | `adjustFontFallback` | | | Boolean or String | \- | | `variable` | | | String | \- | | `declarations` | | | Array of Objects | \- | ### `src` The path of the font file as a string or an array of objects (with type `Array<{path: string, weight?: string, style?: string}>`) relative to the directory where the font loader function is called. Used in `next/font/local` * Required Examples: * `src:'./fonts/my-font.woff2'` where `my-font.woff2` is placed in a directory named `fonts` inside the `app` directory * `src:[{path: './inter/Inter-Thin.ttf', weight: '100',},{path: './inter/Inter-Regular.ttf',weight: '400',},{path: './inter/Inter-Bold-Italic.ttf', weight: '700',style: 'italic',},]` * if the font loader function is called in `app/page.tsx` using `src:'../styles/fonts/my-font.ttf'`, then `my-font.ttf` is placed in `styles/fonts` at the root of the project ### `weight` The font `weight` with the following possibilities: * A string with possible values of the weights available for the specific font or a range of values if it's a variable font * An array of weight values if the font is not a variable google font. It applies to `next/font/google` only. Used in `next/font/google` and `next/font/local` * Required if the font being used is **not** variable Examples: * `weight: '400'`: A string for a single weight value - for the font `Inter`, the possible values are `'100'`, `'200'`, `'300'`, `'400'`, `'500'`, `'600'`, `'700'`, `'800'`, `'900'` or `'variable'` where `'variable'` is the default) * `weight: '100 900'`: A string for the range between `100` and `900` for a variable font * `weight: ['100','400','900']`: An array of 3 possible values for a non variable font ### `style` The font `style` with the following possibilities: * A string value with default value of `'normal'` * An array of style values if the font is not a variable google font. It applies to `next/font/google` only. Used in `next/font/google` and `next/font/local` * Optional Examples: * `style: 'italic'`: A string - it can be `normal` or `italic` for `next/font/google` * `style: 'oblique'`: A string - it can take any value for `next/font/local` but is expected to come from standard font styles * `style: ['italic','normal']`: An array of 2 values for `next/font/google` - the values are from `normal` and `italic` ### `subsets` The font `subsets` defined by an array of string values with the names of each subset you would like to be preloaded. Fonts specified via `subsets` will have a link preload tag injected into the head when the `preload` option is true, which is the default. Used in `next/font/google` * Optional Examples: * `subsets: ['latin']`: An array with the subset `latin` You can find a list of all subsets on the Google Fonts page for your font. ### `axes` Some variable fonts have extra `axes` that can be included. By default, only the font weight is included to keep the file size down. The possible values of `axes` depend on the specific font. Used in `next/font/google` * Optional Examples: * `axes: ['slnt']`: An array with value `slnt` for the `Inter` variable font which has `slnt` as additional `axes` as shown here. You can find the possible `axes` values for your font by using the filter on the Google variable fonts page and looking for axes other than `wght` ### `display` The font `display` with possible string values of `'auto'`, `'block'`, `'swap'`, `'fallback'` or `'optional'` with default value of `'swap'`. Used in `next/font/google` and `next/font/local` * Optional Examples: * `display: 'optional'`: A string assigned to the `optional` value ### `preload` A boolean value that specifies whether the font should be preloaded or not. The default is `true`. Used in `next/font/google` and `next/font/local` * Optional Examples: * `preload: false` ### `fallback` The fallback font to use if the font cannot be loaded. An array of strings of fallback fonts with no default. * Optional Used in `next/font/google` and `next/font/local` Examples: * `fallback: ['system-ui', 'arial']`: An array setting the fallback fonts to `system-ui` or `arial` ### `adjustFontFallback` * For `next/font/google`: A boolean value that sets whether an automatic fallback font should be used to reduce Cumulative Layout Shift. The default is `true`. * For `next/font/local`: A string or boolean `false` value that sets whether an automatic fallback font should be used to reduce Cumulative Layout Shift. The possible values are `'Arial'`, `'Times New Roman'` or `false`. The default is `'Arial'`. Used in `next/font/google` and `next/font/local` * Optional Examples: * `adjustFontFallback: false`: for `next/font/google` * `adjustFontFallback: 'Times New Roman'`: for `next/font/local` ### `variable` A string value to define the CSS variable name to be used if the style is applied with the CSS variable method. Used in `next/font/google` and `next/font/local` * Optional Examples: * `variable: '--my-font'`: The CSS variable `--my-font` is declared ### `declarations` An array of font face descriptor key-value pairs that define the generated `@font-face` further. Used in `next/font/local` * Optional Examples: * `declarations: [{ prop: 'ascent-override', value: '90%' }]` ## Applying Styles You can apply the font styles in three ways: * `className` * `style` * CSS Variables ### `className` Returns a read-only CSS `className` for the loaded font to be passed to an HTML element. <p className={inter.className}>Hello, Next.js!</p> ### `style` Returns a read-only CSS `style` object for the loaded font to be passed to an HTML element, including `style.fontFamily` to access the font family name and fallback fonts. <p style={inter.style}>Hello World</p> ### CSS Variables If you would like to set your styles in an external style sheet and specify additional options there, use the CSS variable method. In addition to importing the font, also import the CSS file where the CSS variable is defined and set the variable option of the font loader object as follows: import { Inter } from 'next/font/google' import styles from '../styles/component.module.css' const inter = Inter({ variable: '--font-inter', }) To use the font, set the `className` of the parent container of the text you would like to style to the font loader's `variable` value and the `className` of the text to the `styles` property from the external CSS file. <main className={inter.variable}> <p className={styles.text}>Hello World</p> </main> Define the `text` selector class in the `component.module.css` CSS file as follows: .text { font-family: var(--font-inter); font-weight: 200; font-style: italic; } In the example above, the text `Hello World` is styled using the `Inter` font and the generated font fallback with `font-weight: 200` and `font-style: italic`. ## Using a font definitions file Every time you call the `localFont` or Google font function, that font will be hosted as one instance in your application. Therefore, if you need to use the same font in multiple places, you should load it in one place and import the related font object where you need it. This is done using a font definitions file. For example, create a `fonts.ts` file in a `styles` folder at the root of your app directory. Then, specify your font definitions as follows: import { Inter, Lora, Source_Sans_3 } from 'next/font/google' import localFont from 'next/font/local' // define your variable fonts const inter = Inter() const lora = Lora() // define 2 weights of a non-variable font const sourceCodePro400 = Source_Sans_3({ weight: '400' }) const sourceCodePro700 = Source_Sans_3({ weight: '700' }) // define a custom local font where GreatVibes-Regular.ttf is stored in the styles folder const greatVibes = localFont({ src: './GreatVibes-Regular.ttf' }) export { inter, lora, sourceCodePro400, sourceCodePro700, greatVibes } You can now use these definitions in your code as follows: import { inter, lora, sourceCodePro700, greatVibes } from '../styles/fonts' export default function Page() { return ( <div> <p className={inter.className}>Hello world using Inter font</p> <p style={lora.style}>Hello world using Lora font</p> <p className={sourceCodePro700.className}> Hello world using Source_Sans_3 font with weight 700 </p> <p className={greatVibes.className}>My title in Great Vibes font</p> </div> ) } To make it easier to access the font definitions in your code, you can define a path alias in your `tsconfig.json` or `jsconfig.json` files as follows: { "compilerOptions": { "paths": { "@/fonts": ["./styles/fonts"] } } } You can now import any font definition as follows: import { greatVibes, sourceCodePro400 } from '@/fonts' ## Version Changes | Version | Changes | | --- | --- | | `v13.2.0` | `@next/font` renamed to `next/font`. Installation no longer required. | | `v13.0.0` | `@next/font` was added. | --- ## Page: https://nextjs.org/docs/13/pages/api-reference/components/head Examples * Head Elements * Layout Component We expose a built-in component for appending elements to the `head` of the page: import Head from 'next/head' function IndexPage() { return ( <div> <Head> <title>My page title</title> </Head> <p>Hello world!</p> </div> ) } export default IndexPage To avoid duplicate tags in your `head` you can use the `key` property, which will make sure the tag is only rendered once, as in the following example: import Head from 'next/head' function IndexPage() { return ( <div> <Head> <title>My page title</title> <meta property="og:title" content="My page title" key="title" /> </Head> <Head> <meta property="og:title" content="My new title" key="title" /> </Head> <p>Hello world!</p> </div> ) } export default IndexPage In this case only the second `<meta property="og:title" />` is rendered. `meta` tags with duplicate `key` attributes are automatically handled. > The contents of `head` get cleared upon unmounting the component, so make sure each page completely defines what it needs in `head`, without making assumptions about what other pages added. `title`, `meta` or any other elements (e.g. `script`) need to be contained as **direct** children of the `Head` element, or wrapped into maximum one level of `<React.Fragment>` or arrays—otherwise the tags won't be correctly picked up on client-side navigations. > We recommend using next/script in your component instead of manually creating a `<script>` in `next/head`. Was this helpful? supported. --- ## Page: https://nextjs.org/docs/13/pages/api-reference/components/image Examples * Image Component > **Good to know**: If you are using a version of Next.js prior to 13, you'll want to use the next/legacy/image documentation since the component was renamed. This API reference will help you understand how to use props and configuration options available for the Image Component. For features and usage, please see the Image Component page. import Image from 'next/image' export default function Page() { return ( <Image src="/profile.png" width={500} height={500} alt="Picture of the author" /> ) } ## Props Here's a summary of the props available for the Image Component: | Prop | Example | Type | Required | | --- | --- | --- | --- | | `src` | `src="/profile.png"` | String | Yes | | `width` | `width={500}` | Integer (px) | Yes | | `height` | `height={500}` | Integer (px) | Yes | | `alt` | `alt="Picture of the author"` | String | Yes | | `loader` | `loader={imageLoader}` | Function | \- | | `fill` | `fill={true}` | Boolean | \- | | `sizes` | `sizes="(max-width: 768px) 100vw"` | String | \- | | `quality` | `quality={80}` | Integer (1-100) | \- | | `priority` | `priority={true}` | Boolean | \- | | `placeholder` | `placeholder="blur"` | String | \- | | `style` | `style={{objectFit: "contain"}}` | Object | \- | | `onLoadingComplete` | `onLoadingComplete={img => done())}` | Function | \- | | `onLoad` | `onLoad={event => done())}` | Function | \- | | `onError` | `onError(event => fail()}` | Function | \- | | `loading` | `loading="lazy"` | String | \- | | `blurDataURL` | `blurDataURL="data:image/jpeg..."` | String | \- | ## Required Props The Image Component requires the following properties: `src`, `width`, `height`, and `alt`. import Image from 'next/image' export default function Page() { return ( <div> <Image src="/profile.png" width={500} height={500} alt="Picture of the author" /> </div> ) } ### `src` Must be one of the following: * A statically imported image file * A path string. This can be either an absolute external URL, or an internal path depending on the loader prop. When using an external URL, you must add it to remotePatterns in `next.config.js`. ### `width` The `width` property represents the _rendered_ width in pixels, so it will affect how large the image appears. Required, except for statically imported images or images with the `fill` property. ### `height` The `height` property represents the _rendered_ height in pixels, so it will affect how large the image appears. Required, except for statically imported images or images with the `fill` property. ### `alt` The `alt` property is used to describe the image for screen readers and search engines. It is also the fallback text if images have been disabled or an error occurs while loading the image. It should contain text that could replace the image without changing the meaning of the page. It is not meant to supplement the image and should not repeat information that is already provided in the captions above or below the image. If the image is purely decorative or not intended for the user, the `alt` property should be an empty string (`alt=""`). Learn more ## Optional Props The `<Image />` component accepts a number of additional properties beyond those which are required. This section describes the most commonly-used properties of the Image component. Find details about more rarely-used properties in the Advanced Props section. ### `loader` A custom function used to resolve image URLs. A `loader` is a function returning a URL string for the image, given the following parameters: * `src` * `width` * `quality` Here is an example of using a custom loader: 'use client' import Image from 'next/image' const imageLoader = ({ src, width, quality }) => { return `https://example.com/${src}?w=${width}&q=${quality || 75}` } export default function Page() { return ( <Image loader={imageLoader} src="me.png" alt="Picture of the author" width={500} height={500} /> ) } Alternatively, you can use the loaderFile configuration in `next.config.js` to configure every instance of `next/image` in your application, without passing a prop. ### `fill` fill={true} // {true} | {false} A boolean that causes the image to fill the parent element, which is useful when the `width` and `height` are unknown. The parent element _must_ assign `position: "relative"`, `position: "fixed"`, or `position: "absolute"` style. By default, the img element will automatically be assigned the `position: "absolute"` style. If no styles are applied to the image, the image will stretch to fit the container. You may prefer to set `object-fit: "contain"` for an image which is letterboxed to fit the container and preserve aspect ratio. Alternatively, `object-fit: "cover"` will cause the image to fill the entire container and be cropped to preserve aspect ratio. For this to look correct, the `overflow: "hidden"` style should be assigned to the parent element. For more information, see also: * `position` * `object-fit` * `object-position` ### `sizes` A string, similar to a media query, that provides information about how wide the image will be at different breakpoints. The value of `sizes` will greatly affect performance for images using `fill` or which are styled to have a responsive size. The `sizes` property serves two important purposes related to image performance: * First, the value of `sizes` is used by the browser to determine which size of the image to download, from `next/image`'s automatically generated `srcset`. When the browser chooses, it does not yet know the size of the image on the page, so it selects an image that is the same size or larger than the viewport. The `sizes` property allows you to tell the browser that the image will actually be smaller than full screen. If you don't specify a `sizes` value in an image with the `fill` property, a default value of `100vw` (full screen width) is used. * Second, the `sizes` property changes the behavior of the automatically generated `srcset` value. If no `sizes` value is present, a small `srcset` is generated, suitable for a fixed-size image (1x/2x/etc). If `sizes` is defined, a large `srcset` is generated, suitable for a responsive image (640w/750w/etc). If the `sizes` property includes sizes such as `50vw`, which represent a percentage of the viewport width, then the `srcset` is trimmed to not include any values which are too small to ever be necessary. For example, if you know your styling will cause an image to be full-width on mobile devices, in a 2-column layout on tablets, and a 3-column layout on desktop displays, you should include a sizes property such as the following: import Image from 'next/image' export default function Page() { return ( <div className="grid-element"> <Image fill src="/example.png" sizes="(max-width: 768px) 100vw, (max-width: 1200px) 50vw, 33vw" /> </div> ) } This example `sizes` could have a dramatic effect on performance metrics. Without the `33vw` sizes, the image selected from the server would be 3 times as wide as it needs to be. Because file size is proportional to the square of the width, without `sizes` the user would download an image that's 9 times larger than necessary. Learn more about `srcset` and `sizes`: * web.dev * mdn ### `quality` quality={75} // {number 1-100} The quality of the optimized image, an integer between `1` and `100`, where `100` is the best quality and therefore largest file size. Defaults to `75`. ### `priority` priority={false} // {false} | {true} When true, the image will be considered high priority and preload. Lazy loading is automatically disabled for images using `priority`. You should use the `priority` property on any image detected as the Largest Contentful Paint (LCP) element. It may be appropriate to have multiple priority images, as different images may be the LCP element for different viewport sizes. Should only be used when the image is visible above the fold. Defaults to `false`. ### `placeholder` placeholder = 'empty' // "empty" | "blur" | "data:image/..." A placeholder to use while the image is loading. Possible values are `blur`, `empty`, or `data:image/...`. Defaults to `empty`. When `blur`, the `blurDataURL` property will be used as the placeholder. If `src` is an object from a static import and the imported image is `.jpg`, `.png`, `.webp`, or `.avif`, then `blurDataURL` will be automatically populated, except when the image is detected to be animated. For dynamic images, you must provide the `blurDataURL` property. Solutions such as Plaiceholder can help with `base64` generation. When `data:image/...`, the Data URL will be used as the placeholder while the image is loading. When `empty`, there will be no placeholder while the image is loading, only empty space. Try it out: * Demo the `blur` placeholder * Demo the shimmer effect with data URL `placeholder` prop * Demo the color effect with `blurDataURL` prop ## Advanced Props In some cases, you may need more advanced usage. The `<Image />` component optionally accepts the following advanced properties. ### `style` Allows passing CSS styles to the underlying image element. const imageStyle = { borderRadius: '50%', border: '1px solid #fff', } export default function ProfileImage() { return <Image src="..." style={imageStyle} /> } Remember that the required width and height props can interact with your styling. If you use styling to modify an image's width, you should also style its height to `auto` to preserve its intrinsic aspect ratio, or your image will be distorted. ### `onLoadingComplete` 'use client' <Image onLoadingComplete={(img) => console.log(img.naturalWidth)} /> A callback function that is invoked once the image is completely loaded and the placeholder has been removed. The callback function will be called with one argument, a reference to the underlying `<img>` element. ### `onLoad` <Image onLoad={(e) => console.log(e.target.naturalWidth)} /> A callback function that is invoked when the image is loaded. The load event might occur before the image placeholder is removed and the image is fully decoded. If you want to wait until the image has fully loaded, use `onLoadingComplete` instead. ### `onError` <Image onError={(e) => console.error(e.target.id)} /> A callback function that is invoked if the image fails to load. ### `loading` > **Recommendation**: This property is only meant for advanced use cases. Switching an image to load with `eager` will normally **hurt performance**. We recommend using the `priority` property instead, which will eagerly preload the image. loading = 'lazy' // {lazy} | {eager} The loading behavior of the image. Defaults to `lazy`. When `lazy`, defer loading the image until it reaches a calculated distance from the viewport. When `eager`, load the image immediately. Learn more about the `loading` attribute. ### `blurDataURL` A Data URL to be used as a placeholder image before the `src` image successfully loads. Only takes effect when combined with `placeholder="blur"`. Must be a base64-encoded image. It will be enlarged and blurred, so a very small image (10px or less) is recommended. Including larger images as placeholders may harm your application performance. Try it out: * Demo the default `blurDataURL` prop * Demo the color effect with `blurDataURL` prop You can also generate a solid color Data URL to match the image. ### `unoptimized` unoptimized = {false} // {false} | {true} When true, the source image will be served as-is instead of changing quality, size, or format. Defaults to `false`. import Image from 'next/image' const UnoptimizedImage = (props) => { return <Image {...props} unoptimized /> } Since Next.js 12.3.0, this prop can be assigned to all images by updating `next.config.js` with the following configuration: module.exports = { images: { unoptimized: true, }, } ### Other Props Other properties on the `<Image />` component will be passed to the underlying `img` element with the exception of the following: * `srcSet`. Use Device Sizes instead. * `decoding`. It is always `"async"`. ## Configuration Options In addition to props, you can configure the Image Component in `next.config.js`. The following options are available: ### `remotePatterns` To protect your application from malicious users, configuration is required in order to use external images. This ensures that only external images from your account can be served from the Next.js Image Optimization API. These external images can be configured with the `remotePatterns` property in your `next.config.js` file, as shown below: module.exports = { images: { remotePatterns: [ { protocol: 'https', hostname: 'example.com', port: '', pathname: '/account123/**', }, ], }, } > **Good to know**: The example above will ensure the `src` property of `next/image` must start with `https://example.com/account123/`. Any other protocol, hostname, port, or unmatched path will respond with 400 Bad Request. Below is another example of the `remotePatterns` property in the `next.config.js` file: module.exports = { images: { remotePatterns: [ { protocol: 'https', hostname: '**.example.com', }, ], }, } > **Good to know**: The example above will ensure the `src` property of `next/image` must start with `https://img1.example.com` or `https://me.avatar.example.com` or any number of subdomains. Any other protocol or unmatched hostname will respond with 400 Bad Request. Wildcard patterns can be used for both `pathname` and `hostname` and have the following syntax: * `*` match a single path segment or subdomain * `**` match any number of path segments at the end or subdomains at the beginning The `**` syntax does not work in the middle of the pattern. ### `domains` > **Warning**: We recommend configuring strict `remotePatterns` instead of `domains` in order to protect your application from malicious users. Only use `domains` if you own all the content served from the domain. Similar to `remotePatterns`, the `domains` configuration can be used to provide a list of allowed hostnames for external images. However, the `domains` configuration does not support wildcard pattern matching and it cannot restrict protocol, port, or pathname. Below is an example of the `domains` property in the `next.config.js` file: module.exports = { images: { domains: ['assets.acme.com'], }, } ### `loaderFile` If you want to use a cloud provider to optimize images instead of using the Next.js built-in Image Optimization API, you can configure the `loaderFile` in your `next.config.js` like the following: module.exports = { images: { loader: 'custom', loaderFile: './my/image/loader.js', }, } This must point to a file relative to the root of your Next.js application. The file must export a default function that returns a string, for example: 'use client' export default function myImageLoader({ src, width, quality }) { return `https://example.com/${src}?w=${width}&q=${quality || 75}` } Alternatively, you can use the `loader` prop to configure each instance of `next/image`. Examples: * Custom Image Loader Configuration ## Advanced The following configuration is for advanced use cases and is usually not necessary. If you choose to configure the properties below, you will override any changes to the Next.js defaults in future updates. ### `deviceSizes` If you know the expected device widths of your users, you can specify a list of device width breakpoints using the `deviceSizes` property in `next.config.js`. These widths are used when the `next/image` component uses `sizes` prop to ensure the correct image is served for user's device. If no configuration is provided, the default below is used. module.exports = { images: { deviceSizes: [640, 750, 828, 1080, 1200, 1920, 2048, 3840], }, } ### `imageSizes` You can specify a list of image widths using the `images.imageSizes` property in your `next.config.js` file. These widths are concatenated with the array of device sizes to form the full array of sizes used to generate image srcsets. The reason there are two separate lists is that imageSizes is only used for images which provide a `sizes` prop, which indicates that the image is less than the full width of the screen. **Therefore, the sizes in imageSizes should all be smaller than the smallest size in deviceSizes.** If no configuration is provided, the default below is used. module.exports = { images: { imageSizes: [16, 32, 48, 64, 96, 128, 256, 384], }, } ### `formats` The default Image Optimization API will automatically detect the browser's supported image formats via the request's `Accept` header. If the `Accept` head matches more than one of the configured formats, the first match in the array is used. Therefore, the array order matters. If there is no match (or the source image is animated), the Image Optimization API will fallback to the original image's format. If no configuration is provided, the default below is used. module.exports = { images: { formats: ['image/webp'], }, } You can enable AVIF support with the following configuration. module.exports = { images: { formats: ['image/avif', 'image/webp'], }, } > **Good to know**: > > * AVIF generally takes 20% longer to encode but it compresses 20% smaller compared to WebP. This means that the first time an image is requested, it will typically be slower and then subsequent requests that are cached will be faster. > * If you self-host with a Proxy/CDN in front of Next.js, you must configure the Proxy to forward the `Accept` header. ## Caching Behavior The following describes the caching algorithm for the default loader. For all other loaders, please refer to your cloud provider's documentation. Images are optimized dynamically upon request and stored in the `<distDir>/cache/images` directory. The optimized image file will be served for subsequent requests until the expiration is reached. When a request is made that matches a cached but expired file, the expired image is served stale immediately. Then the image is optimized again in the background (also called revalidation) and saved to the cache with the new expiration date. The cache status of an image can be determined by reading the value of the `x-nextjs-cache` response header. The possible values are the following: * `MISS` - the path is not in the cache (occurs at most once, on the first visit) * `STALE` - the path is in the cache but exceeded the revalidate time so it will be updated in the background * `HIT` - the path is in the cache and has not exceeded the revalidate time The expiration (or rather Max Age) is defined by either the `minimumCacheTTL` configuration or the upstream image `Cache-Control` header, whichever is larger. Specifically, the `max-age` value of the `Cache-Control` header is used. If both `s-maxage` and `max-age` are found, then `s-maxage` is preferred. The `max-age` is also passed-through to any downstream clients including CDNs and browsers. * You can configure `minimumCacheTTL` to increase the cache duration when the upstream image does not include `Cache-Control` header or the value is very low. * You can configure `deviceSizes` and `imageSizes` to reduce the total number of possible generated images. * You can configure formats to disable multiple formats in favor of a single image format. ### `minimumCacheTTL` You can configure the Time to Live (TTL) in seconds for cached optimized images. In many cases, it's better to use a Static Image Import which will automatically hash the file contents and cache the image forever with a `Cache-Control` header of `immutable`. module.exports = { images: { minimumCacheTTL: 60, }, } The expiration (or rather Max Age) of the optimized image is defined by either the `minimumCacheTTL` or the upstream image `Cache-Control` header, whichever is larger. If you need to change the caching behavior per image, you can configure `headers` to set the `Cache-Control` header on the upstream image (e.g. `/some-asset.jpg`, not `/_next/image` itself). There is no mechanism to invalidate the cache at this time, so its best to keep `minimumCacheTTL` low. Otherwise you may need to manually change the `src` prop or delete `<distDir>/cache/images`. ### `disableStaticImages` The default behavior allows you to import static files such as `import icon from './icon.png'` and then pass that to the `src` property. In some cases, you may wish to disable this feature if it conflicts with other plugins that expect the import to behave differently. You can disable static image imports inside your `next.config.js`: module.exports = { images: { disableStaticImages: true, }, } ### `dangerouslyAllowSVG` The default loader does not optimize SVG images for a few reasons. First, SVG is a vector format meaning it can be resized losslessly. Second, SVG has many of the same features as HTML/CSS, which can lead to vulnerabilities without a proper Content Security Policy. If you need to serve SVG images with the default Image Optimization API, you can set `dangerouslyAllowSVG` inside your `next.config.js`: module.exports = { images: { dangerouslyAllowSVG: true, contentDispositionType: 'attachment', contentSecurityPolicy: "default-src 'self'; script-src 'none'; sandbox;", }, } In addition, it is strongly recommended to also set `contentDispositionType` to force the browser to download the image, as well as `contentSecurityPolicy` to prevent scripts embedded in the image from executing. ## Animated Images The default loader will automatically bypass Image Optimization for animated images and serve the image as-is. Auto-detection for animated files is best-effort and supports GIF, APNG, and WebP. If you want to explicitly bypass Image Optimization for a given animated image, use the unoptimized prop. ## Responsive Images The default generated `srcset` contains `1x` and `2x` images in order to support different device pixel ratios. However, you may wish to render a responsive image that stretches with the viewport. In that case, you'll need to set `sizes` as well as `style` (or `className`). You can render a responsive image using one of the following methods below. ### Responsive image using a static import If the source image is not dynamic, you can statically import to create a responsive image: import Image from 'next/image' import me from '../photos/me.jpg' export default function Author() { return ( <Image src={me} alt="Picture of the author" sizes="100vw" style={{ width: '100%', height: 'auto', }} /> ) } Try it out: * Demo the image responsive to viewport ### Responsive image with aspect ratio If the source image is a dynamic or a remote url, you will also need to provide `width` and `height` to set the correct aspect ratio of the responsive image: import Image from 'next/image' export default function Page({ photoUrl }) { return ( <Image src={photoUrl} alt="Picture of the author" sizes="100vw" style={{ width: '100%', height: 'auto', }} width={500} height={300} /> ) } Try it out: * Demo the image responsive to viewport ### Responsive image with `fill` If you don't know the aspect ratio, you will need to set the `fill` prop and set `position: relative` on the parent. Optionally, you can set `object-fit` style depending on the desired stretch vs crop behavior: import Image from 'next/image' export default function Page({ photoUrl }) { return ( <div style={{ position: 'relative', width: '500px', height: '300px' }}> <Image src={photoUrl} alt="Picture of the author" sizes="500px" fill style={{ objectFit: 'contain', }} /> </div> ) } Try it out: * Demo the `fill` prop ## Theme Detection If you want to display a different image for light and dark mode, you can create a new component that wraps two `<Image>` components and reveals the correct one based on a CSS media query. .imgDark { display: none; } @media (prefers-color-scheme: dark) { .imgLight { display: none; } .imgDark { display: unset; } } import styles from './theme-image.module.css' import Image, { ImageProps } from 'next/image' type Props = Omit<ImageProps, 'src' | 'priority' | 'loading'> & { srcLight: string srcDark: string } const ThemeImage = (props: Props) => { const { srcLight, srcDark, ...rest } = props return ( <> <Image {...rest} src={srcLight} className={styles.imgLight} /> <Image {...rest} src={srcDark} className={styles.imgDark} /> </> ) } > **Good to know**: The default behavior of `loading="lazy"` ensures that only the correct image is loaded. You cannot use `priority` or `loading="eager"` because that would cause both images to load. Instead, you can use `fetchPriority="high"`. Try it out: * Demo light/dark mode theme detection ## Known Browser Bugs This `next/image` component uses browser native lazy loading, which may fallback to eager loading for older browsers before Safari 15.4. When using the blur-up placeholder, older browsers before Safari 12 will fallback to empty placeholder. When using styles with `width`/`height` of `auto`, it is possible to cause Layout Shift on older browsers before Safari 15 that don't preserve the aspect ratio. For more details, see this MDN video. * Safari 15 - 16.3 display a gray border while loading. Safari 16.4 fixed this issue. Possible solutions: * Use CSS `@supports (font: -apple-system-body) and (-webkit-appearance: none) { img[loading="lazy"] { clip-path: inset(0.6px) } }` * Use `priority` if the image is above the fold * Firefox 67+ displays a white background while loading. Possible solutions: * Enable AVIF `formats` * Use `placeholder` ## Version History | Version | Changes | | --- | --- | | `v13.4.14` | `placeholder` prop support for `data:/image...` | | `v13.2.0` | `contentDispositionType` configuration added. | | `v13.0.6` | `ref` prop added. | | `v13.0.0` | The `next/image` import was renamed to `next/legacy/image`. The `next/future/image` import was renamed to `next/image`. A codemod is available to safely and automatically rename your imports. `<span>` wrapper removed. `layout`, `objectFit`, `objectPosition`, `lazyBoundary`, `lazyRoot` props removed. `alt` is required. `onLoadingComplete` receives reference to `img` element. Built-in loader config removed. | | `v12.3.0` | `remotePatterns` and `unoptimized` configuration is stable. | | `v12.2.0` | Experimental `remotePatterns` and experimental `unoptimized` configuration added. `layout="raw"` removed. | | `v12.1.1` | `style` prop added. Experimental support for `layout="raw"` added. | | `v12.1.0` | `dangerouslyAllowSVG` and `contentSecurityPolicy` configuration added. | | `v12.0.9` | `lazyRoot` prop added. | | `v12.0.0` | `formats` configuration added. AVIF support added. Wrapper `<div>` changed to `<span>`. | | `v11.1.0` | `onLoadingComplete` and `lazyBoundary` props added. | | `v11.0.0` | `src` prop support for static import. `placeholder` prop added. `blurDataURL` prop added. | | `v10.0.5` | `loader` prop added. | | `v10.0.1` | `layout` prop added. | | `v10.0.0` | `next/image` introduced. | --- ## Page: https://nextjs.org/docs/13/pages/api-reference/components/image-legacy Examples * Legacy Image Component Starting with Next.js 13, the `next/image` component was rewritten to improve both the performance and developer experience. In order to provide a backwards compatible upgrade solution, the old `next/image` was renamed to `next/legacy/image`. View the **new** `next/image` API Reference ## Comparison Compared to `next/legacy/image`, the new `next/image` component has the following changes: * Removes `<span>` wrapper around `<img>` in favor of native computed aspect ratio * Adds support for canonical `style` prop * Removes `layout` prop in favor of `style` or `className` * Removes `objectFit` prop in favor of `style` or `className` * Removes `objectPosition` prop in favor of `style` or `className` * Removes `IntersectionObserver` implementation in favor of native lazy loading * Removes `lazyBoundary` prop since there is no native equivalent * Removes `lazyRoot` prop since there is no native equivalent * Removes `loader` config in favor of `loader` prop * Changed `alt` prop from optional to required * Changed `onLoadingComplete` callback to receive reference to `<img>` element ## Required Props The `<Image />` component requires the following properties. ### src Must be one of the following: * A statically imported image file * A path string. This can be either an absolute external URL, or an internal path depending on the loader prop or loader configuration. When using an external URL, you must add it to remotePatterns in `next.config.js`. ### width The `width` property can represent either the _rendered_ width or _original_ width in pixels, depending on the `layout` and `sizes` properties. When using `layout="intrinsic"` or `layout="fixed"` the `width` property represents the _rendered_ width in pixels, so it will affect how large the image appears. When using `layout="responsive"`, `layout="fill"`, the `width` property represents the _original_ width in pixels, so it will only affect the aspect ratio. The `width` property is required, except for statically imported images, or those with `layout="fill"`. ### height The `height` property can represent either the _rendered_ height or _original_ height in pixels, depending on the `layout` and `sizes` properties. When using `layout="intrinsic"` or `layout="fixed"` the `height` property represents the _rendered_ height in pixels, so it will affect how large the image appears. When using `layout="responsive"`, `layout="fill"`, the `height` property represents the _original_ height in pixels, so it will only affect the aspect ratio. The `height` property is required, except for statically imported images, or those with `layout="fill"`. ## Optional Props The `<Image />` component accepts a number of additional properties beyond those which are required. This section describes the most commonly-used properties of the Image component. Find details about more rarely-used properties in the Advanced Props section. ### layout The layout behavior of the image as the viewport changes size. | `layout` | Behavior | `srcSet` | `sizes` | Has wrapper and sizer | | --- | --- | --- | --- | --- | | `intrinsic` (default) | Scale _down_ to fit width of container, up to image size | `1x`, `2x` (based on imageSizes) | N/A | yes | | `fixed` | Sized to `width` and `height` exactly | `1x`, `2x` (based on imageSizes) | N/A | yes | | `responsive` | Scale to fit width of container | `640w`, `750w`, ... `2048w`, `3840w` (based on imageSizes and deviceSizes) | `100vw` | yes | | `fill` | Grow in both X and Y axes to fill container | `640w`, `750w`, ... `2048w`, `3840w` (based on imageSizes and deviceSizes) | `100vw` | yes | * Demo the `intrinsic` layout (default) * When `intrinsic`, the image will scale the dimensions down for smaller viewports, but maintain the original dimensions for larger viewports. * Demo the `fixed` layout * When `fixed`, the image dimensions will not change as the viewport changes (no responsiveness) similar to the native `img` element. * Demo the `responsive` layout * When `responsive`, the image will scale the dimensions down for smaller viewports and scale up for larger viewports. * Ensure the parent element uses `display: block` in their stylesheet. * Demo the `fill` layout * When `fill`, the image will stretch both width and height to the dimensions of the parent element, provided the parent element is relative. * This is usually paired with the `objectFit` property. * Ensure the parent element has `position: relative` in their stylesheet. * Demo background image ### loader A custom function used to resolve URLs. Setting the loader as a prop on the Image component overrides the default loader defined in the `images` section of `next.config.js`. A `loader` is a function returning a URL string for the image, given the following parameters: * `src` * `width` * `quality` Here is an example of using a custom loader: import Image from 'next/legacy/image' const myLoader = ({ src, width, quality }) => { return `https://example.com/${src}?w=${width}&q=${quality || 75}` } const MyImage = (props) => { return ( <Image loader={myLoader} src="me.png" alt="Picture of the author" width={500} height={500} /> ) } ### sizes A string that provides information about how wide the image will be at different breakpoints. The value of `sizes` will greatly affect performance for images using `layout="responsive"` or `layout="fill"`. It will be ignored for images using `layout="intrinsic"` or `layout="fixed"`. The `sizes` property serves two important purposes related to image performance: First, the value of `sizes` is used by the browser to determine which size of the image to download, from `next/legacy/image`'s automatically-generated source set. When the browser chooses, it does not yet know the size of the image on the page, so it selects an image that is the same size or larger than the viewport. The `sizes` property allows you to tell the browser that the image will actually be smaller than full screen. If you don't specify a `sizes` value, a default value of `100vw` (full screen width) is used. Second, the `sizes` value is parsed and used to trim the values in the automatically-created source set. If the `sizes` property includes sizes such as `50vw`, which represent a percentage of the viewport width, then the source set is trimmed to not include any values which are too small to ever be necessary. For example, if you know your styling will cause an image to be full-width on mobile devices, in a 2-column layout on tablets, and a 3-column layout on desktop displays, you should include a sizes property such as the following: import Image from 'next/legacy/image' const Example = () => ( <div className="grid-element"> <Image src="/example.png" layout="fill" sizes="(max-width: 768px) 100vw, (max-width: 1200px) 50vw, 33vw" /> </div> ) This example `sizes` could have a dramatic effect on performance metrics. Without the `33vw` sizes, the image selected from the server would be 3 times as wide as it needs to be. Because file size is proportional to the square of the width, without `sizes` the user would download an image that's 9 times larger than necessary. Learn more about `srcset` and `sizes`: * web.dev * mdn ### quality The quality of the optimized image, an integer between `1` and `100` where `100` is the best quality. Defaults to `75`. ### priority When true, the image will be considered high priority and preload. Lazy loading is automatically disabled for images using `priority`. You should use the `priority` property on any image detected as the Largest Contentful Paint (LCP) element. It may be appropriate to have multiple priority images, as different images may be the LCP element for different viewport sizes. Should only be used when the image is visible above the fold. Defaults to `false`. ### placeholder A placeholder to use while the image is loading. Possible values are `blur` or `empty`. Defaults to `empty`. When `blur`, the `blurDataURL` property will be used as the placeholder. If `src` is an object from a static import and the imported image is `.jpg`, `.png`, `.webp`, or `.avif`, then `blurDataURL` will be automatically populated. For dynamic images, you must provide the `blurDataURL` property. Solutions such as Plaiceholder can help with `base64` generation. When `empty`, there will be no placeholder while the image is loading, only empty space. Try it out: * Demo the `blur` placeholder * Demo the shimmer effect with `blurDataURL` prop * Demo the color effect with `blurDataURL` prop ## Advanced Props In some cases, you may need more advanced usage. The `<Image />` component optionally accepts the following advanced properties. ### style Allows passing CSS styles to the underlying image element. Note that all `layout` modes apply their own styles to the image element, and these automatic styles take precedence over the `style` prop. Also keep in mind that the required `width` and `height` props can interact with your styling. If you use styling to modify an image's `width`, you must set the `height="auto"` style as well, or your image will be distorted. ### objectFit Defines how the image will fit into its parent container when using `layout="fill"`. This value is passed to the object-fit CSS property for the `src` image. ### objectPosition Defines how the image is positioned within its parent element when using `layout="fill"`. This value is passed to the object-position CSS property applied to the image. ### onLoadingComplete A callback function that is invoked once the image is completely loaded and the placeholder has been removed. The `onLoadingComplete` function accepts one parameter, an object with the following properties: * `naturalWidth` * `naturalHeight` ### loading > **Attention**: This property is only meant for advanced usage. Switching an image to load with `eager` will normally **hurt performance**. > > We recommend using the `priority` property instead, which properly loads the image eagerly for nearly all use cases. The loading behavior of the image. Defaults to `lazy`. When `lazy`, defer loading the image until it reaches a calculated distance from the viewport. When `eager`, load the image immediately. Learn more ### blurDataURL A Data URL to be used as a placeholder image before the `src` image successfully loads. Only takes effect when combined with `placeholder="blur"`. Must be a base64-encoded image. It will be enlarged and blurred, so a very small image (10px or less) is recommended. Including larger images as placeholders may harm your application performance. Try it out: * Demo the default `blurDataURL` prop * Demo the shimmer effect with `blurDataURL` prop * Demo the color effect with `blurDataURL` prop You can also generate a solid color Data URL to match the image. ### lazyBoundary A string (with similar syntax to the margin property) that acts as the bounding box used to detect the intersection of the viewport with the image and trigger lazy loading. Defaults to `"200px"`. If the image is nested in a scrollable parent element other than the root document, you will also need to assign the lazyRoot prop. Learn more ### lazyRoot A React Ref pointing to the scrollable parent element. Defaults to `null` (the document viewport). The Ref must point to a DOM element or a React component that forwards the Ref to the underlying DOM element. **Example pointing to a DOM element** import Image from 'next/legacy/image' import React from 'react' const Example = () => { const lazyRoot = React.useRef(null) return ( <div ref={lazyRoot} style={{ overflowX: 'scroll', width: '500px' }}> <Image lazyRoot={lazyRoot} src="/one.jpg" width="500" height="500" /> <Image lazyRoot={lazyRoot} src="/two.jpg" width="500" height="500" /> </div> ) } **Example pointing to a React component** import Image from 'next/legacy/image' import React from 'react' const Container = React.forwardRef((props, ref) => { return ( <div ref={ref} style={{ overflowX: 'scroll', width: '500px' }}> {props.children} </div> ) }) const Example = () => { const lazyRoot = React.useRef(null) return ( <Container ref={lazyRoot}> <Image lazyRoot={lazyRoot} src="/one.jpg" width="500" height="500" /> <Image lazyRoot={lazyRoot} src="/two.jpg" width="500" height="500" /> </Container> ) } Learn more ### unoptimized When true, the source image will be served as-is instead of changing quality, size, or format. Defaults to `false`. import Image from 'next/image' const UnoptimizedImage = (props) => { return <Image {...props} unoptimized /> } Since Next.js 12.3.0, this prop can be assigned to all images by updating `next.config.js` with the following configuration: module.exports = { images: { unoptimized: true, }, } ## Other Props Other properties on the `<Image />` component will be passed to the underlying `img` element with the exception of the following: * `srcSet`. Use Device Sizes instead. * `ref`. Use `onLoadingComplete` instead. * `decoding`. It is always `"async"`. ## Configuration Options ### Remote Patterns To protect your application from malicious users, configuration is required in order to use external images. This ensures that only external images from your account can be served from the Next.js Image Optimization API. These external images can be configured with the `remotePatterns` property in your `next.config.js` file, as shown below: module.exports = { images: { remotePatterns: [ { protocol: 'https', hostname: 'example.com', port: '', pathname: '/account123/**', }, ], }, } > **Good to know**: The example above will ensure the `src` property of `next/legacy/image` must start with `https://example.com/account123/`. Any other protocol, hostname, port, or unmatched path will respond with 400 Bad Request. Below is another example of the `remotePatterns` property in the `next.config.js` file: module.exports = { images: { remotePatterns: [ { protocol: 'https', hostname: '**.example.com', }, ], }, } > **Good to know**: The example above will ensure the `src` property of `next/legacy/image` must start with `https://img1.example.com` or `https://me.avatar.example.com` or any number of subdomains. Any other protocol or unmatched hostname will respond with 400 Bad Request. Wildcard patterns can be used for both `pathname` and `hostname` and have the following syntax: * `*` match a single path segment or subdomain * `**` match any number of path segments at the end or subdomains at the beginning The `**` syntax does not work in the middle of the pattern. ### Domains > **Warning**: We recommend configuring strict `remotePatterns` instead of `domains` in order to protect your application from malicious users. Only use `domains` if you own all the content served from the domain. Similar to `remotePatterns`, the `domains` configuration can be used to provide a list of allowed hostnames for external images. However, the `domains` configuration does not support wildcard pattern matching and it cannot restrict protocol, port, or pathname. Below is an example of the `domains` property in the `next.config.js` file: module.exports = { images: { domains: ['assets.acme.com'], }, } ### Loader Configuration If you want to use a cloud provider to optimize images instead of using the Next.js built-in Image Optimization API, you can configure the `loader` and `path` prefix in your `next.config.js` file. This allows you to use relative URLs for the Image `src` and automatically generate the correct absolute URL for your provider. module.exports = { images: { loader: 'imgix', path: 'https://example.com/myaccount/', }, } ### Built-in Loaders The following Image Optimization cloud providers are included: * Default: Works automatically with `next dev`, `next start`, or a custom server * Vercel: Works automatically when you deploy on Vercel, no configuration necessary. Learn more * Imgix: `loader: 'imgix'` * Cloudinary: `loader: 'cloudinary'` * Akamai: `loader: 'akamai'` * Custom: `loader: 'custom'` use a custom cloud provider by implementing the `loader` prop on the `next/legacy/image` component If you need a different provider, you can use the `loader` prop with `next/legacy/image`. > Images can not be optimized at build time using `output: 'export'`, only on-demand. To use `next/legacy/image` with `output: 'export'`, you will need to use a different loader than the default. Read more in the discussion. > The `next/legacy/image` component's default loader uses `squoosh` because it is quick to install and suitable for a development environment. When using `next start` in your production environment, it is strongly recommended that you install `sharp` by running `npm i sharp` in your project directory. This is not necessary for Vercel deployments, as `sharp` is installed automatically. ## Advanced The following configuration is for advanced use cases and is usually not necessary. If you choose to configure the properties below, you will override any changes to the Next.js defaults in future updates. ### Device Sizes If you know the expected device widths of your users, you can specify a list of device width breakpoints using the `deviceSizes` property in `next.config.js`. These widths are used when the `next/legacy/image` component uses `layout="responsive"` or `layout="fill"` to ensure the correct image is served for user's device. If no configuration is provided, the default below is used. module.exports = { images: { deviceSizes: [640, 750, 828, 1080, 1200, 1920, 2048, 3840], }, } ### Image Sizes You can specify a list of image widths using the `images.imageSizes` property in your `next.config.js` file. These widths are concatenated with the array of device sizes to form the full array of sizes used to generate image srcsets. The reason there are two separate lists is that imageSizes is only used for images which provide a `sizes` prop, which indicates that the image is less than the full width of the screen. **Therefore, the sizes in imageSizes should all be smaller than the smallest size in deviceSizes.** If no configuration is provided, the default below is used. module.exports = { images: { imageSizes: [16, 32, 48, 64, 96, 128, 256, 384], }, } ### Acceptable Formats The default Image Optimization API will automatically detect the browser's supported image formats via the request's `Accept` header. If the `Accept` head matches more than one of the configured formats, the first match in the array is used. Therefore, the array order matters. If there is no match (or the source image is animated), the Image Optimization API will fallback to the original image's format. If no configuration is provided, the default below is used. module.exports = { images: { formats: ['image/webp'], }, } You can enable AVIF support with the following configuration. module.exports = { images: { formats: ['image/avif', 'image/webp'], }, } > **Good to know**: AVIF generally takes 20% longer to encode but it compresses 20% smaller compared to WebP. This means that the first time an image is requested, it will typically be slower and then subsequent requests that are cached will be faster. ## Caching Behavior The following describes the caching algorithm for the default loader. For all other loaders, please refer to your cloud provider's documentation. Images are optimized dynamically upon request and stored in the `<distDir>/cache/images` directory. The optimized image file will be served for subsequent requests until the expiration is reached. When a request is made that matches a cached but expired file, the expired image is served stale immediately. Then the image is optimized again in the background (also called revalidation) and saved to the cache with the new expiration date. The cache status of an image can be determined by reading the value of the `x-nextjs-cache` (`x-vercel-cache` when deployed on Vercel) response header. The possible values are the following: * `MISS` - the path is not in the cache (occurs at most once, on the first visit) * `STALE` - the path is in the cache but exceeded the revalidate time so it will be updated in the background * `HIT` - the path is in the cache and has not exceeded the revalidate time The expiration (or rather Max Age) is defined by either the `minimumCacheTTL` configuration or the upstream image `Cache-Control` header, whichever is larger. Specifically, the `max-age` value of the `Cache-Control` header is used. If both `s-maxage` and `max-age` are found, then `s-maxage` is preferred. The `max-age` is also passed-through to any downstream clients including CDNs and browsers. * You can configure `minimumCacheTTL` to increase the cache duration when the upstream image does not include `Cache-Control` header or the value is very low. * You can configure `deviceSizes` and `imageSizes` to reduce the total number of possible generated images. * You can configure formats to disable multiple formats in favor of a single image format. ### Minimum Cache TTL You can configure the Time to Live (TTL) in seconds for cached optimized images. In many cases, it's better to use a Static Image Import which will automatically hash the file contents and cache the image forever with a `Cache-Control` header of `immutable`. module.exports = { images: { minimumCacheTTL: 60, }, } The expiration (or rather Max Age) of the optimized image is defined by either the `minimumCacheTTL` or the upstream image `Cache-Control` header, whichever is larger. If you need to change the caching behavior per image, you can configure `headers` to set the `Cache-Control` header on the upstream image (e.g. `/some-asset.jpg`, not `/_next/image` itself). There is no mechanism to invalidate the cache at this time, so its best to keep `minimumCacheTTL` low. Otherwise you may need to manually change the `src` prop or delete `<distDir>/cache/images`. ### Disable Static Imports The default behavior allows you to import static files such as `import icon from './icon.png'` and then pass that to the `src` property. In some cases, you may wish to disable this feature if it conflicts with other plugins that expect the import to behave differently. You can disable static image imports inside your `next.config.js`: module.exports = { images: { disableStaticImages: true, }, } ### Dangerously Allow SVG The default loader does not optimize SVG images for a few reasons. First, SVG is a vector format meaning it can be resized losslessly. Second, SVG has many of the same features as HTML/CSS, which can lead to vulnerabilities without proper Content Security Policy (CSP) headers. If you need to serve SVG images with the default Image Optimization API, you can set `dangerouslyAllowSVG` inside your `next.config.js`: module.exports = { images: { dangerouslyAllowSVG: true, contentDispositionType: 'attachment', contentSecurityPolicy: "default-src 'self'; script-src 'none'; sandbox;", }, } In addition, it is strongly recommended to also set `contentDispositionType` to force the browser to download the image, as well as `contentSecurityPolicy` to prevent scripts embedded in the image from executing. ### Animated Images The default loader will automatically bypass Image Optimization for animated images and serve the image as-is. Auto-detection for animated files is best-effort and supports GIF, APNG, and WebP. If you want to explicitly bypass Image Optimization for a given animated image, use the unoptimized prop. ## Version History | Version | Changes | | --- | --- | | `v13.0.0` | `next/image` renamed to `next/legacy/image` | --- ## Page: https://nextjs.org/docs/13/pages/api-reference/components/link Examples * Hello World * Active className on Link `<Link>` is a React component that extends the HTML `<a>` element to provide prefetching and client-side navigation between routes. It is the primary way to navigate between routes in Next.js. For an example, consider a `pages` directory with the following files: * `pages/index.js` * `pages/about.js` * `pages/blog/[slug].js` We can have a link to each of these pages like so: import Link from 'next/link' function Home() { return ( <ul> <li> <Link href="/">Home</Link> </li> <li> <Link href="/about">About Us</Link> </li> <li> <Link href="/blog/hello-world">Blog Post</Link> </li> </ul> ) } export default Home ## Props Here's a summary of the props available for the Link Component: | Prop | Example | Type | Required | | --- | --- | --- | --- | | `href` | `href="/dashboard"` | String or Object | Yes | | `replace` | `replace={false}` | Boolean | \- | | `scroll` | `scroll={false}` | Boolean | \- | | `prefetch` | `prefetch={false}` | Boolean | \- | > **Good to know**: `<a>` tag attributes such as `className` or `target="_blank"` can be added to `<Link>` as props and will be passed to the underlying `<a>` element. ### `href` (required) The path or URL to navigate to. <Link href="/dashboard">Dashboard</Link> `href` can also accept an object, for example: // Navigate to /about?name=test <Link href={{ pathname: '/about', query: { name: 'test' }, }} > About </Link> ### `replace` **Defaults to `false`.** When `true`, `next/link` will replace the current history state instead of adding a new URL into the browser’s history stack. import Link from 'next/link' export default function Page() { return ( <Link href="/dashboard" replace> Dashboard </Link> ) } ### `scroll` **Defaults to `true`.** The default behavior of `<Link>` is to scroll to the top of a new route or to maintain the scroll position for backwards and forwards navigation. When `false`, `next/link` will _not_ scroll to the top of the page after a navigation. import Link from 'next/link' export default function Page() { return ( <Link href="/dashboard" scroll={false}> Dashboard </Link> ) } ### `prefetch` **Defaults to `true`.** When `true`, `next/link` will prefetch the page (denoted by the `href`) in the background. This is useful for improving the performance of client-side navigations. Any `<Link />` in the viewport (initially or through scroll) will be preloaded. Prefetch can be disabled by passing `prefetch={false}`. Prefetching is only enabled in production. import Link from 'next/link' export default function Page() { return ( <Link href="/dashboard" prefetch={false}> Dashboard </Link> ) } ## Other Props ### `legacyBehavior` An `<a>` element is no longer required as a child of `<Link>`. Add the `legacyBehavior` prop to use the legacy behavior or remove the `<a>` to upgrade. A codemod is available to automatically upgrade your code. > **Good to know**: when `legacyBehavior` is not set to `true`, all `anchor` tag properties can be passed to `next/link` as well such as, `className`, `onClick`, etc. ### `passHref` Forces `Link` to send the `href` property to its child. Defaults to `false` ### `scroll` Scroll to the top of the page after a navigation. Defaults to `true` ### `shallow` Update the path of the current page without rerunning `getStaticProps`, `getServerSideProps` or `getInitialProps`. Defaults to `false` ### `locale` The active locale is automatically prepended. `locale` allows for providing a different locale. When `false` `href` has to include the locale as the default behavior is disabled. ## Examples ### Linking to Dynamic Routes For dynamic routes, it can be handy to use template literals to create the link's path. For example, you can generate a list of links to the dynamic route `pages/blog/[slug].js` import Link from 'next/link' function Posts({ posts }) { return ( <ul> {posts.map((post) => ( <li key={post.id}> <Link href={`/blog/${post.slug}`}>{post.title}</Link> </li> ))} </ul> ) } export default Posts ### If the child is a custom component that wraps an `<a>` tag If the child of `Link` is a custom component that wraps an `<a>` tag, you must add `passHref` to `Link`. This is necessary if you’re using libraries like styled-components. Without this, the `<a>` tag will not have the `href` attribute, which hurts your site's accessibility and might affect SEO. If you're using ESLint, there is a built-in rule `next/link-passhref` to ensure correct usage of `passHref`. import Link from 'next/link' import styled from 'styled-components' // This creates a custom component that wraps an <a> tag const RedLink = styled.a` color: red; ` function NavLink({ href, name }) { return ( <Link href={href} passHref legacyBehavior> <RedLink>{name}</RedLink> </Link> ) } export default NavLink * If you’re using emotion’s JSX pragma feature (`@jsx jsx`), you must use `passHref` even if you use an `<a>` tag directly. * The component should support `onClick` property to trigger navigation correctly ### If the child is a functional component If the child of `Link` is a functional component, in addition to using `passHref` and `legacyBehavior`, you must wrap the component in `React.forwardRef`: import Link from 'next/link' // `onClick`, `href`, and `ref` need to be passed to the DOM element // for proper handling const MyButton = React.forwardRef(({ onClick, href }, ref) => { return ( <a href={href} onClick={onClick} ref={ref}> Click Me </a> ) }) function Home() { return ( <Link href="/about" passHref legacyBehavior> <MyButton /> </Link> ) } export default Home ### With URL Object `Link` can also receive a URL object and it will automatically format it to create the URL string. Here's how to do it: import Link from 'next/link' function Home() { return ( <ul> <li> <Link href={{ pathname: '/about', query: { name: 'test' }, }} > About us </Link> </li> <li> <Link href={{ pathname: '/blog/[slug]', query: { slug: 'my-post' }, }} > Blog Post </Link> </li> </ul> ) } export default Home The above example has a link to: * A predefined route: `/about?name=test` * A dynamic route: `/blog/my-post` You can use every property as defined in the Node.js URL module documentation. ### Replace the URL instead of push The default behavior of the `Link` component is to `push` a new URL into the `history` stack. You can use the `replace` prop to prevent adding a new entry, as in the following example: <Link href="/about" replace> About us </Link> ### Disable scrolling to the top of the page The default behavior of `Link` is to scroll to the top of the page. When there is a hash defined it will scroll to the specific id, like a normal `<a>` tag. To prevent scrolling to the top / hash `scroll={false}` can be added to `Link`: <Link href="/#hashid" scroll={false}> Disables scrolling to the top </Link> ### Middleware It's common to use Middleware for authentication or other purposes that involve rewriting the user to a different page. In order for the `<Link />` component to properly prefetch links with rewrites via Middleware, you need to tell Next.js both the URL to display and the URL to prefetch. This is required to avoid un-necessary fetches to middleware to know the correct route to prefetch. For example, if you want to serve a `/dashboard` route that has authenticated and visitor views, you may add something similar to the following in your Middleware to redirect the user to the correct page: export function middleware(req) { const nextUrl = req.nextUrl if (nextUrl.pathname === '/dashboard') { if (req.cookies.authToken) { return NextResponse.rewrite(new URL('/auth/dashboard', req.url)) } else { return NextResponse.rewrite(new URL('/public/dashboard', req.url)) } } } In this case, you would want to use the following code in your `<Link />` component: import Link from 'next/link' import useIsAuthed from './hooks/useIsAuthed' export default function Page() { const isAuthed = useIsAuthed() const path = isAuthed ? '/auth/dashboard' : '/dashboard' return ( <Link as="/dashboard" href={path}> Dashboard </Link> ) } > **Good to know**: If you're using Dynamic Routes, you'll need to adapt your `as` and `href` props. For example, if you have a Dynamic Route like `/dashboard/[user]` that you want to present differently via middleware, you would write: `<Link href={{ pathname: '/dashboard/authed/[user]', query: { user: username } }} as="/dashboard/[user]">Profile</Link>`. ## Version History | Version | Changes | | --- | --- | | `v13.0.0` | No longer requires a child `<a>` tag. A codemod is provided to automatically update your codebase. | | `v10.0.0` | `href` props pointing to a dynamic route are automatically resolved and no longer require an `as` prop. | | `v8.0.0` | Improved prefetching performance. | | `v1.0.0` | `next/link` introduced. | --- ## Page: https://nextjs.org/docs/13/pages/api-reference/components/script This API reference will help you understand how to use props available for the Script Component. For features and usage, please see the Optimizing Scripts page. import Script from 'next/script' export default function Dashboard() { return ( <> <Script src="https://example.com/script.js" /> </> ) } ## Props Here's a summary of the props available for the Script Component: | Prop | Example | Type | Required | | --- | --- | --- | --- | | `src` | `src="http://example.com/script"` | String | Required unless inline script is used | | `strategy` | `strategy="lazyOnload"` | String | \- | | `onLoad` | `onLoad={onLoadFunc}` | Function | \- | | `onReady` | `onReady={onReadyFunc}` | Function | \- | | `onError` | `onError={onErrorFunc}` | Function | \- | ## Required Props The `<Script />` component requires the following properties. ### `src` A path string specifying the URL of an external script. This can be either an absolute external URL or an internal path. The `src` property is required unless an inline script is used. ## Optional Props The `<Script />` component accepts a number of additional properties beyond those which are required. ### `strategy` The loading strategy of the script. There are four different strategies that can be used: * `beforeInteractive`: Load before any Next.js code and before any page hydration occurs. * `afterInteractive`: (**default**) Load early but after some hydration on the page occurs. * `lazyOnload`: Load during browser idle time. * `worker`: (experimental) Load in a web worker. ### `beforeInteractive` Scripts that load with the `beforeInteractive` strategy are injected into the initial HTML from the server, downloaded before any Next.js module, and executed in the order they are placed before _any_ hydration occurs on the page. Scripts denoted with this strategy are preloaded and fetched before any first-party code, but their execution does not block page hydration from occurring. `beforeInteractive` scripts must be placed inside the root layout (`app/layout.tsx)` and are designed to load scripts that are needed by the entire site (i.e. the script will load when any page in the application has been loaded server-side). **This strategy should only be used for critical scripts that need to be fetched before any part of the page becomes interactive.** import { Html, Head, Main, NextScript } from 'next/document' import Script from 'next/script' export default function Document() { return ( <Html> <Head /> <body> <Main /> <NextScript /> <Script src="https://example.com/script.js" strategy="beforeInteractive" /> </body> </Html> ) } > **Good to know**: Scripts with `beforeInteractive` will always be injected inside the `head` of the HTML document regardless of where it's placed in the component. Some examples of scripts that should be loaded as soon as possible with `beforeInteractive` include: * Bot detectors * Cookie consent managers ### `afterInteractive` Scripts that use the `afterInteractive` strategy are injected into the HTML client-side and will load after some (or all) hydration occurs on the page. **This is the default strategy** of the Script component and should be used for any script that needs to load as soon as possible but not before any first-party Next.js code. `afterInteractive` scripts can be placed inside of any page or layout and will only load and execute when that page (or group of pages) is opened in the browser. import Script from 'next/script' export default function Page() { return ( <> <Script src="https://example.com/script.js" strategy="afterInteractive" /> </> ) } Some examples of scripts that are good candidates for `afterInteractive` include: * Tag managers * Analytics ### `lazyOnload` Scripts that use the `lazyOnload` strategy are injected into the HTML client-side during browser idle time and will load after all resources on the page have been fetched. This strategy should be used for any background or low priority scripts that do not need to load early. `lazyOnload` scripts can be placed inside of any page or layout and will only load and execute when that page (or group of pages) is opened in the browser. import Script from 'next/script' export default function Page() { return ( <> <Script src="https://example.com/script.js" strategy="lazyOnload" /> </> ) } Examples of scripts that do not need to load immediately and can be fetched with `lazyOnload` include: * Chat support plugins * Social media widgets ### `worker` > **Warning:** The `worker` strategy is not yet stable and does not yet work with the `app` directory. Use with caution. Scripts that use the `worker` strategy are off-loaded to a web worker in order to free up the main thread and ensure that only critical, first-party resources are processed on it. While this strategy can be used for any script, it is an advanced use case that is not guaranteed to support all third-party scripts. To use `worker` as a strategy, the `nextScriptWorkers` flag must be enabled in `next.config.js`: module.exports = { experimental: { nextScriptWorkers: true, }, } `worker` scripts can **only currently be used in the `pages/` directory**: import Script from 'next/script' export default function Home() { return ( <> <Script src="https://example.com/script.js" strategy="worker" /> </> ) } ### `onLoad` > **Warning:** `onLoad` does not yet work with Server Components and can only be used in Client Components. Further, `onLoad` can't be used with `beforeInteractive` – consider using `onReady` instead. Some third-party scripts require users to run JavaScript code once after the script has finished loading in order to instantiate content or call a function. If you are loading a script with either afterInteractive or lazyOnload as a loading strategy, you can execute code after it has loaded using the onLoad property. Here's an example of executing a lodash method only after the library has been loaded. 'use client' import Script from 'next/script' export default function Page() { return ( <> <Script src="https://cdnjs.cloudflare.com/ajax/libs/lodash.js/4.17.20/lodash.min.js" onLoad={() => { console.log(_.sample([1, 2, 3, 4])) }} /> </> ) } ### `onReady` > **Warning:** `onReady` does not yet work with Server Components and can only be used in Client Components. Some third-party scripts require users to run JavaScript code after the script has finished loading and every time the component is mounted (after a route navigation for example). You can execute code after the script's load event when it first loads and then after every subsequent component re-mount using the onReady property. Here's an example of how to re-instantiate a Google Maps JS embed every time the component is mounted: import { useRef } from 'react'; import Script from 'next/script'; export default function Page() { const mapRef = useRef(); return ( <PagesOnly> <div ref={mapRef}></div> <Script id="google-maps" src="https://maps.googleapis.com/maps/api/js" onReady={() => { new google.maps.Map(mapRef.current, { center: { lat: -34.397, lng: 150.644 }, zoom: 8, }); }} /> </> ); } ### `onError` > **Warning:** `onError` does not yet work with Server Components and can only be used in Client Components. `onError` cannot be used with the `beforeInteractive` loading strategy. Sometimes it is helpful to catch when a script fails to load. These errors can be handled with the onError property: import Script from 'next/script' export default function Page() { return ( <> <Script src="https://example.com/script.js" onError={(e: Error) => { console.error('Script failed to load', e) }} /> </> ) } ## Version History | Version | Changes | | --- | --- | | `v13.0.0` | `beforeInteractive` and `afterInteractive` is modified to support `app`. | | `v12.2.4` | `onReady` prop added. | | `v12.2.2` | Allow `next/script` with `beforeInteractive` to be placed in `_document`. | | `v11.0.0` | `next/script` introduced. | --- ## Page: https://nextjs.org/docs/13/pages/api-reference/functions #### Subscribe to our newsletter Stay updated on new releases and features, guides, and case studies. --- ## Page: https://nextjs.org/docs/13/pages/api-reference/functions/get-initial-props You are currently viewing documentation for version 13 of Next.js. > **Good to know**: `getInitialProps` is a legacy API. We recommend using `getStaticProps` or `getServerSideProps` instead. `getInitialProps` is an `async` function that can be added to the default exported React component for the page. It will run on both the server-side and again on the client-side during page transitions. The result of the function will be forwarded to the React component as `props`. pages/index.tsx import { NextPageContext } from 'next' Page.getInitialProps = async (ctx: NextPageContext) => { const res = await fetch('https://api.github.com/repos/vercel/next.js') const json = await res.json() return { stars: json.stargazers_count } } export default function Page({ stars }: { stars: number }) { return stars } > **Good to know**: > > * Data returned from `getInitialProps` is serialized when server rendering. Ensure the returned object from `getInitialProps` is a plain `Object`, and not using `Date`, `Map` or `Set`. > * For the initial page load, `getInitialProps` will run on the server only. `getInitialProps` will then also run on the client when navigating to a different route with the `next/link` component or by using `next/router`. > * If `getInitialProps` is used in a custom `_app.js`, and the page being navigated to is using `getServerSideProps`, then `getInitialProps` will also run on the server. ## Context Object `getInitialProps` receives a single argument called `context`, which is an object with the following properties: | Name | Description | | --- | --- | | `pathname` | Current route, the path of the page in `/pages` | | `query` | Query string of the URL, parsed as an object | | `asPath` | `String` of the actual path (including the query) shown in the browser | | `req` | HTTP request object (server only) | | `res` | HTTP response object (server only) | | `err` | Error object if any error is encountered during the rendering | ## Caveats * `getInitialProps` can only be used in `pages/` top level files, and not in nested components. To have nested data fetching at the component level, consider exploring the App Router. * Regardless of whether your route is static or dynamic, any data returned from `getInitialProps` as `props` will be able to be examined on the client-side in the initial HTML. This is to allow the page to be hydrated correctly. Make sure that you don't pass any sensitive information that shouldn't be available on the client in `props`. --- ## Page: https://nextjs.org/docs/13/pages/api-reference/functions/get-server-side-props When exporting a function called `getServerSideProps` (Server-Side Rendering) from a page, Next.js will pre-render this page on each request using the data returned by `getServerSideProps`. This is useful if you want to fetch data that changes often, and have the page update to show the most current data. import type { InferGetServerSidePropsType, GetServerSideProps } from 'next' type Repo = { name: string stargazers_count: number } export const getServerSideProps = (async (context) => { const res = await fetch('https://api.github.com/repos/vercel/next.js') const repo = await res.json() return { props: { repo } } }) satisfies GetServerSideProps<{ repo: Repo }> export default function Page({ repo, }: InferGetServerSidePropsType<typeof getServerSideProps>) { return repo.stargazers_count } You can import modules in top-level scope for use in `getServerSideProps`. Imports used will **not be bundled for the client-side**. This means you can write **server-side code directly in `getServerSideProps`**, including fetching data from your database. ## Context parameter The `context` parameter is an object containing the following keys: | Name | Description | | --- | --- | | `params` | If this page uses a dynamic route, `params` contains the route parameters. If the page name is `[id].js`, then `params` will look like `{ id: ... }`. | | `req` | The `HTTP` IncomingMessage object, with an additional `cookies` prop, which is an object with string keys mapping to string values of cookies. | | `res` | The `HTTP` response object. | | `query` | An object representing the query string, including dynamic route parameters. | | `preview` | (Deprecated for `draftMode`) `preview` is `true` if the page is in the Preview Mode and `false` otherwise. | | `previewData` | (Deprecated for `draftMode`) The preview data set by `setPreviewData`. | | `draftMode` | `draftMode` is `true` if the page is in the Draft Mode and `false` otherwise. | | `resolvedUrl` | A normalized version of the request `URL` that strips the `_next/data` prefix for client transitions and includes original query values. | | `locale` | Contains the active locale (if enabled). | | `locales` | Contains all supported locales (if enabled). | | `defaultLocale` | Contains the configured default locale (if enabled). | ## getServerSideProps return values The `getServerSideProps` function should return an object with **any one of the following** properties: ### `props` The `props` object is a key-value pair, where each value is received by the page component. It should be a serializable object so that any props passed, could be serialized with `JSON.stringify`. export async function getServerSideProps(context) { return { props: { message: `Next.js is awesome` }, // will be passed to the page component as props } } ### `notFound` The `notFound` boolean allows the page to return a `404` status and 404 Page. With `notFound: true`, the page will return a `404` even if there was a successfully generated page before. This is meant to support use cases like user-generated content getting removed by its author. export async function getServerSideProps(context) { const res = await fetch(`https://.../data`) const data = await res.json() if (!data) { return { notFound: true, } } return { props: { data }, // will be passed to the page component as props } } ### `redirect` The `redirect` object allows redirecting to internal and external resources. It should match the shape of `{ destination: string, permanent: boolean }`. In some rare cases, you might need to assign a custom status code for older `HTTP` clients to properly redirect. In these cases, you can use the `statusCode` property instead of the `permanent` property, but not both. export async function getServerSideProps(context) { const res = await fetch(`https://.../data`) const data = await res.json() if (!data) { return { redirect: { destination: '/', permanent: false, }, } } return { props: {}, // will be passed to the page component as props } } ## Version History | Version | Changes | | --- | --- | | `v13.4.0` | App Router is now stable with simplifed data fetching | | `v10.0.0` | `locale`, `locales`, `defaultLocale`, and `notFound` options added. | | `v9.3.0` | `getServerSideProps` introduced. | --- ## Page: https://nextjs.org/docs/13/pages/api-reference/functions/get-static-paths When exporting a function called `getStaticPaths` from a page that uses Dynamic Routes, Next.js will statically pre-render all the paths specified by `getStaticPaths`. import type { InferGetStaticPropsType, GetStaticProps, GetStaticPaths, } from 'next' type Repo = { name: string stargazers_count: number } export const getStaticPaths = (async () => { return { paths: [ { params: { name: 'next.js', }, }, // See the "paths" section below ], fallback: true, // false or "blocking" } }) satisfies GetStaticPaths export const getStaticProps = (async (context) => { const res = await fetch('https://api.github.com/repos/vercel/next.js') const repo = await res.json() return { props: { repo } } }) satisfies GetStaticProps<{ repo: Repo }> export default function Page({ repo, }: InferGetStaticPropsType<typeof getStaticProps>) { return repo.stargazers_count } ## getStaticPaths return values The `getStaticPaths` function should return an object with the following **required** properties: ### `paths` The `paths` key determines which paths will be pre-rendered. For example, suppose that you have a page that uses Dynamic Routes named `pages/posts/[id].js`. If you export `getStaticPaths` from this page and return the following for `paths`: return { paths: [ { params: { id: '1' }}, { params: { id: '2' }, // with i18n configured the locale for the path can be returned as well locale: "en", }, ], fallback: ... } Then, Next.js will statically generate `/posts/1` and `/posts/2` during `next build` using the page component in `pages/posts/[id].js`. The value for each `params` object must match the parameters used in the page name: * If the page name is `pages/posts/[postId]/[commentId]`, then `params` should contain `postId` and `commentId`. * If the page name uses catch-all routes like `pages/[...slug]`, then `params` should contain `slug` (which is an array). If this array is `['hello', 'world']`, then Next.js will statically generate the page at `/hello/world`. * If the page uses an optional catch-all route, use `null`, `[]`, `undefined` or `false` to render the root-most route. For example, if you supply `slug: false` for `pages/[[...slug]]`, Next.js will statically generate the page `/`. The `params` strings are **case-sensitive** and ideally should be normalized to ensure the paths are generated correctly. For example, if `WoRLD` is returned for a param it will only match if `WoRLD` is the actual path visited, not `world` or `World`. Separate of the `params` object a `locale` field can be returned when i18n is configured, which configures the locale for the path being generated. ### `fallback: false` If `fallback` is `false`, then any paths not returned by `getStaticPaths` will result in a **404 page**. When `next build` is run, Next.js will check if `getStaticPaths` returned `fallback: false`, it will then build **only** the paths returned by `getStaticPaths`. This option is useful if you have a small number of paths to create, or new page data is not added often. If you find that you need to add more paths, and you have `fallback: false`, you will need to run `next build` again so that the new paths can be generated. The following example pre-renders one blog post per page called `pages/posts/[id].js`. The list of blog posts will be fetched from a CMS and returned by `getStaticPaths`. Then, for each page, it fetches the post data from a CMS using `getStaticProps`. function Post({ post }) { // Render post... } // This function gets called at build time export async function getStaticPaths() { // Call an external API endpoint to get posts const res = await fetch('https://.../posts') const posts = await res.json() // Get the paths we want to pre-render based on posts const paths = posts.map((post) => ({ params: { id: post.id }, })) // We'll pre-render only these paths at build time. // { fallback: false } means other routes should 404. return { paths, fallback: false } } // This also gets called at build time export async function getStaticProps({ params }) { // params contains the post `id`. // If the route is like /posts/1, then params.id is 1 const res = await fetch(`https://.../posts/${params.id}`) const post = await res.json() // Pass post data to the page via props return { props: { post } } } export default Post ### `fallback: true` Examples * Static generation of a large number of pages If `fallback` is `true`, then the behavior of `getStaticProps` changes in the following ways: * The paths returned from `getStaticPaths` will be rendered to `HTML` at build time by `getStaticProps`. * The paths that have not been generated at build time will **not** result in a 404 page. Instead, Next.js will serve a “fallback” version of the page on the first request to such a path. Web crawlers, such as Google, won't be served a fallback and instead the path will behave as in `fallback: 'blocking'`. * When a page with `fallback: true` is navigated to through `next/link` or `next/router` (client-side) Next.js will _not_ serve a fallback and instead the page will behave as `fallback: 'blocking'`. * In the background, Next.js will statically generate the requested path `HTML` and `JSON`. This includes running `getStaticProps`. * When complete, the browser receives the `JSON` for the generated path. This will be used to automatically render the page with the required props. From the user’s perspective, the page will be swapped from the fallback page to the full page. * At the same time, Next.js adds this path to the list of pre-rendered pages. Subsequent requests to the same path will serve the generated page, like other pages pre-rendered at build time. > **Good to know**: `fallback: true` is not supported when using `output: 'export'`. #### When is `fallback: true` useful? `fallback: true` is useful if your app has a very large number of static pages that depend on data (such as a very large e-commerce site). If you want to pre-render all product pages, the builds would take a very long time. Instead, you may statically generate a small subset of pages and use `fallback: true` for the rest. When someone requests a page that is not generated yet, the user will see the page with a loading indicator or skeleton component. Shortly after, `getStaticProps` finishes and the page will be rendered with the requested data. From now on, everyone who requests the same page will get the statically pre-rendered page. This ensures that users always have a fast experience while preserving fast builds and the benefits of Static Generation. `fallback: true` will not _update_ generated pages, for that take a look at Incremental Static Regeneration. ### `fallback: 'blocking'` If `fallback` is `'blocking'`, new paths not returned by `getStaticPaths` will wait for the `HTML` to be generated, identical to SSR (hence why _blocking_), and then be cached for future requests so it only happens once per path. `getStaticProps` will behave as follows: * The paths returned from `getStaticPaths` will be rendered to `HTML` at build time by `getStaticProps`. * The paths that have not been generated at build time will **not** result in a 404 page. Instead, Next.js will SSR on the first request and return the generated `HTML`. * When complete, the browser receives the `HTML` for the generated path. From the user’s perspective, it will transition from "the browser is requesting the page" to "the full page is loaded". There is no flash of loading/fallback state. * At the same time, Next.js adds this path to the list of pre-rendered pages. Subsequent requests to the same path will serve the generated page, like other pages pre-rendered at build time. `fallback: 'blocking'` will not _update_ generated pages by default. To update generated pages, use Incremental Static Regeneration in conjunction with `fallback: 'blocking'`. > **Good to know**: `fallback: 'blocking'` is not supported when using `output: 'export'`. ### Fallback pages In the “fallback” version of a page: * The page’s props will be empty. * Using the router, you can detect if the fallback is being rendered, `router.isFallback` will be `true`. The following example showcases using `isFallback`: import { useRouter } from 'next/router' function Post({ post }) { const router = useRouter() // If the page is not yet generated, this will be displayed // initially until getStaticProps() finishes running if (router.isFallback) { return <div>Loading...</div> } // Render post... } // This function gets called at build time export async function getStaticPaths() { return { // Only `/posts/1` and `/posts/2` are generated at build time paths: [{ params: { id: '1' } }, { params: { id: '2' } }], // Enable statically generating additional pages // For example: `/posts/3` fallback: true, } } // This also gets called at build time export async function getStaticProps({ params }) { // params contains the post `id`. // If the route is like /posts/1, then params.id is 1 const res = await fetch(`https://.../posts/${params.id}`) const post = await res.json() // Pass post data to the page via props return { props: { post }, // Re-generate the post at most once per second // if a request comes in revalidate: 1, } } export default Post ## Version History | Version | Changes | | --- | --- | | `v13.4.0` | App Router is now stable with simplifed data fetching, including `generateStaticParams()` | | `v12.2.0` | On-Demand Incremental Static Regeneration is stable. | | `v12.1.0` | On-Demand Incremental Static Regeneration added (beta). | | `v9.5.0` | Stable Incremental Static Regeneration | | `v9.3.0` | `getStaticPaths` introduced. | --- ## Page: https://nextjs.org/docs/13/pages/api-reference/functions/get-static-props Exporting a function called `getStaticProps` will pre-render a page at build time using the props returned from the function: import type { InferGetStaticPropsType, GetStaticProps } from 'next' type Repo = { name: string stargazers_count: number } export const getStaticProps = (async (context) => { const res = await fetch('https://api.github.com/repos/vercel/next.js') const repo = await res.json() return { props: { repo } } }) satisfies GetStaticProps<{ repo: Repo }> export default function Page({ repo, }: InferGetStaticPropsType<typeof getStaticProps>) { return repo.stargazers_count } You can import modules in top-level scope for use in `getStaticProps`. Imports used will **not be bundled for the client-side**. This means you can write **server-side code directly in `getStaticProps`**, including fetching data from your database. ## Context parameter The `context` parameter is an object containing the following keys: | Name | Description | | --- | --- | | `params` | Contains the route parameters for pages using dynamic routes. For example, if the page name is `[id].js`, then `params` will look like `{ id: ... }`. You should use this together with `getStaticPaths`, which we'll explain later. | | `preview` | (Deprecated for `draftMode`) `preview` is `true` if the page is in the Preview Mode and `false` otherwise. | | `previewData` | (Deprecated for `draftMode`) The preview data set by `setPreviewData`. | | `draftMode` | `draftMode` is `true` if the page is in the Draft Mode and `false` otherwise. | | `locale` | Contains the active locale (if enabled). | | `locales` | Contains all supported locales (if enabled). | | `defaultLocale` | Contains the configured default locale (if enabled). | ## getStaticProps return values The `getStaticProps` function should return an object containing either `props`, `redirect`, or `notFound` followed by an **optional** `revalidate` property. ### `props` The `props` object is a key-value pair, where each value is received by the page component. It should be a serializable object so that any props passed, could be serialized with `JSON.stringify`. export async function getStaticProps(context) { return { props: { message: `Next.js is awesome` }, // will be passed to the page component as props } } ### `revalidate` The `revalidate` property is the amount in seconds after which a page re-generation can occur (defaults to `false` or no revalidation). // This function gets called at build time on server-side. // It may be called again, on a serverless function, if // revalidation is enabled and a new request comes in export async function getStaticProps() { const res = await fetch('https://.../posts') const posts = await res.json() return { props: { posts, }, // Next.js will attempt to re-generate the page: // - When a request comes in // - At most once every 10 seconds revalidate: 10, // In seconds } } Learn more about Incremental Static Regeneration. The cache status of a page leveraging ISR can be determined by reading the value of the `x-nextjs-cache` response header. The possible values are the following: * `MISS` - the path is not in the cache (occurs at most once, on the first visit) * `STALE` - the path is in the cache but exceeded the revalidate time so it will be updated in the background * `HIT` - the path is in the cache and has not exceeded the revalidate time ### `notFound` The `notFound` boolean allows the page to return a `404` status and 404 Page. With `notFound: true`, the page will return a `404` even if there was a successfully generated page before. This is meant to support use cases like user-generated content getting removed by its author. Note, `notFound` follows the same `revalidate` behavior described here. export async function getStaticProps(context) { const res = await fetch(`https://.../data`) const data = await res.json() if (!data) { return { notFound: true, } } return { props: { data }, // will be passed to the page component as props } } > **Good to know**: `notFound` is not needed for `fallback: false` mode as only paths returned from `getStaticPaths` will be pre-rendered. ### `redirect` The `redirect` object allows redirecting to internal or external resources. It should match the shape of `{ destination: string, permanent: boolean }`. In some rare cases, you might need to assign a custom status code for older `HTTP` clients to properly redirect. In these cases, you can use the `statusCode` property instead of the `permanent` property, **but not both**. You can also set `basePath: false` similar to redirects in `next.config.js`. export async function getStaticProps(context) { const res = await fetch(`https://...`) const data = await res.json() if (!data) { return { redirect: { destination: '/', permanent: false, // statusCode: 301 }, } } return { props: { data }, // will be passed to the page component as props } } If the redirects are known at build-time, they should be added in `next.config.js` instead. ## Reading files: Use `process.cwd()` Files can be read directly from the filesystem in `getStaticProps`. In order to do so you have to get the full path to a file. Since Next.js compiles your code into a separate directory you can't use `__dirname` as the path it returns will be different from the Pages Router. Instead you can use `process.cwd()` which gives you the directory where Next.js is being executed. import { promises as fs } from 'fs' import path from 'path' // posts will be populated at build time by getStaticProps() function Blog({ posts }) { return ( <ul> {posts.map((post) => ( <li> <h3>{post.filename}</h3> <p>{post.content}</p> </li> ))} </ul> ) } // This function gets called at build time on server-side. // It won't be called on client-side, so you can even do // direct database queries. export async function getStaticProps() { const postsDirectory = path.join(process.cwd(), 'posts') const filenames = await fs.readdir(postsDirectory) const posts = filenames.map(async (filename) => { const filePath = path.join(postsDirectory, filename) const fileContents = await fs.readFile(filePath, 'utf8') // Generally you would parse/transform the contents // For example you can transform markdown to HTML here return { filename, content: fileContents, } }) // By returning { props: { posts } }, the Blog component // will receive `posts` as a prop at build time return { props: { posts: await Promise.all(posts), }, } } export default Blog ## Version History | Version | Changes | | --- | --- | | `v13.4.0` | App Router is now stable with simplifed data fetching | | `v12.2.0` | On-Demand Incremental Static Regeneration is stable. | | `v12.1.0` | On-Demand Incremental Static Regeneration added (beta). | | `v10.0.0` | `locale`, `locales`, `defaultLocale`, and `notFound` options added. | | `v10.0.0` | `fallback: 'blocking'` return option added. | | `v9.5.0` | Stable Incremental Static Regeneration | | `v9.3.0` | `getStaticProps` introduced. | --- ## Page: https://nextjs.org/docs/13/pages/api-reference/functions/next-server `next/server` provides server-only helpers for use in Middleware and Edge API Routes. ## NextRequest The `NextRequest` object is an extension of the native `Request` interface, with the following added methods and properties: * `cookies` - A RequestCookies instance with cookies from the `Request`. It reads/mutates the `Cookie` header of the request. See also Using cookies in Middleware. * `get` - A method that takes a cookie `name` and returns an object with `name` and `value`. If a cookie with `name` isn't found, it returns `undefined`. If multiple cookies match, it will only return the first match. * `getAll` - A method that is similar to `get`, but returns a list of all the cookies with a matching `name`. If `name` is unspecified, it returns all the available cookies. * `set` - A method that takes an object with properties of `CookieListItem` as defined in the W3C CookieStore API spec. * `delete` - A method that takes either a cookie `name` or a list of names. and removes the cookies matching the name(s). Returns `true` for deleted and `false` for undeleted cookies. * `has` - A method that takes a cookie `name` and returns a `boolean` based on if the cookie exists (`true`) or not (`false`). * `clear` - A method that takes no argument and will effectively remove the `Cookie` header. * `nextUrl`: Includes an extended, parsed, URL object that gives you access to Next.js specific properties such as `pathname`, `basePath`, `trailingSlash` and `i18n`. Includes the following properties: * `basePath` (`string`) * `buildId` (`string || undefined`) * `defaultLocale` (`string || undefined`) * `domainLocale` * `defaultLocale`: (`string`) * `domain`: (`string`) * `http`: (`boolean || undefined`) * `locales`: (`string[] || undefined`) * `locale` (`string || undefined`) * `url` (`URL`) * `ip`: (`string || undefined`) - Has the IP address of the `Request`. This information is provided by your hosting platform. * `geo` - Has the geographic location from the `Request`. This information is provided by your hosting platform. Includes the following properties: * `city` (`string || undefined`) * `country` (`string || undefined`) * `region` (`string || undefined`) * `latitude` (`string || undefined`) * `longitude` (`string || undefined`) You can use the `NextRequest` object as a direct replacement for the native `Request` interface, giving you more control over how you manipulate the request. `NextRequest` can be imported from `next/server`: import type { NextRequest } from 'next/server' ## NextFetchEvent The `NextFetchEvent` object extends the native `FetchEvent` object, and includes the `waitUntil()` method. The `waitUntil()` method can be used to prolong the execution of the function if you have other background work to make. import { NextResponse } from 'next/server' import type { NextFetchEvent, NextRequest } from 'next/server' export function middleware(req: NextRequest, event: NextFetchEvent) { event.waitUntil( fetch('https://my-analytics-platform.com', { method: 'POST', body: JSON.stringify({ pathname: req.nextUrl.pathname }), }) ) return NextResponse.next() } The `NextFetchEvent` object can be imported from `next/server`: import type { NextFetchEvent } from 'next/server' ## NextResponse The `NextResponse` class extends the native `Response` interface, with the following: ### Public Methods Public methods are available on an instance of the `NextResponse` class. Depending on your use case, you can create an instance and assign to a variable, then access the following public methods: * `cookies` - A ResponseCookies instance with the cookies from the `Response`. It reads/mutates the `Set-Cookie` header of the response. See also Using cookies in Middleware. * `get` - A method that takes a cookie `name` and returns an object with `name` and `value`. If a cookie with `name` isn't found, it returns `undefined`. If multiple cookies match, it will only return the first match. * `getAll` - A method that is similar to `get`, but returns a list of all the cookies with a matching `name`. If `name` is unspecified, it returns all the available cookies. * `set` - A method that takes an object with properties of `CookieListItem` as defined in the W3C CookieStore API spec. * `delete` - A method that takes either a cookie `name` or a list of names. and removes the cookies matching the name(s). Returns `true` for deleted and `false` for undeleted cookies. ### Static Methods The following static methods are available on the `NextResponse` class directly: * `redirect()` - Returns a `NextResponse` with a redirect set * `rewrite()` - Returns a `NextResponse` with a rewrite set * `next()` - Returns a `NextResponse` that will continue the middleware chain To use the methods above, **you must return the `NextResponse` object** returned. `NextResponse` can be imported from `next/server`: import { NextResponse } from 'next/server' ## userAgent The `userAgent` helper allows you to interact with the user agent object from the request. It is abstracted from the native `Request` object, and is an opt in feature. It has the following properties: * `isBot`: (`boolean`) Whether the request comes from a known bot * `browser` * `name`: (`string || undefined`) The name of the browser * `version`: (`string || undefined`) The version of the browser, determined dynamically * `device` * `model`: (`string || undefined`) The model of the device, determined dynamically * `type`: (`string || undefined`) The type of the browser, can be one of the following values: `console`, `mobile`, `tablet`, `smarttv`, `wearable`, `embedded`, or `undefined` * `vendor`: (`string || undefined`) The vendor of the device, determined dynamically * `engine` * `name`: (`string || undefined`) The name of the browser engine, could be one of the following values: `Amaya`, `Blink`, `EdgeHTML`, `Flow`, `Gecko`, `Goanna`, `iCab`, `KHTML`, `Links`, `Lynx`, `NetFront`, `NetSurf`, `Presto`, `Tasman`, `Trident`, `w3m`, `WebKit` or `undefined` * `version`: (`string || undefined`) The version of the browser engine, determined dynamically, or `undefined` * `os` * `name`: (`string || undefined`) The name of the OS, could be `undefined` * `version`: (`string || undefined`) The version of the OS, determined dynamically, or `undefined` * `cpu` * `architecture`: (`string || undefined`) The architecture of the CPU, could be one of the following values: `68k`, `amd64`, `arm`, `arm64`, `armhf`, `avr`, `ia32`, `ia64`, `irix`, `irix64`, `mips`, `mips64`, `pa-risc`, `ppc`, `sparc`, `sparc64` or `undefined` `userAgent` can be imported from `next/server`: import { userAgent } from 'next/server' import { NextRequest, NextResponse, userAgent } from 'next/server' export function middleware(request: NextRequest) { const url = request.nextUrl const { device } = userAgent(request) const viewport = device.type === 'mobile' ? 'mobile' : 'desktop' url.searchParams.set('viewport', viewport) return NextResponse.rewrite(url) } ## FAQ ### Why does `redirect` use 307 and 308? When using `redirect()` you may notice that the status codes used are `307` for a temporary redirect, and `308` for a permanent redirect. While traditionally a `302` was used for a temporary redirect, and a `301` for a permanent redirect, many browsers changed the request method of the redirect, from a `POST` to `GET` request when using a `302`, regardless of the origins request method. Taking the following example of a redirect from `/users` to `/people`, if you make a `POST` request to `/users` to create a new user, and are conforming to a `302` temporary redirect, the request method will be changed from a `POST` to a `GET` request. This doesn't make sense, as to create a new user, you should be making a `POST` request to `/people`, and not a `GET` request. The introduction of the `307` status code means that the request method is preserved as `POST`. * `302` - Temporary redirect, will change the request method from `POST` to `GET` * `307` - Temporary redirect, will preserve the request method as `POST` The `redirect()` method uses a `307` by default, instead of a `302` temporary redirect, meaning your requests will _always_ be preserved as `POST` requests. If you want to cause a `GET` response to a `POST` request, use `303`. Learn more about HTTP Redirects. ### How do I access Environment Variables? `process.env` can be used to access Environment Variables from Edge Middleware. They are evaluated during `next build`: | Works | Does **not** work | | --- | --- | | `console.log(process.env.MY_ENV_VARIABLE)` | `const getEnv = name => process.env[name]` | | `const { MY_ENV_VARIABLE } = process.env` | | | `const { "MY-ENV-VARIABLE": MY_ENV_VARIABLE } = process.env` | | --- ## Page: https://nextjs.org/docs/13/pages/api-reference/functions/use-amp Examples * AMP > AMP support is one of our advanced features, you can read more about AMP here. To enable AMP, add the following config to your page: export const config = { amp: true } The `amp` config accepts the following values: * `true` - The page will be AMP-only * `'hybrid'` - The page will have two versions, one with AMP and another one with HTML To learn more about the `amp` config, read the sections below. ## AMP First Page Take a look at the following example: export const config = { amp: true } function About(props) { return <h3>My AMP About Page!</h3> } export default About The page above is an AMP-only page, which means: * The page has no Next.js or React client-side runtime * The page is automatically optimized with AMP Optimizer, an optimizer that applies the same transformations as AMP caches (improves performance by up to 42%) * The page has a user-accessible (optimized) version of the page and a search-engine indexable (unoptimized) version of the page ## Hybrid AMP Page Take a look at the following example: import { useAmp } from 'next/amp' export const config = { amp: 'hybrid' } function About(props) { const isAmp = useAmp() return ( <div> <h3>My AMP About Page!</h3> {isAmp ? ( <amp-img width="300" height="300" src="/my-img.jpg" alt="a cool image" layout="responsive" /> ) : ( <img width="300" height="300" src="/my-img.jpg" alt="a cool image" /> )} </div> ) } export default About The page above is a hybrid AMP page, which means: * The page is rendered as traditional HTML (default) and AMP HTML (by adding `?amp=1` to the URL) * The AMP version of the page only has valid optimizations applied with AMP Optimizer so that it is indexable by search-engines The page uses `useAmp` to differentiate between modes, it's a React Hook that returns `true` if the page is using AMP, and `false` otherwise. --- ## Page: https://nextjs.org/docs/13/pages/api-reference/functions/use-report-web-vitals The `useReportWebVitals` hook allows you to report Core Web Vitals, and can be used in combination with your analytics service. import { useReportWebVitals } from 'next/web-vitals' function MyApp({ Component, pageProps }) { useReportWebVitals((metric) => { console.log(metric) }) return <Component {...pageProps} /> } ## useReportWebVitals The `metric` object passed as the hook's argument consists of a number of properties: * `id`: Unique identifier for the metric in the context of the current page load * `name`: The name of the performance metric. Possible values include names of Web Vitals metrics (TTFB, FCP, LCP, FID, CLS) specific to a web application. * `delta`: The difference between the current value and the previous value of the metric. The value is typically in milliseconds and represents the change in the metric's value over time. * `entries`: An array of Performance Entries associated with the metric. These entries provide detailed information about the performance events related to the metric. * `navigationType`: Indicates the type of navigation that triggered the metric collection. Possible values include `"navigate"`, `"reload"`, `"back_forward"`, and `"prerender"`. * `rating`: A qualitative rating of the metric value, providing an assessment of the performance. Possible values are `"good"`, `"needs-improvement"`, and `"poor"`. The rating is typically determined by comparing the metric value against predefined thresholds that indicate acceptable or suboptimal performance. * `value`: The actual value or duration of the performance entry, typically in milliseconds. The value provides a quantitative measure of the performance aspect being tracked by the metric. The source of the value depends on the specific metric being measured and can come from various Performance APIs. ## Web Vitals Web Vitals are a set of useful metrics that aim to capture the user experience of a web page. The following web vitals are all included: * Time to First Byte (TTFB) * First Contentful Paint (FCP) * Largest Contentful Paint (LCP) * First Input Delay (FID) * Cumulative Layout Shift (CLS) * Interaction to Next Paint (INP) You can handle all the results of these metrics using the `name` property. import { useReportWebVitals } from 'next/web-vitals' function MyApp({ Component, pageProps }) { useReportWebVitals((metric) => { switch (metric.name) { case 'FCP': { // handle FCP results } case 'LCP': { // handle LCP results } // ... } }) return <Component {...pageProps} /> } ## Custom Metrics In addition to the core metrics listed above, there are some additional custom metrics that measure the time it takes for the page to hydrate and render: * `Next.js-hydration`: Length of time it takes for the page to start and finish hydrating (in ms) * `Next.js-route-change-to-render`: Length of time it takes for a page to start rendering after a route change (in ms) * `Next.js-render`: Length of time it takes for a page to finish render after a route change (in ms) You can handle all the results of these metrics separately: export function reportWebVitals(metric) { switch (metric.name) { case 'Next.js-hydration': // handle hydration results break case 'Next.js-route-change-to-render': // handle route-change to render results break case 'Next.js-render': // handle render results break default: break } } These metrics work in all browsers that support the User Timing API. ## Usage on Vercel Vercel Speed Insights are automatically configured on Vercel deployments, and don't require the use of `useReportWebVitals`. This hook is useful in local development, or if you're using a different analytics service. ## Sending results to external systems You can send results to any endpoint to measure and track real user performance on your site. For example: useReportWebVitals((metric) => { const body = JSON.stringify(metric) const url = 'https://example.com/analytics' // Use `navigator.sendBeacon()` if available, falling back to `fetch()`. if (navigator.sendBeacon) { navigator.sendBeacon(url, body) } else { fetch(url, { body, method: 'POST', keepalive: true }) } }) > **Good to know**: If you use Google Analytics, using the `id` value can allow you to construct metric distributions manually (to calculate percentiles, etc.) > useReportWebVitals(metric => { > // Use `window.gtag` if you initialized Google Analytics as this example: > // https://github.com/vercel/next.js/blob/canary/examples/with-google-analytics/pages/_app.js > window.gtag('event', metric.name, { > value: Math.round(metric.name === 'CLS' ? metric.value * 1000 : metric.value), // values must be integers > event_label: metric.id, // id unique to current page load > non_interaction: true, // avoids affecting bounce rate. > }); > } > > Read more about sending results to Google Analytics. --- ## Page: https://nextjs.org/docs/13/pages/api-reference/functions/use-router If you want to access the `router` object inside any function component in your app, you can use the `useRouter` hook, take a look at the following example: import { useRouter } from 'next/router' function ActiveLink({ children, href }) { const router = useRouter() const style = { marginRight: 10, color: router.asPath === href ? 'red' : 'black', } const handleClick = (e) => { e.preventDefault() router.push(href) } return ( <a href={href} onClick={handleClick} style={style}> {children} </a> ) } export default ActiveLink > `useRouter` is a React Hook, meaning it cannot be used with classes. You can either use withRouter or wrap your class in a function component. ## `router` object The following is the definition of the `router` object returned by both `useRouter` and `withRouter`: * `pathname`: `String` - The path for current route file that comes after `/pages`. Therefore, `basePath`, `locale` and trailing slash (`trailingSlash: true`) are not included. * `query`: `Object` - The query string parsed to an object, including dynamic route parameters. It will be an empty object during prerendering if the page doesn't use Server-side Rendering. Defaults to `{}` * `asPath`: `String` - The path as shown in the browser including the search params and respecting the `trailingSlash` configuration. `basePath` and `locale` are not included. * `isFallback`: `boolean` - Whether the current page is in fallback mode. * `basePath`: `String` - The active basePath (if enabled). * `locale`: `String` - The active locale (if enabled). * `locales`: `String[]` - All supported locales (if enabled). * `defaultLocale`: `String` - The current default locale (if enabled). * `domainLocales`: `Array<{domain, defaultLocale, locales}>` - Any configured domain locales. * `isReady`: `boolean` - Whether the router fields are updated client-side and ready for use. Should only be used inside of `useEffect` methods and not for conditionally rendering on the server. See related docs for use case with automatically statically optimized pages * `isPreview`: `boolean` - Whether the application is currently in preview mode. > Using the `asPath` field may lead to a mismatch between client and server if the page is rendered using server-side rendering or automatic static optimization. Avoid using `asPath` until the `isReady` field is `true`. The following methods are included inside `router`: ### router.push Examples * Using Router Handles client-side transitions, this method is useful for cases where `next/link` is not enough. router.push(url, as, options) * `url`: `UrlObject | String` - The URL to navigate to (see Node.JS URL module documentation for `UrlObject` properties). * `as`: `UrlObject | String` - Optional decorator for the path that will be shown in the browser URL bar. Before Next.js 9.5.3 this was used for dynamic routes. * `options` - Optional object with the following configuration options: * `scroll` - Optional boolean, controls scrolling to the top of the page after navigation. Defaults to `true` * `shallow`: Update the path of the current page without rerunning `getStaticProps`, `getServerSideProps` or `getInitialProps`. Defaults to `false` * `locale` - Optional string, indicates locale of the new page > You don't need to use `router.push` for external URLs. window.location is better suited for those cases. Navigating to `pages/about.js`, which is a predefined route: import { useRouter } from 'next/router' export default function Page() { const router = useRouter() return ( <button type="button" onClick={() => router.push('/about')}> Click me </button> ) } Navigating `pages/post/[pid].js`, which is a dynamic route: import { useRouter } from 'next/router' export default function Page() { const router = useRouter() return ( <button type="button" onClick={() => router.push('/post/abc')}> Click me </button> ) } Redirecting the user to `pages/login.js`, useful for pages behind authentication: import { useEffect } from 'react' import { useRouter } from 'next/router' // Here you would fetch and return the user const useUser = () => ({ user: null, loading: false }) export default function Page() { const { user, loading } = useUser() const router = useRouter() useEffect(() => { if (!(user || loading)) { router.push('/login') } }, [user, loading]) return <p>Redirecting...</p> } #### Resetting state after navigation When navigating to the same page in Next.js, the page's state **will not** be reset by default as React does not unmount unless the parent component has changed. import Link from 'next/link' import { useState } from 'react' import { useRouter } from 'next/router' export default function Page(props) { const router = useRouter() const [count, setCount] = useState(0) return ( <div> <h1>Page: {router.query.slug}</h1> <p>Count: {count}</p> <button onClick={() => setCount(count + 1)}>Increase count</button> <Link href="/one">one</Link> <Link href="/two">two</Link> </div> ) } In the above example, navigating between `/one` and `/two` **will not** reset the count . The `useState` is maintained between renders because the top-level React component, `Page`, is the same. If you do not want this behavior, you have a couple of options: * Manually ensure each state is updated using `useEffect`. In the above example, that could look like: useEffect(() => { setCount(0) }, [router.query.slug]) * Use a React `key` to tell React to remount the component. To do this for all pages, you can use a custom app: import { useRouter } from 'next/router' export default function MyApp({ Component, pageProps }) { const router = useRouter() return <Component key={router.asPath} {...pageProps} /> } #### With URL object You can use a URL object in the same way you can use it for `next/link`. Works for both the `url` and `as` parameters: import { useRouter } from 'next/router' export default function ReadMore({ post }) { const router = useRouter() return ( <button type="button" onClick={() => { router.push({ pathname: '/post/[pid]', query: { pid: post.id }, }) }} > Click here to read more </button> ) } ### router.replace Similar to the `replace` prop in `next/link`, `router.replace` will prevent adding a new URL entry into the `history` stack. router.replace(url, as, options) * The API for `router.replace` is exactly the same as the API for `router.push`. Take a look at the following example: import { useRouter } from 'next/router' export default function Page() { const router = useRouter() return ( <button type="button" onClick={() => router.replace('/home')}> Click me </button> ) } ### router.prefetch Prefetch pages for faster client-side transitions. This method is only useful for navigations without `next/link`, as `next/link` takes care of prefetching pages automatically. > This is a production only feature. Next.js doesn't prefetch pages in development. router.prefetch(url, as, options) * `url` - The URL to prefetch, including explicit routes (e.g. `/dashboard`) and dynamic routes (e.g. `/product/[id]`) * `as` - Optional decorator for `url`. Before Next.js 9.5.3 this was used to prefetch dynamic routes. * `options` - Optional object with the following allowed fields: * `locale` - allows providing a different locale from the active one. If `false`, `url` has to include the locale as the active locale won't be used. Let's say you have a login page, and after a login, you redirect the user to the dashboard. For that case, we can prefetch the dashboard to make a faster transition, like in the following example: import { useCallback, useEffect } from 'react' import { useRouter } from 'next/router' export default function Login() { const router = useRouter() const handleSubmit = useCallback((e) => { e.preventDefault() fetch('/api/login', { method: 'POST', headers: { 'Content-Type': 'application/json' }, body: JSON.stringify({ /* Form data */ }), }).then((res) => { // Do a fast client-side transition to the already prefetched dashboard page if (res.ok) router.push('/dashboard') }) }, []) useEffect(() => { // Prefetch the dashboard page router.prefetch('/dashboard') }, [router]) return ( <form onSubmit={handleSubmit}> {/* Form fields */} <button type="submit">Login</button> </form> ) } ### router.beforePopState In some cases (for example, if using a Custom Server), you may wish to listen to popstate and do something before the router acts on it. router.beforePopState(cb) * `cb` - The function to run on incoming `popstate` events. The function receives the state of the event as an object with the following props: * `url`: `String` - the route for the new state. This is usually the name of a `page` * `as`: `String` - the url that will be shown in the browser * `options`: `Object` - Additional options sent by router.push If `cb` returns `false`, the Next.js router will not handle `popstate`, and you'll be responsible for handling it in that case. See Disabling file-system routing. You could use `beforePopState` to manipulate the request, or force a SSR refresh, as in the following example: import { useEffect } from 'react' import { useRouter } from 'next/router' export default function Page() { const router = useRouter() useEffect(() => { router.beforePopState(({ url, as, options }) => { // I only want to allow these two routes! if (as !== '/' && as !== '/other') { // Have SSR render bad routes as a 404. window.location.href = as return false } return true }) }, [router]) return <p>Welcome to the page</p> } ### router.back Navigate back in history. Equivalent to clicking the browser’s back button. It executes `window.history.back()`. import { useRouter } from 'next/router' export default function Page() { const router = useRouter() return ( <button type="button" onClick={() => router.back()}> Click here to go back </button> ) } ### router.reload Reload the current URL. Equivalent to clicking the browser’s refresh button. It executes `window.location.reload()`. import { useRouter } from 'next/router' export default function Page() { const router = useRouter() return ( <button type="button" onClick={() => router.reload()}> Click here to reload </button> ) } ### router.events Examples * With a page loading indicator You can listen to different events happening inside the Next.js Router. Here's a list of supported events: * `routeChangeStart(url, { shallow })` - Fires when a route starts to change * `routeChangeComplete(url, { shallow })` - Fires when a route changed completely * `routeChangeError(err, url, { shallow })` - Fires when there's an error when changing routes, or a route load is cancelled * `err.cancelled` - Indicates if the navigation was cancelled * `beforeHistoryChange(url, { shallow })` - Fires before changing the browser's history * `hashChangeStart(url, { shallow })` - Fires when the hash will change but not the page * `hashChangeComplete(url, { shallow })` - Fires when the hash has changed but not the page > **Good to know**: Here `url` is the URL shown in the browser, including the `basePath`. For example, to listen to the router event `routeChangeStart`, open or create `pages/_app.js` and subscribe to the event, like so: import { useEffect } from 'react' import { useRouter } from 'next/router' export default function MyApp({ Component, pageProps }) { const router = useRouter() useEffect(() => { const handleRouteChange = (url, { shallow }) => { console.log( `App is changing to ${url} ${ shallow ? 'with' : 'without' } shallow routing` ) } router.events.on('routeChangeStart', handleRouteChange) // If the component is unmounted, unsubscribe // from the event with the `off` method: return () => { router.events.off('routeChangeStart', handleRouteChange) } }, [router]) return <Component {...pageProps} /> } > We use a Custom App (`pages/_app.js`) for this example to subscribe to the event because it's not unmounted on page navigations, but you can subscribe to router events on any component in your application. Router events should be registered when a component mounts (useEffect or componentDidMount / componentWillUnmount) or imperatively when an event happens. If a route load is cancelled (for example, by clicking two links rapidly in succession), `routeChangeError` will fire. And the passed `err` will contain a `cancelled` property set to `true`, as in the following example: import { useEffect } from 'react' import { useRouter } from 'next/router' export default function MyApp({ Component, pageProps }) { const router = useRouter() useEffect(() => { const handleRouteChangeError = (err, url) => { if (err.cancelled) { console.log(`Route to ${url} was cancelled!`) } } router.events.on('routeChangeError', handleRouteChangeError) // If the component is unmounted, unsubscribe // from the event with the `off` method: return () => { router.events.off('routeChangeError', handleRouteChangeError) } }, [router]) return <Component {...pageProps} /> } ## Potential ESLint errors Certain methods accessible on the `router` object return a Promise. If you have the ESLint rule, no-floating-promises enabled, consider disabling it either globally, or for the affected line. If your application needs this rule, you should either `void` the promise – or use an `async` function, `await` the Promise, then void the function call. **This is not applicable when the method is called from inside an `onClick` handler**. The affected methods are: * `router.push` * `router.replace` * `router.prefetch` ### Potential solutions import { useEffect } from 'react' import { useRouter } from 'next/router' // Here you would fetch and return the user const useUser = () => ({ user: null, loading: false }) export default function Page() { const { user, loading } = useUser() const router = useRouter() useEffect(() => { // disable the linting on the next line - This is the cleanest solution // eslint-disable-next-line no-floating-promises router.push('/login') // void the Promise returned by router.push if (!(user || loading)) { void router.push('/login') } // or use an async function, await the Promise, then void the function call async function handleRouteChange() { if (!(user || loading)) { await router.push('/login') } } void handleRouteChange() }, [user, loading]) return <p>Redirecting...</p> } ## withRouter If `useRouter` is not the best fit for you, `withRouter` can also add the same `router` object to any component. ### Usage import { withRouter } from 'next/router' function Page({ router }) { return <p>{router.pathname}</p> } export default withRouter(Page) ### TypeScript To use class components with `withRouter`, the component needs to accept a router prop: import React from 'react' import { withRouter, NextRouter } from 'next/router' interface WithRouterProps { router: NextRouter } interface MyComponentProps extends WithRouterProps {} class MyComponent extends React.Component<MyComponentProps> { render() { return <p>{this.props.router.pathname}</p> } } export default withRouter(MyComponent) --- ## Page: https://nextjs.org/docs/13/pages/api-reference/next-config-js Next.js can be configured through a `next.config.js` file in the root of your project directory (for example, by `package.json`). /** @type {import('next').NextConfig} */ const nextConfig = { /* config options here */ } module.exports = nextConfig `next.config.js` is a regular Node.js module, not a JSON file. It gets used by the Next.js server and build phases, and it's not included in the browser build. If you need ECMAScript modules, you can use `next.config.mjs`: /** * @type {import('next').NextConfig} */ const nextConfig = { /* config options here */ } export default nextConfig You can also use a function: module.exports = (phase, { defaultConfig }) => { /** * @type {import('next').NextConfig} */ const nextConfig = { /* config options here */ } return nextConfig } Since Next.js 12.1.0, you can use an async function: module.exports = async (phase, { defaultConfig }) => { /** * @type {import('next').NextConfig} */ const nextConfig = { /* config options here */ } return nextConfig } `phase` is the current context in which the configuration is loaded. You can see the available phases. Phases can be imported from `next/constants`: const { PHASE_DEVELOPMENT_SERVER } = require('next/constants') module.exports = (phase, { defaultConfig }) => { if (phase === PHASE_DEVELOPMENT_SERVER) { return { /* development only config options here */ } } return { /* config options for all phases except development here */ } } The commented lines are the place where you can put the configs allowed by `next.config.js`, which are defined in this file. However, none of the configs are required, and it's not necessary to understand what each config does. Instead, search for the features you need to enable or modify in this section and they will show you what to do. > Avoid using new JavaScript features not available in your target Node.js version. `next.config.js` will not be parsed by Webpack, Babel or TypeScript. This page documents all the available configuration options: --- ## Page: https://nextjs.org/docs/13/pages/api-reference/next-config-js/assetPrefix > **Attention**: Deploying to Vercel automatically configures a global CDN for your Next.js project. You do not need to manually setup an Asset Prefix. > **Good to know**: Next.js 9.5+ added support for a customizable Base Path, which is better suited for hosting your application on a sub-path like `/docs`. We do not suggest you use a custom Asset Prefix for this use case. To set up a CDN, you can set up an asset prefix and configure your CDN's origin to resolve to the domain that Next.js is hosted on. Open `next.config.js` and add the `assetPrefix` config: const isProd = process.env.NODE_ENV === 'production' module.exports = { // Use the CDN in production and localhost for development. assetPrefix: isProd ? 'https://cdn.mydomain.com' : undefined, } Next.js will automatically use your asset prefix for the JavaScript and CSS files it loads from the `/_next/` path (`.next/static/` folder). For example, with the above configuration, the following request for a JS chunk: /_next/static/chunks/4b9b41aaa062cbbfeff4add70f256968c51ece5d.4d708494b3aed70c04f0.js Would instead become: https://cdn.mydomain.com/_next/static/chunks/4b9b41aaa062cbbfeff4add70f256968c51ece5d.4d708494b3aed70c04f0.js The exact configuration for uploading your files to a given CDN will depend on your CDN of choice. The only folder you need to host on your CDN is the contents of `.next/static/`, which should be uploaded as `_next/static/` as the above URL request indicates. **Do not upload the rest of your `.next/` folder**, as you should not expose your server code and other configuration to the public. While `assetPrefix` covers requests to `_next/static`, it does not influence the following paths: * Files in the public folder; if you want to serve those assets over a CDN, you'll have to introduce the prefix yourself * `/_next/data/` requests for `getServerSideProps` pages. These requests will always be made against the main domain since they're not static. * `/_next/data/` requests for `getStaticProps` pages. These requests will always be made against the main domain to support Incremental Static Generation, even if you're not using it (for consistency). Was this helpful? supported. --- ## Page: https://nextjs.org/docs/13/pages/api-reference/next-config-js/basePath To deploy a Next.js application under a sub-path of a domain you can use the `basePath` config option. `basePath` allows you to set a path prefix for the application. For example, to use `/docs` instead of `''` (an empty string, the default), open `next.config.js` and add the `basePath` config: module.exports = { basePath: '/docs', } > **Good to know**: This value must be set at build time and cannot be changed without re-building as the value is inlined in the client-side bundles. ### Links When linking to other pages using `next/link` and `next/router` the `basePath` will be automatically applied. For example, using `/about` will automatically become `/docs/about` when `basePath` is set to `/docs`. export default function HomePage() { return ( <> <Link href="/about">About Page</Link> </> ) } Output html: <a href="/docs/about">About Page</a> This makes sure that you don't have to change all links in your application when changing the `basePath` value. ### Images When using the `next/image` component, you will need to add the `basePath` in front of `src`. For example, using `/docs/me.png` will properly serve your image when `basePath` is set to `/docs`. import Image from 'next/image' function Home() { return ( <> <h1>My Homepage</h1> <Image src="/docs/me.png" alt="Picture of the author" width={500} height={500} /> <p>Welcome to my homepage!</p> </> ) } export default Home --- ## Page: https://nextjs.org/docs/13/pages/api-reference/next-config-js/compress You are currently viewing documentation for version 13 of Next.js. Next.js provides **gzip** compression to compress rendered content and static files. In general you will want to enable compression on a HTTP proxy like nginx, to offload load from the `Node.js` process. To disable **compression**, open `next.config.js` and disable the `compress` config: next.config.js module.exports = { compress: false, } --- ## Page: https://nextjs.org/docs/13/pages/api-reference/next-config-js/devIndicators You are currently viewing documentation for version 13 of Next.js. > **Good to know**: This indicator was removed in Next.js version 10.0.1. We recommend upgrading to the latest version of Next.js. When a page qualifies for Automatic Static Optimization we show an indicator to let you know. This is helpful since automatic static optimization can be very beneficial and knowing immediately in development if the page qualifies can be useful. In some cases this indicator might not be useful, like when working on electron applications. To remove it open `next.config.js` and disable the `autoPrerender` config in `devIndicators`: next.config.js module.exports = { devIndicators: { autoPrerender: false, }, } --- ## Page: https://nextjs.org/docs/13/pages/api-reference/next-config-js/distDir You are currently viewing documentation for version 13 of Next.js. You can specify a name to use for a custom build directory to use instead of `.next`. Open `next.config.js` and add the `distDir` config: next.config.js module.exports = { distDir: 'build', } Now if you run `next build` Next.js will use `build` instead of the default `.next` folder. > `distDir` **should not** leave your project directory. For example, `../build` is an **invalid** directory. --- ## Page: https://nextjs.org/docs/13/pages/api-reference/next-config-js/env You are currently viewing documentation for version 13 of Next.js. > Since the release of Next.js 9.4 we now have a more intuitive and ergonomic experience for adding environment variables. Give it a try! Examples * With env > **Good to know**: environment variables specified in this way will **always** be included in the JavaScript bundle, prefixing the environment variable name with `NEXT_PUBLIC_` only has an effect when specifying them through the environment or .env files. To add environment variables to the JavaScript bundle, open `next.config.js` and add the `env` config: next.config.js module.exports = { env: { customKey: 'my-value', }, } Now you can access `process.env.customKey` in your code. For example: function Page() { return <h1>The value of customKey is: {process.env.customKey}</h1> } export default Page Next.js will replace `process.env.customKey` with `'my-value'` at build time. Trying to destructure `process.env` variables won't work due to the nature of webpack DefinePlugin. For example, the following line: return <h1>The value of customKey is: {process.env.customKey}</h1> Will end up being: return <h1>The value of customKey is: {'my-value'}</h1> --- ## Page: https://nextjs.org/docs/13/pages/api-reference/next-config-js/eslint You are currently viewing documentation for version 13 of Next.js. When ESLint is detected in your project, Next.js fails your **production build** (`next build`) when errors are present. If you'd like Next.js to produce production code even when your application has ESLint errors, you can disable the built-in linting step completely. This is not recommended unless you already have ESLint configured to run in a separate part of your workflow (for example, in CI or a pre-commit hook). Open `next.config.js` and enable the `ignoreDuringBuilds` option in the `eslint` config: next.config.js module.exports = { eslint: { // Warning: This allows production builds to successfully complete even if // your project has ESLint errors. ignoreDuringBuilds: true, }, } --- ## Page: https://nextjs.org/docs/13/pages/api-reference/next-config-js/exportPathMap > This feature is exclusive to `next export` and currently **deprecated** in favor of `getStaticPaths` with `pages` or `generateStaticParams` with `app`. Examples * Static Export `exportPathMap` allows you to specify a mapping of request paths to page destinations, to be used during export. Paths defined in `exportPathMap` will also be available when using `next dev`. Let's start with an example, to create a custom `exportPathMap` for an app with the following pages: * `pages/index.js` * `pages/about.js` * `pages/post.js` Open `next.config.js` and add the following `exportPathMap` config: module.exports = { exportPathMap: async function ( defaultPathMap, { dev, dir, outDir, distDir, buildId } ) { return { '/': { page: '/' }, '/about': { page: '/about' }, '/p/hello-nextjs': { page: '/post', query: { title: 'hello-nextjs' } }, '/p/learn-nextjs': { page: '/post', query: { title: 'learn-nextjs' } }, '/p/deploy-nextjs': { page: '/post', query: { title: 'deploy-nextjs' } }, } }, } > **Good to know**: the `query` field in `exportPathMap` cannot be used with automatically statically optimized pages or `getStaticProps` pages as they are rendered to HTML files at build-time and additional query information cannot be provided during `next export`. The pages will then be exported as HTML files, for example, `/about` will become `/about.html`. `exportPathMap` is an `async` function that receives 2 arguments: the first one is `defaultPathMap`, which is the default map used by Next.js. The second argument is an object with: * `dev` - `true` when `exportPathMap` is being called in development. `false` when running `next export`. In development `exportPathMap` is used to define routes. * `dir` - Absolute path to the project directory * `outDir` - Absolute path to the `out/` directory (configurable with `-o`). When `dev` is `true` the value of `outDir` will be `null`. * `distDir` - Absolute path to the `.next/` directory (configurable with the `distDir` config) * `buildId` - The generated build id The returned object is a map of pages where the `key` is the `pathname` and the `value` is an object that accepts the following fields: * `page`: `String` - the page inside the `pages` directory to render * `query`: `Object` - the `query` object passed to `getInitialProps` when prerendering. Defaults to `{}` > The exported `pathname` can also be a filename (for example, `/readme.md`), but you may need to set the `Content-Type` header to `text/html` when serving its content if it is different than `.html`. ## Adding a trailing slash It is possible to configure Next.js to export pages as `index.html` files and require trailing slashes, `/about` becomes `/about/index.html` and is routable via `/about/`. This was the default behavior prior to Next.js 9. To switch back and add a trailing slash, open `next.config.js` and enable the `trailingSlash` config: module.exports = { trailingSlash: true, } ## Customizing the output directory `next export` will use `out` as the default output directory, you can customize this using the `-o` argument, like so: next export -o outdir > **Warning**: Using `exportPathMap` is deprecated and is overridden by `getStaticPaths` inside `pages`. We don't recommend using them together. --- ## Page: https://nextjs.org/docs/13/pages/api-reference/next-config-js/generateBuildId You are currently viewing documentation for version 13 of Next.js. Next.js uses a constant id generated at build time to identify which version of your application is being served. This can cause problems in multi-server deployments when `next build` is run on every server. In order to keep a consistent build id between builds you can provide your own build id. Open `next.config.js` and add the `generateBuildId` function: next.config.js module.exports = { generateBuildId: async () => { // You can, for example, get the latest git commit hash here return 'my-build-id' }, } --- ## Page: https://nextjs.org/docs/13/pages/api-reference/next-config-js/generateEtags You are currently viewing documentation for version 13 of Next.js. Next.js will generate etags for every page by default. You may want to disable etag generation for HTML pages depending on your cache strategy. Open `next.config.js` and disable the `generateEtags` option: next.config.js module.exports = { generateEtags: false, } --- ## Page: https://nextjs.org/docs/13/pages/api-reference/next-config-js/headers Headers allow you to set custom HTTP headers on the response to an incoming request on a given path. To set custom HTTP headers you can use the `headers` key in `next.config.js`: module.exports = { async headers() { return [ { source: '/about', headers: [ { key: 'x-custom-header', value: 'my custom header value', }, { key: 'x-another-custom-header', value: 'my other custom header value', }, ], }, ] }, } `headers` is an async function that expects an array to be returned holding objects with `source` and `headers` properties: * `source` is the incoming request path pattern. * `headers` is an array of response header objects, with `key` and `value` properties. * `basePath`: `false` or `undefined` - if false the basePath won't be included when matching, can be used for external rewrites only. * `locale`: `false` or `undefined` - whether the locale should not be included when matching. * `has` is an array of has objects with the `type`, `key` and `value` properties. * `missing` is an array of missing objects with the `type`, `key` and `value` properties. Headers are checked before the filesystem which includes pages and `/public` files. If two headers match the same path and set the same header key, the last header key will override the first. Using the below headers, the path `/hello` will result in the header `x-hello` being `world` due to the last header value set being `world`. module.exports = { async headers() { return [ { source: '/:path*', headers: [ { key: 'x-hello', value: 'there', }, ], }, { source: '/hello', headers: [ { key: 'x-hello', value: 'world', }, ], }, ] }, } ## Path Matching Path matches are allowed, for example `/blog/:slug` will match `/blog/hello-world` (no nested paths): module.exports = { async headers() { return [ { source: '/blog/:slug', headers: [ { key: 'x-slug', value: ':slug', // Matched parameters can be used in the value }, { key: 'x-slug-:slug', // Matched parameters can be used in the key value: 'my other custom header value', }, ], }, ] }, } ### Wildcard Path Matching To match a wildcard path you can use `*` after a parameter, for example `/blog/:slug*` will match `/blog/a/b/c/d/hello-world`: module.exports = { async headers() { return [ { source: '/blog/:slug*', headers: [ { key: 'x-slug', value: ':slug*', // Matched parameters can be used in the value }, { key: 'x-slug-:slug*', // Matched parameters can be used in the key value: 'my other custom header value', }, ], }, ] }, } ### Regex Path Matching To match a regex path you can wrap the regex in parenthesis after a parameter, for example `/blog/:slug(\\d{1,})` will match `/blog/123` but not `/blog/abc`: module.exports = { async headers() { return [ { source: '/blog/:post(\\d{1,})', headers: [ { key: 'x-post', value: ':post', }, ], }, ] }, } The following characters `(`, `)`, `{`, `}`, `:`, `*`, `+`, `?` are used for regex path matching, so when used in the `source` as non-special values they must be escaped by adding `\\` before them: module.exports = { async headers() { return [ { // this will match `/english(default)/something` being requested source: '/english\\(default\\)/:slug', headers: [ { key: 'x-header', value: 'value', }, ], }, ] }, } ## Header, Cookie, and Query Matching To only apply a header when header, cookie, or query values also match the `has` field or don't match the `missing` field can be used. Both the `source` and all `has` items must match and all `missing` items must not match for the header to be applied. `has` and `missing` items can have the following fields: * `type`: `String` - must be either `header`, `cookie`, `host`, or `query`. * `key`: `String` - the key from the selected type to match against. * `value`: `String` or `undefined` - the value to check for, if undefined any value will match. A regex like string can be used to capture a specific part of the value, e.g. if the value `first-(?<paramName>.*)` is used for `first-second` then `second` will be usable in the destination with `:paramName`. module.exports = { async headers() { return [ // if the header `x-add-header` is present, // the `x-another-header` header will be applied { source: '/:path*', has: [ { type: 'header', key: 'x-add-header', }, ], headers: [ { key: 'x-another-header', value: 'hello', }, ], }, // if the header `x-no-header` is not present, // the `x-another-header` header will be applied { source: '/:path*', missing: [ { type: 'header', key: 'x-no-header', }, ], headers: [ { key: 'x-another-header', value: 'hello', }, ], }, // if the source, query, and cookie are matched, // the `x-authorized` header will be applied { source: '/specific/:path*', has: [ { type: 'query', key: 'page', // the page value will not be available in the // header key/values since value is provided and // doesn't use a named capture group e.g. (?<page>home) value: 'home', }, { type: 'cookie', key: 'authorized', value: 'true', }, ], headers: [ { key: 'x-authorized', value: ':authorized', }, ], }, // if the header `x-authorized` is present and // contains a matching value, the `x-another-header` will be applied { source: '/:path*', has: [ { type: 'header', key: 'x-authorized', value: '(?<authorized>yes|true)', }, ], headers: [ { key: 'x-another-header', value: ':authorized', }, ], }, // if the host is `example.com`, // this header will be applied { source: '/:path*', has: [ { type: 'host', value: 'example.com', }, ], headers: [ { key: 'x-another-header', value: ':authorized', }, ], }, ] }, } When leveraging `basePath` support with headers each `source` is automatically prefixed with the `basePath` unless you add `basePath: false` to the header: module.exports = { basePath: '/docs', async headers() { return [ { source: '/with-basePath', // becomes /docs/with-basePath headers: [ { key: 'x-hello', value: 'world', }, ], }, { source: '/without-basePath', // is not modified since basePath: false is set headers: [ { key: 'x-hello', value: 'world', }, ], basePath: false, }, ] }, } When leveraging `i18n` support with headers each `source` is automatically prefixed to handle the configured `locales` unless you add `locale: false` to the header. If `locale: false` is used you must prefix the `source` with a locale for it to be matched correctly. module.exports = { i18n: { locales: ['en', 'fr', 'de'], defaultLocale: 'en', }, async headers() { return [ { source: '/with-locale', // automatically handles all locales headers: [ { key: 'x-hello', value: 'world', }, ], }, { // does not handle locales automatically since locale: false is set source: '/nl/with-locale-manual', locale: false, headers: [ { key: 'x-hello', value: 'world', }, ], }, { // this matches '/' since `en` is the defaultLocale source: '/en', locale: false, headers: [ { key: 'x-hello', value: 'world', }, ], }, { // this gets converted to /(en|fr|de)/(.*) so will not match the top-level // `/` or `/fr` routes like /:path* would source: '/(.*)', headers: [ { key: 'x-hello', value: 'world', }, ], }, ] }, } ## Cache-Control You cannot set `Cache-Control` headers in `next.config.js` for pages or assets, as these headers will be overwritten in production to ensure that responses and static assets are cached effectively. If you need to revalidate the cache of a page that has been statically generated, you can do so by setting the `revalidate` prop in the page's `getStaticProps` function. You can set the `Cache-Control` header in your API Routes by using the `res.setHeader` method: import type { NextApiRequest, NextApiResponse } from 'next' type ResponseData = { message: string } export default function handler( req: NextApiRequest, res: NextApiResponse<ResponseData> ) { res.setHeader('Cache-Control', 's-maxage=86400') res.status(200).json({ message: 'Hello from Next.js!' }) } ## Options ### X-DNS-Prefetch-Control This header controls DNS prefetching, allowing browsers to proactively perform domain name resolution on external links, images, CSS, JavaScript, and more. This prefetching is performed in the background, so the DNS is more likely to be resolved by the time the referenced items are needed. This reduces latency when the user clicks a link. { key: 'X-DNS-Prefetch-Control', value: 'on' } ### Strict-Transport-Security This header informs browsers it should only be accessed using HTTPS, instead of using HTTP. Using the configuration below, all present and future subdomains will use HTTPS for a `max-age` of 2 years. This blocks access to pages or subdomains that can only be served over HTTP. If you're deploying to Vercel, this header is not necessary as it's automatically added to all deployments unless you declare `headers` in your `next.config.js`. { key: 'Strict-Transport-Security', value: 'max-age=63072000; includeSubDomains; preload' } ### X-Frame-Options This header indicates whether the site should be allowed to be displayed within an `iframe`. This can prevent against clickjacking attacks. **This header has been superseded by CSP's `frame-ancestors` option**, which has better support in modern browsers. { key: 'X-Frame-Options', value: 'SAMEORIGIN' } ### Permissions-Policy This header allows you to control which features and APIs can be used in the browser. It was previously named `Feature-Policy`. { key: 'Permissions-Policy', value: 'camera=(), microphone=(), geolocation=(), browsing-topics=()' } ### X-Content-Type-Options This header prevents the browser from attempting to guess the type of content if the `Content-Type` header is not explicitly set. This can prevent XSS exploits for websites that allow users to upload and share files. For example, a user trying to download an image, but having it treated as a different `Content-Type` like an executable, which could be malicious. This header also applies to downloading browser extensions. The only valid value for this header is `nosniff`. { key: 'X-Content-Type-Options', value: 'nosniff' } ### Referrer-Policy This header controls how much information the browser includes when navigating from the current website (origin) to another. { key: 'Referrer-Policy', value: 'origin-when-cross-origin' } ### Content-Security-Policy Learn more about adding a Content Security Policy to your application. ## Version History | Version | Changes | | --- | --- | | `v13.3.0` | `missing` added. | | `v10.2.0` | `has` added. | | `v9.5.0` | Headers added. | --- ## Page: https://nextjs.org/docs/13/pages/api-reference/next-config-js/httpAgentOptions You are currently viewing documentation for version 13 of Next.js. In Node.js versions prior to 18, Next.js automatically polyfills `fetch()` with undici and enables HTTP Keep-Alive by default. To disable HTTP Keep-Alive for all `fetch()` calls on the server-side, open `next.config.js` and add the `httpAgentOptions` config: next.config.js module.exports = { httpAgentOptions: { keepAlive: false, }, } --- ## Page: https://nextjs.org/docs/13/pages/api-reference/next-config-js/images If you want to use a cloud provider to optimize images instead of using the Next.js built-in Image Optimization API, you can configure `next.config.js` with the following: module.exports = { images: { loader: 'custom', loaderFile: './my/image/loader.js', }, } This `loaderFile` must point to a file relative to the root of your Next.js application. The file must export a default function that returns a string, for example: export default function myImageLoader({ src, width, quality }) { return `https://example.com/${src}?w=${width}&q=${quality || 75}` } Alternatively, you can use the `loader` prop to pass the function to each instance of `next/image`. ## Example Loader Configuration * Akamai * Cloudinary * Cloudflare * Contentful * Fastly * Gumlet * ImageEngine * Imgix * Thumbor * Sanity * Supabase ### Akamai // Docs: https://techdocs.akamai.com/ivm/reference/test-images-on-demand export default function akamaiLoader({ src, width, quality }) { return `https://example.com/${src}?imwidth=${width}` } ### Cloudinary // Demo: https://res.cloudinary.com/demo/image/upload/w_300,c_limit,q_auto/turtles.jpg export default function cloudinaryLoader({ src, width, quality }) { const params = ['f_auto', 'c_limit', `w_${width}`, `q_${quality || 'auto'}`] return `https://example.com/${params.join(',')}${src}` } ### Cloudflare // Docs: https://developers.cloudflare.com/images/url-format export default function cloudflareLoader({ src, width, quality }) { const params = [`width=${width}`, `quality=${quality || 75}`, 'format=auto'] return `https://example.com/cdn-cgi/image/${params.join(',')}/${src}` } ### Contentful // Docs: https://www.contentful.com/developers/docs/references/images-api/ export default function contentfulLoader({ src, width, quality }) { const url = new URL(`https://example.com${src}`) url.searchParams.set('fm', 'webp') url.searchParams.set('w', width.toString()) url.searchParams.set('q', (quality || 75).toString()) return url.href } ### Fastly // Docs: https://developer.fastly.com/reference/io/ export default function fastlyLoader({ src, width, quality }) { const url = new URL(`https://example.com${src}`) url.searchParams.set('auto', 'webp') url.searchParams.set('width', width.toString()) url.searchParams.set('quality', (quality || 75).toString()) return url.href } ### Gumlet // Docs: https://docs.gumlet.com/reference/image-transform-size export default function gumletLoader({ src, width, quality }) { const url = new URL(`https://example.com${src}`) url.searchParams.set('format', 'auto') url.searchParams.set('w', width.toString()) url.searchParams.set('q', (quality || 75).toString()) return url.href } ### ImageEngine // Docs: https://support.imageengine.io/hc/en-us/articles/360058880672-Directives export default function imageengineLoader({ src, width, quality }) { const compression = 100 - (quality || 50) const params = [`w_${width}`, `cmpr_${compression}`)] return `https://example.com${src}?imgeng=/${params.join('/')` } ### Imgix // Demo: https://static.imgix.net/daisy.png?format=auto&fit=max&w=300 export default function imgixLoader({ src, width, quality }) { const url = new URL(`https://example.com${src}`) const params = url.searchParams params.set('auto', params.getAll('auto').join(',') || 'format') params.set('fit', params.get('fit') || 'max') params.set('w', params.get('w') || width.toString()) params.set('q', (quality || 50).toString()) return url.href } ### Thumbor // Docs: https://thumbor.readthedocs.io/en/latest/ export default function thumborLoader({ src, width, quality }) { const params = [`${width}x0`, `filters:quality(${quality || 75})`] return `https://example.com${params.join('/')}${src}` } ### Sanity // Docs: https://www.sanity.io/docs/image-urls export default function sanityLoader({ src, width, quality }) { const prj = 'zp7mbokg' const dataset = 'production' const url = new URL(`https://cdn.sanity.io/images/${prj}/${dataset}${src}`) url.searchParams.set('auto', 'format') url.searchParams.set('fit', 'max') url.searchParams.set('w', width.toString()) if (quality) { url.searchParams.set('q', quality.toString()) } return url.href } ### Supabase // Docs: https://supabase.com/docs/guides/storage/image-transformations#nextjs-loader export default function supabaseLoader({ src, width, quality }) { const url = new URL(`https://example.com${src}`) url.searchParams.set('width', width.toString()) url.searchParams.set('quality', (quality || 75).toString()) return url.href } --- ## Page: https://nextjs.org/docs/13/pages/api-reference/next-config-js/onDemandEntries You are currently viewing documentation for version 13 of Next.js. Next.js exposes some options that give you some control over how the server will dispose or keep in memory built pages in development. To change the defaults, open `next.config.js` and add the `onDemandEntries` config: next.config.js module.exports = { onDemandEntries: { // period (in ms) where the server will keep pages in the buffer maxInactiveAge: 25 * 1000, // number of pages that should be kept simultaneously without being disposed pagesBufferLength: 2, }, } --- ## Page: https://nextjs.org/docs/13/pages/api-reference/next-config-js/output During a build, Next.js will automatically trace each page and its dependencies to determine all of the files that are needed for deploying a production version of your application. This feature helps reduce the size of deployments drastically. Previously, when deploying with Docker you would need to have all files from your package's `dependencies` installed to run `next start`. Starting with Next.js 12, you can leverage Output File Tracing in the `.next/` directory to only include the necessary files. Furthermore, this removes the need for the deprecated `serverless` target which can cause various issues and also creates unnecessary duplication. ## How it Works During `next build`, Next.js will use `@vercel/nft` to statically analyze `import`, `require`, and `fs` usage to determine all files that a page might load. Next.js' production server is also traced for its needed files and output at `.next/next-server.js.nft.json` which can be leveraged in production. To leverage the `.nft.json` files emitted to the `.next` output directory, you can read the list of files in each trace that are relative to the `.nft.json` file and then copy them to your deployment location. ## Automatically Copying Traced Files Next.js can automatically create a `standalone` folder that copies only the necessary files for a production deployment including select files in `node_modules`. To leverage this automatic copying you can enable it in your `next.config.js`: module.exports = { output: 'standalone', } This will create a folder at `.next/standalone` which can then be deployed on its own without installing `node_modules`. Additionally, a minimal `server.js` file is also output which can be used instead of `next start`. This minimal server does not copy the `public` or `.next/static` folders by default as these should ideally be handled by a CDN instead, although these folders can be copied to the `standalone/public` and `standalone/.next/static` folders manually, after which `server.js` file will serve these automatically. > **Good to know**: > > * `next.config.js` is read during `next build` and serialized into the `server.js` output file. If the legacy `serverRuntimeConfig` or `publicRuntimeConfig` options are being used, the values will be specific to values at build time. > * If your project needs to listen to a specific port or hostname, you can define `PORT` or `HOSTNAME` environment variables before running `server.js`. For example, run `PORT=8080 HOSTNAME=0.0.0.0 node server.js` to start the server on `http://0.0.0.0:8080`. > * If your project uses Image Optimization with the default `loader`, you must install `sharp` as a dependency: npm i sharp yarn add sharp pnpm add sharp bun add sharp ## Caveats * While tracing in monorepo setups, the project directory is used for tracing by default. For `next build packages/web-app`, `packages/web-app` would be the tracing root and any files outside of that folder will not be included. To include files outside of this folder you can set `experimental.outputFileTracingRoot` in your `next.config.js`. module.exports = { experimental: { // this includes files from the monorepo base two directories up outputFileTracingRoot: path.join(__dirname, '../../'), }, } * There are some cases in which Next.js might fail to include required files, or might incorrectly include unused files. In those cases, you can leverage `experimental.outputFileTracingExcludes` and `experimental.outputFileTracingIncludes` respectively in `next.config.js`. Each config accepts an object with minimatch globs for the key to match specific pages and a value of an array with globs relative to the project's root to either include or exclude in the trace. module.exports = { experimental: { outputFileTracingExcludes: { '/api/hello': ['./un-necessary-folder/**/*'], }, outputFileTracingIncludes: { '/api/another': ['./necessary-folder/**/*'], }, }, } * Currently, Next.js does not do anything with the emitted `.nft.json` files. The files must be read by your deployment platform, for example Vercel, to create a minimal deployment. In a future release, a new command is planned to utilize these `.nft.json` files. ## Experimental `turbotrace` Tracing dependencies can be slow because it requires very complex computations and analysis. We created `turbotrace` in Rust as a faster and smarter alternative to the JavaScript implementation. To enable it, you can add the following configuration to your `next.config.js`: module.exports = { experimental: { turbotrace: { // control the log level of the turbotrace, default is `error` logLevel?: | 'bug' | 'fatal' | 'error' | 'warning' | 'hint' | 'note' | 'suggestions' | 'info', // control if the log of turbotrace should contain the details of the analysis, default is `false` logDetail?: boolean // show all log messages without limit // turbotrace only show 1 log message for each categories by default logAll?: boolean // control the context directory of the turbotrace // files outside of the context directory will not be traced // set the `experimental.outputFileTracingRoot` has the same effect // if the `experimental.outputFileTracingRoot` and this option are both set, the `experimental.turbotrace.contextDirectory` will be used contextDirectory?: string // if there is `process.cwd()` expression in your code, you can set this option to tell `turbotrace` the value of `process.cwd()` while tracing. // for example the require(process.cwd() + '/package.json') will be traced as require('/path/to/cwd/package.json') processCwd?: string // control the maximum memory usage of the `turbotrace`, in `MB`, default is `6000`. memoryLimit?: number }, }, } --- ## Page: https://nextjs.org/docs/13/pages/api-reference/next-config-js/pageExtensions You can extend the default Page extensions (`.tsx`, `.ts`, `.jsx`, `.js`) used by Next.js. Inside `next.config.js`, add the `pageExtensions` config: module.exports = { pageExtensions: ['mdx', 'md', 'jsx', 'js', 'tsx', 'ts'], } Changing these values affects _all_ Next.js pages, including the following: * `middleware.js` * `instrumentation.js` * `pages/_document.js` * `pages/_app.js` * `pages/api/` For example, if you reconfigure `.ts` page extensions to `.page.ts`, you would need to rename pages like `middleware.page.ts`, `instrumentation.page.ts`, `_app.page.ts`. ## Including non-page files in the `pages` directory You can colocate test files or other files used by components in the `pages` directory. Inside `next.config.js`, add the `pageExtensions` config: module.exports = { pageExtensions: ['page.tsx', 'page.ts', 'page.jsx', 'page.js'], } Then, rename your pages to have a file extension that includes `.page` (e.g. rename `MyPage.tsx` to `MyPage.page.tsx`). Ensure you rename _all_ Next.js pages, including the files mentioned above. --- ## Page: https://nextjs.org/docs/13/pages/api-reference/next-config-js/poweredByHeader You are currently viewing documentation for version 13 of Next.js. By default Next.js will add the `x-powered-by` header. To opt-out of it, open `next.config.js` and disable the `poweredByHeader` config: next.config.js module.exports = { poweredByHeader: false, } --- ## Page: https://nextjs.org/docs/13/pages/api-reference/next-config-js/productionBrowserSourceMaps You are currently viewing documentation for version 13 of Next.js. Source Maps are enabled by default during development. During production builds, they are disabled to prevent you leaking your source on the client, unless you specifically opt-in with the configuration flag. Next.js provides a configuration flag you can use to enable browser source map generation during the production build: next.config.js module.exports = { productionBrowserSourceMaps: true, } When the `productionBrowserSourceMaps` option is enabled, the source maps will be output in the same directory as the JavaScript files. Next.js will automatically serve these files when requested. * Adding source maps can increase `next build` time * Increases memory usage during `next build` --- ## Page: https://nextjs.org/docs/13/pages/api-reference/next-config-js/reactStrictMode **Good to know**: Since Next.js 13.4, Strict Mode is `true` by default with `app` router, so the above configuration is only necessary for `pages`. You can still disable Strict Mode by setting `reactStrictMode: false`. **Suggested**: We strongly suggest you enable Strict Mode in your Next.js application to better prepare your application for the future of React. React's Strict Mode is a development mode only feature for highlighting potential problems in an application. It helps to identify unsafe lifecycles, legacy API usage, and a number of other features. The Next.js runtime is Strict Mode-compliant. To opt-in to Strict Mode, configure the following option in your `next.config.js`: If you or your team are not ready to use Strict Mode in your entire application, that's OK! You can incrementally migrate on a page-by-page basis using `<React.StrictMode>`. --- ## Page: https://nextjs.org/docs/13/pages/api-reference/next-config-js/redirects Redirects allow you to redirect an incoming request path to a different destination path. To use redirects you can use the `redirects` key in `next.config.js`: module.exports = { async redirects() { return [ { source: '/about', destination: '/', permanent: true, }, ] }, } `redirects` is an async function that expects an array to be returned holding objects with `source`, `destination`, and `permanent` properties: * `source` is the incoming request path pattern. * `destination` is the path you want to route to. * `permanent` `true` or `false` - if `true` will use the 308 status code which instructs clients/search engines to cache the redirect forever, if `false` will use the 307 status code which is temporary and is not cached. > **Why does Next.js use 307 and 308?** Traditionally a 302 was used for a temporary redirect, and a 301 for a permanent redirect, but many browsers changed the request method of the redirect to `GET`, regardless of the original method. For example, if the browser made a request to `POST /v1/users` which returned status code `302` with location `/v2/users`, the subsequent request might be `GET /v2/users` instead of the expected `POST /v2/users`. Next.js uses the 307 temporary redirect, and 308 permanent redirect status codes to explicitly preserve the request method used. * `basePath`: `false` or `undefined` - if false the `basePath` won't be included when matching, can be used for external redirects only. * `locale`: `false` or `undefined` - whether the locale should not be included when matching. * `has` is an array of has objects with the `type`, `key` and `value` properties. * `missing` is an array of missing objects with the `type`, `key` and `value` properties. Redirects are checked before the filesystem which includes pages and `/public` files. Redirects are not applied to client-side routing (`Link`, `router.push`), unless Middleware is present and matches the path. When a redirect is applied, any query values provided in the request will be passed through to the redirect destination. For example, see the following redirect configuration: { source: '/old-blog/:path*', destination: '/blog/:path*', permanent: false } When `/old-blog/post-1?hello=world` is requested, the client will be redirected to `/blog/post-1?hello=world`. ## Path Matching Path matches are allowed, for example `/old-blog/:slug` will match `/old-blog/hello-world` (no nested paths): module.exports = { async redirects() { return [ { source: '/old-blog/:slug', destination: '/news/:slug', // Matched parameters can be used in the destination permanent: true, }, ] }, } ### Wildcard Path Matching To match a wildcard path you can use `*` after a parameter, for example `/blog/:slug*` will match `/blog/a/b/c/d/hello-world`: module.exports = { async redirects() { return [ { source: '/blog/:slug*', destination: '/news/:slug*', // Matched parameters can be used in the destination permanent: true, }, ] }, } ### Regex Path Matching To match a regex path you can wrap the regex in parentheses after a parameter, for example `/post/:slug(\\d{1,})` will match `/post/123` but not `/post/abc`: module.exports = { async redirects() { return [ { source: '/post/:slug(\\d{1,})', destination: '/news/:slug', // Matched parameters can be used in the destination permanent: false, }, ] }, } The following characters `(`, `)`, `{`, `}`, `:`, `*`, `+`, `?` are used for regex path matching, so when used in the `source` as non-special values they must be escaped by adding `\\` before them: module.exports = { async redirects() { return [ { // this will match `/english(default)/something` being requested source: '/english\\(default\\)/:slug', destination: '/en-us/:slug', permanent: false, }, ] }, } ## Header, Cookie, and Query Matching To only match a redirect when header, cookie, or query values also match the `has` field or don't match the `missing` field can be used. Both the `source` and all `has` items must match and all `missing` items must not match for the redirect to be applied. `has` and `missing` items can have the following fields: * `type`: `String` - must be either `header`, `cookie`, `host`, or `query`. * `key`: `String` - the key from the selected type to match against. * `value`: `String` or `undefined` - the value to check for, if undefined any value will match. A regex like string can be used to capture a specific part of the value, e.g. if the value `first-(?<paramName>.*)` is used for `first-second` then `second` will be usable in the destination with `:paramName`. module.exports = { async redirects() { return [ // if the header `x-redirect-me` is present, // this redirect will be applied { source: '/:path((?!another-page$).*)', has: [ { type: 'header', key: 'x-redirect-me', }, ], permanent: false, destination: '/another-page', }, // if the header `x-dont-redirect` is present, // this redirect will NOT be applied { source: '/:path((?!another-page$).*)', missing: [ { type: 'header', key: 'x-do-not-redirect', }, ], permanent: false, destination: '/another-page', }, // if the source, query, and cookie are matched, // this redirect will be applied { source: '/specific/:path*', has: [ { type: 'query', key: 'page', // the page value will not be available in the // destination since value is provided and doesn't // use a named capture group e.g. (?<page>home) value: 'home', }, { type: 'cookie', key: 'authorized', value: 'true', }, ], permanent: false, destination: '/another/:path*', }, // if the header `x-authorized` is present and // contains a matching value, this redirect will be applied { source: '/', has: [ { type: 'header', key: 'x-authorized', value: '(?<authorized>yes|true)', }, ], permanent: false, destination: '/home?authorized=:authorized', }, // if the host is `example.com`, // this redirect will be applied { source: '/:path((?!another-page$).*)', has: [ { type: 'host', value: 'example.com', }, ], permanent: false, destination: '/another-page', }, ] }, } ### Redirects with basePath support When leveraging `basePath` support with redirects each `source` and `destination` is automatically prefixed with the `basePath` unless you add `basePath: false` to the redirect: module.exports = { basePath: '/docs', async redirects() { return [ { source: '/with-basePath', // automatically becomes /docs/with-basePath destination: '/another', // automatically becomes /docs/another permanent: false, }, { // does not add /docs since basePath: false is set source: '/without-basePath', destination: 'https://example.com', basePath: false, permanent: false, }, ] }, } ### Redirects with i18n support When leveraging `i18n` support with redirects each `source` and `destination` is automatically prefixed to handle the configured `locales` unless you add `locale: false` to the redirect. If `locale: false` is used you must prefix the `source` and `destination` with a locale for it to be matched correctly. module.exports = { i18n: { locales: ['en', 'fr', 'de'], defaultLocale: 'en', }, async redirects() { return [ { source: '/with-locale', // automatically handles all locales destination: '/another', // automatically passes the locale on permanent: false, }, { // does not handle locales automatically since locale: false is set source: '/nl/with-locale-manual', destination: '/nl/another', locale: false, permanent: false, }, { // this matches '/' since `en` is the defaultLocale source: '/en', destination: '/en/another', locale: false, permanent: false, }, // it's possible to match all locales even when locale: false is set { source: '/:locale/page', destination: '/en/newpage', permanent: false, locale: false, }, { // this gets converted to /(en|fr|de)/(.*) so will not match the top-level // `/` or `/fr` routes like /:path* would source: '/(.*)', destination: '/another', permanent: false, }, ] }, } In some rare cases, you might need to assign a custom status code for older HTTP Clients to properly redirect. In these cases, you can use the `statusCode` property instead of the `permanent` property, but not both. To to ensure IE11 compatibility, a `Refresh` header is automatically added for the 308 status code. ## Other Redirects * Inside API Routes, you can use `res.redirect()`. * Inside `getStaticProps` and `getServerSideProps`, you can redirect specific pages at request-time. ## Version History | Version | Changes | | --- | --- | | `v13.3.0` | `missing` added. | | `v10.2.0` | `has` added. | | `v9.5.0` | `redirects` added. | --- ## Page: https://nextjs.org/docs/13/pages/api-reference/next-config-js/rewrites Rewrites allow you to map an incoming request path to a different destination path. Rewrites act as a URL proxy and mask the destination path, making it appear the user hasn't changed their location on the site. In contrast, redirects will reroute to a new page and show the URL changes. To use rewrites you can use the `rewrites` key in `next.config.js`: module.exports = { async rewrites() { return [ { source: '/about', destination: '/', }, ] }, } Rewrites are applied to client-side routing, a `<Link href="/about">` will have the rewrite applied in the above example. `rewrites` is an async function that expects to return either an array or an object of arrays (see below) holding objects with `source` and `destination` properties: * `source`: `String` - is the incoming request path pattern. * `destination`: `String` is the path you want to route to. * `basePath`: `false` or `undefined` - if false the basePath won't be included when matching, can be used for external rewrites only. * `locale`: `false` or `undefined` - whether the locale should not be included when matching. * `has` is an array of has objects with the `type`, `key` and `value` properties. * `missing` is an array of missing objects with the `type`, `key` and `value` properties. When the `rewrites` function returns an array, rewrites are applied after checking the filesystem (pages and `/public` files) and before dynamic routes. When the `rewrites` function returns an object of arrays with a specific shape, this behavior can be changed and more finely controlled, as of `v10.1` of Next.js: module.exports = { async rewrites() { return { beforeFiles: [ // These rewrites are checked after headers/redirects // and before all files including _next/public files which // allows overriding page files { source: '/some-page', destination: '/somewhere-else', has: [{ type: 'query', key: 'overrideMe' }], }, ], afterFiles: [ // These rewrites are checked after pages/public files // are checked but before dynamic routes { source: '/non-existent', destination: '/somewhere-else', }, ], fallback: [ // These rewrites are checked after both pages/public files // and dynamic routes are checked { source: '/:path*', destination: `https://my-old-site.com/:path*`, }, ], } }, } > **Good to know**: rewrites in `beforeFiles` do not check the filesystem/dynamic routes immediately after matching a source, they continue until all `beforeFiles` have been checked. The order Next.js routes are checked is: 1. headers are checked/applied 2. redirects are checked/applied 3. `beforeFiles` rewrites are checked/applied 4. static files from the public directory, `_next/static` files, and non-dynamic pages are checked/served 5. `afterFiles` rewrites are checked/applied, if one of these rewrites is matched we check dynamic routes/static files after each match 6. `fallback` rewrites are checked/applied, these are applied before rendering the 404 page and after dynamic routes/all static assets have been checked. If you use fallback: true/'blocking' in `getStaticPaths`, the fallback `rewrites` defined in your `next.config.js` will _not_ be run. ## Rewrite parameters When using parameters in a rewrite the parameters will be passed in the query by default when none of the parameters are used in the `destination`. module.exports = { async rewrites() { return [ { source: '/old-about/:path*', destination: '/about', // The :path parameter isn't used here so will be automatically passed in the query }, ] }, } If a parameter is used in the destination none of the parameters will be automatically passed in the query. module.exports = { async rewrites() { return [ { source: '/docs/:path*', destination: '/:path*', // The :path parameter is used here so will not be automatically passed in the query }, ] }, } You can still pass the parameters manually in the query if one is already used in the destination by specifying the query in the `destination`. module.exports = { async rewrites() { return [ { source: '/:first/:second', destination: '/:first?second=:second', // Since the :first parameter is used in the destination the :second parameter // will not automatically be added in the query although we can manually add it // as shown above }, ] }, } > **Good to know**: Static pages from Automatic Static Optimization or prerendering params from rewrites will be parsed on the client after hydration and provided in the query. ## Path Matching Path matches are allowed, for example `/blog/:slug` will match `/blog/hello-world` (no nested paths): module.exports = { async rewrites() { return [ { source: '/blog/:slug', destination: '/news/:slug', // Matched parameters can be used in the destination }, ] }, } ### Wildcard Path Matching To match a wildcard path you can use `*` after a parameter, for example `/blog/:slug*` will match `/blog/a/b/c/d/hello-world`: module.exports = { async rewrites() { return [ { source: '/blog/:slug*', destination: '/news/:slug*', // Matched parameters can be used in the destination }, ] }, } ### Regex Path Matching To match a regex path you can wrap the regex in parenthesis after a parameter, for example `/blog/:slug(\\d{1,})` will match `/blog/123` but not `/blog/abc`: module.exports = { async rewrites() { return [ { source: '/old-blog/:post(\\d{1,})', destination: '/blog/:post', // Matched parameters can be used in the destination }, ] }, } The following characters `(`, `)`, `{`, `}`, `:`, `*`, `+`, `?` are used for regex path matching, so when used in the `source` as non-special values they must be escaped by adding `\\` before them: module.exports = { async rewrites() { return [ { // this will match `/english(default)/something` being requested source: '/english\\(default\\)/:slug', destination: '/en-us/:slug', }, ] }, } ## Header, Cookie, and Query Matching To only match a rewrite when header, cookie, or query values also match the `has` field or don't match the `missing` field can be used. Both the `source` and all `has` items must match and all `missing` items must not match for the rewrite to be applied. `has` and `missing` items can have the following fields: * `type`: `String` - must be either `header`, `cookie`, `host`, or `query`. * `key`: `String` - the key from the selected type to match against. * `value`: `String` or `undefined` - the value to check for, if undefined any value will match. A regex like string can be used to capture a specific part of the value, e.g. if the value `first-(?<paramName>.*)` is used for `first-second` then `second` will be usable in the destination with `:paramName`. module.exports = { async rewrites() { return [ // if the header `x-rewrite-me` is present, // this rewrite will be applied { source: '/:path*', has: [ { type: 'header', key: 'x-rewrite-me', }, ], destination: '/another-page', }, // if the header `x-rewrite-me` is not present, // this rewrite will be applied { source: '/:path*', missing: [ { type: 'header', key: 'x-rewrite-me', }, ], destination: '/another-page', }, // if the source, query, and cookie are matched, // this rewrite will be applied { source: '/specific/:path*', has: [ { type: 'query', key: 'page', // the page value will not be available in the // destination since value is provided and doesn't // use a named capture group e.g. (?<page>home) value: 'home', }, { type: 'cookie', key: 'authorized', value: 'true', }, ], destination: '/:path*/home', }, // if the header `x-authorized` is present and // contains a matching value, this rewrite will be applied { source: '/:path*', has: [ { type: 'header', key: 'x-authorized', value: '(?<authorized>yes|true)', }, ], destination: '/home?authorized=:authorized', }, // if the host is `example.com`, // this rewrite will be applied { source: '/:path*', has: [ { type: 'host', value: 'example.com', }, ], destination: '/another-page', }, ] }, } ## Rewriting to an external URL Examples * Incremental adoption of Next.js * Using Multiple Zones Rewrites allow you to rewrite to an external url. This is especially useful for incrementally adopting Next.js. The following is an example rewrite for redirecting the `/blog` route of your main app to an external site. module.exports = { async rewrites() { return [ { source: '/blog', destination: 'https://example.com/blog', }, { source: '/blog/:slug', destination: 'https://example.com/blog/:slug', // Matched parameters can be used in the destination }, ] }, } If you're using `trailingSlash: true`, you also need to insert a trailing slash in the `source` parameter. If the destination server is also expecting a trailing slash it should be included in the `destination` parameter as well. module.exports = { trailingSlash: true, async rewrites() { return [ { source: '/blog/', destination: 'https://example.com/blog/', }, { source: '/blog/:path*/', destination: 'https://example.com/blog/:path*/', }, ] }, } ### Incremental adoption of Next.js You can also have Next.js fall back to proxying to an existing website after checking all Next.js routes. This way you don't have to change the rewrites configuration when migrating more pages to Next.js module.exports = { async rewrites() { return { fallback: [ { source: '/:path*', destination: `https://custom-routes-proxying-endpoint.vercel.app/:path*`, }, ], } }, } ### Rewrites with basePath support When leveraging `basePath` support with rewrites each `source` and `destination` is automatically prefixed with the `basePath` unless you add `basePath: false` to the rewrite: module.exports = { basePath: '/docs', async rewrites() { return [ { source: '/with-basePath', // automatically becomes /docs/with-basePath destination: '/another', // automatically becomes /docs/another }, { // does not add /docs to /without-basePath since basePath: false is set // Note: this can not be used for internal rewrites e.g. `destination: '/another'` source: '/without-basePath', destination: 'https://example.com', basePath: false, }, ] }, } ### Rewrites with i18n support When leveraging `i18n` support with rewrites each `source` and `destination` is automatically prefixed to handle the configured `locales` unless you add `locale: false` to the rewrite. If `locale: false` is used you must prefix the `source` and `destination` with a locale for it to be matched correctly. module.exports = { i18n: { locales: ['en', 'fr', 'de'], defaultLocale: 'en', }, async rewrites() { return [ { source: '/with-locale', // automatically handles all locales destination: '/another', // automatically passes the locale on }, { // does not handle locales automatically since locale: false is set source: '/nl/with-locale-manual', destination: '/nl/another', locale: false, }, { // this matches '/' since `en` is the defaultLocale source: '/en', destination: '/en/another', locale: false, }, { // it's possible to match all locales even when locale: false is set source: '/:locale/api-alias/:path*', destination: '/api/:path*', locale: false, }, { // this gets converted to /(en|fr|de)/(.*) so will not match the top-level // `/` or `/fr` routes like /:path* would source: '/(.*)', destination: '/another', }, ] }, } ## Version History | Version | Changes | | --- | --- | | `v13.3.0` | `missing` added. | | `v10.2.0` | `has` added. | | `v9.5.0` | Headers added. | --- ## Page: https://nextjs.org/docs/13/pages/api-reference/next-config-js/runtime-configuration You are currently viewing documentation for version 13 of Next.js. > **Warning**: This feature is considered legacy and does not work with Automatic Static Optimization, Output File Tracing, or React Server Components. Please use environment variables instead to avoid initialization overhead. To add runtime configuration to your app, open `next.config.js` and add the `publicRuntimeConfig` and `serverRuntimeConfig` configs: next.config.js module.exports = { serverRuntimeConfig: { // Will only be available on the server side mySecret: 'secret', secondSecret: process.env.SECOND_SECRET, // Pass through env variables }, publicRuntimeConfig: { // Will be available on both server and client staticFolder: '/static', }, } Place any server-only runtime config under `serverRuntimeConfig`. Anything accessible to both client and server-side code should be under `publicRuntimeConfig`. > A page that relies on `publicRuntimeConfig` **must** use `getInitialProps` or `getServerSideProps` or your application must have a Custom App with `getInitialProps` to opt-out of Automatic Static Optimization. Runtime configuration won't be available to any page (or component in a page) without being server-side rendered. To get access to the runtime configs in your app use `next/config`, like so: import getConfig from 'next/config' import Image from 'next/image' // Only holds serverRuntimeConfig and publicRuntimeConfig const { serverRuntimeConfig, publicRuntimeConfig } = getConfig() // Will only be available on the server-side console.log(serverRuntimeConfig.mySecret) // Will be available on both server-side and client-side console.log(publicRuntimeConfig.staticFolder) function MyImage() { return ( <div> <Image src={`${publicRuntimeConfig.staticFolder}/logo.png`} alt="logo" layout="fill" /> </div> ) } export default MyImage --- ## Page: https://nextjs.org/docs/13/pages/api-reference/next-config-js/trailingSlash You are currently viewing documentation for version 13 of Next.js. By default Next.js will redirect urls with trailing slashes to their counterpart without a trailing slash. For example `/about/` will redirect to `/about`. You can configure this behavior to act the opposite way, where urls without trailing slashes are redirected to their counterparts with trailing slashes. Open `next.config.js` and add the `trailingSlash` config: next.config.js module.exports = { trailingSlash: true, } With this option set, urls like `/about` will redirect to `/about/`. ## Version History | Version | Changes | | --- | --- | | `v9.5.0` | `trailingSlash` added. | --- ## Page: https://nextjs.org/docs/13/pages/api-reference/next-config-js/transpilePackages You are currently viewing documentation for version 13 of Next.js. Next.js can automatically transpile and bundle dependencies from local packages (like monorepos) or from external dependencies (`node_modules`). This replaces the `next-transpile-modules` package. next.config.js /** @type {import('next').NextConfig} */ const nextConfig = { transpilePackages: ['@acme/ui', 'lodash-es'], } module.exports = nextConfig ## Version History | Version | Changes | | --- | --- | | `v13.0.0` | `transpilePackages` added. | --- ## Page: https://nextjs.org/docs/13/pages/api-reference/next-config-js/turbo ## turbo (experimental) > **Warning**: These features are experimental and will only work with `next --turbo`. ## webpack loaders Currently, Turbopack supports a subset of webpack's loader API, allowing you to use some webpack loaders to transform code in Turbopack. To configure loaders, add the names of the loaders you've installed and any options in `next.config.js`, mapping file extensions to a list of loaders: module.exports = { experimental: { turbo: { rules: { // Option format '*.md': [ { loader: '@mdx-js/loader', options: { format: 'md', }, }, ], // Option-less format '*.mdx': ['@mdx-js/loader'], }, }, }, } Then, given the above configuration, you can use transformed code from your app: import MyDoc from './my-doc.mdx' export default function Home() { return <MyDoc /> } ## Resolve Alias Through `next.config.js`, Turbopack can be configured to modify module resolution through aliases, similar to webpack's `resolve.alias` configuration. To configure resolve aliases, map imported patterns to their new destination in `next.config.js`: module.exports = { experimental: { turbo: { resolveAlias: { underscore: 'lodash', mocha: { browser: 'mocha/browser-entry.js' }, }, }, }, } This aliases imports of the `underscore` package to the `lodash` package. In other words, `import underscore from 'underscore'` will load the `lodash` module instead of `underscore`. Turbopack also supports conditional aliasing through this field, similar to Node.js's conditional exports. At the moment only the `browser` condition is supported. In the case above, imports of the `mocha` module will be aliased to `mocha/browser-entry.js` when Turbopack targets browser environments. For more information and guidance for how to migrate your app to Turbopack from webpack, see Turbopack's documentation on webpack compatibility. --- ## Page: https://nextjs.org/docs/13/pages/api-reference/next-config-js/typescript You are currently viewing documentation for version 13 of Next.js. Next.js fails your **production build** (`next build`) when TypeScript errors are present in your project. If you'd like Next.js to dangerously produce production code even when your application has errors, you can disable the built-in type checking step. If disabled, be sure you are running type checks as part of your build or deploy process, otherwise this can be very dangerous. Open `next.config.js` and enable the `ignoreBuildErrors` option in the `typescript` config: next.config.js module.exports = { typescript: { // !! WARN !! // Dangerously allow production builds to successfully complete even if // your project has type errors. // !! WARN !! ignoreBuildErrors: true, }, } --- ## Page: https://nextjs.org/docs/13/pages/api-reference/next-config-js/urlImports URL imports are an experimental feature that allows you to import modules directly from external servers (instead of from the local disk). > **Warning**: This feature is experimental. Only use domains that you trust to download and execute on your machine. Please exercise discretion, and caution until the feature is flagged as stable. To opt-in, add the allowed URL prefixes inside `next.config.js`: module.exports = { experimental: { urlImports: ['https://example.com/assets/', 'https://cdn.skypack.dev'], }, } Then, you can import modules directly from URLs: import { a, b, c } from 'https://example.com/assets/some/module.js' URL Imports can be used everywhere normal package imports can be used. ## Security Model This feature is being designed with **security as the top priority**. To start, we added an experimental flag forcing you to explicitly allow the domains you accept URL imports from. We're working to take this further by limiting URL imports to execute in the browser sandbox using the Edge Runtime. ## Lockfile When using URL imports, Next.js will create a `next.lock` directory containing a lockfile and fetched assets. This directory **must be committed to Git**, not ignored by `.gitignore`. * When running `next dev`, Next.js will download and add all newly discovered URL Imports to your lockfile * When running `next build`, Next.js will use only the lockfile to build the application for production Typically, no network requests are needed and any outdated lockfile will cause the build to fail. One exception is resources that respond with `Cache-Control: no-cache`. These resources will have a `no-cache` entry in the lockfile and will always be fetched from the network on each build. ## Examples ### Skypack import confetti from 'https://cdn.skypack.dev/canvas-confetti' import { useEffect } from 'react' export default () => { useEffect(() => { confetti() }) return <p>Hello</p> } ### Static Image Imports import Image from 'next/image' import logo from 'https://example.com/assets/logo.png' export default () => ( <div> <Image src={logo} placeholder="blur" /> </div> ) ### URLs in CSS .className { background: url('https://example.com/assets/hero.jpg'); } ### Asset Imports const logo = new URL('https://example.com/assets/file.txt', import.meta.url) console.log(logo.pathname) // prints "/_next/static/media/file.a9727b5d.txt" --- ## Page: https://nextjs.org/docs/13/pages/api-reference/next-config-js/webpack ## Custom Webpack Config > **Good to know**: changes to webpack config are not covered by semver so proceed at your own risk Before continuing to add custom webpack configuration to your application make sure Next.js doesn't already support your use-case: * CSS imports * CSS modules * Sass/SCSS imports * Sass/SCSS modules * preact * Customizing babel configuration Some commonly asked for features are available as plugins: * @next/mdx * @next/bundle-analyzer In order to extend our usage of `webpack`, you can define a function that extends its config inside `next.config.js`, like so: module.exports = { webpack: ( config, { buildId, dev, isServer, defaultLoaders, nextRuntime, webpack } ) => { // Important: return the modified config return config }, } > The `webpack` function is executed twice, once for the server and once for the client. This allows you to distinguish between client and server configuration using the `isServer` property. The second argument to the `webpack` function is an object with the following properties: * `buildId`: `String` - The build id, used as a unique identifier between builds * `dev`: `Boolean` - Indicates if the compilation will be done in development * `isServer`: `Boolean` - It's `true` for server-side compilation, and `false` for client-side compilation * `nextRuntime`: `String | undefined` - The target runtime for server-side compilation; either `"edge"` or `"nodejs"`, it's `undefined` for client-side compilation. * `defaultLoaders`: `Object` - Default loaders used internally by Next.js: * `babel`: `Object` - Default `babel-loader` configuration Example usage of `defaultLoaders.babel`: // Example config for adding a loader that depends on babel-loader // This source was taken from the @next/mdx plugin source: // https://github.com/vercel/next.js/tree/canary/packages/next-mdx module.exports = { webpack: (config, options) => { config.module.rules.push({ test: /\.mdx/, use: [ options.defaultLoaders.babel, { loader: '@mdx-js/loader', options: pluginOptions.options, }, ], }) return config }, } #### `nextRuntime` Notice that `isServer` is `true` when `nextRuntime` is `"edge"` or `"nodejs"`, nextRuntime "`edge`" is currently for middleware and Server Components in edge runtime only. Was this helpful? supported. --- ## Page: https://nextjs.org/docs/13/pages/api-reference/next-config-js/webVitalsAttribution You are currently viewing documentation for version 13 of Next.js. When debugging issues related to Web Vitals, it is often helpful if we can pinpoint the source of the problem. For example, in the case of Cumulative Layout Shift (CLS), we might want to know the first element that shifted when the single largest layout shift occurred. Or, in the case of Largest Contentful Paint (LCP), we might want to identify the element corresponding to the LCP for the page. If the LCP element is an image, knowing the URL of the image resource can help us locate the asset we need to optimize. Pinpointing the biggest contributor to the Web Vitals score, aka attribution, allows us to obtain more in-depth information like entries for PerformanceEventTiming, PerformanceNavigationTiming and PerformanceResourceTiming. Attribution is disabled by default in Next.js but can be enabled **per metric** by specifying the following in `next.config.js`. next.config.js experimental: { webVitalsAttribution: ['CLS', 'LCP'] } Valid attribution values are all `web-vitals` metrics specified in the `NextWebVitalsMetric` type. --- ## Page: https://nextjs.org/docs/13/pages/api-reference/create-next-app The easiest way to get started with Next.js is by using `create-next-app`. This CLI tool enables you to quickly start building a new Next.js application, with everything set up for you. You can create a new app using the default Next.js template, or by using one of the official Next.js examples. ### Interactive You can create a new project interactively by running: npx create-next-app@latest yarn create next-app pnpm create next-app bunx create-next-app You will then be asked the following prompts: What is your project named? my-app Would you like to use TypeScript? No / Yes Would you like to use ESLint? No / Yes Would you like to use Tailwind CSS? No / Yes Would you like to use `src/` directory? No / Yes Would you like to use App Router? (recommended) No / Yes Would you like to customize the default import alias (@/*)? No / Yes Once you've answered the prompts, a new project will be created with the correct configuration depending on your answers. ### Non-interactive You can also pass command line arguments to set up a new project non-interactively. Further, you can negate default options by prefixing them with `--no-` (e.g. `--no-eslint`). See `create-next-app --help`: Usage: create-next-app <project-directory> [options] Options: -V, --version output the version number --ts, --typescript Initialize as a TypeScript project. (default) --js, --javascript Initialize as a JavaScript project. --tailwind Initialize with Tailwind CSS config. (default) --eslint Initialize with ESLint config. --app Initialize as an App Router project. --src-dir Initialize inside a `src/` directory. --import-alias <alias-to-configure> Specify import alias to use (default "@/*"). --use-npm Explicitly tell the CLI to bootstrap the app using npm --use-pnpm Explicitly tell the CLI to bootstrap the app using pnpm --use-yarn Explicitly tell the CLI to bootstrap the app using Yarn --use-bun Explicitly tell the CLI to bootstrap the app using Bun -e, --example [name]|[github-url] An example to bootstrap the app with. You can use an example name from the official Next.js repo or a public GitHub URL. The URL can use any branch and/or subdirectory --example-path <path-to-example> In a rare case, your GitHub URL might contain a branch name with a slash (e.g. bug/fix-1) and the path to the example (e.g. foo/bar). In this case, you must specify the path to the example separately: --example-path foo/bar --reset-preferences Explicitly tell the CLI to reset any stored preferences -h, --help output usage information ### Why use Create Next App? `create-next-app` allows you to create a new Next.js app within seconds. It is officially maintained by the creators of Next.js, and includes a number of benefits: * **Interactive Experience**: Running `npx create-next-app@latest` (with no arguments) launches an interactive experience that guides you through setting up a project. * **Zero Dependencies**: Initializing a project is as quick as one second. Create Next App has zero dependencies. * **Offline Support**: Create Next App will automatically detect if you're offline and bootstrap your project using your local package cache. * **Support for Examples**: Create Next App can bootstrap your application using an example from the Next.js examples collection (e.g. `npx create-next-app --example api-routes`) or any public GitHub repository. * **Tested**: The package is part of the Next.js monorepo and tested using the same integration test suite as Next.js itself, ensuring it works as expected with every release. --- ## Page: https://nextjs.org/docs/13/pages/api-reference/next-cli The Next.js CLI allows you to start, build, and export your application. To get a list of the available CLI commands, run the following command inside your project directory: npx next -h _(npx comes with npm 5.2+ and higher)_ The output should look like this: Usage $ next <command> Available commands build, start, export, dev, lint, telemetry, info Options --version, -v Version number --help, -h Displays this message For more information run a command with the --help flag $ next build --help You can pass any node arguments to `next` commands: NODE_OPTIONS='--throw-deprecation' next NODE_OPTIONS='-r esm' next NODE_OPTIONS='--inspect' next > **Good to know**: Running `next` without a command is the same as running `next dev` ## Build `next build` creates an optimized production build of your application. The output displays information about each route. * **Size** – The number of assets downloaded when navigating to the page client-side. The size for each route only includes its dependencies. * **First Load JS** – The number of assets downloaded when visiting the page from the server. The amount of JS shared by all is shown as a separate metric. Both of these values are **compressed with gzip**. The first load is indicated by green, yellow, or red. Aim for green for performant applications. You can enable production profiling for React with the `--profile` flag in `next build`. This requires Next.js 9.5: next build --profile After that, you can use the profiler in the same way as you would in development. You can enable more verbose build output with the `--debug` flag in `next build`. This requires Next.js 9.5.3: next build --debug With this flag enabled additional build output like rewrites, redirects, and headers will be shown. ## Development `next dev` starts the application in development mode with hot-code reloading, error reporting, and more: The application will start at `http://localhost:3000` by default. The default port can be changed with `-p`, like so: npx next dev -p 4000 Or using the `PORT` environment variable: PORT=4000 npx next dev > **Good to know**: `PORT` cannot be set in `.env` as booting up the HTTP server happens before any other code is initialized. You can also set the hostname to be different from the default of `0.0.0.0`, this can be useful for making the application available for other devices on the network. The default hostname can be changed with `-H`, like so: npx next dev -H 192.168.1.2 ## Production `next start` starts the application in production mode. The application should be compiled with `next build` first. The application will start at `http://localhost:3000` by default. The default port can be changed with `-p`, like so: npx next start -p 4000 Or using the `PORT` environment variable: PORT=4000 npx next start > **Good to know**: > > \-`PORT` cannot be set in `.env` as booting up the HTTP server happens before any other code is initialized. > > * `next start` cannot be used with `output: 'standalone'` or `output: 'export'`. ### Keep Alive Timeout When deploying Next.js behind a downstream proxy (e.g. a load-balancer like AWS ELB/ALB) it's important to configure Next's underlying HTTP server with keep-alive timeouts that are _larger_ than the downstream proxy's timeouts. Otherwise, once a keep-alive timeout is reached for a given TCP connection, Node.js will immediately terminate that connection without notifying the downstream proxy. This results in a proxy error whenever it attempts to reuse a connection that Node.js has already terminated. To configure the timeout values for the production Next.js server, pass `--keepAliveTimeout` (in milliseconds) to `next start`, like so: npx next start --keepAliveTimeout 70000 ## Lint `next lint` runs ESLint for all files in the `pages/`, `app/`, `components/`, `lib/`, and `src/` directories. It also provides a guided setup to install any required dependencies if ESLint is not already configured in your application. If you have other directories that you would like to lint, you can specify them using the `--dir` flag: next lint --dir utils ## Telemetry Next.js collects **completely anonymous** telemetry data about general usage. Participation in this anonymous program is optional, and you may opt-out if you'd not like to share any information. To learn more about Telemetry, please read this document. ## Next Info `next info` prints relevant details about the current system which can be used to report Next.js bugs. This information includes Operating System platform/arch/version, Binaries (Node.js, npm, Yarn, pnpm) and npm package versions (`next`, `react`, `react-dom`). Running the following in your project's root directory: next info will give you information like this example: Operating System: Platform: linux Arch: x64 Version: #22-Ubuntu SMP Fri Nov 5 13:21:36 UTC 2021 Binaries: Node: 16.13.0 npm: 8.1.0 Yarn: 1.22.17 pnpm: 6.24.2 Relevant packages: next: 12.0.8 react: 17.0.2 react-dom: 17.0.2 This information should then be pasted into GitHub Issues. In order to diagnose installation issues, you can run `next info --verbose` to print additional information about system and the installation of next-related packages. --- ## Page: https://nextjs.org/docs/13/pages/api-reference/edge `AbortController`Allows you to abort one or more DOM requests as and when desired`Array`Represents an array of values`ArrayBuffer`Represents a generic, fixed-length raw binary data buffer`Atomics`Provides atomic operations as static methods`BigInt`Represents a whole number with arbitrary precision`BigInt64Array`Represents a typed array of 64-bit signed integers`BigUint64Array`Represents a typed array of 64-bit unsigned integers`Boolean`Represents a logical entity and can have two values: `true` and `false``clearInterval`Cancels a timed, repeating action which was previously established by a call to `setInterval()``clearTimeout`Cancels a timed, repeating action which was previously established by a call to `setTimeout()``console`Provides access to the browser's debugging console`DataView`Represents a generic view of an `ArrayBuffer``Date`Represents a single moment in time in a platform-independent format`decodeURI`Decodes a Uniform Resource Identifier (URI) previously created by `encodeURI` or by a similar routine`decodeURIComponent`Decodes a Uniform Resource Identifier (URI) component previously created by `encodeURIComponent` or by a similar routine`DOMException`Represents an error that occurs in the DOM`encodeURI`Encodes a Uniform Resource Identifier (URI) by replacing each instance of certain characters by one, two, three, or four escape sequences representing the UTF-8 encoding of the character`encodeURIComponent`Encodes a Uniform Resource Identifier (URI) component by replacing each instance of certain characters by one, two, three, or four escape sequences representing the UTF-8 encoding of the character`Error`Represents an error when trying to execute a statement or accessing a property`EvalError`Represents an error that occurs regarding the global function `eval()``Float32Array`Represents a typed array of 32-bit floating point numbers`Float64Array`Represents a typed array of 64-bit floating point numbers`Function`Represents a function`Infinity`Represents the mathematical Infinity value`Int8Array`Represents a typed array of 8-bit signed integers`Int16Array`Represents a typed array of 16-bit signed integers`Int32Array`Represents a typed array of 32-bit signed integers`Intl`Provides access to internationalization and localization functionality`isFinite`Determines whether a value is a finite number`isNaN`Determines whether a value is `NaN` or not`JSON`Provides functionality to convert JavaScript values to and from the JSON format`Map`Represents a collection of values, where each value may occur only once`Math`Provides access to mathematical functions and constants`Number`Represents a numeric value`Object`Represents the object that is the base of all JavaScript objects`parseFloat`Parses a string argument and returns a floating point number`parseInt`Parses a string argument and returns an integer of the specified radix`Promise`Represents the eventual completion (or failure) of an asynchronous operation, and its resulting value`Proxy`Represents an object that is used to define custom behavior for fundamental operations (e.g. property lookup, assignment, enumeration, function invocation, etc)`queueMicrotask`Queues a microtask to be executed`RangeError`Represents an error when a value is not in the set or range of allowed values`ReferenceError`Represents an error when a non-existent variable is referenced`Reflect`Provides methods for interceptable JavaScript operations`RegExp`Represents a regular expression, allowing you to match combinations of characters`Set`Represents a collection of values, where each value may occur only once`setInterval`Repeatedly calls a function, with a fixed time delay between each call`setTimeout`Calls a function or evaluates an expression after a specified number of milliseconds`SharedArrayBuffer`Represents a generic, fixed-length raw binary data buffer`String`Represents a sequence of characters`structuredClone`Creates a deep copy of a value`Symbol`Represents a unique and immutable data type that is used as the key of an object property`SyntaxError`Represents an error when trying to interpret syntactically invalid code`TypeError`Represents an error when a value is not of the expected type`Uint8Array`Represents a typed array of 8-bit unsigned integers`Uint8ClampedArray`Represents a typed array of 8-bit unsigned integers clamped to 0-255`Uint32Array`Represents a typed array of 32-bit unsigned integers`URIError`Represents an error when a global URI handling function was used in a wrong way`URL`Represents an object providing static methods used for creating object URLs`URLPattern`Represents a URL pattern`URLSearchParams`Represents a collection of key/value pairs`WeakMap`Represents a collection of key/value pairs in which the keys are weakly referenced`WeakSet`Represents a collection of objects in which each object may occur only once`WebAssembly`Provides access to WebAssembly --- ## Page: https://nextjs.org/docs/13/architecture #### Subscribe to our newsletter Stay updated on new releases and features, guides, and case studies. --- ## Page: https://nextjs.org/docs/13/architecture/accessibility The Next.js team is committed to making Next.js accessible to all developers (and their end-users). By adding accessibility features to Next.js by default, we aim to make the Web more inclusive for everyone. ## Route Announcements When transitioning between pages rendered on the server (e.g. using the `<a href>` tag) screen readers and other assistive technology announce the page title when the page loads so that users understand that the page has changed. In addition to traditional page navigations, Next.js also supports client-side transitions for improved performance (using `next/link`). To ensure that client-side transitions are also announced to assistive technology, Next.js includes a route announcer by default. The Next.js route announcer looks for the page name to announce by first inspecting `document.title`, then the `<h1>` element, and finally the URL pathname. For the most accessible user experience, ensure that each page in your application has a unique and descriptive title. ## Linting Next.js provides an integrated ESLint experience out of the box, including custom rules for Next.js. By default, Next.js includes `eslint-plugin-jsx-a11y` to help catch accessibility issues early, including warning on: * aria-props * aria-proptypes * aria-unsupported-elements * role-has-required-aria-props * role-supports-aria-props For example, this plugin helps ensure you add alt text to `img` tags, use correct `aria-*` attributes, use correct `role` attributes, and more. ## Accessibility Resources * WebAIM WCAG checklist * WCAG 2.1 Guidelines * The A11y Project * Check color contrast ratios between foreground and background elements * Use `prefers-reduced-motion` when working with animations --- ## Page: https://nextjs.org/docs/13/architecture/fast-refresh Examples * Fast Refresh Demo Fast Refresh is a Next.js feature that gives you instantaneous feedback on edits made to your React components. Fast Refresh is enabled by default in all Next.js applications on **9.4 or newer**. With Next.js Fast Refresh enabled, most edits should be visible within a second, **without losing component state**. ## How It Works * If you edit a file that **only exports React component(s)**, Fast Refresh will update the code only for that file, and re-render your component. You can edit anything in that file, including styles, rendering logic, event handlers, or effects. * If you edit a file with exports that _aren't_ React components, Fast Refresh will re-run both that file, and the other files importing it. So if both `Button.js` and `Modal.js` import `theme.js`, editing `theme.js` will update both components. * Finally, if you **edit a file** that's **imported by files outside of the React tree**, Fast Refresh **will fall back to doing a full reload**. You might have a file which renders a React component but also exports a value that is imported by a **non-React component**. For example, maybe your component also exports a constant, and a non-React utility file imports it. In that case, consider migrating the constant to a separate file and importing it into both files. This will re-enable Fast Refresh to work. Other cases can usually be solved in a similar way. ## Error Resilience ### Syntax Errors If you make a syntax error during development, you can fix it and save the file again. The error will disappear automatically, so you won't need to reload the app. **You will not lose component state**. ### Runtime Errors If you make a mistake that leads to a runtime error inside your component, you'll be greeted with a contextual overlay. Fixing the error will automatically dismiss the overlay, without reloading the app. Component state will be retained if the error did not occur during rendering. If the error did occur during rendering, React will remount your application using the updated code. If you have error boundaries in your app (which is a good idea for graceful failures in production), they will retry rendering on the next edit after a rendering error. This means having an error boundary can prevent you from always getting reset to the root app state. However, keep in mind that error boundaries shouldn't be _too_ granular. They are used by React in production, and should always be designed intentionally. ## Limitations Fast Refresh tries to preserve local React state in the component you're editing, but only if it's safe to do so. Here's a few reasons why you might see local state being reset on every edit to a file: * Local state is not preserved for class components (only function components and Hooks preserve state). * The file you're editing might have _other_ exports in addition to a React component. * Sometimes, a file would export the result of calling a higher-order component like `HOC(WrappedComponent)`. If the returned component is a class, its state will be reset. * Anonymous arrow functions like `export default () => <div />;` cause Fast Refresh to not preserve local component state. For large codebases you can use our `name-default-component` codemod. As more of your codebase moves to function components and Hooks, you can expect state to be preserved in more cases. ## Tips * Fast Refresh preserves React local state in function components (and Hooks) by default. * Sometimes you might want to _force_ the state to be reset, and a component to be remounted. For example, this can be handy if you're tweaking an animation that only happens on mount. To do this, you can add `// @refresh reset` anywhere in the file you're editing. This directive is local to the file, and instructs Fast Refresh to remount components defined in that file on every edit. * You can put `console.log` or `debugger;` into the components you edit during development. * Remember that imports are case sensitive. Both fast and full refresh can fail, when your import doesn't match the actual filename. For example, `'./header'` vs `'./Header'`. ## Fast Refresh and Hooks When possible, Fast Refresh attempts to preserve the state of your component between edits. In particular, `useState` and `useRef` preserve their previous values as long as you don't change their arguments or the order of the Hook calls. Hooks with dependencies—such as `useEffect`, `useMemo`, and `useCallback`—will _always_ update during Fast Refresh. Their list of dependencies will be ignored while Fast Refresh is happening. For example, when you edit `useMemo(() => x * 2, [x])` to `useMemo(() => x * 10, [x])`, it will re-run even though `x` (the dependency) has not changed. If React didn't do that, your edit wouldn't reflect on the screen! Sometimes, this can lead to unexpected results. For example, even a `useEffect` with an empty array of dependencies would still re-run once during Fast Refresh. However, writing code resilient to occasional re-running of `useEffect` is a good practice even without Fast Refresh. It will make it easier for you to introduce new dependencies to it later on and it's enforced by React Strict Mode, which we highly recommend enabling. --- ## Page: https://nextjs.org/docs/13/architecture/nextjs-compiler The Next.js Compiler, written in Rust using SWC, allows Next.js to transform and minify your JavaScript code for production. This replaces Babel for individual files and Terser for minifying output bundles. Compilation using the Next.js Compiler is 17x faster than Babel and enabled by default since Next.js version 12. If you have an existing Babel configuration or are using unsupported features, your application will opt-out of the Next.js Compiler and continue using Babel. ## Why SWC? SWC is an extensible Rust-based platform for the next generation of fast developer tools. SWC can be used for compilation, minification, bundling, and more – and is designed to be extended. It's something you can call to perform code transformations (either built-in or custom). Running those transformations happens through higher-level tools like Next.js. We chose to build on SWC for a few reasons: * **Extensibility:** SWC can be used as a Crate inside Next.js, without having to fork the library or workaround design constraints. * **Performance:** We were able to achieve ~3x faster Fast Refresh and ~5x faster builds in Next.js by switching to SWC, with more room for optimization still in progress. * **WebAssembly:** Rust's support for WASM is essential for supporting all possible platforms and taking Next.js development everywhere. * **Community:** The Rust community and ecosystem are amazing and still growing. ## Supported Features ### Styled Components We're working to port `babel-plugin-styled-components` to the Next.js Compiler. First, update to the latest version of Next.js: `npm install next@latest`. Then, update your `next.config.js` file: module.exports = { compiler: { // see https://styled-components.com/docs/tooling#babel-plugin for more info on the options. styledComponents: boolean | { // Enabled by default in development, disabled in production to reduce file size, // setting this will override the default for all environments. displayName?: boolean, // Enabled by default. ssr?: boolean, // Enabled by default. fileName?: boolean, // Empty by default. topLevelImportPaths?: string[], // Defaults to ["index"]. meaninglessFileNames?: string[], // Enabled by default. cssProp?: boolean, // Empty by default. namespace?: string, // Not supported yet. minify?: boolean, // Not supported yet. transpileTemplateLiterals?: boolean, // Not supported yet. pure?: boolean, }, }, } `minify`, `transpileTemplateLiterals` and `pure` are not yet implemented. You can follow the progress here. `ssr` and `displayName` transforms are the main requirement for using `styled-components` in Next.js. ### Jest The Next.js Compiler transpiles your tests and simplifies configuring Jest together with Next.js including: * Auto mocking of `.css`, `.module.css` (and their `.scss` variants), and image imports * Automatically sets up `transform` using SWC * Loading `.env` (and all variants) into `process.env` * Ignores `node_modules` from test resolving and transforms * Ignoring `.next` from test resolving * Loads `next.config.js` for flags that enable experimental SWC transforms First, update to the latest version of Next.js: `npm install next@latest`. Then, update your `jest.config.js` file: const nextJest = require('next/jest') // Providing the path to your Next.js app which will enable loading next.config.js and .env files const createJestConfig = nextJest({ dir: './' }) // Any custom config you want to pass to Jest const customJestConfig = { setupFilesAfterEnv: ['<rootDir>/jest.setup.js'], } // createJestConfig is exported in this way to ensure that next/jest can load the Next.js configuration, which is async module.exports = createJestConfig(customJestConfig) ### Relay To enable Relay support: module.exports = { compiler: { relay: { // This should match relay.config.js src: './', artifactDirectory: './__generated__', language: 'typescript', eagerEsModules: false, }, }, } > **Good to know**: In Next.js, all JavaScript files in `pages` directory are considered routes. So, for `relay-compiler` you'll need to specify `artifactDirectory` configuration settings outside of the `pages`, otherwise `relay-compiler` will generate files next to the source file in the `__generated__` directory, and this file will be considered a route, which will break production builds. ### Remove React Properties Allows to remove JSX properties. This is often used for testing. Similar to `babel-plugin-react-remove-properties`. To remove properties matching the default regex `^data-test`: module.exports = { compiler: { reactRemoveProperties: true, }, } To remove custom properties: module.exports = { compiler: { // The regexes defined here are processed in Rust so the syntax is different from // JavaScript `RegExp`s. See https://docs.rs/regex. reactRemoveProperties: { properties: ['^data-custom$'] }, }, } ### Remove Console This transform allows for removing all `console.*` calls in application code (not `node_modules`). Similar to `babel-plugin-transform-remove-console`. Remove all `console.*` calls: module.exports = { compiler: { removeConsole: true, }, } Remove `console.*` output except `console.error`: module.exports = { compiler: { removeConsole: { exclude: ['error'], }, }, } ### Legacy Decorators Next.js will automatically detect `experimentalDecorators` in `jsconfig.json` or `tsconfig.json`. Legacy decorators are commonly used with older versions of libraries like `mobx`. This flag is only supported for compatibility with existing applications. We do not recommend using legacy decorators in new applications. First, update to the latest version of Next.js: `npm install next@latest`. Then, update your `jsconfig.json` or `tsconfig.json` file: { "compilerOptions": { "experimentalDecorators": true } } ### importSource Next.js will automatically detect `jsxImportSource` in `jsconfig.json` or `tsconfig.json` and apply that. This is commonly used with libraries like Theme UI. First, update to the latest version of Next.js: `npm install next@latest`. Then, update your `jsconfig.json` or `tsconfig.json` file: { "compilerOptions": { "jsxImportSource": "theme-ui" } } ### Emotion We're working to port `@emotion/babel-plugin` to the Next.js Compiler. First, update to the latest version of Next.js: `npm install next@latest`. Then, update your `next.config.js` file: module.exports = { compiler: { emotion: boolean | { // default is true. It will be disabled when build type is production. sourceMap?: boolean, // default is 'dev-only'. autoLabel?: 'never' | 'dev-only' | 'always', // default is '[local]'. // Allowed values: `[local]` `[filename]` and `[dirname]` // This option only works when autoLabel is set to 'dev-only' or 'always'. // It allows you to define the format of the resulting label. // The format is defined via string where variable parts are enclosed in square brackets []. // For example labelFormat: "my-classname--[local]", where [local] will be replaced with the name of the variable the result is assigned to. labelFormat?: string, // default is undefined. // This option allows you to tell the compiler what imports it should // look at to determine what it should transform so if you re-export // Emotion's exports, you can still use transforms. importMap?: { [packageName: string]: { [exportName: string]: { canonicalImport?: [string, string], styledBaseImport?: [string, string], } } }, }, }, } ### Minification Next.js' swc compiler is used for minification by default since v13. This is 7x faster than Terser. If Terser is still needed for any reason this can be configured. module.exports = { swcMinify: false, } ### Module Transpilation Next.js can automatically transpile and bundle dependencies from local packages (like monorepos) or from external dependencies (`node_modules`). This replaces the `next-transpile-modules` package. module.exports = { transpilePackages: ['@acme/ui', 'lodash-es'], } ### Modularize Imports This option has been superseded by `optimizePackageImports` in Next.js 13.5. We recommend upgrading to use the new option that does not require manual configuration of import paths. ## Experimental Features ### SWC Trace profiling You can generate SWC's internal transform traces as chromium's trace event format. module.exports = { experimental: { swcTraceProfiling: true, }, } Once enabled, swc will generate trace named as `swc-trace-profile-${timestamp}.json` under `.next/`. Chromium's trace viewer (chrome://tracing/, https://ui.perfetto.dev/), or compatible flamegraph viewer (https://www.speedscope.app/) can load & visualize generated traces. ### SWC Plugins (Experimental) You can configure swc's transform to use SWC's experimental plugin support written in wasm to customize transformation behavior. module.exports = { experimental: { swcPlugins: [ [ 'plugin', { ...pluginOptions, }, ], ], }, } `swcPlugins` accepts an array of tuples for configuring plugins. A tuple for the plugin contains the path to the plugin and an object for plugin configuration. The path to the plugin can be an npm module package name or an absolute path to the `.wasm` binary itself. ## Unsupported Features When your application has a `.babelrc` file, Next.js will automatically fall back to using Babel for transforming individual files. This ensures backwards compatibility with existing applications that leverage custom Babel plugins. If you're using a custom Babel setup, please share your configuration. We're working to port as many commonly used Babel transformations as possible, as well as supporting plugins in the future. ## Version History | Version | Changes | | --- | --- | | `v13.1.0` | Module Transpilation and Modularize Imports stable. | | `v13.0.0` | SWC Minifier enabled by default. | | `v12.3.0` | SWC Minifier stable. | | `v12.2.0` | SWC Plugins experimental support added. | | `v12.1.0` | Added support for Styled Components, Jest, Relay, Remove React Properties, Legacy Decorators, Remove Console, and jsxImportSource. | | `v12.0.0` | Next.js Compiler introduced. | --- ## Page: https://nextjs.org/docs/13/architecture/supported-browsers Next.js supports **modern browsers** with zero configuration. * Chrome 64+ * Edge 79+ * Firefox 67+ * Opera 51+ * Safari 12+ ## Browserslist If you would like to target specific browsers or features, Next.js supports Browserslist configuration in your `package.json` file. Next.js uses the following Browserslist configuration by default: { "browserslist": [ "chrome 64", "edge 79", "firefox 67", "opera 51", "safari 12" ] } ## Polyfills We inject widely used polyfills, including: * **fetch()** — Replacing: `whatwg-fetch` and `unfetch`. * **URL** — Replacing: the `url` package (Node.js API). * **Object.assign()** — Replacing: `object-assign`, `object.assign`, and `core-js/object/assign`. If any of your dependencies include these polyfills, they’ll be eliminated automatically from the production build to avoid duplication. In addition, to reduce bundle size, Next.js will only load these polyfills for browsers that require them. The majority of the web traffic globally will not download these polyfills. ### Custom Polyfills If your own code or any external npm dependencies require features not supported by your target browsers (such as IE 11), you need to add polyfills yourself. In this case, you should add a top-level import for the **specific polyfill** you need in your Custom `<App>` or the individual component. ## JavaScript Language Features Next.js allows you to use the latest JavaScript features out of the box. In addition to ES6 features, Next.js also supports: * Async/await (ES2017) * Object Rest/Spread Properties (ES2018) * Dynamic `import()` (ES2020) * Optional Chaining (ES2020) * Nullish Coalescing (ES2020) * Class Fields and Static Properties (part of stage 3 proposal) * and more! ### Server-Side Polyfills In addition to `fetch()` on the client-side, Next.js polyfills `fetch()` in the Node.js environment where it's not yet available. It uses `undici`, the same implementation that Node.js itself uses. You can use `fetch()` in your server code (such as `getStaticProps`/`getServerSideProps`) without using polyfills such as `isomorphic-unfetch` or `node-fetch`. ### TypeScript Features Next.js has built-in TypeScript support. Learn more here. ### Customizing Babel Config (Advanced) You can customize babel configuration. Learn more here. --- ## Page: https://nextjs.org/docs/13/architecture/turbopack You are currently viewing documentation for version 13 of Next.js. Turbopack (beta) is an incremental bundler optimized for JavaScript and TypeScript, written in Rust, and built into Next.js. ## Usage Turbopack can be used in Next.js in both the `pages` and `app` directories for faster local development. To enable Turbopack, use the `--turbo` flag when running the Next.js development server. package.json { "scripts": { "dev": "next dev --turbo", "build": "next build", "start": "next start", "lint": "next lint" } } ## Supported Features To learn more about the currently supported features for Turbopack, view the documentation. ## Unsupported Features Turbopack currently only supports `next dev` and does not support `next build`. We are currently working on support for builds as we move closer towards stability. --- ## Page: https://nextjs.org/docs/13/community You are currently viewing documentation for version 13 of Next.js. With over 4 million weekly downloads, Next.js has a large and active community of developers across the world. Here's how you can get involved in our community: ## Contributing There are a couple of ways you can contribute to the development of Next.js: * Documentation: Suggest improvements or even write new sections to help our users understand how to use Next.js. * Examples: Help developers integrate Next.js with other tools and services by creating a new example or improving an existing one. * Codebase: Learn more about the underlying architecture, contribute to bug fixes, errors, and suggest new features. ## Discussions If you have a question about Next.js, or want to help others, you're always welcome to join the conversation: * GitHub Discussions * Discord * Reddit ## Social Media Follow Next.js on Twitter for the latest updates, and subscribe to the Vercel YouTube channel for Next.js videos. ## Code of Conduct We believe in creating an inclusive, welcoming community. As such, we ask all members to adhere to our Code of Conduct. This document outlines our expectations for participant behavior. We invite you to read it and help us maintain a safe and respectful environment. --- ## Page: https://nextjs.org/docs/13 Welcome to the Next.js documentation! ## What is Next.js? Next.js is a React framework for building full-stack web applications. You use React Components to build user interfaces, and Next.js for additional features and optimizations. Under the hood, Next.js also abstracts and automatically configures tooling needed for React, like bundling, compiling, and more. This allows you to focus on building your application instead of spending time with configuration. Whether you're an individual developer or part of a larger team, Next.js can help you build interactive, dynamic, and fast React applications. ## Main Features Some of the main Next.js features include: | Feature | Description | | --- | --- | | Routing | A file-system based router built on top of Server Components that supports layouts, nested routing, loading states, error handling, and more. | | Rendering | Client-side and Server-side Rendering with Client and Server Components. Further optimized with Static and Dynamic Rendering on the server with Next.js. Streaming on Edge and Node.js runtimes. | | Data Fetching | Simplified data fetching with async/await in Server Components, and an extended `fetch` API for request memoization, data caching and revalidation. | | Styling | Support for your preferred styling methods, including CSS Modules, Tailwind CSS, and CSS-in-JS | | Optimizations | Image, Fonts, and Script Optimizations to improve your application's Core Web Vitals and User Experience. | | TypeScript | Improved support for TypeScript, with better type checking and more efficient compilation, as well as custom TypeScript Plugin and type checker. | ## How to Use These Docs On the left side of the screen, you'll find the docs navbar. The pages of the docs are organized sequentially, from basic to advanced, so you can follow them step-by-step when building your application. However, you can read them in any order or skip to the pages that apply to your use case. On the right side of the screen, you'll see a table of contents that makes it easier to navigate between sections of a page. If you need to quickly find a page, you can use the search bar at the top, or the search shortcut (`Ctrl+K` or `Cmd+K`). To get started, checkout the Installation guide. ## App Router vs Pages Router Next.js has two different routers: the App Router and the Pages Router. The App Router is a newer router that allows you to use React's latest features, such as Server Components and Streaming. The Pages Router is the original Next.js router, which allowed you to build server-rendered React applications and continues to be supported for older Next.js applications. At the top of the sidebar, you'll notice a dropdown menu that allows you to switch between the **App Router** and the **Pages Router** features. Since there are features that are unique to each directory, it's important to keep track of which tab is selected. The breadcrumbs at the top of the page will also indicate whether you're viewing App Router docs or Pages Router docs. ## Pre-Requisite Knowledge Although our docs are designed to be beginner-friendly, we need to establish a baseline so that the docs can stay focused on Next.js functionality. We'll make sure to provide links to relevant documentation whenever we introduce a new concept. To get the most out of our docs, it's recommended that you have a basic understanding of HTML, CSS, and React. If you need to brush up on your React skills, check out our Next.js Foundations Course, which will introduce you to the fundamentals. ## Accessibility For optimal accessibility when using a screen reader while reading the docs, we recommend using Firefox and NVDA, or Safari and VoiceOver. If you have questions about anything related to Next.js, you're always welcome to ask our community on GitHub Discussions, Discord, Twitter, and Reddit. --- ## Page: https://nextjs.org/docs/13/app The Next.js App Router is a new paradigm for building applications using React's latest features. If you're already familiar with Next.js, you'll find that the App Router is a natural evolution of the existing file-system based router in the Pages Router. For new applications, **we recommend using the App Router**. For existing applications, you can incrementally adopt the App Router. It's also possible to use both routers in the same application. ## Frequently Asked Questions ### How can I access the request object in a layout? You intentionally cannot access the raw request object. However, you can access `headers` and `cookies` through server-only functions. You can also set cookies. Layouts do not rerender. They can be cached and reused to avoid unnecessary computation when navigating between pages. By restricting layouts from accessing the raw request, Next.js can prevent the execution of potentially slow or expensive user code within the layout, which could negatively impact performance. This design also enforces consistent and predictable behavior for layouts across different pages, simplify development and debugging since developers can rely on layouts behaving the same way regardless of the specific page they are applied to. Depending on the UI pattern you're building, Parallel Routes allow you to render multiple pages in the same layout, and pages have access to the route segments as well as the URL search params. ### How can I access the URL on a page? By default, pages are Server Components. You can access the route segments through the `params` prop and the URL search params through the `searchParams` prop for a given page. If you are using Client Components, you can use `usePathname`, `useSelectedLayoutSegment`, and `useSelectedLayoutSegments` for more complex routes. Further, depending on the UI pattern you're building, Parallel Routes allow you to render multiple pages in the same layout, and pages have access to the route segments as well as the URL search params. ### How can I redirect from a Server Component? You can use `redirect` to redirect from a page to a relative or absolute URL. `redirect` is a temporary (307) redirect, while `permanentRedirect` is a permanent (308) redirect. When these functions are used while streaming UI, they will insert a meta tag to emit the redirect on the client side. ### How can I handle authentication with the App Router? Here are some common authentication solutions that support the App Router: * NextAuth.js * Clerk * Auth0 * Stytch * Or manually handling sessions or JWTs ### How can I set cookies? You can set cookies in Server Actions or Route Handlers using the `cookies` function. Since HTTP does not allow setting cookies after streaming starts, you cannot set cookies from a page or layout directly. You can also set cookies from Middleware. ### How can I build multi-tenant apps? If you are looking to build a single Next.js application that serves multiple tenants, we have built an example showing our recommended architecture. ### How can I invalidate the App Router cache? There are multiple layers of caching in Next.js, and thus, multiple ways to invalidate different parts of the cache. Learn more about caching. ### Are there any comprehensive, open-source applications built on the App Router? Yes. You can view Next.js Commerce or the Platforms Starter Kit for two larger examples of using the App Router that are open-source. ## Learn More * Routing Fundamentals * Data Fetching, Caching, and Revalidating * Forms and Mutations * Caching * Rendering Fundamentals * Server Components * Client Components --- ## Page: https://nextjs.org/docs/13/pages You are currently viewing documentation for version 13 of Next.js. Before Next.js 13, the Pages Router was the main way to create routes in Next.js. It used an intuitive file-system router to map each file to a route. The Pages Router is still supported in newer versions of Next.js, but we recommend migrating to the new App Router to leverage React's latest features. Use this section of the documentation for existing applications that use the Pages Router.