W↓
All docs
🔑
Sign Up/Sign In
bun.sh/docs/bundler/
Public Link
Apr 8, 2025, 12:51:52 PM - complete - 119.9 kB
Created by:
****ad@vlad.studio
Starting URLs:
https://bun.sh/docs
Crawl Prefixes:
https://bun.sh/docs/bundler/
## Page: https://bun.sh/docs Bun is an all-in-one toolkit for JavaScript and TypeScript apps. It ships as a single executable called `bun`. At its core is the _Bun runtime_, a fast JavaScript runtime designed as **a drop-in replacement for Node.js**. It's written in Zig and powered by JavaScriptCore under the hood, dramatically reducing startup times and memory usage. bun run index.tsx # TS and JSX supported out of the box The `bun` command-line tool also implements a test runner, script runner, and Node.js-compatible package manager, all significantly faster than existing tools and usable in existing Node.js projects with little to no changes necessary. bun run start # run the `start` script bun install <pkg> # install a package bun build ./index.tsx # bundle a project for browsers bun test # run tests bunx cowsay 'Hello, world!' # execute a package Get started with one of the quick links below, or read on to learn more about Bun. ## What is a runtime? JavaScript (or, more formally, ECMAScript) is just a _specification_ for a programming language. Anyone can write a JavaScript _engine_ that ingests a valid JavaScript program and executes it. The two most popular engines in use today are V8 (developed by Google) and JavaScriptCore (developed by Apple). Both are open source. But most JavaScript programs don't run in a vacuum. They need a way to access the outside world to perform useful tasks. This is where _runtimes_ come in. They implement additional APIs that are then made available to the JavaScript programs they execute. ### Browsers Notably, browsers ship with JavaScript runtimes that implement a set of Web-specific APIs that are exposed via the global `window` object. Any JavaScript code executed by the browser can use these APIs to implement interactive or dynamic behavior in the context of the current webpage. ### Node.js Similarly, Node.js is a JavaScript runtime that can be used in non-browser environments, like servers. JavaScript programs executed by Node.js have access to a set of Node.js-specific globals like `Buffer`, `process`, and `__dirname` in addition to built-in modules for performing OS-level tasks like reading/writing files (`node:fs`) and networking (`node:net`, `node:http`). Node.js also implements a CommonJS-based module system and resolution algorithm that pre-dates JavaScript's native module system. Bun is designed as a faster, leaner, more modern replacement for Node.js. ## Design goals Bun is designed from the ground-up with today's JavaScript ecosystem in mind. * **Speed**. Bun processes start 4x faster than Node.js currently (try it yourself!) * **TypeScript & JSX support**. You can directly execute `.jsx`, `.ts`, and `.tsx` files; Bun's transpiler converts these to vanilla JavaScript before execution. * **ESM & CommonJS compatibility**. The world is moving towards ES modules (ESM), but millions of packages on npm still require CommonJS. Bun recommends ES modules, but supports CommonJS. * **Web-standard APIs**. Bun implements standard Web APIs like `fetch`, `WebSocket`, and `ReadableStream`. Bun is powered by the JavaScriptCore engine, which is developed by Apple for Safari, so some APIs like `Headers` and `URL` directly use Safari's implementation. * **Node.js compatibility**. In addition to supporting Node-style module resolution, Bun aims for full compatibility with built-in Node.js globals (`process`, `Buffer`) and modules (`path`, `fs`, `http`, etc.) _This is an ongoing effort that is not complete._ Refer to the compatibility page for the current status. Bun is more than a runtime. The long-term goal is to be a cohesive, infrastructural toolkit for building apps with JavaScript/TypeScript, including a package manager, transpiler, bundler, script runner, test runner, and more. --- ## Page: https://bun.sh/docs/bundler/executables Bun's bundler implements a `--compile` flag for generating a standalone binary from a TypeScript or JavaScript file. bun build ./cli.ts --compile --outfile mycli cli.ts console.log("Hello world!"); This bundles `cli.ts` into an executable that can be executed directly: $ ./mycli Hello world! All imported files and packages are bundled into the executable, along with a copy of the Bun runtime. All built-in Bun and Node.js APIs are supported. ## Cross-compile to other platforms The `--target` flag lets you compile your standalone executable for a different operating system, architecture, or version of Bun than the machine you're running `bun build` on. To build for Linux x64 (most servers): bun build --compile --target=bun-linux-x64 ./index.ts --outfile myapp # To support CPUs from before 2013, use the baseline version (nehalem) bun build --compile --target=bun-linux-x64-baseline ./index.ts --outfile myapp # To explicitly only support CPUs from 2013 and later, use the modern version (haswell) # modern is faster, but baseline is more compatible. bun build --compile --target=bun-linux-x64-modern ./index.ts --outfile myapp To build for Linux ARM64 (e.g. Graviton or Raspberry Pi): # Note: the default architecture is x64 if no architecture is specified. bun build --compile --target=bun-linux-arm64 ./index.ts --outfile myapp To build for Windows x64: bun build --compile --target=bun-windows-x64 ./path/to/my/app.ts --outfile myapp # To support CPUs from before 2013, use the baseline version (nehalem) bun build --compile --target=bun-windows-x64-baseline ./path/to/my/app.ts --outfile myapp # To explicitly only support CPUs from 2013 and later, use the modern version (haswell) bun build --compile --target=bun-windows-x64-modern ./path/to/my/app.ts --outfile myapp # note: if no .exe extension is provided, Bun will automatically add it for Windows executables To build for macOS arm64: bun build --compile --target=bun-darwin-arm64 ./path/to/my/app.ts --outfile myapp To build for macOS x64: bun build --compile --target=bun-darwin-x64 ./path/to/my/app.ts --outfile myapp #### Supported targets The order of the `--target` flag does not matter, as long as they're delimited by a `-`. | \--target | Operating System | Architecture | Modern | Baseline | Libc | | --- | --- | --- | --- | --- | --- | | bun-linux-x64 | Linux | x64 | ✅ | ✅ | glibc | | bun-linux-arm64 | Linux | arm64 | ✅ | N/A | glibc | | bun-windows-x64 | Windows | x64 | ✅ | ✅ | \- | | ~bun-windows-arm64~ | Windows | arm64 | ❌ | ❌ | \- | | bun-darwin-x64 | macOS | x64 | ✅ | ✅ | \- | | bun-darwin-arm64 | macOS | arm64 | ✅ | N/A | \- | | bun-linux-x64-musl | Linux | x64 | ✅ | ✅ | musl | | bun-linux-arm64-musl | Linux | arm64 | ✅ | N/A | musl | On x64 platforms, Bun uses SIMD optimizations which require a modern CPU supporting AVX2 instructions. The `-baseline` build of Bun is for older CPUs that don't support these optimizations. Normally, when you install Bun we automatically detect which version to use but this can be harder to do when cross-compiling since you might not know the target CPU. You usually don't need to worry about it on Darwin x64, but it is relevant for Windows x64 and Linux x64. If you or your users see `"Illegal instruction"` errors, you might need to use the baseline version. ## Deploying to production Compiled executables reduce memory usage and improve Bun's start time. Normally, Bun reads and transpiles JavaScript and TypeScript files on `import` and `require`. This is part of what makes so much of Bun "just work", but it's not free. It costs time and memory to read files from disk, resolve file paths, parse, transpile, and print source code. With compiled executables, you can move that cost from runtime to build-time. When deploying to production, we recommend the following: bun build --compile --minify --sourcemap ./path/to/my/app.ts --outfile myapp ### Bytecode compilation To improve startup time, enable bytecode compilation: bun build --compile --minify --sourcemap --bytecode ./path/to/my/app.ts --outfile myapp Using bytecode compilation, `tsc` starts 2x faster:  Bytecode compilation moves parsing overhead for large input files from runtime to bundle time. Your app starts faster, in exchange for making the `bun build` command a little slower. It doesn't obscure source code. **Experimental:** Bytecode compilation is an experimental feature introduced in Bun v1.1.30. Only `cjs` format is supported (which means no top-level-await). Let us know if you run into any issues! ### What do these flags do? The `--minify` argument optimizes the size of the transpiled output code. If you have a large application, this can save megabytes of space. For smaller applications, it might still improve start time a little. The `--sourcemap` argument embeds a sourcemap compressed with zstd, so that errors & stacktraces point to their original locations instead of the transpiled location. Bun will automatically decompress & resolve the sourcemap when an error occurs. The `--bytecode` argument enables bytecode compilation. Every time you run JavaScript code in Bun, JavaScriptCore (the engine) will compile your source code into bytecode. We can move this parsing work from runtime to bundle time, saving you startup time. ## Worker To use workers in a standalone executable, add the worker's entrypoint to the CLI arguments: bun build --compile ./index.ts ./my-worker.ts --outfile myapp Then, reference the worker in your code: console.log("Hello from Bun!"); // Any of these will work: new Worker("./my-worker.ts"); new Worker(new URL("./my-worker.ts", import.meta.url)); new Worker(new URL("./my-worker.ts", import.meta.url).href); As of Bun v1.1.25, when you add multiple entrypoints to a standalone executable, they will be bundled separately into the executable. In the future, we may automatically detect usages of statically-known paths in `new Worker(path)` and then bundle those into the executable, but for now, you'll need to add it to the shell command manually like the above example. If you use a relative path to a file not included in the standalone executable, it will attempt to load that path from disk relative to the current working directory of the process (and then error if it doesn't exist). ## SQLite You can use `bun:sqlite` imports with `bun build --compile`. By default, the database is resolved relative to the current working directory of the process. import db from "./my.db" with { type: "sqlite" }; console.log(db.query("select * from users LIMIT 1").get()); That means if the executable is located at `/usr/bin/hello`, the user's terminal is located at `/home/me/Desktop`, it will look for `/home/me/Desktop/my.db`. $ cd /home/me/Desktop $ ./hello ## Embed assets & files Standalone executables support embedding files. To embed files into an executable with `bun build --compile`, import the file in your code // this becomes an internal file path import icon from "./icon.png" with { type: "file" }; import { file } from "bun"; export default { fetch(req) { // Embedded files can be streamed from Response objects return new Response(file(icon)); }, }; Embedded files can be read using `Bun.file`'s functions or the Node.js `fs.readFile` function (in `"node:fs"`). For example, to read the contents of the embedded file: import icon from "./icon.png" with { type: "file" }; import { file } from "bun"; const bytes = await file(icon).arrayBuffer(); // await fs.promises.readFile(icon) // fs.readFileSync(icon) ### Embed SQLite databases If your application wants to embed a SQLite database, set `type: "sqlite"` in the import attribute and the `embed` attribute to `"true"`. import myEmbeddedDb from "./my.db" with { type: "sqlite", embed: "true" }; console.log(myEmbeddedDb.query("select * from users LIMIT 1").get()); This database is read-write, but all changes are lost when the executable exits (since it's stored in memory). ### Embed N-API Addons As of Bun v1.0.23, you can embed `.node` files into executables. const addon = require("./addon.node"); console.log(addon.hello()); Unfortunately, if you're using `@mapbox/node-pre-gyp` or other similar tools, you'll need to make sure the `.node` file is directly required or it won't bundle correctly. ### Embed directories To embed a directory with `bun build --compile`, use a shell glob in your `bun build` command: bun build --compile ./index.ts ./public/**/*.png Then, you can reference the files in your code: import icon from "./public/assets/icon.png" with { type: "file" }; import { file } from "bun"; export default { fetch(req) { // Embedded files can be streamed from Response objects return new Response(file(icon)); }, }; This is honestly a workaround, and we expect to improve this in the future with a more direct API. ### Listing embedded files To get a list of all embedded files, use `Bun.embeddedFiles`: import "./icon.png" with { type: "file" }; import { embeddedFiles } from "bun"; console.log(embeddedFiles[0].name); // `icon-${hash}.png` `Bun.embeddedFiles` returns an array of `Blob` objects which you can use to get the size, contents, and other properties of the files. embeddedFiles: Blob[] The list of embedded files excludes bundled source code like `.ts` and `.js` files. #### Content hash By default, embedded files have a content hash appended to their name. This is useful for situations where you want to serve the file from a URL or CDN and have fewer cache invalidation issues. But sometimes, this is unexpected and you might want the original name instead: To disable the content hash, pass `--asset-naming` to `bun build --compile` like this: bun build --compile --asset-naming="[name].[ext]" ./index.ts ## Minification To trim down the size of the executable a little, pass `--minify` to `bun build --compile`. This uses Bun's minifier to reduce the code size. Overall though, Bun's binary is still way too big and we need to make it smaller. ## Windows-specific flags When compiling a standalone executable on Windows, there are two platform-specific options that can be used to customize metadata on the generated `.exe` file: * `--windows-icon=path/to/icon.ico` to customize the executable file icon. * `--windows-hide-console` to disable the background terminal, which can be used for applications that do not need a TTY. These flags currently cannot be used when cross-compiling because they depend on Windows APIs. ## Code signing on macOS To codesign a standalone executable on macOS (which fixes Gatekeeper warnings), use the `codesign` command. codesign --deep --force -vvvv --sign "XXXXXXXXXX" ./myapp We recommend including an `entitlements.plist` file with JIT permissions. entitlements.plist <?xml version="1.0" encoding="UTF-8"?> <!DOCTYPE plist PUBLIC "-//Apple//DTD PLIST 1.0//EN" "http://www.apple.com/DTDs/PropertyList-1.0.dtd"> <plist version="1.0"> <dict> <key>com.apple.security.cs.allow-jit</key> <true/> <key>com.apple.security.cs.allow-unsigned-executable-memory</key> <true/> <key>com.apple.security.cs.disable-executable-page-protection</key> <true/> <key>com.apple.security.cs.allow-dyld-environment-variables</key> <true/> <key>com.apple.security.cs.disable-library-validation</key> <true/> </dict> </plist> To codesign with JIT support, pass the `--entitlements` flag to `codesign`. codesign --deep --force -vvvv --sign "XXXXXXXXXX" --entitlements entitlements.plist ./myapp After codesigning, verify the executable: codesign -vvv --verify ./myapp ./myapp: valid on disk ./myapp: satisfies its Designated Requirement Codesign support requires Bun v1.2.4 or newer. ## Unsupported CLI arguments Currently, the `--compile` flag can only accept a single entrypoint at a time and does not support the following flags: * `--outdir` — use `outfile` instead. * `--splitting` * `--public-path` * `--target=node` or `--target=browser` * `--format` - always outputs a binary executable. Internally, it's almost esm. * `--no-bundle` - we always bundle everything into the executable. --- ## Page: https://bun.sh/docs/bundler/html Bun's bundler has first-class support for HTML. Build static sites, landing pages, and web applications with zero configuration. Just point Bun at your HTML file and it handles everything else. index.html <!doctype html> <html> <head> <link rel="stylesheet" href="./styles.css" /> <script src="./app.ts" type="module"></script> </head> <body> <img src="./logo.png" /> </body> </html> To get started, pass HTML files to `bun`. bun ./index.html Bunv1.2.8ready in6.62ms http://localhost:3000/ Pressh+Enterto show shortcuts Bun's development server provides powerful features with zero configuration: * **Automatic Bundling** - Bundles and serves your HTML, JavaScript, and CSS * **Multi-Entry Support** - Handles multiple HTML entry points and glob entry points * **Modern JavaScript** - TypeScript & JSX support out of the box * **Smart Configuration** - Reads `tsconfig.json` for paths, JSX options, experimental decorators, and more * **Plugins** - Plugins for TailwindCSS and more * **ESM & CommonJS** - Use ESM and CommonJS in your JavaScript, TypeScript, and JSX files * **CSS Bundling & Minification** - Bundles CSS from `<link>` tags and `@import` statements * **Asset Management** * Automatic copying & hashing of images and assets * Rewrites asset paths in JavaScript, CSS, and HTML ## Single Page Apps (SPA) When you pass a single .html file to Bun, Bun will use it as a fallback route for all paths. This makes it perfect for single page apps that use client-side routing: bun index.html Bunv1.2.8ready in6.62ms http://localhost:3000/ Pressh+Enterto show shortcuts Your React or other SPA will work out of the box — no configuration needed. All routes like `/about`, `/users/123`, etc. will serve the same HTML file, letting your client-side router handle the navigation. index.html <!doctype html> <html> <head> <title>My SPA</title> <script src="./app.tsx" type="module"></script> </head> <body> <div id="root"></div> </body> </html> ## Multi-page apps (MPA) Some projects have several separate routes or HTML files as entry points. To support multiple entry points, pass them all to `bun` bun ./index.html ./about.html Bunv1.2.8ready in6.62ms http://localhost:3000/ Routes: /./index.html /about./about.html Pressh+Enterto show shortcuts This will serve: * `index.html` at `/` * `about.html` at `/about` ### Glob patterns To specify multiple files, you can use glob patterns that end in `.html`: bun ./\*\*/\*.html Bunv1.2.8ready in6.62ms http://localhost:3000/ Routes: /./index.html /about./about.html Pressh+Enterto show shortcuts ### Path normalization The base path is chosen from the longest common prefix among all the files. bun ./index.html ./about/index.html ./about/foo/index.html Bunv1.2.8ready in6.62ms http://localhost:3000/ Routes: /./index.html /about./about/index.html /about/foo./about/foo/index.html Pressh+Enterto show shortcuts ## JavaScript, TypeScript, and JSX Bun's transpiler natively implements JavaScript, TypeScript, and JSX support. Learn more about loaders in Bun. Bun's transpiler is also used at runtime. ### ES Modules & CommonJS You can use ESM and CJS in your JavaScript, TypeScript, and JSX files. Bun will handle the transpilation and bundling automatically. There is no pre-build or separate optimization step. It's all done at the same time. Learn more about module resolution in Bun. ## CSS Bun's CSS parser is also natively implemented (clocking in around 58,000 lines of Zig). It's also a CSS bundler. You can use `@import` in your CSS files to import other CSS files. For example: styles.css @import "./abc.css"; .container { background-color: blue; } abc.css body { background-color: red; } This outputs: styles.css body { background-color: red; } .container { background-color: blue; } ### Referencing local assets in CSS You can reference local assets in your CSS files. styles.css body { background-image: url("./logo.png"); } This will copy `./logo.png` to the output directory and rewrite the path in the CSS file to include a content hash. styles.css body { background-image: url("./logo-[ABC123].png"); } ### Importing CSS in JavaScript To associate a CSS file with a JavaScript file, you can import it in your JavaScript file. app.ts import "./styles.css"; import "./more-styles.css"; This generates `./app.css` and `./app.js` in the output directory. All CSS files imported from JavaScript will be bundled into a single CSS file per entry point. If you import the same CSS file from multiple JavaScript files, it will only be included once in the output CSS file. ## Plugins The dev server supports plugins. ### Tailwind CSS To use TailwindCSS, install the `bun-plugin-tailwind` plugin: # Or any npm client bun install --dev bun-plugin-tailwind Then, add the plugin to your `bunfig.toml`: [serve.static] plugins = ["bun-plugin-tailwind"] Then, reference TailwindCSS in your HTML via `<link>` tag, `@import` in CSS, or `import` in JavaScript. index.html <!-- Reference TailwindCSS in your HTML --> <link rel="stylesheet" href="tailwindcss" /> styles.css /* Import TailwindCSS in your CSS */ @import "tailwindcss"; app.ts /* Import TailwindCSS in your JavaScript */ import "tailwindcss"; Only one of those are necessary, not all three. ## Keyboard Shortcuts While the server is running: * `o + Enter` - Open in browser * `c + Enter` - Clear console * `q + Enter` (or Ctrl+C) - Quit server ## Build for Production When you're ready to deploy, use `bun build` to create optimized production bundles: CLI bun build ./index.html --minify --outdir=dist API Bun.build({ entrypoints: ["./index.html"], outdir: "./dist", minify: { whitespace: true, identifiers: true, syntax: true, } }); Currently, plugins are only supported through `Bun.build`'s API or through `bunfig.toml` with the frontend dev server - not yet supported in `bun build`'s CLI. ### Watch Mode You can run `bun build --watch` to watch for changes and rebuild automatically. This works nicely for library development. You've never seen a watch mode this fast. ### Plugin API Need more control? Configure the bundler through the JavaScript API and use Bun's builtin `HTMLRewriter` to preprocess HTML. await Bun.build({ entrypoints: ["./index.html"], outdir: "./dist", minify: true, plugins: [ { // A plugin that makes every HTML tag lowercase name: "lowercase-html-plugin", setup({ onLoad }) { const rewriter = new HTMLRewriter().on("*", { element(element) { element.tagName = element.tagName.toLowerCase(); }, text(element) { element.replace(element.text.toLowerCase()); }, }); onLoad({ filter: /\.html$/ }, async args => { const html = await Bun.file(args.path).text(); return { // Bun's bundler will scan the HTML for <script> tags, <link rel="stylesheet"> tags, and other assets // and bundle them automatically contents: rewriter.transform(html), loader: "html", }; }); }, }, ], }); ## What Gets Processed? Bun automatically handles all common web assets: * Scripts (`<script src>`) are run through Bun's JavaScript/TypeScript/JSX bundler * Stylesheets (`<link rel="stylesheet">`) are run through Bun's CSS parser & bundler * Images (`<img>`, `<picture>`) are copied and hashed * Media (`<video>`, `<audio>`, `<source>`) are copied and hashed * Any `<link>` tag with an `href` attribute pointing to a local file is rewritten to the new path, and hashed All paths are resolved relative to your HTML file, making it easy to organize your project however you want. ## This is a work in progress * No HMR support yet * Need more plugins * Need more configuration options for things like asset handling * Need a way to configure CORS, headers, etc. If you want to submit a PR, most of the code is here. You could even copy paste that file into your project and use it as a starting point. ## How this works This is a small wrapper around Bun's support for HTML imports in JavaScript. ### Adding a backend to your frontend To add a backend to your frontend, you can use the `"routes"` option in `Bun.serve`. Learn more in the full-stack docs. --- ## Page: https://bun.sh/docs/bundler/css Bun's bundler has built-in support for CSS with the following features: * Transpiling modern/future features to work on all browsers (including vendor prefixing) * Minification * CSS Modules * Tailwind (via a native bundler plugin) ## Transpiling Bun's CSS bundler lets you use modern/future CSS features without having to worry about browser compatibility — all thanks to its transpiling and vendor prefixing features which are enabled by default. Bun's CSS parser and bundler is a direct Rust → Zig port of LightningCSS, with a bundling approach inspired by esbuild. The transpiler converts modern CSS syntax into backwards-compatible equivalents that work across browsers. A huge thanks goes to the amazing work from the authors of LightningCSS and esbuild. ### Browser Compatibility By default, Bun's CSS bundler targets the following browsers: * ES2020 * Edge 88+ * Firefox 78+ * Chrome 87+ * Safari 14+ ### Syntax Lowering #### Nesting The CSS Nesting specification allows you to write more concise and intuitive stylesheets by nesting selectors inside one another. Instead of repeating parent selectors across your CSS file, you can write child styles directly within their parent blocks. /* With nesting */ .card { background: white; border-radius: 4px; .title { font-size: 1.2rem; font-weight: bold; } .content { padding: 1rem; } } Bun's CSS bundler automatically converts this nested syntax into traditional flat CSS that works in all browsers: /* Compiled output */ .card { background: white; border-radius: 4px; } .card .title { font-size: 1.2rem; font-weight: bold; } .card .content { padding: 1rem; } You can also nest media queries and other at-rules inside selectors, eliminating the need to repeat selector patterns: .responsive-element { display: block; @media (min-width: 768px) { display: flex; } } This compiles to: .responsive-element { display: block; } @media (min-width: 768px) { .responsive-element { display: flex; } } #### Color mix The `color-mix()` function gives you an easy way to blend two colors together according to a specified ratio in a chosen color space. This powerful feature lets you create color variations without manually calculating the resulting values. .button { /* Mix blue and red in the RGB color space with a 30/70 proportion */ background-color: color-mix(in srgb, blue 30%, red); /* Create a lighter variant for hover state */ &:hover { background-color: color-mix(in srgb, blue 30%, red, white 20%); } } Bun's CSS bundler evaluates these color mixes at build time when all color values are known (not CSS variables), generating static color values that work in all browsers: .button { /* Computed to the exact resulting color */ background-color: #b31a1a; } .button:hover { background-color: #c54747; } This feature is particularly useful for creating color systems with programmatically derived shades, tints, and accents without needing preprocessors or custom tooling. #### Relative colors CSS now allows you to modify individual components of a color using relative color syntax. This powerful feature lets you create color variations by adjusting specific attributes like lightness, saturation, or individual channels without having to recalculate the entire color. .theme-color { /* Start with a base color and increase lightness by 15% */ --accent: lch(from purple calc(l + 15%) c h); /* Take our brand blue and make a desaturated version */ --subtle-blue: oklch(from var(--brand-blue) l calc(c * 0.8) h); } Bun's CSS bundler computes these relative color modifications at build time (when not using CSS variables) and generates static color values for browser compatibility: .theme-color { --accent: lch(69.32% 58.34 328.37); --subtle-blue: oklch(60.92% 0.112 240.01); } This approach is extremely useful for theme generation, creating accessible color variants, or building color scales based on mathematical relationships instead of hard-coding each value. #### LAB colors Modern CSS supports perceptually uniform color spaces like LAB, LCH, OKLAB, and OKLCH that offer significant advantages over traditional RGB. These color spaces can represent colors outside the standard RGB gamut, resulting in more vibrant and visually consistent designs. .vibrant-element { /* A vibrant red that exceeds sRGB gamut boundaries */ color: lab(55% 78 35); /* A smooth gradient using perceptual color space */ background: linear-gradient( to right, oklch(65% 0.25 10deg), oklch(65% 0.25 250deg) ); } Bun's CSS bundler automatically converts these advanced color formats to backwards-compatible alternatives for browsers that don't yet support them: .vibrant-element { /* Fallback to closest RGB approximation */ color: #ff0f52; /* P3 fallback for browsers with wider gamut support */ color: color(display-p3 1 0.12 0.37); /* Original value preserved for browsers that support it */ color: lab(55% 78 35); background: linear-gradient(to right, #cd4e15, #3887ab); background: linear-gradient( to right, oklch(65% 0.25 10deg), oklch(65% 0.25 250deg) ); } This layered approach ensures optimal color rendering across all browsers while allowing you to use the latest color technologies in your designs. #### Color function The `color()` function provides a standardized way to specify colors in various predefined color spaces, expanding your design options beyond the traditional RGB space. This allows you to access wider color gamuts and create more vibrant designs. .vivid-element { /* Using the Display P3 color space for wider gamut colors */ color: color(display-p3 1 0.1 0.3); /* Using A98 RGB color space */ background-color: color(a98-rgb 0.44 0.5 0.37); } For browsers that don't support these advanced color functions yet, Bun's CSS bundler provides appropriate RGB fallbacks: .vivid-element { /* RGB fallback first for maximum compatibility */ color: #fa1a4c; /* Keep original for browsers that support it */ color: color(display-p3 1 0.1 0.3); background-color: #6a805d; background-color: color(a98-rgb 0.44 0.5 0.37); } This functionality lets you use modern color spaces immediately while ensuring your designs remain functional across all browsers, with optimal colors displayed in supporting browsers and reasonable approximations elsewhere. #### HWB colors The HWB (Hue, Whiteness, Blackness) color model provides an intuitive way to express colors based on how much white or black is mixed with a pure hue. Many designers find this approach more natural for creating color variations compared to manipulating RGB or HSL values. .easy-theming { /* Pure cyan with no white or black added */ --primary: hwb(180 0% 0%); /* Same hue, but with 20% white added (tint) */ --primary-light: hwb(180 20% 0%); /* Same hue, but with 30% black added (shade) */ --primary-dark: hwb(180 0% 30%); /* Muted version with both white and black added */ --primary-muted: hwb(180 30% 20%); } Bun's CSS bundler automatically converts HWB colors to RGB for compatibility with all browsers: .easy-theming { --primary: #00ffff; --primary-light: #33ffff; --primary-dark: #00b3b3; --primary-muted: #339999; } The HWB model makes it particularly easy to create systematic color variations for design systems, providing a more intuitive approach to creating consistent tints and shades than working directly with RGB or HSL values. #### Color notation Modern CSS has introduced more intuitive and concise ways to express colors. Space-separated color syntax eliminates the need for commas in RGB and HSL values, while hex colors with alpha channels provide a compact way to specify transparency. .modern-styling { /* Space-separated RGB notation (no commas) */ color: rgb(50 100 200); /* Space-separated RGB with alpha */ border-color: rgba(100 50 200 / 75%); /* Hex with alpha channel (8 digits) */ background-color: #00aaff80; /* HSL with simplified notation */ box-shadow: 0 5px 10px hsl(200 50% 30% / 40%); } Bun's CSS bundler automatically converts these modern color formats to ensure compatibility with older browsers: .modern-styling { /* Converted to comma format for older browsers */ color: rgb(50, 100, 200); /* Alpha channels handled appropriately */ border-color: rgba(100, 50, 200, 0.75); /* Hex+alpha converted to rgba when needed */ background-color: rgba(0, 170, 255, 0.5); box-shadow: 0 5px 10px rgba(38, 115, 153, 0.4); } This conversion process lets you write cleaner, more modern CSS while ensuring your styles work correctly across all browsers. #### light-dark() color function The `light-dark()` function provides an elegant solution for implementing color schemes that respect the user's system preference without requiring complex media queries. This function accepts two color values and automatically selects the appropriate one based on the current color scheme context. :root { /* Define color scheme support */ color-scheme: light dark; } .themed-component { /* Automatically picks the right color based on system preference */ background-color: light-dark(#ffffff, #121212); color: light-dark(#333333, #eeeeee); border-color: light-dark(#dddddd, #555555); } /* Override system preference when needed */ .light-theme { color-scheme: light; } .dark-theme { color-scheme: dark; } For browsers that don't support this feature yet, Bun's CSS bundler converts it to use CSS variables with proper fallbacks: :root { --lightningcss-light: initial; --lightningcss-dark: ; color-scheme: light dark; } @media (prefers-color-scheme: dark) { :root { --lightningcss-light: ; --lightningcss-dark: initial; } } .light-theme { --lightningcss-light: initial; --lightningcss-dark: ; color-scheme: light; } .dark-theme { --lightningcss-light: ; --lightningcss-dark: initial; color-scheme: dark; } .themed-component { background-color: var(--lightningcss-light, #ffffff) var(--lightningcss-dark, #121212); color: var(--lightningcss-light, #333333) var(--lightningcss-dark, #eeeeee); border-color: var(--lightningcss-light, #dddddd) var(--lightningcss-dark, #555555); } This approach gives you a clean way to handle light and dark themes without duplicating styles or writing complex media queries, while maintaining compatibility with browsers that don't yet support the feature natively. #### Logical properties CSS logical properties let you define layout, spacing, and sizing relative to the document's writing mode and text direction rather than physical screen directions. This is crucial for creating truly international layouts that automatically adapt to different writing systems. .multilingual-component { /* Margin that adapts to writing direction */ margin-inline-start: 1rem; /* Padding that makes sense regardless of text direction */ padding-block: 1rem 2rem; /* Border radius for the starting corner at the top */ border-start-start-radius: 4px; /* Size that respects the writing mode */ inline-size: 80%; block-size: auto; } For browsers that don't fully support logical properties, Bun's CSS bundler compiles them to physical properties with appropriate directional adjustments: /* For left-to-right languages */ .multilingual-component:dir(ltr) { margin-left: 1rem; padding-top: 1rem; padding-bottom: 2rem; border-top-left-radius: 4px; width: 80%; height: auto; } /* For right-to-left languages */ .multilingual-component:dir(rtl) { margin-right: 1rem; padding-top: 1rem; padding-bottom: 2rem; border-top-right-radius: 4px; width: 80%; height: auto; } If the `:dir()` selector isn't supported, additional fallbacks are automatically generated to ensure your layouts work properly across all browsers and writing systems. This makes creating internationalized designs much simpler while maintaining compatibility with older browsers. #### :dir() selector The `:dir()` pseudo-class selector allows you to style elements based on their text direction (RTL or LTR), providing a powerful way to create direction-aware designs without JavaScript. This selector matches elements based on their directionality as determined by the document or explicit direction attributes. /* Apply different styles based on text direction */ .nav-arrow:dir(ltr) { transform: rotate(0deg); } .nav-arrow:dir(rtl) { transform: rotate(180deg); } /* Position elements based on text flow */ .sidebar:dir(ltr) { border-right: 1px solid #ddd; } .sidebar:dir(rtl) { border-left: 1px solid #ddd; } For browsers that don't support the `:dir()` selector yet, Bun's CSS bundler converts it to the more widely supported `:lang()` selector with appropriate language mappings: /* Converted to use language-based selectors as fallback */ .nav-arrow:lang(en, fr, de, es, it, pt, nl) { transform: rotate(0deg); } .nav-arrow:lang(ar, he, fa, ur) { transform: rotate(180deg); } .sidebar:lang(en, fr, de, es, it, pt, nl) { border-right: 1px solid #ddd; } .sidebar:lang(ar, he, fa, ur) { border-left: 1px solid #ddd; } This conversion lets you write direction-aware CSS that works reliably across browsers, even those that don't yet support the `:dir()` selector natively. If multiple arguments to `:lang()` aren't supported, further fallbacks are automatically provided. #### :lang() selector The `:lang()` pseudo-class selector allows you to target elements based on the language they're in, making it easy to apply language-specific styling. Modern CSS allows the `:lang()` selector to accept multiple language codes, letting you group language-specific rules more efficiently. /* Typography adjustments for CJK languages */ :lang(zh, ja, ko) { line-height: 1.8; font-size: 1.05em; } /* Different quote styles by language group */ blockquote:lang(fr, it, es, pt) { font-style: italic; } blockquote:lang(de, nl, da, sv) { font-weight: 500; } For browsers that don't support multiple arguments in the `:lang()` selector, Bun's CSS bundler converts this syntax to use the `:is()` selector to maintain the same behavior: /* Multiple languages grouped with :is() for better browser support */ :is(:lang(zh), :lang(ja), :lang(ko)) { line-height: 1.8; font-size: 1.05em; } blockquote:is(:lang(fr), :lang(it), :lang(es), :lang(pt)) { font-style: italic; } blockquote:is(:lang(de), :lang(nl), :lang(da), :lang(sv)) { font-weight: 500; } If needed, Bun can provide additional fallbacks for `:is()` as well, ensuring your language-specific styles work across all browsers. This approach simplifies creating internationalized designs with distinct typographic and styling rules for different language groups. #### :is() selector The `:is()` pseudo-class function (formerly `:matches()`) allows you to create more concise and readable selectors by grouping multiple selectors together. It accepts a selector list as its argument and matches if any of the selectors in that list match, significantly reducing repetition in your CSS. /* Instead of writing these separately */ /* .article h1, .article h2, .article h3 { margin-top: 1.5em; } */ /* You can write this */ .article :is(h1, h2, h3) { margin-top: 1.5em; } /* Complex example with multiple groups */ :is(header, main, footer) :is(h1, h2, .title) { font-family: "Heading Font", sans-serif; } For browsers that don't support `:is()`, Bun's CSS bundler provides fallbacks using vendor-prefixed alternatives: /* Fallback using -webkit-any */ .article :-webkit-any(h1, h2, h3) { margin-top: 1.5em; } /* Fallback using -moz-any */ .article :-moz-any(h1, h2, h3) { margin-top: 1.5em; } /* Original preserved for modern browsers */ .article :is(h1, h2, h3) { margin-top: 1.5em; } /* Complex example with fallbacks */ :-webkit-any(header, main, footer) :-webkit-any(h1, h2, .title) { font-family: "Heading Font", sans-serif; } :-moz-any(header, main, footer) :-moz-any(h1, h2, .title) { font-family: "Heading Font", sans-serif; } :is(header, main, footer) :is(h1, h2, .title) { font-family: "Heading Font", sans-serif; } It's worth noting that the vendor-prefixed versions have some limitations compared to the standardized `:is()` selector, particularly with complex selectors. Bun handles these limitations intelligently, only using prefixed versions when they'll work correctly. #### :not() selector The `:not()` pseudo-class allows you to exclude elements that match a specific selector. The modern version of this selector accepts multiple arguments, letting you exclude multiple patterns with a single, concise selector. /* Select all buttons except primary and secondary variants */ button:not(.primary, .secondary) { background-color: #f5f5f5; border: 1px solid #ddd; } /* Apply styles to all headings except those inside sidebars or footers */ h2:not(.sidebar *, footer *) { margin-top: 2em; } For browsers that don't support multiple arguments in `:not()`, Bun's CSS bundler converts this syntax to a more compatible form while preserving the same behavior: /* Converted to use :not with :is() for compatibility */ button:not(:is(.primary, .secondary)) { background-color: #f5f5f5; border: 1px solid #ddd; } h2:not(:is(.sidebar *, footer *)) { margin-top: 2em; } And if `:is()` isn't supported, Bun can generate further fallbacks: /* Even more fallbacks for maximum compatibility */ button:not(:-webkit-any(.primary, .secondary)) { background-color: #f5f5f5; border: 1px solid #ddd; } button:not(:-moz-any(.primary, .secondary)) { background-color: #f5f5f5; border: 1px solid #ddd; } button:not(:is(.primary, .secondary)) { background-color: #f5f5f5; border: 1px solid #ddd; } This conversion ensures your negative selectors work correctly across all browsers while maintaining the correct specificity and behavior of the original selector. #### Math functions CSS now includes a rich set of mathematical functions that let you perform complex calculations directly in your stylesheets. These include standard math functions (`round()`, `mod()`, `rem()`, `abs()`, `sign()`), trigonometric functions (`sin()`, `cos()`, `tan()`, `asin()`, `acos()`, `atan()`, `atan2()`), and exponential functions (`pow()`, `sqrt()`, `exp()`, `log()`, `hypot()`). .dynamic-sizing { /* Clamp a value between minimum and maximum */ width: clamp(200px, 50%, 800px); /* Round to the nearest multiple */ padding: round(14.8px, 5px); /* Trigonometry for animations or layouts */ transform: rotate(calc(sin(45deg) * 50deg)); /* Complex math with multiple functions */ --scale-factor: pow(1.25, 3); font-size: calc(16px * var(--scale-factor)); } Bun's CSS bundler evaluates these mathematical expressions at build time when all values are known constants (not variables), resulting in optimized output: .dynamic-sizing { width: clamp(200px, 50%, 800px); padding: 15px; transform: rotate(35.36deg); --scale-factor: 1.953125; font-size: calc(16px * var(--scale-factor)); } This approach lets you write more expressive and maintainable CSS with meaningful mathematical relationships, which then gets compiled to optimized values for maximum browser compatibility and performance. #### Media query ranges Modern CSS supports intuitive range syntax for media queries, allowing you to specify breakpoints using comparison operators like `<`, `>`, `<=`, and `>=` instead of the more verbose `min-` and `max-` prefixes. This syntax is more readable and matches how we normally think about values and ranges. /* Modern syntax with comparison operators */ @media (width >= 768px) { .container { max-width: 720px; } } /* Inclusive range using <= and >= */ @media (768px <= width <= 1199px) { .sidebar { display: flex; } } /* Exclusive range using < and > */ @media (width > 320px) and (width < 768px) { .mobile-only { display: block; } } Bun's CSS bundler converts these modern range queries to traditional media query syntax for compatibility with all browsers: /* Converted to traditional min/max syntax */ @media (min-width: 768px) { .container { max-width: 720px; } } @media (min-width: 768px) and (max-width: 1199px) { .sidebar { display: flex; } } @media (min-width: 321px) and (max-width: 767px) { .mobile-only { display: block; } } This lets you write more intuitive and mathematical media queries while ensuring your stylesheets work correctly across all browsers, including those that don't support the modern range syntax. #### Shorthands CSS has introduced several modern shorthand properties that improve code readability and maintainability. Bun's CSS bundler ensures these convenient shorthands work on all browsers by converting them to their longhand equivalents when needed. /* Alignment shorthands */ .flex-container { /* Shorthand for align-items and justify-items */ place-items: center start; /* Shorthand for align-content and justify-content */ place-content: space-between center; } .grid-item { /* Shorthand for align-self and justify-self */ place-self: end center; } /* Two-value overflow */ .content-box { /* First value for horizontal, second for vertical */ overflow: hidden auto; } /* Enhanced text-decoration */ .fancy-link { /* Combines multiple text decoration properties */ text-decoration: underline dotted blue 2px; } /* Two-value display syntax */ .component { /* Outer display type + inner display type */ display: inline flex; } For browsers that don't support these modern shorthands, Bun converts them to their component longhand properties: .flex-container { /* Expanded alignment properties */ align-items: center; justify-items: start; align-content: space-between; justify-content: center; } .grid-item { align-self: end; justify-self: center; } .content-box { /* Separate overflow properties */ overflow-x: hidden; overflow-y: auto; } .fancy-link { /* Individual text decoration properties */ text-decoration-line: underline; text-decoration-style: dotted; text-decoration-color: blue; text-decoration-thickness: 2px; } .component { /* Single value display */ display: inline-flex; } This conversion ensures your stylesheets remain clean and maintainable while providing the broadest possible browser compatibility. #### Double position gradients The double position gradient syntax is a modern CSS feature that allows you to create hard color stops in gradients by specifying the same color at two adjacent positions. This creates a sharp transition rather than a smooth fade, which is useful for creating stripes, color bands, and other multi-color designs. .striped-background { /* Creates a sharp transition from green to red at 30%-40% */ background: linear-gradient( to right, yellow 0%, green 20%, green 30%, red 30%, /* Double position creates hard stop */ red 70%, blue 70%, blue 100% ); } .progress-bar { /* Creates distinct color sections */ background: linear-gradient( to right, #4caf50 0% 25%, /* Green from 0% to 25% */ #ffc107 25% 50%, /* Yellow from 25% to 50% */ #2196f3 50% 75%, /* Blue from 50% to 75% */ #9c27b0 75% 100% /* Purple from 75% to 100% */ ); } For browsers that don't support this syntax, Bun's CSS bundler automatically converts it to the traditional format by duplicating color stops: .striped-background { background: linear-gradient( to right, yellow 0%, green 20%, green 30%, red 30%, /* Split into two color stops */ red 70%, blue 70%, blue 100% ); } .progress-bar { background: linear-gradient( to right, #4caf50 0%, #4caf50 25%, /* Two stops for green section */ #ffc107 25%, #ffc107 50%, /* Two stops for yellow section */ #2196f3 50%, #2196f3 75%, /* Two stops for blue section */ #9c27b0 75%, #9c27b0 100% /* Two stops for purple section */ ); } This conversion lets you use the cleaner double position syntax in your source code while ensuring gradients display correctly in all browsers. #### system-ui font The `system-ui` generic font family lets you use the device's native UI font, creating interfaces that feel more integrated with the operating system. This provides a more native look and feel without having to specify different font stacks for each platform. .native-interface { /* Use the system's default UI font */ font-family: system-ui; } .fallback-aware { /* System UI font with explicit fallbacks */ font-family: system-ui, sans-serif; } For browsers that don't support `system-ui`, Bun's CSS bundler automatically expands it to a comprehensive cross-platform font stack: .native-interface { /* Expanded to support all major platforms */ font-family: system-ui, -apple-system, BlinkMacSystemFont, "Segoe UI", Roboto, "Noto Sans", Ubuntu, Cantarell, "Helvetica Neue"; } .fallback-aware { /* Preserves the original fallback after the expanded stack */ font-family: system-ui, -apple-system, BlinkMacSystemFont, "Segoe UI", Roboto, "Noto Sans", Ubuntu, Cantarell, "Helvetica Neue", sans-serif; } This approach gives you the simplicity of writing just `system-ui` in your source code while ensuring your interface adapts correctly to all operating systems and browsers. The expanded font stack includes appropriate system fonts for macOS/iOS, Windows, Android, Linux, and fallbacks for older browsers. ## CSS Modules Bun's bundler also supports bundling CSS modules in addition to regular CSS with support for the following features: * Automatically detecting CSS module files (`.module.css`) with zero configuration * Composition (`composes` property) * Importing CSS modules into JSX/TSX * Warnings/errors for invalid usages of CSS modules A CSS module is a CSS file (with the `.module.css` extension) where are all class names and animations are scoped to the file. This helps you avoid class name collisions as CSS declarations are globally scoped by default. Under the hood, Bun's bundler transforms locally scoped class names into unique identifiers. ## Getting started Create a CSS file with the `.module.css` extension: /* styles.module.css */ .button { color: red; } /* other-styles.module.css */ .button { color: blue; } You can then import this file, for example into a TSX file: import styles from "./styles.module.css"; import otherStyles from "./other-styles.module.css"; export default function App() { return ( <> <button className={styles.button}>Red button!</button> <button className={otherStyles.button}>Blue button!</button> </> ); } The `styles` object from importing the CSS module file will be an object with all class names as keys and their unique identifiers as values: import styles from "./styles.module.css"; import otherStyles from "./other-styles.module.css"; console.log(styles); console.log(otherStyles); This will output: { button: "button_123"; } { button: "button_456"; } As you can see, the class names are unique to each file, avoiding any collisions! ### Composition CSS modules allow you to _compose_ class selectors together. This lets you reuse style rules across multiple classes. For example: /* styles.module.css */ .button { composes: background; color: red; } .background { background-color: blue; } Would be the same as writing: .button { background-color: blue; color: red; } .background { background-color: blue; } There are a couple rules to keep in mind when using `composes`: * A `composes` property must come before any regular CSS properties or declarations * You can only use `composes` on a **simple selector with a single class name**: #button { /* Invalid! `#button` is not a class selector */ composes: background; } .button, .button-secondary { /* Invalid! `.button, .button-secondary` is not a simple selector */ composes: background; } ### Composing from a separate CSS module file You can also compose from a separate CSS module file: /* background.module.css */ .background { background-color: blue; } /* styles.module.css */ .button { composes: background from "./background.module.css"; color: red; } When composing classes from separate files, be sure that they do not contain the same properties. The CSS module spec says that composing classes from separate files with conflicting properties is undefined behavior, meaning that the output may differ and be unreliable. --- ## Page: https://bun.sh/docs/bundler/fullstack Using `Bun.serve()`'s `routes` option, you can run your frontend and backend in the same app with no extra steps. To get started, import HTML files and pass them to the `routes` option in `Bun.serve()`. import { sql, serve } from "bun"; import dashboard from "./dashboard.html"; import homepage from "./index.html"; const server = serve({ routes: { // ** HTML imports ** // Bundle & route index.html to "/". This uses HTMLRewriter to scan the HTML for `<script>` and `<link>` tags, run's Bun's JavaScript & CSS bundler on them, transpiles any TypeScript, JSX, and TSX, downlevels CSS with Bun's CSS parser and serves the result. "/": homepage, // Bundle & route dashboard.html to "/dashboard" "/dashboard": dashboard, // ** API endpoints ** (Bun v1.2.3+ required) "/api/users": { async GET(req) { const users = await sql`SELECT * FROM users`; return Response.json(users); }, async POST(req) { const { name, email } = await req.json(); const [user] = await sql`INSERT INTO users (name, email) VALUES (${name}, ${email})`; return Response.json(user); }, }, "/api/users/:id": async req => { const { id } = req.params; const [user] = await sql`SELECT * FROM users WHERE id = ${id}`; return Response.json(user); }, }, // Enable development mode for: // - Detailed error messages // - Hot reloading (Bun v1.2.3+ required) development: true, // Prior to v1.2.3, the `fetch` option was used to handle all API requests. It is now optional. // async fetch(req) { // // Return 404 for unmatched routes // return new Response("Not Found", { status: 404 }); // }, }); console.log(`Listening on ${server.url}`); bun run app.ts ## HTML imports are routes The web starts with HTML, and so does Bun's fullstack dev server. To specify entrypoints to your frontend, import HTML files into your JavaScript/TypeScript/TSX/JSX files. import dashboard from "./dashboard.html"; import homepage from "./index.html"; These HTML files are used as routes in Bun's dev server you can pass to `Bun.serve()`. Bun.serve({ routes: { "/": homepage, "/dashboard": dashboard, } fetch(req) { // ... api requests }, }); When you make a request to `/dashboard` or `/`, Bun automatically bundles the `<script>` and `<link>` tags in the HTML files, exposes them as static routes, and serves the result. An index.html file like this: index.html <!DOCTYPE html> <html> <head> <title>Home</title> <link rel="stylesheet" href="./reset.css" /> <link rel="stylesheet" href="./styles.css" /> </head> <body> <div id="root"></div> <script type="module" src="./sentry-and-preloads.ts"></script> <script type="module" src="./my-app.tsx"></script> </body> </html> Becomes something like this: index.html <!DOCTYPE html> <html> <head> <title>Home</title> <link rel="stylesheet" href="/index-[hash].css" /> </head> <body> <div id="root"></div> <script type="module" src="/index-[hash].js"></script> </body> </html> ### How to use with React To use React in your client-side code, import `react-dom/client` and render your app. src/backend.ts import dashboard from "../public/dashboard.html"; import { serve } from "bun"; serve({ routes: { "/": dashboard, }, async fetch(req) { // ...api requests return new Response("hello world"); }, }); src/frontend.tsx import "./styles.css"; import { createRoot } from "react-dom/client"; import { App } from "./app.tsx"; document.addEventListener("DOMContentLoaded", () => { const root = createRoot(document.getElementById("root")); root.render(<App />); }); public/dashboard.html <!DOCTYPE html> <html> <head> <title>Dashboard</title> </head> <body> <div id="root"></div> <script type="module" src="../src/frontend.tsx"></script> </body> </html> src/styles.css body { background-color: red; } src/app.tsx export function App() { return <div>Hello World</div>; } ### Development mode When building locally, enable development mode by setting `development: true` in `Bun.serve()`. import homepage from "./index.html"; import dashboard from "./dashboard.html"; Bun.serve({ routes: { "/": homepage, "/dashboard": dashboard, } development: true, fetch(req) { // ... api requests }, }); When `development` is `true`, Bun will: * Include the `SourceMap` header in the response so that devtools can show the original source code * Disable minification * Re-bundle assets on each request to a .html file #### Production mode When serving your app in production, set `development: false` in `Bun.serve()`. * Enable in-memory caching of bundled assets. Bun will bundle assets lazily on the first request to an `.html` file, and cache the result in memory until the server restarts. * Enables `Cache-Control` headers and `ETag` headers * Minifies JavaScript/TypeScript/TSX/JSX files ## Plugins Bun's bundler plugins are also supported when bundling static routes. To configure plugins for `Bun.serve`, add a `plugins` array in the `[serve.static]` section of your `bunfig.toml`. ### Using TailwindCSS in HTML routes For example, enable TailwindCSS on your routes by installing and adding the `bun-plugin-tailwind` plugin: bun add bun-plugin-tailwind bunfig.toml [serve.static] plugins = ["bun-plugin-tailwind"] This will allow you to use TailwindCSS utility classes in your HTML and CSS files. All you need to do is import `tailwindcss` somewhere: index.html <!doctype html> <html> <head> <title>Home</title> <link rel="stylesheet" href="tailwindcss" /> </head> <body> <!-- the rest of your HTML... --> </body> </html> Or in your CSS: style.css @import "tailwindcss"; ### Custom plugins Any JS file or module which exports a valid bundler plugin object (essentially an object with a `name` and `setup` field) can be placed inside the `plugins` array: bunfig.toml [serve.static] plugins = ["./my-plugin-implementation.ts"] Bun will lazily resolve and load each plugin and use them to bundle your routes. Note: this is currently in `bunfig.toml` to make it possible to know statically which plugins are in use when we eventually integrate this with the `bun build` CLI. These plugins work in `Bun.build()`'s JS API, but are not yet supported in the CLI. ## How this works Bun uses `HTMLRewriter` to scan for `<script>` and `<link>` tags in HTML files, uses them as entrypoints for Bun's bundler, generates an optimized bundle for the JavaScript/TypeScript/TSX/JSX and CSS files, and serves the result. 1. **`<script>` processing** * Transpiles TypeScript, JSX, and TSX in `<script>` tags * Bundles imported dependencies * Generates sourcemaps for debugging * Minifies when `development` is not `true` in `Bun.serve()` <script type="module" src="./counter.tsx"></script> 2. **`<link>` processing** * Processes CSS imports and `<link>` tags * Concatenates CSS files * Rewrites `url` and asset paths to include content-addressable hashes in URLs <link rel="stylesheet" href="./styles.css" /> 3. **`<img>` & asset processing** * Links to assets are rewritten to include content-addressable hashes in URLs * Small assets in CSS files are inlined into `data:` URLs, reducing the total number of HTTP requests sent over the wire 4. **Rewrite HTML** * Combines all `<script>` tags into a single `<script>` tag with a content-addressable hash in the URL * Combines all `<link>` tags into a single `<link>` tag with a content-addressable hash in the URL * Outputs a new HTML file 5. **Serve** * All the output files from the bundler are exposed as static routes, using the same mechanism internally as when you pass a `Response` object to `static` in `Bun.serve()`. This works similarly to how `Bun.build` processes HTML files. ## This is a work in progress * This doesn't support `bun build` yet. It also will in the future. --- ## Page: https://bun.sh/docs/bundler/hmr Hot Module Replacement (HMR) allows you to update modules in a running application without needing a full page reload. This preserves the application state and improves the development experience. HMR is enabled by default when using Bun's full-stack development server. Bun implements a client-side HMR API modeled after Vite's `import.meta.hot` API. It can be checked for with `if (import.meta.hot)`, tree-shaking it in production However, **this check is often not needed** as Bun will dead-code-eliminate calls to all of the HMR APIs in production builds. For this to work, Bun forces these APIs to be called without indirection. That means the following do not work: **Note** — The HMR API is still a work in progress. Some features are missing. HMR can be disabled in `Bun.serve` by setting the `development` option to `{ hmr: false }`. | | Method | Notes | | --- | --- | --- | | ✅ | `hot.accept()` | Indicate that a hot update can be replaced gracefully. | | ✅ | `hot.data` | Persist data between module evaluations. | | ✅ | `hot.dispose()` | Add a callback function to run when a module is about to be replaced. | | ❌ | `hot.invalidate()` | | | ✅ | `hot.on()` | Attach an event listener | | ✅ | `hot.off()` | Remove an event listener from `on`. | | ❌ | `hot.send()` | | | 🚧 | `hot.prune()` | **NOTE**: Callback is currently never called. | | ✅ | `hot.decline()` | No-op to match Vite's `import.meta.hot` | ### `import.meta.hot.accept()` The `accept()` method indicates that a module can be hot-replaced. When called without arguments, it indicates that this module can be replaced simply by re-evaluating the file. After a hot update, importers of this module will be automatically patched. index.ts import { getCount } from "./foo.ts"; console.log("count is ", getCount()); import.meta.hot.accept(); export function getNegativeCount() { return -getCount(); } This creates a hot-reloading boundary for all of the files that `index.ts` imports. That means whenever `foo.ts` or any of its dependencies are saved, the update will bubble up to `index.ts` will re-evaluate. Files that import `index.ts` will then be patched to import the new version of `getNegativeCount()`. If only `index.ts` is updated, only the one file will be re-evaluated, and the counter in `foo.ts` is reused. This may be used in combination with `import.meta.hot.data` to transfer state from the previous module to the new one. When no modules call `import.meta.hot.accept()` (and there isn't React Fast Refresh or a plugin calling it for you), the page will reload when the file updates, and a console warning shows which files were invalidated. This warning is safe to ignore if it makes more sense to rely on full page reloads. #### With callback When provided one callback, `import.meta.hot.accept` will function how it does in Vite. Instead of patching the importers of this module, it will call the callback with the new module. export const count = 0; import.meta.hot.accept(newModule => { if (newModule) { // newModule is undefined when SyntaxError happened console.log("updated: count is now ", newModule.count); } }); Prefer using `import.meta.hot.accept()` without an argument as it usually makes your code easier to understand. #### Accepting other modules import { count } from "./foo"; import.meta.hot.accept("./foo", () => { if (!newModule) return; console.log("updated: count is now ", count); }); Indicates that a dependency's module can be accepted. When the dependency is updated, the callback will be called with the new module. #### With multiple dependencies import.meta.hot.accept(["./foo", "./bar"], newModules => { // newModules is an array where each item corresponds to the updated module // or undefined if that module had a syntax error }); Indicates that multiple dependencies' modules can be accepted. This variant accepts an array of dependencies, where the callback will receive the updated modules, and `undefined` for any that had errors. ### `import.meta.hot.data` `import.meta.hot.data` maintains state between module instances during hot replacement, enabling data transfer from previous to new versions. When `import.meta.hot.data` is written into, Bun will also mark this module as capable of self-accepting (equivalent of calling `import.meta.hot.accept()`). import { createRoot } from "react-dom/client"; import { App } from "./app"; const root = import.meta.hot.data.root ??= createRoot(elem); root.render(<App />); // re-use an existing root In production, `data` is inlined to be `{}`, meaning it cannot be used as a state holder. The above pattern is recommended for stateful modules because Bun knows it can minify `{}.prop ??= value` into `value` in production. ### `import.meta.hot.dispose()` Attaches an on-dispose callback. This is called: * Just before the module is replaced with another copy (before the next is loaded) * After the module is detached (removing all imports to this module, see `import.meta.hot.prune()`) const sideEffect = setupSideEffect(); import.meta.hot.dispose(() => { sideEffect.cleanup(); }); This callback is not called on route navigation or when the browser tab closes. Returning a promise will delay module replacement until the module is disposed. All dispose callbacks are called in parallel. ### `import.meta.hot.prune()` Attaches an on-prune callback. This is called when all imports to this module are removed, but the module was previously loaded. This can be used to clean up resources that were created when the module was loaded. Unlike `import.meta.hot.dispose()`, this pairs much better with `accept` and `data` to manage stateful resources. A full example managing a `WebSocket`: import { something } from "./something"; // Initialize or re-use a WebSocket connection export const ws = (import.meta.hot.data.ws ??= new WebSocket(location.origin)); // If the module's import is removed, clean up the WebSocket connection. import.meta.hot.prune(() => { ws.close(); }); If `dispose` was used instead, the WebSocket would close and re-open on every hot update. Both versions of the code will prevent page reloads when imported files are updated. ### `import.meta.hot.on()` and `off()` `on()` and `off()` are used to listen for events from the HMR runtime. Event names are prefixed with a prefix so that plugins do not conflict with each other. import.meta.hot.on("bun:beforeUpdate", () => { console.log("before a hot update"); }); When a file is replaced, all of its event listeners are automatically removed. A list of all built-in events: | Event | Emitted when | | --- | --- | | `bun:beforeUpdate` | before a hot update is applied. | | `bun:afterUpdate` | after a hot update is applied. | | `bun:beforeFullReload` | before a full page reload happens. | | `bun:beforePrune` | before prune callbacks are called. | | `bun:invalidate` | when a module is invalidated with `import.meta.hot.invalidate()` | | `bun:error` | when a build or runtime error occurs | | `bun:ws:disconnect` | when the HMR WebSocket connection is lost. This can indicate the development server is offline. | | `bun:ws:connect` | when the HMR WebSocket connects or re-connects. | For compatibility with Vite, the above events are also available via `vite:*` prefix instead of `bun:*`. --- ## Page: https://bun.sh/docs/bundler/loaders The Bun bundler implements a set of default loaders out of the box. As a rule of thumb, the bundler and the runtime both support the same set of file types out of the box. `.js` `.cjs` `.mjs` `.mts` `.cts` `.ts` `.tsx` `.jsx` `.toml` `.json` `.txt` `.wasm` `.node` `.html` Bun uses the file extension to determine which built-in _loader_ should be used to parse the file. Every loader has a name, such as `js`, `tsx`, or `json`. These names are used when building plugins that extend Bun with custom loaders. You can explicitly specify which loader to use using the 'loader' import attribute. import my_toml from "./my_file" with { loader: "toml" }; ## Built-in loaders ### `js` **JavaScript**. Default for `.cjs` and `.mjs`. Parses the code and applies a set of default transforms like dead-code elimination and tree shaking. Note that Bun does not attempt to down-convert syntax at the moment. ### `jsx` **JavaScript + JSX.**. Default for `.js` and `.jsx`. Same as the `js` loader, but JSX syntax is supported. By default, JSX is down-converted to plain JavaScript; the details of how this is done depends on the `jsx*` compiler options in your `tsconfig.json`. Refer to the TypeScript documentation on JSX for more information. ### `ts` **TypeScript loader**. Default for `.ts`, `.mts`, and `.cts`. Strips out all TypeScript syntax, then behaves identically to the `js` loader. Bun does not perform typechecking. ### `tsx` **TypeScript + JSX loader**. Default for `.tsx`. Transpiles both TypeScript and JSX to vanilla JavaScript. ### `json` **JSON loader**. Default for `.json`. JSON files can be directly imported. import pkg from "./package.json"; pkg.name; // => "my-package" During bundling, the parsed JSON is inlined into the bundle as a JavaScript object. var pkg = { name: "my-package", // ... other fields }; pkg.name; If a `.json` file is passed as an entrypoint to the bundler, it will be converted to a `.js` module that `export default`s the parsed object. Input { "name": "John Doe", "age": 35, "email": "johndoe@example.com" } Output export default { name: "John Doe", age: 35, email: "johndoe@example.com" } ### `toml` **TOML loader**. Default for `.toml`. TOML files can be directly imported. Bun will parse them with its fast native TOML parser. import config from "./bunfig.toml"; config.logLevel; // => "debug" // via import attribute: // import myCustomTOML from './my.config' with {type: "toml"}; During bundling, the parsed TOML is inlined into the bundle as a JavaScript object. var config = { logLevel: "debug", // ...other fields }; config.logLevel; If a `.toml` file is passed as an entrypoint, it will be converted to a `.js` module that `export default`s the parsed object. ### `text` **Text loader**. Default for `.txt`. The contents of the text file are read and inlined into the bundle as a string. Text files can be directly imported. The file is read and returned as a string. import contents from "./file.txt"; console.log(contents); // => "Hello, world!" // To import an html file as text // The "type' attribute can be used to override the default loader. import html from "./index.html" with { type: "text" }; When referenced during a build, the contents are into the bundle as a string. var contents = `Hello, world!`; console.log(contents); If a `.txt` file is passed as an entrypoint, it will be converted to a `.js` module that `export default`s the file contents. Input Hello, world! Output export default "Hello, world!"; ### `napi` **Native addon loader**. Default for `.node`. In the runtime, native addons can be directly imported. import addon from "./addon.node"; console.log(addon); In the bundler, `.node` files are handled using the `file` loader. ### `sqlite` **SQLite loader**. `with { "type": "sqlite" }` import attribute In the runtime and bundler, SQLite databases can be directly imported. This will load the database using `bun:sqlite`. import db from "./my.db" with { type: "sqlite" }; This is only supported when the `target` is `bun`. By default, the database is external to the bundle (so that you can potentially use a database loaded elsewhere), so the database file on-disk won't be bundled into the final output. You can change this behavior with the `"embed"` attribute: // embed the database into the bundle import db from "./my.db" with { type: "sqlite", embed: "true" }; When using a standalone executable, the database is embedded into the single-file executable. Otherwise, the database to embed is copied into the `outdir` with a hashed filename. ### `html` The html loader processes HTML files and bundles any referenced assets. It will: * Bundle and hash referenced JavaScript files (`<script src="...">`) * Bundle and hash referenced CSS files (`<link rel="stylesheet" href="...">`) * Hash referenced images (`<img src="...">`) * Preserve external URLs (by default, anything starting with `http://` or `https://`) For example, given this HTML file: src/index.html <!DOCTYPE html> <html> <body> <img src="./image.jpg" alt="Local image"> <img src="https://example.com/image.jpg" alt="External image"> <script type="module" src="./script.js"></script> </body> </html> It will output a new HTML file with the bundled assets: dist/output.html <!DOCTYPE html> <html> <body> <img src="./image-HASHED.jpg" alt="Local image"> <img src="https://example.com/image.jpg" alt="External image"> <script type="module" src="./output-ALSO-HASHED.js"></script> </body> </html> Under the hood, it uses `lol-html` to extract script and link tags as entrypoints, and other assets as external. Currently, the list of selectors is: * `audio[src]` * `iframe[src]` * `img[src]` * `img[srcset]` * `link:not([rel~='stylesheet']):not([rel~='modulepreload']):not([rel~='manifest']):not([rel~='icon']):not([rel~='apple-touch-icon'])[href]` * `link[as='font'][href], link[type^='font/'][href]` * `link[as='image'][href]` * `link[as='style'][href]` * `link[as='video'][href], link[as='audio'][href]` * `link[as='worker'][href]` * `link[rel='icon'][href], link[rel='apple-touch-icon'][href]` * `link[rel='manifest'][href]` * `link[rel='stylesheet'][href]` * `script[src]` * `source[src]` * `source[srcset]` * `video[poster]` * `video[src]` ### `sh` loader **Bun Shell loader**. Default for `.sh` files This loader is used to parse Bun Shell scripts. It's only supported when starting Bun itself, so it's not available in the bundler or in the runtime. bun run ./script.sh ### `file` **File loader**. Default for all unrecognized file types. The file loader resolves the import as a _path/URL_ to the imported file. It's commonly used for referencing media or font assets. logo.ts import logo from "./logo.svg"; console.log(logo); _In the runtime_, Bun checks that the `logo.svg` file exists and converts it to an absolute path to the location of `logo.svg` on disk. bun run logo.ts /path/to/project/logo.svg _In the bundler_, things are slightly different. The file is copied into `outdir` as-is, and the import is resolved as a relative path pointing to the copied file. Output var logo = "./logo.svg"; console.log(logo); If a value is specified for `publicPath`, the import will use value as a prefix to construct an absolute path/URL. | Public path | Resolved import | | --- | --- | | `""` (default) | `/logo.svg` | | `"/assets"` | `/assets/logo.svg` | | `"https://cdn.example.com/"` | `https://cdn.example.com/logo.svg` | The location and file name of the copied file is determined by the value of `naming.asset`. This loader is copied into the `outdir` as-is. The name of the copied file is determined using the value of `naming.asset`. Fixing TypeScript import errors --- ## Page: https://bun.sh/docs/bundler/plugins Bun provides a universal plugin API that can be used to extend both the _runtime_ and _bundler_. Plugins intercept imports and perform custom loading logic: reading files, transpiling code, etc. They can be used to add support for additional file types, like `.scss` or `.yaml`. In the context of Bun's bundler, plugins can be used to implement framework-level features like CSS extraction, macros, and client-server code co-location. ## Lifecycle hooks Plugins can register callbacks to be run at various points in the lifecycle of a bundle: * `onStart()`: Run once the bundler has started a bundle * `onResolve()`: Run before a module is resolved * `onLoad()`: Run before a module is loaded. * `onBeforeParse()`: Run zero-copy native addons in the parser thread before a file is parsed. ### Reference A rough overview of the types (please refer to Bun's `bun.d.ts` for the full type definitions): type PluginBuilder = { onStart(callback: () => void): void; onResolve: ( args: { filter: RegExp; namespace?: string }, callback: (args: { path: string; importer: string }) => { path: string; namespace?: string; } | void, ) => void; onLoad: ( args: { filter: RegExp; namespace?: string }, defer: () => Promise<void>, callback: (args: { path: string }) => { loader?: Loader; contents?: string; exports?: Record<string, any>; }, ) => void; config: BuildConfig; }; type Loader = "js" | "jsx" | "ts" | "tsx" | "css" | "json" | "toml"; ## Usage A plugin is defined as simple JavaScript object containing a `name` property and a `setup` function. myPlugin.ts import type { BunPlugin } from "bun"; const myPlugin: BunPlugin = { name: "Custom loader", setup(build) { // implementation }, }; This plugin can be passed into the `plugins` array when calling `Bun.build`. await Bun.build({ entrypoints: ["./app.ts"], outdir: "./out", plugins: [myPlugin], }); ## Plugin lifecycle ### Namespaces `onLoad` and `onResolve` accept an optional `namespace` string. What is a namespace? Every module has a namespace. Namespaces are used to prefix the import in transpiled code; for instance, a loader with a `filter: /\.yaml$/` and `namespace: "yaml:"` will transform an import from `./myfile.yaml` into `yaml:./myfile.yaml`. The default namespace is `"file"` and it is not necessary to specify it, for instance: `import myModule from "./my-module.ts"` is the same as `import myModule from "file:./my-module.ts"`. Other common namespaces are: * `"bun"`: for Bun-specific modules (e.g. `"bun:test"`, `"bun:sqlite"`) * `"node"`: for Node.js modules (e.g. `"node:fs"`, `"node:path"`) ### `onStart` onStart(callback: () => void): Promise<void> | void; Registers a callback to be run when the bundler starts a new bundle. import { plugin } from "bun"; plugin({ name: "onStart example", setup(build) { build.onStart(() => { console.log("Bundle started!"); }); }, }); The callback can return a `Promise`. After the bundle process has initialized, the bundler waits until all `onStart()` callbacks have completed before continuing. For example: const result = await Bun.build({ entrypoints: ["./app.ts"], outdir: "./dist", sourcemap: "external", plugins: [ { name: "Sleep for 10 seconds", setup(build) { build.onStart(async () => { await Bunlog.sleep(10_000); }); }, }, { name: "Log bundle time to a file", setup(build) { build.onStart(async () => { const now = Date.now(); await Bun.$`echo ${now} > bundle-time.txt`; }); }, }, ], }); In the above example, Bun will wait until the first `onStart()` (sleeping for 10 seconds) has completed, _as well as_ the second `onStart()` (writing the bundle time to a file). Note that `onStart()` callbacks (like every other lifecycle callback) do not have the ability to modify the `build.config` object. If you want to mutate `build.config`, you must do so directly in the `setup()` function. ### `onResolve` onResolve( args: { filter: RegExp; namespace?: string }, callback: (args: { path: string; importer: string }) => { path: string; namespace?: string; } | void, ): void; To bundle your project, Bun walks down the dependency tree of all modules in your project. For each imported module, Bun actually has to find and read that module. The "finding" part is known as "resolving" a module. The `onResolve()` plugin lifecycle callback allows you to configure how a module is resolved. The first argument to `onResolve()` is an object with a `filter` and `namespace` property. The filter is a regular expression which is run on the import string. Effectively, these allow you to filter which modules your custom resolution logic will apply to. The second argument to `onResolve()` is a callback which is run for each module import Bun finds that matches the `filter` and `namespace` defined in the first argument. The callback receives as input the _path_ to the matching module. The callback can return a _new path_ for the module. Bun will read the contents of the _new path_ and parse it as a module. For example, redirecting all imports to `images/` to `./public/images/`: import { plugin } from "bun"; plugin({ name: "onResolve example", setup(build) { build.onResolve({ filter: /.*/, namespace: "file" }, args => { if (args.path.startsWith("images/")) { return { path: args.path.replace("images/", "./public/images/"), }; } }); }, }); ### `onLoad` onLoad( args: { filter: RegExp; namespace?: string }, defer: () => Promise<void>, callback: (args: { path: string, importer: string, namespace: string, kind: ImportKind }) => { loader?: Loader; contents?: string; exports?: Record<string, any>; }, ): void; After Bun's bundler has resolved a module, it needs to read the contents of the module and parse it. The `onLoad()` plugin lifecycle callback allows you to modify the _contents_ of a module before it is read and parsed by Bun. Like `onResolve()`, the first argument to `onLoad()` allows you to filter which modules this invocation of `onLoad()` will apply to. The second argument to `onLoad()` is a callback which is run for each matching module _before_ Bun loads the contents of the module into memory. This callback receives as input the _path_ to the matching module, the _importer_ of the module (the module that imported the module), the _namespace_ of the module, and the _kind_ of the module. The callback can return a new `contents` string for the module as well as a new `loader`. For example: import { plugin } from "bun"; const envPlugin: BunPlugin = { name: "env plugin", setup(build) { build.onLoad({ filter: /env/, namespace: "file" }, args => { return { contents: `export default ${JSON.stringify(process.env)}`, loader: "js", }; }); }, }); Bun.build({ entrypoints: ["./app.ts"], outdir: "./dist", plugins: [envPlugin], }); // import env from "env" // env.FOO === "bar" This plugin will transform all imports of the form `import env from "env"` into a JavaScript module that exports the current environment variables. #### `.defer()` One of the arguments passed to the `onLoad` callback is a `defer` function. This function returns a `Promise` that is resolved when all _other_ modules have been loaded. This allows you to delay execution of the `onLoad` callback until all other modules have been loaded. This is useful for returning contents of a module that depends on other modules. ##### Example: tracking and reporting unused exports import { plugin } from "bun"; plugin({ name: "track imports", setup(build) { const transpiler = new Bun.Transpiler(); let trackedImports: Record<string, number> = {}; // Each module that goes through this onLoad callback // will record its imports in `trackedImports` build.onLoad({ filter: /\.ts/ }, async ({ path }) => { const contents = await Bun.file(path).arrayBuffer(); const imports = transpiler.scanImports(contents); for (const i of imports) { trackedImports[i.path] = (trackedImports[i.path] || 0) + 1; } return undefined; }); build.onLoad({ filter: /stats\.json/ }, async ({ defer }) => { // Wait for all files to be loaded, ensuring // that every file goes through the above `onLoad()` function // and their imports tracked await defer(); // Emit JSON containing the stats of each import return { contents: `export default ${JSON.stringify(trackedImports)}`, loader: "json", }; }); }, }); Note that the `.defer()` function currently has the limitation that it can only be called once per `onLoad` callback. ## Native plugins One of the reasons why Bun's bundler is so fast is that it is written in native code and leverages multi-threading to load and parse modules in parallel. However, one limitation of plugins written in JavaScript is that JavaScript itself is single-threaded. Native plugins are written as NAPI modules and can be run on multiple threads. This allows native plugins to run much faster than JavaScript plugins. In addition, native plugins can skip unnecessary work such as the UTF-8 -> UTF-16 conversion needed to pass strings to JavaScript. These are the following lifecycle hooks which are available to native plugins: * `onBeforeParse()`: Called on any thread before a file is parsed by Bun's bundler. Native plugins are NAPI modules which expose lifecycle hooks as C ABI functions. To create a native plugin, you must export a C ABI function which matches the signature of the native lifecycle hook you want to implement. ### Creating a native plugin in Rust Native plugins are NAPI modules which expose lifecycle hooks as C ABI functions. To create a native plugin, you must export a C ABI function which matches the signature of the native lifecycle hook you want to implement. bun add -g @napi-rs/cli napi new Then install this crate: cargo add bun-native-plugin Now, inside the `lib.rs` file, we'll use the `bun_native_plugin::bun` proc macro to define a function which will implement our native plugin. Here's an example implementing the `onBeforeParse` hook: use bun_native_plugin::{define_bun_plugin, OnBeforeParse, bun, Result, anyhow, BunLoader}; use napi_derive::napi; /// Define the plugin and its name define_bun_plugin!("replace-foo-with-bar"); /// Here we'll implement `onBeforeParse` with code that replaces all occurrences of /// `foo` with `bar`. /// /// We use the #[bun] macro to generate some of the boilerplate code. /// /// The argument of the function (`handle: &mut OnBeforeParse`) tells /// the macro that this function implements the `onBeforeParse` hook. #[bun] pub fn replace_foo_with_bar(handle: &mut OnBeforeParse) -> Result<()> { // Fetch the input source code. let input_source_code = handle.input_source_code()?; // Get the Loader for the file let loader = handle.output_loader(); let output_source_code = input_source_code.replace("foo", "bar"); handle.set_output_source_code(output_source_code, BunLoader::BUN_LOADER_JSX); Ok(()) } And to use it in Bun.build(): import myNativeAddon from "./my-native-addon"; Bun.build({ entrypoints: ["./app.tsx"], plugins: [ { name: "my-plugin", setup(build) { build.onBeforeParse( { namespace: "file", filter: "**/*.tsx", }, { napiModule: myNativeAddon, symbol: "replace_foo_with_bar", // external: myNativeAddon.getSharedState() }, ); }, }, ], }); ### `onBeforeParse` onBeforeParse( args: { filter: RegExp; namespace?: string }, callback: { napiModule: NapiModule; symbol: string; external?: unknown }, ): void; This lifecycle callback is run immediately before a file is parsed by Bun's bundler. As input, it receives the file's contents and can optionally return new source code. This callback can be called from any thread and so the napi module implementation must be thread-safe. --- ## Page: https://bun.sh/docs/bundler/macros Macros are a mechanism for running JavaScript functions _at bundle-time_. The value returned from these functions are directly inlined into your bundle. As a toy example, consider this simple function that returns a random number. export function random() { return Math.random(); } This is just a regular function in a regular file, but we can use it as a macro like so: cli.tsx import { random } from './random.ts' with { type: 'macro' }; console.log(`Your random number is ${random()}`); **Note** — Macros are indicated using _import attribute_ syntax. If you haven't seen this syntax before, it's a Stage 3 TC39 proposal that lets you attach additional metadata to `import` statements. Now we'll bundle this file with `bun build`. The bundled file will be printed to stdout. bun build ./cli.tsx console.log(`Your random number is ${0.6805550949689833}`); As you can see, the source code of the `random` function occurs nowhere in the bundle. Instead, it is executed _during bundling_ and function call (`random()`) is replaced with the result of the function. Since the source code will never be included in the bundle, macros can safely perform privileged operations like reading from a database. ## When to use macros If you have several build scripts for small things where you would otherwise have a one-off build script, bundle-time code execution can be easier to maintain. It lives with the rest of your code, it runs with the rest of the build, it is automatically parallelized, and if it fails, the build fails too. If you find yourself running a lot of code at bundle-time though, consider running a server instead. ## Import attributes Bun Macros are import statements annotated using either: * `with { type: 'macro' }` — an import attribute, a Stage 3 ECMA Scrd * `assert { type: 'macro' }` — an import assertion, an earlier incarnation of import attributes that has now been abandoned (but is already supported by a number of browsers and runtimes) ## Security considerations Macros must explicitly be imported with `{ type: "macro" }` in order to be executed at bundle-time. These imports have no effect if they are not called, unlike regular JavaScript imports which may have side effects. You can disable macros entirely by passing the `--no-macros` flag to Bun. It produces a build error like this: error: Macros are disabled foo(); ^ ./hello.js:3:1 53 To reduce the potential attack surface for malicious packages, macros cannot be _invoked_ from inside `node_modules/**/*`. If a package attempts to invoke a macro, you'll see an error like this: error: For security reasons, macros cannot be run from node_modules. beEvil(); ^ node_modules/evil/index.js:3:1 50 Your application code can still import macros from `node_modules` and invoke them. import {macro} from "some-package" with { type: "macro" }; macro(); ## Export condition `"macro"` When shipping a library containing a macro to `npm` or another package registry, use the `"macro"` export condition to provide a special version of your package exclusively for the macro environment. package.json { "name": "my-package", "exports": { "import": "./index.js", "require": "./index.js", "default": "./index.js", "macro": "./index.macro.js" } } With this configuration, users can consume your package at runtime or at bundle-time using the same import specifier: import pkg from "my-package"; // runtime import import {macro} from "my-package" with { type: "macro" }; // macro import The first import will resolve to `./node_modules/my-package/index.js`, while the second will be resolved by Bun's bundler to `./node_modules/my-package/index.macro.js`. ## Execution When Bun's transpiler sees a macro import, it calls the function inside the transpiler using Bun's JavaScript runtime and converts the return value from JavaScript into an AST node. These JavaScript functions are called at bundle-time, not runtime. Macros are executed synchronously in the transpiler during the visiting phase—before plugins and before the transpiler generates the AST. They are executed in the order they are imported. The transpiler will wait for the macro to finish executing before continuing. The transpiler will also `await` any `Promise` returned by a macro. Bun's bundler is multi-threaded. As such, macros execute in parallel inside of multiple spawned JavaScript "workers". ## Dead code elimination The bundler performs dead code elimination _after_ running and inlining macros. So given the following macro: returnFalse.ts export function returnFalse() { return false; } ...then bundling the following file will produce an empty bundle, provided that the minify syntax option is enabled. import {returnFalse} from './returnFalse.ts' with { type: 'macro' }; if (returnFalse()) { console.log("This code is eliminated"); } ## Serializability Bun's transpiler needs to be able to serialize the result of the macro so it can be inlined into the AST. All JSON-compatible data structures are supported: macro.ts export function getObject() { return { foo: "bar", baz: 123, array: [ 1, 2, { nested: "value" }], }; } Macros can be async, or return `Promise` instances. Bun's transpiler will automatically `await` the `Promise` and inline the result. macro.ts export async function getText() { return "async value"; } The transpiler implements special logic for serializing common data formats like `Response`, `Blob`, `TypedArray`. * `TypedArray`: Resolves to a base64-encoded string. * `Response`: Bun will read the `Content-Type` and serialize accordingly; for instance, a `Response` with type `application/json` will be automatically parsed into an object and `text/plain` will be inlined as a string. Responses with an unrecognized or `undefined` `type` will be base-64 encoded. * `Blob`: As with `Response`, the serialization depends on the `type` property. The result of `fetch` is `Promise<Response>`, so it can be directly returned. macro.ts export function getObject() { return fetch("https://bun.sh") } Functions and instances of most classes (except those mentioned above) are not serializable. export function getText(url: string) { // this doesn't work! return () => {}; } ## Arguments Macros can accept inputs, but only in limited cases. The value must be statically known. For example, the following is not allowed: import {getText} from './getText.ts' with { type: 'macro' }; export function howLong() { // the value of `foo` cannot be statically known const foo = Math.random() ? "foo" : "bar"; const text = getText(`https://example.com/${foo}`); console.log("The page is ", text.length, " characters long"); } However, if the value of `foo` is known at bundle-time (say, if it's a constant or the result of another macro) then it's allowed: import {getText} from './getText.ts' with { type: 'macro' }; import {getFoo} from './getFoo.ts' with { type: 'macro' }; export function howLong() { // this works because getFoo() is statically known const foo = getFoo(); const text = getText(`https://example.com/${foo}`); console.log("The page is", text.length, "characters long"); } This outputs: function howLong() { console.log("The page is", 1322, "characters long"); } export { howLong }; ## Examples ### Embed latest git commit hash getGitCommitHash.ts export function getGitCommitHash() { const {stdout} = Bun.spawnSync({ cmd: ["git", "rev-parse", "HEAD"], stdout: "pipe", }); return stdout.toString(); } When we build it, the `getGitCommitHash` is replaced with the result of calling the function: input import { getGitCommitHash } from './getGitCommitHash.ts' with { type: 'macro' }; console.log(`The current Git commit hash is ${getGitCommitHash()}`); output console.log(`The current Git commit hash is 3ee3259104f`); You're probably thinking "Why not just use `process.env.GIT_COMMIT_HASH`?" Well, you can do that too. But can you do this with an environment variable? ### Make `fetch()` requests at bundle-time In this example, we make an outgoing HTTP request using `fetch()`, parse the HTML response using `HTMLRewriter`, and return an object containing the title and meta tags–all at bundle-time. export async function extractMetaTags(url: string) { const response = await fetch(url); const meta = { title: "", }; new HTMLRewriter() .on("title", { text(element) { meta.title += element.text; }, }) .on("meta", { element(element) { const name = element.getAttribute("name") || element.getAttribute("property") || element.getAttribute("itemprop"); if (name) meta[name] = element.getAttribute("content"); }, }) .transform(response); return meta; } The `extractMetaTags` function is erased at bundle-time and replaced with the result of the function call. This means that the `fetch` request happens at bundle-time, and the result is embedded in the bundle. Also, the branch throwing the error is eliminated since it's unreachable. input import { extractMetaTags } from './meta.ts' with { type: 'macro' }; export const Head = () => { const headTags = extractMetaTags("https://example.com"); if (headTags.title !== "Example Domain") { throw new Error("Expected title to be 'Example Domain'"); } return <head> <title>{headTags.title}</title> <meta name="viewport" content={headTags.viewport} /> </head>; }; output import { jsx, jsxs } from "react/jsx-runtime"; export const Head = () => { jsxs("head", { children: [ jsx("title", { children: "Example Domain", }), jsx("meta", { name: "viewport", content: "width=device-width, initial-scale=1", }), ], }); }; export { Head }; --- ## Page: https://bun.sh/docs/bundler/vs-esbuild Bun's bundler API is inspired heavily by esbuild. Migrating to Bun's bundler from esbuild should be relatively painless. This guide will briefly explain why you might consider migrating to Bun's bundler and provide a side-by-side API comparison reference for those who are already familiar with esbuild's API. There are a few behavioral differences to note. * **Bundling by default**. Unlike esbuild, Bun _always bundles by default_. This is why the `--bundle` flag isn't necessary in the Bun example. To transpile each file individually, use `Bun.Transpiler`. * **It's just a bundler**. Unlike esbuild, Bun's bundler does not include a built-in development server or file watcher. It's just a bundler. The bundler is intended for use in conjunction with `Bun.serve` and other runtime APIs to achieve the same effect. As such, all options relating to HTTP/file watching are not applicable. ## Performance With a performance-minded API coupled with the extensively optimized Zig-based JS/TS parser, Bun's bundler is 1.75x faster than esbuild on esbuild's three.js benchmark. 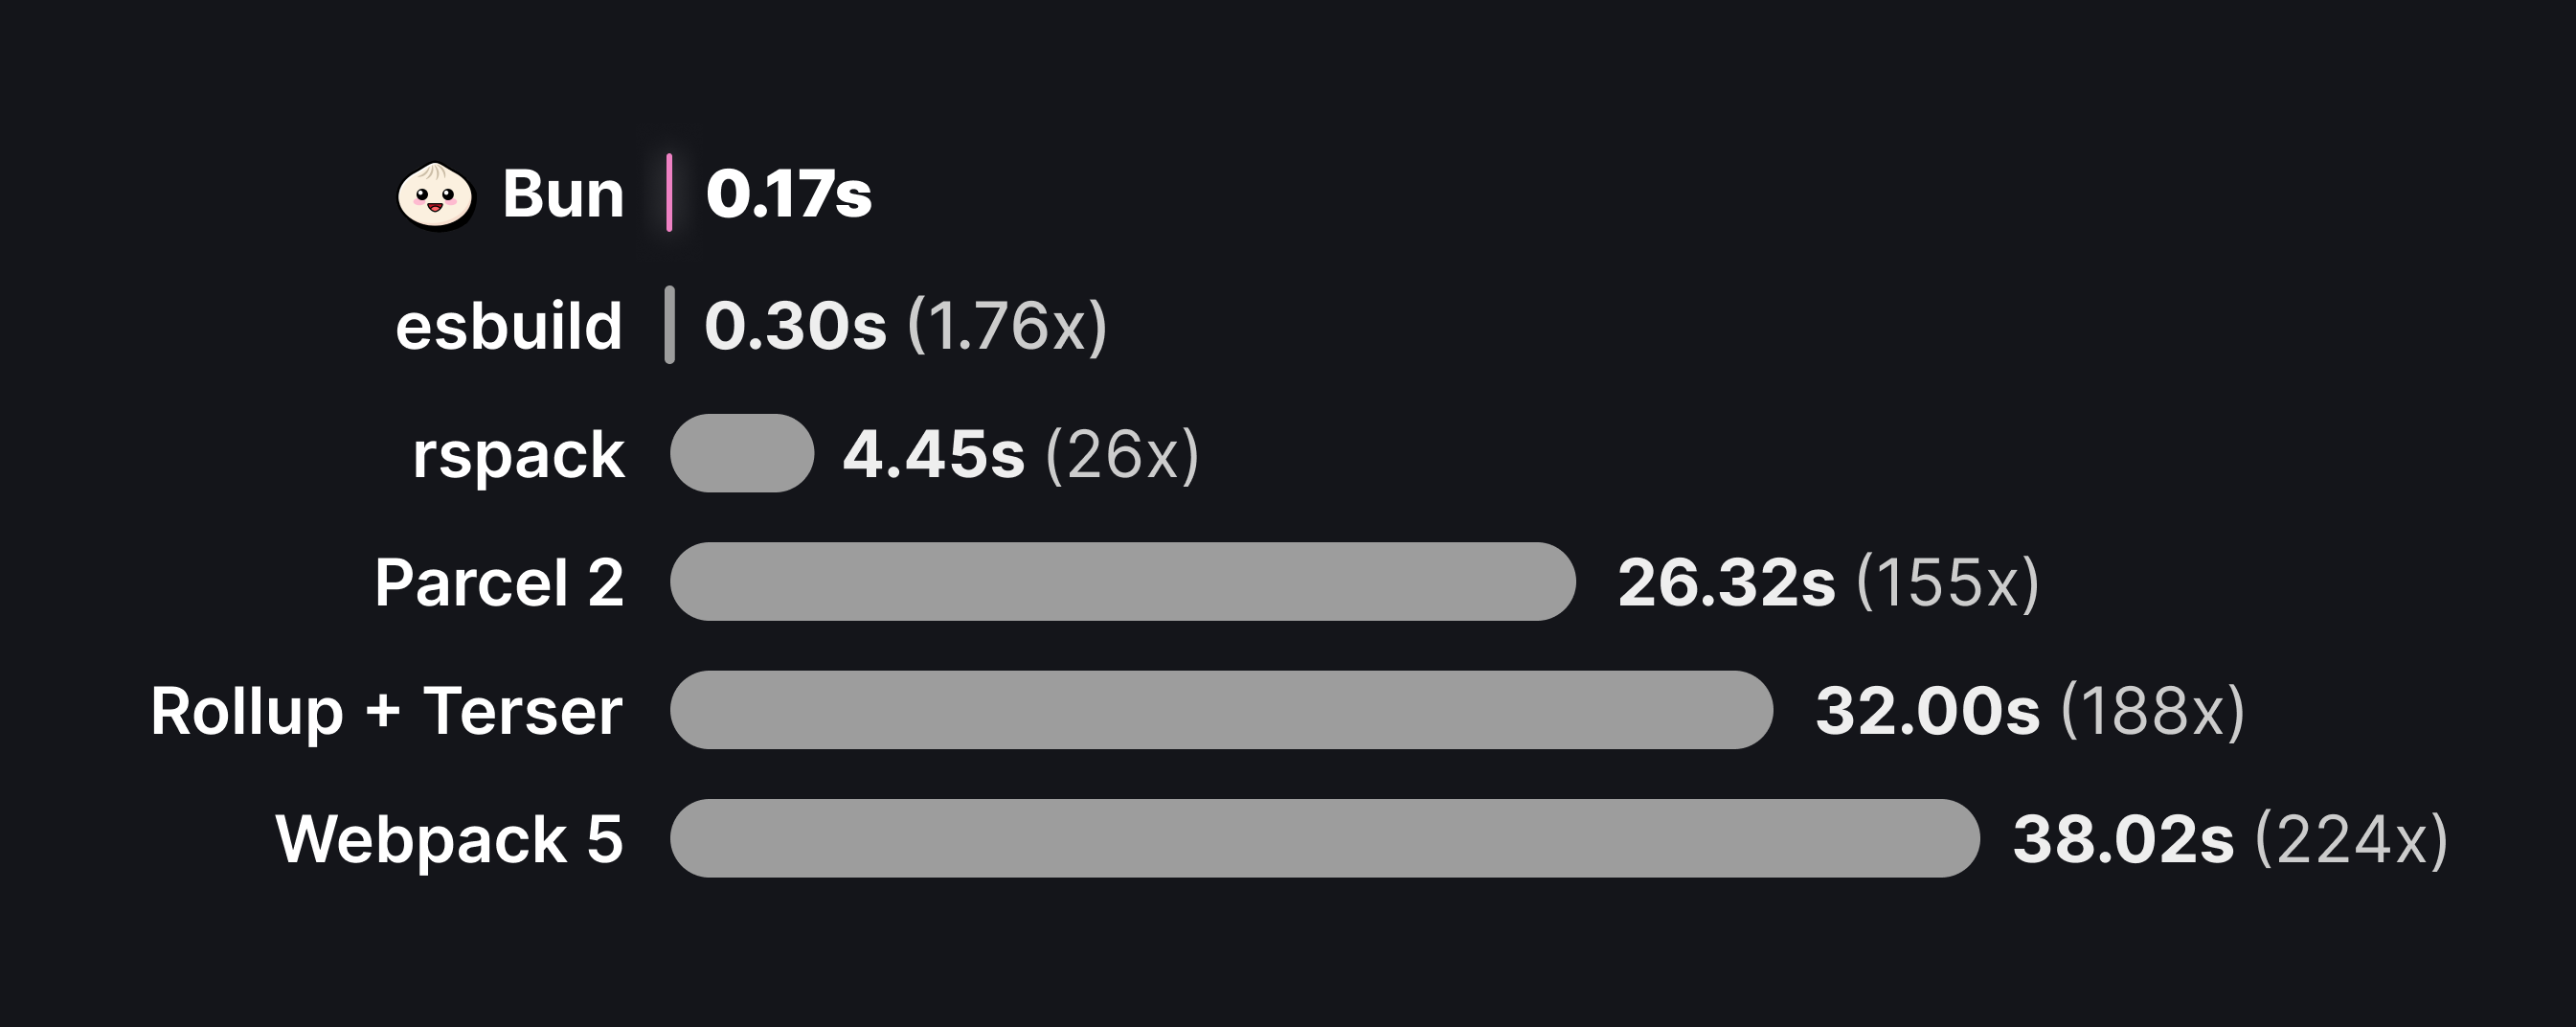 Bundling 10 copies of three.js from scratch, with sourcemaps and minification ## CLI API Bun and esbuild both provide a command-line interface. esbuild <entrypoint> --outdir=out --bundle bun build <entrypoint> --outdir=out In Bun's CLI, simple boolean flags like `--minify` do not accept an argument. Other flags like `--outdir <path>` do accept an argument; these flags can be written as `--outdir out` or `--outdir=out`. Some flags like `--define` can be specified several times: `--define foo=bar --define bar=baz`. | `esbuild` | `bun build` | | --- | --- | | `--bundle` | n/a | Bun always bundles, use `--no-bundle` to disable this behavior. | | `--define:K=V` | `--define K=V` | Small syntax difference; no colon. esbuild --define:foo=bar bun build --define foo=bar | | `--external:<pkg>` | `--external <pkg>` | Small syntax difference; no colon. esbuild --external:react bun build --external react | | `--format` | `--format` | Bun supports `"esm"` and `"cjs"` currently, but more module formats are planned. esbuild defaults to `"iife"`. | | `--loader:.ext=loader` | `--loader .ext:loader` | Bun supports a different set of built-in loaders than esbuild; see Bundler > Loaders for a complete reference. The esbuild loaders `dataurl`, `binary`, `base64`, `copy`, and `empty` are not yet implemented. The syntax for `--loader` is slightly different. esbuild app.ts --bundle --loader:.svg=text bun build app.ts --loader .svg:text | | `--minify` | `--minify` | No differences | | `--outdir` | `--outdir` | No differences | | `--outfile` | `--outfile` | | `--packages` | `--packages` | No differences | | `--platform` | `--target` | Renamed to `--target` for consistency with tsconfig. Does not support `neutral`. | | `--serve` | n/a | Not applicable | | `--sourcemap` | `--sourcemap` | No differences | | `--splitting` | `--splitting` | No differences | | `--target` | n/a | No supported. Bun's bundler performs no syntactic down-leveling at this time. | | `--watch` | `--watch` | No differences | | `--allow-overwrite` | n/a | Overwriting is never allowed | | `--analyze` | n/a | Not supported | | `--asset-names` | `--asset-naming` | Renamed for consistency with `naming` in JS API | | `--banner` | `--banner` | Only applies to js bundles | | `--footer` | `--footer` | Only applies to js bundles | | `--certfile` | n/a | Not applicable | | `--charset=utf8` | n/a | Not supported | | `--chunk-names` | `--chunk-naming` | Renamed for consistency with `naming` in JS API | | `--color` | n/a | Always enabled | | `--drop` | `--drop` | | `--entry-names` | `--entry-naming` | Renamed for consistency with `naming` in JS API | | `--global-name` | n/a | Not applicable, Bun does not support `iife` output at this time | | `--ignore-annotations` | `--ignore-dce-annotations` | | `--inject` | n/a | Not supported | | `--jsx` | `--jsx-runtime <runtime>` | Supports `"automatic"` (uses `jsx` transform) and `"classic"` (uses `React.createElement`) | | `--jsx-dev` | n/a | Bun reads `compilerOptions.jsx` from `tsconfig.json` to determine a default. If `compilerOptions.jsx` is `"react-jsx"`, or if `NODE_ENV=production`, Bun will use the `jsx` transform. Otherwise, it uses `jsxDEV`. For any to Bun uses `jsxDEV`. The bundler does not support `preserve`. | | `--jsx-factory` | `--jsx-factory` | | `--jsx-fragment` | `--jsx-fragment` | | `--jsx-import-source` | `--jsx-import-source` | | `--jsx-side-effects` | n/a | JSX is always assumed to be side-effect-free | | `--keep-names` | n/a | Not supported | | `--keyfile` | n/a | Not applicable | | `--legal-comments` | n/a | Not supported | | `--log-level` | n/a | Not supported. This can be set in `bunfig.toml` as `logLevel`. | | `--log-limit` | n/a | Not supported | | `--log-override:X=Y` | n/a | Not supported | | `--main-fields` | n/a | Not supported | | `--mangle-cache` | n/a | Not supported | | `--mangle-props` | n/a | Not supported | | `--mangle-quoted` | n/a | Not supported | | `--metafile` | n/a | Not supported | | `--minify-whitespace` | `--minify-whitespace` | | `--minify-identifiers` | `--minify-identifiers` | | `--minify-syntax` | `--minify-syntax` | | `--out-extension` | n/a | Not supported | | `--outbase` | `--root` | | `--preserve-symlinks` | n/a | Not supported | | `--public-path` | `--public-path` | | `--pure` | n/a | Not supported | | `--reserve-props` | n/a | Not supported | | `--resolve-extensions` | n/a | Not supported | | `--servedir` | n/a | Not applicable | | `--source-root` | n/a | Not supported | | `--sourcefile` | n/a | Not supported. Bun does not support `stdin` input yet. | | `--sourcemap` | `--sourcemap` | No differences | | `--sources-content` | n/a | Not supported | | `--supported` | n/a | Not supported | | `--tree-shaking` | n/a | Always `true` | | `--tsconfig` | `--tsconfig-override` | | `--version` | n/a | Run `bun --version` to see the version of Bun. | ## JavaScript API | `esbuild.build()` | `Bun.build()` | | --- | --- | | `absWorkingDir` | n/a | Always set to `process.cwd()` | | `alias` | n/a | Not supported | | `allowOverwrite` | n/a | Always `false` | | `assetNames` | `naming.asset` | Uses same templating syntax as esbuild, but `[ext]` must be included explicitly. Bun.build({ entrypoints: ["./index.tsx"], naming: { asset: "[name].[ext]", }, }); | | `banner` | n/a | Not supported | | `bundle` | n/a | Always `true`. Use `Bun.Transpiler` to transpile without bundling. | | `charset` | n/a | Not supported | | `chunkNames` | `naming.chunk` | Uses same templating syntax as esbuild, but `[ext]` must be included explicitly. Bun.build({ entrypoints: ["./index.tsx"], naming: { chunk: "[name].[ext]", }, }); | | `color` | n/a | Bun returns logs in the `logs` property of the build result. | | `conditions` | n/a | Not supported. Export conditions priority is determined by `target`. | | `define` | `define` | | `drop` | n/a | Not supported | | `entryNames` | `naming` or `naming.entry` | Bun supports a `naming` key that can either be a string or an object. Uses same templating syntax as esbuild, but `[ext]` must be included explicitly. Bun.build({ entrypoints: ["./index.tsx"], // when string, this is equivalent to entryNames naming: "[name].[ext]", // granular naming options naming: { entry: "[name].[ext]", asset: "[name].[ext]", chunk: "[name].[ext]", }, }); | | `entryPoints` | `entrypoints` | Capitalization difference | | `external` | `external` | No differences | | `footer` | n/a | Not supported | | `format` | `format` | Only supports `"esm"` currently. Support for `"cjs"` and `"iife"` is planned. | | `globalName` | n/a | Not supported | | `ignoreAnnotations` | n/a | Not supported | | `inject` | n/a | Not supported | | `jsx` | `jsx` | Not supported in JS API, configure in `tsconfig.json` | | `jsxDev` | `jsxDev` | Not supported in JS API, configure in `tsconfig.json` | | `jsxFactory` | `jsxFactory` | Not supported in JS API, configure in `tsconfig.json` | | `jsxFragment` | `jsxFragment` | Not supported in JS API, configure in `tsconfig.json` | | `jsxImportSource` | `jsxImportSource` | Not supported in JS API, configure in `tsconfig.json` | | `jsxSideEffects` | `jsxSideEffects` | Not supported in JS API, configure in `tsconfig.json` | | `keepNames` | n/a | Not supported | | `legalComments` | n/a | Not supported | | `loader` | `loader` | Bun supports a different set of built-in loaders than esbuild; see Bundler > Loaders for a complete reference. The esbuild loaders `dataurl`, `binary`, `base64`, `copy`, and `empty` are not yet implemented. | | `logLevel` | n/a | Not supported | | `logLimit` | n/a | Not supported | | `logOverride` | n/a | Not supported | | `mainFields` | n/a | Not supported | | `mangleCache` | n/a | Not supported | | `mangleProps` | n/a | Not supported | | `mangleQuoted` | n/a | Not supported | | `metafile` | n/a | Not supported | | `minify` | `minify` | In Bun, `minify` can be a boolean or an object. await Bun.build({ entrypoints: ['./index.tsx'], // enable all minification minify: true // granular options minify: { identifiers: true, syntax: true, whitespace: true } }) | | `minifyIdentifiers` | `minify.identifiers` | See `minify` | | `minifySyntax` | `minify.syntax` | See `minify` | | `minifyWhitespace` | `minify.whitespace` | See `minify` | | `nodePaths` | n/a | Not supported | | `outExtension` | n/a | Not supported | | `outbase` | `root` | Different name | | `outdir` | `outdir` | No differences | | `outfile` | `outfile` | No differences | | `packages` | n/a | Not supported, use `external` | | `platform` | `target` | Supports `"bun"`, `"node"` and `"browser"` (the default). Does not support `"neutral"`. | | `plugins` | `plugins` | Bun's plugin API is a subset of esbuild's. Some esbuild plugins will work out of the box with Bun. | | `preserveSymlinks` | n/a | Not supported | | `publicPath` | `publicPath` | No differences | | `pure` | n/a | Not supported | | `reserveProps` | n/a | Not supported | | `resolveExtensions` | n/a | Not supported | | `sourceRoot` | n/a | Not supported | | `sourcemap` | `sourcemap` | Supports `"inline"`, `"external"`, and `"none"` | | `sourcesContent` | n/a | Not supported | | `splitting` | `splitting` | No differences | | `stdin` | n/a | Not supported | | `supported` | n/a | Not supported | | `target` | n/a | No support for syntax downleveling | | `treeShaking` | n/a | Always `true` | | `tsconfig` | n/a | Not supported | | `write` | n/a | Set to `true` if `outdir`/`outfile` is set, otherwise `false` | ## Plugin API Bun's plugin API is designed to be esbuild compatible. Bun doesn't support esbuild's entire plugin API surface, but the core functionality is implemented. Many third-party `esbuild` plugins will work out of the box with Bun. Long term, we aim for feature parity with esbuild's API, so if something doesn't work please file an issue to help us prioritize. Plugins in Bun and esbuild are defined with a `builder` object. import type { BunPlugin } from "bun"; const myPlugin: BunPlugin = { name: "my-plugin", setup(builder) { // define plugin }, }; The `builder` object provides some methods for hooking into parts of the bundling process. Bun implements `onResolve` and `onLoad`; it does not yet implement the esbuild hooks `onStart`, `onEnd`, and `onDispose`, and `resolve` utilities. `initialOptions` is partially implemented, being read-only and only having a subset of esbuild's options; use `config` (same thing but with Bun's `BuildConfig` format) instead. import type { BunPlugin } from "bun"; const myPlugin: BunPlugin = { name: "my-plugin", setup(builder) { builder.onResolve( { /* onResolve.options */ }, args => { return { /* onResolve.results */ }; }, ); builder.onLoad( { /* onLoad.options */ }, args => { return { /* onLoad.results */ }; }, ); }, }; ### `onResolve` #### `options` | 🟢 | `filter` | | --- | --- | | 🟢 | `namespace` | #### `arguments` | 🟢 | `path` | | --- | --- | | 🟢 | `importer` | | 🔴 | `namespace` | | 🔴 | `resolveDir` | | 🔴 | `kind` | | 🔴 | `pluginData` | #### `results` | 🟢 | `namespace` | | --- | --- | | 🟢 | `path` | | 🔴 | `errors` | | 🔴 | `external` | | 🔴 | `pluginData` | | 🔴 | `pluginName` | | 🔴 | `sideEffects` | | 🔴 | `suffix` | | 🔴 | `warnings` | | 🔴 | `watchDirs` | | 🔴 | `watchFiles` | ### `onLoad` #### `options` <table><thead></thead><tbody><tr><td>🟢</td><td><code>filter</code></td></tr><tr><td>🟢</td><td><code>namespace</code></td></tr></tbody></table> #### `arguments` <table><thead></thead><tbody><tr><td>🟢</td><td><code>path</code></td></tr><tr><td>🔴</td><td><code>namespace</code></td></tr><tr><td>🔴</td><td><code>suffix</code></td></tr><tr><td>🔴</td><td><code>pluginData</code></td></tr></tbody></table> #### `results` <table><thead></thead><tbody><tr><td>🟢</td><td><code>contents</code></td></tr><tr><td>🟢</td><td><code>loader</code></td></tr><tr><td>🔴</td><td><code>errors</code></td></tr><tr><td>🔴</td><td><code>pluginData</code></td></tr><tr><td>🔴</td><td><code>pluginName</code></td></tr><tr><td>🔴</td><td><code>resolveDir</code></td></tr><tr><td>🔴</td><td><code>warnings</code></td></tr><tr><td>🔴</td><td><code>watchDirs</code></td></tr><tr><td>🔴</td><td><code>watchFiles</code></td></tr></tbody></table>