W↓
All docs
🔑
Sign Up/Sign In
legendapp.com/open-source/state/v3/
Public Link
Apr 8, 2025, 12:25:23 PM - complete - 384.4 kB
Created by:
****ad@vlad.studio
Starting URLs:
https://legendapp.com/open-source/state/v3/intro/introduction/
Crawl Prefixes:
https://legendapp.com/open-source/state/v3/
## Page: https://legendapp.com/open-source/state/v3/intro/introduction/ Legend-State is a super fast all-in-one local and remote state library that helps you write less code to make faster apps. We think you’ll love it because it brings some huge benefits: ##### 1\. Local and remote state Legend-State handles local, global, and remote state all in one. Just `get()` and `set()` observables, and a robust sync engine makes sure your state is persisted locally and synced with your server. ##### 2\. Great DX and less code Just `use$` an observable to automatically re-render whenever it changes, and `set()` to update it. With the reduced boilerplate and everything that Legend-State does for you, you’ll build better apps with less code. const state$ = observable({ settings: { theme: 'dark' }})state$.settings.theme.set('light')const Component = () => { const theme = use$(state$.settings.theme) return <div>Theme: {theme}</div>} ##### 3\. Fine grained reactivity for the best possible performance Legend-State achieves much better performance than vanilla React and other state libraries because it does smaller re-renders less often, so your apps will load faster and run more smoothly. ## Legend-State has four primary goals: ### 1\. 🦄 As easy as possible to use There is no boilerplate and there are no contexts, actions, reducers, dispatchers, sagas, thunks, or epics. You can structure your data however you want in local state or global stores. It doesn’t modify your data at all, and you can just call `get()` to get the raw data and `set()` to change it. import { observable, observe } from "@legendapp/state"import { observer } from "@legendapp/state/react"// Observables can be primitives or deep objectsconst settings$ = observable({ theme: 'dark' // Computed observables with just a function isDark: () => settings$.theme.get() === 'dark'})// get returns the raw datasettings$.theme.get() // 'dark'// set setssettings$.theme.set('light')// observing contexts re-run when tracked observables changeobserve(() => { console.log(settings$.theme.get())})function Component() { const theme = use$(state$.settings.theme) // use$ tracks get() calls to automatically re-render on changes const isDark = use$(() => state$.settings.theme.get() === 'dark') return <div>Theme: {theme}</div>} import { observable } from "@legendapp/state" import { use$ } from "@legendapp/state/react" const settings$ \= observable({ theme: 'dark' }) function Component() { const theme \= use$(settings$.theme) const toggle \= () \=> { settings$.theme.set(theme \=> theme \=== 'dark' ? 'light' : 'dark' ) } return ( <Box theme\={theme}\> <div\>Theme: {theme}</div\> <Button theme\={theme} onClick\={toggle}\> Toggle theme </Button\> </Box\> ) } Live Editing ### 2\. ⚡️ The fastest React state library Legend-State beats every other state library on just about every metric and is so optimized for arrays that it even beats vanilla JS in some benchmarks. At only `4kb` and with the massive reduction in boilerplate code, you’ll have big savings in file size too. 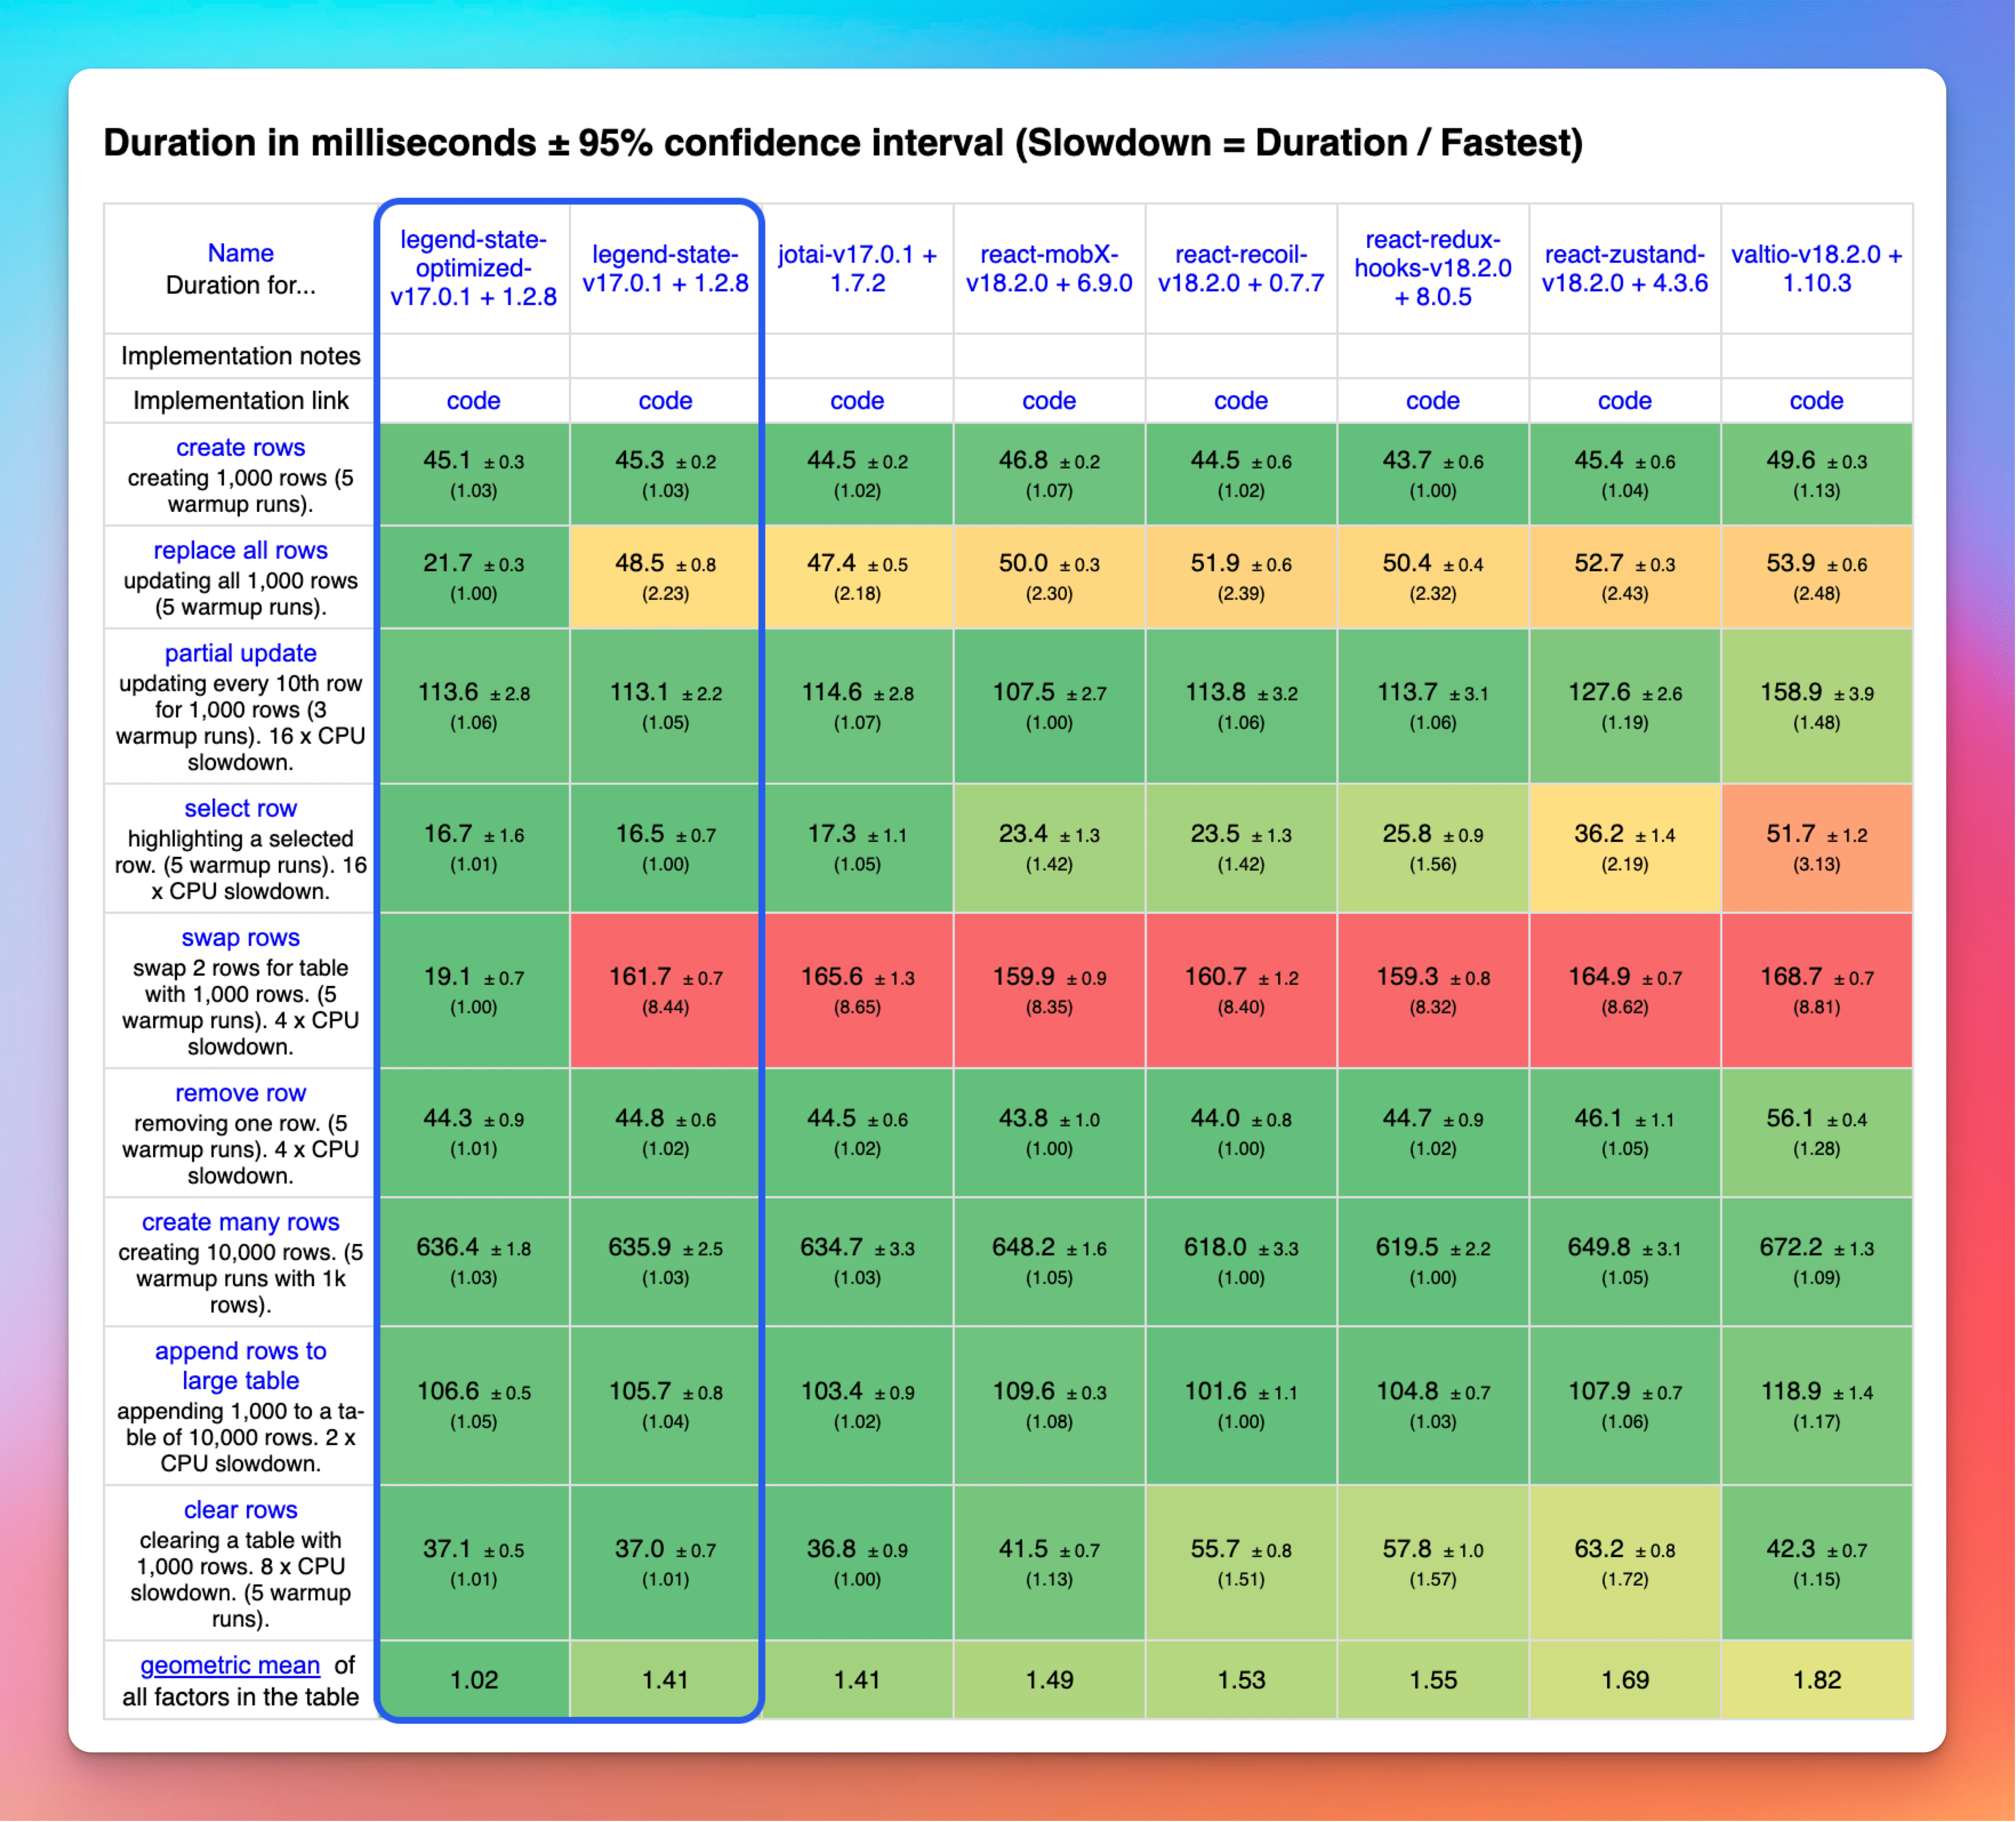 See Fast 🔥 for more details of why Legend-State is so fast. ### 3\. 🔥 Fine-grained reactivity for minimal renders Legend-State helps your re-renders be smaller and less frequent, making your apps faster 🔥. import { observable } from "@legendapp/state" import { Memo, useObservable } from "@legendapp/state/react" import { useRef, useState } from "react" import { useInterval } from "usehooks-ts" function NormalComponent() { const \[count, setCount\] \= useState(1) const renderCount \= useRef(1).current++ useInterval(() \=> { setCount((v) \=> v + 1) }, 600) return ( <FlashingDiv pad\> <h5\>Normal</h5\> <div\>Renders: {renderCount}</div\> <div\>Count: {count}</div\> </FlashingDiv\> ) } function FineGrained() { const count$ \= useObservable(1) const renderCount \= useRef(1).current++ useInterval(() \=> { count$.set((v) \=> v + 1) }, 600) return ( <FlashingDiv pad\> <h5\>Fine-grained</h5\> <div\>Renders: {renderCount}</div\> <div\>Count: <Memo\>{count$}</Memo\></div\> </FlashingDiv\> ) } Live Editing ### 4\. 💾 Powerful sync and persistence Legend-State includes a powerful persistence and sync engine. It easily enables local first apps by optimistically applying all changes locally first, retrying changes even after restart until they eventually sync, and syncing minimal diffs. We use Legend-State as the sync engines in Legend and Bravely, so it is by necessity very full featured while being simple to set up. Local persistence plugins for the browser and React Native are included, with sync plugins for Keel, Supabase, TanStack Query, and `fetch`. const state$ = observable( users: syncedKeel({ list: queries.getUsers, create: mutations.createUsers, update: mutations.updateUsers, delete: mutations.deleteUsers, persist: { name: 'users', retrySync: true }, debounceSet: 500, retry: { infinite: true, }, changesSince: 'last-sync', }), // direct link to my user within the users observable me: () => state$.users['myuid'])observe(() => { // get() activates through to state$.users and starts syncing. // it updates itself and re-runs observers when name changes const name = me$.name.get()})// Setting a value goes through to state$.users and saves update to serverme$.name.set('Annyong') Read more ## Install Version 3 is currently available in the @beta version and may change slightly before the final release. ## Highlights * ✨ Super easy to use 😌 * ✨ Super fast ⚡️ * ✨ Super small at 4kb 🐥 * ✨ Fine-grained reactivity 🔥 * ✨ Built-in sync engine * ✨ Works great with React Compiler * ✨ No boilerplate * ✨ Designed for maximum performance and scalability * ✨ React components re-render only on changes * ✨ Very strongly typed with TypeScript * ✨ Persistence plugins for automatically saving/loading from storage * ✨ State can be global or within components The core is platform agnostic so you can use it in vanilla JS or any framework to create and listen to observables. It includes support for React and React Native, and has plugins for automatically persisting to storage. Read more about why you’ll love Legend-State ❤️ ## Getting Started Continue on to Getting Started to get started! Join us on Discord or Github to get involved with the Legend community. Talk to Jay on Bluesky or Twitter. ## Contributing We welcome contributions! Please read our Contributing Guide on Github ## Legend Kit Legend Kit is our early but growing collection of high performance headless components, general purpose observables, transformer computeds, React hooks that don’t re-render, and observable tools for popular frameworks. Check out Legend Kit to learn more. --- ## Page: https://legendapp.com/open-source/state/v3/intro/getting-started/ This guide will help you get started with Legend-State in a React or React Native App. ## Which Platform? Select React or React Native to customize this guide for your platform. ### Install Legend-State ## Quick Start We’ll build a little Todo example app to show what a Legend-State app looks like. It works a bit differently than normal React apps - components re-render themselves when the state they care about changes. And Legend-State includes many helpful components to reduce the amount of boilerplate code you have to write, like components that two-way bind directly to state. ### Create our first observable First we’ll create an observable store for the example. An observable can be a single primitive or a massive tree of all of your state - it’s up to you. It can infer its type from the data you initialize it with, or you can type it with an interface if you prefer, which we do in this example. We’ll set up the example with a Record of todos, some computed functions to track counts, and an action function to add a todo. These functions can be within an observable or separate, it doesn’t matter, but we will include it all together in this example. import { observable } from "@legendapp/state";// Type your Store interfaceinterface Todo { id: number; text: string; completed?: boolean;}interface Store { todos: Todo[]; total: number; numCompleted: number; addTodo: () => void;}// Create a global observable for the Todoslet nextId = 0;const store$ = observable<Store>({ todos: [], // Computeds total: (): number => { return store$.todos.length; }, numCompleted: (): number => { return store$.todos.get().filter((todo) => todo.completed).length; }, addTodo: () => { const todo: Todo = { id: nextId++, text: "", }; store$.todos.push(todo); },}); Now that we have an observable for our Todos, let’s hook it up to React. ### Observables in React To consume an observable in React, just `use$` it. This will track it automatically so that the component re-renders whenever it changes. Legend-State also includes reactive components for both React and React Native. See Reactive components for more about that. import { observer, use$, useObservable } from "@legendapp/state/react"import { $TextInput } from "@legendapp/state/react-native"export function App() { // Consume the computed observables from the global store$ const total = use$(store$.total) const completed = use$(store$.numCompleted) // Create a local observable const theme$ = useObservable<'light' | 'dark'>('dark') const theme = use$(theme$) const onClickClear = () => store$.todos.set([]) return ( <Box theme={theme}> <ThemeButton $value={theme$} /> <Text>Total: {total}</Text> <Text>Completed: {completed}</Text> <For each={store$.todos} item={TodoItem} /> <View className="flex justify-between"> <Button onClick={store$.addTodo}>Add</Button> <Button onClick={onClickClear}>Clear</Button> </View> </Box> )}// Receives item$ prop from the For componentfunction TodoItem({ item$ }: { item$: Observable<Todo> }) { const onKeyDown = (e) => { // Call addTodo from the global store$ if (e.key === 'Enter') store$.addTodo() } // The child components are bound directly to the observable properties // so this component never has to re-render. return ( <View className="row"> <Checkbox $value={item$.completed} /> <$TextInput $value={item$.text} onKeyDown={onKeyDown} /> </View> );} Now that our Todo app is rendering nicely, let’s persist its state to storage. ### Persistence Legend-State has a built-in full-featured sync and persistence layer. In this example we’ll show basic persistence and you can read persist and sync for details. In this example we first set up a global configuration for sync and persistence. These options can also be set or overriden in each individual observable. Since most apps will use the same persistence for everything it’s easiest to set that up once in a global configuration. Then all you have to do is `syncObservable` with the name you want it to have in storage. Any changes made after that will be saved to storage automatically. import { observable } from "@legendapp/state"import { syncObservable } from '@legendapp/state/sync'import { ObservablePersistMMKV } from "@legendapp/state/persist-plugins/mmkv"const store$ = observable<Store>({ todos: {},})// Persist the observable to the named key of the global persist pluginsyncObservable(store$, { persist: { name: 'gettingStarted', plugin: ObservablePersistMMKV }}) And that’s it! Now we have a full React app that persists its changes. ### Full Example Now let’s put it all together into a live editable example. Feel free to play around in this sandbox on the left and see it running to the right. import { observable, Observable } from "@legendapp/state" import { configureSynced, synced } from "@legendapp/state/sync" import { observer, use$, useObservable } from "@legendapp/state/react" import { $React } from "@legendapp/state/react-web" import { $TextInput } from "@legendapp/state/react-native" import { observablePersistAsyncStorage } from "@legendapp/state/persist-plugins/async-storage" interface Todo { id: number; text: string; completed?: boolean; } interface Store { todos: Todo\[\]; total: number; numCompleted: number; addTodo: () \=> void; } interface TodoItemProps { item$: Observable<Todo\>; } const mySynced \= configureSynced(synced, { persist: { plugin: observablePersistAsyncStorage({ AsyncStorage }) } }) let nextId \= 0; const store$ \= observable<Store\>({ todos: mySynced({ initial: \[\], persist: { name: 'getting-started' }, }), total: (): number \=> { return store$.todos.length; }, numCompleted: (): number \=> { return store$.todos.get().filter((todo) \=> todo.completed).length; }, addTodo: () \=> { const todo: Todo \= { id: nextId++, text: "", }; store$.todos.push(todo); }, }); function TodoItem({ item$ }: TodoItemProps) { const onKeyDown \= (e) \=> { if (e.key \=== 'Enter') store$.addTodo() } return ( <View className\="row"\> <Checkbox $value\={item$.completed} /> <$TextInput $value={item$.text} onKeyDown={onKeyDown} /> </View\> ); } function App() { const theme$ \= useObservable<'light' | 'dark'\>('dark') const theme \= use$(theme$) const total \= use$(store$.total) const completed \= use$(store$.numCompleted) return ( <Box theme\={theme}\> <ThemeButton $value\={theme$} /> <Text\>Total: {total}</Text\> <Text\>Completed: {completed}</Text\> <For each\={store$.todos} item\={TodoItem} /> <View className\="flex justify-between"\> <Button onClick\={() \=> store$.addTodo()}\>Add</Button\> <Button onClick\={() \=> store$.todos.set(\[\])}\>Clear</Button\> </View\> </Box\> ) } Live Editing --- ## Page: https://legendapp.com/open-source/state/v3/intro/fast/ Legend-State is the result of years of iteration and dozens of experiments and rewrites to build the fastest possible state system. The primary reason it’s so fast is that it optimizes for the fewest number of renders - components are only re-rendered when the state they truly care about is changed. It may seem silly to quibble over milliseconds, but state is a hot path of most applications, so it’s important that it be as fast as possible to keep your whole application snappy. In our case, some Legend users have hundreds of thousands of items flowing through state, so it became the core bottleneck and is very important to optimize. We’ll show results of the popular krausest benchmark and use that to describe why Legend-State is so fast. This benchmark is a good approximation of real-world performance, but the most important optimization in Legend-State is that it just does less work because it renders less, less often. ## Benchmark  Legend-State’s **optimized** mode (on the left) optimizes for rendering each row when it changes, but not the entire list, which is reflected in the fast **partial update** and **select row** benchmarks. That typically incurs an extra upfront cost to set up the listeners in each row, but Legend-State is so optimized that even so it’s actually still among the fastest in the **create many rows** benchmark. Legend-State really shines in the **replace all rows** and **swap rows** benchmarks. When the number of elements is unchaged, it does not need to re-render the list and can only render the individual rows that changed. That brings a big speed improvement for drag/drop or when items are moved around in a list. You can opt into the fast array rendering with the `optimized` prop on the For component. Note that this optimization reuses React nodes rather than replacing them as usual, so it may have unexpected behavior with some types of animations or if you are modifying the DOM externally. For that reason the benchmark considers usage of the `optimized` props as “non-keyed”. ### Startup metrics 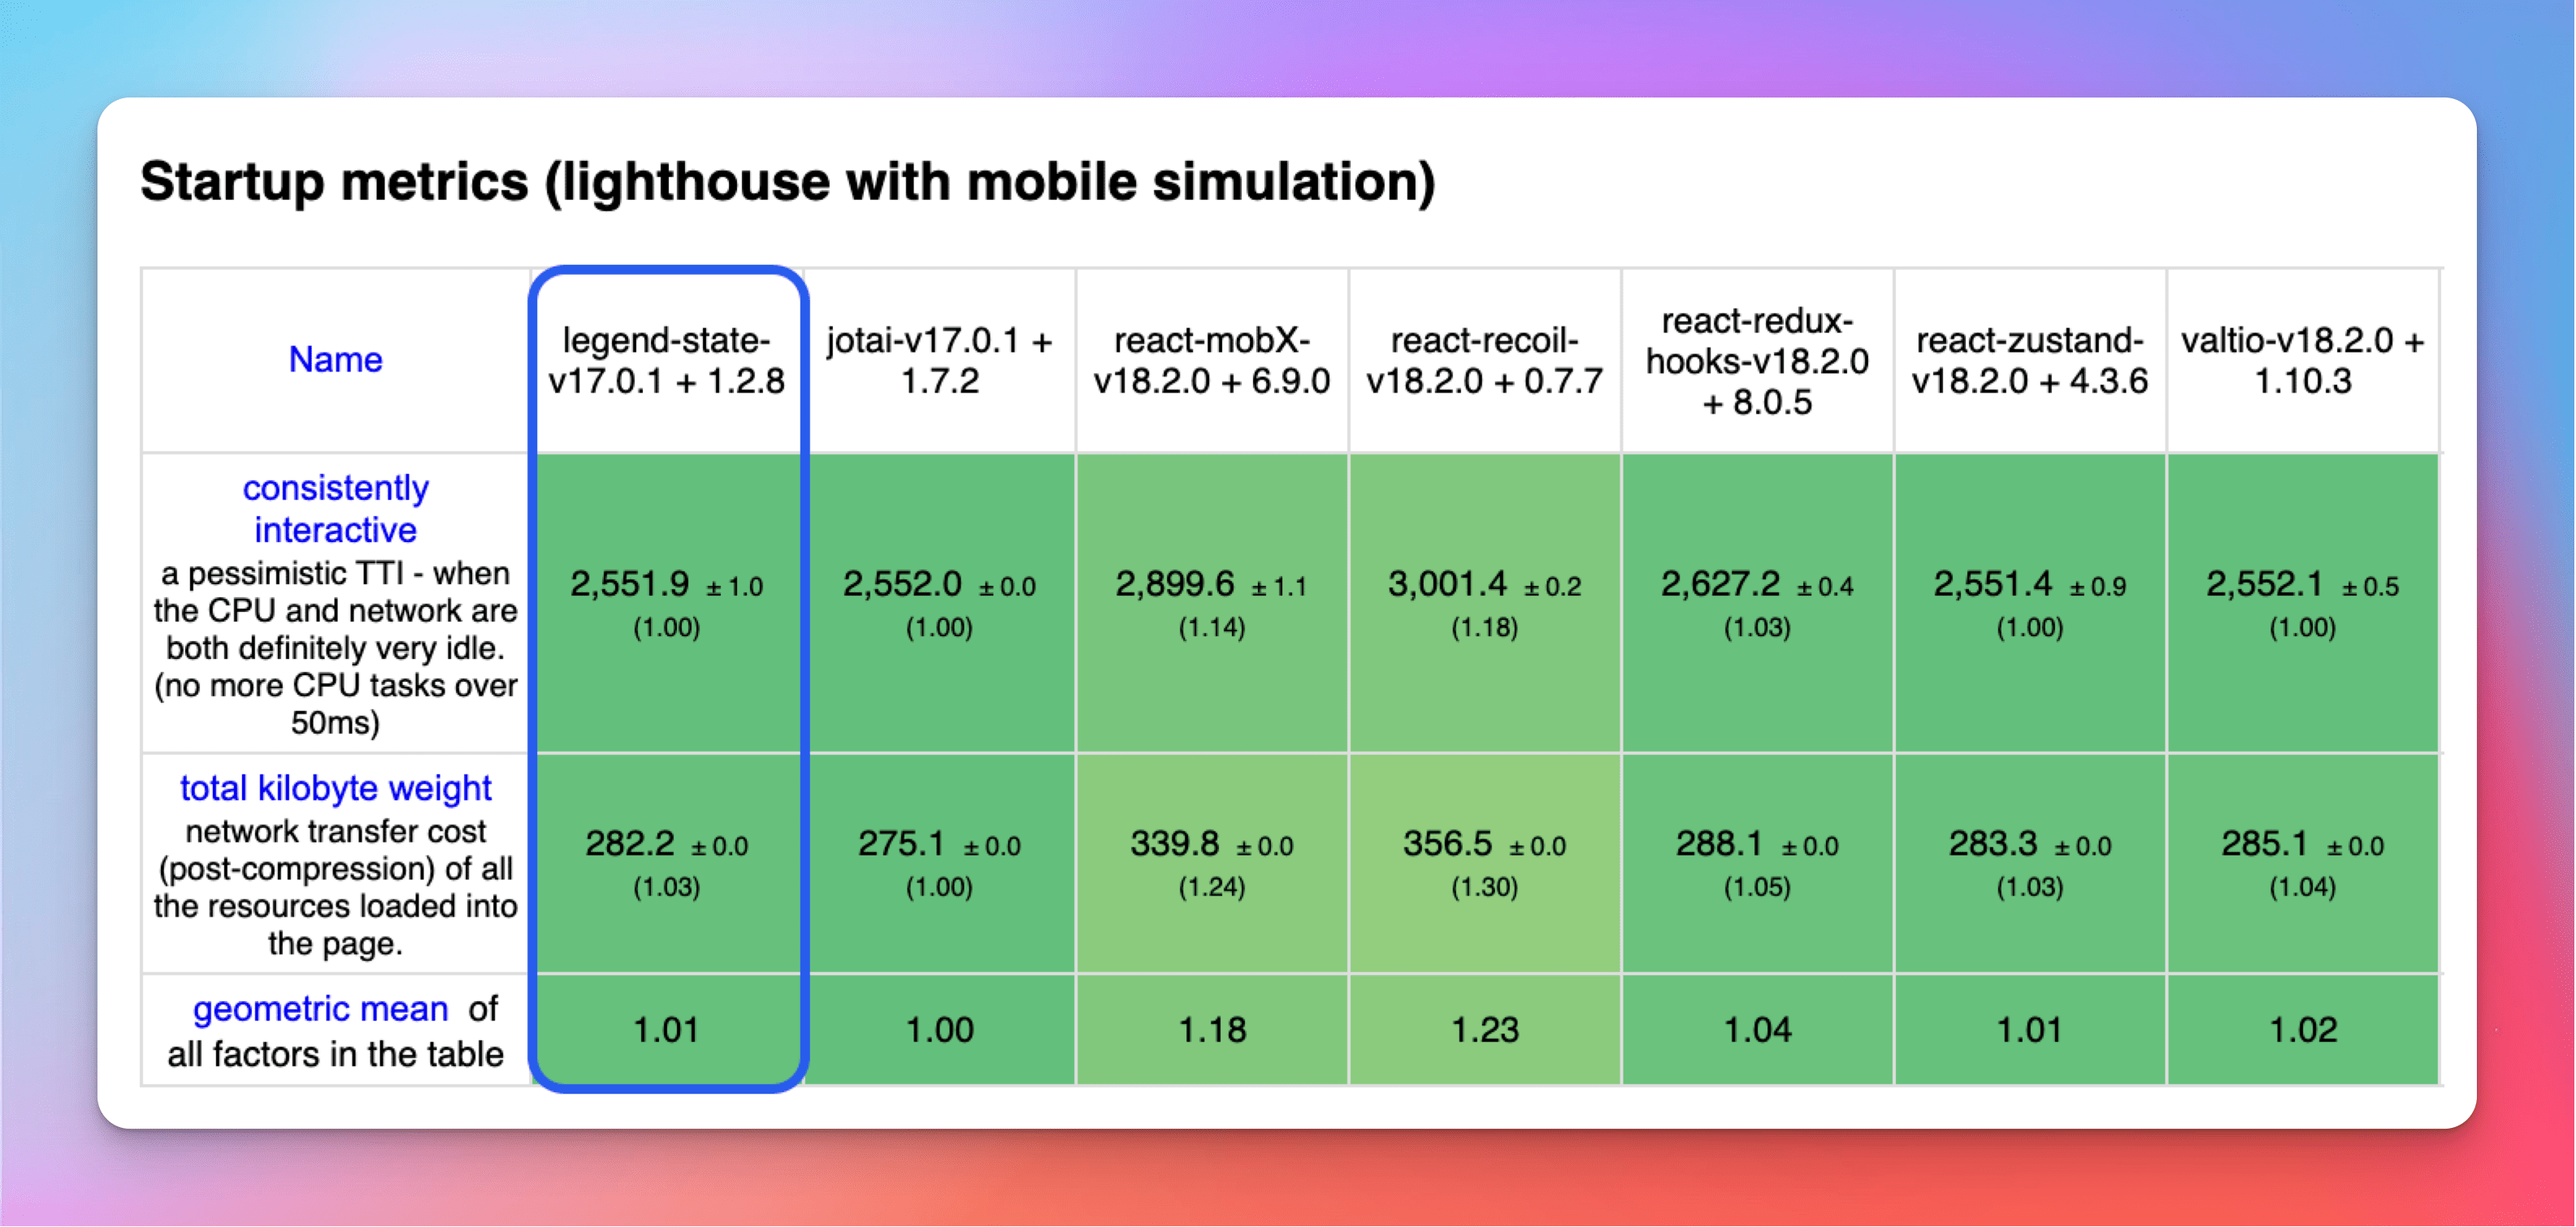 In these benchmarks you can see that Legend-State has the fastest TTI (time to interactive) because Legend-State doesn’t do much processing up front. Creating observables and adding thousands of listeners does very little work. Because observables don’t have to modify the underlying data at all, creating an observable just creates a tiny amount of metadata. ### Memory 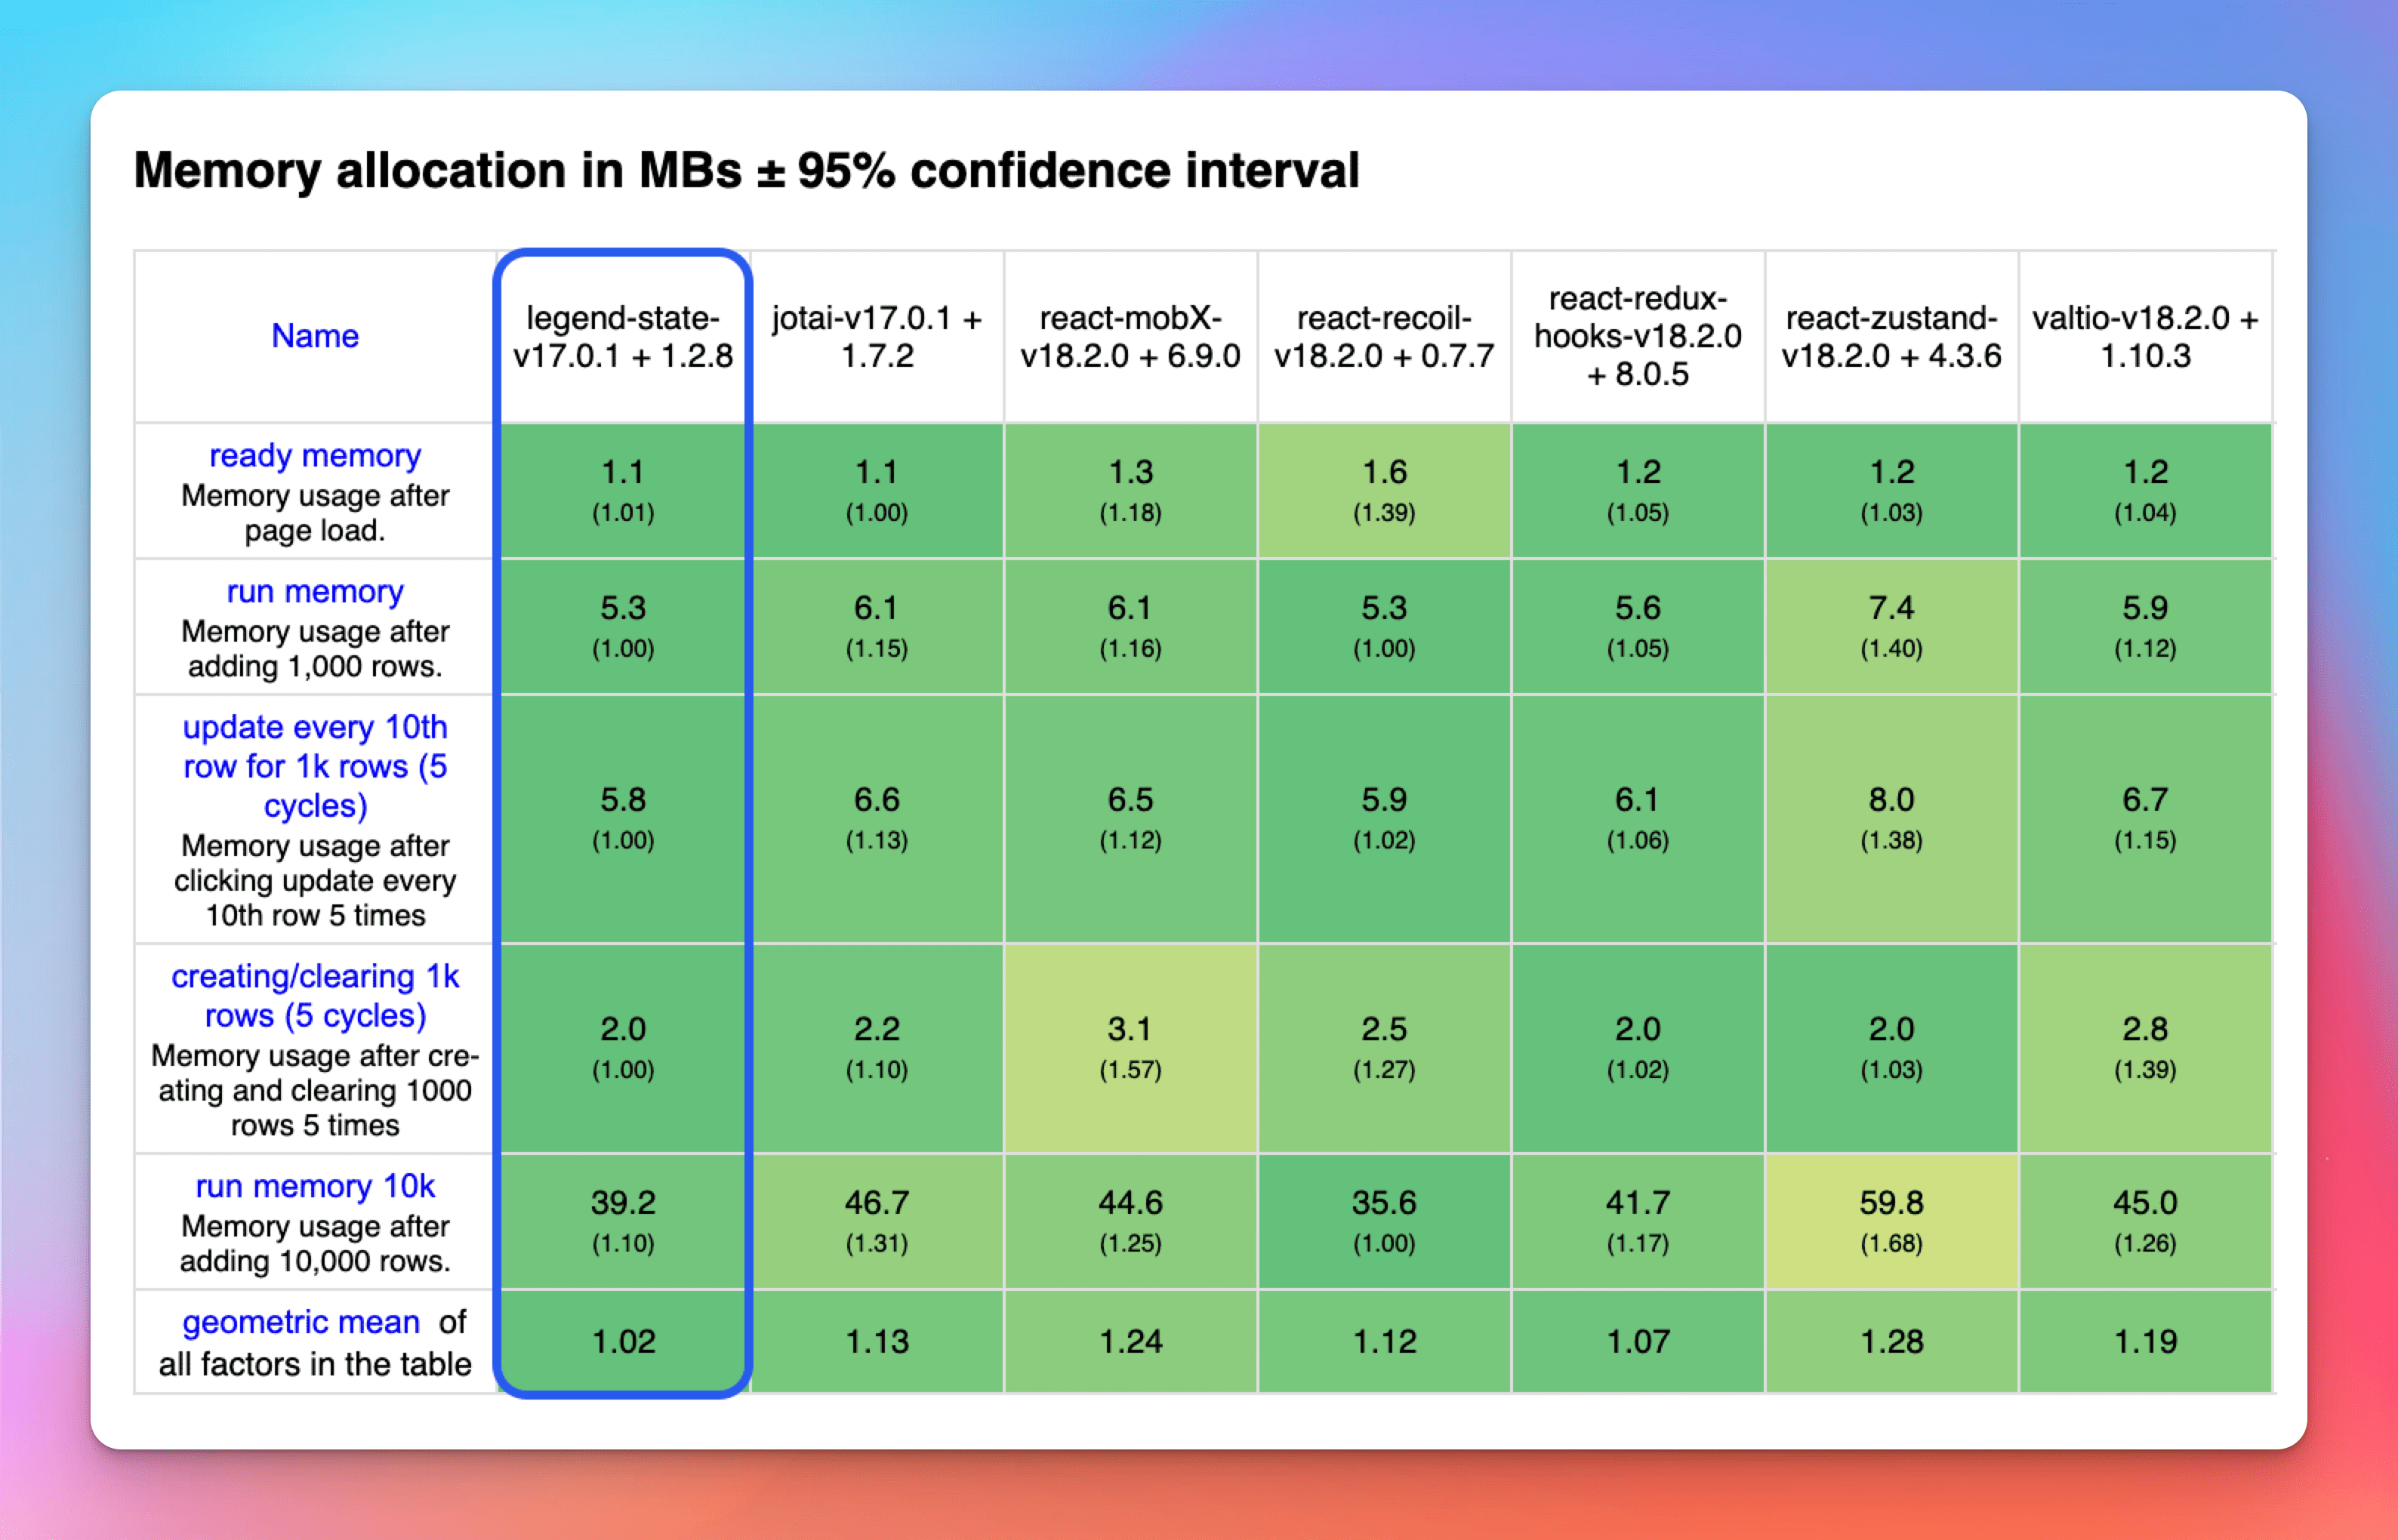 The memory usage is lower than the others because Legend-State does not modify the underlying data or keep a lot of extra metadata, and it does not create many objects or closures. ## Why it’s fast Legend-State is optimized in a lot of different ways: ### Proxy to path Legend-State uses Proxy, which is how it exposes the observable functions (get/set/listen etc…) on anything within an observable object. But it differs from other Proxy-based systems by not touching the underlying data all. Each proxy node represents a path within the object tree, and to get the value of any node it traverses the raw data to that path and returns the value. So every node within the state object stores minimal metadata, and never has to modify or clone the underlying data, which keeps object creation to a minimum and memory usage down. Proxying by path also enables some really interesting list optimizations: in the For component’s optimized mode, the Proxy object for the observable references an index in the array. So when array elements rearrange, the existing Proxy nodes can be updated to point to their new indices, and we can render only the changed/ moved elements and skip rendering the full array. ### Listeners at each node Each node keeps a `Set` of listeners so that you can listen to changes to any value anywhere within the state. This is great for performance because changes only call the few listeners that are affected by that change. JavaScript’s `Set` provides nice benefits here as its uniquenesss constraint ensures callbacks are added only once, and removing listeners is an instant O(1) operation. ### Granular renders Extensive care is taken to ensure that components are rendered only when their state truly changes. Legend-State provides functions to be extra specific about when it tracks changes and useSelector to isolate a tracking computation to return one value. The best thing for your app’s performance is to render less, less often. ### Easy fine-grained reactivity Legend-State has built-in helpers to easily extract children so that their changes do not affect the parent. This keeps large parent components from rendering often just because their children change. import { useInterval } from "usehooks-ts" import { observable } from "@legendapp/state" import { useRef, useState } from "react" import { Memo, observer, useObservable } from "@legendapp/state/react" const MemoExample \= () \=> { const renderCount \= ++useRef(0).current const \[value, setValue\] \= useState(1) const state$ \= useObservable({ count: 1 }) useInterval(() \=> { state$.count.set((v) \=> v + 1) }, 500) const onClick \= () \=> setValue((v) \=> v + 1) return ( <Box center\> <h5\>Normal</h5\> <div\>Renders: {renderCount}</div\> <div\>Value: {value}</div\> <Button onClick\={onClick}\> Render </Button\> <Memo\> {() \=> <\> <h5\>Memo'd</h5\> <div\>Value: {value}</div\> <div\>Count: {state$.count.get()}</div\> </\>} </Memo\> </Box\> ) } Live Editing ### Shallow listeners Shallow listeners are called on objects only when keys are added or removed, but not when children are changed. This lets the child components manage their own rendering and large parent components don’t need to render. ### Array optimizations Optimizing list rendering is a primary goal because Legend-State is built for Legend and its huge documents and lists, so it aims to render parent list components as little as possible. When changes to an array only modify children or transpose elements, and do not add or remove elements, it can render only the changed elements and skip rendering the parent list. See Arrays for more details. ### Minimal closures and object creation While other state libraries create lots of new closures and objects for each observable, Legend-State is careful to keep it to a minimum. The observable functions are created only once so there is little cost to creating tons of observables. ### No boilerplate Because Legend-State’s api is very terse and require no boilerplate code, your apps don’t need to be filled with tons of extra boilerplate code. So your apps are smaller and faster because you’re shipping smaller files to your users. ### Micro-optimizations Beyond the architecture optimization, Legend-State also does a lot of micro-optimizations which don’t necessarily have a huge effect on their own, but it all adds up. * **For loop vs. forEach**: For loops are still quite a bit faster than `forEach` and don’t involve creating closures, so for loops are always favored. * **Set vs. array**: Compared to an array, `Set` has a marginal creation cost, but the uniqueness constraint and fast element removal end up making it overall faster for managing Listeners than arrays. * **Map vs. object**: `Map` has a marginal creation cost compared to an object, but its operations are generally faster, so it is used for all the caching and comparing changing arrays. * **Closures vs. bind**: Closures are surprisingly much faster than `bind`, so Legend-State favors creating small closures when needed. * **isNaN is slow**: This surprised us, but `isNaN` was causing significant slowdown. `+n - +n < 1` is a much faster way to check if a string is a number. Source * **Overloading Object prototype is a no-no**: We tried extending the prototype of the built-in `Object` but that caused a huge slowdown across the board, so that’s no good. * **Proxy vs. Object.defineProperty**: We also tried using `Object.defineProperty` to add properties to objects, but Proxy is much faster. * **Cloning is slow**: Change handlers have a `getPrevious()` function to opt-in to computing the previous state because cloning objects unnecessarily was wasteful. * **for of in Set/Map**: `for of` loops are the fastest way to iterate through Set and Map values. --- ## Page: https://legendapp.com/open-source/state/v3/intro/why/ Legend-State is an evolution of the state system we’ve been using internally in Legend since 2015 and in Bravely since 2020. It needs to be extremely fast because Legend users have documents with hundreds of thousands of items. We recently rewrote it with modern browser features, optimizing for both developer experience and best possible performance / memory usage. Comparing to other state libraries, we think you’ll prefer Legend-State for these reasons: ## ⚡️ Tiny and FAST Legend-State is the fastest React state library, designed to be as efficient as possible. It does very little extra work and minimizes renders by only re-rendering components when their observables change. And at only `4kb` it won’t hurt your bundle size. ## 😌 Feels natural Working with observables is as simple as `get()` and `set()` - they work as you’d expect, and the observable functions are right there on the prototype. const state$ = observable({ value: 1 });state$.value.get();state$.value.set(2);// Tracks automatically and runs on every changeobserve(() => { console.log(state$.value.get());}); ## 🔥 Fine-grained reactivity Using features like Memo it’s easy to isolate renders to the smallest possible change. import { observable } from "@legendapp/state" import { Memo, useObservable } from "@legendapp/state/react" import { useRef, useState } from "react" import { useInterval } from "usehooks-ts" function NormalComponent() { const \[count, setCount\] \= useState(1) const renderCount \= useRef(1).current++ useInterval(() \=> { setCount((v) \=> v + 1) }, 600) return ( <FlashingDiv pad\> <h5\>Normal</h5\> <div\>Renders: {renderCount}</div\> <div\>Count: {count}</div\> </FlashingDiv\> ) } function FineGrained() { const count$ \= useObservable(1) const renderCount \= useRef(1).current++ useInterval(() \=> { count$.set((v) \=> v + 1) }, 600) return ( <FlashingDiv pad\> <h5\>Fine-grained</h5\> <div\>Renders: {renderCount}</div\> <div\>Count: <Memo\>{count$}</Memo\></div\> </FlashingDiv\> ) } Live Editing For isolating a group of elements or computations, Legend-State has built-in helpers to easily extract children so that their changes do not affect the parent. This keeps large parent components from rendering often just because their children change. import { useRef } from "react" import { useInterval } from "usehooks-ts" import { Memo, useObservable } from "@legendapp/state/react" function MemoArrayExample() { const renderCount \= ++useRef(0).current const messages$ \= useObservable(\[\]) useInterval(() \=> { messages$.splice(0, 0, \`Message ${messages$.length + 1}\`) }, 600) return ( <Box\> <h5 className\="renders"\>Renders: {renderCount}</h5\> <div className\="messages"\> <Memo\> {() \=> ( messages$.map((message$, i) \=> ( <div key\={i}\>{message$.get()}</div\> )) )} </Memo\> </div\> </Box\> ) } Live Editing ## 👷 Does not hack React internals Some libraries hack up React internals to make signals and fine-grained reactivity work, which often doesn’t work on all platforms and may break if React internals change. Legend-State does everything above-board using hooks, with all React functionality built on top of useSelector, which just uses `useSyncExternalStore`. Check the source to see the lack of hackery. ## 🤷♀️ Unopinionated Some state libraries are for global state while some want state to reside within React. Some enourage individual atoms and others are for large global stores. Some have “actions” and “reducers” and others require immutability. But you can use Legend-State any way you want. * **Global state or local state in React**: Up to you 🤷♀️ * **Individual atoms or one store**: Up to you 🤷♀️ * **Modify directly or in actions/reducers**: Up to you 🤷♀️ See Patterns for more examples of different ways to use Legend-State. ## 💾 Persistence and sync > There are only two hard things in Computer Science: cache invalidation and naming things. - Phil Karlton We built Legend-State to be both the state and sync engines shared between both Legend and Bravely. So it includes a very full-featured sync and persistence system that we’ve iterated on and optimized for years in production. It’s designed to support local first apps: any changes made while offline are persisted between sessions to be retried whenever connected. It currently includes plugins for local persistence with Local Storage or IndexedDB on web and react-native-mmkv or AsyncStorage in React Native. It has a flexible sync API for all types of backends, and a growing library of plugins for backends like Keel and Firebase Realtime Database. import { ObservablePersistLocalStorage } from '@legendapp/state/persist-plugins/local-storage'import { synced } from '@legendapp/state/sync'import { observable } from '@legendapp/state'const state$ = observable({ initial: { { bigObject: { ... } } }, get: () => fetch('url').then(res => res.json()), set: ({ value }) => fetch('https://url.to.set', { method: 'POST', data: JSON.stringify(value) }), persist: { name: 'test' }}) ## 🔫 It’s safe from footguns Observables prevent direct assignment, favoring more purposeful `set` and `assign` functions instead. Read more in safety. --- ## Page: https://legendapp.com/open-source/state/v3/usage/observable/ You can put anything in an observable: primitives, deeply nested objects, arrays, functions, etc… Observables work just like normal objects so you can interact with them without any extra complication. Just call `get()` to get a value and `set(...)` to modify it. Observables do not modify the underlying data at all. They use Proxy to expose observable functions and track changes, so an observable is a Proxy pointing to the actual data. import { observable } from "@legendapp/state"// Create observable objects as large and deep as you want. They can include computed functions// and action functions.const state$ = observable({ fname: 'Annyong', lname: 'Bluth', // Computeds name: () => state$.fname.get() + ' ' + state$.lname.get(), // Actions setName: (name: string) => { const [fname, lname] = name.split(' '); state$.assign({ fname, lname }) }})// Or create small individual atoms if you preferconst fname$ = observable('Annyong')const lname$ = observable('Bluth') ## Observable methods ### get() You can use `get()` to get the actual value of any observable. const profile = { name: "Test user" }const state$ = observable({ profile, test: 0 })// get the underlying value from the observableconst name = state$.profile.name.get() Accessing properties through the observable will create a Proxy for every property accessed, but it will not do that while accessing the raw data. So you may want to retrieve the raw data before doing expensive computations that do not need to notify. const state$ = observable({ data: someHugeThing })const { data } = state$.get()// Nothing special happens when working with the raw dataprocessData(data) Calling `get()` within a tracking context tracks the observable automatically. You can change that behavior with a parameter `true` to track only when keys are added/removed. See observing contexts for more details. state$.get(true) // Create a shallow listener ### peek() `peek()` returns the raw value in the same way as `get()`, but it does not automatically track it. Use this when you don’t want the component/observing context to update when the value changes. const state$ = observable({ name: 'Test user' })// get the underlying value from the observableconst name = state$.name.peek() ### set() You can use `set()` to modify the observable, at any path within it. You can even `set()` on a node that is currently undefined, and it will fill in the object tree to make it work. const state$ = observable({ text: "hi" })// Set directlystate$.text.set("hello there")// Set with a function relative to previous valuestate$.text.set((prev) => prev + " there")// Set will automatically fill out objects that were undefinedstate$.otherKey.otherProp.set("hi") Note that `set` sets the given value into the raw data without modifying it. Legend-State does deep equality checking to notify of changes to each property, so setting with a clone of an object will not notify of any changes because all properties are the same. ### assign() Assign is a shallow operation matching `Object.assign` to set multiple properties at once. If you want a deep merge, see mergeIntoObservable. These batch all individual set operations so that observers only update once. const state$ = observable({ text: "hi", text2: "there" })// Assignstate$.assign({ text: "hi!" , text2: "there!"}) ### delete() Observables provide a `delete` function to delete a key from an object. const state$ = observable({ text: "hi" })// Delete textstate$.text.delete()// Set the whole value to undefinedstate$.delete() `delete` works on array elements as well, removing the element from the array. const state$ = observable([ 'apple', 'orange' ])// Delete from the arraystate$[0].delete()// state === ['orange'] ## Computed Observables ### Functions Observables can have functions anywhere within them. You can use these for whatever you want, such as adding extra behavior when setting. const state$ = observable({ isReady: false, toggle: () => { state$.isReady.toggle() console.log('set to', state$.isReady.get()) }}) Note that observing contexts track all observable `get()` calls, including within any called functions. So if a function called from within a `use$` hook calls `get()` that will be tracked too. const state$ = observable({ fname: 'Annyong', lname: 'Bluth', fullName: () => state$.fname.get() + ' ' + state$.lname.get()})function Name() { // Tracks [state$.fname, state$.lname] const name = use$(() => state$.fullName()) return <div>{name}</div>} ### Computed Functions Any function in an observable can be used a computed observable, whether at the root or in any child. Computed functions are lazy: a function is turned into an observable when you first call `get()` or `peek()` on it. It will then re-compute itself whenever the observables it accesses with `get()` are changed. const state$ = observable({ fname: 'Annyong', lname: 'Bluth', // A child is computed fullName: () => state$.fname.get() + ' ' + state$.lname.get()})// An observable with a function is a computedconst name$ = observable(() => state$.fname.get() + ' ' + state$.lname.get()) // Calling it like a function returns the value and computes when called.const fullName = state$.fullName()// Calling .get() activates it as a computed observable that recomputes itself on changesconst reactiveFullName = state$.fullName.get() A computed function can be used like an observable or as a function. function Name() { // Use it as a function const name1 = use$(() => state$.fullName()) // Use it as an observable const name2 = use$(state$.fullName) return <div>{name2}</div>} The difference between using it as a function vs. as a computed observable is that a computed observable is an object that caches the value. * `fullName()` is a function that re-computes whenever you call it. * `fullName.get()` creates a computed observable that re-computes itself whenever its dependencies change. ## Async Observables Creating an observable with a Promise or async function will initialize it to `undefined`, and it will be updated with the value of the Promise when it resolves. const serverState$ = observable(() => fetch('url').then(res => res.json()))observe(() => { // Getting the value activates the observable to fetch, and it // updates its value when it resolves. const data = serverState$.get() if (data) { ... }}) Asynchronous observables can be paired with when to activate the function and resolve when the observable’s Promise is resolved. // Await the promise to resolve and then get the data from itconst data = await when(serverState$)console.log(data) You can access the status of an async observable with the syncState helper, which is an observable itself. The most common usage is to check its loaded or error states: const status$ = syncState(serverState$)observe(() => { // This will re-run as the status changes const { isLoaded, error } = status$.get() if (error) { // Handle error } else if (isLoaded) { // Do the thing }}) ## Linked observables ### Two-Way Linked `linked` creates an observable bound to both `get` and `set` functions. This lets you bind or transform a single or multiple other observable values. For example it could be used to create a “Select All” checkbox. import { linked, observable } from "@legendapp/state"const selected$ = observable([false, false, false])const selectedAll$ = observable(linked({ // selectedAll is true when every element is selected get: () => selected$.every((val$) => val$.get()), // setting selectedAll sets the value of every element set: (value) => selected$.forEach((val$) => val$.set(value))}))selectedAll$.set(true)// selected.get() === [true, true, true] Or it could be used to automatically deserialize/serialize a string value. const str$ = observable('[1,2,3]')const arr$ = observable(linked({ get: () => JSON.parse(str$.get()) set: (value) => str$.set(JSON.stringify(value))})) #### Initial value When creating an asynchronous observable with a Promise you may want it to have an initial default value until the promise resolves. You can use the `initial` property of `linked` to do that. import { linked } from "@legendapp/state"const state$ = observable(linked({ get: () => fetch('url').then(res => res.json()), initial: { numUsers: 0, messages: [] }})) ## Advanced Computeds ### Link to another observable If you return an observable from a computed function, it will create a two-way link to the target observable. Interaction with the linked observable will then pass through to the target. Observing contexts tracking the linking observable will re-run both when the linked observable’s value changes and when the link itself changes. In this example, the observable that `selectedItem` points to is changed by setting `selectedIndex`. And because it’s a direct link to the target observable, `set` operations will pass through to the target observable. const state$ = observable({ items: ["hi", "there", "hello"], selectedIndex: 0, selectedItem: () => state$.items[state$.selectedIndex.get()],})observe(() => { console.log('observe:' + state$.selectedItem.get())})// observe: 'hi'state$.selectedIndex.set(2)// observe: 'hello'state$.selectedItem.set('HELLO!')// observe: 'HELLO!'// items = ["hi", "there", "HELLO!"] This could also be used to transform objects to another shape while still linking to the original value. So for example you could filter the values of an object into an array, with each element in the array pointing to the original observable. const state$ = observable({ items: { id1: { id: 'id1', status: 'ready' }, id2: { id: 'id2', status: 'disabled' } }, itemsReady: () => Object.values(state$.items) .filter(item => item.status.get() === 'ready')})observe(() => { console.log('observe:' + state$.itemsReady.get())})// observe: [{ id: 'id1', status: 'ready' }]// modifying the target object recomputes the computed arraystate$.items.id2.status.set('ready')// observe: [{ id: 'id1', status: 'ready' }, { id: 'id2', status: 'ready' }]// set on the computed array goes into the target objectstate$.itemsReady[0].status.set('disabled')// observe: [{ id: 'id2', status: 'ready' }] ### Lookup table A function with a single `string` key can be used as a lookup table (an object with a string key). Accessing it by index will call the function to create a computed observable by that key. const state$ = observable({ selector: 'text', items: { test1: { text: 'hi', othertext: 'bye' }, test2: { text: 'hello', othertext: 'goodbye' } }, // Return a link to the [selector] property in the given item texts: (key: string) => { return state$.items[key][state$.selector.get()] },})// Now these reference the same thing:state$.items.test1.text.get()state$.texts['test1'].get()// And setting a text goes through to the linked observablestate$.texts.test1.set('hello')state$.items.test1.text.get() // 'hello' ### event `event` works like an observable without a value. You can listen for changes as usual, and dispatch it manually whenever you want. This can be useful for simple events with no value, like onClosed. import { event } from "@legendapp/state"const onClosed$ = event()// Simply pass a callback to the `onChange` functiononClosed$.onChange(() => { ... })// Or use 'on' which is an alias of `onChange`onClosed$.on(() => { ... })// Dispatch the event to call listenersonClosed$.fire() ## Notes ### Safety Modifying an observable can have a large effect such as re-rendering or syncing with a database, so it uses a purposeful `set` rather than simple assignments. This prevents potentially catastrophic mistakes and looks visually different than a variable assignment so that it is clear what is happening. const state$ = observable({ text: "hello", num: 10, obj: {} })state$.text = "hi"// ❌ Can't set directlystate$.text.set("hi")// ✅ Calling set on a primitive works.state$ = {}// ❌ Error. This would delete the observable.state$.obj = {}// ❌ Error. Cannot assign to objects directly.state$.set({ text: "hi", num: 20 })// ✅ Calling set on an object works.state$.assign({ text: "hello there" })// ✅ Calling assign on an object works.state$.text.assign({ value: "hello there" })// ❌ Error. Cannot call assign on a primitive. If you really want to assign directly to observables, there is an extension to add `$` as a property you can get/set. See configuration for details. import { enable$get } from "@legendapp/state/config/enable$get"enable$get()// Now you can use $ as a shorthand for get()const testValue = state$.test.$// Assign to $ as a shorthand for set()state$.test.$ = "hello"// Assign objects too just like you can with set()state$.$ = { test: "hello" } ### undefined Because observables track nodes by path and not the underlying data, an observable points to a path within an object regardless of its actual value. So it is perfectly fine to access observables when they are currently undefined in the object. You could to do this to set up a listener to a field whenever it becomes available. const state$ = observable({ user: undefined })when(state$.user.uid, (uid) => { // Handle login}) Or you could set a value inside an undefined object, and it will fill out the object tree to make it work. const state$ = observable({ user: undefined })observe(() => { // This will be undefined until the full user profile is set console.log(`Name: ${state$.user.profile.name.get()}`)})state$.user.profile.name.set("Annyong")// state$ == { user: { profile: { name: 'Annyong' } } } ### Arrays Observable arrays have all of the normal array functions as you’d expect, but some are modified for observables. All looping functions set up shallow tracking automatically, as well as provide the observable in the callback. This includes: * every * filter * find * findIndex * forEach * includes * join * map * some Additionally, `filter` returns an array of observables and `find` returns an observable (or undefined). If you don’t want this extra observable behavior, `get()` or `peek()` the observable to get the raw array to act on. ### Observables are mutable Legend-State does not use immutability because immutability is slow. It needs to do deep equality checking of changes to know which nodes to notify anyway, so immutability just isn’t needed. So there are two things to be careful of. #### 1\. Modifying raw data breaks notifying of changes. Observables are just wrappers around the underlying data, so if you modify the raw data you’re actually modifying the observable data without notifying of changes. Then if you set it back onto the observable, that just sets it to itself so nothing happens. // ❌ This sets it to itself, nothing happensconst value = state$.get()value.key = 'newValue'state$.set(value)// ✅ Set the value directly in the observablestate$.key.set('newValue')// ✅ Assign the key/value to the observablestate$.assign({ key: 'newValue' }) #### 2\. Don’t need to clone A common pattern in React is to set state with a clone of the previous value, which is required because of immutability constraints in React. Legend-State does not have that constraint and cloning is bad for performance, so it’s better to do operations directly on the observables. // ❌ Setting with a cloned object creates a new object unnecessarilyconst record = record$.get()const newRecord = { ...record, key: 'value' }record$.set(newRecord)// ✅ Set the key directly in the observablerecord$.key.set('value') // ❌ Setting with a cloned array creates a new array unnecessarilyconst list = list$.get()const newList = [ ...list, 'value' ]list$.set(newList)// ✅ Just push itlist$.push('value') // ❌ Delete by clone and destructure creates a new object unnecessarilyconst record = record$.get()const { key, ...rest } = recordrecord$.set(rest)// ✅ Delete the key directly in the observablerecord$.key.delete() // ❌ Setting a filtered array creates a new array unnecessarilyconst list = list$.get()const newList = list.filter((item) => item.id != itemId)list$.set(newList)// ✅ Delete it from the array directlyconst list = list$.get()const idx = list.findIndex((item) => item.id === itemId)list$[idx].delete() --- ## Page: https://legendapp.com/open-source/state/v3/usage/reactivity/ Listening for changes is the core purpose of observables, so Legend-State provides many options. You can listen to changes at any level in an object’s hierarchy and it will be notified by changes in any children. ## Observing contexts The core power of Legend-State is the “observing contexts”. Calling `get()` within an observing context will track changes in that node, and re-run itself whenever it changes. Most functions in Legend-State take what we call a “Selector”, which is either a single observable or a function that calls `get()` on some observables and returns a value. Most functions in Legend-State are observing contexts, including computed observables, `observe`, `when`, linked/synced `get` functions, as well as `observer` and reactive components in React. When you call `get()` on an observable inside an observing context it will track it for changes and re-run whenever it changes. observe(() => { console.log(settings$.theme.get())}) ### What tracks `get()` is the primary way to access observables and track for changes, but there are actually a few ways: 1. Call `get()` on an observable: `settings.get()` 2. Array looping functions (shallow listener): `arr.map(settings.accounts, () => ...)` 3. Accessing array length (shallow listener): `if (arr.length > 0) ...` 4. Object.keys (shallow listener): `Object.keys(settings)` 5. Object.values (shallow listener): `Object.values(settings)` These operation do not track: 1. Accessing through an observable: `state$.settings` 2. Call `peek()` on an observable: `settings.peek()` ### Observing examples const state$ = observable({ settings: { theme: "dark", }, chats: { messages: [{ id: 0, text: "hi" }], },});observe(() => { const theme = state$.settings.theme.get(); // ✅ Tracking [state$.settings.theme] because of get() const theme = state$.settings.theme.peek(); // ❌ Not tracking because of peek() const theme = state$.settings.get(true); // ✅ Tracking [state$.settings (shallow)] because of get(true) const settings$ = state$.settings; // ❌ Not tracking, just a reference to an observable state$.chats.messages.map((m) => <Message key={m.peek().id} message={m} />); // ✅ Tracking [state$.chats.messages (shallow)] because of map() const keys = Object.keys(state$.settings); // ✅ Tracking [state$.settings (shallow)] because of Object.keys}); The automatic behavior can be modified with two observable functions: | Function | Tracked | | --- | --- | | `get()` | yes | | `peek()` | no | | `get(true)` | shallow | | `arr$.map(...)` | shallow | | `arr$.length` | shallow | | `Object.keys(state$)` | shallow | | `Object.values(state$)` | shallow | ### get() `get` returns the raw data of an observable and tracks it, so you can work with it without doing any further tracking. You may want to use `get()` to: * Get the value of an observable wrapper of a primitive * Track this object and not its individual fields. Minimizing the number of listeners is better for performance. const theme = state.settings.theme.get();// ✅ Tracking [state.settings.theme] ### Shallow tracking `get()` observes recursively by default, so any child changing will cause an update. You can modify it to be a shallow listener by just adding a `true` parameter. This can be useful when a component only needs to re-render if an object’s keys or an array’s items change. Array and Object functions also track shallowly - see What tracks above. const state$ = observable({ messages: [] });observe(() => { // Only need this to update when messages added/removed const messages = state$.messages.get(true); console.log("Latest message", messages[0]);}); ### Selectors Many of the functions in Legend-State take a Selector, which can be either an observable or a function that returns a value based on observables. The selector is run in an observing context so that `get()` tracks an observable for changes. Whenever an observable changes, it re-runs the function. Using `when` as an example of using Selectors: const isSignedIn$ = observable(false);const isOnline$ = observable(false);// A selector can be just an observable, which will be tracked for changesawait when(isSignedIn$);// Or selector can be a function which tracks all get() calls for changesawait when(() => isSignedIn$.get() && isOnline$.get()); ### observe `observe` can run arbitrary code when observables change, and automatically tracks the observables accessed while running, so it will update whenever any accessed observable changes. This can be useful to use multiple observables at once, for the benefit of cleanup effects, or if you just like it more than onChange. The callback parameter has some useful properties: * `num`: How many times it’s run. Use this to do something only the first time or not the first time. * `previous`: The previous value, which will be undefined on the first run and set to the return value * `cancel`: Set to `true` to stop tracking the observables when you are done observing * `onCleanup`: A function to call before running the selector again `observe` has an optional second `reaction` parameter which will run after the selector, and does not track changes. This can be useful for observing an `event` or a single `observable`. import { observe, observable } from "@legendapp/state";const state$ = observable({ isOnline: false, toasts: [] });const dispose = observe((e) => { // This observe will automatically track state.isOnline for changes if (!state$.isOnline.get()) { // Show an "Offline" toast when offline const toast = { id: "offline", text: "Offline", color: "red" }; state$.toasts.push(toast); // Remove the toast when the observe is re-run, which will be when isOnline becomes true e.onCleanup = () => state$.toasts.splice(state$.toasts.indexOf(toast), 1); }});// Cancel the observedispose(); Or use the second parameter to run a reaction when a selector changes. It has an additional `value` parameter, which contains the value of the selector. // Observe the return value of a selector and observe all accessed observablesobserve(state$.isOnline, (e) => { console.log("Online status", e.value);});// Observe the return value of a selector and observe all accessed observablesobserve( () => state$.isOnline.get() && state$.user.get(), (e) => { console.log("Signed in status", e.value); }); ### when `when` runs the given callback **only once** when the Selector returns a truthy value, and automatically tracks the observables accessed while running the Selector so it will update whenever one of them changes. When the value becomes truthy it will call the callback function and dispose the listeners. It also returns a Promise that resolves when the Selector returns a truthy value that can be used instead of the callback function. import { when } from "@legendapp/state";const state$ = observable({ ok: false });// Option 1: Promiseawait when(state$.ok);// Option 2: callbackwhen( () => state$.ok.get(), () => console.log("Don't worry, it's ok")); ### whenReady `whenReady` is the same as `when` except it waits for objects and arrays to not be empty. import { whenReady } from "@legendapp/state";const state$ = observable({ arr: [] });whenReady(state$.arr, () => console.log("Array has some values"));// Not ready yetstate$.arr.push("hello");// "Array has some values" ### onChange `onChange` listens to an observable for any changes anywhere within it. Use this as specifically as possible because it will fire notifications for every change recursively up the tree. const state$ = observable({ text: "hi" });state$.text.onChange(({ value }) => console.log("text changed to", value));state$.onChange(({ value }) => console.log("state changed to", value));state$.text.set("hello");// Log: text changed to "hello"// Log: state changed to { text: "hello" } `onChange` has some extra options for more advanced use: 1. `getPrevious`: Function to compare with the previous value. It is a function to let you opt into getting the previous value if needed, because it has some performance cost in cloning the object to compute the previous value. 2. `changes`: Array of all of the changes to this observable in the latest batch. This is intended mainly for internal usage by the persistence plugins to know what to sync/update and the history plugin to track all changes, but it may be good for other uses too. 3. `trackingType`: Whether to track only shallow changes 4. `initial`: Whether to run the callback immediately with the current value 5. `immediate`: Whether to run the callback immediately instead of within a batch. This is used internally by `computed` to make sure its value is always correct, but it may be useful for other specific uses. // Full examplestate$.onChange( ({ value, getPrevious, changes }) => { const prev = getPrevious(); changes.forEach(({ path, valueAtPath, prevAtPath }) => { console.log(valueAtPath, "changed at", path, "from", prevAtPath); }); }, { initial: true, trackingType: true }); #### Dispose of listeners Listening to an observable returns a dispose function to stop listening. Just call it when you want to stop listening. const state$ = observable({ text: 'hello' })const onChange = () => { ... }const dispose = state$.text.onChange(onChange)// Cancel listening manuallydispose() ## Batching You may want to modify multiple observables at once without triggering callbacks for each change. Batching postpones renders and listeners until the end of the batch. Batching can be done in two ways, wrapping between `beginBatch()` and `endBatch()` or in a callback with `batch(callback)`. import { batch, beginBatch, endBatch } from "@legendapp/state";// Wrap in begin and endbeginBatch();doManyChanges();endBatch();// Or batch with a callbackbatch(() => { doManyChanges();}); As we all know, you generally shouldn’t optimize pre-emptively. `observable` functions like `assign` already batch changes under the hood, so listeners don’t get called until the full change is complete. In many cases like setting unrelated observables you don’t need to worry about it. Batching is important in a few key situations: ### When observables depend on each other Use `batch` to delay computations/renders until all dependent changes are complete or you might get weird intermediary states. const name$ = observable({ first: "", last: "" });const fullName = observable(() => `${name$.first} ${name$.last}`);observe(() => console.log("fullName = ", fullName.get()));// Not batched:name$.first.set("First");name$.last.set("Last");// ❌ fullName notifies its listeners with incomplete state// fullName = "First "// fullName = "First Last"// Batched:batch(() => { name$.first.set("First"); name$.last.set("Last");});// ✅ fullName notifies only with final state// fullName = "First Last" ### To prevent excessive renders Making multiple changes in a row can cause React components and observers to re-run multiple times when they should wait until changes are complete. const state$ = observable({ items: [] });function addItems() { for (let i = 0; i < 1000; i++) { state$.items.push({ text: `Item ${i}` }); }}// ❌ This can render 1000 times while pushing to the arrayaddItems();// ✅ Batching delays until complete and renders oncebatch(addItems); ### When persisting If you are using `synced` or `syncObservable` to automatically persist your changes, you can prevent excessive writes by delaying persistence until changes are complete. Pushing to an array 1000 times could save to storage 1000 times, which could be very slow! --- ## Page: https://legendapp.com/open-source/state/v3/usage/configuring/ Legend-State is designed to have a lean core that allows you and your team to add additional features, so it has configuration functions to add features as you like. These functions add features and augment the TypeScript interface to add the new functions, so just importing the file adds the interface. These configuration functions only need to be called once, before their effects are used, and then they will work anywhere. It should generally be at the top of the file that’s the entry point of your app or is imported everywhere, or it could be at the top of a global state file. ## enable$GetSet This enables accessing and setting the raw value of an observable directly. It’s a shorthand for `get()` and `set(...)`. import { enable$GetSet } from "@legendapp/state/config/enable$GetSet";enable$GetSet(); Now you can access/modify observables directly. import { observable } from "@legendapp/state"const state$ = observable({ test: "hi", num: 0 })// $ is a shorthand for get()const testValue = state$.test.$// Assign to $ as a shorthand for set()state$.test.$ = "hello"// Assign objects too just like you can with set()state$.$ = { test: "hello" }// Incrementing works as you'd expectstate$.num.$++ ## enable\_PeekAssign This enables accessing and setting the raw value of an observable directly without tracking or notifying listeners. Getting with `._` is a shorthand for `peek()` and assigning to `._` modifies the underlying data without notifying. Modifying data without notifying is likely necessary in only very specific scenarios so use it with care. import { enable_PeekAssign } from "@legendapp/state/config/enable_PeekAssign";enable_PeekAssign(); Now you can access/modify observables directly without notifying. import { observable } from "@legendapp/state"const state$ = observable({ test: "hi", num: 0 })// _ is a shorthand for peek()const testValue = state$.test._// Assign to _ to modify the underlying object without notifying listenersstate$.test._ = "hello"// Assign objects toostate$._ = { test: "hello" } ## enableReactTracking `enableReactTracking` is useful to warn if a `get()` is called within a React component without being wrapped in `use$`, which would break the reactivity. ### warnMissingUse This will log a warning whenever `get()` is called within a React component. This can help you find places where you meant to use `use$` to track the observable in React, or you may want to change it to `peek()` to be clearer that it should not trigger updates. import { enableReactTracking } from "@legendapp/state/config/enableReactTracking"enableReactTracking({ warnMissingUse: true,}) ### (Deprecated) warnUnobserved This makes React components warn if using `get()` without being wrapped in `observer`. This is a very helpful way to catch the easy mistake of forgetting `observer`. It only runs when `process.env.NODE_ENV === 'development'` so it won’t disrupt your app in production. import { enableReactTracking } from "@legendapp/state/config/enableReactTracking"enableReactTracking({ warnUnobserved: true,}) ### (Deprecated) auto tracking This makes React components auto-track observables without using `observer`, so all you need to do is `get()` an observable and the component will re-render when it changes. This is useful for rapid prototyping as observing is done for you. import { enableReactTracking } from "@legendapp/state/config/enableReactTracking"enableReactTracking({ auto: true,}) Now you can just `get()` and components will be automatically reactive. import { observable } from "@legendapp/state"const state$ = observable({ test: "hi" })function Component() { // This makes this component responsive to test changing const test = state$.test.get() return <div>{test}</div>} Note that `enableReactTracking` and `observer` can be used together - observer will optimize away the auto tracking behavior in favor of its more efficient tracking. --- ## Page: https://legendapp.com/open-source/state/v3/usage/helper-functions/ ## ObservableHint These hints tweak the default behavior of observables to improve their performance. ### ObservableHint.opaque `ObservableHint.opaque` marks an object in an observable as opaque so that it will be treated as a primitive, so that properties inside the opaque object will not be observable. This is useful for storing DOM or React elements or other large objects in an observable when you don’t care about tracking its properties changing. import { observable, ObservableHint } from '@legendapp/state'const state$ = observable({ text: 'hi', body: ObservableHint.opaque(document.body) }) ### ObservableHint.plain `ObservableHint.plain` marks an object as not having any child functions or observables. By default observables recurse through their children to find these and setup computed observables and observable links. This is a performance optimization to prevent needing to do that. Note that `ObservableHint.opaque` also prevents that recursion. This will break any descendant functions or computeds, so make sure to only use this when it is for sure a plain object/array. import { observable, ObservableHint } from '@legendapp/state'const bigObject = {}const state$ = observable({ text: 'hi', child: ObservableHint.plain(bigObject) }) ## mergeIntoObservable If you want to merge a deep object into an observable, `mergeIntoObservable` can do that and retain all of the existing observables and listeners on the way, and fire listeners as values change. This is used by `syncObservable` under the hood. import { observable } from "@legendapp/state";import { mergeIntoObservable } from "@legendapp/state";const state$ = observable({ store: { text: "hello", other: "hello there" } });state$.store.text.onChange(({ value }) => console.log(`text changed to "${value}"`));const newValue = { store: { text: "hi", other: "hi there" } };mergeIntoObservable(state$, newValue);// text changed to "hi"state$.store === newValue.store; // ✅ true ## trackHistory `trackHistory` creates an observable that tracks all changes in the target observable, with the previous value at the time it was changed. Since the history is an observable you can observe it or persist it like any other observable. This can be useful for saving a version history for a text editor. If you’d like to create an undo stack, check out the undoRedo helper. An optional second parameter lets you use an existing observable for storing the history, which can be useful to save history into an existing state object. import { observable } from '@legendapp/state'import { trackHistory } from '@legendapp/state/helpers/trackHistory'const state$ = observable({ profile: { name: 'Hello' }})// Track all changes to stateconst history = trackHistory(state$)// Change something in statestate$.profile.name.set('Annyong')// History shows the previous value when it changed:{ 1666593133018: { profile: { name: 'Hello' } }} ## undoRedo `undoRedo` is similar to trackHistory in that it tracks changes to an observable. However, `undoRedo` also provides helpers for undo / redo (as the name suggests) and does the tracking for you. An optional second parameter lets you specify how deep you’re willing to save an undo stack. By default, it will track changes forever, which means your memory will grow unbounded, so it’s recommended to set that. When you undo, you can redo — unless you make new changes to the observable, in which case the redo stack will be removed and the new state will take its place. This is similar to how other undo/redo systems commonly work. import { observable } from "@legendapp/state";import { undoRedo } from "@legendapp/state/helpers/undoRedo";const state$ = observable({ todos: ["Get milk"] });const { undo, redo, getHistory } = undoRedo(state$.todos, { limit: 100 });state$.todos.push("Pick up bread");// todos is now ["Get milk", "Pick up bread"]undo();// todos is now back to ["Get milk"]redo();// todos is restored to ["Get milk", "Pick up bread"]getHistory(); // returns an array of all the different states it containsstate$.todos.set(getHistory()[0]); // reset to the original state in historyundo(); // now back to where it was just prior to resetting For convenience, we also export `undos$` and `redos$` which are observables that let you track how many undos/redos you have available on the undo stack. This is especially useful when rendering UI elements. Hint: use batching to group sets of changes into one history state. import { observable } from "@legendapp/state";import { observer } from "@legendapp/state/react";import { undoRedo } from "@legendapp/state/helpers/undoRedo";const state$ = observable({ todos: ["Get milk"] });const { undo, redo, undos$, redos$ } = undoRedo(state$.todos, { limit: 100 });export function UndoUI() { const undos = use$(undos$); const redos = use$(redos$); return ( <div> {undos > 0 ? ( <button onClick={undo}>Undo</button> ) : ( <button disabled={true}>Undo</button> )} {redos > 0 ? ( <button onClick={undo}>Redo</button> ) : ( <button disabled={true}>Redo</button> )} </div> );} --- ## Page: https://legendapp.com/open-source/state/v3/react/react-api/ ## Reading state ### use$ `use$` computes a value and automatically listens to any observables accessed while running, and only re-renders if the computed value changes. This can take either an observable or a function that consumes observables. Props: * `selector`: Observable or computation function that listens to observables accessed while running * `options`: `{ suspense: boolean }`: Enable suspense when the value is a Promise and you’re using it within React.Suspense. import { observable } from "@legendapp/state"import { use$ } from "@legendapp/state/react"const state$ = observable({ selected: 1, theme })const Component = ({ id }) => { // Only re-renders if the return value changes const isSelected = use$(() => id === state$.selected.get()) // Get the raw value of an observable and re-render when it changes const theme = use$(state$.theme) ...} #### Using with React Suspense Using `{ suspense: true }` as the second parameter makes the component work with Suspense. If the observable is a Promise, Suspense will render the fallback until it resolves to a non-undefined value. import { useObservable, useSelector } from "@legendapp/state/react"import { Suspense } from "react"function Test({ state$ }) { const value = useSelector(state$, { suspense: true }) return <div>{value}</div>}export default function App() { const state$ = useObservable( new Promise((resolve) => { setTimeout(() => { resolve("hello") }, 1000) }) ) return ( <div> <div>Suspense test</div> <Suspense fallback={<div>Loading...</div>}> <Test state$={state$} /> </Suspense> </div> )} ### observer `observer` is a good optimization if you have want to consume observables/selectors conditionally or if you consume many of them in one component. It inserts a single hook into the component and tracks all observables in the one hook. Because `use$` normally runs three hooks, this can drastically reduce the number of hooks in your components if you use `use$` many times. > In previous versions this allowed calling `get()` directly within components, but that is discouraged as of 3.0.0-beta.20. See migrating for more info. See Observing Contexts for more about when it tracks. import { observable } from "@legendapp/state"import { observer, use$ } from "@legendapp/state/react"const state$ = observable({ count: 0 })const Component = observer(function Component() { // Accessing state automatically makes this component track changes to re-render const count = use$(state$.count) // Re-renders whenever count changes return <div>{count}</div>}) ### useObserve `useObserve` creates an observe which you can use to take actions when observables change. This can be effectively similar to `useEffect` for observables, except that it runs when observables change and not because of a deps array changing. Like `observe`, `useObserve` has an optional second callback parameter which will run after the selector, and does not track changes. This can be useful for observing an `event` or a single `observable`. Note that `useObserve` runs during component render, not after render like `useEffect`. If you want an observer that runs after render, see useObserveEffect. import { event } from "@legendapp/state"import { useObserve, useObservable } from "@legendapp/state/react"import { $React } from "@legendapp/state/react-web"const eventUpdateTitle = event()function ProfilePage() { const profile$ = useObservable({ name: "" }) // This runs whenever profile changes useObserve(() => { document.title = `${profile$.name.get()} - Profile` }) // Observe a single observable with a callback when it changes useObserve(profile$.name, ({ value }) => { document.title = `${value} - Profile` }) // Observe an event with a callback when it changes useObserve(eventUpdateTitle, () => { document.title = `${profile$.name.get()} - Profile` }) return ( <div> <span>Name:</span> <$React.input $value={profile$.name} /> </div> )} ### useObserveEffect `useObserveEffect` is the same as useObserve except that it runs after the component is mounted. ### useWhen, useWhenReady These are hook versions of when. ## Hooks for creating local state ### useObservable The `useObservable` hook creates an observable within a React component. This can be useful when state is specific to the lifetime of the component, or to hold multiple values in local state. Its observables will not be automatically tracked for re-rendering, so you can track them the same as any other observable. As with normal observables you can create a computed observable by just using a function. import { observer, useObservable } from "@legendapp/state/react"const Component = function Component() { const state$ = useObservable({ title: 'Title', first: '', last: '', profile: {...} }) const fullname$ = useObservable(() => `${state$.fname.get()} ${state$.lname.get()}`) return ( <div> <div>{fullname$}</div> <Input text={state$.first} /> <Input text={state$.last} /> <Profile name={fullname$} /> </div> )} ### useObservableReducer `useObservableReducer` works the same way as `useReducer` but sets an observable rather than triggering a render. import { useObservableReducer } from "@legendapp/state/react"function reducer(state, action) { if (action.type === 'incremented_age') { return { age: state.age + 1 } }}const Component = () => { // Only re-renders if the return value changes const [age$, dispatch] = useObservableReducer(reducer, { age: 42 }) // Get the value of the reducer const theme = age$.get()} ### Using with Context Passing an observable object through Context gives you all the benfits of Context without the downsides, like any change to context normally re-renders all consumers. Simply set an observable as a Context value and consume it from a child component as usual. The observable itself is a stable object so useContext will never cause a re-render - only observing contexts will be updated as usual. import { createContext, useContext } from "react"import { observer, useObservable } from "@legendapp/state/react"interface UserState { profile: { name: string; };}// Create a typed context. It can have a default value of undefined because// the Provider will always be created with an Observable.const StateContext = createContext<Observable<UserState>>(undefined as any);function App() { const state$ = useObservable({ profile: { name: "", }, }) return ( <StateContext.Provider value={state$}> <div> <Sidebar /> <Main /> </div> </StateContext.Provider> )}const Sidebar = function Sidebar() { // StateContext will never change so this will never cause a render const state$ = useContext(StateContext) // This component never re-renders, but name re-renders itself return ( <div> Name: <Memo>{state$.profile.name}</Memo> </div> )} ## Miscellaneous hooks ### useEffectOnce This is `useEffect` with a workaround in development mode to make sure it only runs once. import { useEffectOnce } from "@legendapp/state/react"const Component = () => { useEffectOnce(() => { console.log("mounted") }, [])} ### useMount Using observable hooks we generally avoid the built-in hooks and dependency arrays, so we have `useMount` and `useUnmount` hooks for convenience, which are just `useEffectOnce` under the hood. import { useMount } from "@legendapp/state/react"const Component = () => { useMount(() => console.log("mounted"))} ### useUnmount Like the `useMount` hook, `useUnmount` just uses `useEffectOnce` under the hood. import { useUnmount } from "@legendapp/state/react"const Component = () => { useUnmount(() => console.log("mounted"))} ### usePauseProvider This creates a React Context Provider with a `paused$` observable. Set `paused$` to `true` to pause all rendering from observable changes under the context, and set it `false` to resume. This applies to everything within Legend-State like observer, useSelector, $React, Memo, etc… But normal renders coming from React or other state is not affected. This can be very useful to stop all updating when UI is not even visible, such as when a fullscreen modal is covering app UI or in inactivate tabs in React Native. import { useInterval } from "usehooks-ts" import { Memo, usePauseProvider, useObservable } from '@legendapp/state/react' function App() { const { PauseProvider, isPaused$ } \= usePauseProvider() const int$ \= useObservable(0) useInterval(() \=> { int$.set((val) \=> val + 1) }, 100) return ( <Box center\> <Button onClick\={isPaused$.toggle}\> <Memo\>{() \=> (isPaused$.get() ? 'Resume' : 'Pause')}</Memo\> </Button\> <PauseProvider\> <Memo\>{int$}</Memo\> </PauseProvider\> </Box\> ) } Live Editing --- ## Page: https://legendapp.com/open-source/state/v3/react/fine-grained-reactivity/ Legend-State enables a new way of thinking about how React components update: to **observe state changing** rather than observing renders. In this pattern, components render once and individual elements re-render themselves. This enables what we call a “render once” style - components render only the first time and state changes trigger only the tiniest possible re-renders. You can render observable primitives directly in mini self-updating components, use reactive props to update props based on state, or use a set of control-flow components to optimize conditional rendering and arrays to re-render as little as possible. Some teams may prefer to use Legend-State in a way that’s more canonically React and skip some or all of these concepts, at least at first. But the fine-grained reactivity features can improve performance and reduce the amount of code you need to write. See Making React fast by default and truly reactive for more details. ## Render an observable/selector directly Use the `Memo` component to create a mini element that re-renders itself when it changes, without needing the parent component to re-render. This is the most basic and recomended way for using Legend-State with React. The children inside of `Memo` re-render themselves when the value changes, but the parent component does not re-render. import { Memo } from "@legendapp/state/react";const count$ = observable(0);// These components never re-render.// The Memo element re-renders itself when its value changes.function WithObservable() { return ( <div> Count: <Memo>{count$}</Memo> </div> );}function WithSelector() { return ( <div> <Memo>{() => <div>Count: {count$.get()}</div>}</Memo> </div> );} ## Reactive components Legend-State provides reactive versions of all platform components with reactive props. This lets you provide a Selector to props so that the component will update itself whenever the Selector changes. For input elements it can create a two-way binding to the value, so that the observable is always in sync with the displayed value of the element. Under the hood this extracts the reactive props to a separate component which re-renders when they change. This can be a big performance boost if these props change often and your outer component is very heavy, as it will move those re-renders down into a tiny wrapper component. But keep in mind that overdoing it can potentially add slightly extra overhead if it’s adding more components to the React tree. ### React Web Legend State includes reactive versions of all of the DOM elements on the `$React` namespace. import { $React } from "@legendapp/state/react-web"function Component() { // This component renders only once const state$ = useObservable({ name: '', age: 18 }) return ( <div> {/* Reactive styling */} <$React.div $style={() => ({ color: state$.age.get() > 5 ? 'green' : 'red' })} $className={() => state$.age.get() > 5 ? 'kid' : 'baby'} /> {/* Reactive children */} <$React.div> {() => ( <div>{state$.age.get() > 5 ? <Kid /> : <Baby />}</div> )} /> {/* Two-way bind to inputs */} <$React.textarea $value={state$.name} /> <$React.select $value={state$.age}>...</$React.select> <$React.input $value={state$.name} $className={() => !state$.name.get() && "border-red-500"} $style={() => !state$.name.get() && { borderWidth: 1 }} /> </div> )} ### React Native Legend State includes reactive versions of all of the built-in React Native components, prefixed with `$` to differentiate them from the normal components. import { $View, $Text, $TextInput } from "@legendapp/state/react-native"function Component() { // This component renders only once const state$ = useObservable({ name: '', age: 18 }) return ( <div> {/* Reactive styling */} <$View $style={() => ({ color: state$.age.get() > 5 ? 'green' : 'red' })} /> {/* Reactive children */} <$Text> {() => state$.age.get() > 5 ? 'child' : 'baby'} </$Text> {/* Two-way bind to inputs */} <$TextInput $value={state$.name} /> </div> )} ## Control-flow components ### Computed Computed extracts children so that their changes do not affect the parent, but the parent’s changes will still re-render them. Use this when children use observables that change often without affecting the parent, but also depends on local state in the parent. This is equivalent to extracting it as a separate component (and passing in all needed props). The child needs to be a function to be able to extract it into a separate tracking context, but the Babel plugin lets you pass it children directly. function Component() { return ( <Computed> {() => state$.messages.map((message) => ( <div key={message.id}> {message.text} {localVar} </div> )) } </Computed> );} In this example see that clicking the “Render parent” button renders the parent and increments `value` and the computed children are updated too. import { useInterval } from "usehooks-ts" import { useRef, useState } from "react" import { observable } from "@legendapp/state" import { Computed, observer, useObservable } from "@legendapp/state/react" const ComputedExample \= () \=> { const renderCount \= ++useRef(0).current const \[value, setValue\] \= useState(1) const state$ \= useObservable({ count: 1 }) useInterval(() \=> { state$.count.set((v) \=> v + 1) }, 500) const onClick \= () \=> setValue((v) \=> v + 1) return ( <Box center\> <h5\>Normal</h5\> <div\>Renders: {renderCount}</div\> <div\>Value: {value}</div\> <Button onClick\={onClick}\> Render </Button\> <Computed\> {() \=> <\> <h5\>Computed</h5\> <div\>Value: {value}</div\> <div\>Count: {state$.count.get()}</div\> </\>} </Computed\> </Box\> ) } Live Editing ### Memo Memo is similar to Computed, but it will never re-render when the parent component renders - only if its own observables change. Use `Memo` when children are truly independent from the parent component. This is equivalent to extracting it as a separate component (and passing in all needed props) with `React.memo`. The child needs to be a function to be able to extract it into a separate tracking context, but the Babel plugin lets you pass it children directly. function Component() { return ( <Memo> {() => state.messages.map((message) => ( <div key={message.id}> {message.text} {localVar} </div> )) } </Memo> );} This is the same as the Computed example, except that the memoized children are not updated with the parent’s value. import { useInterval } from "usehooks-ts" import { observable } from "@legendapp/state" import { useRef, useState } from "react" import { Memo, observer, useObservable } from "@legendapp/state/react" const MemoExample \= () \=> { const renderCount \= ++useRef(0).current const \[value, setValue\] \= useState(1) const state$ \= useObservable({ count: 1 }) useInterval(() \=> { state$.count.set((v) \=> v + 1) }, 500) const onClick \= () \=> setValue((v) \=> v + 1) return ( <Box center\> <h5\>Normal</h5\> <div\>Renders: {renderCount}</div\> <div\>Value: {value}</div\> <Button onClick\={onClick}\> Render </Button\> <Memo\> {() \=> <\> <h5\>Memo'd</h5\> <div\>Value: {value}</div\> <div\>Count: {state$.count.get()}</div\> </\>} </Memo\> </Box\> ) } Live Editing ### Show Show renders child components conditionally based on the if/else props, and does not re-render the parent when the condition changes. Passing children as a function can prevent the JSX from being created until it needs to render. That’s done automatically if you use the babel plugin. Props: * `if`: A computed function or an observable * `ifReady`: A computed function or an observable. This will not render if the value is an empty object or empty array. * `else`: Optionally provide a component to render if the condition is not met * `children`: The components to show conditionally. This can be React elements or a function given the value returned from `if` which you can use to do more complex conditional rendering. * `wrap`: A component to wrap the children. For example this could be Framer Motion’s AnimatePresence to animate the element entering/exiting. <Show if={state.show} else={() => <div>Nothing to see here</div>} wrap={AnimatePresence}> {() => <Modal />}</Show> import { Show, useObservable } from "@legendapp/state/react";import { AnimatePresence } from "framer-motion";function ShowExampleWithSelector() { const state$ = useObservable({ collection: [] }); return ( <Show if={() => state$.collection.get().length > 0} else={() => <div>Nothing to see here</div>} wrap={AnimatePresence} > {() => <Modal />} </Show> );} ### Switch Switch renders one child component conditionally based on the `value` prop, and does not re-render the parent when the condition changes. Props: * `value`: A computed function or an observable * `children`: An object with the possible cases of `value` as keys. If `value` doesn’t match any of the cases it will use the `default` case if available. <Switch value={state.index}> {{ 0: () => <div>Tab 1</div>, 1: () => <div>Tab 2</div>, default: () => <div>Error</div>, }}</Switch> ### For The `For` component is optimized for rendering arrays of observable objects so that they are extracted into a separate tracking context and don’t re-render the parent. An `optimized` prop adds additional optimizations, but in an unusual way by re-using React nodes. See Optimized rendering for more details. Props: * `each`: An observable (array, object, or Map) * `item`: A render function which receives the item id, and item observable or undefined * `itemProps`: Extra props to pass down to each item * `sortValues`: If the `each` parameter is an object or Map, this is a sort function for how to sort the elements. `(A: T, B: T, AKey: string, BKey: string) => number` * `children`: A render function or, you can pass a render function as children instead of in the `item` prop if you prefer. import { observable } from "@legendapp/state"import { For, use$ } from "@legendapp/state/react"const state$ = observable({ arr: [{ id: 1, text: 'hi' }]})const Row = function Row({ item$ }) { const text = use$(item$.text) return <div>{text}</div>}function List() { // 1. Use the For component with an item prop return <For each={state$.arr} item={Row} /> // 2. Use the For component with a render function as the child return ( <For each={list} optimized> {item$ => ( <div> {item$.text.get()} </div> )} </div> )} ## Optionally add the Babel plugin The Babel plugin can make the syntax for Computed, Memo, and Show less verbose. But they work fine without Babel if you don’t want to or can’t use it. The Babel plugin converts the JSX under the hood so you don’t need to use functions as children. It converts inline elements to functions so that they can be treated reactively: // You write<Computed><div>Count: {state$.count.get()}</div></Computed><Memo><div>Count: {state$.count.get()}</div></Memo><Show if={state$.visible}><Modal /></Show>// Babel transforms it to<Computed>{() => <div>Count: {state.count.get()}</div>}</Computed><Memo>{() => <div>Count: {state$.count.get()}</div>}</Memo><Show if={state$.visible}>{() => <Modal />}</Show> To install it, add `@legendapp/state/babel` to the plugins in your `babel.config.js`: module.exports = { plugins: ["@legendapp/state/babel"],}; If you’re using typescript you can add a `.d.ts` file to your project with this in it, to expand the types to allow direct JSX children to Computed and Memo. /// <reference types="@legendapp/state/types/babel" /> ## Create your own reactive components ### reactive You can wrap external components in `reactive` to create reactive versions of all of their props, prefixed with `$`. This makes it so that the reactive component can accept reactive props but the target receives regular props as usual. `reactive` creates a Proxy (not an HOC) that extracts all reactive props and observes them for changes, passing the regular prop down to the component. In this example, `reactive` adds a `$message` prop which takes a Selector, while the target component receives a normal `message` prop and is only re-rendered when `message` changes. import { observable } from "@legendapp/state";import { reactive } from "@legendapp/state/react";const isSignedIn$ = observable(false);const Component = reactive(function Component({ message }) { return <div>{message}</div>;});function App() { return ( <Component $message={() => isSignedIn$.get() ? "Hello" : "Goodbye"} /> );} In addition to wrapping your own functions, you can wrap external library components to make them reactive. In this example we make a Framer Motion component reactive so that we can update its animations based on observables without needing to re-render the parent component or its children. import { reactive } from "@legendapp/state/react";import { motion } from "framer-motion";const $MotionDiv = reactive(motion.div);function Component() { // This component renders only once const width$ = useObservable(100); return ( <$MotionDiv $animate={() => ({ x: width$.get(), })} > ... </$MotionDiv> );} ### reactiveObserver This is a single HOC with the functionality of both `observer` and `reactive`. They both run the same function under the hood, with slightly different options, so this is the optimal way to have one HOC that does both at once. import { observable } from "@legendapp/state";import { reactiveObserver, use$ } from "@legendapp/state/react";const name$ = observable("Annyong");const isSignedIn$ = observable(false);const Component = reactiveObserver(function Component({ message }) { const name = use$(name$); return ( <div> {message} {name} </div> );});function App() { return ( <Component $message={() => (isSignedIn$.get() ? "Hello" : "Goodbye")} /> );} ### reactiveComponents `reactiveComponents` makes multiple reactive components at once. You can use this to create your own internal library of reactive components, or to wrap UI libraries that have multiple components in a namespace like `Modal.Header` and `Modal.Footer`. import { reactiveComponents } from "@legendapp/state/react";import { motion } from "framer-motion";const $Motion = reactiveComponents(motion);function Component() { // This component renders only once const width$ = useObservable(100); return ( <$Motion.div $animate={() => ({ x: width$.get(), })} > ... </$Motion.div> );} --- ## Page: https://legendapp.com/open-source/state/v3/react/helpers-and-hooks/ Legend-State includes some helpful observables and hooks for common tasks. These are available at their own import paths so they don’t increase the size of your bundle unless you use them. ## Helper observables ### currentDate `currentDate` is an observable containing the current date (with no time) that changes automatically at midnight. import { currentDate } from "@legendapp/state/helpers/time"observe(() => { console.log('Today is': currentDate.get())}) ### currentTime `currentTime` is an observable containing the current time that changes automatically every minute. import { currentTime } from "@legendapp/state/helpers/time"observe(() => { console.log('The time is is': currentTime.get())}) ### pageHash (web) `pageHash` is an observable that updates with the page hash, and changes the page hash when the observable is changed. Use `configurePageHash` to control how it sets the page hash, with `pushState | replaceState | location.hash` import { pageHash, configurePageHash } from '@legendapp/state/helpers/pageHash'configurePageHash({ setter: 'pushState' })observe(() => { console.log('hash changed to': pageHash.get())})pageHash.set('value=test')// location.hash == "#value=test" ### pageHashParams (web) `pageHashParams` is an observable that updates with the page hash, and changes the page hash when the observable is changed. Use `configurePageHashParams` to control how it sets the page hash, with `pushState | replaceState | location.hash` import { pageHashParams, configurePageHash } from '@legendapp/state/helpers/pageHashParams'observe(() => { console.log('userid param changed to': pageHashParams.userid.get())})pageHashParams.userid.set('newuser')// location.hash == "#userid=newuser" ## Hooks ### useHover (web) `useHover` returns an observable whose value is `true | false` based on whether the target element is hovered. This can be useful for using fine-grained reactivity features to update without re-rendering the component, or to pass the observable around to other components for them to consume it. import { Show } from "@legendapp/state/react";import { useHover } from "@legendapp/state/react-hooks/useHover";import { useRef } from "react";function ButtonWithTooltip() { const refButton = useRef(); const isHovered = useHover(refButton); return ( <div> <button ref={refButton}>Click me</button> <Show if={isHovered}> {() => <Tooltip text="Tooltip!" target={refButton} />} </Show> </div> );} ### useIsMounted `useIsMounted` returns an observable whose value is `true | false` based on whether the component is mounted. This can be useful in delayed or asynchronous functions to make sure it’s running an a component that’s still mounted. import { useIsMounted } from "@legendapp/state/react/useIsMounted";function Component() { const isMounted = useIsMounted(); const onClick = () => { setTimeout(() => { if (isMounted.get()) { console.log("Debounced click"); } }, 100); }; return <button onClick={onClick}>Click me</button>;} ### useMeasure (web) `useMeasure` returns an observable whose value is the size (`{ width: number, height: number }`) of the target element. It starts with undefined values that get set after initial mount, and whenever the element resizes. import { useMeasure } from "@legendapp/state/react-hooks/useMeasure";import { useRef } from "react";function Component() { const ref = useRef(); const { width, height } = useMeasure(ref); return ( <div ref={ref}> Width: {width}, Height: {height} </div> );} One example of where this could be useful is to drive animations. This example measures the size of an inner element to animate a bottom sheet from the bottom to its height. It uses framer-motion and reactive to be able to drive animations with observable values. import { reactive } from "@legendapp/state/react";import { useMeasure } from "@legendapp/state/react-hooks/useMeasure";import { motion } from "framer-motion";import { useRef } from "react";const MotionDiv$ = reactive(motion.div);function BottomSheet({ children }) { const refInner = useRef(); const { width, height } = useMeasure(refInner); return ( <MotionDiv$ style={{ position: "fixed", bottom: 0, left: 0, right: 0 }} $animate={() => ({ y: -height.get() })} > <div ref={refInner}>{children}</div> </MotionDiv$> );} ### createObservableHook `createObservableHook` is a helper to convert an existing hook to return an observable. It works by overriding `useState` and `useReducer` in the hopes of catching and converting them into observable sets. So it may work for some hooks and it may not. Please let us know on GitHub if it’s not working for some hooks. import { createObservableHook } from "@legendapp/state/react-hooks/createObservableHook"const useMyHookObservable = createObservableHook(useMyHook)function Component() { const value = useMyHookObservable() ...} --- ## Page: https://legendapp.com/open-source/state/v3/react/tracing/ If you notice your components feeling too slow or seeming to render too often, two helpful functions can show you exactly what observables they’re listening to and why they’re rendering. ## useTraceListeners() Call `useTraceListeners()` anywhere within `observer` or any React component to console.log a list of every observable being tracked for changes. This can help you find and reduce the number of listeners. import { useTraceListeners } from "@legendapp/state/trace";const Component = observer(function Component(props) { // Call useTraceListeners anywhere inside the component useTraceListeners(); const count = use$(state.count) return <div>{count}</div>; /* This logs: [legend-state] tracking 1 observable: 1: count */}); ## useTraceUpdates() Call `useTraceUpdates()` anywhere within `observer` or any React component to console.log information about the observable change that causes each render. This can help you track down why components are rendering too often. import { useTraceUpdates } from "@legendapp/state/trace";const Component = observer(function Component(props) { // Call useTraceUpdates anywhere inside the component useTraceUpdates(); const count = use$(state$.count) return <div>{count}</div>; /* This logs: [legend-state] Rendering because "count" changed: from: 0 to: 1 */}); ## useVerifyNotTracking() Call `useVerifyNotTracking()` anywhere within any React component to console.error if it is tracking anything. This is useful if you are going for fine-grained reactivity and want to make sure parent components are not tracking any observables. import { useVerifyNotTracking } from "@legendapp/state/trace";const Component = observer(function Component(props) { // Call useVerifyNotTracking anywhere inside the component useVerifyNotTracking(); const count = use$(state$.count) // This will log an error because get() makes it track return <div>{count}</div>;});const FineComponent = observer(function FineComponent(props) { // Call useVerifyNotTracking anywhere inside the component useVerifyNotTracking(); // This will not log because rendering the observable directly // does not re-render this component return <Memo>{state$.count}</Memo>;}); ## useVerifyOneRender() Call `useVerifyOneRender()` anywhere within any React component to console.error if it renders more than once. This is useful if you and want to make sure components are not rendered more than once. import { useVerifyOneRender } from "@legendapp/state/trace";const Component = observer(function Component(props) { // Call useVerifyOneRender anywhere inside the component useVerifyOneRender(); const count = use$(state$.count) // This will log an error after one render when count is updated return <div>{count}</div>;});const Component = observer(function Component(props) { // Call useVerifyOneRender anywhere inside the component useVerifyOneRender(); const count = state$.count.peek() // This will not log because `get(false)` does not track observable // does not re-render this component return <div>{state.count.peek()}</div>;}); ##### Note: All these hooks take name as an argument which can be used to identify which component is logging it ## What to do with this information * You may want to call `get()` at a higher level in an object to only listen to it, and not every single child. * Use a shallow listener with `get(true)` to only update when keys are added to or removed from the object. * You may want to call `peek()` to not listen at all. If you find an observable changing often and you’re not sure why, you can put a breakpoint on the console log to catch it. Or add your own listener to the observable to watch every change: // Why is count rendering so often?state.count.onChange(({ value }) => { console.log("Count changed", value); console.trace(); debugger;}); --- ## Page: https://legendapp.com/open-source/state/v3/react/react-examples/ The examples on this page use Tailwind CSS for styling and Framer Motion for animations. These examples all use the fine grained reactivity components so that the parent component renders only once and all renders are optimized to be as small as possible. ## Persisted global state This example creates a global state object and persists it to Local Storage. Try changing the username and toggling the sidebar and refreshing - it will restore it to the previous state. ## Auto-saving Form This example uses the useObservableSyncedQuery hook to create an observable using TanStack Query that automatically sends mutations back to the server whenever the observable changes. It then uses the `Reactive` two-way binding components to bind those observable directly to the inputs. So in effect this binds the inputs directly to your server data. ## Form validating This example uses useObserve to listen to changes in the form state to update the error messages as you type. It waits for the first click of the Save button for a better user experience. ## List of messages This example uses the syncedFetch helper to get data from a server as an observable, useComputed to create a computed observable, and For to display the array of messages in a high-performance way. ## Animations with reactive props This example uses reactive to make a version of `motion.div` with reactive props that can animate using observable values. Animating with reactive props is faster than re-rendering the whole component because when the tracked observable changes it triggers a render of only the `motion.div`, so it doesn’t need to re-render the parent or children. This example also creates a computed observable text value from the boolean and renders it directly in JSX, which (under the hood) creates a reactive text element that re-renders itself when it changes. ## Persistence with animations This example shows: 1. State persisted to local storage 2. Reactive components ## Show a modal with multiple pages This example uses Show to show/hide a modal based on an observable value, and Switch to render the active page in the modal. ## Router --- ## Page: https://legendapp.com/open-source/state/v3/sync/persist-sync/ A primary goal of Legend-State is to make automatic persisting and syncing both easy and very robust, as it’s meant to be used to power all storage and sync of complex apps - it was built as the backbone of both Legend and Bravely. It’s designed to support local first apps: any changes made while offline are persisted between sessions to be retried whenever connected. To do this, the sync engine subscribes to changes on an observable, then on change goes through a multi-step flow to ensure that changes are persisted and synced. 1. Save the pending changes to local persistence 2. Save the changes to local persistence 3. Save the changes to remote persistence 4. On remote save, set any needed changes (like updatedAt) back into the observable and local persistence 5. Clear the pending changes in local persistence ## Plugins The sync features are designed to be used through a plugin for your backend of choice. The plugins are all built on top of synced and are configurable with their own options as well as general sync and persist options. ### Database plugins * Keel: Powerful schema-driven SQL backend we use in Bravely * Supabase: Popular PostgreSQL backend * Firebase RTDB: Documentation under construction These are built on top of the CRUD plugin. ### General * CRUD: Supports any backend with list, get, create, update, delete actions * Fetch: A wrapper around fetch to reduce boilerplate * TanStack Query: Query updates observables rather than re-rendering ## Example We’ll start with an example to give you an idea of how Legend-State’s sync works. Because sync and persistence are defined in the observables, your app and UI just needs to work with observables. That immediately updates the UI optimistically, persists changes, and syncs to your database with eventual consistency. This example binds inputs directly to the remote data and shows you when the changes save. Try going offline and making some changes, then refresh and the changes are still there. Then go back online and watch the saved time update. You may want to open the Network panel of the dev tools to see it in action. This is a live playground so you can experiment with the different options. import { observable } from "@legendapp/state" import { use$ } from "@legendapp/state/react" import { configureSynced } from "@legendapp/state/sync" import { syncedFetch } from "@legendapp/state/sync-plugins/fetch"; import { ObservablePersistMMKV } from "@legendapp/state/persist-plugins/mmkv" const mySyncedFetch \= configureSynced(syncedFetch, { persist: { plugin: ObservablePersistMMKV, retrySync: true }, retry: { infinite: true } }) const profile$ \= observable(mySyncedFetch({ get: 'https://reqres.in/api/users/1', set: 'https://reqres.in/api/users/1', setInit: { method: 'PUT' }, transform: { load: (value, method) \=> method \=== 'get' ? value.data : value }, onSaved: (result) \=> ({ updatedAt: new Date(result.saved.updatedAt) }), persist: { name: 'persistSyncExample', }, mode: 'assign' })) function App() { const updatedAt \= use$(profile$.updatedAt) const saved \= updatedAt ? new Date(updatedAt).toLocaleString() : 'Never' return ( <Box\> <$TextInput $value={profile$.first\_name} /> <$TextInput $value={profile$.last\_name} /> <Text\> Saved: {saved} </Text\> </Box\> ) } Live Editing ## Guides This page will show how you use the core synced. The plugins are built on top of `synced` so everything on this page applies to the plugins as well. #### Which Platform? Select React or React Native to customize this guide for your platform. ### Persist data locally Legend-State has a persistence system built in, with plugins for web and React Native. When you initialize the persistence it immediately loads and merges the changes on top of the initial value. Then any changes you make after initialization will be saved to persistence. You can sync/persist a whole observable or any child, and there are two ways to persist observables: `synced` in the observable constructor or `syncObservable` later. In this first example we create an observable with initial data and then use `syncObservable` to persist it. import { observable } from "@legendapp/state"import { syncObservable } from "@legendapp/state/sync"import { ObservablePersistMMKV } from "@legendapp/state/persist-plugins/mmkv"// Create an observableconst store$ = observable({ todos: [],})// Persist the observable to the named key of the global persist pluginsyncObservable(store$, { persist: { name: 'persistKey', plugin: ObservablePersistMMKV }})// Any changes made after syncObservable will be persistedstore$.todos.push({ id: 0 }) Alternatively we can setup the persistence in the constructor with `synced`. This does exactly the same thing as above. import { observable } from "@legendapp/state"import { synced } from "@legendapp/state/sync"// Create an observable with "todos" persistedconst store$ = observable( synced({ initial: [], persist: { name: 'persistKey', } }))// Any changes will be persistedstore$.todos.push({ id: 0 }) #### Async persistence Some persistences like IndexedDB and AsyncStorage are asynchronous, so you’ll need to wait for it to load before you start reading from it. `syncState` returns an observable with load statuses that you can wait for. import { syncState } from "@legendapp/state"import { syncObservable } from '@legendapp/state/sync'syncObservable(state$, { persist: { name: 'store' }})const status$ = syncState(state$)await when(status$.isPersistLoaded)// Proceed with load ### Sync with a server Legend-State makes syncing remote data very easy, while being very powerful under the hood. You can setup your sync engine directly in the observable itself, so that your application code only interacts with observables, and the observables handle the sync for you. This is a great way to isolate your syncing code in one place away from your UI, and then your UI code justs gets/sets observables. Like with persistence you can use either `syncObservable` or `synced` but we’ll just focus on `synced` for this example. import { observable, observe } from "@legendapp/state"import { syncedFetch } from "@legendapp/state/sync-plugins/fetch"// Create an observable with "users" syncedconst store$ = observable({ users: syncedFetch({ initial: [], // When the fetch resolves it will update the observable get: 'https://reqres.in/api/users', // When the observable is changed it will send the changes back to the server. set: 'https://reqres.in/api/users' })})observe(() => { // The first get() activates the synced get function to fetch the data // observe is re-run when the data comes in const users = store$.users.get() if (users) { processUsers(users) }})// Any changes will be savedstore$.users.push({ id: 0, name: 'name' }) ### Sync with paging `get()` is an observing context, so if you get an observable’s value it will re-run if it changes. We can use that to created a paging query by setting the query mode to “append” (or “assign” if it’s an object) to append new pages into the observable array. import { observable, observe } from "@legendapp/state"import { syncedFetch } from "@legendapp/state/sync-plugins/fetch"// Create an observable with "users" syncedconst store$ = observable({ usersPage: 1, users: syncedFetch({ get: () => `https://reqres.in/api/users?page=${store$.usersPage.get()}`, mode: 'append' }),})// Activate the synced to get the first pagestore$.users.get()// gets from https://reqres.in/api/users?page=1// Get the next pagestore$.usersPage.set(page => page + 1)// gets from https://reqres.in/api/users?page=2 ### Local first robust real-time sync The crud based plugins can be used to enable a robust offline-first sync engine by setting a few options. These options will: * Persist all data locally so the app can work offline * Continually retry saves so that failure is not an option * Persist saves locally so that they retry even after refresh * Sync in realtime import { observable } from '@legendapp/state'import { syncedCrud } from '@legendapp/state/sync-plugins/crud'import { ObservablePersistLocalStorage } from '@legendapp/state/persist-plugins/local-storage'const profile$ = observable(syncedCrud({ list: () => {/*...*/}, create: () => {/*...*/}, update: () => {/*...*/}, // Enable realtime. Some plugins have this built in so it's not required. subscribe: ({ refresh, update }) => { return realtime.subscribe({ /*...*/ }, () => { // Trigger a refresh of the list function refresh() }) }, // Local first configuration persist: { plugin: ObservablePersistLocalStorage, // Set the persistence plugin name: 'profile', // Set the name of this object in persistence retrySync: true, // Persist pending changes to retry }, retry: { infinite: true, // Keep retrying until it saves }, changesSince: 'last-sync', // Sync only diffs fieldUpdatedAt: 'updatedAt' // Required for syncing only diffs})) ## API ### configureSynced Sync plugins have a lot of options so you’ll likely want to set some defaults. You can do that with the `configureSynced` function to create a customized version of a plugin with your defaults, to reduce duplication and enforce consistency. You will most likely want to at least set a default persistence plugin. import { configureSynced, syncedCrud } from "@legendapp/state/sync"import { ObservablePersistLocalStorage } from "@legendapp/state/persist-plugins/local-storage"// Configure the base `synced`const syncPlugin = configureSynced({ persist: { plugin: ObservablePersistMMKV }})// Or configure options derived from another pluginconst syncPlugin = configureSynced(syncedCrud, { persist: { plugin: ObservablePersistMMKV }})// Then using them will merge the options on top of the defaults.const state$ = observable(syncPlugin({ persist: { name: 'test', }})) ### synced The easiest way to create a synced observable is to use `synced` when creating an observable to bind it to remote data and/or persist it locally. To simply set up persistence, just create `get` and `set` functions along with a `persist` option. `synced` creates a lazy computed function which will not activate until you `get()` it. So you can set up your observables’ sync/persist options and they will only activate on demand. import { observable } from '@legendapp/state'import { synced } from '@legendapp/state/sync'const state$ = observable(synced({ get: () => fetch('https://url.to.get').then((res) => res.json()), set: ({ value }) => fetch('https://url.to.set', { method: 'POST', data: JSON.stringify(value) }), persist: { name: 'test', },})) Or a more advanced example with many of the possible options: import { observable } from '@legendapp/state'import { synced } from '@legendapp/state/sync'import { ObservablePersistMMKV } from '@legendapp/state/persist-plugins/mmkv'const state$ = observable(synced({ get: () => { // get is an observing function which will re-run whenever any accessed observables // change. You can use that for paging getting data for a specific user. return fetch('https://url.to.get/page=' + page.get()) .then((res) => res.json()) }, set: ({ value }) => { // set is run when the observable changes, debounced by the debounceSet option fetch('https://url.to.set', { method: 'POST', data: JSON.stringify(value) }) } persist: { // The name to be saved in the local persistence name: 'test', // Set the plugin to override the global setting plugin: ObservablePersistMMKV, // persist pending changes to be retried after the app restarts retrySync: true, options: { // Customize the persist plugin options } }, // The initial value before the remote data loads or if it doesn't exist. initial: { numUsers: 0, messages: [] }, // How to update the initial value when the remote data comes in. // defaults to "set" mode: 'set' | 'assign' | 'merge' | 'append' | 'prepend', // The subscribe function is called once to give you an opportunity to // subscribe to another service to trigger refresh subscribe: ({ refresh, update }) => { const unsubscribe = pusher.subscribe({ /*...*/ }, (data) => { // Either update with the received data update(data) // Or trigger a refresh of the get function refresh() }) // return unsubscribe function return unsubscribe }, // Options for retrying in case of error. Applies to both get and set. retry: { infinite: true, backoff: 'exponential', maxDelay: 30 }, // A time to debounce changes before sending them to the server. Use this to // batch multiple changes together or preventing saving every keystroke. debounceSet: 500,})) ### syncObservable If you prefer to set up sync/persistence after the observable is already created, you can use `syncObservable` with the same options as `synced`. It’s effectively the same as using `synced` with an initial value. You can also pass any of the plugins as the second option. import { observable } from '@legendapp/state'import { syncObservable } from '@legendapp/state/sync'const state$ = observable({ initialKey: 'initialValue' })syncObservable(state$, { get: () => fetch('https://url.to.get').then((res) => res.json()), set: ({ value }) => fetch('https://url.to.set', { method: 'POST', data: JSON.stringify(value) }), persist: { name: 'test' }}) You can also use any sync plugin with syncObservable. import { observable } from '@legendapp/state'import { syncObservable } from '@legendapp/state/sync'import { syncedFetch } from "@legendapp/state/sync-plugins/fetch"const users$ = observable([])syncObservable(users$, syncedFetch({ // When the fetch resolves it will update the observable get: 'https://reqres.in/api/users', // When the observable is changed it will send the changes back to the server. set: 'https://reqres.in/api/users'})) ### syncState Each synced observable has a `syncState` observable that you can get to check its status or do some actions. import { observable, syncState } from '@legendapp/state'import { synced } from '@legendapp/state/sync'const obs$ = observable(synced({ /*...*/ }))const state$ = syncState(obs$)const error = state$.error.get()const isLoaded = state$.isLoaded.get()if (error) { // Handle error} else if (!isLoaded) { // Do something while loading} else { // Good to go const value = obs$.get()} The `isLoaded` and `error` properties are accessible when using `syncState` on any asynchronous Observable, but the others are created when using `synced`. * `isPersistLoaded: boolean`: Whether it has loaded from the local persistence * `isPersistEnabled: boolean`: Enable/disable the local persistence * `isLoaded: boolean`: Whether the get function has returned * `isSyncEnabled: boolean`: Enable/disable remote sync * `lastSync: number`: Timestamp of the latest sync * `syncCount: number`: Number of times it’s synced * `clearPersist: () => Promise<void>`: Clear the local persistence * `sync: () => Promise<void>`: Re-run the get function * `getPendingChanges: () => Record<string, object>`: Get all unsaved changed * `error: Error`: The latest error ### useObservable + synced Create a synced observable within a React component using useObservable. import { synced } from '@legendapp/state/sync'import { useObservable } from '@legendapp/state/react'function Component() { const user$ = useObservable(synced({ get: fetch('https://url.to.get').then((res) => res.json()), persist: { name: 'test' } }))} ### Transform data It’s very common to need to transform data into and out of your persistence or remote server. There is an option on `synced` to transform the remote data and an option within the `persist` option to transform to/from persistence. Legend-State includes helpers for easily stringifying data or you can create your own custom transformers. * `transformStringifyKeys`: JSON stringify/parse the data at the given keys, for when your backend stores objects as strings * `transformStringifyDates`: Transform dates to ISO string, with either the given keys or automatically scanning the object for dates * `combineTransforms`: Combine multiple transforms together This can be used in many ways. Some examples: 1. **Migrate between versions**: If the local data has legacy values in it, you can can transform it to the latest format. This can be done by either keeping a version number or just checking for specific fields. This example migrates old persisted data by checking the version and old field name. const state$ = observable(synced({ get: () => {/* ... */}, persist: { name: 'state', transform: { load: (value) => { if (value.version === 2) { if (value.currentPeriodStart) { value.periodStart = new Date(value.currentPeriodStart * 1000) delete value.currentPeriodStart } } return value } } }})) 2. **Transform to backend format**: If you want to interact with data in a different format than your backend stores it, it can be automatically transformed between the observable and the sync functions. This could be used for stringifying or parsing dates for example. In this example we combine the `transformStringifyDates` and `transformStringifyKeys` helpers with a custom transformer. import { combineTransforms, transformStringifyDates } from '@legendapp/state/sync'const state$ = observable(synced({ get: () => {/* ... */}, transform: combineTransforms( transformStringifyDates(), transformStringifyKeys('jsonData', 'messagesArr'), { load: async (value) => { value.localBool = value.serverOption !== 'no' delete value.serverOption return value }, save: async (value) => { value.serverOption = value.localBool ? 'yes' : 'no' delete value.localBool return value } } )})) 3. **Encrypt**: For end-to-end encryption you can encrypt/decrypt in the transformer so that you interact with unencrypted data locally and it’s encrypted before going into your update functions import { combineTransforms, transformStringifyDates } from '@legendapp/state/sync'const state$ = observable(synced({ get: () => {/* ... */}, transform: { load: async (value) => { return decrypt(value) }, save: async (value) => { return encrypt(value) } }})) ## Persist plugins First choose and configure the storage plugin for your platform. ### Local Storage (React) import { ObservablePersistLocalStorage } from '@legendapp/state/persist-plugins/local-storage'syncObservable(state$, { persist: { name: "documents", plugin: ObservablePersistLocalStorage }}) ### IndexedDB (React) The IndexedDB plugin can be used in two ways: 1. Persisting a dictionary where each value has an `id` field, and each value will create a row in the table 2. Persisting multiple observables to their own rows in the table with the `itemID` option It requires some extra configuration for the database name, the table names, and the version. IndexedDB requires changing the version whenever the tables change, so you can start with version 1 and increment the version whenever you add/change tables. import { configureSynced, syncObservable } from "@legendapp/state/sync"import { observablePersistIndexedDB } from "@legendapp/state/persist-plugins/indexeddb"// Create default persist optionsconst persistOptions = configureSynced({ persist: { plugin: observablePersistIndexedDB({ databaseName: "Legend", version: 1, tableNames: ["documents", "store"] }) }})// Mode 1: Persist a dictionaryconst state$ = observable({ obj1: { id: "obj1", text: "..." }, obj2: { id: "obj2", text: "..." },})syncObservable(state$, persistOptions({ persist: { name: "documents" // IndexedDB table name }}))// Mode 2: Persist an object with itemIdconst settings$ = observable({ theme: "light" })syncObservable(settings$, persistOptions({ persist: { name: "store", // IndexedDB table name indexedDB: { itemID: "settings" } }})) Because IndexedDB is an asynchronous API, observables will not load from persistence immediately, so if you’re persisting a large amount of data you may want to show a loading state while persistence is loading. const syncState$ = syncState(state$)await when(syncState$.isPersistLoaded)// Continue with load ### MMKV (RN) First install react-native-mmkv: Then configure it as the persist plugin. import { syncObservable } from '@legendapp/state/sync'import { ObservablePersistMMKV } from '@legendapp/state/persist-plugins/mmkv'syncObservable(state$, { persist: { name: "documents", plugin: ObservablePersistMMKV }}) ### AsyncStorage (RN) Older versions of React Native have AsyncStorage built in, but newer versions may need it installed separately. Check the React Native docs for the latest guidance on that. The AsyncStorage plugin needs an additional bit of global configuration, giving it the instance of AsyncStorage. import { configureSynced, syncObservable } from '@legendapp/state/sync'import { observablePersistAsyncStorage } from '@legendapp/state/persist-plugins/async-storage'import AsyncStorage from '@react-native-async-storage/async-storage'// Global configurationconst persistOptions = configureSynced({ persist: { plugin: observablePersistAsyncStorage({ AsyncStorage }) }})syncObservable(state$, persistOptions({ persist: { name: 'store' }})) Because AsyncStorage is an asynchronous API, observables will not load from persistence immediately, so if you’re persisting a large amount of data you may want to show a loading state while persistence is loading. const syncState$ = syncState(state$)await when(syncState$.isPersistLoaded)// Continue with load ### Expo SQLite (RN) First install Expo SQLite. The Expo SQLite Storage plugin needs an additional bit of global configuration, giving it the instance of Storage. import { configureSynced, syncObservable } from '@legendapp/state/sync';import { observablePersistSqlite } from '@legendapp/state/persist-plugins/expo-sqlite';import Storage from 'expo-sqlite/kv-store';// Global configurationconst persistOptions = configureSynced({ persist: { plugin: observablePersistSqlite(Storage) },});syncObservable( state$, persistOptions({ persist: { name: 'store', }, }),); ## Making a sync plugin Once you’re syncing multiple observables in the same way you’ll likely want to create a plugin that encapsulates the specifics of your backend. The plugin just needs to return a synced. If your backend is CRUD based (it has create, read, update, delete functions) then you may want to build on top of syncedCrud which encapsulates a lot of logic for those specifics for you. It may be easiest to look at the source of the built-in sync plugins to see what they look like. This is a simple contrived example to show what that could look like. import { observable } from '@legendapp/state'import { synced } from '@legendapp/state/sync'const isAuthed$ = observable(false);// Create a custom synced that just needs a name in your APIconst customSynced = ({ name }) => { const basePath = 'https://url/api/v1/' const doFetch = (path) => { return fetch(basePath + path).then((res) => res.json()) } return synced({ get: () => doFetch(`list-${name}s`), set: ({ value }) => { if (value === null || value === undefined) { return doFetch('delete-' + name) } else { return doFetch('upsert-' + name) } }, retry: { infinite: true }, persist: { name }, waitFor: isAuthed$, subscribe: ({ refresh }) => { // Subscribe to realtime service }, })}const store$ = observable({ users: customSynced('user')}) --- ## Page: https://legendapp.com/open-source/state/v3/sync/keel/ Keel pairs especially well with Legend-State because it’s designed for strong typing and developer experience, and because they’ve worked with us to make Legend-State and Keel pair perfectly together. All you need to do is provide the actions in the generated `keelClient.ts` and the observables will be fully typed and handle calling the correct action functions for you. As a basic example, if you have a Keel model that looks like this: model Profile { fields { name Text } actions { get getProfile() create createProfile() with (name) update updateProfile(id) with (name) delete deleteProfile(id) }} Then you can pass the functions from the generated keelClient.ts into `syncedKeel` to create a fully typed observable: import { observable } from '@legendapp/state'import { syncedKeel } from '@legendapp/state/sync-plugins/keel'const { mutations, queries } = client.apiconst profile$ = observable(syncedKeel({ get: queries.getProfile, create: mutations.createProfile, update: mutations.updateProfile, delete: mutations.deleteProfile,})) Then you can just get and modify the observable to two-way sync your data with Keel. ## Install Follow Keel’s instructions to get everything setup with Keel. Then install the `ksuid` library, which the Keel plugin uses to generate IDs locally in the same way that Keel’s backend generates IDs. ## Full Example We’ll start with a full example to see what a full setup looks like, then go into specific details. import { observable } from '@legendapp/state'import { ObservablePersistLocalStorage } from '@legendapp/state/persist-plugins/local-storage'import { configureSynced } from '@legendapp/state/sync/'import { generateKeelId, syncedKeel } from '@legendapp/state/sync-plugins/keel'import { APIClient } from './keelClient'const client = new APIClient({ baseUrl: process.env.API_BASE_URL})const isAuthed$ = observable(false);// Set defaultsconst sync = configureSynced(syncedKeel, { client, persist: { plugin: ObservablePersistLocalStorage, retrySync: true }, debounceSet: 500, retry: { infinite: true, }, changesSince: 'last-sync', waitFor: isAuthed$})// enable sync after authentication succeedsasync function doAuth() { // authenticate the client await keel.auth.authenticateWithPassword(email, pass) // check that the client is authenticated const isAuthenticated = await keel.auth.isAuthenticated() // Set isAuthed$ to start syncing isAuthed$.set(true)}// Set up your observables with Keel queriesconst { mutations, queries } = client.api// create an observable with the action functionsconst messages$ = observable(sync({ list: queries.getMessages, create: mutations.createMessage, update: mutations.updateMessage, delete: mutations.deleteMessage, persist: { name: 'messages' },}))// get() activates and starts syncingconst messages = messages$.get()function addMessage(text: string) { const id = generateKeelId() // Add keyed by id to the messages$ observable to trigger the create action messages$[id].set({ id, text, createdAt: undefined, updatedAt: undefined })}function updateMessage(id: string, text: string) { // Just set valudes in the observable to trigger the update action messages$[id].text.set(text)} ## Configure globals The first step to using the Keel plugin is to set some global configuration options. The suggested options are: * **client**: It needs the client in order to enable the Keel realtime plugins. * **waitFor**: An observable that you set to true after signing in import { observable } from '@legendapp/state'import { syncedKeel } from '@legendapp/state/sync-plugins/keel'import { configureSynced } from '@legendapp/state/sync/'import { APIClient } from './keelClient'const client = new APIClient({ baseUrl: process.env.API_BASE_URL,})const isAuthed$ = observable(false);// Set defaultsconst sync = configureSynced(syncedKeel, { client, persist: { plugin: ObservablePersistLocalStorage, }, waitFor: isAuthed$})// enable sync after authentication succeedsasync function doAuth() { // authenticate the client await keel.auth.authenticateWithPassword(email, pass) // check that the client is authenticated const isAuthenticated = await keel.auth.isAuthenticated() // Set isAuthed$ to start syncing isAuthed$.set(true)} TODO: Other config options ## get and list The Keel plugin has two slightly different patterns depending on whether you’re using a `get` or a `list` action. The behavior when using `get` or `as: 'value'` is: * **get**: Observable value is the value returned from get * **create**: If get returned null, then setting any value on the observable will create * **update**: If get returned a value, then updating any value on the observable will update * **create**: Setting the value to null or undefined, or calling `delete()`, will delete const { mutations, queries } = client.apiconst profile$ = observable(syncedKeel({ get: queries.getProfile, create: mutations.createProfile, update: mutations.updateProfile, delete: mutations.deleteProfile,}))// profile$.get() is a Profile The behavior when using `list` is: * **list**: Observable value is an object containing the listed values keyed by id * **create**: Adding a new value to the object will will create * **update**: Updating a child value will update it with the changed fields * **delete**: Setting a child value to null or undefined, or calling `delete()`, will delete const { mutations, queries } = client.apiconst profiles$ = observable(syncedKeel({ list: queries.listProfiles, create: mutations.createProfile, update: mutations.updateProfile, delete: mutations.deleteProfile,}))// profile$.get() is a Record<string, Profile> The shape of the observable object can be changed with the `as` parameter, which supports three options: 1. `object`: The default, an object keyed by the row’s `id` field. 2. `array`: Treat the result of a query as an array 3. `Map`: A Map, which can be more efficient for accessing rows by key 4. `value`: Treat the result of a query as a single value like a `get` ## where When using a `list` function you may want to provide more options to the `where` query. You can do that by customizing actions, but it is most easily done with the `where` parameter. In this example of using a lookup table by room, we can pass the `roomId` into the query: const { mutations, queries } = client.apiconst messages$ = observable({ room: (roomId: string) => syncedKeel({ list: queries.listMessages, where: { roomId } })})// profile$.get() is a Record<string, Profile> ## Action functions Using Legend-State with Keel puts some requirements on your model structure: ##### 1\. id parameter in create actions Because Legend-State generate ids locally, `id` needs to be include in create functions in your Keel models. You can make it optional if you may sometimes not create with an id. ##### 2\. Include all possibly changeable fields as optional in create/update actions This plugin sends updates with only the changed fields, so having some fields as required in update could cause the update action to fail. And if it changes any field that’s not included in the action, that will also fail. Additionally, using the debounceSet option may result in the `create` action being delayed until after your code has added more fields to the initial value. So we suggest: * **create** actions should have required fields required and include all other fields as optional * **update** actions should include all changeable fields as optional ##### 3\. Include updatedAt? in list actions This is only needed if you’re using `changesSince: 'last-sync'`. See sync only diffs. ##### Example model structure model Message { fields { // Cannot change after create user User // Changeable text Text status Boolean? } actions { list listUsers(updatedAt?) create createUser() with (id?, user.id, name, status?) create updateUser(id) with (name?, status?) delete deleteUser(id) }} ## Customizing actions In the previous examples we provided the Keel function directly, but you can also provide your own function which calls the Keel action. That can be useful for adding extra query or creation options, such as with a lookup table. import { mutations, queries, CreateProfileInput } from './keelClient'const profiles$ = observable({ user: (userId: string) => syncedKeel({ get: () => queries.getProfile({ userId }), create: (data: CreateProfileInput) => mutations.createProfile({ user: { id: staffId }, ...data }), update: mutations.updateProfile, delete: mutations.deleteProfile, })}) ## Sync only diffs An optional but very useful feature is the `changesSince: 'last-sync'` option. This can massively reduce badwidth usage when you’re persisting list results since it only needs to list changes since the last query. The way this works internally is basically: 1. Save the maximum updatedAt to the local persistence 2. In subsequent syncs or after refresh it will list by `updatedAt: lastSync + 1` to get only recent changes 3. The new changes will be merged into the observable To enable this on the Keel side, just include `updatedAt?` in the list parameters to enable querying by updatedAt. model Message { ... actions { list listMessages(updatedAt?) }} And to enable this feature in Legend-State, use the `changesSince` option in combination with `list`. It can not work with get, but you can emulate a get with a list by creating a `list` action with an `id` parameter and the `as: 'value'` option in `syncedKeel`. // Sync diffs of a listsyncedKeel({ list: queries.listMessages, changesSince: 'last-sync', persist: { name: 'messages' }})// Sync diffs of a single valuesyncedKeel({ list: queries.listUserById, where: { id: myId }, as: 'value', changesSince: 'last-sync', persist: { name: 'me' }}) ### Soft deletes The delete parameter does not need to be an actual `delete` action in Keel. You could also implement it as a soft delete if you prefer, just setting a `deleted` field to true. To do that you can have a `deleted` field on your model, or provide a `fieldDeleted` with a custom field name. Then when you delete an element it will internally call the update action with `{ deleted: true }` and the list action will remove deleted elements from the observable. const { mutations, queries } = client.apiconst profiles$ = observable(syncedKeel({ list: queries.listProfiles, create: mutations.createProfile, update: mutations.updateProfile, fieldDeleted: 'deleted'})) ### List deletes from audit table We have a helper function that we use in Keel code to get deleted rows from Keel’s built-in audit log. If the query has an `updatedAt` timestamp, this will get all values updated since `updatedAt` as well as get all rows deleted since `updatedAt` and include them as `{ id, deleted: true }`. The plugin will internally remove those deleted rows from the observable for you. export async function listTableWithDeletes<T extends keyof ModelsAPI>( tableName: T, inputs: { where: { updatedAt?: TimestampQueryInput } },): Promise<Awaited<ReturnType<ModelsAPI[T]['create']>>[]> { const ret = await models[tableName].findMany(inputs); return ret.concat(await listDeletes(tableName, inputs)) as any;}async function listDeletes( tableName: keyof ModelsAPI, inputs: { where: { updatedAt?: TimestampQueryInput } },): Promise<any[]> { const { where: { updatedAt }, } = inputs; if (updatedAt) { const db = useDatabase().withTables<{ keel_audit }>(); const res = await db .selectFrom('keel_audit') .selectAll() .where('table_name', '=', camelCaseToSnakeCase(tableName)) .where('op', '=', 'delete') .where('created_at', '>', updatedAt.after) .execute(); return res.map((r) => ({ id: r.data.id, deleted: true })); } else { return []; }}function camelCaseToSnakeCase(input: string) { return input.replace(/([A-Z])/g, ' $1').split(' ').join('_').toLowerCase();} Then you can use `listTableWithDeletes` in your `beforeQuery` hooks. You will need to add this to any `beforeQuery` hooks that you want to list with deletes. const hooks: ListMessagesHooks = { async beforeQuery(ctx, inputs, query) { return listTableWithDeletes('message', inputs) }} ## Usage #### Add new element to table with id To add a new element to an observable and use it locally before it has been created remotely, you can create it with a local id, and then it will be updated with `createdAt` and `updatedAt` after it’s created in Keel. Note that since `createdAt` and `updatedAt` are defined as required in the types they should to be set to undefined when creating. import { Message } from './keelClient'import { observable } from '@legendapp/state'import { generateKeelId, syncedKeel } from '@legendapp/state/sync-plugins/keel'const profile$ = observable(syncedKeel({ get: queries.getProfile, create: mutations.createProfile, update: mutations.updateProfile, delete: mutations.deleteProfile,}))function addMessage(text: string) { const id = generateKeelId() // Add keyed by id to the messages$ observable messages$[id].set({ id, text, createdAt: undefined, updatedAt: undefined })}addMessage('test') #### Wait for remote load Because Keel automatically adds a `createdAt` field after it creates, you can know that data has been successfully saved to Keel if it has a `createdAt` field. Just make sure that you don’t set `createdAt` yourself as it’s automatically created by Keel. // Wait for profile to have savedawait when(profile$.createdAt) #### waitFor another table If you have a table dependant on another table, it needs to wait for the dependant table to be created, otherwise it will fail because the relationship doesn’t exist. For example you can’t create messages in a chat room before that chat room exists. You can ensure the related table is created first using `waitForSet` and `createdAt`: const rooms$ = observable(syncedKeel({ list: queries.listRooms, create: mutations.createRoom, update: mutations.updateRoom,}))const roomMessages$ = observable( (roomId: string) => syncedKeel({ list: queries.getRoomMessages, where: { roomId }, create: (message) => mutations.createMessage({ roomId, ...message }), update: mutations.updateMessage, waitForSet: rooms$[roomId].createdAt })) ## TODO ### Realtime Keel does not have realtime built in, but it’s very easy to build a realtime system on top of it. More details coming soon. Other todo * options * transforms * Persist in full example --- ## Page: https://legendapp.com/open-source/state/v3/sync/supabase/ Supabase and Legend-State work very well together - all you need to do is provide a typed client and the observables will be fully typed and handle calling the correct action functions for you. ## Full Example We’ll start with a full example to see what a full setup looks like, then go into specific details. import { createClient } from '@supabase/supabase-js'import { Database } from './database.types'import { observable } from '@legendapp/state'import { configureSyncedSupabase, syncedSupabase } from '@legendapp/state/sync-plugins/supabase'import { v4 as uuidv4 } from "uuid"const supabase = createClient<Database>(process.env.SUPABASE_URL, process.env.SUPABASE_ANON_KEY)// provide a function to generate ids locallyconst generateId = () => uuidv4()configureSyncedSupabase({ generateId})const uid = ''const messages$ = observable(syncedSupabase({ supabase, collection: 'messages', // Optional: // Select only id and text fields select: (from) => from.select('id,text'), // Filter by the current user filter: (select) => select.eq('user_id', uid), // Don't allow delete actions: ['read', 'create', 'update'], // Realtime filter by user_id realtime: { filter: `user_id=eq.${uid}` }, // Persist data and pending changes locally persist: { name: 'messages', retrySync: true }, // Sync only diffs changesSince: 'last-sync'}))// get() activates and starts syncingconst messages = messages$.get()function addMessage(text: string) { const id = generateId() // Add keyed by id to the messages$ observable to trigger a create in Supabase messages$[id].set({ id, text, created_at: null, updated_at: null })}function updateMessage(id: string, text: string) { // Just set values in the observable to trigger an update to Supabase messages$[id].text.set(text)} ## Set up Supabase types The first step to getting strongly typed observables from Supabase is to follow their instructions to create a typed client. https://supabase.com/docs/guides/api/rest/generating-types The examples on this page will use the `supabase` client from the generated types: import { createClient } from '@supabase/supabase-js'import { Database } from './database.types'const supabase = createClient<Database>(process.env.SUPABASE_URL, process.env.SUPABASE_ANON_KEY) ## filter By default it will use `select()` on the collection. If you want to filter the data, use the `filter` parameter. See the Using Filters docs for details. const messages$ = observable(syncedSupabase({ supabase, collection: 'messages', // Filter by the current user filter: (select) => select.eq('user_id', 'uid')})) ## select By default it will use `select()` on the collection. If you want to be more specific, use the `select` parameter to customize how you want to select. See the Select docs for details. You can also add filters here if you want. const messages$ = observable(syncedSupabase({ supabase, collection: 'messages', // Select only id and text fields select: (from) => from.select('id,text'), // Or select and filter together select: (from) => from.select('id,text').eq('user_id', 'uid')})) ## actions By default it will support create, read, update, and delete. But you can specify which actions you want to support with the `actions` parameter. const messages$ = observable(syncedSupabase({ supabase, collection: 'messages', // Only read and create, no update or delete actions: ['read', 'create'],})) ## as The shape of the observable object can be changed with the `as` parameter, which supports three options: 1. `object`: The default, an object keyed by the row’s `id` field. 2. `Map`: A Map, which can be more efficient for accessing rows by key 3. `value`: Treat the result of a query as a single value like a `get` Note that `array` is not an option because arrays make it hard to to efficiently and correctly add, update, and remove elements by id. const messages$ = observable(syncedSupabase({ supabase, collection: 'messages', as: 'Map'}))// messages$ is an observable Mapmessages$.get('messageId').text.set('hello') ## Realtime Enable realtime on the observable with the `realtime` option. This will update the observable immediately whenever any realtime changes come in. You can optionally set the `schema` and `filter` for the realtime listener. See Supabase’s Realtime Docs for more details about realtime filters. const messages$ = observable(syncedSupabase({ supabase, collection: 'messages', // Simply enable it realtime: true, // Or set options realtime: { schema: 'public', filter: `user_id=eq.${uid}`},})) ## RPC and Edge Functions You can override any or all of the default list/create/update/delete actions with an rpc or function call. There is just one requirement: create and update need to return either full row data or nothing, because the returned data is used to update the observable with any fields changed remotely (like updated\_at). One caveat is that Supabase’s edge functions are not strongly typed so the observable can’t infer the type from it. const messages$ = observable(syncedSupabase({ supabase, collection: 'messages', // Simply enable it realtime: true, // Use an rpc function for listing list: () => supabase.rpc("list_messages"), // Use an rpc function for creating create: (input) => supabase.rpc("create_country", input), // Or use functions list: () => supabase.functions.invoke("list_messages"),})) ## Sync only diffs An optional but very useful feature is the `changesSince: 'last-sync'` option. This can massively reduce badwidth usage when you’re persisting list results since it only needs to list changes since the last query. The way this works internally is basically: 1. Save the maximum updatedAt to the local persistence 2. In subsequent syncs or after refresh it will list by `updated_at: lastSync + 1` to get only recent changes 3. The new changes will be merged into the observable Enabling this on the Supabase side requires adding `created_at` and `updated_at` columns and a trigger to your table. You can run this snippet to set it up, just replace the two instances of YOUR\_TABLE\_NAME. -- Add new columns to table named `created_at` and `updated_at`ALTER TABLE YOUR_TABLE_NAMEADD COLUMN created_at timestamptz default now(),ADD COLUMN updated_at timestamptz default now(),-- Add column for soft deletes, remove this if you don't need thatADD COLUMN deleted boolean default false;-- This will set the `created_at` column on create and `updated_at` column on every updateCREATE OR REPLACE FUNCTION handle_times() RETURNS trigger AS $$ BEGIN IF (TG_OP = 'INSERT') THEN NEW.created_at := now(); NEW.updated_at := now(); ELSEIF (TG_OP = 'UPDATE') THEN NEW.created_at = OLD.created_at; NEW.updated_at = now(); END IF; RETURN NEW; END; $$ language plpgsql;CREATE TRIGGER handle_times BEFORE INSERT OR UPDATE ON YOUR_TABLE_NAME FOR EACH ROWEXECUTE PROCEDURE handle_times(); And to enable this feature in Legend-State, use the `changesSince` option and set the `fieldCreatedAt` and `fieldUpdatedAt` options to match the Supabase column names. // Sync diffs of a listsyncedSupabase({ supabase, collection: 'messages', persist: { name: 'messages' }, // Enable syncing only changes since last-sync changesSince: 'last-sync', fieldCreatedAt: 'created_at', fieldUpdatedAt: 'updated_at', // Optionally enable soft deletes fieldDeleted: 'deleted'})// Or you can configure this optional globally so it will apply to every instance of syncedSupabase.configureSyncedSupabase({ changesSince: 'last-sync', fieldCreatedAt: 'created_at', fieldUpdatedAt: 'updated_at', // Optionally enable soft deletes fieldDeleted: 'deleted'}) ## Soft deletes The delete parameter does not need to be an actual `delete` action in Supabase. You could also implement it as a soft delete if you prefer, just setting a `deleted` field to true. To do that you can provide `fieldDeleted` matching the field name in your table. Then when you delete an element it will internally update the row with `{ deleted: true }` instead of deleting it, and the list action will remove deleted elements from the observable. // Sync diffs of a listsyncedSupabase({ supabase, collection: 'messages', fieldDeleted: 'deleted'}) ## Resource * Local-first Realtime Apps with Expo and Legend-State Blog - Video --- ## Page: https://legendapp.com/open-source/state/v3/sync/crud/ Legend-State includes a `syncedCrud` plugin that runs on top of `synced` and encapsulates a lot of the behavior you’d use to sync with a CRUD backend. You can use `syncedCrud` directly or you can build a plugin for your backend on top of it. See the source of the Keel and Supabase plugins for examples of plugins built on top of `syncedCrud`. ## get and list The crud plugin has two slightly different patterns depending on whether you’re using a `get` or a `list` action. The behavior when using `get` is: * **get**: Observable value is the value returned from get * **create**: If get returned null, then setting any value on the observable will create * **update**: If get returned a value, then updating any value on the observable will update * **delete**: Setting the value to null or undefined, or calling `delete()`, will delete import { syncedCrud } from '@legendapp/state/sync-plugins/crud'const profile$ = observable(syncedCrud({ get: getProfile, create: createProfile, update: updateProfile, delete: deleteProfile,}))// profile$.get() is a Profile The behavior when using `list` is: * **list**: Observable value is an object containing the listed values keyed by id * **create**: Adding a new value to the object will create * **update**: Updating a child value will update it with the changed fields * **delete**: Setting a child value to null or undefined, or calling `delete()`, will delete const profiles$ = observable(syncedCrud({ list: listProfiles, create: createProfile, update: updateProfile, delete: deleteProfile,}))// profile$.get() is a Record<string, Profile> The `list` function expects an array of rows to be returned from your API. The shape of the observable object returned from a `list` can be changed with the `as` parameter, which supports three options: 1. `object`: The default, an object keyed by the row’s `id` field. 2. `array`: Treat the result of a query as an array 3. `Map`: A Map, which can be more efficient for accessing rows by key 4. `value`: Treat the result of a query as a single value like a `get` ## create The `create` function is called whenever a new object is added to the observable. If you provide a `fieldCreatedAt` then this is determined by whether the object has a value at that field. Otherwise it’s determined by whether the new value was previously undefined. The returned value will be merged into the local value, applying any server defaults or created/updated times from the server value. See onSaved for more details. const profile$ = observable(syncedCrud({ // ... create: (value, options) => { const { data, error } = await serverCreateProfile(value); if (error) { // Handle error, throw an Error to trigger a retry } else if (data) { return data; } }, fieldCreatedAt: 'created_at'})) ## update If an element in the observable is updated it will call the `update` function with the changed value. If you’ve enabled the `updatePartial` option then the value will include only the changed fields and the `id`. Otherwise it will be the full changed object. The returned value will be merged into the local value, applying any server defaults or created/updated times from the server value. See onSaved for more details. const profile$ = observable(syncedCrud({ // ... update: (value, options) => { const { data, error } = await serverUpdateProfile(value); if (error) { // Handle error, throw an Error to trigger a retry } else if (data) { return data; } }, fieldCreatedAt: 'updated_at', updatePartial: true // Update with only changed fields})) ## delete When an element is deleted from the observable, it will call the `delete` function with the `id` of the deleted element. const profile$ = observable(syncedCrud({ // ... delete: ({ id }, options) => { const { data, error } = await serverDeleteProfile(id); if (error) { // Handle error, throw an Error to trigger a retry } else if (data) { return data; } }})) Alternatively if you do soft deletes, you can provide a `fieldDeleted` option instead of `delete`, and then it will call the `update` function with that field set to true. const profile$ = observable(syncedCrud({ // ... update: () => {/* ... */}, fieldDeleted: 'deleted'})) ## onSaved When a value is saved to the server you may want it to apply changes back into the local observable. There are two ways to do that. 1. **onSavedUpdate: ‘createdUpdatedAt’**: This will save any fields ending in `["createdAt", "updatedAt", "created_at", "updated_at"]` back to the observable. This can be useful if your backend updates these values on the server. It also works if you have updated times for specific fields like “noteUpdatedAt”. const profile$ = observable(syncedCrud({ // ... create: () => {/* ... */}, update: () => {/* ... */}, onSavedUpdate: 'createdUpdatedAt';})) 2. **onSaved**: If you want more control over what fields are updated in your object you can do it manually with `onSaved`. Just return an object with the fields you want merged into the observable. Note that you can also just use this for side effects and not return anything. const profile$ = observable(syncedCrud({ // ... create: () => {/* ... */}, update: () => {/* ... */}, onSaved: ({ saved, input, currentValue, isCreate }) => { return { serverValue: saved.serverValue } }})) ## subscribe If your backend has a realtime feature, or if you want to poll periodically for changes, use `subscribe` to set that up. This will be called only once after the first `get`. This can be used in two ways depending on how your backend works, updating with incoming data or simply triggering a refresh. When the observable is no longer being observed it will call the returned unsubscribe function. const profile$ = observable(syncedCrud({ // ... list: () => {/* ... */}, subscribe: ({ refresh, update }) => { const unsubscribe = pusher.subscribe({ /*...*/ }, (data) => { // Either update with the received data update(data) // Or trigger a refresh of the get function refresh() }) // return unsubscribe function return unsubscribe }})) ## Sync only diffs An optional but very useful feature is the `changesSince: 'last-sync'` option. This can massively reduce bandwidth usage when you’re persisting list results since it only needs to list changes since the last query. The way this works internally is basically: 1. Save the maximum updatedAt to the local persistence 2. In subsequent syncs or after refresh it will list by `updatedAt: lastSync + 1` to get only recent changes 3. The new changes will be merged into the observable This has a few requirements to work correctly: 1. Set the `fieldUpdatedAt` with a field that is automatically updated by your backend on save. It should not be set on the frontend because inaccurate user clocks might cause data to be missed. 2. Use soft deletes instead of deleting rows or include deleted rows in your list function. If the list function does not include rows deleted since the last update, the frontend will not know to delete them. You can enable this by adding a `deleted` field in your backend and setting the `fieldDeleted` option. ## All options * `get`: Get a single value from the backend * `list`: List an array of values from the backend * `create`: Create a single value on the backend * `update`: Update a single value on the backend * `delete`: Delete a single value on the backend * `onSaved`: Update local value with remote data * `onSavedUpdate`: Automatically update local value with created and updated times * `fieldCreatedAt`: Set the field your backend uses for created times * `fieldUpdatedAt`: Set the field your backend uses for updated times * `fieldDeleted`: Set the field your backend uses for soft deletes * `updatePartial`: Send only changed fields into update function * `changesSince`: ‘all’ | ‘last-sync’. Defaults to ‘all’. ‘last-sync’ syncs only diffs * `generateId`: Provide a function for creating row ids. * `subscribe`: Set up a realtime connection or polling * `retry`: Options for retrying in case of error. Applies to both get and set. * `persist`: Options for persisting locally. See Persist and sync. * `debounceSet`: Debounce saved changes to reduce the number of updates * `mode`: ‘set’ | ‘assign’ | ‘merge’ | ‘append’ | ‘prepend’. How to apply incoming changes. * `transform`: Transform data as it loads in from the remote source or out as it saves to the remote source. You could use this to encrypt the data or transform it into some other format. * `waitFor`: A Promise or Observable to wait for before getting from remote * `waitForSet`: A Promise or Observable to wait for before setting to remote --- ## Page: https://legendapp.com/open-source/state/v3/sync/fetch/ `syncedFetch` is a simple wrapper around `fetch` to reduce boilerplate. * `get`: The URL to get. If it is an observable or Selector function, it will re-run whenever the value changes. * `set`: The URL to set * `getInit`: The `init` parameter to pass to `fetch` when getting * `setInit`: The `init` parameter to pass to `fetch` when setting. Defaults to `{ method: 'POST' }` * `valueType`: The function to call on the Response set. Defaults to `json`. * `onSavedValueType`: The function to call on the Response from set. Defaults to the `valueType` option or `json`. * `onSaved`: Given the return value from set, return a value to save back into the observable. Example: import { syncedFetch } from '@legendapp/state/sync-plugins/fetch';import { observable } from '@legendapp/state';const state$ = observable(syncedFetch({ get: 'https://url.to.get', set: 'https://url.to.set', onSaved: (value) => { return { updatedAt: value.updatedAt } }})) --- ## Page: https://legendapp.com/open-source/state/v3/sync/tanstack-query/ The built in `syncedFetch` and `synced` plugins should include all you need for remote sync, but this plugin can help when integrating into or migrating from an existing Query-based infrastructure. This plugin takes all of the normal Query parameters, but it updates an observable instead of triggering a re-render. The queryKey can be a function that returns a key array dependent on some observables. If those observables change it will update the queryKey and re-run with the new key. That makes it super easy to do pagination, for example. There are two ways to use this plugin: ### 1\. React Hook The `useObservableSyncedQuery` hook takes the normal Query parameters for the query and mutation, and gets the queryClient from Context. import { useObservableSyncedQuery } from '@legendapp/state/sync-plugins/tanstack-react-query';import { useQueryClient } from '@tanstack/react-query';import { use$ } from '@legendapp/state/react';function Component() { const state$ = useObservableSyncedQuery({ query: { queryKey: ['user'], queryFn: async () => { return fetch('https://reqres.in/api/users/1').then((v) => v.json()) }, }, mutation: { mutationFn: async (variables) => { return fetch( 'https://reqres.in/api/users/1', { body: JSON.stringify(variables), method: 'POST' } ) }, }, }) // get it with use$ to start the sync const state = use$(state$) // Or bind an input directly to a property, which will also start the sync return ( <div> <$React.input $value={state$.first_name} /> </div> )} ### 2\. Outside of React `syncedQuery` takes the normal Query parameters for the query and mutation, and additionally just needs a queryClient. It uses `@tanstack/query-core` and does not need to be used within React components. import { syncedQuery } from '@legendapp/state/sync-plugins/tanstack-query';import { QueryClient } from '@tanstack/react-query';const queryClient = new QueryClient()const state$ = observable(syncedQuery({ queryClient, query: { queryKey: ['user'], queryFn: async () => { return fetch('https://reqres.in/api/users/1').then((v) => v.json()) }, }, mutation: { mutationFn: async (variables) => { return fetch( 'https://reqres.in/api/users/1', { body: JSON.stringify(variables), method: 'POST' } ) }, },}))observe(() => { // get() the value to start syncing, and it will be reactive to updates coming in console.log(state$.get())}) --- ## Page: https://legendapp.com/open-source/state/v3/guides/performance/ Legend-State is already quite optimized by default, but there are some things to keep in mind to make sure it’s as optimized as possible. ## Batching Making multiple changes in a row can cause React components and observers to re-run multiple times when they should wait until changes are complete. So if you’re setting a lot of observables at once, it’s good to batch them together into one operation. See Batching for more. const state$ = observable({ items: [] });function addItems() { for (let i = 0; i < 1000; i++) { state$.items.push({ text: `Item ${i}` }); }}// ❌ This can render 1000 times while pushing to the arrayaddItems();// ✅ Batching delays until complete and renders oncebatch(addItems); ### When persisting If you are using `synced` or `syncObservable` to automatically persist your changes, you can prevent excessive writes by delaying persistence until changes are complete. Pushing to an array 1000 times could save to storage 1000 times, which could be very slow! ## Iterating through observables creates Proxies For most usage this effect is negligible, but may be a concern with huge arrays of objects. Accessing objects/arrays in observables creates Proxies to give them the observable functions. If you are iterating through large objects that don’t need to be tracked for changes, call `get()` first to access the raw data, skipping all the Proxy creation. const state$ = observable({ items: [{ data: { value: 10 }}, ...] })let sum = 0// 🔥 This will create proxies for each element's data and valuestate$.items.forEach(item => sum += item.data.value.get())// 💨 This will not do anything specialstate$.items.get().forEach(item => sum += item.data.value) ## Arrays Legend-State is especially optimized for arrays since it was built for Legend to handle huge lists of data. Here are a few tips to get the best performance out of arrays. ### Arrays of objects require a unique id To optimize rendering of arrays of objects, Legend-State requires a unique `id` or `key` field on each object. If your data needs to have a different id field, you can use a `${arrayName}_keyExtractor` function next to the array object: const data$ = observable({ arr: [], arr_keyExtractor: (item) => item.idObject._id,}); Under the hood, Legend-State listens to elements by path within the object. Operations like `splice` can change the index of an element which changes its path, so it uses the unique `id` to handle elements being moved and keep observables as stable references to their underlying element. It also optimizes for repositioning items within arrays and only re-renders the changed elements. ### Use the `For` component The `For` component is optimized for rendering arrays of observable objects so that they are extracted into a separate tracking context and don’t re-render the parent. You can use it in two ways, providing an `item` component or a function as a child. An `optimized` prop adds additional optimizations, but in an unusual way by re-using React nodes. See Optimized rendering for more details. import { observable } from "@legendapp/state"import { For } from "@legendapp/state/react"const state$ = observable({ arr: [{ id: 1, text: 'hi' }]})function Row({ item }) { return <div>{item.text}</div>}function List() { // 1. Use the For component with an item prop return <For each={state$.arr} item={Row} /> // 2. Use the For component with a render function as the child return ( <For each={list}> {item => ( <div> {item.text} </div> )} </For> )} ### For doesn’t re-render the parent In this more complex example you can see that as elements are added to and update the array, the parent component does not re-render. ### Don’t get() observables while mapping The `map` function automatically sets up a shallow listener, so it will only re-render when the array is changed and not when individual elements are changed. For best performance it’s best to let the child component track each item observable. Make sure that you don’t access any observable properties while mapping, like accessing the id for the key, so use `peek()` to prevent tracking. If you do `get()` inside an `observer` component would trigger the outer component to observe every list element. import { observable } from "@legendapp/state";import { For } from "@legendapp/state/react";const state$ = observable({ arr: [{ id: 1, text: "hi" }] });function Row({ item }) { return <div>{item.text}</div>;}function List() { // Be sure to use peek() to make sure you don't track any observable fields here return state$.arr.map((item) => <Row key={item.peek().id} item={item} />);} ### Optimized rendering The `For` component has an `optimized` prop which takes the optimizations even further. It prevents re-rendering the parent component when possible, so if the array length doesn’t change it updates React elements in place instead of the whole list rendering. This massively reduces the rendering time when swapping elements, sorting an array, or replacing some individual elements. But because it reuses React nodes rather than replacing them as usual, it may have unexpected behavior with some types of animations or if you are modifying the DOM externally. This is how the fast “replace all rows” and “swap rows” speeds in the benchmark are achieved. import { For } from "@legendapp/state/react"...function List() { // Use the optimized prop return <For each={list} item={Row} optimized />} --- ## Page: https://legendapp.com/open-source/state/v3/guides/patterns/ ## Many atoms vs. one large store Legend-State can be used however you want. If your team prefers one large state object containing all app state, that’s great! Or you may prefer to have multiple different individual atoms in their own files, which works too. Here’s some examples of ways to organize your state. ### One large global state const store$ = observable({ UI: { windowSize: undefined as { width: number, height: number }, activeTab: 'home' as 'home' | 'user' | 'profile', ... }, settings: { theme: 'light' as 'light' | 'dark', fontSize: 14, ... }, todos: [] as TodoItem[]}) ### Multiple individual atoms // Settingsexport const theme$ = observable('light')export const fontSize$ = observable(14)// UIStateexport const uiState$ = observable({ windowSize: undefined as { width: number, height: number }, activeTab: 'home' as 'home' | 'user' | 'profile',}) ### Within React components You can use `useObservable` to create state objects within React components, then pass them down to children through either props or Context. function App() { const store$ = useObservable({ profile: { name: "hi" }, }); return ( <div> <Profile profile={store$.profile} /> </div> );}function Profile({ profile }) { return <div>{profile.name}</div>;} --- ## Page: https://legendapp.com/open-source/state/v3/other/other-frameworks/ Legend-State is designed to be cross platform as it’s mostly a vanilla observable system, but our team has expertise in React and React Native so that’s where we started. If you would like to use Legend-State for another framework, please let us know and we will work with you to try to build the integration in the most optimal way and include it as an officially supported plugin. --- ## Page: https://legendapp.com/open-source/state/v3/other/migrating/ ## 3.0.0-beta.19 to 3.0.0-beta.20 ### observer -> use$ Based on discussions with the React Compiler team and a lot of feedback from the community, we’re changing the suggested primary way of using observables in React. The old ways will still work for a while so we don’t break existing apps and we have some tools to aid in the migration, which can be done slowly over time. Basically, we need to change from `observer` tracking all `get()` calls to using a `use$` hook instead, which is just a renamed `useSelector`. #### useSelector to use$ `useSelector` is renamed to `use$`, because the term “Selector” has a lot of baggage from other state libraries and many new users found it confusing. `useSelector` will still work for a while so you can make the change slowly if you want, or a global find and replace should work. // 🔴 Fromconst value = useSelector(state$.value)// ✅ Toconst value = use$(state$.value) #### observer to use$ We are now encouraging using the `use$` hooking rather than using `observer` to track all `get()` calls. `observer` will still work for a while so you can migrate slowly. But we have rewritten the docs to use `use$` everywhere and will be focusing on that going forward. The reason for this is that `observer` is not compatible with React Compiler. To work best with the Compiler, render functions need to be pure, meaning that calling a function (like `state$.get()`) should always return the same value. So based on that assumption, Compiler will wrap function calls in `useMemo`. But Legend State’s current usage of `observer` depends on each `state$.get()` function call to returning a different value when it changes, so memoizing its value would break Legend State’s reactivity. But, Compiler will not memoize any hooks (functions starting with “use”), so if we just use a `use$(state$)` hook instead of `state$.get()` then everything will work fine. So because Compiler is a really great optimization already in its first version and will continue to get better over time, we want to be perfectly compatible with the Compiler to get all of the benefits. const state$ = observable({ value: 10 })// observer is now just an optional performance optimizationconst Component = observer(() => { // ✅ The new way const value = use$(state$.value) // 🔴 The old way const value = state$.value.get()}) #### The full details * ✅ A new hook `use$` (just `useSelector` with a new name) is now the default way to consume observables const state$ = observable({ value: 10 })const Component = () => { const value = use$(state$.value) // ...} * ✅ observer is an optimization to merge all `use$` calls into a single hook, useful for large components const state$ = observable({ value1: 10, /* ... */ })const Component = observer(() => { // Observer makes this run only a single hook const value1 = use$(state$.value1) const value2 = use$(state$.value2) const value3 = use$(state$.value3) const value4 = use$(state$.value4) const value5 = use$(state$.value5) const value6 = use$(state$.value6) const value7 = use$(state$.value7) // ...}) * ✅ If calling a function that consumes observables, wrap it in `use$`. This will have an additional benefit of only triggering re-renders if the return value changes. const state$ = observable({ v1: 10, v2: 20 })const getComputedData = () => { return state$.v1.get() + state$.v2.get()}const Component = () => { const v = use$(() => getComputedData()) // ...} * 🔴 (Deprecated) Calling `.get()` directly within `observer` const state$ = observable({ value: 10 })const Component = observer(() => { const value = state$.value.get() // ...}) * 🔴 (Deprecated) `enableReactTracking({ auto: true })` is deprecated and will be removed in a later version This was a shortcut to use `get()` without needing observer, but since we’re discouraging `get()` anyway, this becomes less useful. It’s broken in React 19, so we’re deprecating it rather than try to fix it for no ongoing benefit. enableReactAutoTracking({ auto: true })const state$ = observable({ value: 10 })const Component = () => { const value = state$.value.get() // ...} ### Reactive -> $React and individual exports Based on conversations with users of reactive components in React Native, many were finding it confusing to have to configure to enable them, and the typing of `Reactive` did not work very well. Plus we want to make sure that bundle size is minimized so we don’t need to include the web code in React Native. So we’re just going to do a more standard thing and have different exports. In React on web there is now a `$React` namespace that includes all of the DOM components. And on React Native there’s separate exports for each of the built-in components. #### Web import { $React } from "@legendapp/state/react-web"function Component() { return ( <$React.div $className={() => state$.age.get() > 5 ? 'kid' : 'baby'} /> )} #### React Native import { $TextInput } from "@legendapp/state/react-native"function Component() { return ( <$TextInput $value={state$.name} /> )} ## 2.x to 3.0 Beta Version 3.0 is a big change focused mainly in four areas. If you have any trouble with the migration join the community on Discord or Github and we will help. ### 1\. Types The types were fully rewritten from scratch, fixing many bugs especially around Promises and nullability, and many of the types were renamed. You may need to rename some of your type imports. ### 2\. Computed/Proxy computed/proxy are no longer separate concepts, they’re just a function in an observable. If you were using `computed` you can just use `observable` now, and if you were using `computed` as a child of an observable, you can remove `computed` and use just a function. The old behavior will still work for now, but the new way is more efficient and `computed` will be deprecated in a later version. See Computed Observables for more details. // Changeconst compValue$ = computed(() => /* ... */)// toconst compValue$ = observable(() => /* ... */)// Changeconst state$ = observable(() => ({ value: 1, comp: computed(() => state$.value.get())}))// toconst state$ = observable(() => ({ value: 1, comp: () => state$.value.get()})) `proxy` is now just a function with a string parameter. See Computed Observables for more details. // Changeconst state$ = observable({ items: { test1: { text: 'hi' }, test2: { text: 'hello' } }, itemText: proxy((key) => { return state$.items[key]['text']; })})// Toconst state$ = observable({ items: { test1: { text: 'hi' }, test2: { text: 'hello' } }, texts: (key: string) => { return state$.items[key]['text'] }}) And you can use `useObservable` in the same way that you used to use `useComputed`: // Changeconst state$ = useComputed(() => state$.text.get())// Toconst state$ = useObservable(() => state$.text.get()) ### 3\. Persist Persistence works in the same way but the API is changed for clarity and new features with the new more robust sync engine. `persistObservable` is changed to `syncObservable` and the persisting features are under the `persist` option instead of `local`. Additionally, `persistObservable` was inserting a `state` property for the sync state, which caused compatibility issues with data that had its own `state` property. So the sync state is now accessible separately with `syncState`. Global configuration was confusing and restricting, so instead of a global `configureObservablePersistence` you can now create customize synced functions. import { syncState } from "@legendapp/state"import { configureSynced, syncObservable } from "@legendapp/state/sync"// ChangeconfigureObservablePersistence({ pluginLocal: ObservablePersistLocalStorage})const { state } = persistObservable(state$, { local: { name: "store", }})// Toconst syncPlugin = configureSynced({ persist: { plugin: ObservablePersistLocalStorage }})syncObservable(state$, syncPlugin({ persist: { name: "store", }}))const state = syncState(state$); ### 4\. Sync It’s now much easier to sync individual observables with a new plugin engine. See the Persist and Sync docs for the latest documentation. If you had made a custom sync plugin on the old system, please post an issue on Github or talk to us on Discord, and we will help you with the migration. ### 5\. Removed old sync plugins Version 2 had inconsistent and varied ways to sync with fetch or Query, and they are now aligned into the Sync engine. * Fetch: syncedFetch * TanStack Query: syncedQuery ### Other changes * useObservable with a function parameter is now reactive like useComputed was. So use peek() when accessing observables inside it if you want it to be just an initial value and not be reactive. * Computeds now only re-compute themselves when observed. This may cause some migration issues if your computeds had side effects, as they will not re-run when dependencies change unless being observed. * Removed lockObservable: With the new method of computeds it’s not possible to modify the types to be readonly, so we removed this feature. * set and toggle return void: They had previously returned the observable in order to allow chaining, but it caused unintended side effects, so they now return void. * `onSet` was renamed to `onAfterSet` for clarity * Removed the concept of “after batch” - it was generally unreliable because batches can run recursively * Renamed `enableDirectAccess()` to `enable$GetSet()` and `enableDirectPeek()` to `enable_PeekAssign()` for clarity * Moved `trackHistory` export, so you can now use `import { trackHistory } from '@legendapp/state/helpers/trackHistory'` ## 1.x to 2.0 Version 2.0 removes old deprecated features to reduce bundle size and encourage everyone to move over to the new features. Version 1.11 displays deprecation warnings to help you migrate. So there are two migration strategies: 1. **Runtime**: Upgrade to version 1.11 and check the console for warnings whenever using deprecated features. This can give you time to do the migration slowly without breaking anything. 2. **Build time**: Upgrade to version 2.0 and use TypeScript warnings to find errors These are all things that were changed over time between 1.0 and 2.0 so depending on when you started using Legend-State you may already be doing it the new way. ### Promise behavior changed When setting a Promise into an observable it creates a `state` child on the observable with `isLoaded` and `error` properties that you can check for load state. After it resolves or rejects it replaces itself with the resolved value and updates the `state`. Previously in the case of an error it would replace itself with an `{ error }` object. So if you had logic to check whether a Promise errored by checking the `error` property on the observable, you can change that to `.state.error`. The direct rendering enabled by `enableLegendStateReact` and `enableReactDirectRender` was fragile, hard to find in files, and the React team advised against it. So instead we are using the `Memo` component. See Render an observable directly for more details. To migrate you can remove usage of `enableLegendStateReact()` or `enableReactDirectRender()` as well as any usage of direct rendering, and replace it with `Memo`. When you remove those imports it will stop overriding the types so rendering observables directly will result in TypeScript errors. If you were using `enableLegendStateReact` to render direct observables heavily, enableReactDirectRender is still usable to ease migration, though it will throw TypeScript errors to help you migrate away. It will be fully removed in version 3.0. // Remove these:enableLegendStateReact();enableLegendStateReact();function Component() { const text$ = useObservable("test"); return ( <> Change this: {text$} To this: <Memo>{text$}</Memo> </> );} ### Legend components changed to Reactive components The reactive components are now better named and more easily customizable with configuration functions, exported from the normal `/react` path. See Reactive components for more details. Change: // Reactimport { Legend } from "@legendapp/state/react-components";function Component() { return <Legend.div>...</Legend.div>;}// React Nativeimport { Legend } from "@legendapp/state/react-native-components";function Component() { return <Legend.View>...</Legend.View>;} To: // Reactimport { enableReactComponents } from "@legendapp/state/config/enableReactComponents";enableReactComponents();// React Nativeimport { enableReactNativeComponents } from "@legendapp/state/config/enableReactNativeComponents";enableReactNativeComponents();// Now you can use them anywhereimport { Reactive } from "@legendapp/state/react";function Component() { // React return <Reactive.div>...</Reactive.div>; // React Native return <Reactive.View>...</Reactive.View>;} ### For parameter name changed As we’ve been adopting a convention of naming observables suffixed with `$`, many users were confused by the `item` prop in the render component used in For’s `item` prop, so we renamed it to `item$` to make it clear that it’s an observable. `item` will still work until version 3.0, but it will throw TypeScript errors to encourage changing it to `item$`. ### Reactive props changed to start with $ In an earlier version reactive props ended with $ and were changed in version 1.3.0 to allow starting with $, because it has a better UX with autocomplete and is easier to visually scan for. Both have been supported but version 2.0 will remove type support for the suffix version. It will still work in code so it doesn’t break your apps, but we will fully remove it in 3.0 and suggest you at least start using the new pattern. A recommended way to find and replace all of instances of the old method is to find `$=` in all files. function Component() { const text$ = useObservable("test"); return ( <Reactive.div // Change this className$={() => "..."} // to this $className={() => "..."} > ... </Reactive.div> );} ### Persistence Changes In version 2 we locked down and cleaned up the interfaces for the remote persistence APIs. #### persistObservable returns an object with sync state To support taking an initial state or an observable, `persistObservable` needs to return both an observable and the syncState, so it now the observable with a `state` property on it, matching the Promise behavior. See persistObservable for details. const { state } = persistObservable(initialStateOrObservable, { ... }) #### persistLocal => pluginLocal We renamed the parameters for clarity as the difference between `local` and `persistLocal` wasn’t clear. So it is now named `pluginLocal` because that makes more sense. persistObservable(initialStateOrObservable, { // Before persistLocal: ObservablePersistLocalStorage // After pluginLocal: ObservablePersistLocalStorage }) #### Remote options renamed Since there were not any remote persistence plugins before, these changes would likely not affect you unless you made your own. See Remote Persistence for details. ### observer, reactive, reactiveObserver not exported from react-components The `/react-components` export was mistakenly exporting `observer`, `reactive`, and `reactiveObserver` which are already exported from `/react`. Your editor may have automatically imported from `/react-components` so may need to be changed. // Change this:import { observer, reactive, reactiveObserver,} from "@legendapp/state/react-components";// To this:import { observer, reactive, reactiveObserver } from "@legendapp/state/react"; ### types.d.ts moved to types/babel.d.ts `types.d.ts` was too generic of a name now that we have a lot of configuration options, so we are naming them more specifically in a “types” folder. For now there’s still only the `babel` types but this gives room to add more in the future. // Change this:/// <reference types="@legendapp/state/types" />// To this:/// <reference types="@legendapp/state/types/babel" /> ### afterBatch removed `afterBatch` was not working 100% correctly in all cases, and the best way to fix it was to make it part of `batch(...)`. // ChangebeginBatch();afterBatch(() => { console.log("done");});obs$.set(true);endBatch();// Tobatch( () => { obs$.set(true); }, () => { console.log("done"); }); ## 0.23 to 1.0 ### onChange changed 1. `onChange` now takes a second object parameter with `trackingType` and `initial` options. If you were using a second parameter (like `true` to track shallowly) before, use `{ trackingType: true }`. 2. The `onChange` callback now receives an object with `value`, `getPrevious`, and `changes` in it, replacing the previous multiple arguments. These changes allow for more flexibility - it’s easier for callers who care about the changes but not the current value or previous values (like persistence plugins), and the new `initial` option lets it behave more like `observe` where it runs immediately instead of waiting for a change. // Oldobs.onChange((value, getPrevious, changes) => { // ...}, true);// Newobs.onChange( ({ value, getPrevious, changes }) => { // ... }, { trackingType: true }); ### when and Show tweaked They were previously checking if the value is “ready”, meaning it doesn’t count if it’s an empty object or empty array. They now do a standard javascript truthiness check as would be expected. For the previous behavior you can use `whenReady` or `<Show ifReady={...}>` ### IndexedDB preloader removed It was actually slower in our testing so we simplified things and just removed it. See IndexedDB for up-to-date docs. ## 0.22 to 0.23 ### Setting an observable object to the same value no longer notifies Setting an object to itself was triggering notifications, which is not great for performance and is undesirable in most cases. It is now more targeted and will only notify on elements that actually changed. It’s unlikely that will affect you, but it may be a breaking change for you if you depended on things re-computing/re-rendering even if nothing changed. ### Not automatically treating DOM nodes and React elements as opaque objects It was adding most likely unnecessary extra code and is easily solved in a more generic way. If you’re storing those in observables, wrap them in `opaqueObject(...)`. ### IndexedDB plugin support for non-dictionaries removed For flexibility of multiple observables persisting to the same IndexedDB table, it now has an `itemID` option to save non-dictionaries. So the IndexedDB persistence plugin can be used in two ways: 1. Persisting a dictionary where each value has an `id` field, and each value will create a row in the table 2. Persisting multiple observables to their own rows in the table with the `itemID` option const settings = observable({ theme: "light" });persistObservable(settings, { local: { name: "store", indexedDB: { itemID: "settings", }, },}); ## 0.21 to 0.22 ### Local Storage is no longer the default persistence This was changed to reduce build size for those who don’t use it. If you want to use Local Storage, configure it at the beginning of your app: import { configureObservablePersistence } from "@legendapp/state/persist";import { ObservablePersistLocalStorage } from "@legendapp/state/local-storage";configureObservablePersistence({ persistLocal: ObservablePersistLocalStorage,}); ### Moved persist plugins to `/persist-plugins` Update your import paths: import { ObservablePersistLocalStorage } from "@legendapp/state/persist-plugins/local-storage";import { ObservablePersistMMKV } from "@legendapp/state/persist-plugins/mmkv"; ### `when` is not triggered by empty or \[\] If you wanted `when` to be triggered by those, you can update it to use a selector to return a boolean like: const obs = {}when(() => !!obs, () => {...}) ## 0.20 to 0.21 ### Changed `onChange` callback The extra paremeters in the `onChange` callback have changed to include an array of of the changes, fixing a bug where it was only showing the latest child’s change when changing multiple children while batching. This likely won’t affect many of you as it’s mostly intended for internal use and persistence plugins. ## Renamed React components from `legend` to `Legend` We had originally used lower casing to match html elements, but in practice it did not autocomplete well and felt wrong. So just rename to uppercase, for example from `<legend.div />` to `<Legend.div />`. ## 0.19 to 0.20 ### Removed deprecated automatic observing The automatic observing from 0.18 was deprecated in 0.19 and is now removed. See Deprecated automatic observing. ### observe and useObserve As `observe` has gotten more and more powerful, it outgrew modifying behavior based on the return value, so it now has an event parameter to control canceling listening and a cleanup function. * If you were returning false to cancel observing, you can now use `e.cancel = true`. * If you were returning a cleanup function you can use `e.onCleanup = () => ...`. * It also adds a `num` param to know how many times it’s run and a `previous` param to compare to the previous value. observe((e) => { // Cancel observing any future changes e.cancel = true // A cleanup function e.cleanup = () => ...}) ### Renamed event `dispatch` to `fire` Just change `evt.dispatch()` to `evt.fire()` and all is good 👍. ## 0.18 to 0.19 ### Deprecated automatic observing We are deprecating the automatic observing that depended on hooking into React’s internals. Components will no longer track observables automatically, but you can easily it per component in a few ways: * Wrap components in `observer` to make them track automatically * Wrap observable access in `useSelector` to return a value and track automatically. * Render observables directly into JSX. So tracking observables in React can look like this now: import { observer } from "@legendapp/state/react";const Component = observer(function Component() { const value = observable.get(); // This tracks because it's inside an observer}); or import { useSelector } from "@legendapp/state/react";function Component() { // Track the value of an observable const value = useSelector(observable); // Track the return value of a function const isSelected = useSelector(() => id === state.selected.get());} See the React guide for how we suggest setting up your components now. Rendering observables directly still works though, and `enableLegendStateReact()` still enables that. You can still enable the previous behavior for now with `enableLegendStateReact({ autoTrackingDEPRECATED: true })` while you migrate to using `observer` or `useSelector`. That option will be removed before we reach 1.0. #### Why * It doesn’t actually work. We thought this method would be safe to use because it was inspired by Preact Signals, but as we’ve integrated Legend-State into more environments we found significant edge cases that seem to be unfixable and suggest that the whole concept is just unworkable. * The React team has asked us not to do it and made it clear that it is likely to break in a future version of React. * As Legend-State has evolved, the ideal way of using it has shifted towards fine-grained reactivity where components render minimally or only once, and we were actually specifically opting out of auto-tracking more often than not. So in the interest of pursuing the render-once ideal, we think it’s actually generally better to use the reactivity components or opt-in to tracking. * We don’t want to distract from the core mission of Legend-State with an unreliable and unstable core. ### Bindable components deprecated We now have a more general purpose way of making reactive props that can also be used for two-way binding for inputs. So change: <Bindable.input bind={observable} /> to import { Legend } from "@legendapp/state/react-components";<legend.input value$={observable} />; See reactive props for more detauls. ### `value` is no longer exposed Primitives no longer have a `value` that you could access and modify. We had previously removed that from the documentation and it is now removed from the code. You can just `get()` and `set()` as you would any other observable. It turned out to cause more bugs than it was worth and made the TypeScript types overly complex. ### Removed get(false) Use `peek()` instead. ## 0.17 to 0.18 The tracing functions are renamed to use\* to be inline with hooks: * useTraceListeners * useTraceUpdates * useVerifyNotTracking * useVerifyOneRender (new) ## 0.16 to 0.17 ### Primitives are now returned as observables Observables previously tried to be clever by returning primitives directly, which was great in making it easy to work with state directly. But especially as the goal has moved more towards fine-grained reactivity, the balance shifted towards observable objects being better. So accessing primitives through state now returns observables like anything else. #### Raw primitives: * Pro: Easy to work with * Con: Required `obs()` to get the observable to pass to props or render directly * Con: Easy to track a value without realizing it #### Observable primitives * Pro: More consistent * Pro: Easier to deal with undefined * Pro: Can dot through undefined paths easily * Pro: Doesn’t need `obs()` or set by key * Pro: Easier to use fine-grained features without `obs()` everywhere * Pro: Easier to pass as props without needing `obs()` * Con: Requires `get()` for primitives #### Changes to make: **get()** Wherever you were accessing primitives directly, add a `.get()` to the end of it. **set(key, value)** Change set by key to access the node first. It will now work fine if the node is undefined. From: `state.profile.set('name', 'Annyong')` To: `state.profile.name.set('Annyong')` **obs()** Just remove it. The default behavior is now the same as what `obs()` did before. ### Hooks renamed `useComputed` is now `useSelector`, re-rendering only when the return value changes. `useComputed` now returns a `computed` observable. ## 0.15 to 0.16 Legend-State now automatically tracks observable access in any component. To set it up, just call `enableLegendStateReact()` at the beginning of your app. Now `observer` is no longer needed, so just remove all usage of `observer`. ## 0.14 to 0.15 ### Safety There are now three levels of safety: **Unsafe**, **Default**, and **Safe**. Default is new and allows direct assignment to primitives but prevents directly assigning to everything else. The previous default behavior was Unsafe so you may see errors if you were directly assigning to objects/arrays/etc… TypeScript should show errors so it should be easy to find them. Replace those with `.set(...)` or pass in `false` as the second parameter to `observable` to go back to “Unsafe” mode. // 1. Unsafe: Use false for the previous unsafe behaviorconst obs = observable({ ... }, /*safe*/ false)// 2. Default: The new default behavior prevent directly assigning to objects, but allows directly assining to primitivesconst obs = observable({ text: 'hello', obj: {} })obs.text = 'hi'// ✅ Setting a primitive works in default mode but not in safe mode.obs.obj = {}// ❌ Error. Cannot assign to objects directly.// 3. Safe: Safe mode prevents all direct assignmentconst obs = observable({ text: 'hello', obj: {} }, /*safe*/true)obs.text = 'hi'// ❌ Error. Cannot assign directly in safe mode. ### Renamed ref to obs `ref` was a bit unclear and conflicted with React - the new feature to directly render observables requires a `ref` property. So it is now renamed to `obs`, which feels more intuitive as it is used to get an observable. const state$ = observable({ text: "" });// Beforeconst textRef = state$.ref("text");const textRef2 = state$.text.ref();// Nowconst textObs = obs.obs("text");const textObs2 = obs.text.obs(); ### Array optimizations The array optimizations are now opt-in, because they are only useful in React and can potentially have some unexpected behavior in React if modifying the DOM externally. You can enable them by using the `For` component with the `optimized` prop. See Arrays for more. const obs = observable({ items: [] });const Row = observer(function Row({ item }) { return <div>{item.text}</div>;});const List = observer(function () { // The optimized prop enables the optimizations which were previously default return <For each={list} item={Row} optimized />;}); ### Shallow Since there’s now a additionally the `optimized` tracking for arrays, the shallow option on `get()` and `obs()` now has another option. So instead of passing `shallow` to an observable, use the `Tracking` namespace now. import { Tracking } from "@legendapp/state";const obs = observable([]);// Beforeobs.get(shallow);// Nowobs.get(Tracking.shallow); ### Batching The `observableBatcher` namespace is removed and the batching functions are now exported on their own. import { batch, beginBatch, endBatch } from '@legendapp/state'beginBatch()obs1.set(...)obs2.set(...)endBatch()// batch()batch(() => { obs1.set(...) obs2.set(...)} ### Change functions => observe/when The new `observe` and `when` functions can automatically track all observables accessed while running them. This made the old extra change utilities unnecessary, so `onTrue`, `onHasValue`, `onEquals`, and `onChangeShallow` have been removed, saving 200 bytes (7%) from the bundle size. These are the new equivalents: import { observe, when } from "@legendapp/state";const obs = observable({ value: undefined });// onTrueobs.value.onTrue(handler);// New onTrue equivalentwhen(() => obs.value === true, handler);// onHasValueobs.value.onHasValue("text", handler);// onHasValue equivalentwhen(() => obs.value, handler);// onEqualsobs.value.onEquals("text", handler);// onEquals equivalentwhen(() => obs.value === "text", handler);// onChangeShallowobs.value.onChangeShallow(handler);// onChangeShallow equivalentobs.value.onChange(handler, { shallow: true }); ### Primitive current => value Primitive observables are now wrapped in `{ value }` instead of `{ current }`. You can also now modify the `value` directly. const obs = observable(10);// Beforeobs.current === 10;obs.curent = 20; // ❌ Error// Nowobs.value === 10;obs.value = 20; // ✅ Works ### Renamed observableComputed and observableEvent `observableComputed` is now just `computed` and `observableEvent` is now just `event`. import { computed, event } from '@legendapp/state'// Beforeconst value = observableComputed(() => ...)// Nowconst value = computed(() => ...)// Beforeconst evt = observableEvent(() => ...)// Nowconst evt = event(() => ...) ### Renamed LS to Bindable The automatically bound exports are now named better and in their own exports, so change your exports from `LS` to: // Webimport { Bindable } from "@legendapp/state/react-components";// React Nativeimport { Bindable } from "@legendapp/state/react-native-components"; ### Renamed Isolate to Computed The control flow component `Isolate` is renamed to `Computed` for naming consistency. ### Removed memo and isolate props We found these confusing in practice as it wasn’t super clear when a component was getting memoized, and it’s not much extra work to use the Memo and Computed components directly. If you were using those, switch to the Computed and Memo components instead // Before<div memo>...</div><div computed>...</div>// Now<Memo><div>...</div></Memo><Computed><div>...</div></Computed> --- ## Page: https://legendapp.com/open-source/state/v3/other/migrating ## 3.0.0-beta.19 to 3.0.0-beta.20 ### observer -> use$ Based on discussions with the React Compiler team and a lot of feedback from the community, we’re changing the suggested primary way of using observables in React. The old ways will still work for a while so we don’t break existing apps and we have some tools to aid in the migration, which can be done slowly over time. Basically, we need to change from `observer` tracking all `get()` calls to using a `use$` hook instead, which is just a renamed `useSelector`. #### useSelector to use$ `useSelector` is renamed to `use$`, because the term “Selector” has a lot of baggage from other state libraries and many new users found it confusing. `useSelector` will still work for a while so you can make the change slowly if you want, or a global find and replace should work. // 🔴 Fromconst value = useSelector(state$.value)// ✅ Toconst value = use$(state$.value) #### observer to use$ We are now encouraging using the `use$` hooking rather than using `observer` to track all `get()` calls. `observer` will still work for a while so you can migrate slowly. But we have rewritten the docs to use `use$` everywhere and will be focusing on that going forward. The reason for this is that `observer` is not compatible with React Compiler. To work best with the Compiler, render functions need to be pure, meaning that calling a function (like `state$.get()`) should always return the same value. So based on that assumption, Compiler will wrap function calls in `useMemo`. But Legend State’s current usage of `observer` depends on each `state$.get()` function call to returning a different value when it changes, so memoizing its value would break Legend State’s reactivity. But, Compiler will not memoize any hooks (functions starting with “use”), so if we just use a `use$(state$)` hook instead of `state$.get()` then everything will work fine. So because Compiler is a really great optimization already in its first version and will continue to get better over time, we want to be perfectly compatible with the Compiler to get all of the benefits. const state$ = observable({ value: 10 })// observer is now just an optional performance optimizationconst Component = observer(() => { // ✅ The new way const value = use$(state$.value) // 🔴 The old way const value = state$.value.get()}) #### The full details * ✅ A new hook `use$` (just `useSelector` with a new name) is now the default way to consume observables const state$ = observable({ value: 10 })const Component = () => { const value = use$(state$.value) // ...} * ✅ observer is an optimization to merge all `use$` calls into a single hook, useful for large components const state$ = observable({ value1: 10, /* ... */ })const Component = observer(() => { // Observer makes this run only a single hook const value1 = use$(state$.value1) const value2 = use$(state$.value2) const value3 = use$(state$.value3) const value4 = use$(state$.value4) const value5 = use$(state$.value5) const value6 = use$(state$.value6) const value7 = use$(state$.value7) // ...}) * ✅ If calling a function that consumes observables, wrap it in `use$`. This will have an additional benefit of only triggering re-renders if the return value changes. const state$ = observable({ v1: 10, v2: 20 })const getComputedData = () => { return state$.v1.get() + state$.v2.get()}const Component = () => { const v = use$(() => getComputedData()) // ...} * 🔴 (Deprecated) Calling `.get()` directly within `observer` const state$ = observable({ value: 10 })const Component = observer(() => { const value = state$.value.get() // ...}) * 🔴 (Deprecated) `enableReactTracking({ auto: true })` is deprecated and will be removed in a later version This was a shortcut to use `get()` without needing observer, but since we’re discouraging `get()` anyway, this becomes less useful. It’s broken in React 19, so we’re deprecating it rather than try to fix it for no ongoing benefit. enableReactAutoTracking({ auto: true })const state$ = observable({ value: 10 })const Component = () => { const value = state$.value.get() // ...} ### Reactive -> $React and individual exports Based on conversations with users of reactive components in React Native, many were finding it confusing to have to configure to enable them, and the typing of `Reactive` did not work very well. Plus we want to make sure that bundle size is minimized so we don’t need to include the web code in React Native. So we’re just going to do a more standard thing and have different exports. In React on web there is now a `$React` namespace that includes all of the DOM components. And on React Native there’s separate exports for each of the built-in components. #### Web import { $React } from "@legendapp/state/react-web"function Component() { return ( <$React.div $className={() => state$.age.get() > 5 ? 'kid' : 'baby'} /> )} #### React Native import { $TextInput } from "@legendapp/state/react-native"function Component() { return ( <$TextInput $value={state$.name} /> )} ## 2.x to 3.0 Beta Version 3.0 is a big change focused mainly in four areas. If you have any trouble with the migration join the community on Discord or Github and we will help. ### 1\. Types The types were fully rewritten from scratch, fixing many bugs especially around Promises and nullability, and many of the types were renamed. You may need to rename some of your type imports. ### 2\. Computed/Proxy computed/proxy are no longer separate concepts, they’re just a function in an observable. If you were using `computed` you can just use `observable` now, and if you were using `computed` as a child of an observable, you can remove `computed` and use just a function. The old behavior will still work for now, but the new way is more efficient and `computed` will be deprecated in a later version. See Computed Observables for more details. // Changeconst compValue$ = computed(() => /* ... */)// toconst compValue$ = observable(() => /* ... */)// Changeconst state$ = observable(() => ({ value: 1, comp: computed(() => state$.value.get())}))// toconst state$ = observable(() => ({ value: 1, comp: () => state$.value.get()})) `proxy` is now just a function with a string parameter. See Computed Observables for more details. // Changeconst state$ = observable({ items: { test1: { text: 'hi' }, test2: { text: 'hello' } }, itemText: proxy((key) => { return state$.items[key]['text']; })})// Toconst state$ = observable({ items: { test1: { text: 'hi' }, test2: { text: 'hello' } }, texts: (key: string) => { return state$.items[key]['text'] }}) And you can use `useObservable` in the same way that you used to use `useComputed`: // Changeconst state$ = useComputed(() => state$.text.get())// Toconst state$ = useObservable(() => state$.text.get()) ### 3\. Persist Persistence works in the same way but the API is changed for clarity and new features with the new more robust sync engine. `persistObservable` is changed to `syncObservable` and the persisting features are under the `persist` option instead of `local`. Additionally, `persistObservable` was inserting a `state` property for the sync state, which caused compatibility issues with data that had its own `state` property. So the sync state is now accessible separately with `syncState`. Global configuration was confusing and restricting, so instead of a global `configureObservablePersistence` you can now create customize synced functions. import { syncState } from "@legendapp/state"import { configureSynced, syncObservable } from "@legendapp/state/sync"// ChangeconfigureObservablePersistence({ pluginLocal: ObservablePersistLocalStorage})const { state } = persistObservable(state$, { local: { name: "store", }})// Toconst syncPlugin = configureSynced({ persist: { plugin: ObservablePersistLocalStorage }})syncObservable(state$, syncPlugin({ persist: { name: "store", }}))const state = syncState(state$); ### 4\. Sync It’s now much easier to sync individual observables with a new plugin engine. See the Persist and Sync docs for the latest documentation. If you had made a custom sync plugin on the old system, please post an issue on Github or talk to us on Discord, and we will help you with the migration. ### 5\. Removed old sync plugins Version 2 had inconsistent and varied ways to sync with fetch or Query, and they are now aligned into the Sync engine. * Fetch: syncedFetch * TanStack Query: syncedQuery ### Other changes * useObservable with a function parameter is now reactive like useComputed was. So use peek() when accessing observables inside it if you want it to be just an initial value and not be reactive. * Computeds now only re-compute themselves when observed. This may cause some migration issues if your computeds had side effects, as they will not re-run when dependencies change unless being observed. * Removed lockObservable: With the new method of computeds it’s not possible to modify the types to be readonly, so we removed this feature. * set and toggle return void: They had previously returned the observable in order to allow chaining, but it caused unintended side effects, so they now return void. * `onSet` was renamed to `onAfterSet` for clarity * Removed the concept of “after batch” - it was generally unreliable because batches can run recursively * Renamed `enableDirectAccess()` to `enable$GetSet()` and `enableDirectPeek()` to `enable_PeekAssign()` for clarity * Moved `trackHistory` export, so you can now use `import { trackHistory } from '@legendapp/state/helpers/trackHistory'` ## 1.x to 2.0 Version 2.0 removes old deprecated features to reduce bundle size and encourage everyone to move over to the new features. Version 1.11 displays deprecation warnings to help you migrate. So there are two migration strategies: 1. **Runtime**: Upgrade to version 1.11 and check the console for warnings whenever using deprecated features. This can give you time to do the migration slowly without breaking anything. 2. **Build time**: Upgrade to version 2.0 and use TypeScript warnings to find errors These are all things that were changed over time between 1.0 and 2.0 so depending on when you started using Legend-State you may already be doing it the new way. ### Promise behavior changed When setting a Promise into an observable it creates a `state` child on the observable with `isLoaded` and `error` properties that you can check for load state. After it resolves or rejects it replaces itself with the resolved value and updates the `state`. Previously in the case of an error it would replace itself with an `{ error }` object. So if you had logic to check whether a Promise errored by checking the `error` property on the observable, you can change that to `.state.error`. The direct rendering enabled by `enableLegendStateReact` and `enableReactDirectRender` was fragile, hard to find in files, and the React team advised against it. So instead we are using the `Memo` component. See Render an observable directly for more details. To migrate you can remove usage of `enableLegendStateReact()` or `enableReactDirectRender()` as well as any usage of direct rendering, and replace it with `Memo`. When you remove those imports it will stop overriding the types so rendering observables directly will result in TypeScript errors. If you were using `enableLegendStateReact` to render direct observables heavily, enableReactDirectRender is still usable to ease migration, though it will throw TypeScript errors to help you migrate away. It will be fully removed in version 3.0. // Remove these:enableLegendStateReact();enableLegendStateReact();function Component() { const text$ = useObservable("test"); return ( <> Change this: {text$} To this: <Memo>{text$}</Memo> </> );} ### Legend components changed to Reactive components The reactive components are now better named and more easily customizable with configuration functions, exported from the normal `/react` path. See Reactive components for more details. Change: // Reactimport { Legend } from "@legendapp/state/react-components";function Component() { return <Legend.div>...</Legend.div>;}// React Nativeimport { Legend } from "@legendapp/state/react-native-components";function Component() { return <Legend.View>...</Legend.View>;} To: // Reactimport { enableReactComponents } from "@legendapp/state/config/enableReactComponents";enableReactComponents();// React Nativeimport { enableReactNativeComponents } from "@legendapp/state/config/enableReactNativeComponents";enableReactNativeComponents();// Now you can use them anywhereimport { Reactive } from "@legendapp/state/react";function Component() { // React return <Reactive.div>...</Reactive.div>; // React Native return <Reactive.View>...</Reactive.View>;} ### For parameter name changed As we’ve been adopting a convention of naming observables suffixed with `$`, many users were confused by the `item` prop in the render component used in For’s `item` prop, so we renamed it to `item$` to make it clear that it’s an observable. `item` will still work until version 3.0, but it will throw TypeScript errors to encourage changing it to `item$`. ### Reactive props changed to start with $ In an earlier version reactive props ended with $ and were changed in version 1.3.0 to allow starting with $, because it has a better UX with autocomplete and is easier to visually scan for. Both have been supported but version 2.0 will remove type support for the suffix version. It will still work in code so it doesn’t break your apps, but we will fully remove it in 3.0 and suggest you at least start using the new pattern. A recommended way to find and replace all of instances of the old method is to find `$=` in all files. function Component() { const text$ = useObservable("test"); return ( <Reactive.div // Change this className$={() => "..."} // to this $className={() => "..."} > ... </Reactive.div> );} ### Persistence Changes In version 2 we locked down and cleaned up the interfaces for the remote persistence APIs. #### persistObservable returns an object with sync state To support taking an initial state or an observable, `persistObservable` needs to return both an observable and the syncState, so it now the observable with a `state` property on it, matching the Promise behavior. See persistObservable for details. const { state } = persistObservable(initialStateOrObservable, { ... }) #### persistLocal => pluginLocal We renamed the parameters for clarity as the difference between `local` and `persistLocal` wasn’t clear. So it is now named `pluginLocal` because that makes more sense. persistObservable(initialStateOrObservable, { // Before persistLocal: ObservablePersistLocalStorage // After pluginLocal: ObservablePersistLocalStorage }) #### Remote options renamed Since there were not any remote persistence plugins before, these changes would likely not affect you unless you made your own. See Remote Persistence for details. ### observer, reactive, reactiveObserver not exported from react-components The `/react-components` export was mistakenly exporting `observer`, `reactive`, and `reactiveObserver` which are already exported from `/react`. Your editor may have automatically imported from `/react-components` so may need to be changed. // Change this:import { observer, reactive, reactiveObserver,} from "@legendapp/state/react-components";// To this:import { observer, reactive, reactiveObserver } from "@legendapp/state/react"; ### types.d.ts moved to types/babel.d.ts `types.d.ts` was too generic of a name now that we have a lot of configuration options, so we are naming them more specifically in a “types” folder. For now there’s still only the `babel` types but this gives room to add more in the future. // Change this:/// <reference types="@legendapp/state/types" />// To this:/// <reference types="@legendapp/state/types/babel" /> ### afterBatch removed `afterBatch` was not working 100% correctly in all cases, and the best way to fix it was to make it part of `batch(...)`. // ChangebeginBatch();afterBatch(() => { console.log("done");});obs$.set(true);endBatch();// Tobatch( () => { obs$.set(true); }, () => { console.log("done"); }); ## 0.23 to 1.0 ### onChange changed 1. `onChange` now takes a second object parameter with `trackingType` and `initial` options. If you were using a second parameter (like `true` to track shallowly) before, use `{ trackingType: true }`. 2. The `onChange` callback now receives an object with `value`, `getPrevious`, and `changes` in it, replacing the previous multiple arguments. These changes allow for more flexibility - it’s easier for callers who care about the changes but not the current value or previous values (like persistence plugins), and the new `initial` option lets it behave more like `observe` where it runs immediately instead of waiting for a change. // Oldobs.onChange((value, getPrevious, changes) => { // ...}, true);// Newobs.onChange( ({ value, getPrevious, changes }) => { // ... }, { trackingType: true }); ### when and Show tweaked They were previously checking if the value is “ready”, meaning it doesn’t count if it’s an empty object or empty array. They now do a standard javascript truthiness check as would be expected. For the previous behavior you can use `whenReady` or `<Show ifReady={...}>` ### IndexedDB preloader removed It was actually slower in our testing so we simplified things and just removed it. See IndexedDB for up-to-date docs. ## 0.22 to 0.23 ### Setting an observable object to the same value no longer notifies Setting an object to itself was triggering notifications, which is not great for performance and is undesirable in most cases. It is now more targeted and will only notify on elements that actually changed. It’s unlikely that will affect you, but it may be a breaking change for you if you depended on things re-computing/re-rendering even if nothing changed. ### Not automatically treating DOM nodes and React elements as opaque objects It was adding most likely unnecessary extra code and is easily solved in a more generic way. If you’re storing those in observables, wrap them in `opaqueObject(...)`. ### IndexedDB plugin support for non-dictionaries removed For flexibility of multiple observables persisting to the same IndexedDB table, it now has an `itemID` option to save non-dictionaries. So the IndexedDB persistence plugin can be used in two ways: 1. Persisting a dictionary where each value has an `id` field, and each value will create a row in the table 2. Persisting multiple observables to their own rows in the table with the `itemID` option const settings = observable({ theme: "light" });persistObservable(settings, { local: { name: "store", indexedDB: { itemID: "settings", }, },}); ## 0.21 to 0.22 ### Local Storage is no longer the default persistence This was changed to reduce build size for those who don’t use it. If you want to use Local Storage, configure it at the beginning of your app: import { configureObservablePersistence } from "@legendapp/state/persist";import { ObservablePersistLocalStorage } from "@legendapp/state/local-storage";configureObservablePersistence({ persistLocal: ObservablePersistLocalStorage,}); ### Moved persist plugins to `/persist-plugins` Update your import paths: import { ObservablePersistLocalStorage } from "@legendapp/state/persist-plugins/local-storage";import { ObservablePersistMMKV } from "@legendapp/state/persist-plugins/mmkv"; ### `when` is not triggered by empty or \[\] If you wanted `when` to be triggered by those, you can update it to use a selector to return a boolean like: const obs = {}when(() => !!obs, () => {...}) ## 0.20 to 0.21 ### Changed `onChange` callback The extra paremeters in the `onChange` callback have changed to include an array of of the changes, fixing a bug where it was only showing the latest child’s change when changing multiple children while batching. This likely won’t affect many of you as it’s mostly intended for internal use and persistence plugins. ## Renamed React components from `legend` to `Legend` We had originally used lower casing to match html elements, but in practice it did not autocomplete well and felt wrong. So just rename to uppercase, for example from `<legend.div />` to `<Legend.div />`. ## 0.19 to 0.20 ### Removed deprecated automatic observing The automatic observing from 0.18 was deprecated in 0.19 and is now removed. See Deprecated automatic observing. ### observe and useObserve As `observe` has gotten more and more powerful, it outgrew modifying behavior based on the return value, so it now has an event parameter to control canceling listening and a cleanup function. * If you were returning false to cancel observing, you can now use `e.cancel = true`. * If you were returning a cleanup function you can use `e.onCleanup = () => ...`. * It also adds a `num` param to know how many times it’s run and a `previous` param to compare to the previous value. observe((e) => { // Cancel observing any future changes e.cancel = true // A cleanup function e.cleanup = () => ...}) ### Renamed event `dispatch` to `fire` Just change `evt.dispatch()` to `evt.fire()` and all is good 👍. ## 0.18 to 0.19 ### Deprecated automatic observing We are deprecating the automatic observing that depended on hooking into React’s internals. Components will no longer track observables automatically, but you can easily it per component in a few ways: * Wrap components in `observer` to make them track automatically * Wrap observable access in `useSelector` to return a value and track automatically. * Render observables directly into JSX. So tracking observables in React can look like this now: import { observer } from "@legendapp/state/react";const Component = observer(function Component() { const value = observable.get(); // This tracks because it's inside an observer}); or import { useSelector } from "@legendapp/state/react";function Component() { // Track the value of an observable const value = useSelector(observable); // Track the return value of a function const isSelected = useSelector(() => id === state.selected.get());} See the React guide for how we suggest setting up your components now. Rendering observables directly still works though, and `enableLegendStateReact()` still enables that. You can still enable the previous behavior for now with `enableLegendStateReact({ autoTrackingDEPRECATED: true })` while you migrate to using `observer` or `useSelector`. That option will be removed before we reach 1.0. #### Why * It doesn’t actually work. We thought this method would be safe to use because it was inspired by Preact Signals, but as we’ve integrated Legend-State into more environments we found significant edge cases that seem to be unfixable and suggest that the whole concept is just unworkable. * The React team has asked us not to do it and made it clear that it is likely to break in a future version of React. * As Legend-State has evolved, the ideal way of using it has shifted towards fine-grained reactivity where components render minimally or only once, and we were actually specifically opting out of auto-tracking more often than not. So in the interest of pursuing the render-once ideal, we think it’s actually generally better to use the reactivity components or opt-in to tracking. * We don’t want to distract from the core mission of Legend-State with an unreliable and unstable core. ### Bindable components deprecated We now have a more general purpose way of making reactive props that can also be used for two-way binding for inputs. So change: <Bindable.input bind={observable} /> to import { Legend } from "@legendapp/state/react-components";<legend.input value$={observable} />; See reactive props for more detauls. ### `value` is no longer exposed Primitives no longer have a `value` that you could access and modify. We had previously removed that from the documentation and it is now removed from the code. You can just `get()` and `set()` as you would any other observable. It turned out to cause more bugs than it was worth and made the TypeScript types overly complex. ### Removed get(false) Use `peek()` instead. ## 0.17 to 0.18 The tracing functions are renamed to use\* to be inline with hooks: * useTraceListeners * useTraceUpdates * useVerifyNotTracking * useVerifyOneRender (new) ## 0.16 to 0.17 ### Primitives are now returned as observables Observables previously tried to be clever by returning primitives directly, which was great in making it easy to work with state directly. But especially as the goal has moved more towards fine-grained reactivity, the balance shifted towards observable objects being better. So accessing primitives through state now returns observables like anything else. #### Raw primitives: * Pro: Easy to work with * Con: Required `obs()` to get the observable to pass to props or render directly * Con: Easy to track a value without realizing it #### Observable primitives * Pro: More consistent * Pro: Easier to deal with undefined * Pro: Can dot through undefined paths easily * Pro: Doesn’t need `obs()` or set by key * Pro: Easier to use fine-grained features without `obs()` everywhere * Pro: Easier to pass as props without needing `obs()` * Con: Requires `get()` for primitives #### Changes to make: **get()** Wherever you were accessing primitives directly, add a `.get()` to the end of it. **set(key, value)** Change set by key to access the node first. It will now work fine if the node is undefined. From: `state.profile.set('name', 'Annyong')` To: `state.profile.name.set('Annyong')` **obs()** Just remove it. The default behavior is now the same as what `obs()` did before. ### Hooks renamed `useComputed` is now `useSelector`, re-rendering only when the return value changes. `useComputed` now returns a `computed` observable. ## 0.15 to 0.16 Legend-State now automatically tracks observable access in any component. To set it up, just call `enableLegendStateReact()` at the beginning of your app. Now `observer` is no longer needed, so just remove all usage of `observer`. ## 0.14 to 0.15 ### Safety There are now three levels of safety: **Unsafe**, **Default**, and **Safe**. Default is new and allows direct assignment to primitives but prevents directly assigning to everything else. The previous default behavior was Unsafe so you may see errors if you were directly assigning to objects/arrays/etc… TypeScript should show errors so it should be easy to find them. Replace those with `.set(...)` or pass in `false` as the second parameter to `observable` to go back to “Unsafe” mode. // 1. Unsafe: Use false for the previous unsafe behaviorconst obs = observable({ ... }, /*safe*/ false)// 2. Default: The new default behavior prevent directly assigning to objects, but allows directly assining to primitivesconst obs = observable({ text: 'hello', obj: {} })obs.text = 'hi'// ✅ Setting a primitive works in default mode but not in safe mode.obs.obj = {}// ❌ Error. Cannot assign to objects directly.// 3. Safe: Safe mode prevents all direct assignmentconst obs = observable({ text: 'hello', obj: {} }, /*safe*/true)obs.text = 'hi'// ❌ Error. Cannot assign directly in safe mode. ### Renamed ref to obs `ref` was a bit unclear and conflicted with React - the new feature to directly render observables requires a `ref` property. So it is now renamed to `obs`, which feels more intuitive as it is used to get an observable. const state$ = observable({ text: "" });// Beforeconst textRef = state$.ref("text");const textRef2 = state$.text.ref();// Nowconst textObs = obs.obs("text");const textObs2 = obs.text.obs(); ### Array optimizations The array optimizations are now opt-in, because they are only useful in React and can potentially have some unexpected behavior in React if modifying the DOM externally. You can enable them by using the `For` component with the `optimized` prop. See Arrays for more. const obs = observable({ items: [] });const Row = observer(function Row({ item }) { return <div>{item.text}</div>;});const List = observer(function () { // The optimized prop enables the optimizations which were previously default return <For each={list} item={Row} optimized />;}); ### Shallow Since there’s now a additionally the `optimized` tracking for arrays, the shallow option on `get()` and `obs()` now has another option. So instead of passing `shallow` to an observable, use the `Tracking` namespace now. import { Tracking } from "@legendapp/state";const obs = observable([]);// Beforeobs.get(shallow);// Nowobs.get(Tracking.shallow); ### Batching The `observableBatcher` namespace is removed and the batching functions are now exported on their own. import { batch, beginBatch, endBatch } from '@legendapp/state'beginBatch()obs1.set(...)obs2.set(...)endBatch()// batch()batch(() => { obs1.set(...) obs2.set(...)} ### Change functions => observe/when The new `observe` and `when` functions can automatically track all observables accessed while running them. This made the old extra change utilities unnecessary, so `onTrue`, `onHasValue`, `onEquals`, and `onChangeShallow` have been removed, saving 200 bytes (7%) from the bundle size. These are the new equivalents: import { observe, when } from "@legendapp/state";const obs = observable({ value: undefined });// onTrueobs.value.onTrue(handler);// New onTrue equivalentwhen(() => obs.value === true, handler);// onHasValueobs.value.onHasValue("text", handler);// onHasValue equivalentwhen(() => obs.value, handler);// onEqualsobs.value.onEquals("text", handler);// onEquals equivalentwhen(() => obs.value === "text", handler);// onChangeShallowobs.value.onChangeShallow(handler);// onChangeShallow equivalentobs.value.onChange(handler, { shallow: true }); ### Primitive current => value Primitive observables are now wrapped in `{ value }` instead of `{ current }`. You can also now modify the `value` directly. const obs = observable(10);// Beforeobs.current === 10;obs.curent = 20; // ❌ Error// Nowobs.value === 10;obs.value = 20; // ✅ Works ### Renamed observableComputed and observableEvent `observableComputed` is now just `computed` and `observableEvent` is now just `event`. import { computed, event } from '@legendapp/state'// Beforeconst value = observableComputed(() => ...)// Nowconst value = computed(() => ...)// Beforeconst evt = observableEvent(() => ...)// Nowconst evt = event(() => ...) ### Renamed LS to Bindable The automatically bound exports are now named better and in their own exports, so change your exports from `LS` to: // Webimport { Bindable } from "@legendapp/state/react-components";// React Nativeimport { Bindable } from "@legendapp/state/react-native-components"; ### Renamed Isolate to Computed The control flow component `Isolate` is renamed to `Computed` for naming consistency. ### Removed memo and isolate props We found these confusing in practice as it wasn’t super clear when a component was getting memoized, and it’s not much extra work to use the Memo and Computed components directly. If you were using those, switch to the Computed and Memo components instead // Before<div memo>...</div><div computed>...</div>// Now<Memo><div>...</div></Memo><Computed><div>...</div></Computed> --- ## Page: https://legendapp.com/open-source/state/v3/intro/fast Legend-State is the result of years of iteration and dozens of experiments and rewrites to build the fastest possible state system. The primary reason it’s so fast is that it optimizes for the fewest number of renders - components are only re-rendered when the state they truly care about is changed. It may seem silly to quibble over milliseconds, but state is a hot path of most applications, so it’s important that it be as fast as possible to keep your whole application snappy. In our case, some Legend users have hundreds of thousands of items flowing through state, so it became the core bottleneck and is very important to optimize. We’ll show results of the popular krausest benchmark and use that to describe why Legend-State is so fast. This benchmark is a good approximation of real-world performance, but the most important optimization in Legend-State is that it just does less work because it renders less, less often. ## Benchmark  Legend-State’s **optimized** mode (on the left) optimizes for rendering each row when it changes, but not the entire list, which is reflected in the fast **partial update** and **select row** benchmarks. That typically incurs an extra upfront cost to set up the listeners in each row, but Legend-State is so optimized that even so it’s actually still among the fastest in the **create many rows** benchmark. Legend-State really shines in the **replace all rows** and **swap rows** benchmarks. When the number of elements is unchaged, it does not need to re-render the list and can only render the individual rows that changed. That brings a big speed improvement for drag/drop or when items are moved around in a list. You can opt into the fast array rendering with the `optimized` prop on the For component. Note that this optimization reuses React nodes rather than replacing them as usual, so it may have unexpected behavior with some types of animations or if you are modifying the DOM externally. For that reason the benchmark considers usage of the `optimized` props as “non-keyed”. ### Startup metrics  In these benchmarks you can see that Legend-State has the fastest TTI (time to interactive) because Legend-State doesn’t do much processing up front. Creating observables and adding thousands of listeners does very little work. Because observables don’t have to modify the underlying data at all, creating an observable just creates a tiny amount of metadata. ### Memory  The memory usage is lower than the others because Legend-State does not modify the underlying data or keep a lot of extra metadata, and it does not create many objects or closures. ## Why it’s fast Legend-State is optimized in a lot of different ways: ### Proxy to path Legend-State uses Proxy, which is how it exposes the observable functions (get/set/listen etc…) on anything within an observable object. But it differs from other Proxy-based systems by not touching the underlying data all. Each proxy node represents a path within the object tree, and to get the value of any node it traverses the raw data to that path and returns the value. So every node within the state object stores minimal metadata, and never has to modify or clone the underlying data, which keeps object creation to a minimum and memory usage down. Proxying by path also enables some really interesting list optimizations: in the For component’s optimized mode, the Proxy object for the observable references an index in the array. So when array elements rearrange, the existing Proxy nodes can be updated to point to their new indices, and we can render only the changed/ moved elements and skip rendering the full array. ### Listeners at each node Each node keeps a `Set` of listeners so that you can listen to changes to any value anywhere within the state. This is great for performance because changes only call the few listeners that are affected by that change. JavaScript’s `Set` provides nice benefits here as its uniquenesss constraint ensures callbacks are added only once, and removing listeners is an instant O(1) operation. ### Granular renders Extensive care is taken to ensure that components are rendered only when their state truly changes. Legend-State provides functions to be extra specific about when it tracks changes and useSelector to isolate a tracking computation to return one value. The best thing for your app’s performance is to render less, less often. ### Easy fine-grained reactivity Legend-State has built-in helpers to easily extract children so that their changes do not affect the parent. This keeps large parent components from rendering often just because their children change. import { useInterval } from "usehooks-ts" import { observable } from "@legendapp/state" import { useRef, useState } from "react" import { Memo, observer, useObservable } from "@legendapp/state/react" const MemoExample \= () \=> { const renderCount \= ++useRef(0).current const \[value, setValue\] \= useState(1) const state$ \= useObservable({ count: 1 }) useInterval(() \=> { state$.count.set((v) \=> v + 1) }, 500) const onClick \= () \=> setValue((v) \=> v + 1) return ( <Box center\> <h5\>Normal</h5\> <div\>Renders: {renderCount}</div\> <div\>Value: {value}</div\> <Button onClick\={onClick}\> Render </Button\> <Memo\> {() \=> <\> <h5\>Memo'd</h5\> <div\>Value: {value}</div\> <div\>Count: {state$.count.get()}</div\> </\>} </Memo\> </Box\> ) } Live Editing ### Shallow listeners Shallow listeners are called on objects only when keys are added or removed, but not when children are changed. This lets the child components manage their own rendering and large parent components don’t need to render. ### Array optimizations Optimizing list rendering is a primary goal because Legend-State is built for Legend and its huge documents and lists, so it aims to render parent list components as little as possible. When changes to an array only modify children or transpose elements, and do not add or remove elements, it can render only the changed elements and skip rendering the parent list. See Arrays for more details. ### Minimal closures and object creation While other state libraries create lots of new closures and objects for each observable, Legend-State is careful to keep it to a minimum. The observable functions are created only once so there is little cost to creating tons of observables. ### No boilerplate Because Legend-State’s api is very terse and require no boilerplate code, your apps don’t need to be filled with tons of extra boilerplate code. So your apps are smaller and faster because you’re shipping smaller files to your users. ### Micro-optimizations Beyond the architecture optimization, Legend-State also does a lot of micro-optimizations which don’t necessarily have a huge effect on their own, but it all adds up. * **For loop vs. forEach**: For loops are still quite a bit faster than `forEach` and don’t involve creating closures, so for loops are always favored. * **Set vs. array**: Compared to an array, `Set` has a marginal creation cost, but the uniqueness constraint and fast element removal end up making it overall faster for managing Listeners than arrays. * **Map vs. object**: `Map` has a marginal creation cost compared to an object, but its operations are generally faster, so it is used for all the caching and comparing changing arrays. * **Closures vs. bind**: Closures are surprisingly much faster than `bind`, so Legend-State favors creating small closures when needed. * **isNaN is slow**: This surprised us, but `isNaN` was causing significant slowdown. `+n - +n < 1` is a much faster way to check if a string is a number. Source * **Overloading Object prototype is a no-no**: We tried extending the prototype of the built-in `Object` but that caused a huge slowdown across the board, so that’s no good. * **Proxy vs. Object.defineProperty**: We also tried using `Object.defineProperty` to add properties to objects, but Proxy is much faster. * **Cloning is slow**: Change handlers have a `getPrevious()` function to opt-in to computing the previous state because cloning objects unnecessarily was wasteful. * **for of in Set/Map**: `for of` loops are the fastest way to iterate through Set and Map values. --- ## Page: https://legendapp.com/open-source/state/v3/sync/persist-sync A primary goal of Legend-State is to make automatic persisting and syncing both easy and very robust, as it’s meant to be used to power all storage and sync of complex apps - it was built as the backbone of both Legend and Bravely. It’s designed to support local first apps: any changes made while offline are persisted between sessions to be retried whenever connected. To do this, the sync engine subscribes to changes on an observable, then on change goes through a multi-step flow to ensure that changes are persisted and synced. 1. Save the pending changes to local persistence 2. Save the changes to local persistence 3. Save the changes to remote persistence 4. On remote save, set any needed changes (like updatedAt) back into the observable and local persistence 5. Clear the pending changes in local persistence ## Plugins The sync features are designed to be used through a plugin for your backend of choice. The plugins are all built on top of synced and are configurable with their own options as well as general sync and persist options. ### Database plugins * Keel: Powerful schema-driven SQL backend we use in Bravely * Supabase: Popular PostgreSQL backend * Firebase RTDB: Documentation under construction These are built on top of the CRUD plugin. ### General * CRUD: Supports any backend with list, get, create, update, delete actions * Fetch: A wrapper around fetch to reduce boilerplate * TanStack Query: Query updates observables rather than re-rendering ## Example We’ll start with an example to give you an idea of how Legend-State’s sync works. Because sync and persistence are defined in the observables, your app and UI just needs to work with observables. That immediately updates the UI optimistically, persists changes, and syncs to your database with eventual consistency. This example binds inputs directly to the remote data and shows you when the changes save. Try going offline and making some changes, then refresh and the changes are still there. Then go back online and watch the saved time update. You may want to open the Network panel of the dev tools to see it in action. This is a live playground so you can experiment with the different options. import { observable } from "@legendapp/state" import { use$ } from "@legendapp/state/react" import { configureSynced } from "@legendapp/state/sync" import { syncedFetch } from "@legendapp/state/sync-plugins/fetch"; import { ObservablePersistMMKV } from "@legendapp/state/persist-plugins/mmkv" const mySyncedFetch \= configureSynced(syncedFetch, { persist: { plugin: ObservablePersistMMKV, retrySync: true }, retry: { infinite: true } }) const profile$ \= observable(mySyncedFetch({ get: 'https://reqres.in/api/users/1', set: 'https://reqres.in/api/users/1', setInit: { method: 'PUT' }, transform: { load: (value, method) \=> method \=== 'get' ? value.data : value }, onSaved: (result) \=> ({ updatedAt: new Date(result.saved.updatedAt) }), persist: { name: 'persistSyncExample', }, mode: 'assign' })) function App() { const updatedAt \= use$(profile$.updatedAt) const saved \= updatedAt ? new Date(updatedAt).toLocaleString() : 'Never' return ( <Box\> <$TextInput $value={profile$.first\_name} /> <$TextInput $value={profile$.last\_name} /> <Text\> Saved: {saved} </Text\> </Box\> ) } Live Editing ## Guides This page will show how you use the core synced. The plugins are built on top of `synced` so everything on this page applies to the plugins as well. #### Which Platform? Select React or React Native to customize this guide for your platform. ### Persist data locally Legend-State has a persistence system built in, with plugins for web and React Native. When you initialize the persistence it immediately loads and merges the changes on top of the initial value. Then any changes you make after initialization will be saved to persistence. You can sync/persist a whole observable or any child, and there are two ways to persist observables: `synced` in the observable constructor or `syncObservable` later. In this first example we create an observable with initial data and then use `syncObservable` to persist it. import { observable } from "@legendapp/state"import { syncObservable } from "@legendapp/state/sync"import { ObservablePersistMMKV } from "@legendapp/state/persist-plugins/mmkv"// Create an observableconst store$ = observable({ todos: [],})// Persist the observable to the named key of the global persist pluginsyncObservable(store$, { persist: { name: 'persistKey', plugin: ObservablePersistMMKV }})// Any changes made after syncObservable will be persistedstore$.todos.push({ id: 0 }) Alternatively we can setup the persistence in the constructor with `synced`. This does exactly the same thing as above. import { observable } from "@legendapp/state"import { synced } from "@legendapp/state/sync"// Create an observable with "todos" persistedconst store$ = observable( synced({ initial: [], persist: { name: 'persistKey', } }))// Any changes will be persistedstore$.todos.push({ id: 0 }) #### Async persistence Some persistences like IndexedDB and AsyncStorage are asynchronous, so you’ll need to wait for it to load before you start reading from it. `syncState` returns an observable with load statuses that you can wait for. import { syncState } from "@legendapp/state"import { syncObservable } from '@legendapp/state/sync'syncObservable(state$, { persist: { name: 'store' }})const status$ = syncState(state$)await when(status$.isPersistLoaded)// Proceed with load ### Sync with a server Legend-State makes syncing remote data very easy, while being very powerful under the hood. You can setup your sync engine directly in the observable itself, so that your application code only interacts with observables, and the observables handle the sync for you. This is a great way to isolate your syncing code in one place away from your UI, and then your UI code justs gets/sets observables. Like with persistence you can use either `syncObservable` or `synced` but we’ll just focus on `synced` for this example. import { observable, observe } from "@legendapp/state"import { syncedFetch } from "@legendapp/state/sync-plugins/fetch"// Create an observable with "users" syncedconst store$ = observable({ users: syncedFetch({ initial: [], // When the fetch resolves it will update the observable get: 'https://reqres.in/api/users', // When the observable is changed it will send the changes back to the server. set: 'https://reqres.in/api/users' })})observe(() => { // The first get() activates the synced get function to fetch the data // observe is re-run when the data comes in const users = store$.users.get() if (users) { processUsers(users) }})// Any changes will be savedstore$.users.push({ id: 0, name: 'name' }) ### Sync with paging `get()` is an observing context, so if you get an observable’s value it will re-run if it changes. We can use that to created a paging query by setting the query mode to “append” (or “assign” if it’s an object) to append new pages into the observable array. import { observable, observe } from "@legendapp/state"import { syncedFetch } from "@legendapp/state/sync-plugins/fetch"// Create an observable with "users" syncedconst store$ = observable({ usersPage: 1, users: syncedFetch({ get: () => `https://reqres.in/api/users?page=${store$.usersPage.get()}`, mode: 'append' }),})// Activate the synced to get the first pagestore$.users.get()// gets from https://reqres.in/api/users?page=1// Get the next pagestore$.usersPage.set(page => page + 1)// gets from https://reqres.in/api/users?page=2 ### Local first robust real-time sync The crud based plugins can be used to enable a robust offline-first sync engine by setting a few options. These options will: * Persist all data locally so the app can work offline * Continually retry saves so that failure is not an option * Persist saves locally so that they retry even after refresh * Sync in realtime import { observable } from '@legendapp/state'import { syncedCrud } from '@legendapp/state/sync-plugins/crud'import { ObservablePersistLocalStorage } from '@legendapp/state/persist-plugins/local-storage'const profile$ = observable(syncedCrud({ list: () => {/*...*/}, create: () => {/*...*/}, update: () => {/*...*/}, // Enable realtime. Some plugins have this built in so it's not required. subscribe: ({ refresh, update }) => { return realtime.subscribe({ /*...*/ }, () => { // Trigger a refresh of the list function refresh() }) }, // Local first configuration persist: { plugin: ObservablePersistLocalStorage, // Set the persistence plugin name: 'profile', // Set the name of this object in persistence retrySync: true, // Persist pending changes to retry }, retry: { infinite: true, // Keep retrying until it saves }, changesSince: 'last-sync', // Sync only diffs fieldUpdatedAt: 'updatedAt' // Required for syncing only diffs})) ## API ### configureSynced Sync plugins have a lot of options so you’ll likely want to set some defaults. You can do that with the `configureSynced` function to create a customized version of a plugin with your defaults, to reduce duplication and enforce consistency. You will most likely want to at least set a default persistence plugin. import { configureSynced, syncedCrud } from "@legendapp/state/sync"import { ObservablePersistLocalStorage } from "@legendapp/state/persist-plugins/local-storage"// Configure the base `synced`const syncPlugin = configureSynced({ persist: { plugin: ObservablePersistMMKV }})// Or configure options derived from another pluginconst syncPlugin = configureSynced(syncedCrud, { persist: { plugin: ObservablePersistMMKV }})// Then using them will merge the options on top of the defaults.const state$ = observable(syncPlugin({ persist: { name: 'test', }})) ### synced The easiest way to create a synced observable is to use `synced` when creating an observable to bind it to remote data and/or persist it locally. To simply set up persistence, just create `get` and `set` functions along with a `persist` option. `synced` creates a lazy computed function which will not activate until you `get()` it. So you can set up your observables’ sync/persist options and they will only activate on demand. import { observable } from '@legendapp/state'import { synced } from '@legendapp/state/sync'const state$ = observable(synced({ get: () => fetch('https://url.to.get').then((res) => res.json()), set: ({ value }) => fetch('https://url.to.set', { method: 'POST', data: JSON.stringify(value) }), persist: { name: 'test', },})) Or a more advanced example with many of the possible options: import { observable } from '@legendapp/state'import { synced } from '@legendapp/state/sync'import { ObservablePersistMMKV } from '@legendapp/state/persist-plugins/mmkv'const state$ = observable(synced({ get: () => { // get is an observing function which will re-run whenever any accessed observables // change. You can use that for paging getting data for a specific user. return fetch('https://url.to.get/page=' + page.get()) .then((res) => res.json()) }, set: ({ value }) => { // set is run when the observable changes, debounced by the debounceSet option fetch('https://url.to.set', { method: 'POST', data: JSON.stringify(value) }) } persist: { // The name to be saved in the local persistence name: 'test', // Set the plugin to override the global setting plugin: ObservablePersistMMKV, // persist pending changes to be retried after the app restarts retrySync: true, options: { // Customize the persist plugin options } }, // The initial value before the remote data loads or if it doesn't exist. initial: { numUsers: 0, messages: [] }, // How to update the initial value when the remote data comes in. // defaults to "set" mode: 'set' | 'assign' | 'merge' | 'append' | 'prepend', // The subscribe function is called once to give you an opportunity to // subscribe to another service to trigger refresh subscribe: ({ refresh, update }) => { const unsubscribe = pusher.subscribe({ /*...*/ }, (data) => { // Either update with the received data update(data) // Or trigger a refresh of the get function refresh() }) // return unsubscribe function return unsubscribe }, // Options for retrying in case of error. Applies to both get and set. retry: { infinite: true, backoff: 'exponential', maxDelay: 30 }, // A time to debounce changes before sending them to the server. Use this to // batch multiple changes together or preventing saving every keystroke. debounceSet: 500,})) ### syncObservable If you prefer to set up sync/persistence after the observable is already created, you can use `syncObservable` with the same options as `synced`. It’s effectively the same as using `synced` with an initial value. You can also pass any of the plugins as the second option. import { observable } from '@legendapp/state'import { syncObservable } from '@legendapp/state/sync'const state$ = observable({ initialKey: 'initialValue' })syncObservable(state$, { get: () => fetch('https://url.to.get').then((res) => res.json()), set: ({ value }) => fetch('https://url.to.set', { method: 'POST', data: JSON.stringify(value) }), persist: { name: 'test' }}) You can also use any sync plugin with syncObservable. import { observable } from '@legendapp/state'import { syncObservable } from '@legendapp/state/sync'import { syncedFetch } from "@legendapp/state/sync-plugins/fetch"const users$ = observable([])syncObservable(users$, syncedFetch({ // When the fetch resolves it will update the observable get: 'https://reqres.in/api/users', // When the observable is changed it will send the changes back to the server. set: 'https://reqres.in/api/users'})) ### syncState Each synced observable has a `syncState` observable that you can get to check its status or do some actions. import { observable, syncState } from '@legendapp/state'import { synced } from '@legendapp/state/sync'const obs$ = observable(synced({ /*...*/ }))const state$ = syncState(obs$)const error = state$.error.get()const isLoaded = state$.isLoaded.get()if (error) { // Handle error} else if (!isLoaded) { // Do something while loading} else { // Good to go const value = obs$.get()} The `isLoaded` and `error` properties are accessible when using `syncState` on any asynchronous Observable, but the others are created when using `synced`. * `isPersistLoaded: boolean`: Whether it has loaded from the local persistence * `isPersistEnabled: boolean`: Enable/disable the local persistence * `isLoaded: boolean`: Whether the get function has returned * `isSyncEnabled: boolean`: Enable/disable remote sync * `lastSync: number`: Timestamp of the latest sync * `syncCount: number`: Number of times it’s synced * `clearPersist: () => Promise<void>`: Clear the local persistence * `sync: () => Promise<void>`: Re-run the get function * `getPendingChanges: () => Record<string, object>`: Get all unsaved changed * `error: Error`: The latest error ### useObservable + synced Create a synced observable within a React component using useObservable. import { synced } from '@legendapp/state/sync'import { useObservable } from '@legendapp/state/react'function Component() { const user$ = useObservable(synced({ get: fetch('https://url.to.get').then((res) => res.json()), persist: { name: 'test' } }))} ### Transform data It’s very common to need to transform data into and out of your persistence or remote server. There is an option on `synced` to transform the remote data and an option within the `persist` option to transform to/from persistence. Legend-State includes helpers for easily stringifying data or you can create your own custom transformers. * `transformStringifyKeys`: JSON stringify/parse the data at the given keys, for when your backend stores objects as strings * `transformStringifyDates`: Transform dates to ISO string, with either the given keys or automatically scanning the object for dates * `combineTransforms`: Combine multiple transforms together This can be used in many ways. Some examples: 1. **Migrate between versions**: If the local data has legacy values in it, you can can transform it to the latest format. This can be done by either keeping a version number or just checking for specific fields. This example migrates old persisted data by checking the version and old field name. const state$ = observable(synced({ get: () => {/* ... */}, persist: { name: 'state', transform: { load: (value) => { if (value.version === 2) { if (value.currentPeriodStart) { value.periodStart = new Date(value.currentPeriodStart * 1000) delete value.currentPeriodStart } } return value } } }})) 2. **Transform to backend format**: If you want to interact with data in a different format than your backend stores it, it can be automatically transformed between the observable and the sync functions. This could be used for stringifying or parsing dates for example. In this example we combine the `transformStringifyDates` and `transformStringifyKeys` helpers with a custom transformer. import { combineTransforms, transformStringifyDates } from '@legendapp/state/sync'const state$ = observable(synced({ get: () => {/* ... */}, transform: combineTransforms( transformStringifyDates(), transformStringifyKeys('jsonData', 'messagesArr'), { load: async (value) => { value.localBool = value.serverOption !== 'no' delete value.serverOption return value }, save: async (value) => { value.serverOption = value.localBool ? 'yes' : 'no' delete value.localBool return value } } )})) 3. **Encrypt**: For end-to-end encryption you can encrypt/decrypt in the transformer so that you interact with unencrypted data locally and it’s encrypted before going into your update functions import { combineTransforms, transformStringifyDates } from '@legendapp/state/sync'const state$ = observable(synced({ get: () => {/* ... */}, transform: { load: async (value) => { return decrypt(value) }, save: async (value) => { return encrypt(value) } }})) ## Persist plugins First choose and configure the storage plugin for your platform. ### Local Storage (React) import { ObservablePersistLocalStorage } from '@legendapp/state/persist-plugins/local-storage'syncObservable(state$, { persist: { name: "documents", plugin: ObservablePersistLocalStorage }}) ### IndexedDB (React) The IndexedDB plugin can be used in two ways: 1. Persisting a dictionary where each value has an `id` field, and each value will create a row in the table 2. Persisting multiple observables to their own rows in the table with the `itemID` option It requires some extra configuration for the database name, the table names, and the version. IndexedDB requires changing the version whenever the tables change, so you can start with version 1 and increment the version whenever you add/change tables. import { configureSynced, syncObservable } from "@legendapp/state/sync"import { observablePersistIndexedDB } from "@legendapp/state/persist-plugins/indexeddb"// Create default persist optionsconst persistOptions = configureSynced({ persist: { plugin: observablePersistIndexedDB({ databaseName: "Legend", version: 1, tableNames: ["documents", "store"] }) }})// Mode 1: Persist a dictionaryconst state$ = observable({ obj1: { id: "obj1", text: "..." }, obj2: { id: "obj2", text: "..." },})syncObservable(state$, persistOptions({ persist: { name: "documents" // IndexedDB table name }}))// Mode 2: Persist an object with itemIdconst settings$ = observable({ theme: "light" })syncObservable(settings$, persistOptions({ persist: { name: "store", // IndexedDB table name indexedDB: { itemID: "settings" } }})) Because IndexedDB is an asynchronous API, observables will not load from persistence immediately, so if you’re persisting a large amount of data you may want to show a loading state while persistence is loading. const syncState$ = syncState(state$)await when(syncState$.isPersistLoaded)// Continue with load ### MMKV (RN) First install react-native-mmkv: Then configure it as the persist plugin. import { syncObservable } from '@legendapp/state/sync'import { ObservablePersistMMKV } from '@legendapp/state/persist-plugins/mmkv'syncObservable(state$, { persist: { name: "documents", plugin: ObservablePersistMMKV }}) ### AsyncStorage (RN) Older versions of React Native have AsyncStorage built in, but newer versions may need it installed separately. Check the React Native docs for the latest guidance on that. The AsyncStorage plugin needs an additional bit of global configuration, giving it the instance of AsyncStorage. import { configureSynced, syncObservable } from '@legendapp/state/sync'import { observablePersistAsyncStorage } from '@legendapp/state/persist-plugins/async-storage'import AsyncStorage from '@react-native-async-storage/async-storage'// Global configurationconst persistOptions = configureSynced({ persist: { plugin: observablePersistAsyncStorage({ AsyncStorage }) }})syncObservable(state$, persistOptions({ persist: { name: 'store' }})) Because AsyncStorage is an asynchronous API, observables will not load from persistence immediately, so if you’re persisting a large amount of data you may want to show a loading state while persistence is loading. const syncState$ = syncState(state$)await when(syncState$.isPersistLoaded)// Continue with load ### Expo SQLite (RN) First install Expo SQLite. The Expo SQLite Storage plugin needs an additional bit of global configuration, giving it the instance of Storage. import { configureSynced, syncObservable } from '@legendapp/state/sync';import { observablePersistSqlite } from '@legendapp/state/persist-plugins/expo-sqlite';import Storage from 'expo-sqlite/kv-store';// Global configurationconst persistOptions = configureSynced({ persist: { plugin: observablePersistSqlite(Storage) },});syncObservable( state$, persistOptions({ persist: { name: 'store', }, }),); ## Making a sync plugin Once you’re syncing multiple observables in the same way you’ll likely want to create a plugin that encapsulates the specifics of your backend. The plugin just needs to return a synced. If your backend is CRUD based (it has create, read, update, delete functions) then you may want to build on top of syncedCrud which encapsulates a lot of logic for those specifics for you. It may be easiest to look at the source of the built-in sync plugins to see what they look like. This is a simple contrived example to show what that could look like. import { observable } from '@legendapp/state'import { synced } from '@legendapp/state/sync'const isAuthed$ = observable(false);// Create a custom synced that just needs a name in your APIconst customSynced = ({ name }) => { const basePath = 'https://url/api/v1/' const doFetch = (path) => { return fetch(basePath + path).then((res) => res.json()) } return synced({ get: () => doFetch(`list-${name}s`), set: ({ value }) => { if (value === null || value === undefined) { return doFetch('delete-' + name) } else { return doFetch('upsert-' + name) } }, retry: { infinite: true }, persist: { name }, waitFor: isAuthed$, subscribe: ({ refresh }) => { // Subscribe to realtime service }, })}const store$ = observable({ users: customSynced('user')}) --- ## Page: https://legendapp.com/open-source/state/v3/intro/why Legend-State is an evolution of the state system we’ve been using internally in Legend since 2015 and in Bravely since 2020. It needs to be extremely fast because Legend users have documents with hundreds of thousands of items. We recently rewrote it with modern browser features, optimizing for both developer experience and best possible performance / memory usage. Comparing to other state libraries, we think you’ll prefer Legend-State for these reasons: ## ⚡️ Tiny and FAST Legend-State is the fastest React state library, designed to be as efficient as possible. It does very little extra work and minimizes renders by only re-rendering components when their observables change. And at only `4kb` it won’t hurt your bundle size. ## 😌 Feels natural Working with observables is as simple as `get()` and `set()` - they work as you’d expect, and the observable functions are right there on the prototype. const state$ = observable({ value: 1 });state$.value.get();state$.value.set(2);// Tracks automatically and runs on every changeobserve(() => { console.log(state$.value.get());}); ## 🔥 Fine-grained reactivity Using features like Memo it’s easy to isolate renders to the smallest possible change. import { observable } from "@legendapp/state" import { Memo, useObservable } from "@legendapp/state/react" import { useRef, useState } from "react" import { useInterval } from "usehooks-ts" function NormalComponent() { const \[count, setCount\] \= useState(1) const renderCount \= useRef(1).current++ useInterval(() \=> { setCount((v) \=> v + 1) }, 600) return ( <FlashingDiv pad\> <h5\>Normal</h5\> <div\>Renders: {renderCount}</div\> <div\>Count: {count}</div\> </FlashingDiv\> ) } function FineGrained() { const count$ \= useObservable(1) const renderCount \= useRef(1).current++ useInterval(() \=> { count$.set((v) \=> v + 1) }, 600) return ( <FlashingDiv pad\> <h5\>Fine-grained</h5\> <div\>Renders: {renderCount}</div\> <div\>Count: <Memo\>{count$}</Memo\></div\> </FlashingDiv\> ) } Live Editing For isolating a group of elements or computations, Legend-State has built-in helpers to easily extract children so that their changes do not affect the parent. This keeps large parent components from rendering often just because their children change. import { useRef } from "react" import { useInterval } from "usehooks-ts" import { Memo, useObservable } from "@legendapp/state/react" function MemoArrayExample() { const renderCount \= ++useRef(0).current const messages$ \= useObservable(\[\]) useInterval(() \=> { messages$.splice(0, 0, \`Message ${messages$.length + 1}\`) }, 600) return ( <Box\> <h5 className\="renders"\>Renders: {renderCount}</h5\> <div className\="messages"\> <Memo\> {() \=> ( messages$.map((message$, i) \=> ( <div key\={i}\>{message$.get()}</div\> )) )} </Memo\> </div\> </Box\> ) } Live Editing ## 👷 Does not hack React internals Some libraries hack up React internals to make signals and fine-grained reactivity work, which often doesn’t work on all platforms and may break if React internals change. Legend-State does everything above-board using hooks, with all React functionality built on top of useSelector, which just uses `useSyncExternalStore`. Check the source to see the lack of hackery. ## 🤷♀️ Unopinionated Some state libraries are for global state while some want state to reside within React. Some enourage individual atoms and others are for large global stores. Some have “actions” and “reducers” and others require immutability. But you can use Legend-State any way you want. * **Global state or local state in React**: Up to you 🤷♀️ * **Individual atoms or one store**: Up to you 🤷♀️ * **Modify directly or in actions/reducers**: Up to you 🤷♀️ See Patterns for more examples of different ways to use Legend-State. ## 💾 Persistence and sync > There are only two hard things in Computer Science: cache invalidation and naming things. - Phil Karlton We built Legend-State to be both the state and sync engines shared between both Legend and Bravely. So it includes a very full-featured sync and persistence system that we’ve iterated on and optimized for years in production. It’s designed to support local first apps: any changes made while offline are persisted between sessions to be retried whenever connected. It currently includes plugins for local persistence with Local Storage or IndexedDB on web and react-native-mmkv or AsyncStorage in React Native. It has a flexible sync API for all types of backends, and a growing library of plugins for backends like Keel and Firebase Realtime Database. import { ObservablePersistLocalStorage } from '@legendapp/state/persist-plugins/local-storage'import { synced } from '@legendapp/state/sync'import { observable } from '@legendapp/state'const state$ = observable({ initial: { { bigObject: { ... } } }, get: () => fetch('url').then(res => res.json()), set: ({ value }) => fetch('https://url.to.set', { method: 'POST', data: JSON.stringify(value) }), persist: { name: 'test' }}) ## 🔫 It’s safe from footguns Observables prevent direct assignment, favoring more purposeful `set` and `assign` functions instead. Read more in safety. --- ## Page: https://legendapp.com/open-source/state/v3/intro/getting-started This guide will help you get started with Legend-State in a React or React Native App. ## Which Platform? Select React or React Native to customize this guide for your platform. ### Install Legend-State ## Quick Start We’ll build a little Todo example app to show what a Legend-State app looks like. It works a bit differently than normal React apps - components re-render themselves when the state they care about changes. And Legend-State includes many helpful components to reduce the amount of boilerplate code you have to write, like components that two-way bind directly to state. ### Create our first observable First we’ll create an observable store for the example. An observable can be a single primitive or a massive tree of all of your state - it’s up to you. It can infer its type from the data you initialize it with, or you can type it with an interface if you prefer, which we do in this example. We’ll set up the example with a Record of todos, some computed functions to track counts, and an action function to add a todo. These functions can be within an observable or separate, it doesn’t matter, but we will include it all together in this example. import { observable } from "@legendapp/state";// Type your Store interfaceinterface Todo { id: number; text: string; completed?: boolean;}interface Store { todos: Todo[]; total: number; numCompleted: number; addTodo: () => void;}// Create a global observable for the Todoslet nextId = 0;const store$ = observable<Store>({ todos: [], // Computeds total: (): number => { return store$.todos.length; }, numCompleted: (): number => { return store$.todos.get().filter((todo) => todo.completed).length; }, addTodo: () => { const todo: Todo = { id: nextId++, text: "", }; store$.todos.push(todo); },}); Now that we have an observable for our Todos, let’s hook it up to React. ### Observables in React To consume an observable in React, just `use$` it. This will track it automatically so that the component re-renders whenever it changes. Legend-State also includes reactive components for both React and React Native. See Reactive components for more about that. import { observer, use$, useObservable } from "@legendapp/state/react"import { $TextInput } from "@legendapp/state/react-native"export function App() { // Consume the computed observables from the global store$ const total = use$(store$.total) const completed = use$(store$.numCompleted) // Create a local observable const theme$ = useObservable<'light' | 'dark'>('dark') const theme = use$(theme$) const onClickClear = () => store$.todos.set([]) return ( <Box theme={theme}> <ThemeButton $value={theme$} /> <Text>Total: {total}</Text> <Text>Completed: {completed}</Text> <For each={store$.todos} item={TodoItem} /> <View className="flex justify-between"> <Button onClick={store$.addTodo}>Add</Button> <Button onClick={onClickClear}>Clear</Button> </View> </Box> )}// Receives item$ prop from the For componentfunction TodoItem({ item$ }: { item$: Observable<Todo> }) { const onKeyDown = (e) => { // Call addTodo from the global store$ if (e.key === 'Enter') store$.addTodo() } // The child components are bound directly to the observable properties // so this component never has to re-render. return ( <View className="row"> <Checkbox $value={item$.completed} /> <$TextInput $value={item$.text} onKeyDown={onKeyDown} /> </View> );} Now that our Todo app is rendering nicely, let’s persist its state to storage. ### Persistence Legend-State has a built-in full-featured sync and persistence layer. In this example we’ll show basic persistence and you can read persist and sync for details. In this example we first set up a global configuration for sync and persistence. These options can also be set or overriden in each individual observable. Since most apps will use the same persistence for everything it’s easiest to set that up once in a global configuration. Then all you have to do is `syncObservable` with the name you want it to have in storage. Any changes made after that will be saved to storage automatically. import { observable } from "@legendapp/state"import { syncObservable } from '@legendapp/state/sync'import { ObservablePersistMMKV } from "@legendapp/state/persist-plugins/mmkv"const store$ = observable<Store>({ todos: {},})// Persist the observable to the named key of the global persist pluginsyncObservable(store$, { persist: { name: 'gettingStarted', plugin: ObservablePersistMMKV }}) And that’s it! Now we have a full React app that persists its changes. ### Full Example Now let’s put it all together into a live editable example. Feel free to play around in this sandbox on the left and see it running to the right. import { observable, Observable } from "@legendapp/state" import { configureSynced, synced } from "@legendapp/state/sync" import { observer, use$, useObservable } from "@legendapp/state/react" import { $React } from "@legendapp/state/react-web" import { $TextInput } from "@legendapp/state/react-native" import { observablePersistAsyncStorage } from "@legendapp/state/persist-plugins/async-storage" interface Todo { id: number; text: string; completed?: boolean; } interface Store { todos: Todo\[\]; total: number; numCompleted: number; addTodo: () \=> void; } interface TodoItemProps { item$: Observable<Todo\>; } const mySynced \= configureSynced(synced, { persist: { plugin: observablePersistAsyncStorage({ AsyncStorage }) } }) let nextId \= 0; const store$ \= observable<Store\>({ todos: mySynced({ initial: \[\], persist: { name: 'getting-started' }, }), total: (): number \=> { return store$.todos.length; }, numCompleted: (): number \=> { return store$.todos.get().filter((todo) \=> todo.completed).length; }, addTodo: () \=> { const todo: Todo \= { id: nextId++, text: "", }; store$.todos.push(todo); }, }); function TodoItem({ item$ }: TodoItemProps) { const onKeyDown \= (e) \=> { if (e.key \=== 'Enter') store$.addTodo() } return ( <View className\="row"\> <Checkbox $value\={item$.completed} /> <$TextInput $value={item$.text} onKeyDown={onKeyDown} /> </View\> ); } function App() { const theme$ \= useObservable<'light' | 'dark'\>('dark') const theme \= use$(theme$) const total \= use$(store$.total) const completed \= use$(store$.numCompleted) return ( <Box theme\={theme}\> <ThemeButton $value\={theme$} /> <Text\>Total: {total}</Text\> <Text\>Completed: {completed}</Text\> <For each\={store$.todos} item\={TodoItem} /> <View className\="flex justify-between"\> <Button onClick\={() \=> store$.addTodo()}\>Add</Button\> <Button onClick\={() \=> store$.todos.set(\[\])}\>Clear</Button\> </View\> </Box\> ) } Live Editing --- ## Page: https://legendapp.com/open-source/state/v3/react/fine-grained-reactivity#for Legend-State enables a new way of thinking about how React components update: to **observe state changing** rather than observing renders. In this pattern, components render once and individual elements re-render themselves. This enables what we call a “render once” style - components render only the first time and state changes trigger only the tiniest possible re-renders. You can render observable primitives directly in mini self-updating components, use reactive props to update props based on state, or use a set of control-flow components to optimize conditional rendering and arrays to re-render as little as possible. Some teams may prefer to use Legend-State in a way that’s more canonically React and skip some or all of these concepts, at least at first. But the fine-grained reactivity features can improve performance and reduce the amount of code you need to write. See Making React fast by default and truly reactive for more details. ## Render an observable/selector directly Use the `Memo` component to create a mini element that re-renders itself when it changes, without needing the parent component to re-render. This is the most basic and recomended way for using Legend-State with React. The children inside of `Memo` re-render themselves when the value changes, but the parent component does not re-render. import { Memo } from "@legendapp/state/react";const count$ = observable(0);// These components never re-render.// The Memo element re-renders itself when its value changes.function WithObservable() { return ( <div> Count: <Memo>{count$}</Memo> </div> );}function WithSelector() { return ( <div> <Memo>{() => <div>Count: {count$.get()}</div>}</Memo> </div> );} ## Reactive components Legend-State provides reactive versions of all platform components with reactive props. This lets you provide a Selector to props so that the component will update itself whenever the Selector changes. For input elements it can create a two-way binding to the value, so that the observable is always in sync with the displayed value of the element. Under the hood this extracts the reactive props to a separate component which re-renders when they change. This can be a big performance boost if these props change often and your outer component is very heavy, as it will move those re-renders down into a tiny wrapper component. But keep in mind that overdoing it can potentially add slightly extra overhead if it’s adding more components to the React tree. ### React Web Legend State includes reactive versions of all of the DOM elements on the `$React` namespace. import { $React } from "@legendapp/state/react-web"function Component() { // This component renders only once const state$ = useObservable({ name: '', age: 18 }) return ( <div> {/* Reactive styling */} <$React.div $style={() => ({ color: state$.age.get() > 5 ? 'green' : 'red' })} $className={() => state$.age.get() > 5 ? 'kid' : 'baby'} /> {/* Reactive children */} <$React.div> {() => ( <div>{state$.age.get() > 5 ? <Kid /> : <Baby />}</div> )} /> {/* Two-way bind to inputs */} <$React.textarea $value={state$.name} /> <$React.select $value={state$.age}>...</$React.select> <$React.input $value={state$.name} $className={() => !state$.name.get() && "border-red-500"} $style={() => !state$.name.get() && { borderWidth: 1 }} /> </div> )} ### React Native Legend State includes reactive versions of all of the built-in React Native components, prefixed with `$` to differentiate them from the normal components. import { $View, $Text, $TextInput } from "@legendapp/state/react-native"function Component() { // This component renders only once const state$ = useObservable({ name: '', age: 18 }) return ( <div> {/* Reactive styling */} <$View $style={() => ({ color: state$.age.get() > 5 ? 'green' : 'red' })} /> {/* Reactive children */} <$Text> {() => state$.age.get() > 5 ? 'child' : 'baby'} </$Text> {/* Two-way bind to inputs */} <$TextInput $value={state$.name} /> </div> )} ## Control-flow components ### Computed Computed extracts children so that their changes do not affect the parent, but the parent’s changes will still re-render them. Use this when children use observables that change often without affecting the parent, but also depends on local state in the parent. This is equivalent to extracting it as a separate component (and passing in all needed props). The child needs to be a function to be able to extract it into a separate tracking context, but the Babel plugin lets you pass it children directly. function Component() { return ( <Computed> {() => state$.messages.map((message) => ( <div key={message.id}> {message.text} {localVar} </div> )) } </Computed> );} In this example see that clicking the “Render parent” button renders the parent and increments `value` and the computed children are updated too. import { useInterval } from "usehooks-ts" import { useRef, useState } from "react" import { observable } from "@legendapp/state" import { Computed, observer, useObservable } from "@legendapp/state/react" const ComputedExample \= () \=> { const renderCount \= ++useRef(0).current const \[value, setValue\] \= useState(1) const state$ \= useObservable({ count: 1 }) useInterval(() \=> { state$.count.set((v) \=> v + 1) }, 500) const onClick \= () \=> setValue((v) \=> v + 1) return ( <Box center\> <h5\>Normal</h5\> <div\>Renders: {renderCount}</div\> <div\>Value: {value}</div\> <Button onClick\={onClick}\> Render </Button\> <Computed\> {() \=> <\> <h5\>Computed</h5\> <div\>Value: {value}</div\> <div\>Count: {state$.count.get()}</div\> </\>} </Computed\> </Box\> ) } Live Editing ### Memo Memo is similar to Computed, but it will never re-render when the parent component renders - only if its own observables change. Use `Memo` when children are truly independent from the parent component. This is equivalent to extracting it as a separate component (and passing in all needed props) with `React.memo`. The child needs to be a function to be able to extract it into a separate tracking context, but the Babel plugin lets you pass it children directly. function Component() { return ( <Memo> {() => state.messages.map((message) => ( <div key={message.id}> {message.text} {localVar} </div> )) } </Memo> );} This is the same as the Computed example, except that the memoized children are not updated with the parent’s value. import { useInterval } from "usehooks-ts" import { observable } from "@legendapp/state" import { useRef, useState } from "react" import { Memo, observer, useObservable } from "@legendapp/state/react" const MemoExample \= () \=> { const renderCount \= ++useRef(0).current const \[value, setValue\] \= useState(1) const state$ \= useObservable({ count: 1 }) useInterval(() \=> { state$.count.set((v) \=> v + 1) }, 500) const onClick \= () \=> setValue((v) \=> v + 1) return ( <Box center\> <h5\>Normal</h5\> <div\>Renders: {renderCount}</div\> <div\>Value: {value}</div\> <Button onClick\={onClick}\> Render </Button\> <Memo\> {() \=> <\> <h5\>Memo'd</h5\> <div\>Value: {value}</div\> <div\>Count: {state$.count.get()}</div\> </\>} </Memo\> </Box\> ) } Live Editing ### Show Show renders child components conditionally based on the if/else props, and does not re-render the parent when the condition changes. Passing children as a function can prevent the JSX from being created until it needs to render. That’s done automatically if you use the babel plugin. Props: * `if`: A computed function or an observable * `ifReady`: A computed function or an observable. This will not render if the value is an empty object or empty array. * `else`: Optionally provide a component to render if the condition is not met * `children`: The components to show conditionally. This can be React elements or a function given the value returned from `if` which you can use to do more complex conditional rendering. * `wrap`: A component to wrap the children. For example this could be Framer Motion’s AnimatePresence to animate the element entering/exiting. <Show if={state.show} else={() => <div>Nothing to see here</div>} wrap={AnimatePresence}> {() => <Modal />}</Show> import { Show, useObservable } from "@legendapp/state/react";import { AnimatePresence } from "framer-motion";function ShowExampleWithSelector() { const state$ = useObservable({ collection: [] }); return ( <Show if={() => state$.collection.get().length > 0} else={() => <div>Nothing to see here</div>} wrap={AnimatePresence} > {() => <Modal />} </Show> );} ### Switch Switch renders one child component conditionally based on the `value` prop, and does not re-render the parent when the condition changes. Props: * `value`: A computed function or an observable * `children`: An object with the possible cases of `value` as keys. If `value` doesn’t match any of the cases it will use the `default` case if available. <Switch value={state.index}> {{ 0: () => <div>Tab 1</div>, 1: () => <div>Tab 2</div>, default: () => <div>Error</div>, }}</Switch> ### For The `For` component is optimized for rendering arrays of observable objects so that they are extracted into a separate tracking context and don’t re-render the parent. An `optimized` prop adds additional optimizations, but in an unusual way by re-using React nodes. See Optimized rendering for more details. Props: * `each`: An observable (array, object, or Map) * `item`: A render function which receives the item id, and item observable or undefined * `itemProps`: Extra props to pass down to each item * `sortValues`: If the `each` parameter is an object or Map, this is a sort function for how to sort the elements. `(A: T, B: T, AKey: string, BKey: string) => number` * `children`: A render function or, you can pass a render function as children instead of in the `item` prop if you prefer. import { observable } from "@legendapp/state"import { For, use$ } from "@legendapp/state/react"const state$ = observable({ arr: [{ id: 1, text: 'hi' }]})const Row = function Row({ item$ }) { const text = use$(item$.text) return <div>{text}</div>}function List() { // 1. Use the For component with an item prop return <For each={state$.arr} item={Row} /> // 2. Use the For component with a render function as the child return ( <For each={list} optimized> {item$ => ( <div> {item$.text.get()} </div> )} </div> )} ## Optionally add the Babel plugin The Babel plugin can make the syntax for Computed, Memo, and Show less verbose. But they work fine without Babel if you don’t want to or can’t use it. The Babel plugin converts the JSX under the hood so you don’t need to use functions as children. It converts inline elements to functions so that they can be treated reactively: // You write<Computed><div>Count: {state$.count.get()}</div></Computed><Memo><div>Count: {state$.count.get()}</div></Memo><Show if={state$.visible}><Modal /></Show>// Babel transforms it to<Computed>{() => <div>Count: {state.count.get()}</div>}</Computed><Memo>{() => <div>Count: {state$.count.get()}</div>}</Memo><Show if={state$.visible}>{() => <Modal />}</Show> To install it, add `@legendapp/state/babel` to the plugins in your `babel.config.js`: module.exports = { plugins: ["@legendapp/state/babel"],}; If you’re using typescript you can add a `.d.ts` file to your project with this in it, to expand the types to allow direct JSX children to Computed and Memo. /// <reference types="@legendapp/state/types/babel" /> ## Create your own reactive components ### reactive You can wrap external components in `reactive` to create reactive versions of all of their props, prefixed with `$`. This makes it so that the reactive component can accept reactive props but the target receives regular props as usual. `reactive` creates a Proxy (not an HOC) that extracts all reactive props and observes them for changes, passing the regular prop down to the component. In this example, `reactive` adds a `$message` prop which takes a Selector, while the target component receives a normal `message` prop and is only re-rendered when `message` changes. import { observable } from "@legendapp/state";import { reactive } from "@legendapp/state/react";const isSignedIn$ = observable(false);const Component = reactive(function Component({ message }) { return <div>{message}</div>;});function App() { return ( <Component $message={() => isSignedIn$.get() ? "Hello" : "Goodbye"} /> );} In addition to wrapping your own functions, you can wrap external library components to make them reactive. In this example we make a Framer Motion component reactive so that we can update its animations based on observables without needing to re-render the parent component or its children. import { reactive } from "@legendapp/state/react";import { motion } from "framer-motion";const $MotionDiv = reactive(motion.div);function Component() { // This component renders only once const width$ = useObservable(100); return ( <$MotionDiv $animate={() => ({ x: width$.get(), })} > ... </$MotionDiv> );} ### reactiveObserver This is a single HOC with the functionality of both `observer` and `reactive`. They both run the same function under the hood, with slightly different options, so this is the optimal way to have one HOC that does both at once. import { observable } from "@legendapp/state";import { reactiveObserver, use$ } from "@legendapp/state/react";const name$ = observable("Annyong");const isSignedIn$ = observable(false);const Component = reactiveObserver(function Component({ message }) { const name = use$(name$); return ( <div> {message} {name} </div> );});function App() { return ( <Component $message={() => (isSignedIn$.get() ? "Hello" : "Goodbye")} /> );} ### reactiveComponents `reactiveComponents` makes multiple reactive components at once. You can use this to create your own internal library of reactive components, or to wrap UI libraries that have multiple components in a namespace like `Modal.Header` and `Modal.Footer`. import { reactiveComponents } from "@legendapp/state/react";import { motion } from "framer-motion";const $Motion = reactiveComponents(motion);function Component() { // This component renders only once const width$ = useObservable(100); return ( <$Motion.div $animate={() => ({ x: width$.get(), })} > ... </$Motion.div> );} --- ## Page: https://legendapp.com/open-source/state/v3/usage/reactivity Listening for changes is the core purpose of observables, so Legend-State provides many options. You can listen to changes at any level in an object’s hierarchy and it will be notified by changes in any children. ## Observing contexts The core power of Legend-State is the “observing contexts”. Calling `get()` within an observing context will track changes in that node, and re-run itself whenever it changes. Most functions in Legend-State take what we call a “Selector”, which is either a single observable or a function that calls `get()` on some observables and returns a value. Most functions in Legend-State are observing contexts, including computed observables, `observe`, `when`, linked/synced `get` functions, as well as `observer` and reactive components in React. When you call `get()` on an observable inside an observing context it will track it for changes and re-run whenever it changes. observe(() => { console.log(settings$.theme.get())}) ### What tracks `get()` is the primary way to access observables and track for changes, but there are actually a few ways: 1. Call `get()` on an observable: `settings.get()` 2. Array looping functions (shallow listener): `arr.map(settings.accounts, () => ...)` 3. Accessing array length (shallow listener): `if (arr.length > 0) ...` 4. Object.keys (shallow listener): `Object.keys(settings)` 5. Object.values (shallow listener): `Object.values(settings)` These operation do not track: 1. Accessing through an observable: `state$.settings` 2. Call `peek()` on an observable: `settings.peek()` ### Observing examples const state$ = observable({ settings: { theme: "dark", }, chats: { messages: [{ id: 0, text: "hi" }], },});observe(() => { const theme = state$.settings.theme.get(); // ✅ Tracking [state$.settings.theme] because of get() const theme = state$.settings.theme.peek(); // ❌ Not tracking because of peek() const theme = state$.settings.get(true); // ✅ Tracking [state$.settings (shallow)] because of get(true) const settings$ = state$.settings; // ❌ Not tracking, just a reference to an observable state$.chats.messages.map((m) => <Message key={m.peek().id} message={m} />); // ✅ Tracking [state$.chats.messages (shallow)] because of map() const keys = Object.keys(state$.settings); // ✅ Tracking [state$.settings (shallow)] because of Object.keys}); The automatic behavior can be modified with two observable functions: | Function | Tracked | | --- | --- | | `get()` | yes | | `peek()` | no | | `get(true)` | shallow | | `arr$.map(...)` | shallow | | `arr$.length` | shallow | | `Object.keys(state$)` | shallow | | `Object.values(state$)` | shallow | ### get() `get` returns the raw data of an observable and tracks it, so you can work with it without doing any further tracking. You may want to use `get()` to: * Get the value of an observable wrapper of a primitive * Track this object and not its individual fields. Minimizing the number of listeners is better for performance. const theme = state.settings.theme.get();// ✅ Tracking [state.settings.theme] ### Shallow tracking `get()` observes recursively by default, so any child changing will cause an update. You can modify it to be a shallow listener by just adding a `true` parameter. This can be useful when a component only needs to re-render if an object’s keys or an array’s items change. Array and Object functions also track shallowly - see What tracks above. const state$ = observable({ messages: [] });observe(() => { // Only need this to update when messages added/removed const messages = state$.messages.get(true); console.log("Latest message", messages[0]);}); ### Selectors Many of the functions in Legend-State take a Selector, which can be either an observable or a function that returns a value based on observables. The selector is run in an observing context so that `get()` tracks an observable for changes. Whenever an observable changes, it re-runs the function. Using `when` as an example of using Selectors: const isSignedIn$ = observable(false);const isOnline$ = observable(false);// A selector can be just an observable, which will be tracked for changesawait when(isSignedIn$);// Or selector can be a function which tracks all get() calls for changesawait when(() => isSignedIn$.get() && isOnline$.get()); ### observe `observe` can run arbitrary code when observables change, and automatically tracks the observables accessed while running, so it will update whenever any accessed observable changes. This can be useful to use multiple observables at once, for the benefit of cleanup effects, or if you just like it more than onChange. The callback parameter has some useful properties: * `num`: How many times it’s run. Use this to do something only the first time or not the first time. * `previous`: The previous value, which will be undefined on the first run and set to the return value * `cancel`: Set to `true` to stop tracking the observables when you are done observing * `onCleanup`: A function to call before running the selector again `observe` has an optional second `reaction` parameter which will run after the selector, and does not track changes. This can be useful for observing an `event` or a single `observable`. import { observe, observable } from "@legendapp/state";const state$ = observable({ isOnline: false, toasts: [] });const dispose = observe((e) => { // This observe will automatically track state.isOnline for changes if (!state$.isOnline.get()) { // Show an "Offline" toast when offline const toast = { id: "offline", text: "Offline", color: "red" }; state$.toasts.push(toast); // Remove the toast when the observe is re-run, which will be when isOnline becomes true e.onCleanup = () => state$.toasts.splice(state$.toasts.indexOf(toast), 1); }});// Cancel the observedispose(); Or use the second parameter to run a reaction when a selector changes. It has an additional `value` parameter, which contains the value of the selector. // Observe the return value of a selector and observe all accessed observablesobserve(state$.isOnline, (e) => { console.log("Online status", e.value);});// Observe the return value of a selector and observe all accessed observablesobserve( () => state$.isOnline.get() && state$.user.get(), (e) => { console.log("Signed in status", e.value); }); ### when `when` runs the given callback **only once** when the Selector returns a truthy value, and automatically tracks the observables accessed while running the Selector so it will update whenever one of them changes. When the value becomes truthy it will call the callback function and dispose the listeners. It also returns a Promise that resolves when the Selector returns a truthy value that can be used instead of the callback function. import { when } from "@legendapp/state";const state$ = observable({ ok: false });// Option 1: Promiseawait when(state$.ok);// Option 2: callbackwhen( () => state$.ok.get(), () => console.log("Don't worry, it's ok")); ### whenReady `whenReady` is the same as `when` except it waits for objects and arrays to not be empty. import { whenReady } from "@legendapp/state";const state$ = observable({ arr: [] });whenReady(state$.arr, () => console.log("Array has some values"));// Not ready yetstate$.arr.push("hello");// "Array has some values" ### onChange `onChange` listens to an observable for any changes anywhere within it. Use this as specifically as possible because it will fire notifications for every change recursively up the tree. const state$ = observable({ text: "hi" });state$.text.onChange(({ value }) => console.log("text changed to", value));state$.onChange(({ value }) => console.log("state changed to", value));state$.text.set("hello");// Log: text changed to "hello"// Log: state changed to { text: "hello" } `onChange` has some extra options for more advanced use: 1. `getPrevious`: Function to compare with the previous value. It is a function to let you opt into getting the previous value if needed, because it has some performance cost in cloning the object to compute the previous value. 2. `changes`: Array of all of the changes to this observable in the latest batch. This is intended mainly for internal usage by the persistence plugins to know what to sync/update and the history plugin to track all changes, but it may be good for other uses too. 3. `trackingType`: Whether to track only shallow changes 4. `initial`: Whether to run the callback immediately with the current value 5. `immediate`: Whether to run the callback immediately instead of within a batch. This is used internally by `computed` to make sure its value is always correct, but it may be useful for other specific uses. // Full examplestate$.onChange( ({ value, getPrevious, changes }) => { const prev = getPrevious(); changes.forEach(({ path, valueAtPath, prevAtPath }) => { console.log(valueAtPath, "changed at", path, "from", prevAtPath); }); }, { initial: true, trackingType: true }); #### Dispose of listeners Listening to an observable returns a dispose function to stop listening. Just call it when you want to stop listening. const state$ = observable({ text: 'hello' })const onChange = () => { ... }const dispose = state$.text.onChange(onChange)// Cancel listening manuallydispose() ## Batching You may want to modify multiple observables at once without triggering callbacks for each change. Batching postpones renders and listeners until the end of the batch. Batching can be done in two ways, wrapping between `beginBatch()` and `endBatch()` or in a callback with `batch(callback)`. import { batch, beginBatch, endBatch } from "@legendapp/state";// Wrap in begin and endbeginBatch();doManyChanges();endBatch();// Or batch with a callbackbatch(() => { doManyChanges();}); As we all know, you generally shouldn’t optimize pre-emptively. `observable` functions like `assign` already batch changes under the hood, so listeners don’t get called until the full change is complete. In many cases like setting unrelated observables you don’t need to worry about it. Batching is important in a few key situations: ### When observables depend on each other Use `batch` to delay computations/renders until all dependent changes are complete or you might get weird intermediary states. const name$ = observable({ first: "", last: "" });const fullName = observable(() => `${name$.first} ${name$.last}`);observe(() => console.log("fullName = ", fullName.get()));// Not batched:name$.first.set("First");name$.last.set("Last");// ❌ fullName notifies its listeners with incomplete state// fullName = "First "// fullName = "First Last"// Batched:batch(() => { name$.first.set("First"); name$.last.set("Last");});// ✅ fullName notifies only with final state// fullName = "First Last" ### To prevent excessive renders Making multiple changes in a row can cause React components and observers to re-run multiple times when they should wait until changes are complete. const state$ = observable({ items: [] });function addItems() { for (let i = 0; i < 1000; i++) { state$.items.push({ text: `Item ${i}` }); }}// ❌ This can render 1000 times while pushing to the arrayaddItems();// ✅ Batching delays until complete and renders oncebatch(addItems); ### When persisting If you are using `synced` or `syncObservable` to automatically persist your changes, you can prevent excessive writes by delaying persistence until changes are complete. Pushing to an array 1000 times could save to storage 1000 times, which could be very slow! --- ## Page: https://legendapp.com/open-source/state/v3/react/react-api#use ## Reading state ### use$ `use$` computes a value and automatically listens to any observables accessed while running, and only re-renders if the computed value changes. This can take either an observable or a function that consumes observables. Props: * `selector`: Observable or computation function that listens to observables accessed while running * `options`: `{ suspense: boolean }`: Enable suspense when the value is a Promise and you’re using it within React.Suspense. import { observable } from "@legendapp/state"import { use$ } from "@legendapp/state/react"const state$ = observable({ selected: 1, theme })const Component = ({ id }) => { // Only re-renders if the return value changes const isSelected = use$(() => id === state$.selected.get()) // Get the raw value of an observable and re-render when it changes const theme = use$(state$.theme) ...} #### Using with React Suspense Using `{ suspense: true }` as the second parameter makes the component work with Suspense. If the observable is a Promise, Suspense will render the fallback until it resolves to a non-undefined value. import { useObservable, useSelector } from "@legendapp/state/react"import { Suspense } from "react"function Test({ state$ }) { const value = useSelector(state$, { suspense: true }) return <div>{value}</div>}export default function App() { const state$ = useObservable( new Promise((resolve) => { setTimeout(() => { resolve("hello") }, 1000) }) ) return ( <div> <div>Suspense test</div> <Suspense fallback={<div>Loading...</div>}> <Test state$={state$} /> </Suspense> </div> )} ### observer `observer` is a good optimization if you have want to consume observables/selectors conditionally or if you consume many of them in one component. It inserts a single hook into the component and tracks all observables in the one hook. Because `use$` normally runs three hooks, this can drastically reduce the number of hooks in your components if you use `use$` many times. > In previous versions this allowed calling `get()` directly within components, but that is discouraged as of 3.0.0-beta.20. See migrating for more info. See Observing Contexts for more about when it tracks. import { observable } from "@legendapp/state"import { observer, use$ } from "@legendapp/state/react"const state$ = observable({ count: 0 })const Component = observer(function Component() { // Accessing state automatically makes this component track changes to re-render const count = use$(state$.count) // Re-renders whenever count changes return <div>{count}</div>}) ### useObserve `useObserve` creates an observe which you can use to take actions when observables change. This can be effectively similar to `useEffect` for observables, except that it runs when observables change and not because of a deps array changing. Like `observe`, `useObserve` has an optional second callback parameter which will run after the selector, and does not track changes. This can be useful for observing an `event` or a single `observable`. Note that `useObserve` runs during component render, not after render like `useEffect`. If you want an observer that runs after render, see useObserveEffect. import { event } from "@legendapp/state"import { useObserve, useObservable } from "@legendapp/state/react"import { $React } from "@legendapp/state/react-web"const eventUpdateTitle = event()function ProfilePage() { const profile$ = useObservable({ name: "" }) // This runs whenever profile changes useObserve(() => { document.title = `${profile$.name.get()} - Profile` }) // Observe a single observable with a callback when it changes useObserve(profile$.name, ({ value }) => { document.title = `${value} - Profile` }) // Observe an event with a callback when it changes useObserve(eventUpdateTitle, () => { document.title = `${profile$.name.get()} - Profile` }) return ( <div> <span>Name:</span> <$React.input $value={profile$.name} /> </div> )} ### useObserveEffect `useObserveEffect` is the same as useObserve except that it runs after the component is mounted. ### useWhen, useWhenReady These are hook versions of when. ## Hooks for creating local state ### useObservable The `useObservable` hook creates an observable within a React component. This can be useful when state is specific to the lifetime of the component, or to hold multiple values in local state. Its observables will not be automatically tracked for re-rendering, so you can track them the same as any other observable. As with normal observables you can create a computed observable by just using a function. import { observer, useObservable } from "@legendapp/state/react"const Component = function Component() { const state$ = useObservable({ title: 'Title', first: '', last: '', profile: {...} }) const fullname$ = useObservable(() => `${state$.fname.get()} ${state$.lname.get()}`) return ( <div> <div>{fullname$}</div> <Input text={state$.first} /> <Input text={state$.last} /> <Profile name={fullname$} /> </div> )} ### useObservableReducer `useObservableReducer` works the same way as `useReducer` but sets an observable rather than triggering a render. import { useObservableReducer } from "@legendapp/state/react"function reducer(state, action) { if (action.type === 'incremented_age') { return { age: state.age + 1 } }}const Component = () => { // Only re-renders if the return value changes const [age$, dispatch] = useObservableReducer(reducer, { age: 42 }) // Get the value of the reducer const theme = age$.get()} ### Using with Context Passing an observable object through Context gives you all the benfits of Context without the downsides, like any change to context normally re-renders all consumers. Simply set an observable as a Context value and consume it from a child component as usual. The observable itself is a stable object so useContext will never cause a re-render - only observing contexts will be updated as usual. import { createContext, useContext } from "react"import { observer, useObservable } from "@legendapp/state/react"interface UserState { profile: { name: string; };}// Create a typed context. It can have a default value of undefined because// the Provider will always be created with an Observable.const StateContext = createContext<Observable<UserState>>(undefined as any);function App() { const state$ = useObservable({ profile: { name: "", }, }) return ( <StateContext.Provider value={state$}> <div> <Sidebar /> <Main /> </div> </StateContext.Provider> )}const Sidebar = function Sidebar() { // StateContext will never change so this will never cause a render const state$ = useContext(StateContext) // This component never re-renders, but name re-renders itself return ( <div> Name: <Memo>{state$.profile.name}</Memo> </div> )} ## Miscellaneous hooks ### useEffectOnce This is `useEffect` with a workaround in development mode to make sure it only runs once. import { useEffectOnce } from "@legendapp/state/react"const Component = () => { useEffectOnce(() => { console.log("mounted") }, [])} ### useMount Using observable hooks we generally avoid the built-in hooks and dependency arrays, so we have `useMount` and `useUnmount` hooks for convenience, which are just `useEffectOnce` under the hood. import { useMount } from "@legendapp/state/react"const Component = () => { useMount(() => console.log("mounted"))} ### useUnmount Like the `useMount` hook, `useUnmount` just uses `useEffectOnce` under the hood. import { useUnmount } from "@legendapp/state/react"const Component = () => { useUnmount(() => console.log("mounted"))} ### usePauseProvider This creates a React Context Provider with a `paused$` observable. Set `paused$` to `true` to pause all rendering from observable changes under the context, and set it `false` to resume. This applies to everything within Legend-State like observer, useSelector, $React, Memo, etc… But normal renders coming from React or other state is not affected. This can be very useful to stop all updating when UI is not even visible, such as when a fullscreen modal is covering app UI or in inactivate tabs in React Native. import { useInterval } from "usehooks-ts" import { Memo, usePauseProvider, useObservable } from '@legendapp/state/react' function App() { const { PauseProvider, isPaused$ } \= usePauseProvider() const int$ \= useObservable(0) useInterval(() \=> { int$.set((val) \=> val + 1) }, 100) return ( <Box center\> <Button onClick\={isPaused$.toggle}\> <Memo\>{() \=> (isPaused$.get() ? 'Resume' : 'Pause')}</Memo\> </Button\> <PauseProvider\> <Memo\>{int$}</Memo\> </PauseProvider\> </Box\> ) } Live Editing --- ## Page: https://legendapp.com/open-source/state/v3/guides/patterns ## Many atoms vs. one large store Legend-State can be used however you want. If your team prefers one large state object containing all app state, that’s great! Or you may prefer to have multiple different individual atoms in their own files, which works too. Here’s some examples of ways to organize your state. ### One large global state const store$ = observable({ UI: { windowSize: undefined as { width: number, height: number }, activeTab: 'home' as 'home' | 'user' | 'profile', ... }, settings: { theme: 'light' as 'light' | 'dark', fontSize: 14, ... }, todos: [] as TodoItem[]}) ### Multiple individual atoms // Settingsexport const theme$ = observable('light')export const fontSize$ = observable(14)// UIStateexport const uiState$ = observable({ windowSize: undefined as { width: number, height: number }, activeTab: 'home' as 'home' | 'user' | 'profile',}) ### Within React components You can use `useObservable` to create state objects within React components, then pass them down to children through either props or Context. function App() { const store$ = useObservable({ profile: { name: "hi" }, }); return ( <div> <Profile profile={store$.profile} /> </div> );}function Profile({ profile }) { return <div>{profile.name}</div>;} --- ## Page: https://legendapp.com/open-source/state/v3/usage/observable#safety You can put anything in an observable: primitives, deeply nested objects, arrays, functions, etc… Observables work just like normal objects so you can interact with them without any extra complication. Just call `get()` to get a value and `set(...)` to modify it. Observables do not modify the underlying data at all. They use Proxy to expose observable functions and track changes, so an observable is a Proxy pointing to the actual data. import { observable } from "@legendapp/state"// Create observable objects as large and deep as you want. They can include computed functions// and action functions.const state$ = observable({ fname: 'Annyong', lname: 'Bluth', // Computeds name: () => state$.fname.get() + ' ' + state$.lname.get(), // Actions setName: (name: string) => { const [fname, lname] = name.split(' '); state$.assign({ fname, lname }) }})// Or create small individual atoms if you preferconst fname$ = observable('Annyong')const lname$ = observable('Bluth') ## Observable methods ### get() You can use `get()` to get the actual value of any observable. const profile = { name: "Test user" }const state$ = observable({ profile, test: 0 })// get the underlying value from the observableconst name = state$.profile.name.get() Accessing properties through the observable will create a Proxy for every property accessed, but it will not do that while accessing the raw data. So you may want to retrieve the raw data before doing expensive computations that do not need to notify. const state$ = observable({ data: someHugeThing })const { data } = state$.get()// Nothing special happens when working with the raw dataprocessData(data) Calling `get()` within a tracking context tracks the observable automatically. You can change that behavior with a parameter `true` to track only when keys are added/removed. See observing contexts for more details. state$.get(true) // Create a shallow listener ### peek() `peek()` returns the raw value in the same way as `get()`, but it does not automatically track it. Use this when you don’t want the component/observing context to update when the value changes. const state$ = observable({ name: 'Test user' })// get the underlying value from the observableconst name = state$.name.peek() ### set() You can use `set()` to modify the observable, at any path within it. You can even `set()` on a node that is currently undefined, and it will fill in the object tree to make it work. const state$ = observable({ text: "hi" })// Set directlystate$.text.set("hello there")// Set with a function relative to previous valuestate$.text.set((prev) => prev + " there")// Set will automatically fill out objects that were undefinedstate$.otherKey.otherProp.set("hi") Note that `set` sets the given value into the raw data without modifying it. Legend-State does deep equality checking to notify of changes to each property, so setting with a clone of an object will not notify of any changes because all properties are the same. ### assign() Assign is a shallow operation matching `Object.assign` to set multiple properties at once. If you want a deep merge, see mergeIntoObservable. These batch all individual set operations so that observers only update once. const state$ = observable({ text: "hi", text2: "there" })// Assignstate$.assign({ text: "hi!" , text2: "there!"}) ### delete() Observables provide a `delete` function to delete a key from an object. const state$ = observable({ text: "hi" })// Delete textstate$.text.delete()// Set the whole value to undefinedstate$.delete() `delete` works on array elements as well, removing the element from the array. const state$ = observable([ 'apple', 'orange' ])// Delete from the arraystate$[0].delete()// state === ['orange'] ## Computed Observables ### Functions Observables can have functions anywhere within them. You can use these for whatever you want, such as adding extra behavior when setting. const state$ = observable({ isReady: false, toggle: () => { state$.isReady.toggle() console.log('set to', state$.isReady.get()) }}) Note that observing contexts track all observable `get()` calls, including within any called functions. So if a function called from within a `use$` hook calls `get()` that will be tracked too. const state$ = observable({ fname: 'Annyong', lname: 'Bluth', fullName: () => state$.fname.get() + ' ' + state$.lname.get()})function Name() { // Tracks [state$.fname, state$.lname] const name = use$(() => state$.fullName()) return <div>{name}</div>} ### Computed Functions Any function in an observable can be used a computed observable, whether at the root or in any child. Computed functions are lazy: a function is turned into an observable when you first call `get()` or `peek()` on it. It will then re-compute itself whenever the observables it accesses with `get()` are changed. const state$ = observable({ fname: 'Annyong', lname: 'Bluth', // A child is computed fullName: () => state$.fname.get() + ' ' + state$.lname.get()})// An observable with a function is a computedconst name$ = observable(() => state$.fname.get() + ' ' + state$.lname.get()) // Calling it like a function returns the value and computes when called.const fullName = state$.fullName()// Calling .get() activates it as a computed observable that recomputes itself on changesconst reactiveFullName = state$.fullName.get() A computed function can be used like an observable or as a function. function Name() { // Use it as a function const name1 = use$(() => state$.fullName()) // Use it as an observable const name2 = use$(state$.fullName) return <div>{name2}</div>} The difference between using it as a function vs. as a computed observable is that a computed observable is an object that caches the value. * `fullName()` is a function that re-computes whenever you call it. * `fullName.get()` creates a computed observable that re-computes itself whenever its dependencies change. ## Async Observables Creating an observable with a Promise or async function will initialize it to `undefined`, and it will be updated with the value of the Promise when it resolves. const serverState$ = observable(() => fetch('url').then(res => res.json()))observe(() => { // Getting the value activates the observable to fetch, and it // updates its value when it resolves. const data = serverState$.get() if (data) { ... }}) Asynchronous observables can be paired with when to activate the function and resolve when the observable’s Promise is resolved. // Await the promise to resolve and then get the data from itconst data = await when(serverState$)console.log(data) You can access the status of an async observable with the syncState helper, which is an observable itself. The most common usage is to check its loaded or error states: const status$ = syncState(serverState$)observe(() => { // This will re-run as the status changes const { isLoaded, error } = status$.get() if (error) { // Handle error } else if (isLoaded) { // Do the thing }}) ## Linked observables ### Two-Way Linked `linked` creates an observable bound to both `get` and `set` functions. This lets you bind or transform a single or multiple other observable values. For example it could be used to create a “Select All” checkbox. import { linked, observable } from "@legendapp/state"const selected$ = observable([false, false, false])const selectedAll$ = observable(linked({ // selectedAll is true when every element is selected get: () => selected$.every((val$) => val$.get()), // setting selectedAll sets the value of every element set: (value) => selected$.forEach((val$) => val$.set(value))}))selectedAll$.set(true)// selected.get() === [true, true, true] Or it could be used to automatically deserialize/serialize a string value. const str$ = observable('[1,2,3]')const arr$ = observable(linked({ get: () => JSON.parse(str$.get()) set: (value) => str$.set(JSON.stringify(value))})) #### Initial value When creating an asynchronous observable with a Promise you may want it to have an initial default value until the promise resolves. You can use the `initial` property of `linked` to do that. import { linked } from "@legendapp/state"const state$ = observable(linked({ get: () => fetch('url').then(res => res.json()), initial: { numUsers: 0, messages: [] }})) ## Advanced Computeds ### Link to another observable If you return an observable from a computed function, it will create a two-way link to the target observable. Interaction with the linked observable will then pass through to the target. Observing contexts tracking the linking observable will re-run both when the linked observable’s value changes and when the link itself changes. In this example, the observable that `selectedItem` points to is changed by setting `selectedIndex`. And because it’s a direct link to the target observable, `set` operations will pass through to the target observable. const state$ = observable({ items: ["hi", "there", "hello"], selectedIndex: 0, selectedItem: () => state$.items[state$.selectedIndex.get()],})observe(() => { console.log('observe:' + state$.selectedItem.get())})// observe: 'hi'state$.selectedIndex.set(2)// observe: 'hello'state$.selectedItem.set('HELLO!')// observe: 'HELLO!'// items = ["hi", "there", "HELLO!"] This could also be used to transform objects to another shape while still linking to the original value. So for example you could filter the values of an object into an array, with each element in the array pointing to the original observable. const state$ = observable({ items: { id1: { id: 'id1', status: 'ready' }, id2: { id: 'id2', status: 'disabled' } }, itemsReady: () => Object.values(state$.items) .filter(item => item.status.get() === 'ready')})observe(() => { console.log('observe:' + state$.itemsReady.get())})// observe: [{ id: 'id1', status: 'ready' }]// modifying the target object recomputes the computed arraystate$.items.id2.status.set('ready')// observe: [{ id: 'id1', status: 'ready' }, { id: 'id2', status: 'ready' }]// set on the computed array goes into the target objectstate$.itemsReady[0].status.set('disabled')// observe: [{ id: 'id2', status: 'ready' }] ### Lookup table A function with a single `string` key can be used as a lookup table (an object with a string key). Accessing it by index will call the function to create a computed observable by that key. const state$ = observable({ selector: 'text', items: { test1: { text: 'hi', othertext: 'bye' }, test2: { text: 'hello', othertext: 'goodbye' } }, // Return a link to the [selector] property in the given item texts: (key: string) => { return state$.items[key][state$.selector.get()] },})// Now these reference the same thing:state$.items.test1.text.get()state$.texts['test1'].get()// And setting a text goes through to the linked observablestate$.texts.test1.set('hello')state$.items.test1.text.get() // 'hello' ### event `event` works like an observable without a value. You can listen for changes as usual, and dispatch it manually whenever you want. This can be useful for simple events with no value, like onClosed. import { event } from "@legendapp/state"const onClosed$ = event()// Simply pass a callback to the `onChange` functiononClosed$.onChange(() => { ... })// Or use 'on' which is an alias of `onChange`onClosed$.on(() => { ... })// Dispatch the event to call listenersonClosed$.fire() ## Notes ### Safety Modifying an observable can have a large effect such as re-rendering or syncing with a database, so it uses a purposeful `set` rather than simple assignments. This prevents potentially catastrophic mistakes and looks visually different than a variable assignment so that it is clear what is happening. const state$ = observable({ text: "hello", num: 10, obj: {} })state$.text = "hi"// ❌ Can't set directlystate$.text.set("hi")// ✅ Calling set on a primitive works.state$ = {}// ❌ Error. This would delete the observable.state$.obj = {}// ❌ Error. Cannot assign to objects directly.state$.set({ text: "hi", num: 20 })// ✅ Calling set on an object works.state$.assign({ text: "hello there" })// ✅ Calling assign on an object works.state$.text.assign({ value: "hello there" })// ❌ Error. Cannot call assign on a primitive. If you really want to assign directly to observables, there is an extension to add `$` as a property you can get/set. See configuration for details. import { enable$get } from "@legendapp/state/config/enable$get"enable$get()// Now you can use $ as a shorthand for get()const testValue = state$.test.$// Assign to $ as a shorthand for set()state$.test.$ = "hello"// Assign objects too just like you can with set()state$.$ = { test: "hello" } ### undefined Because observables track nodes by path and not the underlying data, an observable points to a path within an object regardless of its actual value. So it is perfectly fine to access observables when they are currently undefined in the object. You could to do this to set up a listener to a field whenever it becomes available. const state$ = observable({ user: undefined })when(state$.user.uid, (uid) => { // Handle login}) Or you could set a value inside an undefined object, and it will fill out the object tree to make it work. const state$ = observable({ user: undefined })observe(() => { // This will be undefined until the full user profile is set console.log(`Name: ${state$.user.profile.name.get()}`)})state$.user.profile.name.set("Annyong")// state$ == { user: { profile: { name: 'Annyong' } } } ### Arrays Observable arrays have all of the normal array functions as you’d expect, but some are modified for observables. All looping functions set up shallow tracking automatically, as well as provide the observable in the callback. This includes: * every * filter * find * findIndex * forEach * includes * join * map * some Additionally, `filter` returns an array of observables and `find` returns an observable (or undefined). If you don’t want this extra observable behavior, `get()` or `peek()` the observable to get the raw array to act on. ### Observables are mutable Legend-State does not use immutability because immutability is slow. It needs to do deep equality checking of changes to know which nodes to notify anyway, so immutability just isn’t needed. So there are two things to be careful of. #### 1\. Modifying raw data breaks notifying of changes. Observables are just wrappers around the underlying data, so if you modify the raw data you’re actually modifying the observable data without notifying of changes. Then if you set it back onto the observable, that just sets it to itself so nothing happens. // ❌ This sets it to itself, nothing happensconst value = state$.get()value.key = 'newValue'state$.set(value)// ✅ Set the value directly in the observablestate$.key.set('newValue')// ✅ Assign the key/value to the observablestate$.assign({ key: 'newValue' }) #### 2\. Don’t need to clone A common pattern in React is to set state with a clone of the previous value, which is required because of immutability constraints in React. Legend-State does not have that constraint and cloning is bad for performance, so it’s better to do operations directly on the observables. // ❌ Setting with a cloned object creates a new object unnecessarilyconst record = record$.get()const newRecord = { ...record, key: 'value' }record$.set(newRecord)// ✅ Set the key directly in the observablerecord$.key.set('value') // ❌ Setting with a cloned array creates a new array unnecessarilyconst list = list$.get()const newList = [ ...list, 'value' ]list$.set(newList)// ✅ Just push itlist$.push('value') // ❌ Delete by clone and destructure creates a new object unnecessarilyconst record = record$.get()const { key, ...rest } = recordrecord$.set(rest)// ✅ Delete the key directly in the observablerecord$.key.delete() // ❌ Setting a filtered array creates a new array unnecessarilyconst list = list$.get()const newList = list.filter((item) => item.id != itemId)list$.set(newList)// ✅ Delete it from the array directlyconst list = list$.get()const idx = list.findIndex((item) => item.id === itemId)list$[idx].delete() --- ## Page: https://legendapp.com/open-source/state/v3/usage/configuring#enable$get Legend-State is designed to have a lean core that allows you and your team to add additional features, so it has configuration functions to add features as you like. These functions add features and augment the TypeScript interface to add the new functions, so just importing the file adds the interface. These configuration functions only need to be called once, before their effects are used, and then they will work anywhere. It should generally be at the top of the file that’s the entry point of your app or is imported everywhere, or it could be at the top of a global state file. ## enable$GetSet This enables accessing and setting the raw value of an observable directly. It’s a shorthand for `get()` and `set(...)`. import { enable$GetSet } from "@legendapp/state/config/enable$GetSet";enable$GetSet(); Now you can access/modify observables directly. import { observable } from "@legendapp/state"const state$ = observable({ test: "hi", num: 0 })// $ is a shorthand for get()const testValue = state$.test.$// Assign to $ as a shorthand for set()state$.test.$ = "hello"// Assign objects too just like you can with set()state$.$ = { test: "hello" }// Incrementing works as you'd expectstate$.num.$++ ## enable\_PeekAssign This enables accessing and setting the raw value of an observable directly without tracking or notifying listeners. Getting with `._` is a shorthand for `peek()` and assigning to `._` modifies the underlying data without notifying. Modifying data without notifying is likely necessary in only very specific scenarios so use it with care. import { enable_PeekAssign } from "@legendapp/state/config/enable_PeekAssign";enable_PeekAssign(); Now you can access/modify observables directly without notifying. import { observable } from "@legendapp/state"const state$ = observable({ test: "hi", num: 0 })// _ is a shorthand for peek()const testValue = state$.test._// Assign to _ to modify the underlying object without notifying listenersstate$.test._ = "hello"// Assign objects toostate$._ = { test: "hello" } ## enableReactTracking `enableReactTracking` is useful to warn if a `get()` is called within a React component without being wrapped in `use$`, which would break the reactivity. ### warnMissingUse This will log a warning whenever `get()` is called within a React component. This can help you find places where you meant to use `use$` to track the observable in React, or you may want to change it to `peek()` to be clearer that it should not trigger updates. import { enableReactTracking } from "@legendapp/state/config/enableReactTracking"enableReactTracking({ warnMissingUse: true,}) ### (Deprecated) warnUnobserved This makes React components warn if using `get()` without being wrapped in `observer`. This is a very helpful way to catch the easy mistake of forgetting `observer`. It only runs when `process.env.NODE_ENV === 'development'` so it won’t disrupt your app in production. import { enableReactTracking } from "@legendapp/state/config/enableReactTracking"enableReactTracking({ warnUnobserved: true,}) ### (Deprecated) auto tracking This makes React components auto-track observables without using `observer`, so all you need to do is `get()` an observable and the component will re-render when it changes. This is useful for rapid prototyping as observing is done for you. import { enableReactTracking } from "@legendapp/state/config/enableReactTracking"enableReactTracking({ auto: true,}) Now you can just `get()` and components will be automatically reactive. import { observable } from "@legendapp/state"const state$ = observable({ test: "hi" })function Component() { // This makes this component responsive to test changing const test = state$.test.get() return <div>{test}</div>} Note that `enableReactTracking` and `observer` can be used together - observer will optimize away the auto tracking behavior in favor of its more efficient tracking. --- ## Page: https://legendapp.com/open-source/state/v3/guides/performance#optimized-rendering Legend-State is already quite optimized by default, but there are some things to keep in mind to make sure it’s as optimized as possible. ## Batching Making multiple changes in a row can cause React components and observers to re-run multiple times when they should wait until changes are complete. So if you’re setting a lot of observables at once, it’s good to batch them together into one operation. See Batching for more. const state$ = observable({ items: [] });function addItems() { for (let i = 0; i < 1000; i++) { state$.items.push({ text: `Item ${i}` }); }}// ❌ This can render 1000 times while pushing to the arrayaddItems();// ✅ Batching delays until complete and renders oncebatch(addItems); ### When persisting If you are using `synced` or `syncObservable` to automatically persist your changes, you can prevent excessive writes by delaying persistence until changes are complete. Pushing to an array 1000 times could save to storage 1000 times, which could be very slow! ## Iterating through observables creates Proxies For most usage this effect is negligible, but may be a concern with huge arrays of objects. Accessing objects/arrays in observables creates Proxies to give them the observable functions. If you are iterating through large objects that don’t need to be tracked for changes, call `get()` first to access the raw data, skipping all the Proxy creation. const state$ = observable({ items: [{ data: { value: 10 }}, ...] })let sum = 0// 🔥 This will create proxies for each element's data and valuestate$.items.forEach(item => sum += item.data.value.get())// 💨 This will not do anything specialstate$.items.get().forEach(item => sum += item.data.value) ## Arrays Legend-State is especially optimized for arrays since it was built for Legend to handle huge lists of data. Here are a few tips to get the best performance out of arrays. ### Arrays of objects require a unique id To optimize rendering of arrays of objects, Legend-State requires a unique `id` or `key` field on each object. If your data needs to have a different id field, you can use a `${arrayName}_keyExtractor` function next to the array object: const data$ = observable({ arr: [], arr_keyExtractor: (item) => item.idObject._id,}); Under the hood, Legend-State listens to elements by path within the object. Operations like `splice` can change the index of an element which changes its path, so it uses the unique `id` to handle elements being moved and keep observables as stable references to their underlying element. It also optimizes for repositioning items within arrays and only re-renders the changed elements. ### Use the `For` component The `For` component is optimized for rendering arrays of observable objects so that they are extracted into a separate tracking context and don’t re-render the parent. You can use it in two ways, providing an `item` component or a function as a child. An `optimized` prop adds additional optimizations, but in an unusual way by re-using React nodes. See Optimized rendering for more details. import { observable } from "@legendapp/state"import { For } from "@legendapp/state/react"const state$ = observable({ arr: [{ id: 1, text: 'hi' }]})function Row({ item }) { return <div>{item.text}</div>}function List() { // 1. Use the For component with an item prop return <For each={state$.arr} item={Row} /> // 2. Use the For component with a render function as the child return ( <For each={list}> {item => ( <div> {item.text} </div> )} </For> )} ### For doesn’t re-render the parent In this more complex example you can see that as elements are added to and update the array, the parent component does not re-render. ### Don’t get() observables while mapping The `map` function automatically sets up a shallow listener, so it will only re-render when the array is changed and not when individual elements are changed. For best performance it’s best to let the child component track each item observable. Make sure that you don’t access any observable properties while mapping, like accessing the id for the key, so use `peek()` to prevent tracking. If you do `get()` inside an `observer` component would trigger the outer component to observe every list element. import { observable } from "@legendapp/state";import { For } from "@legendapp/state/react";const state$ = observable({ arr: [{ id: 1, text: "hi" }] });function Row({ item }) { return <div>{item.text}</div>;}function List() { // Be sure to use peek() to make sure you don't track any observable fields here return state$.arr.map((item) => <Row key={item.peek().id} item={item} />);} ### Optimized rendering The `For` component has an `optimized` prop which takes the optimizations even further. It prevents re-rendering the parent component when possible, so if the array length doesn’t change it updates React elements in place instead of the whole list rendering. This massively reduces the rendering time when swapping elements, sorting an array, or replacing some individual elements. But because it reuses React nodes rather than replacing them as usual, it may have unexpected behavior with some types of animations or if you are modifying the DOM externally. This is how the fast “replace all rows” and “swap rows” speeds in the benchmark are achieved. import { For } from "@legendapp/state/react"...function List() { // Use the optimized prop return <For each={list} item={Row} optimized />} --- ## Page: https://legendapp.com/open-source/state/v3/sync/tanstack-query The built in `syncedFetch` and `synced` plugins should include all you need for remote sync, but this plugin can help when integrating into or migrating from an existing Query-based infrastructure. This plugin takes all of the normal Query parameters, but it updates an observable instead of triggering a re-render. The queryKey can be a function that returns a key array dependent on some observables. If those observables change it will update the queryKey and re-run with the new key. That makes it super easy to do pagination, for example. There are two ways to use this plugin: ### 1\. React Hook The `useObservableSyncedQuery` hook takes the normal Query parameters for the query and mutation, and gets the queryClient from Context. import { useObservableSyncedQuery } from '@legendapp/state/sync-plugins/tanstack-react-query';import { useQueryClient } from '@tanstack/react-query';import { use$ } from '@legendapp/state/react';function Component() { const state$ = useObservableSyncedQuery({ query: { queryKey: ['user'], queryFn: async () => { return fetch('https://reqres.in/api/users/1').then((v) => v.json()) }, }, mutation: { mutationFn: async (variables) => { return fetch( 'https://reqres.in/api/users/1', { body: JSON.stringify(variables), method: 'POST' } ) }, }, }) // get it with use$ to start the sync const state = use$(state$) // Or bind an input directly to a property, which will also start the sync return ( <div> <$React.input $value={state$.first_name} /> </div> )} ### 2\. Outside of React `syncedQuery` takes the normal Query parameters for the query and mutation, and additionally just needs a queryClient. It uses `@tanstack/query-core` and does not need to be used within React components. import { syncedQuery } from '@legendapp/state/sync-plugins/tanstack-query';import { QueryClient } from '@tanstack/react-query';const queryClient = new QueryClient()const state$ = observable(syncedQuery({ queryClient, query: { queryKey: ['user'], queryFn: async () => { return fetch('https://reqres.in/api/users/1').then((v) => v.json()) }, }, mutation: { mutationFn: async (variables) => { return fetch( 'https://reqres.in/api/users/1', { body: JSON.stringify(variables), method: 'POST' } ) }, },}))observe(() => { // get() the value to start syncing, and it will be reactive to updates coming in console.log(state$.get())}) --- ## Page: https://legendapp.com/open-source/state/v3/sync/fetch `syncedFetch` is a simple wrapper around `fetch` to reduce boilerplate. * `get`: The URL to get. If it is an observable or Selector function, it will re-run whenever the value changes. * `set`: The URL to set * `getInit`: The `init` parameter to pass to `fetch` when getting * `setInit`: The `init` parameter to pass to `fetch` when setting. Defaults to `{ method: 'POST' }` * `valueType`: The function to call on the Response set. Defaults to `json`. * `onSavedValueType`: The function to call on the Response from set. Defaults to the `valueType` option or `json`. * `onSaved`: Given the return value from set, return a value to save back into the observable. Example: import { syncedFetch } from '@legendapp/state/sync-plugins/fetch';import { observable } from '@legendapp/state';const state$ = observable(syncedFetch({ get: 'https://url.to.get', set: 'https://url.to.set', onSaved: (value) => { return { updatedAt: value.updatedAt } }})) --- ## Page: https://legendapp.com/open-source/state/v3/sync/keel Keel pairs especially well with Legend-State because it’s designed for strong typing and developer experience, and because they’ve worked with us to make Legend-State and Keel pair perfectly together. All you need to do is provide the actions in the generated `keelClient.ts` and the observables will be fully typed and handle calling the correct action functions for you. As a basic example, if you have a Keel model that looks like this: model Profile { fields { name Text } actions { get getProfile() create createProfile() with (name) update updateProfile(id) with (name) delete deleteProfile(id) }} Then you can pass the functions from the generated keelClient.ts into `syncedKeel` to create a fully typed observable: import { observable } from '@legendapp/state'import { syncedKeel } from '@legendapp/state/sync-plugins/keel'const { mutations, queries } = client.apiconst profile$ = observable(syncedKeel({ get: queries.getProfile, create: mutations.createProfile, update: mutations.updateProfile, delete: mutations.deleteProfile,})) Then you can just get and modify the observable to two-way sync your data with Keel. ## Install Follow Keel’s instructions to get everything setup with Keel. Then install the `ksuid` library, which the Keel plugin uses to generate IDs locally in the same way that Keel’s backend generates IDs. ## Full Example We’ll start with a full example to see what a full setup looks like, then go into specific details. import { observable } from '@legendapp/state'import { ObservablePersistLocalStorage } from '@legendapp/state/persist-plugins/local-storage'import { configureSynced } from '@legendapp/state/sync/'import { generateKeelId, syncedKeel } from '@legendapp/state/sync-plugins/keel'import { APIClient } from './keelClient'const client = new APIClient({ baseUrl: process.env.API_BASE_URL})const isAuthed$ = observable(false);// Set defaultsconst sync = configureSynced(syncedKeel, { client, persist: { plugin: ObservablePersistLocalStorage, retrySync: true }, debounceSet: 500, retry: { infinite: true, }, changesSince: 'last-sync', waitFor: isAuthed$})// enable sync after authentication succeedsasync function doAuth() { // authenticate the client await keel.auth.authenticateWithPassword(email, pass) // check that the client is authenticated const isAuthenticated = await keel.auth.isAuthenticated() // Set isAuthed$ to start syncing isAuthed$.set(true)}// Set up your observables with Keel queriesconst { mutations, queries } = client.api// create an observable with the action functionsconst messages$ = observable(sync({ list: queries.getMessages, create: mutations.createMessage, update: mutations.updateMessage, delete: mutations.deleteMessage, persist: { name: 'messages' },}))// get() activates and starts syncingconst messages = messages$.get()function addMessage(text: string) { const id = generateKeelId() // Add keyed by id to the messages$ observable to trigger the create action messages$[id].set({ id, text, createdAt: undefined, updatedAt: undefined })}function updateMessage(id: string, text: string) { // Just set valudes in the observable to trigger the update action messages$[id].text.set(text)} ## Configure globals The first step to using the Keel plugin is to set some global configuration options. The suggested options are: * **client**: It needs the client in order to enable the Keel realtime plugins. * **waitFor**: An observable that you set to true after signing in import { observable } from '@legendapp/state'import { syncedKeel } from '@legendapp/state/sync-plugins/keel'import { configureSynced } from '@legendapp/state/sync/'import { APIClient } from './keelClient'const client = new APIClient({ baseUrl: process.env.API_BASE_URL,})const isAuthed$ = observable(false);// Set defaultsconst sync = configureSynced(syncedKeel, { client, persist: { plugin: ObservablePersistLocalStorage, }, waitFor: isAuthed$})// enable sync after authentication succeedsasync function doAuth() { // authenticate the client await keel.auth.authenticateWithPassword(email, pass) // check that the client is authenticated const isAuthenticated = await keel.auth.isAuthenticated() // Set isAuthed$ to start syncing isAuthed$.set(true)} TODO: Other config options ## get and list The Keel plugin has two slightly different patterns depending on whether you’re using a `get` or a `list` action. The behavior when using `get` or `as: 'value'` is: * **get**: Observable value is the value returned from get * **create**: If get returned null, then setting any value on the observable will create * **update**: If get returned a value, then updating any value on the observable will update * **create**: Setting the value to null or undefined, or calling `delete()`, will delete const { mutations, queries } = client.apiconst profile$ = observable(syncedKeel({ get: queries.getProfile, create: mutations.createProfile, update: mutations.updateProfile, delete: mutations.deleteProfile,}))// profile$.get() is a Profile The behavior when using `list` is: * **list**: Observable value is an object containing the listed values keyed by id * **create**: Adding a new value to the object will will create * **update**: Updating a child value will update it with the changed fields * **delete**: Setting a child value to null or undefined, or calling `delete()`, will delete const { mutations, queries } = client.apiconst profiles$ = observable(syncedKeel({ list: queries.listProfiles, create: mutations.createProfile, update: mutations.updateProfile, delete: mutations.deleteProfile,}))// profile$.get() is a Record<string, Profile> The shape of the observable object can be changed with the `as` parameter, which supports three options: 1. `object`: The default, an object keyed by the row’s `id` field. 2. `array`: Treat the result of a query as an array 3. `Map`: A Map, which can be more efficient for accessing rows by key 4. `value`: Treat the result of a query as a single value like a `get` ## where When using a `list` function you may want to provide more options to the `where` query. You can do that by customizing actions, but it is most easily done with the `where` parameter. In this example of using a lookup table by room, we can pass the `roomId` into the query: const { mutations, queries } = client.apiconst messages$ = observable({ room: (roomId: string) => syncedKeel({ list: queries.listMessages, where: { roomId } })})// profile$.get() is a Record<string, Profile> ## Action functions Using Legend-State with Keel puts some requirements on your model structure: ##### 1\. id parameter in create actions Because Legend-State generate ids locally, `id` needs to be include in create functions in your Keel models. You can make it optional if you may sometimes not create with an id. ##### 2\. Include all possibly changeable fields as optional in create/update actions This plugin sends updates with only the changed fields, so having some fields as required in update could cause the update action to fail. And if it changes any field that’s not included in the action, that will also fail. Additionally, using the debounceSet option may result in the `create` action being delayed until after your code has added more fields to the initial value. So we suggest: * **create** actions should have required fields required and include all other fields as optional * **update** actions should include all changeable fields as optional ##### 3\. Include updatedAt? in list actions This is only needed if you’re using `changesSince: 'last-sync'`. See sync only diffs. ##### Example model structure model Message { fields { // Cannot change after create user User // Changeable text Text status Boolean? } actions { list listUsers(updatedAt?) create createUser() with (id?, user.id, name, status?) create updateUser(id) with (name?, status?) delete deleteUser(id) }} ## Customizing actions In the previous examples we provided the Keel function directly, but you can also provide your own function which calls the Keel action. That can be useful for adding extra query or creation options, such as with a lookup table. import { mutations, queries, CreateProfileInput } from './keelClient'const profiles$ = observable({ user: (userId: string) => syncedKeel({ get: () => queries.getProfile({ userId }), create: (data: CreateProfileInput) => mutations.createProfile({ user: { id: staffId }, ...data }), update: mutations.updateProfile, delete: mutations.deleteProfile, })}) ## Sync only diffs An optional but very useful feature is the `changesSince: 'last-sync'` option. This can massively reduce badwidth usage when you’re persisting list results since it only needs to list changes since the last query. The way this works internally is basically: 1. Save the maximum updatedAt to the local persistence 2. In subsequent syncs or after refresh it will list by `updatedAt: lastSync + 1` to get only recent changes 3. The new changes will be merged into the observable To enable this on the Keel side, just include `updatedAt?` in the list parameters to enable querying by updatedAt. model Message { ... actions { list listMessages(updatedAt?) }} And to enable this feature in Legend-State, use the `changesSince` option in combination with `list`. It can not work with get, but you can emulate a get with a list by creating a `list` action with an `id` parameter and the `as: 'value'` option in `syncedKeel`. // Sync diffs of a listsyncedKeel({ list: queries.listMessages, changesSince: 'last-sync', persist: { name: 'messages' }})// Sync diffs of a single valuesyncedKeel({ list: queries.listUserById, where: { id: myId }, as: 'value', changesSince: 'last-sync', persist: { name: 'me' }}) ### Soft deletes The delete parameter does not need to be an actual `delete` action in Keel. You could also implement it as a soft delete if you prefer, just setting a `deleted` field to true. To do that you can have a `deleted` field on your model, or provide a `fieldDeleted` with a custom field name. Then when you delete an element it will internally call the update action with `{ deleted: true }` and the list action will remove deleted elements from the observable. const { mutations, queries } = client.apiconst profiles$ = observable(syncedKeel({ list: queries.listProfiles, create: mutations.createProfile, update: mutations.updateProfile, fieldDeleted: 'deleted'})) ### List deletes from audit table We have a helper function that we use in Keel code to get deleted rows from Keel’s built-in audit log. If the query has an `updatedAt` timestamp, this will get all values updated since `updatedAt` as well as get all rows deleted since `updatedAt` and include them as `{ id, deleted: true }`. The plugin will internally remove those deleted rows from the observable for you. export async function listTableWithDeletes<T extends keyof ModelsAPI>( tableName: T, inputs: { where: { updatedAt?: TimestampQueryInput } },): Promise<Awaited<ReturnType<ModelsAPI[T]['create']>>[]> { const ret = await models[tableName].findMany(inputs); return ret.concat(await listDeletes(tableName, inputs)) as any;}async function listDeletes( tableName: keyof ModelsAPI, inputs: { where: { updatedAt?: TimestampQueryInput } },): Promise<any[]> { const { where: { updatedAt }, } = inputs; if (updatedAt) { const db = useDatabase().withTables<{ keel_audit }>(); const res = await db .selectFrom('keel_audit') .selectAll() .where('table_name', '=', camelCaseToSnakeCase(tableName)) .where('op', '=', 'delete') .where('created_at', '>', updatedAt.after) .execute(); return res.map((r) => ({ id: r.data.id, deleted: true })); } else { return []; }}function camelCaseToSnakeCase(input: string) { return input.replace(/([A-Z])/g, ' $1').split(' ').join('_').toLowerCase();} Then you can use `listTableWithDeletes` in your `beforeQuery` hooks. You will need to add this to any `beforeQuery` hooks that you want to list with deletes. const hooks: ListMessagesHooks = { async beforeQuery(ctx, inputs, query) { return listTableWithDeletes('message', inputs) }} ## Usage #### Add new element to table with id To add a new element to an observable and use it locally before it has been created remotely, you can create it with a local id, and then it will be updated with `createdAt` and `updatedAt` after it’s created in Keel. Note that since `createdAt` and `updatedAt` are defined as required in the types they should to be set to undefined when creating. import { Message } from './keelClient'import { observable } from '@legendapp/state'import { generateKeelId, syncedKeel } from '@legendapp/state/sync-plugins/keel'const profile$ = observable(syncedKeel({ get: queries.getProfile, create: mutations.createProfile, update: mutations.updateProfile, delete: mutations.deleteProfile,}))function addMessage(text: string) { const id = generateKeelId() // Add keyed by id to the messages$ observable messages$[id].set({ id, text, createdAt: undefined, updatedAt: undefined })}addMessage('test') #### Wait for remote load Because Keel automatically adds a `createdAt` field after it creates, you can know that data has been successfully saved to Keel if it has a `createdAt` field. Just make sure that you don’t set `createdAt` yourself as it’s automatically created by Keel. // Wait for profile to have savedawait when(profile$.createdAt) #### waitFor another table If you have a table dependant on another table, it needs to wait for the dependant table to be created, otherwise it will fail because the relationship doesn’t exist. For example you can’t create messages in a chat room before that chat room exists. You can ensure the related table is created first using `waitForSet` and `createdAt`: const rooms$ = observable(syncedKeel({ list: queries.listRooms, create: mutations.createRoom, update: mutations.updateRoom,}))const roomMessages$ = observable( (roomId: string) => syncedKeel({ list: queries.getRoomMessages, where: { roomId }, create: (message) => mutations.createMessage({ roomId, ...message }), update: mutations.updateMessage, waitForSet: rooms$[roomId].createdAt })) ## TODO ### Realtime Keel does not have realtime built in, but it’s very easy to build a realtime system on top of it. More details coming soon. Other todo * options * transforms * Persist in full example --- ## Page: https://legendapp.com/open-source/state/v3/sync/supabase Supabase and Legend-State work very well together - all you need to do is provide a typed client and the observables will be fully typed and handle calling the correct action functions for you. ## Full Example We’ll start with a full example to see what a full setup looks like, then go into specific details. import { createClient } from '@supabase/supabase-js'import { Database } from './database.types'import { observable } from '@legendapp/state'import { configureSyncedSupabase, syncedSupabase } from '@legendapp/state/sync-plugins/supabase'import { v4 as uuidv4 } from "uuid"const supabase = createClient<Database>(process.env.SUPABASE_URL, process.env.SUPABASE_ANON_KEY)// provide a function to generate ids locallyconst generateId = () => uuidv4()configureSyncedSupabase({ generateId})const uid = ''const messages$ = observable(syncedSupabase({ supabase, collection: 'messages', // Optional: // Select only id and text fields select: (from) => from.select('id,text'), // Filter by the current user filter: (select) => select.eq('user_id', uid), // Don't allow delete actions: ['read', 'create', 'update'], // Realtime filter by user_id realtime: { filter: `user_id=eq.${uid}` }, // Persist data and pending changes locally persist: { name: 'messages', retrySync: true }, // Sync only diffs changesSince: 'last-sync'}))// get() activates and starts syncingconst messages = messages$.get()function addMessage(text: string) { const id = generateId() // Add keyed by id to the messages$ observable to trigger a create in Supabase messages$[id].set({ id, text, created_at: null, updated_at: null })}function updateMessage(id: string, text: string) { // Just set values in the observable to trigger an update to Supabase messages$[id].text.set(text)} ## Set up Supabase types The first step to getting strongly typed observables from Supabase is to follow their instructions to create a typed client. https://supabase.com/docs/guides/api/rest/generating-types The examples on this page will use the `supabase` client from the generated types: import { createClient } from '@supabase/supabase-js'import { Database } from './database.types'const supabase = createClient<Database>(process.env.SUPABASE_URL, process.env.SUPABASE_ANON_KEY) ## filter By default it will use `select()` on the collection. If you want to filter the data, use the `filter` parameter. See the Using Filters docs for details. const messages$ = observable(syncedSupabase({ supabase, collection: 'messages', // Filter by the current user filter: (select) => select.eq('user_id', 'uid')})) ## select By default it will use `select()` on the collection. If you want to be more specific, use the `select` parameter to customize how you want to select. See the Select docs for details. You can also add filters here if you want. const messages$ = observable(syncedSupabase({ supabase, collection: 'messages', // Select only id and text fields select: (from) => from.select('id,text'), // Or select and filter together select: (from) => from.select('id,text').eq('user_id', 'uid')})) ## actions By default it will support create, read, update, and delete. But you can specify which actions you want to support with the `actions` parameter. const messages$ = observable(syncedSupabase({ supabase, collection: 'messages', // Only read and create, no update or delete actions: ['read', 'create'],})) ## as The shape of the observable object can be changed with the `as` parameter, which supports three options: 1. `object`: The default, an object keyed by the row’s `id` field. 2. `Map`: A Map, which can be more efficient for accessing rows by key 3. `value`: Treat the result of a query as a single value like a `get` Note that `array` is not an option because arrays make it hard to to efficiently and correctly add, update, and remove elements by id. const messages$ = observable(syncedSupabase({ supabase, collection: 'messages', as: 'Map'}))// messages$ is an observable Mapmessages$.get('messageId').text.set('hello') ## Realtime Enable realtime on the observable with the `realtime` option. This will update the observable immediately whenever any realtime changes come in. You can optionally set the `schema` and `filter` for the realtime listener. See Supabase’s Realtime Docs for more details about realtime filters. const messages$ = observable(syncedSupabase({ supabase, collection: 'messages', // Simply enable it realtime: true, // Or set options realtime: { schema: 'public', filter: `user_id=eq.${uid}`},})) ## RPC and Edge Functions You can override any or all of the default list/create/update/delete actions with an rpc or function call. There is just one requirement: create and update need to return either full row data or nothing, because the returned data is used to update the observable with any fields changed remotely (like updated\_at). One caveat is that Supabase’s edge functions are not strongly typed so the observable can’t infer the type from it. const messages$ = observable(syncedSupabase({ supabase, collection: 'messages', // Simply enable it realtime: true, // Use an rpc function for listing list: () => supabase.rpc("list_messages"), // Use an rpc function for creating create: (input) => supabase.rpc("create_country", input), // Or use functions list: () => supabase.functions.invoke("list_messages"),})) ## Sync only diffs An optional but very useful feature is the `changesSince: 'last-sync'` option. This can massively reduce badwidth usage when you’re persisting list results since it only needs to list changes since the last query. The way this works internally is basically: 1. Save the maximum updatedAt to the local persistence 2. In subsequent syncs or after refresh it will list by `updated_at: lastSync + 1` to get only recent changes 3. The new changes will be merged into the observable Enabling this on the Supabase side requires adding `created_at` and `updated_at` columns and a trigger to your table. You can run this snippet to set it up, just replace the two instances of YOUR\_TABLE\_NAME. -- Add new columns to table named `created_at` and `updated_at`ALTER TABLE YOUR_TABLE_NAMEADD COLUMN created_at timestamptz default now(),ADD COLUMN updated_at timestamptz default now(),-- Add column for soft deletes, remove this if you don't need thatADD COLUMN deleted boolean default false;-- This will set the `created_at` column on create and `updated_at` column on every updateCREATE OR REPLACE FUNCTION handle_times() RETURNS trigger AS $$ BEGIN IF (TG_OP = 'INSERT') THEN NEW.created_at := now(); NEW.updated_at := now(); ELSEIF (TG_OP = 'UPDATE') THEN NEW.created_at = OLD.created_at; NEW.updated_at = now(); END IF; RETURN NEW; END; $$ language plpgsql;CREATE TRIGGER handle_times BEFORE INSERT OR UPDATE ON YOUR_TABLE_NAME FOR EACH ROWEXECUTE PROCEDURE handle_times(); And to enable this feature in Legend-State, use the `changesSince` option and set the `fieldCreatedAt` and `fieldUpdatedAt` options to match the Supabase column names. // Sync diffs of a listsyncedSupabase({ supabase, collection: 'messages', persist: { name: 'messages' }, // Enable syncing only changes since last-sync changesSince: 'last-sync', fieldCreatedAt: 'created_at', fieldUpdatedAt: 'updated_at', // Optionally enable soft deletes fieldDeleted: 'deleted'})// Or you can configure this optional globally so it will apply to every instance of syncedSupabase.configureSyncedSupabase({ changesSince: 'last-sync', fieldCreatedAt: 'created_at', fieldUpdatedAt: 'updated_at', // Optionally enable soft deletes fieldDeleted: 'deleted'}) ## Soft deletes The delete parameter does not need to be an actual `delete` action in Supabase. You could also implement it as a soft delete if you prefer, just setting a `deleted` field to true. To do that you can provide `fieldDeleted` matching the field name in your table. Then when you delete an element it will internally update the row with `{ deleted: true }` instead of deleting it, and the list action will remove deleted elements from the observable. // Sync diffs of a listsyncedSupabase({ supabase, collection: 'messages', fieldDeleted: 'deleted'}) ## Resource * Local-first Realtime Apps with Expo and Legend-State Blog - Video --- ## Page: https://legendapp.com/open-source/state/v3/sync/crud Legend-State includes a `syncedCrud` plugin that runs on top of `synced` and encapsulates a lot of the behavior you’d use to sync with a CRUD backend. You can use `syncedCrud` directly or you can build a plugin for your backend on top of it. See the source of the Keel and Supabase plugins for examples of plugins built on top of `syncedCrud`. ## get and list The crud plugin has two slightly different patterns depending on whether you’re using a `get` or a `list` action. The behavior when using `get` is: * **get**: Observable value is the value returned from get * **create**: If get returned null, then setting any value on the observable will create * **update**: If get returned a value, then updating any value on the observable will update * **delete**: Setting the value to null or undefined, or calling `delete()`, will delete import { syncedCrud } from '@legendapp/state/sync-plugins/crud'const profile$ = observable(syncedCrud({ get: getProfile, create: createProfile, update: updateProfile, delete: deleteProfile,}))// profile$.get() is a Profile The behavior when using `list` is: * **list**: Observable value is an object containing the listed values keyed by id * **create**: Adding a new value to the object will create * **update**: Updating a child value will update it with the changed fields * **delete**: Setting a child value to null or undefined, or calling `delete()`, will delete const profiles$ = observable(syncedCrud({ list: listProfiles, create: createProfile, update: updateProfile, delete: deleteProfile,}))// profile$.get() is a Record<string, Profile> The `list` function expects an array of rows to be returned from your API. The shape of the observable object returned from a `list` can be changed with the `as` parameter, which supports three options: 1. `object`: The default, an object keyed by the row’s `id` field. 2. `array`: Treat the result of a query as an array 3. `Map`: A Map, which can be more efficient for accessing rows by key 4. `value`: Treat the result of a query as a single value like a `get` ## create The `create` function is called whenever a new object is added to the observable. If you provide a `fieldCreatedAt` then this is determined by whether the object has a value at that field. Otherwise it’s determined by whether the new value was previously undefined. The returned value will be merged into the local value, applying any server defaults or created/updated times from the server value. See onSaved for more details. const profile$ = observable(syncedCrud({ // ... create: (value, options) => { const { data, error } = await serverCreateProfile(value); if (error) { // Handle error, throw an Error to trigger a retry } else if (data) { return data; } }, fieldCreatedAt: 'created_at'})) ## update If an element in the observable is updated it will call the `update` function with the changed value. If you’ve enabled the `updatePartial` option then the value will include only the changed fields and the `id`. Otherwise it will be the full changed object. The returned value will be merged into the local value, applying any server defaults or created/updated times from the server value. See onSaved for more details. const profile$ = observable(syncedCrud({ // ... update: (value, options) => { const { data, error } = await serverUpdateProfile(value); if (error) { // Handle error, throw an Error to trigger a retry } else if (data) { return data; } }, fieldCreatedAt: 'updated_at', updatePartial: true // Update with only changed fields})) ## delete When an element is deleted from the observable, it will call the `delete` function with the `id` of the deleted element. const profile$ = observable(syncedCrud({ // ... delete: ({ id }, options) => { const { data, error } = await serverDeleteProfile(id); if (error) { // Handle error, throw an Error to trigger a retry } else if (data) { return data; } }})) Alternatively if you do soft deletes, you can provide a `fieldDeleted` option instead of `delete`, and then it will call the `update` function with that field set to true. const profile$ = observable(syncedCrud({ // ... update: () => {/* ... */}, fieldDeleted: 'deleted'})) ## onSaved When a value is saved to the server you may want it to apply changes back into the local observable. There are two ways to do that. 1. **onSavedUpdate: ‘createdUpdatedAt’**: This will save any fields ending in `["createdAt", "updatedAt", "created_at", "updated_at"]` back to the observable. This can be useful if your backend updates these values on the server. It also works if you have updated times for specific fields like “noteUpdatedAt”. const profile$ = observable(syncedCrud({ // ... create: () => {/* ... */}, update: () => {/* ... */}, onSavedUpdate: 'createdUpdatedAt';})) 2. **onSaved**: If you want more control over what fields are updated in your object you can do it manually with `onSaved`. Just return an object with the fields you want merged into the observable. Note that you can also just use this for side effects and not return anything. const profile$ = observable(syncedCrud({ // ... create: () => {/* ... */}, update: () => {/* ... */}, onSaved: ({ saved, input, currentValue, isCreate }) => { return { serverValue: saved.serverValue } }})) ## subscribe If your backend has a realtime feature, or if you want to poll periodically for changes, use `subscribe` to set that up. This will be called only once after the first `get`. This can be used in two ways depending on how your backend works, updating with incoming data or simply triggering a refresh. When the observable is no longer being observed it will call the returned unsubscribe function. const profile$ = observable(syncedCrud({ // ... list: () => {/* ... */}, subscribe: ({ refresh, update }) => { const unsubscribe = pusher.subscribe({ /*...*/ }, (data) => { // Either update with the received data update(data) // Or trigger a refresh of the get function refresh() }) // return unsubscribe function return unsubscribe }})) ## Sync only diffs An optional but very useful feature is the `changesSince: 'last-sync'` option. This can massively reduce bandwidth usage when you’re persisting list results since it only needs to list changes since the last query. The way this works internally is basically: 1. Save the maximum updatedAt to the local persistence 2. In subsequent syncs or after refresh it will list by `updatedAt: lastSync + 1` to get only recent changes 3. The new changes will be merged into the observable This has a few requirements to work correctly: 1. Set the `fieldUpdatedAt` with a field that is automatically updated by your backend on save. It should not be set on the frontend because inaccurate user clocks might cause data to be missed. 2. Use soft deletes instead of deleting rows or include deleted rows in your list function. If the list function does not include rows deleted since the last update, the frontend will not know to delete them. You can enable this by adding a `deleted` field in your backend and setting the `fieldDeleted` option. ## All options * `get`: Get a single value from the backend * `list`: List an array of values from the backend * `create`: Create a single value on the backend * `update`: Update a single value on the backend * `delete`: Delete a single value on the backend * `onSaved`: Update local value with remote data * `onSavedUpdate`: Automatically update local value with created and updated times * `fieldCreatedAt`: Set the field your backend uses for created times * `fieldUpdatedAt`: Set the field your backend uses for updated times * `fieldDeleted`: Set the field your backend uses for soft deletes * `updatePartial`: Send only changed fields into update function * `changesSince`: ‘all’ | ‘last-sync’. Defaults to ‘all’. ‘last-sync’ syncs only diffs * `generateId`: Provide a function for creating row ids. * `subscribe`: Set up a realtime connection or polling * `retry`: Options for retrying in case of error. Applies to both get and set. * `persist`: Options for persisting locally. See Persist and sync. * `debounceSet`: Debounce saved changes to reduce the number of updates * `mode`: ‘set’ | ‘assign’ | ‘merge’ | ‘append’ | ‘prepend’. How to apply incoming changes. * `transform`: Transform data as it loads in from the remote source or out as it saves to the remote source. You could use this to encrypt the data or transform it into some other format. * `waitFor`: A Promise or Observable to wait for before getting from remote * `waitForSet`: A Promise or Observable to wait for before setting to remote