W↓
All docs
🔑
Sign Up/Sign In
www.prisma.io/docs/orm/
Public Link
Apr 8, 2025, 1:09:03 PM - complete - 1.2 MB
Created by:
****ad@vlad.studio
Starting URLs:
https://www.prisma.io/docs/orm/overview/introduction
Crawl Prefixes:
https://www.prisma.io/docs/orm/
Exclude Patterns:
https://www.prisma.io/docs/orm/reference/
https://www.prisma.io/docs/orm/more/
## Page: https://www.prisma.io/docs/orm/overview/introduction This page gives a high-level overview of what Prisma ORM is and how it works. If you want to get started with a _practical introduction_ and learn about the Prisma Client API, head over to the **Getting Started** documentation. To learn more about the _motivation_ for Prisma ORM, check out the **Why Prisma ORM?** page. ## In this section ## What is Prisma ORM? Prisma ORM is an open-source next-generation ORM. It consists of the following parts: ## Why Prisma ORM? On this page, you'll learn about the motivation for Prisma ORM and how it compares to other database tools like traditional ORMs and SQL query builders. ## Should you use Prisma ORM? Prisma ORM is a new kind of ORM that - like any other tool - comes with its own tradeoffs. This page explains when Prisma ORM would be a good fit, and provides alternatives for other scenarios. ## Data modeling What is data modeling? --- ## Page: https://www.prisma.io/docs/orm/tools/prisma-studio Prisma Studio is a visual editor for the data in your database. Note that Prisma Studio is not open source but you can still create issues in the `prisma/studio` repo. Run `npx prisma studio` in your terminal. ## Models (tables or collections) When you first open Prisma Studio, you will see a data table layout with a sidebar showing a list of all models defined in your Prisma schema file. 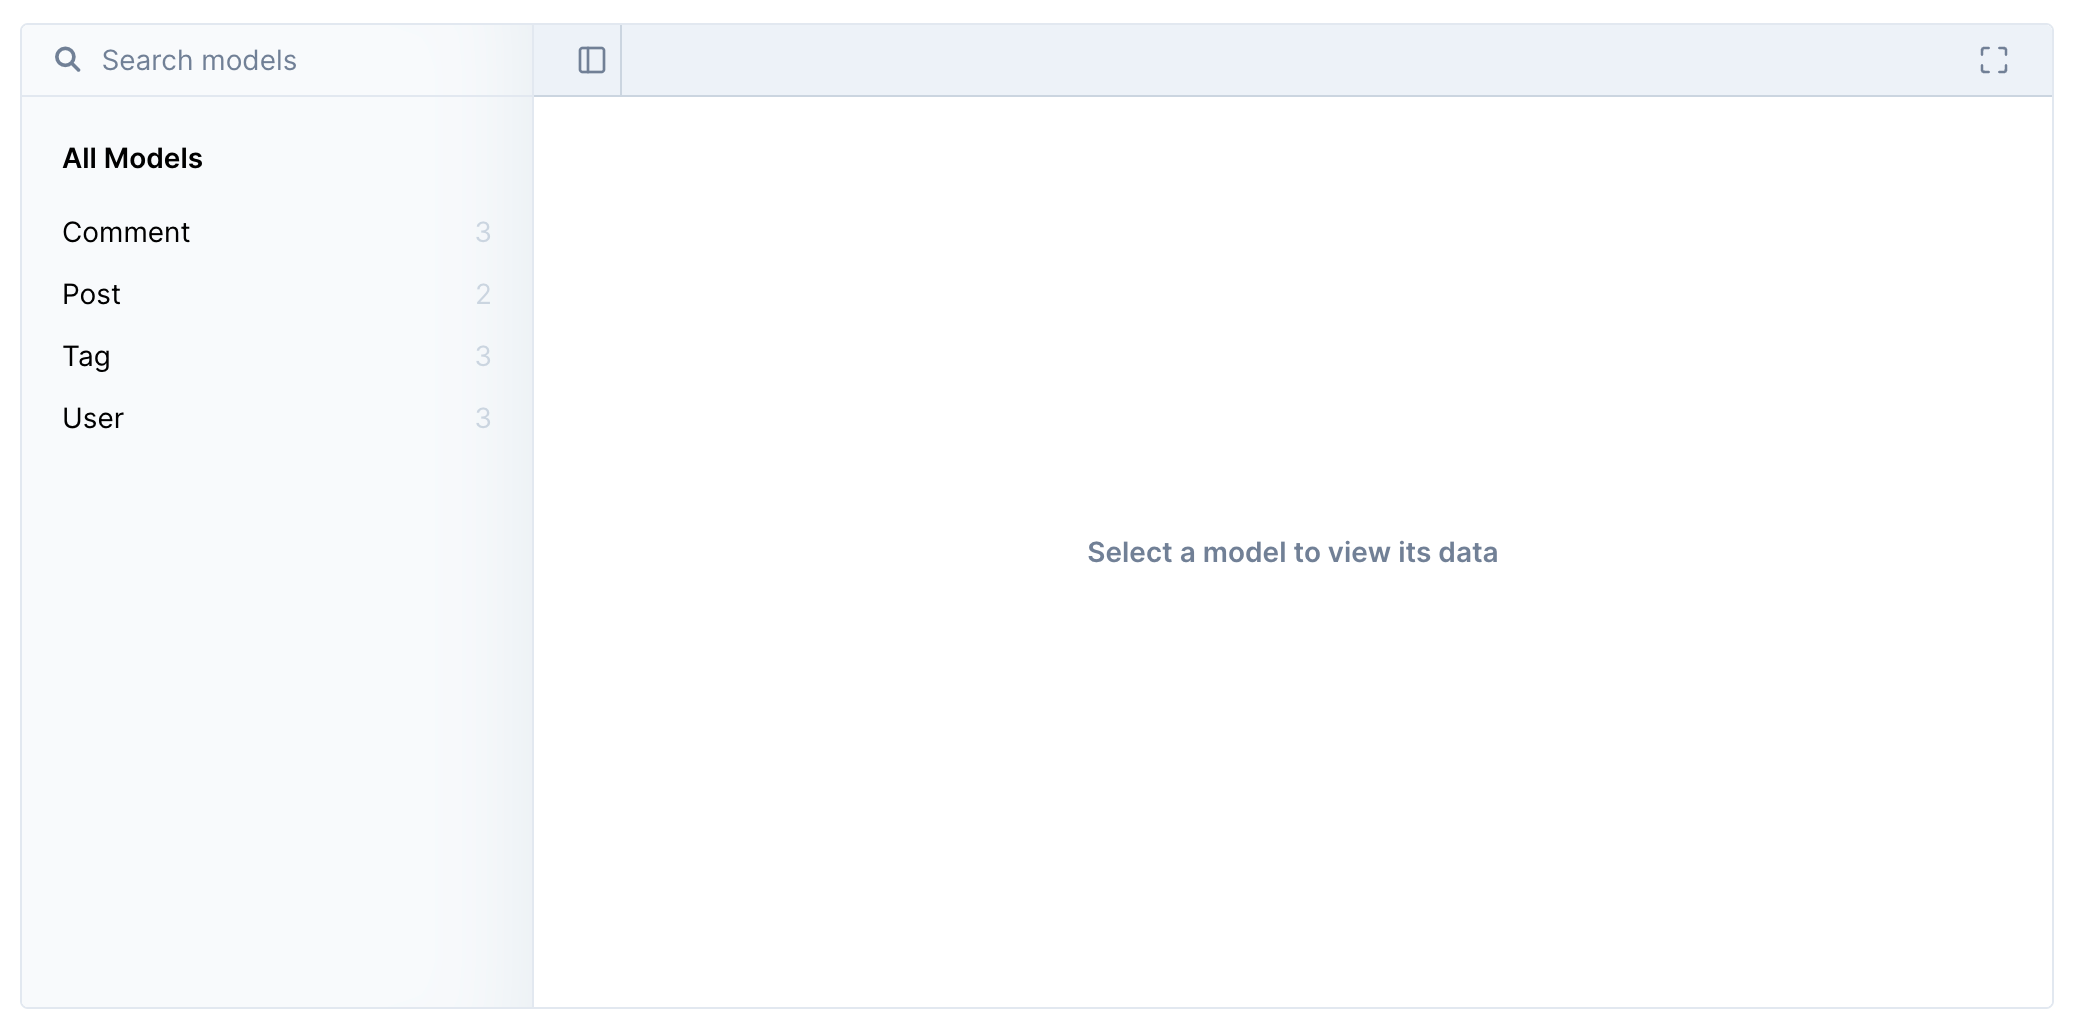 info **What is a model?** The term **model** refers to the data model definitions that you add to the Prisma schema file. Depending on the database that you use, a model definition, such as `model User`, refers to a **table** in a relational database (PostgreSQL, MySQL, SQL Server, SQLite, CockroachDB) or a **collection** in MongoDB. For more information, see Defining models. You can select a model and its data opens in a new tab. In this example, the `User` model is selected. 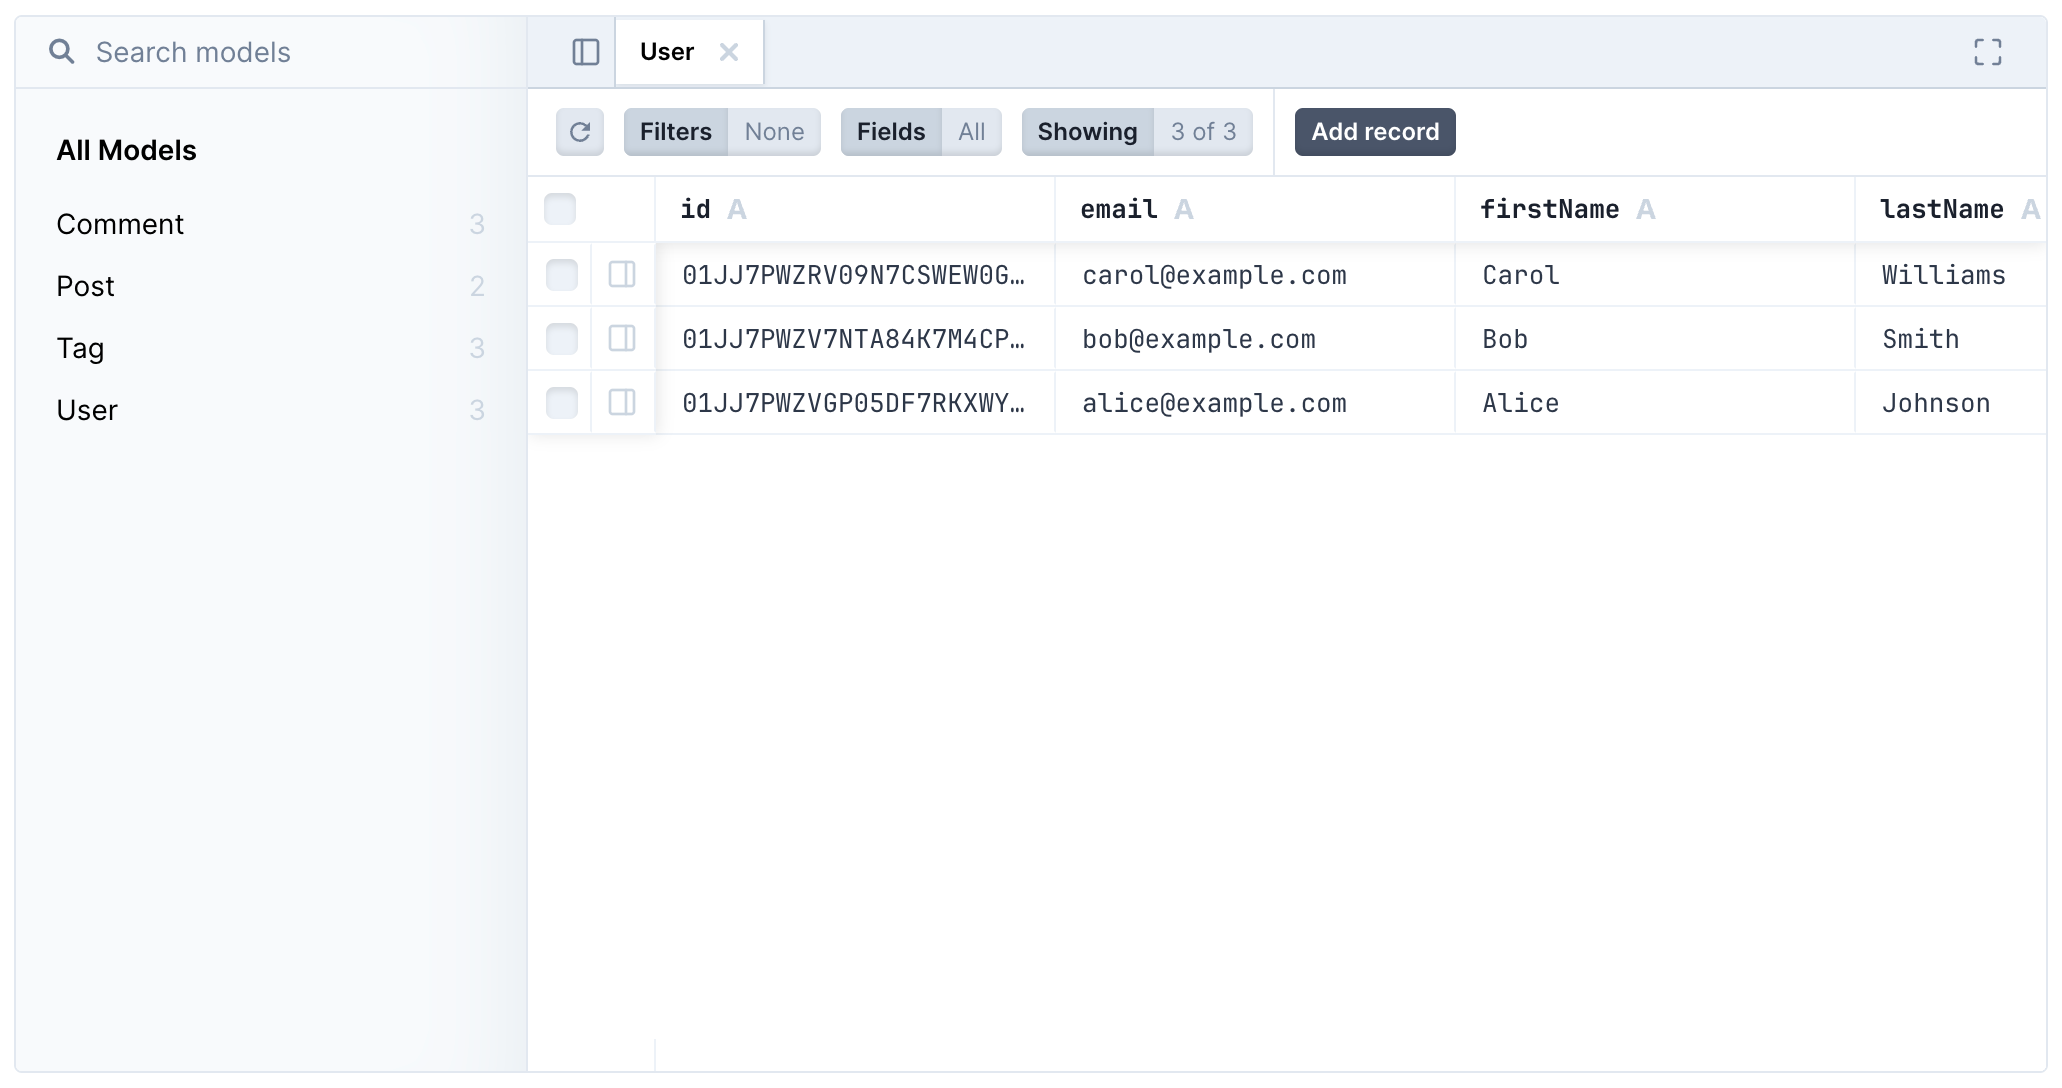 ### Open and close models To open another model, locate the model in the sidebar and click on it. To close a model, click the the **X** button in the model tab. If there are multiple models open, you can also click "Close all" to close all models. 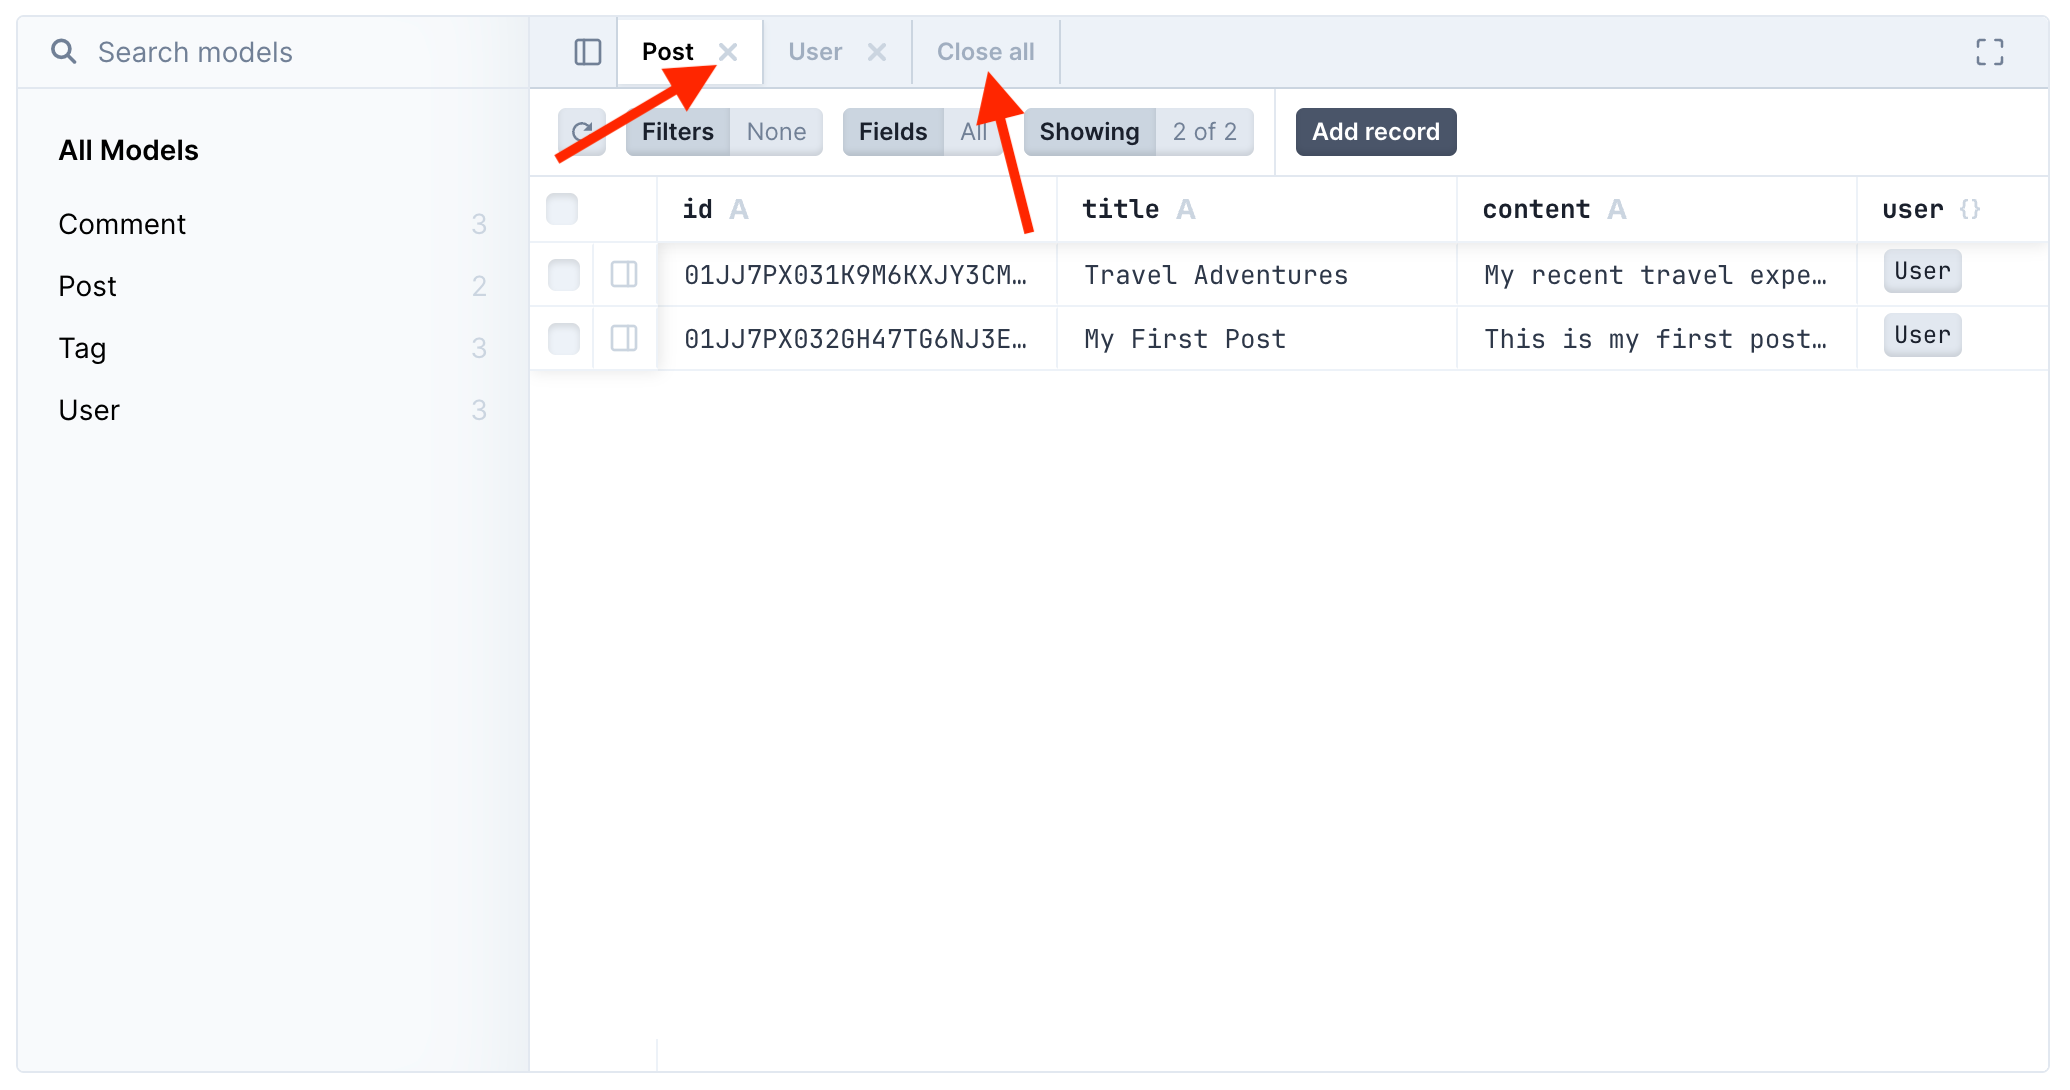 ### Icons of data types in models The data type for each field is indicated with an icon in the header. The table below lists all data types and their identifying icon. | Field data type | Description | | --- | --- | | | Text | | | Integer | | | Date-time | | | Boolean | | | Pre-defined list of values (`enum` data type) | | | List of related records from another model | | | The `{}` symbol can refer to one of the two types of fields. • Relation field • JSON field | ### Keyboard shortcuts in models When you open a model, a number of keyboard shortcuts are available to browse and manipulate the data in the model. info **Note** With Prisma Studio open, you can open the keyboard shortcuts modal by pressing Cmd ⌘+/ on macOS or Ctrl+/ on Windows. 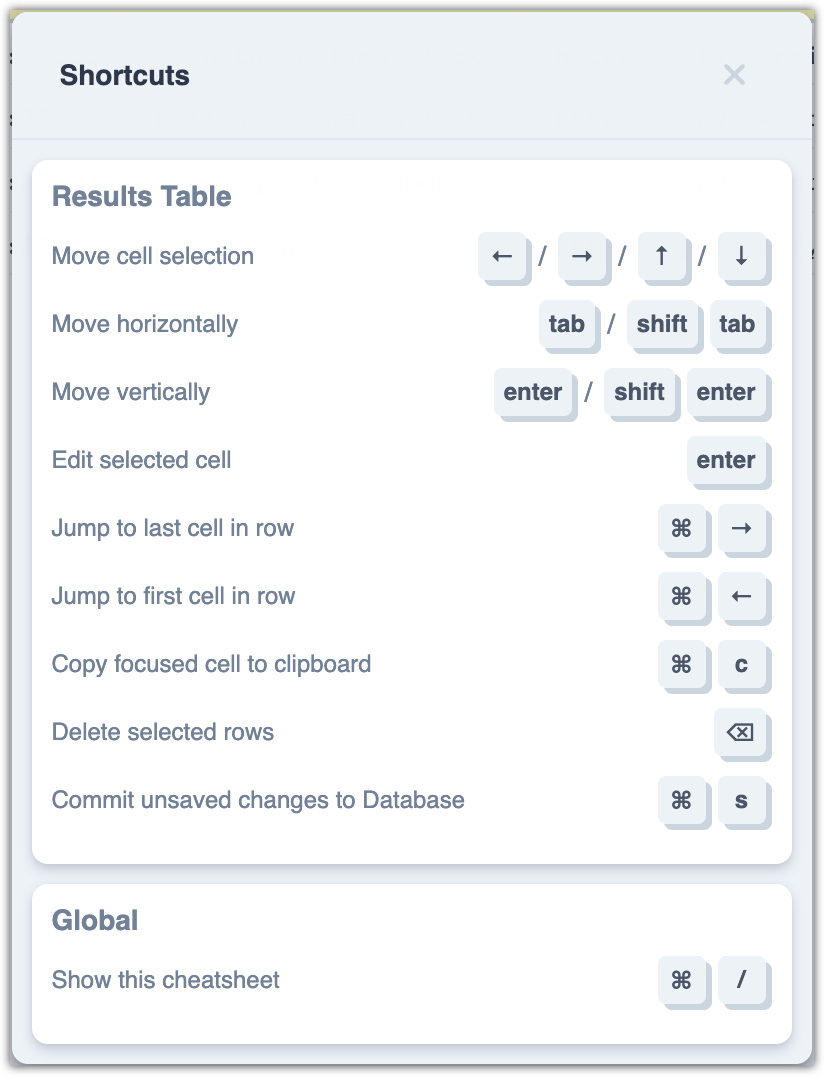 ## Edit data Prisma Studio offers two mechanisms for editing existing data: in-line editing and side panel editing. ### In-line editing To edit data in-line, double-click a cell to enter edit mode. Doing so will place your cursor in the cell and allow you to edit the data. Data can be copied and pasted into cells. All changes (add, edit, or delete) must be confirmed before they will take effect. Confirm added and edited records with the **Save change** button. When you select records and click **Delete records**, confirm the deletion in a dialog box. You can accumulate multiple added records and edited cells, which you can then finalize with the **Save changes** button. 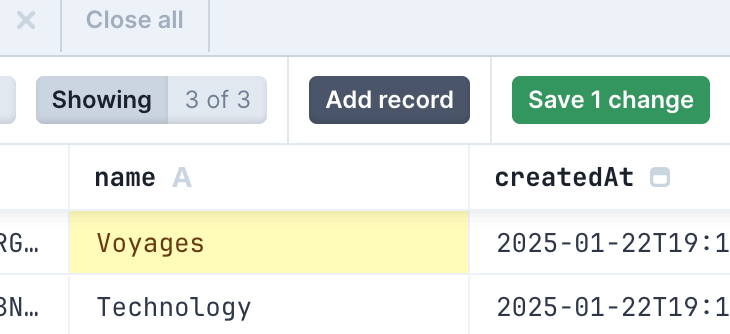 Once you have finished editing the data, click the green **Save** button.  ### Batch editing Multiple records can be edited at once. Double click any cell to edit values, moving to any additional cells as necessary. Once complete, click the green **Save** button. 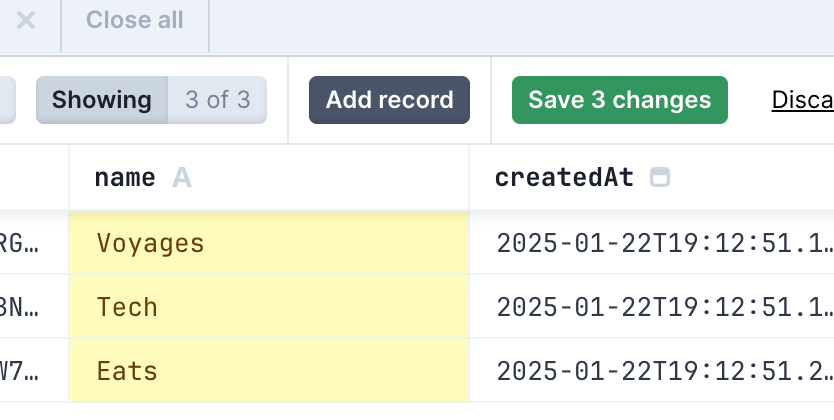 ### Side panel editing Prisma Studio also offers a side panel for editing data. To open the side panel, click the **Edit side panel** icon located beside the select checkbox at the far left of every visible record. 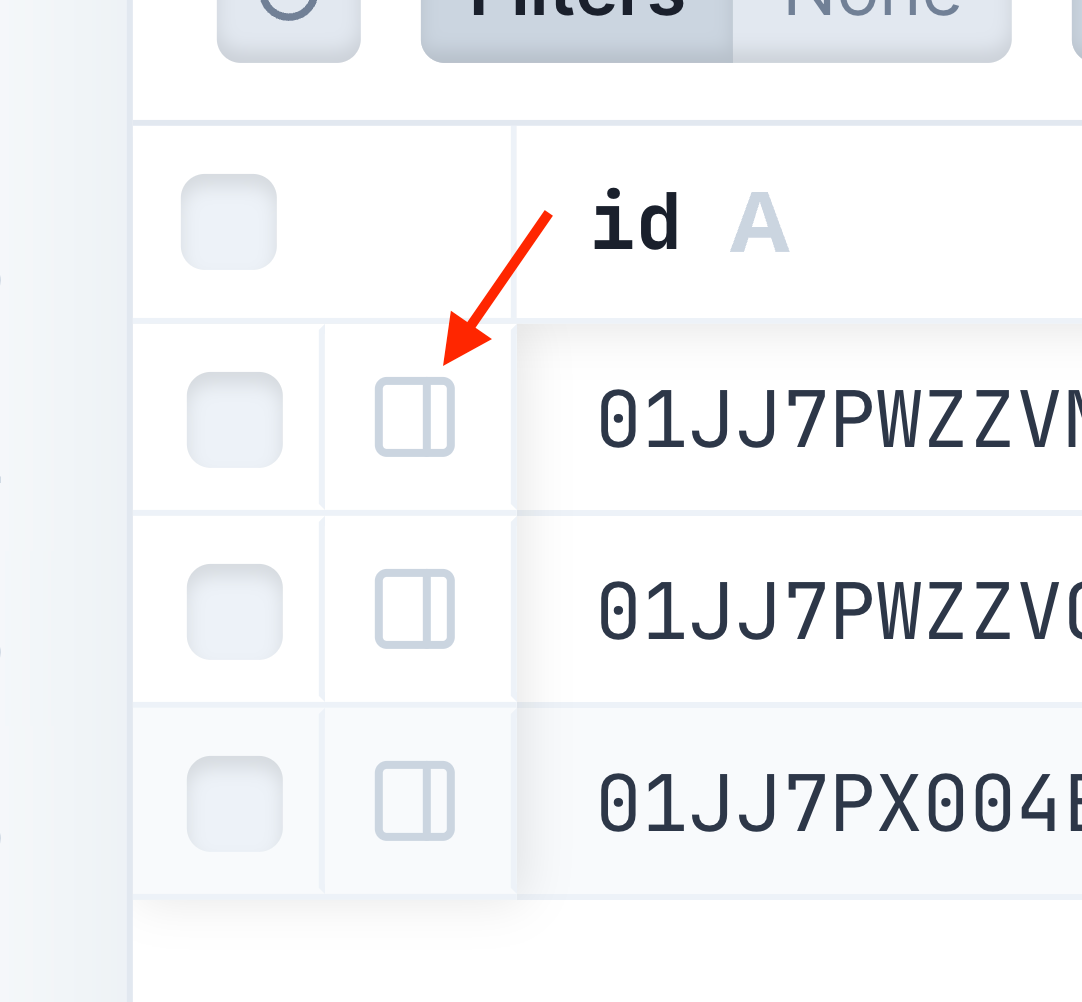 Clicking the icon will open the side panel on the right where edits can be performed. Once complete, click outside the side panel and click the green **Save** button to save the changes.  ### Delete records 1. From the left column, select the check box for the records you want to delete. 2. Click **Delete _n_ record(s)**. 3. Click **Delete** in the confirmation dialog. You can select multiple records and delete them at once with the **Delete records** button. When you delete multiple records, the operation completes immediately (after you confirm it). In addition, if you have any accumulated added or edited records and then decide to delete records, the deletion also force-saves the accumulated edits. warning **Warning** Deleting a record is a separate operation that cannot be accumulated. If you delete a record while having unsaved edits, the delete operation first force-saves the unsaved edits and then completes.  You can discard any accumulated changes with the **Discard changes** button.  ### Copy and paste You can copy the value of any table cell using: * Cmd ⌘ + C on macOS * Ctrl + C on Windows To paste in another cell, first double-click the cell to enter edit mode, and then use: * Cmd ⌘ + V on macOS * Ctrl + V on Windows ### Add a record 1. In the model view, click **Add record**. 2. Based on the data allowed in each field, type the data for the record. | Field data type | Description | | --- | --- | | | Text | | | Integer If such a field has `autoincrement()` pre-filled, do not edit the cell and do not add a number manually. | | | Date-time Date-time fields contain a long string of numbers, letters, and others. As a best practice, copy the value of another date-time cell and modify it as necessary before pasting in the field. | | | Boolean Select `true` or `false`. | | | Pre-defined list Double-click a cell in the field and select one of the pre-defined options. | | | List of related records from another model It typically refers to a list of records that exist in another model in the database. If you are adding a new record and records from the related model do not yet exist, you do not need to enter anything in the current model. | | | The `{}` symbol can refer to one of the two types of fields. • Relation field • JSON field **Relation with a model defined separately in the database** Typically, you need to select the same value as any of the previous records Click the name of the model to see the list of values which you can then select for the related field. **JSON field** Double-click the field to edit the JSON data. As a best practice, validate the edited JSON data in a validator and paste it back in the cell. | 3. (Optional) If you are unhappy with your changes, click **Discard changes** and start over. 4. Click **Save 1 change**. ## Filters ### Filter data Use the **Filters** menu to filter data in the model by adding conditions. In the **Filters** menu, the first condition that you add is the `where` clause. When you add multiple conditions, Prisma Studio filters the results so that all conditions apply in combination. Each new condition indicates this with the `and` operator, which appears in front. **Steps** 1. Click **Filters** to open the **Filters** menu. info **Note** Click **Filters** again if you want to hide the menu. 2. Click **Add a new filter**. 3. Configure the condition. 1. Select the field by which you want to filter. 2. Select a comparison operator. * **equals** * **in** * **notin** * **lt** * **lte** * **gt** * **gte** * **not** 3. Type the value you want to use for the condition. **Step result**: **Prisma Studio** updates the data in the model immediately, based on the condition. 4. To add a new filter, click **Add a new filter** and repeat the steps above. 5. To remove a filter, click the **x** button on the right. 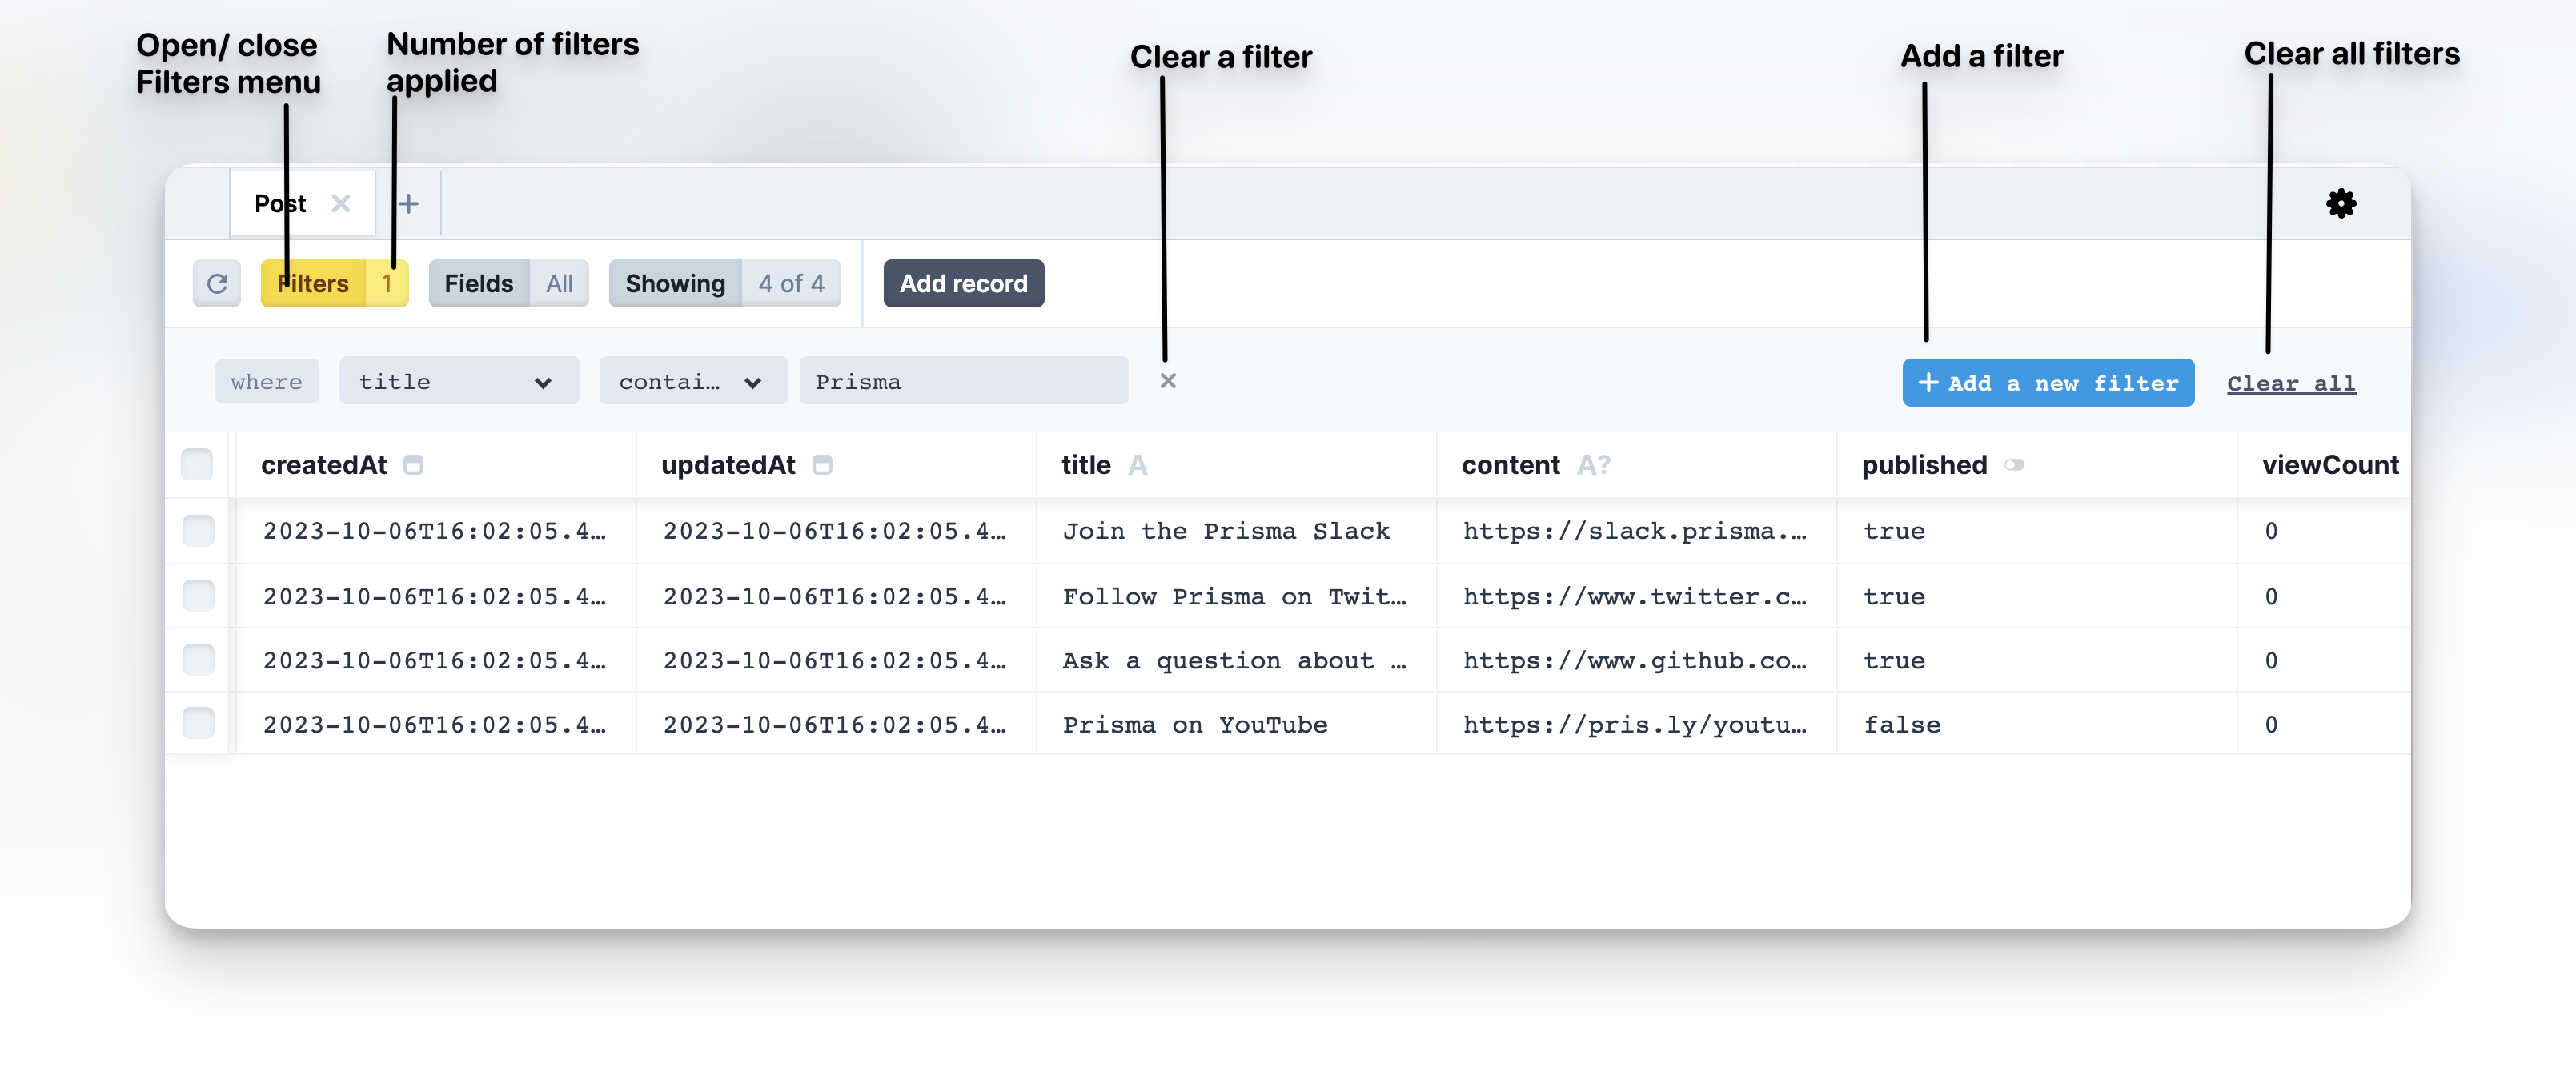 6. To remove all filters, click **Clear all**. **Result** * The data in the model is filtered based on the combination of all conditions you add. * In the **Filters** menu, the default value of **None** changes to display the number of filters you add. ### Show and hide fields You can select which fields to view or hide by using the **Fields** menu. info **What is a field?** A **field** is a property of a model which you add in the data model definitions in the Prisma schema file. Depending on the database that you use, a field, such as the `title` field in `model User { title String }`, refers to a **column** in a relational database (PostgreSQL, MySQL, SQL Server, SQLite, CockroachDB) or a **document field** in MongoDB. For more information, see Defining fields. **Steps** 1. Click the **Fields** menu. 2. Select only the fields you want to see and deselect any fields you want to hide.  **Result** The model is immediately filtered to hide the data from any fields you have deselected. Also, the **Fields** menu shows the number of fields that are currently selected. ### Show and hide records You can also select to show or skip a specific number of records in the model view. info **What is a record?** A **record** refers to a **row of data in a table** in a relational database (PostgreSQL, MySQL, SQL Server, SQLite, CockroachDB) or a **document** in MongoDB. **Steps** 1. Click the **Showing** menu. 2. In the **Take** box, specify the maximum number of records that you want the model view to show. 3. In the **Skip** box, specify how many of the first records you want to hide. 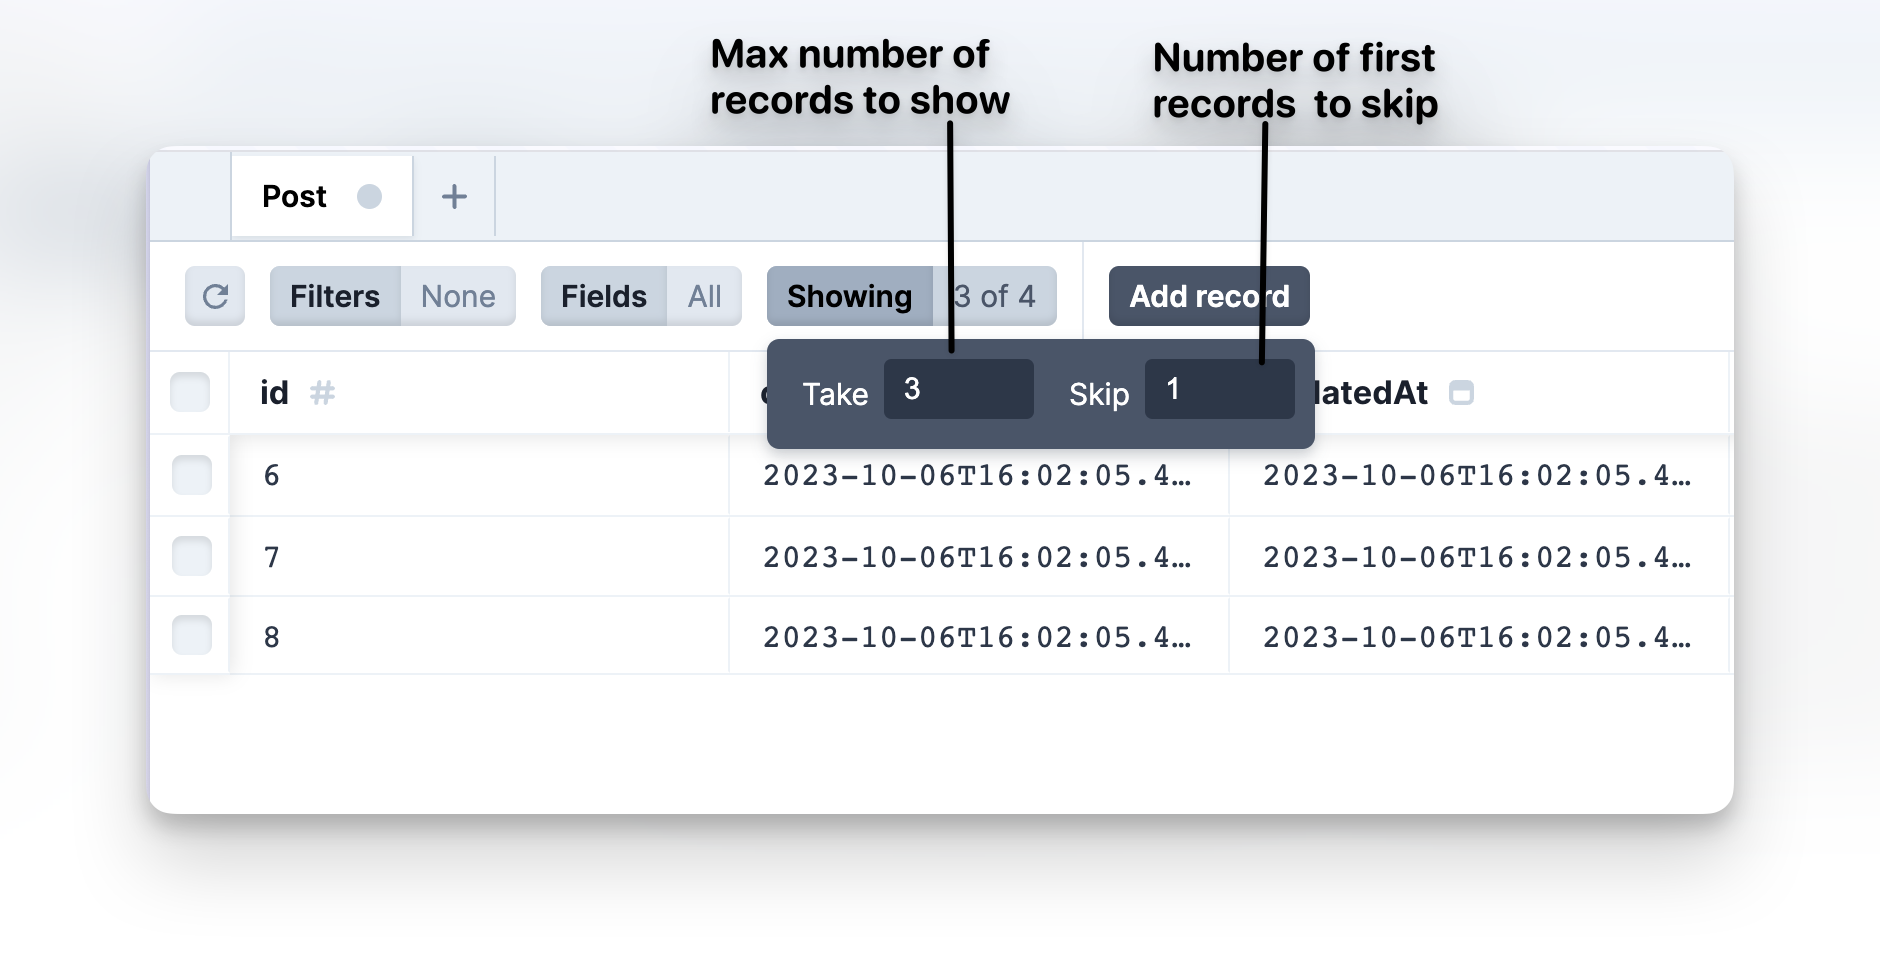 **Result** The model is immediately filtered to show or hide records based on your selection. The **Showing** menu indicates how many records are shown out of how many available records are in the model. ## Sort data Click a field title to sort by the field data. The first click sorts the data in ascending order, the second - in descending order. 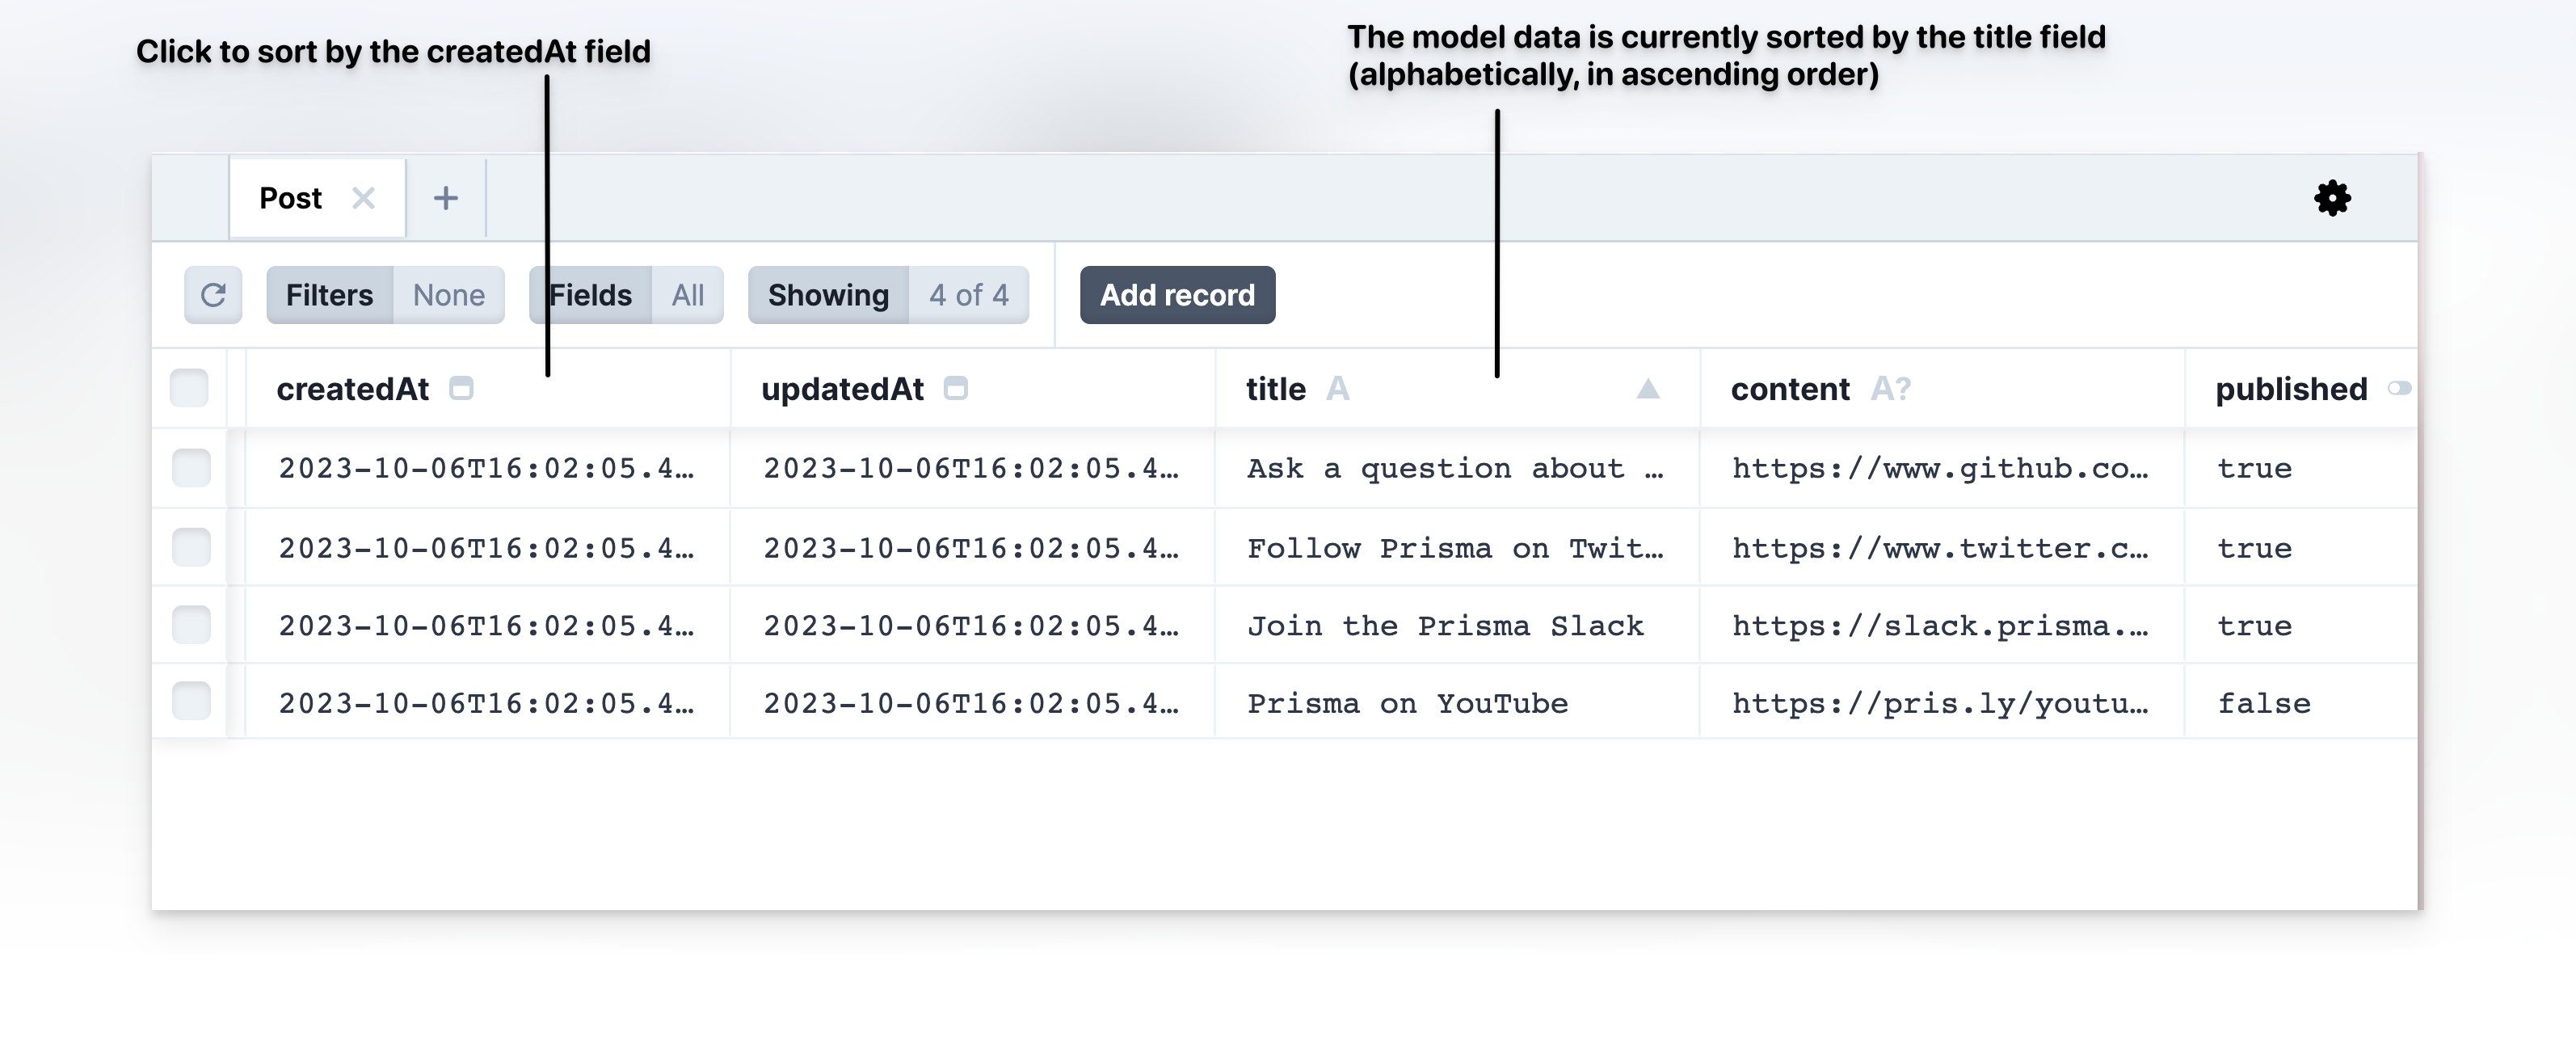 ## Troubleshooting ### Terminal: Failed to run script / Error in Prisma Client request Caching issues may cause Prisma Studio to use an older version of the query engine. You may see the following error: Error in request: PrismaClientKnownRequestError: Failed to validate the query Error occurred during query validation & transformation To resolve, delete the following folders: * `~/.cache/prisma` on macOS and Linux * `%AppData%/Prisma/Studio` on Windows --- ## Page: https://www.prisma.io/docs/orm/overview ## Beyond Prisma ORM Prisma ORM addresses many development needs, but Prisma's additional products like Prisma Postgres, Accelerate and Optimize can further enhance scalability and performance for your applications. --- ## Page: https://www.prisma.io/docs/orm/overview/introduction/what-is-prisma Prisma ORM is an open-source next-generation ORM. It consists of the following parts: * **Prisma Client**: Auto-generated and type-safe query builder for Node.js & TypeScript * **Prisma Migrate**: Migration system * **Prisma Studio**: GUI to view and edit data in your database. info **Prisma Studio** is the only part of Prisma ORM that is not open source. You can only run Prisma Studio locally. Prisma Client can be used in _any_ Node.js (supported versions) or TypeScript backend application (including serverless applications and microservices). This can be a REST API, a GraphQL API, a gRPC API, or anything else that needs a database. ## How does Prisma ORM work? ### The Prisma schema Every project that uses a tool from the Prisma ORM toolkit starts with a Prisma schema. The Prisma schema allows developers to define their _application models_ in an intuitive data modeling language. It also contains the connection to a database and defines a _generator_: * Relational databases * MongoDB datasource db { provider = "postgresql" url = env("DATABASE_URL")}generator client { provider = "prisma-client-js"}model Post { id Int @id @default(autoincrement()) title String content String? published Boolean @default(false) author User? @relation(fields: [authorId], references: [id]) authorId Int?}model User { id Int @id @default(autoincrement()) email String @unique name String? posts Post[]} > **Note**: The Prisma schema has powerful data modeling features. For example, it allows you to define "Prisma-level" relation fields which will make it easier to work with relations in the Prisma Client API. In the case above, the `posts` field on `User` is defined only on "Prisma-level", meaning it does not manifest as a foreign key in the underlying database. In this schema, you configure three things: * **Data source**: Specifies your database connection (via an environment variable) * **Generator**: Indicates that you want to generate Prisma Client * **Data model**: Defines your application models ### The Prisma schema data model On this page, the focus is on the data model. You can learn more about Data sources and Generators on the respective docs pages. #### Functions of Prisma schema data models The data model is a collection of models. A model has two major functions: * Represent a table in relational databases or a collection in MongoDB * Provide the foundation for the queries in the Prisma Client API #### Getting a data model There are two major workflows for "getting" a data model into your Prisma schema: * Manually writing the data model and mapping it to the database with Prisma Migrate * Generating the data model by introspecting a database Once the data model is defined, you can generate Prisma Client which will expose CRUD and more queries for the defined models. If you're using TypeScript, you'll get full type-safety for all queries (even when only retrieving the subsets of a model's fields). ### Accessing your database with Prisma Client #### Generating Prisma Client The first step when using Prisma Client is installing the `@prisma/client` and `prisma` npm packages: npm install @prisma/clientnpm install prisma --save-dev Then, you can run `prisma generate`: npx prisma generate The `prisma generate` command reads your Prisma schema and _generates_ Prisma Client code. The code is generated into the `node_modules/.prisma/client` folder by default. After you change your data model, you'll need to manually re-generate Prisma Client by running `prisma generate` to ensure the code inside `node_modules/.prisma/client` gets updated. #### Using Prisma Client to send queries to your database Once Prisma Client has been generated, you can import it in your code and send queries to your database. This is what the setup code looks like. ##### Import and instantiate Prisma Client * import * require import { PrismaClient } from '@prisma/client'const prisma = new PrismaClient() Now you can start sending queries via the generated Prisma Client API, here are a few sample queries. Note that all Prisma Client queries return _plain old JavaScript objects_. Learn more about the available operations in the Prisma Client API reference. ##### Retrieve all `User` records from the database // Run inside `async` functionconst allUsers = await prisma.user.findMany() ##### Include the `posts` relation on each returned `User` object // Run inside `async` functionconst allUsers = await prisma.user.findMany({ include: { posts: true },}) ##### Filter all `Post` records that contain `"prisma"` // Run inside `async` functionconst filteredPosts = await prisma.post.findMany({ where: { OR: [ { title: { contains: 'prisma' } }, { content: { contains: 'prisma' } }, ], },}) ##### Create a new `User` and a new `Post` record in the same query // Run inside `async` functionconst user = await prisma.user.create({ data: { name: 'Alice', email: 'alice@prisma.io', posts: { create: { title: 'Join us for Prisma Day 2020' }, }, },}) ##### Update an existing `Post` record // Run inside `async` functionconst post = await prisma.post.update({ where: { id: 42 }, data: { published: true },}) #### Usage with TypeScript Note that when using TypeScript, the result of this query will be _statically typed_ so that you can't accidentally access a property that doesn't exist (and any typos are caught at compile-time). Learn more about leveraging Prisma Client's generated types on the Advanced usage of generated types page in the docs. ## Typical Prisma ORM workflows As mentioned above, there are two ways for "getting" your data model into the Prisma schema. Depending on which approach you choose, your main Prisma ORM workflow might look different. ### Prisma Migrate With **Prisma Migrate**, Prisma ORM's integrated database migration tool, the workflow looks as follows: 1. Manually adjust your Prisma schema data model 2. Migrate your development database using the `prisma migrate dev` CLI command 3. Use Prisma Client in your application code to access your database 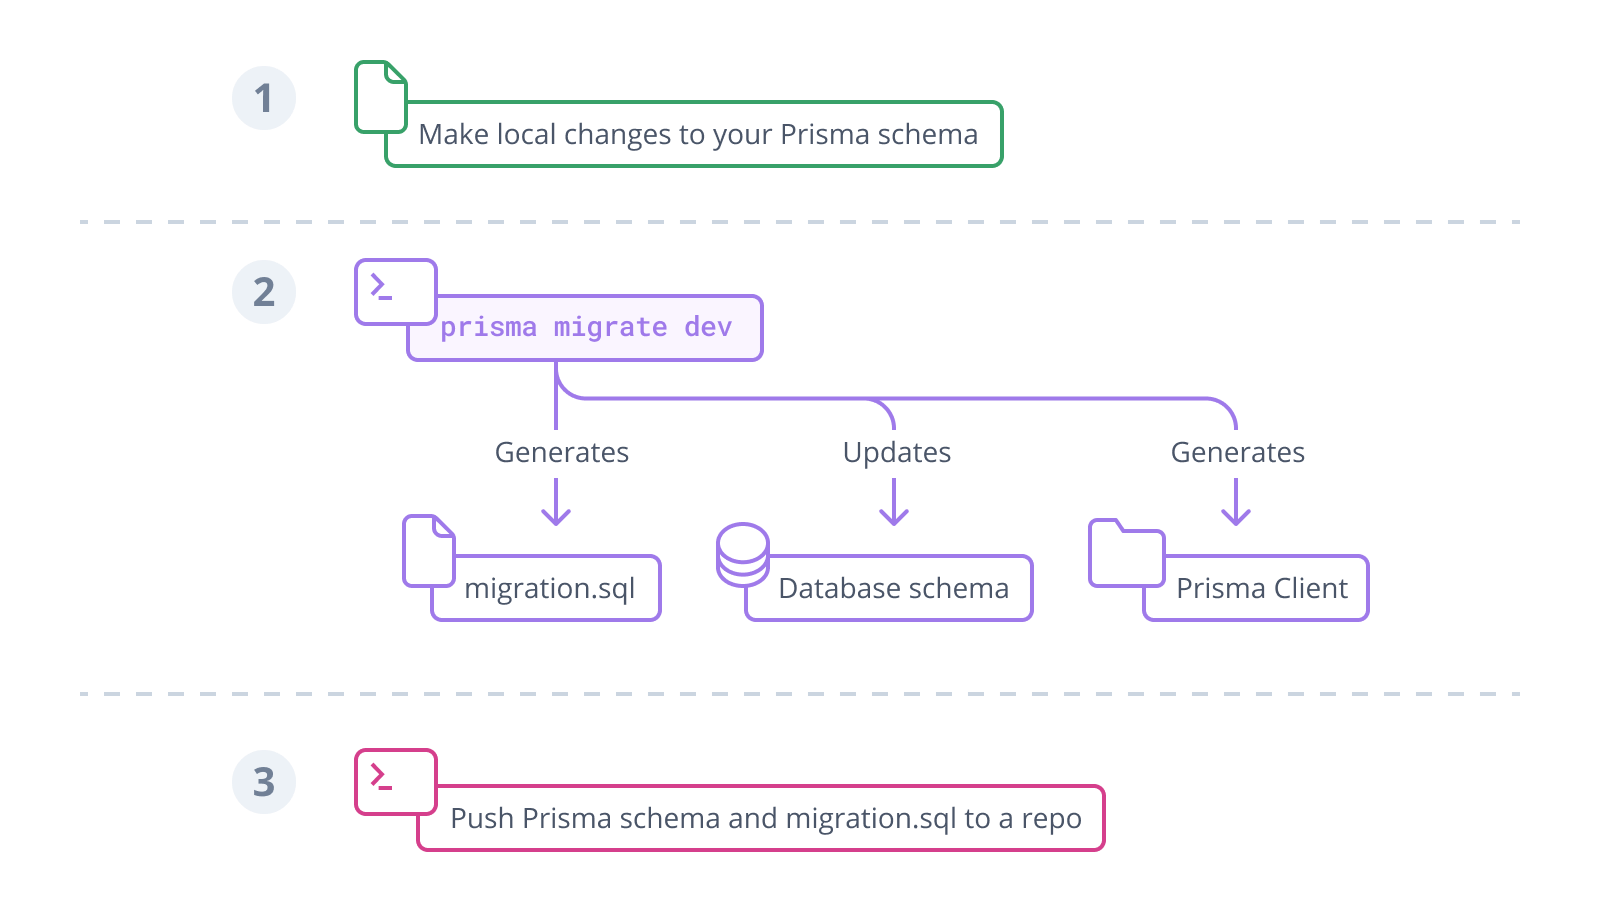 To learn more about the Prisma Migrate workflow, see: * Deploying database changes with Prisma Migrate * Developing with Prisma Migrate ### SQL migrations and introspection If for some reason, you can not or do not want to use Prisma Migrate, you can still use introspection to update your Prisma schema from your database schema. The typical workflow when using **SQL migrations and introspection** is slightly different: 1. Manually adjust your database schema using SQL or a third-party migration tool 2. (Re-)introspect your database 3. Optionally (re-)configure your Prisma Client API) 4. (Re-)generate Prisma Client 5. Use Prisma Client in your application code to access your database 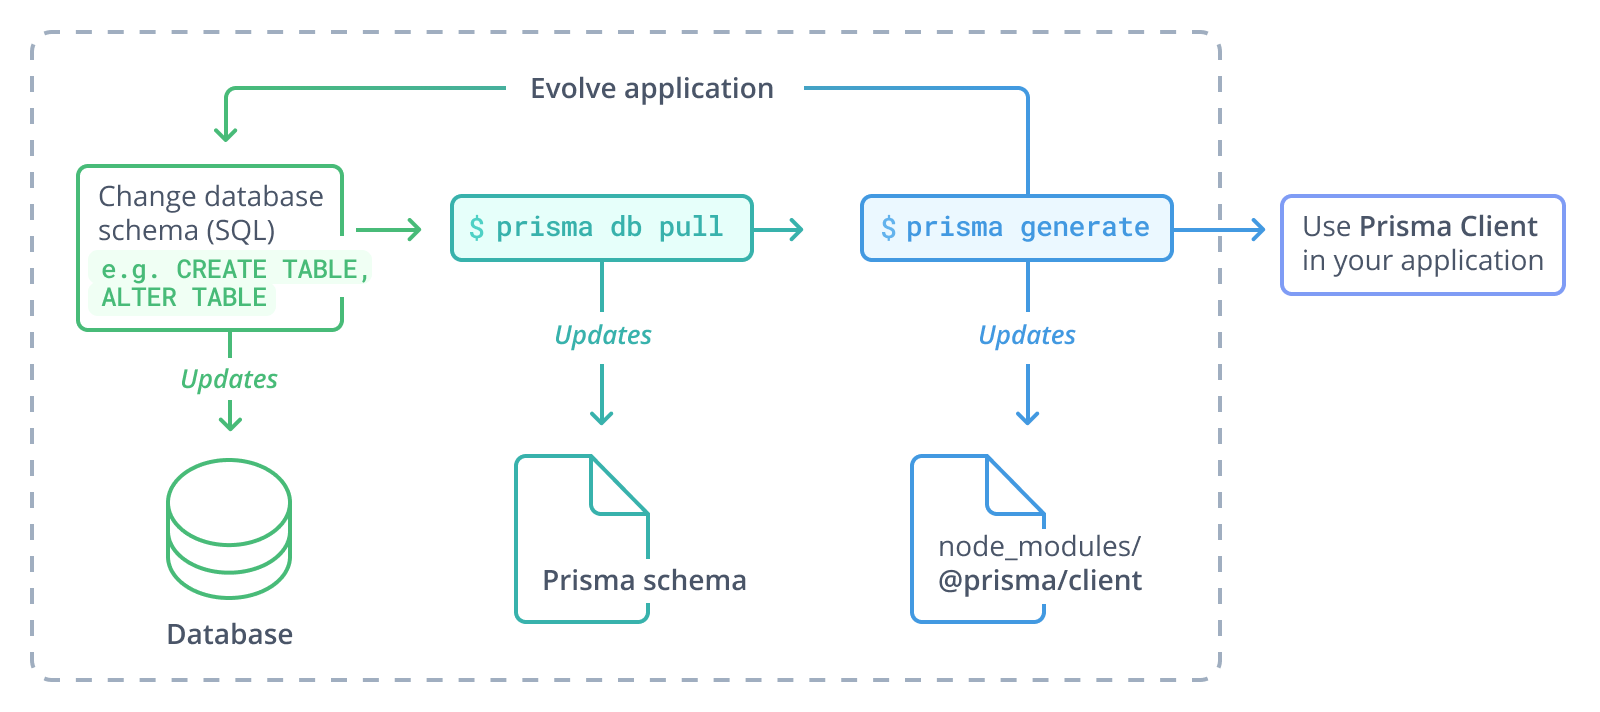 To learn more about the introspection workflow, please refer the introspection section. --- ## Page: https://www.prisma.io/docs/orm/overview/introduction/why-prisma On this page, you'll learn about the motivation for Prisma ORM and how it compares to other database tools like traditional ORMs and SQL query builders. Working with relational databases is a major bottleneck in application development. Debugging SQL queries or complex ORM objects often consume hours of development time. Prisma ORM makes it easy for developers to reason about their database queries by providing a clean and type-safe API for submitting database queries which returns _plain old JavaScript objects_. ## TLDR Prisma ORM's main goal is to make application developers more productive when working with databases. Here are a few examples of how Prisma ORM achieves this: * **Thinking in objects** instead of mapping relational data * **Queries not classes** to avoid complex model objects * **Single source of truth** for database and application models * **Healthy constraints** that prevent common pitfalls and anti-patterns * **An abstraction that makes the right thing easy** ("pit of success") * **Type-safe database queries** that can be validated at compile time * **Less boilerplate** so developers can focus on the important parts of their app * **Auto-completion in code editors** instead of needing to look up documentation The remaining parts of this page discuss how Prisma ORM compares to existing database tools. ## Problems with SQL, traditional ORMs and other database tools The main problem with the database tools that currently exist in the Node.js and TypeScript ecosystem is that they require a major tradeoff between _productivity_ and _control_. 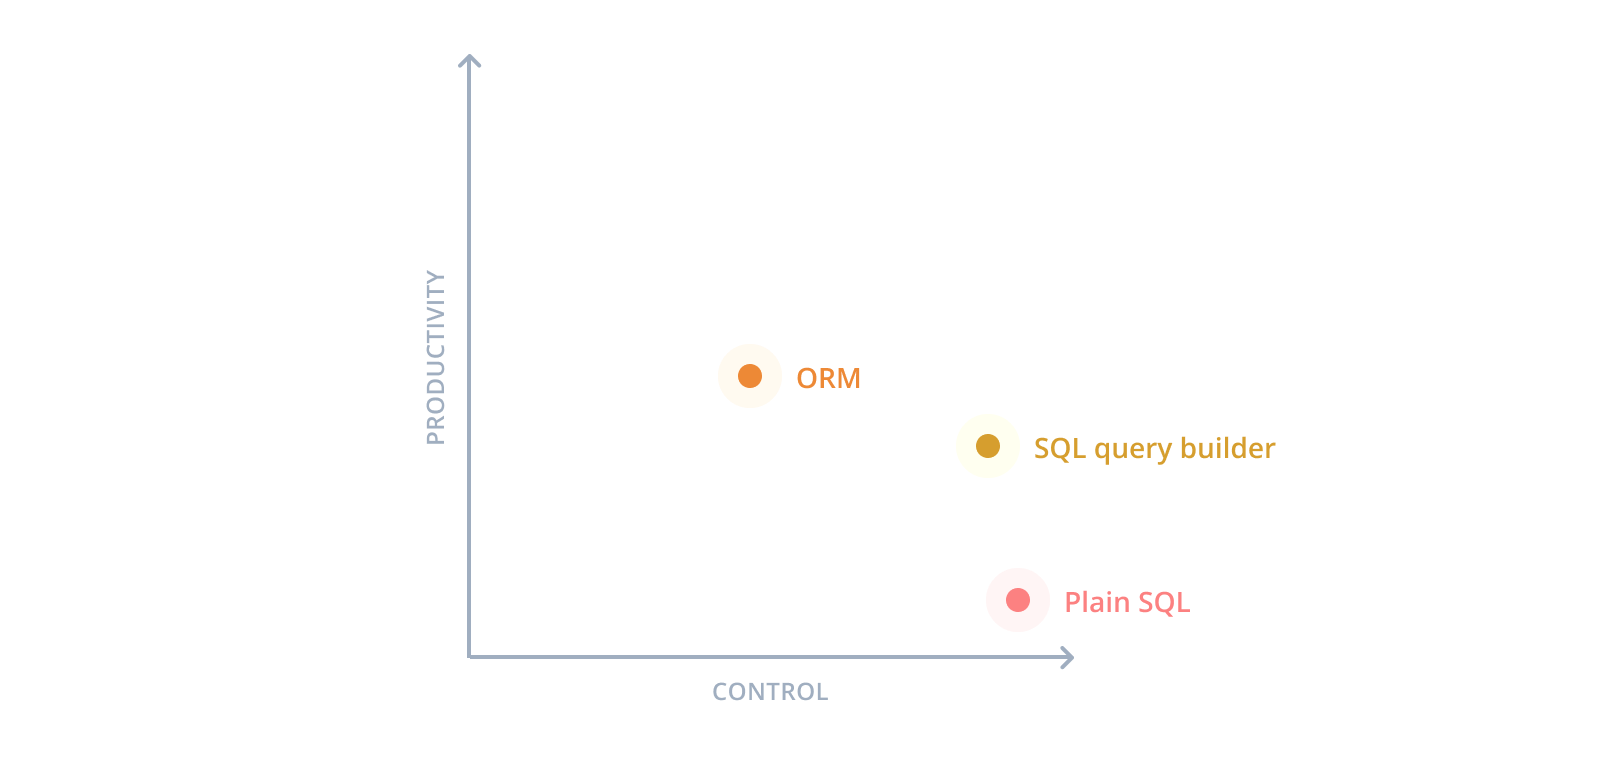 ### Raw SQL: Full control, low productivity With raw SQL (e.g. using the native `pg` or `mysql` Node.js database drivers) you have full control over your database operations. However, productivity suffers as sending plain SQL strings to the database is cumbersome and comes with a lot of overhead (manual connection handling, repetitive boilerplate, ...). Another major issue with this approach is that you don't get any type safety for your query results. Of course, you can type the results manually but this is a huge amount of work and requires major refactorings each time you change your database schema or queries to keep the typings in sync. Furthermore, submitting SQL queries as plain strings means you don't get any autocompletion in your editors. ### SQL query builders: High control, medium productivity A common solution that retains a high level of control and provides better productivity is to use a SQL query builder (e.g. knex.js). These sort of tools provide a programmatic abstraction to construct SQL queries. The biggest drawback with SQL query builders is that application developers still need to think about their data in terms of SQL. This incurs a cognitive and practical cost of translating relational data into objects. Another issue is that it's too easy to shoot yourself in the foot if you don't know exactly what you're doing in your SQL queries. ### Traditional ORMs: Less control, better productivity Traditional ORMs abstract away from SQL by letting you _define your application models as classes_, these classes are mapped to tables in the database. > "Object relational mappers" (ORMs) exist to bridge the gap between the programmers' friend (the object), and the database's primitive (the relation). The reasons for these differing models are as much cultural as functional: programmers like objects because they encapsulate the state of a single thing in a running program. Databases like relations because they better suit whole-dataset constraints and efficient access patterns for the entire dataset. > > The Troublesome Active Record Pattern, Cal Paterson (2020) You can then read and write data by calling methods on the instances of your model classes. This is way more convenient and comes closer to the mental model developers have when thinking about their data. So, what's the catch? > ORM represents a quagmire which starts well, gets more complicated as time passes, and before long entraps its users in a commitment that has no clear demarcation point, no clear win conditions, and no clear exit strategy. > > The Vietnam of Computer Science, Ted Neward (2006) As an application developer, the mental model you have for your data is that of an _object_. The mental model for data in SQL on the other hand are _tables_. The divide between these two different representations of data is often referred to as the object-relational impedance mismatch. The object-relational impedance mismatch also is a major reason why many developers don't like working with traditional ORMs. As an example, consider how data is organized and relationships are handled with each approach: * **Relational databases**: Data is typically normalized (flat) and uses foreign keys to link across entities. The entities then need to be JOINed to manifest the actual relationships. * **Object-oriented**: Objects can be deeply nested structures where you can traverse relationships simply by using dot notation. This alludes to one of the major pitfalls with traditional ORMs: While they make it _seem_ that you can simply traverse relationships using familiar dot notation, under the hood the ORM generates SQL JOINs which are expensive and have the potential to drastically slow down your application (one symptom of this is the n+1 problem). To conclude: The appeal of traditional ORMs is the premise of abstracting away the relational model and thinking about your data purely in terms of objects. While the premise is great, it's based on the wrong assumption that relational data can easily be mapped to objects which leads to lots of complications and pitfalls. ## Application developers should care about data – not SQL Despite being developed in the 1970s(!), SQL has stood the test of time in an impressive manner. However, with the advancement and modernization of developers tools, it's worth asking if SQL really is the best abstraction for application developers to work with? After all, **developers should only care about the _data_ they need to implement a feature** and not spend time figuring out complicated SQL queries or massaging query results to fit their needs. There's another argument to be made against SQL in application development. The power of SQL can be a blessing if you know exactly what you're doing, but its complexity can be a curse. There are a lot of anti-patterns and pitfalls that even experienced SQL users struggle to anticipate, often at the cost of performance and hours of debugging time. Developers should be able to ask for the data they need instead of having to worry about "doing the right thing" in their SQL queries. They should be using an abstraction that makes the right decisions for them. This can mean that the abstraction imposes certain "healthy" constraints that prevent developers from making mistakes. ## Prisma ORM makes developers productive Prisma ORM's main goal is to make application developers more productive when working with databases. Considering the tradeoff between productivity and control again, this is how Prisma ORM fits in: 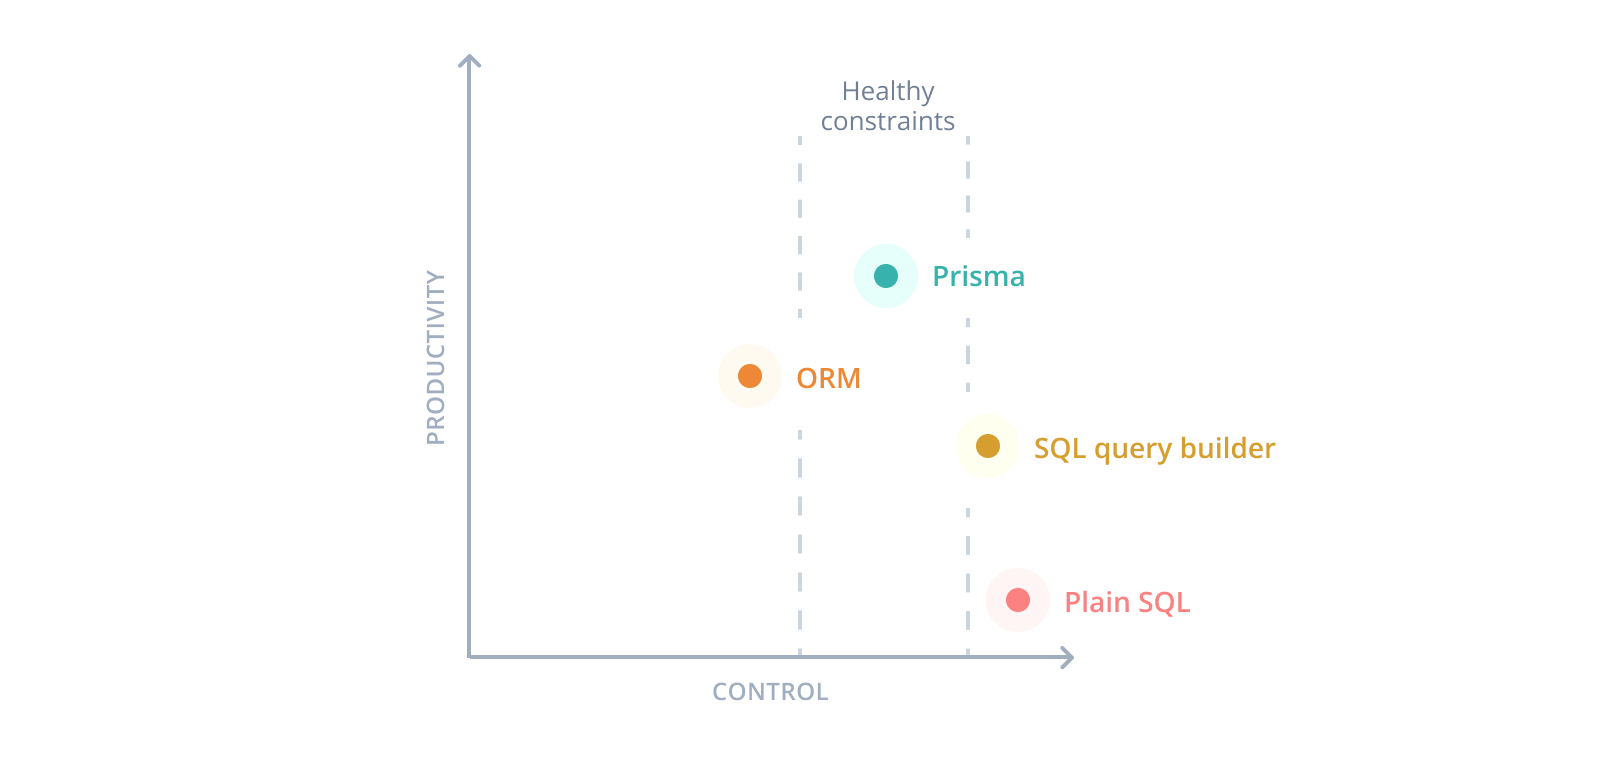 --- ## Page: https://www.prisma.io/docs/orm/overview/introduction/should-you-use-prisma Prisma ORM is a new kind of ORM that - like any other tool - comes with its own tradeoffs. This page explains when Prisma ORM would be a good fit, and provides alternatives for other scenarios. ## Prisma ORM likely _is_ a good fit for you if ... ### ... you are building a server-side application that talks to a database This is the main use case for Prisma ORM. Server-side applications typically are API servers that expose data operations via technologies like REST, GraphQL or gRPC. They are commonly built as microservices or monolithic apps and deployed via long-running servers or serverless functions. Prisma ORM is a great fit for all of these application and deployment models. Refer to the full list of databases (relational, NoSQL, and NewSQL) that Prisma ORM supports. ### ... you care about productivity and developer experience Productivity and developer experience are core to how we're building our tools. We're looking to build developer-friendly abstractions for tasks that are complex, error-prone and time-consuming when performed manually. No matter if you're a SQL newcomer or veteran, Prisma ORM will give you a significant productivity boost for the most common database workflows. Here are a couple of the guiding principles and general practices we apply when designing and building our tools: * make the right thing easy * pit of success * offer intelligent autocompletion where possible * build powerful editor extensions (e.g. for VS Code) * go the extra mile to achieve full type-safety ### ... you are working in a team Prisma ORM shines especially when used in collaborative environments. The declarative Prisma schema provides an overview of the current state of the database that's easy to understand for everyone. This is a major improvement to traditional workflows where developers have to dig through migration files to understand the current table structure. Prisma Client's minimal API surface enables developers to pick it up quickly without much learning overhead, so onboarding new developers to a team becomes a lot smoother. The Prisma Migrate workflows are designed in a way to cover database schema changes in collaborative environments. From the initial schema creation up to the point of deploying schema changes to production and resolving conflicts that were introduced by parallel modifications, Prisma Migrate has you covered. ### ... you want a tool that holistically covers your database workflows Prisma ORM is a lot more than "just another ORM". We are building a database toolkit that covers the daily workflows of application developers that interact with databases. A few examples are: * querying (with Prisma Client) * data modeling (in the Prisma schema) * migrations (with Prisma Migrate) * prototyping (via `prisma db push`) * seeding (via `prisma db seed`) * visual viewing and editing (with Prisma Studio) ### ... you value type-safety Prisma ORM is the only _fully_ type-safe ORM in the TypeScript ecosystem. The generated Prisma Client ensures typed query results even for partial queries and relations. You can learn more about this in the type-safety comparison with TypeORM. ### ... you want to write raw, type-safe SQL In addition to the intuitive, higher-level query API, Prisma ORM also offers a way for you to write raw SQL with full type safety. ### ... you want an ORM with a transparent development process, proper maintenance & support Development of Prisma ORM's open source tools is happening in the open. Most of it happens directly on GitHub in the main `prisma/prisma` repo: * issues and PRs in our repos are triaged and prioritized (usually within 1-2 days) * new releases with new features and improvements are issued every three weeks * we have a dedicated support team that responds to questions in GitHub Discussions Prisma has a lively community that you can find on Discord. We also regularly host Meetups, conferences and other developer-focused events. Join us! ## Prisma ORM likely is _not_ a good fit for you if ... ### ... you need _full_ control over all database queries Prisma ORM is an abstraction. As such, an inherent tradeoff of Prisma ORM is a reduced amount of control in exchange for higher productivity. This means, the Prisma Client API might have less capabilities in some scenarios than you get with plain SQL. If your application has requirements for database queries that Prisma ORM does not provide and the workarounds are too costly, you might be better off with a tool that allows you to exercise full control over your database operations using plain SQL. > **Note**: If you can work around a certain limitation but still would like to see an improvement in the way how Prisma ORM handles the situation, we encourage you to create a feature request on GitHub so that our Product and Engineering teams can look into it. _Alternatives_: SQL drivers (e.g. `node-postgres`, `mysql`, `sqlite3`, ...) ### ... you do not want to write any code for your backend If you don't want to write any code for your backend and just be able to generate your API server and the database out-of-the-box, you might rather choose a Backend-as-a-Service (BaaS) for your project. With a BaaS, you can typically configure your data model via a high-level API (e.g. GraphQL SDL) or a visual editor. Based on this data model, the BaaS generates a CRUD API and provisions a database for you. With this setup, you typically don't have control over the infrastructure the API server and database are running on. With Prisma ORM, you are building the backend yourself using Node.js or TypeScript. This means you'll have to do a lot more coding work compared to using a BaaS. The benefit of this approach is that you have full flexibility for building, deploying, scaling and maintaining your backend and are not dependent on 3rd party software for a crucial part of your stack. _Alternatives_: AWS AppSync, 8base, Nhost, Supabase, Firebase, Amplication ### ... you want a CRUD GraphQL API without writing any code While tools like the `nexus-plugin-prisma` and `typegraphql-prisma` allow you to quickly generate CRUD operations for your Prisma ORM models in a GraphQL API, these approaches still require you to set up your GraphQL server manually and do some work to expose GraphQL queries and mutations for the models defined in your Prisma schema. If you want to get a GraphQL endpoint for your database out-of-the box, other tools might be better suited for your use case. _Alternatives_: Hasura, Postgraphile --- ## Page: https://www.prisma.io/docs/orm/overview/introduction/data-modeling ## What is data modeling? The term _data modeling_ refers to the **process of defining the shape and structure of the objects in an application**, these objects are often called "application models". In relational databases (like PostgreSQL), they are stored in _tables_ . When using document databases (like MongoDB), they are stored in _collections_. Depending on the domain of your application, the models will be different. For example, if you're writing a blogging application, you might have models such as _blog_, _author_, _article_. When writing a car-sharing app, you probably have models like _driver_, _car_, _route_. Application models enable you to represent these different entities in your code by creating respective _data structures_. When modeling data, you typically ask questions like: * What are the main entities/concepts in my application? * How do they relate to each other? * What are their main characteristics/properties? * How can they be represented with my technology stack? ## Data modeling without Prisma ORM Data modeling typically needs to happen on (at least) two levels: * On the **database** level * On the **application** level (i.e., in your programming language) The way that the application models are represented on both levels might differ due to a few reasons: * Databases and programming languages use different data types * Relations are represented differently in a database than in a programming language * Databases typically have more powerful data modeling capabilities, like indexes, cascading deletes, or a variety of additional constraints (e.g. unique, not null, ...) * Databases and programming languages have different technical constraints ### Data modeling on the database level #### Relational databases In relational databases, models are represented by _tables_. For example, you might define a `users` table to store information about the users of your application. Using PostgreSQL, you'd define it as follows: CREATE TABLE users ( user_id SERIAL PRIMARY KEY NOT NULL, name VARCHAR(255), email VARCHAR(255) UNIQUE NOT NULL, isAdmin BOOLEAN NOT NULL DEFAULT false); A visual representation of the `users` table with some random data might look as follows: | `user_id` | `name` | `email` | `isAdmin` | | --- | --- | --- | --- | | `1` | `Alice` | `alice@prisma.io` | `false` | | `2` | `Bob` | `bob@prisma.io` | `false` | | `3` | `Sarah` | `sarah@prisma.io` | `true` | It has the following columns: * `user_id`: An integer that increments with every new record in the `users` table. It also represents the primary key for each record. * `name`: A string with at most 255 characters. * `email`: A string with at most 255 characters. Additionally, the added constraints express that no two records can have duplicate values for the `email` column, and that _every_ record needs to have a value for it. * `isAdmin`: A boolean that indicates whether the user has admin rights (default value: `false`) #### MongoDB In MongoDB databases, models are represented by _collections_ and contain _documents_ that can have any structure: { _id: '607ee94800bbe41f001fd568', slug: 'prisma-loves-mongodb', title: 'Prisma <3 MongoDB', body: "This is my first post. Isn't MongoDB + Prisma awesome?!"} Prisma Client currently expects a consistent model and normalized model design. This means that: * If a model or field is not present in the Prisma schema, it is ignored * If a field is mandatory but not present in the MongoDB dataset, you will get an error ### Data modeling on the application level In addition to creating the tables that represent the entities from your application domain, you also need to create application models in your programming language. In object-oriented languages, this is often done by creating _classes_ to represent your models. Depending on the programming language, this might also be done with _interfaces_ or _structs_. There often is a strong correlation between the tables in your database and the models you define in your code. For example, to represent records from the aforementioned `users` table in your application, you might define a JavaScript (ES6) class looking similar to this: class User { constructor(user_id, name, email, isAdmin) { this.user_id = user_id this.name = name this.email = email this.isAdmin = isAdmin }} When using TypeScript, you might define an interface instead: interface User { user_id: number name: string email: string isAdmin: boolean} Notice how the `User` model in both cases has the same properties as the `users` table in the previous example. While it's often the case that there's a 1:1 mapping between database tables and application models, it can also happen that models are represented completely differently in the database and your application. With this setup, you can retrieve records from the `users` table and store them as instances of your `User` type. The following example code snippet uses `pg` as the driver for PostgreSQL and creates a `User` instance based on the above defined JavaScript class: const resultRows = await client.query('SELECT * FROM users WHERE user_id = 1')const userData = resultRows[0]const user = new User( userData.user_id, userData.name, userData.email, userData.isAdmin)// user = {// user_id: 1,// name: "Alice",// email: "alice@prisma.io",// isAdmin: false// } Notice that in these examples, the application models are "dumb", meaning they don't implement any logic but their sole purpose is to carry data as _plain old JavaScript objects_. ### Data modeling with ORMs ORMs are commonly used in object-oriented languages to make it easier for developers to work with a database. The key characteristic of an ORM is that it lets you model your application data in terms of _classes_ which are mapped to _tables_ in the underlying database. The main difference compared to the approaches explained above is these classes not only carry data but also implement a substantial amount of logic. Mostly for storage, retrieval, serialization, and deserialization, but sometimes they also implement business logic that's specific to your application. This means, you don't write SQL statements to read and write data in the database, but instead the instances of your model classes provide an API to store and retrieve data. Sequelize is a popular ORM in the Node.js ecosystem, this is how you'd define the same `User` model from the sections before using Sequelize's modeling approach: class User extends Model {}User.init( { user_id: { type: Sequelize.INTEGER, primaryKey: true, autoIncrement: true, }, name: Sequelize.STRING(255), email: { type: Sequelize.STRING(255), unique: true, }, isAdmin: Sequelize.BOOLEAN, }, { sequelize, modelName: 'user' }) To get an example with this `User` class to work, you still need to create the corresponding table in the database. With Sequelize, you have two ways of doing this: * Run `User.sync()` (typically not recommended for production) * Use Sequelize migrations to change your database schema Note that you'll never instantiate the `User` class manually (using `new User(...)`) as was shown in the previous section, but rather call _static_ methods on the `User` class which then return the `User` model instances: const user = await User.findByPk(42) The call to `findByPk` creates a SQL statement to retrieve the `User` record that's identified by the ID value `42`. The resulting `user` object is an instance of Sequelize's `Model` class (because `User` inherits from `Model`). It's not a POJO, but an object that implements additional behavior from Sequelize. ## Data modeling with Prisma ORM Depending on which parts of Prisma ORM you want to use in your application, the data modeling flow looks slightly different. The following two sections explain the workflows for using **only Prisma Client** and using **Prisma Client and Prisma Migrate**. No matter which approach though, with Prisma ORM you never create application models in your programming language by manually defining classes, interfaces, or structs. Instead, the application models are defined in your Prisma schema: * **Only Prisma Client**: Application models in the Prisma schema are _generated based on the introspection of your database schema_. Data modeling happens primarily on the database-level. * **Prisma Client and Prisma Migrate**: Data modeling happens in the Prisma schema by _manually adding application models_ to it. Prisma Migrate maps these application models to tables in the underlying database (currently only supported for relational databases). As an example, the `User` model from the previous example would be represented as follows in the Prisma schema: model User { user_id Int @id @default(autoincrement()) name String? email String @unique isAdmin Boolean @default(false)} Once the application models are in your Prisma schema (whether they were added through introspection or manually by you), the next step typically is to generate Prisma Client which provides a programmatic and type-safe API to read and write data in the shape of your application models. Prisma Client uses TypeScript type aliases to represent your application models in your code. For example, the `User` model would be represented as follows in the generated Prisma Client library: export type User = { id: number name: string | null email: string isAdmin: boolean} In addition to the generated types, Prisma Client also provides a data access API that you can use once you've installed the `@prisma/client` package: import { PrismaClient } from '@prisma/client'// or// const { PrismaClient } = require('@prisma/client')const prisma = new PrismaClient()// use inside an `async` function to `await` the resultawait prisma.user.findUnique(...)await prisma.user.findMany(...)await prisma.user.create(...)await prisma.user.update(...)await prisma.user.delete(...)await prisma.user.upsert(...) ### Using only Prisma Client When using only Prisma Client and _not_ using Prisma Migrate in your application, data modeling needs to happen on the database level via SQL. Once your SQL schema is ready, you use Prisma's introspection feature to add the application models to your Prisma schema. Finally, you generate Prisma Client which creates the types as well as the programmatic API for you to read and write data in your database. Here is an overview of the main workflow: 1. Change your database schema using SQL (e.g. `CREATE TABLE`, `ALTER TABLE`, ...) 2. Run `prisma db pull` to introspect the database and add application models to the Prisma schema 3. Run `prisma generate` to update your Prisma Client API ### Using Prisma Client and Prisma Migrate When using Prisma Migrate, you define your application model in the Prisma schema and with relational databases use the `prisma migrate` subcommand to generate plain SQL migration files, which you can edit before applying. With MongoDB, you use `prisma db push` instead which applies the changes to your database directly. Here is an overview of the main workflow: 1. Manually change your application models in the Prisma schema (e.g. add a new model, remove an existing one, ...) 2. Run `prisma migrate dev` to create and apply a migration or run `prisma db push` to apply the changes directly (in both cases Prisma Client is automatically generated) --- ## Page: https://www.prisma.io/docs/orm/overview/prisma-in-your-stack ## Fullstack Fullstack frameworks, such as Next.js, Remix or SvelteKit, blur the lines between the server and the client. These frameworks also provide different patterns for fetching and mutating data on the server. --- ## Page: https://www.prisma.io/docs/orm/overview/databases Learn about the different databases Prisma ORM supports. ## In this section ## Database drivers Default built-in drivers ## PostgreSQL The PostgreSQL data source connector connects Prisma ORM to a PostgreSQL database server. ## MySQL/MariaDB The MySQL data source connector connects Prisma ORM to a MySQL or MariaDB database server. ## SQLite The SQLite data source connector connects Prisma ORM to a SQLite database file. These files always have the file ending .db (e.g.: dev.db). ## MongoDB This guide discusses the concepts behind using Prisma ORM and MongoDB, explains the commonalities and differences between MongoDB and other database providers, and leads you through the process for configuring your application to integrate with MongoDB using Prisma ORM. ## Microsoft SQL Server ## CockroachDB This guide discusses the concepts behind using Prisma ORM and CockroachDB, explains the commonalities and differences between CockroachDB and other database providers, and leads you through the process for configuring your application to integrate with CockroachDB. ## PlanetScale Prisma and PlanetScale together provide a development arena that optimizes rapid, type-safe development of data access applications, using Prisma's ORM and PlanetScale's highly scalable MySQL-based platform. ## Supabase This guide discusses the concepts behind using Prisma ORM and Supabase, explains the commonalities and differences between Supabase and other database providers, and leads you through the process for configuring your application to integrate with Supabase. ## Neon This guide explains how to: ## Turso This guide discusses the concepts behind using Prisma ORM and Turso, explains the commonalities and differences between Turso and other database providers, and leads you through the process for configuring your application to integrate with Turso. ## Cloudflare D1 This guide discusses the concepts behind using Prisma ORM and Cloudflare D1, explains the commonalities and differences between Cloudflare D1 and other database providers, and leads you through the process for configuring your application to integrate with Cloudflare D1. --- ## Page: https://www.prisma.io/docs/orm/overview/beyond-prisma-orm As a Prisma ORM user, you're already experiencing the power of type-safe database queries and intuitive data modeling. When scaling production applications, however, new challenges emerge. As an app matures it’s a given that you’ll begin to experience connection pooling complexities or find ways to effectively cache common queries. Instead of spending your valuable time overcoming these challenges, let’s explore how Prisma can help by extending the capabilities of the ORM as your application grows. ## Boost application performance with Prisma Accelerate As your application scales, you'll likely need tools to handle increased traffic efficiently. This often involves implementing connection pooling to manage database connections and caching strategies to reduce database load and improve response times. Prisma Accelerate addresses these needs in a single solution, eliminating the need to set up and manage separate infrastructure. Prisma Accelerate is particularly useful for applications deployed to serverless and edge environments (also know as Function-as-a-Service) because these deployments lend themselves towards many orders of magnitude more connections being created than a traditional, long-lived application. For these apps, Prisma Accelerate has the added benefit of protecting your database from day one and keeping your app online regardless of traffic you experience. Try out the Accelerate speed test to see what’s possible. ### Improve query performance with connection pooling Place your connection pooler in one of 15+ global regions, minimizing latency for database operations. Enable high-performance distributed workloads across serverless and edge environments. ### Reduce query latency and database load with caching Cache query results across 300+ global points of presence. Accelerate extends your Prisma Client, offering intuitive, granular control over caching patterns such as `ttl` and `swr` on a per-query basis. ### Handle scaling traffic with managed infrastructure Scale to millions of queries per day without infrastructure changes. Efficiently manage database connections and serve more users with fewer resources. ### Get started with Accelerate today Accelerate integrates seamlessly with your Prisma ORM project through the `@prisma/extension-accelerate` client extension. Get started quickly with our setup guide and instantly access full edge environment support, connection pooling, and global caching. import { PrismaClient } from '@prisma/client'import { withAccelerate } from '@prisma/extension-accelerate'// 1. Extend your Prisma Client with the Accelerate extensionconst prisma = new PrismaClient().$extends(withAccelerate())// 2. (Optionally) add cache to your Prisma queriesconst users = await prisma.user.findMany({ cacheStrategy: { ttl: 30, // Consider data fresh for 30 seconds swr: 60 // Serve stale data for up to 60 seconds while fetching fresh data }}) To see more examples, visit our examples repo or try them out yourself with `npx try-prisma`. ## Grow with Prisma Prisma Accelerate take features built into Prisma ORM and build upon them by adding additional capabilities like globally-optimized caching and connection pooling. Get started for free the and explore how Accelerate can help you build scalable, high-performance applications! Improving developer experience doesn’t stop at Accelerate. Prisma is building and expanding our products, such as Prisma Optimize and Prisma Postgres, to improve every aspect of Data DX and we’d love to hear what you think. Join our community and learn more about our products below. Accelerate and Optimize build on Prisma ORM through Prisma Client Extensions. This opens up features that we couldn’t include in the ORM like globally-optimized caching and connection pooling. Create a free account and explore how Accelerate can help you build scalable, high-performance applications! Improving developer experience doesn’t stop at Prisma Postgres, Accelerate and Optimize. Prisma is building and expanding our products to improve every aspect of Data DX and we’d love to hear what you think. Join our community and learn more about our products below --- ## Page: https://www.prisma.io/docs/orm/prisma-schema ## PostgreSQL extensions This page introduces PostgreSQL extensions and describes how to represent extensions in your Prisma schema, how to introspect existing extensions in your database, and how to apply changes to your extensions to your database with Prisma Migrate. --- ## Page: https://www.prisma.io/docs/orm/prisma-schema/overview The Prisma Schema (or _schema_ for short) is the main method of configuration for your Prisma ORM setup. It consists of the following parts: * **Data sources**: Specify the details of the data sources Prisma ORM should connect to (e.g. a PostgreSQL database) * **Generators**: Specifies what clients should be generated based on the data model (e.g. Prisma Client) * **Data model definition**: Specifies your application models (the shape of the data per data source) and their relations It is typically a single file called `schema.prisma` (or multiple files with `.prisma` file extension) that is stored in a defined but customizable location. See the Prisma schema API reference for detailed information about each section of the schema. Whenever a `prisma` command is invoked, the CLI typically reads some information from the schema, e.g.: * `prisma generate`: Reads _all_ above mentioned information from the Prisma schema to generate the correct data source client code (e.g. Prisma Client). * `prisma migrate dev`: Reads the data sources and data model definition to create a new migration. You can also use environment variables inside the schema to provide configuration options when a CLI command is invoked. ## Example The following is an example of a Prisma Schema that specifies: * A data source (PostgreSQL or MongoDB) * A generator (Prisma Client) * A data model definition with two models (with one relation) and one `enum` * Several native data type attributes (`@db.VarChar(255)`, `@db.ObjectId`) * Relational databases * MongoDB datasource db { provider = "postgresql" url = env("DATABASE_URL")}generator client { provider = "prisma-client-js"}model User { id Int @id @default(autoincrement()) createdAt DateTime @default(now()) email String @unique name String? role Role @default(USER) posts Post[]}model Post { id Int @id @default(autoincrement()) createdAt DateTime @default(now()) updatedAt DateTime @updatedAt published Boolean @default(false) title String @db.VarChar(255) author User? @relation(fields: [authorId], references: [id]) authorId Int?}enum Role { USER ADMIN} ## Syntax Prisma Schema files are written in Prisma Schema Language (PSL). See the data sources, generators, data model definition and of course Prisma Schema API reference pages for details and examples. ### VS Code Syntax highlighting for PSL is available via a VS Code extension (which also lets you auto-format the contents of your Prisma schema and indicates syntax errors with red squiggly lines). Learn more about setting up Prisma ORM in your editor. ### GitHub PSL code snippets on GitHub can be rendered with syntax highlighting as well by using the `.prisma` file extension or annotating fenced code blocks in Markdown with `prisma`: ```prismamodel User { id Int @id @default(autoincrement()) createdAt DateTime @default(now()) email String @unique name String?}``` ## Accessing environment variables from the schema You can use environment variables to provide configuration options when a CLI command is invoked, or a Prisma Client query is run. Hardcoding URLs directly in your schema is possible but is discouraged because it poses a security risk. Using environment variables in the schema allows you to **keep secrets out of the schema** which in turn **improves the portability of the schema** by allowing you to use it in different environments. Environment variables can be accessed using the `env()` function: datasource db { provider = "postgresql" url = env("DATABASE_URL")} You can use the `env()` function in the following places: * A datasource url * Generator binary targets See Environment variables for more information about how to use an `.env` file during development. There are two types of comments that are supported in Prisma Schema Language: * `// comment`: This comment is for the reader's clarity and is not present in the abstract syntax tree (AST) of the schema. * `/// comment`: These comments will show up in the abstract syntax tree (AST) of the schema as descriptions to AST nodes. Tools can then use these comments to provide additional information. All comments are attached to the next available node - free-floating comments are not supported and are not included in the AST. Here are some different examples: /// This comment will get attached to the `User` node in the ASTmodel User { /// This comment will get attached to the `id` node in the AST id Int @default(autoincrement()) // This comment is just for you weight Float /// This comment gets attached to the `weight` node}// This comment is just for you. It will not// show up in the AST./// This comment will get attached to the/// Customer node.model Customer {} ## Auto formatting Prisma ORM supports formatting `.prisma` files automatically. There are two ways to format `.prisma` files: * Run the `prisma format` command. * Install the Prisma VS Code extension and invoke the VS Code format action - manually or on save. There are no configuration options - formatting rules are fixed (similar to Golang's `gofmt` but unlike Javascript's `prettier`): ### Formatting rules #### Configuration blocks are aligned by their `=` sign. block _ { key = "value" key2 = 1 long_key = true} A newline resets block alignment: block _ { key = "value" key2 = 1 key10 = true long_key = true long_key_2 = true} #### Field definitions are aligned into columns separated by 2 or more spaces block _ { id String @id first_name LongNumeric @default} #### Multiline field attributes are properly aligned with the rest of the field attributes block _ { id String @id @default first_name LongNumeric @default} A newline resets formatting rules: block _ { id String @id @default first_name LongNumeric @default} #### Block attributes are sorted to the end of the block block _ { key = "value" @@attribute} --- ## Page: https://www.prisma.io/docs/orm/prisma-schema/data-model ## How to use Prisma ORM with multiple database schemas Multiple database schema support is currently available with the PostgreSQL, CockroachDB, and SQL Server connectors. --- ## Page: https://www.prisma.io/docs/orm/prisma-schema/introspection You can introspect your database using the Prisma CLI in order to generate the data model in your Prisma schema. The data model is needed to generate Prisma Client. Introspection is often used to generate an _initial_ version of the data model when adding Prisma ORM to an existing project. However, it can also be used _repeatedly_ in an application. This is most commonly the case when you're _not_ using Prisma Migrate but perform schema migrations using plain SQL or another migration tool. In that case, you also need to re-introspect your database and subsequently re-generate Prisma Client to reflect the schema changes in your Prisma Client API. ## What does introspection do? Introspection has one main function: Populate your Prisma schema with a data model that reflects the current database schema. 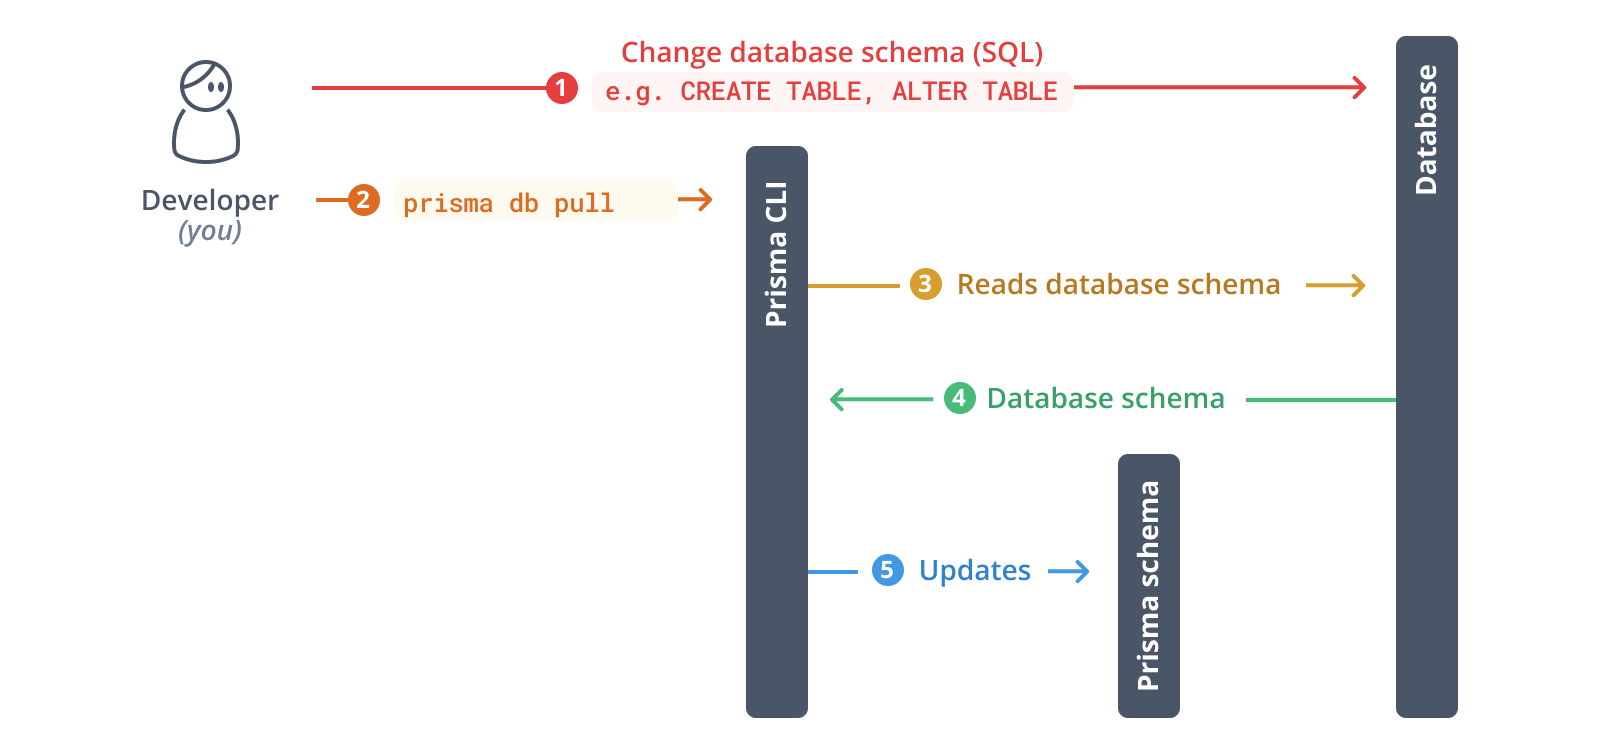 Here's an overview of its main functions on SQL databases: * Map _tables_ in the database to Prisma models * Map _columns_ in the database to the fields of Prisma models * Map _indexes_ in the database to indexes in the Prisma schema * Map _database constraints_ to attributes or type modifiers in the Prisma schema On MongoDB, the main functions are the following: * Map _collections_ in the database to Prisma models. Because a _collection_ in MongoDB doesn't have a predefined structure, Prisma ORM _samples_ the _documents_ in the collection and derives the model structure accordingly (i.e. it maps the fields of the _document_ to the fields of the Prisma model). If _embedded types_ are detected in a collection, these will be mapped to composite types in the Prisma schema. * Map _indexes_ in the database to indexes in the Prisma schema, if the collection contains at least one document contains a field included in the index You can learn more about how Prisma ORM maps types from the database to the types available in the Prisma schema on the respective docs page for the data source connector: * PostgreSQL * MySQL * SQLite * Microsoft SQL Server ## The `prisma db pull` command You can introspect your database using the `prisma db pull` command of the Prisma CLI. Note that using this command requires your connection URL to be set in your Prisma schema `datasource`. Here's a high-level overview of the steps that `prisma db pull` performs internally: 1. Read the connection URL from the `datasource` configuration in the Prisma schema 2. Open a connection to the database 3. Introspect database schema (i.e. read tables, columns and other structures ...) 4. Transform database schema into Prisma schema data model 5. Write data model into Prisma schema or update existing schema ## Introspection workflow The typical workflow for projects that are not using Prisma Migrate, but instead use plain SQL or another migration tool looks as follows: 1. Change the database schema (e.g. using plain SQL) 2. Run `prisma db pull` to update the Prisma schema 3. Run `prisma generate` to update Prisma Client 4. Use the updated Prisma Client in your application Note that as you evolve the application, this process can be repeated for an indefinite number of times.  ## Rules and conventions Prisma ORM employs a number of conventions for translating a database schema into a data model in the Prisma schema: ### Model, field and enum names Field, model and enum names (identifiers) must start with a letter and generally must only contain underscores, letters and digits. You can find the naming rules and conventions for each of these identifiers on the respective docs page: * Naming models * Naming fields * Naming enums The general rule for identifiers is that they need to adhere to this regular expression: [A-Za-z][A-Za-z0-9_]* #### Sanitization of invalid characters **Invalid characters** are being sanitized during introspection: * If they appear _before_ a letter in an identifier, they get dropped. * If they appear _after_ the first letter, they get replaced by an underscore. Additionally, the transformed name is mapped to the database using `@map` or `@@map` to retain the original name. Consider the following table as an example: CREATE TABLE "42User" ( _id SERIAL PRIMARY KEY, _name VARCHAR(255), two$two INTEGER); Because the leading `42` in the table name as well as the leading underscores and the `$` on the columns are forbidden in Prisma ORM, introspection adds the `@map` and `@@map` attributes so that these names adhere to Prisma ORM's naming conventions: model User { id Int @id @default(autoincrement()) @map("_id") name String? @map("_name") two_two Int? @map("two$two") @@map("42User")} #### Duplicate Identifiers after Sanitization If sanitization results in duplicate identifiers, no immediate error handling is in place. You get the error later and can manually fix it. Consider the case of the following two tables: CREATE TABLE "42User" ( _id SERIAL PRIMARY KEY);CREATE TABLE "24User" ( _id SERIAL PRIMARY KEY); This would result in the following introspection result: model User { id Int @id @default(autoincrement()) @map("_id") @@map("42User")}model User { id Int @id @default(autoincrement()) @map("_id") @@map("24User")} Trying to generate your Prisma Client with `prisma generate` you would get the following error: npx prisma generate Show CLI results $ npx prisma generateError: Schema parsingerror: The model "User" cannot be defined because a model with that name already exists. --> schema.prisma:17 |16 | }17 | model User { |Validation Error Count: 1 In this case, you must manually change the name of one of the two generated `User` models because duplicate model names are not allowed in the Prisma schema. ### Order of fields Introspection lists model fields in the same order as the corresponding table columns in the database. ### Order of attributes Introspection adds attributes in the following order (this order is mirrored by `prisma format`): * Block level: `@@id`, `@@unique`, `@@index`, `@@map` * Field level : `@id`, `@unique`, `@default`, `@updatedAt`, `@map`, `@relation` ### Relations Prisma ORM translates foreign keys that are defined on your database tables into relations. #### One-to-one relations Prisma ORM adds a one-to-one relation to your data model when the foreign key on a table has a `UNIQUE` constraint, e.g.: CREATE TABLE "User" ( id SERIAL PRIMARY KEY);CREATE TABLE "Profile" ( id SERIAL PRIMARY KEY, "user" integer NOT NULL UNIQUE, FOREIGN KEY ("user") REFERENCES "User"(id)); Prisma ORM translates this into the following data model: model User { id Int @id @default(autoincrement()) Profile Profile?}model Profile { id Int @id @default(autoincrement()) user Int @unique User User @relation(fields: [user], references: [id])} #### One-to-many relations By default, Prisma ORM adds a one-to-many relation to your data model for a foreign key it finds in your database schema: CREATE TABLE "User" ( id SERIAL PRIMARY KEY);CREATE TABLE "Post" ( id SERIAL PRIMARY KEY, "author" integer NOT NULL, FOREIGN KEY ("author") REFERENCES "User"(id)); These tables are transformed into the following models: model User { id Int @id @default(autoincrement()) Post Post[]}model Post { id Int @id @default(autoincrement()) author Int User User @relation(fields: [author], references: [id])} #### Many-to-many relations Many-to-many relations are commonly represented as relation tables in relational databases. Prisma ORM supports two ways for defining many-to-many relations in the Prisma schema: * Implicit many-to-many relations (Prisma ORM manages the relation table under the hood) * Explicit many-to-many relations (the relation table is present as a model) _Implicit_ many-to-many relations are recognized if they adhere to Prisma ORM's conventions for relation tables. Otherwise the relation table is rendered in the Prisma schema as a model (therefore making it an _explicit_ many-to-many relation). This topic is covered extensively on the docs page about Relations. #### Disambiguating relations Prisma ORM generally omits the `name` argument on the `@relation` attribute if it's not needed. Consider the `User` ↔ `Post` example from the previous section. The `@relation` attribute only has the `references` argument, `name` is omitted because it's not needed in this case: model Post { id Int @id @default(autoincrement()) author Int User User @relation(fields: [author], references: [id])} It would be needed if there were _two_ foreign keys defined on the `Post` table: CREATE TABLE "User" ( id SERIAL PRIMARY KEY);CREATE TABLE "Post" ( id SERIAL PRIMARY KEY, "author" integer NOT NULL, "favoritedBy" INTEGER, FOREIGN KEY ("author") REFERENCES "User"(id), FOREIGN KEY ("favoritedBy") REFERENCES "User"(id)); In this case, Prisma ORM needs to disambiguate the relation using a dedicated relation name: model Post { id Int @id @default(autoincrement()) author Int favoritedBy Int? User_Post_authorToUser User @relation("Post_authorToUser", fields: [author], references: [id]) User_Post_favoritedByToUser User? @relation("Post_favoritedByToUser", fields: [favoritedBy], references: [id])}model User { id Int @id @default(autoincrement()) Post_Post_authorToUser Post[] @relation("Post_authorToUser") Post_Post_favoritedByToUser Post[] @relation("Post_favoritedByToUser")} Note that you can rename the Prisma-ORM level relation field to anything you like so that it looks friendlier in the generated Prisma Client API. ## Introspection with an existing schema Running `prisma db pull` for relational databases with an existing Prisma Schema merges manual changes made to the schema, with changes made in the database. (This functionality has been added for the first time with version 2.6.0.) For MongoDB, Introspection for now is meant to be done only once for the initial data model. Running it repeatedly will lead to loss of custom changes, as the ones listed below. Introspection for relational databases maintains the following manual changes: * Order of `model` blocks * Order of `enum` blocks * Comments * `@map` and `@@map` attributes * `@updatedAt` * `@default(cuid())` (`cuid()` is a Prisma-ORM level function) * `@default(uuid())` (`uuid()` is a Prisma-ORM level function) * Custom `@relation` names > **Note**: Only relations between models on the database level will be picked up. This means that there **must be a foreign key set**. The following properties of the schema are determined by the database: * Order of fields within `model` blocks * Order of values within `enum` blocks > **Note**: All `enum` blocks are listed below `model` blocks. ### Force overwrite To overwrite manual changes, and generate a schema based solely on the introspected database and ignore any existing Prisma Schema, add the `--force` flag to the `db pull` command: npx prisma db pull --force Use cases include: * You want to start from scratch with a schema generated from the underlying database * You have an invalid schema and must use `--force` to make introspection succeed ## Introspecting only a subset of your database schema Introspecting only a subset of your database schema is not yet officially supported by Prisma ORM. However, you can achieve this by creating a new database user that only has access to the tables which you'd like to see represented in your Prisma schema, and then perform the introspection using that user. The introspection will then only include the tables the new user has access to. If your goal is to exclude certain models from the Prisma Client generation, you can add the `@@ignore` attribute to the model definition in your Prisma schema. Ignored models are excluded from the generated Prisma Client. ## Introspection warnings for unsupported features The Prisma Schema Language (PSL) can express a majority of the database features of the target databases Prisma ORM supports. However, there are features and functionality the Prisma Schema Language still needs to express. For these features, the Prisma CLI will surface detect usage of the feature in your database and return a warning. The Prisma CLI will also add a comment in the models and fields the features are in use in the Prisma schema. The warnings will also contain a workaround suggestion. The `prisma db pull` command will surface the following unsupported features: * From version 4.13.0: * Partitioned tables * PostgreSQL Row Level Security * Index sort order, `NULLS FIRST` / `NULLS LAST` * CockroachDB row-level TTL * Comments * PostgreSQL deferred constraints * From version 4.14.0: * Check Constraints (MySQL + PostgreSQL) * Exclusion Constraints * MongoDB $jsonSchema * From version 4.16.0: * Expression indexes You can find the list of features we intend to support on GitHub (labeled with `topic:database-functionality`). ### Workaround for introspection warnings for unsupported features If you are using a relational database and either one of the above features listed in the previous section: 1. Create a draft migration: npx prisma migrate dev --create-only 2. Add the SQL that adds the feature surfaced in the warnings. 3. Apply the draft migration to your database: npx prisma migrate dev --- ## Page: https://www.prisma.io/docs/orm/prisma-schema/postgresql-extensions This page introduces PostgreSQL extensions and describes how to represent extensions in your Prisma schema, how to introspect existing extensions in your database, and how to apply changes to your extensions to your database with Prisma Migrate. warning Support for declaring PostgreSQL extensions in your schema is available in preview for the PostgreSQL connector only in Prisma versions 4.5.0 and later. ## What are PostgreSQL extensions? PostgreSQL allows you to extend your database functionality by installing and activating packages known as _extensions_. For example, the `citext` extension adds a case-insensitive string data type. Some extensions, such as `citext`, are supplied directly by PostgreSQL, while other extensions are developed externally. For more information on extensions, see the PostgreSQL documentation. To use an extension, it must first be _installed_ on the local file system of your database server. You then need to _activate_ the extension, which runs a script file that adds the new functionality. info Note that PostgreSQL's documentation uses the term 'install' to refer to what we call activating an extension. We have used separate terms here to make it clear that these are two different steps. Prisma's `postgresqlExtensions` preview feature allows you to represent PostgreSQL extensions in your Prisma schema. Note that specific extensions may add functionality that is not currently supported by Prisma. For example, an extension may add a type or index that is not supported by Prisma. This functionality must be implemented on a case-by-case basis and is not provided by this preview feature. ## How to enable the `postgresqlExtensions` preview feature Representing PostgreSQL extensions in your Prisma Schema is currently a preview feature. To enable the `postgresqlExtensions` preview feature, you will need to add the `postgresqlExtensions` feature flag to the `previewFeatures` field of the `generator` block in your Prisma schema: schema.prisma generator client { provider = "prisma-client-js" previewFeatures = ["postgresqlExtensions"]}datasource db { provider = "postgresql" url = env("DATABASE_URL")} ## How to represent PostgreSQL extensions in your Prisma schema To represent PostgreSQL extensions in your Prisma schema, add the `extensions` field to the `datasource` block of your `schema.prisma` file with an array of the extensions that you require. For example, the following schema lists the `hstore`, `pg_trgm` and `postgis` extensions: schema.prisma datasource db { provider = "postgresql" url = env("DATABASE_URL") extensions = [hstore(schema: "myHstoreSchema"), pg_trgm, postgis(version: "2.1")]} Each extension name in the Prisma schema can take the following optional arguments: * `schema`: the name of the schema in which to activate the extension's objects. If this argument is not specified, the current default object creation schema is used. * `version`: the version of the extension to activate. If this argument is not specified, the value given in the extension's control file is used. * `map`: the database name of the extension. If this argument is not specified, the name of the extension in the Prisma schema must match the database name. In the example above, the `hstore` extension uses the `myHstoreSchema` schema, and the `postgis` extension is activated with version 2.1 of the extension. The `map` argument is useful when the PostgreSQL extension that you want to activate has a name that is not a valid identifier in the Prisma schema. For example, the `uuid-ossp` PostgreSQL extension name is an invalid identifier because it contains a hyphen. In the following example, the extension is mapped to the valid name `uuidOssp` in the Prisma schema: schema.prisma datasource db { provider = "postgresql" url = env("DATABASE_URL") extensions = [uuidOssp(map: "uuid-ossp")]} ## How to introspect PostgreSQL extensions To introspect PostgreSQL extensions currently activated in your database and add relevant extensions to your Prisma schema, run `npx prisma db pull`. Many PostgreSQL extensions are not relevant to the Prisma schema. For example, some extensions are intended for database administration tasks that do not change the schema. If all these extensions were included, the list of extensions would be very long. To avoid this, Prisma maintains an allowlist of known relevant extensions. The current allowlist is the following: * `citext`: provides a case-insensitive character string type, `citext` * `pgcrypto`: provides cryptographic functions, like `gen_random_uuid()`, to generate universally unique identifiers (UUIDs v4) * `uuid-ossp`: provides functions, like `uuid_generate_v4()`, to generate universally unique identifiers (UUIDs v4) * `postgis`: adds GIS (Geographic Information Systems) support **Note**: Since PostgreSQL v13, `gen_random_uuid()` can be used without an extension to generate universally unique identifiers (UUIDs v4). Extensions are introspected as follows: * The first time you introspect, all database extensions that are on the allowlist are added to your Prisma schema * When you re-introspect, the behavior depends on whether the extension is on the allowlist or not. * Extensions on the allowlist: * are **added** to your Prisma schema if they are in the database but not in the Prisma schema * are **kept** in your Prisma schema if they are in the Prisma schema and in the database * are **removed** from your Prisma schema if they are in the Prisma schema but not the database * Extensions not on the allowlist: * are **kept** in your Prisma schema if they are in the Prisma schema and in the database * are **removed** from your Prisma schema if they are in the Prisma schema but not the database The `version` argument will not be added to the Prisma schema when you introspect. ## How to migrate PostgreSQL extensions You can update your list of PostgreSQL extensions in your Prisma schema and apply the changes to your database with Prisma Migrate. This works in a similar way to migration of other elements of your Prisma schema, such as models or fields. However, there are the following differences: * If you remove an extension from your schema but it is still activated on your database, Prisma Migrate will not deactivate it from the database. * If you add a new extension to your schema, it will only be activated if it does not already exist in the database, because the extension may already have been created manually. * If you remove the `version` or `schema` arguments from the extension definition, it has no effect to the extensions in the database in the following migrations. --- ## Page: https://www.prisma.io/docs/orm/prisma-client ## Debugging & troubleshooting --- ## Page: https://www.prisma.io/docs/orm/prisma-client/setup-and-configuration ## Configuring error formatting By default, Prisma Client uses ANSI escape characters to pretty print the error stack and give recommendations on how to fix a problem. While this is very useful when using Prisma Client from the terminal, in contexts like a GraphQL API, you only want the minimal error without any additional formatting. --- ## Page: https://www.prisma.io/docs/orm/prisma-client/queries ## Aggregation, grouping, and summarizing Prisma Client allows you to count records, aggregate number fields, and select distinct field values. --- ## Page: https://www.prisma.io/docs/orm/prisma-client/using-raw-sql While the Prisma Client API aims to make all your database queries intuitive, type-safe, and convenient, there may still be situations where raw SQL is the best tool for the job. This can happen for various reasons, such as the need to optimize the performance of a specific query or because your data requirements can't be fully expressed by Prisma Client's query API. In most cases, TypedSQL allows you to express your query in SQL while still benefiting from Prisma Client's excellent user experience. However, since TypedSQL is statically typed, it may not handle certain scenarios, such as dynamically generated `WHERE` clauses. In these cases, you will need to use `$queryRaw` or `$executeRaw`, or their unsafe counterparts. ## Writing type-safe queries with Prisma Client and TypedSQL ### What is TypedSQL? TypedSQL is a new feature of Prisma ORM that allows you to write your queries in `.sql` files while still enjoying the great developer experience of Prisma Client. You can write the code you're comfortable with and benefit from fully-typed inputs and outputs. With TypedSQL, you can: 1. Write complex SQL queries using familiar syntax 2. Benefit from full IDE support and syntax highlighting for SQL 3. Import your SQL queries as fully typed functions in your TypeScript code 4. Maintain the flexibility of raw SQL with the safety of Prisma's type system TypedSQL is particularly useful for: * Complex reporting queries that are difficult to express using Prisma's query API * Performance-critical operations that require fine-tuned SQL * Leveraging database-specific features not yet supported in Prisma's API By using TypedSQL, you can write efficient, type-safe database queries without sacrificing the power and flexibility of raw SQL. This feature allows you to seamlessly integrate custom SQL queries into your Prisma-powered applications, ensuring type safety and improving developer productivity. For a detailed guide on how to get started with TypedSQL, including setup instructions and usage examples, please refer to our TypedSQL documentation. ## Raw queries Prior to version 5.19.0, Prisma Client only supported raw SQL queries that were not type-safe and required manual mapping of the query result to the desired type. While not as ergonomic as TypedSQL, these queries are still supported and are useful when TypedSQL queries are not possible either due to features not yet supported in TypedSQL or when the query is dynamically generated. ### Alternative approaches to raw SQL queries in relational databases Prisma ORM supports four methods to execute raw SQL queries in relational databases: * `$queryRaw` * `$executeRaw` * `$queryRawUnsafe` * `$executeRawUnsafe` These commands are similar to using TypedSQL, but they are not type-safe and are written as strings in your code rather than in dedicated `.sql` files. ### Alternative approaches to raw queries in document databases For MongoDB, Prisma ORM supports three methods to execute raw queries: * `$runCommandRaw` * `<model>.findRaw` * `<model>.aggregateRaw` These methods allow you to execute raw MongoDB commands and queries, providing flexibility when you need to use MongoDB-specific features or optimizations. `$runCommandRaw` is used to execute database commands, `<model>.findRaw` is used to find documents that match a filter, and `<model>.aggregateRaw` is used for aggregation operations. All three methods are available from Prisma version 3.9.0 and later. Similar to raw queries in relational databases, these methods are not type-safe and require manual handling of the query results. --- ## Page: https://www.prisma.io/docs/orm/prisma-client/special-fields-and-types This section covers various special fields and types you can use with Prisma Client. ## Working with `Decimal` `Decimal` fields are represented by the `Decimal.js` library. The following example demonstrates how to import and use `Prisma.Decimal`: import { PrismaClient, Prisma } from '@prisma/client'const newTypes = await prisma.sample.create({ data: { cost: new Prisma.Decimal(24.454545), },}) You can also perform arithmetic operations: import { PrismaClient, Prisma } from '@prisma/client'const newTypes = await prisma.sample.create({ data: { cost: new Prisma.Decimal(24.454545).plus(1), },}) `Prisma.Decimal` uses Decimal.js, see Decimal.js docs to learn more. warning ## Working with `BigInt` ### Overview `BigInt` fields are represented by the `BigInt` type (Node.js 10.4.0+ required). The following example demonstrates how to use the `BigInt` type: import { PrismaClient, Prisma } from '@prisma/client'const newTypes = await prisma.sample.create({ data: { revenue: BigInt(534543543534), },}) ### Serializing `BigInt` Prisma Client returns records as plain JavaScript objects. If you attempt to use `JSON.stringify` on an object that includes a `BigInt` field, you will see the following error: Do not know how to serialize a BigInt To work around this issue, use a customized implementation of `JSON.stringify`: JSON.stringify( this, (key, value) => (typeof value === 'bigint' ? value.toString() : value) // return everything else unchanged) ## Working with `Bytes` `Bytes` fields are represented by the `Uint8Array` type. The following example demonstrates how to use the `Uint8Array` type: import { PrismaClient, Prisma } from '@prisma/client'const newTypes = await prisma.sample.create({ data: { myField: new Uint8Array([1, 2, 3, 4]), },}) Note that **before Prisma v6**, `Bytes` were represented by the `Buffer` type: import { PrismaClient, Prisma } from '@prisma/client'const newTypes = await prisma.sample.create({ data: { myField: Buffer.from([1, 2, 3, 4]), },}) Learn more in the upgrade guide to v6. ## Working with `DateTime` note There currently is a bug that doesn't allow you to pass in `DateTime` values as strings and produces a runtime error when you do. `DateTime` values need to be passed as `Date` objects (i.e. `new Date('2024-12-04')` instead of `'2024-12-04'`). When creating records that have fields of type `DateTime`, Prisma Client accepts values as `Date` objects adhering to the ISO 8601 standard. Consider the following schema: model User { id Int @id @default(autoincrement()) birthDate DateTime?} Here are some examples for creating new records: ##### Jan 01, 1998; 00 h 00 min and 000 ms await prisma.user.create({ data: { birthDate: new Date('1998') }}) ##### Dec 01, 1998; 00 h 00 min and 000 ms await prisma.user.create({ data: { birthDate: new Date('1998-12') }}) ##### Dec 24, 1998; 00 h 00 min and 000 ms await prisma.user.create({ data: { birthDate: new Date('1998-12-24') }}) ##### Dec 24, 1998; 06 h 22 min 33s and 444 ms await prisma.user.create({ data: { birthDate: new Date('1998-12-24T06:22:33.444Z') }}) ## Working with `Json` See: Working with `Json` fields ## Working with scalar lists / scalar arrays See: Working with scalar lists / arrays ## Working with composite IDs and compound unique constraints See: Working with composite IDs and compound unique constraints --- ## Page: https://www.prisma.io/docs/orm/prisma-client/client-extensions info Prisma Client extensions are Generally Available from versions 4.16.0 and later. They were introduced in Preview in version 4.7.0. Make sure you enable the `clientExtensions` Preview feature flag if you are running on a version earlier than 4.16.0. You can use Prisma Client extensions to add functionality to your models, result objects, and queries, or to add client-level methods. You can create an extension with one or more of the following component types: * `model`: add custom methods or fields to your models * `client`: add client-level methods to Prisma Client * `query`: create custom Prisma Client queries * `result`: add custom fields to your query results For example, you might create an extension that uses the `model` and `client` component types. ## About Prisma Client extensions When you use a Prisma Client extension, you create an _extended client_. An extended client is a lightweight variant of the standard Prisma Client that is wrapped by one or more extensions. The standard client is not mutated. You can add as many extended clients as you want to your project. Learn more about extended clients. You can associate a single extension, or multiple extensions, with an extended client. Learn more about multiple extensions. You can share your Prisma Client extensions with other Prisma ORM users, and import Prisma Client extensions developed by other users into your Prisma ORM project. ### Extended clients Extended clients interact with each other, and with the standard client, as follows: * Each extended client operates independently in an isolated instance. * Extended clients cannot conflict with each other, or with the standard client. * All extended clients and the standard client communicate with the same Prisma ORM query engine. * All extended clients and the standard client share the same connection pool. > **Note**: The author of an extension can modify this behavior since they're able to run arbitrary code as part of an extension. For example, an extension might actually create an entirely new `PrismaClient` instance (including its own query engine and connection pool). Be sure to check the documentation of the extension you're using to learn about any specific behavior it might implement. ### Example use cases for extended clients Because extended clients operate in isolated instances, they can be a good way to do the following, for example: * Implement row-level security (RLS), where each HTTP request has its own client with its own RLS extension, customized with session data. This can keep each user entirely separate, each in a separate client. * Add a `user.current()` method for the `User` model to get the currently logged-in user. * Enable more verbose logging for requests if a debug cookie is set. * Attach a unique request id to all logs so that you can correlate them later, for example to help you analyze the operations that Prisma Client carries out. * Remove a `delete` method from models unless the application calls the admin endpoint and the user has the necessary privileges. ## Add an extension to Prisma Client You can create an extension using two primary ways: * Use the client-level `$extends` method const prisma = new PrismaClient().$extends({ name: 'signUp', // Optional: name appears in error logs model: { // This is a `model` component user: { ... } // The extension logic for the `user` model goes inside the curly braces },}) * Use the `Prisma.defineExtension` method to define an extension and assign it to a variable, and then pass the extension to the client-level `$extends` method import { Prisma } from '@prisma/client'// Define the extensionconst myExtension = Prisma.defineExtension({ name: 'signUp', // Optional: name appears in error logs model: { // This is a `model` component user: { ... } // The extension logic for the `user` model goes inside the curly braces },})// Pass the extension to a Prisma Client instanceconst prisma = new PrismaClient().$extends(myExtension) tip This pattern is useful for when you would like to separate extensions into multiple files or directories within a project. The above examples use the `model` extension component to extend the `User` model. In your `$extends` method, use the appropriate extension component or components (`model`, `client`, `result` or `query`). ## Name an extension for error logs You can name your extensions to help identify them in error logs. To do so, use the optional field `name`. For example: const prisma = new PrismaClient().$extends({ name: `signUp`, // (Optional) Extension name model: { user: { ... } },}) ## Multiple extensions You can associate an extension with an extended client in one of two ways: * You can associate it with an extended client on its own, or * You can combine the extension with other extensions and associate all of these extensions with an extended client. The functionality from these combined extensions applies to the same extended client. Note: Combined extensions can conflict. You can combine the two approaches above. For example, you might associate one extension with its own extended client and associate two other extensions with another extended client. Learn more about how client instances interact. ### Apply multiple extensions to an extended client In the following example, suppose that you have two extensions, `extensionA` and `extensionB`. There are two ways to combine these. #### Option 1: Declare the new client in one line With this option, you apply both extensions to a new client in one line of code. // First of all, store your original Prisma Client in a variable as usualconst prisma = new PrismaClient()// Declare an extended client that has an extensionA and extensionBconst prismaAB = prisma.$extends(extensionA).$extends(extensionB) You can then refer to `prismaAB` in your code, for example `prismaAB.myExtensionMethod()`. #### Option 2: Declare multiple extended clients The advantage of this option is that you can call any of the extended clients separately. // First of all, store your original Prisma Client in a variable as usualconst prisma = new PrismaClient()// Declare an extended client that has extensionA appliedconst prismaA = prisma.$extends(extensionA)// Declare an extended client that has extensionB appliedconst prismaB = prisma.$extends(extensionB)// Declare an extended client that is a combination of clientA and clientBconst prismaAB = prismaA.$extends(extensionB) In your code, you can call any of these clients separately, for example `prismaA.myExtensionMethod()`, `prismaB.myExtensionMethod()`, or `prismaAB.myExtensionMethod()`. ### Conflicts in combined extensions When you combine two or more extensions into a single extended client, then the _last_ extension that you declare takes precedence in any conflict. In the example in option 1 above, suppose there is a method called `myExtensionMethod()` defined in `extensionA` and a method called `myExtensionMethod()` in `extensionB`. When you call `prismaAB.myExtensionMethod()`, then Prisma Client uses `myExtensionMethod()` as defined in `extensionB`. ## Type of an extended client You can infer the type of an extended Prisma Client instance using the `typeof` utility as follows: const extendedPrismaClient = new PrismaClient().$extends({ /** extension */})type ExtendedPrismaClient = typeof extendedPrismaClient If you're using Prisma Client as a singleton, you can get the type of the extended Prisma Client instance using the `typeof` and `ReturnType` utilities as follows: function getExtendedClient() { return new PrismaClient().$extends({ /* extension */ })}type ExtendedPrismaClient = ReturnType<typeof getExtendedClient> ## Extending model types with `Prisma.Result` You can use the `Prisma.Result` type utility to extend model types to include properties added via client extensions. This allows you to infer the type of the extended model, including the extended properties. ### Example The following example demonstrates how to use `Prisma.Result` to extend the `User` model type to include a `__typename` property added via a client extension. import { PrismaClient, Prisma } from '@prisma/client'const prisma = new PrismaClient().$extends({ result: { user: { __typename: { needs: {}, compute() { return 'User' }, }, }, },})type ExtendedUser = Prisma.Result<typeof prisma.user, { select: { id: true } }, 'findFirstOrThrow'>async function main() { const user: ExtendedUser = await prisma.user.findFirstOrThrow({ select: { id: true, __typename: true, }, }) console.log(user.__typename) // Output: 'User'}main() The `Prisma.Result` type utility is used to infer the type of the extended `User` model, including the `__typename` property added via the client extension. ## Limitations ### Usage of `$on` and `$use` with extended clients `$on` and `$use` are not available in extended clients. If you would like to continue using these client-level methods with an extended client, you will need to hook them up before extending the client. const prisma = new PrismaClient()prisma.$use(async (params, next) => { console.log('This is middleware!') return next(params)})const xPrisma = prisma.$extends({ name: 'myExtension', model: { user: { async signUp(email: string) { await prisma.user.create({ data: { email } }) }, }, },}) To learn more, see our documentation on `$on` and `$use` ### Usage of client-level methods in extended clients Client-level methods do not necessarily exist on extended clients. For these clients you will need to first check for existence before using. const xPrisma = new PrismaClient().$extends(...);if (xPrisma.$connect) { xPrisma.$connect()} ### Usage with nested operations The `query` extension type does not support nested read and write operations. --- ## Page: https://www.prisma.io/docs/orm/prisma-client/type-safety The generated code for Prisma Client contains several helpful types and utilities that you can use to make your application more type-safe. This page describes patterns for leveraging them. > **Note**: If you're interested in advanced type safety topics with Prisma ORM, be sure to check out this blog post about improving your Prisma Client workflows with the new TypeScript `satisfies` keyword. ## Importing generated types You can import the `Prisma` namespace and use dot notation to access types and utilities. The following example shows how to import the `Prisma` namespace and use it to access and use the `Prisma.UserSelect` generated type: import { Prisma } from '@prisma/client'// Build 'select' objectconst userEmail: Prisma.UserSelect = { email: true,}// Use select objectconst createUser = await prisma.user.create({ data: { email: 'bob@prisma.io', }, select: userEmail,}) See also: Using the `Prisma.UserCreateInput` generated type ## What are generated types? Generated types are TypeScript types that are derived from your models. You can use them to create typed objects that you pass into top-level methods like `prisma.user.create(...)` or `prisma.user.update(...)`, or options such as `select` or `include`. For example, `select` accepts an object of type `UserSelect`. Its object properties match those that are supported by `select` statements according to the model. The first tab below shows the `UserSelect` generated type and how each property on the object has a type annotation. The second tab shows the original schema from which the type was generated. * Generated type * Model type Prisma.UserSelect = { id?: boolean | undefined; email?: boolean | undefined; name?: boolean | undefined; posts?: boolean | Prisma.PostFindManyArgs | undefined; profile?: boolean | Prisma.ProfileArgs | undefined;} In TypeScript the concept of type annotations is when you declare a variable and add a type annotation to describe the type of the variable. See the below example. const myAge: number = 37const myName: string = 'Rich' Both of these variable declarations have been given a type annotation to specify what primitive type they are, `number` and `string` respectively. Most of the time this kind of annotation is not needed as TypeScript will infer the type of the variable based on how its initialized. In the above example `myAge` was initialized with a number so TypeScript guesses that it should be typed as a number. Going back to the `UserSelect` type, if you were to use dot notation on the created object `userEmail`, you would have access to all of the fields on the `User` model that can be interacted with using a `select` statement. model User { id Int @id @default(autoincrement()) email String @unique name String? posts Post[] profile Profile?} import { Prisma } from '@prisma/client'const userEmail: Prisma.UserSelect = { email: true,}// properties available on the typed objectuserEmail.iduserEmail.emailuserEmail.nameuserEmail.postsuserEmail.profile In the same mould, you can type an object with an `include` generated type then your object would have access to those properties on which you can use an `include` statement. import { Prisma } from '@prisma/client'const userPosts: Prisma.UserInclude = { posts: true,}// properties available on the typed objectuserPosts.postsuserPosts.profile > See the model query options reference for more information about the different types available. ### Generated `UncheckedInput` types The `UncheckedInput` types are a special set of generated types that allow you to perform some operations that Prisma Client considers "unsafe", like directly writing relation scalar fields. You can choose either the "safe" `Input` types or the "unsafe" `UncheckedInput` type when doing operations like `create`, `update`, or `upsert`. For example, this Prisma schema has a one-to-many relation between `User` and `Post`: model Post { id Int @id @default(autoincrement()) title String @db.VarChar(255) content String? author User @relation(fields: [authorId], references: [id]) authorId Int}model User { id Int @id @default(autoincrement()) email String @unique name String? posts Post[]} The first tab shows the `PostUncheckedCreateInput` generated type. It contains the `authorId` property, which is a relation scalar field. The second tab shows an example query that uses the `PostUncheckedCreateInput` type. This query will result in an error if a user with an `id` of `1` does not exist. * Generated type * Example query type PostUncheckedCreateInput = { id?: number title: string content?: string | null authorId: number} The same query can be rewritten using the "safer" `PostCreateInput` type. This type does not contain the `authorId` field but instead contains the `author` relation field. * Generated type * Example query type PostCreateInput = { title: string content?: string | null author: UserCreateNestedOneWithoutPostsInput}type UserCreateNestedOneWithoutPostsInput = { create?: XOR< UserCreateWithoutPostsInput, UserUncheckedCreateWithoutPostsInput > connectOrCreate?: UserCreateOrConnectWithoutPostsInput connect?: UserWhereUniqueInput} This query will also result in an error if an author with an `id` of `1` does not exist. In this case, Prisma Client will give a more descriptive error message. You can also use the `connectOrCreate` API to safely create a new user if one does not already exist with the given `id`. We recommend using the "safe" `Input` types whenever possible. ## Type utilities info This feature is available from Prisma ORM version 4.9.0 upwards. To help you create highly type-safe applications, Prisma Client provides a set of type utilities that tap into input and output types. These types are fully dynamic, which means that they adapt to any given model and schema. You can use them to improve the auto-completion and developer experience of your projects. This is especially useful in validating inputs and shared Prisma Client extensions. The following type utilities are available in Prisma Client: * `Exact<Input, Shape>`: Enforces strict type safety on `Input`. `Exact` makes sure that a generic type `Input` strictly complies with the type that you specify in `Shape`. It narrows `Input` down to the most precise types. * `Args<Type, Operation>`: Retrieves the input arguments for any given model and operation. This is particularly useful for extension authors who want to do the following: * Re-use existing types to extend or modify them. * Benefit from the same auto-completion experience as on existing operations. * `Result<Type, Arguments, Operation>`: Takes the input arguments and provides the result for a given model and operation. You would usually use this in conjunction with `Args`. As with `Args`, `Result` helps you to re-use existing types to extend or modify them. * `Payload<Type, Operation>`: Retrieves the entire structure of the result, as scalars and relations objects for a given model and operation. For example, you can use this to determine which keys are scalars or objects at a type level. As an example, here's a quick way you can enforce that the arguments to a function matches what you will pass to a `post.create`: type PostCreateBody = Prisma.Args<typeof prisma.post, 'create'>['data']const addPost = async (postBody: PostCreateBody) => { const post = await prisma.post.create({ data: postBody }) return post}await addPost(myData)// ^ guaranteed to match the input of `post.create` --- ## Page: https://www.prisma.io/docs/orm/prisma-client/testing ## Integration testing Integration tests focus on testing how separate parts of the program work together. In the context of applications using a database, integration tests usually require a database to be available and contain data that is convenient to the scenarios intended to be tested. --- ## Page: https://www.prisma.io/docs/orm/prisma-client/deployment ## Deploying database changes To apply pending migrations to staging, testing, or production environments, run the migrate deploy command as part of your CI/CD pipeline: --- ## Page: https://www.prisma.io/docs/orm/prisma-client/observability-and-logging Prisma Optimize helps you generate insights and provides recommendations that can help you make your database queries faster: Optimize aims to help developers of all skill levels write efficient database queries, reducing database load and making applications more responsive. --- ## Page: https://www.prisma.io/docs/orm/prisma-client/debugging-and-troubleshooting Prisma Optimize helps you generate insights and provides recommendations that can help you make your database queries faster: Optimize aims to help developers of all skill levels write efficient database queries, reducing database load and making applications more responsive. --- ## Page: https://www.prisma.io/docs/orm/prisma-migrate ## Getting started This page explains how to get started with migrating your schema in a development environment using Prisma Migrate. --- ## Page: https://www.prisma.io/docs/orm/prisma-migrate/getting-started This page explains how to get started with migrating your schema in a development environment using Prisma Migrate. ## Get started with Prisma Migrate from scratch To get started with Prisma Migrate in a development environment: 1. Create a Prisma schema: schema.prisma datasource db { provider = "postgresql" url = env("DATABASE_URL")}model User { id Int @id @default(autoincrement()) name String posts Post[]}model Post { id Int @id @default(autoincrement()) title String published Boolean @default(true) authorId Int author User @relation(fields: [authorId], references: [id])} tip You can use native type mapping attributes in your schema to decide which exact database type to create (for example, `String` can map to `varchar(100)` or `text`). 1. Create the first migration: prisma migrate dev --name init Show CLI results Your Prisma schema is now in sync with your database schema and you have initialized a migration history: migrations/ └─ 20210313140442_init/ └─ migration.sql 2. Add additional fields to your schema: model User { id Int @id @default(autoincrement()) jobTitle String name String posts Post[]} 3. Create the second migration: prisma migrate dev --name added_job_title Show CLI results Your Prisma schema is once again in sync with your database schema, and your migration history contains two migrations: migrations/ └─ 20210313140442_init/ └─ migration.sql └─ 20210313140442_added_job_title/ └─ migration.sql You now have a migration history that you can source control and use to deploy changes to test environments and production. ## Adding Prisma Migrate to an existing project The steps involved in **adding Prisma Migrate to your existing project** are: 1. Introspect your database to update your Prisma schema 2. Create a baseline migration 3. Update your schema or migration to workaround features not supported by Prisma Schema Language 4. Apply the baseline migration 5. Commit the migration history and Prisma schema ### Introspect to create or update your Prisma schema Make sure your Prisma schema is in sync with your database schema. This should already be true if you are using a previous version of Prisma Migrate. 1. Introspect the database to make sure that your Prisma schema is up-to-date: prisma db pull ### Create a baseline migration Baselining is the process of initializing a migration history for a database that: * Existed before you started using Prisma Migrate * Contains data that must be maintained (like production), which means that the database cannot be reset Baselining tells Prisma Migrate to assume that one or more migrations have **already been applied**. This prevents generated migrations from failing when they try to create tables and fields that already exist. To create a baseline migration: 1. If you have a `prisma/migrations` folder, delete, move, rename, or archive this folder. 2. Run the following command to create a `migrations` directory inside with your preferred name. This example will use `0_init` for the migration name: mkdir -p prisma/migrations/0_init note The `0_` is important because Prisma Migrate applies migrations in a lexicographic order. You can use a different value such as the current timestamp. 3. Generate a migration and save it to a file using `prisma migrate diff`: npx prisma migrate diff \--from-empty \--to-schema-datamodel prisma/schema.prisma \--script > prisma/migrations/0_init/migration.sql 4. Review the generated migration. ### Work around features not supported by Prisma Schema Language To include unsupported database features that already exist in the database, you must replace or modify the initial migration SQL: 1. Open the `migration.sql` file generated in the Create a baseline migration section. 2. Modify the generated SQL. For example: * If the changes are minor, you can append additional custom SQL to the generated migration. The following example creates a partial index: /* Generated migration SQL */CREATE UNIQUE INDEX tests_success_constraint ON posts (subject, target) WHERE success; * If the changes are significant, it can be easier to replace the entire migration file with the result of a database dump (`mysqldump`, `pg_dump`). When using `pg_dump` for this, you'll need to updade the `search_path` as follows with this command: `SELECT pg_catalog.set_config('search_path', '', false);`; otherwise you'll run into the following error: `The underlying table for model '_prisma_migrations' does not exist.` \` info Note that the order of the tables matters when creating all of them at once, since foreign keys are created at the same step. Therefore, either re-order them or move constraint creation to the last step after all tables are created, so you won't face `can't create constraint` errors ### Apply the initial migrations To apply your initial migration(s): 1. Run the following command against your database: npx prisma migrate resolve --applied 0_init 2. Review the database schema to ensure the migration leads to the desired end-state (for example, by comparing the schema to the production database). The new migration history and the database schema should now be in sync with your Prisma schema. ### Commit the migration history and Prisma schema Commit the following to source control: * The entire migration history folder * The `schema.prisma` file ## Going further * Refer to the Deploying database changes with Prisma Migrate guide for more on deploying migrations to production. * Refer to the Production Troubleshooting guide to learn how to debug and resolve failed migrations in production using `prisma migrate diff`, `prisma db execute` and/ or `prisma migrate resolve`. --- ## Page: https://www.prisma.io/docs/orm/prisma-migrate/understanding-prisma-migrate ## About the shadow database The shadow database is a second, temporary database that is created and deleted automatically\\ each time you run prisma migrate dev and is primarily used to detect problems\* such as schema drift or potential data loss of the generated migration. --- ## Page: https://www.prisma.io/docs/orm/prisma-migrate/workflows ## Unsupported database features Prisma Migrate uses the Prisma schema to determine what features to create in the database. However, some database features cannot be represented in the Prisma schema , including but not limited to: --- ## Page: https://www.prisma.io/docs/orm/tools ## Prisma CLI The Prisma command line interface (CLI) is the primary way to interact with your Prisma project from the command line. It can initialize new project assets, generate Prisma Client, and analyze existing database structures through introspection to automatically create your application models. --- ## Page: https://www.prisma.io/docs/orm/tools/prisma-cli The Prisma command line interface (CLI) is the primary way to interact with your Prisma project from the command line. It can initialize new project assets, generate Prisma Client, and analyze existing database structures through introspection to automatically create your application models. ## Command reference See Prisma CLI command reference for a complete list of commands. ## Installation The Prisma CLI is typically installed locally as a **development dependency**, that's why the `--save-dev` (npm) and `--dev` (Yarn) options are used in the commands below. info We **recommend that you install the Prisma CLI locally** in your project's `package.json` to avoid version conflicts that can happen with a global installation. ### npm Install with npm: npm install prisma --save-dev ### Yarn Install with yarn: yarn add prisma --dev ### pnpm Install with pnpm: pnpm install prisma --save-dev ### Bun Install with Bun: bun add prisma Global installation (Not recommended) * **npm** Install with npm: npm install -g prisma * **Yarn** Install with Yarn: yarn global add prisma * **pnpm** Install with pnpm: pnpm install prisma --global * **Bun** Install with Bun: bun add --global prisma ## Usage If you installed Prisma as a development dependency, you need to prefix the `prisma` command with your package runner. ### npm npx prisma ### Yarn yarn prisma ### pnpm pnpm dlx prisma ### Bun bunx prisma ## Synopsis The `prisma` command can be called from command line once installed. When called without arguments, it will display its command usage and help document: prisma Show CLI results Prisma is a modern DB toolkit to query, migrate and model your database (https://www.prisma.io)Usage $ prisma [command]Commands init Setup Prisma for your app generate Generate artifacts (e.g. Prisma Client) db Manage your database schema and lifecycle migrate Migrate your database studio Browse your data with Prisma Studio validate Validate your Prisma schema format Format your Prisma schemaFlags --preview-feature Run Preview Prisma commandsExamples Setup a new Prisma project $ prisma init Generate artifacts (e.g. Prisma Client) $ prisma generate Browse your data $ prisma studio Create migrations from your Prisma schema, apply them to the database, generate artifacts (e.g. Prisma Client) $ prisma migrate dev Pull the schema from an existing database, updating the Prisma schema $ prisma db pull Push the Prisma schema state to the database $ prisma db push You can get additional help on any of the `prisma` commands by adding the `--help` flag after the command. ## Exit codes All `prisma` CLI commands return the following codes when they exit: * exit code 0 when a command runs successfully * exit code 1 when a command errors * exit code 130 when the CLI receives a signal interrupt (SIGINT) message or if the user cancels a prompt. This exit code is available in Prisma ORM versions 4.3.0 and later. ## Telemetry The term **telemetry** refers to the collection of certain usage data to help _improve the quality of a piece of software_. Prisma uses telemetry in two contexts: * when it collects CLI usage data * when it submits CLI error reports This page describes the overall telemetry approach for Prisma, what kind of data is collected and how to opt-out of data collection. ### Why does Prisma collect metrics? Telemetry helps us better understand _how many users_ are using our products and _how often_ they are using our products. Unlike many telemetry services, our telemetry implementation is intentionally limited in scope and is actually useful for the developer: * **Limited in scope**: We use telemetry to answer one question: how many monthly active developers are using Prisma CLI? * **Provides value**: Our telemetry service also checks for version updates and offers security notices. ### When is data collected? Data is collected in two scenarios that are described below. #### Usage data Invocations of the `prisma` CLI and general usage of Studio results in data being sent to the telemetry server at https://checkpoint.prisma.io. Note that: * The data does **not** include your schema or the data in your database * Prisma only sends information after you execute a CLI command Here is an overview of the data that's being submitted: | Field | Attributes | Description | | --- | --- | --- | | `product` | _string_ | Name of the product (e.g. `prisma`) | | `version` | _string_ | Currently installed version of the product (e.g. `1.0.0-rc0`) | | `arch` | _string_ | Client's operating system architecture (e.g. `amd64`). | | `os` | _string_ | Client's operating system (e.g. `darwin`). | | `node_version` | _string_ | Client's node version (e.g. `v12.12.0`). | | `signature` | _string_ | Random, non-identifiable signature UUID (e.g. `91b014df3-9dda-4a27-a8a7-15474fd899f8`) | | `user_agent` | _string_ | User agent of the checkpoint client (e.g. `prisma/js-checkpoint`) | | `timestamp` | _string_ | When the request was made in RFC3339 format (e.g. `2019-12-12T17:45:56Z`) | You can opt-out of this behavior by setting the `CHECKPOINT_DISABLE` environment variable to `1`, e.g.: export CHECKPOINT_DISABLE=1 #### Error reporting Prisma potentially collects error data when there is a crash in the CLI. Before an error report is submitted, there will _always_ be a prompt asking you to confirm or deny the submission of the error report! Error reports are never submitted without your explicit consent! ### How to opt-out of data collection? #### Usage data You can opt-out of usage data collection by setting the `CHECKPOINT_DISABLE` environment variable to `1`, e.g.: export CHECKPOINT_DISABLE=1 #### Error reporting You can opt-out of data collection by responding to the interactive prompt with _no_. --- ## Page: https://www.prisma.io/docs/orm/reference The reference section of the documentation is a collection of reference pages that describe the Prisma ORM APIs and database implementations. ## In this section ## Prisma Client API The Prisma Client API reference documentation is based on the following schema: ## Prisma Schema datasource ## Prisma CLI This document describes the Prisma CLI commands, arguments, and options. ## Errors For more information about how to work with exceptions and error codes, see Handling exceptions and errors. ## Environment variables This document describes different environment variables and their use cases. ## Prisma Config Overview ## Database features matrix This page gives an overview of the features which are provided by the databases that Prisma ORM supports. Additionally, it explains how each of these features can be used in Prisma ORM with pointers to further documentation. ## Supported databases Prisma ORM currently supports the following databases. ## Connection URLs Prisma ORM needs a connection URL to be able to connect to your database, e.g. when sending queries with Prisma Client or when changing the database schema with Prisma Migrate. ## System requirements This page provides an overview of the system requirements for Prisma ORM. ## Preview features --- ## Page: https://www.prisma.io/docs/orm/more ## ORM releases and maturity levels This page explains the release process of Prisma ORM, how it's versioned and how to deal with breaking changes that might happen throughout releases. --- ## Page: https://www.prisma.io/docs/orm/prisma-schema/data-model/models#defining-models The data model definition part of the Prisma schema defines your application models (also called **Prisma models**). Models: * Represent the **entities** of your application domain * Map to the **tables** (relational databases like PostgreSQL) or **collections** (MongoDB) in your database * Form the foundation of the **queries** available in the generated Prisma Client API * When used with TypeScript, Prisma Client provides generated **type definitions** for your models and any variations of them to make database access entirely type safe. The following schema describes a blogging platform - the data model definition is highlighted: * Relational databases * MongoDB datasource db { provider = "postgresql" url = env("DATABASE_URL")}generator client { provider = "prisma-client-js"}model User { id Int @id @default(autoincrement()) email String @unique name String? role Role @default(USER) posts Post[] profile Profile?}model Profile { id Int @id @default(autoincrement()) bio String user User @relation(fields: [userId], references: [id]) userId Int @unique}model Post { id Int @id @default(autoincrement()) createdAt DateTime @default(now()) updatedAt DateTime @updatedAt title String published Boolean @default(false) author User @relation(fields: [authorId], references: [id]) authorId Int categories Category[]}model Category { id Int @id @default(autoincrement()) name String posts Post[]}enum Role { USER ADMIN} The data model definition is made up of: * Models (`model` primitives) that define a number of fields, including relations between models * Enums (`enum` primitives) (if your connector supports Enums) * Attributes and functions that change the behavior of fields and models The corresponding database looks like this: 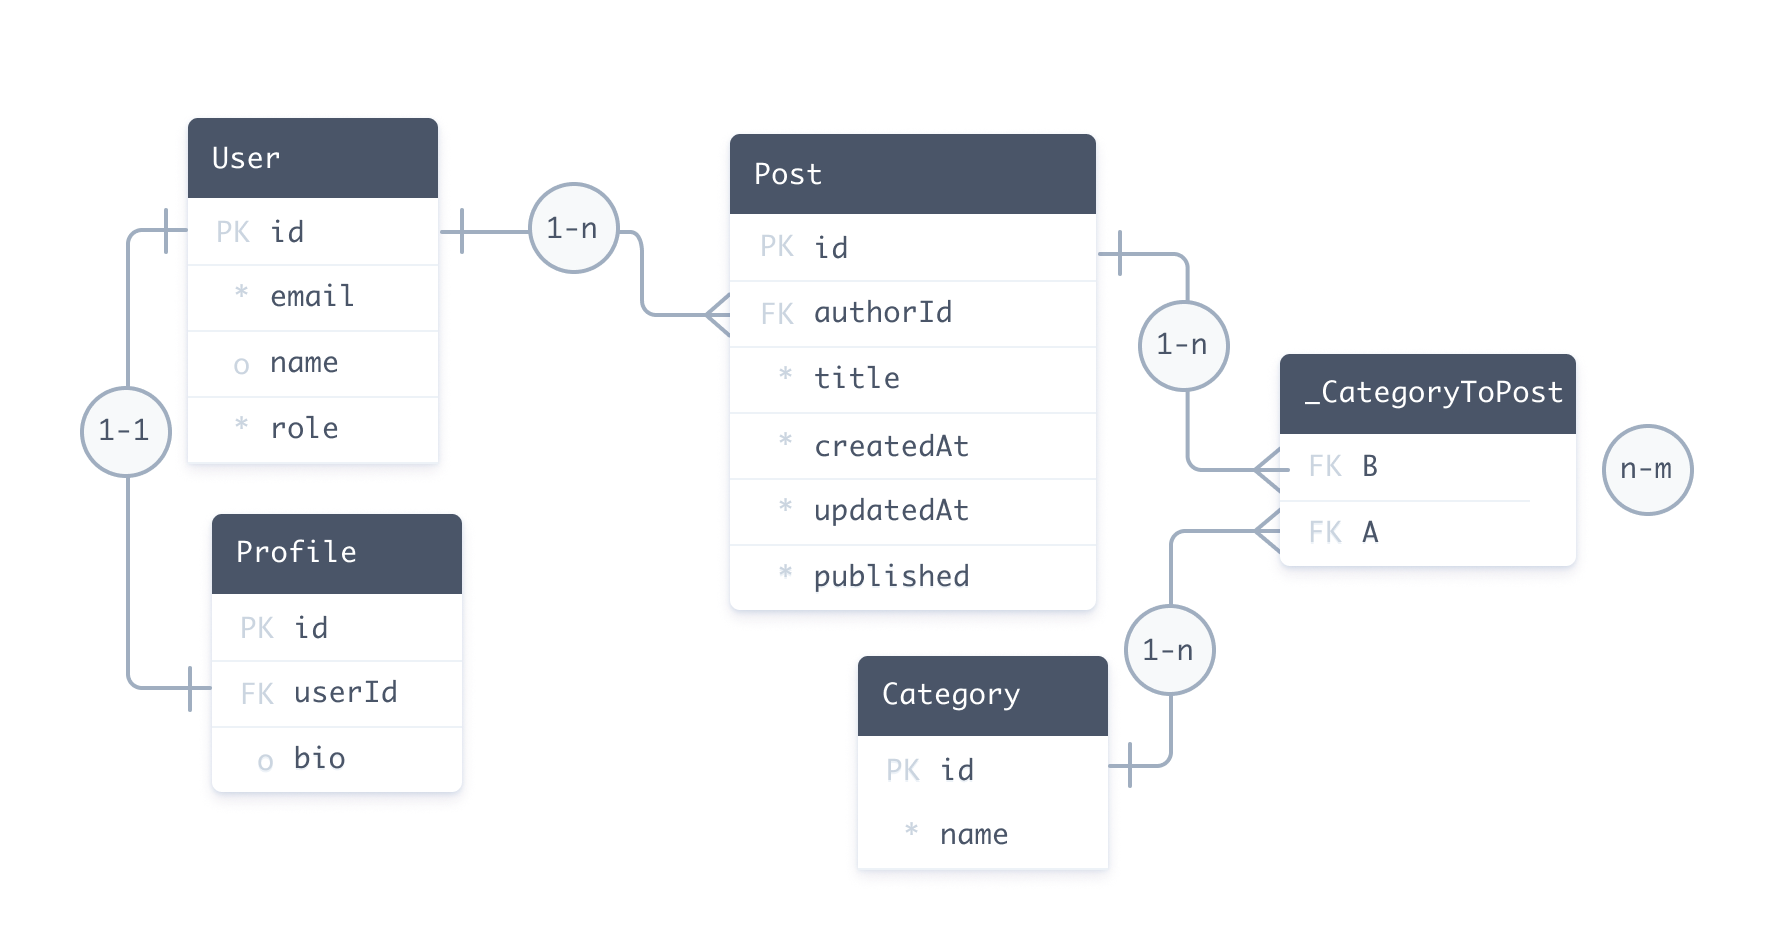 A model maps to the underlying structures of the data source. * In relational databases like PostgreSQL and MySQL, a `model` maps to a **table** * In MongoDB, a `model` maps to a **collection** > **Note**: In the future there might be connectors for non-relational databases and other data sources. For example, for a REST API it would map to a _resource_. The following query uses Prisma Client that's generated from this data model to create: * A `User` record * Two nested `Post` records * Three nested `Category` records * Query Example * Copy-Paste Example const user = await prisma.user.create({ data: { email: 'ariadne@prisma.io', name: 'Ariadne', posts: { create: [ { title: 'My first day at Prisma', categories: { create: { name: 'Office', }, }, }, { title: 'How to connect to a SQLite database', categories: { create: [{ name: 'Databases' }, { name: 'Tutorials' }], }, }, ], }, },}) Your data model reflects _your_ application domain. For example: * In an **ecommerce** application you probably have models like `Customer`, `Order`, `Item` and `Invoice`. * In a **social media** application you probably have models like `User`, `Post`, `Photo` and `Message`. ## Introspection and migration There are two ways to define a data model: * **Write the data model manually and use Prisma Migrate**: You can write your data model manually and map it to your database using Prisma Migrate. In this case, the data model is the single source of truth for the models of your application. * **Generate the data model via introspection**: When you have an existing database or prefer migrating your database schema with SQL, you generate the data model by introspecting your database. In this case, the database schema is the single source of truth for the models of your application. ## Defining models Models represent the entities of your application domain. Models are represented by `model` blocks and define a number of fields. In the example data model above, `User`, `Profile`, `Post` and `Category` are models. A blogging platform can be extended with the following models: model Comment { // Fields}model Tag { // Fields} ### Mapping model names to tables or collections Prisma model naming conventions (singular form, PascalCase) do not always match table names in the database. A common approach for naming tables/collections in databases is to use plural form and snake\_case notation - for example: `comments`. When you introspect a database with a table named `comments`, the result Prisma model will look like this: model comments { // Fields} However, you can still adhere to the naming convention without renaming the underlying `comments` table in the database by using the `@@map` attribute: model Comment { // Fields @@map("comments")} With this model definition, Prisma ORM automatically maps the `Comment` model to the `comments` table in the underlying database. > **Note**: You can also `@map` a column name or enum value, and `@@map` an enum name. `@map` and `@@map` allow you to tune the shape of your Prisma Client API by decoupling model and field names from table and column names in the underlying database. ## Defining fields The properties of a model are called _fields_, which consist of: * A **field name** * A **field type** * Optional **type modifiers** * Optional **attributes**, including native database type attributes A field's type determines its _structure_, and fits into one of two categories: * Scalar types (includes enums) that map to columns (relational databases) or document fields (MongoDB) in the database - for example, `String` or `Int` * Model types (the field is then called relation field) - for example `Post` or `Comment[]`. The following table describes `User` model's fields from the sample schema: Expand to see table | Name | Type | Scalar vs Relation | Type modifier | Attributes | | --- | --- | --- | --- | --- | | `id` | `Int` | Scalar | \- | `@id` and `@default(autoincrement())` | | `email` | `String` | Scalar | \- | `@unique` | | `name` | `String` | Scalar | `?` | \- | | `role` | `Role` | Scalar (`enum`) | \- | `@default(USER)` | | `posts` | `Post` | Relation (Prisma-level field) | `[]` | \- | | `profile` | `Profile` | Relation (Prisma-level field) | `?` | \- | ### Scalar fields The following example extends the `Comment` and `Tag` models with several scalar types. Some fields include attributes: * Relational databases * MongoDB model Comment { id Int @id @default(autoincrement()) title String content String}model Tag { name String @id} See complete list of scalar field types . ### Relation fields A relation field's type is another model - for example, a post (`Post`) can have multiple comments (`Comment[]`): * Relational databases * MongoDB model Post { id Int @id @default(autoincrement()) // Other fields comments Comment[] // A post can have many comments}model Comment { id Int // Other fields post Post? @relation(fields: [postId], references: [id]) // A comment can have one post postId Int?} Refer to the relations documentation for more examples and information about relationships between models. ### Native types mapping Version 2.17.0 and later support **native database type attributes** (type attributes) that describe the underlying database type: model Post { id Int @id title String @db.VarChar(200) content String} Type attributes are: * Specific to the underlying provider - for example, PostgreSQL uses `@db.Boolean` for `Boolean` whereas MySQL uses `@db.TinyInt(1)` * Written in PascalCase (for example, `VarChar` or `Text`) * Prefixed by `@db`, where `db` is the name of the `datasource` block in your schema Furthermore, during Introspection type attributes are _only_ added to the schema if the underlying native type is **not the default type**. For example, if you are using the PostgreSQL provider, `String` fields where the underlying native type is `text` will not have a type attribute. See complete list of native database type attributes per scalar type and provider . #### Benefits and workflows * Control **the exact native type** that Prisma Migrate creates in the database - for example, a `String` can be `@db.VarChar(200)` or `@db.Char(50)` * See an **enriched schema** when you introspect ### Type modifiers The type of a field can be modified by appending either of two modifiers: * `[]` Make a field a list * `?` Make a field optional > **Note**: You **cannot** combine type modifiers - optional lists are not supported. #### Lists The following example includes a scalar list and a list of related models: * Relational databases * MongoDB model Post { id Int @id @default(autoincrement()) // Other fields comments Comment[] // A list of comments keywords String[] // A scalar list} > **Note**: Scalar lists are **only** supported if the database connector supports scalar lists, either natively or at a Prisma ORM level. #### Optional and mandatory fields * Relational databases * MongoDB model Comment { id Int @id @default(autoincrement()) title String content String?}model Tag { name String @id} When **not** annotating a field with the `?` type modifier, the field will be _required_ on every record of the model. This has effects on two levels: * **Databases** * **Relational databases**: Required fields are represented via `NOT NULL` constraints in the underlying database. * **MongoDB**: Required fields are not a concept on a MongoDB database level. * **Prisma Client**: Prisma Client's generated TypeScript types that represent the models in your application code will also define these fields as required to ensure they always carry values at runtime. > **Note**: The default value of an optional field is `null`. ### Unsupported types When you introspect a relational database, unsupported data types are added as `Unsupported` : location Unsupported("POLYGON")? The `Unsupported` type allows you to define fields in the Prisma schema for database types that are not yet supported by Prisma ORM. For example, MySQL's `POLYGON` type is not currently supported by Prisma ORM, but can now be added to the Prisma schema using the `Unsupported("POLYGON")` type. Fields of type `Unsupported` do not appear in the generated Prisma Client API, but you can still use Prisma ORM’s raw database access feature to query these fields. > **Note**: If a model has **mandatory `Unsupported` fields**, the generated client will not include `create` or `update` methods for that model. > **Note**: The MongoDB connector does not support nor require the `Unsupported` type because it supports all scalar types. ## Defining attributes Attributes modify the behavior of fields or model blocks. The following example includes three field attributes (`@id` , `@default` , and `@unique` ) and one block attribute (`@@unique`): * Relational databases * MongoDB model User { id Int @id @default(autoincrement()) firstName String lastName String email String @unique isAdmin Boolean @default(false) @@unique([firstName, lastName])} Some attributes accept arguments - for example, `@default` accepts `true` or `false`: isAdmin Boolean @default(false) // short form of @default(value: false) See complete list of field and block attributes ### Defining an ID field An ID uniquely identifies individual records of a model. A model can only have _one_ ID: * In **relational databases**, the ID can be a single field or based on multiple fields. If a model does not have an `@id` or an `@@id`, you must define a mandatory `@unique` field or `@@unique` block instead. * In **MongoDB**, an ID must be a single field that defines an `@id` attribute and a `@map("_id")` attribute. #### Defining IDs in relational databases In relational databases, an ID can be defined by a single field using the `@id` attribute, or multiple fields using the `@@id` attribute. ##### Single field IDs In the following example, the `User` ID is represented by the `id` integer field: model User { id Int @id @default(autoincrement()) email String @unique name String? role Role @default(USER) posts Post[] profile Profile?} ##### Composite IDs In the following example, the `User` ID is represented by a combination of the `firstName` and `lastName` fields: model User { firstName String lastName String email String @unique isAdmin Boolean @default(false) @@id([firstName, lastName])} By default, the name of this field in Prisma Client queries will be `firstName_lastName`. You can also provide your own name for the composite ID using the `@@id` attribute's `name` field: model User { firstName String lastName String email String @unique isAdmin Boolean @default(false) @@id(name: "fullName", fields: [firstName, lastName])} The `firstName_lastName` field will now be named `fullName` instead. ##### `@unique` fields as unique identifiers In the following example, users are uniquely identified by a `@unique` field. Because the `email` field functions as a unique identifier for the model (which is required), it must be mandatory: model User { email String @unique name String? role Role @default(USER) posts Post[] profile Profile?} #### Defining IDs in MongoDB The MongoDB connector has specific rules for defining an ID field that differs from relational databases. An ID must be defined by a single field using the `@id` attribute and must include `@map("_id")`. In the following example, the `User` ID is represented by the `id` string field that accepts an auto-generated `ObjectId`: model User { id String @id @default(auto()) @map("_id") @db.ObjectId email String @unique name String? role Role @default(USER) posts Post[] profile Profile?} In the following example, the `User` ID is represented by the `id` string field that accepts something other than an `ObjectId` - for example, a unique username: model User { id String @id @map("_id") email String @unique name String? role Role @default(USER) posts Post[] profile Profile?} warning **MongoDB does not support `@@id`** MongoDB does not support composite IDs, which means you cannot identify a model with a `@@id` block. ### Defining a default value You can define default values for scalar fields of your models using the `@default` attribute: * Relational databases * MongoDB model Post { id Int @id @default(autoincrement()) createdAt DateTime @default(now()) title String published Boolean @default(false) data Json @default("{ \"hello\": \"world\" }") author User @relation(fields: [authorId], references: [id]) authorId Int categories Category[] @relation(references: [id])} `@default` attributes either: * Represent `DEFAULT` values in the underlying database (relational databases only) _or_ * Use a Prisma ORM-level function. For example, `cuid()` and `uuid()` are provided by Prisma Client's query engine for all connectors. Default values can be: * Static values that correspond to the field type, such as `5` (`Int`), `Hello` (`String`), or `false` (`Boolean`) * Lists of static values, such as `[5, 6, 8]` (`Int[]`) or `["Hello", "Goodbye"]` (`String`\[\]). These are available in Prisma ORM versions `4.0.0` and later, when using supported databases (PostgreSQL, CockroachDB and MongoDB) * Functions, such as `now()` or `uuid()` * JSON data. Note that JSON needs to be enclosed with double-quotes inside the `@default` attribute, e.g.: `@default("[]")`. If you want to provide a JSON object, you need to enclose it with double-quotes and then escape any internal double quotes using a backslash, e.g.: `@default("{ \"hello\": \"world\" }")`. ### Defining a unique field You can add unique attributes to your models to be able to uniquely identify individual records of that model. Unique attributes can be defined on a single field using `@unique` attribute, or on multiple fields (also called composite or compound unique constraints) using the `@@unique` attribute. In the following example, the value of the `email` field must be unique: * Relational databases * MongoDB model User { id Int @id @default(autoincrement()) email String @unique name String?} In the following example, a combination of `authorId` and `title` must be unique: * Relational databases * MongoDB model Post { id Int @id @default(autoincrement()) createdAt DateTime @default(now()) title String published Boolean @default(false) author User @relation(fields: [authorId], references: [id]) authorId Int categories Category[] @relation(references: [id]) @@unique([authorId, title])} By default, the name of this field in Prisma Client queries will be `authorId_title`. You can also provide your own name for the composite unique constraint using the `@@unique` attribute's `name` field: model Post { id String @id @default(auto()) @map("_id") @db.ObjectId createdAt DateTime @default(now()) title String published Boolean @default(false) author User @relation(fields: [authorId], references: [id]) authorId String @db.ObjectId categories Category[] @relation(references: [id]) @@unique(name: "authorTitle", [authorId, title])} The `authorId_title` field will now be named `authorTitle` instead. #### Composite type unique constraints When using the MongoDB provider in version `3.12.0` and later, you can define a unique constraint on a field of a composite type using the syntax `@@unique([compositeType.field])`. As with other fields, composite type fields can be used as part of a multi-column unique constraint. The following example defines a multi-column unique constraint based on the `email` field of the `User` model and the `number` field of the `Address` composite type which is used in `User.address`: schema.prisma type Address { street String number Int}model User { id Int @id email String address Address @@unique([email, address.number])} This notation can be chained if there is more than one nested composite type: schema.prisma type City { name String}type Address { number Int city City}model User { id Int @id address Address[] @@unique([address.city.name])} ### Defining an index You can define indexes on one or multiple fields of your models via the `@@index` on a model. The following example defines a multi-column index based on the `title` and `content` field: model Post { id Int @id @default(autoincrement()) title String content String? @@index([title, content])} info **Index names in relational databases** You can optionally define a custom index name in the underlying database. #### Defining composite type indexes When using the MongoDB provider in version `3.12.0` and later, you can define an index on a field of a composite type using the syntax `@@index([compositeType.field])`. As with other fields, composite type fields can be used as part of a multi-column index. The following example defines a multi-column index based on the `email` field of the `User` model and the `number` field of the `Address` composite type: schema.prisma type Address { street String number Int}model User { id Int @id email String address Address @@index([email, address.number])} This notation can be chained if there is more than one nested composite type: schema.prisma type City { name String}type Address { number Int city City}model User { id Int @id address Address[] @@index([address.city.name])} ## Defining enums You can define enums in your data model if enums are supported for your database connector, either natively or at Prisma ORM level. Enums are considered scalar types in the Prisma schema data model. They're therefore by default included as return values in Prisma Client queries. Enums are defined via the `enum` block. For example, a `User` has a `Role`: * Relational databases * MongoDB model User { id Int @id @default(autoincrement()) email String @unique name String? role Role @default(USER)}enum Role { USER ADMIN} ## Defining composite types info Composite types were added in version `3.10.0` under the `mongodb` Preview feature flag and are in General Availability since version `3.12.0`. warning Composite types are currently only available on MongoDB. Composite types (known as embedded documents in MongoDB) provide support for embedding records inside other records, by allowing you to define new object types. Composite types are structured and typed in a similar way to models. To define a composite type, use the `type` block. As an example, take the following schema: schema.prisma model Product { id String @id @default(auto()) @map("_id") @db.ObjectId name String photos Photo[]}type Photo { height Int width Int url String} In this case, the `Product` model has a list of `Photo` composite types stored in `photos`. ### Considerations when using composite types Composite types only support a limited set of attributes. The following attributes are supported: * `@default` * `@map` * Native types, such as `@db.ObjectId` The following attributes are not supported inside composite types: * `@unique` * `@id` * `@relation` * `@ignore` * `@updatedAt` However, unique constraints can still be defined by using the `@@unique` attribute on the level of the model that uses the composite type. For more details, see Composite type unique constraints. Indexes can be defined by using the `@@index` attribute on the level of the model that uses the composite type. For more details, see Composite type indexes. ## Using functions The Prisma schema supports a number of functions . These can be used to specify default values on fields of a model. For example, the default value of `createdAt` is `now()` : * Relational databases * MongoDB model Post { id Int @id @default(autoincrement()) createdAt DateTime @default(now())} `cuid()` and `uuid()` are implemented by Prisma ORM and therefore are not "visible" in the underlying database schema. You can still use them when using introspection by manually changing your Prisma schema and generating Prisma Client, in that case the values will be generated by Prisma Client's query engine Support for `autoincrement()`, `now()`, and `dbgenerated(...)` differ between databases. **Relational database connectors** implement `autoincrement()`, `dbgenerated(...)`, and `now()` at database level. The **MongoDB connector** does not support `autoincrement()` or `dbgenerated(...)`, and `now()` is implemented at the Prisma ORM level. The `auto()` function is used to generate an `ObjectId`. ## Relations Refer to the relations documentation for more examples and information about relationships between models. ## Models in Prisma Client ### Queries (CRUD) Every model in the data model definition will result in a number of CRUD queries in the generated Prisma Client API: * `findMany()` * `findFirst()` * `findFirstOrThrow()` * `findUnique()` * `findUniqueOrThrow()` * `create()` * `update()` * `upsert()` * `delete()` * `createMany()` * `createManyAndReturn()` * `updateMany()` * `updateManyAndReturn()` * `deleteMany()` The operations are accessible via a generated property on the Prisma Client instance. By default the name of the property is the lowercase form of the model name, e.g. `user` for a `User` model or `post` for a `Post` model. Here is an example illustrating the use of a `user` property from the Prisma Client API: const newUser = await prisma.user.create({ data: { name: 'Alice', },})const allUsers = await prisma.user.findMany() ### Type definitions Prisma Client also generates **type definitions** that reflect your model structures. These are part of the generated `@prisma/client` node module. When using TypeScript, these type definitions ensure that all your database queries are entirely type safe and validated at compile-time (even partial queries using `select` or `include` ). Even when using plain JavaScript, the type definitions are still included in the `@prisma/client` node module, enabling features like IntelliSense/autocompletion in your editor. > **Note**: The actual types are stored in the `.prisma/client` folder. `@prisma/client/index.d.ts` exports the contents of this folder. For example, the type definition for the `User` model from above would look as follows: export type User = { id: number email: string name: string | null role: string} Note that the relation fields `posts` and `profile` are not included in the type definition by default. However, if you need variations of the `User` type you can still define them using some of Prisma Client's generated helper types (in this case, these helper types would be called `UserGetIncludePayload` and `UserGetSelectPayload`). ## Limitations ### Records must be uniquely identifiable Prisma ORM currently only supports models that have at least one unique field or combination of fields. In practice, this means that every Prisma model must have either at least one of the following attributes: * `@id` or `@@id` for a single- or multi-field primary key constraint (max one per model) * `@unique` or `@@unique` for a single- or multi-field unique constraint --- ## Page: https://www.prisma.io/docs/orm/overview/prisma-in-your-stack/rest When building REST APIs, Prisma Client can be used inside your _route controllers_ to send databases queries.  ## Supported libraries As Prisma Client is "only" responsible for sending queries to your database, it can be combined with any HTTP server library or web framework of your choice. Here's a non-exhaustive list of libraries and frameworks you can use with Prisma ORM: * Express * koa * hapi * Fastify * Sails * AdonisJs * NestJS * Next.js * Foal TS * Polka * Micro * Feathers * Remix ## REST API server example Assume you have a Prisma schema that looks similar to this: datasource db { provider = "sqlite" url = "file:./dev.db"}generator client { provider = "prisma-client-js"}model Post { id Int @id @default(autoincrement()) title String content String? published Boolean @default(false) author User? @relation(fields: [authorId], references: [id]) authorId Int?}model User { id Int @id @default(autoincrement()) email String @unique name String? posts Post[]} You can now implement route controller (e.g. using Express) that use the generated Prisma Client API to perform a database operation when an incoming HTTP request arrives. This page only shows few sample code snippets; if you want to run these code snippets, you can use a REST API example. #### `GET` app.get('/feed', async (req, res) => { const posts = await prisma.post.findMany({ where: { published: true }, include: { author: true }, }) res.json(posts)}) Note that the `feed` endpoint in this case returns a nested JSON response of `Post` objects that _include_ an `author` object. Here's a sample response: [ { "id": "21", "title": "Hello World", "content": "null", "published": "true", "authorId": 42, "author": { "id": "42", "name": "Alice", "email": "alice@prisma.io" } }] #### `POST` app.post(`/post`, async (req, res) => { const { title, content, authorEmail } = req.body const result = await prisma.post.create({ data: { title, content, published: false, author: { connect: { email: authorEmail } }, }, }) res.json(result)}) #### `PUT` app.put('/publish/:id', async (req, res) => { const { id } = req.params const post = await prisma.post.update({ where: { id: Number(id) }, data: { published: true }, }) res.json(post)}) #### `DELETE` app.delete(`/post/:id`, async (req, res) => { const { id } = req.params const post = await prisma.post.delete({ where: { id: Number(id), }, }) res.json(post)}) ## Ready-to-run example projects You can find several ready-to-run examples that show how to implement a REST API with Prisma Client, as well as build full applications, in the `prisma-examples` repository. | **Example** | **Stack** | **Description** | | --- | --- | --- | | `express` | Backend only | REST API with Express for TypeScript | | `fastify` | Backend only | REST API using Fastify and Prisma Client. | | `hapi` | Backend only | REST API using hapi and Prisma Client | | `nestjs` | Backend only | Nest.js app (Express) with a REST API | | `nextjs` | Fullstack | Next.js app (React) with a REST API | --- ## Page: https://www.prisma.io/docs/orm/overview/prisma-in-your-stack/graphql GraphQL is a query language for APIs. It is often used as an alternative to RESTful APIs, but can also be used as an additional "gateway" layer on top of existing RESTful services. With Prisma ORM, you can build GraphQL servers that connect to a database. Prisma ORM is completely agnostic to the GraphQL tools you use. When building a GraphQL server, you can combine Prisma ORM with tools like Apollo Server, GraphQL Yoga, TypeGraphQL, GraphQL.js, or pretty much any tool or library that you're using in your GraphQL server setup. ## GraphQL servers under the hood A GraphQL server consists of two major components: * GraphQL schema (type definitions + resolvers) * HTTP server Note that a GraphQL schema can be written code-first or SDL-first. Check out this article to learn more about these two approaches. If you like the SDL-first approach but still want to make your code type-safe, check out GraphQL Code Generator to generate various type definitions based on SDL. The GraphQL schema and HTTP server are typically handled by separate libraries. Here is an overview of current GraphQL server tools and their purpose: | Library (npm package) | Purpose | Compatible with Prisma ORM | Prisma integration | | --- | --- | --- | --- | | `graphql` | GraphQL schema (code-first) | Yes | No | | `graphql-tools` | GraphQL schema (SDL-first) | Yes | No | | `type-graphql` | GraphQL schema (code-first) | Yes | `typegraphql-prisma` | | `nexus` | GraphQL schema (code-first) | Yes | `nexus-prisma` _Early Preview_ | | `apollo-server` | HTTP server | Yes | n/a | | `express-graphql` | HTTP server | Yes | n/a | | `fastify-gql` | HTTP server | Yes | n/a | | `graphql-yoga` | HTTP server | Yes | n/a | In addition to these standalone and single-purpose libraries, there are several projects building integrated _application frameworks_: | Framework | Stack | Built by | Prisma ORM | Description | | --- | --- | --- | --- | --- | | Redwood.js | Fullstack | Tom Preston-Werner | Built on top of Prisma ORM | _Bringing full-stack to the JAMstack._ | > **Note**: If you notice any GraphQL libraries/frameworks missing from the list, please let us know. ## Prisma ORM & GraphQL examples In the following section will find several ready-to-run examples that showcase how to use Prisma ORM with different combinations of the tools mentioned in the table above. | Example | HTTP Server | GraphQL schema | Description | | --- | --- | --- | --- | | GraphQL API (Pothos) | `graphql-yoga` | `pothos` | GraphQL server based on `graphql-yoga` | | GraphQL API (SDL-first) | `graphql-yoga` | n/a | GraphQL server based on the SDL-first approach | | GraphQL API -- NestJs | `@nestjs/apollo` | n/a | GraphQL server based on NestJS | | GraphQL API -- NestJs (SDL-first) | `@nestjs/apollo` | n/a | GraphQL server based on NestJS | | GraphQL API (Nexus) | `@apollo/server` | `nexus` | GraphQL server based on `@apollo/server` | | GraphQL API (TypeGraphQL) | `apollo-server` | `type-graphql` | GraphQL server based on the code-first approach of TypeGraphQL | | GraphQL API (Auth) | `apollo-server` | `nexus` | GraphQL server with email-password authentication & permissions | | Fullstack app | `graphql-yoga` | `pothos` | Fullstack app with Next.js (React), Apollo Client, GraphQL Yoga and Pothos | | GraphQL subscriptions | `apollo-server` | `nexus` | GraphQL server implementing realtime GraphQL subscriptions | | GraphQL API -- Hapi | `apollo-server-hapi` | `nexus` | GraphQL server based on Hapi | | GraphQL API -- Hapi (SDL-first) | `apollo-server-hapi` | `graphql-tools` | GraphQL server based on Hapi | | GraphQL API -- Fastify | `fastify` & `mercurius` | n/a | GraphQL server based on Fastify and Mercurius | | GraphQL API -- Fastify (SDL-first) | `fastify` | `Nexus` | GraphQL server based on Fastify and Mercurius | ## FAQ ### What is Prisma ORM's role in a GraphQL server? No matter which of the above GraphQL tools/libraries you use, Prisma ORM is used inside your GraphQL resolvers to connect to your database. It has the same role that any other ORM or SQL query builder would have inside your resolvers. In the resolver of a GraphQL query, Prisma ORM typically reads data from the database to return it in the GraphQL response. In the resolver of a GraphQL mutation, Prisma ORM typically also writes data to the database (e.g. creating new or updating existing records). ## Other GraphQL Resources Prisma curates GraphQL Weekly, a newsletter highlighting resources and updates from the GraphQL community. Subscribe to keep up-to-date with GraphQL articles, videos, tutorials, libraries, and more. --- ## Page: https://www.prisma.io/docs/orm/prisma-schema/data-model/relations A relation is a _connection_ between two models in the Prisma schema. For example, there is a one-to-many relation between `User` and `Post` because one user can have many blog posts. The following Prisma schema defines a one-to-many relation between the `User` and `Post` models. The fields involved in defining the relation are highlighted: * Relational databases * MongoDB model User { id Int @id @default(autoincrement()) posts Post[]}model Post { id Int @id @default(autoincrement()) author User @relation(fields: [authorId], references: [id]) authorId Int // relation scalar field (used in the `@relation` attribute above) title String} At a Prisma ORM level, the `User` / `Post` relation is made up of: * Two relation fields: `author` and `posts`. Relation fields define connections between models at the Prisma ORM level and **do not exist in the database**. These fields are used to generate Prisma Client. * The scalar `authorId` field, which is referenced by the `@relation` attribute. This field **does exist in the database** - it is the foreign key that connects `Post` and `User`. At a Prisma ORM level, a connection between two models is **always** represented by a relation field on **each side** of the relation. ## Relations in the database ### Relational databases The following entity relationship diagram defines the same one-to-many relation between the `User` and `Post` tables in a **relational database**: 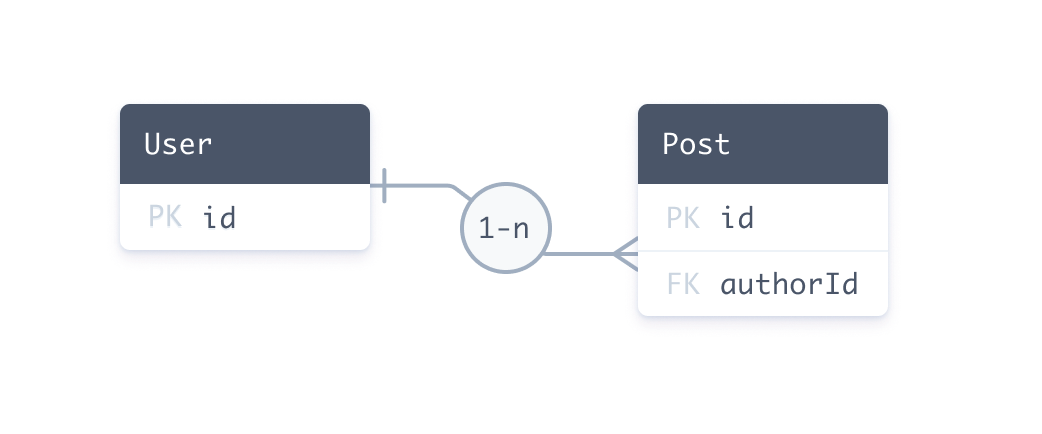 In SQL, you use a _foreign key_ to create a relation between two tables. Foreign keys are stored on **one side** of the relation. Our example is made up of: * A foreign key column in the `Post` table named `authorId`. * A primary key column in the `User` table named `id`. The `authorId` column in the `Post` table references the `id` column in the `User` table. In the Prisma schema, the foreign key / primary key relationship is represented by the `@relation` attribute on the `author` field: author User @relation(fields: [authorId], references: [id]) > **Note**: Relations in the Prisma schema represent relationships that exist between tables in the database. If the relationship does not exist in the database, it does not exist in the Prisma schema. ### MongoDB For MongoDB, Prisma ORM currently uses a normalized data model design, which means that documents reference each other by ID in a similar way to relational databases. The following document represents a `User` (in the `User` collection): { "_id": { "$oid": "60d5922d00581b8f0062e3a8" }, "name": "Ella" } The following list of `Post` documents (in the `Post` collection) each have a `authorId` field which reference the same user: [ { "_id": { "$oid": "60d5922e00581b8f0062e3a9" }, "title": "How to make sushi", "authorId": { "$oid": "60d5922d00581b8f0062e3a8" } }, { "_id": { "$oid": "60d5922e00581b8f0062e3aa" }, "title": "How to re-install Windows", "authorId": { "$oid": "60d5922d00581b8f0062e3a8" } }] This data structure represents a one-to-many relation because multiple `Post` documents refer to the same `User` document. #### `@db.ObjectId` on IDs and relation scalar fields If your model's ID is an `ObjectId` (represented by a `String` field), you must add `@db.ObjectId` to the model's ID _and_ the relation scalar field on the other side of the relation: model User { id String @id @default(auto()) @map("_id") @db.ObjectId posts Post[]}model Post { id String @id @default(auto()) @map("_id") @db.ObjectId author User @relation(fields: [authorId], references: [id]) authorId String @db.ObjectId // relation scalar field (used in the `@relation` attribute above) title String} ## Relations in Prisma Client Prisma Client is generated from the Prisma schema. The following examples demonstrate how relations manifest when you use Prisma Client to get, create, and update records. ### Create a record and nested records The following query creates a `User` record and two connected `Post` records: const userAndPosts = await prisma.user.create({ data: { posts: { create: [ { title: 'Prisma Day 2020' }, // Populates authorId with user's id { title: 'How to write a Prisma schema' }, // Populates authorId with user's id ], }, },}) In the underlying database, this query: 1. Creates a `User` with an auto-generated `id` (for example, `20`) 2. Creates two new `Post` records and sets the `authorId` of both records to `20` ### Retrieve a record and include related records The following query retrieves a `User` by `id` and includes any related `Post` records: const getAuthor = await prisma.user.findUnique({ where: { id: "20", }, include: { posts: true, // All posts where authorId == 20 },}); In the underlying database, this query: 1. Retrieves the `User` record with an `id` of `20` 2. Retrieves all `Post` records with an `authorId` of `20` ### Associate an existing record to another existing record The following query associates an existing `Post` record with an existing `User` record: const updateAuthor = await prisma.user.update({ where: { id: 20, }, data: { posts: { connect: { id: 4, }, }, },}) In the underlying database, this query uses a nested `connect` query to link the post with an `id` of 4 to the user with an `id` of 20. The query does this with the following steps: * The query first looks for the user with an `id` of `20`. * The query then sets the `authorID` foreign key to `20`. This links the post with an `id` of `4` to the user with an `id` of `20`. In this query, the current value of `authorID` does not matter. The query changes `authorID` to `20`, no matter its current value. ## Types of relations There are three different types (or cardinalities) of relations in Prisma ORM: * One-to-one (also called 1-1 relations) * One-to-many (also called 1-n relations) * Many-to-many (also called m-n relations) The following Prisma schema includes every type of relation: * one-to-one: `User` ↔ `Profile` * one-to-many: `User` ↔ `Post` * many-to-many: `Post` ↔ `Category` * Relational databases * MongoDB model User { id Int @id @default(autoincrement()) posts Post[] profile Profile?}model Profile { id Int @id @default(autoincrement()) user User @relation(fields: [userId], references: [id]) userId Int @unique // relation scalar field (used in the `@relation` attribute above)}model Post { id Int @id @default(autoincrement()) author User @relation(fields: [authorId], references: [id]) authorId Int // relation scalar field (used in the `@relation` attribute above) categories Category[]}model Category { id Int @id @default(autoincrement()) posts Post[]} Notice that the syntax is slightly different between relational databases and MongoDB - particularly for many-to-many relations. For relational databases, the following entity relationship diagram represents the database that corresponds to the sample Prisma schema:  For MongoDB, Prisma ORM uses a normalized data model design, which means that documents reference each other by ID in a similar way to relational databases. See the MongoDB section for more details. ### Implicit and explicit many-to-many relations Many-to-many relations in relational databases can be modelled in two ways: * explicit many-to-many relations, where the relation table is represented as an explicit model in your Prisma schema * implicit many-to-many relations, where Prisma ORM manages the relation table and it does not appear in the Prisma schema. Implicit many-to-many relations require both models to have a single `@id`. Be aware of the following: * You cannot use a multi-field ID * You cannot use a `@unique` in place of an `@id` To use either of these features, you must set up an explicit many-to-many instead. The implicit many-to-many relation still manifests in a relation table in the underlying database. However, Prisma ORM manages this relation table. If you use an implicit many-to-many relation instead of an explicit one, it makes the Prisma Client API simpler (because, for example, you have one fewer level of nesting inside of nested writes). If you're not using Prisma Migrate but obtain your data model from introspection, you can still make use of implicit many-to-many relations by following Prisma ORM's conventions for relation tables. ## Relation fields Relation fields are fields on a Prisma model that do _not_ have a scalar type. Instead, their type is another model. Every relation must have exactly two relation fields, one on each model. In the case of one-to-one and one-to-many relations, an additional _relation scalar field_ is required which gets linked by one of the two relation fields in the `@relation` attribute. This relation scalar field is the direct representation of the _foreign key_ in the underlying database. * Relational databases * MongoDB model User { id Int @id @default(autoincrement()) email String @unique role Role @default(USER) posts Post[] // relation field (defined only at the Prisma ORM level)}model Post { id Int @id @default(autoincrement()) title String author User @relation(fields: [authorId], references: [id]) // relation field (uses the relation scalar field `authorId` below) authorId Int // relation scalar field (used in the `@relation` attribute above)} Both `posts` and `author` are relation fields because their types are not scalar types but other models. Also note that the annotated relation field `author` needs to link the relation scalar field `authorId` on the `Post` model inside the `@relation` attribute. The relation scalar field represents the foreign key in the underlying database. Both the relation fields (i.e. `posts` and `author`) are defined purely on a Prisma ORM-level, they don't manifest in the database. ### Annotated relation fields Relations that require one side of the relation to be _annotated_ with the `@relation` attribute are referred to as _annotated relation fields_. This includes: * one-to-one relations * one-to-many relations * many-to-many relations for MongoDB only The side of the relation which is annotated with the `@relation` attribute represents the side that **stores the foreign key in the underlying database**. The "actual" field that represents the foreign key is required on that side of the relation as well, it's called _relation scalar field_, and is referenced inside `@relation` attribute: * Relational databases * MongoDB author User @relation(fields: [authorId], references: [id])authorId Int A scalar field _becomes_ a relation scalar field when it's used in the `fields` of a `@relation` attribute. ### Relation scalar fields #### Relation scalar field naming conventions Because a relation scalar field always _belongs_ to a relation field, the following naming convention is common: * Relation field: `author` * Relation scalar field: `authorId` (relation field name + `Id`) ## The `@relation` attribute The `@relation` attribute can only be applied to the relation fields, not to scalar fields. The `@relation` attribute is required when: * you define a one-to-one or one-to-many relation, it is required on _one side_ of the relation (with the corresponding relation scalar field) * you need to disambiguate a relation (that's e.g. the case when you have two relations between the same models) * you define a self-relation * you define a many-to-many relation for MongoDB * you need to control how the relation table is represented in the underlying database (e.g. use a specific name for a relation table) > **Note**: Implicit many-to-many relations in relational databases do not require the `@relation` attribute. ## Disambiguating relations When you define two relations between the same two models, you need to add the `name` argument in the `@relation` attribute to disambiguate them. As an example for why that's needed, consider the following models: * Relational databases * MongoDB // NOTE: This schema is intentionally incorrect. See below for a working solution.model User { id Int @id @default(autoincrement()) name String? writtenPosts Post[] pinnedPost Post?}model Post { id Int @id @default(autoincrement()) title String? author User @relation(fields: [authorId], references: [id]) authorId Int pinnedBy User? @relation(fields: [pinnedById], references: [id]) pinnedById Int?} In that case, the relations are ambiguous, there are four different ways to interpret them: * `User.writtenPosts` ↔ `Post.author` + `Post.authorId` * `User.writtenPosts` ↔ `Post.pinnedBy` + `Post.pinnedById` * `User.pinnedPost` ↔ `Post.author` + `Post.authorId` * `User.pinnedPost` ↔ `Post.pinnedBy` + `Post.pinnedById` To disambiguate these relations, you need to annotate the relation fields with the `@relation` attribute and provide the `name` argument. You can set any `name` (except for the empty string `""`), but it must be the same on both sides of the relation: * Relational databases * MongoDB model User { id Int @id @default(autoincrement()) name String? writtenPosts Post[] @relation("WrittenPosts") pinnedPost Post? @relation("PinnedPost")}model Post { id Int @id @default(autoincrement()) title String? author User @relation("WrittenPosts", fields: [authorId], references: [id]) authorId Int pinnedBy User? @relation("PinnedPost", fields: [pinnedById], references: [id]) pinnedById Int? @unique} --- ## Page: https://www.prisma.io/docs/orm/prisma-client/queries/relation-queries A key feature of Prisma Client is the ability to query relations between two or more models. Relation queries include: * Nested reads (sometimes referred to as _eager loading_) via `select` and `include` * Nested writes with transactional guarantees * Filtering on related records Prisma Client also has a fluent API for traversing relations. ## Nested reads Nested reads allow you to read related data from multiple tables in your database - such as a user and that user's posts. You can: * Use `include` to include related records, such as a user's posts or profile, in the query response. * Use a nested `select` to include specific fields from a related record. You can also nest `select` inside an `include`. ### Relation load strategies (Preview) Since version 5.8.0, you can decide on a per-query-level _how_ you want Prisma Client to execute a relation query (i.e. what _load strategy_ should be applied) via the `relationLoadStrategy` option for PostgreSQL databases. Since version 5.10.0, this feature is also available for MySQL. Because the `relationLoadStrategy` option is currently in Preview, you need to enable it via the `relationJoins` preview feature flag in your Prisma schema file: schema.prisma generator client { provider = "prisma-client-js" previewFeatures = ["relationJoins"]} After adding this flag, you need to run `prisma generate` again to re-generate Prisma Client. The `relationJoins` feature is currently available on PostgreSQL, CockroachDB and MySQL. Prisma Client supports two load strategies for relations: * `join` (default): Uses a database-level `LATERAL JOIN` (PostgreSQL) or correlated subqueries (MySQL) and fetches all data with a single query to the database. * `query`: Sends multiple queries to the database (one per table) and joins them on the application level. Another important difference between these two options is that the `join` strategy uses JSON aggregation on the database level. That means that it creates the JSON structures returned by Prisma Client already in the database which saves computation resources on the application level. > **Note**: Once `relationLoadStrategy` moves from Preview into General Availability, `join` will universally become the default for all relation queries. #### Examples You can use the `relationLoadStrategy` option on the top-level in any query that supports `include` or `select`. Here is an example with `include`: const users = await prisma.user.findMany({ relationLoadStrategy: 'join', // or 'query' include: { posts: true, },}) And here is another example with `select`: const users = await prisma.user.findMany({ relationLoadStrategy: 'join', // or 'query' select: { posts: true, },}) #### When to use which load strategy? * The `join` strategy (default) will be more effective in most scenarios. On PostgreSQL, it uses a combination of `LATERAL JOINs` and JSON aggregation to reduce redundancy in result sets and delegate the work of transforming the query results into the expected JSON structures on the database server. On MySQL, it uses correlated subqueries to fetch the results with a single query. * There may be edge cases where `query` could be more performant depending on the characteristics of the dataset and query. We recommend that you profile your database queries to identify these situations. * Use `query` if you want to save resources on the database server and do heavy-lifting of merging and transforming data in the application server which might be easier to scale. ### Include a relation The following example returns a single user and that user's posts: const user = await prisma.user.findFirst({ include: { posts: true, },}) Show query results ### Include all fields for a specific relation The following example returns a post and its author: const post = await prisma.post.findFirst({ include: { author: true, },}) Show query results ### Include deeply nested relations You can nest `include` options to include relations of relations. The following example returns a user's posts, and each post's categories: const user = await prisma.user.findFirst({ include: { posts: { include: { categories: true, }, }, },}) Show query results ### Select specific fields of included relations You can use a nested `select` to choose a subset of fields of relations to return. For example, the following query returns the user's `name` and the `title` of each related post: const user = await prisma.user.findFirst({ select: { name: true, posts: { select: { title: true, }, }, },}) Show query results You can also nest a `select` inside an `include` - the following example returns _all_ `User` fields and the `title` field of each post: const user = await prisma.user.findFirst({ include: { posts: { select: { title: true, }, }, },}) Show query results Note that you **cannot** use `select` and `include` _on the same level_. This means that if you choose to `include` a user's post and `select` each post's title, you cannot `select` only the users' `email`: // The following query returns an exceptionconst user = await prisma.user.findFirst({ select: { // This won't work! email: true } include: { // This won't work! posts: { select: { title: true } } },}) Show CLI results Instead, use nested `select` options: const user = await prisma.user.findFirst({ select: { // This will work! email: true, posts: { select: { title: true, }, }, },}) ## Relation count In 3.0.1 and later, you can `include` or `select` a count of relations alongside fields - for example, a user's post count. const relationCount = await prisma.user.findMany({ include: { _count: { select: { posts: true }, }, },}) Show query results ## Filter a list of relations When you use `select` or `include` to return a subset of the related data, you can **filter and sort the list of relations** inside the `select` or `include`. For example, the following query returns list of titles of the unpublished posts associated with the user: const result = await prisma.user.findFirst({ select: { posts: { where: { published: false, }, orderBy: { title: 'asc', }, select: { title: true, }, }, },}) You can also write the same query using `include` as follows: const result = await prisma.user.findFirst({ include: { posts: { where: { published: false, }, orderBy: { title: 'asc', }, }, },}) ## Nested writes A nested write allows you to write **relational data** to your database in **a single transaction**. Nested writes: * Provide **transactional guarantees** for creating, updating or deleting data across multiple tables in a single Prisma Client query. If any part of the query fails (for example, creating a user succeeds but creating posts fails), Prisma Client rolls back all changes. * Support any level of nesting supported by the data model. * Are available for relation fields when using the model's create or update query. The following section shows the nested write options that are available per query. You can create a record and one or more related records at the same time. The following query creates a `User` record and two related `Post` records: const result = await prisma.user.create({ data: { email: 'elsa@prisma.io', name: 'Elsa Prisma', posts: { create: [ { title: 'How to make an omelette' }, { title: 'How to eat an omelette' }, ], }, }, include: { posts: true, // Include all posts in the returned object },}) Show query results ### Create a single record and multiple related records There are two ways to create or update a single record and multiple related records - for example, a user with multiple posts: * Use a nested `create` query * Use a nested `createMany` query In most cases, a nested `create` will be preferable unless the `skipDuplicates` query option is required. Here's a quick table describing the differences between the two options: | Feature | `create` | `createMany` | Notes | | --- | --- | --- | --- | | Supports nesting additional relations | ✔ | ✘ \* | For example, you can create a user, several posts, and several comments per post in one query. \* You can manually set a foreign key in a has-one relation - for example: `{ authorId: 9}` | | Supports 1-n relations | ✔ | ✔ | For example, you can create a user and multiple posts (one user has many posts) | | Supports m-n relations | ✔ | ✘ | For example, you can create a post and several categories (one post can have many categories, and one category can have many posts) | | Supports skipping duplicate records | ✘ | ✔ | Use `skipDuplicates` query option. | #### Using nested `create` The following query uses nested `create` to create: * One user * Two posts * One post category The example also uses a nested `include` to include all posts and post categories in the returned data. const result = await prisma.user.create({ data: { email: 'yvette@prisma.io', name: 'Yvette', posts: { create: [ { title: 'How to make an omelette', categories: { create: { name: 'Easy cooking', }, }, }, { title: 'How to eat an omelette' }, ], }, }, include: { // Include posts posts: { include: { categories: true, // Include post categories }, }, },}) Show query results Here's a visual representation of how a nested create operation can write to several tables in the database as once:  #### Using nested `createMany` The following query uses a nested `createMany` to create: * One user * Two posts The example also uses a nested `include` to include all posts in the returned data. const result = await prisma.user.create({ data: { email: 'saanvi@prisma.io', posts: { createMany: { data: [{ title: 'My first post' }, { title: 'My second post' }], }, }, }, include: { posts: true, },}) Show query results Note that it is **not possible** to nest an additional `create` or `createMany` inside the highlighted query, which means that you cannot create a user, posts, and post categories at the same time. As a workaround, you can send a query to create the records that will be connected first, and then create the actual records. For example: const categories = await prisma.category.createManyAndReturn({ data: [ { name: 'Fun', }, { name: 'Technology', }, { name: 'Sports', } ], select: { id: true }});const posts = await prisma.post.createManyAndReturn({ data: [{ title: "Funniest moments in 2024", categoryId: categories[0].id }, { title: "Linux or macOS — what's better?", categoryId: categories[1].id }, { title: "Who will win the next soccer championship?", categoryId: categories[2].id }]}); If you want to create _all_ records in a single database query, consider using a `$transaction` or type-safe, raw SQL. ### Create multiple records and multiple related records You cannot access relations in a `createMany()` or `createManyAndReturn()` query, which means that you cannot create multiple users and multiple posts in a single nested write. The following is **not** possible: const createMany = await prisma.user.createMany({ data: [ { name: 'Yewande', email: 'yewande@prisma.io', posts: { // Not possible to create posts! }, }, { name: 'Noor', email: 'noor@prisma.io', posts: { // Not possible to create posts! }, }, ],}) ### Connect multiple records The following query creates (`create` ) a new `User` record and connects that record (`connect` ) to three existing posts: const result = await prisma.user.create({ data: { email: 'vlad@prisma.io', posts: { connect: [{ id: 8 }, { id: 9 }, { id: 10 }], }, }, include: { posts: true, // Include all posts in the returned object },}) Show query results > **Note**: Prisma Client throws an exception if any of the post records cannot be found: `connect: [{ id: 8 }, { id: 9 }, { id: 10 }]` ### Connect a single record You can `connect` an existing record to a new or existing user. The following query connects an existing post (`id: 11`) to an existing user (`id: 9`) const result = await prisma.user.update({ where: { id: 9, }, data: { posts: { connect: { id: 11, }, }, }, include: { posts: true, },}) ### Connect _or_ create a record If a related record may or may not already exist, use `connectOrCreate` to connect the related record: * Connect a `User` with the email address `viola@prisma.io` _or_ * Create a new `User` with the email address `viola@prisma.io` if the user does not already exist const result = await prisma.post.create({ data: { title: 'How to make croissants', author: { connectOrCreate: { where: { email: 'viola@prisma.io', }, create: { email: 'viola@prisma.io', name: 'Viola', }, }, }, }, include: { author: true, },}) Show query results To `disconnect` one out of a list of records (for example, a specific blog post) provide the ID or unique identifier of the record(s) to disconnect: const result = await prisma.user.update({ where: { id: 16, }, data: { posts: { disconnect: [{ id: 12 }, { id: 19 }], }, }, include: { posts: true, },}) Show query results To `disconnect` _one_ record (for example, a post's author), use `disconnect: true`: const result = await prisma.post.update({ where: { id: 23, }, data: { author: { disconnect: true, }, }, include: { author: true, },}) Show query results To `disconnect` _all_ related records in a one-to-many relation (a user has many posts), `set` the relation to an empty list as shown: const result = await prisma.user.update({ where: { id: 16, }, data: { posts: { set: [], }, }, include: { posts: true, },}) Show query results Delete all related `Post` records: const result = await prisma.user.update({ where: { id: 11, }, data: { posts: { deleteMany: {}, }, }, include: { posts: true, },}) Update a user by deleting all unpublished posts: const result = await prisma.user.update({ where: { id: 11, }, data: { posts: { deleteMany: { published: false, }, }, }, include: { posts: true, },}) Update a user by deleting specific posts: const result = await prisma.user.update({ where: { id: 6, }, data: { posts: { deleteMany: [{ id: 7 }], }, }, include: { posts: true, },}) You can use a nested `updateMany` to update _all_ related records for a particular user. The following query unpublishes all posts for a specific user: const result = await prisma.user.update({ where: { id: 6, }, data: { posts: { updateMany: { where: { published: true, }, data: { published: false, }, }, }, }, include: { posts: true, },}) const result = await prisma.user.update({ where: { id: 6, }, data: { posts: { update: { where: { id: 9, }, data: { title: 'My updated title', }, }, }, }, include: { posts: true, },}) The following query uses a nested `upsert` to update `"bob@prisma.io"` if that user exists, or create the user if they do not exist: const result = await prisma.post.update({ where: { id: 6, }, data: { author: { upsert: { create: { email: 'bob@prisma.io', name: 'Bob the New User', }, update: { email: 'bob@prisma.io', name: 'Bob the existing user', }, }, }, }, include: { author: true, },}) You can nest `create` or `createMany` inside an `update` to add new related records to an existing record. The following query adds two posts to a user with an `id` of 9: const result = await prisma.user.update({ where: { id: 9, }, data: { posts: { createMany: { data: [{ title: 'My first post' }, { title: 'My second post' }], }, }, }, include: { posts: true, },}) ## Relation filters ### Filter on "-to-many" relations Prisma Client provides the `some`, `every`, and `none` options to filter records by the properties of related records on the "-to-many" side of the relation. For example, filtering users based on properties of their posts. For example: | Requirement | Query option to use | | --- | --- | | "I want a list of every `User` that has _at least one_ unpublished `Post` record" | `some` posts are unpublished | | "I want a list of every `User` that has _no_ unpublished `Post` records" | `none` of the posts are unpublished | | "I want a list of every `User` that has _only_ unpublished `Post` records" | `every` post is unpublished | For example, the following query returns `User` that meet the following criteria: * No posts with more than 100 views * All posts have less than, or equal to 50 likes const users = await prisma.user.findMany({ where: { posts: { none: { views: { gt: 100, }, }, every: { likes: { lte: 50, }, }, }, }, include: { posts: true, },}) ### Filter on "-to-one" relations Prisma Client provides the `is` and `isNot` options to filter records by the properties of related records on the "-to-one" side of the relation. For example, filtering posts based on properties of their author. For example, the following query returns `Post` records that meet the following criteria: * Author's name is not Bob * Author is older than 40 const users = await prisma.post.findMany({ where: { author: { isNot: { name: 'Bob', }, is: { age: { gt: 40, }, }, }, }, include: { author: true, },}) ### Filter on absence of "-to-many" records For example, the following query uses `none` to return all users that have zero posts: const usersWithZeroPosts = await prisma.user.findMany({ where: { posts: { none: {}, }, }, include: { posts: true, },}) ### Filter on absence of "-to-one" relations The following query returns all posts that don't have an author relation: const postsWithNoAuthor = await prisma.post.findMany({ where: { author: null, // or author: { } }, include: { author: true, },}) The following query returns all users with at least one post: const usersWithSomePosts = await prisma.user.findMany({ where: { posts: { some: {}, }, }, include: { posts: true, },}) ## Fluent API The fluent API lets you _fluently_ traverse the relations of your models via function calls. Note that the _last_ function call determines the return type of the entire query (the respective type annotations are added in the code snippets below to make that explicit). This query returns all `Post` records by a specific `User`: const postsByUser: Post[] = await prisma.user .findUnique({ where: { email: 'alice@prisma.io' } }) .posts() This is equivalent to the following `findMany` query: const postsByUser = await prisma.post.findMany({ where: { author: { email: 'alice@prisma.io', }, },}) The main difference between the queries is that the fluent API call is translated into two separate database queries while the other one only generates a single query (see this GitHub issue) > **Note**: You can use the fact that `.findUnique({ where: { email: 'alice@prisma.io' } }).posts()` queries are automatically batched by the Prisma dataloader in Prisma Client to avoid the n+1 problem in GraphQL resolvers. This request returns all categories by a specific post: const categoriesOfPost: Category[] = await prisma.post .findUnique({ where: { id: 1 } }) .categories() Note that you can chain as many queries as you like. In this example, the chaining starts at `Profile` and goes over `User` to `Post`: const posts: Post[] = await prisma.profile .findUnique({ where: { id: 1 } }) .user() .posts() The only requirement for chaining is that the previous function call must return only a _single object_ (e.g. as returned by a `findUnique` query or a "to-one relation" like `profile.user()`). The following query is **not possible** because `findMany` does not return a single object but a _list_: // This query is illegalconst posts = await prisma.user.findMany().posts() --- ## Page: https://www.prisma.io/docs/orm/prisma-schema/overview/data-sources A data source determines how Prisma ORM connects your database, and is represented by the `datasource` block in the Prisma schema. The following data source uses the `postgresql` provider and includes a connection URL: A Prisma schema can only have _one_ data source. However, you can: Some data source `provider`s allow you to configure your connection with SSL/TLS, and provide parameters for the `url` to specify the location of certificates. Prisma ORM resolves SSL certificates relative to the `./prisma` directory. If your certificate files are located outside that directory, e.g. your project root directory, use relative paths for certificates: datasource db { provider = "postgresql" url = "postgresql://johndoe:mypassword@localhost:5432/mydb?schema=public&sslmode=require&sslcert=../server-ca.pem&sslidentity=../client-identity.p12&sslpassword=<REDACTED>"} --- ## Page: https://www.prisma.io/docs/orm/prisma-schema/overview/generators A Prisma schema can have one or more generators, represented by the `generator` block: generator client { provider = "prisma-client-js" output = "./generated/prisma-client-js"} A generator determines which assets are created when you run the `prisma generate` command. The main property `provider` defines which **Prisma Client (language specific)** is created - currently, only `prisma-client-js` is available. Alternatively you can define any npm package that follows our generator specification. Additionally and optionally you can define a custom output folder for the generated assets with `output`. ## Prisma Client: `prisma-client-js` The generator for Prisma's JavaScript Client accepts multiple additional properties: * `previewFeatures`: Preview features to include * `binaryTargets`: Engine binary targets for `prisma-client-js` (for example, `debian-openssl-1.1.x` if you are deploying to Ubuntu 18+, or `native` if you are working locally) generator client { provider = "prisma-client-js" previewFeatures = ["sample-preview-feature"] binaryTargets = ["linux-musl"]} ### Binary targets Prisma Client JS (`prisma-client-js`) uses several engines. Engines are implemented in Rust and are used by Prisma Client in the form of executable, platform dependent engine files. Depending on which platform you are executing your code on, you need the correct file. "Binary targets" are used to define which files should be present for the target platform(s). The correct file is particularly important when deploying your application to production, which often differs from your local development environment. #### The `native` binary target The `native` binary target is special. It doesn't map to a concrete operating system. Instead, when `native` is specified in `binaryTargets`, Prisma Client detects the _current_ operating system and automatically specifies the correct binary target for it. As an example, assume you're running **macOS** and you specify the following generator: generator client { provider = "prisma-client-js" binaryTargets = ["native"]} In that case, Prisma Client detects your operating system and finds the right binary file for it based on the list of supported operating systems . If you use macOS Intel x86 (`darwin`), then the binary file that was compiled for `darwin` will be selected. If you use macOS ARM64 (`darwin-arm64`), then the binary file that was compiled for `darwin-arm64` will be selected. > **Note**: The `native` binary target is the default. You can set it explicitly if you wish to include additional binary targets for deployment to different environments. note Existing generators or new ones should not be affected if you are using the `prismaSchemaFolder` preview feature to manage multiple schema files, unless a generator reads the schema manually. The following is a list of community created generators. * `prisma-dbml-generator`: Transforms the Prisma schema into Database Markup Language (DBML) which allows for an easy visual representation * `prisma-docs-generator`: Generates an individual API reference for Prisma Client * `prisma-json-schema-generator`: Transforms the Prisma schema in JSON schema * `prisma-json-types-generator`: Adds support for Strongly Typed `Json` fields for all databases. It goes on `prisma-client-js` output and changes the json fields to match the type you provide. Helping with code generators, intellisense and much more. All of that without affecting any runtime code. * `typegraphql-prisma`: Generates TypeGraphQL CRUD resolvers for Prisma models * `typegraphql-prisma-nestjs`: Fork of `typegraphql-prisma`, which also generates CRUD resolvers for Prisma models but for NestJS * `prisma-typegraphql-types-gen`: Generates TypeGraphQL class types and enums from your prisma type definitions, the generated output can be edited without being overwritten by the next gen and has the ability to correct you when you mess up the types with your edits. * `nexus-prisma`: Allows to project Prisma models to GraphQL via GraphQL Nexus * `prisma-nestjs-graphql`: Generates object types, inputs, args, etc. from the Prisma Schema for usage with `@nestjs/graphql` module * `prisma-appsync`: Generates a full-blown GraphQL API for AWS AppSync * `prisma-kysely`: Generates type definitions for Kysely, a TypeScript SQL query builder. This can be useful to perform queries against your database from an edge runtime, or to write more complex SQL queries not possible in Prisma without dropping type safety. * `prisma-generator-nestjs-dto`: Generates DTO and Entity classes with relation `connect` and `create` options for use with NestJS Resources and @nestjs/swagger * `prisma-erd-generator`: Generates an entity relationship diagram * `prisma-generator-plantuml-erd`: Generator to generate ER diagrams for PlantUML. Markdown and Asciidoc documents can also be generated by activating the option. * `prisma-class-generator`: Generates classes from your Prisma Schema that can be used as DTO, Swagger Response, TypeGraphQL and so on. * `zod-prisma`: Creates Zod schemas from your Prisma models. * `prisma-pothos-types`: Makes it easier to define Prisma-based object types, and helps solve n+1 queries for relations. It also has integrations for the Relay plugin to make defining nodes and connections easy and efficient. * `prisma-generator-pothos-codegen`: Auto generate input types (for use as args) and auto generate decoupled type-safe base files makes it easy to create customizable objects, queries and mutations for Pothos from Prisma schema. Optionally generate all crud at once from the base files. * `prisma-joi-generator`: Generate full Joi schemas from your Prisma schema. * `prisma-yup-generator`: Generate full Yup schemas from your Prisma schema. * `prisma-class-validator-generator`: Emit TypeScript models from your Prisma schema with class validator validations ready. * `prisma-zod-generator`: Emit Zod schemas from your Prisma schema. * `prisma-trpc-generator`: Emit fully implemented tRPC routers. * `prisma-json-server-generator`: Emit a JSON file that can be run with json-server. * `prisma-trpc-shield-generator`: Emit a tRPC shield from your Prisma schema. * `prisma-custom-models-generator`: Emit custom models from your Prisma schema, based on Prisma recommendations. * `nestjs-prisma-graphql-crud-gen`: Generate CRUD resolvers from GraphQL schema with NestJS and Prisma. * `prisma-generator-dart`: Generates Dart/Flutter class files with to- and fromJson methods. * `prisma-generator-graphql-typedef`: Generates graphql schema. * `prisma-markdown`: Generates markdown document composed with ERD diagrams and their descriptions. Supports pagination of ERD diagrams through `@namespace` comment tag. * `prisma-models-graph`: Generates a bi-directional models graph for schema without strict relationship defined in the schema, works via a custom schema annotation. * `prisma-generator-fake-data`: Generates realistic-looking fake data for your Prisma models that can be used in unit/integration tests, demos, and more. * `prisma-generator-drizzle`: A Prisma generator for generating Drizzle schema with ease. * `prisma-generator-express`: Generates Express CRUD and Router generator function. * `prismabox`: Generates versatile typebox schema from your Prisma models. * `prisma-generator-typescript-interfaces`: Generates zero-dependency TypeScript interfaces from your Prisma schema. --- ## Page: https://www.prisma.io/docs/orm/prisma-client/setup-and-configuration/generating-prisma-client Prisma Client is a generated database client that's tailored to your database schema. By default, Prisma Client is generated into the `node_modules/.prisma/client` folder, but we highly recommend you specify an output location. warning In Prisma ORM 7, Prisma Client will no longer be generated in `node_modules` by default and will require an output path to be defined. Learn more below on how to define an output path. To generate and instantiate Prisma Client: 1. Ensure that you have Prisma CLI installed on your machine. npm install prisma --save-dev 2. Add the following `generator` definition to your Prisma schema: generator client { provider = "prisma-client-js" output = "app/generated/prisma/client"} note Feel free to customize the output location to match your application. Common directories are `app`, `src`, or even the root of your project. 3. Install the `@prisma/client` npm package: npm install @prisma/client 4. Generate Prisma Client with the following command: prisma generate 5. You can now instantiate Prisma Client in your code: import { PrismaClient } from 'app/generated/prisma/client'const prisma = new PrismaClient()// use `prisma` in your application to read and write data in your DB > **Important**: You need to re-run the `prisma generate` command after every change that's made to your Prisma schema to update the generated Prisma Client code. Here is a graphical illustration of the typical workflow for generation of Prisma Client: 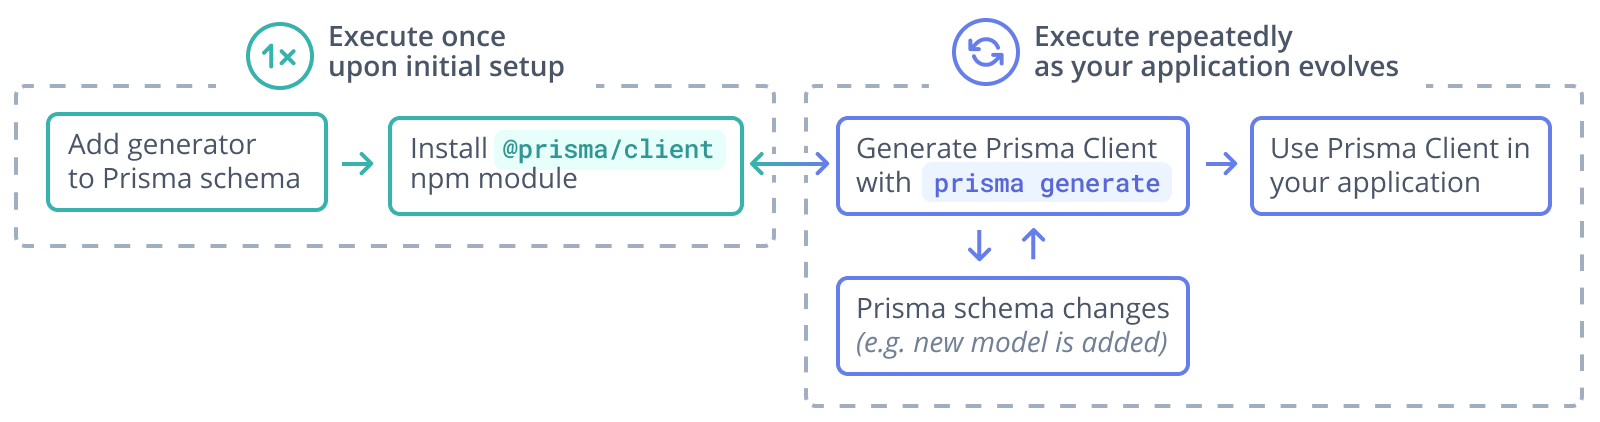 ## The `@prisma/client` npm package The `@prisma/client` npm package consists of two key parts: * The `@prisma/client` module itself, which only changes when you re-install the package * The `.prisma/client` folder, which is the default location for the unique Prisma Client generated from your schema `@prisma/client/index.d.ts` exports `.prisma/client`: export * from '.prisma/client' This means that you still import `@prisma/client` in your own `.ts` files: import { PrismaClient } from '@prisma/client' Prisma Client is generated from your Prisma schema and is unique to your project. Each time you change the schema (for example, by performing a schema migration) and run `prisma generate`, Prisma Client's code changes: 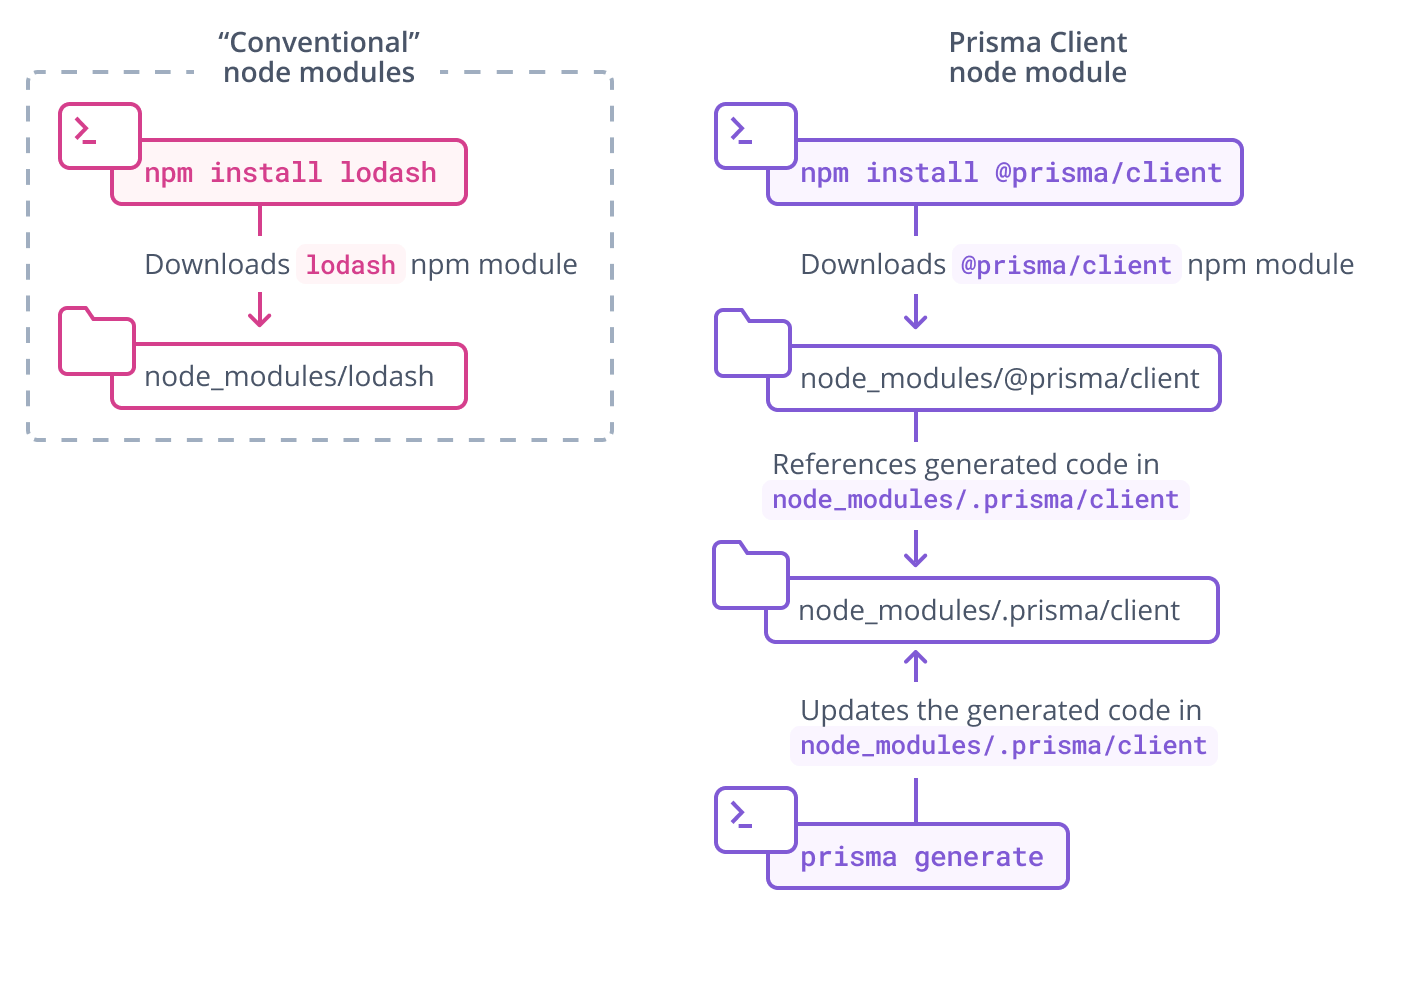 The `.prisma` folder is unaffected by pruning in Node.js package managers. ## The location of Prisma Client danger We strongly recommend you define an output path. In Prisma ORM 6.6, not defining an output path will result in a warning. In Prisma ORM 7, the field will be required. ### Using a custom `output` path You can also specify a custom `output` path on the `generator` configuration, for example (assuming your `schema.prisma` file is located at the default `prisma` subfolder): generator client { provider = "prisma-client-js" output = "../src/generated/client"} After running `prisma generate` for that schema file, the Prisma Client package will be located in: ./src/generated/client To import the `PrismaClient` from a custom location (for example, from a file named `./src/script.ts`): import { PrismaClient } from './generated/client' --- ## Page: https://www.prisma.io/docs/orm/prisma-client/type-safety/operating-against-partial-structures-of-model-types When using Prisma Client, every model from your Prisma schema is translated into a dedicated TypeScript type. For example, assume you have the following `User` and `Post` models: model User { id Int @id email String @unique name String? posts Post[]}model Post { id Int @id author User @relation(fields: [userId], references: [id]) title String published Boolean @default(false) userId Int} The Prisma Client code that's generated from this schema contains this representation of the `User` type: export type User = { id: string email: string name: string | null} ## Problem: Using variations of the generated model type ### Description In some scenarios, you may need a _variation_ of the generated `User` type. For example, when you have a function that expects an instance of the `User` model that carries the `posts` relation. Or when you need a type to pass only the `User` model's `email` and `name` fields around in your application code. ### Solution As a solution, you can customize the generated model type using Prisma Client's helper types. The `User` type only contains the model's scalar fields, but doesn't account for any relations. That's because relations are not included by default in Prisma Client queries. However, sometimes it's useful to have a type available that **includes a relation** (i.e. a type that you'd get from an API call that uses `include`). Similarly, another useful scenario could be to have a type available that **includes only a subset of the model's scalar fields** (i.e. a type that you'd get from an API call that uses `select`). One way of achieving this would be to define these types manually in your application code: // 1: Define a type that includes the relation to `Post`type UserWithPosts = { id: string email: string name: string | null posts: Post[]}// 2: Define a type that only contains a subset of the scalar fieldstype UserPersonalData = { email: string name: string | null} While this is certainly feasible, this approach increases the maintenance burden upon changes to the Prisma schema as you need to manually maintain the types. A cleaner solution to this is to use the `UserGetPayload` type that is generated and exposed by Prisma Client under the `Prisma` namespace in combination with the `validator`. The following example uses the `Prisma.validator` to create two type-safe objects and then uses the `Prisma.UserGetPayload` utility function to create a type that can be used to return all users and their posts. import { Prisma } from '@prisma/client'// 1: Define a type that includes the relation to `Post`const userWithPosts = Prisma.validator<Prisma.UserDefaultArgs>()({ include: { posts: true },})// 2: Define a type that only contains a subset of the scalar fieldsconst userPersonalData = Prisma.validator<Prisma.UserDefaultArgs>()({ select: { email: true, name: true },})// 3: This type will include a user and all their poststype UserWithPosts = Prisma.UserGetPayload<typeof userWithPosts> The main benefits of the latter approach are: * Cleaner approach as it leverages Prisma Client's generated types * Reduced maintenance burden and improved type safety when the schema changes ## Problem: Getting access to the return type of a function ### Description When doing `select` or `include` operations on your models and returning these variants from a function, it can be difficult to gain access to the return type, e.g: // Function definition that returns a partial structureasync function getUsersWithPosts() { const users = await prisma.user.findMany({ include: { posts: true } }) return users} Extracting the type that represents "users with posts" from the above code snippet requires some advanced TypeScript usage: // Function definition that returns a partial structureasync function getUsersWithPosts() { const users = await prisma.user.findMany({ include: { posts: true } }) return users}// Extract `UsersWithPosts` type withtype ThenArg<T> = T extends PromiseLike<infer U> ? U : Ttype UsersWithPosts = ThenArg<ReturnType<typeof getUsersWithPosts>>// run inside `async` functionconst usersWithPosts: UsersWithPosts = await getUsersWithPosts() ### Solution With the `PromiseReturnType` that is exposed by the `Prisma` namespace, you can solve this more elegantly: import { Prisma } from '@prisma/client'type UsersWithPosts = Prisma.PromiseReturnType<typeof getUsersWithPosts> --- ## Page: https://www.prisma.io/docs/orm/prisma-client/deployment/deploy-database-changes-with-prisma-migrate To apply pending migrations to staging, testing, or production environments, run the `migrate deploy` command as part of your CI/CD pipeline: npx prisma migrate deploy info This guide **does not apply for MongoDB**. Instead of `migrate deploy`, `db push` is used for MongoDB. Exactly when to run `prisma migrate deploy` depends on your platform. For example, a simplified Heroku workflow includes: 1. Ensuring the `./prisma/migration` folder is in source control 2. Running `prisma migrate deploy` during the release phase Ideally, `migrate deploy` should be part of an automated CI/CD pipeline, and we do not generally recommend running this command locally to deploy changes to a production database (for example, by temporarily changing the `DATABASE_URL` environment variable). It is not generally considered good practice to store the production database URL locally. Beware that in order to run the `prisma migrate deploy` command, you need access to the `prisma` dependency that is typically added to the `devDependencies`. Some platforms like Vercel, prune development dependencies during the build, thereby preventing you from calling the command. This can be worked around by making the `prisma` a production dependency, by moving it to `dependencies` in your `package.json`. For more information about the `migrate deploy` command, see: * `migrate deploy` reference * How `migrate deploy` works * Production troubleshooting ## Deploying database changes using GitHub Actions As part of your CI/CD, you can run `prisma migrate deploy` as part of your pipeline to apply pending migrations to your production database. Here is an example action that will run your migrations against your database: deploy.yml name: Deployon: push: paths: - prisma/migrations/** branches: - mainjobs: deploy: runs-on: ubuntu-latest steps: - name: Checkout repo uses: actions/checkout@v3 - name: Setup Node uses: actions/setup-node@v3 - name: Install dependencies run: npm install - name: Apply all pending migrations to the database run: npx prisma migrate deploy env: DATABASE_URL: ${{ secrets.DATABASE_URL }} The highlighted line shows that this action will only run if there is a change in the `prisma/migrations` directory, so `npx prisma migrate deploy` will only run when migrations are updated. Ensure you have the `DATABASE_URL` variable set as a secret in your repository, without quotes around the connection string. --- ## Page: https://www.prisma.io/docs/orm/prisma-client/setup-and-configuration/custom-model-and-field-names The Prisma Client API is generated based on the models in your Prisma schema. Models are _typically_ 1:1 mappings of your database tables. In some cases, especially when using introspection, it might be useful to _decouple_ the naming of database tables and columns from the names that are used in your Prisma Client API. This can be done via the `@map` and `@@map` attributes in your Prisma schema. You can use `@map` and `@@map` to rename MongoDB fields and collections respectively. This page uses a relational database example. ## Example: Relational database Assume you have a PostgreSQL relational database schema looking similar to this: CREATE TABLE users ( user_id SERIAL PRIMARY KEY NOT NULL, name VARCHAR(256), email VARCHAR(256) UNIQUE NOT NULL);CREATE TABLE posts ( post_id SERIAL PRIMARY KEY NOT NULL, created_at TIMESTAMP WITH TIME ZONE DEFAULT CURRENT_TIMESTAMP, title VARCHAR(256) NOT NULL, content TEXT, author_id INTEGER REFERENCES users(user_id));CREATE TABLE profiles ( profile_id SERIAL PRIMARY KEY NOT NULL, bio TEXT, user_id INTEGER NOT NULL UNIQUE REFERENCES users(user_id));CREATE TABLE categories ( category_id SERIAL PRIMARY KEY NOT NULL, name VARCHAR(256));CREATE TABLE post_in_categories ( post_id INTEGER NOT NULL REFERENCES posts(post_id), category_id INTEGER NOT NULL REFERENCES categories(category_id));CREATE UNIQUE INDEX post_id_category_id_unique ON post_in_categories(post_id int4_ops,category_id int4_ops); When introspecting a database with that schema, you'll get a Prisma schema looking similar to this: model categories { category_id Int @id @default(autoincrement()) name String? @db.VarChar(256) post_in_categories post_in_categories[]}model post_in_categories { post_id Int category_id Int categories categories @relation(fields: [category_id], references: [category_id], onDelete: NoAction, onUpdate: NoAction) posts posts @relation(fields: [post_id], references: [post_id], onDelete: NoAction, onUpdate: NoAction) @@unique([post_id, category_id], map: "post_id_category_id_unique")}model posts { post_id Int @id @default(autoincrement()) created_at DateTime? @default(now()) @db.Timestamptz(6) title String @db.VarChar(256) content String? author_id Int? users users? @relation(fields: [author_id], references: [user_id], onDelete: NoAction, onUpdate: NoAction) post_in_categories post_in_categories[]}model profiles { profile_id Int @id @default(autoincrement()) bio String? user_id Int @unique users users @relation(fields: [user_id], references: [user_id], onDelete: NoAction, onUpdate: NoAction)}model users { user_id Int @id @default(autoincrement()) name String? @db.VarChar(256) email String @unique @db.VarChar(256) posts posts[] profiles profiles?} There are a few "issues" with this Prisma schema when the Prisma Client API is generated: **Adhering to Prisma ORM's naming conventions** Prisma ORM has a naming convention of **camelCasing** and using the **singular form** for Prisma models. If these naming conventions are not met, the Prisma schema can become harder to interpret and the generated Prisma Client API will feel less natural. Consider the following, generated model: model users { user_id Int @id @default(autoincrement()) name String? @db.VarChar(256) email String @unique @db.VarChar(256) posts posts[] profiles profiles?} Although `profiles` refers to a 1:1 relation, its type is currently called `profiles` in plural, suggesting that there might be many `profiles` in this relation. With Prisma ORM conventions, the models and fields were _ideally_ named as follows: model User { user_id Int @id @default(autoincrement()) name String? @db.VarChar(256) email String @unique @db.VarChar(256) posts Post[] profile Profile?} Because these fields are "Prisma ORM-level" relation fields that do not manifest you can manually rename them in your Prisma schema. **Naming of annotated relation fields** Foreign keys are represented as a combination of a annotated relation fields and its corresponding relation scalar field in the Prisma schema. Here's how all the relations from the SQL schema are currently represented: model categories { category_id Int @id @default(autoincrement()) name String? @db.VarChar(256) post_in_categories post_in_categories[] // virtual relation field}model post_in_categories { post_id Int // relation scalar field category_id Int // relation scalar field categories categories @relation(fields: [category_id], references: [category_id], onDelete: NoAction, onUpdate: NoAction) // virtual relation field posts posts @relation(fields: [post_id], references: [post_id], onDelete: NoAction, onUpdate: NoAction) @@unique([post_id, category_id], map: "post_id_category_id_unique")}model posts { post_id Int @id @default(autoincrement()) created_at DateTime? @default(now()) @db.Timestamptz(6) title String @db.VarChar(256) content String? author_id Int? users users? @relation(fields: [author_id], references: [user_id], onDelete: NoAction, onUpdate: NoAction) post_in_categories post_in_categories[]}model profiles { profile_id Int @id @default(autoincrement()) bio String? user_id Int @unique users users @relation(fields: [user_id], references: [user_id], onDelete: NoAction, onUpdate: NoAction)}model users { user_id Int @id @default(autoincrement()) name String? @db.VarChar(256) email String @unique @db.VarChar(256) posts posts[] profiles profiles?} ## Using `@map` and `@@map` to rename fields and models in the Prisma Client API You can "rename" fields and models that are used in Prisma Client by mapping them to the "original" names in the database using the `@map` and `@@map` attributes. For the example above, you could e.g. annotate your models as follows. _After_ you introspected your database with `prisma db pull`, you can manually adjust the resulting Prisma schema as follows: model Category { id Int @id @default(autoincrement()) @map("category_id") name String? @db.VarChar(256) post_in_categories PostInCategories[] @@map("categories")}model PostInCategories { post_id Int category_id Int categories Category @relation(fields: [category_id], references: [id], onDelete: NoAction, onUpdate: NoAction) posts Post @relation(fields: [post_id], references: [id], onDelete: NoAction, onUpdate: NoAction) @@unique([post_id, category_id], map: "post_id_category_id_unique") @@map("post_in_categories")}model Post { id Int @id @default(autoincrement()) @map("post_id") created_at DateTime? @default(now()) @db.Timestamptz(6) title String @db.VarChar(256) content String? author_id Int? users User? @relation(fields: [author_id], references: [id], onDelete: NoAction, onUpdate: NoAction) post_in_categories PostInCategories[] @@map("posts")}model Profile { id Int @id @default(autoincrement()) @map("profile_id") bio String? user_id Int @unique users User @relation(fields: [user_id], references: [id], onDelete: NoAction, onUpdate: NoAction) @@map("profiles")}model User { id Int @id @default(autoincrement()) @map("user_id") name String? @db.VarChar(256) email String @unique @db.VarChar(256) posts Post[] profiles Profile? @@map("users")} With these changes, you're now adhering to Prisma ORM's naming conventions and the generated Prisma Client API feels more "natural": // Nested writesconst profile = await prisma.profile.create({ data: { bio: 'Hello World', users: { create: { name: 'Alice', email: 'alice@prisma.io', }, }, },})// Fluent APIconst userByProfile = await prisma.profile .findUnique({ where: { id: 1 }, }) .users() info `prisma db pull` preserves the custom names you defined via `@map` and `@@map` in your Prisma schema on re-introspecting your database. ## Renaming relation fields Prisma ORM-level relation fields (sometimes referred to as "virtual relation fields") only exist in the Prisma schema, but do not actually manifest in the underlying database. You can therefore name these fields whatever you want. Consider the following example of an ambiguous relation in a SQL database: CREATE TABLE "User" ( id SERIAL PRIMARY KEY);CREATE TABLE "Post" ( id SERIAL PRIMARY KEY, "author" integer NOT NULL, "favoritedBy" INTEGER, FOREIGN KEY ("author") REFERENCES "User"(id), FOREIGN KEY ("favoritedBy") REFERENCES "User"(id)); Prisma ORM's introspection will output the following Prisma schema: model Post { id Int @id @default(autoincrement()) author Int favoritedBy Int? User_Post_authorToUser User @relation("Post_authorToUser", fields: [author], references: [id], onDelete: NoAction, onUpdate: NoAction) User_Post_favoritedByToUser User? @relation("Post_favoritedByToUser", fields: [favoritedBy], references: [id], onDelete: NoAction, onUpdate: NoAction)}model User { id Int @id @default(autoincrement()) Post_Post_authorToUser Post[] @relation("Post_authorToUser") Post_Post_favoritedByToUser Post[] @relation("Post_favoritedByToUser")} Because the names of the virtual relation fields `Post_Post_authorToUser` and `Post_Post_favoritedByToUser` are based on the generated relation names, they don't look very friendly in the Prisma Client API. In that case, you can rename the relation fields. For example: model Post { id Int @id @default(autoincrement()) author Int favoritedBy Int? User_Post_authorToUser User @relation("Post_authorToUser", fields: [author], references: [id], onDelete: NoAction, onUpdate: NoAction) User_Post_favoritedByToUser User? @relation("Post_favoritedByToUser", fields: [favoritedBy], references: [id], onDelete: NoAction, onUpdate: NoAction)}model User { id Int @id @default(autoincrement()) writtenPosts Post[] @relation("Post_authorToUser") favoritedPosts Post[] @relation("Post_favoritedByToUser")} info `prisma db pull` preserves custom relation fields defined in your Prisma schema on re-introspecting your database. --- ## Page: https://www.prisma.io/docs/orm/overview/prisma-in-your-stack/fullstack Fullstack frameworks, such as Next.js, Remix or SvelteKit, blur the lines between the server and the client. These frameworks also provide different patterns for fetching and mutating data on the server. You can query your database using Prisma Client, using your framework of choice, from the server-side part of your application. ## Supported frameworks Here's a non-exhaustive list of frameworks and libraries you can use with Prisma ORM: * Next.js * Remix * SvelteKit * Nuxt * Redwood * t3 stack — using tRPC * Wasp ## Fullstack app example (e.g. Next.js) tip If you want to learn how to build an app with Next.js and Prisma ORM, check out this comprehensive video tutorial. Assume you have a Prisma schema that looks similar to this: datasource db { provider = "sqlite" url = "file:./dev.db"}generator client { provider = "prisma-client-js"}model Post { id Int @id @default(autoincrement()) title String content String? published Boolean @default(false) author User? @relation(fields: [authorId], references: [id]) authorId Int?}model User { id Int @id @default(autoincrement()) email String @unique name String? posts Post[]} You can now implement the logic for querying your database using Prisma Client API inside `getServerSideProps`, `getStaticProps`, API routes, or using API libraries such as tRPC and GraphQL. ### `getServerSideProps` // (in /pages/index.tsx)// Alternatively, you can use `getStaticProps`// in place of `getServerSideProps`.export const getServerSideProps = async () => { const feed = await prisma.post.findMany({ where: { published: true, }, }) return { props: { feed } }} Next.js will pass the props to your React component where you can display the data from your database. ### API Routes // Fetch all posts (in /pages/api/posts.ts)const prisma = new PrismaClient()export default async function handle(req, res) { const posts = await prisma.post.findMany({ where: { published: true, }, }) res.json(posts)} Note that you can use Prisma ORM inside of Next.js API routes to send queries to your database – with REST, GraphQL, and tRPC. You can then fetch data and display it in your frontend. ## Ready-to-run fullstack example projects You can find several ready-to-run examples that show how to fullstack apps with Prisma Client in the `prisma-examples` repository. | **Example** | **Description** | | --- | --- | | Next.js | Fullstack Next.js 15 app | | Next.js (GraphQL) | Fullstack Next.js app using GraphQL Yoga, Pothos, & Apollo Client | | Remix | Fullstack Remix app using actions and loaders | | SvelteKit | Fullstack Sveltekit app using actions and loaders | | Nuxt | Fullstack Nuxt app using API routes | --- ## Page: https://www.prisma.io/docs/orm/overview/prisma-in-your-stack/is-prisma-an-orm To answer the question briefly: _Yes, Prisma ORM is a new kind of ORM that fundamentally differs from traditional ORMs and doesn't suffer from many of the problems commonly associated with these_. Traditional ORMs provide an object-oriented way for working with relational databases by mapping tables to _model classes_ in your programming language. This approach leads to many problems that are caused by the object-relational impedance mismatch. Prisma ORM works fundamentally different compared to that. With Prisma ORM, you define your models in the declarative Prisma schema which serves as the single source of truth for your database schema and the models in your programming language. In your application code, you can then use Prisma Client to read and write data in your database in a type-safe manner without the overhead of managing complex model instances. This makes the process of querying data a lot more natural as well as more predictable since Prisma Client always returns plain JavaScript objects. In this article, you will learn in more detail about ORM patterns and workflows, how Prisma ORM implements the Data Mapper pattern, and the benefits of Prisma ORM's approach. ## What are ORMs? If you're already familiar with ORMs, feel free to jump to the next section on Prisma ORM. ### ORM Patterns - Active Record and Data Mapper ORMs provide a high-level database abstraction. They expose a programmatic interface through objects to create, read, delete, and manipulate data while hiding some of the complexity of the database. The idea with ORMs is that you define your models as **classes** that map to tables in a database. The classes and their instances provide you with a programmatic API to read and write data in the database. There are two common ORM patterns: _Active Record_ and _Data Mapper_ which differ in how they transfer data between objects and the database. While both patterns require you to define classes as the main building block, the most notable difference between the two is that the Data Mapper pattern decouples in-memory objects in the application code from the database and uses the data mapper layer to transfer data between the two. In practice, this means that with Data Mapper the in-memory objects (representing data in the database) don't even know that there’s a database present. #### Active Record _Active Record_ ORMs map model classes to database tables where the structure of the two representations is closely related, e.g. each field in the model class will have a matching column in the database table. Instances of the model classes wrap database rows and carry both the data and the access logic to handle persisting changes in the database. Additionally, model classes can carry business logic specific to the data in the model. The model class typically has methods that do the following: * Construct an instance of the model from an SQL query. * Construct a new instance for later insertion into the table. * Wrap commonly used SQL queries and return Active Record objects. * Update the database and insert into it the data in the Active Record. * Get and set the fields. * Implement business logic. #### Data Mapper _Data Mapper_ ORMs, in contrast to Active Record, decouple the application's in-memory representation of data from the database's representation. The decoupling is achieved by requiring you to separate the mapping responsibility into two types of classes: * **Entity classes**: The application's in-memory representation of entities which have no knowledge of the database * **Mapper classes**: These have two responsibilities: * Transforming the data between the two representations. * Generating the SQL necessary to fetch data from the database and persist changes in the database. Data Mapper ORMs allow for greater flexibility between the problem domain as implemented in code and the database. This is because the data mapper pattern allows you to hide the ways in which your database is implemented which isn’t an ideal way to think about your domain behind the whole data-mapping layer. One of the reasons that traditional data mapper ORMs do this is due to the structure of organizations where the two responsibilities would be handled by separate teams, e.g., DBAs and backend developers. In reality, not all Data Mapper ORMs adhere to this pattern strictly. For example, TypeORM, a popular ORM in the TypeScript ecosystem which supports both Active Record and Data Mapper, takes the following approach to Data Mapper: * Entity classes use decorators (`@Column`) to map class properties to table columns and are aware of the database. * Instead of mapper classes, _repository_ classes are used for querying the database and may contain custom queries. Repositories use the decorators to determine the mapping between entity properties and database columns. Given the following `User` table in the database:  This is what the corresponding entity class would look like: import { Entity, PrimaryGeneratedColumn, Column } from 'typeorm'@Entity()export class User { @PrimaryGeneratedColumn() id: number @Column({ name: 'first_name' }) firstName: string @Column({ name: 'last_name' }) lastName: string @Column({ unique: true }) email: string} ### Schema migration workflows A central part of developing applications that make use of a database is changing the database schema to accommodate new features and to better fit the problem you're solving. In this section, we'll discuss what schema migrations are and how they affect the workflow. Because the ORM sits between the developer and the database, most ORMs provide a **migration tool** to assist with the creation and modification of the database schema. A migration is a set of steps to take the database schema from one state to another. The first migration usually creates tables and indices. Subsequent migrations may add or remove columns, introduce new indices, or create new tables. Depending on the migration tool, the migration may be in the form of SQL statements or programmatic code which will get converted to SQL statements (as with ActiveRecord and SQLAlchemy). Because databases usually contain data, migrations assist you with breaking down schema changes into smaller units which helps avoid inadvertent data loss. Assuming you were starting a project from scratch, this is what a full workflow would look like: you create a migration that will create the `User` table in the database schema and define the `User` entity class as in the example above. Then, as the project progresses and you decide you want to add a new `salutation` column to the `User` table, you would create another migration which would alter the table and add the `salutation` column. Let's take a look at how that would look like with a TypeORM migration: import { MigrationInterface, QueryRunner } from 'typeorm'export class UserRefactoring1604448000 implements MigrationInterface { async up(queryRunner: QueryRunner): Promise<void> { await queryRunner.query(`ALTER TABLE "User" ADD COLUMN "salutation" TEXT`) } async down(queryRunner: QueryRunner): Promise<void> { await queryRunner.query(`ALTER TABLE "User" DROP COLUMN "salutation"`) }} Once a migration is carried out and the database schema has been altered, the entity and mapper classes must also be updated to account for the new `salutation` column. With TypeORM that means adding a `salutation` property to the `User` entity class: import { Entity, PrimaryGeneratedColumn, Column } from 'typeorm'@Entity()export class User { @PrimaryGeneratedColumn() id: number @Column({ name: 'first_name' }) firstName: string @Column({ name: 'last_name' }) lastName: string @Column({ unique: true }) email: string @Column() salutation: string} Synchronizing such changes can be a challenge with ORMs because the changes are applied manually and are not easily verifiable programmatically. Renaming an existing column can be even more cumbersome and involve searching and replacing references to the column. > **Note:** Django's makemigrations CLI generates migrations by inspecting changes in models which, similar to Prisma ORM, does away with the synchronization problem. In summary, evolving the schema is a key part of building applications. With ORMs, the workflow for updating the schema involves using a migration tool to create a migration followed by updating the corresponding entity and mapper classes (depending on the implementation). As you'll see, Prisma ORM takes a different approach to this. Now that you've seen what migrations are and how they fit into the development workflows, you will learn more about the benefits and drawbacks of ORMs. ### Benefits of ORMs There are different reasons why developers choose to use ORMs: * ORMs facilitate implementing the domain model. The domain model is an object model that incorporates the behavior and data of your business logic. In other words, it allows you to focus on real business concepts rather than the database structure or SQL semantics. * ORMs help reduce the amount of code. They save you from writing repetitive SQL statements for common CRUD (Create Read Update Delete) operations and escaping user input to prevent vulnerabilities such as SQL injections. * ORMs require you to write little to no SQL (depending on your complexity you may still need to write the odd raw query). This is beneficial for developers who are not familiar with SQL but still want to work with a database. * Many ORMs abstract database-specific details. In theory, this means that an ORM can make changing from one database to another easier. It should be noted that in practice applications rarely change the database they use. As with all abstractions that aim to improve productivity, there are also drawbacks to using ORMs. ### Drawbacks of ORMs The drawbacks of ORMs are not always apparent when you start using them. This section covers some of the commonly accepted ones: * With ORMs, you form an object graph representation of database tables which may lead to the object-relational impedance mismatch. This happens when the problem you are solving forms a complex object graph which doesn't trivially map to a relational database. Synchronizing between two different representations of data, one in the relational database, and the other in-memory (with objects) is quite difficult. This is because objects are more flexible and varied in the way they can relate to each other compared to relational database records. * While ORMs handle the complexity associated with the problem, the synchronization problem doesn't go away. Any changes to the database schema or the data model require the changes to be mapped back to the other side. This burden is often on the developer. In the context of a team working on a project, database schema changes require coordination. * ORMs tend to have a large API surface due to the complexity they encapsulate. The flip side of not having to write SQL is that you spend a lot of time learning how to use the ORM. This applies to most abstractions, however without understanding how the database works, improving slow queries can be difficult. * Some _complex queries_ aren't supported by ORMs due to the flexibility that SQL offers. This problem is alleviated by raw SQL querying functionality in which you pass the ORM a SQL statement string and the query is run for you. Now that the costs and benefits of ORMs have been covered, you can better understand what Prisma ORM is and how it fits in. ## Prisma ORM Prisma ORM is a **next-generation ORM** that makes working with databases easy for application developers and features the following tools: * **Prisma Client**: Auto-generated and type-safe database client for use in your application. * **Prisma Migrate**: A declarative data modeling and migration tool. * **Prisma Studio**: A modern GUI for browsing and managing data in your database. > **Note:** Since Prisma Client is the most prominent tool, we often refer to it as simply Prisma. These three tools use the Prisma schema as a single source of truth for the database schema, your application's object schema, and the mapping between the two. It's defined by you and is your main way of configuring Prisma ORM. Prisma ORM makes you productive and confident in the software you're building with features such as _type safety_, rich auto-completion, and a natural API for fetching relations. In the next section, you will learn about how Prisma ORM implements the Data Mapper ORM pattern. ### How Prisma ORM implements the Data Mapper pattern As mentioned earlier in the article, the Data Mapper pattern aligns well with organizations where the database and application are owned by different teams. With the rise of modern cloud environments with managed database services and DevOps practices, more teams embrace a cross-functional approach, whereby teams own both the full development cycle including the database and operational concerns. Prisma ORM enables the evolution of the DB schema and object schema in tandem, thereby reducing the need for deviation in the first place, while still allowing you to keep your application and database somewhat decoupled using `@map` attributes. While this may seem like a limitation, it prevents the domain model's evolution (through the object schema) from getting imposed on the database as an afterthought. To understand how Prisma ORM's implementation of the Data Mapper pattern differs conceptually to traditional Data Mapper ORMs, here's a brief comparison of their concepts and building blocks: | Concept | Description | Building block in traditional ORMs | Building block in Prisma ORM | Source of truth in Prisma ORM | | --- | --- | --- | --- | --- | | Object schema | The in-memory data structures in your applications | Model classes | Generated TypeScript types | Models in the Prisma schema | | Data Mapper | The code which transforms between the object schema and the database | Mapper classes | Generated functions in Prisma Client | @map attributes in the Prisma schema | | Database schema | The structure of data in the database, e.g., tables and columns | SQL written by hand or with a programmatic API | SQL generated by Prisma Migrate | Prisma schema | Prisma ORM aligns with the Data Mapper pattern with the following added benefits: * Reducing the boilerplate of defining classes and mapping logic by generating a Prisma Client based on the Prisma schema. * Eliminating the synchronization challenges between application objects and the database schema. * Database migrations are a first-class citizen as they're derived from the Prisma schema. Now that we've talked about the concepts behind Prisma ORM's approach to Data Mapper, we can go through how the Prisma schema works in practice. ### Prisma schema At the heart of Prisma's implementation of the Data Mapper pattern is the _Prisma schema_ – a single source of truth for the following responsibilities: * Configuring how Prisma connects to your database. * Generating Prisma Client – the type-safe ORM for use in your application code. * Creating and evolving the database schema with Prisma Migrate. * Defining the mapping between application objects and database columns. Models in Prisma ORM mean something slightly different to Active Record ORMs. With Prisma ORM, models are defined in the Prisma schema as abstract entities which describe tables, relations, and the mappings between columns to properties in Prisma Client. As an example, here's a Prisma schema for a blog: datasource db { provider = "postgresql" url = env("DATABASE_URL")}generator client { provider = "prisma-client-js"}model Post { id Int @id @default(autoincrement()) title String content String? @map("post_content") published Boolean @default(false) author User? @relation(fields: [authorId], references: [id]) authorId Int?}model User { id Int @id @default(autoincrement()) email String @unique name String? posts Post[]} Here's a break down of the example above: * The `datasource` block defines the connection to the database. * The `generator` block tells Prisma ORM to generate Prisma Client for TypeScript and Node.js. * The `Post` and `User` models map to database tables. * The two models have a _1-n_ relation where each `User` can have many related `Post`s. * Each field in the models has a type, e.g. the `id` has the type `Int`. * Fields may contain field attributes to define: * Primary keys with the `@id` attribute. * Unique keys with the `@unique` attribute. * Default values with the `@default` attribute. * Mapping between table columns and Prisma Client fields with the `@map` attribute, e.g., the `content` field (which will be accessible in Prisma Client) maps to the `post_content` database column. The `User` / `Post` relation can be visualized with the following diagram: 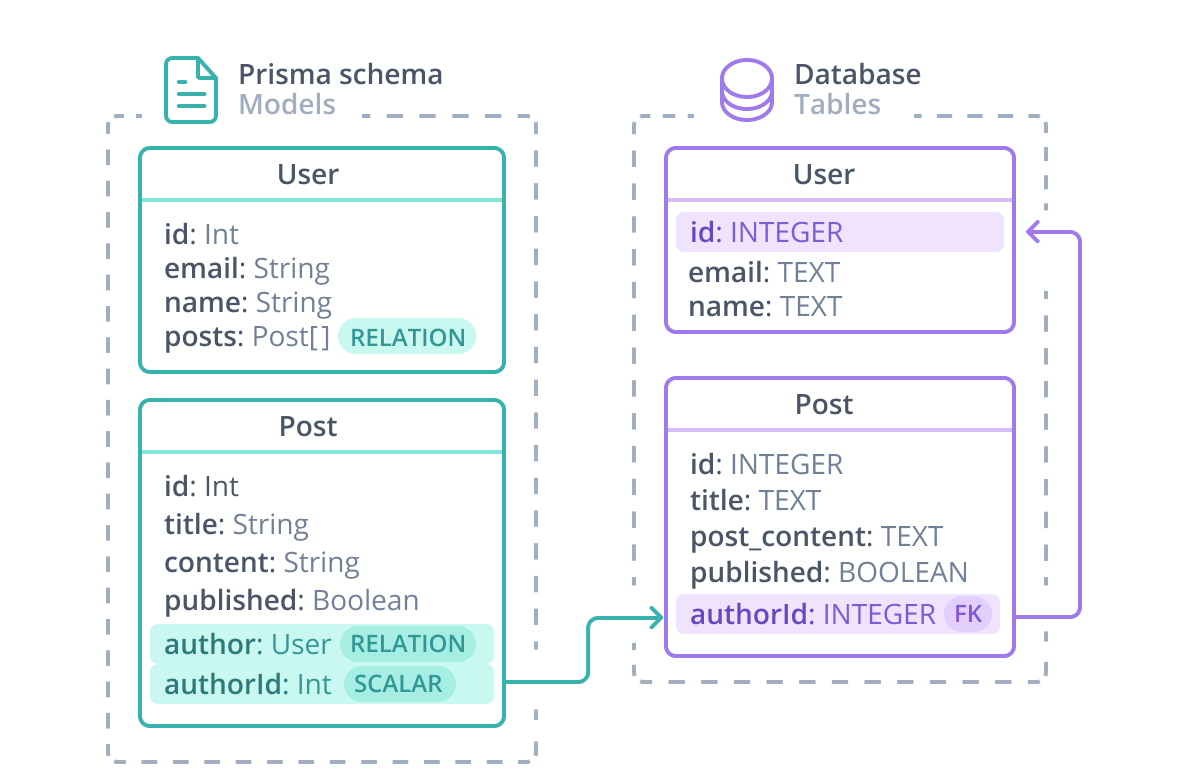 At a Prisma ORM level, the `User` / `Post` relation is made up of: * The scalar `authorId` field, which is referenced by the `@relation` attribute. This field exists in the database table – it is the foreign key that connects Post and User. * The two relation fields: `author` and `posts` **do not exist** in the database table. Relation fields define connections between models at the Prisma ORM level and exist only in the Prisma schema and generated Prisma Client, where they are used to access the relations. The declarative nature of Prisma schema is concise and allows defining the database schema and corresponding representation in Prisma Client. In the next section, you will learn about Prisma ORM's supported workflows. ### Prisma ORM workflow The workflow with Prisma ORM is slightly different to traditional ORMs. You can use Prisma ORM when building new applications from scratch or adopt it incrementally: * _New application_ (greenfield): Projects that have no database schema yet can use Prisma Migrate to create the database schema. * _Existing application_ (brownfield): Projects that already have a database schema can be introspected by Prisma ORM to generate the Prisma schema and Prisma Client. This use-case works with any existing migration tool and is useful for incremental adoption. It's possible to switch to Prisma Migrate as the migration tool. However, this is optional. With both workflows, the Prisma schema is the main configuration file. #### Workflow for incremental adoption in projects with an existing database Brownfield projects typically already have some database abstraction and schema. Prisma ORM can integrate with such projects by introspecting the existing database to obtain a Prisma schema that reflects the existing database schema and to generate Prisma Client. This workflow is compatible with any migration tool and ORM which you may already be using. If you prefer to incrementally evaluate and adopt, this approach can be used as part of a parallel adoption strategy. A non-exhaustive list of setups compatible with this workflow: * Projects using plain SQL files with `CREATE TABLE` and `ALTER TABLE` to create and alter the database schema. * Projects using a third party migration library like db-migrate or Umzug. * Projects already using an ORM. In this case, database access through the ORM remains unchanged while the generated Prisma Client can be incrementally adopted. In practice, these are the steps necessary to introspect an existing DB and generate Prisma Client: 1. Create a `schema.prisma` defining the `datasource` (in this case, your existing DB) and `generator`: datasource db { provider = "postgresql" url = "postgresql://janedoe:janedoe@localhost:5432/hello-prisma"}generator client { provider = "prisma-client-js"} 2. Run `prisma db pull` to populate the Prisma schema with models derived from your database schema. 3. (Optional) Customize field and model mappings between Prisma Client and the database. 4. Run `prisma generate`. Prisma ORM will generate Prisma Client inside the `node_modules` folder, from which it can be imported in your application. For more extensive usage documentation, see the Prisma Client API docs. To summarize, Prisma Client can be integrated into projects with an existing database and tooling as part of a parallel adoption strategy. New projects will use a different workflow detailed next. #### Workflow for new projects Prisma ORM is different from ORMs in terms of the workflows it supports. A closer look at the steps necessary to create and change a new database schema is useful for understanding Prisma Migrate. Prisma Migrate is a CLI for declarative data modeling & migrations. Unlike most migration tools that come as part of an ORM, you only need to describe the current schema, instead of the operations to move from one state to another. Prisma Migrate infers the operations, generates the SQL and carries out the migration for you. This example demonstrates using Prisma ORM in a new project with a new database schema similar to the blog example above: 1. Create the Prisma schema: // schema.prismadatasource db { provider = "postgresql" url = "postgresql://janedoe:janedoe@localhost:5432/hello-prisma"}generator client { provider = "prisma-client-js"}model Post { id Int @id @default(autoincrement()) title String content String? @map("post_content") published Boolean @default(false) author User? @relation(fields: [authorId], references: [id]) authorId Int?}model User { id Int @id @default(autoincrement()) email String @unique name String? posts Post[]} 2. Run `prisma migrate` to generate the SQL for the migration, apply it to the database, and generate Prisma Client. For any further changes to the database schema: 1. Apply changes to the Prisma schema, e.g., add a `registrationDate` field to the `User` model 2. Run `prisma migrate` again. The last step demonstrates how declarative migrations work by adding a field to the Prisma schema and using Prisma Migrate to transform the database schema to the desired state. After the migration is run, Prisma Client is automatically regenerated so that it reflects the updated schema. If you don't want to use Prisma Migrate but still want to use the type-safe generated Prisma Client in a new project, see the next section. ##### Alternative for new projects without Prisma Migrate It is possible to use Prisma Client in a new project with a third-party migration tool instead of Prisma Migrate. For example, a new project could choose to use the Node.js migration framework db-migrate to create the database schema and migrations and Prisma Client for querying. In essence, this is covered by the workflow for existing databases. ## Accessing data with Prisma Client So far, the article covered the concepts behind Prisma ORM, its implementation of the Data Mapper pattern, and the workflows it supports. In this last section, you will see how to access data in your application using Prisma Client. Accessing the database with Prisma Client happens through the query methods it exposes. All queries return plain old JavaScript objects. Given the blog schema from above, fetching a user looks as follows: import { PrismaClient } from '@prisma/client'const prisma = new PrismaClient()const user = await prisma.user.findUnique({ where: { email: 'alice@prisma.io', },}) In this query, the `findUnique()` method is used to fetch a single row from the `User` table. By default, Prisma ORM will return all the scalar fields in the `User` table. > **Note:** The example uses TypeScript to make full use of the type safety features offered by Prisma Client. However, Prisma ORM also works with JavaScript in Node.js. Prisma Client maps queries and results to structural types by generating code from the Prisma schema. This means that `user` has an associated type in the generated Prisma Client: export type User = { id: number email: string name: string | null} This ensures that accessing a non-existent field will raise a type error. More broadly, it means that the result's type for every query is known ahead of running the query, which helps catch errors. For example, the following code snippet will raise a type error: console.log(user.lastName) // Property 'lastName' does not exist on type 'User'. ### Fetching relations Fetch relations with Prisma Client is done with the `include` option. For example, to fetch a user and their posts would be done as follows: const user = await prisma.user.findUnique({ where: { email: 'alice@prisma.io', }, include: { posts: true, },}) With this query, `user`'s type will also include `Post`s which can be accessed with the `posts` array field: console.log(user.posts[0].title) The example only scratches the surface of Prisma Client's API for CRUD operations which you can learn more about in the docs. The main idea is that all queries and results are backed by types and you have full control over how relations are fetched. ## Conclusion In summary, Prisma ORM is a new kind of Data Mapper ORM that differs from traditional ORMs and doesn't suffer from the problems commonly associated with them. Unlike traditional ORMs, with Prisma ORM, you define the Prisma schema – a declarative single source of truth for the database schema and application models. All queries in Prisma Client return plain JavaScript objects which makes the process of interacting with the database a lot more natural as well as more predictable. Prisma ORM supports two main workflows for starting new projects and adopting in an existing project. For both workflows, your main avenue for configuration is via the Prisma schema. Like all abstractions, both Prisma ORM and other ORMs hide away some of the underlying details of the database with different assumptions. These differences and your use case all affect the workflow and cost of adoption. Hopefully understanding how they differ can help you make an informed decision. --- ## Page: https://www.prisma.io/docs/orm/overview/databases/database-drivers ## Default built-in drivers One of Prisma Client's components is the Query Engine. The Query Engine is responsible for transforming Prisma Client queries into SQL statements. It connects to your database via TCP using built-in drivers that don't require additional setup.  ## Driver adapters Prisma Client can connect and run queries against your database using JavaScript database drivers using **driver adapters**. Adapters act as _translators_ between Prisma Client and the JavaScript database driver. Prisma Client will use the Query Engine to transform the Prisma Client query to SQL and run the generated SQL queries via the JavaScript database driver. 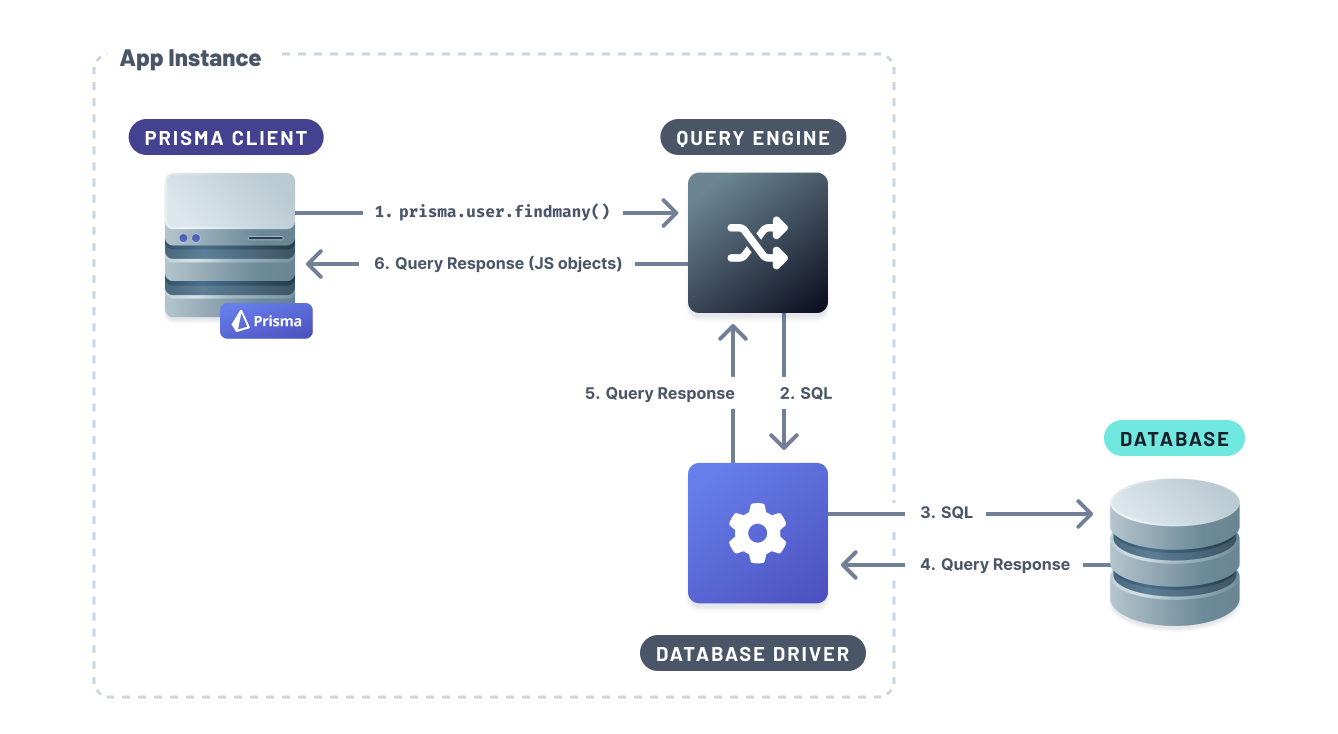 There are two different types of driver adapters: * Database driver adapters * Serverless driver adapters > **Note**: Driver adapters enable edge deployments of applications that use Prisma ORM. ### Database driver adapters You can connect to your database using a Node.js-based driver from Prisma Client using a database driver adapter. Prisma maintains the following database driver adapters: * PostgreSQL * Turso ### Serverless driver adapters Database providers, such as Neon and PlanetScale, allow you to connect to your database using other protocols besides TCP, such as HTTP and WebSockets. These database drivers are optimized for connecting to your database in serverless and edge environments. Prisma ORM maintains the following serverless driver adapters: * Neon (and Vercel Postgres) * PlanetScale * Cloudflare D1 ### Community-maintained database driver adapters You can also build your own driver adapter for the database you're using. The following is a list of community-maintained driver adapters: * TiDB Cloud Serverless Driver * PGlite - Postgres in WASM ## How to use driver adapters To use this feature: 1. Update the `previewFeatures` block in your schema to include the `driverAdapters` Preview feature: generator client { provider = "prisma-client-js" previewFeatures = ["driverAdapters"]} 2. Generate Prisma Client: npx prisma generate 3. Refer to the following pages to learn more about how to use the specific driver adapters with the specific database providers: * PostgreSQL * Neon * PlanetScale * Turso * Cloudflare D1 ## Notes about using driver adapters ### Driver adapters don't read the connection string from the Prisma schema When using Prisma ORM's built-in drivers, the connection string is read from the `url` field of the `datasource` block in your Prisma schema. On the other hand, when using a driver adapter, the connection string needs to be provided in your _application code_ when the driver adapter is set up initially. Here is how this is done for the `pg` driver and the `@prisma/adapter-pg` adapter: import { PrismaClient } from '@prisma/client'import { PrismaPg } from '@prisma/adapter-pg'import { Pool } from 'pg'const pool = new Pool({ connectionString: env.DATABASE_URL })const adapter = new PrismaPg(pool)const prisma = new PrismaClient({ adapter }) See the docs for the driver adapter you're using for concrete setup instructions. ### Driver adapters and custom output paths Since Prisma 5.9.0, when using the driver adapters Preview feature along with a custom output path for Prisma Client, you cannot reference Prisma Client using a relative path. Let's assume you had `output` in your Prisma schema set to `../src/generated/client`: generator client { provider = "prisma-client-js" output = "../src/generated/client"} What you should **not** do is reference that path relatively: // what not to do!import { PrismaClient } from './src/generated/client'const client = new PrismaClient() Instead, you will need to use a linked dependency. * npm * pnpm * yarn npm add db@./src/generated/client Now, you should be able to reference your generated client using `db`! import { PrismaClient } from 'db'const client = new PrismaClient() ### Driver adapters and specific frameworks #### Nuxt Using a driver adapter with Nuxt to deploy to an edge function environment does not work out of the box, but adding the `nitro.experimental.wasm` configuration option fixes that: export default defineNuxtConfig({ // ... nitro: { // ... experimental: { wasm: true, }, }, // ...}) See this example project for a full example that can be deployed to Cloudflare Pages. --- ## Page: https://www.prisma.io/docs/orm/overview/databases/postgresql The PostgreSQL data source connector connects Prisma ORM to a PostgreSQL database server. By default, the PostgreSQL connector contains a database driver responsible for connecting to your database. You can use a driver adapter (Preview) to connect to your database using a JavaScript database driver from Prisma Client. info Need a Postgres instance yesterday? With Prisma Postgres you can get a database running on bare-metal in three clicks. Connection pooling, query caching, and automated backups are all included. to get started today. Want any even faster way to get started with Prisma Postgres? Just run `npx prisma init --db` in your terminal. 🚀 ## Example To connect to a PostgreSQL database server, you need to configure a `datasource` block in your Prisma schema: schema.prisma datasource db { provider = "postgresql" url = env("DATABASE_URL")} The fields passed to the `datasource` block are: * `provider`: Specifies the `postgresql` data source connector. * `url`: Specifies the connection URL for the PostgreSQL database server. In this case, an environment variable is used to provide the connection URL. ## Using the `node-postgres` driver As of `v5.4.0`, you can use Prisma ORM with database drivers from the JavaScript ecosystem (instead of using Prisma ORM's built-in drivers). You can do this by using a driver adapter. For PostgreSQL, `node-postgres` (`pg`) is one of the most popular drivers in the JavaScript ecosystem. It can be used with any PostgreSQL database that's accessed via TCP. This section explains how you can use it with Prisma ORM and the `@prisma/adapter-pg` driver adapter. ### 1\. Enable the `driverAdapters` Preview feature flag Since driver adapters are currently in Preview, you need to enable its feature flag on the `datasource` block in your Prisma schema: // schema.prismagenerator client { provider = "prisma-client-js" previewFeatures = ["driverAdapters"]}datasource db { provider = "postgresql" url = env("DATABASE_URL")} Once you have added the feature flag to your schema, re-generate Prisma Client: npx prisma generate ### 2\. Install the dependencies Next, install the `pg` package and Prisma ORM's driver adapter: npm install pgnpm install @prisma/adapter-pg ### 3\. Instantiate Prisma Client using the driver adapter Finally, when you instantiate Prisma Client, you need to pass an instance of Prisma ORM's driver adapter to the `PrismaClient` constructor: import { Pool } from 'pg'import { PrismaPg } from '@prisma/adapter-pg'import { PrismaClient } from '@prisma/client'const connectionString = `${process.env.DATABASE_URL}`const pool = new Pool({ connectionString })const adapter = new PrismaPg(pool)const prisma = new PrismaClient({ adapter }) Notice that this code requires the `DATABASE_URL` environment variable to be set to your PostgreSQL connection string. You can learn more about the connection string below. ### Notes #### Specifying a PostgreSQL schema You can specify a PostgreSQL schema by passing in the `schema` option when instantiating `PrismaPg`: const adapter = new PrismaPg(pool, { schema: 'myPostgresSchema'}) ## Connection details ### Connection URL Prisma ORM follows the connection URL format specified by PostgreSQL's official guidelines, but does not support all arguments and includes additional arguments such as `schema`. Here's an overview of the components needed for a PostgreSQL connection URL:  #### Base URL and path Here is an example of the structure of the _base URL_ and the _path_ using placeholder values in uppercase letters: postgresql://USER:PASSWORD@HOST:PORT/DATABASE The following components make up the _base URL_ of your database, they are always required: | Name | Placeholder | Description | | --- | --- | --- | | Host | `HOST` | IP address/domain of your database server, e.g. `localhost` | | Port | `PORT` | Port on which your database server is running, e.g. `5432` | | User | `USER` | Name of your database user, e.g. `janedoe` | | Password | `PASSWORD` | Password for your database user | | Database | `DATABASE` | Name of the database you want to use, e.g. `mydb` | info #### Arguments A connection URL can also take arguments. Here is the same example from above with placeholder values in uppercase letters for three _arguments_: postgresql://USER:PASSWORD@HOST:PORT/DATABASE?KEY1=VALUE&KEY2=VALUE&KEY3=VALUE The following arguments can be used: | Argument name | Required | Default | Description | | --- | --- | --- | --- | | `schema` | **Yes** | `public` | Name of the schema you want to use, e.g. `myschema` | | `connection_limit` | No | `num_cpus * 2 + 1` | Maximum size of the connection pool | | `connect_timeout` | No | `5` | Maximum number of seconds to wait for a new connection to be opened, `0` means no timeout | | `pool_timeout` | No | `10` | Maximum number of seconds to wait for a new connection from the pool, `0` means no timeout | | `sslmode` | No | `prefer` | Configures whether to use TLS. Possible values: `prefer`, `disable`, `require` | | `sslcert` | No | | Path of the server certificate. Certificate paths are resolved relative to the `./prisma folder` | | `sslrootcert` | No | | Path of the root certificate. Certificate paths are resolved relative to the `./prisma folder` | | `sslidentity` | No | | Path to the PKCS12 certificate | | `sslpassword` | No | | Password that was used to secure the PKCS12 file | | `sslaccept` | No | `accept_invalid_certs` | Configures whether to check for missing values in the certificate. Possible values: `accept_invalid_certs`, `strict` | | `host` | No | | Points to a directory that contains a socket to be used for the connection | | `socket_timeout` | No | | Maximum number of seconds to wait until a single query terminates | | `pgbouncer` | No | `false` | Configure the Engine to enable PgBouncer compatibility mode | | `statement_cache_size` | No | `100` | Since 2.1.0: Specifies the number of prepared statements cached per connection | | `application_name` | No | | Since 3.3.0: Specifies a value for the application\_name configuration parameter | | `channel_binding` | No | `prefer` | Since 4.8.0: Specifies a value for the channel\_binding configuration parameter | | `options` | No | | Since 3.8.0: Specifies command line options to send to the server at connection start | As an example, if you want to connect to a schema called `myschema`, set the connection pool size to `5` and configure a timeout for queries of `3` seconds. You can use the following arguments: postgresql://USER:PASSWORD@HOST:PORT/DATABASE?schema=myschema&connection_limit=5&socket_timeout=3 ### Configuring an SSL connection You can add various parameters to the connection URL if your database server uses SSL. Here's an overview of the possible parameters: * `sslmode=(disable|prefer|require)`: * `prefer` (default): Prefer TLS if possible, accept plain text connections. * `disable`: Do not use TLS. * `require`: Require TLS or fail if not possible. * `sslcert=<PATH>`: Path to the server certificate. This is the root certificate used by the database server to sign the client certificate. You need to provide this if the certificate doesn't exist in the trusted certificate store of your system. For Google Cloud this likely is `server-ca.pem`. Certificate paths are resolved relative to the `./prisma folder` * `sslidentity=<PATH>`: Path to the PKCS12 certificate database created from client cert and key. This is the SSL identity file in PKCS12 format which you will generate using the client key and client certificate. It combines these two files in a single file and secures them via a password (see next parameter). You can create this file using your client key and client certificate by using the following command (using `openssl`): openssl pkcs12 -export -out client-identity.p12 -inkey client-key.pem -in client-cert.pem * `sslpassword=<PASSWORD>`: Password that was used to secure the PKCS12 file. The `openssl` command listed in the previous step will ask for a password while creating the PKCS12 file, you will need to provide that same exact password here. * `sslaccept=(strict|accept_invalid_certs)`: * `strict`: Any missing value in the certificate will lead to an error. For Google Cloud, especially if the database doesn't have a domain name, the certificate might miss the domain/IP address, causing an error when connecting. * `accept_invalid_certs` (default): Bypass this check. Be aware of the security consequences of this setting. Your database connection URL will look similar to this: postgresql://USER:PASSWORD@HOST:PORT/DATABASE?sslidentity=client-identity.p12&sslpassword=mypassword&sslcert=rootca.cert ### Connecting via sockets To connect to your PostgreSQL database via sockets, you must add a `host` field as a _query parameter_ to the connection URL (instead of setting it as the `host` part of the URI). The value of this parameter then must point to the directory that contains the socket, e.g.: `postgresql://USER:PASSWORD@localhost/database?host=/var/run/postgresql/` Note that `localhost` is required, the value itself is ignored and can be anything. > **Note**: You can find additional context in this GitHub issue. ## Type mapping between PostgreSQL and Prisma schema These two tables show the type mapping between PostgreSQL and Prisma schema. First how Prisma ORM scalar types are translated into PostgreSQL database column types, and then how PostgreSQL database column types relate to Prisma ORM scalar and native types. > Alternatively, see Prisma schema reference for type mappings organized by Prisma type. ### Mapping between Prisma ORM scalar types and PostgreSQL database column types The PostgreSQL connector maps the scalar types from the Prisma ORM data model as follows to database column types: | Prisma ORM | PostgreSQL | | --- | --- | | `String` | `text` | | `Boolean` | `boolean` | | `Int` | `integer` | | `BigInt` | `bigint` | | `Float` | `double precision` | | `Decimal` | `decimal(65,30)` | | `DateTime` | `timestamp(3)` | | `Json` | `jsonb` | | `Bytes` | `bytea` | ### Mapping between PostgreSQL database column types to Prisma ORM scalar and native types * When introspecting a PostgreSQL database, the database types are mapped to Prisma ORM types according to the following table. * When creating a migration or prototyping your schema the table is also used - in the other direction. | PostgreSQL (Type | Aliases) | Supported | Prisma ORM | Native database type attribute | Notes | | --- | --- | --- | --- | --- | | `bigint` | `int8` | ✔️ | `BigInt` | `@db.BigInt`\* | \*Default mapping for `BigInt` - no type attribute added to schema. | | `boolean` | `bool` | ✔️ | `Bool` | `@db.Boolean`\* | \*Default mapping for `Bool` - no type attribute added to schema. | | `timestamp with time zone` | `timestamptz` | ✔️ | `DateTime` | `@db.Timestamptz(x)` | | | `time without time zone` | `time` | ✔️ | `DateTime` | `@db.Time(x)` | | | `time with time zone` | `timetz` | ✔️ | `DateTime` | `@db.Timetz(x)` | | | `numeric(p,s)` | `decimal(p,s)` | ✔️ | `Decimal` | `@db.Decimal(x, y)` | | | `real` | `float`, `float4` | ✔️ | `Float` | `@db.Real` | | | `double precision` | `float8` | ✔️ | `Float` | `@db.DoublePrecision`\* | \*Default mapping for `Float` - no type attribute added to schema. | | `smallint` | `int2` | ✔️ | `Int` | `@db.SmallInt` | | | `integer` | `int`, `int4` | ✔️ | `Int` | `@db.Int`\* | \*Default mapping for `Int` - no type attribute added to schema. | | `smallserial` | `serial2` | ✔️ | `Int` | `@db.SmallInt @default(autoincrement())` | | | `serial` | `serial4` | ✔️ | `Int` | `@db.Int @default(autoincrement())` | | | `bigserial` | `serial8` | ✔️ | `Int` | `@db.BigInt @default(autoincrement()` | | | `character(n)` | `char(n)` | ✔️ | `String` | `@db.Char(x)` | | | `character varying(n)` | `varchar(n)` | ✔️ | `String` | `@db.VarChar(x)` | | | `money` | ✔️ | `Decimal` | `@db.Money` | | | `text` | ✔️ | `String` | `@db.Text`\* | \*Default mapping for `String` - no type attribute added to schema. | | `timestamp` | ✔️ | `DateTime` | `@db.TimeStamp`\* | \*Default mapping for `DateTime` - no type attribute added to schema. | | `date` | ✔️ | `DateTime` | `@db.Date` | | | `enum` | ✔️ | `Enum` | N/A | | | `inet` | ✔️ | `String` | `@db.Inet` | | | `bit(n)` | ✔️ | `String` | `@Bit(x)` | | | `bit varying(n)` | ✔️ | `String` | `@VarBit` | | | `oid` | ✔️ | `Int` | `@db.Oid` | | | `uuid` | ✔️ | `String` | `@db.Uuid` | | | `json` | ✔️ | `Json` | `@db.Json` | | | `jsonb` | ✔️ | `Json` | `@db.JsonB`\* | \*Default mapping for `Json` - no type attribute added to schema. | | `bytea` | ✔️ | `Bytes` | `@db.ByteA`\* | \*Default mapping for `Bytes` - no type attribute added to schema. | | `xml` | ✔️ | `String` | `@db.Xml` | | | Array types | ✔️ | `[]` | | | | `citext` | ✔️\* | `String` | `@db.Citext` | \* Only available if Citext extension is enabled. | | `interval` | Not yet | `Unsupported` | | | | `cidr` | Not yet | `Unsupported` | | | | `macaddr` | Not yet | `Unsupported` | | | | `tsvector` | Not yet | `Unsupported` | | | | `tsquery` | Not yet | `Unsupported` | | | | `int4range` | Not yet | `Unsupported` | | | | `int8range` | Not yet | `Unsupported` | | | | `numrange` | Not yet | `Unsupported` | | | | `tsrange` | Not yet | `Unsupported` | | | | `tstzrange` | Not yet | `Unsupported` | | | | `daterange` | Not yet | `Unsupported` | | | | `point` | Not yet | `Unsupported` | | | | `line` | Not yet | `Unsupported` | | | | `lseg` | Not yet | `Unsupported` | | | | `box` | Not yet | `Unsupported` | | | | `path` | Not yet | `Unsupported` | | | | `polygon` | Not yet | `Unsupported` | | | | `circle` | Not yet | `Unsupported` | | | | Composite types | Not yet | n/a | | | | Domain types | Not yet | n/a | | | Introspection adds native database types that are **not yet supported** as `Unsupported` fields: schema.prisma model Device { id Int @id @default(autoincrement()) name String data Unsupported("circle")} ## Prepared statement caching A prepared statement is a feature that can be used to optimize performance. A prepared statement is parsed, compiled, and optimized only once and then can be executed directly multiple times without the overhead of parsing the query again. By caching prepared statements, Prisma Client's query engine does not repeatedly compile the same query which reduces database CPU usage and query latency. For example, here is the generated SQL for two different queries made by Prisma Client: SELECT * FROM user WHERE name = "John";SELECT * FROM user WHERE name = "Brenda"; The two queries after parameterization will be the same, and the second query can skip the preparing step, saving database CPU and one extra roundtrip to the database. Query after parameterization: SELECT * FROM user WHERE name = $1 Every database connection maintained by Prisma Client has a separate cache for storing prepared statements. The size of this cache can be tweaked with the `statement_cache_size` parameter in the connection string. By default, Prisma Client caches `100` statements per connection. Due to the nature of pgBouncer, if the `pgbouncer` parameter is set to `true`, the prepared statement cache is automatically disabled for that connection. --- ## Page: https://www.prisma.io/docs/orm/overview/databases/mysql ## MySQL/MariaDB The MySQL data source connector connects Prisma ORM to a MySQL or MariaDB database server. By default, the MySQL connector contains a database driver responsible for connecting to your database. You can use a driver adapter (Preview) to connect to your database using a JavaScript database driver from Prisma Client. ## Example To connect to a MySQL database server, you need to configure a `datasource` block in your Prisma schema: schema.prisma datasource db { provider = "mysql" url = env("DATABASE_URL")} The fields passed to the `datasource` block are: * `provider`: Specifies the `mysql` data source connector, which is used both for MySQL and MariaDB. * `url`: Specifies the connection URL for the MySQL database server. In this case, an environment variable is used to provide the connection URL. ## Connection details ### Connection URL Here's an overview of the components needed for a MySQL connection URL:  #### Base URL and path Here is an example of the structure of the _base URL_ and the _path_ using placeholder values in uppercase letters: mysql://USER:PASSWORD@HOST:PORT/DATABASE The following components make up the _base URL_ of your database, they are always required: | Name | Placeholder | Description | | --- | --- | --- | | Host | `HOST` | IP address/domain of your database server, e.g. `localhost` | | Port | `PORT` | Port on which your database server is running, e.g. `5432` (default is `3306`, or no port when using Unix socket) | | User | `USER` | Name of your database user, e.g. `janedoe` | | Password | `PASSWORD` | Password for your database user | | Database | `DATABASE` | Name of the database you want to use, e.g. `mydb` | info #### Arguments A connection URL can also take arguments. Here is the same example from above with placeholder values in uppercase letters for three _arguments_: mysql://USER:PASSWORD@HOST:PORT/DATABASE?KEY1=VALUE&KEY2=VALUE&KEY3=VALUE The following arguments can be used: | Argument name | Required | Default | Description | | --- | --- | --- | --- | | `connection_limit` | No | `num_cpus * 2 + 1` | Maximum size of the connection pool | | `connect_timeout` | No | `5` | Maximum number of seconds to wait for a new connection to be opened, `0` means no timeout | | `pool_timeout` | No | `10` | Maximum number of seconds to wait for a new connection from the pool, `0` means no timeout | | `sslcert` | No | | Path to the server certificate. Certificate paths are resolved relative to the `./prisma folder` | | `sslidentity` | No | | Path to the PKCS12 certificate | | `sslpassword` | No | | Password that was used to secure the PKCS12 file | | `sslaccept` | No | `accept_invalid_certs` | Configures whether to check for missing values in the certificate. Possible values: `accept_invalid_certs`, `strict` | | `socket` | No | | Points to a directory that contains a socket to be used for the connection | | `socket_timeout` | No | | Number of seconds to wait until a single query terminates | As an example, if you want to set the connection pool size to `5` and configure a timeout for queries of `3` seconds, you can use the following arguments: mysql://USER:PASSWORD@HOST:PORT/DATABASE?connection_limit=5&socket_timeout=3 ### Configuring an SSL connection You can add various parameters to the connection URL if your database server uses SSL. Here's an overview of the possible parameters: * `sslcert=<PATH>`: Path to the server certificate. This is the root certificate used by the database server to sign the client certificate. You need to provide this if the certificate doesn't exist in the trusted certificate store of your system. For Google Cloud this likely is `server-ca.pem`. Certificate paths are resolved relative to the `./prisma folder` * `sslidentity=<PATH>`: Path to the PKCS12 certificate database created from client cert and key. This is the SSL identity file in PKCS12 format which you will generate using the client key and client certificate. It combines these two files in a single file and secures them via a password (see next parameter). You can create this file using your client key and client certificate by using the following command (using `openssl`): openssl pkcs12 -export -out client-identity.p12 -inkey client-key.pem -in client-cert.pem * `sslpassword=<PASSWORD>`: Password that was used to secure the PKCS12 file. The `openssl` command listed in the previous step will ask for a password while creating the PKCS12 file, you will need to provide that same exact password here. * `sslaccept=(strict|accept_invalid_certs)`: * `strict`: Any missing value in the certificate will lead to an error. For Google Cloud, especially if the database doesn't have a domain name, the certificate might miss the domain/IP address, causing an error when connecting. * `accept_invalid_certs` (default): Bypass this check. Be aware of the security consequences of this setting. Your database connection URL will look similar to this: mysql://USER:PASSWORD@HOST:PORT/DATABASE?sslidentity=client-identity.p12&sslpassword=mypassword&sslcert=rootca.cert ### Connecting via sockets To connect to your MySQL/MariaDB database via a socket, you must add a `socket` field as a _query parameter_ to the connection URL (instead of setting it as the `host` part of the URI). The value of this parameter then must point to the directory that contains the socket, e.g. on a default installation of MySQL/MariaDB on Ubuntu or Debian use: `mysql://USER:PASSWORD@HOST/DATABASE?socket=/run/mysqld/mysqld.sock` Note that `localhost` is required, the value itself is ignored and can be anything. > **Note**: You can find additional context in this GitHub issue. ## Type mapping between MySQL to Prisma schema The MySQL connector maps the scalar types from the Prisma ORM data model as follows to native column types: > Alternatively, see Prisma schema reference for type mappings organized by Prisma ORM type. ### Native type mapping from Prisma ORM to MySQL | Prisma ORM | MySQL | Notes | | --- | --- | --- | | `String` | `VARCHAR(191)` | | | `Boolean` | `BOOLEAN` | In MySQL `BOOLEAN` is a synonym for `TINYINT(1)` | | `Int` | `INT` | | | `BigInt` | `BIGINT` | | | `Float` | `DOUBLE` | | | `Decimal` | `DECIMAL(65,30)` | | | `DateTime` | `DATETIME(3)` | Currently, Prisma ORM does not support zero dates (`0000-00-00`, `00:00:00`) in MySQL | | `Json` | `JSON` | Supported in MySQL 5.7+ only | | `Bytes` | `LONGBLOB` | | ### Native type mapping from Prisma ORM to MariaDB | Prisma ORM | MariaDB | Notes | | --- | --- | --- | | `String` | `VARCHAR(191)` | | | `Boolean` | `BOOLEAN` | In MariaDB `BOOLEAN` is a synonym for `TINYINT(1)` | | `Int` | `INT` | | | `BigInt` | `BIGINT` | | | `Float` | `DOUBLE` | | | `Decimal` | `DECIMAL(65,30)` | | | `DateTime` | `DATETIME(3)` | | | `Json` | `LONGTEXT` | See https://mariadb.com/kb/en/json-data-type/ | | `Bytes` | `LONGBLOB` | | ### Native type mappings When introspecting a MySQL database, the database types are mapped to Prisma ORM according to the following table: | MySQL | Prisma ORM | Supported | Native database type attribute | Notes | | --- | --- | --- | --- | --- | | `serial` | `BigInt` | ✔️ | `@db.UnsignedBigInt @default(autoincrement())` | | | `bigint` | `BigInt` | ✔️ | `@db.BigInt` | | | `bigint unsigned` | `BigInt` | ✔️ | `@db.UnsignedBigInt` | | | `bit` | `Bytes` | ✔️ | `@db.Bit(x)` | `bit(1)` maps to `Boolean` - all other `bit(x)` map to `Bytes` | | `boolean` | `tinyint(1)` | `Boolean` | ✔️ | `@db.TinyInt(1)` | | | `varbinary` | `Bytes` | ✔️ | `@db.VarBinary` | | | `longblob` | `Bytes` | ✔️ | `@db.LongBlob` | | | `tinyblob` | `Bytes` | ✔️ | `@db.TinyBlob` | | | `mediumblob` | `Bytes` | ✔️ | `@db.MediumBlob` | | | `blob` | `Bytes` | ✔️ | `@db.Blob` | | | `binary` | `Bytes` | ✔️ | `@db.Binary` | | | `date` | `DateTime` | ✔️ | `@db.Date` | | | `datetime` | `DateTime` | ✔️ | `@db.DateTime` | | | `timestamp` | `DateTime` | ✔️ | `@db.TimeStamp` | | | `time` | `DateTime` | ✔️ | `@db.Time` | | | `decimal(a,b)` | `Decimal` | ✔️ | `@db.Decimal(x,y)` | | | `numeric(a,b)` | `Decimal` | ✔️ | `@db.Decimal(x,y)` | | | `enum` | `Enum` | ✔️ | N/A | | | `float` | `Float` | ✔️ | `@db.Float` | | | `double` | `Float` | ✔️ | `@db.Double` | | | `smallint` | `Int` | ✔️ | `@db.SmallInt` | | | `smallint unsigned` | `Int` | ✔️ | `@db.UnsignedSmallInt` | | | `mediumint` | `Int` | ✔️ | `@db.MediumInt` | | | `mediumint unsigned` | `Int` | ✔️ | `@db.UnsignedMediumInt` | | | `int` | `Int` | ✔️ | `@db.Int` | | | `int unsigned` | `Int` | ✔️ | `@db.UnsignedInt` | | | `tinyint` | `Int` | ✔️ | `@db.TinyInt(x)` | `tinyint(1)` maps to `Boolean` all other `tinyint(x)` map to `Int` | | `tinyint unsigned` | `Int` | ✔️ | `@db.UnsignedTinyInt(x)` | `tinyint(1) unsigned` **does not** map to `Boolean` | | `year` | `Int` | ✔️ | `@db.Year` | | | `json` | `Json` | ✔️ | `@db.Json` | Supported in MySQL 5.7+ only | | `char` | `String` | ✔️ | `@db.Char(x)` | | | `varchar` | `String` | ✔️ | `@db.VarChar(x)` | | | `tinytext` | `String` | ✔️ | `@db.TinyText` | | | `text` | `String` | ✔️ | `@db.Text` | | | `mediumtext` | `String` | ✔️ | `@db.MediumText` | | | `longtext` | `String` | ✔️ | `@db.LongText` | | | `set` | `Unsupported` | Not yet | | | | `geometry` | `Unsupported` | Not yet | | | | `point` | `Unsupported` | Not yet | | | | `linestring` | `Unsupported` | Not yet | | | | `polygon` | `Unsupported` | Not yet | | | | `multipoint` | `Unsupported` | Not yet | | | | `multilinestring` | `Unsupported` | Not yet | | | | `multipolygon` | `Unsupported` | Not yet | | | | `geometrycollection` | `Unsupported` | Not yet | | | Introspection adds native database types that are **not yet supported** as `Unsupported` fields: schema.prisma model Device { id Int @id @default(autoincrement()) name String data Unsupported("circle")} ## Engine If you are using a version of MySQL where MyISAM is the default engine, you must specify `ENGINE = InnoDB;` when you create a table. If you introspect a database that uses a different engine, relations in the Prisma Schema are not created (or lost, if the relation already existed). ## Permissions A fresh new installation of MySQL/MariaDB has by default only a `root` database user. Do not use `root` user in your Prisma configuration, but instead create a database and database user for each application. On most Linux hosts (e.g. Ubuntu) you can simply run this as the Linux `root` user (which automatically has database `root` access as well): mysql -e "CREATE DATABASE IF NOT EXISTS $DB_PRISMA;"mysql -e "GRANT ALL PRIVILEGES ON $DB_PRISMA.* TO $DB_USER@'%' IDENTIFIED BY '$DB_PASSWORD';" The above is enough to run the `prisma db pull` and `prisma db push` commands. In order to also run `prisma migrate` commands these permissions need to be granted: mysql -e "GRANT CREATE, DROP, REFERENCES, ALTER ON *.* TO $DB_USER@'%';" --- ## Page: https://www.prisma.io/docs/orm/overview/databases/sqlite The SQLite data source connector connects Prisma ORM to a SQLite database file. These files always have the file ending `.db` (e.g.: `dev.db`). By default, the SQLite connector contains a database driver responsible for connecting to your database. You can use a driver adapter (Preview) to connect to your database using a JavaScript database driver from Prisma Client. ## Example To connect to a SQLite database file, you need to configure a `datasource` block in your Prisma schema: schema.prisma datasource db { provider = "sqlite" url = "file:./dev.db"} The fields passed to the `datasource` block are: * `provider`: Specifies the `sqlite` data source connector. * `url`: Specifies the connection URL for the SQLite database. The connection URL always starts with the prefix `file:` and then contains a file path pointing to the SQLite database file. In this case, the file is located in the same directory and called `dev.db`. ## Type mapping between SQLite to Prisma schema The SQLite connector maps the scalar types from the data model to native column types as follows: > Alternatively, see Prisma schema reference for type mappings organized by Prisma ORM type. ### Native type mapping from Prisma ORM to SQLite | Prisma ORM | SQLite | | --- | --- | | `String` | `TEXT` | | `Boolean` | `BOOLEAN` | | `Int` | `INTEGER` | | `BigInt` | `INTEGER` | | `Float` | `REAL` | | `Decimal` | `DECIMAL` | | `DateTime` | `NUMERIC` | | `Json` | `JSONB` | | `Bytes` | `BLOB` | | `Enum` | `TEXT` | note SQLite doesn't have a dedicated Boolean type. While this table shows `BOOLEAN`, columns are assigned a **NUMERIC affinity** (storing `0` for false and `1` for true). Learn more. warning When using `enum` fields in SQLite, be aware of the following: * **No database-level enforcement for correctness**: If you bypass Prisma ORM and store an invalid enum entry in the database, Prisma Client queries will fail at runtime when reading that entry. * **No migration-level enforcement for correctness**: It's possible to end up with incorrect data after schema changes similarly to MongoDB (since the enums aren't checked by the database). ## Rounding errors on big numbers SQLite is a loosely-typed database. If your Schema has a field of type `Int`, then Prisma ORM prevents you from inserting a value larger than an integer. However, nothing prevents the database from directly accepting a bigger number. These manually-inserted big numbers cause rounding errors when queried. To avoid this problem, Prisma ORM 4.0.0 and later checks numbers on the way out of the database to verify that they fit within the boundaries of an integer. If a number does not fit, then Prisma ORM throws a P2023 error, such as: Inconsistent column data: Conversion failed:Value 9223372036854775807 does not fit in an INT column,try migrating the 'int' column type to BIGINT ## Connection details ### Connection URL The connection URL of a SQLite connector points to a file on your file system. For example, the following two paths are equivalent because the `.db` is in the same directory: schema.prisma datasource db { provider = "sqlite" url = "file:./dev.db"} is the same as: schema.prisma datasource db { provider = "sqlite" url = "file:dev.db"} You can also target files from the root or any other place in your file system: schema.prisma datasource db { provider = "sqlite" url = "file:/Users/janedoe/dev.db"} --- ## Page: https://www.prisma.io/docs/orm/overview/databases/mongodb This guide discusses the concepts behind using Prisma ORM and MongoDB, explains the commonalities and differences between MongoDB and other database providers, and leads you through the process for configuring your application to integrate with MongoDB using Prisma ORM. ## What is MongoDB? MongoDB is a NoSQL database that stores data in BSON format, a JSON-like document format designed for storing data in key-value pairs. It is commonly used in JavaScript application development because the document model maps easily to objects in application code, and there is built in support for high availability and horizontal scaling. MongoDB stores data in collections that do not need a schema to be defined in advance, as you would need to do with tables in a relational database. The structure of each collection can also be changed over time. This flexibility can allow rapid iteration of your data model, but it does mean that there are a number of differences when using Prisma ORM to work with your MongoDB database. ## Commonalities with other database providers Some aspects of using Prisma ORM with MongoDB are the same as when using Prisma ORM with a relational database. You can still: * model your database with the Prisma Schema Language * connect to your database, using the `mongodb` database connector * use Introspection for existing projects if you already have a MongoDB database * use `db push` to push changes in your schema to the database * use Prisma Client in your application to query your database in a type safe way based on your Prisma Schema ## Differences to consider MongoDB's document-based structure and flexible schema means that using Prisma ORM with MongoDB differs from using it with a relational database in a number of ways. These are some areas where there are differences that you need to be aware of: * **Defining IDs**: MongoDB documents have an `_id` field (that often contains an ObjectID). Prisma ORM does not support fields starting with `_`, so this needs to be mapped to a Prisma ORM field using the `@map` attribute. For more information, see Defining IDs in MongoDB. * **Migrating existing data to match your Prisma schema**: In relational databases, all your data must match your schema. If you change the type of a particular field in your schema when you migrate, all the data must also be updated to match. In contrast, MongoDB does not enforce any particular schema, so you need to take care when migrating. For more information, see How to migrate old data to new schemas. * **Introspection and Prisma ORM relations**: When you introspect an existing MongoDB database, you will get a schema with no relations and will need to add the missing relations in manually. For more information, see How to add in missing relations after Introspection. * **Filtering for `null` and missing fields**: MongoDB makes a distinction between setting a field to `null` and not setting it at all, which is not present in relational databases. Prisma ORM currently does not express this distinction, which means that you need to be careful when filtering for `null` and missing fields. For more information, see How to filter for `null` and missing fields * **Enabling replication**: Prisma ORM uses MongoDB transactions internally to avoid partial writes on nested queries. When using transactions, MongoDB requires replication of your data set to be enabled. To do this, you will need to configure a replica set — this is a group of MongoDB processes that maintain the same data set. Note that it is still possible to use a single database, by creating a replica set with only one node in it. If you use MongoDB's Atlas hosting service, the replica set is configured for you, but if you are running MongoDB locally you will need to set up a replica set yourself. For more information, see MongoDB's guide to deploying a replica set. ### Performance considerations for large collections #### Problem When working with large MongoDB collections through Prisma, certain operations can become slow and resource-intensive. In particular, operations that require scanning the entire collection, such as `count()`, can hit query execution time limits and significantly impact performance as your dataset grows. #### Solution To address performance issues with large MongoDB collections, consider the following approaches: 1. For large collections, consider using MongoDB's `estimatedDocumentCount()` instead of `count()`. This method is much faster as it uses metadata about the collection. You can use Prisma's `runCommandRaw` method to execute this command. 2. For frequently accessed counts, consider implementing a counter cache. This involves maintaining a separate document with pre-calculated counts that you update whenever documents are added or removed. ## How to use Prisma ORM with MongoDB This section provides instructions for how to carry out tasks that require steps specific to MongoDB. ### How to migrate existing data to match your Prisma schema Migrating your database over time is an important part of the development cycle. During development, you will need to update your Prisma schema (for example, to add new fields), then update the data in your development environment’s database, and eventually push both the updated schema and the new data to the production database. info When using MongoDB, be aware that the “coupling” between your schema and the database is purposefully designed to be less rigid than with SQL databases; MongoDB will not enforce the schema, so you have to verify data integrity. These iterative tasks of updating the schema and the database can result in inconsistencies between your schema and the actual data in the database. Let’s look at one scenario where this can happen, and then examine several strategies for you and your team to consider for handling these inconsistencies. **Scenario**: you need to include a phone number for users, as well as an email. You currently have the following `User` model in your `schema.prisma` file: prisma/schema.prisma model User { id String @id @default(auto()) @map("_id") @db.ObjectId email String} There are a number of strategies you could use for migrating this schema: * **"On-demand" updates**: with this strategy, you and your team have agreed that updates can be made to the schema as needed. However, in order to avoid migration failures due to inconsistencies between the data and schema, there is agreement in the team that any new fields added are explicitly defined as optional. In our scenario above, you can add an optional `phoneNumber` field to the `User` model in your Prisma schema: prisma/schema.prisma model User { id String @id @default(auto()) @map("_id") @db.ObjectId email String phoneNumber String?} Then regenerate your Prisma Client using the `npx prisma generate` command. Next, update your application to reflect the new field, and redeploy your app. As the `phoneNumber` field is optional, you can still query the old users where the phone number has not been defined. The records in the database will be updated "on demand" as the application's users begin to enter their phone number in the new field. Another option is to add a default value on a required field, for example: prisma/schema.prisma model User { id String @id @default(auto()) @map("_id") @db.ObjectId email String phoneNumber String @default("000-000-0000")} Then when you encounter a missing `phoneNumber`, the value will be coerced into `000-000-0000`. * **"No breaking changes" updates**: this strategy builds on the first one, with further consensus amongst your team that you don't rename or delete fields, only add new fields, and always define the new fields as optional. This policy can be reinforced by adding checks in the CI/CD process to verify that there are no backwards-incompatible changes to the schema. * **"All-at-once" updates**: this strategy is similar to traditional migrations in relational databases, where all data is updated to reflect the new schema. In the scenario above, you would create a script to add a value for the phone number field to all existing users in your database. You can then make the field a required field in the application because the schema and the data are consistent. ### How to add in missing relations after Introspection After introspecting an existing MongoDB database, you will need to manually add in relations between models. MongoDB does not have the concept of defining relations via foreign keys, as you would in a relational database. However, if you have a collection in MongoDB with a "foreign-key-like" field that matches the ID field of another collection, Prisma ORM will allow you to emulate relations between the collections. As an example, take a MongoDB database with two collections, `User` and `Post`. The data in these collections has the following format, with a `userId` field linking users to posts: `User` collection: * `_id` field with a type of `objectId` * `email` field with a type of `string` `Post` collection: * `_id` field with a type of `objectId` * `title` field with a type of `string` * `userId` with a type of `objectID` On introspection with `db pull`, this is pulled in to the Prisma Schema as follows: prisma/schema.prisma model Post { id String @id @default(auto()) @map("_id") @db.ObjectId title String userId String @db.ObjectId}model User { id String @id @default(auto()) @map("_id") @db.ObjectId email String} This is missing the relation between the `User` and `Post` models. To fix this, manually add a `user` field to the `Post` model with a `@relation` attribute using `userId` as the `fields` value, linking it to the `User` model, and a `posts` field to the `User` model as the back relation: prisma/schema.prisma model Post { id String @id @default(auto()) @map("_id") @db.ObjectId title String userId String @db.ObjectId user User @relation(fields: [userId], references: [id])}model User { id String @id @default(auto()) @map("_id") @db.ObjectId email String posts Post[]} For more information on how to use relations in Prisma ORM, see our documentation. ### How to filter for `null` and missing fields To understand how MongoDB distinguishes between `null` and missing fields, consider the example of a `User` model with an optional `name` field: model User { id String @id @default(auto()) @map("_id") @db.ObjectId email String name String?} First, try creating a record with the `name` field explicitly set to `null`. Prisma ORM will return `name: null` as expected: const createNull = await prisma.user.create({ data: { email: 'user1@prisma.io', name: null, },})console.log(createNull) Show CLI results { id: '6242c4ae032bc76da250b207', email: 'user1@prisma.io', name: null} If you check your MongoDB database directly, you will also see a new record with `name` set to `null`: { "_id": "6242c4af032bc76da250b207", "email": "user1@prisma.io", "name": null} Next, try creating a record without explicitly setting the `name` field: const createMissing = await prisma.user.create({ data: { email: 'user2@prisma.io', },})console.log(createMissing) Show CLI results { id: '6242c4ae032bc76da250b208', email: 'user2@prisma.io', name: null} Prisma ORM still returns `name: null`, but if you look in the database directly you will see that the record has no `name` field defined at all: { "_id": "6242c4af032bc76da250b208", "email": "user2@prisma.io"} Prisma ORM returns the same result in both cases, because we currently don't have a way to specify this difference in MongoDB between fields that are `null` in the underlying database, and fields that are not defined at all — see this Github issue for more information. This means that you currently have to be careful when filtering for `null` and missing fields. Filtering for records with `name: null` will only return the first record, with the `name` explicitly set to `null`: const findNulls = await prisma.user.findMany({ where: { name: null, },})console.log(findNulls) Show CLI results [ { id: '6242c4ae032bc76da250b207', email: 'user1@prisma.io', name: null }] This is because `name: null` is checking for equality, and a non-existing field isn't equal to `null`. To include missing fields as well, use the `isSet` filter to explicitly search for fields which are either `null` or not set. This will return both records: const findNullOrMissing = await prisma.user.findMany({ where: { OR: [ { name: null, }, { name: { isSet: false, }, }, ], },})console.log(findNullOrMissing) Show CLI results [ { id: '6242c4ae032bc76da250b207', email: 'user1@prisma.io', name: null }, { id: '6242c4ae032bc76da250b208', email: 'user2@prisma.io', name: null }] ## More on using MongoDB with Prisma ORM The fastest way to start using MongoDB with Prisma ORM is to refer to our Getting Started documentation: * Start from scratch * Add to existing project These tutorials will take you through the process of connecting to MongoDB, pushing schema changes, and using Prisma Client. Further reference information is available in the MongoDB connector documentation. For more information on how to set up and manage a MongoDB database, see the Prisma Data Guide. ## Example To connect to a MongoDB server, configure the `datasource` block in your Prisma Schema: schema.prisma datasource db { provider = "mongodb" url = env("DATABASE_URL")} The fields passed to the `datasource` block are: * `provider`: Specifies the `mongodb` data source connector. * `url`: Specifies the connection URL for the MongoDB server. In this case, an environment variable is used to provide the connection URL. warning The MongoDB database connector uses transactions to support nested writes. Transactions **require** a replica set deployment. The easiest way to deploy a replica set is with Atlas. It's free to get started. ## Connection details ### Connection URL The MongoDB connection URL can be configured in different ways depending on how you are hosting your database. The standard configuration is made up of the following components:  #### Base URL and path The base URL and path sections of the connection URL are made up of your authentication credentials followed by the host (and optionally, a port number) and database. mongodb://USERNAME:PASSWORD@HOST/DATABASE The following components make up the _base URL_ of your database: | Name | Placeholder | Description | | --- | --- | --- | | User | `USERNAME` | Name of your database user, e.g. `janedoe` | | Password | `PASSWORD` | Password for your database user | | Host | `HOST` | The host where a `mongod` instance is running. If you are running a sharded cluster this will a `mongos` instance. This can be a hostname, IP address or UNIX domain socket. | | Port | `PORT` | Port on which your database server is running, e.g. `1234`. If none is provided the default `27017` is used. | | Database | `DATABASE` | Name of the database to use. If none is specified but the `authSource` option is set then the `authSource` database name is used. If neither the database in the connection string nor the `authSource` option is specified then it defaults to `admin` | info #### Arguments A connection URL can also take arguments. The following example sets three arguments: * An `ssl` connection * A `connectTimeoutMS` * And the `maxPoolSize` mongodb://USERNAME:PASSWORD@HOST/DATABASE?ssl=true&connectTimeoutMS=5000&maxPoolSize=50 Refer to the MongoDB connection string documentation for a complete list of connection string arguments. There are no Prisma ORM-specific arguments. ## Using `ObjectId` It is common practice for the `_id` field of a MongoDB document to contain an ObjectId: { "_id": { "$oid": "60d599cb001ef98000f2cad2" }, "createdAt": { "$date": { "$numberLong": "1624611275577" } }, "email": "ella@prisma.io", "name": "Ella", "role": "ADMIN"} Any field (most commonly IDs and relation scalar fields) that maps to an `ObjectId` in the underlying database: * Must be of type `String` or `Bytes` * Must include the `@db.ObjectId` attribute * Can optionally use `@default(auto())` to auto-generate a valid `ObjectId` on document creation Here is an example that uses `String`: model User { id String @id @default(auto()) @map("_id") @db.ObjectId // Other fields} And here is another example that uses `Bytes`: model User { id Bytes @id @default(auto()) @map("_id") @db.ObjectId // Other fields} See also: Defining ID fields in MongoDB ### Generating `ObjectId` To generate a valid `ObjectId` (for testing purposes or to manually set an ID field value) in your application, use the `bson` package. npm install --save bson import { ObjectId } from 'bson'const id = new ObjectId() ## Differences to connectors for relational databases This section covers ways in which the MongoDB connector differs from Prisma ORM connectors for relational databases. ### No support for Prisma Migrate Currently, there are no plans to add support for Prisma Migrate as MongoDB projects do not rely on internal schemas where changes need to be managed with an extra tool. Management of `@unique` indexes is realized through `db push`. ### No support for `@@id` and `autoincrement()` The `@@id` attribute (an ID for multiple fields) is not supported because primary keys in MongoDB are always on the `_id` field of a model. The `autoincrement()` function (which creates incrementing `@id` values) is not supported because `autoincrement()` does not work with the `ObjectID` type that the `_id` field has in MongoDB. ### Cyclic references and referential actions If you have cyclic references in your models, either from self-relations or a cycle of relations between models, and you use referential actions, you must set a referential action of `NoAction` to prevent an infinite loop of actions. See Special rules for referential actions for more details. ### Replica set configuration MongoDB only allows you to start a transaction on a replica set. Prisma ORM uses transactions internally to avoid partial writes on nested queries. This means we inherit the requirement of needing a replica set configured. When you try to use Prisma ORM's MongoDB connector on a deployment that has no replica set configured, Prisma ORM shows the message `Error: Transactions are not supported by this deployment`. The full text of the error message is the following: PrismaClientUnknownRequestError2 [PrismaClientUnknownRequestError]:Invalid `prisma.post.create()` invocation in/index.ts:9:21 6 await prisma.$connect() 7 8 // Create the first post→ 9 await prisma.post.create( Error in connector: Database error. error code: unknown, error message: Transactions are not supported by this deployment at cb (/node_modules/@prisma/client/runtime/index.js:34804:17) at processTicksAndRejections (internal/process/task_queues.js:97:5) { clientVersion: '3.xx.0'} To resolve this, we suggest you change your deployment to one with a replica set configured. One simple way for this is to use MongoDB Atlas to launch a free instance that has replica set support out of the box. There's also an option to run the replica set locally with this guide: https://www.mongodb.com/docs/manual/tutorial/convert-standalone-to-replica-set ## Type mapping between MongoDB and the Prisma schema The MongoDB connector maps the scalar types from the Prisma ORM data model to MongoDB's native column types as follows: > Alternatively, see Prisma schema reference for type mappings organized by Prisma type. ### Native type mapping from Prisma ORM to MongoDB | Prisma ORM | MongoDB | | --- | --- | | `String` | `string` | | `Boolean` | `bool` | | `Int` | `int` | | `BigInt` | `long` | | `Float` | `double` | | `Decimal` | Currently unsupported | | `DateTime` | `timestamp` | | `Bytes` | `binData` | | `Json` | | MongoDB types that are currently unsupported: * `Decimal128` * `Undefined` * `DBPointer` * `Null` * `Symbol` * `MinKey` * `MaxKey` * `Object` * `Javascript` * `JavascriptWithScope` * `Regex` ### Mapping from MongoDB to Prisma ORM types on Introspection When introspecting a MongoDB database, Prisma ORM uses the relevant scalar types. Some special types also get additional native type annotations: | MongoDB (Type | Aliases) | Prisma ORM | Supported | Native database type attribute | Notes | | --- | --- | --- | --- | --- | | `objectId` | `String` | ✔️ | `@db.ObjectId` | | Introspection adds native database types that are **not yet supported** as `Unsupported` fields: schema.prisma model Example { id String @id @default(auto()) @map("_id") @db.ObjectId name String regex Unsupported("RegularExpression")} --- ## Page: https://www.prisma.io/docs/orm/overview/databases/sql-server The Microsoft SQL Server data source connector connects Prisma ORM to a Microsoft SQL Server database server. ## Example To connect to a Microsoft SQL Server database, you need to configure a `datasource` block in your Prisma schema: schema.prisma datasource db { provider = "sqlserver" url = env("DATABASE_URL")} The fields passed to the `datasource` block are: * `provider`: Specifies the `sqlserver` data source connector. * `url`: Specifies the connection URL for the Microsoft SQL Server database. In this case, an environment variable is used to provide the connection URL. ## Connection details The connection URL used to connect to an Microsoft SQL Server database follows the JDBC standard. The following example uses SQL authentication (username and password) with an enabled TLS encrypted connection: sqlserver://HOST[:PORT];database=DATABASE;user=USER;password=PASSWORD;encrypt=true warning Note: If you are using any of the following characters in your connection string, you will need to escape them. :\=;/[]{} # these are characters that will need to be escaped To escape these characters, use curly braces `{}` around values that contain special characters. As an example: sqlserver://HOST[:PORT];database=DATABASE;user={MyServer/MyUser};password={ThisIsA:SecurePassword;};encrypt=true ### Arguments | Argument name | Required | Default | Comments | | --- | --- | --- | --- | | * `database` * `initial catalog` | No | `master` | The database to connect to. | | * `username` * `user` * `uid` * `userid` | No - see Comments | | SQL Server login (such as `sa`) _or_ a valid Windows (Active Directory) username if `integratedSecurity` is set to `true` (Windows only). | | * `password` * `pwd` | No - see Comments | | Password for SQL Server login _or_ Windows (Active Directory) username if `integratedSecurity` is set to `true` (Windows only). | | `encrypt` | No | `true` | Configures whether to use TLS all the time, or only for the login procedure, possible values: `true` (use always), `false` (only for login credentials). | | `integratedSecurity` | No | | Enables Windows authentication (integrated security), possible values: `true`, `false`, `yes`, `no`. If set to `true` or `yes` and `username` and `password` are present, login is performed through Windows Active Directory. If login details are not given via separate arguments, the current logged in Windows user is used to login to the server. | | `connectionLimit` | No | `num_cpus * 2 + 1` | Maximum size of the connection pool | | `connectTimeout` | No | `5` | Maximum number of seconds to wait for a new connection | | `schema` | No | `dbo` | Added as a prefix to all the queries if schema name is not the default. | | * `loginTimeout` * `connectTimeout` * `connectionTimeout` | No | | Number of seconds to wait for login to succeed. | | `socketTimeout` | No | | Number of seconds to wait for each query to succeed. | | `isolationLevel` | No | | Sets transaction isolation level. | | `poolTimeout` | No | `10` | Maximum number of seconds to wait for a new connection from the pool. If all connections are in use, the database will return a `PoolTimeout` error after waiting for the given time. | | * `ApplicationName` * `Application Name` (case insensitive) | No | | Sets the application name for the connection. Since version 2.28.0. | | `trustServerCertificate` | No | `false` | Configures whether to trust the server certificate. | | `trustServerCertificateCA` | No | | A path to a certificate authority file to be used instead of the system certificates to authorize the server certificate. Must be either in `pem`, `crt` or `der` format. Cannot be used together with `trustServerCertificate` parameter. | ### Using integrated security (Windows only) The following example uses the currently logged in Windows user to log in to Microsoft SQL Server: sqlserver://localhost:1433;database=sample;integratedSecurity=true;trustServerCertificate=true; The following example uses a specific Active Directory user to log in to Microsoft SQL Server: sqlserver://localhost:1433;database=sample;integratedSecurity=true;username=prisma;password=aBcD1234;trustServerCertificate=true; #### Connect to a named instance The following example connects to a named instance of Microsoft SQL Server (`mycomputer\sql2019`) using integrated security: sqlserver://mycomputer\sql2019;database=sample;integratedSecurity=true;trustServerCertificate=true; ## Type mapping between Microsoft SQL Server to Prisma schema For type mappings organized by Prisma ORM type, refer to the Prisma schema reference documentation. ## Supported versions See Supported databases. ## Limitations and known issues ### Prisma Migrate caveats Prisma Migrate is supported in 2.13.0 and later with the following caveats: #### Database schema names SQL Server does not have an equivalent to the PostgreSQL `SET search_path` command familiar from PostgreSQL. This means that when you create migrations, you must define the same schema name in the connection URL that is used by the production database. For most of the users this is `dbo` (the default value). However, if the production database uses another schema name, all the migration SQL must be either edited by hand to reflect the production _or_ the connection URL must be changed before creating migrations (for example: `schema=name`). #### Cyclic references Circular references can occur between models when each model references another, creating a closed loop. When using a Microsoft SQL Server database, Prisma ORM will show a validation error if the referential action on a relation is set to something other than `NoAction`. See Special rules for referential actions in SQL Server for more information. #### Destructive changes Certain migrations will cause more changes than you might expect. For example: * Adding or removing `autoincrement()`. This cannot be achieved by modifying the column, but requires recreating the table (including all constraints, indices, and foreign keys) and moving all data between the tables. * Additionally, it is not possible to delete all the columns from a table (possible with PostgreSQL or MySQL). If a migration needs to recreate all table columns, it will also re-create the table. #### Shared default values are not supported In some cases, user might want to define default values as shared objects: default\_objects.sql CREATE DEFAULT catcat AS 'musti';CREATE TABLE cats ( id INT IDENTITY PRIMARY KEY, name NVARCHAR(1000));sp_bindefault 'catcat', 'dbo.cats.name'; Using the stored procedure `sp_bindefault`, the default value `catcat` can be used in more than one table. The way Prisma ORM manages default values is per table: default\_per\_table.sql CREATE TABLE cats ( id INT IDENTITY PRIMARY KEY, name NVARCHAR(1000) CONSTRAINT DF_cat_name DEFAULT 'musti'); The last example, when introspected, leads to the following model: schema.prisma model cats { id Int @id @default(autoincrement()) name String? @default("musti")} And the first doesn't get the default value introspected: schema.prisma model cats { id Int @id @default(autoincrement()) name String?} If using Prisma Migrate together with shared default objects, changes to them must be done manually to the SQL. ### Data model limitations #### Cannot use column with `UNIQUE` constraint and filtered index as foreign key Microsoft SQL Server only allows one `NULL` value in a column that has a `UNIQUE` constraint. For example: * A table of users has a column named `license_number` * The `license_number` field has a `UNIQUE` constraint * The `license_number` field only allows **one** `NULL` value The standard way to get around this issue is to create a filtered unique index that excludes `NULL` values. This allows you to insert multiple `NULL` values. If you do not create an index in the database, you will get an error if you try to insert more than one `null` value into a column with Prisma Client. _However_, creating an index makes it impossible to use `license_number` as a foreign key in the database (or a relation scalar field in corresponding Prisma Schema) ### Raw query considerations #### Raw queries with `String @db.VarChar(n)` fields / `VARCHAR(N)` columns `String` query parameters in raw queries are always encoded to SQL Server as `NVARCHAR(4000)` (if your `String` length is <= 4000) or `NVARCHAR(MAX)`. If you compare a `String` query parameter to a column of type `String @db.VarChar(N)`/`VARCHAR(N)`, this can lead to implicit conversion on SQL Server which affects your index performance and can lead to high CPU usage. Here is an example: model user { id Int @id name String @db.VarChar(40)} This query would be affected: await prisma.$queryRaw`SELECT * FROM user WHERE name = ${"John"}` To avoid the problem, we recommend you always manually cast your `String` query parameters to `VARCHAR(N)` in the raw query: await prisma.$queryRaw`SELECT * FROM user WHERE name = CAST(${"John"} AS VARCHAR(40))` This enables SQL Server to perform a Clustered Index Seek instead of a Clustered Index Scan. --- ## Page: https://www.prisma.io/docs/orm/overview/databases/cockroachdb This guide discusses the concepts behind using Prisma ORM and CockroachDB, explains the commonalities and differences between CockroachDB and other database providers, and leads you through the process for configuring your application to integrate with CockroachDB. info The CockroachDB connector is generally available in versions `3.14.0` and later. It was first added as a Preview feature in version `3.9.0` with support for Introspection, and Prisma Migrate support was added in `3.11.0`. ## What is CockroachDB? CockroachDB is a distributed database that is designed for scalability and high availability. Features include: * **Compatibility with PostgreSQL:** CockroachDB is compatible with PostgreSQL, allowing interoperability with a large ecosystem of existing products * **Built-in scaling:** CockroachDB comes with automated replication, failover and repair capabilities to allow easy horizontal scaling of your application ## Commonalities with other database providers CockroachDB is largely compatible with PostgreSQL, and can mostly be used with Prisma ORM in the same way. You can still: * model your database with the Prisma Schema Language * connect to your database, using Prisma ORM's `cockroachdb` database connector * use Introspection for existing projects if you already have a CockroachDB database * use Prisma Migrate to migrate your database schema to a new version * use Prisma Client in your application to query your database in a type safe way based on your Prisma Schema ## Differences to consider There are some CockroachDB-specific differences to be aware of when working with Prisma ORM's `cockroachdb` connector: * **Cockroach-specific native types:** Prisma ORM's `cockroachdb` database connector provides support for CockroachDB's native data types. To learn more, see How to use CockroachDB's native types. * **Creating database keys:** Prisma ORM allows you to generate a unique identifier for each record using the `autoincrement()` function. For more information, see How to use database keys with CockroachDB. ## How to use Prisma ORM with CockroachDB This section provides more details on how to use CockroachDB-specific features. ### How to use CockroachDB's native types CockroachDB has its own set of native data types which are supported in Prisma ORM. For example, CockroachDB uses the `STRING` data type instead of PostgreSQL's `VARCHAR`. As a demonstration of this, say you create a `User` table in your CockroachDB database using the following SQL command: CREATE TABLE public."Post" ( "id" INT8 NOT NULL, "title" VARCHAR(200) NOT NULL, CONSTRAINT "Post_pkey" PRIMARY KEY ("id" ASC), FAMILY "primary" ("id", "title")); After introspecting your database with `npx prisma db pull`, you will have a new `Post` model in your Prisma Schema: schema.prisma model Post { id BigInt @id title String @db.String(200)} Notice that the `title` field has been annotated with `@db.String(200)` — this differs from PostgreSQL where the annotation would be `@db.VarChar(200)`. For a full list of type mappings, see our connector documentation. ### How to use database keys with CockroachDB When generating unique identifiers for records in a distributed database like CockroachDB, it is best to avoid using sequential IDs – for more information on this, see CockroachDB's blog post on choosing index keys. Instead, Prisma ORM provides the `autoincrement()` attribute function, which uses CockroachDB's `unique_rowid()` function for generating unique identifiers. For example, the following `User` model has an `id` primary key, generated using the `autoincrement()` function: schema.prisma model User { id BigInt @id @default(autoincrement()) name String} For compatibility with existing databases, you may sometimes still need to generate a fixed sequence of integer key values. In these cases, you can use Prisma ORM's inbuilt `sequence()` function for CockroachDB. For a list of available options for the `sequence()` function, see our reference documentation. For more information on generating database keys, see CockroachDB's Primary key best practices guide. ## Example To connect to a CockroachDB database server, you need to configure a `datasource` block in your Prisma schema: schema.prisma datasource db { provider = "cockroachdb" url = env("DATABASE_URL")} The fields passed to the `datasource` block are: * `provider`: Specifies the `cockroachdb` data source connector. * `url`: Specifies the connection URL for the CockroachDB database server. In this case, an environment variable is used to provide the connection URL. info While `cockroachdb` and `postgresql` connectors are similar, it is mandatory to use the `cockroachdb` connector instead of `postgresql` when connecting to a CockroachDB database from version 5.0.0. ## Connection details CockroachDB uses the PostgreSQL format for its connection URL. See the PostgreSQL connector documentation for details of this format, and the optional arguments it takes. ## Differences between CockroachDB and PostgreSQL The following table lists differences between CockroachDB and PostgreSQL: | Issue | Area | Notes | | --- | --- | --- | | By default, the `INT` type is an alias for `INT8` in CockroachDB, whereas in PostgreSQL it is an alias for `INT4`. This means that Prisma ORM will introspect an `INT` column in CockroachDB as `BigInt`, whereas in PostgreSQL Prisma ORM will introspect it as `Int`. | Schema | For more information on the `INT` type, see the CockroachDB documentation | | When using `@default(autoincrement())` on a field, CockroachDB will automatically generate 64-bit integers for the row IDs. These integers will be increasing but not consecutive. This is in contrast to PostgreSQL, where generated row IDs are consecutive and start from 1. | Schema | For more information on generated values, see the CockroachDB documentation | | The `@default(autoincrement())` attribute can only be used together with the `BigInt` field type. | Schema | For more information on generated values, see the CockroachDB documentation | ## Type mapping limitations in CockroachDB The CockroachDB connector maps the scalar types from the Prisma ORM data model to native column types. These native types are mostly the same as for PostgreSQL — see the Native type mapping from Prisma ORM to CockroachDB for details. However, there are some limitations: | CockroachDB (Type | Aliases) | Prisma ORM | Supported | Native database type attribute | Notes | | --- | --- | --- | --- | --- | | `money` | `Decimal` | Not yet | `@db.Money` | Supported in PostgreSQL but not currently in CockroachDB | | `xml` | `String` | Not yet | `@db.Xml` | Supported in PostgreSQL but not currently in CockroachDB | | `jsonb` arrays | `Json[]` | Not yet | N/A | `Json[]` supported in PostgreSQL but not currently in CockroachDB | ## Other limitations The following table lists any other current known limitations of CockroachDB compared to PostgreSQL: | Issue | Area | Notes | | --- | --- | --- | | Primary keys are named `primary` instead of `TABLE_pkey`, the Prisma ORM default. | Introspection | This means that they are introspected as `@id(map: "primary")`. This will be fixed in CockroachDB 22.1. | | Foreign keys are named `fk_COLUMN_ref_TABLE` instead of `TABLE_COLUMN_fkey`, the Prisma ORM default. | Introspection | This means that they are introspected as `@relation([...], map: "fk_COLUMN_ref_TABLE")`. This will be fixed in CockroachDB 22.1 | | Index types `Hash`, `Gist`, `SpGist` or `Brin` are not supported. | Schema | In PostgreSQL, Prisma ORM allows configuration of indexes to use the different index access method. CockroachDB only currently supports `BTree` and `Gin`. | | Pushing to `Enum` types not supported | Client | Pushing to `Enum` types (e.g. `data: { enum { push: "A" }, }`) is currently not supported in CockroachDB | | Searching on `String` fields without a full text index not supported | Client | Searching on `String` fields without a full text index (e.g. `where: { text: { search: "cat & dog", }, },`) is currently not supported in CockroachDB | | Integer division not supported | Client | Integer division (e.g. `data: { int: { divide: 10, }, }`) is currently not supported in CockroachDB | | Limited filtering on `Json` fields | Client | Currently CockroachDB only supports `equals` and `not` filtering on `Json` fields | ## Type mapping between CockroachDB and the Prisma schema The CockroachDB connector maps the scalar types from the Prisma ORM data model as follows to native column types: > Alternatively, see the Prisma schema reference for type mappings organized by Prisma ORM type. ### Native type mapping from Prisma ORM to CockroachDB | Prisma ORM | CockroachDB | | --- | --- | | `String` | `STRING` | | `Boolean` | `BOOL` | | `Int` | `INT4` | | `BigInt` | `INT8` | | `Float` | `FLOAT8` | | `Decimal` | `DECIMAL(65,30)` | | `DateTime` | `TIMESTAMP(3)` | | `Json` | `JSONB` | | `Bytes` | `BYTES` | ### Mapping from CockroachDB to Prisma ORM types on Introspection When introspecting a CockroachDB database, the database types are mapped to Prisma ORM according to the following table: | CockroachDB (Type | Aliases) | Prisma ORM | Supported | Native database type attribute | Notes | | --- | --- | --- | --- | --- | | `INT` | `BIGINT`, `INTEGER` | `BigInt` | ✔️ | `@db.Int8` | | | `BOOL` | `BOOLEAN` | `Bool` | ✔️ | `@db.Bool`\* | | | `TIMESTAMP` | `TIMESTAMP WITHOUT TIME ZONE` | `DateTime` | ✔️ | `@db.Timestamp(x)` | | | `TIMESTAMPTZ` | `TIMESTAMP WITH TIME ZONE` | `DateTime` | ✔️ | `@db.Timestamptz(x)` | | | `TIME` | `TIME WITHOUT TIME ZONE` | `DateTime` | ✔️ | `@db.Time(x)` | | | `TIMETZ` | `TIME WITH TIME ZONE` | `DateTime` | ✔️ | `@db.Timetz(x)` | | | `DECIMAL(p,s)` | `NUMERIC(p,s)`, `DEC(p,s)` | `Decimal` | ✔️ | `@db.Decimal(x, y)` | | | `REAL` | `FLOAT4`, `FLOAT` | `Float` | ✔️ | `@db.Float4` | | | `DOUBLE PRECISION` | `FLOAT8` | `Float` | ✔️ | `@db.Float8` | | | `INT2` | `SMALLINT` | `Int` | ✔️ | `@db.Int2` | | | `INT4` | `Int` | ✔️ | `@db.Int4` | | | `CHAR(n)` | `CHARACTER(n)` | `String` | ✔️ | `@db.Char(x)` | | | `"char"` | `String` | ✔️ | `@db.CatalogSingleChar` | Internal type for CockroachDB catalog tables, not meant for end users. | | `STRING` | `TEXT`, `VARCHAR` | `String` | ✔️ | `@db.String` | | | `DATE` | `DateTime` | ✔️ | `@db.Date` | | | `ENUM` | `enum` | ✔️ | N/A | | | `INET` | `String` | ✔️ | `@db.Inet` | | | `BIT(n)` | `String` | ✔️ | `@Bit(x)` | | | `VARBIT(n)` | `BIT VARYING(n)` | `String` | ✔️ | `@VarBit` | | | `OID` | `Int` | ✔️ | `@db.Oid` | | | `UUID` | `String` | ✔️ | `@db.Uuid` | | | `JSONB` | `JSON` | `Json` | ✔️ | `@db.JsonB` | | | Array types | `[]` | ✔️ | | | Introspection adds native database types that are **not yet supported** as `Unsupported` fields: schema.prisma model Device { id BigInt @id @default(autoincrement()) interval Unsupported("INTERVAL")} ## More on using CockroachDB with Prisma ORM The fastest way to start using CockroachDB with Prisma ORM is to refer to our Getting Started documentation: * Start from scratch * Add to existing project These tutorials will take you through the process of connecting to CockroachDB, migrating your schema, and using Prisma Client. Further reference information is available in the CockroachDB connector documentation. --- ## Page: https://www.prisma.io/docs/orm/overview/databases/planetscale Prisma and PlanetScale together provide a development arena that optimizes rapid, type-safe development of data access applications, using Prisma's ORM and PlanetScale's highly scalable MySQL-based platform. This document discusses the concepts behind using Prisma ORM and PlanetScale, explains the commonalities and differences between PlanetScale and other database providers, and leads you through the process for configuring your application to integrate with PlanetScale. ## What is PlanetScale? PlanetScale uses the Vitess database clustering system to provide a MySQL-compatible database platform. Features include: * **Enterprise scalability.** PlanetScale provides a highly available production database cluster that supports scaling across multiple database servers. This is particularly useful in a serverless context, as it avoids the problem of having to manage connection limits. * **Database branches.** PlanetScale allows you to create branches of your database schema, so that you can test changes on a development branch before applying them to your production database. * **Support for non-blocking schema changes.** PlanetScale provides a workflow that allows users to update database schemas without locking the database or causing downtime. ## Commonalities with other database providers Many aspects of using Prisma ORM with PlanetScale are just like using Prisma ORM with any other relational database. You can still: * model your database with the Prisma Schema Language * use Prisma ORM's existing `mysql` database connector in your schema, along with the connection string PlanetScale provides you * use Introspection for existing projects if you already have a database schema in PlanetScale * use `db push` to push changes in your schema to the database * use Prisma Client in your application to talk to the database server at PlanetScale ## Differences to consider PlanetScale's branching model and design for scalability means that there are also a number of differences to consider. You should be aware of the following points when deciding to use PlanetScale with Prisma ORM: * **Branching and deploy requests.** PlanetScale provides two types of database branches: _development branches_, which allow you to test out schema changes, and _production branches_, which are protected from direct schema changes. Instead, changes must be first created on a development branch and then deployed to production using a deploy request. Production branches are highly available and include automated daily backups. To learn more, see How to use branches and deploy requests. * **Referential actions and integrity.** To support scaling across multiple database servers, PlanetScale by default does not use foreign key constraints, which are normally used in relational databases to enforce relationships between data in different tables, and asks users to handle this manually in their applications. However, you can explicitly enable them in the PlanetScale database settings. If you don't enable these explicitly, you can still maintain these relationships in your data and allow the use of referential actions by using Prisma ORM's ability to emulate relations in Prisma Client with the `prisma` relation mode. For more information, see How to emulate relations in Prisma Client. * **Creating indexes on foreign keys.** When emulating relations in Prisma ORM (i.e. when _not_ using foreign key constraints on the database-level), you will need to create dedicated indexes on foreign keys. In a standard MySQL database, if a table has a column with a foreign key constraint, an index is automatically created on that column. When PlanetScale is configured to not use foreign key constraints, these indexes are currently not created when Prisma Client emulates relations, which can lead to issues with queries not being well optimized. To avoid this, you can create indexes in Prisma ORM. For more information, see How to create indexes on foreign keys. * **Making schema changes with `db push`.** When you merge a development branch into your production branch, PlanetScale will automatically compare the two schemas and generate its own schema diff. This means that Prisma ORM's `prisma migrate` workflow, which generates its own history of migration files, is not a natural fit when working with PlanetScale. These migration files may not reflect the actual schema changes run by PlanetScale when the branch is merged. warning We recommend not using `prisma migrate` when making schema changes with PlanetScale. Instead, we recommend that you use the `prisma db push` command. For an example of how this works, see How to make schema changes with `db push` * **Introspection**. When you introspect on an existing database and you have _not_ enabled foreign key constraints in your PlanetScale database, you will get a schema with no relations, as they are usually defined based on foreign keys that connect tables. In that case, you will need to add the missing relations in manually. For more information, see How to add in missing relations after Introspection. ## How to use branches and deploy requests When connecting to PlanetScale with Prisma ORM, you will need to use the correct connection string for your branch. The connection URL for a given database branch can be found from your PlanetScale account by going to the overview page for the branch and selecting the 'Connect' dropdown. In the 'Passwords' section, generate a new password and select 'Prisma' from the dropdown to get the Prisma format for the connection URL. See Prisma ORM's Getting Started guide for more details of how to connect to a PlanetScale database. Every PlanetScale database is created with a branch called `main`, which is initially a development branch that you can use to test schema changes on. Once you are happy with the changes you make there, you can promote it to become a production branch. Note that you can only push new changes to a development branch, so further changes will need to be created on a separate development branch and then later deployed to production using a deploy request. If you try to push to a production branch, you will get the error message `Direct execution of DDL (Data Definition Language) SQL statements is disabled on this database.` ## How to use relations (and enable referential integrity) with PlanetScale ### Option 1: Emulate relations in Prisma Client #### 1\. Set `relationMode = "prisma"` PlanetScale does not use foreign key constraints in its database schema by default. However, Prisma ORM relies on foreign key constraints in the underlying database to enforce referential integrity between models in your Prisma schema. In Prisma ORM versions 3.1.1 and later, you can emulate relations in Prisma Client with the `prisma` relation mode, which avoids the need for foreign key constraints in the database. To enable emulation of relations in Prisma Client, set the `relationMode` field to `"prisma"` in the `datasource` block: schema.prisma datasource db { provider = "mysql" url = env("DATABASE_URL") relationMode = "prisma"} info The ability to set the relation mode was introduced as part of the `referentialIntegrity` preview feature in Prisma ORM version 3.1.1, and is generally available in Prisma ORM versions 4.8.0 and later. The `relationMode` field was renamed in Prisma ORM version 4.5.0, and was previously named `referentialIntegrity`. If you use relations in your Prisma schema with the default `"foreignKeys"` option for the `relationMode` field, PlanetScale will error and Prisma ORM output the P3021 error message when it tries to create foreign keys. (In versions before 2.27.0 it will output a raw database error.) #### 2\. Create indexes on foreign keys When you emulate relations in Prisma Client, you need to create your own indexes. As an example of a situation where you would want to add an index, take this schema for a blog with posts and comments: schema.prisma model Post { id Int @id @default(autoincrement()) title String content String likes Int @default(0) comments Comment[]}model Comment { id Int @id @default(autoincrement()) comment String postId Int post Post @relation(fields: [postId], references: [id], onDelete: Cascade)} The `postId` field in the `Comment` model refers to the corresponding `id` field in the `Post` model. However this is not implemented as a foreign key in PlanetScale, so the column doesn't have an automatic index. This means that some queries may not be well optimized. For example, if you query for all comments with a certain post `id`, PlanetScale may have to do a full table lookup. This could be slow, and also expensive because PlanetScale's billing model charges for the number of rows read. To avoid this, you can define an index on the `postId` field using Prisma ORM's `@@index` argument: schema.prisma model Post { id Int @id @default(autoincrement()) title String content String likes Int @default(0) comments Comment[]}model Comment { id Int @id @default(autoincrement()) comment String postId Int post Post @relation(fields: [postId], references: [id], onDelete: Cascade) @@index([postId])} You can then add this change to your schema using `db push`. In versions 4.7.0 and later, Prisma ORM warns you if you have a relation with no index on the relation scalar field. For more information, see Index validation. ### Option 2: Enable foreign key constraints in the PlanetScale database settings Support for foreign key constraints in PlanetScale databases has been Generally Available since February 2024. Follow the instructions in the PlanetScale documentation to enable them in your database. You can then use Prisma ORM and define relations in your Prisma schema without the need for extra configuration. In that case, you can define a relation as with other database that supports foreign key constraints, for example: schema.prisma model Post { id Int @id @default(autoincrement()) title String content String likes Int @default(0) comments Comment[]}model Comment { id Int @id @default(autoincrement()) comment String postId Int post Post @relation(fields: [postId], references: [id], onDelete: Cascade)} With this approach, it is _not_ necessary to: * set `relationMode = "prisma"` in your Prisma schema * define additional indexes on foreign keys Also, introspection will automatically create relation fields in your Prisma schema because it can detect the foreign key constraints in the database. ## How to make schema changes with `db push` To use `db push` with PlanetScale, you will first need to enable emulation of relations in Prisma Client. Pushing to your branch without referential emulation enabled will give the error message `Foreign keys cannot be created on this database.` As an example, let's say you decide to decide to add a new `excerpt` field to the blog post schema above. You will first need to create a new development branch and connect to it. Next, add the following to your `schema.prisma` file: schema.prisma model Post { id Int @id @default(autoincrement()) title String content String excerpt String? likes Int @default(0) comments Comment[]}model Comment { id Int @id @default(autoincrement()) comment String postId Int post Post @relation(fields: [postId], references: [id], onDelete: Cascade) @@index([postId])} To push these changes, navigate to your project directory in your terminal and run npx prisma db push Once you are happy with your changes on your development branch, you can open a deploy request to deploy these to your production branch. For more examples, see PlanetScale's tutorial on automatic migrations with Prisma ORM using `db push`. ## How to add in missing relations after Introspection > **Note**: This section is only relevant if you use `relationMode = "prisma"` to emulate foreign key constraints with Prisma ORM. If you enabled foreign key constraints in your PlanetScale database, you can ignore this section. After introspecting with `npx prisma db pull`, the schema you get may be missing some relations. For example, the following schema is missing a relation between the `User` and `Post` models: schema.prisma model Post { id Int @id @default(autoincrement()) createdAt DateTime @default(now()) title String @db.VarChar(255) content String? authorId Int @@index([authorId])}model User { id Int @id @default(autoincrement()) email String @unique name String?} In this case you need to add the relation in manually: schema.prisma model Post { id Int @id @default(autoincrement()) createdAt DateTime @default(now()) title String @db.VarChar(255) content String? author User @relation(fields: [authorId], references: [id]) authorId Int @@index([authorId])}model User { id Int @id @default(autoincrement()) email String @unique name String? posts Post[]} For a more detailed example, see the Getting Started guide for PlanetScale. ## How to use the PlanetScale serverless driver with Prisma ORM (Preview) The PlanetScale serverless driver provides a way of communicating with your database and executing queries over HTTP. You can use Prisma ORM along with the PlanetScale serverless driver using the `@prisma/adapter-planetscale` driver adapter. The driver adapter allows you to communicate with your database over HTTP. info This feature is available in Preview from Prisma ORM versions 5.4.2 and later. To get started, enable the `driverAdapters` Preview feature flag: generator client { provider = "prisma-client-js" previewFeatures = ["driverAdapters"]} Generate Prisma Client: npx prisma generate info Ensure you update the host value in your connection string to `aws.connect.psdb.cloud`. You can learn more about this here. DATABASE_URL='mysql://johndoe:strongpassword@aws.connect.psdb.cloud/clear_nightsky?sslaccept=strict' Install the Prisma ORM adapter for PlanetScale, PlanetScale serverless driver and `undici` packages: npm install @prisma/adapter-planetscale @planetscale/database undici info When using a Node.js version below 18, you must provide a custom fetch function implementation. We recommend the `undici` package on which Node's built-in fetch is based. Node.js versions 18 and later include a built-in global `fetch` function, so you don't have to install an extra package. Update your Prisma Client instance to use the PlanetScale serverless driver: import { Client } from '@planetscale/database'import { PrismaPlanetScale } from '@prisma/adapter-planetscale'import { PrismaClient } from '@prisma/client'import dotenv from 'dotenv'import { fetch as undiciFetch } from 'undici'dotenv.config()const connectionString = `${process.env.DATABASE_URL}`const client = new Client({ url: connectionString, fetch: undiciFetch })const adapter = new PrismaPlanetScale(client)const prisma = new PrismaClient({ adapter }) You can then use Prisma Client as you normally would with full type-safety. Prisma Migrate, introspection, and Prisma Studio will continue working as before using the connection string defined in the Prisma schema. ## More on using PlanetScale with Prisma ORM The fastest way to start using PlanetScale with Prisma ORM is to refer to our Getting Started documentation: * Start from scratch * Add to existing project These tutorials will take you through the process of connecting to PlanetScale, pushing schema changes, and using Prisma Client. For further tips on best practices when using Prisma ORM and PlanetScale together, watch our video: --- ## Page: https://www.prisma.io/docs/orm/overview/databases/supabase This guide discusses the concepts behind using Prisma ORM and Supabase, explains the commonalities and differences between Supabase and other database providers, and leads you through the process for configuring your application to integrate with Supabase. ## What is Supabase? Supabase is a PostgreSQL hosting service and open source Firebase alternative providing all the backend features you need to build a product. Unlike Firebase, Supabase is backed by PostgreSQL which can be accessed directly using Prisma ORM. To learn more about Supabase, you can check out their architecture here and features here ## Commonalities with other database providers Many aspects of using Prisma ORM with Supabase are just like using Prisma ORM with any other relational database. You can still: * model your database with the Prisma Schema Language * use Prisma ORM's existing `postgresql` database connector in your schema, along with the connection string Supabase provides you * use Introspection for existing projects if you already have a database schema in Supabase * use `db push` to push changes in your schema to Supabase * use Prisma Client in your application to talk to the database server at Supabase ## Specific considerations If you'd like to use the connection pooling feature available with Supabase, you will need to use the connection pooling connection string available via your Supabase database settings with `?pgbouncer=true` appended to the end of your `DATABASE_URL` environment variable: .env # Connect to Supabase via connection pooling with Supavisor.DATABASE_URL="postgres://postgres.[your-supabase-project]:[password]@aws-0-[aws-region].pooler.supabase.com:6543/postgres?pgbouncer=true" If you would like to use the Prisma CLI in order to perform other actions on your database (e.g. migrations) you will need to add a `DIRECT_URL` environment variable to use in the `datasource.directUrl` property so that the CLI can bypass Supavisor: .env # Connect to Supabase via connection pooling with Supavisor.DATABASE_URL="postgres://postgres.[your-supabase-project]:[password]@aws-0-[aws-region].pooler.supabase.com:6543/postgres?pgbouncer=true"# Direct connection to the database. Used for migrations.DIRECT_URL="postgres://postgres.[your-supabase-project]:[password]@aws-0-[aws-region].pooler.supabase.com:5432/postgres" You can then update your `schema.prisma` to use the new direct URL: schema.prisma datasource db { provider = "postgresql" url = env("DATABASE_URL") directUrl = env("DIRECT_URL")} More information about the `directUrl` field can be found here. info We strongly recommend using connection pooling with Supavisor in addition to `DIRECT_URL`. You will gain the great developer experience of the Prisma CLI while also allowing for connections to be pooled regardless of your deployment strategy. While this is not strictly necessary for every app, serverless solutions will inevitably require connection pooling. ## Getting started with Supabase If you're interested in learning more, Supabase has a great guide for connecting a database provided by Supabase to your Prisma project available here. If you're running into issues integrating with Supabase, check out these specific troubleshooting tips or Prisma's GitHub Discussions for more help. --- ## Page: https://www.prisma.io/docs/orm/overview/databases/neon This guide explains how to: * Connect Prisma ORM using Neon's connection pooling feature * Resolve connection timeout issues * Use Neon's serverless driver with Prisma ORM ## What is Neon?  Neon is a fully managed serverless PostgreSQL with a generous free tier. Neon separates storage and compute, and offers modern developer features such as serverless, branching, bottomless storage, and more. Neon is open source and written in Rust. Learn more about Neon here. ## Commonalities with other database providers Many aspects of using Prisma ORM with Neon are just like using Prisma ORM with any other PostgreSQL database. You can: * model your database with the Prisma Schema Language * use Prisma ORM's `postgresql` database connector in your schema, along with the connection string Neon provides you * use Introspection for existing projects if you already have a database schema on Neon * use `prisma migrate dev` to track schema migrations in your Neon database * use `prisma db push` to push changes in your schema to Neon * use Prisma Client in your application to communicate with the database hosted by Neon ## Differences to consider There are a few differences between Neon and PostgreSQL you should be aware of the following when deciding to use Neon with Prisma ORM: * **Neon's serverless model** — By default, Neon scales a compute to zero after 5 minutes of inactivity. During this state, a compute instance is in _idle_ state. A characteristic of this feature is the concept of a "cold start". Activating a compute from an idle state takes from 500ms to a few seconds. Depending on how long it takes to connect to your database, your application may timeout. To learn more, see: Connection latency and timeouts. * **Neon's connection pooler** — Neon offers connection pooling using PgBouncer, enabling up to 10,000 concurrent connections. To learn more, see: Connection pooling. ## How to use Neon's connection pooling If you would like to use the connection pooling available in Neon, you will need to add `-pooler` in the hostname of your `DATABASE_URL` environment variable used in the `url` property of the `datasource` block of your Prisma schema: .env # Connect to Neon with Pooling.DATABASE_URL=postgres://daniel:<password>@ep-mute-rain-952417-pooler.us-east-2.aws.neon.tech:5432/neondb?sslmode=require If you would like to use Prisma CLI in order to perform other actions on your database (e.g. for migrations) you will need to add a `DIRECT_URL` environment variable to use in the `directUrl` property of the `datasource` block of your Prisma schema so that the CLI will use a direct connection string (without PgBouncer): .env # Connect to Neon with Pooling.DATABASE_URL=postgres://daniel:<password>@ep-mute-rain-952417-pooler.us-east-2.aws.neon.tech/neondb?sslmode=require# Direct connection to the database used by Prisma CLI for e.g. migrations.DIRECT_URL="postgres://daniel:<password>@ep-mute-rain-952417.us-east-2.aws.neon.tech/neondb" You can then update your `schema.prisma` to use the new direct URL: schema.prisma datasource db { provider = "postgresql" url = env("DATABASE_URL") directUrl = env("DIRECT_URL")} More information about the `directUrl` field can be found here. info We strongly recommend using the pooled connection string in your `DATABASE_URL` environment variable. You will gain the great developer experience of the Prisma CLI while also allowing for connections to be pooled regardless of deployment strategy. While this is not strictly necessary for every app, serverless solutions will inevitably require connection pooling. ## Resolving connection timeouts A connection timeout that occurs when connecting from Prisma ORM to Neon causes an error similar to the following: Error: P1001: Can't reach database server at `ep-white-thunder-826300.us-east-2.aws.neon.tech`:`5432`Please make sure your database server is running at `ep-white-thunder-826300.us-east-2.aws.neon.tech`:`5432`. This error most likely means that the connection created by Prisma Client timed out before the Neon compute was activated. A Neon compute has two main states: _Active_ and _Idle_. Active means that the compute is currently running. If there is no query activity for 5 minutes, Neon places a compute into an idle state by default. Refer to Neon's docs to learn more. When you connect to an idle compute from Prisma ORM, Neon automatically activates it. Activation typically happens within a few seconds but added latency can result in a connection timeout. To address this issue, your can adjust your Neon connection string by adding a `connect_timeout` parameter. This parameter defines the maximum number of seconds to wait for a new connection to be opened. The default value is 5 seconds. A higher setting should provide the time required to avoid connection timeout issues. For example: DATABASE_URL=postgres://daniel:<password>@ep-mute-rain-952417.us-east-2.aws.neon.tech/neondb?connect_timeout=10 info A `connect_timeout` setting of 0 means no timeout. Another possible cause of connection timeouts is Prisma ORM's connection pool, which has a default timeout of 10 seconds. This is typically enough time for Neon, but if you are still experiencing connection timeouts, you can try increasing this limit (in addition to the `connect_timeout` setting described above) by setting the `pool_timeout` parameter to a higher value. For example: DATABASE_URL=postgres://daniel:<password>@ep-mute-rain-952417.us-east-2.aws.neon.tech/neondb?connect_timeout=15&pool_timeout=15 ## How to use Neon's serverless driver with Prisma ORM (Preview) The Neon serverless driver is a low-latency Postgres driver for JavaScript and TypeScript that allows you to query data from serverless and edge environments over HTTP or WebSockets in place of TCP. You can use Prisma ORM along with the Neon serverless driver using a driver adapter . A driver adapter allows you to use a different database driver from the default Prisma ORM provides to communicate with your database. info This feature is available in Preview from Prisma ORM versions 5.4.2 and later. To get started, enable the `driverAdapters` Preview feature flag: generator client { provider = "prisma-client-js" previewFeatures = ["driverAdapters"]}datasource db { provider = "postgresql" url = env("DATABASE_URL")} Generate Prisma Client: npx prisma generate Install the Prisma ORM adapter for Neon, Neon serverless driver and `ws` packages: npm install @prisma/adapter-neon @neondatabase/serverless wsnpm install --save-dev @types/ws Update your Prisma Client instance: import { Pool, neonConfig } from '@neondatabase/serverless'import { PrismaNeon } from '@prisma/adapter-neon'import { PrismaClient } from '@prisma/client'import dotenv from 'dotenv'import ws from 'ws'dotenv.config()neonConfig.webSocketConstructor = wsconst connectionString = `${process.env.DATABASE_URL}`const pool = new Pool({ connectionString })const adapter = new PrismaNeon(pool)const prisma = new PrismaClient({ adapter }) You can then use Prisma Client as you normally would with full type-safety. Prisma Migrate, introspection, and Prisma Studio will continue working as before, using the connection string defined in the Prisma schema. ### Notes #### Specifying a PostgreSQL schema You can specify a PostgreSQL schema by passing in the `schema` option when instantiating `PrismaNeon`: const adapter = new PrismaNeon(pool, { schema: 'myPostgresSchema'}) --- ## Page: https://www.prisma.io/docs/orm/overview/databases/turso This guide discusses the concepts behind using Prisma ORM and Turso, explains the commonalities and differences between Turso and other database providers, and leads you through the process for configuring your application to integrate with Turso. Prisma ORM support for Turso is currently in Early Access. We would appreciate your feedback in this GitHub discussion. ## What is Turso? Turso is an edge-hosted, distributed database that's based on libSQL, an open-source and open-contribution fork of SQLite, enabling you to bring data closer to your application and minimize query latency. Turso can also be hosted on a remote server. warning Support for Turso is available in Early Access from Prisma ORM versions 5.4.2 and later. ## Commonalities with other database providers libSQL is 100% compatible with SQLite. libSQL extends SQLite and adds the following features and capabilities: * Support for replication * Support for automated backups * Ability to embed Turso as part of other programs such as the Linux kernel * Supports user-defined functions * Support for asynchronous I/O > To learn more about the differences between libSQL and how it is different from SQLite, see libSQL Manifesto. Many aspects of using Prisma ORM with Turso are just like using Prisma ORM with any other relational database. You can still: * model your database with the Prisma Schema Language * use Prisma ORM's existing `sqlite` database connector in your schema * use Prisma Client in your application to talk to the database server at Turso ## Differences to consider There are a number of differences between Turso and SQLite to consider. You should be aware of the following when deciding to use Turso and Prisma ORM: * **Remote and embedded SQLite databases**. libSQL uses HTTP to connect to the remote SQLite database. libSQL also supports remote database replicas and embedded replicas. Embedded replicas enable you to replicate your primary database inside your application. * **Making schema changes**. Since libSQL uses HTTP to connect to the remote database, this makes it incompatible with Prisma Migrate. However, you can use `prisma migrate diff` to create a schema migration and then apply the changes to your database using Turso's CLI. ## How to connect and query a Turso database The subsequent section covers how you can create a Turso database, retrieve your database credentials and connect to your database. ### How to provision a database and retrieve database credentials info Ensure that you have the Turso CLI installed to manage your databases. If you don't have an existing database, you can provision a database by running the following command: turso db create turso-prisma-db The above command will create a database in the closest region to your location. Run the following command to retrieve your database's connection string: turso db show turso-prisma-db Next, create an authentication token that will allow you to connect to the database: turso db tokens create turso-prisma-db Update your `.env` file with the authentication token and connection string: .env TURSO_AUTH_TOKEN="eyJhbGciOiJFZERTQSIsInR5cCI6IkpXVCJ9..."TURSO_DATABASE_URL="libsql://turso-prisma-db-user.turso.io" ### How to connect to a Turso database To get started, enable the `driverAdapters` Preview feature flag: generator client { provider = "prisma-client-js" previewFeatures = ["driverAdapters"]}datasource db { provider = "sqlite" url = "file:./dev.db"} Generate Prisma Client: npx prisma generate Install the libSQL database client and Prisma ORM driver adapter for libSQL packages: npm install @libsql/client @prisma/adapter-libsql Update your Prisma Client instance: import { PrismaClient } from '@prisma/client'import { PrismaLibSQL } from '@prisma/adapter-libsql'import { createClient } from '@libsql/client'const libsql = createClient({ url: `${process.env.TURSO_DATABASE_URL}`, authToken: `${process.env.TURSO_AUTH_TOKEN}`,})const adapter = new PrismaLibSQL(libsql)const prisma = new PrismaClient({ adapter }) You can use Prisma Client as you normally would with full type-safety in your project. ## How to manage schema changes Prisma Migrate and Introspection workflows are currently not supported when working with Turso. This is because Turso uses HTTP to connect to your database, which Prisma Migrate doesn't support. To update your database schema: 1. Generate a migration file using `prisma migrate dev` against a local SQLite database: npx prisma migrate dev --name init 2. Apply the migration using Turso's CLI: turso db shell turso-prisma-db < ./prisma/migrations/20230922132717_init/migration.sql info Replace `20230922132717_init` with the name of your migration. For subsequent migrations, repeat the above steps to apply changes to your database. This workflow does not support track the history of applied migrations to your remote database. ## Embedded Turso database replicas Turso supports embedded replicas. Turso's embedded replicas enable you to have a copy of your primary, remote database _inside_ your application. Embedded replicas behave similarly to a local SQLite database. Database queries are faster because your database is inside your application. ### How embedded database replicas work When your app initially establishes a connection to your database, the primary database will fulfill the query: 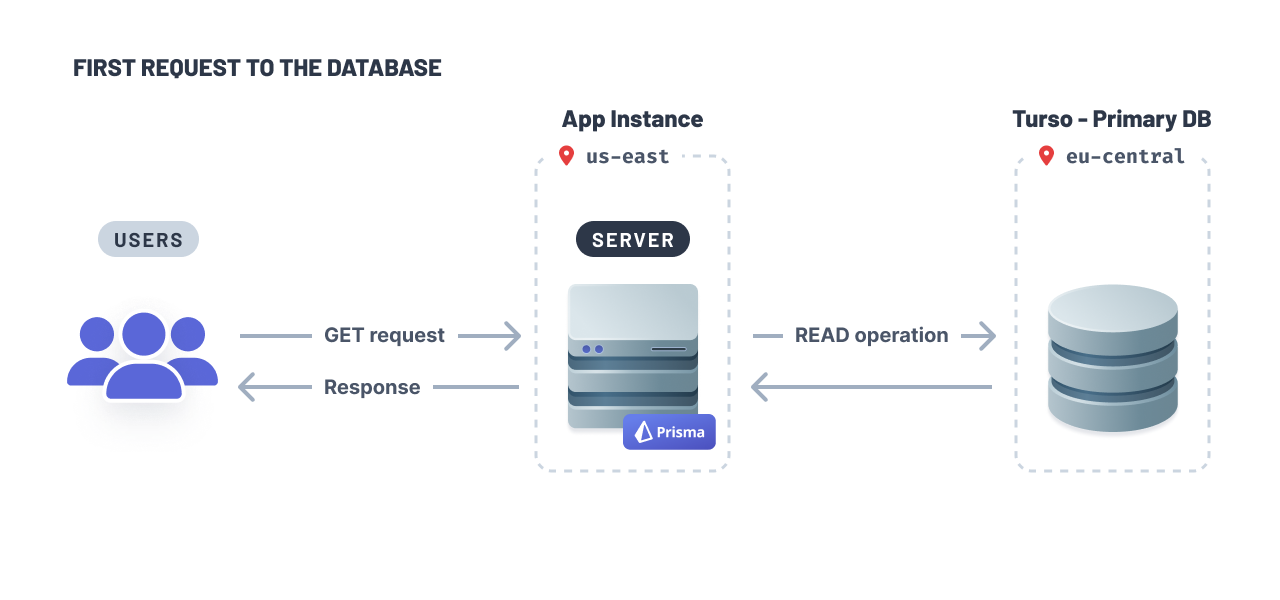 Turso will (1) create an embedded replica inside your application and (2) copy data from your primary database to the replica so it is locally available: 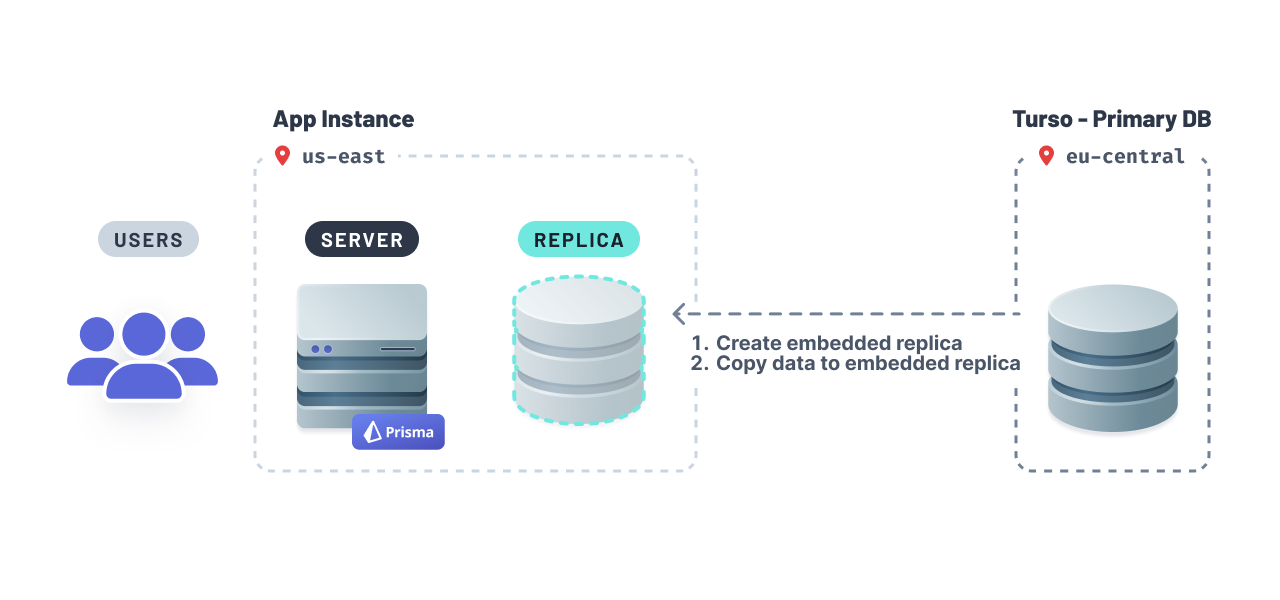 The embedded replica will fulfill subsequent read queries. The libSQL client provides a `sync()` method which you can invoke to ensure the embedded replica's data remains fresh. 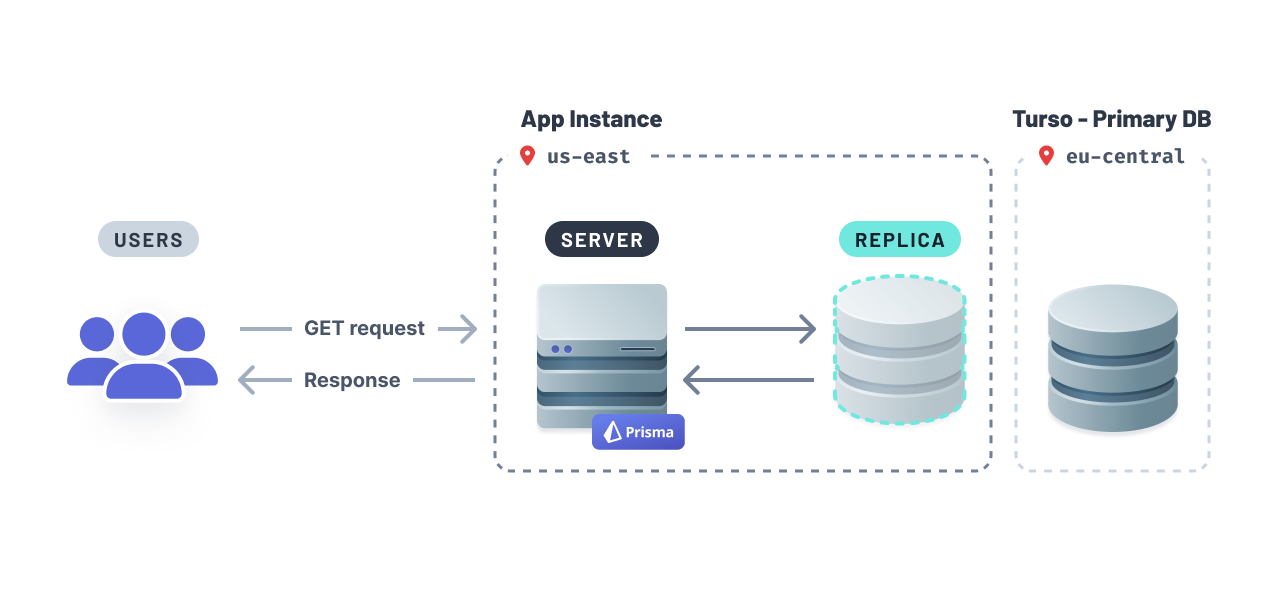 With embedded replicas, this setup guarantees a responsive application, because the data will be readily available locally and faster to access. Like a read replica setup you may be familiar with, write operations are forwarded to the primary remote database and executed before being propagated to all embedded replicas. 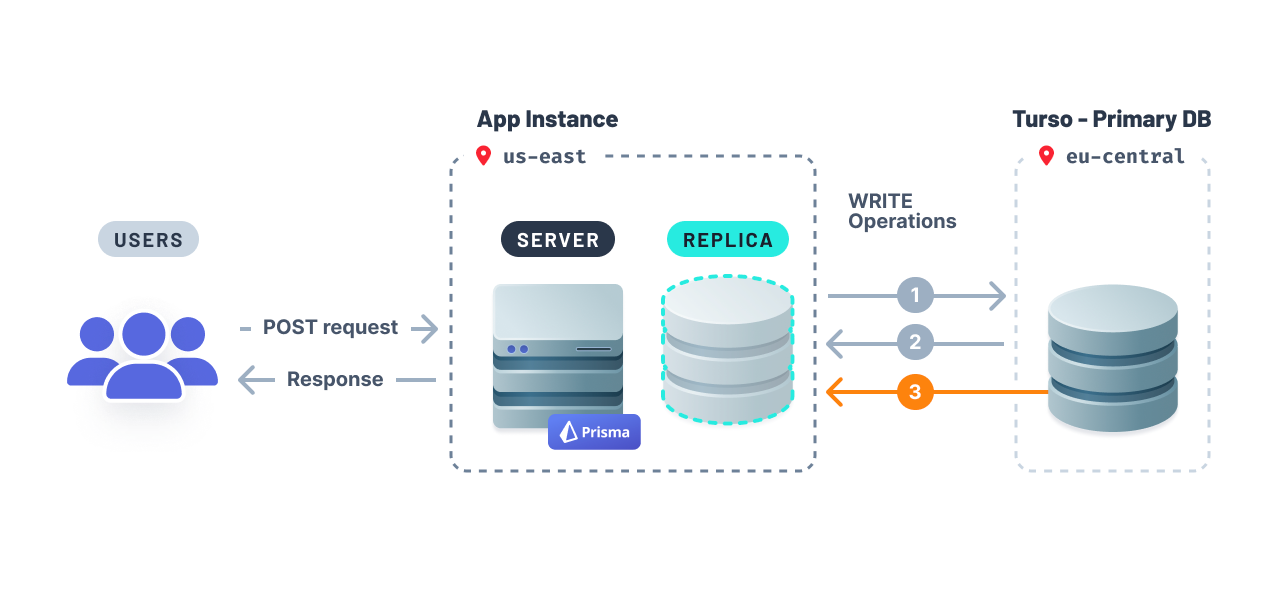 1. Write operations propagation are forwarded to the database. 2. Database responds to the server with the updates from 1. 3. Write operations are propagated to the database replica. Your application's data needs will determine how often you should synchronize data between your remote database and embedded database replica. For example, you can use either middleware functions (e.g. Express and Fastify) or a cron job to synchronize the data. ### How to synchronize data between your remote database and embedded replica To get started using embedded replicas with Prisma ORM, add the `sync()` method from libSQL in your application. The example below shows how you can synchronize data using Express middleware. import express from 'express'const app = express()// ... the rest of your application codeapp.use(async (req, res, next) => { await libsql.sync() next()})app.listen(3000, () => console.log(`Server ready at http://localhost:3000`)) It could be also implemented as a Prisma Client extension. The below example shows auto-syncing after create, update or delete operation is performed. const prisma = new PrismaClient().$extends({ query: { $allModels: { async $allOperations({ operation, model, args, query }) { const result = await query(args) // Synchronize the embedded replica after any write operation if (['create', 'update', 'delete'].includes(operation)) { await libsql.sync() } return result } } }}) --- ## Page: https://www.prisma.io/docs/orm/overview/databases/cloudflare-d1 This guide discusses the concepts behind using Prisma ORM and Cloudflare D1, explains the commonalities and differences between Cloudflare D1 and other database providers, and leads you through the process for configuring your application to integrate with Cloudflare D1. Prisma ORM support for Cloudflare D1 is currently in Preview. We would appreciate your feedback on GitHub. If you want to deploy a Cloudflare Worker with D1 and Prisma ORM, follow this tutorial. ## What is Cloudflare D1? D1 is Cloudflare's native serverless database and was initially launched in 2022. It's based on SQLite and can be used when deploying applications with Cloudflare. Following Cloudflare's principles of geographic distribution and bringing compute and data closer to application users, D1 supports automatic read-replication. It dynamically manages the number of database instances and locations of read-only replicas based on how many queries a database is getting, and from where. For write-operations, queries travel to a single primary instance in order to propagate the changes to all read-replicas and ensure data consistency. ## Commonalities with other database providers D1 is based on SQLite. Many aspects of using Prisma ORM with D1 are just like using Prisma ORM with any other relational database. You can still: * model your database with the Prisma Schema Language * use Prisma ORM's existing `sqlite` database connector in your schema * use Prisma Client in your application to talk to the database server at D1 ## Differences to consider There are a number of differences between D1 and SQLite to consider. You should be aware of the following when deciding to use D1 and Prisma ORM: * **Local and remote D1 (SQLite) databases**. Cloudflare provides local and remote versions of D1. The local version is managed using the `--local` option of the `wrangler d1` CLI and is located in `.wrangler/state`. The remote version is managed by Cloudflare and is accessed via HTTP. * **Making schema changes**. Since D1 uses HTTP to connect to the remote database, this makes it incompatible with some commands of Prisma Migrate, like `prisma migrate dev`. However, you can use D1's migration system and the `prisma migrate diff` command for your migration workflows. See the Migration workflows below for more information. ## How to connect to D1 in Cloudflare Workers or Cloudflare Pages When using Prisma ORM with D1, you need to use the `sqlite` database provider and the `@prisma/adapter-d1` driver adapter. If you want to deploy a Cloudflare Worker with D1 and Prisma ORM, follow these step-by-step instructions. ## Migration workflows Cloudflare D1 comes with its own migration system. We recommend that you use this migration system via the `wrangler d1 migrations` command to create and manage migration files on your file system. This command doesn't help you in figuring out the SQL statements for creating your database schema that need to be put _inside_ of these migration files though. If you want to query your database using Prisma Client, it's important that your database schema maps to your Prisma schema, this is why it's recommended to generate the SQL statements from your Prisma schema. When using D1, you can use the `prisma migrate diff` command for that purpose. ### Creating an initial migration The workflow for creating an initial migration looks as follows. Assume you have a fresh D1 instance without any tables. #### 1\. Update your Prisma data model This is your initial version of the Prisma schema that you want to map to your D1 instance: model User { id Int @id @default(autoincrement()) email String @unique name String?} #### 2\. Create migration file using `wrangler` CLI Next, you need to create the migration file using the `wrangler d1 migrations create` command: npx wrangler d1 migrations create __YOUR_DATABASE_NAME__ create_user_table Since this is the very first migration, this command will prompt you to also create a `migrations` folder. Note that if you want your migration files to be stored in a different location, you can customize it using Wrangler. Once the command has executed and assuming you have chosen the default `migrations` name for the location of your migration files, the command has created the following folder and file for you: migrations/└── 0001_create_user_table.sql However, before you can apply the migration to your D1 instance, you actually need to put a SQL statement into the currently empty `0001_create_user_table.sql` file. #### 3\. Generate SQL statements using `prisma migrate diff` To generate the initial SQL statement, you can use the `prisma migrate diff` command which compares to _schemas_ (via its `--to-X` and `--from-X` options) and generates the steps that are needed to "evolve" from one to the other. These schemas can be either Prisma or SQL schemas. For the initial migration, you can use the special `--from-empty` option though: npx prisma migrate diff \ --from-empty \ --to-schema-datamodel ./prisma/schema.prisma \ --script \ --output migrations/0001_create_user_table.sql The command above uses the following options: * `--from-empty`: The source for the SQL statement is an empty schema. * `--to-schema-datamodel ./prisma/schema.prisma`: The target for the SQL statement is the data model in `./prisma/schema.prisma`. * `--script`: Output the result as SQL. If you omit this option, the "migration steps" will be generated in plain English. * `--output migrations/0001_create_user_table.sql`: Store the result in `migrations/0001_create_user_table.sql`. After running this command, `migrations/0001_create_user_table.sql` will have the following contents: migrations/0001\_create\_user\_table.sql -- CreateTableCREATE TABLE "User" ( "id" INTEGER NOT NULL PRIMARY KEY AUTOINCREMENT, "email" TEXT NOT NULL, "name" TEXT);-- CreateIndexCREATE UNIQUE INDEX "User_email_key" ON "User"("email"); #### 4\. Execute the migration using `wrangler d1 migrations apply` Finally, you can apply the migration against your D1 instances. For the **local** instance, run: npx wrangler d1 migrations apply __YOUR_DATABASE_NAME__ --local For the **remote** instance, run: npx wrangler d1 migrations apply __YOUR_DATABASE_NAME__ --remote ### Evolve your schema with further migrations For any further migrations, you can use the same workflow but instead of using `--from-empty`, you'll need to use `--from-local-d1` because your source schema for the `prisma migrate diff` command now is the current schema of that local D1 instance, while the target remains your (then updated) Prisma schema. #### 1\. Update your Prisma data model Assume you have updated your Prisma schema with another model: model User { id Int @id @default(autoincrement()) email String @unique name String? posts Post[]}model Post { id Int @id @default(autoincrement()) title String author User @relation(fields: [authorId], references: [id]) authorId Int} #### 2\. Create migration file using `wrangler` CLI Like before, you first need to create the migration file: npx wrangler d1 migrations create __YOUR_DATABASE_NAME__ create_post_table Once the command has executed (again assuming you have chosen the default `migrations` name for the location of your migration files), the command has created a new file inside of the `migrations` folder: migrations/├── 0001_create_user_table.sql└── 0002_create_post_table.sql As before, you now need to put a SQL statement into the currently empty `0002_create_post_table.sql` file. #### 3\. Generate SQL statements using `prisma migrate diff` As explained above, you now need to use `--from-local-d1` instead of `--from-empty` to specify a source schema: npx prisma migrate diff \ --from-local-d1 \ --to-schema-datamodel ./prisma/schema.prisma \ --script \ --output migrations/0002_create_post_table.sql The command above uses the following options: * `--from-local-d1`: The source for the SQL statement is the local D1 database file. * `--to-schema-datamodel ./prisma/schema.prisma`: The target for the SQL statement is the data model in `./prisma/schema.prisma`. * `--script`: Output the result as SQL. If you omit this option, the "migration steps" will be generated in plain English. * `--output migrations/0002_create_post_table.sql`: Store the result in `migrations/0002_create_post_table.sql`. After running this command, `migrations/0002_create_post_table.sql` will have the following contents: migrations/0002\_create\_post\_table.sql -- CreateTableCREATE TABLE "Post" ( "id" INTEGER NOT NULL PRIMARY KEY AUTOINCREMENT, "title" TEXT NOT NULL, "authorId" INTEGER NOT NULL, CONSTRAINT "Post_authorId_fkey" FOREIGN KEY ("authorId") REFERENCES "User" ("id") ON DELETE RESTRICT ON UPDATE CASCADE); #### 4\. Execute the migration using `wrangler d1 migrations apply` Finally, you can apply the migration against your D1 instances. For the **local** instance, run: npx wrangler d1 migrations apply __YOUR_DATABASE_NAME__ --local For the **remote** instance, run: npx wrangler d1 migrations apply __YOUR_DATABASE_NAME__ --remote ## Limitations ### Transactions not supported Cloudflare D1 currently does not support transactions (see the open feature request). As a result, Prisma ORM does not support transactions for Cloudflare D1. When using Prisma's D1 adapter, implicit & explicit transactions will be ignored and run as individual queries, which breaks the guarantees of the ACID properties of transactions. --- ## Page: https://www.prisma.io/docs/orm/prisma-schema/overview/location The default name for the Prisma Schema is a single file `schema.prisma` in your `prisma` folder. When your schema is named like this, the Prisma CLI will detect it automatically. > If you are using the `prismaSchemaFolder` preview feature any files in the `prisma/schema` directory are detected automatically. ## Prisma Schema location The Prisma CLI looks for the Prisma Schema in the following locations, in the following order: 1. The location specified by the `--schema` flag, which is available when you `introspect`, `generate`, `migrate`, and `studio`: prisma generate --schema=./alternative/schema.prisma 2. The location specified in the `package.json` file (version 2.7.0 and later): "prisma": { "schema": "db/schema.prisma"} 3. Default locations: * `./prisma/schema.prisma` * `./schema.prisma` The Prisma CLI outputs the path of the schema that will be used. The following example shows the terminal output for `prisma db pull`: Environment variables loaded from .envPrisma Schema loaded from prisma/schema.prismaIntrospecting based on datasource defined in prisma/schema.prisma …✔ Introspected 4 models and wrote them into prisma/schema.prisma in 239msRun prisma generate to generate Prisma Client. ## Multi-file Prisma Schema tip Multi-file Prisma Schema is available via the `prismaSchemaFolder` preview feature in Prisma versions 5.15.0 and later. To use multiple Prisma Schema files, add a `schema` folder inside of your current `prisma` directory. With the `prismaSchemaFolder` Preview feature enabled, you can add as many files as you want to the `prisma/schema` directory. my-app/├─ ...├─ prisma/│ ├─ schema/│ │ ├─ post.prisma│ │ ├─ schema.prisma│ │ ├─ user.prisma├─ ... ### How to enable multi-file Prisma schema support Support for multiple Prisma Schema files is currently in preview. To enable the feature, add the `prismaSchemaFolder` feature flag to the `previewFeatures` field of the `generator` block in your Prisma Schema: schema.prisma generator client { provider = "prisma-client-js" previewFeatures = ["prismaSchemaFolder"]}datasource db { provider = "postgresql" url = env("DATABASE_URL")} info When first updating to Prisma ORM 5.15.0 or later, your IDE may not recognize the new multi-file format immediately. Be sure to restart your IDE to confirm you have the latest version of the Prisma VS Code Extension installed. ### How to use existing Prisma CLI commands with multiple Prisma schema files For most Prisma CLI commands, no changes will be necessary to work with a multi-file Prisma schema. Only in the specific cases where you need to supply a schema via an option will a command need to be changed. In these cases, simply replace references to a file with a directory. As an example, the following `prisma db push` command: npx prisma db push --schema custom/path/to/my/schema.prisma becomes the following: npx prisma db push --schema custom/path/to/my/schema # note this is now a directory! ### Tips for multi-file Prisma Schema We’ve found that a few patterns work well with this feature and will help you get the most out of it: * Organize your files by domain: group related models into the same file. For example, keep all user-related models in `user.prisma` while post-related models go in `post.prisma`. Try to avoid having “kitchen sink” schema files. * Use clear naming conventions: schema files should be named clearly and succinctly. Use names like `user.prisma` and `post.prisma` and not `myModels.prisma` or `CommentFeaturesSchema.prisma`. * Have an obvious “main” schema file: while you can now have as many schema files as you want, you’ll still need a place where you define `datasource` and `generator` blocks. We recommend having a single schema file that’s obviously the “main” file so that these blocks are easy to find. `main.prisma`, `schema.prisma`, and `base.prisma` are a few we’ve seen that work well. ### Examples Our fork of `dub` by dub.co is a great example of a real world project adapted to use a multi-file Prisma Schema. ### Learn more about the `prismaSchemaFolder` preview feature To give feedback on the `prismaSchemaFolder` Preview feature, please refer to our dedicated Github discussion. --- ## Page: https://www.prisma.io/docs/orm/prisma-schema/data-model/indexes Prisma ORM allows configuration of database indexes, unique constraints and primary key constraints. This is in General Availability in versions `4.0.0` and later. You can enable this with the `extendedIndexes` Preview feature in versions `3.5.0` and later. Version `3.6.0` also introduces support for introspection and migration of full text indexes in MySQL and MongoDB through a new `@@fulltext` attribute, available through the `fullTextIndex` Preview feature. warning If you are upgrading from a version earlier than 4.0.0, these changes to index configuration and full text indexes might be **breaking changes** if you have a database that already uses these features. See Upgrading from previous versions for more information on how to upgrade. ## Index configuration You can configure indexes, unique constraints, and primary key constraints with the following attribute arguments: * The `length` argument allows you to specify a maximum length for the subpart of the value to be indexed on `String` and `Bytes` types * Available on the `@id`, `@@id`, `@unique`, `@@unique` and `@@index` attributes * MySQL only * The `sort` argument allows you to specify the order that the entries of the constraint or index are stored in the database * Available on the `@unique`, `@@unique` and `@@index` attributes in all databases, and on the `@id` and `@@id` attributes in SQL Server * The `type` argument allows you to support index access methods other than PostgreSQL's default `BTree` access method * Available on the `@@index` attribute * PostgreSQL only * Supported index access methods: `Hash`, `Gist`, `Gin`, `SpGist` and `Brin` * The `clustered` argument allows you to configure whether a constraint or index is clustered or non-clustered * Available on the `@id`, `@@id`, `@unique`, `@@unique` and `@@index` attributes * SQL Server only See the linked sections for details of which version each feature was first introduced in. ### Configuring the length of indexes with `length` (MySQL) The `length` argument is specific to MySQL and allows you to define indexes and constraints on columns of `String` and `Byte` types. For these types, MySQL requires you to specify a maximum length for the subpart of the value to be indexed in cases where the full value would exceed MySQL's limits for index sizes. See the MySQL documentation for more details. The `length` argument is available on the `@id`, `@@id`, `@unique`, `@@unique` and `@@index` attributes. It is generally available in versions 4.0.0 and later, and available as part of the `extendedIndexes` preview feature in versions 3.5.0 and later. As an example, the following data model declares an `id` field with a maximum length of 3000 characters: schema.prisma model Id { id String @id @db.VarChar(3000)} This is not valid in MySQL because it exceeds MySQL's index storage limit and therefore Prisma ORM rejects the data model. The generated SQL would be rejected by the database. CREATE TABLE `Id` ( `id` VARCHAR(3000) PRIMARY KEY) The `length` argument allows you to specify that only a subpart of the `id` value represents the primary key. In the example below, the first 100 characters are used: schema.prisma model Id { id String @id(length: 100) @db.VarChar(3000)} Prisma Migrate is able to create constraints and indexes with the `length` argument if specified in your data model. This means that you can create indexes and constraints on values of Prisma schema type `Byte` and `String`. If you don't specify the argument the index is treated as covering the full value as before. Introspection will fetch these limits where they are present in your existing database. This allows Prisma ORM to support indexes and constraints that were previously suppressed and results in better support of MySQL databases utilizing this feature. The `length` argument can also be used on compound primary keys, using the `@@id` attribute, as in the example below: schema.prisma model CompoundId { id_1 String @db.VarChar(3000) id_2 String @db.VarChar(3000) @@id([id_1(length: 100), id_2(length: 10)])} A similar syntax can be used for the `@@unique` and `@@index` attributes. ### Configuring the index sort order with `sort` The `sort` argument is available for all databases supported by Prisma ORM. It allows you to specify the order that the entries of the index or constraint are stored in the database. This can have an effect on whether the database is able to use an index for specific queries. The `sort` argument is available for all databases on `@unique`, `@@unique` and `@@index`. Additionally, SQL Server also allows it on `@id` and `@@id`. It is generally available in versions 4.0.0 and later, and available as part of the `extendedIndexes` preview feature in versions 3.5.0 and later. As an example, the following table CREATE TABLE `Unique` ( `unique` INT, CONSTRAINT `Unique_unique_key` UNIQUE (`unique` DESC)) is now introspected as schema.prisma model Unique { unique Int @unique(sort: Desc)} The `sort` argument can also be used on compound indexes: schema.prisma model CompoundUnique { unique_1 Int unique_2 Int @@unique([unique_1(sort: Desc), unique_2])} ### Example: using `sort` and `length` together The following example demonstrates the use of the `sort` and `length` arguments to configure indexes and constraints for a `Post` model: schema.prisma model Post { title String @db.VarChar(300) abstract String @db.VarChar(3000) slug String @unique(sort: Desc, length: 42) @db.VarChar(3000) author String created_at DateTime @@id([title(length: 100, sort: Desc), abstract(length: 10)]) @@index([author, created_at(sort: Desc)])} ### Configuring the access type of indexes with `type` (PostgreSQL) The `type` argument is available for configuring the index type in PostgreSQL with the `@@index` attribute. The index access methods available are `Hash`, `Gist`, `Gin`, `SpGist` and `Brin`, as well as the default `BTree` index access method. The `type` argument is generally available in versions 4.0.0 and later. The `Hash` index access method is available as part of the `extendedIndexes` preview feature in versions 3.6.0 and later, and the `Gist`, `Gin`, `SpGist` and `Brin` index access methods are available in preview in versions 3.14.0 and later. #### Hash The `Hash` type will store the index data in a format that is much faster to search and insert, and that will use less disk space. However, only the `=` and `<>` comparisons can use the index, so other comparison operators such as `<` and `>` will be much slower with `Hash` than when using the default `BTree` type. As an example, the following model adds an index with a `type` of `Hash` to the `value` field: schema.prisma model Example { id Int @id value Int @@index([value], type: Hash)} This translates to the following SQL commands: CREATE TABLE "Example" ( id INT PRIMARY KEY, value INT NOT NULL);CREATE INDEX "Example_value_idx" ON "Example" USING HASH (value); #### Generalized Inverted Index (GIN) The GIN index stores composite values, such as arrays or `JsonB` data. This is useful for speeding up querying whether one object is part of another object. It is commonly used for full-text searches. An indexed field can define the operator class, which defines the operators handled by the index. warning Indexes using a function (such as `to_tsvector`) to determine the indexed value are not yet supported by Prisma ORM. Indexes defined in this way will not be visible with `prisma db pull`. As an example, the following model adds a `Gin` index to the `value` field, with `JsonbPathOps` as the class of operators allowed to use the index: schema.prisma model Example { id Int @id value Json // ^ field type matching the operator class // ^ operator class ^ index type @@index([value(ops: JsonbPathOps)], type: Gin)} This translates to the following SQL commands: CREATE TABLE "Example" ( id INT PRIMARY KEY, value JSONB NOT NULL);CREATE INDEX "Example_value_idx" ON "Example" USING GIN (value jsonb_path_ops); As part of the `JsonbPathOps` the `@>` operator is handled by the index, speeding up queries such as `value @> '{"foo": 2}'`. ##### Supported Operator Classes for GIN Prisma ORM generally supports operator classes provided by PostgreSQL in versions 10 and later. If the operator class requires the field type to be of a type Prisma ORM does not yet support, using the `raw` function with a string input allows you to use these operator classes without validation. The default operator class (marked with ✅) can be omitted from the index definition. | Operator class | Allowed field type (native types) | Default | Other | | --- | --- | --- | --- | | `ArrayOps` | Any array | ✅ | Also available in CockroachDB | | `JsonbOps` | `Json` (`@db.JsonB`) | ✅ | Also available in CockroachDB | | `JsonbPathOps` | `Json` (`@db.JsonB`) | | | | `raw("other")` | | | | Read more about built-in operator classes in the official PostgreSQL documentation. ##### CockroachDB GIN and BTree are the only index types supported by CockroachDB. The operator classes marked to work with CockroachDB are the only ones allowed on that database and supported by Prisma ORM. The operator class cannot be defined in the Prisma Schema Language: the `ops` argument is not necessary or allowed on CockroachDB. #### Generalized Search Tree (GiST) The GiST index type is used for implementing indexing schemes for user-defined types. By default there are not many direct uses for GiST indexes, but for example the B-Tree index type is built using a GiST index. As an example, the following model adds a `Gist` index to the `value` field with `InetOps` as the operators that will be using the index: schema.prisma model Example { id Int @id value String @db.Inet // ^ native type matching the operator class // ^ index type // ^ operator class @@index([value(ops: InetOps)], type: Gist)} This translates to the following SQL commands: CREATE TABLE "Example" ( id INT PRIMARY KEY, value INET NOT NULL);CREATE INDEX "Example_value_idx" ON "Example" USING GIST (value inet_ops); Queries comparing IP addresses, such as `value > '10.0.0.2'`, will use the index. ##### Supported Operator Classes for GiST Prisma ORM generally supports operator classes provided by PostgreSQL in versions 10 and later. If the operator class requires the field type to be of a type Prisma ORM does not yet support, using the `raw` function with a string input allows you to use these operator classes without validation. | Operator class | Allowed field type (allowed native types) | | --- | --- | | `InetOps` | `String` (`@db.Inet`) | | `raw("other")` | | Read more about built-in operator classes in the official PostgreSQL documentation. #### Space-Partitioned GiST (SP-GiST) The SP-GiST index is a good choice for many different non-balanced data structures. If the query matches the partitioning rule, it can be very fast. As with GiST, SP-GiST is important as a building block for user-defined types, allowing implementation of custom search operators directly with the database. As an example, the following model adds a `SpGist` index to the `value` field with `TextOps` as the operators using the index: schema.prisma model Example { id Int @id value String // ^ field type matching the operator class @@index([value], type: SpGist) // ^ index type // ^ using the default ops: TextOps} This translates to the following SQL commands: CREATE TABLE "Example" ( id INT PRIMARY KEY, value TEXT NOT NULL);CREATE INDEX "Example_value_idx" ON "Example" USING SPGIST (value); Queries such as `value LIKE 'something%'` will be sped up by the index. ##### Supported Operator Classes for SP-GiST Prisma ORM generally supports operator classes provided by PostgreSQL in versions 10 and later. If the operator class requires the field type to be of a type Prisma ORM does not yet support, using the `raw` function with a string input allows you to use these operator classes without validation. The default operator class (marked with ✅) can be omitted from the index definition. | Operator class | Allowed field type (native types) | Default | Supported PostgreSQL versions | | --- | --- | --- | --- | | `InetOps` | `String` (`@db.Inet`) | ✅ | 10+ | | `TextOps` | `String` (`@db.Text`, `@db.VarChar`) | ✅ | | | `raw("other")` | | | | Read more about built-in operator classes from official PostgreSQL documentation. #### Block Range Index (BRIN) The BRIN index type is useful if you have lots of data that does not change after it is inserted, such as date and time values. If your data is a good fit for the index, it can store large datasets in a minimal space. As an example, the following model adds a `Brin` index to the `value` field with `Int4BloomOps` as the operators that will be using the index: schema.prisma model Example { id Int @id value Int // ^ field type matching the operator class // ^ operator class ^ index type @@index([value(ops: Int4BloomOps)], type: Brin)} This translates to the following SQL commands: CREATE TABLE "Example" ( id INT PRIMARY KEY, value INT4 NOT NULL);CREATE INDEX "Example_value_idx" ON "Example" USING BRIN (value int4_bloom_ops); Queries like `value = 2` will now use the index, which uses a fraction of the space used by the `BTree` or `Hash` indexes. ##### Supported Operator Classes for BRIN Prisma ORM generally supports operator classes provided by PostgreSQL in versions 10 and later, and some supported operators are only available from PostgreSQL versions 14 and later. If the operator class requires the field type to be of a type Prisma ORM does not yet support, using the `raw` function with a string input allows you to use these operator classes without validation. The default operator class (marked with ✅) can be omitted from the index definition. | Operator class | Allowed field type (native types) | Default | Supported PostgreSQL versions | | --- | --- | --- | --- | | `BitMinMaxOps` | `String` (`@db.Bit`) | ✅ | | | `VarBitMinMaxOps` | `String` (`@db.VarBit`) | ✅ | | | `BpcharBloomOps` | `String` (`@db.Char`) | | 14+ | | `BpcharMinMaxOps` | `String` (`@db.Char`) | ✅ | | | `ByteaBloomOps` | `Bytes` (`@db.Bytea`) | | 14+ | | `ByteaMinMaxOps` | `Bytes` (`@db.Bytea`) | ✅ | | | `DateBloomOps` | `DateTime` (`@db.Date`) | | 14+ | | `DateMinMaxOps` | `DateTime` (`@db.Date`) | ✅ | | | `DateMinMaxMultiOps` | `DateTime` (`@db.Date`) | | 14+ | | `Float4BloomOps` | `Float` (`@db.Real`) | | 14+ | | `Float4MinMaxOps` | `Float` (`@db.Real`) | ✅ | | | `Float4MinMaxMultiOps` | `Float` (`@db.Real`) | | 14+ | | `Float8BloomOps` | `Float` (`@db.DoublePrecision`) | | 14+ | | `Float8MinMaxOps` | `Float` (`@db.DoublePrecision`) | ✅ | | | `Float8MinMaxMultiOps` | `Float` (`@db.DoublePrecision`) | | 14+ | | `InetInclusionOps` | `String` (`@db.Inet`) | ✅ | 14+ | | `InetBloomOps` | `String` (`@db.Inet`) | | 14+ | | `InetMinMaxOps` | `String` (`@db.Inet`) | | | | `InetMinMaxMultiOps` | `String` (`@db.Inet`) | | 14+ | | `Int2BloomOps` | `Int` (`@db.SmallInt`) | | 14+ | | `Int2MinMaxOps` | `Int` (`@db.SmallInt`) | ✅ | | | `Int2MinMaxMultiOps` | `Int` (`@db.SmallInt`) | | 14+ | | `Int4BloomOps` | `Int` (`@db.Integer`) | | 14+ | | `Int4MinMaxOps` | `Int` (`@db.Integer`) | ✅ | | | `Int4MinMaxMultiOps` | `Int` (`@db.Integer`) | | 14+ | | `Int8BloomOps` | `BigInt` (`@db.BigInt`) | | 14+ | | `Int8MinMaxOps` | `BigInt` (`@db.BigInt`) | ✅ | | | `Int8MinMaxMultiOps` | `BigInt` (`@db.BigInt`) | | 14+ | | `NumericBloomOps` | `Decimal` (`@db.Decimal`) | | 14+ | | `NumericMinMaxOps` | `Decimal` (`@db.Decimal`) | ✅ | | | `NumericMinMaxMultiOps` | `Decimal` (`@db.Decimal`) | | 14+ | | `OidBloomOps` | `Int` (`@db.Oid`) | | 14+ | | `OidMinMaxOps` | `Int` (`@db.Oid`) | ✅ | | | `OidMinMaxMultiOps` | `Int` (`@db.Oid`) | | 14+ | | `TextBloomOps` | `String` (`@db.Text`, `@db.VarChar`) | | 14+ | | `TextMinMaxOps` | `String` (`@db.Text`, `@db.VarChar`) | ✅ | | | `TextMinMaxMultiOps` | `String` (`@db.Text`, `@db.VarChar`) | | 14+ | | `TimestampBloomOps` | `DateTime` (`@db.Timestamp`) | | 14+ | | `TimestampMinMaxOps` | `DateTime` (`@db.Timestamp`) | ✅ | | | `TimestampMinMaxMultiOps` | `DateTime` (`@db.Timestamp`) | | 14+ | | `TimestampTzBloomOps` | `DateTime` (`@db.Timestamptz`) | | 14+ | | `TimestampTzMinMaxOps` | `DateTime` (`@db.Timestamptz`) | ✅ | | | `TimestampTzMinMaxMultiOps` | `DateTime` (`@db.Timestamptz`) | | 14+ | | `TimeBloomOps` | `DateTime` (`@db.Time`) | | 14+ | | `TimeMinMaxOps` | `DateTime` (`@db.Time`) | ✅ | | | `TimeMinMaxMultiOps` | `DateTime` (`@db.Time`) | | 14+ | | `TimeTzBloomOps` | `DateTime` (`@db.Timetz`) | | 14+ | | `TimeTzMinMaxOps` | `DateTime` (`@db.Timetz`) | ✅ | | | `TimeTzMinMaxMultiOps` | `DateTime` (`@db.Timetz`) | | 14+ | | `UuidBloomOps` | `String` (`@db.Uuid`) | | 14+ | | `UuidMinMaxOps` | `String` (`@db.Uuid`) | ✅ | | | `UuidMinMaxMultiOps` | `String` (`@db.Uuid`) | | 14+ | | `raw("other")` | | | | Read more about built-in operator classes in the official PostgreSQL documentation. ### Configuring if indexes are clustered or non-clustered with `clustered` (SQL Server) The `clustered` argument is available to configure (non)clustered indexes in SQL Server. It can be used on the `@id`, `@@id`, `@unique`, `@@unique` and `@@index` attributes. It is generally available in versions 4.0.0 and later, and available as part of the `extendedIndexes` preview feature in versions 3.13.0 and later. As an example, the following model configures the `@id` to be non-clustered (instead of the clustered default): schema.prisma model Example { id Int @id(clustered: false) value Int} This translates to the following SQL commands: CREATE TABLE [Example] ( id INT NOT NULL, value INT, CONSTRAINT [Example_pkey] PRIMARY KEY NONCLUSTERED (id)) The default value of `clustered` for each attribute is as follows: | Attribute | Value | | --- | --- | | `@id` | `true` | | `@@id` | `true` | | `@unique` | `false` | | `@@unique` | `false` | | `@@index` | `false` | A table can have at most one clustered index. ### Upgrading from previous versions warning These index configuration changes can be **breaking changes** when activating the functionality for certain, existing Prisma schemas for existing databases. After enabling the preview features required to use them, run `prisma db pull` to introspect the existing database to update your Prisma schema before using Prisma Migrate again. A breaking change can occur in the following situations: * **Existing sort constraints and indexes:** earlier versions of Prisma ORM will assume that the desired sort order is _ascending_ if no order is specified explicitly. This means that this is a breaking change if you have existing constraints or indexes that are using descending sort order and migrate your database without first specifying this in your data model. * **Existing length constraints and indexes:** in earlier versions of Prisma ORM, indexes and constraints that were length constrained in MySQL could not be represented in the Prisma schema. Therefore `prisma db pull` was not fetching these and you could not manually specify them. When you ran `prisma db push` or `prisma migrate dev` they were ignored if already present in your database. Since you are now able to specify these, migrate commands will now drop them if they are missing from your data model but present in the database. * **Existing indexes other than `BTree` (PostgreSQL):** earlier versions of Prisma ORM only supported the default `BTree` index type. Other supported indexes (`Hash`, `Gist`, `Gin`, `SpGist` and `Brin`) need to be added before migrating your database. * **Existing (non-)clustered indexes (SQL Server):** earlier versions of Prisma ORM did not support configuring an index as clustered or non-clustered. For indexes that do not use the default, these need to be added before migrating your database. In each of the cases above unwanted changes to your database can be prevented by properly specifying these properties in your data model where necessary. **The easiest way to do this is to use `prisma db pull` to retrieve any existing constraints or configuration.** Alternatively, you could also add these arguments manually. This should be done before using `prisma db push` or `prisma migrate dev` the first time after the upgrade. ## Full text indexes (MySQL and MongoDB) The `fullTextIndex` preview feature provides support for introspection and migration of full text indexes in MySQL and MongoDB in version 3.6.0 and later. This can be configured using the `@@fulltext` attribute. Existing full text indexes in the database are added to your Prisma schema after introspecting with `db pull`, and new full text indexes added in the Prisma schema are created in the database when using Prisma Migrate. This also prevents validation errors in some database schemas that were not working before. warning For now we do not enable the full text search commands in Prisma Client for MongoDB; the progress can be followed in the MongoDB issue. ### Enabling the `fullTextIndex` preview feature To enable the `fullTextIndex` preview feature, add the `fullTextIndex` feature flag to the `generator` block of the `schema.prisma` file: schema.prisma generator client { provider = "prisma-client-js" previewFeatures = ["fullTextIndex"]} ### Examples The following example demonstrates adding a `@@fulltext` index to the `title` and `content` fields of a `Post` model: schema.prisma model Post { id Int @id title String @db.VarChar(255) content String @db.Text @@fulltext([title, content])} On MongoDB, you can use the `@@fulltext` index attribute (via the `fullTextIndex` preview feature) with the `sort` argument to add fields to your full-text index in ascending or descending order. The following example adds a `@@fulltext` index to the `title` and `content` fields of the `Post` model, and sorts the `title` field in descending order: schema.prisma generator js { provider = "prisma-client-js" previewFeatures = ["fullTextIndex"]}datasource db { provider = "mongodb" url = env("DATABASE_URL")}model Post { id String @id @map("_id") @db.ObjectId title String content String @@fulltext([title(sort: Desc), content])} ### Upgrading from previous versions warning This can be a **breaking change** when activating the functionality for certain, existing Prisma schemas for existing databases. After enabling the preview features required to use them, run `prisma db pull` to introspect the existing database to update your Prisma schema before using Prisma Migrate again. Earlier versions of Prisma ORM converted full text indexes using the `@@index` attribute rather than the `@@fulltext` attribute. After enabling the `fullTextIndex` preview feature, run `prisma db pull` to convert these indexes to `@@fulltext` before migrating again with Prisma Migrate. If you do not do this, the existing indexes will be dropped instead and normal indexes will be created in their place. --- ## Page: https://www.prisma.io/docs/orm/prisma-schema/data-model/views warning Support for views is currently a very early Preview feature. You can add a view to your Prisma schema with the `view` keyword or introspect the views in your database schema with `db pull`. You cannot yet apply views in your schema to your database with Prisma Migrate and `db push` unless the changes are added manually to your migration file using the `--create-only` flag. For updates on progress with this feature, follow our GitHub issue . Database views allow you to name and store queries. In relational databases, views are stored SQL queries that might include columns in multiple tables, or calculated values such as aggregates. In MongoDB, views are queryable objects where the contents are defined by an aggregation pipeline on other collections. The `views` preview feature allows you to represent views in your Prisma schema with the `view` keyword. To use views in Prisma ORM, follow these steps: * Enable the `views` preview feature * Create a view in the underlying database, either directly or as a manual addition to a Prisma Migrate migration file, or use an existing view * Represent the view in your Prisma schema * Query the view in Prisma Client ## Enable the `views` preview feature Support for views is currently in an early preview. To enable the `views` preview feature, add the `views` feature flag to the `previewFeatures` field of the `generator` block in your Prisma Schema: schema.prisma generator client { provider = "prisma-client-js" previewFeatures = ["views"]} Please leave feedback about this preview feature in our dedicated preview feature feedback issue for `views`. ## Create a view in the underlying database Currently, you cannot apply views that you define in your Prisma schema to your database with Prisma Migrate and `db push`. Instead, you must first create the view in the underlying database, either manually or as part of a migration. For example, take the following Prisma schema with a `User` model and a related `Profile` model: * Relational databases * MongoDB model User { id Int @id @default(autoincrement()) email String @unique name String? profile Profile?}model Profile { id Int @id @default(autoincrement()) bio String user User @relation(fields: [userId], references: [id]) userId Int @unique} Next, take a `UserInfo` view in the underlying database that combines the `email` and `name` fields from the `User` model and the `bio` field from the `Profile` model. For a relational database, the SQL statement to create this view is: CREATE VIEW "UserInfo" AS SELECT u.id, email, name, bio FROM "User" u LEFT JOIN "Profile" p ON u.id = p."userId"; For MongoDB, you can create a view with the following command: db.createView('UserInfo', 'User', [ { $lookup: { from: 'Profile', localField: '_id', foreignField: 'userId', as: 'ProfileData', }, }, { $project: { _id: 1, email: 1, name: 1, bio: '$ProfileData.bio', }, }, { $unwind: '$bio' },]) ## Use views with Prisma Migrate and `db push` If you apply changes to your Prisma schema with Prisma Migrate or `db push`, Prisma ORM does not create or run any SQL related to views. To include views in a migration, run `migrate dev --create-only` and then manually add the SQL for views to your migration file. Alternatively, you can create views manually in the database. ## Add views to your Prisma schema To add a view to your Prisma schema, use the `view` keyword. You can represent the `UserInfo` view from the example above in your Prisma schema as follows: * Relational databases * MongoDB view UserInfo { id Int @unique email String name String bio String} ### Write by hand A `view` block is comprised of two main pieces: * The `view` block definition * The view's field definitions These two pieces allow you to define the name of your view in the generated Prisma Client and the columns present in your view's query results. #### Define a `view` block To define the `UserInfo` view from the example above, begin by using the `view` keyword to define a `view` block in your schema named `UserInfo`: view UserInfo { // Fields} #### Define fields The properties of a view are called _fields_, which consist of: * A field name * A field type The fields of the `UserInfo` example view can be defined as follows: * Relational databases * MongoDB view UserInfo { id Int @unique email String name String bio String} Each _field_ of a `view` block represents a column in the query results of the view in the underlying database. ### Use introspection warning Currently only available for PostgreSQL, MySQL, SQL Server and CockroachDB. If you have an existing view or views defined in your database, introspection will automatically generate `view` blocks in your Prisma schema that represent those views. Assuming the example `UserInfo` view exists in your underlying database, running the following command will generate a `view` block in your Prisma schema representing that view: npx prisma db pull The resulting `view` block will be defined as follows: /// The underlying view does not contain a valid unique identifier and can therefore currently not be handled by Prisma Client.view UserInfo { id Int? email String? name String? bio String? @@ignore} The `view` block is generated initially with a `@@ignore` attribute because there is no unique identifier defined (which is currently a limitation of the views preview feature). warning Please note for now `db pull` will only introspect views in your schema when using PostgreSQL, MySQL, SQL Server or CockroachDB. Support for this workflow will be extended to other database providers. #### Adding a unique identifier to an introspected view To be able to use the introspected view in Prisma Client, you will need to select and define one or multiple of the fields as the unique identifier. In the above view's case, the `id` column refers to a uniquely identifiable field in the underlying `User` table so that field can also be used as the uniquely identifiable field in the `view` block. In order to make this `view` block valid you will need to: * Remove the _optional_ flag `?` from the `id` field * Add the `@unique` attribute to the `id` field * Remove the `@@ignore` attribute * Remove the generated comment warning about an invalid view /// The underlying view does not contain a valid unique identifier and can therefore currently not be handled by Prisma Client.view UserInfo { id Int? id Int @unique email String? name String? bio String? @@ignore} When re-introspecting your database, any custom changes to your view definitions will be preserved. #### The `views` directory Introspection of a database with one or more existing views will also create a new `views` directory within your `prisma` directory (starting with Prisma version 4.12.0). This directory will contain a subdirectory named after your database's schema which contains a `.sql` file for each view that was introspected in that schema. Each file will be named after an individual view and will contain the query the related view defines. For example, after introspecting a database with the default `public` schema using the model used above you will find a `prisma/views/public/UserInfo.sql` file was created with the following contents: SELECT u.id, u.email, u.name, p.bioFROM ( "User" u LEFT JOIN "Profile" p ON ((u.id = p."userId")) ); ### Limitations #### Unique Identifier Currently, Prisma ORM treats views in the same way as models. This means that a view needs to have at least one _unique identifier_, which can be represented by any of the following: * A unique constraint denoted with `@unique` * A composite unique constraint denoted with `@@unique` * An `@id` field * A composite identifier denoted with `@@id` In relational databases, a view's unique identifier can be defined as a `@unique` attribute on one field, or a `@@unique` attribute on multiple fields. When possible, it is preferable to use a `@unique` or `@@unique` constraint over an `@id` or `@@id` field. In MongoDB, however, the unique identifier must be an `@id` attribute that maps to the `_id` field in the underlying database with `@map("_id")`. In the example above, the `id` field has a `@unique` attribute. If another column in the underlying `User` table had been defined as uniquely identifiable and made available in the view's query results, that column could have been used as the unique identifier instead. #### Introspection Currently, introspection of views is only available for PostgreSQL, MySQL, SQL Server and CockroachDB. If you are using another database provider, your views must be added manually. This is a temporary limitation and support for introspection will be extended to the other supported datasource providers. ## Query views in Prisma Client You can query views in Prisma Client in the same way that you query models. For example, the following query finds all users with a `name` of `'Alice'` in the `UserInfo` view defined above. const userinfo = await prisma.userInfo.findMany({ where: { name: 'Alice', },}) Currently, Prisma Client allows you to update a view if the underlying database allows it, without any additional validation. ## Special types of views This section describes how to use Prisma ORM with updatable and materialized views in your database. ### Updatable views Some databases support updatable views (e.g. PostgreSQL, MySQL and SQL Server). Updatable views allow you to create, update or delete entries. Currently Prisma ORM treats all `view`s as updatable views. If the underlying database supports this functionality for the view, the operation should succeed. If the view is not marked as updatable, the database will return an error, and Prisma Client will then throw this error. In the future, Prisma Client might support marking individual views as updatable or not updatable. Please comment on our `views` feedback issue with your use case. ### Materialized views Some databases support materialized views, e.g. PostgreSQL, CockroachDB, MongoDB, and SQL Server (where they're called "indexed views"). Materialized views persist the result of the view query for faster access and only update it on demand. Currently, Prisma ORM does not support materialized views. However, when you manually create a view, you can also create a materialized view with the corresponding command in the underlying database. You can then use Prisma Client's TypedSQL functionality to execute the command and refresh the view manually. In the future Prisma Client might support marking individual views as materialized and add a Prisma Client method to refresh the materialized view. Please comment on our `views` feedback issue with your use case. --- ## Page: https://www.prisma.io/docs/orm/prisma-schema/data-model/database-mapping The Prisma schema includes mechanisms that allow you to define names of certain database objects. You can: * Map model and field names to different collection/table and field/column names * Define constraint and index names ## Mapping collection/table and field/column names Sometimes the names used to describe entities in your database might not match the names you would prefer in your generated API. Mapping names in the Prisma schema allows you to influence the naming in your Client API without having to change the underlying database names. A common approach for naming tables/collections in databases for example is to use plural form and snake\_case notation. However, we recommended a different naming convention (singular form, PascalCase). `@map` and `@@map` allow you to tune the shape of your Prisma Client API by decoupling model and field names from table and column names in the underlying database. ### Map collection / table names As an example, when you introspect a database with a table named `comments`, the resulting Prisma model will look like this: model comments { // Fields} However, you can still choose `Comment` as the name of the model (e.g. to follow the naming convention) without renaming the underlying `comments` table in the database by using the `@@map` attribute: model Comment { // Fields @@map("comments")} With this modified model definition, Prisma Client automatically maps the `Comment` model to the `comments` table in the underlying database. ### Map field / column names You can also `@map` a column/field name: model Comment { content String @map("comment_text") email String @map("commenter_email") type Enum @map("comment_type") @@map("comments")} This way the `comment_text` column is not available under `prisma.comment.comment_text` in the Prisma Client API, but can be accessed via `prisma.comment.content`. ### Map enum names and values You can also `@map` an enum value, or `@@map` an enum: enum Type { Blog, Twitter @map("comment_twitter") @@map("comment_source_enum")} ## Constraint and index names You can optionally use the `map` argument to explicitly define the **underlying constraint and index names** in the Prisma schema for the attributes `@id`, `@@id`, `@unique`, `@@unique`, `@@index` and `@relation`. (This is available in Prisma ORM version 2.29.0 and later.) When introspecting a database, the `map` argument will _only_ be rendered in the schema if the name _differs_ from Prisma ORM's default constraint naming convention for indexes and constraints. danger If you use Prisma Migrate in a version earlier than 2.29.0 and want to maintain your existing constraint and index names after upgrading to a newer version, **do not** immediately run `prisma migrate` or `prisma db push`. This will **change any underlying constraint name that does not follow Prisma ORM's convention**. Follow the upgrade path that allows you to maintain existing constraint and index names. ### Use cases for named constraints Some use cases for explicitly named constraints include: * Company policy * Conventions of other tools ### Prisma ORM's default naming conventions for indexes and constraints Prisma ORM naming convention was chosen to align with PostgreSQL since it is deterministic. It also helps to maximize the amount of times where names do not need to be rendered because many databases out there they already align with the convention. Prisma ORM always uses the database names of entities when generating the default index and constraint names. If a model is remapped to a different name in the data model via `@@map` or `@map`, the default name generation will still take the name of the _table_ in the database as input. The same is true for fields and _columns_. | Entity | Convention | Example | | --- | --- | --- | | Primary Key | {tablename}\_pkey | `User_pkey` | | Unique Constraint | {tablename}\_{column\_names}\_key | `User_firstName_last_Name_key` | | Non-Unique Index | {tablename}\_{column\_names}\_idx | `User_age_idx` | | Foreign Key | {tablename}\_{column\_names}\_fkey | `User_childName_fkey` | Since most databases have a length limit for entity names, the names will be trimmed if necessary to not violate the database limits. We will shorten the part before the `_suffix` as necessary so that the full name is at most the maximum length permitted. ### Using default constraint names When no explicit names are provided via `map` arguments Prisma ORM will generate index and constraint names following the default naming convention. If you introspect a database the names for indexes and constraints will be added to your schema unless they follow Prisma ORM's naming convention. If they do, the names are not rendered to keep the schema more readable. When you migrate such a schema Prisma will infer the default names and persist them in the database. #### Example The following schema defines three constraints (`@id`, `@unique`, and `@relation`) and one index (`@@index`): model User { id Int @id @default(autoincrement()) name String @unique posts Post[]}model Post { id Int @id @default(autoincrement()) title String authorName String @default("Anonymous") author User? @relation(fields: [authorName], references: [name]) @@index([title, authorName])} Since no explicit names are provided via `map` arguments Prisma will assume they follow our default naming convention. The following table lists the name of each constraint and index in the underlying database: | Constraint or index | Follows convention | Underlying constraint or index names | | --- | --- | --- | | `@id` (on `User` > `id` field) | Yes | `User_pk` | | `@@index` (on `Post`) | Yes | `Post_title_authorName_idx` | | `@id` (on `Post` > `id` field) | Yes | `Post_pk` | | `@relation` (on `Post` > `author`) | Yes | `Post_authorName_fkey` | ### Using custom constraint / index names You can use the `map` argument to define **custom constraint and index names** in the underlying database. #### Example The following example adds custom names to one `@id` and the `@@index`: model User { id Int @id(map: "Custom_Primary_Key_Constraint_Name") @default(autoincrement()) name String @unique posts Post[]}model Post { id Int @id @default(autoincrement()) title String authorName String @default("Anonymous") author User? @relation(fields: [authorName], references: [name]) @@index([title, authorName], map: "My_Custom_Index_Name")} The following table lists the name of each constraint and index in the underlying database: | Constraint or index | Follows convention | Underlying constraint or index names | | --- | --- | --- | | `@id` (on `User` > `id` field) | No | `Custom_Primary_Key_Constraint_Name` | | `@@index` (on `Post`) | No | `My_Custom_Index_Name` | | `@id` (on `Post` > `id` field) | Yes | `Post_pk` | | `@relation` (on `Post` > `author`) | Yes | `Post_authorName_fkey` | ### Related: Naming indexes and primary keys for Prisma Client Additionally to `map`, the `@@id` and `@@unique` attributes take an optional `name` argument that allows you to customize your Prisma Client API. On a model like: model User { firstName String lastName String @@id([firstName, lastName])} the default API for selecting on that primary key uses a generated combination of the fields: const user = await prisma.user.findUnique({ where: { firstName_lastName: { firstName: 'Paul', lastName: 'Panther', }, },}) Specifying `@@id([firstName, lastName], name: "fullName")` will change the Prisma Client API to this instead: const user = await prisma.user.findUnique({ where: { fullName: { firstName: 'Paul', lastName: 'Panther', }, },}) --- ## Page: https://www.prisma.io/docs/orm/prisma-schema/data-model/multi-schema warning Multiple database schema support is currently available with the PostgreSQL, CockroachDB, and SQL Server connectors. Many database providers allow you to organize database tables into named groups. You can use this to make the logical structure of the data model easier to understand, or to avoid naming collisions between tables. In PostgreSQL, CockroachDB, and SQL Server, these groups are known as schemas. We will refer to them as _database schemas_ to distinguish them from Prisma ORM's own schema. This guide explains how to: * include multiple database schemas in your Prisma schema * apply your schema changes to your database with Prisma Migrate and `db push` * introspect an existing database with multiple database schemas * query across multiple database schemas with Prisma Client ## How to enable the `multiSchema` preview feature Multi-schema support is currently in preview. To enable the `multiSchema` preview feature, add the `multiSchema` feature flag to the `previewFeatures` field of the `generator` block in your Prisma Schema: schema.prisma generator client { provider = "prisma-client-js" previewFeatures = ["multiSchema"]}datasource db { provider = "postgresql" url = env("DATABASE_URL")} ## How to include multiple database schemas in your Prisma schema To use multiple database schemas in your Prisma schema file, add the names of your database schemas to an array in the `schemas` field, in the `datasource` block. The following example adds a `"base"` and a `"transactional"` schema: schema.prisma generator client { provider = "prisma-client-js" previewFeatures = ["multiSchema"]}datasource db { provider = "postgresql" url = env("DATABASE_URL") schemas = ["base", "transactional"]} You do not need to change your connection string. The `schema` value of your connection string is the default database schema that Prisma Client connects to and uses for raw queries. All other Prisma Client queries use the schema of the model or enum that you are querying. To designate that a model or enum belongs to a specific database schema, add the `@@schema` attribute with the name of the database schema as a parameter. In the following example, the `User` model is part of the `"base"` schema, and the `Order` model and `Size` enum are part of the `"transactional"` schema: schema.prisma model User { id Int @id orders Order[] @@schema("base")}model Order { id Int @id user User @relation(fields: [id], references: [id]) user_id Int @@schema("transactional")}enum Size { Small Medium Large @@schema("transactional")} ### Tables with the same name in different database schemas If you have tables with the same name in different database schemas, you will need to map the table names to unique model names in your Prisma schema. This avoids name conflicts when you query models in Prisma Client. For example, consider a situation where the `config` table in the `base` database schema has the same name as the `config` table in the `users` database schema. To avoid name conflicts, give the models in your Prisma schema unique names (`BaseConfig` and `UserConfig`) and use the `@@map` attribute to map each model to the corresponding table name: schema.prisma model BaseConfig { id Int @id @@map("config") @@schema("base")}model UserConfig { id Int @id @@map("config") @@schema("users")} ## How to apply your schema changes with Prisma Migrate and `db push` You can use Prisma Migrate or `db push` to apply changes to a Prisma schema with multiple database schemas. As an example, add a `Profile` model to the `base` schema of the blog post model above: schema.prisma model User { id Int @id orders Order[] profile Profile? @@schema("base")}model Profile { id Int @id @default(autoincrement()) bio String user User @relation(fields: [userId], references: [id]) userId Int @unique @@schema("base")}model Order { id Int @id user User @relation(fields: [id], references: [id]) user_id Int @@schema("transactional")}enum Size { Small Medium Large @@schema("transactional")} You can then apply this schema change to your database. For example, you can use `migrate dev` to create and apply your schema changes as a migration: npx prisma migrate dev --name add_profile Note that if you move a model or enum from one schema to another, Prisma ORM deletes the model or enum from the source schema and creates a new one in the target schema. ## How to introspect an existing database with multiple database schemas You can introspect an existing database that has multiple database schemas in the same way that you introspect a database that has a single database schema, using `db pull`: npx prisma db pull This updates your Prisma schema to match the current state of the database. If you have tables with the same name in different database schemas, Prisma ORM shows a validation error pointing out the conflict. To fix this, rename the introspected models with the `@map` attribute. ## How to query across multiple database schemas with Prisma Client You can query models in multiple database schemas without any change to your Prisma Client query syntax. For example, the following query finds all orders for a given user, using the Prisma schema above: const orders = await prisma.order.findMany({ where: { user: { id: 1, }, },}) ## Learn more about the `multiSchema` preview feature To learn more about future plans for the `multiSchema` preview feature, or to give feedback, refer to our Github issue. --- ## Page: https://www.prisma.io/docs/orm/prisma-schema/data-model/unsupported-database-features Not all database functions and features of Prisma ORM's supported databases have a Prisma Schema Language equivalent. Refer to the database features matrix for a complete list of supported features. ## Native database functions Prisma Schema Language supports several functions that you can use to set the default value of a field. The following example uses the Prisma ORM-level `uuid()` function to set the value of the `id` field: model Post { id String @id @default(uuid())} However, you can also use **native database functions** to define default values with `dbgenerated(...)` on relational databases (MongoDB does not have the concept of database-level functions). The following example uses the PostgreSQL `gen_random_uuid()` function to populate the `id` field: model User { id String @id @default(dbgenerated("gen_random_uuid()")) @db.Uuid} ### When to use a database-level function There are two reasons to use a database-level function: * There is no equivalent Prisma ORM function (for example, `gen_random_bytes` in PostgreSQL). * You cannot or do not want to rely on functions such `uuid()` and `cuid()`, which are only implemented at a Prisma ORM level and do not manifest in the database. Consider the following example, which sets the `id` field to a randomly generated `UUID`: model Post { id String @id @default(uuid())} The UUID is _only_ generated if you use Prisma Client to create the `Post`. If you create posts in any other way, such as a bulk import script written in plain SQL, you must generate the UUID yourself. ### Enable PostgreSQL extensions for native database functions In PostgreSQL, some native database functions are part of an extension. For example, in PostgreSQL versions 12.13 and earlier, the `gen_random_uuid()` function is part of the `pgcrypto` extension. To use a PostgreSQL extension, you must first install it on the file system of your database server. In Prisma ORM versions 4.5.0 and later, you can then activate the extension by declaring it in your Prisma schema with the `postgresqlExtensions` preview feature: schema.prisma generator client { provider = "prisma-client-js" previewFeatures = ["postgresqlExtensions"]}datasource db { provider = "postgresql" url = env("DATABASE_URL") extensions = [pgcrypto]} In earlier versions of Prisma ORM, you must instead run a SQL command to activate the extension: CREATE EXTENSION IF NOT EXISTS pgcrypto; If your project uses Prisma Migrate, you must install the extension as part of a migration . Do not install the extension manually, because it is also required by the shadow database. Prisma Migrate returns the following error if the extension is not available: Migration `20210221102106_failed_migration` failed to apply cleanly to a temporary database.Database error: Error querying the database: db error: ERROR: type "pgcrypto" does not exist ## Unsupported field types Some database types of relational databases, such as `polygon` or `geometry`, do not have a Prisma Schema Language equivalent. Use the `Unsupported` field type to represent the field in your Prisma schema: model Star { id Int @id @default(autoincrement()) position Unsupported("circle")? @default(dbgenerated("'<(10,4),11>'::circle"))} The `prisma migrate dev` and `prisma db push` command will both create a `position` field of type `circle` in the database. However, the field will not be available in the generated Prisma Client. ## Unsupported database features Some features, like SQL views or partial indexes, cannot be represented in the Prisma schema. If your project uses Prisma Migrate, you must include unsupported features as part of a migration . --- ## Page: https://www.prisma.io/docs/orm/prisma-schema/data-model/table-inheritance ## Overview Table inheritance is a software design pattern that allows the modeling of hierarchical relationships between entities. Using table inheritance on the database level can also enable the use of union types in your JavaScript/TypeScript application or share a set of common properties across multiple models. This page introduces two approaches to table inheritance and explains how to use them with Prisma ORM. A common use case for table inheritance may be when an application needs to display a _feed_ of some kind of _content activities_. A content activity in this case, could be a _video_ or an _article_. As an example, let's assume that: * a content activity always has an `id` and a `url` * in addition to `id` and a `url`, a video also has a `duration` (modeled as an `Int`) * in addition to `id` and a `url`, an article also a `body` (modeled as a `String`) ### Use cases #### Union types Union types are a convenient feature in TypeScript that allows developers to work more flexibly with the types in their data model. In TypeScript, union types look as follows: type Activity = Video | Article While it's currently not possible to model union types in the Prisma schema, you can use them with Prisma ORM by using table inheritance and some additional type definitions. #### Sharing properties across multiple models If you have a use case where multiple models should share a particular set of properties, you can model this using table inheritance as well. For example, if both the `Video` and `Article` models from above should have a shared `title` property, you can achieve this with table inheritance as well. ### Example In a simple Prisma schema, this would look as follows. Note that we're adding a `User` model as well to illustrate how this can work with relations: schema.prisma model Video { id Int @id url String @unique duration Int user User @relation(fields: [userId], references: [id]) userId Int}model Article { id Int @id url String @unique body String user User @relation(fields: [userId], references: [id]) userId Int}model User { id Int @id name String videos Video[] articles Article[]} Let's investigate how we can model this using table inheritance. ### Single-table vs multi-table inheritance Here is a quick comparison of the two main approaches for table inheritance: * **Single-table inheritance (STI)**: Uses a _single_ table to store data of _all_ the different entities in one location. In our example, there'd be a single `Activity` table with the `id`, `url` as well as the `duration` and `body` column. It also uses a `type` column that indicates whether an _activity_ is a _video_ or an _article_. * **Multi-table inheritance (MTI)**: Uses _multiple_ tables to store the data of the different entities separately and links them via foreign keys. In our example, there'd be an `Activity` table with the `id`, `url` column, a `Video` table with the `duration` and a foreign key to `Activity` as well as an `Article` table with the `body` and a foreign key. There is also a `type` column that acts as a discriminator and indicates whether an _activity_ is a _video_ or an _article_. Note that multi-table inheritance is also sometimes called _delegated types_. You can learn about the tradeoffs of both approaches below. ## Single-table inheritance (STI) ### Data model Using STI, the above scenario can be modeled as follows: model Activity { id Int @id // shared url String @unique // shared duration Int? // video-only body String? // article-only type ActivityType // discriminator owner User @relation(fields: [ownerId], references: [id]) ownerId Int}enum ActivityType { Video Article}model User { id Int @id @default(autoincrement()) name String? activities Activity[]} A few things to note: * The model-specific properties `duration` and `body` must be marked as optional (i.e., with `?`). That's because a record in the `Activity` table that represents a _video_ must not have a value for `body`. Conversely, an `Activity` record representing an _article_ can never have a `duration` set. * The `type` discriminator column indicates whether each record represents a _video_ or an _article_ item. ### Prisma Client API Due to how Prisma ORM generates types and an API for the data model, there will only to be an `Activity` type and the CRUD queries that belong to it (`create`, `update`, `delete`, ...) available to you. #### Querying for videos and articles You can now query for only _videos_ or _articles_ by filtering on the `type` column. For example: // Query all videosconst videos = await prisma.activity.findMany({ where: { type: 'Video' },})// Query all articlesconst articles = await prisma.activity.findMany({ where: { type: 'Article' },}) #### Defining dedicated types When querying for videos and articles like that, TypeScript will still only recognize an `Activity` type. That can be annoying because even the objects in `videos` will have (optional) `body` and the objects in `articles` will have (optional) `duration` fields. If you want to have type safety for these objects, you need to define dedicated types for them. You can do this, for example, by using the generated `Activity` type and the TypeScript `Omit` utility type to remove properties from it: import { Activity } from '@prisma/client'type Video = Omit<Activity, 'body' | 'type'>type Article = Omit<Activity, 'duration' | 'type'> In addition, it will be helpful to create mapping functions that convert an object of type `Activity` to the `Video` and `Article` types: function activityToVideo(activity: Activity): Video { return { url: activity.url, duration: activity.duration ? activity.duration : -1, ownerId: activity.ownerId, } as Video}function activityToArticle(activity: Activity): Article { return { url: activity.url, body: activity.body ? activity.body : '', ownerId: activity.ownerId, } as Article} Now you can turn an `Activity` into a more specific type (i.e., `Article` or `Video`) after querying: const videoActivities = await prisma.activity.findMany({ where: { type: 'Video' },})const videos: Video[] = videoActivities.map(activityToVideo) #### Using Prisma Client extension for a more convenient API You can use Prisma Client extensions to create a more convenient API for the table structures in your database. ## Multi-table inheritance (MTI) ### Data model Using MTI, the above scenario can be modeled as follows: model Activity { id Int @id @default(autoincrement()) url String // shared type ActivityType // discriminator video Video? // model-specific 1-1 relation article Article? // model-specific 1-1 relation owner User @relation(fields: [ownerId], references: [id]) ownerId Int}model Video { id Int @id @default(autoincrement()) duration Int // video-only activityId Int @unique activity Activity @relation(fields: [activityId], references: [id])}model Article { id Int @id @default(autoincrement()) body String // article-only activityId Int @unique activity Activity @relation(fields: [activityId], references: [id])}enum ActivityType { Video Article}model User { id Int @id @default(autoincrement()) name String? activities Activity[]} A few things to note: * A 1-1 relation is needed between `Activity` and `Video` as well as `Activity` and `Article`. This relationship is used to fetch the specific information about a record when needed. * The model-specific properties `duration` and `body` can be made _required_ with this approach. * The `type` discriminator column indicates whether each record represents a _video_ or an _article_ item. ### Prisma Client API This time, you can query for videos and articles directly via the `video` and `article` properties on your `PrismaClient` instance. #### Querying for videos and articles If you want to access the shared properties, you need to use `include` to fetch the relation to `Activity`. // Query all videosconst videos = await prisma.video.findMany({ include: { activity: true },})// Query all articlesconst articles = await prisma.article.findMany({ include: { activity: true },}) Depending on your needs, you may also query the other way around by filtering on the `type` discriminator column: // Query all videosconst videoActivities = await prisma.activity.findMany({ where: { type: 'Video' } include: { video: true }}) #### Defining dedicated types While a bit more convenient in terms of types compared to STI, the generated typings likely still won't fit all your needs. Here's how you can define `Video` and `Article` types by combining Prisma ORM's generated `Video` and `Article` types with the `Activity` type. These combinations create a new type with the desired properties. Note that we're also omitting the `type` discriminator column because that's not needed anymore on the specific types: import { Video as VideoDB, Article as ArticleDB, Activity,} from '@prisma/client'type Video = Omit<VideoDB & Activity, 'type'>type Article = Omit<ArticleDB & Activity, 'type'> Once these types are defined, you can define mapping functions to convert the types you receive from the queries above into the desired `Video` and `Article` types. Here's the example for the `Video` type: import { Prisma, Video as VideoDB, Activity } from '@prisma/client'type Video = Omit<VideoDB & Activity, 'type'>// Create `VideoWithActivity` typings for the objects returned aboveconst videoWithActivity = Prisma.validator<Prisma.VideoDefaultArgs>()({ include: { activity: true },})type VideoWithActivity = Prisma.VideoGetPayload<typeof videoWithActivity>// Map to `Video` typefunction toVideo(a: VideoWithActivity): Video { return { id: a.id, url: a.activity.url, ownerId: a.activity.ownerId, duration: a.duration, activityId: a.activity.id, }} Now you can take the objects returned by the queries above and transform them using `toVideo`: const videoWithActivities = await prisma.video.findMany({ include: { activity: true },})const videos: Video[] = videoWithActivities.map(toVideo) #### Using Prisma Client extension for a more convenient API You can use Prisma Client extensions to create a more convenient API for the table structures in your database. ## Tradeoffs between STI and MTI * **Data model**: The data model may feel more clean with MTI. With STI, you may end up with very wide rows and lots of columns that have `NULL` values in them. * **Performance**: MTI may come with a performance cost because you need to join the parent and child tables to access _all_ properties relevant for a model. * **Typings**: With Prisma ORM, MTI gives you proper typings for the specific models (i.e., `Article` and `Video` in the examples above) already, while you need to create these from scratch with STI. * **IDs / Primary keys**: With MTI, records have two IDs (one on the parent and another on the child table) that may not match. You need to consider this in the business logic of your application. ## Third-party solutions While Prisma ORM doesn't natively support union types or polymorphism at the moment, you can check out Zenstack which is adding an extra layer of features to the Prisma schema. Read their blog post about polymorphism in Prisma ORM to learn more. --- ## Page: https://www.prisma.io/docs/orm/prisma-schema/data-model/relations/one-to-one-relations This page introduces one-to-one relations and explains how to use them in your Prisma schema. ## Overview One-to-one (1-1) relations refer to relations where at most **one** record can be connected on both sides of the relation. In the example below, there is a one-to-one relation between `User` and `Profile`: * Relational databases * MongoDB model User { id Int @id @default(autoincrement()) profile Profile?}model Profile { id Int @id @default(autoincrement()) user User @relation(fields: [userId], references: [id]) userId Int @unique // relation scalar field (used in the `@relation` attribute above)} The `userId` relation scalar is a direct representation of the foreign key in the underlying database. This one-to-one relation expresses the following: * "a user can have zero profiles or one profile" (because the `profile` field is optional on `User`) * "a profile must always be connected to one user" In the previous example, the `user` relation field of the `Profile` model references the `id` field of the `User` model. You can also reference a different field. In this case, you need to mark the field with the `@unique` attribute, to guarantee that there is only a single `User` connected to each `Profile`. In the following example, the `user` field references an `email` field in the `User` model, which is marked with the `@unique` attribute: * Relational databases * MongoDB model User { id Int @id @default(autoincrement()) email String @unique // <-- add unique attribute profile Profile?}model Profile { id Int @id @default(autoincrement()) user User @relation(fields: [userEmail], references: [email]) userEmail String @unique // relation scalar field (used in the `@relation` attribute above)} warning In MySQL, you can create a foreign key with only an index on the referenced side, and not a unique constraint. In Prisma ORM versions 4.0.0 and later, if you introspect a relation of this type it will trigger a validation error. To fix this, you will need to add a `@unique` constraint to the referenced field. ## Multi-field relations in relational databases In **relational databases only**, you can also use multi-field IDs to define a 1-1 relation: model User { firstName String lastName String profile Profile? @@id([firstName, lastName])}model Profile { id Int @id @default(autoincrement()) user User @relation(fields: [userFirstName, userLastName], references: [firstName, lastName]) userFirstName String // relation scalar field (used in the `@relation` attribute above) userLastName String // relation scalar field (used in the `@relation` attribute above) @@unique([userFirstName, userLastName])} ## 1-1 relations in the database ### Relational databases The following example demonstrates how to create a 1-1 relation in SQL: CREATE TABLE "User" ( id SERIAL PRIMARY KEY);CREATE TABLE "Profile" ( id SERIAL PRIMARY KEY, "userId" INTEGER NOT NULL UNIQUE, FOREIGN KEY ("userId") REFERENCES "User"(id)); Notice that there is a `UNIQUE` constraint on the foreign key `userId`. If this `UNIQUE` constraint was missing, the relation would be considered a 1-n relation. The following example demonstrates how to create a 1-1 relation in SQL using a composite key (`firstName` and `lastName`): CREATE TABLE "User" ( firstName TEXT, lastName TEXT, PRIMARY KEY ("firstName","lastName"));CREATE TABLE "Profile" ( id SERIAL PRIMARY KEY, "userFirstName" TEXT NOT NULL, "userLastName" TEXT NOT NULL, UNIQUE ("userFirstName", "userLastName") FOREIGN KEY ("userFirstName", "userLastName") REFERENCES "User"("firstName", "lastName")); ### MongoDB For MongoDB, Prisma ORM currently uses a normalized data model design, which means that documents reference each other by ID in a similar way to relational databases. The following MongoDB document represents a `User`: { "_id": { "$oid": "60d58e130011041800d209e1" }, "name": "Bob" } The following MongoDB document represents a `Profile` - notice the `userId` field, which references the `User` document's `$oid`: { "_id": { "$oid": "60d58e140011041800d209e2" }, "bio": "I'm Bob, and I like drawing.", "userId": { "$oid": "60d58e130011041800d209e1" }} ## Required and optional 1-1 relation fields In a one-to-one relation, the side of the relation _without_ a relation scalar (the field representing the foreign key in the database) _must_ be optional: model User { id Int @id @default(autoincrement()) profile Profile? // No relation scalar - must be optional} This restriction was introduced in 2.12.0. However, you can choose if the side of the relation _with_ a relation scalar should be optional or mandatory. ### Mandatory 1-1 relation In the following example, `profile` and `profileId` are mandatory. This means that you cannot create a `User` without connecting or creating a `Profile`: model User { id Int @id @default(autoincrement()) profile Profile @relation(fields: [profileId], references: [id]) // references `id` of `Profile` profileId Int @unique // relation scalar field (used in the `@relation` attribute above)}model Profile { id Int @id @default(autoincrement()) user User?} ### Optional 1-1 relation In the following example, `profile` and `profileId` are optional. This means that you can create a user without connecting or creating a `Profile`: model User { id Int @id @default(autoincrement()) profile Profile? @relation(fields: [profileId], references: [id]) // references `id` of `Profile` profileId Int? @unique // relation scalar field (used in the `@relation` attribute above)}model Profile { id Int @id @default(autoincrement()) user User?} ## Choosing which side should store the foreign key in a 1-1 relation In **1-1 relations**, you can decide yourself which side of the relation you want to annotate with the `@relation` attribute (and therefore holds the foreign key). In the following example, the relation field on the `Profile` model is annotated with the `@relation` attribute. `userId` is a direct representation of the foreign key in the underlying database: * Relational databases * MongoDB model User { id Int @id @default(autoincrement()) profile Profile?}model Profile { id Int @id @default(autoincrement()) user User @relation(fields: [userId], references: [id]) userId Int @unique // relation scalar field (used in the `@relation` attribute above)} You can also annotate the other side of the relation with the `@relation` attribute. The following example annotates the relation field on the `User` model. `profileId` is a direct representation of the foreign key in the underlying database: * Relational databases * MongoDB model User { id Int @id @default(autoincrement()) profile Profile? @relation(fields: [profileId], references: [id]) profileId Int? @unique // relation scalar field (used in the `@relation` attribute above)}model Profile { id Int @id @default(autoincrement()) user User?} --- ## Page: https://www.prisma.io/docs/orm/prisma-schema/data-model/relations/one-to-many-relations This page introduces one-to-many relations and explains how to use them in your Prisma schema. ## Overview One-to-many (1-n) relations refer to relations where one record on one side of the relation can be connected to zero or more records on the other side. In the following example, there is one one-to-many relation between the `User` and `Post` models: * Relational databases * MongoDB model User { id Int @id @default(autoincrement()) posts Post[]}model Post { id Int @id @default(autoincrement()) author User @relation(fields: [authorId], references: [id]) authorId Int} > **Note** The `posts` field does not "manifest" in the underlying database schema. On the other side of the relation, the annotated relation field `author` and its relation scalar `authorId` represent the side of the relation that stores the foreign key in the underlying database. This one-to-many relation expresses the following: * "a user can have zero or more posts" * "a post must always have an author" In the previous example, the `author` relation field of the `Post` model references the `id` field of the `User` model. You can also reference a different field. In this case, you need to mark the field with the `@unique` attribute, to guarantee that there is only a single `User` connected to each `Post`. In the following example, the `author` field references an `email` field in the `User` model, which is marked with the `@unique` attribute: * Relational databases * MongoDB model User { id Int @id @default(autoincrement()) email String @unique // <-- add unique attribute posts Post[]}model Post { id Int @id @default(autoincrement()) authorEmail String author User @relation(fields: [authorEmail], references: [email])} warning In MySQL, you can create a foreign key with only an index on the referenced side, and not a unique constraint. In Prisma ORM versions 4.0.0 and later, if you introspect a relation of this type it will trigger a validation error. To fix this, you will need to add a `@unique` constraint to the referenced field. ## Multi-field relations in relational databases In **relational databases only**, you can also define this relation using multi-field IDs/composite key: model User { firstName String lastName String post Post[] @@id([firstName, lastName])}model Post { id Int @id @default(autoincrement()) author User @relation(fields: [authorFirstName, authorLastName], references: [firstName, lastName]) authorFirstName String // relation scalar field (used in the `@relation` attribute above) authorLastName String // relation scalar field (used in the `@relation` attribute above)} ## 1-n relations in the database ### Relational databases The following example demonstrates how to create a 1-n relation in SQL: CREATE TABLE "User" ( id SERIAL PRIMARY KEY);CREATE TABLE "Post" ( id SERIAL PRIMARY KEY, "authorId" integer NOT NULL, FOREIGN KEY ("authorId") REFERENCES "User"(id)); Since there's no `UNIQUE` constraint on the `authorId` column (the foreign key), you can create **multiple `Post` records that point to the same `User` record**. This makes the relation a one-to-many rather than a one-to-one. The following example demonstrates how to create a 1-n relation in SQL using a composite key (`firstName` and `lastName`): CREATE TABLE "User" ( firstName TEXT, lastName TEXT, PRIMARY KEY ("firstName","lastName"));CREATE TABLE "Post" ( id SERIAL PRIMARY KEY, "authorFirstName" TEXT NOT NULL, "authorLastName" TEXT NOT NULL, FOREIGN KEY ("authorFirstName", "authorLastName") REFERENCES "User"("firstName", "lastName")); #### Comparing one-to-one and one-to-many relations In relational databases, the main difference between a 1-1 and a 1-n-relation is that in a 1-1-relation the foreign key must have a `UNIQUE` constraint defined on it. ### MongoDB For MongoDB, Prisma ORM currently uses a normalized data model design, which means that documents reference each other by ID in a similar way to relational databases. The following MongoDB document represents a `User`: { "_id": { "$oid": "60d5922d00581b8f0062e3a8" }, "name": "Ella" } Each of the following `Post` MongoDB documents has an `authorId` field which references the same user: [ { "_id": { "$oid": "60d5922e00581b8f0062e3a9" }, "title": "How to make sushi", "authorId": { "$oid": "60d5922d00581b8f0062e3a8" } }, { "_id": { "$oid": "60d5922e00581b8f0062e3aa" }, "title": "How to re-install Windows", "authorId": { "$oid": "60d5922d00581b8f0062e3a8" } }] #### Comparing one-to-one and one-to-many relations In MongoDB, the only difference between a 1-1 and a 1-n is the number of documents referencing another document in the database - there are no constraints. ## Required and optional relation fields in one-to-many relations A 1-n-relation always has two relation fields: * a list relation field which is _not_ annotated with `@relation` * the annotated relation field (including its relation scalar) The annotated relation field and relation scalar of a 1-n relation can either _both_ be optional, or _both_ be mandatory. On the other side of the relation, the list is **always mandatory**. ### Optional one-to-many relation In the following example, you can create a `Post` without assigning a `User`: * Relational databases * MongoDB model User { id Int @id @default(autoincrement()) posts Post[]}model Post { id Int @id @default(autoincrement()) author User? @relation(fields: [authorId], references: [id]) authorId Int?} ### Mandatory one-to-many relation In the following example, you must assign a `User` when you create a `Post`: * Relational databases * MongoDB model User { id Int @id @default(autoincrement()) posts Post[]}model Post { id Int @id @default(autoincrement()) author User @relation(fields: [authorId], references: [id]) authorId Int} --- ## Page: https://www.prisma.io/docs/orm/prisma-schema/data-model/relations/many-to-many-relations Many-to-many (m-n) relations refer to relations where zero or more records on one side of the relation can be connected to zero or more records on the other side. Prisma schema syntax and the implementation in the underlying database differs between relational databases and MongoDB. ## Relational databases In relational databases, m-n-relations are typically modelled via relation tables. m-n-relations can be either explicit or implicit in the Prisma schema. We recommend using implicit m-n-relations if you do not need to store any additional meta-data in the relation table itself. You can always migrate to an explicit m-n-relation later if needed. ### Explicit many-to-many relations In an explicit m-n relation, the **relation table is represented as a model in the Prisma schema** and can be used in queries. Explicit m-n relations define three models: * Two models with m-n relation, such as `Category` and `Post`. * One model that represents the relation table, such as `CategoriesOnPosts` (also sometimes called _JOIN_, _link_ or _pivot_ table) in the underlying database. The fields of a relation table model are both annotated relation fields (`post` and `category`) with a corresponding relation scalar field (`postId` and `categoryId`). The relation table `CategoriesOnPosts` connects related `Post` and `Category` records. In this example, the model representing the relation table also **defines additional fields** that describe the `Post`/`Category` relationship - who assigned the category (`assignedBy`), and when the category was assigned (`assignedAt`): model Post { id Int @id @default(autoincrement()) title String categories CategoriesOnPosts[]}model Category { id Int @id @default(autoincrement()) name String posts CategoriesOnPosts[]}model CategoriesOnPosts { post Post @relation(fields: [postId], references: [id]) postId Int // relation scalar field (used in the `@relation` attribute above) category Category @relation(fields: [categoryId], references: [id]) categoryId Int // relation scalar field (used in the `@relation` attribute above) assignedAt DateTime @default(now()) assignedBy String @@id([postId, categoryId])} The underlying SQL looks like this: CREATE TABLE "Post" ( "id" SERIAL NOT NULL, "title" TEXT NOT NULL, CONSTRAINT "Post_pkey" PRIMARY KEY ("id"));CREATE TABLE "Category" ( "id" SERIAL NOT NULL, "name" TEXT NOT NULL, CONSTRAINT "Category_pkey" PRIMARY KEY ("id"));-- Relation table + indexes --CREATE TABLE "CategoriesOnPosts" ( "postId" INTEGER NOT NULL, "categoryId" INTEGER NOT NULL, "assignedAt" TIMESTAMP(3) NOT NULL DEFAULT CURRENT_TIMESTAMP, CONSTRAINT "CategoriesOnPosts_pkey" PRIMARY KEY ("postId","categoryId"));ALTER TABLE "CategoriesOnPosts" ADD CONSTRAINT "CategoriesOnPosts_postId_fkey" FOREIGN KEY ("postId") REFERENCES "Post"("id") ON DELETE RESTRICT ON UPDATE CASCADE;ALTER TABLE "CategoriesOnPosts" ADD CONSTRAINT "CategoriesOnPosts_categoryId_fkey" FOREIGN KEY ("categoryId") REFERENCES "Category"("id") ON DELETE RESTRICT ON UPDATE CASCADE; Note that the same rules as for 1-n relations apply (because `Post`↔ `CategoriesOnPosts` and `Category` ↔ `CategoriesOnPosts` are both in fact 1-n relations), which means one side of the relation needs to be annotated with the `@relation` attribute. When you don't need to attach additional information to the relation, you can model m-n-relations as implicit m-n-relations. If you're not using Prisma Migrate but obtain your data model from introspection, you can still make use of implicit m-n-relations by following Prisma ORM's conventions for relation tables. #### Querying an explicit many-to-many The following section demonstrates how to query an explicit m-n-relation. You can query the relation model directly (`prisma.categoriesOnPosts(...)`), or use nested queries to go from `Post` -> `CategoriesOnPosts` -> `Category` or the other way. The following query does three things: 1. Creates a `Post` 2. Creates a new record in the relation table `CategoriesOnPosts` 3. Creates a new `Category` that is associated with the newly created `Post` record const createCategory = await prisma.post.create({ data: { title: 'How to be Bob', categories: { create: [ { assignedBy: 'Bob', assignedAt: new Date(), category: { create: { name: 'New category', }, }, }, ], }, },}) The following query: * Creates a new `Post` * Creates a new record in the relation table `CategoriesOnPosts` * Connects the category assignment to existing categories (with IDs `9` and `22`) const assignCategories = await prisma.post.create({ data: { title: 'How to be Bob', categories: { create: [ { assignedBy: 'Bob', assignedAt: new Date(), category: { connect: { id: 9, }, }, }, { assignedBy: 'Bob', assignedAt: new Date(), category: { connect: { id: 22, }, }, }, ], }, },}) Sometimes you might not know if a `Category` record exists. If the `Category` record exists, you want to connect a new `Post` record to that category. If the `Category` record does not exist, you want to create the record first and then connect it to the new `Post` record. The following query: 1. Creates a new `Post` 2. Creates a new record in the relation table `CategoriesOnPosts` 3. Connects the category assignment to an existing category (with ID `9`), or creates a new category first if it does not exist const assignCategories = await prisma.post.create({ data: { title: 'How to be Bob', categories: { create: [ { assignedBy: 'Bob', assignedAt: new Date(), category: { connectOrCreate: { where: { id: 9, }, create: { name: 'New Category', id: 9, }, }, }, }, ], }, },}) The following query returns all `Post` records where at least one (`some`) category assignment (`categories`) refers to a category named `"New category"`: const getPosts = await prisma.post.findMany({ where: { categories: { some: { category: { name: 'New Category', }, }, }, },}) The following query returns all categories where at least one (`some`) related `Post` record titles contain the words `"Cool stuff"` _and_ the category was assigned by Bob. const getAssignments = await prisma.category.findMany({ where: { posts: { some: { assignedBy: 'Bob', post: { title: { contains: 'Cool stuff', }, }, }, }, },}) The following query gets all category assignments (`CategoriesOnPosts`) records that were assigned by `"Bob"` to one of 5 posts: const getAssignments = await prisma.categoriesOnPosts.findMany({ where: { assignedBy: 'Bob', post: { id: { in: [9, 4, 10, 12, 22], }, }, },}) ### Implicit many-to-many relations Implicit m-n relations define relation fields as lists on both sides of the relation. Although the relation table exists in the underlying database, **it is managed by Prisma ORM and does not manifest in the Prisma schema**. Implicit relation tables follow a specific convention. Implicit m-n-relations makes the Prisma Client API for m-n-relations a bit simpler (since you have one fewer level of nesting inside of nested writes). In the example below, there's one _implicit_ m-n-relation between `Post` and `Category`: * Relational databases * MongoDB model Post { id Int @id @default(autoincrement()) title String categories Category[]}model Category { id Int @id @default(autoincrement()) name String posts Post[]} #### Querying an implicit many-to-many The following section demonstrates how to query an implicit m-n relation. The queries require less nesting than explicit m-n queries. The following query creates a single `Post` and multiple `Category` records: const createPostAndCategory = await prisma.post.create({ data: { title: 'How to become a butterfly', categories: { create: [{ name: 'Magic' }, { name: 'Butterflies' }], }, },}) The following query creates a single `Category` and multiple `Post` records: const createCategoryAndPosts = await prisma.category.create({ data: { name: 'Stories', posts: { create: [ { title: 'That one time with the stuff' }, { title: 'The story of planet Earth' }, ], }, },}) The following query returns all `Post` records with a list of that post's assigned categories: const getPostsAndCategories = await prisma.post.findMany({ include: { categories: true, },}) #### Rules for defining an implicit m-n relation Implicit m-n relations: * Use a specific convention for relation tables * Do **not** require the `@relation` attribute unless you need to disambiguate relations with a name, e.g. `@relation("MyRelation")` or `@relation(name: "MyRelation")`. * If you do use the `@relation` attribute, you cannot use the `references`, `fields`, `onUpdate` or `onDelete` arguments. This is because these take a fixed value for implicit m-n-relations and cannot be changed. * Require both models to have a single `@id`. Be aware that: * You cannot use a multi-field ID * You cannot use a `@unique` in place of an `@id` info To use either of these features, you must use an explicit m-n instead. #### Conventions for relation tables in implicit m-n relations If you obtain your data model from introspection, you can still use implicit m-n-relations by following Prisma ORM's conventions for relation tables. The following example assumes you want to create a relation table to get an implicit m-n-relation for two models called `Post` and `Category`. ##### Relation table If you want a relation table to be picked up by introspection as an implicit m-n-relation, the name must follow this exact structure: * It must start with an underscore `_` * Then the name of the first model in alphabetical order (in this case `Category`) * Then the relationship (in this case `To`) * Then the name of the second model in alphabetical order (in this case `Post`) In the example, the correct table name is `_CategoryToPost`. When creating an implicit m-n-relation yourself in the Prisma schema file, you can configure the relation to have a different name. This will change the name given to the relation table in the database. For example, for a relation named `"MyRelation"` the corresponding table will be called `_MyRelation`. ###### Multi-schema If your implicit many-to-many relationship spans multiple database schemas (using the `multiSchema` preview feature), the relation table (with the name defined directly above, in the example `_CategoryToPost`) must be present in the same database schema as the first model in alphabetical order (in this case `Category`). ##### Columns A relation table for an implicit m-n-relation must have exactly two columns: * A foreign key column that points to `Category` called `A` * A foreign key column that points to `Post` called `B` The columns must be called `A` and `B` where `A` points to the model that comes first in the alphabet and `B` points to the model which comes last in the alphabet. ##### Indexes There further must be: * A unique index defined on both foreign key columns: CREATE UNIQUE INDEX "_CategoryToPost_AB_unique" ON "_CategoryToPost"("A" int4_ops,"B" int4_ops); * A non-unique index defined on B: CREATE INDEX "_CategoryToPost_B_index" ON "_CategoryToPost"("B" int4_ops); ##### Example This is a sample SQL statement that would create the three tables including indexes (in PostgreSQL dialect) that are picked up as a implicit m-n-relation by Prisma Introspection: CREATE TABLE "_CategoryToPost" ( "A" integer NOT NULL REFERENCES "Category"(id) , "B" integer NOT NULL REFERENCES "Post"(id));CREATE UNIQUE INDEX "_CategoryToPost_AB_unique" ON "_CategoryToPost"("A" int4_ops,"B" int4_ops);CREATE INDEX "_CategoryToPost_B_index" ON "_CategoryToPost"("B" int4_ops);CREATE TABLE "Category" ( id integer SERIAL PRIMARY KEY);CREATE TABLE "Post" ( id integer SERIAL PRIMARY KEY); And you can define multiple many-to-many relations between two tables by using the different relationship name. This example shows how the Prisma introspection works under such case: CREATE TABLE IF NOT EXISTS "User" ( "id" SERIAL PRIMARY KEY);CREATE TABLE IF NOT EXISTS "Video" ( "id" SERIAL PRIMARY KEY);CREATE TABLE IF NOT EXISTS "_UserLikedVideos" ( "A" SERIAL NOT NULL, "B" SERIAL NOT NULL, CONSTRAINT "_UserLikedVideos_A_fkey" FOREIGN KEY ("A") REFERENCES "User" ("id") ON DELETE CASCADE ON UPDATE CASCADE, CONSTRAINT "_UserLikedVideos_B_fkey" FOREIGN KEY ("B") REFERENCES "Video" ("id") ON DELETE CASCADE ON UPDATE CASCADE);CREATE TABLE IF NOT EXISTS "_UserDislikedVideos" ( "A" SERIAL NOT NULL, "B" SERIAL NOT NULL, CONSTRAINT "_UserDislikedVideos_A_fkey" FOREIGN KEY ("A") REFERENCES "User" ("id") ON DELETE CASCADE ON UPDATE CASCADE, CONSTRAINT "_UserDislikedVideos_B_fkey" FOREIGN KEY ("B") REFERENCES "Video" ("id") ON DELETE CASCADE ON UPDATE CASCADE);CREATE UNIQUE INDEX "_UserLikedVideos_AB_unique" ON "_UserLikedVideos"("A", "B");CREATE INDEX "_UserLikedVideos_B_index" ON "_UserLikedVideos"("B");CREATE UNIQUE INDEX "_UserDislikedVideos_AB_unique" ON "_UserDislikedVideos"("A", "B");CREATE INDEX "_UserDislikedVideos_B_index" ON "_UserDislikedVideos"("B"); If you run `prisma db pull` on this database, the Prisma CLI will generate the following schema through introspection: model User { id Int @id @default(autoincrement()) Video_UserDislikedVideos Video[] @relation("UserDislikedVideos") Video_UserLikedVideos Video[] @relation("UserLikedVideos")}model Video { id Int @id @default(autoincrement()) User_UserDislikedVideos User[] @relation("UserDislikedVideos") User_UserLikedVideos User[] @relation("UserLikedVideos")} #### Configuring the name of the relation table in implicit many-to-many relations When using Prisma Migrate, you can configure the name of the relation table that's managed by Prisma ORM using the `@relation` attribute. For example, if you want the relation table to be called `_MyRelationTable` instead of the default name `_CategoryToPost`, you can specify it as follows: model Post { id Int @id @default(autoincrement()) categories Category[] @relation("MyRelationTable")}model Category { id Int @id @default(autoincrement()) posts Post[] @relation("MyRelationTable")} ### Relation tables A relation table (also sometimes called a _JOIN_, _link_ or _pivot_ table) connects two or more other tables and therefore creates a _relation_ between them. Creating relation tables is a common data modelling practice in SQL to represent relationships between different entities. In essence it means that "one m-n relation is modeled as two 1-n relations in the database". We recommend using implicit m-n-relations, where Prisma ORM automatically generates the relation table in the underlying database. Explicit m-n-relations should be used when you need to store additional data in the relations, such as the date the relation was created. ## MongoDB In MongoDB, m-n-relations are represented by: * relation fields on both sides, that each have a `@relation` attribute, with mandatory `fields` and `references` arguments * a scalar list of referenced IDs on each side, with a type that matches the ID field on the other side The following example demonstrates a m-n-relation between posts and categories: model Post { id String @id @default(auto()) @map("_id") @db.ObjectId categoryIDs String[] @db.ObjectId categories Category[] @relation(fields: [categoryIDs], references: [id])}model Category { id String @id @default(auto()) @map("_id") @db.ObjectId name String postIDs String[] @db.ObjectId posts Post[] @relation(fields: [postIDs], references: [id])} Prisma ORM validates m-n-relations in MongoDB with the following rules: * The fields on both sides of the relation must have a list type (in the example above, `categories` have a type of `Category[]` and `posts` have a type of `Post[]`) * The `@relation` attribute must define `fields` and `references` arguments on both sides * The `fields` argument must have only one scalar field defined, which must be of a list type * The `references` argument must have only one scalar field defined. This scalar field must exist on the referenced model and must be of the same type as the scalar field in the `fields` argument, but singular (no list) * The scalar field to which `references` points must have the `@id` attribute * No referential actions are allowed in `@relation` The implicit m-n-relations used in relational databases are not supported on MongoDB. ### Querying MongoDB many-to-many relations This section demonstrates how to query m-n-relations in MongoDB, using the example schema above. The following query finds posts with specific matching category IDs: const newId1 = new ObjectId()const newId2 = new ObjectId()const posts = await prisma.post.findMany({ where: { categoryIDs: { hasSome: [newId1.toHexString(), newId2.toHexString()], }, },}) The following query finds posts where the category name contains the string `'Servers'`: const posts = await prisma.post.findMany({ where: { categories: { some: { name: { contains: 'Servers', }, }, }, },}) --- ## Page: https://www.prisma.io/docs/orm/prisma-client/setup-and-configuration/introduction Prisma Client is an auto-generated and type-safe query builder that's _tailored_ to your data. The easiest way to get started with Prisma Client is by following the **Quickstart**. Quickstart (5 min) The setup instructions below provide a high-level overview of the steps needed to set up Prisma Client. If you want to get started using Prisma Client with your own database, follow one of these guides: Set up a new project from scratch Add Prisma to an existing project ## Set up ### 1\. Prerequisites In order to set up Prisma Client, you need a Prisma schema file with your database connection, the Prisma Client generator, and at least one model: schema.prisma datasource db { url = env("DATABASE_URL") provider = "postgresql"}generator client { provider = "prisma-client-js"}model User { id Int @id @default(autoincrement()) createdAt DateTime @default(now()) email String @unique name String?} Also make sure to install the Prisma CLI: npm install prisma --save-devnpx prisma ### 2\. Installation Install Prisma Client in your project with the following command: npm install @prisma/client This command also runs the `prisma generate` command, which generates Prisma Client into the `node_modules/.prisma/client` directory. ### 3\. Importing Prisma Client There are multiple ways to import Prisma Client in your project depending on your use case: * TypeScript * JavaScript import { PrismaClient } from '@prisma/client'const prisma = new PrismaClient()// use `prisma` in your application to read and write data in your DB For edge environments, you can import Prisma Client as follows: * TypeScript * JavaScript import { PrismaClient } from '@prisma/client/edge'const prisma = new PrismaClient()// use `prisma` in your application to read and write data in your DB > **Note**: If you're using driver adapters, you can import from `@prisma/client` directly. No need to import from `@prisma/client/edge`. For Deno, you can import Prisma Client as follows: lib/prisma.ts import { PrismaClient } from './generated/client/deno/edge.ts'const prisma = new PrismaClient()// use `prisma` in your application to read and write data in your DB The import path will depend on the custom `output` specified in Prisma Client's `generator` block in your Prisma schema. ### 4\. Use Prisma Client to send queries to your database Once you have instantiated `PrismaClient`, you can start sending queries in your code: // run inside `async` functionconst newUser = await prisma.user.create({ data: { name: 'Alice', email: 'alice@prisma.io', },})const users = await prisma.user.findMany() info All Prisma Client methods return an instance of `PrismaPromise` which only executes when you call `await` or `.then()` or `.catch()`. ### 5\. Evolving your application Whenever you make changes to your database that are reflected in the Prisma schema, you need to manually re-generate Prisma Client to update the generated code in the `node_modules/.prisma/client` directory: prisma generate --- ## Page: https://www.prisma.io/docs/orm/prisma-client/setup-and-configuration/instantiate-prisma-client The following example demonstrates how to import and instantiate your generated client from the default path: * TypeScript * JavaScript import { PrismaClient } from '@prisma/client'const prisma = new PrismaClient() tip ## The number of `PrismaClient` instances matters Your application should generally only create **one instance** of `PrismaClient`. How to achieve this depends on whether you are using Prisma ORM in a long-running application or in a serverless environment . The reason for this is that each instance of `PrismaClient` manages a connection pool, which means that a large number of clients can **exhaust the database connection limit**. This applies to all database connectors. If you use the **MongoDB connector**, connections are managed by the MongoDB driver connection pool. If you use a **relational database connector**, connections are managed by Prisma ORM's connection pool. Each instance of `PrismaClient` creates its own pool. 1. Each client creates its own instance of the query engine. 2. Each query engine creates a connection pool with a default pool size of: * `num_physical_cpus * 2 + 1` for relational databases * `100` for MongoDB 3. Too many connections may start to **slow down your database** and eventually lead to errors such as: Error in connector: Error querying the database: db error: FATAL: sorry, too many clients already at PrismaClientFetcher.request --- ## Page: https://www.prisma.io/docs/orm/prisma-client/setup-and-configuration/databases-connections Databases can handle a limited number of concurrent connections. Each connection requires RAM, which means that simply increasing the database connection limit without scaling available resources: * ✔ might allow more processes to connect _but_ * ✘ significantly affects **database performance**, and can result in the database being **shut down** due to an out of memory error The way your application **manages connections** also impacts performance. This guide describes how to approach connection management in serverless environments and long-running processes. warning This guide focuses on **relational databases** and how to configure and tune the Prisma ORM connection pool (MongoDB uses the MongoDB driver connection pool). ## Long-running processes Examples of long-running processes include Node.js applications hosted on a service like Heroku or a virtual machine. Use the following checklist as a guide to connection management in long-running environments: * Start with the recommended pool size (`connection_limit`) and tune it * Make sure you have **one** global instance of `PrismaClient` ### Recommended connection pool size The recommended connection pool size (`connection_limit`) to start with for long-running processes is the **default pool size** (`num_physical_cpus * 2 + 1`) ÷ **number of application instances**. info `num_physical_cpus` refers to the the number of CPUs of the machine your application is running on. If you have **one** application instances: * The default pool size applies by default (`num_physical_cpus * 2 + 1`) - you do not need to set the `connection_limit` parameter. * You can optionally tune the pool size. If you have **multiple** application instances: * You must **manually** set the `connection_limit` parameter . For example, if your calculated pool size is _10_ and you have _2_ instances of your app, the `connection_limit` parameter should be **no more than _5_**. * You can optionally tune the pool size. ### `PrismaClient` in long-running applications In **long-running** applications, we recommend that you: * ✔ Create **one** instance of `PrismaClient` and re-use it across your application * ✔ Assign `PrismaClient` to a global variable _in dev environments only_ to prevent hot reloading from creating new instances #### Re-using a single `PrismaClient` instance To re-use a single instance, create a module that exports a `PrismaClient` object: client.ts import { PrismaClient } from '@prisma/client'let prisma = new PrismaClient()export default prisma The object is cached the first time the module is imported. Subsequent requests return the cached object rather than creating a new `PrismaClient`: app.ts import prisma from './client'async function main() { const allUsers = await prisma.user.findMany()}main() You do not have to replicate the example above exactly - the goal is to make sure `PrismaClient` is cached. For example, you can instantiate `PrismaClient` in the `context` object that you pass into an Express app. #### Do not explicitly `$disconnect()` You do not need to explicitly `$disconnect()` in the context of a long-running application that is continuously serving requests. Opening a new connection takes time and can slow down your application if you disconnect after each query. #### Prevent hot reloading from creating new instances of `PrismaClient` Frameworks like Next.js support hot reloading of changed files, which enables you to see changes to your application without restarting. However, if the framework refreshes the module responsible for exporting `PrismaClient`, this can result in **additional, unwanted instances of `PrismaClient` in a development environment**. As a workaround, you can store `PrismaClient` as a global variable in development environments only, as global variables are not reloaded: client.ts import { PrismaClient } from '@prisma/client'const globalForPrisma = globalThis as unknown as { prisma: PrismaClient }export const prisma = globalForPrisma.prisma || new PrismaClient()if (process.env.NODE_ENV !== 'production') globalForPrisma.prisma = prisma The way that you import and use Prisma Client does not change: app.ts import { prisma } from './client'async function main() { const allUsers = await prisma.user.findMany()}main() ## Connections Created per CLI Command In local tests with Postgres, MySQL, and SQLite, each Prisma CLI command typically uses a single connection. The table below shows the ranges observed in these tests. Your environment _may_ produce slightly different results. | Command | Connections | Description | | --- | --- | --- | | `migrate status` | 1 | Checks the status of migrations | | `migrate dev` | 1–4 | Applies pending migrations in development | | `migrate diff` | 1–2 | Compares database schema with migration history | | `migrate reset` | 1–2 | Resets the database and reapplies migrations | | `migrate deploy` | 1–2 | Applies pending migrations in production | | `db pull` | 1 | Pulls the database schema into the Prisma schema | | `db push` | 1–2 | Pushes the Prisma schema to the database | | `db execute` | 1 | Executes raw SQL commands | | `db seed` | 1 | Seeds the database with initial data | ## Serverless environments (FaaS) Examples of serverless environments include Node.js functions hosted on AWS Lambda, Vercel or Netlify Functions. Use the following checklist as a guide to connection management in serverless environments: * Familiarize yourself with the serverless connection management challenge * Set pool size (`connection_limit`) based on whether you have an external connection pooler, and optionally tune the pool size * Instantiate `PrismaClient` outside the handler and do not explicitly `$disconnect()` * Configure function concurrency and handle idle connections ### The serverless challenge In a serverless environment, each function creates **its own instance** of `PrismaClient`, and each client instance has its own connection pool. Consider the following example, where a single AWS Lambda function uses `PrismaClient` to connect to a database. The `connection_limit` is **3**: 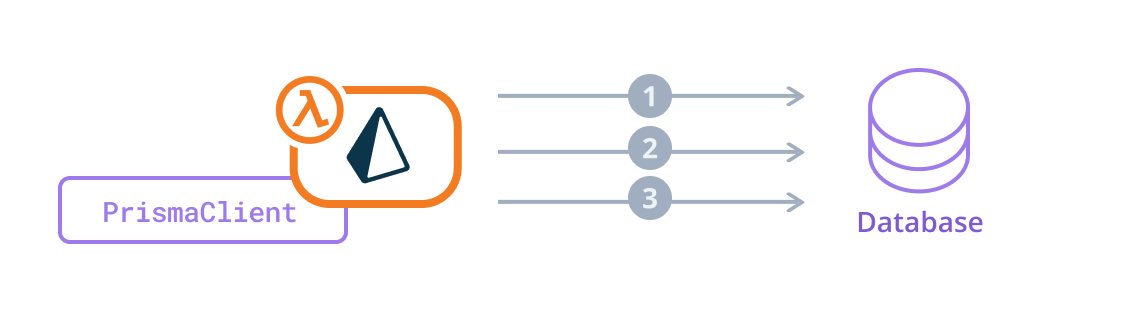 A traffic spike causes AWS Lambda to spawn two additional lambdas to handle the increased load. Each lambda creates an instance of `PrismaClient`, each with a `connection_limit` of **3**, which results in a maximum of **9** connections to the database: 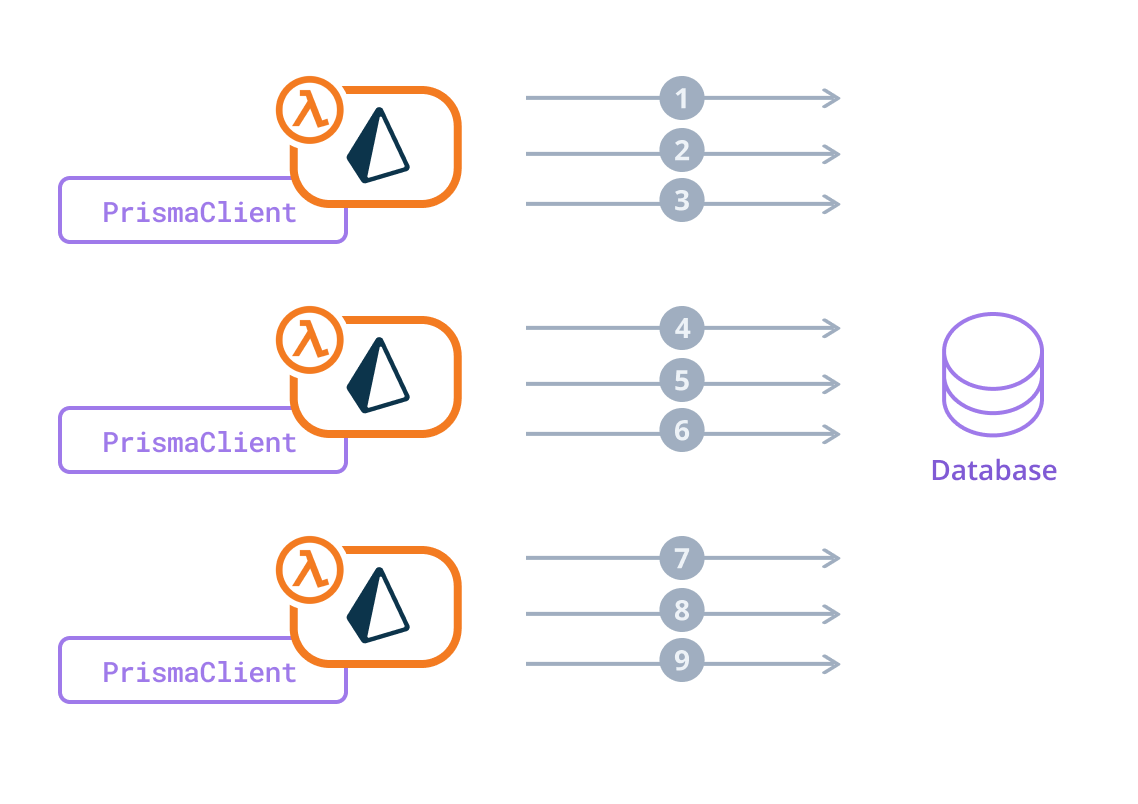 200 _concurrent functions_ (and therefore 600 possible connections) responding to a traffic spike 📈 can exhaust the database connection limit very quickly. Furthermore, any functions that are **paused** keep their connections open by default and block them from being used by another function. 1. Start by setting the `connection_limit` to `1` 2. If a smaller pool size is not enough, consider using an external connection pooler like PgBouncer ### Recommended connection pool size The recommended pool size (`connection_limit`) in serverless environments depends on: * Whether you are using an external connection pooler * Whether your functions are designed to send queries in parallel #### Without an external connection pooler If you are **not** using an external connection pooler, _start_ by setting the pool size (`connection_limit`) to **1**, then optimize. Each incoming request starts a short-lived Node.js process, and many concurrent functions with a high `connection_limit` can quickly **exhaust the _database_ connection limit** during a traffic spike. The following example demonstrates how to set the `connection_limit` to 1 in your connection URL: * PostgreSQL * MySQL postgresql://USER:PASSWORD@HOST:PORT/DATABASE?schema=public&connection_limit=1 #### With an external connection pooler If you are using an external connection pooler, use the default pool size (`num_physical_cpus * 2 + 1`) as a starting point and then tune the pool size. The external connection pooler should prevent a traffic spike from overwhelming the database. #### Optimizing for parallel requests If you rarely or never exceed the database connection limit with the pool size set to 1, you can further optimize the connection pool size. Consider a function that sends queries in parallel: Promise.all() { query1, query2, query3 query4, ...} If the `connection_limit` is 1, this function is forced to send queries **serially** (one after the other) rather than **in parallel**. This slows down the function's ability to process requests, and may result in pool timeout errors. Tune the `connection_limit` parameter until a traffic spike: * Does not exhaust the database connection limit * Does not result in pool timeout errors ### `PrismaClient` in serverless environments #### Instantiate `PrismaClient` outside the handler Instantiate `PrismaClient` outside the scope of the function handler to increase the chances of reuse. As long as the handler remains 'warm' (in use), the connection is potentially reusable: import { PrismaClient } from '@prisma/client'const client = new PrismaClient()export async function handler() { /* ... */} #### Do not explicitly `$disconnect()` You do not need to explicitly `$disconnect()` at the end of a function, as there is a possibility that the container might be reused. Opening a new connection takes time and slows down your function's ability to process requests. ### Other serverless considerations #### Container reuse There is no guarantee that subsequent nearby invocations of a function will hit the same container - for example, AWS can choose to create a new container at any time. Code should assume the container to be stateless and create a connection only if it does not exist - Prisma Client JS already implements this logic. #### Zombie connections Containers that are marked "to be removed" and are not being reused still **keep a connection open** and can stay in that state for some time (unknown and not documented from AWS). This can lead to sub-optimal utilization of the database connections. A potential solution is to **clean up idle connections** (`serverless-mysql` implements this idea, but cannot be used with Prisma ORM). #### Concurrency limits Depending on your serverless concurrency limit (the number of serverless functions running in parallel), you might still exhaust your database's connection limit. This can happen when too many functions are invoked concurrently, each with its own connection pool, which eventually exhausts the database connection limit. To prevent this, you can set your serverless concurrency limit to a number lower than the maximum connection limit of your database divided by the number of connections used by each function invocation (as you might want to be able to connect from another client for other purposes). ## Optimizing the connection pool If the query engine cannot process a query in the queue before the time limit , you will see connection pool timeout exceptions in your log. A connection pool timeout can occur if: * Many users are accessing your app simultaneously * You send a large number of queries in parallel (for example, using `await Promise.all()`) If you consistently experience connection pool timeouts after configuring the recommended pool size, you can further tune the `connection_limit` and `pool_timeout` parameters. ### Increasing the pool size Increasing the pool size allows the query engine to process a larger number of queries in parallel. Be aware that your database must be able to support the increased number of concurrent connections, otherwise you will **exhaust the database connection limit**. To increase the pool size, manually set the `connection_limit` to a higher number: datasource db { provider = "postgresql" url = "postgresql://johndoe:mypassword@localhost:5432/mydb?schema=public&connection_limit=40"} > **Note**: Setting the `connection_limit` to 1 in serverless environments is a recommended starting point, but this value can also be tuned. ### Increasing the pool timeout Increasing the pool timeout gives the query engine more time to process queries in the queue. You might consider this approach in the following scenario: * You have already increased the `connection_limit`. * You are confident that the queue will not grow beyond a certain size, otherwise **you will eventually run out of RAM**. To increase the pool timeout, set the `pool_timeout` parameter to a value larger than the default (10 seconds): datasource db { provider = "postgresql" url = "postgresql://johndoe:mypassword@localhost:5432/mydb?connection_limit=5&pool_timeout=20"} ### Disabling the pool timeout Disabling the pool timeout prevents the query engine from throwing an exception after x seconds of waiting for a connection and allows the queue to build up. You might consider this approach in the following scenario: * You are submitting a large number of queries for a limited time - for example, as part of a job to import or update every customer in your database. * You have already increased the `connection_limit`. * You are confident that the queue will not grow beyond a certain size, otherwise **you will eventually run out of RAM**. To disable the pool timeout, set the `pool_timeout` parameter to `0`: datasource db { provider = "postgresql" url = "postgresql://johndoe:mypassword@localhost:5432/mydb?connection_limit=5&pool_timeout=0"} ## External connection poolers Connection poolers like Prisma Accelerate and PgBouncer prevent your application from exhausting the database's connection limit. If you would like to use the Prisma CLI in order to perform other actions on your database ,e.g. migrations and introspection, you will need to add an environment variable that provides a direct connection to your database in the `datasource.directUrl` property in your Prisma schema: .env # Connection URL to your database using PgBouncer.DATABASE_URL="postgres://root:password@127.0.0.1:54321/postgres?pgbouncer=true"# Direct connection URL to the database used for migrationsDIRECT_URL="postgres://root:password@127.0.0.1:5432/postgres" You can then update your `schema.prisma` to use the new direct URL: schema.prisma datasource db { provider = "postgresql" url = env("DATABASE_URL") directUrl = env("DIRECT_URL")} More information about the `directUrl` field can be found here. ### Prisma Accelerate Prisma Accelerate is a managed external connection pooler built by Prisma that is integrated in the Prisma Data Platform and handles connection pooling for you. ### PgBouncer PostgreSQL only supports a certain amount of concurrent connections, and this limit can be reached quite fast when the service usage goes up – especially in serverless environments. PgBouncer holds a connection pool to the database and proxies incoming client connections by sitting between Prisma Client and the database. This reduces the number of processes a database has to handle at any given time. PgBouncer passes on a limited number of connections to the database and queues additional connections for delivery when connections becomes available. To use PgBouncer, see Configure Prisma Client with PgBouncer. ### AWS RDS Proxy Due to the way AWS RDS Proxy pins connections, it does not provide any connection pooling benefits when used together with Prisma Client. --- ## Page: https://www.prisma.io/docs/orm/prisma-client/setup-and-configuration/error-formatting By default, Prisma Client uses ANSI escape characters to pretty print the error stack and give recommendations on how to fix a problem. While this is very useful when using Prisma Client from the terminal, in contexts like a GraphQL API, you only want the minimal error without any additional formatting. This page explains how error formatting can be configured with Prisma Client. In order to configure these different error formatting levels, there are two options: Alternatively, use the `PrismaClient` `errorFormat` parameter to set the error format: const prisma = new PrismaClient({ errorFormat: 'pretty',}) --- ## Page: https://www.prisma.io/docs/orm/prisma-client/setup-and-configuration/read-replicas Read replicas enable you to distribute workloads across database replicas for high-traffic workloads. The read replicas extension, `@prisma/extension-read-replicas`, adds support for read-only database replicas to Prisma Client. The read replicas extension supports Prisma ORM versions 5.2.0 and higher. If you run into a bug or have feedback, create a GitHub issue here. ## Setup the read replicas extension Install the extension: npm install @prisma/extension-read-replicas Initialize the extension by extending your Prisma Client instance and provide the extension a connection string that points to your read replica in the `url` option of the extension. import { PrismaClient } from '@prisma/client'import { readReplicas } from '@prisma/extension-read-replicas'const prisma = new PrismaClient().$extends( readReplicas({ url: process.env.DATABASE_URL_REPLICA, }))// Query is run against the database replicaawait prisma.post.findMany()// Query is run against the primary databaseawait prisma.post.create({ data: {/** */},}) All read operations, e.g. `findMany`, will be executed against the database replica with the above setup. All write operations — e.g. `create`, `update` — and `$transaction` queries, will be executed against your primary database. If you run into a bug or have feedback, create a GitHub issue here. ## Configure multiple database replicas The `url` property also accepts an array of values, i.e. an array of all your database replicas you would like to configure: const prisma = new PrismaClient().$extends( readReplicas({ url: [ process.env.DATABASE_URL_REPLICA_1, process.env.DATABASE_URL_REPLICA_2, ], })) If you have more than one read replica configured, a database replica will be randomly selected to execute your query. ## Executing read operations against your primary database You can use the `$primary()` method to explicitly execute a read operation against your primary database: const posts = await prisma.$primary().post.findMany() ## Executing operations against a database replica You can use the `$replica()` method to explicitly execute your query against a replica instead of your primary database: const result = await prisma.$replica().user.findFirst(...) --- ## Page: https://www.prisma.io/docs/orm/prisma-client/setup-and-configuration/database-polyfills Prisma Client provides features that are typically either not achievable with particular databases or require extensions. These features are referred to as _polyfills_. For all databases, this includes: * Initializing ID values with `cuid` and `uuid` values * Using `@updatedAt` to store the time when a record was last updated For relational databases, this includes: * Implicit many-to-many relations For MongoDB, this includes: * Relations in general - foreign key relations between documents are not enforced in MongoDB --- ## Page: https://www.prisma.io/docs/orm/prisma-client/setup-and-configuration/databases-connections/connection-management `PrismaClient` connects and disconnects from your data source using the following two methods: * `$connect()` * `$disconnect()` In most cases, you **do not need to explicitly call these methods**. `PrismaClient` automatically connects when you run your first query, creates a connection pool, and disconnects when the Node.js process ends. See the connection management guide for information about managing connections for different deployment paradigms (long-running processes and serverless functions). ## `$connect()` It is not necessary to call `$connect()` thanks to the _lazy connect_ behavior: The `PrismaClient` instance connects lazily when the first request is made to the API (`$connect()` is called for you under the hood). ### Calling `$connect()` explicitly If you need the first request to respond instantly and cannot wait for a lazy connection to be established, you can explicitly call `prisma.$connect()` to establish a connection to the data source: const prisma = new PrismaClient()// run inside `async` functionawait prisma.$connect() ## `$disconnect()` When you call `$disconnect()` , Prisma Client: 1. Runs the `beforeExit` hook 2. Ends the Query Engine child process and closes all connections In a long-running application such as a GraphQL API, which constantly serves requests, it does not make sense to `$disconnect()` after each request - it takes time to establish a connection, and doing so as part of each request will slow down your application. ### Calling `$disconnect()` explicitly One scenario where you should call `$disconnect()` explicitly is where a script: 1. Runs **infrequently** (for example, a scheduled job to send emails each night), which means it does not benefit from a long-running connection to the database _and_ 2. Exists in the context of a **long-running application**, such as a background service. If the application never shuts down, Prisma Client never disconnects. The following script creates a new instance of `PrismaClient`, performs a task, and then disconnects - which closes the connection pool: import { PrismaClient } from '@prisma/client'const prisma = new PrismaClient()const emailService = new EmailService()async function main() { const allUsers = await prisma.user.findMany() const emails = allUsers.map((x) => x.email) await emailService.send(emails, 'Hello!')}main() .then(async () => { await prisma.$disconnect() }) .catch(async (e) => { console.error(e) await prisma.$disconnect() process.exit(1) }) If the above script runs multiple times in the context of a long-running application _without_ calling `$disconnect()`, a new connection pool is created with each new instance of `PrismaClient`. ## Exit hooks The `beforeExit` hook runs when Prisma ORM is triggered externally (e.g. via a `SIGINT` signal) to shut down, and allows you to run code _before_ Prisma Client disconnects - for example, to issue queries as part of a graceful shutdown of a service: const prisma = new PrismaClient()prisma.$on('beforeExit', async () => { console.log('beforeExit hook') // PrismaClient still available await prisma.message.create({ data: { message: 'Shutting down server', }, })}) --- ## Page: https://www.prisma.io/docs/orm/prisma-client/queries/crud This page describes how to perform CRUD operations with your generated Prisma Client API. CRUD is an acronym that stands for: * Create * Read * Update * Delete Refer to the Prisma Client API reference documentation for detailed explanations of each method. ## Example schema All examples are based on the following schema: Expand for sample schema * Relational databases * MongoDB datasource db { provider = "postgresql" url = env("DATABASE_URL")}generator client { provider = "prisma-client-js"}model ExtendedProfile { id Int @id @default(autoincrement()) biography String user User @relation(fields: [userId], references: [id]) userId Int @unique}model User { id Int @id @default(autoincrement()) name String? email String @unique profileViews Int @default(0) role Role @default(USER) coinflips Boolean[] posts Post[] profile ExtendedProfile?}model Post { id Int @id @default(autoincrement()) title String published Boolean @default(true) author User @relation(fields: [authorId], references: [id]) authorId Int comments Json? views Int @default(0) likes Int @default(0) categories Category[]}model Category { id Int @id @default(autoincrement()) name String @unique posts Post[]}enum Role { USER ADMIN} For **relational databases**, use `db push` command to push the example schema to your own database npx prisma db push For **MongoDB**, ensure your data is in a uniform shape and matches the model defined in the Prisma schema. ## Create ### Create a single record The following query creates (`create()`) a single user with two fields: const user = await prisma.user.create({ data: { email: 'elsa@prisma.io', name: 'Elsa Prisma', },}) Show query results The user's `id` is auto-generated, and your schema determines which fields are mandatory. #### Create a single record using generated types The following example produces an identical result, but creates a `UserCreateInput` variable named `user` _outside_ the context of the `create()` query. After completing a simple check ("Should posts be included in this `create()` query?"), the `user` variable is passed into the query: import { PrismaClient, Prisma } from '@prisma/client'const prisma = new PrismaClient()async function main() { let includePosts: boolean = false let user: Prisma.UserCreateInput // Check if posts should be included in the query if (includePosts) { user = { email: 'elsa@prisma.io', name: 'Elsa Prisma', posts: { create: { title: 'Include this post!', }, }, } } else { user = { email: 'elsa@prisma.io', name: 'Elsa Prisma', } } // Pass 'user' object into query const createUser = await prisma.user.create({ data: user })}main() For more information about working with generated types, see: Generated types. ### Create multiple records Prisma Client supports bulk inserts as a GA feature in 2.20.0 and later. The following `createMany()` query creates multiple users and skips any duplicates (`email` must be unique): const createMany = await prisma.user.createMany({ data: [ { name: 'Bob', email: 'bob@prisma.io' }, { name: 'Bobo', email: 'bob@prisma.io' }, // Duplicate unique key! { name: 'Yewande', email: 'yewande@prisma.io' }, { name: 'Angelique', email: 'angelique@prisma.io' }, ], skipDuplicates: true, // Skip 'Bobo'}) Show query results { count: 3} warning Note `skipDuplicates` is not supported when using MongoDB, SQLServer, or SQLite. `createMany()` uses a single `INSERT INTO` statement with multiple values, which is generally more efficient than a separate `INSERT` per row: BEGININSERT INTO "public"."User" ("id","name","email","profileViews","role","coinflips","testing","city","country") VALUES (DEFAULT,$1,$2,$3,$4,DEFAULT,DEFAULT,DEFAULT,$5), (DEFAULT,$6,$7,$8,$9,DEFAULT,DEFAULT,DEFAULT,$10), (DEFAULT,$11,$12,$13,$14,DEFAULT,DEFAULT,DEFAULT,$15), (DEFAULT,$16,$17,$18,$19,DEFAULT,DEFAULT,DEFAULT,$20) ON CONFLICT DO NOTHINGCOMMITSELECT "public"."User"."country", "public"."User"."city", "public"."User"."email", SUM("public"."User"."profileViews"), COUNT(*) FROM "public"."User" WHERE 1=1 GROUP BY "public"."User"."country", "public"."User"."city", "public"."User"."email" HAVING AVG("public"."User"."profileViews") >= $1 ORDER BY "public"."User"."country" ASC OFFSET $2 > **Note**: Multiple `create()` statements inside a `$transaction` results in multiple `INSERT` statements. The following video demonstrates how to use `createMany()` and faker.js to seed a database with sample data: ### Create records and connect or create related records See Working with relations > Nested writes for information about creating a record and one or more related records at the same time. ### Create and return multiple records info This feature is available in Prisma ORM version 5.14.0 and later for PostgreSQL, CockroachDB and SQLite. You can use `createManyAndReturn()` in order to create many records and return the resulting objects. const users = await prisma.user.createManyAndReturn({ data: [ { name: 'Alice', email: 'alice@prisma.io' }, { name: 'Bob', email: 'bob@prisma.io' }, ],}) Show query results warning `relationLoadStrategy: join` is not available when using `createManyAndReturn()`. ## Read ### Get record by ID or unique identifier The following queries return a single record (`findUnique()`) by unique identifier or ID: // By unique identifierconst user = await prisma.user.findUnique({ where: { email: 'elsa@prisma.io', },})// By IDconst user = await prisma.user.findUnique({ where: { id: 99, },}) If you are using the MongoDB connector and your underlying ID type is `ObjectId`, you can use the string representation of that `ObjectId`: // By IDconst user = await prisma.user.findUnique({ where: { id: '60d5922d00581b8f0062e3a8', },}) ### Get all records The following `findMany()` query returns _all_ `User` records: const users = await prisma.user.findMany() You can also paginate your results. ### Get the first record that matches a specific criteria The following `findFirst()` query returns the _most recently created user_ with at least one post that has more than 100 likes: 1. Order users by descending ID (largest first) - the largest ID is the most recent 2. Return the first user in descending order with at least one post that has more than 100 likes const findUser = await prisma.user.findFirst({ where: { posts: { some: { likes: { gt: 100, }, }, }, }, orderBy: { id: 'desc', },}) ### Get a filtered list of records Prisma Client supports filtering on record fields and related record fields. #### Filter by a single field value The following query returns all `User` records with an email that ends in `"prisma.io"`: const users = await prisma.user.findMany({ where: { email: { endsWith: 'prisma.io', }, },}) #### Filter by multiple field values The following query uses a combination of operators to return users whose name start with `E` _or_ administrators with at least 1 profile view: const users = await prisma.user.findMany({ where: { OR: [ { name: { startsWith: 'E', }, }, { AND: { profileViews: { gt: 0, }, role: { equals: 'ADMIN', }, }, }, ], },}) The following query returns users with an email that ends with `prisma.io` _and_ have at least _one_ post (`some`) that is not published: const users = await prisma.user.findMany({ where: { email: { endsWith: 'prisma.io', }, posts: { some: { published: false, }, }, },}) See Working with relations for more examples of filtering on related field values. ### Select a subset of fields The following `findUnique()` query uses `select` to return the `email` and `name` fields of a specific `User` record: const user = await prisma.user.findUnique({ where: { email: 'emma@prisma.io', }, select: { email: true, name: true, },}) Show query results For more information about including relations, refer to: * Select fields * Relation queries The following query uses a nested `select` to return: * The user's `email` * The `likes` field of each post const user = await prisma.user.findUnique({ where: { email: 'emma@prisma.io', }, select: { email: true, posts: { select: { likes: true, }, }, },}) Show query results For more information about including relations, see Select fields and include relations. ### Select distinct field values See Select `distinct` for information about selecting distinct field values. The following query returns all `ADMIN` users and includes each user's posts in the result: const users = await prisma.user.findMany({ where: { role: 'ADMIN', }, include: { posts: true, },}) Show query results For more information about including relations, see Select fields and include relations. #### Include a filtered list of relations See Working with relations to find out how to combine `include` and `where` for a filtered list of relations - for example, only include a user's published posts. ## Update ### Update a single record The following query uses `update()` to find and update a single `User` record by `email`: const updateUser = await prisma.user.update({ where: { email: 'viola@prisma.io', }, data: { name: 'Viola the Magnificent', },}) Show query results ### Update multiple records The following query uses `updateMany()` to update all `User` records that contain `prisma.io`: const updateUsers = await prisma.user.updateMany({ where: { email: { contains: 'prisma.io', }, }, data: { role: 'ADMIN', },}) Show query results ### Update and return multiple records info This feature is available in Prisma ORM version 6.2.0 and later for PostgreSQL, CockroachDB, and SQLite. You can use `updateManyAndReturn()` in order to update many records and return the resulting objects. const users = await prisma.user.updateManyAndReturn({ where: { email: { contains: 'prisma.io', } }, data: { role: 'ADMIN' }}) Show query results warning `relationLoadStrategy: join` is not available when using `updateManyAndReturn()`. ### Update _or_ create records The following query uses `upsert()` to update a `User` record with a specific email address, or create that `User` record if it does not exist: const upsertUser = await prisma.user.upsert({ where: { email: 'viola@prisma.io', }, update: { name: 'Viola the Magnificent', }, create: { email: 'viola@prisma.io', name: 'Viola the Magnificent', },}) Show query results info From version 4.6.0, Prisma Client carries out upserts with database native SQL commands where possible. Learn more. Prisma Client does not have a `findOrCreate()` query. You can use `upsert()` as a workaround. To make `upsert()` behave like a `findOrCreate()` method, provide an empty `update` parameter to `upsert()`. warning A limitation to using `upsert()` as a workaround for `findOrCreate()` is that `upsert()` will only accept unique model fields in the `where` condition. So it's not possible to use `upsert()` to emulate `findOrCreate()` if the `where` condition contains non-unique fields. ### Update a number field Use atomic number operations to update a number field **based on its current value** - for example, increment or multiply. The following query increments the `views` and `likes` fields by `1`: const updatePosts = await prisma.post.updateMany({ data: { views: { increment: 1, }, likes: { increment: 1, }, },}) ### Connect and disconnect related records Refer to Working with relations for information about disconnecting (`disconnect`) and connecting (`connect`) related records. ## Delete ### Delete a single record The following query uses `delete()` to delete a single `User` record: const deleteUser = await prisma.user.delete({ where: { email: 'bert@prisma.io', },}) Attempting to delete a user with one or more posts result in an error, as every `Post` requires an author - see cascading deletes. ### Delete multiple records The following query uses `deleteMany()` to delete all `User` records where `email` contains `prisma.io`: const deleteUsers = await prisma.user.deleteMany({ where: { email: { contains: 'prisma.io', }, },}) Attempting to delete a user with one or more posts result in an error, as every `Post` requires an author - see cascading deletes. ### Delete all records The following query uses `deleteMany()` to delete all `User` records: const deleteUsers = await prisma.user.deleteMany({}) Be aware that this query will fail if the user has any related records (such as posts). In this case, you need to delete the related records first. The following query uses `delete()` to delete a single `User` record: const deleteUser = await prisma.user.delete({ where: { email: 'bert@prisma.io', },}) However, the example schema includes a **required relation** between `Post` and `User`, which means that you cannot delete a user with posts: The change you are trying to make would violate the required relation 'PostToUser' between the `Post` and `User` models. To resolve this error, you can: * Make the relation optional: model Post { id Int @id @default(autoincrement()) author User? @relation(fields: [authorId], references: [id]) authorId Int? author User @relation(fields: [authorId], references: [id]) authorId Int} * Change the author of the posts to another user before deleting the user. * Delete a user and all their posts with two separate queries in a transaction (all queries must succeed): const deletePosts = prisma.post.deleteMany({ where: { authorId: 7, },})const deleteUser = prisma.user.delete({ where: { id: 7, },})const transaction = await prisma.$transaction([deletePosts, deleteUser]) ### Delete all records from all tables Sometimes you want to remove all data from all tables but keep the actual tables. This can be particularly useful in a development environment and whilst testing. The following shows how to delete all records from all tables with Prisma Client and with Prisma Migrate. #### Deleting all data with `deleteMany()` When you know the order in which your tables should be deleted, you can use the `deleteMany` function. This is executed synchronously in a `$transaction` and can be used with all types of databases. const deletePosts = prisma.post.deleteMany()const deleteProfile = prisma.profile.deleteMany()const deleteUsers = prisma.user.deleteMany()// The transaction runs synchronously so deleteUsers must run last.await prisma.$transaction([deleteProfile, deletePosts, deleteUsers]) ✅ **Pros**: * Works well when you know the structure of your schema ahead of time * Synchronously deletes each tables data ❌ **Cons**: * When working with relational databases, this function doesn't scale as well as having a more generic solution which looks up and `TRUNCATE`s your tables regardless of their relational constraints. Note that this scaling issue does not apply when using the MongoDB connector. > **Note**: The `$transaction` performs a cascading delete on each models table so they have to be called in order. #### Deleting all data with raw SQL / `TRUNCATE` If you are comfortable working with raw SQL, you can perform a `TRUNCATE` query on a table using `$executeRawUnsafe`. In the following examples, the first tab shows how to perform a `TRUNCATE` on a Postgres database by using a `$queryRaw` look up that maps over the table and `TRUNCATES` all tables in a single query. The second tab shows performing the same function but with a MySQL database. In this instance the constraints must be removed before the `TRUNCATE` can be executed, before being reinstated once finished. The whole process is run as a `$transaction` * PostgreSQL * MySQL const tablenames = await prisma.$queryRaw< Array<{ tablename: string }>>`SELECT tablename FROM pg_tables WHERE schemaname='public'`const tables = tablenames .map(({ tablename }) => tablename) .filter((name) => name !== '_prisma_migrations') .map((name) => `"public"."${name}"`) .join(', ')try { await prisma.$executeRawUnsafe(`TRUNCATE TABLE ${tables} CASCADE;`)} catch (error) { console.log({ error })} ✅ **Pros**: * Scalable * Very fast ❌ **Cons**: * Can't undo the operation * Using reserved SQL key words as tables names can cause issues when trying to run a raw query #### Deleting all records with Prisma Migrate If you use Prisma Migrate, you can use `migrate reset`, this will: 1. Drop the database 2. Create a new database 3. Apply migrations 4. Seed the database with data ## Advanced query examples ### Create a deeply nested tree of records * A single `User` * Two new, related `Post` records * Connect or create `Category` per post const u = await prisma.user.create({ include: { posts: { include: { categories: true, }, }, }, data: { email: 'emma@prisma.io', posts: { create: [ { title: 'My first post', categories: { connectOrCreate: [ { create: { name: 'Introductions' }, where: { name: 'Introductions', }, }, { create: { name: 'Social' }, where: { name: 'Social', }, }, ], }, }, { title: 'How to make cookies', categories: { connectOrCreate: [ { create: { name: 'Social' }, where: { name: 'Social', }, }, { create: { name: 'Cooking' }, where: { name: 'Cooking', }, }, ], }, }, ], }, },}) --- ## Page: https://www.prisma.io/docs/orm/prisma-client/queries/select-fields ## Overview By default, when a query returns records (as opposed to a count), the result includes: * **All scalar fields** of a model (including enums) * **No relations** defined on a model As an example, consider this schema: model User { id Int @id @default(autoincrement()) email String @unique name String? role Role @default(USER) posts Post[]}model Post { id Int @id @default(autoincrement()) published Boolean @default(false) title String author User? @relation(fields: [authorId], references: [id]) authorId Int?}enum Role { USER ADMIN} A query to the `User` model will include the `id`, `email`, `name` and `role` fields (because these are _scalar_ fields), but not the `posts` field (because that's a _relation_ field): const users = await prisma.user.findFirst() Show query results { id: 42, name: "Sabelle", email: "sabelle@prisma.io", role: "ADMIN"} If you want to customize the result and have a different combination of fields returned, you can: * Use `select` to return specific fields. You can also use a nested `select` by selecting relation fields. * Use `omit` to exclude specific fields from the result. `omit` can be seen as the "opposite" to `select`. * Use `include` to additionally include relations. In all cases, the query result will be statically typed, ensuring that you don't accidentally access any fields that you did not actually query from the database. Selecting only the fields and relations that you require rather than relying on the default selection set can reduce the size of the response and improve query speed. Since version 5.9.0, when doing a relation query with `include` or by using `select` on a relation field, you can also specify the `relationLoadStrategy` to decide whether you want to use a database-level join or perform multiple queries and merge the data on the application level. This feature is currently in Preview, you can learn more about it here. ## Example schema All following examples on this page are based on the following schema: model User { id Int @id name String? email String @unique password String role Role @default(USER) coinflips Boolean[] posts Post[] profile Profile?}model Post { id Int @id title String published Boolean @default(true) author User @relation(fields: [authorId], references: [id]) authorId Int}model Profile { id Int @id biography String user User @relation(fields: [userId], references: [id]) userId Int @unique}enum Role { USER ADMIN} ## Return the default fields The following query returns the default fields (all scalar fields, no relations): const user = await prisma.user.findFirst() Show query results { id: 22, name: "Alice", email: "alice@prisma.io", password: "mySecretPassword42" role: "ADMIN", coinflips: [true, false],} ## Select specific fields Use `select` to return a _subset_ of fields instead of _all_ fields. The following example returns the `email` and `name` fields only: const user = await prisma.user.findFirst({ select: { email: true, name: true, },}) Show query results { name: "Alice", email: "alice@prisma.io",} ## Return nested objects by selecting relation fields You can also return relations by nesting `select` multiple times on relation fields. The following query uses a nested `select` to select each user's `name` and the `title` of each related post: const usersWithPostTitles = await prisma.user.findFirst({ select: { name: true, posts: { select: { title: true }, }, },}) Show query results { "name":"Sabelle", "posts":[ { "title":"Getting started with Azure Functions" }, { "title":"All about databases" } ]} The following query uses `select` within an `include`, and returns _all_ user fields and each post's `title` field: const usersWithPostTitles = await prisma.user.findFirst({ include: { posts: { select: { title: true }, }, },}) Show query results { id: 9 name: "Sabelle", email: "sabelle@prisma.io", password: "mySecretPassword42", role: "USER", coinflips: [], posts:[ { title:"Getting started with Azure Functions" }, { title:"All about databases" } ]} You can nest your queries arbitrarily deep. The following query fetches: * the `title` of a `Post` * the `name` of the related `User` * the `biography` of the related `Profile` const postsWithAuthorsAndProfiles = await prisma.post.findFirst({ select: { title: true, author: { select: { name: true, profile: { select: { biography: true } } }, }, },}) Show query results { id: 9 title:"All about databases", author: { name: "Sabelle",. profile: { biography: "I like turtles" } }} note Be careful when deeply nesting relations because the underlying database query may become slow due it needing to access a lot of different tables. To ensure your queries always have optimal speed, consider adding a caching layer with Prisma Accelerate or use Prisma Optimize to get query insights and recommendations for performance optimizations. For more information about querying relations, refer to the following documentation: * Include a relation (including all fields) * Select specific relation fields ## Omit specific fields There may be situations when you want to return _most_ fields of a model, excluding only a _small_ subset. A common example for this is when you query a `User` but want to exclude the `password` field for security reasons. In these cases, you can use `omit`, which can be seen as the counterpart to `select`: const users = await prisma.user.findFirst({ omit: { password: true }}) Show query results { id: 9 name: "Sabelle", email: "sabelle@prisma.io", profileViews: 90, role: "USER", coinflips: [],} Notice how the returned object does _not_ contain the `password` field. ## Relation count In 3.0.1 and later, you can `include` or `select` a count of relations alongside fields. For example, a user's post count. --- ## Page: https://www.prisma.io/docs/orm/prisma-client/queries/filtering-and-sorting Prisma Client supports filtering with the `where` query option, and sorting with the `orderBy` query option. ## Filtering Prisma Client allows you to filter records on any combination of model fields, including related models, and supports a variety of filter conditions. warning Some filter conditions use the SQL operators `LIKE` and `ILIKE` which may cause unexpected behavior in your queries. Please refer to our filtering FAQs for more information. The following query: * Returns all `User` records with: * an email address that ends with `prisma.io` _and_ * at least one published post (a relation query) * Returns all `User` fields * Includes all related `Post` records where `published` equals `true` const result = await prisma.user.findMany({ where: { email: { endsWith: 'prisma.io', }, posts: { some: { published: true, }, }, }, include: { posts: { where: { published: true, }, }, },}) Show CLI results ### Filter conditions and operators Refer to Prisma Client's reference documentation for a full list of operators , such as `startsWith` and `contains`. #### Combining operators You can use operators (such as `NOT` and `OR` ) to filter by a combination of conditions. The following query returns all users whose `email` ends with `gmail.com` or `company.com`, but excludes any emails ending with `admin.company.com` const result = await prisma.user.findMany({ where: { OR: [ { email: { endsWith: 'gmail.com', }, }, { email: { endsWith: 'company.com' } }, ], NOT: { email: { endsWith: 'admin.company.com', }, }, }, select: { email: true, },}) Show CLI results ### Filter on null fields The following query returns all posts whose `content` field is `null`: const posts = await prisma.post.findMany({ where: { content: null, },}) ### Filter for non-null fields The following query returns all posts whose `content` field is **not** `null`: const posts = await prisma.post.findMany({ where: { content: { not: null }, },}) ### Filter on relations Prisma Client supports filtering on related records. For example, in the following schema, a user can have many blog posts: model User { id Int @id @default(autoincrement()) name String? email String @unique posts Post[] // User can have many posts}model Post { id Int @id @default(autoincrement()) title String published Boolean @default(true) author User @relation(fields: [authorId], references: [id]) authorId Int} The one-to-many relation between `User` and `Post` allows you to query users based on their posts - for example, the following query returns all users where _at least one_ post (`some`) has more than 10 views: const result = await prisma.user.findMany({ where: { posts: { some: { views: { gt: 10, }, }, }, },}) You can also query posts based on the properties of the author. For example, the following query returns all posts where the author's `email` contains `"prisma.io"`: const res = await prisma.post.findMany({ where: { author: { email: { contains: 'prisma.io', }, }, },}) ### Filter on scalar lists / arrays Scalar lists (for example, `String[]`) have a special set of filter conditions - for example, the following query returns all posts where the `tags` array contains `databases`: const posts = await client.post.findMany({ where: { tags: { has: 'databases', }, },}) ### Case-insensitive filtering Case-insensitive filtering is available as a feature for the PostgreSQL and MongoDB providers. MySQL, MariaDB and Microsoft SQL Server are case-insensitive by default, and do not require a Prisma Client feature to make case-insensitive filtering possible. To use case-insensitive filtering, add the `mode` property to a particular filter and specify `insensitive`: const users = await prisma.user.findMany({ where: { email: { endsWith: 'prisma.io', mode: 'insensitive', // Default value: default }, name: { equals: 'Archibald', // Default mode }, },}) See also: Case sensitivity ### Filtering FAQs #### How does filtering work at the database level? For MySQL and PostgreSQL, Prisma Client utilizes the `LIKE` (and `ILIKE`) operator to search for a given pattern. The operators have built-in pattern matching using symbols unique to `LIKE`. The pattern-matching symbols include `%` for zero or more characters (similar to `*` in other regex implementations) and `_` for one character (similar to `.`) To match the literal characters, `%` or `_`, make sure you escape those characters. For example: const users = await prisma.user.findMany({ where: { name: { startsWith: '_benny', }, },}) The above query will match any user whose name starts with a character followed by `benny` such as `7benny` or `&benny`. If you instead wanted to find any user whose name starts with the literal string `_benny`, you could do: const users = await prisma.user.findMany({ where: { name: { startsWith: '\\_benny', // note that the `_` character is escaped, preceding `\` with `\` when included in a string }, },}) ## Sorting Use `orderBy` to sort a list of records or a nested list of records by a particular field or set of fields. For example, the following query returns all `User` records sorted by `role` and `name`, **and** each user's posts sorted by `title`: const usersWithPosts = await prisma.user.findMany({ orderBy: [ { role: 'desc', }, { name: 'desc', }, ], include: { posts: { orderBy: { title: 'desc', }, select: { title: true, }, }, },}) Show CLI results > **Note**: You can also sort lists of nested records to retrieve a single record by ID. ### Sort by relation You can also sort by properties of a relation. For example, the following query sorts all posts by the author's email address: const posts = await prisma.post.findMany({ orderBy: { author: { email: 'asc', }, },}) ### Sort by relation aggregate value In 2.19.0 and later, you can sort by the **count of related records**. For example, the following query sorts users by the number of related posts: const getActiveUsers = await prisma.user.findMany({ take: 10, orderBy: { posts: { _count: 'desc', }, },}) > **Note**: It is not currently possible to return the count of a relation. ### Sort by relevance (PostgreSQL and MySQL) In 3.5.0+ for PostgreSQL and 3.8.0+ for MySQL, you can sort records by relevance to the query using the `_relevance` keyword. This uses the relevance ranking functions from full text search features. This feature is further explain in the PostgreSQL documentation and the MySQL documentation. **For PostgreSQL**, you need to enable order by relevance with the `fullTextSearchPostgres` preview feature: generator client { provider = "prisma-client-js" previewFeatures = ["fullTextSearchPostgres"]} Ordering by relevance can be used either separately from or together with the `search` filter: `_relevance` is used to order the list, while `search` filters the unordered list. For example, the following query uses `_relevance` to filter by the term `developer` in the `bio` field, and then sorts the result by relevance in a _descending_ manner: const getUsersByRelevance = await prisma.user.findMany({ take: 10, orderBy: { _relevance: { fields: ['bio'], search: 'developer', sort: 'desc', }, },}) note Prior to Prisma ORM 5.16.0, enabling the `fullTextSearch` preview feature would rename the `<Model>OrderByWithRelationInput` TypeScript types to `<Model>OrderByWithRelationAndSearchRelevanceInput`. If you are using the Preview feature, you will need to update your type imports. ### Sort with null records first or last info Notes: * This feature is generally available in version `4.16.0` and later. To use this feature in versions `4.1.0` to `4.15.0` the Preview feature `orderByNulls` will need to be enabled. * This feature is not available for MongoDB. * You can only sort by nulls on optional scalar fields. If you try to sort by nulls on a required or relation field, Prisma Client throws a P2009 error. You can sort the results so that records with `null` fields appear either first or last. If `name` is an optional field, then the following query using `last` sorts users by `name`, with `null` records at the end: const users = await prisma.user.findMany({ orderBy: { updatedAt: { sort: 'asc', nulls: 'last' }, },}) If you want the records with `null` values to appear at the beginning of the returned array, use `first`: const users = await prisma.user.findMany({ orderBy: { updatedAt: { sort: 'asc', nulls: 'first' }, },}) Note that `first` also is the default value, so if you omit the `null` option, `null` values will appear first in the returned array. ### Sorting FAQs #### Can I perform case-insensitive sorting? Follow issue #841 on GitHub. --- ## Page: https://www.prisma.io/docs/orm/prisma-client/queries/pagination * * ORM * Prisma Client * Queries ## Pagination Prisma Client supports both offset pagination and cursor-based pagination. ## Offset pagination Offset pagination uses `skip` and `take` to skip a certain number of results and select a limited range. The following query skips the first 3 `Post` records and returns records 4 - 7: const results = await prisma.post.findMany({ skip: 3, take: 4,}) 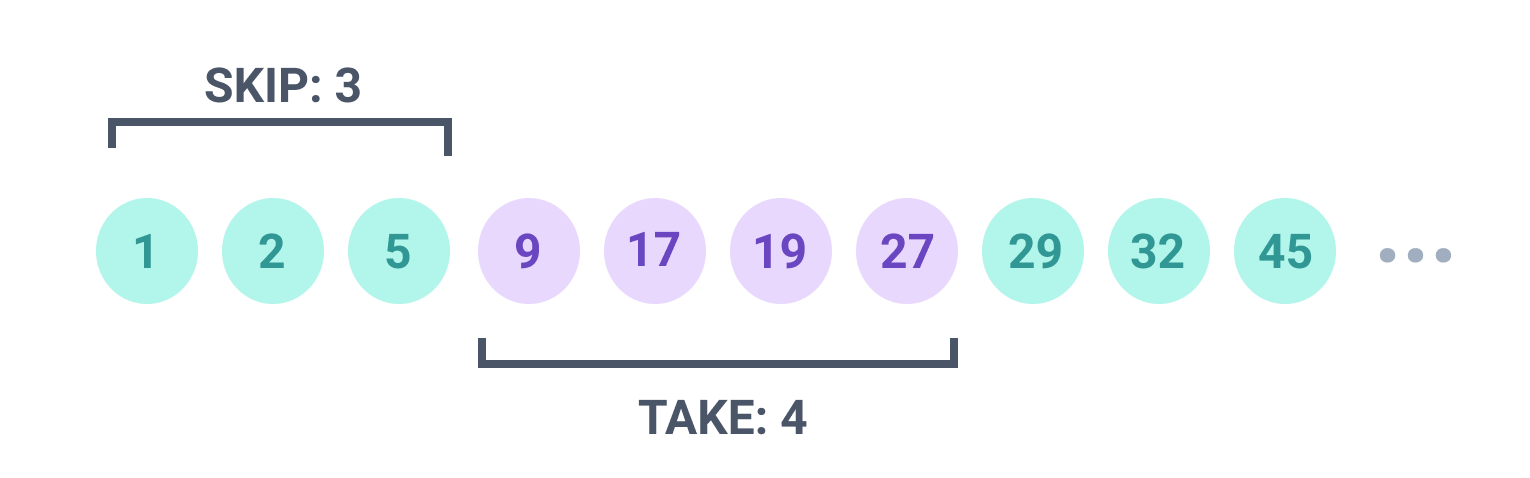 To implement pages of results, you would just `skip` the number of pages multiplied by the number of results you show per page. ### ✔ Pros of offset pagination * You can jump to any page immediately. For example, you can `skip` 200 records and `take` 10, which simulates jumping straight to page 21 of the result set (the underlying SQL uses `OFFSET`). This is not possible with cursor-based pagination. * You can paginate the same result set in any sort order. For example, you can jump to page 21 of a list of `User` records sorted by first name. This is not possible with cursor-based pagination, which requires sorting by a unique, sequential column. ### ✘ Cons of offset pagination * Offset pagination **does not scale** at a database level. For example, if you skip 200,000 records and take the first 10, the database still has to traverse the first 200,000 records before returning the 10 that you asked for - this negatively affects performance. ### Use cases for offset pagination * Shallow pagination of a small result set. For example, a blog interface that allows you to filter `Post` records by author and paginate the results. ### Example: Filtering and offset pagination The following query returns all records where the `email` field contains `prisma.io`. The query skips the first 40 records and returns records 41 - 50. const results = await prisma.post.findMany({ skip: 40, take: 10, where: { email: { contains: 'prisma.io', }, },}) ### Example: Sorting and offset pagination The following query returns all records where the `email` field contains `Prisma`, and sorts the result by the `title` field. The query skips the first 200 records and returns records 201 - 220. const results = await prisma.post.findMany({ skip: 200, take: 20, where: { email: { contains: 'Prisma', }, }, orderBy: { title: 'desc', },}) ## Cursor-based pagination Cursor-based pagination uses `cursor` and `take` to return a limited set of results before or after a given **cursor**. A cursor bookmarks your location in a result set and must be a unique, sequential column - such as an ID or a timestamp. The following example returns the first 4 `Post` records that contain the word `"Prisma"` and saves the ID of the last record as `myCursor`: > **Note**: Since this is the first query, there is no cursor to pass in. const firstQueryResults = await prisma.post.findMany({ take: 4, where: { title: { contains: 'Prisma' /* Optional filter */, }, }, orderBy: { id: 'asc', },})// Bookmark your location in the result set - in this// case, the ID of the last post in the list of 4.const lastPostInResults = firstQueryResults[3] // Remember: zero-based index! :)const myCursor = lastPostInResults.id // Example: 29 The following diagram shows the IDs of the first 4 results - or page 1. The cursor for the next query is **29**:  The second query returns the first 4 `Post` records that contain the word `"Prisma"` **after the supplied cursor** (in other words - IDs that are larger than **29**): const secondQueryResults = await prisma.post.findMany({ take: 4, skip: 1, // Skip the cursor cursor: { id: myCursor, }, where: { title: { contains: 'Prisma' /* Optional filter */, }, }, orderBy: { id: 'asc', },})const lastPostInResults = secondQueryResults[3] // Remember: zero-based index! :)const myCursor = lastPostInResults.id // Example: 52 The following diagram shows the first 4 `Post` records **after** the record with ID **29**. In this example, the new cursor is **52**:  ### FAQ #### Do I always have to skip: 1? If you do not `skip: 1`, your result set will include your previous cursor. The first query returns four results and the cursor is **29**:  Without `skip: 1`, the second query returns 4 results after (and _including_) the cursor:  If you `skip: 1`, the cursor is not included:  You can choose to `skip: 1` or not depending on the pagination behavior that you want. #### Can I guess the value of the cursor? If you guess the value of the next cursor, you will page to an unknown location in your result set. Although IDs are sequential, you cannot predict the rate of increment (`2`, `20`, `32` is more likely than `1`, `2`, `3`, particularly in a filtered result set). #### Does cursor-based pagination use the concept of a cursor in the underlying database? No, cursor pagination does not use cursors in the underlying database (e.g. PostgreSQL). #### What happens if the cursor value does not exist? Using a nonexistent cursor returns `null`. Prisma Client does not try to locate adjacent values. ### ✔ Pros of cursor-based pagination * Cursor-based pagination **scales**. The underlying SQL does not use `OFFSET`, but instead queries all `Post` records with an ID greater than the value of `cursor`. ### ✘ Cons of cursor-based pagination * You must sort by your cursor, which has to be a unique, sequential column. * You cannot jump to a specific page using only a cursor. For example, you cannot accurately predict which cursor represents the start of page 400 (page size 20) without first requesting pages 1 - 399. ### Use cases for cursor-based pagination * Infinite scroll - for example, sort blog posts by date/time descending and request 10 blog posts at a time. * Paging through an entire result set in batches - for example, as part of a long-running data export. ### Example: Filtering and cursor-based pagination const secondQuery = await prisma.post.findMany({ take: 4, cursor: { id: myCursor, }, where: { title: { contains: 'Prisma' /* Optional filter */, }, }, orderBy: { id: 'asc', },}) ### Sorting and cursor-based pagination Cursor-based pagination requires you to sort by a sequential, unique column such as an ID or a timestamp. This value - known as a cursor - bookmarks your place in the result set and allows you to request the next set. ### Example: Paging backwards with cursor-based pagination To page backwards, set `take` to a negative value. The following query returns 4 `Post` records with an `id` of less than 200, excluding the cursor: const myOldCursor = 200const firstQueryResults = await prisma.post.findMany({ take: -4, skip: 1, cursor: { id: myOldCursor, }, where: { title: { contains: 'Prisma' /* Optional filter */, }, }, orderBy: { id: 'asc', },}) * Offset pagination * ✔ Pros of offset pagination * ✘ Cons of offset pagination * Use cases for offset pagination * Example: Filtering and offset pagination * Example: Sorting and offset pagination * Cursor-based pagination * FAQ * ✔ Pros of cursor-based pagination * ✘ Cons of cursor-based pagination * Use cases for cursor-based pagination * Example: Filtering and cursor-based pagination * Sorting and cursor-based pagination * Example: Paging backwards with cursor-based pagination --- ## Page: https://www.prisma.io/docs/orm/prisma-client/queries/aggregation-grouping-summarizing Prisma Client allows you to count records, aggregate number fields, and select distinct field values. ## Aggregate Prisma Client allows you to `aggregate` on the **number** fields (such as `Int` and `Float`) of a model. The following query returns the average age of all users: const aggregations = await prisma.user.aggregate({ _avg: { age: true, },})console.log('Average age:' + aggregations._avg.age) You can combine aggregation with filtering and ordering. For example, the following query returns the average age of users: * Ordered by `age` ascending * Where `email` contains `prisma.io` * Limited to the 10 users const aggregations = await prisma.user.aggregate({ _avg: { age: true, }, where: { email: { contains: 'prisma.io', }, }, orderBy: { age: 'asc', }, take: 10,})console.log('Average age:' + aggregations._avg.age) ### Aggregate values are nullable In 2.21.0 and later, aggregations on **nullable fields** can return a `number` or `null`. This excludes `count`, which always returns 0 if no records are found. Consider the following query, where `age` is nullable in the schema: const aggregations = await prisma.user.aggregate({ _avg: { age: true, }, _count: { age: true, },}) Show CLI results { _avg: { age: null }, _count: { age: 9 }} The query returns `{ _avg: { age: null } }` in either of the following scenarios: * There are no users * The value of every user's `age` field is `null` This allows you to differentiate between the true aggregate value (which could be zero) and no data. ## Group by Prisma Client's `groupBy()` allows you to **group records** by one or more field values - such as `country`, or `country` and `city` and **perform aggregations** on each group, such as finding the average age of people living in a particular city. `groupBy()` is a GA in 2.20.0 and later. The following video uses `groupBy()` to summarize total COVID-19 cases by continent: The following example groups all users by the `country` field and returns the total number of profile views for each country: const groupUsers = await prisma.user.groupBy({ by: ['country'], _sum: { profileViews: true, },}) Show CLI results If you have a single element in the `by` option, you can use the following shorthand syntax to express your query: const groupUsers = await prisma.user.groupBy({ by: 'country',}) ### `groupBy()` and filtering `groupBy()` supports two levels of filtering: `where` and `having`. #### Filter records with `where` Use `where` to filter all records **before grouping**. The following example groups users by country and sums profile views, but only includes users where the email address contains `prisma.io`: const groupUsers = await prisma.user.groupBy({ by: ['country'], where: { email: { contains: 'prisma.io', }, }, _sum: { profileViews: true, },}) #### Filter groups with `having` Use `having` to filter **entire groups** by an aggregate value such as the sum or average of a field, not individual records - for example, only return groups where the _average_ `profileViews` is greater than 100: const groupUsers = await prisma.user.groupBy({ by: ['country'], where: { email: { contains: 'prisma.io', }, }, _sum: { profileViews: true, }, having: { profileViews: { _avg: { gt: 100, }, }, },}) ##### Use case for `having` The primary use case for `having` is to filter on aggregations. We recommend that you use `where` to reduce the size of your data set as far as possible _before_ grouping, because doing so ✔ reduces the number of records the database has to return and ✔ makes use of indices. For example, the following query groups all users that are _not_ from Sweden or Ghana: const fd = await prisma.user.groupBy({ by: ['country'], where: { country: { notIn: ['Sweden', 'Ghana'], }, }, _sum: { profileViews: true, }, having: { profileViews: { _min: { gte: 10, }, }, },}) The following query technically achieves the same result, but excludes users from Ghana _after_ grouping. This does not confer any benefit and is not recommended practice. const groupUsers = await prisma.user.groupBy({ by: ['country'], where: { country: { not: 'Sweden', }, }, _sum: { profileViews: true, }, having: { country: { not: 'Ghana', }, profileViews: { _min: { gte: 10, }, }, },}) > **Note**: Within `having`, you can only filter on aggregate values _or_ fields available in `by`. ### `groupBy()` and ordering The following constraints apply when you combine `groupBy()` and `orderBy`: * You can `orderBy` fields that are present in `by` * You can `orderBy` aggregate (Preview in 2.21.0 and later) * If you use `skip` and/or `take` with `groupBy()`, you must also include `orderBy` in the query #### Order by aggregate group You can **order by aggregate group**. Prisma ORM added support for using `orderBy` with aggregated groups in relational databases in version 2.21.0 and support for MongoDB in 3.4.0. The following example sorts each `city` group by the number of users in that group (largest group first): const groupBy = await prisma.user.groupBy({ by: ['city'], _count: { city: true, }, orderBy: { _count: { city: 'desc', }, },}) Show CLI results #### Order by field The following query orders groups by country, skips the first two groups, and returns the 3rd and 4th group: const groupBy = await prisma.user.groupBy({ by: ['country'], _sum: { profileViews: true, }, orderBy: { country: 'desc', }, skip: 2, take: 2,}) ### `groupBy()` FAQ #### Can I use `select` with `groupBy()`? You cannot use `select` with `groupBy()`. However, all fields included in `by` are automatically returned. #### What is the difference between using `where` and `having` with `groupBy()`? `where` filters all records before grouping, and `having` filters entire groups and supports filtering on an aggregate field value, such as the average or sum of a particular field in that group. #### What is the difference between `groupBy()` and `distinct`? Both `distinct` and `groupBy()` group records by one or more unique field values. `groupBy()` allows you to aggregate data within each group - for example, return the average number of views on posts from Denmark - whereas distinct does not. ## Count ### Count records Use `count()` to count the number of records or non-`null` field values. The following example query counts all users: const userCount = await prisma.user.count() ### Count relations info This feature is generally available in version 3.0.1 and later. To use this feature in versions before 3.0.1 the Preview feature `selectRelationCount` will need to be enabled. To return a count of relations (for example, a user's post count), use the `_count` parameter with a nested `select` as shown: const usersWithCount = await prisma.user.findMany({ include: { _count: { select: { posts: true }, }, },}) Show CLI results The `_count` parameter: * Can be used inside a top-level `include` _or_ `select` * Can be used with any query that returns records (including `delete`, `update`, and `findFirst`) * Can return multiple relation counts * Can filter relation counts (from version 4.3.0) #### Return a relations count with `include` The following query includes each user's post count in the results: const usersWithCount = await prisma.user.findMany({ include: { _count: { select: { posts: true }, }, },}) Show CLI results #### Return a relations count with `select` The following query uses `select` to return each user's post count _and no other fields_: const usersWithCount = await prisma.user.findMany({ select: { _count: { select: { posts: true }, }, },}) Show CLI results #### Return multiple relation counts The following query returns a count of each user's `posts` and `recipes` and no other fields: const usersWithCount = await prisma.user.findMany({ select: { _count: { select: { posts: true, recipes: true, }, }, },}) Show CLI results #### Filter the relation count info This feature is generally available in version `4.16.0` and later. To use this feature in versions `4.3.0` to `4.15.0` the Preview feature `filteredRelationCount` will need to be enabled. Use `where` to filter the fields returned by the `_count` output type. You can do this on scalar fields, relation fields and fields of a composite type. For example, the following query returns all user posts with the title "Hello!": // Count all user posts with the title "Hello!"await prisma.user.findMany({ select: { _count: { select: { posts: { where: { title: 'Hello!' } }, }, }, },}) The following query finds all user posts with comments from an author named "Alice": // Count all user posts that have comments// whose author is named "Alice"await prisma.user.findMany({ select: { _count: { select: { posts: { where: { comments: { some: { author: { is: { name: 'Alice' } } } } }, }, }, }, },}) ### Count non-`null` field values In 2.15.0 and later, you can count all records as well as all instances of non-`null` field values. The following query returns a count of: * All `User` records (`_all`) * All non-`null` `name` values (not distinct values, just values that are not `null`) const userCount = await prisma.user.count({ select: { _all: true, // Count all records name: true, // Count all non-null field values },}) Show CLI results ### Filtered count `count` supports filtering. The following example query counts all users with more than 100 profile views: const userCount = await prisma.user.count({ where: { profileViews: { gte: 100, }, },}) The following example query counts a particular user's posts: const postCount = await prisma.post.count({ where: { authorId: 29, },}) ## Select distinct Prisma Client allows you to filter duplicate rows from a Prisma Query response to a `findMany` query using `distinct` . `distinct` is often used in combination with `select` to identify certain unique combinations of values in the rows of your table. The following example returns all fields for all `User` records with distinct `name` field values: const result = await prisma.user.findMany({ where: {}, distinct: ['name'],}) The following example returns distinct `role` field values (for example, `ADMIN` and `USER`): const distinctRoles = await prisma.user.findMany({ distinct: ['role'], select: { role: true, },}) Show CLI results ### `distinct` under the hood Prisma Client's `distinct` option does not use SQL `SELECT DISTINCT`. Instead, `distinct` uses: * A `SELECT` query * In-memory post-processing to select distinct It was designed in this way in order to **support `select` and `include`** as part of `distinct` queries. The following example selects distinct on `gameId` and `playerId`, ordered by `score`, in order to return **each player's highest score per game**. The query uses `include` and `select` to include additional data: * Select `score` (field on `Play`) * Select related player name (relation between `Play` and `User`) * Select related game name (relation between `Play` and `Game`) Expand for sample schema model User { id Int @id @default(autoincrement()) name String? play Play[]}model Game { id Int @id @default(autoincrement()) name String? play Play[]}model Play { id Int @id @default(autoincrement()) score Int? @default(0) playerId Int? player User? @relation(fields: [playerId], references: [id]) gameId Int? game Game? @relation(fields: [gameId], references: [id])} const distinctScores = await prisma.play.findMany({ distinct: ['playerId', 'gameId'], orderBy: { score: 'desc', }, select: { score: true, game: { select: { name: true, }, }, player: { select: { name: true, }, }, },}) Show CLI results Without `select` and `distinct`, the query would return: [ { gameId: 2, playerId: 5 }, { gameId: 2, playerId: 10 }] --- ## Page: https://www.prisma.io/docs/orm/prisma-client/queries/transactions A database transaction refers to a sequence of read/write operations that are _guaranteed_ to either succeed or fail as a whole. This section describes the ways in which the Prisma Client API supports transactions. ## Transactions overview info Before Prisma ORM version 4.4.0, you could not set isolation levels on transactions. The isolation level in your database configuration always applied. Developers take advantage of the safety guarantees provided by the database by wrapping the operations in a transaction. These guarantees are often summarized using the ACID acronym: * **Atomic**: Ensures that either _all_ or _none_ operations of the transactions succeed. The transaction is either _committed_ successfully or _aborted_ and _rolled back_. * **Consistent**: Ensures that the states of the database before and after the transaction are _valid_ (i.e. any existing invariants about the data are maintained). * **Isolated**: Ensures that concurrently running transactions have the same effect as if they were running in serial. * **Durability**: Ensures that after the transaction succeeded, any writes are being stored persistently. While there's a lot of ambiguity and nuance to each of these properties (for example, consistency could actually be considered an _application-level responsibility_ rather than a database property or isolation is typically guaranteed in terms of stronger and weaker _isolation levels_), overall they serve as a good high-level guideline for expectations developers have when thinking about database transactions. > "Transactions are an abstraction layer that allows an application to pretend that certain concurrency problems and certain kinds of hardware and software faults don’t exist. A large class of errors is reduced down to a simple transaction abort, and the application just needs to try again." Designing Data-Intensive Applications, Martin Kleppmann Prisma Client supports six different ways of handling transactions for three different scenarios: | Scenario | Available techniques | | --- | --- | | Dependent writes | * Nested writes | | Independent writes | * `$transaction([])` API * Batch operations | | Read, modify, write | * Idempotent operations * Optimistic concurrency control * Interactive transactions | The technique you choose depends on your particular use case. > **Note**: For the purposes of this guide, _writing_ to a database encompasses creating, updating, and deleting data. ## About transactions in Prisma Client Prisma Client provides the following options for using transactions: * Nested writes: use the Prisma Client API to process multiple operations on one or more related records inside the same transaction. * Batch / bulk transactions: process one or more operations in bulk with `updateMany`, `deleteMany`, and `createMany`. * The `$transaction` API in Prisma Client: * Sequential operations: pass an array of Prisma Client queries to be executed sequentially inside a transaction, using `$transaction<R>(queries: PrismaPromise<R>[]): Promise<R[]>`. * Interactive transactions: pass a function that can contain user code including Prisma Client queries, non-Prisma code and other control flow to be executed in a transaction, using `$transaction<R>(fn: (prisma: PrismaClient) => R, options?: object): R` ## Nested writes A nested write lets you perform a single Prisma Client API call with multiple _operations_ that touch multiple _related_ records. For example, creating a _user_ together with a _post_ or updating an _order_ together with an _invoice_. Prisma Client ensures that all operations succeed or fail as a whole. The following example demonstrates a nested write with `create`: // Create a new user with two posts in a// single transactionconst newUser: User = await prisma.user.create({ data: { email: 'alice@prisma.io', posts: { create: [ { title: 'Join the Prisma Discord at https://pris.ly/discord' }, { title: 'Follow @prisma on Twitter' }, ], }, },}) The following example demonstrates a nested write with `update`: // Change the author of a post in a single transactionconst updatedPost: Post = await prisma.post.update({ where: { id: 42 }, data: { author: { connect: { email: 'alice@prisma.io' }, }, },}) ## Batch/bulk operations The following bulk operations run as transactions: * `createMany()` * `createManyAndReturn()` * `updateMany()` * `updateManyAndReturn()` * `deleteMany()` > Refer to the section about bulk operations for more examples. ## The `$transaction` API The `$transaction` API can be used in two ways: * Sequential operations: Pass an array of Prisma Client queries to be executed sequentially inside of a transaction. `$transaction<R>(queries: PrismaPromise<R>[]): Promise<R[]>` * Interactive transactions: Pass a function that can contain user code including Prisma Client queries, non-Prisma code and other control flow to be executed in a transaction. `$transaction<R>(fn: (prisma: PrismaClient) => R): R` ### Sequential Prisma Client operations The following query returns all posts that match the provided filter as well as a count of all posts: const [posts, totalPosts] = await prisma.$transaction([ prisma.post.findMany({ where: { title: { contains: 'prisma' } } }), prisma.post.count(),]) You can also use raw queries inside of a `$transaction`: * Relational databases * MongoDB import { selectUserTitles, updateUserName } from '@prisma/client/sql'const [userList, updateUser] = await prisma.$transaction([ prisma.$queryRawTyped(selectUserTitles()), prisma.$queryRawTyped(updateUserName(2)),]) Instead of immediately awaiting the result of each operation when it's performed, the operation itself is stored in a variable first which later is submitted to the database with a method called `$transaction`. Prisma Client will ensure that either all three `create` operations succeed or none of them succeed. > **Note**: Operations are executed according to the order they are placed in the transaction. Using a query in a transaction does not influence the order of operations in the query itself. > > Refer to the section about the transactions API for more examples. From version 4.4.0, the sequential operations transaction API has a second parameter. You can use the following optional configuration option in this parameter: * `isolationLevel`: Sets the transaction isolation level. By default this is set to the value currently configured in your database. For example: await prisma.$transaction( [ prisma.resource.deleteMany({ where: { name: 'name' } }), prisma.resource.createMany({ data }), ], { isolationLevel: Prisma.TransactionIsolationLevel.Serializable, // optional, default defined by database configuration }) ### Interactive transactions #### Overview Sometimes you need more control over what queries execute within a transaction. Interactive transactions are meant to provide you with an escape hatch. info Interactive transactions have been generally available from version 4.7.0. If you use interactive transactions in preview from version 2.29.0 to 4.6.1 (inclusive), you need to add the `interactiveTransactions` preview feature to the generator block of your Prisma schema. To use interactive transactions, you can pass an async function into `$transaction`. The first argument passed into this async function is an instance of Prisma Client. Below, we will call this instance `tx`. Any Prisma Client call invoked on this `tx` instance is encapsulated into the transaction. warning **Use interactive transactions with caution**. Keeping transactions open for a long time hurts database performance and can even cause deadlocks. Try to avoid performing network requests and executing slow queries inside your transaction functions. We recommend you get in and out as quick as possible! #### Example Let's look at an example: Imagine that you are building an online banking system. One of the actions to perform is to send money from one person to another. As experienced developers, we want to make sure that during the transfer, * the amount doesn't disappear * the amount isn't doubled This is a great use-case for interactive transactions because we need to perform logic in-between the writes to check the balance. In the example below, Alice and Bob each have $100 in their account. If they try to send more money than they have, the transfer is rejected. Alice is expected to be able to make 1 transfer for $100 while the other transfer would be rejected. This would result in Alice having $0 and Bob having $200. import { PrismaClient } from '@prisma/client'const prisma = new PrismaClient()function transfer(from: string, to: string, amount: number) { return prisma.$transaction(async (tx) => { // 1. Decrement amount from the sender. const sender = await tx.account.update({ data: { balance: { decrement: amount, }, }, where: { email: from, }, }) // 2. Verify that the sender's balance didn't go below zero. if (sender.balance < 0) { throw new Error(`${from} doesn't have enough to send ${amount}`) } // 3. Increment the recipient's balance by amount const recipient = await tx.account.update({ data: { balance: { increment: amount, }, }, where: { email: to, }, }) return recipient })}async function main() { // This transfer is successful await transfer('alice@prisma.io', 'bob@prisma.io', 100) // This transfer fails because Alice doesn't have enough funds in her account await transfer('alice@prisma.io', 'bob@prisma.io', 100)}main() In the example above, both `update` queries run within a database transaction. When the application reaches the end of the function, the transaction is **committed** to the database. If your application encounters an error along the way, the async function will throw an exception and automatically **rollback** the transaction. To catch the exception, you can wrap `$transaction` in a try-catch block: try { await prisma.$transaction(async (tx) => { // Code running in a transaction... })} catch (err) { // Handle the rollback...} #### Transaction options The transaction API has a second parameter. For interactive transactions, you can use the following optional configuration options in this parameter: * `maxWait`: The maximum amount of time Prisma Client will wait to acquire a transaction from the database. The default value is 2 seconds. * `timeout`: The maximum amount of time the interactive transaction can run before being canceled and rolled back. The default value is 5 seconds. * `isolationLevel`: Sets the transaction isolation level. By default this is set to the value currently configured in your database. For example: await prisma.$transaction( async (tx) => { // Code running in a transaction... }, { maxWait: 5000, // default: 2000 timeout: 10000, // default: 5000 isolationLevel: Prisma.TransactionIsolationLevel.Serializable, // optional, default defined by database configuration }) You can also set these globally on the constructor-level: const prisma = new PrismaClient({ transactionOptions: { isolationLevel: Prisma.TransactionIsolationLevel.Serializable, maxWait: 5000, // default: 2000 timeout: 10000, // default: 5000 },}) ### Transaction isolation level info This feature is not available on MongoDB, because MongoDB does not support isolation levels. You can set the transaction isolation level for transactions. info This is available in the following Prisma ORM versions for interactive transactions from version 4.2.0, for sequential operations from version 4.4.0. In versions before 4.2.0 (for interactive transactions), or 4.4.0 (for sequential operations), you cannot configure the transaction isolation level at a Prisma ORM level. Prisma ORM does not explicitly set the isolation level, so the isolation level configured in your database is used. #### Set the isolation level To set the transaction isolation level, use the `isolationLevel` option in the second parameter of the API. For sequential operations: await prisma.$transaction( [ // Prisma Client operations running in a transaction... ], { isolationLevel: Prisma.TransactionIsolationLevel.Serializable, // optional, default defined by database configuration }) For an interactive transaction: await prisma.$transaction( async (prisma) => { // Code running in a transaction... }, { isolationLevel: Prisma.TransactionIsolationLevel.Serializable, // optional, default defined by database configuration maxWait: 5000, // default: 2000 timeout: 10000, // default: 5000 }) #### Supported isolation levels Prisma Client supports the following isolation levels if they are available in the underlying database: * `ReadUncommitted` * `ReadCommitted` * `RepeatableRead` * `Snapshot` * `Serializable` The isolation levels available for each database connector are as follows: | Database | `ReadUncommitted` | `ReadCommitted` | `RepeatableRead` | `Snapshot` | `Serializable` | | --- | --- | --- | --- | --- | --- | | PostgreSQL | ✔️ | ✔️ | ✔️ | No | ✔️ | | MySQL | ✔️ | ✔️ | ✔️ | No | ✔️ | | SQL Server | ✔️ | ✔️ | ✔️ | ✔️ | ✔️ | | CockroachDB | No | No | No | No | ✔️ | | SQLite | No | No | No | No | ✔️ | By default, Prisma Client sets the isolation level to the value currently configured in your database. The isolation levels configured by default in each database are as follows: | Database | Default | | --- | --- | | PostgreSQL | `ReadCommitted` | | MySQL | `RepeatableRead` | | SQL Server | `ReadCommitted` | | CockroachDB | `Serializable` | | SQLite | `Serializable` | #### Database-specific information on isolation levels See the following resources: * Transaction isolation levels in PostgreSQL * Transaction isolation levels in Microsoft SQL Server * Transaction isolation levels in MySQL CockroachDB and SQLite only support the `Serializable` isolation level. ### Transaction timing issues info * The solution in this section does not apply to MongoDB, because MongoDB does not support isolation levels. * The timing issues discussed in this section do not apply to CockroachDB and SQLite, because these databases only support the highest `Serializable` isolation level. When two or more transactions run concurrently in certain isolation levels, timing issues can cause write conflicts or deadlocks, such as the violation of unique constraints. For example, consider the following sequence of events where Transaction A and Transaction B both attempt to execute a `deleteMany` and a `createMany` operation: 1. Transaction B: `createMany` operation creates a new set of rows. 2. Transaction B: The application commits transaction B. 3. Transaction A: `createMany` operation. 4. Transaction A: The application commits transaction A. The new rows conflict with the rows that transaction B added at step 2. This conflict can occur at the isolation level `ReadCommited`, which is the default isolation level in PostgreSQL and Microsoft SQL Server. To avoid this problem, you can set a higher isolation level (`RepeatableRead` or `Serializable`). You can set the isolation level on a transaction. This overrides your database isolation level for that transaction. To avoid transaction write conflicts and deadlocks on a transaction: 1. On your transaction, use the `isolationLevel` parameter to `Prisma.TransactionIsolationLevel.Serializable`. This ensures that your application commits multiple concurrent or parallel transactions as if they were run serially. When a transaction fails due to a write conflict or deadlock, Prisma Client returns a P2034 error. 2. In your application code, add a retry around your transaction to handle any P2034 errors, as shown in this example: import { Prisma, PrismaClient } from '@prisma/client'const prisma = new PrismaClient()async function main() { const MAX_RETRIES = 5 let retries = 0 let result while (retries < MAX_RETRIES) { try { result = await prisma.$transaction( [ prisma.user.deleteMany({ where: { /** args */ }, }), prisma.post.createMany({ data: { /** args */ }, }), ], { isolationLevel: Prisma.TransactionIsolationLevel.Serializable, } ) break } catch (error) { if (error.code === 'P2034') { retries++ continue } throw error } }} ### Using `$transaction` within `Promise.all()` If you wrap a `$transaction` inside a call to `Promise.all()`, the queries inside the transaction will be executed _serially_ (i.e. one after another): await prisma.$transaction(async (prisma) => { await Promise.all([ prisma.user.findMany(), prisma.user.findMany(), prisma.user.findMany(), prisma.user.findMany(), prisma.user.findMany(), prisma.user.findMany(), prisma.user.findMany(), prisma.user.findMany(), prisma.user.findMany(), prisma.user.findMany(), ])}) This may be counterintuitive because `Promise.all()` usually _parallelizes_ the calls passed into it. The reason for this behaviour is that: * One transaction means that all queries inside it have to be run on the same connection. * A database connection can only ever execute one query at a time. * As one query blocks the connection while it is doing its work, putting a transaction into `Promise.all` effectively means that queries should be ran one after another. ## Dependent writes Writes are considered **dependent** on each other if: * Operations depend on the result of a preceding operation (for example, the database generating an ID) The most common scenario is creating a record and using the generated ID to create or update a related record. Examples include: * Creating a user and two related blog posts (a one-to-many relationship) - the author ID must be known before creating blog posts * Creating a team and assigning members (a many-to-many relationship) - the team ID must be known before assigning members Dependent writes must succeed together in order to maintain data consistency and prevent unexpected behavior, such as blog post without an author or a team without members. ### Nested writes Prisma Client's solution to dependent writes is the **nested writes** feature, which is supported by `create` and `update`. The following nested write creates one user and two blog posts: const nestedWrite = await prisma.user.create({ data: { email: 'imani@prisma.io', posts: { create: [ { title: 'My first day at Prisma' }, { title: 'How to configure a unique constraint in PostgreSQL' }, ], }, },}) If any operation fails, Prisma Client rolls back the entire transaction. Nested writes are not currently supported by top-level bulk operations like `client.user.deleteMany` and `client.user.updateMany`. #### When to use nested writes Consider using nested writes if: * ✔ You want to create two or more records related by ID at the same time (for example, create a blog post and a user) * ✔ You want to update and create records related by ID at the same time (for example, change a user's name and create a new blog post) #### Scenario: Sign-up flow Consider the Slack sign-up flow, which: 1. Creates a team 2. Adds one user to that team, which automatically becomes that team's administrator This scenario can be represented by the following schema - note that users can belong to many teams, and teams can have many users (a many-to-many relationship): model Team { id Int @id @default(autoincrement()) name String members User[] // Many team members}model User { id Int @id @default(autoincrement()) email String @unique teams Team[] // Many teams} The most straightforward approach is to create a team, then create and attach a user to that team: // Create a teamconst team = await prisma.team.create({ data: { name: 'Aurora Adventures', },})// Create a user and assign them to the teamconst user = await prisma.user.create({ data: { email: 'alice@prisma.io', team: { connect: { id: team.id, }, }, },}) However, this code has a problem - consider the following scenario: 1. Creating the team succeeds - "Aurora Adventures" is now taken 2. Creating and connecting the user fails - the team "Aurora Adventures" exists, but has no users 3. Going through the sign-up flow again and attempting to recreate "Aurora Adventures" fails - the team already exists Creating a team and adding a user should be one atomic operation that **succeeds or fails as a whole**. To implement atomic writes in a low-level database clients, you must wrap your inserts in `BEGIN`, `COMMIT` and `ROLLBACK` statements. Prisma Client solves the problem with nested writes. The following query creates a team, creates a user, and connects the records in a single transaction: const team = await prisma.team.create({ data: { name: 'Aurora Adventures', members: { create: { email: 'alice@prisma.io', }, }, },}) Furthermore, if an error occurs at any point, Prisma Client rolls back the entire transaction. #### Nested writes FAQs ##### Why can't I use the `$transaction([])` API to solve the same problem? The `$transaction([])` API does not allow you to pass IDs between distinct operations. In the following example, `createUserOperation.id` is not available yet: const createUserOperation = prisma.user.create({ data: { email: 'ebony@prisma.io', },})const createTeamOperation = prisma.team.create({ data: { name: 'Aurora Adventures', members: { connect: { id: createUserOperation.id, // Not possible, ID not yet available }, }, },})await prisma.$transaction([createUserOperation, createTeamOperation]) ##### Nested writes support nested updates, but updates are not dependent writes - should I use the `$transaction([])` API? It is correct to say that because you know the ID of the team, you can update the team and its team members independently within a `$transaction([])`. The following example performs both operations in a `$transaction([])`: const updateTeam = prisma.team.update({ where: { id: 1, }, data: { name: 'Aurora Adventures Ltd', },})const updateUsers = prisma.user.updateMany({ where: { teams: { some: { id: 1, }, }, name: { equals: null, }, }, data: { name: 'Unknown User', },})await prisma.$transaction([updateUsers, updateTeam]) However, you can achieve the same result with a nested write: const updateTeam = await prisma.team.update({ where: { id: 1, }, data: { name: 'Aurora Adventures Ltd', // Update team name members: { updateMany: { // Update team members that do not have a name data: { name: 'Unknown User', }, where: { name: { equals: null, }, }, }, }, },}) ##### Can I perform multiple nested writes - for example, create two new teams and assign users? Yes, but this is a combination of scenarios and techniques: * Creating a team and assigning users is a dependent write - use nested writes * Creating all teams and users at the same time is an independent write because team/user combination #1 and team/user combination #2 are unrelated writes - use the `$transaction([])` API // Nested writeconst createOne = prisma.team.create({ data: { name: 'Aurora Adventures', members: { create: { email: 'alice@prisma.io', }, }, },})// Nested writeconst createTwo = prisma.team.create({ data: { name: 'Cool Crew', members: { create: { email: 'elsa@prisma.io', }, }, },})// $transaction([]) APIawait prisma.$transaction([createTwo, createOne]) ## Independent writes Writes are considered **independent** if they do not rely on the result of a previous operation. The following groups of independent writes can occur in any order: * Updating the status field of a list of orders to "Dispatched" * Marking a list of emails as "Read" > **Note**: Independent writes may have to occur in a specific order if constraints are present - for example, you must delete blog posts before the blog author if the post have a mandatory `authorId` field. However, they are still considered independent writes because no operations depend on the _result_ of a previous operation, such as the database returning a generated ID. Depending on your requirements, Prisma Client has four options for handling independent writes that should succeed or fail together. ### Bulk operations Bulk writes allow you to write multiple records of the same type in a single transaction - if any operation fails, Prisma Client rolls back the entire transaction. Prisma Client currently supports: * `createMany()` * `createManyAndReturn()` * `updateMany()` * `updateManyAndReturn()` * `deleteMany()` #### When to use bulk operations Consider bulk operations as a solution if: * ✔ You want to update a batch of the _same type_ of record, like a batch of emails #### Scenario: Marking emails as read You are building a service like gmail.com, and your customer wants a **"Mark as read"** feature that allows users to mark all emails as read. Each update to the status of an email is an independent write because the emails do not depend on one another - for example, the "Happy Birthday! 🍰" email from your aunt is unrelated to the promotional email from IKEA. In the following schema, a `User` can have many received emails (a one-to-many relationship): model User { id Int @id @default(autoincrement()) email String @unique receivedEmails Email[] // Many emails}model Email { id Int @id @default(autoincrement()) user User @relation(fields: [userId], references: [id]) userId Int subject String body String unread Boolean} Based on this schema, you can use `updateMany` to mark all unread emails as read: await prisma.email.updateMany({ where: { user: { id: 10, }, unread: true, }, data: { unread: false, },}) #### Can I use nested writes with bulk operations? No - neither `updateMany` nor `deleteMany` currently supports nested writes. For example, you cannot delete multiple teams and all of their members (a cascading delete): await prisma.team.deleteMany({ where: { id: { in: [2, 99, 2, 11], }, }, data: { members: {}, // Cannot access members here },}) #### Can I use bulk operations with the `$transaction([])` API? Yes — for example, you can include multiple `deleteMany` operations inside a `$transaction([])`. ### `$transaction([])` API The `$transaction([])` API is generic solution to independent writes that allows you to run multiple operations as a single, atomic operation - if any operation fails, Prisma Client rolls back the entire transaction. Its also worth noting that operations are executed according to the order they are placed in the transaction. await prisma.$transaction([iRunFirst, iRunSecond, iRunThird]) > **Note**: Using a query in a transaction does not influence the order of operations in the query itself. As Prisma Client evolves, use cases for the `$transaction([])` API will increasingly be replaced by more specialized bulk operations (such as `createMany`) and nested writes. #### When to use the `$transaction([])` API Consider the `$transaction([])` API if: * ✔ You want to update a batch that includes different types of records, such as emails and users. The records do not need to be related in any way. * ✔ You want to batch raw SQL queries (`$executeRaw`) - for example, for features that Prisma Client does not yet support. #### Scenario: Privacy legislation GDPR and other privacy legislation give users the right to request that an organization deletes all of their personal data. In the following example schema, a `User` can have many posts and private messages: model User { id Int @id @default(autoincrement()) posts Post[] privateMessages PrivateMessage[]}model Post { id Int @id @default(autoincrement()) user User @relation(fields: [userId], references: [id]) userId Int title String content String}model PrivateMessage { id Int @id @default(autoincrement()) user User @relation(fields: [userId], references: [id]) userId Int message String} If a user invokes the right to be forgotten, we must delete three records: the user record, private messages, and posts. It is critical that _all_ delete operations succeed together or not at all, which makes this a use case for a transaction. However, using a single bulk operation like `deleteMany` is not possible in this scenario because we need to delete across three models. Instead, we can use the `$transaction([])` API to run three operations together - two `deleteMany` and one `delete`: const id = 9 // User to be deletedconst deletePosts = prisma.post.deleteMany({ where: { userId: id, },})const deleteMessages = prisma.privateMessage.deleteMany({ where: { userId: id, },})const deleteUser = prisma.user.delete({ where: { id: id, },})await prisma.$transaction([deletePosts, deleteMessages, deleteUser]) // Operations succeed or fail together #### Scenario: Pre-computed IDs and the `$transaction([])` API Dependent writes are not supported by the `$transaction([])` API - if operation A relies on the ID generated by operation B, use nested writes. However, if you _pre-computed_ IDs (for example, by generating GUIDs), your writes become independent. Consider the sign-up flow from the nested writes example: await prisma.team.create({ data: { name: 'Aurora Adventures', members: { create: { email: 'alice@prisma.io', }, }, },}) Instead of auto-generating IDs, change the `id` fields of `Team` and `User` to a `String` (if you do not provide a value, a UUID is generated automatically). This example uses UUIDs: model Team { id Int @id @default(autoincrement()) id String @id @default(uuid()) name String members User[]}model User { id Int @id @default(autoincrement()) id String @id @default(uuid()) email String @unique teams Team[]} Refactor the sign-up flow example to use the `$transaction([])` API instead of nested writes: import { v4 } from 'uuid'const teamID = v4()const userID = v4()await prisma.$transaction([ prisma.user.create({ data: { id: userID, email: 'alice@prisma.io', team: { id: teamID, }, }, }), prisma.team.create({ data: { id: teamID, name: 'Aurora Adventures', }, }),]) Technically you can still use nested writes with pre-computed APIs if you prefer that syntax: import { v4 } from 'uuid'const teamID = v4()const userID = v4()await prisma.team.create({ data: { id: teamID, name: 'Aurora Adventures', members: { create: { id: userID, email: 'alice@prisma.io', team: { id: teamID, }, }, }, },}) There's no compelling reason to switch to manually generated IDs and the `$transaction([])` API if you are already using auto-generated IDs and nested writes. ## Read, modify, write In some cases you may need to perform custom logic as part of an atomic operation - also known as the read-modify-write pattern. The following is an example of the read-modify-write pattern: * Read a value from the database * Run some logic to manipulate that value (for example, contacting an external API) * Write the value back to the database All operations should **succeed or fail together** without making unwanted changes to the database, but you do not necessarily need to use an actual database transaction. This section of the guide describes two ways to work with Prisma Client and the read-modify-write pattern: * Designing idempotent APIs * Optimistic concurrency control ### Idempotent APIs Idempotency is the ability to run the same logic with the same parameters multiple times with the same result: the **effect on the database** is the same whether you run the logic once or one thousand times. For example: * **NOT IDEMPOTENT**: Upsert (update-or-insert) a user in the database with email address `"letoya@prisma.io"`. The `User` table **does not** enforce unique email addresses. The effect on the database is different if you run the logic once (one user created) or ten times (ten users created). * **IDEMPOTENT**: Upsert (update-or-insert) a user in the database with the email address `"letoya@prisma.io"`. The `User` table **does** enforce unique email addresses. The effect on the database is the same if you run the logic once (one user created) or ten times (existing user is updated with the same input). Idempotency is something you can and should actively design into your application wherever possible. #### When to design an idempotent API * ✔ You need to be able to retry the same logic without creating unwanted side-effects in the databases #### Scenario: Upgrading a Slack team You are creating an upgrade flow for Slack that allows teams to unlock paid features. Teams can choose between different plans and pay per user, per month. You use Stripe as your payment gateway, and extend your `Team` model to store a `stripeCustomerId`. Subscriptions are managed in Stripe. model Team { id Int @id @default(autoincrement()) name String User User[] stripeCustomerId String?} The upgrade flow looks like this: 1. Count the number of users 2. Create a subscription in Stripe that includes the number of users 3. Associate the team with the Stripe customer ID to unlock paid features const teamId = 9const planId = 'plan_id'// Count team membersconst numTeammates = await prisma.user.count({ where: { teams: { some: { id: teamId, }, }, },})// Create a customer in Stripe for plan-9454549const customer = await stripe.customers.create({ externalId: teamId, plan: planId, quantity: numTeammates,})// Update the team with the customer id to indicate that they are a customer// and support querying this customer in Stripe from our application code.await prisma.team.update({ data: { customerId: customer.id, }, where: { id: teamId, },}) This example has a problem: you can only run the logic _once_. Consider the following scenario: 1. Stripe creates a new customer and subscription, and returns a customer ID 2. Updating the team **fails** - the team is not marked as a customer in the Slack database 3. The customer is charged by Stripe, but paid features are not unlocked in Slack because the team lacks a valid `customerId` 4. Running the same code again either: * Results in an error because the team (defined by `externalId`) already exists - Stripe never returns a customer ID * If `externalId` is not subject to a unique constraint, Stripe creates yet another subscription (**not idempotent**) You cannot re-run this code in case of an error and you cannot change to another plan without being charged twice. The following refactor (highlighted) introduces a mechanism that checks if a subscription already exists, and either creates the description or updates the existing subscription (which will remain unchanged if the input is identical): // Calculate the number of users times the cost per userconst numTeammates = await prisma.user.count({ where: { teams: { some: { id: teamId, }, }, },})// Find customer in Stripelet customer = await stripe.customers.get({ externalId: teamID })if (customer) { // If team already exists, update customer = await stripe.customers.update({ externalId: teamId, plan: 'plan_id', quantity: numTeammates, })} else { customer = await stripe.customers.create({ // If team does not exist, create customer externalId: teamId, plan: 'plan_id', quantity: numTeammates, })}// Update the team with the customer id to indicate that they are a customer// and support querying this customer in Stripe from our application code.await prisma.team.update({ data: { customerId: customer.id, }, where: { id: teamId, },}) You can now retry the same logic multiple times with the same input without adverse effect. To further enhance this example, you can introduce a mechanism whereby the subscription is cancelled or temporarily deactivated if the update does not succeed after a set number of attempts. ### Optimistic concurrency control Optimistic concurrency control (OCC) is a model for handling concurrent operations on a single entity that does not rely on 🔒 locking. Instead, we **optimistically** assume that a record will remain unchanged in between reading and writing, and use a concurrency token (a timestamp or version field) to detect changes to a record. If a ❌ conflict occurs (someone else has changed the record since you read it), you cancel the transaction. Depending on your scenario, you can then: * Re-try the transaction (book another cinema seat) * Throw an error (alert the user that they are about to overwrite changes made by someone else) This section describes how to build your own optimistic concurrency control. See also: Plans for application-level optimistic concurrency control on GitHub info * If you use version 4.4.0 or earlier, you cannot use optimistic concurrency control on `update` operations, because you cannot filter on non-unique fields. The `version` field you need to use with optimistic concurrency control is a non-unique field. * Since version 5.0.0 you are able to filter on non-unique fields in `update` operations so that optimistic concurrency control is being used. The feature was also available via the Preview flag `extendedWhereUnique` from versions 4.5.0 to 4.16.2. #### When to use optimistic concurrency control * ✔ You anticipate a high number of concurrent requests (multiple people booking cinema seats) * ✔ You anticipate that conflicts between those concurrent requests will be rare Avoiding locks in an application with a high number of concurrent requests makes the application more resilient to load and more scalable overall. Although locking is not inherently bad, locking in a high concurrency environment can lead to unintended consequences - even if you are locking individual rows, and only for a short amount of time. For more information, see: * Why ROWLOCK Hints Can Make Queries Slower and Blocking Worse in SQL Server #### Scenario: Reserving a seat at the cinema You are creating a booking system for a cinema. Each movie has a set number of seats. The following schema models movies and seats: model Seat { id Int @id @default(autoincrement()) userId Int? claimedBy User? @relation(fields: [userId], references: [id]) movieId Int movie Movie @relation(fields: [movieId], references: [id])}model Movie { id Int @id @default(autoincrement()) name String @unique seats Seat[]} The following sample code finds the first available seat and assigns that seat to a user: const movieName = 'Hidden Figures'// Find first available seatconst availableSeat = await prisma.seat.findFirst({ where: { movie: { name: movieName, }, claimedBy: null, },})// Throw an error if no seats are availableif (!availableSeat) { throw new Error(`Oh no! ${movieName} is all booked.`)}// Claim the seatawait prisma.seat.update({ data: { claimedBy: userId, }, where: { id: availableSeat.id, },}) However, this code suffers from the "double-booking problem" - it is possible for two people to book the same seats: 1. Seat 3A returned to Sorcha (`findFirst`) 2. Seat 3A returned to Ellen (`findFirst`) 3. Seat 3A claimed by Sorcha (`update`) 4. Seat 3A claimed by Ellen (`update` - overwrites Sorcha's claim) Even though Sorcha has successfully booked the seat, the system ultimately stores Ellen's claim. To solve this problem with optimistic concurrency control, add a `version` field to the seat: model Seat { id Int @id @default(autoincrement()) userId Int? claimedBy User? @relation(fields: [userId], references: [id]) movieId Int movie Movie @relation(fields: [movieId], references: [id]) version Int} Next, adjust the code to check the `version` field before updating: const userEmail = 'alice@prisma.io'const movieName = 'Hidden Figures'// Find the first available seat// availableSeat.version might be 0const availableSeat = await client.seat.findFirst({ where: { Movie: { name: movieName, }, claimedBy: null, },})if (!availableSeat) { throw new Error(`Oh no! ${movieName} is all booked.`)}// Only mark the seat as claimed if the availableSeat.version// matches the version we're updating. Additionally, increment the// version when we perform this update so all other clients trying// to book this same seat will have an outdated version.const seats = await client.seat.updateMany({ data: { claimedBy: userEmail, version: { increment: 1, }, }, where: { id: availableSeat.id, version: availableSeat.version, // This version field is the key; only claim seat if in-memory version matches database version, indicating that the field has not been updated },})if (seats.count === 0) { throw new Error(`That seat is already booked! Please try again.`)} It is now impossible for two people to book the same seat: 1. Seat 3A returned to Sorcha (`version` is 0) 2. Seat 3A returned to Ellen (`version` is 0) 3. Seat 3A claimed by Sorcha (`version` is incremented to 1, booking succeeds) 4. Seat 3A claimed by Ellen (in-memory `version` (0) does not match database `version` (1) - booking does not succeed) ### Interactive transactions If you have an existing application, it can be a significant undertaking to refactor your application to use optimistic concurrency control. Interactive Transactions offers a useful escape hatch for cases like this. To create an interactive transaction, pass an async function into $transaction. The first argument passed into this async function is an instance of Prisma Client. Below, we will call this instance `tx`. Any Prisma Client call invoked on this `tx` instance is encapsulated into the transaction. In the example below, Alice and Bob each have $100 in their account. If they try to send more money than they have, the transfer is rejected. The expected outcome would be for Alice to make 1 transfer for $100 and the other transfer would be rejected. This would result in Alice having $0 and Bob having $200. import { PrismaClient } from '@prisma/client'const prisma = new PrismaClient()async function transfer(from: string, to: string, amount: number) { return await prisma.$transaction(async (tx) => { // 1. Decrement amount from the sender. const sender = await tx.account.update({ data: { balance: { decrement: amount, }, }, where: { email: from, }, }) // 2. Verify that the sender's balance didn't go below zero. if (sender.balance < 0) { throw new Error(`${from} doesn't have enough to send ${amount}`) } // 3. Increment the recipient's balance by amount const recipient = tx.account.update({ data: { balance: { increment: amount, }, }, where: { email: to, }, }) return recipient })}async function main() { // This transfer is successful await transfer('alice@prisma.io', 'bob@prisma.io', 100) // This transfer fails because Alice doesn't have enough funds in her account await transfer('alice@prisma.io', 'bob@prisma.io', 100)}main() In the example above, both `update` queries run within a database transaction. When the application reaches the end of the function, the transaction is **committed** to the database. If the application encounters an error along the way, the async function will throw an exception and automatically **rollback** the transaction. You can learn more about interactive transactions in this section. warning **Use interactive transactions with caution**. Keeping transactions open for a long time hurts database performance and can even cause deadlocks. Try to avoid performing network requests and executing slow queries inside your transaction functions. We recommend you get in and out as quick as possible! ## Conclusion Prisma Client supports multiple ways of handling transactions, either directly through the API or by supporting your ability to introduce optimistic concurrency control and idempotency into your application. If you feel like you have use cases in your application that are not covered by any of the suggested options, please open a GitHub issue to start a discussion. --- ## Page: https://www.prisma.io/docs/orm/prisma-client/queries/full-text-search Prisma Client supports full-text search for **PostgreSQL** databases in versions 2.30.0 and later, and **MySQL** databases in versions 3.8.0 and later. With full-text search (FTS) enabled, you can add search functionality to your application by searching for text within a database column. ## Enabling full-text search for PostgreSQL The full-text search API is currently a Preview feature. To enable this feature, carry out the following steps: 1. Update the `previewFeatures` block in your schema to include the `fullTextSearchPostgres` preview feature flag: schema.prisma generator client { provider = "prisma-client-js" previewFeatures = ["fullTextSearchPostgres"]} 2. Generate Prisma Client: npx prisma generate After you regenerate your client, a new `search` field will be available on any `String` fields created on your models. For example, the following search will return all posts that contain the word 'cat'. // All posts that contain the word 'cat'.const result = await prisma.posts.findMany({ where: { body: { search: 'cat', }, },}) > **Note**: There currently is a known issue in the full-text search feature for PostgreSQL. If you observe slow search queries, you can optimize your query with raw SQL. ## Querying the database The `search` field uses the database's native querying capabilities under the hood. This means that the exact query operators available are also database-specific. ### PostgreSQL The following examples demonstrate the use of the PostgreSQL 'and' (`&`) and 'or' (`|`) operators: // All posts that contain the words 'cat' or 'dog'.const result = await prisma.posts.findMany({ where: { body: { search: 'cat | dog', }, },})// All drafts that contain the words 'cat' and 'dog'.const result = await prisma.posts.findMany({ where: { status: 'Draft', body: { search: 'cat & dog', }, },}) To get a sense of how the query format works, consider the following text: **"The quick brown fox jumps over the lazy dog"** Here's how the following queries would match that text: | Query | Match? | Explanation | | --- | --- | --- | | `fox & dog` | Yes | The text contains 'fox' and 'dog' | | `dog & fox` | Yes | The text contains 'dog' and 'fox' | | `dog & cat` | No | The text contains 'dog' but not 'cat' | | `!cat` | Yes | 'cat' is not in the text | | `fox | cat` | Yes | The text contains 'fox' or 'cat' | | `cat | pig` | No | The text doesn't contain 'cat' or 'pig' | | `fox <-> dog` | Yes | 'dog' follows 'fox' in the text | | `dog <-> fox` | No | 'fox' doesn't follow 'dog' in the text | For the full range of supported operations, see the PostgreSQL full text search documentation. ### MySQL The following examples demonstrate use of the MySQL 'and' (`+`) and 'not' (`-`) operators: // All posts that contain the words 'cat' or 'dog'.const result = await prisma.posts.findMany({ where: { body: { search: 'cat dog', }, },})// All posts that contain the words 'cat' and not 'dog'.const result = await prisma.posts.findMany({ where: { body: { search: '+cat -dog', }, },})// All drafts that contain the words 'cat' and 'dog'.const result = await prisma.posts.findMany({ where: { status: 'Draft', body: { search: '+cat +dog', }, },}) To get a sense of how the query format works, consider the following text: **"The quick brown fox jumps over the lazy dog"** Here's how the following queries would match that text: | Query | Match? | Description | | --- | --- | --- | | `+fox +dog` | Yes | The text contains 'fox' and 'dog' | | `+dog +fox` | Yes | The text contains 'dog' and 'fox' | | `+dog -cat` | Yes | The text contains 'dog' but not 'cat' | | `-cat` | No | The minus operator cannot be used on its own (see note below) | | `fox dog` | Yes | The text contains 'fox' or 'dog' | | `quic*` | Yes | The text contains a word starting with 'quic' | | `quick fox @2` | Yes | 'fox' starts within a 2 word distance of 'quick' | | `fox dog @2` | No | 'dog' does not start within a 2 word distance of 'fox' | | `"jumps over"` | Yes | The text contains the whole phrase 'jumps over' | > **Note**: The - operator acts only to exclude rows that are otherwise matched by other search terms. Thus, a boolean-mode search that contains only terms preceded by - returns an empty result. It does not return “all rows except those containing any of the excluded terms.” MySQL also has `>`, `<` and `~` operators for altering the ranking order of search results. As an example, consider the following two records: **1\. "The quick brown fox jumps over the lazy dog"** **2\. "The quick brown fox jumps over the lazy cat"** | Query | Result | Description | | --- | --- | --- | | `fox ~cat` | Return 1. first, then 2. | Return all records containing 'fox', but rank records containing 'cat' lower | | `fox (<cat >dog)` | Return 1. first, then 2. | Return all records containing 'fox', but rank records containing 'cat' lower than rows containing 'dog' | For the full range of supported operations, see the MySQL full text search documentation. ## Sorting results by `_relevance` warning Sorting by relevance is only available for PostgreSQL and MySQL. In addition to Prisma Client's default `orderBy` behavior, full-text search also adds sorting by relevance to a given string or strings. As an example, if you wanted to order posts by their relevance to the term `'database'` in their title, you could use the following: const posts = await prisma.post.findMany({ orderBy: { _relevance: { fields: ['title'], search: 'database', sort: 'asc' }, },}) ## Adding indexes ### PostgreSQL Prisma Client does not currently support using indexes to speed up full text search. There is an existing GitHub Issue for this. ### MySQL For MySQL, it is necessary to add indexes to any columns you search using the `@@fulltext` argument in the `schema.prisma` file. In the following example, one full text index is added to the `content` field of the `Blog` model, and another is added to both the `content` and `title` fields together: schema.prisma generator client { provider = "prisma-client-js"}model Blog { id Int @unique content String title String @@fulltext([content]) @@fulltext([content, title])} The first index allows searching the `content` field for occurrences of the word 'cat': const result = await prisma.blogs.findMany({ where: { content: { search: 'cat', }, },}) The second index allows searching both the `content` and `title` fields for occurrences of the word 'cat' in the `content` and 'food' in the `title`: const result = await prisma.blogs.findMany({ where: { content: { search: 'cat', }, title: { search: 'food', }, },}) However, if you try to search on `title` alone, the search will fail with the error "Cannot find a fulltext index to use for the search" and the message code is `P2030`, because the search requires an index on both fields. ## Full-text search with raw SQL Full-text search is currently in Preview, and due to a known issue, you might experience slow search queries. If so, you can optimize your query using TypedSQL. ### PostgreSQL With TypedSQL, you can use PostgreSQL's `to_tsvector` and `to_tsquery` to express your search query. * fullTextSearch.sql * index.ts SELECT * FROM "Blog" WHERE to_tsvector('english', "Blog"."content") @@ to_tsquery('english', ${term}); > **Note**: Depending on your language preferences, you may exchange `english` against another language in the SQL statement. If you want to include a wildcard in your search term, you can do this as follows: * fullTextSearch.sql * index.ts SELECT * FROM "Blog" WHERE to_tsvector('english', "Blog"."content") @@ to_tsquery('english', ${term}); ### MySQL In MySQL, you can express your search query as follows: * fullTextSearch.sql * index.ts SELECT * FROM Blog WHERE MATCH(content) AGAINST(${term} IN NATURAL LANGUAGE MODE); --- ## Page: https://www.prisma.io/docs/orm/prisma-client/queries/custom-validation import { PrismaClient, Prisma } from '@prisma/client'import { z } from 'zod'/** * Zod schema */export const ProductCreateInput = z.object({ slug: z .string() .max(100) .regex(/^[a-z0-9]+(?:-[a-z0-9]+)*$/), name: z.string().max(100), description: z.string().max(1000), price: z .instanceof(Prisma.Decimal) .refine((price) => price.gte('0.01') && price.lt('1000000.00')),}) satisfies z.Schema<Prisma.ProductUncheckedCreateInput>/** * Prisma Client Extension */const prisma = new PrismaClient().$extends({ query: { product: { create({ args, query }) { args.data = ProductCreateInput.parse(args.data) return query(args) }, update({ args, query }) { args.data = ProductCreateInput.partial().parse(args.data) return query(args) }, updateMany({ args, query }) { args.data = ProductCreateInput.partial().parse(args.data) return query(args) }, upsert({ args, query }) { args.create = ProductCreateInput.parse(args.create) args.update = ProductCreateInput.partial().parse(args.update) return query(args) }, }, },})async function main() { /** * Example usage */ // Valid product const product = await prisma.product.create({ data: { slug: 'example-product', name: 'Example Product', description: 'Lorem ipsum dolor sit amet', price: new Prisma.Decimal('10.95'), }, }) // Invalid product try { await prisma.product.create({ data: { slug: 'invalid-product', name: 'Invalid Product', description: 'Lorem ipsum dolor sit amet', price: new Prisma.Decimal('-1.00'), }, }) } catch (err: any) { console.log(err?.cause?.issues) }}main() --- ## Page: https://www.prisma.io/docs/orm/prisma-client/queries/computed-fields warning With Prisma Client extensions Generally Available as of Prisma ORM version 4.16.0, the following steps are not recommended. Please use a client extension to accomplish this. Prisma Client does not yet natively support computed fields, but, you can define a function that accepts a generic type as an input then extend that generic to ensure it conforms to a specific structure. Finally, you can return that generic with additional computed fields. Let's see how that might look: * TypeScript * JavaScript // Define a type that needs a first and last nametype FirstLastName = { firstName: string lastName: string}// Extend the T generic with the fullName attributetype WithFullName<T> = T & { fullName: string}// Take objects that satisfy FirstLastName and computes a full namefunction computeFullName<User extends FirstLastName>( user: User): WithFullName<User> { return { ...user, fullName: user.firstName + ' ' + user.lastName, }}async function main() { const user = await prisma.user.findUnique({ where: 1 }) const userWithFullName = computeFullName(user)} In the TypeScript example above, a `User` generic has been defined that extends the `FirstLastName` type. This means that whatever you pass into `computeFullName` must contain `firstName` and `lastName` keys. A `WithFullName<User>` return type has also been defined, which takes whatever `User` is and tacks on a `fullName` string attribute. With this function, any object that contains `firstName` and `lastName` keys can compute a `fullName`. Pretty neat, right? --- ## Page: https://www.prisma.io/docs/orm/prisma-client/queries/excluding-fields By default Prisma Client returns all fields from a model. You can use `select` to narrow the result set, but that can be unwieldy if you have a large model and you only want to exclude a small number of fields. info As of Prisma ORM 6.2.0, excluding fields is supported via the `omit` option that you can pass to Prisma Client. From versions 5.16.0 through 6.1.0, you must use the `omitApi` Preview feature to access this option. ## Excluding a field globally using `omit` The following is a type-safe way to exclude a field _globally_ (i.e. for _all_ queries against a given model): * Code * Schema const prisma = new PrismaClient({ omit: { user: { password: true } }})// The password field is excluded in all queries, including this oneconst user = await prisma.user.findUnique({ where: { id: 1 } }) ## Excluding a field locally using `omit` The following is a type-safe way to exclude a field _locally_ (i.e. for a _single_ query): * Code * Schema const prisma = new PrismaClient()// The password field is excluded only in this queryconst user = await prisma.user.findUnique({ omit: { password: true }, where: { id: 1 } }) ## How to omit multiple fields Omitting multiple fields works the same as selecting multiple fields: add multiple key-value pairs to the omit option. Using the same schema as before, you could omit password and email with the following: const prisma = new PrismaClient()// password and email are excludedconst user = await prisma.user.findUnique({ omit: { email: true, password: true, }, where: { id: 1, },}) Multiple fields can be omitted locally and globally. ## How to select a previously omitted field If you omit a field globally, you can "override" by either selecting the field specifically or by setting `omit` to `false` in a query. * Explicit Select * Omit False const user = await prisma.user.findUnique({ select: { firstName: true, lastName: true, password: true // The password field is now selected. }, where: { id: 1 }}) ## When to use `omit` globally or locally It's important to understand when to omit a field globally or locally: * If you are omitting a field in order to prevent it from accidentally being included in a query, it's best to omit it _globally_. For example: Globally omitting the `password` field from a `User` model so that sensitive information doesn't accidentally get exposed. * If you are omitting a field because it's not needed in a query, it's best to omit it _locally_. Local omit (when an `omit` option is provided in a query) only applies to the query it is defined in, while a global omit applies to every query made with the same Prisma Client instance, unless a specific select is used or the omit is overridden. --- ## Page: https://www.prisma.io/docs/orm/prisma-client/queries/custom-models As your application grows, you may find the need to group related logic together. We suggest either: * Creating static methods using a Prisma Client extension * Wrapping a model in a class * Extending Prisma Client model object ## Static methods with Prisma Client extensions The following example demonstrates how to create a Prisma Client extension that adds a `signUp` and `findManyByDomain` methods to a User model. * Prisma Client extension * Prisma schema import bcrypt from 'bcryptjs'import { PrismaClient } from '@prisma/client'const prisma = new PrismaClient().$extends({ model: { user: { async signUp(email: string, password: string) { const hash = await bcrypt.hash(password, 10) return prisma.user.create({ data: { email, password: { create: { hash, }, }, }, }) }, async findManyByDomain(domain: string) { return prisma.user.findMany({ where: { email: { endsWith: `@${domain}` } }, }) }, }, },})async function main() { // Example usage await prisma.user.signUp('user2@example2.com', 's3cret') await prisma.user.findManyByDomain('example2.com')} ## Wrap a model in a class In the example below, you'll see how you can wrap the `user` model in the Prisma Client within a `Users` class. import { PrismaClient, User } from '@prisma/client'type Signup = { email: string firstName: string lastName: string}class Users { constructor(private readonly prismaUser: PrismaClient['user']) {} // Signup a new user async signup(data: Signup): Promise<User> { // do some custom validation... return this.prismaUser.create({ data }) }}async function main() { const prisma = new PrismaClient() const users = new Users(prisma.user) const user = await users.signup({ email: 'alice@prisma.io', firstName: 'Alice', lastName: 'Prisma', })} With this new `Users` class, you can define custom functions like `signup`: Note that in the example above, you're only exposing a `signup` method from Prisma Client. The Prisma Client is hidden within the `Users` class, so you're no longer be able to call methods like `findMany` and `upsert`. This approach works well when you have a large application and you want to intentionally limit what your models can do. ## Extending Prisma Client model object But what if you don't want to hide existing functionality but still want to group custom functions together? In this case, you can use `Object.assign` to extend Prisma Client without limiting its functionality: import { PrismaClient, User } from '@prisma/client'type Signup = { email: string firstName: string lastName: string}function Users(prismaUser: PrismaClient['user']) { return Object.assign(prismaUser, { /** * Signup the first user and create a new team of one. Return the User with * a full name and without a password */ async signup(data: Signup): Promise<User> { return prismaUser.create({ data }) }, })}async function main() { const prisma = new PrismaClient() const users = Users(prisma.user) const user = await users.signup({ email: 'alice@prisma.io', firstName: 'Alice', lastName: 'Prisma', }) const numUsers = await users.count() console.log(user, numUsers)} Now you can use your custom `signup` method alongside `count`, `updateMany`, `groupBy()` and all of the other wonderful methods that Prisma Client provides. Best of all, it's all type-safe! ## Going further We recommend using Prisma Client extensions to extend your models with custom model methods. --- ## Page: https://www.prisma.io/docs/orm/prisma-client/queries/case-sensitivity Case sensitivity affects **filtering** and **sorting** of data, and is determined by your database collation. Sorting and filtering data yields different results depending on your settings: | Action | Case sensitive | Case insensitive | | --- | --- | --- | | Sort ascending | `Apple`, `Banana`, `apple pie`, `banana pie` | `Apple`, `apple pie`, `Banana`, `banana pie` | | Match `"apple"` | `apple` | `Apple`, `apple` | If you use a **relational database connector**, Prisma Client respects your database collation. Options and recommendations for supporting **case-insensitive** filtering and sorting with Prisma Client depend on your database provider. If you use the MongoDB connector, Prisma Client uses RegEx rules to enable case-insensitive filtering. The connector _does not_ use MongoDB collation. > **Note**: Follow the progress of case-insensitive sorting on GitHub. ## Database collation and case sensitivity info In the context of Prisma Client, the following section refers to relational database connectors only. Collation specifies how data is **sorted and compared** in a database, which includes casing. Collation is something you choose when you set up a database. The following example demonstrates how to view the collation of a MySQL database: SELECT @@character_set_database, @@collation_database; Show CLI results +--------------------------+----------------------+ | @@character_set_database | @@collation_database | +--------------------------+----------------------+ | utf8mb4 | utf8mb4_0900_ai_ci | +--------------------------+----------------------+ The example collation, `utf8mb4_0900_ai_ci`, is: * Accent-insensitive (`ai`) * Case-insensitive (`ci`). This means that `prisMa` will match `prisma`, `PRISMA`, `priSMA`, and so on: SELECT id, email FROM User WHERE email LIKE "%prisMa%" Show CLI results +----+-----------------------------------+ | id | email | +----+-----------------------------------+ | 61 | alice@prisma.io | | 49 | birgitte@prisma.io | +----+-----------------------------------+ The same query with Prisma Client: const users = await prisma.user.findMany({ where: { email: { contains: 'prisMa', }, }, select: { id: true, name: true, },}) ## Options for case-insensitive filtering The recommended way to support case-insensitive filtering with Prisma Client depends on your underlying provider. ### PostgreSQL provider PostgreSQL uses deterministic collation by default, which means that filtering is **case-sensitive**. To support case-insensitive filtering, use the `mode: 'insensitive'` property on a per-field basis. Use the `mode` property on a filter as shown: const users = await prisma.user.findMany({ where: { email: { endsWith: 'prisma.io', mode: 'insensitive', // Default value: default }, },}) See also: Filtering (Case-insensitive filtering) #### Caveats * You cannot use case-insensitive filtering with C collation * `citext` columns are always case-insensitive and are not affected by `mode` #### Performance If you rely heavily on case-insensitive filtering, consider creating indexes in the PostgreSQL database to improve performance: * Create an expression index for Prisma Client queries that use `equals` or `not` * Use the `pg_trgm` module to create a trigram-based index for Prisma Client queries that use `startsWith`, `endsWith`, `contains` (maps to`LIKE` / `ILIKE` in PostgreSQL) ### MySQL provider MySQL uses **case-insensitive collation** by default. Therefore, filtering with Prisma Client and MySQL is case-insensitive by default. `mode: 'insensitive'` property is not required and therefore not available in the generated Prisma Client API. #### Caveats * You _must_ use a case-insensitive (`_ci`) collation in order to support case-insensitive filtering. Prisma Client does no support the `mode` filter property for the MySQL provider. ### MongoDB provider To support case-insensitive filtering, use the `mode: 'insensitive'` property on a per-field basis: const users = await prisma.user.findMany({ where: { email: { endsWith: 'prisma.io', mode: 'insensitive', // Default value: default }, },}) The MongoDB uses a RegEx rule for case-insensitive filtering. ### SQLite provider By default, text fields created by Prisma Client in SQLite databases do not support case-insensitive filtering. In SQLite, only case-insensitive comparisons of ASCII characters are possible. To enable limited support (ASCII only) for case-insensitive filtering on a per-column basis, you will need to add `COLLATE NOCASE` when you define a text column. #### Adding case-insensitive filtering to a new column. To add case-insensitive filtering to a new column, you will need to modify the migration file that is created by Prisma Client. Taking the following Prisma Schema model: model User { id Int @id email String} and using `prisma migrate dev --create-only` to create the following migration file: -- CreateTableCREATE TABLE "User" ( "id" INTEGER NOT NULL PRIMARY KEY AUTOINCREMENT, "email" TEXT NOT NULL); You would need to add `COLLATE NOCASE` to the `email` column in order to make case-insensitive filtering possible: -- CreateTableCREATE TABLE "User" ( "id" INTEGER NOT NULL PRIMARY KEY AUTOINCREMENT, //highlight-next-line "email" TEXT NOT NULL COLLATE NOCASE); #### Adding case-insensitive filtering to an existing column. Since columns cannot be updated in SQLite, `COLLATE NOCASE` can only be added to an existing column by creating a blank migration file and migrating data to a new table. Taking the following Prisma Schema model: model User { id Int @id email String} and using `prisma migrate dev --create-only` to create an empty migration file, you will need to rename the current `User` table and create a new `User` table with `COLLATE NOCASE`. -- UpdateTableALTER TABLE "User" RENAME TO "User_old";CREATE TABLE "User" ( "id" INTEGER NOT NULL PRIMARY KEY AUTOINCREMENT, "email" TEXT NOT NULL COLLATE NOCASE);INSERT INTO "User" (id, email)SELECT id, email FROM "User_old";DROP TABLE "User_old"; ### Microsoft SQL Server provider Microsoft SQL Server uses **case-insensitive collation** by default. Therefore, filtering with Prisma Client and Microsoft SQL Server is case-insensitive by default. `mode: 'insensitive'` property is not required and therefore not available in the generated Prisma Client API. --- ## Page: https://www.prisma.io/docs/orm/prisma-client/queries/query-optimization-performance This guide shows how to identify and optimize query performance, debug performance issues, and address common challenges. ## Debugging performance issues Several common practices can lead to slow queries and performance problems, such as: * Over-fetching data * Missing indexes * Not caching repeated queries * Performing full table scans info For more potential causes of performance issues, visit this page. Prisma Optimize offers recommendations to identify and address the inefficiencies listed above and more, helping to improve query performance. To get started, follow the integration guide and add Prisma Optimize to your project to begin diagnosing slow queries. ## Using bulk queries It is generally more performant to read and write large amounts of data in bulk - for example, inserting `50,000` records in batches of `1000` rather than as `50,000` separate inserts. `PrismaClient` supports the following bulk queries: * `createMany()` * `createManyAndReturn()` * `deleteMany()` * `updateMany()` * `updateManyAndReturn()` * `findMany()` ## Reuse `PrismaClient` or use connection pooling to avoid database connection pool exhaustion Creating multiple instances of `PrismaClient` can exhaust your database connection pool, especially in serverless or edge environments, potentially slowing down other queries. Learn more in the serverless challenge. For applications with a traditional server, instantiate `PrismaClient` once and reuse it throughout your app instead of creating multiple instances. For example, instead of: query.ts async function getPosts() { const prisma = new PrismaClient() await prisma.post.findMany()}async function getUsers() { const prisma = new PrismaClient() await prisma.user.findMany()} Define a single `PrismaClient` instance in a dedicated file and re-export it for reuse: db.ts export const prisma = new PrismaClient() Then import the shared instance: query.ts import { prisma } from "db.ts"async function getPosts() { await prisma.post.findMany()}async function getUsers() { await prisma.user.findMany()} For serverless development environments with frameworks that use HMR (Hot Module Replacement), ensure you properly handle a single instance of Prisma in development. ## Solving the n+1 problem The n+1 problem occurs when you loop through the results of a query and perform one additional query **per result**, resulting in `n` number of queries plus the original (n+1). This is a common problem with ORMs, particularly in combination with GraphQL, because it is not always immediately obvious that your code is generating inefficient queries. ### Solving n+1 in GraphQL with `findUnique()` and Prisma Client's dataloader The Prisma Client dataloader automatically _batches_ `findUnique()` queries that occur in the same tick and have the same `where` and `include` parameters if: * All criteria of the `where` filter are on scalar fields (unique or non-unique) of the same model you're querying. * All criteria use the `equal` filter, whether that's via the shorthand or explicit syntax `(where: { field: <val>, field1: { equals: <val> } })`. * No boolean operators or relation filters are present. Automatic batching of `findUnique()` is particularly useful in a **GraphQL context**. GraphQL runs a separate resolver function for every field, which can make it difficult to optimize a nested query. For example - the following GraphQL runs the `allUsers` resolver to get all users, and the `posts` resolver **once per user** to get each user's posts (n+1): query { allUsers { id, posts { id } }} The `allUsers` query uses `user.findMany(..)` to return all users: const Query = objectType({ name: 'Query', definition(t) { t.nonNull.list.nonNull.field('allUsers', { type: 'User', resolve: (_parent, _args, context) => { return context.prisma.user.findMany() }, }) },}) This results in a single SQL query: { timestamp: 2021-02-19T09:43:06.332Z, query: 'SELECT `dev`.`User`.`id`, `dev`.`User`.`email`, `dev`.`User`.`name` FROM `dev`.`User` WHERE 1=1 LIMIT ? OFFSET ?', params: '[-1,0]', duration: 0, target: 'quaint::connector::metrics'} However, the resolver function for `posts` is then invoked **once per user**. This results in a `findMany()` query **✘ per user** rather than a single `findMany()` to return all posts by all users (expand CLI output to see queries). const User = objectType({ name: 'User', definition(t) { t.nonNull.int('id') t.string('name') t.nonNull.string('email') t.nonNull.list.nonNull.field('posts', { type: 'Post', resolve: (parent, _, context) => { return context.prisma.post.findMany({ where: { authorId: parent.id || undefined }, }) }, }) },}) Show CLI results #### Solution 1: Batching queries with the fluent API Use `findUnique()` in combination with the fluent API (`.posts()`) as shown to return a user's posts. Even though the resolver is called once per user, the Prisma dataloader in Prisma Client **✔ batches the `findUnique()` queries**. info It may seem counterintitive to use a `prisma.user.findUnique(...).posts()` query to return posts instead of `prisma.posts.findMany()` - particularly as the former results in two queries rather than one. The **only** reason you need to use the fluent API (`user.findUnique(...).posts()`) to return posts is that the dataloader in Prisma Client batches `findUnique()` queries and does not currently batch `findMany()` queries. When the dataloader batches `findMany()` queries or your query has the `relationStrategy` set to `join`, you no longer need to use `findUnique()` with the fluent API in this way. const User = objectType({ name: 'User', definition(t) { t.nonNull.int('id') t.string('name') t.nonNull.string('email') t.nonNull.list.nonNull.field('posts', { type: 'Post', resolve: (parent, _, context) => { return context.prisma.post.findMany({ where: { authorId: parent.id || undefined }, }) return context.prisma.user .findUnique({ where: { id: parent.id || undefined }, }) .posts() }, }) },}) Show CLI results If the `posts` resolver is invoked once per user, the dataloader in Prisma Client groups `findUnique()` queries with the same parameters and selection set. Each group is optimized into a single `findMany()`. #### Solution 2: Using JOINs to perform queries You can perform the query with a database join by setting `relationLoadStrategy` to `"join"`, ensuring that only **one** query is executed against the database. const User = objectType({ name: 'User', definition(t) { t.nonNull.int('id') t.string('name') t.nonNull.string('email') t.nonNull.list.nonNull.field('posts', { type: 'Post', resolve: (parent, _, context) => { return context.prisma.post.findMany({ relationLoadStrategy: "join", where: { authorId: parent.id || undefined }, }) }, }) },}) ### n+1 in other contexts The n+1 problem is most commonly seen in a GraphQL context because you have to find a way to optimize a single query across multiple resolvers. However, you can just as easily introduce the n+1 problem by looping through results with `forEach` in your own code. The following code results in n+1 queries - one `findMany()` to get all users, and one `findMany()` **per user** to get each user's posts: // One query to get all usersconst users = await prisma.user.findMany({})// One query PER USER to get all postsusers.forEach(async (usr) => { const posts = await prisma.post.findMany({ where: { authorId: usr.id, }, }) // Do something with each users' posts}) Show CLI results SELECT "public"."User"."id", "public"."User"."email", "public"."User"."name" FROM "public"."User" WHERE 1=1 OFFSET $1SELECT "public"."Post"."id", "public"."Post"."title" FROM "public"."Post" WHERE "public"."Post"."authorId" = $1 OFFSET $2SELECT "public"."Post"."id", "public"."Post"."title" FROM "public"."Post" WHERE "public"."Post"."authorId" = $1 OFFSET $2SELECT "public"."Post"."id", "public"."Post"."title" FROM "public"."Post" WHERE "public"."Post"."authorId" = $1 OFFSET $2SELECT "public"."Post"."id", "public"."Post"."title" FROM "public"."Post" WHERE "public"."Post"."authorId" = $1 OFFSET $2/* ..and so on .. */ This is not an efficient way to query. Instead, you can: * Use nested reads (`include` ) to return users and related posts * Use the `in` filter * Set the `relationLoadStrategy` to `"join"` #### Solving n+1 with `include` You can use `include` to return each user's posts. This only results in **two** SQL queries - one to get users, and one to get posts. This is known as a nested read. const usersWithPosts = await prisma.user.findMany({ include: { posts: true, },}) Show CLI results SELECT "public"."User"."id", "public"."User"."email", "public"."User"."name" FROM "public"."User" WHERE 1=1 OFFSET $1SELECT "public"."Post"."id", "public"."Post"."title", "public"."Post"."authorId" FROM "public"."Post" WHERE "public"."Post"."authorId" IN ($1,$2,$3,$4) OFFSET $5 #### Solving n+1 with `in` If you have a list of user IDs, you can use the `in` filter to return all posts where the `authorId` is `in` that list of IDs: const users = await prisma.user.findMany({})const userIds = users.map((x) => x.id)const posts = await prisma.post.findMany({ where: { authorId: { in: userIds, }, },}) Show CLI results SELECT "public"."User"."id", "public"."User"."email", "public"."User"."name" FROM "public"."User" WHERE 1=1 OFFSET $1SELECT "public"."Post"."id", "public"."Post"."createdAt", "public"."Post"."updatedAt", "public"."Post"."title", "public"."Post"."content", "public"."Post"."published", "public"."Post"."authorId" FROM "public"."Post" WHERE "public"."Post"."authorId" IN ($1,$2,$3,$4) OFFSET $5 #### Solving n+1 with `relationLoadStrategy: "join"` You can perform the query with a database join by setting `relationLoadStrategy` to `"join"`, ensuring that only **one** query is executed against the database. const users = await prisma.user.findMany({})const userIds = users.map((x) => x.id)const posts = await prisma.post.findMany({ relationLoadStrategy: "join", where: { authorId: { in: userIds, }, },}) --- ## Page: https://www.prisma.io/docs/orm/prisma-client/using-raw-sql/typedsql ## Getting started with TypedSQL To start using TypedSQL in your Prisma project, follow these steps: 1. Ensure you have `@prisma/client` and `prisma` installed and updated to at least version `5.19.0`. npm install @prisma/client@latestnpm install -D prisma@latest 2. Add the `typedSql` preview feature flag to your `schema.prisma` file: generator client { provider = "prisma-client-js" previewFeatures = ["typedSql"]} 3. Create a `sql` directory inside your `prisma` directory. This is where you'll write your SQL queries. mkdir -p prisma/sql 4. Create a new `.sql` file in your `prisma/sql` directory. For example, `getUsersWithPosts.sql`. Note that the file name must be a valid JS identifier and cannot start with a `$`. 5. Write your SQL queries in your new `.sql` file. For example: prisma/sql/getUsersWithPosts.sql SELECT u.id, u.name, COUNT(p.id) as "postCount"FROM "User" uLEFT JOIN "Post" p ON u.id = p."authorId"GROUP BY u.id, u.name 6. Generate Prisma Client with the `sql` flag to ensure TypeScript functions and types for your SQL queries are created: warning Make sure that any pending migrations are applied before generating the client with the `sql` flag. prisma generate --sql If you don't want to regenerate the client after every change, this command also works with the existing `--watch` flag: prisma generate --sql --watch 7. Now you can import and use your SQL queries in your TypeScript code: /src/index.ts import { PrismaClient } from '@prisma/client'import { getUsersWithPosts } from '@prisma/client/sql'const prisma = new PrismaClient()const usersWithPostCounts = await prisma.$queryRawTyped(getUsersWithPosts())console.log(usersWithPostCounts) ## Passing Arguments to TypedSQL Queries To pass arguments to your TypedSQL queries, you can use parameterized queries. This allows you to write flexible and reusable SQL statements while maintaining type safety. Here's how to do it: 1. In your SQL file, use placeholders for the parameters you want to pass. The syntax for placeholders depends on your database engine: * PostgreSQL * MySQL * SQLite For PostgreSQL, use the positional placeholders `$1`, `$2`, etc.: prisma/sql/getUsersByAge.sql SELECT id, name, ageFROM usersWHERE age > $1 AND age < $2 note See below for information on how to define argument types in your SQL files. 2. When using the generated function in your TypeScript code, pass the arguments as additional parameters to `$queryRawTyped`: /src/index.ts import { PrismaClient } from '@prisma/client'import { getUsersByAge } from '@prisma/client/sql'const prisma = new PrismaClient()const minAge = 18const maxAge = 30const users = await prisma.$queryRawTyped(getUsersByAge(minAge, maxAge))console.log(users) By using parameterized queries, you ensure type safety and protect against SQL injection vulnerabilities. The TypedSQL generator will create the appropriate TypeScript types for the parameters based on your SQL query, providing full type checking for both the query results and the input parameters. ### Passing array arguments to TypedSQL TypedSQL supports passing arrays as arguments for PostgreSQL. Use PostgreSQL's `ANY` operator with an array parameter. prisma/sql/getUsersByIds.sql SELECT id, name, emailFROM usersWHERE id = ANY($1) /src/index.ts import { PrismaClient } from '@prisma/client'import { getUsersByIds } from '@prisma/client/sql'const prisma = new PrismaClient()const userIds = [1, 2, 3]const users = await prisma.$queryRawTyped(getUsersByIds(userIds))console.log(users) TypedSQL will generate the appropriate TypeScript types for the array parameter, ensuring type safety for both the input and the query results. note When passing array arguments, be mindful of the maximum number of placeholders your database supports in a single query. For very large arrays, you may need to split the query into multiple smaller queries. ### Defining argument types in your SQL files Argument typing in TypedSQL is accomplished via specific comments in your SQL files. These comments are of the form: -- @param {Type} $N:alias optional description Where `Type` is a valid database type, `N` is the position of the argument in the query, and `alias` is an optional alias for the argument that is used in the TypeScript type. As an example, if you needed to type a single string argument with the alias `name` and the description "The name of the user", you would add the following comment to your SQL file: -- @param {String} $1:name The name of the user To indicate that a parameter is nullable, add a question mark after the alias: -- @param {String} $1:name? The name of the user (optional) Currently accepted types are `Int`, `BigInt`, `Float`, `Boolean`, `String`, `DateTime`, `Json`, `Bytes`, `null`, and `Decimal`. Taking the example from above, the SQL file would look like this: -- @param {Int} $1:minAge-- @param {Int} $2:maxAgeSELECT id, name, ageFROM usersWHERE age > $1 AND age < $2 The format of argument type definitions is the same regardless of the database engine. note Manually argument type definitions are not supported for array arguments. For these arguments, you will need to rely on the type inference provided by TypedSQL. ## Examples For practical examples of how to use TypedSQL in various scenarios, please refer to the Prisma Examples repo. This repo contains a collection of ready-to-run Prisma example projects that demonstrate best practices and common use cases, including TypedSQL implementations. ## Limitations of TypedSQL ### Supported Databases TypedSQL supports modern versions of MySQL and PostgreSQL without any further configuration. For MySQL versions older than 8.0 and all SQLite versions, you will need to manually describe argument types in your SQL files. The types of inputs are inferred in all supported versions of PostgreSQL and MySQL 8.0 and later. TypedSQL does not work with MongoDB, as it is specifically designed for SQL databases. ### Active Database Connection Required TypedSQL requires an active database connection to function properly. This means you need to have a running database instance that Prisma can connect to when generating the client with the `--sql` flag. If a `directUrl` is provided in your Prisma configuration, TypedSQL will use that for the connection. ### Dynamic SQL Queries with Dynamic Columns TypedSQL does not natively support constructing SQL queries with dynamically added columns. When you need to create a query where the columns are determined at runtime, you must use the `$queryRaw` and `$executeRaw` methods. These methods allow for the execution of raw SQL, which can include dynamic column selections. **Example of a query using dynamic column selection:** const columns = 'name, email, age'; // Columns determined at runtimeconst result = await prisma.$queryRawUnsafe( `SELECT ${columns} FROM Users WHERE active = true`); In this example, the columns to be selected are defined dynamically and included in the SQL query. While this approach provides flexibility, it requires careful attention to security, particularly to avoid SQL injection vulnerabilities. Additionally, using raw SQL queries means foregoing the type-safety and DX of TypedSQL. ## Acknowledgements This feature was heavily inspired by PgTyped and SQLx. Additionally, SQLite parsing is handled by SQLx. --- ## Page: https://www.prisma.io/docs/orm/prisma-client/using-raw-sql/raw-queries warning With Prisma ORM `5.19.0`, we have released TypedSQL. TypedSQL is a new way to write SQL queries that are type-safe and even easier to add to your workflow. We strongly recommend using TypedSQL queries over the legacy raw queries described below whenever possible. Prisma Client supports the option of sending raw queries to your database. You may wish to use raw queries if: * you want to run a heavily optimized query * you require a feature that Prisma Client does not yet support (please consider raising an issue) Raw queries are available for all relational databases Prisma ORM supports. In addition, from version `3.9.0` raw queries are supported in MongoDB. For more details, see the relevant sections: * Raw queries with relational databases * Raw queries with MongoDB ## Raw queries with relational databases For relational databases, Prisma Client exposes four methods that allow you to send raw queries. You can use: * `$queryRaw` to return actual records (for example, using `SELECT`). * `$executeRaw` to return a count of affected rows (for example, after an `UPDATE` or `DELETE`). * `$queryRawUnsafe` to return actual records (for example, using `SELECT`) using a raw string. * `$executeRawUnsafe` to return a count of affected rows (for example, after an `UPDATE` or `DELETE`) using a raw string. The methods with "Unsafe" in the name are a lot more flexible but are at **significant risk of making your code vulnerable to SQL injection**. The other two methods are safe to use with a simple template tag, no string building, and no concatenation. **However**, caution is required for more complex use cases as it is still possible to introduce SQL injection if these methods are used in certain ways. For more details, see the SQL injection prevention section below. > **Note**: All methods in the above list can only run **one** query at a time. You cannot append a second query - for example, calling any of them with `select 1; select 2;` will not work. ### `$queryRaw` `$queryRaw` returns actual database records. For example, the following `SELECT` query returns all fields for each record in the `User` table: const result = await prisma.$queryRaw`SELECT * FROM User`; The method is implemented as a tagged template, which allows you to pass a template literal where you can easily insert your variables. In turn, Prisma Client creates prepared statements that are safe from SQL injections: const email = "emelie@prisma.io";const result = await prisma.$queryRaw`SELECT * FROM User WHERE email = ${email}`; You can also use the `Prisma.sql` helper, in fact, the `$queryRaw` method will **only accept** a template string or the `Prisma.sql` helper: const email = "emelie@prisma.io";const result = await prisma.$queryRaw(Prisma.sql`SELECT * FROM User WHERE email = ${email}`); warning If you use string building to incorporate untrusted input into queries passed to this method, then you open up the possibility for SQL injection attacks. SQL injection attacks can expose your data to modification or deletion. The preferred mechanism would be to include the text of the query at the point that you run this method. For more information on this risk and also examples of how to prevent it, see the SQL injection prevention section below. #### Considerations Be aware that: * Template variables cannot be used inside SQL string literals. For example, the following query would **not** work: const name = "Bob";await prisma.$queryRaw`SELECT 'My name is ${name}';`; Instead, you can either pass the whole string as a variable, or use string concatenation: const name = "My name is Bob";await prisma.$queryRaw`SELECT ${name};`; const name = "Bob";await prisma.$queryRaw`SELECT 'My name is ' || ${name};`; * Template variables can only be used for data values (such as `email` in the example above). Variables cannot be used for identifiers such as column names, table names or database names, or for SQL keywords. For example, the following two queries would **not** work: const myTable = "user";await prisma.$queryRaw`SELECT * FROM ${myTable};`; const ordering = "desc";await prisma.$queryRaw`SELECT * FROM Table ORDER BY ${ordering};`; * Prisma maps any database values returned by `$queryRaw` and `$queryRawUnsafe` to their corresponding JavaScript types. Learn more. * `$queryRaw` does not support dynamic table names in PostgreSQL databases. Learn more #### Return type `$queryRaw` returns an array. Each object corresponds to a database record: [ { id: 1, email: "emelie@prisma.io", name: "Emelie" }, { id: 2, email: "yin@prisma.io", name: "Yin" },] You can also type the results of `$queryRaw`. #### Signature $queryRaw<T = unknown>(query: TemplateStringsArray | Prisma.Sql, ...values: any[]): PrismaPromise<T>; #### Typing `$queryRaw` results `PrismaPromise<T>` uses a generic type parameter `T`. You can determine the type of `T` when you invoke the `$queryRaw` method. In the following example, `$queryRaw` returns `User[]`: // import the generated `User` type from the `@prisma/client` moduleimport { User } from "@prisma/client";const result = await prisma.$queryRaw<User[]>`SELECT * FROM User`;// result is of type: `User[]` > **Note**: If you do not provide a type, `$queryRaw` defaults to `unknown`. If you are selecting **specific fields** of the model or want to include relations, refer to the documentation about leveraging Prisma Client's generated types if you want to make sure that the results are properly typed. #### Type caveats when using raw SQL When you type the results of `$queryRaw`, the raw data might not always match the suggested TypeScript type. For example, the following Prisma model includes a `Boolean` field named `published`: model Post { id Int @id @default(autoincrement()) published Boolean @default(false) title String content String?} The following query returns all posts. It then prints out the value of the `published` field for each `Post`: const result = await prisma.$queryRaw<Post[]>`SELECT * FROM Post`;result.forEach((x) => { console.log(x.published);}); For regular CRUD queries, the Prisma Client query engine standardizes the return type for all databases. **Using the raw queries does not**. If the database provider is MySQL, the returned values are `1` or `0`. However, if the database provider is PostgreSQL, the values are `true` or `false`. > **Note**: Prisma sends JavaScript integers to PostgreSQL as `INT8`. This might conflict with your user-defined functions that accept only `INT4` as input. If you use `$queryRaw` in conjunction with a PostgreSQL database, update the input types to `INT8`, or cast your query parameters to `INT4`. #### Dynamic table names in PostgreSQL It is not possible to interpolate table names. This means that you cannot use dynamic table names with `$queryRaw`. Instead, you must use `$queryRawUnsafe`, as follows: let userTable = "User";let result = await prisma.$queryRawUnsafe(`SELECT * FROM ${userTable}`); Note that if you use `$queryRawUnsafe` in conjunction with user inputs, you risk SQL injection attacks. Learn more. ### `$queryRawUnsafe()` The `$queryRawUnsafe()` method allows you to pass a raw string (or template string) to the database. warning If you use this method with user inputs (in other words, `SELECT * FROM table WHERE columnx = ${userInput}`), then you open up the possibility for SQL injection attacks. SQL injection attacks can expose your data to modification or deletion. Wherever possible you should use the `$queryRaw` method instead. When used correctly `$queryRaw` method is significantly safer but note that the `$queryRaw` method can also be made vulnerable in certain circumstances. For more information, see the SQL injection prevention section below. The following query returns all fields for each record in the `User` table: // import the generated `User` type from the `@prisma/client` moduleimport { User } from "@prisma/client";const result = await prisma.$queryRawUnsafe("SELECT * FROM User"); You can also run a parameterized query. The following example returns all users whose email contains the string `emelie@prisma.io`: prisma.$queryRawUnsafe("SELECT * FROM users WHERE email = $1", "emelie@prisma.io"); > **Note**: Prisma sends JavaScript integers to PostgreSQL as `INT8`. This might conflict with your user-defined functions that accept only `INT4` as input. If you use a parameterized `$queryRawUnsafe` query in conjunction with a PostgreSQL database, update the input types to `INT8`, or cast your query parameters to `INT4`. For more details on using parameterized queries, see the parameterized queries section below. #### Signature $queryRawUnsafe<T = unknown>(query: string, ...values: any[]): PrismaPromise<T>; ### `$executeRaw` `$executeRaw` returns the _number of rows affected by a database operation_, such as `UPDATE` or `DELETE`. This function does **not** return database records. The following query updates records in the database and returns a count of the number of records that were updated: const result: number = await prisma.$executeRaw`UPDATE User SET active = true WHERE emailValidated = true`; The method is implemented as a tagged template, which allows you to pass a template literal where you can easily insert your variables. In turn, Prisma Client creates prepared statements that are safe from SQL injections: const emailValidated = true;const active = true;const result: number = await prisma.$executeRaw`UPDATE User SET active = ${active} WHERE emailValidated = ${emailValidated};`; warning If you use string building to incorporate untrusted input into queries passed to this method, then you open up the possibility for SQL injection attacks. SQL injection attacks can expose your data to modification or deletion. The preferred mechanism would be to include the text of the query at the point that you run this method. For more information on this risk and also examples of how to prevent it, see the SQL injection prevention section below. #### Considerations Be aware that: * `$executeRaw` does not support multiple queries in a single string (for example, `ALTER TABLE` and `CREATE TABLE` together). * Prisma Client submits prepared statements, and prepared statements only allow a subset of SQL statements. For example, `START TRANSACTION` is not permitted. You can learn more about the syntax that MySQL allows in Prepared Statements here. * `PREPARE` does not support `ALTER` - see the workaround. * Template variables cannot be used inside SQL string literals. For example, the following query would **not** work: const name = "Bob";await prisma.$executeRaw`UPDATE user SET greeting = 'My name is ${name}';`; Instead, you can either pass the whole string as a variable, or use string concatenation: const name = "My name is Bob";await prisma.$executeRaw`UPDATE user SET greeting = ${name};`; const name = "Bob";await prisma.$executeRaw`UPDATE user SET greeting = 'My name is ' || ${name};`; * Template variables can only be used for data values (such as `email` in the example above). Variables cannot be used for identifiers such as column names, table names or database names, or for SQL keywords. For example, the following two queries would **not** work: const myTable = "user";await prisma.$executeRaw`UPDATE ${myTable} SET active = true;`; const ordering = "desc";await prisma.$executeRaw`UPDATE User SET active = true ORDER BY ${desc};`; #### Return type `$executeRaw` returns a `number`. #### Signature $executeRaw<T = unknown>(query: TemplateStringsArray | Prisma.Sql, ...values: any[]): PrismaPromise<number>; ### `$executeRawUnsafe()` The `$executeRawUnsafe()` method allows you to pass a raw string (or template string) to the database. Like `$executeRaw`, it does **not** return database records, but returns the number of rows affected. warning If you use this method with user inputs (in other words, `SELECT * FROM table WHERE columnx = ${userInput}`), then you open up the possibility for SQL injection attacks. SQL injection attacks can expose your data to modification or deletion. Wherever possible you should use the `$executeRaw` method instead. When used correctly `$executeRaw` method is significantly safer but note that the `$executeRaw` method can also be made vulnerable in certain circumstances. For more information, see the SQL injection prevention section below. The following example uses a template string to update records in the database. It then returns a count of the number of records that were updated: const emailValidated = true;const active = true;const result = await prisma.$executeRawUnsafe( `UPDATE User SET active = ${active} WHERE emailValidated = ${emailValidated}`); The same can be written as a parameterized query: const result = prisma.$executeRawUnsafe( "UPDATE User SET active = $1 WHERE emailValidated = $2", "yin@prisma.io", true); For more details on using parameterized queries, see the parameterized queries section below. #### Signature $executeRawUnsafe<T = unknown>(query: string, ...values: any[]): PrismaPromise<number>; ### Raw query type mapping Prisma maps any database values returned by `$queryRaw` and `$queryRawUnsafe`to their corresponding JavaScript types. This behavior is the same as for regular Prisma query methods like `findMany()`. info **Feature availability:** * In v3.14.x and v3.15.x, raw query type mapping was available with the preview feature `improvedQueryRaw`. We made raw query type mapping Generally Available in version 4.0.0, so you do not need to use `improvedQueryRaw` in version 4.0.0 or later. * Before version 4.0.0, raw query type mapping was not available for SQLite. As an example, take a raw query that selects columns with `BigInt`, `Bytes`, `Decimal` and `Date` types from a table: const result = await prisma.$queryRaw`SELECT bigint, bytes, decimal, date FROM "Table";`;console.log(result); Show CLI results { bigint: BigInt("123"), bytes: <Buffer 01 02>), decimal: Decimal("12.34"), date: Date("<some_date>") } In the `result` object, the database values have been mapped to the corresponding JavaScript types. The following table shows the conversion between types used in the database and the JavaScript type returned by the raw query: | Database type | JavaScript type | | --- | --- | | Text | `String` | | 32-bit integer | `Number` | | 32-bit unsigned integer | `BigInt` | | Floating point number | `Number` | | Double precision number | `Number` | | 64-bit integer | `BigInt` | | Decimal / numeric | `Decimal` | | Bytes | `Uint8Array` (before v6: `Buffer`) | | Json | `Object` | | DateTime | `Date` | | Date | `Date` | | Time | `Date` | | Uuid | `String` | | Xml | `String` | Note that the exact name for each database type will vary between databases – for example, the boolean type is known as `boolean` in PostgreSQL and `STRING` in CockroachDB. See the Scalar types reference for full details of type names for each database. ### Raw query typecasting behavior Raw queries with Prisma Client might require parameters to be in the expected types of the SQL function or query. Prisma Client does not do subtle, implicit casts. As an example, take the following query using PostgreSQL's `LENGTH` function, which only accepts the `text` type as an input: await prisma.$queryRaw`SELECT LENGTH(${42});`; This query returns an error: // ERROR: function length(integer) does not exist// HINT: No function matches the given name and argument types. You might need to add explicit type casts. The solution in this case is to explicitly cast `42` to the `text` type: await prisma.$queryRaw`SELECT LENGTH(${42}::text);`; info **Feature availability:** This funtionality is Generally Available since version 4.0.0. In v3.14.x and v3.15.x, it was available with the preview feature `improvedQueryRaw`. For the example above before version 4.0.0, Prisma ORM silently coerces `42` to `text` and does not require the explicit cast. On the other hand the following raw query now works correctly, returning an integer result, and failed before: await prisma.$queryRaw`SELECT ${1.5}::int as int`;// Now: [{ int: 2 }]// Before: db error: ERROR: incorrect binary data format in bind parameter 1 ### Transactions In 2.10.0 and later, you can use `.$executeRaw()` and `.$queryRaw()` inside a transaction. ### Using variables `$executeRaw` and `$queryRaw` are implemented as **tagged templates**. Tagged templates are the recommended way to use variables with raw SQL in the Prisma Client. The following example includes a placeholder named `${userId}`: const userId = 42;const result = await prisma.$queryRaw`SELECT * FROM User WHERE id = ${userId};`; ✔ Benefits of using the tagged template versions of `$queryRaw` and `$executeRaw` include: * Prisma Client escapes all variables. * Tagged templates are database-agnostic - you do not need to remember if variables should be written as `$1` (PostgreSQL) or `?` (MySQL). * SQL Template Tag give you access to useful helpers. * Embedded, named variables are easier to read. > **Note**: You cannot pass a table or column name into a tagged template placeholder. For example, you cannot `SELECT ?` and pass in `*` or `id, name` based on some condition. #### Tagged template helpers Prisma Client specifically uses SQL Template Tag, which exposes a number of helpers. For example, the following query uses `join()` to pass in a list of IDs: import { Prisma } from "@prisma/client";const ids = [1, 3, 5, 10, 20];const result = await prisma.$queryRaw`SELECT * FROM User WHERE id IN (${Prisma.join(ids)})`; The following example uses the `empty` and `sql` helpers to change the query depending on whether `userName` is empty: import { Prisma } from "@prisma/client";const userName = "";const result = await prisma.$queryRaw`SELECT * FROM User ${ userName ? Prisma.sql`WHERE name = ${userName}` : Prisma.empty // Cannot use "" or NULL here!}`; #### `ALTER` limitation (PostgreSQL) PostgreSQL does not support using `ALTER` in a prepared statement, which means that the following queries **will not work**: await prisma.$executeRaw`ALTER USER prisma WITH PASSWORD "${password}"`;await prisma.$executeRaw(Prisma.sql`ALTER USER prisma WITH PASSWORD "${password}"`); You can use the following query, but be aware that this is potentially **unsafe** as `${password}` is not escaped: await prisma.$executeRawUnsafe('ALTER USER prisma WITH PASSWORD "$1"', password}) ### Unsupported types `Unsupported` types need to be cast to Prisma Client supported types before using them in `$queryRaw` or `$queryRawUnsafe`. For example, take the following model, which has a `location` field with an `Unsupported` type: model Country { location Unsupported("point")?} The following query on the unsupported field will **not** work: await prisma.$queryRaw`SELECT location FROM Country;`; Instead, cast `Unsupported` fields to any supported Prisma Client type, **if your `Unsupported` column supports the cast**. The most common type you may want to cast your `Unsupported` column to is `String`. For example, on PostgreSQL, this would map to the `text` type: await prisma.$queryRaw`SELECT location::text FROM Country;`; The database will thus provide a `String` representation of your data which Prisma Client supports. For details of supported Prisma types, see the Prisma connector overview for the relevant database. ## SQL injection prevention The ideal way to avoid SQL injection in Prisma Client is to use the ORM models to perform queries wherever possible. Where this is not possible and raw queries are required, Prisma Client provides various raw methods, but it is important to use these methods safely. This section will provide various examples of using these methods safely and unsafely. You can test these examples in the Prisma Playground. ### In `$queryRaw` and `$executeRaw` #### Simple, safe use of `$queryRaw` and `$executeRaw` These methods can mitigate the risk of SQL injection by escaping all variables when you use tagged templates and sends all queries as prepared statements. $queryRaw`...`; // Tagged template$executeRaw`...`; // Tagged template The following example is safe ✅ from SQL Injection: const inputString = `'Sarah' UNION SELECT id, title FROM "Post"`;const result = await prisma.$queryRaw`SELECT id, name FROM "User" WHERE name = ${inputString}`;console.log(result); #### Unsafe use of `$queryRaw` and `$executeRaw` However, it is also possible to use these methods in unsafe ways. One way is by artificially generating a tagged template that unsafely concatenates user input. The following example is vulnerable ❌ to SQL Injection: // Unsafely generate query textconst inputString = `'Sarah' UNION SELECT id, title FROM "Post"`; // SQL Injectionconst query = `SELECT id, name FROM "User" WHERE name = ${inputString}`;// Version for Typescriptconst stringsArray: any = [...[query]];// Version for Javascriptconst stringsArray = [...[query]];// Use the `raw` property to impersonate a tagged templatestringsArray.raw = [query];// Use queryRawconst result = await prisma.$queryRaw(stringsArray);console.log(result); Another way to make these methods vulnerable is misuse of the `Prisma.raw` function. The following examples are all vulnerable ❌ to SQL Injection: const inputString = `'Sarah' UNION SELECT id, title FROM "Post"`;const result = await prisma.$queryRaw`SELECT id, name FROM "User" WHERE name = ${Prisma.raw( inputString)}`;console.log(result); const inputString = `'Sarah' UNION SELECT id, title FROM "Post"`;const result = await prisma.$queryRaw( Prisma.raw(`SELECT id, name FROM "User" WHERE name = ${inputString}`));console.log(result); const inputString = `'Sarah' UNION SELECT id, title FROM "Post"`;const query = Prisma.raw(`SELECT id, name FROM "User" WHERE name = ${inputString}`);const result = await prisma.$queryRaw(query);console.log(result); #### Safely using `$queryRaw` and `$executeRaw` in more complex scenarios ##### Building raw queries separate to query execution If you want to build your raw queries elsewhere or separate to your parameters you will need to use one of the following methods. In this example, the `sql` helper method is used to build the query text by safely including the variable. It is safe ✅ from SQL Injection: // inputString can be untrusted inputconst inputString = `'Sarah' UNION SELECT id, title FROM "Post"`;// Safe if the text query below is completely trusted contentconst query = Prisma.sql`SELECT id, name FROM "User" WHERE name = ${inputString}`;const result = await prisma.$queryRaw(query);console.log(result); In this example which is safe ✅ from SQL Injection, the `sql` helper method is used to build the query text including a parameter marker for the input value. Each variable is represented by a marker symbol (`?` for MySQL, `$1`, `$2`, and so on for PostgreSQL). Note that the examples just show PostgreSQL queries. // Version for Typescriptconst query: any;// Version for Javascriptconst query;// Safe if the text query below is completely trusted contentquery = Prisma.sql`SELECT id, name FROM "User" WHERE name = $1`;// inputString can be untrusted inputconst inputString = `'Sarah' UNION SELECT id, title FROM "Post"`;query.values = [inputString];const result = await prisma.$queryRaw(query);console.log(result); > **Note**: PostgreSQL variables are represented by `$1`, etc ##### Building raw queries elsewhere or in stages If you want to build your raw queries somewhere other than where the query is executed, the ideal way to do this is to create an `Sql` object from the segments of your query and pass it the parameter value. In the following example we have two variables to parameterize. The example is safe ✅ from SQL Injection as long as the query strings being passed to `Prisma.sql` only contain trusted content: // Example is safe if the text query below is completely trusted contentconst query1 = `SELECT id, name FROM "User" WHERE name = `; // The first parameter would be inserted after this stringconst query2 = ` OR name = `; // The second parameter would be inserted after this stringconst inputString1 = "Fred";const inputString2 = `'Sarah' UNION SELECT id, title FROM "Post"`;const query = Prisma.sql([query1, query2, ""], inputString1, inputString2);const result = await prisma.$queryRaw(query);console.log(result); > Note: Notice that the string array being passed as the first parameter `Prisma.sql` needs to have an empty string at the end as the `sql` function expects one more query segment than the number of parameters. If you want to build your raw queries into one large string, this is still possible but requires some care as it is uses the potentially dangerous `Prisma.raw` method. You also need to build your query using the correct parameter markers for your database as Prisma won't be able to provide markers for the relevant database as it usually is. The following example is safe ✅ from SQL Injection as long as the query strings being passed to `Prisma.raw` only contain trusted content: // Version for Typescriptconst query: any;// Version for Javascriptconst query;// Example is safe if the text query below is completely trusted contentconst query1 = `SELECT id, name FROM "User" `;const query2 = `WHERE name = $1 `;query = Prisma.raw(`${query1}${query2}`);// inputString can be untrusted inputconst inputString = `'Sarah' UNION SELECT id, title FROM "Post"`;query.values = [inputString];const result = await prisma.$queryRaw(query);console.log(result); ### In `$queryRawUnsafe` and `$executeRawUnsafe` #### Using `$queryRawUnsafe` and `$executeRawUnsafe` unsafely If you cannot use tagged templates, you can instead use `$queryRawUnsafe` or `$executeRawUnsafe`. However, **be aware that these functions significantly increase the risk of SQL injection vulnerabilities in your code**. The following example concatenates `query` and `inputString`. Prisma Client ❌ **cannot** escape `inputString` in this example, which makes it vulnerable to SQL injection: const inputString = '"Sarah" UNION SELECT id, title, content FROM Post'; // SQL Injectionconst query = "SELECT id, name, email FROM User WHERE name = " + inputString;const result = await prisma.$queryRawUnsafe(query);console.log(result); #### Parameterized queries As an alternative to tagged templates, `$queryRawUnsafe` supports standard parameterized queries where each variable is represented by a symbol (`?` for MySQL, `$1`, `$2`, and so on for PostgreSQL). Note that the examples just show PostgreSQL queries. The following example is safe ✅ from SQL Injection: const userName = "Sarah";const email = "sarah@prisma.io";const result = await prisma.$queryRawUnsafe( "SELECT * FROM User WHERE (name = $1 OR email = $2)", userName, email); > **Note**: PostgreSQL variables are represented by `$1` and `$2` As with tagged templates, Prisma Client escapes all variables when they are provided in this way. > **Note**: You cannot pass a table or column name as a variable into a parameterized query. For example, you cannot `SELECT ?` and pass in `*` or `id, name` based on some condition. ##### Parameterized PostgreSQL `ILIKE` query When you use `ILIKE`, the `%` wildcard character(s) should be included in the variable itself, not the query (`string`). This example is safe ✅ from SQL Injection. const userName = "Sarah";const emailFragment = "prisma.io";const result = await prisma.$queryRawUnsafe( 'SELECT * FROM "User" WHERE (name = $1 OR email ILIKE $2)', userName, `%${emailFragment}`); > **Note**: Using `%$2` as an argument would not work ## Raw queries with MongoDB For MongoDB in versions `3.9.0` and later, Prisma Client exposes three methods that allow you to send raw queries. You can use: * `$runCommandRaw` to run a command against the database * `<model>.findRaw` to find zero or more documents that match the filter. * `<model>.aggregateRaw` to perform aggregation operations on a collection. ### `$runCommandRaw()` `$runCommandRaw()` runs a raw MongoDB command against the database. As input, it accepts all MongoDB database commands, with the following exceptions: * `find` (use `findRaw()` instead) * `aggregate` (use `aggregateRaw()` instead) When you use `$runCommandRaw()` to run a MongoDB database command, note the following: * The object that you pass when you invoke `$runCommandRaw()` must follow the syntax of the MongoDB database command. * You must connect to the database with an appropriate role for the MongoDB database command. In the following example, a query inserts two records with the same `_id`. This bypasses normal document validation. prisma.$runCommandRaw({ insert: "Pets", bypassDocumentValidation: true, documents: [ { _id: 1, name: "Felinecitas", type: "Cat", breed: "Russian Blue", age: 12, }, { _id: 1, name: "Nao Nao", type: "Dog", breed: "Chow Chow", age: 2, }, ],}); warning Do not use `$runCommandRaw()` for queries which contain the `"find"` or `"aggregate"` commands, because you might be unable to fetch all data. This is because MongoDB returns a cursor that is attached to your MongoDB session, and you might not hit the same MongoDB session every time. For these queries, you should use the specialised `findRaw()` and `aggregateRaw()` methods instead. #### Return type `$runCommandRaw()` returns a `JSON` object whose shape depends on the inputs. #### Signature $runCommandRaw(command: InputJsonObject): PrismaPromise<JsonObject>; ### `findRaw()` `<model>.findRaw()` returns actual database records. It will find zero or more documents that match the filter on the `User` collection: const result = await prisma.user.findRaw({ filter: { age: { $gt: 25 } }, options: { projection: { _id: false } },}); #### Return type `<model>.findRaw()` returns a `JSON` object whose shape depends on the inputs. #### Signature <model>.findRaw(args?: {filter?: InputJsonObject, options?: InputJsonObject}): PrismaPromise<JsonObject>; * `filter`: The query predicate filter. If unspecified, then all documents in the collection will match the predicate. * `options`: Additional options to pass to the `find` command. ### `aggregateRaw()` `<model>.aggregateRaw()` returns aggregated database records. It will perform aggregation operations on the `User` collection: const result = await prisma.user.aggregateRaw({ pipeline: [ { $match: { status: "registered" } }, { $group: { _id: "$country", total: { $sum: 1 } } }, ],}); #### Return type `<model>.aggregateRaw()` returns a `JSON` object whose shape depends on the inputs. #### Signature <model>.aggregateRaw(args?: {pipeline?: InputJsonObject[], options?: InputJsonObject}): PrismaPromise<JsonObject>; * `pipeline`: An array of aggregation stages to process and transform the document stream via the aggregation pipeline. * `options`: Additional options to pass to the `aggregate` command. #### Caveats When working with custom objects like `ObjectId` or `Date,` you will have to pass them according to the MongoDB extended JSON Spec. Example: const result = await prisma.user.aggregateRaw({ pipeline: [ { $match: { _id: { $oid: id } } }// ^ notice the $oid convention here ],}); --- ## Page: https://www.prisma.io/docs/orm/prisma-client/using-raw-sql/safeql ## Overview This page explains how to improve the experience of writing raw SQL in Prisma ORM. It uses Prisma Client extensions and SafeQL to create custom, type-safe Prisma Client queries which abstract custom SQL that your app might need (using `$queryRaw`). The example will be using PostGIS and PostgreSQL, but is applicable to any raw SQL queries that you might need in your application. note This page builds on the legacy raw query methods available in Prisma Client. While many use cases for raw SQL in Prisma Client are covered by TypedSQL, using these legacy methods is still the recommended approach for working with `Unsupported` fields. ## What is SafeQL? SafeQL allows for advanced linting and type safety within raw SQL queries. After setup, SafeQL works with Prisma Client `$queryRaw` and `$executeRaw` to provide type safety when raw queries are required. SafeQL runs as an ESLint plugin and is configured using ESLint rules. This guide doesn't cover setting up ESLint and we will assume that you already having it running in your project. ## Prerequisites To follow along, you will be expected to have: * A PostgreSQL database with PostGIS installed * Prisma ORM set up in your project * ESLint set up in your project ## Geographic data support in Prisma ORM At the time of writing, Prisma ORM does not support working with geographic data, specifically using PostGIS. A model that has geographic data columns will be stored using the `Unsupported` data type. Fields with `Unsupported` types are present in the generated Prisma Client and will be typed as `any`. A model with a required `Unsupported` type does not expose write operations such as `create`, and `update`. Prisma Client supports write operations on models with a required `Unsupported` field using `$queryRaw` and `$executeRaw`. You can use Prisma Client extensions and SafeQL to improve the type-safety when working with geographical data in raw queries. ## 1\. Set up Prisma ORM for use with PostGIS If you haven't already, enable the `postgresqlExtensions` Preview feature and add the `postgis` PostgreSQL extension in your Prisma schema: generator client { provider = "prisma-client-js" previewFeatures = ["postgresqlExtensions"]}datasource db { provider = "postgresql" url = env("DATABASE_URL") extensions = [postgis]} warning If you are not using a hosted database provider, you will likely need to install the `postgis` extension. Refer to PostGIS's docs to learn more about how to get started with PostGIS. If you're using Docker Compose, you can use the following snippet to set up a PostgreSQL database that has PostGIS installed: version: '3.6'services: pgDB: image: postgis/postgis:13-3.1-alpine restart: always ports: - '5432:5432' volumes: - db_data:/var/lib/postgresql/data environment: POSTGRES_PASSWORD: password POSTGRES_DB: geoexamplevolumes: db_data: Next, create a migration and execute a migration to enable the extension: npx prisma migrate dev --name add-postgis For reference, the output of the migration file should look like the following: migrations/TIMESTAMP\_add\_postgis/migration.sql -- CreateExtensionCREATE EXTENSION IF NOT EXISTS "postgis"; You can double-check that the migration has been applied by running `prisma migrate status`. ## 2\. Create a new model that uses a geographic data column Add a new model with a column with a `geography` data type once the migration is applied. For this guide, we'll use a model called `PointOfInterest`. model PointOfInterest { id Int @id @default(autoincrement()) name String location Unsupported("geography(Point, 4326)")} You'll notice that the `location` field uses an `Unsupported` type. This means that we lose a lot of the benefits of Prisma ORM when working with `PointOfInterest`. We'll be using SafeQL to fix this. Like before, create and execute a migration using the `prisma migrate dev` command to create the `PointOfInterest` table in your database: npx prisma migrate dev --name add-poi For reference, here is the output of the SQL migration file generated by Prisma Migrate: migrations/TIMESTAMP\_add\_poi/migration.sql -- CreateTableCREATE TABLE "PointOfInterest" ( "id" SERIAL NOT NULL, "name" TEXT NOT NULL, "location" geography(Point, 4326) NOT NULL, CONSTRAINT "PointOfInterest_pkey" PRIMARY KEY ("id")); ## 3\. Integrate SafeQL SafeQL is easily integrated with Prisma ORM in order to lint `$queryRaw` and `$executeRaw` Prisma operations. You can reference SafeQL's integration guide or follow the steps below. ### 3.1. Install the `@ts-safeql/eslint-plugin` npm package npm install -D @ts-safeql/eslint-plugin libpg-query This ESLint plugin is what will allow for queries to be linted. ### 3.2. Add `@ts-safeql/eslint-plugin` to your ESLint plugins Next, add `@ts-safeql/eslint-plugin` to your list of ESLint plugins. In our example we are using an `.eslintrc.js` file, but this can be applied to any way that you configure ESLint. .eslintrc.js /** @type {import('eslint').Linter.Config} */module.exports = { "plugins": [..., "@ts-safeql/eslint-plugin"], ...} ### 3.3 Add `@ts-safeql/check-sql` rules Now, setup the rules that will enable SafeQL to mark invalid SQL queries as ESLint errors. .eslintrc.js /** @type {import('eslint').Linter.Config} */module.exports = { plugins: [..., '@ts-safeql/eslint-plugin'], rules: { '@ts-safeql/check-sql': [ 'error', { connections: [ { // The migrations path: migrationsDir: './prisma/migrations', targets: [ // This makes `prisma.$queryRaw` and `prisma.$executeRaw` commands linted { tag: 'prisma.+($queryRaw|$executeRaw)', transform: '{type}[]' }, ], }, ], }, ], },} > **Note**: If your `PrismaClient` instance is called something different than `prisma`, you need to adjust the value for `tag` accordingly. For example, if it is called `db`, the value for `tag` should be `'db.+($queryRaw|$executeRaw)'`. ### 3.4. Connect to your database Finally, set up a `connectionUrl` for SafeQL so that it can introspect your database and retrieve the table and column names you use in your schema. SafeQL then uses this information for linting and highlighting problems in your raw SQL statements. Our example relies on the `dotenv` package to get the same connection string that is used by Prisma ORM. We recommend this in order to keep your database URL out of version control. If you haven't installed `dotenv` yet, you can install it as follows: npm install dotenv Then update your ESLint config as follows: .eslintrc.js require('dotenv').config()/** @type {import('eslint').Linter.Config} */module.exports = { plugins: ['@ts-safeql/eslint-plugin'], // exclude `parserOptions` if you are not using TypeScript parserOptions: { project: './tsconfig.json', }, rules: { '@ts-safeql/check-sql': [ 'error', { connections: [ { connectionUrl: process.env.DATABASE_URL, // The migrations path: migrationsDir: './prisma/migrations', targets: [ // what you would like SafeQL to lint. This makes `prisma.$queryRaw` and `prisma.$executeRaw` // commands linted { tag: 'prisma.+($queryRaw|$executeRaw)', transform: '{type}[]' }, ], }, ], }, ], },} SafeQL is now fully configured to help you write better raw SQL using Prisma Client. ## 4\. Creating extensions to make raw SQL queries type-safe In this section, we'll create two `model` extensions with custom queries to be able to work conveniently with the `PointOfInterest` model: 1. A `create` query that allows us to create new `PointOfInterest` records in the database 2. A `findClosestPoints` query that returns the `PointOfInterest` records that are closest to a given coordinate ### 4.1. Adding an extension to create `PointOfInterest` records The `PointOfInterest` model in the Prisma schema uses an `Unsupported` type. As a consequence, the generated `PointOfInterest` type in Prisma Client can't be used to carry values for latitude and longitude. We will resolve this by defining two custom types that better represent our model in TypeScript: type MyPoint = { latitude: number longitude: number}type MyPointOfInterest = { name: string location: MyPoint} Next, you can add a `create` query to the `pointOfInterest` property of your Prisma Client: const prisma = new PrismaClient().$extends({ model: { pointOfInterest: { async create(data: { name: string latitude: number longitude: number }) { // Create an object using the custom types from above const poi: MyPointOfInterest = { name: data.name, location: { latitude: data.latitude, longitude: data.longitude, }, } // Insert the object into the database const point = `POINT(${poi.location.longitude} ${poi.location.latitude})` await prisma.$queryRaw` INSERT INTO "PointOfInterest" (name, location) VALUES (${poi.name}, ST_GeomFromText(${point}, 4326)); ` // Return the object return poi }, }, },}) Notice that the SQL in the line that's highlighted in the code snippet gets checked by SafeQL! For example, if you change the name of the table from `"PointOfInterest"` to `"PointOfInterest2"`, the following error appears: error Invalid Query: relation "PointOfInterest2" does not exist @ts-safeql/check-sql This also works with the column names `name` and `location`. You can now create new `PointOfInterest` records in your code as follows: const poi = await prisma.pointOfInterest.create({ name: 'Berlin', latitude: 52.52, longitude: 13.405,}) ### 4.2. Adding an extension to query for closest to `PointOfInterest` records Now let's make a Prisma Client extension in order to query this model. We will be making an extension that finds the closest points of interest to a given longitude and latitude. const prisma = new PrismaClient().$extends({ model: { pointOfInterest: { async create(data: { name: string latitude: number longitude: number }) { // ... same code as before }, async findClosestPoints(latitude: number, longitude: number) { // Query for clostest points of interests const result = await prisma.$queryRaw< { id: number | null name: string | null st_x: number | null st_y: number | null }[] >`SELECT id, name, ST_X(location::geometry), ST_Y(location::geometry) FROM "PointOfInterest" ORDER BY ST_DistanceSphere(location::geometry, ST_MakePoint(${longitude}, ${latitude})) DESC` // Transform to our custom type const pois: MyPointOfInterest[] = result.map((data) => { return { name: data.name, location: { latitude: data.st_x || 0, longitude: data.st_y || 0, }, } }) // Return data return pois }, }, },}) Now, you can use our Prisma Client as normal to find close points of interest to a given longitude and latitude using the custom method created on the `PointOfInterest` model. const closestPointOfInterest = await prisma.pointOfInterest.findClosestPoints( 53.5488, 9.9872) Similar to before, we again have the benefit of SafeQL to add extra type safety to our raw queries. For example, if we removed the cast to `geometry` for `location` by changing `location::geometry` to just `location`, we would get linting errors in the `ST_X`, `ST_Y` or `ST_DistanceSphere` functions respectively. error Invalid Query: function st_distancesphere(geography, geometry) does not exist @ts-safeql/check-sql ## Conclusion While you may sometimes need to drop down to raw SQL when using Prisma ORM, you can use various techniques to make the experience of writing raw SQL queries with Prisma ORM better. In this article, you have used SafeQL and Prisma Client extensions to create custom, type-safe Prisma Client queries to abstract PostGIS operations which are currently not natively supported in Prisma ORM. --- ## Page: https://www.prisma.io/docs/orm/prisma-client/special-fields-and-types/composite-types warning Composite types are only available with MongoDB. Composite types, known as embedded documents in MongoDB, allow you to embed records within other records. We made composite types Generally Available in v3.12.0. They were previously available in Preview from v3.10.0. This page explains how to: * find records that contain composite types using `findFirst` and `findMany` * create new records with composite types using `create` and `createMany` * update composite types within existing records using `update` and `updateMany` * delete records with composite types using `delete` and `deleteMany` ## Example schema We’ll use this schema for the examples that follow: schema.prisma generator client { provider = "prisma-client-js"}datasource db { provider = "mongodb" url = env("DATABASE_URL")}model Product { id String @id @default(auto()) @map("_id") @db.ObjectId name String @unique price Float colors Color[] sizes Size[] photos Photo[] orders Order[]}model Order { id String @id @default(auto()) @map("_id") @db.ObjectId product Product @relation(fields: [productId], references: [id]) color Color size Size shippingAddress Address billingAddress Address? productId String @db.ObjectId}enum Color { Red Green Blue}enum Size { Small Medium Large XLarge}type Photo { height Int @default(200) width Int @default(100) url String}type Address { street String city String zip String} In this schema, the `Product` model has a `Photo[]` composite type, and the `Order` model has two composite `Address` types. The `shippingAddress` is required, but the `billingAddress` is optional. ## Considerations when using composite types There are currently some limitations when using composite types in Prisma Client: * `findUnique()` can't filter on composite types * `aggregate`, `groupBy()`, `count` don’t support composite operations ## Default values for required fields on composite types From version 4.0.0, if you carry out a database read on a composite type when all of the following conditions are true, then Prisma Client inserts the default value into the result. Conditions: * A field on the composite type is required, and * this field has a default value, and * this field is not present in the returned document or documents. Note: * This is the same behavior as with model fields. * On read operations, Prisma Client inserts the default value into the result, but does not insert the default value into the database. In our example schema, suppose that you add a required field to `photo`. This field, `bitDepth`, has a default value: schema.prisma ...type Photo { ... bitDepth Int @default(8)}... Suppose that you then run `npx prisma db push` to update your database and regenerate your Prisma Client with `npx prisma generate`. Then, you run the following application code: console.dir(await prisma.product.findMany({}), { depth: Infinity }) The `bitDepth` field has no content because you have only just added this field, so the query returns the default value of `8`. \*\* Earlier versions \*\* Before version 4.0.0, Prisma ORM threw a P2032 error as follows: Error converting field "bitDepth" of expected non-nullabletype "int", found incompatible value of "null". ## Finding records that contain composite types with `find` and `findMany` Records can be filtered by a composite type within the `where` operation. The following section describes the operations available for filtering by a single type or multiple types, and gives examples of each. ### Filtering for one composite type Use the `is`, `equals`, `isNot` and `isSet` operations to change a single composite type: * `is`: Filter results by matching composite types. Requires one or more fields to be present _(e.g. Filter orders by the street name on the shipping address)_ * `equals`: Filter results by matching composite types. Requires all fields to be present. _(e.g. Filter orders by the full shipping address)_ * `isNot`: Filter results by non-matching composite types * `isSet` : Filter optional fields to include only results that have been set (either set to a value, or explicitly set to `null`). Setting this filter to `true` will exclude `undefined` results that are not set at all. For example, use `is` to filter for orders with a street name of `'555 Candy Cane Lane'`: const orders = await prisma.order.findMany({ where: { shippingAddress: { is: { street: '555 Candy Cane Lane', }, }, },}) Use `equals` to filter for orders which match on all fields in the shipping address: const orders = await prisma.order.findMany({ where: { shippingAddress: { equals: { street: '555 Candy Cane Lane', city: 'Wonderland', zip: '52337', }, }, },}) You can also use a shorthand notation for this query, where you leave out the `equals`: const orders = await prisma.order.findMany({ where: { shippingAddress: { street: '555 Candy Cane Lane', city: 'Wonderland', zip: '52337', }, },}) Use `isNot` to filter for orders that do not have a `zip` code of `'52337'`: const orders = await prisma.order.findMany({ where: { shippingAddress: { isNot: { zip: '52337', }, }, },}) Use `isSet` to filter for orders where the optional `billingAddress` has been set (either to a value or to `null`): const orders = await prisma.order.findMany({ where: { billingAddress: { isSet: true, }, },}) ### Filtering for many composite types Use the `equals`, `isEmpty`, `every`, `some` and `none` operations to filter for multiple composite types: * `equals`: Checks exact equality of the list * `isEmpty`: Checks if the list is empty * `every`: Every item in the list must match the condition * `some`: One or more of the items in the list must match the condition * `none`: None of the items in the list can match the condition * `isSet` : Filter optional fields to include only results that have been set (either set to a value, or explicitly set to `null`). Setting this filter to `true` will exclude `undefined` results that are not set at all. For example, you can use `equals` to find products with a specific list of photos (all `url`, `height` and `width` fields must match): const product = prisma.product.findMany({ where: { photos: { equals: [ { url: '1.jpg', height: 200, width: 100, }, { url: '2.jpg', height: 200, width: 100, }, ], }, },}) You can also use a shorthand notation for this query, where you leave out the `equals` and specify just the fields that you want to filter for: const product = prisma.product.findMany({ where: { photos: [ { url: '1.jpg', height: 200, width: 100, }, { url: '2.jpg', height: 200, width: 100, }, ], },}) Use `isEmpty` to filter for products with no photos: const product = prisma.product.findMany({ where: { photos: { isEmpty: true, }, },}) Use `some` to filter for products where one or more photos has a `url` of `"2.jpg"`: const product = prisma.product.findFirst({ where: { photos: { some: { url: '2.jpg', }, }, },}) Use `none` to filter for products where no photos have a `url` of `"2.jpg"`: const product = prisma.product.findFirst({ where: { photos: { none: { url: '2.jpg', }, }, },}) ## Creating records with composite types using `create` and `createMany` info When you create a record with a composite type that has a unique restraint, note that MongoDB does not enforce unique values inside a record. Learn more. Composite types can be created within a `create` or `createMany` method using the `set` operation. For example, you can use `set` within `create` to create an `Address` composite type inside an `Order`: const order = await prisma.order.create({ data: { // Normal relation product: { connect: { id: 'some-object-id' } }, color: 'Red', size: 'Large', // Composite type shippingAddress: { set: { street: '1084 Candycane Lane', city: 'Silverlake', zip: '84323', }, }, },}) You can also use a shorthand notation where you leave out the `set` and specify just the fields that you want to create: const order = await prisma.order.create({ data: { // Normal relation product: { connect: { id: 'some-object-id' } }, color: 'Red', size: 'Large', // Composite type shippingAddress: { street: '1084 Candycane Lane', city: 'Silverlake', zip: '84323', }, },}) For an optional type, like the `billingAddress`, you can also set the value to `null`: const order = await prisma.order.create({ data: { // Normal relation product: { connect: { id: 'some-object-id' } }, color: 'Red', size: 'Large', // Composite type shippingAddress: { street: '1084 Candycane Lane', city: 'Silverlake', zip: '84323', }, // Embedded optional type, set to null billingAddress: { set: null, }, },}) To model the case where an `product` contains a list of multiple `photos`, you can `set` multiple composite types at once: const product = await prisma.product.create({ data: { name: 'Forest Runners', price: 59.99, colors: ['Red', 'Green'], sizes: ['Small', 'Medium', 'Large'], // New composite type photos: { set: [ { height: 100, width: 200, url: '1.jpg' }, { height: 100, width: 200, url: '2.jpg' }, ], }, },}) You can also use a shorthand notation where you leave out the `set` and specify just the fields that you want to create: const product = await prisma.product.create({ data: { name: 'Forest Runners', price: 59.99, // Scalar lists that we already support colors: ['Red', 'Green'], sizes: ['Small', 'Medium', 'Large'], // New composite type photos: [ { height: 100, width: 200, url: '1.jpg' }, { height: 100, width: 200, url: '2.jpg' }, ], },}) These operations also work within the `createMany` method. For example, you can create multiple `product`s which each contain a list of `photos`: const product = await prisma.product.createMany({ data: [ { name: 'Forest Runners', price: 59.99, colors: ['Red', 'Green'], sizes: ['Small', 'Medium', 'Large'], photos: [ { height: 100, width: 200, url: '1.jpg' }, { height: 100, width: 200, url: '2.jpg' }, ], }, { name: 'Alpine Blazers', price: 85.99, colors: ['Blue', 'Red'], sizes: ['Large', 'XLarge'], photos: [ { height: 100, width: 200, url: '1.jpg' }, { height: 150, width: 200, url: '4.jpg' }, { height: 200, width: 200, url: '5.jpg' }, ], }, ],}) ## Changing composite types within `update` and `updateMany` info When you update a record with a composite type that has a unique restraint, note that MongoDB does not enforce unique values inside a record. Learn more. Composite types can be set, updated or removed within an `update` or `updateMany` method. The following section describes the operations available for updating a single type or multiple types at once, and gives examples of each. ### Changing a single composite type Use the `set`, `unset` `update` and `upsert` operations to change a single composite type: * Use `set` to set a composite type, overriding any existing value * Use `unset` to unset a composite type. Unlike `set: null`, `unset` removes the field entirely * Use `update` to update a composite type * Use `upsert` to `update` an existing composite type if it exists, and otherwise `set` the composite type For example, use `update` to update a required `shippingAddress` with an `Address` composite type inside an `Order`: const order = await prisma.order.update({ where: { id: 'some-object-id', }, data: { shippingAddress: { // Update just the zip field update: { zip: '41232', }, }, },}) For an optional embedded type, like the `billingAddress`, use `upsert` to create a new record if it does not exist, and update the record if it does: const order = await prisma.order.update({ where: { id: 'some-object-id', }, data: { billingAddress: { // Create the address if it doesn't exist, // otherwise update it upsert: { set: { street: '1084 Candycane Lane', city: 'Silverlake', zip: '84323', }, update: { zip: '84323', }, }, }, },}) You can also use the `unset` operation to remove an optional embedded type. The following example uses `unset` to remove the `billingAddress` from an `Order`: const order = await prisma.order.update({ where: { id: 'some-object-id', }, data: { billingAddress: { // Unset the billing address // Removes "billingAddress" field from order unset: true, }, },}) You can use filters within `updateMany` to update all records that match a composite type. The following example uses the `is` filter to match the street name from a shipping address on a list of orders: const orders = await prisma.order.updateMany({ where: { shippingAddress: { is: { street: '555 Candy Cane Lane', }, }, }, data: { shippingAddress: { update: { street: '111 Candy Cane Drive', }, }, },}) ### Changing multiple composite types Use the `set`, `push`, `updateMany` and `deleteMany` operations to change a list of composite types: * `set`: Set an embedded list of composite types, overriding any existing list * `push`: Push values to the end of an embedded list of composite types * `updateMany`: Update many composite types at once * `deleteMany`: Delete many composite types at once For example, use `push` to add a new photo to the `photos` list: const product = prisma.product.update({ where: { id: '62de6d328a65d8fffdae2c18', }, data: { photos: { // Push a photo to the end of the photos list push: [{ height: 100, width: 200, url: '1.jpg' }], }, },}) Use `updateMany` to update photos with a `url` of `1.jpg` or `2.png`: const product = prisma.product.update({ where: { id: '62de6d328a65d8fffdae2c18', }, data: { photos: { updateMany: { where: { url: '1.jpg', }, data: { url: '2.png', }, }, }, },}) The following example uses `deleteMany` to delete all photos with a `height` of 100: const product = prisma.product.update({ where: { id: '62de6d328a65d8fffdae2c18', }, data: { photos: { deleteMany: { where: { height: 100, }, }, }, },}) ## Upserting composite types with `upsert` info When you create or update the values in a composite type that has a unique restraint, note that MongoDB does not enforce unique values inside a record. Learn more. To create or update a composite type, use the `upsert` method. You can use the same composite operations as the `create` and `update` methods above. For example, use `upsert` to either create a new product or add a photo to an existing product: const product = await prisma.product.upsert({ where: { name: 'Forest Runners', }, create: { name: 'Forest Runners', price: 59.99, colors: ['Red', 'Green'], sizes: ['Small', 'Medium', 'Large'], photos: [ { height: 100, width: 200, url: '1.jpg' }, { height: 100, width: 200, url: '2.jpg' }, ], }, update: { photos: { push: { height: 300, width: 400, url: '3.jpg' }, }, },}) ## Deleting records that contain composite types with `delete` and `deleteMany` To remove records which embed a composite type, use the `delete` or `deleteMany` methods. This will also remove the embedded composite type. For example, use `deleteMany` to delete all products with a `size` of `"Small"`. This will also delete any embedded `photos`. const deleteProduct = await prisma.product.deleteMany({ where: { sizes: { equals: 'Small', }, },}) You can also use filters to delete records that match a composite type. The example below uses the `some` filter to delete products that contain a certain photo: const product = await prisma.product.deleteMany({ where: { photos: { some: { url: '2.jpg', }, }, },}) ## Ordering composite types You can use the `orderBy` operation to sort results in ascending or descending order. For example, the following command finds all orders and orders them by the city name in the shipping address, in ascending order: const orders = await prisma.order.findMany({ orderBy: { shippingAddress: { city: 'asc', }, },}) ## Duplicate values in unique fields of composite types Be careful when you carry out any of the following operations on a record with a composite type that has a unique constraint. In this situation, MongoDB does not enforce unique values inside a record. * When you create the record * When you add data to the record * When you update data in the record If your schema has a composite type with a `@@unique` constraint, MongoDB prevents you from storing the same value for the constrained value in two or more of the records that contain this composite type. However, MongoDB does does not prevent you from storing multiple copies of the same field value in a single record. Note that you can use Prisma ORM relations to work around this issue. For example, in the following schema, `MailBox` has a composite type, `addresses`, which has a `@@unique` constraint on the `email` field. type Address { email String}model MailBox { name String addresses Address[] @@unique([addresses.email])} The following code creates a record with two identical values in `address`. MongoDB does not throw an error in this situation, and it stores `alice@prisma.io` in `addresses` twice. await prisma.MailBox.createMany({ data: [ { name: 'Alice', addresses: { set: [ { address: 'alice@prisma.io', // Not unique }, { address: 'alice@prisma.io', // Not unique }, ], }, }, ],}) Note: MongoDB throws an error if you try to store the same value in two separate records. In our example above, if you try to store the email address `alice@prisma.io` for the user Alice and for the user Bob, MongoDB does not store the data and throws an error. ### Use Prisma ORM relations to enforce unique values in a record In the example above, MongoDB did not enforce the unique constraint on a nested address name. However, you can model your data differently to enforce unique values in a record. To do so, use Prisma ORM relations to turn the composite type into a collection. Set a relationship to this collection and place a unique constraint on the field that you want to be unique. In the following example, MongoDB enforces unique values in a record. There is a relation between `Mailbox` and the `Address` model. Also, the `name` field in the `Address` model has a unique constraint. model Address { id String @id @default(auto()) @map("_id") @db.ObjectId name String mailbox Mailbox? @relation(fields: [mailboxId], references: [id]) mailboxId String? @db.ObjectId @@unique([name])}model Mailbox { id String @id @default(auto()) @map("_id") @db.ObjectId name String addresses Address[] @relation} await prisma.MailBox.create({ data: { name: 'Alice', addresses: { create: [ { name: 'alice@prisma.io' }, // Not unique { name: 'alice@prisma.io' }, // Not unique ], }, },}) If you run the above code, MongoDB enforces the unique constraint. It does not allow your application to add two addresses with the name `alice@prisma.io`. --- ## Page: https://www.prisma.io/docs/orm/prisma-client/special-fields-and-types/null-and-undefined warning In Prisma ORM, if `undefined` is passed as a value, it is not included in the generated query. This behavior can lead to unexpected results and data loss. In order to prevent this, we strongly recommend updating to version 5.20.0 or later to take advantage of the new `strictUndefinedChecks` Preview feature, described below. For documentation on the current behavior (without the `strictUndefinedChecks` Preview feature) see current behavior. ## Strict undefined checks (Preview feature) Prisma ORM 5.20.0 introduces a new Preview feature called `strictUndefinedChecks`. This feature changes how Prisma Client handles `undefined` values, offering better protection against accidental data loss or unintended query behavior. ### Enabling strict undefined checks To enable this feature, add the following to your Prisma schema: generator client { provider = "prisma-client-js" previewFeatures = ["strictUndefinedChecks"]} ### Using strict undefined checks When this feature is enabled: 1. Explicitly setting a field to `undefined` in a query will cause a runtime error. 2. To skip a field in a query, use the new `Prisma.skip` symbol instead of `undefined`. Example usage: // This will throw an errorprisma.user.create({ data: { name: 'Alice', email: undefined // Error: Cannot explicitly use undefined here }})// Use `Prisma.skip` (a symbol provided by Prisma) to omit a fieldprisma.user.create({ data: { name: 'Alice', email: Prisma.skip // This field will be omitted from the query }}) This change helps prevent accidental deletions or updates, such as: // Before: This would delete all usersprisma.user.deleteMany({ where: { id: undefined }})// After: This will throw an errorInvalid \`prisma.user.deleteMany()\` invocation in/client/tests/functional/strictUndefinedChecks/test.ts:0:0 XX }) XX XX test('throws on undefined input field', async () => {→ XX const result = prisma.user.deleteMany({ where: { id: undefined ~~~~~~~~~ } })Invalid value for argument \`where\`: explicitly \`undefined\` values are not allowed." ### Migration path To migrate existing code: // Beforelet optionalEmail: string | undefinedprisma.user.create({ data: { name: 'Alice', email: optionalEmail }})// Afterprisma.user.create({ data: { name: 'Alice', email: optionalEmail ?? Prisma.skip }}) ### `exactOptionalPropertyTypes` In addition to `strictUndefinedChecks`, we also recommend enabling the TypeScript compiler option `exactOptionalPropertyTypes`. This option enforces that optional properties must match exactly, which can help catch potential issues with `undefined` values in your code. While `strictUndefinedChecks` will raise runtime errors for invalid `undefined` usage, `exactOptionalPropertyTypes` will catch these issues during the build process. Learn more about `exactOptionalPropertyTypes` in the TypeScript documentation. ### Feedback As always, we welcome your feedback on this feature. Please share your thoughts and suggestions in the GitHub discussion for this Preview feature. ## current behavior Prisma Client differentiates between `null` and `undefined`: * `null` is a **value** * `undefined` means **do nothing** info This is particularly important to account for in a **Prisma ORM with GraphQL context**, where `null` and `undefined` are interchangeable. The data below represents a `User` table. This set of data will be used in all of the examples below: | id | name | email | | --- | --- | --- | | 1 | Nikolas | nikolas@gmail.com | | 2 | Martin | martin@gmail.com | | 3 | _empty_ | sabin@gmail.com | | 4 | Tyler | tyler@gmail.com | ### `null` and `undefined` in queries that affect _many_ records This section will cover how `undefined` and `null` values affect the behavior of queries that interact with or create multiple records in a database. #### Null Consider the following Prisma Client query which searches for all users whose `name` value matches the provided `null` value: const users = await prisma.user.findMany({ where: { name: null, },}) Show query results [ { "id": 3, "name": null, "email": "sabin@gmail.com" }] Because `null` was provided as the filter for the `name` column, Prisma Client will generate a query that searches for all records in the `User` table whose `name` column is _empty_. #### Undefined Now consider the scenario where you run the same query with `undefined` as the filter value on the `name` column: const users = await prisma.user.findMany({ where: { name: undefined, },}) Show query results [ { "id": 1, "name": "Nikolas", "email": "nikolas@gmail.com" }, { "id": 2, "name": "Martin", "email": "martin@gmail.com" }, { "id": 3, "name": null, "email": "sabin@gmail.com" }, { "id": 4, "name": "Tyler", "email": "tyler@gmail.com" }] Using `undefined` as a value in a filter essentially tells Prisma Client you have decided _not to define a filter_ for that column. An equivalent way to write the above query would be: const users = await prisma.user.findMany() This query will select every row from the `User` table. info **Note**: Using `undefined` as the value of any key in a Prisma Client query's parameter object will cause Prisma ORM to act as if that key was not provided at all. Although this section's examples focused on the `findMany` function, the same concepts apply to any function that can affect multiple records, such as `updateMany` and `deleteMany`. ### `null` and `undefined` in queries that affect _one_ record This section will cover how `undefined` and `null` values affect the behavior of queries that interact with or create a single record in a database. warning **Note**: `null` is not a valid filter value in a `findUnique()` query. The query behavior when using `null` and `undefined` in the filter criteria of a query that affects a single record is very similar to the behaviors described in the previous section. #### Null Consider the following query where `null` is used to filter the `name` column: const user = await prisma.user.findFirst({ where: { name: null, },}) Show query results [ { "id": 3, "name": null, "email": "sabin@gmail.com" }] Because `null` was used as the filter on the `name` column, Prisma Client will generate a query that searches for the first record in the `User` table whose `name` value is _empty_. #### Undefined If `undefined` is used as the filter value on the `name` column instead, _the query will act as if no filter criteria was passed to that column at all_. Consider the query below: const user = await prisma.user.findFirst({ where: { name: undefined, },}) Show query results [ { "id": 1, "name": "Nikolas", "email": "nikolas@gmail.com" }] In this scenario, the query will return the very first record in the database. Another way to represent the above query is: const user = await prisma.user.findFirst() Although this section's examples focused on the `findFirst` function, the same concepts apply to any function that affects a single record. ### `null` and `undefined` in a GraphQL resolver For this example, consider a database based on the following Prisma schema: model User { id Int @id @default(autoincrement()) email String @unique name String?} In the following GraphQL mutation that updates a user, both `authorEmail` and `name` accept `null`. From a GraphQL perspective, this means that fields are **optional**: type Mutation { // Update author's email or name, or both - or neither! updateUser(id: Int!, authorEmail: String, authorName: String): User!} However, if you pass `null` values for `authorEmail` or `authorName` on to Prisma Client, the following will happen: * If `args.authorEmail` is `null`, the query will **fail**. `email` does not accept `null`. * If `args.authorName` is `null`, Prisma Client changes the value of `name` to `null`. This is probably not how you want an update to work. updateUser: (parent, args, ctx: Context) => { return ctx.prisma.user.update({ where: { id: Number(args.id) }, data: { email: args.authorEmail, // email cannot be null name: args.authorName // name set to null - potentially unwanted behavior }, })}, Instead, set the value of `email` and `name` to `undefined` if the input value is `null`. Doing this is the same as not updating the field at all: updateUser: (parent, args, ctx: Context) => { return ctx.prisma.user.update({ where: { id: Number(args.id) }, data: { email: args.authorEmail != null ? args.authorEmail : undefined, // If null, do nothing name: args.authorName != null ? args.authorName : undefined // If null, do nothing }, })}, ### The effect of `null` and `undefined` on conditionals There are some caveats to filtering with conditionals which might produce unexpected results. When filtering with conditionals you might expect one result but receive another given how Prisma Client treats nullable values. The following table provides a high-level overview of how the different operators handle 0, 1 and `n` filters. | Operator | 0 filters | 1 filter | n filters | | --- | --- | --- | --- | | `OR` | return empty list | validate single filter | validate all filters | | `AND` | return all items | validate single filter | validate all filters | | `NOT` | return all items | validate single filter | validate all filters | This example shows how an `undefined` parameter impacts the results returned by a query that uses the `OR` operator. interface FormData { name: string email?: string}const formData: FormData = { name: 'Emelie',}const users = await prisma.user.findMany({ where: { OR: [ { email: { contains: formData.email, }, }, ], },})// returns: [] The query receives filters from a formData object, which includes an optional email property. In this instance, the value of the email property is `undefined`. When this query is run no data is returned. This is in contrast to the `AND` and `NOT` operators, which will both return all the users if you pass in an `undefined` value. > This is because passing an `undefined` value to an `AND` or `NOT` operator is the same as passing nothing at all, meaning the `findMany` query in the example will run without any filters and return all the users. interface FormData { name: string email?: string}const formData: FormData = { name: 'Emelie',}const users = await prisma.user.findMany({ where: { AND: [ { email: { contains: formData.email, }, }, ], },})// returns: { id: 1, email: 'ems@boop.com', name: 'Emelie' }const users = await prisma.user.findMany({ where: { NOT: [ { email: { contains: formData.email, }, }, ], },})// returns: { id: 1, email: 'ems@boop.com', name: 'Emelie' } --- ## Page: https://www.prisma.io/docs/orm/prisma-client/special-fields-and-types/working-with-json-fields Use the `Json` Prisma ORM field type to read, write, and perform basic filtering on JSON types in the underlying database. In the following example, the `User` model has an optional `Json` field named `extendedPetsData`: model User { id Int @id @default(autoincrement()) email String @unique name String? posts Post[] extendedPetsData Json?} Example field value: { "pet1": { "petName": "Claudine", "petType": "House cat" }, "pet2": { "petName": "Sunny", "petType": "Gerbil" }} The `Json` field supports a few additional types, such as `string` and `boolean`. These additional types exist to match the types supported by `JSON.parse()`: export type JsonValue = | string | number | boolean | null | JsonObject | JsonArray ## Use cases for JSON fields Reasons to store data as JSON rather than representing data as related models include: * You need to store data that does not have a consistent structure * You are importing data from another system and do not want to map that data to Prisma models ## Reading a `Json` field You can use the `Prisma.JsonArray` and `Prisma.JsonObject` utility classes to work with the contents of a `Json` field: const { PrismaClient, Prisma } = require('@prisma/client')const user = await prisma.user.findFirst({ where: { id: 9, },})// Example extendedPetsData data:// [{ name: 'Bob the dog' }, { name: 'Claudine the cat' }]if ( user?.extendedPetsData && typeof user?.extendedPetsData === 'object' && Array.isArray(user?.extendedPetsData)) { const petsObject = user?.extendedPetsData as Prisma.JsonArray const firstPet = petsObject[0]} See also: Advanced example: Update a nested JSON key value ## Writing to a `Json` field The following example writes a JSON object to the `extendedPetsData` field: var json = [ { name: 'Bob the dog' }, { name: 'Claudine the cat' },] as Prisma.JsonArrayconst createUser = await prisma.user.create({ data: { email: 'birgitte@prisma.io', extendedPetsData: json, },}) > **Note**: JavaScript objects (for example, `{ extendedPetsData: "none"}`) are automatically converted to JSON. See also: Advanced example: Update a nested JSON key value ## Filter on a `Json` field (simple) You can filter rows of `Json` type. ### Filter on exact field value The following query returns all users where the value of `extendedPetsData` matches the `json` variable exactly: var json = { [{ name: 'Bob the dog' }, { name: 'Claudine the cat' }] }const getUsers = await prisma.user.findMany({ where: { extendedPetsData: { equals: json, }, },}) The following query returns all users where the value of `extendedPetsData` does **not** match the `json` variable exactly: var json = { extendedPetsData: [{ name: 'Bob the dog' }, { name: 'Claudine the cat' }],}const getUsers = await prisma.user.findMany({ where: { extendedPetsData: { not: json, }, },}) ## Filter on a `Json` field (advanced) You can also filter rows by the data inside a `Json` field. We call this **advanced `Json` filtering**. This functionality is supported by PostgreSQL and MySQL only with different syntaxes for the `path` option. warning PostgreSQL does not support filtering on object key values in arrays. info The availability of advanced `Json` filtering depends on your Prisma version: * v4.0.0 or later: advanced `Json` filtering is generally available. * From v2.23.0, but before v4.0.0: advanced `Json` filtering is a preview feature. Add `previewFeatures = ["filterJson"]` to your schema. Learn more. * Before v2.23.0: you can filter on the exact `Json` field value, but you cannot use the other features described in this section. ### `path` syntax depending on database The filters below use a `path` option to select specific parts of the `Json` value to filter on. The implementation of that filtering differs between connectors: * The MySQL connector uses MySQL's implementation of JSON path * The PostgreSQL connector uses the custom JSON functions and operators supported in version 12 _and earlier_ For example, the following is a valid MySQL `path` value: $petFeatures.petName The following is a valid PostgreSQL `path` value: ["petFeatures", "petName"] ### Filter on object property You can filter on a specific property inside a block of JSON. In the following examples, the value of `extendedPetsData` is a one-dimensional, unnested JSON object: { "petName": "Claudine", "petType": "House cat"} The following query returns all users where the value of `petName` is `"Claudine"`: * PostgreSQL * MySQL const getUsers = await prisma.user.findMany({ where: { extendedPetsData: { path: ['petName'], equals: 'Claudine', }, },}) The following query returns all users where the value of `petType` _contains_ `"cat"`: * PostgreSQL * MySQL const getUsers = await prisma.user.findMany({ where: { extendedPetsData: { path: ['petType'], string_contains: 'cat', }, },}) The following string filters are available: * `string_contains` * `string_starts_with` * `string_ends_with` . To use case insensitive filter with these, you can use the `mode` option: * PostgreSQL * MySQL const getUsers = await prisma.user.findMany({ where: { extendedPetsData: { path: ['petType'], string_contains: 'cat', mode: 'insensitive' }, },}) ### Filter on nested object property You can filter on nested JSON properties. In the following examples, the value of `extendedPetsData` is a JSON object with several levels of nesting. { "pet1": { "petName": "Claudine", "petType": "House cat" }, "pet2": { "petName": "Sunny", "petType": "Gerbil", "features": { "eyeColor": "Brown", "furColor": "White and black" } }} The following query returns all users where `"pet2"` → `"petName"` is `"Sunny"`: * PostgreSQL * MySQL const getUsers = await prisma.user.findMany({ where: { extendedPetsData: { path: ['pet2', 'petName'], equals: 'Sunny', }, },}) The following query returns all users where: * `"pet2"` → `"petName"` is `"Sunny"` * `"pet2"` → `"features"` → `"furColor"` contains `"black"` * PostgreSQL * MySQL const getUsers = await prisma.user.findMany({ where: { AND: [ { extendedPetsData: { path: ['pet2', 'petName'], equals: 'Sunny', }, }, { extendedPetsData: { path: ['pet2', 'features', 'furColor'], string_contains: 'black', }, }, ], },}) ### Filtering on an array value You can filter on the presence of a specific value in a scalar array (strings, integers). In the following example, the value of `extendedPetsData` is an array of strings: ["Claudine", "Sunny"] The following query returns all users with a pet named `"Claudine"`: * PostgreSQL * MySQL const getUsers = await prisma.user.findMany({ where: { extendedPetsData: { array_contains: ['Claudine'], }, },}) info **Note**: In PostgreSQL, the value of `array_contains` must be an array and not a string, even if the array only contains a single value. The following array filters are available: * `array_contains` * `array_starts_with` * `array_ends_with` ### Filtering on nested array value You can filter on the presence of a specific value in a scalar array (strings, integers). In the following examples, the value of `extendedPetsData` includes nested scalar arrays of names: { "cats": { "owned": ["Bob", "Sunny"], "fostering": ["Fido"] }, "dogs": { "owned": ["Ella"], "fostering": ["Prince", "Empress"] }} #### Scalar value arrays The following query returns all users that foster a cat named `"Fido"`: * PostgreSQL * MySQL const getUsers = await prisma.user.findMany({ where: { extendedPetsData: { path: ['cats', 'fostering'], array_contains: ['Fido'], }, },}) info **Note**: In PostgreSQL, the value of `array_contains` must be an array and not a string, even if the array only contains a single value. The following query returns all users that foster cats named `"Fido"` _and_ `"Bob"`: * PostgreSQL * MySQL const getUsers = await prisma.user.findMany({ where: { extendedPetsData: { path: ['cats', 'fostering'], array_contains: ['Fido', 'Bob'], }, },}) #### JSON object arrays * PostgreSQL * MySQL const json = [{ status: 'expired', insuranceID: 92 }]const checkJson = await prisma.user.findMany({ where: { extendedPetsData: { path: ['insurances'], array_contains: json, }, },}) * If you are using PostgreSQL, you must pass in an array of objects to match, even if that array only contains one object: [{ status: 'expired', insuranceID: 92 }]// PostgreSQL If you are using MySQL, you must pass in a single object to match: { status: 'expired', insuranceID: 92 }// MySQL * If your filter array contains multiple objects, PostgreSQL will only return results if _all_ objects are present - not if at least one object is present. * You must set `array_contains` to a JSON object, not a string. If you use a string, Prisma Client escapes the quotation marks and the query will not return results. For example: array_contains: '[{"status": "expired", "insuranceID": 92}]' is sent to the database as: [{\"status\": \"expired\", \"insuranceID\": 92}] ### Targeting an array element by index You can filter on the value of an element in a specific position. { "owned": ["Bob", "Sunny"], "fostering": ["Fido"] } * PostgreSQL * MySQL const getUsers = await prisma.user.findMany({ where: { comments: { path: ['owned', '1'], string_contains: 'Bob', }, },}) ### Filtering on object key value inside array Depending on your provider, you can filter on the key value of an object inside an array. In the following example, the value of `extendedPetsData` is an array of objects with a nested `insurances` array, which contains two objects: [ { "petName": "Claudine", "petType": "House cat", "insurances": [ { "insuranceID": 92, "status": "expired" }, { "insuranceID": 12, "status": "active" } ] }, { "petName": "Sunny", "petType": "Gerbil" }, { "petName": "Gerald", "petType": "Corn snake" }, { "petName": "Nanna", "petType": "Moose" }] The following query returns all users where at least one pet is a moose: const getUsers = await prisma.user.findMany({ where: { extendedPetsData: { path: '$[*].petType', array_contains: 'Moose', }, },}) * `$[*]` is the root array of pet objects * `petType` matches the `petType` key in any pet object The following query returns all users where at least one pet has an expired insurance: const getUsers = await prisma.user.findMany({ where: { extendedPetsData: { path: '$[*].insurances[*].status', array_contains: 'expired', }, },}) * `$[*]` is the root array of pet objects * `insurances[*]` matches any `insurances` array inside any pet object * `status` matches any `status` key in any insurance object ## Advanced example: Update a nested JSON key value The following example assumes that the value of `extendedPetsData` is some variation of the following: { "petName": "Claudine", "petType": "House cat", "insurances": [ { "insuranceID": 92, "status": "expired" }, { "insuranceID": 12, "status": "active" } ]} The following example: 1. Gets all users 2. Change the `"status"` of each insurance object to `"expired"` 3. Get all users that have an expired insurance where the ID is `92` * PostgreSQL * MySQL const userQueries: string | any[] = []getUsers.forEach((user) => { if ( user.extendedPetsData && typeof user.extendedPetsData === 'object' && !Array.isArray(user.extendedPetsData) ) { const petsObject = user.extendedPetsData as Prisma.JsonObject const i = petsObject['insurances'] if (i && typeof i === 'object' && Array.isArray(i)) { const insurancesArray = i as Prisma.JsonArray insurancesArray.forEach((i) => { if (i && typeof i === 'object' && !Array.isArray(i)) { const insuranceObject = i as Prisma.JsonObject insuranceObject['status'] = 'expired' } }) const whereClause = Prisma.validator<Prisma.UserWhereInput>()({ id: user.id, }) const dataClause = Prisma.validator<Prisma.UserUpdateInput>()({ extendedPetsData: petsObject, }) userQueries.push( prisma.user.update({ where: whereClause, data: dataClause, }) ) } }})if (userQueries.length > 0) { console.log(userQueries.length + ' queries to run!') await prisma.$transaction(userQueries)}const json = [{ status: 'expired', insuranceID: 92 }]const checkJson = await prisma.user.findMany({ where: { extendedPetsData: { path: ['insurances'], array_contains: json, }, },})console.log(checkJson.length) ## Using `null` Values There are two types of `null` values possible for a `JSON` field in an SQL database. * Database `NULL`: The value in the database is a `NULL`. * JSON `null`: The value in the database contains a JSON value that is `null`. To differentiate between these possibilities, we've introduced three _null enums_ you can use: * `JsonNull`: Represents the `null` value in JSON. * `DbNull`: Represents the `NULL` value in the database. * `AnyNull`: Represents both `null` JSON values and `NULL` database values. (Only when filtering) info From v4.0.0, `JsonNull`, `DbNull`, and `AnyNull` are objects. Before v4.0.0, they were strings. info * When filtering using any of the _null enums_ you can not use a shorthand and leave the `equals` operator off. * These _null enums_ do not apply to MongoDB because there the difference between a JSON `null` and a database `NULL` does not exist. * The _null enums_ do not apply to the `array_contains` operator in all databases because there can only be a JSON `null` within a JSON array. Since there cannot be a database `NULL` within a JSON array, `{ array_contains: null }` is not ambiguous. For example: model Log { id Int @id meta Json} Here is an example of using `AnyNull`: import { Prisma } from '@prisma/client'prisma.log.findMany({ where: { data: { meta: { equals: Prisma.AnyNull, }, }, },}) ### Inserting `null` Values This also applies to `create`, `update` and `upsert`. To insert a `null` value into a `Json` field, you would write: import { Prisma } from '@prisma/client'prisma.log.create({ data: { meta: Prisma.JsonNull, },}) And to insert a database `NULL` into a `Json` field, you would write: import { Prisma } from '@prisma/client'prisma.log.create({ data: { meta: Prisma.DbNull, },}) ### Filtering by `null` Values To filter by `JsonNull` or `DbNull`, you would write: import { Prisma } from '@prisma/client'prisma.log.findMany({ where: { meta: { equals: Prisma.AnyNull, }, },}) info These _null enums_ do not apply to MongoDB because MongoDB does not differentiate between a JSON `null` and a database `NULL`. They also do not apply to the `array_contains` operator in all databases because there can only be a JSON `null` within a JSON array. Since there cannot be a database `NULL` within a JSON array, `{ array_contains: null }` is not ambiguous. ## Typed `Json` By default, `Json` fields are not typed in Prisma models. To accomplish strong typing inside of these fields, you will need to use an external package like prisma-json-types-generator to accomplish this. ### Using `prisma-json-types-generator` First, install and configure `prisma-json-types-generator` according to the package's instructions. Then, assuming you have a model like the following: model Log { id Int @id meta Json} You can update it and type it by using abstract syntax tree comments schema.prisma model Log { id Int @id /// [LogMetaType] meta Json} Then, make sure you define the above type in a type declaration file included in your `tsconfig.json` types.ts declare global { namespace PrismaJson { type LogMetaType = { timestamp: number; host: string } }} Now, when working with `Log.meta` it will be strongly typed! ## `Json` FAQs ### Can you select a subset of JSON key/values to return? No - it is not yet possible to select which JSON elements to return. Prisma Client returns the entire JSON object. ### Can you filter on the presence of a specific key? No - it is not yet possible to filter on the presence of a specific key. ### Is case insensitive filtering supported? No - case insensitive filtering is not yet supported. ### Can you sort an object property within a JSON value? No, sorting object properties within a JSON value (order-by-prop) is not currently supported. ### How to set a default value for JSON fields? When you want to set a `@default` value the `Json` type, you need to enclose it with double-quotes inside the `@default` attribute (and potentially escape any "inner" double-quotes using a backslash), for example: model User { id Int @id @default(autoincrement()) json1 Json @default("[]") json2 Json @default("{ \"hello\": \"world\" }")} --- ## Page: https://www.prisma.io/docs/orm/prisma-client/special-fields-and-types/working-with-scalar-lists-arrays Scalar lists are represented by the `[]` modifier and are only available if the underlying database supports scalar lists. The following example has one scalar `String` list named `pets`: * Relational databases * MongoDB model User { id Int @id @default(autoincrement()) name String pets String[]} Example field value: ['Fido', 'Snoopy', 'Brian'] ## Setting the value of a scalar list The following example demonstrates how to `set` the value of a scalar list (`coinflips`) when you create a model: const createdUser = await prisma.user.create({ data: { email: 'eloise@prisma.io', coinflips: [true, true, true, false, true], },}) ## Unsetting the value of a scalar list warning This method is available on MongoDB only in versions 3.11.1 and later. The following example demonstrates how to `unset` the value of a scalar list (`coinflips`): const createdUser = await prisma.user.create({ data: { email: 'eloise@prisma.io', coinflips: { unset: true, }, },}) Unlike `set: null`, `unset` removes the list entirely. ## Adding items to a scalar list warning Available for: * PostgreSQL in versions 2.15.0 and later * CockroachDB in versions 3.9.0 and later * MongoDB in versions 3.11.0 and later Use the `push` method to add a single value to a scalar list: const userUpdate = await prisma.user.update({ where: { id: 9, }, data: { coinflips: { push: true, }, },}) In earlier versions, you have to overwrite the entire value. The following example retrieves user, uses `push()` to add three new coin flips, and overwrites the `coinflips` field in an `update`: const user = await prisma.user.findUnique({ where: { email: 'eloise@prisma.io', },})if (user) { console.log(user.coinflips) user.coinflips.push(true, true, false) const updatedUser = await prisma.user.update({ where: { email: 'eloise@prisma.io', }, data: { coinflips: user.coinflips, }, }) console.log(updatedUser.coinflips)} ## Filtering scalar lists warning Available for: * PostgreSQL in versions 2.15.0 and later * CockroachDB in versions 3.9.0 and later * MongoDB in versions 3.11.0 and later Use scalar list filters to filter for records with scalar lists that match a specific condition. The following example returns all posts where the tags list includes `databases` _and_ `typescript`: const posts = await prisma.post.findMany({ where: { tags: { hasEvery: ['databases', 'typescript'], }, },}) ### `NULL` values in arrays warning This section applies to: * PostgreSQL in versions 2.15.0 and later * CockroachDB in versions 3.9.0 and later When using scalar list filters with a relational database connector, array fields with a `NULL` value are not considered by the following conditions: * `NOT` (array does not contain X) * `isEmpty` (array is empty) This means that records you might expect to see are not returned. Consider the following examples: * The following query returns all posts where the `tags` **do not** include `databases`: const posts = await prisma.post.findMany({ where: { NOT: { tags: { has: 'databases', }, }, },}) * ✔ Arrays that do not contain `"databases"`, such as `{"typescript", "graphql"}` * ✔ Empty arrays, such as `[]` The query does not return: * ✘ `NULL` arrays, even though they do not contain `"databases"` The following query returns all posts where `tags` is empty: const posts = await prisma.post.findMany({ where: { tags: { isEmpty: true, }, },}) The query returns: * ✔ Empty arrays, such as `[]` The query does not return: * ✘ `NULL` arrays, even though they could be considered empty To work around this issue, you can set the default value of array fields to `[]`. --- ## Page: https://www.prisma.io/docs/orm/prisma-client/special-fields-and-types/working-with-composite-ids-and-constraints Composite IDs and compound unique constraints can be defined in your Prisma schema using the `@@id` and `@@unique` attributes. warning **MongoDB does not support `@@id`** MongoDB does not support composite IDs, which means you cannot identify a model with a `@@id` attribute. A composite ID or compound unique constraint uses the combined values of two fields as a primary key or identifier in your database table. In the following example, the `postId` field and `userId` field are used as a composite ID for a `Like` table: model User { id Int @id @default(autoincrement()) name String post Post[] likes Like[]}model Post { id Int @id @default(autoincrement()) content String User User? @relation(fields: [userId], references: [id]) userId Int? likes Like[]}model Like { postId Int userId Int User User @relation(fields: [userId], references: [id]) Post Post @relation(fields: [postId], references: [id]) @@id([postId, userId])} Querying for records from the `Like` table (e.g. using `prisma.like.findMany()`) would return objects that look as follows: { "postId": 1, "userId": 1} Although there are only two fields in the response, those two fields make up a compound ID named `postId_userId`. You can also create a named compound ID or compound unique constraint by using the `@@id` or `@@unique` attributes' `name` field. For example: model Like { postId Int userId Int User User @relation(fields: [userId], references: [id]) Post Post @relation(fields: [postId], references: [id]) @@id(name: "likeId", [postId, userId])} ## Where you can use compound IDs and unique constraints Compound IDs and compound unique constraints can be used when working with _unique_ data. Below is a list of Prisma Client functions that accept a compound ID or compound unique constraint in the `where` filter of the query: * `findUnique()` * `findUniqueOrThrow` * `delete` * `update` * `upsert` A composite ID and a composite unique constraint is also usable when creating relational data with `connect` and `connectOrCreate`. ## Filtering records by a compound ID or unique constraint Although your query results will not display a compound ID or unique constraint as a field, you can use these compound values to filter your queries for unique records: const like = await prisma.like.findUnique({ where: { likeId: { userId: 1, postId: 1, }, },}) info Note composite ID and compound unique constraint keys are only available as filter options for _unique_ queries such as `findUnique()` and `findUniqueOrThrow`. See the section above for a list of places these fields may be used. ## Deleting records by a compound ID or unique constraint A compound ID or compound unique constraint may be used in the `where` filter of a `delete` query: const like = await prisma.like.delete({ where: { likeId: { userId: 1, postId: 1, }, },}) ## Updating and upserting records by a compound ID or unique constraint A compound ID or compound unique constraint may be used in the `where` filter of an `update` query: const like = await prisma.like.update({ where: { likeId: { userId: 1, postId: 1, }, }, data: { postId: 2, },}) They may also be used in the `where` filter of an `upsert` query: await prisma.like.upsert({ where: { likeId: { userId: 1, postId: 1, }, }, update: { userId: 2, }, create: { userId: 2, postId: 1, },}) ## Filtering relation queries by a compound ID or unique constraint Compound IDs and compound unique constraint can also be used in the `connect` and `connectOrCreate` keys used when connecting records to create a relationship. For example, consider this query: await prisma.user.create({ data: { name: 'Alice', likes: { connect: { likeId: { postId: 1, userId: 2, }, }, }, },}) The `likeId` compound ID is used as the identifier in the `connect` object that is used to locate the `Like` table's record that will be linked to the new user: `"Alice"`. Similarly, the `likeId` can be used in `connectOrCreate`'s `where` filter to attempt to locate an existing record in the `Like` table: await prisma.user.create({ data: { name: 'Alice', likes: { connectOrCreate: { create: { postId: 1, }, where: { likeId: { postId: 1, userId: 1, }, }, }, }, },}) --- ## Page: https://www.prisma.io/docs/orm/prisma-client/client-extensions/model ## \`model\`: Add custom methods to your models info Prisma Client extensions are Generally Available from versions 4.16.0 and later. They were introduced in Preview in version 4.7.0. Make sure you enable the `clientExtensions` Preview feature flag if you are running on a version earlier than 4.16.0. You can use the `model` Prisma Client extensions component type to add custom methods to your models. Possible uses for the `model` component include the following: * New operations to operate alongside existing Prisma Client operations, such as `findMany` * Encapsulated business logic * Repetitive operations * Model-specific utilities ## Add a custom method Use the `$extends` client-level method to create an _extended client_. An extended client is a variant of the standard Prisma Client that is wrapped by one or more extensions. Use the `model` extension component to add methods to models in your schema. ### Add a custom method to a specific model To extend a specific model in your schema, use the following structure. This example adds a method to the `user` model. const prisma = new PrismaClient().$extends({ name?: '<name>', // (optional) names the extension for error logs model?: { user: { ... } // in this case, we extend the `user` model },}); #### Example The following example adds a method called `signUp` to the `user` model. This method creates a new user with the specified email address: const prisma = new PrismaClient().$extends({ model: { user: { async signUp(email: string) { await prisma.user.create({ data: { email } }) }, }, },}) You would call `signUp` in your application as follows: const user = await prisma.user.signUp('john@prisma.io') ### Add a custom method to all models in your schema To extend _all_ models in your schema, use the following structure: const prisma = new PrismaClient().$extends({ name?: '<name>', // `name` is an optional field that you can use to name the extension for error logs model?: { $allModels: { ... } },}) #### Example The following example adds an `exists` method to all models. const prisma = new PrismaClient().$extends({ model: { $allModels: { async exists<T>( this: T, where: Prisma.Args<T, 'findFirst'>['where'] ): Promise<boolean> { // Get the current model at runtime const context = Prisma.getExtensionContext(this) const result = await (context as any).findFirst({ where }) return result !== null }, }, },}) You would call `exists` in your application as follows: // `exists` method available on all modelsawait prisma.user.exists({ name: 'Alice' })await prisma.post.exists({ OR: [{ title: { contains: 'Prisma' } }, { content: { contains: 'Prisma' } }],}) ## Call a custom method from another custom method You can call a custom method from another custom method, if the two methods are declared on the same model. For example, you can call a custom method on the `user` model from another custom method on the `user` model. It does not matter if the two methods are declared in the same extension or in different extensions. To do so, use `Prisma.getExtensionContext(this).methodName`. Note that you cannot use `prisma.user.methodName`. This is because `prisma` is not extended yet, and therefore does not contain the new method. For example: const prisma = new PrismaClient().$extends({ model: { user: { firstMethod() { ... }, secondMethod() { Prisma.getExtensionContext(this).firstMethod() } } }}) ## Get the current model name at runtime info This feature is available from version 4.9.0. You can get the name of the current model at runtime with `Prisma.getExtensionContext(this).$name`. You might use this to write out the model name to a log, to send the name to another service, or to branch your code based on the model. For example: // `context` refers to the current modelconst context = Prisma.getExtensionContext(this)// `context.name` returns the name of the current modelconsole.log(context.name)// Usageawait(context as any).findFirst({ args }) Refer to Add a custom method to all models in your schema for a concrete example for retrieving the current model name at runtime. ## Advanced type safety: type utilities for defining generic extensions You can improve the type-safety of `model` components in your shared extensions with type utilities. --- ## Page: https://www.prisma.io/docs/orm/prisma-client/client-extensions/client You can use the `client` Prisma Client extensions component to add top-level methods to Prisma Client. Use the `$extends` client-level method to create an _extended client_. An extended client is a variant of the standard Prisma Client that is wrapped by one or more extensions. Use the `client` extension component to add top-level methods to Prisma Client. The following example uses the `client` component to add two methods to Prisma Client: const prisma = new PrismaClient().$extends({ client: { $log: (s: string) => console.log(s), async $totalQueries() { const index_prisma_client_queries_total = 0 // Prisma.getExtensionContext(this) in the following block // returns the current client instance const metricsCounters = await ( await Prisma.getExtensionContext(this).$metrics.json() ).counters return metricsCounters[index_prisma_client_queries_total].value }, },})async function main() { prisma.$log('Hello world') const totalQueries = await prisma.$totalQueries() console.log(totalQueries)} --- ## Page: https://www.prisma.io/docs/orm/prisma-client/client-extensions/query ## \`query\`: Create custom Prisma Client queries info Prisma Client extensions are Generally Available from versions 4.16.0 and later. They were introduced in Preview in version 4.7.0. Make sure you enable the `clientExtensions` Preview feature flag if you are running on a version earlier than 4.16.0. You can use the `query` Prisma Client extensions component type to hook into the query life-cycle and modify an incoming query or its result. You can use Prisma Client extensions `query` component to create independent clients. This provides an alternative to middlewares. You can bind one client to a specific filter or user, and another client to another filter or user. For example, you might do this to get user isolation in a row-level security (RLS) extension. In addition, unlike middlewares the `query` extension component gives you end-to-end type safety. Learn more about `query` extensions versus middlewares. ## Extend Prisma Client query operations Use the `$extends` client-level method to create an extended client. An extended client is a variant of the standard Prisma Client that is wrapped by one or more extensions. Use the `query` extension component to modify queries. You can modify a custom query in the following: * A specific operation in a specific model * A specific operation in all models of your schema * All Prisma Client operations * All operations in a specific model * All operations in all models of your schema * A specific top-level raw query operation To create a custom query, use the following structure: const prisma = new PrismaClient().$extends({ name?: 'name', query?: { user: { ... } // in this case, we add a query to the `user` model },}); The properties are as follows: * `name`: (optional) specifies a name for the extension that appears in error logs. * `query`: defines a custom query. ### Modify a specific operation in a specific model The `query` object can contain functions that map to the names of the Prisma Client operations, such as `findUnique()`, `findFirst`, `findMany`, `count`, and `create`. The following example modifies `user.findMany` to a use a customized query that finds only users who are older than 18 years: const prisma = new PrismaClient().$extends({ query: { user: { async findMany({ model, operation, args, query }) { // take incoming `where` and set `age` args.where = { ...args.where, age: { gt: 18 } } return query(args) }, }, },})await prisma.user.findMany() // returns users whose age is greater than 18 In the above example, a call to `prisma.user.findMany` triggers `query.user.findMany`. Each callback receives a type-safe `{ model, operation, args, query }` object that describes the query. This object has the following properties: * `model`: the name of the containing model for the query that we want to extend. In the above example, the `model` is a string of type `"User"`. * `operation`: the name of the operation being extended and executed. In the above example, the `operation` is a string of type `"findMany"`. * `args`: the specific query input information to be extended. This is a type-safe object that you can mutate before the query happens. You can mutate any of the properties in `args`. Exception: you cannot mutate `include` or `select` because that would change the expected output type and break type safety. * `query`: a promise for the result of the query. * You can use `await` and then mutate the result of this promise, because its value is type-safe. TypeScript catches any unsafe mutations on the object. ### Modify a specific operation in all models of your schema To extend the queries in all the models of your schema, use `$allModels` instead of a specific model name. For example: const prisma = new PrismaClient().$extends({ query: { $allModels: { async findMany({ model, operation, args, query }) { // set `take` and fill with the rest of `args` args = { ...args, take: 100 } return query(args) }, }, },}) ### Modify all operations in a specific model Use `$allOperations` to extend all operations in a specific model. For example, the following code applies a custom query to all operations on the `user` model: const prisma = new PrismaClient().$extends({ query: { user: { $allOperations({ model, operation, args, query }) { /* your custom logic here */ return query(args) }, }, },}) ### Modify all Prisma Client operations Use the `$allOperations` method to modify all query methods present in Prisma Client. The `$allOperations` can be used on both model operations and raw queries. You can modify all methods as follows: const prisma = new PrismaClient().$extends({ query: { $allOperations({ model, operation, args, query }) { /* your custom logic for modifying all Prisma Client operations here */ return query(args) }, },}) In the event a raw query is invoked, the `model` argument passed to the callback will be `undefined`. For example, you can use the `$allOperations` method to log queries as follows: const prisma = new PrismaClient().$extends({ query: { async $allOperations({ operation, model, args, query }) { const start = performance.now() const result = await query(args) const end = performance.now() const time = end - start console.log( util.inspect( { model, operation, args, time }, { showHidden: false, depth: null, colors: true } ) ) return result }, },}) ### Modify all operations in all models of your schema Use `$allModels` and `$allOperations` to extend all operations in all models of your schema. To apply a custom query to all operations on all models of your schema: const prisma = new PrismaClient().$extends({ query: { $allModels: { $allOperations({ model, operation, args, query }) { /* your custom logic for modifying all operations on all models here */ return query(args) }, }, },}) ### Modify a top-level raw query operation To apply custom behavior to a specific top-level raw query operation, use the name of a top-level raw query function instead of a model name: * Relational databases * MongoDB const prisma = new PrismaClient().$extends({ query: { $queryRaw({ args, query, operation }) { // handle $queryRaw operation return query(args) }, $executeRaw({ args, query, operation }) { // handle $executeRaw operation return query(args) }, $queryRawUnsafe({ args, query, operation }) { // handle $queryRawUnsafe operation return query(args) }, $executeRawUnsafe({ args, query, operation }) { // handle $executeRawUnsafe operation return query(args) }, },}) ### Mutate the result of a query You can use `await` and then mutate the result of the `query` promise. const prisma = new PrismaClient().$extends({ query: { user: { async findFirst({ model, operation, args, query }) { const user = await query(args) if (user.password !== undefined) { user.password = '******' } return user }, }, },}) info We include the above example to show that this is possible. However, for performance reasons we recommend that you use the `result` component type to override existing fields. The `result` component type usually gives better performance in this situation because it computes only on access. The `query` component type computes after query execution. ## Wrap a query into a batch transaction You can wrap your extended queries into a batch transaction. For example, you can use this to enact row-level security (RLS). The following example extends `findFirst` so that it runs in a batch transaction. const transactionExtension = Prisma.defineExtension((prisma) => prisma.$extends({ query: { user: { // Get the input `args` and a callback to `query` async findFirst({ args, query, operation }) { const [result] = await prisma.$transaction([query(args)]) // wrap the query in a batch transaction, and destructure the result to return an array return result // return the first result found in the array }, }, }, }))const prisma = new PrismaClient().$extends(transactionExtension) ## Query extensions versus middlewares You can use query extensions or middlewares to hook into the query life-cycle and modify an incoming query or its result. Client extensions and middlewares differ in the following ways: * Middlewares always apply globally to the same client. Client extensions are isolated, unless you deliberately combine them. Learn more about client extensions. * For example, in a row-level security (RLS) scenario, you can keep each user in an entirely separate client. With middlewares, all users are active in the same client. * During application execution, with extensions you can choose from one or more extended clients, or the standard Prisma Client. With middlewares, you cannot choose which client to use, because there is only one global client. * Extensions benefit from end-to-end type safety and inference, but middlewares don't. You can use Prisma Client extensions in all scenarios where middlewares can be used. ### If you use the `query` extension component and middlewares If you use the `query` extension component and middlewares in your project, then the following rules and priorities apply: * In your application code, you must declare all your middlewares on the main Prisma Client instance. You cannot declare them on an extended client. * In situations where middlewares and extensions with a `query` component execute, Prisma Client executes the middlewares before it executes the extensions with the `query` component. Prisma Client executes the individual middlewares and extensions in the order in which you instantiated them with `$use` or `$extends`. --- ## Page: https://www.prisma.io/docs/orm/prisma-client/client-extensions/result ## \`result\`: Add custom fields and methods to query results info Prisma Client extensions are Generally Available from versions 4.16.0 and later. They were introduced in Preview in version 4.7.0. Make sure you enable the `clientExtensions` Preview feature flag if you are running on a version earlier than 4.16.0. You can use the `result` Prisma Client extensions component type to add custom fields and methods to query results. Use the `$extends` client-level method to create an _extended client_. An extended client is a variant of the standard Prisma Client that is wrapped by one or more extensions. To add a custom field or method to query results, use the following structure. In this example, we add the custom field `myComputedField` to the result of a `user` model query. const prisma = new PrismaClient().$extends({ name?: 'name', result?: { user: { // in this case, we extend the `user` model myComputedField: { // the name of the new computed field needs: { ... }, compute() { ... } }, }, },}); The parameters are as follows: * `name`: (optional) specifies a name for the extension that appears in error logs. * `result`: defines new fields and methods to the query results. * `needs`: an object which describes the dependencies of the result field. * `compute`: a method that defines how the virtual field is computed when it is accessed. ## Add a custom field to query results You can use the `result` extension component to add fields to query results. These fields are computed at runtime and are type-safe. In the following example, we add a new virtual field called `fullName` to the `user` model. const prisma = new PrismaClient().$extends({ result: { user: { fullName: { // the dependencies needs: { firstName: true, lastName: true }, compute(user) { // the computation logic return `${user.firstName} ${user.lastName}` }, }, }, },})const user = await prisma.user.findFirst()// return the user's full name, such as "John Doe"console.log(user.fullName) In above example, the input `user` of `compute` is automatically typed according to the object defined in `needs`. `firstName` and `lastName` are of type `string`, because they are specified in `needs`. If they are not specified in `needs`, then they cannot be accessed. ## Re-use a computed field in another computed field The following example computes a user's title and full name in a type-safe way. `titleFullName` is a computed field that reuses the `fullName` computed field. const prisma = new PrismaClient() .$extends({ result: { user: { fullName: { needs: { firstName: true, lastName: true }, compute(user) { return `${user.firstName} ${user.lastName}` }, }, }, }, }) .$extends({ result: { user: { titleFullName: { needs: { title: true, fullName: true }, compute(user) { return `${user.title} (${user.fullName})` }, }, }, }, }) ### Considerations for fields * For performance reasons, Prisma Client computes results on access, not on retrieval. * You can only create computed fields that are based on scalar fields. * You can only use computed fields with `select` and you cannot aggregate them. For example: const user = await prisma.user.findFirst({ select: { email: true },})console.log(user.fullName) // undefined ## Add a custom method to the result object You can use the `result` component to add methods to query results. The following example adds a new method, `save` to the result object. const prisma = new PrismaClient().$extends({ result: { user: { save: { needs: { id: true }, compute(user) { return () => prisma.user.update({ where: { id: user.id }, data: user }) }, }, }, },})const user = await prisma.user.findUniqueOrThrow({ where: { id: someId } })user.email = 'mynewmail@mailservice.com'await user.save() ## Using `omit` query option with `result` extension component You can use the `omit` (Preview) option with custom fields and fields needed by custom fields. ### `omit` fields needed by custom fields from query result If you `omit` a field that is a dependency of a custom field, it will still be read from the database even though it will not be included in the query result. The following example omits the `password` field, which is a dependency of the custom field `sanitizedPassword`: const xprisma = prisma.$extends({ result: { user: { sanitizedPassword: { needs: { password: true }, compute(user) { return sanitize(user.password) }, }, }, },})const user = await xprisma.user.findFirstOrThrow({ omit: { password: true, },}) In this case, although `password` is omitted from the result, it will still be queried from the database because it is a dependency of the `sanitizedPassword` custom field. ### `omit` custom field and dependencies from query result To ensure omitted fields are not queried from the database at all, you must omit both the custom field and its dependencies. The following example omits both the custom field `sanitizedPassword` and the dependent `password` field: const xprisma = prisma.$extends({ result: { user: { sanitizedPassword: { needs: { password: true }, compute(user) { return sanitize(user.password) }, }, }, },})const user = await xprisma.user.findFirstOrThrow({ omit: { sanitizedPassword: true, password: true, },}) In this case, omitting both `password` and `sanitizedPassword` will exclude both from the result as well as prevent the `password` field from being read from the database. ## Limitation As of now, Prisma Client's result extension component does not support relation fields. This means that you cannot create custom fields or methods based on related models or fields in a relational relationship (e.g., user.posts, post.author). The needs parameter can only reference scalar fields within the same model. Follow issue #20091 on GitHub. const prisma = new PrismaClient().$extends({ result: { user: { postsCount: { needs: { posts: true }, // This will not work because posts is a relation field compute(user) { return user.posts.length; // Accessing a relation is not allowed }, }, }, },}) --- ## Page: https://www.prisma.io/docs/orm/prisma-client/client-extensions/shared-extensions You can share your Prisma Client extensions with other users, either as packages or as modules, and import extensions that other users create into your project. If you would like to build a shareable extension, we also recommend using the `prisma-client-extension-starter` template. To explore examples of Prisma's official Client extensions and those made by the community, visit this page. In your project, you can install any Prisma Client extension that another user has published to `npm`. To do so, run the following command: npm install prisma-extension-<package-name> For example, if the package name for an available extension is `prisma-extension-find-or-create`, you could install it as follows: npm install prisma-extension-find-or-create To import the `find-or-create` extension from the example above, and wrap your client instance with it, you could use the following code. This example assumes that the extension name is `findOrCreate`. import findOrCreate from 'prisma-extension-find-or-create'const prisma = new PrismaClient().$extends(findOrCreate)const user = await prisma.user.findOrCreate() When you call a method in an extension, use the constant name from your `$extends` statement, not `prisma`. In the above example,`xprisma.user.findOrCreate` works, but `prisma.user.findOrCreate` does not, because the original `prisma` is not modified. When you want to create extensions other users can use, and that are not tailored just for your schema, Prisma ORM provides utilities to allow you to create shareable extensions. To create a shareable extension: 1. Define the extension as a module using `Prisma.defineExtension` 2. Use one of the methods that begin with the `$all` prefix such as `$allModels` or `$allOperations` ### Define an extension Use the `Prisma.defineExtension` method to make your extension shareable. You can use it to package the extension to either separate your extensions into a separate file or share it with other users as an npm package. The benefit of `Prisma.defineExtension` is that it provides strict type checks and auto completion for authors of extension in development and users of shared extensions. ### Use a generic method Extensions that contain methods under `$allModels` apply to every model instead of a specific one. Similarly, methods under `$allOperations` apply to a client instance as a whole and not to a named component, e.g. `result` or `query`. You do not need to use the `$all` prefix with the `client` component, because the `client` component always applies to the client instance. For example, a generic extension might take the following form: export default Prisma.defineExtension({ name: 'prisma-extension-find-or-create', //Extension name model: { $allModels: { // new method findOrCreate(/* args */) { /* code for the new method */ return query(args) }, }, },}) Refer to the following pages to learn the different ways you can modify Prisma Client operations: * Modify all Prisma Client operations * Modify a specific operation in all models of your schema * Modify all operations in all models of your schema For versions earlier than 4.16.0 The `Prisma` import is available from a different path shown in the snippet below: import { Prisma } from '@prisma/client/scripts/default-index'export default Prisma.defineExtension({ name: 'prisma-extension-<extension-name>',}) ### Publishing the shareable extension to npm You can then share the extension on `npm`. When you choose a package name, we recommend that you use the `prisma-extension-<package-name>` convention, to make it easier to find and install. ### Call a client-level method from your packaged extension In the following situations, you need to refer to a Prisma Client instance that your extension wraps: * When you want to use a client-level method, such as `$queryRaw`, in your packaged extension. * When you want to chain multiple `$extends` calls in your packaged extension. However, when someone includes your packaged extension in their project, your code cannot know the details of the Prisma Client instance. You can refer to this client instance as follows: Prisma.defineExtension((client) => { // The Prisma Client instance that the extension user applies the extension to return client.$extends({ name: 'prisma-extension-<extension-name>', })}) For example: export default Prisma.defineExtension((client) => { return client.$extends({ name: 'prisma-extension-find-or-create', query: { $allModels: { async findOrCreate({ args, query, operation }) { return (await client.$transaction([query(args)]))[0] }, }, }, })}) ### Advanced type safety: type utilities for defining generic extensions You can improve the type-safety of your shared extensions using type utilities. --- ## Page: https://www.prisma.io/docs/orm/prisma-client/client-extensions/type-utilities Several type utilities exist within Prisma Client that can assist in the creation of highly type-safe extensions. Prisma Client type utilities are utilities available within your application and Prisma Client extensions and provide useful ways of constructing safe and extendable types for your extension. The following example creates a new operation, `exists`, based on `findFirst`. It has all of the arguments that `findFirst`. const prisma = new PrismaClient().$extends({ model: { $allModels: { // Define a new `exists` operation on all models // T is a generic type that corresponds to the current model async exists<T>( // `this` refers to the current type, e.g. `prisma.user` at runtime this: T, // The `exists` function will use the `where` arguments from the current model, `T`, and the `findFirst` operation where: Prisma.Args<T, 'findFirst'>['where'] ): Promise<boolean> { // Retrieve the current model at runtime const context = Prisma.getExtensionContext(this) // Prisma Client query that retrieves data based const result = await (context as any).findFirst({ where }) return result !== null }, }, },})async function main() { const user = await prisma.user.exists({ name: 'Alice' }) const post = await prisma.post.exists({ OR: [ { title: { contains: 'Prisma' } }, { content: { contains: 'Prisma' } }, ], })} The following example illustrates how you can add custom arguments, to a method in an extension: type CacheStrategy = { swr: number ttl: number}const prisma = new PrismaClient().$extends({ model: { $allModels: { findMany<T, A>( this: T, args: Prisma.Exact< A, // For the `findMany` method, use the arguments from model `T` and the `findMany` method // and intersect it with `CacheStrategy` as part of `findMany` arguments Prisma.Args<T, 'findMany'> & CacheStrategy > ): Prisma.Result<T, A, 'findMany'> { // method implementation with the cache strategy }, }, },})async function main() { await prisma.post.findMany({ cacheStrategy: { ttl: 360, swr: 60, }, })} The example here is only conceptual. For the actual caching to work, you will have to implement the logic. If you're interested in a caching extension/ service, we recommend taking a look at Prisma Accelerate. --- ## Page: https://www.prisma.io/docs/orm/prisma-client/client-extensions/extension-examples ## Extensions made by Prisma The following is a list of extensions we've built at Prisma: | Extension | Description | | --- | --- | | `@prisma/extension-accelerate` | Enables Accelerate, a global database cache available in 300+ locations with built-in connection pooling | | `@prisma/extension-read-replicas` | Adds read replica support to Prisma Client | The following is a list of extensions created by the community. If you want to create your own package, refer to the Shared Prisma Client extensions documentation. | Extension | Description | | --- | --- | | `prisma-extension-supabase-rls` | Adds support for Supabase Row Level Security with Prisma | | `prisma-extension-bark` | Implements the Materialized Path pattern that allows you to easily create and interact with tree structures in Prisma | | `prisma-cursorstream` | Adds cursor-based streaming | | `prisma-gpt` | Lets you query your database using natural language | | `prisma-extension-caching` | Adds the ability to cache complex queries | | `prisma-extension-cache-manager` | Caches model queries with any cache-manager compatible cache | | `prisma-extension-random` | Lets you query for random rows in your database | | `prisma-paginate` | Adds support for paginating read queries | | `prisma-extension-streamdal` | Adds support for Code-Native data pipelines using Streamdal | | `prisma-rbac` | Adds customizable role-based access control | | `prisma-extension-redis` | Extensive Prisma extension designed for efficient caching and cache invalidation using Redis and Dragonfly Databases | | `prisma-cache-extension` | Prisma extension for caching and invalidating cache with Redis(other Storage options to be supported) | | `prisma-extension-casl` | Prisma client extension that utilizes CASL to enforce authorization logic on most simple and nested queries. | If you have built an extension and would like to see it featured, feel free to add it to the list by opening a pull request. ## Examples info The following example extensions are provided as examples only, and without warranty. They are supposed to show how Prisma Client extensions can be created using approaches documented here. We recommend using these examples as a source of inspiration for building your own extensions. | Example | Description | | --- | --- | | `audit-log-context` | Provides the current user's ID as context to Postgres audit log triggers | | `callback-free-itx` | Adds a method to start interactive transactions without callbacks | | `computed-fields` | Adds virtual / computed fields to result objects | | `input-transformation` | Transforms the input arguments passed to Prisma Client queries to filter the result set | | `input-validation` | Runs custom validation logic on input arguments passed to mutation methods | | `instance-methods` | Adds Active Record-like methods like `save()` and `delete()` to result objects | | `json-field-types` | Uses strongly-typed runtime parsing for data stored in JSON columns | | `model-filters` | Adds reusable filters that can composed into complex `where` conditions for a model | | `obfuscated-fields` | Prevents sensitive data (e.g. `password` fields) from being included in results | | `query-logging` | Wraps Prisma Client queries with simple query timing and logging | | `readonly-client` | Creates a client that only allows read operations | | `retry-transactions` | Adds a retry mechanism to transactions with exponential backoff and jitter | | `row-level-security` | Uses Postgres row-level security policies to isolate data a multi-tenant application | | `static-methods` | Adds custom query methods to Prisma Client models | | `transformed-fields` | Demonstrates how to use result extensions to transform query results and add i18n to an app | | `exists-method` | Demonstrates how to add an `exists` method to all your models | | `update-delete-ignore-not-found` | Demonstrates how to add the `updateIgnoreOnNotFound` and `deleteIgnoreOnNotFound` methods to all your models. | ## Going further * Learn more about Prisma Client extensions. --- ## Page: https://www.prisma.io/docs/orm/prisma-client/client-extensions/middleware warning **Deprecated**: Middleware is deprecated in version 4.16.0. We recommend using the Prisma Client extensions `query` component type as an alternative to middleware. Prisma Client extensions were first introduced into Preview in version 4.7.0 and made Generally Available in 4.16.0. Prisma Client extensions allow you to create independent Prisma Client instances and bind each client to a specific filter or user. For example, you could bind clients to specific users to provide user isolation. Prisma Client extensions also provide end-to-end type safety. Middlewares act as query-level lifecycle hooks, which allow you to perform an action before or after a query runs. Use the `prisma.$use` method to add middleware, as follows: const prisma = new PrismaClient()// Middleware 1prisma.$use(async (params, next) => { // Manipulate params here const result = await next(params) // See results here return result})// Middleware 2prisma.$use(async (params, next) => { // Manipulate params here const result = await next(params) // See results here return result})// Queries here warning Do not invoke `next` multiple times within a middleware when using batch transactions. This will cause you to break out of the transaction and lead to unexpected results. `params` represent parameters available in the middleware, such as the name of the query, and `next` represents the next middleware in the stack _or_ the original Prisma Client query. Possible use cases for middleware include: * Setting or overwriting a field value - for example, setting the context language of a blog post comment * Validating input data - for example, check user input for inappropriate language via an external service * Intercept a `delete` query and change it to an `update` in order to perform a soft delete * Log the time taken to perform a query There are many more use cases for middleware - this list serves as inspiration for the types of problems that middleware is designed to address. ## Samples The following sample scenarios show how to use middleware in practice: ## Middleware sample: soft delete The following sample uses middleware to perform a soft delete. Soft delete means that a record is marked as deleted by changing a field like deleted to true rather than actually being removed from the database. Reasons to use a soft delete include: ## Middleware sample: logging The following example logs the time taken for a Prisma Client query to run: ## Middleware sample: session data The following example sets the language field of each Post to the context language (taken, for example, from session state): ## Where to add middleware Add Prisma Client middleware **outside the context of the request handler**, otherwise each request adds a new _instance_ of the middleware to the stack. The following example demonstrates where to add Prisma Client middleware in the context of an Express app: import express from 'express'import { PrismaClient } from '@prisma/client'const prisma = new PrismaClient()prisma.$use(async (params, next) => { // Manipulate params here const result = await next(params) // See results here return result})const app = express()app.get('/feed', async (req, res) => { // NO MIDDLEWARE HERE const posts = await prisma.post.findMany({ where: { published: true }, include: { author: true }, }) res.json(posts)}) ## Running order and the middleware stack If you have multiple middlewares, the running order for **each separate query** is: 1. All logic **before** `await next(params)` in each middleware, in descending order 2. All logic **after** `await next(params)` in each middleware, in ascending order Depending on where you are in the stack, `await next(params)` either: * Runs the next middleware (in middlewares #1 and #2 in the example) _or_ * Runs the original Prisma Client query (in middleware #3) const prisma = new PrismaClient()// Middleware 1prisma.$use(async (params, next) => { console.log(params.args.data.title) console.log('1') const result = await next(params) console.log('6') return result})// Middleware 2prisma.$use(async (params, next) => { console.log('2') const result = await next(params) console.log('5') return result})// Middleware 3prisma.$use(async (params, next) => { console.log('3') const result = await next(params) console.log('4') return result})const create = await prisma.post.create({ data: { title: 'Welcome to Prisma Day 2020', },})const create2 = await prisma.post.create({ data: { title: 'How to Prisma!', },}) Output: Welcome to Prisma Day 2020123456How to Prisma!123456 ## Performance and appropriate use cases Middleware executes for **every** query, which means that overuse has the potential to negatively impact performance. To avoid adding performance overheads: * Check the `params.model` and `params.action` properties early in your middleware to avoid running logic unnecessarily: prisma.$use(async (params, next) => { if (params.model == 'Post' && params.action == 'delete') { // Logic only runs for delete action and Post model } return next(params)}) * Consider whether middleware is the appropriate solution for your scenario. For example: * If you need to populate a field, can you use the `@default` attribute? * If you need to set the value of a `DateTime` field, can you use the `now()` function or the `@updatedAt` attribute? * If you need to perform more complex validation, can you use a `CHECK` constraint in the database itself? --- ## Page: https://www.prisma.io/docs/orm/prisma-client/type-safety/prisma-validator The `Prisma.validator` is a utility function that takes a generated type and returns a type-safe object which adheres to the generated types model fields. This page introduces the `Prisma.validator` and offers some motivations behind why you might choose to use it. > **Note**: If you have a use case for `Prisma.validator`, be sure to check out this blog post about improving your Prisma Client workflows with the new TypeScript `satisfies` keyword. It's likely that you can solve your use case natively using `satisfies` instead of using `Prisma.validator`. ## Creating a typed query statement Let's imagine that you created a new `userEmail` object that you wanted to re-use in different queries throughout your application. It's typed and can be safely used in queries. The below example asks `Prisma` to return the `email` of the user whose `id` is 3, if no user exists it will return `null`. import { Prisma } from '@prisma/client'const userEmail: Prisma.UserSelect = { email: true,}// Run inside async functionconst user = await prisma.user.findUnique({ where: { id: 3, }, select: userEmail,}) This works well but there is a caveat to extracting query statements this way. You'll notice that if you hover your mouse over `userEmail` TypeScript won't infer the object's key or value (that is, `email: true`). The same applies if you use dot notation on `userEmail` within the `prisma.user.findUnique(...)` query, you will be able to access all of the properties available to a `select` object. If you are using this in one file that may be fine, but if you are going to export this object and use it in other queries, or if you are compiling an external library where you want to control how the user uses this object within their queries then this won't be type-safe. The object `userEmail` has been created to select only the user's `email`, and yet it still gives access to all the other properties available. **It is typed, but not type-safe**. `Prisma` has a way to validate generated types to make sure they are type-safe, a utility function available on the namespace called `validator`. ## Using the `Prisma.validator` The following example passes the `UserSelect` generated type into the `Prisma.validator` utility function and defines the expected return type in much the same way as the previous example. import { Prisma } from '@prisma/client'const userEmail: Prisma.UserSelect = { email: true,}const userEmail = Prisma.validator<Prisma.UserSelect>()({ email: true,})// Run inside async functionconst user = await prisma.user.findUnique({ where: { id: 3, }, select: userEmail,}) Alternatively, you can use the following syntax that uses a "selector" pattern using an existing instance of Prisma Client: import { Prisma } from '@prisma/client'import prisma from './lib/prisma'const userEmail = Prisma.validator( prisma, 'user', 'findUnique', 'select')({ email: true,}) The big difference is that the `userEmail` object is now type-safe. If you hover your mouse over it TypeScript will tell you the object's key/value pair. If you use dot notation to access the object's properties you will only be able to access the `email` property of the object. This functionality is handy when combined with user defined input, like form data. ## Combining `Prisma.validator` with form input The following example creates a type-safe function from the `Prisma.validator` which can be used when interacting with user created data, such as form inputs. > **Note**: Form input is determined at runtime so can't be verified by only using TypeScript. Be sure to validate your form input through other means too (such as an external validation library) before passing that data through to your database. import { Prisma, PrismaClient } from '@prisma/client'const prisma = new PrismaClient()// Create a new function and pass the parameters onto the validatorconst createUserAndPost = ( name: string, email: string, postTitle: string, profileBio: string) => { return Prisma.validator<Prisma.UserCreateInput>()({ name, email, posts: { create: { title: postTitle, }, }, profile: { create: { bio: profileBio, }, }, })}const findSpecificUser = (email: string) => { return Prisma.validator<Prisma.UserWhereInput>()({ email, })}// Create the user in the database based on form input// Run inside async functionawait prisma.user.create({ data: createUserAndPost( 'Rich', 'rich@boop.com', 'Life of Pie', 'Learning each day' ),})// Find the specific user based on form input// Run inside async functionconst oneUser = await prisma.user.findUnique({ where: findSpecificUser('rich@boop.com'),}) The `createUserAndPost` custom function is created using the `Prisma.validator` and passed a generated type, `UserCreateInput`. The `Prisma.validator` validates the functions input because the types assigned to the parameters must match those the generated type expects. --- ## Page: https://www.prisma.io/docs/orm/prisma-client/type-safety/prisma-type-system This guide introduces Prisma ORM's type system and explains how to introspect existing native types in your database, and how to use types when you apply schema changes to your database with Prisma Migrate or `db push`. ## How does Prisma ORM's type system work? Prisma ORM uses _types_ to define the kind of data that a field can hold. To make it easy to get started, Prisma ORM provides a small number of core scalar types that should cover most default use cases. For example, take the following blog post model: schema.prisma datasource db { provider = "postgresql" url = env("DATABASE_URL")}model Post { id Int @id title String createdAt DateTime} The `title` field of the `Post` model uses the `String` scalar type, while the `createdAt` field uses the `DateTime` scalar type. Databases also have their own type system, which defines the type of value that a column can hold. Most databases provide a large number of data types to allow fine-grained control over exactly what a column can store. For example, a database might provide inbuilt support for multiple sizes of integers, or for XML data. The names of these types vary between databases. For example, in PostgreSQL the column type for booleans is `boolean`, whereas in MySQL the `tinyint(1)` type is typically used. In the blog post example above, we are using the PostgreSQL connector. This is specified in the `datasource` block of the Prisma schema. ### Default type mappings To allow you to get started with our core scalar types, Prisma ORM provides _default type mappings_ that map each scalar type to a default type in the underlying database. For example: * by default Prisma ORM's `String` type gets mapped to PostgreSQL's `text` type and MySQL's `varchar` type * by default Prisma ORM's `DateTime` type gets mapped to PostgreSQL's `timestamp(3)` type and SQL Server's `datetime2` type See Prisma ORM's database connector pages for the default type mappings for a given database. For example, this table gives the default type mappings for PostgreSQL. To see the default type mappings for all databases for a specific given Prisma ORM type, see the model field scalar types section of the Prisma schema reference. For example, this table gives the default type mappings for the `Float` scalar type. ### Native type mappings Sometimes you may need to use a more specific database type that is not one of the default type mappings for your Prisma ORM type. For this purpose, Prisma ORM provides native type attributes to refine the core scalar types. For example, in the `createdAt` field of your `Post` model above you may want to use a date-only column in your underlying PostgreSQL database, by using the `date` type instead of the default type mapping of `timestamp(3)`. To do this, add a `@db.Date` native type attribute to the `createdAt` field: schema.prisma model Post { id Int @id title String createdAt DateTime @db.Date} Native type mappings allow you to express all the types in your database. However, you do not need to use them if the Prisma ORM defaults satisfy your needs. This leads to a shorter, more readable Prisma schema for common use cases. ## How to introspect database types When you introspect an existing database, Prisma ORM will take the database type of each table column and represent it in your Prisma schema using the correct Prisma ORM type for the corresponding model field. If the database type is not the default database type for that Prisma ORM scalar type, Prisma ORM will also add a native type attribute. As an example, take a `User` table in a PostgreSQL database, with: * an `id` column with a data type of `serial` * a `name` column with a data type of `text` * an `isActive` column with a data type of `boolean` You can create this with the following SQL command: CREATE TABLE "public"."User" ( id serial PRIMARY KEY NOT NULL, name text NOT NULL, "isActive" boolean NOT NULL); Introspect your database with the following command run from the root directory of your project: npx prisma db pull You will get the following Prisma schema: schema.prisma model User { id Int @id @default(autoincrement()) name String isActive Boolean} The `id`, `name` and `isActive` columns in the database are mapped respectively to the `Int`, `String` and `Boolean` Prisma ORM types. The database types are the _default_ database types for these Prisma ORM types, so Prisma ORM does not add any native type attributes. Now add a `createdAt` column to your database with a data type of `date` by running the following SQL command: ALTER TABLE "public"."User"ADD COLUMN "createdAt" date NOT NULL; Introspect your database again: npx prisma db pull Your Prisma schema now includes the new `createdAt` field with a Prisma ORM type of `DateTime`. The `createdAt` field also has a `@db.Date` native type attribute, because PostgreSQL's `date` is not the default type for the `DateTime` type: schema.prisma model User { id Int @id @default(autoincrement()) name String isActive Boolean createdAt DateTime @db.Date} ## How to use types when you apply schema changes to your database When you apply schema changes to your database using Prisma Migrate or `db push`, Prisma ORM will use both the Prisma ORM scalar type of each field and any native attribute it has to determine the correct database type for the corresponding column in the database. As an example, create a Prisma schema with the following `Post` model: schema.prisma model Post { id Int @id title String createdAt DateTime updatedAt DateTime @db.Date} This `Post` model has: * an `id` field with a Prisma ORM type of `Int` * a `title` field with a Prisma ORM type of `String` * a `createdAt` field with a Prisma ORM type of `DateTime` * an `updatedAt` field with a Prisma ORM type of `DateTime` and a `@db.Date` native type attribute Now apply these changes to an empty PostgreSQL database with the following command, run from the root directory of your project: npx prisma db push You will see that the database has a newly created `Post` table, with: * an `id` column with a database type of `integer` * a `title` column with a database type of `text` * a `createdAt` column with a database type of `timestamp(3)` * an `updatedAt` column with a database type of `date` Notice that the `@db.Date` native type attribute modifies the database type of the `updatedAt` column to `date`, rather than the default of `timestamp(3)`. ## More on using Prisma ORM's type system For further reference information on using Prisma ORM's type system, see the following resources: * The database connector page for each database provider has a type mapping section with a table of default type mappings between Prisma ORM types and database types, and a table of database types with their corresponding native type attribute in Prisma ORM. For example, the type mapping section for PostgreSQL is here. * The model field scalar types section of the Prisma schema reference has a subsection for each Prisma ORM scalar type. This includes a table of default mappings for that Prisma ORM type in each database, and a table for each database listing the corresponding database types and their native type attributes in Prisma ORM. For example, the entry for the `String` Prisma ORM type is here. --- ## Page: https://www.prisma.io/docs/orm/prisma-client/client-extensions/middleware/session-data-middleware * * ORM * Prisma Client * Extensions * Middleware The following example sets the `language` field of each `Post` to the context language (taken, for example, from session state): const prisma = new PrismaClient()const contextLanguage = 'en-us' // Session stateprisma.$use(async (params, next) => { if (params.model == 'Post' && params.action == 'create') { params.args.data.language = contextLanguage } return next(params)})const create = await prisma.post.create({ data: { title: 'My post in English', },}) The example is based on the following sample schema: generator client { provider = "prisma-client-js"}datasource db { provider = "mysql" url = env("DATABASE_URL")}model Post { authorId Int? content String? id Int @id @default(autoincrement()) published Boolean @default(false) title String user User? @relation(fields: [authorId], references: [id]) language String? @@index([authorId], name: "authorId")}model User { email String @unique id Int @id @default(autoincrement()) name String? posts Post[] extendedProfile Json? role Role @default(USER)}enum Role { ADMIN USER MODERATOR} Previous Middleware sample: logging Next Type safety --- ## Page: https://www.prisma.io/docs/orm/prisma-client/testing/unit-testing Unit testing aims to isolate a small portion (unit) of code and test it for logically predictable behaviors. It generally involves mocking objects or server responses to simulate real world behaviors. Some benefits to unit testing include: * Quickly find and isolate bugs in code. * Provides documentation for each module of code by way of indicating what certain code blocks should be doing. * A helpful gauge that a refactor has gone well. The tests should still pass after code has been refactored. In the context of Prisma ORM, this generally means testing a function which makes database calls using Prisma Client. A single test should focus on how your function logic handles different inputs (such as a null value or an empty list). This means that you should aim to remove as many dependencies as possible, such as external services and databases, to keep the tests and their environments as lightweight as possible. > **Note**: This blog post provides a comprehensive guide to implementing unit testing in your Express project with Prisma ORM. If you're looking to delve into this topic, be sure to give it a read! ## Prerequisites This guide assumes you have the JavaScript testing library `Jest` and `ts-jest` already setup in your project. ## Mocking Prisma Client To ensure your unit tests are isolated from external factors you can mock Prisma Client, this means you get the benefits of being able to use your schema (**_type-safety_**), without having to make actual calls to your database when your tests are run. This guide will cover two approaches to mocking Prisma Client, a singleton instance and dependency injection. Both have their merits depending on your use cases. To help with mocking Prisma Client the `jest-mock-extended` package will be used. npm install jest-mock-extended@2.0.4 --save-dev danger At the time of writing, this guide uses `jest-mock-extended` version `^2.0.4`. ### Singleton The following steps guide you through mocking Prisma Client using a singleton pattern. 1. Create a file at your projects root called `client.ts` and add the following code. This will instantiate a Prisma Client instance. client.ts import { PrismaClient } from '@prisma/client'const prisma = new PrismaClient()export default prisma 2. Next create a file named `singleton.ts` at your projects root and add the following: singleton.ts import { PrismaClient } from '@prisma/client'import { mockDeep, mockReset, DeepMockProxy } from 'jest-mock-extended'import prisma from './client'jest.mock('./client', () => ({ __esModule: true, default: mockDeep<PrismaClient>(),}))beforeEach(() => { mockReset(prismaMock)})export const prismaMock = prisma as unknown as DeepMockProxy<PrismaClient> The singleton file tells Jest to mock a default export (the Prisma Client instance in `./client.ts`), and uses the `mockDeep` method from `jest-mock-extended` to enable access to the objects and methods available on Prisma Client. It then resets the mocked instance before each test is run. Next, add the `setupFilesAfterEnv` property to your `jest.config.js` file with the path to your `singleton.ts` file. jest.config.js module.exports = { clearMocks: true, preset: 'ts-jest', testEnvironment: 'node', setupFilesAfterEnv: ['<rootDir>/singleton.ts'],} ### Dependency injection Another popular pattern that can be used is dependency injection. 1. Create a `context.ts` file and add the following: context.ts import { PrismaClient } from '@prisma/client'import { mockDeep, DeepMockProxy } from 'jest-mock-extended'export type Context = { prisma: PrismaClient}export type MockContext = { prisma: DeepMockProxy<PrismaClient>}export const createMockContext = (): MockContext => { return { prisma: mockDeep<PrismaClient>(), }} tip If you find that you're seeing a circular dependency error highlighted through mocking Prisma Client, try adding `"strictNullChecks": true` to your `tsconfig.json`. 2. To use the context, you would do the following in your test file: import { MockContext, Context, createMockContext } from '../context'let mockCtx: MockContextlet ctx: ContextbeforeEach(() => { mockCtx = createMockContext() ctx = mockCtx as unknown as Context}) This will create a new context before each test is run via the `createMockContext` function. This (`mockCtx`) context will be used to make a mock call to Prisma Client and run a query to test. The `ctx` context will be used to run a scenario query that is tested against. ## Example unit tests A real world use case for unit testing Prisma ORM might be a signup form. Your user fills in a form which calls a function, which in turn uses Prisma Client to make a call to your database. All of the examples that follow use the following schema model: schema.prisma model User { id Int @id @default(autoincrement()) email String @unique name String? acceptTermsAndConditions Boolean} The following unit tests will mock the process of * Creating a new user * Updating a users name * Failing to create a user if terms are not accepted The functions that use the dependency injection pattern will have the context injected (passed in as a parameter) into them, whereas the functions that use the singleton pattern will use the singleton instance of Prisma Client. functions-with-context.ts import { Context } from './context'interface CreateUser { name: string email: string acceptTermsAndConditions: boolean}export async function createUser(user: CreateUser, ctx: Context) { if (user.acceptTermsAndConditions) { return await ctx.prisma.user.create({ data: user, }) } else { return new Error('User must accept terms!') }}interface UpdateUser { id: number name: string email: string}export async function updateUsername(user: UpdateUser, ctx: Context) { return await ctx.prisma.user.update({ where: { id: user.id }, data: user, })} functions-without-context.ts import prisma from './client'interface CreateUser { name: string email: string acceptTermsAndConditions: boolean}export async function createUser(user: CreateUser) { if (user.acceptTermsAndConditions) { return await prisma.user.create({ data: user, }) } else { return new Error('User must accept terms!') }}interface UpdateUser { id: number name: string email: string}export async function updateUsername(user: UpdateUser) { return await prisma.user.update({ where: { id: user.id }, data: user, })} The tests for each methodology are fairly similar, the difference is how the mocked Prisma Client is used. The **_dependency injection_** example passes the context through to the function that is being tested as well as using it to call the mock implementation. The **_singleton_** example uses the singleton client instance to call the mock implementation. \_\_tests\_\_/with-singleton.ts import { createUser, updateUsername } from '../functions-without-context'import { prismaMock } from '../singleton'test('should create new user ', async () => { const user = { id: 1, name: 'Rich', email: 'hello@prisma.io', acceptTermsAndConditions: true, } prismaMock.user.create.mockResolvedValue(user) await expect(createUser(user)).resolves.toEqual({ id: 1, name: 'Rich', email: 'hello@prisma.io', acceptTermsAndConditions: true, })})test('should update a users name ', async () => { const user = { id: 1, name: 'Rich Haines', email: 'hello@prisma.io', acceptTermsAndConditions: true, } prismaMock.user.update.mockResolvedValue(user) await expect(updateUsername(user)).resolves.toEqual({ id: 1, name: 'Rich Haines', email: 'hello@prisma.io', acceptTermsAndConditions: true, })})test('should fail if user does not accept terms', async () => { const user = { id: 1, name: 'Rich Haines', email: 'hello@prisma.io', acceptTermsAndConditions: false, } prismaMock.user.create.mockImplementation() await expect(createUser(user)).resolves.toEqual( new Error('User must accept terms!') )}) \_\_tests\_\_/with-dependency-injection.ts import { MockContext, Context, createMockContext } from '../context'import { createUser, updateUsername } from '../functions-with-context'let mockCtx: MockContextlet ctx: ContextbeforeEach(() => { mockCtx = createMockContext() ctx = mockCtx as unknown as Context})test('should create new user ', async () => { const user = { id: 1, name: 'Rich', email: 'hello@prisma.io', acceptTermsAndConditions: true, } mockCtx.prisma.user.create.mockResolvedValue(user) await expect(createUser(user, ctx)).resolves.toEqual({ id: 1, name: 'Rich', email: 'hello@prisma.io', acceptTermsAndConditions: true, })})test('should update a users name ', async () => { const user = { id: 1, name: 'Rich Haines', email: 'hello@prisma.io', acceptTermsAndConditions: true, } mockCtx.prisma.user.update.mockResolvedValue(user) await expect(updateUsername(user, ctx)).resolves.toEqual({ id: 1, name: 'Rich Haines', email: 'hello@prisma.io', acceptTermsAndConditions: true, })})test('should fail if user does not accept terms', async () => { const user = { id: 1, name: 'Rich Haines', email: 'hello@prisma.io', acceptTermsAndConditions: false, } mockCtx.prisma.user.create.mockImplementation() await expect(createUser(user, ctx)).resolves.toEqual( new Error('User must accept terms!') )}) --- ## Page: https://www.prisma.io/docs/orm/prisma-client/testing/integration-testing Integration tests focus on testing how separate parts of the program work together. In the context of applications using a database, integration tests usually require a database to be available and contain data that is convenient to the scenarios intended to be tested. One way to simulate a real world environment is to use Docker to encapsulate a database and some test data. This can be spun up and torn down with the tests and so operate as an isolated environment away from your production databases. > **Note:** This blog post offers a comprehensive guide on setting up an integration testing environment and writing integration tests against a real database, providing valuable insights for those looking to explore this topic. ## Prerequisites This guide assumes you have Docker and Docker Compose installed on your machine as well as `Jest` setup in your project. The following ecommerce schema will be used throughout the guide. This varies from the traditional `User` and `Post` models used in other parts of the docs, mainly because it is unlikely you will be running integration tests against your blog. Ecommerce schema schema.prisma // Can have 1 customer// Can have many order detailsmodel CustomerOrder { id Int @id @default(autoincrement()) createdAt DateTime @default(now()) customer Customer @relation(fields: [customerId], references: [id]) customerId Int orderDetails OrderDetails[]}// Can have 1 order// Can have many productsmodel OrderDetails { id Int @id @default(autoincrement()) products Product @relation(fields: [productId], references: [id]) productId Int order CustomerOrder @relation(fields: [orderId], references: [id]) orderId Int total Decimal quantity Int}// Can have many order details// Can have 1 categorymodel Product { id Int @id @default(autoincrement()) name String description String price Decimal sku Int orderDetails OrderDetails[] category Category @relation(fields: [categoryId], references: [id]) categoryId Int}// Can have many productsmodel Category { id Int @id @default(autoincrement()) name String products Product[]}// Can have many ordersmodel Customer { id Int @id @default(autoincrement()) email String @unique address String? name String? orders CustomerOrder[]} The guide uses a singleton pattern for Prisma Client setup. Refer to the singleton docs for a walk through of how to set that up. ## Add Docker to your project 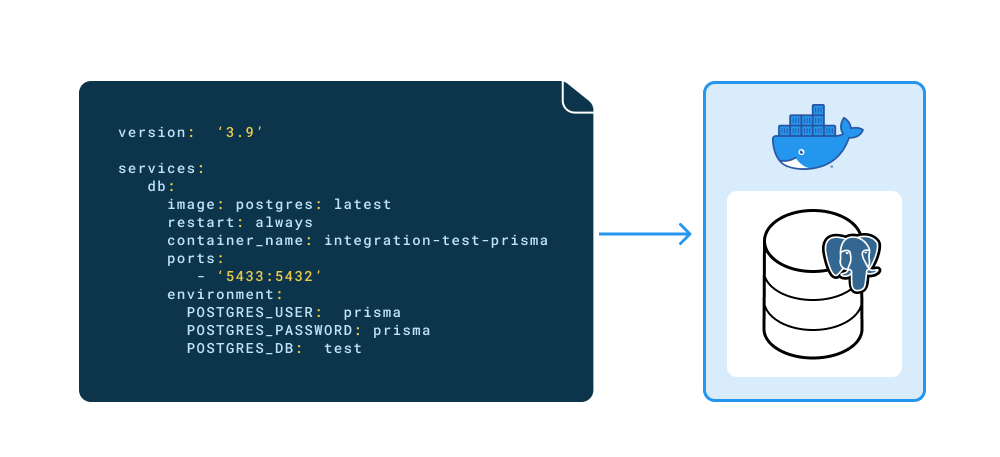 With Docker and Docker compose both installed on your machine you can use them in your project. 1. Begin by creating a `docker-compose.yml` file at your projects root. Here you will add a Postgres image and specify the environments credentials. docker-compose.yml # Set the version of docker compose to useversion: '3.9'# The containers that compose the projectservices: db: image: postgres:13 restart: always container_name: integration-tests-prisma ports: - '5433:5432' environment: POSTGRES_USER: prisma POSTGRES_PASSWORD: prisma POSTGRES_DB: tests > **Note**: The compose version used here (`3.9`) is the latest at the time of writing, if you are following along be sure to use the same version for consistency. The `docker-compose.yml` file defines the following: * The Postgres image (`postgres`) and version tag (`:13`). This will be downloaded if you do not have it locally available. * The port `5433` is mapped to the internal (Postgres default) port `5432`. This will be the port number the database is exposed on externally. * The database user credentials are set and the database given a name. 2. To connect to the database in the container, create a new connection string with the credentials defined in the `docker-compose.yml` file. For example: .env.test DATABASE_URL="postgresql://prisma:prisma@localhost:5433/tests" info The above `.env.test` file is used as part of a multiple `.env` file setup. Checkout the using multiple .env files. section to learn more about setting up your project with multiple `.env` files 3. To create the container in a detached state so that you can continue to use the terminal tab, run the following command: docker compose up -d 4. Next you can check that the database has been created by executing a `psql` command inside the container. Make a note of the container id. docker ps Show CLI results CONTAINER ID IMAGE COMMAND CREATED STATUS PORTS NAMES1322e42d833f postgres:13 "docker-entrypoint.s…" 2 seconds ago Up 1 second 0.0.0.0:5433->5432/tcp integration-tests-prisma > **Note**: The container id is unique to each container, you will see a different id displayed. 5. Using the container id from the previous step, run `psql` in the container, login with the created user and check the database is created: docker exec -it 1322e42d833f psql -U prisma tests Show CLI results tests=# \l List of databases Name | Owner | Encoding | Collate | Ctype | Access privileges postgres | prisma | UTF8 | en_US.utf8 | en_US.utf8 | template0 | prisma | UTF8 | en_US.utf8 | en_US.utf8 | =c/prisma + | | | | | prisma=CTc/prisma template1 | prisma | UTF8 | en_US.utf8 | en_US.utf8 | =c/prisma + | | | | | prisma=CTc/prisma tests | prisma | UTF8 | en_US.utf8 | en_US.utf8 |(4 rows) ## Integration testing Integration tests will be run against a database in a **dedicated test environment** instead of the production or development environments. ### The flow of operations The flow for running said tests goes as follows: 1. Start the container and create the database 2. Migrate the schema 3. Run the tests 4. Destroy the container Each test suite will seed the database before all the test are run. After all the tests in the suite have finished, the data from all the tables will be dropped and the connection terminated. ### The function to test The ecommerce application you are testing has a function which creates an order. This function does the following: * Accepts input about the customer making the order * Accepts input about the product being ordered * Checks if the customer has an existing account * Checks if the product is in stock * Returns an "Out of stock" message if the product doesn't exist * Creates an account if the customer doesn't exist in the database * Create the order An example of how such a function might look can be seen below: create-order.ts import prisma from '../client'export interface Customer { id?: number name?: string email: string address?: string}export interface OrderInput { customer: Customer productId: number quantity: number}/** * Creates an order with customer. * @param input The order parameters */export async function createOrder(input: OrderInput) { const { productId, quantity, customer } = input const { name, email, address } = customer // Get the product const product = await prisma.product.findUnique({ where: { id: productId, }, }) // If the product is null its out of stock, return error. if (!product) return new Error('Out of stock') // If the customer is new then create the record, otherwise connect via their unique email await prisma.customerOrder.create({ data: { customer: { connectOrCreate: { create: { name, email, address, }, where: { email, }, }, }, orderDetails: { create: { total: product.price, quantity, products: { connect: { id: product.id, }, }, }, }, }, })} ### The test suite The following tests will check if the `createOrder` function works as it should do. They will test: * Creating a new order with a new customer * Creating an order with an existing customer * Show an "Out of stock" error message if a product doesn't exist Before the test suite is run the database is seeded with data. After the test suite has finished a `deleteMany` is used to clear the database of its data. tip Using `deleteMany` may suffice in situations where you know ahead of time how your schema is structured. This is because the operations need to be executed in the correct order according to how the model relations are setup. However, this doesn't scale as well as having a more generic solution that maps over your models and performs a truncate on them. For those scenarios and examples of using raw SQL queries see Deleting all data with raw SQL / `TRUNCATE` \_\_tests\_\_/create-order.ts import prisma from '../src/client'import { createOrder, Customer, OrderInput } from '../src/functions/index'beforeAll(async () => { // create product categories await prisma.category.createMany({ data: [{ name: 'Wand' }, { name: 'Broomstick' }], }) console.log('✨ 2 categories successfully created!') // create products await prisma.product.createMany({ data: [ { name: 'Holly, 11", phoenix feather', description: 'Harry Potters wand', price: 100, sku: 1, categoryId: 1, }, { name: 'Nimbus 2000', description: 'Harry Potters broom', price: 500, sku: 2, categoryId: 2, }, ], }) console.log('✨ 2 products successfully created!') // create the customer await prisma.customer.create({ data: { name: 'Harry Potter', email: 'harry@hogwarts.io', address: '4 Privet Drive', }, }) console.log('✨ 1 customer successfully created!')})afterAll(async () => { const deleteOrderDetails = prisma.orderDetails.deleteMany() const deleteProduct = prisma.product.deleteMany() const deleteCategory = prisma.category.deleteMany() const deleteCustomerOrder = prisma.customerOrder.deleteMany() const deleteCustomer = prisma.customer.deleteMany() await prisma.$transaction([ deleteOrderDetails, deleteProduct, deleteCategory, deleteCustomerOrder, deleteCustomer, ]) await prisma.$disconnect()})it('should create 1 new customer with 1 order', async () => { // The new customers details const customer: Customer = { id: 2, name: 'Hermione Granger', email: 'hermione@hogwarts.io', address: '2 Hampstead Heath', } // The new orders details const order: OrderInput = { customer, productId: 1, quantity: 1, } // Create the order and customer await createOrder(order) // Check if the new customer was created by filtering on unique email field const newCustomer = await prisma.customer.findUnique({ where: { email: customer.email, }, }) // Check if the new order was created by filtering on unique email field of the customer const newOrder = await prisma.customerOrder.findFirst({ where: { customer: { email: customer.email, }, }, }) // Expect the new customer to have been created and match the input expect(newCustomer).toEqual(customer) // Expect the new order to have been created and contain the new customer expect(newOrder).toHaveProperty('customerId', 2)})it('should create 1 order with an existing customer', async () => { // The existing customers email const customer: Customer = { email: 'harry@hogwarts.io', } // The new orders details const order: OrderInput = { customer, productId: 1, quantity: 1, } // Create the order and connect the existing customer await createOrder(order) // Check if the new order was created by filtering on unique email field of the customer const newOrder = await prisma.customerOrder.findFirst({ where: { customer: { email: customer.email, }, }, }) // Expect the new order to have been created and contain the existing customer with an id of 1 (Harry Potter from the seed script) expect(newOrder).toHaveProperty('customerId', 1)})it("should show 'Out of stock' message if productId doesn't exit", async () => { // The existing customers email const customer: Customer = { email: 'harry@hogwarts.io', } // The new orders details const order: OrderInput = { customer, productId: 3, quantity: 1, } // The productId supplied doesn't exit so the function should return an "Out of stock" message await expect(createOrder(order)).resolves.toEqual(new Error('Out of stock'))}) ## Running the tests This setup isolates a real world scenario so that you can test your applications functionality against real data in a controlled environment. You can add some scripts to your projects `package.json` file which will setup the database and run the tests, then afterwards manually destroy the container. warning If the test doesn't work for you, you'll need to ensure the test database is properly set up and ready, as explained in this blog. package.json "scripts": { "docker:up": "docker compose up -d", "docker:down": "docker compose down", "test": "yarn docker:up && yarn prisma migrate deploy && jest -i" }, The `test` script does the following: 1. Runs `docker compose up -d` to create the container with the Postgres image and database. 2. Applies the migrations found in `./prisma/migrations/` directory to the database, this creates the tables in the container's database. 3. Executes the tests. Once you are satisfied you can run `yarn docker:down` to destroy the container, its database and any test data. --- ## Page: https://www.prisma.io/docs/orm/prisma-client/deployment/deploy-prisma ## Deploy Prisma ORM Projects using Prisma Client can be deployed to many different cloud platforms. Given the variety of cloud platforms and different names, it's noteworthy to mention the different deployment paradigms, as they affect the way you deploy an application using Prisma Client. ## Deployment paradigms Each paradigm has different tradeoffs that affect the performance, scalability, and operational costs of your application. Moreover, the user traffic pattern of your application is also an important factor to consider. For example, any application with consistent user traffic may be better suited for a continuously running paradigm, whereas an application with sudden spikes may be better suited to serverless. ### Traditional servers Your application is traditionally deployed if a Node.js process is continuously running and handles multiple requests at the same time. Your application could be deployed to a Platform-as-a-Service (PaaS) like Heroku, Koyeb, or Render; as a Docker container to Kubernetes; or as a Node.js process on a virtual machine or bare metal server. See also: Connection management in long-running processes ### Serverless Functions Your application is serverless if the Node.js processes of your application (or subsets of it broken into functions) are started as requests come in, and each function only handles one request at a time. Your application would most likely be deployed to a Function-as-a-Service (FaaS) offering, such as AWS Lambda or Azure Functions Serverless environments have the concept of warm starts, which means that for subsequent invocations of the same function, it may use an already existing container that has the allocated processes, memory, file system (`/tmp` is writable on AWS Lambda), and even DB connection still available. Typically, any piece of code outside the handler remains initialized. See also: Connection management in serverless environments ### Edge Functions Your application is edge deployed if your application is serverless and the functions are distributed across one or more regions close to the user. Typically, edge environments also have a different runtime than a traditional or serverless environment, leading to common APIs being unavailable. --- ## Page: https://www.prisma.io/docs/orm/prisma-client/deployment/traditional ## Deploy to Heroku In this guide, you will set up and deploy a Node.js server that uses Prisma ORM with PostgreSQL to Heroku. The application exposes a REST API and uses Prisma Client to handle fetching, creating, and deleting records from a database. --- ## Page: https://www.prisma.io/docs/orm/prisma-client/deployment/serverless ## Serverless functions If your application is deployed via a "Serverless Function" or "Function-as-a-Service (FaaS)" offering and uses a standard Node.js runtime, it is a serverless app. Common deployment examples include AWS Lambda and Vercel Serverless Functions. ## Guides for Serverless Function providers ## Deploy to Azure Functions This guide explains how to avoid common issues when deploying a Node.js-based function app to Azure using Azure Functions. ## Deploy to Vercel This guide takes you through the steps to set up and deploy a serverless application that uses Prisma to Vercel. ## Deploy to AWS Lambda This guide explains how to avoid common issues when deploying a project using Prisma ORM to AWS Lambda. ## Deploy to Netlify This guide covers the steps you will need to take in order to deploy your application that uses Prisma ORM to Netlify. --- ## Page: https://www.prisma.io/docs/orm/prisma-client/deployment/edge ## Edge functions If your application is deployed via an "Edge Function" offering or is deployed from a serverless offering and has a non-standard runtime, it is a _edge-deployed_ app. Common examples for such offerings include Cloudflare Workers or Pages, Vercel Edge Functions or Edge Middleware, and Deno Deploy. ## In this section ## Overview You can deploy an application that uses Prisma ORM to the edge. Depending on which edge function provider and which database you use, there are different considerations and things to be aware of. ## Deploy to Cloudflare This page covers everything you need to know to deploy an app with Prisma ORM to a Cloudflare Worker or to Cloudflare Pages. ## Deploy to Vercel This page covers everything you need to know to deploy an app that uses Prisma Client for talking to a database in Vercel Edge Middleware or a Vercel Function deployed to the Vercel Edge Runtime. With this guide, you can learn how to build and deploy a simple application to Deno Deploy. The application uses Prisma ORM to save a log of each request to a Prisma Postgres database. --- ## Page: https://www.prisma.io/docs/orm/prisma-client/deployment/module-bundlers ## Overview _Module bundlers_ bundle JavaScript modules into a single JavaScript file. Most bundlers work by copying over the JavaScript code from a variety of source files into the target file. Since Prisma Client is not only based on JavaScript code, but also relies on the **query engine binary file** to be available, you need to make sure that your bundled code has access to the binary file. To do so, you can use plugins that let you copy over static assets: | Bundler | Plugin | | --- | --- | | Webpack | `copy-webpack-plugin` | | Webpack (with Next.js monorepo) | `nextjs-monorepo-workaround-plugin` | | Parcel | `parcel-plugin-static-files-copy` | --- ## Page: https://www.prisma.io/docs/orm/prisma-client/deployment/deploy-migrations-from-a-local-environment There are two scenarios where you might consider deploying migrations directly from a local environment to a production environment. This page outlines some examples of how you can do that and **why we would generally not recommend it**. If you do not have an automated CI/CD process, you can technically deploy new migrations from your local environment to production in the following ways: //delete-next-lineDATABASE_URL="postgresql://johndoe:randompassword@localhost:5432/my_local_database"//add-next-lineDATABASE_URL="postgresql://johndoe:randompassword@localhost:5432/my_production_database" The pipeline should handle deployment to staging and production environments, and use `migrate deploy` in a pipeline step. See the deployment guides for examples. When you add Prisma Migrate to an **existing database**, you must baseline the production database. Baselining is performed **once**, and can be done from a local instance. --- ## Page: https://www.prisma.io/docs/orm/prisma-client/deployment/caveats-when-deploying-to-aws-platforms The following describes some caveats you might face when deploying to different AWS platforms. ## AWS RDS Proxy Prisma ORM is compatible with AWS RDS Proxy. However, there is no benefit in using it for connection pooling with Prisma ORM due to the way RDS Proxy pins connections: > "Your connections to the proxy can enter a state known as pinning. When a connection is pinned, each later transaction uses the same underlying database connection until the session ends. Other client connections also can't reuse that database connection until the session ends. The session ends when Prisma Client's connection is dropped." - AWS RDS Proxy Docs Prepared statements (of any size) or query statements greater than 16 KB cause RDS Proxy to pin the session. Because Prisma ORM uses prepared statements for all queries, you won't see any benefit when using RDS Proxy with Prisma ORM. ## AWS Elastic Beanstalk AWS Elastic Beanstalk is a PaaS-like deployment service that abstracts away infrastructure and allows you to deploy applications to AWS quickly. When deploying an app using Prisma Client to AWS Elastic Beanstalk, Prisma ORM generates the Prisma Client code into `node_modules`. This is typically done in a `postinstall` hook defined in a `package.json`. Because Beanstalk limits the ability to write to the filesystem in the `postinstall` hook, you need to create an `.npmrc` file in the root of your project and add the following configuration: .npmrc unsafe-perm=true Enabling `unsafe-perm` forces _npm_ to run as _root_, avoiding the filesystem access problem, thereby allowing the `prisma generate` command in the `postinstall` hook to generate your code. ### Error: @prisma/client did not initialize yet This error happens because AWS Elastic Beanstalk doesn't install `devDependencies`, which means that it doesn't pick up the Prisma CLI. To remedy this you can either: 1. Add the `prisma` CLI package to your `dependencies` instead of the `devDependencies`. (Making sure to run `npm install` afterward to update the `package-lock.json`). 2. Or install your `devDependencies` on AWS Elastic Beanstalk instances. To do this you must set the AWS Elastic Beanstalk `NPM_USE_PRODUCTION` environment property to false. ## AWS RDS Postgres When using Prisma ORM with AWS RDS Postgres, you may encounter connection issues or the following error during migration or runtime: Error: P1010: User <username> was denied access on the database <database> ### Cause AWS RDS enforces SSL connections by default, and Prisma parses the database connection string with `rejectUnauthorized: true`, which requires a valid SSL certificate. If the certificate is not configured properly, Prisma cannot connect to the database. ### Solution To resolve this issue, update the `DATABASE_URL` environment variable to include the `sslmode=no-verify` option. This bypasses strict SSL certificate verification and allows Prisma to connect to the database. Update your `.env` file as follows: DATABASE_URL=postgresql://<username>:<password>@<host>/<database>?sslmode=no-verify&schema=public ### Why This Works The `sslmode=no-verify` setting passes `rejectUnauthorized: false` to the SSL configuration via the pg-connection-string package. This disables strict certificate validation, allowing Prisma to establish a connection with the RDS database. ### Note While using `sslmode=no-verify` can be a quick fix, it bypasses SSL verification and might not meet security requirements for production environments. In such cases, ensure that a valid SSL certificate is properly configured. ## AWS Lambda upload limit AWS Lambda defines an **deployment package upload limit**, which includes: * All application code * Binaries like the Prisma ORM query engine The deployment package (.zip) size limit for lambdas is 50MB. When you prepare a deployment package, remove any files that the function does not require in production to keep the final .zip as small as possible. This includes some Prisma ORM engine binaries. ### Deleting Prisma ORM engines that are not required Prisma CLI downloads additional engine binaries that are **not required** in production. You can delete the following files and folders: 1. The entire `node_modules/@prisma/engines` folder (refer to the sample bash script used by the Prisma end-to-end tests) 2. The **local engine file** for your development platform from the `node_modules/.prisma/client` folder. For example, your schema might define the following `binaryTargets` if you develop on Debian (`native`) but deploy to AWS Lambda (`rhel-openssl-3.0.x`): binaryTargets = ["native", "rhel-openssl-3.0.x"] In this scenario: * Keep `node_modules/.prisma/client/query-engine-rhel-openssl-3.0.x`, which is the engine file used by AWS Lambda * Delete `node_modules/.prisma/client/query-engine-debian-openssl-1.1.x`, which is only required locally > **Note**: When using Node.js 18 or earlier, the correct `binaryTarget` for AWS Lambda is `rhel-openssl-1.0.x`. `rhel-openssl-3.0.x` is the correct `binaryTarget` for Node.js versions greater than 18. --- ## Page: https://www.prisma.io/docs/orm/prisma-client/deployment/deploy-to-a-different-os Prisma Client depends on the query engine that is running as a binary on the same host as your application. The query engine is implemented in Rust and is used by Prisma Client in the form of executable binary files. The binary is downloaded when `prisma generate` is called. If you have developed your application on a Windows machine for example, and wish to upload to AWS Lambda, which is a Linux environment, you may encounter issues and be presented with some warnings in your terminal. To solve this, if you know ahead of time that you will be deploying to a different environment, you can use the binary targets and specify which of the supported operating systems binaries should be included. > **Note**: If your OS isn't supported you can include a custom binary. --- ## Page: https://www.prisma.io/docs/orm/prisma-client/observability-and-logging/logging Use the `PrismaClient` `log` parameter to configure log levels , including warnings, errors, and information about the queries sent to the database. Prisma Client supports two types of logging: * Logging to stdout (default) * Event-based logging (use `$on()` method to subscribe to events) info You can also use the `DEBUG` environment variable to enable debugging output in Prisma Client. See Debugging for more information. info If you want a detailed insight into your Prisma Client's performance at the level of individual operations, see Tracing. ## Log to stdout The simplest way to print _all_ log levels to stdout is to pass in an array `LogLevel` objects: const prisma = new PrismaClient({ log: ['query', 'info', 'warn', 'error'],}) This is the short form of passing in an array of `LogDefinition` objects where the value of `emit` is always `stdout`: const prisma = new PrismaClient({ log: [ { emit: 'stdout', level: 'query', }, { emit: 'stdout', level: 'error', }, { emit: 'stdout', level: 'info', }, { emit: 'stdout', level: 'warn', }, ],}) ## Event-based logging To use event-based logging: 1. Set `emit` to `event` for a specific log level, such as query 2. Use the `$on()` method to subscribe to the event The following example subscribes to all `query` events and write the `duration` and `query` to console: * Relational databases * MongoDB const prisma = new PrismaClient({ log: [ { emit: 'event', level: 'query', }, { emit: 'stdout', level: 'error', }, { emit: 'stdout', level: 'info', }, { emit: 'stdout', level: 'warn', }, ],})prisma.$on('query', (e) => { console.log('Query: ' + e.query) console.log('Params: ' + e.params) console.log('Duration: ' + e.duration + 'ms')}) Show CLI results Query: SELECT "public"."User"."id", "public"."User"."email", "public"."User"."name" FROM "public"."User" WHERE 1=1 OFFSET $1Params: [0]Duration: 3msQuery: SELECT "public"."Post"."id", "public"."Post"."title", "public"."Post"."authorId" FROM "public"."Post" WHERE "public"."Post"."authorId" IN ($1,$2,$3,$4) OFFSET $5Params: [2, 7, 18, 29]Duration: 2ms The exact event (`e`) type and the properties available depends on the log level. --- ## Page: https://www.prisma.io/docs/orm/prisma-client/observability-and-logging/metrics { "counters": [ { "key": "prisma_client_queries_total", "labels": {}, "value": 2, "description": "Total number of Prisma Client queries executed" }, { "key": "prisma_datasource_queries_total", "labels": {}, "value": 5, "description": "Total number of Datasource Queries executed" }, { "key": "prisma_pool_connections_open", "labels": {}, "value": 1, "description": "Number of currently open Pool Connections" } ], "gauges": [ { "key": "prisma_client_queries_active", "labels": {}, "value": 0, "description": "Number of currently active Prisma Client queries" }, { "key": "prisma_client_queries_wait", "labels": {}, "value": 0, "description": "Number of Prisma Client queries currently waiting for a connection" }, { "key": "prisma_pool_connections_busy", "labels": {}, "value": 0, "description": "Number of currently busy Pool Connections (executing a datasource query)" }, { "key": "prisma_pool_connections_idle", "labels": {}, "value": 21, "description": "Number of currently unused Pool Connections (waiting for the next datasource query to run)" }, { "key": "prisma_pool_connections_open", "labels": {}, "value": 1, "description": "Number of currently open Pool Connections" } ], "histograms": [ { "key": "prisma_client_queries_duration_histogram_ms", "labels": {}, "value": { "buckets": [ [0, 0], [1, 0], [5, 0], [10, 1], [50, 1], [100, 0], [500, 0], [1000, 0], [5000, 0], [50000, 0] ], "sum": 47.430541000000005, "count": 2 }, "description": "Histogram of the duration of all executed Prisma Client queries in ms" }, { "key": "prisma_client_queries_wait_histogram_ms", "labels": {}, "value": { "buckets": [ [0, 0], [1, 3], [5, 0], [10, 0], [50, 0], [100, 0], [500, 0], [1000, 0], [5000, 0], [50000, 0] ], "sum": 0.0015830000000000002, "count": 3 }, "description": "Histogram of the wait time of all Prisma Client Queries in ms" }, { "key": "prisma_datasource_queries_duration_histogram_ms", "labels": {}, "value": { "buckets": [ [0, 0], [1, 0], [5, 2], [10, 2], [50, 1], [100, 0], [500, 0], [1000, 0], [5000, 0], [50000, 0] ], "sum": 47.134498, "count": 5 }, "description": "Histogram of the duration of all executed Datasource Queries in ms" } ]} --- ## Page: https://www.prisma.io/docs/orm/prisma-client/observability-and-logging/opentelemetry-tracing Tracing provides a detailed log of the activity that Prisma Client carries out, at an operation level, including the time taken to execute each query. It helps you analyze your application's performance and identify bottlenecks. Tracing is fully compliant with OpenTelemetry, so you can use it as part of your end-to-end application tracing system. info Tracing gives you a highly detailed, operation-level insight into your Prisma ORM project. If you want aggregated numerical reporting, such as query counts, connection counts, and total query execution times, see Metrics. ## About tracing When you enable tracing, Prisma Client outputs the following: * One trace for each operation (e.g. findMany) that Prisma Client makes. * In each trace, one or more spans. Each span represents the length of time that one stage of the operation takes, such as serialization, or a database query. Spans are represented in a tree structure, where child spans indicate that execution is happening within a larger parent span. The number and type of spans in a trace depends on the type of operation the trace covers, but an example is as follows: 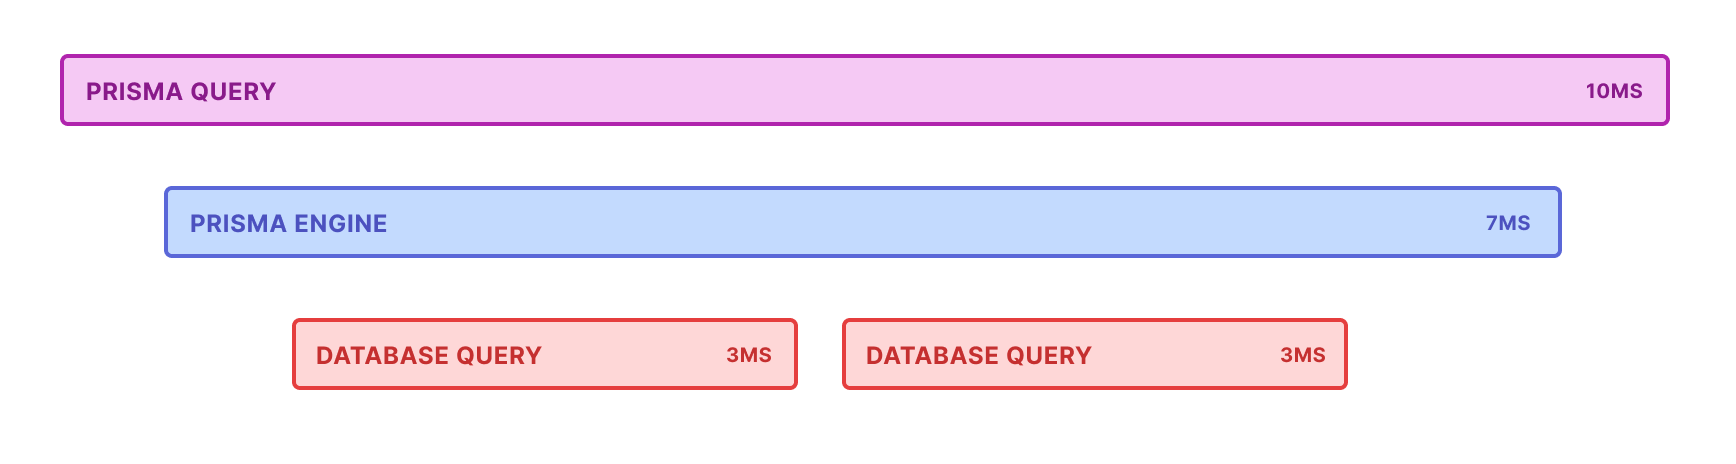 You can send tracing output to the console, or analyze it in any OpenTelemetry-compatible tracing system, such as Jaeger, Honeycomb and Datadog. On this page, we give an example of how to send tracing output to Jaeger, which you can run locally. ## Trace output For each trace, Prisma Client outputs a series of spans. The number and type of these spans depends on the Prisma Client operation. A typical Prisma trace has the following spans: * `prisma:client:operation`: Represents the entire Prisma Client operation, from Prisma Client to the database and back. It contains details such as the model and method called by Prisma Client. Depending on the Prisma operation, it contains one or more of the following spans: * `prisma:client:connect`: Represents how long it takes for Prisma Client to connect to the database. * `prisma:client:serialize`: Represents how long it takes to validate and transform a Prisma Client operation into a query for the query engine. * `prisma:engine:query`: Represents how long a query takes in the query engine. * `prisma:engine:connection`: Represents how long it takes for Prisma Client to get a database connection. * `prisma:engine:db_query`: Represents the database query that was executed against the database. It includes the query in the tags, and how long the query took to run. * `prisma:engine:serialize`: Represents how long it takes to transform a raw response from the database into a typed result. * `prisma:engine:response_json_serialization`: Represents how long it takes to serialize the database query result into a JSON response to the Prisma Client. For example, given the following Prisma Client code: prisma.user.findMany({ where: { email: email, }, include: { posts: true, },}) The trace is structured as follows: * `prisma:client:operation` * `prisma:client:serialize` * `prisma:engine:query` * `prisma:engine:connection` * `prisma:engine:db_query`: details of the first SQL query or command... * `prisma:engine:db_query`: ...details of the next SQL query or command... * `prisma:engine:serialize` * `prisma:engine:response_json_serialization` ## Considerations and prerequisites If your application sends a large number of spans to a collector, this can have a significant performance impact. For information on how to minimize this impact, see Reducing performance impact. To use tracing, you must do the following: 1. Install the appropriate dependencies. 2. Install OpenTelemetry packages. 3. Register tracing in your application. ## Get started with tracing in Prisma ORM This section explains how to install and register tracing in your application. ### Step 1. Install up-to-date Prisma ORM dependencies Use version `6.1.0` or later of the `prisma`, `@prisma/client`, and `@prisma/instrumentation` npm packages. You will also need to install the `@opentelemetry/api` package as it's a peer dependency. npm install prisma@latest --save-devnpm install @prisma/client@latest --savenpm install @prisma/instrumentation@latest --savenpm install @opentelemetry/api@latest --save Tracing on previous versions of Prisma ORM Tracing was added in version `4.2.0` of Prisma ORM as a Preview feature. For versions of Prisma ORM between `4.2.0` and `6.1.0`, you need to enable the `tracing` Preview feature in your Prisma schema file. generator client { provider = "prisma-client-js" previewFeatures = ["tracing"]} ### Step 2: Install OpenTelemetry packages Now install the appropriate OpenTelemetry packages, as follows: npm install @opentelemetry/semantic-conventions @opentelemetry/exporter-trace-otlp-http @opentelemetry/sdk-trace-base @opentelemetry/sdk-trace-node @opentelemetry/resources ### Step 3: Register tracing in your application The following code provides two examples of configuring OpenTelemetry tracing in Prisma: 1. Using `@opentelemetry/sdk-trace-node` (existing example), which gives fine-grained control over tracing setup. 2. Using `@opentelemetry/sdk-node`, which offers a simpler configuration and aligns with OpenTelemetry's JavaScript getting started guide. * * * #### Option 1: Using `@opentelemetry/sdk-trace-node` This setup gives you fine-grained control over instrumentation and tracing. You need to customize this configuration for your specific application. This approach is concise and easier for users who need a quick setup for sending traces to OTLP-compatible backends, such as Honeycomb, Jaeger, or Datadog. // Importsimport { ATTR_SERVICE_NAME, ATTR_SERVICE_VERSION } from '@opentelemetry/semantic-conventions'import { OTLPTraceExporter } from '@opentelemetry/exporter-trace-otlp-http'import { SimpleSpanProcessor } from '@opentelemetry/sdk-trace-base'import { NodeTracerProvider } from '@opentelemetry/sdk-trace-node'import { PrismaInstrumentation, registerInstrumentations } from '@prisma/instrumentation'import { Resource } from '@opentelemetry/resources'// Configure the trace providerconst provider = new NodeTracerProvider({ resource: new Resource({ [SEMRESATTRS_SERVICE_NAME]: 'example application', // Replace with your service name [SEMRESATTRS_SERVICE_VERSION]: '0.0.1', // Replace with your service version }),})// Configure how spans are processed and exported. In this case, we're sending spans// as we receive them to an OTLP-compatible collector (e.g., Jaeger).provider.addSpanProcessor(new SimpleSpanProcessor(new OTLPTraceExporter()))// Register your auto-instrumentorsregisterInstrumentations({ tracerProvider: provider, instrumentations: [new PrismaInstrumentation()],})// Register the provider globallyprovider.register() This approach provides maximum flexibility but may involve additional configuration steps. #### Option 2: Using `@opentelemetry/sdk-node` For many users, especially beginners, the `NodeSDK` class simplifies OpenTelemetry setup by bundling common defaults into a single, unified configuration. // Importsimport { OTLPTraceExporter } from '@opentelemetry/exporter-trace-otlp-proto'import { NodeSDK } from '@opentelemetry/sdk-node'import { PrismaInstrumentation } from '@prisma/instrumentation'// Configure the OTLP trace exporterconst traceExporter = new OTLPTraceExporter({ url: 'https://api.honeycomb.io/v1/traces', // Replace with your collector's endpoint headers: { 'x-honeycomb-team': 'HONEYCOMB_API_KEY', // Replace with your Honeycomb API key or collector auth header },})// Initialize the NodeSDKconst sdk = new NodeSDK({ serviceName: 'my-service-name', // Replace with your service name traceExporter, instrumentations: [ new PrismaInstrumentation({ middleware: true, // Enable middleware tracing if needed }), ],})// Start the SDKsdk.start()// Handle graceful shutdownprocess.on('SIGTERM', async () => { try { await sdk.shutdown() console.log('Tracing shut down successfully') } catch (err) { console.error('Error shutting down tracing', err) } finally { process.exit(0) }}) Choose the `NodeSDK` approach if: * You are starting with OpenTelemetry and want a simplified setup. * You need to quickly integrate tracing with minimal boilerplate. * You are using an OTLP-compatible tracing backend like Honeycomb, Jaeger, or Datadog. Choose the `NodeTracerProvider` approach if: * You need detailed control over how spans are created, processed, and exported. * You are using custom span processors or exporters. * Your application requires specific instrumentation or sampling strategies. OpenTelemetry is highly configurable. You can customize the resource attributes, what components gets instrumented, how spans are processed, and where spans are sent. You can find a complete example that includes metrics in this sample application. ## Tracing how-tos ### Visualize traces with Jaeger Jaeger is a free and open source OpenTelemetry collector and dashboard that you can use to visualize your traces. The following screenshot shows an example trace visualization: 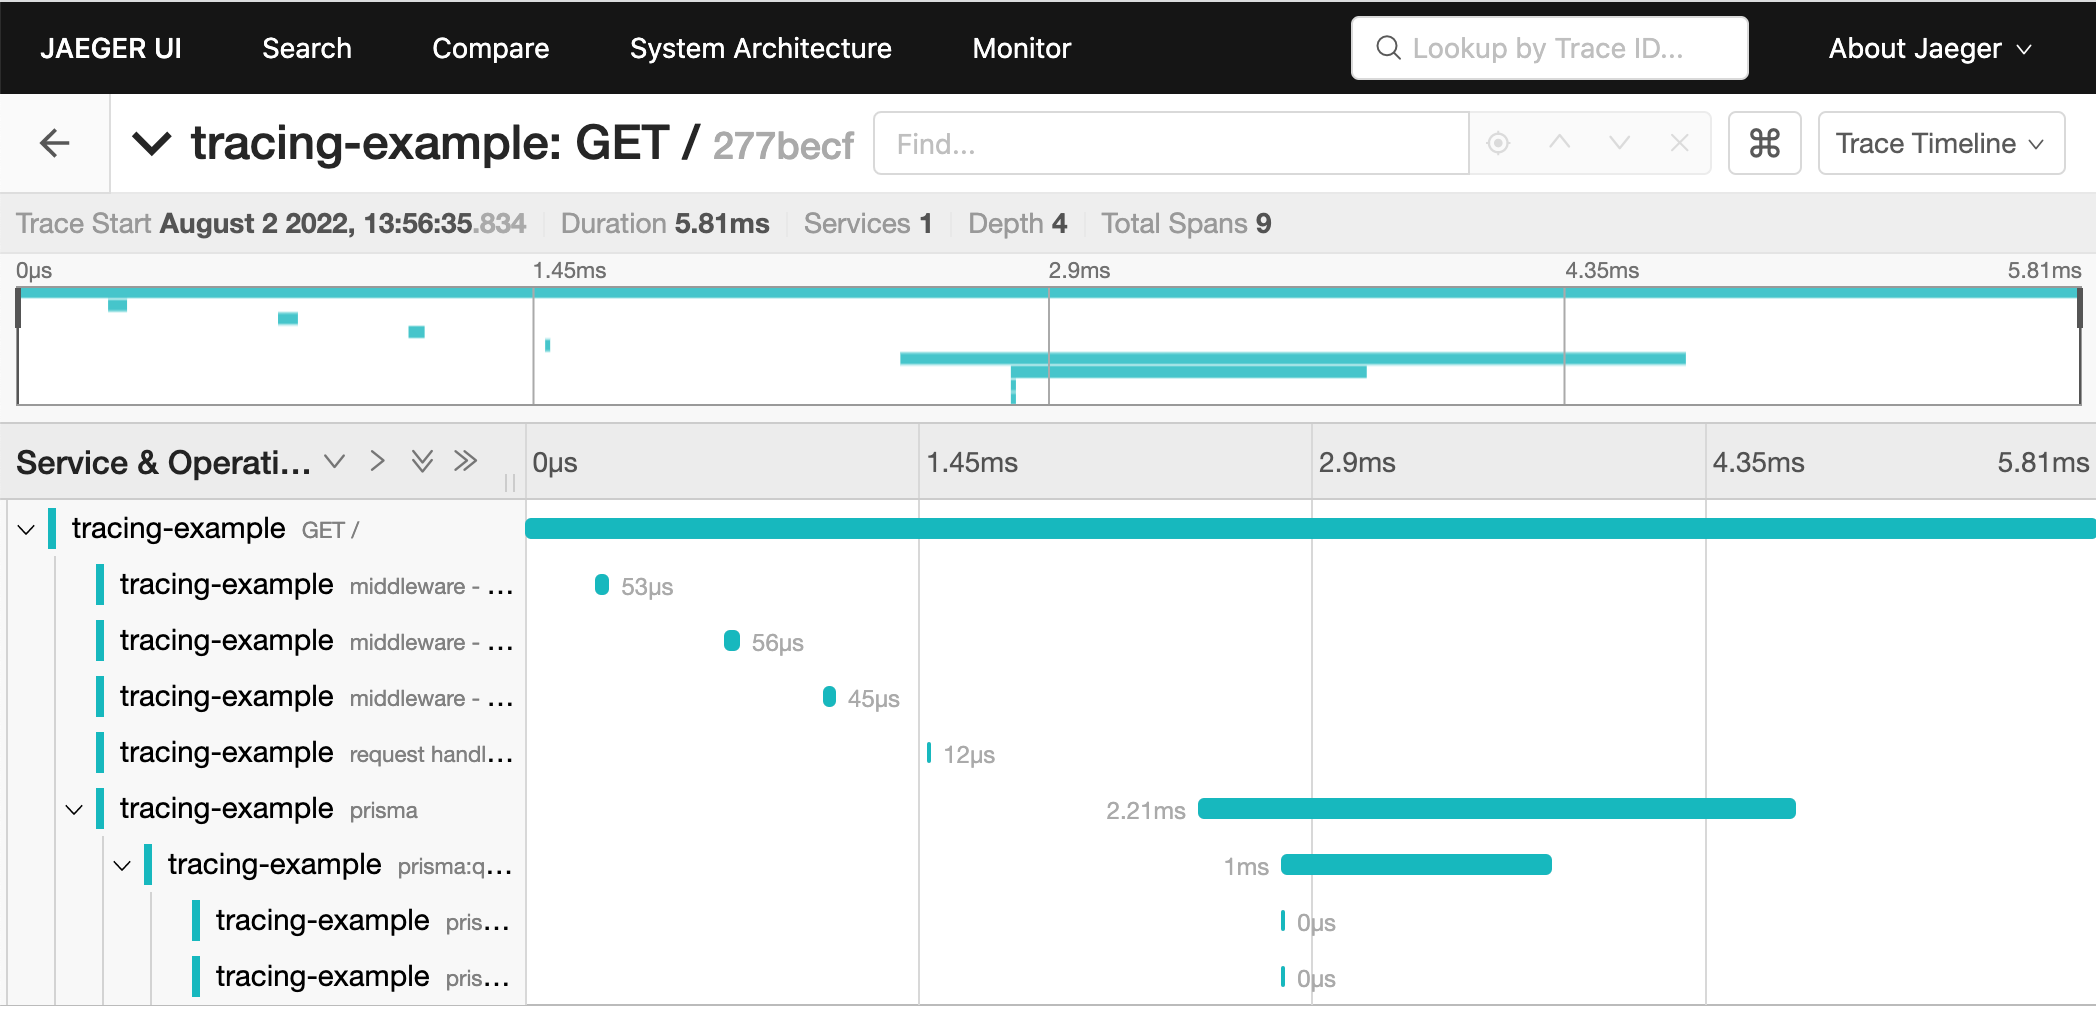 To run Jaeger locally, use the following Docker command: docker run --rm --name jaeger -d -e COLLECTOR_OTLP_ENABLED=true -p 16686:16686 -p 4318:4318 jaegertracing/all-in-one:latest You'll now find the tracing dashboard available at `http://localhost:16686/`. When you use your application with tracing enabled, you'll start to see traces in this dashboard. ### Send tracing output to the console The following example sends output tracing to the console with `ConsoleSpanExporter` from `@opentelemetry/sdk-trace-base`. // Importsimport { SemanticResourceAttributes } from '@opentelemetry/semantic-conventions'import { BasicTracerProvider, ConsoleSpanExporter, SimpleSpanProcessor,} from '@opentelemetry/sdk-trace-base'import { AsyncHooksContextManager } from '@opentelemetry/context-async-hooks'import * as api from '@opentelemetry/api'import { PrismaInstrumentation, registerInstrumentations } from '@prisma/instrumentation'import { Resource } from '@opentelemetry/resources'// Export the tracingexport function otelSetup() { const contextManager = new AsyncHooksContextManager().enable() api.context.setGlobalContextManager(contextManager) //Configure the console exporter const consoleExporter = new ConsoleSpanExporter() // Configure the trace provider const provider = new BasicTracerProvider({ resource: new Resource({ [SemanticResourceAttributes.SERVICE_NAME]: 'test-tracing-service', [SemanticResourceAttributes.SERVICE_VERSION]: '1.0.0', }), }) // Configure how spans are processed and exported. In this case we're sending spans // as we receive them to the console provider.addSpanProcessor(new SimpleSpanProcessor(consoleExporter)) // Register your auto-instrumentors registerInstrumentations({ tracerProvider: provider, instrumentations: [new PrismaInstrumentation()], }) // Register the provider provider.register()} ### Trace Prisma Client middleware By default, tracing does not output spans for Prisma Client middleware. To include your middleware in your traces, set `middleware` to `true` in your `registerInstrumentations` statement, as follows: registerInstrumentations({ instrumentations: [new PrismaInstrumentation({ middleware: true })],}) This will add the following span type to your traces: * `prisma:client:middleware`: Represents how long the operation spent in your middleware. ### Trace interactive transactions When you perform an interactive transaction, you'll see the following spans in addition to the standard spans: * `prisma:client:transaction`: A root span that wraps the `prisma` span. * `prisma:engine:itx_runner`: Represents how long an interactive transaction takes in the query engine. * `prisma:engine:itx_query_builder`: Represents the time it takes to build an interactive transaction. As an example, take the following Prisma schema: schema.prisma generator client { provider = "prisma-client-js"}datasource db { provider = "postgresql" url = env("DATABASE_URL")}model User { id Int @id @default(autoincrement()) email String @unique}model Audit { id Int @id table String action String} Given the following interactive transaction: await prisma.$transaction(async (tx) => { const user = await tx.user.create({ data: { email: email, }, }) await tx.audit.create({ data: { table: 'user', action: 'create', id: user.id, }, }) return user}) The trace is structured as follows: * `prisma:client:transaction` * `prisma:client:connect` * `prisma:engine:itx_runner` * `prisma:engine:connection` * `prisma:engine:db_query` * `prisma:engine:itx_query_builder` * `prisma:engine:db_query` * `prisma:engine:db_query` * `prisma:engine:serialize` * `prisma:engine:itx_query_builder` * `prisma:engine:db_query` * `prisma:engine:db_query` * `prisma:engine:serialize` * `prisma:client:operation` * `prisma:client:serialize` * `prisma:client:operation` * `prisma:client:serialize` ### Add more instrumentation A nice benefit of OpenTelemetry is the ability to add more instrumentation with only minimal changes to your application code. For example, to add HTTP and ExpressJS tracing, add the following instrumentations to your OpenTelemetry configuration. These instrumentations add spans for the full request-response lifecycle. These spans show you how long your HTTP requests take. // Importsimport { ExpressInstrumentation } from '@opentelemetry/instrumentation-express'import { HttpInstrumentation } from '@opentelemetry/instrumentation-http'// Register your auto-instrumentorsregisterInstrumentations({ tracerProvider: provider, instrumentations: [ new HttpInstrumentation(), new ExpressInstrumentation(), new PrismaInstrumentation(), ],}) For a full list of available instrumentation, take a look at the OpenTelemetry Registry. ### Customize resource attributes You can adjust how your application's traces are grouped by changing the resource attributes to be more specific to your application: const provider = new NodeTracerProvider({ resource: new Resource({ [SemanticResourceAttributes.SERVICE_NAME]: 'weblog', [SemanticResourceAttributes.SERVICE_VERSION]: '1.0.0', }),}) There is an ongoing effort to standardize common resource attributes. Whenever possible, it's a good idea to follow the standard attribute names. ### Reduce performance impact If your application sends a large number of spans to a collector, this can have a significant performance impact. You can use the following approaches to reduce this impact: * Use the BatchSpanProcessor * Send fewer spans to the collector #### Send traces in batches using the `BatchSpanProcessor` In a production environment, you can use OpenTelemetry's `BatchSpanProcessor` to send the spans to a collector in batches rather than one at a time. However, during development and testing, you might not want to send spans in batches. In this situation, you might prefer to use the `SimpleSpanProcessor`. You can configure your tracing configuration to use the appropriate span processor, depending on the environment, as follows: import { SimpleSpanProcessor, BatchSpanProcessor,} from '@opentelemetry/sdk-trace-base'if (process.env.NODE_ENV === 'production') { provider.addSpanProcessor(new BatchSpanProcessor(otlpTraceExporter))} else { provider.addSpanProcessor(new SimpleSpanProcessor(otlpTraceExporter))} #### Send fewer spans to the collector with sampling Another way to reduce the performance impact is to use probability sampling to send fewer spans to the collector. This reduces the collection cost of tracing but still gives a good representation of what is happening in your application. An example implementation looks like this: import { SemanticResourceAttributes } from '@opentelemetry/semantic-conventions'import { NodeTracerProvider } from '@opentelemetry/sdk-trace-node'import { TraceIdRatioBasedSampler } from '@opentelemetry/core'import { Resource } from '@opentelemetry/resources'const provider = new NodeTracerProvider({ sampler: new TraceIdRatioBasedSampler(0.1), resource: new Resource({ // we can define some metadata about the trace resource [SemanticResourceAttributes.SERVICE_NAME]: 'test-tracing-service', [SemanticResourceAttributes.SERVICE_VERSION]: '1.0.0', }),}) ## Troubleshoot tracing ### My traces aren't showing up The order in which you set up tracing matters. In your application, ensure that you register tracing and instrumentation before you import any instrumented dependencies. For example: import { registerTracing } from './tracing'registerTracing({ name: 'tracing-example', version: '0.0.1',})// You must import any dependencies after you register tracing.import { PrismaClient } from '@prisma/client'import async from 'express-async-handler'import express from 'express' --- ## Page: https://www.prisma.io/docs/orm/prisma-client/debugging-and-troubleshooting/debugging You can enable debugging output in Prisma Client and Prisma CLI via the `DEBUG` environment variable. It accepts two namespaces to print debugging output: * `prisma:engine`: Prints relevant debug messages happening in a Prisma ORM engine * `prisma:client`: Prints relevant debug messages happening in the Prisma Client runtime * `prisma*`: Prints all debug messages from Prisma Client or CLI * `*`: Prints all debug messages info Prisma Client can be configured to log warnings, errors and information related to queries sent to the database. See Configuring logging for more information. ## Setting the `DEBUG` environment variable Here are examples for setting these debugging options in bash: # enable only `prisma:engine`-level debugging outputexport DEBUG="prisma:engine"# enable only `prisma:client`-level debugging outputexport DEBUG="prisma:client"# enable both `prisma-client`- and `engine`-level debugging outputexport DEBUG="prisma:client,prisma:engine" To enable all `prisma` debugging options, set `DEBUG` to `prisma*`: export DEBUG="prisma*" On Windows, use `set` instead of `export`: set DEBUG="prisma*" To enable _all_ debugging options, set `DEBUG` to `*`: export DEBUG="*" --- ## Page: https://www.prisma.io/docs/orm/prisma-client/debugging-and-troubleshooting/handling-exceptions-and-errors In order to handle different types of errors you can use `instanceof` to check what the error is and handle it accordingly. The following example tries to create a user with an already existing email record. This will throw an error because the `email` field has the `@unique` attribute applied to it. Use the `Prisma` namespace to access the error type. The error code can then be checked and a message can be printed. import { PrismaClient, Prisma } from '@prisma/client'const client = new PrismaClient()try { await client.user.create({ data: { email: 'alreadyexisting@mail.com' } })} catch (e) { if (e instanceof Prisma.PrismaClientKnownRequestError) { // The .code property can be accessed in a type-safe manner if (e.code === 'P2002') { console.log( 'There is a unique constraint violation, a new user cannot be created with this email' ) } } throw e} See Errors reference for a detailed breakdown of the different error types and their codes. --- ## Page: https://www.prisma.io/docs/orm/prisma-migrate/workflows/native-database-types Prisma Migrate translates the model defined in your Prisma schema into features in your database. 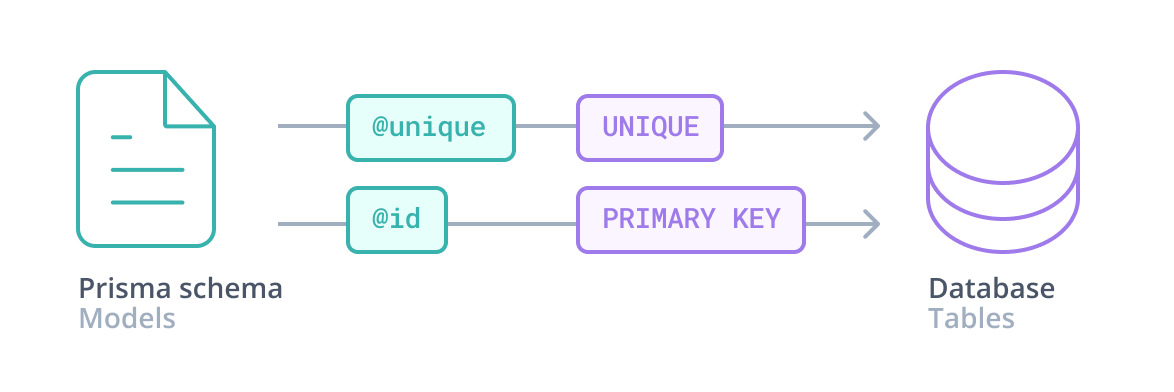 Every¹ feature in your data model maps to a corresponding feature in the underlying database. **If you can define a feature in the Prisma schema, it is supported by Prisma Migrate.** For a complete list of Prisma schema features, refer to: * Database features matrix for a list of database features and what they map to in the Prisma schema. * Prisma schema reference for a list of all Prisma schema features, including field types, attributes, and functions. Prisma Migrate also supports mapping each field to a specific native type, and there are ways to include features without a Prisma schema equivalent in your database. note Comments and Prisma ORM-level functions (`uuid()` and `cuid()`) do not map to database features. ## Mapping fields to a specific native type Each Prisma ORM type maps to a default underlying database type - for example, the PostgreSQL connector maps `String` to `text` by default. Native database type attributes determines which _specific_ native type should be created in the database. info **Note**: Some Prisma ORM types only map to a single native type. In the following example, the `name` and `title` fields have a `@db.VarChar(X)` type attribute: datasource db { provider = "postgresql" url = env("DATABASE_URL")}model User { id Int @id @default(autoincrement()) name String @db.VarChar(200) posts Post[]}model Post { id Int @id @default(autoincrement()) title String @db.VarChar(150) published Boolean @default(true) authorId Int author User @relation(fields: [authorId], references: [id])} Prisma Migrate uses the specified types when it creates a migration: -- CreateTableCREATE TABLE "User" ( "id" SERIAL, "name" VARCHAR(200) NOT NULL, PRIMARY KEY ("id")); -- CreateTableCREATE TABLE "Post" ( "id" SERIAL, "title" VARCHAR(150) NOT NULL, "published" BOOLEAN NOT NULL DEFAULT true, "authorId" INTEGER NOT NULL, PRIMARY KEY ("id")); -- AddForeignKeyALTER TABLE "Post" ADD FOREIGN KEY("authorId")REFERENCES "User"("id") ON DELETE CASCADE ON UPDATE CASCADE; ### Mappings by Prisma ORM type For type mappings organized by Prisma ORM type, refer to the Prisma schema reference documentation. ### Mappings by database provider For type mappings organized by database provider, see: * PostgreSQL mappings * MySQL mappings * Microsoft SQL Server mappings * SQLite mappings ## Handling unsupported database features Prisma Migrate cannot automatically create database features that have no equivalent in Prisma Schema Language (PSL). For example, there is currently no way to define a stored procedure or a partial index in PSL. However, there are ways to add unsupported features to your database with Prisma Migrate: * Handle unsupported field types (like `circle`) * Handle unsupported features, like stored procedures * How to use native database functions --- ## Page: https://www.prisma.io/docs/orm/prisma-migrate/understanding-prisma-migrate/migration-histories#committing-the-migration-history-to-source-control This page explains how Prisma ORM uses migration histories to track changes to your schema. ## Migration history Your migration history is the story of the changes to your data model, and is represented by: * A `prisma/migrations` folder with a sub-folder and `migration.sql` file for each migration: migrations/ └─ 20210313140442_init/ └─ migration.sql └─ 20210313140442_added_job_title/ └─ migration.sql The `migrations` folder is the **source of truth** for the history of your data model. * A `_prisma_migrations` table in the database, which is used to check: * If a migration was run against the database * If an applied migration was deleted * If an applied migration was changed If you change or delete a migration (**not** recommended), the next steps depend on whether you are in a development environment (and therefore using `migrate dev`) or a production / testing environment (and therefore using `migrate deploy`). ## Do not edit or delete migrations that have been applied In general, you **should not edit or delete** a migration that has already been applied. Doing so can lead to inconsistencies between development and production environment migration histories, which may have unforeseen consequences — even if the change does not _appear_ to break anything at first. The following scenario simulates a change that creates a seemingly harmless inconsistency: 1. Modify an **existing migration** that has **already been applied** in a development environment by changing the value of `VARCHAR(550)` to `VARCHAR(560)`: ./prisma/migrations/20210310143435\_default\_value/migrations.sql -- AlterTable ALTER TABLE "Post" ALTER COLUMN "content" SET DATA TYPE VARCHAR(560); After making this change, the end state of the migration history no longer matches the Prisma schema, which still has `@db.VarChar(550)`. 2. Running `prisma migrate dev` results in an error because a migration has been changed and suggests resetting the database. 3. Run `prisma migrate reset` - Prisma Migrate resets the database and replays all migrations, including the migration you edited. 4. After applying all existing migrations, Prisma Migrate compares the end state of the migration history to the Prisma schema and detects a discrepancy: * Prisma schema has `@db.VarChar(550)` * Database schema has `VARCHAR(560)` 5. Prisma Migrate generates a new migration to change the value back to `550`, because the end state of the migration history should match the Prisma schema. 6. From now on, when you use `prisma migrate deploy` to deploy migrations to production and test environments, Prisma Migrate will always **warn you** that migration histories do not match (and continue to warn you each time you run the command ) - even though the schema end states match: 6 migrations found in prisma/migrationsWARNING The following migrations have been modified since they were applied:20210310143435_change_type A change that does not appear to break anything after a `migrate reset` can hide problems - you may end up with a bug in production that you cannot replicate in development, or the other way around - particularly if the change concerns a highly customized migration. If Prisma Migrate reports a missing or edited migration that has already been applied, we recommend fixing the **root cause** (restoring the file or reverting the change) rather than resetting. ## Committing the migration history to source control You must commit the entire `prisma/migrations` folder to source control. This includes the `prisma/migrations/migration_lock.toml` file, which is used to detect if you have attempted to change providers. Source-controlling the `schema.prisma` file is not enough - you must include your migration history. This is because: * As you start to customize migrations, your migration history contains **information that cannot be represented in the Prisma schema**. For example, you can customize a migration to mitigate data loss that would be caused by a breaking change. * The `prisma migrate deploy` command, which is used to deploy changes to staging, testing, and production environments, _only_ runs migration files. It does not use the Prisma schema to fetch the models. --- ## Page: https://www.prisma.io/docs/orm/prisma-migrate/workflows/development-and-production#production-and-testing-environments This page explains how to use Prisma Migrate commands in development and production environments. ## Development environments In a development environment, use the `migrate dev` command to generate and apply migrations: npx prisma migrate dev ### Create and apply migrations danger `migrate dev` is a development command and should never be used in a production environment. This command: 1. Reruns the existing migration history in the shadow database in order to detect schema drift (edited or deleted migration file, or a manual changes to the database schema) 2. Applies pending migrations to the shadow database (for example, new migrations created by colleagues) 3. If it detects changes to the Prisma schema, it generates a new migration from these changes 4. Applies all unapplied migrations to the development database and updates the `_prisma_migrations` table 5. Triggers the generation of artifacts (for example, Prisma Client) The `migrate dev` command will prompt you to reset the database in the following scenarios: * Migration history conflicts caused by modified or missing migrations * The database schema has drifted away from the end-state of the migration history ### Reset the development database You can also `reset` the database yourself to undo manual changes or `db push` experiments by running: npx prisma migrate reset warning `migrate reset` is a development command and should never be used in a production environment. This command: 1. Drops the database/schema¹ if possible, or performs a soft reset if the environment does not allow deleting databases/schemas¹ 2. Creates a new database/schema¹ with the same name if the database/schema¹ was dropped 3. Applies all migrations 4. Runs seed scripts ¹ For MySQL and MongoDB this refers to the database, for PostgreSQL and SQL Server to the schema, and for SQLite to the database file. > **Note**: For a simple and integrated way to re-create data in your development database as often as needed, check out our seeding guide. ### Customizing migrations Sometimes, you need to modify a migration **before applying it**. For example: * You want to introduce a significant refactor, such as changing blog post tags from a `String[]` to a `Tag[]` * You want to rename a field (by default, Prisma Migrate will drop the existing field) * You want to change the direction of a 1-1 relationship * You want to add features that cannot be represented in Prisma Schema Language - such as a partial index or a stored procedure. The `--create-only` command allows you to create a migration without applying it: npx prisma migrate dev --create-only To apply the edited migration, run `prisma migrate dev` again. Refer to Customizing migrations for examples. ### Team development See: Team development with Prisma Migrate . ## Production and testing environments In production and testing environments, use the `migrate deploy` command to apply migrations: npx prisma migrate deploy > **Note**: `migrate deploy` should generally be part of an automated CI/CD pipeline, and we do not recommend running this command locally to deploy changes to a production database. This command: 1. Compares applied migrations against the migration history and **warns** if any migrations have been modified: WARNING The following migrations have been modified since they were applied:20210313140442_favorite_colors 2. Applies pending migrations The `migrate deploy` command: * **Does not** issue a warning if an already applied migration is _missing_ from migration history * **Does not** detect drift (production database schema differs from migration history end state - for example, due to a hotfix) * **Does not** reset the database or generate artifacts (such as Prisma Client) * **Does not** rely on a shadow database See also: * Prisma Migrate in deployment * Production troubleshooting ### Advisory locking Prisma Migrate makes use of advisory locking when you run production commands such as: * `prisma migrate deploy` * `prisma migrate dev` * `prisma migrate resolve` This safeguard ensures that multiple commands cannot run at the same time - for example, if you merge two pull requests in quick succession. Advisory locking has a **10 second timeout** (not configurable), and uses the default advisory locking mechanism available in the underlying provider: * PostgreSQL * MySQL * Microsoft SQL server Prisma Migrate's implementation of advisory locking is purely to avoid catastrophic errors - if your command times out, you will need to run it again. Since `5.3.0`, the advisory locking can be disabled using the `PRISMA_SCHEMA_DISABLE_ADVISORY_LOCK` environment variable --- ## Page: https://www.prisma.io/docs/orm/prisma-migrate/workflows/unsupported-database-features * * ORM * Prisma Migrate * Workflows Prisma Migrate uses the Prisma schema to determine what features to create in the database. However, some database features cannot be represented in the Prisma schema , including but not limited to: * Stored procedures * Triggers * Views * Partial indexes To add an unsupported feature to your database, you must customize a migration to include that feature before you apply it. tip warning This guide **does not apply for MongoDB**. Instead of `migrate dev`, `db push` is used for MongoDB. ## Customize a migration to include an unsupported feature To customize a migration to include an unsupported feature: 1. Use the `--create-only` flag to generate a new migration without applying it: npx prisma migrate dev --create-only 2. Open the generated `migration.sql` file and add the unsupported feature - for example, a partial index: CREATE UNIQUE INDEX tests_success_constraint ON posts (subject, target) WHERE success; 3. Apply the migration: npx prisma migrate dev 4. Commit the modified migration to source control. Previous Patching & hotfixing Next Development and production --- ## Page: https://www.prisma.io/docs/orm/prisma-migrate/workflows/patching-and-hotfixing#fixing-failed-migrations-with-migrate-diff-and-db-execute Patching or hotfixing a database involves making an often time critical change directly in production. For example, you might add an index directly to a production database to resolve an issue with a slow-running query. Patching the production database directly results in **schema drift**: your database schema has 'drifted away' from the source of truth, and is out of sync with your migration history. You can use the `prisma migrate resolve` command to reconcile your migration history _without_ having to remove and re-apply the hotfix with `prisma migrate deploy`. warning This guide **does not apply for MongoDB**. Instead of `migrate dev`, `db push` is used for MongoDB. ## Reconciling your migration history with a patch or hotfix The following scenario assumes that you made a manual change in production and want to propagate that change to your migration history and other databases. To reconcile your migration history and database schema in production: 1. Replicate the change you made in production in the schema - for example, add an `@@index` to a particular model. 2. Generate a new migration and take note of the full migration name, including a timestamp, which is written to the CLI:(`20210316150542_retroactively_add_index`): npx prisma migrate dev --name retroactively-add-index Show CLI results migrations/└─ 20210316150542_retroactively_add_index/└─ migration.sqlYour database is now in sync with your schema.✔ Generated Prisma Client (2.19.0-dev.29) to .\node_modules\@prisma\client in 190ms 3. Push the migration to production **without running `migrate deploy`**. Instead, mark the migration created in the previous step as 'already applied' so that Prisma Migrate does not attempt to apply your hotfix a second time: prisma migrate resolve --applied "20201127134938-retroactively-add-index" This command adds the migration to the migration history table without running the actual SQL. 4. Repeat the previous step for other databases that were patched - for example, if you applied the patch to a staging database. 5. Propagate the migration to other databases that were not patched - for example, by committing the migration to source control and allowing your CI/CD pipeline to apply it to all databases. > **Note**: The migration will not be applied to databases where it has been marked as already applied by the `prisma migrate resolve` command. ## Failed migration A migration might fail if: * You modify a migration before running it and introduce a syntax error * You add a mandatory (`NOT NULL`) column to a table that already has data * The migration process stopped unexpectedly * The database shut down in the middle of the migration process Each migration in the `_prisma_migrations` table has a `logs` column that stores the error. There are two ways to deal with failed migrations in a production environment: * Roll back, optionally fix issues, and re-deploy * Manually complete the migration steps and resolve the migration ### Option 1: Mark the migration as rolled back and re-deploy The following example demonstrates how to roll back a migration, optionally make changes to fix the issue, and re-deploy: 1. Mark the migration as rolled back - this updates the migration record in the `_prisma_migrations` table to register it as rolled back, allowing it to be applied again: prisma migrate resolve --rolled-back "20201127134938_added_bio_index" 2. If the migration was partially run, you can either: * Modify the migration to check if a step was already completed (for example: `CREATE TABLE ... IF NOT EXISTS`) _OR_ * Manually revert the steps that were completed (for example, delete created tables) > If you modify the migration, make sure you copy it back to source control to ensure that state of your production database is reflected exactly in development. 3. Fix the root cause of the failed migration, if relevant - for example, if the migration failed due to an issue with the SQL script itself. Make sure that you copy any changed migrations back to source control. 4. Re-deploy the migration: prisma migrate deploy ### Option 2: Manually complete migration and resolve as applied The following example demonstrates how to manually complete the steps of a migration and mark that migration as applied. 1. Manually complete the migration steps on the production database. Make sure that any manual steps exactly match the steps in the migration file, and copy any changes back to source control. 2. Resolve the migration as applied - this tells Prisma Migrate to consider the migration successfully applied: prisma migrate resolve --applied "20201127134938_my_migration" ## Fixing failed migrations with `migrate diff` and `db execute` To help with fixing a failed migration, Prisma ORM provides the following commands for creating and executing a migration file: * `prisma migrate diff` which diffs two database schema sources to create a migration taking one to the state of the second. You can output either a summary of the difference or a sql script. The script can be output into a file via `> file_name.sql` or be piped to the `db execute --stdin` command. * `prisma db execute` which applies a SQL script to the database without interacting with the Prisma migrations table. These commands are available in Preview in versions `3.9.0` and later (with the `--preview-feature` CLI flag), and generally available in versions `3.13.0` and later. This section gives an example scenario of a failed migration, and explains how to use `migrate diff` and `db execute` to fix it. ### Example of a failed migration Imagine that you have the following `User` model in your schema, in both your local development environment and your production environment: schema.prisma model User { id Int @id name String} At this point, your schemas are in sync, but the data in the two environments is different. You then decide to make changes to your data model, adding another `Post` model and making the `name` field on `User` unique: schema.prisma model User { id Int @id name String @unique email String?}model Post { id Int @id title String} You create a migration called 'Unique' with the command `prisma migrate dev -n Unique` which is saved in your local migrations history. Applying the migration succeeds in your dev environment and now it is time to release to production. Unfortunately this migration can only be partially executed. Creating the `Post` model and adding the `email` column succeeds, but making the `name` field unique fails with the following error: ERROR 1062 (23000): Duplicate entry 'paul' for key 'User_name_key' This is because there is non-unique data in your production database (e.g. two users with the same name). You now need to recover manually from the partially executed migration. Until you recover from the failed state, further migrations using `prisma migrate deploy` are impossible. At this point there are two options, depending on what you decide to do with the non-unique data: * You realize that non-unique data is valid and you cannot move forward with your current development work. You want to roll back the complete migration. To do this, see Moving backwards and reverting all changes * The existence of non-unique data in your database is unintentional and you want to fix that. After fixing, you want to go ahead with the rest of the migration. To do this, see Moving forwards and applying missing changes #### Moving backwards and reverting all changes In this case, you need to create a migration that takes your production database to the state of your data model before the last migration. * First you need your migration history at the time before the failed migration. You can either get this from your git history, or locally delete the folder of the last failed migration in your migration history. * You now want to take your production environment from its current failed state back to the state specified in your local migrations history: * Run the following `prisma migrate diff` command: npx prisma migrate diff \ --from-url "$DATABASE_URL_PROD" \ --to-migrations ./prisma/migrations \ --shadow-database-url $SHADOW_DATABASE_URL \ --script > backward.sql This will create a SQL script file containing all changes necessary to take your production environment from its current failed state to the target state defined by your migrations history. Note that because we're using `--to-migrations`, the command requires a shadow database. * Run the following `prisma db execute` command: npx prisma db execute --url "$DATABASE_URL_PROD" --file backward.sql This applies the changes in the SQL script against the target database without interacting with the migrations table. * Run the following `prisma migrate resolve` command: npx prisma migrate resolve --rolled-back Unique This will mark the failed migration called 'Unique' in the migrations table on your production environment as rolled back. Your local migration history now yields the same result as the state your production database is in. You can now modify the datamodel again to create a migration that suits your new understanding of the feature you're working on (with non-unique names). #### Moving forwards and applying missing changes In this case, you need to fix the non-unique data and then go ahead with the rest of the migration as planned: * The error message from trying to deploy the migration to production already told you there was duplicate data in the column `name`. You need to either alter or delete the offending rows. * Continue applying the rest of the failed migration to get to the data model defined in your `schema.prisma` file: * Run the following `prisma migrate diff` command: npx prisma migrate diff --from-url "$DATABASE_URL_PROD" --to-schema-datamodel schema.prisma --script > forward.sql This will create a SQL script file containing all changes necessary to take your production environment from its current failed state to the target state defined in your `schema.prisma` file. * Run the following `prisma db execute` command: npx prisma db execute --url "$DATABASE_URL_PROD" --file forward.sql This applies the changes in the SQL script against the target database without interacting with the migrations table. * Run the following `prisma migrate resolve` command: npx prisma migrate resolve --applied Unique This will mark the failed migration called 'Unique' in the migrations table on your production environment as applied. Your local migration history now yields the same result as the state your production environment is in. You can now continue using the already known `migrate dev` /`migrate deploy` workflow. ## Migration history conflicts info This does not apply from version 3.12.0 upwards. `prisma migrate deploy` issues a warning if an already applied migration has been edited - however, it does not stop the migration process. To remove the warnings, restore the original migration from source control. ## Prisma Migrate and PgBouncer You might see the following error if you attempt to run Prisma Migrate commands in an environment that uses PgBouncer for connection pooling: Error: undefined: Database errorError querying the database: db error: ERROR: prepared statement "s0" already exists See Prisma Migrate and PgBouncer workaround for further information and a workaround. Follow GitHub issue #6485 for updates. --- ## Page: https://www.prisma.io/docs/orm/prisma-migrate/understanding-prisma-migrate/overview * * ORM * Prisma Migrate * Understanding Prisma Migrate info **Does not apply for MongoDB** Instead of `migrate dev` and related commands, use `db push` for MongoDB. Prisma Migrate enables you to: * Keep your database schema in sync with your Prisma schema as it evolves _and_ * Maintain existing data in your database Prisma Migrate generates a history of `.sql` migration files, and plays a role in both development and production. Prisma Migrate can be considered a _hybrid_ database schema migration tool, meaning it has both of _declarative_ and _imperative_ elements: * Declarative: The data model is described in a declarative way in the Prisma schema. Prisma Migrate generates SQL migration files from that data model. * Imperative: All generated SQL migration files are fully customizable. Prisma Migrate hence provides the flexibility of an imperative migration tool by enabling you to modify what and how migrations are executed (and allows you to run custom SQL to e.g. make use of native database feature, perform data migrations, ...). tip See the Prisma Migrate reference for detailed information about the Prisma Migrate CLI commands. Previous Understanding Prisma Migrate Next Mental model --- ## Page: https://www.prisma.io/docs/orm/prisma-migrate/understanding-prisma-migrate/mental-model This guide provides a conceptual overview of database migrations using Prisma Migrate when working with relational databases. It covers: what database migrations are, their value, and what Prisma Migrate is and how you can evolve your database schema with Prisma Migrate in different environments. **If you are working with MongoDB, use `prisma db push` to evolve your schema.** ## What are database migrations? Database migrations are a controlled set of changes that modify and evolve the structure of your database schema. Migrations help you transition your database schema from one state to another. For example, within a migration you can create or remove tables and columns, split fields in a table, or add types and constraints to your database. ### Patterns for evolving database schemas This section describes general schema migration patterns for evolving database schemas. The two main schema migration patterns are: * **Model/Entity-first migration:** with this pattern, you define the structure of the database schema with code and then use a migration tool to generate the SQL, for example, for syncing your application and database schema. 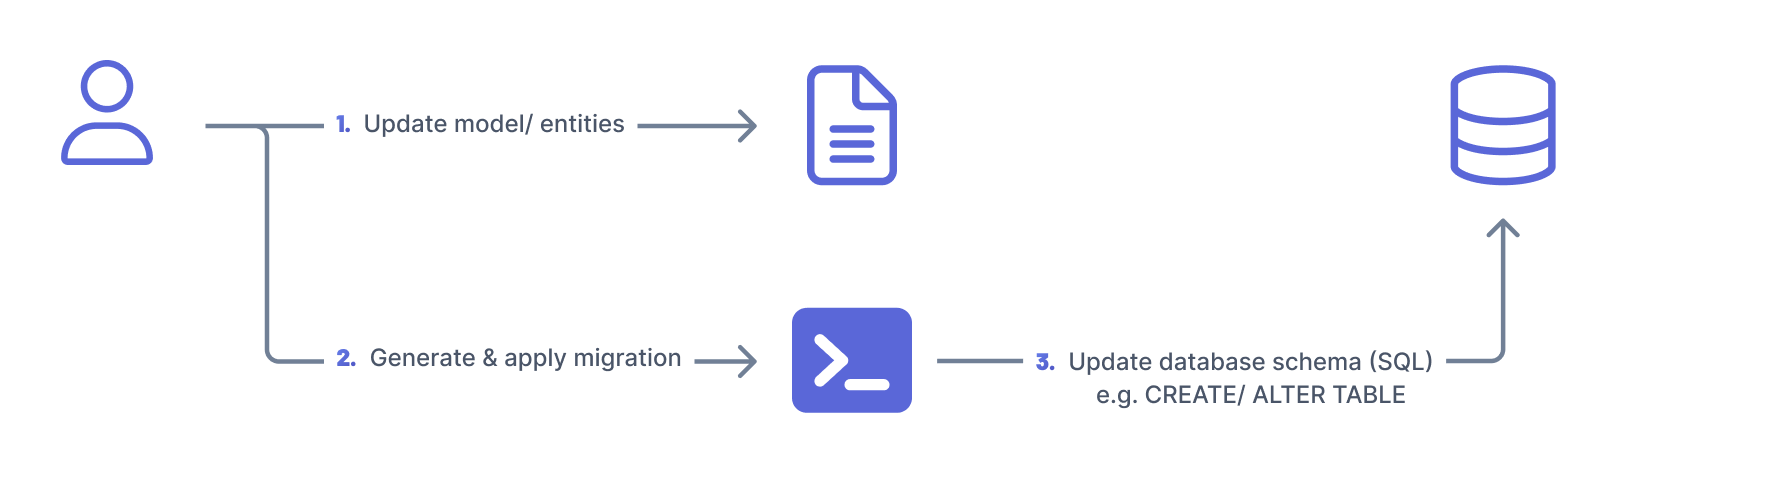 * **Database-first migration:** with this pattern, you define the structure of your database and apply it to your database using SQL. You then _introspect_ the database to generate the code that describes the structure of your database to sync your application and database schema. 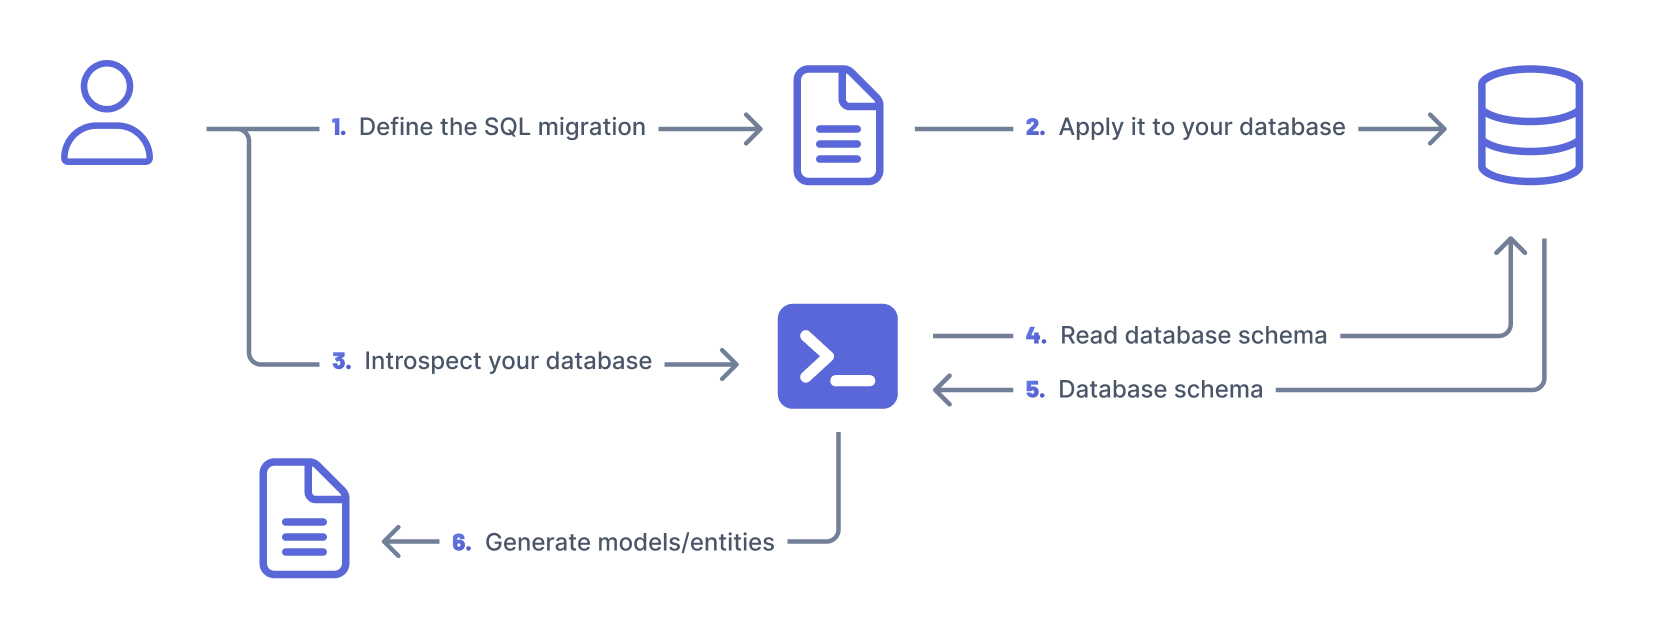 info **Note** For simplicity, we chose the terminology above to describe the different patterns for evolving database schemas. Other tools and libraries may use different terminology to describe the different patterns. The migration files (SQL) should ideally be stored together with your application code. They should also be tracked in version control and shared with the rest of the team working on the application. Migrations provide _state management_ which helps you to track the state of the database. Migrations also allow you to replicate the state of a database at a specific point in time which is useful when collaborating with other members of the team, e.g. switching between different branches. For further information on database migrations, see the Prisma Data Guide. ## What is Prisma Migrate? Prisma Migrate is a database migration tool that supports the _model/ entity-first_ migration pattern to manage database schemas in your local environment and in production. The workflow when using Prisma Migrate in your project would be iterative and look like this: **Local development environment (Feature branch)** 1. Evolve your Prisma schema 2. Use either `prisma migrate dev` or `prisma db push` to sync your Prisma schema with the database schema of your local development database **Preview/ staging environment(Feature pull request)** 1. Push your changes to the feature pull request 2. Use a CI system (e.g. GitHub Actions) to sync your Prisma schema and migration history with your preview database using `prisma migrate deploy` **Production (main branch)** 1. Merge your application code from the feature branch to your main branch 2. Use a CI system (e.g. GitHub Actions) to sync your Prisma schema and migration history with your production database using `prisma migrate deploy` 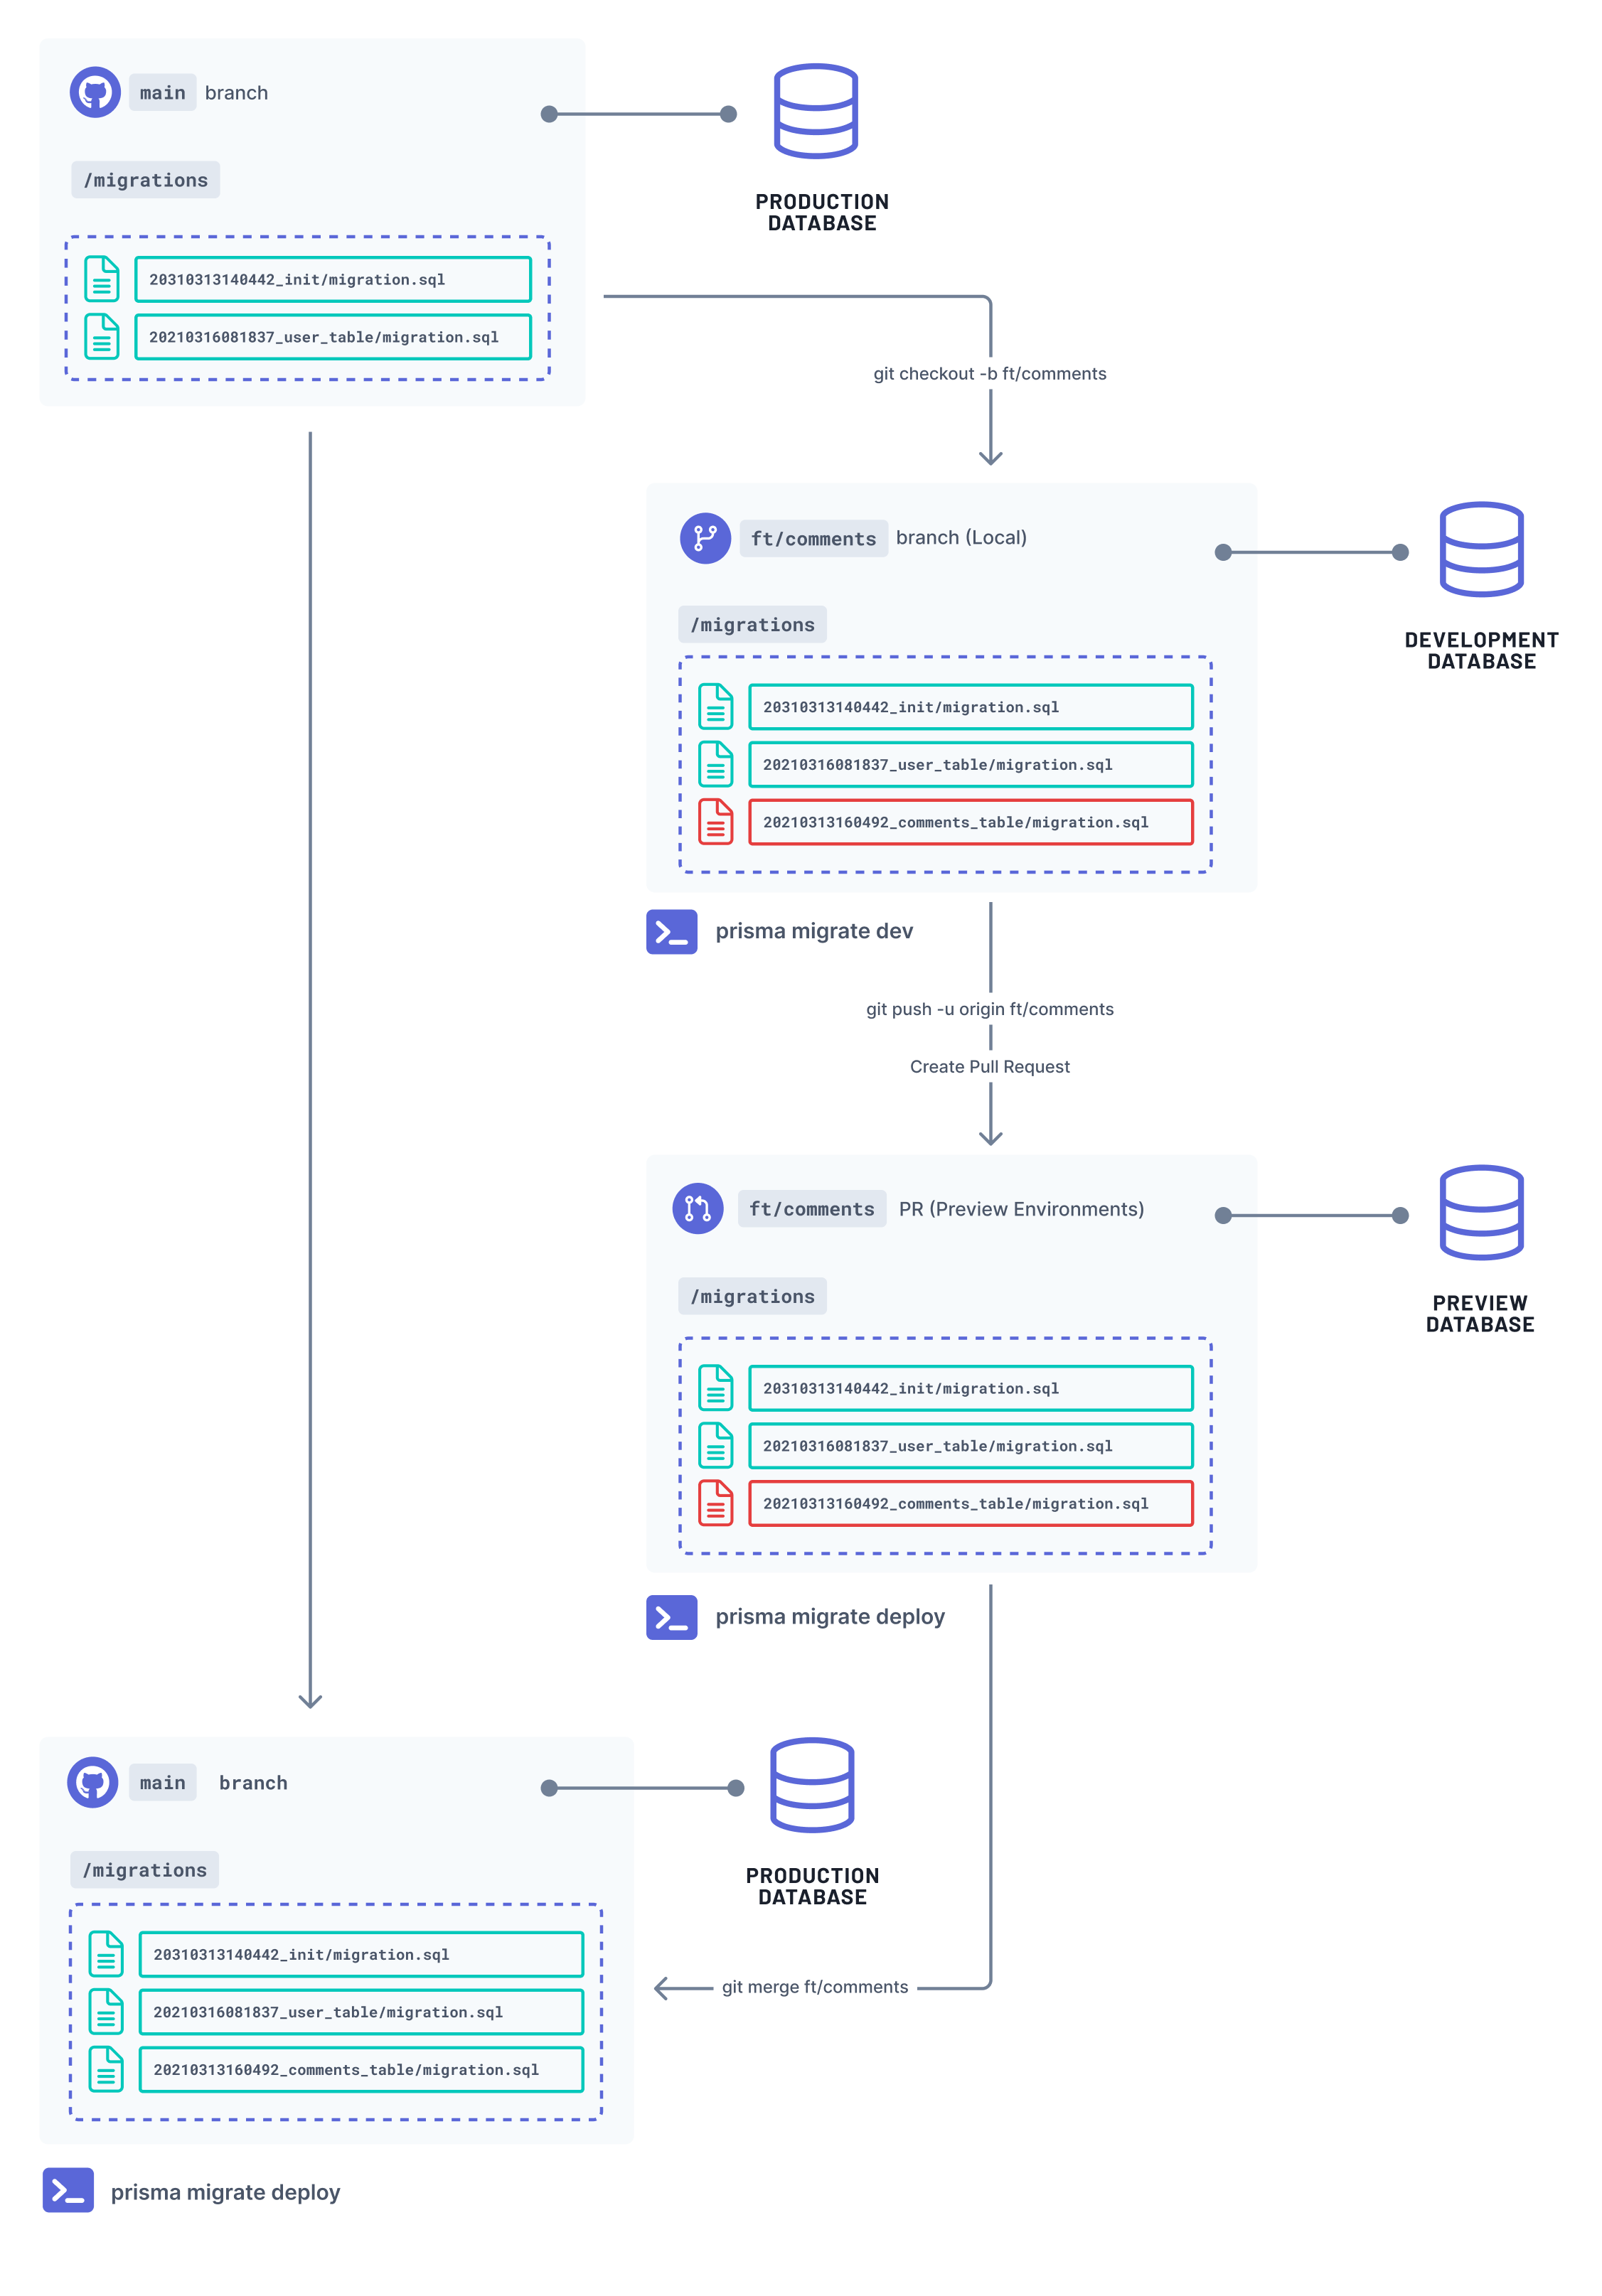 ## How Prisma Migrate tracks the migration state Prisma Migrate uses the following pieces of state to track the state of your database schema: * **Prisma schema**: your source of truth that defines the structure of the database schema. * **Migrations history**: SQL files in your `prisma/migrations` folder representing the history of changes made to your database schema. * **Migrations table**: `prisma_migrations` table in the database that stores metadata for migrations that have been applied to the database. * **Database schema**: the state of the database. 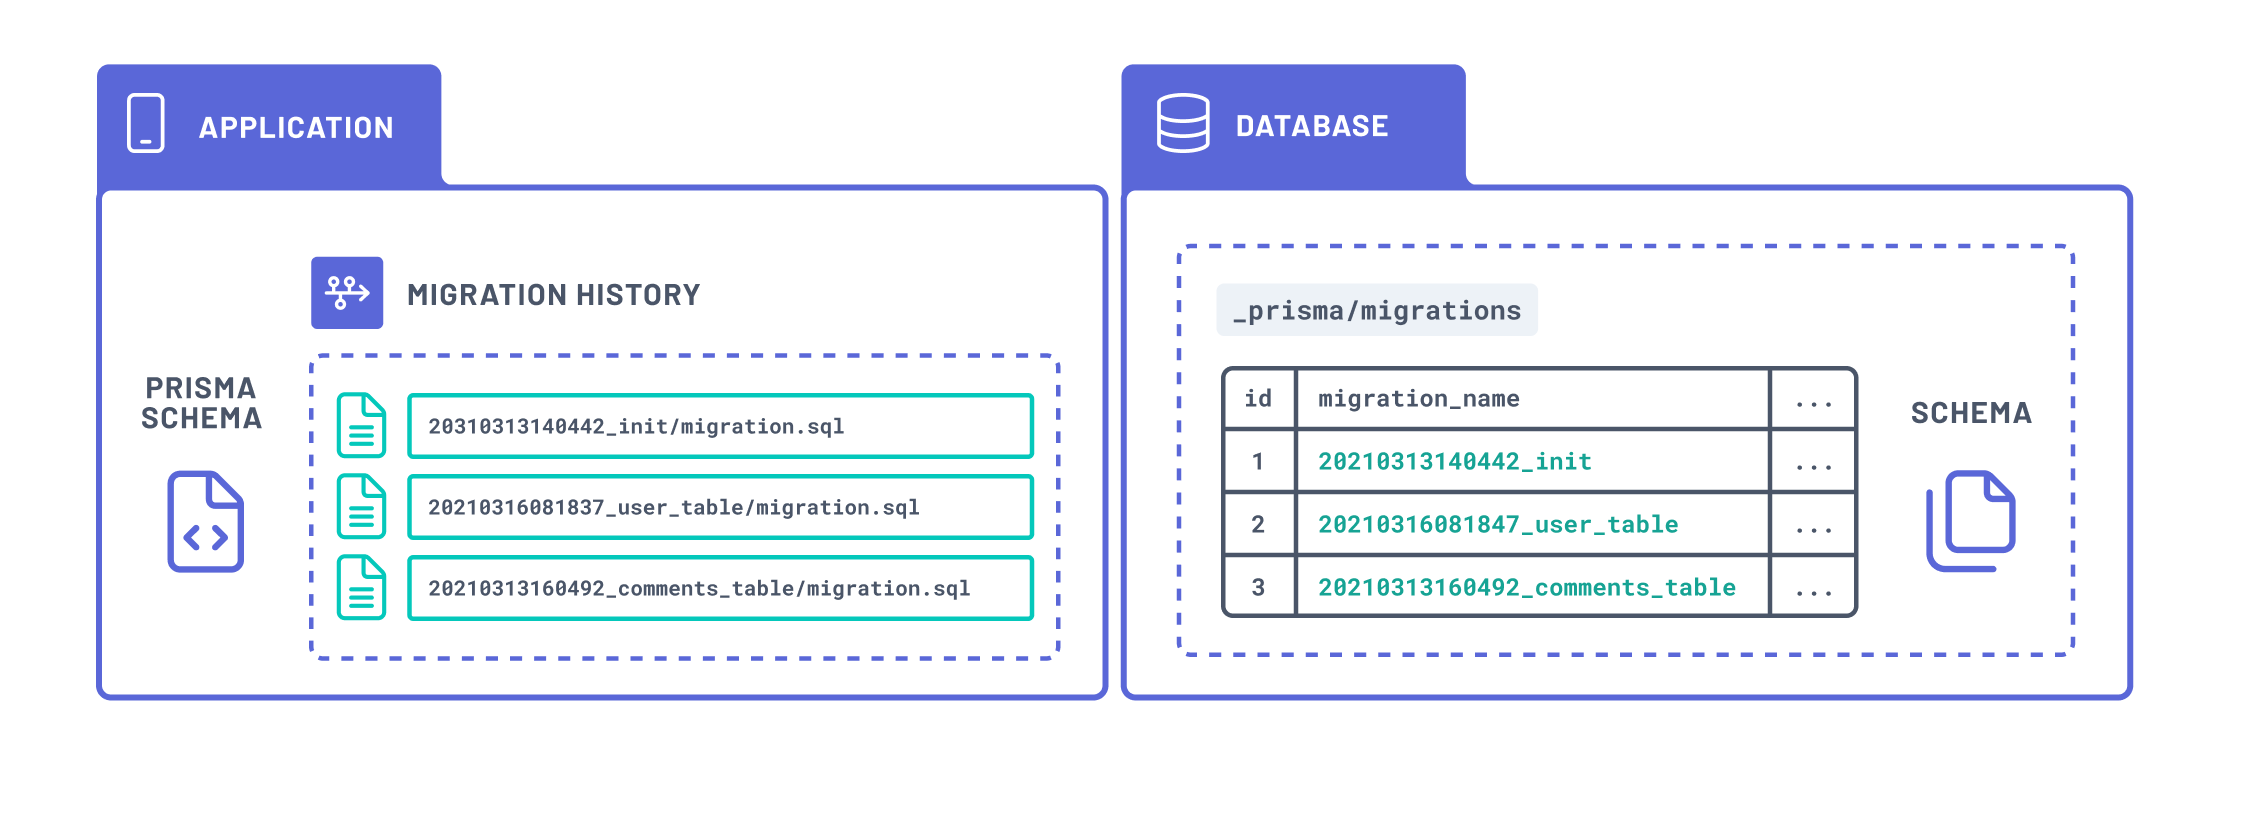 ## Requirements when working with Prisma Migrate * Ideally, you should use one database per environment. For example, you might have a separate database for development, preview, and production environments. * The databases you use in development environments are disposable — you can easily create, use, and delete databases on demand. * The database configuration used in each environments should be consistent. This is important to ensure a certain migration that moves across the workflow yields the same changes to the database. * The Prisma schema serves as the source of truth — describing the shape of your database schema. ## Evolve your database schema with Prisma Migrate This section describes how you can evolve your database schema in different environments: development, staging, and production, using Prisma Migrate. ### Prisma Migrate in a development environment (local) #### Track your migration history with `prisma migrate dev` The `prisma migrate dev` command allows you to track the changes you make to your database. The `prisma migrate dev` command automatically generates SQL migration files (saved in `/prisma/migrations`) and applies them to the database. When a migration is applied to the database, the migrations table (`_prisma_migrations`) in your database is also updated. 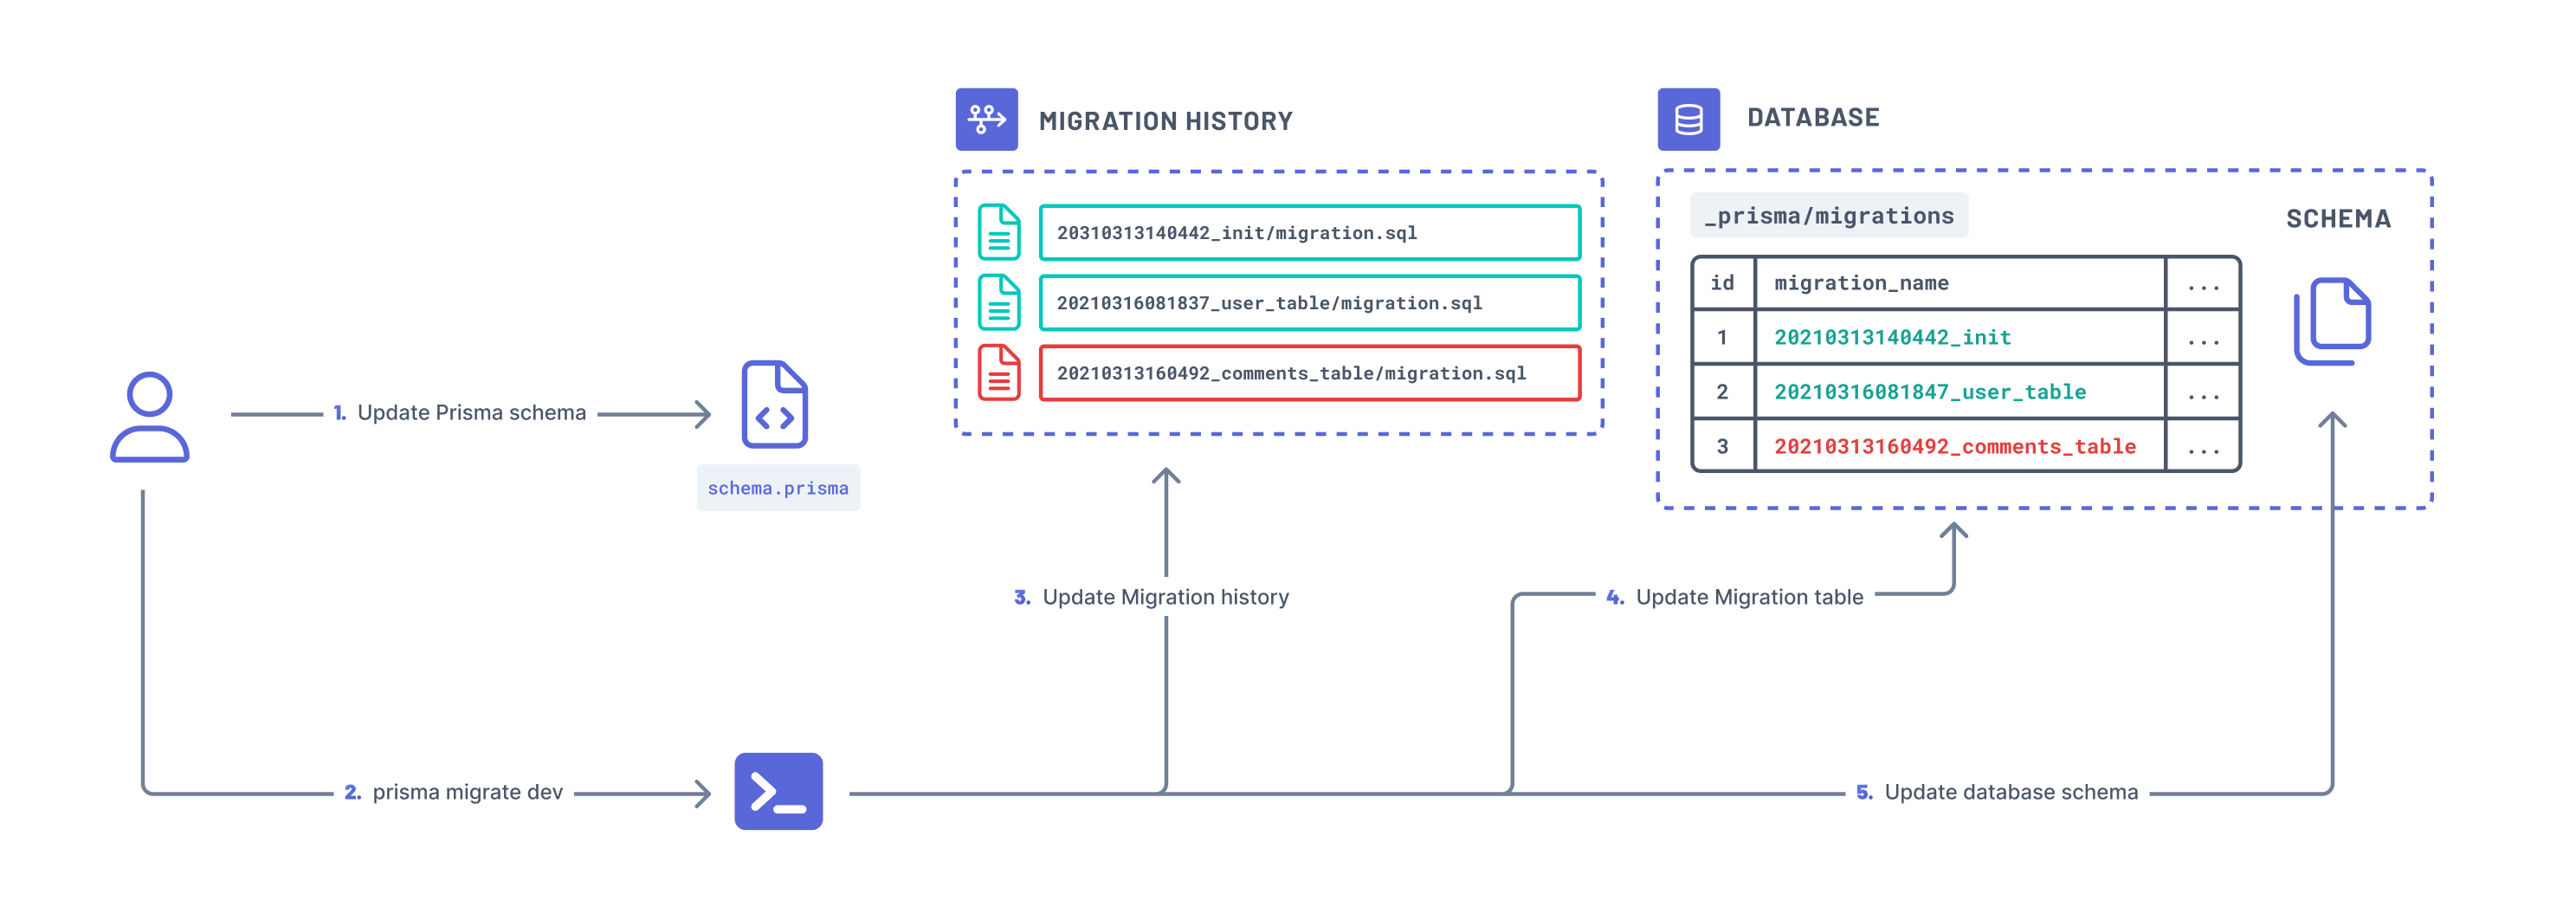 The `prisma migrate dev` command tracks the state of the database using the following pieces of state: * the Prisma schema * the migrations history * the migrations table * the database schema > **Note**: The pieces of state used to track the state of a migration are the same as the ones described in how Prisma Migrate tracks the migration state section. You can customize migrations before you apply them to the database using the `--create-only` flag. For example, you might want to edit a migration if you want to rename columns without incurring any data loss or load database extensions (in PostgreSQL) and database views (currently not supported). Under the hood, Prisma Migrate uses a shadow database to detect a schema drift and generate new migrations. > **Note**: `prisma migrate dev` is intended to be used only in development with a disposable database. If `prisma migrate dev` detects a schema drift or a migration history conflict, you will be prompted to reset (drop and recreate your database) your database to sync the migration history and the database schema. Expand to see the shadow database explained using a cartoon 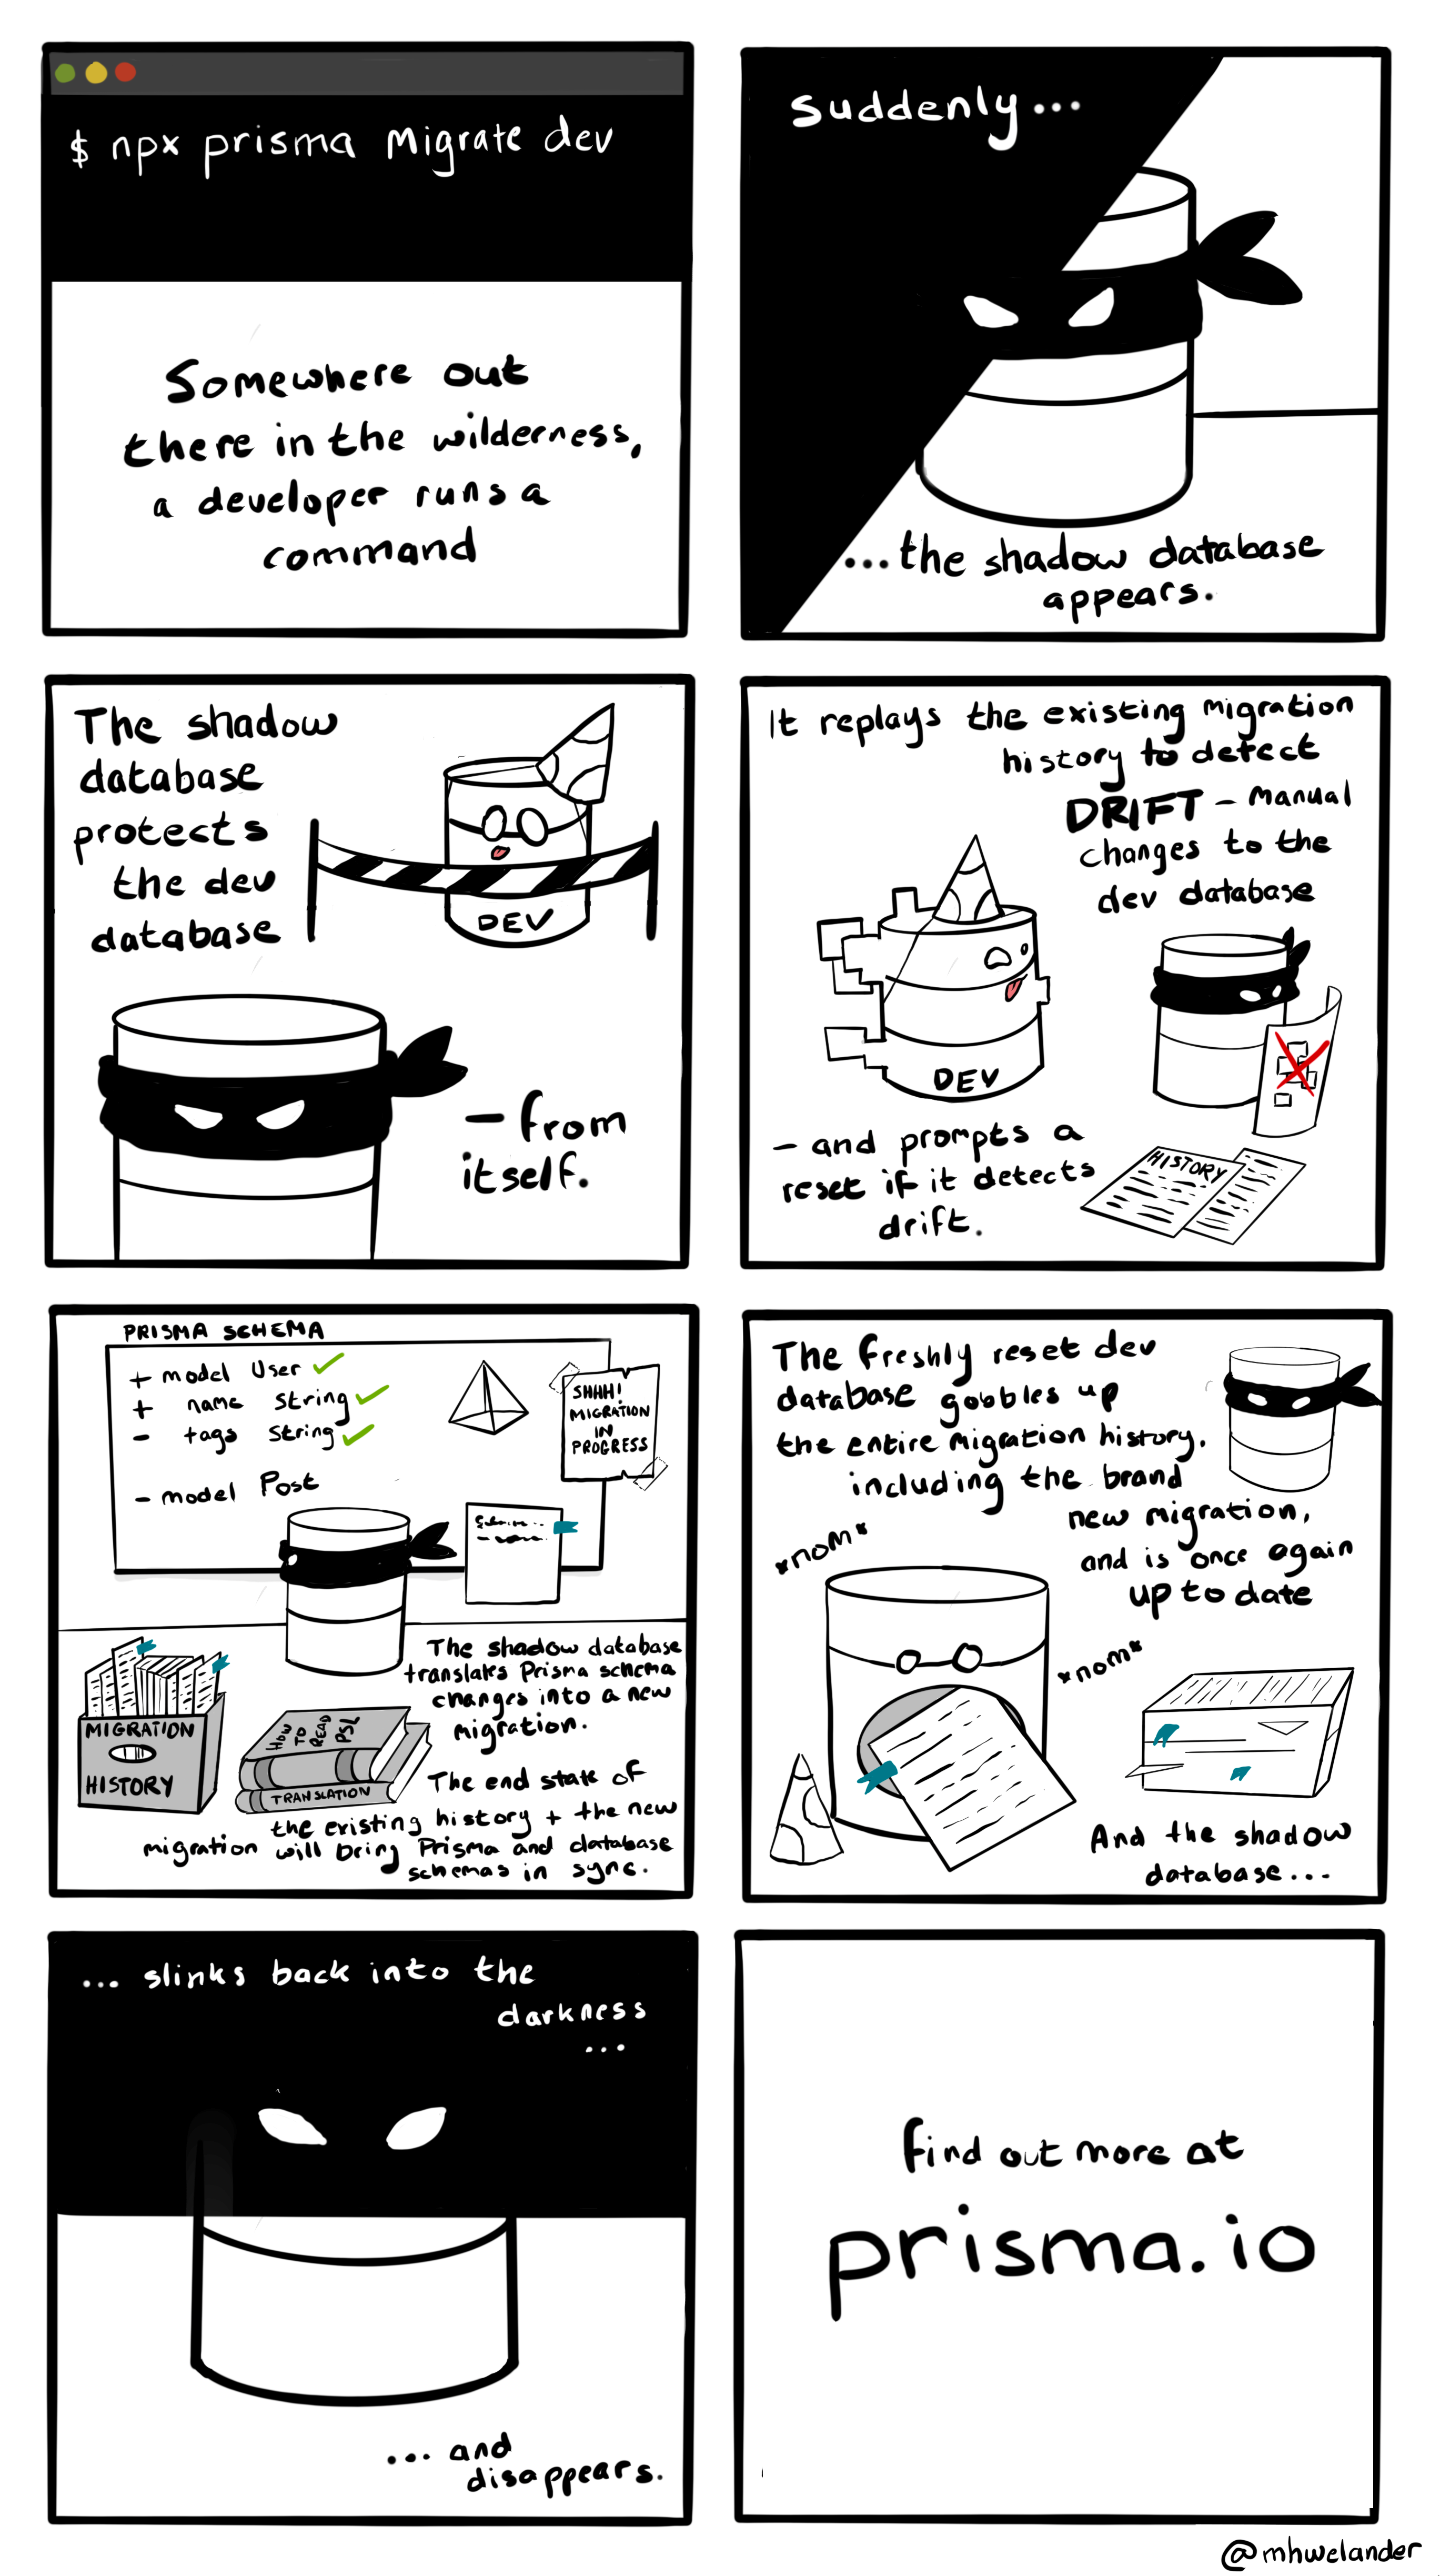 #### Resolve schema drifts A schema drift occurs when the expected database schema is different from what is in the migration history. For example, this can occur when you manually update the database schema without also updating the Prisma schema and `prisma/migrations` accordingly. For such instances, you can use the `prisma migrate diff` command to compare your migration history and revert changes made to your database schema. 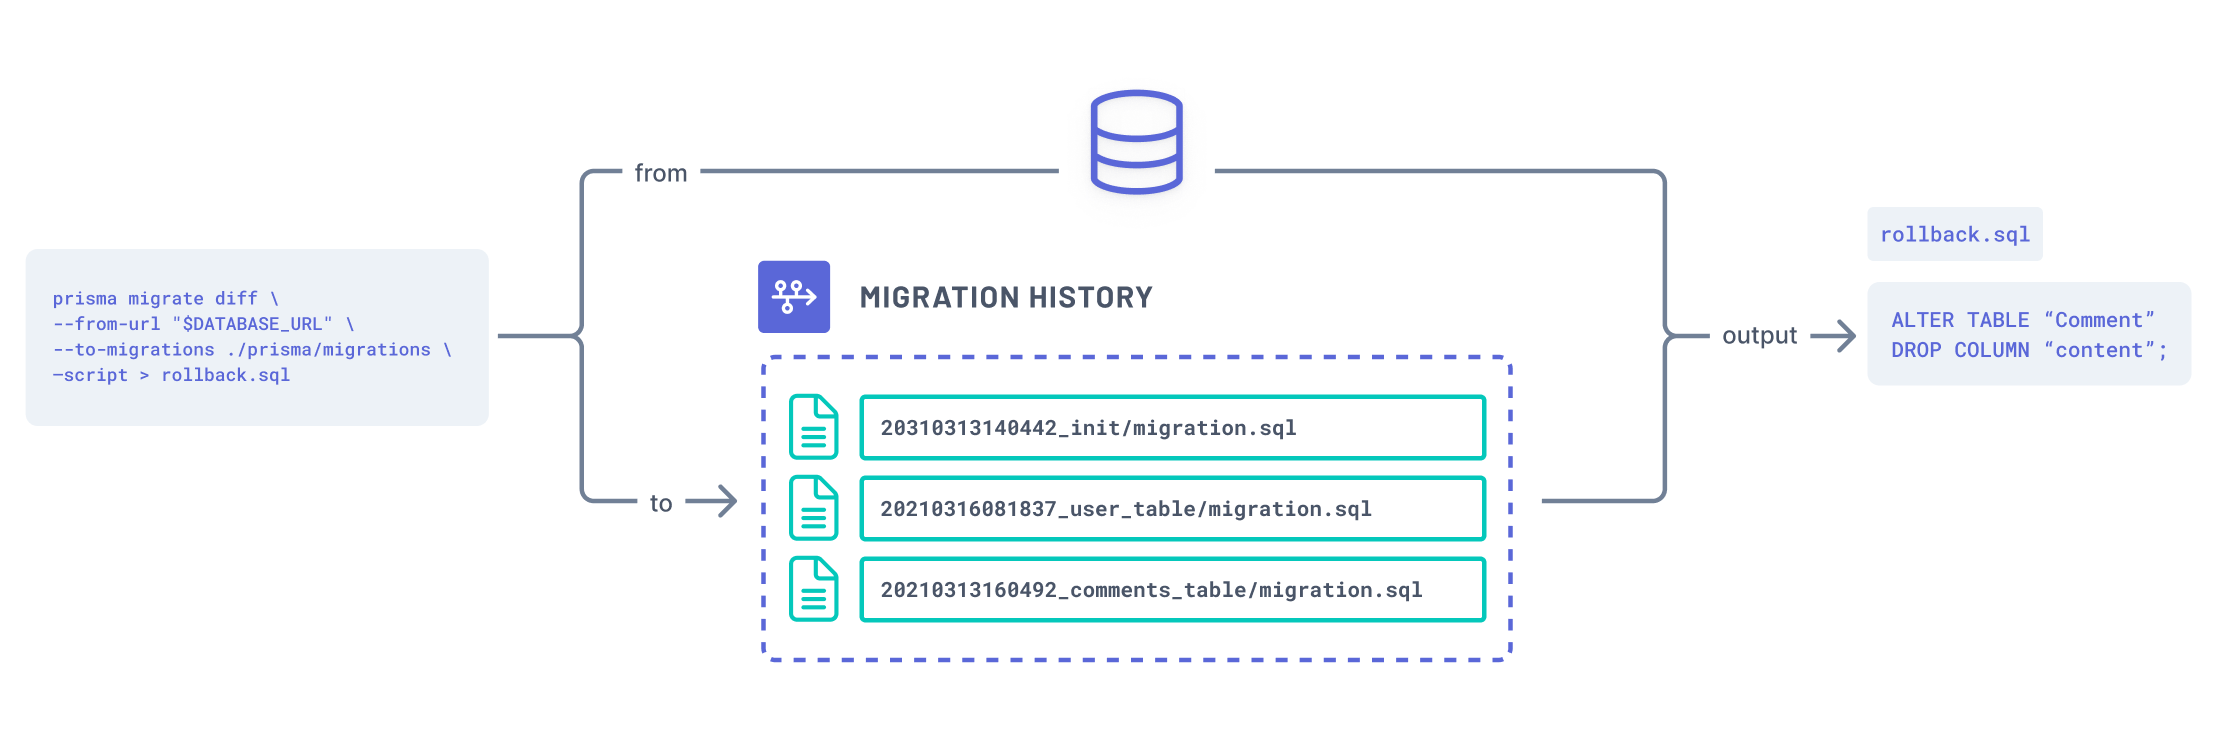 You can use `migrate diff` to generate the SQL that either: * Reverts the changes made in the database schema to synchronize it with the current Prisma schema * Moves your database schema forward to apply missing changes from the Prisma schema and `/migrations` You can then apply the changes to your database using `prisma db execute` command. #### Prototype your schema The `prisma db push` command allows you to sync your Prisma schema and database schema without persisting a migration (`/prisma/migrations`). The `prisma db push` command tracks the state of the database using the following pieces of state: * the Prisma schema * the database schema 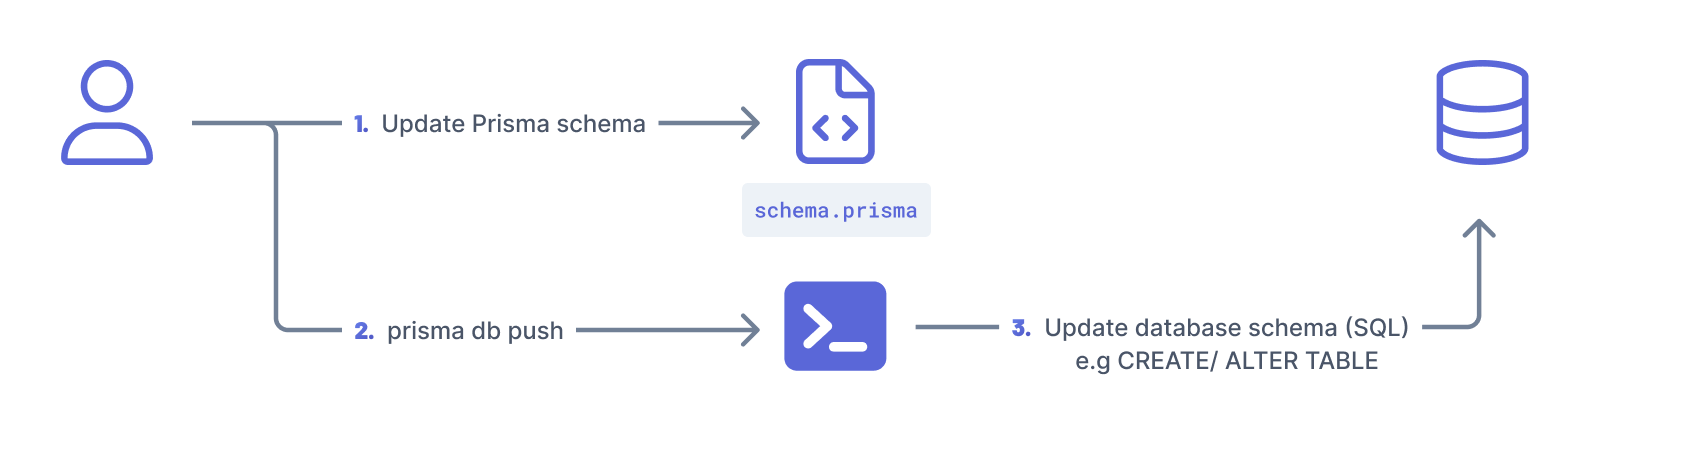 The `prisma db push` command is useful when: * You want to **quickly prototype and iterate** on schema design locally without the need to deploy these changes to other environments such as other developers, or staging and production environments. * You are prioritizing reaching a **desired end-state** and not the changes or steps executed to reach that end-state (there is no way to preview changes made by `prisma db push`) * You do not need to control how schema changes impact data. There is no way to orchestrate schema and data migrations - if `prisma db push` anticipates that changes will result in data loss, you can either accept data loss with the `--accept-data-loss` option or stop the process - there is no way to customize the changes. If the `prisma db push` command detects destructive change to your database schema, it will prompt you to reset your database. For example, this will happen when you add a required field to a table with existing content without providing a default value. > A schema drift occurs when your database schema is out of sync with your migrations history and migrations table. ### Prisma Migrate in a staging and production environment #### Sync your migration histories The `prisma migrate deploy` command allows you to sync your migration history from your development environment with your database in your **staging or production environment**. Under the hood, the `migrate deploy` command: 1. Compares already applied migrations (captured `_prisma_migrations`) and the migration history (`/prisma/migrations`) 2. Applies pending migrations 3. Updates `_prisma_migrations` table with the new migrations 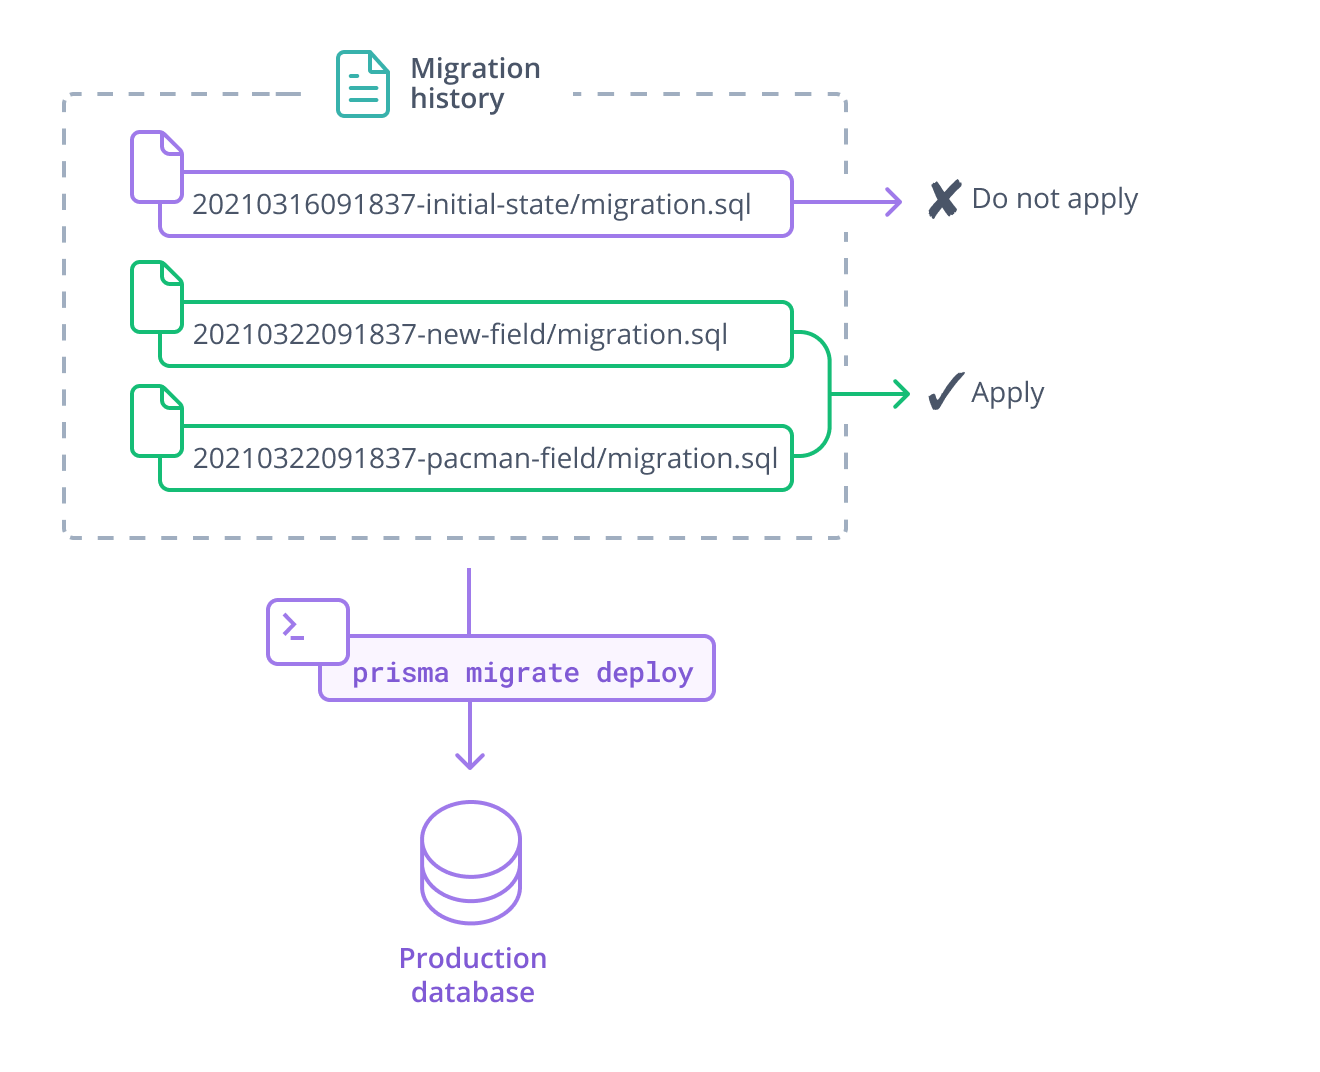 The command should be run in an automated CI/ CD environment, for example GitHub Actions. If you don't have a migration history (`/migrations`), i.e using `prisma db push`, you will have to continue using `prisma db push` in your staging and production environments. Beware of the changes being applied to the database schema as some of them might be destructive. For example, `prisma db push` can't tell when you're performing a column rename. It will prompt a database reset (drop and re-creation). --- ## Page: https://www.prisma.io/docs/orm/prisma-migrate/understanding-prisma-migrate/shadow-database The shadow database is a second, _temporary_ database that is **created and deleted automatically**\* each time you run `prisma migrate dev` and is primarily used to **detect problems** such as schema drift or potential data loss of the generated migration. `migrate diff` command also requires a shadow database when diffing against a local `migrations` directory with `--from-migrations` or `--to-migrations`. * If your database does not allow creation and deleting of databases (e.g. in a cloud-hosted environment), you need to create and configure the shadow database manually. warning The shadow database is **not** required in production, and is not used by production-focused commands such as `prisma migrate resolve` and `prisma migrate deploy`. note A shadow database is never used for MongoDB as `migrate dev` is not used there. ## How the shadow database works When you run `prisma migrate dev` to create a new migration, Prisma Migrate uses the shadow database to: * Detect schema drift, which means checking that no **unexpected changes** have been made to the development database * Generate new migrations and evaluate if those could lead to **data loss** when applied 🎨 Expand to see the shadow database explained as a cartoon.  ### Detecting schema drift To detect drift in development, Prisma Migrate: 1. Creates a fresh copy of the shadow database (or performs a soft reset if the shadow database is configured via `shadowDatabaseUrl`) 2. Reruns the **current**, existing migration history in the shadow database. 3. **Introspects** the shadow database to generate the 'current state' of your Prisma schema. 4. Compares the end state of the current migration history to the development database. 5. Reports **schema drift** if the end state of the current migration history (via the shadow database) does not match the development database (for example, due to a manual change) If Prisma Migrate does not detect schema drift, it moves on to generating new migrations. > **Note**: The shadow database is not responsible for checking if a migration file has been **edited or deleted**. This is done using the `checksum` field in the `_prisma_migrations` table. If Prisma Migrate detects schema drift, it outputs detailed information about which parts of the database have drifted. The following example output could be shown when the development database has been modified manually: The `Color` enum is missing the expected variant `RED` and includes the unexpected variant `TRANSPARENT`: [*] Changed the `Color` enum [+] Added variant `TRANSPARENT` [-] Removed variant `RED` ### Generating new migrations Assuming Prisma Migrate did not detect schema drift, it moves on to generating new migrations from Prisma schema changes. To generate new migrations, Prisma Migrate: 1. Calculates the target database schema as a function of the current Prisma schema. 2. Compares the end state of the existing migration history and the target schema, and generates steps to get from one to the other. 3. Renders these steps to a SQL string and saves it in the new migration file. 4. Evaluate data loss caused by the SQL and warns about that. 5. Applies the generated migration to the development database (assuming you have not specified the `--create-only` flag) 6. Drops the shadow database (shadow databases configured via `shadowDatabaseUrl` are not dropped, but are reset at the start of the `migrate dev` command) ## Manually configuring the shadow database In some cases it might make sense (e.g. when creating and dropping databases is not allowed on cloud-hosted databases) to manually define the connection string and name of the database that should be used as the shadow database for `migrate dev`. In such a case you can: 1. Create a dedicated database that should be used as the shadow database 2. Add the connection string of that database your environment variable `SHADOW_DATABASE_URL` (or `.env` file) 3. Add the `shadowDatabaseUrl` field reading this environment variable: datasource db { provider = "postgresql" url = env("DATABASE_URL") shadowDatabaseUrl = env("SHADOW_DATABASE_URL")} > **Important**: Do not use the exact same values for `url` and `shadowDatabaseUrl` as that might delete all the data in your database. ## Cloud-hosted shadow databases must be created manually Some cloud providers do not allow you to drop and create databases with SQL. Some require to create or drop the database via an online interface, and some really limit you to 1 database. If you **develop** in such a cloud-hosted environment, you must: 1. Create a dedicated cloud-hosted shadow database 2. Add the URL to your environment variable `SHADOW_DATABASE_URL` 3. Add the `shadowDatabaseUrl` field reading this environment variable: datasource db { provider = "postgresql" url = env("DATABASE_URL") shadowDatabaseUrl = env("SHADOW_DATABASE_URL")} > **Important**: Do not use the same values for `url` and `shadowDatabaseUrl`. ## Shadow database user permissions In order to create and delete the shadow database when using `migrate dev`, Prisma Migrate currently requires that the database user defined in your `datasource` has permission to **create databases**. | Database | Database user requirements | | --- | --- | | SQLite | No special requirements. | | MySQL/MariaDB | Database user must have `CREATE, ALTER, DROP, REFERENCES ON *.*` privileges | | PostgreSQL | The user must be a super user or have `CREATEDB` privilege. See `CREATE ROLE` (PostgreSQL official documentation) | | Microsoft SQL Server | The user must be a site admin or have the `SERVER` securable. See the official documentation. | > If you use a cloud-hosted database for development and can not use these permissions, see: Cloud-hosted shadow databases > Note: The automatic creation of shadow databases is disabled on Azure SQL for example. Prisma Migrate throws the following error if it cannot create the shadow database with the credentials your connection URL supplied: Error: A migration failed when applied to the shadow databaseDatabase error: Error querying the database: db error: ERROR: permission denied to create database To resolve this error: * If you are working locally, we recommend that you update the database user's privileges. * If you are developing against a database that does not allow creating and dropping databases (for any reason) see Manually configuring the shadow database * If you are developing against a cloud-based database (for example, on Heroku, Digital Ocean, or Vercel Postgres) see: Cloud-hosted shadow databases. * If you are developing against a cloud-based database (for example, on Heroku, Digital Ocean, or Vercel Postgres) and are currently **prototyping** such that you don't care about generated migration files and only need to apply your Prisma schema to the database schema, you can run `prisma db push` instead of the `prisma migrate dev` command. > **Important**: The shadow database is _only_ required in a development environment (specifically for the `prisma migrate dev` command) - you **do not** need to make any changes to your production environment. --- ## Page: https://www.prisma.io/docs/orm/prisma-migrate/understanding-prisma-migrate/limitations-and-known-issues The following limitations apply to Prisma Migrate. ## MongoDB connector not supported Prisma Migrate does not currently support the MongoDB connector. ## You cannot automatically switch database providers Prisma Migrate generates SQL files that are specific to your provider. This means that you cannot use the same migration files for PostgreSQL in production and SQLite in development, because the syntax in the migrations will be incompatible. In 2.15.0 and later, Prisma Migrate detects when the migrations do not match the configured provider and prints a helpful error message. For example, if your migrations are for a PostgreSQL database but you are using a `provider` is set to `mysql`: Error: P3014The datasource provider `postgresql` specified in your schema does not match the one specified in the migration_lock.toml, mysql. Please remove your current migration directory and start a new migration history with prisma migrate dev. In order to manually switch the database provider, you must: * Change the `provider` and `url` parameters in the `datasource` block in your schema * Archive or remove your existing migration history - there must not be a `./prisma/migrations` folder * Run `prisma migrate dev` to start a new migration history The last step creates a new initial migration that goes from an empty database to your current `schema.prisma`. Be aware that: * This migration will _only_ contain what is reflected in your `schema.prisma`. If you manually edited your previous migration files to add custom SQL you will need to again add this yourself. * The newly created database using the new provider will not contain any data. ## Data loss when resetting database In a development environment, Prisma Migrate sometimes prompts you to reset the database. Resetting drops and recreates the database, which results in data loss. The database is reset when: * You call `prisma migrate reset` explicitly * You call `prisma migrate dev` and Prisma Migrate detects drift in the database or a migration history conflict The `prisma migrate dev` and `prisma migrate reset` commands are designed to be used **in development only**, and should not affect production data. When the database is reset, if Prisma Migrate detects a seed script in `package.json`, it will trigger seeding. > **Note**: For a simple and integrated way to re-create data when the database is reset, check out our seeding guide. ## Prisma Migrate and PgBouncer You might see the following error if you attempt to run Prisma Migrate commands in an environment that uses PgBouncer for connection pooling: Error: undefined: Database errorError querying the database: db error: ERROR: prepared statement "s0" already exists See Prisma Migrate and PgBouncer workaround for further information and a workaround. Follow GitHub issue #6485 for updates. ## Prisma Migrate in non-interactive environments Prisma ORM detects when you run CLI commands in non-interactive environments, such as Docker, from Node scripts or in bash shells. When this happens a warning displays, indicating that the environment is non-interactive and the `migrate dev` command is not supported. To ensure the Docker environment picks up the command, run the image in `interactive` mode so that it reacts to the `migrate dev` command. docker run --interactive --tty <image name># ordocker -it <image name># Example usagedocker run -it node --- ## Page: https://www.prisma.io/docs/orm/prisma-migrate/workflows/seeding This guide describes how to seed your database using Prisma Client and Prisma ORM's integrated seeding functionality. Seeding allows you to consistently re-create the same data in your database and can be used to: * Populate your database with data that is required for your application to start, such as a default language or currency. * Provide basic data for validating and using your application in a development environment. This is particularly useful if you are using Prisma Migrate, which sometimes requires resetting your development database. ## How to seed your database in Prisma ORM Prisma ORM's integrated seeding functionality expects a command in the `"seed"` key in the `"prisma"` key of your `package.json` file. This can be any command, `prisma db seed` will just execute it. In this guide and as a default, we recommend writing a seed script inside your project's `prisma/` folder and starting it with the command. * TypeScript * JavaScript "prisma": { "seed": "ts-node prisma/seed.ts"}, info With TypeScript,`ts-node` does transpiling and typechecking by default; typechecking can be disabled with the following flag `--transpile-only`. Example: `"seed": "ts-node --transpile-only prisma/seed.ts"` This can be useful to reduce memory usage (RAM) and increase execution speed of the seed script. ## Integrated seeding with Prisma Migrate Database seeding happens in two ways with Prisma ORM: manually with `prisma db seed` and automatically in `prisma migrate reset` and (in some scenarios) `prisma migrate dev`. With `prisma db seed`, _you_ decide when to invoke the seed command. It can be useful for a test setup or to prepare a new development environment, for example. Prisma Migrate also integrates seamlessly with your seeds, assuming you follow the steps in the section below. Seeding is triggered automatically when Prisma Migrate resets the development database. Prisma Migrate resets the database and triggers seeding in the following scenarios: * You manually run the `prisma migrate reset` CLI command. * The database is reset interactively in the context of using `prisma migrate dev` - for example, as a result of migration history conflicts or database schema drift. * The database is actually created by `prisma migrate dev`, because it did not exist before. When you want to use `prisma migrate dev` or `prisma migrate reset` without seeding, you can pass the `--skip-seed` flag. ## Example seed scripts Here we suggest some specific seed scripts for different situations. You are free to customize these in any way, but can also use them as presented here: ### Seeding your database with TypeScript or JavaScript * TypeScript * JavaScript 1. Create a new file named `seed.ts`. This can be placed anywhere within your project's folder structure. The example below places it in the `/prisma` folder. 2. In the `seed.ts` file, import Prisma Client, initialize it and create some records. As an example, take the following Prisma schema with a `User` and `Post` model: schema.prisma model User { id Int @id @default(autoincrement()) email String @unique name String posts Post[]}model Post { id Int @id @default(autoincrement()) title String content String published Boolean user User @relation(fields: [userId], references: [id]) userId Int} Create some new users and posts in your `seed.ts` file: seed.ts import { PrismaClient } from '@prisma/client'const prisma = new PrismaClient()async function main() { const alice = await prisma.user.upsert({ where: { email: 'alice@prisma.io' }, update: {}, create: { email: 'alice@prisma.io', name: 'Alice', posts: { create: { title: 'Check out Prisma with Next.js', content: 'https://www.prisma.io/nextjs', published: true, }, }, }, }) const bob = await prisma.user.upsert({ where: { email: 'bob@prisma.io' }, update: {}, create: { email: 'bob@prisma.io', name: 'Bob', posts: { create: [ { title: 'Follow Prisma on Twitter', content: 'https://twitter.com/prisma', published: true, }, { title: 'Follow Nexus on Twitter', content: 'https://twitter.com/nexusgql', published: true, }, ], }, }, }) console.log({ alice, bob })}main() .then(async () => { await prisma.$disconnect() }) .catch(async (e) => { console.error(e) await prisma.$disconnect() process.exit(1) }) 3. Add `typescript`, `ts-node` and `@types/node` development dependencies: npm install -D typescript ts-node @types/node 4. Add the `prisma.seed` field to your `package.json` file: package.json { "name": "my-project", "version": "1.0.0", "prisma": { "seed": "ts-node prisma/seed.ts" }, "devDependencies": { "@types/node": "^14.14.21", "ts-node": "^9.1.1", "typescript": "^4.1.3" }} Some projects may require you to add compile options. When using Next.js for example, you would setup your seed script like so: package.json "prisma": { "seed": "ts-node --compiler-options {\"module\":\"CommonJS\"} prisma/seed.ts"}, 5. To seed the database, run the `db seed` CLI command: npx prisma db seed ### Seeding your database via raw SQL queries You can also make use of raw SQL queries in order to seed the database with data. While you can use a plain-text `.sql` file (such as a data dump) for that, it is often easier to place those raw queries, if they're of short size, into the `seed.js` file because it saves you the hassle of working out database connection strings and creating a dependency on a binary like `psql`. To seed additional data to the `schema.prisma` above, add the following to the `seed.js` (or `seed.ts`) file: seed.js async function rawSql() { const result = await prisma.$executeRaw`INSERT INTO "User" ("id", "email", "name") VALUES (3, 'foo@example.com', 'Foo') ON CONFLICT DO NOTHING;` console.log({ result })} and chain this function to the promise calls, such as the following change towards the end of the file: seed.js main() .then(rawSql) .then(async () => { await prisma.$disconnect() }) .catch(async (e) => { console.error(e) await prisma.$disconnect() process.exit(1) }) ### Seeding your database via any language (with a Bash script) In addition to TypeScript and JavaScript, you can also use a Bash script (`seed.sh`) to seed your database in another language such as Go, or plain SQL. * Go * SQL The following example runs a Go script in the same folder as `seed.sh`: seed.sh #!/bin/sh# -e Exit immediately when a command returns a non-zero status.# -x Print commands before they are executedset -ex# Seeding commandgo run ./seed/ ### User-defined arguments > This feature is available from version 4.15.0 and later. `prisma db seed` allows you to define custom arguments in your seed file that you can pass to the `prisma db seed` command. For example, you could define your own arguments to seed different data for different environments or partially seeding data in some tables. Here is an example seed file that defines a custom argument to seed different data in different environments: "seed.js" import { parseArgs } from 'node:util'const options = { environment: { type: 'string' },}async function main() { const { values: { environment }, } = parseArgs({ options }) switch (environment) { case 'development': /** data for your development */ break case 'test': /** data for your test environment */ break default: break }}main() .then(async () => { await prisma.$disconnect() }) .catch(async (e) => { console.error(e) await prisma.$disconnect() process.exit(1) }) You can then provide the `environment` argument when using `prisma db seed` by adding a delimiter — `--` —, followed by your custom arguments: npx prisma db seed -- --environment development ## Going further Here's a non-exhaustive list of other tools you can integrate with Prisma ORM in your development workflow to seed your database: * Supabase community project * Replibyte --- ## Page: https://www.prisma.io/docs/orm/prisma-migrate/workflows/prototyping-your-schema The Prisma CLI has a dedicated command for prototyping schemas: `db push` `db push` uses the same engine as Prisma Migrate to synchronize your Prisma schema with your database schema. The `db push` command: 1. Introspects the database to infer and executes the changes required to make your database schema reflect the state of your Prisma schema. 2. By default, after changes have been applied to the database schema, generators are triggered (for example, Prisma Client). You do not need to manually invoke `prisma generate`. 3. If `db push` anticipates that the changes could result in data loss, it will: * Throw an error * Require the `--accept-data-loss` option if you still want to make the changes > **Notes**: > > * `db push` does not interact with or rely on migrations. The migrations table `_prisma_migrations` will not be created or updated, and no migration files will be generated. > * When working with PlanetScale, we recommend that you use `db push` instead of `migrate`. For details refer to our Getting Started documentation, either Start from scratch or Add to existing project depending on your situation. ## Choosing `db push` or Prisma Migrate `db push` works well if: * You want to **quickly prototype and iterate** on schema design locally without the need to deploy these changes to other environments such as other developers, or staging and production environments. * You are prioritizing reaching a **desired end-state** and not the changes or steps executed to reach that end-state (there is no way to preview changes made by `db push`) * You do not need to control how schema changes impact data. There is no way to orchestrate schema and data migrations—if `db push` anticipates that changes will result in data loss, you can either accept data loss with the `--accept-data-loss` option or stop the process. There is no way to customize the changes. See Schema prototyping with `db push` for an example of how to use `db push` in this way. `db push` is **not recommended** if: * You want to replicate your schema changes in other environments without losing data. You can use `db push` for prototyping, but you should use migrations to commit the schema changes and apply these in your other environments. * You want fine-grained control over how the schema changes are executed - for example, renaming a column instead of dropping it and creating a new one. * You want to keep track of changes made to the database schema over time. `db push` does not create any artifacts that allow you to keep track of these changes. * You want the schema changes to be reversible. You can use `db push` again to revert to the original state, but this might result in data loss. ## Can I use Prisma Migrate and `db push` together? Yes, you can use `db push` and Prisma Migrate together in your development workflow . For example, you can: * Use `db push` to prototype a schema at the start of a project and initialize a migration history when you are happy with the first draft * Use `db push` to prototype a change to an existing schema, then run `prisma migrate dev` to generate a migration from your changes (you will be asked to reset) ## Prototyping a new schema The following scenario demonstrates how to use `db push` to synchronize a new schema with an empty database, and evolve that schema - including what happens when `db push` detects that a change will result in data loss. 1. Create a first draft of your schema: generator client { provider = "prisma-client-js"}datasource db { provider = "postgresql" url = env("DATABASE_URL")}model User { id Int @id @default(autoincrement()) name String jobTitle String posts Post[] profile Profile?}model Profile { id Int @id @default(autoincrement()) biograpy String // Intentional typo! userId Int @unique user User @relation(fields: [userId], references: [id])}model Post { id Int @id @default(autoincrement()) title String published Boolean @default(true) content String @db.VarChar(500) authorId Int author User @relation(fields: [authorId], references: [id]) categories Category[]}model Category { id Int @id @default(autoincrement()) name String @db.VarChar(50) posts Post[] @@unique([name])} 2. Use `db push` to push the initial schema to the database: npx prisma db push 3. Create some example content: const add = await prisma.user.create({ data: { name: 'Eloise', jobTitle: 'Programmer', posts: { create: { title: 'How to create a MySQL database', content: 'Some content', }, }, },}) 4. Make an additive change - for example, create a new required field: // ... //model Post { id Int @id @default(autoincrement()) title String description String published Boolean @default(true) content String @db.VarChar(500) authorId Int author User @relation(fields: [authorId], references: [id]) categories Category[]}// ... // 5. Push the changes: npx prisma db push `db push` will fail because you cannot add a required field to a table with existing content unless you provide a default value. 6. Reset **all data** in your database and re-apply migrations. npx prisma migrate reset > **Note**: Unlike Prisma Migrate, `db push` does not generate migrations that you can modify to preserve data, and is therefore best suited for prototyping in a development environment. 7. Continue to evolve your schema until it reaches a relatively stable state. 8. Initialize a migration history: npx prisma migrate dev --name initial-state The steps taken to reach the initial prototype are not preserved - `db push` does not generate a history. 9. Push your migration history and Prisma schema to source control (e.g. Git). At this point, the final draft of your prototyping is preserved in a migration and can be pushed to other environments (testing, production, or other members of your team). ## Prototyping with an existing migration history The following scenario demonstrates how to use `db push` to prototype a change to a Prisma schema where a migration history already exists. 1. Check out the latest Prisma schema and migration history: generator client { provider = "prisma-client-js"}datasource db { provider = "postgresql" url = env("DATABASE_URL")}model User { id Int @id @default(autoincrement()) name String jobTitle String posts Post[] profile Profile?}model Profile { id Int @id @default(autoincrement()) biograpy String // Intentional typo! userId Int @unique user User @relation(fields: [userId], references: [id])}model Post { id Int @id @default(autoincrement()) title String published Boolean @default(true) content String @db.VarChar(500) authorId Int author User @relation(fields: [authorId], references: [id]) categories Category[]}model Category { id Int @id @default(autoincrement()) name String @db.VarChar(50) posts Post[] @@unique([name])} 2. Prototype your new feature, which can involve any number of steps. For example, you might: * Create a `tags String[]` field, then run `db push` * Change the field type to `tags Tag[]` and add a new model named `Tag`, then run `db push` * Change your mind and restore the original `tags String[]` field, then call `db push` * Make a manual change to the `tags` field in the database - for example, adding a constraint After experimenting with several solutions, the final schema change looks like this: model Post { id Int @id @default(autoincrement()) title String description String published Boolean @default(true) content String @db.VarChar(500) authorId Int author User @relation(fields: [authorId], references: [id]) categories Category[] tags String[]} 3. To create a migration that adds the new `tags` field, run the `migrate dev` command: npx prisma migrate dev --name added-tags Prisma Migrate will prompt you to reset because the changes you made manually and with `db push` while prototyping are not part of the migration history: √ Drift detected: Your database schema is not in sync with your migration history.We need to reset the PostgreSQL database "prototyping" at "localhost:5432". warning This will result in total data loss. npx prisma migrate reset 4. Prisma Migrate replays the existing migration history, generates a new migration based on your schema changes, and applies those changes to the database. tip When using `migrate dev`, if your schema changes mean that seed scripts will no longer work, you can use the `--skip-seed` flag to ignore seed scripts. At this point, the final result of your prototyping is preserved in a migration, and can be pushed to other environments (testing, production, or other members of your team). --- ## Page: https://www.prisma.io/docs/orm/prisma-migrate/workflows/baselining Baselining is the process of initializing a migration history for a database that: * ✔ Existed before you started using Prisma Migrate * ✔ Contains data that must be maintained (like production), which means that the database cannot be reset Baselining tells Prisma Migrate to assume that one or more migrations have **already been applied**. This prevents generated migrations from failing when they try to create tables and fields that already exist. > **Note**: We assume it is acceptable to reset and seed development databases. Baselining is part of adding Prisma Migrate to a project with an existing database. warning This guide **does not apply for MongoDB**. Instead of `migrate deploy`, `db push` is used for MongoDB. ## Why you need to baseline When you add Prisma Migrate to an existing project, your initial migration contains all the SQL required to recreate the state of the database **before you started using Prisma Migrate**: 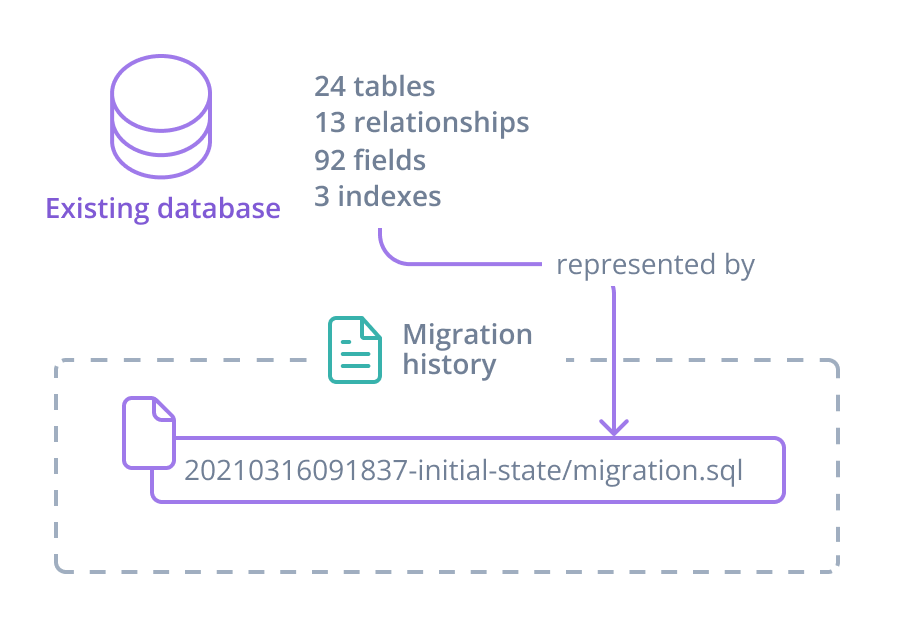 tip You can edit the initial migration to include schema elements that cannot be represented in the Prisma schema - such as stored procedures or triggers. You need this initial migration to create and reset **development environments**: 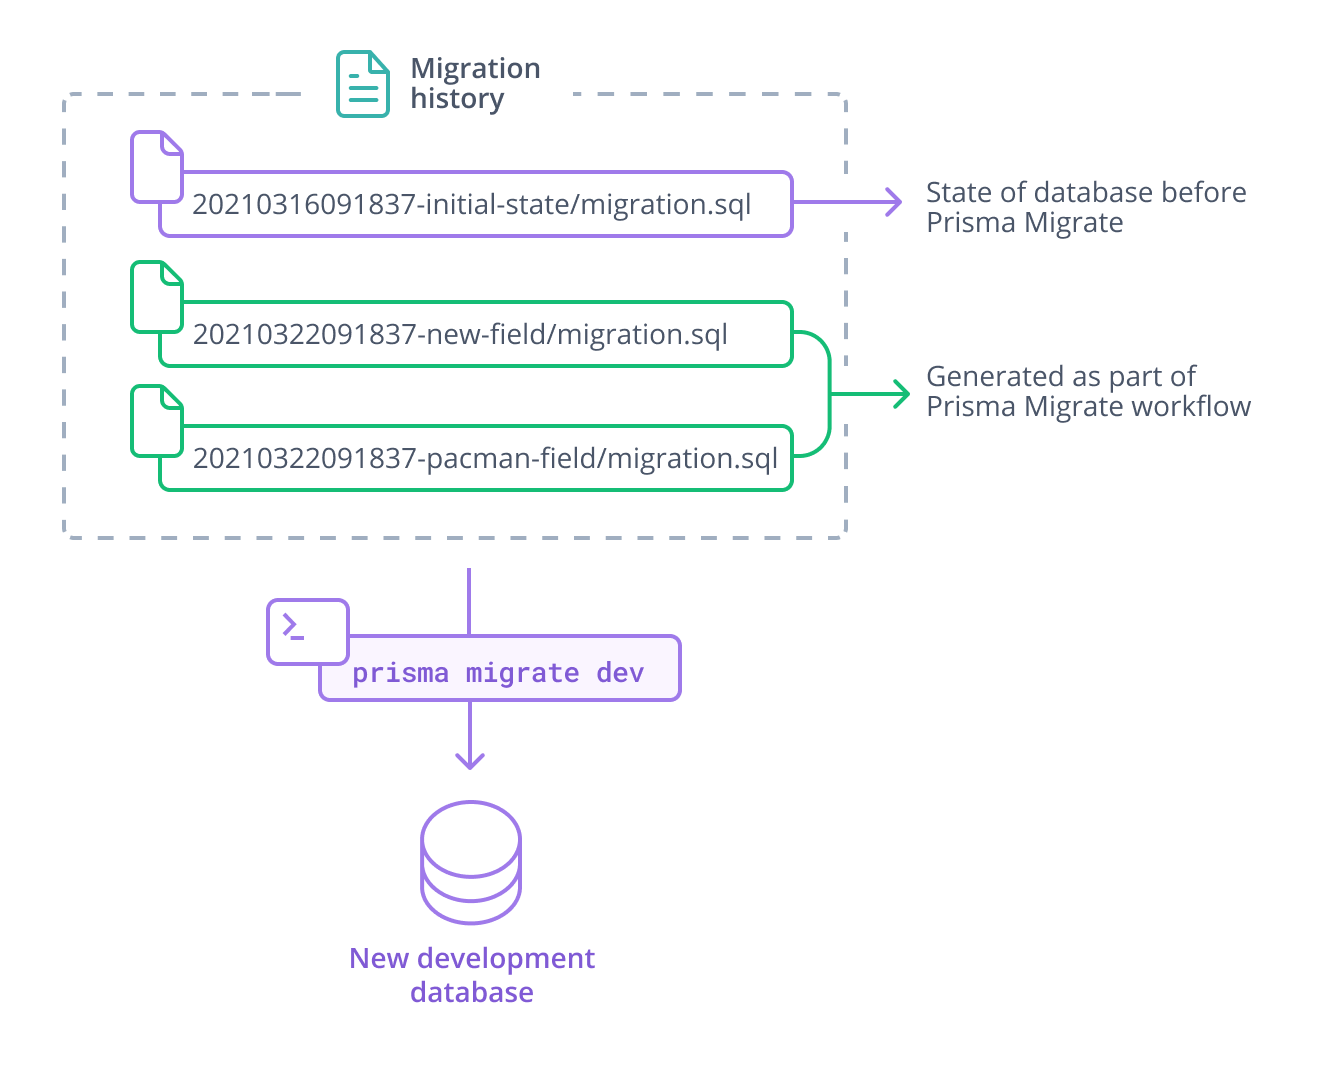 However, when you `prisma migrate deploy` your migrations to databases that already exist and _cannot_ be reset - such as production - you **do not want to include the initial migrations**. The target database already contains the tables and columns created by the initial migration, and attempting to create these elements again will most likely result in an error.  Baselining solves this problem by telling Prisma Migrate to pretend that the initial migration(s) **have already been applied**. ## Baselining a database To create a baseline migration: 1. If you have a `prisma/migrations` folder, delete, move, rename, or archive this folder. 2. Run the following command to create a `migrations` directory inside with your preferred name. This example will use `0_init` for the migration name: mkdir -p prisma/migrations/0_init info Then `0_` is important because Prisma Migrate applies migrations in a lexicographic order. You can use a different value such as the current timestamp. 3. Generate a migration and save it to a file using `prisma migrate diff` npx prisma migrate diff \--from-empty \--to-schema-datamodel prisma/schema.prisma \--script > prisma/migrations/0_init/migration.sql 4. Run the `prisma migrate resolve` command for each migration that should be ignored: npx prisma migrate resolve --applied 0_init This command adds the target migration to the `_prisma_migrations` table and marks it as applied. When you run `prisma migrate deploy` to apply new migrations, Prisma Migrate: 1. Skips all migrations marked as 'applied', including the baseline migration 2. Applies any new migrations that come _after_ the baseline migration --- ## Page: https://www.prisma.io/docs/orm/prisma-migrate/workflows/customizing-migrations warning This guide **does not apply for MongoDB**. Instead of `migrate dev`, `db push` is used for MongoDB. In some scenarios, you need to edit a migration file before you apply it. For example, to change the direction of a 1-1 relation (moving the foreign key from one side to another) without data loss, you need to move data as part of the migration - this SQL is not part of the default migration, and must be written by hand. This guide explains how to edit migration files and gives some examples of use cases where you may want to do this. ## How to edit a migration file To edit a migration file before applying it, the general procedure is the following: 1. Make a schema change that requires custom SQL (for example, to preserve existing data) 2. Create a draft migration using: npx prisma migrate dev --create-only 3. Modify the generated SQL file. 4. Apply the modified SQL by running: npx prisma migrate dev ### Example: Rename a field By default, renaming a field in the schema results in a migration that will: * `CREATE` a new column (for example, `fullname`) * `DROP` the existing column (for example, `name`) and the data in that column To actually **rename** a field and avoid data loss when you run the migration in production, you need to modify the generated migration SQL before applying it to the database. Consider the following schema fragment - the `biograpy` field is spelled wrong. model Profile { id Int @id @default(autoincrement()) biograpy String userId Int @unique user User @relation(fields: [userId], references: [id])} To rename the `biograpy` field to `biography`: 1. Rename the field in the schema: model Profile { id Int @id @default(autoincrement()) biograpy String biography String userId Int @unique user User @relation(fields: [userId], references: [id])} 2. Run the following command to create a **draft migration** that you can edit before applying to the database: npx prisma migrate dev --name rename-migration --create-only 3. Edit the draft migration as shown, changing `DROP` / `DELETE` to a single `RENAME COLUMN`: * Before * After ./prisma/migrations/20210308092620\_rename\_migration/migration.sql ALTER TABLE "Profile" DROP COLUMN "biograpy",ADD COLUMN "biography" TEXT NOT NULL; 4. Save and apply the migration: npx prisma migrate dev You can use the same technique to rename a `model` - edit the generated SQL to _rename_ the table rather than drop and re-create it. ### Example: Use the expand and contract pattern to evolve the schema without downtime Making schema changes to existing fields, e.g., renaming a field can lead to downtime. It happens in the time frame between applying a migration that modifies an existing field, and deploying a new version of the application code which uses the modified field. You can prevent downtime by breaking down the steps required to alter a field into a series of discrete steps designed to introduce the change gradually. This pattern is known as the _expand and contract pattern_. The pattern involves two components: your application code accessing the database and the database schema you intend to alter. With the _expand and contract_ pattern, renaming the field `bio` to `biography` would look as follows with Prisma: 1. Add the new `biography` field to your Prisma schema and create a migration model Profile { id Int @id @default(autoincrement()) bio String biography String userId Int @unique user User @relation(fields: [userId], references: [id])} 2. _Expand_: update the application code and write to both the `bio` and `biography` fields, but continue reading from the `bio` field, and deploy the code 3. Create an empty migration and copy existing data from the `bio` to the `biography` field npx prisma migrate dev --name copy_biography --create-only prisma/migrations/20210420000000\_copy\_biography/migration.sql UPDATE "Profile" SET biography = bio; 4. Verify the integrity of the `biography` field in the database 5. Update application code to **read** from the new `biography` field 6. Update application code to **stop writing** to the `bio` field 7. _Contract_: remove the `bio` from the Prisma schema, and create a migration to remove the `bio` field model Profile { id Int @id @default(autoincrement()) bio String biography String userId Int @unique user User @relation(fields: [userId], references: [id])} npx prisma migrate dev --name remove_bio By using this approach, you avoid potential downtime that altering existing fields that are used in the application code are prone to, and reduce the amount of coordination required between applying the migration and deploying the updated application code. Note that this pattern is applicable in any situation involving a change to a column that has data and is in use by the application code. Examples include combining two fields into one, or transforming a `1:n` relation to a `m:n` relation. To learn more, check out the Data Guide article on the expand and contract pattern ### Example: Change the direction of a 1-1 relation To change the direction of a 1-1 relation: 1. Make the change in the schema: model User { id Int @id @default(autoincrement()) name String posts Post[] profile Profile? @relation(fields: [profileId], references: [id]) profileId Int @unique}model Profile { id Int @id @default(autoincrement()) biography String user User} 2. Run the following command to create a **draft migration** that you can edit before applying to the database: npx prisma migrate dev --name rename-migration --create-only Show CLI results ⚠️ There will be data loss when applying the migration:• The migration will add a unique constraint covering the columns `[profileId]` on the table `User`. If there are existing duplicate values, the migration will fail. 3. Edit the draft migration as shown: * Before * After -- DropForeignKeyALTER TABLE "Profile" DROP CONSTRAINT "Profile_userId_fkey";-- DropIndexDROP INDEX "Profile_userId_unique";-- AlterTableALTER TABLE "Profile" DROP COLUMN "userId";-- AlterTableALTER TABLE "User" ADD COLUMN "profileId" INTEGER NOT NULL;-- CreateIndexCREATE UNIQUE INDEX "User_profileId_unique" ON "User"("profileId");-- AddForeignKeyALTER TABLE "User" ADD FOREIGN KEY ("profileId") REFERENCES "Profile"("id") ON DELETE CASCADE ON UPDATE CASCADE; 1. Save and apply the migration: npx prisma migrate dev --- ## Page: https://www.prisma.io/docs/orm/prisma-migrate/workflows/data-migration This guide has been moved to our new guides section. You can find the guide there. --- ## Page: https://www.prisma.io/docs/orm/prisma-migrate/workflows/squashing-migrations This guide describes how to squash multiple migration files into a single migration. ## About squashing migrations It is sometimes useful to squash either some or all migration files into a single migration. This guide will describe two scenarios where you may want to do this: * Migrating cleanly from a development environment by squashing your local migrations into one before merging * Creating a clean history in a production environment by squashing all migrations into a single file In both cases, Prisma Migrate provides the tools for doing this, by using the `migrate diff` command to compare two database schemas and output a single SQL file that takes you from one to the other. The rest of this guide gives detailed instructions on how to carry this out in these two scenarios. ### Migrating cleanly from a development environment Squashing migrations can be useful when developing with a branch-based workflow. During a large local development effort on a feature branch you might generate multiple migrations using `migrate dev`. After the feature is finished, the migration history might contain unnecessary intermediate steps that are unwanted in the final migration history that will be pushed to the `main` branch. There could be important reasons to avoid applying the intermediate steps in production — they might lose data or be extremely slow / disruptive). Even when this is not the case, you may want to avoid clutter in your production environment's migrations history. For detailed steps on how to achieve this using `migrate dev`, see the section on how to migrate cleanly from a development environment. ### Creating a clean history in a production environment Squashing migrations can also be used in a production environment to squash all migration files into one. This can be useful when the production environment has accumulated a longer migration history, and replaying it in new environments has become a burden due to intermediate steps requiring extra time. Since the team is not deriving value from the migration steps (and could get them back from version control history in a pinch) the decision is made to squash the whole history into a single migration. For detailed steps on how to achieve this using `migrate diff` and `migrate resolve` see the section on how to create a clean history in a production environment. ## Considerations when squashing migrations warning When squashing migrations, be aware that any manually changed or added SQL in your `migration.sql` files will not be retained. If you have migration files with custom additions such as a view or a trigger, ensure to re-add them after your migrations were squashed. ## How to squash migrations This section provides step-by-step instructions on how to squash migrations in the two scenarios discussed above: * Migrating cleanly from a development environment * Creating a clean history in a production environment ### How to migrate cleanly from a development environment Before squashing your migrations, make sure you have the following starting conditions: * The contents of the migrations to be squashed are not yet applied on the production database * All migrations applied to production are part of the local migration history already * There is no custom SQL in any of the new migration files that you have added to your branch info If the migration history on the production database has diverged after you created your feature branch, then you would need to first merge the migrations history and the datamodel changes from production into your local history. Then follow these steps: 1. Reset the contents of your local `./prisma/migrations` folder to match the migration history on the `main` branch 2. Create a new migration: npx prisma migrate dev --name squashed_migrations This creates a single migration that takes you: * from the state of the `main` branch as described in your reset migration history * to the state of your local feature as described in your `./prisma/schema.prisma` file * and outputs this to a new `migration.sql` file in a new directory ending with `squashed_migrations` (specified with the `--name` flag) This single migration file can now be applied to production using `migrate deploy`. ### How to create a clean history in a production environment Before squashing your migrations, make sure you have the following starting conditions: * All migrations in the migration history are applied on the production database * The datamodel matches the migration history * The datamodel and the migration history are in sync Then follow these steps, either on your `main` branch or on a newly checked out branch that gets merged back to `main` before anything else changes there: 1. Delete all contents of the `./prisma/migrations` directory 2. Create a new empty directory in the `./prisma/migrations` directory. In this guide this will be called `000000000000_squashed_migrations`. Inside this, add a new empty `migration.sql` file. info We name the migration `000000000000_squashed_migrations` with all the leading zeroes because we want it to be the first migration in the migrations directory. Migrate runs the migrations in the directory in lexicographic (alphabetical) order. This is why it generates migrations with the date and time as a prefix when you use `migrate dev`. You can give the migration another name, as long as it it sorts lower than later migrations, for example `0_squashed` or `202207180000_squashed`. 3. Create a single migration that takes you: * from an empty database * to the current state of the production database schema as described in your `./prisma/schema.prisma` file * and outputs this to the `migration.sql` file created above You can do this using the `migrate diff` command. From the root directory of your project, run the following command: npx prisma migrate diff \ --from-empty \ --to-schema-datamodel ./prisma/schema.prisma \ --script > ./prisma/migrations/000000000000_squashed_migrations/migration.sql 4. Mark this migration as having been applied on production, to prevent it from being run there: You can do this using the `migrate resolve` command to mark the migration in the `000000000000_squashed_migrations` directory as already applied: npx prisma migrate resolve \ --applied 000000000000_squashed_migrations You should now have a single migration file that is marked as having been applied on production. New checkouts only get one single migration taking them to the state of the production database schema. The production database still contains the history of applied migrations in the migrations table. The history of the migrations folder and data models is also still available in source control. --- ## Page: https://www.prisma.io/docs/orm/prisma-migrate/workflows/generating-down-migrations This guide describes how to generate a down migration SQL file that reverses a given migration file. ## About down migrations When generating a migration SQL file, you may wish to also create a "down migration" SQL file that reverses the schema changes in the corresponding "up migration" file. Note that "down migrations" are also sometimes called "migration rollbacks". This guide explains how to use Prisma Migrate's `migrate diff` command to create a down migration, and how to apply it to your production database with the `db execute` command in the case of a failed up migration. warning This guide applies to generating SQL down migrations for relational databases only. It does not apply to MongoDB. info The `migrate diff` and `db execute` commands are available in Preview in versions `3.9.0` and later, and are generally available in versions `3.13.0` and later. ## Considerations when generating down migrations When generating a down migration file, there are some considerations to be aware of: * The down migration can be used to revert your database schema after a failed migration using the steps in How to apply your down migration to a failed migration. This requires the use of the `migrate resolve` command, which can only be used on failed migrations. If your up migration was successful and you want to revert it, you will instead need to revert your `schema.prisma` file to its state before the up migration, and generate a new migration with the `migrate dev` command. * The down migration will revert your database schema, but other changes to data and application code that are carried out as part of the up migration will not be reverted. For example, if you have a script that changes data during the migration, this data will not be changed back when you run the down migration. * You will not be able to use `migrate diff` to revert manually changed or added SQL in your migration files. If you have any custom additions, such as a view or trigger, you will need to: * Create the down migration following the instructions below * Create the up migration using `migrate dev --create-only`, so that it can be edited before it is applied to the database * Manually add your custom SQL to the up migration (e.g. adding a view) * Manually add the inverted custom SQL to the down migration (e.g. dropping the view) ## How to generate and run down migrations This section describes how to generate a down migration SQL file along with the corresponding up migration, and then run it to revert your database schema after a failed up migration on production. As an example, take the following Prisma schema with a `User` and `Post` model as a starting point: schema.prisma model Post { id Int @id @default(autoincrement()) title String @db.VarChar(255) content String? author User @relation(fields: [authorId], references: [id]) authorId Int}model User { id Int @id @default(autoincrement()) name String? posts Post[]} You will need to create the down migration first, before creating the corresponding up migration. ### Generating the migrations 1. Edit your Prisma schema to make the changes you require for your up migration. In this example, you will add a new `Profile` model: schema.prisma model Post { id Int @id @default(autoincrement()) title String @db.VarChar(255) content String? author User @relation(fields: [authorId], references: [id]) authorId Int}model Profile { id Int @id @default(autoincrement()) bio String? user User @relation(fields: [userId], references: [id]) userId Int @unique}model User { id Int @id @default(autoincrement()) name String? posts Post[] profile Profile?} 2. Generate the SQL file for the down migration. To do this, you will use `migrate diff` to make a comparison: * from the newly edited schema * to the state of the schema after the last migration and output this to a SQL script, `down.sql`. There are two potential options for specifying the 'to' state: * Using `--to-migrations`: this makes a comparison to the state of the migrations given in the migrations directory. This is the preferred option, as it is more robust, but it requires a shadow database. To use this option, run: npx prisma migrate diff \ --from-schema-datamodel prisma/schema.prisma \ --to-migrations prisma/migrations \ --shadow-database-url $SHADOW_DATABASE_URL \ --script > down.sql * Using `--to-schema-datasource`: this makes a comparison to the state of the database. This does not require a shadow database, but it does rely on the database having an up-to-date schema. To use this option, run: npx prisma migrate diff \ --from-schema-datamodel prisma/schema.prisma \ --to-schema-datasource prisma/schema.prisma \ --script > down.sql 3. Generate and apply the up migration with a name of `add_profile`: npx prisma migrate dev --name add_profile This will create a new `<timestamp>_add_profile` directory inside the `prisma/migrations` directory, with your new `migration.sql` up migration file inside. 4. Copy your `down.sql` file into the new directory along with the up migration file. ### How to apply your down migration to a failed migration If your previous up migration failed, you can apply your down migration on your production database with the following steps: To apply the down migration on your production database after a failed up migration: 1. Use `db execute` to run your `down.sql` file on the database server: npx prisma db execute --file ./down.sql --schema prisma/schema.prisma 2. Use `migrate resolve` to record that you rolled back the up migration named `add_profile`: npx prisma migrate resolve --rolled-back add_profile --- ## Page: https://www.prisma.io/docs/orm/prisma-migrate/workflows/team-development This guide has been moved to the guides section. You can find the guide there. --- ## Page: https://www.prisma.io/docs/orm/prisma-migrate/workflows/native-database-functions In PostgreSQL, some native database functions are part of optional extensions. For example, in PostgreSQL versions 12.13 and earlier the `gen_random_uuid()` function is part of the `pgcrypto` extension. To use a PostgreSQL extension, you must install it on the file system of your database server and then activate the extension. If you use Prisma Migrate, this must be done as part of a migration. warning Do not activate extensions outside a migration file if you use Prisma Migrate. The shadow database requires the same extensions. Prisma Migrate creates and deletes the shadow database automatically, so the only way to activate an extension is to include it in a migration file. In Prisma ORM versions 4.5.0 and later, you can activate the extension by declaring it in your Prisma schema with the `postgresqlExtensions` preview feature: schema.prisma generator client { provider = "prisma-client-js" previewFeatures = ["postgresqlExtensions"]}datasource db { provider = "postgresql" url = env("DATABASE_URL") extensions = [pgcrypto]} You can then apply these changes to your database with Prisma Migrate. See How to migrate PostgreSQL extensions for details. In earlier versions of Prisma ORM, you must instead add a SQL command to your migration file to activate the extension. See How to install a PostgreSQL extension as part of a migration. ## How to install a PostgreSQL extension as part of a migration This section describes how to add a SQL command to a migration file to activate a PostgreSQL extension. If you manage PostgreSQL extensions in your Prisma Schema with the `postgresqlExtensions` preview feature instead, see How to migrate PostgreSQL extensions. The following example demonstrates how to install the `pgcrypto` extension as part of a migration: 1. Add the field with the native database function to your schema: model User { id String @id @default(dbgenerated("gen_random_uuid()")) @db.Uuid} If you include a cast operator (such as `::TEXT`), you must surround the entire function with parentheses: @default(dbgenerated("(gen_random_uuid()::TEXT)")) 2. Use the `--create-only` flag to generate a new migration without applying it: npx prisma migrate dev --create-only 3. Open the generated `migration.sql` file and enable the `pgcrypto` module: CREATE EXTENSION IF NOT EXISTS pgcrypto;ADD COLUMN "id" UUID NOT NULL DEFAULT gen_random_uuid(),ADD PRIMARY KEY ("id"); 4. Apply the migration: npx prisma migrate dev Each time you reset the database or add a new member to your team, all required functions are part of the migration history. --- ## Page: https://www.prisma.io/docs/orm/prisma-migrate/workflows/troubleshooting This guide describes how to resolve issues with Prisma Migrate in a development environment, which often involves resetting your database. For production-focused troubleshooting, see: * Production troubleshooting * Patching / hotfixing production databases warning This guide **does not apply for MongoDB**. Instead of `migrate dev`, `db push` is used for MongoDB. ## Handling migration history conflicts A migration history conflict occurs when there are discrepancies between the **migrations folder in the file system** and the **`_prisma_migrations` table in the database**. #### Causes of migration history conflict in a development environment * A migration that has already been applied is later modified * A migration that has already been applied is missing from the file system In a development environment, switching between feature branches can result in a history conflict because the `_prisma_migrations` table contains migrations from `branch-1`, and switching to `branch-2` might cause some of those migrations to disappear. > **Note**: You should never purposefully delete or edit a migration, as this might result in discrepancies between development and production. #### Fixing a migration history conflict in a development environment If Prisma Migrate detects a migration history conflict when you run `prisma migrate dev`, the CLI will ask to reset the database and reapply the migration history. ## Schema drift Database schema drift occurs when your database schema is out of sync with your migration history - the database schema has 'drifted away' from the source of truth. #### Causes of schema drift in a development environment Schema drift can occur if: * The database schema was changed _without_ using migrations - for example, by using `prisma db push` or manually changing the database schema. > **Note**: The shadow database is required to detect schema drift, and can therefore only be done in a development environment. #### Fixing schema drift in a development environment If you made manual changes to the database that you do not want to keep, or can easily replicate in the Prisma schema: 1. Reset your database: npx prisma migrate reset 2. Replicate the changes in the Prisma schema and generate a new migration: npx prisma migrate dev If you made manual changes to the database that you want to keep, you can: 1. Introspect the database: npx prisma db pull Prisma will update your schema with the changes made directly in the database. 2. Generate a new migration to include the introspected changes in your migration history: npx prisma migrate dev --name introspected_change Prisma Migrate will prompt you to reset, then applies all existing migrations and a new migration based on the introspected changes. Your database and migration history are now in sync, including your manual changes. ## Failed migrations #### Causes of failed migrations in a development environment A migration might fail if: * You modify a migration before running it and introduce a syntax error * You add a mandatory (`NOT NULL`) column to a table that already has data * The migration process stopped unexpectedly * The database shut down in the middle of the migration process Each migration in the `_prisma_migrations` table has a `logs` column that stores the error. #### Fixing failed migrations in a development environment The easiest way to handle a failed migration in a developer environment is to address the root cause and reset the database. For example: * If you introduced a SQL syntax error by manually editing the database, update the `migration.sql` file that failed and reset the database: prisma migrate reset * If you introduced a change in the Prisma schema that cannot be applied to a database with data (for example, a mandatory column in a table with data): 1. Delete the `migration.sql` file. 2. Modify the schema - for example, add a default value to the mandatory field. 3. Migrate: prisma migrate dev Prisma Migrate will prompt you to reset the database and re-apply all migrations. * If something interrupted the migration process, reset the database: prisma migrate reset ## Prisma Migrate and PgBouncer You might see the following error if you attempt to run Prisma Migrate commands in an environment that uses PgBouncer for connection pooling: Error: undefined: Database errorError querying the database: db error: ERROR: prepared statement "s0" already exists See Prisma Migrate and PgBouncer workaround for further information and a workaround. --- ## Page: https://www.prisma.io/docs/orm/prisma-schema/data-model/relations/self-relations A relation field can also reference its own model, in this case the relation is called a _self-relation_. Self-relations can be of any cardinality, 1-1, 1-n and m-n. Note that self-relations always require the `@relation` attribute. ## One-to-one self-relations The following example models a one-to-one self-relation: * Relational databases * MongoDB model User { id Int @id @default(autoincrement()) name String? successorId Int? @unique successor User? @relation("BlogOwnerHistory", fields: [successorId], references: [id]) predecessor User? @relation("BlogOwnerHistory")} This relation expresses the following: * "a user can have one or zero predecessors" (for example, Sarah is Mary's predecessor as blog owner) * "a user can have one or zero successors" (for example, Mary is Sarah's successor as blog owner) > **Note**: One-to-one self-relations cannot be made required on both sides. One or both sides must be optional, otherwise it becomes impossible to create the first `User` record. To create a one-to-one self-relation: * Both sides of the relation must define a `@relation` attribute that share the same name - in this case, **BlogOwnerHistory**. * One relation field must be a fully annotated. In this example, the `successor` field defines both the `field` and `references` arguments. * One relation field must be backed by a foreign key. The `successor` field is backed by the `successorId` foreign key, which references a value in the `id` field. The `successorId` scalar relation field also requires a `@unique` attribute to guarantee a one-to-one relation. > **Note**: One-to-one self relations require two sides even if both sides are equal in the relationship. For example, to model a 'best friends' relation, you would need to create two relation fields: `bestfriend1` and a `bestfriend2`. Either side of the relation can be backed by a foreign key. In the previous example, repeated below, `successor` is backed by `successorId`: * Relational databases * MongoDB model User { id Int @id @default(autoincrement()) name String? successorId Int? @unique successor User? @relation("BlogOwnerHistory", fields: [successorId], references: [id]) predecessor User? @relation("BlogOwnerHistory")} Alternatively, you could rewrite this so that `predecessor` is backed by `predecessorId`: * Relational databases * MongoDB model User { id Int @id @default(autoincrement()) name String? successor User? @relation("BlogOwnerHistory") predecessorId Int? @unique predecessor User? @relation("BlogOwnerHistory", fields: [predecessorId], references: [id])} No matter which side is backed by a foreign key, Prisma Client surfaces both the `predecessor` and `successor` fields: const x = await prisma.user.create({ data: { name: "Bob McBob", successor: { connect: { id: 2, }, }, predecessor: { connect: { id: 4, }, }, },}); ### One-to-one self relations in the database ### Relational databases In **relational databases only**, a one-to-one self-relation is represented by the following SQL: CREATE TABLE "User" ( id SERIAL PRIMARY KEY, "name" TEXT, "successorId" INTEGER);ALTER TABLE "User" ADD CONSTRAINT fk_successor_user FOREIGN KEY ("successorId") REFERENCES "User" (id);ALTER TABLE "User" ADD CONSTRAINT successor_unique UNIQUE ("successorId"); ### MongoDB For MongoDB, Prisma ORM currently uses a normalized data model design, which means that documents reference each other by ID in a similar way to relational databases. The following MongoDB documents represent a one-to-one self-relation between two users: { "_id": { "$oid": "60d97df70080618f000e3ca9" }, "name": "Elsa the Elder" } { "_id": { "$oid": "60d97df70080618f000e3caa" }, "name": "Elsa", "successorId": { "$oid": "60d97df70080618f000e3ca9" }} ## One-to-many self relations A one-to-many self-relation looks as follows: * Relational databases * MongoDB model User { id Int @id @default(autoincrement()) name String? teacherId Int? teacher User? @relation("TeacherStudents", fields: [teacherId], references: [id]) students User[] @relation("TeacherStudents")} This relation expresses the following: * "a user has zero or one _teachers_ " * "a user can have zero or more _students_" Note that you can also require each user to have a teacher by making the `teacher` field required. ### One-to-many self-relations in the database ### Relational databases In relational databases, a one-to-many self-relation is represented by the following SQL: CREATE TABLE "User" ( id SERIAL PRIMARY KEY, "name" TEXT, "teacherId" INTEGER);ALTER TABLE "User" ADD CONSTRAINT fk_teacherid_user FOREIGN KEY ("teacherId") REFERENCES "User" (id); Notice the lack of `UNIQUE` constraint on `teacherId` - multiple students can have the same teacher. ### MongoDB For MongoDB, Prisma ORM currently uses a normalized data model design, which means that documents reference each other by ID in a similar way to relational databases. The following MongoDB documents represent a one-to-many self-relation between three users - one teacher and two students with the same `teacherId`: { "_id": { "$oid": "60d9b9e600fe3d470079d6f9" }, "name": "Ms. Roberts"} { "_id": { "$oid": "60d9b9e600fe3d470079d6fa" }, "name": "Student 8", "teacherId": { "$oid": "60d9b9e600fe3d470079d6f9" }} { "_id": { "$oid": "60d9b9e600fe3d470079d6fb" }, "name": "Student 9", "teacherId": { "$oid": "60d9b9e600fe3d470079d6f9" }} ## Many-to-many self relations A many-to-many self-relation looks as follows: * Relational databases * MongoDB model User { id Int @id @default(autoincrement()) name String? followedBy User[] @relation("UserFollows") following User[] @relation("UserFollows")} This relation expresses the following: * "a user can be followed by zero or more users" * "a user can follow zero or more users" Note that for relational databases, this many-to-many-relation is implicit. This means Prisma ORM maintains a relation table for it in the underlying database. If you need the relation to hold other fields, you can create an explicit many-to-many self relation as well. The explicit version of the self relation shown previously is as follows: model User { id Int @id @default(autoincrement()) name String? followedBy Follows[] @relation("followedBy") following Follows[] @relation("following")}model Follows { followedBy User @relation("followedBy", fields: [followedById], references: [id]) followedById Int following User @relation("following", fields: [followingId], references: [id]) followingId Int @@id([followingId, followedById])} ### Many-to-many self-relations in the database ### Relational databases In relational databases, a many-to-many self-relation (implicit) is represented by the following SQL: CREATE TABLE "User" ( id integer DEFAULT nextval('"User_id_seq"'::regclass) PRIMARY KEY, name text);CREATE TABLE "_UserFollows" ( "A" integer NOT NULL REFERENCES "User"(id) ON DELETE CASCADE ON UPDATE CASCADE, "B" integer NOT NULL REFERENCES "User"(id) ON DELETE CASCADE ON UPDATE CASCADE); ### MongoDB For MongoDB, Prisma ORM currently uses a normalized data model design, which means that documents reference each other by ID in a similar way to relational databases. The following MongoDB documents represent a many-to-many self-relation between five users - two users that follow `"Bob"`, and two users that follow him: { "_id": { "$oid": "60d9866f00a3e930009a6cdd" }, "name": "Bob", "followedByIDs": [ { "$oid": "60d9866f00a3e930009a6cde" }, { "$oid": "60d9867000a3e930009a6cdf" } ], "followingIDs": [ { "$oid": "60d9867000a3e930009a6ce0" }, { "$oid": "60d9867000a3e930009a6ce1" } ]} { "_id": { "$oid": "60d9866f00a3e930009a6cde" }, "name": "Follower1", "followingIDs": [{ "$oid": "60d9866f00a3e930009a6cdd" }]} { "_id": { "$oid": "60d9867000a3e930009a6cdf" }, "name": "Follower2", "followingIDs": [{ "$oid": "60d9866f00a3e930009a6cdd" }]} { "_id": { "$oid": "60d9867000a3e930009a6ce0" }, "name": "CoolPerson1", "followedByIDs": [{ "$oid": "60d9866f00a3e930009a6cdd" }]} { "_id": { "$oid": "60d9867000a3e930009a6ce1" }, "name": "CoolPerson2", "followedByIDs": [{ "$oid": "60d9866f00a3e930009a6cdd" }]} ## Defining multiple self-relations on the same model You can also define multiple self-relations on the same model at once. Taking all relations from the previous sections as example, you could define a `User` model as follows: * Relational databases * MongoDB model User { id Int @id @default(autoincrement()) name String? teacherId Int? teacher User? @relation("TeacherStudents", fields: [teacherId], references: [id]) students User[] @relation("TeacherStudents") followedBy User[] @relation("UserFollows") following User[] @relation("UserFollows")} --- ## Page: https://www.prisma.io/docs/orm/prisma-schema/data-model/relations/referential-actions Referential actions determine what happens to a record when your application deletes or updates a related record. From version 2.26.0, you can define referential actions on the relation fields in your Prisma schema. This allows you to define referential actions like cascading deletes and cascading updates at a Prisma ORM level. info **Version differences** * If you use version 3.0.1 or later, you can use referential actions as described on this page. * If you use a version between 2.26.0 and 3.0.0, you can use referential actions as described on this page, but you must enable the preview feature flag `referentialActions`. * If you use version 2.25.0 or earlier, you can configure cascading deletes manually in your database. In the following example, adding `onDelete: Cascade` to the `author` field on the `Post` model means that deleting the `User` record will also delete all related `Post` records. schema.prisma model Post { id Int @id @default(autoincrement()) title String author User @relation(fields: [authorId], references: [id], onDelete: Cascade) authorId Int}model User { id Int @id @default(autoincrement()) posts Post[]} If you do not specify a referential action, Prisma ORM uses a default. danger If you upgrade from a version earlier than 2.26.0: It is extremely important that you check the upgrade paths for referential actions section. Prisma ORM's support of referential actions **removes the safety net in Prisma Client that prevents cascading deletes at runtime**. If you use the feature _without upgrading your database_, the old default action - `ON DELETE CASCADE` - becomes active. This might result in cascading deletes that you did not expect. ## What are referential actions? Referential actions are policies that define how a referenced record is handled by the database when you run an `update` or `delete` query. Referential actions on the database level Referential actions are features of foreign key constraints that exist to preserve referential integrity in your database. When you define relationships between data models in your Prisma schema, you use relation fields, **which do not exist on the database**, and scalar fields, **which do exist on the database**. These foreign keys connect the models on the database level. Referential integrity states that these foreign keys must reference an existing primary key value in the related database table. In your Prisma schema, this is generally represented by the `id` field on the related model. By default a database will reject any operation that violates the referential integrity, for example, by deleting referenced records. ### How to use referential actions Referential actions are defined in the `@relation` attribute and map to the actions on the **foreign key constraint** in the underlying database. If you do not specify a referential action, Prisma ORM falls back to a default. The following model defines a one-to-many relation between `User` and `Post` and a many-to-many relation between `Post` and `Tag`, with explicitly defined referential actions: schema.prisma model User { id Int @id @default(autoincrement()) posts Post[]}model Post { id Int @id @default(autoincrement()) title String tags TagOnPosts[] User User? @relation(fields: [userId], references: [id], onDelete: SetNull, onUpdate: Cascade) userId Int?}model TagOnPosts { id Int @id @default(autoincrement()) post Post? @relation(fields: [postId], references: [id], onUpdate: Cascade, onDelete: Cascade) tag Tag? @relation(fields: [tagId], references: [id], onUpdate: Cascade, onDelete: Cascade) postId Int? tagId Int?}model Tag { id Int @id @default(autoincrement()) name String @unique posts TagOnPosts[]} This model explicitly defines the following referential actions: * If you delete a `Tag`, the corresponding tag assignment is also deleted in `TagOnPosts`, using the `Cascade` referential action * If you delete a `User`, the author is removed from all posts by setting the field value to `Null`, because of the `SetNull` referential action. To allow this, `User` and `userId` must be optional fields in `Post`. Prisma ORM supports the following referential actions: * `Cascade` * `Restrict` * `NoAction` * `SetNull` * `SetDefault` ### Referential action defaults If you do not specify a referential action, Prisma ORM uses the following defaults: | Clause | Optional relations | Mandatory relations | | --- | --- | --- | | `onDelete` | `SetNull` | `Restrict` | | `onUpdate` | `Cascade` | `Cascade` | For example, in the following schema all `Post` records must be connected to a `User` via the `author` relation: model Post { id Int @id @default(autoincrement()) title String author User @relation(fields: [authorId], references: [id]) authorId Int}model User { id Int @id @default(autoincrement()) posts Post[]} The schema does not explicitly define referential actions on the mandatory `author` relation field, which means that the default referential actions of `Restrict` for `onDelete` and `Cascade` for `onUpdate` apply. ## Caveats The following caveats apply: * Referential actions are **not** supported on implicit many-to-many relations. To use referential actions, you must define an explicit many-to-many relation and define your referential actions on the join table. * Certain combinations of referential actions and required/optional relations are incompatible. For example, using `SetNull` on a required relation will lead to database errors when deleting referenced records because the non-nullable constraint would be violated. See this GitHub issue for more information. ## Types of referential actions The following table shows which referential action each database supports. | Database | Cascade | Restrict | NoAction | SetNull | SetDefault | | --- | --- | --- | --- | --- | --- | | PostgreSQL | ✔️ | ✔️ | ✔️ | ✔️⌘ | ✔️ | | MySQL/MariaDB | ✔️ | ✔️ | ✔️ | ✔️ | ❌ (✔️†) | | SQLite | ✔️ | ✔️ | ✔️ | ✔️ | ✔️ | | SQL Server | ✔️ | ❌‡ | ✔️ | ✔️ | ✔️ | | CockroachDB | ✔️ | ✔️ | ✔️ | ✔️ | ✔️ | | MongoDB†† | ✔️ | ✔️ | ✔️ | ✔️ | ❌ | * † See special cases for MySQL. * ⌘ See special cases for PostgreSQL. * ‡ See special cases for SQL Server. * †† Referential actions for MongoDB are available in Prisma ORM versions 3.7.0 and later. ### Special cases for referential actions Referential actions are part of the ANSI SQL standard. However, there are special cases where some relational databases diverge from the standard. #### MySQL/MariaDB MySQL/MariaDB, and the underlying InnoDB storage engine, does not support `SetDefault`. The exact behavior depends on the database version: * In MySQL versions 8 and later, and MariaDB versions 10.5 and later, `SetDefault` effectively acts as an alias for `NoAction`. You can define tables using the `SET DEFAULT` referential action, but a foreign key constraint error is triggered at runtime. * In MySQL versions 5.6 and later, and MariaDB versions before 10.5, attempting to create a table definition with the `SET DEFAULT` referential action fails with a syntax error. For this reason, when you set `mysql` as the database provider, Prisma ORM warns users to replace `SetDefault` referential actions in the Prisma schema with another action. #### PostgreSQL PostgreSQL is the only database supported by Prisma ORM that allows you to define a `SetNull` referential action that refers to a non-nullable field. However, this raises a foreign key constraint error when the action is triggered at runtime. For this reason, when you set `postgres` as the database provider in the (default) `foreignKeys` relation mode, Prisma ORM warns users to mark as optional any fields that are included in a `@relation` attribute with a `SetNull` referential action. For all other database providers, Prisma ORM rejects the schema with a validation error. #### SQL Server `Restrict` is not available for SQL Server databases, but you can use `NoAction` instead. ### `Cascade` * `onDelete: Cascade` Deleting a referenced record will trigger the deletion of referencing record. * `onUpdate: Cascade` Updates the relation scalar fields if the referenced scalar fields of the dependent record are updated. #### Example usage schema.prisma model Post { id Int @id @default(autoincrement()) title String author User @relation(fields: [authorId], references: [id], onDelete: Cascade, onUpdate: Cascade) authorId Int}model User { id Int @id @default(autoincrement()) posts Post[]} ##### Result of using `Cascade` If a `User` record is deleted, then their posts are deleted too. If the user's `id` is updated, then the corresponding `authorId` is also updated. ##### How to use cascading deletes ### `Restrict` * `onDelete: Restrict` Prevents the deletion if any referencing records exist. * `onUpdate: Restrict` Prevents the identifier of a referenced record from being changed. #### Example usage schema.prisma model Post { id Int @id @default(autoincrement()) title String author User @relation(fields: [authorId], references: [id], onDelete: Restrict, onUpdate: Restrict) authorId Int}model User { id Int @id @default(autoincrement()) posts Post[]} ##### Result of using `Restrict` `User`s with posts **cannot** be deleted. The `User`'s `id` **cannot** be changed. warning The `Restrict` action is **not** available on Microsoft SQL Server and triggers a schema validation error. Instead, you can use `NoAction`, which produces the same result and is compatible with SQL Server. ### `NoAction` The `NoAction` action is similar to `Restrict`, the difference between the two is dependent on the database being used: * **PostgreSQL**: `NoAction` allows the check (if a referenced row on the table exists) to be deferred until later in the transaction. See the PostgreSQL docs for more information. * **MySQL**: `NoAction` behaves exactly the same as `Restrict`. See the MySQL docs for more information. * **SQLite**: When a related primary key is modified or deleted, no action is taken. See the SQLite docs for more information. * **SQL Server**: When a referenced record is deleted or modified, an error is raised. See the SQL Server docs for more information. * **MongoDB** (in preview from version 3.6.0): When a record is modified or deleted, nothing is done to any related records. warning If you are managing relations in Prisma Client rather than using foreign keys in the database, you should be aware that currently Prisma ORM only implements the referential actions. Foreign keys also create constraints, which make it impossible to manipulate data in a way that would violate these constraints: instead of executing the query, the database responds with an error. These constraints will not be created if you emulate referential integrity in Prisma Client, so if you set the referential action to `NoAction` there will be no checks to prevent you from breaking the referential integrity. #### Example usage schema.prisma model Post { id Int @id @default(autoincrement()) title String author User @relation(fields: [authorId], references: [id], onDelete: NoAction, onUpdate: NoAction) authorId Int}model User { id Int @id @default(autoincrement()) posts Post[]} ##### Result of using `NoAction` `User`'s with posts **cannot** be deleted. The `User`'s `id` **cannot** be changed. ### `SetNull` * `onDelete: SetNull` The scalar field of the referencing object will be set to `NULL`. * `onUpdate: SetNull` When updating the identifier of a referenced object, the scalar fields of the referencing objects will be set to `NULL`. `SetNull` will only work on optional relations. On required relations, a runtime error will be thrown since the scalar fields cannot be null. schema.prisma model Post { id Int @id @default(autoincrement()) title String author User? @relation(fields: [authorId], references: [id], onDelete: SetNull, onUpdate: SetNull) authorId Int?}model User { id Int @id @default(autoincrement()) posts Post[]} ##### Result of using `SetNull` When deleting a `User`, the `authorId` will be set to `NULL` for all its authored posts. When changing a `User`'s `id`, the `authorId` will be set to `NULL` for all its authored posts. ### `SetDefault` * `onDelete: SetDefault` The scalar field of the referencing object will be set to the fields default value. * `onUpdate: SetDefault` The scalar field of the referencing object will be set to the fields default value. These require setting a default for the relation scalar field with `@default`. If no defaults are provided for any of the scalar fields, a runtime error will be thrown. schema.prisma model Post { id Int @id @default(autoincrement()) title String authorUsername String? @default("anonymous") author User? @relation(fields: [authorUsername], references: [username], onDelete: SetDefault, onUpdate: SetDefault)}model User { username String @id posts Post[]} ##### Result of using `SetDefault` When deleting a `User`, its existing posts' `authorUsername` field values will be set to 'anonymous'. When the `username` of a `User` changes, its existing posts' `authorUsername` field values will be set to 'anonymous'. ### Database-specific requirements MongoDB and SQL Server have specific requirements for referential actions if you have self-relations or cyclic relations in your data model. SQL Server also has specific requirements if you have relations with multiple cascade paths. ## Upgrade paths from versions 2.25.0 and earlier There are a couple of paths you can take when upgrading which will give different results depending on the desired outcome. If you currently use the migration workflow, you can run an introspection to check how the defaults are reflected in your schema. You can then manually update your database if you need to. You can also decide to skip checking the defaults and run a migration to update your database with the new default values. The following assumes you have upgraded to 2.26.0 or newer and enabled the preview feature flag, or upgraded to 3.0.0 or newer: ### Using Introspection If you Introspect your database, the referential actions configured at the database level will be reflected in your Prisma Schema. If you have been using Prisma Migrate or `prisma db push` to manage the database schema, these are likely to be the default values from 2.25.0 and earlier. When you run an Introspection, Prisma ORM compares all the foreign keys in the database with the schema, if the SQL statements `ON DELETE` and `ON UPDATE` do **not** match the default values, they will be explicitly set in the schema file. After introspecting, you can review the non-default clauses in your schema. The most important clause to review is `onDelete`, which defaults to `Cascade` in 2.25.0 and earlier. warning If you are using either the `delete()` or `deleteMany()` methods, **cascading deletes will now be performed** as the `referentialActions` preview feature **removed the safety net in Prisma Client that previously prevented cascading deletes at runtime**. Be sure to check your code and make any adjustments accordingly. Make sure you are happy with every case of `onDelete: Cascade` in your schema. If not, either: * Modify your Prisma schema and `db push` or `dev migrate` to change the database _or_ * Manually update the underlying database if you use an introspection-only workflow The following example would result in a cascading delete, if the `User` is deleted then all of their `Post`'s will be deleted too. #### A blog schema example model Post { id Int @id @default(autoincrement()) title String author User @relation(fields: [authorId], references: [id], onDelete: Cascade) authorId Int}model User { id Int @id @default(autoincrement()) posts Post[]} ### Using Migration When running a Migration (or the `prisma db push` command) the new defaults will be applied to your database. info Unlike when you run an Introspect for the first time, the new referential actions clause and property, will **not** automatically be added to your prisma schema by the Prisma VSCode extension. You will have to manually add them if you wish to use anything other than the new defaults. Explicitly defining referential actions in your Prisma schema is optional. If you do not explicitly define a referential action for a relation, Prisma ORM uses the new defaults. Note that referential actions can be added on a case by case basis. This means that you can add them to one single relation and leave the rest set to the defaults by not manually specifying anything. ### Checking for errors **Before** upgrading to 2.26.0 and enabling the referential actions **preview feature**, Prisma ORM prevented the deletion of records while using `delete()` or `deleteMany()` to preserve referential integrity. A custom runtime error would be thrown by Prisma Client with the error code `P2014`. **After** upgrading and enabling the referential actions **preview feature**, Prisma ORM no longer performs runtime checks. You can instead specify a custom referential action to preserve the referential integrity between relations. When you use `NoAction` or `Restrict` to prevent the deletion of records, the error messages will be different post 2.26.0 compared to pre 2.26.0. This is because they are now triggered by the database and **not** Prisma Client. The new error code that can be expected is `P2003`. To make sure you catch these new errors you can adjust your code accordingly. #### Example of catching errors The following example uses the below blog schema with a one-to-many relationship between `Post` and `User` and sets a `Restrict` referential actions on the `author` field. This means that if a user has a post, that user (and their posts) **cannot** be deleted. schema.prisma model Post { id Int @id @default(autoincrement()) title String author User @relation(fields: [authorId], references: [id], onDelete: Restrict) authorId String}model User { id Int @id @default(autoincrement()) posts Post[]} Prior to upgrading and enabling the referential actions **preview feature**, the error code you would receive when trying to delete a user which has posts would be `P2014` and it's message: > "The change you are trying to make would violate the required relation '{relation\_name}' between the {model\_a\_name} and {model\_b\_name} models." import { PrismaClient } from '@prisma/client'const prisma = new PrismaClient()async function main() { try { await prisma.user.delete({ where: { id: 'some-long-id', }, }) } catch (error) { if (error instanceof Prisma.PrismaClientKnownRequestError) { if (error.code === 'P2014') { console.log(error.message) } } }}main() To make sure you are checking for the correct errors in your code, modify your check to look for `P2003`, which will deliver the message: > "Foreign key constraint failed on the field: {field\_name}" import { PrismaClient } from '@prisma/client'const prisma = new PrismaClient()async function main() { try { await prisma.user.delete({ where: { id: 'some-long-id' } }) } catch (error) { if (error instanceof Prisma.PrismaClientKnownRequestError) { if (error.code === 'P2014') { if (error.code === 'P2003') { console.log(error.message) } } }}main() --- ## Page: https://www.prisma.io/docs/orm/prisma-schema/data-model/relations/relation-mode ## Relation mode In Prisma schema, relations between records are defined with the `@relation` attribute. For example, in the following schema there is a one-to-many relation between the `User` and `Post` models: schema.prisma model Post { id Int @id @default(autoincrement()) title String author User @relation(fields: [authorId], references: [id], onDelete: Cascade, onUpdate: Cascade) authorId Int}model User { id Int @id @default(autoincrement()) posts Post[]} Prisma ORM has two _relation modes_, `foreignKeys` and `prisma`, that specify how relations between records are enforced. If you use Prisma ORM with a relational database, then by default Prisma ORM uses the `foreignKeys` relation mode, which enforces relations between records at the database level with foreign keys. A foreign key is a column or group of columns in one table that take values based on the primary key in another table. Foreign keys allow you to: * set constraints that prevent you from making changes that break references * set referential actions that define how changes to records are handled Together these constraints and referential actions guarantee the _referential integrity_ of the data. For the example schema above, Prisma Migrate will generate the following SQL by default if you use the PostgreSQL connector: -- CreateTableCREATE TABLE "Post" ( "id" SERIAL NOT NULL, "title" TEXT NOT NULL, "authorId" INTEGER NOT NULL, CONSTRAINT "Post_pkey" PRIMARY KEY ("id"));-- CreateTableCREATE TABLE "User" ( "id" SERIAL NOT NULL, CONSTRAINT "User_pkey" PRIMARY KEY ("id"));-- AddForeignKey//highlight-startALTER TABLE "Post" ADD CONSTRAINT "Post_authorId_fkey" FOREIGN KEY ("authorId") REFERENCES "User"("id") ON DELETE CASCADE ON UPDATE CASCADE;//highlight-end In this case, the foreign key constraint on the `authorId` column of the `Post` table references the `id` column of the `User` table, and guarantees that a post must have an author that exists. If you update or delete a user then the `ON DELETE` and `ON UPDATE` referential actions specify the `CASCADE` option, which will also delete or update all posts belonging to the user. Some databases, such as MongoDB or PlanetScale, do not support foreign keys. Additionally, in some cases developers may prefer not to use foreign keys in their relational database that usually does support foreign keys. For these situations, Prisma ORM offers the `prisma` relation mode, which emulates some properties of relations in relational databases. When you use Prisma Client with the `prisma` relation mode enabled, the behavior of queries is identical or similar, but referential actions and some constraints are handled by the Prisma engine rather than in the database. warning There are performance implications to emulation of referential integrity and referential actions in Prisma Client. In cases where the underlying database supports foreign keys, it is usually the preferred choice. ## How to set the relation mode in your Prisma schema To set the relation mode, add the `relationMode` field in the `datasource` block: schema.prisma datasource db { provider = "mysql" url = env("DATABASE_URL") relationMode = "prisma"} info The ability to set the relation mode was introduced as part of the `referentialIntegrity` preview feature in Prisma ORM version 3.1.1, and is generally available in Prisma ORM versions 4.8.0 and later. The `relationMode` field was renamed in Prisma ORM version 4.5.0, and was previously named `referentialIntegrity`. For relational databases, the available options are: * `foreignKeys`: this handles relations in the database with foreign keys. This is the default option for all relational database connectors and is active if no `relationMode` is explicitly set in the `datasource` block. * `prisma`: this emulates relations in Prisma Client. You should also enable this option when you use the MySQL connector with a PlanetScale database and don't have native foreign key constraints enabled in your PlanetScale database settings. For MongoDB, the only available option is the `prisma` relation mode. This mode is also active if no `relationMode` is explicitly set in the `datasource` block. warning If you switch between relation modes, Prisma ORM will add or remove foreign keys to your database next time you apply changes to your schema with Prisma Migrate or `db push`. See Switch between relation modes for more information. ## Handle relations in your relational database with the `foreignKeys` relation mode The `foreignKeys` relation mode handles relations in your relational database with foreign keys. This is the default option when you use a relational database connector (PostgreSQL, MySQL, SQLite, SQL Server, CockroachDB). The `foreignKeys` relation mode is not available when you use the MongoDB connector. Some relational databases, such as PlanetScale, also forbid the use of foreign keys. In these cases, you should instead emulate relations in Prisma ORM with the `prisma` relation mode. ### Referential integrity The `foreignKeys` relation mode maintains referential integrity at the database level with foreign key constraints and referential actions. #### Foreign key constraints When you _create_ or _update_ a record with a relation to another record, the related record needs to exist. Foreign key constraints enforce this behavior in the database. If the record does not exist, the database will return an error message. #### Referential actions When you _update_ or _delete_ a record with a relation to another record, referential actions are triggered in the database. To maintain referential integrity in related records, referential actions prevent changes that would break referential integrity, cascade changes through to related records, or set the value of fields that reference the updated or deleted records to a `null` or default value. For more information, see the referential actions page. ### Introspection When you introspect a relational database with the `db pull` command with the `foreignKeys` relation mode enabled, a `@relation` attribute will be added to your Prisma schema for relations where foreign keys exist. ### Prisma Migrate and `db push` When you apply changes to your Prisma schema with Prisma Migrate or `db push` with the `foreignKeys` relation mode enabled, foreign keys will be created in your database for all `@relation` attributes in your schema. ## Emulate relations in Prisma ORM with the `prisma` relation mode The `prisma` relation mode emulates some foreign key constraints and referential actions for each Prisma Client query to maintain referential integrity, using some additional database queries and logic. The `prisma` relation mode is the default option for the MongoDB connector. It should also be set if you use a relational database that does not support foreign keys. For example, if you use PlanetScale without foreign key constraints, you should use the `prisma` relation mode. warning There are performance implications to emulation of referential integrity in Prisma Client, because it uses additional database queries to maintain referential integrity. In cases where the underlying database can handle referential integrity with foreign keys, it is usually the preferred choice. Emulation of relations is only available for Prisma Client queries and does not apply to raw queries. ### Which foreign key constraints are emulated? When you _update_ a record, Prisma ORM will emulate foreign key constraints. This means that when you update a record with a relation to another record, the related record needs to exist. If the record does not exist, Prisma Client will return an error message. However, when you _create_ a record, Prisma ORM does not emulate any foreign key constraints. You will be able to create invalid data. ### Which referential actions are emulated? When you _update_ or _delete_ a record with related records, Prisma ORM will emulate referential actions. The following table shows which emulated referential actions are available for each database connector: | Database | Cascade | Restrict | NoAction | SetNull | SetDefault | | --- | --- | --- | --- | --- | --- | | PostgreSQL | **✔️** | **✔️** | **❌**‡ | **✔️** | **❌**† | | MySQL | **✔️** | **✔️** | **✔️** | **✔️** | **❌**† | | SQLite | **✔️** | **✔️** | **❌**‡ | **✔️** | **❌**† | | SQL Server | **✔️** | **✔️** | **✔️** | **✔️** | **❌**† | | CockroachDB | **✔️** | **✔️** | **✔️** | **✔️** | **❌**† | | MongoDB | **✔️** | **✔️** | **✔️** | **✔️** | **❌**† | * † The `SetDefault` referential action is not supported in the `prisma` relation mode. * ‡ The `NoAction` referential action is not supported in the `prisma` relation mode for PostgreSQL and SQLite. Instead, use the `Restrict` action. ### Error messages Error messages returned by emulated constraints and referential actions in the `prisma` relation mode are generated by Prisma Client and differ slightly from the error messages in the `foreignKeys` relation mode: Example:// foreignKeys:... Foreign key constraint failed on the field: `ProfileOneToOne_userId_fkey (index)`// prisma:... The change you are trying to make would violate the required relation 'ProfileOneToOneToUserOneToOne' between the `ProfileOneToOne` and `UserOneToOne` models. ### Introspection When you introspect a database with the `db pull` command with the `prisma` relation mode enabled, relations will not be automatically added to your schema. You will instead need to add any relations manually with the `@relation` attribute. This only needs to be done once – next time you introspect your database, Prisma ORM will keep your added `@relation` attributes. ### Prisma Migrate and `db push` When you apply changes to your Prisma schema with Prisma Migrate or `db push` with the `prisma` relation mode enabled, Prisma ORM will not use foreign keys in your database. ### Indexes In relational databases that use foreign key constraints, the database usually also implicitly creates an index for the foreign key columns. For example, MySQL will create an index on all foreign key columns. This is to allow foreign key checks to run fast and not require a table scan. The `prisma` relation mode does not use foreign keys, so no indexes are created when you use Prisma Migrate or `db push` to apply changes to your database. You instead need to manually add an index on your relation scalar fields with the `@@index` attribute (or the `@unique`, `@@unique` or `@@id` attributes, if applicable). #### Index validation If you do not add the index manually, queries might require full table scans. This can be slow, and also expensive on database providers that bill per accessed row. To help avoid this, Prisma ORM warns you when your schema contains fields that are used in a `@relation` that does not have an index defined. For example, take the following schema with a relation between the `User` and `Post` models: schema.prisma datasource db { provider = "mysql" url = env("DATABASE_URL") relationMode = "prisma"}model User { id Int @id posts Post[]}model Post { id Int @id userId Int user User @relation(fields: [userId], references: [id])} Prisma ORM displays the following warning when you run `prisma format` or `prisma validate`: With `relationMode = "prisma"`, no foreign keys are used, so relation fields will not benefit from the index usually created by the relational database under the hood. This can lead to poor performance when querying these fields. We recommend adding an index manually. To fix this, add an index to your `Post` model: schema.prisma model Post { id Int @id userId Int user User @relation(fields: [userId], references: [id]) @@index([userId])} If you use the Prisma VS Code extension (or our language server in another editor), the warning is augmented with a Quick Fix that adds the required index for you: 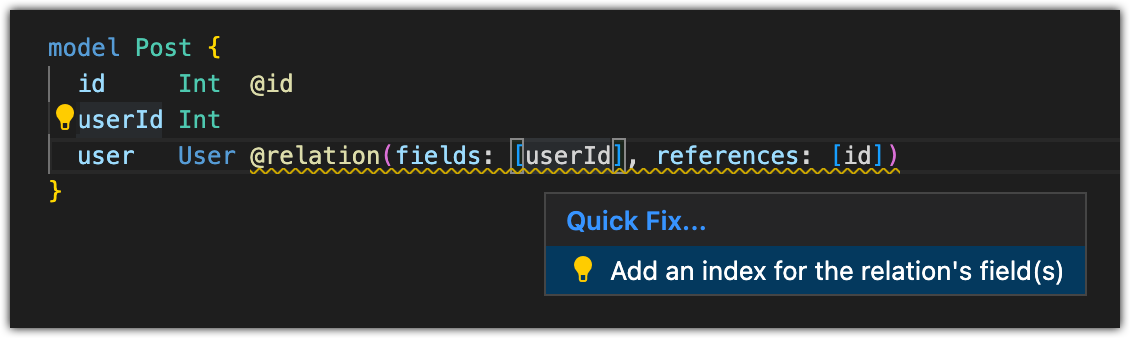 It is only possible to switch between relation modes when you use a relational database connector (PostgreSQL, MySQL, SQLite, SQL Server, CockroachDB). ### Switch from `foreignKeys` to `prisma` The default relation mode if you use a relational database and do not include the `relationMode` field in your `datasource` block is `foreignKeys`. To switch to the `prisma` relation mode, add the `relationMode` field with a value of `prisma`, or update the `relationMode` field value to `prisma` if it already exists. When you switch the relation mode from `foreignKeys` to `prisma`, after you first apply changes to your schema with Prisma Migrate or `db push` Prisma ORM will remove all previously created foreign keys in the next migration. If you keep the same database, you can then continue to work as normal. If you switch to a database that does not support foreign keys at all, your existing migration history contains SQL DDL that creates foreign keys, which might trigger errors if you ever have to rerun these migrations. In this case, we recommend that you delete the `migrations` directory. (If you use PlanetScale, which does not support foreign keys, we generally recommend that you use `db push` rather than Prisma Migrate.) ### Switch from `prisma` to `foreignKeys` To switch from the `prisma` relation mode to the `foreignKeys` relation mode, update the `relationMode` field value from `prisma` to `foreignKeys`. To do this, the database must support foreign keys. When you apply changes to your schema with Prisma Migrate or `db push` for the first time after you switch relation modes, Prisma ORM will create foreign keys for all relations in the next migration. --- ## Page: https://www.prisma.io/docs/orm/prisma-schema/data-model/relations/troubleshooting-relations Modelling your schema can sometimes offer up some unexpected results. This section aims to cover the most prominent of those. ## Implicit many-to-many self-relations return incorrect data if order of relation fields change ### Problem In the following implicit many-to-many self-relation, the lexicographic order of relation fields in `a_eats` (1) and `b_eatenBy` (2): model Animal { id Int @id @default(autoincrement()) name String a_eats Animal[] @relation(name: "FoodChain") b_eatenBy Animal[] @relation(name: "FoodChain")} The resulting relation table in SQL looks as follows, where `A` represents prey (`a_eats`) and `B` represents predators (`b_eatenBy`): | A | B | | --- | --- | | 8 (Plankton) | 7 (Salmon) | | 7 (Salmon) | 9 (Bear) | The following query returns a salmon's prey and predators: const getAnimals = await prisma.animal.findMany({ where: { name: 'Salmon', }, include: { b_eats: true, a_eatenBy: true, },}) Show query results { "id": 7, "name": "Salmon", "b_eats": [ { "id": 8, "name": "Plankton" } ], "a_eatenBy": [ { "id": 9, "name": "Bear" } ]} Now change the order of the relation fields: model Animal { id Int @id @default(autoincrement()) name String b_eats Animal[] @relation(name: "FoodChain") a_eatenBy Animal[] @relation(name: "FoodChain")} Migrate your changes and re-generate Prisma Client. When you run the same query with the updated field names, Prisma Client returns incorrect data (salmon now eats bears and gets eaten by plankton): const getAnimals = await prisma.animal.findMany({ where: { name: 'Salmon', }, include: { b_eats: true, a_eatenBy: true, },}) Show query results { "id": 1, "name": "Salmon", "b_eats": [ { "id": 3, "name": "Bear" } ], "a_eatenBy": [ { "id": 2, "name": "Plankton" } ]} Although the lexicographic order of the relation fields in the Prisma schema changed, columns `A` and `B` in the database **did not change** (they were not renamed and data was not moved). Therefore, `A` now represents predators (`a_eatenBy`) and `B` represents prey (`b_eats`): | A | B | | --- | --- | | 8 (Plankton) | 7 (Salmon) | | 7 (Salmon) | 9 (Bear) | ### Solution If you rename relation fields in an implicit many-to-many self-relations, make sure that you maintain the alphabetic order of the fields - for example, by prefixing with `a_` and `_b`. ## How to use a relation table with a many-to-many relationship There are a couple of ways to define a m-n relationship, implicitly or explicitly. Implicitly means letting Prisma ORM handle the relation table (JOIN table) under the hood, all you have to do is define an array/list for the non scalar types on each model, see implicit many-to-many relations. Where you might run into trouble is when creating an explicit m-n relationship, that is, to create and handle the relation table yourself. **It can be overlooked that Prisma ORM requires both sides of the relation to be present**. Take the following example, here a relation table is created to act as the JOIN between the `Post` and `Category` tables. This will not work however as the relation table (`PostCategories`) must form a 1-to-many relationship with the other two models respectively. The back relation fields are missing from the `Post` to `PostCategories` and `Category` to `PostCategories` models. // This example schema shows how NOT to define an explicit m-n relationmodel Post { id Int @id @default(autoincrement()) title String categories Category[] // This should refer to PostCategories}model PostCategories { post Post @relation(fields: [postId], references: [id]) postId Int category Category @relation(fields: [categoryId], references: [id]) categoryId Int @@id([postId, categoryId])}model Category { id Int @id @default(autoincrement()) name String posts Post[] // This should refer to PostCategories} To fix this the `Post` model needs to have a many relation field defined with the relation table `PostCategories`. The same applies to the `Category` model. This is because the relation model forms a 1-to-many relationship with the other two models its joining. model Post { id Int @id @default(autoincrement()) title String categories Category[] postCategories PostCategories[]}model PostCategories { post Post @relation(fields: [postId], references: [id]) postId Int category Category @relation(fields: [categoryId], references: [id]) categoryId Int @@id([postId, categoryId])}model Category { id Int @id @default(autoincrement()) name String posts Post[] postCategories PostCategories[]} ## Using the `@relation` attribute with a many-to-many relationship It might seem logical to add a `@relation("Post")` annotation to a relation field on your model when composing an implicit many-to-many relationship. model Post { id Int @id @default(autoincrement()) title String categories Category[] @relation("Category") Category Category? @relation("Post", fields: [categoryId], references: [id]) categoryId Int?}model Category { id Int @id @default(autoincrement()) name String posts Post[] @relation("Post") Post Post? @relation("Category", fields: [postId], references: [id]) postId Int?} This however tells Prisma ORM to expect **two** separate one-to-many relationships. See disambiguating relations for more information on using the `@relation` attribute. The following example is the correct way to define an implicit many-to-many relationship. model Post { id Int @id @default(autoincrement()) title String categories Category[] @relation("Category") categories Category[]}model Category { id Int @id @default(autoincrement()) name String posts Post[] @relation("Post") posts Post[]} The `@relation` annotation can also be used to name the underlying relation table created on a implicit many-to-many relationship. model Post { id Int @id @default(autoincrement()) title String categories Category[] @relation("CategoryPostRelation")}model Category { id Int @id @default(autoincrement()) name String posts Post[] @relation("CategoryPostRelation")} ## Using m-n relations in databases with enforced primary keys ### Problem Some cloud providers enforce the existence of primary keys in all tables. However, any relation tables (JOIN tables) created by Prisma ORM (expressed via `@relation`) for many-to-many relations using implicit syntax do not have primary keys. ### Solution You need to use explicit relation syntax, manually create the join model, and verify that this join model has a primary key. --- ## Page: https://www.prisma.io/docs/orm/prisma-client/deployment/traditional/deploy-to-heroku In this guide, you will set up and deploy a Node.js server that uses Prisma ORM with PostgreSQL to Heroku. The application exposes a REST API and uses Prisma Client to handle fetching, creating, and deleting records from a database. Heroku is a cloud platform as a service (PaaS). In contrast to the popular serverless deployment model, with Heroku, your application is constantly running even if no requests are made to it. This has several benefits due to the connection limits of a PostgreSQL database. For more information, check out the general deployment documentation Typically Heroku integrates with a Git repository for automatic deployments upon commits. You can deploy to Heroku from a GitHub repository or by pushing your source to a Git repository that Heroku creates per app. This guide uses the latter approach whereby you push your code to the app's repository on Heroku, which triggers a build and deploys the application. The application has the following components: * **Backend**: Node.js REST API built with Express.js with resource endpoints that use Prisma Client to handle database operations against a PostgreSQL database (e.g., hosted on Heroku). * **Frontend**: Static HTML page to interact with the API. 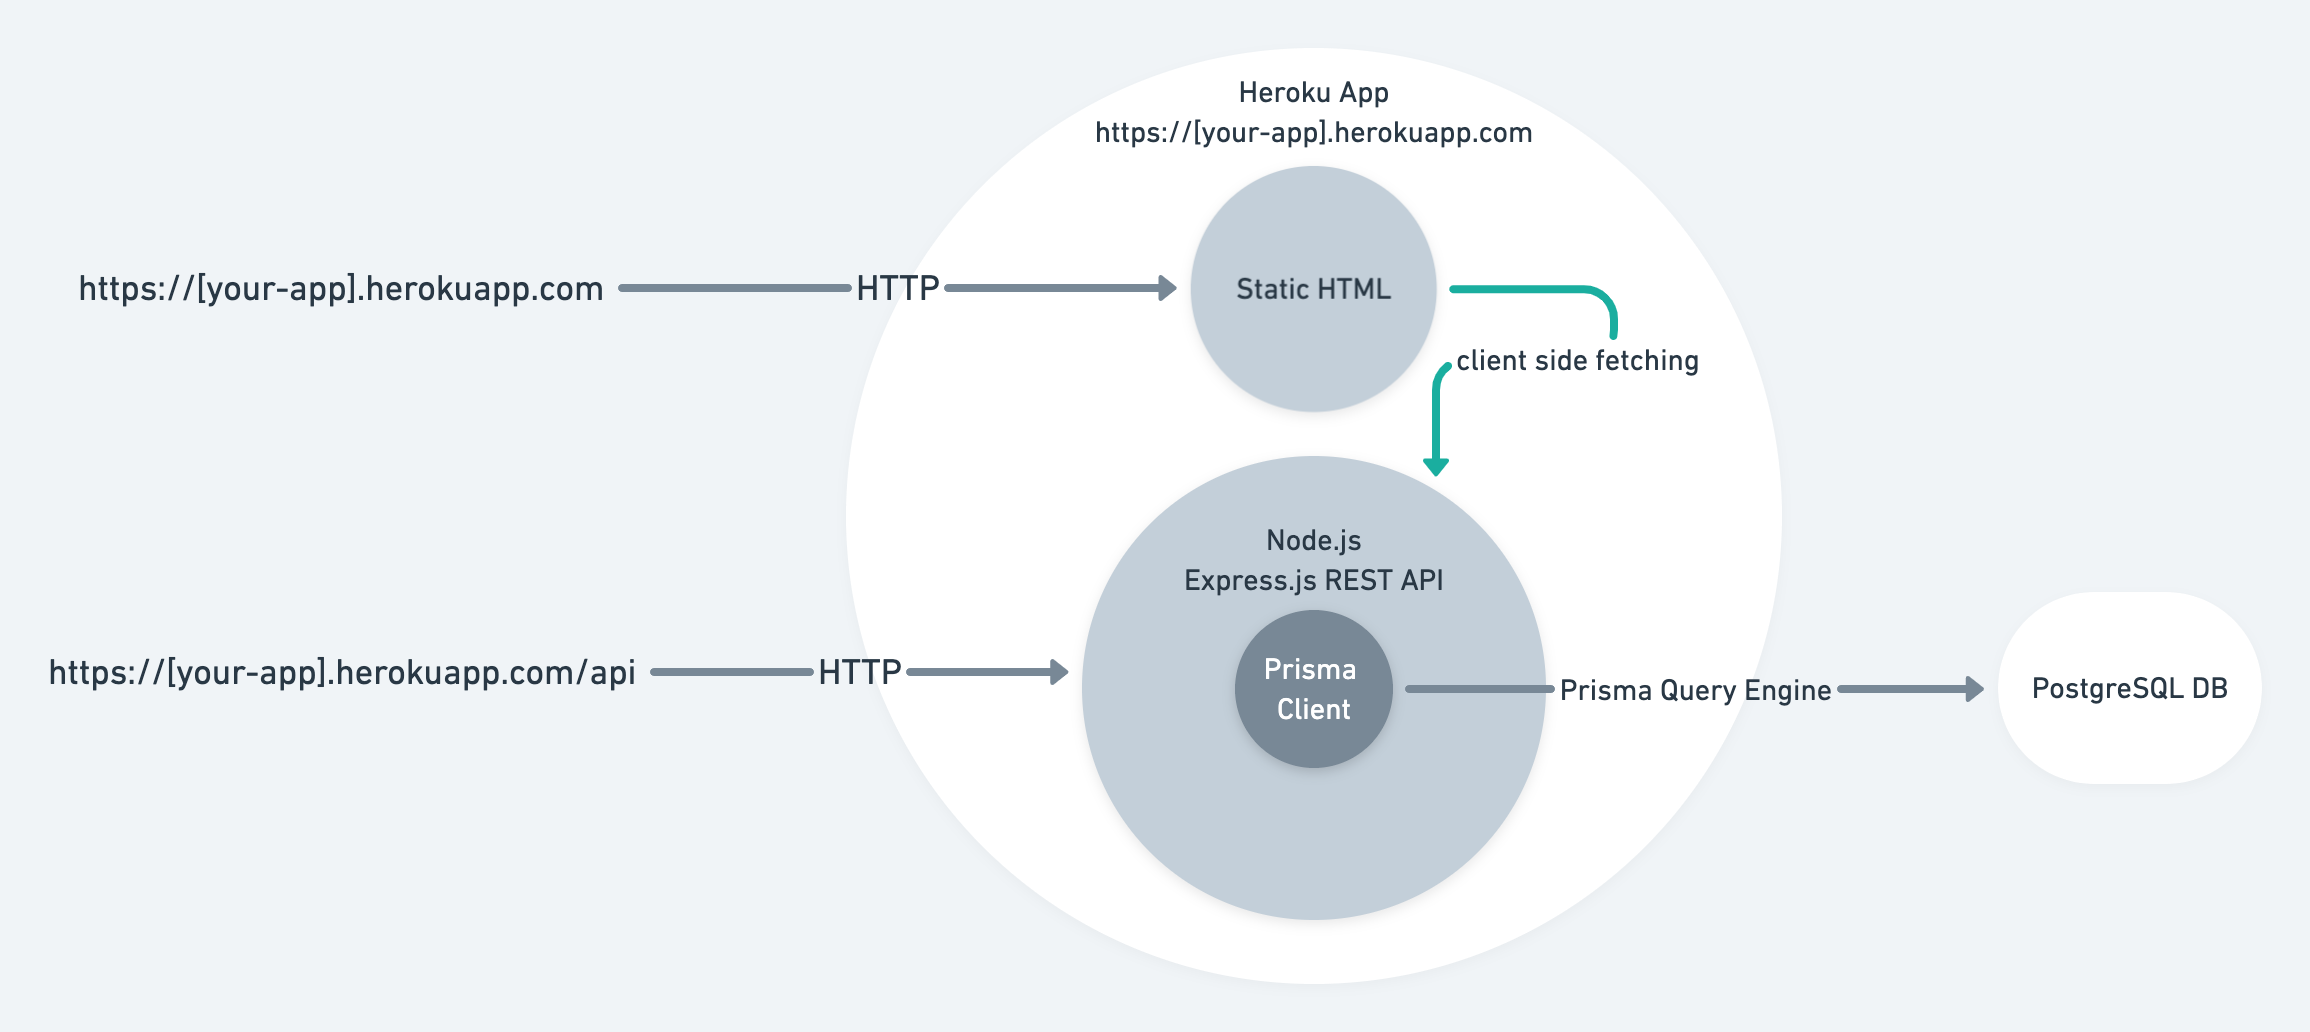 The focus of this guide is showing how to deploy projects using Prisma ORM to Heroku. The starting point will be the Prisma Heroku example, which contains an Express.js server with a couple of preconfigured REST endpoints and a simple frontend. > **Note:** The various **checkpoints** throughout the guide allowing you to validate whether you performed the steps correctly. ## A note on deploying GraphQL servers to Heroku While the example uses REST, the same principles apply to a GraphQL server, with the main difference being that you typically have a single GraphQL API endpoint rather than a route for every resource as with REST. ## Prerequisites * Heroku account. * Heroku CLI installed. * Node.js installed. * PostgreSQL CLI `psql` installed. > **Note:** Heroku doesn't provide a free plan, so billing information is required. ## Prisma ORM workflow At the core of Prisma ORM is the Prisma schema – a declarative configuration where you define your data model and other Prisma ORM-related configuration. The Prisma schema is also a single source of truth for both Prisma Client and Prisma Migrate. In this guide, you will use Prisma Migrate to create the database schema. Prisma Migrate is based on the Prisma schema and works by generating `.sql` migration files that are executed against the database. Migrate comes with two primary workflows: * Creating migrations and applying during local development with `prisma migrate dev` * Applying generated migration to production with `prisma migrate deploy` For brevity, the guide does not cover how migrations are created with `prisma migrate dev`. Rather, it focuses on the production workflow and uses the Prisma schema and SQL migration that are included in the example code. You will use Heroku's release phase to run the `prisma migrate deploy` command so that the migrations are applied before the application starts. To learn more about how migrations are created with Prisma Migrate, check out the start from scratch guide ## 1\. Download the example and install dependencies Open your terminal and navigate to a location of your choice. Create the directory that will hold the application code and download the example code: mkdir prisma-herokucd prisma-herokucurl https://codeload.github.com/prisma/prisma-examples/tar.gz/latest | tar -xz --strip=3 prisma-examples-latest/deployment-platforms/heroku **Checkpoint:** `ls -1` should show: ls -1ProcfileREADME.mdpackage.jsonprismapublicsrc Install the dependencies: npm install > **Note:** The `Procfile` tells Heroku the command needed to start the application, i.e. `npm start`, and the command to run during the release phase, i.e., `npx prisma migrate deploy` ## 2\. Create a Git repository for the application In the previous step, you downloaded the code. In this step, you will create a repository from the code so that you can push it to Heroku for deployment. To do so, run `git init` from the source code folder: git init> Initialized empty Git repository in /Users/alice/prisma-heroku/.git/ To use the `main` branch as the default branch, run the following command: git branch -M main With the repository initialized, add and commit the files: git add .git commit -m 'Initial commit' **Checkpoint:** `git log -1` should show the commit: git log -1commit 895534590fdd260acee6396e2e1c0438d1be7fed (HEAD -> main) ## 3\. Heroku CLI login Make sure you're logged in to Heroku with the CLI: heroku login This will allow you to deploy to Heroku from the terminal. **Checkpoint:** `heroku auth:whoami` should show your username: heroku auth:whoami> your-email ## 4\. Create a Heroku app To deploy an application to Heroku, you need to create an app. You can do so with the following command: heroku apps:create your-app-name > **Note:** Use a unique name of your choice instead of `your-app-name`. **Checkpoint:** You should see the URL and the repository for your Heroku app: heroku apps:create your-app-name> Creating ⬢ your-app-name... done> https://your-app-name.herokuapp.com/ | https://git.heroku.com/your-app-name.git Creating the Heroku app will add the git remote Heroku created to your local repository. Pushing commits to this remote will trigger a deploy. **Checkpoint:** `git remote -v` should show the Heroku git remote for your application: heroku https://git.heroku.com/your-app-name.git (fetch)heroku https://git.heroku.com/your-app-name.git (push) If you don't see the heroku remote, use the following command to add it: heroku git:remote --app your-app-name ## 5\. Add a PostgreSQL database to your application Heroku allows your to provision a PostgreSQL database as part of an application. Create the database with the following command: heroku addons:create heroku-postgresql:hobby-dev **Checkpoint:** To verify the database was created you should see the following: Creating heroku-postgresql:hobby-dev on ⬢ your-app-name... freeDatabase has been created and is available ! This database is empty. If upgrading, you can transfer ! data from another database with pg:copyCreated postgresql-parallel-73780 as DATABASE_URL > **Note:** Heroku automatically sets the `DATABASE_URL` environment variable when the app is running on Heroku. Prisma ORM uses this environment variable because it's declared in the _datasource_ block of the Prisma schema (`prisma/schema.prisma`) with `env("DATABASE_URL")`. ## 6\. Push to deploy Deploy the app by pushing the changes to the Heroku app repository: git push heroku main This will trigger a build and deploy your application to Heroku. Heroku will also run the `npx prisma migrate deploy` command which executes the migrations to create the database schema before deploying the app (as defined in the `release` step of the `Procfile`). **Checkpoint:** `git push` will emit the logs from the build and release phase and display the URL of the deployed app: remote: -----> Launching...remote: ! Release command declared: this new release will not be available until the command succeeds.remote: Released v5remote: https://your-app-name.herokuapp.com/ deployed to Herokuremote:remote: Verifying deploy... done.remote: Running release command...remote:remote: Prisma schema loaded from prisma/schema.prismaremote: Datasource "db": PostgreSQL database "your-db-name", schema "public" at "your-db-host.compute-1.amazonaws.com:5432"remote:remote: 1 migration found in prisma/migrationsremote:remote: The following migration have been applied:remote:remote: migrations/remote: └─ 20210310152103_init/remote: └─ migration.sqlremote:remote: All migrations have been successfully applied.remote: Waiting for release.... done. > **Note:** Heroku will also set the `PORT` environment variable to which your application is bound. ## 7\. Test your deployed application You can use the static frontend to interact with the API you deployed via the preview URL. Open up the preview URL in your browser, the URL should like this: `https://APP_NAME.herokuapp.com`. You should see the following:  The buttons allow you to make requests to the REST API and view the response: * **Check API status**: Will call the REST API status endpoint that returns `{"up":true}`. * **Seed data**: Will seed the database with a test `user` and `post`. Returns the created users. * **Load feed**: Will load all `users` in the database with their related `profiles`. For more insight into Prisma Client's API, look at the route handlers in the `src/index.js` file. You can view the application's logs with the `heroku logs --tail` command: 2020-07-07T14:39:07.396544+00:00 app[web.1]:2020-07-07T14:39:07.396569+00:00 app[web.1]: > prisma-heroku@1.0.0 start /app2020-07-07T14:39:07.396569+00:00 app[web.1]: > node src/index.js2020-07-07T14:39:07.396570+00:00 app[web.1]:2020-07-07T14:39:07.657505+00:00 app[web.1]: 🚀 Server ready at: http://localhost:125162020-07-07T14:39:07.657526+00:00 app[web.1]: ⭐️ See sample requests: http://pris.ly/e/ts/rest-express#3-using-the-rest-api2020-07-07T14:39:07.842546+00:00 heroku[web.1]: State changed from starting to up ## Heroku specific notes There are some implementation details relating to Heroku that this guide addresses and are worth reiterating: * **Port binding**: web servers bind to a port so that they can accept connections. When deploying to Heroku The `PORT` environment variable is set by Heroku. Ensure you bind to `process.env.PORT` so that your application can accept requests once deployed. A common pattern is to try binding to try `process.env.PORT` and fallback to a preset port as follows: const PORT = process.env.PORT || 3000const server = app.listen(PORT, () => { console.log(`app running on port ${PORT}`)}) * **Database URL**: As part of Heroku's provisioning process, a `DATABASE_URL` config var is added to your app’s configuration. This contains the URL your app uses to access the database. Ensure that your `schema.prisma` file uses `env("DATABASE_URL")` so that Prisma Client can successfully connect to the database. ## Summary Congratulations! You have successfully deployed a Node.js app with Prisma ORM to Heroku. You can find the source code for the example in this GitHub repository. For more insight into Prisma Client's API, look at the route handlers in the `src/index.js` file. --- ## Page: https://www.prisma.io/docs/orm/prisma-client/setup-and-configuration/databases-connections/pgbouncer An external connection pooler like PgBouncer holds a connection pool to the database, and proxies incoming client connections by sitting between Prisma Client and the database. This reduces the number of processes a database has to handle at any given time. Usually, this works transparently, but some connection poolers only support a limited set of functionality. One common feature that external connection poolers do not support are named prepared statements, which Prisma ORM uses. For these cases, Prisma ORM can be configured to behave differently. info Looking for an easy, infrastructure-free solution? Try Prisma Accelerate! It requires little to no setup and works seamlessly with all databases supported by Prisma ORM. Ready to begin? Get started with Prisma Accelerate by clicking . ## PgBouncer ### Set PgBouncer to transaction mode For Prisma Client to work reliably, PgBouncer must run in **Transaction mode**. Transaction mode offers a connection for every transaction – a requirement for the Prisma Client to work with PgBouncer. ### Add `pgbouncer=true` for PgBouncer versions below `1.21.0` warning We recommend **not** setting `pgbouncer=true` in the database connection string if you're using PgBouncer `1.21.0` or later. To use Prisma Client with PgBouncer, add the `?pgbouncer=true` flag to the PostgreSQL connection URL: postgresql://USER:PASSWORD@HOST:PORT/DATABASE?pgbouncer=true info `PORT` specified for PgBouncer pooling is sometimes different from the default `5432` port. Check your database provider docs for the correct port number. ### Configure `max_prepared_statements` in PgBouncer to be greater than zero Prisma uses prepared statements, and setting `max_prepared_statements` to a value greater than `0` enables PgBouncer to use those prepared statements. info `PORT` specified for PgBouncer pooling is sometimes different from the default `5432` port. Check your database provider docs for the correct port number. ### Prisma Migrate and PgBouncer workaround Prisma Migrate uses **database transactions** to check out the current state of the database and the migrations table. However, the Schema Engine is designed to use a **single connection to the database**, and does not support connection pooling with PgBouncer. If you attempt to run Prisma Migrate commands in any environment that uses PgBouncer for connection pooling, you might see the following error: Error: undefined: Database errorError querying the database: db error: ERROR: prepared statement "s0" already exists To work around this issue, you must connect directly to the database rather than going through PgBouncer. To achieve this, you can use the `directUrl` field in your `datasource` block. For example, consider the following `datasource` block: datasource db { provider = "postgresql" url = "postgres://USER:PASSWORD@HOST:PORT/DATABASE?pgbouncer=true" directUrl = "postgres://USER:PASSWORD@HOST:PORT/DATABASE"} The block above uses a PgBouncer connection string as the primary URL using `url`, allowing Prisma Client to take advantage of the PgBouncer connection pooler. It also provides a connection string directly to the database, without PgBouncer, using the `directUrl` field. This connection string will be used when commands that require a single connection to the database, such as `prisma migrate dev` or `prisma db push`, are invoked. ### PgBouncer with different database providers There are sometimes minor differences in how to connect directly to a Postgres database that depend on the provider hosting the database. Below are links to information on how to set up these connections with providers who have setup steps not covered here in our documentation: * Connecting directly to a PostgreSQL database hosted on Digital Ocean * Connecting directly to a PostgreSQL database hosted on ScaleGrid ## Supabase Supavisor Supabase's Supavisor behaves similarly to PgBouncer. You can add `?pgbouncer=true` to your connection pooled connection string available via your Supabase database settings. ## Other external connection poolers Although Prisma ORM does not have explicit support for other connection poolers, if the limitations are similar to the ones of PgBouncer you can usually also use `pgbouncer=true` in your connection string to put Prisma ORM in a mode that works with them as well. --- ## Page: https://www.prisma.io/docs/orm/prisma-client/deployment/edge/overview ## Deploying edge functions with Prisma ORM You can deploy an application that uses Prisma ORM to the edge. Depending on which edge function provider and which database you use, there are different considerations and things to be aware of. Here is a brief overview of all the edge function providers that are currently supported by Prisma ORM: | Provider / Product | Supported natively with Prisma ORM | Supported with Prisma Postgres (and Prisma Accelerate) | | --- | --- | --- | | Vercel Edge Functions | ✅ (Preview; only compatible drivers) | ✅ | | Vercel Edge Middleware | ✅ (Preview; only compatible drivers) | ✅ | | Cloudflare Workers | ✅ (Preview; only compatible drivers) | ✅ | | Cloudflare Pages | ✅ (Preview; only compatible drivers) | ✅ | | Deno Deploy | Not yet | ✅ | Deploying edge functions that use Prisma ORM on Cloudflare and Vercel is currently in Preview. ## Edge-compatibility of database drivers ### Why are there limitations around database drivers in edge functions? Edge functions typically don't use the standard Node.js runtime. For example, Vercel Edge Functions and Cloudflare Workers are running code in V8 isolates. Deno Deploy is using the Deno JavaScript runtime. As a consequence, these edge functions only have access to a small subset of the standard Node.js APIs and also have constrained computing resources (CPU and memory). In particular, the constraint of not being able to freely open TCP connections makes it difficult to talk to a traditional database from an edge function. While Cloudflare has introduced a `connect()` API that enables limited TCP connections, this still only enables database access using specific database drivers that are compatible with that API. note We recommend using Prisma Postgres. It is fully supported on edge runtimes and does not require a specialized edge-compatible driver. For other databases, Prisma Accelerate extends edge compatibility so you can connect to _any_ database from _any_ edge function provider. ### Which database drivers are edge-compatible? Here is an overview of the different database drivers and their compatibility with different edge function offerings: * Neon Serverless uses HTTP to access the database. It works with Cloudflare Workers and Vercel Edge Functions. * PlanetScale Serverless uses HTTP to access the database. It works with Cloudflare Workers and Vercel Edge Functions. * `node-postgres` (`pg`) uses Cloudflare's `connect()` (TCP) to access the database. It is only compatible with Cloudflare Workers, not with Vercel Edge Functions. * `@libsql/client` is used to access Turso databases. It works with Cloudflare Workers and Vercel Edge Functions. * Cloudflare D1 is used to access D1 databases. It is only compatible with Cloudflare Workers, not with Vercel Edge Functions. * Prisma Postgres is used to access a PostgreSQL database built on bare-metal using unikernels. It is supported on both Cloudflare Workers and Vercel. There's also work being done on the `node-mysql2` driver which will enable access to traditional MySQL databases from Cloudflare Workers and Pages in the future as well. You can use all of these drivers with Prisma ORM using the respective driver adapters. Depending on which deployment provider and database/driver you use, there may be special considerations. Please take a look at the deployment docs for your respective scenario to make sure you can deploy your application successfully: * Cloudflare * PostgreSQL (traditional) * PlanetScale * Neon * Cloudflare D1 * Prisma Postgres * Vercel * Vercel Postgres * Neon * PlanetScale * Prisma Postgres If you want to deploy an app using Turso, you can follow the instructions here. --- ## Page: https://www.prisma.io/docs/orm/prisma-client/setup-and-configuration/databases-connections/connection-pool The query engine manages a **connection pool** of database connections. The pool is created when Prisma Client opens the _first_ connection to the database, which can happen in one of two ways: * By explicitly calling `$connect()` _or_ * By running the first query, which calls `$connect()` under the hood Relational database connectors use Prisma ORM's own connection pool, and the MongoDB connectors uses the MongoDB driver connection pool. ## Relational databases The relational database connectors use Prisma ORM's connection pool. The connection pool has a **connection limit** and a **pool timeout**, which are controlled by connection URL parameters. ### How the connection pool works The following steps describe how the query engine uses the connection pool: 1. The query engine instantiates a connection pool with a configurable pool size and pool timeout. 2. The query engine creates one connection and adds it to the connection pool. 3. When a query comes in, the query engine reserves a connection from the pool to process query. 4. If there are no idle connections available in the connection pool, the query engine opens additional database connections and adds them to the connection pool until the number of database connections reaches the limit defined by `connection_limit`. 5. If the query engine cannot reserve a connection from the pool, queries are added to a FIFO (First In First Out) queue in memory. FIFO means that queries are processed in the order they enter the queue. 6. If the query engine cannot process a query in the queue for **before the time limit**, it throws an exception with error code `P2024` for that query and moves on to the next one in the queue. If you consistently experience pool timeout errors, you need to optimize the connection pool . ### Connection pool size #### Default connection pool size The default number of connections (pool size) is calculated with the following formula: num_physical_cpus * 2 + 1 `num_physical_cpus` represents the number of physical CPUs on the machine your application is running on. If your machine has **four** physical CPUs, your connection pool will contain **nine** connections (`4 * 2 + 1 = 9`). Although the formula represents a good starting point, the recommended connection limit also depends on your deployment paradigm - particularly if you are using serverless. #### Setting the connection pool size You can specify the number of connections by explicitly setting the `connection_limit` parameter in your database connection URL. For example, with the following `datasource` configuration in your Prisma schema the connection pool will have exactly five connections: datasource db { provider = "postgresql" url = "postgresql://johndoe:mypassword@localhost:5432/mydb?connection_limit=5"} #### Viewing the connection pool size The number of connections Prisma Client uses can be viewed using logging and metrics. Using the `info` logging level, you can log the number of connections in a connection pool that are opened when Prisma Client is instantiated. For example, consider the following Prisma Client instance and invocation: import { PrismaClient } from '@prisma/client'const prisma = new PrismaClient({ log: ['info'],})async function main() { await prisma.user.findMany()}main() Show CLI results prisma:info Starting a postgresql pool with 21 connections. When the `PrismaClient` class was instantiated, the logging notified `stdout` that a connection pool with 21 connections was started. warning Note that the output generated by `log: ['info']` can change in any release without notice. Be aware of this in case you are relying on the output in your application or a tool that you're building. If you need even more insights into the size of your connection pool and the amount of in-use and idle connection, you can use the metrics feature (which is currently in Preview). Consider the following example: import { PrismaClient } from '@prisma/client'const prisma = new PrismaClient()async function main() { await Promise.all([prisma.user.findMany(), prisma.post.findMany()]) const metrics = await prisma.$metrics.json() console.dir(metrics, { depth: Infinity })}main() Show CLI results { "counters": [ // ... { "key": "prisma_pool_connections_open", "labels": {}, "value": 2, "description": "Number of currently open Pool Connections" } ], "gauges": [ // ... { "key": "prisma_pool_connections_busy", "labels": {}, "value": 0, "description": "Number of currently busy Pool Connections (executing a datasource query)" }, { "key": "prisma_pool_connections_idle", "labels": {}, "value": 21, "description": "Number of currently unused Pool Connections (waiting for the next datasource query to run)" }, { "key": "prisma_pool_connections_opened_total", "labels": {}, "value": 2, "description": "Total number of Pool Connections opened" } ], "histograms": [ /** ... **/ ]} info For more details on what is available in the metrics output, see the About metrics section. ### Connection pool timeout #### Default pool timeout The default connection pool timeout is 10 seconds. If the Query Engine does not get a connection from the database connection pool within that time, it throws an exception and moves on to the next query in the queue. #### Setting the connection pool timeout You can specify the pool timeout by explicitly setting the `pool_timeout` parameter in your database connection URL. In the following example, the pool times out after `2` seconds: datasource db { provider = "postgresql" url = "postgresql://johndoe:mypassword@localhost:5432/mydb?connection_limit=5&pool_timeout=2"} #### Disabling the connection pool timeout You disable the connection pool timeout by setting the `pool_timeout` parameter to `0`: datasource db { provider = "postgresql" url = "postgresql://johndoe:mypassword@localhost:5432/mydb?connection_limit=5&pool_timeout=0"} You can choose to disable the connection pool timeout if queries **must** remain in the queue - for example, if you are importing a large number of records in parallel and are confident that the queue will not use up all available RAM before the job is complete. ## MongoDB The MongoDB connector does not use the Prisma ORM connection pool. The connection pool is managed internally by the MongoDB driver and configured via connection string parameters. ## External connection poolers You cannot increase the `connection_limit` beyond what the underlying database can support. This is a particular challenge in serverless environments, where each function manages an instance of `PrismaClient` - and its own connection pool. Consider introducing an external connection pooler like PgBouncer to prevent your application or functions from exhausting the database connection limit. ## Manual database connection handling When using Prisma ORM, the database connections are handled on an engine\-level. This means they're not exposed to the developer and it's not possible to manually access them. --- ## Page: https://www.prisma.io/docs/orm/prisma-schema/data-model/relations/referential-actions/special-rules-for-referential-actions Some databases have specific requirements that you should consider if you are using referential actions. * Microsoft SQL Server doesn't allow cascading referential actions on a foreign key, if the relation chain causes a cycle or multiple cascade paths. If the referential actions on the foreign key are set to something other than `NO ACTION` (or `NoAction` if Prisma ORM is managing referential integrity), the server will check for cycles or multiple cascade paths and return an error when executing the SQL. * With MongoDB, using referential actions in Prisma ORM requires that for any data model with self-referential relations or cycles between three models, you must set the referential action of `NoAction` to prevent the referential action emulations from looping infinitely. Be aware that by default, the `relationMode = "prisma"` mode is used for MongoDB, which means that Prisma ORM manages referential integrity. Given the SQL: CREATE TABLE [dbo].[Employee] ( [id] INT NOT NULL IDENTITY(1,1), [managerId] INT, CONSTRAINT [PK__Employee__id] PRIMARY KEY ([id]));ALTER TABLE [dbo].[Employee] ADD CONSTRAINT [FK__Employee__managerId] FOREIGN KEY ([managerId]) REFERENCES [dbo].[Employee]([id]) ON DELETE CASCADE ON UPDATE CASCADE; When the SQL is run, the database would throw the following error: Introducing FOREIGN KEY constraint 'FK__Employee__managerId' on table 'Employee' may cause cycles or multiple cascade paths. Specify ON DELETE NO ACTION or ON UPDATE NO ACTION, or modify other FOREIGN KEY constraints. In more complicated data models, finding the cascade paths can get complex. Therefore in Prisma ORM, the data model is validated _before_ generating any SQL to be run during any migrations, highlighting relations that are part of the paths. This makes it much easier to find and break these action chains. ## Self-relation (SQL Server and MongoDB) The following model describes a self-relation where an `Employee` can have a manager and managees, referencing entries of the same model. model Employee { id Int @id @default(autoincrement()) manager Employee? @relation(name: "management", fields: [managerId], references: [id]) managees Employee[] @relation(name: "management") managerId Int?} This will result in the following error: Error parsing attribute "@relation": A self-relation must have `onDelete` and `onUpdate` referential actions set to `NoAction` in one of the @relation attributes. (Implicit default `onDelete`: `SetNull`, and `onUpdate`: `Cascade`) By not defining any actions, Prisma ORM will use the following default values depending if the underlying scalar fields are set to be optional or required. | Clause | All of the scalar fields are optional | At least one scalar field is required | | --- | --- | --- | | `onDelete` | `SetNull` | `NoAction` | | `onUpdate` | `Cascade` | `Cascade` | Since the default referential action for `onUpdate` in the above relation would be `Cascade` and for `onDelete` it would be `SetNull`, it creates a cycle and the solution is to explicitly set the `onUpdate` and `onDelete` values to `NoAction`. model Employee { id Int @id @default(autoincrement()) manager Employee @relation(name: "management", fields: [managerId], references: [id]) manager Employee @relation(name: "management", fields: [managerId], references: [id], onDelete: NoAction, onUpdate: NoAction) managees Employee[] @relation(name: "management") managerId Int} ## Cyclic relation between three tables (SQL Server and MongoDB) The following models describe a cyclic relation between a `Chicken`, an `Egg` and a `Fox`, where each model references the other. model Chicken { id Int @id @default(autoincrement()) egg Egg @relation(fields: [eggId], references: [id]) eggId Int predators Fox[]}model Egg { id Int @id @default(autoincrement()) predator Fox @relation(fields: [predatorId], references: [id]) predatorId Int parents Chicken[]}model Fox { id Int @id @default(autoincrement()) meal Chicken @relation(fields: [mealId], references: [id]) mealId Int foodStore Egg[]} This will result in three validation errors in every relation field that is part of the cycle. The first one is in the relation `egg` in the `Chicken` model: Error parsing attribute "@relation": Reference causes a cycle. One of the @relation attributes in this cycle must have `onDelete` and `onUpdate` referential actions set to `NoAction`. Cycle path: Chicken.egg → Egg.predator → Fox.meal. (Implicit default `onUpdate`: `Cascade`) The second one is in the relation `predator` in the `Egg` model: Error parsing attribute "@relation": Reference causes a cycle. One of the @relation attributes in this cycle must have `onDelete` and `onUpdate` referential actions set to `NoAction`. Cycle path: Egg.predator → Fox.meal → Chicken.egg. (Implicit default `onUpdate`: `Cascade`) And the third one is in the relation `meal` in the `Fox` model: Error parsing attribute "@relation": Reference causes a cycle. One of the @relation attributes in this cycle must have `onDelete` and `onUpdate` referential actions set to `NoAction`. Cycle path: Fox.meal → Chicken.egg → Egg.predator. (Implicit default `onUpdate`: `Cascade`) As the relation fields are required, the default referential action for `onDelete` is `NoAction` but for `onUpdate` it is `Cascade`, which causes a referential action cycle. The solution is to set the `onUpdate` value to `NoAction` in any one of the relations. model Chicken { id Int @id @default(autoincrement()) egg Egg @relation(fields: [eggId], references: [id]) egg Egg @relation(fields: [eggId], references: [id], onUpdate: NoAction) eggId Int predators Fox[]} or model Egg { id Int @id @default(autoincrement()) predator Fox @relation(fields: [predatorId], references: [id]) predator Fox @relation(fields: [predatorId], references: [id], onUpdate: NoAction) predatorId Int parents Chicken[]} or model Fox { id Int @id @default(autoincrement()) meal Chicken @relation(fields: [mealId], references: [id]) meal Chicken @relation(fields: [mealId], references: [id], onUpdate: NoAction) mealId Int foodStore Egg[]} ## Multiple cascade paths between two models (SQL Server only) The data model describes two different paths between same models, with both relations triggering cascading referential actions. model User { id Int @id @default(autoincrement()) comments Comment[] posts Post[]}model Post { id Int @id @default(autoincrement()) authorId Int author User @relation(fields: [authorId], references: [id]) comments Comment[]}model Comment { id Int @id @default(autoincrement()) writtenById Int postId Int writtenBy User @relation(fields: [writtenById], references: [id]) post Post @relation(fields: [postId], references: [id])} The problem in this data model is how there are two paths from `Comment` to the `User`, and how the default `onUpdate` action in both relations is `Cascade`. This leads into two validation errors: The first one is in the relation `writtenBy`: Error parsing attribute "@relation": When any of the records in model `User` is updated or deleted, the referential actions on the relations cascade to model `Comment` through multiple paths. Please break one of these paths by setting the `onUpdate` and `onDelete` to `NoAction`. (Implicit default `onUpdate`: `Cascade`) The second one is in the relation `post`: Error parsing attribute "@relation": When any of the records in model `User` is updated or deleted, the referential actions on the relations cascade to model `Comment` through multiple paths. Please break one of these paths by setting the `onUpdate` and `onDelete` to `NoAction`. (Implicit default `onUpdate`: `Cascade`) The error means that by updating a primary key in a record in the `User` model, the update will cascade once between the `Comment` and `User` through the `writtenBy` relation, and again through the `Post` model from the `post` relation due to `Post` being related with the `Comment` model. The fix is to set the `onUpdate` referential action to `NoAction` in the `writtenBy` or `post` relation fields, or from the `Post` model by changing the actions in the `author` relation: model Comment { id Int @id @default(autoincrement()) writtenById Int postId Int writtenBy User @relation(fields: [writtenById], references: [id]) writtenBy User @relation(fields: [writtenById], references: [id], onUpdate: NoAction) post Post @relation(fields: [postId], references: [id])} or model Comment { id Int @id @default(autoincrement()) writtenById Int postId Int writtenBy User @relation(fields: [writtenById], references: [id]) post Post @relation(fields: [postId], references: [id]) post Post @relation(fields: [postId], references: [id], onUpdate: NoAction)} or model Post { id Int @id @default(autoincrement()) authorId Int author User @relation(fields: [authorId], references: [id]) author User @relation(fields: [authorId], references: [id], onUpdate: NoAction) comments Comment[]} --- ## Page: https://www.prisma.io/docs/orm/overview/databases/sql-server/sql-server-local To run a Microsoft SQL Server locally on a Windows machine: 1. If you do not have access to an instance of Microsoft SQL Server, download and set up SQL Server 2019 Developer. 2. Download and install SQL Server Management Studio. 3. Use Windows Authentication to log in to Microsoft SQL Server Management Studio (expand the **Server Name** dropdown and click **<Browse for more...>** to find your database engine):  ## Enable TCP/IP Prisma Client requires TCP/IP to be enabled. To enable TCP/IP: 1. Open SQL Server Configuration Manager. (Search for "SQL Server Configuration Manager" in the Start Menu, or open the Start Menu and type "SQL Server Configuration Manager".) 2. In the left-hand panel, click **SQL Server Network Configuration** > **Protocols for MSSQLSERVER** 3. Right-click **TCP/IP** and choose **Enable**. ## Enable authentication with SQL logins (Optional) If you want to use a username and password in your connection URL rather than integrated security, enable mixed authentication mode as follows: 1. Right-click on your database engine in the Object Explorer and click **Properties**. 2. In the Server Properties window, click **Security** in the left-hand list and tick the **SQL Server and Windows Authentication Mode** option, then click **OK**. 3. Right-click on your database engine in the Object Explorer and click **Restart**. ### Enable the `sa` login To enable the default `sa` (administrator) SQL Server login: 1. In SQL Server Management Studio, in the Object Explorer, expand **Security** > **Logins** and double-click **sa**. 2. On the **General** page, choose a password for the `sa` account (untick **Enforce password policy** if you do not want to enforce a policy). 3. On the **Status** page, under **Settings** > **Login**, tick **Enabled**, then click **OK**. You can now use the `sa` account in a connection URL and when you log in to SQL Server Management Studio. > **Note**: The `sa` user has extensive permissions. You can also create your own login with fewer permissions. --- ## Page: https://www.prisma.io/docs/orm/overview/databases/sql-server/sql-server-docker * * ORM * Overview * Databases * Microsoft SQL Server To run a Microsoft SQL Server container image with Docker: 1. Install and set up Docker 2. Run the following command in your terminal to download the Microsoft SQL Server 2019 image: docker pull mcr.microsoft.com/mssql/server:2019-latest 3. Create an instance of the container image, replacing the value of `SA_PASSWORD` with a password of your choice: docker run --name sql_container -e 'ACCEPT_EULA=Y' -e 'SA_PASSWORD=myPassword' -p 1433:1433 -d mcr.microsoft.com/mssql/server:2019-latest 4. Follow Microsoft's instructions to connect to SQL Server and use the `sqlcmd` tool, replacing the image name and password with your own. 5. From the `sqlcmd` command prompt, create a new database: CREATE DATABASE quickstartGO 6. Run the following command to check that your database was created successfully: sp_databasesGO ## Connection URL credentials Based on this example, your credentials are: * **Username**: sa * **Password**: myPassword * **Database**: quickstart * **Port**: 1433 Previous SQL Server on Windows (local) Next CockroachDB --- ## Page: https://www.prisma.io/docs/orm/prisma-client/client-extensions/middleware/logging-middleware The following example logs the time taken for a Prisma Client query to run: const prisma = new PrismaClient()prisma.$use(async (params, next) => { const before = Date.now() const result = await next(params) const after = Date.now() console.log(`Query ${params.model}.${params.action} took ${after - before}ms`) return result})const create = await prisma.post.create({ data: { title: 'Welcome to Prisma Day 2020', },})const createAgain = await prisma.post.create({ data: { title: 'All about database collation', },}) Example output: Query Post.create took 92msQuery Post.create took 15ms The example is based on the following sample schema: generator client { provider = "prisma-client-js"}datasource db { provider = "mysql" url = env("DATABASE_URL")}model Post { authorId Int? content String? id Int @id @default(autoincrement()) published Boolean @default(false) title String user User? @relation(fields: [authorId], references: [id]) language String? @@index([authorId], name: "authorId")}model User { email String @unique id Int @id @default(autoincrement()) name String? posts Post[] extendedProfile Json? role Role @default(USER)}enum Role { ADMIN USER MODERATOR} ## Going further You can also use Prisma Client extensions to log the time it takes to perform a query. A functional example can be found in this GitHub repository. --- ## Page: https://www.prisma.io/docs/orm/prisma-client/client-extensions/middleware/soft-delete-middleware The following sample uses middleware to perform a **soft delete**. Soft delete means that a record is **marked as deleted** by changing a field like `deleted` to `true` rather than actually being removed from the database. Reasons to use a soft delete include: * Regulatory requirements that mean you have to keep data for a certain amount of time * 'Trash' / 'bin' functionality that allows users to restore content that was deleted warning **Note:** This page demonstrates a sample use of middleware. We do not intend the sample to be a fully functional soft delete feature and it does not cover all edge cases. For example, the middleware does not work with nested writes and therefore won't capture situations where you use `delete` or `deleteMany` as an option e.g. in an `update` query. This sample uses the following schema - note the `deleted` field on the `Post` model: datasource db { provider = "postgresql" url = env("DATABASE_URL")}generator client { provider = "prisma-client-js"}model User { id Int @id @default(autoincrement()) name String? email String @unique posts Post[] followers User[] @relation("UserToUser") user User? @relation("UserToUser", fields: [userId], references: [id]) userId Int?}model Post { id Int @id @default(autoincrement()) title String content String? user User? @relation(fields: [userId], references: [id]) userId Int? tags Tag[] views Int @default(0) deleted Boolean @default(false)}model Category { id Int @id @default(autoincrement()) parentCategory Category? @relation("CategoryToCategory", fields: [categoryId], references: [id]) category Category[] @relation("CategoryToCategory") categoryId Int?}model Tag { tagName String @id // Must be unique posts Post[]} ## Step 1: Store status of record Add a field named `deleted` to the `Post` model. You can choose between two field types depending on your requirements: * `Boolean` with a default value of `false`: model Post { id Int @id @default(autoincrement()) ... deleted Boolean @default(false)} * Create a nullable `DateTime` field so that you know exactly _when_ a record was marked as deleted - `NULL` indicates that a record has not been deleted. In some cases, storing when a record was removed may be a regulatory requirement: model Post { id Int @id @default(autoincrement()) ... deleted DateTime?} > **Note**: Using two separate fields (`isDeleted` and `deletedDate`) may result in these two fields becoming out of sync - for example, a record may be marked as deleted but have no associated date.) This sample uses a `Boolean` field type for simplicity. ## Step 2: Soft delete middleware Add a middleware that performs the following tasks: * Intercepts `delete()` and `deleteMany()` queries for the `Post` model * Changes the `params.action` to `update` and `updateMany` respectively * Introduces a `data` argument and sets `{ deleted: true }`, preserving other filter arguments if they exist Run the following sample to test the soft delete middleware: import { PrismaClient } from '@prisma/client'const prisma = new PrismaClient({})async function main() { /***********************************/ /* SOFT DELETE MIDDLEWARE */ /***********************************/ prisma.$use(async (params, next) => { // Check incoming query type if (params.model == 'Post') { if (params.action == 'delete') { // Delete queries // Change action to an update params.action = 'update' params.args['data'] = { deleted: true } } if (params.action == 'deleteMany') { // Delete many queries params.action = 'updateMany' if (params.args.data != undefined) { params.args.data['deleted'] = true } else { params.args['data'] = { deleted: true } } } } return next(params) }) /***********************************/ /* TEST */ /***********************************/ const titles = [ { title: 'How to create soft delete middleware' }, { title: 'How to install Prisma' }, { title: 'How to update a record' }, ] console.log('\u001b[1;34mSTARTING SOFT DELETE TEST \u001b[0m') console.log('\u001b[1;34m#################################### \u001b[0m') let i = 0 let posts = new Array() // Create 3 new posts with a randomly assigned title each time for (i == 0; i < 3; i++) { const createPostOperation = prisma.post.create({ data: titles[Math.floor(Math.random() * titles.length)], }) posts.push(createPostOperation) } var postsCreated = await prisma.$transaction(posts) console.log( 'Posts created with IDs: ' + '\u001b[1;32m' + postsCreated.map((x) => x.id) + '\u001b[0m' ) // Delete the first post from the array const deletePost = await prisma.post.delete({ where: { id: postsCreated[0].id, // Random ID }, }) // Delete the 2nd two posts const deleteManyPosts = await prisma.post.deleteMany({ where: { id: { in: [postsCreated[1].id, postsCreated[2].id], }, }, }) const getPosts = await prisma.post.findMany({ where: { id: { in: postsCreated.map((x) => x.id), }, }, }) console.log() console.log( 'Deleted post with ID: ' + '\u001b[1;32m' + deletePost.id + '\u001b[0m' ) console.log( 'Deleted posts with IDs: ' + '\u001b[1;32m' + [postsCreated[1].id + ',' + postsCreated[2].id] + '\u001b[0m' ) console.log() console.log( 'Are the posts still available?: ' + (getPosts.length == 3 ? '\u001b[1;32m' + 'Yes!' + '\u001b[0m' : '\u001b[1;31m' + 'No!' + '\u001b[0m') ) console.log() console.log('\u001b[1;34m#################################### \u001b[0m') // 4. Count ALL posts const f = await prisma.post.findMany({}) console.log('Number of posts: ' + '\u001b[1;32m' + f.length + '\u001b[0m') // 5. Count DELETED posts const r = await prisma.post.findMany({ where: { deleted: true, }, }) console.log( 'Number of SOFT deleted posts: ' + '\u001b[1;32m' + r.length + '\u001b[0m' )}main() The sample outputs the following: STARTING SOFT DELETE TEST####################################Posts created with IDs: 587,588,589Deleted post with ID: 587Deleted posts with IDs: 588,589Are the posts still available?: Yes!#################################### tip Comment out the middleware to see the message change. ✔ Pros of this approach to soft delete include: * Soft delete happens at data access level, which means that you cannot delete records unless you use raw SQL ✘ Cons of this approach to soft delete include: * Content can still be read and updated unless you explicitly filter by `where: { deleted: false }` - in a large project with a lot of queries, there is a risk that soft deleted content will still be displayed * You can still use raw SQL to delete records tip You can create rules or triggers (MySQL and PostgreSQL) at a database level to prevent records from being deleted. ## Step 3: Optionally prevent read/update of soft deleted records In step 2, we implemented middleware that prevents `Post` records from being deleted. However, you can still read and update deleted records. This step explores two ways to prevent the reading and updating of deleted records. > **Note**: These options are just ideas with pros and cons, you may choose to do something entirely different. ### Option 1: Implement filters in your own application code In this option: * Prisma Client middleware is responsible for preventing records from being deleted * Your own application code (which could be a GraphQL API, a REST API, a module) is responsible for filtering out deleted posts where necessary (`{ where: { deleted: false } }`) when reading and updating data - for example, the `getPost` GraphQL resolver never returns a deleted post ✔ Pros of this approach to soft delete include: * No change to Prisma Client's create/update queries - you can easily request deleted records if you need them * Modifying queries in middleware can have some unintended consequences, such as changing query return types (see option 2) ✘ Cons of this approach to soft delete include: * Logic relating to soft delete maintained in two different places * If your API surface is very large and maintained by multiple contributors, it may be difficult to enforce certain business rules (for example, never allow deleted records to be updated) ### Option 2: Use middleware to determine the behavior of read/update queries for deleted records Option two uses Prisma Client middleware to prevent soft deleted records from being returned. The following table describes how the middleware affects each query: | **Query** | **Middleware logic** | **Changes to return type** | | --- | --- | --- | | `findUnique()` | 🔧 Change query to `findFirst` (because you cannot apply `deleted: false` filters to `findUnique()`) 🔧 Add `where: { deleted: false }` filter to exclude soft deleted posts 🔧 From version 5.0.0, you can use `findUnique()` to apply `delete: false` filters since non unique fields are exposed. | No change | | `findMany` | 🔧 Add `where: { deleted: false }` filter to exclude soft deleted posts by default 🔧 Allow developers to **explicitly request** soft deleted posts by specifying `deleted: true` | No change | | `update` | 🔧 Change query to `updateMany` (because you cannot apply `deleted: false` filters to `update`) 🔧 Add `where: { deleted: false }` filter to exclude soft deleted posts | `{ count: n }` instead of `Post` | | `updateMany` | 🔧 Add `where: { deleted: false }` filter to exclude soft deleted posts | No change | * **Is it not possible to utilize soft delete with `findFirstOrThrow()` or `findUniqueOrThrow()`?** From version 5.1.0, you can apply soft delete `findFirstOrThrow()` or `findUniqueOrThrow()` by using middleware. * **Why are you making it possible to use `findMany()` with a `{ where: { deleted: true } }` filter, but not `updateMany()`?** This particular sample was written to support the scenario where a user can _restore_ their deleted blog post (which requires a list of soft deleted posts) - but the user should not be able to edit a deleted post. * **Can I still `connect` or `connectOrCreate` a deleted post?** In this sample - yes. The middleware does not prevent you from connecting an existing, soft deleted post to a user. Run the following sample to see how middleware affects each query: import { PrismaClient, Prisma } from '@prisma/client'const prisma = new PrismaClient({})async function main() { /***********************************/ /* SOFT DELETE MIDDLEWARE */ /***********************************/ prisma.$use(async (params, next) => { if (params.model == 'Post') { if (params.action === 'findUnique' || params.action === 'findFirst') { // Change to findFirst - you cannot filter // by anything except ID / unique with findUnique() params.action = 'findFirst' // Add 'deleted' filter // ID filter maintained params.args.where['deleted'] = false } if ( params.action === 'findFirstOrThrow' || params.action === 'findUniqueOrThrow' ) { if (params.args.where) { if (params.args.where.deleted == undefined) { // Exclude deleted records if they have not been explicitly requested params.args.where['deleted'] = false } } else { params.args['where'] = { deleted: false } } } if (params.action === 'findMany') { // Find many queries if (params.args.where) { if (params.args.where.deleted == undefined) { params.args.where['deleted'] = false } } else { params.args['where'] = { deleted: false } } } } return next(params) }) prisma.$use(async (params, next) => { if (params.model == 'Post') { if (params.action == 'update') { // Change to updateMany - you cannot filter // by anything except ID / unique with findUnique() params.action = 'updateMany' // Add 'deleted' filter // ID filter maintained params.args.where['deleted'] = false } if (params.action == 'updateMany') { if (params.args.where != undefined) { params.args.where['deleted'] = false } else { params.args['where'] = { deleted: false } } } } return next(params) }) prisma.$use(async (params, next) => { // Check incoming query type if (params.model == 'Post') { if (params.action == 'delete') { // Delete queries // Change action to an update params.action = 'update' params.args['data'] = { deleted: true } } if (params.action == 'deleteMany') { // Delete many queries params.action = 'updateMany' if (params.args.data != undefined) { params.args.data['deleted'] = true } else { params.args['data'] = { deleted: true } } } } return next(params) }) /***********************************/ /* TEST */ /***********************************/ const titles = [ { title: 'How to create soft delete middleware' }, { title: 'How to install Prisma' }, { title: 'How to update a record' }, ] console.log('\u001b[1;34mSTARTING SOFT DELETE TEST \u001b[0m') console.log('\u001b[1;34m#################################### \u001b[0m') let i = 0 let posts = new Array() // Create 3 new posts with a randomly assigned title each time for (i == 0; i < 3; i++) { const createPostOperation = prisma.post.create({ data: titles[Math.floor(Math.random() * titles.length)], }) posts.push(createPostOperation) } var postsCreated = await prisma.$transaction(posts) console.log( 'Posts created with IDs: ' + '\u001b[1;32m' + postsCreated.map((x) => x.id) + '\u001b[0m' ) // Delete the first post from the array const deletePost = await prisma.post.delete({ where: { id: postsCreated[0].id, // Random ID }, }) // Delete the 2nd two posts const deleteManyPosts = await prisma.post.deleteMany({ where: { id: { in: [postsCreated[1].id, postsCreated[2].id], }, }, }) const getOnePost = await prisma.post.findUnique({ where: { id: postsCreated[0].id, }, }) const getOneUniquePostOrThrow = async () => await prisma.post.findUniqueOrThrow({ where: { id: postsCreated[0].id, }, }) const getOneFirstPostOrThrow = async () => await prisma.post.findFirstOrThrow({ where: { id: postsCreated[0].id, }, }) const getPosts = await prisma.post.findMany({ where: { id: { in: postsCreated.map((x) => x.id), }, }, }) const getPostsAnDeletedPosts = await prisma.post.findMany({ where: { id: { in: postsCreated.map((x) => x.id), }, deleted: true, }, }) const updatePost = await prisma.post.update({ where: { id: postsCreated[1].id, }, data: { title: 'This is an updated title (update)', }, }) const updateManyDeletedPosts = await prisma.post.updateMany({ where: { deleted: true, id: { in: postsCreated.map((x) => x.id), }, }, data: { title: 'This is an updated title (updateMany)', }, }) console.log() console.log( 'Deleted post (delete) with ID: ' + '\u001b[1;32m' + deletePost.id + '\u001b[0m' ) console.log( 'Deleted posts (deleteMany) with IDs: ' + '\u001b[1;32m' + [postsCreated[1].id + ',' + postsCreated[2].id] + '\u001b[0m' ) console.log() console.log( 'findUnique: ' + (getOnePost?.id != undefined ? '\u001b[1;32m' + 'Posts returned!' + '\u001b[0m' : '\u001b[1;31m' + 'Post not returned!' + '(Value is: ' + JSON.stringify(getOnePost) + ')' + '\u001b[0m') ) try { console.log('findUniqueOrThrow: ') await getOneUniquePostOrThrow() } catch (error) { if ( error instanceof Prisma.PrismaClientKnownRequestError && error.code == 'P2025' ) console.log( '\u001b[1;31m' + 'PrismaClientKnownRequestError is catched' + '(Error name: ' + error.name + ')' + '\u001b[0m' ) } try { console.log('findFirstOrThrow: ') await getOneFirstPostOrThrow() } catch (error) { if ( error instanceof Prisma.PrismaClientKnownRequestError && error.code == 'P2025' ) console.log( '\u001b[1;31m' + 'PrismaClientKnownRequestError is catched' + '(Error name: ' + error.name + ')' + '\u001b[0m' ) } console.log() console.log( 'findMany: ' + (getPosts.length == 3 ? '\u001b[1;32m' + 'Posts returned!' + '\u001b[0m' : '\u001b[1;31m' + 'Posts not returned!' + '\u001b[0m') ) console.log( 'findMany ( delete: true ): ' + (getPostsAnDeletedPosts.length == 3 ? '\u001b[1;32m' + 'Posts returned!' + '\u001b[0m' : '\u001b[1;31m' + 'Posts not returned!' + '\u001b[0m') ) console.log() console.log( 'update: ' + (updatePost.id != undefined ? '\u001b[1;32m' + 'Post updated!' + '\u001b[0m' : '\u001b[1;31m' + 'Post not updated!' + '(Value is: ' + JSON.stringify(updatePost) + ')' + '\u001b[0m') ) console.log( 'updateMany ( delete: true ): ' + (updateManyDeletedPosts.count == 3 ? '\u001b[1;32m' + 'Posts updated!' + '\u001b[0m' : '\u001b[1;31m' + 'Posts not updated!' + '\u001b[0m') ) console.log() console.log('\u001b[1;34m#################################### \u001b[0m') // 4. Count ALL posts const f = await prisma.post.findMany({}) console.log( 'Number of active posts: ' + '\u001b[1;32m' + f.length + '\u001b[0m' ) // 5. Count DELETED posts const r = await prisma.post.findMany({ where: { deleted: true, }, }) console.log( 'Number of SOFT deleted posts: ' + '\u001b[1;32m' + r.length + '\u001b[0m' )}main() The sample outputs the following: STARTING SOFT DELETE TEST####################################Posts created with IDs: 680,681,682Deleted post (delete) with ID: 680Deleted posts (deleteMany) with IDs: 681,682findUnique: Post not returned!(Value is: [])findMany: Posts not returned!findMany ( delete: true ): Posts returned!update: Post not updated!(Value is: {"count":0})updateMany ( delete: true ): Posts not updated!####################################Number of active posts: 0Number of SOFT deleted posts: 95 ✔ Pros of this approach: * A developer can make a conscious choice to include deleted records in `findMany` * You cannot accidentally read or update a deleted record ✖ Cons of this approach: * Not obvious from API that you aren't getting all records and that `{ where: { deleted: false } }` is part of the default query * Return type `update` affected because middleware changes the query to `updateMany` * Doesn't handle complex queries with `AND`, `OR`, `every`, etc... * Doesn't handle filtering when using `include` from another model. ## FAQ ### Can I add a global `includeDeleted` to the `Post` model? You may be tempted to 'hack' your API by adding a `includeDeleted` property to the `Post` model and make the following query possible: prisma.post.findMany({ where: { includeDeleted: true } }) > **Note**: You would still need to write middleware. We **✘ do not** recommend this approach as it pollutes the schema with fields that do not represent real data. --- ## Page: https://www.prisma.io/docs/orm/prisma-client/deployment/traditional/deploy-to-koyeb In this guide, you will set up and deploy a Node.js server that uses Prisma ORM with PostgreSQL to Koyeb. The application exposes a REST API and uses Prisma Client to handle fetching, creating, and deleting records from a database. Koyeb is a developer-friendly serverless platform to deploy apps globally. The platform lets you seamlessly run Docker containers, web apps, and APIs with git-based deployment, TLS encryption, native autoscaling, a global edge network, and built-in service mesh & discovery. When using the Koyeb git-driven deployment method, each time you push code changes to a GitHub repository a new build and deployment of the application are automatically triggered on the Koyeb Serverless Platform. This guide uses the latter approach whereby you push your code to the app's repository on GitHub. The application has the following components: * **Backend**: Node.js REST API built with Express.js with resource endpoints that use Prisma Client to handle database operations against a PostgreSQL database (e.g., hosted on Heroku). * **Frontend**: Static HTML page to interact with the API. 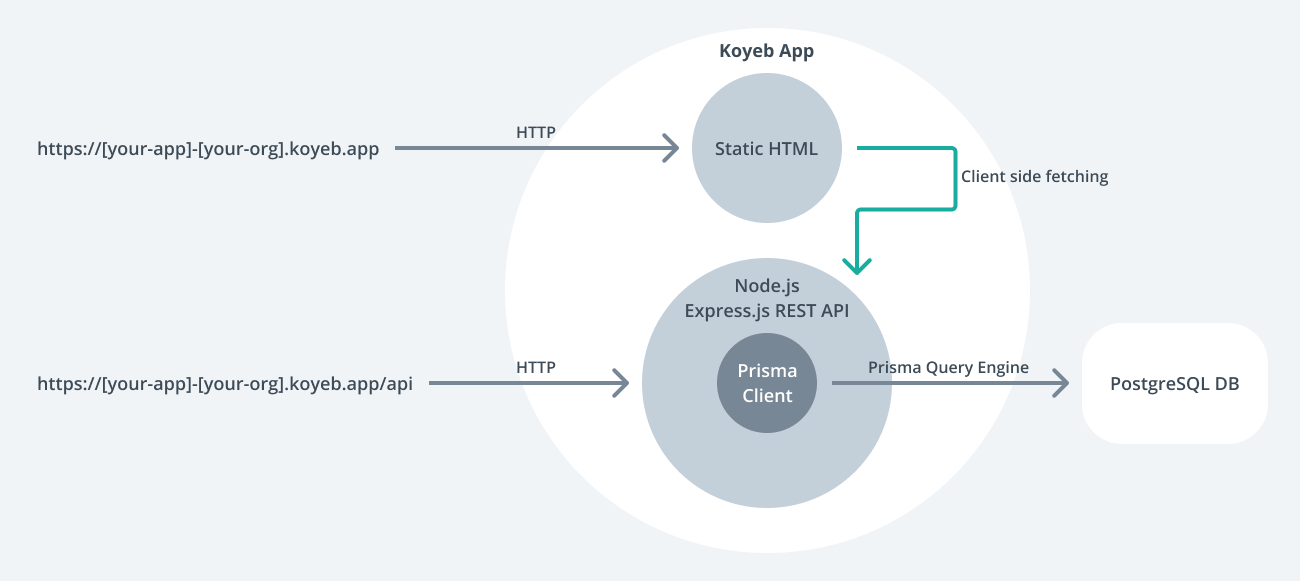 The focus of this guide is showing how to deploy projects using Prisma ORM to Koyeb. The starting point will be the Prisma Koyeb example, which contains an Express.js server with a couple of preconfigured REST endpoints and a simple frontend. > **Note:** The various **checkpoints** throughout the guide allow you to validate whether you performed the steps correctly. ## Prerequisites * Hosted PostgreSQL database and a URL from which it can be accessed, e.g. `postgresql://username:password@your_postgres_db.cloud.com/db_identifier` (you can use Supabase, which offers a free plan). * GitHub account with an empty public repository we will use to push the code. * Koyeb account. * Node.js installed. ## Prisma ORM workflow At the core of Prisma ORM is the Prisma schema – a declarative configuration where you define your data model and other Prisma ORM-related configuration. The Prisma schema is also a single source of truth for both Prisma Client and Prisma Migrate. In this guide, you will create the database schema with Prisma Migrate to create the database schema. Prisma Migrate is based on the Prisma schema and works by generating `.sql` migration files that are executed against the database. Migrate comes with two primary workflows: * Creating migrations and applying them during local development with `prisma migrate dev` * Applying generated migration to production with `prisma migrate deploy` For brevity, the guide does not cover how migrations are created with `prisma migrate dev`. Rather, it focuses on the production workflow and uses the Prisma schema and SQL migration that are included in the example code. You will use Koyeb's build step to run the `prisma migrate deploy` command so that the migrations are applied before the application starts. To learn more about how migrations are created with Prisma Migrate, check out the start from scratch guide ## 1\. Download the example and install dependencies Open your terminal and navigate to a location of your choice. Create the directory that will hold the application code and download the example code: mkdir prisma-on-koyebcd prisma-on-koyebcurl https://github.com/koyeb/example-prisma/tarball/main/latest | tar xz --strip=1 **Checkpoint:** Executing the `tree` command should show the following directories and files: .├── README.md├── package.json├── prisma│ ├── migrations│ │ ├── 20210310152103_init│ │ │ └── migration.sql│ │ └── migration_lock.toml│ └── schema.prisma├── public│ └── index.html└── src └── index.js5 directories, 8 files Install the dependencies: npm install ## 2\. Initialize a Git repository and push the application code to GitHub In the previous step, you downloaded the code. In this step, you will create a repository from the code so that you can push it to a GitHub repository for deployment. To do so, run `git init` from the source code folder: git init> Initialized empty Git repository in /Users/edouardb/prisma-on-koyeb/.git/ With the repository initialized, add and commit the files: git add .git commit -m 'Initial commit' **Checkpoint:** `git log -1` should show the commit: git log -1commit 895534590fdd260acee6396e2e1c0438d1be7fed (HEAD -> main) Then, push the code to your GitHub repository by adding the remote git remote add origin git@github.com:<YOUR_GITHUB_USERNAME>/<YOUR_GITHUB_REPOSITORY_NAME>.gitgit push -u origin main ## 3\. Deploy the application on Koyeb On the Koyeb Control Panel, click the **Create App** button. You land on the Koyeb App creation page where you are asked for information about the application to deploy such as the deployment method to use, the repository URL, the branch to deploy, the build and run commands to execute. Pick GitHub as the deployment method and select the GitHub repository containing your application and set the branch to deploy to `main`. > **Note:** If this is your first time using Koyeb, you will be prompted to install the Koyeb app in your GitHub account. In the **Environment variables** section, create a new environment variable `DATABASE_URL` that is type Secret. In the value field, click **Create Secret**, name your secret `prisma-pg-url` and set the PostgreSQL database connection string as the secret value which should look as follows: `postgresql://__USER__:__PASSWORD__@__HOST__/__DATABASE__`. Koyeb Secrets allow you to securely store and retrieve sensitive information like API tokens, database connection strings. They enable you to secure your code by removing hardcoded credentials and let you pass environment variables securely to your applications. Last, give your application a name and click the **Create App** button. **Checkpoint:** Open the deployed app by clicking on the screenshot of the deployed app. Once the page loads, click on the **Check API status** button, which should return: `{"up":true}` 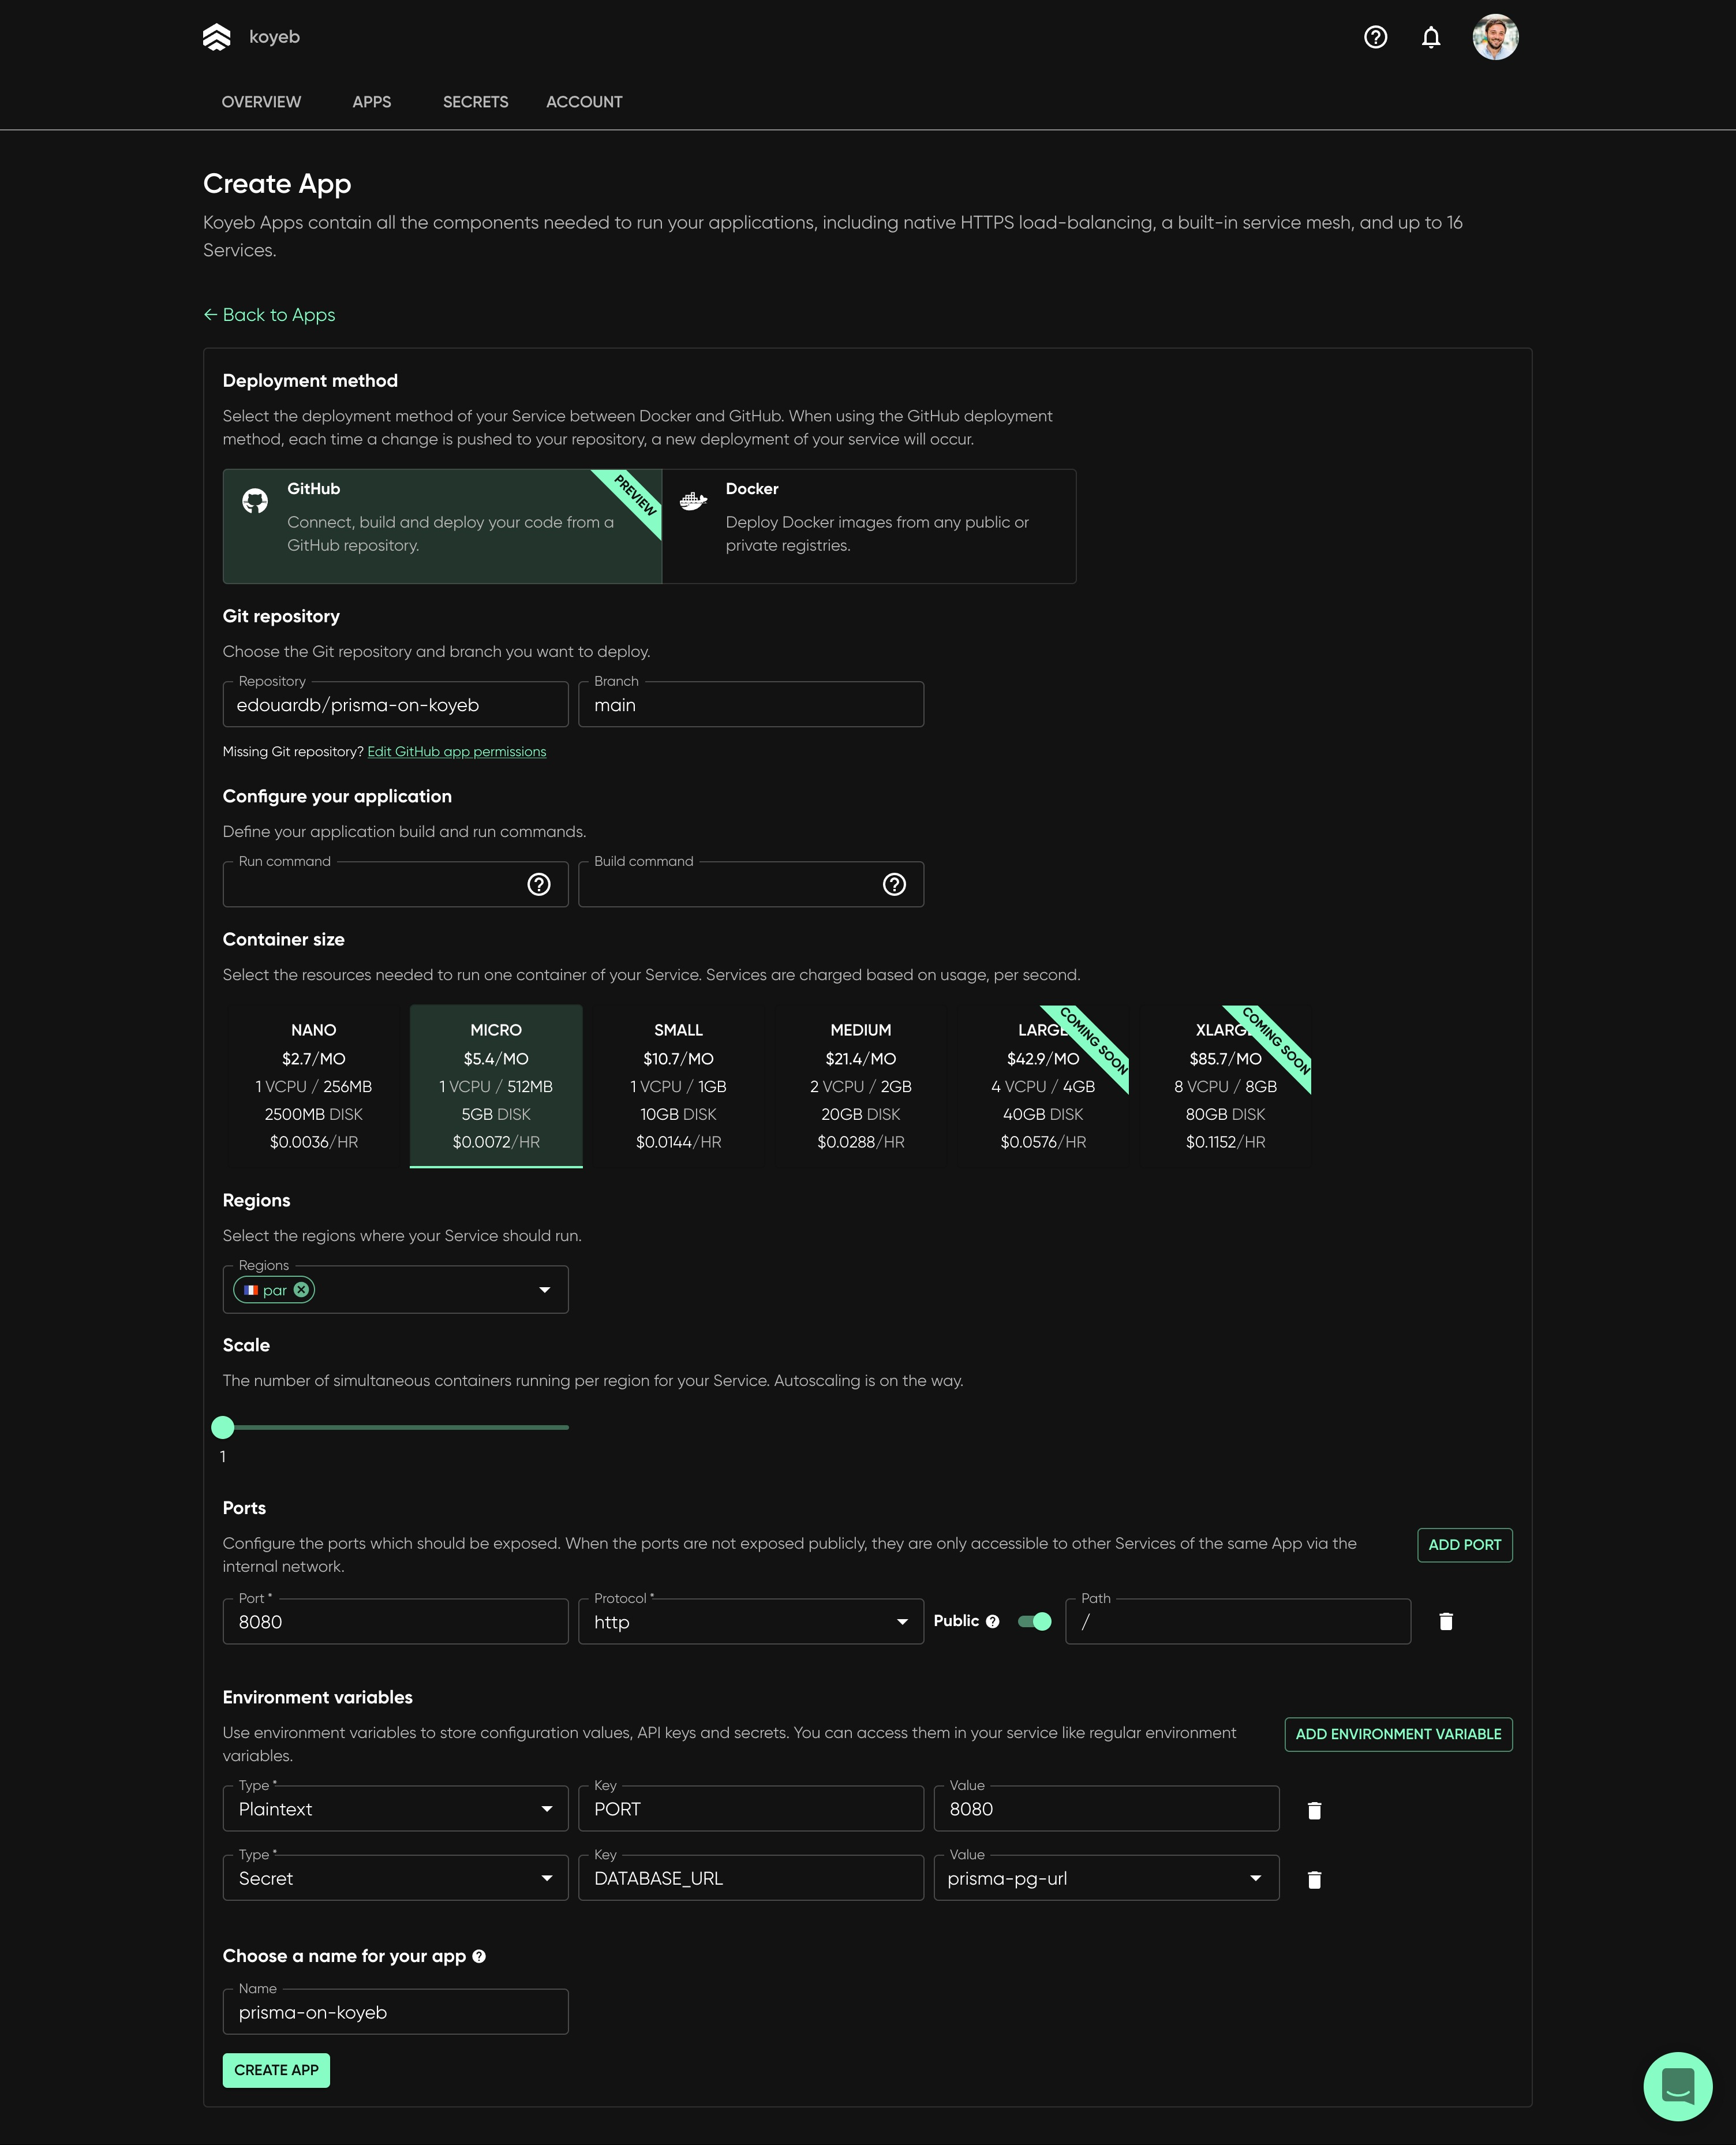 Congratulations! You have successfully deployed the app to Koyeb. Koyeb will build and deploy the application. Additional commits to your GitHub repository will trigger a new build and deployment on Koyeb. **Checkpoint:** Once the build and deployment are completed, you can access your application by clicking the App URL ending with koyeb.app in the Koyeb control panel. Once on the app page loads, Once the page loads, click on the **Check API status** button, which should return: `{"up":true}` ## 4\. Test your deployed application You can use the static frontend to interact with the API you deployed via the preview URL. Open up the preview URL in your browser, the URL should like this: `https://APP_NAME-ORG_NAME.koyeb.app`. You should see the following:  The buttons allow you to make requests to the REST API and view the response: * **Check API status**: Will call the REST API status endpoint that returns `{"up":true}`. * **Seed data**: Will seed the database with a test `user` and `post`. Returns the created users. * **Load feed**: Will load all `users` in the database with their related `profiles`. For more insight into Prisma Client's API, look at the route handlers in the `src/index.js` file. You can view the application's logs clicking the `Runtime logs` tab on your app service from the Koyeb control panel: node-72d14691 stdout > prisma-koyeb@1.0.0 startnode-72d14691 stdout > node src/index.jsnode-72d14691 stdout 🚀 Server ready at: http://localhost:8080node-72d14691 stdout ⭐️ See sample requests: http://pris.ly/e/ts/rest-express#3-using-the-rest-api ## Koyeb specific notes ### Build By default, for applications using the Node.js runtime, if the `package.json` contains a `build` script, Koyeb automatically executes it after the dependencies installation. In the example, the `build` script is used to run `prisma generate && prisma migrate deploy && next build`. ### Deployment By default, for applications using the Node.js runtime, if the `package.json` contains a `start` script, Koyeb automatically executes it to launch the application. In the example, the `start` script is used to run `node src/index.js`. ### Database migrations and deployments In the example you deployed, migrations are applied using the `prisma migrate deploy` command during the Koyeb build (as defined in the `build` script in `package.json`). ### Additional notes In this guide, we kept pre-set values for the region, instance size, and horizontal scaling. You can customize them according to your needs. > **Note:** The Ports section is used to let Koyeb know which port your application is listening to and properly route incoming HTTP requests. A default `PORT` environment variable is set to `8080` and incoming HTTP requests are routed to the `/` path when creating a new application. If your application is listening on another port, you can define another port to route incoming HTTP requests. ## Summary Congratulations! You have successfully deployed a Node.js app with Prisma ORM to Koyeb. You can find the source code for the example in this GitHub repository. For more insight into Prisma Client's API, look at the route handlers in the `src/index.js` file. --- ## Page: https://www.prisma.io/docs/orm/prisma-client/deployment/traditional/deploy-to-render This guide explains how to deploy a Node.js server that uses Prisma ORM and PostgreSQL to Render. The Prisma Render deployment example contains an Express.js application with REST endpoints and a simple frontend. This app uses Prisma Client to fetch, create, and delete records from its database. ## About Render Render is a cloud application platform that lets developers easily deploy and scale full-stack applications. For this example, it's helpful to know: * Render lets you deploy long-running, "serverful" full-stack applications. You can configure Render services to autoscale based on CPU and/or memory usage. This is one of several deployment paradigms you can choose from. * Render natively supports common runtimes, including Node.js and Bun. In this guide, we'll use the Node.js runtime. * Render integrates with Git repos for automatic deployments upon commits. You can deploy to Render from GitHub, GitLab, or Bitbucket. In this guide, we'll deploy from a Git repository. ## Prerequisites * Sign up for a Render account ## Get the example code Download the example code to your local machine. curl https://codeload.github.com/prisma/prisma-examples/tar.gz/latest | tar -xz --strip=2 prisma-examples-latest/deployment-platforms/rendercd render ## Understand the example Before we deploy the app, let's take a look at the example code. ### Web application The logic for the Express app is in two files: * `src/index.js`: The API. The endpoints use Prisma Client to fetch, create, and delete data from the database. * `public/index.html`: The web frontend. The frontend calls a few of the API endpoints. ### Prisma schema and migrations The Prisma components of this app are in two files: * `prisma/schema.prisma`: The data model of this app. This example defines two models, `User` and `Post`. The format of this file follows the Prisma schema. * `prisma/migrations/<migration name>/migration.sql`: The SQL commands that construct this schema in a PostgreSQL database. You can auto-generate migration files like this one by running `prisma migrate dev`. ### Render Blueprint The `render.yaml` file is a Render blueprint. Blueprints are Render's Infrastructure as Code format. You can use a Blueprint to programmatically create and modify services on Render. A `render.yaml` defines the services that will be spun up on Render by a Blueprint. In this `render.yaml`, we see: * **A web service that uses a Node runtime**: This is the Express app. * **A PostgreSQL database**: This is the database that the Express app uses. The format of this file follows the Blueprint specification. ### How Render deploys work with Prisma Migrate In general, you want all your database migrations to run before your web app is started. Otherwise, the app may hit errors when it queries a database that doesn't have the expected tables and rows. You can use the Pre-Deploy Command setting in a Render deploy to run any commands, such as database migrations, before the app is started. For more details about the Pre-Deploy Command, see Render's deploy guide. In our example code, the `render.yaml` shows the web service's build command, pre-deploy command, and start command. Notably, `npx prisma migrate deploy` (the pre-deploy command) will run before `npm run start` (the start command). | **Command** | **Value** | | --- | --- | | Build Command | `npm install --production=false` | | Pre-Deploy Command | `npx prisma migrate deploy` | | Start Command | `npm run start` | ## Deploy the example ### 1\. Initialize your Git repository 1. Download the example code to your local machine. 2. Create a new Git repository on GitHub, GitLab, or BitBucket. 3. Upload the example code to your new repository. ### 2\. Deploy manually 1. In the Render Dashboard, click **New** > **PostgreSQL**. Provide a database name, and select a plan. (The Free plan works for this demo.) 2. After your database is ready, look up its internal URL. 3. In the Render Dashboard, click **New** > **Web Service** and connect the Git repository that contains the example code. 4. Provide the following values during service creation: | **Setting** | **Value** | | --- | --- | | Language | `Node` | | Build Command | `npm install --production=false` | | Pre-Deploy Command (Note: this may be in the "Advanced" tab) | `npx prisma migrate deploy` | | Start Command | `npm run start` | | Environment Variables | Set `DATABASE_URL` to the internal URL of the database | That’s it. Your web service will be live at its `onrender.com` URL as soon as the build finishes. ### 3\. (optional) Deploy with Infrastructure as Code You can also deploy the example using the Render Blueprint. Follow Render's \[Blueprint setup guide\] and use the `render.yaml` in the example. ## Bonus: Seed the database Prisma ORM includes a framework for seeding the database with starter data. In our example, `prisma/seed.js` defines some test users and posts. To add these users to the database, we can either: 1. Add the seed script to our Pre-Deploy Command, or 2. Manually run the command on our server via an SSH shell ### Method 1: Pre-Deploy Command If you manually deployed your Render services: 1. In the Render dashboard, navigate to your web service. 2. Select **Settings**. 3. Set the Pre-Deploy Command to: `npx prisma migrate deploy; npx prisma db seed` If you deployed your Render services using the Blueprint: 1. In your `render.yaml` file, change the `preDeployCommand` to: `npx prisma migrate deploy; npx prisma db seed` 2. Commit the change to your Git repo. ### Method 2: SSH Render allows you to SSH into your web service. 1. Follow Render's SSH guide to connect to your server. 2. In the shell, run: `npx prisma db seed` --- ## Page: https://www.prisma.io/docs/orm/prisma-client/deployment/serverless/deploy-to-aws-lambda This guide explains how to avoid common issues when deploying a project using Prisma ORM to AWS Lambda. While a deployment framework is not required to deploy to AWS Lambda, this guide covers deploying with: * AWS Serverless Application Model (SAM) is an open-source framework from AWS that can be used in the creation of serverless applications. AWS SAM includes the AWS SAM CLI, which you can use to build, test, and deploy your application. * Serverless Framework provides a CLI that helps with workflow automation and AWS resource provisioning. While Prisma ORM works well with the Serverless Framework "out of the box", there are a few improvements that can be made within your project to ensure a smooth deployment and performance. There is also additional configuration that is needed if you are using the `serverless-webpack` or `serverless-bundle` libraries. * SST provides tools that make it easy for developers to define, test, debug, and deploy their applications. Prisma ORM works well with SST but must be configured so that your schema is correctly packaged by SST. ## General considerations when deploying to AWS Lambda This section covers changes you will need to make to your application, regardless of framework. After following these steps, follow the steps for your framework. * Deploying with AWS SAM * Deploying with the Serverless Framework * Deploying with SST ### Define binary targets in Prisma Schema Depending on the version of Node.js, your Prisma schema should contain either `rhel-openssl-1.0.x` or `rhel-openssl-3.0.x` in the `generator` block: * Node.js 16 and 18 * Node.js 20+ binaryTargets = ["native", "rhel-openssl-1.0.x"] This is necessary because the runtimes used in development and deployment differ. Add the `binaryTarget` to make the compatible Prisma ORM engine file available. #### Lambda functions with arm64 architectures Lambda functions that use arm64 architectures (AWS Graviton2 processor) must use an `arm64` precompiled engine file. In the `generator` block of your `schema.prisma` file, add the following: schema.prisma binaryTargets = ["native", "linux-arm64-openssl-1.0.x"] ### Prisma CLI binary targets While we do not recommend running migrations within AWS Lambda, some applications will require it. In these cases, you can use the PRISMA\_CLI\_BINARY\_TARGETS environment variable to make sure that Prisma CLI commands, including `prisma migrate`, have access to the correct schema engine. In the case of AWS lambda, you will have to add the following environment variable: .env PRISMA_CLI_BINARY_TARGETS=native,rhel-openssl-1.0.x info `prisma migrate` is a command in the `prisma` package. Normally, this package is installed as a dev dependency. Depending on your setup, you may need to install this package as a dependency instead so that it is included in the bundle or archive that is uploaded to Lambda and executed. ### Connection pooling In a Function as a Service (FaaS) environment, each function invocation typically creates a new database connection. Unlike a continuously running Node.js server, these connections aren't maintained between executions. For better performance in serverless environments, implement connection pooling to reuse existing database connections rather than creating new ones for each function call. You can use Accelerate for connection pooling or Prisma Postgres, which has built-in connection pooling, to solve this issue. For other solutions, see the connection management guide for serverless environments. ## Deploying with AWS SAM ### Loading environment variables AWS SAM does not directly support loading values from a `.env` file. You will have to use one of AWS's services to store and retrieve these parameters. This guide provides a great overview of your options and how to store and retrieve values in Parameters, SSM, Secrets Manager, and more. ### Loading required files AWS SAM uses esbuild to bundle your TypeScript code. However, the full esbuild API is not exposed and esbuild plugins are not supported. This leads to problems when using Prisma ORM in your application as certain files (like `schema.prisma`) must be available at runtime. To get around this, you need to directly reference the needed files in your code to bundle them correctly. In your application, you could add the following lines to your application where Prisma ORM is instantiated. app.ts import schema from './prisma/schema.prisma'import x from './node_modules/.prisma/client/libquery_engine-rhel-openssl-1.0.x.so.node'if (process.env.NODE_ENV !== 'production') { console.debug(schema, x)} ## Deploying with the Serverless Framework ### Loading environment variables via a `.env` file Your functions will need the `DATABASE_URL` environment variable to access the database. The `serverless-dotenv-plugin` will allow you to use your `.env` file in your deployments. First, make sure that the plugin is installed: npm install -D serverless-dotenv-plugin Then, add `serverless-dotenv-plugin` to your list of plugins in `serverless.yml`: serverless.yml plugins: - serverless-dotenv-plugin The environment variables in your `.env` file will now be automatically loaded on package or deployment. serverless package Show CLI results ### Deploy only the required files To reduce your deployment footprint, you can update your deployment process to only upload the files your application needs. The Serverless configuration file, `serverless.yml`, below shows a `package` pattern that includes only the Prisma ORM engine file relevant to the Lambda runtime and excludes the others. This means that when Serverless Framework packages your app for upload, it includes only one engine file. This ensures the packaged archive is as small as possible. serverless.yml package: patterns: - '!node_modules/.prisma/client/libquery_engine-*' - 'node_modules/.prisma/client/libquery_engine-rhel-*' - '!node_modules/prisma/libquery_engine-*' - '!node_modules/@prisma/engines/**' - '!node_modules/.cache/prisma/**' # only required for Windows If you are deploying to Lambda functions with ARM64 architecture you should update the Serverless configuration file to package the `arm64` engine file, as follows: serverless.yml package: patterns: - '!node_modules/.prisma/client/libquery_engine-*' - 'node_modules/.prisma/client/libquery_engine-linux-arm64-*' - '!node_modules/prisma/libquery_engine-*' - '!node_modules/@prisma/engines/**' If you use `serverless-webpack`, see Deployment with serverless webpack below. ### Deployment with `serverless-webpack` If you use `serverless-webpack`, you will need additional configuration so that your `schema.prisma` is properly bundled. You will need to: 1. Copy your `schema.prisma` with `copy-webpack-plugin`. 2. Run `prisma generate` via `custom > webpack > packagerOptions > scripts` in your `serverless.yml`. 3. Only package the correct Prisma ORM engine file to save more than 40mb of capacity. #### 1\. Install webpack specific dependencies First, ensure the following webpack dependencies are installed: npm install --save-dev webpack webpack-node-externals copy-webpack-plugin serverless-webpack #### 2\. Update `webpack.config.js` In your `webpack.config.js`, make sure that you set `externals` to `nodeExternals()` like the following: webpack.config.js const nodeExternals = require('webpack-node-externals')module.exports = { // ... other configuration externals: [nodeExternals()], // ... other configuration} Update the `plugins` property in your `webpack.config.js` file to include the `copy-webpack-plugin`: webpack.config.js const nodeExternals = require('webpack-node-externals')const CopyPlugin = require('copy-webpack-plugin')module.exports = { // ... other configuration externals: [nodeExternals()], plugins: [ new CopyPlugin({ patterns: [ { from: './node_modules/.prisma/client/schema.prisma', to: './' }, // you may need to change `to` here. ], }), ], // ... other configuration} This plugin will allow you to copy your `schema.prisma` file into your bundled code. Prisma ORM requires that your `schema.prisma` be present in order make sure that queries are encoded and decoded according to your schema. In most cases, bundlers will not include this file by default and will cause your application to fail to run. info Depending on how your application is bundled, you may need to copy the schema to a location other than `./`. Use the `serverless package` command to package your code locally so you can review where your schema should be put. Refer to the Serverless Webpack documentation for additional configuration. #### 3\. Update `serverless.yml` In your `serverless.yml` file, make sure that the `custom > webpack` block has `prisma generate` under `packagerOptions > scripts` as follows: serverless.yml custom: webpack: packagerOptions: scripts: - prisma generate This will ensure that, after webpack bundles your code, the Prisma Client is generated according to your schema. Without this step, your app will fail to run. Lastly, you will want to exclude Prisma ORM query engines that do not match the AWS Lambda runtime. Update your `serverless.yml` by adding the following script that makes sure only the required query engine, `rhel-openssl-1.0.x`, is included in the final packaged archive. serverless.yml custom: webpack: packagerOptions: scripts: - prisma generate -- find . -name "libquery_engine-*" -not -name "libquery_engine-rhel-openssl-*" | xargs rm If you are deploying to Lambda functions with ARM64 architecture you should update the `find` command to the following: serverless.yml custom: webpack: packagerOptions: scripts: - prisma generate -- find . -name "libquery_engine-*" -not -name "libquery_engine-arm64-openssl-*" | xargs rm #### 4\. Wrapping up You can now re-package and re-deploy your application. To do so, run `serverless deploy`. Webpack output will show the schema being moved with `copy-webpack-plugin`: serverless package Show CLI results ## Deploying with SST ### Working with environment variables While SST supports `.env` files, it is not recommended. SST recommends using `Config` to access these environment variables in a secure way. The SST guide available here is a step-by-step guide to get started with `Config`. Assuming you have created a new secret called `DATABASE_URL` and have bound that secret to your app, you can set up `PrismaClient` with the following: prisma.ts import { PrismaClient } from '@prisma/client'import { Config } from 'sst/node/config'const globalForPrisma = global as unknown as { prisma: PrismaClient }export const prisma = globalForPrisma.prisma || new PrismaClient({ datasourceUrl: Config.DATABASE_URL, })if (process.env.NODE_ENV !== 'production') globalForPrisma.prisma = prismaexport default prisma --- ## Page: https://www.prisma.io/docs/orm/prisma-client/deployment/serverless/deploy-to-azure-functions This guide explains how to avoid common issues when deploying a Node.js-based function app to Azure using Azure Functions. Azure Functions is a serverless deployment platform. You do not need to maintain infrastructure to deploy your code. With Azure Functions, the fundamental building block is the function app. A function app provides an execution context in Azure in which your functions run. It is comprised of one or more individual functions that Azure manages, deploys, and scales together. You can organize and collectively manage multiple functions as a single logical unit. ## Prerequisites * An existing function app project with Prisma ORM ## Things to know While Prisma ORM works well with Azure functions, there are a few things to take note of before deploying your application. ### Define multiple binary targets When deploying a function app, the operating system that Azure functions runs a remote build is different from the one used to host your functions. Therefore, we recommend specifying the following `binaryTargets` options in your Prisma schema: schema.prisma generator client { provider = "prisma-client-js" binaryTargets = ["native", "debian-openssl-1.1.x"]} ### Connection pooling Generally, when you use a FaaS (Function as a Service) environment to interact with a database, every function invocation can result in a new connection to the database. This is not a problem with a constantly running Node.js server. Therefore, it is beneficial to pool DB connections to get better performance. To solve this issue, you can use the Prisma Accelerate. For other solutions, see the connection management guide for serverless environments. ## Summary For more insight into Prisma Client's API, explore the function handlers and check out the Prisma Client API Reference --- ## Page: https://www.prisma.io/docs/orm/prisma-client/deployment/traditional/deploy-to-flyio This guide explains how to deploy a Node.js server that uses Prisma ORM and PostgreSQL to Fly.io. The Prisma Render deployment example contains an Express.js application with REST endpoints and a simple frontend. This app uses Prisma Client to fetch, create, and delete records from its database. This guide will show you how to deploy the same application, without modification, on Fly.io. ## About Fly.io fly.io is a cloud application platform that lets developers easily deploy and scale full-stack applications that start on request near on machines near to users. For this example, it's helpful to know: * Fly.io lets you deploy long-running, "serverful" full-stack applications in 35 regions around the world. By default, applications are configured to to auto-stop when not in use, and auto-start as needed as requests come in. * Fly.io natively supports a wide variety of languages and frameworks, including Node.js and Bun. In this guide, we'll use the Node.js runtime. * Fly.io can launch apps directly from GitHub. When run from the CLI, `fly launch` will automatically configure applications hosted on GitHub to deploy on push. ## Prerequisites * Sign up for a Fly.io account ## Get the example code Download the example code to your local machine. curl https://codeload.github.com/prisma/prisma-examples/tar.gz/latest | tar -xz --strip=2 prisma-examples-latest/deployment-platforms/rendercd render ## Understand the example Before we deploy the app, let's take a look at the example code. ### Web application The logic for the Express app is in two files: * `src/index.js`: The API. The endpoints use Prisma Client to fetch, create, and delete data from the database. * `public/index.html`: The web frontend. The frontend calls a few of the API endpoints. ### Prisma schema and migrations The Prisma components of this app are in three files: * `prisma/schema.prisma`: The data model of this app. This example defines two models, `User` and `Post`. The format of this file follows the Prisma schema. * `prisma/migrations/<migration name>/migration.sql`: The SQL commands that construct this schema in a PostgreSQL database. You can auto-generate migration files like this one by running `prisma migrate dev`. * `prisma/seed.js`: defines some test users and postsPrisma, used to seed the database with starter data. ## Deploy the example ### 1\. Run `fly launch` and accept the defaults That’s it. Your web service will be live at its `fly.dev` URL as soon as the deploy completes. Optionally scale the size, number, and placement of machines as desired. `fly console` can be used to ssh into a new or existing machine. More information can be found on in the fly.io documentation. --- ## Page: https://www.prisma.io/docs/orm/prisma-client/deployment/serverless/deploy-to-vercel This guide takes you through the steps to set up and deploy a serverless application that uses Prisma to Vercel. Vercel is a cloud platform that hosts static sites, serverless, and edge functions. You can integrate a Vercel project with a GitHub repository to allow you to deploy automatically when you make new commits. We created an example application using Next.js you can use as a reference when deploying an application using Prisma to Vercel. While our examples use Next.js, you can deploy other applications to Vercel. See Using Express with Vercel and Nuxt on Vercel as examples of other options. ## Build configuration ### Updating Prisma Client during Vercel builds Vercel will automatically cache dependencies on deployment. For most applications, this will not cause any issues. However, for Prisma ORM, it may result in an outdated version of Prisma Client on a change in your Prisma schema. To avoid this issue, add `prisma generate` to the `postinstall` script of your application: package.json { ... "scripts" { "postinstall": "prisma generate" } ...} This will re-generate Prisma Client at build time so that your deployment always has an up-to-date client. info If you see `prisma: command not found` errors during your deployment to Vercel, you are missing `prisma` in your dependencies. By default, `prisma` is a dev dependency and may need to be moved to be a standard dependency. Another option to avoid an outdated Prisma Client is to use a custom output path and check your client into version control. This way each deployment is guaranteed to include the correct Prisma Client. schema.prisma generator client { provider = "prisma-client-js" output = "./generated/client"} ### Deploying Prisma in Monorepos on Vercel If you are using Prisma inside a monorepo (e.g., with TurboRepo) and deploying to Vercel, you may encounter issues where required files—such as `libquery_engine-rhel-openssl-3.0.x.so.node` are missing from the deployed bundle. This is because Vercel aggressively optimizes serverless deployments, sometimes stripping out necessary Prisma files. To resolve this, use the @prisma/nextjs-monorepo-workaround-plugin plugin, which ensures that Prisma engine files are correctly included in the final bundle. For more details on how Prisma interacts with different bundlers like Webpack and Parcel, see our Module bundlers page. ### CI/CD workflows In a more sophisticated CI/CD environment, you may additonally want to update the database schema with any migrations you have performed during local development. You can do this using the `prisma migrate deploy` command. In that case, you could create a custom build command in your `package.json` (e.g. called `vercel-build`) that looks as follows: package.json { ... "scripts" { "vercel-build": "prisma generate && prisma migrate deploy && next build", } ...} You can invoke this script inside your CI/CD pipeline using the following command: npm run vercel-build ## Add a separate database for preview deployments By default, your application will have a single _production_ environment associated with the `main` git branch of your repository. If you open a pull request to change your application, Vercel creates a new _preview_ environment. Vercel uses the `DATABASE_URL` environment variable you define when you import the project for both the production and preview environments. This causes problems if you create a pull request with a database schema migration because the pull request will change the schema of the production database. To prevent this, use a _second_ hosted database to handle preview deployments. Once you have that connection string, you can add a `DATABASE_URL` for your preview environment using the Vercel dashboard: 1. Click the **Settings** tab of your Vercel project. 2. Click **Environment variables**. 3. Add an environment variable with a key of `DATABASE_URL` and select only the **Preview** environment option: 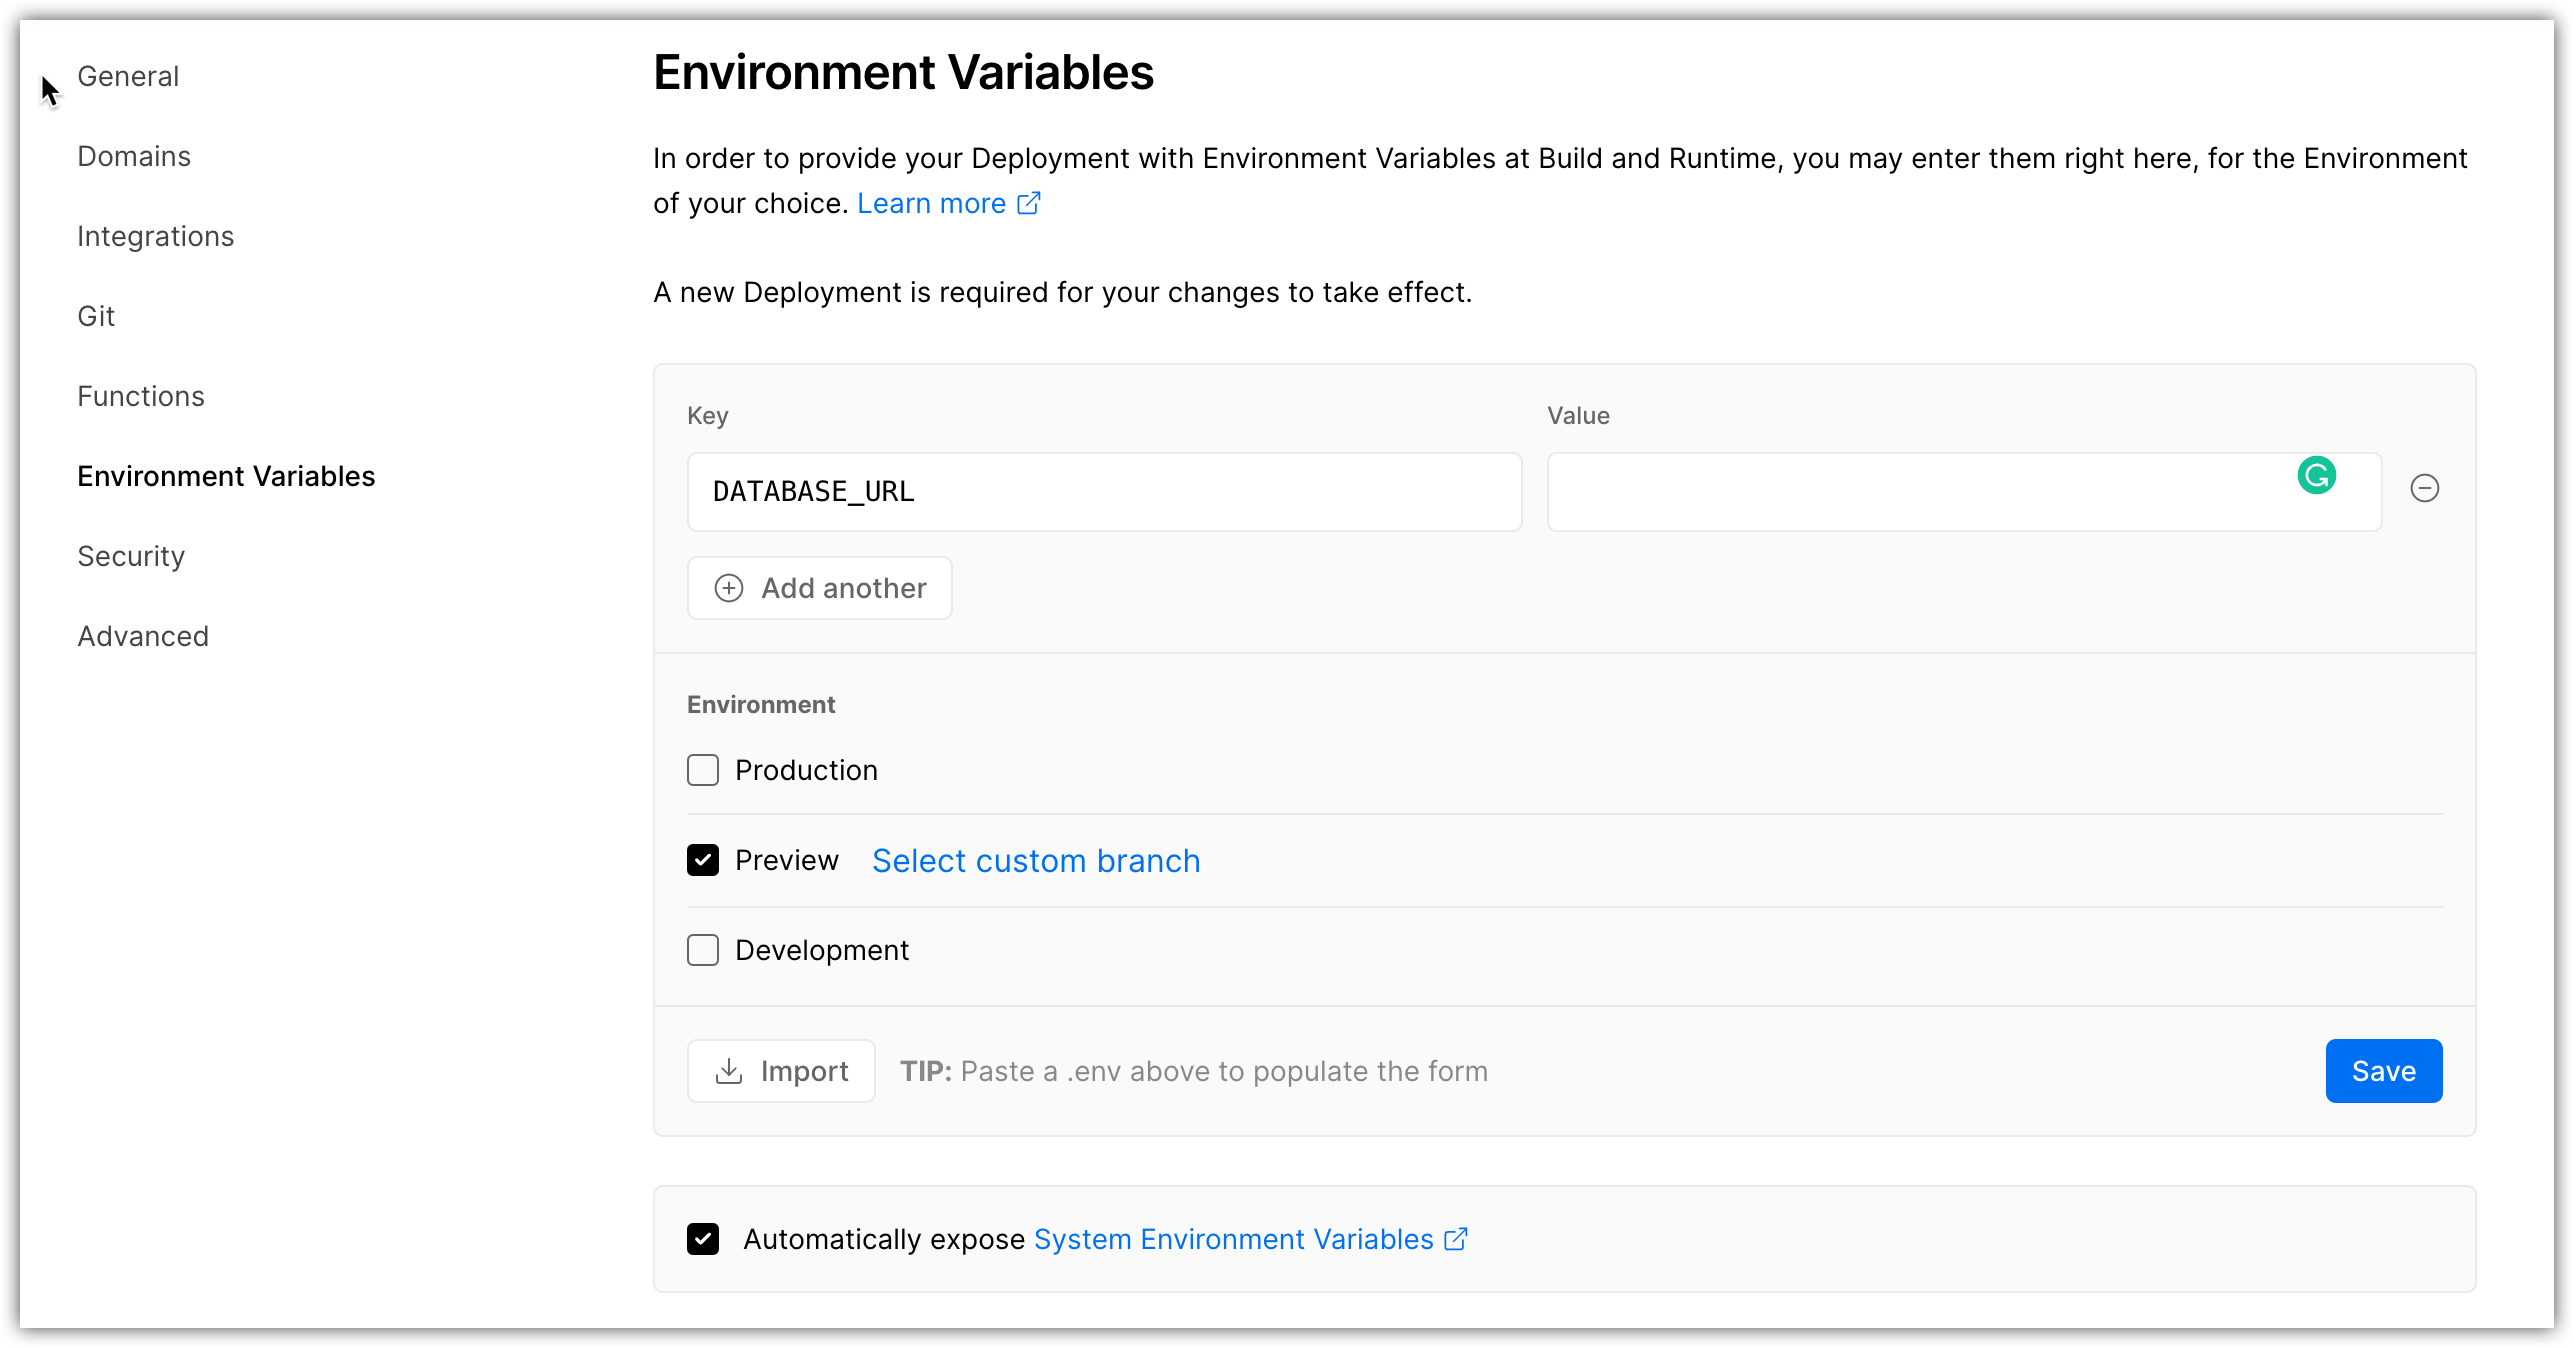 4. Set the value to the connection string of your second database: postgresql://dbUsername:dbPassword@myhost:5432/mydb 5. Click **Save**. ## Connection pooling When you use a Function-as-a-Service provider, like Vercel Serverless functions, every invocation may result in a new connection to your database. This can cause your database to quickly run out of open connections and cause your application to stall. For this reason, pooling connections to your database is essential. You can use Accelerate for connection pooling or Prisma Postgres, which has built-in connection pooling, to reduce your Prisma Client bundle size, and to avoid cold starts. For more information on connection management for serverless environments, refer to our connection management guide. --- ## Page: https://www.prisma.io/docs/orm/prisma-client/deployment/serverless/deploy-to-netlify This guide covers the steps you will need to take in order to deploy your application that uses Prisma ORM to Netlify. Netlify is a cloud platform for continuous deployment, static sites, and serverless functions. Netlify integrates seamlessly with GitHub for automatic deployments upon commits. When you follow the steps below, you will use that approach to create a CI/CD pipeline that deploys your application from a GitHub repository. ## Prerequisites Before you can follow this guide, you will need to set up your application to begin deploying to Netlify. We recommend the "Get started with Netlify" guide for a quick overview and "Deploy functions" for an in-depth look at your deployment options. ## Binary targets in `schema.prisma` Since your code is being deployed to Netlify's environment, which isn't necessarily the same as your development environment, you will need to set `binaryTargets` in order to download the query engine that is compatible with the Netlify runtime during your build step. If you do not set this option, your deployed code will have an incorrect query engine deployed with it and will not function. Depending on the version of Node.js, your Prisma schema should contain either `rhel-openssl-1.0.x` or `rhel-openssl-3.0.x` in the `generator` block: * Node.js 16 and 18 * Node.js 20+ binaryTargets = ["native", "rhel-openssl-1.0.x"] ## Store environment variables in Netlify We recommend keeping `.env` files in your `.gitignore` in order to prevent leakage of sensitives connection strings. Instead, you can use the Netlify CLI to import values into netlify directly. Assuming you have a file like the following: .env # Connect to DBDATABASE_URL="postgresql://postgres:__PASSWORD__@__HOST__:__PORT__/__DB_NAME__" You can upload the file as environment variables using the `env:import` command: netlify env:import .env Show query results site: my-very-very-cool-site---------------------------------------------------------------------------------. Imported environment variables |---------------------------------------------------------------------------------| Key | Value |--------------|------------------------------------------------------------------| DATABASE_URL | postgresql://postgres:__PASSWORD__@__HOST__:__PORT__/__DB_NAME__ |---------------------------------------------------------------------------------' If you are not using an `.env` file If you are storing your database connection string and other environment variables in a different method, you will need to manually upload your environment variables to Netlify. These options are discussed in Netlfiy's documentation and one method, uploading via the UI, is described below. 1. Open the Netlify admin UI for the site. You can use Netlify CLI as follows: netlify open --admin 2. Click **Site settings**: 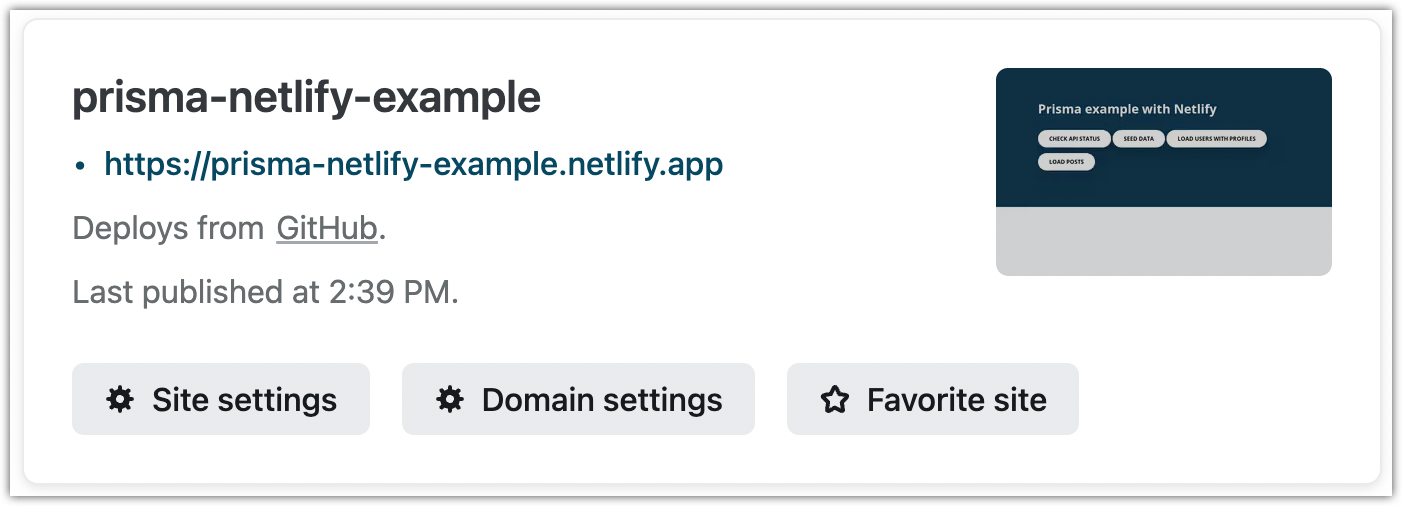 3. Navigate to **Build & deploy** in the sidebar on the left and select **Environment**. 4. Click **Edit variables** and create a variable with the key `DATABASE_URL` and set its value to your database connection string. 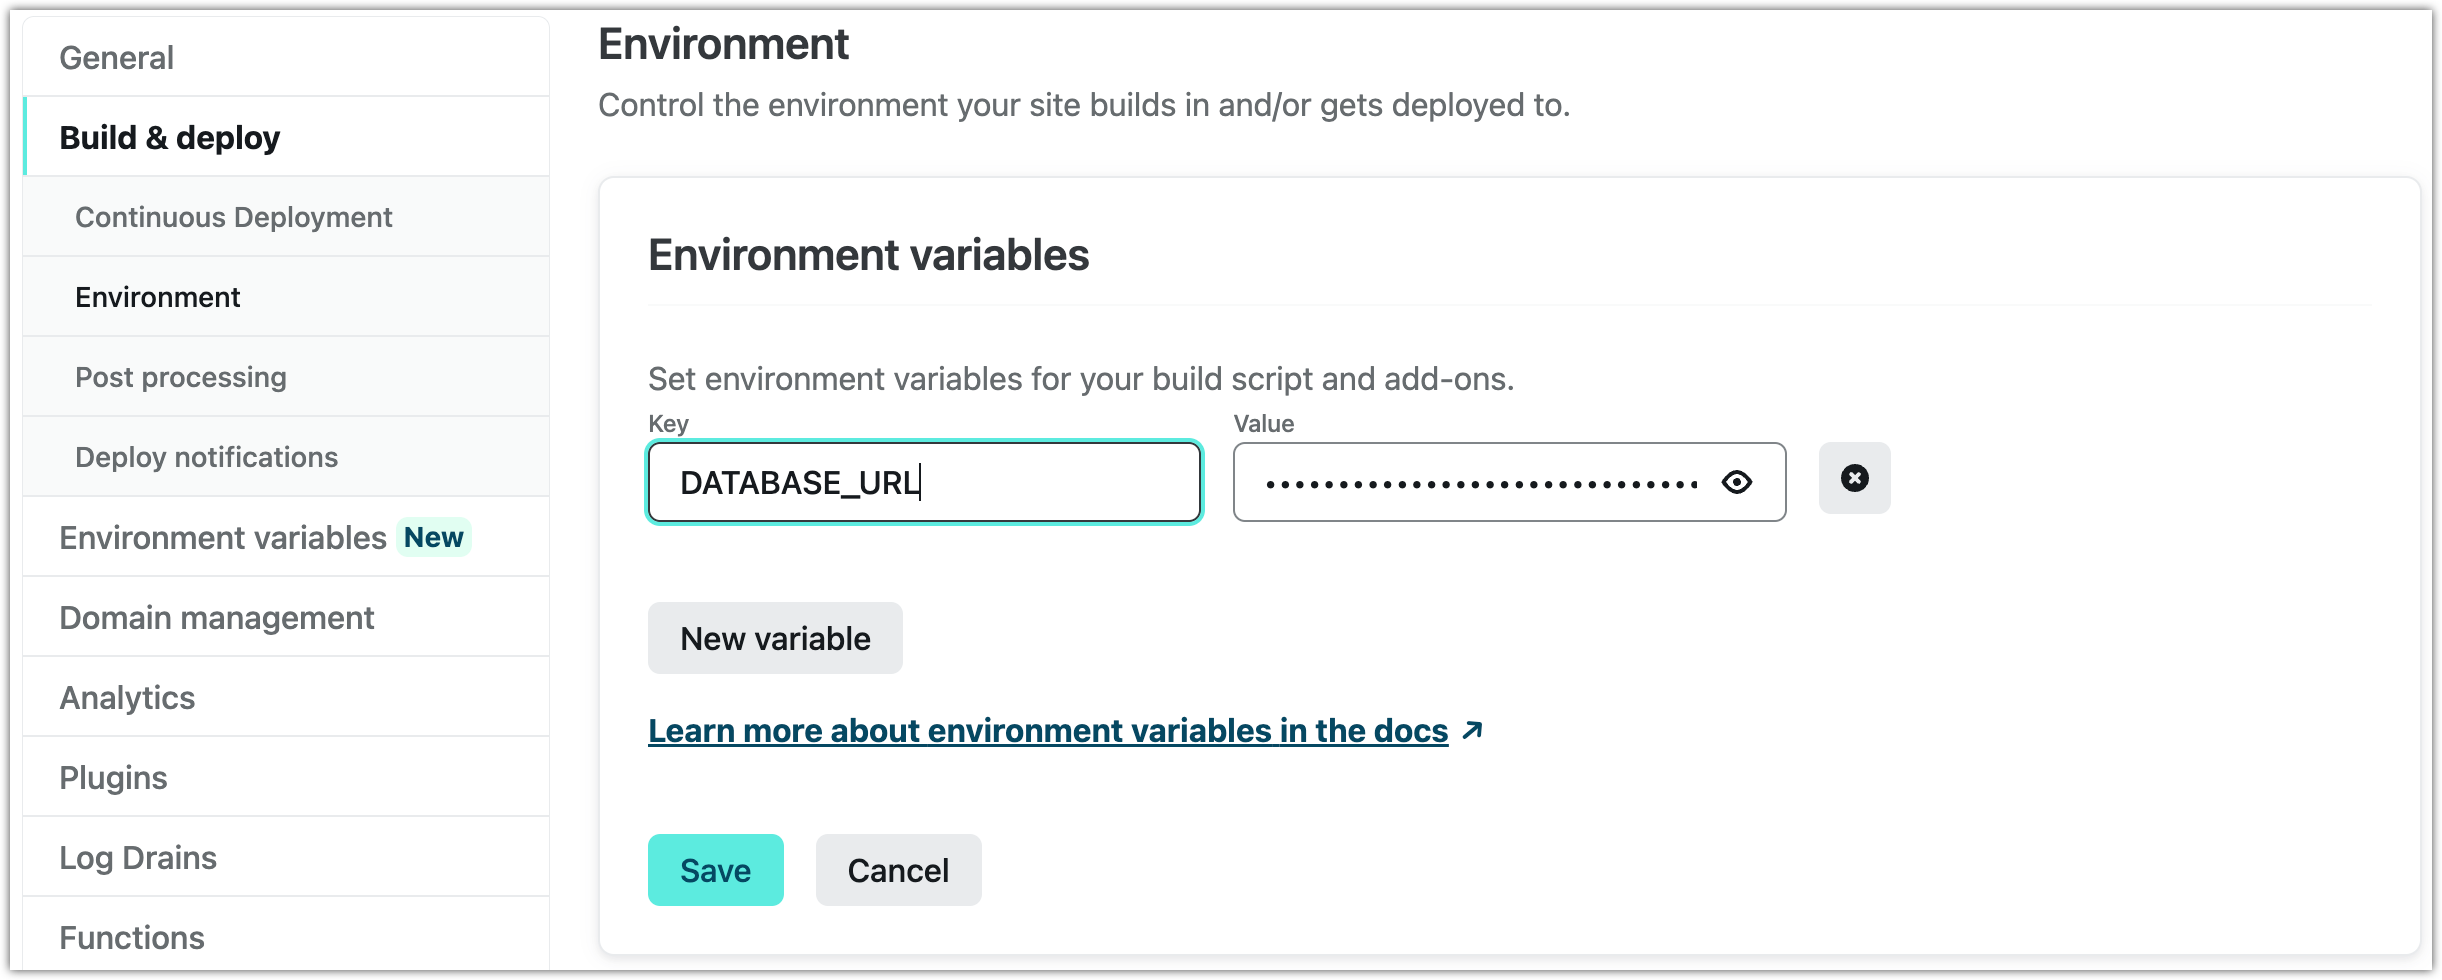 5. Click **Save**. Now start a new Netlify build and deployment so that the new build can use the newly uploaded environment variables. netlify deploy You can now test the deployed application. ## Connection pooling When you use a Function-as-a-Service provider, like Netlify, it is beneficial to pool database connections for performance reasons. This is because every function invocation may result in a new connection to your database which can quickly run out of open connections. You can use Accelerate for connection pooling or Prisma Postgres, which has built-in connection pooling, to reduce your Prisma Client bundle size, and to avoid cold starts. For more information on connection management for serverless environments, refer to our connection management guide. --- ## Page: https://www.prisma.io/docs/orm/prisma-client/deployment/edge/deploy-to-cloudflare This page covers everything you need to know to deploy an app with Prisma ORM to a Cloudflare Worker or to Cloudflare Pages. ## General considerations when deploying to Cloudflare Workers This section covers _general_ things you need to be aware of when deploying to Cloudflare Workers or Pages and are using Prisma ORM, regardless of the database provider you use. ### Using Prisma Postgres You can use Prisma Postgres and deploy to Cloudflare Workers. After you create a Worker, run: npx prisma@latest init --db Enter a name for your project and choose a database region. This command: * Connects your CLI to your account. If you're not logged in or don't have an account, your browser will open to guide you through creating a new account or signing into your existing one. * Creates a `prisma` directory containing a `schema.prisma` file for your database models. * Creates a `.env` file with your `DATABASE_URL` (e.g., for Prisma Postgres it should have something similar to `DATABASE_URL="prisma+postgres://accelerate.prisma-data.net/?api_key=eyJhbGciOiJIUzI..."`). You'll need to install the Client extension required to use Prisma Postgres: npm i @prisma/extension-accelerate And extend `PrismaClient` with the extension in your application code: import { PrismaClient } from "@prisma/client/edge";import { withAccelerate } from "@prisma/extension-accelerate";export interface Env { DATABASE_URL: string;}export default { async fetch(request, env, ctx) { const prisma = new PrismaClient({ datasourceUrl: env.DATABASE_URL, }).$extends(withAccelerate()); const users = await prisma.user.findMany(); const result = JSON.stringify(users); return new Response(result); },} satisfies ExportedHandler<Env>; Then setup helper scripts to perform migrations and generate `PrismaClient` as shown in this section. note You need to have the `dotenv-cli` package installed as Cloudflare Workers does not support `.env` files. You can do this by running the following command to install the package locally in your project: `npm install -D dotenv-cli`. ### Using an edge-compatible driver When deploying a Cloudflare Worker that uses Prisma ORM, you need to use an edge-compatible driver and its respective driver adapter for Prisma ORM. The edge-compatible drivers for Cloudflare Workers and Pages are: * Neon Serverless uses HTTP to access the database * PlanetScale Serverless uses HTTP to access the database * `node-postgres` (`pg`) uses Cloudflare's `connect()` (TCP) to access the database * `@libsql/client` is used to access Turso databases via HTTP * Cloudflare D1 is used to access D1 databases There's also work being done on the `node-mysql2` driver which will enable access to traditional MySQL databases from Cloudflare Workers and Pages in the future as well. note If your application uses PostgreSQL, we recommend using Prisma Postgres. It is fully supported on edge runtimes and does not require a specialized edge-compatible driver. For other databases, Prisma Accelerate extends edge compatibility so you can connect to _any_ database from _any_ edge function provider. ### Setting your database connection URL as an environment variable First, ensure that the `DATABASE_URL` is set as the `url` of the `datasource` in your Prisma schema: datasource db { provider = "postgresql" // this might also be `mysql` or another value depending on your database url = env("DATABASE_URL")} #### Development When using your Worker in **development**, you can configure your database connection via the `.dev.vars` file locally. Assuming you use the `DATABASE_URL` environment variable from above, you can set it inside `.dev.vars` as follows: .dev.vars DATABASE_URL="your-database-connection-string" In the above snippet, `your-database-connection-string` is a placeholder that you need to replace with the value of your own connection string, for example: .dev.vars DATABASE_URL="postgresql://admin:mypassword42@somehost.aws.com:5432/mydb" Note that the `.dev.vars` file is not compatible with `.env` files which are typically used by Prisma ORM. This means that you need to make sure that Prisma ORM gets access to the environment variable when needed, e.g. when running a Prisma CLI command like `prisma migrate dev`. There are several options for achieving this: * Run your Prisma CLI commands using `dotenv` to specify from where the CLI should read the environment variable, for example: dotenv -e .dev.vars -- npx prisma migrate dev * Create a script in `package.json` that reads `.dev.vars` via `dotenv`. You can then execute `prisma` commands as follows: `npm run env -- npx prisma migrate dev`. Here's a reference for the script: package.json "scripts": { "env": "dotenv -e .dev.vars" } * Duplicate the `DATABASE_URL` and any other relevant env vars into a new file called `.env` which can then be used by Prisma ORM. note If you're using an approach that requires `dotenv`, you need to have the `dotenv-cli` package installed. You can do this e.g. by using this command to install the package locally in your project: `npm install -D dotenv-cli`. #### Production When deploying your Worker to **production**, you'll need to set the database connection using the `wrangler` CLI: npx wrangler secret put DATABASE_URL The command is interactive and will ask you to enter the value for the `DATABASE_URL` env var as the next step in the terminal. note This command requires you to be authenticated, and will ask you to log in to your Cloudflare account in case you are not. ### Size limits on free accounts Cloudflare has a size limit of 3 MB for Workers on the free plan. If your application bundle with Prisma ORM exceeds that size, we recommend upgrading to a paid Worker plan or using Prisma Accelerate to deploy your application. If you're running into this problem with `pg` and the `@prisma/adapter-pg` package, you can replace the `pg` with the custom `@prisma/pg-worker` package and use the `@prisma/adapter-pg-worker` adapter that belongs to it. `@prisma/pg-worker` is an optimized and lightweight version of `pg` that is designed to be used in a Worker. It is a drop-in replacement for `pg` and is fully compatible with Prisma ORM. ### Deploying a Next.js app to Cloudflare Pages with `@cloudflare/next-on-pages` Cloudflare offers an option to run Next.js apps on Cloudflare Pages with `@cloudflare/next-on-pages`, see the docs for instructions. Based on some testing, we found the following: * You can deploy using the PlanetScale or Neon Serverless Driver. * Traditional PostgreSQL deployments using `pg` don't work because `pg` itself currently does not work with `@cloudflare/next-on-pages` (see here). Feel free to reach out to us on Discord if you find that anything has changed about this. ### Set `PRISMA_CLIENT_FORCE_WASM=1` when running locally with `node` Some frameworks (e.g. hono) use `node` instead of `wrangler` for running Workers locally. If you're using such a framework or are running your Worker locally with `node` for another reason, you need to set the `PRISMA_CLIENT_FORCE_WASM` environment variable: export PRISMA_CLIENT_FORCE_WASM=1 ## Database-specific considerations & examples This section provides database-specific instructions for deploying a Cloudflare Worker with Prisma ORM. ### Prerequisites As a prerequisite for the following section, you need to have a Cloudflare Worker running locally and the Prisma CLI installed. If you don't have that yet, you can run these commands: npm create cloudflare@latest prisma-cloudflare-worker-example -- --type hello-worldcd prisma-cloudflare-worker-examplenpm install prisma --save-devnpx prisma init --output ../generated/prisma You'll further need a database instance of your database provider of choice available. Refer to the respective documentation of the provider for setting up that instance. We'll use the default `User` model for the example below: model User { id Int @id @default(autoincrement()) email String @unique name String?} ### PostgreSQL (traditional) If you are using a traditional PostgreSQL database that's accessed via TCP and the `pg` driver, you need to: * use the `@prisma/adapter-pg` database adapter (via the `driverAdapters` Preview feature) * set `node_compat = true` in `wrangler.toml` (see the Cloudflare docs) If you are running into a size issue and can't deploy your application because of that, you can use our slimmer variant of the `pg` driver package `@prisma/pg-worker` and the `@prisma/adapter-pg-worker` adapter that belongs to it. `@prisma/pg-worker` is an optimized and lightweight version of `pg` that is designed to be used in a Worker. It is a drop-in replacement for `pg` and is fully compatible with Prisma ORM. #### 1\. Configure Prisma schema & database connection note If you don't have a project to deploy, follow the instructions in the Prerequisites to bootstrap a basic Cloudflare Worker with Prisma ORM in it. First, ensure that the database connection is configured properly. In your Prisma schema, set the `url` of the `datasource` block to the `DATABASE_URL` environment variable. You also need to enable the `driverAdapters` feature flag: schema.prisma generator client { provider = "prisma-client-js" previewFeatures = ["driverAdapters"]}datasource db { provider = "postgresql" url = env("DATABASE_URL")} Next, you need to set the `DATABASE_URL` environment variable to the value of your database connection string. You'll do this in a file called `.dev.vars` used by Cloudflare: .dev.vars DATABASE_URL="postgresql://admin:mypassword42@somehost.aws.com:5432/mydb" Because the Prisma CLI by default is only compatible with `.env` files, you can adjust your `package.json` with the following script that loads the env vars from `.dev.vars`. You can then use this script to load the env vars before executing a `prisma` command. Add this script to your `package.json`: package.json { // ... "scripts": { // .... "env": "dotenv -e .dev.vars" }, // ...} Now you can execute Prisma CLI commands as follows while ensuring that the command has access to the env vars in `.dev.vars`: npm run env -- npx prisma #### 2\. Install dependencies Next, install the required packages: npm install @prisma/adapter-pgnpm install pgnpm install @types/pg --save-dev # if you're using TypeScript #### 3\. Set `node_compat = true` in `wrangler.toml` In your `wrangler.toml` file, add the following line: wrangler.toml node_compat = true note For Cloudflare Pages, using `node_compat` is not officially supported. If you want to use `pg` in Cloudflare Pages, you can find a workaround here. #### 4\. Migrate your database schema (if applicable) If you ran `npx prisma init` above, you need to migrate your database schema to create the `User` table that's defined in your Prisma schema (if you already have all the tables you need in your database, you can skip this step): npm run env -- npx prisma migrate dev --name init #### 5\. Use Prisma Client in your Worker to send a query to the database Here is a sample code snippet that you can use to instantiate `PrismaClient` and send a query to your database: import { PrismaClient } from '@prisma/client'import { PrismaPg } from '@prisma/adapter-pg'import { Pool } from 'pg'export default { async fetch(request, env, ctx) { const pool = new Pool({ connectionString: env.DATABASE_URL }) const adapter = new PrismaPg(pool) const prisma = new PrismaClient({ adapter }) const users = await prisma.user.findMany() const result = JSON.stringify(users) return new Response(result) },} #### 6\. Run the Worker locally To run the Worker locally, you can run the `wrangler dev` command: npx wrangler dev #### 7\. Set the `DATABASE_URL` environment variable and deploy the Worker To deploy the Worker, you first need to the `DATABASE_URL` environment variable via the `wrangler` CLI: npx wrangler secret put DATABASE_URL The command is interactive and will ask you to enter the value for the `DATABASE_URL` env var as the next step in the terminal. note This command requires you to be authenticated, and will ask you to log in to your Cloudflare account in case you are not. Then you can go ahead then deploy the Worker: npx wrangler deploy The command will output the URL where you can access the deployed Worker. ### PlanetScale If you are using a PlanetScale database, you need to: * use the `@prisma/adapter-planetscale` database adapter (via the `driverAdapters` Preview feature) * manually remove the conflicting `cache` field (learn more): export default { async fetch(request, env, ctx) { const client = new Client({ url: env.DATABASE_URL, // see https://github.com/cloudflare/workerd/issues/698 fetch(url, init) { delete init['cache'] return fetch(url, init) }, }) const adapter = new PrismaPlanetScale(client) const prisma = new PrismaClient({ adapter }) // ... },} #### 1\. Configure Prisma schema & database connection note If you don't have a project to deploy, follow the instructions in the Prerequisites to bootstrap a basic Cloudflare Worker with Prisma ORM in it. First, ensure that the database connection is configured properly. In your Prisma schema, set the `url` of the `datasource` block to the `DATABASE_URL` environment variable. You also need to enable the `driverAdapters` feature flag: schema.prisma generator client { provider = "prisma-client-js" previewFeatures = ["driverAdapters"]}datasource db { provider = "mysql" url = env("DATABASE_URL") relationMode = "prisma" // required for PlanetScale (as by default foreign keys are disabled)} Next, you need to set the `DATABASE_URL` environment variable to the value of your database connection string. You'll do this in a file called `.dev.vars` used by Cloudflare: .dev.vars DATABASE_URL="mysql://32qxa2r7hfl3102wrccj:password@us-east.connect.psdb.cloud/demo-cf-worker-ps?sslaccept=strict" Because the Prisma CLI by default is only compatible with `.env` files, you can adjust your `package.json` with the following script that loads the env vars from `.dev.vars`. You can then use this script to load the env vars before executing a `prisma` command. Add this script to your `package.json`: package.json { // ... "scripts": { // .... "env": "dotenv -e .dev.vars" }, // ...} Now you can execute Prisma CLI commands as follows while ensuring that the command has access to the env vars in `.dev.vars`: npm run env -- npx prisma #### 2\. Install dependencies Next, install the required packages: npm install @prisma/adapter-planetscalenpm install @planetscale/database #### 3\. Migrate your database schema (if applicable) If you ran `npx prisma init` above, you need to migrate your database schema to create the `User` table that's defined in your Prisma schema (if you already have all the tables you need in your database, you can skip this step): npm run env -- npx prisma db push #### 4\. Use Prisma Client in your Worker to send a query to the database Here is a sample code snippet that you can use to instantiate `PrismaClient` and send a query to your database: import { PrismaClient } from '@prisma/client'import { PrismaPlanetScale } from '@prisma/adapter-planetscale'import { Client } from '@planetscale/database'export default { async fetch(request, env, ctx) { const client = new Client({ url: env.DATABASE_URL, // see https://github.com/cloudflare/workerd/issues/698 fetch(url, init) { delete init['cache'] return fetch(url, init) }, }) const adapter = new PrismaPlanetScale(client) const prisma = new PrismaClient({ adapter }) const users = await prisma.user.findMany() const result = JSON.stringify(users) return new Response(result) },} #### 6\. Run the Worker locally To run the Worker locally, you can run the `wrangler dev` command: npx wrangler dev #### 7\. Set the `DATABASE_URL` environment variable and deploy the Worker To deploy the Worker, you first need to the `DATABASE_URL` environment variable via the `wrangler` CLI: npx wrangler secret put DATABASE_URL The command is interactive and will ask you to enter the value for the `DATABASE_URL` env var as the next step in the terminal. note This command requires you to be authenticated, and will ask you to log in to your Cloudflare account in case you are not. Then you can go ahead then deploy the Worker: npx wrangler deploy The command will output the URL where you can access the deployed Worker. ### Neon If you are using a Neon database, you need to: * use the `@prisma/adapter-neon` database adapter (via the `driverAdapters` Preview feature) #### 1\. Configure Prisma schema & database connection note If you don't have a project to deploy, follow the instructions in the Prerequisites to bootstrap a basic Cloudflare Worker with Prisma ORM in it. First, ensure that the database connection is configured properly. In your Prisma schema, set the `url` of the `datasource` block to the `DATABASE_URL` environment variable. You also need to enable the `driverAdapters` feature flag: schema.prisma generator client { provider = "prisma-client-js" previewFeatures = ["driverAdapters"]}datasource db { provider = "postgresql" url = env("DATABASE_URL")} Next, you need to set the `DATABASE_URL` environment variable to the value of your database connection string. You'll do this in a file called `.dev.vars` used by Cloudflare: .dev.vars DATABASE_URL="postgresql://janedoe:password@ep-nameless-pond-a23b1mdz.eu-central-1.aws.neon.tech/neondb?sslmode=require" Because the Prisma CLI by default is only compatible with `.env` files, you can adjust your `package.json` with the following script that loads the env vars from `.dev.vars`. You can then use this script to load the env vars before executing a `prisma` command. Add this script to your `package.json`: package.json { // ... "scripts": { // .... "env": "dotenv -e .dev.vars" }, // ...} Now you can execute Prisma CLI commands as follows while ensuring that the command has access to the env vars in `.dev.vars`: npm run env -- npx prisma #### 2\. Install dependencies Next, install the required packages: npm install @prisma/adapter-neonnpm install @neondatabase/serverless #### 3\. Migrate your database schema (if applicable) If you ran `npx prisma init` above, you need to migrate your database schema to create the `User` table that's defined in your Prisma schema (if you already have all the tables you need in your database, you can skip this step): npm run env -- npx prisma migrate dev --name init #### 5\. Use Prisma Client in your Worker to send a query to the database Here is a sample code snippet that you can use to instantiate `PrismaClient` and send a query to your database: import { PrismaClient } from '@prisma/client'import { PrismaNeon } from '@prisma/adapter-neon'import { Pool } from '@neondatabase/serverless'export default { async fetch(request, env, ctx) { const neon = new Pool({ connectionString: env.DATABASE_URL }) const adapter = new PrismaNeon(neon) const prisma = new PrismaClient({ adapter }) const users = await prisma.user.findMany() const result = JSON.stringify(users) return new Response(result) },} #### 6\. Run the Worker locally To run the Worker locally, you can run the `wrangler dev` command: npx wrangler dev #### 7\. Set the `DATABASE_URL` environment variable and deploy the Worker To deploy the Worker, you first need to the `DATABASE_URL` environment variable via the `wrangler` CLI: npx wrangler secret put DATABASE_URL The command is interactive and will ask you to enter the value for the `DATABASE_URL` env var as the next step in the terminal. note This command requires you to be authenticated, and will ask you to log in to your Cloudflare account in case you are not. Then you can go ahead then deploy the Worker: npx wrangler deploy The command will output the URL where you can access the deployed Worker. --- ## Page: https://www.prisma.io/docs/orm/prisma-client/deployment/edge/deploy-to-vercel This page covers everything you need to know to deploy an app that uses Prisma Client for talking to a database in Vercel Edge Middleware or a Vercel Function deployed to the Vercel Edge Runtime. To deploy a Vercel Function to the Vercel Edge Runtime, you can set `export const runtime = 'edge'` outside the request handler of the Vercel Function. ## General considerations when deploying to Vercel Edge Functions & Edge Middleware ### Using Prisma Postgres You can use Prisma Postgres in Vercel's edge runtime. Follow this guide for an end-to-end tutorial on deploying an application to Vercel using Prisma Postgres. ### Using an edge-compatible driver Vercel's Edge Runtime currently only supports a limited set of database drivers: * Neon Serverless uses HTTP to access the database (also compatible with Vercel Postgres) * PlanetScale Serverless uses HTTP to access the database * `@libsql/client` is used to access Turso databases Note that `node-postgres` (`pg`) is currently _not_ supported on Vercel Edge Functions. When deploying a Vercel Edge Function that uses Prisma ORM, you need to use one of these edge-compatible drivers and its respective driver adapter for Prisma ORM. note If your application uses PostgreSQL, we recommend using Prisma Postgres. It is fully supported on edge runtimes and does not require a specialized edge-compatible driver. For other databases, Prisma Accelerate extends edge compatibility so you can connect to _any_ database from _any_ edge function provider. ### Setting your database connection URL as an environment variable First, ensure that the `DATABASE_URL` is set as the `url` of the `datasource` in your Prisma schema: datasource db { provider = "postgresql" // this might also be `mysql` or another value depending on your database url = env("DATABASE_URL")} #### Development When in **development**, you can configure your database connection via the `DATABASE_URL` environment variable (e.g. using `.env` files). #### Production When deploying your Edge Function to **production**, you'll need to set the database connection using the `vercel` CLI: npx vercel env add DATABASE_URL This command is interactive and will ask you to select environments and provide the value for the `DATABASE_URL` in subsequent steps. Alternatively, you can configure the environment variable via the UI of your project in the Vercel Dashboard. ### Generate Prisma Client in `postinstall` hook In your `package.json`, you should add a `"postinstall"` section as follows: package.json { // ..., "postinstall": "prisma generate"} ### Size limits on free accounts Vercel has a size limit of 1 MB on free accounts. If your application bundle with Prisma ORM exceeds that size, we recommend upgrading to a paid account or using Prisma Accelerate to deploy your application. ## Database-specific considerations & examples This section provides database-specific instructions for deploying a Vercel Edge Functions with Prisma ORM. ### Prerequisites As a prerequisite for the following section, you need to have a Vercel Edge Function (which typically comes in the form of a Next.js API route) running locally and the Prisma and Vercel CLIs installed. If you don't have that yet, you can run these commands to set up a Next.js app from scratch (following the instructions of the Vercel Functions Quickstart): npm install -g vercelnpx create-next-app@latestnpm install prisma --save-devnpx prisma init --output ../app/generated/prisma We'll use the default `User` model for the example below: model User { id Int @id @default(autoincrement()) email String @unique name String?} ### Vercel Postgres If you are using Vercel Postgres, you need to: * use the `@prisma/adapter-neon` database adapter (via the `driverAdapters` Preview feature) because Vercel Postgres uses Neon under the hood * be aware that Vercel by default calls the environment variable for the database connection string `POSTGRES_PRISMA_URL` while the default name used in the Prisma docs is typically `DATABASE_URL`; using Vercel's naming, you need to set the following fields on your `datasource` block: datasource db { provider = "postgresql" url = env("POSTGRES_PRISMA_URL") // uses connection pooling directUrl = env("POSTGRES_URL_NON_POOLING") // uses a direct connection} #### 1\. Configure Prisma schema & database connection note If you don't have a project to deploy, follow the instructions in the Prerequisites to bootstrap a basic Next.js app with Prisma ORM in it. First, ensure that the database connection is configured properly. In your Prisma schema, set the `url` of the `datasource` block to the `POSTGRES_PRISMA_URL` and the `directUrl` to the `POSTGRES_URL_NON_POOLING` environment variable. You also need to enable the `driverAdapters` feature flag: schema.prisma generator client { provider = "prisma-client-js" previewFeatures = ["driverAdapters"]}datasource db { provider = "postgresql" url = env("POSTGRES_PRISMA_URL") // uses connection pooling directUrl = env("POSTGRES_URL_NON_POOLING") // uses a direct connection} Next, you need to set the `POSTGRES_PRISMA_URL` and `POSTGRES_URL_NON_POOLING` environment variable to the values of your database connection. If you ran `npx prisma init`, you can use the `.env` file that was created by this command to set these: .env POSTGRES_PRISMA_URL="postgres://user:password@host-pooler.region.postgres.vercel-storage.com:5432/name?pgbouncer=true&connect_timeout=15"POSTGRES_URL_NON_POOLING="postgres://user:password@host.region.postgres.vercel-storage.com:5432/name" #### 2\. Install dependencies Next, install the required packages: npm install @prisma/adapter-neonnpm install @neondatabase/serverless #### 3\. Configure `postinstall` hook Next, add a new key to the `scripts` section in your `package.json`: package.json { // ... "scripts": { // ... "postinstall": "prisma generate" }} #### 4\. Migrate your database schema (if applicable) If you ran `npx prisma init` above, you need to migrate your database schema to create the `User` table that's defined in your Prisma schema (if you already have all the tables you need in your database, you can skip this step): npx prisma migrate dev --name init #### 5\. Use Prisma Client in your Vercel Edge Function to send a query to the database If you created the project from scratch, you can create a new edge function as follows. First, create a new API route, e.g. by using these commands: mkdir src/app/apimkdir src/app/api/edgetouch src/app/api/edge/route.ts Here is a sample code snippet that you can use to instantiate `PrismaClient` and send a query to your database in the new `app/api/edge/route.ts` file you just created: app/api/edge/route.ts import { NextResponse } from 'next/server'import { PrismaClient } from '@prisma/client'import { PrismaNeon } from '@prisma/adapter-neon'import { Pool } from '@neondatabase/serverless'export const runtime = 'edge'export async function GET(request: Request) { const neon = new Pool({ connectionString: process.env.POSTGRES_PRISMA_URL }) const adapter = new PrismaNeon(neon) const prisma = new PrismaClient({ adapter }) const users = await prisma.user.findMany() return NextResponse.json(users, { status: 200 })} #### 6\. Run the Edge Function locally Run the app with the following command: npm run dev You can now access the Edge Function via this URL: `http://localhost:3000/api/edge`. #### 7\. Set the `POSTGRES_PRISMA_URL` environment variable and deploy the Edge Function Run the following command to deploy your project with Vercel: npx vercel deploy Note that once the project was created on Vercel, you will need to set the `POSTGRES_PRISMA_URL` environment variable (and if this was your first deploy, it likely failed). You can do this either via the Vercel UI or by running the following command: npx vercel env add POSTGRES_PRISMA_URL At this point, you can get the URL of the deployed application from the Vercel Dashboard and access the edge function via the `/api/edge` route. ### PlanetScale If you are using a PlanetScale database, you need to: * use the `@prisma/adapter-planetscale` database adapter (via the `driverAdapters` Preview feature) #### 1\. Configure Prisma schema & database connection note If you don't have a project to deploy, follow the instructions in the Prerequisites to bootstrap a basic Next.js app with Prisma ORM in it. First, ensure that the database connection is configured properly. In your Prisma schema, set the `url` of the `datasource` block to the `DATABASE_URL` environment variable. You also need to enable the `driverAdapters` feature flag: schema.prisma generator client { provider = "prisma-client-js" previewFeatures = ["driverAdapters"]}datasource db { provider = "mysql" url = env("DATABASE_URL") relationMode = "prisma" // required for PlanetScale (as by default foreign keys are disabled)} Next, you need to set the `DATABASE_URL` environment variable in your `.env` file that's used both by Prisma and Next.js to read your env vars: .env DATABASE_URL="mysql://32qxa2r7hfl3102wrccj:password@us-east.connect.psdb.cloud/demo-cf-worker-ps?sslaccept=strict" #### 2\. Install dependencies Next, install the required packages: npm install @prisma/adapter-planetscalenpm install @planetscale/database #### 3\. Configure `postinstall` hook Next, add a new key to the `scripts` section in your `package.json`: package.json { // ... "scripts": { // ... "postinstall": "prisma generate" }} #### 4\. Migrate your database schema (if applicable) If you ran `npx prisma init` above, you need to migrate your database schema to create the `User` table that's defined in your Prisma schema (if you already have all the tables you need in your database, you can skip this step): npx prisma db push #### 5\. Use Prisma Client in an Edge Function to send a query to the database If you created the project from scratch, you can create a new edge function as follows. First, create a new API route, e.g. by using these commands: mkdir src/app/apimkdir src/app/api/edgetouch src/app/api/edge/route.ts Here is a sample code snippet that you can use to instantiate `PrismaClient` and send a query to your database in the new `app/api/edge/route.ts` file you just created: app/api/edge/route.ts import { NextResponse } from 'next/server'import { PrismaClient } from '@prisma/client'import { PrismaPlanetScale } from '@prisma/adapter-planetscale'import { Client } from '@planetscale/database'export const runtime = 'edge'export async function GET(request: Request) { const client = new Client({ url: process.env.DATABASE_URL }) const adapter = new PrismaPlanetScale(client) const prisma = new PrismaClient({ adapter }) const users = await prisma.user.findMany() return NextResponse.json(users, { status: 200 })} #### 6\. Run the Edge Function locally Run the app with the following command: npm run dev You can now access the Edge Function via this URL: `http://localhost:3000/api/edge`. #### 7\. Set the `DATABASE_URL` environment variable and deploy the Edge Function Run the following command to deploy your project with Vercel: npx vercel deploy Note that once the project was created on Vercel, you will need to set the `DATABASE_URL` environment variable (and if this was your first deploy, it likely failed). You can do this either via the Vercel UI or by running the following command: npx vercel env add DATABASE_URL At this point, you can get the URL of the deployed application from the Vercel Dashboard and access the edge function via the `/api/edge` route. ### Neon If you are using a Neon database, you need to: * use the `@prisma/adapter-neon` database adapter (via the `driverAdapters` Preview feature) #### 1\. Configure Prisma schema & database connection note If you don't have a project to deploy, follow the instructions in the Prerequisites to bootstrap a basic Next.js app with Prisma ORM in it. First, ensure that the database connection is configured properly. In your Prisma schema, set the `url` of the `datasource` block to the `DATABASE_URL` environment variable. You also need to enable the `driverAdapters` feature flag: schema.prisma generator client { provider = "prisma-client-js" previewFeatures = ["driverAdapters"]}datasource db { provider = "postgresql" url = env("DATABASE_URL")} Next, you need to set the `DATABASE_URL` environment variable in your `.env` file that's used both by Prisma and Next.js to read your env vars: .env DATABASE_URL="postgresql://janedoe:password@ep-nameless-pond-a23b1mdz.eu-central-1.aws.neon.tech/neondb?sslmode=require" #### 2\. Install dependencies Next, install the required packages: npm install @prisma/adapter-neonnpm install @neondatabase/serverless #### 3\. Configure `postinstall` hook Next, add a new key to the `scripts` section in your `package.json`: package.json { // ... "scripts": { // ... "postinstall": "prisma generate" }} #### 4\. Migrate your database schema (if applicable) If you ran `npx prisma init` above, you need to migrate your database schema to create the `User` table that's defined in your Prisma schema (if you already have all the tables you need in your database, you can skip this step): npx prisma migrate dev --name init #### 5\. Use Prisma Client in an Edge Function to send a query to the database If you created the project from scratch, you can create a new edge function as follows. First, create a new API route, e.g. by using these commands: mkdir src/app/apimkdir src/app/api/edgetouch src/app/api/edge/route.ts Here is a sample code snippet that you can use to instantiate `PrismaClient` and send a query to your database in the new `app/api/edge/route.ts` file you just created: app/api/edge/route.ts import { NextResponse } from 'next/server'import { PrismaClient } from '@prisma/client'import { PrismaNeon } from '@prisma/adapter-neon'import { Pool } from '@neondatabase/serverless'export const runtime = 'edge'export async function GET(request: Request) { const neon = new Pool({ connectionString: process.env.DATABASE_URL }) const adapter = new PrismaNeon(neon) const prisma = new PrismaClient({ adapter }) const users = await prisma.user.findMany() return NextResponse.json(users, { status: 200 })} #### 6\. Run the Edge Function locally Run the app with the following command: npm run dev You can now access the Edge Function via this URL: `http://localhost:3000/api/edge`. #### 7\. Set the `DATABASE_URL` environment variable and deploy the Edge Function Run the following command to deploy your project with Vercel: npx vercel deploy Note that once the project was created on Vercel, you will need to set the `DATABASE_URL` environment variable (and if this was your first deploy, it likely failed). You can do this either via the Vercel UI or by running the following command: npx vercel env add DATABASE_URL At this point, you can get the URL of the deployed application from the Vercel Dashboard and access the edge function via the `/api/edge` route. --- ## Page: https://www.prisma.io/docs/orm/prisma-client/deployment/edge/deploy-to-deno-deploy With this guide, you can learn how to build and deploy a simple application to Deno Deploy. The application uses Prisma ORM to save a log of each request to a Prisma Postgres database. This guide covers the use of Prisma CLI with Deno CLI, Deno Deploy, Prisma Client, and Prisma Postgres. ## Prerequisites * a free account * a free Deno Deploy account * Node.js & npm installed * Deno v1.29.4 or later installed. Learn more. * (Recommended) Latest version of Prisma ORM. * (Recommended) Deno extension for VS Code. Learn more. ## 1\. Set up your application and database To start, you create a directory for your project, and then use `deno run` to initialize your application with `prisma init` as an npm package with npm specifiers. To set up your application, open your terminal and navigate to a location of your choice. Then, run the following commands to set up your application: mkdir prisma-deno-deploycd prisma-deno-deploydeno run --reload -A npm:prisma@latest init --db Enter a name for your project and choose a database region. This command: * Connects your CLI to your account. If you're not logged in or don't have an account, your browser will open to guide you through creating a new account or signing into your existing one. * Creates a `prisma` directory containing a `schema.prisma` file for your database models. * Creates a `.env` file with your `DATABASE_URL` (e.g., for Prisma Postgres it should have something similar to `DATABASE_URL="prisma+postgres://accelerate.prisma-data.net/?api_key=eyJhbGciOiJIUzI..."`). Edit the `prisma/schema.prisma` file to define a `Log` model, add a custom `output` path and enable the `deno` preview feature flag: schema.prisma generator client { provider = "prisma-client-js" previewFeatures = ["deno"] output = "../generated/client"}datasource db { provider = "postgresql" url = env("DATABASE_URL")}model Log { id Int @id @default(autoincrement()) level Level message String meta Json}enum Level { Info Warn Error} note To use Deno, you need to add the preview feature flag `deno` to the `generator` block of your `schema.prisma` file. Deno also requires you to generate Prisma Client in a custom location. You can enable this with the `output` parameter in the `generator` block. Then, install the Client extension required to use Prisma Postgres: deno install npm:@prisma/extension-accelerate Prisma Client does not read `.env` files by default on Deno, so you must also install `dotenv-cli` locally: deno install npm:dotenv-cli ## 2\. Create the database schema With the data model in place and your database connection configured, you can now apply the data model to your database. deno run -A npm:prisma migrate dev --name init The command does two things: 1. It creates a new SQL migration file for this migration 2. It runs the SQL migration file against the database At this point, the command has an additional side effects. The command installs Prisma Client and creates the `package.json` file for the project. ## 3\. Create your application You can now create a local Deno application. Create `index.ts` in the root folder of your project and add the content below: index.ts import { serve } from "https://deno.land/std@0.140.0/http/server.ts";import { withAccelerate } from "npm:@prisma/extension-accelerate";import { PrismaClient } from "./generated/client/deno/edge.ts";const prisma = new PrismaClient().$extends(withAccelerate());async function handler(request: Request) { // Ignore /favicon.ico requests: const url = new URL(request.url); if (url.pathname === "/favicon.ico") { return new Response(null, { status: 204 }); } const log = await prisma.log.create({ data: { level: "Info", message: `${request.method} ${request.url}`, meta: { headers: JSON.stringify(request.headers), }, }, }); const body = JSON.stringify(log, null, 2); return new Response(body, { headers: { "content-type": "application/json; charset=utf-8" }, });}serve(handler); info **VS Code error: `An import path cannot end with a '.ts' extension`** If you use VS Code and see the error `An import path cannot end with a '.ts' extension` for the `import` statements at the beginning of `index.ts`, you need to install the Deno extension for VS Code, select **View** > **Command Palette** and run the command **Deno: Initialize Workspace Configuration**. This tells VS Code that the TypeScript files in the current project need to run with Deno, which then triggers the correct validations. ## 4\. Test your application locally You can now start your application locally and test the creation of log entries. npx dotenv -- deno run -A ./index.ts In a web browser, open http://localhost:8000/. This page writes your request to the database. { "id": 1, "level": "Info", "message": "GET http://localhost:8000/", "meta": { "headers": "{}" }} Reload the page a few times. Every time you reload, the script generates a new log entry and the `id` of the current log entry increments. This confirms that your application works when you run it from your local environment. ## 5\. Create a repository and push to GitHub You need a GitHub repository to add your project to Deno Deploy and enable automated deployments whenever you push changes. To set up a GitHub repository: 1. Create a private GitHub repository. 2. Initialize your repository locally and push your changes to GitHub, with the following commands: git init -b maingit remote add origin https://github.com/<username>/prisma-deno-deploygit add .git commit -m "initial commit"git push -u origin main ## 6\. Deploy to Deno Deploy Use the GitHub repository to add your application to Deno Deploy: 1. Go to https://dash.deno.com/. 2. Select a GitHub organization or user and then select a repository. 3. Select a production branch and select **Fresh (Automatic)** mode so that Deno Deploy can deploy every time you push a change to the repository. 4. Select `index.ts` as the entry point to your project. 5. Click `Create & Deploy`. The deployment should fail as you have to add the `DATABASE_URL` environment variable. Locate and navigate to the settings for the project. 1. To define the database connection string, click **Add Variable** in the **Environment Variables** section. 1. For **KEY**, enter `DATABASE_URL`. 2. For **VALUE**, paste the database connection string. 2. Click **Save**. You have to add some code and create another commit to trigger a re-dployment. Add the following code in your `index.ts` file: index.ts import { serve } from "https://deno.land/std@0.140.0/http/server.ts";import { withAccelerate } from "npm:@prisma/extension-accelerate";import { PrismaClient } from "./generated/client/deno/edge.ts";const prisma = new PrismaClient().$extends(withAccelerate());async function handler(request: Request) { // Ignore /favicon.ico requests: const url = new URL(request.url); if (url.pathname === "/favicon.ico") { return new Response(null, { status: 204 }); } console.log("Request received.") const log = await prisma.log.create({ data: { level: "Info", message: `${request.method} ${request.url}`, meta: { headers: JSON.stringify(request.headers), }, }, }); const body = JSON.stringify(log, null, 2); return new Response(body, { headers: { "content-type": "application/json; charset=utf-8" }, });}serve(handler); Commit the new changes: git add . git commit -m "add log"git push origin main This rebuilds the deployment, which now works because the environment variable has been added. After it completes, follow the URL in the deployment output. The application should show the same result as before, with a new, incremented log record ID: { "id": 5, "level": "Info", "message": "GET https://prisma-deno-deploy.deno.dev/", "meta": { "headers": "{}" }} ## Summary You successfully deployed a Deno application that you created in TypeScript, which uses Prisma Client connecting to a Prisma Postgres database.