W↓
All docs
🔑
Sign Up/Sign In
bun.sh/docs/api/
Public Link
Apr 8, 2025, 12:52:27 PM - complete - 327 kB
Created by:
****ad@vlad.studio
Starting URLs:
https://bun.sh/docs
Crawl Prefixes:
https://bun.sh/docs/api/
## Page: https://bun.sh/docs Bun is an all-in-one toolkit for JavaScript and TypeScript apps. It ships as a single executable called `bun`. At its core is the _Bun runtime_, a fast JavaScript runtime designed as **a drop-in replacement for Node.js**. It's written in Zig and powered by JavaScriptCore under the hood, dramatically reducing startup times and memory usage. bun run index.tsx # TS and JSX supported out of the box The `bun` command-line tool also implements a test runner, script runner, and Node.js-compatible package manager, all significantly faster than existing tools and usable in existing Node.js projects with little to no changes necessary. bun run start # run the `start` script bun install <pkg> # install a package bun build ./index.tsx # bundle a project for browsers bun test # run tests bunx cowsay 'Hello, world!' # execute a package Get started with one of the quick links below, or read on to learn more about Bun. ## What is a runtime? JavaScript (or, more formally, ECMAScript) is just a _specification_ for a programming language. Anyone can write a JavaScript _engine_ that ingests a valid JavaScript program and executes it. The two most popular engines in use today are V8 (developed by Google) and JavaScriptCore (developed by Apple). Both are open source. But most JavaScript programs don't run in a vacuum. They need a way to access the outside world to perform useful tasks. This is where _runtimes_ come in. They implement additional APIs that are then made available to the JavaScript programs they execute. ### Browsers Notably, browsers ship with JavaScript runtimes that implement a set of Web-specific APIs that are exposed via the global `window` object. Any JavaScript code executed by the browser can use these APIs to implement interactive or dynamic behavior in the context of the current webpage. ### Node.js Similarly, Node.js is a JavaScript runtime that can be used in non-browser environments, like servers. JavaScript programs executed by Node.js have access to a set of Node.js-specific globals like `Buffer`, `process`, and `__dirname` in addition to built-in modules for performing OS-level tasks like reading/writing files (`node:fs`) and networking (`node:net`, `node:http`). Node.js also implements a CommonJS-based module system and resolution algorithm that pre-dates JavaScript's native module system. Bun is designed as a faster, leaner, more modern replacement for Node.js. ## Design goals Bun is designed from the ground-up with today's JavaScript ecosystem in mind. * **Speed**. Bun processes start 4x faster than Node.js currently (try it yourself!) * **TypeScript & JSX support**. You can directly execute `.jsx`, `.ts`, and `.tsx` files; Bun's transpiler converts these to vanilla JavaScript before execution. * **ESM & CommonJS compatibility**. The world is moving towards ES modules (ESM), but millions of packages on npm still require CommonJS. Bun recommends ES modules, but supports CommonJS. * **Web-standard APIs**. Bun implements standard Web APIs like `fetch`, `WebSocket`, and `ReadableStream`. Bun is powered by the JavaScriptCore engine, which is developed by Apple for Safari, so some APIs like `Headers` and `URL` directly use Safari's implementation. * **Node.js compatibility**. In addition to supporting Node-style module resolution, Bun aims for full compatibility with built-in Node.js globals (`process`, `Buffer`) and modules (`path`, `fs`, `http`, etc.) _This is an ongoing effort that is not complete._ Refer to the compatibility page for the current status. Bun is more than a runtime. The long-term goal is to be a cohesive, infrastructural toolkit for building apps with JavaScript/TypeScript, including a package manager, transpiler, bundler, script runner, test runner, and more. --- ## Page: https://bun.sh/docs/api/http The page primarily documents the Bun-native `Bun.serve` API. Bun also implements `fetch` and the Node.js `http` and `https` modules. These modules have been re-implemented to use Bun's fast internal HTTP infrastructure. Feel free to use these modules directly; frameworks like Express that depend on these modules should work out of the box. For granular compatibility information, see Runtime > Node.js APIs. To start a high-performance HTTP server with a clean API, the recommended approach is `Bun.serve`. ## `Bun.serve()` Use `Bun.serve` to start an HTTP server in Bun. Bun.serve({ // `routes` requires Bun v1.2.3+ routes: { // Static routes "/api/status": new Response("OK"), // Dynamic routes "/users/:id": req => { return new Response(`Hello User ${req.params.id}!`); }, // Per-HTTP method handlers "/api/posts": { GET: () => new Response("List posts"), POST: async req => { const body = await req.json(); return Response.json({ created: true, ...body }); }, }, // Wildcard route for all routes that start with "/api/" and aren't otherwise matched "/api/*": Response.json({ message: "Not found" }, { status: 404 }), // Redirect from /blog/hello to /blog/hello/world "/blog/hello": Response.redirect("/blog/hello/world"), // Serve a file by buffering it in memory "/favicon.ico": new Response(await Bun.file("./favicon.ico").bytes(), { headers: { "Content-Type": "image/x-icon", }, }), }, // (optional) fallback for unmatched routes: // Required if Bun's version < 1.2.3 fetch(req) { return new Response("Not Found", { status: 404 }); }, }); ### Routing Routes in `Bun.serve()` receive a `BunRequest` (which extends `Request`) and return a `Response` or `Promise<Response>`. This makes it easier to use the same code for both sending & receiving HTTP requests. // Simplified for brevity interface BunRequest<T extends string> extends Request { params: Record<T, string>; readonly cookies: CookieMap; } #### Async/await in routes You can use async/await in route handlers to return a `Promise<Response>`. import { sql, serve } from "bun"; serve({ port: 3001, routes: { "/api/version": async () => { const [version] = await sql`SELECT version()`; return Response.json(version); }, }, }); #### Promise in routes You can also return a `Promise<Response>` from a route handler. import { sql, serve } from "bun"; serve({ routes: { "/api/version": () => { return new Promise(resolve => { setTimeout(async () => { const [version] = await sql`SELECT version()`; resolve(Response.json(version)); }, 100); }); }, }, }); #### Type-safe route parameters TypeScript parses route parameters when passed as a string literal, so that your editor will show autocomplete when accessing `request.params`. import type { BunRequest } from "bun"; Bun.serve({ routes: { // TypeScript knows the shape of params when passed as a string literal "/orgs/:orgId/repos/:repoId": req => { const { orgId, repoId } = req.params; return Response.json({ orgId, repoId }); }, "/orgs/:orgId/repos/:repoId/settings": ( // optional: you can explicitly pass a type to BunRequest: req: BunRequest<"/orgs/:orgId/repos/:repoId/settings">, ) => { const { orgId, repoId } = req.params; return Response.json({ orgId, repoId }); }, }, }); Percent-encoded route parameter values are automatically decoded. Unicode characters are supported. Invalid unicode is replaced with the unicode replacement character `&0xFFFD;`. ### Static responses Routes can also be `Response` objects (without the handler function). Bun.serve() optimizes it for zero-allocation dispatch - perfect for health checks, redirects, and fixed content: Bun.serve({ routes: { // Health checks "/health": new Response("OK"), "/ready": new Response("Ready", { headers: { // Pass custom headers "X-Ready": "1", }, }), // Redirects "/blog": Response.redirect("https://bun.sh/blog"), // API responses "/api/config": Response.json({ version: "1.0.0", env: "production", }), }, }); Static responses do not allocate additional memory after initialization. You can generally expect at least a 15% performance improvement over manually returning a `Response` object. Static route responses are cached for the lifetime of the server object. To reload static routes, call `server.reload(options)`. const server = Bun.serve({ static: { "/api/time": new Response(new Date().toISOString()), }, fetch(req) { return new Response("404!"); }, }); // Update the time every second. setInterval(() => { server.reload({ static: { "/api/time": new Response(new Date().toISOString()), }, fetch(req) { return new Response("404!"); }, }); }, 1000); Reloading routes only impact the next request. In-flight requests continue to use the old routes. After in-flight requests to old routes are finished, the old routes are freed from memory. To simplify error handling, static routes do not support streaming response bodies from `ReadableStream` or an `AsyncIterator`. Fortunately, you can still buffer the response in memory first: const time = await fetch("https://api.example.com/v1/data"); // Buffer the response in memory first. const blob = await time.blob(); const server = Bun.serve({ static: { "/api/data": new Response(blob), }, fetch(req) { return new Response("404!"); }, }); ### Route precedence Routes are matched in order of specificity: 1. Exact routes (`/users/all`) 2. Parameter routes (`/users/:id`) 3. Wildcard routes (`/users/*`) 4. Global catch-all (`/*`) Bun.serve({ routes: { // Most specific first "/api/users/me": () => new Response("Current user"), "/api/users/:id": req => new Response(`User ${req.params.id}`), "/api/*": () => new Response("API catch-all"), "/*": () => new Response("Global catch-all"), }, }); ### Per-HTTP Method Routes Route handlers can be specialized by HTTP method: Bun.serve({ routes: { "/api/posts": { // Different handlers per method GET: () => new Response("List posts"), POST: async req => { const post = await req.json(); return Response.json({ id: crypto.randomUUID(), ...post }); }, PUT: async req => { const updates = await req.json(); return Response.json({ updated: true, ...updates }); }, DELETE: () => new Response(null, { status: 204 }), }, }, }); You can pass any of the following methods: | Method | Usecase example | | --- | --- | | `GET` | Fetch a resource | | `HEAD` | Check if a resource exists | | `OPTIONS` | Get allowed HTTP methods (CORS) | | `DELETE` | Delete a resource | | `PATCH` | Update a resource | | `POST` | Create a resource | | `PUT` | Update a resource | When passing a function instead of an object, all methods will be handled by that function: const server = Bun.serve({ routes: { "/api/version": () => Response.json({ version: "1.0.0" }), }, }); await fetch(new URL("/api/version", server.url)); await fetch(new URL("/api/version", server.url), { method: "PUT" }); // ... etc ### Hot Route Reloading Update routes without server restarts using `server.reload()`: const server = Bun.serve({ routes: { "/api/version": () => Response.json({ version: "1.0.0" }), }, }); // Deploy new routes without downtime server.reload({ routes: { "/api/version": () => Response.json({ version: "2.0.0" }), }, }); ### Error Handling Bun provides structured error handling for routes: Bun.serve({ routes: { // Errors are caught automatically "/api/risky": () => { throw new Error("Something went wrong"); }, }, // Global error handler error(error) { console.error(error); return new Response(`Internal Error: ${error.message}`, { status: 500, headers: { "Content-Type": "text/plain", }, }); }, }); ### HTML imports To add a client-side single-page app, you can use an HTML import: import myReactSinglePageApp from "./index.html"; Bun.serve({ routes: { "/": myReactSinglePageApp, }, }); HTML imports don't just serve HTML. It's a full-featured frontend bundler, transpiler, and toolkit built using Bun's bundler, JavaScript transpiler and CSS parser. You can use this to build a full-featured frontend with React, TypeScript, Tailwind CSS, and more. Check out /docs/bundler/fullstack to learn more. ### Practical example: REST API Here's a basic database-backed REST API using Bun's router with zero dependencies: server.ts import type { Post } from "./types.ts"; import { Database } from "bun:sqlite"; const db = new Database("posts.db"); db.exec(` CREATE TABLE IF NOT EXISTS posts ( id TEXT PRIMARY KEY, title TEXT NOT NULL, content TEXT NOT NULL, created_at TEXT NOT NULL ) `); Bun.serve({ routes: { // List posts "/api/posts": { GET: () => { const posts = db.query("SELECT * FROM posts").all(); return Response.json(posts); }, // Create post POST: async req => { const post: Omit<Post, "id" | "created_at"> = await req.json(); const id = crypto.randomUUID(); db.query( `INSERT INTO posts (id, title, content, created_at) VALUES (?, ?, ?, ?)`, ).run(id, post.title, post.content, new Date().toISOString()); return Response.json({ id, ...post }, { status: 201 }); }, }, // Get post by ID "/api/posts/:id": req => { const post = db .query("SELECT * FROM posts WHERE id = ?") .get(req.params.id); if (!post) { return new Response("Not Found", { status: 404 }); } return Response.json(post); }, }, error(error) { console.error(error); return new Response("Internal Server Error", { status: 500 }); }, }); types.ts export interface Post { id: string; title: string; content: string; created_at: string; } ### Routing performance `Bun.serve()`'s router builds on top uWebSocket's tree-based approach to add SIMD-accelerated route parameter decoding and JavaScriptCore structure caching to push the performance limits of what modern hardware allows. ### `fetch` request handler The `fetch` handler handles incoming requests that weren't matched by any route. It receives a `Request` object and returns a `Response` or `Promise<Response>`. Bun.serve({ fetch(req) { const url = new URL(req.url); if (url.pathname === "/") return new Response("Home page!"); if (url.pathname === "/blog") return new Response("Blog!"); return new Response("404!"); }, }); The `fetch` handler supports async/await: import { sleep, serve } from "bun"; serve({ async fetch(req) { const start = performance.now(); await sleep(10); const end = performance.now(); return new Response(`Slept for ${end - start}ms`); }, }); Promise-based responses are also supported: Bun.serve({ fetch(req) { // Forward the request to another server. return fetch("https://example.com"); }, }); You can also access the `Server` object from the `fetch` handler. It's the second argument passed to the `fetch` function. // `server` is passed in as the second argument to `fetch`. const server = Bun.serve({ fetch(req, server) { const ip = server.requestIP(req); return new Response(`Your IP is ${ip}`); }, }); ### Changing the `port` and `hostname` To configure which port and hostname the server will listen on, set `port` and `hostname` in the options object. Bun.serve({ port: 8080, // defaults to $BUN_PORT, $PORT, $NODE_PORT otherwise 3000 hostname: "mydomain.com", // defaults to "0.0.0.0" fetch(req) { return new Response("404!"); }, }); To randomly select an available port, set `port` to `0`. const server = Bun.serve({ port: 0, // random port fetch(req) { return new Response("404!"); }, }); // server.port is the randomly selected port console.log(server.port); You can view the chosen port by accessing the `port` property on the server object, or by accessing the `url` property. console.log(server.port); // 3000 console.log(server.url); // http://localhost:3000 #### Configuring a default port Bun supports several options and environment variables to configure the default port. The default port is used when the `port` option is not set. * `--port` CLI flag bun --port=4002 server.ts * `BUN_PORT` environment variable BUN_PORT=4002 bun server.ts * `PORT` environment variable PORT=4002 bun server.ts * `NODE_PORT` environment variable NODE_PORT=4002 bun server.ts ### Unix domain sockets To listen on a unix domain socket, pass the `unix` option with the path to the socket. Bun.serve({ unix: "/tmp/my-socket.sock", // path to socket fetch(req) { return new Response(`404!`); }, }); ### Abstract namespace sockets Bun supports Linux abstract namespace sockets. To use an abstract namespace socket, prefix the `unix` path with a null byte. Bun.serve({ unix: "\0my-abstract-socket", // abstract namespace socket fetch(req) { return new Response(`404!`); }, }); Unlike unix domain sockets, abstract namespace sockets are not bound to the filesystem and are automatically removed when the last reference to the socket is closed. ## Error handling To activate development mode, set `development: true`. Bun.serve({ development: true, fetch(req) { throw new Error("woops!"); }, }); In development mode, Bun will surface errors in-browser with a built-in error page.  Bun's built-in 500 page ### `error` callback To handle server-side errors, implement an `error` handler. This function should return a `Response` to serve to the client when an error occurs. This response will supersede Bun's default error page in `development` mode. Bun.serve({ fetch(req) { throw new Error("woops!"); }, error(error) { return new Response(`<pre>${error}\n${error.stack}</pre>`, { headers: { "Content-Type": "text/html", }, }); }, }); The call to `Bun.serve` returns a `Server` object. To stop the server, call the `.stop()` method. const server = Bun.serve({ fetch() { return new Response("Bun!"); }, }); server.stop(); ## TLS Bun supports TLS out of the box, powered by BoringSSL. Enable TLS by passing in a value for `key` and `cert`; both are required to enable TLS. Bun.serve({ fetch(req) { return new Response("Hello!!!"); }, tls: { key: Bun.file("./key.pem"), cert: Bun.file("./cert.pem"), } }); The `key` and `cert` fields expect the _contents_ of your TLS key and certificate, _not a path to it_. This can be a string, `BunFile`, `TypedArray`, or `Buffer`. Bun.serve({ fetch() {}, tls: { // BunFile key: Bun.file("./key.pem"), // Buffer key: fs.readFileSync("./key.pem"), // string key: fs.readFileSync("./key.pem", "utf8"), // array of above key: [Bun.file("./key1.pem"), Bun.file("./key2.pem")], }, }); If your private key is encrypted with a passphrase, provide a value for `passphrase` to decrypt it. Bun.serve({ fetch(req) { return new Response("Hello!!!"); }, tls: { key: Bun.file("./key.pem"), cert: Bun.file("./cert.pem"), passphrase: "my-secret-passphrase", } }); Optionally, you can override the trusted CA certificates by passing a value for `ca`. By default, the server will trust the list of well-known CAs curated by Mozilla. When `ca` is specified, the Mozilla list is overwritten. Bun.serve({ fetch(req) { return new Response("Hello!!!"); }, tls: { key: Bun.file("./key.pem"), // path to TLS key cert: Bun.file("./cert.pem"), // path to TLS cert ca: Bun.file("./ca.pem"), // path to root CA certificate } }); To override Diffie-Hellman parameters: Bun.serve({ // ... tls: { // other config dhParamsFile: "/path/to/dhparams.pem", // path to Diffie Hellman parameters }, }); ### Server name indication (SNI) To configure the server name indication (SNI) for the server, set the `serverName` field in the `tls` object. Bun.serve({ // ... tls: { // ... other config serverName: "my-server.com", // SNI }, }); To allow multiple server names, pass an array of objects to `tls`, each with a `serverName` field. Bun.serve({ // ... tls: [ { key: Bun.file("./key1.pem"), cert: Bun.file("./cert1.pem"), serverName: "my-server1.com", }, { key: Bun.file("./key2.pem"), cert: Bun.file("./cert2.pem"), serverName: "my-server2.com", }, ], }); ## idleTimeout To configure the idle timeout, set the `idleTimeout` field in Bun.serve. Bun.serve({ // 10 seconds: idleTimeout: 10, fetch(req) { return new Response("Bun!"); }, }); This is the maximum amount of time a connection is allowed to be idle before the server closes it. A connection is idling if there is no data sent or received. ## export default syntax Thus far, the examples on this page have used the explicit `Bun.serve` API. Bun also supports an alternate syntax. server.ts import {type Serve} from "bun"; export default { fetch(req) { return new Response("Bun!"); }, } satisfies Serve; Instead of passing the server options into `Bun.serve`, `export default` it. This file can be executed as-is; when Bun sees a file with a `default` export containing a `fetch` handler, it passes it into `Bun.serve` under the hood. ## Streaming files To stream a file, return a `Response` object with a `BunFile` object as the body. Bun.serve({ fetch(req) { return new Response(Bun.file("./hello.txt")); }, }); ⚡️ **Speed** — Bun automatically uses the `sendfile(2)` system call when possible, enabling zero-copy file transfers in the kernel—the fastest way to send files. You can send part of a file using the `slice(start, end)` method on the `Bun.file` object. This automatically sets the `Content-Range` and `Content-Length` headers on the `Response` object. Bun.serve({ fetch(req) { // parse `Range` header const [start = 0, end = Infinity] = req.headers .get("Range") // Range: bytes=0-100 .split("=") // ["Range: bytes", "0-100"] .at(-1) // "0-100" .split("-") // ["0", "100"] .map(Number); // [0, 100] // return a slice of the file const bigFile = Bun.file("./big-video.mp4"); return new Response(bigFile.slice(start, end)); }, }); ## Server Lifecycle Methods ### server.stop() - Stop the server To stop the server from accepting new connections: const server = Bun.serve({ fetch(req) { return new Response("Hello!"); }, }); // Gracefully stop the server (waits for in-flight requests) await server.stop(); // Force stop and close all active connections await server.stop(true); By default, `stop()` allows in-flight requests and WebSocket connections to complete. Pass `true` to immediately terminate all connections. ### server.ref() and server.unref() - Process lifecycle control Control whether the server keeps the Bun process alive: // Don't keep process alive if server is the only thing running server.unref(); // Restore default behavior - keep process alive server.ref(); ### server.reload() - Hot reload handlers Update the server's handlers without restarting: const server = Bun.serve({ routes: { "/api/version": Response.json({ version: "v1" }), }, fetch(req) { return new Response("v1"); }, }); // Update to new handler server.reload({ routes: { "/api/version": Response.json({ version: "v2" }), }, fetch(req) { return new Response("v2"); }, }); This is useful for development and hot reloading. Only `fetch`, `error`, and `routes` can be updated. ## Per-Request Controls ### server.timeout(Request, seconds) - Custom request timeouts Set a custom idle timeout for individual requests: const server = Bun.serve({ fetch(req, server) { // Set 60 second timeout for this request server.timeout(req, 60); // If they take longer than 60 seconds to send the body, the request will be aborted await req.text(); return new Response("Done!"); }, }); Pass `0` to disable the timeout for a request. ### server.requestIP(Request) - Get client information Get client IP and port information: const server = Bun.serve({ fetch(req, server) { const address = server.requestIP(req); if (address) { return new Response( `Client IP: ${address.address}, Port: ${address.port}`, ); } return new Response("Unknown client"); }, }); Returns `null` for closed requests or Unix domain sockets. ## Working with Cookies Bun provides a built-in API for working with cookies in HTTP requests and responses. The `BunRequest` object includes a `cookies` property that provides a `CookieMap` for easily accessing and manipulating cookies. When using `routes`, `Bun.serve()` automatically tracks `request.cookies.set` and applies them to the response. ### Reading cookies Read cookies from incoming requests using the `cookies` property on the `BunRequest` object: Bun.serve({ routes: { "/profile": req => { // Access cookies from the request const userId = req.cookies.get("user_id"); const theme = req.cookies.get("theme") || "light"; return Response.json({ userId, theme, message: "Profile page", }); }, }, }); ### Setting cookies To set cookies, use the `set` method on the `CookieMap` from the `BunRequest` object. Bun.serve({ routes: { "/login": req => { const cookies = req.cookies; // Set a cookie with various options cookies.set("user_id", "12345", { maxAge: 60 * 60 * 24 * 7, // 1 week httpOnly: true, secure: true, path: "/", }); // Add a theme preference cookie cookies.set("theme", "dark"); // Modified cookies from the request are automatically applied to the response return new Response("Login successful"); }, }, }); `Bun.serve()` automatically tracks modified cookies from the request and applies them to the response. ### Deleting cookies To delete a cookie, use the `delete` method on the `request.cookies` (`CookieMap`) object: Bun.serve({ routes: { "/logout": req => { // Delete the user_id cookie req.cookies.delete("user_id", { path: "/", }); return new Response("Logged out successfully"); }, }, }); Deleted cookies become a `Set-Cookie` header on the response with the `maxAge` set to `0` and an empty `value`. ## Server Metrics ### server.pendingRequests and server.pendingWebSockets Monitor server activity with built-in counters: const server = Bun.serve({ fetch(req, server) { return new Response( `Active requests: ${server.pendingRequests}\n` + `Active WebSockets: ${server.pendingWebSockets}`, ); }, }); ### server.subscriberCount(topic) - WebSocket subscribers Get count of subscribers for a WebSocket topic: const server = Bun.serve({ fetch(req, server) { const chatUsers = server.subscriberCount("chat"); return new Response(`${chatUsers} users in chat`); }, websocket: { message(ws) { ws.subscribe("chat"); }, }, }); ## WebSocket Configuration ### server.publish(topic, data, compress) - WebSocket Message Publishing The server can publish messages to all WebSocket clients subscribed to a topic: const server = Bun.serve({ websocket: { message(ws) { // Publish to all "chat" subscribers server.publish("chat", "Hello everyone!"); }, }, fetch(req) { // ... }, }); The `publish()` method returns: * Number of bytes sent if successful * `0` if the message was dropped * `-1` if backpressure was applied ### WebSocket Handler Options When configuring WebSockets, several advanced options are available through the `websocket` handler: Bun.serve({ websocket: { // Maximum message size (in bytes) maxPayloadLength: 64 * 1024, // Backpressure limit before messages are dropped backpressureLimit: 1024 * 1024, // Close connection if backpressure limit is hit closeOnBackpressureLimit: true, // Handler called when backpressure is relieved drain(ws) { console.log("Backpressure relieved"); }, // Enable per-message deflate compression perMessageDeflate: { compress: true, decompress: true, }, // Send ping frames to keep connection alive sendPings: true, // Handlers for ping/pong frames ping(ws, data) { console.log("Received ping"); }, pong(ws, data) { console.log("Received pong"); }, // Whether server receives its own published messages publishToSelf: false, }, }); ## Benchmarks Below are Bun and Node.js implementations of a simple HTTP server that responds `Bun!` to each incoming `Request`. Bun Bun.serve({ fetch(req: Request) { return new Response("Bun!"); }, port: 3000, }); Node require("http") .createServer((req, res) => res.end("Bun!")) .listen(8080); The `Bun.serve` server can handle roughly 2.5x more requests per second than Node.js on Linux. | Runtime | Requests per second | | --- | --- | | Node 16 | ~64,000 | | Bun | ~160,000 |  ## Reference See TypeScript definitions --- ## Page: https://bun.sh/docs/api/fetch Bun implements the WHATWG `fetch` standard, with some extensions to meet the needs of server-side JavaScript. Bun also implements `node:http`, but `fetch` is generally recommended instead. ## Sending an HTTP request To send an HTTP request, use `fetch` const response = await fetch("http://example.com"); console.log(response.status); // => 200 const text = await response.text(); // or response.json(), response.formData(), etc. `fetch` also works with HTTPS URLs. const response = await fetch("https://example.com"); You can also pass `fetch` a `Request` object. const request = new Request("http://example.com", { method: "POST", body: "Hello, world!", }); const response = await fetch(request); ### Sending a POST request To send a POST request, pass an object with the `method` property set to `"POST"`. const response = await fetch("http://example.com", { method: "POST", body: "Hello, world!", }); `body` can be a string, a `FormData` object, an `ArrayBuffer`, a `Blob`, and more. See the MDN documentation for more information. ### Proxying requests To proxy a request, pass an object with the `proxy` property set to a URL. const response = await fetch("http://example.com", { proxy: "http://proxy.com", }); To set custom headers, pass an object with the `headers` property set to an object. const response = await fetch("http://example.com", { headers: { "X-Custom-Header": "value", }, }); You can also set headers using the Headers object. const headers = new Headers(); headers.append("X-Custom-Header", "value"); const response = await fetch("http://example.com", { headers, }); ### Response bodies To read the response body, use one of the following methods: * `response.text(): Promise<string>`: Returns a promise that resolves with the response body as a string. * `response.json(): Promise<any>`: Returns a promise that resolves with the response body as a JSON object. * `response.formData(): Promise<FormData>`: Returns a promise that resolves with the response body as a `FormData` object. * `response.bytes(): Promise<Uint8Array>`: Returns a promise that resolves with the response body as a `Uint8Array`. * `response.arrayBuffer(): Promise<ArrayBuffer>`: Returns a promise that resolves with the response body as an `ArrayBuffer`. * `response.blob(): Promise<Blob>`: Returns a promise that resolves with the response body as a `Blob`. #### Streaming response bodies You can use async iterators to stream the response body. const response = await fetch("http://example.com"); for await (const chunk of response.body) { console.log(chunk); } You can also more directly access the `ReadableStream` object. const response = await fetch("http://example.com"); const stream = response.body; const reader = stream.getReader(); const { value, done } = await reader.read(); ### Streaming request bodies You can also stream data in request bodies using a `ReadableStream`: const stream = new ReadableStream({ start(controller) { controller.enqueue("Hello"); controller.enqueue(" "); controller.enqueue("World"); controller.close(); }, }); const response = await fetch("http://example.com", { method: "POST", body: stream, }); When using streams with HTTP(S): * The data is streamed directly to the network without buffering the entire body in memory * If the connection is lost, the stream will be canceled * The `Content-Length` header is not automatically set unless the stream has a known size When using streams with S3: * For PUT/POST requests, Bun automatically uses multipart upload * The stream is consumed in chunks and uploaded in parallel * Progress can be monitored through the S3 options ### Fetching a URL with a timeout To fetch a URL with a timeout, use `AbortSignal.timeout`: const response = await fetch("http://example.com", { signal: AbortSignal.timeout(1000), }); #### Canceling a request To cancel a request, use an `AbortController`: const controller = new AbortController(); const response = await fetch("http://example.com", { signal: controller.signal, }); controller.abort(); ### Unix domain sockets To fetch a URL using a Unix domain socket, use the `unix: string` option: const response = await fetch("https://hostname/a/path", { unix: "/var/run/path/to/unix.sock", method: "POST", body: JSON.stringify({ message: "Hello from Bun!" }), headers: { "Content-Type": "application/json", }, }); ### TLS To use a client certificate, use the `tls` option: await fetch("https://example.com", { tls: { key: Bun.file("/path/to/key.pem"), cert: Bun.file("/path/to/cert.pem"), // ca: [Bun.file("/path/to/ca.pem")], }, }); #### Custom TLS Validation To customize the TLS validation, use the `checkServerIdentity` option in `tls` await fetch("https://example.com", { tls: { checkServerIdentity: (hostname, peerCertificate) => { // Return an Error if the certificate is invalid }, }, }); This is similar to how it works in Node's `net` module. #### Disable TLS validation To disable TLS validation, set `rejectUnauthorized` to `false`: await fetch("https://example.com", { tls: { rejectUnauthorized: false, }, }); This is especially useful to avoid SSL errors when using self-signed certificates, but this disables TLS validation and should be used with caution. ### Request options In addition to the standard fetch options, Bun provides several extensions: const response = await fetch("http://example.com", { // Control automatic response decompression (default: true) decompress: true, // Disable connection reuse for this request keepalive: false, // Debug logging level verbose: true, // or "curl" for more detailed output }); ### Protocol support Beyond HTTP(S), Bun's fetch supports several additional protocols: #### S3 URLs - `s3://` Bun supports fetching from S3 buckets directly. // Using environment variables for credentials const response = await fetch("s3://my-bucket/path/to/object"); // Or passing credentials explicitly const response = await fetch("s3://my-bucket/path/to/object", { s3: { accessKeyId: "YOUR_ACCESS_KEY", secretAccessKey: "YOUR_SECRET_KEY", region: "us-east-1", }, }); Note: Only PUT and POST methods support request bodies when using S3. For uploads, Bun automatically uses multipart upload for streaming bodies. You can read more about Bun's S3 support in the S3 documentation. #### File URLs - `file://` You can fetch local files using the `file:` protocol: const response = await fetch("file:///path/to/file.txt"); const text = await response.text(); On Windows, paths are automatically normalized: // Both work on Windows const response = await fetch("file:///C:/path/to/file.txt"); const response2 = await fetch("file:///c:/path\\to/file.txt"); #### Data URLs - `data:` Bun supports the `data:` URL scheme: const response = await fetch("data:text/plain;base64,SGVsbG8sIFdvcmxkIQ=="); const text = await response.text(); // "Hello, World!" #### Blob URLs - `blob:` You can fetch blobs using URLs created by `URL.createObjectURL()`: const blob = new Blob(["Hello, World!"], { type: "text/plain" }); const url = URL.createObjectURL(blob); const response = await fetch(url); ### Error handling Bun's fetch implementation includes several specific error cases: * Using a request body with GET/HEAD methods will throw an error (which is expected for the fetch API) * Attempting to use both `proxy` and `unix` options together will throw an error * TLS certificate validation failures when `rejectUnauthorized` is true (or undefined) * S3 operations may throw specific errors related to authentication or permissions ### Content-Type handling Bun automatically sets the `Content-Type` header for request bodies when not explicitly provided: * For `Blob` objects, uses the blob's `type` * For `FormData`, sets appropriate multipart boundary * For JSON objects, sets `application/json` ## Debugging To help with debugging, you can pass `verbose: true` to `fetch`: const response = await fetch("http://example.com", { verbose: true, }); This will print the request and response headers to your terminal: [fetch] > HTTP/1.1 GET http://example.com/ [fetch] > Connection: keep-alive [fetch] > User-Agent: Bun/1.2.8 [fetch] > Accept: */* [fetch] > Host: example.com [fetch] > Accept-Encoding: gzip, deflate, br [fetch] < 200 OK [fetch] < Content-Encoding: gzip [fetch] < Age: 201555 [fetch] < Cache-Control: max-age=604800 [fetch] < Content-Type: text/html; charset=UTF-8 [fetch] < Date: Sun, 21 Jul 2024 02:41:14 GMT [fetch] < Etag: "3147526947+gzip" [fetch] < Expires: Sun, 28 Jul 2024 02:41:14 GMT [fetch] < Last-Modified: Thu, 17 Oct 2019 07:18:26 GMT [fetch] < Server: ECAcc (sac/254F) [fetch] < Vary: Accept-Encoding [fetch] < X-Cache: HIT [fetch] < Content-Length: 648 Note: `verbose: boolean` is not part of the Web standard `fetch` API and is specific to Bun. ## Performance Before an HTTP request can be sent, the DNS lookup must be performed. This can take a significant amount of time, especially if the DNS server is slow or the network connection is poor. After the DNS lookup, the TCP socket must be connected and the TLS handshake might need to be performed. This can also take a significant amount of time. After the request completes, consuming the response body can also take a significant amount of time and memory. At every step of the way, Bun provides APIs to help you optimize the performance of your application. ### DNS prefetching To prefetch a DNS entry, you can use the `dns.prefetch` API. This API is useful when you know you'll need to connect to a host soon and want to avoid the initial DNS lookup. import { dns } from "bun"; dns.prefetch("bun.sh"); #### DNS caching By default, Bun caches and deduplicates DNS queries in-memory for up to 30 seconds. You can see the cache stats by calling `dns.getCacheStats()`: To learn more about DNS caching in Bun, see the DNS caching documentation. ### Preconnect to a host To preconnect to a host, you can use the `fetch.preconnect` API. This API is useful when you know you'll need to connect to a host soon and want to start the initial DNS lookup, TCP socket connection, and TLS handshake early. import { fetch } from "bun"; fetch.preconnect("https://bun.sh"); Note: calling `fetch` immediately after `fetch.preconnect` will not make your request faster. Preconnecting only helps if you know you'll need to connect to a host soon, but you're not ready to make the request yet. #### Preconnect at startup To preconnect to a host at startup, you can pass `--fetch-preconnect`: bun --fetch-preconnect https://bun.sh ./my-script.ts This is sort of like `<link rel="preconnect">` in HTML. This feature is not implemented on Windows yet. If you're interested in using this feature on Windows, please file an issue and we can implement support for it on Windows. ### Connection pooling & HTTP keep-alive Bun automatically reuses connections to the same host. This is known as connection pooling. This can significantly reduce the time it takes to establish a connection. You don't need to do anything to enable this; it's automatic. #### Simultaneous connection limit By default, Bun limits the maximum number of simultaneous `fetch` requests to 256. We do this for several reasons: * It improves overall system stability. Operating systems have an upper limit on the number of simultaneous open TCP sockets, usually in the low thousands. Nearing this limit causes your entire computer to behave strangely. Applications hang and crash. * It encourages HTTP Keep-Alive connection reuse. For short-lived HTTP requests, the slowest step is often the initial connection setup. Reusing connections can save a lot of time. When the limit is exceeded, the requests are queued and sent as soon as the next request ends. You can increase the maximum number of simultaneous connections via the `BUN_CONFIG_MAX_HTTP_REQUESTS` environment variable: BUN_CONFIG_MAX_HTTP_REQUESTS=512 bun ./my-script.ts The max value for this limit is currently set to 65,336. The maximum port number is 65,535, so it's quite difficult for any one computer to exceed this limit. ### Response buffering Bun goes to great lengths to optimize the performance of reading the response body. The fastest way to read the response body is to use one of these methods: * `response.text(): Promise<string>` * `response.json(): Promise<any>` * `response.formData(): Promise<FormData>` * `response.bytes(): Promise<Uint8Array>` * `response.arrayBuffer(): Promise<ArrayBuffer>` * `response.blob(): Promise<Blob>` You can also use `Bun.write` to write the response body to a file on disk: import { write } from "bun"; await write("output.txt", response); ### Implementation details * Connection pooling is enabled by default but can be disabled per-request with `keepalive: false`. The `"Connection: close"` header can also be used to disable keep-alive. * Large file uploads are optimized using the operating system's `sendfile` syscall under specific conditions: * The file must be larger than 32KB * The request must not be using a proxy * On macOS, only regular files (not pipes, sockets, or devices) can use `sendfile` * When these conditions aren't met, or when using S3/streaming uploads, Bun falls back to reading the file into memory * This optimization is particularly effective for HTTP (not HTTPS) requests where the file can be sent directly from the kernel to the network stack * S3 operations automatically handle signing requests and merging authentication headers Note: Many of these features are Bun-specific extensions to the standard fetch API. --- ## Page: https://bun.sh/docs/api/websockets `Bun.serve()` supports server-side WebSockets, with on-the-fly compression, TLS support, and a Bun-native publish-subscribe API. **⚡️ 7x more throughput** — Bun's WebSockets are fast. For a simple chatroom on Linux x64, Bun can handle 7x more requests per second than Node.js + `"ws"`. | Messages sent per second | Runtime | Clients | | --- | --- | --- | | ~700,000 | (`Bun.serve`) Bun v0.2.1 (x64) | 16 | | ~100,000 | (`ws`) Node v18.10.0 (x64) | 16 | Internally Bun's WebSocket implementation is built on uWebSockets. ## Start a WebSocket server Below is a simple WebSocket server built with `Bun.serve`, in which all incoming requests are upgraded to WebSocket connections in the `fetch` handler. The socket handlers are declared in the `websocket` parameter. Bun.serve({ fetch(req, server) { // upgrade the request to a WebSocket if (server.upgrade(req)) { return; // do not return a Response } return new Response("Upgrade failed", { status: 500 }); }, websocket: {}, // handlers }); The following WebSocket event handlers are supported: Bun.serve({ fetch(req, server) {}, // upgrade logic websocket: { message(ws, message) {}, // a message is received open(ws) {}, // a socket is opened close(ws, code, message) {}, // a socket is closed drain(ws) {}, // the socket is ready to receive more data }, }); An API designed for speed The first argument to each handler is the instance of `ServerWebSocket` handling the event. The `ServerWebSocket` class is a fast, Bun-native implementation of `WebSocket` with some additional features. Bun.serve({ fetch(req, server) {}, // upgrade logic websocket: { message(ws, message) { ws.send(message); // echo back the message }, }, }); ### Sending messages Each `ServerWebSocket` instance has a `.send()` method for sending messages to the client. It supports a range of input types. ws.send("Hello world"); // string ws.send(response.arrayBuffer()); // ArrayBuffer ws.send(new Uint8Array([1, 2, 3])); // TypedArray | DataView Once the upgrade succeeds, Bun will send a `101 Switching Protocols` response per the spec. Additional `headers` can be attached to this `Response` in the call to `server.upgrade()`. Bun.serve({ fetch(req, server) { const sessionId = await generateSessionId(); server.upgrade(req, { headers: { "Set-Cookie": `SessionId=${sessionId}`, }, }); }, websocket: {}, // handlers }); ### Contextual data Contextual `data` can be attached to a new WebSocket in the `.upgrade()` call. This data is made available on the `ws.data` property inside the WebSocket handlers. type WebSocketData = { createdAt: number; channelId: string; authToken: string; }; // TypeScript: specify the type of `data` Bun.serve<WebSocketData>({ fetch(req, server) { // use a library to parse cookies const cookies = parseCookies(req.headers.get("Cookie")); server.upgrade(req, { // this object must conform to WebSocketData data: { createdAt: Date.now(), channelId: new URL(req.url).searchParams.get("channelId"), authToken: cookies["X-Token"], }, }); return undefined; }, websocket: { // handler called when a message is received async message(ws, message) { const user = getUserFromToken(ws.data.authToken); await saveMessageToDatabase({ channel: ws.data.channelId, message: String(message), userId: user.id, }); }, }, }); To connect to this server from the browser, create a new `WebSocket`. browser.js const socket = new WebSocket("ws://localhost:3000/chat"); socket.addEventListener("message", event => { console.log(event.data); }) **Identifying users** — The cookies that are currently set on the page will be sent with the WebSocket upgrade request and available on `req.headers` in the `fetch` handler. Parse these cookies to determine the identity of the connecting user and set the value of `data` accordingly. ### Pub/Sub Bun's `ServerWebSocket` implementation implements a native publish-subscribe API for topic-based broadcasting. Individual sockets can `.subscribe()` to a topic (specified with a string identifier) and `.publish()` messages to all other subscribers to that topic (excluding itself). This topic-based broadcast API is similar to MQTT and Redis Pub/Sub. const server = Bun.serve<{ username: string }>({ fetch(req, server) { const url = new URL(req.url); if (url.pathname === "/chat") { console.log(`upgrade!`); const username = getUsernameFromReq(req); const success = server.upgrade(req, { data: { username } }); return success ? undefined : new Response("WebSocket upgrade error", { status: 400 }); } return new Response("Hello world"); }, websocket: { open(ws) { const msg = `${ws.data.username} has entered the chat`; ws.subscribe("the-group-chat"); server.publish("the-group-chat", msg); }, message(ws, message) { // this is a group chat // so the server re-broadcasts incoming message to everyone server.publish("the-group-chat", `${ws.data.username}: ${message}`); }, close(ws) { const msg = `${ws.data.username} has left the chat`; ws.unsubscribe("the-group-chat"); server.publish("the-group-chat", msg); }, }, }); console.log(`Listening on ${server.hostname}:${server.port}`); Calling `.publish(data)` will send the message to all subscribers of a topic _except_ the socket that called `.publish()`. To send a message to all subscribers of a topic, use the `.publish()` method on the `Server` instance. const server = Bun.serve({ websocket: { // ... }, }); // listen for some external event server.publish("the-group-chat", "Hello world"); ### Compression Per-message compression can be enabled with the `perMessageDeflate` parameter. Bun.serve({ fetch(req, server) {}, // upgrade logic websocket: { // enable compression and decompression perMessageDeflate: true, }, }); Compression can be enabled for individual messages by passing a `boolean` as the second argument to `.send()`. ws.send("Hello world", true); For fine-grained control over compression characteristics, refer to the Reference. ### Backpressure The `.send(message)` method of `ServerWebSocket` returns a `number` indicating the result of the operation. * `-1` — The message was enqueued but there is backpressure * `0` — The message was dropped due to a connection issue * `1+` — The number of bytes sent This gives you better control over backpressure in your server. ### Timeouts and limits By default, Bun will close a WebSocket connection if it is idle for 120 seconds. This can be configured with the `idleTimeout` parameter. Bun.serve({ fetch(req, server) {}, // upgrade logic websocket: { idleTimeout: 60, // 60 seconds // ... }, }); Bun will also close a WebSocket connection if it receives a message that is larger than 16 MB. This can be configured with the `maxPayloadLength` parameter. Bun.serve({ fetch(req, server) {}, // upgrade logic websocket: { maxPayloadLength: 1024 * 1024, // 1 MB // ... }, }); ## Connect to a `Websocket` server Bun implements the `WebSocket` class. To create a WebSocket client that connects to a `ws://` or `wss://` server, create an instance of `WebSocket`, as you would in the browser. const socket = new WebSocket("ws://localhost:3000"); In browsers, the cookies that are currently set on the page will be sent with the WebSocket upgrade request. This is a standard feature of the `WebSocket` API. For convenience, Bun lets you setting custom headers directly in the constructor. This is a Bun-specific extension of the `WebSocket` standard. _This will not work in browsers._ const socket = new WebSocket("ws://localhost:3000", { headers: { // custom headers }, }); To add event listeners to the socket: // message is received socket.addEventListener("message", event => {}); // socket opened socket.addEventListener("open", event => {}); // socket closed socket.addEventListener("close", event => {}); // error handler socket.addEventListener("error", event => {}); ## Reference namespace Bun { export function serve(params: { fetch: (req: Request, server: Server) => Response | Promise<Response>; websocket?: { message: ( ws: ServerWebSocket, message: string | ArrayBuffer | Uint8Array, ) => void; open?: (ws: ServerWebSocket) => void; close?: (ws: ServerWebSocket, code: number, reason: string) => void; error?: (ws: ServerWebSocket, error: Error) => void; drain?: (ws: ServerWebSocket) => void; maxPayloadLength?: number; // default: 16 * 1024 * 1024 = 16 MB idleTimeout?: number; // default: 120 (seconds) backpressureLimit?: number; // default: 1024 * 1024 = 1 MB closeOnBackpressureLimit?: boolean; // default: false sendPings?: boolean; // default: true publishToSelf?: boolean; // default: false perMessageDeflate?: | boolean | { compress?: boolean | Compressor; decompress?: boolean | Compressor; }; }; }): Server; } type Compressor = | `"disable"` | `"shared"` | `"dedicated"` | `"3KB"` | `"4KB"` | `"8KB"` | `"16KB"` | `"32KB"` | `"64KB"` | `"128KB"` | `"256KB"`; interface Server { pendingWebSockets: number; publish( topic: string, data: string | ArrayBufferView | ArrayBuffer, compress?: boolean, ): number; upgrade( req: Request, options?: { headers?: HeadersInit; data?: any; }, ): boolean; } interface ServerWebSocket { readonly data: any; readonly readyState: number; readonly remoteAddress: string; send(message: string | ArrayBuffer | Uint8Array, compress?: boolean): number; close(code?: number, reason?: string): void; subscribe(topic: string): void; unsubscribe(topic: string): void; publish(topic: string, message: string | ArrayBuffer | Uint8Array): void; isSubscribed(topic: string): boolean; cork(cb: (ws: ServerWebSocket) => void): void; } --- ## Page: https://bun.sh/docs/api/workers **🚧** — The `Worker` API is still experimental and should not be considered ready for production. `Worker` lets you start and communicate with a new JavaScript instance running on a separate thread while sharing I/O resources with the main thread. Bun implements a minimal version of the Web Workers API with extensions that make it work better for server-side use cases. Like the rest of Bun, `Worker` in Bun support CommonJS, ES Modules, TypeScript, JSX, TSX and more out of the box. No extra build steps are necessary. ## Creating a `Worker` Like in browsers, `Worker` is a global. Use it to create a new worker thread. ### From the main thread Main thread const worker = new Worker("./worker.ts"); worker.postMessage("hello"); worker.onmessage = event => { console.log(event.data); }; ### Worker thread worker.ts (Worker thread) // prevents TS errors declare var self: Worker; self.onmessage = (event: MessageEvent) => { console.log(event.data); postMessage("world"); }; To prevent TypeScript errors when using `self`, add this line to the top of your worker file. declare var self: Worker; You can use `import` and `export` syntax in your worker code. Unlike in browsers, there's no need to specify `{type: "module"}` to use ES Modules. To simplify error handling, the initial script to load is resolved at the time `new Worker(url)` is called. const worker = new Worker("/not-found.js"); // throws an error immediately The specifier passed to `Worker` is resolved relative to the project root (like typing `bun ./path/to/file.js`). ### `preload` - load modules before the worker starts You can pass an array of module specifiers to the `preload` option to load modules before the worker starts. This is useful when you want to ensure some code is always loaded before the application starts, like loading OpenTelemetry, Sentry, DataDog, etc. const worker = new Worker("./worker.ts", { preload: ["./load-sentry.js"], }); Like the `--preload` CLI argument, the `preload` option is processed before the worker starts. You can also pass a single string to the `preload` option: const worker = new Worker("./worker.ts", { preload: "./load-sentry.js", }); This feature was added in Bun v1.1.35. ### `blob:` URLs As of Bun v1.1.13, you can also pass a `blob:` URL to `Worker`. This is useful for creating workers from strings or other sources. const blob = new Blob( [ ` self.onmessage = (event: MessageEvent) => postMessage(event.data)`, ], { type: "application/typescript", }, ); const url = URL.createObjectURL(blob); const worker = new Worker(url); Like the rest of Bun, workers created from `blob:` URLs support TypeScript, JSX, and other file types out of the box. You can communicate it should be loaded via typescript either via `type` or by passing a `filename` to the `File` constructor. const file = new File( [ ` self.onmessage = (event: MessageEvent) => postMessage(event.data)`, ], "worker.ts", ); const url = URL.createObjectURL(file); const worker = new Worker(url); ### `"open"` The `"open"` event is emitted when a worker is created and ready to receive messages. This can be used to send an initial message to a worker once it's ready. (This event does not exist in browsers.) const worker = new Worker(new URL("worker.ts", import.meta.url).href); worker.addEventListener("open", () => { console.log("worker is ready"); }); Messages are automatically enqueued until the worker is ready, so there is no need to wait for the `"open"` event to send messages. ## Messages with `postMessage` To send messages, use `worker.postMessage` and `self.postMessage`. This leverages the HTML Structured Clone Algorithm. // On the worker thread, `postMessage` is automatically "routed" to the parent thread. postMessage({ hello: "world" }); // On the main thread worker.postMessage({ hello: "world" }); To receive messages, use the `message` event handler on the worker and main thread. // Worker thread: self.addEventListener("message", event => { console.log(event.data); }); // or use the setter: // self.onmessage = fn // if on the main thread worker.addEventListener("message", event => { console.log(event.data); }); // or use the setter: // worker.onmessage = fn ## Terminating a worker A `Worker` instance terminates automatically once it's event loop has no work left to do. Attaching a `"message"` listener on the global or any `MessagePort`s will keep the event loop alive. To forcefully terminate a `Worker`, call `worker.terminate()`. const worker = new Worker(new URL("worker.ts", import.meta.url).href); // ...some time later worker.terminate(); This will cause the worker's to exit as soon as possible. ### `process.exit()` A worker can terminate itself with `process.exit()`. This does not terminate the main process. Like in Node.js, `process.on('beforeExit', callback)` and `process.on('exit', callback)` are emitted on the worker thread (and not on the main thread), and the exit code is passed to the `"close"` event. ### `"close"` The `"close"` event is emitted when a worker has been terminated. It can take some time for the worker to actually terminate, so this event is emitted when the worker has been marked as terminated. The `CloseEvent` will contain the exit code passed to `process.exit()`, or 0 if closed for other reasons. const worker = new Worker(new URL("worker.ts", import.meta.url).href); worker.addEventListener("close", event => { console.log("worker is being closed"); }); This event does not exist in browsers. ## Managing lifetime By default, an active `Worker` will keep the main (spawning) process alive, so async tasks like `setTimeout` and promises will keep the process alive. Attaching `message` listeners will also keep the `Worker` alive. ### `worker.unref()` To stop a running worker from keeping the process alive, call `worker.unref()`. This decouples the lifetime of the worker to the lifetime of the main process, and is equivalent to what Node.js' `worker_threads` does. const worker = new Worker(new URL("worker.ts", import.meta.url).href); worker.unref(); Note: `worker.unref()` is not available in browsers. ### `worker.ref()` To keep the process alive until the `Worker` terminates, call `worker.ref()`. A ref'd worker is the default behavior, and still needs something going on in the event loop (such as a `"message"` listener) for the worker to continue running. const worker = new Worker(new URL("worker.ts", import.meta.url).href); worker.unref(); // later... worker.ref(); Alternatively, you can also pass an `options` object to `Worker`: const worker = new Worker(new URL("worker.ts", import.meta.url).href, { ref: false, }); Note: `worker.ref()` is not available in browsers. ## Memory usage with `smol` JavaScript instances can use a lot of memory. Bun's `Worker` supports a `smol` mode that reduces memory usage, at a cost of performance. To enable `smol` mode, pass `smol: true` to the `options` object in the `Worker` constructor. const worker = new Worker("./i-am-smol.ts", { smol: true, }); What does `smol` mode actually do? ## `Bun.isMainThread` You can check if you're in the main thread by checking `Bun.isMainThread`. if (Bun.isMainThread) { console.log("I'm the main thread"); } else { console.log("I'm in a worker"); } This is useful for conditionally running code based on whether you're in the main thread or not. --- ## Page: https://bun.sh/docs/api/binary-data This page is intended as an introduction to working with binary data in JavaScript. Bun implements a number of data types and utilities for working with binary data, most of which are Web-standard. Any Bun-specific APIs will be noted as such. Below is a quick "cheat sheet" that doubles as a table of contents. Click an item in the left column to jump to that section. <table><thead></thead><tbody><tr><td><a href="#typedarray"><code>TypedArray</code></a></td><td>A family of classes that provide an <code>Array</code>-like interface for interacting with binary data. Includes <code>Uint8Array</code>, <code>Uint16Array</code>, <code>Int8Array</code>, and more.</td></tr><tr><td><a href="#buffer"><code>Buffer</code></a></td><td>A subclass of <code>Uint8Array</code> that implements a wide range of convenience methods. Unlike the other elements in this table, this is a Node.js API (which Bun implements). It can't be used in the browser.</td></tr><tr><td><a href="#dataview"><code>DataView</code></a></td><td>A class that provides a <code>get/set</code> API for writing some number of bytes to an <code>ArrayBuffer</code> at a particular byte offset. Often used reading or writing binary protocols.</td></tr><tr><td><a href="#blob"><code>Blob</code></a></td><td>A readonly blob of binary data usually representing a file. Has a MIME <code>type</code>, a <code>size</code>, and methods for converting to <code>ArrayBuffer</code>, <code>ReadableStream</code>, and string.</td></tr><tr><td><a href="#file"><code>File</code></a></td><td>A subclass of <code>Blob</code> that represents a file. Has a <code>name</code> and <code>lastModified</code> timestamp. There is experimental support in Node.js v20.</td></tr><tr><td><a href="#bunfile"><code>BunFile</code></a></td><td><em>Bun only</em>. A subclass of <code>Blob</code> that represents a lazily-loaded file on disk. Created with <code>Bun.file(path)</code>.</td></tr></tbody></table> ## `ArrayBuffer` and views Until 2009, there was no language-native way to store and manipulate binary data in JavaScript. ECMAScript v5 introduced a range of new mechanisms for this. The most fundamental building block is `ArrayBuffer`, a simple data structure that represents a sequence of bytes in memory. // this buffer can store 8 bytes const buf = new ArrayBuffer(8); Despite the name, it isn't an array and supports none of the array methods and operators one might expect. In fact, there is no way to directly read or write values from an `ArrayBuffer`. There's very little you can do with one except check its size and create "slices" from it. const buf = new ArrayBuffer(8); buf.byteLength; // => 8 const slice = buf.slice(0, 4); // returns new ArrayBuffer slice.byteLength; // => 4 To do anything interesting we need a construct known as a "view". A view is a class that _wraps_ an `ArrayBuffer` instance and lets you read and manipulate the underlying data. There are two types of views: _typed arrays_ and `DataView`. ### `DataView` The `DataView` class is a lower-level interface for reading and manipulating the data in an `ArrayBuffer`. Below we create a new `DataView` and set the first byte to 3. const buf = new ArrayBuffer(4); // [0b00000000, 0b00000000, 0b00000000, 0b00000000] const dv = new DataView(buf); dv.setUint8(0, 3); // write value 3 at byte offset 0 dv.getUint8(0); // => 3 // [0b00000011, 0b00000000, 0b00000000, 0b00000000] Now let's write a `Uint16` at byte offset `1`. This requires two bytes. We're using the value `513`, which is `2 * 256 + 1`; in bytes, that's `00000010 00000001`. dv.setUint16(1, 513); // [0b00000011, 0b00000010, 0b00000001, 0b00000000] console.log(dv.getUint16(1)); // => 513 We've now assigned a value to the first three bytes in our underlying `ArrayBuffer`. Even though the second and third bytes were created using `setUint16()`, we can still read each of its component bytes using `getUint8()`. console.log(dv.getUint8(1)); // => 2 console.log(dv.getUint8(2)); // => 1 Attempting to write a value that requires more space than is available in the underlying `ArrayBuffer` will cause an error. Below we attempt to write a `Float64` (which requires 8 bytes) at byte offset `0`, but there are only four total bytes in the buffer. dv.setFloat64(0, 3.1415); // ^ RangeError: Out of bounds access The following methods are available on `DataView`: | Getters | Setters | | --- | --- | | `getBigInt64()` | `setBigInt64()` | | `getBigUint64()` | `setBigUint64()` | | `getFloat32()` | `setFloat32()` | | `getFloat64()` | `setFloat64()` | | `getInt16()` | `setInt16()` | | `getInt32()` | `setInt32()` | | `getInt8()` | `setInt8()` | | `getUint16()` | `setUint16()` | | `getUint32()` | `setUint32()` | | `getUint8()` | `setUint8()` | ### `TypedArray` Typed arrays are a family of classes that provide an `Array`\-like interface for interacting with data in an `ArrayBuffer`. Whereas a `DataView` lets you write numbers of varying size at a particular offset, a `TypedArray` interprets the underlying bytes as an array of numbers, each of a fixed size. **Note** — It's common to refer to this family of classes collectively by their shared superclass `TypedArray`. This class as _internal_ to JavaScript; you can't directly create instances of it, and `TypedArray` is not defined in the global scope. Think of it as an `interface` or an abstract class. const buffer = new ArrayBuffer(3); const arr = new Uint8Array(buffer); // contents are initialized to zero console.log(arr); // Uint8Array(3) [0, 0, 0] // assign values like an array arr[0] = 0; arr[1] = 10; arr[2] = 255; arr[3] = 255; // no-op, out of bounds While an `ArrayBuffer` is a generic sequence of bytes, these typed array classes interpret the bytes as an array of numbers of a given byte size. The top row contains the raw bytes, and the later rows contain how these bytes will be interpreted when _viewed_ using different typed array classes. The following classes are typed arrays, along with a description of how they interpret the bytes in an `ArrayBuffer`: | Class | Description | | --- | --- | | `Uint8Array` | Every one (1) byte is interpreted as an unsigned 8-bit integer. Range 0 to 255. | | `Uint16Array` | Every two (2) bytes are interpreted as an unsigned 16-bit integer. Range 0 to 65535. | | `Uint32Array` | Every four (4) bytes are interpreted as an unsigned 32-bit integer. Range 0 to 4294967295. | | `Int8Array` | Every one (1) byte is interpreted as a signed 8-bit integer. Range -128 to 127. | | `Int16Array` | Every two (2) bytes are interpreted as a signed 16-bit integer. Range -32768 to 32767. | | `Int32Array` | Every four (4) bytes are interpreted as a signed 32-bit integer. Range -2147483648 to 2147483647. | | `Float16Array` | Every two (2) bytes are interpreted as a 16-bit floating point number. Range -6.104e5 to 6.55e4. | | `Float32Array` | Every four (4) bytes are interpreted as a 32-bit floating point number. Range -3.4e38 to 3.4e38. | | `Float64Array` | Every eight (8) bytes are interpreted as a 64-bit floating point number. Range -1.7e308 to 1.7e308. | | `BigInt64Array` | Every eight (8) bytes are interpreted as a signed `BigInt`. Range -9223372036854775808 to 9223372036854775807 (though `BigInt` is capable of representing larger numbers). | | `BigUint64Array` | Every eight (8) bytes are interpreted as an unsigned `BigInt`. Range 0 to 18446744073709551615 (though `BigInt` is capable of representing larger numbers). | | `Uint8ClampedArray` | Same as `Uint8Array`, but automatically "clamps" to the range 0-255 when assigning a value to an element. | The table below demonstrates how the bytes in an `ArrayBuffer` are interpreted when viewed using different typed array classes. <table><thead></thead><tbody><tr><td><code>ArrayBuffer</code></td><td><code>00000000</code></td><td><code>00000001</code></td><td><code>00000010</code></td><td><code>00000011</code></td><td><code>00000100</code></td><td><code>00000101</code></td><td><code>00000110</code></td><td><code>00000111</code></td></tr><tr><td><code>Uint8Array</code></td><td>0</td><td>1</td><td>2</td><td>3</td><td>4</td><td>5</td><td>6</td><td>7</td></tr><tr><td><code>Uint16Array</code></td><td colspan="2">256 (<code>1 * 256 + 0</code>)</td><td colspan="2">770 (<code>3 * 256 + 2</code>)</td><td colspan="2">1284 (<code>5 * 256 + 4</code>)</td><td colspan="2">1798 (<code>7 * 256 + 6</code>)</td></tr><tr><td><code>Uint32Array</code></td><td colspan="4">50462976</td><td colspan="4">117835012</td></tr><tr><td><code>BigUint64Array</code></td><td colspan="8">506097522914230528n</td></tr></tbody></table> To create a typed array from a pre-defined `ArrayBuffer`: // create typed array from ArrayBuffer const buf = new ArrayBuffer(10); const arr = new Uint8Array(buf); arr[0] = 30; arr[1] = 60; // all elements are initialized to zero console.log(arr); // => Uint8Array(10) [ 30, 60, 0, 0, 0, 0, 0, 0, 0, 0 ]; If we tried to instantiate a `Uint32Array` from this same `ArrayBuffer`, we'd get an error. const buf = new ArrayBuffer(10); const arr = new Uint32Array(buf); // ^ RangeError: ArrayBuffer length minus the byteOffset // is not a multiple of the element size A `Uint32` value requires four bytes (16 bits). Because the `ArrayBuffer` is 10 bytes long, there's no way to cleanly divide its contents into 4-byte chunks. To fix this, we can create a typed array over a particular "slice" of an `ArrayBuffer`. The `Uint16Array` below only "views" the _first_ 8 bytes of the underlying `ArrayBuffer`. To achieve these, we specify a `byteOffset` of `0` and a `length` of `2`, which indicates the number of `Uint32` numbers we want our array to hold. // create typed array from ArrayBuffer slice const buf = new ArrayBuffer(10); const arr = new Uint32Array(buf, 0, 2); /* buf _ _ _ _ _ _ _ _ _ _ 10 bytes arr [_______,_______] 2 4-byte elements */ arr.byteOffset; // 0 arr.length; // 2 You don't need to explicitly create an `ArrayBuffer` instance; you can instead directly specify a length in the typed array constructor: const arr2 = new Uint8Array(5); // all elements are initialized to zero // => Uint8Array(5) [0, 0, 0, 0, 0] Typed arrays can also be instantiated directly from an array of numbers, or another typed array: // from an array of numbers const arr1 = new Uint8Array([0, 1, 2, 3, 4, 5, 6, 7]); arr1[0]; // => 0; arr1[7]; // => 7; // from another typed array const arr2 = new Uint8Array(arr); Broadly speaking, typed arrays provide the same methods as regular arrays, with a few exceptions. For example, `push` and `pop` are not available on typed arrays, because they would require resizing the underlying `ArrayBuffer`. const arr = new Uint8Array([0, 1, 2, 3, 4, 5, 6, 7]); // supports common array methods arr.filter(n => n > 128); // Uint8Array(1) [255] arr.map(n => n * 2); // Uint8Array(8) [0, 2, 4, 6, 8, 10, 12, 14] arr.reduce((acc, n) => acc + n, 0); // 28 arr.forEach(n => console.log(n)); // 0 1 2 3 4 5 6 7 arr.every(n => n < 10); // true arr.find(n => n > 5); // 6 arr.includes(5); // true arr.indexOf(5); // 5 Refer to the MDN documentation for more information on the properties and methods of typed arrays. ### `Uint8Array` It's worth specifically highlighting `Uint8Array`, as it represents a classic "byte array"—a sequence of 8-bit unsigned integers between 0 and 255. This is the most common typed array you'll encounter in JavaScript. In Bun, and someday in other JavaScript engines, it has methods available for converting between byte arrays and serialized representations of those arrays as base64 or hex strings. new Uint8Array([1, 2, 3, 4, 5]).toBase64(); // "AQIDBA==" Uint8Array.fromBase64("AQIDBA=="); // Uint8Array(4) [1, 2, 3, 4, 5] new Uint8Array([255, 254, 253, 252, 251]).toHex(); // "fffefdfcfb==" Uint8Array.fromHex("fffefdfcfb"); // Uint8Array(5) [255, 254, 253, 252, 251] It is the return value of `TextEncoder#encode`, and the input type of `TextDecoder#decode`, two utility classes designed to translate strings and various binary encodings, most notably `"utf-8"`. const encoder = new TextEncoder(); const bytes = encoder.encode("hello world"); // => Uint8Array(11) [ 104, 101, 108, 108, 111, 32, 119, 111, 114, 108, 100 ] const decoder = new TextDecoder(); const text = decoder.decode(bytes); // => hello world ### `Buffer` Bun implements `Buffer`, a Node.js API for working with binary data that pre-dates the introduction of typed arrays in the JavaScript spec. It has since been re-implemented as a subclass of `Uint8Array`. It provides a wide range of methods, including several Array-like and `DataView`\-like methods. const buf = Buffer.from("hello world"); // => Buffer(11) [ 104, 101, 108, 108, 111, 32, 119, 111, 114, 108, 100 ] buf.length; // => 11 buf[0]; // => 104, ascii for 'h' buf.writeUInt8(72, 0); // => ascii for 'H' console.log(buf.toString()); // => Hello world For complete documentation, refer to the Node.js documentation. ## `Blob` `Blob` is a Web API commonly used for representing files. `Blob` was initially implemented in browsers (unlike `ArrayBuffer` which is part of JavaScript itself), but it is now supported in Node and Bun. It isn't common to directly create `Blob` instances. More often, you'll receive instances of `Blob` from an external source (like an `<input type="file">` element in the browser) or library. That said, it is possible to create a `Blob` from one or more string or binary "blob parts". const blob = new Blob(["<html>Hello</html>"], { type: "text/html", }); blob.type; // => text/html blob.size; // => 19 These parts can be `string`, `ArrayBuffer`, `TypedArray`, `DataView`, or other `Blob` instances. The blob parts are concatenated together in the order they are provided. const blob = new Blob([ "<html>", new Blob(["<body>"]), new Uint8Array([104, 101, 108, 108, 111]), // "hello" in binary "</body></html>", ]); The contents of a `Blob` can be asynchronously read in various formats. await blob.text(); // => <html><body>hello</body></html> await blob.bytes(); // => Uint8Array (copies contents) await blob.arrayBuffer(); // => ArrayBuffer (copies contents) await blob.stream(); // => ReadableStream ### `BunFile` `BunFile` is a subclass of `Blob` used to represent a lazily-loaded file on disk. Like `File`, it adds a `name` and `lastModified` property. Unlike `File`, it does not require the file to be loaded into memory. const file = Bun.file("index.txt"); // => BunFile ### `File` Browser only. Experimental support in Node.js 20. `File` is a subclass of `Blob` that adds a `name` and `lastModified` property. It's commonly used in the browser to represent files uploaded via a `<input type="file">` element. Node.js and Bun implement `File`. // on browser! // <input type="file" id="file" /> const files = document.getElementById("file").files; // => File[] const file = new File(["<html>Hello</html>"], "index.html", { type: "text/html", }); Refer to the MDN documentation for complete docs information. ## Streams Streams are an important abstraction for working with binary data without loading it all into memory at once. They are commonly used for reading and writing files, sending and receiving network requests, and processing large amounts of data. Bun implements the Web APIs `ReadableStream` and `WritableStream`. Bun also implements the `node:stream` module, including `Readable`, `Writable`, and `Duplex`. For complete documentation, refer to the Node.js docs. To create a simple readable stream: const stream = new ReadableStream({ start(controller) { controller.enqueue("hello"); controller.enqueue("world"); controller.close(); }, }); The contents of this stream can be read chunk-by-chunk with `for await` syntax. for await (const chunk of stream) { console.log(chunk); // => "hello" // => "world" } For a more complete discussion of streams in Bun, see API > Streams. ## Conversion Converting from one binary format to another is a common task. This section is intended as a reference. ### From `ArrayBuffer` Since `ArrayBuffer` stores the data that underlies other binary structures like `TypedArray`, the snippets below are not _converting_ from `ArrayBuffer` to another format. Instead, they are _creating_ a new instance using the data stored underlying data. #### To `TypedArray` new Uint8Array(buf); #### To `DataView` new DataView(buf); #### To `Buffer` // create Buffer over entire ArrayBuffer Buffer.from(buf); // create Buffer over a slice of the ArrayBuffer Buffer.from(buf, 0, 10); #### To `string` As UTF-8: new TextDecoder().decode(buf); #### To `number[]` Array.from(new Uint8Array(buf)); #### To `Blob` new Blob([buf], { type: "text/plain" }); #### To `ReadableStream` The following snippet creates a `ReadableStream` and enqueues the entire `ArrayBuffer` as a single chunk. new ReadableStream({ start(controller) { controller.enqueue(buf); controller.close(); }, }); With chunking ### From `TypedArray` #### To `ArrayBuffer` This retrieves the underlying `ArrayBuffer`. Note that a `TypedArray` can be a view of a _slice_ of the underlying buffer, so the sizes may differ. arr.buffer; #### To `DataView` To creates a `DataView` over the same byte range as the TypedArray. new DataView(arr.buffer, arr.byteOffset, arr.byteLength); #### To `Buffer` Buffer.from(arr); #### To `string` As UTF-8: new TextDecoder().decode(arr); #### To `number[]` Array.from(arr); #### To `Blob` // only if arr is a view of its entire backing TypedArray new Blob([arr.buffer], { type: "text/plain" }); #### To `ReadableStream` new ReadableStream({ start(controller) { controller.enqueue(arr); controller.close(); }, }); With chunking ### From `DataView` #### To `ArrayBuffer` view.buffer; #### To `TypedArray` Only works if the `byteLength` of the `DataView` is a multiple of the `BYTES_PER_ELEMENT` of the `TypedArray` subclass. new Uint8Array(view.buffer, view.byteOffset, view.byteLength); new Uint16Array(view.buffer, view.byteOffset, view.byteLength / 2); new Uint32Array(view.buffer, view.byteOffset, view.byteLength / 4); // etc... #### To `Buffer` Buffer.from(view.buffer, view.byteOffset, view.byteLength); #### To `string` As UTF-8: new TextDecoder().decode(view); #### To `number[]` Array.from(view); #### To `Blob` new Blob([view.buffer], { type: "text/plain" }); #### To `ReadableStream` new ReadableStream({ start(controller) { controller.enqueue(view.buffer); controller.close(); }, }); With chunking ### From `Buffer` #### To `ArrayBuffer` buf.buffer; #### To `TypedArray` new Uint8Array(buf); #### To `DataView` new DataView(buf.buffer, buf.byteOffset, buf.byteLength); #### To `string` As UTF-8: buf.toString(); As base64: buf.toString('base64'); As hex: buf.toString('hex'); #### To `number[]` Array.from(buf); #### To `Blob` new Blob([buf], { type: "text/plain" }); #### To `ReadableStream` new ReadableStream({ start(controller) { controller.enqueue(buf); controller.close(); }, }); With chunking ### From `Blob` #### To `ArrayBuffer` The `Blob` class provides a convenience method for this purpose. await blob.arrayBuffer(); #### To `TypedArray` await blob.bytes(); #### To `DataView` new DataView(await blob.arrayBuffer()); #### To `Buffer` Buffer.from(await blob.arrayBuffer()); #### To `string` As UTF-8: await blob.text(); #### To `number[]` Array.from(await blob.bytes()); #### To `ReadableStream` blob.stream(); ### From `ReadableStream` It's common to use `Response` as a convenient intermediate representation to make it easier to convert `ReadableStream` to other formats. stream; // ReadableStream const buffer = new Response(stream).arrayBuffer(); However this approach is verbose and adds overhead that slows down overall performance unnecessarily. Bun implements a set of optimized convenience functions for converting `ReadableStream` various binary formats. #### To `ArrayBuffer` // with Response new Response(stream).arrayBuffer(); // with Bun function Bun.readableStreamToArrayBuffer(stream); #### To `Uint8Array` // with Response new Response(stream).bytes(); // with Bun function Bun.readableStreamToBytes(stream); #### To `TypedArray` // with Response const buf = await new Response(stream).arrayBuffer(); new Int8Array(buf); // with Bun function new Int8Array(Bun.readableStreamToArrayBuffer(stream)); #### To `DataView` // with Response const buf = await new Response(stream).arrayBuffer(); new DataView(buf); // with Bun function new DataView(Bun.readableStreamToArrayBuffer(stream)); #### To `Buffer` // with Response const buf = await new Response(stream).arrayBuffer(); Buffer.from(buf); // with Bun function Buffer.from(Bun.readableStreamToArrayBuffer(stream)); #### To `string` As UTF-8: // with Response await new Response(stream).text(); // with Bun function await Bun.readableStreamToText(stream); #### To `number[]` // with Response const arr = await new Response(stream).bytes(); Array.from(arr); // with Bun function Array.from(new Uint8Array(Bun.readableStreamToArrayBuffer(stream))); Bun provides a utility for resolving a `ReadableStream` to an array of its chunks. Each chunk may be a string, typed array, or `ArrayBuffer`. // with Bun function Bun.readableStreamToArray(stream); #### To `Blob` new Response(stream).blob(); #### To `ReadableStream` To split a `ReadableStream` into two streams that can be consumed independently: const [a, b] = stream.tee(); --- ## Page: https://bun.sh/docs/api/streams Streams are an important abstraction for working with binary data without loading it all into memory at once. They are commonly used for reading and writing files, sending and receiving network requests, and processing large amounts of data. Bun implements the Web APIs `ReadableStream` and `WritableStream`. Bun also implements the `node:stream` module, including `Readable`, `Writable`, and `Duplex`. For complete documentation, refer to the Node.js docs. To create a simple `ReadableStream`: const stream = new ReadableStream({ start(controller) { controller.enqueue("hello"); controller.enqueue("world"); controller.close(); }, }); The contents of a `ReadableStream` can be read chunk-by-chunk with `for await` syntax. for await (const chunk of stream) { console.log(chunk); // => "hello" // => "world" } ## Direct `ReadableStream` Bun implements an optimized version of `ReadableStream` that avoid unnecessary data copying & queue management logic. With a traditional `ReadableStream`, chunks of data are _enqueued_. Each chunk is copied into a queue, where it sits until the stream is ready to send more data. const stream = new ReadableStream({ start(controller) { controller.enqueue("hello"); controller.enqueue("world"); controller.close(); }, }); With a direct `ReadableStream`, chunks of data are written directly to the stream. No queueing happens, and there's no need to clone the chunk data into memory. The `controller` API is updated to reflect this; instead of `.enqueue()` you call `.write`. const stream = new ReadableStream({ type: "direct", pull(controller) { controller.write("hello"); controller.write("world"); }, }); When using a direct `ReadableStream`, all chunk queueing is handled by the destination. The consumer of the stream receives exactly what is passed to `controller.write()`, without any encoding or modification. ## Async generator streams Bun also supports async generator functions as a source for `Response` and `Request`. This is an easy way to create a `ReadableStream` that fetches data from an asynchronous source. const response = new Response(async function* () { yield "hello"; yield "world"; }()); await response.text(); // "helloworld" You can also use `[Symbol.asyncIterator]` directly. const response = new Response({ [Symbol.asyncIterator]: async function* () { yield "hello"; yield "world"; }, }); await response.text(); // "helloworld" If you need more granular control over the stream, `yield` will return the direct ReadableStream controller. const response = new Response({ [Symbol.asyncIterator]: async function* () { const controller = yield "hello"; await controller.end(); }, }); await response.text(); // "hello" ## `Bun.ArrayBufferSink` The `Bun.ArrayBufferSink` class is a fast incremental writer for constructing an `ArrayBuffer` of unknown size. const sink = new Bun.ArrayBufferSink(); sink.write("h"); sink.write("e"); sink.write("l"); sink.write("l"); sink.write("o"); sink.end(); // ArrayBuffer(5) [ 104, 101, 108, 108, 111 ] To instead retrieve the data as a `Uint8Array`, pass the `asUint8Array` option to the `start` method. const sink = new Bun.ArrayBufferSink(); sink.start({ asUint8Array: true }); sink.write("h"); sink.write("e"); sink.write("l"); sink.write("l"); sink.write("o"); sink.end(); // Uint8Array(5) [ 104, 101, 108, 108, 111 ] The `.write()` method supports strings, typed arrays, `ArrayBuffer`, and `SharedArrayBuffer`. sink.write("h"); sink.write(new Uint8Array([101, 108])); sink.write(Buffer.from("lo").buffer); sink.end(); Once `.end()` is called, no more data can be written to the `ArrayBufferSink`. However, in the context of buffering a stream, it's useful to continuously write data and periodically `.flush()` the contents (say, into a `WriteableStream`). To support this, pass `stream: true` to the constructor. const sink = new Bun.ArrayBufferSink(); sink.start({ stream: true, }); sink.write("h"); sink.write("e"); sink.write("l"); sink.flush(); // ArrayBuffer(5) [ 104, 101, 108 ] sink.write("l"); sink.write("o"); sink.flush(); // ArrayBuffer(5) [ 108, 111 ] The `.flush()` method returns the buffered data as an `ArrayBuffer` (or `Uint8Array` if `asUint8Array: true`) and clears internal buffer. To manually set the size of the internal buffer in bytes, pass a value for `highWaterMark`: const sink = new Bun.ArrayBufferSink(); sink.start({ highWaterMark: 1024 * 1024, // 1 MB }); Reference --- ## Page: https://bun.sh/docs/api/sql Bun provides native bindings for working with PostgreSQL databases with a modern, Promise-based API. The interface is designed to be simple and performant, using tagged template literals for queries and offering features like connection pooling, transactions, and prepared statements. import { sql } from "bun"; const users = await sql` SELECT * FROM users WHERE active = ${true} LIMIT ${10} `; // Select with multiple conditions const activeUsers = await sql` SELECT * FROM users WHERE active = ${true} AND age >= ${18} `; #### Features <table><tbody><tr><td><svg xmlns="http://www.w3.org/2000/svg" width="20" height="20" viewBox="0 0 24 24" fill="none" stroke="currentColor" stroke-width="2" stroke-linecap="round" stroke-linejoin="round"><path d="M20 13c0 5-3.5 7.5-7.66 8.95a1 1 0 0 1-.67-.01C7.5 20.5 4 18 4 13V6a1 1 0 0 1 1-1c2 0 4.5-1.2 6.24-2.72a1.17 1.17 0 0 1 1.52 0C14.51 3.81 17 5 19 5a1 1 0 0 1 1 1z"></path></svg></td><td><p>Tagged template literals to protect against SQL injection</p></td></tr><tr><td><svg xmlns="http://www.w3.org/2000/svg" width="20" height="20" viewBox="0 0 24 24" fill="none" stroke="currentColor" stroke-width="2" stroke-linecap="round" stroke-linejoin="round"><circle cx="18" cy="18" r="3"></circle><circle cx="6" cy="6" r="3"></circle><path d="M6 21V9a9 9 0 0 0 9 9"></path></svg></td><td><p>Transactions</p></td></tr><tr><td><svg xmlns="http://www.w3.org/2000/svg" width="20" height="20" viewBox="0 0 24 24" fill="none" stroke="currentColor" stroke-width="2" stroke-linecap="round" stroke-linejoin="round"><path d="M8 21s-4-3-4-9 4-9 4-9"></path><path d="M16 3s4 3 4 9-4 9-4 9"></path><line x1="15" x2="9" y1="9" y2="15"></line><line x1="9" x2="15" y1="9" y2="15"></line></svg></td><td><p>Named & positional parameters</p></td></tr><tr><td><svg xmlns="http://www.w3.org/2000/svg" width="20" height="20" viewBox="0 0 24 24" fill="none" stroke="currentColor" stroke-width="2" stroke-linecap="round" stroke-linejoin="round"><rect x="16" y="16" width="6" height="6" rx="1"></rect><rect x="2" y="16" width="6" height="6" rx="1"></rect><rect x="9" y="2" width="6" height="6" rx="1"></rect><path d="M5 16v-3a1 1 0 0 1 1-1h12a1 1 0 0 1 1 1v3"></path><path d="M12 12V8"></path></svg></td><td><p>Connection pooling</p></td></tr><tr><td><svg xmlns="http://www.w3.org/2000/svg" width="20" height="20" viewBox="0 0 24 24" fill="none" stroke="currentColor" stroke-width="2" stroke-linecap="round" stroke-linejoin="round"><rect x="14" y="14" width="4" height="6" rx="2"></rect><rect x="6" y="4" width="4" height="6" rx="2"></rect><path d="M6 20h4"></path><path d="M14 10h4"></path><path d="M6 14h2v6"></path><path d="M14 4h2v6"></path></svg></td><td><p><code>BigInt</code> support</p></td></tr><tr><td><svg xmlns="http://www.w3.org/2000/svg" width="20" height="20" viewBox="0 0 24 24" fill="none" stroke="currentColor" stroke-width="2" stroke-linecap="round" stroke-linejoin="round"><path d="m15.5 7.5 2.3 2.3a1 1 0 0 0 1.4 0l2.1-2.1a1 1 0 0 0 0-1.4L19 4"></path><path d="m21 2-9.6 9.6"></path><circle cx="7.5" cy="15.5" r="5.5"></circle></svg></td><td><p>SASL Auth support (SCRAM-SHA-256), MD5, and Clear Text</p></td></tr><tr><td><svg xmlns="http://www.w3.org/2000/svg" width="20" height="20" viewBox="0 0 24 24" fill="none" stroke="currentColor" stroke-width="2" stroke-linecap="round" stroke-linejoin="round"><line x1="10" x2="14" y1="2" y2="2"></line><line x1="12" x2="15" y1="14" y2="11"></line><circle cx="12" cy="14" r="8"></circle></svg></td><td><p>Connection timeouts</p></td></tr><tr><td><svg xmlns="http://www.w3.org/2000/svg" width="20" height="20" viewBox="0 0 24 24" fill="none" stroke="currentColor" stroke-width="2" stroke-linecap="round" stroke-linejoin="round"><ellipse cx="12" cy="5" rx="9" ry="3"></ellipse><path d="M3 5V19A9 3 0 0 0 21 19V5"></path><path d="M3 12A9 3 0 0 0 21 12"></path></svg></td><td><p>Returning rows as data objects, arrays of arrays, or <code>Buffer</code></p></td></tr><tr><td><svg xmlns="http://www.w3.org/2000/svg" width="20" height="20" viewBox="0 0 24 24" fill="none" stroke="currentColor" stroke-width="2" stroke-linecap="round" stroke-linejoin="round"><polyline points="16 18 22 12 16 6"></polyline><polyline points="8 6 2 12 8 18"></polyline></svg></td><td><p>Binary protocol support makes it faster</p></td></tr><tr><td><svg xmlns="http://www.w3.org/2000/svg" width="20" height="20" viewBox="0 0 24 24" fill="none" stroke="currentColor" stroke-width="2" stroke-linecap="round" stroke-linejoin="round"><rect width="18" height="11" x="3" y="11" rx="2" ry="2"></rect><path d="M7 11V7a5 5 0 0 1 10 0v4"></path></svg></td><td><p>TLS support (and auth mode)</p></td></tr><tr><td><svg xmlns="http://www.w3.org/2000/svg" width="20" height="20" viewBox="0 0 24 24" fill="none" stroke="currentColor" stroke-width="2" stroke-linecap="round" stroke-linejoin="round"><path d="M12.22 2h-.44a2 2 0 0 0-2 2v.18a2 2 0 0 1-1 1.73l-.43.25a2 2 0 0 1-2 0l-.15-.08a2 2 0 0 0-2.73.73l-.22.38a2 2 0 0 0 .73 2.73l.15.1a2 2 0 0 1 1 1.72v.51a2 2 0 0 1-1 1.74l-.15.09a2 2 0 0 0-.73 2.73l.22.38a2 2 0 0 0 2.73.73l.15-.08a2 2 0 0 1 2 0l.43.25a2 2 0 0 1 1 1.73V20a2 2 0 0 0 2 2h.44a2 2 0 0 0 2-2v-.18a2 2 0 0 1 1-1.73l.43-.25a2 2 0 0 1 2 0l.15.08a2 2 0 0 0 2.73-.73l.22-.39a2 2 0 0 0-.73-2.73l-.15-.08a2 2 0 0 1-1-1.74v-.5a2 2 0 0 1 1-1.74l.15-.09a2 2 0 0 0 .73-2.73l-.22-.38a2 2 0 0 0-2.73-.73l-.15.08a2 2 0 0 1-2 0l-.43-.25a2 2 0 0 1-1-1.73V4a2 2 0 0 0-2-2z"></path><circle cx="12" cy="12" r="3"></circle></svg></td><td><p>Automatic configuration with environment variable</p></td></tr></tbody></table> ### Inserting data You can pass JavaScript values directly to the SQL template literal and escaping will be handled for you. import { sql } from "bun"; // Basic insert with direct values const [user] = await sql` INSERT INTO users (name, email) VALUES (${name}, ${email}) RETURNING * `; // Using object helper for cleaner syntax const userData = { name: "Alice", email: "alice@example.com", }; const [newUser] = await sql` INSERT INTO users ${sql(userData)} RETURNING * `; // Expands to: INSERT INTO users (name, email) VALUES ('Alice', 'alice@example.com') ### Bulk Insert You can also pass arrays of objects to the SQL template literal and it will be expanded to a `INSERT INTO ... VALUES ...` statement. const users = [ { name: "Alice", email: "alice@example.com" }, { name: "Bob", email: "bob@example.com" }, { name: "Charlie", email: "charlie@example.com" }, ]; await sql`INSERT INTO users ${sql(users)}`; ### Picking columns to insert You can use `sql(object, ...string)` to pick which columns to insert. Each of the columns must be defined on the object. const user = { name: "Alice", email: "alice@example.com", age: 25, }; await sql`INSERT INTO users ${sql(user, "name", "email")}`; // Only inserts name and email columns, ignoring other fields ## Query Results By default, Bun's SQL client returns query results as arrays of objects, where each object represents a row with column names as keys. However, there are cases where you might want the data in a different format. The client provides two additional methods for this purpose. ### `sql``.values()` format The `sql``.values()` method returns rows as arrays of values rather than objects. Each row becomes an array where the values are in the same order as the columns in your query. const rows = await sql`SELECT * FROM users`.values(); console.log(rows); This returns something like: [ ["Alice", "alice@example.com"], ["Bob", "bob@example.com"], ]; `sql``.values()` is especially useful if duplicate column names are returned in the query results. When using objects (the default), the last column name is used as the key in the object, which means duplicate column names overwrite each other — but when using `sql``.values()`, each column is present in the array so you can access the values of duplicate columns by index. ### `sql``.raw()` format The `.raw()` method returns rows as arrays of `Buffer` objects. This can be useful for working with binary data or for performance reasons. const rows = await sql`SELECT * FROM users`.raw(); console.log(rows); // [[Buffer, Buffer], [Buffer, Buffer], [Buffer, Buffer]] ## SQL Fragments A common need in database applications is the ability to construct queries dynamically based on runtime conditions. Bun provides safe ways to do this without risking SQL injection. ### Dynamic Table Names When you need to reference tables or schemas dynamically, use the `sql()` helper to ensure proper escaping: // Safely reference tables dynamically await sql`SELECT * FROM ${sql("users")}`; // With schema qualification await sql`SELECT * FROM ${sql("public.users")}`; ### Conditional Queries You can use the `sql()` helper to build queries with conditional clauses. This allows you to create flexible queries that adapt to your application's needs: // Optional WHERE clauses const filterAge = true; const minAge = 21; const ageFilter = sql`AND age > ${minAge}`; await sql` SELECT * FROM users WHERE active = ${true} ${filterAge ? ageFilter : sql``} `; ### Dynamic columns in updates You can use `sql(object, ...string)` to pick which columns to update. Each of the columns must be defined on the object. If the columns are not informed all keys will be used to update the row. await sql`UPDATE users SET ${sql(user, "name", "email")} WHERE id = ${user.id}`; // uses all keys from the object to update the row await sql`UPDATE users SET ${sql(user)} WHERE id = ${user.id}`; ### Dynamic values and `where in` Value lists can also be created dynamically, making where in queries simple too. Optionally you can pass a array of objects and inform what key to use to create the list. await sql`SELECT * FROM users WHERE id IN ${sql([1, 2, 3])}`; const users = [ { id: 1, name: "Alice" }, { id: 2, name: "Bob" }, { id: 3, name: "Charlie" }, ]; await sql`SELECT * FROM users WHERE id IN ${sql(users, "id")}`; ## `sql``.simple()` The PostgreSQL wire protocol supports two types of queries: "simple" and "extended". Simple queries can contain multiple statements but don't support parameters, while extended queries (the default) support parameters but only allow one statement. To run multiple statements in a single query, use `sql``.simple()`: // Multiple statements in one query await sql` SELECT 1; SELECT 2; `.simple(); Simple queries are often useful for database migrations and setup scripts. Note that simple queries cannot use parameters (`${value}`). If you need parameters, you must split your query into separate statements. ### Queries in files You can use the `sql.file` method to read a query from a file and execute it, if the file includes $1, $2, etc you can pass parameters to the query. If no parameters are used it can execute multiple commands per file. const result = await sql.file("query.sql", [1, 2, 3]); ### Unsafe Queries You can use the `sql.unsafe` function to execute raw SQL strings. Use this with caution, as it will not escape user input. Executing more than one command per query is allowed if no parameters are used. // Multiple commands without parameters const result = await sql.unsafe(` SELECT ${userColumns} FROM users; SELECT ${accountColumns} FROM accounts; `); // Using parameters (only one command is allowed) const result = await sql.unsafe( "SELECT " + dangerous + " FROM users WHERE id = $1", [id], ); #### What is SQL Injection?  ### Execute and Cancelling Queries Bun's SQL is lazy, which means it will only start executing when awaited or executed with `.execute()`. You can cancel a query that is currently executing by calling the `cancel()` method on the query object. const query = await sql`SELECT * FROM users`.execute(); setTimeout(() => query.cancel(), 100); await query; ## Database Environment Variables `sql` connection parameters can be configured using environment variables. The client checks these variables in a specific order of precedence. The following environment variables can be used to define the connection URL: | Environment Variable | Description | | --- | --- | | `POSTGRES_URL` | Primary connection URL for PostgreSQL | | `DATABASE_URL` | Alternative connection URL | | `PGURL` | Alternative connection URL | | `PG_URL` | Alternative connection URL | | `TLS_POSTGRES_DATABASE_URL` | SSL/TLS-enabled connection URL | | `TLS_DATABASE_URL` | Alternative SSL/TLS-enabled connection URL | If no connection URL is provided, the system checks for the following individual parameters: | Environment Variable | Fallback Variables | Default Value | Description | | --- | --- | --- | --- | | `PGHOST` | \- | `localhost` | Database host | | `PGPORT` | \- | `5432` | Database port | | `PGUSERNAME` | `PGUSER`, `USER`, `USERNAME` | `postgres` | Database user | | `PGPASSWORD` | \- | (empty) | Database password | | `PGDATABASE` | \- | username | Database name | ## Connection Options You can configure your database connection manually by passing options to the SQL constructor: import { SQL } from "bun"; const db = new SQL({ // Required url: "postgres://user:pass@localhost:5432/dbname", // Optional configuration hostname: "localhost", port: 5432, database: "myapp", username: "dbuser", password: "secretpass", // Connection pool settings max: 20, // Maximum connections in pool idleTimeout: 30, // Close idle connections after 30s maxLifetime: 0, // Connection lifetime in seconds (0 = forever) connectionTimeout: 30, // Timeout when establishing new connections // SSL/TLS options tls: true, // tls: { // rejectUnauthorized: true, // requestCert: true, // ca: "path/to/ca.pem", // key: "path/to/key.pem", // cert: "path/to/cert.pem", // checkServerIdentity(hostname, cert) { // ... // }, // }, // Callbacks onconnect: client => { console.log("Connected to database"); }, onclose: client => { console.log("Connection closed"); }, }); ## Dynamic passwords When clients need to use alternative authentication schemes such as access tokens or connections to databases with rotating passwords, provide either a synchronous or asynchronous function that will resolve the dynamic password value at connection time. import { SQL } from "bun"; const sql = new SQL(url, { // Other connection config ... // Password function for the database user password: async () => await signer.getAuthToken(), }); ## Transactions To start a new transaction, use `sql.begin`. This method reserves a dedicated connection for the duration of the transaction and provides a scoped `sql` instance to use within the callback function. Once the callback completes, `sql.begin` resolves with the return value of the callback. The `BEGIN` command is sent automatically, including any optional configurations you specify. If an error occurs during the transaction, a `ROLLBACK` is triggered to release the reserved connection and ensure the process continues smoothly. ### Basic Transactions await sql.begin(async tx => { // All queries in this function run in a transaction await tx`INSERT INTO users (name) VALUES (${"Alice"})`; await tx`UPDATE accounts SET balance = balance - 100 WHERE user_id = 1`; // Transaction automatically commits if no errors are thrown // Rolls back if any error occurs }); It's also possible to pipeline the requests in a transaction if needed by returning an array with queries from the callback function like this: await sql.begin(async tx => { return [ tx`INSERT INTO users (name) VALUES (${"Alice"})`, tx`UPDATE accounts SET balance = balance - 100 WHERE user_id = 1`, ]; }); ### Savepoints Savepoints in SQL create intermediate checkpoints within a transaction, enabling partial rollbacks without affecting the entire operation. They are useful in complex transactions, allowing error recovery and maintaining consistent results. await sql.begin(async tx => { await tx`INSERT INTO users (name) VALUES (${"Alice"})`; await tx.savepoint(async sp => { // This part can be rolled back separately await sp`UPDATE users SET status = 'active'`; if (someCondition) { throw new Error("Rollback to savepoint"); } }); // Continue with transaction even if savepoint rolled back await tx`INSERT INTO audit_log (action) VALUES ('user_created')`; }); ### Distributed Transactions Two-Phase Commit (2PC) is a distributed transaction protocol where Phase 1 has the coordinator preparing nodes by ensuring data is written and ready to commit, while Phase 2 finalizes with nodes either committing or rolling back based on the coordinator's decision. This process ensures data durability and proper lock management. In PostgreSQL and MySQL, distributed transactions persist beyond their original session, allowing privileged users or coordinators to commit or rollback them later. This supports robust distributed transactions, recovery processes, and administrative operations. Each database system implements distributed transactions differently: PostgreSQL natively supports them through prepared transactions, while MySQL uses XA Transactions. If any exceptions occur during the distributed transaction and aren't caught, the system will automatically rollback all changes. When everything proceeds normally, you maintain the flexibility to either commit or rollback the transaction later. // Begin a distributed transaction await sql.beginDistributed("tx1", async tx => { await tx`INSERT INTO users (name) VALUES (${"Alice"})`; }); // Later, commit or rollback await sql.commitDistributed("tx1"); // or await sql.rollbackDistributed("tx1"); ## Authentication Bun supports SCRAM-SHA-256 (SASL), MD5, and Clear Text authentication. SASL is recommended for better security. Check Postgres SASL Authentication for more information. ### SSL Modes Overview PostgreSQL supports different SSL/TLS modes to control how secure connections are established. These modes determine the behavior when connecting and the level of certificate verification performed. const sql = new SQL({ hostname: "localhost", username: "user", password: "password", ssl: "disable", // | "prefer" | "require" | "verify-ca" | "verify-full" }); | SSL Mode | Description | | --- | --- | | `disable` | No SSL/TLS used. Connections fail if server requires SSL. | | `prefer` | Tries SSL first, falls back to non-SSL if SSL fails. Default mode if none specified. | | `require` | Requires SSL without certificate verification. Fails if SSL cannot be established. | | `verify-ca` | Verifies server certificate is signed by trusted CA. Fails if verification fails. | | `verify-full` | Most secure mode. Verifies certificate and hostname match. Protects against untrusted certificates and MITM attacks. | ### Using With Connection Strings The SSL mode can also be specified in connection strings: // Using prefer mode const sql = new SQL("postgres://user:password@localhost/mydb?sslmode=prefer"); // Using verify-full mode const sql = new SQL( "postgres://user:password@localhost/mydb?sslmode=verify-full", ); ## Connection Pooling Bun's SQL client automatically manages a connection pool, which is a pool of database connections that are reused for multiple queries. This helps to reduce the overhead of establishing and closing connections for each query, and it also helps to manage the number of concurrent connections to the database. const db = new SQL({ // Pool configuration max: 20, // Maximum 20 concurrent connections idleTimeout: 30, // Close idle connections after 30s maxLifetime: 3600, // Max connection lifetime 1 hour connectionTimeout: 10, // Connection timeout 10s }); No connection will be made until a query is made. const sql = Bun.sql(); // no connection are created await sql`...`; // pool is started until max is reached (if possible), first available connection is used await sql`...`; // previous connection is reused // two connections are used now at the same time await Promise.all([ sql`INSERT INTO users ${sql({ name: "Alice" })}`, sql`UPDATE users SET name = ${user.name} WHERE id = ${user.id}`, ]); await sql.close(); // await all queries to finish and close all connections from the pool await sql.close({ timeout: 5 }); // wait 5 seconds and close all connections from the pool await sql.close({ timeout: 0 }); // close all connections from the pool immediately ## Reserved Connections Bun enables you to reserve a connection from the pool, and returns a client that wraps the single connection. This can be used for running queries on an isolated connection. // Get exclusive connection from pool const reserved = await sql.reserve(); try { await reserved`INSERT INTO users (name) VALUES (${"Alice"})`; } finally { // Important: Release connection back to pool reserved.release(); } // Or using Symbol.dispose { using reserved = await sql.reserve(); await reserved`SELECT 1`; } // Automatically released ## Prepared Statements By default, Bun's SQL client automatically creates named prepared statements for queries where it can be inferred that the query is static. This provides better performance. However, you can change this behavior by setting `prepare: false` in the connection options: const sql = new SQL({ // ... other options ... prepare: false, // Disable persisting named prepared statements on the server }); When `prepare: false` is set: Queries are still executed using the "extended" protocol, but they are executed using unnamed prepared statements, an unnamed prepared statement lasts only until the next Parse statement specifying the unnamed statement as destination is issued. * Parameter binding is still safe against SQL injection * Each query is parsed and planned from scratch by the server * Queries will not be pipelined You might want to use `prepare: false` when: * Using PGBouncer in transaction mode (though since PGBouncer 1.21.0, protocol-level named prepared statements are supported when configured properly) * Debugging query execution plans * Working with dynamic SQL where query plans need to be regenerated frequently * More than one command per query will not be supported (unless you use `sql``.simple()`) Note that disabling prepared statements may impact performance for queries that are executed frequently with different parameters, as the server needs to parse and plan each query from scratch. ## Error Handling The client provides typed errors for different failure scenarios: ### Connection Errors | Connection Errors | Description | | --- | --- | | `ERR_POSTGRES_CONNECTION_CLOSED` | Connection was terminated or never established | | `ERR_POSTGRES_CONNECTION_TIMEOUT` | Failed to establish connection within timeout period | | `ERR_POSTGRES_IDLE_TIMEOUT` | Connection closed due to inactivity | | `ERR_POSTGRES_LIFETIME_TIMEOUT` | Connection exceeded maximum lifetime | | `ERR_POSTGRES_TLS_NOT_AVAILABLE` | SSL/TLS connection not available | | `ERR_POSTGRES_TLS_UPGRADE_FAILED` | Failed to upgrade connection to SSL/TLS | ### Authentication Errors | Authentication Errors | Description | | --- | --- | | `ERR_POSTGRES_AUTHENTICATION_FAILED_PBKDF2` | Password authentication failed | | `ERR_POSTGRES_UNKNOWN_AUTHENTICATION_METHOD` | Server requested unknown auth method | | `ERR_POSTGRES_UNSUPPORTED_AUTHENTICATION_METHOD` | Server requested unsupported auth method | | `ERR_POSTGRES_INVALID_SERVER_KEY` | Invalid server key during authentication | | `ERR_POSTGRES_INVALID_SERVER_SIGNATURE` | Invalid server signature | | `ERR_POSTGRES_SASL_SIGNATURE_INVALID_BASE64` | Invalid SASL signature encoding | | `ERR_POSTGRES_SASL_SIGNATURE_MISMATCH` | SASL signature verification failed | ### Query Errors | Query Errors | Description | | --- | --- | | `ERR_POSTGRES_SYNTAX_ERROR` | Invalid SQL syntax (extends `SyntaxError`) | | `ERR_POSTGRES_SERVER_ERROR` | General error from PostgreSQL server | | `ERR_POSTGRES_INVALID_QUERY_BINDING` | Invalid parameter binding | | `ERR_POSTGRES_QUERY_CANCELLED` | Query was cancelled | | `ERR_POSTGRES_NOT_TAGGED_CALL` | Query was called without a tagged call | ### Data Type Errors | Data Type Errors | Description | | --- | --- | | `ERR_POSTGRES_INVALID_BINARY_DATA` | Invalid binary data format | | `ERR_POSTGRES_INVALID_BYTE_SEQUENCE` | Invalid byte sequence | | `ERR_POSTGRES_INVALID_BYTE_SEQUENCE_FOR_ENCODING` | Encoding error | | `ERR_POSTGRES_INVALID_CHARACTER` | Invalid character in data | | `ERR_POSTGRES_OVERFLOW` | Numeric overflow | | `ERR_POSTGRES_UNSUPPORTED_BYTEA_FORMAT` | Unsupported binary format | | `ERR_POSTGRES_UNSUPPORTED_INTEGER_SIZE` | Integer size not supported | | `ERR_POSTGRES_MULTIDIMENSIONAL_ARRAY_NOT_SUPPORTED_YET` | Multidimensional arrays not supported | | `ERR_POSTGRES_NULLS_IN_ARRAY_NOT_SUPPORTED_YET` | NULL values in arrays not supported | ### Protocol Errors | Protocol Errors | Description | | --- | --- | | `ERR_POSTGRES_EXPECTED_REQUEST` | Expected client request | | `ERR_POSTGRES_EXPECTED_STATEMENT` | Expected prepared statement | | `ERR_POSTGRES_INVALID_BACKEND_KEY_DATA` | Invalid backend key data | | `ERR_POSTGRES_INVALID_MESSAGE` | Invalid protocol message | | `ERR_POSTGRES_INVALID_MESSAGE_LENGTH` | Invalid message length | | `ERR_POSTGRES_UNEXPECTED_MESSAGE` | Unexpected message type | ### Transaction Errors | Transaction Errors | Description | | --- | --- | | `ERR_POSTGRES_UNSAFE_TRANSACTION` | Unsafe transaction operation detected | | `ERR_POSTGRES_INVALID_TRANSACTION_STATE` | Invalid transaction state | ## Numbers and BigInt Bun's SQL client includes special handling for large numbers that exceed the range of a 53-bit integer. Here's how it works: import { sql } from "bun"; const [{ x, y }] = await sql`SELECT 9223372036854777 as x, 12345 as y`; console.log(typeof x, x); // "string" "9223372036854777" console.log(typeof y, y); // "number" 12345 ## BigInt Instead of Strings If you need large numbers as BigInt instead of strings, you can enable this by setting the `bigint` option to `true` when initializing the SQL client: const sql = new SQL({ bigint: true, }); const [{ x }] = await sql`SELECT 9223372036854777 as x`; console.log(typeof x, x); // "bigint" 9223372036854777n ## Roadmap There's still some things we haven't finished yet. * Connection preloading via `--db-preconnect` Bun CLI flag * MySQL support: we're working on it * SQLite support: planned, but not started. Ideally, we implement it natively instead of wrapping `bun:sqlite`. * Column name transforms (e.g. `snake_case` to `camelCase`). This is mostly blocked on a unicode-aware implementation of changing the case in C++ using WebKit's `WTF::String`. * Column type transforms ### Postgres-specific features We haven't implemented these yet: * `COPY` support * `LISTEN` support * `NOTIFY` support We also haven't implemented some of the more uncommon features like: * GSSAPI authentication * `SCRAM-SHA-256-PLUS` support * Point & PostGIS types * All the multi-dimensional integer array types (only a couple of the types are supported) ## Frequently Asked Questions Why is this `Bun.sql` and not `Bun.postgres`? The plan is to add more database drivers in the future. Why not just use an existing library? npm packages like postgres.js, pg, and node-postgres can be used in Bun too. They're great options. Two reasons why: 1. We think it's simpler for developers to have a database driver built into Bun. The time you spend library shopping is time you could be building your app. 2. We leverage some JavaScriptCore engine internals to make it faster to create objects that would be difficult to implement in a library ## Credits Huge thanks to @porsager's postgres.js for the inspiration for the API interface. --- ## Page: https://bun.sh/docs/api/s3 Production servers often read, upload, and write files to S3-compatible object storage services instead of the local filesystem. Historically, that means local filesystem APIs you use in development can't be used in production. When you use Bun, things are different. ### Bun's S3 API is fast  Left: Bun v1.1.44. Right: Node.js v23.6.0 Bun provides fast, native bindings for interacting with S3-compatible object storage services. Bun's S3 API is designed to be simple and feel similar to fetch's `Response` and `Blob` APIs (like Bun's local filesystem APIs). import { s3, write, S3Client } from "bun"; // Bun.s3 reads environment variables for credentials // file() returns a lazy reference to a file on S3 const metadata = s3.file("123.json"); // Download from S3 as JSON const data = await metadata.json(); // Upload to S3 await write(metadata, JSON.stringify({ name: "John", age: 30 })); // Presign a URL (synchronous - no network request needed) const url = metadata.presign({ acl: "public-read", expiresIn: 60 * 60 * 24, // 1 day }); // Delete the file await metadata.delete(); S3 is the de facto standard internet filesystem. Bun's S3 API works with S3-compatible storage services like: * AWS S3 * Cloudflare R2 * DigitalOcean Spaces * MinIO * Backblaze B2 * ...and any other S3-compatible storage service ## Basic Usage There are several ways to interact with Bun's S3 API. ### `Bun.S3Client` & `Bun.s3` `Bun.s3` is equivalent to `new Bun.S3Client()`, relying on environment variables for credentials. To explicitly set credentials, pass them to the `Bun.S3Client` constructor. import { S3Client } from "bun"; const client = new S3Client({ accessKeyId: "your-access-key", secretAccessKey: "your-secret-key", bucket: "my-bucket", // sessionToken: "..." // acl: "public-read", // endpoint: "https://s3.us-east-1.amazonaws.com", // endpoint: "https://<account-id>.r2.cloudflarestorage.com", // Cloudflare R2 // endpoint: "https://<region>.digitaloceanspaces.com", // DigitalOcean Spaces // endpoint: "http://localhost:9000", // MinIO }); // Bun.s3 is a global singleton that is equivalent to `new Bun.S3Client()` ### Working with S3 Files The **`file`** method in `S3Client` returns a **lazy reference to a file on S3**. // A lazy reference to a file on S3 const s3file: S3File = client.file("123.json"); Like `Bun.file(path)`, the `S3Client`'s `file` method is synchronous. It does zero network requests until you call a method that depends on a network request. ### Reading files from S3 If you've used the `fetch` API, you're familiar with the `Response` and `Blob` APIs. `S3File` extends `Blob`. The same methods that work on `Blob` also work on `S3File`. // Read an S3File as text const text = await s3file.text(); // Read an S3File as JSON const json = await s3file.json(); // Read an S3File as an ArrayBuffer const buffer = await s3file.arrayBuffer(); // Get only the first 1024 bytes const partial = await s3file.slice(0, 1024).text(); // Stream the file const stream = s3file.stream(); for await (const chunk of stream) { console.log(chunk); } #### Memory optimization Methods like `text()`, `json()`, `bytes()`, or `arrayBuffer()` avoid duplicating the string or bytes in memory when possible. If the text happens to be ASCII, Bun directly transfers the string to JavaScriptCore (the engine) without transcoding and without duplicating the string in memory. When you use `.bytes()` or `.arrayBuffer()`, it will also avoid duplicating the bytes in memory. These helper methods not only simplify the API, they also make it faster. ### Writing & uploading files to S3 Writing to S3 is just as simple. // Write a string (replacing the file) await s3file.write("Hello World!"); // Write a Buffer (replacing the file) await s3file.write(Buffer.from("Hello World!")); // Write a Response (replacing the file) await s3file.write(new Response("Hello World!")); // Write with content type await s3file.write(JSON.stringify({ name: "John", age: 30 }), { type: "application/json", }); // Write using a writer (streaming) const writer = s3file.writer({ type: "application/json" }); writer.write("Hello"); writer.write(" World!"); await writer.end(); // Write using Bun.write await Bun.write(s3file, "Hello World!"); ### Working with large files (streams) Bun automatically handles multipart uploads for large files and provides streaming capabilities. The same API that works for local files also works for S3 files. // Write a large file const bigFile = Buffer.alloc(10 * 1024 * 1024); // 10MB const writer = s3file.writer({ // Automatically retry on network errors up to 3 times retry: 3, // Queue up to 10 requests at a time queueSize: 10, // Upload in 5 MB chunks partSize: 5 * 1024 * 1024, }); for (let i = 0; i < 10; i++) { await writer.write(bigFile); } await writer.end(); ## Presigning URLs When your production service needs to let users upload files to your server, it's often more reliable for the user to upload directly to S3 instead of your server acting as an intermediary. To facilitate this, you can presign URLs for S3 files. This generates a URL with a signature that allows a user to securely upload that specific file to S3, without exposing your credentials or granting them unnecessary access to your bucket. The default behaviour is to generate a `GET` URL that expires in 24 hours. Bun attempts to infer the content type from the file extension. If inference is not possible, it will default to `application/octet-stream`. import { s3 } from "bun"; // Generate a presigned URL that expires in 24 hours (default) const download = s3.presign("my-file.txt"); // GET, text/plain, expires in 24 hours const upload = s3.presign("my-file", { expiresIn: 3600, // 1 hour method: "PUT", type: "application/json", // No extension for inferring, so we can specify the content type to be JSON }); // You can call .presign() if on a file reference, but avoid doing so // unless you already have a reference (to avoid memory usage). const myFile = s3.file("my-file.txt"); const presignedFile = myFile.presign({ expiresIn: 3600, // 1 hour }); ### Setting ACLs To set an ACL (access control list) on a presigned URL, pass the `acl` option: const url = s3file.presign({ acl: "public-read", expiresIn: 3600, }); You can pass any of the following ACLs: | ACL | Explanation | | --- | --- | | `"public-read"` | The object is readable by the public. | | `"private"` | The object is readable only by the bucket owner. | | `"public-read-write"` | The object is readable and writable by the public. | | `"authenticated-read"` | The object is readable by the bucket owner and authenticated users. | | `"aws-exec-read"` | The object is readable by the AWS account that made the request. | | `"bucket-owner-read"` | The object is readable by the bucket owner. | | `"bucket-owner-full-control"` | The object is readable and writable by the bucket owner. | | `"log-delivery-write"` | The object is writable by AWS services used for log delivery. | ### Expiring URLs To set an expiration time for a presigned URL, pass the `expiresIn` option. const url = s3file.presign({ // Seconds expiresIn: 3600, // 1 hour // access control list acl: "public-read", // HTTP method method: "PUT", }); ### `method` To set the HTTP method for a presigned URL, pass the `method` option. const url = s3file.presign({ method: "PUT", // method: "DELETE", // method: "GET", // method: "HEAD", // method: "POST", // method: "PUT", }); ### `new Response(S3File)` To quickly redirect users to a presigned URL for an S3 file, pass an `S3File` instance to a `Response` object as the body. const response = new Response(s3file); console.log(response); This will automatically redirect the user to the presigned URL for the S3 file, saving you the memory, time, and bandwidth cost of downloading the file to your server and sending it back to the user. Response (0 KB) { ok: false, url: "", status: 302, statusText: "", headers: Headers { "location": "https://<account-id>.r2.cloudflarestorage.com/...", }, redirected: true, bodyUsed: false } ## Support for S3-Compatible Services Bun's S3 implementation works with any S3-compatible storage service. Just specify the appropriate endpoint: ### Using Bun's S3Client with AWS S3 AWS S3 is the default. You can also pass a `region` option instead of an `endpoint` option for AWS S3. import { S3Client } from "bun"; // AWS S3 const s3 = new S3Client({ accessKeyId: "access-key", secretAccessKey: "secret-key", bucket: "my-bucket", // endpoint: "https://s3.us-east-1.amazonaws.com", // region: "us-east-1", }); ### Using Bun's S3Client with Google Cloud Storage To use Bun's S3 client with Google Cloud Storage, set `endpoint` to `"https://storage.googleapis.com"` in the `S3Client` constructor. import { S3Client } from "bun"; // Google Cloud Storage const gcs = new S3Client({ accessKeyId: "access-key", secretAccessKey: "secret-key", bucket: "my-bucket", endpoint: "https://storage.googleapis.com", }); ### Using Bun's S3Client with Cloudflare R2 To use Bun's S3 client with Cloudflare R2, set `endpoint` to the R2 endpoint in the `S3Client` constructor. The R2 endpoint includes your account ID. import { S3Client } from "bun"; // CloudFlare R2 const r2 = new S3Client({ accessKeyId: "access-key", secretAccessKey: "secret-key", bucket: "my-bucket", endpoint: "https://<account-id>.r2.cloudflarestorage.com", }); ### Using Bun's S3Client with DigitalOcean Spaces To use Bun's S3 client with DigitalOcean Spaces, set `endpoint` to the DigitalOcean Spaces endpoint in the `S3Client` constructor. import { S3Client } from "bun"; const spaces = new S3Client({ accessKeyId: "access-key", secretAccessKey: "secret-key", bucket: "my-bucket", // region: "nyc3", endpoint: "https://<region>.digitaloceanspaces.com", }); ### Using Bun's S3Client with MinIO To use Bun's S3 client with MinIO, set `endpoint` to the URL that MinIO is running on in the `S3Client` constructor. import { S3Client } from "bun"; const minio = new S3Client({ accessKeyId: "access-key", secretAccessKey: "secret-key", bucket: "my-bucket", // Make sure to use the correct endpoint URL // It might not be localhost in production! endpoint: "http://localhost:9000", }); ### Using Bun's S3Client with supabase To use Bun's S3 client with supabase, set `endpoint` to the supabase endpoint in the `S3Client` constructor. The supabase endpoint includes your account ID and /storage/v1/s3 path. Make sure to set Enable connection via S3 protocol on in the supabase dashboard in https://supabase.com/dashboard/project/<account-id>/settings/storage and to set the region informed in the same section. import { S3Client } from "bun"; const supabase = new S3Client({ accessKeyId: "access-key", secretAccessKey: "secret-key", bucket: "my-bucket", region: "us-west-1", endpoint: "https://<account-id>.supabase.co/storage/v1/s3/storage", }); ### Using Bun's S3Client with S3 Virtual Hosted-Style endpoints When using a S3 Virtual Hosted-Style endpoint, you need to set the `virtualHostedStyle` option to `true` and if no endpoint is provided, Bun will use region and bucket to infer the endpoint to AWS S3, if no region is provided it will use `us-east-1`. If you provide a the endpoint, there are no need to provide the bucket name. import { S3Client } from "bun"; // AWS S3 endpoint inferred from region and bucket const s3 = new S3Client({ accessKeyId: "access-key", secretAccessKey: "secret-key", bucket: "my-bucket", virtualHostedStyle: true, // endpoint: "https://my-bucket.s3.us-east-1.amazonaws.com", // region: "us-east-1", }); // AWS S3 const s3WithEndpoint = new S3Client({ accessKeyId: "access-key", secretAccessKey: "secret-key", endpoint: "https://<bucket-name>.s3.<region>.amazonaws.com", virtualHostedStyle: true, }); // Cloudflare R2 const r2WithEndpoint = new S3Client({ accessKeyId: "access-key", secretAccessKey: "secret-key", endpoint: "https://<bucket-name>.<account-id>.r2.cloudflarestorage.com", virtualHostedStyle: true, }); ## Credentials Credentials are one of the hardest parts of using S3, and we've tried to make it as easy as possible. By default, Bun reads the following environment variables for credentials. | Option name | Environment variable | | --- | --- | | `accessKeyId` | `S3_ACCESS_KEY_ID` | | `secretAccessKey` | `S3_SECRET_ACCESS_KEY` | | `region` | `S3_REGION` | | `endpoint` | `S3_ENDPOINT` | | `bucket` | `S3_BUCKET` | | `sessionToken` | `S3_SESSION_TOKEN` | If the `S3_*` environment variable is not set, Bun will also check for the `AWS_*` environment variable, for each of the above options. | Option name | Fallback environment variable | | --- | --- | | `accessKeyId` | `AWS_ACCESS_KEY_ID` | | `secretAccessKey` | `AWS_SECRET_ACCESS_KEY` | | `region` | `AWS_REGION` | | `endpoint` | `AWS_ENDPOINT` | | `bucket` | `AWS_BUCKET` | | `sessionToken` | `AWS_SESSION_TOKEN` | These environment variables are read from `.env` files or from the process environment at initialization time (`process.env` is not used for this). These defaults are overridden by the options you pass to `s3.file(credentials)`, `new Bun.S3Client(credentials)`, or any of the methods that accept credentials. So if, for example, you use the same credentials for different buckets, you can set the credentials once in your `.env` file and then pass `bucket: "my-bucket"` to the `s3.file()` function without having to specify all the credentials again. ### `S3Client` objects When you're not using environment variables or using multiple buckets, you can create a `S3Client` object to explicitly set credentials. import { S3Client } from "bun"; const client = new S3Client({ accessKeyId: "your-access-key", secretAccessKey: "your-secret-key", bucket: "my-bucket", // sessionToken: "..." endpoint: "https://s3.us-east-1.amazonaws.com", // endpoint: "https://<account-id>.r2.cloudflarestorage.com", // Cloudflare R2 // endpoint: "http://localhost:9000", // MinIO }); // Write using a Response await file.write(new Response("Hello World!")); // Presign a URL const url = file.presign({ expiresIn: 60 * 60 * 24, // 1 day acl: "public-read", }); // Delete the file await file.delete(); ### `S3Client.prototype.write` To upload or write a file to S3, call `write` on the `S3Client` instance. const client = new Bun.S3Client({ accessKeyId: "your-access-key", secretAccessKey: "your-secret-key", endpoint: "https://s3.us-east-1.amazonaws.com", bucket: "my-bucket", }); await client.write("my-file.txt", "Hello World!"); await client.write("my-file.txt", new Response("Hello World!")); // equivalent to // await client.file("my-file.txt").write("Hello World!"); ### `S3Client.prototype.delete` To delete a file from S3, call `delete` on the `S3Client` instance. const client = new Bun.S3Client({ accessKeyId: "your-access-key", secretAccessKey: "your-secret-key", bucket: "my-bucket", }); await client.delete("my-file.txt"); // equivalent to // await client.file("my-file.txt").delete(); ### `S3Client.prototype.exists` To check if a file exists in S3, call `exists` on the `S3Client` instance. const client = new Bun.S3Client({ accessKeyId: "your-access-key", secretAccessKey: "your-secret-key", bucket: "my-bucket", }); const exists = await client.exists("my-file.txt"); // equivalent to // const exists = await client.file("my-file.txt").exists(); ## `S3File` `S3File` instances are created by calling the `S3Client` instance method or the `s3.file()` function. Like `Bun.file()`, `S3File` instances are lazy. They don't refer to something that necessarily exists at the time of creation. That's why all the methods that don't involve network requests are fully synchronous. interface S3File extends Blob { slice(start: number, end?: number): S3File; exists(): Promise<boolean>; unlink(): Promise<void>; presign(options: S3Options): string; text(): Promise<string>; json(): Promise<any>; bytes(): Promise<Uint8Array>; arrayBuffer(): Promise<ArrayBuffer>; stream(options: S3Options): ReadableStream; write( data: | string | Uint8Array | ArrayBuffer | Blob | ReadableStream | Response | Request, options?: BlobPropertyBag, ): Promise<number>; exists(options?: S3Options): Promise<boolean>; unlink(options?: S3Options): Promise<void>; delete(options?: S3Options): Promise<void>; presign(options?: S3Options): string; stat(options?: S3Options): Promise<S3Stat>; /** * Size is not synchronously available because it requires a network request. * * @deprecated Use `stat()` instead. */ size: NaN; // ... more omitted for brevity } Like `Bun.file()`, `S3File` extends `Blob`, so all the methods that are available on `Blob` are also available on `S3File`. The same API for reading data from a local file is also available for reading data from S3. | Method | Output | | --- | --- | | `await s3File.text()` | `string` | | `await s3File.bytes()` | `Uint8Array` | | `await s3File.json()` | `JSON` | | `await s3File.stream()` | `ReadableStream` | | `await s3File.arrayBuffer()` | `ArrayBuffer` | That means using `S3File` instances with `fetch()`, `Response`, and other web APIs that accept `Blob` instances just works. ### Partial reads with `slice` To read a partial range of a file, you can use the `slice` method. const partial = s3file.slice(0, 1024); // Read the partial range as a Uint8Array const bytes = await partial.bytes(); // Read the partial range as a string const text = await partial.text(); Internally, this works by using the HTTP `Range` header to request only the bytes you want. This `slice` method is the same as `Blob.prototype.slice`. ### Deleting files from S3 To delete a file from S3, you can use the `delete` method. await s3file.delete(); // await s3File.unlink(); `delete` is the same as `unlink`. ## Error codes When Bun's S3 API throws an error, it will have a `code` property that matches one of the following values: * `ERR_S3_MISSING_CREDENTIALS` * `ERR_S3_INVALID_METHOD` * `ERR_S3_INVALID_PATH` * `ERR_S3_INVALID_ENDPOINT` * `ERR_S3_INVALID_SIGNATURE` * `ERR_S3_INVALID_SESSION_TOKEN` When the S3 Object Storage service returns an error (that is, not Bun), it will be an `S3Error` instance (an `Error` instance with the name `"S3Error"`). ## `S3Client` static methods The `S3Client` class provides several static methods for interacting with S3. ### `S3Client.presign` (static) To generate a presigned URL for an S3 file, you can use the `S3Client.presign` static method. import { S3Client } from "bun"; const credentials = { accessKeyId: "your-access-key", secretAccessKey: "your-secret-key", bucket: "my-bucket", // endpoint: "https://s3.us-east-1.amazonaws.com", // endpoint: "https://<account-id>.r2.cloudflarestorage.com", // Cloudflare R2 }; const url = S3Client.presign("my-file.txt", { ...credentials, expiresIn: 3600, }); This is equivalent to calling `new S3Client(credentials).presign("my-file.txt", { expiresIn: 3600 })`. ### `S3Client.exists` (static) To check if an S3 file exists, you can use the `S3Client.exists` static method. import { S3Client } from "bun"; const credentials = { accessKeyId: "your-access-key", secretAccessKey: "your-secret-key", bucket: "my-bucket", // endpoint: "https://s3.us-east-1.amazonaws.com", }; const exists = await S3Client.exists("my-file.txt", credentials); The same method also works on `S3File` instances. import { s3 } from "bun"; const s3file = s3.file("my-file.txt", { ...credentials, }); const exists = await s3file.exists(); ### `S3Client.stat` (static) To get the size, etag, and other metadata of an S3 file, you can use the `S3Client.stat` static method. import { S3Client } from "bun"; const credentials = { accessKeyId: "your-access-key", secretAccessKey: "your-secret-key", bucket: "my-bucket", // endpoint: "https://s3.us-east-1.amazonaws.com", }; const stat = await S3Client.stat("my-file.txt", credentials); // { // etag: "\"7a30b741503c0b461cc14157e2df4ad8\"", // lastModified: 2025-01-07T00:19:10.000Z, // size: 1024, // type: "text/plain;charset=utf-8", // } ### `S3Client.delete` (static) To delete an S3 file, you can use the `S3Client.delete` static method. import { S3Client } from "bun"; const credentials = { accessKeyId: "your-access-key", secretAccessKey: "your-secret-key", bucket: "my-bucket", // endpoint: "https://s3.us-east-1.amazonaws.com", }; await S3Client.delete("my-file.txt", credentials); // equivalent to // await new S3Client(credentials).delete("my-file.txt"); // S3Client.unlink is alias of S3Client.delete await S3Client.unlink("my-file.txt", credentials); ## `s3://` protocol To make it easier to use the same code for local files and S3 files, the `s3://` protocol is supported in `fetch` and `Bun.file()`. const response = await fetch("s3://my-bucket/my-file.txt"); const file = Bun.file("s3://my-bucket/my-file.txt"); You can additionally pass `s3` options to the `fetch` and `Bun.file` functions. const response = await fetch("s3://my-bucket/my-file.txt", { s3: { accessKeyId: "your-access-key", secretAccessKey: "your-secret-key", endpoint: "https://s3.us-east-1.amazonaws.com", }, headers: { "range": "bytes=0-1023", }, }); ### UTF-8, UTF-16, and BOM (byte order mark) Like `Response` and `Blob`, `S3File` assumes UTF-8 encoding by default. When calling one of the `text()` or `json()` methods on an `S3File`: * When a UTF-16 byte order mark (BOM) is detected, it will be treated as UTF-16. JavaScriptCore natively supports UTF-16, so it skips the UTF-8 transcoding process (and strips the BOM). This is mostly good, but it does mean if you have invalid surrogate pairs characters in your UTF-16 string, they will be passed through to JavaScriptCore (same as source code). * When a UTF-8 BOM is detected, it gets stripped before the string is passed to JavaScriptCore and invalid UTF-8 codepoints are replaced with the Unicode replacement character (`\uFFFD`). * UTF-32 is not supported. --- ## Page: https://bun.sh/docs/api/file-io **Note** — The `Bun.file` and `Bun.write` APIs documented on this page are heavily optimized and represent the recommended way to perform file-system tasks using Bun. For operations that are not yet available with `Bun.file`, such as `mkdir` or `readdir`, you can use Bun's nearly complete implementation of the `node:fs` module. Bun provides a set of optimized APIs for reading and writing files. ## Reading files (`Bun.file()`) `Bun.file(path): BunFile` Create a `BunFile` instance with the `Bun.file(path)` function. A `BunFile` represents a lazily-loaded file; initializing it does not actually read the file from disk. const foo = Bun.file("foo.txt"); // relative to cwd foo.size; // number of bytes foo.type; // MIME type The reference conforms to the `Blob` interface, so the contents can be read in various formats. const foo = Bun.file("foo.txt"); await foo.text(); // contents as a string await foo.stream(); // contents as ReadableStream await foo.arrayBuffer(); // contents as ArrayBuffer await foo.bytes(); // contents as Uint8Array File references can also be created using numerical file descriptors or `file://` URLs. Bun.file(1234); Bun.file(new URL(import.meta.url)); // reference to the current file A `BunFile` can point to a location on disk where a file does not exist. const notreal = Bun.file("notreal.txt"); notreal.size; // 0 notreal.type; // "text/plain;charset=utf-8" const exists = await notreal.exists(); // false The default MIME type is `text/plain;charset=utf-8`, but it can be overridden by passing a second argument to `Bun.file`. const notreal = Bun.file("notreal.json", { type: "application/json" }); notreal.type; // => "application/json;charset=utf-8" For convenience, Bun exposes `stdin`, `stdout` and `stderr` as instances of `BunFile`. Bun.stdin; // readonly Bun.stdout; Bun.stderr; ### Deleting files (`file.delete()`) You can delete a file by calling the `.delete()` function. await Bun.file("logs.json").delete() ## Writing files (`Bun.write()`) `Bun.write(destination, data): Promise<number>` The `Bun.write` function is a multi-tool for writing payloads of all kinds to disk. The first argument is the `destination` which can have any of the following types: * `string`: A path to a location on the file system. Use the `"path"` module to manipulate paths. * `URL`: A `file://` descriptor. * `BunFile`: A file reference. The second argument is the data to be written. It can be any of the following: * `string` * `Blob` (including `BunFile`) * `ArrayBuffer` or `SharedArrayBuffer` * `TypedArray` (`Uint8Array`, et. al.) * `Response` All possible permutations are handled using the fastest available system calls on the current platform. See syscalls | Output | Input | System call | Platform | | --- | --- | --- | --- | | file | file | copy\_file\_range | Linux | | file | pipe | sendfile | Linux | | pipe | pipe | splice | Linux | | terminal | file | sendfile | Linux | | terminal | terminal | sendfile | Linux | | socket | file or pipe | sendfile (if http, not https) | Linux | | file (doesn't exist) | file (path) | clonefile | macOS | | file (exists) | file | fcopyfile | macOS | | file | Blob or string | write | macOS | | file | Blob or string | write | Linux | To write a string to disk: const data = `It was the best of times, it was the worst of times.`; await Bun.write("output.txt", data); To copy a file to another location on disk: const input = Bun.file("input.txt"); const output = Bun.file("output.txt"); // doesn't exist yet! await Bun.write(output, input); To write a byte array to disk: const encoder = new TextEncoder(); const data = encoder.encode("datadatadata"); // Uint8Array await Bun.write("output.txt", data); To write a file to `stdout`: const input = Bun.file("input.txt"); await Bun.write(Bun.stdout, input); To write the body of an HTTP response to disk: const response = await fetch("https://bun.sh"); await Bun.write("index.html", response); ## Incremental writing with `FileSink` Bun provides a native incremental file writing API called `FileSink`. To retrieve a `FileSink` instance from a `BunFile`: const file = Bun.file("output.txt"); const writer = file.writer(); To incrementally write to the file, call `.write()`. const file = Bun.file("output.txt"); const writer = file.writer(); writer.write("it was the best of times\n"); writer.write("it was the worst of times\n"); These chunks will be buffered internally. To flush the buffer to disk, use `.flush()`. This returns the number of flushed bytes. writer.flush(); // write buffer to disk The buffer will also auto-flush when the `FileSink`'s _high water mark_ is reached; that is, when its internal buffer is full. This value can be configured. const file = Bun.file("output.txt"); const writer = file.writer({ highWaterMark: 1024 * 1024 }); // 1MB To flush the buffer and close the file: writer.end(); Note that, by default, the `bun` process will stay alive until this `FileSink` is explicitly closed with `.end()`. To opt out of this behavior, you can "unref" the instance. writer.unref(); // to "re-ref" it later writer.ref(); ## Directories Bun's implementation of `node:fs` is fast, and we haven't implemented a Bun-specific API for reading directories just yet. For now, you should use `node:fs` for working with directories in Bun. ### Reading directories (readdir) To read a directory in Bun, use `readdir` from `node:fs`. import { readdir } from "node:fs/promises"; // read all the files in the current directory const files = await readdir(import.meta.dir); #### Reading directories recursively To recursively read a directory in Bun, use `readdir` with `recursive: true`. import { readdir } from "node:fs/promises"; // read all the files in the current directory, recursively const files = await readdir("../", { recursive: true }); ### Creating directories (mkdir) To recursively create a directory, use `mkdir` in `node:fs`: import { mkdir } from "node:fs/promises"; await mkdir("path/to/dir", { recursive: true }); ## Benchmarks The following is a 3-line implementation of the Linux `cat` command. cat.ts // Usage // $ bun ./cat.ts ./path-to-file import { resolve } from "path"; const path = resolve(process.argv.at(-1)); await Bun.write(Bun.stdout, Bun.file(path)); To run the file: bun ./cat.ts ./path-to-file It runs 2x faster than GNU `cat` for large files on Linux.  ## Reference interface Bun { stdin: BunFile; stdout: BunFile; stderr: BunFile; file(path: string | number | URL, options?: { type?: string }): BunFile; write( destination: string | number | BunFile | URL, input: | string | Blob | ArrayBuffer | SharedArrayBuffer | TypedArray | Response, ): Promise<number>; } interface BunFile { readonly size: number; readonly type: string; text(): Promise<string>; stream(): ReadableStream; arrayBuffer(): Promise<ArrayBuffer>; json(): Promise<any>; writer(params: { highWaterMark?: number }): FileSink; exists(): Promise<boolean>; } export interface FileSink { write( chunk: string | ArrayBufferView | ArrayBuffer | SharedArrayBuffer, ): number; flush(): number | Promise<number>; end(error?: Error): number | Promise<number>; start(options?: { highWaterMark?: number }): void; ref(): void; unref(): void; } --- ## Page: https://bun.sh/docs/api/redis Bun provides native bindings for working with Redis databases with a modern, Promise-based API. The interface is designed to be simple and performant, with built-in connection management, fully typed responses, and TLS support. **New in Bun v1.2.9** import { redis } from "bun"; // Set a key await redis.set("greeting", "Hello from Bun!"); // Get a key const greeting = await redis.get("greeting"); console.log(greeting); // "Hello from Bun!" // Increment a counter await redis.set("counter", 0); await redis.incr("counter"); // Check if a key exists const exists = await redis.exists("greeting"); // Delete a key await redis.del("greeting"); #### Features <table><tbody><tr><td><svg xmlns="http://www.w3.org/2000/svg" width="20" height="20" viewBox="0 0 24 24" fill="none" stroke="currentColor" stroke-width="2" stroke-linecap="round" stroke-linejoin="round"><path d="M21 16V8a2 2 0 0 0-1-1.73l-7-4a2 2 0 0 0-2 0l-7 4A2 2 0 0 0 3 8v8a2 2 0 0 0 1 1.73l7 4a2 2 0 0 0 2 0l7-4A2 2 0 0 0 21 16z"></path><circle cx="12" cy="12" r="4"></circle></svg></td><td><p>Fast native implementation using Zig and JavaScriptCore</p></td></tr><tr><td><svg xmlns="http://www.w3.org/2000/svg" width="20" height="20" viewBox="0 0 24 24" fill="none" stroke="currentColor" stroke-width="2" stroke-linecap="round" stroke-linejoin="round"><path d="M10 13a5 5 0 0 0 7.54.54l3-3a5 5 0 0 0-7.07-7.07l-1.72 1.71"></path><path d="M14 11a5 5 0 0 0-7.54-.54l-3 3a5 5 0 0 0 7.07 7.07l1.71-1.71"></path></svg></td><td><p>Automatic pipelining for better performance</p></td></tr><tr><td><svg xmlns="http://www.w3.org/2000/svg" width="20" height="20" viewBox="0 0 24 24" fill="none" stroke="currentColor" stroke-width="2" stroke-linecap="round" stroke-linejoin="round"><path d="m15 20 3-3h2a2 2 0 0 0 2-2V6a2 2 0 0 0-2-2H4a2 2 0 0 0-2 2v9a2 2 0 0 0 2 2h2l3 3z"></path><path d="M6 8v1"></path><path d="M10 8v1"></path><path d="M14 8v1"></path><path d="M18 8v1"></path></svg></td><td><p>Auto-reconnect with exponential backoff</p></td></tr><tr><td><svg xmlns="http://www.w3.org/2000/svg" width="20" height="20" viewBox="0 0 24 24" fill="none" stroke="currentColor" stroke-width="2" stroke-linecap="round" stroke-linejoin="round"><path d="M3 20h4.5a.5.5 0 0 0 .5-.5v-.282a.52.52 0 0 0-.247-.437 8 8 0 1 1 8.494-.001.52.52 0 0 0-.247.438v.282a.5.5 0 0 0 .5.5H21"></path></svg></td><td><p>Support for RESP3 protocol</p></td></tr><tr><td><svg xmlns="http://www.w3.org/2000/svg" width="20" height="20" viewBox="0 0 24 24" fill="none" stroke="currentColor" stroke-width="2" stroke-linecap="round" stroke-linejoin="round"><rect width="18" height="11" x="3" y="11" rx="2" ry="2"></rect><path d="M7 11V7a5 5 0 0 1 10 0v4"></path></svg></td><td><p>TLS support</p></td></tr><tr><td><svg xmlns="http://www.w3.org/2000/svg" width="20" height="20" viewBox="0 0 24 24" fill="none" stroke="currentColor" stroke-width="2" stroke-linecap="round" stroke-linejoin="round"><circle cx="12" cy="12" r="10"></circle><polyline points="12 6 12 12 16 14"></polyline></svg></td><td><p>Connection management with configurable timeouts</p></td></tr><tr><td><svg xmlns="http://www.w3.org/2000/svg" width="20" height="20" viewBox="0 0 24 24" fill="none" stroke="currentColor" stroke-width="2" stroke-linecap="round" stroke-linejoin="round"><path d="M21 12H11"></path><path d="M21 18H11"></path><path d="M21 6H11"></path><path d="m7 8-4 4 4 4"></path></svg></td><td><p>Offline command queue</p></td></tr><tr><td><svg xmlns="http://www.w3.org/2000/svg" width="20" height="20" viewBox="0 0 24 24" fill="none" stroke="currentColor" stroke-width="2" stroke-linecap="round" stroke-linejoin="round"><path d="M12.22 2h-.44a2 2 0 0 0-2 2v.18a2 2 0 0 1-1 1.73l-.43.25a2 2 0 0 1-2 0l-.15-.08a2 2 0 0 0-2.73.73l-.22.38a2 2 0 0 0 .73 2.73l.15.1a2 2 0 0 1 1 1.72v.51a2 2 0 0 1-1 1.74l-.15.09a2 2 0 0 0-.73 2.73l.22.38a2 2 0 0 0 2.73.73l.15-.08a2 2 0 0 1 2 0l.43.25a2 2 0 0 1 1 1.73V20a2 2 0 0 0 2 2h.44a2 2 0 0 0 2-2v-.18a2 2 0 0 1 1-1.73l.43-.25a2 2 0 0 1 2 0l.15.08a2 2 0 0 0 2.73-.73l.22-.39a2 2 0 0 0-.73-2.73l-.15-.08a2 2 0 0 1-1-1.74v-.5a2 2 0 0 1 1-1.74l.15-.09a2 2 0 0 0 .73-2.73l-.22-.38a2 2 0 0 0-2.73-.73l-.15.08a2 2 0 0 1-2 0l-.43-.25a2 2 0 0 1-1-1.73V4a2 2 0 0 0-2-2z"></path><circle cx="12" cy="12" r="3"></circle></svg></td><td><p>Automatic configuration with environment variables</p></td></tr><tr><td><svg xmlns="http://www.w3.org/2000/svg" width="20" height="20" viewBox="0 0 24 24" fill="none" stroke="currentColor" stroke-width="2" stroke-linecap="round" stroke-linejoin="round"><line x1="4" x2="20" y1="9" y2="9"></line><line x1="4" x2="20" y1="15" y2="15"></line><line x1="10" x2="8" y1="3" y2="21"></line><line x1="16" x2="14" y1="3" y2="21"></line></svg></td><td><p>Support for hash, set, and other Redis data structures</p></td></tr></tbody></table> ## Getting Started To use the Redis client, you first need to create a connection: import { redis, RedisClient } from "bun"; // Using the default client (reads connection info from environment) // process.env.REDIS_URL is used by default await redis.set("hello", "world"); const result = await redis.get("hello"); // Creating a custom client const client = new RedisClient("redis://username:password@localhost:6379"); await client.set("counter", "0"); await client.incr("counter"); By default, the client reads connection information from the following environment variables (in order of precedence): * `REDIS_URL` * If not set, defaults to `"redis://localhost:6379"` ### Connection Lifecycle The Redis client automatically handles connections in the background: // No connection is made until a command is executed const client = new RedisClient(); // First command initiates the connection await client.set("key", "value"); // Connection remains open for subsequent commands await client.get("key"); // Explicitly close the connection when done client.disconnect(); You can also manually control the connection lifecycle: const client = new RedisClient(); // Explicitly connect await client.connect(); // Run commands await client.set("key", "value"); // Disconnect when done client.disconnect(); ## Basic Operations ### String Operations // Set a key await redis.set("user:1:name", "Alice"); // Get a key const name = await redis.get("user:1:name"); // Delete a key await redis.del("user:1:name"); // Check if a key exists const exists = await redis.exists("user:1:name"); // Set expiration (in seconds) await redis.set("session:123", "active"); await redis.expire("session:123", 3600); // expires in 1 hour // Get time to live (in seconds) const ttl = await redis.ttl("session:123"); ### Numeric Operations // Set initial value await redis.set("counter", "0"); // Increment by 1 await redis.incr("counter"); // Decrement by 1 await redis.decr("counter"); ### Hash Operations // Set multiple fields in a hash await redis.hmset("user:123", [ "name", "Alice", "email", "alice@example.com", "active", "true", ]); // Get multiple fields from a hash const userFields = await redis.hmget("user:123", ["name", "email"]); console.log(userFields); // ["Alice", "alice@example.com"] // Increment a numeric field in a hash await redis.hincrby("user:123", "visits", 1); // Increment a float field in a hash await redis.hincrbyfloat("user:123", "score", 1.5); ### Set Operations // Add member to set await redis.sadd("tags", "javascript"); // Remove member from set await redis.srem("tags", "javascript"); // Check if member exists in set const isMember = await redis.sismember("tags", "javascript"); // Get all members of a set const allTags = await redis.smembers("tags"); // Get a random member const randomTag = await redis.srandmember("tags"); // Pop (remove and return) a random member const poppedTag = await redis.spop("tags"); ## Advanced Usage ### Command Execution and Pipelining The client automatically pipelines commands, improving performance by sending multiple commands in a batch and processing responses as they arrive. // Commands are automatically pipelined by default const [infoResult, listResult] = await Promise.all([ redis.get("user:1:name"), redis.get("user:2:email"), ]); To disable automatic pipelining, you can set the `enableAutoPipelining` option to `false`: const client = new RedisClient("redis://localhost:6379", { enableAutoPipelining: false, }); ### Raw Commands When you need to use commands that don't have convenience methods, you can use the `send` method: // Run any Redis command const info = await redis.send("INFO", []); // LPUSH to a list await redis.send("LPUSH", ["mylist", "value1", "value2"]); // Get list range const list = await redis.send("LRANGE", ["mylist", "0", "-1"]); The `send` method allows you to use any Redis command, even ones that don't have dedicated methods in the client. The first argument is the command name, and the second argument is an array of string arguments. ### Connection Events You can register handlers for connection events: const client = new RedisClient(); // Called when successfully connected to Redis server client.onconnect = () => { console.log("Connected to Redis server"); }; // Called when disconnected from Redis server client.onclose = error => { console.error("Disconnected from Redis server:", error); }; // Manually connect/disconnect await client.connect(); client.disconnect(); ### Connection Status and Monitoring // Check if connected console.log(client.connected); // boolean indicating connection status // Check amount of data buffered (in bytes) console.log(client.bufferedAmount); ### Type Conversion The Redis client handles automatic type conversion for Redis responses: * Integer responses are returned as JavaScript numbers * Bulk strings are returned as JavaScript strings * Simple strings are returned as JavaScript strings * Null bulk strings are returned as `null` * Array responses are returned as JavaScript arrays * Error responses throw JavaScript errors with appropriate error codes * Boolean responses (RESP3) are returned as JavaScript booleans * Map responses (RESP3) are returned as JavaScript objects * Set responses (RESP3) are returned as JavaScript arrays Special handling for specific commands: * `EXISTS` returns a boolean instead of a number (1 becomes true, 0 becomes false) * `SISMEMBER` returns a boolean (1 becomes true, 0 becomes false) The following commands disable automatic pipelining: * `AUTH` * `INFO` * `QUIT` * `EXEC` * `MULTI` * `WATCH` * `SCRIPT` * `SELECT` * `CLUSTER` * `DISCARD` * `UNWATCH` * `PIPELINE` * `SUBSCRIBE` * `UNSUBSCRIBE` * `UNPSUBSCRIBE` ## Connection Options When creating a client, you can pass various options to configure the connection: const client = new RedisClient("redis://localhost:6379", { // Connection timeout in milliseconds (default: 10000) connectionTimeout: 5000, // Idle timeout in milliseconds (default: 0 = no timeout) idleTimeout: 30000, // Whether to automatically reconnect on disconnection (default: true) autoReconnect: true, // Maximum number of reconnection attempts (default: 10) maxRetries: 10, // Whether to queue commands when disconnected (default: true) enableOfflineQueue: true, // Whether to automatically pipeline commands (default: true) enableAutoPipelining: true, // TLS options (default: false) tls: true, // Alternatively, provide custom TLS config: // tls: { // rejectUnauthorized: true, // ca: "path/to/ca.pem", // cert: "path/to/cert.pem", // key: "path/to/key.pem", // } }); ### Reconnection Behavior When a connection is lost, the client automatically attempts to reconnect with exponential backoff: 1. The client starts with a small delay (50ms) and doubles it with each attempt 2. Reconnection delay is capped at 2000ms (2 seconds) 3. The client attempts to reconnect up to `maxRetries` times (default: 10) 4. Commands executed during disconnection are: * Queued if `enableOfflineQueue` is true (default) * Rejected immediately if `enableOfflineQueue` is false ## Supported URL Formats The Redis client supports various URL formats: // Standard Redis URL new RedisClient("redis://localhost:6379"); new RedisClient("redis://localhost:6379"); // With authentication new RedisClient("redis://username:password@localhost:6379"); // With database number new RedisClient("redis://localhost:6379/0"); // TLS connections new RedisClient("rediss://localhost:6379"); new RedisClient("rediss://localhost:6379"); new RedisClient("redis+tls://localhost:6379"); new RedisClient("redis+tls://localhost:6379"); // Unix socket connections new RedisClient("redis+unix:///path/to/socket"); new RedisClient("redis+unix:///path/to/socket"); // TLS over Unix socket new RedisClient("redis+tls+unix:///path/to/socket"); new RedisClient("redis+tls+unix:///path/to/socket"); ## Error Handling The Redis client throws typed errors for different scenarios: try { await redis.get("non-existent-key"); } catch (error) { if (error.code === "ERR_REDIS_CONNECTION_CLOSED") { console.error("Connection to Redis server was closed"); } else if (error.code === "ERR_REDIS_AUTHENTICATION_FAILED") { console.error("Authentication failed"); } else { console.error("Unexpected error:", error); } } Common error codes: * `ERR_REDIS_CONNECTION_CLOSED` - Connection to the server was closed * `ERR_REDIS_AUTHENTICATION_FAILED` - Failed to authenticate with the server * `ERR_REDIS_INVALID_RESPONSE` - Received an invalid response from the server ## Example Use Cases ### Caching async function getUserWithCache(userId) { const cacheKey = `user:${userId}`; // Try to get from cache first const cachedUser = await redis.get(cacheKey); if (cachedUser) { return JSON.parse(cachedUser); } // Not in cache, fetch from database const user = await database.getUser(userId); // Store in cache for 1 hour await redis.set(cacheKey, JSON.stringify(user)); await redis.expire(cacheKey, 3600); return user; } ### Rate Limiting async function rateLimit(ip, limit = 100, windowSecs = 3600) { const key = `ratelimit:${ip}`; // Increment counter const count = await redis.incr(key); // Set expiry if this is the first request in window if (count === 1) { await redis.expire(key, windowSecs); } // Check if limit exceeded return { limited: count > limit, remaining: Math.max(0, limit - count), }; } ### Session Storage async function createSession(userId, data) { const sessionId = crypto.randomUUID(); const key = `session:${sessionId}`; // Store session with expiration await redis.hmset(key, [ "userId", userId.toString(), "created", Date.now().toString(), "data", JSON.stringify(data), ]); await redis.expire(key, 86400); // 24 hours return sessionId; } async function getSession(sessionId) { const key = `session:${sessionId}`; // Get session data const exists = await redis.exists(key); if (!exists) return null; const [userId, created, data] = await redis.hmget(key, [ "userId", "created", "data", ]); return { userId: Number(userId), created: Number(created), data: JSON.parse(data), }; } ## Implementation Notes Bun's Redis client is implemented in Zig and uses the Redis Serialization Protocol (RESP3). It manages connections efficiently and provides automatic reconnection with exponential backoff. The client supports pipelining commands, meaning multiple commands can be sent without waiting for the replies to previous commands. This significantly improves performance when sending multiple commands in succession. ### RESP3 Protocol Support Bun's Redis client uses the newer RESP3 protocol by default, which provides more data types and features compared to RESP2: * Better error handling with typed errors * Native Boolean responses * Map/Dictionary responses (key-value objects) * Set responses * Double (floating point) values * BigNumber support for large integer values When connecting to Redis servers using older versions that don't support RESP3, the client automatically fallbacks to compatible modes. ## Limitations and Future Plans Current limitations of the Redis client we are planning to address in future versions: No dedicated API for pub/sub functionality (though you can use the raw command API) Transactions (MULTI/EXEC) must be done through raw commands for now Streams are supported but without dedicated methods Unsupported features: * Redis Sentinel * Redis Cluster --- ## Page: https://bun.sh/docs/api/import-meta The `import.meta` object is a way for a module to access information about itself. It's part of the JavaScript language, but its contents are not standardized. Each "host" (browser, runtime, etc) is free to implement any properties it wishes on the `import.meta` object. Bun implements the following properties. /path/to/project/file.ts import.meta.dir; // => "/path/to/project" import.meta.file; // => "file.ts" import.meta.path; // => "/path/to/project/file.ts" import.meta.url; // => "file:///path/to/project/file.ts" import.meta.main; // `true` if this file is directly executed by `bun run` // `false` otherwise import.meta.resolve("zod"); // => "file:///path/to/project/node_modules/zod/index.js" <table><thead></thead><tbody><tr><td><code>import.meta.dir</code></td><td>Absolute path to the directory containing the current file, e.g. <code>/path/to/project</code>. Equivalent to <code>__dirname</code> in CommonJS modules (and Node.js)</td></tr><tr><td><code>import.meta.dirname</code></td><td>An alias to <code>import.meta.dir</code>, for Node.js compatibility</td></tr><tr><td><code>import.meta.env</code></td><td>An alias to <code>process.env</code>.</td></tr><tr><td><code>import.meta.file</code></td><td>The name of the current file, e.g. <code>index.tsx</code></td></tr><tr><td><code>import.meta.path</code></td><td>Absolute path to the current file, e.g. <code>/path/to/project/index.ts</code>. Equivalent to <code>__filename</code> in CommonJS modules (and Node.js)</td></tr><tr><td><code>import.meta.filename</code></td><td>An alias to <code>import.meta.path</code>, for Node.js compatibility</td></tr><tr><td><code>import.meta.main</code></td><td>Indicates whether the current file is the entrypoint to the current <code>bun</code> process. Is the file being directly executed by <code>bun run</code> or is it being imported?</td></tr><tr><td><p><code>import.meta.resolve</code></p></td><td><p>Resolve a module specifier (e.g. <code>"zod"</code> or <code>"./file.tsx"</code>) to a url. Equivalent to <a href="https://developer.mozilla.org/en-US/docs/Web/JavaScript/Reference/Operators/import.meta#resolve"><code>import.meta.resolve</code> in browsers</a></p><div><pre><code><span><span>import</span><span>.meta.</span><span>resolve</span><span>(</span><span>"</span><span>zod</span><span>"</span><span>);</span></span> <span><span>// => "file:///path/to/project/node_modules/zod/index.ts"</span></span> <span></span></code></pre></div></td></tr><tr><td><code>import.meta.url</code></td><td>A <code>string</code> url to the current file, e.g. <code>file:///path/to/project/index.ts</code>. Equivalent to <a href="https://developer.mozilla.org/en-US/docs/Web/JavaScript/Reference/Operators/import.meta#url"><code>import.meta.url</code> in browsers</a></td></tr></tbody></table> --- ## Page: https://bun.sh/docs/api/sqlite Bun natively implements a high-performance SQLite3 driver. To use it import from the built-in `bun:sqlite` module. import { Database } from "bun:sqlite"; const db = new Database(":memory:"); const query = db.query("select 'Hello world' as message;"); query.get(); // => { message: "Hello world" } The API is simple, synchronous, and fast. Credit to better-sqlite3 and its contributors for inspiring the API of `bun:sqlite`. Features include: * Transactions * Parameters (named & positional) * Prepared statements * Datatype conversions (`BLOB` becomes `Uint8Array`) * Map query results to classes without an ORM - `query.as(MyClass)` * The fastest performance of any SQLite driver for JavaScript * `bigint` support * Multi-query statements (e.g. `SELECT 1; SELECT 2;`) in a single call to database.run(query) The `bun:sqlite` module is roughly 3-6x faster than `better-sqlite3` and 8-9x faster than `deno.land/x/sqlite` for read queries. Each driver was benchmarked against the Northwind Traders dataset. View and run the benchmark source. 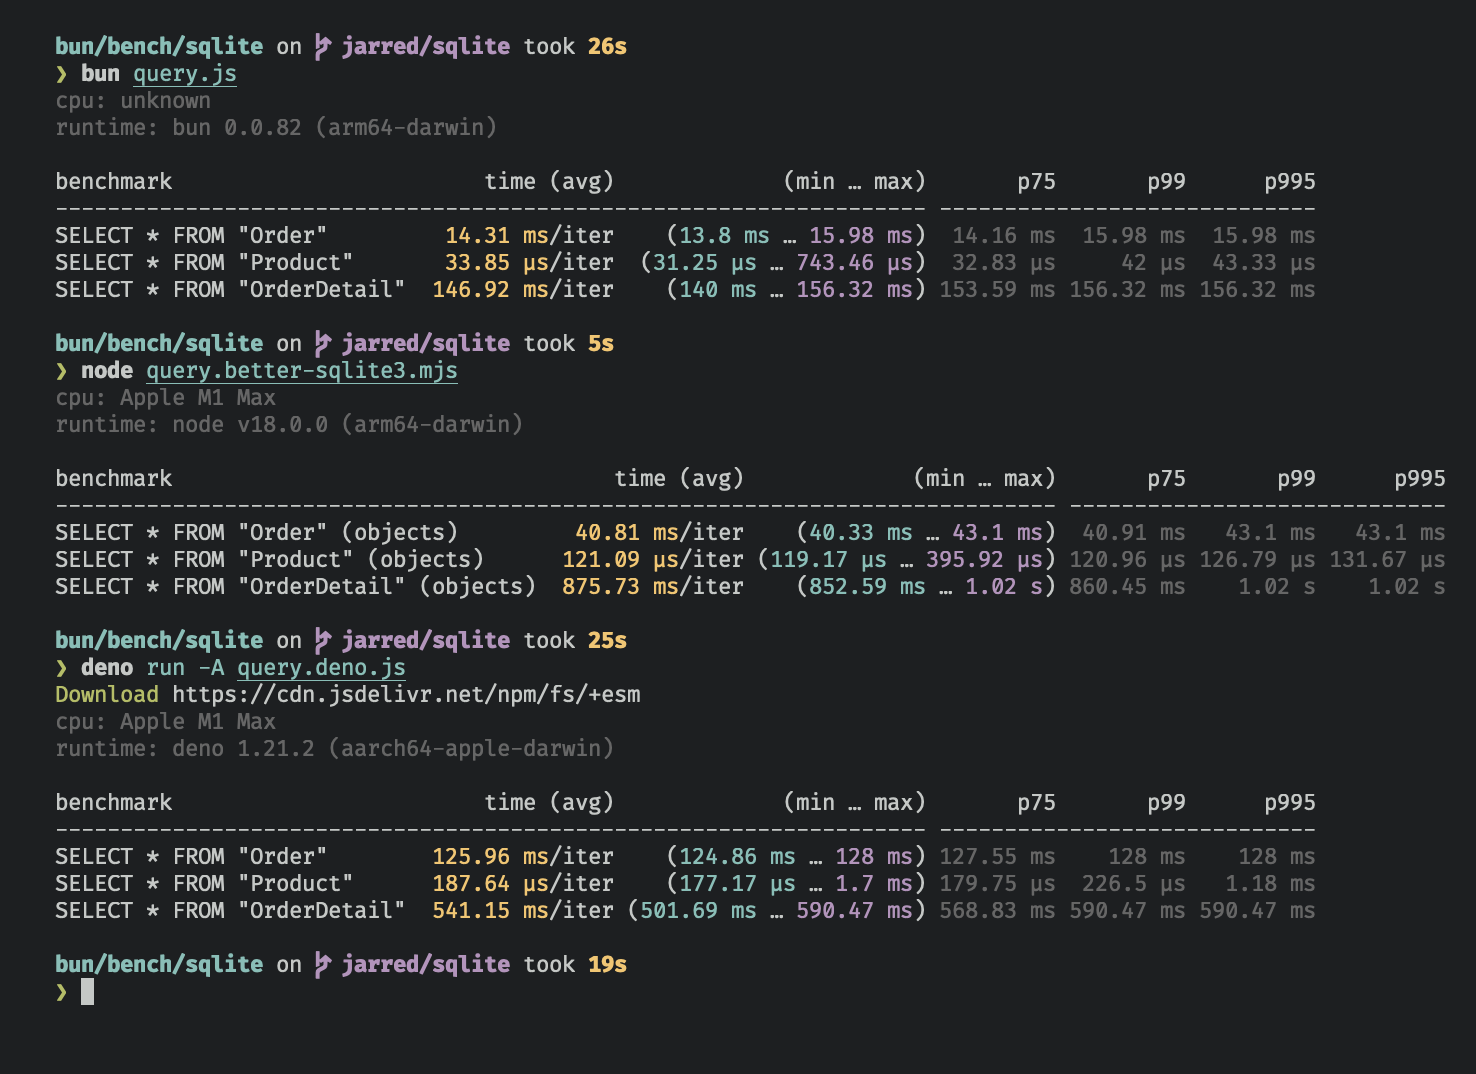 Benchmarked on an M1 MacBook Pro (64GB) running macOS 12.3.1 ## Database To open or create a SQLite3 database: import { Database } from "bun:sqlite"; const db = new Database("mydb.sqlite"); To open an in-memory database: import { Database } from "bun:sqlite"; // all of these do the same thing const db = new Database(":memory:"); const db = new Database(); const db = new Database(""); To open in `readonly` mode: import { Database } from "bun:sqlite"; const db = new Database("mydb.sqlite", { readonly: true }); To create the database if the file doesn't exist: import { Database } from "bun:sqlite"; const db = new Database("mydb.sqlite", { create: true }); ### Strict mode Added in Bun v1.1.14 By default, `bun:sqlite` requires binding parameters to include the `$`, `:`, or `@` prefix, and does not throw an error if a parameter is missing. To instead throw an error when a parameter is missing and allow binding without a prefix, set `strict: true` on the `Database` constructor: import { Database } from "bun:sqlite"; const strict = new Database( ":memory:", { strict: true } ); // throws error because of the typo: const query = strict .query("SELECT $message;") .all({ message: "Hello world" }); const notStrict = new Database( ":memory:" ); // does not throw error: notStrict .query("SELECT $message;") .all({ message: "Hello world" }); ### Load via ES module import You can also use an import attribute to load a database. import db from "./mydb.sqlite" with { "type": "sqlite" }; console.log(db.query("select * from users LIMIT 1").get()); This is equivalent to the following: import { Database } from "bun:sqlite"; const db = new Database("./mydb.sqlite"); ### `.close(throwOnError: boolean = false)` To close a database connection, but allow existing queries to finish, call `.close(false)`: const db = new Database(); // ... do stuff db.close(false); To close the database and throw an error if there are any pending queries, call `.close(true)`: const db = new Database(); // ... do stuff db.close(true); Note: `close(false)` is called automatically when the database is garbage collected. It is safe to call multiple times but has no effect after the first. ### `using` statement You can use the `using` statement to ensure that a database connection is closed when the `using` block is exited. import { Database } from "bun:sqlite"; { using db = new Database("mydb.sqlite"); using query = db.query("select 'Hello world' as message;"); console.log(query.get()); // => { message: "Hello world" } } ### `.serialize()` `bun:sqlite` supports SQLite's built-in mechanism for serializing and deserializing databases to and from memory. const olddb = new Database("mydb.sqlite"); const contents = olddb.serialize(); // => Uint8Array const newdb = Database.deserialize(contents); Internally, `.serialize()` calls `sqlite3_serialize`. ### `.query()` Use the `db.query()` method on your `Database` instance to prepare a SQL query. The result is a `Statement` instance that will be cached on the `Database` instance. _The query will not be executed._ const query = db.query(`select "Hello world" as message`); **Note** — Use the `.prepare()` method to prepare a query _without_ caching it on the `Database` instance. // compile the prepared statement const query = db.prepare("SELECT * FROM foo WHERE bar = ?"); ## WAL mode SQLite supports write-ahead log mode (WAL) which dramatically improves performance, especially in situations with many concurrent readers and a single writer. It's broadly recommended to enable WAL mode for most typical applications. To enable WAL mode, run this pragma query at the beginning of your application: db.exec("PRAGMA journal_mode = WAL;"); What is WAL mode ## Statements A `Statement` is a _prepared query_, which means it's been parsed and compiled into an efficient binary form. It can be executed multiple times in a performant way. Create a statement with the `.query` method on your `Database` instance. const query = db.query(`select "Hello world" as message`); Queries can contain parameters. These can be numerical (`?1`) or named (`$param` or `:param` or `@param`). const query = db.query(`SELECT ?1, ?2;`); const query = db.query(`SELECT $param1, $param2;`); Values are bound to these parameters when the query is executed. A `Statement` can be executed with several different methods, each returning the results in a different form. ### Binding values To bind values to a statement, pass an object to the `.all()`, `.get()`, `.run()`, or `.values()` method. const query = db.query(`select $message;`); query.all({ $message: "Hello world" }); You can bind using positional parameters too: const query = db.query(`select ?1;`); query.all("Hello world"); #### `strict: true` lets you bind values without prefixes Added in Bun v1.1.14 By default, the `$`, `:`, and `@` prefixes are **included** when binding values to named parameters. To bind without these prefixes, use the `strict` option in the `Database` constructor. import { Database } from "bun:sqlite"; const db = new Database(":memory:", { // bind values without prefixes strict: true, }); const query = db.query(`select $message;`); // strict: true query.all({ message: "Hello world" }); // strict: false // query.all({ $message: "Hello world" }); ### `.all()` Use `.all()` to run a query and get back the results as an array of objects. const query = db.query(`select $message;`); query.all({ $message: "Hello world" }); // => [{ message: "Hello world" }] Internally, this calls `sqlite3_reset` and repeatedly calls `sqlite3_step` until it returns `SQLITE_DONE`. ### `.get()` Use `.get()` to run a query and get back the first result as an object. const query = db.query(`select $message;`); query.get({ $message: "Hello world" }); // => { $message: "Hello world" } Internally, this calls `sqlite3_reset` followed by `sqlite3_step` until it no longer returns `SQLITE_ROW`. If the query returns no rows, `undefined` is returned. ### `.run()` Use `.run()` to run a query and get back `undefined`. This is useful for schema-modifying queries (e.g. `CREATE TABLE`) or bulk write operations. const query = db.query(`create table foo;`); query.run(); // { // lastInsertRowid: 0, // changes: 0, // } Internally, this calls `sqlite3_reset` and calls `sqlite3_step` once. Stepping through all the rows is not necessary when you don't care about the results. Since Bun v1.1.14, `.run()` returns an object with two properties: `lastInsertRowid` and `changes`. The `lastInsertRowid` property returns the ID of the last row inserted into the database. The `changes` property is the number of rows affected by the query. ### `.as(Class)` - Map query results to a class Added in Bun v1.1.14 Use `.as(Class)` to run a query and get back the results as instances of a class. This lets you attach methods & getters/setters to results. class Movie { title: string; year: number; get isMarvel() { return this.title.includes("Marvel"); } } const query = db.query("SELECT title, year FROM movies").as(Movie); const movies = query.all(); const first = query.get(); console.log(movies[0].isMarvel); // => true console.log(first.isMarvel); // => true As a performance optimization, the class constructor is not called, default initializers are not run, and private fields are not accessible. This is more like using `Object.create` than `new`. The class's prototype is assigned to the object, methods are attached, and getters/setters are set up, but the constructor is not called. The database columns are set as properties on the class instance. ### `.iterate()` (`@@iterator`) Use `.iterate()` to run a query and incrementally return results. This is useful for large result sets that you want to process one row at a time without loading all the results into memory. const query = db.query("SELECT * FROM foo"); for (const row of query.iterate()) { console.log(row); } You can also use the `@@iterator` protocol: const query = db.query("SELECT * FROM foo"); for (const row of query) { console.log(row); } This feature was added in Bun v1.1.31. ### `.values()` Use `values()` to run a query and get back all results as an array of arrays. const query = db.query(`select $message;`); query.values({ $message: "Hello world" }); query.values(2); // [ // [ "Iron Man", 2008 ], // [ "The Avengers", 2012 ], // [ "Ant-Man: Quantumania", 2023 ], // ] Internally, this calls `sqlite3_reset` and repeatedly calls `sqlite3_step` until it returns `SQLITE_DONE`. ### `.finalize()` Use `.finalize()` to destroy a `Statement` and free any resources associated with it. Once finalized, a `Statement` cannot be executed again. Typically, the garbage collector will do this for you, but explicit finalization may be useful in performance-sensitive applications. const query = db.query("SELECT title, year FROM movies"); const movies = query.all(); query.finalize(); ### `.toString()` Calling `toString()` on a `Statement` instance prints the expanded SQL query. This is useful for debugging. import { Database } from "bun:sqlite"; // setup const query = db.query("SELECT $param;"); console.log(query.toString()); // => "SELECT NULL" query.run(42); console.log(query.toString()); // => "SELECT 42" query.run(365); console.log(query.toString()); // => "SELECT 365" Internally, this calls `sqlite3_expanded_sql`. The parameters are expanded using the most recently bound values. ## Parameters Queries can contain parameters. These can be numerical (`?1`) or named (`$param` or `:param` or `@param`). Bind values to these parameters when executing the query: Query const query = db.query("SELECT * FROM foo WHERE bar = $bar"); const results = query.all({ $bar: "bar", }); Results [ { "$bar": "bar" } ] Numbered (positional) parameters work too: Query const query = db.query("SELECT ?1, ?2"); const results = query.all("hello", "goodbye"); Results [ { "?1": "hello", "?2": "goodbye" } ] ## Integers sqlite supports signed 64 bit integers, but JavaScript only supports signed 52 bit integers or arbitrary precision integers with `bigint`. `bigint` input is supported everywhere, but by default `bun:sqlite` returns integers as `number` types. If you need to handle integers larger than 2^53, set `safeIntegers` option to `true` when creating a `Database` instance. This also validates that `bigint` passed to `bun:sqlite` do not exceed 64 bits. By default, `bun:sqlite` returns integers as `number` types. If you need to handle integers larger than 2^53, you can use the `bigint` type. ### `safeIntegers: true` Added in Bun v1.1.14 When `safeIntegers` is `true`, `bun:sqlite` will return integers as `bigint` types: import { Database } from "bun:sqlite"; const db = new Database(":memory:", { safeIntegers: true }); const query = db.query( `SELECT ${BigInt(Number.MAX_SAFE_INTEGER) + 102n} as max_int`, ); const result = query.get(); console.log(result.max_int); // => 9007199254741093n When `safeIntegers` is `true`, `bun:sqlite` will throw an error if a `bigint` value in a bound parameter exceeds 64 bits: import { Database } from "bun:sqlite"; const db = new Database(":memory:", { safeIntegers: true }); db.run("CREATE TABLE test (id INTEGER PRIMARY KEY, value INTEGER)"); const query = db.query("INSERT INTO test (value) VALUES ($value)"); try { query.run({ $value: BigInt(Number.MAX_SAFE_INTEGER) ** 2n }); } catch (e) { console.log(e.message); // => BigInt value '81129638414606663681390495662081' is out of range } ### `safeIntegers: false` (default) When `safeIntegers` is `false`, `bun:sqlite` will return integers as `number` types and truncate any bits beyond 53: import { Database } from "bun:sqlite"; const db = new Database(":memory:", { safeIntegers: false }); const query = db.query( `SELECT ${BigInt(Number.MAX_SAFE_INTEGER) + 102n} as max_int`, ); const result = query.get(); console.log(result.max_int); // => 9007199254741092 ## Transactions Transactions are a mechanism for executing multiple queries in an _atomic_ way; that is, either all of the queries succeed or none of them do. Create a transaction with the `db.transaction()` method: const insertCat = db.prepare("INSERT INTO cats (name) VALUES ($name)"); const insertCats = db.transaction(cats => { for (const cat of cats) insertCat.run(cat); }); At this stage, we haven't inserted any cats! The call to `db.transaction()` returns a new function (`insertCats`) that _wraps_ the function that executes the queries. To execute the transaction, call this function. All arguments will be passed through to the wrapped function; the return value of the wrapped function will be returned by the transaction function. The wrapped function also has access to the `this` context as defined where the transaction is executed. const insert = db.prepare("INSERT INTO cats (name) VALUES ($name)"); const insertCats = db.transaction(cats => { for (const cat of cats) insert.run(cat); return cats.length; }); const count = insertCats([ { $name: "Keanu" }, { $name: "Salem" }, { $name: "Crookshanks" }, ]); console.log(`Inserted ${count} cats`); The driver will automatically `begin` a transaction when `insertCats` is called and `commit` it when the wrapped function returns. If an exception is thrown, the transaction will be rolled back. The exception will propagate as usual; it is not caught. **Nested transactions** — Transaction functions can be called from inside other transaction functions. When doing so, the inner transaction becomes a savepoint. View nested transaction example Transactions also come with `deferred`, `immediate`, and `exclusive` versions. insertCats(cats); // uses "BEGIN" insertCats.deferred(cats); // uses "BEGIN DEFERRED" insertCats.immediate(cats); // uses "BEGIN IMMEDIATE" insertCats.exclusive(cats); // uses "BEGIN EXCLUSIVE" ### `.loadExtension()` To load a SQLite extension, call `.loadExtension(name)` on your `Database` instance import { Database } from "bun:sqlite"; const db = new Database(); db.loadExtension("myext"); For macOS users ### .fileControl(cmd: number, value: any) To use the advanced `sqlite3_file_control` API, call `.fileControl(cmd, value)` on your `Database` instance. import { Database, constants } from "bun:sqlite"; const db = new Database(); // Ensure WAL mode is NOT persistent // this prevents wal files from lingering after the database is closed db.fileControl(constants.SQLITE_FCNTL_PERSIST_WAL, 0); `value` can be: * `number` * `TypedArray` * `undefined` or `null` ## Reference class Database { constructor( filename: string, options?: | number | { readonly?: boolean; create?: boolean; readwrite?: boolean; }, ); query<Params, ReturnType>(sql: string): Statement<Params, ReturnType>; run( sql: string, params?: SQLQueryBindings, ): { lastInsertRowid: number; changes: number }; exec = this.run; } class Statement<Params, ReturnType> { all(params: Params): ReturnType[]; get(params: Params): ReturnType | undefined; run(params: Params): { lastInsertRowid: number; changes: number; }; values(params: Params): unknown[][]; finalize(): void; // destroy statement and clean up resources toString(): string; // serialize to SQL columnNames: string[]; // the column names of the result set paramsCount: number; // the number of parameters expected by the statement native: any; // the native object representing the statement as(Class: new () => ReturnType): this; } type SQLQueryBindings = | string | bigint | TypedArray | number | boolean | null | Record<string, string | bigint | TypedArray | number | boolean | null>; ### Datatypes | JavaScript type | SQLite type | | --- | --- | | `string` | `TEXT` | | `number` | `INTEGER` or `DECIMAL` | | `boolean` | `INTEGER` (1 or 0) | | `Uint8Array` | `BLOB` | | `Buffer` | `BLOB` | | `bigint` | `INTEGER` | | `null` | `NULL` | --- ## Page: https://bun.sh/docs/api/file-system-router Bun provides a fast API for resolving routes against file-system paths. This API is primarily intended for library authors. At the moment only Next.js-style file-system routing is supported, but other styles may be added in the future. ## Next.js-style The `FileSystemRouter` class can resolve routes against a `pages` directory. (The Next.js 13 `app` directory is not yet supported.) Consider the following `pages` directory: pages ├── index.tsx ├── settings.tsx ├── blog │ ├── [slug].tsx │ └── index.tsx └── [[...catchall]].tsx The `FileSystemRouter` can be used to resolve routes against this directory: const router = new Bun.FileSystemRouter({ style: "nextjs", dir: "./pages", origin: "https://mydomain.com", assetPrefix: "_next/static/" }); router.match("/"); // => { filePath: "/path/to/pages/index.tsx", kind: "exact", name: "/", pathname: "/", src: "https://mydomain.com/_next/static/pages/index.tsx" } Query parameters will be parsed and returned in the `query` property. router.match("/settings?foo=bar"); // => { filePath: "/Users/colinmcd94/Documents/bun/fun/pages/settings.tsx", kind: "dynamic", name: "/settings", pathname: "/settings?foo=bar", src: "https://mydomain.com/_next/static/pages/settings.tsx", query: { foo: "bar" } } The router will automatically parse URL parameters and return them in the `params` property: router.match("/blog/my-cool-post"); // => { filePath: "/Users/colinmcd94/Documents/bun/fun/pages/blog/[slug].tsx", kind: "dynamic", name: "/blog/[slug]", pathname: "/blog/my-cool-post", src: "https://mydomain.com/_next/static/pages/blog/[slug].tsx", params: { slug: "my-cool-post" } } The `.match()` method also accepts `Request` and `Response` objects. The `url` property will be used to resolve the route. router.match(new Request("https://example.com/blog/my-cool-post")); The router will read the directory contents on initialization. To re-scan the files, use the `.reload()` method. router.reload(); ## Reference interface Bun { class FileSystemRouter { constructor(params: { dir: string; style: "nextjs"; origin?: string; assetPrefix?: string; fileExtensions?: string[]; }); reload(): void; match(path: string | Request | Response): { filePath: string; kind: "exact" | "catch-all" | "optional-catch-all" | "dynamic"; name: string; pathname: string; src: string; params?: Record<string, string>; query?: Record<string, string>; } | null } } --- ## Page: https://bun.sh/docs/api/tcp Use Bun's native TCP API to implement performance sensitive systems like database clients, game servers, or anything that needs to communicate over TCP (instead of HTTP). This is a low-level API intended for library authors and for advanced use cases. ## Start a server (`Bun.listen()`) To start a TCP server with `Bun.listen`: Bun.listen({ hostname: "localhost", port: 8080, socket: { data(socket, data) {}, // message received from client open(socket) {}, // socket opened close(socket, error) {}, // socket closed drain(socket) {}, // socket ready for more data error(socket, error) {}, // error handler }, }); An API designed for speed Contextual data can be attached to a socket in the `open` handler. type SocketData = { sessionId: string }; Bun.listen<SocketData>({ hostname: "localhost", port: 8080, socket: { data(socket, data) { socket.write(`${socket.data.sessionId}: ack`); }, open(socket) { socket.data = { sessionId: "abcd" }; }, }, }); To enable TLS, pass a `tls` object containing `key` and `cert` fields. Bun.listen({ hostname: "localhost", port: 8080, socket: { data(socket, data) {}, }, tls: { // can be string, BunFile, TypedArray, Buffer, or array thereof key: Bun.file("./key.pem"), cert: Bun.file("./cert.pem"), }, }); The `key` and `cert` fields expect the _contents_ of your TLS key and certificate. This can be a string, `BunFile`, `TypedArray`, or `Buffer`. Bun.listen({ // ... tls: { // BunFile key: Bun.file("./key.pem"), // Buffer key: fs.readFileSync("./key.pem"), // string key: fs.readFileSync("./key.pem", "utf8"), // array of above key: [Bun.file("./key1.pem"), Bun.file("./key2.pem")], }, }); The result of `Bun.listen` is a server that conforms to the `TCPSocket` interface. const server = Bun.listen({ /* config*/ }); // stop listening // parameter determines whether active connections are closed server.stop(true); // let Bun process exit even if server is still listening server.unref(); ## Create a connection (`Bun.connect()`) Use `Bun.connect` to connect to a TCP server. Specify the server to connect to with `hostname` and `port`. TCP clients can define the same set of handlers as `Bun.listen`, plus a couple client-specific handlers. // The client const socket = await Bun.connect({ hostname: "localhost", port: 8080, socket: { data(socket, data) {}, open(socket) {}, close(socket, error) {}, drain(socket) {}, error(socket, error) {}, // client-specific handlers connectError(socket, error) {}, // connection failed end(socket) {}, // connection closed by server timeout(socket) {}, // connection timed out }, }); To require TLS, specify `tls: true`. // The client const socket = await Bun.connect({ // ... config tls: true, }); ## Hot reloading Both TCP servers and sockets can be hot reloaded with new handlers. Server Client Server const server = Bun.listen({ /* config */ }) // reloads handlers for all active server-side sockets server.reload({ socket: { data(){ // new 'data' handler } } }) Client const socket = await Bun.connect({ /* config */ }) socket.reload({ data(){ // new 'data' handler } }) ## Buffering Currently, TCP sockets in Bun do not buffer data. For performance-sensitive code, it's important to consider buffering carefully. For example, this: socket.write("h"); socket.write("e"); socket.write("l"); socket.write("l"); socket.write("o"); ...performs significantly worse than this: socket.write("hello"); To simplify this for now, consider using Bun's `ArrayBufferSink` with the `{stream: true}` option: import { ArrayBufferSink } from "bun"; const sink = new ArrayBufferSink(); sink.start({ stream: true, highWaterMark: 1024 }); sink.write("h"); sink.write("e"); sink.write("l"); sink.write("l"); sink.write("o"); queueMicrotask(() => { const data = sink.flush(); const wrote = socket.write(data); if (wrote < data.byteLength) { // put it back in the sink if the socket is full sink.write(data.subarray(wrote)); } }); **Corking** — Support for corking is planned, but in the meantime backpressure must be managed manually with the `drain` handler. --- ## Page: https://bun.sh/docs/api/udp Use Bun's UDP API to implement services with advanced real-time requirements, such as voice chat. ## Bind a UDP socket (`Bun.udpSocket()`) To create a new (bound) UDP socket: const socket = await Bun.udpSocket({}) console.log(socket.port); // assigned by the operating system Specify a port: const socket = await Bun.udpSocket({ port: 41234 }) console.log(socket.port); // 41234 ### Send a datagram Specify the data to send, as well as the destination port and address. socket.send("Hello, world!", 41234, "127.0.0.1"); Note that the address must be a valid IP address - `send` does not perform DNS resolution, as it is intended for low-latency operations. ### Receive datagrams When creating your socket, add a callback to specify what should be done when packets are received: const server = await Bun.udpSocket({ socket: { data(socket, buf, port, addr) { console.log(`message from ${addr}:${port}:`) console.log(buf.toString()); } } }) const client = await Bun.udpSocket({}); client.send("Hello!", server.port, "127.0.0.1"); ### Connections While UDP does not have a concept of a connection, many UDP communications (especially as a client) involve only one peer. In such cases it can be beneficial to connect the socket to that peer, which specifies to which address all packets are sent and restricts incoming packets to that peer only. const server = await Bun.udpSocket({ socket: { data(socket, buf, port, addr) { console.log(`message from ${addr}:${port}:`) console.log(buf.toString()); } } }) const client = await Bun.udpSocket({ connect: { port: server.port, hostname: '127.0.0.1', } }); client.send("Hello"); Because connections are implemented on the operating system level, you can potentially observe performance benefits, too. ### Send many packets at once using `sendMany()` If you want to send a large volume of packets at once, it can make sense to batch them all together to avoid the overhead of making a system call for each. This is made possible by the `sendMany()` API: For an unconnected socket, `sendMany` takes an array as its only argument. Each set of three array elements describes a packet: The first item is the data to be sent, the second is the target port, and the last is the target address. const socket = await Bun.udpSocket({}) // sends 'Hello' to 127.0.0.1:41234, and 'foo' to 1.1.1.1:53 in a single operation socket.sendMany(['Hello', 41234, '127.0.0.1', 'foo', 53, '1.1.1.1']) With a connected socket, `sendMany` simply takes an array, where each element represents the data to be sent to the peer. const socket = await Bun.udpSocket({ connect: { port: 41234, hostname: 'localhost', } }); socket.sendMany(['foo', 'bar', 'baz']); `sendMany` returns the number of packets that were successfully sent. As with `send`, `sendMany` only takes valid IP addresses as destinations, as it does not perform DNS resolution. ### Handle backpressure It may happen that a packet that you're sending does not fit into the operating system's packet buffer. You can detect that this has happened when: * `send` returns `false` * `sendMany` returns a number smaller than the number of packets you specified In this case, the `drain` socket handler will be called once the socket becomes writable again: const socket = await Bun.udpSocket({ socket: { drain(socket) { // continue sending data } } }); --- ## Page: https://bun.sh/docs/api/globals Bun implements the following globals. | Global | Source | Notes | | --- | --- | --- | | `AbortController` | Web | | | `AbortSignal` | Web | | | `alert` | Web | Intended for command-line tools | | `Blob` | Web | | | `Buffer` | Node.js | See Node.js > `Buffer` | | `Bun` | Bun | Subject to change as additional APIs are added | | `ByteLengthQueuingStrategy` | Web | | | `confirm` | Web | Intended for command-line tools | | `__dirname` | Node.js | | | `__filename` | Node.js | | | `atob()` | Web | | | `btoa()` | Web | | | `BuildMessage` | Bun | | | `clearImmediate()` | Web | | | `clearInterval()` | Web | | | `clearTimeout()` | Web | | | `console` | Web | | | `CountQueuingStrategy` | Web | | | `Crypto` | Web | | | `crypto` | Web | | | `CryptoKey` | Web | | | `CustomEvent` | Web | | | `Event` | Web | Also `ErrorEvent` `CloseEvent` `MessageEvent`. | | `EventTarget` | Web | | | `exports` | Node.js | | | `fetch` | Web | | | `FormData` | Web | | | `global` | Node.js | See Node.js > `global`. | | `globalThis` | Cross-platform | Aliases to `global` | | `Headers` | Web | | | `HTMLRewriter` | Cloudflare | | | `JSON` | Web | | | `MessageEvent` | Web | | | `module` | Node.js | | | `performance` | Web | | | `process` | Node.js | See Node.js > `process` | | `prompt` | Web | Intended for command-line tools | | `queueMicrotask()` | Web | | | `ReadableByteStreamController` | Web | | | `ReadableStream` | Web | | | `ReadableStreamDefaultController` | Web | | | `ReadableStreamDefaultReader` | Web | | | `reportError` | Web | | | `require()` | Node.js | | | `ResolveMessage` | Bun | | | `Response` | Web | | | `Request` | Web | | | `setImmediate()` | Web | | | `setInterval()` | Web | | | `setTimeout()` | Web | | | `ShadowRealm` | Web | Stage 3 proposal | | `SubtleCrypto` | Web | | | `DOMException` | Web | | | `TextDecoder` | Web | | | `TextEncoder` | Web | | | `TransformStream` | Web | | | `TransformStreamDefaultController` | Web | | | `URL` | Web | | | `URLSearchParams` | Web | | | `WebAssembly` | Web | | | `WritableStream` | Web | | | `WritableStreamDefaultController` | Web | | | `WritableStreamDefaultWriter` | Web | | --- ## Page: https://bun.sh/docs/api/spawn Spawn child processes with `Bun.spawn` or `Bun.spawnSync`. ## Spawn a process (`Bun.spawn()`) Provide a command as an array of strings. The result of `Bun.spawn()` is a `Bun.Subprocess` object. const proc = Bun.spawn(["bun", "--version"]); console.log(await proc.exited); // 0 The second argument to `Bun.spawn` is a parameters object that can be used to configure the subprocess. const proc = Bun.spawn(["bun", "--version"], { cwd: "./path/to/subdir", // specify a working directory env: { ...process.env, FOO: "bar" }, // specify environment variables onExit(proc, exitCode, signalCode, error) { // exit handler }, }); proc.pid; // process ID of subprocess ## Input stream By default, the input stream of the subprocess is undefined; it can be configured with the `stdin` parameter. const proc = Bun.spawn(["cat"], { stdin: await fetch( "https://raw.githubusercontent.com/oven-sh/bun/main/examples/hashing.js", ), }); const text = await new Response(proc.stdout).text(); console.log(text); // "const input = "hello world".repeat(400); ..." <table><thead></thead><tbody><tr><td><code>null</code></td><td><strong>Default.</strong> Provide no input to the subprocess</td></tr><tr><td><code>"pipe"</code></td><td>Return a <code>FileSink</code> for fast incremental writing</td></tr><tr><td><code>"inherit"</code></td><td>Inherit the <code>stdin</code> of the parent process</td></tr><tr><td><code>Bun.file()</code></td><td>Read from the specified file.</td></tr><tr><td><code>TypedArray | DataView</code></td><td>Use a binary buffer as input.</td></tr><tr><td><code>Response</code></td><td>Use the response <code>body</code> as input.</td></tr><tr><td><code>Request</code></td><td>Use the request <code>body</code> as input.</td></tr><tr><td><code>ReadableStream</code></td><td>Use a readable stream as input.</td></tr><tr><td><code>Blob</code></td><td>Use a blob as input.</td></tr><tr><td><code>number</code></td><td>Read from the file with a given file descriptor.</td></tr></tbody></table> The `"pipe"` option lets incrementally write to the subprocess's input stream from the parent process. const proc = Bun.spawn(["cat"], { stdin: "pipe", // return a FileSink for writing }); // enqueue string data proc.stdin.write("hello"); // enqueue binary data const enc = new TextEncoder(); proc.stdin.write(enc.encode(" world!")); // send buffered data proc.stdin.flush(); // close the input stream proc.stdin.end(); ## Output streams You can read results from the subprocess via the `stdout` and `stderr` properties. By default these are instances of `ReadableStream`. const proc = Bun.spawn(["bun", "--version"]); const text = await new Response(proc.stdout).text(); console.log(text); // => "1.2.8" Configure the output stream by passing one of the following values to `stdout/stderr`: <table><thead></thead><tbody><tr><td><code>"pipe"</code></td><td><strong>Default for <code>stdout</code>.</strong> Pipe the output to a <code>ReadableStream</code> on the returned <code>Subprocess</code> object.</td></tr><tr><td><code>"inherit"</code></td><td><strong>Default for <code>stderr</code>.</strong> Inherit from the parent process.</td></tr><tr><td><code>"ignore"</code></td><td>Discard the output.</td></tr><tr><td><code>Bun.file()</code></td><td>Write to the specified file.</td></tr><tr><td><code>number</code></td><td>Write to the file with the given file descriptor.</td></tr></tbody></table> ## Exit handling Use the `onExit` callback to listen for the process exiting or being killed. const proc = Bun.spawn(["bun", "--version"], { onExit(proc, exitCode, signalCode, error) { // exit handler }, }); For convenience, the `exited` property is a `Promise` that resolves when the process exits. const proc = Bun.spawn(["bun", "--version"]); await proc.exited; // resolves when process exit proc.killed; // boolean — was the process killed? proc.exitCode; // null | number proc.signalCode; // null | "SIGABRT" | "SIGALRM" | ... To kill a process: const proc = Bun.spawn(["bun", "--version"]); proc.kill(); proc.killed; // true proc.kill(15); // specify a signal code proc.kill("SIGTERM"); // specify a signal name The parent `bun` process will not terminate until all child processes have exited. Use `proc.unref()` to detach the child process from the parent. const proc = Bun.spawn(["bun", "--version"]); proc.unref(); ## Resource usage You can get information about the process's resource usage after it has exited: const proc = Bun.spawn(["bun", "--version"]); await proc.exited; const usage = proc.resourceUsage(); console.log(`Max memory used: ${usage.maxRSS} bytes`); console.log(`CPU time (user): ${usage.cpuTime.user} µs`); console.log(`CPU time (system): ${usage.cpuTime.system} µs`); ## Using AbortSignal You can abort a subprocess using an `AbortSignal`: const controller = new AbortController(); const { signal } = controller; const proc = Bun.spawn({ cmd: ["sleep", "100"], signal, }); // Later, to abort the process: controller.abort(); ## Using timeout and killSignal You can set a timeout for a subprocess to automatically terminate after a specific duration: // Kill the process after 5 seconds const proc = Bun.spawn({ cmd: ["sleep", "10"], timeout: 5000, // 5 seconds in milliseconds }); await proc.exited; // Will resolve after 5 seconds By default, timed-out processes are killed with the `SIGTERM` signal. You can specify a different signal with the `killSignal` option: // Kill the process with SIGKILL after 5 seconds const proc = Bun.spawn({ cmd: ["sleep", "10"], timeout: 5000, killSignal: "SIGKILL", // Can be string name or signal number }); The `killSignal` option also controls which signal is sent when an AbortSignal is aborted. ## Using maxBuffer For spawnSync, you can limit the maximum number of bytes of output before the process is killed: // KIll 'yes' after it emits over 100 bytes of output const result = Bun.spawnSync({ cmd: ["yes"], // or ["bun", "exec", "yes"] on windows maxBuffer: 100, }); // process exits ## Inter-process communication (IPC) Bun supports direct inter-process communication channel between two `bun` processes. To receive messages from a spawned Bun subprocess, specify an `ipc` handler. parent.ts const child = Bun.spawn(["bun", "child.ts"], { ipc(message) { /** * The message received from the sub process **/ }, }); The parent process can send messages to the subprocess using the `.send()` method on the returned `Subprocess` instance. A reference to the sending subprocess is also available as the second argument in the `ipc` handler. parent.ts const childProc = Bun.spawn(["bun", "child.ts"], { ipc(message, childProc) { /** * The message received from the sub process **/ childProc.send("Respond to child") }, }); childProc.send("I am your father"); // The parent can send messages to the child as well Meanwhile the child process can send messages to its parent using with `process.send()` and receive messages with `process.on("message")`. This is the same API used for `child_process.fork()` in Node.js. child.ts process.send("Hello from child as string"); process.send({ message: "Hello from child as object" }); process.on("message", (message) => { // print message from parent console.log(message); }); child.ts // send a string process.send("Hello from child as string"); // send an object process.send({ message: "Hello from child as object" }); The `serialization` option controls the underlying communication format between the two processes: * `advanced`: (default) Messages are serialized using the JSC `serialize` API, which supports cloning everything `structuredClone` supports. This does not support transferring ownership of objects. * `json`: Messages are serialized using `JSON.stringify` and `JSON.parse`, which does not support as many object types as `advanced` does. To disconnect the IPC channel from the parent process, call: childProc.disconnect(); ### IPC between Bun & Node.js To use IPC between a `bun` process and a Node.js process, set `serialization: "json"` in `Bun.spawn`. This is because Node.js and Bun use different JavaScript engines with different object serialization formats. bun-node-ipc.js if (typeof Bun !== "undefined") { const prefix = `[bun ${process.versions.bun} 🐇]`; const node = Bun.spawn({ cmd: ["node", __filename], ipc({ message }) { console.log(message); node.send({ message: `${prefix} 👋 hey node` }); node.kill(); }, stdio: ["inherit", "inherit", "inherit"], serialization: "json", }); node.send({ message: `${prefix} 👋 hey node` }); } else { const prefix = `[node ${process.version}]`; process.on("message", ({ message }) => { console.log(message); process.send({ message: `${prefix} 👋 hey bun` }); }); } ## Blocking API (`Bun.spawnSync()`) Bun provides a synchronous equivalent of `Bun.spawn` called `Bun.spawnSync`. This is a blocking API that supports the same inputs and parameters as `Bun.spawn`. It returns a `SyncSubprocess` object, which differs from `Subprocess` in a few ways. 1. It contains a `success` property that indicates whether the process exited with a zero exit code. 2. The `stdout` and `stderr` properties are instances of `Buffer` instead of `ReadableStream`. 3. There is no `stdin` property. Use `Bun.spawn` to incrementally write to the subprocess's input stream. const proc = Bun.spawnSync(["echo", "hello"]); console.log(proc.stdout.toString()); // => "hello\n" As a rule of thumb, the asynchronous `Bun.spawn` API is better for HTTP servers and apps, and `Bun.spawnSync` is better for building command-line tools. ## Benchmarks ⚡️ Under the hood, `Bun.spawn` and `Bun.spawnSync` use `posix_spawn(3)`. Bun's `spawnSync` spawns processes 60% faster than the Node.js `child_process` module. bun spawn.mjs cpu: Apple M1 Max runtime: bun 1.x (arm64-darwin) benchmark time (avg) (min … max) p75 p99 p995 --------------------------------------------------------- ----------------------------- spawnSync echo hi 888.14 µs/iter (821.83 µs … 1.2 ms) 905.92 µs 1 ms 1.03 ms node spawn.node.mjs cpu: Apple M1 Max runtime: node v18.9.1 (arm64-darwin) benchmark time (avg) (min … max) p75 p99 p995 --------------------------------------------------------- ----------------------------- spawnSync echo hi 1.47 ms/iter (1.14 ms … 2.64 ms) 1.57 ms 2.37 ms 2.52 ms ## Reference A reference of the Spawn API and types are shown below. The real types have complex generics to strongly type the `Subprocess` streams with the options passed to `Bun.spawn` and `Bun.spawnSync`. For full details, find these types as defined bun.d.ts. interface Bun { spawn(command: string[], options?: SpawnOptions.OptionsObject): Subprocess; spawnSync( command: string[], options?: SpawnOptions.OptionsObject, ): SyncSubprocess; spawn(options: { cmd: string[] } & SpawnOptions.OptionsObject): Subprocess; spawnSync( options: { cmd: string[] } & SpawnOptions.OptionsObject, ): SyncSubprocess; } namespace SpawnOptions { interface OptionsObject { cwd?: string; env?: Record<string, string | undefined>; stdio?: [Writable, Readable, Readable]; stdin?: Writable; stdout?: Readable; stderr?: Readable; onExit?( subprocess: Subprocess, exitCode: number | null, signalCode: number | null, error?: ErrorLike, ): void | Promise<void>; ipc?(message: any, subprocess: Subprocess): void; serialization?: "json" | "advanced"; windowsHide?: boolean; windowsVerbatimArguments?: boolean; argv0?: string; signal?: AbortSignal; timeout?: number; killSignal?: string | number; maxBuffer?: number; } type Readable = | "pipe" | "inherit" | "ignore" | null // equivalent to "ignore" | undefined // to use default | BunFile | ArrayBufferView | number; type Writable = | "pipe" | "inherit" | "ignore" | null // equivalent to "ignore" | undefined // to use default | BunFile | ArrayBufferView | number | ReadableStream | Blob | Response | Request; } interface Subprocess extends AsyncDisposable { readonly stdin: FileSink | number | undefined; readonly stdout: ReadableStream<Uint8Array> | number | undefined; readonly stderr: ReadableStream<Uint8Array> | number | undefined; readonly readable: ReadableStream<Uint8Array> | number | undefined; readonly pid: number; readonly exited: Promise<number>; readonly exitCode: number | null; readonly signalCode: NodeJS.Signals | null; readonly killed: boolean; kill(exitCode?: number | NodeJS.Signals): void; ref(): void; unref(): void; send(message: any): void; disconnect(): void; resourceUsage(): ResourceUsage | undefined; } interface SyncSubprocess { stdout: Buffer | undefined; stderr: Buffer | undefined; exitCode: number; success: boolean; resourceUsage: ResourceUsage; signalCode?: string; exitedDueToTimeout?: true; pid: number; } interface ResourceUsage { contextSwitches: { voluntary: number; involuntary: number; }; cpuTime: { user: number; system: number; total: number; }; maxRSS: number; messages: { sent: number; received: number; }; ops: { in: number; out: number; }; shmSize: number; signalCount: number; swapCount: number; } type Signal = | "SIGABRT" | "SIGALRM" | "SIGBUS" | "SIGCHLD" | "SIGCONT" | "SIGFPE" | "SIGHUP" | "SIGILL" | "SIGINT" | "SIGIO" | "SIGIOT" | "SIGKILL" | "SIGPIPE" | "SIGPOLL" | "SIGPROF" | "SIGPWR" | "SIGQUIT" | "SIGSEGV" | "SIGSTKFLT" | "SIGSTOP" | "SIGSYS" | "SIGTERM" | "SIGTRAP" | "SIGTSTP" | "SIGTTIN" | "SIGTTOU" | "SIGUNUSED" | "SIGURG" | "SIGUSR1" | "SIGUSR2" | "SIGVTALRM" | "SIGWINCH" | "SIGXCPU" | "SIGXFSZ" | "SIGBREAK" | "SIGLOST" | "SIGINFO"; --- ## Page: https://bun.sh/docs/api/html-rewriter HTMLRewriter lets you use CSS selectors to transform HTML documents. It works with `Request`, `Response`, as well as `string`. Bun's implementation is based on Cloudflare's lol-html. ## Usage A common usecase is rewriting URLs in HTML content. Here's an example that rewrites image sources and link URLs to use a CDN domain: // Replace all images with a rickroll const rewriter = new HTMLRewriter().on("img", { element(img) { // Famous rickroll video thumbnail img.setAttribute( "src", "https://img.youtube.com/vi/dQw4w9WgXcQ/maxresdefault.jpg", ); // Wrap the image in a link to the video img.before( '<a href="https://www.youtube.com/watch?v=dQw4w9WgXcQ" target="_blank">', { html: true }, ); img.after("</a>", { html: true }); // Add some fun alt text img.setAttribute("alt", "Definitely not a rickroll"); }, }); // An example HTML document const html = ` <html> <body> <img src="/cat.jpg"> <img src="dog.png"> <img src="https://example.com/bird.webp"> </body> </html> `; const result = rewriter.transform(html); console.log(result); This replaces all images with a thumbnail of Rick Astley and wraps each `<img>` in a link, producing a diff like this: <html> <body> <img src="/cat.jpg"> <img src="dog.png"> <img src="https://example.com/bird.webp"> <a href="https://www.youtube.com/watch?v=dQw4w9WgXcQ" target="_blank"> <img src="https://img.youtube.com/vi/dQw4w9WgXcQ/maxresdefault.jpg" alt="Definitely not a rickroll"> </a> <a href="https://www.youtube.com/watch?v=dQw4w9WgXcQ" target="_blank"> <img src="https://img.youtube.com/vi/dQw4w9WgXcQ/maxresdefault.jpg" alt="Definitely not a rickroll"> </a> <a href="https://www.youtube.com/watch?v=dQw4w9WgXcQ" target="_blank"> <img src="https://img.youtube.com/vi/dQw4w9WgXcQ/maxresdefault.jpg" alt="Definitely not a rickroll"> </a> </body> </html> Now every image on the page will be replaced with a thumbnail of Rick Astley, and clicking any image will lead to a very famous video. ### Input types HTMLRewriter can transform HTML from various sources. The input is automatically handled based on its type: // From Response rewriter.transform(new Response("<div>content</div>")); // From string rewriter.transform("<div>content</div>"); // From ArrayBuffer rewriter.transform(new TextEncoder().encode("<div>content</div>").buffer); // From Blob rewriter.transform(new Blob(["<div>content</div>"])); // From File rewriter.transform(Bun.file("index.html")); Note that Cloudflare Workers implementation of HTMLRewriter only supports `Response` objects. ### Element Handlers The `on(selector, handlers)` method allows you to register handlers for HTML elements that match a CSS selector. The handlers are called for each matching element during parsing: rewriter.on("div.content", { // Handle elements element(element) { element.setAttribute("class", "new-content"); element.append("<p>New content</p>", { html: true }); }, // Handle text nodes text(text) { text.replace("new text"); }, // Handle comments comments(comment) { comment.remove(); }, }); The handlers can be asynchronous and return a Promise. Note that async operations will block the transformation until they complete: rewriter.on("div", { async element(element) { await Bun.sleep(1000); element.setInnerContent("<span>replace</span>", { html: true }); }, }); ### CSS Selector Support The `on()` method supports a wide range of CSS selectors: // Tag selectors rewriter.on("p", handler); // Class selectors rewriter.on("p.red", handler); // ID selectors rewriter.on("h1#header", handler); // Attribute selectors rewriter.on("p[data-test]", handler); // Has attribute rewriter.on('p[data-test="one"]', handler); // Exact match rewriter.on('p[data-test="one" i]', handler); // Case-insensitive rewriter.on('p[data-test="one" s]', handler); // Case-sensitive rewriter.on('p[data-test~="two"]', handler); // Word match rewriter.on('p[data-test^="a"]', handler); // Starts with rewriter.on('p[data-test$="1"]', handler); // Ends with rewriter.on('p[data-test*="b"]', handler); // Contains rewriter.on('p[data-test|="a"]', handler); // Dash-separated // Combinators rewriter.on("div span", handler); // Descendant rewriter.on("div > span", handler); // Direct child // Pseudo-classes rewriter.on("p:nth-child(2)", handler); rewriter.on("p:first-child", handler); rewriter.on("p:nth-of-type(2)", handler); rewriter.on("p:first-of-type", handler); rewriter.on("p:not(:first-child)", handler); // Universal selector rewriter.on("*", handler); ### Element Operations Elements provide various methods for manipulation. All modification methods return the element instance for chaining: rewriter.on("div", { element(el) { // Attributes el.setAttribute("class", "new-class").setAttribute("data-id", "123"); const classAttr = el.getAttribute("class"); // "new-class" const hasId = el.hasAttribute("id"); // boolean el.removeAttribute("class"); // Content manipulation el.setInnerContent("New content"); // Escapes HTML by default el.setInnerContent("<p>HTML content</p>", { html: true }); // Parses HTML el.setInnerContent(""); // Clear content // Position manipulation el.before("Content before") .after("Content after") .prepend("First child") .append("Last child"); // HTML content insertion el.before("<span>before</span>", { html: true }) .after("<span>after</span>", { html: true }) .prepend("<span>first</span>", { html: true }) .append("<span>last</span>", { html: true }); // Removal el.remove(); // Remove element and contents el.removeAndKeepContent(); // Remove only the element tags // Properties console.log(el.tagName); // Lowercase tag name console.log(el.namespaceURI); // Element's namespace URI console.log(el.selfClosing); // Whether element is self-closing (e.g. <div />) console.log(el.canHaveContent); // Whether element can contain content (false for void elements like <br>) console.log(el.removed); // Whether element was removed // Attributes iteration for (const [name, value] of el.attributes) { console.log(name, value); } // End tag handling el.onEndTag(endTag => { endTag.before("Before end tag"); endTag.after("After end tag"); endTag.remove(); // Remove the end tag console.log(endTag.name); // Tag name in lowercase }); }, }); ### Text Operations Text handlers provide methods for text manipulation. Text chunks represent portions of text content and provide information about their position in the text node: rewriter.on("p", { text(text) { // Content console.log(text.text); // Text content console.log(text.lastInTextNode); // Whether this is the last chunk console.log(text.removed); // Whether text was removed // Manipulation text.before("Before text").after("After text").replace("New text").remove(); // HTML content insertion text .before("<span>before</span>", { html: true }) .after("<span>after</span>", { html: true }) .replace("<span>replace</span>", { html: true }); }, }); ### Comment Operations Comment handlers allow comment manipulation with similar methods to text nodes: rewriter.on("*", { comments(comment) { // Content console.log(comment.text); // Comment text comment.text = "New comment text"; // Set comment text console.log(comment.removed); // Whether comment was removed // Manipulation comment .before("Before comment") .after("After comment") .replace("New comment") .remove(); // HTML content insertion comment .before("<span>before</span>", { html: true }) .after("<span>after</span>", { html: true }) .replace("<span>replace</span>", { html: true }); }, }); ### Document Handlers The `onDocument(handlers)` method allows you to handle document-level events. These handlers are called for events that occur at the document level rather than within specific elements: rewriter.onDocument({ // Handle doctype doctype(doctype) { console.log(doctype.name); // "html" console.log(doctype.publicId); // public identifier if present console.log(doctype.systemId); // system identifier if present }, // Handle text nodes text(text) { console.log(text.text); }, // Handle comments comments(comment) { console.log(comment.text); }, // Handle document end end(end) { end.append("<!-- Footer -->", { html: true }); }, }); ### Response Handling When transforming a Response: * The status code, headers, and other response properties are preserved * The body is transformed while maintaining streaming capabilities * Content-encoding (like gzip) is handled automatically * The original response body is marked as used after transformation * Headers are cloned to the new response ## Error Handling HTMLRewriter operations can throw errors in several cases: * Invalid selector syntax in `on()` method * Invalid HTML content in transformation methods * Stream errors when processing Response bodies * Memory allocation failures * Invalid input types (e.g., passing Symbol) * Body already used errors Errors should be caught and handled appropriately: try { const result = rewriter.transform(input); // Process result } catch (error) { console.error("HTMLRewriter error:", error); } ## See also You can also read the Cloudflare documentation, which this API is intended to be compatible with. --- ## Page: https://bun.sh/docs/api/hashing Bun implements the `createHash` and `createHmac` functions from `node:crypto` in addition to the Bun-native APIs documented below. ## `Bun.password` `Bun.password` is a collection of utility functions for hashing and verifying passwords with various cryptographically secure algorithms. const password = "super-secure-pa$$word"; const hash = await Bun.password.hash(password); // => $argon2id$v=19$m=65536,t=2,p=1$tFq+9AVr1bfPxQdh6E8DQRhEXg/M/SqYCNu6gVdRRNs$GzJ8PuBi+K+BVojzPfS5mjnC8OpLGtv8KJqF99eP6a4 const isMatch = await Bun.password.verify(password, hash); // => true The second argument to `Bun.password.hash` accepts a params object that lets you pick and configure the hashing algorithm. const password = "super-secure-pa$$word"; // use argon2 (default) const argonHash = await Bun.password.hash(password, { algorithm: "argon2id", // "argon2id" | "argon2i" | "argon2d" memoryCost: 4, // memory usage in kibibytes timeCost: 3, // the number of iterations }); // use bcrypt const bcryptHash = await Bun.password.hash(password, { algorithm: "bcrypt", cost: 4, // number between 4-31 }); The algorithm used to create the hash is stored in the hash itself. When using `bcrypt`, the returned hash is encoded in Modular Crypt Format for compatibility with most existing `bcrypt` implementations; with `argon2` the result is encoded in the newer PHC format. The `verify` function automatically detects the algorithm based on the input hash and use the correct verification method. It can correctly infer the algorithm from both PHC- or MCF-encoded hashes. const password = "super-secure-pa$$word"; const hash = await Bun.password.hash(password, { /* config */ }); const isMatch = await Bun.password.verify(password, hash); // => true Synchronous versions of all functions are also available. Keep in mind that these functions are computationally expensive, so using a blocking API may degrade application performance. const password = "super-secure-pa$$word"; const hash = Bun.password.hashSync(password, { /* config */ }); const isMatch = Bun.password.verifySync(password, hash); // => true ### Salt When you use `Bun.password.hash`, a salt is automatically generated and included in the hash. ### bcrypt - Modular Crypt Format In the following Modular Crypt Format hash (used by `bcrypt`): Input: await Bun.password.hash("hello", { algorithm: "bcrypt", }); Output: 2b$10$Lyj9kHYZtiyfxh2G60TEfeqs7xkkGiEFFDi3iJGc50ZG/XJ1sxIFi; The format is composed of: * `bcrypt`: `$2b` * `rounds`: `$10` - rounds (log10 of the actual number of rounds) * `salt`: `$Lyj9kHYZtiyfxh2G60TEfeqs7xkkGiEFFDi3iJGc50ZG/XJ1sxIFi` * `hash`: `$GzJ8PuBi+K+BVojzPfS5mjnC8OpLGtv8KJqF99eP6a4` By default, the bcrypt library truncates passwords longer than 72 bytes. In Bun, if you pass `Bun.password.hash` a password longer than 72 bytes and use the `bcrypt` algorithm, the password will be hashed via SHA-512 before being passed to bcrypt. await Bun.password.hash("hello".repeat(100), { algorithm: "bcrypt", }); So instead of sending bcrypt a 500-byte password silently truncated to 72 bytes, Bun will hash the password using SHA-512 and send the hashed password to bcrypt (only if it exceeds 72 bytes). This is a more secure default behavior. ### argon2 - PHC format In the following PHC format hash (used by `argon2`): Input: await Bun.password.hash("hello", { algorithm: "argon2id", }); Output: argon2id$v=19$m=65536,t=2,p=1$xXnlSvPh4ym5KYmxKAuuHVlDvy2QGHBNuI6bJJrRDOs$2YY6M48XmHn+s5NoBaL+ficzXajq2Yj8wut3r0vnrwI The format is composed of: * `algorithm`: `$argon2id` * `version`: `$v=19` * `memory cost`: `65536` * `iterations`: `t=2` * `parallelism`: `p=1` * `salt`: `$xXnlSvPh4ym5KYmxKAuuHVlDvy2QGHBNuI6bJJrRDOs` * `hash`: `$2YY6M48XmHn+s5NoBaL+ficzXajq2Yj8wut3r0vnrwI` ## `Bun.hash` `Bun.hash` is a collection of utilities for _non-cryptographic_ hashing. Non-cryptographic hashing algorithms are optimized for speed of computation over collision-resistance or security. The standard `Bun.hash` functions uses Wyhash to generate a 64-bit hash from an input of arbitrary size. Bun.hash("some data here"); // 11562320457524636935n The input can be a string, `TypedArray`, `DataView`, `ArrayBuffer`, or `SharedArrayBuffer`. const arr = new Uint8Array([1, 2, 3, 4]); Bun.hash("some data here"); Bun.hash(arr); Bun.hash(arr.buffer); Bun.hash(new DataView(arr.buffer)); Optionally, an integer seed can be specified as the second parameter. For 64-bit hashes seeds above `Number.MAX_SAFE_INTEGER` should be given as BigInt to avoid loss of precision. Bun.hash("some data here", 1234); // 15724820720172937558n Additional hashing algorithms are available as properties on `Bun.hash`. The API is the same for each, only changing the return type from number for 32-bit hashes to bigint for 64-bit hashes. Bun.hash.wyhash("data", 1234); // equivalent to Bun.hash() Bun.hash.crc32("data", 1234); Bun.hash.adler32("data", 1234); Bun.hash.cityHash32("data", 1234); Bun.hash.cityHash64("data", 1234); Bun.hash.xxHash32("data", 1234); Bun.hash.xxHash64("data", 1234); Bun.hash.xxHash3("data", 1234); Bun.hash.murmur32v3("data", 1234); Bun.hash.murmur32v2("data", 1234); Bun.hash.murmur64v2("data", 1234); ## `Bun.CryptoHasher` `Bun.CryptoHasher` is a general-purpose utility class that lets you incrementally compute a hash of string or binary data using a range of cryptographic hash algorithms. The following algorithms are supported: * `"blake2b256"` * `"blake2b512"` * `"md4"` * `"md5"` * `"ripemd160"` * `"sha1"` * `"sha224"` * `"sha256"` * `"sha384"` * `"sha512"` * `"sha512-224"` * `"sha512-256"` * `"sha3-224"` * `"sha3-256"` * `"sha3-384"` * `"sha3-512"` * `"shake128"` * `"shake256"` const hasher = new Bun.CryptoHasher("sha256"); hasher.update("hello world"); hasher.digest(); // Uint8Array(32) [ <byte>, <byte>, ... ] Once initialized, data can be incrementally fed to to the hasher using `.update()`. This method accepts `string`, `TypedArray`, and `ArrayBuffer`. const hasher = new Bun.CryptoHasher("sha256"); hasher.update("hello world"); hasher.update(new Uint8Array([1, 2, 3])); hasher.update(new ArrayBuffer(10)); If a `string` is passed, an optional second parameter can be used to specify the encoding (default `'utf-8'`). The following encodings are supported: <table><thead></thead><tbody><tr><td>Binary encodings</td><td><code>"base64"</code> <code>"base64url"</code> <code>"hex"</code> <code>"binary"</code></td></tr><tr><td>Character encodings</td><td><code>"utf8"</code> <code>"utf-8"</code> <code>"utf16le"</code> <code>"latin1"</code></td></tr><tr><td>Legacy character encodings</td><td><code>"ascii"</code> <code>"binary"</code> <code>"ucs2"</code> <code>"ucs-2"</code></td></tr></tbody></table> hasher.update("hello world"); // defaults to utf8 hasher.update("hello world", "hex"); hasher.update("hello world", "base64"); hasher.update("hello world", "latin1"); After the data has been feed into the hasher, a final hash can be computed using `.digest()`. By default, this method returns a `Uint8Array` containing the hash. const hasher = new Bun.CryptoHasher("sha256"); hasher.update("hello world"); hasher.digest(); // => Uint8Array(32) [ 185, 77, 39, 185, 147, ... ] The `.digest()` method can optionally return the hash as a string. To do so, specify an encoding: hasher.digest("base64"); // => "uU0nuZNNPgilLlLX2n2r+sSE7+N6U4DukIj3rOLvzek=" hasher.digest("hex"); // => "b94d27b9934d3e08a52e52d7da7dabfac484efe37a5380ee9088f7ace2efcde9" Alternatively, the method can write the hash into a pre-existing `TypedArray` instance. This may be desirable in some performance-sensitive applications. const arr = new Uint8Array(32); hasher.digest(arr); console.log(arr); // => Uint8Array(32) [ 185, 77, 39, 185, 147, ... ] ### HMAC in `Bun.CryptoHasher` `Bun.CryptoHasher` can be used to compute HMAC digests. To do so, pass the key to the constructor. const hasher = new Bun.CryptoHasher("sha256", "secret-key"); hasher.update("hello world"); console.log(hasher.digest("hex")); // => "095d5a21fe6d0646db223fdf3de6436bb8dfb2fab0b51677ecf6441fcf5f2a67" When using HMAC, a more limited set of algorithms are supported: * `"blake2b512"` * `"md5"` * `"sha1"` * `"sha224"` * `"sha256"` * `"sha384"` * `"sha512-224"` * `"sha512-256"` * `"sha512"` Unlike the non-HMAC `Bun.CryptoHasher`, the HMAC `Bun.CryptoHasher` instance is not reset after `.digest()` is called, and attempting to use the same instance again will throw an error. Other methods like `.copy()` and `.update()` are supported (as long as it's before `.digest()`), but methods like `.digest()` that finalize the hasher are not. const hasher = new Bun.CryptoHasher("sha256", "secret-key"); hasher.update("hello world"); const copy = hasher.copy(); copy.update("!"); console.log(copy.digest("hex")); // => "3840176c3d8923f59ac402b7550404b28ab11cb0ef1fa199130a5c37864b5497" console.log(hasher.digest("hex")); // => "095d5a21fe6d0646db223fdf3de6436bb8dfb2fab0b51677ecf6441fcf5f2a67" --- ## Page: https://bun.sh/docs/api/console **Note** — Bun provides a browser- and Node.js-compatible console global. This page only documents Bun-native APIs. In Bun, the `console` object can be used as an `AsyncIterable` to sequentially read lines from `process.stdin`. for await (const line of console) { console.log(line); } This is useful for implementing interactive programs, like the following addition calculator. adder.ts console.log(`Let's add some numbers!`); console.write(`Count: 0\n> `); let count = 0; for await (const line of console) { count += Number(line); console.write(`Count: ${count}\n> `); } To run the file: bun adder.ts Let's add some numbers! Count: 0 5 Count: 5 5 Count: 10 5 Count: 15 --- ## Page: https://bun.sh/docs/api/cookie Bun provides native APIs for working with HTTP cookies through `Bun.Cookie` and `Bun.CookieMap`. These APIs offer fast, easy-to-use methods for parsing, generating, and manipulating cookies in HTTP requests and responses. ## CookieMap class `Bun.CookieMap` provides a Map-like interface for working with collections of cookies. It implements the `Iterable` interface, allowing you to use it with `for...of` loops and other iteration methods. // Empty cookie map const cookies = new Bun.CookieMap(); // From a cookie string const cookies1 = new Bun.CookieMap("name=value; foo=bar"); // From an object const cookies2 = new Bun.CookieMap({ session: "abc123", theme: "dark", }); // From an array of name/value pairs const cookies3 = new Bun.CookieMap([ ["session", "abc123"], ["theme", "dark"], ]); ### In HTTP servers In Bun's HTTP server, the `cookies` property on the request object (in `routes`) is an instance of `CookieMap`: const server = Bun.serve({ routes: { "/": req => { // Access request cookies const cookies = req.cookies; // Get a specific cookie const sessionCookie = cookies.get("session"); if (sessionCookie != null) { console.log(sessionCookie); } // Check if a cookie exists if (cookies.has("theme")) { // ... } // Set a cookie, it will be automatically applied to the response cookies.set("visited", "true"); return new Response("Hello"); }, }, }); console.log("Server listening at: " + server.url); ### Methods #### `get(name: string): string | null` Retrieves a cookie by name. Returns `null` if the cookie doesn't exist. // Get by name const cookie = cookies.get("session"); if (cookie != null) { console.log(cookie); } #### `has(name: string): boolean` Checks if a cookie with the given name exists. // Check if cookie exists if (cookies.has("session")) { // Cookie exists } #### `set(name: string, value: string): void` #### `set(options: CookieInit): void` #### `set(cookie: Cookie): void` Adds or updates a cookie in the map. Cookies default to `{ path: "/", sameSite: "lax" }`. // Set by name and value cookies.set("session", "abc123"); // Set using options object cookies.set({ name: "theme", value: "dark", maxAge: 3600, secure: true, }); // Set using Cookie instance const cookie = new Bun.Cookie("visited", "true"); cookies.set(cookie); #### `delete(name: string): void` #### `delete(options: CookieStoreDeleteOptions): void` Removes a cookie from the map. When applied to a Response, this adds a cookie with an empty string value and an expiry date in the past. A cookie will only delete successfully on the browser if the domain and path is the same as it was when the cookie was created. // Delete by name using default domain and path. cookies.delete("session"); // Delete with domain/path options. cookies.delete({ name: "session", domain: "example.com", path: "/admin", }); #### `toJSON(): Record<string, string>` Converts the cookie map to a serializable format. const json = cookies.toJSON(); #### `toSetCookieHeaders(): string[]` Returns an array of values for Set-Cookie headers that can be used to apply all cookie changes. When using `Bun.serve()`, you don't need to call this method explicitly. Any changes made to the `req.cookies` map are automatically applied to the response headers. This method is primarily useful when working with other HTTP server implementations. import { createServer } from "node:http"; import { CookieMap } from "bun"; const server = createServer((req, res) => { const cookieHeader = req.headers.cookie || ""; const cookies = new CookieMap(cookieHeader); cookies.set("view-count", Number(cookies.get("view-count") || "0") + 1); cookies.delete("session"); res.writeHead(200, { "Content-Type": "text/plain", "Set-Cookie": cookies.toSetCookieHeaders(), }); res.end(`Found ${cookies.size} cookies`); }); server.listen(3000, () => { console.log("Server running at http://localhost:3000/"); }); ### Iteration `CookieMap` provides several methods for iteration: // Iterate over [name, cookie] entries for (const [name, value] of cookies) { console.log(`${name}: ${value}`); } // Using entries() for (const [name, value] of cookies.entries()) { console.log(`${name}: ${value}`); } // Using keys() for (const name of cookies.keys()) { console.log(name); } // Using values() for (const value of cookies.values()) { console.log(value); } // Using forEach cookies.forEach((value, name) => { console.log(`${name}: ${value}`); }); ### Properties #### `size: number` Returns the number of cookies in the map. console.log(cookies.size); // Number of cookies ## Cookie class `Bun.Cookie` represents an HTTP cookie with its name, value, and attributes. import { Cookie } from "bun"; // Create a basic cookie const cookie = new Bun.Cookie("name", "value"); // Create a cookie with options const secureSessionCookie = new Bun.Cookie("session", "abc123", { domain: "example.com", path: "/admin", expires: new Date(Date.now() + 86400000), // 1 day httpOnly: true, secure: true, sameSite: "strict", }); // Parse from a cookie string const parsedCookie = new Bun.Cookie("name=value; Path=/; HttpOnly"); // Create from an options object const objCookie = new Bun.Cookie({ name: "theme", value: "dark", maxAge: 3600, secure: true, }); ### Constructors // Basic constructor with name/value new Bun.Cookie(name: string, value: string); // Constructor with name, value, and options new Bun.Cookie(name: string, value: string, options: CookieInit); // Constructor from cookie string new Bun.Cookie(cookieString: string); // Constructor from cookie object new Bun.Cookie(options: CookieInit); ### Properties cookie.name; // string - Cookie name cookie.value; // string - Cookie value cookie.domain; // string | null - Domain scope (null if not specified) cookie.path; // string - URL path scope (defaults to "/") cookie.expires; // number | undefined - Expiration timestamp (ms since epoch) cookie.secure; // boolean - Require HTTPS cookie.sameSite; // "strict" | "lax" | "none" - SameSite setting cookie.partitioned; // boolean - Whether the cookie is partitioned (CHIPS) cookie.maxAge; // number | undefined - Max age in seconds cookie.httpOnly; // boolean - Accessible only via HTTP (not JavaScript) ### Methods #### `isExpired(): boolean` Checks if the cookie has expired. // Expired cookie (Date in the past) const expiredCookie = new Bun.Cookie("name", "value", { expires: new Date(Date.now() - 1000), }); console.log(expiredCookie.isExpired()); // true // Valid cookie (Using maxAge instead of expires) const validCookie = new Bun.Cookie("name", "value", { maxAge: 3600, // 1 hour in seconds }); console.log(validCookie.isExpired()); // false // Session cookie (no expiration) const sessionCookie = new Bun.Cookie("name", "value"); console.log(sessionCookie.isExpired()); // false #### `serialize(): string` #### `toString(): string` Returns a string representation of the cookie suitable for a `Set-Cookie` header. const cookie = new Bun.Cookie("session", "abc123", { domain: "example.com", path: "/admin", expires: new Date(Date.now() + 86400000), secure: true, httpOnly: true, sameSite: "strict", }); console.log(cookie.serialize()); // => "session=abc123; Domain=example.com; Path=/admin; Expires=Sun, 19 Mar 2025 15:03:26 GMT; Secure; HttpOnly; SameSite=strict" console.log(cookie.toString()); // => "session=abc123; Domain=example.com; Path=/admin; Expires=Sun, 19 Mar 2025 15:03:26 GMT; Secure; HttpOnly; SameSite=strict" #### `toJSON(): CookieInit` Converts the cookie to a plain object suitable for JSON serialization. const cookie = new Bun.Cookie("session", "abc123", { secure: true, httpOnly: true, }); const json = cookie.toJSON(); // => { // name: "session", // value: "abc123", // path: "/", // secure: true, // httpOnly: true, // sameSite: "lax", // partitioned: false // } // Works with JSON.stringify const jsonString = JSON.stringify(cookie); ### Static methods #### `Cookie.parse(cookieString: string): Cookie` Parses a cookie string into a `Cookie` instance. const cookie = Bun.Cookie.parse("name=value; Path=/; Secure; SameSite=Lax"); console.log(cookie.name); // "name" console.log(cookie.value); // "value" console.log(cookie.path); // "/" console.log(cookie.secure); // true console.log(cookie.sameSite); // "lax" #### `Cookie.from(name: string, value: string, options?: CookieInit): Cookie` Factory method to create a cookie. const cookie = Bun.Cookie.from("session", "abc123", { httpOnly: true, secure: true, maxAge: 3600, }); ## Types interface CookieInit { name?: string; value?: string; domain?: string; /** Defaults to '/'. To allow the browser to set the path, use an empty string. */ path?: string; expires?: number | Date | string; secure?: boolean; /** Defaults to `lax`. */ sameSite?: CookieSameSite; httpOnly?: boolean; partitioned?: boolean; maxAge?: number; } interface CookieStoreDeleteOptions { name: string; domain?: string | null; path?: string; } interface CookieStoreGetOptions { name?: string; url?: string; } type CookieSameSite = "strict" | "lax" | "none"; class Cookie { constructor(name: string, value: string, options?: CookieInit); constructor(cookieString: string); constructor(cookieObject?: CookieInit); readonly name: string; value: string; domain?: string; path: string; expires?: Date; secure: boolean; sameSite: CookieSameSite; partitioned: boolean; maxAge?: number; httpOnly: boolean; isExpired(): boolean; serialize(): string; toString(): string; toJSON(): CookieInit; static parse(cookieString: string): Cookie; static from(name: string, value: string, options?: CookieInit): Cookie; } class CookieMap implements Iterable<[string, string]> { constructor(init?: string[][] | Record<string, string> | string); get(name: string): string | null; toSetCookieHeaders(): string[]; has(name: string): boolean; set(name: string, value: string, options?: CookieInit): void; set(options: CookieInit): void; delete(name: string): void; delete(options: CookieStoreDeleteOptions): void; delete(name: string, options: Omit<CookieStoreDeleteOptions, "name">): void; toJSON(): Record<string, string>; readonly size: number; entries(): IterableIterator<[string, string]>; keys(): IterableIterator<string>; values(): IterableIterator<string>; forEach(callback: (value: string, key: string, map: CookieMap) => void): void; [Symbol.iterator](): IterableIterator<[string, string]>; } --- ## Page: https://bun.sh/docs/api/ffi **⚠️ Warning** — `bun:ffi` is **experimental**, with known bugs and limitations, and should not be relied on in production. The most stable way to interact with native code from Bun is to write a Node-API module. Use the built-in `bun:ffi` module to efficiently call native libraries from JavaScript. It works with languages that support the C ABI (Zig, Rust, C/C++, C#, Nim, Kotlin, etc). ## dlopen usage (`bun:ffi`) To print the version number of `sqlite3`: import { dlopen, FFIType, suffix } from "bun:ffi"; // `suffix` is either "dylib", "so", or "dll" depending on the platform // you don't have to use "suffix", it's just there for convenience const path = `libsqlite3.${suffix}`; const { symbols: { sqlite3_libversion, // the function to call }, } = dlopen( path, // a library name or file path { sqlite3_libversion: { // no arguments, returns a string args: [], returns: FFIType.cstring, }, }, ); console.log(`SQLite 3 version: ${sqlite3_libversion()}`); ## Performance According to our benchmark, `bun:ffi` is roughly 2-6x faster than Node.js FFI via `Node-API`. 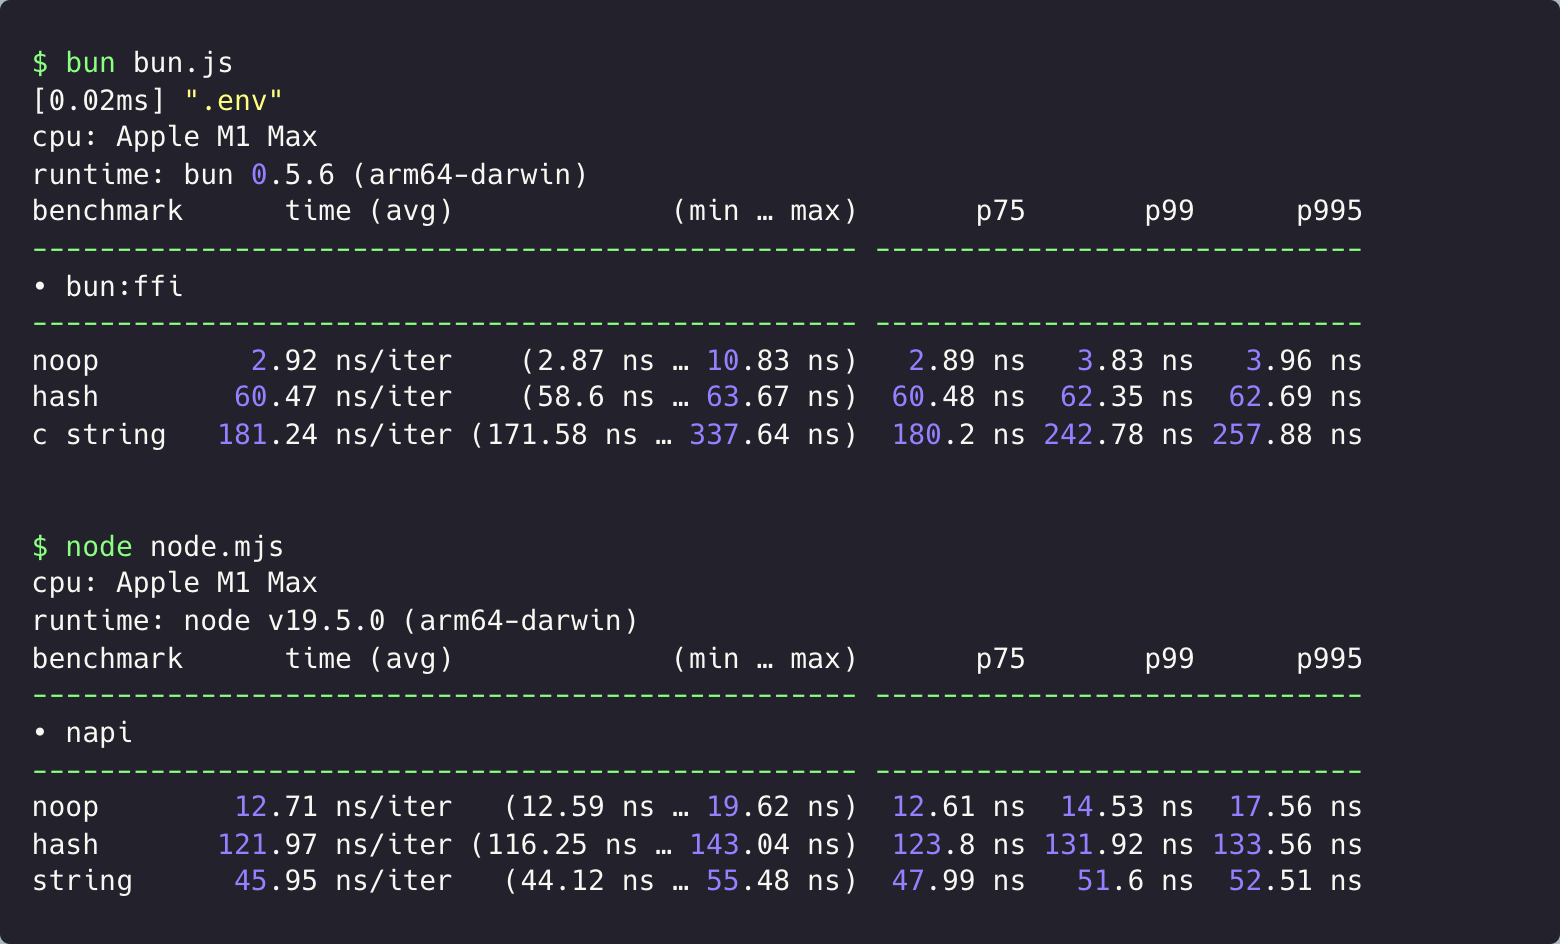 Bun generates & just-in-time compiles C bindings that efficiently convert values between JavaScript types and native types. To compile C, Bun embeds TinyCC, a small and fast C compiler. ## Usage ### Zig // add.zig pub export fn add(a: i32, b: i32) i32 { return a + b; } To compile: zig build-lib add.zig -dynamic -OReleaseFast Pass a path to the shared library and a map of symbols to import into `dlopen`: import { dlopen, FFIType, suffix } from "bun:ffi"; const { i32 } = FFIType; const path = `libadd.${suffix}`; const lib = dlopen(path, { add: { args: [i32, i32], returns: i32, }, }); console.log(lib.symbols.add(1, 2)); ### Rust // add.rs #[no_mangle] pub extern "C" fn add(a: i32, b: i32) -> i32 { a + b } To compile: rustc --crate-type cdylib add.rs ### C++ #include <cstdint> extern "C" int32_t add(int32_t a, int32_t b) { return a + b; } To compile: zig build-lib add.cpp -dynamic -lc -lc++ ## FFI types The following `FFIType` values are supported. | `FFIType` | C Type | Aliases | | --- | --- | --- | | buffer | `char*` | | | cstring | `char*` | | | function | `(void*)(*)()` | `fn`, `callback` | | ptr | `void*` | `pointer`, `void*`, `char*` | | i8 | `int8_t` | `int8_t` | | i16 | `int16_t` | `int16_t` | | i32 | `int32_t` | `int32_t`, `int` | | i64 | `int64_t` | `int64_t` | | i64\_fast | `int64_t` | | | u8 | `uint8_t` | `uint8_t` | | u16 | `uint16_t` | `uint16_t` | | u32 | `uint32_t` | `uint32_t` | | u64 | `uint64_t` | `uint64_t` | | u64\_fast | `uint64_t` | | | f32 | `float` | `float` | | f64 | `double` | `double` | | bool | `bool` | | | char | `char` | | | napi\_env | `napi_env` | | | napi\_value | `napi_value` | | Note: `buffer` arguments must be a `TypedArray` or `DataView`. ## Strings JavaScript strings and C-like strings are different, and that complicates using strings with native libraries. How are JavaScript strings and C strings different? To solve this, `bun:ffi` exports `CString` which extends JavaScript's built-in `String` to support null-terminated strings and add a few extras: class CString extends String { /** * Given a `ptr`, this will automatically search for the closing `\0` character and transcode from UTF-8 to UTF-16 if necessary. */ constructor(ptr: number, byteOffset?: number, byteLength?: number): string; /** * The ptr to the C string * * This `CString` instance is a clone of the string, so it * is safe to continue using this instance after the `ptr` has been * freed. */ ptr: number; byteOffset?: number; byteLength?: number; } To convert from a null-terminated string pointer to a JavaScript string: const myString = new CString(ptr); To convert from a pointer with a known length to a JavaScript string: const myString = new CString(ptr, 0, byteLength); The `new CString()` constructor clones the C string, so it is safe to continue using `myString` after `ptr` has been freed. my_library_free(myString.ptr); // this is safe because myString is a clone console.log(myString); When used in `returns`, `FFIType.cstring` coerces the pointer to a JavaScript `string`. When used in `args`, `FFIType.cstring` is identical to `ptr`. ## Function pointers **Note** — Async functions are not yet supported. To call a function pointer from JavaScript, use `CFunction`. This is useful if using Node-API (napi) with Bun, and you've already loaded some symbols. import { CFunction } from "bun:ffi"; let myNativeLibraryGetVersion = /* somehow, you got this pointer */ const getVersion = new CFunction({ returns: "cstring", args: [], ptr: myNativeLibraryGetVersion, }); getVersion(); If you have multiple function pointers, you can define them all at once with `linkSymbols`: import { linkSymbols } from "bun:ffi"; // getVersionPtrs defined elsewhere const [majorPtr, minorPtr, patchPtr] = getVersionPtrs(); const lib = linkSymbols({ // Unlike with dlopen(), the names here can be whatever you want getMajor: { returns: "cstring", args: [], // Since this doesn't use dlsym(), you have to provide a valid ptr // That ptr could be a number or a bigint // An invalid pointer will crash your program. ptr: majorPtr, }, getMinor: { returns: "cstring", args: [], ptr: minorPtr, }, getPatch: { returns: "cstring", args: [], ptr: patchPtr, }, }); const [major, minor, patch] = [ lib.symbols.getMajor(), lib.symbols.getMinor(), lib.symbols.getPatch(), ]; ## Callbacks Use `JSCallback` to create JavaScript callback functions that can be passed to C/FFI functions. The C/FFI function can call into the JavaScript/TypeScript code. This is useful for asynchronous code or whenever you want to call into JavaScript code from C. import { dlopen, JSCallback, ptr, CString } from "bun:ffi"; const { symbols: { search }, close, } = dlopen("libmylib", { search: { returns: "usize", args: ["cstring", "callback"], }, }); const searchIterator = new JSCallback( (ptr, length) => /hello/.test(new CString(ptr, length)), { returns: "bool", args: ["ptr", "usize"], }, ); const str = Buffer.from("wwutwutwutwutwutwutwutwutwutwutut\0", "utf8"); if (search(ptr(str), searchIterator)) { // found a match! } // Sometime later: setTimeout(() => { searchIterator.close(); close(); }, 5000); When you're done with a JSCallback, you should call `close()` to free the memory. ### Experimental thread-safe callbacks `JSCallback` has experimental support for thread-safe callbacks. This will be needed if you pass a callback function into a different thread from its instantiation context. You can enable it with the optional `threadsafe` parameter. Currently, thread-safe callbacks work best when run from another thread that is running JavaScript code, i.e. a `Worker`. A future version of Bun will enable them to be called from any thread (such as new threads spawned by your native library that Bun is not aware of). const searchIterator = new JSCallback( (ptr, length) => /hello/.test(new CString(ptr, length)), { returns: "bool", args: ["ptr", "usize"], threadsafe: true, // Optional. Defaults to `false` }, ); **⚡️ Performance tip** — For a slight performance boost, directly pass `JSCallback.prototype.ptr` instead of the `JSCallback` object: const onResolve = new JSCallback(arg => arg === 42, { returns: "bool", args: ["i32"], }); const setOnResolve = new CFunction({ returns: "bool", args: ["function"], ptr: myNativeLibrarySetOnResolve, }); // This code runs slightly faster: setOnResolve(onResolve.ptr); // Compared to this: setOnResolve(onResolve); ## Pointers Bun represents pointers as a `number` in JavaScript. How does a 64 bit pointer fit in a JavaScript number? To convert from a `TypedArray` to a pointer: import { ptr } from "bun:ffi"; let myTypedArray = new Uint8Array(32); const myPtr = ptr(myTypedArray); To convert from a pointer to an `ArrayBuffer`: import { ptr, toArrayBuffer } from "bun:ffi"; let myTypedArray = new Uint8Array(32); const myPtr = ptr(myTypedArray); // toArrayBuffer accepts a `byteOffset` and `byteLength` // if `byteLength` is not provided, it is assumed to be a null-terminated pointer myTypedArray = new Uint8Array(toArrayBuffer(myPtr, 0, 32), 0, 32); To read data from a pointer, you have two options. For long-lived pointers, use a `DataView`: import { toArrayBuffer } from "bun:ffi"; let myDataView = new DataView(toArrayBuffer(myPtr, 0, 32)); console.log( myDataView.getUint8(0, true), myDataView.getUint8(1, true), myDataView.getUint8(2, true), myDataView.getUint8(3, true), ); For short-lived pointers, use `read`: import { read } from "bun:ffi"; console.log( // ptr, byteOffset read.u8(myPtr, 0), read.u8(myPtr, 1), read.u8(myPtr, 2), read.u8(myPtr, 3), ); The `read` function behaves similarly to `DataView`, but it's usually faster because it doesn't need to create a `DataView` or `ArrayBuffer`. | `FFIType` | `read` function | | --- | --- | | ptr | `read.ptr` | | i8 | `read.i8` | | i16 | `read.i16` | | i32 | `read.i32` | | i64 | `read.i64` | | u8 | `read.u8` | | u16 | `read.u16` | | u32 | `read.u32` | | u64 | `read.u64` | | f32 | `read.f32` | | f64 | `read.f64` | ### Memory management `bun:ffi` does not manage memory for you. You must free the memory when you're done with it. #### From JavaScript If you want to track when a `TypedArray` is no longer in use from JavaScript, you can use a FinalizationRegistry. #### From C, Rust, Zig, etc If you want to track when a `TypedArray` is no longer in use from C or FFI, you can pass a callback and an optional context pointer to `toArrayBuffer` or `toBuffer`. This function is called at some point later, once the garbage collector frees the underlying `ArrayBuffer` JavaScript object. The expected signature is the same as in JavaScriptCore's C API: typedef void (*JSTypedArrayBytesDeallocator)(void *bytes, void *deallocatorContext); import { toArrayBuffer } from "bun:ffi"; // with a deallocatorContext: toArrayBuffer( bytes, byteOffset, byteLength, // this is an optional pointer to a callback deallocatorContext, // this is a pointer to a function jsTypedArrayBytesDeallocator, ); // without a deallocatorContext: toArrayBuffer( bytes, byteOffset, byteLength, // this is a pointer to a function jsTypedArrayBytesDeallocator, ); ### Memory safety Using raw pointers outside of FFI is extremely not recommended. A future version of Bun may add a CLI flag to disable `bun:ffi`. ### Pointer alignment If an API expects a pointer sized to something other than `char` or `u8`, make sure the `TypedArray` is also that size. A `u64*` is not exactly the same as `[8]u8*` due to alignment. ### Passing a pointer Where FFI functions expect a pointer, pass a `TypedArray` of equivalent size: import { dlopen, FFIType } from "bun:ffi"; const { symbols: { encode_png }, } = dlopen(myLibraryPath, { encode_png: { // FFIType's can be specified as strings too args: ["ptr", "u32", "u32"], returns: FFIType.ptr, }, }); const pixels = new Uint8ClampedArray(128 * 128 * 4); pixels.fill(254); pixels.subarray(0, 32 * 32 * 2).fill(0); const out = encode_png( // pixels will be passed as a pointer pixels, 128, 128, ); The auto-generated wrapper converts the pointer to a `TypedArray`. Hardmode ### Reading pointers const out = encode_png( // pixels will be passed as a pointer pixels, // dimensions: 128, 128, ); // assuming it is 0-terminated, it can be read like this: let png = new Uint8Array(toArrayBuffer(out)); // save it to disk: await Bun.write("out.png", png); --- ## Page: https://bun.sh/docs/api/cc `bun:ffi` has experimental support for compiling and running C from JavaScript with low overhead. ## Usage (cc in `bun:ffi`) See the introduction blog post for more information. JavaScript: hello.js import { cc } from "bun:ffi"; import source from "./hello.c" with { type: "file" }; const { symbols: { hello }, } = cc({ source, symbols: { hello: { args: [], returns: "int", }, }, }); console.log("What is the answer to the universe?", hello()); C source: hello.c int hello() { return 42; } When you run `hello.js`, it will print: bun hello.js What is the answer to the universe? 42 Under the hood, `cc` uses TinyCC to compile the C code and then link it with the JavaScript runtime, efficiently converting types in-place. ### Primitive types The same `FFIType` values in `dlopen` are supported in `cc`. | `FFIType` | C Type | Aliases | | --- | --- | --- | | cstring | `char*` | | | function | `(void*)(*)()` | `fn`, `callback` | | ptr | `void*` | `pointer`, `void*`, `char*` | | i8 | `int8_t` | `int8_t` | | i16 | `int16_t` | `int16_t` | | i32 | `int32_t` | `int32_t`, `int` | | i64 | `int64_t` | `int64_t` | | i64\_fast | `int64_t` | | | u8 | `uint8_t` | `uint8_t` | | u16 | `uint16_t` | `uint16_t` | | u32 | `uint32_t` | `uint32_t` | | u64 | `uint64_t` | `uint64_t` | | u64\_fast | `uint64_t` | | | f32 | `float` | `float` | | f64 | `double` | `double` | | bool | `bool` | | | char | `char` | | | napi\_env | `napi_env` | | | napi\_value | `napi_value` | | ### Strings, objects, and non-primitive types To make it easier to work with strings, objects, and other non-primitive types that don't map 1:1 to C types, `cc` supports N-API. To pass or receive a JavaScript values without any type conversions from a C function, you can use `napi_value`. You can also pass a `napi_env` to receive the N-API environment used to call the JavaScript function. #### Returning a C string to JavaScript For example, if you have a string in C, you can return it to JavaScript like this: hello.js import { cc } from "bun:ffi"; import source from "./hello.c" with { type: "file" }; const { symbols: { hello }, } = cc({ source, symbols: { hello: { args: ["napi_env"], returns: "napi_value", }, }, }); const result = hello(); And in C: hello.c #include <node/node_api.h> napi_value hello(napi_env env) { napi_value result; napi_create_string_utf8(env, "Hello, Napi!", NAPI_AUTO_LENGTH, &result); return result; } You can also use this to return other types like objects and arrays: hello.c #include <node/node_api.h> napi_value hello(napi_env env) { napi_value result; napi_create_object(env, &result); return result; } ### `cc` Reference #### `library: string[]` The `library` array is used to specify the libraries that should be linked with the C code. type Library = string[]; cc({ source: "hello.c", library: ["sqlite3"], }); #### `symbols` The `symbols` object is used to specify the functions and variables that should be exposed to JavaScript. type Symbols = { [key: string]: { args: FFIType[]; returns: FFIType; }; }; #### `source` The `source` is a file path to the C code that should be compiled and linked with the JavaScript runtime. type Source = string | URL | BunFile; cc({ source: "hello.c", symbols: { hello: { args: [], returns: "int", }, }, }); #### `flags: string | string[]` The `flags` is an optional array of strings that should be passed to the TinyCC compiler. type Flags = string | string[]; These are flags like `-I` for include directories and `-D` for preprocessor definitions. #### `define: Record<string, string>` The `define` is an optional object that should be passed to the TinyCC compiler. type Defines = Record<string, string>; cc({ source: "hello.c", define: { "NDEBUG": "1", }, }); These are preprocessor definitions passed to the TinyCC compiler. --- ## Page: https://bun.sh/docs/api/test See the `bun test` documentation. --- ## Page: https://bun.sh/docs/api/utils ## `Bun.version` A `string` containing the version of the `bun` CLI that is currently running. Bun.version; // => "0.6.4" ## `Bun.revision` The git commit of Bun that was compiled to create the current `bun` CLI. Bun.revision; // => "f02561530fda1ee9396f51c8bc99b38716e38296" ## `Bun.env` An alias for `process.env`. ## `Bun.main` An absolute path to the entrypoint of the current program (the file that was executed with `bun run`). script.ts Bun.main; // /path/to/script.ts This is particular useful for determining whether a script is being directly executed, as opposed to being imported by another script. if (import.meta.path === Bun.main) { // this script is being directly executed } else { // this file is being imported from another script } This is analogous to the `require.main = module` trick in Node.js. ## `Bun.sleep()` `Bun.sleep(ms: number)` Returns a `Promise` that resolves after the given number of milliseconds. console.log("hello"); await Bun.sleep(1000); console.log("hello one second later!"); Alternatively, pass a `Date` object to receive a `Promise` that resolves at that point in time. const oneSecondInFuture = new Date(Date.now() + 1000); console.log("hello"); await Bun.sleep(oneSecondInFuture); console.log("hello one second later!"); ## `Bun.sleepSync()` `Bun.sleepSync(ms: number)` A blocking synchronous version of `Bun.sleep`. console.log("hello"); Bun.sleepSync(1000); // blocks thread for one second console.log("hello one second later!"); ## `Bun.which()` `Bun.which(bin: string)` Returns the path to an executable, similar to typing `which` in your terminal. const ls = Bun.which("ls"); console.log(ls); // "/usr/bin/ls" By default Bun looks at the current `PATH` environment variable to determine the path. To configure `PATH`: const ls = Bun.which("ls", { PATH: "/usr/local/bin:/usr/bin:/bin", }); console.log(ls); // "/usr/bin/ls" Pass a `cwd` option to resolve for executable from within a specific directory. const ls = Bun.which("ls", { cwd: "/tmp", PATH: "", }); console.log(ls); // null You can think of this as a builtin alternative to the `which` npm package. ## `Bun.randomUUIDv7()` `Bun.randomUUIDv7()` returns a UUID v7, which is monotonic and suitable for sorting and databases. import { randomUUIDv7 } from "bun"; const id = randomUUIDv7(); // => "0192ce11-26d5-7dc3-9305-1426de888c5a" A UUID v7 is a 128-bit value that encodes the current timestamp, a random value, and a counter. The timestamp is encoded using the lowest 48 bits, and the random value and counter are encoded using the remaining bits. The `timestamp` parameter defaults to the current time in milliseconds. When the timestamp changes, the counter is reset to a pseudo-random integer wrapped to 4096. This counter is atomic and threadsafe, meaning that using `Bun.randomUUIDv7()` in many Workers within the same process running at the same timestamp will not have colliding counter values. The final 8 bytes of the UUID are a cryptographically secure random value. It uses the same random number generator used by `crypto.randomUUID()` (which comes from BoringSSL, which in turn comes from the platform-specific system random number generator usually provided by the underlying hardware). namespace Bun { function randomUUIDv7( encoding?: "hex" | "base64" | "base64url" = "hex", timestamp?: number = Date.now(), ): string; /** * If you pass "buffer", you get a 16-byte buffer instead of a string. */ function randomUUIDv7( encoding: "buffer", timestamp?: number = Date.now(), ): Buffer; // If you only pass a timestamp, you get a hex string function randomUUIDv7(timestamp?: number = Date.now()): string; } You can optionally set encoding to `"buffer"` to get a 16-byte buffer instead of a string. This can sometimes avoid string conversion overhead. buffer.ts const buffer = Bun.randomUUIDv7("buffer"); `base64` and `base64url` encodings are also supported when you want a slightly shorter string. base64.ts const base64 = Bun.randomUUIDv7("base64"); const base64url = Bun.randomUUIDv7("base64url"); ## `Bun.peek()` `Bun.peek(prom: Promise)` Reads a promise's result without `await` or `.then`, but only if the promise has already fulfilled or rejected. import { peek } from "bun"; const promise = Promise.resolve("hi"); // no await! const result = peek(promise); console.log(result); // "hi" This is important when attempting to reduce number of extraneous microticks in performance-sensitive code. It's an advanced API and you probably shouldn't use it unless you know what you're doing. import { peek } from "bun"; import { expect, test } from "bun:test"; test("peek", () => { const promise = Promise.resolve(true); // no await necessary! expect(peek(promise)).toBe(true); // if we peek again, it returns the same value const again = peek(promise); expect(again).toBe(true); // if we peek a non-promise, it returns the value const value = peek(42); expect(value).toBe(42); // if we peek a pending promise, it returns the promise again const pending = new Promise(() => {}); expect(peek(pending)).toBe(pending); // If we peek a rejected promise, it: // - returns the error // - does not mark the promise as handled const rejected = Promise.reject( new Error("Successfully tested promise rejection"), ); expect(peek(rejected).message).toBe("Successfully tested promise rejection"); }); The `peek.status` function lets you read the status of a promise without resolving it. import { peek } from "bun"; import { expect, test } from "bun:test"; test("peek.status", () => { const promise = Promise.resolve(true); expect(peek.status(promise)).toBe("fulfilled"); const pending = new Promise(() => {}); expect(peek.status(pending)).toBe("pending"); const rejected = Promise.reject(new Error("oh nooo")); expect(peek.status(rejected)).toBe("rejected"); }); ## `Bun.openInEditor()` Opens a file in your default editor. Bun auto-detects your editor via the `$VISUAL` or `$EDITOR` environment variables. const currentFile = import.meta.url; Bun.openInEditor(currentFile); You can override this via the `debug.editor` setting in your `bunfig.toml`. bunfig.toml [debug] editor = "code" Or specify an editor with the `editor` param. You can also specify a line and column number. Bun.openInEditor(import.meta.url, { editor: "vscode", // or "subl" line: 10, column: 5, }); ## `Bun.deepEquals()` Recursively checks if two objects are equivalent. This is used internally by `expect().toEqual()` in `bun:test`. const foo = { a: 1, b: 2, c: { d: 3 } }; // true Bun.deepEquals(foo, { a: 1, b: 2, c: { d: 3 } }); // false Bun.deepEquals(foo, { a: 1, b: 2, c: { d: 4 } }); A third boolean parameter can be used to enable "strict" mode. This is used by `expect().toStrictEqual()` in the test runner. const a = { entries: [1, 2] }; const b = { entries: [1, 2], extra: undefined }; Bun.deepEquals(a, b); // => true Bun.deepEquals(a, b, true); // => false In strict mode, the following are considered unequal: // undefined values Bun.deepEquals({}, { a: undefined }, true); // false // undefined in arrays Bun.deepEquals(["asdf"], ["asdf", undefined], true); // false // sparse arrays Bun.deepEquals([, 1], [undefined, 1], true); // false // object literals vs instances w/ same properties class Foo { a = 1; } Bun.deepEquals(new Foo(), { a: 1 }, true); // false ## `Bun.escapeHTML()` `Bun.escapeHTML(value: string | object | number | boolean): string` Escapes the following characters from an input string: * `"` becomes `"` * `&` becomes `&` * `'` becomes `'` * `<` becomes `<` * `>` becomes `>` This function is optimized for large input. On an M1X, it processes 480 MB/s - 20 GB/s, depending on how much data is being escaped and whether there is non-ascii text. Non-string types will be converted to a string before escaping. ## `Bun.stringWidth()` ~6,756x faster `string-width` alternative Get the column count of a string as it would be displayed in a terminal. Supports ANSI escape codes, emoji, and wide characters. Example usage: Bun.stringWidth("hello"); // => 5 Bun.stringWidth("\u001b[31mhello\u001b[0m"); // => 5 Bun.stringWidth("\u001b[31mhello\u001b[0m", { countAnsiEscapeCodes: true }); // => 12 This is useful for: * Aligning text in a terminal * Quickly checking if a string contains ANSI escape codes * Measuring the width of a string in a terminal This API is designed to match the popular "string-width" package, so that existing code can be easily ported to Bun and vice versa. In this benchmark, `Bun.stringWidth` is a ~6,756x faster than the `string-width` npm package for input larger than about 500 characters. Big thanks to sindresorhus for their work on `string-width`! ❯ bun string-width.mjs cpu: 13th Gen Intel(R) Core(TM) i9-13900 runtime: bun 1.0.29 (x64-linux) benchmark time (avg) (min … max) p75 p99 p995 ------------------------------------------------------------------------------------- ----------------------------- Bun.stringWidth 500 chars ascii 37.09 ns/iter (36.77 ns … 41.11 ns) 37.07 ns 38.84 ns 38.99 ns ❯ node string-width.mjs benchmark time (avg) (min … max) p75 p99 p995 ------------------------------------------------------------------------------------- ----------------------------- npm/string-width 500 chars ascii 249,710 ns/iter (239,970 ns … 293,180 ns) 250,930 ns 276,700 ns 281,450 ns To make `Bun.stringWidth` fast, we've implemented it in Zig using optimized SIMD instructions, accounting for Latin1, UTF-16, and UTF-8 encodings. It passes `string-width`'s tests. View full benchmark As a reminder, 1 nanosecond (ns) is 1 billionth of a second. Here's a quick reference for converting between units: | Unit | 1 Millisecond | | --- | --- | | ns | 1,000,000 | | µs | 1,000 | | ms | 1 | ❯ bun string-width.mjs cpu: 13th Gen Intel(R) Core(TM) i9-13900 runtime: bun 1.0.29 (x64-linux) benchmark time (avg) (min … max) p75 p99 p995 ------------------------------------------------------------------------------------- ----------------------------- Bun.stringWidth 5 chars ascii 16.45 ns/iter (16.27 ns … 19.71 ns) 16.48 ns 16.93 ns 17.21 ns Bun.stringWidth 50 chars ascii 19.42 ns/iter (18.61 ns … 27.85 ns) 19.35 ns 21.7 ns 22.31 ns Bun.stringWidth 500 chars ascii 37.09 ns/iter (36.77 ns … 41.11 ns) 37.07 ns 38.84 ns 38.99 ns Bun.stringWidth 5,000 chars ascii 216.9 ns/iter (215.8 ns … 228.54 ns) 216.23 ns 228.52 ns 228.53 ns Bun.stringWidth 25,000 chars ascii 1.01 µs/iter (1.01 µs … 1.01 µs) 1.01 µs 1.01 µs 1.01 µs Bun.stringWidth 7 chars ascii+emoji 54.2 ns/iter (53.36 ns … 58.19 ns) 54.23 ns 57.55 ns 57.94 ns Bun.stringWidth 70 chars ascii+emoji 354.26 ns/iter (350.51 ns … 363.96 ns) 355.93 ns 363.11 ns 363.96 ns Bun.stringWidth 700 chars ascii+emoji 3.3 µs/iter (3.27 µs … 3.4 µs) 3.3 µs 3.4 µs 3.4 µs Bun.stringWidth 7,000 chars ascii+emoji 32.69 µs/iter (32.22 µs … 45.27 µs) 32.7 µs 34.57 µs 34.68 µs Bun.stringWidth 35,000 chars ascii+emoji 163.35 µs/iter (161.17 µs … 170.79 µs) 163.82 µs 169.66 µs 169.93 µs Bun.stringWidth 8 chars ansi+emoji 66.15 ns/iter (65.17 ns … 69.97 ns) 66.12 ns 69.8 ns 69.87 ns Bun.stringWidth 80 chars ansi+emoji 492.95 ns/iter (488.05 ns … 499.5 ns) 494.8 ns 498.58 ns 499.5 ns Bun.stringWidth 800 chars ansi+emoji 4.73 µs/iter (4.71 µs … 4.88 µs) 4.72 µs 4.88 µs 4.88 µs Bun.stringWidth 8,000 chars ansi+emoji 47.02 µs/iter (46.37 µs … 67.44 µs) 46.96 µs 49.57 µs 49.63 µs Bun.stringWidth 40,000 chars ansi+emoji 234.45 µs/iter (231.78 µs … 240.98 µs) 234.92 µs 236.34 µs 236.62 µs Bun.stringWidth 19 chars ansi+emoji+ascii 135.46 ns/iter (133.67 ns … 143.26 ns) 135.32 ns 142.55 ns 142.77 ns Bun.stringWidth 190 chars ansi+emoji+ascii 1.17 µs/iter (1.16 µs … 1.17 µs) 1.17 µs 1.17 µs 1.17 µs Bun.stringWidth 1,900 chars ansi+emoji+ascii 11.45 µs/iter (11.26 µs … 20.41 µs) 11.45 µs 12.08 µs 12.11 µs Bun.stringWidth 19,000 chars ansi+emoji+ascii 114.06 µs/iter (112.86 µs … 120.06 µs) 114.25 µs 115.86 µs 116.15 µs Bun.stringWidth 95,000 chars ansi+emoji+ascii 572.69 µs/iter (565.52 µs … 607.22 µs) 572.45 µs 604.86 µs 605.21 µs ❯ node string-width.mjs cpu: 13th Gen Intel(R) Core(TM) i9-13900 runtime: node v21.4.0 (x64-linux) benchmark time (avg) (min … max) p75 p99 p995 -------------------------------------------------------------------------------------- ----------------------------- npm/string-width 5 chars ascii 3.19 µs/iter (3.13 µs … 3.48 µs) 3.25 µs 3.48 µs 3.48 µs npm/string-width 50 chars ascii 20.09 µs/iter (18.93 µs … 435.06 µs) 19.49 µs 21.89 µs 22.59 µs npm/string-width 500 chars ascii 249.71 µs/iter (239.97 µs … 293.18 µs) 250.93 µs 276.7 µs 281.45 µs npm/string-width 5,000 chars ascii 6.69 ms/iter (6.58 ms … 6.76 ms) 6.72 ms 6.76 ms 6.76 ms npm/string-width 25,000 chars ascii 139.57 ms/iter (137.17 ms … 143.28 ms) 140.49 ms 143.28 ms 143.28 ms npm/string-width 7 chars ascii+emoji 3.7 µs/iter (3.62 µs … 3.94 µs) 3.73 µs 3.94 µs 3.94 µs npm/string-width 70 chars ascii+emoji 23.93 µs/iter (22.44 µs … 331.2 µs) 23.15 µs 25.98 µs 30.2 µs npm/string-width 700 chars ascii+emoji 251.65 µs/iter (237.78 µs … 444.69 µs) 252.92 µs 325.89 µs 354.08 µs npm/string-width 7,000 chars ascii+emoji 4.95 ms/iter (4.82 ms … 5.19 ms) 5 ms 5.04 ms 5.19 ms npm/string-width 35,000 chars ascii+emoji 96.93 ms/iter (94.39 ms … 102.58 ms) 97.68 ms 102.58 ms 102.58 ms npm/string-width 8 chars ansi+emoji 3.92 µs/iter (3.45 µs … 4.57 µs) 4.09 µs 4.57 µs 4.57 µs npm/string-width 80 chars ansi+emoji 24.46 µs/iter (22.87 µs … 4.2 ms) 23.54 µs 25.89 µs 27.41 µs npm/string-width 800 chars ansi+emoji 259.62 µs/iter (246.76 µs … 480.12 µs) 258.65 µs 349.84 µs 372.55 µs npm/string-width 8,000 chars ansi+emoji 5.46 ms/iter (5.41 ms … 5.57 ms) 5.48 ms 5.55 ms 5.57 ms npm/string-width 40,000 chars ansi+emoji 108.91 ms/iter (107.55 ms … 109.5 ms) 109.25 ms 109.5 ms 109.5 ms npm/string-width 19 chars ansi+emoji+ascii 6.53 µs/iter (6.35 µs … 6.75 µs) 6.54 µs 6.75 µs 6.75 µs npm/string-width 190 chars ansi+emoji+ascii 55.52 µs/iter (52.59 µs … 352.73 µs) 54.19 µs 80.77 µs 167.21 µs npm/string-width 1,900 chars ansi+emoji+ascii 701.71 µs/iter (653.94 µs … 893.78 µs) 715.3 µs 855.37 µs 872.9 µs npm/string-width 19,000 chars ansi+emoji+ascii 27.19 ms/iter (26.89 ms … 27.41 ms) 27.28 ms 27.41 ms 27.41 ms npm/string-width 95,000 chars ansi+emoji+ascii 3.68 s/iter (3.66 s … 3.7 s) 3.69 s 3.7 s 3.7 s TypeScript definition: namespace Bun { export function stringWidth( /** * The string to measure */ input: string, options?: { /** * If `true`, count ANSI escape codes as part of the string width. If `false`, ANSI escape codes are ignored when calculating the string width. * * @default false */ countAnsiEscapeCodes?: boolean; /** * When it's ambiugous and `true`, count emoji as 1 characters wide. If `false`, emoji are counted as 2 character wide. * * @default true */ ambiguousIsNarrow?: boolean; }, ): number; } ## `Bun.fileURLToPath()` Converts a `file://` URL to an absolute path. const path = Bun.fileURLToPath(new URL("file:///foo/bar.txt")); console.log(path); // "/foo/bar.txt" ## `Bun.pathToFileURL()` Converts an absolute path to a `file://` URL. const url = Bun.pathToFileURL("/foo/bar.txt"); console.log(url); // "file:///foo/bar.txt" ## `Bun.gzipSync()` Compresses a `Uint8Array` using zlib's GZIP algorithm. const buf = Buffer.from("hello".repeat(100)); // Buffer extends Uint8Array const compressed = Bun.gzipSync(buf); buf; // => Uint8Array(500) compressed; // => Uint8Array(30) Optionally, pass a parameters object as the second argument: zlib compression options ## `Bun.gunzipSync()` Decompresses a `Uint8Array` using zlib's GUNZIP algorithm. const buf = Buffer.from("hello".repeat(100)); // Buffer extends Uint8Array const compressed = Bun.gzipSync(buf); const dec = new TextDecoder(); const uncompressed = Bun.gunzipSync(compressed); dec.decode(uncompressed); // => "hellohellohello..." ## `Bun.deflateSync()` Compresses a `Uint8Array` using zlib's DEFLATE algorithm. const buf = Buffer.from("hello".repeat(100)); const compressed = Bun.deflateSync(buf); buf; // => Uint8Array(25) compressed; // => Uint8Array(10) The second argument supports the same set of configuration options as `Bun.gzipSync`. ## `Bun.inflateSync()` Decompresses a `Uint8Array` using zlib's INFLATE algorithm. const buf = Buffer.from("hello".repeat(100)); const compressed = Bun.deflateSync(buf); const dec = new TextDecoder(); const decompressed = Bun.inflateSync(compressed); dec.decode(decompressed); // => "hellohellohello..." ## `Bun.inspect()` Serializes an object to a `string` exactly as it would be printed by `console.log`. const obj = { foo: "bar" }; const str = Bun.inspect(obj); // => '{\nfoo: "bar" \n}' const arr = new Uint8Array([1, 2, 3]); const str = Bun.inspect(arr); // => "Uint8Array(3) [ 1, 2, 3 ]" ## `Bun.inspect.custom` This is the symbol that Bun uses to implement `Bun.inspect`. You can override this to customize how your objects are printed. It is identical to `util.inspect.custom` in Node.js. class Foo { [Bun.inspect.custom]() { return "foo"; } } const foo = new Foo(); console.log(foo); // => "foo" ## `Bun.inspect.table(tabularData, properties, options)` Format tabular data into a string. Like `console.table`, except it returns a string rather than printing to the console. console.log( Bun.inspect.table([ { a: 1, b: 2, c: 3 }, { a: 4, b: 5, c: 6 }, { a: 7, b: 8, c: 9 }, ]), ); // // ┌───┬───┬───┬───┐ // │ │ a │ b │ c │ // ├───┼───┼───┼───┤ // │ 0 │ 1 │ 2 │ 3 │ // │ 1 │ 4 │ 5 │ 6 │ // │ 2 │ 7 │ 8 │ 9 │ // └───┴───┴───┴───┘ Additionally, you can pass an array of property names to display only a subset of properties. console.log( Bun.inspect.table( [ { a: 1, b: 2, c: 3 }, { a: 4, b: 5, c: 6 }, ], ["a", "c"], ), ); // // ┌───┬───┬───┐ // │ │ a │ c │ // ├───┼───┼───┤ // │ 0 │ 1 │ 3 │ // │ 1 │ 4 │ 6 │ // └───┴───┴───┘ You can also conditionally enable ANSI colors by passing `{ colors: true }`. console.log( Bun.inspect.table( [ { a: 1, b: 2, c: 3 }, { a: 4, b: 5, c: 6 }, ], { colors: true, }, ), ); ## `Bun.nanoseconds()` Returns the number of nanoseconds since the current `bun` process started, as a `number`. Useful for high-precision timing and benchmarking. Bun.nanoseconds(); // => 7288958 ## `Bun.readableStreamTo*()` Bun implements a set of convenience functions for asynchronously consuming the body of a `ReadableStream` and converting it to various binary formats. const stream = (await fetch("https://bun.sh")).body; stream; // => ReadableStream await Bun.readableStreamToArrayBuffer(stream); // => ArrayBuffer await Bun.readableStreamToBytes(stream); // => Uint8Array await Bun.readableStreamToBlob(stream); // => Blob await Bun.readableStreamToJSON(stream); // => object await Bun.readableStreamToText(stream); // => string // returns all chunks as an array await Bun.readableStreamToArray(stream); // => unknown[] // returns all chunks as a FormData object (encoded as x-www-form-urlencoded) await Bun.readableStreamToFormData(stream); // returns all chunks as a FormData object (encoded as multipart/form-data) await Bun.readableStreamToFormData(stream, multipartFormBoundary); ## `Bun.resolveSync()` Resolves a file path or module specifier using Bun's internal module resolution algorithm. The first argument is the path to resolve, and the second argument is the "root". If no match is found, an `Error` is thrown. Bun.resolveSync("./foo.ts", "/path/to/project"); // => "/path/to/project/foo.ts" Bun.resolveSync("zod", "/path/to/project"); // => "/path/to/project/node_modules/zod/index.ts" To resolve relative to the current working directory, pass `process.cwd()` or `"."` as the root. Bun.resolveSync("./foo.ts", process.cwd()); Bun.resolveSync("./foo.ts", "/path/to/project"); To resolve relative to the directory containing the current file, pass `import.meta.dir`. Bun.resolveSync("./foo.ts", import.meta.dir); ## `serialize` & `deserialize` in `bun:jsc` To save a JavaScript value into an ArrayBuffer & back, use `serialize` and `deserialize` from the `"bun:jsc"` module. import { serialize, deserialize } from "bun:jsc"; const buf = serialize({ foo: "bar" }); const obj = deserialize(buf); console.log(obj); // => { foo: "bar" } Internally, `structuredClone` and `postMessage` serialize and deserialize the same way. This exposes the underlying HTML Structured Clone Algorithm to JavaScript as an ArrayBuffer. ## `estimateShallowMemoryUsageOf` in `bun:jsc` The `estimateShallowMemoryUsageOf` function returns a best-effort estimate of the memory usage of an object in bytes, excluding the memory usage of properties or other objects it references. For accurate per-object memory usage, use `Bun.generateHeapSnapshot`. import { estimateShallowMemoryUsageOf } from "bun:jsc"; const obj = { foo: "bar" }; const usage = estimateShallowMemoryUsageOf(obj); console.log(usage); // => 16 const buffer = Buffer.alloc(1024 * 1024); estimateShallowMemoryUsageOf(buffer); // => 1048624 const req = new Request("https://bun.sh"); estimateShallowMemoryUsageOf(req); // => 167 const array = Array(1024).fill({ a: 1 }); // Arrays are usually not stored contiguously in memory, so this will not return a useful value (which isn't a bug). estimateShallowMemoryUsageOf(array); // => 16 --- ## Page: https://bun.sh/docs/api/node-api Node-API is an interface for building native add-ons to Node.js. Bun implements 95% of this interface from scratch, so most existing Node-API extensions will work with Bun out of the box. Track the completion status of it in this issue. As in Node.js, `.node` files (Node-API modules) can be required directly in Bun. const napi = require("./my-node-module.node"); Alternatively, use `process.dlopen`: let mod = { exports: {} }; process.dlopen(mod, "./my-node-module.node"); --- ## Page: https://bun.sh/docs/api/glob Bun includes a fast native implementation of file globbing. ## Quickstart **Scan a directory for files matching `*.ts`**: import { Glob } from "bun"; const glob = new Glob("**/*.ts"); // Scans the current working directory and each of its sub-directories recursively for await (const file of glob.scan(".")) { console.log(file); // => "index.ts" } **Match a string against a glob pattern**: import { Glob } from "bun"; const glob = new Glob("*.ts"); glob.match("index.ts"); // => true glob.match("index.js"); // => false `Glob` is a class which implements the following interface: class Glob { scan(root: string | ScanOptions): AsyncIterable<string>; scanSync(root: string | ScanOptions): Iterable<string>; match(path: string): boolean; } interface ScanOptions { /** * The root directory to start matching from. Defaults to `process.cwd()` */ cwd?: string; /** * Allow patterns to match entries that begin with a period (`.`). * * @default false */ dot?: boolean; /** * Return the absolute path for entries. * * @default false */ absolute?: boolean; /** * Indicates whether to traverse descendants of symbolic link directories. * * @default false */ followSymlinks?: boolean; /** * Throw an error when symbolic link is broken * * @default false */ throwErrorOnBrokenSymlink?: boolean; /** * Return only files. * * @default true */ onlyFiles?: boolean; } ## Supported Glob Patterns Bun supports the following glob patterns: ### `?` - Match any single character const glob = new Glob("???.ts"); glob.match("foo.ts"); // => true glob.match("foobar.ts"); // => false ### `*` - Matches zero or more characters, except for path separators (`/` or `\`) const glob = new Glob("*.ts"); glob.match("index.ts"); // => true glob.match("src/index.ts"); // => false ### `**` - Match any number of characters including `/` const glob = new Glob("**/*.ts"); glob.match("index.ts"); // => true glob.match("src/index.ts"); // => true glob.match("src/index.js"); // => false ### `[ab]` - Matches one of the characters contained in the brackets, as well as character ranges const glob = new Glob("ba[rz].ts"); glob.match("bar.ts"); // => true glob.match("baz.ts"); // => true glob.match("bat.ts"); // => false You can use character ranges (e.g `[0-9]`, `[a-z]`) as well as the negation operators `^` or `!` to match anything _except_ the characters contained within the braces (e.g `[^ab]`, `[!a-z]`) const glob = new Glob("ba[a-z][0-9][^4-9].ts"); glob.match("bar01.ts"); // => true glob.match("baz83.ts"); // => true glob.match("bat22.ts"); // => true glob.match("bat24.ts"); // => false glob.match("ba0a8.ts"); // => false ### `{a,b,c}` - Match any of the given patterns const glob = new Glob("{a,b,c}.ts"); glob.match("a.ts"); // => true glob.match("b.ts"); // => true glob.match("c.ts"); // => true glob.match("d.ts"); // => false These match patterns can be deeply nested (up to 10 levels), and contain any of the wildcards from above. ### `!` - Negates the result at the start of a pattern const glob = new Glob("!index.ts"); glob.match("index.ts"); // => false glob.match("foo.ts"); // => true ### `\` - Escapes any of the special characters above const glob = new Glob("\\!index.ts"); glob.match("!index.ts"); // => true glob.match("index.ts"); // => false --- ## Page: https://bun.sh/docs/api/dns Bun implements the `node:dns` module. import * as dns from "node:dns"; const addrs = await dns.promises.resolve4("bun.sh", { ttl: true }); console.log(addrs); // => [{ address: "172.67.161.226", family: 4, ttl: 0 }, ...] ## DNS caching in Bun In Bun v1.1.9, we added support for DNS caching. This cache makes repeated connections to the same hosts faster. At the time of writing, we cache up to 255 entries for a maximum of 30 seconds (each). If any connections to a host fail, we remove the entry from the cache. When multiple connections are made to the same host simultaneously, DNS lookups are deduplicated to avoid making multiple requests for the same host. This cache is automatically used by: * `bun install` * `fetch()` * `node:http` (client) * `Bun.connect` * `node:net` * `node:tls` ### When should I prefetch a DNS entry? Web browsers expose `<link rel="dns-prefetch">` to allow developers to prefetch DNS entries. This is useful when you know you'll need to connect to a host in the near future and want to avoid the initial DNS lookup. In Bun, you can use the `dns.prefetch` API to achieve the same effect. import {dns} from "bun"; dns.prefetch("my.database-host.com", 5432); An example where you might want to use this is a database driver. When your application first starts up, you can prefetch the DNS entry for the database host so that by the time it finishes loading everything, the DNS query to resolve the database host may already be completed. ### `dns.prefetch` **🚧** — This API is experimental and may change in the future. To prefetch a DNS entry, you can use the `dns.prefetch` API. This API is useful when you know you'll need to connect to a host soon and want to avoid the initial DNS lookup. dns.prefetch(hostname: string, port: number): void; Here's an example: import {dns} from "bun"; dns.prefetch("bun.sh", 443); // // ... sometime later ... await fetch("https://bun.sh"); ### `dns.getCacheStats()` **🚧** — This API is experimental and may change in the future. To get the current cache stats, you can use the `dns.getCacheStats` API. This API returns an object with the following properties: { // Cache hits cacheHitsCompleted: number; cacheHitsInflight: number; cacheMisses: number; // Number of items in the DNS cache size: number; // Number of times a connection failed errors: number; // Number of times a connection was requested at all (including cache hits and misses) totalCount: number; } Example: import {dns} from "bun"; const stats = dns.getCacheStats(); console.log(stats); // => { cacheHitsCompleted: 0, cacheHitsInflight: 0, cacheMisses: 0, size: 0, errors: 0, totalCount: 0 } ### Configuring DNS cache TTL Bun defaults to 30 seconds for the TTL of DNS cache entries. To change this, you can set the environment variable `$BUN_CONFIG_DNS_TIME_TO_LIVE_SECONDS`. For example, to set the TTL to 5 seconds: BUN_CONFIG_DNS_TIME_TO_LIVE_SECONDS=5 bun run my-script.ts #### Why is 30 seconds the default? Unfortunately, the system API underneath (`getaddrinfo`) does not provide a way to get the TTL of a DNS entry. This means we have to pick a number arbitrarily. We chose 30 seconds because it's long enough to see the benefits of caching, and short enough to be unlikely to cause issues if a DNS entry changes. Amazon Web Services recommends 5 seconds for the Java Virtual Machine, however the JVM defaults to cache indefinitely. --- ## Page: https://bun.sh/docs/api/semver Bun implements a semantic versioning API which can be used to compare versions and determine if a version is compatible with another range of versions. The versions and ranges are designed to be compatible with `node-semver`, which is used by npm clients. It's about 20x faster than `node-semver`.  Currently, this API provides two functions : #### `Bun.semver.satisfies(version: string, range: string): boolean` Returns `true` if `version` satisfies `range`, otherwise `false`. Example: import { semver } from "bun"; semver.satisfies("1.0.0", "^1.0.0"); // true semver.satisfies("1.0.0", "^1.0.1"); // false semver.satisfies("1.0.0", "~1.0.0"); // true semver.satisfies("1.0.0", "~1.0.1"); // false semver.satisfies("1.0.0", "1.0.0"); // true semver.satisfies("1.0.0", "1.0.1"); // false semver.satisfies("1.0.1", "1.0.0"); // false semver.satisfies("1.0.0", "1.0.x"); // true semver.satisfies("1.0.0", "1.x.x"); // true semver.satisfies("1.0.0", "x.x.x"); // true semver.satisfies("1.0.0", "1.0.0 - 2.0.0"); // true semver.satisfies("1.0.0", "1.0.0 - 1.0.1"); // true If `range` is invalid, it returns false. If `version` is invalid, it returns false. #### `Bun.semver.order(versionA: string, versionB: string): 0 | 1 | -1` Returns `0` if `versionA` and `versionB` are equal, `1` if `versionA` is greater than `versionB`, and `-1` if `versionA` is less than `versionB`. Example: import { semver } from "bun"; semver.order("1.0.0", "1.0.0"); // 0 semver.order("1.0.0", "1.0.1"); // -1 semver.order("1.0.1", "1.0.0"); // 1 const unsorted = ["1.0.0", "1.0.1", "1.0.0-alpha", "1.0.0-beta", "1.0.0-rc"]; unsorted.sort(semver.order); // ["1.0.0-alpha", "1.0.0-beta", "1.0.0-rc", "1.0.0", "1.0.1"] console.log(unsorted); If you need other semver functions, feel free to open an issue or pull request. --- ## Page: https://bun.sh/docs/api/color `Bun.color(input, outputFormat?)` leverages Bun's CSS parser to parse, normalize, and convert colors from user input to a variety of output formats, including: | Format | Example | | --- | --- | | `"css"` | `"red"` | | `"ansi"` | `"\x1b[38;2;255;0;0m"` | | `"ansi-16"` | `"\x1b[38;5;\tm"` | | `"ansi-256"` | `"\x1b[38;5;196m"` | | `"ansi-16m"` | `"\x1b[38;2;255;0;0m"` | | `"number"` | `0x1a2b3c` | | `"rgb"` | `"rgb(255, 99, 71)"` | | `"rgba"` | `"rgba(255, 99, 71, 0.5)"` | | `"hsl"` | `"hsl(120, 50%, 50%)"` | | `"hex"` | `"#1a2b3c"` | | `"HEX"` | `"#1A2B3C"` | | `"{rgb}"` | `{ r: 255, g: 99, b: 71 }` | | `"{rgba}"` | `{ r: 255, g: 99, b: 71, a: 1 }` | | `"[rgb]"` | `[ 255, 99, 71 ]` | | `"[rgba]"` | `[ 255, 99, 71, 255]` | There are many different ways to use this API: * Validate and normalize colors to persist in a database (`number` is the most database-friendly) * Convert colors to different formats * Colorful logging beyond the 16 colors many use today (use `ansi` if you don't want to figure out what the user's terminal supports, otherwise use `ansi-16`, `ansi-256`, or `ansi-16m` for how many colors the terminal supports) * Format colors for use in CSS injected into HTML * Get the `r`, `g`, `b`, and `a` color components as JavaScript objects or numbers from a CSS color string You can think of this as an alternative to the popular npm packages `color` and `tinycolor2` except with full support for parsing CSS color strings and zero dependencies built directly into Bun. ### Flexible input You can pass in any of the following: * Standard CSS color names like `"red"` * Numbers like `0xff0000` * Hex strings like `"#f00"` * RGB strings like `"rgb(255, 0, 0)"` * RGBA strings like `"rgba(255, 0, 0, 1)"` * HSL strings like `"hsl(0, 100%, 50%)"` * HSLA strings like `"hsla(0, 100%, 50%, 1)"` * RGB objects like `{ r: 255, g: 0, b: 0 }` * RGBA objects like `{ r: 255, g: 0, b: 0, a: 1 }` * RGB arrays like `[255, 0, 0]` * RGBA arrays like `[255, 0, 0, 255]` * LAB strings like `"lab(50% 50% 50%)"` * ... anything else that CSS can parse as a single color value ### Format colors as CSS The `"css"` format outputs valid CSS for use in stylesheets, inline styles, CSS variables, css-in-js, etc. It returns the most compact representation of the color as a string. Bun.color("red", "css"); // "red" Bun.color(0xff0000, "css"); // "#f000" Bun.color("#f00", "css"); // "red" Bun.color("#ff0000", "css"); // "red" Bun.color("rgb(255, 0, 0)", "css"); // "red" Bun.color("rgba(255, 0, 0, 1)", "css"); // "red" Bun.color("hsl(0, 100%, 50%)", "css"); // "red" Bun.color("hsla(0, 100%, 50%, 1)", "css"); // "red" Bun.color({ r: 255, g: 0, b: 0 }, "css"); // "red" Bun.color({ r: 255, g: 0, b: 0, a: 1 }, "css"); // "red" Bun.color([255, 0, 0], "css"); // "red" Bun.color([255, 0, 0, 255], "css"); // "red" If the input is unknown or fails to parse, `Bun.color` returns `null`. ### Format colors as ANSI (for terminals) The `"ansi"` format outputs ANSI escape codes for use in terminals to make text colorful. Bun.color("red", "ansi"); // "\u001b[38;2;255;0;0m" Bun.color(0xff0000, "ansi"); // "\u001b[38;2;255;0;0m" Bun.color("#f00", "ansi"); // "\u001b[38;2;255;0;0m" Bun.color("#ff0000", "ansi"); // "\u001b[38;2;255;0;0m" Bun.color("rgb(255, 0, 0)", "ansi"); // "\u001b[38;2;255;0;0m" Bun.color("rgba(255, 0, 0, 1)", "ansi"); // "\u001b[38;2;255;0;0m" Bun.color("hsl(0, 100%, 50%)", "ansi"); // "\u001b[38;2;255;0;0m" Bun.color("hsla(0, 100%, 50%, 1)", "ansi"); // "\u001b[38;2;255;0;0m" Bun.color({ r: 255, g: 0, b: 0 }, "ansi"); // "\u001b[38;2;255;0;0m" Bun.color({ r: 255, g: 0, b: 0, a: 1 }, "ansi"); // "\u001b[38;2;255;0;0m" Bun.color([255, 0, 0], "ansi"); // "\u001b[38;2;255;0;0m" Bun.color([255, 0, 0, 255], "ansi"); // "\u001b[38;2;255;0;0m" This gets the color depth of stdout and automatically chooses one of `"ansi-16m"`, `"ansi-256"`, `"ansi-16"` based on the environment variables. If stdout doesn't support any form of ANSI color, it returns an empty string. As with the rest of Bun's color API, if the input is unknown or fails to parse, it returns `null`. #### 24-bit ANSI colors (`ansi-16m`) The `"ansi-16m"` format outputs 24-bit ANSI colors for use in terminals to make text colorful. 24-bit color means you can display 16 million colors on supported terminals, and requires a modern terminal that supports it. This converts the input color to RGBA, and then outputs that as an ANSI color. Bun.color("red", "ansi-16m"); // "\x1b[38;2;255;0;0m" Bun.color(0xff0000, "ansi-16m"); // "\x1b[38;2;255;0;0m" Bun.color("#f00", "ansi-16m"); // "\x1b[38;2;255;0;0m" Bun.color("#ff0000", "ansi-16m"); // "\x1b[38;2;255;0;0m" #### 256 ANSI colors (`ansi-256`) The `"ansi-256"` format approximates the input color to the nearest of the 256 ANSI colors supported by some terminals. Bun.color("red", "ansi-256"); // "\u001b[38;5;196m" Bun.color(0xff0000, "ansi-256"); // "\u001b[38;5;196m" Bun.color("#f00", "ansi-256"); // "\u001b[38;5;196m" Bun.color("#ff0000", "ansi-256"); // "\u001b[38;5;196m" To convert from RGBA to one of the 256 ANSI colors, we ported the algorithm that `tmux` uses. #### 16 ANSI colors (`ansi-16`) The `"ansi-16"` format approximates the input color to the nearest of the 16 ANSI colors supported by most terminals. Bun.color("red", "ansi-16"); // "\u001b[38;5;\tm" Bun.color(0xff0000, "ansi-16"); // "\u001b[38;5;\tm" Bun.color("#f00", "ansi-16"); // "\u001b[38;5;\tm" Bun.color("#ff0000", "ansi-16"); // "\u001b[38;5;\tm" This works by first converting the input to a 24-bit RGB color space, then to `ansi-256`, and then we convert that to the nearest 16 ANSI color. ### Format colors as numbers The `"number"` format outputs a 24-bit number for use in databases, configuration, or any other use case where a compact representation of the color is desired. Bun.color("red", "number"); // 16711680 Bun.color(0xff0000, "number"); // 16711680 Bun.color({ r: 255, g: 0, b: 0 }, "number"); // 16711680 Bun.color([255, 0, 0], "number"); // 16711680 Bun.color("rgb(255, 0, 0)", "number"); // 16711680 Bun.color("rgba(255, 0, 0, 1)", "number"); // 16711680 Bun.color("hsl(0, 100%, 50%)", "number"); // 16711680 Bun.color("hsla(0, 100%, 50%, 1)", "number"); // 16711680 ### Get the red, green, blue, and alpha channels You can use the `"{rgba}"`, `"{rgb}"`, `"[rgba]"` and `"[rgb]"` formats to get the red, green, blue, and alpha channels as objects or arrays. #### `{rgba}` object The `"{rgba}"` format outputs an object with the red, green, blue, and alpha channels. type RGBAObject = { // 0 - 255 r: number; // 0 - 255 g: number; // 0 - 255 b: number; // 0 - 1 a: number; }; Example: Bun.color("hsl(0, 0%, 50%)", "{rgba}"); // { r: 128, g: 128, b: 128, a: 1 } Bun.color("red", "{rgba}"); // { r: 255, g: 0, b: 0, a: 1 } Bun.color(0xff0000, "{rgba}"); // { r: 255, g: 0, b: 0, a: 1 } Bun.color({ r: 255, g: 0, b: 0 }, "{rgba}"); // { r: 255, g: 0, b: 0, a: 1 } Bun.color([255, 0, 0], "{rgba}"); // { r: 255, g: 0, b: 0, a: 1 } To behave similarly to CSS, the `a` channel is a decimal number between `0` and `1`. The `"{rgb}"` format is similar, but it doesn't include the alpha channel. Bun.color("hsl(0, 0%, 50%)", "{rgb}"); // { r: 128, g: 128, b: 128 } Bun.color("red", "{rgb}"); // { r: 255, g: 0, b: 0 } Bun.color(0xff0000, "{rgb}"); // { r: 255, g: 0, b: 0 } Bun.color({ r: 255, g: 0, b: 0 }, "{rgb}"); // { r: 255, g: 0, b: 0 } Bun.color([255, 0, 0], "{rgb}"); // { r: 255, g: 0, b: 0 } #### `[rgba]` array The `"[rgba]"` format outputs an array with the red, green, blue, and alpha channels. // All values are 0 - 255 type RGBAArray = [number, number, number, number]; Example: Bun.color("hsl(0, 0%, 50%)", "[rgba]"); // [128, 128, 128, 255] Bun.color("red", "[rgba]"); // [255, 0, 0, 255] Bun.color(0xff0000, "[rgba]"); // [255, 0, 0, 255] Bun.color({ r: 255, g: 0, b: 0 }, "[rgba]"); // [255, 0, 0, 255] Bun.color([255, 0, 0], "[rgba]"); // [255, 0, 0, 255] Unlike the `"{rgba}"` format, the alpha channel is an integer between `0` and `255`. This is useful for typed arrays where each channel must be the same underlying type. The `"[rgb]"` format is similar, but it doesn't include the alpha channel. Bun.color("hsl(0, 0%, 50%)", "[rgb]"); // [128, 128, 128] Bun.color("red", "[rgb]"); // [255, 0, 0] Bun.color(0xff0000, "[rgb]"); // [255, 0, 0] Bun.color({ r: 255, g: 0, b: 0 }, "[rgb]"); // [255, 0, 0] Bun.color([255, 0, 0], "[rgb]"); // [255, 0, 0] ### Format colors as hex strings The `"hex"` format outputs a lowercase hex string for use in CSS or other contexts. Bun.color("hsl(0, 0%, 50%)", "hex"); // "#808080" Bun.color("red", "hex"); // "#ff0000" Bun.color(0xff0000, "hex"); // "#ff0000" Bun.color({ r: 255, g: 0, b: 0 }, "hex"); // "#ff0000" Bun.color([255, 0, 0], "hex"); // "#ff0000" The `"HEX"` format is similar, but it outputs a hex string with uppercase letters instead of lowercase letters. Bun.color("hsl(0, 0%, 50%)", "HEX"); // "#808080" Bun.color("red", "HEX"); // "#FF0000" Bun.color(0xff0000, "HEX"); // "#FF0000" Bun.color({ r: 255, g: 0, b: 0 }, "HEX"); // "#FF0000" Bun.color([255, 0, 0], "HEX"); // "#FF0000" ### Bundle-time client-side color formatting Like many of Bun's APIs, you can use macros to invoke `Bun.color` at bundle-time for use in client-side JavaScript builds: client-side.ts import { color } from "bun" with { type: "macro" }; console.log(color("#f00", "css")); Then, build the client-side code: bun build ./client-side.ts This will output the following to `client-side.js`: // client-side.ts console.log("red"); --- ## Page: https://bun.sh/docs/api/transpiler Bun exposes its internal transpiler via the `Bun.Transpiler` class. To create an instance of Bun's transpiler: const transpiler = new Bun.Transpiler({ loader: "tsx", // "js | "jsx" | "ts" | "tsx" }); ## `.transformSync()` Transpile code synchronously with the `.transformSync()` method. Modules are not resolved and the code is not executed. The result is a string of vanilla JavaScript code. Example Result Example const transpiler = new Bun.Transpiler({ loader: 'tsx', }); const code = ` import * as whatever from "./whatever.ts" export function Home(props: {title: string}){ return <p>{props.title}</p>; }`; const result = transpiler.transformSync(code); Result import { __require as require } from "bun:wrap"; import * as JSX from "react/jsx-dev-runtime"; var jsx = require(JSX).jsxDEV; export default jsx( "div", { children: "hi!", }, undefined, false, undefined, this, ); To override the default loader specified in the `new Bun.Transpiler()` constructor, pass a second argument to `.transformSync()`. transpiler.transformSync("<div>hi!</div>", "tsx"); Nitty gritty ## `.transform()` The `transform()` method is an async version of `.transformSync()` that returns a `Promise<string>`. const transpiler = new Bun.Transpiler({ loader: "jsx" }); const result = await transpiler.transform("<div>hi!</div>"); console.log(result); Unless you're transpiling _many_ large files, you should probably use `Bun.Transpiler.transformSync`. The cost of the threadpool will often take longer than actually transpiling code. await transpiler.transform("<div>hi!</div>", "tsx"); Nitty gritty ## `.scan()` The `Transpiler` instance can also scan some source code and return a list of its imports and exports, plus additional metadata about each one. Type-only imports and exports are ignored. Example Output Example const transpiler = new Bun.Transpiler({ loader: 'tsx', }); const code = ` import React from 'react'; import type {ReactNode} from 'react'; const val = require('./cjs.js') import('./loader'); export const name = "hello"; `; const result = transpiler.scan(code); Output { "exports": [ "name" ], "imports": [ { "kind": "import-statement", "path": "react" }, { "kind": "import-statement", "path": "remix" }, { "kind": "dynamic-import", "path": "./loader" } ] } Each import in the `imports` array has a `path` and `kind`. Bun categories imports into the following kinds: * `import-statement`: `import React from 'react'` * `require-call`: `const val = require('./cjs.js')` * `require-resolve`: `require.resolve('./cjs.js')` * `dynamic-import`: `import('./loader')` * `import-rule`: `@import 'foo.css'` * `url-token`: `url('./foo.png')` ## `.scanImports()` For performance-sensitive code, you can use the `.scanImports()` method to get a list of imports. It's faster than `.scan()` (especially for large files) but marginally less accurate due to some performance optimizations. Example Results Example const transpiler = new Bun.Transpiler({ loader: 'tsx', }); const code = ` import React from 'react'; import type {ReactNode} from 'react'; const val = require('./cjs.js') import('./loader'); export const name = "hello"; `; const result = transpiler.scanImports(code); Results [ { kind: "import-statement", path: "react" }, { kind: "require-call", path: "./cjs.js" }, { kind: "dynamic-import", path: "./loader" } ] ## Reference type Loader = "jsx" | "js" | "ts" | "tsx"; interface TranspilerOptions { // Replace key with value. Value must be a JSON string. // { "process.env.NODE_ENV": "\"production\"" } define?: Record<string, string>, // Default loader for this transpiler loader?: Loader, // Default platform to target // This affects how import and/or require is used target?: "browser" | "bun" | "node", // Specify a tsconfig.json file as stringified JSON or an object // Use this to set a custom JSX factory, fragment, or import source // For example, if you want to use Preact instead of React. Or if you want to use Emotion. tsconfig?: string | TSConfig, // Replace imports with macros macro?: MacroMap, // Specify a set of exports to eliminate // Or rename certain exports exports?: { eliminate?: string[]; replace?: Record<string, string>; }, // Whether to remove unused imports from transpiled file // Default: false trimUnusedImports?: boolean, // Whether to enable a set of JSX optimizations // jsxOptimizationInline ..., // Experimental whitespace minification minifyWhitespace?: boolean, // Whether to inline constant values // Typically improves performance and decreases bundle size // Default: true inline?: boolean, } // Map import paths to macros interface MacroMap { // { // "react-relay": { // "graphql": "bun-macro-relay/bun-macro-relay.tsx" // } // } [packagePath: string]: { [importItemName: string]: string, }, } class Bun.Transpiler { constructor(options: TranspilerOptions) transform(code: string, loader?: Loader): Promise<string> transformSync(code: string, loader?: Loader): string scan(code: string): {exports: string[], imports: Import} scanImports(code: string): Import[] } type Import = { path: string, kind: // import foo from 'bar'; in JavaScript | "import-statement" // require("foo") in JavaScript | "require-call" // require.resolve("foo") in JavaScript | "require-resolve" // Dynamic import() in JavaScript | "dynamic-import" // @import() in CSS | "import-rule" // url() in CSS | "url-token" // The import was injected by Bun | "internal" // Entry point (not common) | "entry-point-build" | "entry-point-run" } const transpiler = new Bun.Transpiler({ loader: "jsx" });