W↓
All docs
🔑
Sign Up/Sign In
docs.deno.com/runtime/fundamentals/
Public Link
Apr 8, 2025, 12:53:14 PM - complete - 228.3 kB
Created by:
****ad@vlad.studio
Starting URLs:
https://docs.deno.com/runtime/fundamentals/
## Page: https://docs.deno.com/runtime/fundamentals/ * Runtime * Fundamentals On this page * Built in tooling * Node and npm Support * Standard Library * Secure by Default * Modern Language Features ## Fundamentals Deno is designed with the developer in mind, aiming to provide a smooth and enjoyable development process. Its simplicity and efficiency make it quick and easy to pick up, even for those new to the backend development. ## Built in tooling Jump to heading Deno's inbuilt tooling significantly eases the onboarding process. With a single executable, you can get started without worrying about complex setups or dependencies. This allows you to focus on writing code rather than configuring your environment. * Configuring your project * TypeScript support * Linting and formatting * Testing * Debugging * HTTP server ## Node and npm Support Jump to heading Deno supports Node.js and npm packages, enabling you to leverage the vast ecosystem of existing libraries and tools. This compatibility ensures that you can integrate Deno into your projects seamlessly. * Node.js compatibility * npm compatibility ## Standard Library Jump to heading Deno comes with a comprehensive standard library written in TypeScript. This library includes modules for common tasks such as HTTP servers, file system operations, and more, allowing you to avoid "reinventing the wheel" and focus on your application's features. * Standard Library ## Secure by Default Jump to heading Security is a top priority for Deno. By default, it requires explicit permission for file, network, and environment access, reducing the risk of security vulnerabilities. This secure-by-default approach helps protect your applications from potential threats. * Security and permissions * Foreign Function Interface (FFI) ## Modern Language Features Jump to heading Deno embraces modern JavaScript features, including ESModules. This means you can use the latest syntax and capabilities of the language, ensuring your code is up-to-date and leveraging the best practices in the industry. * Using ESModules * Migrating from CJS to ESM ## Did you find what you needed? * Built in tooling * Node and npm Support * Standard Library * Secure by Default * Modern Language Features --- ## Page: https://docs.deno.com/runtime/fundamentals/typescript/ TypeScript is a first class language in Deno, just like JavaScript or WebAssembly. You can run or import TypeScript without installing anything more than the Deno CLI. With its built-in TypeScript compiler, Deno will compile your TypeScript code to JavaScript with no extra config needed. Deno can also type check your TypeScript code, without requiring a separate type checking tool like `tsc`. ## Type Checking Jump to heading One of the main advantages of TypeScript is that it can make your code type safe, catching errors during development rather than runtime. TypeScript is a superset of JavaScript meaning that syntactically valid JavaScript becomes TypeScript with warnings about being "unsafe". Deno allows you to type-check your code (without executing it) with the `deno check` subcommand: deno check module.ts # or also type check remote modules and npm packages deno check --all module.ts # code snippets written in JSDoc can also be type checked deno check --doc module.ts # or type check code snippets in markdown files deno check --doc-only markdown.md Note Type checking can take a significant amount of time, especially if you are working on a codebase where you are making a lot of changes. Deno optimizes type checking, but it still comes at a cost. Therefore, **by default, TypeScript modules are not type-checked before they are executed**. When using the `deno run` command, Deno will skip type-checking and run the code directly. In order to perform a type check of the module before execution occurs, you can use the `--check` flag with `deno run`: deno run --check module.ts # or also type check remote modules and npm packages deno run --check=all module.ts When Deno encounters a type error when using this flag, the process will exit before executing the code. In order to avoid this, you will either need to: * resolve the issue * use the `// @ts-ignore` or `// @ts-expect-error` pragmas to ignore the error * or skip type checking all together. When testing your code, type checking is enabled by default. You can use the `--no-check` flag to skip type checking if preferred: deno test --no-check ## Using with JavaScript Jump to heading Deno runs JavaScript and TypeScript code. During type checking, Deno will only type check TypeScript files by default though. If you want to type check JavaScript files too, you can either add a `// @ts-check` pragma at the top of the file, or add `compilerOptions.checkJs` to your `deno.json` file. main.js // @ts-check let x = "hello"; x = 42; // Type 'number' is not assignable to type 'string'. deno.json { "compilerOptions": { "checkJs": true } } In JavaScript files, you can not use TypeScript syntax like type annotations or importing types. You can use TSDoc comments to provide type information to the TypeScript compiler though. main.js // @ts-check /** * @param a {number} * @param b {number} * @returns {number} */ function add(a, b) { return a + b; } ## Providing declaration files Jump to heading When importing untyped JavaScript modules from TypeScript code, you may need to provide type information for the JavaScript module. This is not necessary if the JavaScript is annotated with TSDoc comments. Without this additional type information (in the form of a `.d.ts` declaration file), TypeScript will assume everything exported from the JavaScript module is of type `any`. `tsc` will pick up `d.ts` files that are siblings of a `js` file and have the same basename, automatically. **Deno does not do this.** You must explicitly specify either in the `.js` file (the source), or the `.ts` file (the importer) where to find the `.d.ts` file. ### Providing types in the source Jump to heading One should prefer specifying the `.d.ts` file in the `.js` file, as this makes it easier to use the JavaScript module from multiple TypeScript modules: you won't have to specify the `.d.ts` file in every TypeScript module that imports the JavaScript module. add.js // @ts-self-types="./add.d.ts" export function add(a, b) { return a + b; } add.d.ts export function add(a: number, b: number): number; ### Providing types in the importer Jump to heading If you can't modify the JavaScript source, you can specify the `.d.ts` file in the TypeScript module that imports the JavaScript module. main.ts // @ts-types="./add.d.ts" import { add } from "./add.js"; This is also useful for NPM packages that don't provide type information: main.ts // @ts-types="npm:@types/lodash" import * as _ from "npm:lodash"; ### Providing types for HTTP modules Jump to heading Servers that host JavaScript modules via HTTP can also provide type information for those modules in a HTTP header. Deno will use this information when type-checking the module. HTTP/1.1 200 OK Content-Type: application/javascript; charset=UTF-8 Content-Length: 648 X-TypeScript-Types: ./add.d.ts The `X-TypeScript-Types` header specifies the location of the `.d.ts` file that provides type information for the JavaScript module. It is resolved relative to the URL of the JavaScript module, just like `Location` headers. ## Type checking for browsers and web workers Jump to heading By default, Deno type checks TypeScript modules as if they were running in the main thread of the Deno runtime. However, Deno also supports type checking for browsers, type checking for web workers, and type checking for combination browser-Deno environments like when using SSR (Server Side Rendering) with Deno. These environments have different global objects and APIs available to them. Deno provides type definitions for these environments in the form of library files. These library files are used by the TypeScript compiler to provide type information for the global objects and APIs available in these environments. The loaded library files can be changed using the `compilerOptions.lib` option in a `deno.json` configuration file, or through `/// <reference lib="..." />` comments in your TypeScript files. It is recommended to use the `compilerOptions.lib` option in the `deno.json` configuration file to specify the library files to use. To enable type checking for a **browser environment**, you can specify the `dom` library file in the `compilerOptions.lib` option in a `deno.json` configuration file: deno.json { "compilerOptions": { "lib": ["dom"] } } This will enable type checking for a browser environment, providing type information for global objects like `document`. This will however disable type information for Deno-specific APIs like `Deno.readFile`. To enable type checking for combined **browser and Deno environments**, like using SSR with Deno, you can specify both the `dom` and `deno.ns` (Deno namespace) library files in the `compilerOptions.lib` option in a `deno.json` configuration file: deno.json { "compilerOptions": { "lib": ["dom", "deno.ns"] } } This will enable type checking for both browser and Deno environments, providing type information for global objects like `document` and Deno-specific APIs like `Deno.readFile`. To enable type checking for a **web worker environment in Deno**, (ie code that is run with `new Worker`), you can specify the `deno.worker` library file in the `compilerOptions.lib` option in a `deno.json`. deno.json { "compilerOptions": { "lib": ["deno.worker"] } } To specify the library files to use in a TypeScript file, you can use `/// <reference lib="..." />` comments: /// <reference no-default-lib="true" /> /// <reference lib="dom" /> ## Augmenting global types Jump to heading Deno supports ambient or global types in TypeScript. This is useful when polyfilling global objects or augmenting the global scope with additional properties. **You should avoid using ambient or global types when possible**, since they can lead to naming conflicts and make it harder to reason about your code. They are also not supported when publishing to JSR. To use ambient or global types in Deno, you can use either the `declare global` syntax, or load a `.d.ts` file that augments the global scope. ### Using declare global to augment the global scope Jump to heading You can use the `declare global` syntax in any of the TypeScript files that are imported in your project to augment the global scope with additional properties. For example: declare global { interface Window { polyfilledAPI(): string; } } This makes the `polyfilledAPI` function available globally when the type definition is imported. ### Using .d.ts files to augment the global scope Jump to heading You can also use `.d.ts` files to augment the global scope. For example, you can create a `global.d.ts` file with the following content: interface Window { polyfilledAPI(): string; } Then you can load this `.d.ts` file in your TypeScript using `/// <reference types="./global.d.ts" />`. This will augment the global scope with the `polyfilledAPI` function. Alternatively you can specify the `.d.ts` file in the `deno.json` configuration file, in the `compilerOptions.types` array: { "compilerOptions": { "types": ["./global.d.ts"] } } This will also augment the global scope with the `polyfilledAPI` function. --- ## Page: https://docs.deno.com/runtime/fundamentals/node/ * **Deno is Node-compatible**. Most Node projects will run in Deno with little or no change! * **Deno supports npm packages**. Just use the `npm:` specifier in the import, and Deno takes care of the rest. For example, here's how you'd import Hono from npm in a Deno project: import { Hono } from "npm:hono"; That's all you really need to know to get started! However, there are some key differences between the two runtimes that you can take advantage of to make your code simpler and smaller when migrating your Node.js projects to Deno. ## Using Node's built-in modules Jump to heading Deno provides a compatibility layer that allows the use of Node.js built-in APIs within Deno programs. However, in order to use them, you will need to add the `node:` specifier to any import statements that use them: import * as os from "node:os"; console.log(os.cpus()); And run it with `deno run main.mjs` - you will notice you get the same output as running the program in Node.js. Updating any imports in your application to use `node:` specifiers should enable any code using Node built-ins to function as it did in Node.js. To make updating existing code easier, Deno will provide helpful hints for imports that don't use `node:` prefix: main.mjs import * as os from "os"; console.log(os.cpus()); $ deno run main.mjs error: Relative import path "os" not prefixed with / or ./ or ../ hint: If you want to use a built-in Node module, add a "node:" prefix (ex. "node:os"). at file:///main.mjs:1:21 The same hints and additional quick-fixes are provided by the Deno LSP in your editor. Explore built-in Node APIs ## Using npm packages Jump to heading Deno has native support for importing npm packages by using `npm:` specifiers. For example: main.js import * as emoji from "npm:node-emoji"; console.log(emoji.emojify(`:sauropod: :heart: npm`)); Can be run with: $ deno run main.js 🦕 ❤️ npm No `npm install` is necessary before the `deno run` command and no `node_modules` folder is created. These packages are also subject to the same permissions as other code in Deno. npm specifiers have the following format: npm:[@][/] For examples with popular libraries, please refer to the tutorial section. ## CommonJS support Jump to heading CommonJS is a module system that predates ES modules. While we firmly believe that ES modules are the future of JavaScript, there are millions of npm libraries that are written in CommonJS and Deno offers full support for them. Deno will automatically determine if a package is using CommonJS and make it work seamlessly when imported: main.js import react from "npm:react"; console.log(react); $ deno run -E main.js 18.3.1 _`npm:react` is a CommonJS package. Deno allows you to import it as if it were an ES module._ Deno strongly encourages the use of ES modules in your code but offers CommonJS support with following restrictions: **Deno's permission system is still in effect when using CommonJS modules.** It may be necessary to provide at least `--allow-read` permission as Deno will probe the file system for `package.json` files and `node_modules` directory to properly resolve CommonJS modules. ### Use .cjs extension Jump to heading If the file extension is `.cjs` Deno will treat this module as CommonJS. main.cjs const express = require("express"); Deno does not look for `package.json` files and `type` option to determine if the file is CommonJS or ESM. When using CommonJS, Deno expects that dependencies will be installed manually and a `node_modules` directory will be present. It's best to set `"nodeModulesDir": "auto"` in your `deno.json` to ensure that. $ cat deno.json { "nodeModulesDir": "auto" } $ deno install npm:express Add npm:express@5.0.0 $ deno run -R -E main.cjs [Function: createApplication] { application: { init: [Function: init], defaultConfiguration: [Function: defaultConfiguration], ... } } `-R` and `-E` flags are used to allow permissions to read files and environment variables. ### package.json type option Jump to heading Deno will attempt to load `.js`, `.jsx`, `.ts`, and `.tsx` files as CommonJS if there's a `package.json` file with `"type": "commonjs"` option next to the file, or up in the directory tree when in a project with a package.json file. package.json { "type": "commonjs" } main.js const express = require("express"); Tools like Next.js's bundler and others will generate a `package.json` file like that automatically. If you have an existing project that uses CommonJS modules, you can make it work with both Node.js and Deno, by adding `"type": "commonjs"` option to the `package.json` file. ### Always detecting if a file might be CommonJS Jump to heading Telling Deno to analyze modules as possibly being CommonJS is possible by running with the `--unstable-detect-cjs` in Deno >= 2.1.2. This will take effect, except when there's a _package.json_ file with `{ "type": "module" }`. Looking for package.json files on the file system and analyzing a module to detect if its CommonJS takes longer than not doing it. For this reason and to discourage the use of CommonJS, Deno does not do this behavior by default. ### Create require() manually Jump to heading An alternative option is to create an instance of the `require()` function manually: main.js import { createRequire } from "node:module"; const require = createRequire(import.meta.url); const express = require("express"); In this scenario the same requirements apply, as when running `.cjs` files - dependencies need to be installed manually and appropriate permission flags given. ### require(ESM) Jump to heading Deno's `require()` implementation supports requiring ES modules. This works the same as in Node.js, where you can only `require()` ES modules that don't have Top-Level Await in their module graph - or in other words you can only `require()` ES modules that are "synchronous". greet.js export function greet(name) { return `Hello ${name}`; } esm.js import { greet } from "./greet.js"; export { greet }; main.cjs const esm = require("./esm"); console.log(esm); console.log(esm.greet("Deno")); $ deno run -R main.cjs [Module: null prototype] { greet: [Function: greet] } Hello Deno ### Import CommonJS modules Jump to heading You can also import CommonJS files in ES modules. greet.cjs module.exports = { hello: "world", }; main.js import greet from "./greet.js"; console.log(greet); $ deno run main.js { "hello": "world" } **Hints and suggestions** Deno will provide useful hints and suggestions to guide you towards working code when working with CommonJS modules. As an example, if you try to run a CommonJS module that doesn't have `.cjs` extension or doesn't have a `package.json` with `{ "type": "commonjs" }` you might see this: main.js module.exports = { hello: "world", }; $ deno run main.js error: Uncaught (in promise) ReferenceError: module is not defined module.exports = { ^ at file:///main.js:1:1 info: Deno supports CommonJS modules in .cjs files, or when the closest package.json has a "type": "commonjs" option. hint: Rewrite this module to ESM, or change the file extension to .cjs, or add package.json next to the file with "type": "commonjs" option, or pass --unstable-detect-cjs flag to detect CommonJS when loading. docs: https://docs.deno.com/go/commonjs ## Importing types Jump to heading Many npm packages ship with types, you can import these and use them with types directly: import chalk from "npm:chalk@5"; Some packages do not ship with types but you can specify their types with the `@ts-types` directive. For example, using a `@types` package: // @ts-types="npm:@types/express@^4.17" import express from "npm:express@^4.17"; **Module resolution** The official TypeScript compiler `tsc` supports different moduleResolution settings. Deno only supports the modern `node16` resolution. Unfortunately many npm packages fail to correctly provide types under node16 module resolution, which can result in `deno check` reporting type errors, that `tsc` does not report. If a default export from an `npm:` import appears to have a wrong type (with the right type seemingly being available under the `.default` property), it's most likely that the package provides wrong types under node16 module resolution for imports from ESM. You can verify this by checking if the error also occurs with `tsc --module node16` and `"type": "module"` in `package.json` or by consulting the Are the types wrong? website (particularly the "node16 from ESM" row). If you want to use a package that doesn't support TypeScript's node16 module resolution, you can: 1. Open an issue at the issue tracker of the package about the problem. (And perhaps contribute a fix 😃 (Although, unfortunately, there is a lack of tooling for packages to support both ESM and CJS, since default exports require different syntaxes. See also microsoft/TypeScript#54593) 2. Use a CDN, that rebuilds the packages for Deno support, instead of an `npm:` identifier. 3. Ignore the type errors you get in your code base with `// @ts-expect-error` or `// @ts-ignore`. ## Including Node types Jump to heading Node ships with many built-in types like `Buffer` that might be referenced in an npm package's types. To load these you must add a types reference directive to the `@types/node` package: /// <reference types="npm:@types/node" /> Note that it is fine to not specify a version for this in most cases because Deno will try to keep it in sync with its internal Node code, but you can always override the version used if necessary. ## Executable npm scripts Jump to heading npm packages with `bin` entries can be executed from the command line without an `npm install` using a specifier in the following format: npm:[@][/] For example: $ deno run --allow-read npm:cowsay@1.5.0 "Hello there!" ______________ < Hello there! > -------------- \ ^__^ \ (oo)\_______ (__)\ )\/\ ||----w | || || $ deno run --allow-read npm:cowsay@1.5.0/cowthink "What to eat?" ______________ ( What to eat? ) -------------- o ^__^ o (oo)\_______ (__)\ )\/\ ||----w | || || ## node\_modules Jump to heading When you run `npm install`, npm creates a `node_modules` directory in your project which houses the dependencies as specified in the `package.json` file. Deno uses npm specifiers to resolve npm packages to a central global npm cache, instead of using a `node_modules` folder in your projects. This is ideal since it uses less space and keeps your project directory clean. There may however be cases where you need a local `node_modules` directory in your Deno project, even if you don’t have a `package.json` (eg. when using frameworks like Next.js or Svelte or when depending on npm packages that use Node-API). #### Default Deno dependencies behavior Jump to heading By default, Deno will not create a `node_modules` directory when you use the `deno run` command, dependencies will be installed into the global cache. This is the recommended setup for new Deno projects. #### Automatic node\_modules creation Jump to heading If you need a `node_modules` directory in your project, you can use the `--node-modules-dir` flag or `nodeModulesDir: auto` option in the config file to tell Deno to create a `node_modules` directory in the current working directory: deno run --node-modules-dir=auto main.ts or with a configuration file: deno.json { "nodeModulesDir": "auto" } The auto mode automatically installs dependencies into the global cache and creates a local node\_modules directory in the project root. This is recommended for projects that have npm dependencies that rely on node\_modules directory - mostly projects using bundlers or ones that have npm dependencies with postinstall scripts. #### Manual node\_modules creation Jump to heading If your project has a `package.json` file, you can use the manual mode, which requires an installation step to create your `node_modules` directory: deno install deno run --node-modules-dir=manual main.ts or with a configuration file: deno.json { "nodeModulesDir": "manual" } You would then run `deno install/npm install/pnpm install` or any other package manager to create the `node_modules` directory. Manual mode is the default mode for projects using a `package.json`. You may recognize this workflow from Node.js projects. It is recommended for projects using frameworks like Next.js, Remix, Svelte, Qwik etc, or tools like Vite, Parcel or Rollup. Note We recommend that you use the default `none` mode, and fallback to `auto` or `manual` mode if you get errors about missing packages inside the `node_modules` directory. #### node\_modules with Deno 1.X Jump to heading Use the `--node-modules-dir` flag. For example, given `main.ts`: import chalk from "npm:chalk@5"; console.log(chalk.green("Hello")); deno run --node-modules-dir main.ts Running the above command, with a `--node-modules-dir` flag, will create a `node_modules` folder in the current directory with a similar folder structure to npm. ## Node.js global objects Jump to heading In Node.js, there are a number of global objects available in the scope of all programs that are specific to Node.js, eg. `process` object. Here are a few globals that you might encounter in the wild and how to use them in Deno: * `process` - Deno provides the `process` global, which is by far the most popular global used in popular npm packages. It is available to all code. However, Deno will guide you towards importing it explicitly from `node:process` module by providing lint warnings and quick-fixes: process.js console.log(process.versions.deno); $ deno run process.js 2.0.0 $ deno lint process.js error[no-process-global]: NodeJS process global is discouraged in Deno --> /process.js:1:13 | 1 | console.log(process.versions.deno); | ^^^^^^^ = hint: Add `import process from "node:process";` docs: https://docs.deno.com/lint/rules/no-process-global Found 1 problem (1 fixable via --fix) Checked 1 file * `require()` - see CommonJS support * `Buffer` - to use `Buffer` API it needs to be explicitly imported from the `node:buffer` module: buffer.js import { Buffer } from "node:buffer"; const buf = new Buffer(5, "0"); Prefer using `Uint8Array` or other `TypedArray` subclasses instead. * `__filename` - use `import.meta.filename` instead. * `__dirname` - use `import.meta.dirname` instead. ## Node-API addons Jump to heading Deno supports Node-API addons that are used by popular npm packages like `esbuild`, `npm:sqlite3` or `npm:duckdb`. You can expect all packages that use public and documented Node-APIs to work. Info Most packages using Node-API addons rely on npm "lifecycle scripts", like `postinstall`. While Deno supports them, they are not run by default due to security considerations. Read more in `deno install` docs. As of Deno 2.0, npm packages using Node-API addons **are only supported when a `node_modules/` directory is present**. Add `"nodeModulesDir": "auto"` or `"nodeModulesDir": "manual"` setting your `deno.json` file, or run with `--node-modules-dir=auto|manual` flag to ensure these packages work correctly. In case of misconfiguration Deno will provide hints how the situation can be resolved. ## Migrating from Node to Deno Jump to heading Running your Node.js project with Deno is a straightforward process. In most cases you can expect little to no changes to be required, if your project is written using ES modules. Main points to be aware of, include: 1. Importing Node.js built-in modules requires the `node:` specifier: // ❌ import * as fs from "fs"; import * as http from "http"; // ✅ import * as fs from "node:fs"; import * as http from "node:http"; Tip It is recommended to change these import specifiers in your existing project anyway. This is a recommended way to import them in Node.js too. 2. Some globals available in Node.js need to be explicitly imported, eg. `Buffer`: import { Buffer } from "node:buffer"; 3. `require()` is only available in files with `.cjs` extension, in other files an instance of `require()` needs to be created manually. npm dependencies can use `require()` regardless of file extension. ### Running scripts Jump to heading Deno supports running npm scripts natively with the `deno task` subcommand (If you're migrating from Node.js, this is similar to the `npm run script` command). Consider the following Node.js project with a script called `start` inside its `package.json`: package.json { "name": "my-project", "scripts": { "start": "eslint" } } You can execute this script with Deno by running: deno task start ### Optional improvements Jump to heading One of Deno's core strengths is a unified toolchain that comes with support for TypeScript out of the box, and tools like a linter, formatter and a test runner. Switching to Deno allows you to simplify your toolchain and reduces the number of moving components in your project. **Configuration** Deno has its own config file, `deno.json` or `deno.jsonc`, which can be used to configure your project You can use it to define dependencies using the `imports` option - you can migrate your dependencies one-by-one from `package.json`, or elect to not define them in the config file at all and use `npm:` specifiers inline in your code. In addition to specifying dependencies you can use `deno.json` to define tasks, lint and format options, path mappings, and other runtime configurations. **Linting** Deno ships with a built-in linter that is written with performance in mind. It's similar to ESlint, though with a limited number of rules. If you don't rely on ESLint plugins, you can drop `eslint` dependency from `devDependencies` section of `package.json` and use `deno lint` instead. Deno can lint large projects in just a few milliseconds. You can try it out on your project by running: deno lint This will lint all files in your project. When the linter detects a problem, it will show the line in your editor and in the terminal output. An example of what that might look like: error[no-constant-condition]: Use of a constant expressions as conditions is not allowed. --> /my-project/bar.ts:1:5 | 1 | if (true) { | ^^^^ = hint: Remove the constant expression docs: https://docs.deno.com/lint/rules/no-constant-condition Found 1 problem Checked 4 files Many linting issues can be fixed automatically by passing the `--fix` flag: deno lint --fix A full list of all supported linting rules can be found on https://docs.deno.com/lint/. To learn more about how to configure the linter, check out the `deno lint` subcommand. **Formatting** Deno ships with a built-in formatter that can optionally format your code according to the Deno style guide. Instead of adding `prettier` to your `devDependencies` you can instead use Deno's built-in zero-config code formatter `deno fmt`. You can run the formatter on your project by running: deno fmt If using `deno fmt` in CI, you can pass the `--check` argument to make the formatter exit with an error when it detects improperly formatted code. deno fmt --check The formatting rules can be configured in your `deno.json` file. To learn more about how to configure the formatter, check out the `deno fmt` subcommand. **Testing** Deno encourages writing tests for your code, and provides a built-in test runner to make it easy to write and run tests. The test runner is tightly integrated into Deno, so that you don't have to do any additional configuration to make TypeScript or other features work. my\_test.ts Deno.test("my test", () => { // Your test code here }); deno test When passing the `--watch` flag, the test runner will automatically reload when any of the imported modules change. To learn more about the test runner and how to configure it, check out the `deno test` subcommand documentation. ## Private registries Jump to heading Deno supports private registries, which allow you to host and share your own modules. This is useful for organizations that want to keep their code private or for individuals who want to share their code with a select group of people. ### What are private registries? Jump to heading Large organizations often host their own private npm registries to manage internal packages securely. These private registries serve as repositories where organizations can publish and store their proprietary or custom packages. Unlike public npm registries, private registries are accessible only to authorized users within the organization. ### How to use private registries with Deno Jump to heading First, configure your `.npmrc` file to point to your private registry. The `.npmrc` file must be in the project root or `$HOME` directory. Add the following to your `.npmrc` file: @mycompany:registry=http://mycompany.com:8111/ //mycompany.com:8111/:_auth=secretToken Replace `http://mycompany.com:8111/` with the actual URL of your private registry and `secretToken` with your authentication token. Then update Your `deno.json` or `package.json` to specify the import path for your private package. For example: deno.json { "imports": { "@mycompany/package": "npm:@mycompany/package@1.0.0" } } or if you're using a `package.json`: package.json { "dependencies": { "@mycompany/package": "1.0.0" } } Now you can import your private package in your Deno code: main.ts import { hello } from "@mycompany/package"; console.log(hello()); and run it using the `deno run` command: deno run main.ts ## Node to Deno Cheatsheet Jump to heading | Node.js | Deno | | --- | --- | | `node file.js` | `deno file.js` | | `ts-node file.ts` | `deno file.ts` | | `nodemon` | `deno run --watch` | | `node -e` | `deno eval` | | `npm i` / `npm install` | `deno install` | | `npm install -g` | `deno install -g` | | `npm run` | `deno task` | | `eslint` | `deno lint` | | `prettier` | `deno fmt` | | `package.json` | `deno.json` or `package.json` | | `tsc` | `deno check` ¹ | | `typedoc` | `deno doc` | | `jest` / `ava` / `mocha` / `tap` / etc | `deno test` | | `nexe` / `pkg` | `deno compile` | | `npm explain` | `deno info` | | `nvm` / `n` / `fnm` | `deno upgrade` | | `tsserver` | `deno lsp` | | `nyc` / `c8` / `istanbul` | `deno coverage` | | benchmarks | `deno bench` | ¹ Type checking happens automatically, TypeScript compiler is built into the `deno` binary. --- ## Page: https://docs.deno.com/runtime/fundamentals/security/ Deno is secure by default. Unless you specifically enable it, a program run with Deno has no access to sensitive APIs, such as file system access, network connectivity, or environment access. You must explicitly grant access to these resources with command line flags or with a runtime permission prompt. This is a major difference from Node, where dependencies are automatically granted full access to all system I/O, potentially introducing hidden vulnerabilities into your project. Before using Deno to run completely untrusted code, read the section on executing untrusted code below. ## Key Principles Jump to heading Before diving into the specifics of permissions, it's important to understand the key principles of Deno's security model: * **No access to I/O by default**: Code executing in a Deno runtime has no access to read or write arbitrary files on the file system, to make network requests or open network listeners, to access environment variables, or to spawn subprocesses. * **No limits on the execution of code at the same privilege level**: Deno allows the execution of any code (JS/TS/Wasm) via multiple means, including `eval`, `new Function`, dynamic imports and web workers at the same privilege level with little restriction as to where the code originates (network, npm, JSR, etc). * **Multiple invocations of the same application can share data**: Deno provides a mechanism for multiple invocations of the same application to share data, through built in caching and KV storage APIs. Different applications can not see each other's data. * **All code executing on the same thread shares the same privilege level**: All code executing on the same thread shares the same privilege level. It is not possible for different modules to have different privilege levels within the same thread. * **Code can not escalate its privileges without user consent**: Code executing in a Deno runtime can not escalate its privileges without the user agreeing explicitly to an escalation via interactive prompt or a invocation time flag. * **The initial static module graph can import local files without restrictions**: All files that are imported in the initial static module graph can be imported without restrictions, so even if an explicit read permission is not granted for that file. This does not apply to any dynamic module imports. These key principles are designed to provide an environment where a user can execute code with minimal risk of harm to the host machine or network. The security model is designed to be simple to understand and to provide a clear separation of concerns between the runtime and the code executing within it. The security model is enforced by the Deno runtime, and is not dependent on the underlying operating system. ## Permissions Jump to heading By default, access to most system I/O is denied. There are some I/O operations that are allowed in a limited capacity, even by default. These are described below. To enable these operations, the user must explicitly grant permission to the Deno runtime. This is done by passing the `--allow-read`, `--allow-write`, `--allow-net`, `--allow-env`, and `--allow-run` flags to the `deno` command. During execution of a script, a user can also explicitly grant permission to specific files, directories, network addresses, environment variables, and subprocesses when prompted by the runtime. Prompts are not shown if stdout/stderr are not a TTY, or when the `--no-prompt` flag is passed to the `deno` command. Users can also explicitly disallow access to specific resources by using the `--deny-read`, `--deny-write`, `--deny-net`, `--deny-env`, and `--deny-run` flags. These flags take precedence over the allow flags. For example, if you allow network access but deny access to a specific domain, the deny flag will take precedence. Deno also provides a `--allow-all` flag that grants all permissions to the script. This **disables** the security sandbox entirely, and should be used with caution. The `--allow-all` has the same security properties as running a script in Node.js (ie none). Definition: `-A, --allow-all` deno run -A script.ts deno run --allow-all script.ts By default, Deno will not generate a stack trace for permission requests as it comes with a hit to performance. Users can enable stack traces with the `DENO_TRACE_PERMISSIONS` environment variable. ### File system access Jump to heading By default, executing code can not read or write arbitrary files on the file system. This includes listing the contents of directories, checking for the existence of a given file, and opening or connecting to Unix sockets. Access to read files is granted using the `--allow-read` (or `-R`) flag, and access to write files is granted using the `--allow-write` (or `-W`) flag. These flags can be specified with a list of paths to allow access to specific files or directories and any subdirectories in them. Definition: `--allow-read[=<PATH>...]` or `-R[=<PATH>...]` # Allow all reads from file system deno run -R script.ts # or deno run --allow-read script.ts # Allow reads from file foo.txt and bar.txt only deno run --allow-read=foo.txt,bar.txt script.ts # Allow reads from any file in any subdirectory of ./node_modules deno run --allow-read=node_modules script.ts Definition: `--deny-read[=<PATH>...]` # Allow reading files in /etc but disallow reading /etc/hosts deno run --allow-read=/etc --deny-read=/etc/hosts script.ts # Deny all read access to disk, disabling permission prompts for reads. deno run --deny-read script.ts Definition: `--allow-write[=<PATH>...]` or `-W[=<PATH>...]` # Allow all writes to file system deno run -W script.ts # or deno run --allow-write script.ts # Allow writes to file foo.txt and bar.txt only deno run --allow-write=foo.txt,bar.txt script.ts Definition: `--deny-write[=<PATH>...]` # Allow reading files in current working directory # but disallow writing to ./secrets directory. deno run --allow-write=./ --deny-write=./secrets script.ts # Deny all write access to disk, disabling permission prompts. deno run --deny-write script.ts Some APIs in Deno are implemented using file system operations under the hood, even though they do not provide direct read/write access to specific files. These APIs read and write to disk but do not require any explicit read/write permissions. Some examples of these APIs are: * `localStorage` * Deno KV * `caches` * `Blob` Because these APIs are implemented using file system operations, users can use them to consume file system resources like storage space, even if they do not have direct access to the file system. During module loading, Deno can load files from disk. This sometimes requires explicit permissions, and sometimes is allowed by default: * All files that are imported from the entrypoint module in a way that they can be statically analyzed are allowed to be read by default. This includes static `import` statements and dynamic `import()` calls where the argument is a string literal that points to a specific file or a directory of files. The full list of files that are in this list can be printed using `deno info <entrypoint>`. * Files that are dynamically imported in a way that can not be statically analyzed require runtime read permissions. * Files inside of a `node_modules/` directory are allowed to be read by default. When fetching modules from the network, or when transpiling code from TypeScript to JavaScript, Deno uses the file system as a cache. This means that file system resources like storage space can be consumed by Deno even if the user has not explicitly granted read/write permissions. ### Network access Jump to heading By default, executing code can not make network requests, open network listeners or perform DNS resolution. This includes making HTTP requests, opening TCP/UDP sockets, and listening for incoming connections on TCP or UDP. Network access is granted using the `--allow-net` flag. This flag can be specified with a list of IP addresses or hostnames to allow access to specific network addresses. Definition: `--allow-net[=<IP_OR_HOSTNAME>...]` or `-N[=<IP_OR_HOSTNAME>...]` # Allow network access deno run -N script.ts # or deno run --allow-net script.ts # Allow network access to github.com and jsr.io deno run --allow-net=github.com,jsr.io script.ts # A hostname at port 80: deno run --allow-net=example.com:80 script.ts # An IPv4 address on port 443 deno run --allow-net=1.1.1.1:443 script.ts # An IPv6 address, all ports allowed deno run --allow-net=[2606:4700:4700::1111] script.ts Definition: `--deny-net[=<IP_OR_HOSTNAME>...]` # Allow access to network, but deny access # to github.com and jsr.io deno run --allow-net --deny-net=github.com,jsr.io script.ts # Deny all network access, disabling permission prompts. deno run --deny-net script.ts During module loading, Deno can load modules from the network. By default Deno allows loading modules from the following locations using both static and dynamic imports, without requiring explicit network access: * `https://deno.land/` * `https://jsr.io/` * `https://esm.sh/` * `https://raw.githubusercontent.com` * `https://gist.githubusercontent.com` These locations are trusted "public good" registries that are not expected to enable data exfiltration through URL paths. You can add more trusted registries using the `--allow-imports` flag. In addition Deno allows importing any NPM package through `npm:` specifiers. Deno also sends requests to `https://dl.deno.land/` at most once a day to check for updates to the Deno CLI. This can be disabled using `DENO_NO_UPDATE_CHECK=1` environment var. ### Environment variables Jump to heading By default, executing code can not read or write environment variables. This includes reading environment variables, and setting new values. Access to environment variables is granted using the `--allow-env` flag. This flag can be specified with a list of environment variables to allow access to specific environment variables. Starting with Deno v2.1, you can now specify suffix wildcards to allow “scoped” access to environmental variables. Definition: `--allow-env[=<VARIABLE_NAME>...]` or `-E[=<VARIABLE_NAME>...]` # Allow access to all environment variables deno run -E script.ts # or deno run --allow-env script.ts # Allow HOME and FOO environment variables deno run --allow-env=HOME,FOO script.ts # Allow access to all environment variables starting with AWS_ deno run --allow-env="AWS_*" script.ts Definition: `--deny-env[=<VARIABLE_NAME>...]` # Allow all environment variables except # AWS_ACCESS_KEY_ID and AWS_SECRET_ACCESS_KEY. deno run \ --allow-env \ --deny-env=AWS_ACCESS_KEY_ID,AWS_SECRET_ACCESS_KEY \ script.ts # Deny all access to env variables, disabling permission prompts. deno run --deny-env script.ts > Note for Windows users: environment variables are case insensitive on Windows, so Deno also matches them case insensitively (on Windows only). Deno reads certain environment variables on startup, such as `DENO_DIR` and `NO_COLOR` (see the full list). The value of the `NO_COLOR` environment variable is visible to all code running in the Deno runtime, regardless of whether the code has been granted permission to read environment variables. ### System Information Jump to heading By default, executing code can not access system information, such as the operating system release, system uptime, load average, network interfaces, and system memory information. Access to system information is granted using the `--allow-sys` flag. This flag can be specified with a list of allowed interfaces from the following list: `hostname`, `osRelease`, `osUptime`, `loadavg`, `networkInterfaces`, `systemMemoryInfo`, `uid`, and `gid`. These strings map to functions in the `Deno` namespace that provide OS info, like Deno.systemMemoryInfo. Definition: `--allow-sys[=<API_NAME>...]` or `-S[=<API_NAME>...]` # Allow all system information APIs deno run -S script.ts # or deno run --allow-sys script.ts # Allow systemMemoryInfo and osRelease APIs deno run --allow-sys="systemMemoryInfo,osRelease" script.ts Definition: `--deny-sys[=<API_NAME>...]` # Allow accessing all system information but "networkInterfaces" deno run --allow-sys --deny-sys="networkInterfaces" script.ts # Deny all access to system information, disabling permission prompts. deno run --deny-sys script.ts ### Subprocesses Jump to heading Code executing inside of a Deno runtime can not spawn subprocesses by default, as this would constitute a violation of the principle that code can not escalate its privileges without user consent. Deno provides a mechanism for executing subprocesses, but this requires explicit permission from the user. This is done using the `--allow-run` flag. Any subprocesses you spawn from your program run independently from the permissions granted to the parent process. This means the child processes can access system resources regardless of the permissions you granted to the Deno process that spawned it. This is often referred to as privilege escalation. Because of this, make sure you carefully consider if you want to grant a program `--allow-run` access: it essentially invalidates the Deno security sandbox. If you really need to spawn a specific executable, you can reduce the risk by limiting which programs a Deno process can start by passing specific executable names to the `--allow-run` flag. Definition: `--allow-run[=<PROGRAM_NAME>...]` # Allow running all subprocesses deno run --allow-run script.ts # Allow running "curl" and "whoami" subprocesses deno run --allow-run="curl,whoami" script.ts Caution You probably don't ever want to use `--allow-run=deno` unless the parent process has `--allow-all`, as being able to spawn a `deno` process means the script can spawn another `deno` process with full permissions. Definition: `--deny-run[=<PROGRAM_NAME>...]` # Allow running running all programs, but "whoami" and "ps". deno run --allow-run --deny-run="whoami,ps" script.ts # Deny all access for spawning subprocessing, disabling # permission prompts. deno run --deny-run script.ts By default `npm` packages will not have their post-install scripts executed during installation (like with `deno install`), as this would allow arbitrary code execution. When running with the `--allow-scripts` flag, post-install scripts for npm packages will be executed as a subprocess. ### FFI (Foreign Function Interface) Jump to heading Deno provides an FFI mechanism for executing code written in other languages, such as Rust, C, or C++, from within a Deno runtime. This is done using the `Deno.dlopen` API, which can load shared libraries and call functions from them. By default, executing code can not use the `Deno.dlopen` API, as this would constitute a violation of the principle that code can not escalate it's privileges without user consent. In addition to `Deno.dlopen`, FFI can also be used via Node-API (NAPI) native addons. These are also not allowed by default. Both `Deno.dlopen` and NAPI native addons require explicit permission using the `--allow-ffi` flag. This flag can be specified with a list of files or directories to allow access to specific dynamic libraries. _Like subprocesses, dynamic libraries are not run in a sandbox and therefore do not have the same security restrictions as the Deno process they are being loaded into. Therefore, use with extreme caution._ Definition: `--allow-ffi[=<PATH>...]` # Allow loading dynamic all libraries deno run --allow-ffi script.ts # Allow loading dynamic libraries from a specific path deno run --allow-ffi=./libfoo.so script.ts Definition: `--deny-ffi[=<PATH>...]` # Allow loading all dynamic libraries, but ./libfoo.so deno run --allow-ffi --deny-ffi=./libfoo.so script.ts # Deny loading all dynamic libraries, disabling permission prompts. deno run --deny-ffi script.ts ### Importing from the Web Jump to heading Allow importing code from the Web. By default Deno limits hosts you can import code from. This is true for both static and dynamic imports. If you want to dynamically import code, either using the `import()` or the `new Worker()` APIs, additional permissions need to be granted. Importing from the local file system requires `--allow-read`, but Deno also allows to import from `http:` and `https:` URLs. In such case you will need to specify an explicit `--allow-import` flag: # allow importing code from `https://example.com` $ deno run --allow-import=example.com main.ts By default Deno allows importing sources from following hosts: * `deno.land` * `esm.sh` * `jsr.io` * `cdn.jsdelivr.net` * `raw.githubusercontent.com` * `gist.githubusercontent.com` **Imports are only allowed using HTTPS** This allow list is applied by default for static imports, and by default to dynamic imports if the `--allow-import` flag is specified. # allow dynamically importing code from `https://deno.land` $ deno run --allow-import main.ts Note that specifying an allow list for `--allow-import` will override the list of default hosts. ## Evaluation of code Jump to heading Deno sets no limits on the execution of code at the same privilege level. This means that code executing in a Deno runtime can use `eval`, `new Function`, or even dynamic import or web workers to execute **arbitrary** code with the same privilege level as the code that called `eval`, `new Function`, or the dynamic import or web worker. This code can be hosted on the network, be in a local file (if read permissions are granted), or be stored as plain text in a string inside of the code that called `eval`, `new Function`, or the dynamic import or web worker. ## Executing untrusted code Jump to heading While Deno provides security features that are designed to protect the host machine and network from harm, untrusted code is still scary. When executing untrusted code, it is important to have more than one layer of defense. Some suggestions for executing untrusted code are outlined below, and we recommend using all of these when executing arbitrary untrusted code: * Run `deno` with limited permissions and determine upfront what code actually needs to run (and prevent more code being loaded using `--frozen` lockfile and `--cached-only`). * Use OS provided sandboxing mechanisms like `chroot`, `cgroups`, `seccomp`, etc. * Use a sandboxed environment like a VM or MicroVM (gVisor, Firecracker, etc). --- ## Page: https://docs.deno.com/runtime/fundamentals/modules/ Deno uses ECMAScript modules as its default module system to align with modern JavaScript standards and to promote a more efficient and consistent development experience. It's the official standard for JavaScript modules, allows for better tree-shaking, improved tooling integration, and native support across different environments. By adopting ECMAScript modules, Deno ensures compatibility with the ever-evolving JavaScript ecosystem. For developers, this means a streamlined and predictable module system that avoids the complexities associated with legacy module formats like CommonJS. ## Importing modules Jump to heading In this example the `add` function is imported from a local `calc.ts` module. calc.ts export function add(a: number, b: number): number { return a + b; } main.ts // imports the `calc.ts` module next to this file import { add } from "./calc.ts"; console.log(add(1, 2)); // 3 You can run this example by calling `deno run main.ts` in the directory that contains both `main.ts` and `calc.ts`. With ECMAScript modules, local import specifiers must always include the full file extension. It cannot be omitted. example.ts // WRONG: missing file extension import { add } from "./calc"; // CORRECT: includes file extension import { add } from "./calc.ts"; ## Import attributes Jump to heading Deno supports the `with { type: "json" }` import attribute syntax for importing JSON files: import data from "./data.json" with { type: "json" }; console.log(data.property); // Access JSON data as an object This is the only import attribute type currently supported in Deno. Support for `type: text` and `type: bytes` is being considered for future updates, and currently waiting on the Module Harmony proposal. ## Importing third party modules and libraries Jump to heading When working with third-party modules in Deno, use the same `import` syntax as you do for local code. Third party modules are typically imported from a remote registry and start with `jsr:` , `npm:` or `https://`. main.ts import { camelCase } from "jsr:@luca/cases@1.0.0"; import { say } from "npm:cowsay@1.6.0"; import { pascalCase } from "https://deno.land/x/case/mod.ts"; Deno recommends JSR, the modern JavaScript registry, for third party modules. There, you'll find plenty of well documented ES modules for your projects, including the Deno Standard Library. You can read more about Deno's support for npm packages here. ## Managing third party modules and libraries Jump to heading Typing out the module name with the full version specifier can become tedious when importing them in multiple files. You can centralize management of remote modules with an `imports` field in your `deno.json` file. We call this `imports` field the **import map**, which is based on the Import Maps Standard. deno.json { "imports": { "@luca/cases": "jsr:@luca/cases@^1.0.0", "cowsay": "npm:cowsay@^1.6.0", "cases": "https://deno.land/x/case/mod.ts" } } With remapped specifiers, the code looks cleaner: main.ts import { camelCase } from "@luca/cases"; import { say } from "cowsay"; import { pascalCase } from "cases"; The remapped name can be any valid specifier. It's a very powerful feature in Deno that can remap anything. Learn more about what the import map can do here. ## Differentiating between `imports` or `importMap` in `deno.json` and `--import-map` option Jump to heading The Import Maps Standard requires two entries for each module: one for the module specifier and another for the specifier with a trailing `/`. This is because the standard allows only one entry per module specifier, and the trailing `/` indicates that the specifier refers to a directory. For example, when using the `--import-map import_map.json` option, the `import_map.json` file must include both entries for each module (note the use of `jsr:/@std/async` instead of `jsr:@std/async`): import\_map.json { "imports": { "@std/async": "jsr:@std/async@^1.0.0", "@std/async/": "jsr:/@std/async@^1.0.0/" } } An `import_map.json` file referenced by the `importMap` field in `deno.json` behaves exactly the same as using the `--import-map` option, with the same requirements for including both entries for each module as shown above. In contrast, `deno.json` extends the import maps standard. When you use the imports field in `deno.json`, you only need to specify the module specifier without the trailing `/`: deno.json { "imports": { "@std/async": "jsr:@std/async@^1.0.0" } } ## Adding dependencies with `deno add` Jump to heading The installation process is made easy with the `deno add` subcommand. It will automatically add the latest version of the package you requested to the `imports` section in `deno.json`. # Add the latest version of the module to deno.json $ deno add jsr:@luca/cases Add @luca/cases - jsr:@luca/cases@1.0.0 deno.json { "imports": { "@luca/cases": "jsr:@luca/cases@^1.0.0" } } You can also specify an exact version: # Passing an exact version $ deno add jsr:@luca/cases@1.0.0 Add @luca/cases - jsr:@luca/cases@1.0.0 Read more in `deno add` reference. You can also remove dependencies using `deno remove`: $ deno remove @luca/cases Remove @luca/cases deno.json { "imports": {} } Read more in `deno remove` reference. ## Package Versions Jump to heading It is possible to specify a version range for the package you are importing. This is done using the `@` symbol followed by a version range specifier, and follows the semver versioning scheme. For example: @scopename/mypackage # highest version @scopename/mypackage@16.1.0 # exact version @scopename/mypackage@16 # highest 16.x version >= 16.0.0 @scopename/mypackage@^16.1.0 # highest 16.x version >= 16.1.0 @scopename/mypackage@~16.1.0 # highest 16.1.x version >= 16.1.0 Here is an overview of all the ways you can specify a version or a range: | Symbol | Description | Example | | --- | --- | --- | | `1.2.3` | An exact version. Only this specific version will be used. | `1.2.3` | | `^1.2.3` | Compatible with version 1.2.3. Allows updates that do not change the leftmost non-zero digit. For example, `1.2.4` and `1.3.0` are allowed, but `2.0.0` is not. | `^1.2.3` | | `~1.2.3` | Approximately equivalent to version 1.2.3. Allows updates to the patch version. For example, `1.2.4` is allowed, but `1.3.0` is not. | `~1.2.3` | | `>=1.2.3` | Greater than or equal to version 1.2.3. Any version `1.2.3` or higher is allowed. | `>=1.2.3` | | `<=1.2.3` | Less than or equal to version 1.2.3. Any version `1.2.3` or lower is allowed. | `<=1.2.3` | | `>1.2.3` | Greater than version 1.2.3. Only versions higher than `1.2.3` are allowed. | `>1.2.3` | | `<1.2.3` | Less than version 1.2.3. Only versions lower than `1.2.3` are allowed. | `<1.2.3` | | `1.2.x` | Any patch version within the minor version 1.2. For example, `1.2.0`, `1.2.1`, etc. | `1.2.x` | | `1.x` | Any minor and patch version within the major version 1. For example, `1.0.0`, `1.1.0`, `1.2.0`, etc. | `1.x` | | `*` | Any version is allowed. | `*` | ## HTTPS imports Jump to heading Deno also supports import statements that reference HTTP/HTTPS URLs, either directly: import { Application } from "https://deno.land/x/oak/mod.ts"; or part of your `deno.json` import map: { "imports": { "oak": "https://deno.land/x/oak/mod.ts" } } Supporting HTTPS imports enables us to support the following JavaScript CDNs, as they provide URL access to JavaScript modules: * deno.land/x * esm.sh * unpkg.com HTTPS imports are useful if you have a small, often single file, Deno project that doesn't require any other configuration. With HTTPS imports, you can avoid having a `deno.json` file at all. It is **not** advised to use this style of import in larger applications however, as you may end up with version conflicts (where different files use different version specifiers). Info Use HTTPS imports with caution, and only **from trusted sources**. If the server is compromised, it could serve malicious code to your application. They can also cause versioning issues if you import different versions in different files. HTTPS imports remain supported, **but we recommend using a package registry for the best experience.** ## Overriding dependencies Jump to heading Deno provides mechanisms to override dependencies, enabling developers to use custom or local versions of libraries during development or testing. Note: If you need to cache and modify dependencies locally for use across builds, consider vendoring remote modules. ### Overriding local JSR packages Jump to heading For developers familiar with `npm link` in Node.js, Deno provides a similar feature for local JSR packages through the `patch` field in `deno.json`. This allows you to override dependencies with local versions during development without needing to publish them. Example: deno.json { "patch": [ "../some-package-or-workspace" ] } Key points: * The `patch` field accepts paths to directories containing JSR packages or workspaces. If you reference a single package within a workspace, the entire workspace will be included. * This feature is only respected in the workspace root. Using `patch` elsewhere will trigger warnings. * Currently, `patch` is limited to JSR packages. Attempting to patch `npm` packages will result in a warning with no effect. Limitations: * `npm` package overrides are not supported yet. This is planned for future updates. * Git-based dependency overrides are unavailable. * The `patch` field requires proper configuration in the workspace root. * This feature is experimental and may change based on user feedback. ### Overriding NPM packages Jump to heading We plan to support NPM packages with the patch functionality described above, but until then if you have a `node_modules` directory, `npm link` can be used without change to accheive the same effect. This is typically done with `{ "nodeModulesDir": "manual" }` set in the `deno.json` file. See also the documentation on `node_modules` ### Overriding HTTPS imports Jump to heading Deno also allows overriding HTTPS imports through the `importMap` field in `deno.json`. This feature is particularly useful when substituting a remote dependency with a local patched version for debugging or temporary fixes. Example: deno.json { "imports": { "example/": "https://deno.land/x/example/" }, "scopes": { "https://deno.land/x/example/": { "https://deno.land/x/my-library@1.0.0/mod.ts": "./patched/mod.ts" } } } Key points: * The `scopes` field in the import map allows you to redirect specific imports to alternative paths. * This is commonly used to override remote dependencies with local files for testing or development purposes. * Import maps apply only to the root of your project. Nested import maps within dependencies are ignored. ## Vendoring remote modules Jump to heading If your project has external dependencies, you may want to store them locally to avoid downloading them from the internet every time you build your project. This is especially useful when building your project on a CI server or in a Docker container, or patching or otherwise modifying the remote dependencies. Deno offers this functionality through a setting in your `deno.json` file: { "vendor": true } Add the above snippet to your `deno.json` file and Deno will cache all dependencies locally in a `vendor` directory when the project is run, or you can optionally run the `deno install --entrypoint` command to cache the dependencies immediately: deno install --entrypoint main.ts You can then run the application as usual with `deno run`: deno run main.ts After vendoring, you can run `main.ts` without internet access by using the `--cached-only` flag, which forces Deno to use only locally available modules. For more advanced overrides, such as substituting dependencies during development, see Overriding dependencies. ## Publishing modules Jump to heading Any Deno program that defines an export can be published as a module. This allows other developers to import and use your code in their own projects. Modules can be published to: * JSR - recommended, supports TypeScript natively and auto-generates documentation for you * npm - use dnt to create the npm package * deno.land/x - for HTTPS imports, use JSR instead if possible ## Reloading modules Jump to heading By default, Deno uses a global cache directory (`DENO_DIR`) for downloaded dependencies. This cache is shared across all projects. You can force deno to refetch and recompile modules into the cache using the `--reload` flag. # Reload everything deno run --reload my_module.ts # Reload a specific module deno run --reload=jsr:@std/fs my_module.ts ## Using only cached modules Jump to heading To force Deno to only use modules that have previously been cached, use the `--cached-only` flag: deno run --cached-only mod.ts This will fail if there are any dependencies in the dependency tree for mod.ts which are not yet cached. ## Integrity Checking and Lock Files Jump to heading Imagine your module relies on a remote module located at https://some.url/a.ts. When you compile your module for the first time, `a.ts` is fetched, compiled, and cached. This cached version will be used until you either run your module on a different machine (such as in a production environment) or manually reload the cache (using a command like `deno install --reload`). But what if the content at `https://some.url/a.ts` changes? This could result in your production module running with different dependency code than your local module. To detect this, Deno uses integrity checking and lock files. Deno uses a `deno.lock` file to check external module integrity. To opt into a lock file, either: 1. Create a `deno.json` file in the current or an ancestor directory, which will automatically create an additive lockfile at `deno.lock`. Note that this can be disabled by specifying the following in your deno.json: deno.json { "lock": false } 2. Use the `--lock` flag to enable and specify lock file checking. ### Frozen lockfile Jump to heading By default, Deno uses an additive lockfile, where new dependencies are added to the lockfile instead of erroring. This might not be desired in certain scenarios (ex. CI pipelines or production environments) where you'd rather have Deno error when it encounters a dependency it's never seen before. To enable this, you can specify the `--frozen` flag or set the following in a deno.json file: deno.json { "lock": { "frozen": true } } When running a deno command with a frozen lockfile, any attempts to update the lockfile with new contents will cause the command to exit with an error showing the modifications that would have been made. If you wish to update the lockfile, specify `--frozen=false` on the command line to temporarily disable the frozen lockfile. ### Changing lockfile path Jump to heading The lockfile path can be configured by specifying `--lock=deps.lock` or the following in a Deno configuration file: deno.json { "lock": { "path": "deps.lock" } } ## Private repositories Jump to heading Note If you're looking for private npm registries and `.npmrc` support, visit the npm support page. There may be instances where you want to load a remote module that is located in a _private_ repository, like a private repository on GitHub. Deno supports sending bearer tokens when requesting a remote module. Bearer tokens are the predominant type of access token used with OAuth 2.0, and are broadly supported by hosting services (e.g., GitHub, GitLab, Bitbucket, Cloudsmith, etc.). ### DENO\_AUTH\_TOKENS Jump to heading The Deno CLI will look for an environment variable named `DENO_AUTH_TOKENS` to determine what authentication tokens it should consider using when requesting remote modules. The value of the environment variable is in the format of _n_ number of tokens delimited by a semi-colon (`;`) where each token is either: * a bearer token in the format of `{token}@{hostname[:port]}` or * basic auth data in the format of `{username}:{password}@{hostname[:port]}` For example, a single token for `deno.land` would look something like this: DENO_AUTH_TOKENS=a1b2c3d4e5f6@deno.land or: DENO_AUTH_TOKENS=username:password@deno.land And multiple tokens would look like this: DENO_AUTH_TOKENS=a1b2c3d4e5f6@deno.land;f1e2d3c4b5a6@example.com:8080;username:password@deno.land When Deno goes to fetch a remote module, where the hostname matches the hostname of the remote module, Deno will set the `Authorization` header of the request to the value of `Bearer {token}` or `Basic {base64EncodedData}`. This allows the remote server to recognize that the request is an authorized request tied to a specific authenticated user, and provide access to the appropriate resources and modules on the server. ### GitHub Jump to heading To access private repositories on GitHub, you would need to issue yourself a _personal access token_. You do this by logging into GitHub and going under _Settings -> Developer settings -> Personal access tokens_:  You would then choose to _Generate new token_ and give your token a description and appropriate access to the `repo` scope. The `repo` scope will enable reading file contents (more on scopes in the GitHub docs):  And once created GitHub will display the new token a single time, the value of which you would want to use in the environment variable: 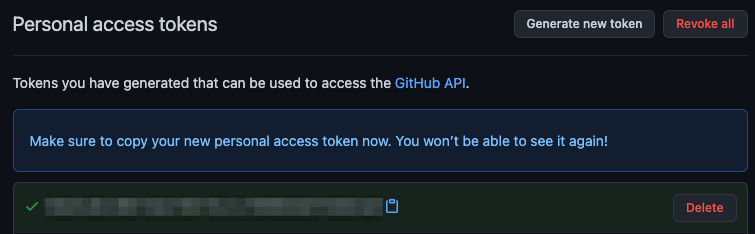 In order to access modules that are contained in a private repository on GitHub, you would want to use the generated token in the `DENO_AUTH_TOKENS` environment variable scoped to the `raw.githubusercontent.com` hostname. For example: DENO_AUTH_TOKENS=a1b2c3d4e5f6@raw.githubusercontent.com This should allow Deno to access any modules that the user who the token was issued for has access to. When the token is incorrect, or the user does not have access to the module, GitHub will issue a `404 Not Found` status, instead of an unauthorized status. So if you are getting errors that the modules you are trying to access are not found on the command line, check the environment variable settings and the personal access token settings. In addition, `deno run -L debug` should print out a debug message about the number of tokens that are parsed out of the environment variable. It will print an error message if it feels any of the tokens are malformed. It won't print any details about the tokens for security purposes. --- ## Page: https://docs.deno.com/runtime/fundamentals/configuration/ You can configure Deno using a `deno.json` file. This file can be used to configure the TypeScript compiler, linter, formatter, and other Deno tools. The configuration file supports `.json` and `.jsonc` extensions. Deno will automatically detect a `deno.json` or `deno.jsonc` configuration file if it's in your current working directory or parent directories. The `--config` flag can be used to specify a different configuration file. ## package.json support Jump to heading Deno also supports a `package.json` file for compatibility with Node.js projects. If you have a Node.js project, it is not necessary to create a `deno.json` file. Deno will use the `package.json` file to configure the project. If both a `deno.json` and `package.json` file are present in the same directory, Deno will understand dependencies specified in both `deno.json` and `package.json`; and use the `deno.json` file for Deno-specific configurations. Read more about Node compatibility in Deno. ## Dependencies Jump to heading The `"imports"` field in your `deno.json` allows you to specify dependencies used in your project. You can use it to map bare specifiers to URLs or file paths making it easier to manage dependencies and module resolution in your applications. For example, if you want to use the `assert` module from the standard library in your project, you could use this import map: deno.json { "imports": { "@std/assert": "jsr:@std/assert@^1.0.0", "chalk": "npm:chalk@5" } } Then your script can use the bare specifier `std/assert`: script.ts import { assertEquals } from "@std/assert"; import chalk from "chalk"; assertEquals(1, 2); console.log(chalk.yellow("Hello world")); You can also use a `"dependencies"` field in `package.json`: package.json { "dependencies": { "express": "express@^1.0.0" } } script.ts import express from "express"; const app = express(); Note that this will require you to run `deno install`. Read more about module imports and dependencies ### Custom path mappings Jump to heading The import map in `deno.json` can be used for more general path mapping of specifiers. You can map an exact specifiers to a third party module or a file directly, or you can map a part of an import specifier to a directory. deno.jsonc { "imports": { // Map to an exact file "foo": "./some/long/path/foo.ts", // Map to a directory, usage: "bar/file.ts" "bar/": "./some/folder/bar/" } } Usage: import * as foo from "foo"; import * as bar from "bar/file.ts"; Path mapping of import specifies is commonly used in larger code bases for brevity. To use your project root for absolute imports: deno.json { "imports": { "/": "./", "./": "./" } } main.ts import { MyUtil } from "/util.ts"; This causes import specifiers starting with `/` to be resolved relative to the import map's URL or file path. ## Tasks Jump to heading The `tasks` field in your `deno.json` file is used to define custom commands that can be executed with the `deno task` command and allows you to tailor commands and permissions to the specific needs of your project. It is similar to the `scripts` field in a `package.json` file, which is also supported. deno.json { "tasks": { "start": "deno run --allow-net --watch=static/,routes/,data/ dev.ts", "test": "deno test --allow-net", "lint": "deno lint" } } package.json { "scripts": { "dev": "vite dev", "build": "vite build" } } To execute a task, use the `deno task` command followed by the task name. For example: deno task start deno task test deno task lint deno task dev deno task build Read more about `deno task`. ## Linting Jump to heading The `lint` field in the `deno.json` file is used to configure the behavior of Deno’s built-in linter. This allows you to specify which files to include or exclude from linting, as well as customize the linting rules to suit your project’s needs. For example: deno.json { "lint": { "include": ["src/"], "exclude": ["src/testdata/", "src/fixtures/**/*.ts"], "rules": { "tags": ["recommended"], "include": ["ban-untagged-todo"], "exclude": ["no-unused-vars"] } } } This configuration will: * only lint files in the `src/` directory, * not lint files in the `src/testdata/` directory or any TypeScript files in the `src/fixtures/` directory. * specify that the recommended linting rules should be applied, * add the `ban-untagged-todo`, and * exclude the `no-unused-vars` rule. You can find a full list of available linting rules in the List of rules documentation page. Read more about linting with Deno. ## Formatting Jump to heading The `fmt` field in the `deno.json` file is used to configure the behavior of Deno’s built-in code formatter. This allows you to customize how your code is formatted, ensuring consistency across your project, making it easier to read and collaborate on. Here are the key options you can configure: deno.json { "fmt": { "useTabs": true, "lineWidth": 80, "indentWidth": 4, "semiColons": true, "singleQuote": true, "proseWrap": "preserve", "include": ["src/"], "exclude": ["src/testdata/", "src/fixtures/**/*.ts"] } } This configuration will: * use tabs instead of spaces for indentation, * limit lines to 80 characters, * use an indentation width of 4 spaces, * add semicolons to the end of statements, * use single quotes for strings, * preserve prose wrapping, * format files in the `src/` directory, * exclude files in the `src/testdata/` directory and any TypeScript files in the `src/fixtures/` directory. Read more about formatting your code with Deno. ## Lockfile Jump to heading The `lock` field in the `deno.json` file is used to specify configuration of the lock file that Deno uses to ensure the integrity of your dependencies. A lock file records the exact versions and integrity hashes of the modules your project depends on, ensuring that the same versions are used every time the project is run, even if the dependencies are updated or changed remotely. deno.json { "lock": { "path": "./deno.lock", "frozen": true } } This configuration will: * specify lockfile location at `./deno.lock` (this is the default and can be omitted) * tell Deno that you want to error out if any dependency changes Deno uses lockfile by default, you can disable it with following configuration: deno.json { "lock": false } ## Node modules directory Jump to heading By default Deno uses a local `node_modules` directory if you have a `package.json` file in your project directory. You can control this behavior using the `nodeModulesDir` field in the `deno.json` file. deno.json { "nodeModulesDir": "auto" } You can set this field to following values: | Value | Behavior | | --- | --- | | `"none"` | Don't use a local `node_modules` directory. Instead use global cache in `$DENO_DIR` that is automatically kept up to date by Deno. | | `"auto"` | Use a local `node_modules` directory. The directory is automatically created and kept up to date by Deno. | | `"manual"` | Use a local `node_modules` directory. User must keep this directory up to date manually, eg. using `deno install` or `npm install`. | It is not required to specify this setting, the following defaults are applied: * `"none"` if there is no `package.json` file in your project directory * `"manual"` if there is a `package.json` file in your project directory When using workspaces, this setting can only be used in the workspace root. Specifying it in any of the members will result in warnings. The `"manual"` setting will only be applied automatically if there's a `package.json` file in the workspace root. ## TypeScript compiler options Jump to heading The `compilerOptions` field in the `deno.json` file is used to configure TypeScript compiler settings for your Deno project. This allows you to customize how TypeScript code is compiled, ensuring it aligns with your project’s requirements and coding standards. Info Deno recommends the default TypeScript configuration. This will help when sharing code. See also Configuring TypeScript in Deno. ## Unstable features Jump to heading The `unstable` field in a `deno.json` file is used to enable specific unstable features for your Deno project. These features are still in development and not yet part of the stable API. By listing features in the `unstable` array, you can experiment with and use these new capabilities before they are officially released. deno.json { "unstable": ["cron", "kv", "webgpu"] } Learn more. ## include and exclude Jump to heading Many configurations (ex. `lint`, `fmt`) have an `include` and `exclude` property for specifying the files to include. ### include Jump to heading Only the paths or patterns specified here will be included. { "lint": { // only format the src/ directory "include": ["src/"] } } ### exclude Jump to heading The paths or patterns specified here will be excluded. { "lint": { // don't lint the dist/ folder "exclude": ["dist/"] } } This has HIGHER precedence than `include` and will win over `include` if a path is matched in both `include` and `exclude`. You may wish to exclude a directory, but include a sub directory. In Deno 1.41.2+, you may un-exclude a more specific path by specifying a negated glob below the more general exclude: { "fmt": { // don't format the "fixtures" directory, // but do format "fixtures/scripts" "exclude": [ "fixtures", "!fixtures/scripts" ] } } ### Top level exclude Jump to heading If there's a directory you never want Deno to fmt, lint, type check, analyze in the LSP, etc., then specify it in the top level exclude array: { "exclude": [ // exclude the dist folder from all sub-commands and the LSP "dist/" ] } Sometimes you may find that you want to un-exclude a path or pattern that's excluded in the top level-exclude. In Deno 1.41.2+, you may un-exclude a path by specifying a negated glob in a more specific config: { "fmt": { "exclude": [ // format the dist folder even though it's // excluded at the top level "!dist" ] }, "exclude": [ "dist/" ] } ### Publish - Override .gitignore Jump to heading The `.gitignore` is taken into account for the `deno publish` command. In Deno 1.41.2+, you can opt-out of excluded files ignored in the _.gitignore_ by using a negated exclude glob: .gitignore dist/ .env deno.json { "publish": { "exclude": [ // include the .gitignored dist folder "!dist/" ] } } Alternatively, explicitly specifying the gitignored paths in an `"include"` works as well: { "publish": { "include": [ "dist/", "README.md", "deno.json" ] } } ## An example `deno.json` file Jump to heading { "compilerOptions": { "allowJs": true, "lib": ["deno.window"], "strict": true }, "lint": { "include": ["src/"], "exclude": ["src/testdata/", "src/fixtures/**/*.ts"], "rules": { "tags": ["recommended"], "include": ["ban-untagged-todo"], "exclude": ["no-unused-vars"] } }, "fmt": { "useTabs": true, "lineWidth": 80, "indentWidth": 4, "semiColons": false, "singleQuote": true, "proseWrap": "preserve", "include": ["src/"], "exclude": ["src/testdata/", "src/fixtures/**/*.ts"] }, "lock": false, "nodeModulesDir": "auto", "unstable": ["webgpu"], "test": { "include": ["src/"], "exclude": ["src/testdata/", "src/fixtures/**/*.ts"] }, "tasks": { "start": "deno run --allow-read main.ts" }, "imports": { "oak": "jsr:@oak/oak" }, "exclude": [ "dist/" ] } This is an example of a `deno.json` file that configures the TypeScript compiler options, linter, formatter, node modules directory, etc. For a full list of available fields and configurations, see the Deno configuration file schema. ## JSON schema Jump to heading A JSON schema file is available for editors to provide autocompletion. The file is versioned and available at: https://github.com/denoland/deno/blob/main/cli/schemas/config-file.v1.json ## Proxies Jump to heading Deno supports proxies for module downloads and the fetch API. Proxy configuration is read from environment variables: HTTP\_PROXY, HTTPS\_PROXY and NO\_PROXY. If you are using Windows - if environment variables are not found Deno falls back to reading proxies from the registry. --- ## Page: https://docs.deno.com/runtime/fundamentals/standard_library/ Deno provides a standard library written in TypeScript. It is a set of standard modules that can be reused by programs, allowing you to focus on your application logic rather than "reinventing the wheel" for common tasks. All of the modules in the Deno Standard Library are audited by the core team and are guaranteed to work with Deno, ensuring consistency and reliability. See all packages on Many packages in the Deno Standard Library are also compatible with Node.js, Cloudflare Workers, and other JavaScript environments. This allows you to write code that can be run in multiple environments without modification. The standard library is hosted on JSR and is available at: https://jsr.io/@std. Packages are documented, tested, and include usage examples. You can browse the full list of standard library packages on JSR, but here are a few examples: * @std/path: Path manipulation utilities, akin to Node.js's `path` module. * @std/jsonc: (De)serialization of JSON with comments * @std/encoding: Utilities for encoding and decoding common formats like hex, base64, and variant ## Versioning and stability Each package of the standard library is independently versioned. Packages follow semantic versioning rules. You can use version pinning or version ranges to prevent major releases from affecting your code. ## Importing standard library modules To install packages from the Deno Standard Library, you can use the `deno add` subcommand to add the package to your `deno.json` import map. deno add jsr:@std/fs jsr:@std/path The `deno.json` `imports` field will be updated to include those imports: { "imports": { "@std/fs": "jsr:@std/fs@^1.0.2", "@std/path": "jsr:@std/path@^1.0.3" } } You can then import these packages in your source code: import { copy } from "@std/fs"; import { join } from "@std/path"; await copy("foo.txt", join("dist", "foo.txt")); Alternatively, you can import modules directly with the `jsr:` specifier: import { copy } from "jsr:@std/fs@^1.0.2"; import { join } from "jsr:@std/path@^1.0.3"; await copy("foo.txt", join("dist", "foo.txt")); ## Node.js compatibility The Deno Standard Library is designed to be compatible with Node.js, Cloudflare Workers, and other JavaScript environments. The standard library is written in TypeScript and compiled to JavaScript, so it can be used in any JavaScript environment. npx jsr add @std/fs @std/path Running this command will add those packages to your `package.json`: { "dependencies": { "@std/fs": "npm:@jsr/std__fs@^1.0.2", "@std/path": "npm:@jsr/std__path@^1.0.3" } } Then you can import them in your source code, just like you would with any other Node.js package. TypeScript will automatically find the type definitions for these packages. import { copy } from "@std/fs"; import { join } from "@std/path"; await copy("foo.txt", join("dist", "foo.txt")); --- ## Page: https://docs.deno.com/runtime/fundamentals/web_dev/ Deno offers a secure and developer-friendly environment for building web applications, making your web dev a delightful experience. 1. Deno has secure defaults, meaning it requires explicit permission for file, network, and environment access, reducing the risk of security vulnerabilities. 2. Deno has built-in TypeScript support, allowing you to write TypeScript code without additional configuration or tooling. 3. Deno comes with a standard library that includes modules for common tasks like HTTP servers, file system operations, and more. Most likely, if you're building a more complex application, you'll be interacting with Deno through a web framework. ## React/Next Jump to heading React is a popular JavaScript library for building user interfaces. To use React with Deno, you can use the popular web framework Next.js. To get started with Next.js in Deno, you can create a new next app and run it immediately with Deno: deno run -A npm:create-next-app@latest my-next-app cd my-next-app deno task dev This will create a new Next.js app with TypeScript and run it with Deno. You can then open your browser to `http://localhost:3000` to see your new app, and start editing `page.tsx` to see your changes live. To better understand how JSX and Deno interface under the hood, read on here. ## Fresh Jump to heading Fresh is the most popular web framework for Deno. It uses a model where you send no JavaScript to clients by default. To get started with a Fresh app, you can use the following command and follow the cli prompts to create your app: deno run -A -r https://fresh.deno.dev cd my-fresh-app deno task start This will create a new Fresh app and run it with Deno. You can then open your browser to `http://localhost:8000` to see your new app. Edit `/routes/index.tsx` to see your changes live. Fresh does the majority of its rendering on the server, and the client is only responsible for re-rendering small islands of interactivity. This means the developer explicitly opts in to client side rendering for specific components. ## Astro Jump to heading Astro is a static site generator that allows developers to create fast and lightweight websites. To get started with Astro, you can use the following command to create a new Astro site: deno run -A npm:create-astro my-astro-site cd my-astro-site deno task dev This will create a new Astro site and run it with Deno. You can then open your browser to `http://localhost:4321` to see your new site. Edit `/src/pages/index.astro` to see your changes live. ## Vite Jump to heading Vite is a web dev build tool that serves your code via native ES modules, which can be run directly in the browser. Vite is a great choice for building modern web applications with Deno. To get started with Vite, you can use the following command to create a new Vite app: deno run -A npm:create-vite@latest cd my-vite-app deno install deno task dev ## Lume Jump to heading Lume is a static site generator for Deno that is inspired by other static site generators such Jekyll or Eleventy. To get started with Lume, you can use the following command to create a new Lume site: mkdir my-lume-site cd my-lume-site deno run -A https://lume.land/init.ts deno task serve ## Docusaurus Jump to heading Docusaurus is a static site generator that is optimized for technical documentation websites. To get started with Docusaurus, you can use the following command to create a new Docusaurus site: deno run -A npm:create-docusaurus@latest my-website classic cd my-website deno task start ## Hono Jump to heading Hono is a light-weight web app framework in the tradition of Express and Sinatra. To get started with Hono, you can use the following command to create a new Hono app: deno run -A npm:create-hono@latest cd my-hono-app deno task start This will create a new Hono app and run it with Deno. You can then open your browser to `http://localhost:8000` to see your new app. ## Oak Jump to heading Oak is a middleware framework for handling HTTP with Deno. Oak is the glue between your frontend application and a potential database or other data sources (e.g. REST APIs, GraphQL APIs). Oak offers additional functionality over the native Deno HTTP server, including a basic router, JSON parser, middlewares, plugins, etc. To get started with Oak, make a file called `server.ts` and add the following: import { Application } from "jsr:@oak/oak/application"; import { Router } from "jsr:@oak/oak/router"; const router = new Router(); router.get("/", (ctx) => { ctx.response.body = `<!DOCTYPE html> <html> <head><title>Hello oak!</title><head> <body> <h1>Hello oak!</h1> </body> </html> `; }); const app = new Application(); const port = 8080; app.use(router.routes()); app.use(router.allowedMethods()); console.log(`Server running on http://localhost:${port}`); app.listen({ port: port }); Run the server with the following command: deno run --allow-net server.ts ## Node projects Jump to heading Deno will run your Node.js projects out the box. Check out our guide on migrating your Node.js project to Deno. --- ## Page: https://docs.deno.com/runtime/fundamentals/testing/ Deno provides a built-in test runner for writing and running tests in both JavaScript and TypeScript. This makes it easy to ensure your code is reliable and functions as expected without needing to install any additional dependencies or tools. The `deno test` runner allows you fine-grained control over permissions for each test, ensuring that code does not do anything unexpected. In addition to the built-in test runner, you can also use other test runners from the JS ecosystem, such as Jest, Mocha, or AVA, with Deno. We will not cover these in this document however. ## Writing Tests Jump to heading To define a test in Deno, you use the `Deno.test()` function. Here are some examples: my\_test.ts import { assertEquals } from "jsr:@std/assert"; Deno.test("simple test", () => { const x = 1 + 2; assertEquals(x, 3); }); import { delay } from "jsr:@std/async"; Deno.test("async test", async () => { const x = 1 + 2; await delay(100); assertEquals(x, 3); }); Deno.test({ name: "read file test", permissions: { read: true }, fn: () => { const data = Deno.readTextFileSync("./somefile.txt"); assertEquals(data, "expected content"); }, }); If you prefer a "jest-like" `expect` style of assertions, the Deno standard library provides an `expect` function that can be used in place of `assertEquals`: my\_test.ts import { expect } from "jsr:@std/expect"; import { add } from "./add.js"; Deno.test("add function adds two numbers correctly", () => { const result = add(2, 3); expect(result).toBe(5); }); ## Running Tests Jump to heading To run your tests, use the `deno test` subcommand. If run without a file name or directory name, this subcommand will automatically find and execute all tests in the current directory (recursively) that match the glob `{*_,*.,}test.{ts, tsx, mts, js, mjs, jsx}`. # Run all tests in the current directory and all sub-directories deno test # Run all tests in the util directory deno test util/ # Run just my_test.ts deno test my_test.ts # Run test modules in parallel deno test --parallel # Pass additional arguments to the test file that are visible in `Deno.args` deno test my_test.ts -- -e --foo --bar # Provide permission for deno to read from the filesystem, which is necessary # for the final test above to pass deno test --allow-read my_test.ts ## Test Steps Jump to heading Deno also supports test steps, which allow you to break down tests into smaller, manageable parts. This is useful for setup and teardown operations within a test: Deno.test("database operations", async (t) => { using db = await openDatabase(); await t.step("insert user", async () => { // Insert user logic }); await t.step("insert book", async () => { // Insert book logic }); }); ## Command line filtering Jump to heading Deno allows you to run specific tests or groups of tests using the `--filter` option on the command line. This option accepts either a string or a pattern to match test names. Filtering does not affect steps; if a test name matches the filter, all of its steps are executed. Consider the following tests: Deno.test("my-test", () => {}); Deno.test("test-1", () => {}); Deno.test("test-2", () => {}); ### Filtering by string Jump to heading To run all tests that contain the word "my" in their names, use: deno test --filter "my" tests/ This command will execute `my-test` because it contains the word "my". ### Filtering by Pattern Jump to heading To run tests that match a specific pattern, use: deno test --filter "/test-*\d/" tests/ This command will run `test-1` and `test-2` because they match the pattern `test-*` followed by a digit. To indicate that you are using a pattern (regular expression), wrap your filter value with forward slashes `/`, much like JavaScript’s syntax for regular expressions. ### Including and excluding test files in the configuration file Jump to heading You can also filter tests by specifying paths to include or exclude in the Deno configuration file. For example, if you want to only test `src/fetch_test.ts` and `src/signal_test.ts` and exclude everything in `out/`: { "test": { "include": [ "src/fetch_test.ts", "src/signal_test.ts" ] } } Or more likely: { "test": { "exclude": ["out/"] } } ## Test definition selection Jump to heading Deno provides two options for selecting tests within the test definitions themselves: ignoring tests and focusing on specific tests. ### Ignoring/Skipping Tests Jump to heading You can ignore certain tests based on specific conditions using the `ignore` boolean in the test definition. If `ignore` is set to `true`, the test will be skipped. This is useful, for example, if you only want a test to run on a specific operating system. Deno.test({ name: "do macOS feature", ignore: Deno.build.os !== "darwin", // This test will be ignored if not running on macOS fn() { // do MacOS feature here }, }); If you want to ignore a test without passing any conditions, you can use the `ignore()` function from the `Deno.test` object: Deno.test.ignore("my test", () => { // your test code }); ### Only Run Specific Tests Jump to heading If you want to focus on a particular test and ignore the rest, you can use the `only` option. This tells the test runner to run only the tests with `only` set to true. Multiple tests can have this option set. However, if any test is flagged with only, the overall test run will always fail, as this is intended to be a temporary measure for debugging. Deno.test.only("my test", () => { // some test code }); or Deno.test({ name: "Focus on this test only", only: true, // Only this test will run fn() { // test complicated stuff here }, }); ## Failing fast Jump to heading If you have a long-running test suite and wish for it to stop on the first failure, you can specify the `--fail-fast` flag when running the suite. deno test --fail-fast This will cause the test runner to stop execution after the first test failure. ## Reporters Jump to heading Deno includes three built-in reporters to format test output: * `pretty` (default): Provides a detailed and readable output. * `dot`: Offers a concise output, useful for quickly seeing test results. * `junit`: Produces output in JUnit XML format, which is useful for integrating with CI/CD tools. You can specify which reporter to use with the --reporter flag: # Use the default pretty reporter deno test # Use the dot reporter for concise output deno test --reporter=dot # Use the JUnit reporter deno test --reporter=junit Additionally, you can write the JUnit report to a file while still getting human-readable output in the terminal by using the `--junit-path` flag: deno test --junit-path=./report.xml ## Spying, mocking (test doubles), stubbing and faking time Jump to heading The Deno Standard Library provides a set of functions to help you write tests that involve spying, mocking, and stubbing. Check out the @std/testing documentation on JSR for more information on each of these utilities. ## Coverage Jump to heading Deno will collect test coverage into a directory for your code if you specify the `--coverage` flag when starting `deno test`. This coverage information is acquired directly from the V8 JavaScript engine, ensuring high accuracy. This can then be further processed from the internal format into well known formats like `lcov` with the `deno coverage` tool. ## Behavior-Driven Development Jump to heading With the @std/testing/bdd module you can write your tests in a familiar format for grouping tests and adding setup/teardown hooks used by other JavaScript testing frameworks like Jasmine, Jest, and Mocha. The `describe` function creates a block that groups together several related tests. The `it` function registers an individual test case. For example: import { describe, it } from "jsr:@std/testing/bdd"; import { expect } from "jsr:@std/expect"; import { add } from "./add.js"; describe("add function", () => { it("adds two numbers correctly", () => { const result = add(2, 3); expect(result).toBe(5); }); it("handles negative numbers", () => { const result = add(-2, -3); expect(result).toBe(-5); }); }); Check out the documentation on JSR for more information on these functions and hooks. ## Documentation Tests Jump to heading Deno allows you to evaluate code snippets written in JSDoc or markdown files. This ensures the examples in your documentation are up-to-date and functional. ### Example code blocks Jump to heading example.ts /** * # Examples * * ```ts * import { assertEquals } from "jsr:@std/assert/equals"; * * const sum = add(1, 2); * assertEquals(sum, 3); * ``` */ export function add(a: number, b: number): number { return a + b; } The triple backticks mark the start and end of code blocks, the language is determined by the language identifier attribute which may be one of the following: * `js` * `javascript` * `mjs` * `cjs` * `jsx` * `ts` * `typescript` * `mts` * `cts` * `tsx` If no language identifier is specified then the language is inferred from media type of the source document that the code block is extracted from. deno test --doc example.ts The above command will extract this example, turn it into a pseudo test case that looks like below: example.ts$4-10.ts import { assertEquals } from "jsr:@std/assert/equals"; import { add } from "file:///path/to/example.ts"; Deno.test("example.ts$4-10.ts", async () => { const sum = add(1, 2); assertEquals(sum, 3); }); and then run it as a standalone module living in the same directory as the module being documented. Want to type-check only? If you want to type-check your code snippets in JSDoc and markdown files without actually running them, you can use `deno check` command with `--doc` option (for JSDoc) or with `--doc-only` option (for markdown) instead. ### Exported items are automatically imported Jump to heading Looking at the generated test code above, you will notice that it includes the `import` statement to import the `add` function even though the original code block does not have it. When documenting a module, any items exported from the module are automatically included in the generated test code using the same name. Let's say we have the following module: example.ts /** * # Examples * * ```ts * import { assertEquals } from "jsr:@std/assert/equals"; * * const sum = add(ONE, getTwo()); * assertEquals(sum, 3); * ``` */ export function add(a: number, b: number): number { return a + b; } export const ONE = 1; export default function getTwo() { return 2; } This will get converted to the following test case: example.ts$4-10.ts import { assertEquals } from "jsr:@std/assert/equals"; import { add, ONE }, getTwo from "file:///path/to/example.ts"; Deno.test("example.ts$4-10.ts", async () => { const sum = add(ONE, getTwo()); assertEquals(sum, 3); }); ### Skipping code blocks Jump to heading You can skip the evaluation of code blocks by adding the `ignore` attribute. /** * This code block will not be run. * * ```ts ignore * await sendEmail("deno@example.com"); * ``` */ export async function sendEmail(to: string) { // send an email to the given address... } ## Sanitizers Jump to heading The test runner offers several sanitizers to ensure that the test behaves in a reasonable and expected way. ### Resource sanitizer Jump to heading The resource sanitizer ensures that all I/O resources created during a test are closed, to prevent leaks. I/O resources are things like `Deno.FsFile` handles, network connections, `fetch` bodies, timers, and other resources that are not automatically garbage collected. You should always close resources when you are done with them. For example, to close a file: const file = await Deno.open("hello.txt"); // Do something with the file file.close(); // <- Always close the file when you are done with it To close a network connection: const conn = await Deno.connect({ hostname: "example.com", port: 80 }); // Do something with the connection conn.close(); // <- Always close the connection when you are done with it To close a `fetch` body: const response = await fetch("https://example.com"); // Do something with the response await response.body?.cancel(); // <- Always cancel the body when you are done with it, if you didn't consume it otherwise This sanitizer is enabled by default, but can be disabled in this test with `sanitizeResources: false`: Deno.test({ name: "leaky resource test", async fn() { await Deno.open("hello.txt"); }, sanitizeResources: false, }); ### Async operation sanitizer Jump to heading The async operation sanitizer ensures that all async operations started in a test are completed before the test ends. This is important because if an async operation is not awaited, the test will end before the operation is completed, and the test will be marked as successful even if the operation may have actually failed. You should always await all async operations in your tests. For example: Deno.test({ name: "async operation test", async fn() { await new Promise((resolve) => setTimeout(resolve, 1000)); }, }); This sanitizer is enabled by default, but can be disabled with `sanitizeOps: false`: Deno.test({ name: "leaky operation test", fn() { crypto.subtle.digest( "SHA-256", new TextEncoder().encode("a".repeat(100000000)), ); }, sanitizeOps: false, }); ### Exit sanitizer Jump to heading The exit sanitizer ensures that tested code doesn’t call `Deno.exit()`, which could signal a false test success. This sanitizer is enabled by default, but can be disabled with `sanitizeExit: false`. Deno.test({ name: "false success", fn() { Deno.exit(0); }, sanitizeExit: false, }); // This test never runs, because the process exits during "false success" test Deno.test({ name: "failing test", fn() { throw new Error("this test fails"); }, }); ## Snapshot testing Jump to heading The Deno Standard Library includes a snapshot module that allows developers to write tests by comparing values against reference snapshots. These snapshots are serialized representations of the original values and are stored alongside the test files. Snapshot testing enables catching a wide array of bugs with very little code. It is particularly helpful in situations where it is difficult to precisely express what should be asserted, without requiring a prohibitive amount of code, or where the assertions a test makes are expected to change often. ## Tests and Permissions Jump to heading The `permissions` property in the `Deno.test` configuration allows you to specifically deny permissions, but does not grant them. Permissions must be provided when running the test command. When building robust applications, you often need to handle cases where permissions are denied, (for example you may want to write tests to check whether fallbacks have been set up correctly). Consider a situation where you are reading from a file, you may want to offer a fallback value in the case that the function does not have read permission: import { assertEquals } from "jsr:@std/assert"; import getFileText from "./main.ts"; Deno.test({ name: "File reader gets text with permission", permissions: { read: true }, fn: async () => { const result = await getFileText(); console.log(result); assertEquals(result, "the content of the file"); }, }); Deno.test({ name: "File reader falls back to error message without permission", permissions: { read: false }, fn: async () => { const result = await getFileText(); console.log(result); assertEquals(result, "oops don't have permission"); }, }); # Run the tests with read permission deno test --allow-read The permissions object supports detailed configuration: Deno.test({ name: "permission configuration example", permissions: { read: true, // Grant all read permissions // OR read: ["./data", "./config"], // Grant read to specific paths only write: false, // Explicitly deny write permissions net: ["example.com:443"], // Allow specific host:port combinations env: ["API_KEY"], // Allow access to specific env variables run: false, // Deny subprocess execution ffi: false, // Deny loading dynamic libraries hrtime: false, // Deny high-resolution time }, fn() { // Test code that respects these permission boundaries }, }); Remember that any permission not explicitly granted at the command line will be denied, regardless of what's specified in the test configuration. --- ## Page: https://docs.deno.com/runtime/fundamentals/debugging/ Deno supports the V8 Inspector Protocol used by Chrome, Edge and Node.js. This makes it possible to debug Deno programs using Chrome DevTools or other clients that support the protocol (for example VSCode). To activate debugging capabilities run Deno with one of the following flags: * `--inspect` * `--inspect-wait` * `--inspect-brk` ## \--inspect Jump to heading Using the `--inspect` flag will start your program with an inspector server which allows client connections from tools that support the V8 Inspector Protocol, for example Chrome DevTools. Visit `chrome://inspect` in a Chromium derived browser to connect Deno to the inspector server. This allows you to inspect your code, add breakpoints, and step through your code. deno run --inspect your_script.ts Note If you use the `--inspect` flag, the code will start executing immediately. If your program is short, you might not have enough time to connect the debugger before the program finishes execution. In such cases, try running with `--inspect-wait` or `--inspect-brk` flag instead, or add a timeout at the end of your code. ## \--inspect-wait Jump to heading The `--inspect-wait` flag will wait for a debugger to connect before executing your code. deno run --inspect-wait your_script.ts ## \--inspect-brk Jump to heading The `--inspect-brk` flag will wait for a debugger to connect before executing your code and then put a breakpoint in your program as soon as you connect, allowing you to add additional breakpoints or evaluate expressions before resuming execution. **This is the most commonly used inspect flag**. JetBrains and VSCode IDEs use this flag by default. deno run --inspect-brk your_script.ts ## Example with Chrome DevTools Jump to heading Let's try debugging a program using Chrome Devtools. For this, we'll use @std/http/file-server, a static file server. Use the `--inspect-brk` flag to break execution on the first line: $ deno run --inspect-brk -RN jsr:@std/http/file-server Debugger listening on ws://127.0.0.1:9229/ws/1e82c406-85a9-44ab-86b6-7341583480b1 ... In a Chromium derived browser such as Google Chrome or Microsoft Edge, open `chrome://inspect` and click `Inspect` next to target:  It might take a few seconds after opening the DevTools to load all modules.  You might notice that DevTools pauses execution on the first line of `_constants.ts` instead of `file_server.ts`. This is expected behavior caused by the way ES modules are evaluated in JavaScript (`_constants.ts` is left-most, bottom-most dependency of `file_server.ts` so it is evaluated first). At this point all source code is available in the DevTools, so let's open up `file_server.ts` and add a breakpoint there; go to "Sources" pane and expand the tree: 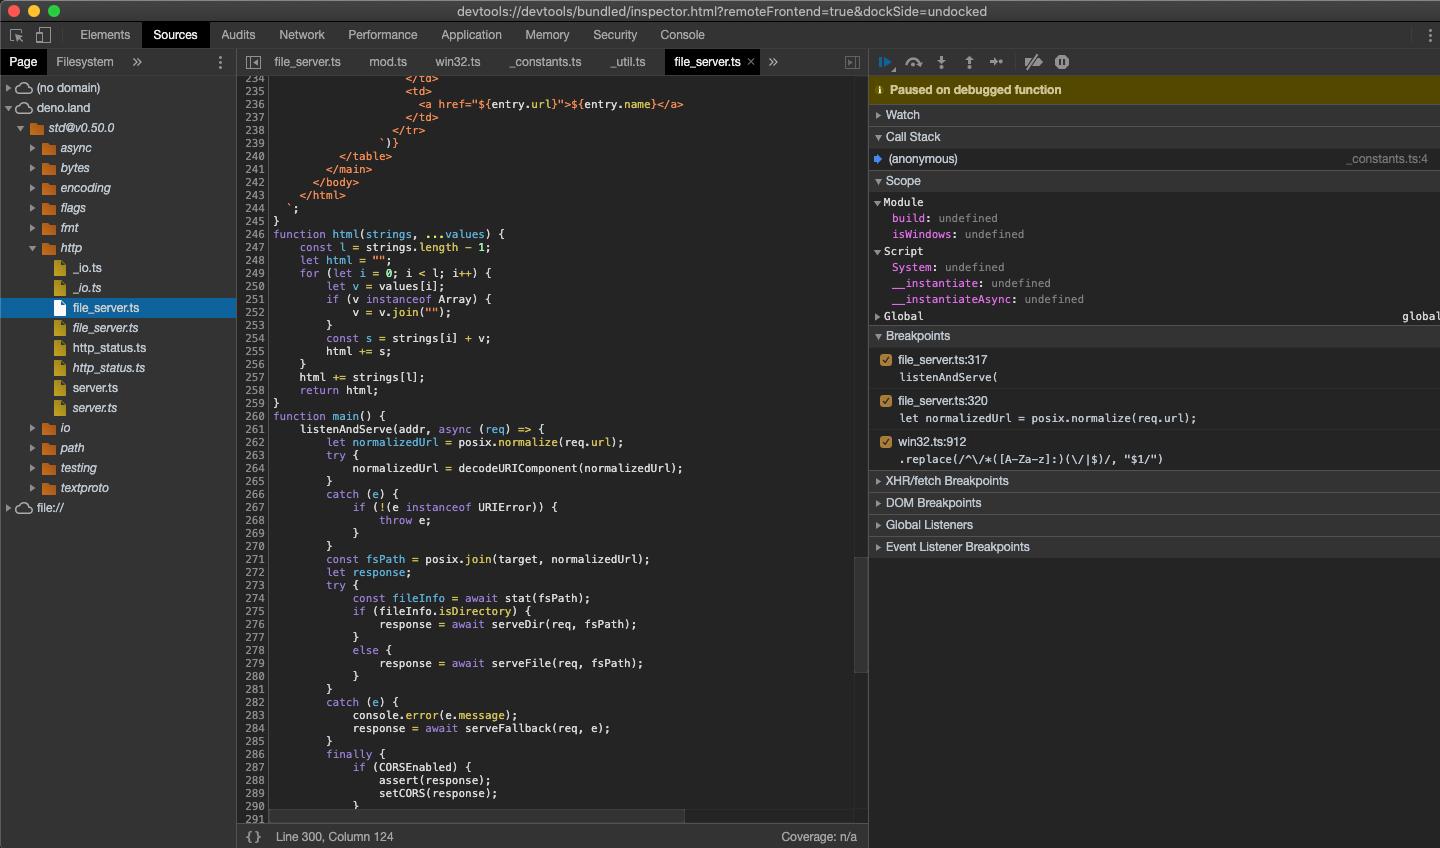 _Looking closely you'll find duplicate entries for each file; one written regularly and one in italics. The former is compiled source file (so in the case of `.ts` files it will be emitted JavaScript source), while the latter is a source map for the file._ Next, add a breakpoint in the `listenAndServe` method: 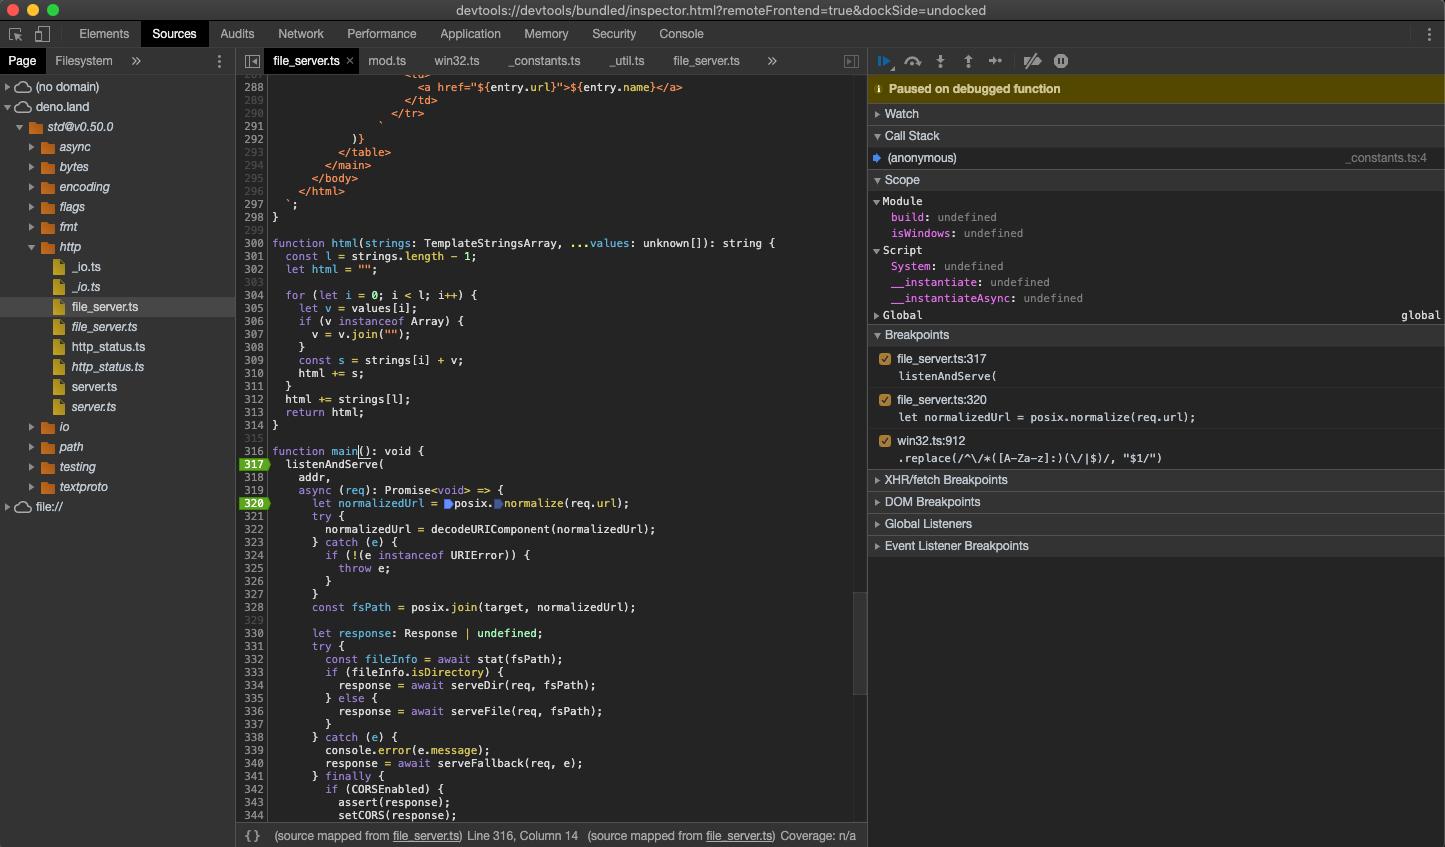 As soon as we've added the breakpoint, DevTools automatically opens up the source map file, which allows us step through the actual source code that includes types. Now that we have our breakpoints set, we can resume the execution of our script so that we can inspect an incoming request. Hit the "Resume script execution" button to do so. You might even need to hit it twice! Once our script is running, try send a request and inspect it in Devtools: curl http://0.0.0.0:4507/ 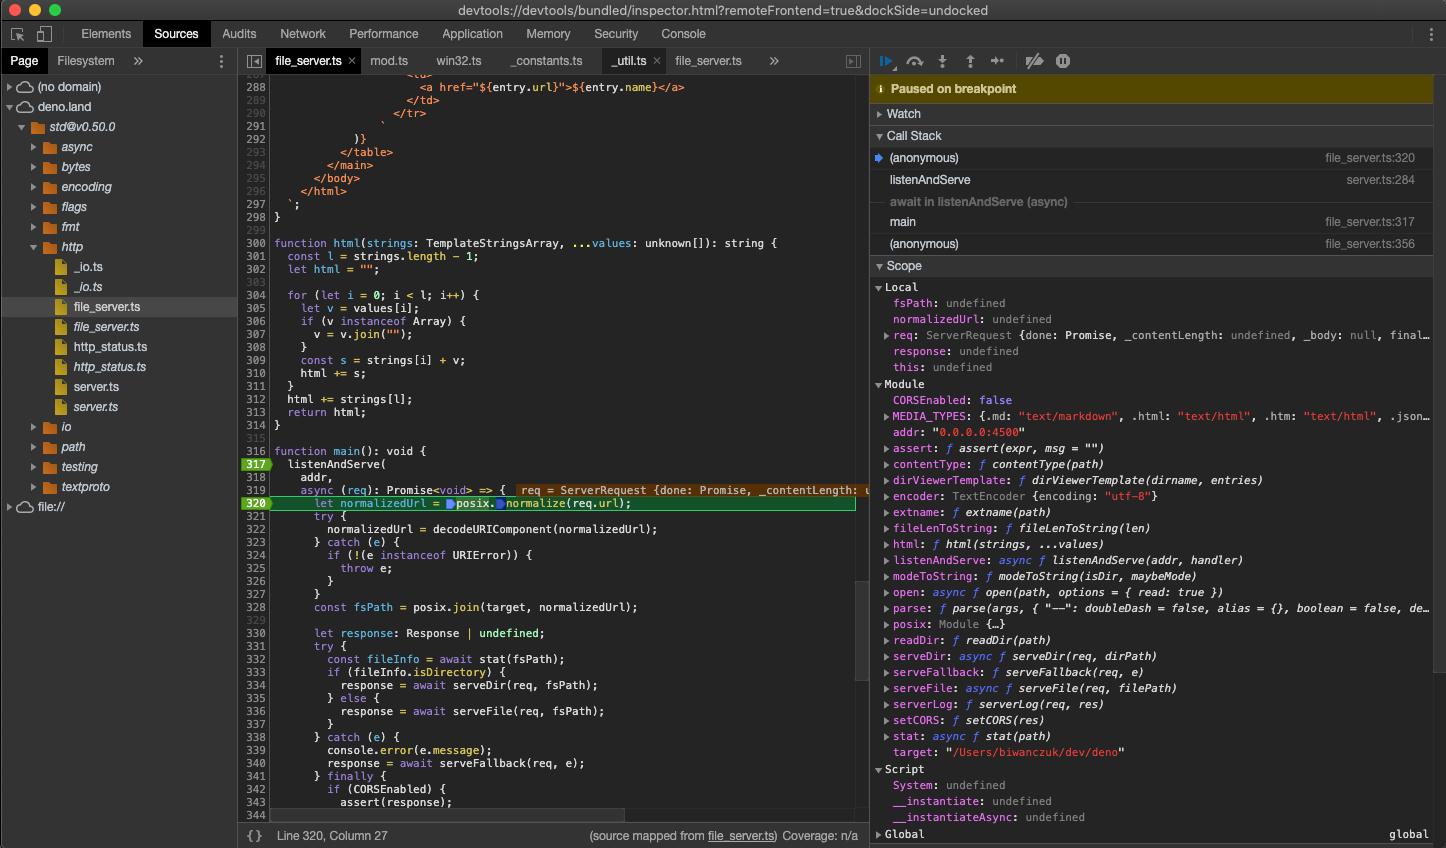 At this point we can introspect the contents of the request and go step-by-step to debug the code. ## VSCode Jump to heading Deno can be debugged using VSCode. This is best done with help from the official `vscode_deno` extension. Documentation for this can be found here. ## JetBrains IDEs Jump to heading _**Note**: make sure you have this Deno plugin installed and enabled in Preferences / Settings | Plugins. For more information, see this blog post._ You can debug Deno using your JetBrains IDE by right-clicking the file you want to debug and selecting the `Debug 'Deno: <file name>'` option. 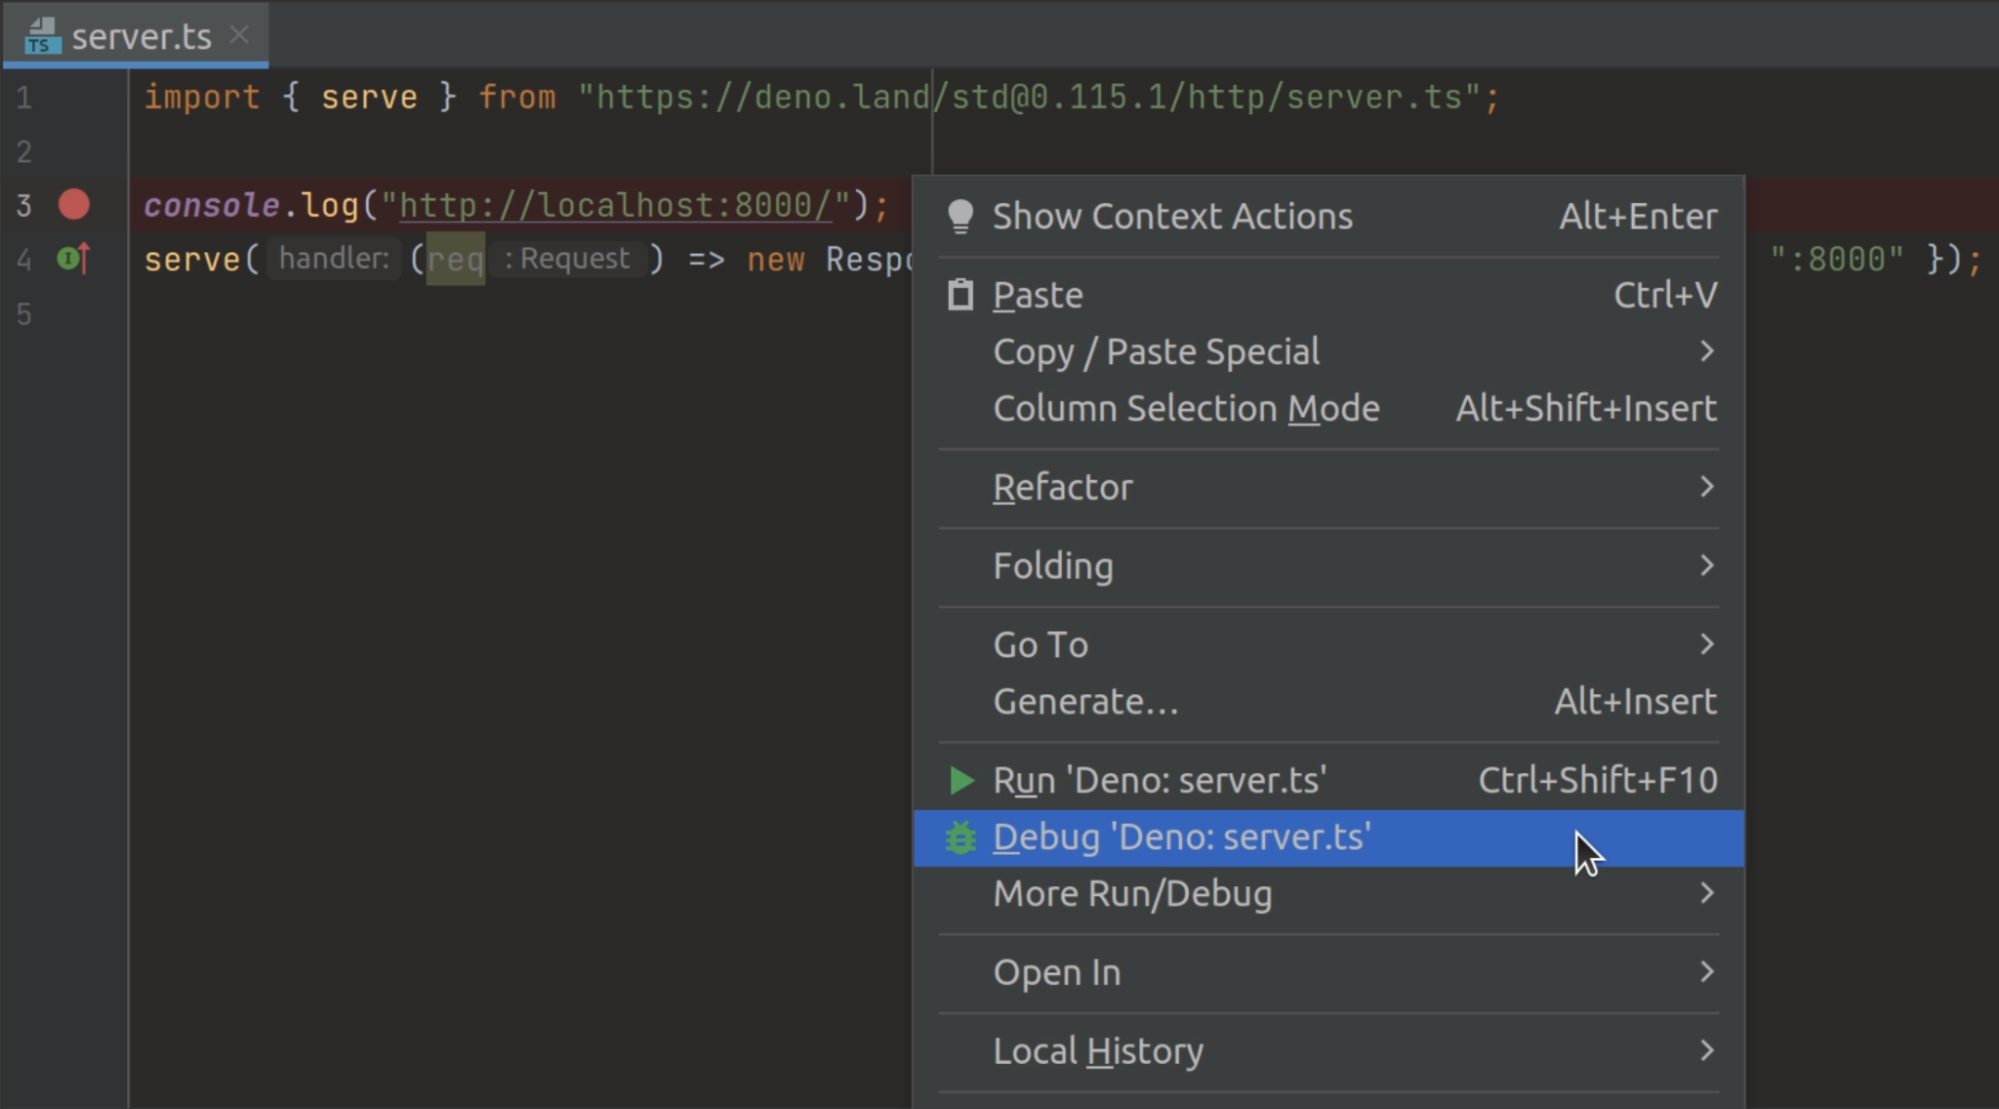 This will create a run/debug configuration with no permission flags set. If you want to configure them, open your run/debug configuration and add the required flags to the `Command` field. ## \--log-level=debug Jump to heading If you're having trouble connecting to the inspector, you can use the `--log-level=debug` flag to get more information about what's happening. This will show you information like module resolution, network requests, and other permission checks. deno run --inspect-brk --log-level=debug your_script.ts ## \--strace-ops Jump to heading Deno ops are an RPC mechanism between JavaScript and Rust. They provide functionality like file I/O, networking, and timers to JavaScript. The `--strace-ops` flag will print out all ops that are being executed by Deno when a program is run along with their timings. deno run --strace-ops your_script.ts Each op should have a `Dispatch` and a `Complete` event. The time between these two events is the time taken to execute the op. This flag can be useful for performance profiling, debugging hanging programs, or understanding how Deno works under the hood. --- ## Page: https://docs.deno.com/runtime/fundamentals/workspaces/ Deno supports workspaces, also known as "monorepos", which allow you to manage multiple related and interdependent packages simultaneously. A "workspace" is a collection of folders containing `deno.json` or `package.json` configuration files. The root `deno.json` file defines the workspace: deno.json { "workspace": ["./add", "./subtract"] } This configures a workspace with `add` and `subtract` members, which are directories expected to have `deno.json(c)` and/or `package.json` files. Naming Deno uses `workspace` rather than npm's `workspaces` to represent a singular workspace with multiple members. ## Example Jump to heading Let's expand on the `deno.json` workspace example and see its functionality. The file hierarchy looks like this: / ├── deno.json ├── main.ts ├── add/ │ ├── deno.json │ └── mod.ts └── subtract/ ├── deno.json └── mod.ts There are two workspace members (add and subtract), each with `mod.ts` files. There is also a root `deno.json` and a `main.ts`. The top-level `deno.json` configuration file defines the workspace and a top-level import map applied to all members: deno.json { "workspace": ["./add", "./subtract"], "imports": { "chalk": "npm:chalk@5" } } The root `main.ts` file uses the `chalk` bare specifier from the import map and imports the `add` and `subtract` functions from the workspace members. Note that it imports them using `@scope/add` and `@scope/subtract`, even though these are not proper URLs and aren't in the import map. How are they resolved? main.ts import chalk from "chalk"; import { add } from "@scope/add"; import { subtract } from "@scope/subtract"; console.log("1 + 2 =", chalk.green(add(1, 2))); console.log("2 - 4 =", chalk.red(subtract(2, 4))); In the `add/` subdirectory, we define a `deno.json` with a `"name"` field, which is important for referencing the workspace member. The `deno.json` file also contains example configurations, like turning off semicolons when using `deno fmt`. add/deno.json { "name": "@scope/add", "version": "0.1.0", "exports": "./mod.ts", "fmt": { "semiColons": false } } add/mod.ts export function add(a: number, b: number): number { return a + b; } The `subtract/` subdirectory is similar but does not have the same `deno fmt` configuration. subtract/deno.json { "name": "@scope/subtract", "version": "0.3.0", "exports": "./mod.ts" } subtract/mod.ts import { add } from "@scope/add"; export function subtract(a: number, b: number): number { return add(a, b * -1); } Let's run it: > deno run main.ts 1 + 2 = 3 2 - 4 = -2 There's a lot to unpack here, showcasing some of the Deno workspace features: 1. This monorepo consists of two packages, placed in `./add` and `./subtract` directories. 2. By using `name` and `version` options in members' `deno.json` files, it's possible to refer to them using "bare specifiers" across the whole workspace. In this case, the packages are named `@scope/add` and `@scope/subtract`, where `scope` is the "scope" name you can choose. With these two options, it's not necessary to use long and relative file paths in import statements. 3. `npm:chalk@5` package is a shared dependency in the entire workspace. Workspace members "inherit" `imports` of the workspace root, allowing to easily manage a single version of a dependency across the codebase. 4. `add` subdirectory specifies in its `deno.json` that `deno fmt` should not apply semicolons when formatting the code. This makes for a much smoother transition for existing projects, without a need to change tens or hundreds of files in one go. * * * Deno workspaces are flexible and can work with Node packages. To make migration for existing Node.js projects easier you can have both Deno-first and Node-first packages in a single workspace. ## How Deno Resolves Workspace Dependencies Jump to heading When running a project in a workspace that imports from another workspace member, Deno follows these steps to resolve the dependencies: 1. Deno starts in the directory of the executing project (e.g., project A) 2. It looks up in the parent directory for a root `deno.json` file 3. If found, it checks for the `workspace` property in that file 4. For each import statement in project A, Deno checks if the import matches a package name defined in any workspace member's `deno.json` 5. If a matching package name is found, Deno verifies that the containing directory is listed in the root workspace configuration 6. The import is then resolved to the correct file using the `exports` field in the workspace member's `deno.json` For example, given this structure: / ├── deno.json # workspace: ["./project-a", "./project-b"] ├── project-a/ │ ├── deno.json # name: "@scope/project-a" │ └── mod.ts # imports from "@scope/project-b" └── project-b/ ├── deno.json # name: "@scope/project-b" └── mod.ts When `project-a/mod.ts` imports from `"@scope/project-b"`, Deno: 1. Sees the import statement 2. Checks parent directory's `deno.json` 3. Finds `project-b` in the workspace array 4. Verifies `project-b/deno.json` exists and has matching package name 5. Resolves the import using `project-b`'s exports ### Important Note for Containerization Jump to heading When containerizing a workspace member that depends on other workspace members, you must include: 1. The root `deno.json` file 2. All dependent workspace packages 3. The same directory structure as your development environment For example, if dockerizing `project-a` above, your Dockerfile should: COPY deno.json /app/deno.json COPY project-a/ /app/project-a/ COPY project-b/ /app/project-b/ This preserves the workspace resolution mechanism that Deno uses to find and import workspace dependencies. ### Multiple package entries Jump to heading So far, our package only has a single entry. This is fine for simple packages, but often you'll want to have multiple entries that group relevant aspects of your package. This can be done by passing an `object` instead of a `string` to `exports`: my-package/deno.json { "name": "@scope/my-package", "version": "0.3.0", "exports": { ".": "./mod.ts", "./foo": "./foo.ts", "./other": "./dir/other.ts" } } The `"."` entry is the default entry that's picked when importing `@scope/my-package`. Therefore, the above `deno.json` example provides the folowing entries: * `@scope/my-package` * `@scope/my-package/foo` * `@scope/my-package/other` ### Migrating from `npm` workspaces Jump to heading Deno workspaces support using a Deno-first package from an existing npm package. In this example, we mix and match a Deno library called `@deno/hi`, with a Node.js library called `@deno/log` that we developed a couple years back. We'll need to include a `deno.json` configuration file in the root: deno.json { "workspace": { "members": ["hi"] } } Alongside our existing package.json workspace: package.json { "workspaces": ["log"] } The workspace currently has a log npm package: log/package.json { "name": "@deno/log", "version": "0.5.0", "type": "module", "main": "index.js" } log/index.js export function log(output) { console.log(output); } Let's create an `@deno/hi` Deno-first package that imports `@deno/log`: hi/deno.json { "name": "@deno/hi", "version": "0.2.0", "exports": "./mod.ts", "imports": { "log": "npm:@deno/log@^0.5" } } hi/mod.ts import { log } from "log"; export function sayHiTo(name: string) { log(`Hi, ${name}!`); } Now, we can write a `main.ts` file that imports and calls `hi`: main.ts import { sayHiTo } from "@deno/hi"; sayHiTo("friend"); $ deno run main.ts Hi, friend! You can even have both `deno.json` and `package.json` in your existing Node.js package. Additionally, you could remove the package.json in the root and specify the npm package in the deno.json workspace members. That allows you to gradually migrate to Deno, without putting a lot of upfront work. For example, you can add `log/deno.json` to configure Deno's linter and formatter: { "fmt": { "semiColons": false }, "lint": { "rules": { "exclude": ["no-unused-vars"] } } } Running `deno fmt` in the workspace, will format the `log` package to not have any semicolons, and `deno lint` won't complain if you leave an unused var in one of the source files. ## Configuring built-in Deno tools Jump to heading Some configuration options only make sense at the root of the workspace, eg. specifying `nodeModulesDir` option in one of the members is not available and Deno will warn if an option needs to be applied at the workspace root. Here's a full matrix of various `deno.json` options available at the workspace root and its members: | Option | Workspace | Package | Notes | | --- | --- | --- | --- | | compilerOptions | ✅ | ❌ | For now we only allow one set of compilerOptions per workspace. This is because multiple changes to both deno\_graph and the TSC integration are required to allow more than one set. Also we’d have to determine what compilerOptions apply to remote dependencies. We can revisit this in the future. | | importMap | ✅ | ❌ | Exclusive with imports and scopes per config file. Additionally, it is not supported to have importMap in the workspace config, and imports in the package config. | | imports | ✅ | ✅ | Exclusive with importMap per config file. | | scopes | ✅ | ❌ | Exclusive with importMap per config file. | | exclude | ✅ | ✅ | | | lint.include | ✅ | ✅ | | | lint.exclude | ✅ | ✅ | | | lint.files | ⚠️ | ❌ | Deprecated | | lint.rules.tags | ✅ | ✅ | Tags are merged by appending package to workspace list. Duplicates are ignored. | | lint.rules.include | | | | | lint.rules.exclude | ✅ | ✅ | Rules are merged per package, with package taking priority over workspace (package include is stronger than workspace exclude). | | lint.report | ✅ | ❌ | Only one reporter can be active at a time, so allowing different reporters per workspace would not work in the case where you lint files spanning multiple packages. | | fmt.include | ✅ | ✅ | | | fmt.exclude | ✅ | ✅ | | | fmt.files | ⚠️ | ❌ | Deprecated | | fmt.useTabs | ✅ | ✅ | Package takes priority over workspace. | | fmt.indentWidth | ✅ | ✅ | Package takes priority over workspace. | | fmt.singleQuote | ✅ | ✅ | Package takes priority over workspace. | | fmt.proseWrap | ✅ | ✅ | Package takes priority over workspace. | | fmt.semiColons | ✅ | ✅ | Package takes priority over workspace. | | fmt.options.\* | ⚠️ | ❌ | Deprecated | | nodeModulesDir | ✅ | ❌ | Resolution behaviour must be the same in the entire workspace. | | vendor | ✅ | ❌ | Resolution behaviour must be the same in the entire workspace. | | tasks | ✅ | ✅ | Package tasks take priority over workspace. cwd used is the cwd of the config file that the task was inside of. | | test.include | ✅ | ✅ | | | test.exclude | ✅ | ✅ | | | test.files | ⚠️ | ❌ | Deprecated | | publish.include | ✅ | ✅ | | | publish.exclude | ✅ | ✅ | | | bench.include | ✅ | ✅ | | | bench.exclude | ✅ | ✅ | | | bench.files | ⚠️ | ❌ | Deprecated | | lock | ✅ | ❌ | Only a single lock file may exist per resolver, and only resolver may exist per workspace, so conditional enablement of the lockfile per package does not make sense. | | unstable | ✅ | ❌ | For simplicities sake, we do not allow unstable flags, because a lot of the CLI assumes that unstable flags are immutable and global to the entire process. Also weird interaction with DENO\_UNSTABLE\_\* flags. | | name | ❌ | ✅ | | | version | ❌ | ✅ | | | exports | ❌ | ✅ | | | workspace | ✅ | ❌ | Nested workspaces are not supported. | --- ## Page: https://docs.deno.com/runtime/fundamentals/linting_and_formatting/ In an ideal world, your code is always clean, consistent, and free of pesky errors. That’s the promise of Deno’s built-in linting and formatting tools. By integrating these features directly into the runtime, Deno eliminates the need for external dependencies and complex configurations in your projects. These inbuilt tools are fast and performant, not only saving time but also ensuring that every line of code adheres to best practices. With `deno fmt` and `deno lint`, you can focus on writing great code, knowing that Deno has your back. It’s like having a vigilant assistant who keeps your codebase in top shape, allowing you to concentrate on what truly matters: building amazing applications. ## Linting Explore all the lint rules Linting is the process of analyzing your code for potential errors, bugs, and stylistic issues. Deno’s built-in linter, `deno lint`, supports recommended set of rules from ESLint to provide comprehensive feedback on your code. This includes identifying syntax errors, enforcing coding conventions, and highlighting potential issues that could lead to bugs. To run the linter, use the following command in your terminal: deno lint By default, `deno lint` analyzes all TypeScript and JavaScript files in the current directory and its subdirectories. If you want to lint specific files or directories, you can pass them as arguments to the command. For example: deno lint src/ This command will lint all files in the `src/` directory. The linter can be configured in a `deno.json` file. You can specify custom rules, plugins, and settings to tailor the linting process to your needs. ### Linting rules You can view and search the list of available rules and their usage on the List of rules documentation page. ## Formatting Formatting is the process of automatically adjusting the layout of your code to adhere to a consistent style. Deno’s built-in formatter, `deno fmt`, uses the powerful dprint engine to ensure that your code is always clean, readable, and consistent. To format your code, simply execute the following command in your terminal: deno fmt By default, `deno fmt` formats all TypeScript and JavaScript files in the current directory and its subdirectories. If you want to format specific files or directories, you can pass them as arguments to the command. For example: deno fmt src/ This command will format all files in the `src/` directory. ### Checking your formatting The `deno fmt --check` command is used to verify if your code is properly formatted according to Deno’s default formatting rules. Instead of modifying the files, it checks them and reports any formatting issues. This is particularly useful for integrating into continuous integration (CI) pipelines or pre-commit hooks to ensure code consistency across your project. If there are formatting issues, `deno fmt --check` will list the files that need formatting. If all files are correctly formatted, it will simply exit without any output. ### Integration in CI You can add `deno fmt --check` to your CI pipeline to automatically check for formatting issues. For example, in a GitHub Actions workflow: jobs: build: runs-on: ubuntu-latest steps: - uses: actions/checkout@v3 - uses: denoland/setup-deno@v2 with: deno-version: v2.x - run: deno fmt --check This ensures that any code changes adhere to the project’s formatting standards before being merged. ### Available options | Rule | Description | Default | possible values | | --- | --- | --- | --- | | indent-width | Define indentation width | **2** | number | | line-width | Define maximum line width | **80** | number | | no-semicolons | Don't use semicolons except where necessary | **false** | true, false | | prose-wrap | Define how prose should be wrapped | **always** | always, never, preserve | | single-quote | Use single quotes | **false** | true, false | | unstable-component | Enable formatting Svelte, Vue, Astro and Angular files | | | | unstable-sql | Enable formatting SQL files | | | | use-tabs | Use tabs instead of spaces for indentation | **false** | true, false | The formatter can be configured in a `deno.json` file. You can specify custom settings to tailor the formatting process to your needs. --- ## Page: https://docs.deno.com/runtime/fundamentals/http_server/ HTTP servers are the backbone of the web, allowing you to access websites, download files, and interact with web services. They listen for incoming requests from clients (like web browsers) and send back responses. When you build your own HTTP server, you have complete control over its behavior and can tailor it to your specific needs. You may be using it for local development, to serve your HTML, CSS, and JS files, or building a REST API - having your own server lets you define endpoints, handle requests and manage data. ## Deno's built-in HTTP server Jump to heading Deno has a built in HTTP server API that allows you to write HTTP servers. The `Deno.serve` API supports HTTP/1.1 and HTTP/2. ### A "Hello World" server Jump to heading The `Deno.serve` function takes a handler function that will be called for each incoming request, and is expected to return a response (or a promise resolving to a response). Here is an example of a server that returns a "Hello, World!" response for each request: server.ts Deno.serve((_req) => { return new Response("Hello, World!"); }); The handler can also return a `Promise<Response>`, which means it can be an `async` function. To run this server, you can use the `deno run` command: deno run --allow-net server.ts ### Listening on a specific port Jump to heading By default `Deno.serve` will listen on port `8000`, but this can be changed by passing in a port number in options bag as the first or second argument: server.ts // To listen on port 4242. Deno.serve({ port: 4242 }, handler); // To listen on port 4242 and bind to 0.0.0.0. Deno.serve({ port: 4242, hostname: "0.0.0.0" }, handler); ### Inspecting the incoming request Jump to heading Most servers will not answer with the same response for every request. Instead they will change their answer depending on various aspects of the request: the HTTP method, the headers, the path, or the body contents. The request is passed in as the first argument to the handler function. Here is an example showing how to extract various parts of the request: Deno.serve(async (req) => { console.log("Method:", req.method); const url = new URL(req.url); console.log("Path:", url.pathname); console.log("Query parameters:", url.searchParams); console.log("Headers:", req.headers); if (req.body) { const body = await req.text(); console.log("Body:", body); } return new Response("Hello, World!"); }); Caution Be aware that the `req.text()` call can fail if the user hangs up the connection before the body is fully received. Make sure to handle this case. Do note this can happen in all methods that read from the request body, such as `req.json()`, `req.formData()`, `req.arrayBuffer()`, `req.body.getReader().read()`, `req.body.pipeTo()`, etc. ### Responding with real data Jump to heading Most servers do not respond with "Hello, World!" to every request. Instead they might respond with different headers, status codes, and body contents (even body streams). Here is an example of returning a response with a 404 status code, a JSON body, and a custom header: server.ts Deno.serve((req) => { const body = JSON.stringify({ message: "NOT FOUND" }); return new Response(body, { status: 404, headers: { "content-type": "application/json; charset=utf-8", }, }); }); ### Responding with a stream Jump to heading Response bodies can also be streams. Here is an example of a response that returns a stream of "Hello, World!" repeated every second: server.ts Deno.serve((req) => { let timer: number; const body = new ReadableStream({ async start(controller) { timer = setInterval(() => { controller.enqueue("Hello, World!\n"); }, 1000); }, cancel() { clearInterval(timer); }, }); return new Response(body.pipeThrough(new TextEncoderStream()), { headers: { "content-type": "text/plain; charset=utf-8", }, }); }); Note Note the `cancel` function above. This is called when the client hangs up the connection. It is important to make sure that you handle this case, otherwise the server will keep queuing up messages forever, and eventually run out of memory. Be aware that the response body stream is "cancelled" when the client hangs up the connection. Make sure to handle this case. This can surface itself as an error in a `write()` call on a `WritableStream` object that is attached to the response body `ReadableStream` object (for example through a `TransformStream`). ### HTTPS support Jump to heading To use HTTPS, pass two extra arguments in the options: `cert` and `key`. These are contents of the certificate and key files, respectively. Deno.serve({ port: 443, cert: Deno.readTextFileSync("./cert.pem"), key: Deno.readTextFileSync("./key.pem"), }, handler); Note To use HTTPS, you will need a valid TLS certificate and a private key for your server. ### HTTP/2 support Jump to heading HTTP/2 support is "automatic" when using the HTTP server APIs with Deno. You just need to create your server, and it will handle HTTP/1 or HTTP/2 requests seamlessly. HTTP/2 is also supported over cleartext with prior knowledge. ### Automatic body compression Jump to heading The HTTP server has built in automatic compression of response bodies. When a response is sent to a client, Deno determines if the response body can be safely compressed. This compression happens within the internals of Deno, so it is fast and efficient. Currently Deno supports gzip and brotli compression. A body is automatically compressed if the following conditions are true: * The request has an `Accept-Encoding` header which indicates the requester supports `br` for Brotli or `gzip`. Deno will respect the preference of the quality value in the header. * The response includes a `Content-Type` which is considered compressible. (The list is derived from `jshttp/mime-db` with the actual list in the code.) * The response body is greater than 64 bytes. When the response body is compressed, Deno will set the `Content-Encoding` header to reflect the encoding, as well as ensure the `Vary` header is adjusted or added to indicate which request headers affected the response. In addition to the logic above, there are a few reasons why a response **won’t** be compressed automatically: * The response contains a `Content-Encoding` header. This indicates your server has done some form of encoding already. * The response contains a `Content-Range` header. This indicates that your server is responding to a range request, where the bytes and ranges are negotiated outside of the control of the internals to Deno. * The response has a `Cache-Control` header which contains a `no-transform` value. This indicates that your server doesn’t want Deno or any downstream proxies to modify the response. ### Serving WebSockets Jump to heading Deno can upgrade incoming HTTP requests to a WebSocket. This allows you to handle WebSocket endpoints on your HTTP servers. To upgrade an incoming `Request` to a WebSocket you use the `Deno.upgradeWebSocket` function. This returns an object consisting of a `Response` and a web standard `WebSocket` object. The returned response should be used to respond to the incoming request. Because the WebSocket protocol is symmetrical, the `WebSocket` object is identical to the one that can be used for client side communication. Documentation for it can be found on MDN. server.ts Deno.serve((req) => { if (req.headers.get("upgrade") != "websocket") { return new Response(null, { status: 501 }); } const { socket, response } = Deno.upgradeWebSocket(req); socket.addEventListener("open", () => { console.log("a client connected!"); }); socket.addEventListener("message", (event) => { if (event.data === "ping") { socket.send("pong"); } }); return response; }); The connection the WebSocket was created on can not be used for HTTP traffic after a WebSocket upgrade has been performed. Note Note that WebSockets are only supported on HTTP/1.1 for now. ## Default fetch export Jump to heading Another way to create an HTTP server in Deno is by exporting a default `fetch` function. The fetch API initiates an HTTP request to retrieve data from across a network and is built into the Deno runtime. server.ts export default { fetch(request) { const userAgent = request.headers.get("user-agent") || "Unknown"; return new Response(`User Agent: ${userAgent}`); }, } satisfies Deno.ServeDefaultExport; You can run this file with the `deno serve` command: deno serve server.ts The server will start and display a message in the console. Open your browser and navigate to http://localhost:8000/ to see the user-agent information. ## Building on these examples Jump to heading You will likely want to expand on these examples to create more complex servers. Deno recommends using Oak for building web servers. Oak is a middleware framework for Deno's HTTP server, designed to be expressive and easy to use. It provides a simple way to create web servers with middleware support. Check out the Oak documentation for examples of how to define routes. --- ## Page: https://docs.deno.com/runtime/fundamentals/ffi/ Deno's Foreign Function Interface (FFI) allows JavaScript and TypeScript code to call functions in dynamic libraries written in languages like C, C++, or Rust. This enables you to integrate native code performance and capabilities directly into your Deno applications. Deno FFI Reference Docs ## Introduction to FFI FFI provides a bridge between Deno's JavaScript runtime and native code. This allows you to: * Use existing native libraries within your Deno applications * Implement performance-critical code in languages like Rust or C * Access operating system APIs and hardware features not directly available in JavaScript Deno's FFI implementation is based on the `Deno.dlopen` API, which loads dynamic libraries and creates JavaScript bindings to the functions they export. ## Security considerations FFI requires explicit permission using the `--allow-ffi` flag, as native code runs outside of Deno's security sandbox: deno run --allow-ffi my_ffi_script.ts info **Important security warning**: Unlike JavaScript code running in the Deno sandbox, native libraries loaded via FFI have the same access level as the Deno process itself. This means they can: * Access the filesystem * Make network connections * Access environment variables * Execute system commands Always ensure you trust the native libraries you're loading through FFI. ## Basic usage The basic pattern for using FFI in Deno involves: 1. Defining the interface for the native functions you want to call 2. Loading the dynamic library using `Deno.dlopen()` 3. Calling the loaded functions Here's a simple example loading a C library: const dylib = Deno.dlopen("libexample.so", { add: { parameters: ["i32", "i32"], result: "i32" }, }); console.log(dylib.symbols.add(5, 3)); // 8 dylib.close(); ## Supported types Deno's FFI supports a variety of data types for parameters and return values: | FFI Type | Deno | C | Rust | | --- | --- | --- | --- | | `i8` | `number` | `char` / `signed char` | `i8` | | `u8` | `number` | `unsigned char` | `u8` | | `i16` | `number` | `short int` | `i16` | | `u16` | `number` | `unsigned short int` | `u16` | | `i32` | `number` | `int` / `signed int` | `i32` | | `u32` | `number` | `unsigned int` | `u32` | | `i64` | `bigint` | `long long int` | `i64` | | `u64` | `bigint` | `unsigned long long int` | `u64` | | `usize` | `bigint` | `size_t` | `usize` | | `isize` | `bigint` | `size_t` | `isize` | | `f32` | `number` | `float` | `f32` | | `f64` | `number` | `double` | `f64` | | `void`\[1\] | `undefined` | `void` | `()` | | `pointer` | `{} | null` | `void *` | `*mut c_void` | | `buffer`\[2\] | `TypedArray | null` | `uint8_t *` | `*mut u8` | | `function`\[3\] | `{} | null` | `void (*fun)()` | `Option<extern "C" fn()>` | | `{ struct: [...] }`\[4\] | `TypedArray` | `struct MyStruct` | `MyStruct` | As of Deno 1.25, the `pointer` type has been split into a `pointer` and a `buffer` type to ensure users take advantage of optimizations for Typed Arrays, and as of Deno 1.31 the JavaScript representation of `pointer` has become an opaque pointer object or `null` for null pointers. * \[1\] `void` type can only be used as a result type. * \[2\] `buffer` type accepts TypedArrays as parameter, but it always returns a pointer object or `null` when used as result type like the `pointer` type. * \[3\] `function` type works exactly the same as the `pointer` type as a parameter and result type. * \[4\] `struct` type is for passing and returning C structs by value (copy). The `struct` array must enumerate each of the struct's fields' type in order. The structs are padded automatically: Packed structs can be defined by using an appropriate amount of `u8` fields to avoid padding. Only TypedArrays are supported as structs, and structs are always returned as `Uint8Array`s. ## Working with structs You can define and use C structures in your FFI code: // Define a struct type for a Point const pointStruct = { fields: { x: "f64", y: "f64", }, } as const; // Define the library interface const signatures = { distance: { parameters: [ { struct: pointStruct }, { struct: pointStruct }, ], result: "f64", }, } as const; // Create struct instances const point1 = new Deno.UnsafePointer( new BigUint64Array([ BigInt(Float64Array.of(1.0).buffer), BigInt(Float64Array.of(2.0).buffer), ]).buffer, ); const point2 = new Deno.UnsafePointer( new BigUint64Array([ BigInt(Float64Array.of(4.0).buffer), BigInt(Float64Array.of(6.0).buffer), ]).buffer, ); // Call the function with structs const dist = dylib.symbols.distance(point1, point2); ## Working with callbacks You can pass JavaScript functions as callbacks to native code: const signatures = { setCallback: { parameters: ["function"], result: "void", }, runCallback: { parameters: [], result: "void", }, } as const; // Create a callback function const callback = new Deno.UnsafeCallback( { parameters: ["i32"], result: "void" } as const, (value) => { console.log("Callback received:", value); }, ); // Pass the callback to the native library dylib.symbols.setCallback(callback.pointer); // Later, this will trigger our JavaScript function dylib.symbols.runCallback(); // Always clean up when done callback.close(); ## Best practices with FFI 1. Always close resources. Close libraries with `dylib.close()` and callbacks with `callback.close()` when done. 2. Prefer TypeScript. Use TypeScript for better type-checking when working with FFI. 3. Wrap FFI calls in try/catch blocks to handle errors gracefully. 4. Be extremely careful when using FFI, as native code can bypass Deno's security sandbox. 5. Keep the FFI interface as small as possible to reduce the attack surface. ## Examples ### Using a Rust library Here's an example of creating and using a Rust library with Deno: First, create a Rust library: // lib.rs #[no_mangle] pub extern "C" fn fibonacci(n: u32) -> u32 { if n <= 1 { return n; } fibonacci(n - 1) + fibonacci(n - 2) } Compile it as a dynamic library: rustc --crate-type cdylib lib.rs Then use it from Deno: const libName = { windows: "./lib.dll", linux: "./liblib.so", darwin: "./liblib.dylib", }[Deno.build.os]; const dylib = Deno.dlopen( libName, { fibonacci: { parameters: ["u32"], result: "u32" }, } as const, ); // Calculate the 10th Fibonacci number const result = dylib.symbols.fibonacci(10); console.log(`Fibonacci(10) = ${result}`); // 55 dylib.close(); ### Examples * Netsaur * WebView\_deno * Deno\_sdl2 * Deno FFI examples repository These community-maintained repos includes working examples of FFI integrations with various native libraries across different operating systems. ## Related Approaches to Native Code Integration While Deno's FFI provides a direct way to call native functions, there are other approaches to integrate native code: ### Using Node-API (N-API) with Deno Deno supports Node-API (N-API) for compatibility with native Node.js addons. This enables you to use existing native modules written for Node.js. Directly loading a Node-API addon: import process from "node:process"; process.dlopen(module, "./native_module.node", 0); Using an npm package that uses a Node-API addon: import someNativeAddon from "npm:some-native-addon"; console.log(someNativeAddon.doSomething()); How is this different from FFI? | **Aspect** | **FFI** | **Node-API Support** | | --- | --- | --- | | Setup | No build step required | Requires precompiled binaries or build step | | Portability | Tied to library ABI | ABI-stable across versions | | Use Case | Direct library calls | Reuse Node.js addons | Node-API support is ideal for leveraging existing Node.js native modules, whereas FFI is best for direct, lightweight calls to native libraries. ## Alternatives to FFI Before using FFI, consider these alternatives: * WebAssembly, for portable native code that runs within Deno's sandbox. * Use `Deno.run` to execute external binaries and subprocesses with controlled permissions. * Check whether Deno's native APIs already provide the functionality you need. Deno's FFI capabilities provide powerful integration with native code, enabling performance optimizations and access to system-level functionality. However, this power comes with significant security considerations. Always be cautious when working with FFI and ensure you trust the native libraries you're using. --- ## Page: https://docs.deno.com/runtime/fundamentals/open_telemetry/ Caution The OpenTelemetry integration for Deno is still in development and may change. To use it, you must pass the `--unstable-otel` flag to Deno. Deno has built in support for OpenTelemetry. > OpenTelemetry is a collection of APIs, SDKs, and tools. Use it to instrument, generate, collect, and export telemetry data (metrics, logs, and traces) to help you analyze your software’s performance and behavior. > > _\- https://opentelemetry.io/_ This integration enables you to monitor your Deno applications using OpenTelemetry observability tooling with instruments like logs, metrics, and traces. Deno provides the following features: * Exporting of collected metrics, traces, and logs to a server using the OpenTelemetry protocol. * Automatic instrumentation of the Deno runtime with OpenTelemetry metrics, traces, and logs. * Collection of user defined metrics, traces, and logs created with the `npm:@opentelemetry/api` package. ## Quick start Jump to heading To enable the OpenTelemetry integration, run your Deno script with the `--unstable-otel` flag and set the environment variable `OTEL_DENO=true`: OTEL_DENO=true deno run --unstable-otel my_script.ts This will automatically collect and export runtime observability data to an OpenTelemetry endpoint at `localhost:4318` using Protobuf over HTTP (`http/protobuf`). Tip If you do not have an OpenTelemetry collector set up yet, you can get started with a local LGTM stack in Docker (Loki (logs), Grafana (dashboard), Tempo (traces), and Prometheus (metrics)) by running the following command: docker run --name lgtm -p 3000:3000 -p 4317:4317 -p 4318:4318 --rm -ti \ -v "$PWD"/lgtm/grafana:/data/grafana \ -v "$PWD"/lgtm/prometheus:/data/prometheus \ -v "$PWD"/lgtm/loki:/data/loki \ -e GF_PATHS_DATA=/data/grafana \ docker.io/grafana/otel-lgtm:0.8.1 You can then access the Grafana dashboard at `http://localhost:3000` with the username `admin` and password `admin`. This will automatically collect and export runtime observability data like `console.log`, traces for HTTP requests, and metrics for the Deno runtime. Learn more about auto instrumentation. You can also create your own metrics, traces, and logs using the `npm:@opentelemetry/api` package. Learn more about user defined metrics. ## Auto instrumentation Jump to heading Deno automatically collects and exports some observability data to the OTLP endpoint. This data is exported in the built-in instrumentation scope of the Deno runtime. This scope has the name `deno`. The version of the Deno runtime is the version of the `deno` instrumentation scope. (e.g. `deno:2.1.4`). ### Traces Jump to heading Deno automatically creates spans for various operations, such as: * Incoming HTTP requests served with `Deno.serve`. * Outgoing HTTP requests made with `fetch`. #### `Deno.serve` Jump to heading When you use `Deno.serve` to create an HTTP server, a span is created for each incoming request. The span automatically ends when response headers are sent (not when the response body is done sending). The name of the created span is `${method}`. The span kind is `server`. The following attributes are automatically added to the span on creation: * `http.request.method`: The HTTP method of the request. * `url.full`: The full URL of the request (as would be reported by `req.url`). * `url.scheme`: The scheme of the request URL (e.g. `http` or `https`). * `url.path`: The path of the request URL. * `url.query`: The query string of the request URL. After the request is handled, the following attributes are added: * `http.response.status_code`: The status code of the response. Deno does not automatically add a `http.route` attribute to the span as the route is not known by the runtime, and instead is determined by the routing logic in a user's handler function. If you want to add a `http.route` attribute to the span, you can do so in your handler function using `npm:@opentelemetry/api`. In this case you should also update the span name to include the route. import { trace } from "npm:@opentelemetry/api@1"; const INDEX_ROUTE = new URLPattern({ pathname: "/" }); const BOOK_ROUTE = new URLPattern({ pathname: "/book/:id" }); Deno.serve(async (req) => { const span = trace.getActiveSpan(); if (INDEX_ROUTE.test(req.url)) { span.setAttribute("http.route", "/"); span.updateName(`${req.method} /`); // handle index route } else if (BOOK_ROUTE.test(req.url)) { span.setAttribute("http.route", "/book/:id"); span.updateName(`${req.method} /book/:id`); // handle book route } else { return new Response("Not found", { status: 404 }); } }); #### `fetch` Jump to heading When you use `fetch` to make an HTTP request, a span is created for the request. The span automatically ends when the response headers are received. The name of the created span is `${method}`. The span kind is `client`. The following attributes are automatically added to the span on creation: * `http.request.method`: The HTTP method of the request. * `url.full`: The full URL of the request. * `url.scheme`: The scheme of the request URL. * `url.path`: The path of the request URL. * `url.query`: The query string of the request URL. After the response is received, the following attributes are added: * `http.status_code`: The status code of the response. ### Metrics Jump to heading The following metrics are automatically collected and exported: #### `Deno.serve` / `Deno.serveHttp` Jump to heading ##### `http.server.request.duration` Jump to heading A histogram of the duration of incoming HTTP requests served with `Deno.serve` or `Deno.serveHttp`. The time that is measured is from when the request is received to when the response headers are sent. This does not include the time to send the response body. The unit of this metric is seconds. The histogram buckets are `[0.005, 0.01, 0.025, 0.05, 0.075, 0.1, 0.25, 0.5, 0.75, 1.0, 2.5, 5.0, 7.5, 10.0]`. This metric is recorded with the following attributes: * `http.request.method`: The HTTP method of the request. * `url.scheme`: The scheme of the request URL. * `network.protocol.version`: The version of the HTTP protocol used for the request (e.g. `1.1` or `2`). * `server.address`: The address that the server is listening on. * `server.port`: The port that the server is listening on. * `http.response.status_code`: The status code of the response (if the request has been handled without a fatal error). * `error.type`: The type of error that occurred (if the request handling was subject to an error). ##### `http.server.active_requests` Jump to heading A gauge of the number of active requests being handled by `Deno.serve` or `Deno.serveHttp` at any given time. This is the number of requests that have been received but not yet responded to (where the response headers have not yet been sent). This metric is recorded with the following attributes: * `http.request.method`: The HTTP method of the request. * `url.scheme`: The scheme of the request URL. * `server.address`: The address that the server is listening on. * `server.port`: The port that the server is listening on. ##### `http.server.request.body.size` Jump to heading A histogram of the size of the request body of incoming HTTP requests served with `Deno.serve` or `Deno.serveHttp`. The unit of this metric is bytes. The histogram buckets are `[0, 100, 1000, 10000, 100000, 1000000, 10000000, 100000000, 1000000000]`. This metric is recorded with the following attributes: * `http.request.method`: The HTTP method of the request. * `url.scheme`: The scheme of the request URL. * `network.protocol.version`: The version of the HTTP protocol used for the request (e.g. `1.1` or `2`). * `server.address`: The address that the server is listening on. * `server.port`: The port that the server is listening on. * `http.response.status_code`: The status code of the response (if the request has been handled without a fatal error). * `error.type`: The type of error that occurred (if the request handling was subject to an error). ##### `http.server.response.body.size` Jump to heading A histogram of the size of the response body of incoming HTTP requests served with `Deno.serve` or `Deno.serveHttp`. The unit of this metric is bytes. The histogram buckets are `[0, 100, 1000, 10000, 100000, 1000000, 10000000, 100000000, 1000000000]`. This metric is recorded with the following attributes: * `http.request.method`: The HTTP method of the request. * `url.scheme`: The scheme of the request URL. * `network.protocol.version`: The version of the HTTP protocol used for the request (e.g. `1.1` or `2`). * `server.address`: The address that the server is listening on. * `server.port`: The port that the server is listening on. * `http.response.status_code`: The status code of the response (if the request has been handled without a fatal error). * `error.type`: The type of error that occurred (if the request handling was subject to an error). ### Logs Jump to heading The following logs are automatically collected and exported: * Any logs created with `console.*` methods such as `console.log` and `console.error`. * Any logs created by the Deno runtime, such as debug logs, `Downloading` logs, and similar. * Any errors that cause the Deno runtime to exit (both from user code, and from the runtime itself). Logs raised from JavaScript code will be exported with the relevant span context, if the log occurred inside of an active span. `console` auto instrumentation can be configured using the `OTEL_DENO_CONSOLE` environment variable: * `capture`: Logs are emitted to stdout/stderr and are also exported with OpenTelemetry. (default) * `replace`: Logs are only exported with OpenTelemetry, and not emitted to stdout/stderr. * `ignore`: Logs are emitted only to stdout/stderr, and will not be exported with OpenTelemetry. ## User metrics Jump to heading In addition to the automatically collected telemetry data, you can also create your own metrics and traces using the `npm:@opentelemetry/api` package. You do not need to configure the `npm:@opentelemetry/api` package to use it with Deno. Deno sets up the `npm:@opentelemetry/api` package automatically when the `--unstable-otel` flag is passed. There is no need to call `metrics.setGlobalMeterProvider()`, `trace.setGlobalTracerProvider()`, or `context.setGlobalContextManager()`. All configuration of resources, exporter settings, etc. is done via environment variables. Deno works with version `1.x` of the `npm:@opentelemetry/api` package. You can either import directly from `npm:@opentelemetry/api@1`, or you can install the package locally with `deno add` and import from `@opentelemetry/api`. deno add npm:@opentelemetry/api@1 For both traces and metrics, you need to define names for the tracer and meter respectively. If you are instrumenting a library, you should name the tracer or meter after the library (such as `my-awesome-lib`). If you are instrumenting an application, you should name the tracer or meter after the application (such as `my-app`). The version of the tracer or meter should be set to the version of the library or application. ### Traces Jump to heading To create a new span, first import the `trace` object from `npm:@opentelemetry/api` and create a new tracer: import { trace } from "npm:@opentelemetry/api@1"; const tracer = trace.getTracer("my-app", "1.0.0"); Then, create a new span using the `tracer.startActiveSpan` method and pass a callback function to it. You have to manually end the span by calling the `end` method on the span object returned by `startActiveSpan`. function myFunction() { return tracer.startActiveSpan("myFunction", (span) => { try { // do myFunction's work } catch (error) { span.recordException(error); span.setStatus({ code: trace.SpanStatusCode.ERROR, message: (error as Error).message, }); throw error; } finally { span.end(); } }); } `span.end()` should be called in a `finally` block to ensure that the span is ended even if an error occurs. `span.recordException` and `span.setStatus` should also be called in a `catch` block, to record any errors that occur. Inside of the callback function, the created span is the "active span". You can get the active span using `trace.getActiveSpan()`. The "active span" will be used as the parent span for any spans created (manually, or automatically by the runtime) inside of the callback function (or any functions that are called from the callback function). Learn more about context propagation. The `startActiveSpan` method returns the return value of the callback function. Spans can have attributes added to them during their lifetime. Attributes are key value pairs that represent structured metadata about the span. Attributes can be added using the `setAttribute` and `setAttributes` methods on the span object. span.setAttribute("key", "value"); span.setAttributes({ success: true, "bar.count": 42n, "foo.duration": 123.45 }); Values for attributes can be strings, numbers (floats), bigints (clamped to u64), booleans, or arrays of any of these types. If an attribute value is not one of these types, it will be ignored. The name of a span can be updated using the `updateName` method on the span object. span.updateName("new name"); The status of a span can be set using the `setStatus` method on the span object. The `recordException` method can be used to record an exception that occurred during the span's lifetime. `recordException` creates an event with the exception stack trace and name and attaches it to the span. **`recordException` does not set the span status to `ERROR`, you must do that manually.** import { SpanStatusCode } from "npm:@opentelemetry/api@1"; span.setStatus({ code: SpanStatusCode.ERROR, message: "An error occurred", }); span.recordException(new Error("An error occurred")); // or span.setStatus({ code: SpanStatusCode.OK, }); Spans can also have events and links added to them. Events are points in time that are associated with the span. Links are references to other spans. Spans can also be created manually with `tracer.startSpan` which returns a span object. This method does not set the created span as the active span, so it will not automatically be used as the parent span for any spans created later, or any `console.log` calls. A span can manually be set as the active span for a callback, by using the context propagation API. Both `tracer.startActiveSpan` and `tracer.startSpan` can take an optional options bag containing any of the following properties: * `kind`: The kind of the span. Can be `SpanKind.CLIENT`, `SpanKind.SERVER`, `SpanKind.PRODUCER`, `SpanKind.CONSUMER`, or `SpanKind.INTERNAL`. Defaults to `SpanKind.INTERNAL`. * `startTime` A `Date` object representing the start time of the span, or a number representing the start time in milliseconds since the Unix epoch. If not provided, the current time will be used. * `attributes`: An object containing attributes to add to the span. * `links`: An array of links to add to the span. * `root`: A boolean indicating whether the span should be a root span. If `true`, the span will not have a parent span (even if there is an active span). After the options bag, both `tracer.startActiveSpan` and `tracer.startSpan` can also take a `context` object from the context propagation API. Learn more about the full tracing API in the OpenTelemetry JS API docs. ### Metrics Jump to heading To create a metric, first import the `metrics` object from `npm:@opentelemetry/api` and create a new meter: import { metrics } from "npm:@opentelemetry/api@1"; const meter = metrics.getMeter("my-app", "1.0.0"); Then, an instrument can be created from the meter, and used to record values: const counter = meter.createCounter("my_counter", { description: "A simple counter", unit: "1", }); counter.add(1); counter.add(2); Each recording can also have associated attributes: counter.add(1, { color: "red" }); counter.add(2, { color: "blue" }); Tip In OpenTelemetry, metric attributes should generally have low cardinality. This means that there should not be too many unique combinations of attribute values. For example, it is probably fine to have an attribute for which continent a user is on, but it would be too high cardinality to have an attribute for the exact latitude and longitude of the user. High cardinality attributes can cause problems with metric storage and exporting, and should be avoided. Use spans and logs for high cardinality data. There are several types of instruments that can be created with a meter: * **Counter**: A counter is a monotonically increasing value. Counters can only be positive. They can be used for values that are always increasing, such as the number of requests handled. * **UpDownCounter**: An up-down counter is a value that can both increase and decrease. Up-down counters can be used for values that can increase and decrease, such as the number of active connections or requests in progress. * **Gauge**: A gauge is a value that can be set to any value. They are used for values that do not "accumulate" over time, but rather have a specific value at any given time, such as the current temperature. * **Histogram**: A histogram is a value that is recorded as a distribution of values. Histograms can be used for values that are not just a single number, but a distribution of numbers, such as the response time of a request in milliseconds. Histograms can be used to calculate percentiles, averages, and other statistics. They have a predefined set of boundaries that define the buckets that the values are placed into. By default, the boundaries are `[0.0, 5.0, 10.0, 25.0, 50.0, 75.0, 100.0, 250.0, 500.0, 750.0, 1000.0, 2500.0, 5000.0, 7500.0, 10000.0]`. There are also several types of observable instruments. These instruments do not have a synchronous recording method, but instead return a callback that can be called to record a value. The callback will be called when the OpenTelemetry SDK is ready to record a value, for example just before exporting. const counter = meter.createObservableCounter("my_counter", { description: "A simple counter", unit: "1", }); counter.addCallback((res) => { res.observe(1); // or res.observe(1, { color: "red" }); }); There are three types of observable instruments: * **ObservableCounter**: An observable counter is a counter that can be observed asynchronously. It can be used for values that are always increasing, such as the number of requests handled. * **ObservableUpDownCounter**: An observable up-down counter is a value that can both increase and decrease, and can be observed asynchronously. Up-down counters can be used for values that can increase and decrease, such as the number of active connections or requests in progress. * **ObservableGauge**: An observable gauge is a value that can be set to any value, and can be observed asynchronously. They are used for values that do not "accumulate" over time, but rather have a specific value at any given time, such as the current temperature. Learn more about the full metrics API in the OpenTelemetry JS API docs. ## Context propagation Jump to heading In OpenTelemetry, context propagation is the process of passing some context information (such as the current span) from one part of an application to another, without having to pass it explicitly as an argument to every function. In Deno, context propagation is done using the rules of `AsyncContext`, the TC39 proposal for async context propagation. The `AsyncContext` API is not yet exposed to users in Deno, but it is used internally to propagate the active span and other context information across asynchronous boundaries. A quick overview how AsyncContext propagation works: * When a new asynchronous task is started (such as a promise, or a timer), the current context is saved. * Then some other code can execute concurrently with the asynchronous task, in a different context. * When the asynchronous task completes, the saved context is restored. This means that async context propagation essentially behaves like a global variable that is scoped to the current asynchronous task, and is automatically copied to any new asynchronous tasks that are started from this current task. The `context` API from `npm:@opentelemetry/api@1` exposes this functionality to users. It works as follows: import { context } from "npm:@opentelemetry/api@1"; // Get the currently active context const currentContext = context.active(); // You can add create a new context with a value added to it const newContext = currentContext.setValue("id", 1); // The current context is not changed by calling setValue console.log(currentContext.getValue("id")); // undefined // You can run a function inside a new context context.with(newContext, () => { // Any code in this block will run with the new context console.log(context.active().getValue("id")); // 1 // The context is also available in any functions called from this block function myFunction() { return context.active().getValue("id"); } console.log(myFunction()); // 1 // And it is also available in any asynchronous callbacks scheduled from here setTimeout(() => { console.log(context.active().getValue("id")); // 1 }, 10); }); // Outside, the context is still the same console.log(context.active().getValue("id")); // undefined The context API integrates with spans too. For example, to run a function in the context of a specific span, the span can be added to a context, and then the function can be run in that context: import { context, trace } from "npm:@opentelemetry/api@1"; const tracer = trace.getTracer("my-app", "1.0.0"); const span = tracer.startSpan("myFunction"); const contextWithSpan = trace.setSpan(context.active(), span); context.with(contextWithSpan, () => { const activeSpan = trace.getActiveSpan(); console.log(activeSpan === span); // true }); // Don't forget to end the span! span.end(); Learn more about the full context API in the OpenTelemetry JS API docs. ## Configuration Jump to heading The OpenTelemetry integration can be enabled by setting the `OTEL_DENO=true` environment variable. The endpoint and protocol for the OTLP exporter can be configured using the `OTEL_EXPORTER_OTLP_ENDPOINT` and `OTEL_EXPORTER_OTLP_PROTOCOL` environment variables. If the endpoint requires authentication, headers can be configured using the `OTEL_EXPORTER_OTLP_HEADERS` environment variable. Endpoint can all be overridden individually for metrics, traces, and logs by using specific environment variables, such as: * `OTEL_EXPORTER_OTLP_METRICS_ENDPOINT` * `OTEL_EXPORTER_OTLP_TRACES_ENDPOINT` * `OTEL_EXPORTER_OTLP_LOGS_ENDPOINT` For more information on headers that can be used to configure the OTLP exporter, see the OpenTelemetry website. The resource that is associated with the telemetry data can be configured using the `OTEL_SERVICE_NAME` and `OTEL_RESOURCE_ATTRIBUTES` environment variables. In addition to attributes set via the `OTEL_RESOURCE_ATTRIBUTES` environment variable, the following attributes are automatically set: * `service.name`: If `OTEL_SERVICE_NAME` is not set, the value is set to `<unknown_service>`. * `process.runtime.name`: `deno` * `process.runtime.version`: The version of the Deno runtime. * `telemetry.sdk.name`: `deno-opentelemetry` * `telemetry.sdk.language`: `deno-rust` * `telemetry.sdk.version`: The version of the Deno runtime, plus the version of the `opentelemetry` Rust crate being used by Deno, separated by a `-`. Metric collection frequency can be configured using the `OTEL_METRIC_EXPORT_INTERVAL` environment variable. The default value is `60000` milliseconds (60 seconds). Span exporter batching can be configured using the batch span processor environment variables described in the OpenTelemetry specification. Log exporter batching can be configured using the batch log record processor environment variables described in the OpenTelemetry specification. ## Limitations Jump to heading While the OpenTelemetry integration for Deno is in development, there are some limitations to be aware of: * Traces are always sampled (i.e. `OTEL_TRACE_SAMPLER=parentbased_always_on`). * Traces do not support events. * Traces only support links with no attributes. * Automatic propagation of the trace context in `Deno.serve` and `fetch` is not supported. * Metric exemplars are not supported. * Custom log streams (e.g. logs other than `console.log` and `console.error`) are not supported. * The only supported exporter is OTLP - other exporters are not supported. * Only `http/protobuf` and `http/json` protocols are supported for OTLP. Other protocols such as `grpc` are not supported. * Metrics from observable (asynchronous) meters are not collected on process exit/crash, so the last value of metrics may not be exported. Synchronous metrics are exported on process exit/crash. * The limits specified in the `OTEL_ATTRIBUTE_VALUE_LENGTH_LIMIT`, `OTEL_ATTRIBUTE_COUNT_LIMIT`, `OTEL_SPAN_EVENT_COUNT_LIMIT`, `OTEL_SPAN_LINK_COUNT_LIMIT`, `OTEL_EVENT_ATTRIBUTE_COUNT_LIMIT`, and `OTEL_LINK_ATTRIBUTE_COUNT_LIMIT` environment variable are not respected for trace spans. * The `OTEL_METRIC_EXPORT_TIMEOUT` environment variable is not respected. * HTTP methods are that are not known are not normalized to `_OTHER` in the `http.request.method` span attribute as per the OpenTelemetry semantic conventions. * The HTTP server span for `Deno.serve` does not have an OpenTelemetry status set, and if the handler throws (ie `onError` is invoked), the span will not have an error status set and the error will not be attached to the span via event. * There is no mechanism to add a `http.route` attribute to the HTTP client span for `fetch`, or to update the span name to include the route. --- ## Page: https://docs.deno.com/runtime/fundamentals/stability_and_releases/ As of Deno 1.0.0, the `Deno` namespace APIs are stable. That means we will strive to make code working under 1.0.0 continue to work in future versions. ## Release schedule, channels and long term support Jump to heading Deno releases a new stable, minor version (eg. v2.1.0, v2.0.0) on a 12 week schedule. Patch releases including bug fixes for the latest minor version are released as needed - you can expect several patch releases before a new minor version is released. ### Release channels Jump to heading Deno offers 4 release channels * `stable` - a semver minor/patch release, as described above. This is **the default** distribution channel that is recommended for most users. * `lts` - long term support for a particular stable release, recommended for enterprise users who prefer not to upgrade so often. See below for details. * `rc` - a release candidate for the upcoming semver minor release. * `canary` - an unstable release that changes multiple timer per day, allows to try out latest bug fixes and new features that might end up in the `stable` channel. ### Long Term Support (LTS) Jump to heading Starting with Deno v2.1.0 (released in November 2024), Deno offers an LTS (long-term support) channel. An LTS channel is a minor semver version that we maintain with only backwards-compatible bug fixes. 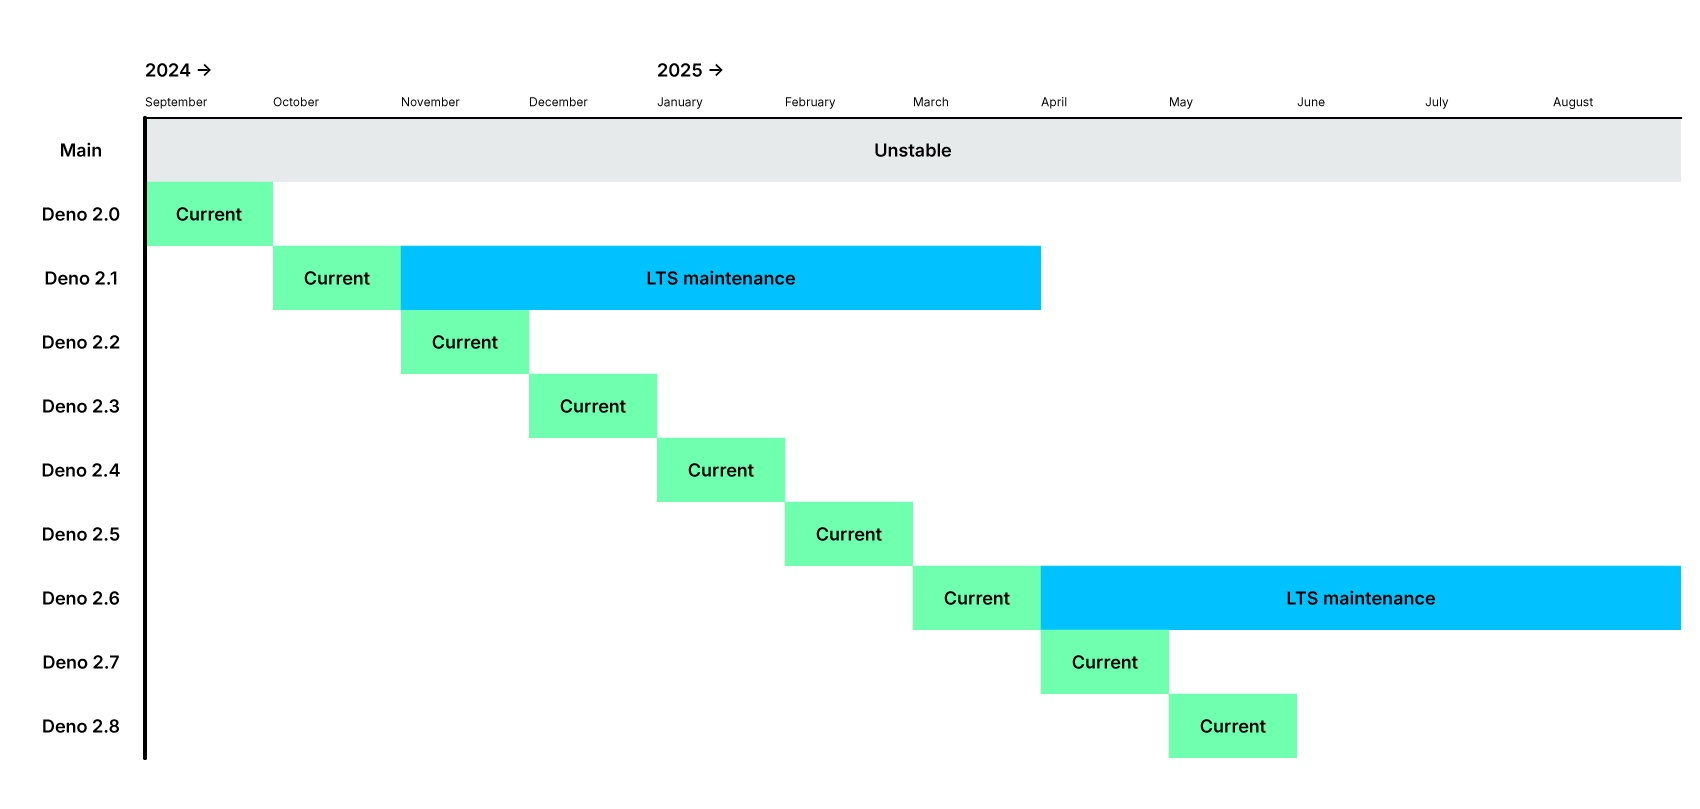 We are initially keeping the LTS support window short while we refine the process. **LTS releases occur every six months**, with patch releases as needed for bug fixes. We plan to extend this support window to one year in the future. LTS backports include: * Security patches * Critical bug fixes (e.g., crashes, incorrect computations) * **Critical** performance improvements _may_ be backported based on severity. **API changes and major new features will not be backported.** ## Unstable APIs Jump to heading When introducing new APIs, these are first marked as unstable. This means that the API may change in the future. These APIs are not available to use unless you explicitly pass an unstable flag, like `--unstable-kv`. Learn more about `--unstable-*` flags. There are also some non-runtime features of Deno that are considered unstable, and are locked behind unstable flags. For example, the `--unstable-sloppy-imports` flag is used to enable `import`ing code without specifying file extensions. ## Standard library Jump to heading The Deno Standard Library (https://jsr.io/@std) is mostly stable. All standard library modules that are version 1.0.0 or higher are considered stable. All other modules (0.x) are considered unstable, and may change in the future. Using unstable standard library modules is not recommended for production code, but it is a great way to experiment with new features and provide feedback to the Deno team. It is not necessary to use any unstable flags to use unstable standard library modules. --- ## Page: https://docs.deno.com/runtime/fundamentals/typescript TypeScript is a first class language in Deno, just like JavaScript or WebAssembly. You can run or import TypeScript without installing anything more than the Deno CLI. With its built-in TypeScript compiler, Deno will compile your TypeScript code to JavaScript with no extra config needed. Deno can also type check your TypeScript code, without requiring a separate type checking tool like `tsc`. ## Type Checking Jump to heading One of the main advantages of TypeScript is that it can make your code type safe, catching errors during development rather than runtime. TypeScript is a superset of JavaScript meaning that syntactically valid JavaScript becomes TypeScript with warnings about being "unsafe". Deno allows you to type-check your code (without executing it) with the `deno check` subcommand: deno check module.ts # or also type check remote modules and npm packages deno check --all module.ts # code snippets written in JSDoc can also be type checked deno check --doc module.ts # or type check code snippets in markdown files deno check --doc-only markdown.md Note Type checking can take a significant amount of time, especially if you are working on a codebase where you are making a lot of changes. Deno optimizes type checking, but it still comes at a cost. Therefore, **by default, TypeScript modules are not type-checked before they are executed**. When using the `deno run` command, Deno will skip type-checking and run the code directly. In order to perform a type check of the module before execution occurs, you can use the `--check` flag with `deno run`: deno run --check module.ts # or also type check remote modules and npm packages deno run --check=all module.ts When Deno encounters a type error when using this flag, the process will exit before executing the code. In order to avoid this, you will either need to: * resolve the issue * use the `// @ts-ignore` or `// @ts-expect-error` pragmas to ignore the error * or skip type checking all together. When testing your code, type checking is enabled by default. You can use the `--no-check` flag to skip type checking if preferred: deno test --no-check ## Using with JavaScript Jump to heading Deno runs JavaScript and TypeScript code. During type checking, Deno will only type check TypeScript files by default though. If you want to type check JavaScript files too, you can either add a `// @ts-check` pragma at the top of the file, or add `compilerOptions.checkJs` to your `deno.json` file. main.js // @ts-check let x = "hello"; x = 42; // Type 'number' is not assignable to type 'string'. deno.json { "compilerOptions": { "checkJs": true } } In JavaScript files, you can not use TypeScript syntax like type annotations or importing types. You can use TSDoc comments to provide type information to the TypeScript compiler though. main.js // @ts-check /** * @param a {number} * @param b {number} * @returns {number} */ function add(a, b) { return a + b; } ## Providing declaration files Jump to heading When importing untyped JavaScript modules from TypeScript code, you may need to provide type information for the JavaScript module. This is not necessary if the JavaScript is annotated with TSDoc comments. Without this additional type information (in the form of a `.d.ts` declaration file), TypeScript will assume everything exported from the JavaScript module is of type `any`. `tsc` will pick up `d.ts` files that are siblings of a `js` file and have the same basename, automatically. **Deno does not do this.** You must explicitly specify either in the `.js` file (the source), or the `.ts` file (the importer) where to find the `.d.ts` file. ### Providing types in the source Jump to heading One should prefer specifying the `.d.ts` file in the `.js` file, as this makes it easier to use the JavaScript module from multiple TypeScript modules: you won't have to specify the `.d.ts` file in every TypeScript module that imports the JavaScript module. add.js // @ts-self-types="./add.d.ts" export function add(a, b) { return a + b; } add.d.ts export function add(a: number, b: number): number; ### Providing types in the importer Jump to heading If you can't modify the JavaScript source, you can specify the `.d.ts` file in the TypeScript module that imports the JavaScript module. main.ts // @ts-types="./add.d.ts" import { add } from "./add.js"; This is also useful for NPM packages that don't provide type information: main.ts // @ts-types="npm:@types/lodash" import * as _ from "npm:lodash"; ### Providing types for HTTP modules Jump to heading Servers that host JavaScript modules via HTTP can also provide type information for those modules in a HTTP header. Deno will use this information when type-checking the module. HTTP/1.1 200 OK Content-Type: application/javascript; charset=UTF-8 Content-Length: 648 X-TypeScript-Types: ./add.d.ts The `X-TypeScript-Types` header specifies the location of the `.d.ts` file that provides type information for the JavaScript module. It is resolved relative to the URL of the JavaScript module, just like `Location` headers. ## Type checking for browsers and web workers Jump to heading By default, Deno type checks TypeScript modules as if they were running in the main thread of the Deno runtime. However, Deno also supports type checking for browsers, type checking for web workers, and type checking for combination browser-Deno environments like when using SSR (Server Side Rendering) with Deno. These environments have different global objects and APIs available to them. Deno provides type definitions for these environments in the form of library files. These library files are used by the TypeScript compiler to provide type information for the global objects and APIs available in these environments. The loaded library files can be changed using the `compilerOptions.lib` option in a `deno.json` configuration file, or through `/// <reference lib="..." />` comments in your TypeScript files. It is recommended to use the `compilerOptions.lib` option in the `deno.json` configuration file to specify the library files to use. To enable type checking for a **browser environment**, you can specify the `dom` library file in the `compilerOptions.lib` option in a `deno.json` configuration file: deno.json { "compilerOptions": { "lib": ["dom"] } } This will enable type checking for a browser environment, providing type information for global objects like `document`. This will however disable type information for Deno-specific APIs like `Deno.readFile`. To enable type checking for combined **browser and Deno environments**, like using SSR with Deno, you can specify both the `dom` and `deno.ns` (Deno namespace) library files in the `compilerOptions.lib` option in a `deno.json` configuration file: deno.json { "compilerOptions": { "lib": ["dom", "deno.ns"] } } This will enable type checking for both browser and Deno environments, providing type information for global objects like `document` and Deno-specific APIs like `Deno.readFile`. To enable type checking for a **web worker environment in Deno**, (ie code that is run with `new Worker`), you can specify the `deno.worker` library file in the `compilerOptions.lib` option in a `deno.json`. deno.json { "compilerOptions": { "lib": ["deno.worker"] } } To specify the library files to use in a TypeScript file, you can use `/// <reference lib="..." />` comments: /// <reference no-default-lib="true" /> /// <reference lib="dom" /> ## Augmenting global types Jump to heading Deno supports ambient or global types in TypeScript. This is useful when polyfilling global objects or augmenting the global scope with additional properties. **You should avoid using ambient or global types when possible**, since they can lead to naming conflicts and make it harder to reason about your code. They are also not supported when publishing to JSR. To use ambient or global types in Deno, you can use either the `declare global` syntax, or load a `.d.ts` file that augments the global scope. ### Using declare global to augment the global scope Jump to heading You can use the `declare global` syntax in any of the TypeScript files that are imported in your project to augment the global scope with additional properties. For example: declare global { interface Window { polyfilledAPI(): string; } } This makes the `polyfilledAPI` function available globally when the type definition is imported. ### Using .d.ts files to augment the global scope Jump to heading You can also use `.d.ts` files to augment the global scope. For example, you can create a `global.d.ts` file with the following content: interface Window { polyfilledAPI(): string; } Then you can load this `.d.ts` file in your TypeScript using `/// <reference types="./global.d.ts" />`. This will augment the global scope with the `polyfilledAPI` function. Alternatively you can specify the `.d.ts` file in the `deno.json` configuration file, in the `compilerOptions.types` array: { "compilerOptions": { "types": ["./global.d.ts"] } } This will also augment the global scope with the `polyfilledAPI` function. --- ## Page: https://docs.deno.com/runtime/fundamentals/configuration You can configure Deno using a `deno.json` file. This file can be used to configure the TypeScript compiler, linter, formatter, and other Deno tools. The configuration file supports `.json` and `.jsonc` extensions. Deno will automatically detect a `deno.json` or `deno.jsonc` configuration file if it's in your current working directory or parent directories. The `--config` flag can be used to specify a different configuration file. ## package.json support Jump to heading Deno also supports a `package.json` file for compatibility with Node.js projects. If you have a Node.js project, it is not necessary to create a `deno.json` file. Deno will use the `package.json` file to configure the project. If both a `deno.json` and `package.json` file are present in the same directory, Deno will understand dependencies specified in both `deno.json` and `package.json`; and use the `deno.json` file for Deno-specific configurations. Read more about Node compatibility in Deno. ## Dependencies Jump to heading The `"imports"` field in your `deno.json` allows you to specify dependencies used in your project. You can use it to map bare specifiers to URLs or file paths making it easier to manage dependencies and module resolution in your applications. For example, if you want to use the `assert` module from the standard library in your project, you could use this import map: deno.json { "imports": { "@std/assert": "jsr:@std/assert@^1.0.0", "chalk": "npm:chalk@5" } } Then your script can use the bare specifier `std/assert`: script.ts import { assertEquals } from "@std/assert"; import chalk from "chalk"; assertEquals(1, 2); console.log(chalk.yellow("Hello world")); You can also use a `"dependencies"` field in `package.json`: package.json { "dependencies": { "express": "express@^1.0.0" } } script.ts import express from "express"; const app = express(); Note that this will require you to run `deno install`. Read more about module imports and dependencies ### Custom path mappings Jump to heading The import map in `deno.json` can be used for more general path mapping of specifiers. You can map an exact specifiers to a third party module or a file directly, or you can map a part of an import specifier to a directory. deno.jsonc { "imports": { // Map to an exact file "foo": "./some/long/path/foo.ts", // Map to a directory, usage: "bar/file.ts" "bar/": "./some/folder/bar/" } } Usage: import * as foo from "foo"; import * as bar from "bar/file.ts"; Path mapping of import specifies is commonly used in larger code bases for brevity. To use your project root for absolute imports: deno.json { "imports": { "/": "./", "./": "./" } } main.ts import { MyUtil } from "/util.ts"; This causes import specifiers starting with `/` to be resolved relative to the import map's URL or file path. ## Tasks Jump to heading The `tasks` field in your `deno.json` file is used to define custom commands that can be executed with the `deno task` command and allows you to tailor commands and permissions to the specific needs of your project. It is similar to the `scripts` field in a `package.json` file, which is also supported. deno.json { "tasks": { "start": "deno run --allow-net --watch=static/,routes/,data/ dev.ts", "test": "deno test --allow-net", "lint": "deno lint" } } package.json { "scripts": { "dev": "vite dev", "build": "vite build" } } To execute a task, use the `deno task` command followed by the task name. For example: deno task start deno task test deno task lint deno task dev deno task build Read more about `deno task`. ## Linting Jump to heading The `lint` field in the `deno.json` file is used to configure the behavior of Deno’s built-in linter. This allows you to specify which files to include or exclude from linting, as well as customize the linting rules to suit your project’s needs. For example: deno.json { "lint": { "include": ["src/"], "exclude": ["src/testdata/", "src/fixtures/**/*.ts"], "rules": { "tags": ["recommended"], "include": ["ban-untagged-todo"], "exclude": ["no-unused-vars"] } } } This configuration will: * only lint files in the `src/` directory, * not lint files in the `src/testdata/` directory or any TypeScript files in the `src/fixtures/` directory. * specify that the recommended linting rules should be applied, * add the `ban-untagged-todo`, and * exclude the `no-unused-vars` rule. You can find a full list of available linting rules in the List of rules documentation page. Read more about linting with Deno. ## Formatting Jump to heading The `fmt` field in the `deno.json` file is used to configure the behavior of Deno’s built-in code formatter. This allows you to customize how your code is formatted, ensuring consistency across your project, making it easier to read and collaborate on. Here are the key options you can configure: deno.json { "fmt": { "useTabs": true, "lineWidth": 80, "indentWidth": 4, "semiColons": true, "singleQuote": true, "proseWrap": "preserve", "include": ["src/"], "exclude": ["src/testdata/", "src/fixtures/**/*.ts"] } } This configuration will: * use tabs instead of spaces for indentation, * limit lines to 80 characters, * use an indentation width of 4 spaces, * add semicolons to the end of statements, * use single quotes for strings, * preserve prose wrapping, * format files in the `src/` directory, * exclude files in the `src/testdata/` directory and any TypeScript files in the `src/fixtures/` directory. Read more about formatting your code with Deno. ## Lockfile Jump to heading The `lock` field in the `deno.json` file is used to specify configuration of the lock file that Deno uses to ensure the integrity of your dependencies. A lock file records the exact versions and integrity hashes of the modules your project depends on, ensuring that the same versions are used every time the project is run, even if the dependencies are updated or changed remotely. deno.json { "lock": { "path": "./deno.lock", "frozen": true } } This configuration will: * specify lockfile location at `./deno.lock` (this is the default and can be omitted) * tell Deno that you want to error out if any dependency changes Deno uses lockfile by default, you can disable it with following configuration: deno.json { "lock": false } ## Node modules directory Jump to heading By default Deno uses a local `node_modules` directory if you have a `package.json` file in your project directory. You can control this behavior using the `nodeModulesDir` field in the `deno.json` file. deno.json { "nodeModulesDir": "auto" } You can set this field to following values: | Value | Behavior | | --- | --- | | `"none"` | Don't use a local `node_modules` directory. Instead use global cache in `$DENO_DIR` that is automatically kept up to date by Deno. | | `"auto"` | Use a local `node_modules` directory. The directory is automatically created and kept up to date by Deno. | | `"manual"` | Use a local `node_modules` directory. User must keep this directory up to date manually, eg. using `deno install` or `npm install`. | It is not required to specify this setting, the following defaults are applied: * `"none"` if there is no `package.json` file in your project directory * `"manual"` if there is a `package.json` file in your project directory When using workspaces, this setting can only be used in the workspace root. Specifying it in any of the members will result in warnings. The `"manual"` setting will only be applied automatically if there's a `package.json` file in the workspace root. ## TypeScript compiler options Jump to heading The `compilerOptions` field in the `deno.json` file is used to configure TypeScript compiler settings for your Deno project. This allows you to customize how TypeScript code is compiled, ensuring it aligns with your project’s requirements and coding standards. Info Deno recommends the default TypeScript configuration. This will help when sharing code. See also Configuring TypeScript in Deno. ## Unstable features Jump to heading The `unstable` field in a `deno.json` file is used to enable specific unstable features for your Deno project. These features are still in development and not yet part of the stable API. By listing features in the `unstable` array, you can experiment with and use these new capabilities before they are officially released. deno.json { "unstable": ["cron", "kv", "webgpu"] } Learn more. ## include and exclude Jump to heading Many configurations (ex. `lint`, `fmt`) have an `include` and `exclude` property for specifying the files to include. ### include Jump to heading Only the paths or patterns specified here will be included. { "lint": { // only format the src/ directory "include": ["src/"] } } ### exclude Jump to heading The paths or patterns specified here will be excluded. { "lint": { // don't lint the dist/ folder "exclude": ["dist/"] } } This has HIGHER precedence than `include` and will win over `include` if a path is matched in both `include` and `exclude`. You may wish to exclude a directory, but include a sub directory. In Deno 1.41.2+, you may un-exclude a more specific path by specifying a negated glob below the more general exclude: { "fmt": { // don't format the "fixtures" directory, // but do format "fixtures/scripts" "exclude": [ "fixtures", "!fixtures/scripts" ] } } ### Top level exclude Jump to heading If there's a directory you never want Deno to fmt, lint, type check, analyze in the LSP, etc., then specify it in the top level exclude array: { "exclude": [ // exclude the dist folder from all sub-commands and the LSP "dist/" ] } Sometimes you may find that you want to un-exclude a path or pattern that's excluded in the top level-exclude. In Deno 1.41.2+, you may un-exclude a path by specifying a negated glob in a more specific config: { "fmt": { "exclude": [ // format the dist folder even though it's // excluded at the top level "!dist" ] }, "exclude": [ "dist/" ] } ### Publish - Override .gitignore Jump to heading The `.gitignore` is taken into account for the `deno publish` command. In Deno 1.41.2+, you can opt-out of excluded files ignored in the _.gitignore_ by using a negated exclude glob: .gitignore dist/ .env deno.json { "publish": { "exclude": [ // include the .gitignored dist folder "!dist/" ] } } Alternatively, explicitly specifying the gitignored paths in an `"include"` works as well: { "publish": { "include": [ "dist/", "README.md", "deno.json" ] } } ## An example `deno.json` file Jump to heading { "compilerOptions": { "allowJs": true, "lib": ["deno.window"], "strict": true }, "lint": { "include": ["src/"], "exclude": ["src/testdata/", "src/fixtures/**/*.ts"], "rules": { "tags": ["recommended"], "include": ["ban-untagged-todo"], "exclude": ["no-unused-vars"] } }, "fmt": { "useTabs": true, "lineWidth": 80, "indentWidth": 4, "semiColons": false, "singleQuote": true, "proseWrap": "preserve", "include": ["src/"], "exclude": ["src/testdata/", "src/fixtures/**/*.ts"] }, "lock": false, "nodeModulesDir": "auto", "unstable": ["webgpu"], "test": { "include": ["src/"], "exclude": ["src/testdata/", "src/fixtures/**/*.ts"] }, "tasks": { "start": "deno run --allow-read main.ts" }, "imports": { "oak": "jsr:@oak/oak" }, "exclude": [ "dist/" ] } This is an example of a `deno.json` file that configures the TypeScript compiler options, linter, formatter, node modules directory, etc. For a full list of available fields and configurations, see the Deno configuration file schema. ## JSON schema Jump to heading A JSON schema file is available for editors to provide autocompletion. The file is versioned and available at: https://github.com/denoland/deno/blob/main/cli/schemas/config-file.v1.json ## Proxies Jump to heading Deno supports proxies for module downloads and the fetch API. Proxy configuration is read from environment variables: HTTP\_PROXY, HTTPS\_PROXY and NO\_PROXY. If you are using Windows - if environment variables are not found Deno falls back to reading proxies from the registry. --- ## Page: https://docs.deno.com/runtime/fundamentals/security#ffi-foreign-function-interface Deno is secure by default. Unless you specifically enable it, a program run with Deno has no access to sensitive APIs, such as file system access, network connectivity, or environment access. You must explicitly grant access to these resources with command line flags or with a runtime permission prompt. This is a major difference from Node, where dependencies are automatically granted full access to all system I/O, potentially introducing hidden vulnerabilities into your project. Before using Deno to run completely untrusted code, read the section on executing untrusted code below. ## Key Principles Jump to heading Before diving into the specifics of permissions, it's important to understand the key principles of Deno's security model: * **No access to I/O by default**: Code executing in a Deno runtime has no access to read or write arbitrary files on the file system, to make network requests or open network listeners, to access environment variables, or to spawn subprocesses. * **No limits on the execution of code at the same privilege level**: Deno allows the execution of any code (JS/TS/Wasm) via multiple means, including `eval`, `new Function`, dynamic imports and web workers at the same privilege level with little restriction as to where the code originates (network, npm, JSR, etc). * **Multiple invocations of the same application can share data**: Deno provides a mechanism for multiple invocations of the same application to share data, through built in caching and KV storage APIs. Different applications can not see each other's data. * **All code executing on the same thread shares the same privilege level**: All code executing on the same thread shares the same privilege level. It is not possible for different modules to have different privilege levels within the same thread. * **Code can not escalate its privileges without user consent**: Code executing in a Deno runtime can not escalate its privileges without the user agreeing explicitly to an escalation via interactive prompt or a invocation time flag. * **The initial static module graph can import local files without restrictions**: All files that are imported in the initial static module graph can be imported without restrictions, so even if an explicit read permission is not granted for that file. This does not apply to any dynamic module imports. These key principles are designed to provide an environment where a user can execute code with minimal risk of harm to the host machine or network. The security model is designed to be simple to understand and to provide a clear separation of concerns between the runtime and the code executing within it. The security model is enforced by the Deno runtime, and is not dependent on the underlying operating system. ## Permissions Jump to heading By default, access to most system I/O is denied. There are some I/O operations that are allowed in a limited capacity, even by default. These are described below. To enable these operations, the user must explicitly grant permission to the Deno runtime. This is done by passing the `--allow-read`, `--allow-write`, `--allow-net`, `--allow-env`, and `--allow-run` flags to the `deno` command. During execution of a script, a user can also explicitly grant permission to specific files, directories, network addresses, environment variables, and subprocesses when prompted by the runtime. Prompts are not shown if stdout/stderr are not a TTY, or when the `--no-prompt` flag is passed to the `deno` command. Users can also explicitly disallow access to specific resources by using the `--deny-read`, `--deny-write`, `--deny-net`, `--deny-env`, and `--deny-run` flags. These flags take precedence over the allow flags. For example, if you allow network access but deny access to a specific domain, the deny flag will take precedence. Deno also provides a `--allow-all` flag that grants all permissions to the script. This **disables** the security sandbox entirely, and should be used with caution. The `--allow-all` has the same security properties as running a script in Node.js (ie none). Definition: `-A, --allow-all` deno run -A script.ts deno run --allow-all script.ts By default, Deno will not generate a stack trace for permission requests as it comes with a hit to performance. Users can enable stack traces with the `DENO_TRACE_PERMISSIONS` environment variable. ### File system access Jump to heading By default, executing code can not read or write arbitrary files on the file system. This includes listing the contents of directories, checking for the existence of a given file, and opening or connecting to Unix sockets. Access to read files is granted using the `--allow-read` (or `-R`) flag, and access to write files is granted using the `--allow-write` (or `-W`) flag. These flags can be specified with a list of paths to allow access to specific files or directories and any subdirectories in them. Definition: `--allow-read[=<PATH>...]` or `-R[=<PATH>...]` # Allow all reads from file system deno run -R script.ts # or deno run --allow-read script.ts # Allow reads from file foo.txt and bar.txt only deno run --allow-read=foo.txt,bar.txt script.ts # Allow reads from any file in any subdirectory of ./node_modules deno run --allow-read=node_modules script.ts Definition: `--deny-read[=<PATH>...]` # Allow reading files in /etc but disallow reading /etc/hosts deno run --allow-read=/etc --deny-read=/etc/hosts script.ts # Deny all read access to disk, disabling permission prompts for reads. deno run --deny-read script.ts Definition: `--allow-write[=<PATH>...]` or `-W[=<PATH>...]` # Allow all writes to file system deno run -W script.ts # or deno run --allow-write script.ts # Allow writes to file foo.txt and bar.txt only deno run --allow-write=foo.txt,bar.txt script.ts Definition: `--deny-write[=<PATH>...]` # Allow reading files in current working directory # but disallow writing to ./secrets directory. deno run --allow-write=./ --deny-write=./secrets script.ts # Deny all write access to disk, disabling permission prompts. deno run --deny-write script.ts Some APIs in Deno are implemented using file system operations under the hood, even though they do not provide direct read/write access to specific files. These APIs read and write to disk but do not require any explicit read/write permissions. Some examples of these APIs are: * `localStorage` * Deno KV * `caches` * `Blob` Because these APIs are implemented using file system operations, users can use them to consume file system resources like storage space, even if they do not have direct access to the file system. During module loading, Deno can load files from disk. This sometimes requires explicit permissions, and sometimes is allowed by default: * All files that are imported from the entrypoint module in a way that they can be statically analyzed are allowed to be read by default. This includes static `import` statements and dynamic `import()` calls where the argument is a string literal that points to a specific file or a directory of files. The full list of files that are in this list can be printed using `deno info <entrypoint>`. * Files that are dynamically imported in a way that can not be statically analyzed require runtime read permissions. * Files inside of a `node_modules/` directory are allowed to be read by default. When fetching modules from the network, or when transpiling code from TypeScript to JavaScript, Deno uses the file system as a cache. This means that file system resources like storage space can be consumed by Deno even if the user has not explicitly granted read/write permissions. ### Network access Jump to heading By default, executing code can not make network requests, open network listeners or perform DNS resolution. This includes making HTTP requests, opening TCP/UDP sockets, and listening for incoming connections on TCP or UDP. Network access is granted using the `--allow-net` flag. This flag can be specified with a list of IP addresses or hostnames to allow access to specific network addresses. Definition: `--allow-net[=<IP_OR_HOSTNAME>...]` or `-N[=<IP_OR_HOSTNAME>...]` # Allow network access deno run -N script.ts # or deno run --allow-net script.ts # Allow network access to github.com and jsr.io deno run --allow-net=github.com,jsr.io script.ts # A hostname at port 80: deno run --allow-net=example.com:80 script.ts # An IPv4 address on port 443 deno run --allow-net=1.1.1.1:443 script.ts # An IPv6 address, all ports allowed deno run --allow-net=[2606:4700:4700::1111] script.ts Definition: `--deny-net[=<IP_OR_HOSTNAME>...]` # Allow access to network, but deny access # to github.com and jsr.io deno run --allow-net --deny-net=github.com,jsr.io script.ts # Deny all network access, disabling permission prompts. deno run --deny-net script.ts During module loading, Deno can load modules from the network. By default Deno allows loading modules from the following locations using both static and dynamic imports, without requiring explicit network access: * `https://deno.land/` * `https://jsr.io/` * `https://esm.sh/` * `https://raw.githubusercontent.com` * `https://gist.githubusercontent.com` These locations are trusted "public good" registries that are not expected to enable data exfiltration through URL paths. You can add more trusted registries using the `--allow-imports` flag. In addition Deno allows importing any NPM package through `npm:` specifiers. Deno also sends requests to `https://dl.deno.land/` at most once a day to check for updates to the Deno CLI. This can be disabled using `DENO_NO_UPDATE_CHECK=1` environment var. ### Environment variables Jump to heading By default, executing code can not read or write environment variables. This includes reading environment variables, and setting new values. Access to environment variables is granted using the `--allow-env` flag. This flag can be specified with a list of environment variables to allow access to specific environment variables. Starting with Deno v2.1, you can now specify suffix wildcards to allow “scoped” access to environmental variables. Definition: `--allow-env[=<VARIABLE_NAME>...]` or `-E[=<VARIABLE_NAME>...]` # Allow access to all environment variables deno run -E script.ts # or deno run --allow-env script.ts # Allow HOME and FOO environment variables deno run --allow-env=HOME,FOO script.ts # Allow access to all environment variables starting with AWS_ deno run --allow-env="AWS_*" script.ts Definition: `--deny-env[=<VARIABLE_NAME>...]` # Allow all environment variables except # AWS_ACCESS_KEY_ID and AWS_SECRET_ACCESS_KEY. deno run \ --allow-env \ --deny-env=AWS_ACCESS_KEY_ID,AWS_SECRET_ACCESS_KEY \ script.ts # Deny all access to env variables, disabling permission prompts. deno run --deny-env script.ts > Note for Windows users: environment variables are case insensitive on Windows, so Deno also matches them case insensitively (on Windows only). Deno reads certain environment variables on startup, such as `DENO_DIR` and `NO_COLOR` (see the full list). The value of the `NO_COLOR` environment variable is visible to all code running in the Deno runtime, regardless of whether the code has been granted permission to read environment variables. ### System Information Jump to heading By default, executing code can not access system information, such as the operating system release, system uptime, load average, network interfaces, and system memory information. Access to system information is granted using the `--allow-sys` flag. This flag can be specified with a list of allowed interfaces from the following list: `hostname`, `osRelease`, `osUptime`, `loadavg`, `networkInterfaces`, `systemMemoryInfo`, `uid`, and `gid`. These strings map to functions in the `Deno` namespace that provide OS info, like Deno.systemMemoryInfo. Definition: `--allow-sys[=<API_NAME>...]` or `-S[=<API_NAME>...]` # Allow all system information APIs deno run -S script.ts # or deno run --allow-sys script.ts # Allow systemMemoryInfo and osRelease APIs deno run --allow-sys="systemMemoryInfo,osRelease" script.ts Definition: `--deny-sys[=<API_NAME>...]` # Allow accessing all system information but "networkInterfaces" deno run --allow-sys --deny-sys="networkInterfaces" script.ts # Deny all access to system information, disabling permission prompts. deno run --deny-sys script.ts ### Subprocesses Jump to heading Code executing inside of a Deno runtime can not spawn subprocesses by default, as this would constitute a violation of the principle that code can not escalate its privileges without user consent. Deno provides a mechanism for executing subprocesses, but this requires explicit permission from the user. This is done using the `--allow-run` flag. Any subprocesses you spawn from your program run independently from the permissions granted to the parent process. This means the child processes can access system resources regardless of the permissions you granted to the Deno process that spawned it. This is often referred to as privilege escalation. Because of this, make sure you carefully consider if you want to grant a program `--allow-run` access: it essentially invalidates the Deno security sandbox. If you really need to spawn a specific executable, you can reduce the risk by limiting which programs a Deno process can start by passing specific executable names to the `--allow-run` flag. Definition: `--allow-run[=<PROGRAM_NAME>...]` # Allow running all subprocesses deno run --allow-run script.ts # Allow running "curl" and "whoami" subprocesses deno run --allow-run="curl,whoami" script.ts Caution You probably don't ever want to use `--allow-run=deno` unless the parent process has `--allow-all`, as being able to spawn a `deno` process means the script can spawn another `deno` process with full permissions. Definition: `--deny-run[=<PROGRAM_NAME>...]` # Allow running running all programs, but "whoami" and "ps". deno run --allow-run --deny-run="whoami,ps" script.ts # Deny all access for spawning subprocessing, disabling # permission prompts. deno run --deny-run script.ts By default `npm` packages will not have their post-install scripts executed during installation (like with `deno install`), as this would allow arbitrary code execution. When running with the `--allow-scripts` flag, post-install scripts for npm packages will be executed as a subprocess. ### FFI (Foreign Function Interface) Jump to heading Deno provides an FFI mechanism for executing code written in other languages, such as Rust, C, or C++, from within a Deno runtime. This is done using the `Deno.dlopen` API, which can load shared libraries and call functions from them. By default, executing code can not use the `Deno.dlopen` API, as this would constitute a violation of the principle that code can not escalate it's privileges without user consent. In addition to `Deno.dlopen`, FFI can also be used via Node-API (NAPI) native addons. These are also not allowed by default. Both `Deno.dlopen` and NAPI native addons require explicit permission using the `--allow-ffi` flag. This flag can be specified with a list of files or directories to allow access to specific dynamic libraries. _Like subprocesses, dynamic libraries are not run in a sandbox and therefore do not have the same security restrictions as the Deno process they are being loaded into. Therefore, use with extreme caution._ Definition: `--allow-ffi[=<PATH>...]` # Allow loading dynamic all libraries deno run --allow-ffi script.ts # Allow loading dynamic libraries from a specific path deno run --allow-ffi=./libfoo.so script.ts Definition: `--deny-ffi[=<PATH>...]` # Allow loading all dynamic libraries, but ./libfoo.so deno run --allow-ffi --deny-ffi=./libfoo.so script.ts # Deny loading all dynamic libraries, disabling permission prompts. deno run --deny-ffi script.ts ### Importing from the Web Jump to heading Allow importing code from the Web. By default Deno limits hosts you can import code from. This is true for both static and dynamic imports. If you want to dynamically import code, either using the `import()` or the `new Worker()` APIs, additional permissions need to be granted. Importing from the local file system requires `--allow-read`, but Deno also allows to import from `http:` and `https:` URLs. In such case you will need to specify an explicit `--allow-import` flag: # allow importing code from `https://example.com` $ deno run --allow-import=example.com main.ts By default Deno allows importing sources from following hosts: * `deno.land` * `esm.sh` * `jsr.io` * `cdn.jsdelivr.net` * `raw.githubusercontent.com` * `gist.githubusercontent.com` **Imports are only allowed using HTTPS** This allow list is applied by default for static imports, and by default to dynamic imports if the `--allow-import` flag is specified. # allow dynamically importing code from `https://deno.land` $ deno run --allow-import main.ts Note that specifying an allow list for `--allow-import` will override the list of default hosts. ## Evaluation of code Jump to heading Deno sets no limits on the execution of code at the same privilege level. This means that code executing in a Deno runtime can use `eval`, `new Function`, or even dynamic import or web workers to execute **arbitrary** code with the same privilege level as the code that called `eval`, `new Function`, or the dynamic import or web worker. This code can be hosted on the network, be in a local file (if read permissions are granted), or be stored as plain text in a string inside of the code that called `eval`, `new Function`, or the dynamic import or web worker. ## Executing untrusted code Jump to heading While Deno provides security features that are designed to protect the host machine and network from harm, untrusted code is still scary. When executing untrusted code, it is important to have more than one layer of defense. Some suggestions for executing untrusted code are outlined below, and we recommend using all of these when executing arbitrary untrusted code: * Run `deno` with limited permissions and determine upfront what code actually needs to run (and prevent more code being loaded using `--frozen` lockfile and `--cached-only`). * Use OS provided sandboxing mechanisms like `chroot`, `cgroups`, `seccomp`, etc. * Use a sandboxed environment like a VM or MicroVM (gVisor, Firecracker, etc).